Redsys: How it turned into a Boon for the eCommerce Businesses?

Every online transaction involves the integration of a seamless and secure payment gateway. The payment gateway directly affects the success rate of online trading. On top of that, the traditional ways of payments through cheques and other offline channels is lengthy and tiring for the modern tech-savvy customers. This is the reason that payment gateways have gained popularity in recent past.For instance, Paypal and Alipay are one of the mostly used gateways in the tech-hubs like the US and China respectively. Even the emerging economies like India is gearing up for these changes with payment wallets like PayTm. With over eCommerce figures in Spain reaching 24,185 million euros in the past few years, having a featured payment gateway is a must. Redsys is one such platform in Spain that can prevent the customer flow from diverting towards your competitor’s website. So, the very first question that arises is, what exactly is Redsys.

What is Redsys?

Redsys offers a high-quality, secure, and flexible payment system for the eCommerce platform. Being a leading national and international reference, Redsys Payment Gateway has created a variety of standards and technological-operational solutions for financial institutions and other major industry players, in Spain, Europe, and Latin America.

Redsys: Enhancing eCommerce Payment Solutions!

Redsys provides a high-quality, secure, and flexible payment system crucial for eCommerce platforms. As a leading reference in Spain and beyond, Redsys simplifies online transactions with no software installation required and compatibility with various eCommerce stores like Magento and PrestaShop. Its 3D Secure authentication minimizes fraud, and real-time notifications enhance transparency and trust. With support for major cards and multilingual capabilities, Redsys ensures seamless, reliable payments, boosting customer confidence and sales. The easy integration and robust security features make Redsys a vital tool for online merchants aiming to optimize their payment processes.

Key Features of Redsys

Here are some of the features offered by Redsys.

  • Redsys has developed a means of payment that has turned out to be a boon for millions of online businesses. Here are some of the major features offered by the gateway.
  • The identity platform is simple to use and easy to execute. The simplicity lies in the fact that it does not require any software installation.
  • Moreover, it is compatible in multiple stores. There are plugins available that make it a handy platform for Magento, Prestashop, OpenCart and other eCommerce stores. The versatile gateway adapts to the need each store. Not just this, it even allows various types of payment operations like pre-authorizations, sales, returns, and others.
  • The security concern is one of the reasons that make online payment not-so-popular among the cardholders even today. The (3D secure methodology in Redsys) ensures compliance by involving an additional validation step for online payment. Even Redsys offers a 3D Secure authentication. The powerful fraud prevention tool can effortlessly minimize dropouts.
  • Despite the user-friendly interface, the management module offers full control to the admin. The images on the payment page can be personalized and the transaction can be monitored by the seller.  The System manages the flow of the transaction for each chosen payment alternative. Once the owner selects the payment method, the trade only needs to send a web form to the Redsys server with the data of the trade and transaction.

Having discussed all the major features offered by Redsys, listed below are some of the reasons that makes it a must-have for all the online merchants.

Recommended blog – How to Get PayPal Client ID and Secret Key?

Why should you choose Redsys?

The payment extensions offer an array of benefits and advantages to customers and traders. Check them out.

Benefits of Redsys Payment Integration to the Customers

1. Supports payment through all major cards

With applications such as MPOS and virtual POS, Redsys can provide support and service integration. The service certification and attested approval to third parties ensure the correct use of the application. Not just this, earlier debit cards were not allowed for financial transactions online. However, with the introduction of 3-D Secure, banks allow the customers to use all sorts of cards for online payment. Redsys Payments extension is compatible with more than 60 banks, among others: La Caixa, Sabadell, Bankia, ING Direct, and many others. And the virtual POS terminal guarantees the integration of bank card payments into your store.

2. Multi-lingual

The Payment gateway Redsys uses the same language that the store is using. As mentioned above, this gateway is supported on the various eCommerce stores. This versatility is an addon for the customers as well as for the online traders. Narrowing the language barrier, the payment extension brings the sellers and the buyers on the same platform.

3. Proven technology for secure transaction

3-D Secure is a proven tool to reduce fraudulent in online transactions. Ensuring the ease and security of online payments to the cardholders, Redsys shopping and other transactions convenient for the online shoppers. The transaction includes 3 different parties during the process of payment. The bank that has issued the cars, the merchant to which money is being paid and the network being used like Visa / MasterCard. The payment is at first redirected to the website of the bank that has issued the card to authenticate the transaction. The shoppers are asked to enter either a static or dynamic password to help confirm the identity of the cardholder.

4. Real time notification

The uncertainty in online transactions is something that annoys the consumers the most. The cart abandonment and the bounce rates are a consequence of the unsure payment gateways. The payment extension takes the insecurity off the shoulder of the customers by providing real time notification of the payment success or failure. The users are notified whether the payment was received or declined instantly. Keeping the entire transaction transparent, the gateway makes the entire process seamless for the end-users.

5. Flexible payment methods

The customers are not just notified about the failure of the transaction, they are even given the facility of changing their payment method. In case, the payment fails, the users can change the payment method or try with another credit or debit card.

Every benefit offered to the end user, adds a plus-point to the traders. At the same time, the extension offers some direct benefits to the online merchants as well. These benefits are listed below.

Do You Know!
We provide One Page Checkout extensions for Prestashop, OpenCart, and Magento 2 eCommerce platforms. You can seamlessly integrate all the available shipping and major payment methods including Redsys and PayPal on your checkout page using our One Page Checkout addon.
Prestashop One Page Supercheckout Addon

The Prestashop One Page Supercheckout addon by Knowband makes checkout faster and easier by putting everything on one page, helping to reduce cart abandonment.

SHOP NOW

Benefits For the online traders

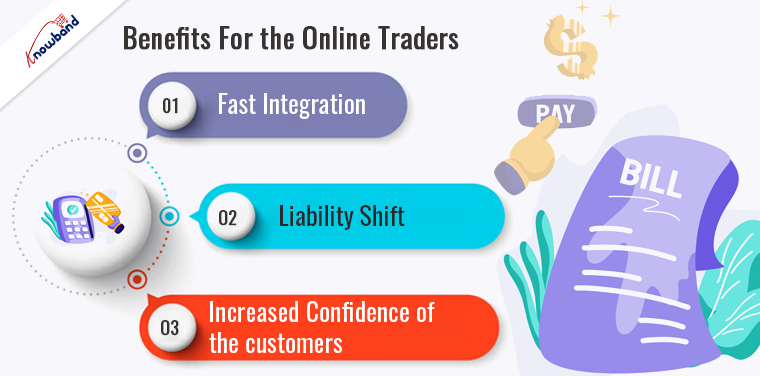
1. Fast integration

The intelligent 3DSecure authentication is fully configurable and offers a lot of options. The flexible tool is customizable and adapted to mobile devices and tablets, with responsive web design. It requires no software installation and so it can be integrated easily and quickly. Along with easy installations, Redsys offers high availability with a monitored service 24×7 to the merchants. The full control to the administration module facilitates business and online sales management.

2. Liability shift

The major benefit of the payment gateway is liability shift. The merchants can now do their business without carrying the headache of the financial transactions. It offers a shield against all sorts of chargebacks and other such liability. All sorts of disagreements and frauds are taken care of. The best part is that the merchants can even enjoy this benefit when the issuer or the cardholder is not taking part.

3. Increased confidence of the customers

Gaining and retaining the confidence of the customers is the key to run an online business. The payment extension detail all the fee in an upfront manner and keep the entire operating mode transparent. Reducing the risk of fraudulent, the biggest fear of online shoppers, it helps increase the confidence of the buyer. Thus, it can prove to be a big reason for online payments and your eCommerce business to takeoff.

Over to you 

In the previous article, we discussed how a payment and shipping page can provide you an edge over your competitors. This blog has compiled some of the points that make a secure payment method like Redsys inevitable for your online businesses. Amongst the countless factors, optimizing the eCommerce store with one-page payment modules for Magento, OpenCart, and PrestaShop is considered as one of the ways to boost the sales. Improvise the situation and find the best solution for your website. Also, you can watch videos here:

At Knowband, with 13+ years of technical expertise, we offer web and development services on the latest technologies and trends. In case you have any queries regarding your projects, you can reach out to our technical support team at our official email address support@knowband.com.

Liked This? You’ll Like These Too

5 Checkout optimization that can Reduce Abandoned Carts and Boost Sales

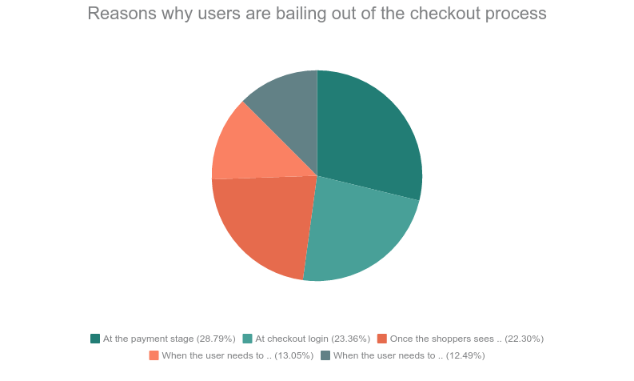
As per a data shared by Business Insider, the U.S. online shoppers, in particular, are abandoning their carts during the payment phase. This is a common scenario on both desktop and mobile platforms. Here are some of the phases according to the survey from where the users tend to leave the cart without completing the payment procedure.

  • 46.1% of cart abandonment occur at the payment stage
  • 37.4% occur at checkout login
  • 35.7% occur once the shoppers see shipping costs
  • 20.9% occur when the user needs to enter their billing address
  • 20% occur when the user needs to enter their shipping or delivery address

Data Source: Business Insider

In one of our previous articles, “Abandoned Cart: Biggest lie you probably believe to be true“, we discussed that hardly 30-40 % of the visitors actually have an intention to buy when they are adding a product to the online virtual shopping cart. Having said that tapping that market of the prospective customer can effortlessly boost your sales. While most of the eCommerce business opt for email marketing in order to convert those visitors into the lead, the Checkout page optimization is a frequently overlooked area for online retailers.

The blog is a compilation of some of the optimization tricks to reduce the abandoned cart. Gear your store with these tips and make sure that no opportunity is left untapped for your business.

Go for a one page checkout

The whole idea of shopping online is to remove the unwanted hassles and get everything at a click of a button. No one would go for online shopping if they don’t get rid of the long queue and waiting hours. Thus, making the checkout process simpler and convenient is the need of the hour. Make the call-to-action on the page clear by removing the clutter. The entire process should be self-explanatory and as precise as possible. One page checkout addon help you manage the fields you want to show in your page and customize the buttons. However, make sure that you keep everything transparent. Do not surprise the users with extra charges and shipping costs.

Minimize the insecurity of checking out

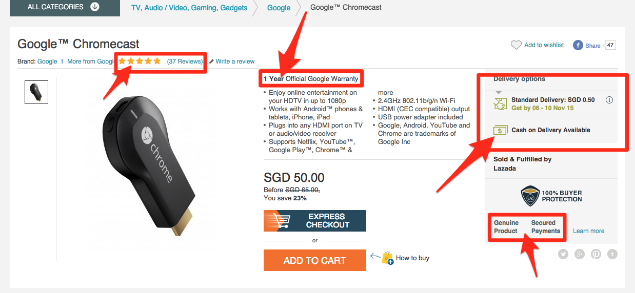
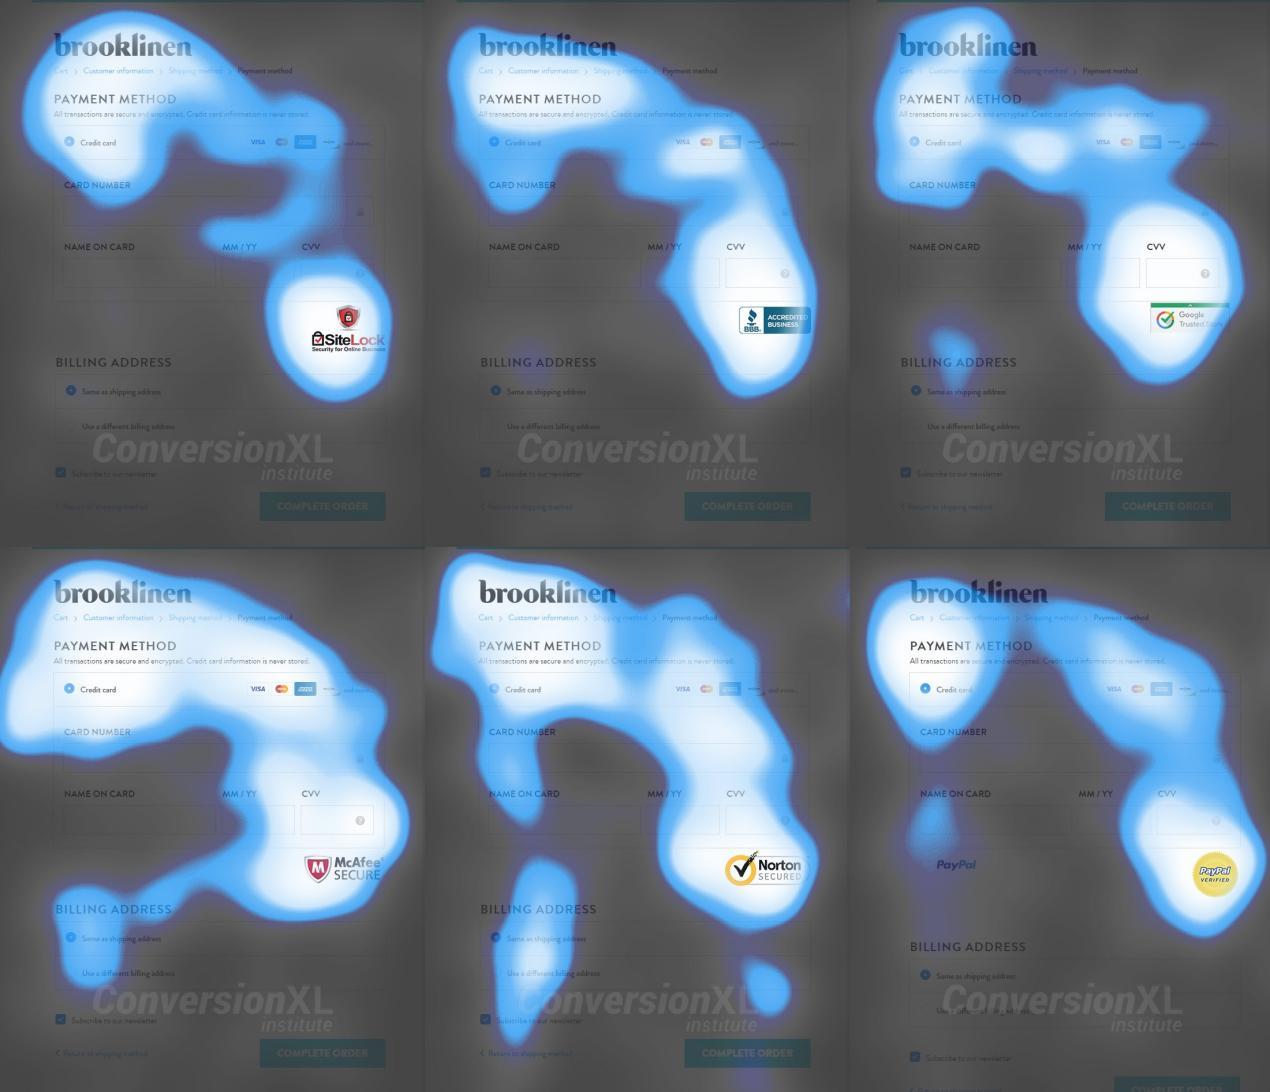
Building the trust factor at the payment gateway is the key to trigger the users to go further. The payment process is a sensitive part of online shopping and users tend to get worried about the security. The trust signals is very obvious, but is not always implemented on the websites. As per an article of conversionxl.com, an eye-tracking test showcased a general pattern of observation on the checkout page. These maps tell us that all trust badges were pretty noticeable.

Img Source: Conversionxl.com

Some of the trust signals that were recommended after the eye-tracking analysis are shown in the image below.

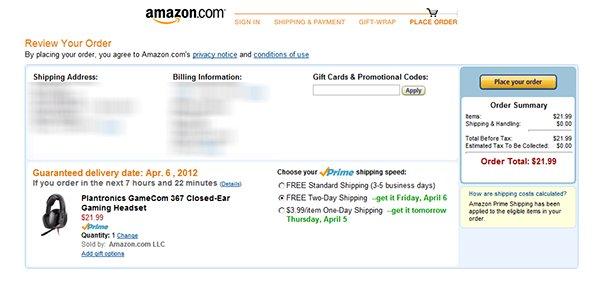
Img Source: Conversionxl.com

Offer refund and replacement option

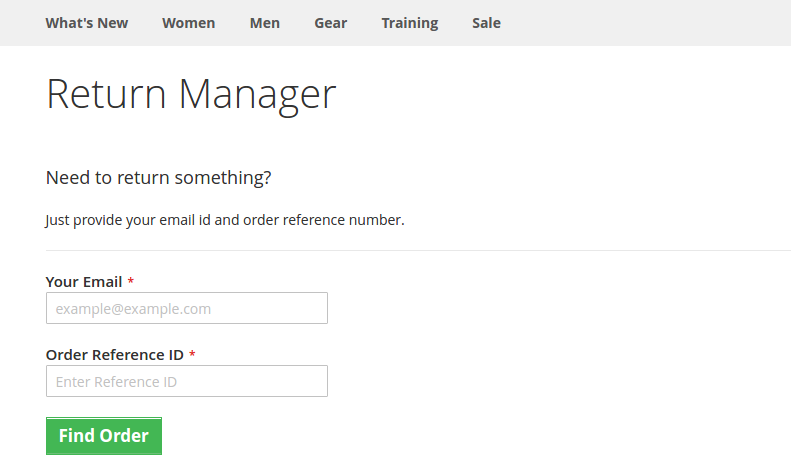
The money back and replacement guarantee is a must for the users as they don’t get the touch and feel of the products. Reducing the fear associated with online purchases is the essential to reduce abandoned cart and enhance sales. There is always a risk that the product will be returned by the customer, so, return guarantee is a must. Make the entire return process flawless by using an efficient extension. Prestashop Return Manager Addon is one such tool that can manage the return request placed by registered or Guest customer on a PrestaShop store. Thus, it provides you a great way to influence repurchase and revisits.

Make the form quick and easy to fill

As mentioned above, the long and tedious checkout process is the biggest turn off for the customer. The form should be concise and simple. Do not ask for too many information from the customer. The form should be restricted to the front fold only. Online shoppers hate to commit, so, ask for account creation during the payment process.

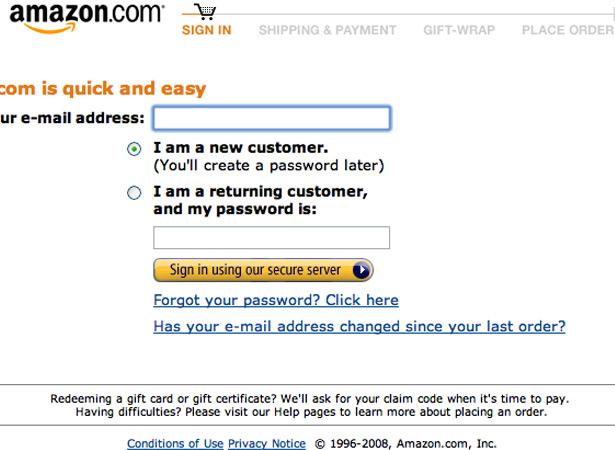
Get the email address before the person proceeds to the checkout process

Having mentioned the above point, there is one more factor that needs consideration. The email ids of the shoppers are essential whether he is a registered user or a guest. The reason being even if all the other factor is aligned in the right place, 100% conversion is not guaranteed. So, you need to keep inviting the shoppers with your sales pitches. Ask the user to enter their email address in the starting. They can later choose whether they want to check out as a guest or create an account. This way you’ll get the email ids without even annoying the customer. Use email marketing for the abandoned carts and win more conversions.

Conclusion

Whether you have your own eCommerce store or you have delved into a marketplace scenario, reducing and handling the abandoned cart is the key to boost sales. For the PrestaShop marketplace, you can install PrestaShop marketplace extensions to make the process simpler. Optimize your checkout process and make sure that make sure that your website stands out in the crowd.

Liked This? You’ll Like These Too
Prestashop Facebook Store Addon by Knowband – User Manual

1.0 Introduction

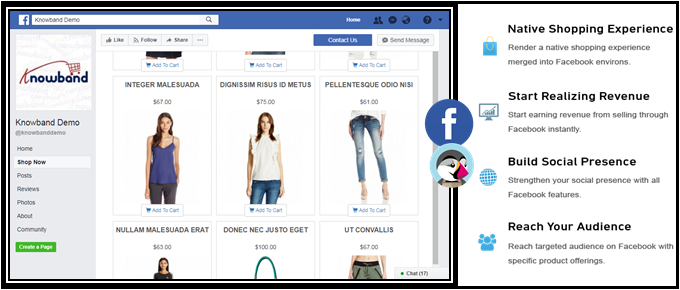
Having a Facebook store is one of the intelligent ways to hike your business growth. One of the best steps to recognize your business globally is to step into a social community, one amongst them is Facebook. It allows you to seek attention of your new audiences and thereby generate more customers for the store. The best part is that you can easily share your content with ease, market your store product and services. Opening a Prestashop Facebook Store is a no-brainer that improves your site sales from the bottom line.

PrestaShop is a free e-commerce platform where anyone can create his/her shop with just few steps. After having a shop, the main concern comes up to every shop owner is the marketing and making his products/brand more and more exposed to the world. As the Facebook claims, there are over 2 billion active users on Facebook by the year 2017. Here, we have made your work easier with Prestashop Facebook Store Addon.

  • Now you can have your Facebook Shop, change layout, template, and module with no design or coding skills required.
  • KnowBand Prestashop Facebook Store module helps you connect your PrestaShop store with Facebook and help you showcase your products to a very wide range of people.

1.1. Benefits of Prestashop Facebook Store Module for merchant

The store owner can increase the number of visitors and potential buyers on his/her PrestaShop store and boost their Facebook community with the help of this Facebook store integration Prestashop module.

  • The Prestashop Facebook integration module integrates your fan page on Facebook with your PrestaShop store.
  • The Facebook store integration with Prestashop offers auto listing of products on your Facebook store.
  • The Prestashop Facebook shop integration module has the option to display categories and featured products, etc.
  • The Prestashop Facebook Store Integration module increases your revenue and increase customer following/loyalty to your brand.
  • The Prestashop Facebook store module increase the genuine likes and followers on your Facebook Page.
  • The Prestashop Facebook Store Setup module creates a Shop tab inside your Facebook fan page to allow users to see products.
  • The Prestashop Facebook Integration module analyzes the change in sale with Google Analytics.
  • Change look and feel of the Prestashop Facebook shop anytime.
  • The Prestashop Facebook Shop Addon displays the desired products and categories.

1.2. Benefits of the Prestashop Facebook Store Integration for customers

With this Prestashop Facebook integration module by Knowband, the customer can have a look at your shop/products without actually visiting your PrestaShop store.

  • The Prestashop Facebook store module can be translated into desired language.
  • The prices of the Prestashop Facebook shop module can be changed to the local currency.
  • After clicking the “Add to cart” button corresponding to a product on FB Store, the customer is taken to the store to have an authenticated shopping experience.

2.0 Installation of Prestashop Facebook Shop Module

After purchasing the Prestashop Facebook shop module, you will get following files as listed below:

  • facebookstore.zip (contains source code of the module)
  • User Manual

Follow the following steps to install the Prestashop Facebook shop module:

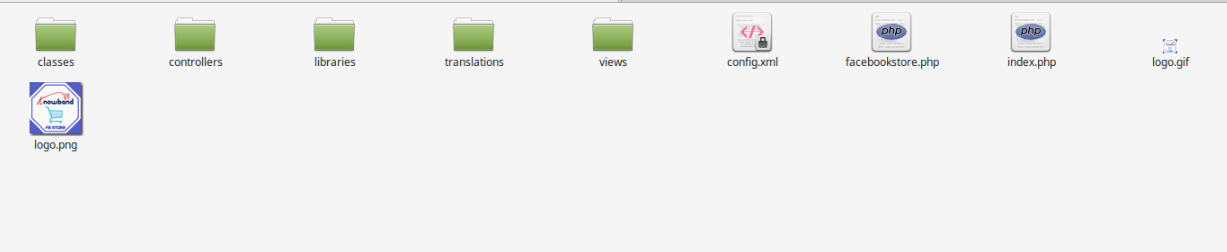
Step 1: Unzip the facebookstore.zip file. It would contain files and folders as shown below –

Step 2: Copy all the files and folders of unzipped folder into your store “modules” directory on the path – Root Directory/modules/.

Step 3: Now the Prestashop Facebook Store module is ready to be installed on your store and you can find that in Store Admin -> Modules and Services. It would shown as below –

In case, you are not able to find this Prestashop Facebook shop module in admin modules list, please try searching module with following details –

Keyword – Fb Store

Category – Front office

Filter By – Installed & Not Installed / Enabled & Disabled

Step 4: Click on “Install” button to install the Prestashop Facebook shop module. It would show a pop-up for your confirmation. Click on “Proceed with the installation” option. This step will install the Prestashop Facebook store module and show notification – “Module(s) installed successfully”.

3.0 System Setup of Prestashop Facebook Store Addon

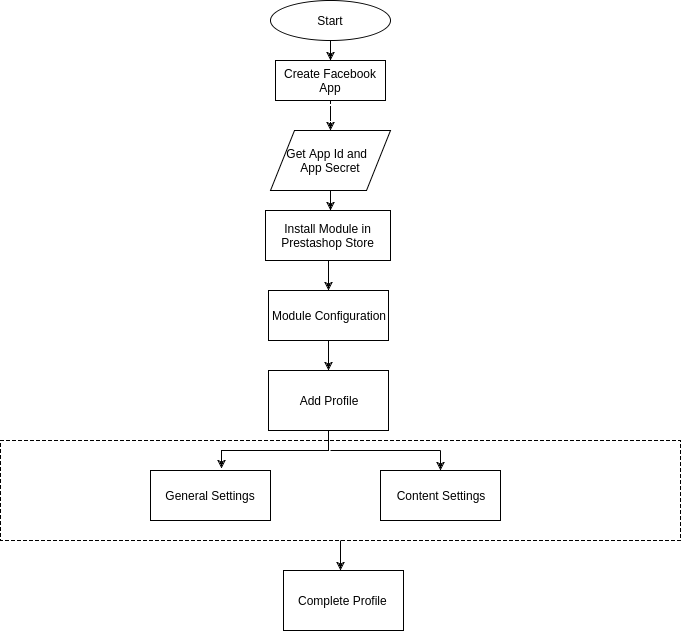
Before proceeding ahead, it is important to know that what is the correct flow of actions to setup this system as there are several things which are dependent of other things and if we do not take care of them then it would become difficult to process smoothly or may be error prone.

4.0 Facebook App Creation

Facebook App can be created by following below mentioned steps:-

Step 1: Go to given url :https://developers.facebook.com/apps/

Step 2: Click on the “Add a New App”button.

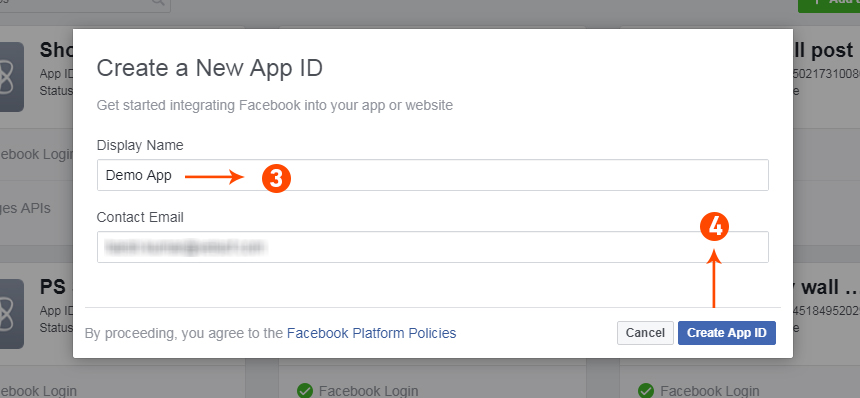
Step 3&4: Enter your App name and email id, then click on “Create App ID” button.

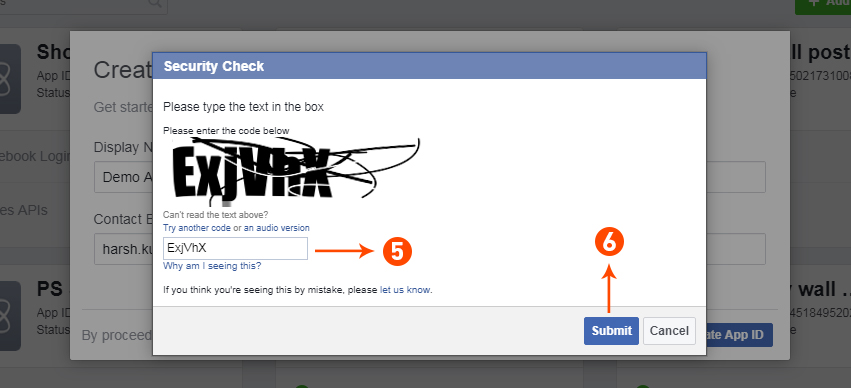
Step 5&6: After clicking on Create App ID you will have to go through a security check as shown:

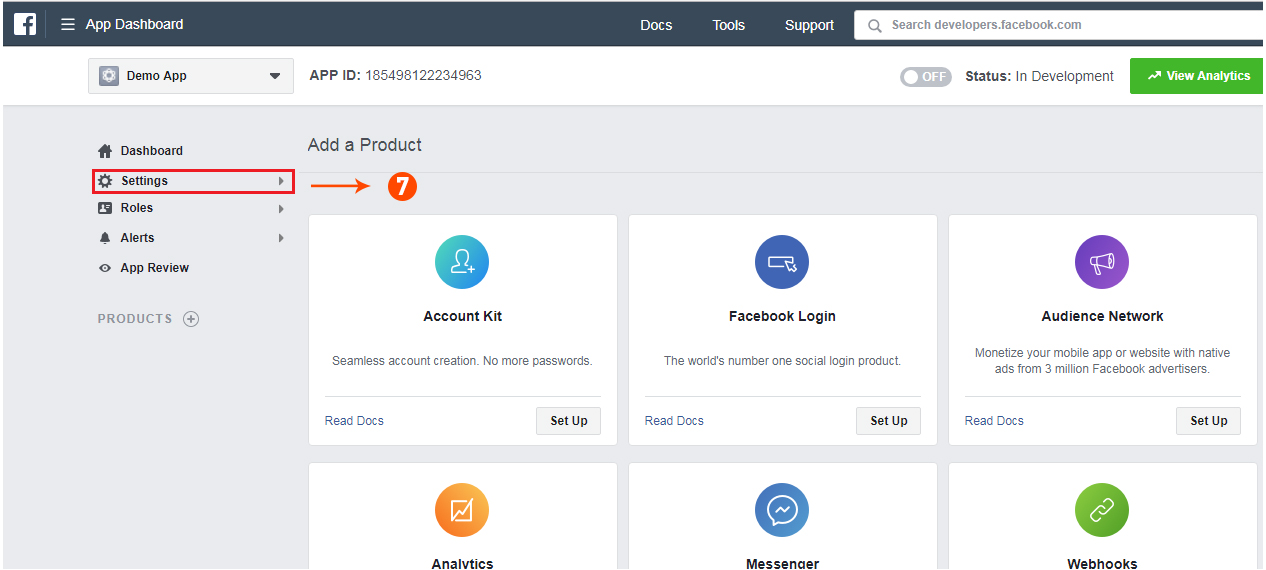
Step 7: Click on “Setting” tab of Prestashop Facebook Store Addon.

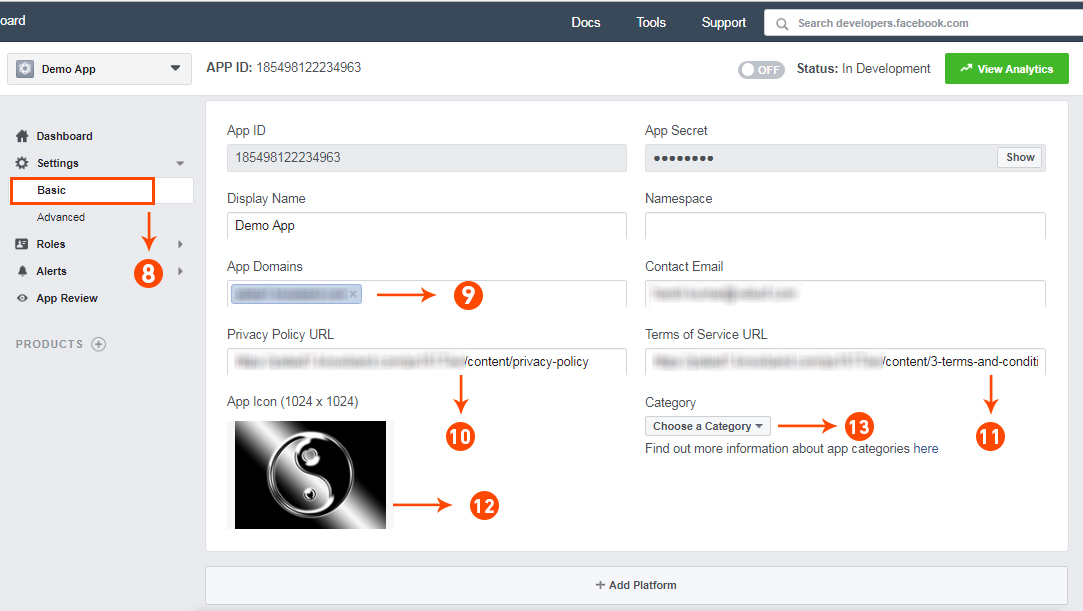
Step 8-13: Two option will be available in the dropdown, Basic and Advanced, click on “Basic”. And then enter your “App Domain”, “Contact Email”, ”Privacy URL”, ”Terms and Conditions URL”, ”Add Logo”, ”Select Category” and click on “Save Changes” button.

App Domains:

yourdomain.com is correct

yourdomain.com/store is incorrect

www.domain.com is incorrect

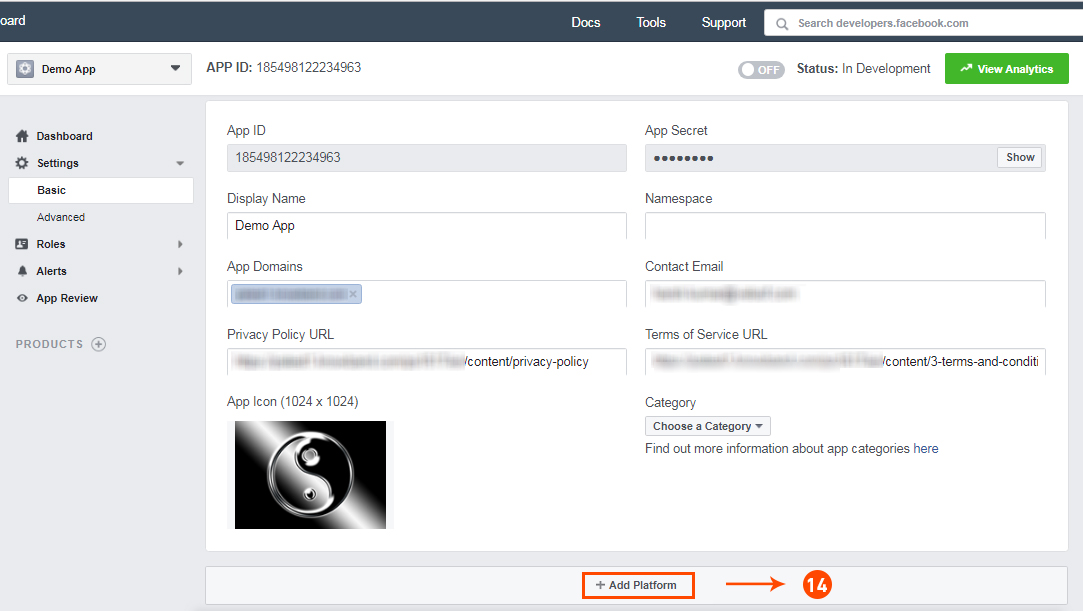
Step 14: Now click on “+Add Platform”.

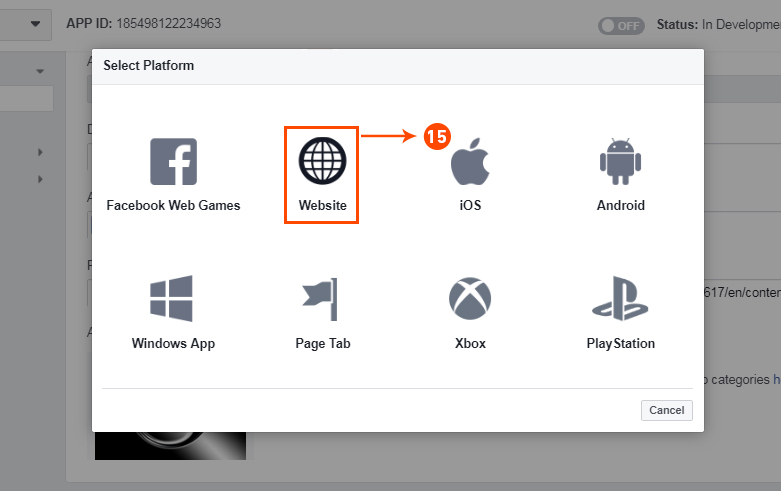
Step 15: And select Website as Platform

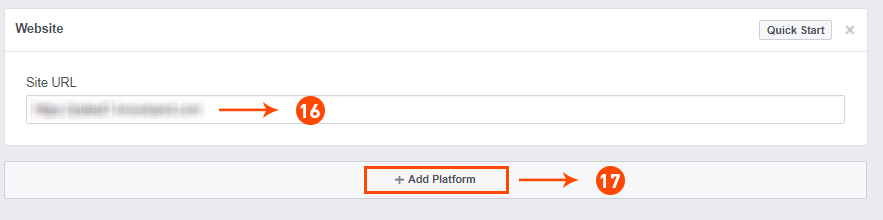
Step 16&17: Now Enter your site URL and Click on “+Add Platform”.

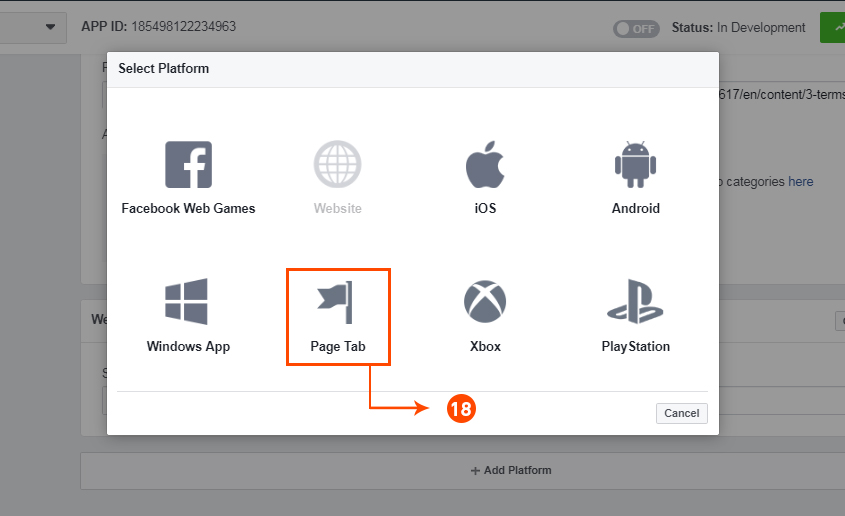
Step 18: This time select “Page Tab” as your platform.

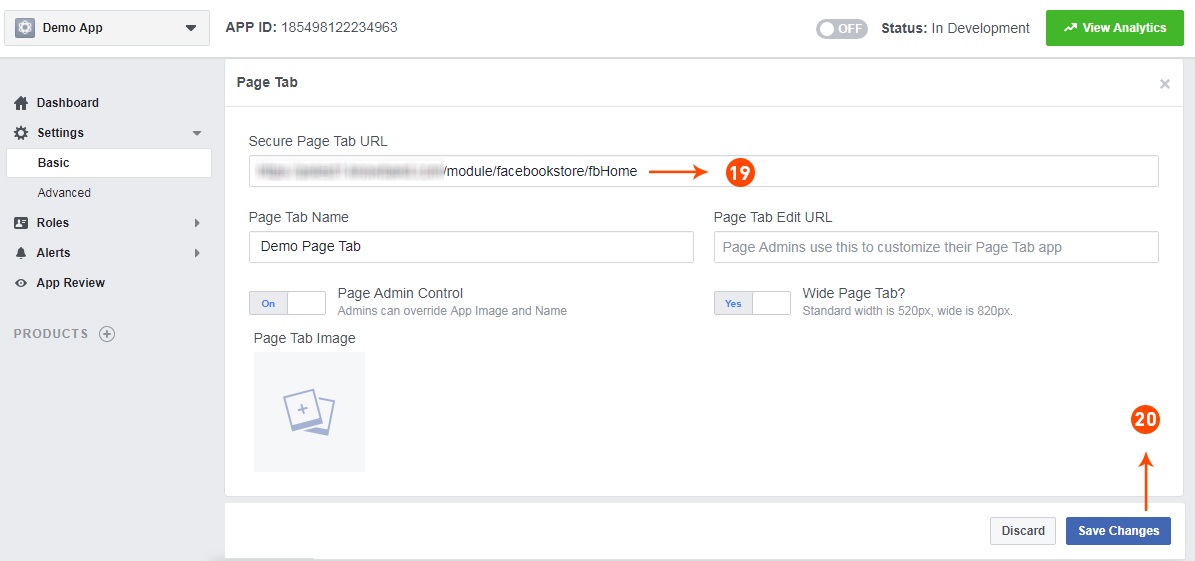
Step 19&20: Add Page tab URL and Save changes. If the changes are not saved, it means you have not configured the app properly. Check again the app domain, privacy policy, terms and condition URLs and website URL and try again.

Page Tab URL: www.example.com/module/facebookstore/fbHome

If URL is not SEO friendly then use, Page Tab URL:

https://www.example.com/index.php?fc=module&module=facebookstore&controller= fbHome

Page Tab Name: Enter a Name of the tab.

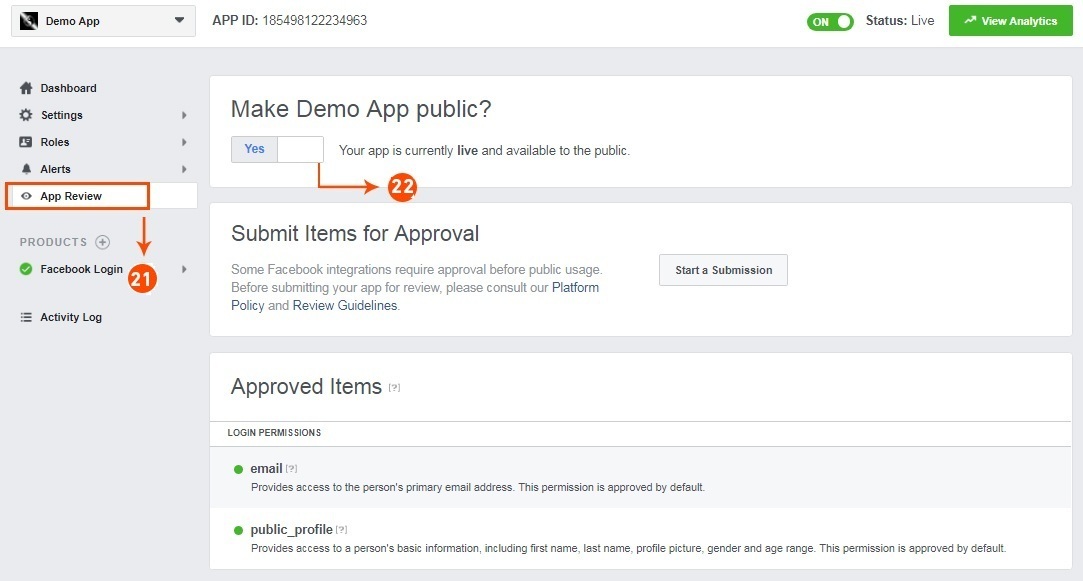
Step 21&22: Click on “App review”. And mark “Make ‘your app name’ Public” to Yes.

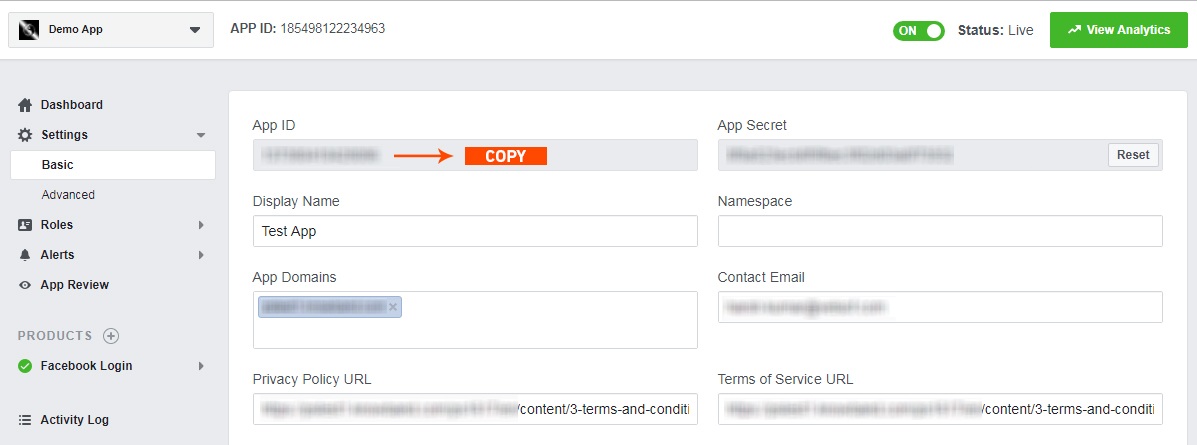
Step 23: Copy the App ID and paste it into the fields provided in the module.

5.0 Admin Interface of Prestashop Facebook Store Module

The admin interface of the facebook store integration with Prestashop is designed in such a way that a PrestaShop store owner can make the changes to his/her Facebook Store have the changes without wasting the time. Once the Prestashop module is setup completely, then the store owner can change the logo, banners and the layout of the shop.

Following are the steps which will help you setup your admin interface of the Facebook store plugin by Knowband:

5.1 How To Start configuration process of Prestashop Facebook Store Addon?

On clicking configure from Prestashop Facebook shop integration module listing page, the admin will be redirected to configuration page to save the “Facebook App Id” as shown below:-

  1. Facebook App Id:- This field of the Prestashop Facebook Store Integration module is for Facebook App Id created for this Facebook shop module.

Click on the following link to create App Id:

https://developers.facebook.com/docs/apps/register/

      2.  Next:- On Clicking this button, Facebook App ID will be saved in Db

5.2 How To Add Profile?

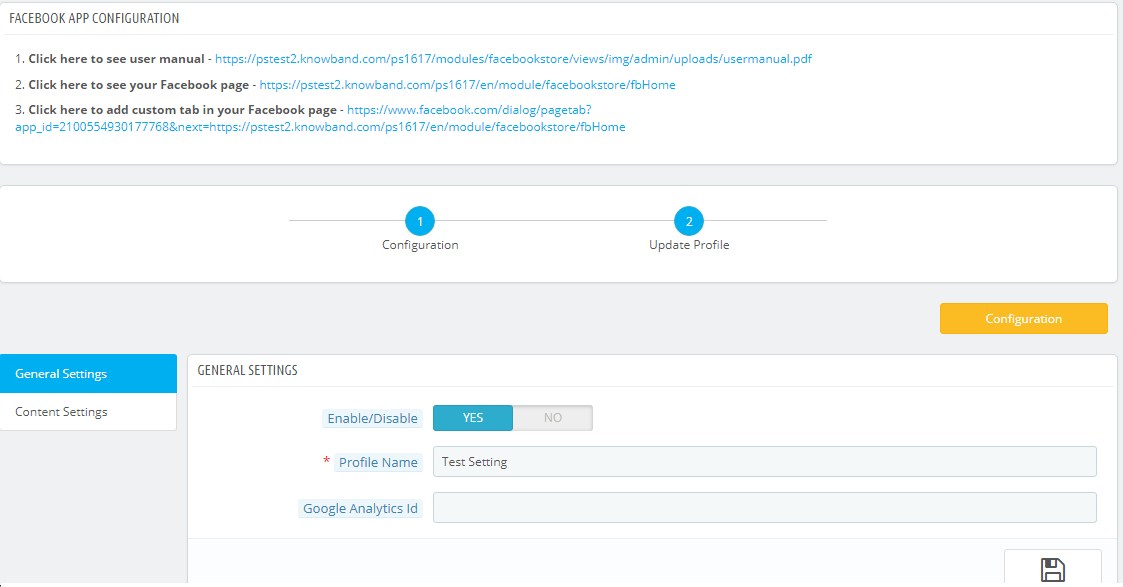
After successfully saving the App Id you will be redirected to the General settings page.

Add Profile Form has mainly two sections:-

  1. General Settings
  2. Content Settings

5.2.1 General Settings

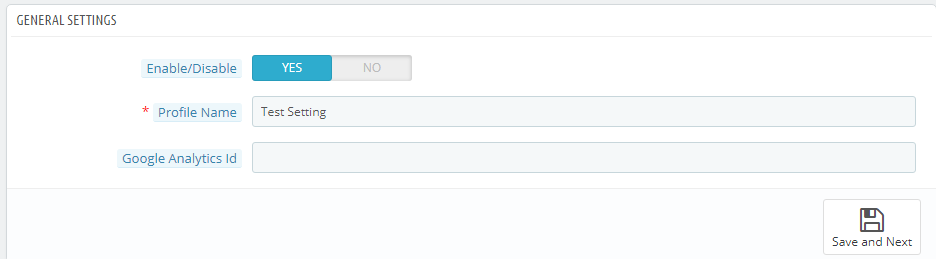
In general settings tab of Prestashop Facebook Store Addon, the Prestashop Admin has an option to add the profile name, option to enable and diable the Profile and Integration with the Google analytics using Google analytics ID.

Save and Next: Clicking on this button will save the settings and will create a profile.

  1. Enable:- Facebook Tab content will be enabled or disables using this setting of the Prestashop Facebook Integration module.
  2. Profile Name:- This field of the Prestashop Facebook Shop Addon is for the profile name for differentiating Profiles.
  3. Google Analytics Id:- This field of Prestashop facebook shop integration module, the admin can enter Google analytics id to track the performance of the pages of Prestashop Facebook store.

5.2.2 Content Settings:–

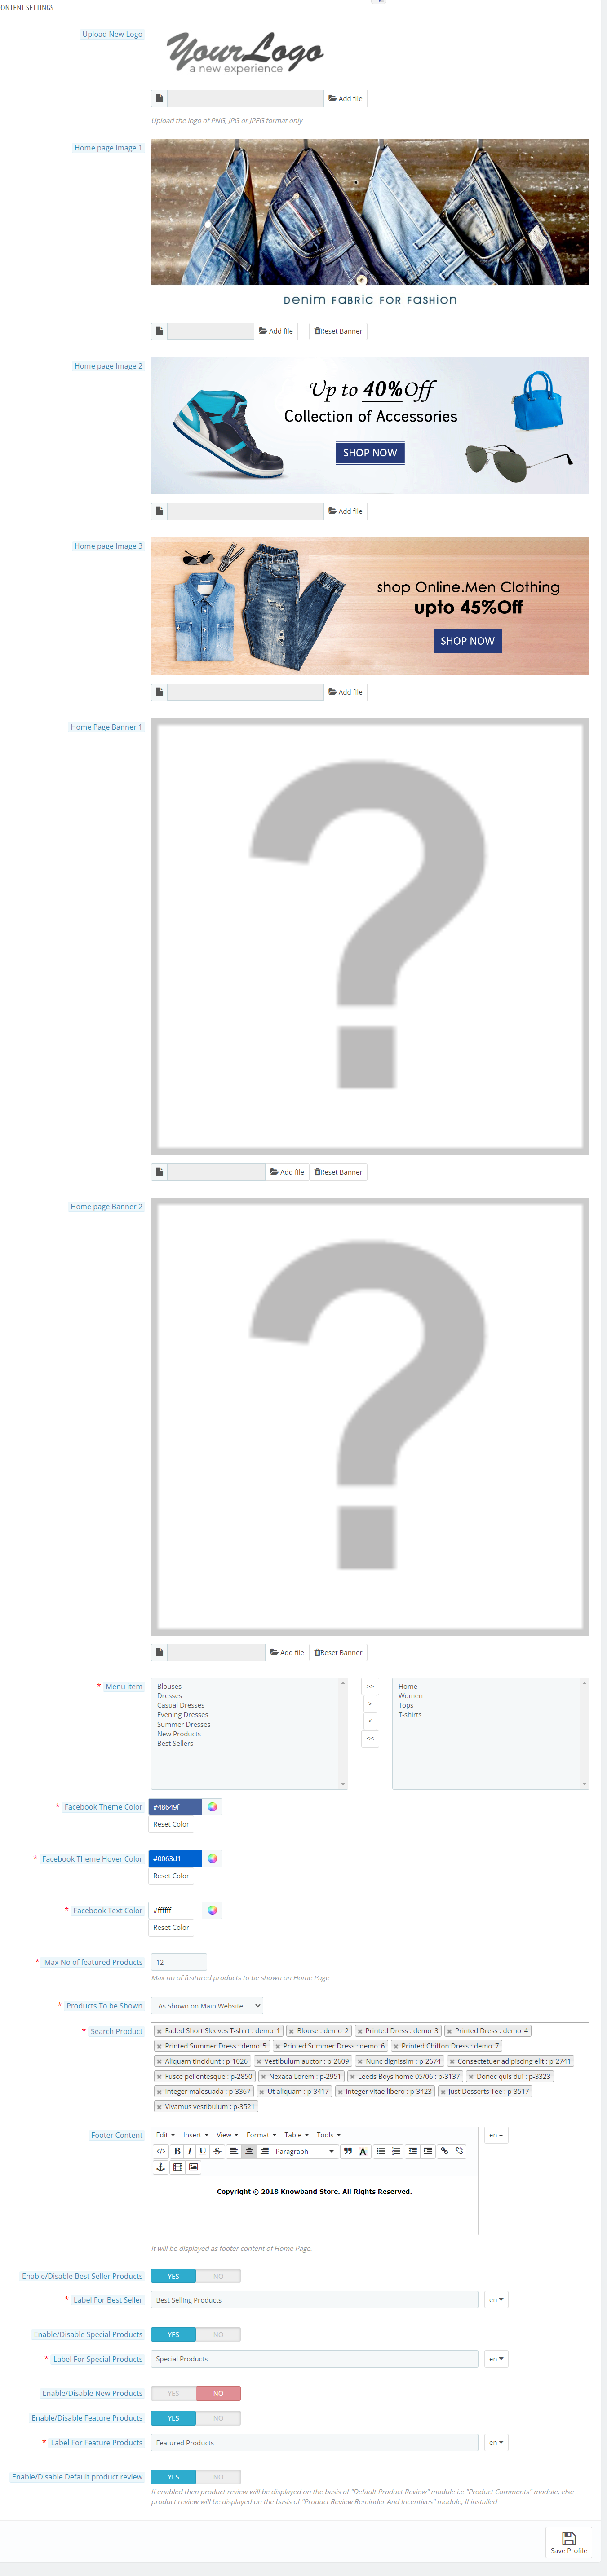
All home page content settings of the Prestashop Facebook integration module will be saved from here:-

  • Logo: System will pick the default logo from the PrestaShop. If user wants, he/she can upload new logo which will be displayed on Prestashop Facebook Shop Page.
  • Home Page Banner: In this field of Facebook store integration with Prestashop plugin, the admin can upload a banner image which will be displayed on the home page.
  • Home Page Content: In this field of Prestashop Facebook Store Setup module, added text will be displayed on Home Page of Prestashop Facebook shop tab.
  • Menu Items: Admin can select the menu items from Predefined list of the Prestashop Facebook shop integration module, which will be displayed on Facebook Shop tab. As of now keep the menu as single level which will be displayed on the Facebook Store tab.

Possible Menu Items which user can select.

  1. Home Page
  2. Categories
  3. Best Sellers
  4. New Products
  • Facebook Page Color: This option of Prestashop Facebook shop integration addon will be the color of all buttons and menu of Facebook Store Page.there will be option to reset to FB original color any time on clicking reset button. Default color will be :”#48649f”
  • Max No of featured Categories: Admin can select max number of featured categories to be shown on Home page under this field of Prestashop Facebook Store Integration module.
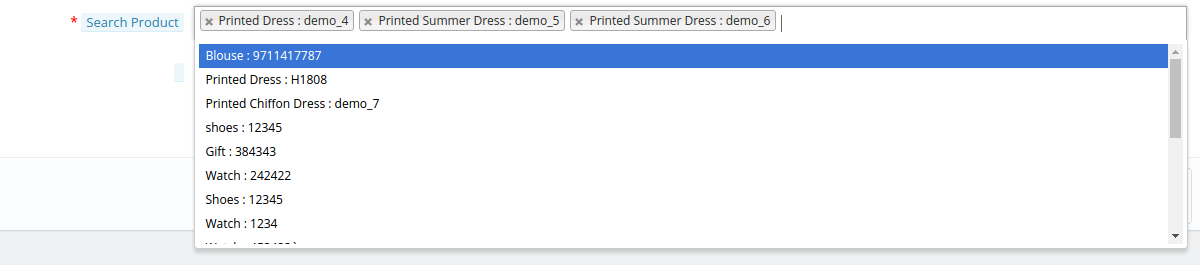
  • Featured Categories: In this field of Prestashop Facebook store module, the admin user can select the categories which will be displayed on the Home Page.
  • Product To be shown: In this field of Prestashop Facebook Store Integration module, system will ask the type of product to be shown on home page, i.e. From selected from below options or as shown on main website home page. It will be a dropdown.
  • Max No of featured Products: This field of Prestashop Facebook Store Setup module by Knowband allows the admin to select max number of featured products to be shown on Home page.
  • Featured Products On Home: In this field of Prestashop Facebook integration module, the admin user can select the products which will be displayed on the Home Page of the Facebook store.

  • Product Image Size: In this field of Prestashop Facebook Integration module by Knowband, the system will ask the size of image, i.e. small or big.
  • Footer Content: In this field of Facebook store integration with Prestashop module, the admin can add the content in the footer. Added text will be displayed on Home Page of Prestashop Facebook shop tab.

5.2.2 How to add a Custom tab in the FB page?

After saving the General settings and Content settings, you will have to add the Custom tab in the FB page. And to do this, click on the link to add the Custom tab as shown in the Screenshot below:

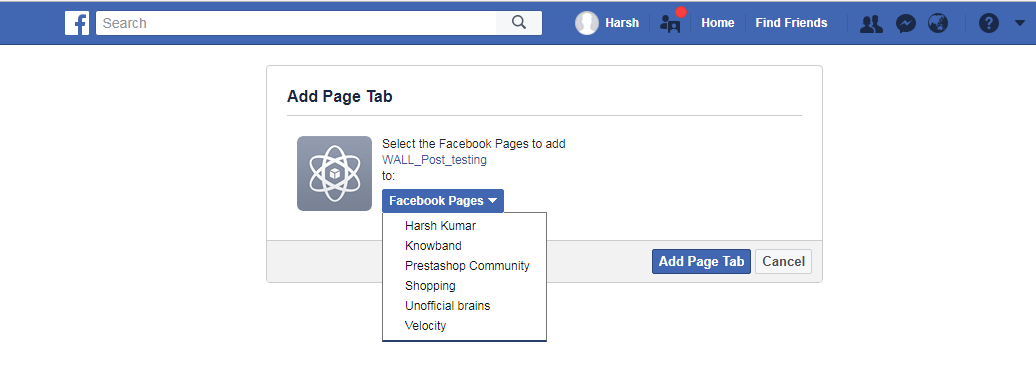
After clicking on this link you will be directed to page shown below:

You can select the page where you want to add the Custom tab. After selecting the page click on Add Page tab. After clicking on this button you will be directed to the page shown below:

This page will display how the Custom tab will look.

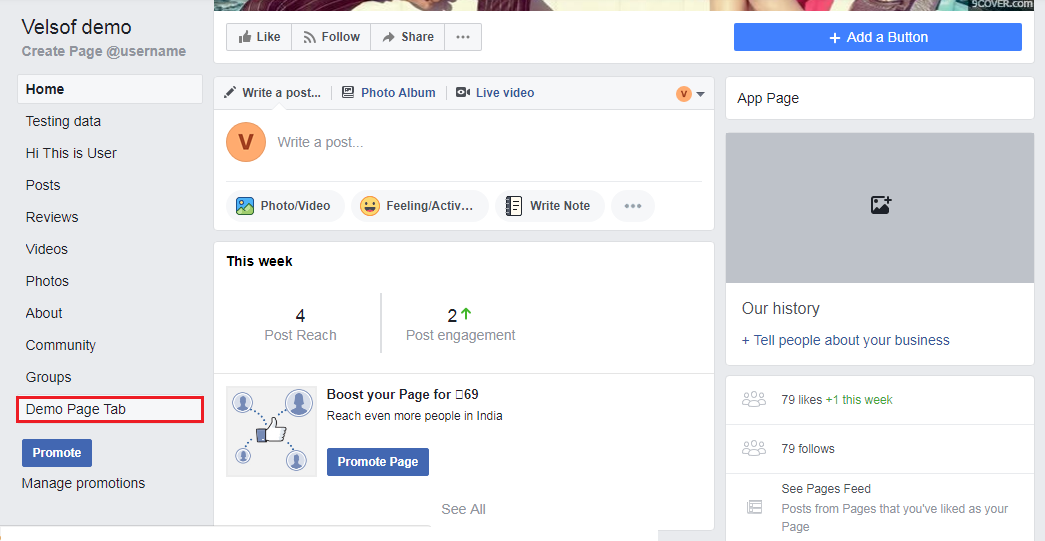
After this, you can go to the FB page where you have added the Custom Tab. You can see it will be added to the FB page as shown below:

The Custom Tab will look as shown as below:


6.0 Facebook Tab UI

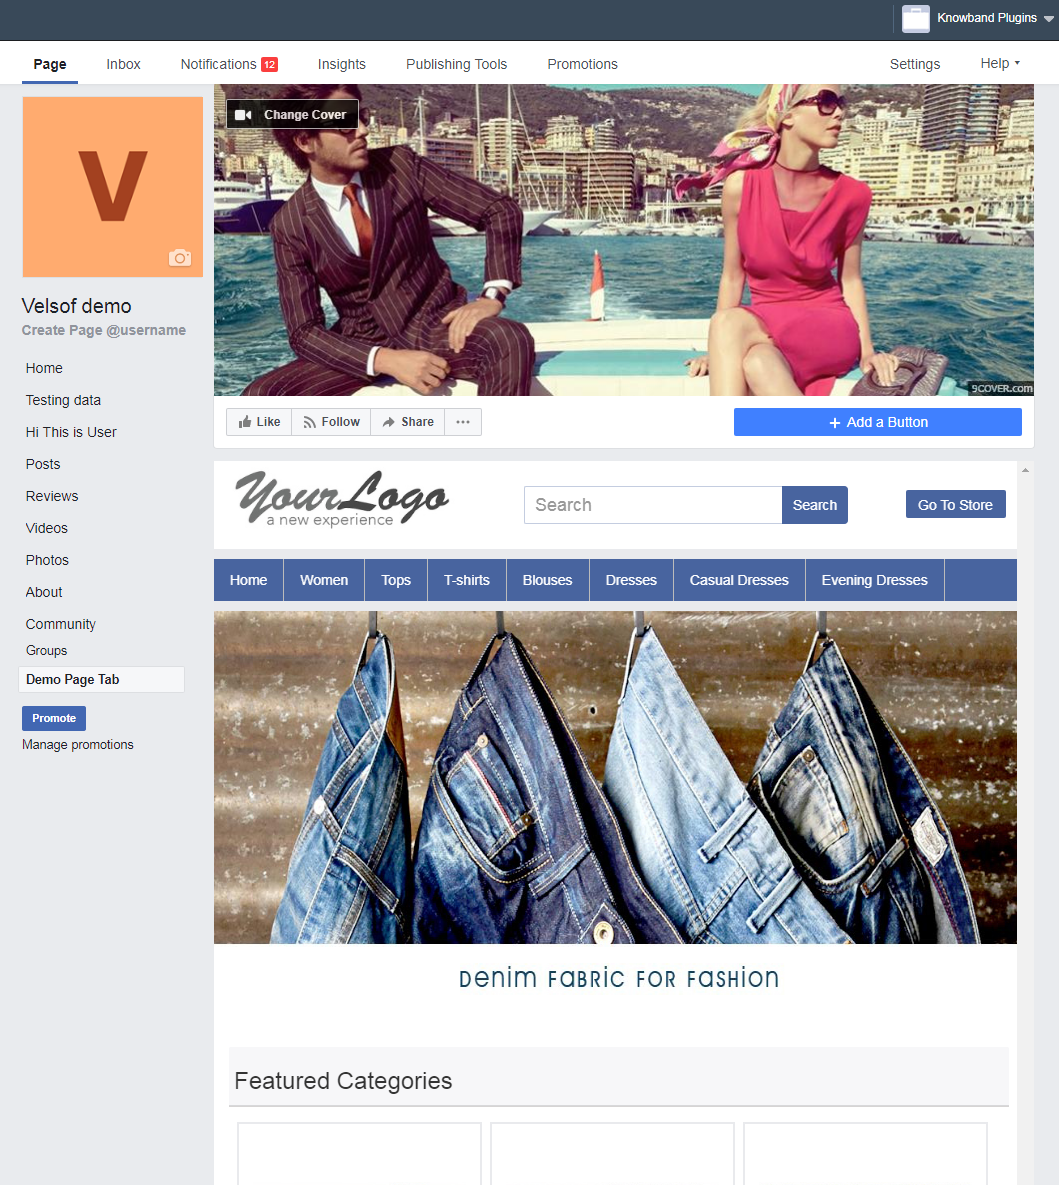
Clicking on the Added Tab from the Facebook page, Facebook Shop home page will be displayed.

6.1 Home Page

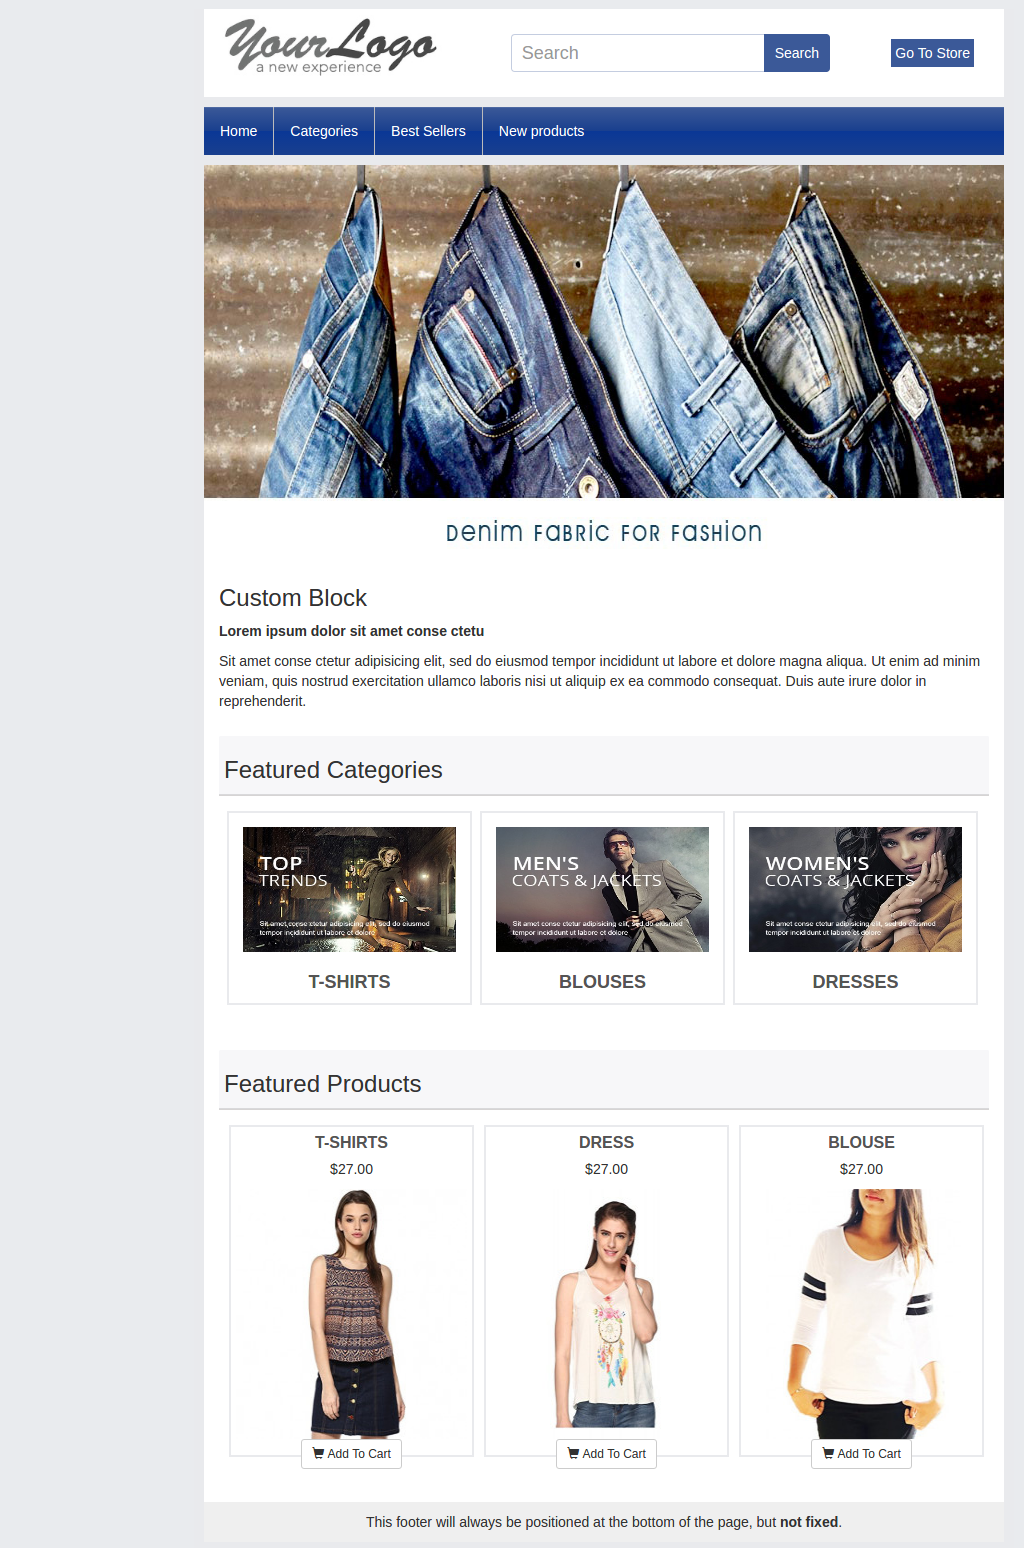
Home page will have the UI similar as mentioned below displaying the following:

  • Top bar
  • Header section
  • Menu bar
  • Text
  • Featured categories
  • Featured products, etc.

  • Top Bar: Top bar of the Prestashop facebook integration plugin will have Home link, Language Selection Dropdown & Currency Selection Dropdown if store is having multiple language or currency. Option to Go to Online will also be there (Go to Shop)
  • Header Section: Header section of the Prestashop Facebook store will have the logo, Search bar and Go to Store link.
  • Menu Bar: In thi field of Prestashop Facebook store module, based on the selection of Menu Items, Menu will be displayed. All the links needs to be opened in facebook iframe itself instead of redirecting user to Website.
  • Banner Image: In this field of Prestashop Facebook Store Setup addon, the admin can upload the banner image as well. If uploaded from Admin Panel, Home page of the Prestashop Facebook store will display the banner on Home page.
  • Text: If any text added in admin, Home page of the Prestashop Facebook store will display the text block otherwise it will be not be displayed.
  • Featured Categories: Featured categories section of the Prestashop Facebook Store Setup module will be displayed after “Text” section. Feature categories section will have category image, name of the category. Clicking on the same will redirect user to respective category page.
  • Featured Products: Featured Products will be shown as per profile settings.

6.2 Other Pages

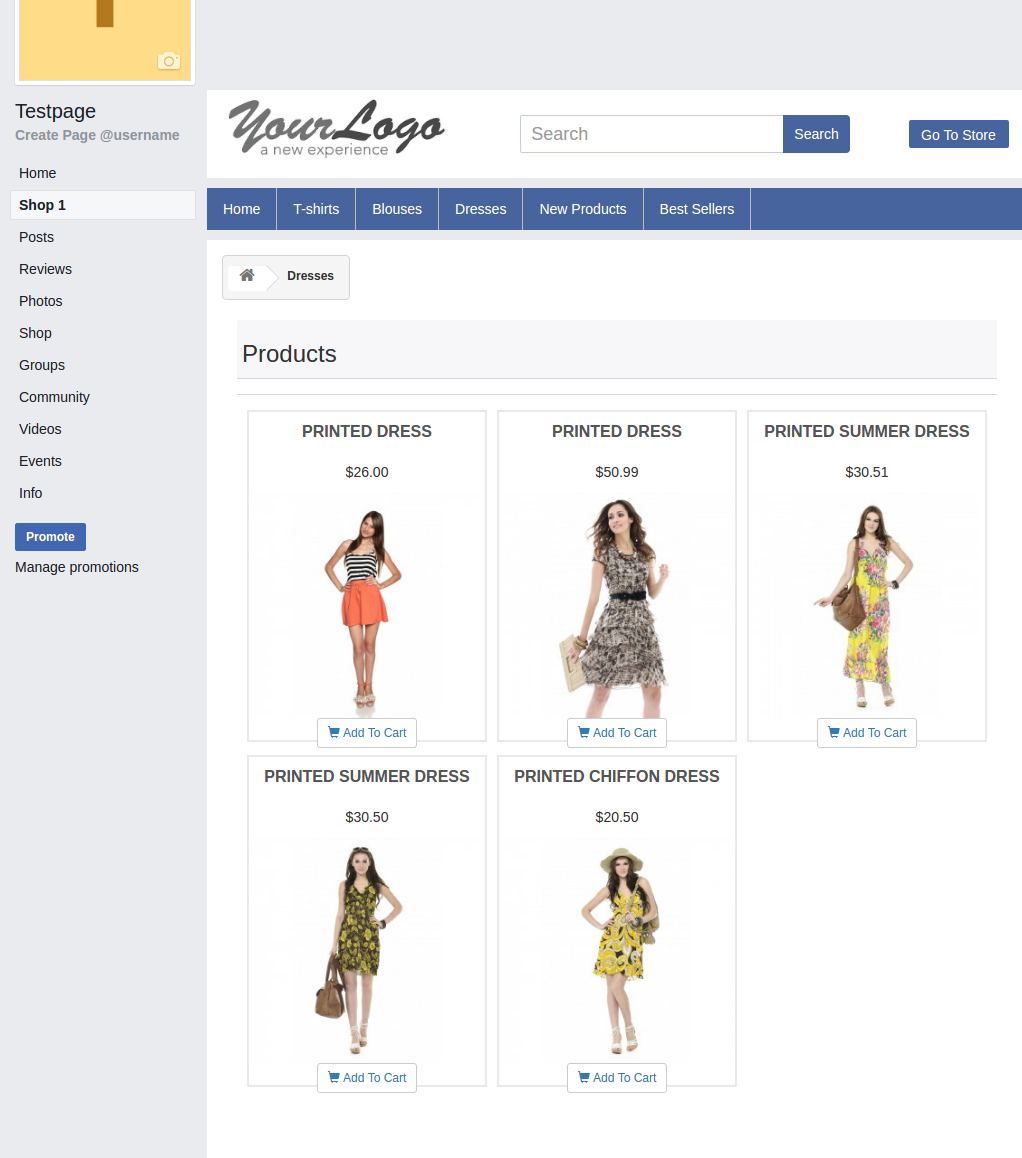
New Products page, Best sellers, category pages layout will be similar to below screen.

Now you are ready to have your Prestashop Facebook Shop giving your customers a way to connect with you with just one click. Clicking on the “Add to cart” option, the customer is redirected to your store to have a secure shopping experience.

Find below more details about this Prestashop Facebook Store Addon by Knowband:

Prestashop Facebook Store Module Link: https://www.knowband.com/prestashop-fb-store

Prestashop Facebook Store Module Admin Demo Link: https://ps.knowband.com/demo2/16/admin1/index.php?controller=AdminLogin&token=aea1bb3fb1bab860c86c4db00ce5949e&redirect=AdminModules&demo_lang=en

Prestashop Facebook Store Front Demo Link: https://www.facebook.com/knowbanddemo/app/227556457771171/?ref=page_internal

Get this Prestashop Facebook Store Plugin by Knowband on Addon Store as well. Visit: https://addons.prestashop.com/en/products-on-facebook-social-networks/28252-knowband-fb-store.html

Please contact us at support@knowband.com for any query or custom change request as per your business requirement.

You Might Also Like:

One-page Checkout for eCommerce Stores, Is It a One Stop Solution for All Your Issues?

Here at Knowband, we get questions from all our clients looking to boost their checkout conversion rate, if they should switch to a one-page checkout?

Their aim with the question is simple; they want to get more check-out page conversions, fewer cart abandonment, and more sales. We respond by always saying this, “It depends”. It sometimes comes as a surprise to most customers to hear this reply. As we are selling a one-page checkout Extension, and still not pitching a sale to them. Maybe they expect an answer like “Yes, it is the best. You should use our one-page checkout”.

I wish it was this easy. We don’t pitch our solution with a blindfold, instead, we recommend them something that will help them understand if their issue can be solved by simply installing the one-page checkout module. Let’s just take a pause and inspect some pros and cons of one-step checkout and then decide, whether a one-page checkout is simply an all-in-one solution for all your issues?

The misunderstood part of the one-page checkout solution

This is a common misconception among the eCommerce store owners that the one-page checkout is one medicine to all the check-out-related cart abandonment issues. It’s really understandable. The Fewer steps a customer has to go through easier it will be for him to complete the process and checkout bounce backs will reduce.

However, that’s not always the exact case. The implementation of one-page checkout is definitely appealing, but it does not mean it is the solution to all your issues. Truth to be told, one-page checkouts have their own set of problems that should be addressed to make them more organized and informed for the customers. Simply, a one-page checkout solution can make your store, but can also break it with some negative impacts if you don’t know the correct way to implement it.

For the customers who inquire about our one-page checkout, often time we come to hear that they read some article or attended some event where they told it is better. Most likely these customers did not pry into their existing multi-step checkout process and neglect the mistakes they are already doing with their checkout. So, even if they go for a one-page checkout, they are more likely to repeat those same mistakes, and then blame the checkout solution for the breakdown.

Consider these factors before deciding your checkout page:

So, Which one should you consider, One-Page Checkout or Multi-Page Checkout?  An honest reply would be both. A one-page checkout can be really effective in the right conditions and with proper implementation. You need to make sure that it addresses the common issues of a one-page checkout and has handled them effectively.

The right conditions for deciding the right checkout process for your business can depend on the aspects like:

  • Niche
  • Customers
  • Price point
  • Product Type
  • Pain Points and
  • Solutions

For instance, if you are selling luxury items that already receive fewer sales due to the high price point, and you have a loyal base of old customers, then a multi-page checkout is a better choice here. It will guide the users through the checkout process and will convert better.

On the other hand, if you sell non-expensive items where there are more sales and you are also offering free shipping options, then a one-page checkout solution would be more effective here. It will be quick, give a faster way to review the products in the cart, show the free shipping option right away, and allow the shopper to make the payment straight on the same page.

Perform A/B testing for the best checkout page solution

These are just the example of two simple cases. However, the best way to know which option works best for you is to test, analyze, test, and iterate. A/B testing can be really helpful where you can test both the types of checkout (i.e. one-page checkout and multi-step checkout) at the same time and see which one pleases your customers better.

Be cautious while testing, because here you’ll be pitting the best against the best. You wouldn’t get the right results if you compared a well-optimized one-page checkout to a cluttered and unorganized multi-step checkout. So, always test an apple with another apple.

A simple recommendation would be to first optimize the current multi-page checkout as far as possible. Once, you have fully optimized the multi-step checkout, then compare it with a well-optimized checkout by testing them. It will give a fair chance to your multi-page checkout, or else, the one-page checkout solution will always overshadow it.

One-page checkouts still have some benefits by default

  • The one-page checkout is quick since everything is on a single page.
  • There are only a few steps for customers to complete on a one-page checkout solution.
  • Well-optimized checkouts provide the cart review option on the same page.
  • Shipping option selection is available on the same page in the one-page checkout module.
  • The one-page checkout offers payment options on the same page.
  • Some advanced checkouts offer social login options as well.

Features to look for while selecting a One-Page Checkout Solution

Optimization is one such thing that differentiates a checkout Page from another checkout solution. Whether you are talking about a multi-step checkout or a one-page checkout, it has to be well optimized.  You won’t be able to solve all of the problems with the checkout page by simply consolidating it onto a single page; you’ll still need to optimize it for cart abandonment issues.

A true one-page checkout developed to curb the checkout page abandonments must address the issues like these:

Length- The length of the checkout process does not merely depend on the number of pages, but the number of details a customer has to fill in to complete it. Make sure your one-page checkout does not ask the customers to fill in unnecessary and redundant details. You can segregate the mandatory and optional fields.

For example, you can reduce the billing or shipping address form size by removing the unnecessary fields like fax number, anyone from the phone or mobile number, etc.

Cart review and update- What most of the one-page checkout solutions miss is the option for the customers to review their cart and update the product quantity from the checkout page. However, there are Advanced one-page checkout solutions that do provide the cart review and update options. So make sure, your one-step checkout does provide this feature.

Guest checkout: Guest checkout is an important feature. On both the checkouts(i.e. one step checkout or multi-page checkout), if you miss providing a guest checkout option, then you may lose some business. So, make sure whichever checkout option you choose, you should offer the guest checkout.

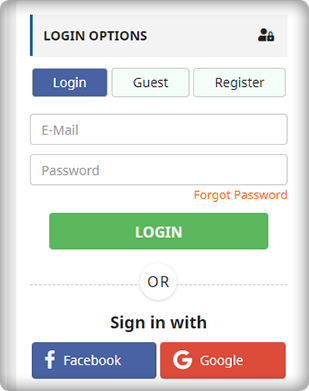
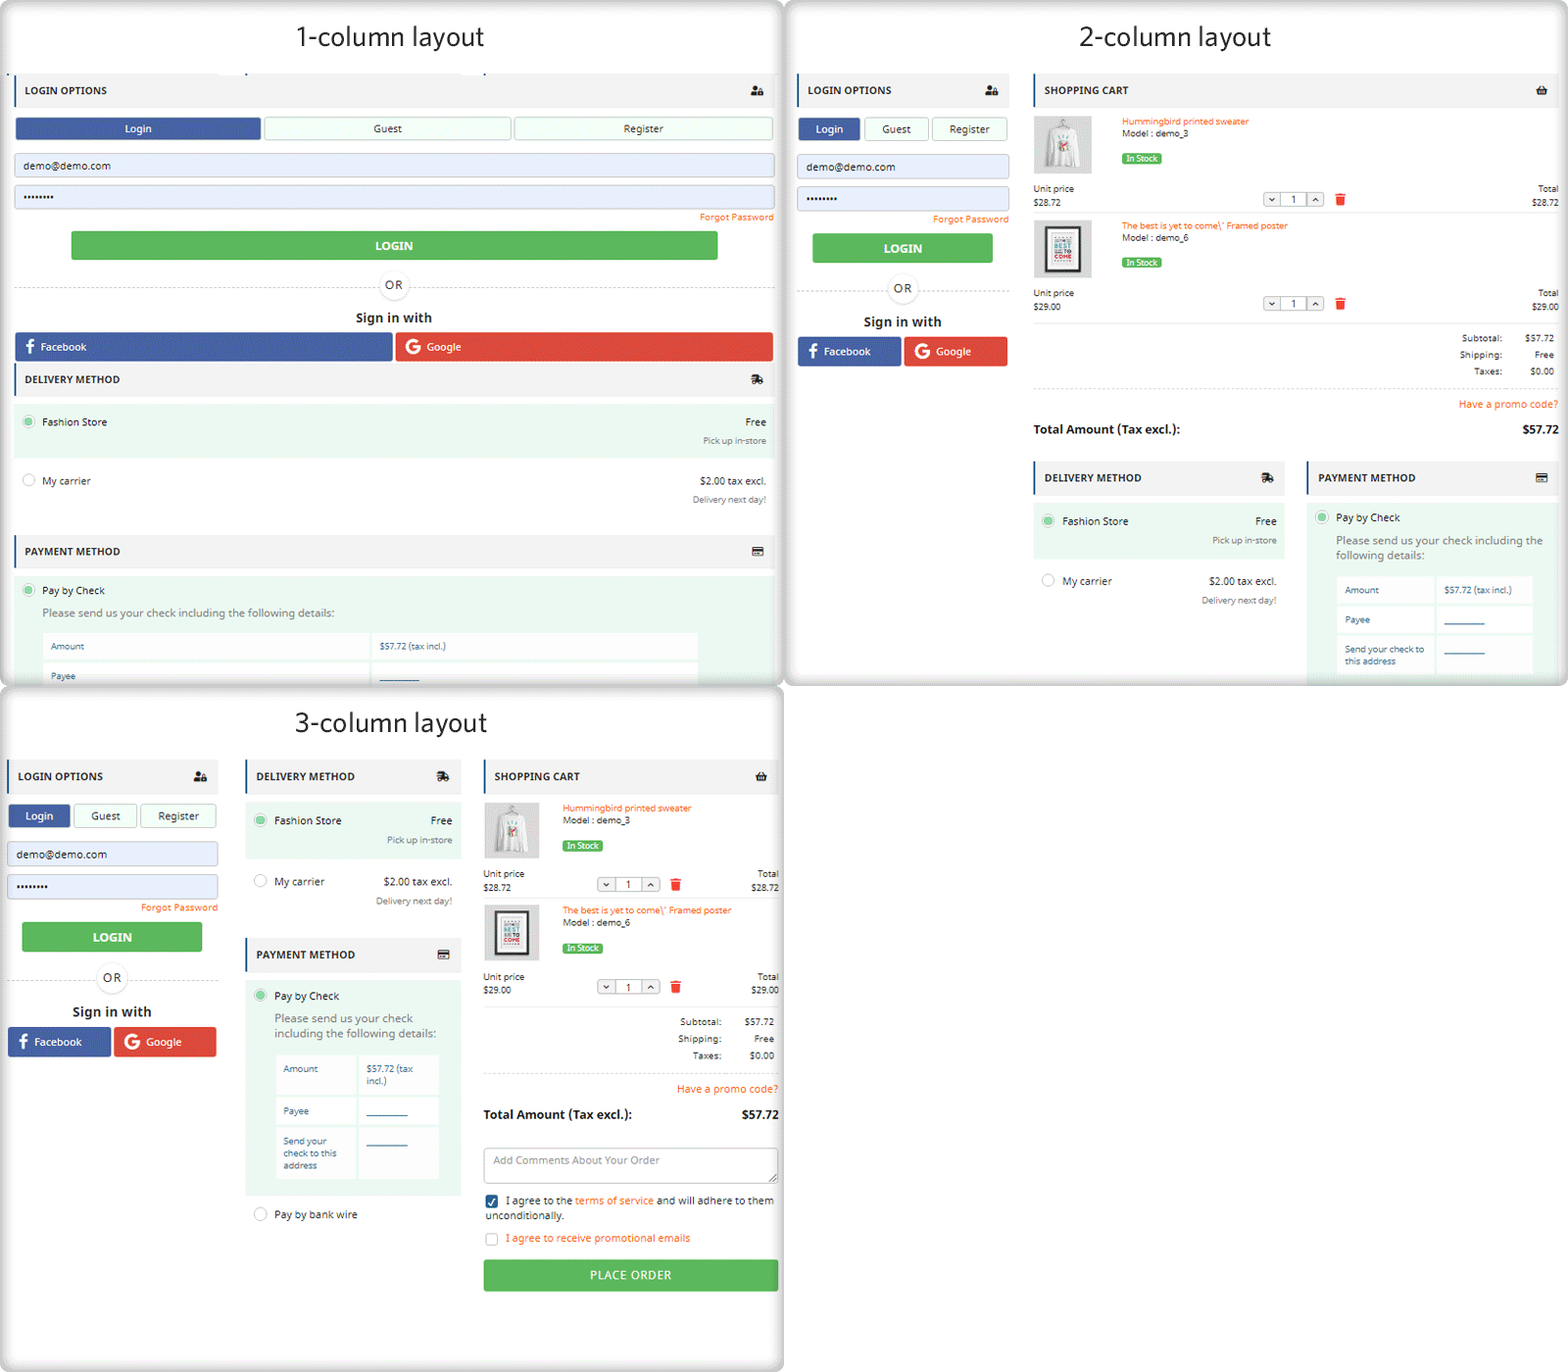
Social Login: Social login option is more of a competitive advantage than an optimization. If you are not asking your customers to necessarily create an account and offering guest checkout, it’s optimization. However, if you are allowing them to sign up or log in with their Facebook or Google Account, it’s a competitive advantage. Our  PrestaShop one-page checkout offers social login through Facebook and Google to help you gain the most out of your checkout process.

Clutter-free design: What haunts most of the merchants while switching to one-page checkout is the design issue. A one-page checkout in-housing the whole checkout process on a single page is more likely to look congested and cluttered. Therefore, you must ensure that your checkout page does not only fits with your theme design but should also have enough white-spaces to segregate each element and section. For example, it would not be a nice look if the shipping section overlaps the payment section or any other section of the page.

We have tried our best

We have tried our best to optimize our one-page checkout modules for Magento, OpenCart, and PrestaShop in the best possible way. We have included all the options that have been mentioned in the previous point. Moreover, we have also tried it to have the best possible clutter-free design.

Check out how we eliminated all the one-page checkout-specific issues in our checkout modules.

We don’t say a one-page checkout is a one-stop solution to all your checkout page issues. However, a well-optimized one-step checkout can always provide an upper hand. Optimize your multi-step checkout to the best possible extent and then test it with the one-page checkout solution, the results will ensure you have the best checkout, no matter it’s one page or multi-page. Always choose the best for your brand.

Liked This? You’ll Like These Too

Top FAQs related to the PrestaShop Marketplace Module

We have been receiving a lot of queries regarding the working and features of our Prestashop Marketplace Module. Therefore, we have decided to accumulate those queries as provide the answers to all of them in this FAQ. We have tried to answer all the major questions that are often asked by the merchants. In case if your query is not resolved by the answers in this article or you have any doubt, you are always welcome to get in touch with us.

So, here are some commonly asked questions and their answers by our developers

1. How are sellers introduced to the marketplace, how they sign up?

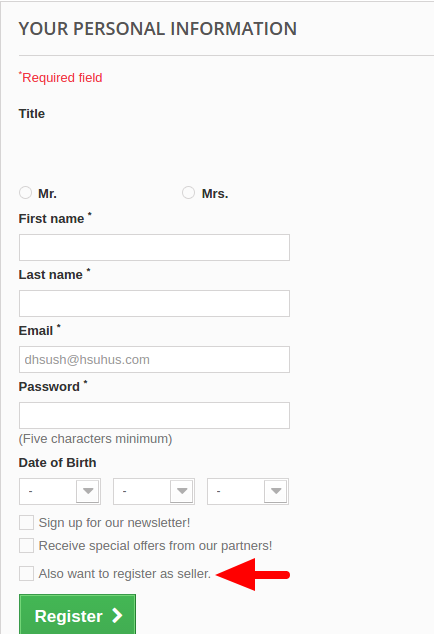
After installing and enabling the PrestaShop marketplace module, your store becomes ready to accept the seller registrations. The sellers can sign up using the same registration form used for customer registration on the front. The Prestashop marketplace module simply adds a checkbox below the form as “Also register as a seller”. By checking this box, any user can sign up on the marketplace.

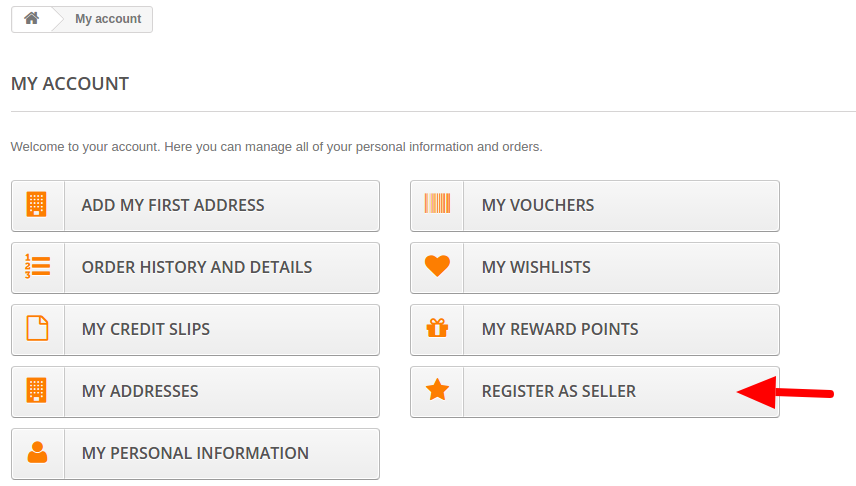
Moreover, there is another option in the customer user account section. All the customer accounts will have the “Register as a seller” in My Account section as an option with the help of this Prestashop marketplace module. Any customer can anytime upgrade the customer account to a seller account by simply using this option of the Prestashop marketplace module.

2. The seller panel is on front-end or back-end?

After registering a seller account with the help of Prestashop marketplace module, the seller gets a dashboard on the front end of the marketplace. We have done this to save the sellers from the complex management of PrestaShop back-end interfere. The seller panel is well organized and provides a number of seller account and shop management controls.

3. Who manages the shipping options for the sellers?

The Prestashop marketplace module allows the sellers to add shipping options for themselves. They can add as many shipping options and map them to their products with the help of this Prestashop marketplace module.

4. What is the “Default free shipping” option?

The default free shipping option is automatically mapped by the Prestashop marketplace module on any seller product which has not been mapped with any other shipping option. We have added this option in the Prestashop marketplace module to prevent a faulty product listing in case a seller forgets to map a shipping option to a product. This default free shipping will be automatically removed from those products which are mapped to at least one seller created shipping option.

5. Can any one just sign up and start selling on the marketplace?

Yes, in an indirect way, but No, not directly. All the seller sign-ups first go the admin as seller account approval requests. The seller will not be allowed to sell on the Prestashop marketplace until the seller account is approved by the marketplace admin.

6. Can a seller still upload products without seller account approval?

We have added a feature in our Prestashop marketplace module to save the time of the sellers. According to this, if allowed by the admin, the seller can upload a certain number of products, update the shop profile, even before getting the seller account approved.

However, the uploaded products won’t get live on the marketplace until the admin approves the seller account and also the product upload request.

7. How is the commission configured?

The admin can configure the commission from the sellers on two levels. First, the global commission rate which will be applicable on all the sellers on the Prestashop marketplace. Second is the seller level commission where the admin can set different commission rates for each seller on the marketplace.

8. If both seller level and global level commission is applied on a seller, which one would be finally applicable?

In case if the admin has mentioned both the seller level and Global level commission for a seller, then only the seller level commission will be applicable. The priority of seller level commission is more than that of global level commission.

9. Can the seller upload the products in whichever category he wants?

No, the seller can only upload the products in the categories allowed by the Prestashop marketplace admin. In case if the seller wants access to a particular Prestashop marketplace category, he can send a category request to the admin from the seller panel itself.

10. Who handles the orders received on the marketplace?

Both the admin and the respective seller can handle the order received on the Prestashop marketplace. The seller can see the orders in the seller panel, while the admin can see all the seller orders on the marketplace, from the admin panel of he Prestashop marketplace module. They can change the order status, mark an order as shipped, delivered etc.

Moreover, admin can decide to allow or disallow the sellers from handling the orders with the help of this Prestashop marketplace module.

11. Does the Prestashop marketplace module support 3rd party modules?

The products added by the sellers, and after approval by the Prestashop marketplace admin will become a part of the PrestaShop global catalog. So any module or extension will work as a normal on the PrestaShop but not work with the seller management or seller controls as those modules were developed for default PrestaShop.

12. Does your Prestashop marketplace module support multi-language including RTL languages?

Yes, the PrestaShop Marketplace module supports all the languages supported by the PrestaShop platform. It also supports the RTL languages like Arabic and Hebrew.

13. Does your Prestashop marketplace module affect the performance of the PrestaShop site?

No, our Prestashop marketplace module has been developed strictly according to the MVC (Model View Controller) and ORM (Object Relation Mapping) designing. Moreover, the Prestashop marketplace module follows the standard PrestaShop codding structure and has been verified on the Official Addons Store already. So, there is no performance issue with the Prestashop marketplace module.

We follow the best practices of Prestashop module development to make our Prestashop marketplace module as scalable as your standard PrestaShop store.

14. What is the payment flow structure of the marketplace?

In our Prestashop marketplace module, all the payments are received by the Marketplace admin. Later the marketplace admin can manually distribute the payments to the respective sellers after deducting his commission.

Our Prestashop marketplace module does not have an interface to automatically distribute the payments to the sellers, so the admin has to manually distribute the seller earnings to all the sellers.

However, the Prestashop marketplace module has an interface where the marketplace admin can review the seller earnings and see how much he has earned and how much he has to transfer to the sellers. The commission is also specified in the same interface. The seller earnings and commissions are listed in the back end of the Prestashop marketplace module on the basis of the sellers. Say, the admin has to pay $XYZ to the Seller 1, $ABC to the Seller 2 and so on.

Addon support: There is a Marketplace Admin to Seller Paypal Payment Addon using which the admin can distribute the seller earnings to the sellers right from the admin panel through the Paypal. There is also an option for admin to request reverse payment from Seller to his account, seller approval is required in this case.

15. Do the Prestashop marketplace module and marketplace addons work fine with all the PrestaShop themes?

Yes, the Prestashop marketplace and all its addons work perfectly fine with all the PrestaShop themes and templates. In case if there is any theme compatibility issue, we will fix that for you.

16. Can seller add products in bulk in PrestaShop Marketplace?

Yes, but not by default. There is our Prestashop Marketplace CSV Import/Export Addon which enables sellers to import their products and its combinations via CSV file.

17. How can the admin edit the different email templates used by the Prestashop marketplace module?

We have listed all the email templates in our Prestashop marketplace module’s back-end interface. Using this interface, the admin can edit any email template right from the back-office without editing the module’s files. All the email templates also support the multiple-languages.

18. How does the shipping costs apply when a cart consists of products from the multiple sellers?

If two products are from the two different sellers in the cart, then shipping charges will be calculated on the basis of the shipping method mapped to those products by the sellers. Shipping in our Prestashop marketplace module is calculated seller wise that is if a cart has 2 products of different sellers than two shipping is added each for the different sellers.

Also, the shipping methods will be merged together and shown as one; same goes to the shipping cost which will be added into one. The shipping option having the least shipping cost from all the shipping options available for the particular seller will be selected for merging.

For example, if seller 1 has 2 shipping options with shipping cost $2 and $4. And seller 2 has 2 shipping options with cost $3 and $5 then, shipping option with least cost from each seller will be selected for merging. I.e. $2 from seller 1 and $3 from seller 2.

The final shipping cost will be shown to the customer as 2+3 i.e. $5. However, each seller will see the shipping cost as split only. i.e seller one will see his shipping cost 2$ and seller two will see 3$. It is just that customer will see the shipping cost as 2+3.

19. How can sellers translate their products in other languages?

Multi-lingual is supported by ourPrestashop marketplace module. The sellers can manage the translations of product information and name from the seller panel itself. Just a one time input of corresponding translated phrases is required in respective languages of each of the products. After that those products will save the respective texts in the corresponding languages.

At first, the phrases will come in English only. After the manual input of the respective translated phrase or text, the system will save the translation and next time it will show the corresponding text in translated language selection of the store.

Steps to do that: 

  • Keep the store language as English (I am amusing English is your default store language), Enter all the details in English first.
  • Save them.
  • Now change the language of the store to say Spanish.
  • At first, you will see the English version by default even if store language is selected as Spanish. Edit the text you want to translate in Spanish. Replace the English texts with Spanish text.
  • Save it, Now you will see that if store language is selected as English, it will show English version of the same. And if store language is selected a Spanish, you will see the Spanish version of the same text.

20. What is the difference between the free and Paid version of the Prestashop marketplace module?

We provide the free version marketplace module so that you can have a demo of how our full version Prestashop marketplace module will look on your store. It has restricted features and is for testing and demo purposes. We have defined a detailed difference between the free and paid PrestaShop marketplace module. Please, refer it for better understanding.

21. What is the Prestashop Membership plan feature?

The Prestashop membership plan feature enables the admin to start subscription-based service. Admin can create various membership plans and sellers need to purchase these membership plans in order to upload products in the marketplace.

22. What types of membership plan an admin can create?

Admin can create various membership plans depend on the requirements of the sellers. Although admin can create membership plans based on product upload limit and duration of membership plans.

This Would Also Interest You:

Top eCommerce shopping Apps trends to follow in 2017

E-Commerce has grown up enormously in 2017 and so is the new trends and requirements. Each day you come across a new research, a new patent, a new feature, and a new trend that is engaging users from all corners.

Developing an App for your eCommerce store is a bit different from the stand alone apps. Here you don’t only need to provide the best user experience but also keep a sync with the website. It’s a tough job.

However, the new developments in the app development and eCommerce technology have made the task really easy. Now, getting a mobile app for your eCommerce website is not a headache but a smooth walk. In this article, I am going to enlist the top eCommerce Shopping apps trends that have made the business smooth, UX great, and ROI better likes never before.

E-Commerce shopping Apps trends

360-degree product images

With 360-degree cameras and equipment becoming accessible day by day, eCommerce store owners are utilizing this technology to establish a cutting edge in their mobile apps and product listings. Mobile apps are coming with the support to show the 360-degree view of the products through the 3D images.

These images provide a well-covered display of the product from all the angles and let the customers experience something new and informative. With 360-degree images integrated with the mobile apps, customers get an effective demonstration of the product through a single image only. Thus ensuring a high level of engagement from the users.

E-Commerce shopping in Virtual or Augmented Reality

The technology of VR and AR has been in the trend this whole year till now and was in trend last year as well. So far, the implementation could be seen in the games like Pokemon Go. However, now the eCommerce players are also in the race to use this technology for providing a lavish shopping experience through the mobile apps.

Image source: flashmode.tn

The VR and AR technologies can provide a reality like experience allowing the users to view the products from all the angles, thus improving the sales presentation of the products.

Unfortunately, these technologies are not in their full fledge yet. Many researchers like Google, Sony, and Samsung are already working to make them accessible and applicable to the real world scenario. Moreover, till now there are only a few phones supporting these techs.

Hopefully, with the current pace of development, it can be said that eCommerce mobile apps will soon be found with VR and AR features. With the tech being accessible in the future it is also expected that more and more of your customers will have the devices supporting the VR and AR.

However, Lens-kart did apply a mild concept of AR in its mobile app. Here, the users just need to put their face in the virtually specified area on the screen through the front camera. Based on the virtual measurements the app can virtually show how the particular frame will look on them.

Chat While Shopping While shopping on an eCommerce mobile app, buying confusion is a common thing to come up. We often get confused with so many choices at the fingertips. If this confusion is cleared on time, the app receives a sale. While if not, this may result in a shopping cart abandonment.

To avoid such confusion situations, eCommerce mobile apps are expected to integrate the chat functions. Using this feature the shopper can contact his friends and ask for advice regarding which product to purchase. Sounds simple, but it can help the store owners a lot and can eliminate a significant reason of shopping cart abandonment.

With the growing pace of development, the chat function is expected to get common in all kinds of mobile apps soon.

Shop with your voice

One thing that users don’t like about mobile is typing on that tiny screen. Voice search has become quite an impressive source of convenience in this regard. With voice search on the apps, the users can navigate on your store and find their favorite products with really fewer efforts.

Shopping becomes so easy when customers can just talk with their mobile phones rather than typing things. This technology is already in boom and is expected to get integrated in all kind of eCommerce apps in the coming future.

You can experience the extensive voice search function in the PrestaShop Android mobile app builder as well. It’s an App builder service that is used to develop mobile apps for the PrestaShop, Magento, and OpenCart stores.

Mobile wallet integration

E-Commerce apps are becoming easier and simpler to use day by day. To ensure the best user experience for the customers, the apps try to make the checkout and payment process as quick as possible. With mobile wallets, the users don’t have to enter the card details or any other detail to make a payment.

Mobile wallets are the one step solutions to make the payment process really short. Users just need to select their wallet as the payment option and then provide the authentication when prompted, that’s it; payment was done.

In fact, in most of the native mobile wallets integrated into the mobile app, users don’t have to provide the authentication. Just a single click and payment is done. Amazon Pay is one such native payment option on the Amazon’s app that makes the checkout real quick.

All the eCommerce apps in 2017 and onward are greatly expected to integrate such wallet payment options. Of course, no eCommerce store owner wants to give their customers a lengthy payment form to complete the checkout.

Future of eCommerce apps is bright

Mobile commerce is the next big thing, and it is expected to grow rigorously in the upcoming future. eCommerce mobile apps are playing a pioneering role in giving the best user experience to the users. If you don’t have a mobile app for your eCommerce store, you are losing a great share of the business that mobile app can give. It’s a time for you get a mobile app for your store and start selling in style and convenience to your customers.

If you own a PrestaShop, Magento, or OpenCart based eCommerce store, it very easy for you to get a mobile app in really affordable investment. The Android mobile app builder will help you get the best eCommerce app in just a few steps. Check out:

Android Mobile App Builder – Magento Extensions

Android Mobile App Builder – OpenCart Extensions

Android Mobile App Builder – PrestaShop Addons

Liked This? You’ll Like These Too
How to use Google Analytics for tracking Shopping cart abandonment?

Google Analytics is an ultimate solution by Google to help you on almost every issue of your store. From website traffic, Adwords, Search engine optimize to even conversion rate optimization, you can see the use of Google Analytics everywhere.

In this article, we will see how can you set a conversion funnel on Google Analytics. This will not only help you to know how and when visitors bounce from your store but also let you measure the rate of cart abandonment in a time period.

Funnel and the Goal

To track the shopping cart abandonment on your store, you will need to set up two reports for your store:

  • A Goal and
  • A funnel

Goal

The goal is typically an URL, page, time, or CTA where you want your customers to visit or click and you have a conversion objective with that goal.

For example, here our aim is to track the shopping cart abandonment so we will add the goal as the “Thank You page” or so-called “order confirmation page”. If the visitors reach to the thank you page, it means he/she has completed the purchase process and you have a successful conversion now. So the objective is see if a customer reaches to this page.

Funnel

A funnel is a path that the visitors take to reach the goal.

For example, not every visitor who exits your site without a purchase is a cart abandoner. Only those customers will be considered for shopping cart abandonment tracking who add a product to the cart and leave the site without checking out. So our funnel will include the pages like “cart page” and “checkout page”.

Google Analytics: Set up the Shopping cart funnel

Step 1: Sign in to your Google Analytics account.

Step 2: After logging in, click on the Admin tab

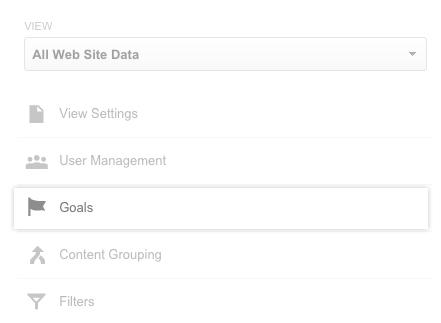
Step 3: Select your profile and Click on the Goals

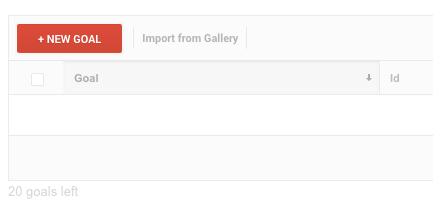
Step 4: Click on the +NEW GOAL button to set a new goal.

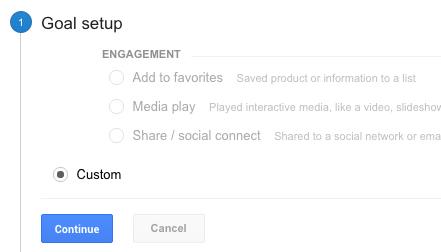
Step 5: In Goal Setup select Custom and click on the Continue button.

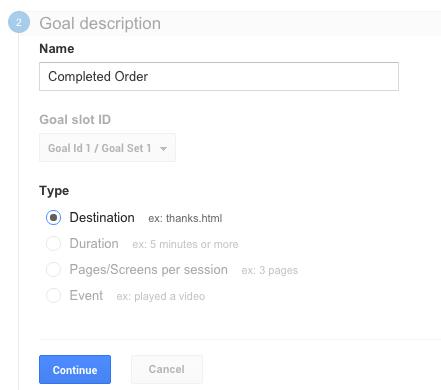
Step 6: On the next page, you will be asked to set up your Goal Description and Goal Type.

Here we are setting up the goal for our order success page, so I will Name it as “Completed Order”.

I will choose the Type as the “Destination” as it’s an URL that I want to add.

Click Continue after making the set up as explained.

Step 7: On next page, you will need to enter the URL of your destination. Since we want to add the order success page in the destination, we will enter its URL in the same.

Please note: If your thank you page’s URL is static and does not contains dynamic values, keep it as “Equals to”. While if your URL contains a dynamic value at the end, you should select “ Begins With” option.

Use destination Equals to if the URL is something like this:

“www.example.com/checkout/thankyou”

Use destination Begins With if URL is something like this:

“www.example.com/checkout/thankyouid=12234”  

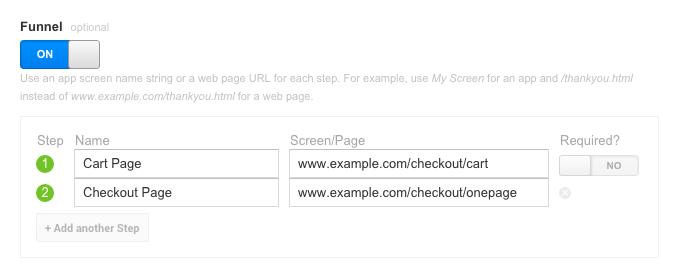
Step 8: Now, turn on the Funnel option. Here you will need to enter all the URLs or steps that lead the customer to the Thank You page. Enter all the intermediate steps/URL starting from the Shopping cart till the thank you page.

Set the “Required” option for the first URL in the funnel as “NO”.

You would probably need to make a test purchase on your store and note down every important URL you want to track from in the process. For the time being, I am adding these two dummy URLs:

  • Cart page (URL-example.com/checkout/cart/)
  • Checkout page (URL-example.com/checkout/onepage/)

Step 9: After adding all the URLs in the funnel, click “Save” to save your new goal.

Step 10: Google Analytics will start collecting the data for your sale funnel over the next 24 hours.

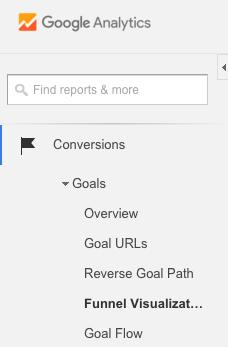
Step 11: To view your funnel report, go to “Conversions” tab and then Goals>>Funnel Visualization.

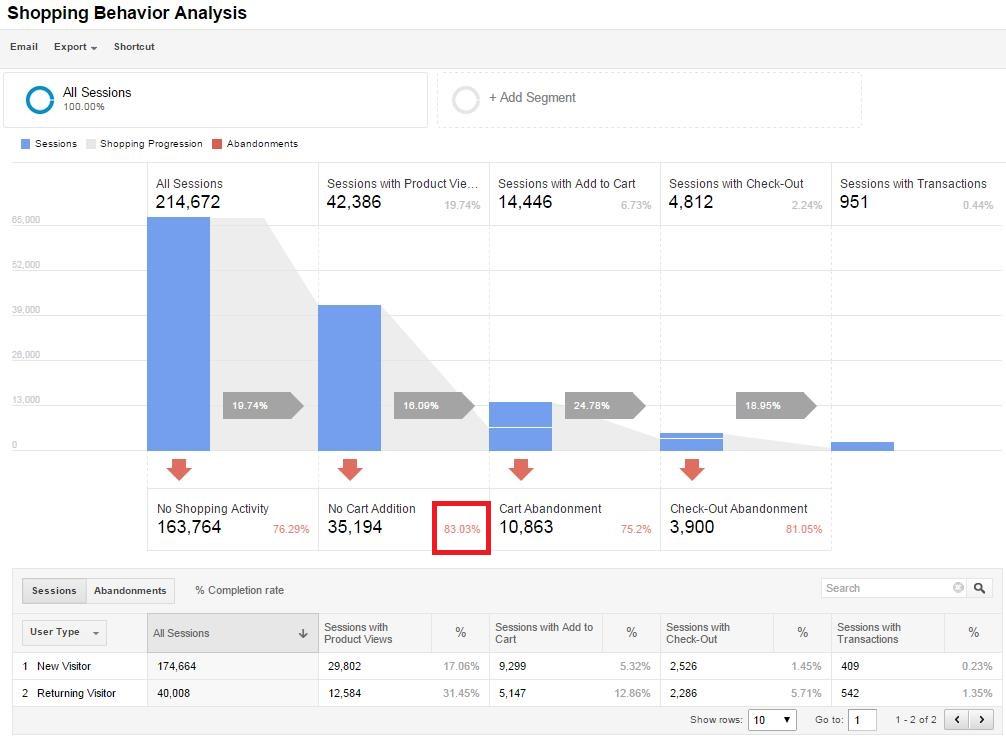
The funnel visualization will look something like this as per your funnel set up:

An easy solution

Google Analytics always has a treasure of information for your eCommerce store. However, it’s not that easy to setup the right tracking environments. Especially when you not proficient with it, it will give you a hard time even reading the reports. With experience, you will become a proficient user and Google Analytics will flow like butter for you.

Google analytics definitely makes the process of tracking and finding the bottlenecks of your conversion funnel effortless. However, the job is not done yet. Churning the data and converting these abandoners into paying customers is your responsibility?

How to convert the abandoned cart into leads?

According to experts and Analytic toolmakers, “If your shopping cart abandonment rate is X%, you are not actually losing X% of your sales”. If you make a closer analysis, you’ll see that actually only the 30%-40% of the abandoning customers come to your site with a buying intention. So, you can atleast achieve these many conversions if not 100%. Discussed below are some quick-fixes that can help you take care of the abandoned carts.

Find the exact pitfalls

The Google analytic provides a greater insight of the abandonment behavior of the store visitors. In addition to the numbers, you can figure out the exact place from where they left your site. Dig a bit deeper and see for the places of the site that are having higher bounce rates. Check the aspects at those areas that are not motivating the visitors to go further. Take the shoppers before they leave the door. Optimize the pain areas for your customers and make them stay for longer.

Go for retargeting

The retargeting methods like email marketing, push notification, SMSs and others might sound conventional, but is an effective way to bring the prospective customers back to the store. Sending personalized emails and regular follow-ups has helped a lot of stores achieve their target. Instead of sticking to the generic format of the email, send their personalized mails.

Offer reasons for conversion

See the products that the visitors have saved in their cart and offer them discounts on that particular products. Push notifications can really help if you are using eCommerce mobile apps. Notify them whenever their cart is on sale. This can give them compelling reasons to return to your store and place the orders.

Boost the session time

It is no news that the more time the visitors spend on your site, the more will be the chances of conversion. This is when exit popups might help you. However, the exit popups are considered annoying by online shoppers. You can use some gamified popups at the exit-intent of the customers instead of the conventional popups. Knowband’s Spin and Win exit popup for Prestashop, Magento, Magento 2, OpenCart and WooCommerce are one of the ways to reduce the bounce rate of the site without annoying the customers.

For the time being, you might want to have a look at a more specialized and easier alternative to tracking the cart abandonments on your store. If so, Abandon cart extension for PrestaShop, Magento and OpenCart could be a great option for you. You might want to try the free demo of these extensions.

  • This extension helps you to track all the abandoned carts on your store and automatically send cart serial reminders to the respective customers.
  • This is not only an abandoned cart tracker but also an automatic abandoned cart recovery tool by using proper follows.
  • The automatic follow ups will be done from time to time through email. These emails may consist of a simple plain reminder or an offer for the customer to encourage him to complete the checkout.
  • There is also a direct checkout button the email that will automatically take the customer to the checkout page with all the products in the cart already added.

Check out the module description for more detail and free live demo.

recover abandoned cart, how to use Google analytics to recover abandoned cart, how to recover abandoned cart, recover abandoned cart with Google analytics,

Liked This? You’ll Like These Too
3 marketplace add-ons to attract sellers on Magento Multi-Vendor Marketplace

The Magento Multi-Vendor Marketplace Extension is a solution that converts your Magento eCommerce store into an online multi-vendor marketplace site. Just like a physical Shopping mall or marketplace where you can invite sellers to open their shop and sell their products. In return to it, you have the option to take commission from the sellers as the rent for the online space you would provide them in your complex (marketplace site).

Marketplace ad-dons on the other hand, are those extensions which add new features and functionalities to the Magento marketplace extension. These features add new opportunities for the marketplace admin and sellers to manage various aspects of the whole marketplace. There are ad-dons for SEO improvement, Conversion Rate Optimization, Product Management, Helpdesk management and much more.

Here in this article, we are going to enlist 3 such marketplace ad-dons that can help you make a strong relationship with your sellers. These extensions provide some extended accessibility options that make the operation of the marketplace shop easier for the sellers. By using these ad-dons, the marketplace admin can create an improved UX for the sellers/merchants/vendors and encourage more sellers to come and register a shop account on the marketplace.

Now, if you ask, why it’s so important to keep the sellers happy, then just understand the Chicken and Egg problem of a Marketplace business, and you will understand.

1. The Marketplace Contact Admin ad-don

Any seller who wishes to register on a marketplace would first of all want to know if he is doing business with a responsible business on the other side. Not having a seller support system is a clear sign of chances for negligence in seller grievance handling by the marketplace admin. No seller would want to open a shop in a marketplace where they can’t even register their query or complaint if needed.

In this situation a marketplace site can always provide the desired support to its sellers with a seller support system on board. The Marketplace Contact Admin ad-don is one such seller support system that would be liked by your onboard sellers.

  • It allows a seller to create a query or complaint ticket with the marketplace admin right from the seller dashboard.

  • Allows admin to check the complaint and queries from all the sellers and reply back repetitively.

The seller or admin might not be logged for the whole time to instantly see the tickets and replies. That’s why, along with the messages on the marketplace interface, the ad-don also sends an email to the seller and admin whenever a new message is received.

This ad-don could be a great extension for the marketplace. With better user experience and seamless seller support, you will have a USP on your marketplace site that will attract more and more Merchants to do business with you.

2. The Marketplace Return Manager Ad-don

When we look at the eCommerce competition level in 2017, keeping the sales rate at desired level is a complex task. When everyone in eCommerce market is busy recovering their abandoned carts, new sales generation seems to be a mega task.

However, if you are not able to complete this mega task and keep your marketplace’s conversion rate optimal, you would hardly attract any new seller to your site. Moreover, there are chances that the onboard merchants would also pull their hands back.

In this situation, you need to keep your customers happy by providing every possible facility that can be imagined on an eCommerce store as of now. Happy customers mean more sales, more sales mean happy sellers.

The option for easy returns is one such facility which every eCommerce customer looks out for. You will hardly find an eCommerce customer making a purchase without reading the products return policy of the store. That’s where you need a return management ad-don on your marketplace.

  • With easy return facility through the ad-don, you can allow your customers to place a return, refund or replacement request directly to the concerned sellers.

  • The admin and sellers both get notified on a new return request. The sellers can process the return request and can approve/disapprove it based on the marketplace’s return policies.

Now based on your return policies you can use this ad-don to create an ultimate shopping experience on your marketplace. Of course, the customers will like the return and refund facility. Such facilities to the customers can help generate more sells and a good name for your website in the market.

Who doesn’t like the speedy refund management of Amazon on failed for undelivered orders? Despite, I had an undelivered order experience due to courier boy’s mistake, I was happy to place a re-order with Amazon because they refunded me for the undelivered order so fast.

That’s how even a bad shopping experience cannot stop your customers to trust you if you have a recovery plan like easy refund and returns.

3. Marketplace Seller Vacation Mode Ad-don

Whether you have a run a marketplace site or an inventory based eCommerce store, customer experience is one such thing that will decide the fate of your business. But you cannot expect your website to provide even a decent customer experience when you cannot fulfill the orders on time.

On a marketplace, the failure to fulfill an order on time can happen due to many reasons:

  • Product was out of stock
  • Courier service’s mistake
  • Seller didn’t dispatch the order or time etc.

Whatever be the reason for the failure in product delivery or order fulfillment, the bad name is going to stick on your marketplace; not on the seller. So it’s your job to make sure that sellers are dispatching the orders on time.

Now, that’s a hectic task. Not always but sometimes there might come a situation for a seller when he/she might not be available to fulfill an order received for his product. The reason could be anything:

The seller might have gone on a holiday and he might not have anyone else deployed to manage the marketplace shop till then. The reasons for the holiday could be numerous- recreational or unavoidable circumstances.

In such situation, when the seller would not be available to fulfill the orders, it’s a sure thing that you will lose some happy customers due to this.

How to avoid this?

The Marketplace Seller Vacation Mode Ad-don is the answer. Behind explanation of all these situations, my main aim was to introduce this ad-don as a big problem solver, and it efficiently does that.

This ad-don allows a seller to turn on the vacation mode before going for any such holidays. In this situation:

  • All the product listing from the particular seller will get hidden from the customers. That is, the customers will not see the products of this seller on the marketplace until he is back from the holiday.
  • The seller can set an automatic timer to turn off the vacation mode, or can manually do it when he is back from the holiday.
  • The marketplace admin sees the list of all the sellers who have turned on their vacation mode.
  • The admin can choose to approve or disapprove a seller’s vacation mode request. That means, the sellers cannot turn on the vacation mode until the admin allows them.

So, admin is still the boss, sellers cannot just go on the vacation every now or then.

Over to you

So, these three features on any marketplace site are definitely the conversion booster and saver as well. The Magento Multi-Vendor Marketplace Extension is backed by many such ad-dons like these. You can have a free demo of both the Admin panel and Front-end interface. Have a tour of the extension as see how it can help you launch a marketplace business of your own.

Liked This? You’ll Like These Too:

Step by Step tutorial to test and create eCommerce mobile app for your web-store!

With a change in the eCommerce business scenario, the revenue of online stores has also been affected. Mobile optimization has become quite an essential requirement for eCommerce website sites nowadays. From conversion rate optimization to search engine optimization, no expert will tell you that targeting mobile customers is not beneficial. In fact, you will remain in a disadvantage against your rivals by not considering mobile customers in your marketing plan. In this write-up, I am going to tell you the easiest way to own a pair of native mobile apps. Earlier, you either required to learn the coding/programming or hire a professional to create eCommerce Mobile App. But, now all you need to go for automated solutions and launch fully synced eCommerce apps for your business.

KnowBand has brought one such solution with Mobile App Builder plugin. This is a readymade solution to provide you native Android/iOS apps for your store. It is designed in such a way that all the functionalities of the app can be controlled from the backend panel without making any code changes. The eCommerce Mobile App Creator is available for following CMS platforms:

PrestaShop Mobile App Builder
OpenCart Mobile App Builder
Magento Mobile App Builder
Magento 2 Mobile App Builder
WooCommerce Mobile App Builder

How to create eCommerce mobile app in a few steps?

In order to utilize the services of Mobile App Builder extension, you need to follow the following steps:

Step 1: Purchase the Module

Visit the above links as per your eCommerce website platform. Purchase the module and install the zip file on your store. Once installed you get the complete admin panel access to control the app. Open it and enable the respective Mobile App Builder.

Step 2: Share your App Specifications

After purchasing the module, you will receive an email having a small questionnaire that you need to fill and respond back. In the questionnaire, you will be asked to share some information regarding your app. Based on which, the development team will develop and customize the app.

Step 3: Publish APK/IPA on App Stores

After the development is complete, the team will share the APK file of the app with you. Now, you need to publish this APK on Google Play to make your App available to your customers. You can publish the app by yourself, or it can also be done by Knowband for a small fee.

That’s all with the process to create your own mobile app with KnowBand. You can even test your store on our demo app before going for the actual module purchase. Let’s find out how?

How to test your store on our demo Mobile App for free?

In case you want to see how your mobile app would look like, there are free versions of the Mobile App builder that you can try. The free version of the Mobile App Builder lets you see how your eCommerce store will look and work on the App. You need to implement the following steps that are mentioned below for having a free demo:

Step 1: Visit any of the links below according to your eCommerce platform:

Android Mobile App Builder Free – Prestashop Addon
Android Mobile App Builder Free – OpenCart Extension
Android Mobile App Builder Free – Magento Extension
Android Mobile App Builder Free – Magento 2 Extension
Android Mobile App Builder Free – WooCommerce Extension

Step 2: Download, install and enable the free mobile app builder extension on your store.

Step 3: Next, install the respective demo Mobile app on your Android/iOS testing phone from the Play Store/App Store as per your choice:

PrestaShop Mobile App – Android & iOS
OpenCart Mobile App –   Android & iOS
Magento Mobile App –    Android & iOS
Magento 2 Mobile App – Android & iOS
WooCommerce Mobile App – Android & iOS

Step 4: Open the App and enter your store URL in the field.  Make sure you enter the full store URL of your store i.e. https://www.example.com/

Step 5: You have successfully completed the initial setup of the demo app. Now you can experience your store as a mobile app and test it as you want.

That’s all! Now, analyze your app functionalities. You can even find the detailed testing process from here.

Why own a pair of native eCommerce mobile app?

In addition to having a mobile responsive site, mobile apps have come up as a more advanced way to target mobile users. No doubt you still need a mobile site to come in the good eyes of Google and your mobile customers. But, all of your rival sites know this too, and that’s why they have already started the mobile optimization for their stores. So, what else do you need to have an upper hand against your competitors? A mobile app for sure. Let’s take a look at some of the major benefits of tapping into mobile commerce:

1. Improved Usability for online shoppers-

Downloading and installing the app is a one-time process. After that, your customers can visit your store anytime in just a single click. This ease of visiting your store improves the interactivity of the customers with your business and ensures a 24X7 availability. The exclusive mobile app interface makes navigation through your store quite easy, quick, and interactive. Furthermore, mobile apps can be presented as per your will. You can design the home screen and highlight popular products of your store as well.

2. Leverage built-in Smart Phone features-

The Android and iOS platforms provide a number of built-in features on smartphones. Mobile apps can adapt to these built-in features and leverage them for providing a more engaging user experience to the customers. For example, you can use the GPS location tracking to present the location-based shopping experience to your customers. You can leverage microphone to provide voice-based app search for faster-searching experience.

3. Users always prefer mobile apps over the mobile site-

Apps make the shopping experience faster, interactive, more secure, and reliable. Users don’t have to remember an URL or log in each time they visit the store. Sites having both mobile apps and mobile sites receive more qualified traffic on the mobile app than on the mobile sites.

4. Mobile app push notifications is a boon-

You don’t have to depend only on email marketing for communicating with your customers. Through mobile apps push notifications, you can always and instantly send messages to your users that too in a more personalized way. You can’t integrate push notifications to boost sales if you don’t have an app. Push notifications are more hardware features that are based on GPS, secure connection and some API and it’s not available for websites.
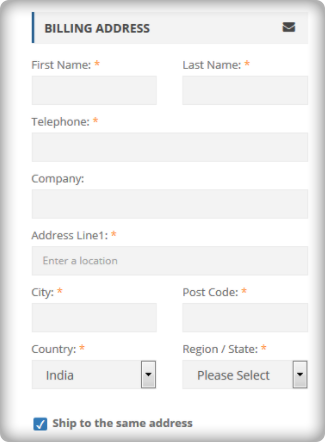
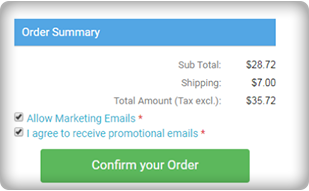
5. Brand loyalty will enhance user engagement-

Nothing can be more useful for putting your products and brand in the center of attraction than a mobile app. Apps are the shortest route to your business available for 24X7. Just a single click on the app icon and customer is on your business center. Mobile apps are useful tools for creating a more loyal section of customers who love online shopping anytime from anywhere. Showcasing your brand logo on the mobile app leave your professionalism on the shoppers.

Over To You

So, this is how you can get a mobile app for your eCommerce store without doing much of the complex tasks. KnowBand’s Mobile app builder is the easiest way to get a native Android/iOS app for your store. Moreover, I have also explained how you can try a free demo of the app to experience your store as a mobile app. Leverage this useful service and get your app developed today by the expert eCommerce and mobile app developers.

You Might Also Like: