Don’t Leave! 4 Exit-intend Pop-up Optimization that can Curtail your Exit Rate

As an online store visitor, most of us will relate to the fact that an exit popup, while you are browsing a site, are annoying. From a prospect of an eCommerce store owner, the good news is that it actually works. The classic discussion of whether to have this functionality on your site or not is still on.

The statistics have given a green signal to exit pop-ups. Especially, the gamified exit popups have shown double the conversions as compared to the traditional ones. Listed below are some of the reasons that show the worth of having such triggers when the visitor plans to exits.

How Pop-up Optimization can Curtail your Exit Rate?

Customer engagement is the key to enhance the chances of conversion. Hence, the exit popup triggers can hold the visitor back and can enable you to retarget your products. Using exit popup marketing tactics while the users are still browsing the site may be fatal. Hence, using an exit popup at the end is a no-lose trick.

The discounts and other such offers may help the visitors in making the purchase decision.

The exit popup serves the purpose without breaking the natural flow of the customers. The usual behavior of online visitors includes the process of web search. Once they end up on the landing page, they browse the products and leave the site if they are not satisfied with the price or the product.

Thus, offering a discount just as they are about exit may help them reconsider.

Moreover, the exit popup gives enough time to the visitors to browse the site and grab the information being offered. However, trying anything of this sort, in the beginning, may distract them.
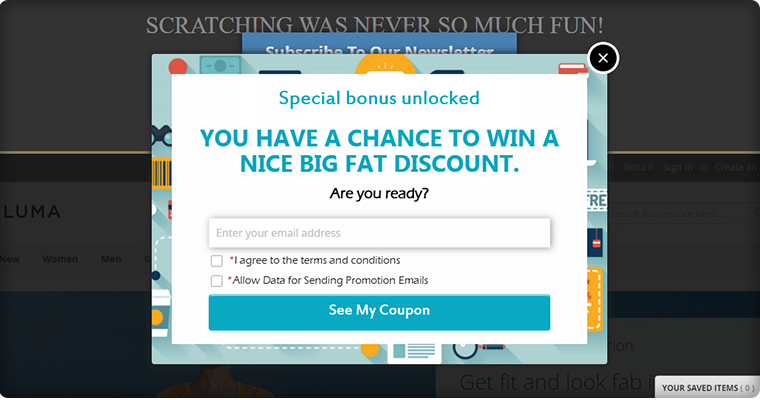
Having discussed the various benefits that make use of exit popup inevitable, it is now time to lay some light on how to make full use of it. The blog has compiled some of the hacks that can help you optimize the exit popup for your site. Scan the points mentioned below and get the desired result.

Apply these pro tips for exit pop-up

1. Get rid of the monotony

Even though the whole idea of exit popups is to keep the visitors from leaving the site, it can still ruin the entire user experience if not targeted appropriately. The tedious and boring exit popups asking for the visitors to enter their email ids may even reduce the chances of them revisiting your site.

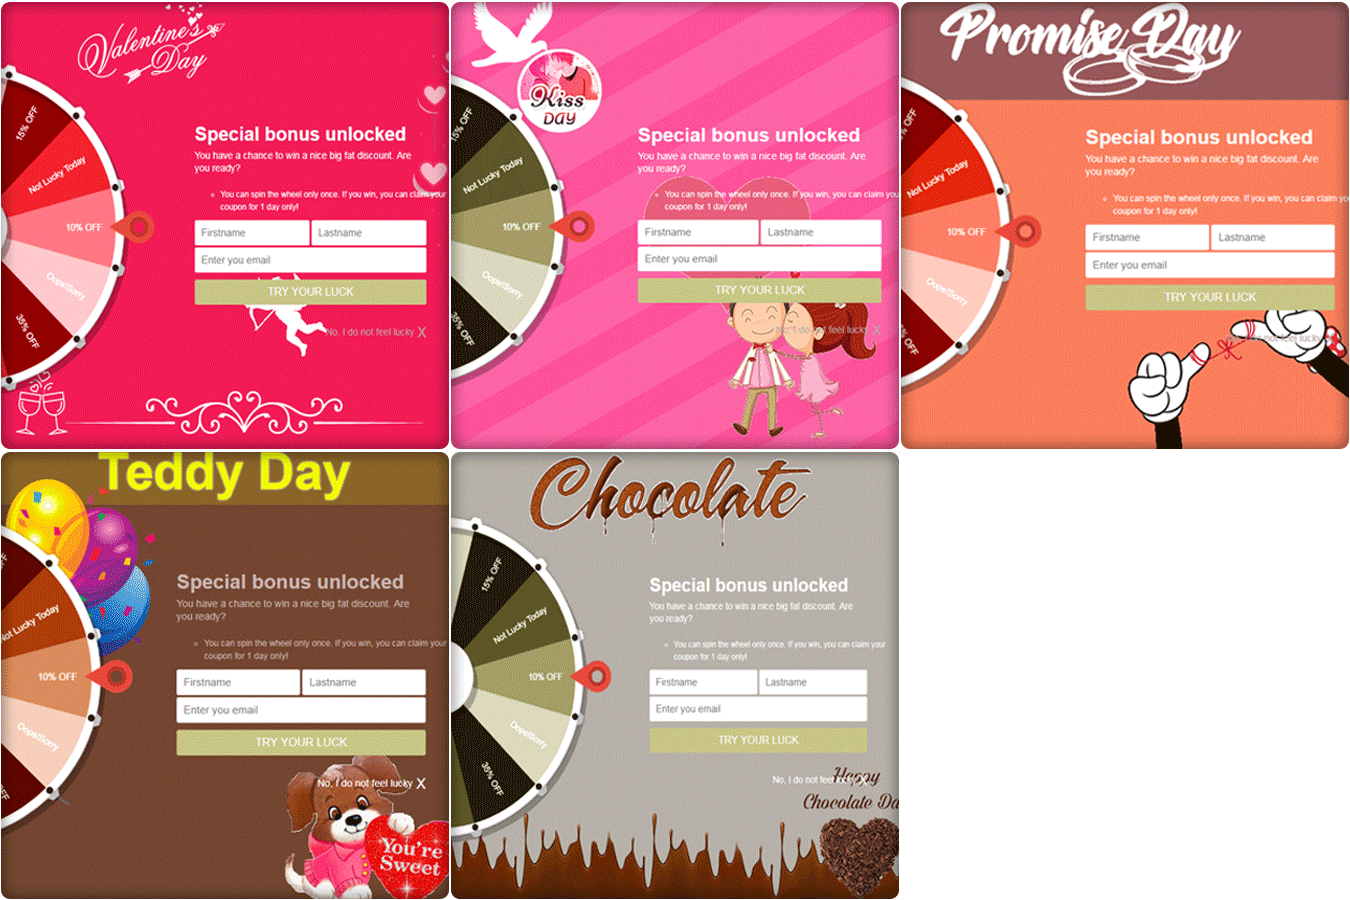
Hence, the very first exit popup hack is to make them interesting. Prestashop spin and win module are one of the examples of a fun-filled exit popup. Instead of flashing the annoying messages on the screen, the exit popup module provides a playful interface to visitors. This exit popup is made to spin a wheel by entering their email ids.

Additionally, the pop-up displays multiple themes for holidays, events, and festivals such as Halloween, valentines day, Diwali, New Year, etc.  The Spin and Win pop-up also display the number of offers grabbed by visitors.

The prizes won can be used while shopping. The use of exit popup is not just an effective way to improve customer engagement but can help to enhance the UX without annoying them. Hence, making it enjoyable is one of the ways to exit popups effective.

2. Make it appear as if the customers have hit a bargain

The messages in the exit popup need to be in line with the visitors’ activity. The visitors of eCommerce usually look for offers and discounts. Their online searches are in general aimed at comparing the prices of the product.

However, the free coupons sometimes fail to entice the visitors. Its human psychology that if a discount of 10% is offered to them by a person distributing pamphlets, it may not intrigue them. While they will be happy if they bargain the same amount or win the discount through a context.

The Spin and Win exit popup is one of the ways to cater to this human psychology. To wrap things up, use innovative ways to give away the prizes and even a small offer will be well appreciated.

NOTE: You can use spin and win as entry pop-up, exit-popup as well as email subscription pop up

3. Keep it mobile responsive

A significant share of the eCommerce traffic comes from mobile phones. Hence, making your website mobile responsive is not enough. Even these exit popups should be responsive enough to effectively curb this traffic into leads. Considering this aspect, no matter what type of exit popup you use, it should be mobile responsive. View your exit popup on the screen of the mobile as well as other handheld devices. The content and the CTA buttons should be placed optimally. Some of the exit popups may even ask visitors to download your mobile applications when they try to leave the site.

4. Give visitors an option to say no

Ironically, the exit popups that allow the customers to say “no” are the ones that are less annoying for the visitors. The exit popups that cover the entire screen and provide no option to remove them are considered most annoying. Moreover, instead of the ‘X’ button, the use of ‘Yes’ and ‘No’ buttons are considered more effective. It has a psychological impact and compels the visitors to read the text. The aggressive text such as “No thanks, I don’t want to boost my sales” and other such contents at times make the user think twice. However, it may not be fruitful every time.

More PrestaShop Modules to use as Exit Popup

1. PrestaShop Exit Pop-up Addon

Use an exit popup addon on the PrestaShop store to increase the conversion on your store. The Exit Popup developed by Knowband displays a pop-up window on the visitor’s screen as soon as they intend to leave the website. It can also be used as an entry popup.
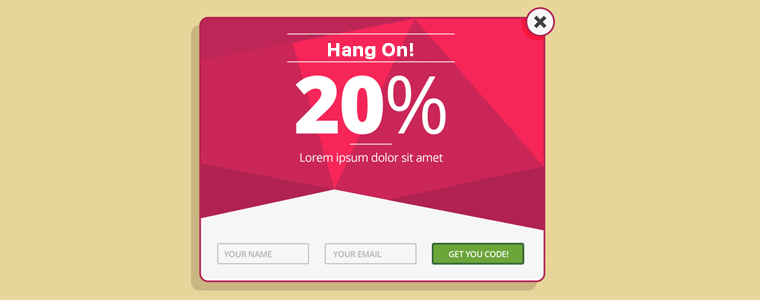
2. Scratch Card as Exit Popup

Another way you can stop your visitors from leaving your website is by offering a scratch coupon. The scratch card for PrestaShop allows you to customize it for various activities.

3. Abandoned Cart reminder Popup

You can also consider using an abandoned cart reminder pop for the customers who left products in their cart. The abandoned cart addon does not just allow you to send a popup but also reminder emails and push notifications. many features are included in this powerful converting tool. Read this pro tips article to learn how to design and send serial reminders for reducing abandoned carts.

Conclusion

Before wrapping up the entire write-up, here are some of the key points that you need to consider before design an entry or even exit popup for your website.

  • User experience is the key.
  • The content of the enter or exit popup should be self-explanatory.
  • Give people a choice to exit as well.
  • Use an attractive and engaging design in the enter or exit popup.
  • Make the entire scenario fun for the visitors.
  • Don’t just give away the offer. Ensure that your customers feel as if they have won the deal.
  • Do not promise anything that you can’t keep. You need to build the trust factor with your customers.

A number of eCommerce businesses have used this strategy to reduce their exit rates and raise conversions. However, it now the time to take the marketing tactics to the next level by ditching the traditional methodologies and considering the human psychology. Work on the things that your target audience is looking for and avoid introducing the things that annoy them. Optimize your site with an exit popup like the Spin & Win module and boost your conversions effortlessly.

You Might Also Like:

5 Ways Prestashop Spin and Win Popup Module can boost your Conversions

In the competitive eCommerce ecosystem, staying ahead of trends and in sync with the hot and happenings of the industry. Tapping the psychology of the site visitors and selling them the idea instead of the products is the best way to have an edge. The spin and win contest is one of the trends that has reaped results for a lot of players in the industry. Prestashop Spin and Win Module is one such addon that can help boost conversions.

Features of PrestaShop Spin and Win Popup Module

The Spin and Win Module is a 3-in-one PrestaShop addon that you can use as an Entry popup, Exit popup, and email subscription module.

This amazing gamified tool is very helpful in increasing customer engagement in your store. You can offer various discounts to your customers when they spin the wheel to win a reward. This Wheelio like module is made for every eCommerce store that is having customer engagement issues and a higher bounce rate.

  1. Use it as an Entry popup, Exit popup, and email subscription module
  2. Several themes for every occasion like events, festivals, holiday season, such as for Halloween, Easter, Black Friday, Christmas, New Year, and others, etc.
  3. Gamified Popup tricks the customer’s psychology and keeps them engaged in your store.
  4. You can edit the offers displayed on the slices of the wheel.
  5. The wheel can have different numbers of slices as you want and change the cart rules.
  6.  Control the display frequency, gravity, and position, of the Prestashop Popup module.
  7. You can schedule the module and themes prior to the occasion in case you have a busy schedule.
  8. It effortlessly synchronizes the email IDs with Mailchimp, Klavio, and Sendinblue integrators.
  9. The Spin and Win Popup supports multiple languages and is compatible will all PrestaShop themes.

Wonder how can this spin and win module help increase the conversions. Check out the points about this Spin and Win Popup module mentioned below to know the reasons that make it a revenue booster.

5 Ways Prestashop Spin and Win Popup Module can boost your Conversions

Increases the website traffic

It is a proven fact that a better and attractive UI of the site can lure more customers. Even though there are many other factors that affect the purchase decision of the customers, the look and feel of the site is one aspect that can entice them to stay in the store. Any tedious or monotonous-looking site can put down the browse intention of your target audience. The playful way to give away the offers is something that intrigues the customers to visit your site again and again. Not just this, as per a psychological study, any free coupon is as good as no coupon for online shoppers. Hence, the entire scenario should be structured in such a way that the customer feels as if he/she has stricken a deal or bargain. And what can be better than making them spin the wheel to get the offers?

Better customer engagement

As mentioned above, a better UI is an effortless way to keep the visitors engaged for a longer period of time. While a coupon 10% discount is considered worthless by the shoppers in general, the fun-filled way to get the same offer will make it worthwhile. Another striking factor of the spin and win popup module is that is a better option than the exit pop-ups. Add a spin and win module to your online store and this can effortlessly cripple the exit intent of the visitors. Greater customer engagement is the key to greater conversions. So, the playful spin and win popup wheel option will ultimately aid your conversions.

Aids Email marketing and remarketing

The customers can spin the wheel of the spin and win module only after entering the email ids. Hence, the exit pop-up can even increase the database of the customer is you have. Along with this, the store owners get an additional feature in this spin and win module. The visitor can spin the wheel only with a single id. Hence, one person can’t claim multiple coupons. Moreover, the playful spin and win popup module can get the customers hooked and they even tend to enter multiple email ids. Hence, this facilitates the email marketing campaign of the store owner. The promotional emails can be sent to a greater audience and hence the chances of conversions increases ultimately.

Reduces the bounce rate due to annoying pop-ups

The pop-ups have been used for a very long time to curb the exit intention of the visitors. However, it was even accused of annoying the customers. Prestashop Exit Spin Wheel module is one to stop the visitors from exiting the site without even annoying them. The best thing about this spin and win popup module is that the store owners can even regulate the frequency of the wheel display. Thus, the alluring spin and win module reduce the bounce and exit rates. It is obvious that the more time the customers spend on the site, the more will be the chances of conversions.

Facilitates the purchase decision of the customers

The prizes won by spinning the wheel can be easily used while shopping. The coupon code is generated automatically in this spin and win popup module. The customers can copy the code and paste it in the Voucher Code area of the PrestaShop checkout page. Not just this, the customers are even notified about the coupon code through email. This can facilitate the purchase decision of the visitors and compel them to go to the checkout page.

Final say 

The best way to enhance the conversions and revenue is to keep the customers engaged for a longer duration. While the classic exit pop-ups are considered annoying, Prestashop Spin and Win Module by Knowband are some of the most attractive ways to reduce the exit rate and lure visitors to the checkout page. You can use different themes for various occasions. Voila, This module can keep you ahead of your competitors.

You Might Also Like:

F-Commerce: 6 Steps to Tap the Future of Online Selling

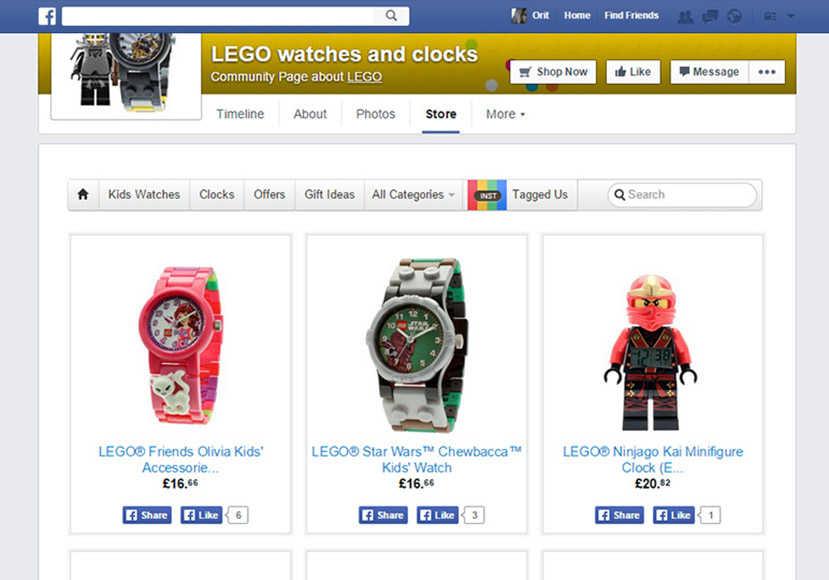
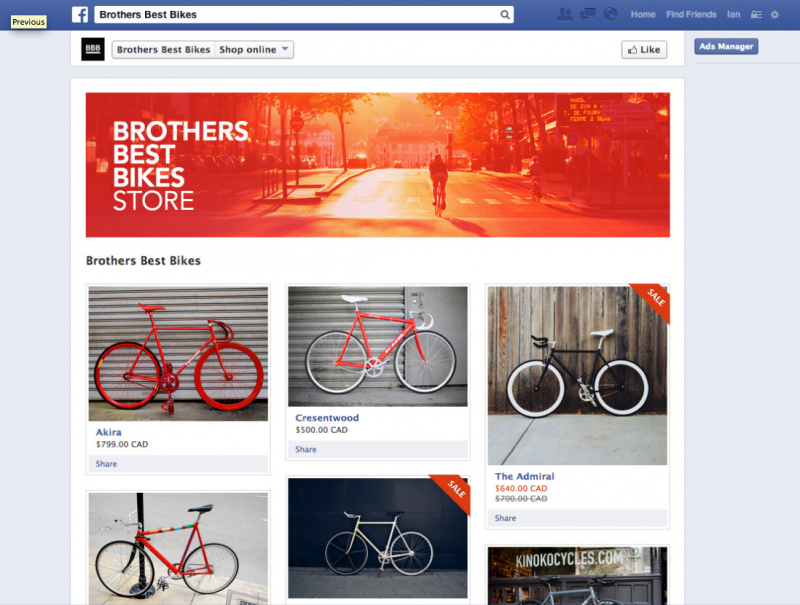
With 600 million users, Facebook poses a huge opportunity to the online traders. While this was a source of entertainment in the past, the face of the social media platforms is changing with time. It is said that nearly 40% of the online customers use social networking sites when shopping. Hence, this is one of the ways that can effortlessly boost your sales. Some of the businesses who have used this medium saw a 20% of their sales coming from Facebook. Not just this, the Facebook transaction is even increasing 10% every month. Moreover, the cart value of the eCommerce store is expected to be 7 – 10% higher.

Despite all the alluring figures, most of the online businesses still hesitate in delving into the technicalities of a Facebook store. The store owners need not worry as there are ways to make it a cinch. just like Prestashop social login and other such modules, there are extensions that are aimed at making your life easier. The Prestashop store owner can take advantage of Prestashop Facebook Store addon that helps to create a shopping store on the social media platform. Once you have created the store, the next important thing is to optimize your business structure. So, for all the store owners out there, this article is a compilation of few steps that can help you find the right customer base and cater them with greater efficiency. Check them out.

1. Focus on high-quality content flow

Content marketing is the need of the hour in the eCommerce ecosystem. Even the online trade through the Facebook store should focus on the content flow. Since the customers don’t get an access to the touch and feel of the products, the content is the only way to get an insight of the same. Hence, the merchandise should come up with innovative ways of showcasing the products. The images and descriptions should not misguide or confuse the end-users. Just the ‘Buy Now’ is not enough to convert the users. The call-to-actions should compel the users to proceed to the checkout pages. The captions and phrases should stand out. One way of doing this is by building the trust through right information and user testimonials.

2. Boost social sharing

While the end goal is to optimize the conversions, the store should be able to reach out to greater masses. One of the ways to touch a wider customer base is by activating social sharing option. This is specifically a must in the fashion industry. A research in the human behavior states that people tend to take a second opinion before placing the order online. The social sharing option will help them share the product with their friends and family. The more shares you get, the bigger will the customer database of the store owners.

3. Optimize the layout and customize the Facebook store

Just like the eCommerce stores, the layout of the Facebook stores plays a big part in enhancing user experience and eliminating hassles. Choosing the right font and color scheme is essential. Set up distinct categories for the products, so that, the consumer can effortlessly reach the product that he is looking for.

4. Target the right audience

The entire concept of social media marketing is all about taping the right customer base. As per a study, Americans spend at least 40 minutes of their day on the Facebook. However, not every visitor is your prospect customers, so you need to come up with a strategy that is directed to the right audience base. Here are few steps to get an insight of the customers.

Keep a track of the recent purchase behavior of the customers. Take a close look at the things that they searched. The Facebook ads should be customised according to the interest of the viewers. Not just the purchasing behavior, even the life-events can help you target the right person. For instance, jewelry and other such gift items is an option for the people whose wedding anniversary is somewhere around the corner. The layer targeting options are one of the most powerful things that Facebook offers. With this social media platform, you have an access to the demographic, geolocation and behavioral data of the users. This is all that is required to create the marketing strategy. These informations can reduce the audience to as little as possible and hand-picking the target customer becomes easier.  Once you have recognized your ideal audience, then, you can reciprocate the features to find the Facebook users with similar characteristics.

5. Lure the customers

Since there is so much that can distract the customers, you need to provide them a reason to like and subscribe your Facebook page. According to a report, 42% of the visitors like the pages for discounts and coupons. Enticing offers and coupons codes is one of the factors that can allure the target base. Along with this as mentioned above, focus on the content flow. Post blogs and articles to engage the customers. Keep the heading and images attractive. These offers should be on the storefront of the Facebook page to get the attention instantly.

6. Sell without actually selling

The sales promotion is the only way to reach out to the prospect audience. However, this is one factor that put off the customer. None of the customers want to hear about buying and selling, especially when they are scrolling through the Facebook. Therefore, the promotion should be subtle. Interesting write-ups, customer testimonials, and videos should convey what you are trying to say. Other than this, creating poll or competition is another way to grab the attention of the target audience. Selling the idea instead of the product is the future of eCommerce structure.

Conclusion

Facebook not just provide you an access to a larger audience, but even your customer has the access to the masses. Thus, you need to have a one-to-one connection with them. Maintain a personal relation and deal with the negativity that comes along with the benefits of social media. Even a single bad rating may prove hazardous to the business. So, deal with it wisely. Use this platform with a bit of care and boost your sales as well as customer engagement effortlessly.

You Might Also Like:
6 Prompt Tips for Creating an Effective Promotion Campaign on Prestashop

With the Holiday season just around the corner, it is high time for all the eCommerce store to gear up with their promotional and marketing strategies. Even though the business is not just dependent on the sales promotions, it is an essential aspect of building up the much-needed customer relation. This is not just a way of achieving the annual sales target, but also a way of communicating and connecting with the prospective customers. Do you own a Prestashop eCommerce store? Are you getting ready for the much awaited sales season of the year? Are you looking forward for creating effective promotions on your store? Then, you are at the right place. The blog brings forth some of the tips and tricks for building your next sales or marketing campaign.

Take the below mentioned ideas that have worked for the Prestashop store owners in the past and apply them to your own store.

1. Design the Discount and Offer

Compelling the customers to plunk down their cash and cards is a slow process. Even alluring the potential customer with offers and discounts is not an easy task. Earlier just the word ‘Flat Discount’ and ‘Free Gifts’ would attract a lot of attention of the visitors. However, these days creating a promotion or sales campaign involves a lot of considerations. Here are some of the tips for creating an effective offer.

  • The 10 to 20% discounts are considered uninspiring. The offer should be strong enough to compel the visitors to make the purchase. At the same time, it should keep your business out of red ink.
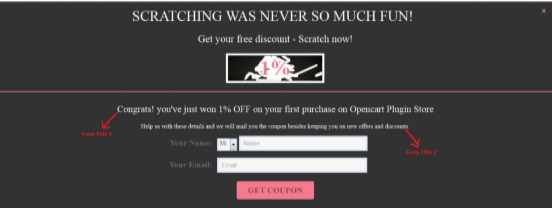
  • In case, you are offering discounts that are not very compelling, then, present it in an innovative way. Things like ‘Spin the Wheel’ or ‘Scratch coupons’ are fun to use and can attract more visitors even if the discount is low. There are varied Prestashop addons that can facilitate your sales campaign. The Prestashop Scratch Coupon is one such plugin that integrates an interactive scratch coupon interface on the website.
  • The job is not done even after designing a perfect deal. Use powerful marketing words to boost the sales. According to Shopify, words like ‘You’, ‘New’, ‘Offer’, ‘Guaranteed’ are some of the trigger words that should be used in the promotional phrases.

2. Schedule Communication

                                                                  Image Source: blog.bufferapp.com

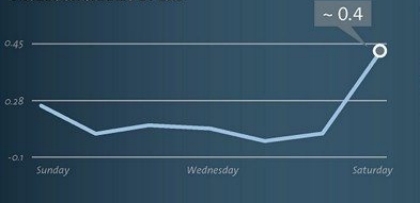
Sales campaign, in general, revolves around any major events such as holidays. Hence, the promotional triggers should be scheduled wisely. You need to choose your moment in order to run the campaign. The campaign should not be overlapping similar ones running on your site. Set the flash sales or special offers to reward the customers on a more personalized basis. In case you are using social media platform for the promotion, then, use the right time for the postings. According to a study, the engagement on social media is 32% higher on weekends, so it is definitely a good time. The best time of day to post on Facebook is from 1:00 p.m. to get the most shares, to 3:00 p.m. to get more clicks. On twitter, the click-through rates are generally highest on weekends, as well as mid-week, on Wednesdays.

3. Insert Promo Blocks

Blocks are the entities of an eCommerce store where the store owners place and display their products and ads. Prestashop Promotion blocks are used to show the products of the store that are on sales. Use the blocks wisely in order to promote the sales campaign. For getting more exposure place them in blocks in left/right column. Or else you can use the heatmap tool to detect the place that grabs most of the attention of the user. This will give help you with the placement.

4. Reminder for abandoned shopping cart

Remarketing your products to the visitors who abandoned the cart is a must for optimizing the sales. Use the email ids of the visitors who didn’t convert into leads by sending them promotional emails. Prestashop abandoned cart addon will help you track all the abandoned carts on the website. This module can help you experience a drop down in abandonment rate. You can send the follow-up and promotional emails to these visitors.

5. Promote across the channel

Pushing your promotional campaign through multiple channels can help you maximize the impact. Use various communication channel and adapting the message to the various outlet, that is, your website, via email, on the various social media platforms as well as traditional media such as TV and newspaper. Make a clever holiday video and share it on YouTube and other platforms. Amazon is one such name who reaped a lot of positive response from their videos. It helps create an emotional connection with the end users. You need not invest a heavy budget for these videos to get views. Just focus on the message that you are trying to convey along with relevancy to your audience, and the video will give you the desired result.

6. Track and improvise

Make use of the tools like Google Analytics or A/B testing, in order to get an insight of the result of the campaign. No matter how strong your strategy is, you need to have a backup to make up for the pitfalls and setbacks. Compare the current data with what you had planned and make necessary improvisions. The testing and changes should be an ongoing process. Keep checking the impact over the time and track the data regularly. Analyze the visitor response in terms of the conversion rates. Based on this you can make necessary changes and implement a seamless strategy on your site.

Get Started

eCommerce is huge, and so is the competition in this industry. Surviving in the heat of this competition is not a bed of roses. You need to acquiring and retaining the customers in your database. For this, you need to have an effective marketing and sales campaign. Your Prestashop eCommerce store doesn’t need a big budget to compete with the big players in the market. All it needs is a bit of innovation eCommerce ideas and a detailed analysis of the behavior of the market as well as the customers.

You Might Also Like:

Top FAQs related to the PrestaShop Marketplace Module

We have been receiving a lot of queries regarding the working and features of our Prestashop Marketplace Module. Therefore, we have decided to accumulate those queries as provide the answers to all of them in this FAQ. We have tried to answer all the major questions that are often asked by the merchants. In case if your query is not resolved by the answers in this article or you have any doubt, you are always welcome to get in touch with us.

So, here are some commonly asked questions and their answers by our developers

1. How are sellers introduced to the marketplace, how they sign up?

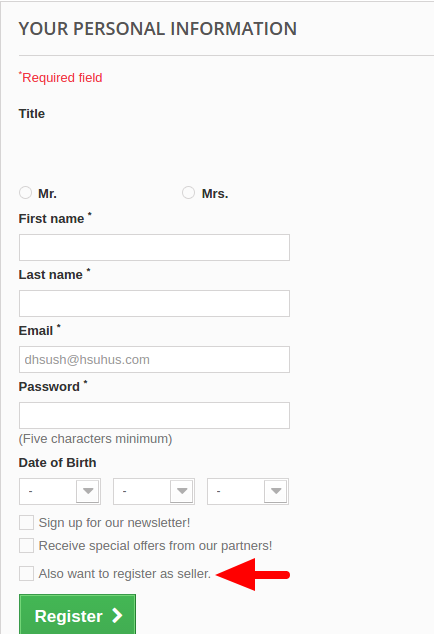
After installing and enabling the PrestaShop marketplace module, your store becomes ready to accept the seller registrations. The sellers can sign up using the same registration form used for customer registration on the front. The Prestashop marketplace module simply adds a checkbox below the form as “Also register as a seller”. By checking this box, any user can sign up on the marketplace.

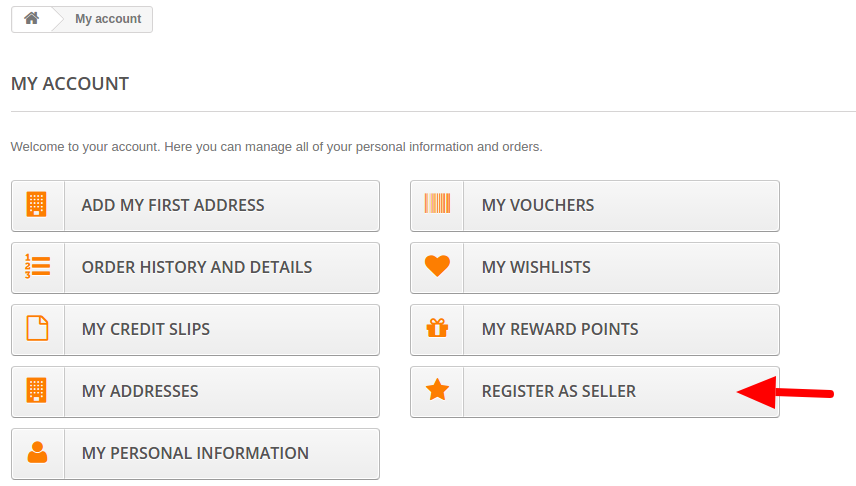
Moreover, there is another option in the customer user account section. All the customer accounts will have the “Register as a seller” in My Account section as an option with the help of this Prestashop marketplace module. Any customer can anytime upgrade the customer account to a seller account by simply using this option of the Prestashop marketplace module.

2. The seller panel is on front-end or back-end?

After registering a seller account with the help of Prestashop marketplace module, the seller gets a dashboard on the front end of the marketplace. We have done this to save the sellers from the complex management of PrestaShop back-end interfere. The seller panel is well organized and provides a number of seller account and shop management controls.

3. Who manages the shipping options for the sellers?

The Prestashop marketplace module allows the sellers to add shipping options for themselves. They can add as many shipping options and map them to their products with the help of this Prestashop marketplace module.

4. What is the “Default free shipping” option?

The default free shipping option is automatically mapped by the Prestashop marketplace module on any seller product which has not been mapped with any other shipping option. We have added this option in the Prestashop marketplace module to prevent a faulty product listing in case a seller forgets to map a shipping option to a product. This default free shipping will be automatically removed from those products which are mapped to at least one seller created shipping option.

5. Can any one just sign up and start selling on the marketplace?

Yes, in an indirect way, but No, not directly. All the seller sign-ups first go the admin as seller account approval requests. The seller will not be allowed to sell on the Prestashop marketplace until the seller account is approved by the marketplace admin.

6. Can a seller still upload products without seller account approval?

We have added a feature in our Prestashop marketplace module to save the time of the sellers. According to this, if allowed by the admin, the seller can upload a certain number of products, update the shop profile, even before getting the seller account approved.

However, the uploaded products won’t get live on the marketplace until the admin approves the seller account and also the product upload request.

7. How is the commission configured?

The admin can configure the commission from the sellers on two levels. First, the global commission rate which will be applicable on all the sellers on the Prestashop marketplace. Second is the seller level commission where the admin can set different commission rates for each seller on the marketplace.

8. If both seller level and global level commission is applied on a seller, which one would be finally applicable?

In case if the admin has mentioned both the seller level and Global level commission for a seller, then only the seller level commission will be applicable. The priority of seller level commission is more than that of global level commission.

9. Can the seller upload the products in whichever category he wants?

No, the seller can only upload the products in the categories allowed by the Prestashop marketplace admin. In case if the seller wants access to a particular Prestashop marketplace category, he can send a category request to the admin from the seller panel itself.

10. Who handles the orders received on the marketplace?

Both the admin and the respective seller can handle the order received on the Prestashop marketplace. The seller can see the orders in the seller panel, while the admin can see all the seller orders on the marketplace, from the admin panel of he Prestashop marketplace module. They can change the order status, mark an order as shipped, delivered etc.

Moreover, admin can decide to allow or disallow the sellers from handling the orders with the help of this Prestashop marketplace module.

11. Does the Prestashop marketplace module support 3rd party modules?

The products added by the sellers, and after approval by the Prestashop marketplace admin will become a part of the PrestaShop global catalog. So any module or extension will work as a normal on the PrestaShop but not work with the seller management or seller controls as those modules were developed for default PrestaShop.

12. Does your Prestashop marketplace module support multi-language including RTL languages?

Yes, the PrestaShop Marketplace module supports all the languages supported by the PrestaShop platform. It also supports the RTL languages like Arabic and Hebrew.

13. Does your Prestashop marketplace module affect the performance of the PrestaShop site?

No, our Prestashop marketplace module has been developed strictly according to the MVC (Model View Controller) and ORM (Object Relation Mapping) designing. Moreover, the Prestashop marketplace module follows the standard PrestaShop codding structure and has been verified on the Official Addons Store already. So, there is no performance issue with the Prestashop marketplace module.

We follow the best practices of Prestashop module development to make our Prestashop marketplace module as scalable as your standard PrestaShop store.

14. What is the payment flow structure of the marketplace?

In our Prestashop marketplace module, all the payments are received by the Marketplace admin. Later the marketplace admin can manually distribute the payments to the respective sellers after deducting his commission.

Our Prestashop marketplace module does not have an interface to automatically distribute the payments to the sellers, so the admin has to manually distribute the seller earnings to all the sellers.

However, the Prestashop marketplace module has an interface where the marketplace admin can review the seller earnings and see how much he has earned and how much he has to transfer to the sellers. The commission is also specified in the same interface. The seller earnings and commissions are listed in the back end of the Prestashop marketplace module on the basis of the sellers. Say, the admin has to pay $XYZ to the Seller 1, $ABC to the Seller 2 and so on.

Addon support: There is a Marketplace Admin to Seller Paypal Payment Addon using which the admin can distribute the seller earnings to the sellers right from the admin panel through the Paypal. There is also an option for admin to request reverse payment from Seller to his account, seller approval is required in this case.

15. Do the Prestashop marketplace module and marketplace addons work fine with all the PrestaShop themes?

Yes, the Prestashop marketplace and all its addons work perfectly fine with all the PrestaShop themes and templates. In case if there is any theme compatibility issue, we will fix that for you.

16. Can seller add products in bulk in PrestaShop Marketplace?

Yes, but not by default. There is our Prestashop Marketplace CSV Import/Export Addon which enables sellers to import their products and its combinations via CSV file.

17. How can the admin edit the different email templates used by the Prestashop marketplace module?

We have listed all the email templates in our Prestashop marketplace module’s back-end interface. Using this interface, the admin can edit any email template right from the back-office without editing the module’s files. All the email templates also support the multiple-languages.

18. How does the shipping costs apply when a cart consists of products from the multiple sellers?

If two products are from the two different sellers in the cart, then shipping charges will be calculated on the basis of the shipping method mapped to those products by the sellers. Shipping in our Prestashop marketplace module is calculated seller wise that is if a cart has 2 products of different sellers than two shipping is added each for the different sellers.

Also, the shipping methods will be merged together and shown as one; same goes to the shipping cost which will be added into one. The shipping option having the least shipping cost from all the shipping options available for the particular seller will be selected for merging.

For example, if seller 1 has 2 shipping options with shipping cost $2 and $4. And seller 2 has 2 shipping options with cost $3 and $5 then, shipping option with least cost from each seller will be selected for merging. I.e. $2 from seller 1 and $3 from seller 2.

The final shipping cost will be shown to the customer as 2+3 i.e. $5. However, each seller will see the shipping cost as split only. i.e seller one will see his shipping cost 2$ and seller two will see 3$. It is just that customer will see the shipping cost as 2+3.

19. How can sellers translate their products in other languages?

Multi-lingual is supported by ourPrestashop marketplace module. The sellers can manage the translations of product information and name from the seller panel itself. Just a one time input of corresponding translated phrases is required in respective languages of each of the products. After that those products will save the respective texts in the corresponding languages.

At first, the phrases will come in English only. After the manual input of the respective translated phrase or text, the system will save the translation and next time it will show the corresponding text in translated language selection of the store.

Steps to do that: 

  • Keep the store language as English (I am amusing English is your default store language), Enter all the details in English first.
  • Save them.
  • Now change the language of the store to say Spanish.
  • At first, you will see the English version by default even if store language is selected as Spanish. Edit the text you want to translate in Spanish. Replace the English texts with Spanish text.
  • Save it, Now you will see that if store language is selected as English, it will show English version of the same. And if store language is selected a Spanish, you will see the Spanish version of the same text.

20. What is the difference between the free and Paid version of the Prestashop marketplace module?

We provide the free version marketplace module so that you can have a demo of how our full version Prestashop marketplace module will look on your store. It has restricted features and is for testing and demo purposes. We have defined a detailed difference between the free and paid PrestaShop marketplace module. Please, refer it for better understanding.

21. What is the Prestashop Membership plan feature?

The Prestashop membership plan feature enables the admin to start subscription-based service. Admin can create various membership plans and sellers need to purchase these membership plans in order to upload products in the marketplace.

22. What types of membership plan an admin can create?

Admin can create various membership plans depend on the requirements of the sellers. Although admin can create membership plans based on product upload limit and duration of membership plans.

This Would Also Interest You:

How we eliminated 3 crucial design drawbacks of a One-Page Checkout in our extension?

Updated on 31-Jan-2018 

One page checkout has been in the debate for a very long time now. The whole idea of simplified checkout revolves around the optimizing the shopping experience of the store visitor. The shopping site will lead to conversions only when the customers are able to complete their transaction effortlessly.

How can one page checkout optimize your site?

The online shoppers prefer to make purchases only if the web store offers easy to approach and with minimal efforts. Here are some of the ways in which the this feature can optimize the shopping site and enhance the user experience.

  • Most of the e-marketers advocate the incorporation of a single-page checkout as it is an easier approach for the customers to complete their transactions. The online shoppers prefer going with the idea of single page checkout as it reduces the time consumed in reloading the web pages.
  • The idea of using super page checkout is more convincing than the traditional idea where the customers have to be jumped from page to page filling out all the details. The e-sellers can help the customer complete their transaction with minimal effort. Even though the number of fields remains almost the same, the shoppers can view the length of the form left to be filled. This provides them a psychological motivation to complete the transaction.

There are dozens of articles on the topics like “Should you choose a one-page checkout?” “Pros and Cons of One Page Checkout” and so one. Most of these articles effectively address the drawbacks, but it seems like we have been promoting these drawbacks like they are there forever and cannot be taken down anyhow.

Let’s face the truth, every new introduction has some cons for sure. Gradually, with the development and research, these cons fade away for sure.

In this blog, I am going to address 3 such cons of a one-page checkout which we eliminated from our Magento one page checkout extension and also the PrestaShop One page checkout module. Most of these cons were never there in our checkout extension, as we took care of them while in the development and testing phase itself.

One page checkout fixed drawbacks

1. So much of details on a single page? It will be congested

Most of the checkout pages, when introduced in the past, had this problem. It was really a massive task to adjust everything from a multi-page checkout on a single page.

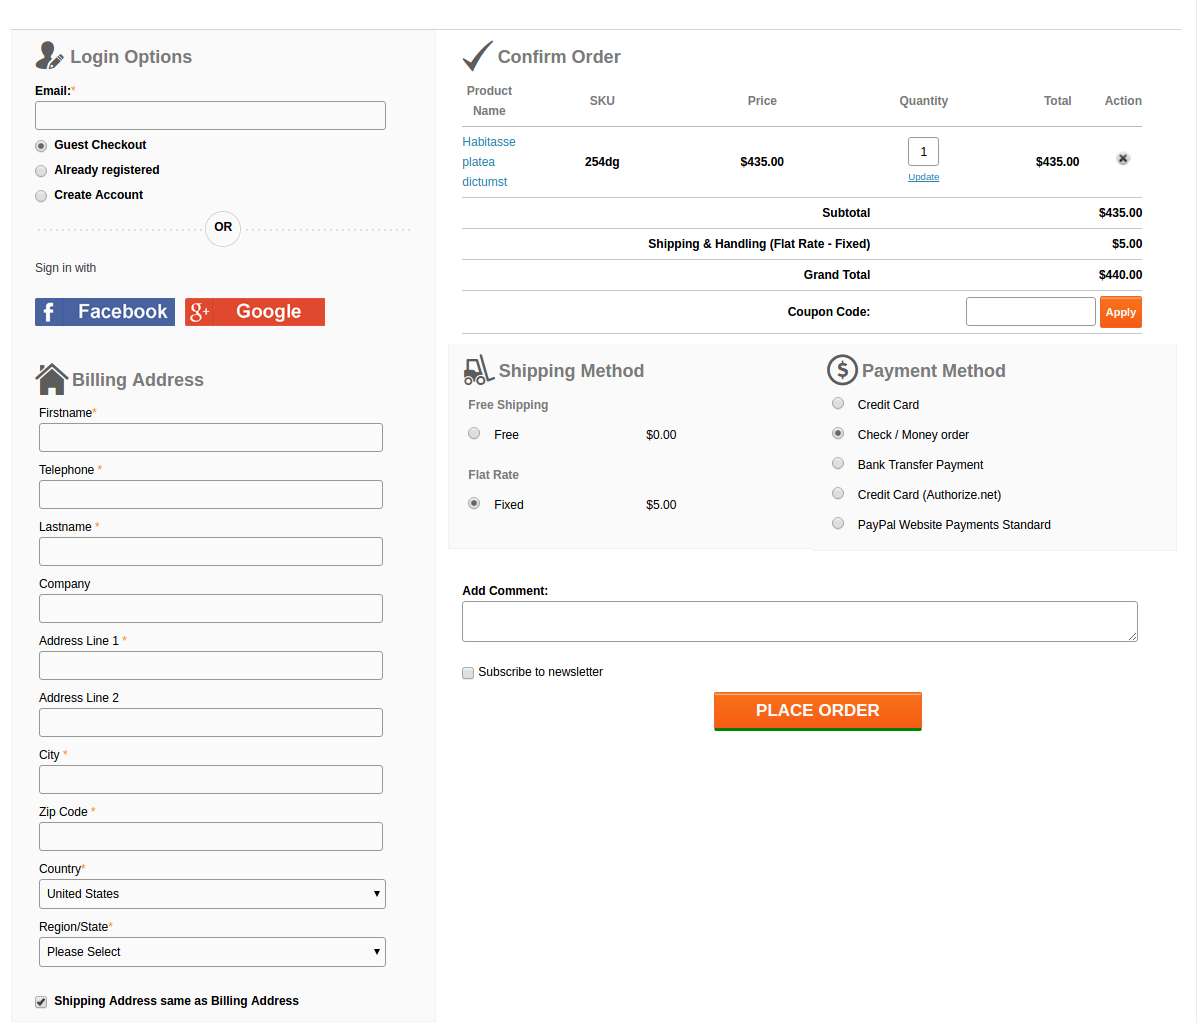
The most problematic challenge was to fit all those checkout elements on a single page and it should provide a full view of the whole checkout page as well. Moreover, all the checkout elements like login, delivery address form, billing address form, payment options, shipping options, and cart review should not overlap with each other, and neither they should overlap on themselves.  A lot of HTML, CSS, JavaScript, and Ajax were needed to be handled to keep the design all fine with the default as well as the third party Magento themes. But we intended to keep them as lesser as possible for faster page loading.

This is what we came up with:

A lot of HTML, CSS, JS, and Ajax were tweaked by our designers to fit all the elements neatly and clearly on a single page and also to keep the page loading time optimal. Moreover, thanks to our designers, after all these, there was sufficient space left to add the Social login option using Facebook and Google+ on our checkout page.

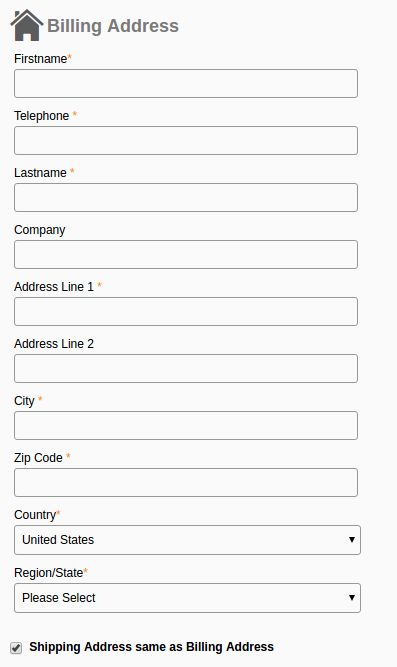
2. The form on the page are congested with no white-spaces and proper label usage

While designing the forms, the main aspects that we were looking for were:

  • Keeping the forms compact
  • All the necessary fields should be there
  • Fields should have proper white-spaces
  • Labels should not confuse the users
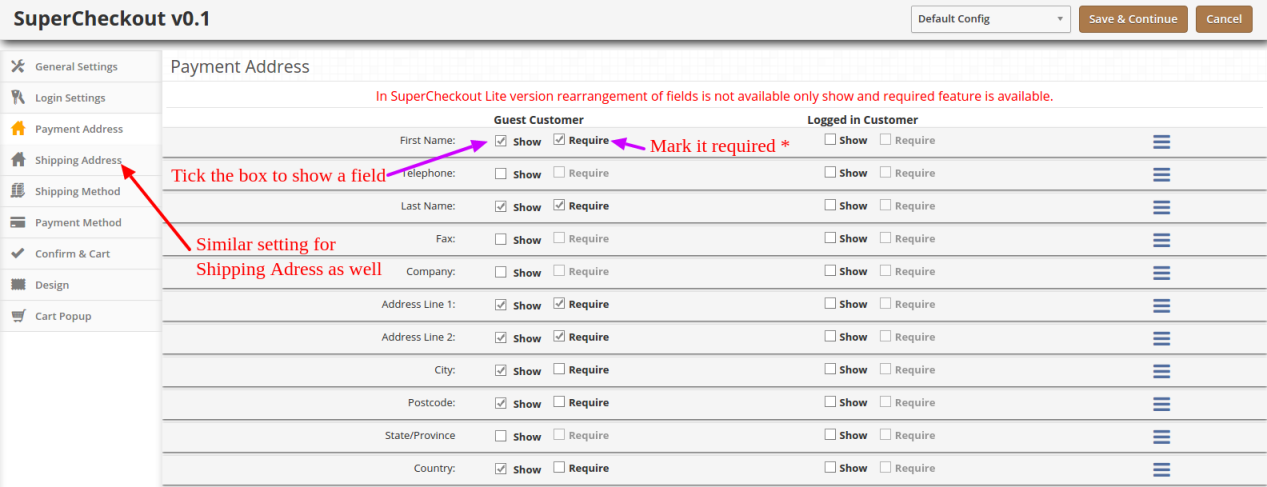
  • Admin should be able to choose which form field he wants to show on the page to customers.

Labels

Labels were coming out as a major concern here. If we would keep the labels by the side of the respective fields, the horizontal length of the form would give a very less space for the other sections on the page.

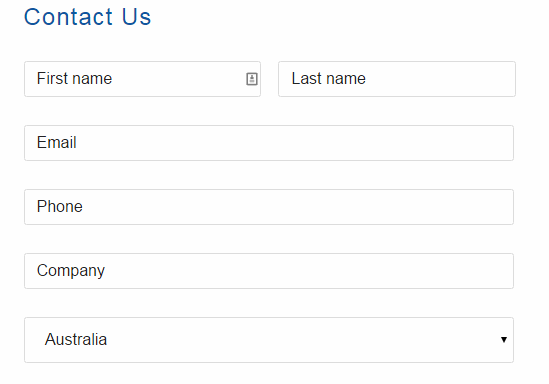
We also thought about a form design where we would skip the labels and use Placeholders in place of them. Something like this:

But, there was a problem in that. For considerably long forms like Billing and Address forms, if customer once filled the detail, and the later stage if he would want to re-check them, he would get confused about what actually are these details. Since the placeholder vanishes away as you type in, and there is no label as well, there always remains a confusion if my details are right or wrong.

We didn’t want your customers to get into such confusion and forget the main goal of making a purchase, that’s why we drop the idea. Otherwise, it could have saved a lot of space as well.

Finally, we decided to not to compromise with the user experience anyhow and we adopted the label placement above the fields as shown in this image:

It saved the horizontal space that we needed for other elements and also helped in one another feature which has been discussed below.

The necessary fields

After dealing with the label placement, the last thing in the forms that gave us a nightmare was to include every necessary field in the form. Problem is, the term necessary is quite relative here. A form field which is necessary for one store owner might be of no use to the other.

For example, the VAT number, and Company Name is a necessary field of a store owner who has a B2B selling business. All of your European business clients would also need this field for making the purchases on your store. On the other hand, a store owner who directly sells to the individual consumers would have no use of the fields like VAT Number and Company Name.

How we handled it?

It was a time to open our checkout extension a bit and give the store owners some easy yet crucial development access. We add a feature in our module, using which the admin can easily enable, disable, add, and delete a field from the checkout form. That too, without editing the code. All this can be done from the backend itself.

So, if any of the fields is not usable for a store owner, he can simply hide it with a simple click and save. No need to go through the complex Magento or PrestaShop codes to do this now.

3. Frequent page reload on cart update

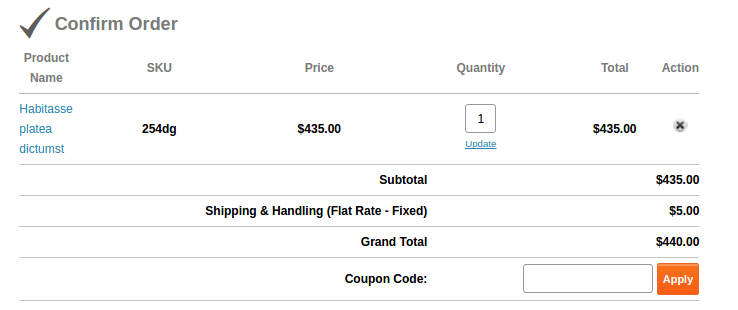
Those multi-page checkouts have a dedicated page for editing the shopping carts. It was a challenge for us to include the shopping cart on the checkout page. Customers would frequently update the cart by increasing or decreasing the product counts, removing a product from the cart and so one.

All these requests required a page reload to update all the checkout details and information according to the latest cart status. If a product has been removed from the cart, we needed to update the total cost, cart product quantity, shipping methods and so on with it.

It would have become so irritating for the customers if the checkout page would reload every now and then. This challenge is faced by every one-page checkout development. However, we managed to fix it with the Ajax based shopping cart and form update request.

Now, with Ajax shopping cart and updates, if a customer changes anything in the cart, all the dependent details would get automatically updated without reloading the whole checkout page. Even the customer can apply a coupon code to the cart and page would validate the coupon without being reloaded.

This is how we solved these issues in our checkout extension. You can have a free demo to experience all these features of the extension. Free Demo one page checkout Magento and PrestaShop and OpenCart.

This functionality can be added to a Prestashop site with the help of Prestashop one page super checkout addon. The same extensions are available for Magento, Opencart and other eCommerce platforms as well. Whether you go for the Prestashop addon, Magento extension or OpenCart plugin, it enables the customers to complete their transaction and make the product purchase on the same page. It is one of the best features for reducing the exit rate at the checkout page. The customers are annoyed if they are redirected to lengthy checkout process in order to complete the purchasing. Thus, one-page checkout makes sure that the customers can complete the purchase by filing up all the necessary details in one single page and provides the customers with an easy approach to complete the purchase.

You Might Also Like:
How to add a CMS page on PrestaShop 1.6.x and 1.7.x linked with header and footer menu?

PrestaShop is purely an eCommerce platform and possesses a great CMS capability too. Though you don’t have the fully fledged controls like in the CMS platforms, you can still achieve all your basic requirements as a CMS with PrestaShop. In this post, taking PrestaShop 1.6.x and 1.7.x as the target version, I am going to explain how you can add a CMS page on PrestaShop store. Furthermore, we will also see how you can link that page to the header/footer menu.

Adding a CMS page on PrestaShop 1.6.x

Step 1: Log into your PrestaShop back-office as an admin user.

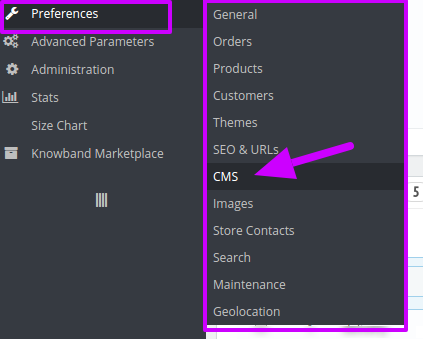
Step 2: Go to Preferences>>CMS.  Here you will see all the CMS pages created on your PrestaShop store.

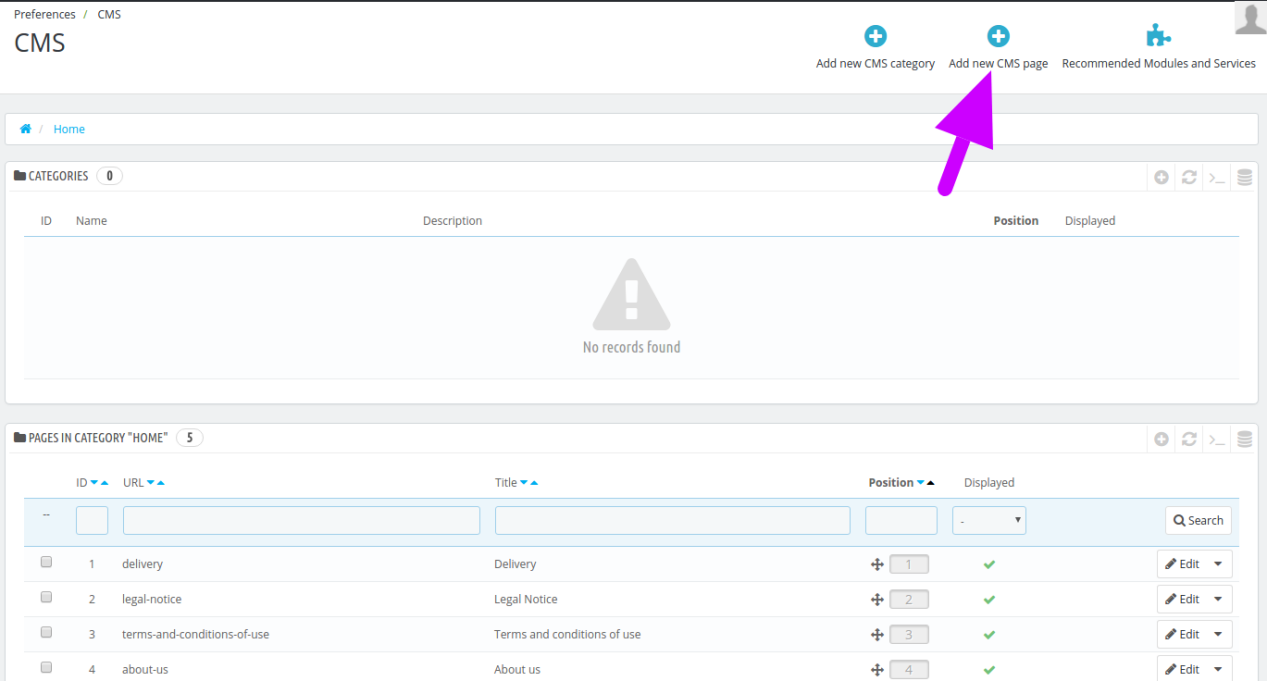
Step 3: Click on “Add New CMS Page” button at the top right corner of the page.

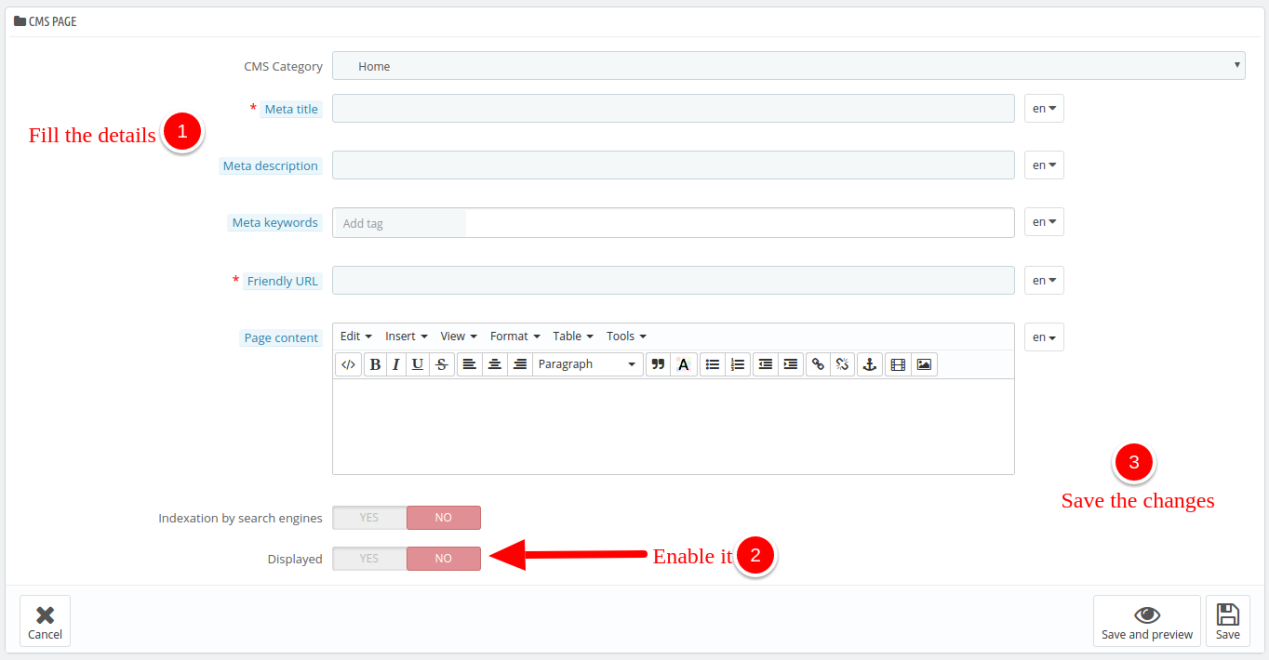
Step 4: Next, you need to fill out all the required fields. After filling the fields, just enable the page and “Save” the changes.

Step 5: Note down the CMS page ID displayed in the first column of the CMS pages list. You will need this ID later.

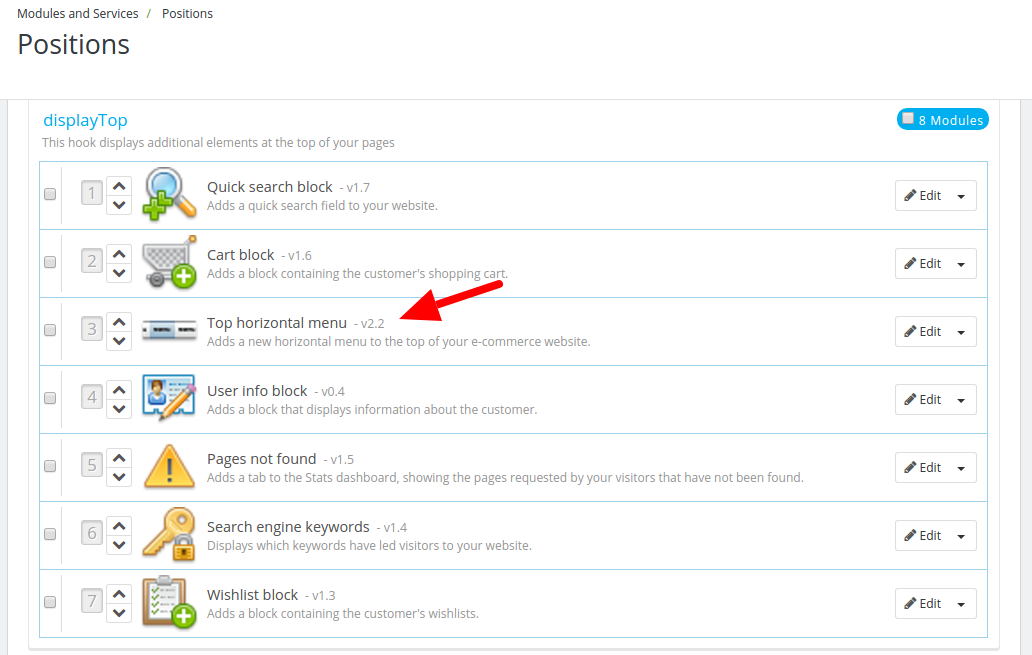
Step 6: Now, go to Module>>Positions, and check which module is showing the Top horizontal menu in your template. I found it in “displayTop” section of the position in my version.

Adding a CMS page on PrestaShop 1.7.x

Similarly for adding a CMS page in the Prestashop version 1.7.x, follow the steps mentioned-below:

Step 1: Log into your PrestaShop back-office as an admin user.

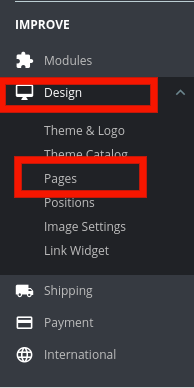
Step 2: Go to Dashboard>>Improve>>Design>>Pages as shown in the image below:

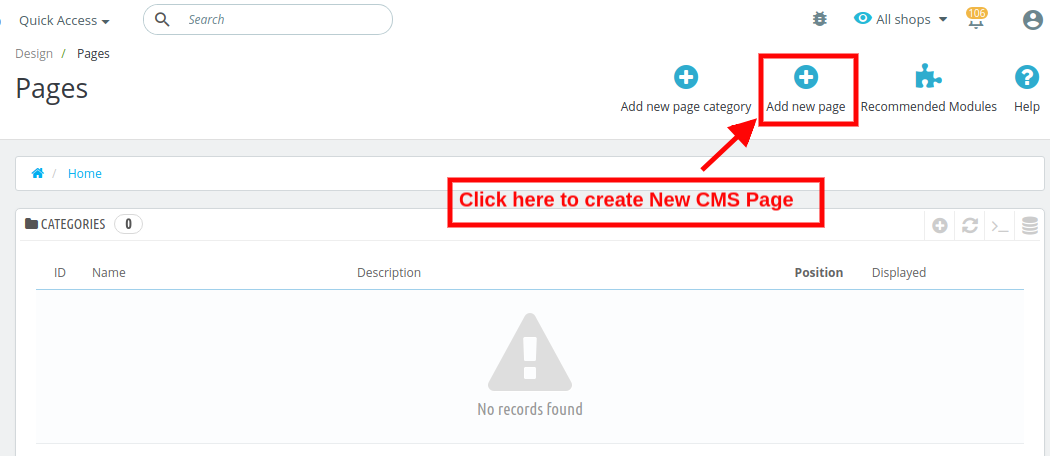
Step 3: Click on “Add New Page” button at the top right corner of the page.

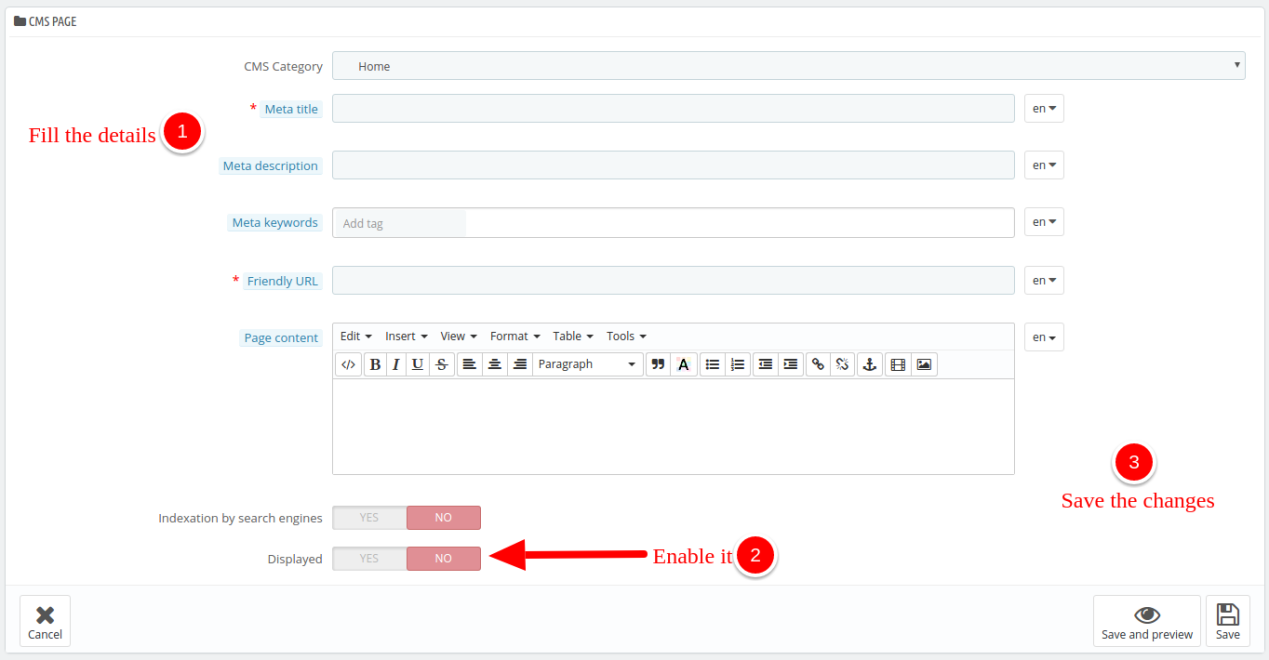
Step 4: Next, you need to fill out all the required fields. After filling the fields, just enable the page and “Save” the changes.

Step 5: Note down the CMS page ID displayed in the first column of the CMS pages list. You will need this ID later. Save the changes.

Adding a link of the CMS page to the header menu

Step 1: Connect to your site’s files by logging into your FTP account. You can use FileZilla to access the files or the cPanel access if you host has provided one.

Step 2: Now, navigate to the following file directory:

themes/themeXXX/modules/blockpermanentlinks   

PS: “themeXXX” is the name of your theme.

Edit, blockpermanentlinks-header.tpl file. You can use any text or code editor. I am using Netbeans for editing.

Step 3: Each of the list element in the code here represent one menu element in the Header. For example this code represents a header menu element named sitemap:

<li id="header_link_sitemap"><a href="{$link->getPageLink('sitemap')|escape:'html'}" title="{l s='sitemap' mod='blockpermanentlinks'}">{l s='sitemap' mod='blockpermanentlinks'}</a></li>

Step 4: Copy that line of code and paste it on a new line next to the one that you have copied.

Step 5: Now, change the copied code to this one:

<li><a href="{$link->getCMSLink('8', 'new')|escape:'html'}" title="{l s='new' mod='blockpermanentlinks'}">{l s='new' mod='blockpermanentlinks'}</a></li>

Step 6: Save the file. You have now added a link to the CMS page named “new” which had the Page ID “8”.
Adding a link of the CMS page to the Footer menu

How to Add a link of the CMS page to the Footer menu of Prestashop 1.7.x?

We will now link the same page to the footer menu of Prestashop 1.7.x.

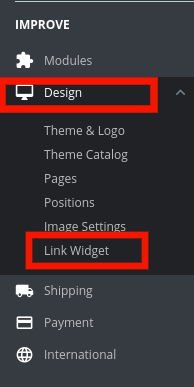
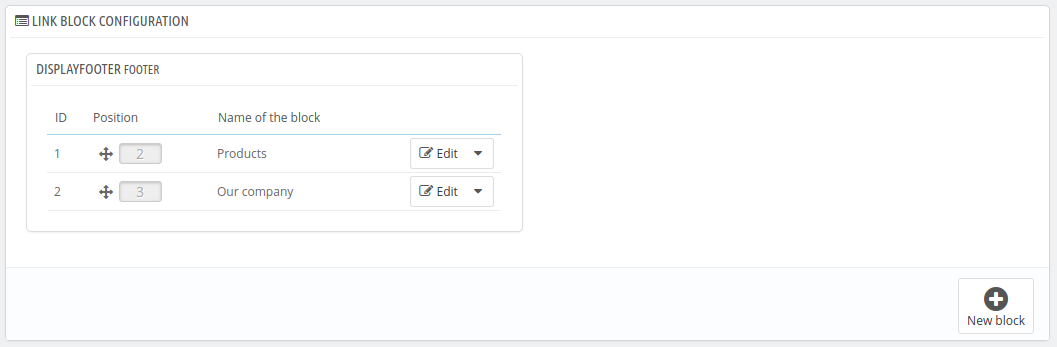
Step 1: Go to Design – > Link widget. This will display the blocks that are currently displayed on your site.

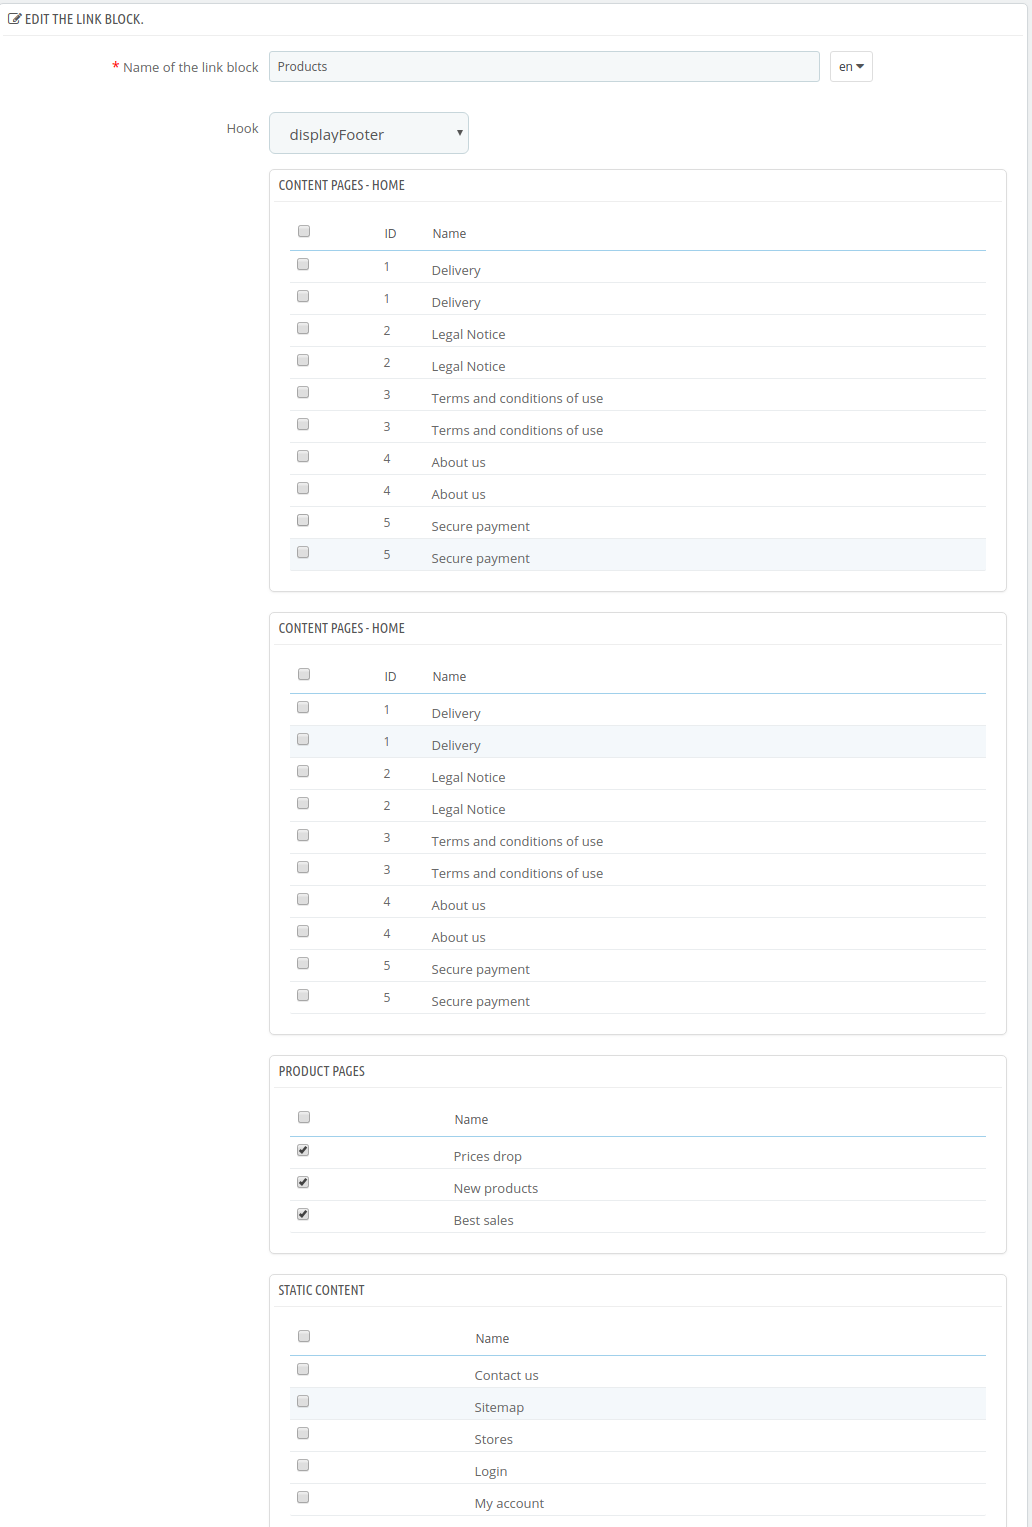
Step 2: In order to open a Block setting from the existing ones, click the Edit button corresponding to it.

In order to activate the newly created page and make it visible, select the checkbox corresponding to it’s title. You can find the link to your CMS page in the footer.

We will now link the same page to the footer menu.

How to Add a link of the CMS page to the Footer menu of Prestashop 1.6.x?

Follow the steps mentioned below to link the same page to the footer menu of Prestashop 1.6.x.

Step 1: Go to your Admin panel and navigate to “Modules & Services >> Modules & Services” and search “CMS Block” module.

Step 2: Click on the Configure button.

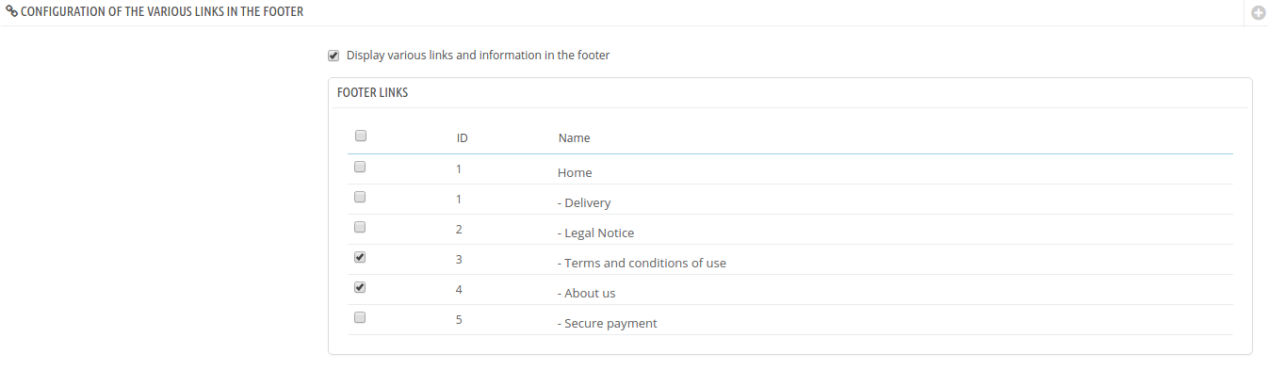
Step 3: Look for the “CONFIGURATION OF THE VARIOUS LINKS IN THE FOOTER” section. Here, if you find your newly added CMS page in the list.

Step 4: Enable your page by clicking on the check-box in the first column. Click the “Save” button to apply the changes. You have now added a link to your CMS page on the Footer menu.

An Easier way to Create CMS Pages on Prestashop

Well, that was quite a show. We created a page, edited the codes, navigated from pages to pages and finally linked it to the Header and Footer menu. But that was just a single page we created, what if you need to link more pages? Each time editing the codes is a quite tiring job.

Is there any easier way to do that without messing with the code?

Yes, Of Course! The PrestaShop page Maker module by Knowband has been designed to serve the exact purpose. Frankly, there is a lot more it can offer. For now, let’s see how can you use this module to create CMS pages and add them to the header link without editing the code.

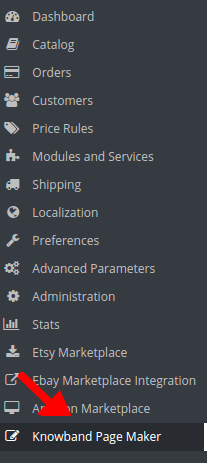
Step 1: Go to Knowband Page Maker menu in the left menu bar.

Step 2: In the next screen, Click on “Add new page” button.

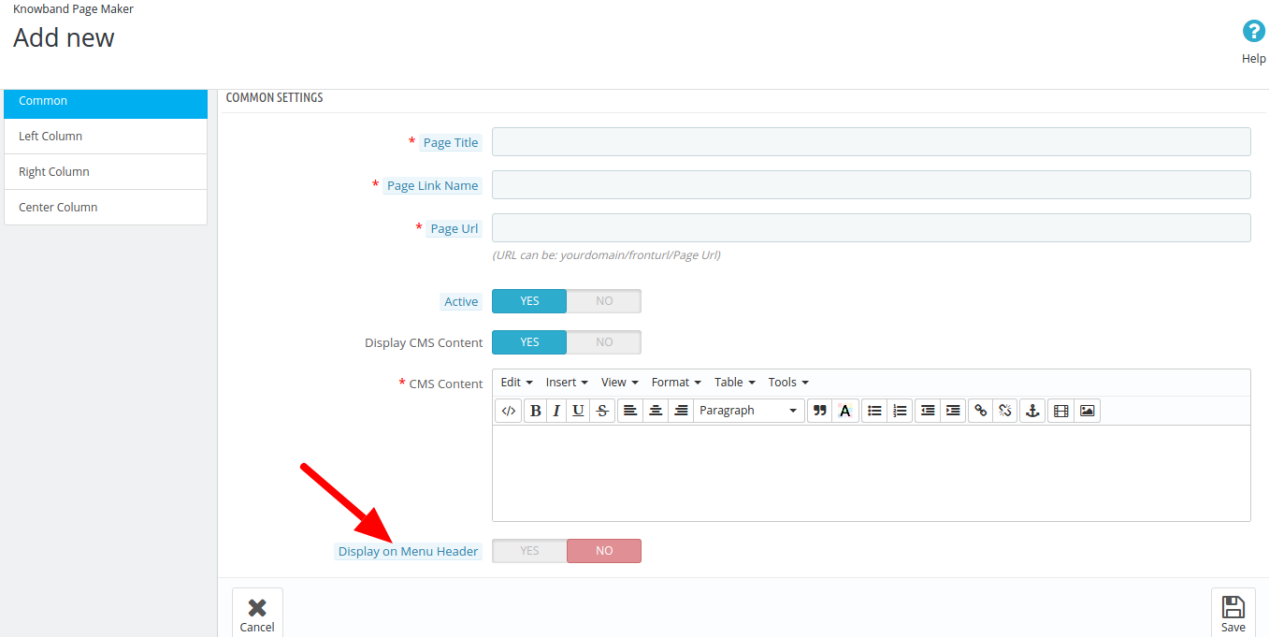
Step 3: The Add new page interface consists of the four tabs. In the Common Settings tab, fill out all the details.  You can give a Page Title, Page Link Name, and custom page URL.

Step 4: After filling out the details, You will see an option at the end of the page “Display on Menu Header”. You need to just enable this option and your newly added page will be instantly linked on the Header Menu.

In addition, to the ease of creation of the CMS pages, the Prestashop CMS Page Maker addon offers a number of other features. Some of them are discussed below:

  • The best thing about this Prestashop page creator module is the multi-lingual functionality. Thus, the landing pages can be made in multiple any language as per the requirement of the store admin.
  • The URL of the created page can be linked to the header without getting into the technicalities as mentioned above.
  • Along with the generic contents, the admin even gets an option to display the Best Sellers, New Arrivals, Featured Products and Special Products as well.
  • The Prestashop landing page maker addon even allows the admin to align the contents left, right or center without making any changes in the CSS of the site. This is done just at a button click.
  • With the ease of creating the meta data, the page maker extension for Prestashop helps you keep it SEO-optimized.
  • Additionally, you can even custom CSS codes for customizing the look and feel of the webpages.
  • Along with creation, the Prestashop page maker enables you to edit or remove the CMS pages as well.
  • The Prestashop addon creates mobile-responsive pages. Thus, the site will stay optimized for the mobile user even after you create new webpages.

To conclude

That was very quick. With the Prestashop Page Maker module, we did the linking in a snap of time- 4 simple steps to be exact. Fortunately, we did not have to edit any code. You have multiple options for performing the same task here, both the options are quite open, now you can choose which one is best for you.


Liked This? You’ll Like These Too

A PrestaShop eBay integration – Making multi-channel trade seamless

Long after the official partnership between eBay and PrestaShop, the multi-channel trade have become so easy for the business owners. This partnership made a way for various PrestaShop community developers to develop various eBay integration solutions helping store owners to seamlessly expand their market on an established platform like eBay. “Our partnership with PrestaShop corresponds perfectly with eBay’s development strategy in the main European countries. After France and Italy, we are delighted to continue working closely with the PrestaShop team to reach British and Spanish merchants together,” said François Coumau, managing director for continental Europe, eBay.

1. The PrestaShop eBay connection-

Today more than 270,000 websites are using PrestaShop platform, and this statistics is going to increase further in the coming time for sure. It would be redundant to say how big is eBay’s customer base. It’s undoubtedly a huge population of users who trust eBay for selling and purchasing online. This American multinational marketplace is enormously popular and used by millions of people out there.

The PrestaShop-eBay connection is a smooth way to allows users with an eBay seller account export their product catalog to eBay marketplace, making their products accessible to thousands of new customers. Thanks to Prestashop eBay integration that allows the online merchants to select which of their product categories they want to share on eBay. Not just this, they can also customize the product information, and fully manage the store inventory between both platforms with the help of this Prestashop eBay integration module.

2. The PrestaShop eBay integration module-

A PrestaShop eBay integration module is a solution that connects your PrestaShop store with eBay marketplace. Such eBay integration modules are recommended to all those PrestaShop store owners who are interested in selling on eBay but doesn’t want to manage the seller account separately.

The Prestashop eBay integration module by Knowband enables the store owners to add, remove, or update products directly from their PrestaShop site to the eBay marketplace. Further, they can also manage the orders and update the order details from the PrestaShop site itself with the help of this Prestashop eBay integration module. This solution helps in saving the time that would consume in controlling the seller panel on eBay and the PrestaShop separately.

With an aim to provide easy PrestaShop-eBay connection, PrestaShop community offers some seamless integration solutions. The PrestaShop eBay marketplace integration module is one such solution that goes beyond a simple connection. The Prestashop eBay integration module presents a comprehensive control over eBay product listing, shipping, management, Profile management and order management.

The easy to use interface and module configuration of Prestashop eBay integration module makes the task so easy even for a person with no technical skills. Just:

  • Set up an eBay Seller account and an eBay developer account
  • Get the eBay API details
  • Install the eBay Marketplace Integration module
  • Configure the Prestashop eBay integration module
  • Start exporting-importing to and from eBay and your PrestaShop store

3. Benefits of using a PrestaShop eBay integration module-

  • You do not need to manage the eBay account and your eCommerce store separately.
  • You have an option to showcase your products on an established marketplace.
  • You will have the capacity to showcase your products to an expanded population of customers.
  • Customers will purchase from eBay and you can deal with the orders from your PrestaShop store itself.
  • The Prestashop eBay integration module will save the time and effort required to manage both entities separately.
  • It Prestashop eBay integration module will generate more sales and conversions as compared to that on your store only.
  • Your Prestashop store will act as a centralized system that can manage everything on the store and the marketplace as well.
  • The Prestashop eBay integration module will automate all the tasks from listing products to syncing inventory and order management.
  • The Prestashop eBay integration module allows the admin to sync the inventory of products in bulk without updating any other product information (title, description, etc.).
  • Prestashop eBay integration allows the admin to send modified prices on eBay.
  • eBay Prestashop integration module allows admin to set a quantity buffer while listing products on eBay.

Finally, eBay is the most popular online auction and marketplace site in the world. With that in mind, your eCommerce business can grow up in parallel to this platform with a simple tie-up between the eCommerce sites and eBay marketplace. So, it’s time to bring more customers to your website by starting an export-import of products and orders through a PrestaShop-eBay integration.

4. Frequently Asked Questions

Question1: What is the best PrestaShop eBay integration?
Answer: The Prestashop eBay integration provided by Knowband is used for connecting your Prestashop website with the eBay selling account. With the help of the Prestashop eBay integration module, you can easily manage your products on both websites through one single dashboard.

Question2: Is it necessary for me to have a dedicated eBay seller account in addition to my PrestaShop account to integrate the eBay module?
Answer: For using this module you will require an eBay seller account as well as an eBay developer account, which is required to obtain the credentials for integrating the module.

Question 3: Would it be possible for me to select my own products to upload to eBay through PrestaShop?
Answer: The owner of the store would have the liberty to export only specific product categories to eBay and can then edit them.

Question 4: Is the PrestaShop eBay integration extension responsible for taking care of order management too?
Answer: The orders placed on eBay can be conveniently managed through PrestaShop backend with the help of Knowband Prestashop eBay Integration Module. (Updated on September 9, 2026)

Question 5: Is PrestaShop eBay integration hard to implement?

Answer: In general, it will be necessary to create a PrestaShop seller and developer accounts, get the API keys and then install the integration module that does not need special knowledge.

Question 6: Would it impact my current business if I sold on eBay using PrestaShop?
Answer: The PrestaShop eBay integration module was developed in such a way that your PrestaShop store would work as the main system while eBay becomes another source of sales for you.

Question 7: Is it possible to synchronize inventory from PrestaShop and eBay without making any changes to product attributes?
Answer: It is possible to do this using the PrestaShop eBay integration module.

Question 8: Explain a Quantity Buffer in eBay Integration.
Answer: With Quantity Buffer, admins have the option to list fewer items than they actually have in their PrestaShop because they can avoid overselling when orders are made through both websites simultaneously.

Question 9: Why should a PrestaShop store owner consider eBay Integration?Answer: eBay is one of the most popular established marketplaces out there; hence, eBay integration offers store owners a bigger customer base from which to make sales without having to create the traffic by themselves.

Liked This? You’ll Like These Too

5. Check out the tutorial Video for the PrestaShop eBay Module


Integrating PrestaShop Store with Amazon Marketplace Web Service

Amazon Marketplace Web Service (Amazon MWS) is an API system provided by Amazon marketplace to establish an exchange of information on the product listing, product orders, payments, reports and much more. The Amazon MWS API enables the programmers to develop selling automation solutions which help the store owners to grow their business on the Amazon marketplace.

The solutions developed using Amazon MWS help the sellers to:

  • Increase selling efficiency
  • Reduce extra efforts and labor and,
  • Improve response time to marketplace customers

Earlier, if you had an eCommerce website and also wanted to sell on the Amazon marketplace, you had to create a separate seller account and manage it separately. It was a tough job to manage an eCommerce site and an Amazon seller account separately.

With Amazon MWS, a broader scope of functionalities was introduced to those who have an eCommerce store and also want to sell on Amazon. With the new API, Amazon product listing, order management, payment, and much more functionalities were integrated into various solutions developed for different eCommerce platforms.

The PrestaShop Amazon US connection is one such solution that integrates the Amazon seller functionalities into existing workflow of PrestaShop stores so that selling on Amazon fits seamlessly to the current eCommerce operations.

The PrestaShop integration-

Using the Amazon MWS connection, the PrestaShop Amazon integration module allows product import-export, order management, payment report etc right on a PrestaShop dashboard itself. You do not have to login to your Amazon seller account to manage the product feeds, or product orders anymore. You can manage all these right from your PrestaShop store.

To use this functionality, you need to install the PrestaShop Amazon US Marketplace integration module on your PrestaShop. After that, you need to create a professional seller account at Amazon which you will use to show your product on the Amazon marketplace.

Now, when you have the module and a seller account on Amazon, you need the following API details that you can get from the Amazon MWS and Amazon Seller Central account setup:

1 . Seller or Merchant Id:

You will get this when you create the Amazon seller account. It is mandatory to make connection to Amazon MWS API.

2. AWS Access Key Id:

You will get this when you sign up for Amazon MWS. This information is also mandatory to make connection to Amazon MWS API.

3. Secret Key:

You will get it when you sign up for Amazon MWS.

After configuring these details in your PrestaShop module, your Amazon-PrestaShop connection is ready to use. Now, you can use the profile management, order management, product feed management interfaces to seamlessly carry out your multi-channel trade.

With the PrestaShop Amazon US Integration, you can perform all the functionalities that you can perform in an Amazon Seller Central panel.

  • You can create profiles for product listing on Amazon
  • You can manage Amazon product exports from the PrestaShop dashboard itself. You can map and upload your existing PrestaShop products to Amazon product feed.
  • You can manage the Amazon product orders from the PrestaShop dashboard.
  • You can map PrestaShop categories with Amazon US Marketplace Categories.
  • You can map PrestaShop attributes to the corresponding Marketplace attribute
  • You can view list of orders from Amazon whose status is not pending on Amazon.com.

Amazon MWS can provide you a wider platform to showcase your products. This operation can be further simplified with the platform based solutions like the PrestaShop Amazon US integration module. So, if you run a PrestaShop store and want to expand your reach to a broader section of customers, Amazon Marketplace is one such effective option for you.

This Would Also Interest You: