Introduction of Prestashop Page Maker Module:
The Prestashop Page Maker module by Knowband will provide a feature to the store owner through which the store owner can make the page(s) look like CMS page according to his need. With the help of this Prestashop create page feature, the store owner can create multiple pages in which he/she can display banners, blogs, products, etc.
Technology for Development
Language: PHP
FrameWork: PrestaShop
Installation
Installation Guide
Follow the following steps for installing Prestashop Page Maker Module:
- Copy “pagemaker” module folder under your “root_directory/modules/”of your store via FTP or use prestashop interface to upload the plugin.
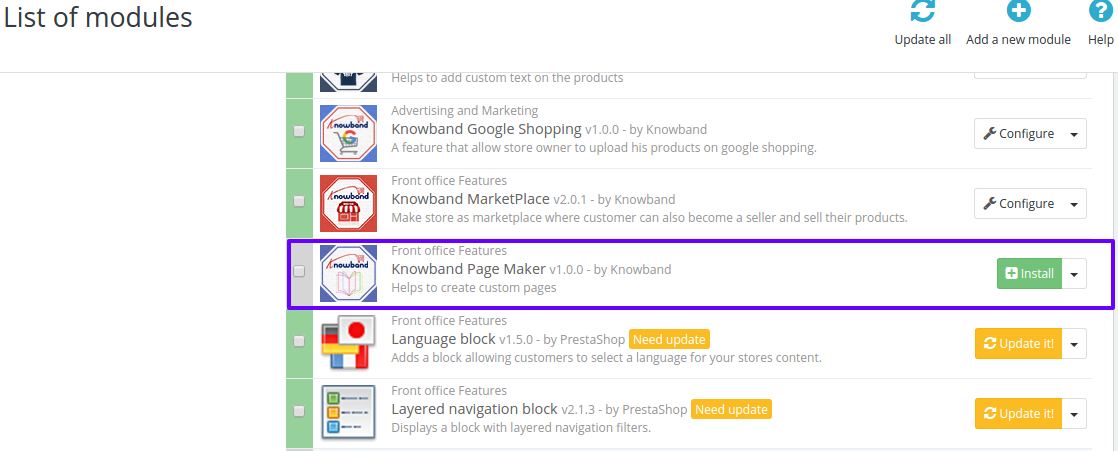
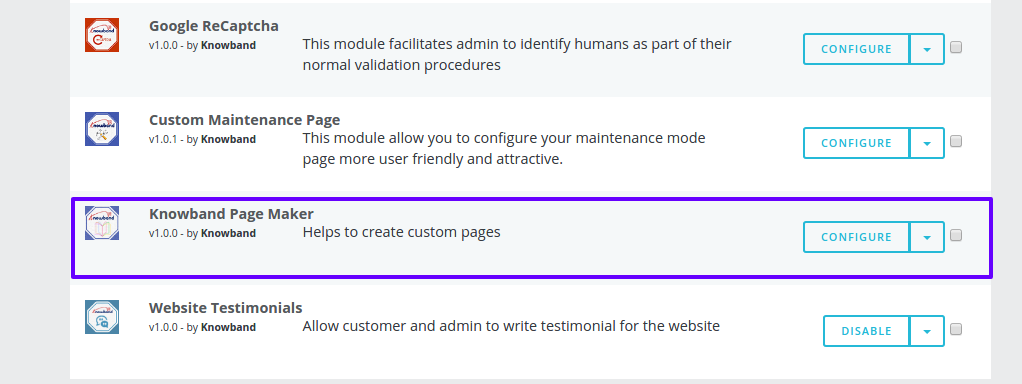
- After copying, the Knowband page maker module will be listed on module listing page in admin panel as shown given below screen.
 (for Prestashop 1.6)
 (for Prestashop 1.7)
In Prestashop 1.6, if you are not able to find module in the admin module list, please try searching the module with following details –
Keyword: pagemaker
Category: front-office feature
Filter by: Installed & Not Installed/Enabled & Disabled
In Prestashop 1.7, you can search the Prestashop page maker module by typing the name of the module in the search box provided in the admin module page.
Note:
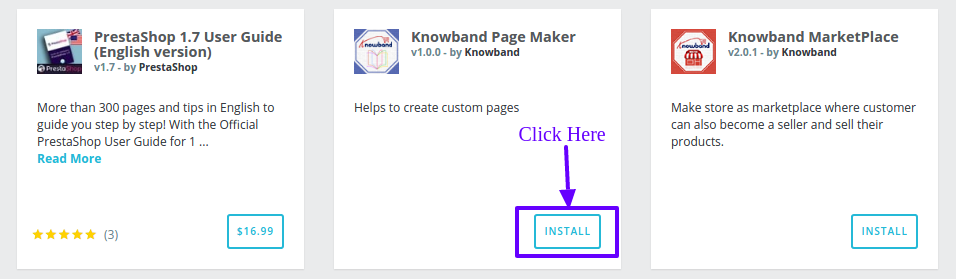
- When you will click on install button, a pop up box will appear which will display warning messages. You can ignore these messages and move ahead. There will be no negative impact of this warning message on your store.
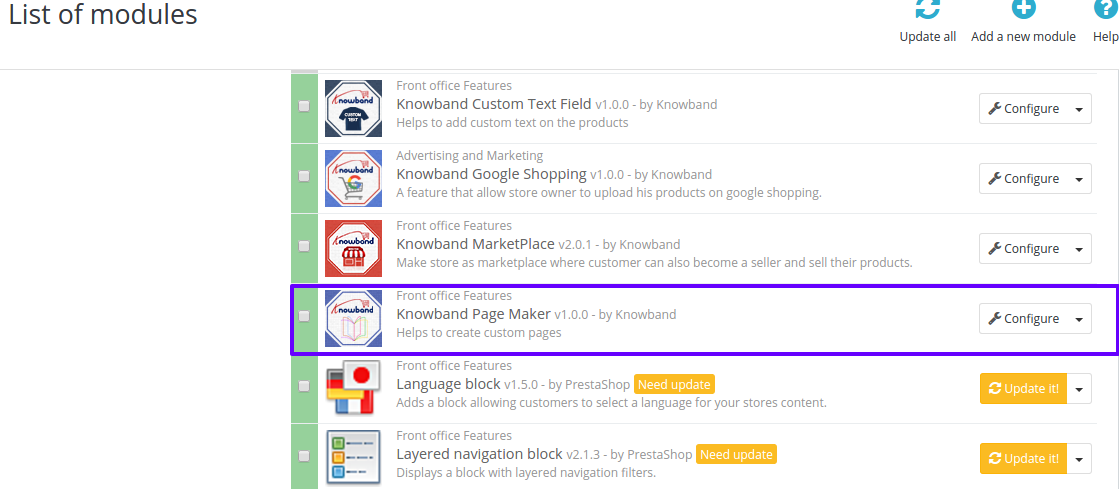
- After installing the Prestashop create page module, a “configure” button will be in front of this plugin on module listing page as shown in the screen below:
 (for Prestashop 1.6)
 (For Prestashop 1.7)
Admin Interface
The Prestashop CMS page creation module is configurable and the configuration settings can be updated via the admin interface.
Configuration
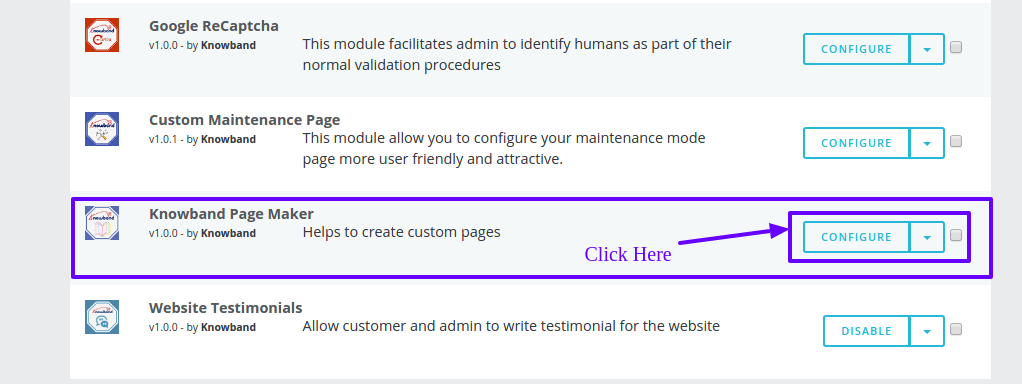
To configure this Prestashop module, click on the “Configure” button in Module listing page as shown below:
 (For Prestashop 1.6)
 (For Prestashop 1.7)
After clicking the “Configure” button, PageMaker Configuration page will be displayed which have the following blocks:
- Configuration
- Best Seller
- New Arrival
- Special Products
- Featured Products
You can find below the description of each block:
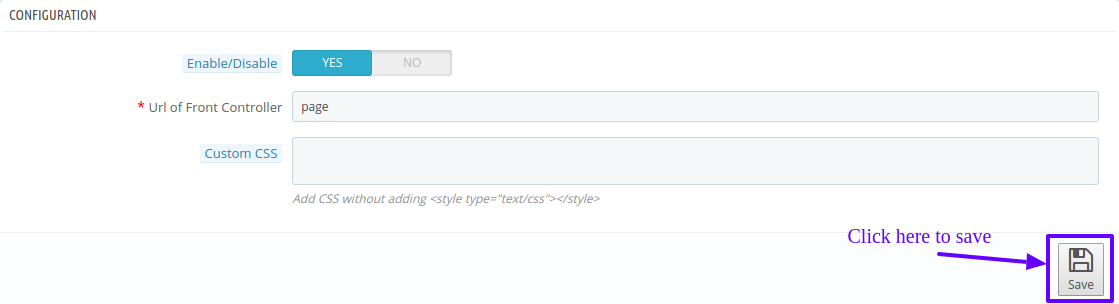
- Configuration: In the Configuration block, module settings can be configured. Please find the description of each input below:
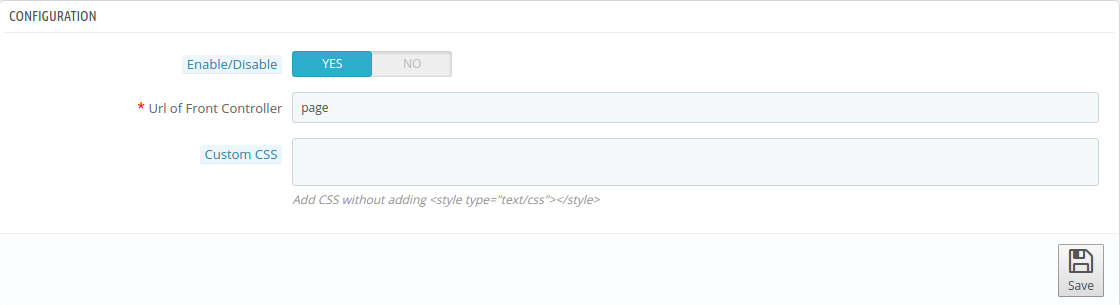
- Enable/Disable: This is on/off switch. Admin has the option to Enable/Disable the page composer module. If enabled, then only this Prestashop module and its settings will be working otherwise, there will be no impact of this page builder module on the store.
- URL of Front Controller: This is for the front controller sub- URL. Admin can set the sub URL of page builder module’s front controller so that page created by admin can be viewed as “yourdomain/URL of Front Controller/Page URL”
- Custom CSS: This field of Prestashop landing page maker offers a text box in which admin can add their custom CSS in all pages created by admin.
- Best Seller: You can configure the settings for “Best Seller” block which will be displayed in the page maker module’s front end. Please find the description of each input field below:
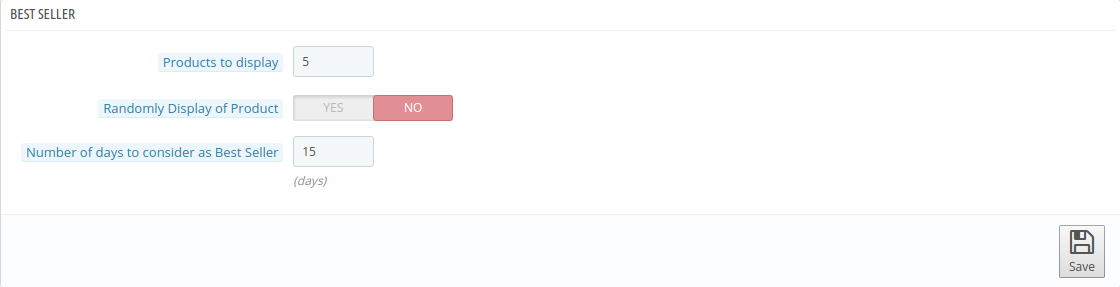
- Products to Display: In this field of Prestashop landing page maker, the admin has to enter the number of products to be displayed in “Best Seller block” for front end. By default, this will be 5 Products.
- Randomly Display of Product: This is the on/off switch of this Prestashop plugin. Admin has the option to enable/disable this field of page composer module. If enabled, then only products will be displayed randomly otherwise, they will be displayed based on the best seller on the front end.
- Number of days to consider as Best Seller: In this field of Prestashop create page, the admin has to enter the number of days from which best seller product to be considered. By default, it will be 15 days.
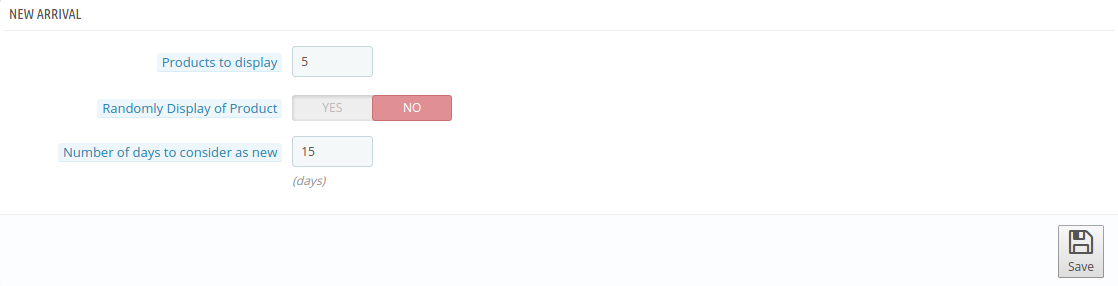
- New Arrival: You can configure the setting for “Best Seller” block which will be displayed on the landing page maker module’s front end. Please find the description of each input field below:

- Products to display: In this text box of Prestashop CMS page creation module, the admin has to enter the number of products to be displayed in “New Arrival” block for the front end. By default, this will be 5 Products.
- Randomly Display of Product: This is on/off switch. Admin has the option to enable/disable this field of the page builder plugin. If enabled, then only products will be displayed randomly otherwise will be displayed based on the arrival date in the front end.
- Number of days to consider as New: In this text box of Prestashop create page module, the admin has to enter the number of days from which new product can be considered. By default, it will be 15 days.
- Special Product:You can configure the setting for “Special Product” block which will be displayed in this Prestashop addon’s front end. Please find the description of each input field below:
- Product to display: In this field of Prestashop page builder module, the admin has to enter the number of products to be displayed in “Special Product” block on the front end. By default, this will be 5 Products.
- Randomly Display of Product: This is on/off switch of the Prestashop page builder addon. Admin has the option to enable/disable this field. If enabled, then only products will be displayed randomly otherwise, will be displayed based on arrival date in the front end.
- Featured Products: You can configure the setting for “Featured Products” block which will be displayed in the Prestashop module’s front end. Please find the description of each input field below:

- Products to Display: This is text box of Prestashop CMS page creation plugin, in which admin has to enter the number of products to be displayed in “Special Product” block for the front end. By default, this will be 5 Products.
- Randomly Display of Product: This is the on/off switch of the Prestashop create page plugin. Admin has the option to enable/disable this field. If enabled, then only the products will be displayed randomly otherwise, they will be displayed based on arrival date in the front end.
- Product Category:In this field of Prestashop page builder module, the admin has to enter the category id so that products which are mapped to that category id will be displayed in the “Featured Products” block.After filling up the form, click on “Save” button present in any block as shown below.
It will validate each form input before saving into the system. If there is any error/ issue, it will be displayed as shown below:

If there is no error/issue, it will save the form data into system and display the success message as shown below:
![]()
Page Maker:
This section of the Prestashop create page module manages the pages. Admin can create new pages, update existing pages and delete pages of Pagemaker. Admin can find a menu named “ Page Maker” in the left panel of Admin as shown below:
![]()
On clicking “ Page Maker” displayed on Admin Menu, the listing of Page Maker added by admin is open as shown below:
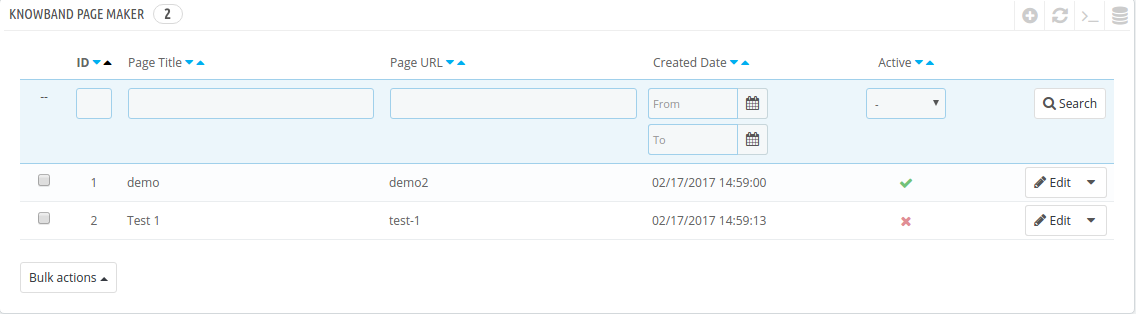
There are also several other filters as well to filter the list of the page as shown in the above screenshot.
Admin can also enable or disable pages using the bulk actions. If a page is disabled then that page will not be visible on the store front. Admin can enable/disable page by clicking on “Tick” or “Cross” in the “Active” field of the list for the particular page.
How to create New Page:
Following are the steps to follow to add the new page with the help of this Prestashop addon into the system:
- Click on “ Page Maker” menu displaying in the admin menu.
- It would display the page where already added Pages will be listed (If any). Click on the “+” (Plus Icon – as shown in above screenshot).
- It would redirect admin to the new page where a form with some input field will be shown (Screenshot is shown below).
- Fill up the following described input fields of multiple form:

There are four forms displaying in four different tabs as shown above.
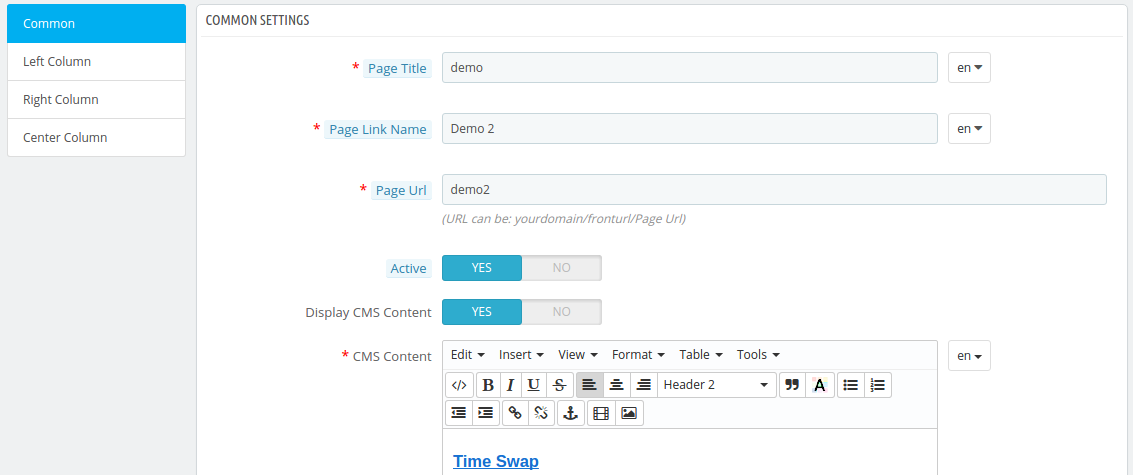
- Common Settings:
- Page Title: Enter the page title which can be displayed on the top of the page.
- Page Link Name: Enter the text which can be displayed as link on the menu header of front end.
- Page URL: This field of landing page maker allows the admin to enter the valid and distinct sub URL for the page.
- Active: By default, it is “ON”. Admin can disable/enable the display of page in front side by turning OFF/ON
- Display CMS Content: By default, this field of Prestashop create page is “ON”. Admin can disable/enable the display of page on front side by turning OFF/ON
- CMS Content: By default, it is “ON”. Admin can disable/enable the display of CMS content written in “CMS Content” field on the page.
- Display on Menu Header: By default, it is “OFF”. Admin can add page link on Header Menu of Front side be enabling the field.
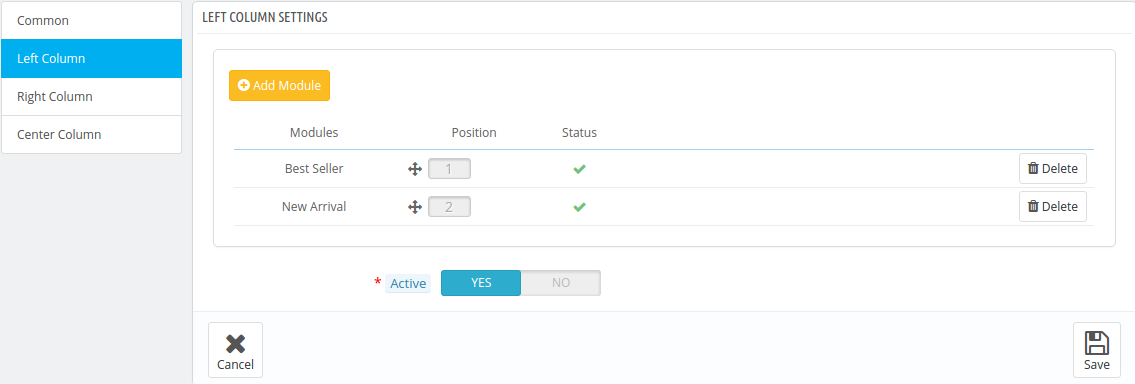
- Left Column:
This setting is for Left Column displayed on the page in Front Side as shown below:

There is an block to add “Modules” for left Column which can be displayed after adding the page.
Active: By default, this is “ON”. Admin can add or remove left column displayed on page on front end by turning ON/OFF.
- Right Column:
This setting of the Prestashop page builder module is for Right Column displayed on the page on Front Side as shown below:

There is a block to add “Modules” for right column which can be displayed after adding the page.
Active: By default, this is “ON”. Admin can add or remove right column displayed on the page on the front end by turning ON/OFF.
- Center Column:
This setting is for Center Column displayed on page in Front Side as shown below:
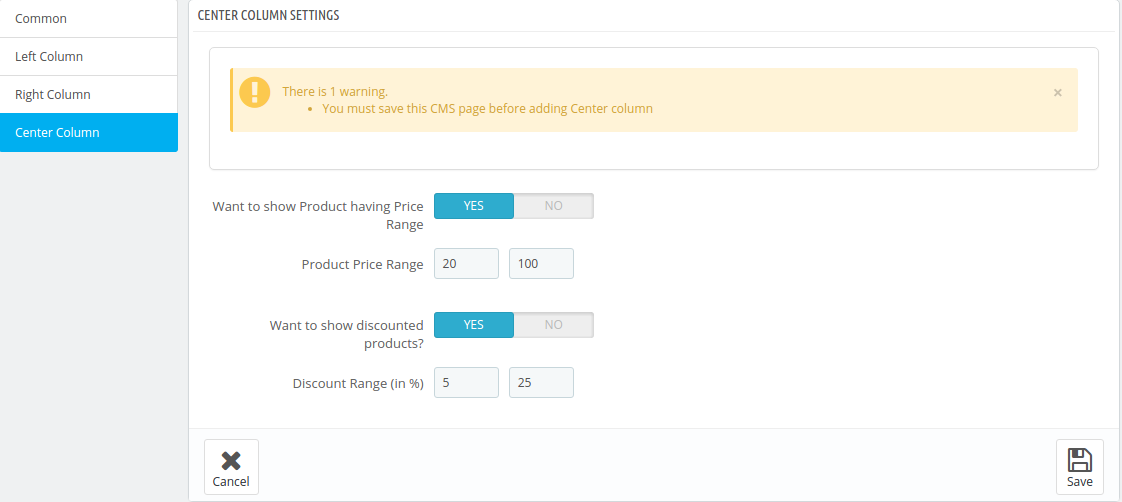
There is a block to add “Modules” for the right column which can be displayed after adding the page.Want to show
- Product having Price Range: By default, this is “ON”. Admin can disable/ enable the display of Price Range Block in the center column.
- Product Price Range: By default, the Price Range is 20 to 100. Admin can set the price range for the products to display on Price Range Block in the center column.
- Want to show discounted Products: By default, this is “ON”. Admin can disable/ enable the display of Product Discount Block in the center column.
- Discount Range: By default, the discount range is 5 to 20%. Admin can set the discount range for the products to display on Product Discount block in center column.
After filling the form, Admin can click on “Save” button to add the new page or click on “Cancel” button to go back to listing page.
- If you click on save button, it would validate the provided data and save the details into the system if valid.
How to Edit Page:
Following the steps to follow to edit the page from the system-
- Click on the “ Page Maker” menu present in Admin Menu.
- It would display the page where already added pages will be listed (if any). Click on the “Edit” link shown corresponding to each page.
- It would redirect admin to a new page where forms with already filled input field will be shown. Admin can simply update values and save the details by clicking on “Save” button.
You can find the screenshot of Edit Section below:
Add Module:
- Click on any column setting like the left column. It would display column form.
- To add module, click on “Add Module” button as shown below:
- If more module is available, the select box will then appeared to add module otherwise error message “No More module is available” is displayed.
- After selecting the module, click on “Add Module” button. It will add the module with the display of success message.
You can find the scrrenshot to add module in the column setting:
![]()
Change Position:
- Click on any column setting like Left Column. It would display left column form.
- To change the position of any existing row, drag it to the desired position and drop it.
- It then updates the current position of each existing modules with the display of success message.
You can find the screenshot as below:

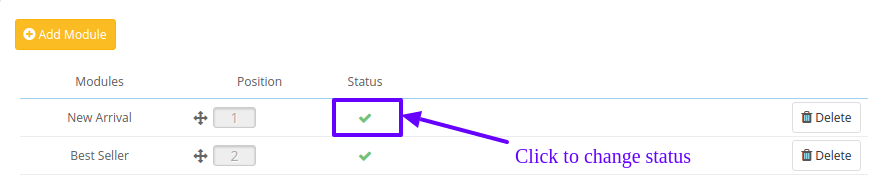
Change Module Status:
- Click on any column setting like Left Column. It would display left column form.
- If modules are added, tick icon displayed for Enabled and cross icon displayed for Disabled in the Status column.
- To change the status of existing modules, click on the icon displayed in “Status” column corresponding to the particular module.
- If already enabled, it then changes to “Cross” icon otherwise “Tick” icon with the display of the message.
You can find the screenshot as below:
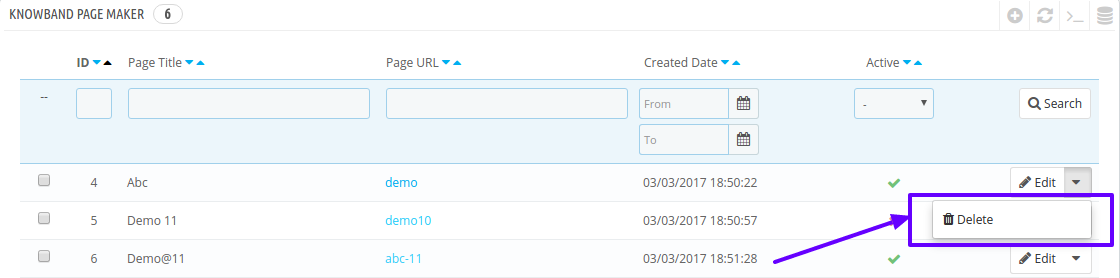
How to Delete Page:
- Click on “ Page Maker” menu present in Admin Menu.
- It would display the page where already added pages will be listed (if any). Click on the “Delete” link given under the drop-down being shown corresponding to each page.
- It then, the system will confirm the admin before deleting by asking “Delete Selected Item”. If click on “Yes”, it will delete the page.
You can find the screenshot as below:
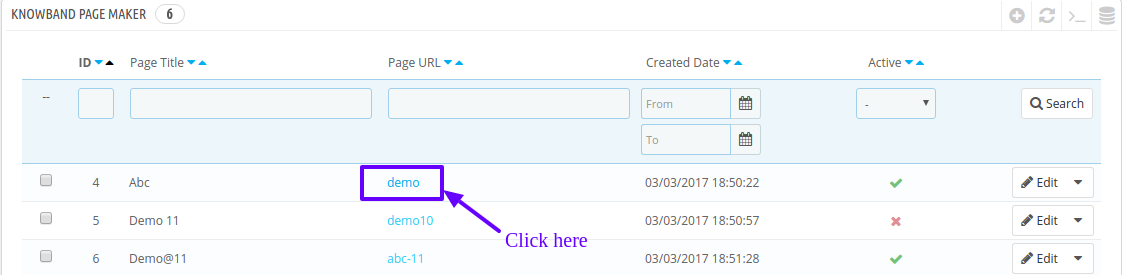
How to access Page:
- Click on “ Page Maker” menu present in Admin Menu.
- It would display the page where already added pages will be listed(if any).
- Click on the link in “Page URL” column corresponding to particular page. It then opens the created page for the front side in new tab.
You can find the screenshot as below:
Front End Module
After enabling the Prestashop CMS page creation module, the front-end user can see the added paged by manually entering of URL in Address bar or create a link for the page.
- The page with both the column enabled can be displayed as shown below:
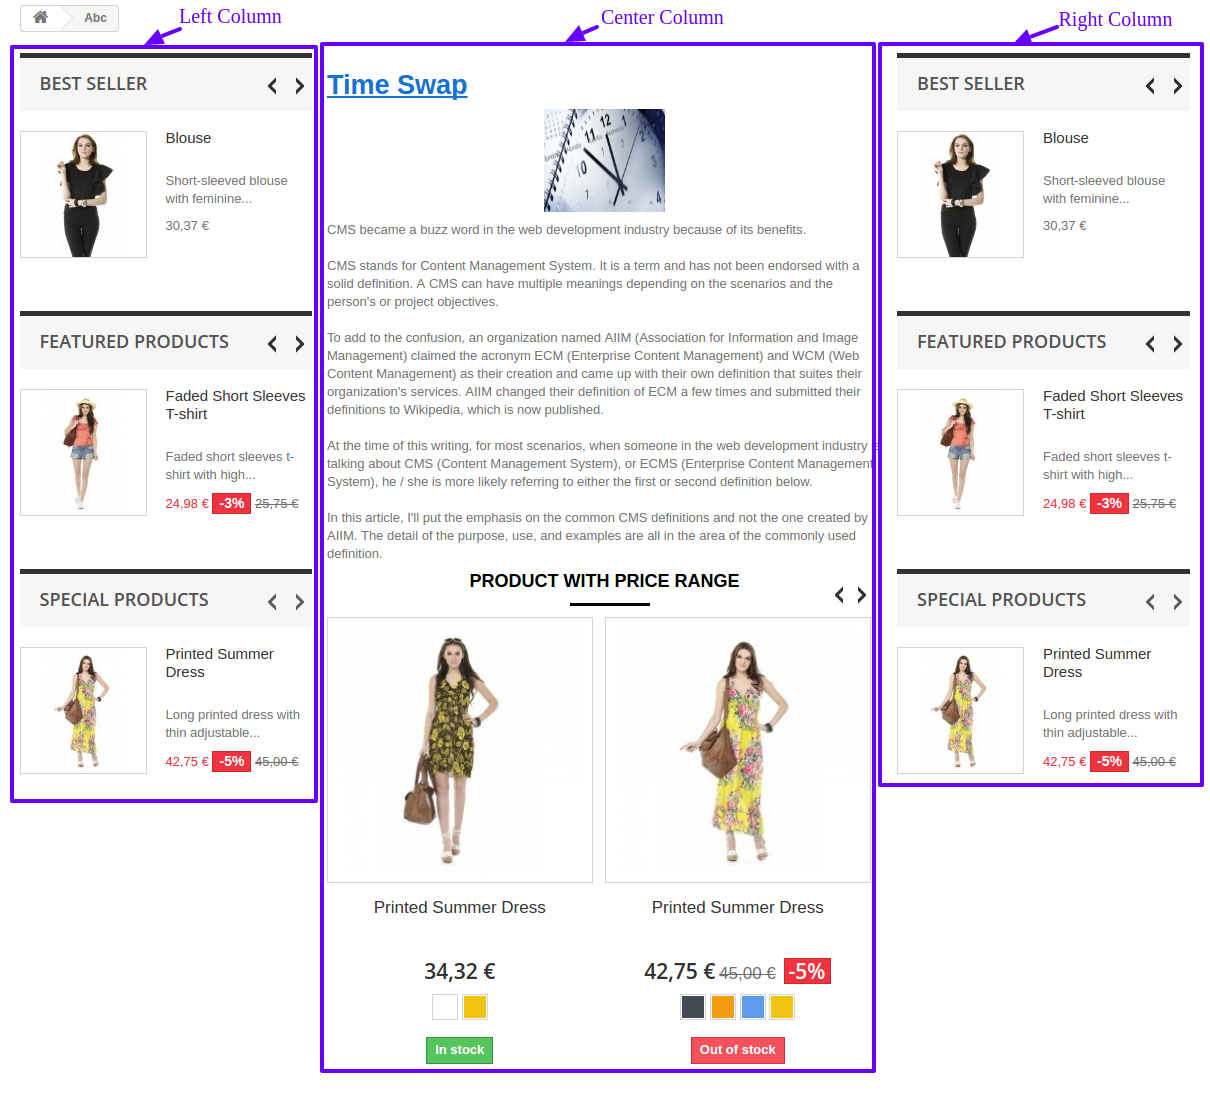 (for Prestashop 1.6)
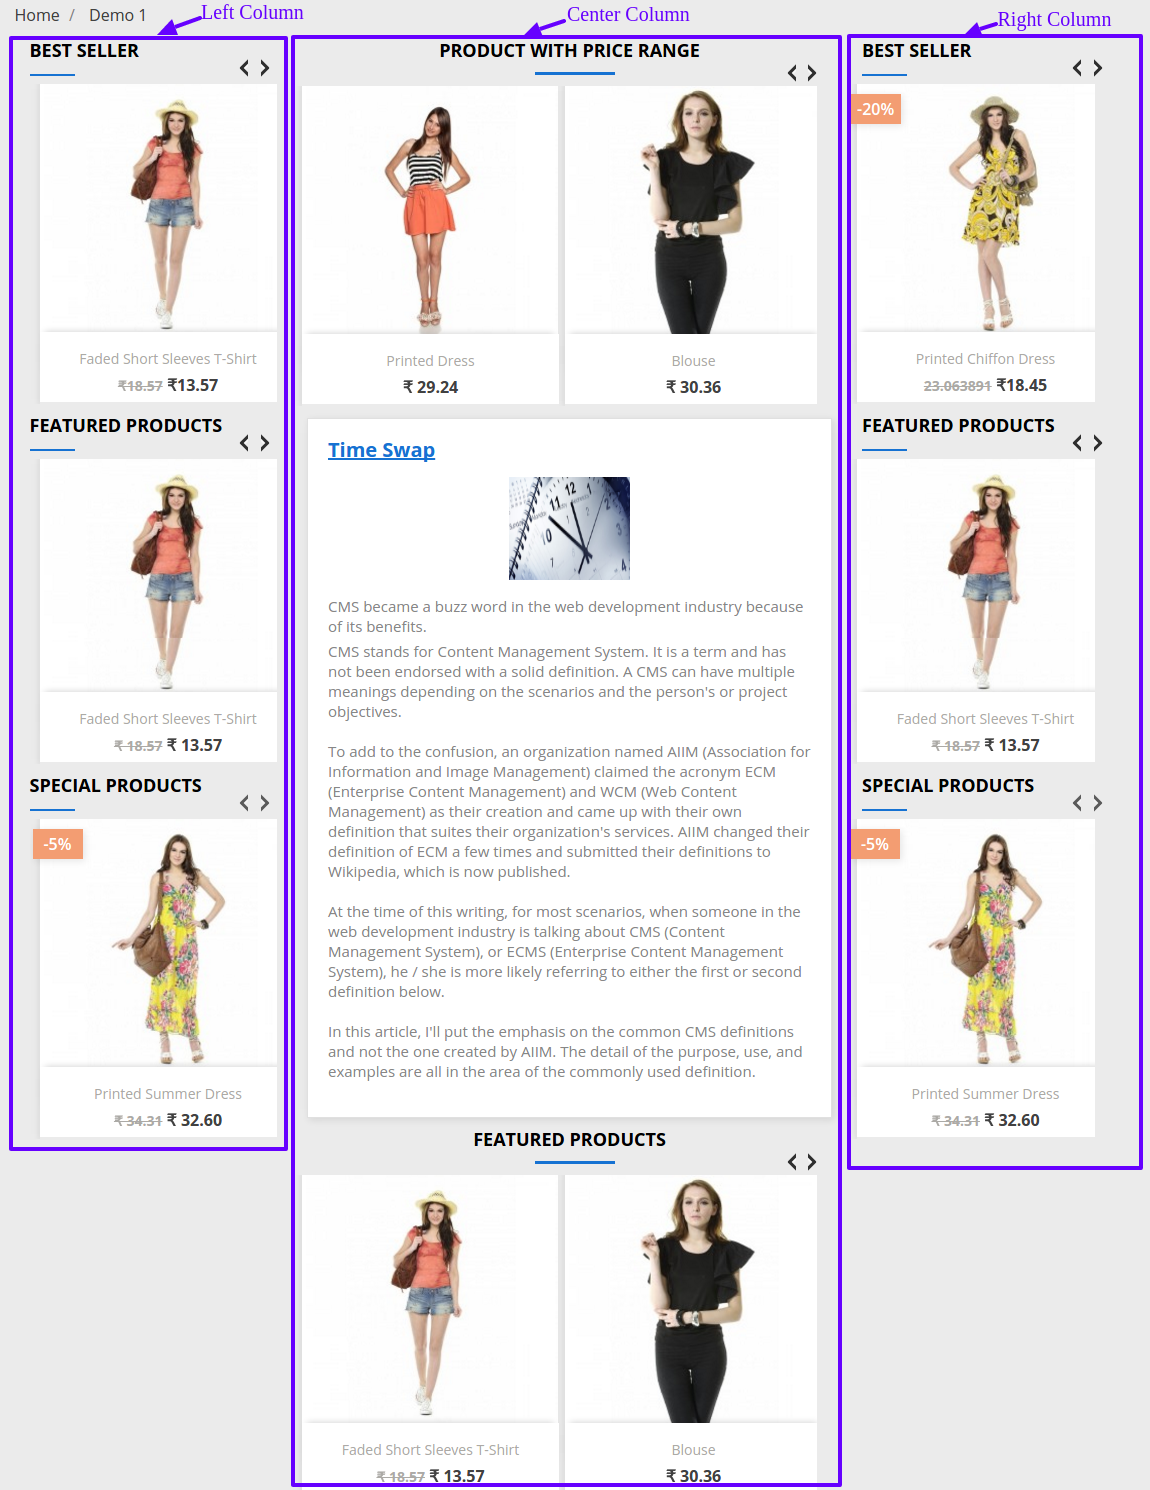 (for Prestashop 1.7)
- Page with one column enabled as shown below:
 (for Prestashop 1.6)
 (for Prestashop 1.7)
- Page with no column as shown below:

 (for Prestashop 1.7)
Watch how this Prestashop Page Builder plugin by Knowband works in this video tutorial:
Find more details about this Prestashop plugin here:
Module Link: https://www.knowband.com/prestashop-page-maker
Front Demo: https://ps.knowband.com/demo4/16/en/page/demo-page
