9 Useful but Underrated Magento 2 Plugins to look out for

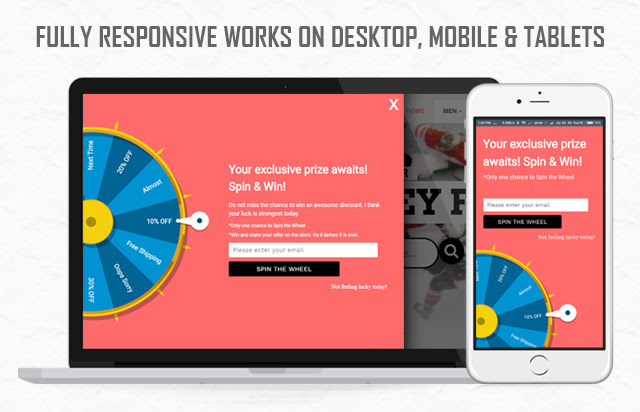
One of the most common questions we get from users is, ‘Which extensions do people normally use on Magento 2 store?’ You often struggle when exploring for the extension which matches your store’s requirement. The holiday season is right around the corner and extensions like One Page checkout, Spin and Win email subscription module, Multi-Vendor Marketplace and Abandoned Cart are the popular Magento 2 plugins which you are already aware with.

In this article, I’ll be highlighting some ‘not so famous’ but best Magento 2 plugins that might help you with your sales, conversions, bounce rate or abandon cart issues.

Let’s dive into it.

1.     Custom Registration Fields
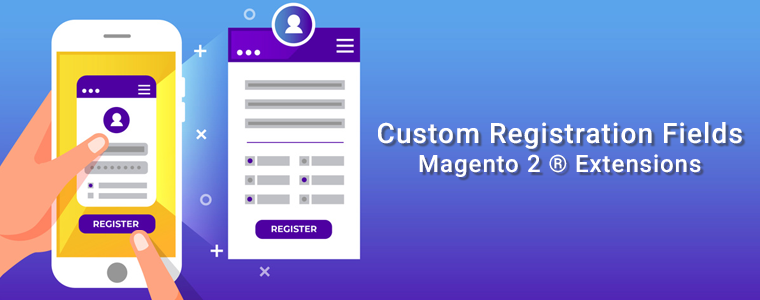
I am adding Custome Registration Fields Magento 2 extension at the top of the list. If you want to give personalised customer experience to your users and need more information from the user then you need to add some custom fields. A Magento 2 plugin, Custom Registration Fields is developed to help you add custom fields on the registration page of your eCommerce store. This can be useful to gather more information for providing custom personalisation experience to customers.

2.     Earn Loyalty Points- Magento 2 Extension

Online shop owners can now attract more customers by giving them loyalty points on various occasions. You must offer loyalty points to your existing customers or on the new registration because it can get you to achieve customer acquisition. Loyalty Points – Magento 2 Plugin will increase customer engagement and boosts customer retention.

3.     Become an Affiliate or Referral

Affiliate and referral programs are sources of passive income. The affiliate and referral program plugin for Magento 2 is highly customisable and feature-rich. Any customer can register as an affiliate and an affiliate customer earn money in exchange for the purchase done through their channel.

The Magento 2 Customer Affiliate and Referral program allow the store owner to display social media icons for sharing the referral link on social media platforms like Facebook, Twitter and Pinterest.

4.     Gift Card Manager

One of the best ways to call new customers on your store to shop is by offering them a dynamic product called Gift Card. It is the new preferred way of showering love on special ones on special occasions. Gift Card saves the time of the indecisive user and gives them a choice to present the best on any event.

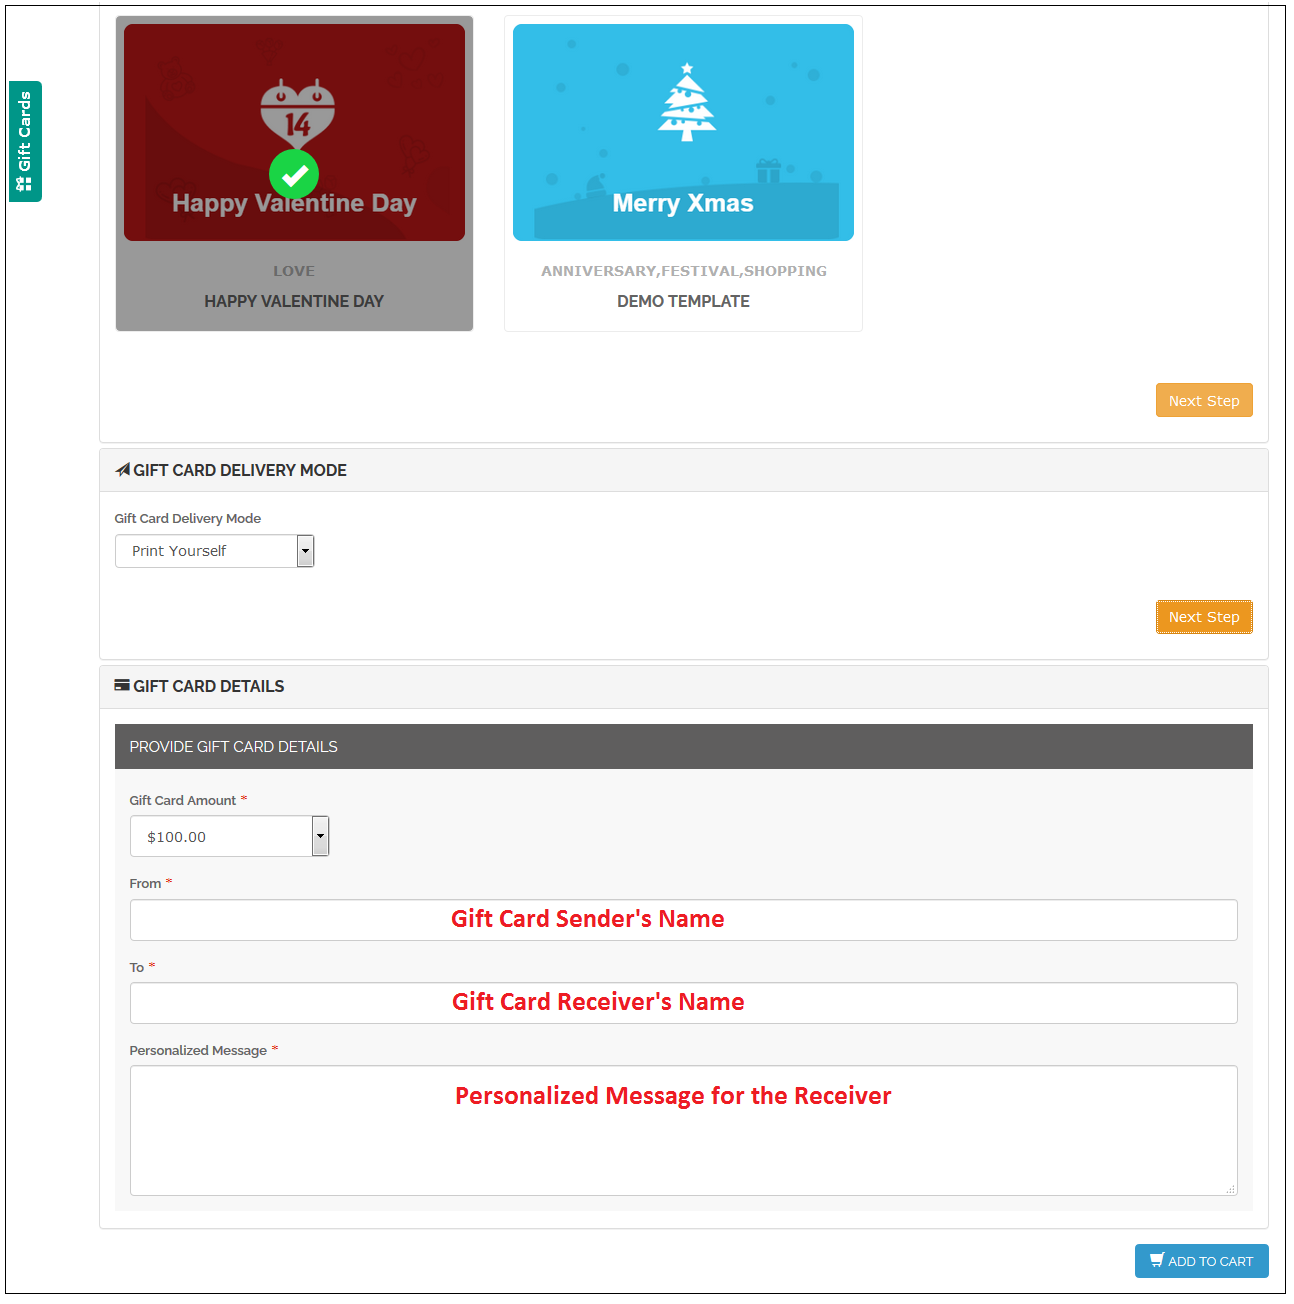
With Magento 2 Gift Card Manager extension, you can increase your customer base, generate advance revenue and increase brand awareness. The gift card can be sent via email on the desired date or the sender can print it for delivering it physically.

5.     Facebook Share and win

Customers never miss the opportunity of earning rewards or discounts. With Facebook Share And Win Discount Magento 2 extension, you can entice your customers for sharing the link on their Facebook feeds.

If the customer shares the store product on Facebook, it allows the e-marketer to offer a fixed or percentage-based discount. Customers will get a coupon code. It is the sneakiest way of advertising without any additional effort. This Magento 2 plug-in multiplies the customer base, brings new customer and increases brand awareness.

6.     Return manager

If you are looking for a solution to manage your cancelled orders and return orders then Magento 2 Return Manager Extension is all that you need. It allows the customers to raise a return request and add a reason for the return. Customers can ask for a return, refund or replacement.

It reduces the extra efforts and manages the return requests flawlessly. Admin can place the order return button in different sections of the front end. Do not miss out on potential customers because a return policy on eCommerce store brings more loyal customers to your store.

7.     Product Size Chart- Magento 2 Plugin

When it comes to buying an outfit, online shoppers mostly have concerns about the size of the product. They aren’t sure which size will fit them perfectly. This inevitably causes customers to place a return request later due to the size issue.

You can incorporate a Product Size Chart extension in your Magento 2 store. A size chart allows you to improve the purchase experience of shoppers and also makes your product page user-friendly. You will observe a downfall in product return or exchange rate.

8.     Social login Extension

Social Loginizer 12 In 1 – Magento 2 extension allows visitors or customers to log in via Facebook, Google, Twitter, Pinterest or any other social media platform. Social Login can help grow your business.   It saves customer’s time and reduces the extra efforts which are required in filling the lengthy registration form.

Incorporate social login option in your checkout page because it reduces cart abandonment by improving the conversion rate graph.

9.     Preferred delivery time

Some of our users ask for an extension through which the product can be delivered to their customer on the desired date and time. The Preferred Delivery Time extension for Magento 2 is the one you need.

By installing this extension you can allow customers to pick a desired date and time slot for the delivery of their order. Be it a birthday or an anniversary, now you can deliver a gift on their special day.

Final Thought:

These are the extensions that can reduce cart abandonment, boost the conversion rate, increase your eCommerce sales and give your customers a user-friendly experience. Install these extensions to your Magento 2 store and enhance the customer experience.

Knowband provides Magento plugin development services to enhance the functionality of your eCommerce stores. There are many extensions available on Knowband store for Magento, Magento 2, PrestaShop and OpenCart store. www.knowband.com

Recommended Reads:

10 best Magento 2 Extensions to uplift eCommerce Sales

Creating an eCommerce store on Magento 2 is easy, simple, and affordable. Optimize store with some of its best and popular Magento 2 extensions to make it user friendly. A fully developed website that can provide customer satisfaction that increases conversion and reduce cart abandonment rate is all that an eCommerce merchant need.

Optimizing your web store pages related to product and checkout will help you boost conversion. Ensure that the visitor land to correct search results on your website. You will only get conversions if you deliver what you have promised. Consider the design, navigation, and product page, the main factors for website optimization which will lead to the result that is ‘purchase’.

I am going to tell you about some most popular Magento 2 extensions you should have for uplifting the sales.

1. Go smart with Magento 2 Mobile App builder

With the evolving technology, it is quite essential to keep up with the trend. There are 5.2billion mobile users in the world and the graph is predicted to go up by 7.22billion till 2023. Make your eCommerce Magento 2 store completely mobile responsive with the Mobile App builder plugin. The module turns the store into a customizable app and the new version has a lot to offer.

This Magento 2 extension allows the admin to edit the home page design and update the layout. This ensures greater customization and improved user experience for the users of the application. Hence these variables increase customer engagement.

2. Magento 2 One Page Checkout Extension to Boost Conversion

The rushed billing counter in a brick and mortar store drive away from the potential customers. This can happen on an online store if your checkout page is not optimized. Replace the long, boring checkout page with a Magento 2 extension, One Page Checkout. It gives you all the required functionality and super-smooth checkout experience to users.

Reduce checkout friction with Magento 2 One Page Checkout. It offers guest checkout and social login for the buyers who do not like to spend extra time in the registration process. A lot of alluring features like multiple payment and shipping choices and customizable layout are the features that make it the best extension for Magento 2 store.

3. Magento 2 Abandoned Cart Extension to Reduce Cart Abandonment

We have got a solution to all your problems and cart abandonment is the one every seller deals with. Abandoned Cart – Magento 2 Extension, helps the seller to keep the track of all the carts which are abandoned by the customer, and its statistics settings allow the admin to analyze the reasons for the same.

The auto-trigger email functionality is the best feature of the abandoned cart Magento 2 extension as it converts the clogged sales by recovering the carts. Reduce cart abandonment with the Abandoned cart plugin.

4. Magento 2 Return Manager Extension for flexible return management

Product return and cancellation takes place in massive number and to manage the returns, every eCommerce website owner needs a flexible management system. The Return Manager plugin also known as the RMA extension is a perfect plugin for this job. Disappointing the customers by not providing an easy return facility will discourage the customers and degrade your brand reputation.

Manage your returns comfortably on Magento 2 store with the Return manager extension.

5. Magento 2 Social Loginizer Extension allows quick sign up

5 out of 10 people do not like to fill up the registration form or like proceeding through an easy way like social login. Social Login only requires the email ID of the user and it synchronizes the information from the social media account of the user. The collected information can be used in personalized email marketing.

Magento 2 Social Loginiser extension comes with 12 social media platform options for easy login. It is compatible with One Page Checkout and helps customers to complete the sign-up process in a few clicks. Social login 12 in 1 Magento 2 extension encourages quick sign-up, captures more leads, and reduces cart abandonment.

6. Magento 2 Review Reminder and Incentives Extension enhances customer satisfaction

Now you know how to uplift sales, reduce cart abandonment, and minimize the checkout friction. There are modules that are designed to increase user experience and built customer loyalty. The Review Reminder and Incentive extension is one that increases customer satisfaction.

The seller can offer Incentives to collect Product Reviews and Rating in Magento 2 stores. Giving customers a source of passive income can be beneficial. 92% of the visitors prefer reading the product reviews given by other customers to make the purchase decision.

7. Magento 2 Spin and Win Extension increases email subscribers

Add a fun game element to your store for gathering more email subscribers for the newsletter. Spin and Win – Magento 2 extension adds a gamified interface to the front end. This is a 3 in one plugin which can be used as an entry popup, exit popup, and email subscription module.

Attract more customers to your store with this customer engaging extension. It helps you increase the conversion rate and customer retention. There are many unique features that make it a part of the top 10 Magento 2 extension list.

8. Magento 2 Store Locator Extension allows the in-store pickup

By staying in their comfort zone and saving both time and energy, shoppers are happy shopping online. Many customers, however, believe in shopping online and picking the orders physically from the store. Online retailers should try to apply the BOPIS factor, i.e. Buy Online and Pick-up In-store, on their website.

The demand for one-click shopping and in-store pickup is increasing. The Store locator and pickup extension of the Magento 2 store detect the Geo-location of the customer to show the most appropriate recommendations for in-store pickup. Add Store Locator extension to Magento 2 store to keep up with the trend.

9. Magento 2 Affiliate and Referral program Extension

Give incentives or commission to the customers for new user registration, order placement, or both. Knowband developed an extension for the Magento 2 Affiliate and Referral Program that enables the customers to have an opportunity to become an affiliate and earn a profit. With this program, the owner can increase brand awareness at a low cost.

Affiliates have an opportunity to share vouchers with their referrals. These vouchers can be used during the checkout process. Customers are always looking for discounts and sellers are always looking to get more potential customers. Offering Incentives and making them an affiliate can solve both the purposes.

10. Magento 2 Multi-vendor Marketplace Extension

With such rising competition, keeping up with the market’s speed & trend is important. Today, the multi-vendor marketplace is attracting lots of vendors. The COVID 19 triggered the situation and now every brick and mortar is willing to sell online. This is the perfect time to convert your eCommerce Magento 2 website into a Multi-Seller Marketplace with a Multi-vendor Marketplace extension.

You will get a passive source of income and sellers will have a platform for their product to sell. The multi-vendor market place is a win-win idea booming these days. The extension has separate dashboards for admin and seller. Easy seller handling, product management, and many such features are incorporated into it. There are various types of online marketplaces and you can start your own with Multi-Vendor Marketplace Extension.

Wrapping up:

These are the top 10 extensions that can be a great fit for your Magento 2 store. I would recommend you to add them to your existing store for boosting sales, improving conversions, and enhancing user experience. To know more about these extensions, you can visit the Knowband store. All the Knowband extensions are designed to increase UX and are easy to configure.

Recommended Reads: 
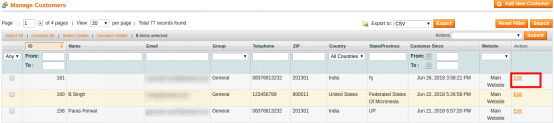
How to programmatically create customer in Magento?

Magento is one of the most flexible and widely used e-commerce platforms nowadays. Many times during our development we need to create customers via our code. For example, if we are developing a Magento plugin to connect our Magento store to marketplaces like Walmart, Etsy etc then we create an order for the customer via our code. But to create an order we need to create customer if that customer does not exist on our Magento store. We can create customer in Magento simply by using the following code.

Code for creating a customer in Magento:

$_website = Mage::app()->getWebsite()-->getId();
        $store = Mage::app()->getStore();       
        $_firstName = 'Jhon';
        $_lastName = 'Doe';
        $_customerEmail = 'demo@demo.com';
        $_customerPassword = '#KnowbandPlugins';
        
        $_newCustomer = Mage::getModel("customer/customer");
        $_newCustomer->setWebsiteId($_website)
                     ->setStore($store)
                     ->setFirstname($_firstName)
                     ->setLastname($_lastName)
                     ->setEmail($_customerEmail)
                     ->setPassword($_customerPassword);
        try{
            $_newCustomer->save();
        }
        catch (Exception $e) {
            Mage::getSingleton('customer/session')->addException($e, $this->__('Error in creating customer'));
            Mage::logException($e);
        }
<a href="https://www.knowband.com/blog/wp-content/uploads/2018/10/untitled-26.png"><img class="alignnone size-medium wp-image-22306" src="https://www.knowband.com/blog/wp-content/uploads/2018/10/untitled-26-300x48.png" alt="creating-customer-in-magento" width="300" height="48" /></a>

But this customer only has very basic information like first name, last name, email etc. It does not have shipping or billing address. We can save complete address information of the customer via the following code.

Code for saving the address of the customer:

$_website = Mage::app();getWebsite();
$_customerEmail = 'demo@demo.com'; //Customer Email
$_countryId = 'IN';
        $_postCode = '201301';
        $_city = 'Noida';
        $_telephone = '1111111111';
        $_fax= '';
        $_company = 'Velocity Software Solutions';
        $_street = '';
        
        $_customer = Mage::getModel('customer/customer')
                ->setWebsiteId($_website->;getId())
                ->loadByEmail($_customerEmail);
        $_customerAddress = Mage::getModel("customer/address");
        $_customerAddress->setCustomerId($_customer->getId())
                ->setFirstname($_customer->getFirstname())
                ->setMiddleName($_customer->getMiddlename())
                ->setLastname($_customer->getLastname())
                ->setCountryId($_countryId)
                ->setPostcode($_postCode)
                ->setCity($_city)
                ->setTelephone($_telephone)
                ->setFax($_fax)
                ->setCompany($_company)
                ->setStreet($_street)
                ->setIsDefaultBilling('1')
                ->setIsDefaultShipping('1')
                ->setSaveInAddressBook('1');

        try{
            $_customerAddress->save();
        }
        catch (Exception $e) {
            Mage::getSingleton('customer/session')->addException($e, $this->__('Error in saving customer address.'));
            Mage::logException($e);
        }
<a href="https://www.knowband.com/blog/wp-content/uploads/2018/10/untitled-27.png"><img class="alignnone size-medium wp-image-22308" src="https://www.knowband.com/blog/wp-content/uploads/2018/10/untitled-27-300x133.png" alt="saving-address-of-customer" width="300" height="133" /></a>

Now the customer address information is complete. Hope the above-mentioned code will help you in adding a new customer to your Magento store.

How to install Magento using command line?

Magento is one of the best e-commerce based open-source platform which is written in PHP. Magento provides three different platforms:

  1. Magento Community Edition
  2. Magento Enterprise Edition
  3. Magento Enterprise Cloud Edition

Here we will be learning how to install Magento using the command line(CLI). Command line installation of Magento is one of the most efficient ways of installing if we are installing it on servers.

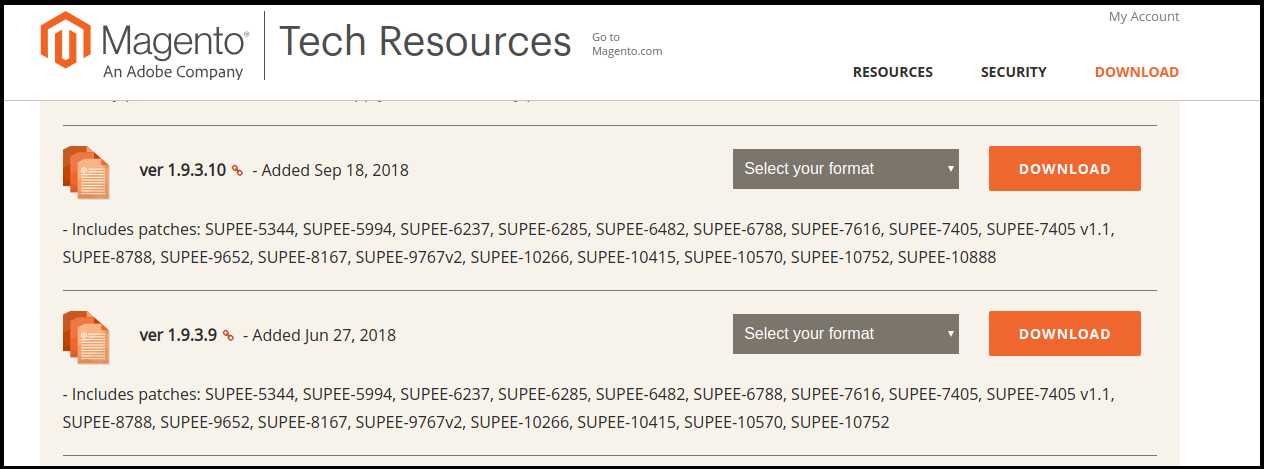
Download Magento Community Edition 1.X

One can download the required version of the Magento from the official website of the magneto. Use below link to download your package.

https://magento.com/tech-resources/download

It will ask to login. If you do not have an account then create an account and proceed further.

Uncompressing the downloaded file

Move the file to a directory where you want to install it and uncompress it.

a) If it is a zip file then using following way:

Syntax:- unzip file_name

e.g –

unzip magento-1.9.3.10-2018-09-18-03-21-10.zip

b) If it is a tar file then use the following way:

Syntax:- tar xf file_name

e.g –

tar xf magento-1.9.3.10-2018-09-18-03-21-10.tar.bz2

Prerequisite for Magento installation:

For the installation of the Magento, you will need to meet the standard system requirements. As per the documentation of Magento you need to meet the following requirement for the installation of the Magento.

a) Environment:

LAMP (Linux, Apache, MySQL, and PHP) or LNMP stack

b) Operating System:

Linux x 86, x86-64

c) Web Server:

  • Apache 2.x
  • Nginx 1.7.x

d) Server Hosting:

  • Ability to run scheduled jobs (crontab) with PHP 5.
  • Ability to override options in .htaccess files.

e) PHP:

  • PHP 5.6
  • PHP 5.5
  • PHP 5.4

f) Required extensions:

  • PDO_MySQL
  • Simplexml
  • Mcrypt
  • Hash
  • GD
  • DOM
  • Iconv
  • Curl
  • SOAP (for Webservices API)

g) Additional configuration:

  • safe_mode off
  • memory_limit no less than 256 MB (512 MB recommended)

h) Database:

  • MySQL 5.6 (Oracle or Percona)

For detailed information please check:

https://docs.magento.com/m1/ce/user_guide/magento/system-requirements.html

Setup Database

Now we will set up the database for our Magento. For setting up database one must have following things

  1. DB Host
  2. DB Name
  3. DB Username
  4. DB Password

Steps for creating a database:

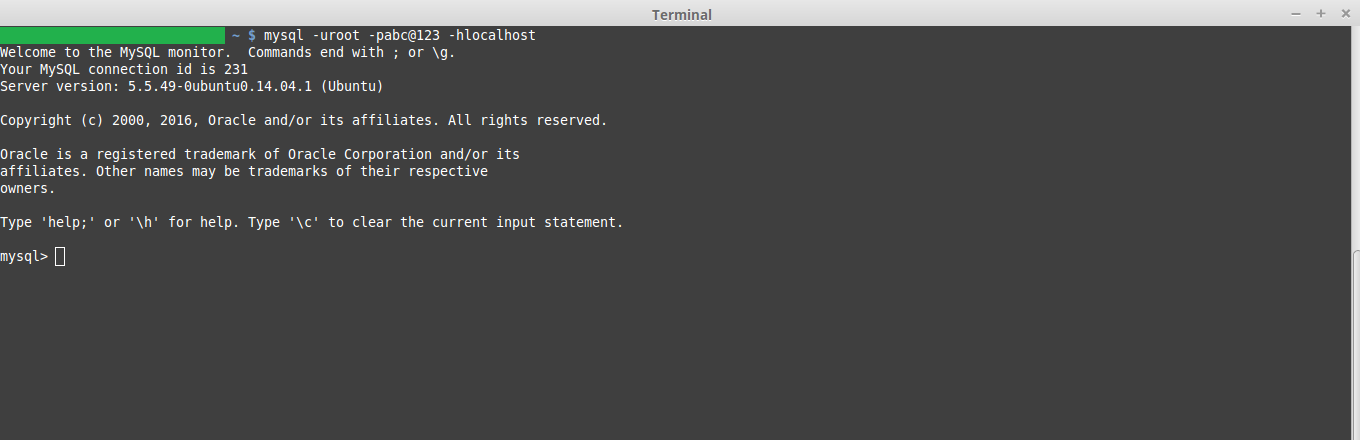
Step 1. Login to your MySQL:

MySQL -uDB_User -pDB_Password -hDB_Host

a) DB_User:- Username of the MySQL

b) DB_Password:- Password of the MySQL

c) DB_Host:- Hostname of the MySQL

Step 2. Create a database:

Syntax:- create database DB_NAME

E.g

create database kb_mage_db;

Here kb_mage_db is the name of the database which we are creating.

Step 3. Check the newly created database using below command

Show databases;

This will show the list of all the created database in your system. Here the name of the database which you created should show.

Step 3. Exit from your MySQL server using the following command

exit;

Installation of Magento

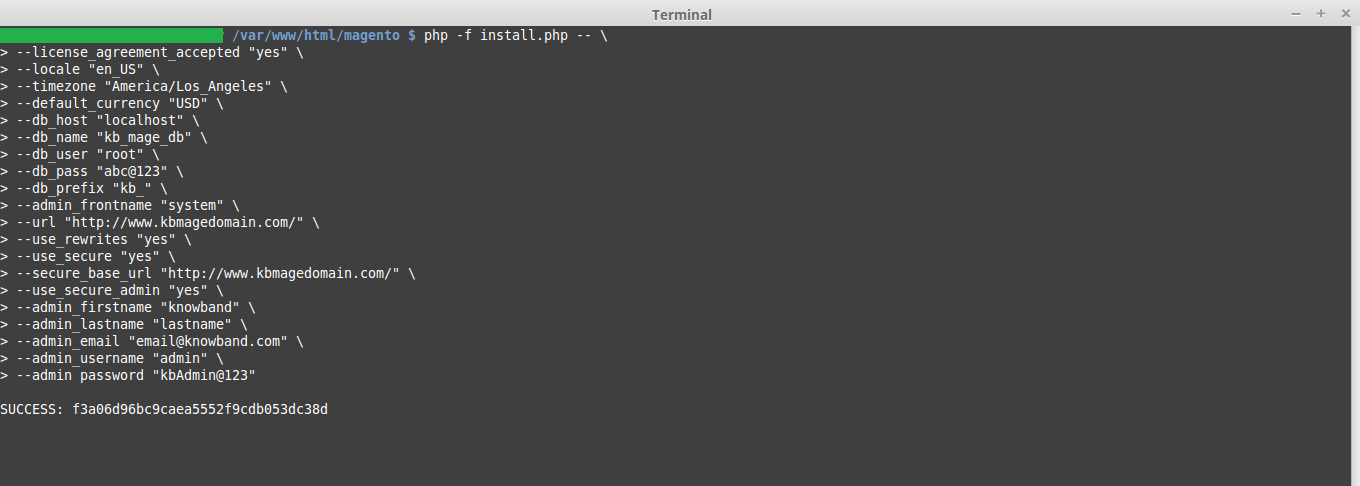
For CLI installation, we need to run the following command:

php -f install.php -- \
--license_agreement_accepted "yes" \
--locale "en_US" \
--timezone "America/Los_Angeles" \
--default_currency "USD" \
--db_host "DB_HOST" \
--db_name "DB_NAME" \
--db_user "DB_USER" \
--db_pass "DB_PASS" \
--db_prefix "DB_PREFIX" \
--admin_frontname "ADMIN_FRONT_NAME" \
--url "SITE_URL" \
--use_rewrites "yes" \
--use_secure "yes" \
--secure_base_url "SITE_URL" \
--use_secure_admin "yes" \
--admin_firstname "ADMIN_FIRST_NAME" \
--admin_lastname "ADMIN_FIRST_LAST_NAME" \
--admin_email "EMAIL" \
--admin_username "USERNAME" \
--admin_password "PASSWORD"

Explanation of the keywords used in the CLI command.

  1. Locale: Place language code like “en_US” which want to use in Magento.
  2. Timezone: Place timezone which wants to use in Magento. In this case, we have used “America/Los_Angeles”.
  3. Default_currency: Place currency which wants to use in Magento.
  4. DB_HOST – Database hostname, in case of a local system put localhost
  5. DB_NAME – The name of your database e.g. kb_mage_db
  6. DB_USER – The username with access rights to the database
  7. DB_PASS – The password for the database user
  8. SITE_URL – The path where Magento is installed, e.g. https://www.kbmagedomain.com/
  9. ADMIN_FIRST_NAME – First name of the admin
  10. ADMIN_LAST_NAME – Last name of the admin
  11. EMAIL – The store owner’s email address, e.g. email@knowband.com
  12. USERNAME – The administrator’s username. This will be used to login on magneto backend.
  13. PASSWORD – The administrator’s password. This will be used to login on magneto backend.

After the installation of the Magento, success message will show with the encryption id.

Now open your favorite browser and check you installed Magento using the URL you used.

How to programmatically create orders in Magento?

Sometimes we need to programmatically create orders in Magento. Suppose you are creating a Magento plugin for your store to connect it to the marketplace like Walmart or Etsy. In these cases, we need to create order on our Magneto store whenever a customer places an order on the marketplace. To do so we fetch the details of the item ordered and the customer details like shipping and billing details and create order on our Magento store programmatically.

So in today’s article, we will be learning how we can programmatically create an order for a customer for any particular item. We will follow the following steps for creating an order on the Magento store.

Steps involved in creating order:

  • We will define customer data like first name, last name, email.
  • Define Shipping and Billing address of the customer.
  • Define Shipping and Payment method of the customer.
  • Define product and the quantity which needs to be ordered on our Magento store.
  • Create a customer if the customer does not exist our Magento store. It’s an optional step.
  • Add product to the quote of the customer.
  • Add Shipping and Billing address to the quote of the customer.
  • Prepare and save quote of the customer.
  • The order is created on your Magento store.

Use the below code to create order in Magneto 1.x –

         $_store = Mage::app()->getStore();
         $_website = Mage::app()->getWebsite();
         $_firstName = John';
         $_lastName = 'doe;
         $_email = 'demo@demo.com';
        /*
         * Custom billing address
         */
        $billingAddress = array(
            'customer_address_id' => '',
                         'prefix' => '',
            'firstname' => $_firstName,
            'middlename' => '',
             'lastname' => $_lastName,
            'suffix' => '',
            'company' => '',
            'street' => array(
                 '0' => 'Sector 63', // Required
                '1' => 'Noida, UP' 
            ),
             'city' => 'Noida',
            'country_id' => 'IN', // Country code
            'region' => 'UP', 
            'region_id' => '',
            'postcode' => '201301',
            'telephone' => '888-888-8888',
            'fax' => '',
            'save_in_address_book' => 1
        );
 
        /*
         * Custom shipping address
         */
        $shippingAddress = array(
            'customer_address_id' => '',
            'prefix' => '',
            'firstname' => $_firstName,
            'middlename' => '',
            'lastname' => $_lastName,
            'suffix' => '',
            'company' => '',
            'street' => array(
                '0' => 'Sector 63', // Required
                '1' => 'Noida, UP' 
            ),
            'city' => 'Noida',
            'country_id' => 'IN', // Country code
            'region' => 'UP',
            'region_id' => '',
            'postcode' => '201301',
            'telephone' => '888-888-8888',
            'fax' => '',
            'save_in_address_book' => 1
        );
 
        /**
         * Enter the shipping method you want to use. Some of the other shipping
         * methods are tablerate_tablerate, freeshipping_freeshipping etc.
         * Here we are using flatrate_flatrate
         */
        $_shippingMethod = 'flatrate_flatrate';
 
        /**
         * Enter the payment method you want to use. Some of the order payment  
   	*methods are checkmo, free, banktransfer, ccsave, purchaseorder etc.
         */
        $_paymentMethod = 'cashondelivery';
 
        /**
         * Provide array of product and their qty.
         * $array = array(product_id => qty)
         */
        $productIds = array(905 => 1);
        $quote = Mage::getModel('sales/quote')
                ->setStoreId($_store->getId());
 
        $quote->setCurrency(Mage::app()->getStore()->getBaseCurrencyCode());
 
        $customer = Mage::getModel('customer/customer')
                ->setWebsiteId($_website->getId())
                ->loadByEmail($_email);
 
        /**
         * Preparing customer for the quote 
         * if the customer is not registered then we will create a new customer. This is  	*an optional process.
         */
        if (!$customer->getId()) {
            $customer = Mage::getModel('customer/customer');
 
            $customer->setWebsiteId($_website->getId())
                    ->setStore($_store)
                    ->setFirstname($_firstName)
                    ->setLastname($_lastName)
                    ->setEmail($_email);
 
            /**
             * Creating new customer
             * Skip try-catch if you don't want to create a new customer.
             */
            try {
                // Generating password for customer. You can also use any custom  // password for it.
                $password = $customer->generatePassword();
                $customer->setPassword($password);
                $customer->setForceConfirmed(true);
                $customer->save();
 
                $customer->setConfirmation(null);
                $customer->save();
                $customerId = $customer->getId();
                $customAddress = Mage::getModel('customer/address');
                $customAddress->setData($billingAddress)
                        ->setCustomerId($customerId)
                        ->setIsDefaultBilling('1')
                        ->setIsDefaultShipping('1')
                        ->setSaveInAddressBook('1');
                $customAddress->save();
 
            } catch (Mage_Core_Exception $e) {
                Mage::getSingleton('customer/session')->addException($e, $this- >__('Error in creating customer'));
                Mage::logException($e);
            } catch (Exception $e) {
                Mage::getSingleton('customer/session')->addException($e, $this- >__('Error in creating customer'));
                Mage::logException($e);
            }
        }
 
        // Assign customer to quote
        $quote->assignCustomer($customer);
 
        // Add products to quote
        foreach ($productIds as $productId => $qty) {
            $product = Mage::getModel('catalog/product')->load($productId);
            $quote->addProduct($product, $qty);
        }
 
        // Add billing address to quote
        $_billingAddressData = $quote->getBillingAddress()- >addData($billingAddress);
 
        // Add shipping address to quote
        $_shippingAddressData = $quote->getShippingAddress()- >addData($shippingAddress);
 
        /**
         * If the customer is a registered customer then you can fetch their billing or  *shipping address as below
         * 
         * $_customerBillingAddress = $customer->getPrimaryBillingAddress();
         * $_customerShippingAddress = $customer->getPrimaryShippingAddress();
         * 
         * $_billingAddressData = $quote->getBillingAddress()- >addData($_customerBillingAddress);
         * $_shippingAddressData = $quote->getShippingAddress()- >addData($_customerShippingAddress);
         */
 
        // Collect shipping rates on quote shipping address data
        $_shippingAddressData->setCollectShippingRates(true)
                ->collectShippingRates();
 
        // Set shipping and payment method on quote shipping address data
        $_shippingAddressData->setShippingMethod($_shippingMethod)
                ->setPaymentMethod($_paymentMethod);
 
        // Set payment method for the quote
        $quote->getPayment()->importData(array('method' => $_paymentMethod));
 
        try {
            $quote->collectTotals();
            $quote->save();
 
            // Preparing Order From Quote
            $service = Mage::getModel('sales/service_quote', $quote);
            $service->submitAll();
            
            // $incrementId is the increment id of the order created.
            $incrementId = $service->getOrder()->getRealOrderId();
 
            Mage::getSingleton('checkout/session')
                    ->setLastQuoteId($quote->getId())
                    ->setLastSuccessQuoteId($quote->getId())
                    ->clearHelperData();
 
           /*
           * $response is the Array of the response with the status of the order  creation.
           */
            $response['success'] = true;
            $response['error'] = false;
        $response['messages'] = 'Order number '.$incrementId.' created  successfully.';
        } catch (Mage_Core_Exception $e) {
            $response['success'] = false;
            $response['error'] = true;
            $response['messages'] = $e->getMessage();
            Mage::logException($e);
        } catch (Exception $e) {
            $response['success'] = false;
            $response['error'] = true;
            $response['messages'] = $this->__('Error in processing order. Please try  again later.');
 
            Mage::logException($e);
        }
        
        Mage::app()->getResponse()->setBody(Mage::helper('core')- >jsonEncode($response));

Please go through the above-mentioned code to create order on your store.  In the above example, we have placed an order of one simple item with quantity 1. We have used “cash on delivery” as the payment method and “flatrate_flatrate” as the shipping method. You can make any combination as per your requirement and your Magento store configuration. Hope this will help you in understanding the mechanism of creating order.

How to run Direct SQL Queries in Magento?

Today we will learn how to run direct SQL queries in the Magento 1.x. By default Magento usages data model to access and modify the database. The data model provides good abstraction which hides the tricky queries but they also make the operation slow. Direct SQL queries come very handily whenever we need to update/insert a large number of data. For example, you have to update the price of all the products of a manufacturer and there are 15k products in that manufacturer. Doing this via loading product model in Magento will take a lot of time.

We can also use Magento resource to directly run our SQL queries without loading the whole collection.

Get the core resource model –

$resource = Mage::getSingleton('core/resource');

After this we need to create read or write connection as per our need.

/**

* Retrieve the read connection

*/

$readConnection = $resource->getConnection('core_read');

/**

* Retrieve the write connection

*/

$writeConnection = $resource->getConnection('core_write');

Fetching the correct Table name –

In case you are unaware of the prefix of the table then you can use below code to fetch the correct table name.

$_tableName = $resource->getTableName('catalog_product_entity');

If the prefix is mage_ then the table name it will return will be mage_catalog_product_entity

Reading Data –

To read data from the table use the following code

$query = “select * from {$_tableName}”;

$query_result = $readConnection->fetchAll($query);

Here, $query_result will return the result of select query. In our case it will return the array of all the product. In case you need data of only product then use following command.

$query = “select * from {$_tableName} where entity_id={$_productId}”;

$query_result = $readConnection->fetchAll($query);

Here $_productId is the id of the product whose data we need.

Writing Data –

For inserting data into the table use the following code.

$insert_query = “INSERT INTO {$_tableName} (‘COL_NAME1’,’COL_NAME2’) VALUES                                                                 (‘COL_VALUE1’,’COL_VALUE2’)”;

$writeConnection->query($insert_query);

Updated Data –

If we have to update the type_id of a product to “configurable” then we can use following code. Here $_productId is the product id.

$update_query = “UPDATE {$_tableName} SET type_id=”configurable” WHERE 						entity_id={$_productId}”;
$writeConnection->query($update_query);

But Magento has provided the concept of the model for database connection as they provide abstraction and they are more secure that the direct SQL queries.

Magento Auto Switch Language and Currency Extension- User Manual

1.0 Introduction of Magento Auto Switch Language and Currency Extension:

Knowband Magento Auto Switch Language and Currency Module automatically change the language and currency of the eCommerce site according to the visitor’s country or region. The admin in Magento auto switch currency can offer a better store experience to the store visitors by providing them the relevant information in their preferred language. This is one of the must-have extensions to improve the user experience and the customer base globally.

1.1 Features of the Magento Auto change language and currency:

1. Magento language and currency autoswitcher automatically convert the language of the online store based on the location of users by detecting their IP address.

2. Magento Language and Currency switch Extension can be easily implemented on the store.

3. Knowband’s Magento Automatic language and currency converter tracks the IP address of the user and finds out their country or region of the user.

4. Magento Auto Switch Language and Currency Module convert the default language and currency according to the customer’s geolocation.

5. This Magento Auto Change Language Module is supported in multiple languages.

6. The Magento auto switch currency are SSL compatible also.

7. The Magento language and currency auto switcher by Knowband is multi-store compatible.

8. With the help of this Knowband Magento Automatic Switch Language and Currency Extension, the store admin can offer a better user experience to the customers by showing the content in their preferred language and currency.

9. The Magento auto switch currency back-end interface is extremely easy to use.

2.0 Installation

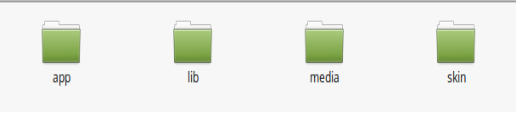
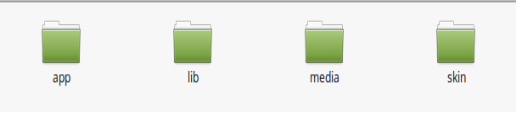
1. The folder structure of the Auto Switch Language and Currency folder.

2. Copy all the folders into Magento root directory and clear the cache (if enabled).

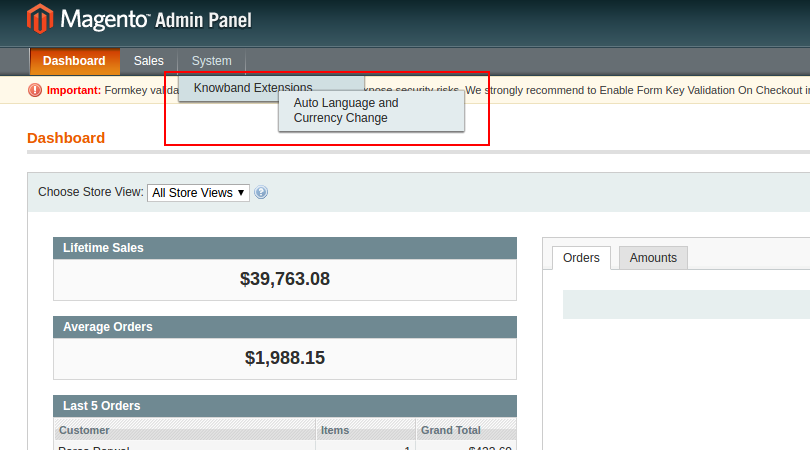
3. You will be able to find the “Auto Switch Language and Currency” option inside the “System > Knowband Extensions > Auto Switch Language and Currency”.

4. You can now configure the Magento language and currency autoswitcher as per your requirements and check its working in the front end at following URL:

3.0 Admin Panel

After installing Magento Language and Currency Switcher Module in the Magento store. The admin interface of the Magento language and currency switcher offers two tabs. They are mentioned below:

1. General Settings

2. Country List

Let us discuss the various customization options of Magento Automatic language and currency converter:

3.1 General Settings

The various fields of the tab of Magento Auto Change Language and Currency Extension are listed below:

1.Language Switching
2.Currency Switching

1. Language Switching: In this section of Magento Auto Switch Language Module, the admin can enable/disable the auto switch language option. After enabling this feature, it will automatically change the website language whenever customers will visit the website.

2. Currency Switching: This Knowband Magento Auto Switch Currency Extension allows the admin to enable the auto switch currency option. If this button is enabled, then, the Magento Auto Currency Switch plugin will automatically change the currency being used in the front-end.

3.2 Country List

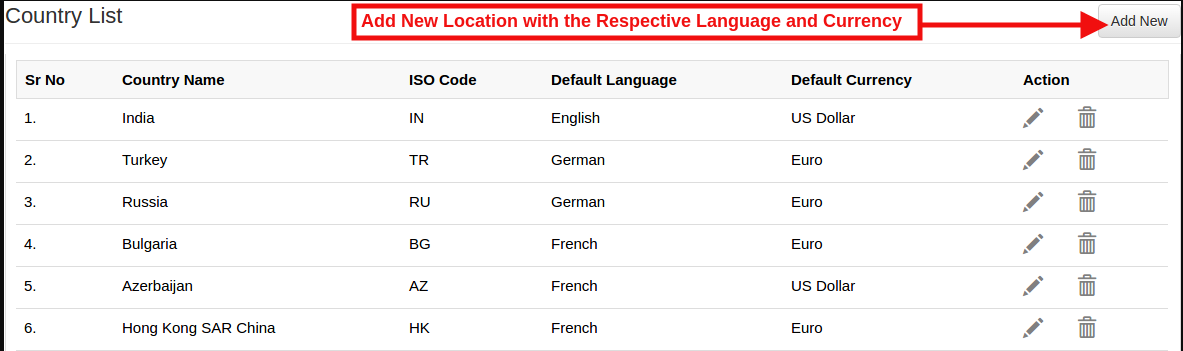
The Automatic Language and Currency Converter for Magento offers an option to the online retailer to add the Countries with preferred language and currency. For all the countries listed here with default language and currency will be different for the language.(As per the option selected by the admin)

3.2.1 How to Add New location/Country with the respective language and currency?

As per the requirement of the store the admin can add the countries here.

For adding the country the Store admin needs to Click on the ‘Add New’ button.

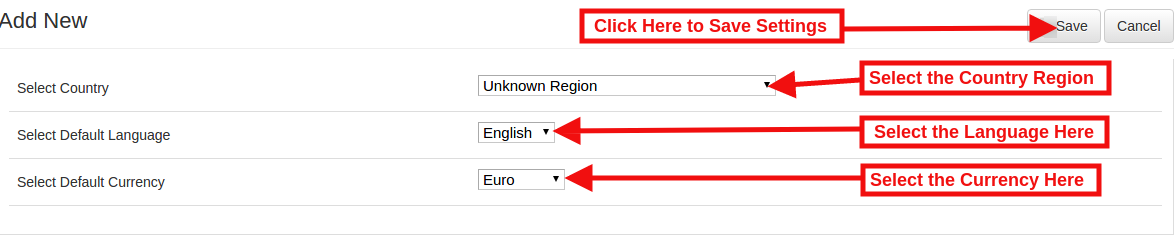
By clicking on the Add New button, the store admin will be redirected to the below-mentioned page:

Select Country: In this field of Magento Auto change currency and language, the online merchant can select the country from the drop-down list.

Select Default Language: This contains the list of languages. The admin in Magento Auto Switch Currency Module can select the language used in that particular country.

Select Default Currency: By Select default currency option of the Magento Auto change currency the Magento store admin can select the currency for the selected country.

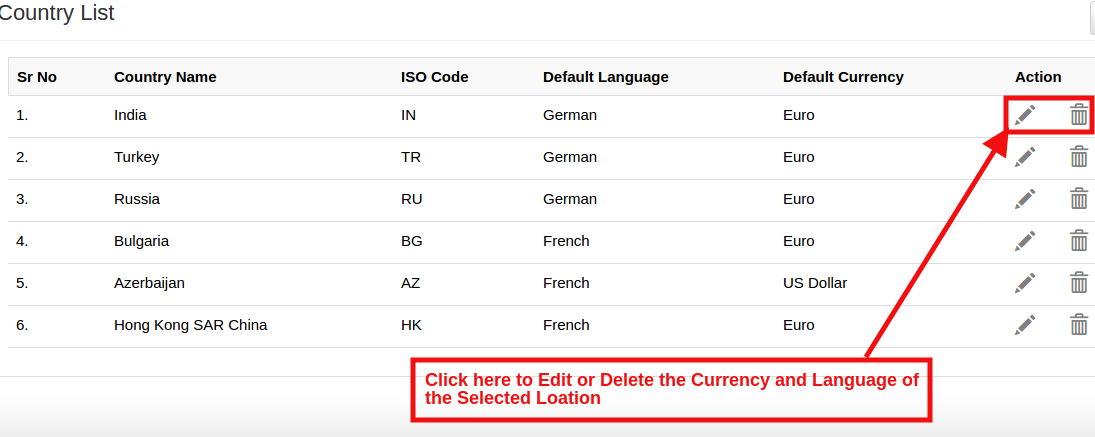
In case of admin need to update the Currency and Language for any particular Country then the admin can update the information by click on the ‘Edit’ button in Magento language and currency switcher.

Please refer the below screenshot for edit the details:

They can delete the specific country by clicking on the Delete button.

4.0 Front End

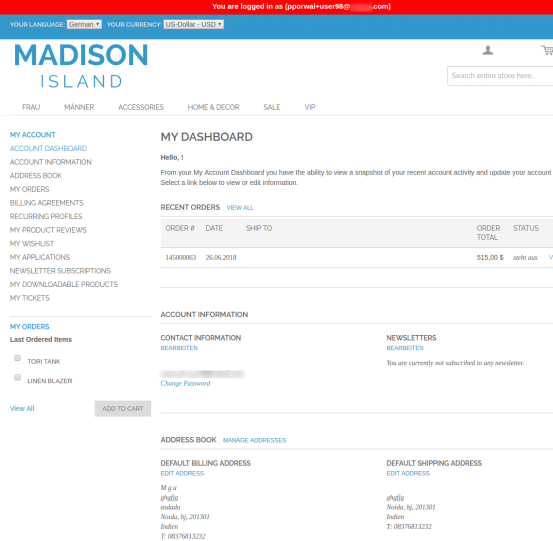
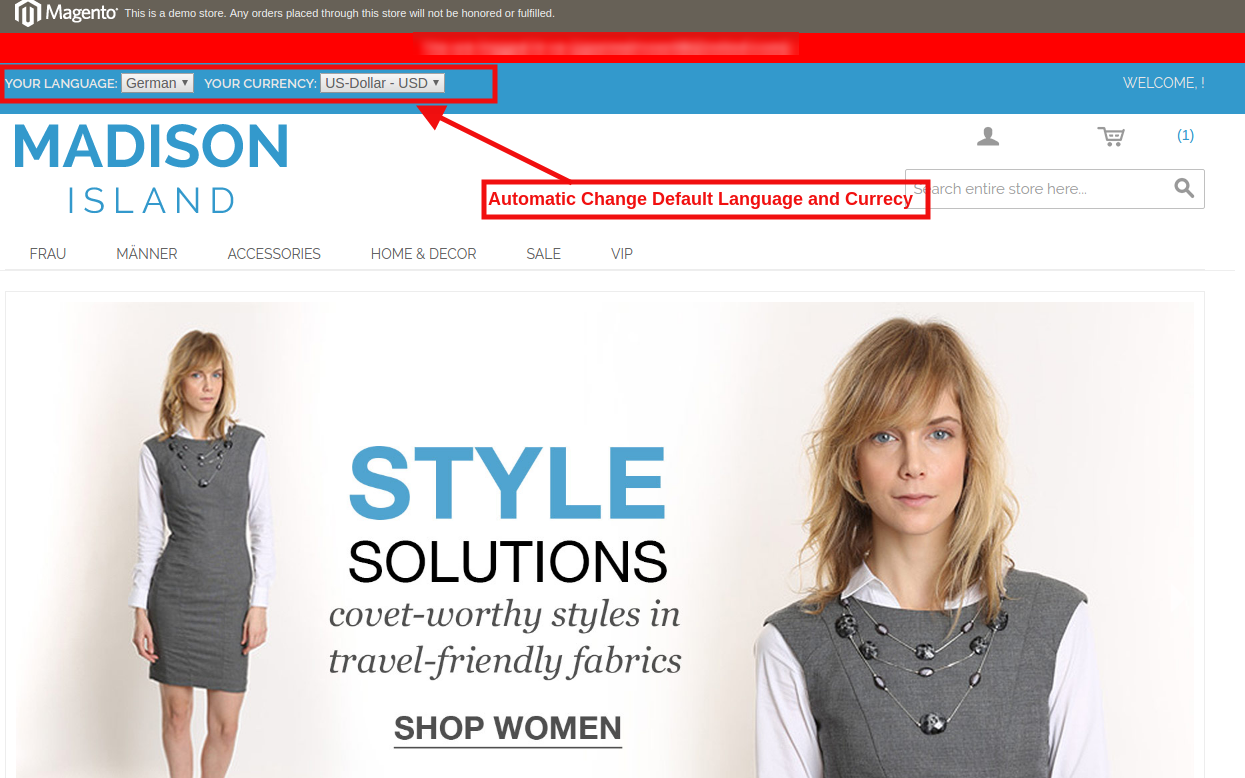
In the Front End, the Language and Currency will automatically switch according to admin configuration in Back-Office of

Magento language and currency switcher.

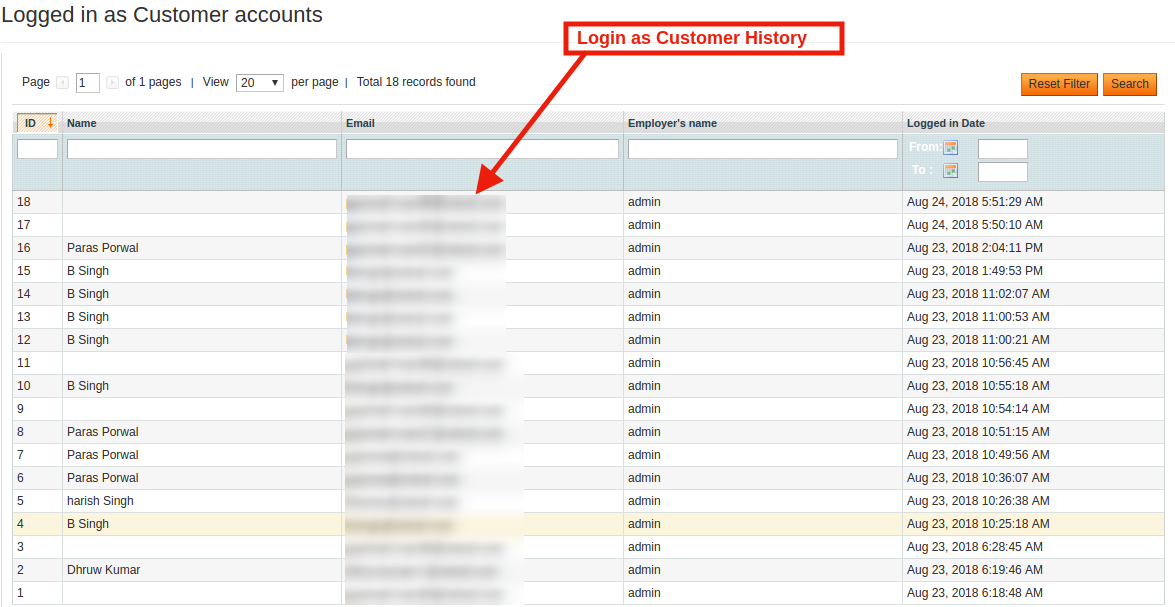
With Magento Auto change currency and language, the IP of the user will be detected and the default language and currency is changed automatically as shown in the image above. The changes will be based on the configuration of done in the back-end of the Magento Auto Switch Language and Currency Extension.

Magento Gift Card Manager Extension- User Manual

1.0 Introduction Magento Gift Card Manager Extension.

Gift cards have become a major factor of eCommerce businesses. Knowband provides the Magento Gift Cart Manager Extension that allows the Magento store owner to offer gift cards to their customers. Magento gift voucher extension is a module that enables the admin to acquire new online consumers while retaining the existing customers.

This Magento gift card extension by Knowband gives the flexibility to a customer to buy the gift card online and send the Gift voucher to their friends via email on a specific date and time. The online shoppers can order the gift cards for the special occasions for their near and dear ones.

1.1 Features of the Magento Gift Card Manager Extension

  • By using the Magento gift card manager extension, the eCommerce store merchant can offer the e-gift card option to their store visitors.
  • Magento store owner can place the link for Gift Card anywhere in the front-end of the website.
  • Knowband’s Magento send gift card manager extension allows the admin to fix the minimum duration within which the gift card is delivered to the end-user after the order for the same is placed.
  • Magento gift card module by Knowband enables the admin to set the prefix for the Gift card.
  • With the help of Magento gift voucher extension, the online store owners can customize the readymade email template subject and content as per desires.
  • Magento gift card extension by Knowband offers the PDF customization option to the admin where they can change the Gift card prefix and content.
  • The Store admin can run the cron for implementing the changes automatically.
  • Magento gift card extension by Knowband allows the store admin to add, edit or delete the gift card template.
  • The online merchants can add the N number of gift card templates for various occasions including Anniversary, Birthdays, Holidays or any other special event. The default gift card designs or templates can be edited, disabled or deleted as required.
  • The store admin even gets an option to keep a track on the orders received for the gift card from the back-end of the Magento gift card manager extension.
  • Magento gift voucher extension helps the admin to increase the customer retention.
  • Knowband’s Magento send gift card extension is easy to install and configure.
  • Magento gift card extension is fully mobile responsive.

1.2 Magento Gift Card Manager Benefits for Customers:

1. Magento Gift card extension by Knowband save the valuable time of the customers. They can get the gift cards for the different occasion in case they are finding it hard to choose a tangible gift from the store.

2. The gift card option incorporated by Magento gift card module by Knowband is best for those customers who find it hard to select a gift for any occasion.

2.0 Installation

After purchasing the Magento gift card module from the store and you’ll get following files.

1. The zipped file that consists of the source code of the module
2. User Manual

Follow the following steps to install the Magento gift card manager extension:

1. The folder structure of the Gift Card Manager.

2. Copy all the folders of the zipped file and paste them into Magento root directory and clear the cash cache (if enabled).

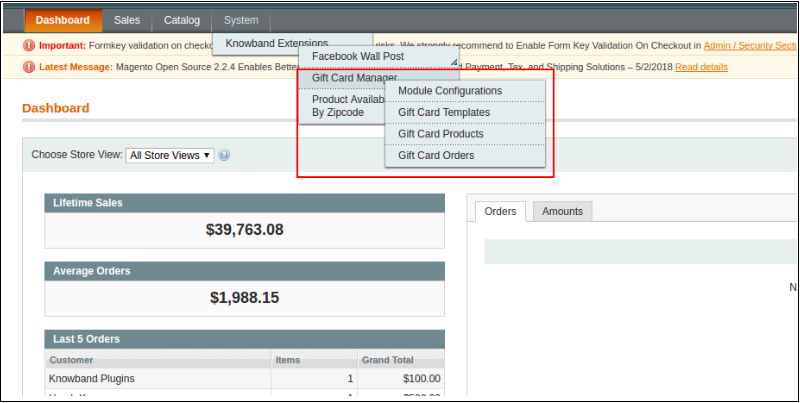
3. You will be able to find the “Gift Card Manager” option inside the “System > Knowband Extensions > Gift Card Manager”.

4. You can now configure the Magento Gift Card Manager as per your requirements and check its working in the front end.

3.0 Admin Panel

After installing Magento Gift Card Manager Extension in the Magento store, the admin gets a number of configuration options. There are following sections available to admin interface:

1. Module Configuration
2. Gift Card Template
3. Gift Card Products
4. Gift Card Orders

Let us discuss the various customization options of Magento gift voucher extension.

3.1.1 Module Configuration

The Module configuration tab of Magento gift card manager module by Knowband offers the basic configuration options to the store admin. The Module Configuration tab is discussed below.

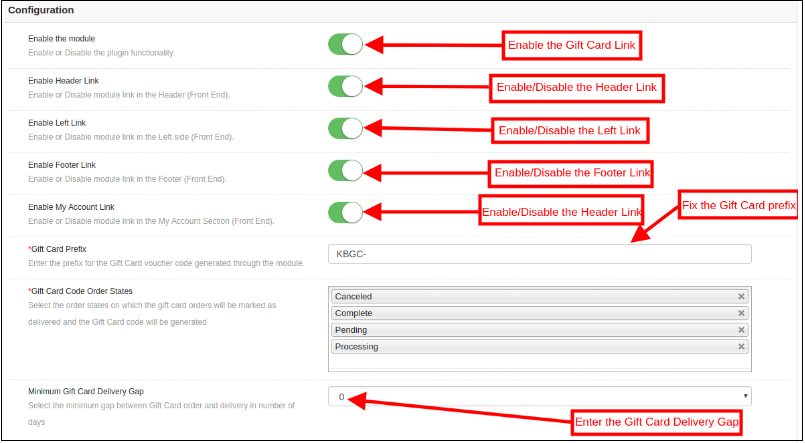
1. Enable the module: Initially, this Magento Gift voucher extension is disabled. The store admin can enable this option and offers their customer Gift card option. This can be done by toggling the button as shown below.

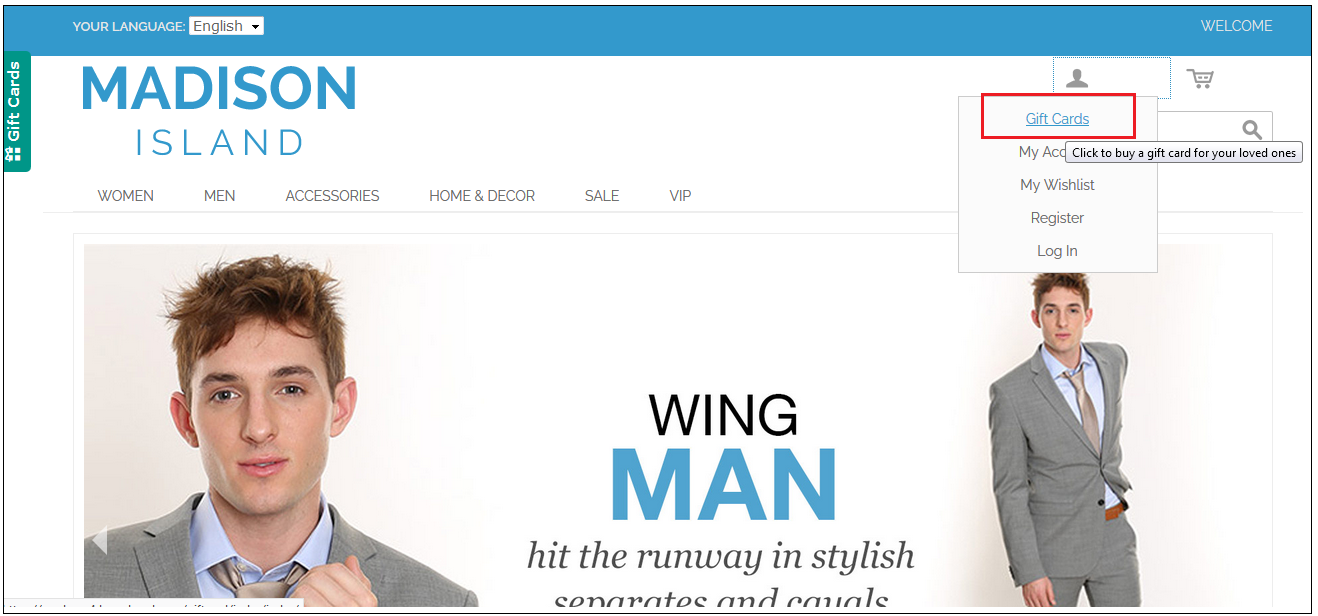
2. Enable Header Link: The Store admin can enable the button to display the gift card link in the header of the webpage.

Front End Preview: 

3. Enable Left Link: In this section, the online retailer can enable the display of the link on the left side of the site.

4. Enable Footer Link: The admin can enable the display of the Gift cards link at the footer of the site.

Front End Preview:

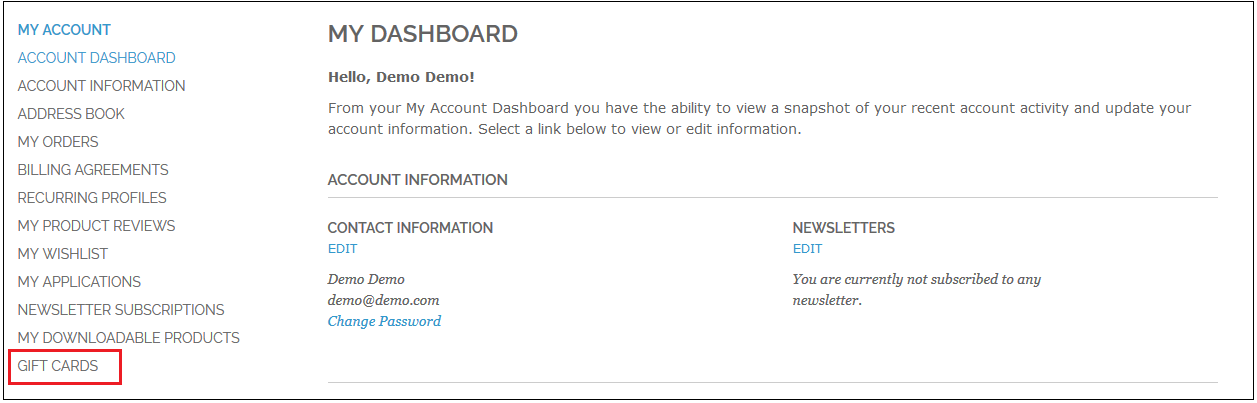
5. Enable My Account Link: The admin can enable the Gift card link in My Account page.

Front End Preview:

6. Gift Card Prefix: With this option of Magento gift card extension, the admin can set the prefix for the voucher code of the pre-paid gift card from here. For example, the code can be entered in the format KBGC – ******

7. Gift Card order Status: The admin gets an option to select the status of the orders.

8. Minimum Gift Card Delivery Gap: Knowband Magento gift voucher allows the store admin can specify the minimum duration of the day when the order was placed and day of the gift card delivery.

3.1.2 Email Setting

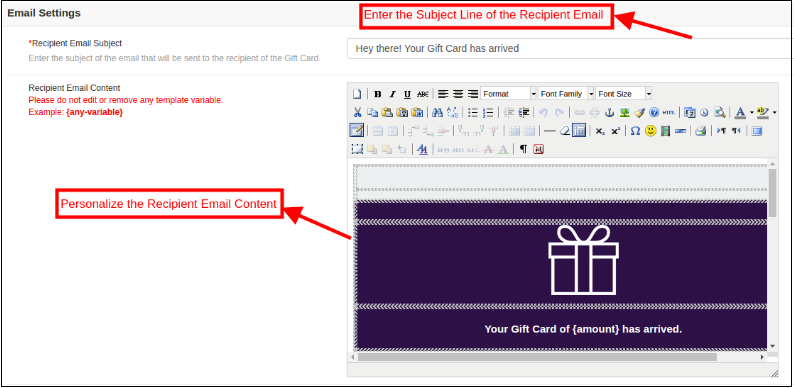
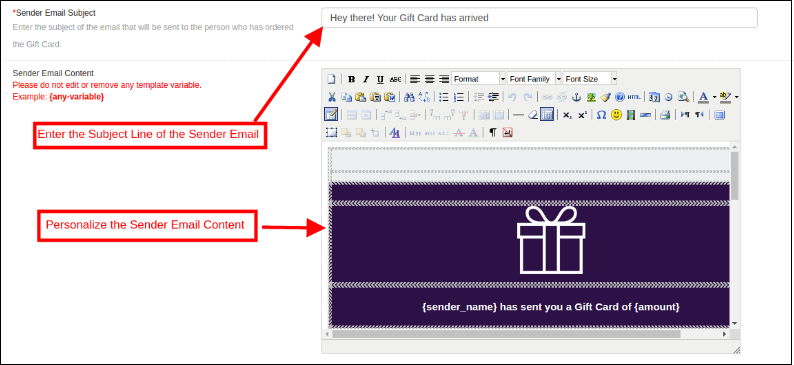
In this tab, the admin can customize the gift card email template as desires. This Magento gift card extension by Knowband offers default email templates. The entire email right from the subject line to the content can be edited and personalized as per the requirement.

This Magento gift card manager extension offers the two Email templates option.

  • Recipient Email Template
  • Sender Email Template

Recipient Email Template: In this section, the store admin can enter the subject line of the email and content as per the requirement.

Sender Email Content: In this section of Magento gift card extension, the store merchant can customize the email content as per the business requirement.

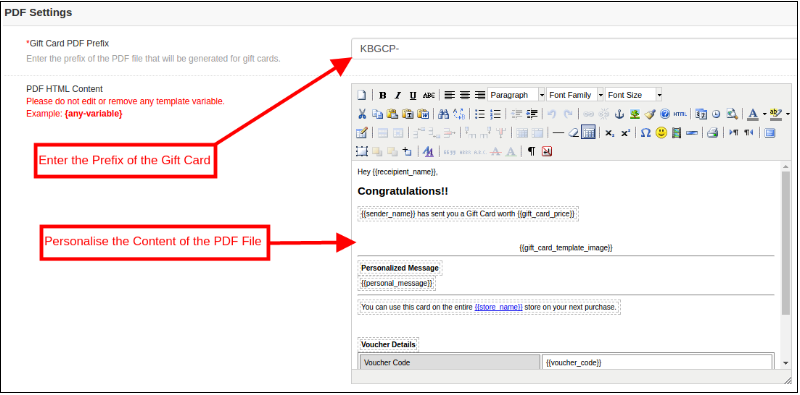
3.1.3 PDF Setting

The admin can enable the customers to download the gift card in PDF format. Magento gift voucher module offers the PDF Settings option to the admin. The buyer can print the gift cards in PDF format with the help of Magento gift card manager module. The admin can change the Gift Card prefix and PDF content from the back-end and the changes will be reflected in the PDF.

3.1.4 Cron Setting

The admin can execute the cron manually by clicking on the button shown in the image below.

Or else, the eCommerce store admin can enable automatic execution of the cron option by toggling the button as shown below.

3.2 Gift Card Template

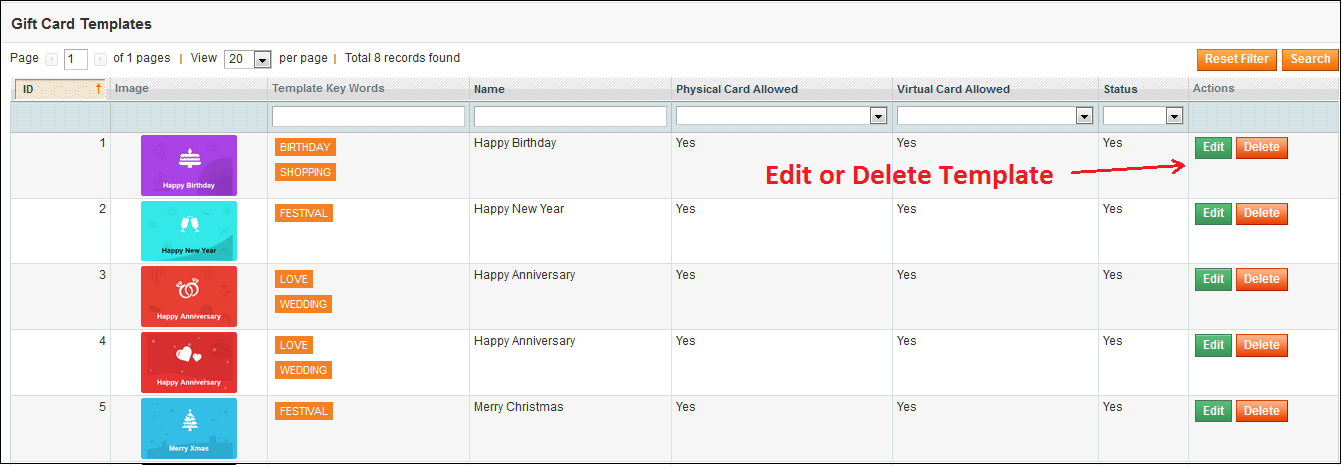
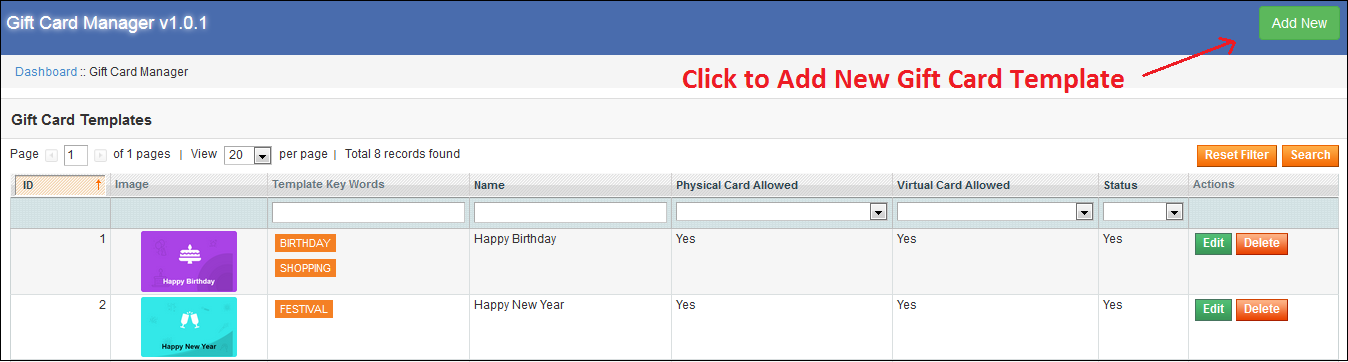
This tab lists out the default Gift card template. Admin can customize these Gift card template as per their desire. Other than this, the store merchant can edit or delete the Gift card template.

3.2.1 How to Edit and Delete Gift Card Template?

The admin even gets an option to edit the template or delete it. This can be done by clicking on the Edit or Delete button respectively as shown below:

3.2.2 How to Add New Gift Card?

In order to create the new templates for the Magento gift card manager extension, go to the Gift Card template tab and then click on ‘Add New’ option at the top right side of the module.

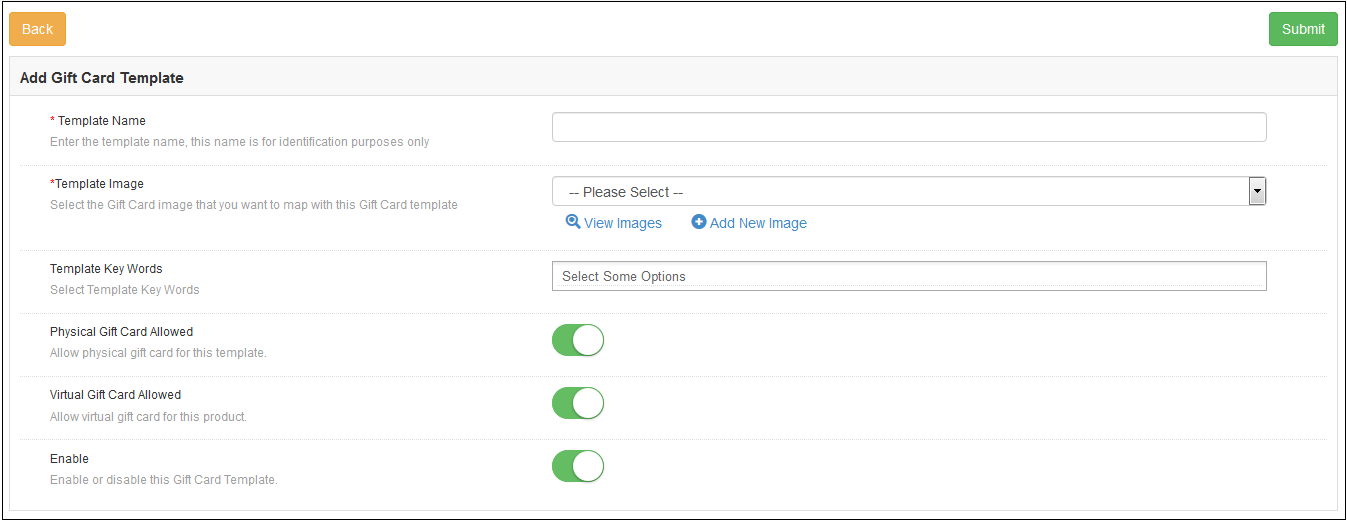
Fill-up the information in order to create the template as shown in the image:

1. Template Name: In this section of Magento send gift card extension, enter the name of the Gift Card template.

2. Template Image: The admin can select the image or the layout of the gift cards that will be shown in the front-end of the eCommerce site.

The images for the various occasions can be saved in the back-end of the Magento gift card manager extension by Knowband.

3.2.3 How to customize the template of the gift card?

3.2.4 View Gift Card Template Images

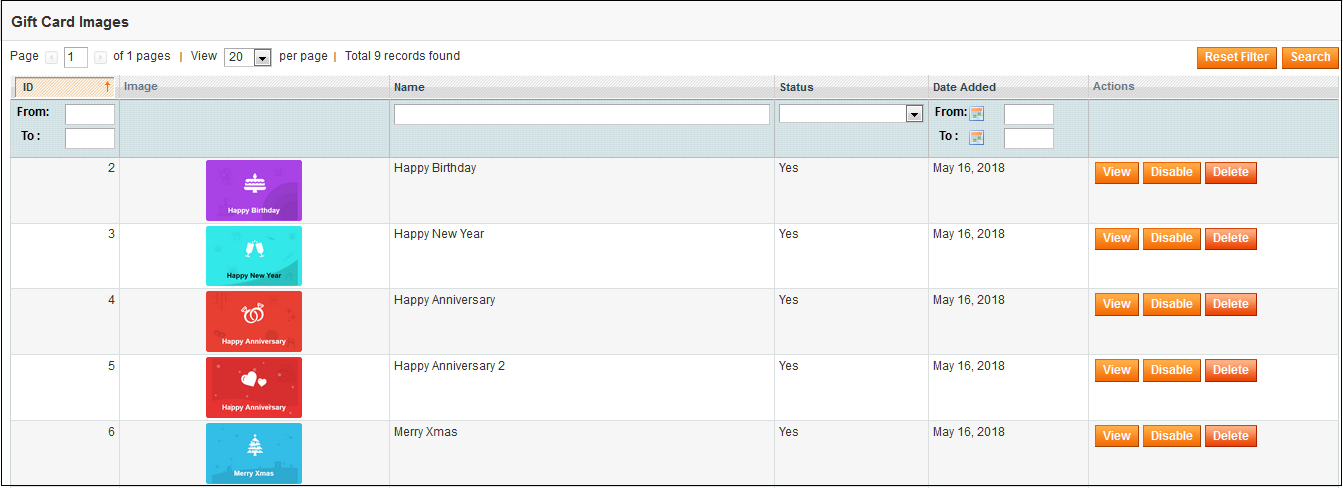
The store admin can even view the images for the various events has been saved or can create a new image for the same.

As you click on the ‘View Images’ you’ll be redirected to the page below.

The list showcases the entire images that were created and saved. You can view the complete image or even delete it if required.

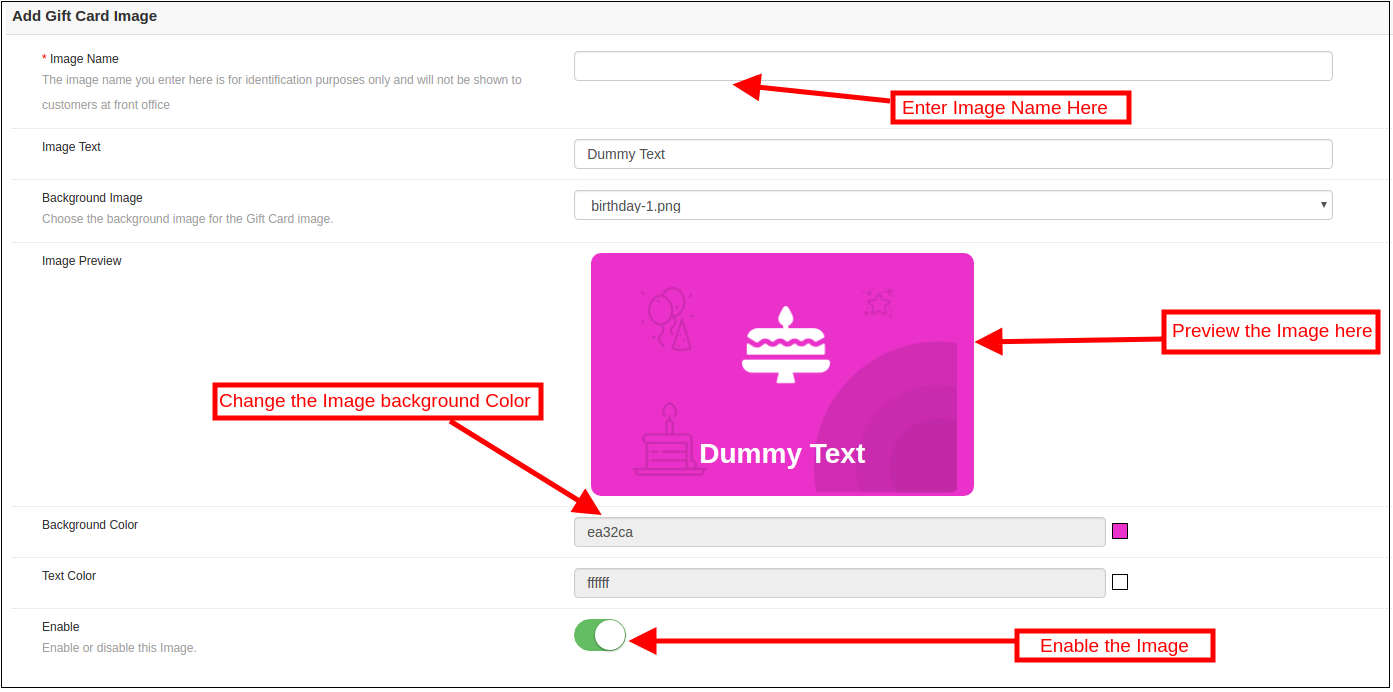
In order to create new images, click ‘Add New Image’ as shown below.

3.2.2 Add Gift Card Template Image

You can enter the image name and the text of the image to be shown on the gift card. Even the background image and color, as well as font color, can be changed at a button click. Preview the final image before making it live on the website.

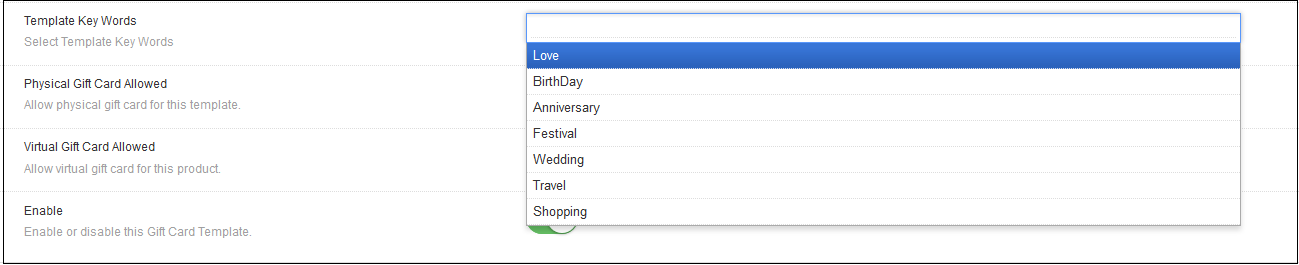
3.Template Keywords: The Magento gift card extension allows the admin to select the keywords of the gift cards.
4. Physical Gift Card Allowed: Enable this button if you want to offer the gift cards in physical form. If this functionality is enabled, then, the admin can allow the customers to send the gift card in physical form to the recipient.

5. Virtual Gift Card Allowed: The online retailer can enable the Virtual gift card functionality. This will allow the customers to download the e-cards.

6. Enable: Toggle this button to enable or disable the Gift card template.

3.3 Gift Card Product

Magento gift card template allows the e-merchants to customize the pre-paid gift card products in few simple steps.

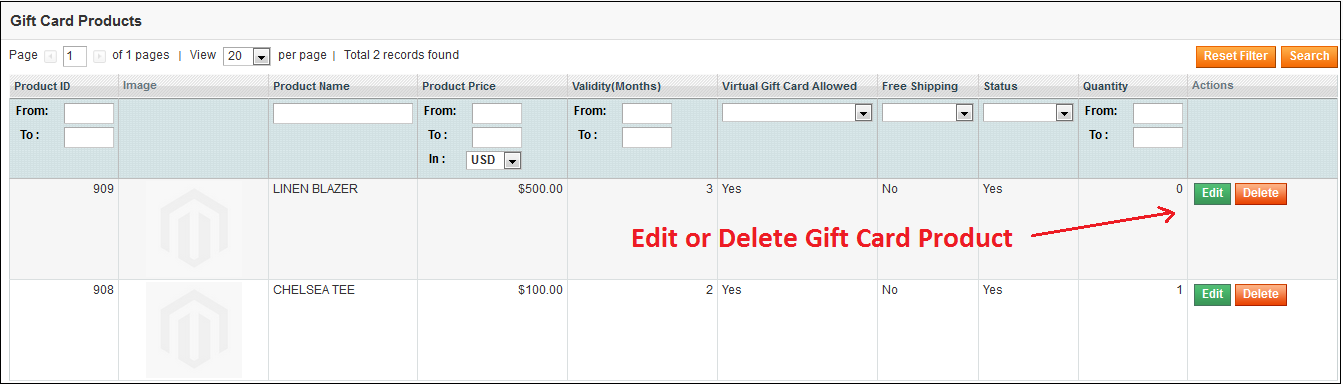
3.3.1 How to Edit and Delete Gift Card Product?

The admin even gets an option to edit/delete the gift card product from the section shown below:

3.3.2 How to Add New Gift Card Product?

In order to create the new gift card product for the Magento gift card manager extension, go to the Gift Card template tab, then, click the ‘Add New’ option at the top right side of the module.

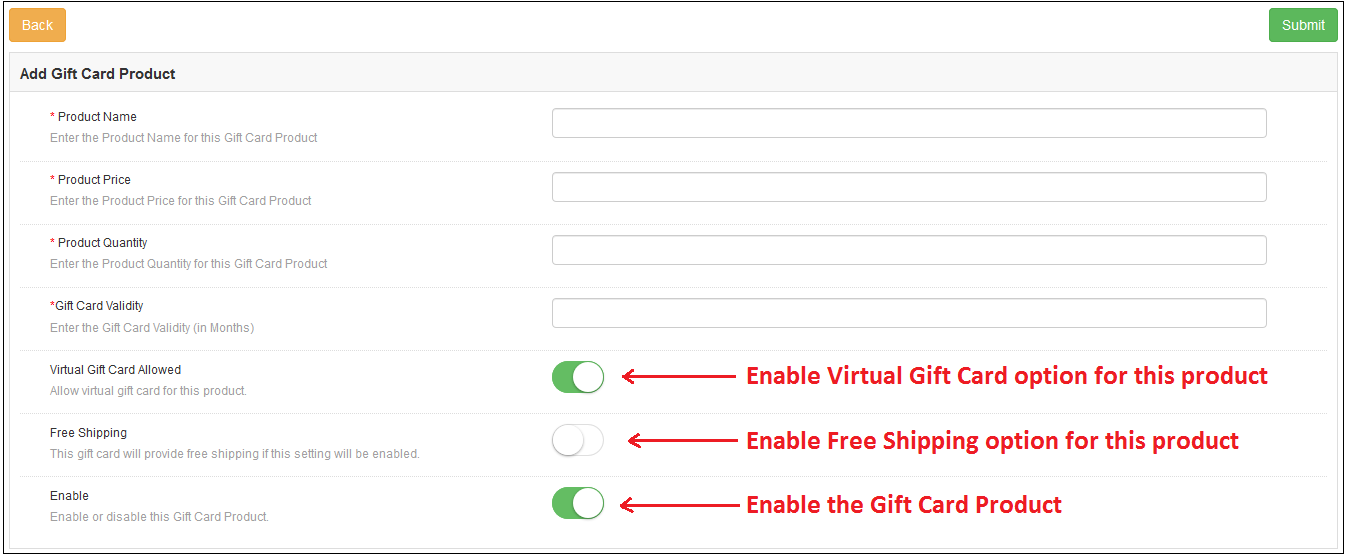
Listed below is the information that you need to provide for creating the product.

Product Name: Enter the name of the product here. It can be Happy Anniversary, Happy Birthday, Merry Christmas or any other.

Product Price: Enter the amount allowed in the gift card in this section.

Product Quality: Enter the product quality of this gift card product.

Gift Card Validity: The validity period in months of the gift card can be entered here.

Virtual Gift Card Allowed: Enable e-card by switching on the button.

Free Shipping: The eCommerce seller can even allow free shipping to the customer.

Enable: Gift Card Product can be enabled or disabled from here.

3.4 Gift Card Orders

The Gift Card Order tab provides the entire list of the orders received for the gift cards. It involves the recipient email, date of sending as well as the status of the gift cards.

In the ‘Gift Card Order’ tab go to the ‘View’ button in the right section. In this section shows the entire information about the order.

4.0 Website UI

The links to the gift cards page can be viewed in the front end as opted by the store admin.

Once the store visitors click on the link, they will be redirected to the gift card page of the site.

Now, the Customer can buy the gift card and add the product to the shopping cart and proceed to the checkout page. The gift card will then be sent to the receiver.

For more details about this Magento Gift Voucher extension, you can visit here:

Magento Gift Card extension link

Magento Gift Card extension Admin Demo

Magento Gift Card Manager Extension Front-end Demo

eCommerce Extensions to help you Achieve your Business goals in the Year 2023

In order to achieve the success in the eCommerce business, it is important to stay up to date with the latest trends in the industry. Staying abreast with the current technological advancements and market trends can keep you ahead of the competitors. One of the best ways to achieve your business goals is to steps into the shoes of the well-established businesses and get inspirations from them. The ideal workflow of the eCommerce business should attract the shoppers to the website, filer the prospective customers from the website traffic and then convert them into the paying customers. This can be done by improved customer experience, customer retention strategy and ultimately winning the customer loyalty.

It won’t be wrong to state that even the digital era word-of-mouth plays a vital role. If you offer better services and improved customer experience at your store, then, you will certainly win back old customers and attract new ones. Social media also provides a platform to the online sellers to reach out to the new customers. In this post, we will discuss the most popular strategies which will help you to achieve your business goals in the year 2018.

Strategy#1 Attracting New Customers and Retaining old ones:

Effective lead generation strategy is the secret of the success in the e-commerce. Most of the time, when you visit established e-commerce sites, you may come across the welcome popup offering enticing discounts on the first purchase. In order to avail of this special discount, the visitors need to provide their email-ids. All the top e-commerce giants leave no chances to capture the email-id of the customers. The email address is the best way to establish a new and long-lasting relationship with the customers.

Getting the email addresses of the visitors is not an easy task. In order to get the email id of the visitors, you need to offer special deals to the new visitors. You can offer free shipping or enticing discount on the first purchase. Most of the top brands use this strategy to reach out to the more customers.

How can you use this strategy for your online business?

Gamified Welcome Popup-

Gamification of the site is the best way to retain the customers. Spin and Win popup is a gamified popup which allows the visitors to win the enticing discounts by spinning the wheel just like the roulette-game. The Spin and Win popup is one of the best ways to display an interactive popup to gather the customer information. Customers need to enter their email ids to play the game. The gamified interface develops the interest of the customers and they happily provide their email-ids to play the game.

Spin and Win gamified popup is available for the Magento1, Magento2, Prestashop, OpenCart and Shopify platforms.

Exit Intent Popup

Exit Intent Popup monitors the mouse movement and as soon as the visitor intends to exit, it displays an awesome popup with the discount offer. Special encourages the customers to complete their purchase and helps you to grow your email list.

Exit Intent Popup is available for the Magento1, Magento2, PrestaShop and OpenCart platforms.

Strategy#2 Offer Free Shipping

The latest trend in the eCommerce world is to offer free shipping. Customers prefer to buy with the free shipping option. Most of the sellers on the top marketplace like Amazon, Etsy, Walmart, eBay offers the free shipping.

Why is Free Shipping a must?

1) Shoppers Love Free Shipping option – According to the studies, the online shoppers prefer placing the order of the products if the shipping is free.
2) Competition – The marketplaces like Amazon, eBay, Walmart, Etsy and many more are expanding their presence and offering great benefits to the customers including the free shipping services. So, it is a must for the online business to offer free shipping to retain their existing customers.
3) Free shipping reduces shopping cart abandonment – Most of the time customer leave the cart abandoned because of the additional costs (shipping and taxes).
4) Free Shipping Increases Average Order Value – Shoppers buy more products to qualify for the free shipping.

Tactics to offer free shipping

1) One of the methods to offer free shipping is to include the shipping cost in the product price itself. This approach will work if you offer unique products to your niche market and there are not so many competitors.
2) You can create special promotional to offer free shipping on the products that have a higher margin.
3) You can offer free shipping only for a particular cart value. Orders with the cart value higher than the set limit will be eligible for the free shipping.
4) You can offer free shipping on special sale occasions or during the holiday season.

eCommerce extensions to offer better shipping services:

a) Free Shipping Manager
The Free Shipping Manager extension is available for the Prestashop platform. This addon allows the store admin to create the rules, terms and conditions for shipping charges. The merchants can fix the cart limit beyond which free shipping will be offered. This module can help you to increase revenue and conversion rate of the site. Click here for the details.

b) Shipping Cost by ZipCode:
Sometimes you need to offer shipping charges based on the location of the user. The Shiping Cost by ZipCode extension is the best way to offer shipping charges based on the location of the user. The Shipping Cost by ZipCode module is available for the Prestashop. Similar extension Product Availability check by ZipCode is available for the Magento 1 platform.

Strategy#3 Improve Customer Experience

Better customer experience at your store encourages the customer to browse more products which helps to increase the chances of the purchase. As per the latest trends in the industry, you should try to offer the best experience to the visitors to convert them into a customer.
There are following extensions which can be helpful to you to achieve the same.

a) Infinite Scroll
In the recent years, the growth of mobile devices brings a revolution in the eCommerce world. Now, most of the users prefer to browse the internet by using their handheld devices like mobiles and iPad. Infinite scrolling allows the users to browse more products with ease and improves the user experience for the touch devices. Moreover, the infinite scrolling option works efficiently while mobile browsing as well. Infinite Scroll extension developed by Knowband is available for the Magento 1, Magento 2 and Prestashop platforms.

b) Size Chart
If you sell Footwear or Clothing, then, a size chart on the product page is a must. The Size Chart helps the users to select the correct fit and also reduces the chances of the return. Size Chart extension developed by Knowband is available for the Magento 1, Magento 2, and Prestashop platforms.

c) Product Video
Instead of going through the long text, the users prefer to watch the video for the better understanding of the product. Product videos are more engaging than the text. Knowband offers the Product video extension which allows you to display the videos on the product pages from the video channels like YouTube, Vimeo. Product Video extension is available for the Prestashop, Magento 1 and OpenCart platforms.

d) Wishlist
With the dynamic growth of the marketplaces in the last few years, a new trend emerged in the eCommerce industry. Now shoppers prefer to search for the products on Google or marketplaces like Amazon, Etsy, Walmart, eBay, Cdiscount etc to get a better comparative price and offers before making their purchase decisions. Wishlist feature allows the shoppers to shortlist the products of their choice, so that, they can later place their order for the products. After adding the products to the Wishlist a shopper can access his/her wishlist any time. This saves the time of the shoppers as they can easily add the wishlist products to the cart to place their final order. The Wishlist extension is available for the Prestashop, Magento 1, Magento 2 and OpenCart platforms.

e) Express Checkout
The easy checkout process is the key factor to get the higher sales. Most of the online businesses provide the one step checkout to make the shopping experience of the shoppers hassle-free. One step checkout allows the user to enter the all the details at a single page and reduces the cart abandonment. The one step checkout allows the shoppers to create the account, place order as a guest or login to the account at the checkout page. Knowband offers the One Page Checkout module for the Magento 1, Magento 2, Prestashop and OpenCart platforms.

Strategy#4 Customer Retention Techniques

a) Helpdesk
If you have observed most of the online businesses offers the 24*7 chat support. Recently Chat Boats have also provided an effective tool to improve the customer engagements. By assisting the customers and visitors to make their purchase decisions and after sale inquires you can develop a bond between your brand and the customers. This long-lasting relationship might convert the customers into loyal customers. The Helpdesk extension is available for the Prestashop and Magento 1 platforms.

b) Loyalty Points
Offering loyalty points for each purchase of the customers helps you to retain the customers for a long time. As for each order, customers get the store credit which they can use towards their further purchases encourages the customer to return back to the store to use the store credit available in the account. The Loyalty Points module is available for the Prestashop platform.

c) Return Management
Efficient return policies are one of the most important aspects to retain the customers. The return and refund policy of the online store also encourages the customers to place their orders. In order to offer the hassle free return management online stores can use the Return Manager Extension. Knowband offers the Return Manager Extension for the Prestashop, Magento 1 and Magento 2 platforms.

d) Birthday Surprise
Everyone loves surprises because it shows how much the businesses value the customers. In order to win the trust of the customers, businesses need to go beyond the normal services and offers. You can offer an additional discount to the customers on their birthday. Knowband offers Birthday Coupon module for the Prestashop platform.

Strategy #5 Multi-channel selling

With the evolving technology and changing shopping habits of the customers, it is must for all the sellers to sell their products through multiple channels. All the top marketplaces like Amazon, eBay, Walmart, Etsy etc provides a platform to the sellers to sell their products through the marketplace.

Selling through the multiple channels is the best way to increase the brand reorganization.

In order to sell on multiple channels, the biggest challenge for the sellers is the management of the inventory and shipping. Knowband has developed the Marketplace Integration extensions for the top marketplaces like eBay, Walmart and Etsy. The marketplace integration module automates the product listing process and allows the sellers to manage the inventory and shipping for the marketplace from their existing online store.

eBay Marketplace Integration: eBay Marketplace integration extension is available for the Prestashop, Magento 1 and OpenCart platform.

Etsy Marketplace Integration: Etsy Marketplace integration extension is available for the Prestashop, Magento 1, Magento 2 and OpenCart platform.

Walmart Marketplace Integration: Walmart Marketplace integration extension is available for the Prestashop, Magento 1 and OpenCart platform.

You may also like: 

The Pluses and Minuses of becoming a Walmart Marketplace seller

https://www.knowband.com/blog/ecommerce-blog/pluses-minuses-becoming-walmart-marketplace-seller/

Multi-vendor marketplace: 6 Ways to deals with the Post-holiday glitches

What are sandbox sites in eBay Marketplace?