Adopt a feature-loaded PrestaShop One Page Checkout module for your PrestaShop 1.7 store.
PrestaShop is one of the widely used eCommerce platforms that has grabbed worldwide attention due to its amazing features and functionalities. It is used all across the world by the people who are involved in the field of eCommerce business and is growing every year. This eCommerce platform has the bulk of features, themes, and extensions that can effortlessly improve the performance of any PrestaShop store.
It is a proven fact that 70% of your customers abandon their cart while checking out of the site. This is when the customers find the checkout process to be long and tedious. It won’t be wrong to state that with easy access to so many choices, the online shoppers won’t bother going through the lengthy checkout forms. The lengthy process may prove hazardous especially when the customers are already on the fence about making the purchase. This is when a single-page checkout scores over the multi-page checkout processes.
PrestaShop One Page Checkout module is one of the ways of optimizing the checkout process of the eCommerce store. The Prestashop addon has made another major step towards improving customer experience and boosting eCommerce performance with its latest PrestaShop 1.7 version. With its latest offering that was available for PrestaShop clients since 7th November 2016, people are increasingly embracing this new PrestaShop version. This PrestaShop 1.7 platform has new exciting features like the introduction of Symfony2 framework, a rebuilt Theme system, Starter theme, a revamped product creation page, a modified modules page, a reorganized main menu and other such functionalities.
However, if you still feel the need to optimize the checkout experience of your PrestaShop 1.7 store, here is the brilliant PrestaShop 1.7 One Page checkout addon for you. If you think that this PrestaShop Addon is not worth your attention, do take a quick look at these features mentioned below:
1. Guest Checkout and Social login facility
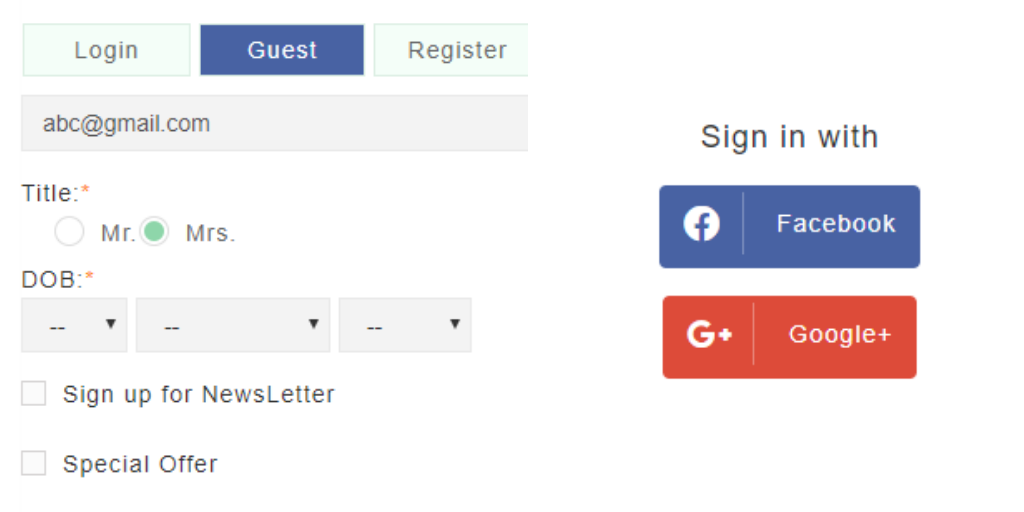
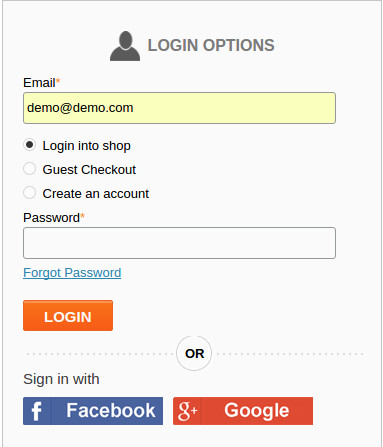
Customers on your PrestaShop 1.7 store don’t require any separate checkout accounts for making a quick online product purchase. The Prestashop module offers easy account login facility with the help of social media sites like Facebook and Google+ thereby improving the overall customer engagement. In fact, users can now log in/sign-up using their Paypal account too. Along with the social login options, the customers can even complete the transaction as a Guest user. The online shoppers can even register via their email account.
PrestaShop One Page Checkout module also offers the Guest Checkout facility, hence allowing your store visitors to checkout without getting registered.
2. Error reporting to customers
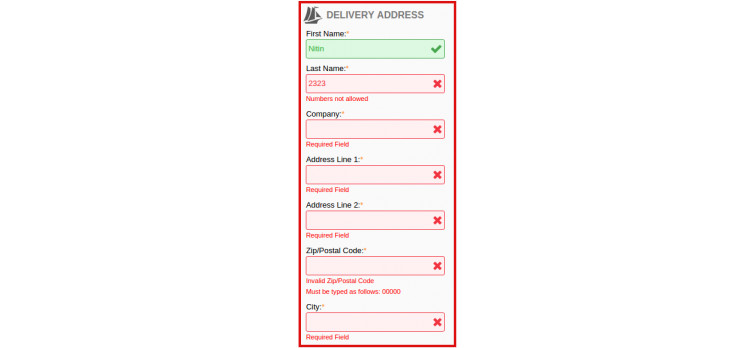
Now, the customers making an online purchase on your site can easily know where he/she has actually committed the mistakes on the checkout page. This PrestaShop 1.7 checkout extension offers immediate error messages along with the inline validation facility for helping out customers during the checkout process.
3. Easy for field customization
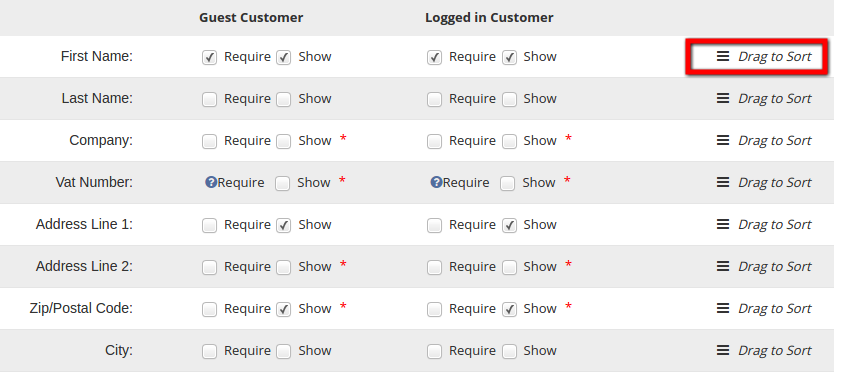
The checkout form includes a large number of fields which at times may become difficult to handle. You get a number of already created fields in the admin interface. All you need to do is to select the ones that you are looking to display in the front-end. The admin can display different fields to the customers who are logged in and to the ones who are not. There is an option to select the fields for different customer groups. In addition, the robust Prestashop One Page Checkout module makes it easier for the store owners to rearrange the various fields. This can be simply done by dragging and dropping the various fields.
4. MailChimp Integration
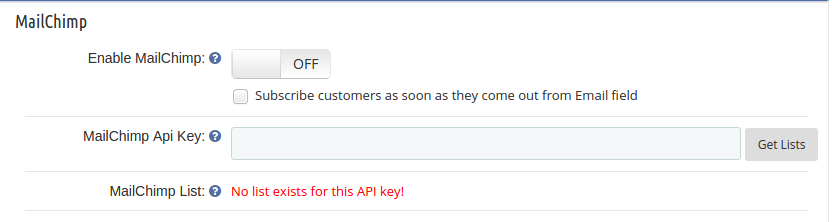
The Prestashop plugin comes with an inbuilt MailChimp integrator. The integrator sends the email ids of the customers captured on the checkout page directly to the MailChimp account of the store admin. This can be done either when the customer selects the checkbox for newsletter subscription. Even if the customer logins via their Google account, the email id will be sent to the MailChimp account. This makes it easier for the e-marketers, to design their marketing strategies and reach out to the customers for re-marketing.
5. Presence of multiple payment and shipping methods
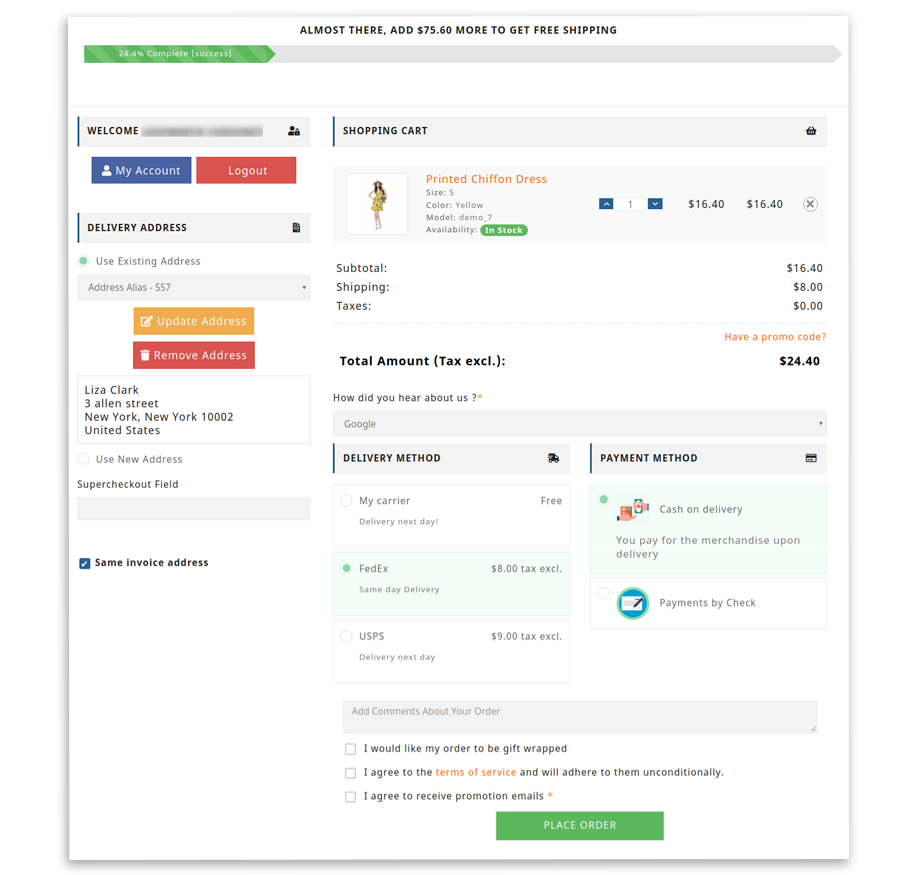
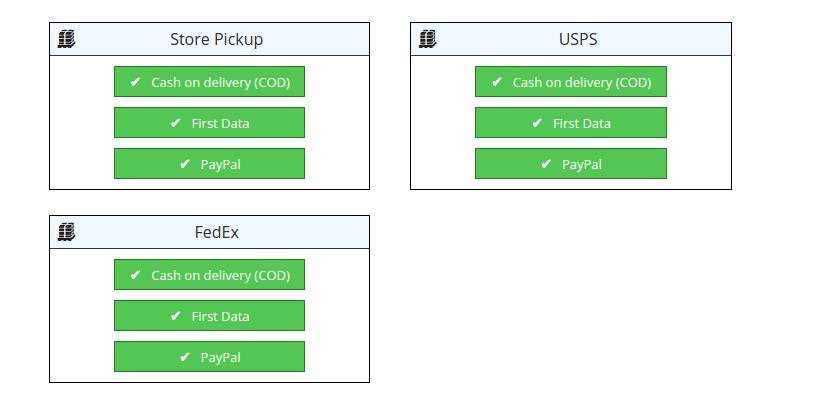
Now, your customers arriving at the PrestaShop 1.7 store will not be forced to fill all information first to be able to view shipping and payment methods. With one page checkout layout of this PrestaShop extension, customers will be able to view available shipping and payment methods as soon as they come on the checkout page. The feature-packed module is even compatible with the Mondial Relay like shipping methods.
6. Offers the wide range of customer base
This PrestaShop One Page Checkout module is fully responsive in nature that makes it ideal to be used on multiple platforms for desktops, laptops, smartphones, and tablets. By targeting multiple device users at the same time, you can effortlessly improve your chances of product sales and conversion rates. The fully-customizable interface makes it easier for the store owner to retain the customers and reduce the cart abandonment rate of the shopping site.
7. Custom fields
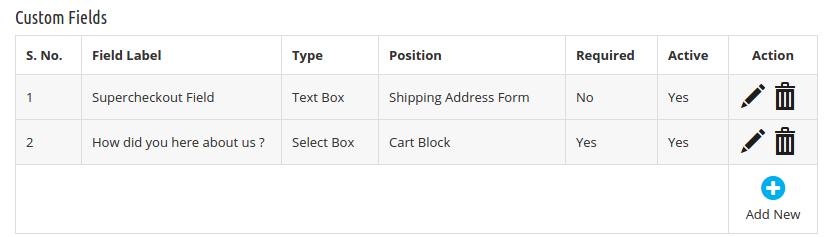
Versatility is the key when it comes to this module. The admin interface offers a number of form field to the store owner. In addition, he can add custom fields on the checkout page. The already created fields can be edited or deleted as per the requirement of the admin. Hence the extension, squeezes the checkout process for your store visitors, at the same time it even allows you to get additional information about your potential customers.
8. Shopping cart customization
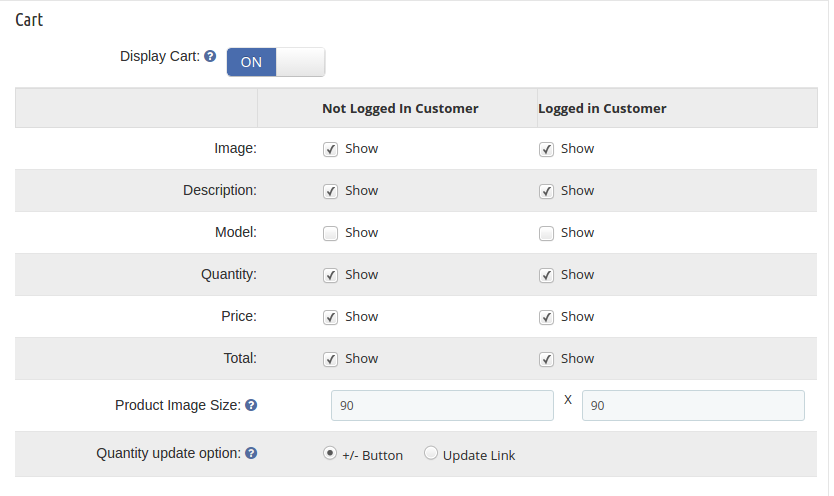
The module is a one-stop-solution for the Prestashop store owners when it comes to optimizing the shopping experience of the customers. The store admin can select the fields that he wants to display in the shopping cart of the site. The various information fields can be arranged in the front-end as it was done in the checkout page. Besides the information fields, the admin can even display the order details of the customer in the cart.
9. Front-end optimization
The module allows you to squeeze multiple steps of the checkout into a single page without affecting the front layout. The best part of the addon is that there are no code changes required to be done. The frontal layout can be changed by just dragging and dropping the various elements.
10. PrestaShop One Page Checkout module is GDPR compliant
In addition to all the features, the Prestashop one step checkout extension offers compliance with EU’s GDPR as well. The Prestashop addon has been upgraded as per GDPR standards. You can now include multiple opt-ins in your site. There is an option to create multiple policies for this compliance. You can enable the policy that you want to display in the front-end.
In case you site deals into the European Union countries in any way, then, you need to take the consent of the customers before using their personal details for any purpose. The PrestaShop One Page Checkout module allows you to check the consent of the customer from the back-end.
11. Mobile-friendly Interface
With the increasing dominance of mobile sites and mobile-first users, providing a responsive interface to the prospective customers is the key. Keeping this in mind, Prestashop one page checkout addon has been designed to be mobile-friendly. The single-step checkout process will work flawlessly on mobile devices. Thus, you can now offer at-par services to your target customer base whether they are using a desktop site or mobile devices. All the features offered by the Prestashop one page checkout plugin will be compatible with your mobile site as well.
12. Track Abandoned Carts during Checkout [New]
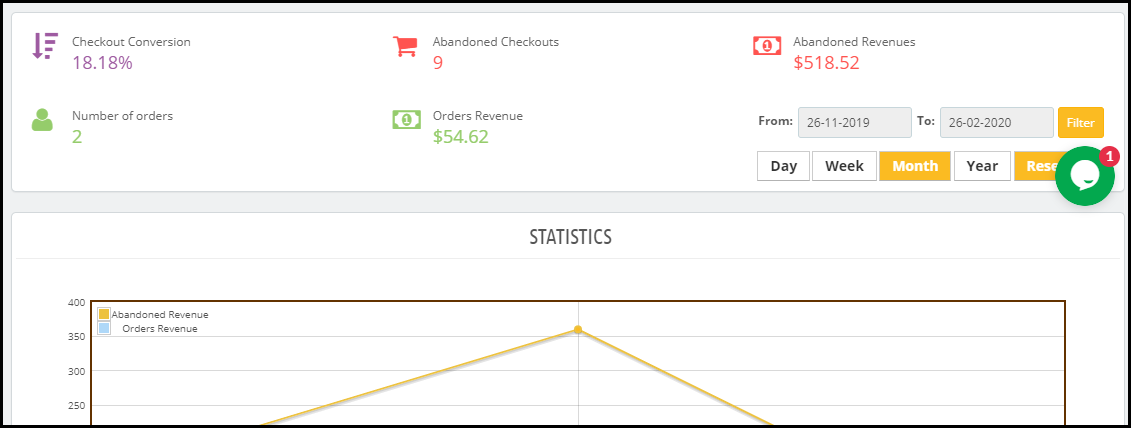
PrestaShop One Page Checkout module now displays statistics around checkout abandonments under the “Abandoned Checkout Statistics.” This section displays how many orders have been placed, how many checkout abandonments have happened alongside the checkout conversion, abandoned revenue, and revenue generated from the orders. The data can be filtered out for a specific period.
The statistics are represented in graphical as well as tabular form.
13. Track User Behaviour on the Checkout [New]
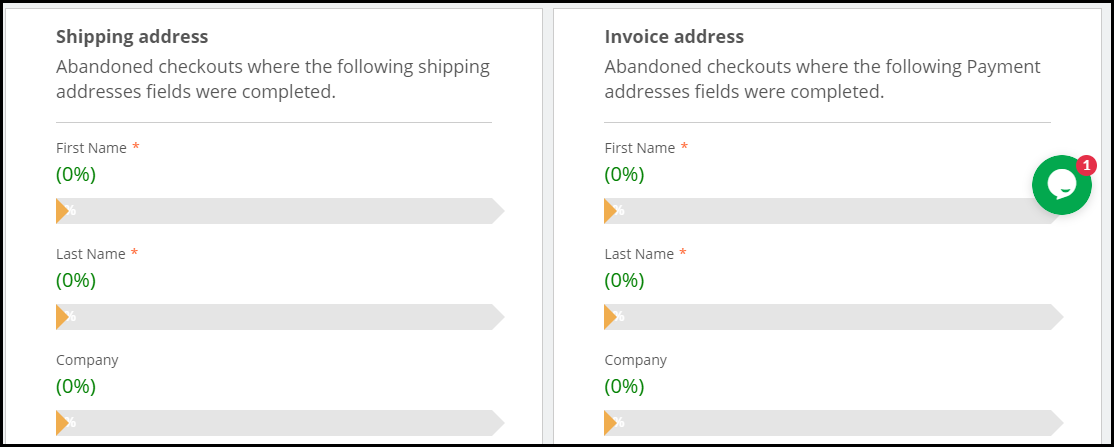
This option in the PrestaShop One Page Checkout module lets you check which specific fields are causing checkout abandonment. It displays the entire checkout fields and shows a percentage bar for each. Field having higher percentage means they are not causing any trouble to the visitors whereas the fields having low percentage means it is the actual cause of checkout abandonment.
This particular feature gives you the option to optimize your checkout fields so that you could improve your conversions.
14. CIF/DNI/NIF Validator [New]
Enabling CIF/DNI/NIF validation on the checkout page verifies the identification number of the shoppers coming to your website from Spain.
15. Free Shipping Banner [New]
PrestaShop One Page Checkout module also allows you to display a free shipping banner on the top your checkout page. You can specify the minimum amount on or above which the free shipping banner would be displayed to the user. This helps you increase the average order value since customers would be tempted to get free shipping.
16. Easy customization facility
This PrestaShop addon allows easy customization in the checkout process.
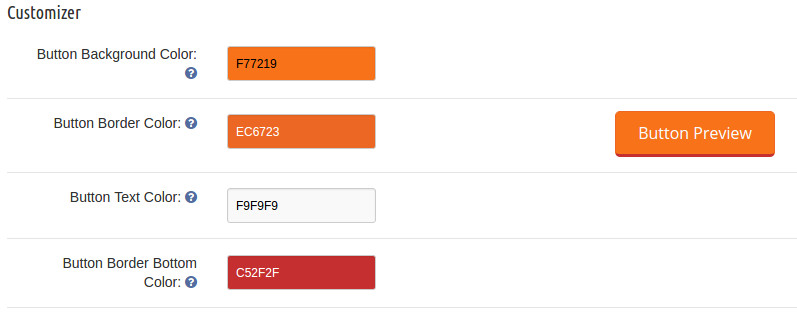
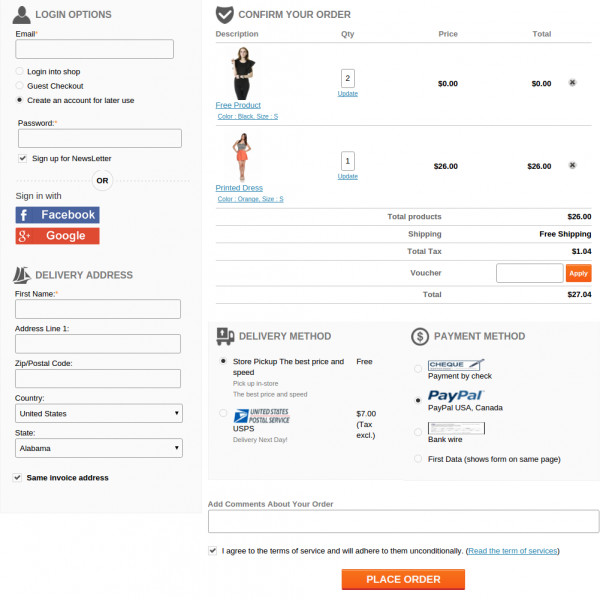
This Prestashop addon allows easy customization in the checkout process. Every checkout process on a PrestaShop site that claims to be simplified still contains a wide number of unnecessary checkout fields and steps. It is important to remove these irrelevant checkout steps from your checkout process to grab maximum customer attention and sales. The PrestaShop One Page Checkout module allows site admin to perform quick customization on the checkout page of their website. The store admin can even change the look and feel of the checkout page by incorporating the custom CSS code and JavaScript. With easy customization option, the admin can easily upgrade their site as per the need and requirement.
Over to You
Just upgrading the version of your store is not enough. You need to keep every single aspect in sync with the changes. The checkout process is one of the most important aspects that contribute to the overall conversions. So, don’t compromise with the ineffective checkout process on your PrestaShop 1.7 store, but take the right steps now. You just need to install this feature-packed PrestaShop checkout extension from the Knowband store to stay ahead of your business rivals. For more information, do visit the Knowband store without any further delay.
PrestaShop One Page Checkout module has been downloaded 7000+ times on the official addon store and over 5000 times on the Knowband store.
Adopt a feature loaded PrestaShop checkout addon for your PrestaShop 1.7 store.
PrestaShop is one of the widely used eCommerce platforms that has grabbed the worldwide attention due to its amazing features and functionalities. It is used all across the world by the people who are involved in the field of eCommerce business and is growing every year. This eCommerce platform has the bulk of features, themes, and extensions that can effortlessly improve the performance of any PrestaShop store.
It is a proven fact that 70% of your customers abandon their cart while checking out of the site. This is when the customers find the checkout process to be long and tedious. It won’t be wrong to state that with an easy access to so many choices, the online shoppers won’t bother going through the lengthy checkout forms. The lengthy process may prove hazardous especially when the customers are already on the fence about making the purchase. This is when a single-page checkout scores over the multi-page checkout processes.
Prestashop one page checkout addon is one of the ways of optimizing the checkout process of the eCommerce store. The Prestashop addon has made another major step towards poprawa jakości obsługi klienta oraz zwiększanie wydajności e-commerce dzięki najnowszej wersji PrestaShop 1.7. Dzięki najnowszej ofercie, dostępnej dla klientów PrestaShop od X X XUM, ludzie coraz częściej korzystają z nowej wersji PrestaShop. Ta platforma PrestaShop 7 ma nowe ekscytujące funkcje, takie jak wprowadzenie frameworka Symfony2016, przebudowany system motywów, motyw Starter,
Jeśli jednak nadal czujesz potrzebę optymalizacji zakupów w sklepie PrestaShop 1.7, oto genialny Dodatek do kasy PrestaShop 1.7 One Page dla Ciebie. Jeśli tak uważasz PrestaShop Addon nie jest warta twojej uwagi, spójrz na te funkcje wymienione poniżej:
1. Łatwe dostosowanie obiektu
[Caption id = "attachment_1939" align = "aligncenter" width = "749"] Ten dodatek do prestashopu pozwala na łatwe dostosowanie do procesu realizacji transakcji. [/ Caption]
Ten dodatek Prestashop pozwala na łatwe dostosowanie w procesie realizacji transakcji. Każdy proces kasowania w witrynie PrestaShop, która twierdzi, że jest uproszczony, wciąż zawiera wiele niepotrzebnych pól i kroków związanych z realizacją transakcji. Ważne jest, aby usunąć te nieistotne etapy realizacji transakcji, aby uzyskać maksymalną uwagę klientów i ich sprzedaż. To rozszerzenie na jedną stronę w Prestashop umożliwia administratorowi witryny szybkie dostosowanie na stronie kasy swojej witryny. Administrator sklepu może nawet zmienić wygląd strony kasy, włączając niestandardowy kod CSS i JavaScript. Dzięki łatwej opcji dostosowywania administrator może łatwo zaktualizować swoją witrynę zgodnie z potrzebami i wymaganiami.
2. Prosta funkcja logowania
[Caption id = "attachment_1935" align = "aligncenter" width = "383"] Zaoferuj szybkie logowanie do klienta za pomocą tego dodatku do kasy PrestaShop. [/ Caption] Niektórzy kupujący online zaakceptowali fakt, że opuszczają witrynę, gdy zostaną poproszeni o utworzenie konta. W związku z tym oferowanie opcji łatwej rejestracji zawsze może pomóc administratorowi zmniejszyć liczbę porzuconych koszyków. Moduł kasowania pojedynczej strony Prestashop oferuje funkcję szybkiego logowania do klienta. Klienci korzystający ze sklepu PrestaShop 1.7 nie wymagają osobnych kont do kas do szybkiego zakupu produktu online. Moduł Prestashop
3. Zgłaszanie błędów klientom
Teraz klienci dokonujący zakupów online na twojej stronie mogą łatwo wiedzieć, gdzie popełnił błędy na stronie kasy. To rozszerzenie do kasy PrestaShop 1.7 oferuje natychmiastowe komunikaty o błędach wraz z wbudowanym mechanizmem walidacji, który pomaga klientom podczas procesu realizacji transakcji.
4. Łatwe do dostosowywania w terenie
Formularz kasowy obejmuje dużą liczbę pól, które czasami mogą być trudne do obsługi. Otrzymujesz liczbę już utworzonych pól w interfejsie administratora. Wszystko, co musisz zrobić, to wybrać te, które chcesz wyświetlić w interfejsie użytkownika. Administrator może wyświetlać różne pola klientom, którzy są zalogowani, i tym, którzy nie są zalogowani. Istnieje możliwość wyboru pól dla różnych grup klientów. Ponadto solidne rozszerzenie Prestashop ułatwia właścicielom sklepów zmianę rozmieszczenia różnych pól. Można to łatwo zrobić, przeciągając i upuszczając różne pola.
5. Integracja MailChimp
Wtyczka Prestashop jest dostarczana z wbudowanym integratorem MailChimp. Integrator wysyła identyfikatory e-mail klientów przechwyconych na stronie kasy bezpośrednio do konta MailChimp administratora sklepu. Można to zrobić, gdy klient wybierze pole wyboru subskrypcji biuletynu. Nawet jeśli klient zaloguje się za pośrednictwem swojego konta Google, identyfikator e-mail zostanie wysłany na konto MailChimp. Ułatwia to e-marketingowcom tworzenie strategii marketingowych i dotarcie do klientów w celu ich ponownej sprzedaży.
6. Obecność wielu metod płatności i wysyłki
Teraz twoi klienci przybywający do sklepu PrestaShop 1.7 nie będą musieli najpierw wypełniać wszystkich informacji, aby móc zobaczyć sposób wysyłki i płatności. Z jednym układem zamówienia strony tego rozszerzenia PrestaShop, klienci będą mogli zobaczyć dostępną wysyłkę i
7. Oferuje szeroką bazę klientów
Ten dodatek do kasy Prestashop jest w pełni responsywny, dzięki czemu idealnie nadaje się do stosowania na wielu platformach do komputerów stacjonarnych, laptopów, smartfonów i tabletów. Kierując reklamy na wielu użytkowników urządzeń jednocześnie, możesz bez wysiłku zwiększyć swoje szanse na sprzedaż produktów i współczynniki konwersji. W pełni konfigurowalny interfejs ułatwia właścicielowi sklepu zatrzymanie klientów i zmniejszenie wskaźnika porzucania koszyka w witrynie zakupowej.
8. Pola niestandardowe
Wszechstronność jest kluczem do tego modułu. Interfejs administracyjny oferuje właścicielowi sklepu kilka pól formularza. Dodatkowo może dodać niestandardowe pola na stronie kasy. Utworzone pola można edytować lub usuwać zgodnie z wymaganiami administratora. W związku z tym rozszerzenie, wyciska proces kasowania dla odwiedzających Twój sklep, a jednocześnie pozwala uzyskać dodatkowe informacje o potencjalnych klientach.
9. Dostosowywanie koszyka na zakupy
Moduł to kompleksowe rozwiązanie dla właścicieli sklepów Prestashop, jeśli chodzi o optymalizację zakupów klientów. Administrator sklepu może wybrać pola, które chce wyświetlić w koszyku na stronie. Różne pola informacyjne mogą być ułożone w przedniej części, tak jak zostało to zrobione na stronie kasy. Oprócz pól informacyjnych administrator może nawet wyświetlać szczegóły zamówienia klienta w koszyku.
10. Optymalizacja front-end
The module allows you to squeeze multiple steps of the checkout into a single page without affecting the front layout. The best part of the addon is that there is no code changes required to be done. The frontal layout can be changed by just dragging and dropping the various elements.
11. GDPR compliance
In addition to all the features, the Prestahop one step checkout extension offers compliance with EU’s GDPR as well. The Prestashop addon has been upgraded as per GDPR standards. You can now include multiple opt-ins in your site. There is an option to create multiple policies for this compliance. You can enable the policy that you want to display in the front-end.
In case you site deals into the European Union countries in any way, then, you need to take the consent of the customers before using their personal details for any purpose. The Prestashop one page checkout addon allows you to check the consent of the customer from the back-end.
12. Mobile-friendly interface
With the increasing dominance of mobile sites and mobile-first users, providing a responsive interface to the prospective customers is the key. Keeping this in mind, Prestashop one page checkout addon has been designed to be mobile-friendly. The single-step checkout process will work flawlessly on mobile devices. Thus, you can now offer at-par services to your target customer base whether they are using a desktop site or mobile devices. All the features offered by the Prestashop one page checkout plugin will be compatible with your mobile site as well.
Just upgrading the version of your store is not enough. You need to keep every single aspect in sync with the changes. The checkout process is one of the most important aspects that contribute to the overall conversions. So, don’t compromise with the ineffective checkout process on your PrestaShop 1.7 store, but take the right steps now. You just need to install this feature-packed PrestaShop checkout extension from the Knowband store to stay ahead of your business rivals. For more information, do visit the Knowband store without any further delay.
[Caption id = "attachment_1936" align = "aligncenter" width = "600"] Przyłącz dodatek do kasy PrestaShop wyposażony w funkcję do sklepu PrestaShop 1.7. [/ Caption] Zaadoptuj funkcję wczytującą dodatek do kasy PrestaShop do sklepu PrestaShop 1.7. PrestaShop jest jedną z powszechnie używanych platform eCommerce, która przyciągnęła uwagę całego świata dzięki swoim niesamowitym funkcjom i funkcjonalności. Jest używany na całym świecie przez ludzi zaangażowanych w biznes eCommerce i rośnie z każdym rokiem. Ta platforma eCommerce ma większość funkcji, motywów i rozszerzeń, które mogą bez wysiłku poprawić wydajność dowolnego sklepu PrestaShop. Jest udowodnionym faktem, że 70% klientów porzuca koszyk podczas sprawdzania na stronie. Wtedy klienci stwierdzają, że proces realizacji transakcji jest długi i żmudny. Nie będzie błędem stwierdzenie, że dzięki łatwemu dostępowi do tak wielu opcji kupujący online nie będą zawracać sobie głowy przeglądaniem długich formularzy kasowych. Ten długotrwały proces może okazać się niebezpieczny, zwłaszcza gdy klienci już próbują dokonać zakupu. Ma to miejsce, gdy wyniki pojedynczej strony są sprawdzane w przypadku wielu transakcji. Dodatek do kasy Prestashop na jedną stronę to jeden ze sposobów optymalizacji procesu kasowania sklepu eCommerce. Dodatek Prestashop zrobił kolejny ważny krok w kierunku poprawa jakości obsługi klienta oraz zwiększanie wydajności e-commerce dzięki najnowszej wersji PrestaShop 1.7. Dzięki najnowszej ofercie, dostępnej dla klientów PrestaShop od X X XUM, ludzie coraz częściej korzystają z nowej wersji PrestaShop. Ta platforma PrestaShop 7 ma nowe ekscytujące funkcje, takie jak wprowadzenie frameworka Symfony2016, przebudowany system motywów, motyw Starter,
Jeśli jednak nadal czujesz potrzebę optymalizacji zakupów w sklepie PrestaShop 1.7, oto genialny Dodatek do kasy PrestaShop 1.7 One Page dla Ciebie. Jeśli tak uważasz PrestaShop Addon nie jest warta twojej uwagi, spójrz na te funkcje wymienione poniżej:
1. Łatwe dostosowanie obiektu
[Caption id = "attachment_1939" align = "aligncenter" width = "749"] Ten dodatek do prestashopu pozwala na łatwe dostosowanie do procesu realizacji transakcji. [/ Caption]
Ten dodatek Prestashop pozwala na łatwe dostosowanie w procesie realizacji transakcji. Każdy proces kasowania w witrynie PrestaShop, która twierdzi, że jest uproszczony, wciąż zawiera wiele niepotrzebnych pól i kroków związanych z realizacją transakcji. Ważne jest, aby usunąć te nieistotne etapy realizacji transakcji, aby uzyskać maksymalną uwagę klientów i ich sprzedaż. To rozszerzenie na jedną stronę w Prestashop umożliwia administratorowi witryny szybkie dostosowanie na stronie kasy swojej witryny. Administrator sklepu może nawet zmienić wygląd strony kasy, włączając niestandardowy kod CSS i JavaScript. Dzięki łatwej opcji dostosowywania administrator może łatwo zaktualizować swoją witrynę zgodnie z potrzebami i wymaganiami.
2. Prosta funkcja logowania
[Caption id = "attachment_1935" align = "aligncenter" width = "383"] Zaoferuj szybkie logowanie do klienta za pomocą tego dodatku do kasy PrestaShop. [/ Caption] Niektórzy kupujący online zaakceptowali fakt, że opuszczają witrynę, gdy zostaną poproszeni o utworzenie konta. W związku z tym oferowanie opcji łatwej rejestracji zawsze może pomóc administratorowi zmniejszyć liczbę porzuconych koszyków. Moduł kasowania pojedynczej strony Prestashop oferuje funkcję szybkiego logowania do klienta. Klienci korzystający ze sklepu PrestaShop 1.7 nie wymagają osobnych kont do kas do szybkiego zakupu produktu online. Moduł Prestashop
3. Zgłaszanie błędów klientom
Teraz klienci dokonujący zakupów online na twojej stronie mogą łatwo wiedzieć, gdzie popełnił błędy na stronie kasy. To rozszerzenie do kasy PrestaShop 1.7 oferuje natychmiastowe komunikaty o błędach wraz z wbudowanym mechanizmem walidacji, który pomaga klientom podczas procesu realizacji transakcji.
4. Łatwe do dostosowywania w terenie
Formularz kasowy obejmuje dużą liczbę pól, które czasami mogą być trudne do obsługi. Otrzymujesz liczbę już utworzonych pól w interfejsie administratora. Wszystko, co musisz zrobić, to wybrać te, które chcesz wyświetlić w interfejsie użytkownika. Administrator może wyświetlać różne pola klientom, którzy są zalogowani, i tym, którzy nie są zalogowani. Istnieje możliwość wyboru pól dla różnych grup klientów. Ponadto solidne rozszerzenie Prestashop ułatwia właścicielom sklepów zmianę rozmieszczenia różnych pól. Można to łatwo zrobić, przeciągając i upuszczając różne pola.
5. Integracja MailChimp
Wtyczka Prestashop jest dostarczana z wbudowanym integratorem MailChimp. Integrator wysyła identyfikatory e-mail klientów przechwyconych na stronie kasy bezpośrednio do konta MailChimp administratora sklepu. Można to zrobić, gdy klient wybierze pole wyboru subskrypcji biuletynu. Nawet jeśli klient zaloguje się za pośrednictwem swojego konta Google, identyfikator e-mail zostanie wysłany na konto MailChimp. Ułatwia to e-marketingowcom tworzenie strategii marketingowych i dotarcie do klientów w celu ich ponownej sprzedaży.
6. Obecność wielu metod płatności i wysyłki
Teraz twoi klienci przybywający do sklepu PrestaShop 1.7 nie będą musieli najpierw wypełniać wszystkich informacji, aby móc zobaczyć sposób wysyłki i płatności. Z jednym układem zamówienia strony tego rozszerzenia PrestaShop, klienci będą mogli zobaczyć dostępną wysyłkę i
7. Oferuje szeroką bazę klientów
Ten dodatek do kasy Prestashop jest w pełni responsywny, dzięki czemu idealnie nadaje się do stosowania na wielu platformach do komputerów stacjonarnych, laptopów, smartfonów i tabletów. Kierując reklamy na wielu użytkowników urządzeń jednocześnie, możesz bez wysiłku zwiększyć swoje szanse na sprzedaż produktów i współczynniki konwersji. W pełni konfigurowalny interfejs ułatwia właścicielowi sklepu zatrzymanie klientów i zmniejszenie wskaźnika porzucania koszyka w witrynie zakupowej.
8. Pola niestandardowe
Wszechstronność jest kluczem do tego modułu. Interfejs administracyjny oferuje właścicielowi sklepu kilka pól formularza. Dodatkowo może dodać niestandardowe pola na stronie kasy. Utworzone pola można edytować lub usuwać zgodnie z wymaganiami administratora. W związku z tym rozszerzenie, wyciska proces kasowania dla odwiedzających Twój sklep, a jednocześnie pozwala uzyskać dodatkowe informacje o potencjalnych klientach.
9. Dostosowywanie koszyka na zakupy
Moduł to kompleksowe rozwiązanie dla właścicieli sklepów Prestashop, jeśli chodzi o optymalizację zakupów klientów. Administrator sklepu może wybrać pola, które chce wyświetlić w koszyku na stronie. Różne pola informacyjne mogą być ułożone w przedniej części, tak jak zostało to zrobione na stronie kasy. Oprócz pól informacyjnych administrator może nawet wyświetlać szczegóły zamówienia klienta w koszyku.
10. Optymalizacja front-end
Moduł pozwala wycisnąć wiele kroków z kasy do jednej strony bez wpływu na układ przedni. Najlepszą częścią dodatku jest to, że nie trzeba wprowadzać żadnych zmian kodu. Przedni układ można zmienić, przeciągając i upuszczając różne elementy. Po prostu uaktualnienie wersji twojego sklepu to za mało. Musisz zachować każdy aspekt zsynchronizowany ze zmianami. Proces realizacji transakcji jest jednym z najważniejszych aspektów, które wpływają na ogólne konwersje. Tak więc, nie idź na kompromis z nieskutecznym procesem kasowym w swoim sklepie PrestaShop 1.7, ale podejmij teraz odpowiednie kroki. Trzeba tylko zainstalować to wypasione rozszerzenie do kasy PrestaShop od
The Prestashop Product Size chart addon is a Size Chart creating module for Prestashop. Using this extension, the merchant can show the different types of size charts for each category, product, and manufacturers available on his/her store.
The eCommerce store admin can assign a single chart in ‘n’ number of the category in a single configuration. Products under the default category will show the size chart on the product landing page. The eCommerce store admin can assign the created size chart on any product or any category or any manufacturer. And, a product can have a unique size chart which means, any merchant can assign a pre-configured chart to any product.
The eCommerce store admin can assign the chart to a particular product or products of a particular category or products of a particular manufacturer. Thus with the help of this Prestashop Product Size chart module the eCommerce store owner can easily resolve the size-related issues of the store customers. The user-friendly interface of this Prestashop size catalog extension makes it more useful.
Features –
The Prestashop Product Size chart module allows the eCommerce admin to display the size chart on the product pages of the eCommerce store.
It’s very easy to install and configure this Prestashop size guide addon.
The store admin can enable/disable this Prestashop size catalog extension without any hassle.
The Prestashop Size Chart Popup addon is fully customizable.
The Prestashop Size Chart link module offers a simple and hassle-free implementation.
No technical knowledge is required for the configuration of this size chart popup addon.
The Prestashop size catalog extension provides an option to add images, guidelines or any HTML content to the size chart.
The Prestashop size guide for a category of products, a single product, or a manufacturer.
An unlimited number of rows and columns on the size charts can be added as per requirement.
The Prestashop Product Size chart extension provides the preview option.
Helps in making the purchase decision.
The Prestashop Size Catalog plugin is multi-lingual Compatible.
What’s New in 1.0.7 Update:
Customizable Size Chart:
You can now customize the size chart according to your needs and preferences, providing a more personalized experience for your customers.
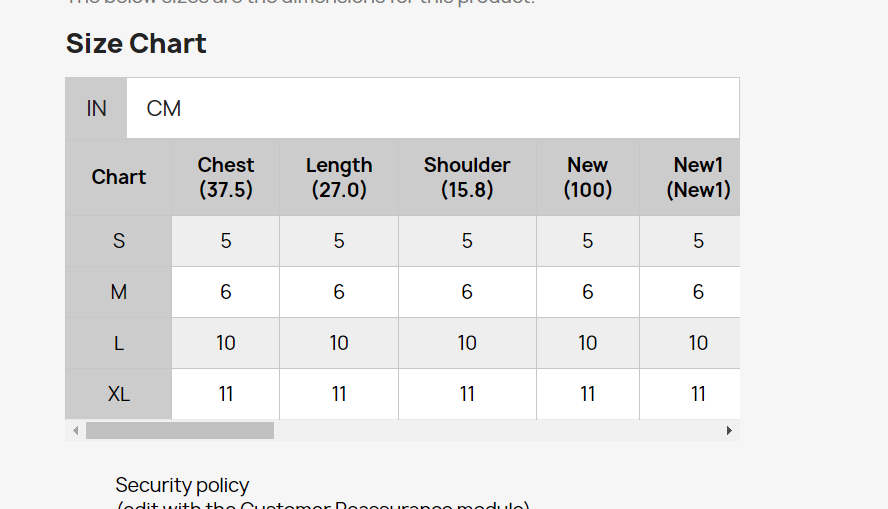
UNIT Feature Update:
With this feature, Admin has the ability to specify the unit of measurement for the size charts
Custom CSS and JS:
You can now load your own custom CSS and JS files, allowing you to further customize and enhance the look and feel.
Improved Popup:
The all-updated 1.0.7 Size Chart Module allows for popups to be displayed over the other popups or directly on the product page under the “Add to Cart” button, providing a more seamless and user-friendly experience to both users and Presta admins.
New Rule Options:
Now, the Prestashop store admins can find two new rule options based on product reference and attribute, giving administrators more flexibility and control over how they map charts with products.
Multistore Compatibility:
The all-new Prestashop Size Chart module is now compatible with multistore. The PrestaShop store admins can now manage and customize their e-commerce platform with greater ease and efficiency.
Benefits offered by Prestashop Product Size Chart:
With the help of this Prestashop size guide addon the store admin can create appropriate size charts just by entering values.
The Prestashop size catalog extension allows e-merchant to set the size chart on a particular category, product or manufacturer.
This size chart will be available on every product page for a better store experience.
The admin can add n number of rows and columns in the size chart.
A preview option is available on the back-end.
This size related information reduces product return based on size issues.
With the help of Prestashop size catalog extension, the customers can view the size chart before purchasing the product.
The Prestashop product size table allows adding text and images in the size chart for better understanding.
The customers can easily understand the guidelines given with the size chart.
The Size Chart module offers admins to use the module for their Multi-Store Prestashop stores.
Along with all the pre-tailored options, the admins can now also add custom CSS and JS to improve the look and feel of their Product Size chart.
To install the Prestashop product size table addon, please follow the following steps:
1. Add the addon folder to the modules folder of your system.
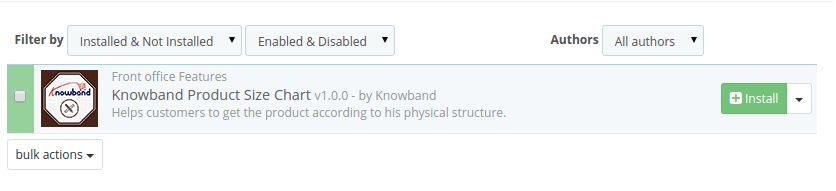
2. After adding this addon folder, system will list the addon on module page under front office feature category as given below:
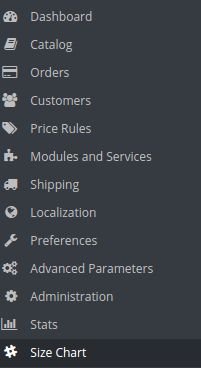
After the module is installed a new entry in the menu bar of the shop starts appearing in the back end with the name ‘Size Chart’. This menu will contain a sub-menu which further will be containing the following options.
1. Attributes Set
2. Chart
3. Category/Manufacturer Chart
4. Category Chart
5. Product Chart
Each section is described in detail below.
Configuration Setting:
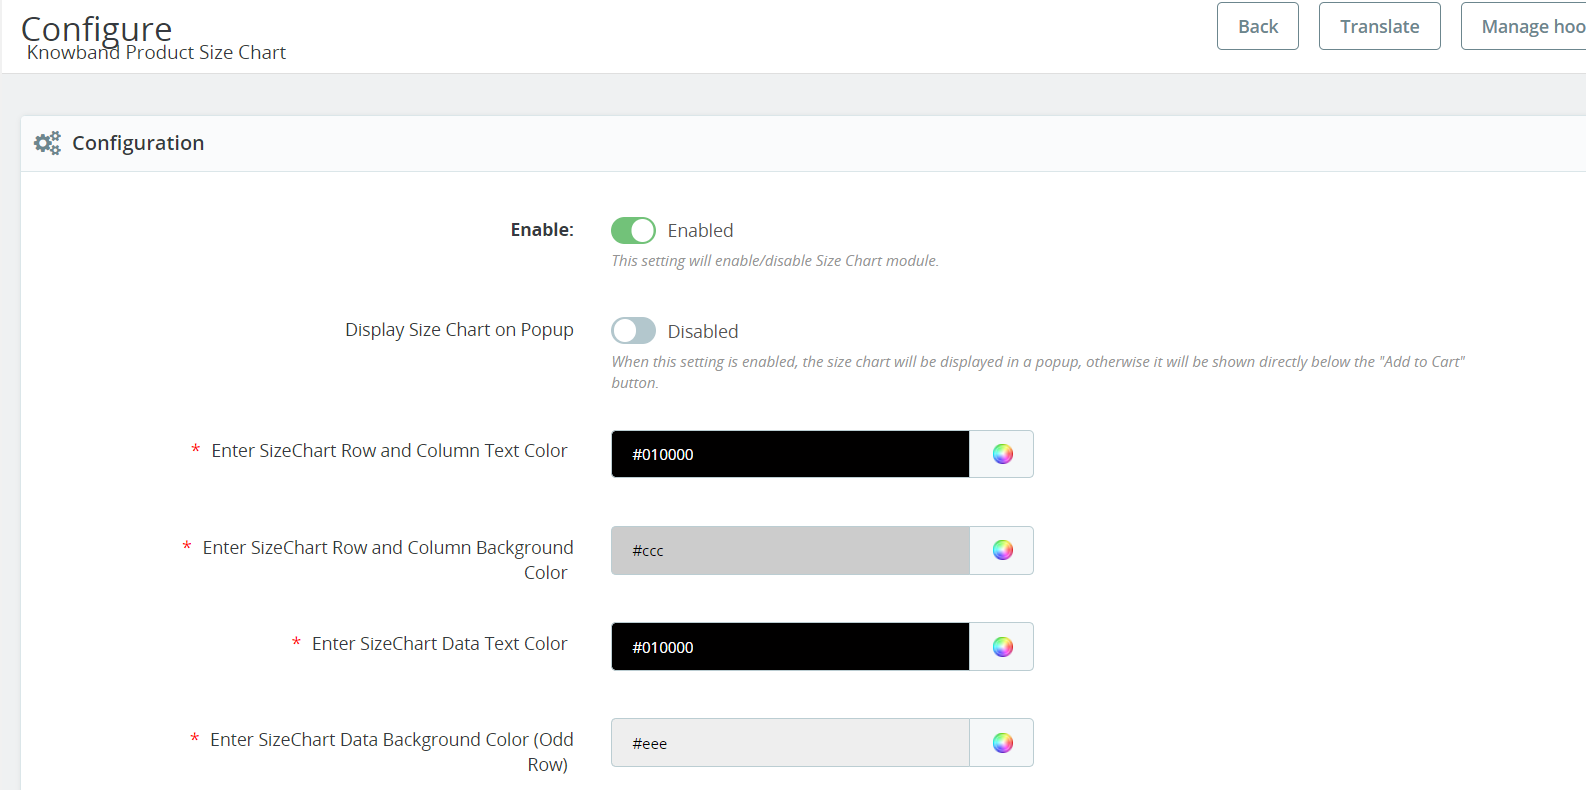
In the following tab, the store admins can configure their Prestashop Size chart module and choose all the major size chart attributes such as component colours, CSS, JS, etc.
Enable/Disable:
The store admins can enable/disable the module with the help of this particular button.
Display Size Chart on Popup:
When this setting is enabled, the size chart will be displayed in a popup, otherwise, it will be shown directly below the “Add to Cart” button.
Enter SizeChart Row and Column Text Color:
This particular option will manage the row and column text color of the size chart.
Enter SizeChart Row and Column Background Color:
Like text color, the Prestashop store admins can manage the background color of size chart rows and columns.
Enter Size Chart Data Text Color:
With the help of this button, the store admins can manage the text color of size chart data.
Enter SizeChart Data Background Color (Odd Row):
You can choose the color of the background of the size chart data from here. This option will manage the background color for the odd row only.
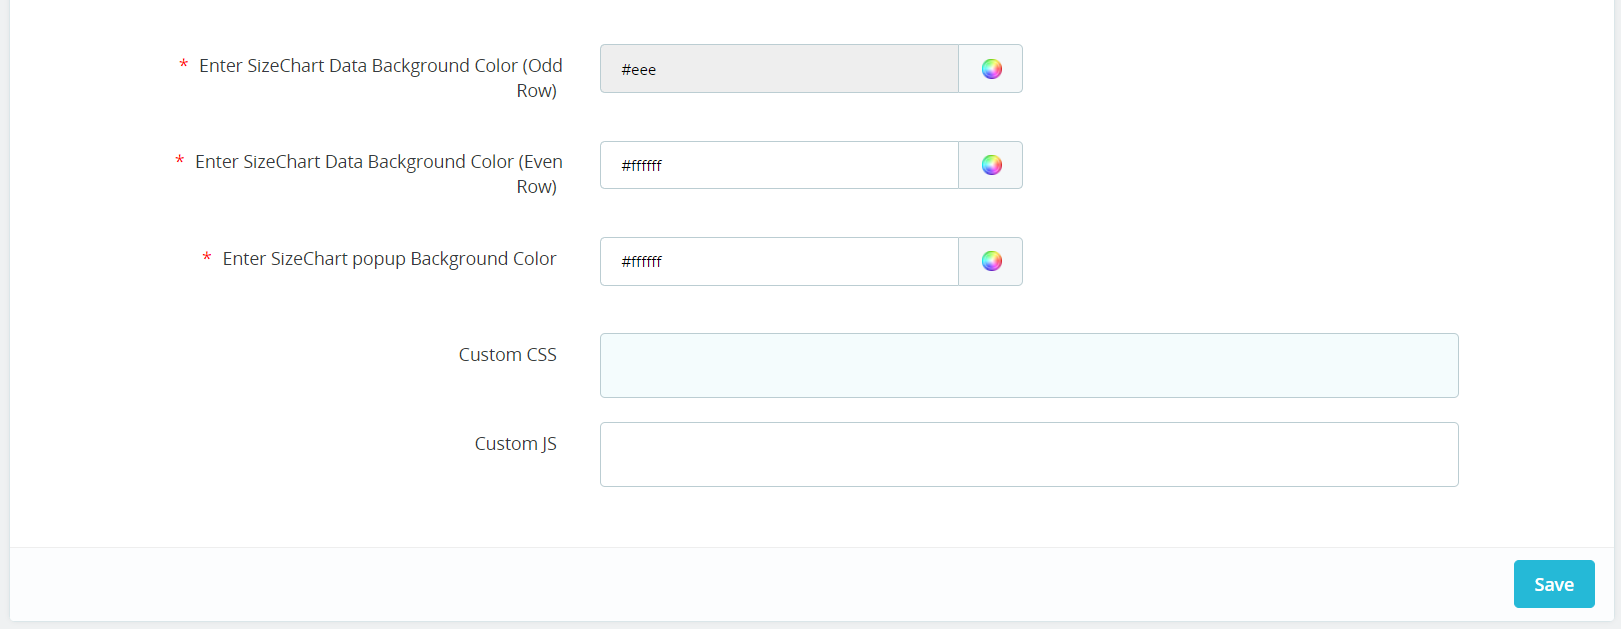
Enter SizeChart Data Background Color (Even row):
Like odd rows background color, the Prestashop store retailers can manage the the data background color for the even rows from this option.
Enter SizeChart Popup Background Color:
This option will allow the store admins to manage the SizeChart popup background color.
Custom CSS:
In the following text field, the admins can enter customized CSS to make their size chart sounding.
Custom JS:
Likewise, this particular field can be used for adding customized JS for the size chart.
Attributes Set
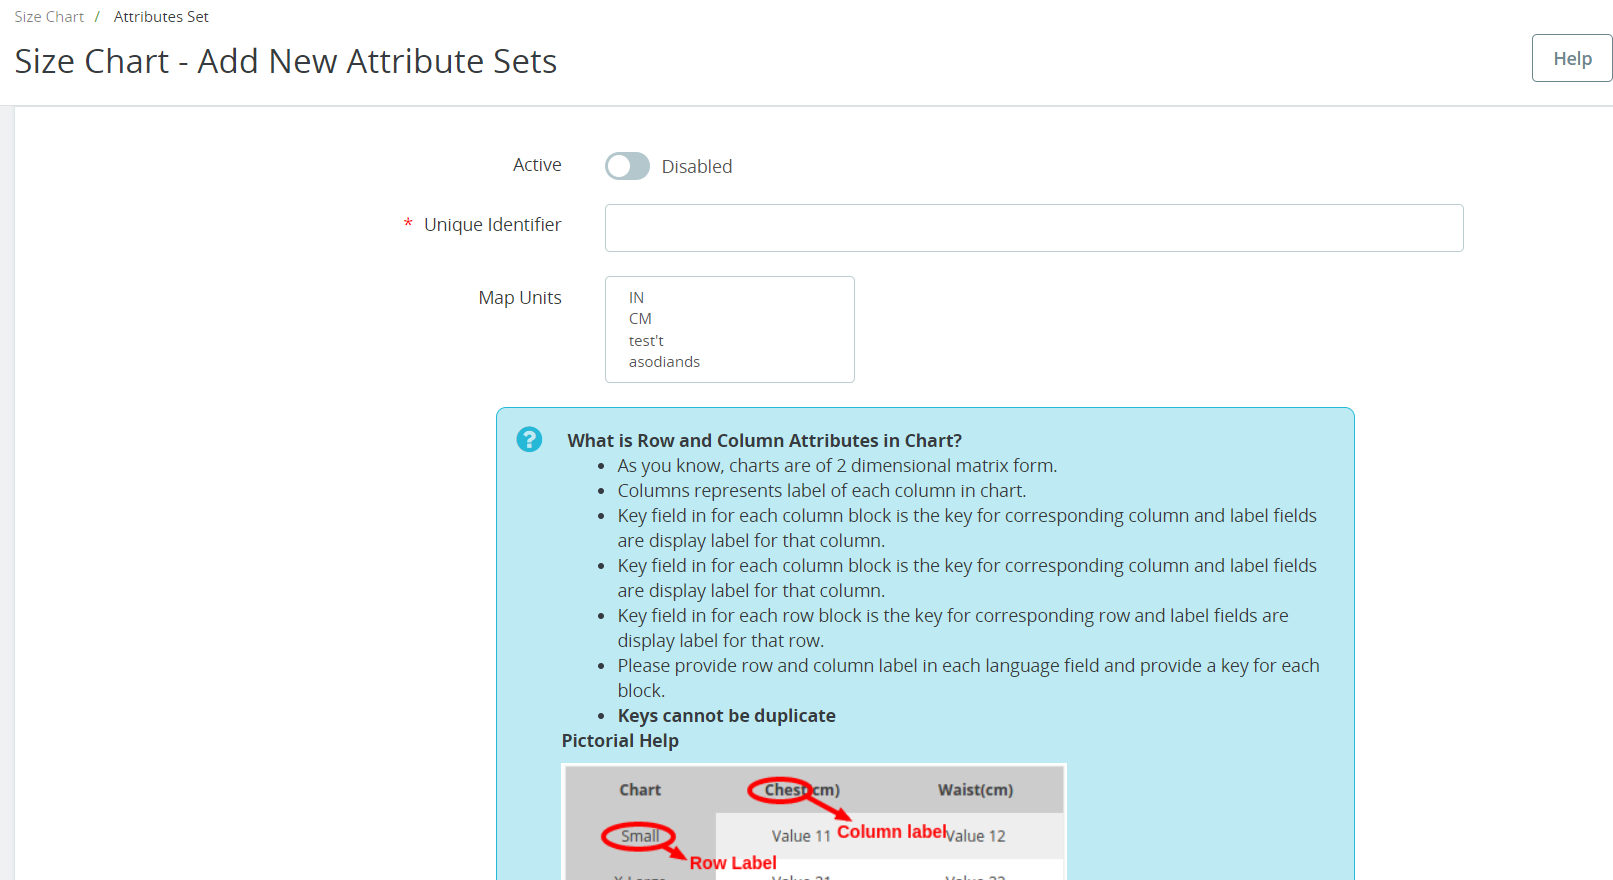
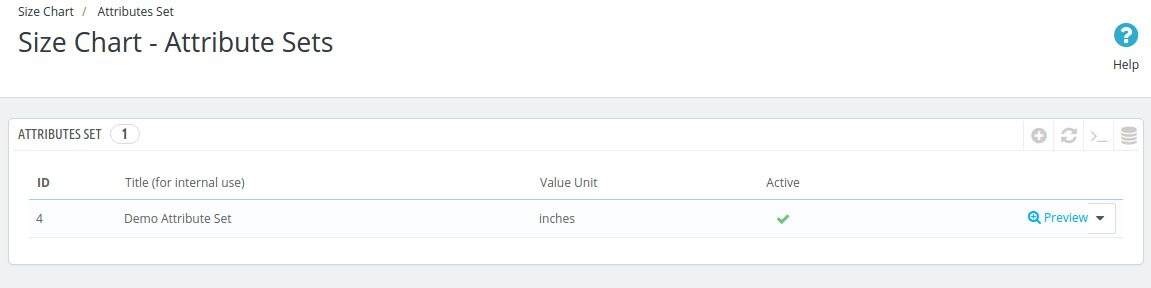
Once the admin will click on this option, a table appears which will contain the details of all the attributes of the chart which has been created to date. The admin can also create new attributes set by clicking on the add icon above the table. After the admin will click on the add icon, a new form appears containing the following fields.
1. Active: This field indicates whether the particular attribute set is enabled or not. The attribute set will only work if it is enabled.
2. Unique Identifier: In this field, the admin has to enter the unique name of the attribute set from which the attribute is going to be identified in the back end of the shop to create full-size chart.
3. Map Units: This feature allows you to choose the units that you wish to associate with the size charts. By visiting the size chart unit page, you can create Units for the size chart of your choice and then map them to your preferred charts using this option.
4. Value Unit: This is the field where the admin will choose the unit of the attributes set may be in inches, cms, kms, grams.
5. Chart Column Labels: In this field, the Prestashop eCommerce store admin has to choose the chart column labels and their name in the different store languages. The admin can add ‘n’ number of column labels.
6. Chart Row Labels: In this field, the eCommerce store admin has to choose the chart row labels and their names in different store languages. The admin can add ‘n’ number of column labels.
7. Preview: By clicking on this link the Prestashop store admin can view the preview of the attributes set which will be created by the values that are filled above.
8. Actions: Actions like edit and delete are also available to edit the entries which are already done by the admin.
Charts
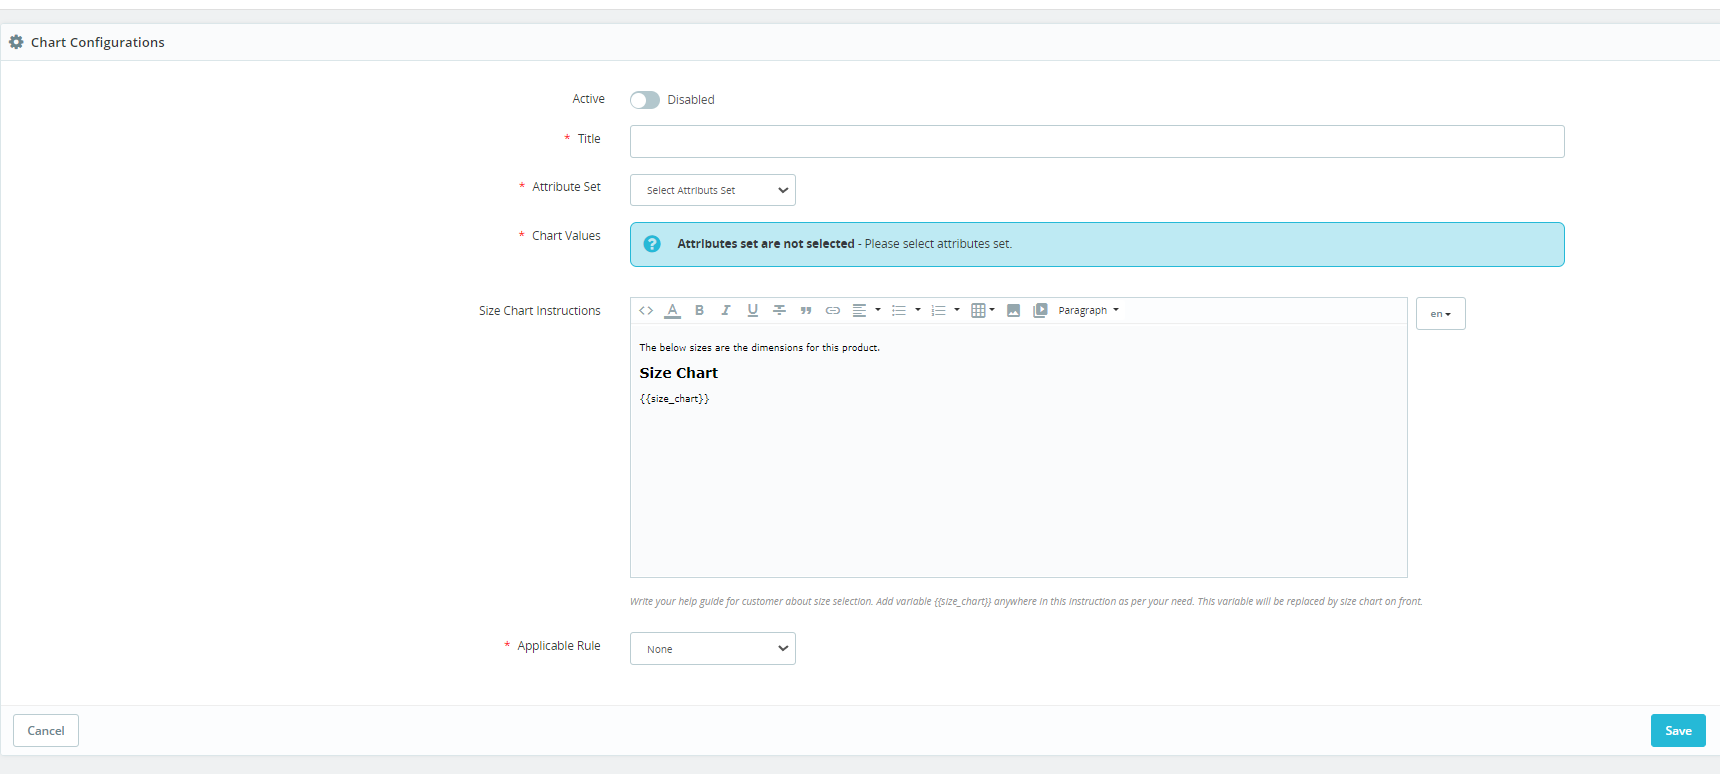
Here, the admin will create the full chart using the attribute sets which were created in the previous tab. To create a chart, the eCommerce store admin has to click on the add button on the right side of the chart. As soon as the eCommerce store admin clicks on that add button, a new form appears with the following options.
1. Active: From here, the Prestashop store admin can set the chart enabled or disabled. The chart will be displayed only if it is enabled.
2. Title: This is the title of the chart which is for internal use only to uniquely identify the chart when assigning them to the product, category or manufacturer.
3. Attributes Set: This field will contain all the data attribute sets which were created earlier and are enabled. The admin can choose any of the attributes set in this field.
4. Chart Values: After the admin selects the attributes set, then he/she has to fill in the values which will be reflected where this chart will be used.
5. Size Chart Instructions: Here, the admin can add up the instructions which he/she feels are important for the customers to understand the above attribute set chart.
6. Actions: Actions like edit and delete are also available to edit the entries which are already done by the admin.
7. Applicable Rule: From here, the admins can select the rule for which the product chart is going the display on the product page. Instance, we have provided 2 options here. Using the first one, the store admins can add the conditions for a chart based on product features such as color, conditions, and more. Apart from it using the other option (reference), the admins can add the product reference in the text field and the chart will be automatically applicable for all the products that are having mentioned references.
Manufacturer Chart
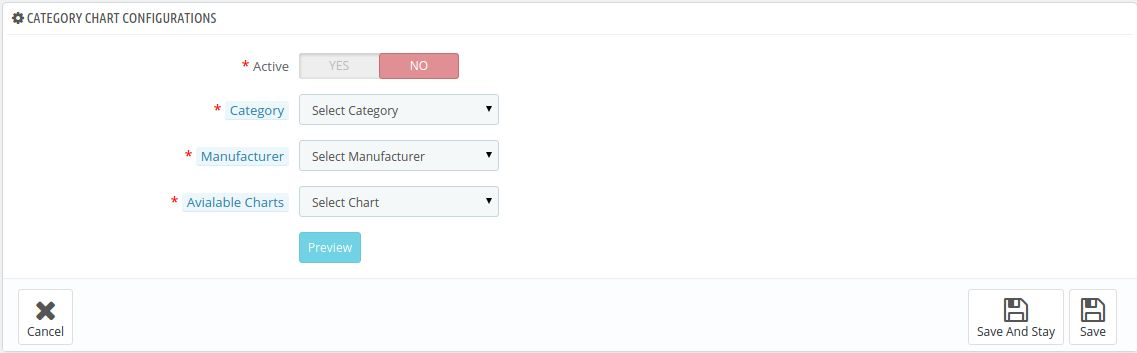
A table appears in this tab. This table shows which charts are mapped to which manufacturer. To add a new entry, the admin can click on the add icon appearing on the right side of the table. The following form appears after clicking on the add icon button –
1. Active: This is the field that decides whether the chart should be enabled or disabled. The chart only works if it is enabled from this end.
2. Category: Here the admin may select the category of the products where this chart should appear.
3. Manufacturer: In this field, the admin has to select the manufacturer to which this particular chart is to be mapped.
4. Available Chart: In this field, all the charts which are created till now are listed. The admin can select any of the charts from this field and then save the settings.
5. Preview: Admin can also view the preview of the chart by clicking on the preview button below.
6. Actions: Actions like edit and delete are also available to edit the entries which are already done by the admin.
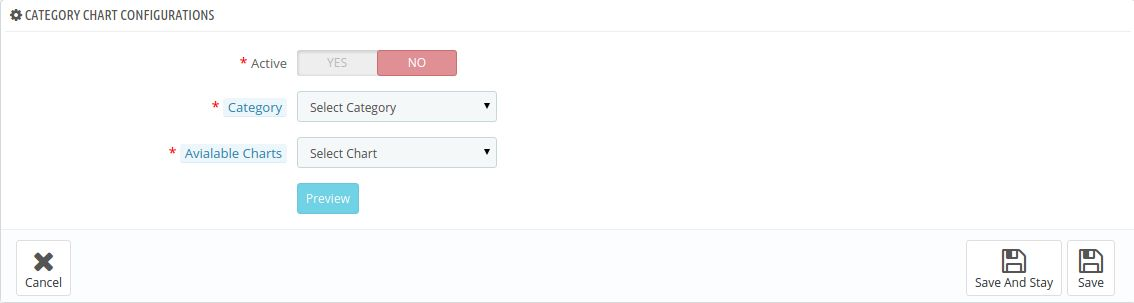
Category Chart
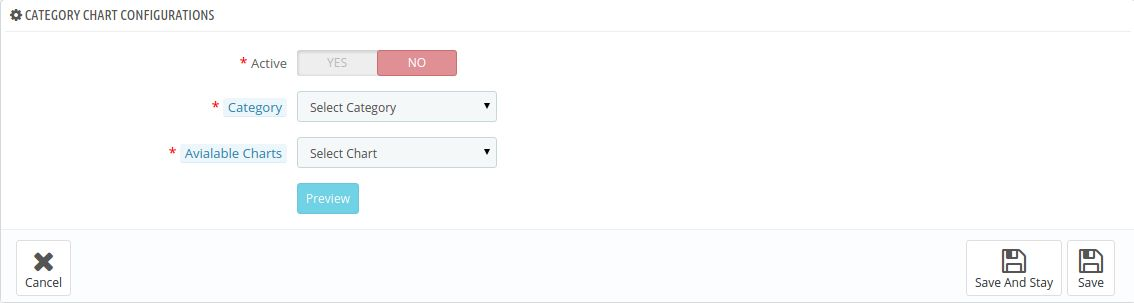
In this tab, a table appears. This table shows that which charts are mapped to which category. The following form appears after clicking on the add icon button –
1. Active: This is the field that decides whether the chart should be enabled or disabled. The chart only works if it is enabled from this end.
2. Category: Here, the Prestashop store admin may select the category of the products where this chart should appear.
3. Available Chart: In this field, all the charts which are created till now are listed. The admin can select any of the charts from this field and then save the settings.
4. Preview: The eCommerce store admin can also view the preview of the chart by clicking on the preview button below.
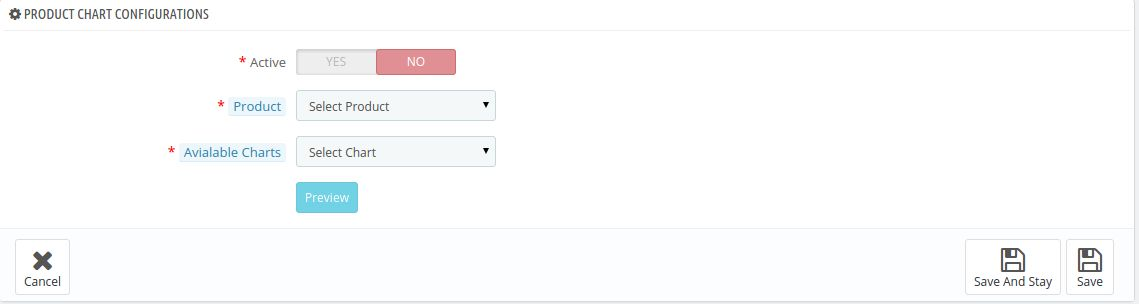
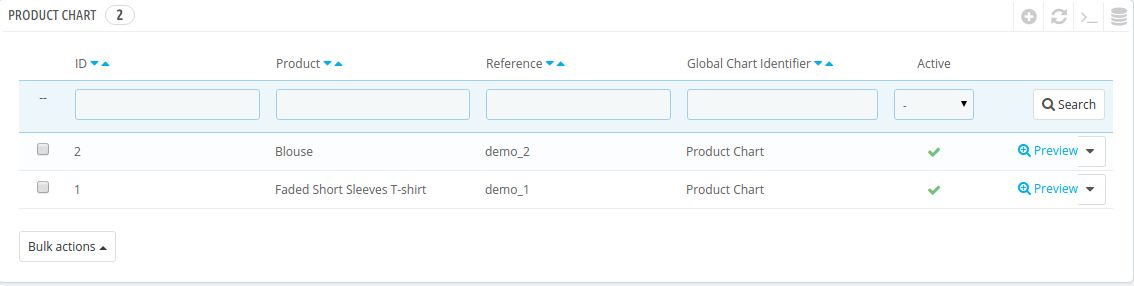
Product Chart
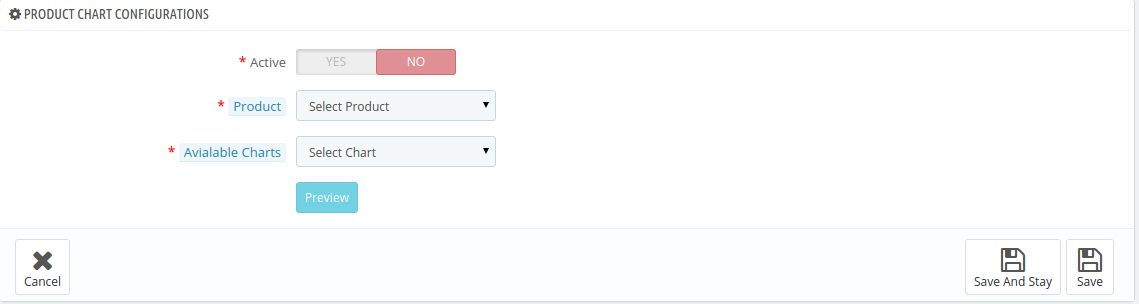
A table appears in this tab. This table shows that which charts are mapped to which product. The following form appears after clicking on the add icon button –
1. Active: This is the field that decides whether the chart is enabled or disabled. The chart only works if it is enabled from this end.
2. Select Product: In this field, all the products which are available in this particular store appear and the admin can choose any one of those products and get that product mapped with that particular chart.
3. Available Chart: In this field, all the charts which are created till now are listed. The admin can select any of the charts from this field and then save the setting.
4. Preview: Admin can also view the preview of the chart by clicking on the preview button below.
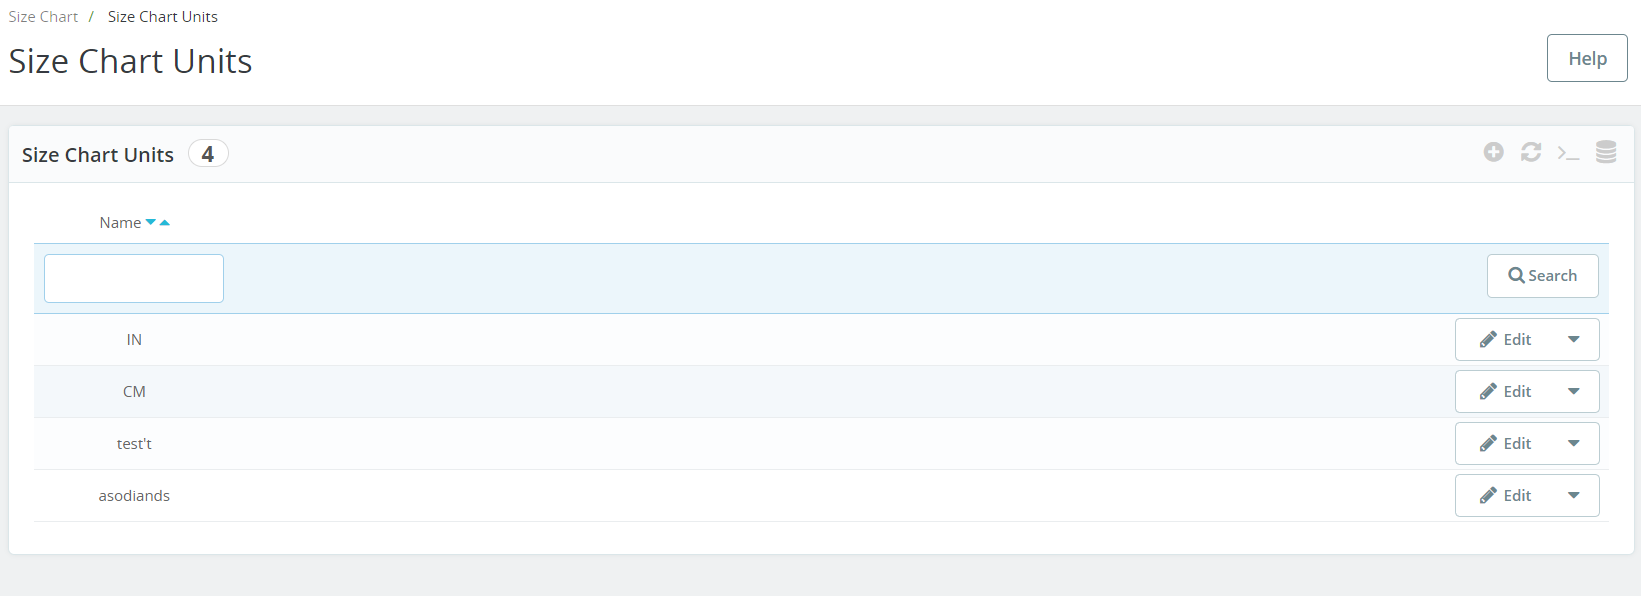
Size Chart Units:
In the following tab offered by the Prestashop size chart addon, the admin can manage all the size chart units. Not only the admin can modify the added units but also can add as many units as he wants for the size charts.
Front End Module
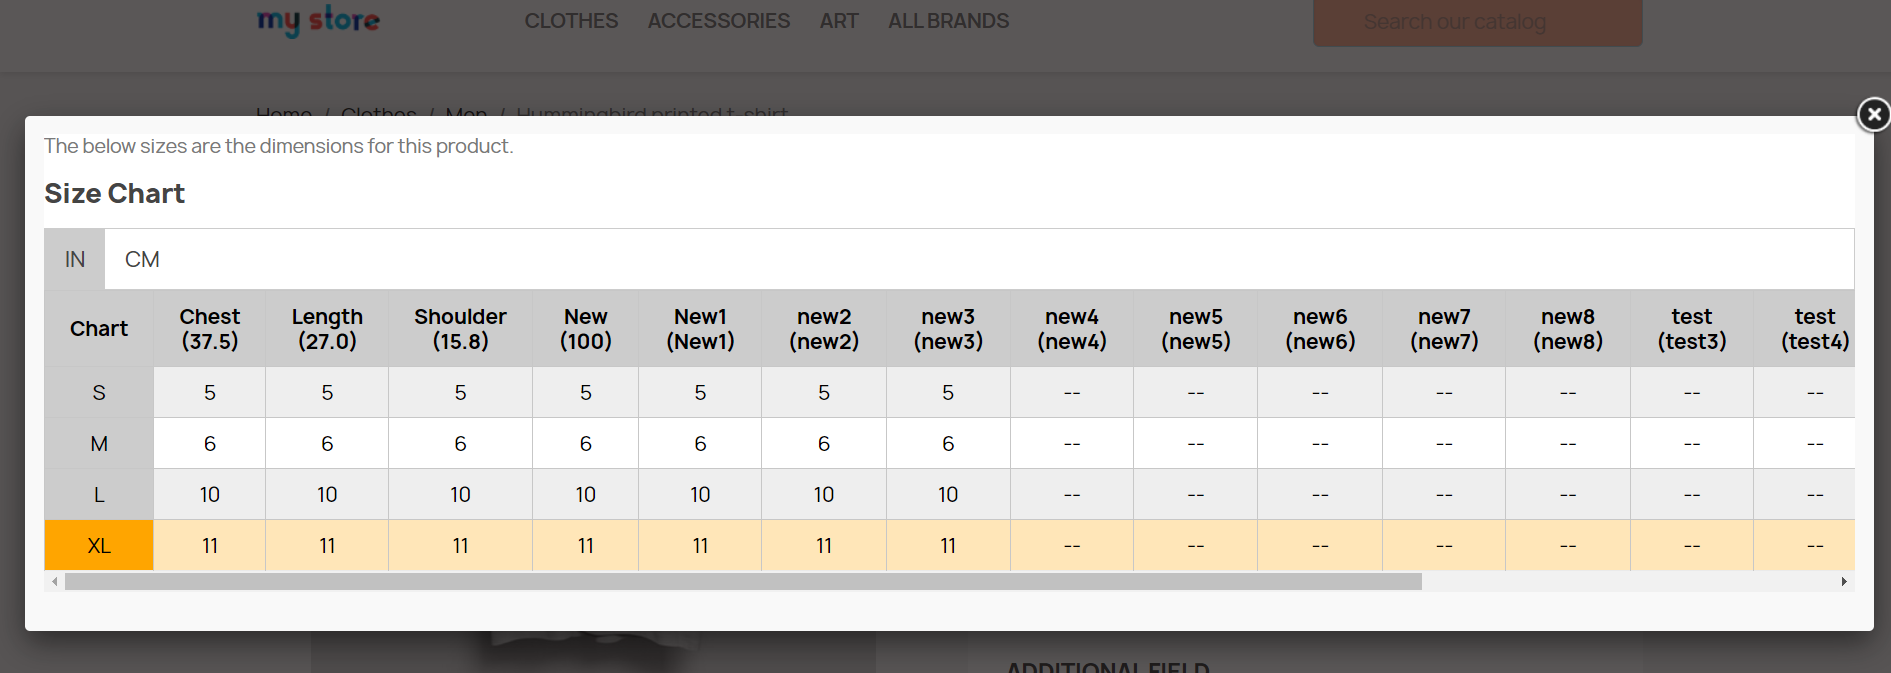
When this extension is enabled from the back end with all the entries done, then a link named ‘VIEW SIZE CHART’ appears on the right side of the page just like the screenshot below.
Also, if “Display size chart on popup” is enabled then the “View Size Chart” button is available otherwise, the chart is displayed directly under the Add to Cart button.
It may be a case when a product has a chart mapped to itself and it also has a chart mapped to its category and it also has a chart mapped to its manufacturer. In this case, the priority of the chart has been decided. So, the priority of a product chart is higher than the priority of the category chart and the priority of the category chart is higher than the priority of the manufacturer chart.
So, the chart on the product page is shown according to the priority basis which has been explained above.
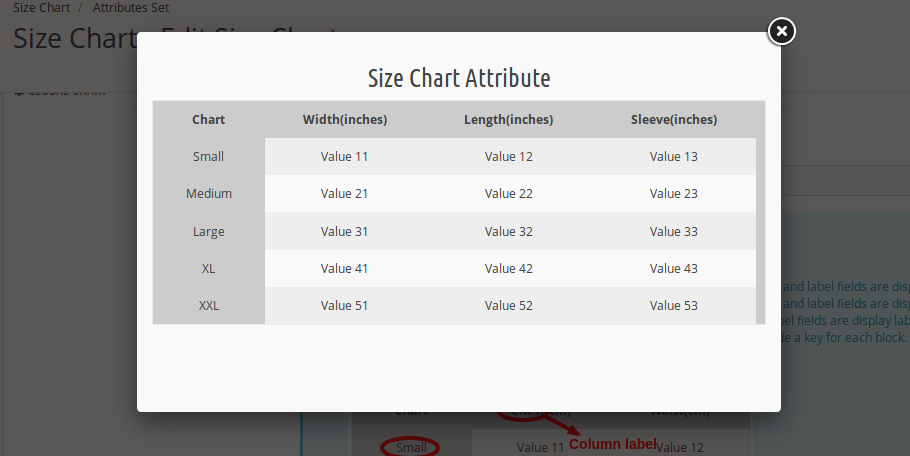
When the customer will click on the link, a pop-up will appear with all the data of size for that product.
Thus this Prestashop product size chart addon makes shopping easy for the online customers. The admin can reduce the complexity of choosing the perfect size. By using this Prestashop product size table plugin the admin can display size charts on the product page. The customers can buy the products easily after viewing the size chart.
Prestashop Size Chart Addon: Video Tutorial
For a more visual and hands-on understanding of how to install, configure, and use the Knowband Prestashop Size Chart Addon, we have created a step-by-step video tutorial.
This video covers:
Module installation
Creating and customising size charts
Assigning size charts to products
Front-end display and functionality
Watch the full tutorial below to get started quickly and make the most out of this addon.
For more information about this Prestashop Size Chart Popup Addon please visit Knowband.
Well!! Every online shoppers must be excited to hear about any discount coupons, gift cards or scratch cards while doing online shopping from a site. It not only encourages them to shop more but also builds their trust and loyalty towards your online store. This in turn, helps in improving your conversion rates and product sales to a great extent. It is a open fact that freebies and amazing shopping deals/offers can help in grabbing more customer attention towards your eCommerce site to enhance your business fortunes. It is also an amazing way to grab that initial lead among your competitors by offering your customers exciting shopping offers and deals.
This is a great day for PrestaShop owners to boost their conversions and sales by taking the assistance of various feature packed PrestaShop coupon extensions that can make your cash counters ringing again. These PrestaShop addons can persuade your customers to spend more time on your site and search various products on your website for a quick purchase. Here are some of the PrestaShop Module from Knowband store that can be a game changer for your online store.
1. PrestaShop Facebook share and win discount-
With the support of this Prestashop Facebook share module, you can revolutionize your marketing strategies by encouraging your customers to share your products on sites like Facebook in return of amazing discount coupons. This PrestaShop coupon extensions not only boosts your sales but also helps with your social engagement. Here are some of the amazing features of this PrestaShop Facebook share and win discount addon. Take a look below:
The Prestashop Facebook share and win module offers quick sharing of the product on the Facebook wall of your customers.
The Prestashop Facebook share and win module provides the ability to check status of shared products on your site.
The Prestashop Facebook share and win module helps in boosting the customer engagement and traffic on your PrestaShop site.
The Prestashop Facebook share and win module offers easy discount to customers in return of the product sharing on their Facebook wall.
The Prestashop Facebook share and win module by Knowband works effectively with various devices and platforms like desktops, laptops, smart phones and tablets.
2. PrestaShop Scratch Coupon-
Ensuring appealing discounts and shopping offers are a great way of bringing customers and sales on your online store. If you are looking to enhance the performance and productivity of your PrestaShop site, this PrestaShop Scratch Coupon addons is the ideal match for you. This PrestaShop Scratch Coupon Module can offer wonderful scratch discounts to your customers for increasing their interest towards your products and site. Some of the amazing features and functionalities of this PrestaShop scratch coupon module are described below:
The scratch coupon module consists of a user friendly admin panel to perform various changes and customizations in a seamless manner.
The scratch coupon module ensures simple installation and configuration within few clicks.
The Prestashop scratch coupon module is designed to handle various multi- lingual eCommerce stores.
The scratch coupon module by Knowband provides timely and detailed reporting regarding all the coupons used, expired and remaining for enhancing the sales and conversions on your store.
The scratch coupon is compatible with various PrestaShop themes and eCommerce stores.
The Prestashop scratch coupon module wrks with various available devices and platforms like desktops, laptops, smart phones and tablets.
3. PrestaShop Product Jackpot-
If you are facing a decline in your sales and conversions on your PrestaShop store, this PrestaShop Product Jackpot module can help you improve your business fortunes. This PrestaShop Coupon extension provide customers a chance to win Jackpot in terms of a free product on your site. Let us take a look at some of the amazing features of this module which is explained below:
The Prestashop Product Jackpot module provides facility to select few products or whole category for the game.
The Prestashop Product Jackpot module by Knowband offers facility to exclude some products of a category for the Jackpot offer.
The Prestashop Product Jackpot module provides admin the freedom to control coupon validity.
The Prestashop Product Jackpot module supports multiple devices and platforms like desktops, laptops, smart phones and tablets.
So, don’t compromise with the dropping sales of your online store but take the required action by taking the help of these PrestaShop Coupon extensions from Knowband store. They have all the features and functionalities that can take the conversions and sales of your PrestaShop store to a new heights. Go grab them for the better performance of your eCommerce store from this Knowband store.
The Prestashop Helpdesk Module by Knowband acts as a Ticket Management System for a particular store that makes easier for the merchant to manage the ticket which will be raised for his store by the customer.
The Prestashop customer helpdesk module is very useful for both the ends i.e for the merchant and the customer because it lets the customer raise the ticket in a very convenient way and at the other end lets the merchant manage the ticket in a very efficient way. This extension also shows the merchant the details of the customer those who have raised the ticket on his/her store.
To install this Prestashop addon, please follow the following steps:
1. Add addon folder under modules folder of your system.
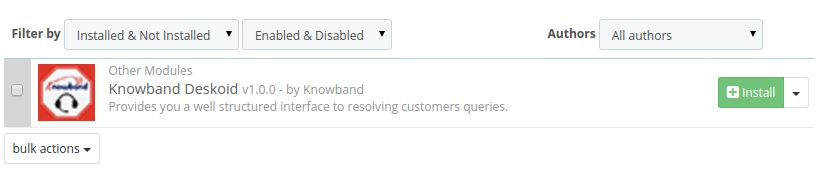
2. After adding this addon folder, system will list the addon on module page under front office feature category as given below:
3. Click install to install Prestashop desktop helpdesk plugin.
Administration Module
After the Prestashop module is installed a new entry in the menu bar of the shop starts appearing in the back end with the name DESKOID. This menu will be containing a sub menu which further will be containing following options.
Each section of the Prestashop customer helpdesk is described in details below.
Tickets
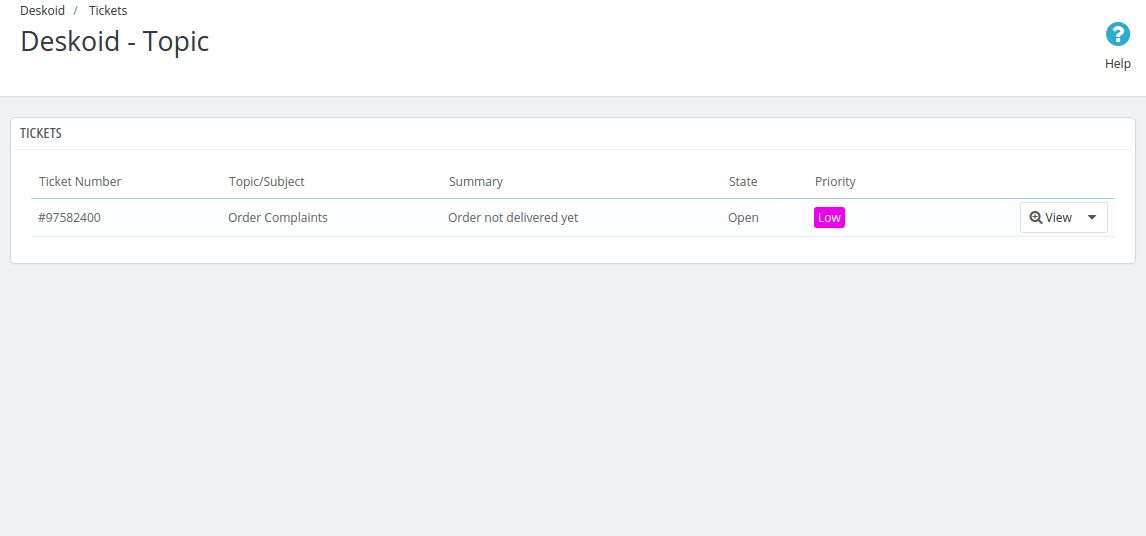
After the admin will click on this option of the sub menu of the Prestashop customer contact addon, a new page will appear which will be containing all the tickets raised by the customers
1. Ticket Number: This field of the Prestashop ticket system will be having a number value which will represent each of the ticket uniquely i.e each ticket will be having a unique ticket number.
2. Topic/Subject: This field of the Prestashop contact us addon will be having the topic to which a ticket has been raised. These fields will be already described in the back end and will be discussed later in the manual.
3. Summary: Here the summary of the ticket will be present which will be entered by the customer when he/she will be raising the ticket in the front end of the Prestashop desktop helpdesk.
4. State: This field of the Prestashop customer helpdesk will show the current state of the ticket. It may be open,closed,on hold,Progress, Waiting for reply, unknown.
5. Priority: The priority of the ticket will be represented in this field of Prestashop customer contact. It will be having the options like: Low, normal, urgent , high, unknown.
6. Actions: Their will be many action for each ticket-
a) Change State: This action of the Prestashop ticket system will let the admin to change the state of the ticket to what he wants.
b) Change Priority: On clicking on this action the admin can change the priority level of a particular ticket.
c) View State Changes: This option of the Prestashop contact us addon will show the admin that how the state of a particular ticket has changed from the item it has been raised.
d) View Priority Changes: This field of the Prestashop desktop helpdesk will do the same as the view state changes action but will show the changes done in the priority of the ticket.
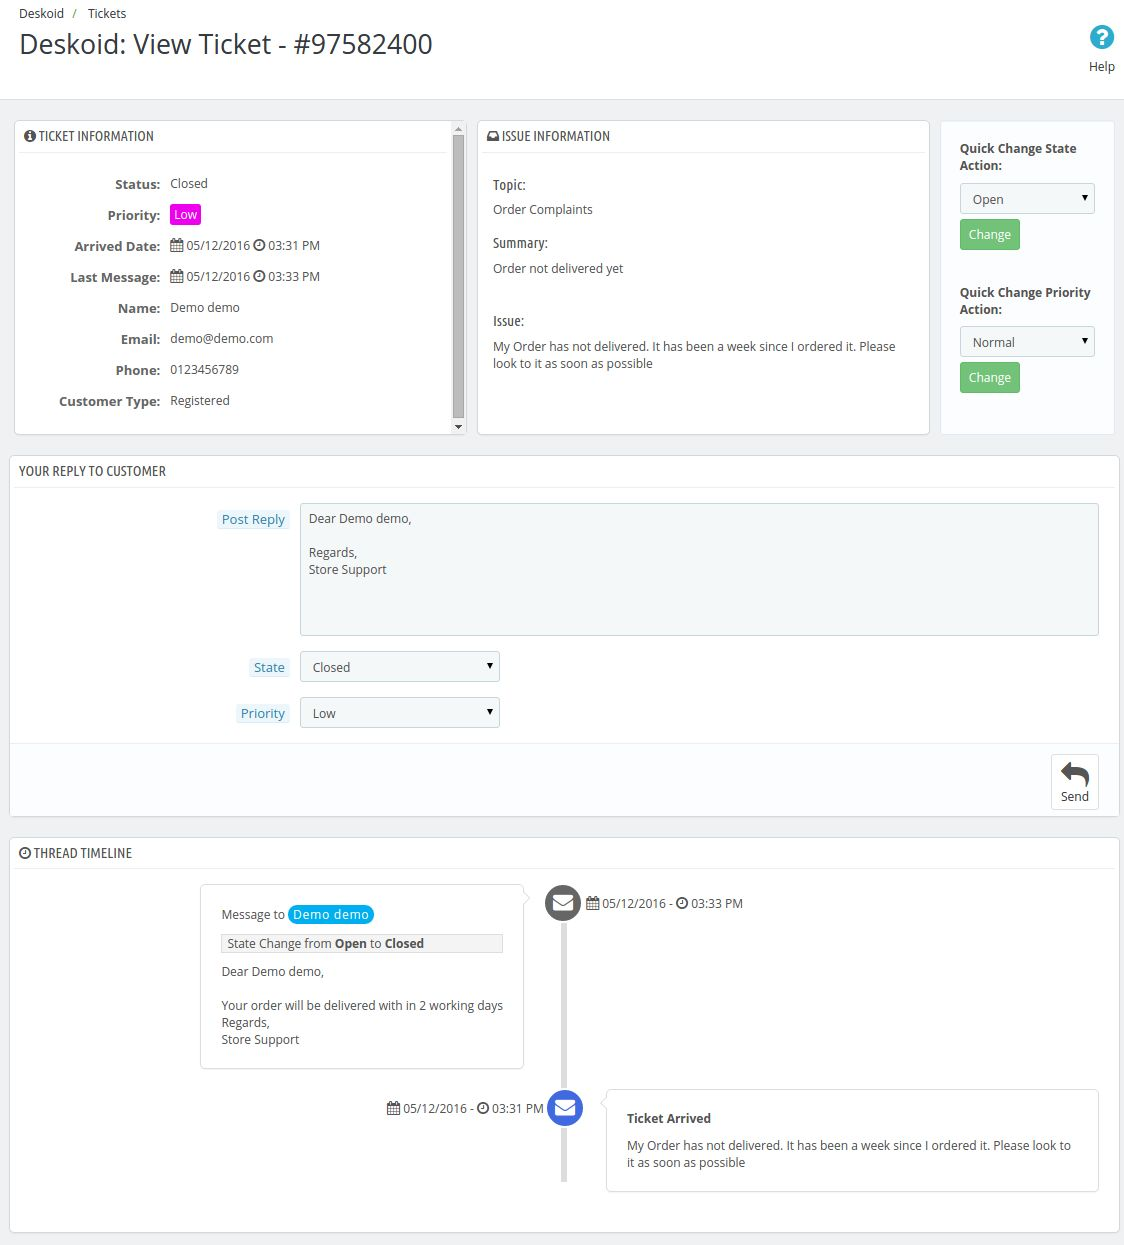
7. View Ticket: When the admin will click on the view ticket action then it will link the admin to an another page in which all the details with the conversation thread of the ticket will be mentioned. Admin can view all the details of the ticket here and can change the state and priority of the ticket. Admin can also reply to the customer from this page and all the details will be mentioned in the conversation thread given below the page.
Customers
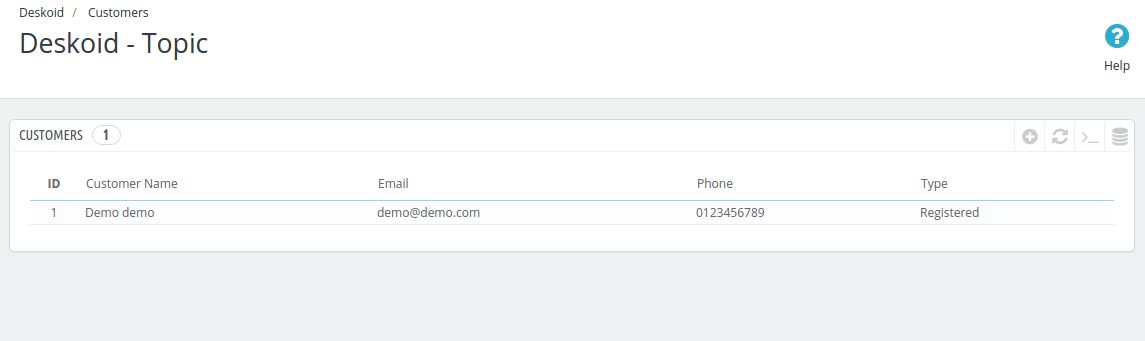
In this menu of the Prestashop customer helpdesk the admin can view all the customer those who have raised the tickets on the store. The admin can also view their email id, phone number , customer name and which type of customer has raised the ticked i.i it is a registered customer or a guest customer.
Ticket Topics
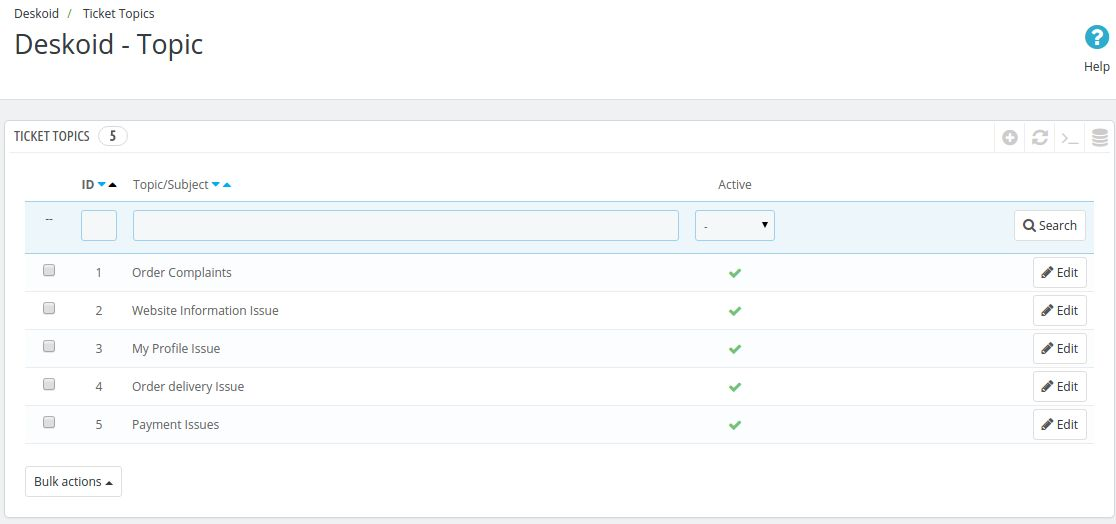
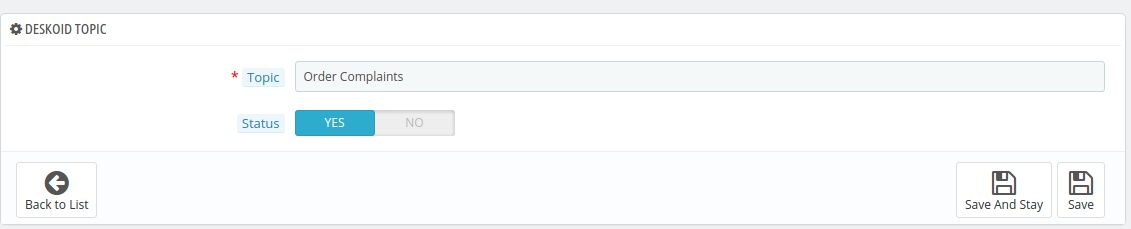
This sub menu of Prestashop customer contact plugin will be having all the topics which will show up in the front while the customer will raise the tickets. The customers can raise the tickets below these topics only.
The status of each topics can also be changed by just clicking in the active link in the row of each topics respectively. If the topic is not active then it will not appear in the front end of the customer drop down menu when they will raise the ticket.
Each topic can also be edited and can be stored in different languages in the back end. So the topic name of this Prestashop plugin which will be appearing in the front will be according to the language of the store and the settings done for each topic name.
Configuration
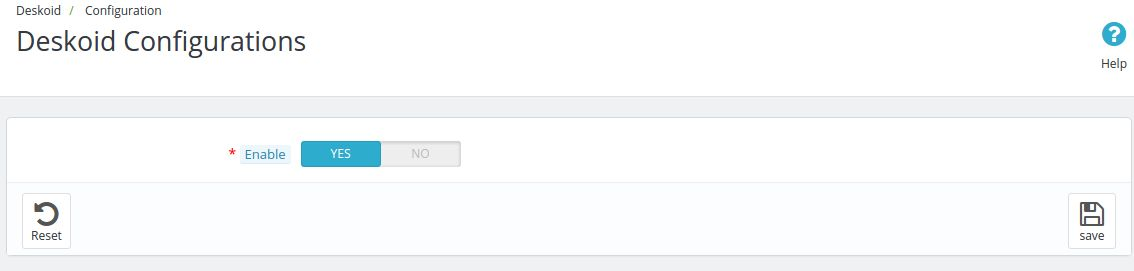
In this sub menu of the Prestashop plugin by Knowband a button will be present which will be used to enable or disable the module in the front. If this setting of the Prestashop module is disabled than the Prestashop ticket system module will not work in the front end.
Front End Module
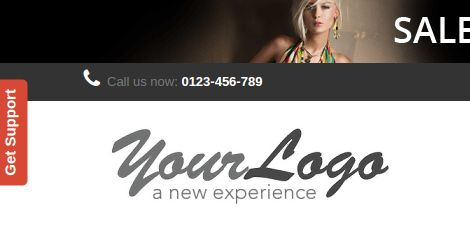
After enabling the Prestashop module from the back end a button starts appearing in the left hand side of the screen.
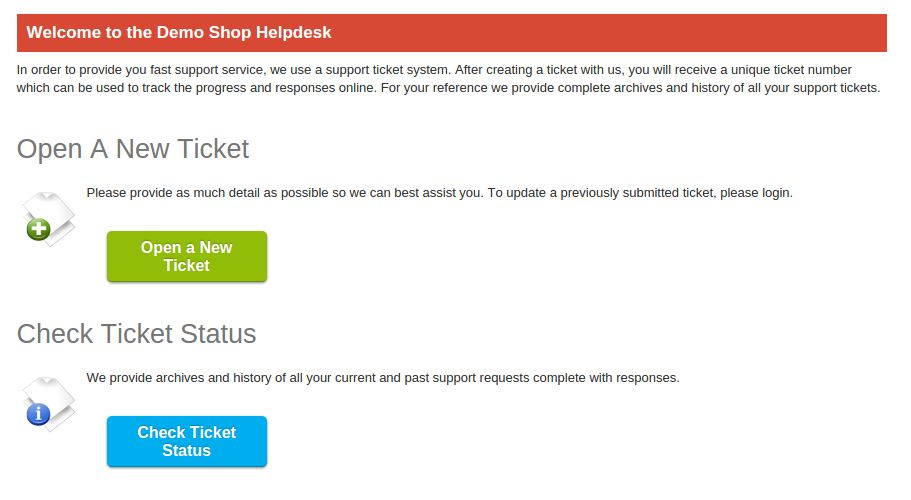
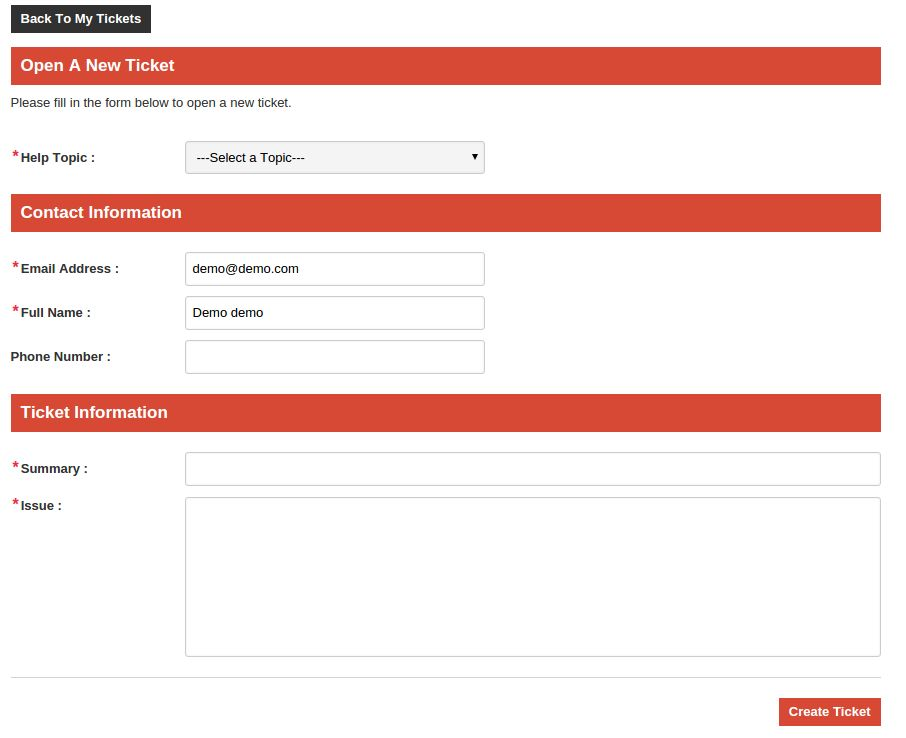
After clicking on this button of the Prestashop plugin, the user is redirected to the ticket system page where he can search a ticket and view it or he can create a new ticket.
The customer can create the ticket by using the topics which are given by admin in the back end of the Prestashop contact us addon by Knowband.
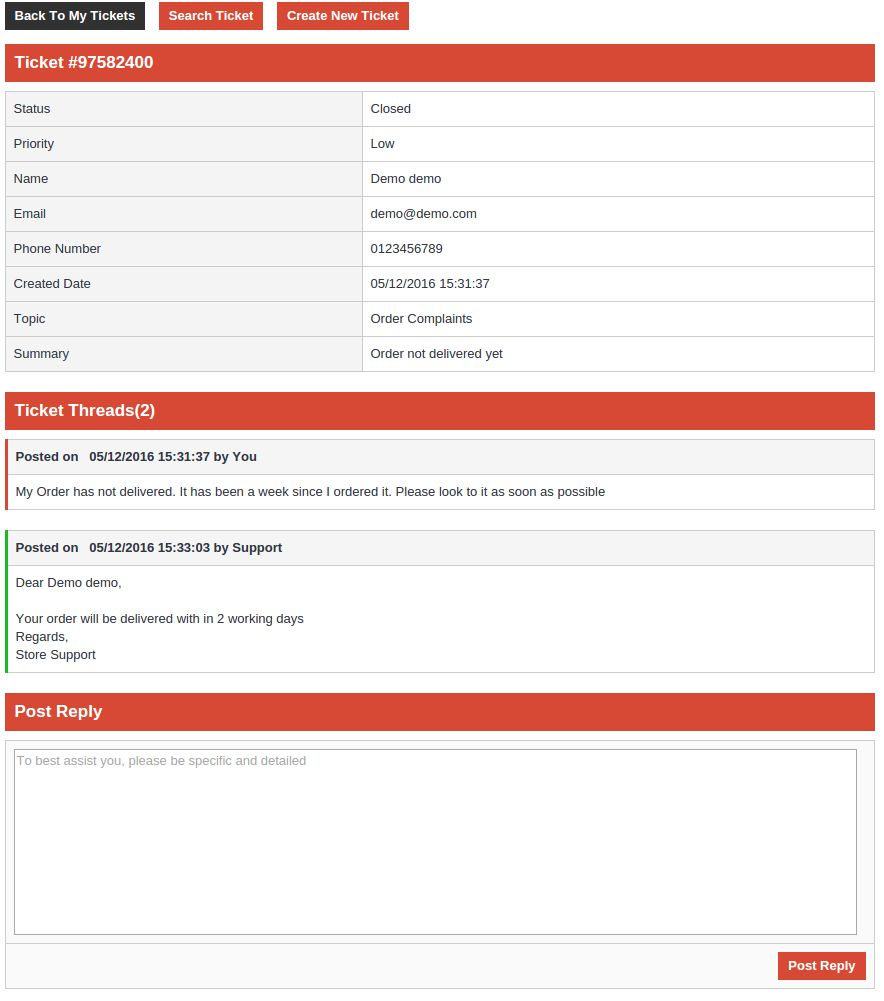
The customer can also view the conversation between him/her and admin when he views his ticket.
shopping cart abandonments can let your eCommerce business down that can drastically affect your sales. This not only affects your brand reputation but also the trust of your loyal customers. You can’t guess which element on your eCommerce store might work against you and can turn away your potential customers from your site.
Abandoned Carts can bring your conversions and sales to a great halt. Although, you will surely employ various techniques and approaches to deal with shopping cart abandonment there is one PrestaShop module that has brought a considerable change in the whole scenario. PrestaShop Abandoned Cart module is remarkable work from the Knowband team!
Let us explore more about this amazing module by taking a quick look at the various features and functionalities that are explained below:
1. capture the shopping carts of guest and logged- in customers
With the help of this PrestaShop module, you can keep a track of the guest and logged-in customer’s shopping carts that have been left abandoned. With its detailed analytics report, it is now much easier to target abandoners in order to boost your sales and conversions. This PrestaShop Abandoned Cart module can simplify the task of customer retargeting and conversion rate optimization.
2. Reminder email templates in multiple languages
You might have customers from different regions. If you want to grab higher conversions and sales for your eCommerce store, you need to provide preferential treatment to your targeted customers. The language translation feature of this PrestaShop Abandoned Cart module helps in sending personalized reminder emails or you can choose an email template from the listed ones to your abandoned customers in their native language that encourages a swift cart recovery.
With this module, the store owner can send emails automatically after a set delay. Also, the carts are marked abandoned in the same manner.
3. Send them a push notification when surfing through the browser
Not all your customers use the mobile app but are your PrestaShop store is ready for browser surfing? Progressive web apps are the new trend followed by almost every popular online website. In case you have an abandoner who is reaching you through the browser, you can use the push notification feature to grab their attention. Of course, emails are the best tool but sometimes customers just avoid them.
4. Inclusion of coupon codes and other appealing offers
There are times when your persuasive words in an email may not work for your eCommerce store and maybe completely futile. In these circumstances, you need to try out the last resorted option in the form of coupon code inclusion for making the desired conversion rates and cart recovery. It is one of the brilliant features of this PrestaShop Abandoned Cart module that allows the store managers to offer appealing coupon codes, discounts on the shopping cart products for effective customer targeting and sales.
5. Display a pop-up with a discount coupon that motivates
After targeting your customers with emails and push notifications, you can also display a pop-up on their screen whenever they visit your store. The abandoned cart pop-up window can be displayed on one or multiple pages. You can even add some discounts on the entry popup or exit pop-up that can encourage impulse buying. The PrestaShop Abandoned Cart module is different and has several unique features that make it different from any other available module.
6. Detailed statistical report about abandoned carts and converted carts
With this PrestaShop Abandoned Cart module, store admin can get a detailed report about abandoned carts like the number of abandoned carts, the number of recovered carts, conversion rates achieved, and other such crucial information. By having this data, it will be much easier for your store to plan your eCommerce marketing strategies and the pain points to achieve the desired conversions and sales.
Finally,
It is time to keep your abandoned carts under check and think about ways to control and get them converted back again in a seamless manner. For providing expert assistance in this critical task, you need to install this feature-loaded PrestaShop Abandoned Cart module from the Knowband store for a drastic makeover. It will surely make your online store the most preferred destination for making a quick product purchase and improve your business gains.
Customers have now become more selective during online shopping and are not in a mood to compromise with quality, delivery time, and price of the product. They are always looking for a product that is high in terms of quality and performance that is available without any significant delay and comes with the most economical price among other available products.
It may sound to be a hyperbole statement but it is actually what online shoppers are expecting from their eCommerce store owners. On top of it, if they are not getting the required product/services, they will not think twice about leaving a site and will contribute towards shopping cart abandonments.
It could be a severe blow to the reputation of your company if you are unable to control the shopping cart abandonments. If you are not having enough clue about how to check the increasing abandoned carts in your store, it is time to explore this PrestaShop Abandoned Cart module from the Knowband store. Let us explain to you more about the amazing features of this PrestaShop extension for the growth and expansion of your eCommerce store.
Display attractive pop-ups and send endless push notifications-
Many a time, email marketing strategies fail to deliver the expected results because of the frequency of average emails sent or received every day. To combat this situation, the PrestaShop module for Abandoned Cart is integrated with the web-browser push notification feature and entry/exit pop-up for sending a reminder alert to abandoners.
Option to personalize emails in various languages
Personalization makes a tremendous impact on the minds of your customers and can help in effective customer engagement in your store. This PrestaShop Abandoned Cart module provides the facility to create customized emails for your targeted customers by making various personalization attempts. Keep in mind that there are several types of customers and you have to be creative and you have to be creative to entice them.
Functionality to choose CRON jobs as and when required
With this module, it is now possible to manually or automatically update the list of abandoned carts on your store for achieving higher conversion rates and sales. For the orders that are not claimed in the given period of time, the module will mark them abandoned automatically. It allows you to send sequence reminder mails by setting a delay time once a cart is marked abandoned.
Provides facility to include coupon codes in your reminder alerts
Online shoppers are always looking for attractive shopping offers, discounts, and coupon codes that can persuade them to make a quick product purchase. Understanding this mindset, it is now much easier to include engaging discount coupons in your reminder emails for effective targeting of your customers.
Seamless cart recovery for higher customer engagement and sales
One of the main reasons that hamper the conversion of abandoned carts is the ease of cart recovery. This is one of the crucial issues that have been handled effectively by this PrestaShop Abandoned Cart module. Abandoned customers are provided with reminder emails that consist of a direct checkout button that can take users back to their shopping carts with all the added products and cart details. Customers don’t have to scratch their heads anymore for retrieving their abandoned cart due to the presence of this outstanding module.
Boosts decision-making process with analytical reports
This Prestashop extension provides a detailed analytical report about abandoned carts and converted carts in the form of graphs and other statistics. By studying the data of these representation figures, you can seamlessly improve your conversion rates and product sales. The abandoned and converted carts of both logged-in users and guest customers can be tracked with this amazing module.
Wrap-up
If you have been struggling with the sales and conversions on your store, it is time to make amends with the help of this PrestaShop Abandoned Cart module from the Knowband store. In spite of having numerous options in this field, this eCommerce extension has made its own place and mark due to the presence of various unmatched features and functionalities. Don’t be a victim of shopping cart abandonments anymore and take the required action with the support of this extraordinary Knowband module.
Uzyskaj w pełni natywne aplikacje na Androida i iOS na swoją stronę PrestaShop i zacznij sprzedawać swoje produkty na aplikacje mobilne!
1.0 Wprowadzenie
To jest podręcznik użytkownika zaawansowanego i gotowego rozwiązania natywnej aplikacji mobilnej PrestaShop Mobile App Builder. Jest to wtyczka do witryny handlu elektronicznego zaprojektowana i stworzona, aby budować dla Ciebie idealne i funkcjonalne aplikacje do zakupów na Androida i iOS.
1.1 PrestaShop Mobile App Builder: krótkie wprowadzenie
PrestaShop Mobile App Builder jest najbardziej zaawansowanym i zautomatyzowanym rozwiązaniem, które przeniesie Twoją stronę internetową do platformy mobilnej. Przekształca całą witrynę w funkcjonalną aplikację mobilną i pozwala sprzedawać produkty na telefon komórkowy wraz z tradycyjną stroną internetową. Funkcje i działanie aplikacji są dokładnie dopasowane do strony internetowej i działają bez zarzutu zarówno na urządzeniach z Androidem, jak i iPhone'ach.
Nasze PrestaShop Mobile App Builder to wstępnie skonfigurowany framework zaprojektowany przez ekspertów i specjalistów w celu zbudowania pary natywnych aplikacji eCommerce. Aplikacje są w stanie przenieść wszystkie produkty w sklepie na wyciągnięcie ręki i zwiększyć sprzedaż i przychody. Więc jeśli jesteś sprzedawcą sklepu PrestaShop i szukasz pełnowartościowego rozwiązania dla aplikacji mobilnych, jest to Twoja najlepsza szansa. Przeczytaj cały artykuł, aby uzyskać pełne informacje o rozwoju aplikacji mobilnych PrestaShop.
Ponadto nasze rozszerzenie PrestaShop Mobile App Builder jest w pełni kompatybilne Rynek wielu dostawców podłącz. Możesz wyświetlić całą listę rynków na tych samych aplikacjach mobilnych. Oferujemy nawet pakiet combo PrestaShop Mobile App Builder z PrestaShop Multi-Vendor Marketplace in PrestaShop Advanced Marketplace Z aplikacją mobilną.
Co więcej,
A?no-code?Mobile?App?solution.
Przyjazny
3-miesięcy
Całkowicie
100%
Wysoko
Zwiększa
Zwiększa
1.2 Najważniejsze cechy PrestaShop Mobile App Builder:
Oto lista najważniejszych funkcji, które otrzymasz w aplikacjach za pomocą Prestashop Mobile App Builder:
Konfigurowalny układ ekranu głównego (pełna elastyczność)
Branding sklepu
Obsługa czatu Zopim & WhatsApp (24 * 7)
Logowanie Google i Facebook
Logowanie OTP i odcisków palców
Zarówno obsługa tabletu, jak i telefonu komórkowego
Android 4.2 na Android 8.0 (Oreo) Wsparcie
iOS 9 na iOS 11 Support
Automatyczna aktualizacja zapasów
Wiele opcji wyboru koloru i czcionki
Wsparcie wielojęzyczne i RTL (od prawej do lewej)
Obsługa wielu walut
Obsługa wszystkich typów produktów
Obsługiwana metoda płatności za pośrednictwem aplikacji w aplikacjach
Obsługiwana metoda wysyłki strony w aplikacjach
Integracja metody płatności niestandardowej
Nieograniczone powiadomienia Push
Opcje udostępniania produktów
Wiele opcji filtrowania i sortowania
Zaawansowane wyszukiwanie głosowe (tylko Android)
Lista życzeń Funkcjonalność
Kupon internetowy / kupony obsługiwane na aplikacjach.
Uproszczony ekran kasowy
Śledzenie zamówień w czasie rzeczywistym
Bezszwowe menu akordeonu
Wyraźny ekran produktu i kategorii
Lista niesamowitych licznych funkcji jest stale wyświetlana. Czytaj dalej, nowe zalety tej wtyczki nie zostały jeszcze ujawnione.
Dowiedz się więcej o szczegółach funkcji z tutaj.?
Aplikacja mobilna 2.0 PrestaShop
KnowBand rozumie Twoje obawy związane z niepewnością, aby znaleźć rozwiązanie i aby je ograniczyć, oferuje bezpłatne demo dla wszystkich właścicieli sklepów eCommerce. Handlowcy mogą przeglądać nasz sklep demonstracyjny działający w aplikacji mobilnej, a nawet ich sklep pracujący nad naszymi aplikacjami demonstracyjnymi.
2.1 Zobacz nasz sklep demonstracyjny działający na aplikacjach
Chcesz zobaczyć funkcje aplikacji eCommerce? Zintegrowaliśmy nasz sklep demonstracyjny z aplikacją, w której możesz poznać w pełni funkcjonalną aplikację i zobaczyć wszystkie jej funkcje. Po prostu wykonaj poniższe instrukcje:
Krok 1: Pobierz i zainstaluj aplikację mobilną Nautica PrestaShop z obu sklepów App Store na urządzeniu mobilnym. Oto linki do pobrania aplikacji demonstracyjnych:
Krok 2: Otwórz aplikację i dotknij przycisku „Wyświetl demo” na ekranie powitalnym. Wprowadź odpowiednie informacje, takie jak nazwa, adres e-mail i adres URL sklepu. To jest to! Zobaczysz nasz sklep demonstracyjny działający w aplikacji demo. Możesz przeglądać to samo, sprawdzać wszystkie funkcje, tworzyć zamówienia itp. Uwaga: Aby uzyskać dostęp do panelu administracyjnego aplikacji KnowBand Mobile App Builder w naszym sklepie demonstracyjnym, odwiedź tutaj.
2.2 Zobacz swój sklep działający na aplikacjach demonstracyjnych
Niezadowolony? Chcesz przetestować swój sklep w aplikacjach demonstracyjnych? Mamy wszystko pokryte. Możesz doświadczyć swojego sklepu w naszej aplikacji demo, a także bez żadnych kosztów. Tylko kroki 3 to wszystko, czego potrzebujesz do tego samego:
Krok 1: Pobierz i zainstaluj bezpłatną wtyczkę PrestaShop Mobile App Builder i zainstaluj ją w swoim sklepie.
Krok 2: Zainstaluj aplikacje demonstracyjne (linki w poprzedniej sekcji) na urządzeniu mobilnym. Otwórz aplikację i wprowadź adres URL sklepu.
Krok 3: Dotknij „Wyświetl swój sklep” i zacznij doświadczać własnego sklepu w aplikacjach demonstracyjnych. Możesz skonfigurować zainstalowany moduł aplikacji mobilnej PrestaShop na zapleczu swojej witryny. Dowiedz się więcej o testowaniu aplikacji PrestaShop Mobile App Maker tutaj.
3.0 Zbuduj swoją aplikację mobilną PrestaShop w 3 Simple Steps
Mamy nadzieję, że spodobała Ci się wersja demonstracyjna naszych aplikacji mobilnych PrestaShop i znalazłeś to, czego szukałeś. Jest to więc czas, aby uzyskać rodzimą parę aplikacji dla swojego sklepu. Proces tworzenia aplikacji mobilnej eCommerce jest tak prosty, jak to tylko możliwe. Po prostu wykonaj proste kroki 3, a Twoja aplikacja będzie gotowa w dni robocze 1-2.
Krok 1: Zainstaluj moduł na swojej stronie internetowej
Ściągnij
Krok 2: Udostępnij swoje specyfikacje aplikacji
Udostępnij swoje dane / wymagania aplikacji w
Krok 3: Uzyskaj aplikacje w dniach 1-2
Nasi wykwalifikowani i profesjonalni programiści budują Twoje aplikacje pasujące dokładnie do udostępnionych szczegółów. Wrócimy do Ciebie z plikami APK / IPA w dniach 1-2.
Uwaga: Możesz publikować te pliki APK / IPA w odpowiednich sklepach z aplikacjami. Poniższe linki dotyczą tego samego:
Nadal masz problem? Powiedz nam, że opublikujemy aplikacje dla Ciebie. Co więcej, w przypadku jakichkolwiek zapytań prosimy o kontakt pod adresem support@knowband.com.
Po pomyślnym zainstalowaniu aplikacji PrestaShop Mobile App Maker w Twojej witrynie nadszedł czas na skonfigurowanie panelu administracyjnego PrestaShop Mobile App Creator. Po kliknięciu opcji „Konfiguruj” w aplikacji KnowBand Mobile App Builder pojawi się następująca karta z przyjaznymi interfejsami. Zawęźmy je jeden po drugim.
Ustawienia ogólne 5.1
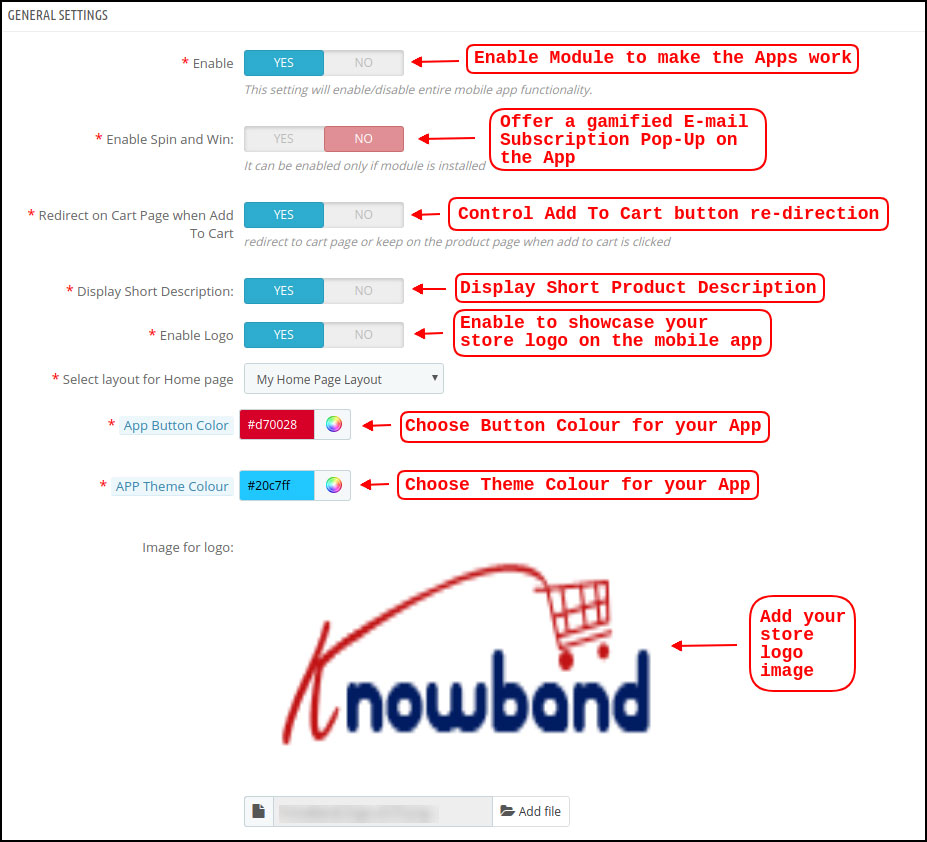
Zakładka Ustawienia ogólne dotyczy ustawień wymaganych do uruchomienia aplikacji mobilnej na urządzeniach użytkownika. Ta karta zawiera wszystkie niezbędne uogólnione opcje synchronizowania aplikacji z urządzeniem, które działa na urządzeniach.
a) Włącz wtyczkę: Włącz wtyczkę PrestaShop Mobile App Creator, aby aplikacja mobilna działała na urządzeniach użytkownika.
b) Włącz spin i wygraj: Włącz wyświetlanie wyskakującego okienka obrotowego na ekranie głównym, gdy dowolny użytkownik otworzy aplikację. Może służyć do oferowania rabatów / ofert i przechwytywania ich e-maili w zamian za cele marketingowe. Aby ta funkcjonalność działała, musisz zainstalować moduł Spin and Win firmy Knowband na swojej stronie internetowej.
c) Przekieruj na stronę koszyka, gdy Dodaj do koszyka: Ta funkcja umożliwia sterowanie nawigacją przycisku „Dodaj do koszyka”. Możesz przekierować użytkowników do koszyka lub zachować je na stronie produktu po każdym naciśnięciu przycisku Dodaj do koszyka. Zwiększa to szanse na dodatkowy zakup.
d) Wyświetl krótki opis: Włącz wyświetlanie krótkiego opisu produktu na ekranie produktu wraz z pełnym opisem i innymi szczegółami.
e) Wybierz układ: Wybierz żądany układ strony głównej dla swojej aplikacji PrestaShop. Możesz tworzyć wiele układów ekranu głównego w backend, jak na różnych festiwalach i tematach i używać ich zgodnie z wymaganiami sklepu.
g) Kolor motywu aplikacji: Wybierz żądany kolor motywu dla swojej aplikacji mobilnej PrestaShop.
h) Obraz logo: Prześlij obraz logo sklepu, aby był wyświetlany w górnym nagłówku aplikacji. To promowało Twoją markę wśród klientów na całym świecie.
i) Metody wysyłki osób niepełnosprawnych: Wybierz żądane metody wysyłki, których nie chcesz wyświetlać w aplikacji mobilnej PrestaShop.
j) Włączone strony CMS: Wybierz żądane strony CMS, które będą wyświetlane w aplikacjach mobilnych.
k) Włącz raportowanie dziennika żądań: Włącz logowanie do aplikacji mobilnych, aby uzyskać szczegółowe informacje o wszelkich nietypowych zachowaniach aplikacji.
l) Włącz obsługę czatu na żywo: Włącz opcję czatu Zopim (Zendesk) w aplikacjach mobilnych PrestaShop. Aby funkcja czatu działała, wymagany byłby klucz API czatu, który zostanie Ci dostarczony wraz z aplikacją.
m) Włącz obsługę WhatsApp Chat: Włącz opcję czatu WhatsApp w aplikacjach mobilnych PrestaShop. Użytkownicy mogą się z tobą skontaktować bezpośrednio pod numerem WhatsApp wpisanym w backend.
n) Włącz / wyłącz rejestrację numeru telefonu: Włącz opcję logowania do numeru telefonu w aplikacji mobilnej PrestaShop i pozwól użytkownikom uwierzytelniać się za pomocą weryfikacji OTP.
o) Włącz kodowanie URL linków obrazu: Włącz tę funkcję, aby obsługiwać znaki inne niż ASCII w aplikacji.
Ustawienia powiadomień Push 5.2
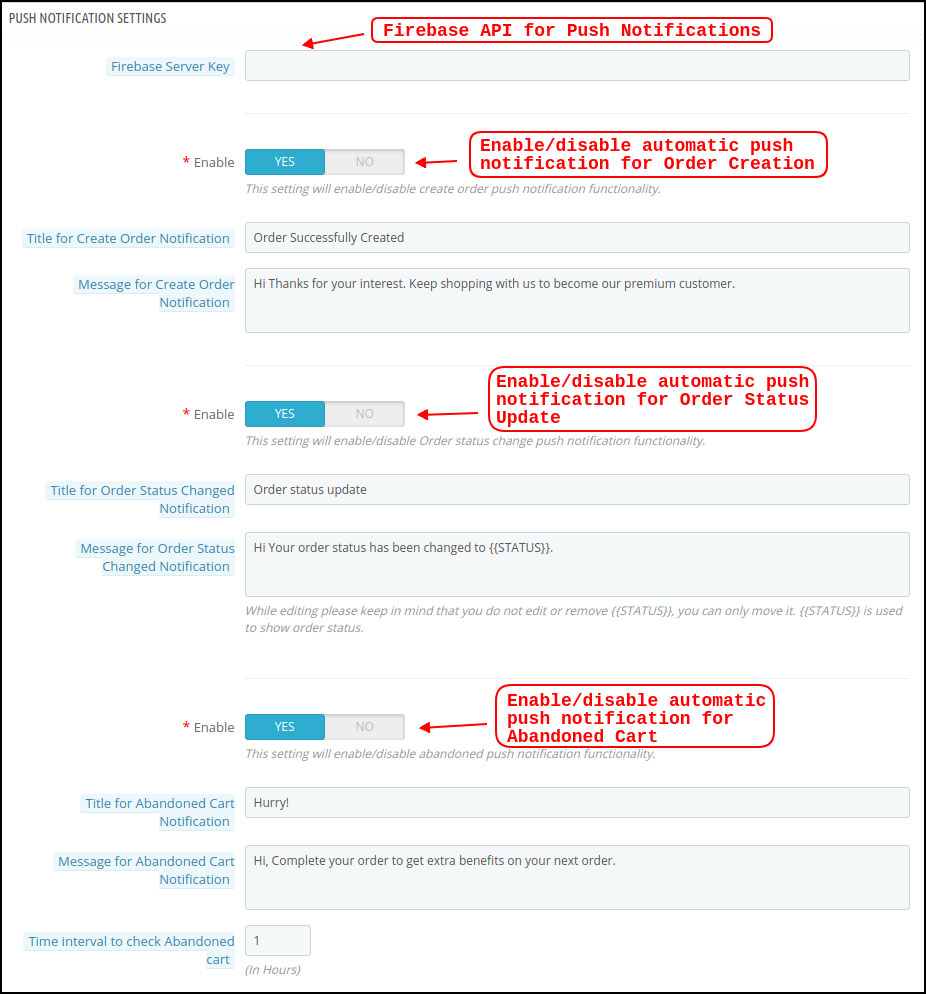
PrestaShop Mobile App Creator dla systemu Android / iOS korzysta z funkcji Power of Push Notification przy użyciu podstawowych usług Google dla powiadomień Push do urządzeń mobilnych. Przynosi to poręczne narzędzie marketingowe, które przyciąga uwagę użytkowników i zwiększa sprzedaż. Podkreślanie swoich codziennych ofert i ofert to tylko wiadomość od Twojej aplikacji mobilnej PrestaShop. Zarówno automatyczne, jak i niestandardowe powiadomienia są dostępne w aplikacji PrestaShop Mobile App Maker.
a) Klucz serwera Firebase: Klucz serwera Firebase służy do konfigurowania powiadomień wypychanych dla aplikacji. Ten klucz zapewnia, że powiadomienia są odbierane przez wszystkich użytkowników aplikacji na całym świecie.
b) Włącz / wyłącz powiadomienie o tworzeniu zamówienia: Włącz / wyłącz automatyczne wysyłanie powiadomień wysyłanych do użytkowników aplikacji w celu pomyślnego utworzenia zamówienia. -> Tytuł i wiadomość dla powiadomienia wypychanego:?Enter title and message of push notification for successful order creation.
c) Włącz / Wyłącz powiadomienie o zmianie statusu zamówienia:Włącz / wyłącz automatyczne wysyłanie powiadomień wysyłanych do użytkowników aplikacji w celu uzyskania aktualizacji dotyczących stanu poprzedniego zamówienia. -> Tytuł i wiadomość dla powiadomienia wypychanego:?Enter title and message of push notification whenever there is an update in previous order delivery status.
d) Włącz / wyłącz powiadomienie o opuszczonym koszyku: Włącz / wyłącz automatyczne powiadomienia wypychania wysyłane do użytkowników, którzy porzucili koszyk bez pomyślnego zakupu. -> Tytuł i wiadomość dla powiadomienia wypychanego:?Enter the title & message of push notification for abandoned cart app users.
e) Przedział czasu:?Interval (in hours) for sending Push Notification to app users who have abandoned their cart without successful purchase.
5.3 Push Notification History
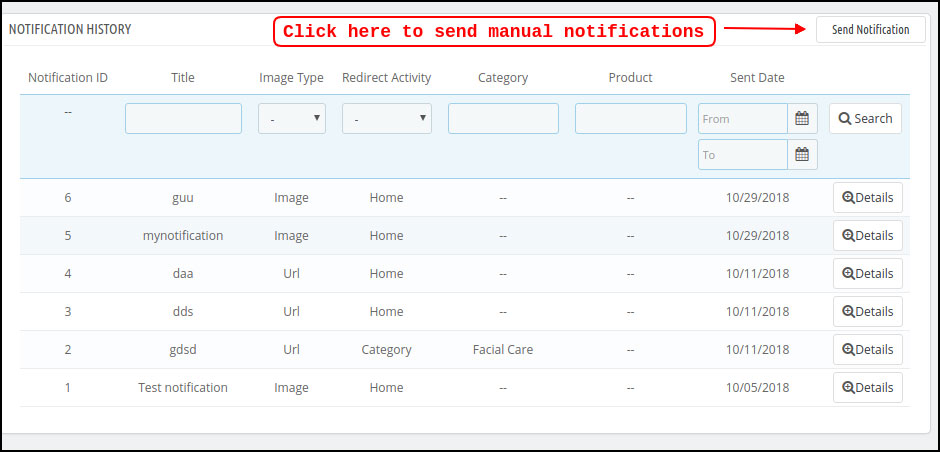
Ta karta zawiera historię wszystkich rodzajów powiadomień push wysyłanych do każdego użytkownika z danymi szczegółowymi. Kupiec może dowiedzieć się o każdym wcześniejszym powiadomieniu. Ta karta ma również opcję wysyłania niestandardowych powiadomień do użytkowników utworzonych z zaplecza. Możesz łatwo uświadomić im wszelkie szczegóły związane ze sklepem lub rabaty dzięki ręcznie wysyłanym powiadomieniom.
Wyślij powiadomienie:
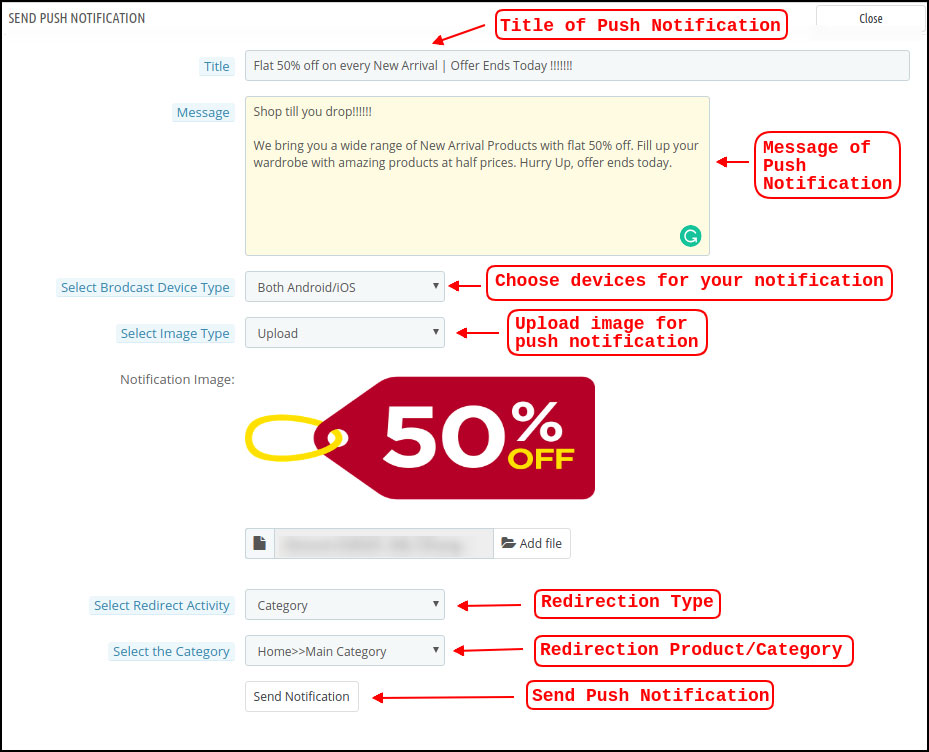
Ta opcja służy do wysyłania ręcznego powiadomienia do użytkowników aplikacji zgodnie z wybranym wyborem. Możesz skonfigurować tytuł, wiadomość, stronę docelową, obraz itp. Oraz wybrane powiadomienie, jak pokazano poniżej:
a) Tytuł powiadomienia push: Tytuł ręcznego powiadomienia o wypychaniu, które ma zostać wysłane do użytkowników aplikacji.
b) Wiadomość o powiadomieniu wypychanym: Wiadomość o ręcznym powiadomieniu, które ma zostać wysłane do użytkowników aplikacji.
c) Typ urządzenia: Możesz wybrać użytkowników na Androida / iOS lub na tych, do których ręczne powiadomienie wypychane ma zostać wysłane.
d) Typ obrazu:?You can upload the desired image/banner justifying your notification. The banner image can be uploaded or used through an existing URL.
e) Obraz powiadomienia: Administrator sklepu może przejrzeć obraz powiadomienia i przeanalizować, jak będzie wyglądać w aplikacjach użytkownika.
f) Adres URL obrazu: Rzeczywisty adres URL obrazu powiadomienia, który ma zostać wysłany do użytkowników aplikacji.
g) Aktywność przekierowania:Możesz wybrać przekierowanie powiadomienia, wybierając z Ekranu głównego / Dowolnej kategorii / Dowolny produkt tutaj. Cokolwiek ustawisz, twoi użytkownicy zostaną przekierowani na to samo po dotknięciu powiadomienia push.
h) Wybierz kategorię / produkt:?You can choose any relevant category/product screen for your notification.
i) Wyślij powiadomienie: Po utworzeniu i wyświetleniu podglądu powiadomienia nadszedł czas, aby wysłać to samo w swoich aplikacjach.
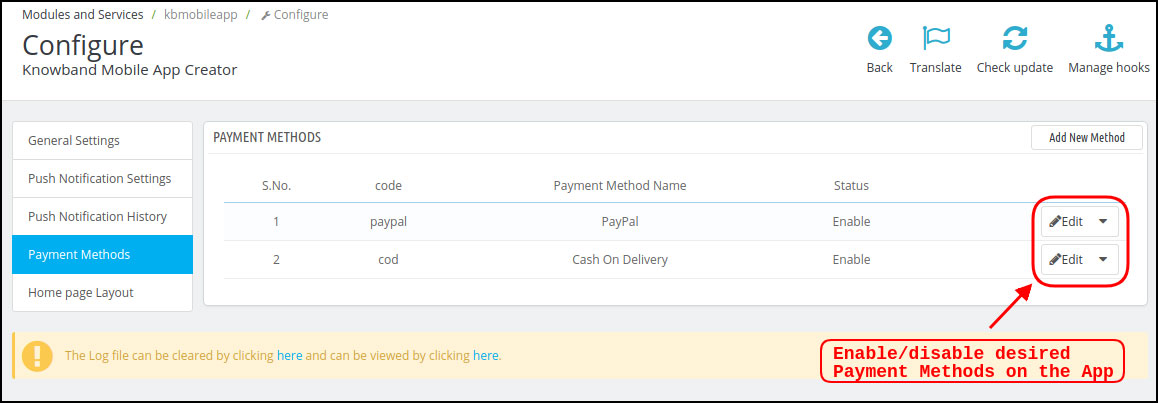
Metody płatności 5.4
PrestaShop Mobile App Creator na Androida i iOS obsługuje wszelkiego rodzaju metody płatności na stronie w aplikacjach na Androida i iOS. Dodatkowo oferuje opcje płatności PayPal i COD oraz elastyczność dodawania innych rodzimych metod płatności.
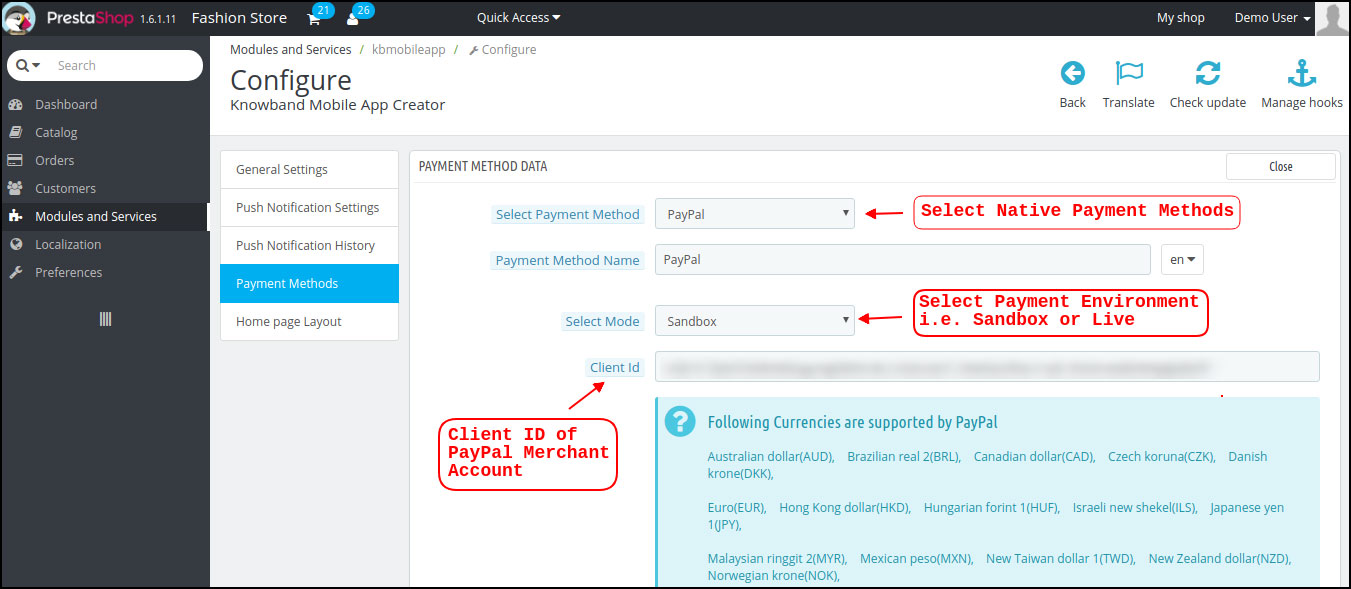
W domyślnych metodach płatności (PayPal) możesz edytować następujące parametry:
a) Nazwa metody płatności: Edytuj nazwę metody płatności, aby wyświetlić ją w aplikacji.
b) Wybierz tryb: Wybierz Środowisko płatności, tj. Sandbox lub Live. Ustawienia te są dostępne na wypadek, gdyby administrator sklepu chciał przetestować metodę płatności przed kontynuowaniem.
c) ID klienta:?This is used in the case of PayPal Payment in order to identify the Merchant Account to which the Payment has to be made while placing the order.
Układ strony głównej 5.5
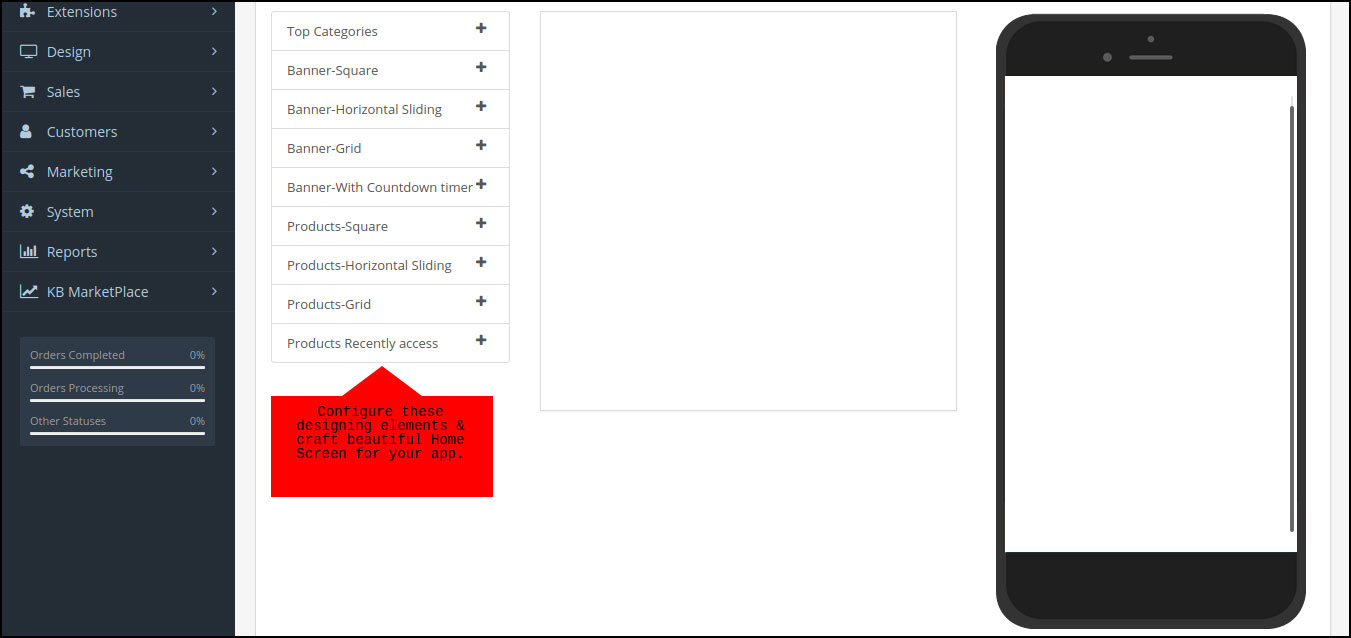
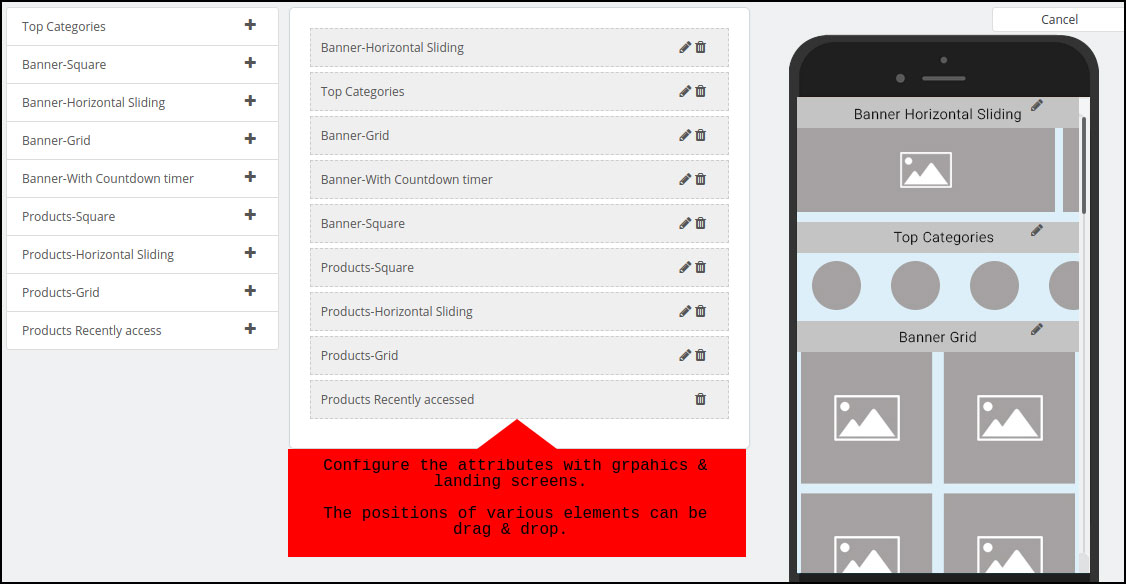
Jest to jedna z najbardziej niesamowitych funkcjonalności wtyczki PrestaShop Mobile App Builder do projektowania i tworzenia wielu układów ekranu głównego przy użyciu różnych atrybutów / elementów projektowych. Ta karta zawiera listę wszystkich układów ekranu głównego skonfigurowanych wcześniej na podstawie różnych tematów i czcionek, jak pokazano w poniższej migawce:
Aby skonfigurować układ strony głównej, następujące elementy są dostępne w zapleczu:
Top
Plac
Poziomy
Krata
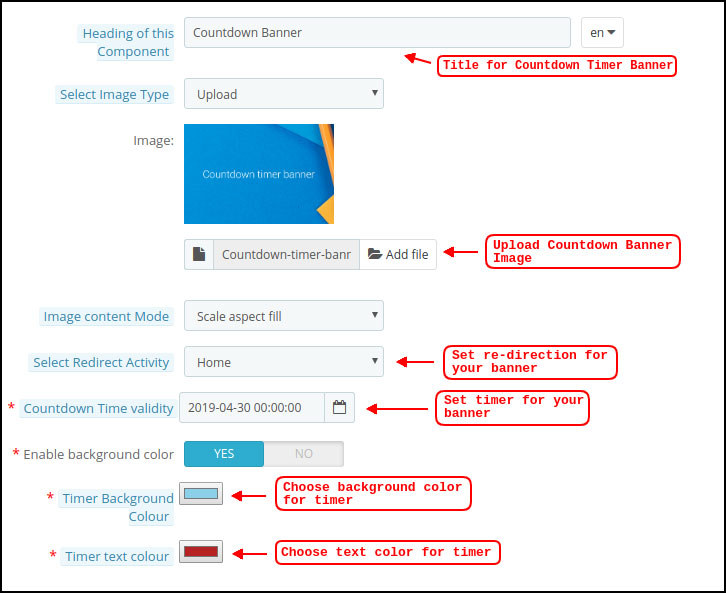
Odliczanie
Krata
Poziomy
Niedawno
Sprzedawca sklepu może skonfigurować i używać dowolnego z tych atrybutów do tworzenia i zapisywania wielu układów. Układy te mogą być używane zgodnie z tematem i wymaganiami. Pozycjonowanie różnych elementów można również zmienić za pomocą prostej funkcji przeciągnij i upuść.
Top
Top
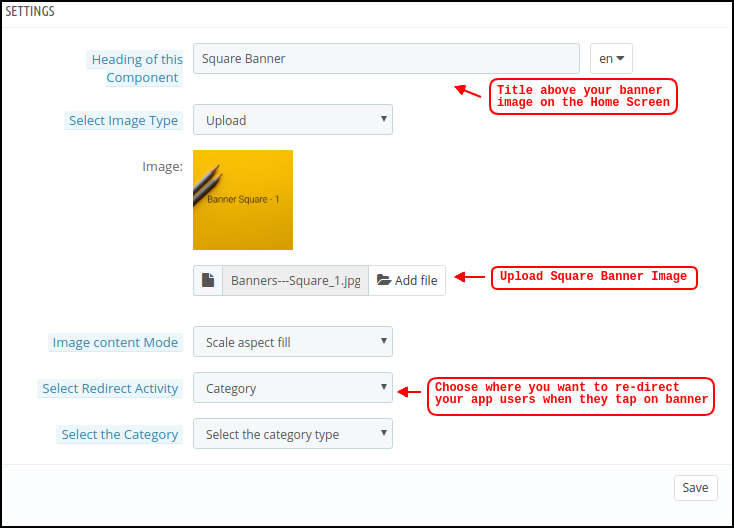
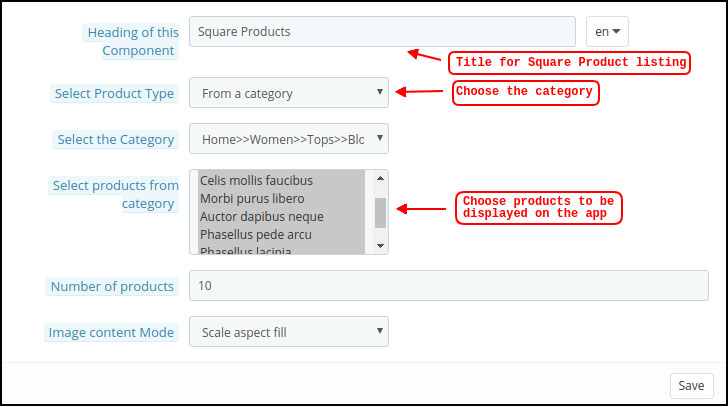
Plac
Innym atrybutem jest lista banerów kwadratowych, która służy do oferowania baneru w kształcie kwadratu na ekranie głównym aplikacji. Możesz dostosować baner, wybierając odpowiedni obraz i ekran lądowania dla tego samego.
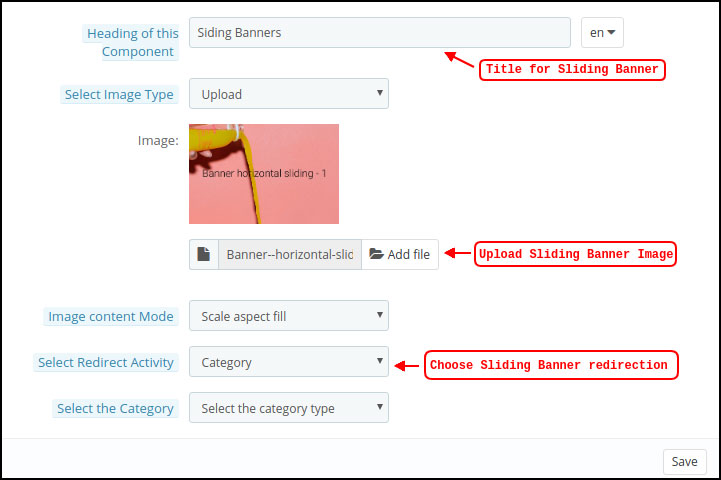
Poziomy
Są to prostokątne kształty dostępne w poziomym przesuwaniu i mogą być w pełni dostosowane do zaplecza.
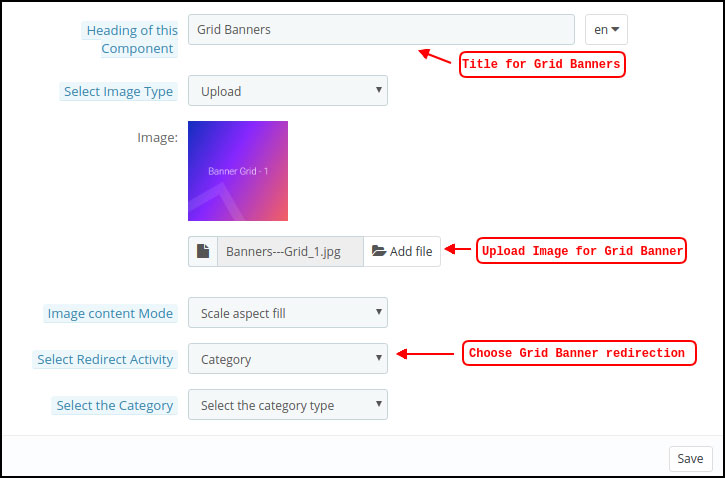
Krata
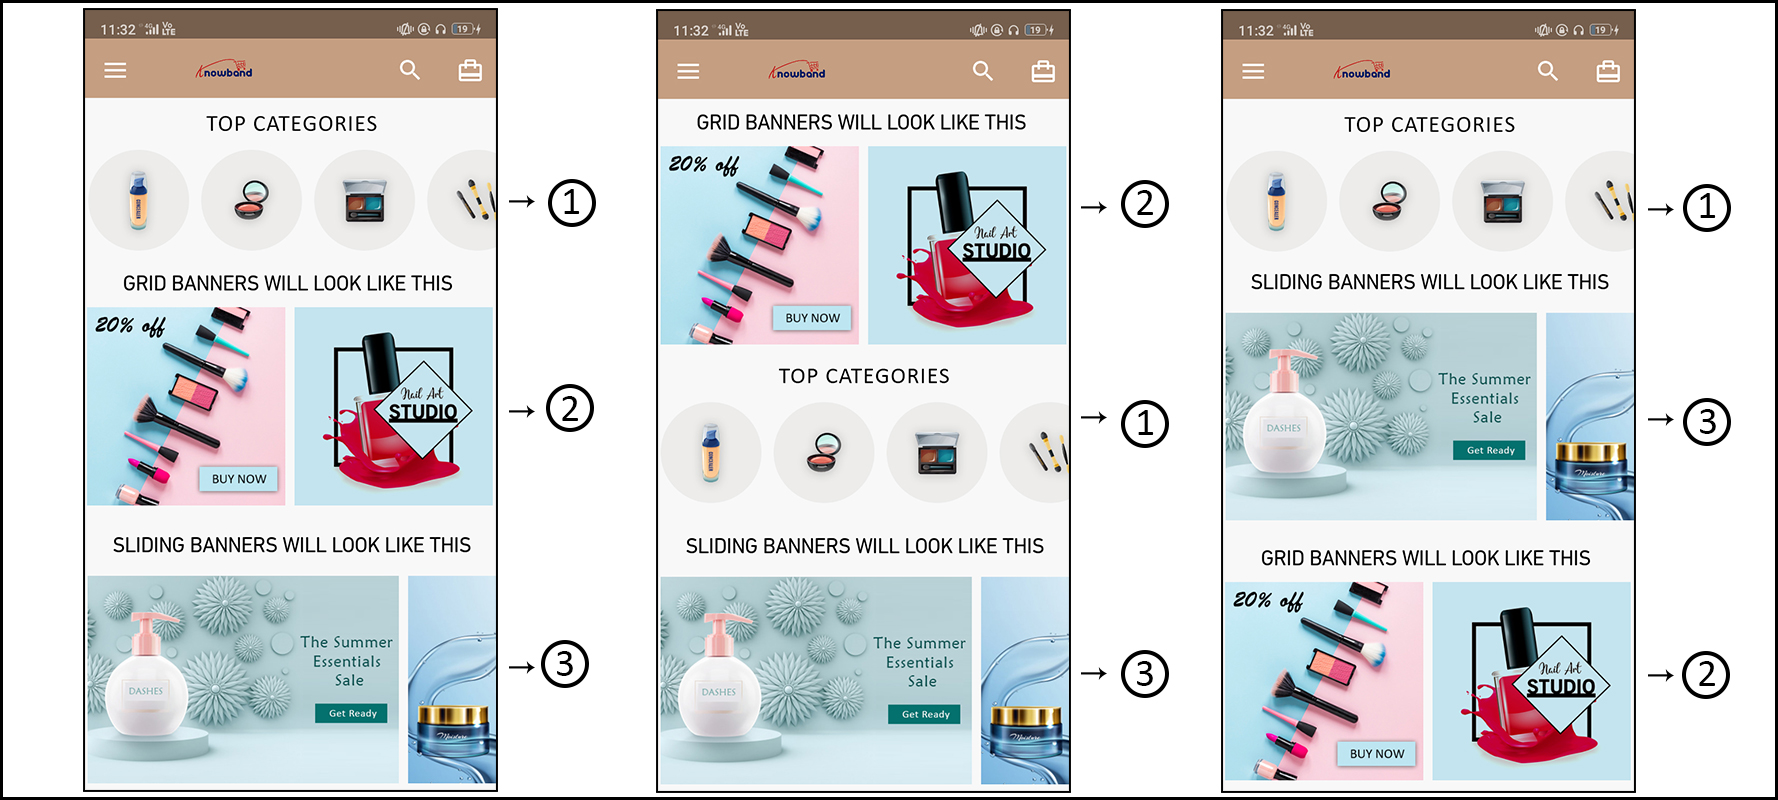
Są to banery w kształcie kwadratu wymienione na ekranie głównym w formie siatki. Możesz ustawić dowolną liczbę banerów na ekranie głównym i odpowiednio dostosować ich obraz i stronę docelową.
Odliczanie
The
Plac
Jeśli chodzi o banery, PrestaShop Mobile App Creator oferuje produkty do wyświetlania na ekranie głównym w formie kwadratowej listy.
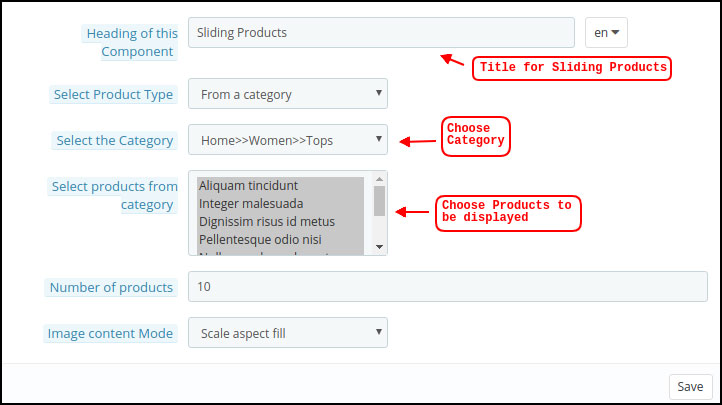
Produkty przesuwne poziome
Możesz dodawać produkty w postaci poziomych suwaków. Wybrane produkty mogą być dowolnej konkretnej kategorii lub innych wyróżników, takich jak Bestsellery, Polecane produkty itp.
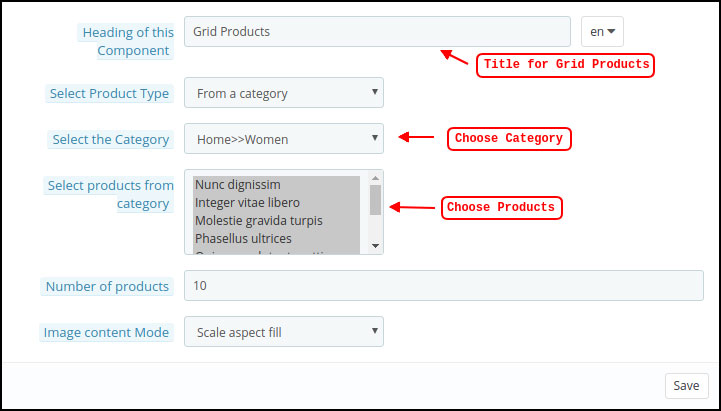
Produkty siatkowe:
Produkty można również dodawać na ekranie głównym w postaci list siatki. Produkty można wybrać z dowolnej kategorii.
Ostatnio dostępne produkty:
Kreator aplikacji mobilnych PrestaShop udostępnia najnowszy element karty, który wyświetla najnowsze produkty wyświetlane przez użytkownika. Możesz po prostu dodać element w swoim układzie, aby wyświetlić go na ekranie głównym.
Ekrany aplikacji mobilnych 6.0
Ekran główny 6.1
Ekran główny aplikacji mobilnej PrestaShop będzie dokładnie taki, jak chcesz. PrestaShop Mobile App Maker oferuje pełną elastyczność projektowania i tworzenia ekranu głównego w Twoich rękach. Korzystając z wielu banerów (kwadratowych, siatki, przesuwnych), produktów (kwadratowych, siatkowych, przesuwnych), banera z licznikiem czasu, karty najnowszych produktów w zapleczu, możesz zaprojektować intuicyjne układy ekranu głównego. Na ekranie głównym aplikacji dostępne są następujące opcje:
Co więcej, pozycjonowanie różnych elementów projektowych może być również zmieniane zgodnie z wymaganiem.
1. Układy dynamiczne:
Korzystając z różnych elementów, możesz tworzyć i zapisywać różne układy w backendie i ponownie wykorzystywać je na różnych imprezach i festiwalach. Możesz dynamicznie projektować i tworzyć ekran główny aplikacji.
2. Logo marki:
Twoje logo sklepu jest reprezentowane w lewej środkowej części górnego nagłówka Twojej aplikacji mobilnej PrestaShop. Logo jest w pełni konfigurowalne z backendu modułu i może być włączone / wyłączone, w tym zmiana obrazu.
3. Szukaj:
Opcja wyszukiwania pozwala kupującym aplikację mobilną łatwo i szybko uzyskać to, czego pragną. W aplikacji mobilnej PrestaShop wyszukiwanie produktów będzie odbywać się w dwóch formach:
-> Z tekstem: Użytkownicy aplikacji mogą wyszukiwać pożądane produkty, wpisując odpowiednie słowa kluczowe. Aplikacja mobilna PrestaShop wyświetli odpowiednie wyniki tego słowa kluczowego.
-> Z głosem: Nie musisz pisać, Twoja aplikacja na Androida PrestaShop zostanie zintegrowana z zaawansowaną opcją wyszukiwania głosowego. Użytkownicy mogą po prostu przeszukiwać produkty, wypowiadając odpowiednie słowa kluczowe.
4. Lista życzeń Torba:
Torba z listą życzeń wyświetlana jest w górnym nagłówku aplikacji mobilnej PrestaShop zawierającej wszystkie produkty oznaczone zakładkami. Użytkownicy aplikacji mogą zapisywać pożądane produkty w torbie z listą życzeń na przyszłość.
5. Wózek sklepowy:
Koszyk jest dostępny w prawym górnym rogu ekranu głównego aplikacji. Użytkownicy mogą poznać stamtąd produkty dodane w koszyku.
6. Czat WhatsApp / Zendesk:
W prawym dolnym rogu ekranu głównego dostępna jest opcja czatu sprzedawca-kupujący na żywo. Kupujący aplikacji mobilnej mogą łatwo i bezpośrednio przesłać Ci zapytanie i możesz je natychmiast rozwiązać.
Menu akordeonu 6.2 (pasek nawigacyjny)
Aplikacje mobilne PrestaShop dla systemu Android i iOS zawierają odpowiednią kategoryzację produktów dostępnych na stronie internetowej. Klienci mobilni mogą łatwo przeglądać produkty z wielu kategorii. Wszystkie strony CMS są również dostępne w menu Accordion. Zapewnia następujące opcje:
1. Moje konto
Ekran Moje konto zawiera wszystkie informacje o użytkowniku, takie jak dane osobowe, adres (y) wysyłkowy i szczegóły zamówienia. Użytkownicy mogą nawet zarejestrować swój odcisk palca. Klienci mogą przeglądać wszystkie związane z nimi informacje i mogą również aktualizować dane osobowe i hasło logowania.
2. Kategorie
Te kategorie są takie same jak w Twojej witrynie. Możesz je odpowiednio mapować i zaoferować użytkownikom aplikacji na poziomie 3 bezproblemowe przeglądanie.
3. Strony CMS
Różne strony CMS, takie jak O nas, Skontaktuj się z nami, Warunki i zasady itp. Dostępne są na Twojej stronie internetowej. Możesz wybrać żądany z backendu PrestaShop Mobile App Builder, który będzie wyświetlany w aplikacji mobilnej.
4. Języki)
Opcja języka pozwala użytkownikom przeglądać aplikację PrestaShop Mobile w swoim języku ojczystym. Wszystkie dostępne języki są wyświetlane tylko w tej opcji.
5. Waluta (-y)
Wszystkie dostępne waluty na stronie e-commerce są również wyświetlane w aplikacji mobilnej PrestaShop. Klienci mogą przeglądać i kupować cenę produktu w wybranej walucie.
6. Zaloguj Wyloguj
Użytkownicy mogą łatwo zalogować się / wylogować z aplikacji mobilnej PrestaShop za pomocą tej opcji.
Ekran kategorii 6.3:
Wszystkie podkategorie, kategorie nadrzędne i inne powiązane kategorie są dostępne w aplikacji mobilnej PrestaShop. Ekran kategorii został zaprojektowany w dwóch wersjach podstawowe widoki: Siatka i lista. Obraz produktu, nazwa, cena, rabat jest wyświetlany na wszystkich aukcjach z opcją dodania ich również do torby z życzeniami. Aplikacje mobilne z PrestaShop Mobile App Builder mają warstwową nawigację, dzięki czemu wyszukiwanie produktu jest prostsze. Na ekranach kategorii dostępne są następujące opcje:
1. Sortować:
Ta opcja pozwala kupującym wybrać żądaną kolejność, w której ma być sortowana cena produktów kategorii. W twoich aplikacjach dostępne są dwa zlecenia sortowania: Cena: od niskiej do wysokiej i cena: od wysokiej do niskiej.
2. Filtr:
Opcja filtrowania produktów upraszcza wyszukiwanie produktów. Użytkownicy aplikacji mogą filtrować produkty w aplikacji mobilnej PrestaShop na podstawie różnych atrybutów, takich jak rozmiar, kolor, skład, stan, producent, cena itp. Użytkownicy mogą przeszukiwać swój ulubiony produkt w ciągu kilku minut za pomocą tych filtrów.
Ekran produktu 6.4:
Ekran produktu aplikacji mobilnej PrestaShop jest prosty i intrygujący. Wyświetlanych jest wiele obrazów tego samego produktu wraz z nazwą i ceną. Dostępność produktu jest również wyświetlana jako „W magazynie” lub „W magazynie” na podstawie stanu zapasów. Zawiera następujące inne opcje:
1. Opcje produktu:
Wszystkie opcje związane z produktem, takie jak rozmiar, kolor itp. Są wyświetlane na tym ekranie. Te opcje produktu są takie same, jak dostępne na stronie internetowej.
2. krótki opis
Użytkownicy mogą przeczytać krótki opis swojego produktu, aby szybko podjąć decyzję.
3. Informacje o produkcie i opieka
Tutaj wyświetlane są pełne informacje o produkcie wymienione na stronie internetowej. Użytkownicy aplikacji mogą uzyskać tutaj pełne informacje o produkcie.
4. Dodaj do listy życzeń:
Użytkownicy aplikacji mobilnej mogą bezpośrednio dodawać zakładki do produktu, klikając „Dodaj do listy życzeń” w lewym dolnym rogu ekranu produktu.
5. Dodaj do koszyka:
Nazwa „Dodaj do koszyka” dodaje produkt bezpośrednio do koszyka, a użytkownicy mogą dalej kupować.
6. Udostępnianie produktów:
Na tym ekranie dostępna jest opcja udostępniania produktu na wielu platformach społecznościowych, Bluetooth i e-mail. Użytkownicy aplikacji mogą udostępniać produkty swoim przyjaciołom / krewnym na wielu platformach społecznościowych i przyciągać użytkowników do swojej aplikacji.
Ekran 6.5 Wishlist:
Twój Kreator aplikacji mobilnych PrestaShop miałby torba z listą życzeń umożliwiająca użytkownikom tworzenie zakładek do przyszłych zakupów. Użytkownicy mogą przeglądać listę wszystkich produktów z zakładkami tutaj. Ma dwie opcje:
1. Dodaj do koszyka:
Użytkownicy aplikacji mogą dodawać produkty oznaczone zakładkami bezpośrednio do koszyka, wybierając opcję Dodaj do koszyka.
2. Usuń z listy życzeń:
Użytkownicy mogą nawet usunąć dowolny produkt z listy życzeń, jeśli nie chcą tego kupować.
Ekran logowania 6.6
Kreator aplikacji mobilnych PrestaShop oferuje różne opcje logowania jednym dotknięciem i usprawnia proces rejestracji / rejestracji:
1. Zaloguj Się
Użytkownicy aplikacji mogą uwierzytelniać się i uzyskiwać dostęp do aplikacji przy użyciu poświadczeń logowania za pomocą poczty e-mail.
2. Zapisz się
Wszyscy nowi użytkownicy aplikacji mogą zarejestrować się i utworzyć swoje konto w sklepie z aplikacji mobilnej. Formularz rejestracji PrestaShop Mobile App prosi tylko o podanie odpowiednich szczegółów.
3. Zaloguj się za pomocą numeru telefonu
Twoja aplikacja mobilna oferuje łatwiejszą i solidniejszą opcję logowania na numer telefonu, która ułatwia użytkownikom weryfikację aplikacji OTP i logowania.
4. Zaloguj się za pomocą odcisku palca
Użytkownicy mają również możliwość zalogowania się za pomocą uwierzytelniania na podstawie linii papilarnych. Umożliwia to użytkownikom dostęp do aplikacji w kilka sekund.
5. Zaloguj się przez facebook
Użytkownicy mogą zalogować się do aplikacji przy użyciu swoich poświadczeń konta Facebook.
6. Zaloguj się za pomocą Google+
Użytkownicy mogą zalogować się do aplikacji przy użyciu swoich poświadczeń konta Google+.
Ekran koszyka na zakupy 6.7:
Ekran koszyka na zakupy w aplikacji mobilnej PrestaShop wyświetli wszystkie produkty dodane do koszyka. Użytkownicy aplikacji mogą zobaczyć nazwę produktu, ilość, łączną cenę i koszt wysyłki. Ten ekran ma następujące opcje:
1. Zastosuj kupon
Ta opcja pozwala użytkownikom uzyskać rabaty i oferty, wprowadzając ważny kupon i kupon na swojej stronie.
2. Całkowita cena produktu
Użytkownicy mogą stąd zobaczyć pełny koszt swojej torby na zakupy. Jest on automatycznie aktualizowany zgodnie z każdą aktualizacją z ilością lub dodatkiem produktu.
3. Zaktualizuj ilość produktu
Użytkownicy aplikacji mogą nawet zaktualizować ilość produktu za pomocą opcji „Aktualizuj ilość”.
4. Usuń produkt
Użytkownicy aplikacji mogą po prostu usunąć produkt z koszyka po prostu wybierając opcję „Usuń”.
5. Kontynuować zakupy
Użytkownicy aplikacji mogą opuścić koszyk, aby przeglądać więcej produktów w swojej aplikacji. Klienci aplikacji mobilnej zostaną przekierowani na ekran główny po dotknięciu opcji Kontynuuj zakupy.
6. Kontynułuj żeby sprawdzić
Użytkownicy aplikacji mobilnych front-end mogą przejść do ekranów kas i płatności, wybierając opcję „Kontynuuj do kasy”. Przekieruje je ponownie na ekranie kasy.
Ekran kasowania 6.8
Aplikacje mobilne z PrestaShop Mobile App Maker mają uproszczoną obsługę pojedynczego ekranu z jedynie istotnymi informacjami. Użytkownicy mogą przeglądać pełne dane dotyczące transakcji, takie jak szczegóły wysyłki, dane rozliczeniowe, podsumowanie zamówienia, komentarz do zamówienia, płatność Podsumowanie.
1. adres wysyłki
Ten ekran zawiera szczegółowe informacje o adresach wysyłki zapisanych przez użytkownika. W razie potrzeby użytkownik może również edytować / zapisać nowy adres wysyłki. Całkowity koszt produktu zostanie zaktualizowany zgodnie z wybraną metodą wysyłki.
2. Szczegóły płatności
Ta opcja pozwala użytkownikom wprowadzić dane rozliczeniowe do ich zakupu. Mogą również wybrać adres wysyłki, aby był taki sam jak adres rozliczeniowy. Wstępnie zapisany adres rozliczeniowy można również edytować.
3. podsumowanie zamowienia
Użytkownicy aplikacji mogą zobaczyć szczegóły dotyczące zakupionego produktu w tej sekcji przed dokonaniem ostatecznego zakupu.
4. Metody wysyłki
Wszystkie dostępne metody wysyłki są wyświetlane w tej części ekranu kasy. Użytkownicy mogą wybrać żądany tutaj.
5. Zamów komentarz
Użytkownicy aplikacji mogą również dodawać komentarze związane z zamówieniem, które będą widoczne na stronie zamówienia w zapleczu.
6. Podsumowanie płatności
Ta sekcja wyświetla pełny podział wszystkich szczegółów płatności.
7. Przejdź do płatności
Użytkownicy aplikacji zostaną przekierowani na ekran Płatności po naciśnięciu przycisku „Przejdź do płatności”.
Ekran płatności 6.9:
Ekran płatności na Twoim PrestaShop Aplikacja mobilna wyświetla zarówno rodzime metody przeglądania stron internetowych, jak i płatności aplikacji. PrestaShop Mobile App Maker obsługuje wszystkie rodzaje opcji płatności w aplikacji. Dodatkowo metody płatności PayPal i COD są dostępne w aplikacjach na Androida i iOS. Co więcej, różne inne opcje płatności rodzimych, takie jak PayU, Apple Pay, Amazon Pay, Braintree, Stripe itp. Można również zintegrować z aplikacją, jeśli o to poprosisz.
Ekran 6.10 Moje konto
Ekran mojego konta w aplikacji eCommerce dla systemu Android / iOS umożliwia użytkownikom wyświetlanie pełnych danych konta, w tym listy poprzednich zamówień. Moje konto
1. Historia zamówień
Użytkownicy zapoznają się z kompletnymi szczegółami zamówienia umieszczanymi wcześniej. Wyświetlana jest data złożenia zamówienia, referencja zamówienia, cena i status dostawy.
2. Zaktualizować profil
Użytkownicy mogą również aktualizować swoje wcześniej zapisane dane profilu, takie jak imię i nazwisko, numer telefonu i hasło.
3. Adresy wysyłki
Użytkownicy aplikacji mogą zobaczyć pełną listę zapisanych adresów wysyłkowych. Można tutaj również dodać nowy adres wysyłki.
4. Szczegóły zamówienia
Użytkownicy aplikacji mogą wyświetlić pełną listę wcześniej złożonych zamówień aplikacji.
5. Zmień kolejność funkcji
Bezpośrednio zamawiasz produkt, klikając przycisk „Zamów ponownie”. Wszystkie poprzednie zamówienia zostaną dodane do koszyka za pomocą pojedynczego przycisku.
Ekran szczegółów zamówienia 6.11
Ekran szczegółów zamówienia aplikacji e-commerce PrestaShop zapewnia pełne szczegóły zamówienia, takie jak adres wysyłki, podsumowanie produktu, sposób wysyłki i płatności oraz podsumowanie kosztów całkowitych. Użytkownicy mogą nawet śledzić dostawy wcześniej złożonych zamówień bezpośrednio z tego ekranu.
Today, Online Customers on eCommerce sites browse through multiple products but only make a purchase of a selected product at a particular instance of time because the goal of the shoppers is not to make an immediate purchase always. Sometimes, the customers just visit to have a look at the product and add it to their cart, so that later when they would need the product they can buy it. Moreover, they check the other store prices and checkout. The Prestashop Advanced Wishlist addon by Knowband provides a special feature to display the shortlisted, recently viewed and recommended products/banners into the website. This Prestashop wishlist module allows the customer to shortlist their favorite products so that they can be aware of the products they want to purchase or view later. This Prestashop save for later extension is like a basket in hand where you add whatever you like and can change the quantity at last when making the purchase.
Knowband Prestashop Advanced Wishlist addon is integrated with GDPR hooks. GDPR settings are added in the module using which the Prestashop admin can comply with the rules of the GDPR. Please refer to the General Settings to know more about the GDPR.
The Prestashop advanced wishlist module by Knowband is beneficial for both merchant and the customer. Let us discuss how Prestashop wishlist addon is working.
1.1 Benefits for the Merchant
This Prestashop advanced wishlist addon is a help to the store owners for tracking the Customer requirement.
This Prestashop wishlist module shows the bar at the bottom of every page containing three different blocks as ‘My Shortlist’, ‘Recently Viewed’ and ‘Recommendations’. Each block has a pop-up containing respective data. This bar is managed by the admin according to the need.
This Knowband Prestashop advanced wishlist addon shows my wishlist block which is controlled by the online merchant. My Shortlist pop-up shows the products shortlisted by the customer.
This Prestashop advanced wishlist extension shows the recommendations block which is totally controlled by the Store Owner. Store the admin can choose products or banners as per choice.
This Prestashop save for later extension gives the access to the admin to enable/disable the recently viewed block that shows the products which are recently viewed by the customer.
This Prestashop wishlist addon helps the admin to view the product details which product is high on demand or which product is added in the wishlist the most. The Graph shows the whole information about the wishlist product.
This Prestashop advanced wishlist extension allows the admin to know what customers wish to purchase.
The Prestashop save for later extension helps for re-marketing.
This Prestashop wishlist addon reduces the abandoned cart of the website.
This module helps the admin in boosting sales and conversion rates for your online store.
The admin can easily customize the save for later addon.
The online store admin can set the number of products which he wants to show on the customer’s wishlist page.
The online store merchant can also provide an option to share wish-listed products on Social media platforms like Facebook, Twitter and WhatsApp.
Customers can view wishlist products, recently viewed products and recommendations.
The Prestashop wishlist module offers a userfriendly and eye-catchy interface.
The Prestashop wishlist addon is mobile responsive, multi-lingual compatible and offers multi-store support.
Admin can show specific Wishlist tab on the website.
The Prestashop plugin shows wishlist on the checkout page.
The customers can add available products from wishlist and move any product from cart to wishlist.
1.2 Benefits for the Customer
This Prestashop favorite product list addon helps online shoppers to add products to their wishlist and feel free to buy it later.
This Prestashop save for later module by Knowband is mobile responsive and allows the customers to use the Wishlist feature both on their mobile phones and desktop.
Customers can add product from the wishlist while checkout.
The online users can move any product to wishlist by clicking on “Add to Wishlist” button.
The online users can also share their wishlist on Facebook, Twitter and Whatsapp.
2.0 Installation
After purchasing the Prestashop advanced wishlist addon, you will get the following files as listed below:
1. Compressed File in ZIP format (contains source code of the module)
2. User Manual
Follow the following steps to install the Prestashop save for later extension:
1. Unzip the compressed file. It would contain files and folders as shown below –
2.Copy all the files and folders of the unzipped folder into your store “modules” directory on the path – Root Directory/modules/.
3. Now, the module is ready to be installed on your store and you can find that in Store the admin -> Modules and Services. It would shown as below –
PrestaShop 1.6
PrestaShop 1.7
4. Before installing the module, please make sure that ‘Customer.php’ does not exist in ‘Root Directory/override/classes/ folder. If it exists, then please remove it. Also, clear cache before installing the module.
5. Click on “Install” button to install the module. It would show a pop-up for your confirmation. Click on “Proceed with the installation” option. This step will install the module and show notification – “Module(s) installed successfully”.
3.0 How to configure module?
Once the Prestashop wishlist addon is configurable, the Store Owner can setup or configure this Prestashop save for later module through the Admin Panel of the store. There are following sections available to configure this module –
Go to Store the admin -> Modules and Services
Find “Advanced WishList Addon” and click “configure” button given corresponding to the module i.e. shown below-
After clicking on the “configure” button, you will see a window like the one mentioned below-
4.0 Admin Interface
After installing the Prestashop wishlist addon into the Prestashop store, the admin interface is designed in such a way that a Prestashop store owner can make the changes without any hassles. There are the following sections available on the admin interface: –
General Settings
Save for Later
Recently Viewed
Recommendations
Social Sharing
Recommendations
Product Analysis
Customer Analysis
Order Analysis
Above 5 points are actually one section which comes under “Settings” but as described here as a separate entity for more clarity.
Each section of this Prestashop save for later module is explained below.
4.1 Settings Tab
4.1.1 General Settings
In the General settings tab, we have five options which the admin can use to manage the store;
Below mentioned is the general setting tab image-
This tab contains the following input fields which the Store Owner or the admin can update –
Enable/Disable: Initially, this will be notified as “OFF” And the admin can enable/disable the module by turning ON/OFF this option.
Compatibility with Prestashop GDPR Module: The Admin can enable the GDPR option. The Customer has an access to request the admin to delete and export the personal data from the back-office. The Admin can also export the customer data from the back-end.
Note: If you are using the official GDPR module then you must need to enable this setting. The main purpose of this feature is export and deletes user data on PrestaShop GDPR module request. It is also compatible with Prestashop GDPR Module developed by Knowband.
Pop-up Border Color: This setting enables the admin to change the border color of the pop-ups appearing at the front-end. Initially, it has a default color that best suits the pop-ups.
Buy Button Color: This setting enables the admin to change the buy button color appearing at the front-end, in front of every product in the pop-ups. Initially, it has a default color that best suits the button.
Button Preview: This option is not a setting, it is just a preview window of the buy-button appearing on the front-end. When the color of the buy button is changed using the above setting, then the color of the button preview will change dynamically displaying the current appearance of the buy button.
Bar Background Color: This Prestashop Advanced Wishlist addon enables the admin to change the background color for the bottom bar that appears at every page on the front-end. Initially, it has a default color that best suits the background of the bar.
Pagination Limit: The online merchant can set the number of products which he wants to show in a single page.
4.1.2 Save For later
In this section, the Prestashop Save for later addon allows Store Owner or the admin to update the settings of “My Shortlist” section of the Front-end. Through this section, the Store Owner or the admin can do the following things –
1.Enable/Disable “My Shortlist” section in the Store Front.
2.Show/Hide the Buy button
3. Add some text to “My Shortlist” popup which will be shown at the top of popup.
This Prestashop Advanced Wishlist extension form contains the following input fields which the Store Owner can update:
Enable Save for Later: Initially, this will be displayed as “OFF”. the admin can enable/disable the shortlist option by toggling the button.
Show buy Button : This Prestashop save for later addon allows the admin to choose whether to display the buy button in front of the products in the Shortlist pop-up or not.
Text above pop up: This Prestashop advanced wishlist addon allows the admin to enter the text that should be displayed at the front-end as a heading for the shortlist pop-up. the admin can enter the different text for different languages available in the system and can also customize the appearance (i.e. bold, italic and color of text) of the text using the font-style options.
4.1.3 Recently Viewed
Through this section, the Store Owner or the admin can do following things –
1.Enable/Disable “Recently Viewed” section in Store Front.
2.Show/Hide the Buy button
3.Limit the number of products to display
Add some text to the “Recently Viewed” popup which will be shown at the top of pop-up.
This Section contains the following input fields which the Store Owner or the admin can update –
1. Enable Recently Viewed: Initially, this will be OFF. Admin can enable/disable Recently viewed option by turning ON/OFF this setting.
2. Show buy Button : This setting enables the admin to choose whether to display the buy button in front of the products in the Recently viewed pop-up.
3. Limit: Admin can limit the products to display in recently viewed product section.
4. Text above pop up: This setting enables the admin to enter text that should be displayed at the front-end as a heading for the recently viewed pop-up. The admin can enter different text for different languages available in the system and can also customize the appearance (i.e. bold, italic and color of text) of the text using the font-style options.
4.1.4 Recommendations
In this tab, change the settings for the Recommendations block of the plugin. Here, the admin can recommend various things to the customer as per the need. the admin can enable/disable it and can also customize the text above the recommendations popup.
1.Enable/Disable “Recommendations” section in the Store Front.
2.Show/Hide Buy Button
3.Add some text to the “Recommendations” popup which will be shown at the top of pop-up.
This form contains the following input fields which Store Owner or the admin can update –
1. Enable Recommendations : Initially, this will be OFF. Admin can enable/disable Recommendations option by turning ON/OFF this setting.
2. Show buy Button : This setting enables the admin to choose whether to display the buy button in front of the products(if admin wants to recommends products to customers) in the Recommendations pop-up.
3. Text above pop up : This setting enables the admin to enter text that should be displayed at the front-end as a heading for the Recommendations pop-up. The admin can enter different text for different languages available in the system and can also customize the appearance (i.e. bold, italic and color of text) of the text using the font-style options.
4.1.5 Social Sharing
The online store merchant can allow the online buyers to share wish list products in various Social Media Platform.
Enable Social Sharing: Enable or Disable social sharing option
Enable Facebook: Activate or deactivate to allow users to share wish-listed products on Facebook.
Enable Whatapp: Allow/disallow customers to share products on Whatsapp.
Enable Twitter: Enable the functionality to allow customers to share wish-listed products on Twitter.
5.0 Recommendations
This Prestashop advanced wishlist addon by Knowband allows the Store Owner or the admin to setup the content of Recommendation pop-up to display at Store Front.
There are 3 options available for Store Owner:
1.Banner
2.Related Products
3.Selected Products.
The admin can only choose one of them to display at Store Front as the content of Recommendations Pop-up.
5.1 Banners
Using this option, the admin can upload a maximum of two banners for the recommendations popup, there is also an option to enter the URls for the banners uploaded.
You have to follow steps given below to show banners in Recommendations Pop-up –
Go to the Module and Services -> Module and Services
It would list out all the modules of store. Find ‘Save for Later’ in modules list.
Now click on the ‘Configure’ button given corresponding to the ‘Save for Later’ module.
It would redirect the Store Owner or the admin to a module settings page. Now click on “Recommendations” option listed at left side column.
It would open a new section. Choose “Banner” option. It would display the section where you can upload/change banners (Max. 2) with their Title and Link. You can find the screenshot below –
Click on “Save Recommendation Options” button. It would validate the data and submit the form.
5.2 Related Products
You have to follow the steps given below to show the related products in the Recommendations Pop-up –
Go to the Module and Services -> Module and Services
It would list all the modules of the store. Find ‘Save for Later’ in modules list.
Now click on ‘Configure’
button given corresponding to the ‘Save for Later’ module.It would redirect the Store Owner or the admin to a module settings page. Now click on “Recommendations” option listed at left side column.
It would open a new section. Choose “Related Products” option. You can find the screenshot below –
Click on “Save Recommendation Options” button. It would validate the data and submit the form.
That’s It.
5.3 Selected Products
You have to follow the steps given below to show selected products in Recommendations Pop-up –
Go to the Module and Services -> Module and Services
It would list all the modules of the store. Find ‘Save for Later’ in modules list.
Now click on ‘Configure’ button given corresponding to the ‘Save for Later’ module.
It would redirect the Store Owner or the admin to a module settings page. Now click on “Recommendations” option listed at left side column.
It would open a new section. Choose “Selected Products” option. You can find the screenshot below –
After choosing “Selected Products” option, the module will ask to choose Category and then the Products to display at Store Front. Choose Products and module will list them one by one in a list. The admin can remove selected one from this list if needed.
Click on “Save Recommendation Options” button. It would validate the data and submit the form.
That’s It.
6.0 Product Analysis
This Prestashop save for later addon tab will display the category/product reports in the form of graphs and list. The graph will display top ten categories/products shortlisted by customers in descending order. You can find the screenshot below –
Below is the screen of this Product wishlist module product analysis tab:
1. Filter your analysis: The filter will be used for filtering data. There are folowing parameters on the basis of you can filter report:
Analysis Type: This will be the dropdown list. With this filter, you can change the behavior of report such displaying report for top 10 categories or top 10 products.
Category(s): Here you can select multiple categories to filter the report. This option will be hidden if you select analysis type as Products.
Products: The products will be in this drop-down will be displayed on the basis of categories you have selected. If analysis typeset as Product, it will display all the products.
Start and Date: To Specify start and end date.
Filter: To display filtered data, the user must have to click on this button.
Reset: On clicking this button, the module will reset all parameter and display default report i.e displaying report according to categories.
Export: To export the current report in excel.
2. Category(s)/Product(s) Statistics: This Prestashop wishlist addon by Knowband shows a bar graph which will display top 10 categories or top 10 products on the basis of analysis type.
3. Category(s)/Product(s) List: In this, Prestashop advanced wishlist addon will list all the categories/products in descending order. If the analysis type is “Category” the module will display the category name in this list as clickable. On clicking the category, the module will display how many and which products of this category shortlisted by customers in the pop up box as shown in the below screen:
7.0 Customer Analysis
This Knowband Prestashop advanced wishlist addon shows the tab to display the list of customers with their number of shortlisted products. Here, the admin can also view the products list shortlisted by the particular customer.
1. Filter your analysis: The filter will be used for filtering data. There are folowing parameters on the basis of you can filter report:
Category(s): Here you can select multiple categories to filter the report.
Products: The products will be in this drop down will be displayed on the basis of categories you have selected.
Start and Date: To Specify start and end date.
Filter: To display filtered data, the user must have to click on this button.
Reset: On clicking this button, the Prestashop save for later module will reset all parameter and display default report i.e displaying report according to categories.
Export: To export the current report in excel.
2. Customer Analysis Report: In this, the Prestashop wishlist module will list all the registered customers and guest customers (who have placed an order as the guest) with how many products he/she has shortlisted. The customer email in this link will be clickable. On clicking email, a popup will display to showcase which product he/she has shortlisted and among these, which products are bought by corresponding customers as shown below:
8.0 Order Analysis
This tab is for doing analysis on the basis of how many products are ordered after shortlisted by the customer as shown in below screen:
1. Filter your analysis: The filter will be used for filtering data. There are folowing parameters on the basis of you can filter report:
Category(s): Here you can select multiple categories to filter the report.
Products: The products will be in this drop-down will be displayed on the basis of categories you have selected.
Start and Date: To Specify start and end date.
Filter: To display filtered data, the user must have to click on this button.
Reset: On clicking this button, Prestashop save for later addon will reset all parameter and display default report i.e displaying report according to categories.
Export: To export the current report in excel.
2. Order Report: In this, Prestashop advance wishlist addon by Knowband will list all the products which are shortlisted by customers with Purchased status. This Purchased status will tell you that this product is bought after shortlisted by the same customer.
9.0 Front End
After enabling the Prestashop wishlist addon the front-end user will see a bottom bar at every page of the front-end containing the blocks as they are enabled using the admin panel of the plugin.
The bottom bar at the front-end appears as follows:
PrestaShop Advanced Wishlist Addon 1.6
PrestaShop Advanced Wishlist Addon 1.7
The highlighted Shortlist button will allow customers to shortlist corresponding products into the separate bucket. This bucket displays at the bottom of the page as highlighted in above screen.
When the customer clicks on Shortlist button, the product will be added into bucket and button text will be changed from Shortlist to Added.
My Shortlist Pop-up
This Prestashop advanced wishlist addon by Knowband shows pop-up contains the products that are shortlisted by the customer. The customer can also remove the products from the shortlist by using the cross sign in front of products from the pop-up.
PrestaShop Wishlist Addon 1.6
PrestaShop Wishlist Addon 1.7
Recently Viewed Pop-up
This pop-up contains the products that are recently viewed by the customer. They can directly go to the product detail page of any product listed in this pop-up by clicking on the product name or by clicking on the ‘Buy’ button in front of the respective product.
PrestaShop Advanced Wishlist Addon 1.6
PrestaShop Advanced Wishlist Addon 1.7
Recommendations
Content of this pop-up depends upon the choice of the admin. This Prestashop wishlist addon may have a list of selected products, it may have related products based on the browsing history of the customer or it can also have a maximum of two banners with an option of the link over them.
The recommendation pop-up with banners looks as follows:
PrestaShop Advanced Wishlist Addon 1.6
PrestaShop Advance Wishlist Addon 1.7
The online store admin can provide an option to share wish listed products on social media platforms like Facebook, Twitter and Whatsapp:
Online users can view whatsapp sharing option on their mobile devices:
The online users can view a specific tab for viewing wish list.
The online users can view wishlist on checkout page.
The online users get an option to move any cart product in wishlist:
Important Things
Refresh home page of your store every time you enable/disable plugin. If Prestashop favorite product list module is not working after installation then please check permissions on modules folder. The folder should be writable. Please make the folder permission to 755.
Before Installing Prestashop wishlist module, please check that Customer.php file already exists in root/override/classes/ folder. if yes, then Please remove it and clear the cache. We prefere that if exist, then please contact to our support to doing the same.
Now you can try Prestashop advanced wishlist addon by Knowband for on your Prestashop website. KnowBand Prestashop save for later addon helps you engage more customer to your store & increase the customer base.