Magento 2 Gift Card Manager Extension- User Manual

1.0 Introduction

Let your customers purchase gift cards for their friends and family. The store admin can create multiple Gift Cards for special occasions like Birthday, Anniversary, Valentine Day, Friendship Day, Fathers Day etc so that as per the need customers can select the gift cards for their dear ones.

Gift Card offers the following benefits:

1) Encourage customers to spend more
2) Lower return rates
3) Make last-minute shopping possible
4) Generate revenue in advance of sales
5) More convenient

Knowband offers Magento 2 Gift Card Module which provides a flexible way for your customers to purchase a gift for someone from your store. This feature-rich Magento 2 Gift Card Extension allows the online merchant to create multiple templates for gift cards and sell the gifty cards easily. The online store merchant can set the gift card amount from the admin interface and the customers can select the preferred gift card for sending to their loved ones.

1.1 Features of Magento 2 Gift Card Manager Extension:

  1. With the help of this Magento 2 Gift Card Manager Addon by Knowband, the Online retailer can easily incorporate the Gift card functionality in their store.
  2. Magento 2 Gift Module provides an option for the merchant to link the Gift Card option to the Header, Footer, My Account and Left Side on the Front-end as per the requirement.
  3. The Admin can select the Gift Card order status in which the gift card orders will be marked as delivered and the Gift Card code will be generated.
  4. Magento 2 Gift Card Vouchers Extension allows the store owner to set the Gift Card delivery gap in the number of days.
  5. By using the responsive Knowband Magento 2 Gift Card Manager Extension, the eCommerce retailer can set the prefix for the voucher code of the gift card.
  6. The Magento 2 Gift Card Module allows the admin to create N number of interactive gift card interfaces for various occasions including Birthdays, Halloweens, New Year, Christmas, Feast, Holidays or any other special event.
  7. Knowband’s Magento 2 Gift Module enables the e-merchants can customize the gift card products in a few simple steps. They can fix the Product amount, validity duration and other terms at a few button clicks.
  8. The Store Admin can enable the Free Shipping option as per the need from the back-end of the Gift Card for Magento 2.
  9. Magento 2 Gift Card Vouchers offers the readymade email template and he/she can customize the email template as per the requirement.
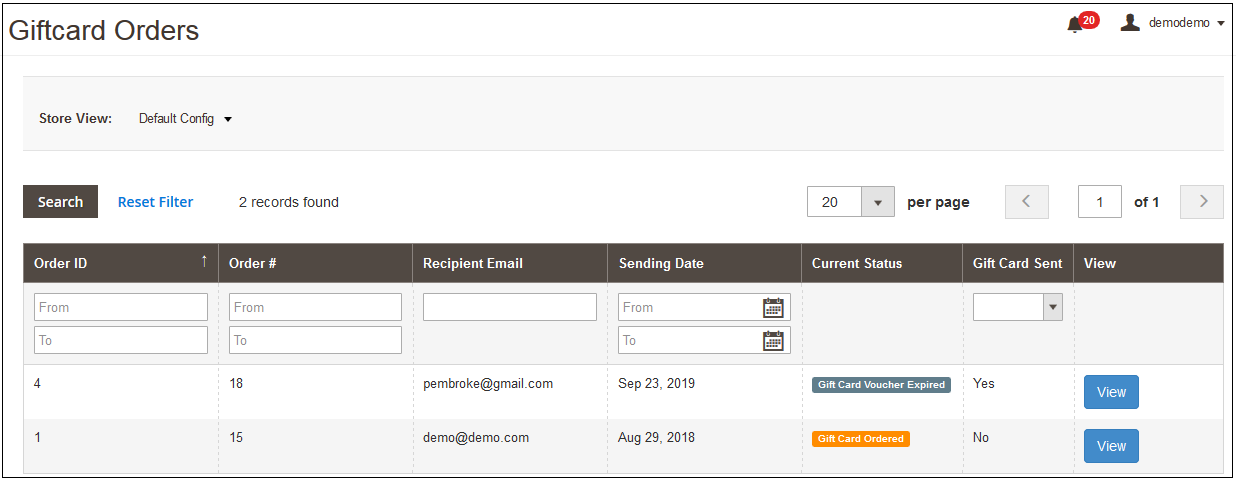
  10. The Store admin even gets an option to keep track on the orders received for the gift card from the back-end. It involves the recipient email, date of sending as well as the status of the gift cards.
  11. Magento 2 Send Gift Card Extension is Mobile responsive.
  12. With the help of this Magento 2 Gift Card Extension, the Store admin has a chance to acquire new customers while retaining the existing customers.
  13. Magento Gift Voucher is easy to use and install.
  14. Magento Gift Card Manager Module is fully customizable.

Technology for Development

Language: PHP
Frame Work: Magento

2. Installation

After purchasing Magento 2 Gift Card Extension, the store admin will get following files:

1.Knowband_Giftcardmanager.zip which contain source code of the Magento 2 Send Gift Card Extension.
2. User Manual which includes all the details and helps regarding an extension.
3. Follow the following steps to install Magento 2 Gift Vouchers extension:

The steps to install the Magento 2 Gift Card Module are mentioned below:

1. Buy the Magento 2 Gift Card Manager module from Knowband. You can download the extension package.
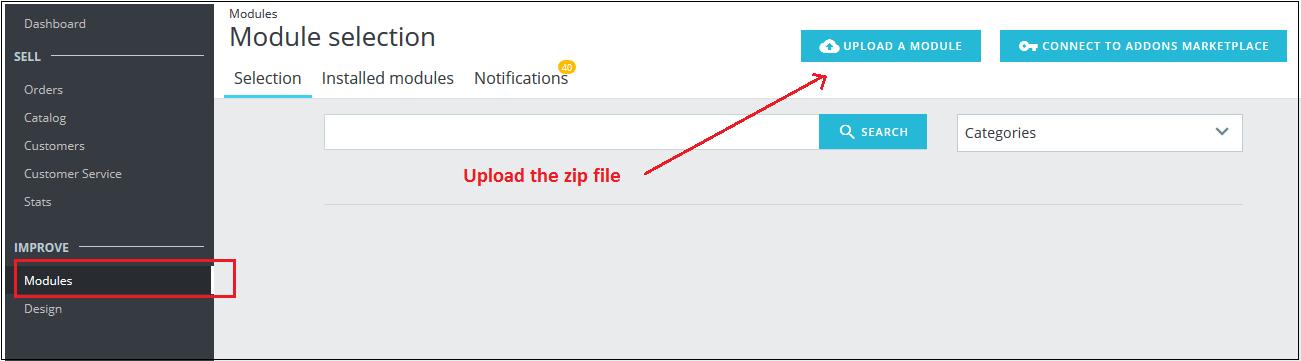
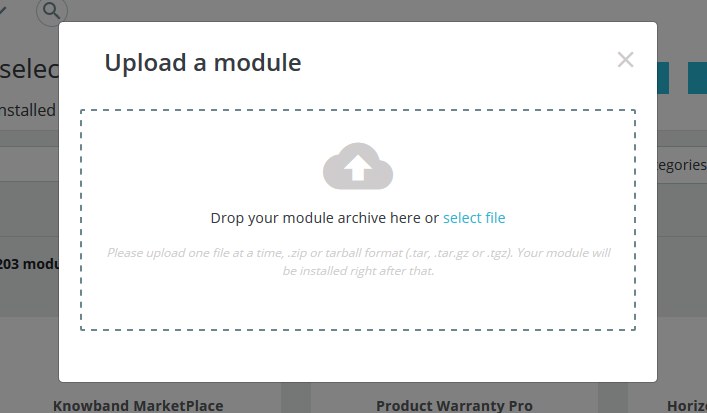
2. The package has a zipped file that contains the user manual and the source code of Magento 2 Gift Card Extension. Unzip the package.
3. Create a folder{Magentoroot}/app/code/Knowband/Giftcardmanager
php -f bin/magento module: enable –clear-static-content Knowband_Giftcardmanager
4. Upload the extracted content in the above folder via FTP manager (like Filezilla or WinSCP – download here: https://filezilla-project.org/).
5. Now run below commands to install the plugin:

php -f bin/magento module: enable –clear-static-content Knowband_Giftcard
php -f bin/magento setup:upgrade
php -f bin/magento setup:di:compile
php bin/magento setup:static-content:deploy

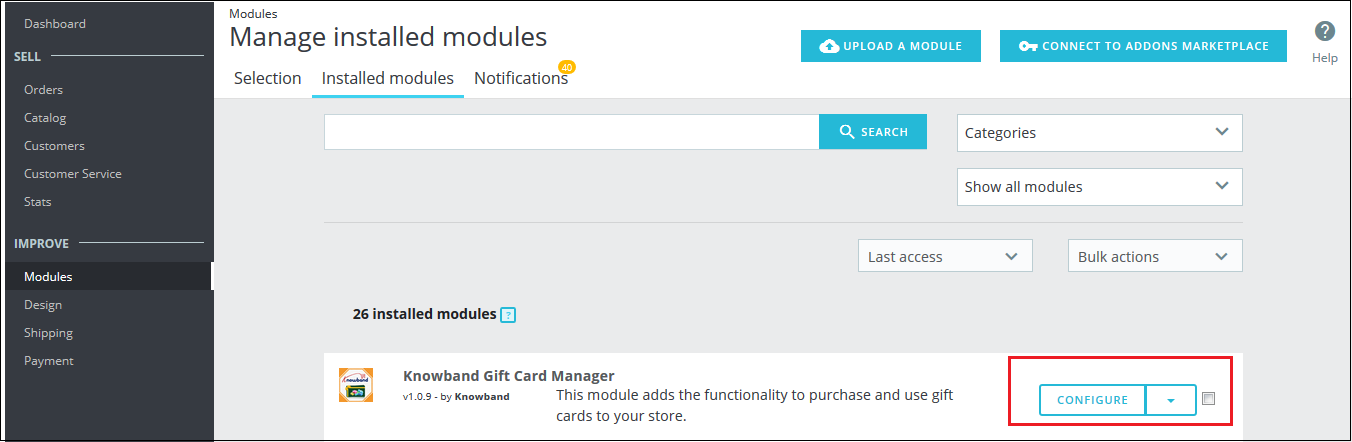
6. The extension is now installed and ready for use. In Admin Panel go to “Knowband > Gift Card Manager”

You can now configure and use the Knowband Magento 2 Gift Card for product module.

3.0 Admin Panel

After installing Magento 2 Gift Card Manager Extension in the Magento store, the store owner can make the changes without any hassles. There are following ways in which admin will interact with Magento 2 Gift Card Vouchers module functionality:

1. Module Configuration
2. Gift Card Template
3. Gift Card Products
4. Gift Card Orders

Each interface has been explained with proper detailing in following sections.

3.1.1 Module Configuration

After clicking on the Gift Card Module, the system will open Module Configuration tabs by default.

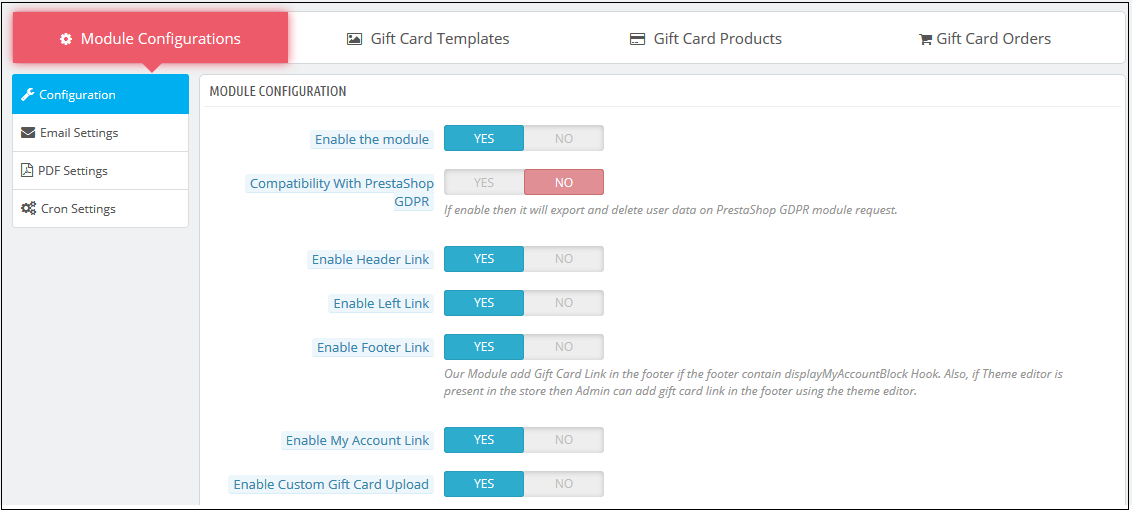
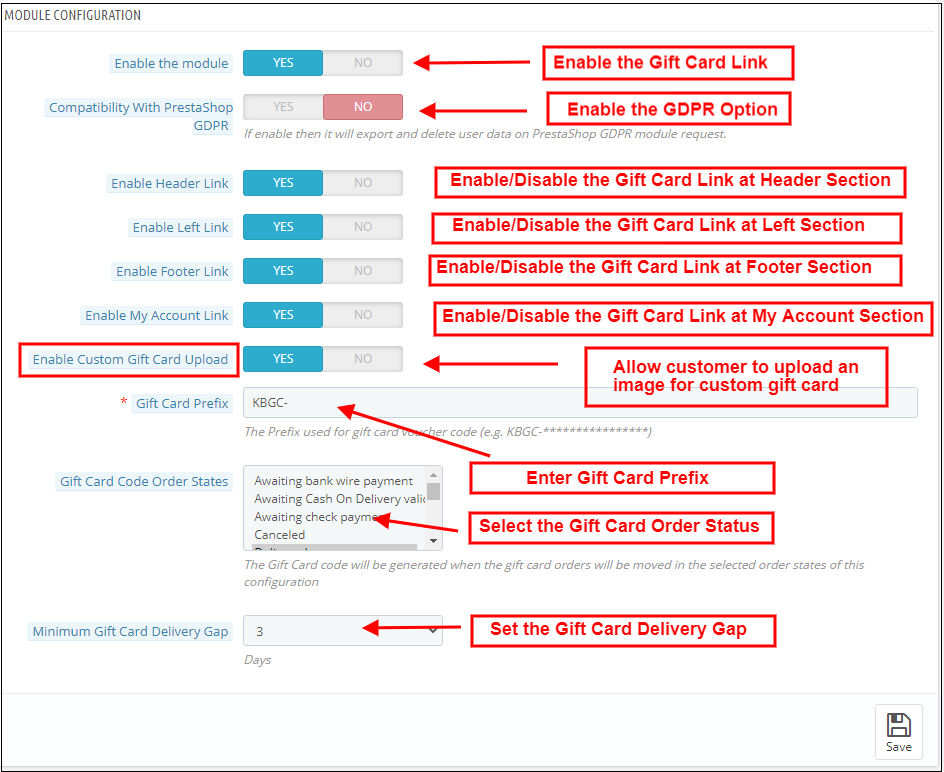
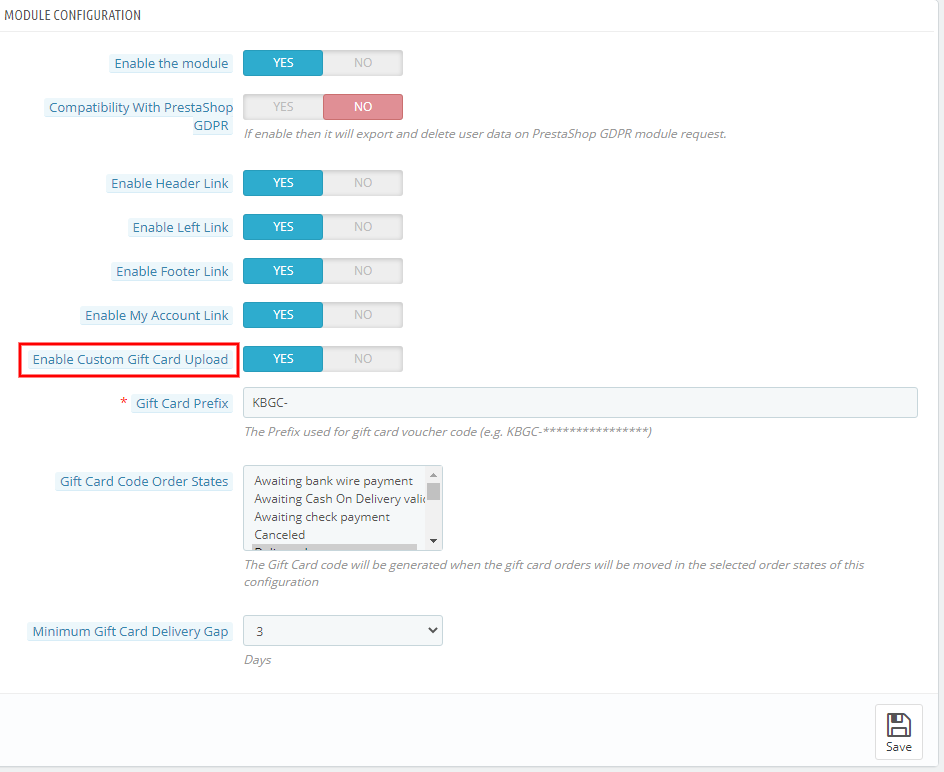
In the Module Configuration tab of Magento 2 Gift Card Extension by Knowband, online sellers can enable Gift Card functionality and set the delivery gap, gift card prefix and more. Screenshot of the Module Configuration tab shown below:

Initially, fields in the above form will be already filled with their default values.

1. Enable the Extension:  Initially, this will be “OFF”. Admin can enable/disable Magento 2 Gift Card Extension by turning ON/OFF this setting.

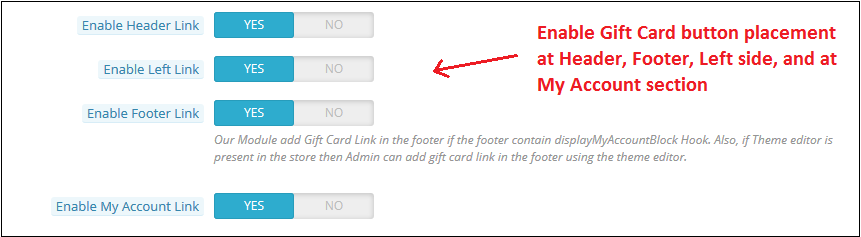
2. Enable Header Link: In this section, the online retailer can enable the display of the gift card option on the header.

Front End Preview:

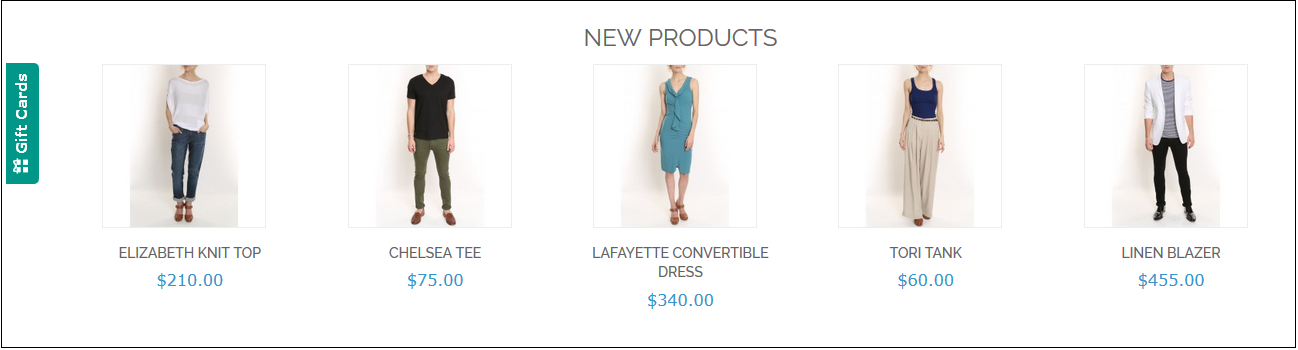
3. Enable Left Link: By using the Magento 2 Gift Voucher Extension, the admin has can enable display of gift card link on the left side of the screen by clicking the button.

Front End Preview:

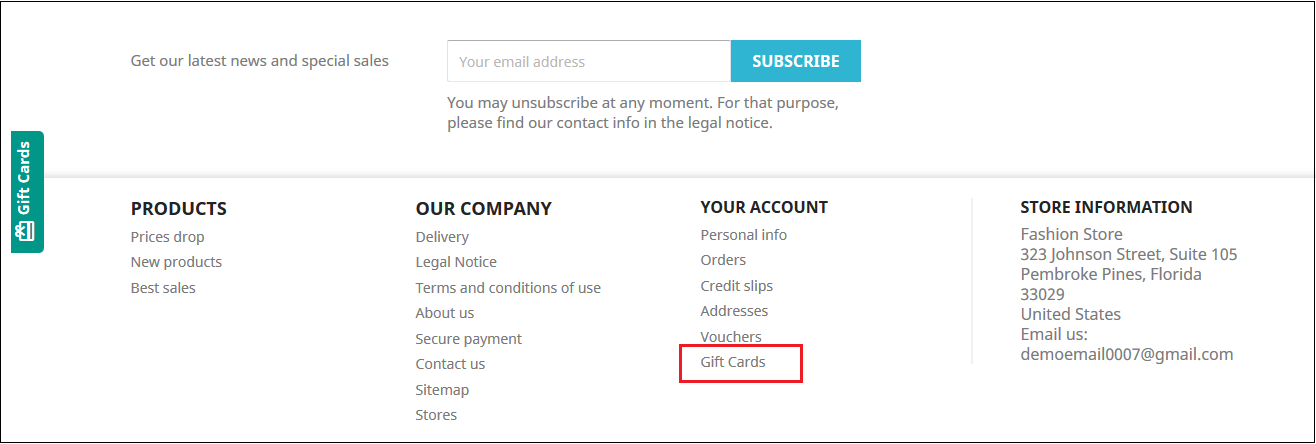
4. Enable My Account Link: The Admin can enable/disable Gift Card link in the Footer section as per the business requirement.

Front End Preview:
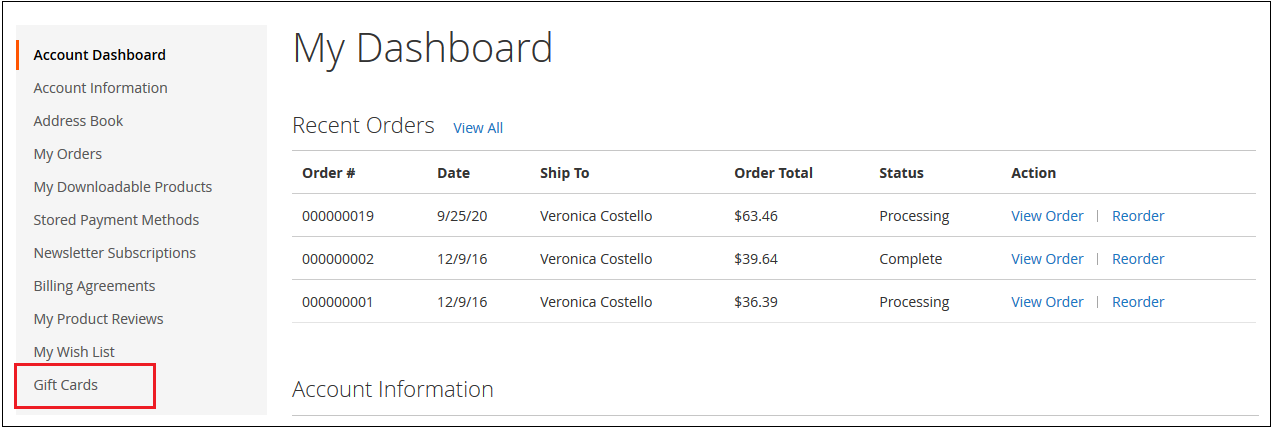
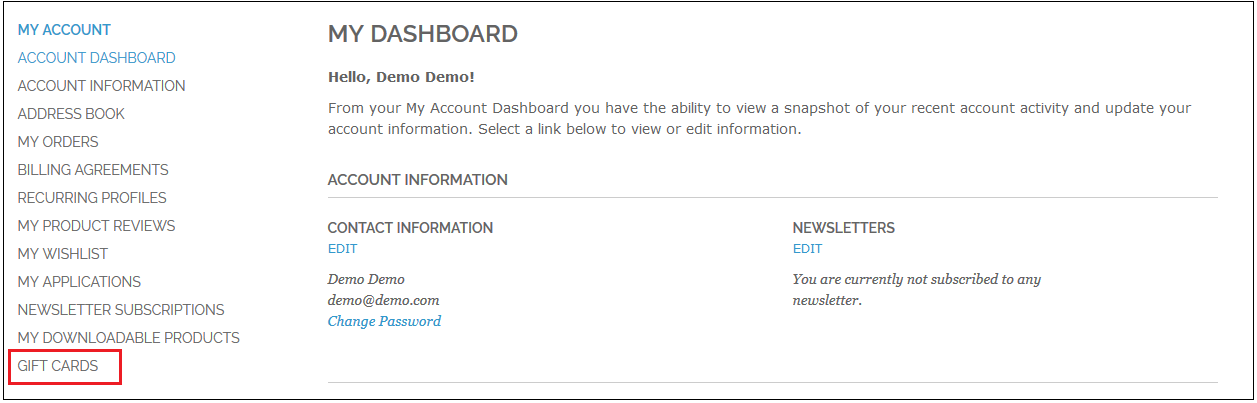
5. Enable Footer Link: The admin can enable the display of the gift card option in the My Account section.

Front End Preview:

6. Gift Card Prefix: In this option Magento 2 Gift Module the admin can set the prefix for the voucher code of the gift vouchers from here. The code can be entered in the format Ex: KB******

7. Gift Card Order Status: In this field of the Magento 2 Gift Cards module the admin can the default order status for the gift card orders.

As soon as the admin updates the order status for the Gift Card order, the gift card will be sent to the recipient via email.

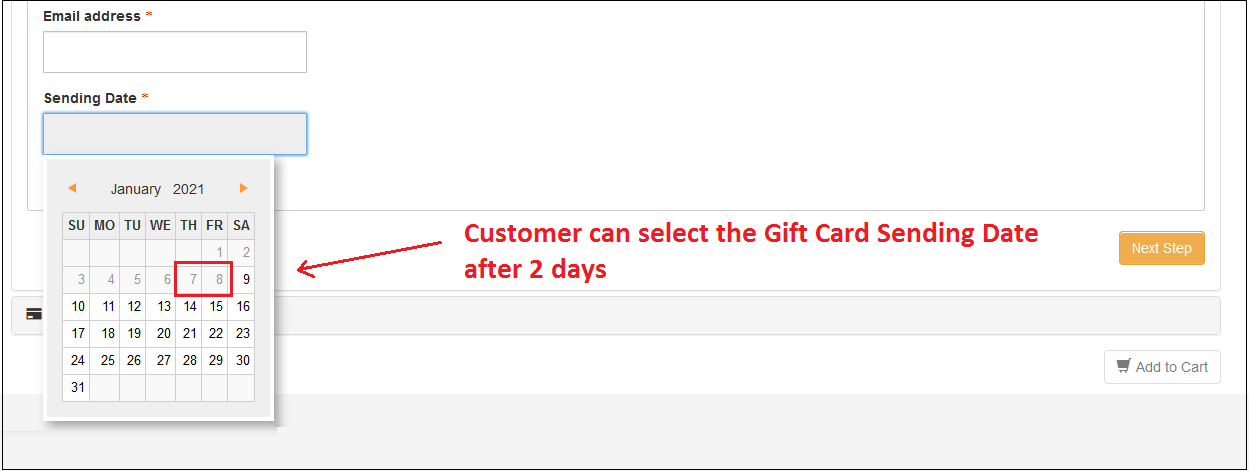
8. Minimum Gift Card Delivery Gap: This field of Magento 2 Gift Card Voucher Module allows the Store admin to enable the Voucher to send data after the specific no of days.

Ex: If gift card window values are set to 2 from the admin panel. These changes will reflect the Front End and the user will be able to select the send date after two days of the current date.

Admin Panel:

Front End Settings:
3.1.2 Email Settings

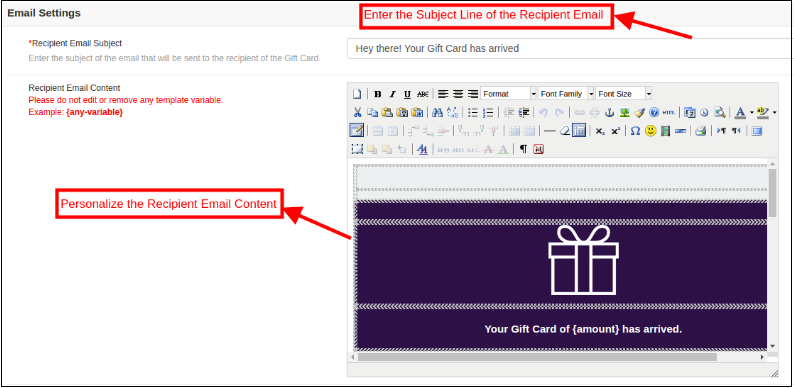
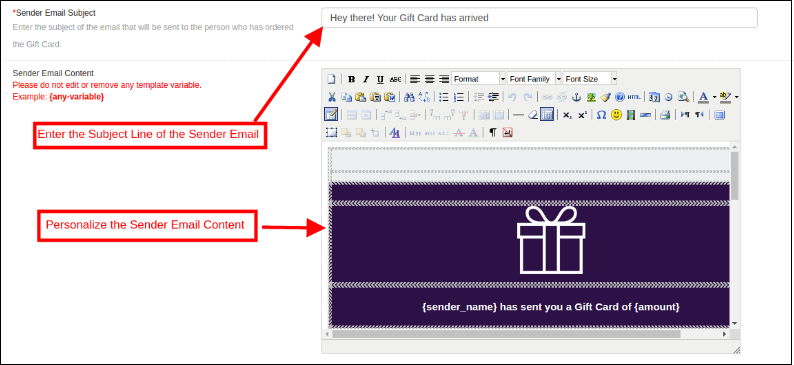
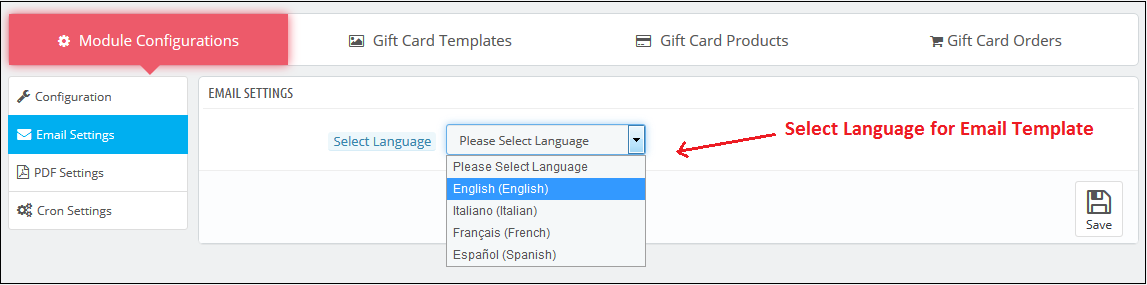
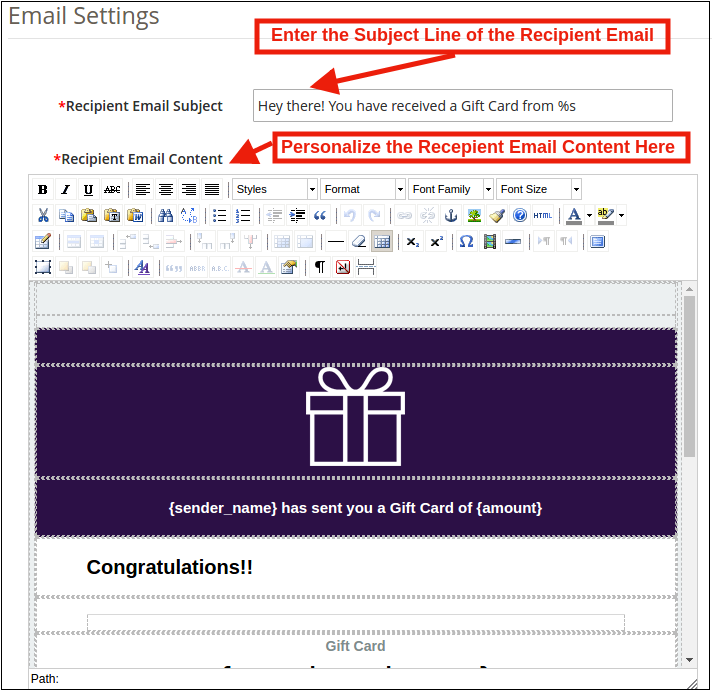
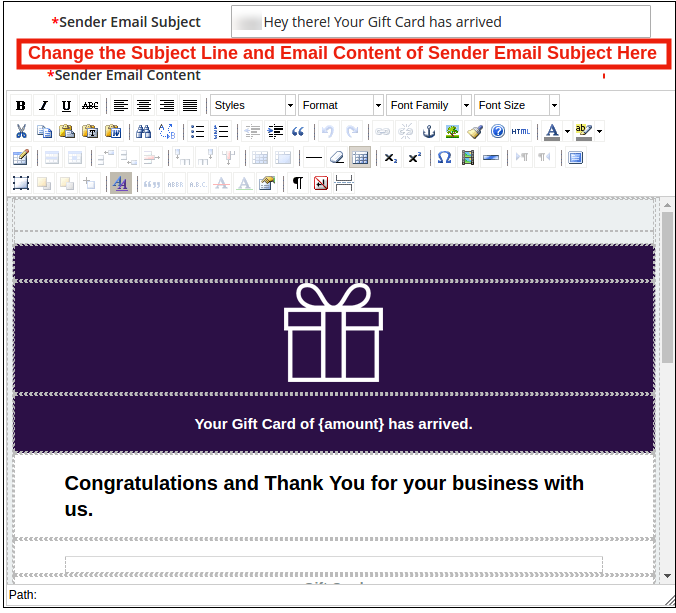
The customer gets an option to print the gift cards or else they can be sent to the receiver via email. The Magento 2 Gift module by Knowband offers default email templates that can be personalized as per the requirement of the store admin.

Recipient Email Settings:
Sender Email Settings:
3.1.3 PDF Settings

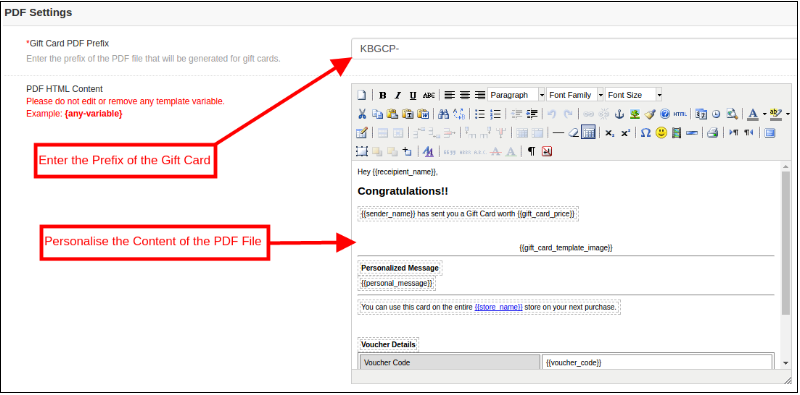
Magento 2 Send Gift Card Module also sends a PDF with along with the image, voucher code, voucher expiry date and voucher value. Users can also get the printout of the PDF.

Apart from this, the store admin can change the Gift Card prefix and update the PDF content to make it more attractive from the back-end.

3.1.4 Cron Setting

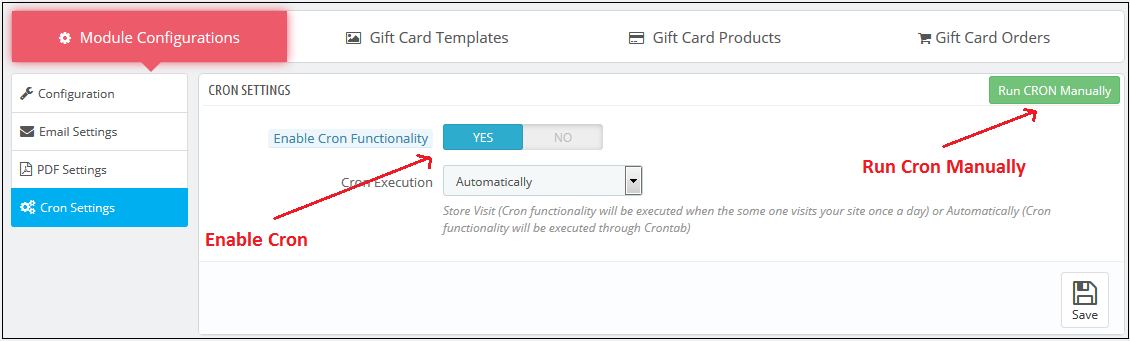
In this tab, the eCommerce store admin can run the CRON manually or automatically.

The Admin can run the CRON to your store via the control panel to send gift card vouchers automatically.

URLs to Add to Cron via Control Panel 

https://ma2testing.knowband.com/ma218/giftcard/index/cron/secure_key/20da59b52ef8b049dc21dfa5bdcc4c72/?SID=qbtfepld8dfkau56tf2lm4gj17
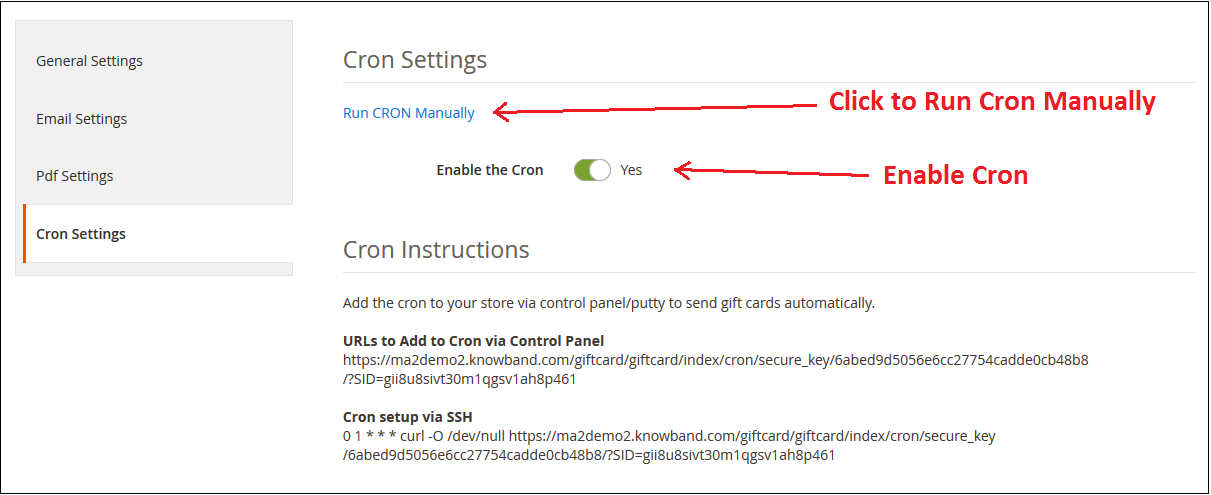
Cron setup via SSH 

0 1 * * * curl -O /dev/null https://ma2testing.knowband.com/ma218/giftcard/index/cron/secure_key/20da59b52ef8b049dc21dfa5bdcc4c72/?SID=qbtfepld8dfkau56tf2lm4gj17

3.2 Gift Card Template

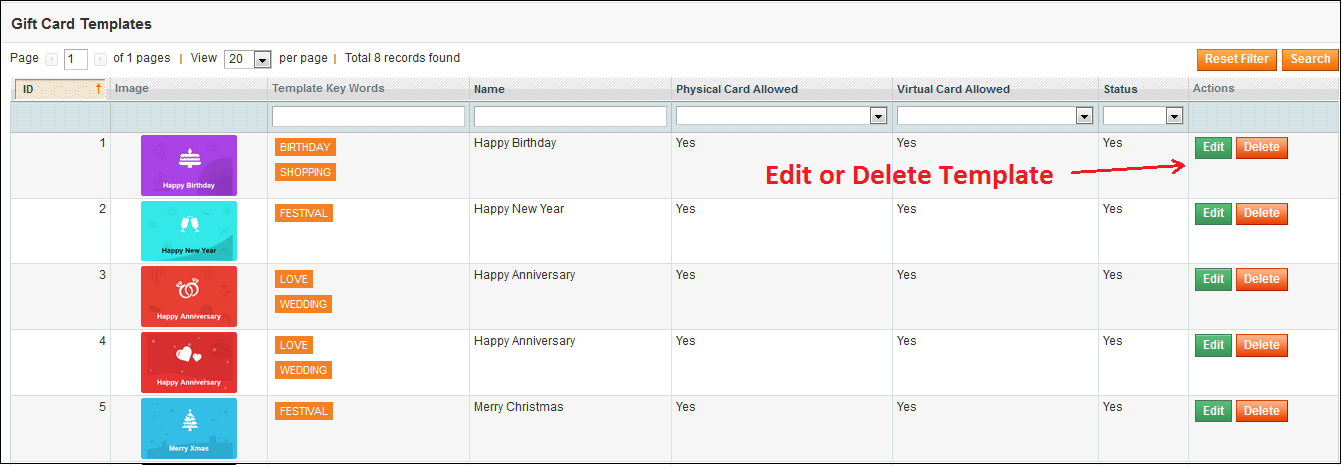
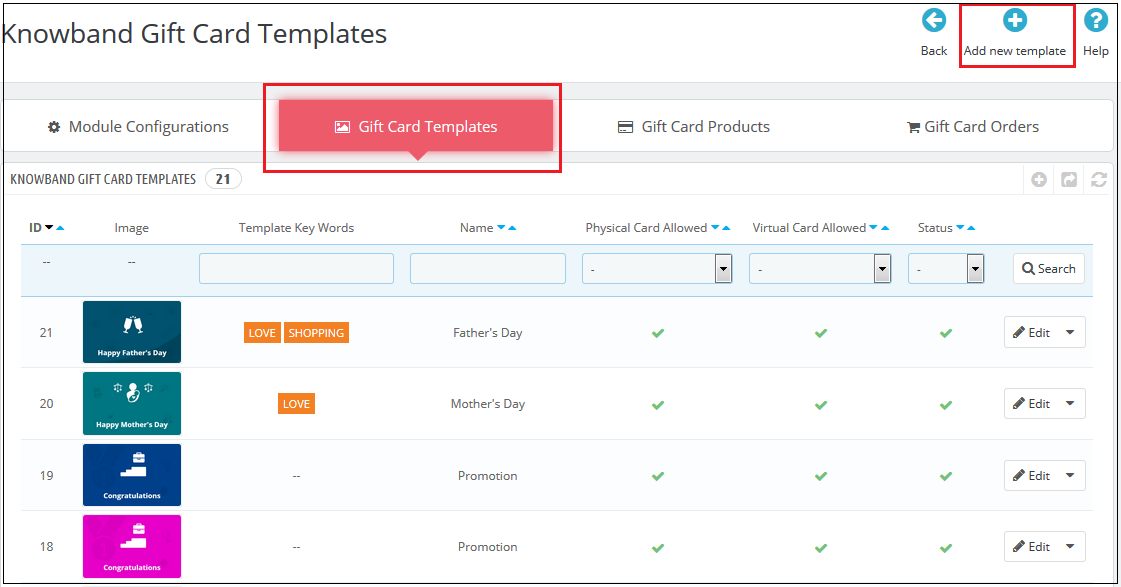
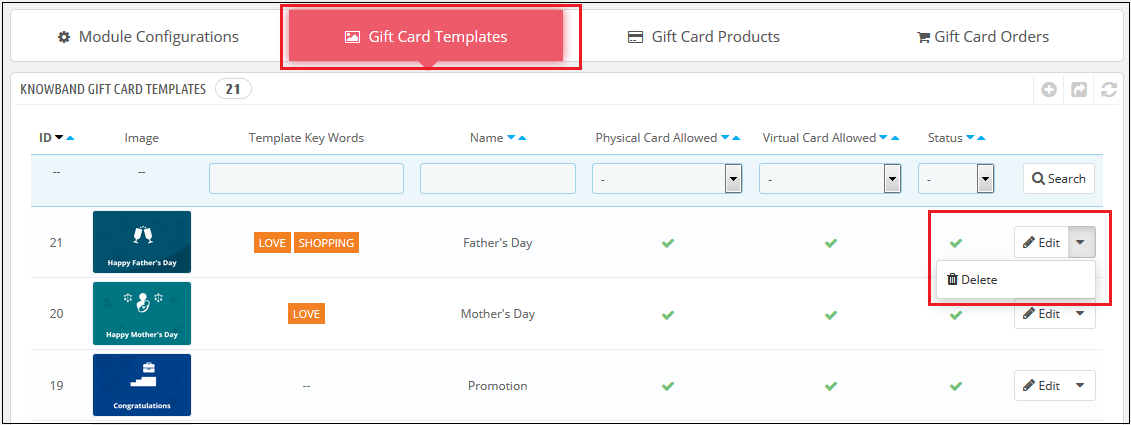
This tab shows already added Gift card templates. The admin can customize these Gift card template as per their desires. Other than this, the store merchant can edit or delete the Gift card template.

3.2.1 How to customize the template of the gift card?

3.2.1.1 Add New Gift Card Template

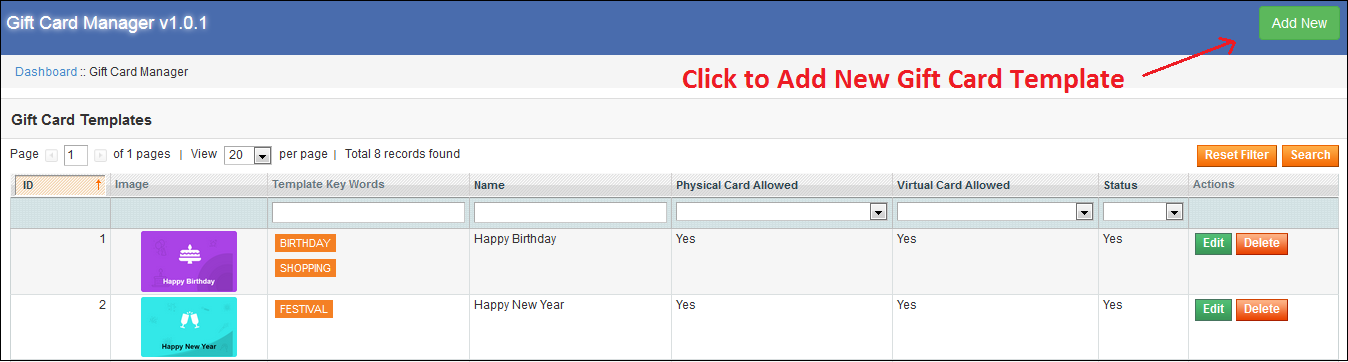
There is a ‘ADD NEW‘ button present on the top right corner of gift card template tab of Magento 2 Gift Card Manager Module. The store merchants can easily add new Gift Card template sets whenever they need by clicking on the button. Further details about its functionality are described in the next section.

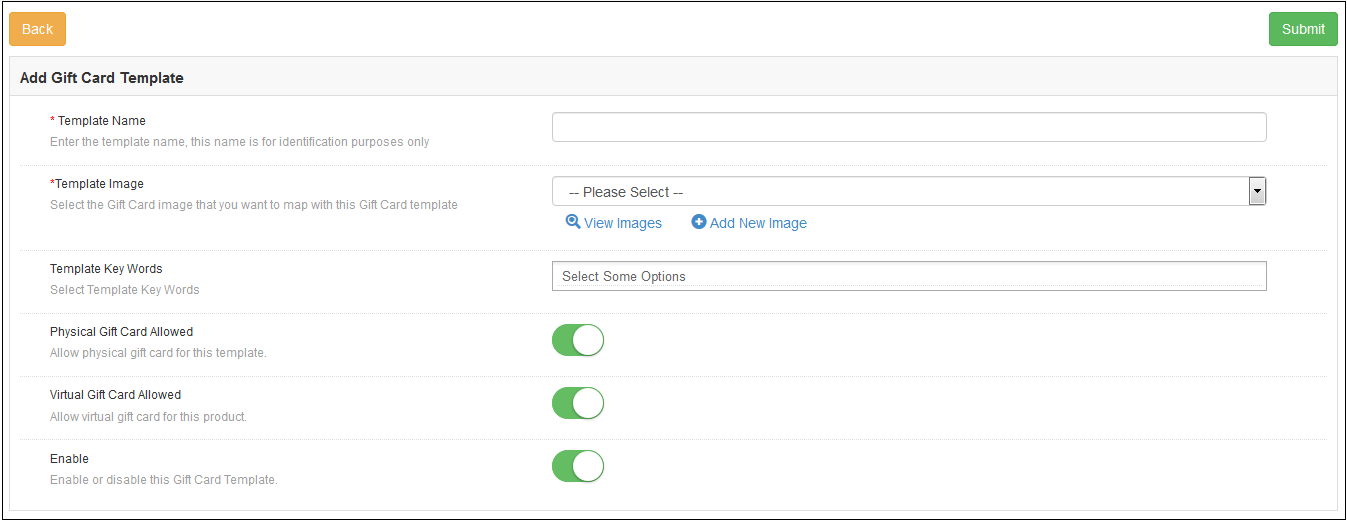
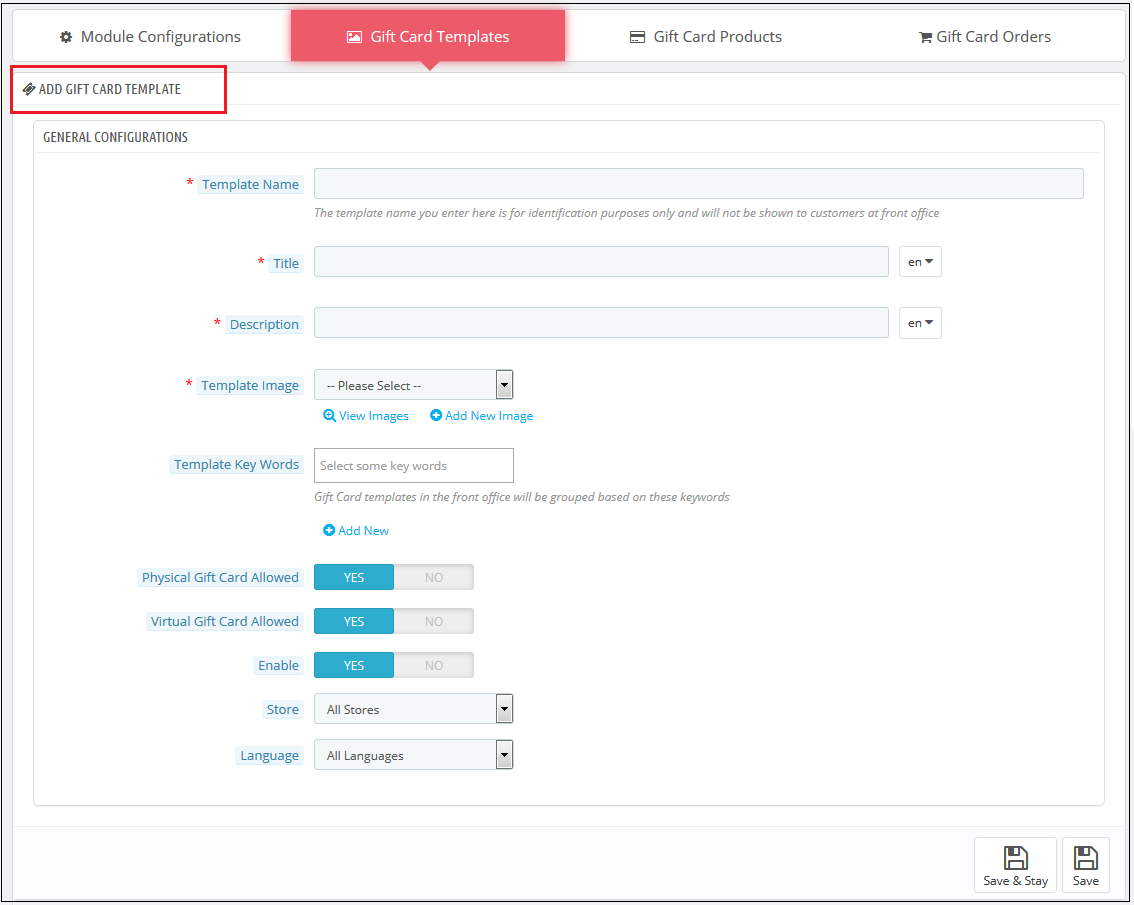
For creating new Gift Card template, ‘Add New’ option is used. By clicking on this, the module will redirect store merchants to the gift card template configuration form as displayed in the below screen:

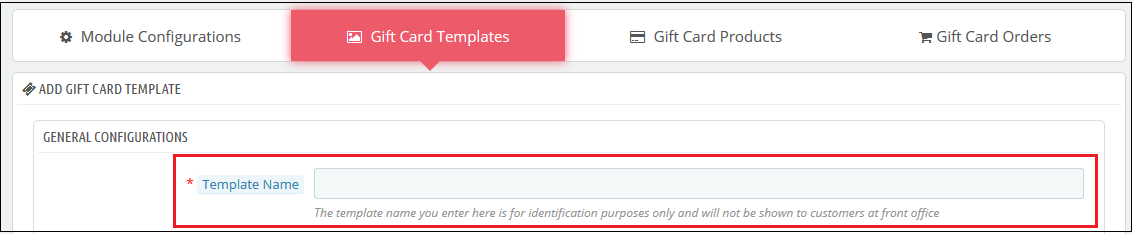
1. Template Name: In this option of Magento 2 Gift Voucher Extension the admin can enter the name of the New Gift Card Template like: Happy Friendship Day.

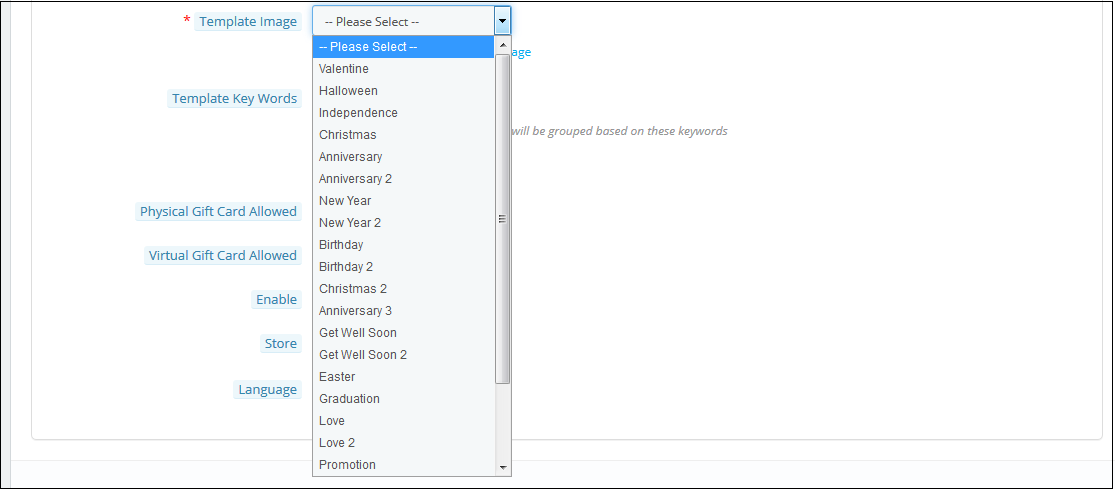
2. Template Image: Magento 2 Send Gift Card Extension by Knowband allows the store admin to select the image or the layout of the gift cards that will be shown in the front-end.

The images for the various occasions can be saved in the back-end of the Magento 2 Gift Card Extension. The admin selects the occasion in order to find the image as shown below:
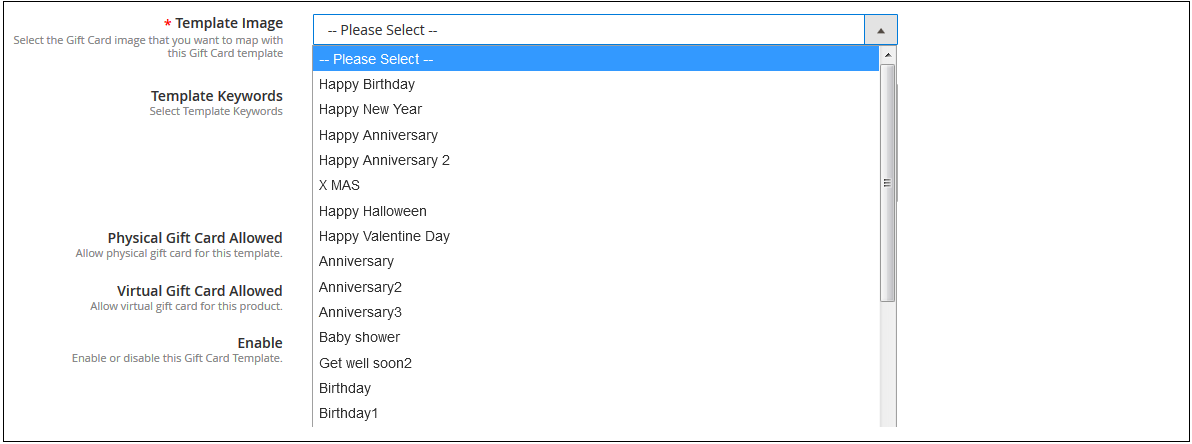
The store admin can even view the images for the various events has been saved for the same.

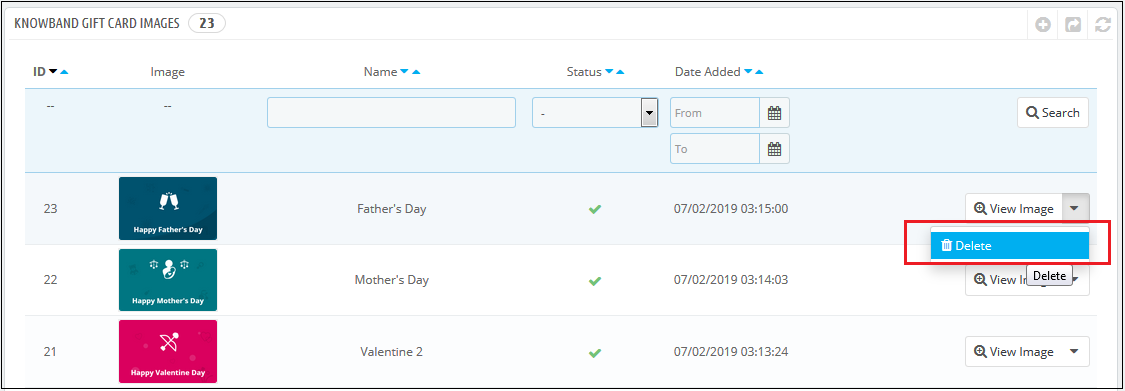
As you click on the ‘View Image’, you’ll be redirected to the page below.

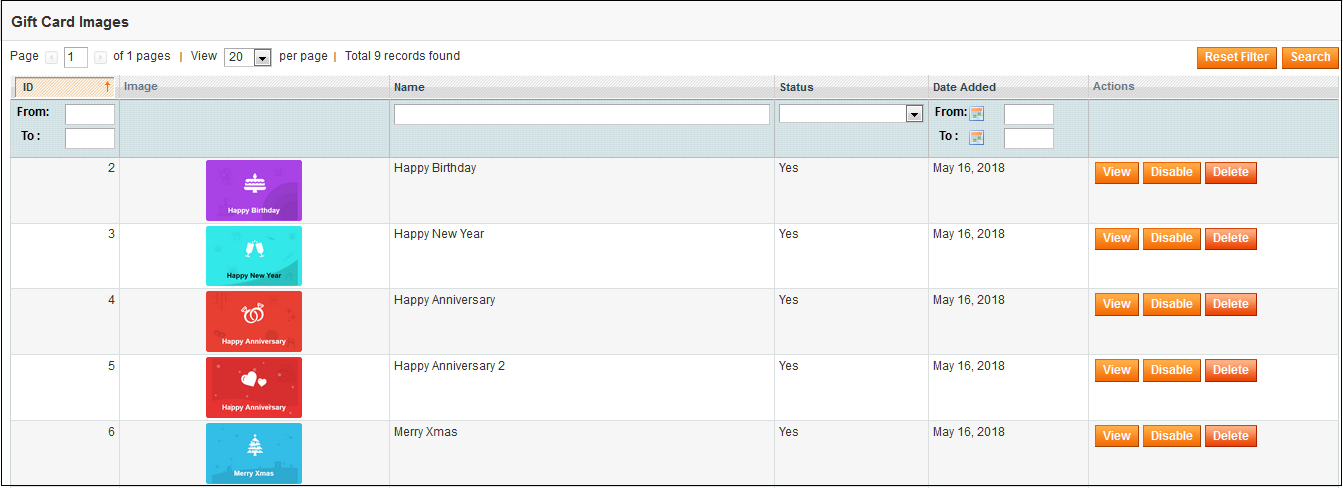
The list showcases all the gift cards that have been created and saved. You can view the complete image or even delete it if required.

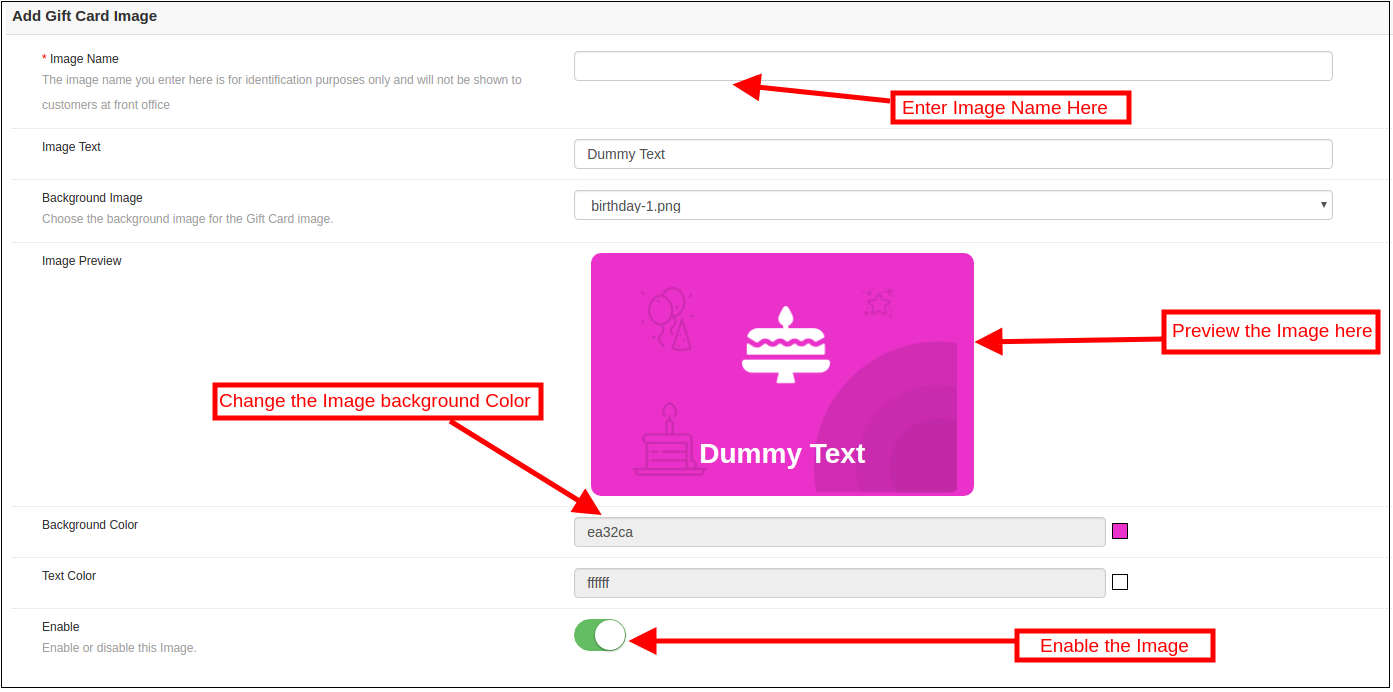
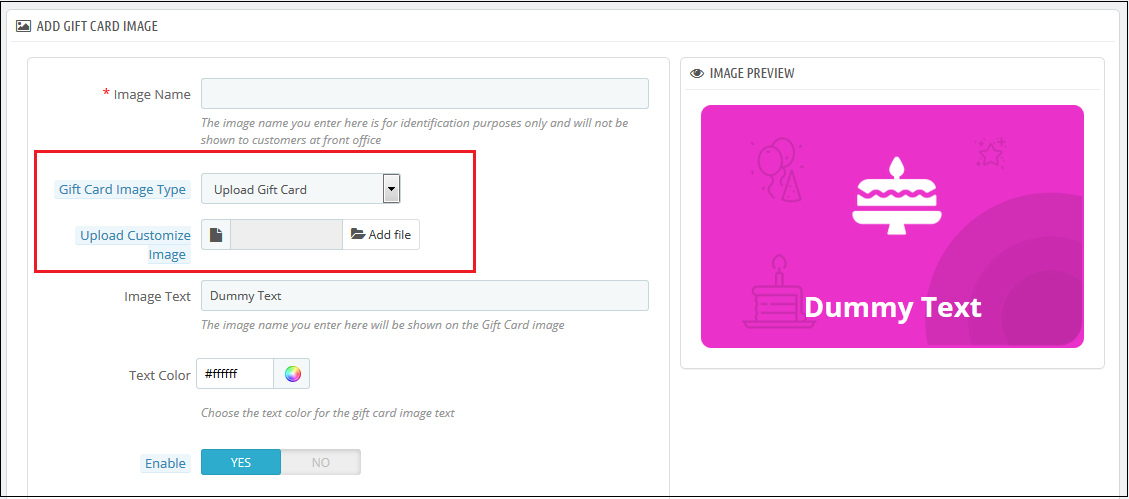
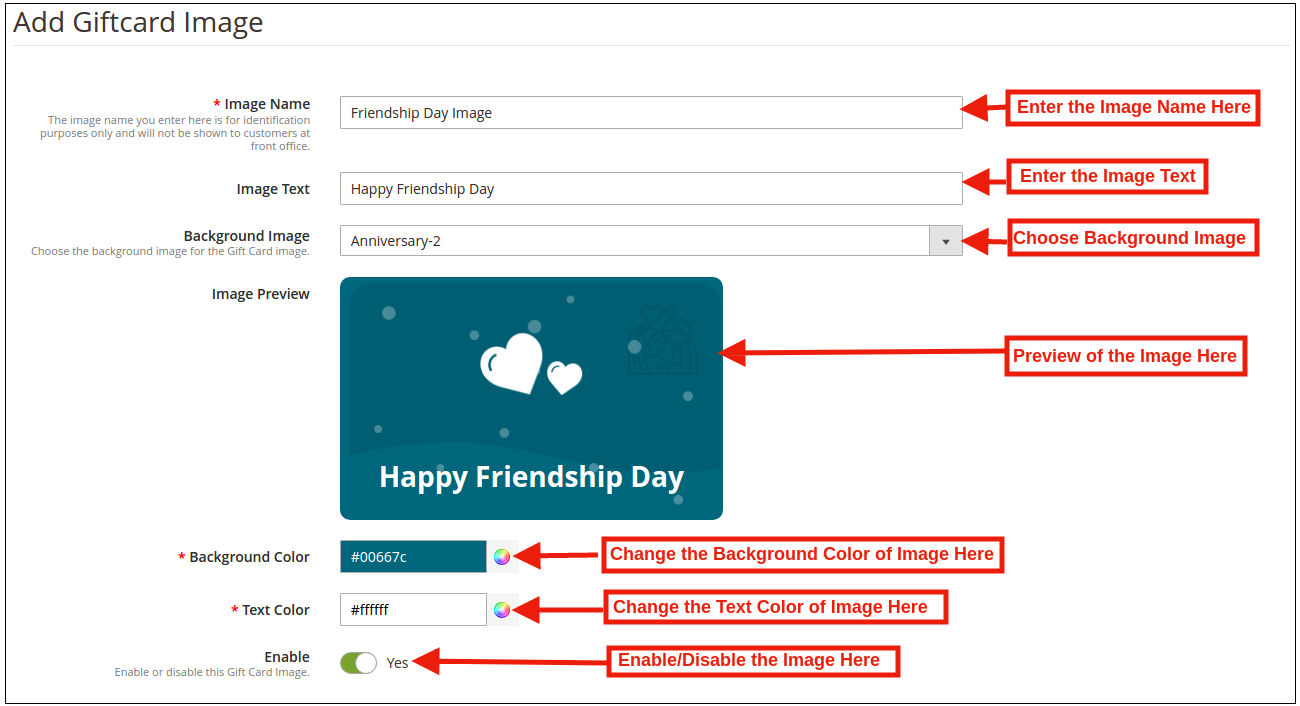
In order to create new images, click ‘Add New Image’ as shown below.

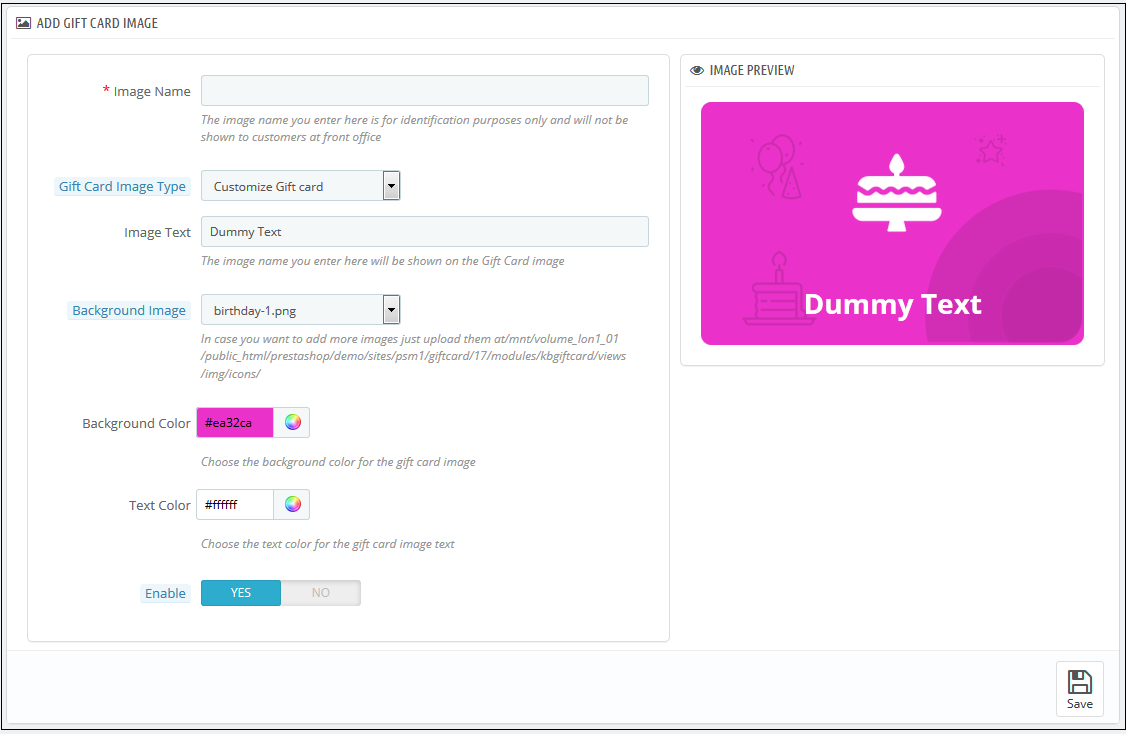
You can enter the image name and the text of the image to be shown on the gift card. Even the background image and color, as well as font color, can be changed at a button click. Preview the final image before making it live on the website.
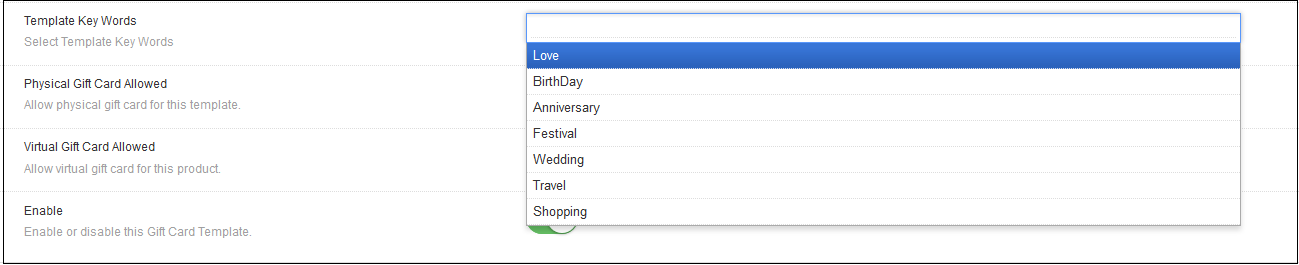
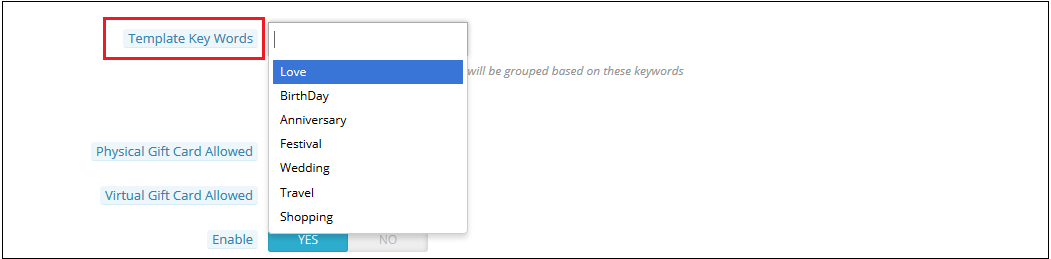
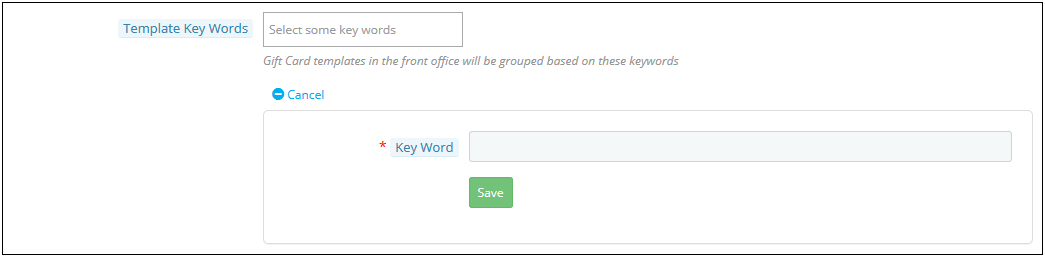
3. Template Keywords: This option includes the list of the Keyword in this dropdown list the store admin can select the template keywords.

4. Physical Gift Card Allowed: The Magento 2 Gift Card Voucher module by Knowband allows the store admin to enable the physical gift card option for the particular gift template.

5. Virtual Gift Card Allowed: The Online retailer can enable the Virtual gift card functionality will allow the e-cards.

6. Enable: Initially, this option will be ‘ON’. The Store admin can enable/disable the settings as per the need.

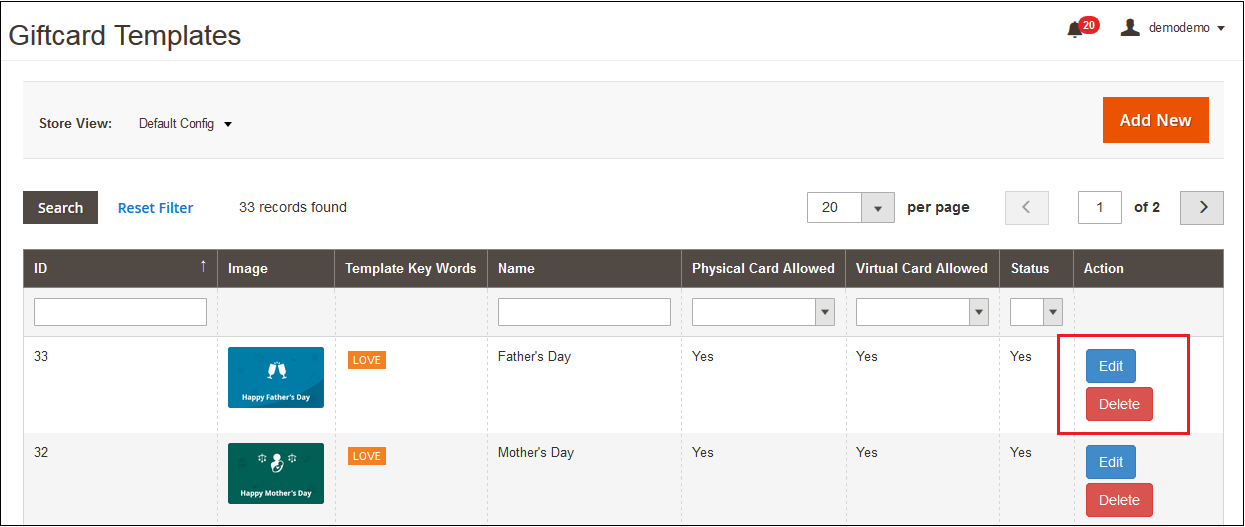
3.2.1.2 Edit Gift Card Template

Magento 2 Gift Module allows the online retailer to edit or delete the gift card template as per the need. The screenshot is shown below:
3.3 Gift Card Product

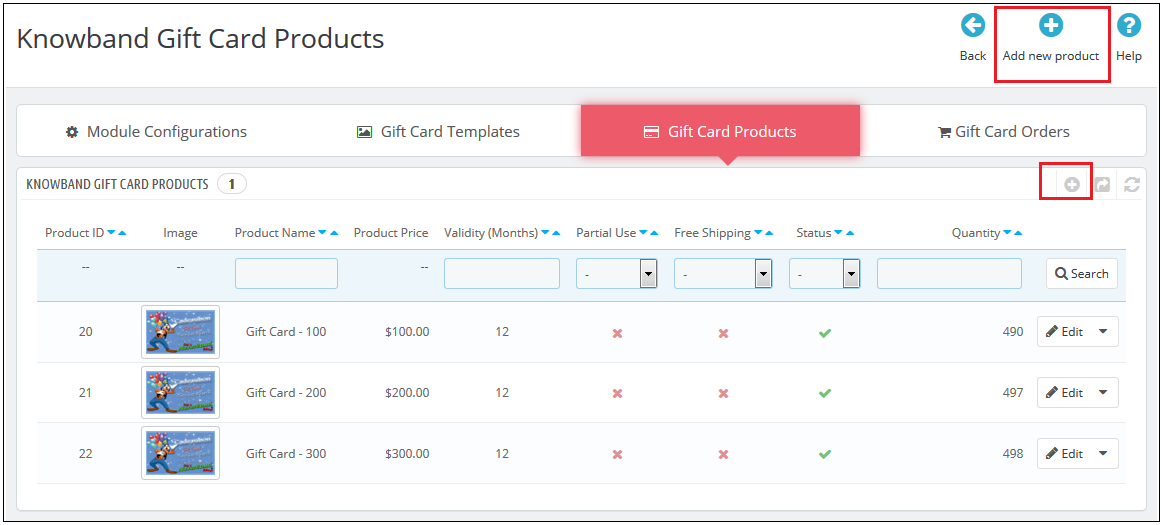
In this tab of Magento 2 Gift Voucher Module allows the store admin to add the Gift Cards product of different values like: product name, product price, quantity and more or edit the already added product from the back-end.

3.3.1 How to customize the Product of the gift card?

3.3.1.1 Add New Gift Card Product

Magento 2 Gift Card Manager Module allows the store admin to add the new Gift Card template by clicking on the ‘ADD NEW’ button present on the top right corner of gift card template tab of Gift Module.
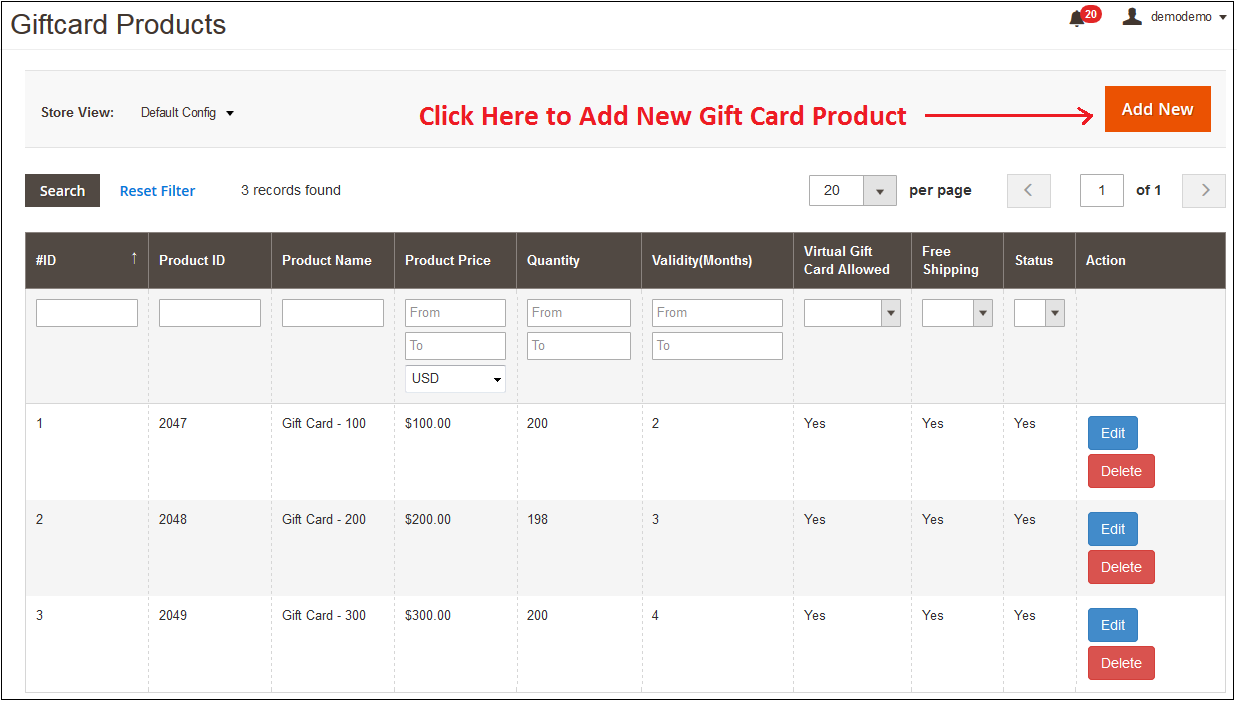
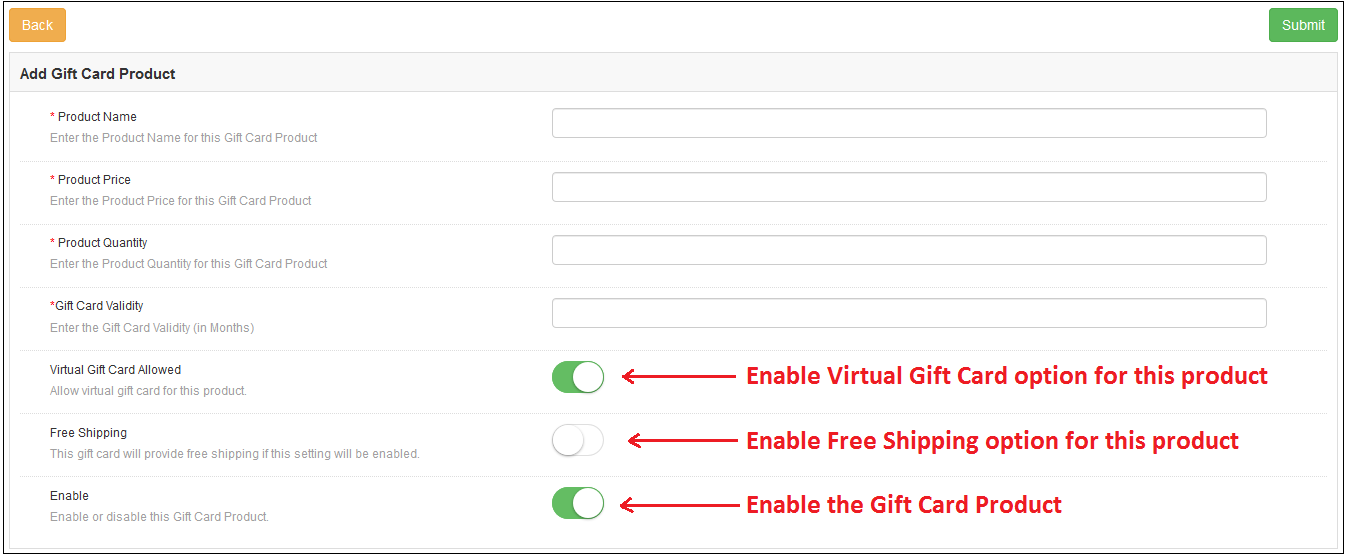
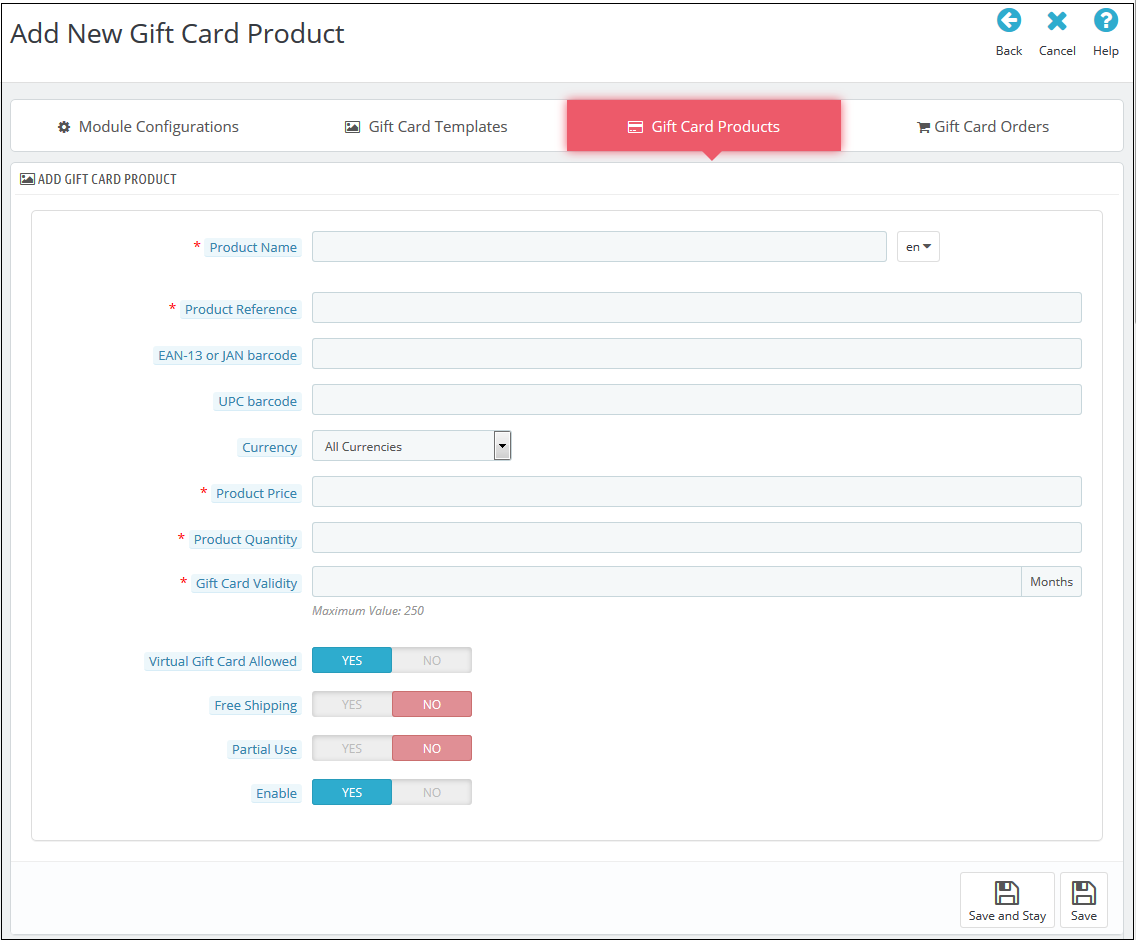
Fill out the information that you need to provide for creating the product.
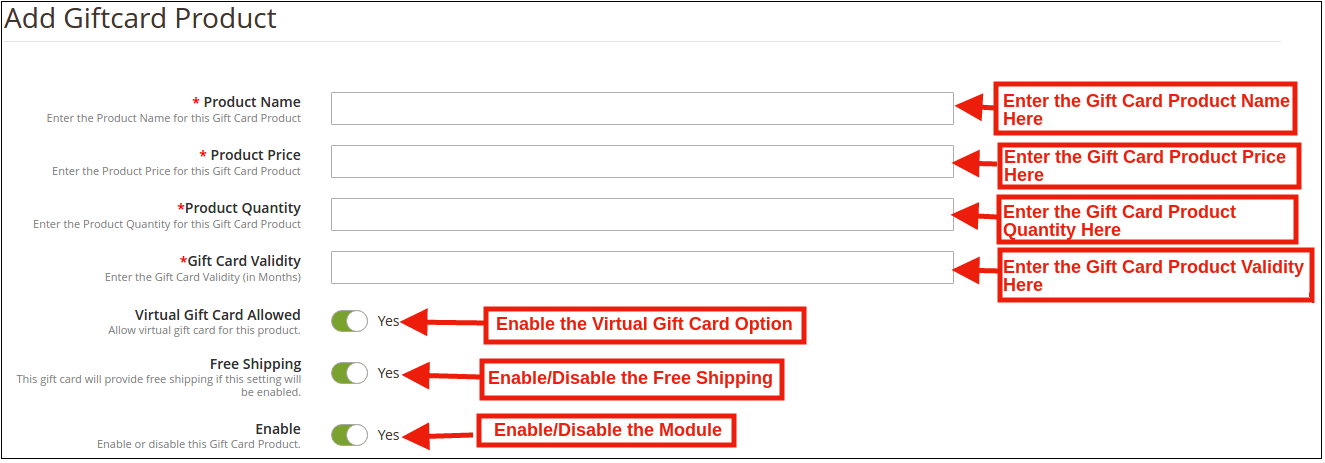
  • Product Price: Magento 2 Gift Card Manager Module by Knowband allows the store admin to enter the price of the product.
  • Product Name: Enter the name of the product here. It can be Happy Anniversary, Happy Birthday, Merry Christmas or any other.
  • Product Quality: In this tab of Magento 2 Send Card Module the admin can enter the product quality of this gift card product.
  • Gift Card Validity: The validity period in months of the gift card can be entered here by using this Magento 2 Gift Module.
  • Virtual Gift Card Allowed: Enable e-card by switching on the button.
  • Free Shipping: The Magento 2 store admin can even allow free shipping to the customer.
  • Enable: The Magento 2 Send Gift Card Extension can be enabled or disabled from here.

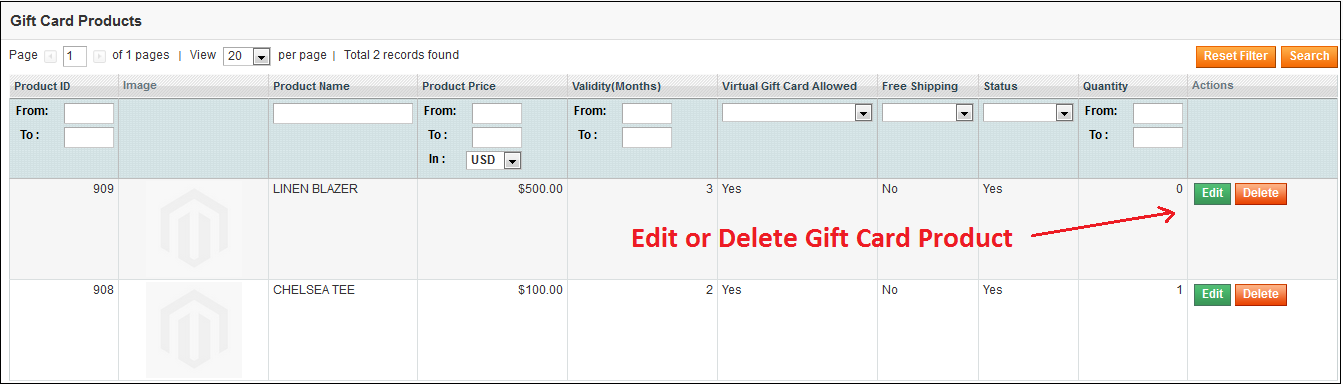
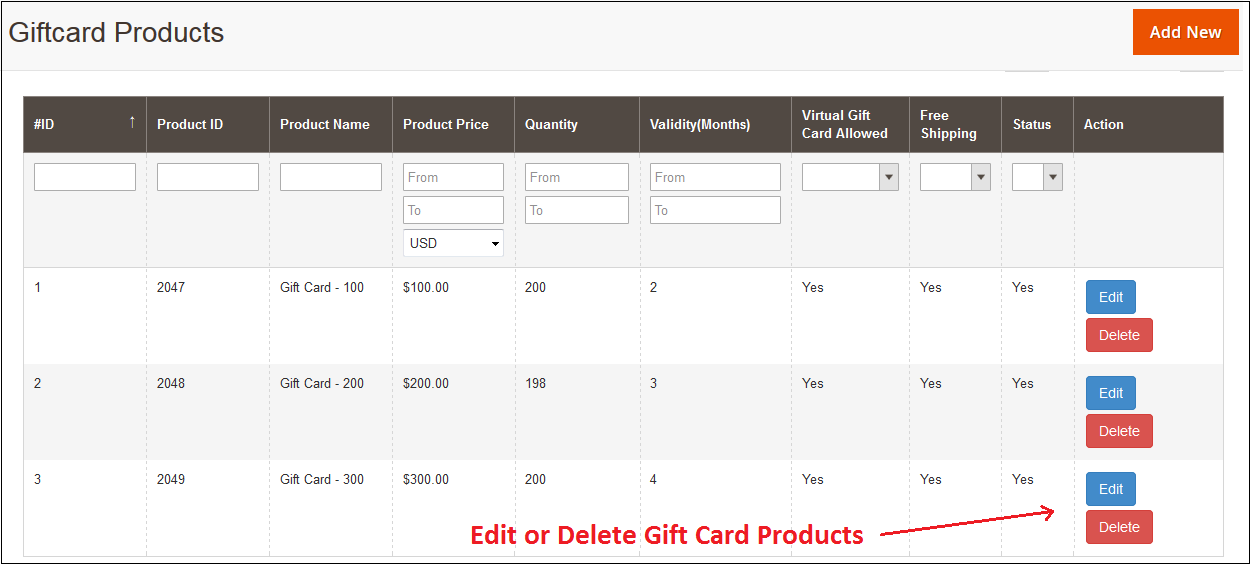
3.3.1.2 Edit and Delete Gift Card Product

The admin even gets an option to edit the gift card product or delete from the section shown below:
3.4 Gift Card Orders

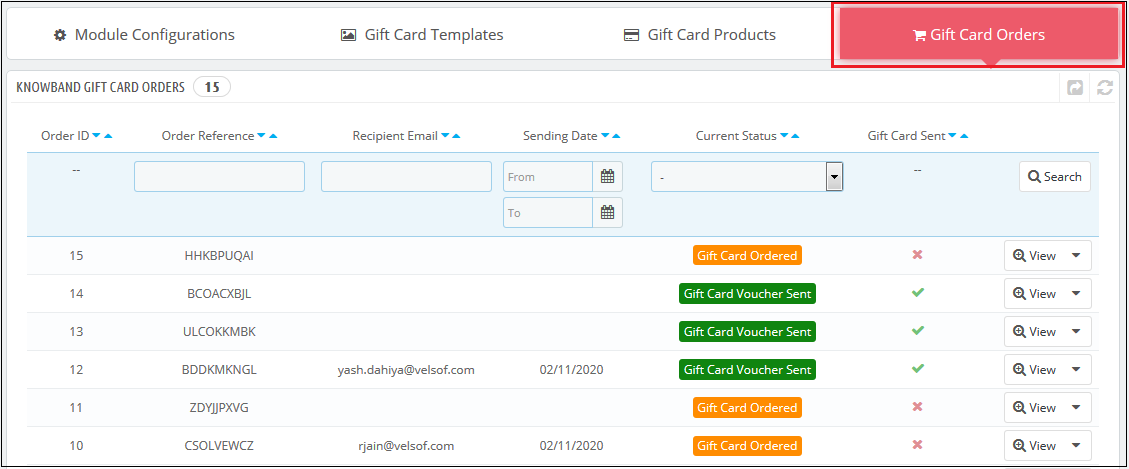
In this Gift Card Order, tab provides the store admin an option to view the entire list of the orders received for the gift cards. It involves the recipient email, date of sending as well as the status of the gift cards.

In the ‘Gift Card Order’ tab go to the ‘View’ button in the right section. In this section shows the entire information about the order.
4.0 Front End

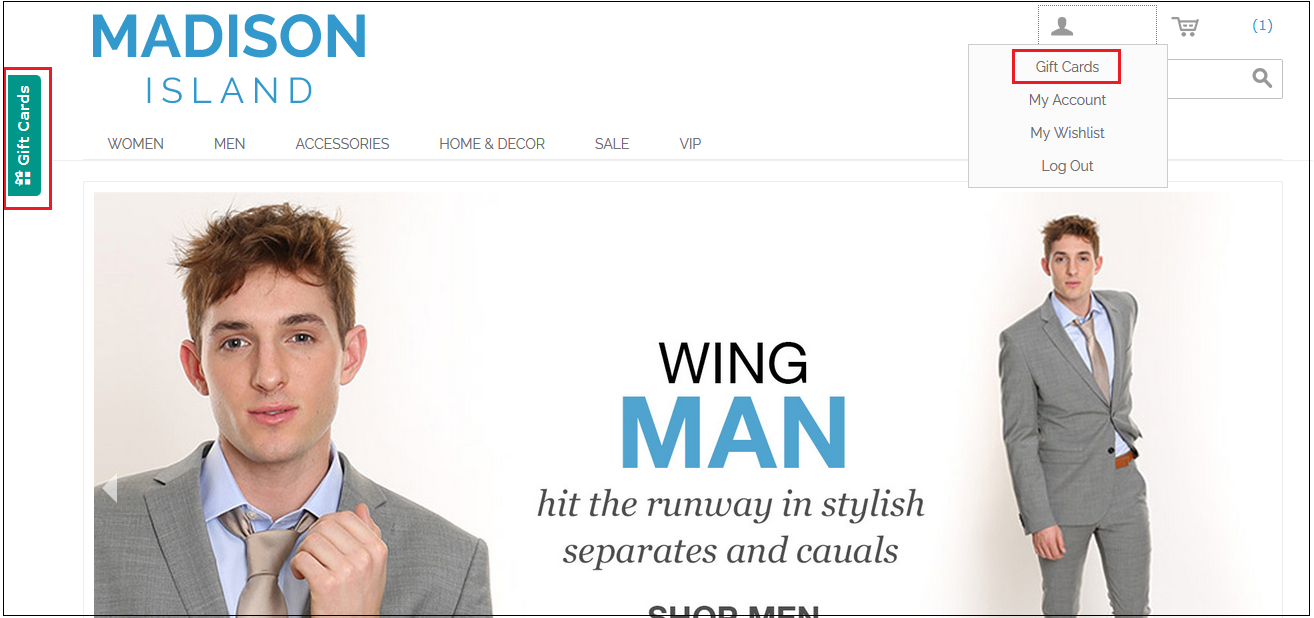
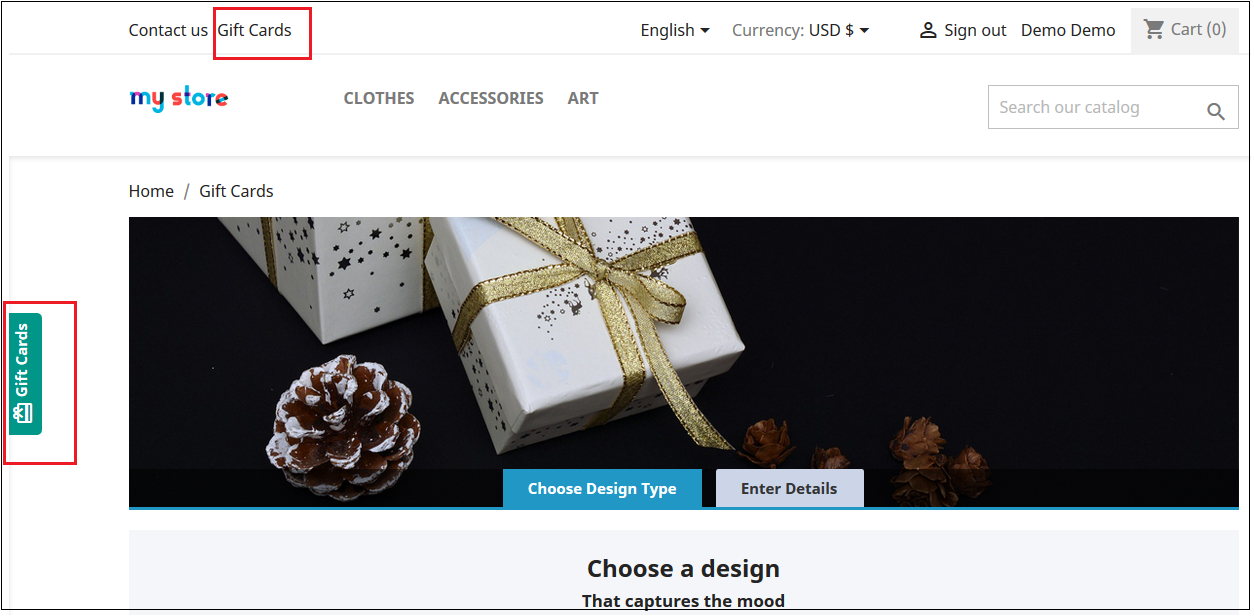
Magento 2 Gift Voucher Module adds a Gift Card link on storefront end in the Header, Footer, Left and My Account section of the module. By accessing this gift card link customers can browse the gift cards.

This link redirects the user gift card page of the site.

Gift Card Front End Header Link Preview:

Gift Card Front End Left Link Preview:

Gift Card Front End Footer Link Preview:

Gift Card Front End My Account Link Preview:

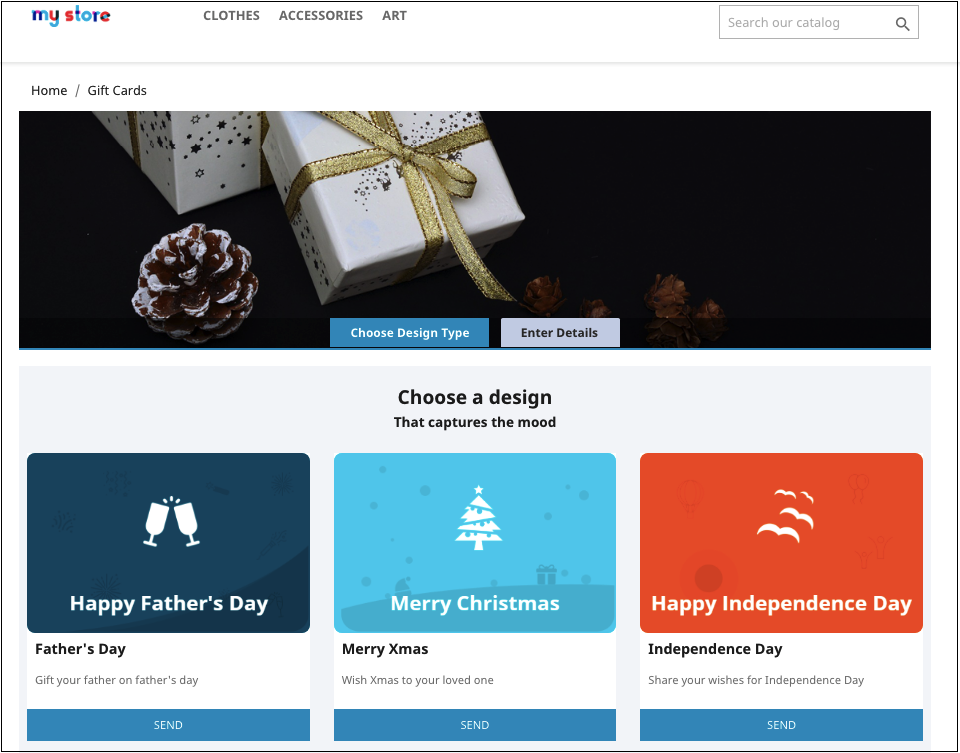
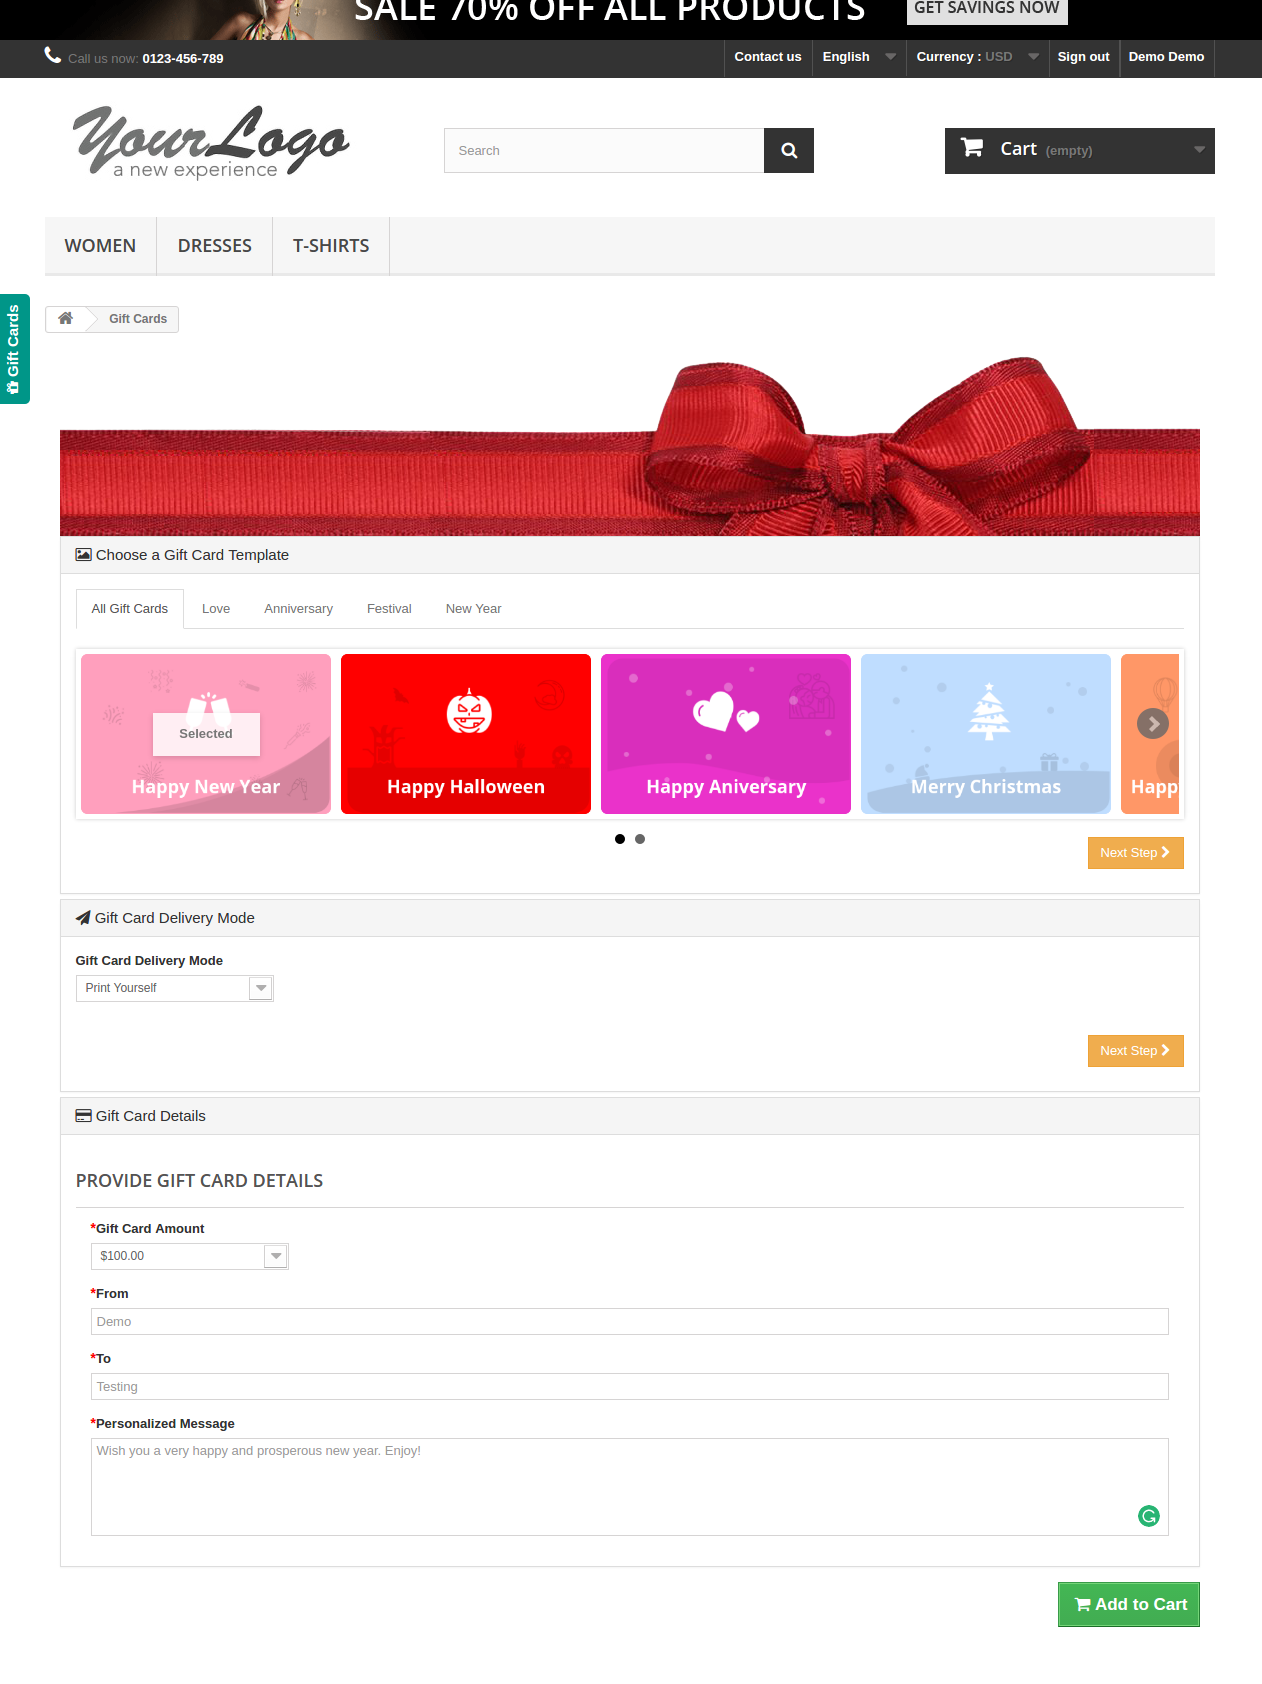
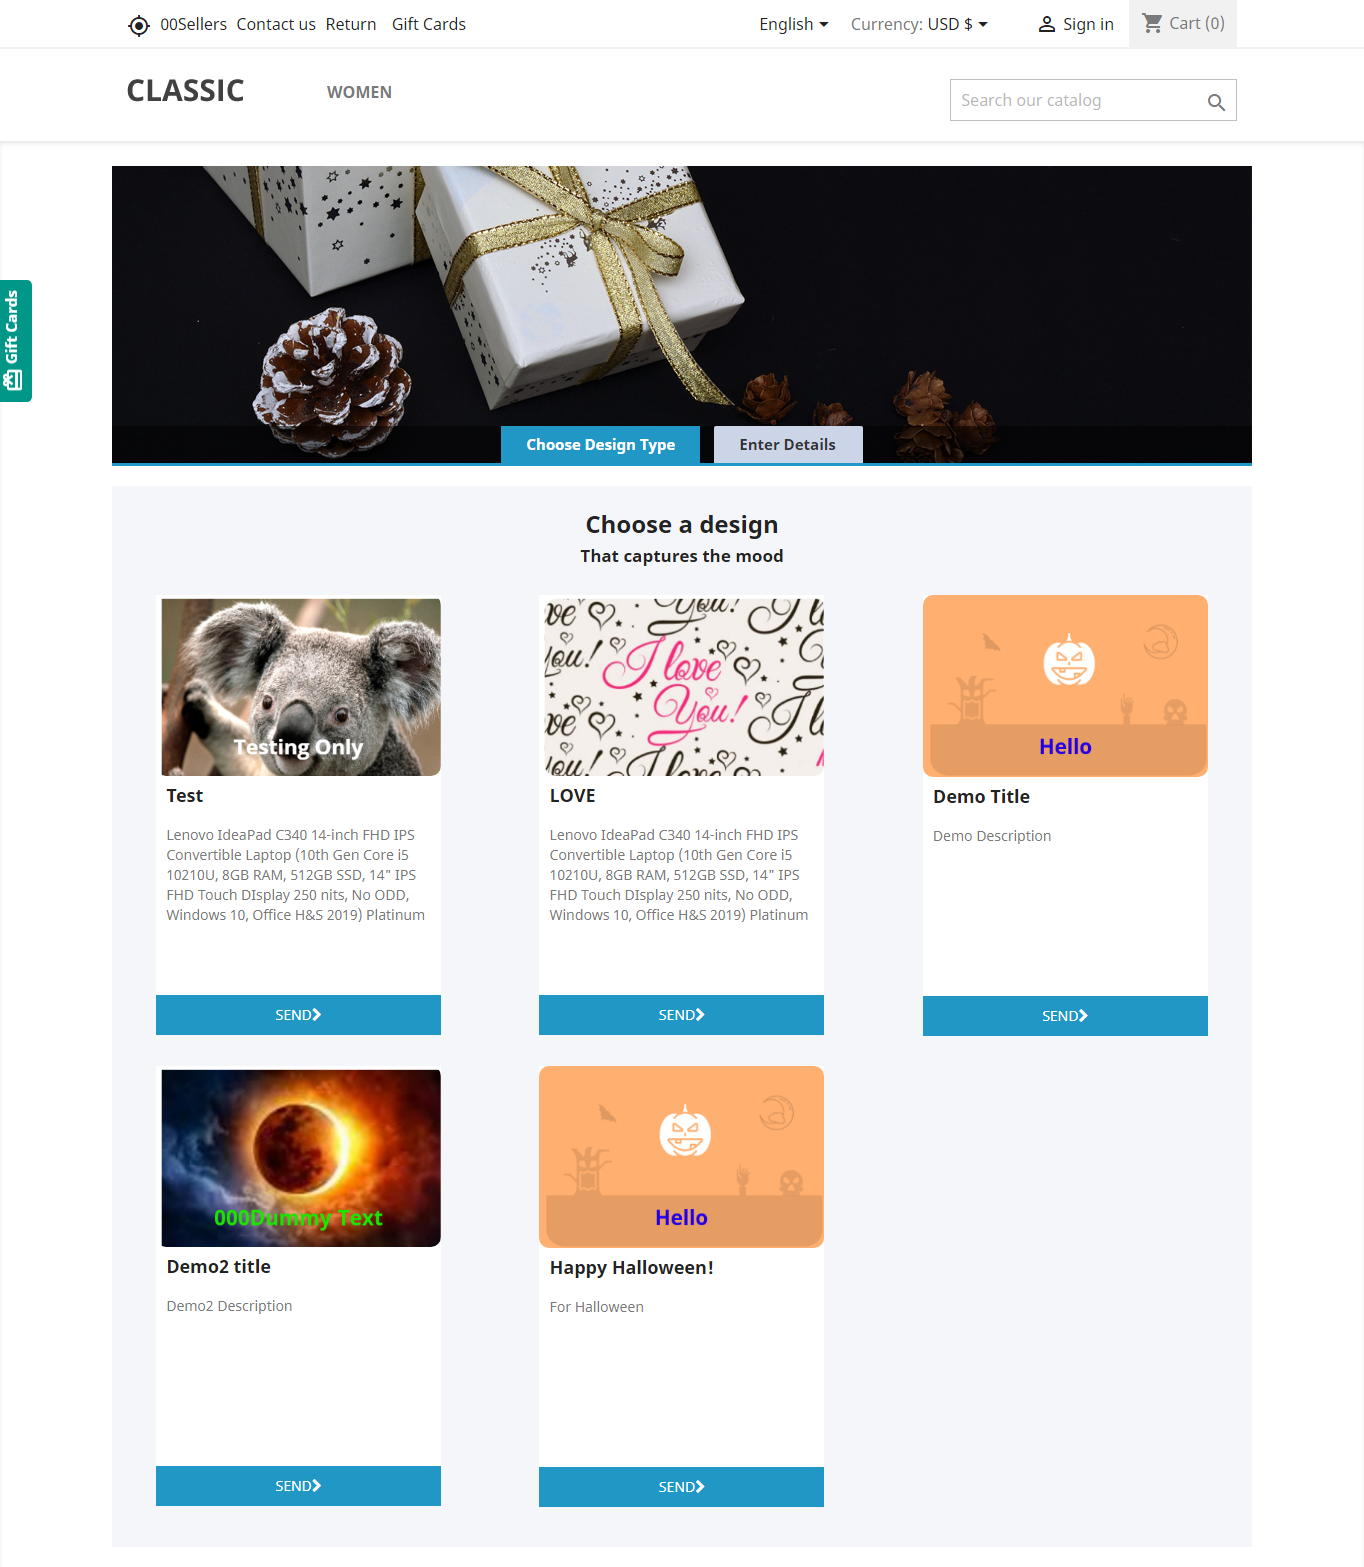
After clicking on the Gift Card link module redirect the following page:
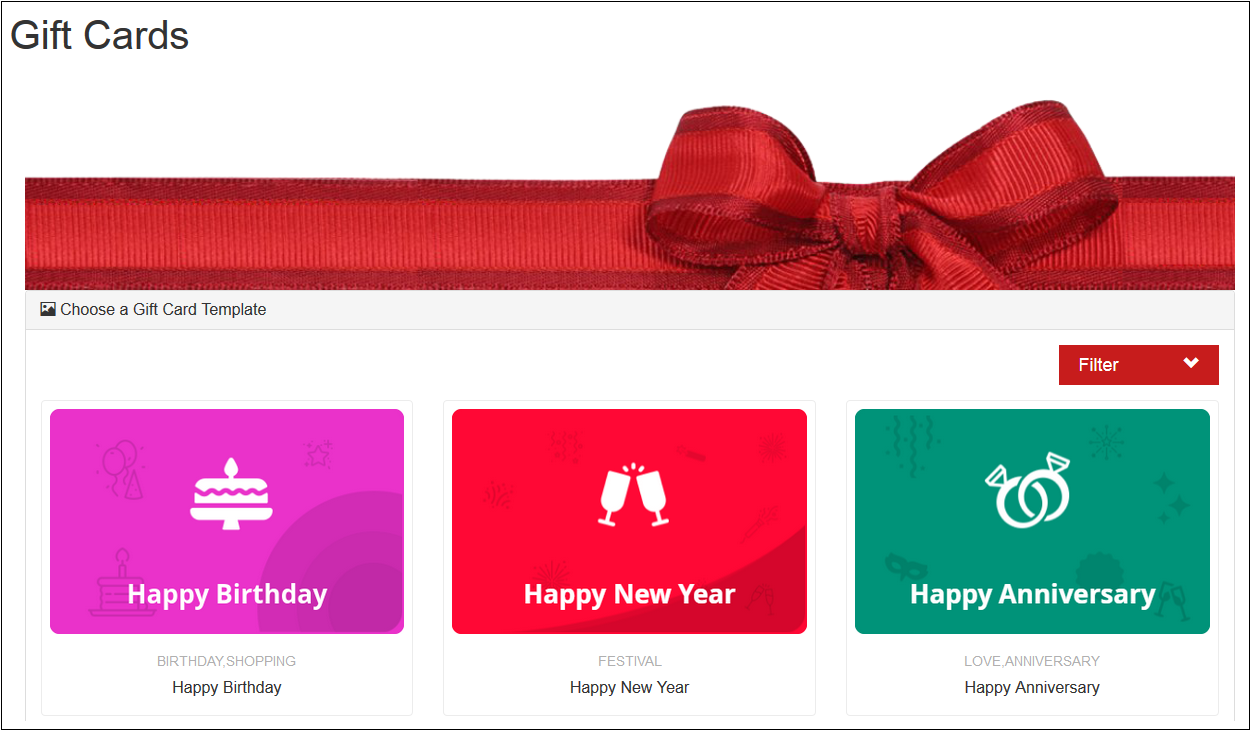
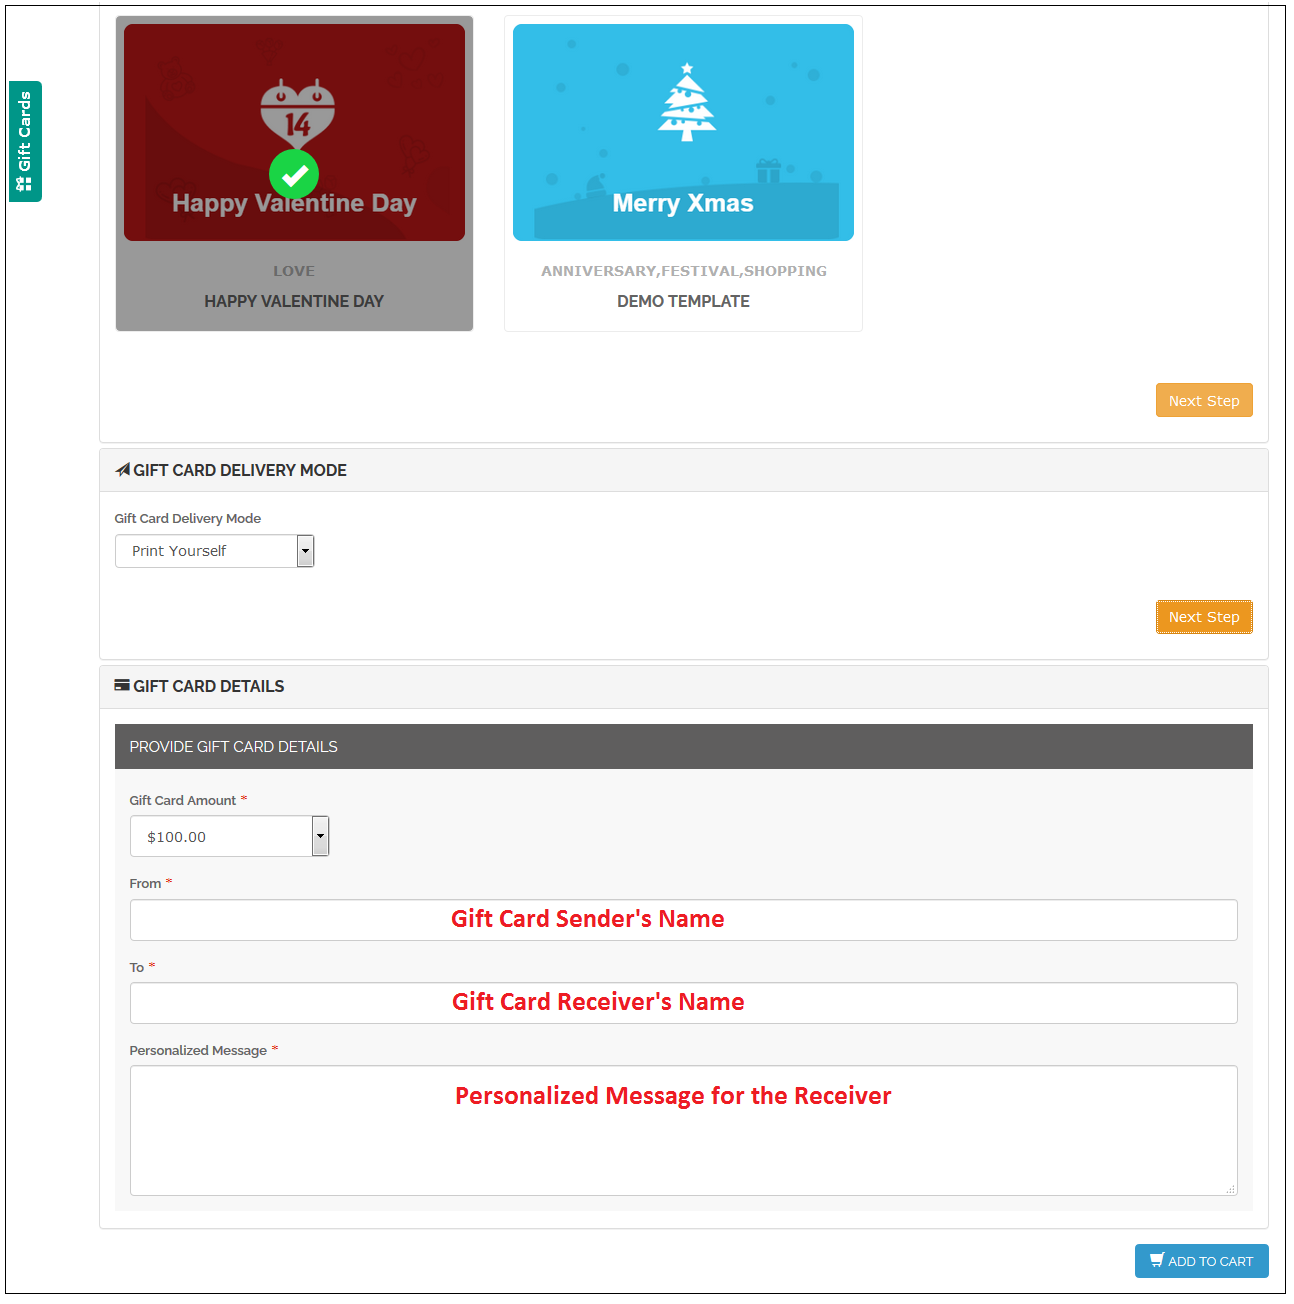
Shopping for the same is easy. The customers can select the card for the different occasion. For instance, he chooses the Happy Birthday card. All he needs to do is to click on the card.

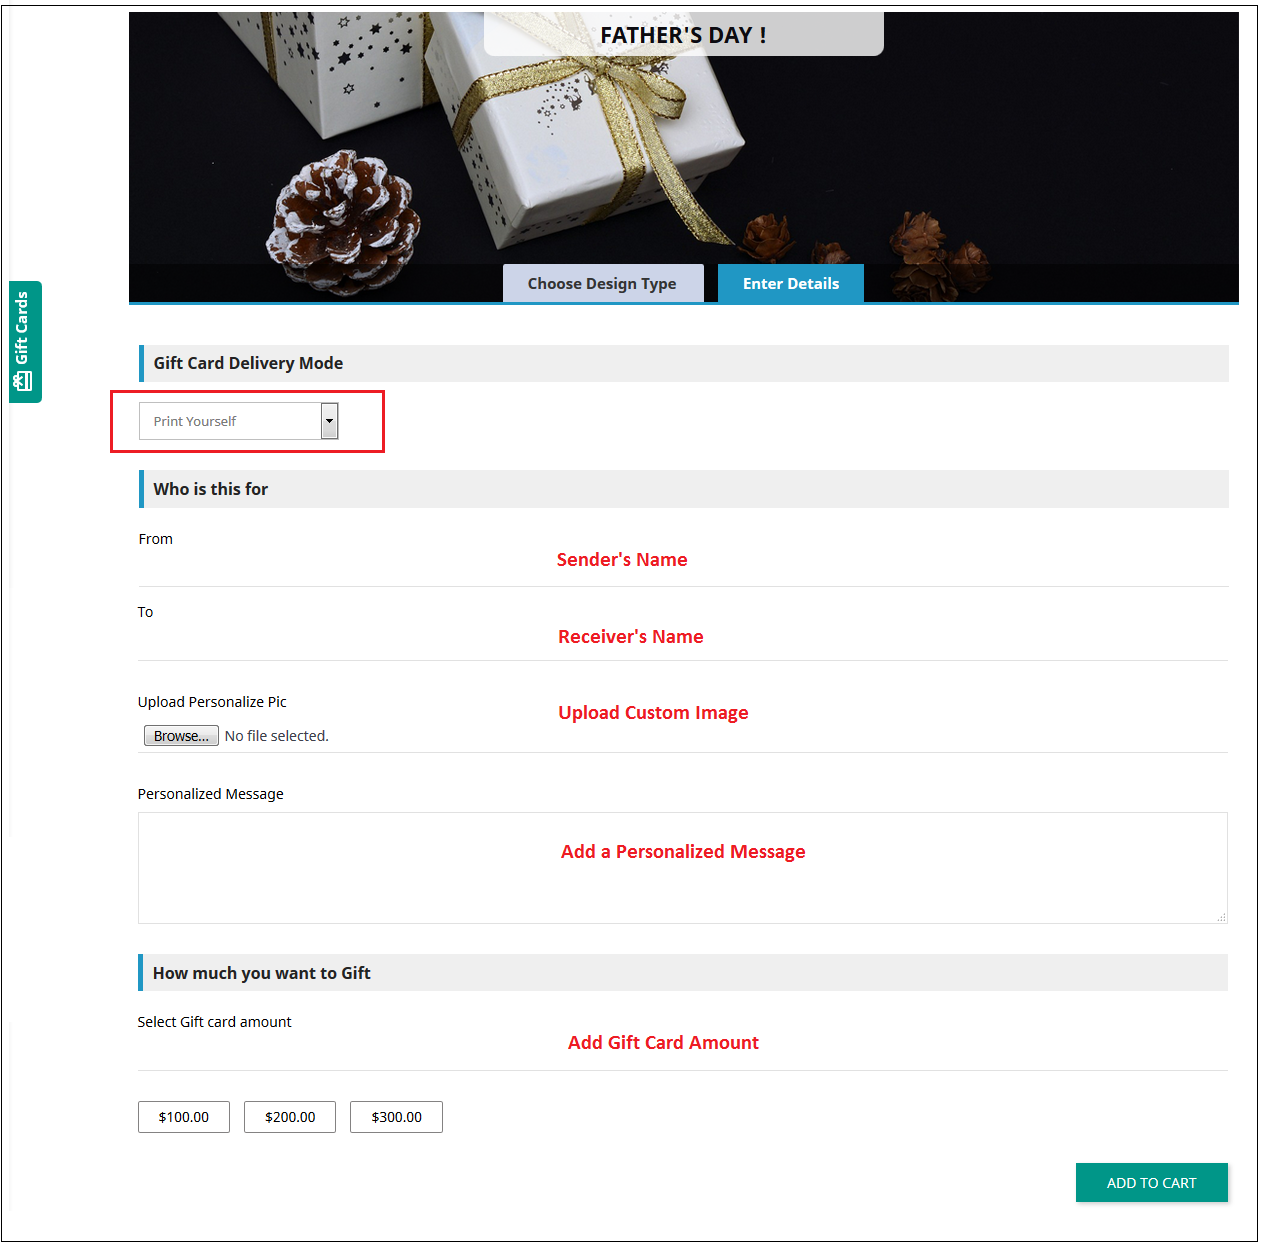
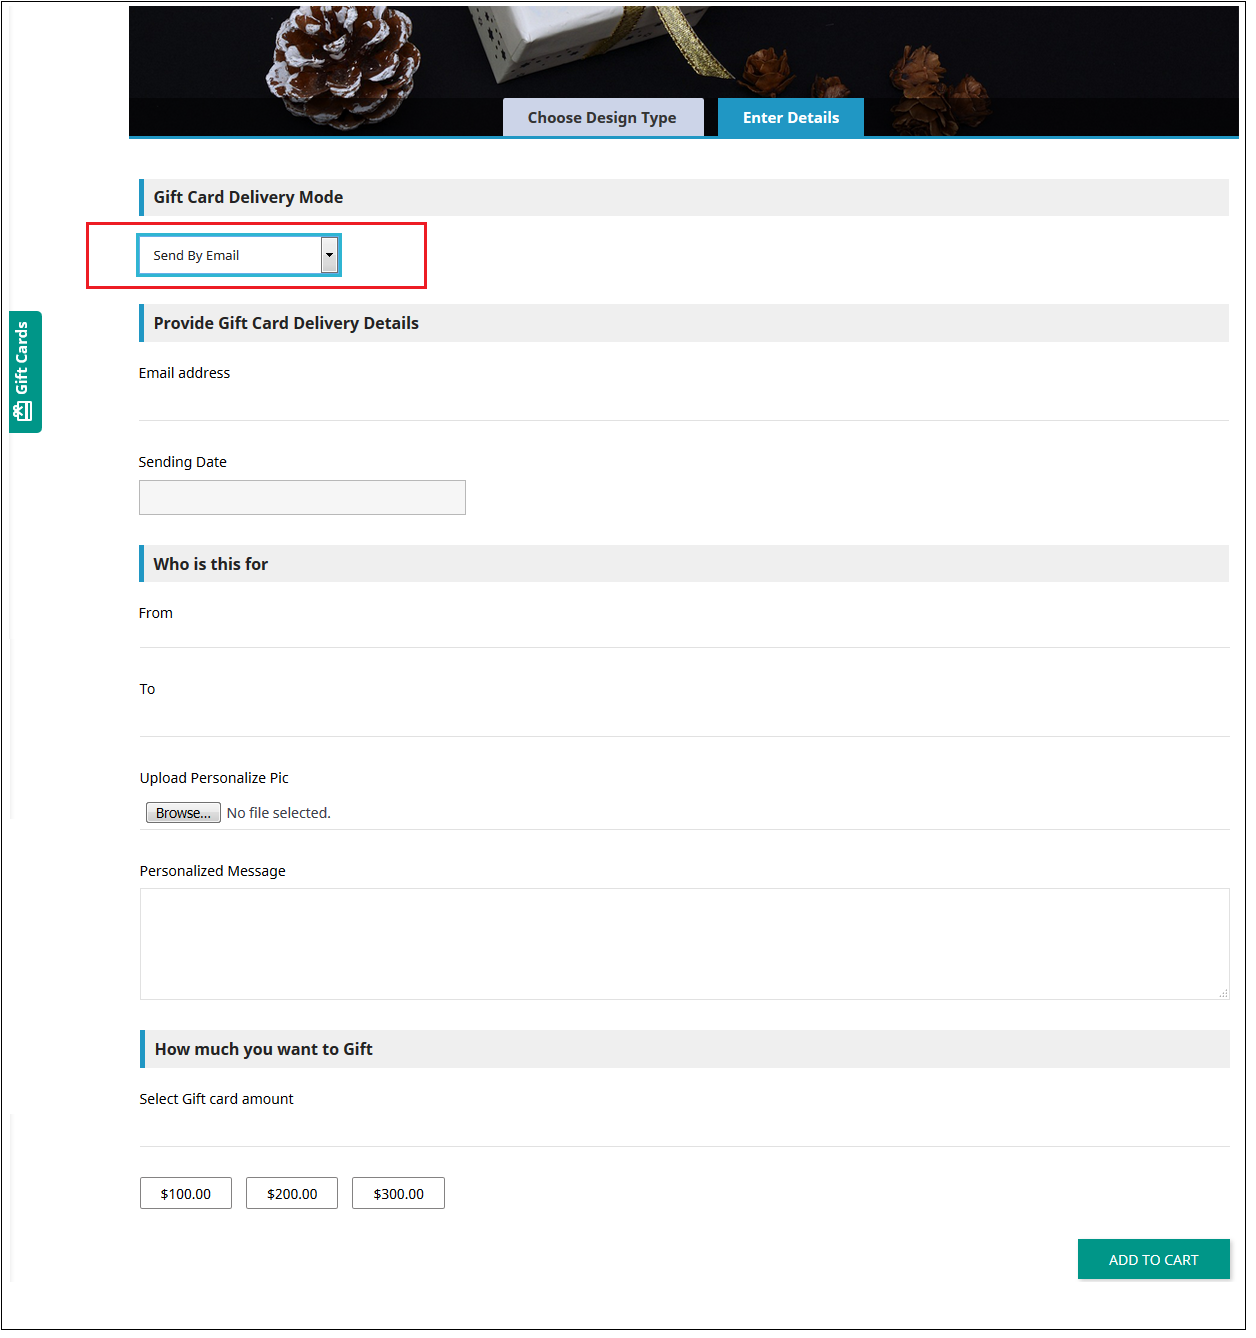
They can print the card or send it via email. The sender and receiver name along with the message can be mentioned in the section as shown below.
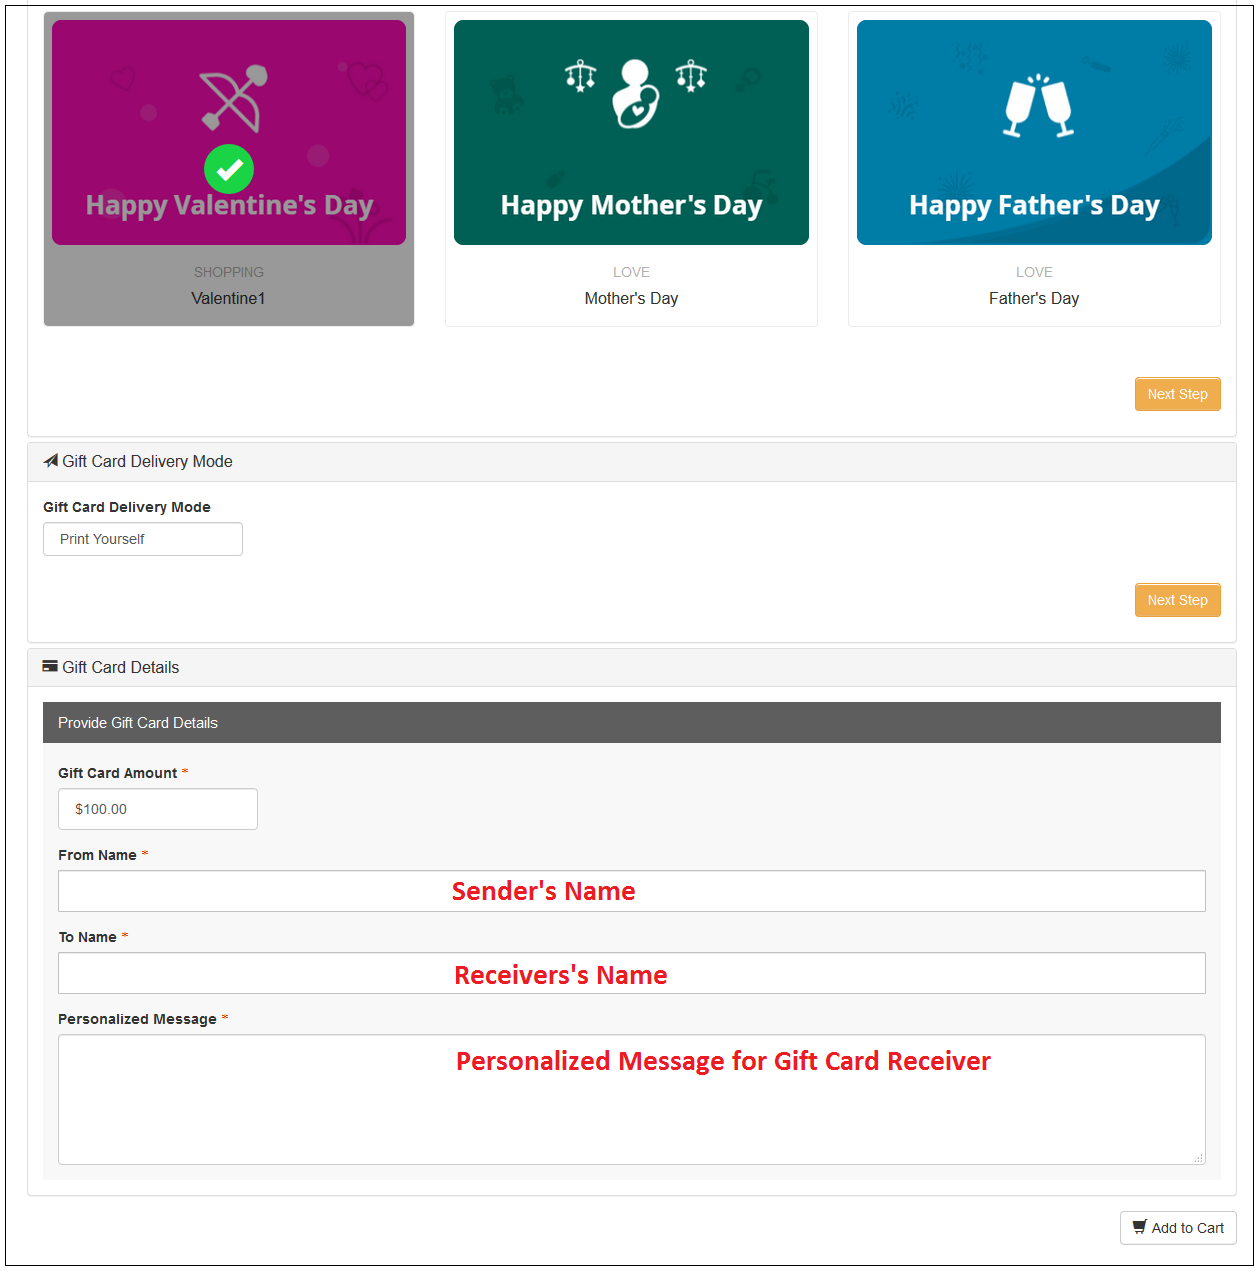
Add the product to the shopping cart and proceed to the checkout page. The gift card will then be sent to the receiver.

This way, the online store admin can easily offer the facility to purchase gift cards from the website. The online merchant can set the gift card amount and also create multiple gift card templates for various occasions. Magento 2 Gift Card Manager plugin is highly customizable and offers smooth functioning. The eCommerce store merchant can show gift card options on the left side, show as a header/footer link and also show the Gift card option on my account link. The Magento 2 Gift Card Manager plugin allows the store merchant to select the order status on which he wants to send gift card.

The online merchant can also set a delivery days gap after which the gift card will be delivered. The Magento 2 Gift Card Manager Module allows sending the gift card email to the gift card sender as well as the receiver.  Admin can also send a pdf document that can be printed by the customers. So the store admin can get more profit and the online users can purchase gift cards and share it with their loved ones easily.

For more details about this Magento 2 Gift Voucher extension, you can visit here:

Magento 2 Gift Card module link

Magento 2 Gift Card Module Admin Demo

Magento 2 Gift Card Manager Extension Front-end Demo

Magento 2 Gift Card Manager Module Youtube video

Prestashop Accelerated Mobile Pages (AMP) Addon- User Manual

1.0 Introduction of Knowband Prestashop Accelerated Mobile Pages (AMP) Addon:

Accelerated mobile pages or AMP can effortlessly boost the performance of the websites on the mobile devices. AMP provides convenient access to information on the Internet from the screens of smartphones and tablets. AMP is an advance Google technology which reduces the load time of the mobile website. With the introduction of mobile-first indexing, the goal of every eCommerce store owner should be to reduce the load time of their websites for the mobile users. High load time increases the bounce rate of the website. For increasing the performance of Prestashop store website on mobiles, Knowband offers the Prestashop Accelerated Mobile Pages (AMP) Module.

Prestashop AMP module allows the admin to convert the home page, category pages, product pages and CMS pages into fast-loading AMP pages. By limiting the data displayed, Prestashop Accelerated Mobile Pages Module reduces the load time of the mobile sites. Also, with the Prestashop addon, the e-merchant has an ability to enable/disable additional sections on the webpages like Best Sellers, Featured Products, New Arrival. You can now provide amazing user experience to your audience base who browses the site through their handheld devices. In the mobile generation, once your mobile-first customers are happy, sales will happen easily.

1.1 Features of Prestashop Accelerated Mobile Pages Module:

1. Prestashop Accelerated Mobile (AMP) Module allows the store admin to convert web page to AMP without making any core changes in the code of the website. This limits the data displayed on the mobile site, thus, boosting the load time of the same. In short, the Prestashop addon can amp up the load time of the mobile sites by creating accelerated mobile pages of the site. However, it will not affect the load time or performance of the desktop sites.

2. With the help of the Prestashop AMP Module, the store admin can convert the home page, category pages, product pages and CMS pages to AMP.

3. Knowband’s Prestashop Accelerated Mobile(AMP) addon provides an option to the store owner to customize the home page, category pages, product pages and CMS pages settings form the back-office.

4. The admin can upload the Business logo on AMP and they can also fix the width and height of the website.

5. Prestashop AMP Module offers the store merchant an option to add the Custom CSS for adding the additional functionality.

6. Google Accelerated Mobile Pages Module enables the store admin to enable/disable the display of the bestsellers option, featured and new products on home page. Apart from this, they can set the number of featured products to be shown in a particular section. The random products are automatically fetched and displayed to the user.

7. The Prestashop store owner can change the banner of the best sellers, featured and new products on the homepage.

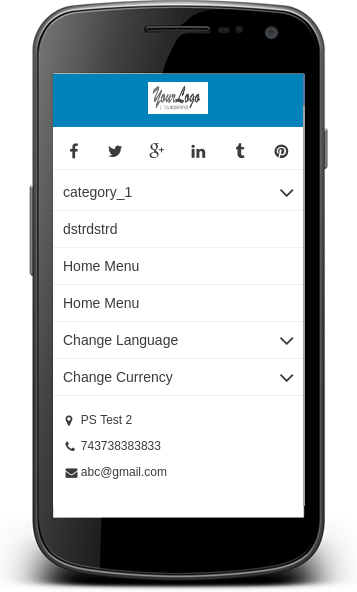
8. Prestashop Accelerated Mobile Pages (AMP) module has provided the social media sharing options on the AMP. Even admin can add more icon by adding the script.

9. The Admin can customize the categories of AMP from the back-end of the Prestashop AMP Module. The customers to browse categories from the AMP page.

10. By using the Google Accelerated Mobile Pages Module, the admin can automatically generate AMP sitemap with the help of CRON.

11. The Admin can generate AMP sitemap by click the button.

12. Knowband’s Prestashop Accelerated Mobile Pages Addon supports Google Analytics. The eCommerce admin can enter the Analytics client Id for tracking the AMP performance.

13. Google Accelerated Mobile Pages Module supports multiple languages.

14. With the help of Prestashop AMP Module, the Prestashop store admin can set color and background color for AMP website and other different blocks of AMP.

15. Prestashop AMP module is easy to use and handle.

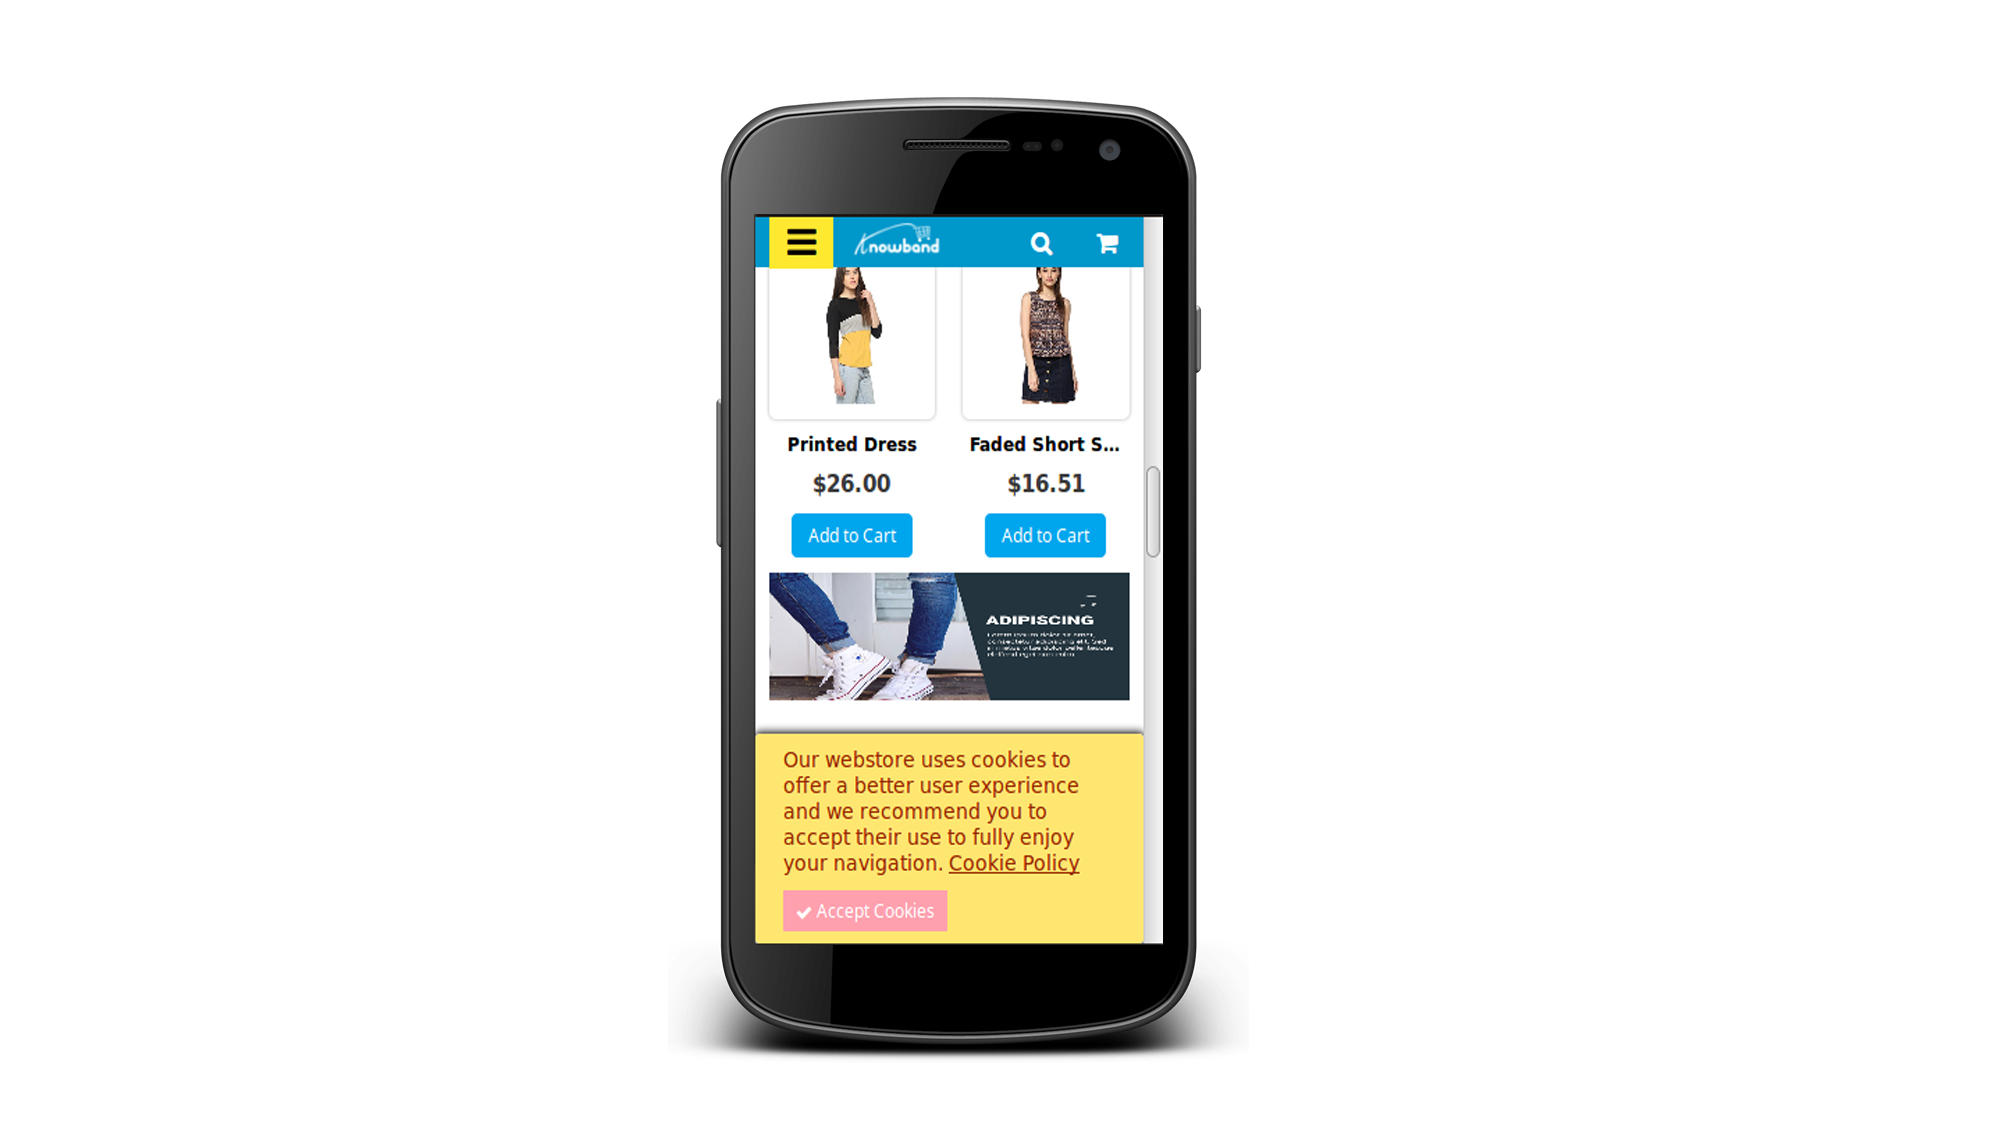
16. This Knowband’s Prestashop AMP Module also supports GDPR compatibilty. Admin can map the cookie policy to any CMS page of the website.

17. The eCommerce store owner can show YouTube, Vimeo and DailyMotion videos on the homepage of mobile pages.
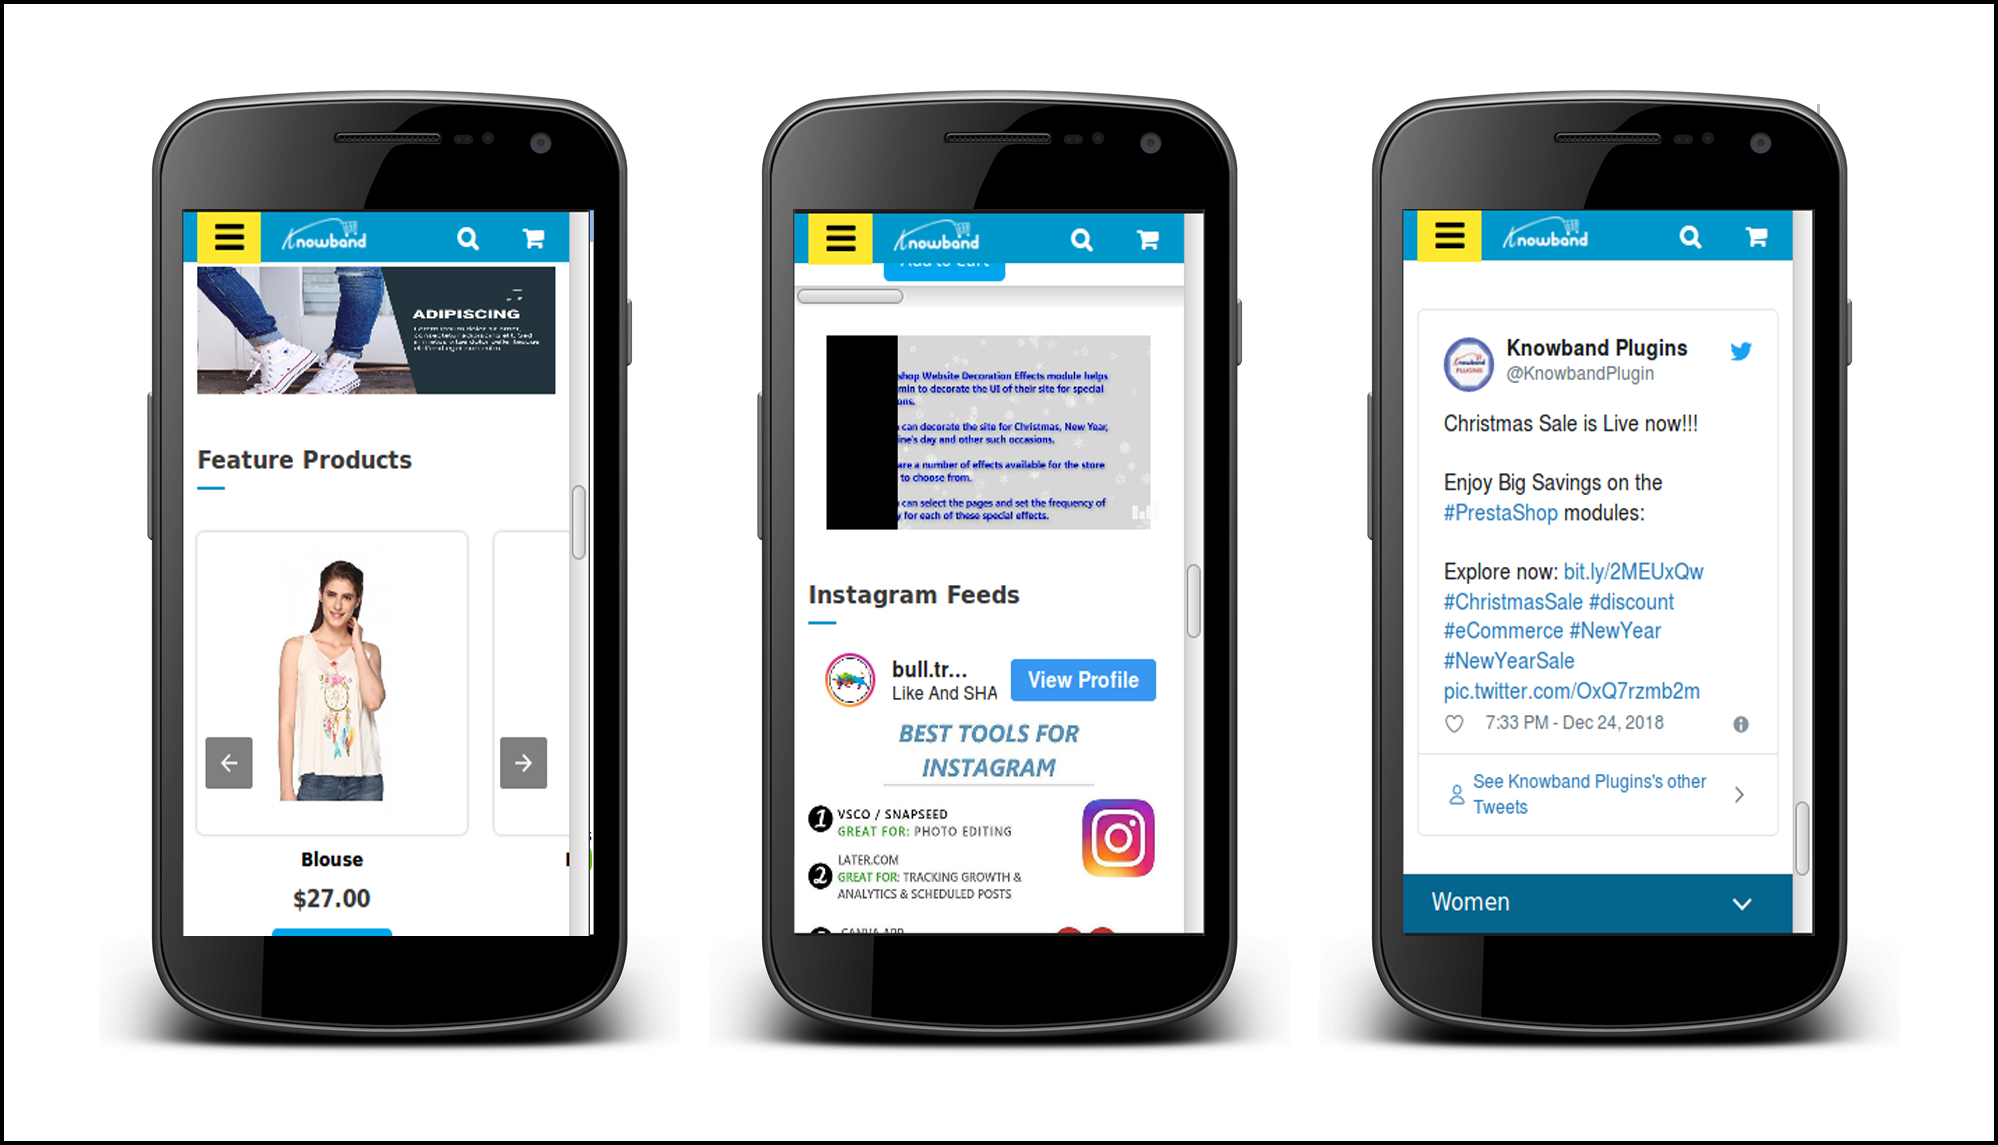
18. Google Accelerated Mobile Pages(AMP) Addon provides an   option to display Instagram and twitter feeds on the homepage.
19. The e-merchant can manage the look and feel of cookie consent bar from the admin interface without any hassle.
20. The store admin can display advertisement on all the Mobile Pages by including Google adsense from the admin interface of Prestashop Accelerated Mobile Pages module.
21. The store owner can also implement Facebook pixel on the mobile pages. Facebook pixel is an analytic tool which tracks the store visitors.

Technology for Development

Language: PHP

FrameWork: PrestaShop

2.0 Steps For Installation of Prestashop Accelerated Mobile Pages (AMP) Addon:

1.The folder structure of the Prestashop AMP module.

2. Copy the whole folder named as product update into your modules folder of the root directory of your PrestaShop store through FTP.

3. You will be able to find the product AMP plug-in ready to be installed in the Modules in your PrestaShop store as shown below.

4. Click on the Install link to install the plugin.

Now, your Prestashop Accelerated Mobile Pages (AMP) Plugin is ready to use and click on “Configure” link to configure this Prestashop module by Knowband.

3.0 Admin Interface

After installing Google Accelerated Mobile Pages(AMP) Module into the store, the Prestashop addon will provide the following interfaces:

1. General Settings
2. Home Settings
3. Category Page Settings
4. Product Page Settings
5. Menu Settings
6. Look and Feel Settings
7. Social Media Settings
8. Extra Icon Settings
9. Google Settings
10. Sitemap Settings

Each interface of this Knowband’s Accelerated Mobile Pages (AMP) module for Prestashop is explained below.

3.1 General Settings

General Settings tab of this Prestashop AMP addon has following options:

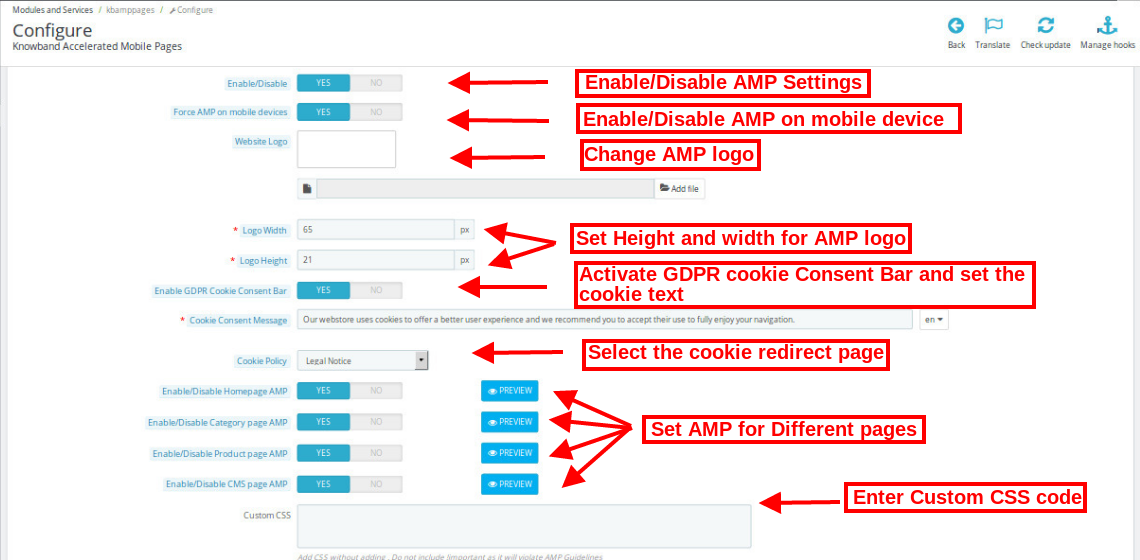
  • Enable/Disable: Initially, this field of Prestashop Accelerated Mobile Pages module by Knowband will be disabled. The admin can enable/disable the plugin by toggling the button.
  • Enabling this setting will convert the Website Pages into AMP.
  • Force AMP on Mobile Device: In this section of Knowband Prestashop AMP addon, the admin can enable the settings to AMP pages on Mobile Device.
  • Website Logo: Using this option of the Google Accelerated Mobile Pages(AMP) Module, the store merchant can upload or change the logo of the AMP.
  • Logo Width: Here the store admin can set the width of the Logo in Pixel.
  • Logo Height: Here the store admin can set the height of the Logo in Pixel.
  • Enable GDPR Cookie Consent Bar: Admin can enable/disable this setting to display on AMP pages.
  • Cookie Consent Message: Admin can add custom text for cookie consent bar displayed to the user.
  • Cookie Policy: Admin can select the page which is to be displayed on Cookie Policy.
  • Enable/Disable Home Page AMP: The store admin can enable/disable AMP on the Home Page of the site. After enabling the option, the admin can check the Home page AMP by clicking on the Preview button.
  • Enable/Disable Category Page AMP: The store admin can enable/disable AMP on the category pages. After enabling the option, the admin can check category page AMP by clicking on the Preview button.
  • Enable/Disable Product Page AMP: Using this option of the Prestashop Accelerated Mobile Page (AMP) addon, the store admin can enable AMP on the product pages AMP of the site and can view the same by clicking on the PREVIEW button.
  • Enable/Disable CMS Page AMP: Prestashop AMP Page Module gives an option the store retailer to convert the CMS page to AMP. The look and feel of the pages can be viewed by clicking on the Preview button.
  • Custom CSS: Prestashop store admin can add Custom CSS code as per business requirement in this section.

3.2 Home Page Settings

In this tab of the Prestashop Accelerated Mobile Pages (AMP) Addon by Knowband, the admin can enable/disable the display of new arrivals, best sellers and featured products on the AMP Home page of this Prestashop module in various languages. This tab will have the following options:

1. Home Page Settings
2. Featured Product Settings
3. Best Selling Product Settings
4. New Arrival Product Settings

3.2.1 Home Page Settings:

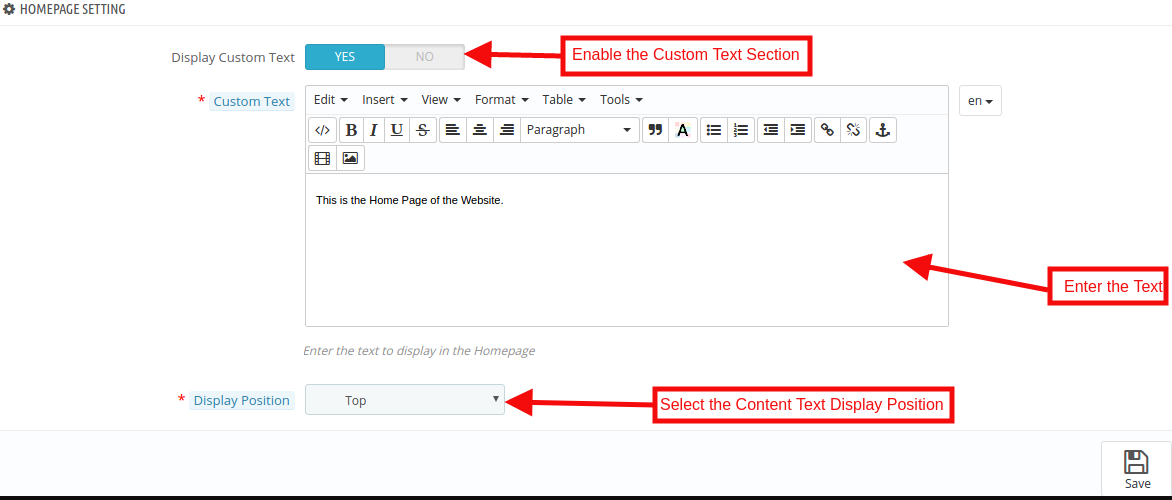
  • Display Custom Text: The Admin can enable/disable the Custom Text option here.
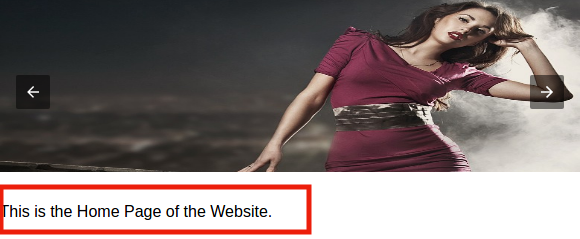
  • Custom Text: In this Google Accelerated Mobile Pages Addon, the store admin can change the text of the Home page block.

  • Display Position: The admin can select the display position that will be reflected the front end of the site.

3.2.2 Featured Products Settings:

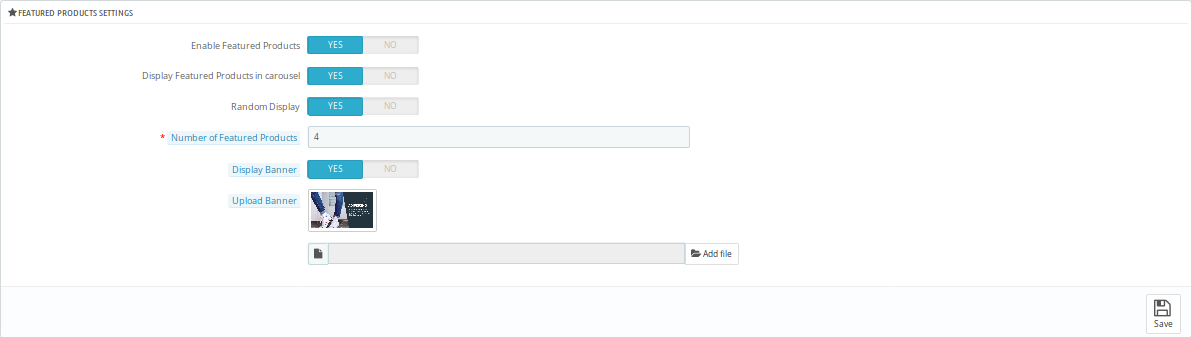
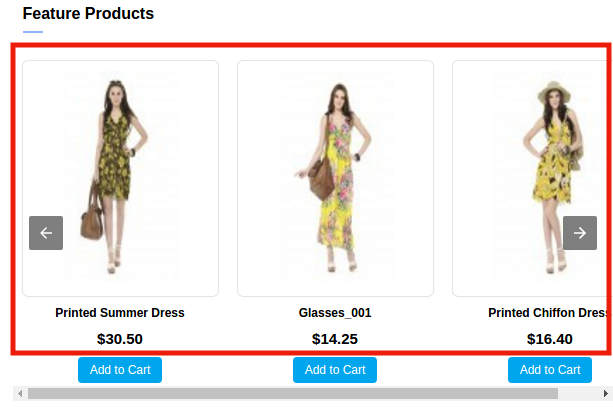
  • Enable Featured Products: Using this option of the Prestashop AMP extension, the eCommerce store admin can enable/disable the featured products section.
  • Display Featured Products in Carousel: Here the store admin can the featured products in the carousel.
  • Random Display: The Store admin can enable/disable the Random product display option. After enabling this feature, random product display in the particular section in AMP.

  • Number of Featured Products: Knowband’s Prestashop Accelerated Mobile Pages Addon allows the store admin to select the number of products which they want to show in the Feature Product section.
  • Display Banner: The eCommerce merchant can enable/disable the display banner option.
  • Upload Banner: In this field, the store admin can upload the banner for the featured product.

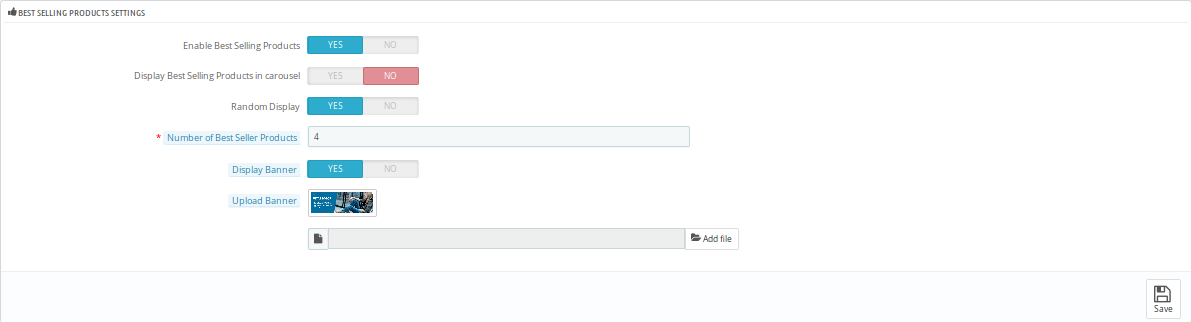
3.2.2 Best Selling Products Settings:

In this tab, the Prestashop store admin can customize the settings of the best selling product. Refer to the attached screenshot below:

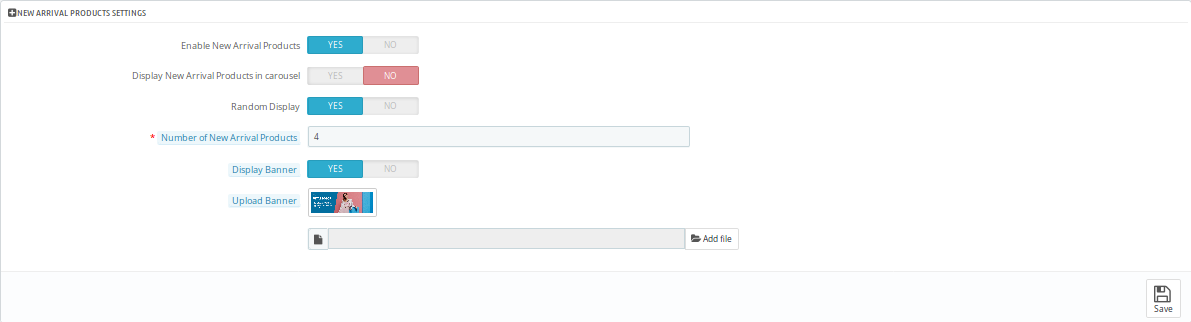
3.2.3 New Arrival Products Settings:

The admin has control over the display of New Arrival Product positions on AMP pages.

3.2.4 YouTube Video

Here, you can apply the settings for showing the YouTube videos.

  • Display Youtube Video: The store admin can enable or disable the settings to show youtube videos on the homepage.
  • Youtube video id: The online store admin can enter the video id in order to display it on the homepage.
  • Enable Youtube header text: The Prestashop Accelerated Mobile Pages Addon provides an option to enable the settings for showing youtube video’s header text.
  • Youtube header text: Admin can set the header text in various languages.
  • Autoplay: Admin can apply the settings for video autoplay.
  • Display controls: Admin can show the display controls by enabling the option.
  • Display positions: The store admin can show the display position for the videos.

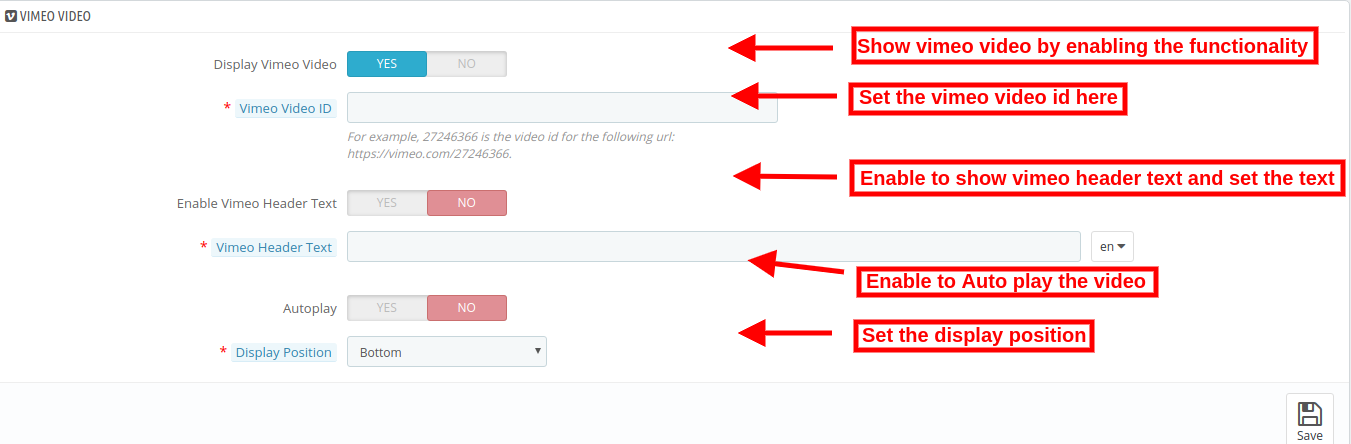
3.2.5 Vimeo Video

The store admin can also show Vimeo videos on the website’s homepage by applying these settings.

  • Enable the settings for showing Vimeo video on the homepage. Customization options are same as youtube videos.

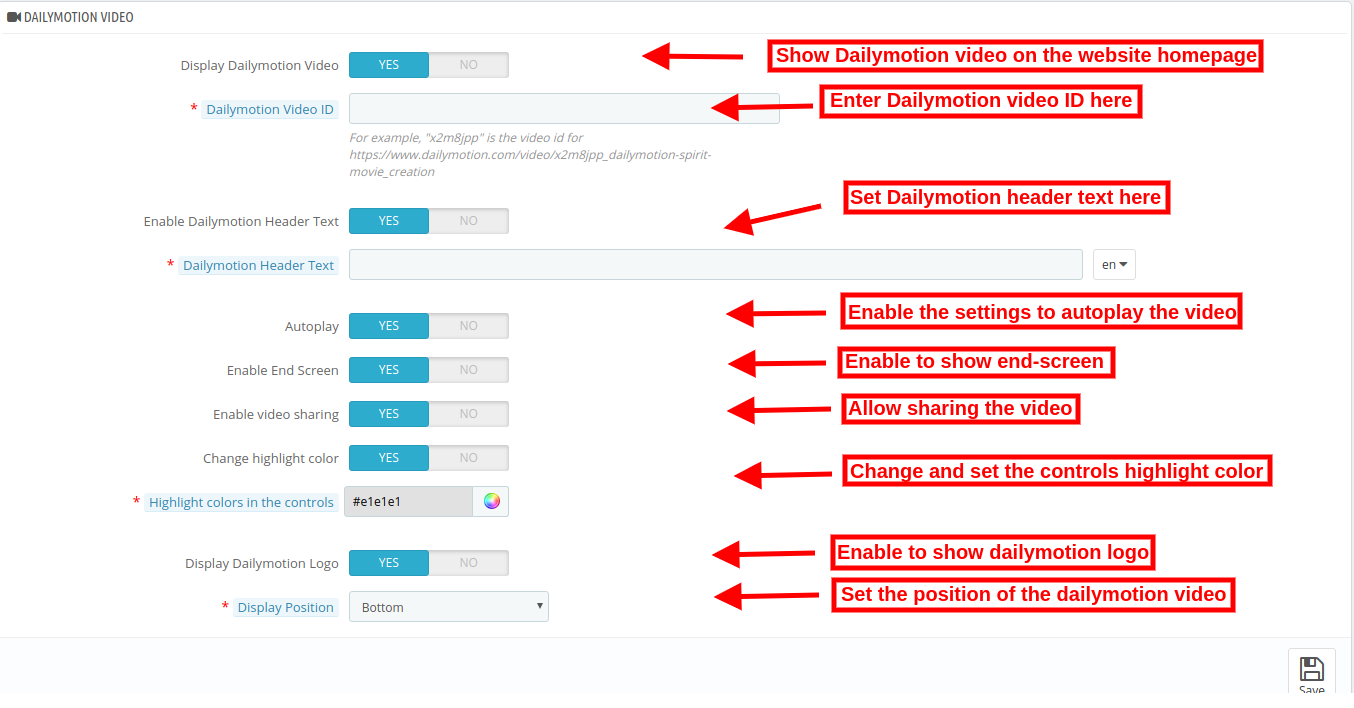
3.2.6 DailyMotion Video

As an eCommerce store admin, you can also show DailyMotion videos on the website homepage by applying these settings.

  • Display DailyMotion Video: The store admin can show DailyMotion videos on the homepage.
  • DailyMotion Video ID: The online store admin can enter the DailyMotion video id from the admin interface of this Google Accelerated Mobile Pages (AMP) Addon.
  • Enable DailyMotion Header Text: The store admin can enable or disable the settings from the admin interface.
  • DailyMotion Header text: Enter the header text here.
  • Autoplay: Enable to Auto play videos.
  • Enable End Screen: Enable the settings to show the end screen.
  • Enable video sharing: Allow video sharing by enabling the options.
  • Change Highlight color: Admin can also enable the settings in order to change the highlight color.
  • Highlight colors in the controls: Set the color from the color picker tool.
  • Display DailyMotion Logo: Enable the settings in order to display DailyMotion logo.
  • Display Position: Set the video position from the admin interface.

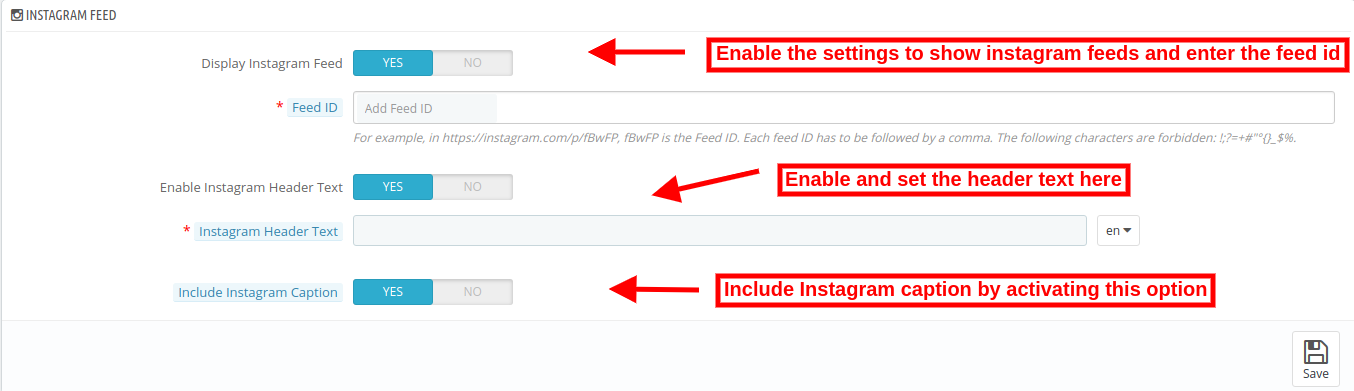
3.2.7 Instagram feed

Admin can show Instagram feeds on the homepage.

  • Display Instagram feed: Enable the settings to display Instagram feeds.
  • Feed id: Enter the feed id here.
  • Enable Instagram Header Text: Switch the button to yes in order to display header text.
  • Instagram Header Text: Enter the header text for Instagram.
  • Include Instagram Caption: Enter the Instagram caption in order to display it on the website homepage.

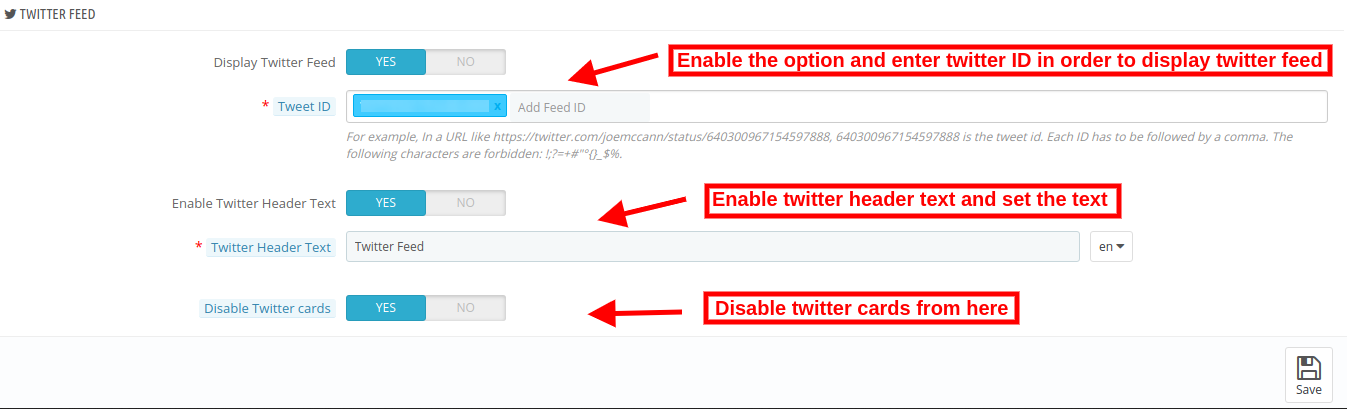
3.2.8 Twitter Feed

The online store admin can show twitter feed on the homepage if he wishes to do so.

  • Display Twitter Feed ID: Enable the settings in order to display twitter feeds on the homepage of the website.
  • Twitter ID: Enter the twitter id here.
  • Enable twitter header text: Enable the settings for showing header text.
  • Twitter Header text: Set the header text here.
  • Disable Twitter cards: By enabling the option you can show twitter cards on the homepage.

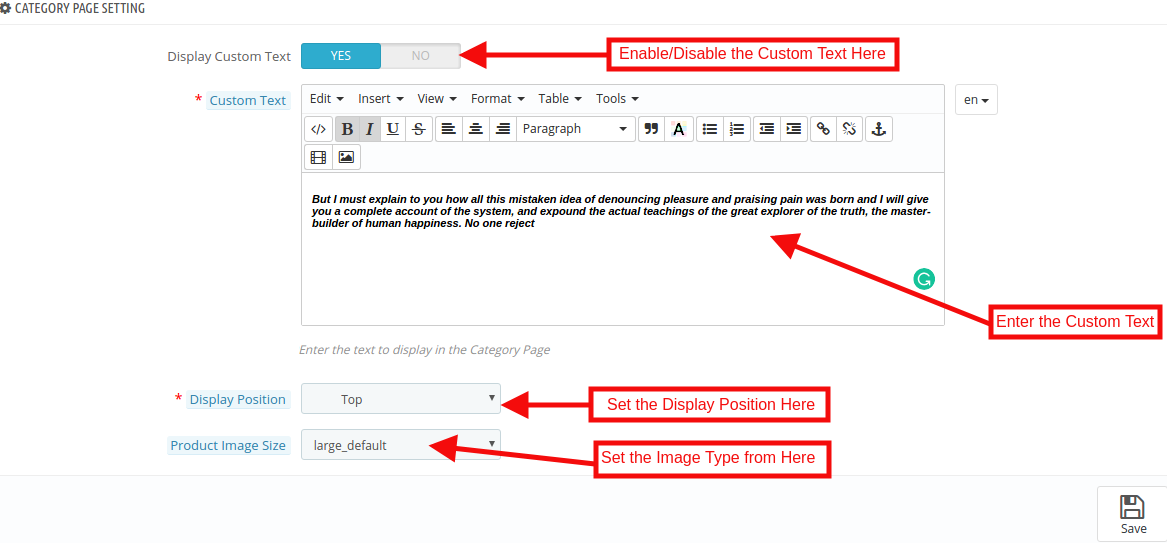
3.3 Category Page Settings

The Category Page Settings tab of the Prestashop Accelerated Mobile Pages Addon allows the admin to add the text and images. Apart from this, the admin can also define the position of the text on the Category page. This tab will have the following options:

  • Display Custom Text: The Admin can enable/disable the Custom message option.
  • Custom Text: Using this option of the Prestashop AMP Module, the eCommerce store admin can set the message of the category Page.
  • Display Position: In this tab, the store admin can change the display position as per desires. These changes will be reflected in the front of the store.
  • Product Image Size: The Prestashop store admin can set the Image type here.

3.4 Product Page Settings

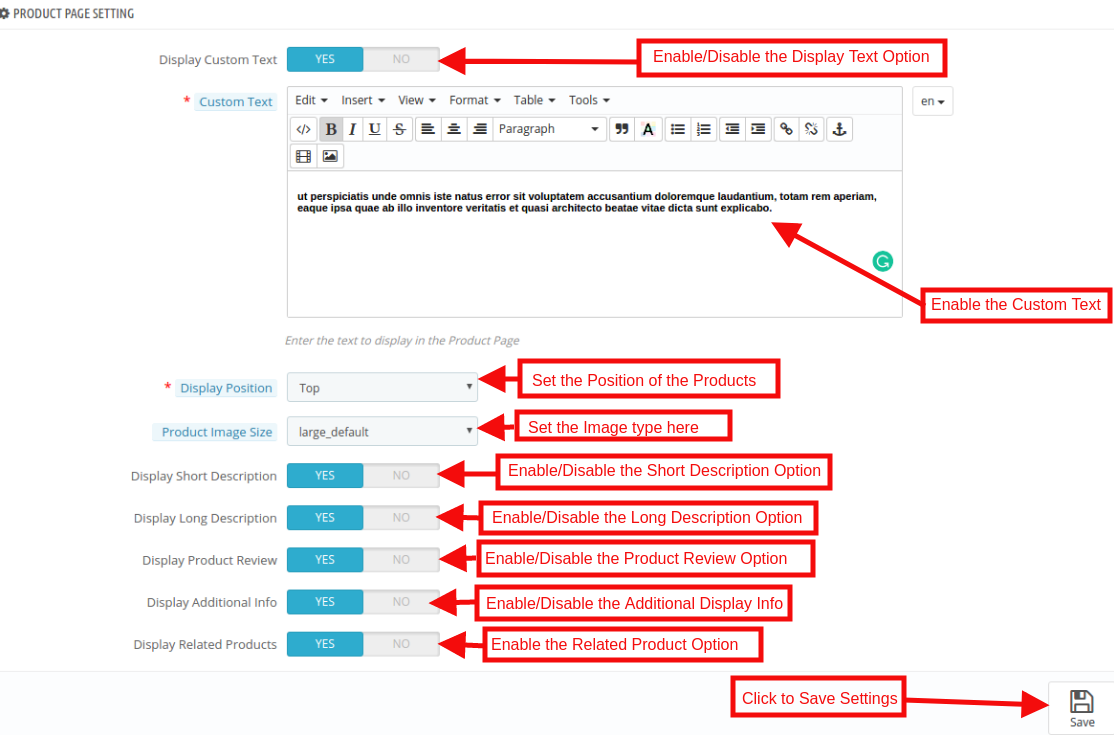
The admin has control over product page settings on AMP pages. This tab will have the following options:

  • Display Custom Text: The Admin can enable/disable the Custom message option.
  • Custom Text: Using this option of the Prestashop AMP Module, the eCommerce store admin can set the message of the Category Page.
  • Display Position: In this option, the store admin can change the display position as per desires. These changes will be reflected in the front-end of the store.
  • Product Image Size: The Prestashop store admin can select the image size to be displayed here.
  • Display Short Description: In this option, the store admin can show the short description of the product by enabling this feature.

  • Display Long Description: The store owner has an option to show the long description of the product as per the requirement.

  • Display Product Review: By using the Prestashop Accelerated Mobile Pages Module, the store admin can enable the Product review option. After enabling this feature, product review will be shown in the front-end of the store.
  • Display Additional Info: By enabling this feature, the admin can show the additional info of the products.

  • Display Related Products: By enabling this option, the store admin can display related product. These changes will be reflected in the front of the store.

3.5 Menu Settings

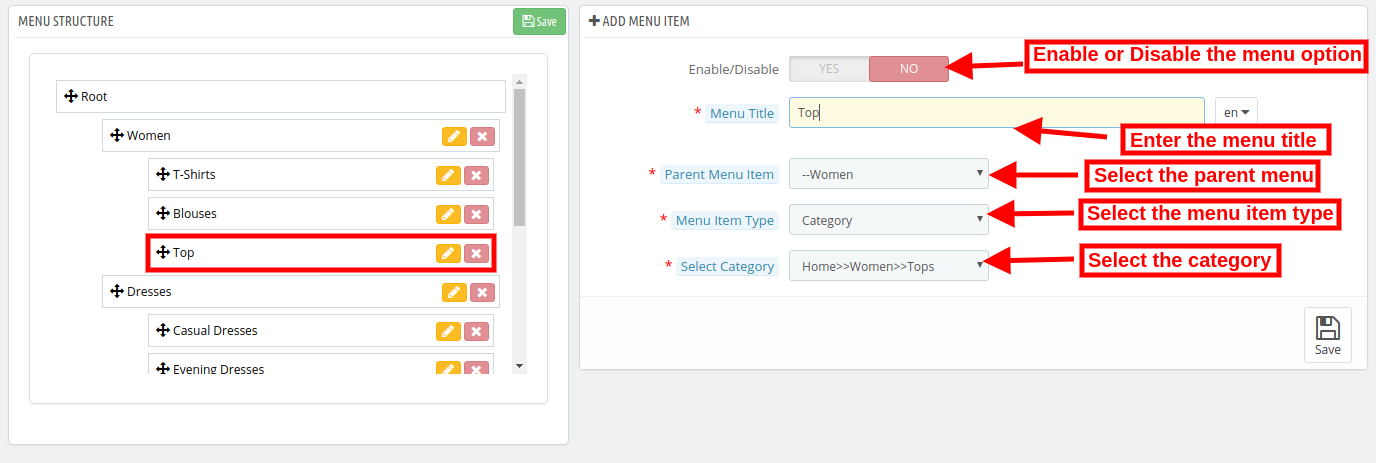
In this Tab, the Prestashop store admin can configure the menus on AMP. The admin can even add new menu options. This tab will have the following options:

  • Enable/Disable: The admin can enable the AMP in menus by toggling the button.
  • Menu Title: Prestashop AMP Addon by Knowband allows the store admin to add the Menu by entering the title here.
  • Parent Menu Item: Here the eCommerce merchant can select the Parent menu as per the desire.
  • Menu Item Type: The Admin can select the item type of menu.
  • Select Category: The Store admin can select the specific page where they want to redirect the user to the defined AMP page.

NOTE: These Changes shown in the Menu Structure section.

3.6 Look and Feel Settings

The Admin can control the color settings, personalize their website AMP colors as per your needs. They can change the AMP page colors according to your theme and preferences. This tab will have the following section:

1. General Settings

2. Product Listing Settings

3. Category Settings

4. Product Settings

5. Cookie Consent Bar Settings

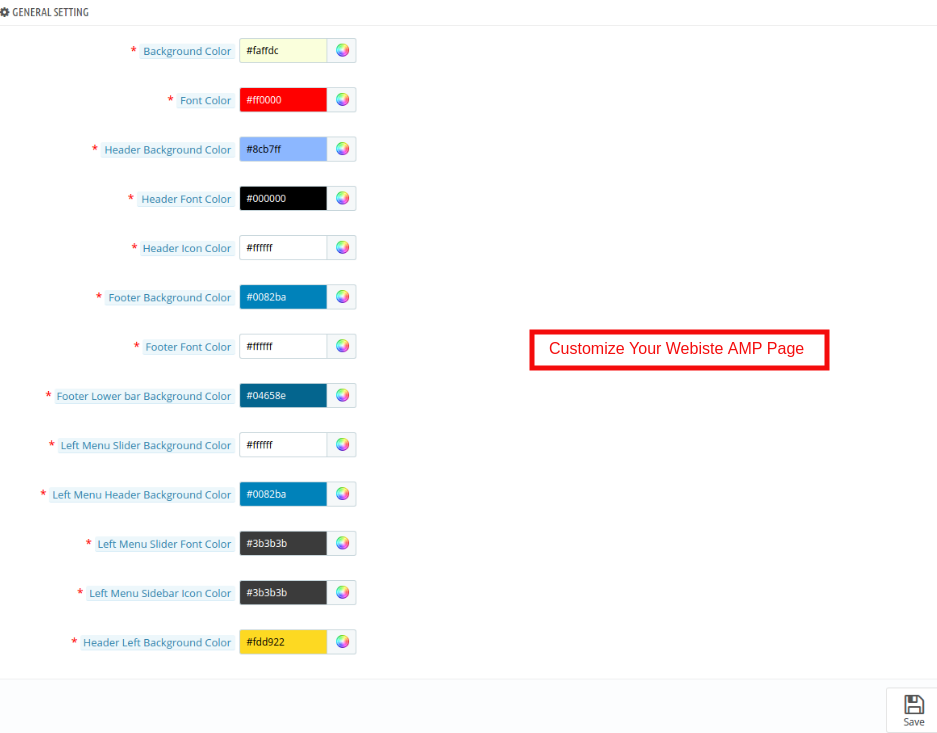
3.6.1 General Settings

In this tab of the Prestashop Accelerated Mobile Pages(AMP) addon by Knowband, the admin can customize the AMP Homepage settings. This tab will have the following options:

  • Background Color: The Admin can change the background color of the home page.
  • Font Color: The admin can change the font color from this section.
  • Header Background Color: This field of Prestashop Accelerated Mobile Pages (AMP) Module allows the admin to set the header background color.
  • Header Font Color: Using this option of the Prestashop AMP module, the admin can set the font color of the text displayed in the Header section.
  • Header Icon Color: The Prestashop store admin can change the icon color of the.
  • Footer Background Color: This option of the Google Accelerated Mobile Pages(AMP) Module allows the admin to set the background color of the Footer.
  • Footer Font Color: The admin can change the font color from this section.
  • Footer Lower Bar Background Color: The Store merchant can change the background color of the Footer Lower Bar.
  • Left Menu Slider Background Color: The Prestashop Merchant can change the Left menu slider background color in this section of Knowband Accelerated Mobile Pages(AMP) For Prestashop.
  • Left Menu Header Background Color: The Prestashop store admin can change the left menu header background color as per the requirement.
  • Left Menu Slider Font Color: The admin can change the font color from this section.
  • Left Menu Sidebar Icon Color: The admin can change the icon color from this section.
  • Header Left Background Color: In this section of Prestashop Accelerated Mobile Pages(AMP) Module allows the admin to set the header left background color.

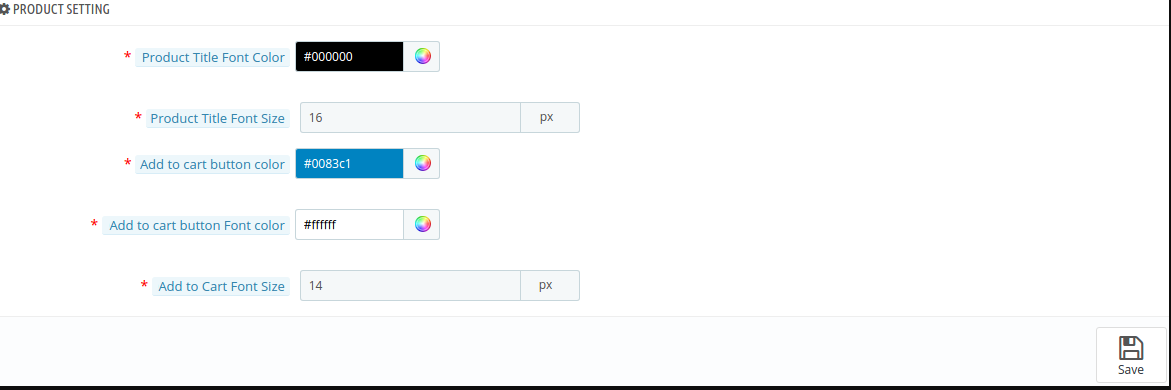
3.6.2 Product Listing Settings

The admin can customize the settings of the Product listing as per the requirement. Below mentioned the option:

  • Product Title Color: In this section of Google Accelerated Mobile Pages(AMP) Module allows the admin to change the Product title color.
  • Product Title Font Size: The Store admin can set the font size of the Product.
  • Add to Cart Button Color: Knowband’s Prestashop AMP Pages module allows the admin to change the Add to Cart Button Color as per desires.
  • Add to Cart Button Font Color: The admin can customize the font color of the Add to Cart button.
  • Add to Cart Font Size: The Store admin can set the font size of the Add to Cart button.

3.6.3 Category Settings

In this tab, the store admin can customize the settings of the Category pages. These changes will be reflected in the front of the store.

  • Category Heading Font Color: The Prestashop store admin can change the category heading font color as per the requirement.
  • Category Heading Font Size: The admin can change the font color from this section.

3.6.4 Product Settings

In this section, the Admin can customize the Product settings as per the requirement. The configuration option of this section is same as discussed in the Product listing section.

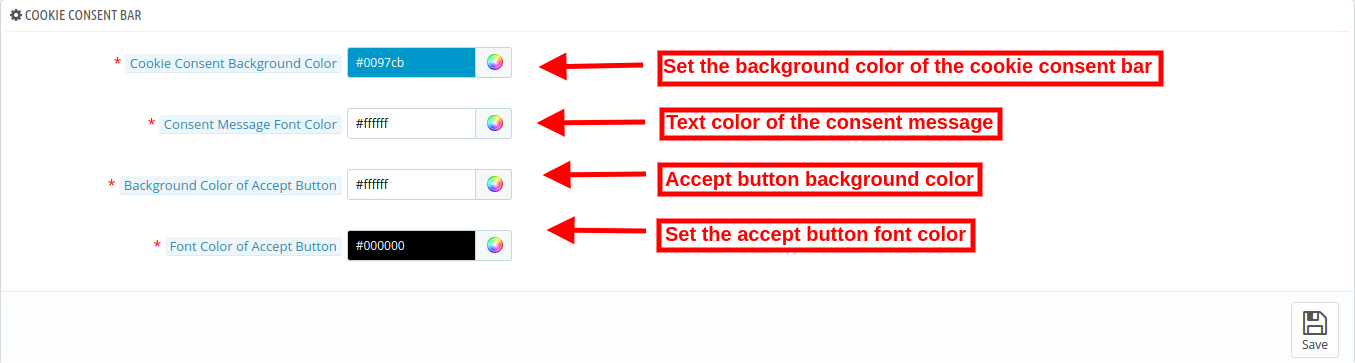
3.6.5 Cookie Consent Bar

The store admin can set the look and feel of the cookie consent bar.

  • Cookie Consent Background color: Select the cookie consent background color with the help of color picker tool.
  • Consent message font color: Select the front color for consent message.
  • Background color of Accept button: Select the “Accept” button background color.
  • Font color of accept button: Set the font color of accept button using color picker tool.

3.7 Social Media Settings

In this section of the Prestashop AMP module, the store admin can enable/disable the social media sharing option on the AMP webpages. All the enabled social media sharing options will be shown on the AMP. This tab will have the following options:

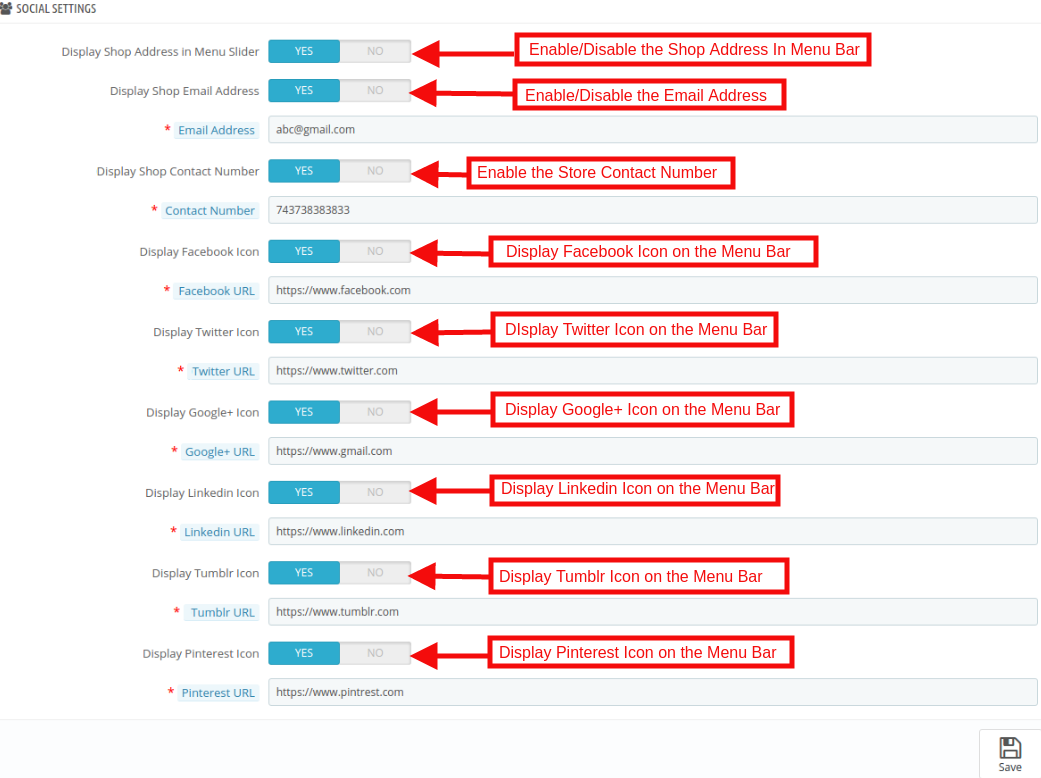
  • Display Shop Address in Menu Slider: The Admin can show the Store address by enabling this feature.
  • Display Shop Email Address: The Prestashop store owner can show the email address.
  • Display Shop Contact Number: In this field, the store admin can display the contact details of the site.
  • Display Facebook Icon: The store admin has the option to display a Facebook icon in the menu bar. For this admin need to specify the Facebook page URL in the respective field.
  • Display Twitter Icon: This section the admin can enable/disable the Twitter icon.
  • Display Google Icon: By using this Option the Prestashop store merchant can display the Google icon in the menu bar. For this admin need to Specify the Google page URL in the respective field.
  • Display Linkedin Icon: In this section, the store admin can display the Linkedin icon here. The Store admin must need to enter the URL of the profile.
  • Display Tumblr Icon: The Prestashop store owner can show the Tumblr profile here.
  • Display Pinterest Icon: The Store admin has the option to display a Pinterest icon in the menu bar. For this admin need to Specify the Pinterest page URL in the respective field.

3.8 Extra Icon Settings

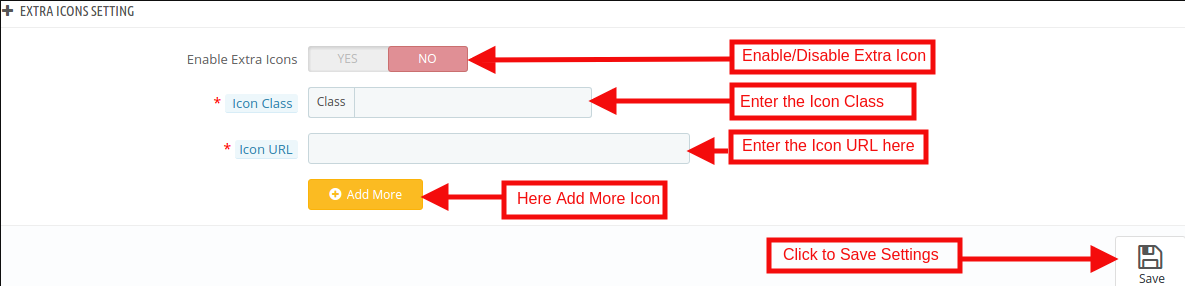
In this section, the admin can add the extra social media icon as per the requirement of the business. This tab will have the following options:

  • Enable Extra Icon: The Prestashop store admin can enable/disable the extra icon feature. If they want to add more social media icon then they can add here with an ease.
  • Icon Class: The Admin can enter the Icon class.
  • Icon URL: In this tab, the store admin can Icon URL as per desires. These changes will be reflected in the front of the store.

3.9 Google Settings

The store admin can apply AMP Google settings from this section.

3.9.1 Google Analytics

Admin will need to have the Analytics Client ID in order to configure this feature.

  • Enable Google Analytics: If you want to track the performance of the accelerated mobile pages of your site, this feature allows the admin to enter Google Analytics client.
  • Analytics Client Id: The eCommerce merchant can enter your Google analytics client ID to configure.

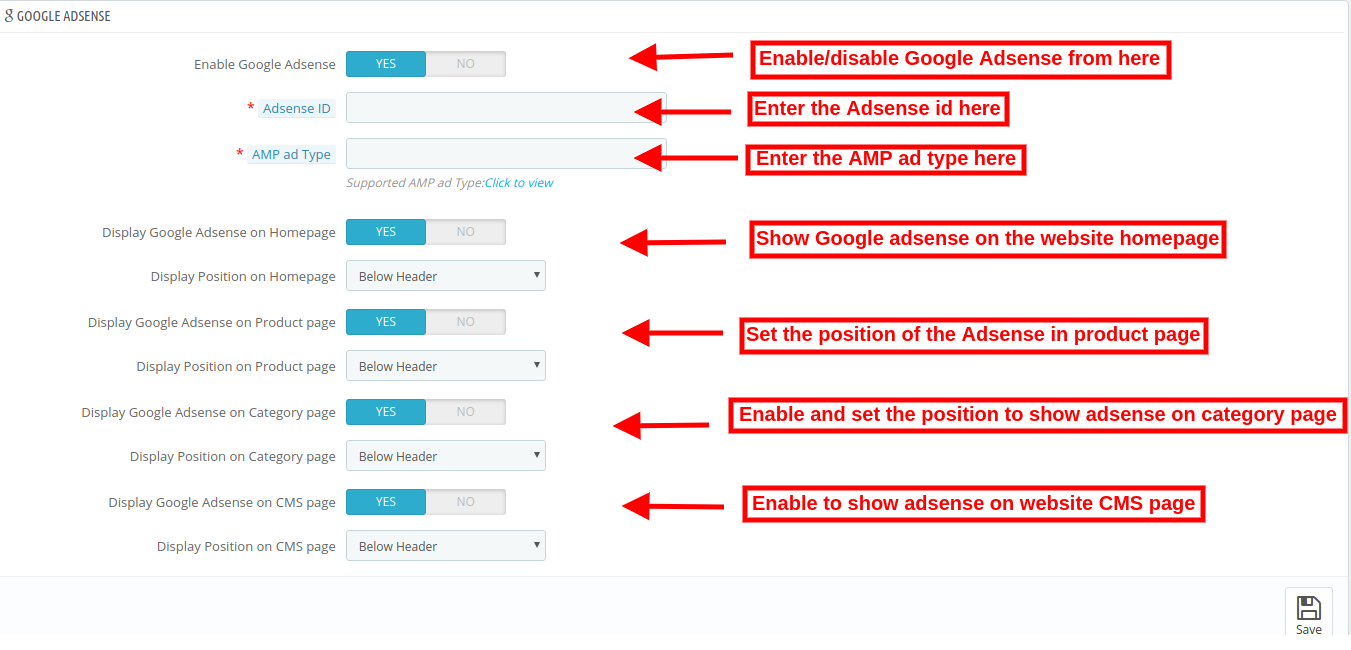
3.9.2 Google Adsense

  • Enable Google Adsense: Activate or Deactivate the functionality from here.
  • Adsense ID: Enter the Adsense ID here.
  • AMP ad type: Enter the supported AMP ad type. This way the admin can specify an identifier for the ad network. The type attribute selects the template to use for the ad tag.
  • Display Google Adsense on Homepage: Enable the option in order to display Google adsense on Homepage.
  • Display Position on Homepage: Select the position for showing Google adsense on homepage.
  • Display Google Adsense on Product page: Enable the option to show adsense on Product page.
  • Display Position on Product page: Select the position for displaying Google adsense on product page.
  • Display Google Adsense on Category page: Enable the option to show adsense on category page.
  • Display Position on Category page: Select the position for showing Google adsense on category.
  • Display Google Adsense on CMS page: Enable the option to show adsense on CMS page.
  • Display Position on CMS page: Select the position for showing Google adsense on CMS.

3.9.3 Facebook Pixel

Facebook pixel is a analytic tool which helps to track store visitors. You can also implement this to get store visitor details on the Accelerated Mobile Pages.

  • Enable Facebook Pixel: Enable or disable the option from here for implementing Facebook pixel tool to track site visitors.
  • Facebook Pixel ID: Enter the Facebook Pixel ID here.

3.10 Sitemap Settings

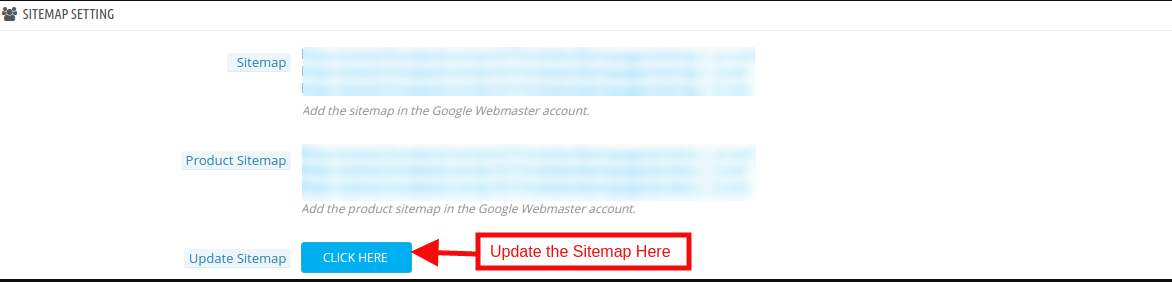
In this section, the store admin can generate the AMP Sitemap by clicking the button.

Generating the Sitemap are here.

How to Generate Sitemap for AMP?

The Admin can generate Sitemap by running CRON.

Accelerated Mobile Pages(AMP) module allows the store admin to setup Cron via

URLs to Add to Cron via Control Panel
Cron setup via SSH

CRON Configuration:

In order to generate the Sitemap automatically, the Prestashop store admin can set up the cron job. There are two options available in the admin panel of the module.

1.  The Admin can run the cron manually.

Add the cron to your store via control panel/putty to generate/update the sitemap. Please find the instructions to setup crons below –

URLs to Add to Cron via Control Panel

Generate Sitemap – 

https://psm.knowband.com/amp/16/en/module/kbamppages/cron?action=syncSiteMap&secure_key=09ce2811f9ab619dc4b64f69b134d4d4

Cron setup via SSH

Generate Sitemap – 40 * * * * curl -O /dev/null

‘https://psm.knowband.com/amp/16/en/module/kbamppages/cron?action=syncSiteMap&secure_key=09ce2811f9ab619dc4b64f69b134d4d4’

4.0 Front Interface of the Prestashop Accelerated Mobile Pages Module:

After enabling the Prestashop Accelerated Mobile Pages(AMP) Module by Knowband the store admin can enable the settings for the home page, category pages, product pages and CMS pages. As per the settings enabled by the admin, AMP will look as shown below:

Home Page:

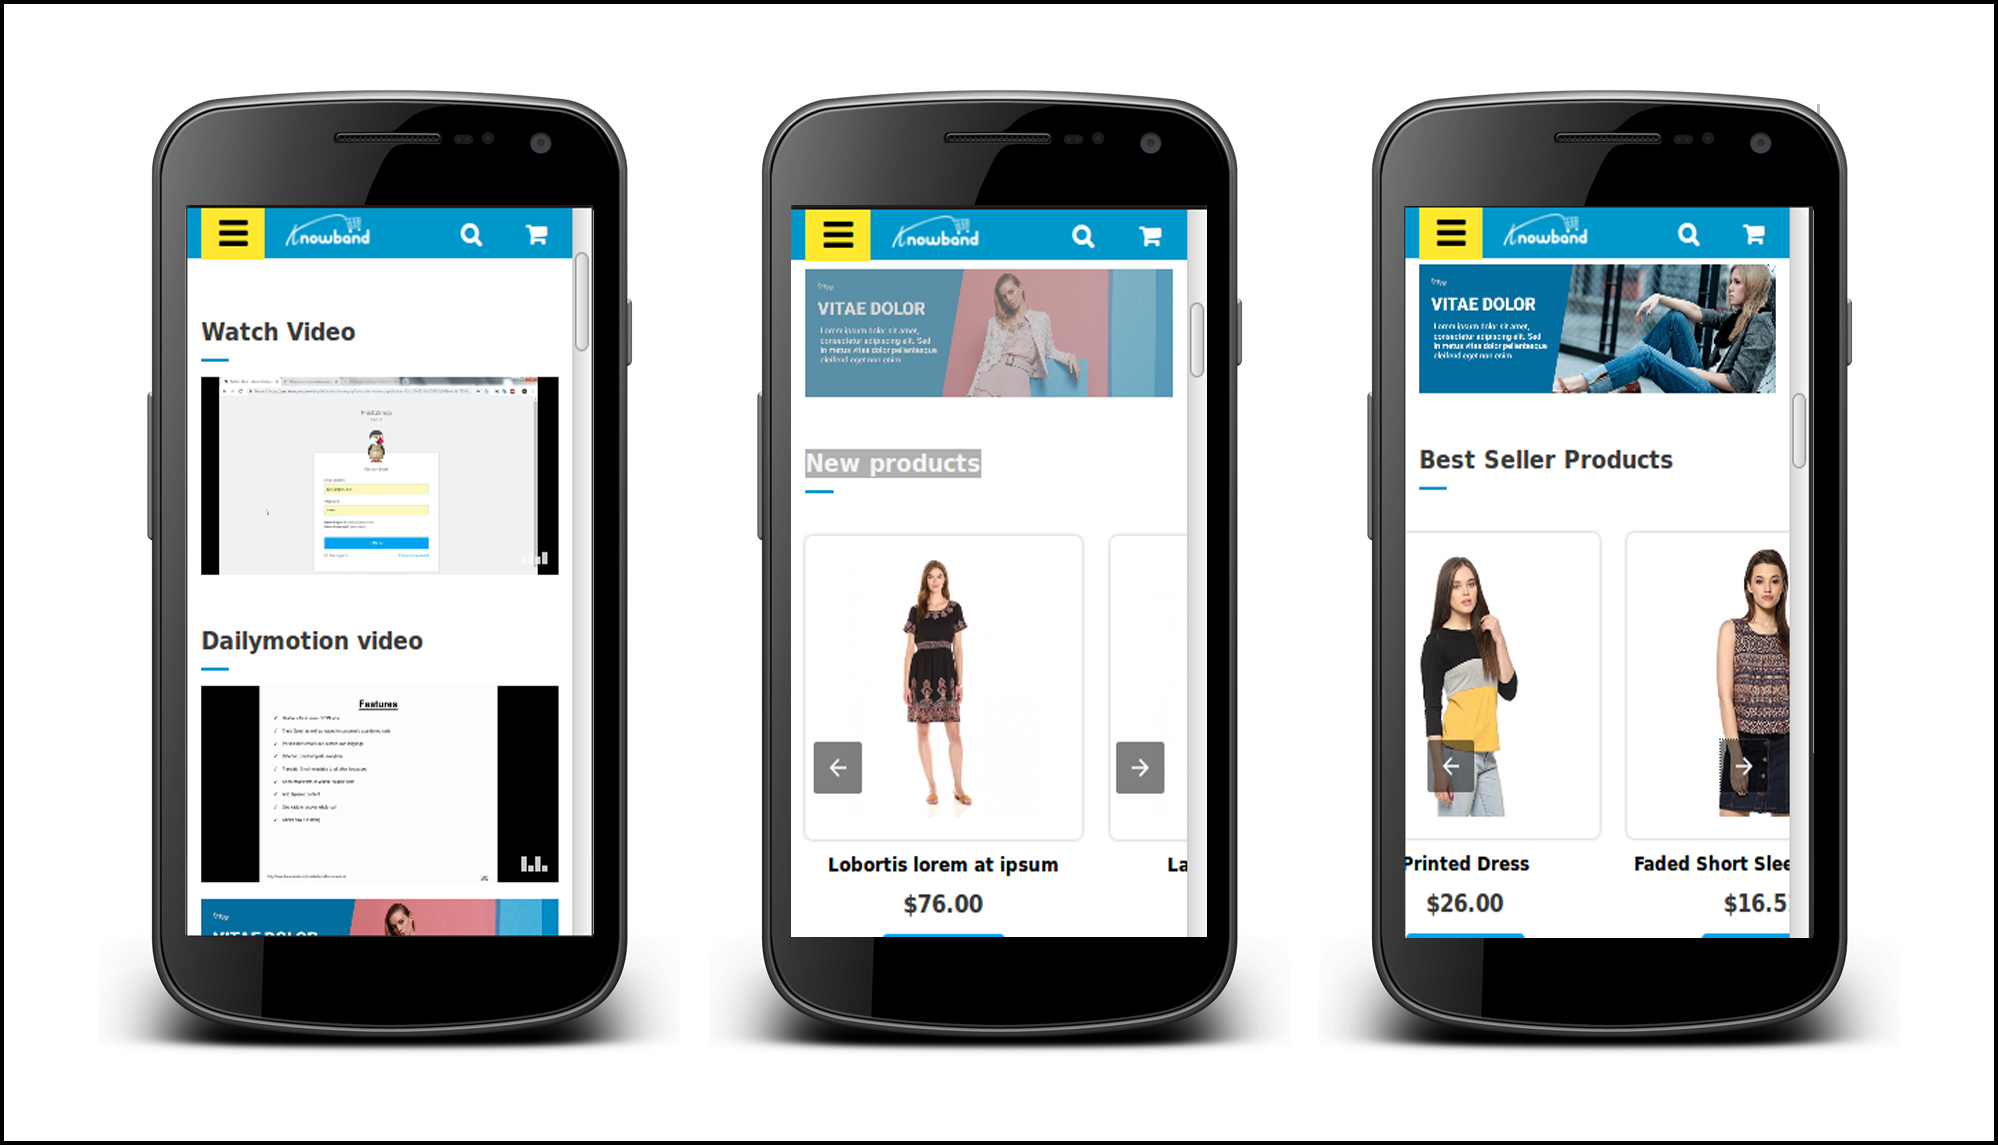
Prestashop AMP Pages allows the admin to show the Best Seller, New Products and Features Product on the Home page. For better user engagement.

Now the online store admin can also show Youtube video, Vimeo video and Dailymotion video on the website homepage.

Apart from that, the store admin can show Instagram feeds and twitter feeds on the homepage.

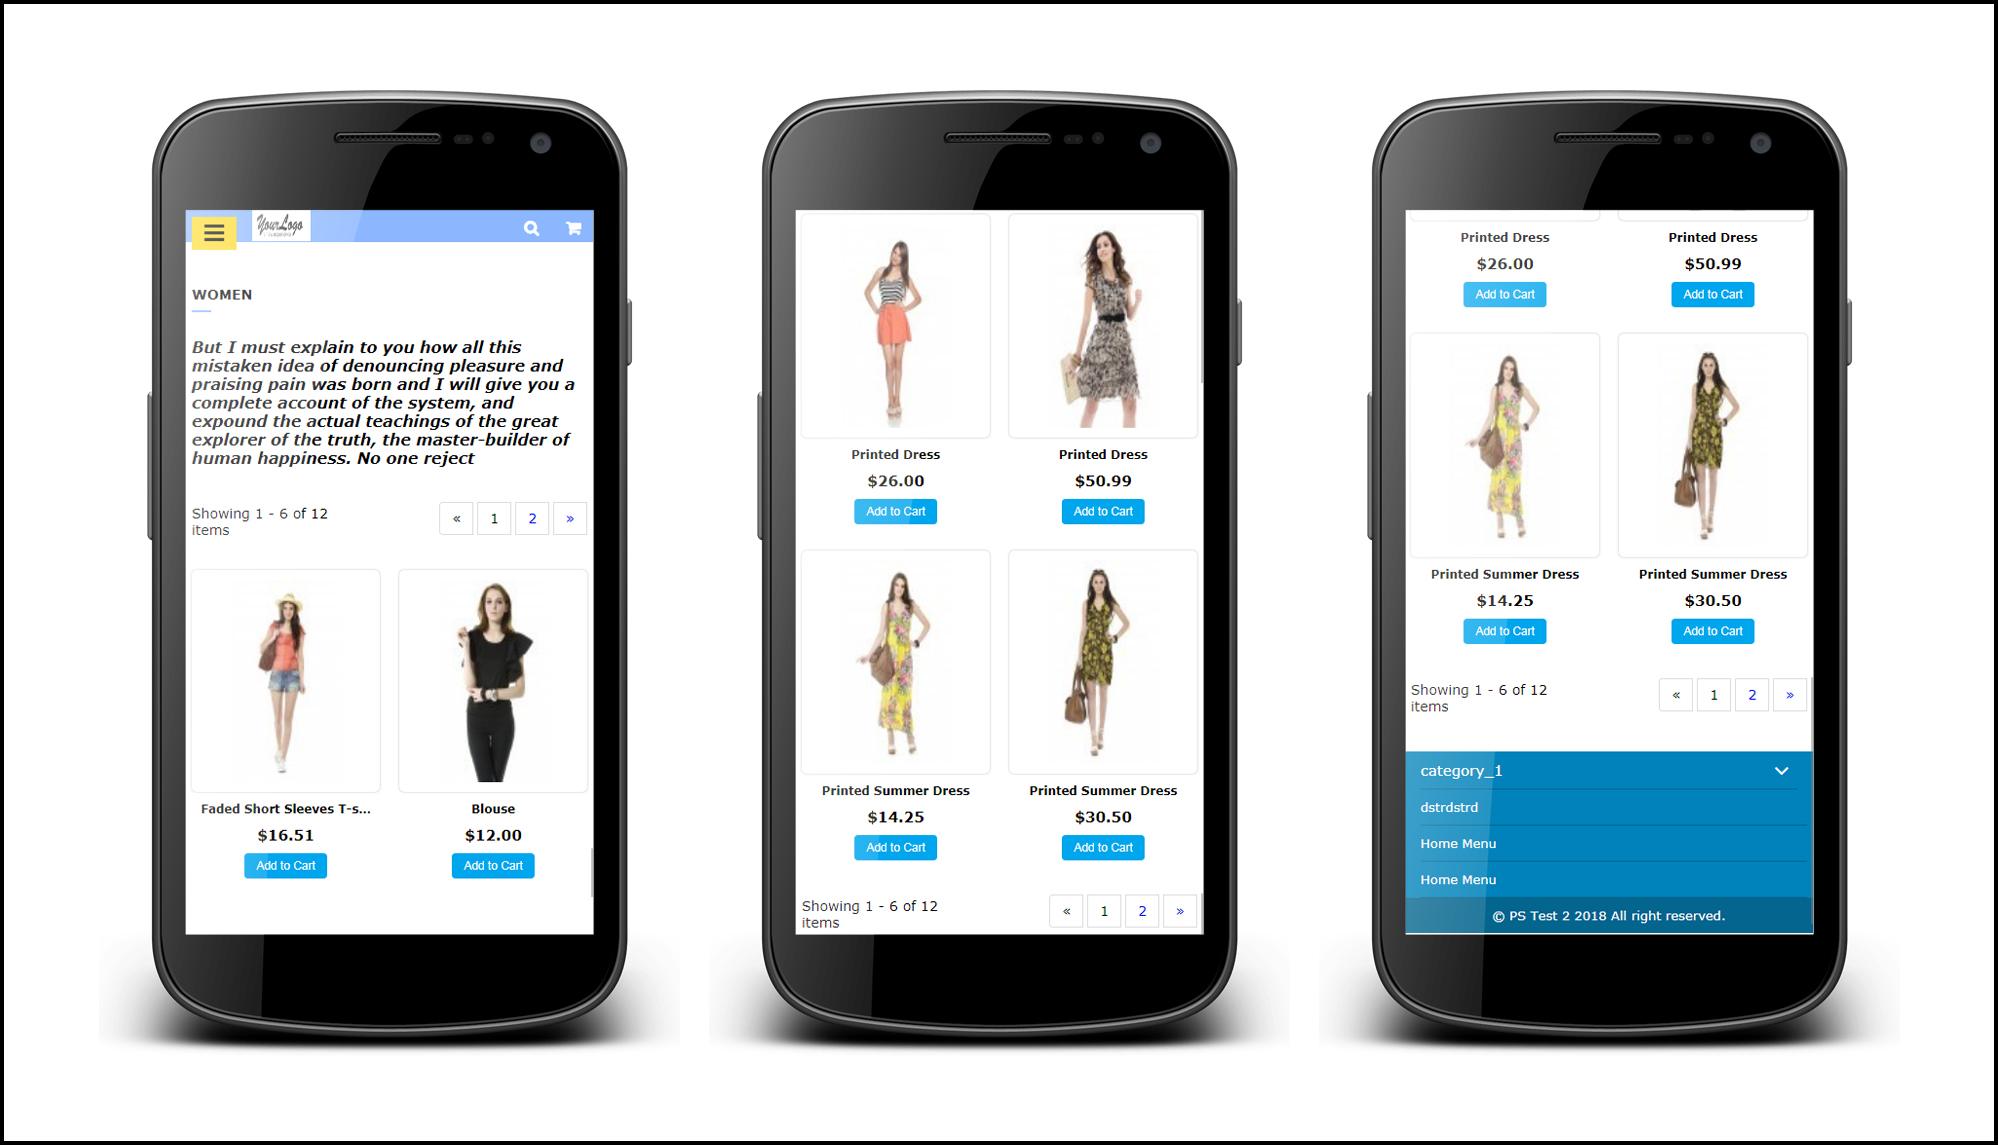
Category Page

As per the setting enabled by the admin, the Category AMP Pages on the Mobile device will appear like this screenshot.

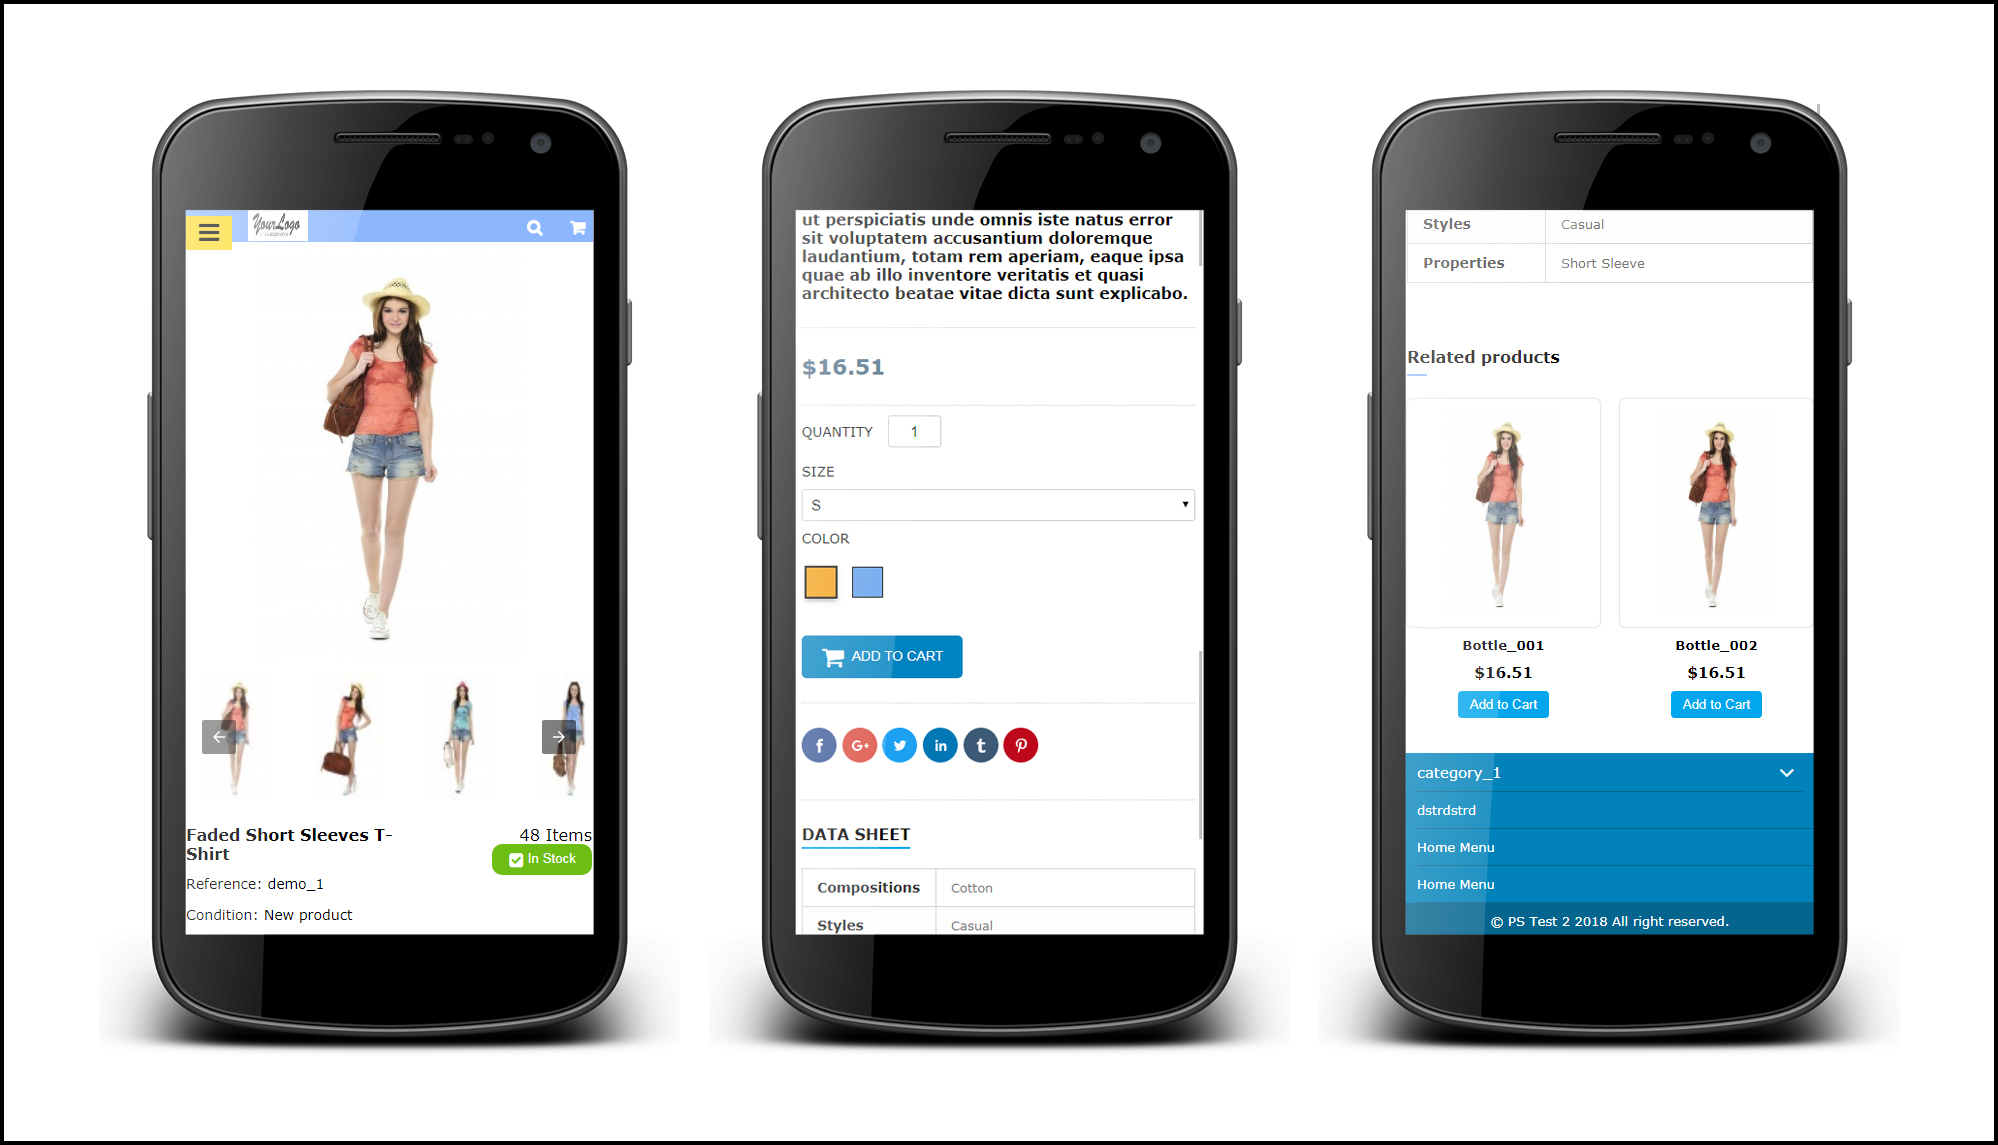
Product Page

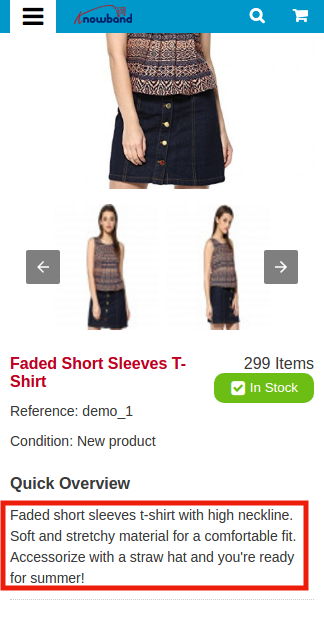
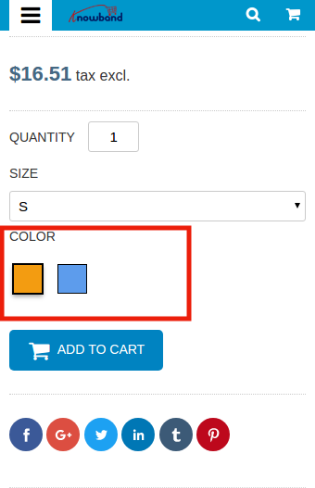
As per the setting enabled by the admin from the back-office the layout of Product AMP Page on the Mobile device will appear like this screenshot.

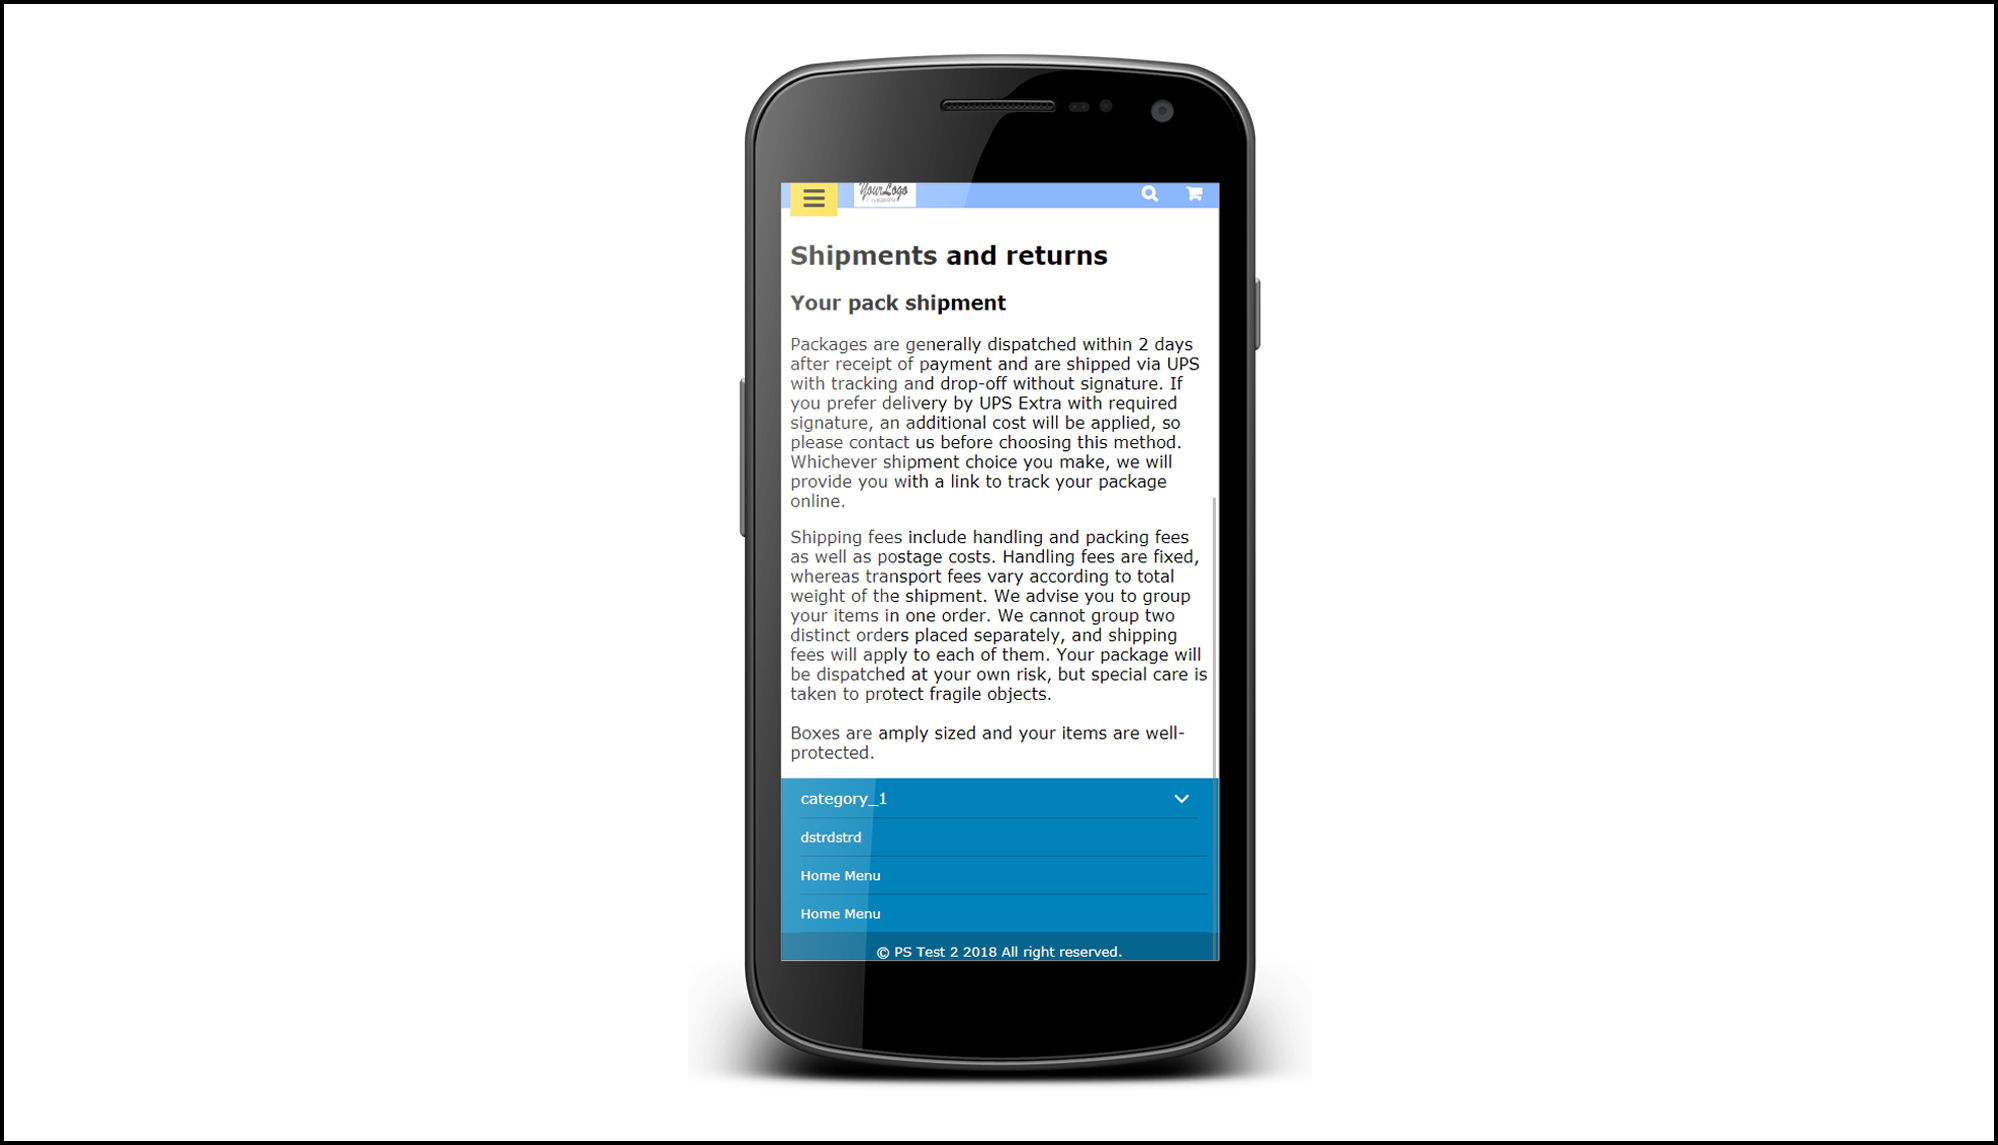
CMS Page

The Admin can view the CMS page setting like below settings.

Menu Icon

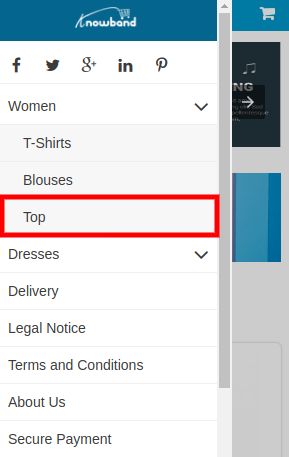
Prestashop Accelerated Mobile Pages shows the Menu icon like this.

Cookie Consent Bar

Cookie consent bar will be displayed as shown below:

This way the online store admin can increase the speed of mobile website pages and offer a better store experience to the online store visitors and customers. This Prestashop Accelerated Mobile Pages module converts the general pages into accelerated mobile pages. The Prestashop Accelerated Mobile Pages Addon provides simple and easy steps to set up accelerated mobile pages. The e-merchant can separately configure the homepage, product pages and category pages. The Prestashop store admin can easily manage all the settings of Prestashop Accelerated Mobile Pages module without changing even a single line of codes. The e-merchant can also show product videos, menu items and social media icons easily.

For more information about PrestaShop Accelerated Mobile Pages(AMP) Addon:

PrestaShop Accelerated Mobile Pages Module Link

PrestaShop Accelerated Mobile Pages(AMP) Addon Admin Demo Link
PrestaShop Accelerated Mobile Pages(AMP) Addon Front Demo Link

Prestashop Accelerated Mobile Pages plugin marketplace link

Prestashop Accelerated Mobile Pages Addon Video Link

Prestashop Web Push Notification Addon- User Manual

1.0 Introduction of Knowband Prestashop Web Push Notification Addon:

Web Push notification is a service that allows the eCommerce store owner to send automated push notifications on the browser to all users who have allowed web push notification. Prestashop Browser push notification addon allows the admin to display unlimited push notifications on the user’s browser even when they aren’t browsing your website.

Knowband offers Prestashop Web Push Notification addon which sends automated push notifications like Welcome Notifications, Order Status Update Notifications, Price Alert and Back in stock alert notifications, etc. It increases the chances of conversion of the lost sales by sending automated abandoned cart notifications. Prestashop web browser push notification module helps the admin to get the customer’s attention back to their store. One of the best things about browser push notification is that the store admin re-engages with their visitors without knowing their email or any other contact details.

Important: Web Push Notifications are compatible with Chrome and Mozilla browser only.

What’s new in the updated version:

In the new version of this Prestashop web push notification module, the online store merchant can configure Firebase API by following the steps provided in the admin interface of this PrestaShop module. In order to show push notifications on the browser, the online store admin needs to set API key, Project id, message sender id and server key from the module back-end interface.

1.2 Features of the Prestashop Web Push Notification Addon:

1. Prestashop web push notification extension by Knowband adds push notification functionality in your Prestashop store with the help of which the admin can show browser notification to the users.

2. This user-friendly Prestashop Web Push Notification addon allows the admin enable/disable the order status update notification option.

3. The Admin can customize the confirmation block notification button from the back-end of the Prestashop Push Notification for web browsers module.

4. Prestashop Cart Reminder Push Notification module pushes the web notification to the customer from time to time when they abandon the cart.

5. The admin can send the price alert notification to the online shoppers when the price of the subscribed product is low.

6. Knowband’s Prestashop Browser Notification addon offers the store merchant to enable the product back in stock notification functionality. It pushes a browser notification on the customer’s browser once the product is back-in-stock.

7. The Prestashop store owner can customize the look and feel of the notification block from the back-end of the Prestashop Push Notification for web browsers addon.

8. Knowland’s Prestashop web push notification module allows the store owner can change the look and feel of the Subscription box as per the website theme.

9. Prestashop Website Push Notification module offers an option for the seller to customize the confirmation pop up from the back-end.

10. The admin can change the logo of the confirmation notification box.

11. Prestashop Web Push Notification module is easy to use and handle.

12. The Knowband Prestashop Browser Notification module offers multilingual support.

13. Prestashop Push Notification for web browsers Addon is compatible with all browsers.

14. Prestashop Web Push Notification Addon is multi-store compatible.

15. The online merchant can setup web browser configuration and configure firebase API by following the provided steps along with the screenshots. The online merchant can setup API key, Project id, message sender id and server key for showing web browser notifications to the online users.

Technology for Development

Language: PHP

FrameWork: PrestaShop

2.0 Steps for Installation of Prestashop Web Push Notification Addon:

1. The folder structure of the Prestashop Browser Push Notification module.

2. Copy the whole folder named as product update into your modules folder of the root directory of your PrestaShop store through FTP.

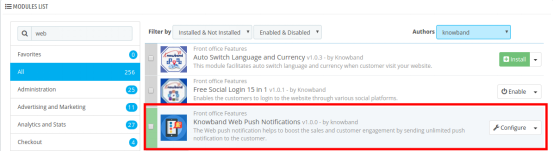
3. You will be able to find the product web push notification plug-in ready to be installed in the Modules in your PrestaShop store as shown below.

4. Click on the Install link to install the plugin.

4. Another way is, you can zip the whole folder and then click on “Add New Module” link displaying on the top right corner of Prestashop module listing page.

5. After installing the Prestashop Push Notification for Web Browsers module, “Configure” link will be displayed instead of “Install” link as shown in below screen:


Now, your Prestashop Web Push Notification Addon is ready to use and click on “Configure” link to configure this Prestashop module by Knowband.

3.0 Admin Interface

After installing Prestashop Web Push Notification module into the store, the Prestashop addon will provide the following interfaces:

1.General Settings
2.Templates
3.Push Notification
4.Delay Push Notification
5.Subscriber
6.Product Subscriber
7.History
8.Statistics

Each interface of this Prestashop browser push notification module is explained below.

3.1 General Settings

General Settings tab of this Prestashop Web Push update notification addon has following options:

3.1.1 Configuration Settings

On clicking on configure link corresponding to Prestashop Website Push Notification addon, the system will open Configuration tabs of this Prestashop plugin as shown in the screen below:

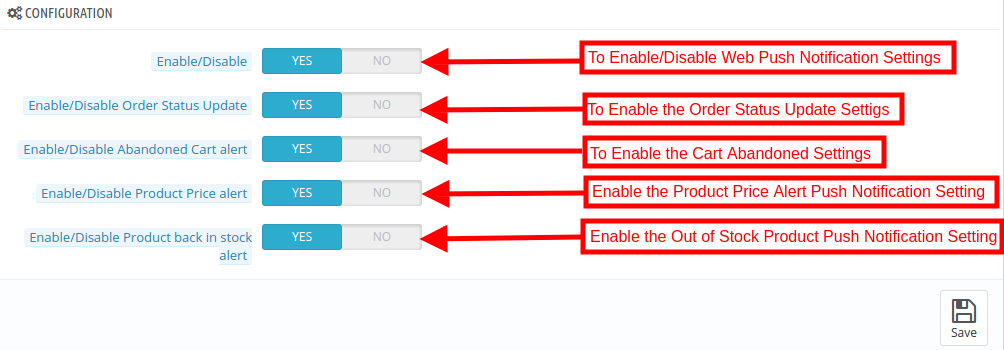
  • Enable/Disable: Initially, this field of Prestashop browser push module by Knowband will be disabled. The admin can enable/disable the plugin by toggling the button.

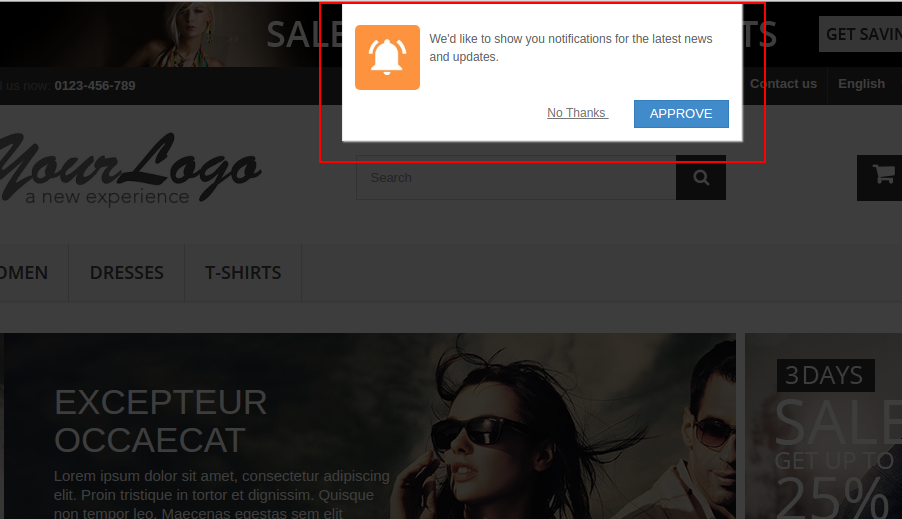
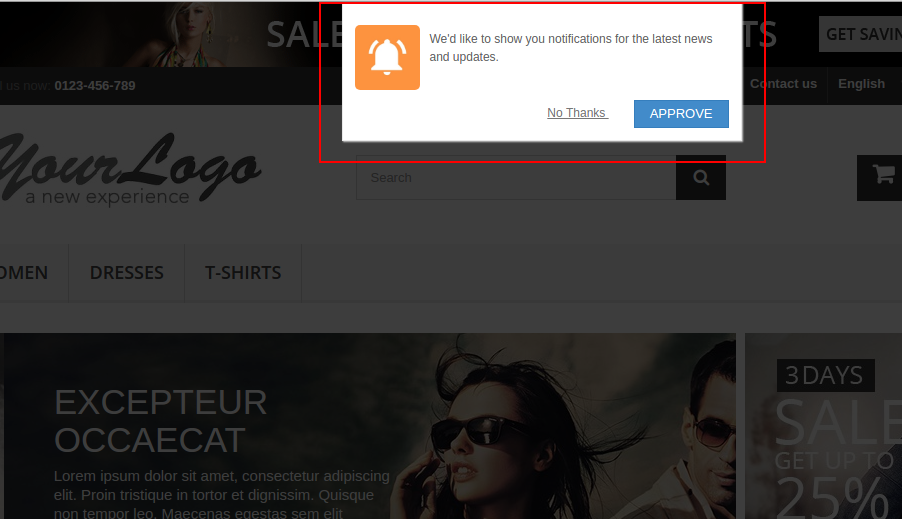
After enabling the settings the module, a confirmation box will be displayed in the in the front-end of the store. The store visitors or customers can click on ‘Approve’ to enable the push notifications.

  • Enable/Disable the Order Status Update: In this section of Prestashop Push Notification for web browsers addon, the admin can enable the settings to send web notification for the order status. After enabling this setting, the admin can send order status notification the customer.

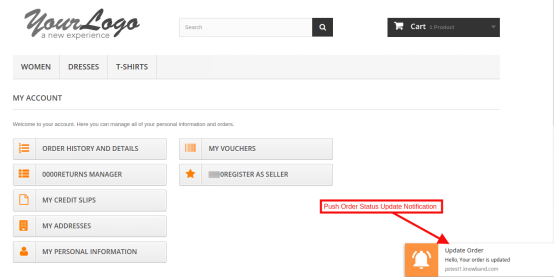
The push notification for order status will be displayed as shown in the image below:

  • Enable/Disable the Abandoned Cart Alert: Using this option of the Prestashop Web Push Notification addon, the admin can enable the settings to send web notification for the abandoned carts of the customers.

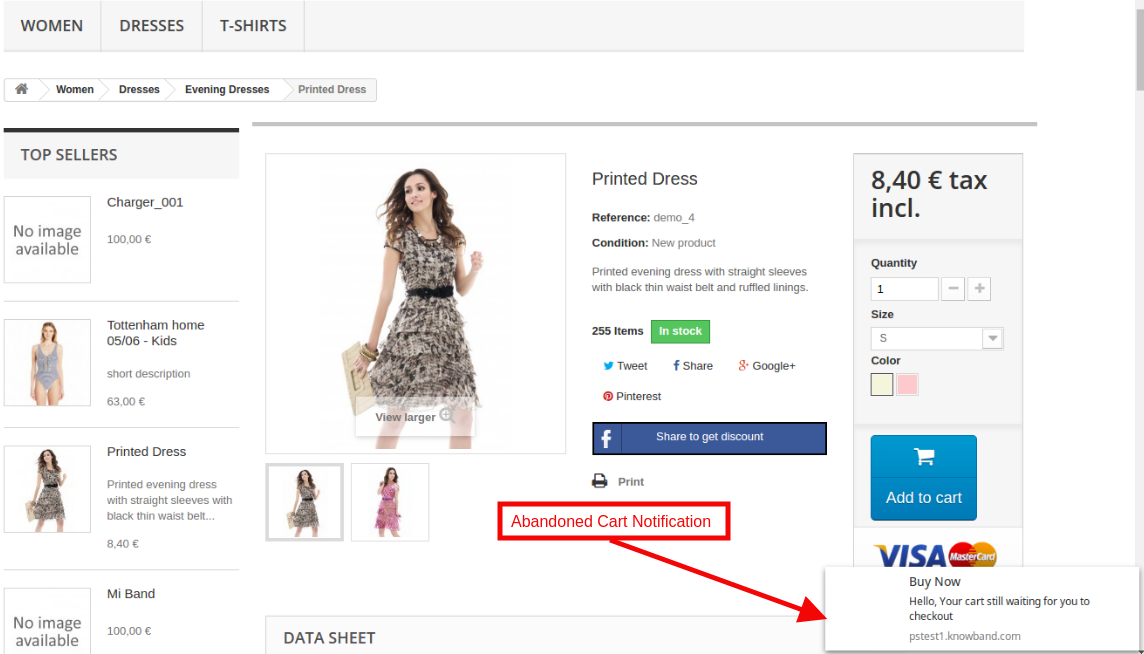
These settings work only when the customers abandon their cart for some reasons. Then this module sends the web push notification to the customer saying “Your cart is waiting”.

Note: Web push notification module allows the admin to run cron to send the push notification immediately or after a fixed time.

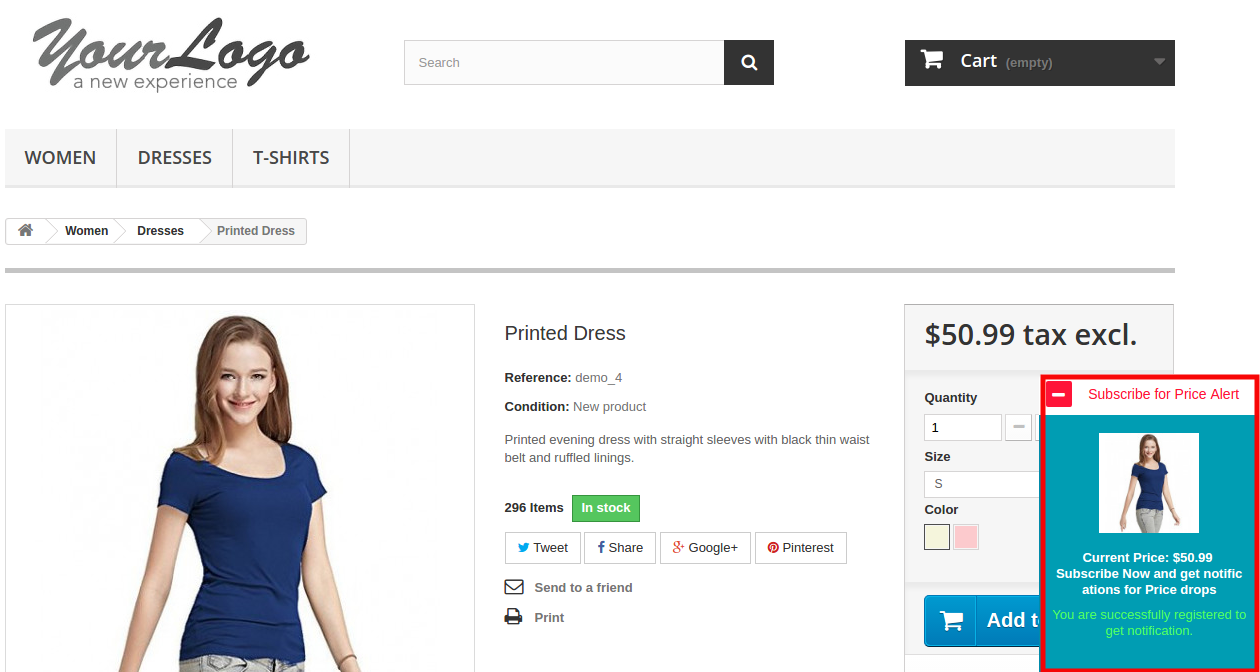
  • Enable/Disable the Product Price Alert Settings: Using this option of the Prestashop Browser Notification addon, the admin can enable the settings to send web notification for the customer when the product price is down.
  • At the front-end, this Price alert notification box will appear like below screenshot:

Note: These settings are only applicable when the users subscribe for the Price Alert.

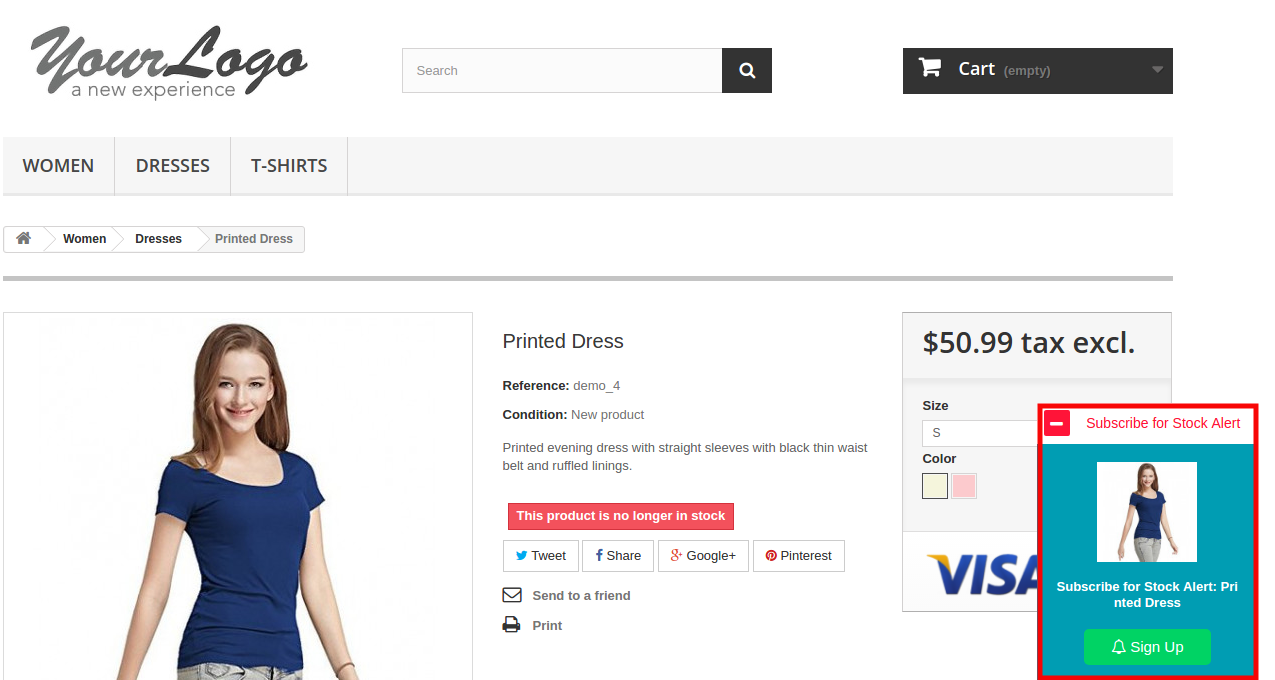
  • Enable/Disable the Product Back In Stock Alert Settings: Initially, this setting is enabled, this Prestashop Push Notification for web browsers Addon allows the admin to send product alert notification to the customer when the product is back in stock.
  • At the front-end this Back In Stock notification box will appear like below screenshot:

Note: These settings are only applicable when the user subscribes for the notification.

3.1.2 Product Sign Up Box

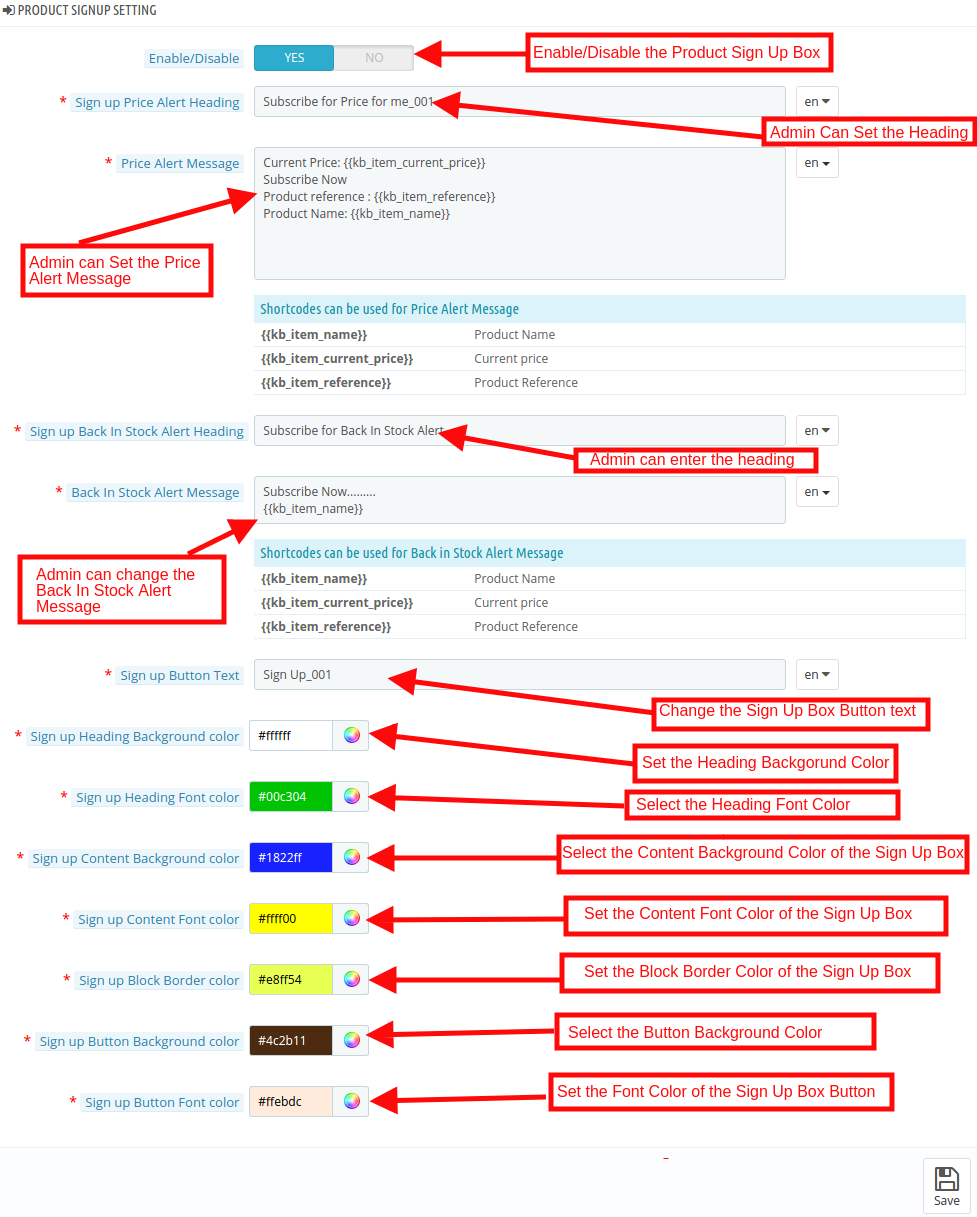
In this tab of the Prestashop Web Push Notification addon by Knowband, the admin can edit the Sign-Up Box settings of this Prestashop module in various languages. This tab will have the following options:

  • Enable/Disable Product Subscription Box Settings: In this tab, the admin can enable the product subscription box option. If enabled, the Prestashop Browser Push Notification module will show the Subscription box in the Front-end of the store where the customer can subscribe for the price alert or back in stock product.
  • Sign Up Price Alert Heading: Initially, this field of Prestashop Web Push Notification module allows the admin to change the heading price alert notification as per the requirement.
  • Price Alert Message: In this section of Prestashop Browser Push Notification module, the store admin can change the message flashed in the Price alert subscription box.
  • Sign Up Back In Stock Heading: This option of the Prestashop back in stock web push alert module allows the admin to edit the heading of the back-in-stock notification.
  • Back In Stock Message: In this Prestashop Push Notification for web browsers Addon tab, the Online retailer can change the message of the back in stock subscription box.
  • Sign Up Box text: The Prestahsop store admin can change the look and feel of the subscription box by picking the color from the color picker. The changes made in the back-end will be reflected in the front end.
  • Sign Up Box Heading Background Color: The Store merchant can change the background color of the heading of the signup box in this.
  • Sign Up Heading Font Color: This option of the Prestashop Website Push Notification module allows the admin to set the Heading font color as per requirement and will be reflected the front end of the site.
  • Sign Up Box Content Background Color: The Prestashop Merchant can change the Subscription box Content color in this section of Knowband Web Push Notification For Prestashop.
  • Sign Up Box Content Font Color: The admin can change the font color from this section.
  • Sign Up Box Content Border Color: This field of Prestashop Web Push Notification addon allows the admin to set the border color.
  • Sign Up Box Content Background Color: This option of the Prestashop back in stock web push alert module allows the admin to set the background color of the sign-up box.
  • Sign Up Box Button Font Color: Using this option of the Prestashop Browser Push Notification module, the admin can set the font color of the text displayed in the buttons.

3.1.3 Welcome Push Notification Setting

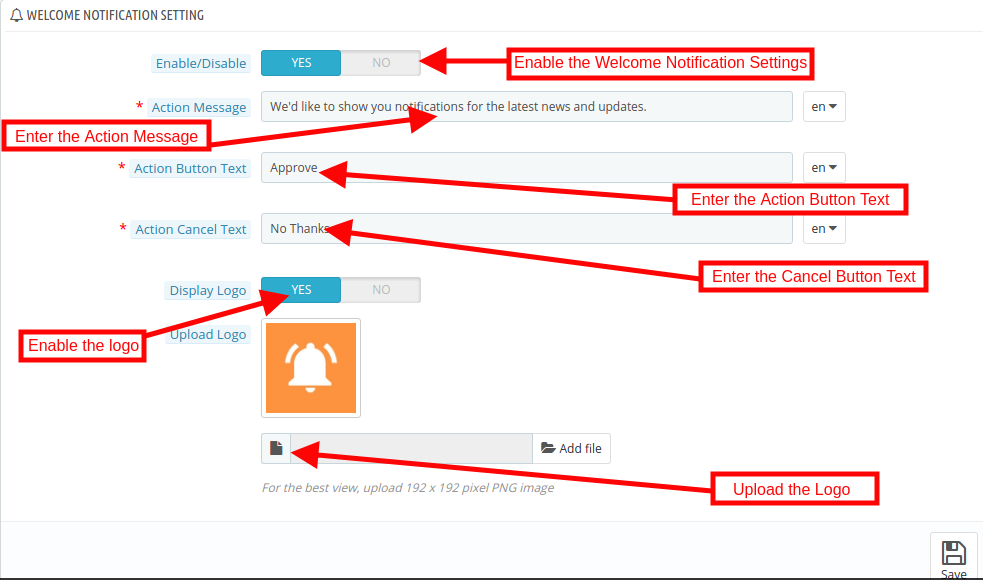
In this Prestashop Web Push Notification, the store admin can customize the look and feel of the Welcome notification box. This Welcome Notification box will be shown in the Front-end of the store when the customer enters the store. Users have an option to subscribe to the notifications or cancel the option. This tab will have the following options:

  • Enable/Disable: Admin will have the option to Enable/Disable the Permission Box. If enabled, the permission box in the front-end of the store.

  • Action Message: The Admin can change the action message that will be reflected the front end of the site.
  • Action Button Message: In this Prestashop Website Push Notification Addon, the store admin can change the message of the Permission box action button message.
  • Action Cancel Text: In this tab, the store admin can set the Cancel button text.
  • Display Logo: The store admin can enable/disable the option to display the logo.
  • Upload Logo: The online retailers can upload their own business in this section.

3.1.4 Web Browser Configuration

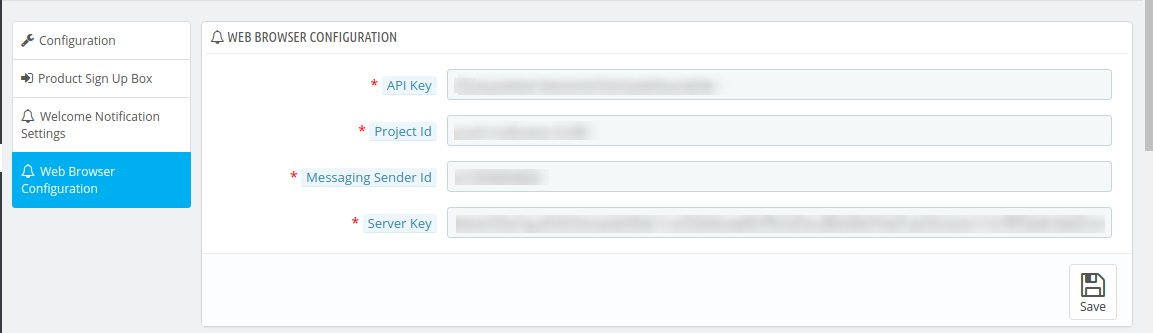
In the updated version, the online merchant got an option to configure Firebase API and setup these details for showing web browser notifications to the online users:

  • API Key: Enter the API key here.
  • Project ID: Enter Project Id here.
  • Messaging Sender ID: Here, enter messaging sender ID.
  • Server Key: Enter the server key here.

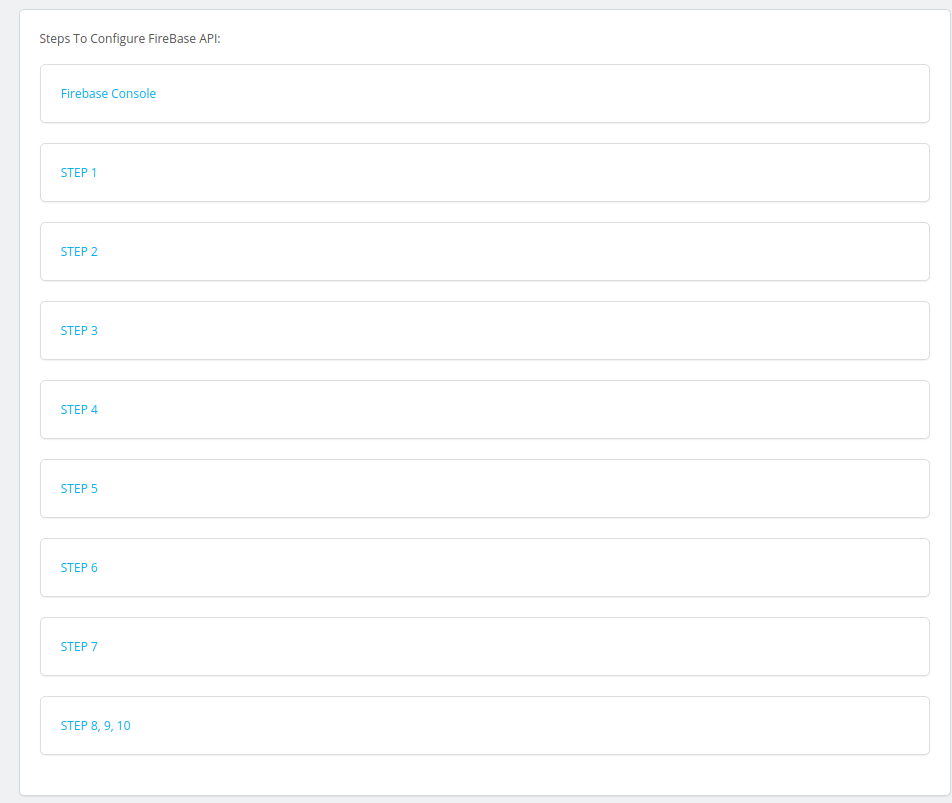
The online merchant can view the configuration steps along with the screenshots.

3.2 Templates

Here store owner can customize or add the Web Push notification template in this section of the Prestashop Website Push Notification addon according to the requirements.

Web push notification allows the store admin to customize the template for the following option:

1. Custom Notification Alert
2. Product Back In Stock Alert
3. Product Price Alert
4. Abandoned Cart Alert
5. Order Status Update Alert

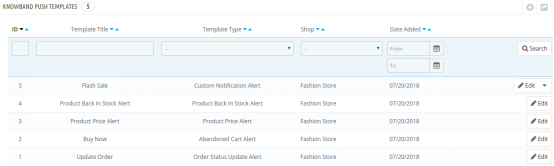
3.2.1 How to add Custom Notification Template?

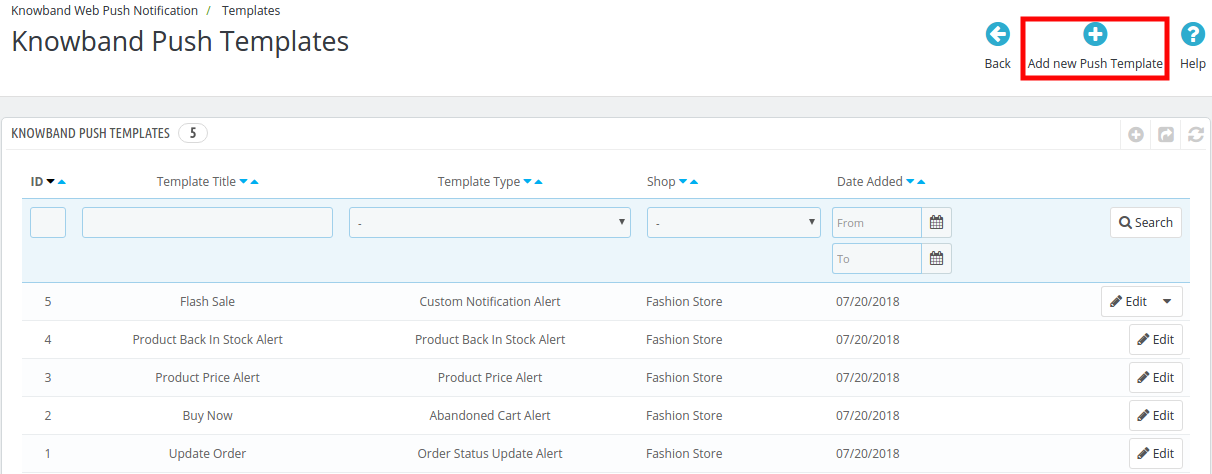
The Prestashop Web Push Notification addon by Knowband allows the store admin to add the new Custom Notification template. Following are the steps to add a Custom Notification template –

1. Go to “Web Push Template”.

2. Click on “Add New Push Template” tab. A pop-up will display to add a new push template.

3. Fill all the mandatory fields and click on the “Save” button.

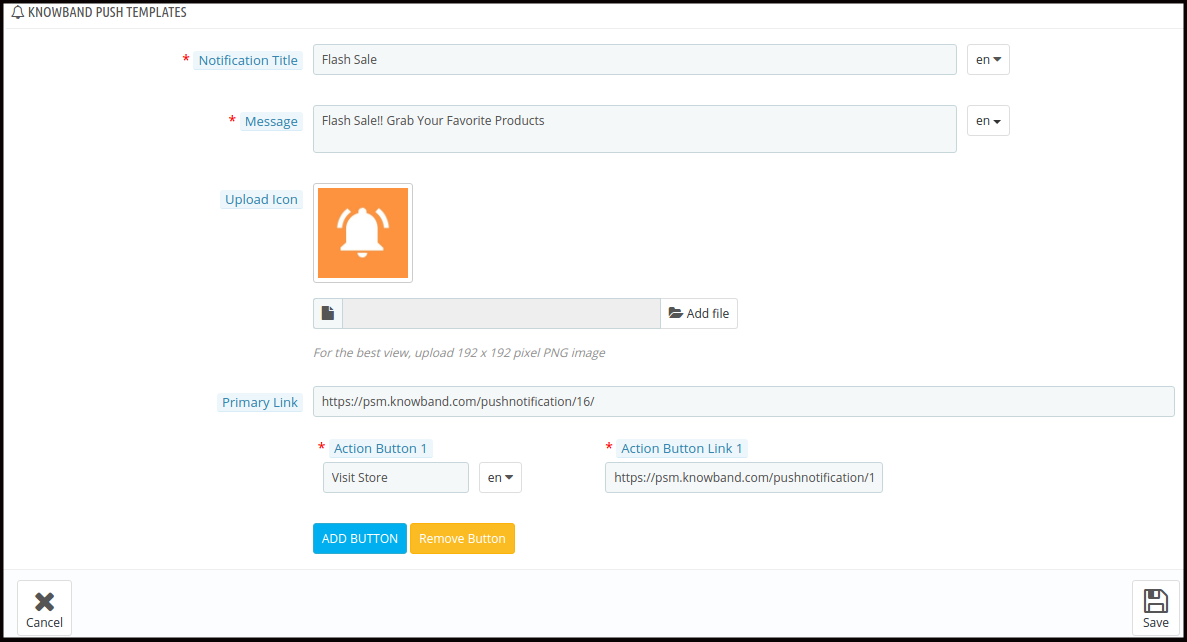
The various mandatory fields are discussed below. Please find the attached screen-shot:

  • Notification Title: Here the admin can set the Notification title.
  • Message: Using this option of the Prestashop web push notification module, the eCommerce store admin can set the message that will be displayed along with the notification.
  • Upload Icon: In this field, the store admin can upload the icon for the notification.
  • Primary Link: The Store admin can add the link of any specific page where they want to redirect the user.
  • Action Button: In this tab, the online merchant can add the two buttons that will be displayed along with the push notification. These action buttons can be used for various promotions.

4. After the successful enter the details, the new custom template would be added in the “Web Push Template” table.

Note: The Admin can add the N no of Custom template for various promotional offers like Flash Sale, Buy 2 Get 1, Happy hours and more.

The other notification options are discussed below:

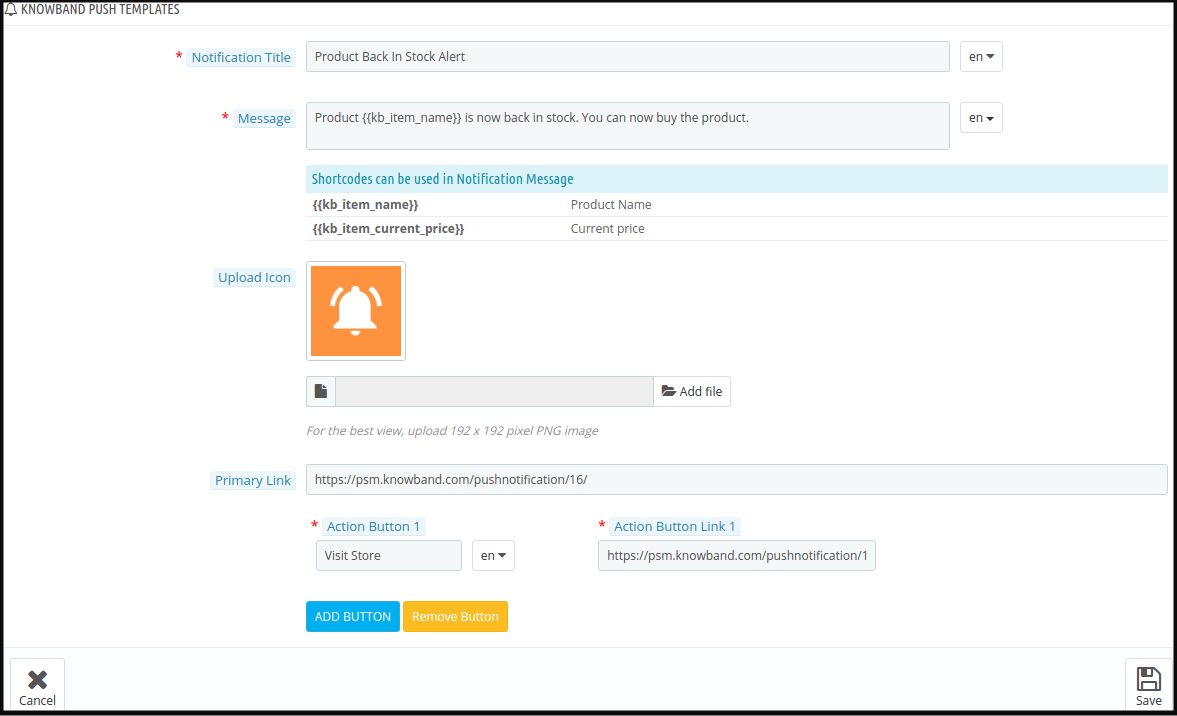
  • Product Back In Stock Alert: In this tab, the store admin can customize the settings of the back in stock notification like Your product is out of stock. Please find the attached screen-shot:

When the store admin changes the status of the Product quantity from the back-end of the Prestashop Web Push Notification module the Product quantity Push Notification send to the customer.

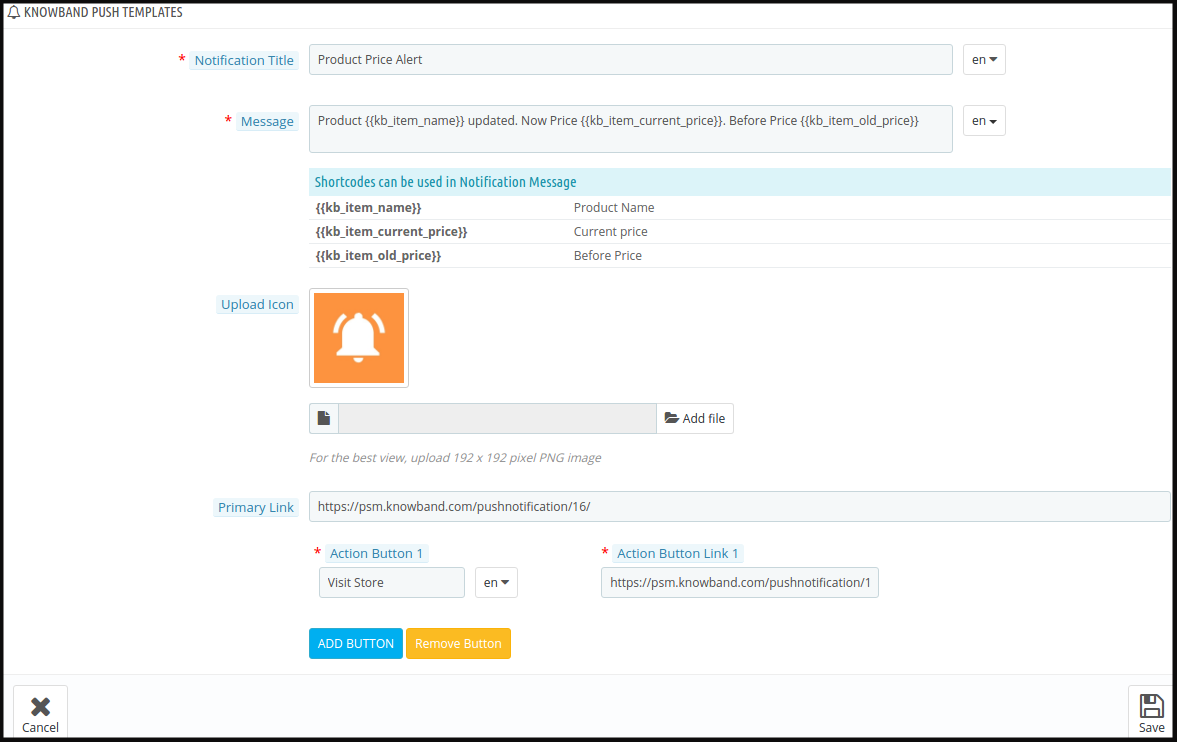
  • Product Price Alert: In this tab, the store admin can customize the settings of the product price alert notification. Please find the attached screen-shot:

When the store admin changes the product price/run the special deal from the back-end of the module the Push Notification send to the customer.

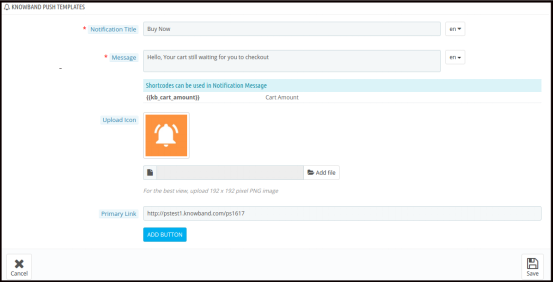
  • Abandoned Cart Alert Template: This Prestashop Browser Push Notification module offers an option for the admin to customize the abandoned cart template form the back-end.

Here the store admin can customize the Abandoned Cart template.

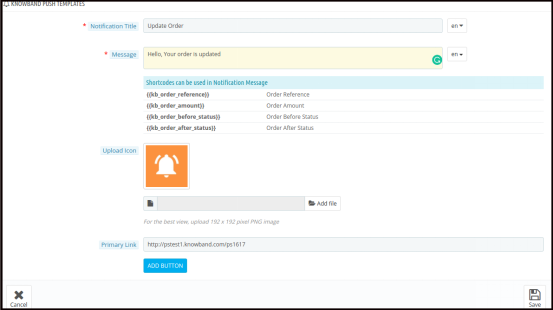
  • Order Status Update Alert: This Prestashop Web Push Notification module offers an option for the admin to customize the Order status template.

Here the store admin can customize the Order status template.

When the store admin changes the status of the order from the back-end of the Prestashop Web Push Notification module the Order Status Push Notification send to the customer.

3.3 Push Notification

Prestashop Web Push Notification module allows the admin to set up the cron to send a push notification. The Admin has the option to send push notification manually or by the setting of the cron.

3.3.1 How to send Push Notification Manually?

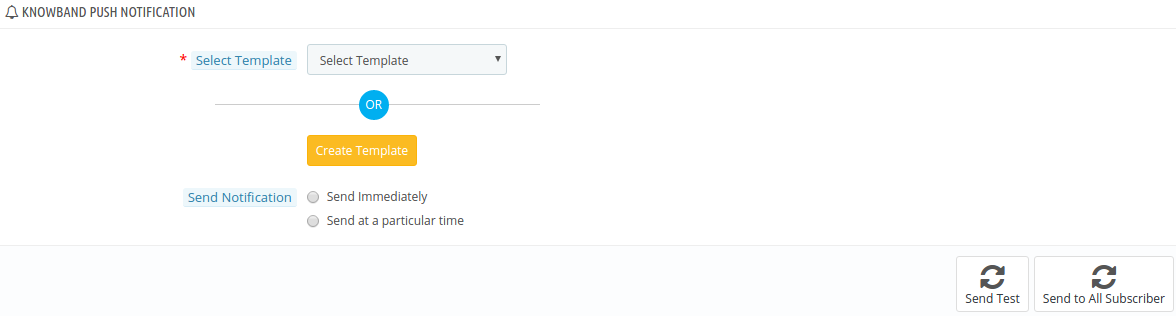
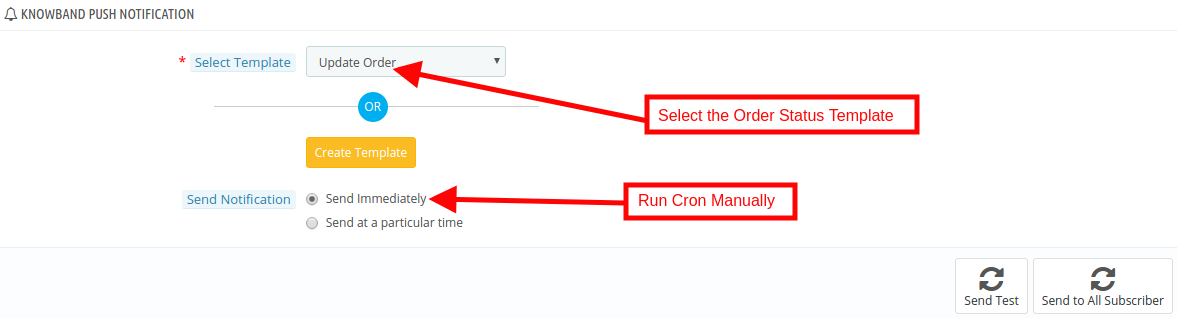
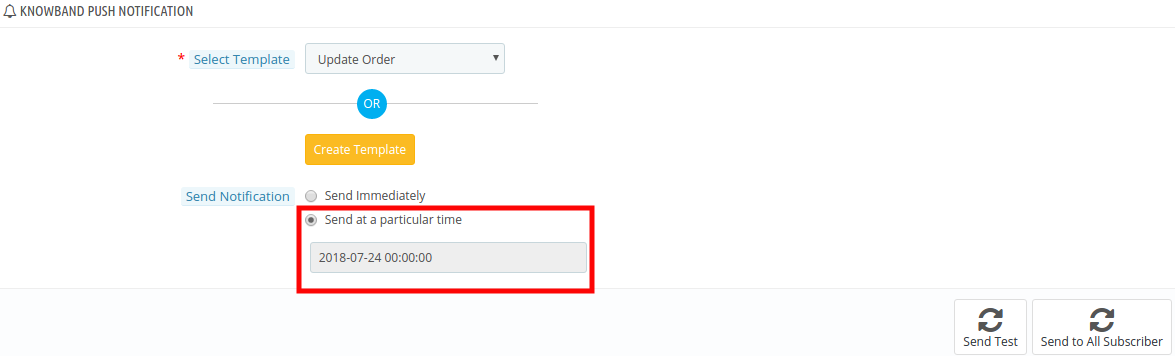
In order to send the Push notification manually for Update Order, Buy Now, Product Price Alert, Product back in stock and Custom Notification. The store admin needs to select the template type from the drop-down list.

For example: If the store admin wants to Push the “Order Status Notification” manually, then he has to select the “Update Order” option from the drop-down list and click on the Send to All Subscriber option.

3.3.2 How to Schedule the Notification?

There are the steps for scheduling the Notification:

1. Go the Push Notification template.

2. Select the template which you want to schedule for future notification.

3.Set the time when the admin wants to send the notification.

4. Delay notification set.

CRON Configuration:

In order to send the Push Notification automatically, the Prestashop store admin can set up the cron job. There is two option available in the admin panel of the module.

1.  The Admin can run the cron manually.

2. Cron Setup via Control Panel: In order to automate the setup the admin can configure this setting.

Please find the instructions to setup crons below –

URLs to Add to Cron via Control Panel

1. Push Delay Notification –

https://psm.knowband.com/pushnotification/16/en/module/kbpushnotification/cron?action=syncdelaypush&secure_key=833529a5a031ca74519cb78116dbd145

1. Push Abandoned Cart Notification –

https://psm.knowband.com/pushnotification/16/en/module/kbpushnotification/cron?action=syncabandonedcart&secure_key=48b7fd9add0e1bd32807a51fb2ba6cd0

Cron setup via SSH

Push Delay Notification – 40 * * * * curl -O /dev/null

‘https://psm.knowband.com/pushnotification/16/en/module/kbpushnotification/cron?action=syncdelaypush&secure_key=833529a5a031ca74519cb78116dbd145’

Push Abandoned Cart Notification – 10 * * * * curl -O /dev/null

‘https://psm.knowband.com/pushnotification/16/en/module/kbpushnotification/cron?action=syncabandonedcart&secure_key=48b7fd9add0e1bd32807a51fb2ba6cd0’

3.4 Push Delay Notification

Web Push Notification For Prestashop allows the Prestashop store admin to schedule the notification for a particular time. All the scheduled notification will be displayed in the Push Delay Notification tab along with their status.

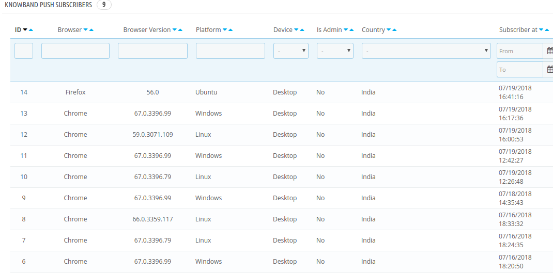
3.5 Push Subscriber

Prestashop web push notification plugin allows the admin to view the list of the subscribe browser.

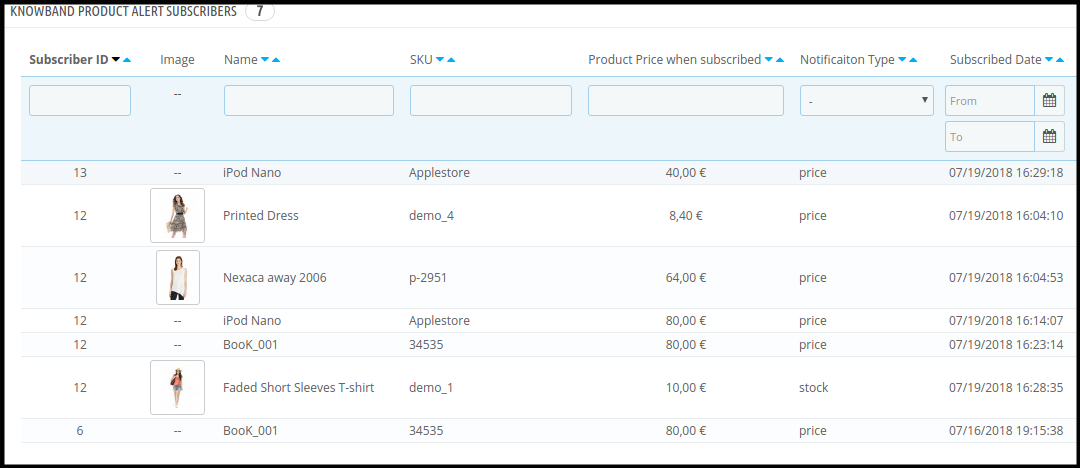
3.6 Product Alert Subscriber

This Prestashop Push Notification for web browsers addon allows the online retailer to view the list of subscribed product. They can also view the product notification type like price alert or back in stock.

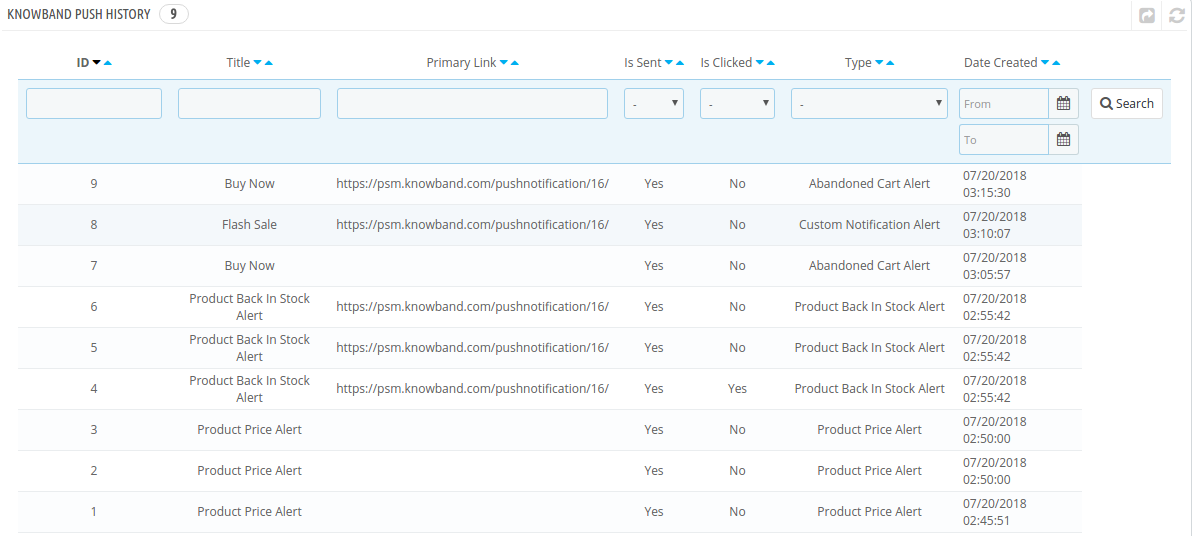
3.7 Push History

In this Prestashop web push notification module, the store admin can view the overall history of the web push notification. Apart from this, the admin can filter the history and view the notifications pushed for options like abandoned cart, price alert, back in stock and more.

3.8 Web Push Statistics

The complete analysis of the subscribed customers can be done with the help of report offered in this tab of the Prestashop web push notification module.

4.0 Front End Module of the Prestashop Web Push Notification module:

After enabling the Prestashop Website Notification module by Knowband the front-end user will see a confirmation block at the home page. The block of the Prestashop Browser Push Notification addon contains two buttons as to Approve or Cancel the notification. If the user Click the approve button they will be subscribed to the respective website.

The Confirmation block of Prestashop reminder email module would appear as follows:

Abandoned Cart Web Push Notification:

Oder Status Update Web Push Notification:

Magento Gift Card Manager Extension- User Manual

1.0 Introduction Magento Gift Card Manager Extension.

Gift cards have become a major factor of eCommerce businesses. Knowband provides the Magento Gift Cart Manager Extension that allows the Magento store owner to offer gift cards to their customers. Magento gift voucher extension is a module that enables the admin to acquire new online consumers while retaining the existing customers.

This Magento gift card extension by Knowband gives the flexibility to a customer to buy the gift card online and send the Gift voucher to their friends via email on a specific date and time. The online shoppers can order the gift cards for the special occasions for their near and dear ones.

1.1 Features of the Magento Gift Card Manager Extension

  • By using the Magento gift card manager extension, the eCommerce store merchant can offer the e-gift card option to their store visitors.
  • Magento store owner can place the link for Gift Card anywhere in the front-end of the website.
  • Knowband’s Magento send gift card manager extension allows the admin to fix the minimum duration within which the gift card is delivered to the end-user after the order for the same is placed.
  • Magento gift card module by Knowband enables the admin to set the prefix for the Gift card.
  • With the help of Magento gift voucher extension, the online store owners can customize the readymade email template subject and content as per desires.
  • Magento gift card extension by Knowband offers the PDF customization option to the admin where they can change the Gift card prefix and content.
  • The Store admin can run the cron for implementing the changes automatically.
  • Magento gift card extension by Knowband allows the store admin to add, edit or delete the gift card template.
  • The online merchants can add the N number of gift card templates for various occasions including Anniversary, Birthdays, Holidays or any other special event. The default gift card designs or templates can be edited, disabled or deleted as required.
  • The store admin even gets an option to keep a track on the orders received for the gift card from the back-end of the Magento gift card manager extension.
  • Magento gift voucher extension helps the admin to increase the customer retention.
  • Knowband’s Magento send gift card extension is easy to install and configure.
  • Magento gift card extension is fully mobile responsive.

1.2 Magento Gift Card Manager Benefits for Customers:

1. Magento Gift card extension by Knowband save the valuable time of the customers. They can get the gift cards for the different occasion in case they are finding it hard to choose a tangible gift from the store.

2. The gift card option incorporated by Magento gift card module by Knowband is best for those customers who find it hard to select a gift for any occasion.

2.0 Installation

After purchasing the Magento gift card module from the store and you’ll get following files.

1. The zipped file that consists of the source code of the module
2. User Manual

Follow the following steps to install the Magento gift card manager extension:

1. The folder structure of the Gift Card Manager.

2. Copy all the folders of the zipped file and paste them into Magento root directory and clear the cash cache (if enabled).

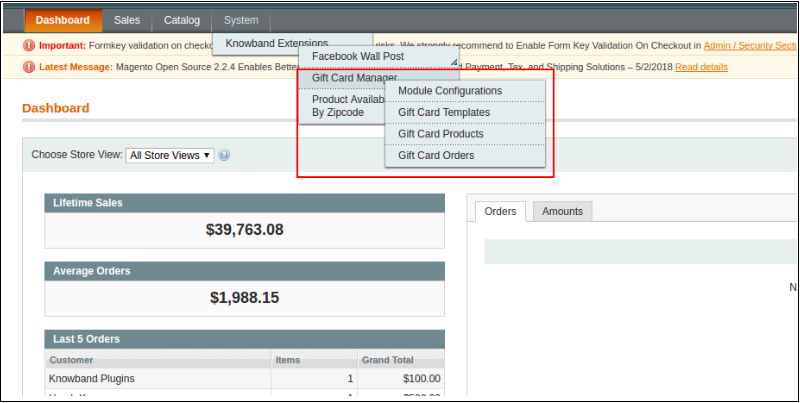
3. You will be able to find the “Gift Card Manager” option inside the “System > Knowband Extensions > Gift Card Manager”.

4. You can now configure the Magento Gift Card Manager as per your requirements and check its working in the front end.

3.0 Admin Panel

After installing Magento Gift Card Manager Extension in the Magento store, the admin gets a number of configuration options. There are following sections available to admin interface:

1. Module Configuration
2. Gift Card Template
3. Gift Card Products
4. Gift Card Orders

Let us discuss the various customization options of Magento gift voucher extension.

3.1.1 Module Configuration

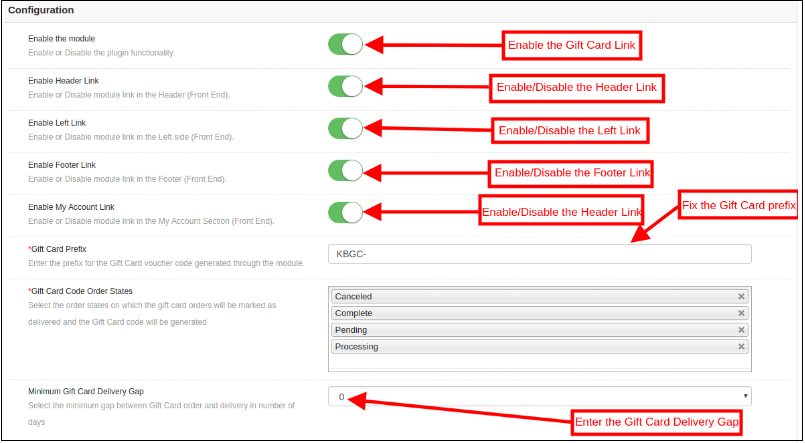
The Module configuration tab of Magento gift card manager module by Knowband offers the basic configuration options to the store admin. The Module Configuration tab is discussed below.

1. Enable the module: Initially, this Magento Gift voucher extension is disabled. The store admin can enable this option and offers their customer Gift card option. This can be done by toggling the button as shown below.

2. Enable Header Link: The Store admin can enable the button to display the gift card link in the header of the webpage.

Front End Preview: 

3. Enable Left Link: In this section, the online retailer can enable the display of the link on the left side of the site.

4. Enable Footer Link: The admin can enable the display of the Gift cards link at the footer of the site.

Front End Preview:

5. Enable My Account Link: The admin can enable the Gift card link in My Account page.

Front End Preview:

6. Gift Card Prefix: With this option of Magento gift card extension, the admin can set the prefix for the voucher code of the pre-paid gift card from here. For example, the code can be entered in the format KBGC – ******

7. Gift Card order Status: The admin gets an option to select the status of the orders.

8. Minimum Gift Card Delivery Gap: Knowband Magento gift voucher allows the store admin can specify the minimum duration of the day when the order was placed and day of the gift card delivery.

3.1.2 Email Setting

In this tab, the admin can customize the gift card email template as desires. This Magento gift card extension by Knowband offers default email templates. The entire email right from the subject line to the content can be edited and personalized as per the requirement.

This Magento gift card manager extension offers the two Email templates option.

  • Recipient Email Template
  • Sender Email Template

Recipient Email Template: In this section, the store admin can enter the subject line of the email and content as per the requirement.

Sender Email Content: In this section of Magento gift card extension, the store merchant can customize the email content as per the business requirement.

3.1.3 PDF Setting

The admin can enable the customers to download the gift card in PDF format. Magento gift voucher module offers the PDF Settings option to the admin. The buyer can print the gift cards in PDF format with the help of Magento gift card manager module. The admin can change the Gift Card prefix and PDF content from the back-end and the changes will be reflected in the PDF.

3.1.4 Cron Setting

The admin can execute the cron manually by clicking on the button shown in the image below.

Or else, the eCommerce store admin can enable automatic execution of the cron option by toggling the button as shown below.

3.2 Gift Card Template

This tab lists out the default Gift card template. Admin can customize these Gift card template as per their desire. Other than this, the store merchant can edit or delete the Gift card template.

3.2.1 How to Edit and Delete Gift Card Template?

The admin even gets an option to edit the template or delete it. This can be done by clicking on the Edit or Delete button respectively as shown below:

3.2.2 How to Add New Gift Card?

In order to create the new templates for the Magento gift card manager extension, go to the Gift Card template tab and then click on ‘Add New’ option at the top right side of the module.

Fill-up the information in order to create the template as shown in the image:

1. Template Name: In this section of Magento send gift card extension, enter the name of the Gift Card template.

2. Template Image: The admin can select the image or the layout of the gift cards that will be shown in the front-end of the eCommerce site.

The images for the various occasions can be saved in the back-end of the Magento gift card manager extension by Knowband.

3.2.3 How to customize the template of the gift card?

3.2.4 View Gift Card Template Images

The store admin can even view the images for the various events has been saved or can create a new image for the same.

As you click on the ‘View Images’ you’ll be redirected to the page below.

The list showcases the entire images that were created and saved. You can view the complete image or even delete it if required.

In order to create new images, click ‘Add New Image’ as shown below.

3.2.2 Add Gift Card Template Image

You can enter the image name and the text of the image to be shown on the gift card. Even the background image and color, as well as font color, can be changed at a button click. Preview the final image before making it live on the website.

3.Template Keywords: The Magento gift card extension allows the admin to select the keywords of the gift cards.

4. Physical Gift Card Allowed: Enable this button if you want to offer the gift cards in physical form. If this functionality is enabled, then, the admin can allow the customers to send the gift card in physical form to the recipient.

5. Virtual Gift Card Allowed: The online retailer can enable the Virtual gift card functionality. This will allow the customers to download the e-cards.

6. Enable: Toggle this button to enable or disable the Gift card template.

3.3 Gift Card Product

Magento gift card template allows the e-merchants to customize the pre-paid gift card products in few simple steps.

3.3.1 How to Edit and Delete Gift Card Product?

The admin even gets an option to edit/delete the gift card product from the section shown below:

3.3.2 How to Add New Gift Card Product?

In order to create the new gift card product for the Magento gift card manager extension, go to the Gift Card template tab, then, click the ‘Add New’ option at the top right side of the module.

Listed below is the information that you need to provide for creating the product.

Product Name: Enter the name of the product here. It can be Happy Anniversary, Happy Birthday, Merry Christmas or any other.

Product Price: Enter the amount allowed in the gift card in this section.

Product Quality: Enter the product quality of this gift card product.

Gift Card Validity: The validity period in months of the gift card can be entered here.

Virtual Gift Card Allowed: Enable e-card by switching on the button.

Free Shipping: The eCommerce seller can even allow free shipping to the customer.

Enable: Gift Card Product can be enabled or disabled from here.

3.4 Gift Card Orders

The Gift Card Order tab provides the entire list of the orders received for the gift cards. It involves the recipient email, date of sending as well as the status of the gift cards.

In the ‘Gift Card Order’ tab go to the ‘View’ button in the right section. In this section shows the entire information about the order.

4.0 Website UI

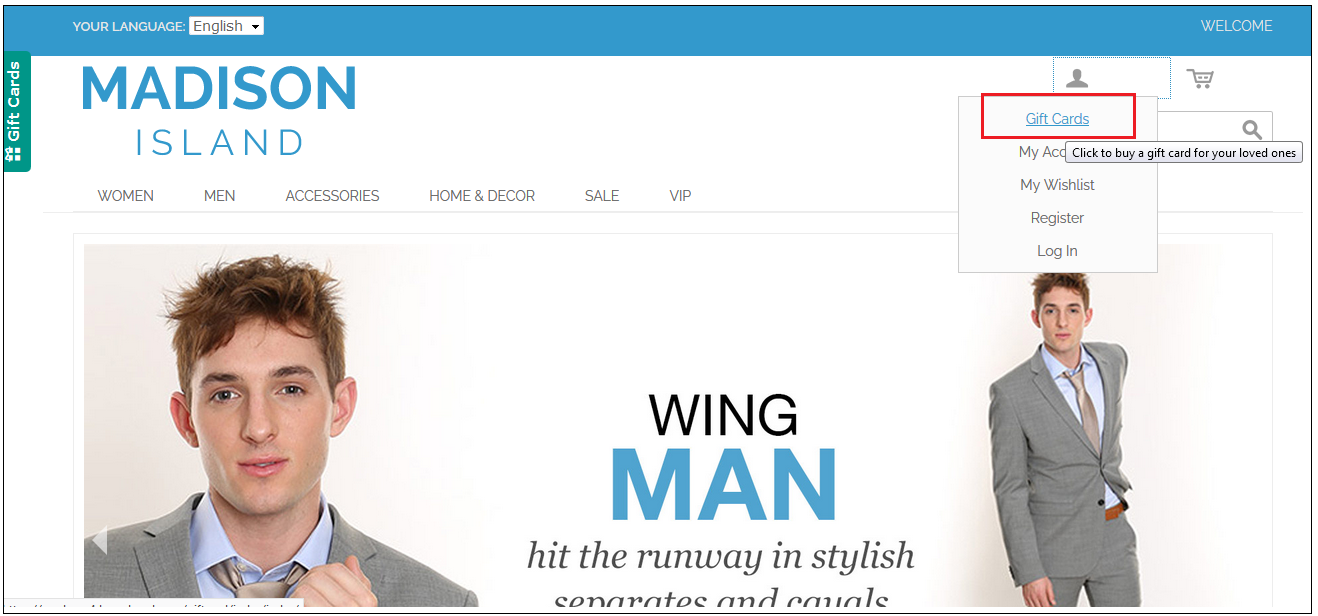
The links to the gift cards page can be viewed in the front end as opted by the store admin.

Once the store visitors click on the link, they will be redirected to the gift card page of the site.

Now, the Customer can buy the gift card and add the product to the shopping cart and proceed to the checkout page. The gift card will then be sent to the receiver.

For more details about this Magento Gift Voucher extension, you can visit here:

Magento Gift Card extension link

Magento Gift Card extension Admin Demo

Magento Gift Card Manager Extension Front-end Demo

Are you ready for the Magic of Soccer?

The biggest soccer event has begun. Millions of the soccer fans across the globe are pumped to cheer for their teams. It happens once every four years when all the football fans go super crazy. Football is one such sport which has the fans following all over the world. This is also a golden chance for the companies to take advantage of all the excitements around and promote their businesses. But wait! You need to know that FIFA has strict rules and regulations for how the official marks can be used. To check out the details click here.

What is common in eCommerce and Soccer?

There are few similarities in the Football and eCommerce. The energetic game has so many learning’s which can be used to implement a successful strategy for your online store. The commercials and the news regarding the soccer match also give an idea to promote the products and services. Here we will discuss some similarities in Soccer and eCommerce.

Similarity 1: Study the moves of the competitor players and teams

In order to create a successful strategy for winning the match, it is required for the teams to study the moves of the top players of the competitor team and analyze the game plan of the competitor team.

Similarly, in eCommerce, it is required to keep the track of the competitors in order to stay ahead of the competition. You just can’t afford to ignore even the smallest factor as it may prove hazardous.

Listed below are some of the key points that should be kept in mind while competitor analysis –

1) What strategy are they using for the lead generation?
2) What special promotions they are running?
3) What strategy are they using for the SEO?
4) How are they promoting their products and services on Social Media?
5) How are they retargeting their customers?
6) How they are using the email marketing to reach existing customers and what is the email frequency?
7) What is the customer retention techniques used by the competitor stores?

Similarity 2: The ball is faster than the players

To win a match, it is essential for the players to spread out and cover the entire field. If the players will keep on moving the ball then they will able to make a goal. In order to achieve the same, the teams use the different formations. This is the best way by which players organize themselves at the ground is with a formation like 4-4-2, 4-4-1-1, 4-4-3 etc.

In a similar manner, the eCommerce companies need to spread out their wings and tap the various opportunities, trends and technological advancements. Here are some of the points that you to take care of:

1) User-friendly website
2) Beautiful and clear images of the products
3) Well organized product description
4) Awesome promotions
5) Social media presence
6) Multi-channel selling
7) Customer experience – Return, refund, replacement, live chat, helpdesk, shipping, payments etc
8) Review and testimonials
9) Mobile friendly websites/Mobile apps
10) Customer loyalty programs

In this competitive environment, you need to consider multiple points and accordingly offer the best services to your customers. In order to offer best services to your customers read our article “eCommerce Extensions to help you Achieve your Business goals in the Year 2018“.

Now that you are geared up with the rules and the similarities between Football and eCommerce, wonder what should you do next? Here’s the answer.

Prepare your game plan

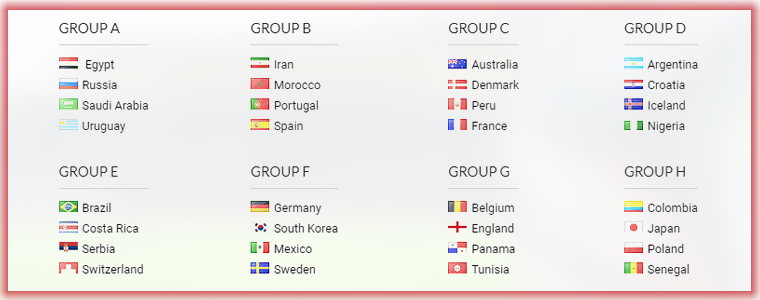
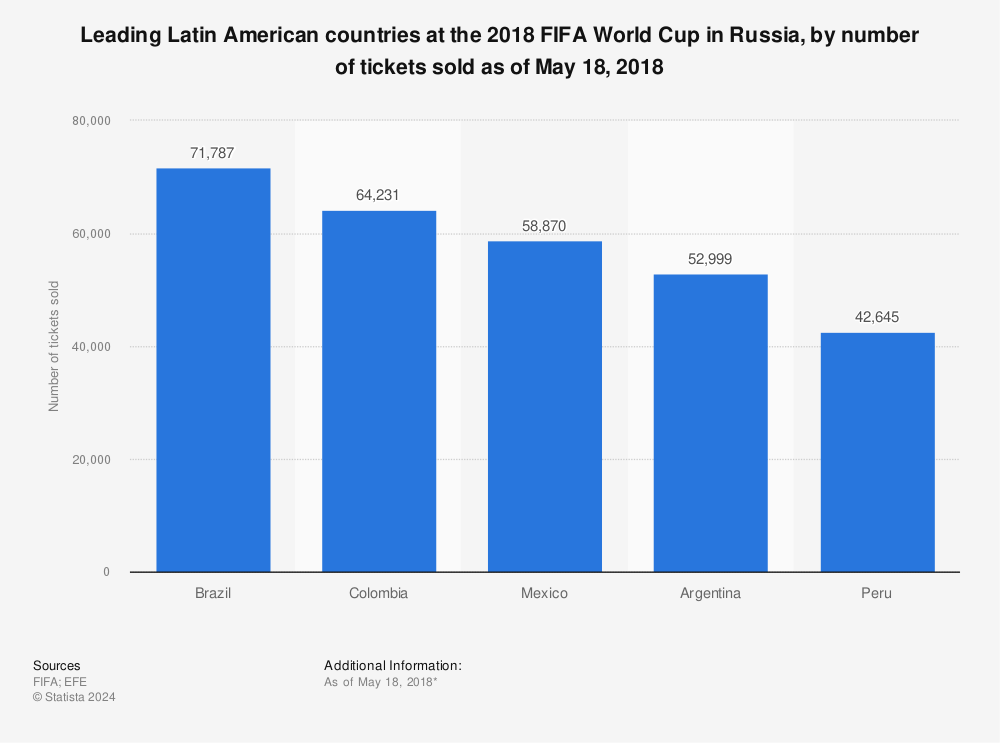
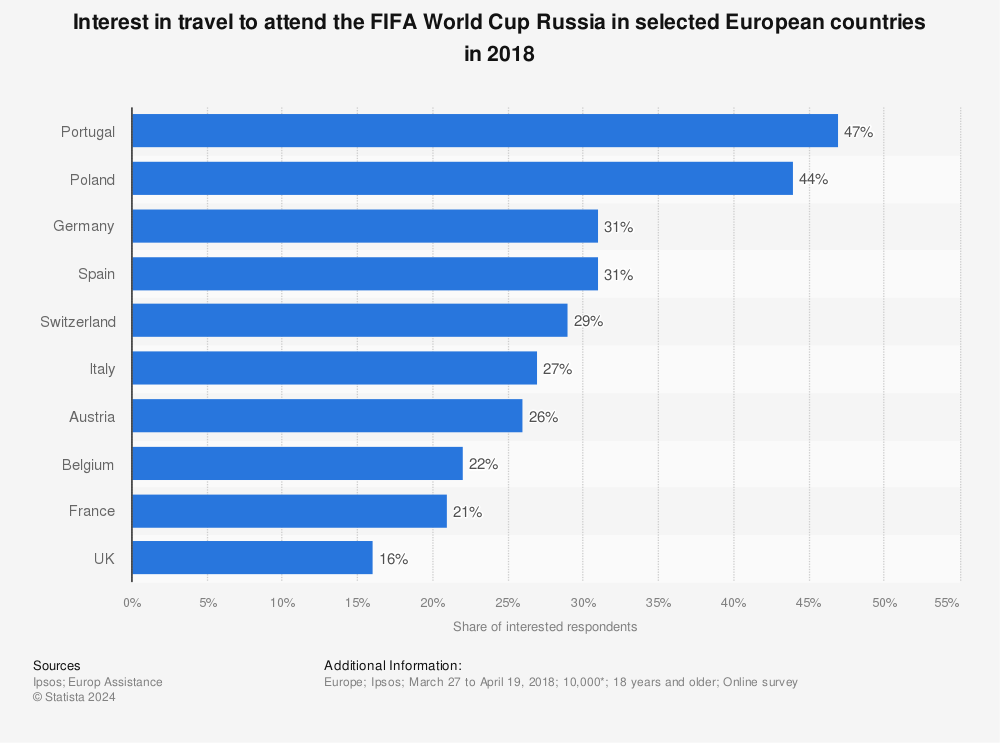
If you are running any kind of promotion to seek advantage of the soccer-fever you need to play smartly. There are some key points which you need to consider before preparing your promotion strategy. There are 32 countries which are participating in 2018 World Cup. So, if your target audience is from one of these countries, you can plan your promotions based on the national team. Additionally, you can plan promotions based on the interest of the fans in your country. Make sure to follow the instructions given by FIFA regarding the use of the trademarks.

How can Knowband’s extension help you?

Knowband offers “Spin and Win Popup Extension” for Prestashop, Magento1, Magento2, Opencart and Shopify with the Soccer theme to trigger the sports feel of the fans and motivate them to shop from your site. With the eye-catchy soccer theme, you can grab the attention of the site visitors instantly. This will also help you to increase the rate of customer retention and boost the overall leads. As of now, 2 generic themes and one theme for the selected country are available. You can use these themes to grab the attention of your store visitors; this will help you to achieve your sales goals for the year 2018.

Why should you use Soccer theme at your site?

The viewership and fan-following of soccer are in millions across the world. It is the national sport of around 60 nations. There are 32 teams participating in the World Cup. The teams are following:

If your national team is participating in the World Cup, then, you can show your support for the team and even let your customers get the enticing discount during this sports season.

Here a stats for the popularity of the Football.

You will find more infographics at Statista

There are one more stats for the popularity of the Football in the Latin American Countries.


Find more statistics at Statista

Stats showing the interest of the European fans


Find more statistics at Statista

By analyzing these stats we can say that everyone loves the magic of soccer and this is the golden opportunity for you to promote your business as well as reach your business goals.

What is new in the Spin and Win?

We have added some new themes for the Prestashop Spin and Win Popup module. The store admin can change the theme of the Spin and Win Welcome Popup from the back-office. Please see the attached screenshots:

Apart from the generic themes of country, wise themes are also available which will help you to spread the magic of soccer and win the new customers.

Click here to get the Spin and Win Popup module for your Prestashop store.

Click here to get the Spin and Win Popup module for your Magento Store.

Click here to get the Spin and Win Popup module for your Magento 2 Store.

eCommerce Extensions to help you Achieve your Business goals in the Year 2023

In order to achieve the success in the eCommerce business, it is important to stay up to date with the latest trends in the industry. Staying abreast with the current technological advancements and market trends can keep you ahead of the competitors. One of the best ways to achieve your business goals is to steps into the shoes of the well-established businesses and get inspirations from them. The ideal workflow of the eCommerce business should attract the shoppers to the website, filer the prospective customers from the website traffic and then convert them into the paying customers. This can be done by improved customer experience, customer retention strategy and ultimately winning the customer loyalty.

It won’t be wrong to state that even the digital era word-of-mouth plays a vital role. If you offer better services and improved customer experience at your store, then, you will certainly win back old customers and attract new ones. Social media also provides a platform to the online sellers to reach out to the new customers. In this post, we will discuss the most popular strategies which will help you to achieve your business goals in the year 2018.

Strategy#1 Attracting New Customers and Retaining old ones:

Effective lead generation strategy is the secret of the success in the e-commerce. Most of the time, when you visit established e-commerce sites, you may come across the welcome popup offering enticing discounts on the first purchase. In order to avail of this special discount, the visitors need to provide their email-ids. All the top e-commerce giants leave no chances to capture the email-id of the customers. The email address is the best way to establish a new and long-lasting relationship with the customers.

Getting the email addresses of the visitors is not an easy task. In order to get the email id of the visitors, you need to offer special deals to the new visitors. You can offer free shipping or enticing discount on the first purchase. Most of the top brands use this strategy to reach out to the more customers.

How can you use this strategy for your online business?

Gamified Welcome Popup-

Gamification of the site is the best way to retain the customers. Spin and Win popup is a gamified popup which allows the visitors to win the enticing discounts by spinning the wheel just like the roulette-game. The Spin and Win popup is one of the best ways to display an interactive popup to gather the customer information. Customers need to enter their email ids to play the game. The gamified interface develops the interest of the customers and they happily provide their email-ids to play the game.

Spin and Win gamified popup is available for the Magento1, Magento2, Prestashop, OpenCart and Shopify platforms.

Exit Intent Popup

Exit Intent Popup monitors the mouse movement and as soon as the visitor intends to exit, it displays an awesome popup with the discount offer. Special encourages the customers to complete their purchase and helps you to grow your email list.

Exit Intent Popup is available for the Magento1, Magento2, PrestaShop and OpenCart platforms.

Strategy#2 Offer Free Shipping

The latest trend in the eCommerce world is to offer free shipping. Customers prefer to buy with the free shipping option. Most of the sellers on the top marketplace like Amazon, Etsy, Walmart, eBay offers the free shipping.

Why is Free Shipping a must?

1) Shoppers Love Free Shipping option – According to the studies, the online shoppers prefer placing the order of the products if the shipping is free.
2) Competition – The marketplaces like Amazon, eBay, Walmart, Etsy and many more are expanding their presence and offering great benefits to the customers including the free shipping services. So, it is a must for the online business to offer free shipping to retain their existing customers.
3) Free shipping reduces shopping cart abandonment – Most of the time customer leave the cart abandoned because of the additional costs (shipping and taxes).
4) Free Shipping Increases Average Order Value – Shoppers buy more products to qualify for the free shipping.

Tactics to offer free shipping

1) One of the methods to offer free shipping is to include the shipping cost in the product price itself. This approach will work if you offer unique products to your niche market and there are not so many competitors.
2) You can create special promotional to offer free shipping on the products that have a higher margin.
3) You can offer free shipping only for a particular cart value. Orders with the cart value higher than the set limit will be eligible for the free shipping.
4) You can offer free shipping on special sale occasions or during the holiday season.

eCommerce extensions to offer better shipping services:

a) Free Shipping Manager
The Free Shipping Manager extension is available for the Prestashop platform. This addon allows the store admin to create the rules, terms and conditions for shipping charges. The merchants can fix the cart limit beyond which free shipping will be offered. This module can help you to increase revenue and conversion rate of the site. Click here for the details.

b) Shipping Cost by ZipCode:
Sometimes you need to offer shipping charges based on the location of the user. The Shiping Cost by ZipCode extension is the best way to offer shipping charges based on the location of the user. The Shipping Cost by ZipCode module is available for the Prestashop. Similar extension Product Availability check by ZipCode is available for the Magento 1 platform.

Strategy#3 Improve Customer Experience

Better customer experience at your store encourages the customer to browse more products which helps to increase the chances of the purchase. As per the latest trends in the industry, you should try to offer the best experience to the visitors to convert them into a customer.
There are following extensions which can be helpful to you to achieve the same.

a) Infinite Scroll
In the recent years, the growth of mobile devices brings a revolution in the eCommerce world. Now, most of the users prefer to browse the internet by using their handheld devices like mobiles and iPad. Infinite scrolling allows the users to browse more products with ease and improves the user experience for the touch devices. Moreover, the infinite scrolling option works efficiently while mobile browsing as well. Infinite Scroll extension developed by Knowband is available for the Magento 1, Magento 2 and Prestashop platforms.

b) Size Chart
If you sell Footwear or Clothing, then, a size chart on the product page is a must. The Size Chart helps the users to select the correct fit and also reduces the chances of the return. Size Chart extension developed by Knowband is available for the Magento 1, Magento 2, and Prestashop platforms.

c) Product Video
Instead of going through the long text, the users prefer to watch the video for the better understanding of the product. Product videos are more engaging than the text. Knowband offers the Product video extension which allows you to display the videos on the product pages from the video channels like YouTube, Vimeo. Product Video extension is available for the Prestashop, Magento 1 and OpenCart platforms.

d) Wishlist
With the dynamic growth of the marketplaces in the last few years, a new trend emerged in the eCommerce industry. Now shoppers prefer to search for the products on Google or marketplaces like Amazon, Etsy, Walmart, eBay, Cdiscount etc to get a better comparative price and offers before making their purchase decisions. Wishlist feature allows the shoppers to shortlist the products of their choice, so that, they can later place their order for the products. After adding the products to the Wishlist a shopper can access his/her wishlist any time. This saves the time of the shoppers as they can easily add the wishlist products to the cart to place their final order. The Wishlist extension is available for the Prestashop, Magento 1, Magento 2 and OpenCart platforms.

e) Express Checkout
The easy checkout process is the key factor to get the higher sales. Most of the online businesses provide the one step checkout to make the shopping experience of the shoppers hassle-free. One step checkout allows the user to enter the all the details at a single page and reduces the cart abandonment. The one step checkout allows the shoppers to create the account, place order as a guest or login to the account at the checkout page. Knowband offers the One Page Checkout module for the Magento 1, Magento 2, Prestashop and OpenCart platforms.

Strategy#4 Customer Retention Techniques

a) Helpdesk
If you have observed most of the online businesses offers the 24*7 chat support. Recently Chat Boats have also provided an effective tool to improve the customer engagements. By assisting the customers and visitors to make their purchase decisions and after sale inquires you can develop a bond between your brand and the customers. This long-lasting relationship might convert the customers into loyal customers. The Helpdesk extension is available for the Prestashop and Magento 1 platforms.

b) Loyalty Points
Offering loyalty points for each purchase of the customers helps you to retain the customers for a long time. As for each order, customers get the store credit which they can use towards their further purchases encourages the customer to return back to the store to use the store credit available in the account. The Loyalty Points module is available for the Prestashop platform.

c) Return Management
Efficient return policies are one of the most important aspects to retain the customers. The return and refund policy of the online store also encourages the customers to place their orders. In order to offer the hassle free return management online stores can use the Return Manager Extension. Knowband offers the Return Manager Extension for the Prestashop, Magento 1 and Magento 2 platforms.

d) Birthday Surprise
Everyone loves surprises because it shows how much the businesses value the customers. In order to win the trust of the customers, businesses need to go beyond the normal services and offers. You can offer an additional discount to the customers on their birthday. Knowband offers Birthday Coupon module for the Prestashop platform.

Strategy #5 Multi-channel selling

With the evolving technology and changing shopping habits of the customers, it is must for all the sellers to sell their products through multiple channels. All the top marketplaces like Amazon, eBay, Walmart, Etsy etc provides a platform to the sellers to sell their products through the marketplace.

Selling through the multiple channels is the best way to increase the brand reorganization.

In order to sell on multiple channels, the biggest challenge for the sellers is the management of the inventory and shipping. Knowband has developed the Marketplace Integration extensions for the top marketplaces like eBay, Walmart and Etsy. The marketplace integration module automates the product listing process and allows the sellers to manage the inventory and shipping for the marketplace from their existing online store.

eBay Marketplace Integration: eBay Marketplace integration extension is available for the Prestashop, Magento 1 and OpenCart platform.

Etsy Marketplace Integration: Etsy Marketplace integration extension is available for the Prestashop, Magento 1, Magento 2 and OpenCart platform.

Walmart Marketplace Integration: Walmart Marketplace integration extension is available for the Prestashop, Magento 1 and OpenCart platform.

You may also like: 

The Pluses and Minuses of becoming a Walmart Marketplace seller

https://www.knowband.com/blog/ecommerce-blog/pluses-minuses-becoming-walmart-marketplace-seller/

Multi-vendor marketplace: 6 Ways to deals with the Post-holiday glitches

What are sandbox sites in eBay Marketplace?

2019 Update: 10 Reasons Why Mobile Apps are Better Than Mobile Websites?

We have finally ushered in the Mobile era of the year 2019. With a lot of emphasizing on eCommerce mobile apps and ways to stay mobile, the eCommerce industry has entered an era that works towards improving their businesses by remodeling the user experience. While everything has gone online from buying foods, groceries, fashion apparels, and even housing, you should be focused on providing all this with a seamless experience on smaller screens like smartphones, tablets, iPhone or iPad. Like every year even this year, it’ll be the survival of the fittest in the eCommerce businesses.

With the increase in the popularity of mobile phones and hand-held devices, the prominence of m-commerce has increased as well. E-commerce app is a preferred option for online shoppers. In the past 6 months, 79% of smartphone users have made a purchase using their mobile devices. Moreover, with the saturation of the eCommerce industry, the importance of a mobile app cannot be ignored. The convenience-craving consumers have made it inevitable for the marketers to believe that eCommerce mobile apps are not just a fad.

Having just an online website in today’s time is not enough. Having an eCommerce mobile app for your business is mandatory. If you take a look at this study, you’ll find that 86% of the time users spend is on mobile apps whereas; only 14% is devoted to browsing the websites on their mobile phones. Don’t you now think that you should invest in mobile apps? Despite the popularity of mobile phones, the discussion of mobile apps versus mobile sites is still on. The graph below shows some statistics that can make adds to the reason why you should have an eCommerce mobile app.

 Image source: Pakman.com

There are numerous reasons which eCommerce make apps better than websites and we’ll focus on them in this blog. eCommerce mobile app maker allows you to stay updated without delving into the complexity of the app development. Read on to find out the reasons why you should be thinking of having a mobile app.

1. Mobile apps are speedy

At the end of the day, what would you prefer – users coming, finding their product, check out, and happy feedback or waiting till the website loads for minutes and takes forever to load the product pages?

The choice is certainly clear because as an e-merchant you don’t want to make your business suffer. If you take a closer look, you’ll find that mobile applications are 1.5 times faster than the websites which for sure makes the mobile apps better than the websites. For example,

Mobile app: The user clicks on the app from the many available, uses the filters or the search bar to type what they’re looking for and finally landing on the product page. In addition, they can save the details directly on their phones.

Mobile website: Clicks on the browser icon, types the website name, waits for it to load, searches the products, waits for it to load and show up the products on the screen and so on.

Which one would you prefer? Adopt the one that comes across as accessible to you and your users.

2. Enhanced Personalization


Isn’t it a good feeling when you get personalized messages? Personalization is all about getting tailor-made push notifications and messages from the online stores.

When a user downloads your eCommerce mobile app on their phone, log in and access the products & services, it gets easier for you to send personalized Push Notifications to them. That’s not it! You will also be able to give discounts on products, categories based on their browsing behavior. As a part of the Conversion Rate Optimization techniques, your customers will feel delighted to receive the same and your conversion rate will surely go up.

3. Hassle-free Push Notifications

Just when we’re talking about reaching out to the customers, eCommerce mobile app has another benefit over mobile websites and that is of sending Push Notifications. The in-app marketing feature that allows the admin to stay in touch with the prospective customers 24/7 adds to the reason for choosing mobile apps over mobile sites. When your customers are logged in to your eCommerce mobile app, push notifications are the easy and effective way to increase your conversion rate. However, some websites have started to work on sending these notifications through web browsers as well, but all browsers don’t have this support.

4. Offline Access

One of the most fundamental differences between mobile apps and mobile website is that the former provides offline access to the users whereas; the latter does not.

When it comes to eCommerce mobile apps, they too definitely need internet access for a lot of work, but there are some application that even work in offline mode. On the other hand, a strong internet connection is mandatory for every mobile website. You cannot even depend on weak connections because they’ll take time to load and the user might just get irritated and call it to quit.

For example, some banking apps, news, retail chains and more have the facility to browse through even without an internet connection.

5. Making use of the device features

These days every smartphone comes with a set of features inbuilt into the device. For example, high-resolution camera, accelerometer and more. Another advantage that eCommerce mobile app has on the website is that you can code your app into utilizing the respective features. For example, the camera can scan the OR codes, Barcodes, PDFs and more whereas; the NFC features lets you make payments safely and more. With the new age fingerprint sensors, the devices and the user experience has become safe. Samsung Pay is one of the best examples here.

6. App store presence

One of the many reasons e-merchants are going from websites to apps is sole because they want to have their business presence in the app store. Whether it is Android apps or iOS apps, ranking there is what adds in better chances of being noticed by users while looking for something. Mobile websites do not show up in the app store and hence, they optimize their site to an app with the help of mobile app creator. Having an app gives your business an access to the millions of users who search and browse through iTunes and Google Play, giving them extended brand awareness and opportunities for downloads that can come from users outside their typical sphere of influence.

7. Enhanced SEO possibility for your website

Taking a look at the advantages that you get having a mobile app, the last one on the list would be better SEO possibilities. When Google will take into account the content, it will consider both in-app contents as well as the website content. Hence, with some alterations on both the types, you gain better chances of being in the good books of the search engines.

8. Designing Freedom

Mobile Apps have always been a more interactive and engaging platform for online shoppers than mobile websites. Mobile websites need to somewhere rely on the browsers even for the basic features. But, eCommerce mobile apps are completely free of such restrictions.

Moreover, mobile apps come with configurable designs and functionalities. So, you get full control over how your app will look and work on the user’s devices. The custom home screen of the apps can be crafted with various sliders, banners, categories, products etc. The rich color choices offered in the mobile app make them appealing for the users. There are various such automated modules available for PrestaShop, OpenCart, Magento, Magento 2, WooCommerce and Shopify which provides every design-related control into your hands.

9. Brand Presence


Your eCommerce mobile app has a larger reach and visibility scope than the websites. Voicing out your brand on the mobile apps would definitely strengthen your brand position in the market.

The best way is to showcase your own logo on the header of the eCommerce mobile app. It will enhance the branding strategies of your store along with the products.

10. Reduced Cost

This might be in your mind that is it worth to put your money in the mobile apps? But, trust me, spending a few bucks on the mobile app development would result in almost double conversions on your store.

Moreover, you need to go for the option of eCommerce mobile app development without any code. These are pocket-friendly ways and save you from all the involved technicalities and codings. All the necessary changes can be easily done from the admin panel.

Conclusion

There you have it. These ten reasons or advantages of investing in a mobile app this year should be your next step towards success. Invest in a eCommerce mobile apps because every business needs it for better results.

Some other articles related to eCommerce Mobile Apps:

What eCommerce can learn from brick and mortar?

The online sales account for 8-10% of the total consumer spending. This figure is expected to shoot up to a massive amount of $6.7 trillion by 2020. The incredible statistics show the potential the virtual shops have in the future. Despite the growing awareness and the technological advancement of the consumers, the market share for the eCommerce companies is currently low. This is because, there are a lot of aspects in which the physical still has a upper hand.

In addition, over the past few years the eCommerce stores has given fresh competition to brick and mortar stores. Yet there are a lot of things that the online store can learn from physical shops. Listed below are some of the things that eCommerce can learn from brick and mortal. Scan on to know.

Focus on visual merchandising

Every purchase intention starts with window shopping. The products kept at the window might motivate the visitors to go inside and explore the store. The same goes true for the online shopping stores as well. A well-designed layout and front-end might attract the customers. Even if the store is digital, a neat and uncluttered interface can influence the customers to further browse the site.

Here are some of the takeaways from the brick and mortar store in this regards.

  • The visual appeal is the first thing that grabs the attention of the visitors. So, the product images with high resolution is a must. The graphical triggers should be able to grab the attention of the visitors.
  • The product description should be informative enough to fill-in for the sales person.
  • The seasonal influence is one of the ways to standout in the crowd. The layout of the website should be in accordance to the occasion.
  • The call-to-actions and other such buttons should be clearly visible and should motivate the customer purchase in.

Instant presence is a must

It is not just the visual branding that’s important. One of the trend that has seen a change in recent past is the customer buying behavior. While earlier the shoppers would rely on the word-of-mouth, the customers these days tend to make their purchases then and there. This has compelled the physical stores to open up their outlets at every nook-and-corner. This implies to the online shopping sites as well. As per a report, 54% of the American shopper would use their mobile devices to make their purchases. The eCommerce store owners need to bring their sites in the pockets of the customers. A mobile responsive website may be handy, but a mobile store can help you tap a larger audience. The mobile app builder for Android and iOS is one of the ways to convert your store into a mobile app. Offers your services to the customers whenever they require. Moreover, the location-based services is another factor that the online companies need to learn from the physical stores. Even the location-based mobile searches are on the rise. The content of your mobile app should be optimized in order to provide the answers to the questions being asked by the customers. The search volume of the queries such as ‘Where can I find…’ are high. So, optimize your site and application accordingly.

Personalize the shopping experience

The eCommerce giants such as Amazon has reaped result by including this aspect. Personalize the shopping experience of the customers and help them relate to the services offered by you. This is what the sales pitch at any shop is all about. In fact, 85% of the consumers think that personalization play a vital role in their purchase decision. Use the personal information of the customers to enhance their shopping experience. The online shoppers get distracted soon and never actually completes the transaction. Use their transaction history to send them personalize pitches. For instance, messages like ‘Get 10% off on this product in your cart’ can trigger the purchase intention of the buyers.

Let them bargain

Hitting the bargain is the most intriguing factor for the shoppers while shopping offline. It won’t be wrong to state that the a discount coupon of 10-20% is usually taken for granted and may even be ignored. However, if the same discount will be well-appreciated if the customers get a feel of striking a deal. Offer the giveaways in an innovative way. The interactive pop-ups like spin and win or scratch coupons can help you tap this psychology of the shoppers.

Recreate the in-store feel

The biggest drawback of the online stores is that they lack the touch and feel of the products. While earlier bridging this gap was slightly difficult, with the technological advancements, this can now be done. LensCart is one of the best examples for the same. The option to try the glasses without actually trying them has provided them the competitive edge. Other than the product images, the product videos can provide a better clarity to the customers. Quick product delivery is another important aspect that eCommerce companies need to learn from brick and mortar stores. Providing options like one-day delivery and quick shipping options can enhance the user experience.

Guide the customers to the checkout page

Who would like to stand in long queues? The organized sections and multiple counters at the physical stores are aimed at driving the customers to the conversion funnel. The same funnel is to be followed by online shops as well. Make sure that your category pages are uncluttered and well-organized. Easy navigation coupled with filters should allow the customers to find their product easily. Instead of making the customers to fumble upon the lengthy sign-up process, improve the registrations with social media sign-up. The path from the product page to the payment gateway should be simple as well. One page checkout is the best way to motivate the customers to complete the transaction.

Wrap up

From personalized marketing to discount sale, traditional retailers have many options to spur their business growth. Even the e-retailers have a lot of tactics at their disposal to reduce abandoned cart and boost the conversions. Just a bit of learning from the conventional business models coupled with the advanced technology can help you take your eCommerce business to new heights.

Black Friday and Cyber Monday Throw-back: Lessons you can Learn from 2016

The Black Friday sales touched remarkable heights last year. With a record-breaking $ 3.34 sales, the eCommerce industry saw a boost of around 21%. But beyond the statistics, it is the lesson that the e-retailers should focus on. The incredible achievements of the year 2016 has for sure shaped a lot of trend to follow this year as well.

The blog has outlined some of the essential takeaways of the sales season of last year. Amp yourself up with these facts and get ready for the busiest season of the year.

It is not a one-day affair

One of the biggest aspect that requires the consideration of the e-marketers is that this is not a one-day affair. This implies that the expectation of the customers won’t end on same day. In fact, there is a huge customer base who actually waits for the post-sale offers. There were a lot of sites last year that extended their deals from Black Friday to Black November. What was earlier a single day sale has now turned into a week-long sale. The eCommerce giants like Amazon extended there sales from Black Friday to Thanksgiving. And this is what your customers will be expecting this year as well. While the bargain hunters must have already started hitting the internet to strike the right deal, it is important to provide them with what they are looking for.

Suggestion: With few more days to go, it is high time that you gear up for the extended sales season. This behavior might continue the entire holiday season. Thus, you need to gear up for the holidays accordingly. Do not expect close the deal and achieve the target on the same day. There are many more opportunities ahead and you need to be prepared for the same.

Mobile domination is the key

It is interesting to note that 75% of the total net searches online was done using mobile phones. Moreover, 55% of the online purchases was done using hand-held devices. The mobile domination is bound to increase this season as well. Moreover, if we take a close insight into the consumer behavior, we’ll see that the online shoppers expects to get everything then and there. This is what makes it even important to bring the store at an arms distance of the customers. In addition to this, another exciting figure shows that the mobile apps touched a peak of 1.2 million installs on Black Friday.

Suggestion: The very first consideration is to make the website mobile-responsive which you must have already done. However, the last minutes preparation for the busiest week must include the final testing as well. Make sure that the site is ready to handle the unexpected traffic coming from the mobile devices. The additional holiday functionalities such as exit pop-ups must be working on the mobile phones as well as. Besides, this is the best time upgrade your site to a mobile platform. Knowband’s mobile app builder can help you go mobile even in the eleventh hour. Whether you have a eCommerce store on Prestashop, Magento, OpenCart or any other platform, you can convert it into a complete mobile store. Provide lucrative offers in return of the downloads and motivate your loyal customers to install your application.

Greater traffic, but lesser revenue

This was one of the observations last year. The website traffic was more than the expectation while the revenue earned was less. This is proven fact that the customers are spending less than expectation. The reason might be the presence of so many choices or the intention of the customers to hit a better deal. This may hit you hard if you are still not prepared to counter the same. The e-merchants should focus on the aiding the purchase intention of the visitors. Provide compelling reasons to customers to avoid procrastination and place the order instantly. Another way to curb these exits is to showcase deadline offers to the customers. Provides the customers with the offers that they just can’t resist. One day delivery option with a countdown timer can do the magic. Something like Prestashop shipping timer is one such way to create the sense urgency in the minds of the shoppers.

Suggestion: Get your landing pages ready for unexpected traffic. Along with this, be ready to get less conversions that expected. This is when the role of the re-marketing and re-targeting comes into play. The holiday season are more prone to cart abandonment. Use this as an opportunity for future conversions. The Black Friday is getting longer every year and this trend may continue in the future as well. The opportunities would not end after this day. The e-marketers need to stay at their toes in order to bring these customers back to the store.

Let them hit the bargain

The whole idea of Black Friday and Cyber Monday sales is to get an edgy deal. With so many options to choose from, even the expectation of the online shoppers has gone up. Thus, the flat discounts may not intrigue them. You need to lure them to checkout page, but in a subtle way. Even though it is the perfect time for aggressive marketing, it might not be fruitful at times. In addition, the bargain seeker love to shop early. According to report, more than half a million visit on the eCommerce store happened at 1 AM in the morning.

Suggestion: With the above-mentioned aspect in mind, the e-marketers need to find out innovative ways of giveaways to attract the visitors. Instead of going with the conventional means, provide them an opportunity to hit a bargain. The interactive gamified pop-ups such as spin and win can be of some help. The process of spinning the wheel in order to get offers makes the customers feel as if they have won something hit a bargain. Even a small discount may be well-appreciated. Moreover, offering mid-night offers may boost up the sales to new heights.

Wrap up

The expectation of the customers is high. While any strategic changes in this hour may be hazardous, this is the perfect time to make some back-up plans. As well as, it important that you plan out the post-holiday sales strategies. Use the takeaways from the last year and tap the opportunities effectively.

You Might Also Like:

PrestaShop Gift Card Manager Extension- User Manual

1.0 Introduction

The digital gift card is a pleasant commodity to buy, sell, and receive! Whoever bought the digital gift card, saves time, fuel, and efforts to find the right thing to gift. Whoever receives it, find lucky enough to save from getting the wrong thing. Finally, whoever sells it, find cash upfront for an unsold thing! If you are looking for a perfect e-gift card addon, then, KnowBand PrestaShop gift card manager module helps you send the gift card to anyone without any hassle. With easy customer acquisition, the e-merchants can now double their revenue

The PrestaShop gift card manager Addon by Knowband allows the PrestaShop store owners to manage the gift cards according to the need. This PrestaShop gift card voucher addon is an effortless way to engage more customers with the website. The pre-paid vouchers can help the e-merchants aid the purchase intention of the store visitors and easily convert them into paying leads.

This PrestaShop gift card addon gives the flexibility to a customer to buy the gift card online and send Gift vouchers to friends via email on a specific date and time. The sender can print a gift card for giving it in person. It provides the functionality to create a personalized image gift card. Online shoppers can order gift cards for special occasions for their near and dear ones.

How Gift Card can help you to boost sales in your store?

  • 81% of online buyers prefer to buy a gift card for a birthday, anniversary, holiday season, or festival.
  • 38% of adults buy a gift voucher for a friend’s birthday.
  • One of the biggest selling days of the gift card is Father’s Day. In contrast, only 24,7% of moms wish to get a gift card for Mother’s Day, putting above homemade stuff, greeting cards, and dinner.
  • 12% of buyers will buy gift cards for Wedding wishes and presents.

These are major facts that can prove the importance of the Gift card.

Prestashop gift card addon by Knowband has rich functionality that can help the admin to increase the revenue by selling gift cards.

1.1 Benefits for merchant

The store owner can increase customer engagement and the number of potential buyers on his/her PrestaShop store as well as boost their revenue. The following are the benefits for the merchant:

  • The store admin can add multiple gift cards in a matter of moments from the backend of the PrestaShop gift card addon.
  • PrestaShop gift manager addon by Knowband allows the store admin to set the card amount, validity period and other conditions that can be set from the backend of the PrestaShop send gift card module.
  • The PrestaShop store admin even gets easy options to change and edit the look and feel of the cards that will be shown in the front-end.
  • With the help of the PrestaShop gift voucher addon, the store admin can easily add the gift card templates according to the need.
  • The orders for the gift cards is trackable at a button click from the admin interface of the PrestaShop gift card manager module.
  • Knowband PrestaShop gift card addon enables the store merchant to show the gift card buttons on which page they want to show.
  • Even the email template for sending the gift cards and its PDF format to the recipient is customizable in a few easy steps from the backend of the PrestaShop gift card addon.
  • This PrestaShop send gift card module increases conversions especially for occasions like holidays.
  • PrestaShop Gift Card Manager addon by Knowband allows you to earn more revenue, get new customers by sending online gift cards, and offer discounts on the vouchers.

1.2 Benefits of customer

  • Customers can easily buy a gift card for their loved ones.
  • This PrestaShop gift card module by Knowband is best for those customers who are helpless for selecting a gift.
  • Customers can send a gift card with a custom image that the sender can upload while making the gift card purchase.
  • PrestaShop gift card add-ons allow online buyers to send the gift cards to their loved ones on the desired date and time.
  • The receiver of the Gift Card can redeem the amount partially while purchasing in the store.

2.0 Installation

After purchasing the PrestaShop gift card module from the store and you’ll get the following files.

1. The zipped file that consists of the source code of the module

2. User Manual

Follow the following steps to install the PrestaShop gift card manager extension:

Extract the “kbgiftcard.zip” zip file.

Go to the “Modules” section and click on the “Upload a Module” button. Select the “kbgiftcard.zip” file.

The PrestaShop gift card module is now ready for configuration. You can find that in Store Admin -> Modules. It would be shown as below –

You may even search for the module in the admin modules list by using the following details –

Keyword – Gift Card Manager

Category – Pricing and Promotion

Filter By – Installed & Not Installed / Enabled & Disabled

3.0 Admin Interface

The admin can enable and configure the PrestaShop Gift Card module by Knowband easily in a few simple steps. The admin interface of the addon has four customization options. They are below:

  • Module Configuration
  • Gift Card Templates
  • The Gift Card Products
  • Gift Card Orders


The various options are below in detail:

3.1 Module Configuration

The ‘Module configuration’ tab of the PrestaShop gift voucher addon offers the four features to admin that are below:

  • Configuration
  • Email Settings
  • PDF Settings
  • Cron Settings

The following features are available in detail below:

3.1.1 Configuration Tab

When the admin comes to the configuration tab of the PrestaShop gift card extension. The  configuration tab shows the multiple features that are shown below:

1. Enable the module: When the admin comes to the configuration tab of the PrestaShop gift voucher addon, he/she needs to enable the same from the backend. This happens with a button toggle as shown below.

2. Compatibility with PrestaShop GDPR: If the admin enables the settings, then the customers can access their GDPR rights to delete or export the customer data from their store

Note: If you are using the official GDPR module then you must need to enable this setting. The main purpose of this feature is to export and delete user data on the PrestaShop GDPR module request. It is also compatible with PrestaShop GDPR Module developed by Knowband.

The link to the eCommerce gift cards can place on the web pages as per the requirement. The admin can enable or disable the link at the header or footer. It is placeable at the left side of the website where the visitors pay maximum attention. In addition, the option to redirect the customers to the ‘Gift card page’ can be provided in the ‘My Account’ page of the registered customers.

The links will be shown in the front-end of the website as shown below:

In the header & At the left side of the web page

In the footer

My Account Page

3. Enable Custom Gift Card Upload: If the admin enables this, the Gift Card Module allows users to upload an image to personalize a custom Gift cards.

4. Gift Card Prefix: In this option PrestaShop gift card addon the admin can set the prefix for the voucher code of the pre-paid gift card from here. The code enters in the format KBGC – ******

5. Gift Card order Status: The admin gets an option to select the status of the orders. The gift card code will be generated when the order is moved in any of the selected order states.

6. Minimum Gift Card Delivery Gap: The PrestaShop gift voucher allows the store admin to specify the minimum duration of the day. Further,  when the order places and the day of the gift card delivery.

3.1.2 Email Setting

The customer gets an option to print the gift cards or else they can be sent to the receiver via email. The PrestaShop gift card module by Knowband offers default email templates that can be personalized as per the requirement of the store admin.

In addition, the PrestaShop gift voucher module offers multi-lingual support. The emails can be sent in various languages. The admin can select the desired language from the drop-down list.

Once the language is selected, the entire email right from the subject line to the content can be edited and personalized as per the requirement.

3.1.3 PDF Setting

The buyer can print the PrestaShop gift voucher module in PDF format. The PDF file of the Gift voucher can be printed in different languages. The admin can edit the content of the file. The changes made in the backend will be reflected in the PDF.

The admin needs to select the language as done in the email settings.

3.1.4 Cron Setting

You can add the Cron to your store via the control panel to send gift card vouchers automatically.

3.2 How to customize the template of the gift card?

3.2.1 Add New Gift Card Template

To create the new templates for the PrestaShop gift card manager addon, go to the Gift Card template tab and then click the ‘Add New Template’ option or ‘+’ sign at the top right side of the module.

Fill up the information to create the template as shown in the image:

1.  Template Name: The PrestaShop send gift card addon allows the store admin to name the template in this section.

2. Title and Description: With PrestaShop Gift Card Module, the admin can add a title and description for the Gift Card template.

3. Template Image: The admin can select the image or the layout of the gift cards that will be shown in the front-end of the eCommerce site.

The images for the various occasions can be saved in the back-end of the PrestaShop gift card addon. The admin selects the occasion to find the image as shown below:

The store admin can even view the images for the various events that have been saved or can create a new image for the same.

As you click on the ‘View Image’, you’ll head to the page below.

The list showcases the entire images that were created and saved. You can view the complete image or even delete it if is necessary.

To create new images, click ‘Add New Image’ as shown below. The admin can choose a Gift Card Image Type. The store admin can customize the gift card or upload custom images also.

You can enter the image name and the text of the image to be shown on the gift card. Even the background image and color, as well as font color, can be changed at a button click. Preview the final image before making it live on the website.

4. Template Keywords: The keywords of the gift cards can be selected from the list as shown below.

To create new keywords, click on ‘Add New’.

The admin can enter the keywords and save them here.

5. Physical Gift Card Allowed: The PrestaShop gift card manager addon by Knowband allows the store admin to enable the physical gift card for this template.

6. Virtual Gift Card Allowed: The functionality will allow the e-cards.

7. Enable: The functionality can enable or disable the template.

8. Stores: The PrestaShop gift voucher module is multi-store compatible. The admin can either enable the functionality in all the stores or can select anyone from the drop-down list.

9. Languages: The admin can select the desired language for the template from the drop-down list.

3.2.2 Edit Gift Card Template

The admin even gets an option to edit the template or delete from the section shown below:

3.3 How to customize the gift cards product?

3.3.1 Create New Conditions for the gift vouchers

The e-merchants can customize the pre-paid gift card products in a few simple steps.

In the ‘Gift Card Product’ tab go to the ‘Add New Product’ or click on the ‘+’ sign in the top right section.

Below is the information that you need to provide for creating the product.

Product Name: Enter the name of the product here. It can be Happy Anniversary, Happy Birthday, Merry Christmas, or any other.

Product Reference: This includes the unique reference id. The admin can enter the internal reference code as per the requirement.

EAN-13 or JAN barcode: This product code is widely used internationally, but is specifically included for Europe and Japan. It is a super-set of UPC code and will be acceptable in North America.

UPC barcode: This product code is acceptable in almost all countries.

Currency: The admin can select the currency for the card from the drop-down list.

Product Price: The gift card amount enters here.

Gift Card Validity: The validity period in months of the gift card enters here.

Virtual Gift Card Allowed: Enable e-card by switching on the button.

Partial Use: The eCommerce seller can even allow partial use of the voucher amount.

Enable: The admin can enable or disable the PrestaShop gift voucher module from here.

3.3 Track the order for the gift cards of the site

The Gift Card Order tab provides the entire list of the orders received for the gift cards. It involves the recipient email, date of sending as well as the status of the gift cards.

In the ‘Gift Card Order’ tab go to the ‘View’ button in the right section. This section shows the entire information about the order.

4.0 Website UI

The links to the gift cards page can be viewed in the front end as opted by the store admin. Once the store visitors click on the link, they will head to the gift card page of the site.

The PrestaShop gift card manager addon by Knowband is the front-end of the website will be shown very similarly to the image below:


Shopping for the same is easy. The customers can select the card for different occasions. For instance, he chooses the Happy Halloween card. All he needs to do is to click on the Send button of the card.

The customer will head to the ‘Enter Details’ page where he can add all the needful details.

He can print the card or send it via email. The sender and receiver names along with the message can be mentioned in the section as shown below.

Upload Image: The sender can upload a custom image for a Personalised Gift Card.

Print By Yourself: Insert the details to print the gift card.

Send via email: Add the email address of the receiver, upload a custom image, and a note for your loved one.

Add the product to the shopping cart and proceed to the checkout page. The gift card will then be sent to the receiver.

Now you want to buy gift cards for your near and dear ones this PrestaShop addon is a way to connect with you with just one click. KnowBand PrestaShop Gift Card Module helps you engage more customers to your store.

Tutorial: Watch the Video Guide

To help you set up and use the PrestaShop Gift Card Manager Module, we have created a detailed YouTube tutorial. The video explains the installation process, configuration options, and how to manage gift cards step by step.

Watch the tutorial here:

Module Link: https://www.knowband.com/prestashop-gift-card

Video Link: https://www.youtube.com/watch?v=hLQWuBfvnRE
Admin Demo Link: https://psm.knowband.com/demo/?module=giftcard&demo=admin&referrer=kb&lang=en

Font End Demo Link: https://psm.knowband.com/demo/?module=giftcard&demo=front&referrer=kb&lang=en
Addon Store Link: https://addons.prestashop.com/en/wishlist-gift-card/29376-knowband-gift-card-manager.html

Please contact us at support@knowband.com for any query or custom change request as per your business requirement.