The curse of abandoned carts on eCommerce- Face it or Prevent it?

If you run an eCommerce business, I am sure you must have heard of it. If am sure that you must have heard of the frustration that ends ups in a pile of failed potentials sales. I am talking about abandoned carts. The abandoned carts are a by-product of a very old trend that has followed the eCommerce market from the inception. Customers visit your website, add some product(s) in their virtual shopping carts and then disappear in the thin air- one thing to mention, they never return to claim their loaded shopping cart.

Should we ignore it?

Statistics from the last couple of years show that the percentage of shopping cart abandonments has risen exponentially to 70 % till date. It means that out of every 10 visitors, it’s a general site to see 7 of them not completing their order. It’s a statistics that is too big to be ignored, especially when it’s directly linked to your revenue generation. Now, the big question- there are uncountable reasons for why they abandon their shopping carts, so is it wise to spend the crucial time in preventing them from occurring? Or, should we look for the ways to face them so as to minimize the losses?

Prevent it VS Face it

Either of the ways mentioned in the above questions works on the same motive. That is, to minimize the losses and generate revenue from potential conversions. Must, say that ignoring any of the two ways is not a wise suggestion at all. A/B testing and heatmap tracking done on various websites suggest that most of the cart abandonments occur due to some key mistakes that are common in all of the websites. If we could rectify these key mistakes we can prevent the abandonments up to a very large extent. Here, I am going to mention these key points to prevent a major percentage of shopping cart abandonments. After that, we will look for the ways that you can adopt to face them after some uninvited abandonments forcibly occur on your site. There are few questions asked in the below point, you just need to ask yourself these questions.

  • Is your checkout process easier?

Ask yourself- why people choose eCommerce sites to shop over offline retails? The answer is very simple; it is very easy, convenient, and quick to shop online rather than visiting a physical market, buy things, and then carry them back home. If this is the major reason for why eCommerce sites are preferred over physical markets, then why to make it more difficult for your customers to shop on your site? The reference is on the checkout process. Making a checkout process easier would be an excellent starting point in your way to prevent shopping cart abandonments.

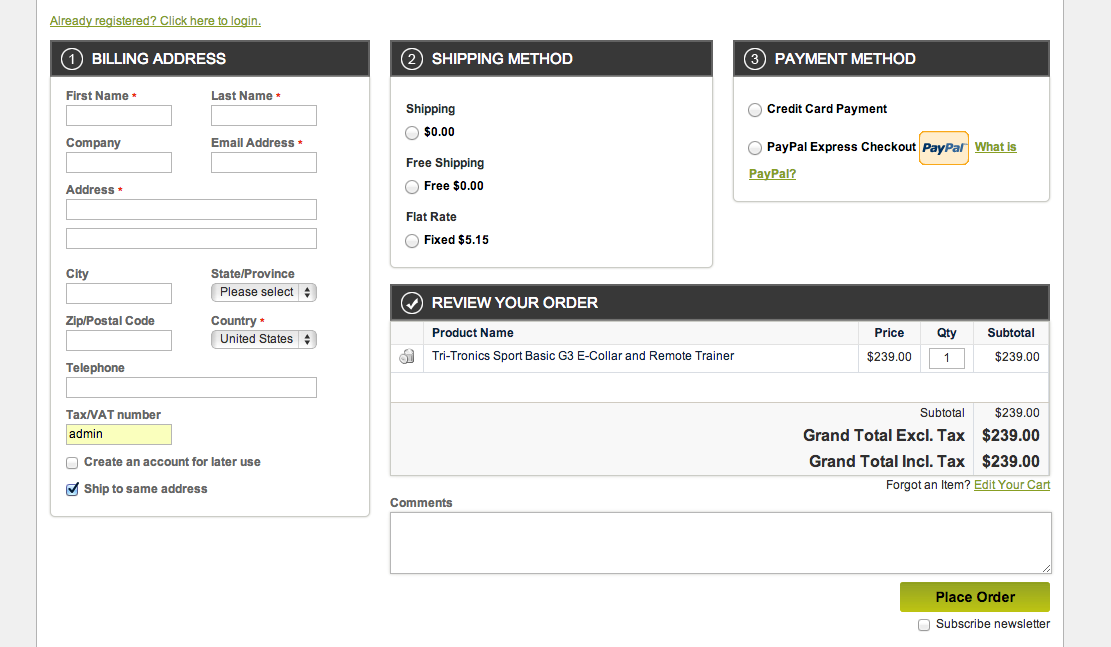
  1. Number of pages: Start with reducing the number of pages in your checkout process. For example, PrestaShop, OpenCart, and Magento, the major eCommerce platforms have generic checkout process in a multi-page structure. But, when introduced to the modules and extensions like one-page checkout module, the multi-page structure just vanishes and replaced by a simple one-page checkout structure. The one-page checkout will save your customers from the frustration of lengthy checkout process and frequent page loading. Thus, eliminating a very basic reason for customer frustration from your website.
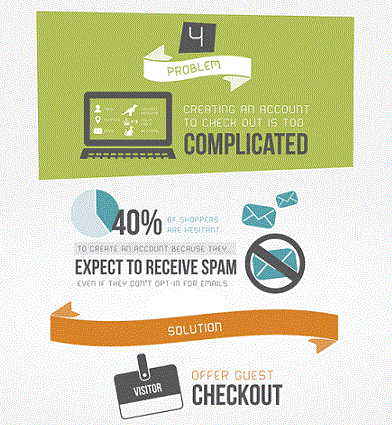
  2. Compulsory account registration: This is another eCommerce trend that has proven to be one of the major reasons for customer frustration. Websites ask the visitors to create an account before they can place an order. Sometimes, even the tiniest distraction like filling a registration form, thinking of a new password and then remembering it, can prove to be a major reason for customer frustration. A study says that customers do not like to create an account because they fear to receive spam emails forcibly. Thus, they leave the site and search for someone who does not ask for these things.

Interestingly, they even find that someone very easily, because there are uncountable websites like yours and they are looking for ways to grab customers like these. The solution is, do not ask for compulsory registration, make it optional, allow guest checkout and save their information to create an account automatically. On the whole, just register the guest after checkout is completed.
  • Do you surprise them with the hidden cost?

Some eCommerce sites make a very blusterous mistake by hiding additional costs and conditions. They reveal these hidden terms and fees just at the time of final step in the checkout process. Trust me, it’s a blunder; not a pleasant surprise for your customers. Always be transparent with your customers in terms of pricing and fees related to your products. Make the shipping charges, additional fees, tax to be included, and all relevant information clear like crystal. Reveal all these information at the product pages itself, or you can show them at the very beginning of your checkout process.

If you try to trick your customers, they might fell once, but they will never come back to you and your website ever again.

  • Let’s face the abandoned carts if they arise somehow

Information in the sections till now were all related to how you can prevent some major reasons for shopping cart abandonment. It’s a harsh truth that despite all your efforts, some uninvited cart abandonments do occur, and you cannot do anything to stop them. So, why not to face them by converting these carts.

  • Remind them

Remind the abandoned customers that they have left something in their cart when they were last online with you. You can do this by sending reminder emails. The reminder emails are a smart way to curb the level of abandoned carts that have already occurred on your site. Just mind one thing that you have to remind them; not bully them. Don’t send messages like, “This is your last call to claim the cart” “hurry there is no time” “It’s now or never” etc. Be clever and polite about the reminder emails. Make something useful from the customer’s point of view.
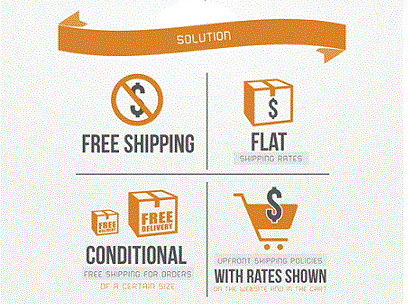
You can send some offers with your emails. Like an exclusive discount coupon, free shipping or support etc. There is a good news for websites using Magento platform because a Magento abandoned cart extension is available that will provide all the help in the above-mentioned task. The Magento abandoned extension is capable of capturing all the abandoned carts on your store along with the customer’s information like email id, contents in the cart, time of cart abandonment and much more. This Magento extension uses the captured information to send automatic reminders to the abandoned cart customers. The emails can be sent either manually by the site admin, you can set a cron that will perform all the task from capturing the abandoned carts to sending the automatic serial reminders with offers or without offers.

Finally,

On the whole, it is possible to both prevent the shopping cart abandonment and face them at the same time. Extensions like Magento abandoned cart extension will help you fight the already occurred abandonments, while the tips in upper sections will help to prevent a major proportion of abandonments.

Liked This? You’ll Like These Too
How to add menu Items in Magento

Adding Menu Items In Magento

This tutorial will guide you how to add Menu items on the Menu bar on the Front-end of your store. Adding menu is very important task, as all the users use the menu items to navigate through-out the site, so it is very important to set the most appropriate menu items on menu bar. You can add menu items on the menu bar in number of ways, in this tutorial we have used the method of creating categories and adding it on the menu bar.

Creating Categories

For adding menu items you can follow the steps below:

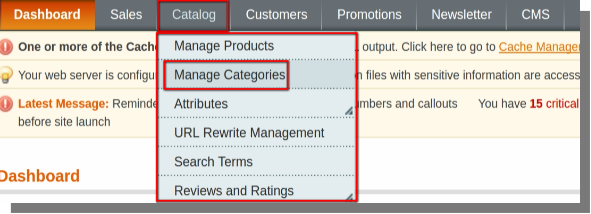
  • Open the back-end of your store and hover your cursor on the Catalog menu and then click on the Manage Categories option.

Catalog Menu(menu bar)>>Manage Categories.


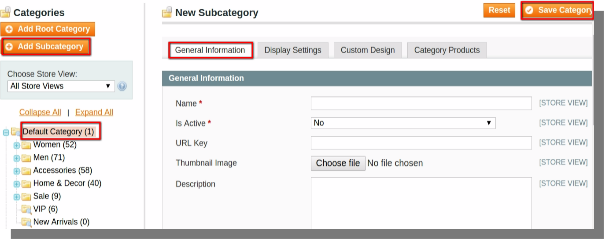
A page will open which will contain options like :

  • Add root category
  • Add subcategory
  • Save category and Reset at top right corner of the page.
  • General Information, Display Settings, Custom Design, Category Products.
  • The same Page will also contain the list of all categories and their subcategories.

  • First, click on Default category and then immediately on add subcategory.
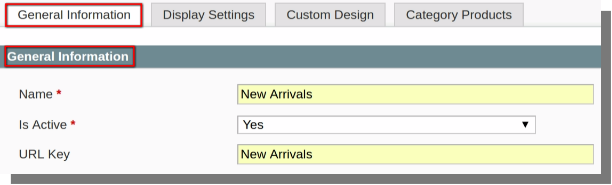
  • Fill in the details in the box provided, as shown below:

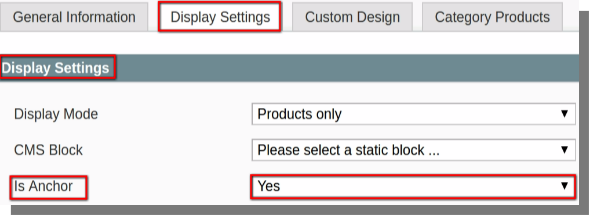
  • After filling the details click on Display settings tab available on the same page.
  • Change the status of Is Anchor from ‘No’ to ‘Yes’.

  • Now all you have to do is Click on the save category button to save the category you have created.
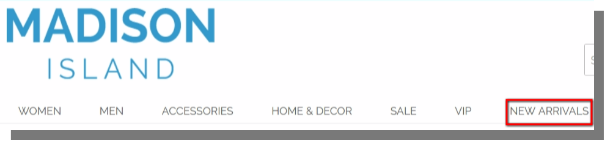
  • Now go to the Front-end of your store and refresh the page, you will notice that the menu item is added on the menu bar.
  • Below an example is presented:
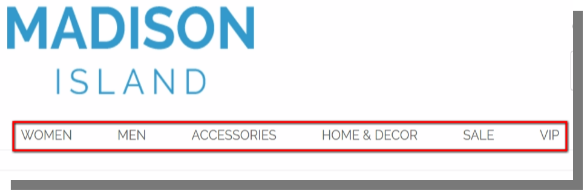
  • Before adding menu item:

  • After adding ‘New Arrivals’ to the menu bar:

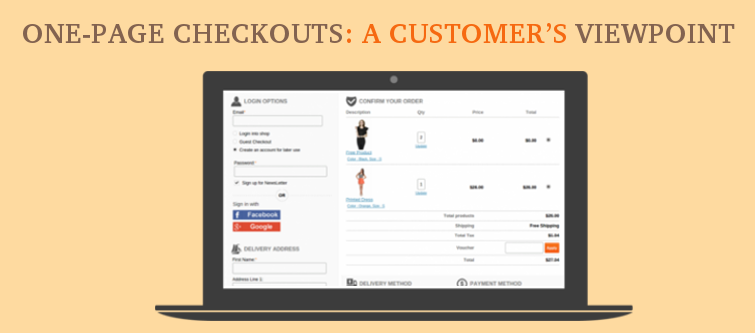
One-page checkouts: A customer’s viewpoint

One-page checkouts have become the trend since they entered the eCommerce market on a trial basis. They entered the web world as a variation to enhance the usability of the website and gathered the attention of the digital shopping world. There efficacy and efficiency is what that has made them a must add feature on your website. The analysis of customer behavior before and after the inception of one-page checkout has revealed that the feature is an effective tool against checkout abandonment. It has reduced the cart abandonment rate drastically and has acted as a tool for propelling conversions.

Customer’s viewpoint on one-page checkout

Magento one-page checkout extension is effective in nature.

Now, we will take a look at what the customer feel about one-page checkout.

1. Ease of operation:

Most of the customers found it easy and smooth to operate through the one-page checkout process rather than indulging in a lengthy page-by-page checkout. This one thing has contributed significantly on the conversion front.

2. Smooth navigation:

Another thing which customers pointed out was the smooth navigational aspect of the one-page checkout. Most of the customer found it easy to navigate through the login, credentials and transaction parts due to the single page arrangement. The column based arrangement and clear description helped them in sailing through the process.

3. Ease of correction:

This is one thing which has helped the customer to cut the hassle of re-initiation of transaction again and again. Most of the time customer found themselves frustrated due to re-filling of information in case they make a petty mistake in filling details. One-page checkout makes this task easy by allowing you the freedom of correcting that specific mistake without refilling the correct ones.

4. Mobile friendly:

Since a lot of traffic is driven by mobiles and tablets these days catering to the needs of mobile audience is very important. A one-page checkout fits in this process and saves the mobile audience from non-compatibility of their device (sometimes) to multi-page long loading checkouts. Also, it is often found that most of the multi-page checkouts are not responsive in nature, thus, causing a jolt to conversions.

5. Frequent page re-loading was a burden:

In generic multi-page checkout structure, the checkout process used to break as soon as a customer decides to update something in the cart. The updates could be anything from adding a new product, removing a product from the cart to increasing or decreasing a product quantity. With the introduction of one page checkouts, the frequent page re-loading has been curbed by the use of Ajax coding. Now a customer can perform all these tasks without reloading a page each time. So, a major burden has been removed from the customers and it has curbed the customer frustration up to a major extent.

Final say

Considering the positive feedback of customers in regards to one-page checkout this is a must-have for every website, in order to, excel their conversions. Various online modules like Magento one-page checkout extension are available in the market that can enrich your website with the feature. Magento one-page checkout extension is suitable for Magento based website and you should look for an extension that is suitable for your website platform.

Related Stories:

Why is shopping cart a must-add for your website?
The shopping cart has been one such feature that is making a buzz in the eCommerce arena. The feature has become a driving force for pulling conversions. Many eCommerce websites have already adopted it and those who have not are considering it. Having a shopping cart feature has become an unequivocal necessity, especially in the wake of cut-throat competition. In a scenario where cart abandonment is already acting as a huge revenue killer, loss of revenue due to some petty avoidance can be really drastic. Here, we will talk about the need for having a shopping cart feature on your website.

Advantages of a shopping cart

Now, we will take a look at those advantages which a shopping cart feature brings in.

  1. One-stop-shop: It acts as a one-stop-shop for data management. The customer can easily manage all those products and services that he/she wants to avail through a particular website. Apart from this, a shopping cart also contains data like customer name, card details, processing details, etc., thus making the transaction smoother.
  2. Stats and analysis: A shopping cart feature helps in maintaining the data and stats related to successful ( as well as dropped) transactions. This will help you to manage multiple requests from a single customer, which otherwise would be difficult to maintain.
  3. Discounts and coupons: An effective shopping cart feature allows you the freedom to integrate coupons and discounts into the transaction process. Other features like inventory tracking, customer review, etc., may also be channelized by the shopping cart feature. It acts as a profit-generating medium between payment processors and website.
  4. Customer and SEO friendly: By providing the customer with ease of transaction and instant access to product details as well as comparison, a shopping cart feature proves it worth in creating a customer-friendly environment. Apart from that, a good shopping cart ensures maximum traffic flow to your website by generating keyword rich URL for products and services, thus acting as an SEO booster.

Tools for shopping cart

To have a shopping cart feature on your website, all you need to do is to install an add-on compatible with the platform of your website. Prestashop Ajax cart module is one such tool for Prestashop-based eCommerce websites. You can choose from the variety of add-ons available in the market.

Last thoughts

Keeping in mind the target of conversion optimization, the addition of a shopping cart feature on your website will surely be a game-changer. To latch on to the revenue ladder you must ponder about the same.

Related Stories:

Prestashop Preferred Delivery Time module – User Manual

1.0 Introduction

The Prestashop Preferred Delivery Time Addon module is developed for the Prestashop eCommerce website to provide preferred delivery time at checkout. Customers can add preferred delivery time at checkout so that products will be delivered at the preferred time. This Prestashop prefer delivery time module helps the owner to know the availability of the customer on the provided delivery address to deliver the product. During checkout, the customer has to select the preferred date & time for preferred delivery of the product.

1.1 Salient Features Offered by Prestashop prefer delivery time addon

  • With the help of this Prestashop prefer delivery module, admin can offer the online users to choose the preferred date and time for product delivery.
  • The online users can also get a chance to update the preferences even after placing their order.
  • The Prestashop prefer delivery date display a calendar format for the date and a drop-down menu for choosing the delivery time slot. In the updated version, the Prestashop prefer delivery module shows calendar for every language.
  • The e-merchant can configure the ‘time slot range’ according to the requirement. In the updated version of this Prestashop prefer delivery date extension, the online merchant can also set 30 minutes time slot range.
  • The start time of the delivery and the end time of the day can also be configured in the Prefer delivery time Prestashop addon by Knowband.
  • The online store merchant can activate or deactivate the delivery time slot feature from the admin panel.
  • This Prestashop prefer delivery date extension allows the store merchant to set ‘Delivery Days Gap’ between the order date and preferred delivery date.
  • There is an option to set specific days on which delivery will not be available.
  • The online merchant can select 12-hour or 24-hour format from the admin interface of this Prestashop prefer delivery date and time addon.
  • The online merchant can set the first day of week. The admin can select 1-6 number for weekdays. 0 will be selected for Sunday.
  • The online store merchant can customize and send email notification to the online users along with the preferred delivery date and time-related details.
  • The Prestashop prefer delivery date and time addon is multi-lingual compatible and offers theme compatibility too.
  • The Prestashop Prefer delivery date and time module is SSL compatible and offers multi-lingual support.

2.0 Technology for Development

Language: PHP

FrameWork: PrestaShop

3.0 Installation Steps for Prestashop prefer time addon

Follow the following steps for installing Preferred Delivery Date Prestashop Addon:

  • Download the module package offered by Knowband.
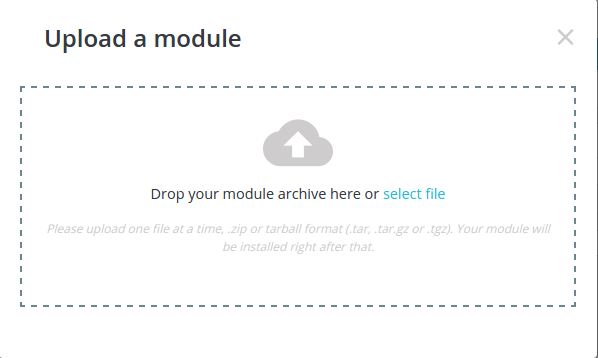
  • Open the “Installed Modules” page in your store and click on the “Upload a Modules” link which provides a dialog box to upload package as shown below:

  • After successful uploading of the module package, the Prestashop prefer delivery module is installed in your store.

4.0 Admin Module

Here, the Prestashop store owner can change the various settings of this plugin according to requirements, which will be reflected on the front end as well as in the admin panel.

To install this plug-in, please follow the following steps:

  • Add all the whole plugin folder to the modules folder into the root directory of the PrestaShop Store.
  • After adding plug-in files, the system will list the plug-in on the module page.
  • Click on install/uninstall according to the need.
  • Another way is, you can zip the whole folder and then click on the “Add New Module” link displaying on the top right corner of the module listing page.
  • After installing the Prefer delivery time Prestashop addon, the “Configure” link will be displayed instead of the “Install” link.
  • Now, your Prestashop module is ready to use and click on the “Configure” link to configure the module.

4.1 Configuration

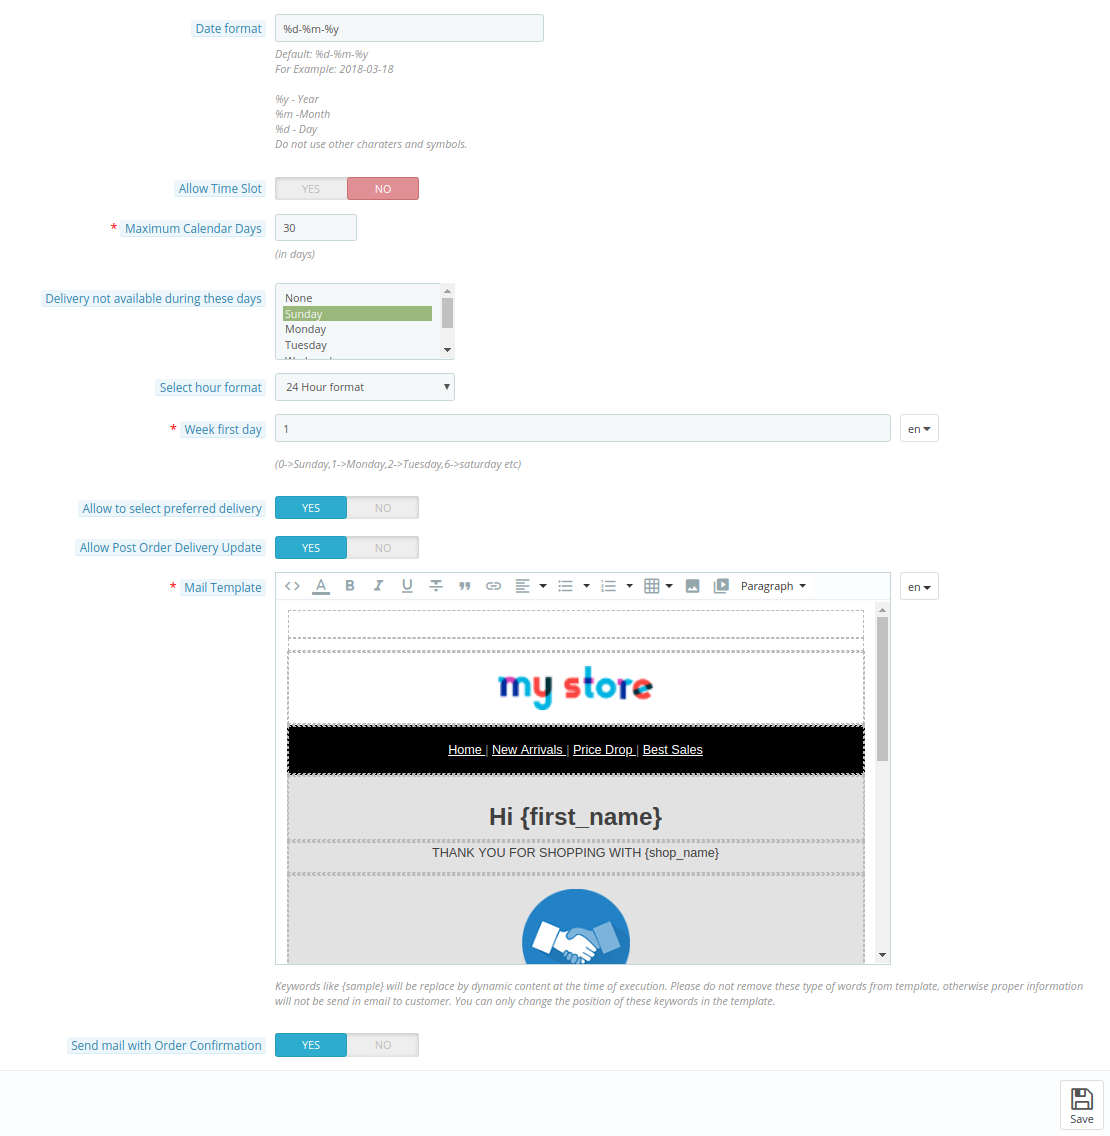
On clicking on configure link on the module listing page, the system will open configuration settings as shown in the screen below:

Initially, fields in the above form will be already filled with their default values.

  • Enable/Disable: Initially, this will be “OFF”. Admin can enable/disable Prestashop prefer delivery date plug-in by turning ON/OFF this setting.
  • Delivery Days Gap: Initially, this will be 4 days. This is the gap in the number of days from the date on which order has been placed. Customers will be able to select the preferred date after the “Delivery Days Gap” days.
  • Delivery Hours Gap– After placing an order this is the minimum time gap in hours after which the preferred delivery time slots can be selected.
  • Delivery Minutes Gap- After placing an order this is the minimum time gap in minutes after which the preferred delivery time slots can be selected.
  • Date Format: The Prestashop Prefer delivery date and time module allows the online store merchant to set the format of dates.

  • Allow Time Slot: Initially, this will be ON. Admin can enable/disable the display of Time Slot on the front end for the preferred delivery time.
  • Added Custom Slots– Using this option the time slot under which the delivery has to be completed can be set.
  • Time Slot Range: Initially, this will be 2 hrs. Admin can set the range in hours to display the time range in the Time Slot in the front end. The maximum Value allowed is 6 hrs. For Example, if the range is 2 hrs then it will show the time range as 12AM-2AM, 2AM-4AM. In the updated version of this Prestashop prefer delivery date extension, the online merchant can also set the time slot of 30 minutes by setting it as 0.5.
  • Start Delivery Time: Initially, this will be 08:00 AM. Admin can set the start time for the starting of delivery time which will be provided to display the time range from “Start Delivery Time”. The only defined format of time is allowed.
  • End Delivery Time: Initially, this will be 09:00 PM. The Prestashop store admin can set the “End time” for the closing of delivery time which will be provided to display the time range until “End Delivery Time”. The only defined format of the time is allowed.
  • Allow Incomplete Time Range: Initially, it will be ON. Admin can enable/disable the setting to display the time range which is not in a regular fashion. For Example, If it is enabled then Range can be 08:00 AM-10:00 AM, 10:00 AM-12:00 PM, 12:00 PM-1:00 PM as difference of range in each time range is 2hr except the last one which is 1 hr. If it is disabled, then Time Range can be 08:00 AM-10:00 AM, 10:00 AM-12:00 PM only.
  • Maximum Calendar Days: Initially, this will be 15 days. Admin can set the maximum enabled days to select the preferred delivery date in the front end.
  • Delivery not available during these days: Initially, “Sunday” will be selected. Admin can disable the multiple days so that the customer will not be able to select the delivery date on that day.
  • Select Hour Format: The online store merchant can also set hour format as 12 hours or 24 hours.
  • Week First Day: Admin can now set the first day of the week by setting numbers from 0 to 6. 0 will be used for Sunday and 6 for Saturday.
  • Allow Select Preferred Delivery: Initially, it will be “OFF”. Admin can enable/disable to provide the option for the customers to add preferred delivery time when placing an order.
  • Allow Post Order Delivery Update: Initially, it will be “OFF”. Admin can enable/disable the setting to provide the option to update the preferred delivery time even after the order is placed.
  • Mail Template: The admin can edit the mail template which will be sent to the customer to provide information regarding the preferred delivery time after the order is placed. This mail will be sent if “Send Mail with Order Confirmation” is enabled.
  • Send Mail with order Confirmation: By default, the setting will be ON which allows sending the preferred delivery mail after placing the order to the customer.

4.2 Order Detail Page

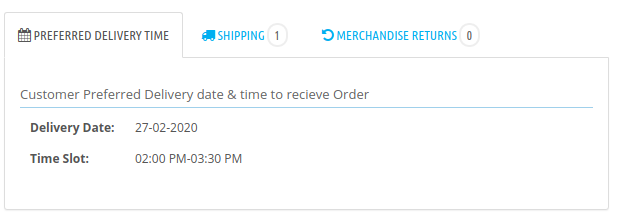
To view the details of the preferred delivery time of an order placed by the customer. Click on the “Orders” in the Admin Menu followed by a click on particular order. The full detailed page will open. In the “Order” block, click on the “Preferred Delivery Time” tab to view details regarding preferred delivery time as shown below:

5.0 Front-end Interface

After enabling the Prestashop prefer delivery module, the front-end user will see the preferred delivery time block on the Checkout page and Order Details page.

On Checkout Page

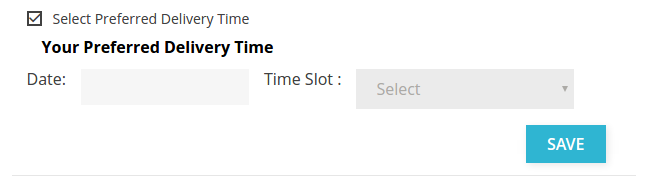
If “Allow to select Preferred Delivery” option is disabled then it will be mandatory for customers to select preferred delivery time otherwise, a checkbox will be shown to provide an option to customers to select preferred delivery time or not at the time of placing an order. By default, it will be checked so the “Your Preferred Delivery Time” will be displayed in the shipping methods on the checkout page and if it will be unchecked then “Your preferred Delivery Time” will not be displayed as shown below:

If “Select Preferred Delivery Time” is unchecked then it will be displayed as shown below:

If the admin disables the “Allow Time Slot” as displayed above, the “Time Slot” will not be displayed.

If “Date” field is empty or “Time Slot” is not selected and clicked on “Save” button then it will display error message as shown below:

If Preferred Delivery Time is not saved and clicked on “Proceed to Checkout” then it will display an error message as shown below:

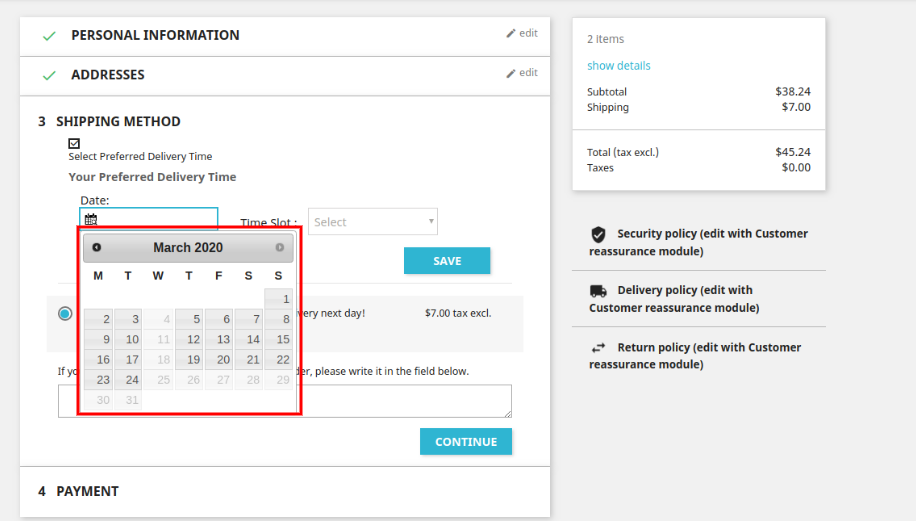
The online users can select the preferred date from the available calendar.

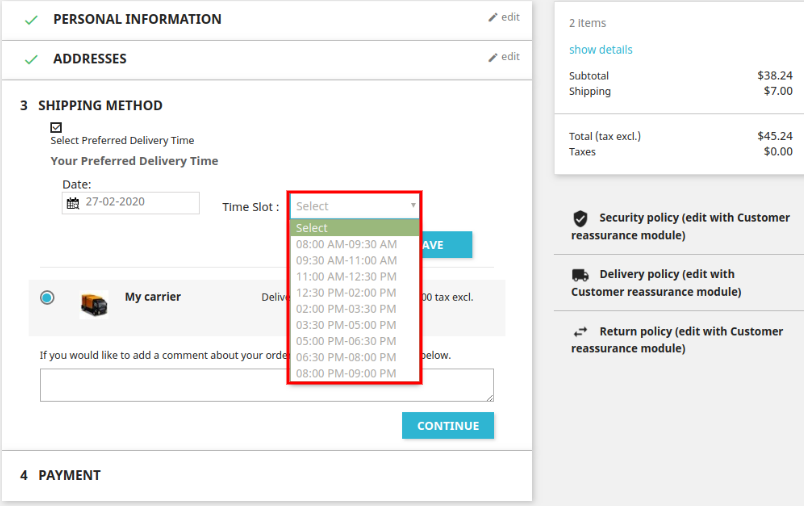
After selecting the date, online users needs to select the time slot as shown below:

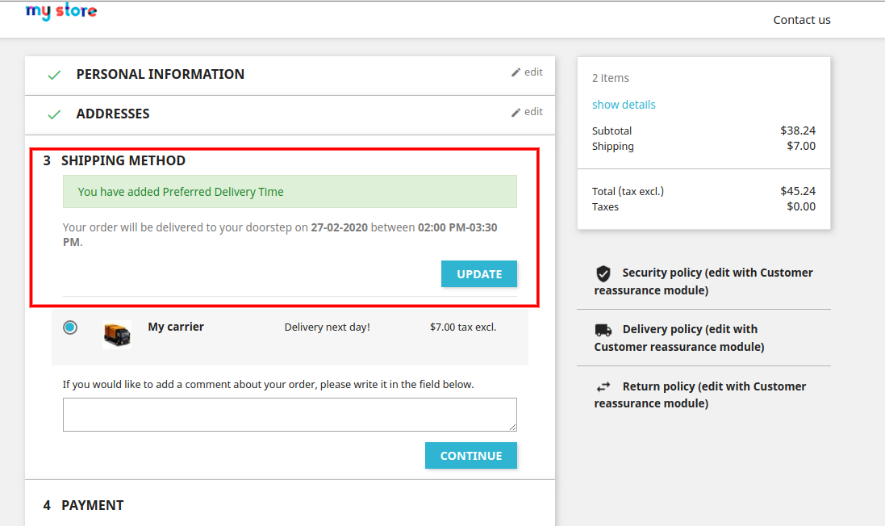
When customer adds the “Date” & select the “Time Slot” and click on “Save” button, then it will be saved in the database after validating with displaying of success message as shown below:

On Order Detail Page

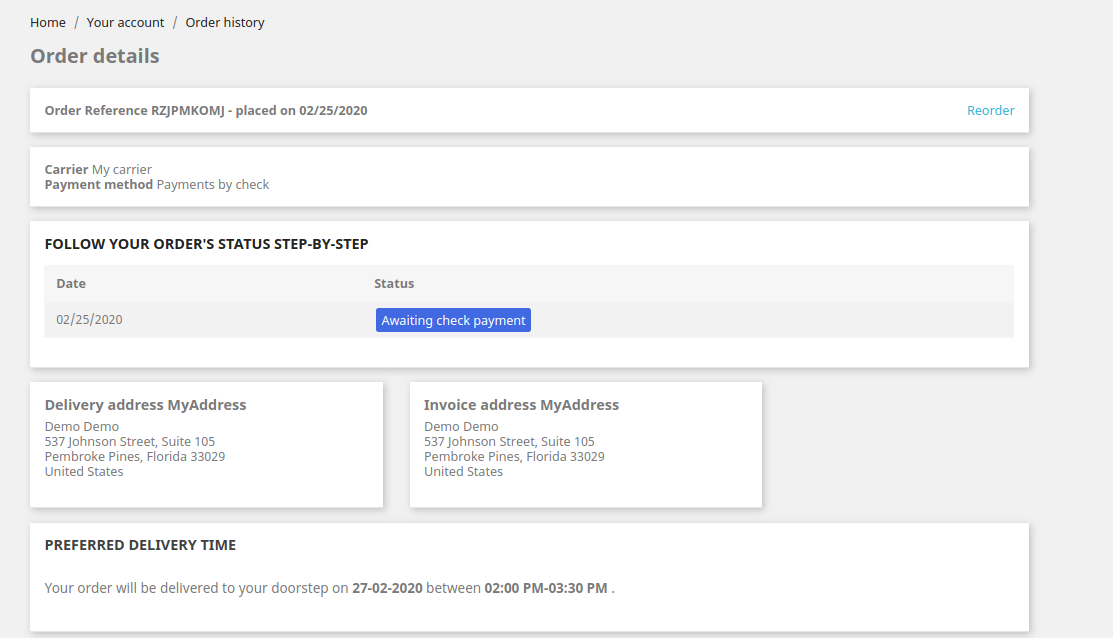
If the customer added the “Preferred Delivery Time” while placing an order the customer will be able to see the details of Preferred Delivery Time in “Order Detail Page” by clicking on the “My Account” link followed by “Order History and Details” page. A list of all orders will be displayed.

NOTE: To Display the preferred delivery block in Prestashop 1.7.x.x, you have to add “no filter” with $HOOK_DISPLAYORDERDETAIL in root_directory/themes/classic/templates/customer/order-detail.tpl as there is a bug in Prestashop 1.7.x.x. It should be resolved in the higher version.

To view the preferred delivery time, click on the “Details” button of the particular order. All details regarding the order will be displayed below in the list.

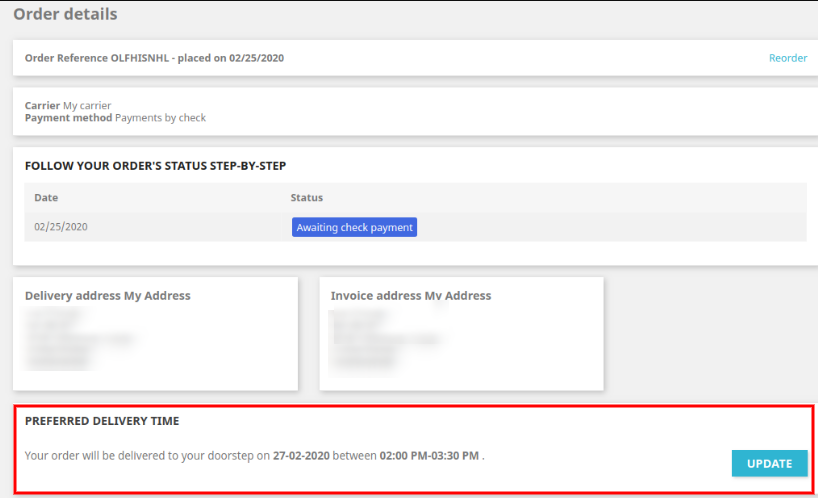
Preferred Delivery Time block will be displayed as shown below:

If “Allow Post Order Delivery Update” is enabled, then the customer will be able to update the preferred delivery time by clicking on the “Update” button as shown below:

On clicking the “Update” button, Date & Time field will be displayed to update the preferred delivery time as shown below:

After changing the date & time, click on the “Update” button to update the delivery time. After successful updating, the success message will be displayed as shown below:

For more details about this Prestashop prefer delivery time addon please visit here:

Prestashop prefer delivery date module link.

Prestashop prefer delivery time addon Admin Demo link.

Knowband Prestashop prefer time module Front Demo link.

Knowband Prestashop prefer delivery date module Addon store link.

Knowband Prestashop prefer delivery extension YouTube video link.

Please contact us at support@knowband.com for any query or custom change request as per your business requirement.

How to add Banners in Magento

This tutorial will guide you how to add banners in your Magento store.

Adding Banners

To add Banners in your store, you can follow the steps provided below :

  • Open the back-end of your store and hover your cursor on the CMS menu and then click on the Static Blocks option.
  • CMS Menu(menu bar)>>Static Blocks.
  • A page will open which will contain Add New Block option, click on it.
  • After clicking, you will be directed to a page where you have to:
  • Add the block title.
  • Add Identifier.
  • Set Status (Enable or Disable).
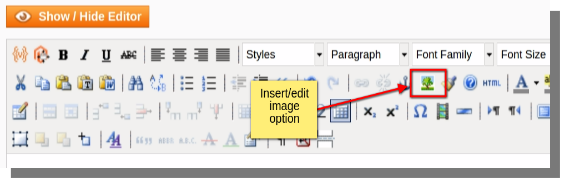
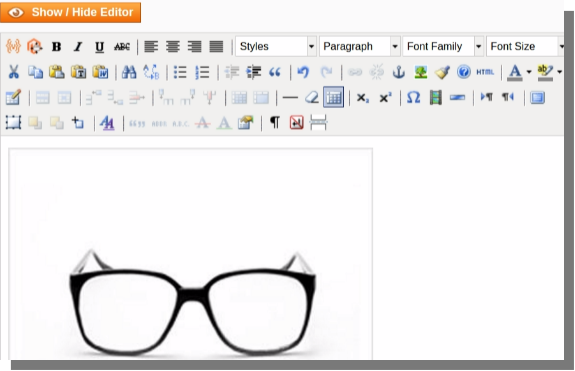
  • After adding all the above mentioned info, click on Show/Hide Editor option and then :
  • Click on the insert/edit image option.

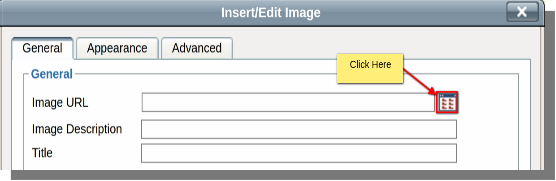
  • A dialog box will appear, click on the button provided for browsing your files and uploading them.

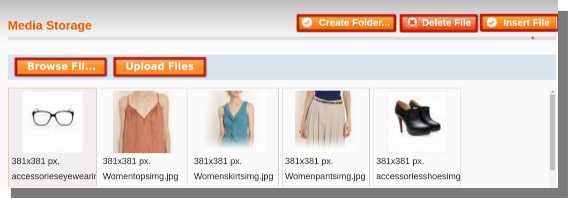
  • On clicking the button, a new dialog box will appear where you can browse and upload images and also insert images as banners on different pages.

  • After clicking on the insert image, the image will be inserted and you can save it using Save Block option.

  • The banner will be added after completion of above mentioned steps.

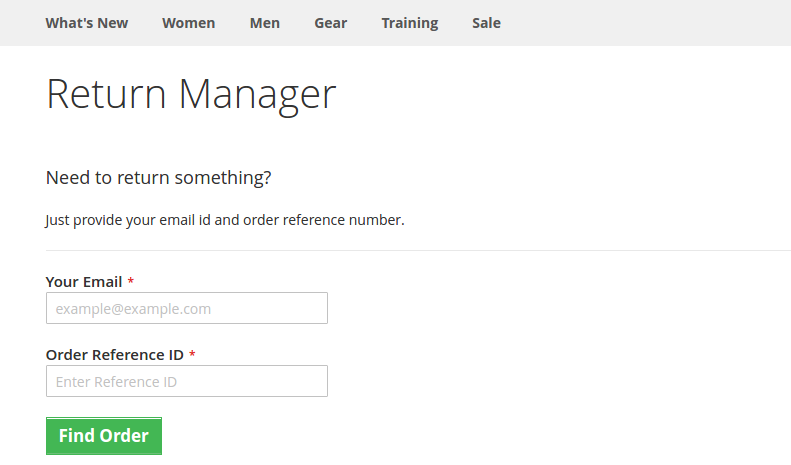
Product Return Manager for Magento-2 that ensures Customer Satisfaction

Lack of a flexible return policy can be a cause for cart abandonment on the checkout page of your online store. And, for a generous return policy, up to 66 percent of customers claim they will spend more. Many retailers, unfortunately, impose strict return policies. There are two ways to go about doing this. To begin with, policies that place an excessive amount of time restriction. Second, policies that enforce a fee for returns, which is typically in the form of shipping. And the others don’t even have a return policy on their store.

What if there is a way that might not just minimize the abandoned carts but might also boost the conversion rates at the same time? Create an ambiance that allows your customers to shop without any tension on your website. I am talking about, returns, refunds, replacements, and exchange management on your websites. Here, I am taking the example of a Magento 2 website to explain how an efficient Magento 2 return manager extension would help you to make online shopping a ball for your customers.

How would a website owner benefit from the Magento2 return manager extension?

With the easy return, more customers will be attracted to shop with you- In the era of huge competition from similar eCommerce sites, if you secure even the slightest competitive advantage against your rivals, you will score fortunes with your conversions. What most of the eCommerce customers fear is the tricky return procedures of the eCommerce websites. By installing the Magento 2 return manager on your website, you can make sure that these tricky procedures are converted to the easiest ones.

  • Single product return: The return manager will allow customers to return the whole cart or even a single product from the cart.
  • Partial Product Return: With Magento 2 Return Manager, customers can also return partial orders from the complete list.
    This feature of the return manager will make sure that customers do not have to return the whole bulk in order to return a single product. Thus, preventing a serious loss that could happen if your Magento 2 return manager could not handle a single product return.
  • Every request is not a return request: Not every customer wishes to return a product or to get a refund. Some might even want to replace or exchange a product. If your return manager extension treats every return request as a refund request, then it is a serious threat to your conversion rate as a whole.

For example, the Magento 2 return manager extension is capable of handling three types of return requests- Replace, Refund, or Get Credit. For those who want to get a refund, for those who want to replace a product, and for those who want to get a refund a buy something else from your site respectively.

Status tracking to keep them informed- When a customer places a return request, he/she wants to stay updated with the procedure. Customers should be able to track the status of the return request in the same way they tracked the product delivery status.

This is one of the trickiest parts of any return management process. An effective return manager extension like the Magento 2 return manager, allows the customers to track their return status very easily using a unique id provided at the time of return request.

The easy returning process with Magento2 return manager

The choice to attach a file: The Magento 2 order refund extension allows customers to attach a file to their replacement/return request.

Request forms, statuses, and reasons are all unlimited: Magento 2 RMA allows the store owner to build an unlimited number of return reasons and statuses to meet the needs of their customers. The admin can easily generate an order refund with the Magento 2 order refund extension.

More about Magento 2 return manager extension

Easy Order Return Manager for Magento 2 aids in the reduction of abandoned carts and ensures that they are as few as possible.

Some other features of Magento 2 Return Manager that benefits your business

  • The admin will handle the return requests of both registered customers and guests using the Magento 2 extension.
  • The request for a return may be approved by the administrator. When the request is accepted, an email trigger will be sent.
  • From the backend of the admin interface, the Magento 2 store admin can also generate return requests on behalf of customers.

Finally,

The importance of an efficient return manager extension on your eCommerce site cannot be ignored. Product returns strategies that are well-organized will result in higher sales, a stronger brand, higher consumer loyalty, and better customer service. The aim of a perfect RMA is to strengthen customer relationships. Choas continuity is being developed by simplified return management. You should not miss any opportunity to optimize the shopping experience on your website. Handling the trickiest return situations with the help of a proper return manager extension is all you need.

It is not just about a Magento 2 website, there are efficient return manager modules and extensions for PrestaShop, and Magento also. You just need to install the respective return manager extension as per your eCommerce platform and you are ready to manage even the trickiest returns on your site.

Liked This? You’ll Like These Too:

Boosting customer engagement and sales by encouraging reviews and opinions

Online shoppers have a habit of checking out reviews and opinions of other users before investing in anything. Even when you go to purchase a nail clipper from Amazon, you would see the bulk of customers reviews and opinions. If in case the reviews are all so good, then it takes no time to boost the product’s monetary value. Take the example of this nail clipper being sold on Amazon.

Good product reviews can have direct effect on the pricing of the products.

The above example explains how a bulk of positive product reviews can determine the pricing of a product. This example is aimed to explain the importance of positive product reviews. Instead it has been given to explain how product reviews are important and how people them very seriously.

Product reviews have become a habit

For every online customer, online product review is not just a piece of information on an eCommerce site, but it a valuable asset that maintains the credibility of decision making without even touching a product from hand. Product reviews have become an integral prat of any eCommerce purchase. It is one of the best ways to gather information about a product, plus one of the best ways to site owners to build trust and credibility among the customers.

It has become a habit of customers to check reviews before any online purchase. And, it is a good habit for sure.

Showing product reviews- using it as a tool for CRO-

With the growing competition in the eCommerce market, every website owner is looking for new ways to engage their customers. In most of the CRO campaigns, a proper focus on online product reviews is an inseparable part. No wise e-store owner would commit the mistake of ignoring product reviews and their role in customers’ decision-making process. Product reviews have always played a great role in Influencing the customer’s decision making and they will continue to do so forever.

Product reviews are not just about products, but other metrics are also analyzed using them. For example, a customer review might not just include his experience with the product, but it might also explain how the shipping services were and in what condition did he get the product. So, a single product review can guide your customers not just about the products but also about your efficacy in providing the shipping services.

How to adopt a better product review system on your eCommerce store?

If you own an OpenCart or a PrestaShop store then you get an effective product review system by default from the first installation itself. In PrestaShop, you might have to install an additional “Product comment” module which is a free module from official PrestaShop itself.

However, having a product review system alone is not enough. You have to encourage your shoppers to write review on your site about their experience with your products. These encouragements can be provided by using the OpenCart Review Incentive extension and PrestaShop Review Booster module. These modules are competent to encourage the customers to write reviews by providing them offers and discounts on their next purchase. You can use these modules for your review boosting campaign if you are planning to latch on reviews for better conversion rates on your eCommerce stores.

Liked This? You’ll Like These Too

Methods by which you can minimize cart abandonment on your store

Cart abandonment is a big issue that haunts most of the eCommerce website. As a matter of fact the average cart abandonment rate is well above 50% for most of the website. The issue is same but the way you tackle it makes the difference. An effective card abandonment strategy is what that can change the game for you. Here we will take a look at those strategies and will analyze how they work in reducing the percentage of your cart abandonment.

Tips to reduce shopping cart abandonment:-

Now, we will look at the various strategies that can be adopted to tackle the problem of cart abandonment.

The revenue at stake on abandon cart is huge, which cannot be neglected.

1. Provide multiple payment methods: Restricting the customer to a specific payment mode has been the most significant reason behind cart abandonment. Allowing the customer to avail the benefits from various payment methods like Paypal, Google wallet, Paytm, Mobikwik etc. has a good chance of turning an abandonment cart into a potential sale.

2. Be clear about your policy: Clearly, spell out your return and shipment policy in the content part of your website. This will enrich the customer’s confidence and will drive him to purchase the product as, he/she will clearly know what to do in case of return or delivery problem.

3. Avoid shipping charges: Try to keep out shipping charges as far as possible. The Customer really doesn’t like charges to be paid for delivery of their products. If unavoidable then try to lure the customer by providing some equivalent discounts or cash backs.

4. Provide social login registration: Allow the customer to enter and purchase from your website by channelizing his/her social login credentials. Restricting the customers for a specific registration process act as big turn off. Social login allows the users to purchase from a new website without necessarily creating an account there. The user can use their social accounts to sign up on-the-go in few clicks.

5. Provide some analysis: Provide some fact, analysis, data and reviews with regards to every product. This will allow the customer to get a holistic picture and make an informed decision. The more you inform your customers, the more they will trust your brand.

6. Utilize the power of mailing: Use effective innovations to retain the customer by customizing your abandonment card mails. An effective and attractive abandonment cart mail can be created using some good tools based on your CMS platform. Magento’s abandon cart extension is one such tool for Magento based website.

Conclusion

Cart abandonment is an issue that most of the eCommerce website are facing. The revenue at stake on abandon carts is huge and nobody wants to miss this big piece of cake. However the winner is one who adopts to effective strategies to counter this problem. Keeping in mind the level of competition in eCommerce arena, the adoption of the above-mentioned technique can prove to be handy for your website.

Liked This? You’ll Like These Too

PrestaShop Auto Switch Language and Currency Module – User Manual

1.0 Introduction

As you know Prestashop supports multiple languages and multiple currencies for customers. If there are multiple language and currency on the store, then customers need to change language and currency according to their region.

Knowband offers Prestashop auto switch language and currency module which will change the language and currency automatically according to the customer’s region whenever customer will visit the website. This Auto change language and currency addon implements a functionality through which the Prestashop website will automatically change the language according to the customer’s region. The Auto change language and currency addon fetches the customers actual location and country details using their system’s IP address. After having the location information, the Auto change language addon switches the language and currency of the website easily within a second.

The Auto change language and currency addon is highly customizable and offers hassle-free implementation. The store admin can increase his business and offer the store products, services globally. The online users can view the products and order easily without having any confusion. The online users can view store details and currency information in their preferred language.

1.1 Features of Prestashop Auto change language addon

  • The online store admin can Enable/Disable the Language Setting Option in Prestashop auto switch language and currency module for all active countries.
  • Admin can Enable/Disable the Currency Setting Option for all active countries from the admin interface of this Auto change language and currency addon.
  • In this Prestashop auto switch language module the admin can set one common language for all the countries.
  • The Auto change language and currency addon allows the store owner to set one common currency for all the countries.
  • Admin can search for any country by its name.
  • The auto change language and currency addon allow the admin to configure any language for a particular country.
  • The Auto change currency module allows the admin to configure any currency for a particular country.
  • The auto change currency extension is multi-lingual compatible.
  • The auto change language extension is multi-store compatible.
  • The auto change language and currency module offer SSL Compatibility.
  • The auto change language addon is compatible with all PrestaShop themes.
  • Whenever Customer will visit the website language will automatically change according to the region.
  • Whenever Customer will visit the website currency will automatically change according to the region.
  • The auto change language and currency extension use IP address of the user to track Country or Region of the user.
  • The Auto change language addon offers a user-friendly interface.
  • Auto change language addon offers a smooth and hassle-free implementation.

2.0 Installation Manual

Once the store admin purchases the Prestashop Auto change language and currency addon from the Knowband store, he will get below-mentioned files:

1. The zipped file consists of the source code of the Prestashop Auto change language and currency addon.

2. User Manual

The online store owner can follow the provided steps to install the Prestashop Auto change language and currency addon.

  • First of all the admin needs to unzip the zipped file. This file includes a few files and folders.
  • Copy the all the folder and paste them into the “Modules” folder of the store’s directory. The admin can follow the path – Root Directory/modules/.

3. Now the store owner can install the Prestashop Auto change language and currency addon. As an eCommerce store owner, the admin can find that in Store Admin -> Modules and Services. It would be shown as below –

The admin can click on the “Install” button to install this Prestashop Auto change language addon easily. A confirmation pop-up will be shown. Click on “Proceed with the installation” option. This step will install the Prestashop Auto change language module and show notification – “Module(s) installed successfully”.

3.0 User Manual

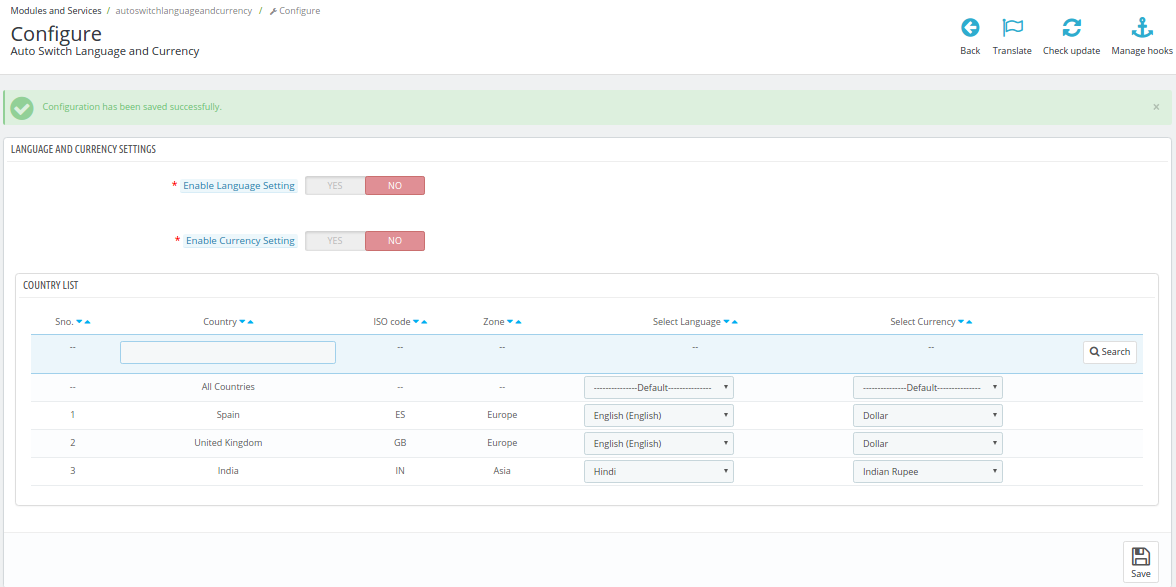
This User Manual will guide you through the Admin Module/Store Front settings and various features of this Auto Switch Language and Currency Addon. This will contain one screen where admin can configure language and currency after successful installation.

3.1 Language and Currency Setting

Following are the steps to configure the General Setting tab from the admin interface of this Prestashop Auto Switch Language and Currency module-

  1. Go to modules and Setting.
  2. Search Module ‘Auto Switch Language and Currency.
  3. Click on the Configure button.

Fields

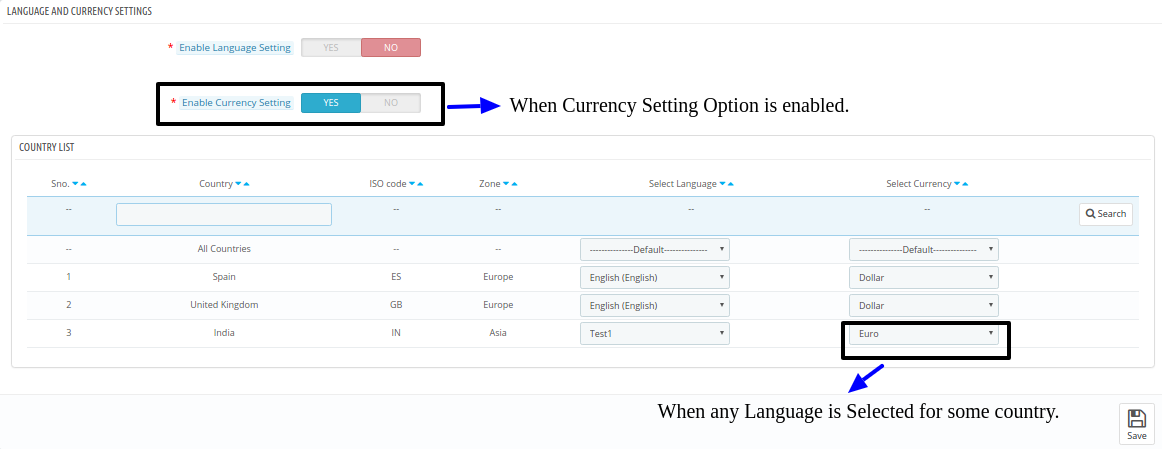
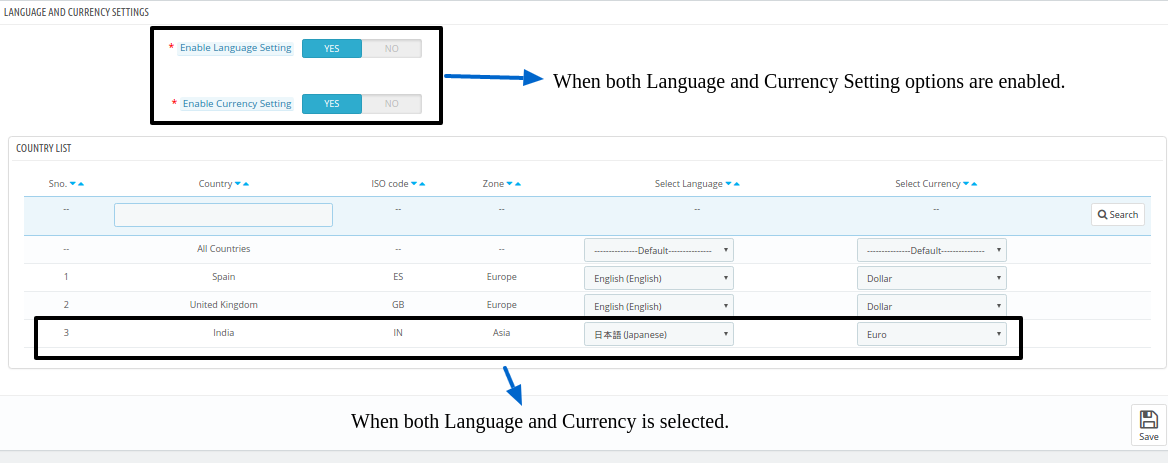
  • Enable Language Setting: By default, it will be OFF. Language auto switch will only work if this setting is ON.

Following are the steps to Enable plugin-

  1. Go to modules and Setting.
  2. Search Module ‘Auto Switch Language and Currency.
  3. Click on the Configure button.
  4. Enable the Language Setting Option.
  5. Click on Save.
  6. Enable Currency Setting: By default, it will be OFF. Currency auto switch will only work if this setting is ON.

Following are the steps to Enable Prestashop Auto Switch Language and Currency plugin-

  1. Go to modules and Setting.
  2. Search Module ‘Auto Switch Language and Currency.
  3. Click on Configure button.
  4. Enable Currency Setting Option.
  5. Click on Save.
  6. Country Configuration: This contains the list of active countries with Country name, ISO-Code, Zone, active Languages and active Currencies. First row is having “All Countries” which allow admin to mark all countries with one common language or currency.

Following are the steps to configure common Language or Currency (Mapping Common to All)-

  1. Go to modules and Setting.
  2. Search Module ‘Auto Switch Language and Currency.
  3. Click on Configure button.
  4. Select any language or currency for “All Countries”.
  5. Click on Save.

Following are the steps to configure countries with any particular language or currency (One to One Mapping)-

  1. Go to modules and Setting.
  2. Search Module ‘Auto Switch Language and Currency.
  3. Click on Configure button.
  4. Select any language or currency for any particular country.
  5. Click on Save.
  6. Save: By clicking this button, the Auto change language addon will save setting into the database and return back with success message.

4.0 Front End Interface

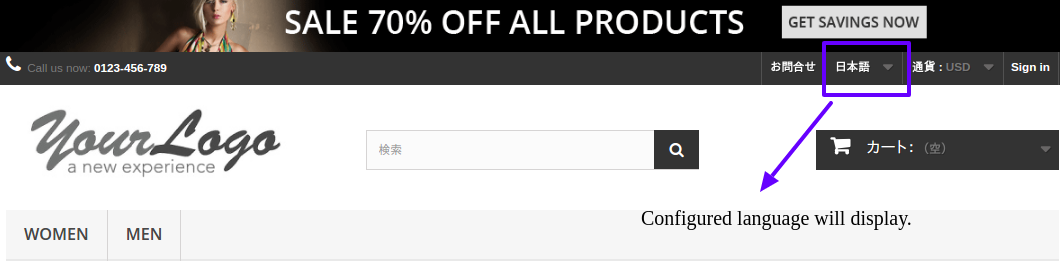
In the Front End, the Language and Currency will automatically switch according to admin configuration in Back-Office.

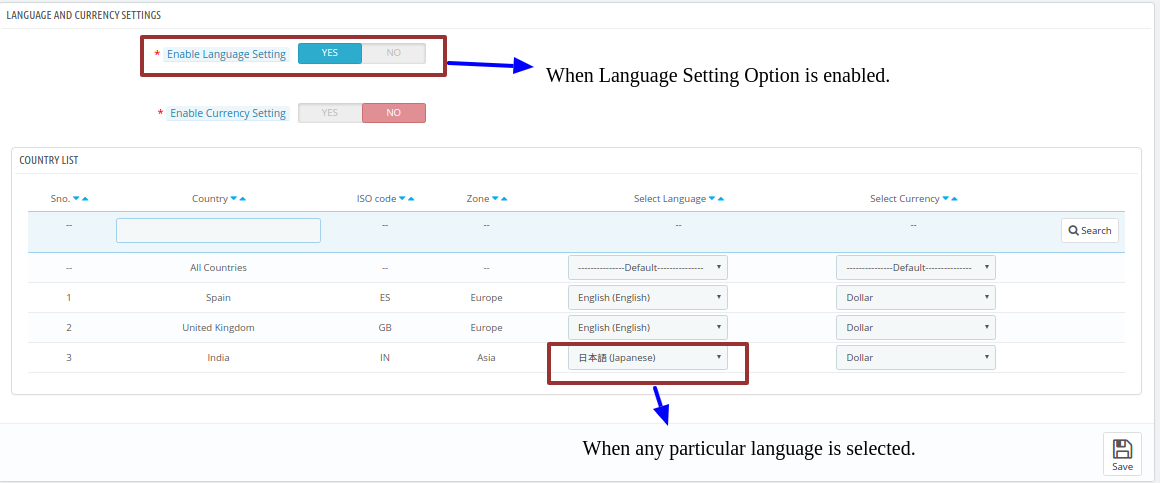
Enable Language Setting

When Admin enables “Language Setting” Option and select some language like “Japanese” from the admin interface of this Auto change language extension.

Enable Currency Setting

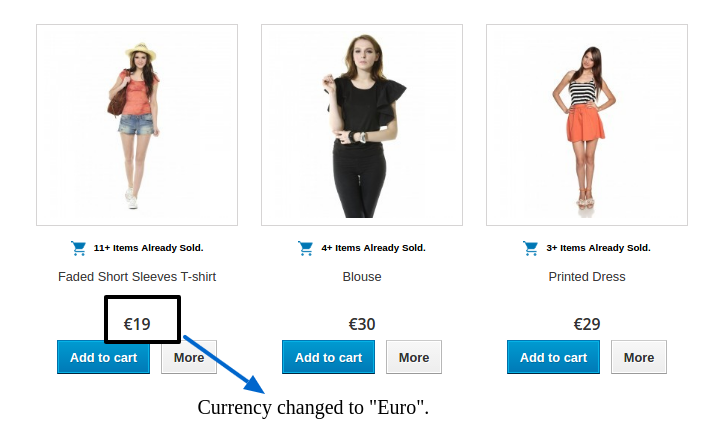
When Admin enables “Currency Setting” Option and select some Currency like “EURO” from the admin interface of this Prestashop Auto change currency plugin.

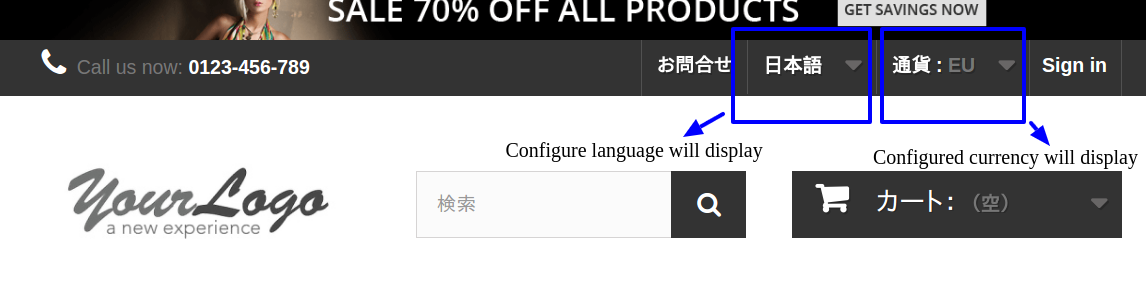
Enable Both Language and Currency Setting

When Admin enables “Language Setting” Option and select some language like “Japanese”.

When Admin enables “Currency Setting” Option and select some Currency like “EURO”.

Thus by implementing this Auto change language and currency addon, the store admin can reduce all the language and currency-related hurdles and issues. The language and currency are the basic factors in order to grow business globally. The store owner can set the language and currency according to requirement. The customers can view the store details as per the settings of the admin interface. This is one of the easiest ways to offer a better store experience to the customers.

It is very easy to implement automatic language switching functionality on the eCommerce store with the help of this Prestashop auto switch language and currency Module. The Prestashop auto switch language module fetches the customers geological location and changes the language and currency at the same time. The customers can view the store details and price-related information easily in their familiar language and currency type.  Prestashop auto switch currency module is very simple to implement and it offers smooth functioning. You can also implement Auto change language and currency addon for offering a better store experience to the global customers.

For more Prestashop addons please visit Knowband.

For more details about this Prestashop auto switch language and currency addon:

Knowband Auto change language addon Module Link.

Knowband Auto change currency module Admin Demo Link.

Knowband Prestashop Auto change language and currency addon Front Demo.

Knowband Prestashop auto switch language and currency Watch Video.

Knowband Prestashop auto switch language Addon Store link.

Please contact us at support@knowband.com for any query or custom change request as per your business requirement.