A PrestaShop social login module can be used to integrate a Google login to your eCommerce site. Social login module constitutes of several other social login options such as Facebook social login, Twitter social login, Drop box social login, etc. When webmasters implemented a social login for the first time, it was believed that most of the customers have an account on at least one of the social sites. So, the webmasters can effectively utilize the customers’ information in these sites to create a user account on their websites, and that too without asking the customers to fill a lengthy registration form.
Why has Google Login been a success?
Google is one of the most used, search engine, email services, and a social network. In parallel to other social sites like Facebook and Twitter, most of the customers have a Google account. So, why not utilize this platform for optimizing the user experience on the websites.
Considering the PrestaShop websites, they are one of the most popular eCommerce platforms today. Everyday, a large number of new PrestaShop websites are coming live and one thing they lack is the Social login option. So, we have found a way to make this platform even more strong in terms of usability and optimization. The PrestaShop Social loginizer module allows a perfect combination of Google login and PrestaShop to be implemented on your eCommerce site. With the availability of other 12 social login options in the same PrestaShop module, this PrestaShop social login module is a wise choice for your pocket.
How does Google login work?
One thing is clear here, you don’t have to worry about the user authentication. Google will handle that for you. When you set up a Google login on your website, the users will see a link to Google page at the Sign in and Sign up page. Something like this:
When the user clicks on the link, if he is already registered on your site, he will be directly logged into the website’s user account page.
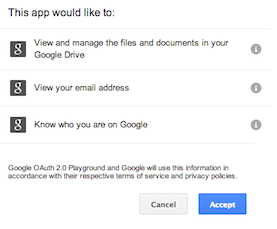
If he is there on your website for the first time (User not registered already), he will be asked to provide his Google login credentials in the following pop up:
After providing the details, just give the authorization to Google in the next step.
After that, the user will be directed to your website’s user page or any page that you choose. In this way, you will retrieve his/her data that will be used on your website.
Setting up PrestaShop Google login in Social login module
Step 1: You can use any PrestaShop Google login module. However, here I am using the Social Loginizer module here. So, you need to first download and install the PrestaShop social loginizer module (Or any PrestaShop Google login you have ).
Step 2: After you install the module, go to configuration panel from the modules listing page.
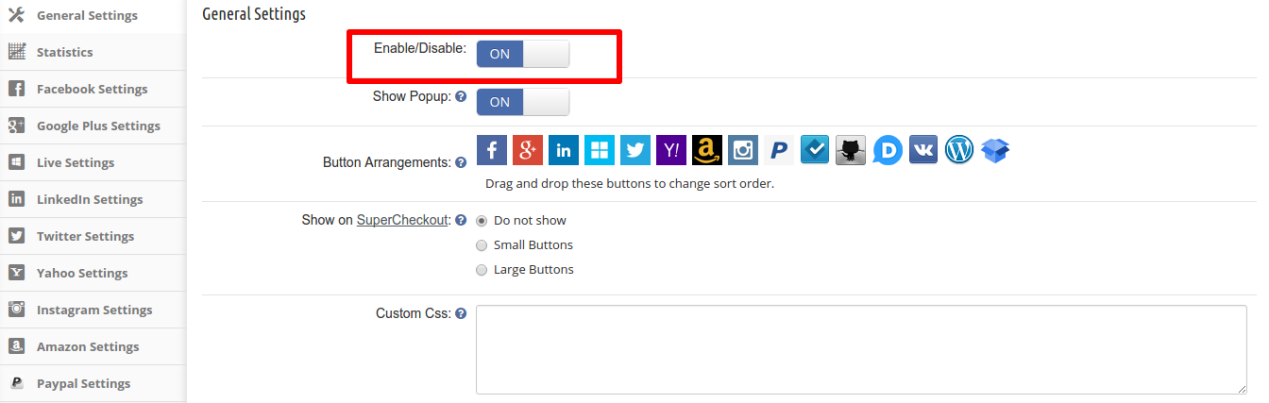
Step 3: Enable the module in the General settings Tab
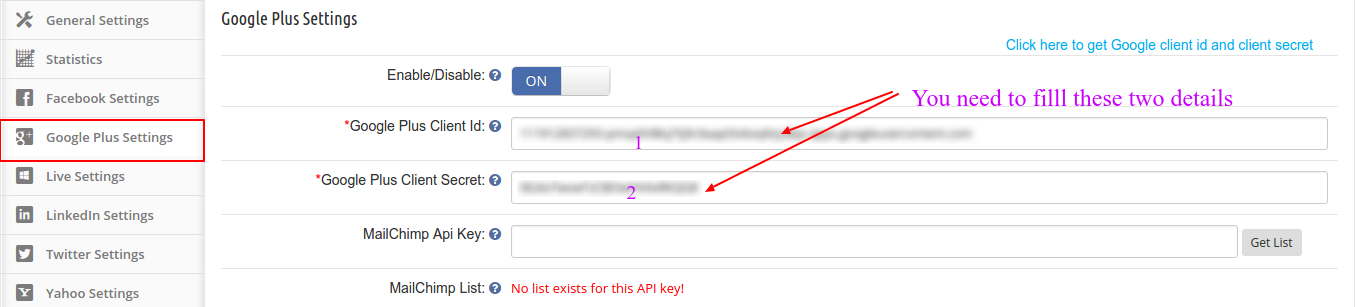
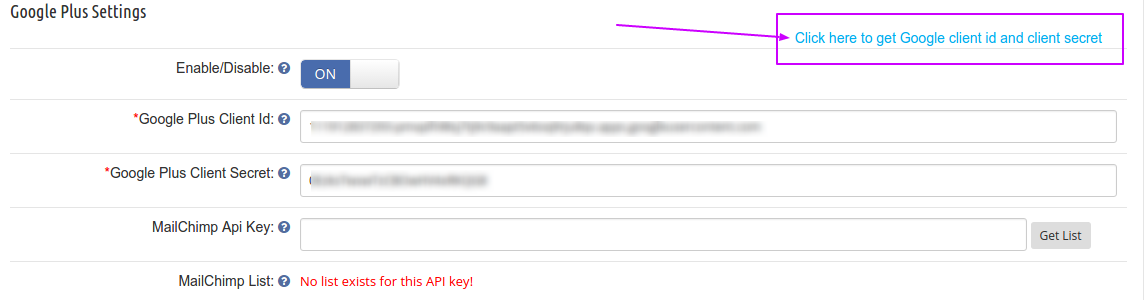
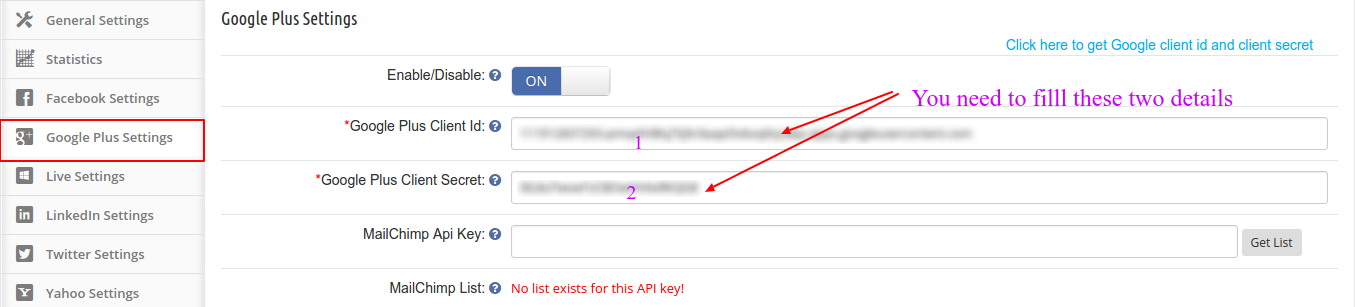
Step 4: Next, navigate to Google Plus Settings, you will find the following interface to setup the Google Login.
To setup the Google Plus login, you need two important details. Google Plus Client Id and Google Plus Client Secret.
How to get the Google Plus Client Id and Google Plus Client Secret?
You can follow these steps to get the Google Plus Client Id and Google Plus Client Secret:
Click on the highlighted link if you are using the Social loginizer module. Otherwise you can directly visit the below URL:
https://console.developers.google.com/project
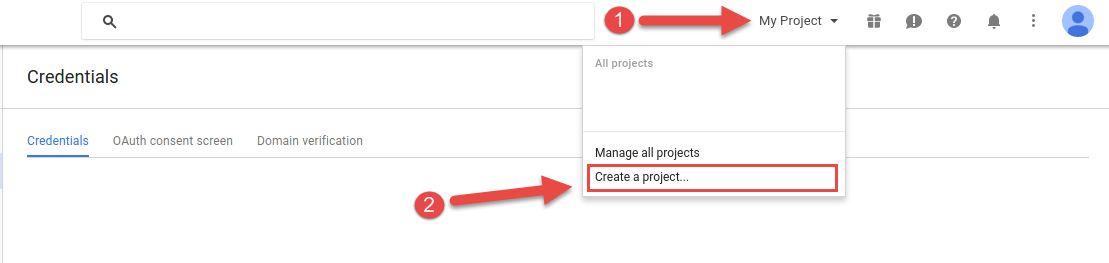
2. Now, Click on My Project and then Create a project
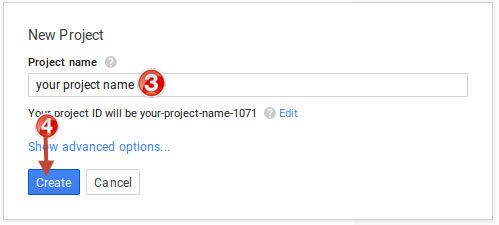
3. Give a Name to your Project and then click Create
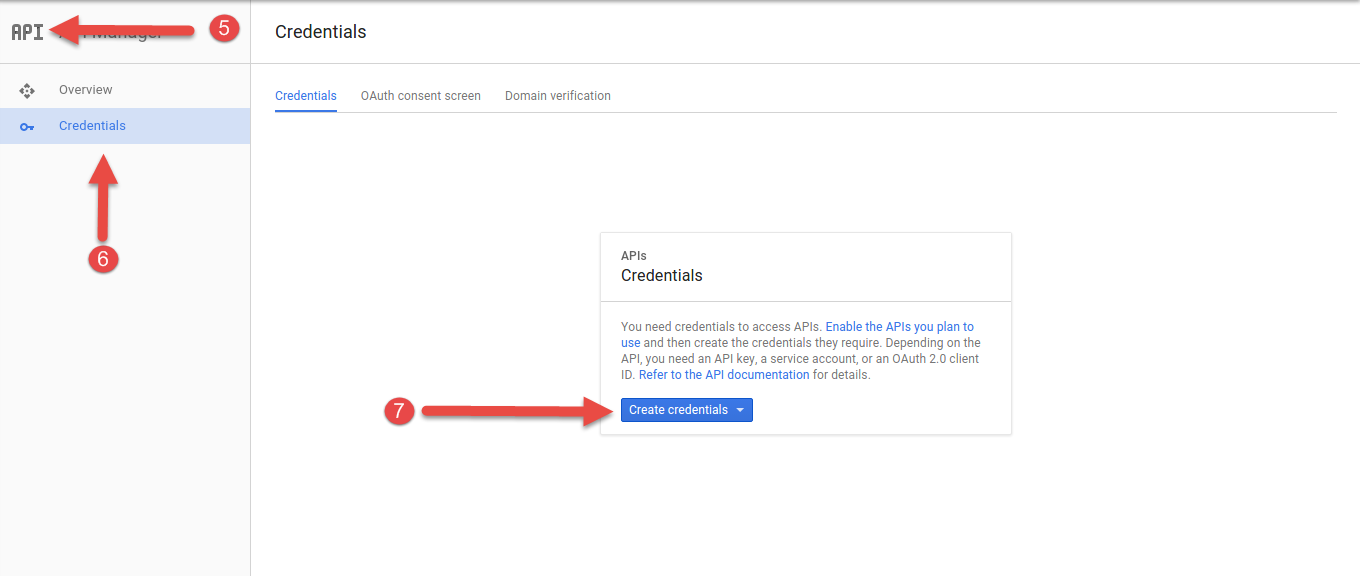
4.In API Setting, go to Credentials and click on Create credentials button.
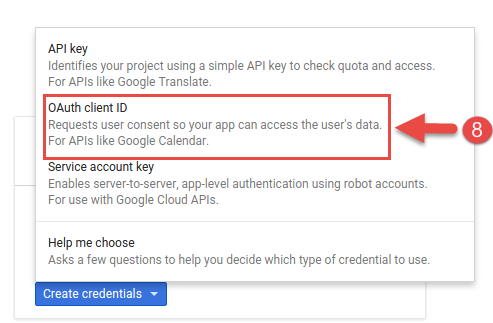
5. In the next step, you will see a pop-up. Click on OAuth client ID
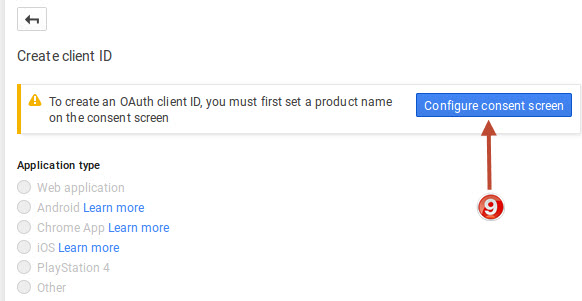
6. To configure the OAuth client ID, you have to first set a product name on the consent screen. So, now, Click on Configure consent screen for the next step.
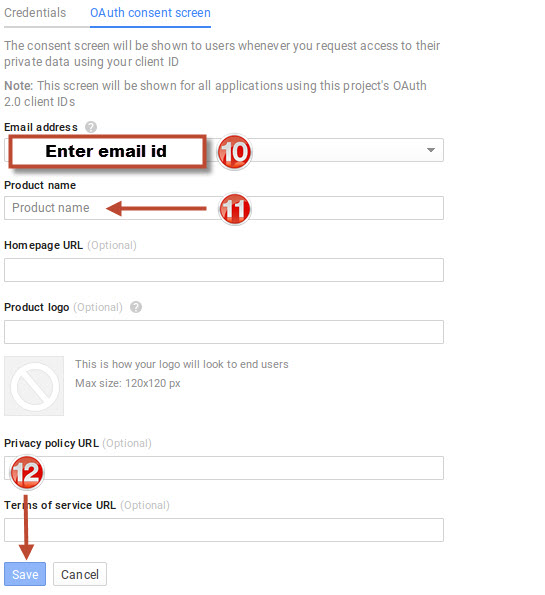
7. Enter the details as asked in the image below and click Save
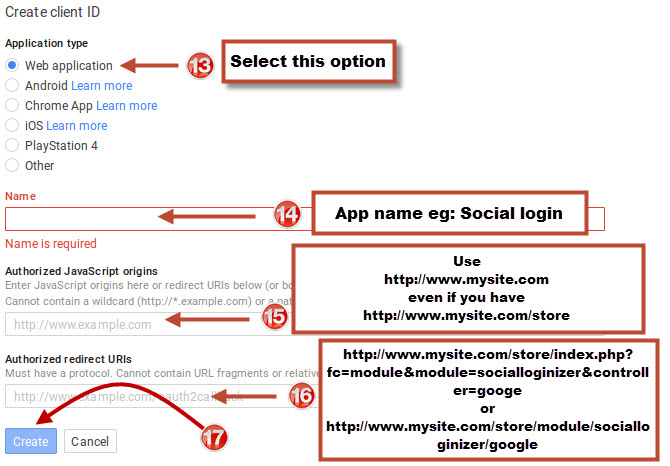
8. In the next screen select Web application. Then provide the App name (say Social login) and enter the URLs as shown in the image below:
Please note:
If you have SEO URL enabled on your site then use below redirect URL
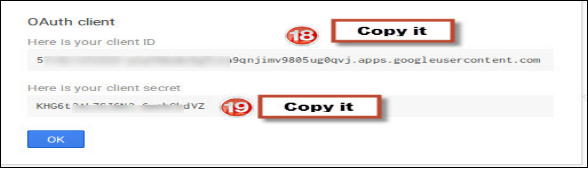
9. Now, your Google Plus Client Id and Google Plus Client Secret are ready. You need to copy and paste these details in the correct field in the module setting.
Finally,
The above-explained method is one of the easiest ways to start accepting the Google plus login on your PrestaShop site. Social login using Google plus can prove to be a milestone in your store’s conversion optimization. In today’s era of huge competition among the eCommerce sites, a site without social login option will not survive. So, you need to adopt a social login for your website from the very beginning itself. PrestaShop social loginizer module could be a wise choice as it has multiple social login options that can be configured very easily. So, start a PrestaShop Google login on your eCommerce site now to tackle your rival sites with a competent weapon.
Magento offers useful and powerful facility to import/export products in bulk via CSV using DATAFLOW profiles. You can import/export your current magento data very easily.
Method 1: Manually
Step 1: Importing Product Data
Data format is very important in importing the data. First you need to learn the data format required by Magento for import. The simplest way is to create a sample product and export all products. Following steps have to be followed-
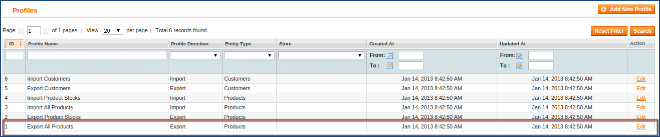
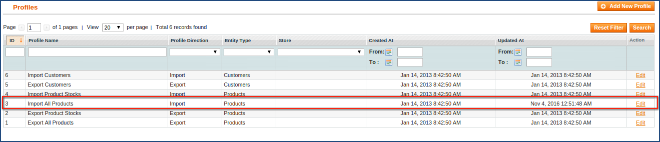
System -> Import/Export -> DataFlow-Profiles.
Click “Edit” in the row of “Export All Products”.
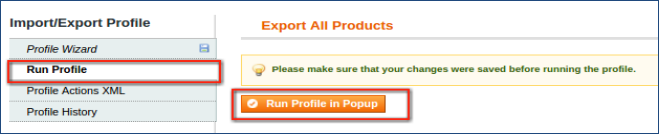
Go to “Run Profile” tab, click “Run Profile In Pop-up.
The exported CSV File will be downloaded/placed in-
Open the downloaded file with spreadsheet application.
You can update data if you want to and save it with .csv extension.
Now you can import the product data by running Import All Products DataFlow Profile.
Upload your edited CSV file and run the profile.
Following steps have to be followed-
System -> Import/Export -> DataFlow-Profiles.
Click “Edit” in the row of “Import All Products”.
“Upload” tab -> Choose file(1 or more) -> “Save and continue edit”
Note: Your file should be in .csv format.
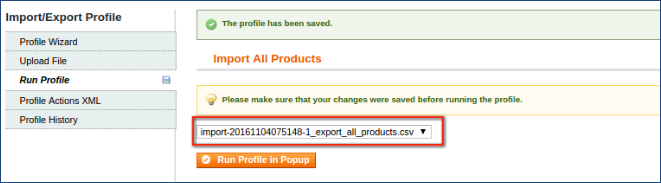
“Run Profile” tab -> Select file from the drop-down menu -> “Run profile in popup”
Step 2: Importing Product Images
After successfully importing database into your Magento, now you can import product images with following steps-
FTP all the product images to “/media/import” folder of your Magento setup folder. We highly recommend you to store the images in the high quality as Magento will resize the images to required dimensions while importing.
Create a new spreadsheet having sku and image column.
Copy the sku column from your product data file(.csv).
Copy the image file names from your inventory and copy them to the image column in spreadsheet.
Images should have .jpeg extension with “/” leading the name.
Create new DataFlow profile called Import Products Images with the following settings-
Entity Type: Products
Direction: Import
Data Transfer: Interactive
Type: CSV/Tab Separated
Field Markup: sku -> sku, image -> image.
Upload the file and Run.
Method 2: Using Extension
You can use extension for import/export bulk products at a time, which you can download at Magento Connect.
Step 3: Removing Duplicated Images
Whenever you run a product image import, Magento copies the image from /media/import to a subdirectory of the /media/catalog/product folder, thus after many imports, it creates duplicate files in the media folder.
1.0 What is Product Availability Check By Zipcode?
As you know that after finding a suitable product, the customer wants to know the availability of the same in a particular region.
By this Prestashop Availability Check by Zipcode Addon, the customer can check the availability of the product in a particular location using its Zipcode. This Prestashop zipcode validator will ease the work of the customers to check the availability of the product in any particular area before placing an order.
2.0 Product Availability Check By Zipcode
2.1 Introduction
This Prestashop Zipcode addon has a functionality through which the customers can check the availability of the products in a particular region.
The Prestashop Zipcode validator addon provides lots of enticing features which are as follows:
Prestashop zipcode addon allows the customer can check the availability of a product at any location using Zip-code.
A popup will be displayed on the frontend of the PrestaShop store when the user visits the website.
With the help of this Prestashop zip code validator module, the admin can easily map Zones with Zip-codes by uploading a CSV file.
This zip code validator module offers the admin to easily map Zones with the Product by uploading the CSV file.
The Prestashop Product Availability module helps in displaying the Delivery date, Success message, and Failure message on the front end.
The product availability check PrestaShop module lets the admin Enable/Disable the availability of the product for a specific Zip-code at any time.
The product availability check by zipcode Prestashop module allows the admin to map multiple Products with multiple Zones.
This Prestashop Postal Code Validator module offers to add the multiple Zip-codes with Zones by comma separated values.
The Prestashop Postal Code Validator Addon provides the admin to search, delete, or even modify Zones.
The product zipcode validator module allows the admin to search, delete, modify Zip-codes.
The Prestashop product zipcode validator plugin offers the admin can search, delete Product-Zone Mapping.
This Prestashop Availability check by zipcode module allows the admin to add Custom CSS and Custom JS at Product Page of the front end to change the look and feel of the box.
Prestashop Product Postal Code Validator allows the admin to disable product availability check for specific products.
With autofill feature of Prestashop product zipcode validator, the user need not fill zipcode field for every product on the store. Once the zipcode is entered for a product, it will automatically show availability for every product they visit.
2.2 Installation Manual:
Follow the following steps for installing the Product Availability Check By Zipcode addon:
Download the Prestashop zipcode validator package.
Unzip the package in your modules folder of Prestashop setup via FTP manager (like Filezilla or WinSCP – download here).
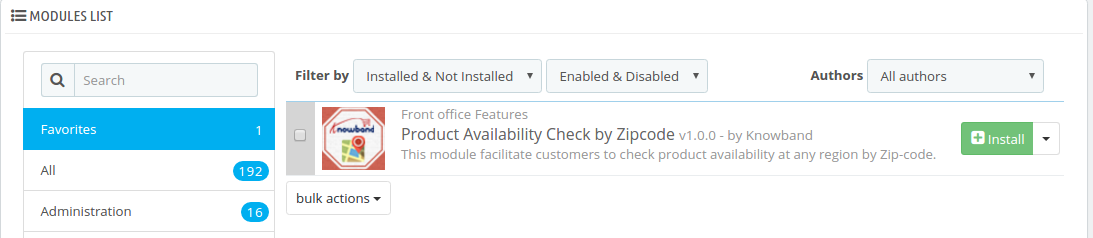
In the admin Panel go to “Modules and Services> Product Availability Check By Zipcode >Install”.
Click ‘Configure’ to edit settings of this Prestashop zipcode module.
3.0 User Manual:
This User Manual will guide the the admin through the Module/Store Front settings of the Prestashop zipcode validator module and the various features of the Prestashop Product Availability Check By Zipcode Addon.
4.0 The Admin Interface:
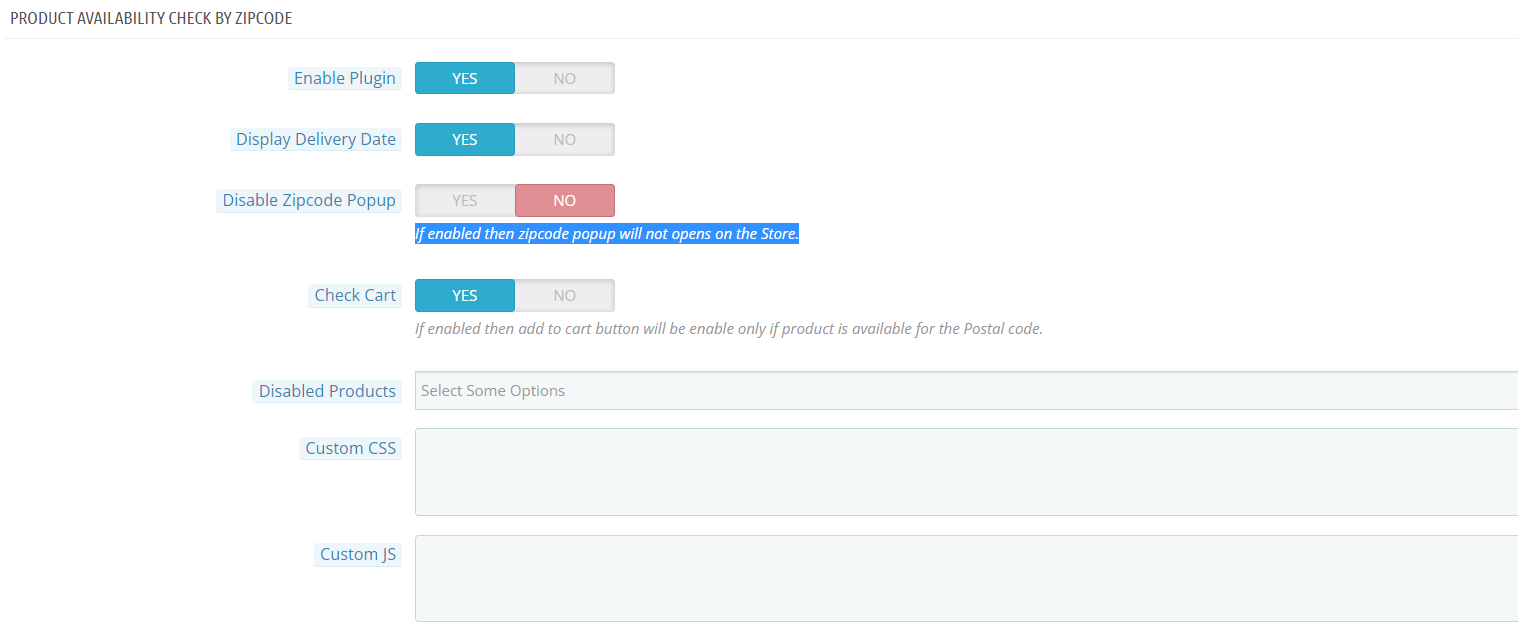
After installation, when the the admin clicks on Configure, a screen will be displayed where he/she can configure general settings of this product zipcode validator module.
4.1 Configure Product Availability Check By Zipcode Setting:
Following are the steps to configure this Prestashop Zipcode module –
Go to Modules and Services.
Search module ‘Product Availability Check By Zipcode ’ .
Click on ‘Configure’ button.
Fields:
Enable: By default, this setting of the product availability check Prestashop module will be OFF. Whole Prestashop zipcode validator module functionality depends on this toggle button. When it is enabled, a text field to check product availability will be displayed on the product page on the front end of the product zipcode validator module.
Display Delivery Date: This field of the Prestashop Postal Code Validator Module is offered to the admin to display the delivery date of the products. The admin just needs to turn on the setting to display the delivery date. But, if he doesn’t want to show the delivery date, then he can set the toggle button on OFF mode.
Display Zipcode Popup – If this option is enabled then the module popup doesn’t appear on the front.
Check cart: Check cart feature restricts the visitor to go to the checkout page if any of the product is not available in the zip code entered by the customer in the address field.
Disabled Product: The store admin can restrict zipcode check functionality for particular products using this option.
Custom CSS: This field of Prestashop Prestashop product zipcode validator is offered to the admin to add custom CSS to the product page if required.
Save: By clicking this button, this Prestashop Zipcode module will save setting into the database and return back with success message.
4.2. Zipcode Availability Check:
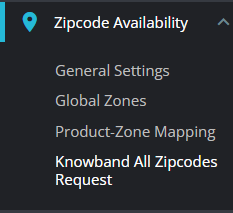
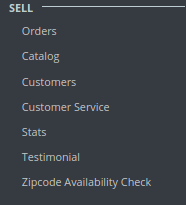
After installing the product zipcode validator module, a separate menu (named “Zipcode Availability Check”) will be added at the end of menu listing as shown below.
.
Figure 3.1 – Product Availability Check by Zipcode – Menu Tabs(1.6.x.x)
Figure 3.2 – Product Availability Check by Zipcode – Menu Tabs(1.7.x.x)
In this tab of the Prestashop zipcode validator module, there will be 3 sub-tabs described below.
4.3. Global Zones:
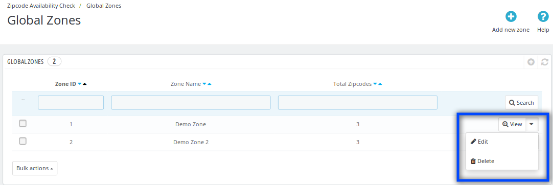
This tab of the Prestashop Postal Code Validator Addon contains the list of zones that are created by the the admin by adding new zones from ‘Add new Zone’ button appears at the top right of the page. The admin can perform operations like searching the zone, view a zone, delete zones, edit zones and add a new zone in the image mentioned below.
Following are the steps-
Hover on ‘Zipcode Availability Check ’ menu.
Go to ‘Global Zones ’.
Figure 4 – Product Availability Check by Zipcode – Global Zone
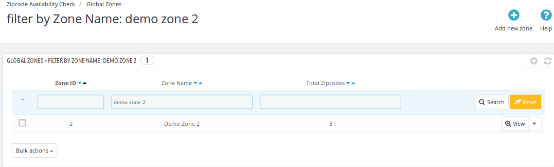
The image below would be displayed when the admin searches any zone.
Figure 5 – Product Availability Check by Zipcode – Search Global Zone
4.3.1 Add New Global Zone:
In this field of the Prestashop zipcode addon admin can add a new Global Zone and the image mentioned below will display when the admin clicks on the ‘Add New‘ button.
Following are the steps –
Hover on ‘Zipcode Availability Check’ menu.
Go to ‘Global Zones’.
Click on ‘Add new zone’.
Figure 6.- Product Availability Check by Zipcode – Add New Zone
Fields:
Availability: By default, this setting of the zipcode validator module will be ON/enabled. When the admin disables this button then the product will not be available at added zipcode location.
Zone Name: In this field of Prestashop Availability check by zipcode, the admin can define zone names according to his/her understanding.
NOTE: Zone name must be unique.
Zip-code: This is text-area Field. In this field of Prestashop product zipcode validator module, the admin can enter multiple Zip-codes here separated by the comma (,). Ex- 201301, 983923, 345453
Deliver By: This is the estimated day of product delivery. The Prestashop zipcode addon offers the the admin to configure the number of days of delivery. When the customer will enter the zip code, a message will be showen with the estimated delivery date.
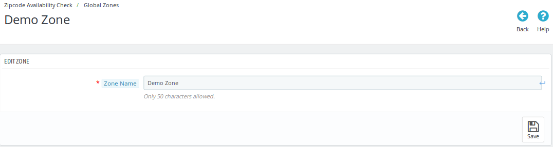
The image mentioned below will be displayed when the admin clicks on the ‘Edit‘ button.
Figure 7.2 – Product Availability Check by Zipcode – Edit Zone
Fields:
Zone Name: The Prestashop Postal Code Validator Addon offers the admin to define the zone names according to his/her understanding.
4.3.3. Delete Global Zone:
The admin can delete a particular Global Zone.
Following are the steps to Delete Zone –
Hover on ‘Zipcode Availability Check ’ menu.
Go to ‘Global Zones ’.
Click on ‘Delete ’.
Click on ‘OK ’.
Note: If Admin delete a zone then all the zip-codes in that zone will also be deleted.
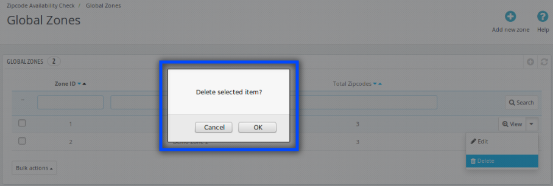
The image mentioned below will display when the admin clicks on the ‘Delete’ button.
Figure 8.1- Product Availability Check by Zipcode – Delete Zone
4.3.4. View Global Zone
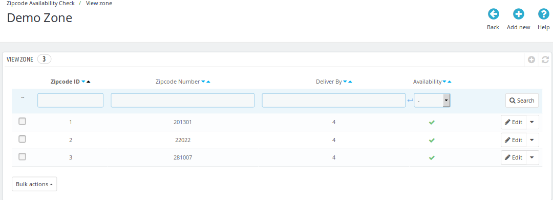
This field of Prestashop Product Availability module lets the the admin view a particular Zone by clicking on ‘View ’. Each zone contains a list of zip-codes with their number of days of delivery and availability status. The admin can perform the search, edit and delete operations in this list of the product availability check Prestashop module.
Following are the steps to View Zone –
Hover on ‘Zipcode Availability Check’ menu.
Go to ‘Global Zones’.
Click on ‘View’.
Figure 9 – Product Availability Check by Zipcode – Delete Zone
4.3.4.1. Add new Zipcodes:
In this field of Prestashop Postal Code Validator Addon, the admin can add more zipcodes in a particular Zone by clicking on ‘Add new’ button to a particular zone.
Following are the steps to add new Zone –
Hover on ‘Zipcode Availability Check’ menu.
Go to ‘Global Zones’.
Click on ‘View’ for a particular Zone.
Click on ‘Add new’.
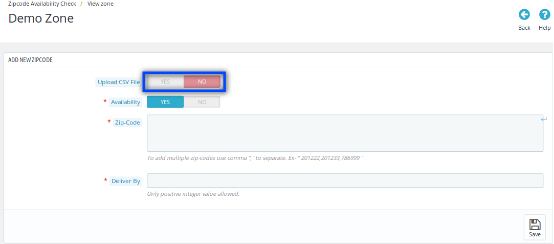
When ‘Upload CSV File’ option is Disabled:
Figure 10.1- Product Availability Check by Zipcode – Add new Zipcodes
Fields:
Availability: By default, this setting of the product availability check by zipcode Prestashop addon will be ON. When the admin disables this button, then the product will not be available at added zipcode location.
Zone Name: This Product Availability Check by Zipcode module lets the the admin define zone names according to his/her understanding.
NOTE: Zone names must be unique.
Zip-code: This is text-area Field. In this field of Prestashop Postal Code Validator plugin, the admin can enter multiple Zip-codes here by the comma (,) separated. Ex- 201301, 983923, 345453.
Deliver By: In this field of Prestashop product zipcode validator module, the admin can configure the number of days of the delivery.
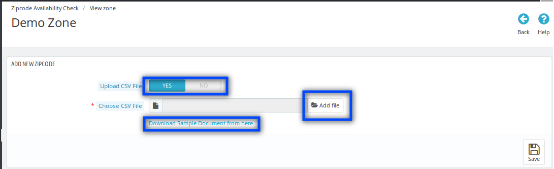
When Upload CSV File option is enabled:
Figure 10.2 – Product Availability Check by Zipcode – Add New Zone
Field:
Upload CSV File: By enabling this option of the Prestashop zipcode validator module, Choose CSV file Option with a link to download the sample ‘.csv ‘ file will be displayed.
Add File: In this field of Prestashop product zipcode validator module, the admin can choose the CSV file by clicking on Add file option.
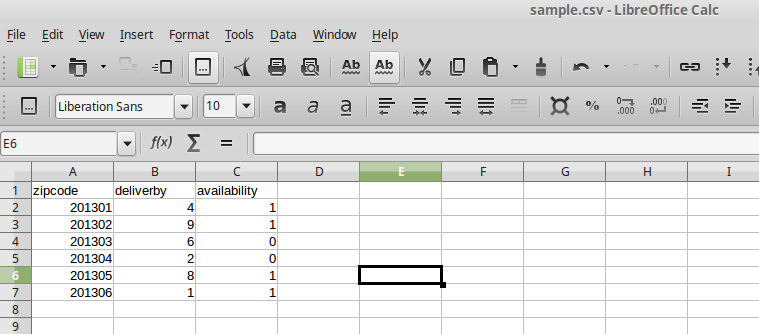
Download Sample Document from here: When the admin clicks on this link, this file will be downloaded.
Figure 11 – Product Availability Check by Zipcode – Download Sample (Add New Zone)
4.3.4.2. Edit Zip-codes:
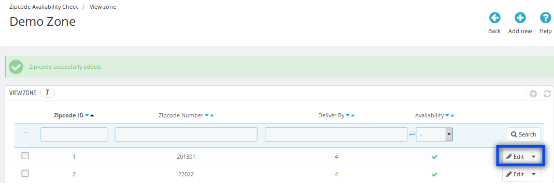
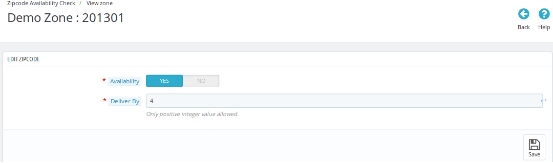
This Prestashop Product Availability addon offers the admin to edit the particular zip code. This can be done just by clicking on ‘Edit’ option of that particular zip code. The image mentioned below will be displayed when the admin clicks on ‘Edit’ button of a particular zip-code from ‘View Global Zones’ page.
Figure 12- Product Availability Check by Zipcode – Edit Zipcodes
Field:
Availability: By default, this setting of the product availability check by zipcode Prestashop addon will be OFF. When the admin enables this toggle button, then the products added to the ‘Product Details Tab’ will be available at this location. But if the admin sets the option to NO, then the product mapped to that particular zip code will not be available.
Delivery By: In this field of product availability check Prestashop addon, the admin can edit the day of delivery to that particular zipcode just by entering any positive integer value.
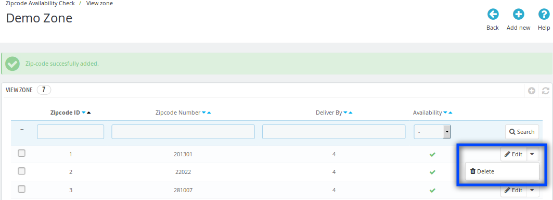
4.3.4.3. Delete Zipcode
This Prestashop Availability check by zipcode allows the admin to delete a particular Zipcode.
Figure 13- Product Availability Check by Zipcode – Delete Button
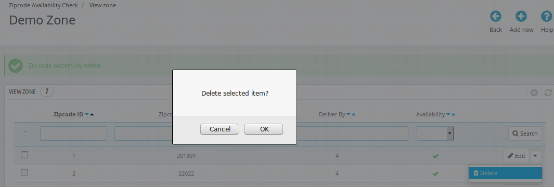
The image mentioned below will be displayed when the admin clicks on the ‘Delete‘ button of the zipcode validator module.
Figure 13.2- Product Availability Check by Zipcode – Delete Zipcodes
4.4. Product-Zone Mapping:
This tab of Prestashop Product Availability Check by Zipcode module contains the list of the zones which are mapped with some products. The admin can search, view, delete and can map (add) new Products with Zones.
The admin can view the products which are mapped to a particular zone by clicking on ‘View‘ button of the Prestashop Availability check by zipcode module.
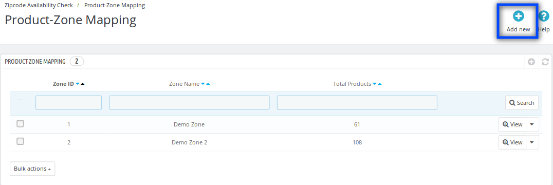
Figure 14- Product Availability Check by Zipcode – Product Zone Mapping
4.4.1 Add new Product-Zone Mapping
When the admin clicks on ‘Add New’ button of the ‘Product-Zone Mapping Tab‘ then the image mentioned below will be displayed.
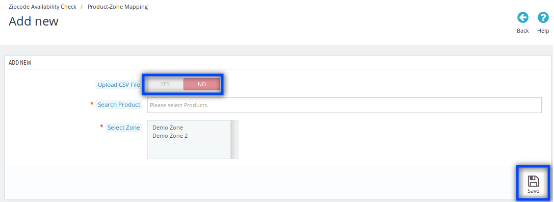
When ‘Upload CSV File’ option is disabled:
Figure 15.1- Product Availability Check by Zipcode – Add New Product Zone Mapping
Fields:
Upload CSV File: In this field of Prestashop zipcode addon, the admin can upload a CSV file to add the large number of Zip-codes.
Search Product: In this field of Prestashop Zip code addon, the admin can select and enter any searched product/multiple products.
Select Zone: This is a multiple-select drop-down. In this field of zipcode validator module, the admin can select zones from this drop-down.
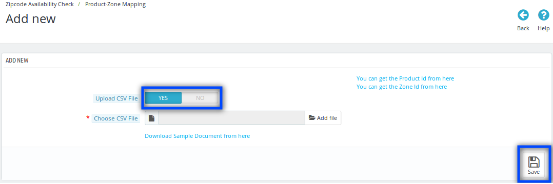
When Upload CSV File option is enabled
Figure 15.2- Product Availability Check by Zipcode – Add New Product Zone Mapping
Fields:
Upload CSV File: By enabling this field of the Prestashop Postal Code Validator Module, Choose CSV File option will be displayed with a link to Download Sample Document from here.
Choose File: In this field of product availability check by zipcode Prestashop addon, the admin can choose a file by clicking on Add File option.
Download CSV file format from here: In this field of Prestashop Product Availability addon, when the admin clicks on this link, file inside the image mentioned below will be downloaded.
Figure 16- Product Availability Check by Zipcode – Document Sample (Add New Product-Zone Mapping)
You can get the Product ID from here: In this field of Prestashop Zipcode plugin, when the admin clicks on this link the admin will be redirected to Products Listing Page of the admin panel.
You can get the Zone ID from here: After clicking on this link of the Prestashop zipcode addon, the admin will be redirected to Global Zones Page of the admin panel.
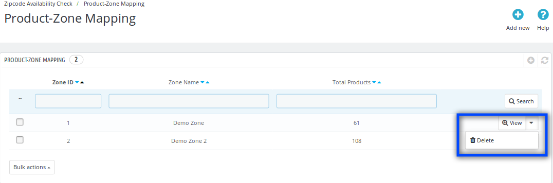
4.4.2 Delete Product-Zone Mapping
This field of zipcode validator module allows the admin to delete zone which is mapped with the products.
Figure 17.1- Product Availability Check by Zipcode – Delete Button
Following are the steps to Delete Zipcode-
Hover on ‘Zipcode Availability Check’ menu.
Go to ‘Product-Zone Mapping’.
Click on ‘Delete’.
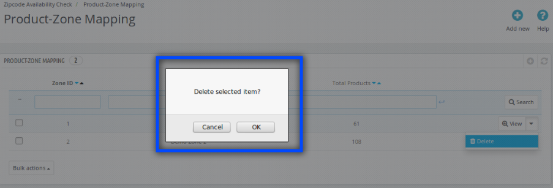
Click on ‘OK’.
The image mentioned below will be displayed when the admin clicks on the ‘Delete’ button.
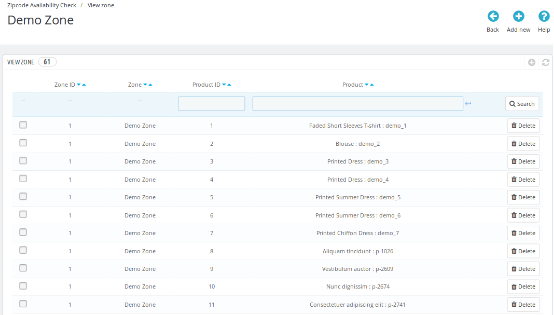
When the admin clicks on the View Button of the Prestashop Availability check by zipcode plugin, then the list of products mapped with that selected zone will be displayed. The admin can search and delete any product.
The admin can delete a particular product which is mapped to a zone.
Following are the steps to Delete Zipcode –
Hover on ‘Zipcode Availability Check’ menu.
Go to ‘Product-Zone Mapping’.
Click on ‘View’ for a particular zone.
Click on ‘Delete’ for a particular product.
Click on ‘OK’.
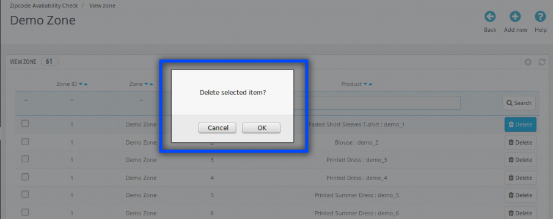
The image mentioned below will be displayed when the admin clicks on the ‘Delete‘ button.
Figure 19- Product Availability Check by Zipcode – Delete Product
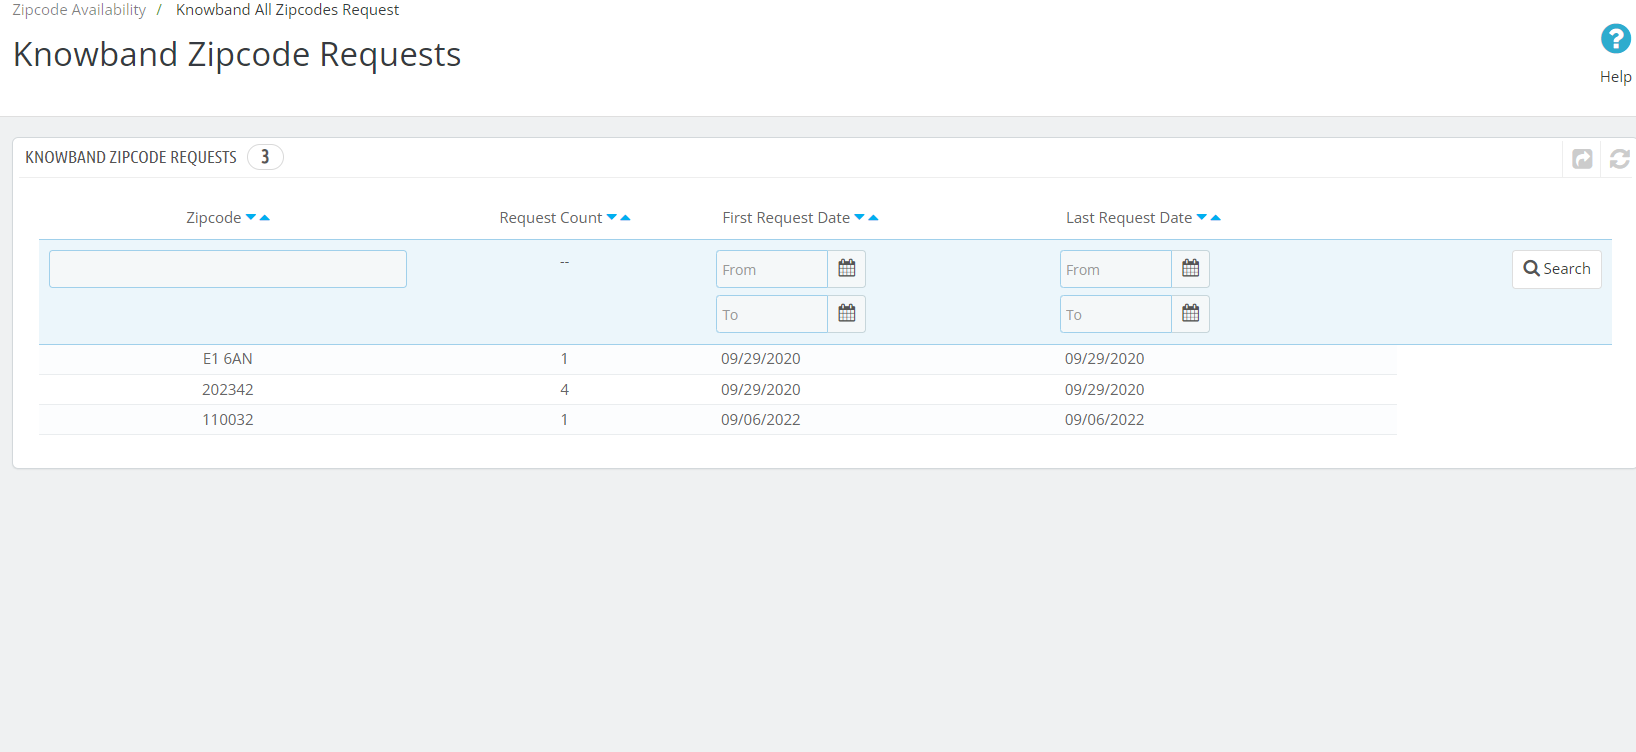
4.5. Knowband All Zipcode Request:
Using this option the Admin can see the product availability requested under the specific Zipcode area.
5.0 Front End Interfaces:
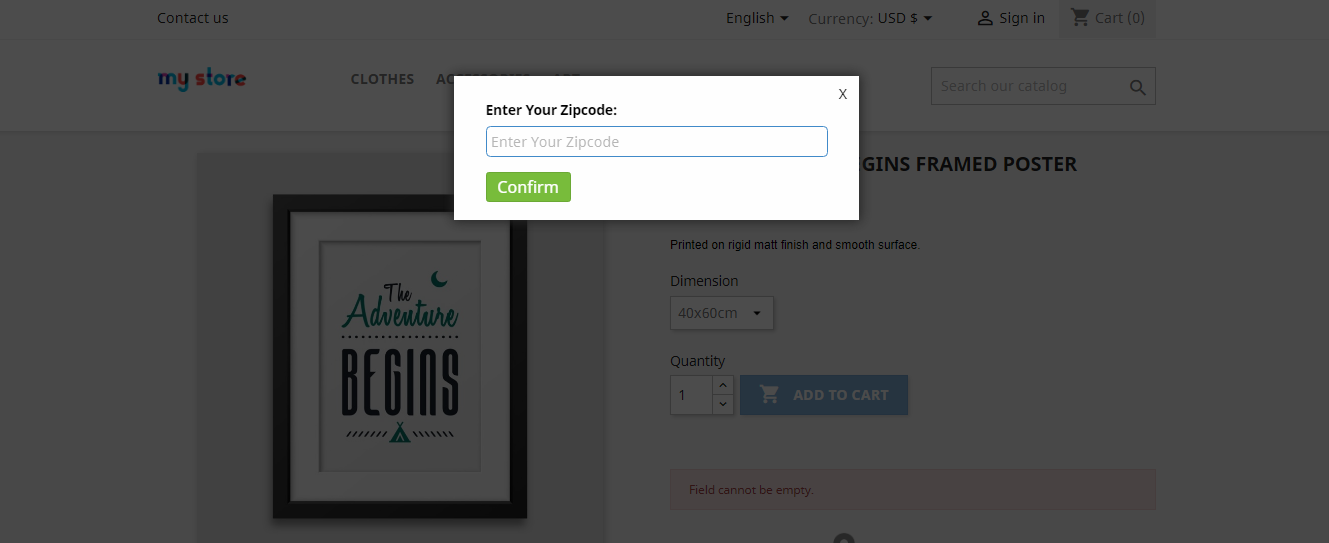
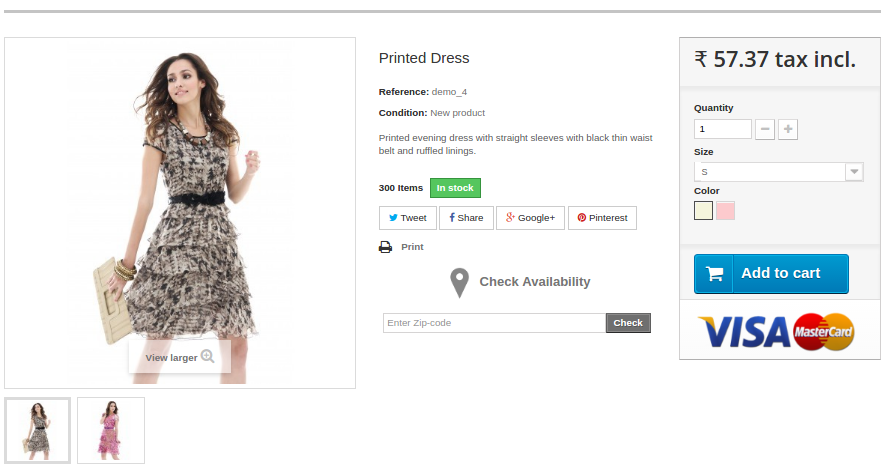
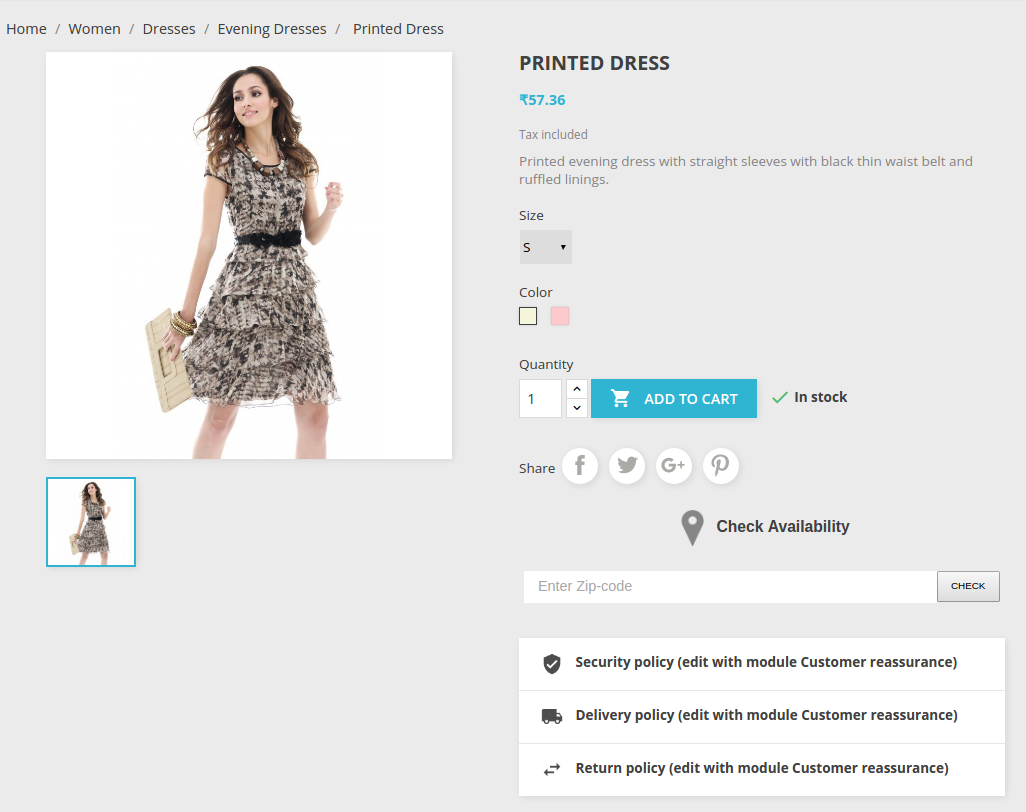
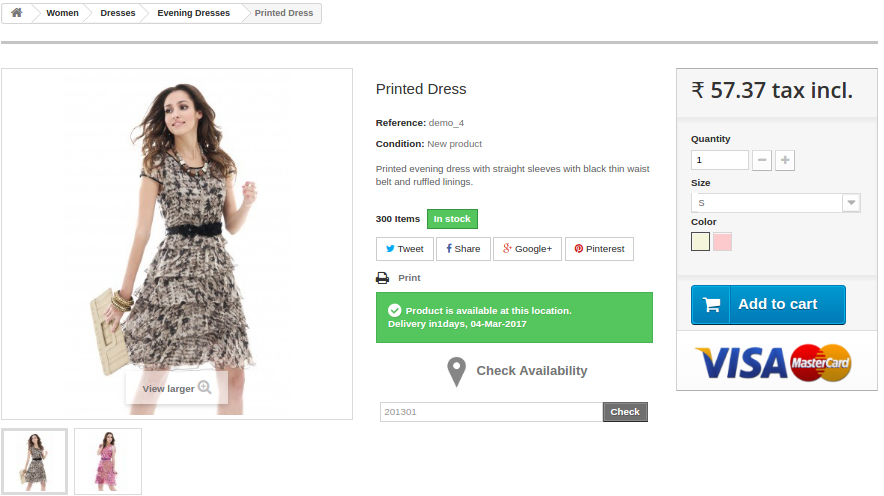
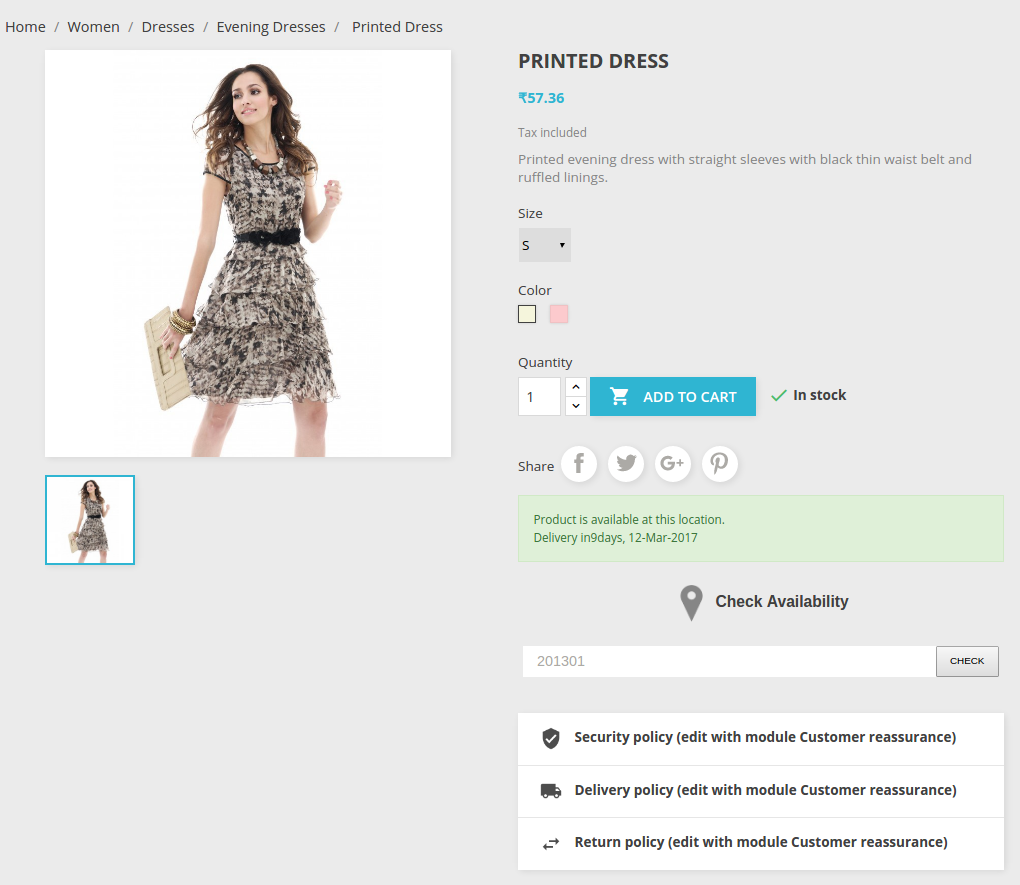
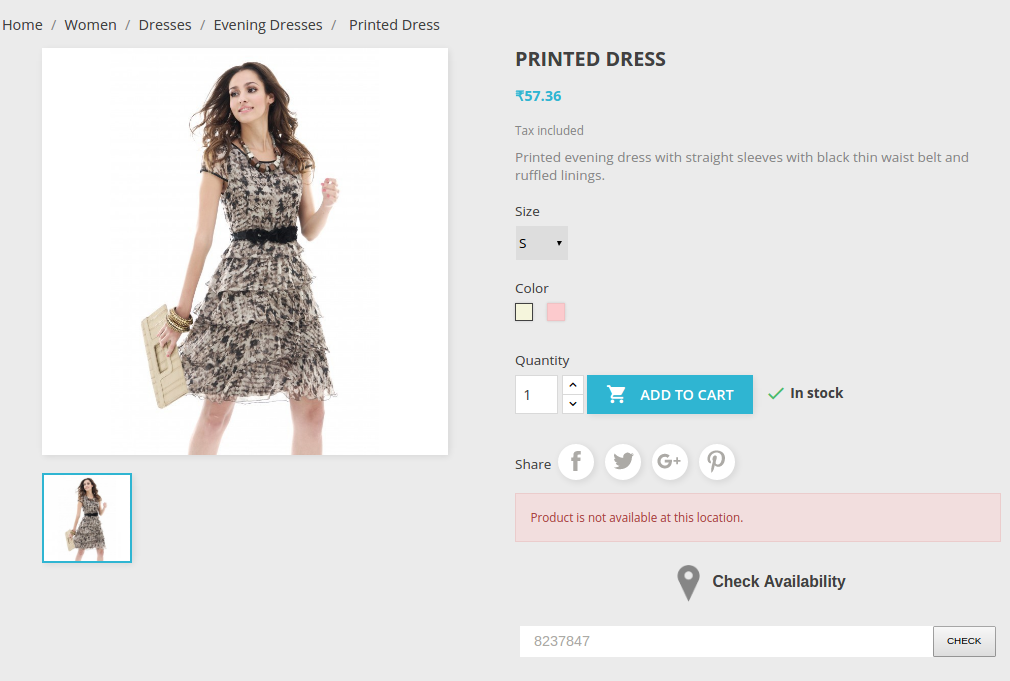
If the Prestashop zipcode validator module is enabled, then the customer can check the availability of a product in a particular location by entering the Zip-code of the region. The customer will see a popup on the screen when he/she visits the website as displayed in the picture below:
On the frontend, the image mentioned below will be displayed.
Magento has been the best tool for eCommerce startups for a very long time. It is not just a better eCommerce platform but also a better platform for the B2B business model. From handling heavy transactions from a large number of customers to Managing the complex pricing system as a B2B website, Magento has proven it’s efficiency on multiple grounds.
Despite all these advanced functionalities and great a abilities, even Magento is not safe from the evil of shopping cart abandonment. Hail the Magento’s affinity to acquire even more advanced functionalities by incorporating third party Magento extensions. Magento Abandoned cart extension is one such extension to the core functionalities of Magento.
How Magento Abandoned cart extension works?
The core logic behind a Magento Abandoned cart extension is to track and capture the information of customers checking out on a Magento site. The information basically includes Name of the customers, E-mail id, and the Cart content. Now, that the Magento Abandoned cart extension captures all these information from a Magento checkout, it uses this information to establish a communication between the Website Owner/Admin and the customer in case the when a customer decides to abandoned the cart.
How Magento Abandoned cart extension uses the customer information?
The active role of a Magento Abandoned cart extension comes into the lime-light when a customer leaves the site after adding some products and without making a payment. It means that the customer has finally abandoned a cart from your site. In the meantime, during certain instances of the checkout process, the Magento Abandoned cart extension captures the information about that customer. The information is then utilized in multiple areas to present an abandoned cart recovery medium to the website owner.
To mark a cart as abandoned–
Magento Abandoned cart extension basically captures the information about every customer and his cart on the site. However, not all the carts can be considered as abandoned. Therefore a Magento Abandoned cart extension provides the option to configure a time limit after which if the customers do not return to the cart, then the cart will be considered an abandoned.
After a cart is marked Abandoned–
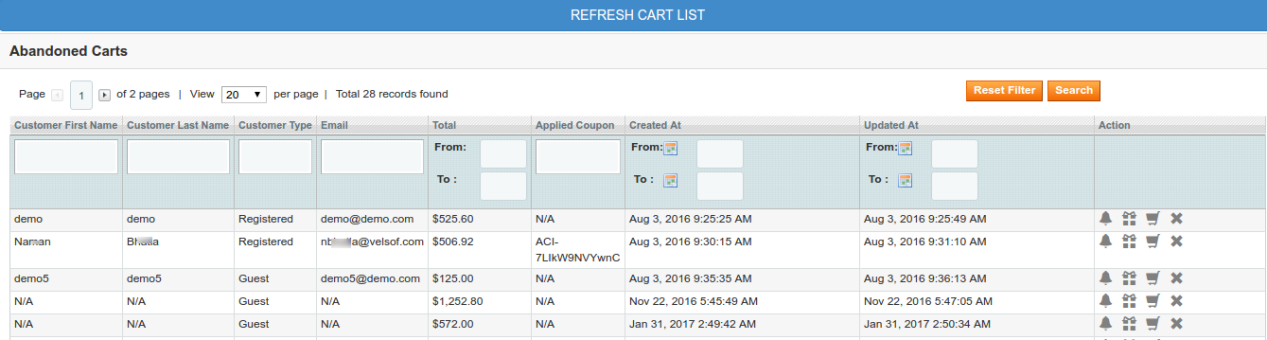
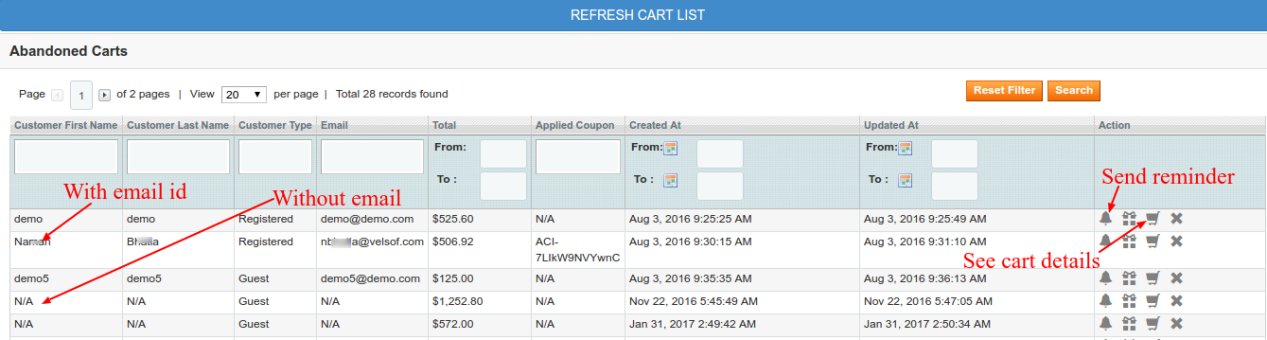
After a cart is marked as an abandoned cart, the Magento Abandoned cart extension process it’s working for the recovery of the lost sale. The marked abandoned carts are first listed on a separate interface from where the website owner can easily see the details of the cart. There are two types of carts that are captured in this list. One is the carts without email id and other is the carts with email ids.
The carts without email ids cannot be used for the recovery here, as the only communication medium (email reminder) that the Magento Abandoned cart extension uses is not available in this case.
Carts with email ids–
The carts where customers have provided their email id during the incomplete checkout process are used by the Magento Abandoned cart extension to send serial reminders directly from the extension’s interface. For doing so, the extension stores a large number of email templates that can be used here. There are basically two types of email templates that are used by the Magento Abandoned cart extension. Email templates that offer a promotion, discount, or any other offer in the lieu of completing the checkout process. Other types of email templates are general reminders that are not accompanied by an offer or discount. They are just the reminders for the customer to inform that he has left a cart abandoned on your site and he can still complete his checkout process.
If customer decides to complete the checkout- Now, it depends on the efficacy of your serial reminders and quality of your reminder emails to encourage the customer to complete his checkout. So, let’s say you have written some nice emails that encouraged the customer to come back and complete his purchase. In this case, the emails that you have sent, all of them consist of a direct checkout link. Clicking on this link will directly take the customer to your checkout page with all the products and customer information already restored. The customer has to just make a payment and complete the checkout to earn you a recovered sale that was lost because of shopping cart abandonment.
Concluding,
This is how a well developed Magento Abandoned cart extension works to recover the lost sales for you. There are some advanced Magento Abandoned cart extensions that go ahead and deliver some more useful functionalities. For example, with Knowband’s Magento Abandoned cart extension:
A Cron can be set to automatically capture and list the abandoned carts according to the time limit set.
A Cron can be set to automatically send the reminder emails to the customers after they are captured.
Admin can decide the time period after which the emails will be sent to the customer.
Admin can set the time frame for a particular cart during which a particular email template will be used to send the reminder. The template could be with an offer or without offer; depends on the template set.
E-mail marketing is an essential part of any business optimization strategy today. Whether you do it in a planned way or just some random emails to your potential customers, emails are used by a majority of the businesses to reach out the customers. Consider it a product update, new update, or just a greeting message, emails are used by the businesses to expose their offerings to the customers. As compared to any other marketing medium emails are the oldest among the active mediums and they intend to be there for a long time.
So, why not leverage this useful marketing tool for your eCommerce business on OpenCart platform too.
How can you leverage the email marketing for your OpenCart website?
What is Mailigen?
Mailigen is a very popular email marketing platform that supports a repository of huge email database to be stored and utilize the email list to send bulk emails to those email ids stored. It provides various options to organize the email campaigns and prepare the group of email ids that will receive the emails from your side from time to time. The automatic email scheduling in one such popular feature of Mailigen.
Mailigen and OpenCart
For most of the eCommerce platforms do not consist on inbuilt medium to manage email marketing campaigns. That is why business owners on platforms (like OpenCart) depend on email marketing agents (like Mailigen) to provide that medium. Now, that we know the basics of how Mailigen could be useful for your OpenCart store, let’s see how can you actually leverage this email marketing tool on your OpenCart store.
The OpenCart Mailigen integrator extension can be used to synchronize your store’s email database to your Mailigen account. Since you have a tool (Mailigen) that can easily organize the email campaigns for your marketing, you just need the email data of your customers whom you have to send the marketing emails. The best thing about OpenCart Mailigen integrator extension is it can capture the emails of your customers from the OpenCart store and sync them to your Mailigen account so that you can use them for your marketing campaign.
How OpenCart Mailigen integrator captures the email ids?
Every eCommerce website possesses certain forms that it uses to collect information of the customers on different occasions. These occasions could be the account registration form, Newsletter subscription form, or most important-the checkout form. In all these forms, customers have to enter their email ids in the respective email fields.
This is the time when the OpenCart Mailigen integrator extension comes in the picture. The OpenCart Mailigen integrator extension captures the email address as soon as the customer comes out from email id field in any of these forms. The captured email id with the help of this OpenCasrt Mailigen integrator extension is then synced with the Mailigen account. Thus, building a database of email ids from your own OpenCart store.
Benefits of using OpenCart Mailigen integrator extension
The OpenCart Mailigen integrator extension capture email ids of your customers from your own OpenCart store.
Since email ids are from your own website, they are more relevant to your business and have high chances of conversion.
You have to just update your Mailigen account and API details and you can start capturing the email ids with this OpenCart Mailigen integrator extension.
The OpenCart Mailigen integrator extension syncs the OpenCart store with your Mailigen account automatically.
You can enable or disable automatic capture anytime.
For eCommerce store owners, emails have been an effective way to acquire customers. Various merchants take emails as a sufficient tool to reach out their potential customers very easily. Though it was a hype that email marketing has been dead for years, it remains an enormously valuable asset for small and start-up business owners.
Talking about eCommerce start-ups and small-scale businesses, PrestaShop is one of the most popular platforms among them. A large number of eCommerce start-ups, small and medium scale eCommerce businesses are already rocking their ways on PrestaShop platform. So, let’s take this opportunity to enlighten some tips that can be used to acquire relevant email list on a PrestaShop store.
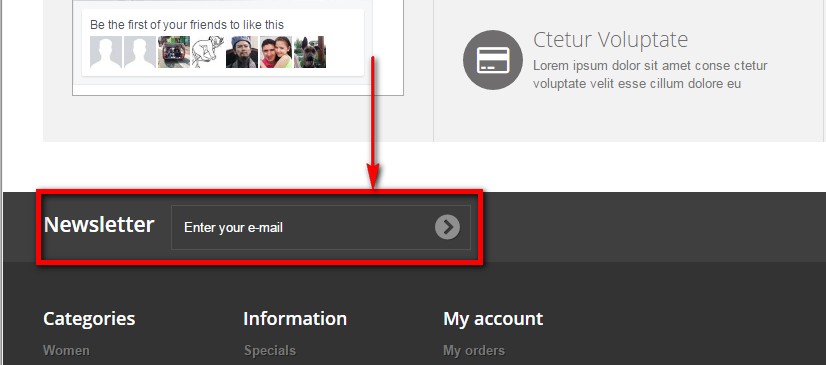
Installing a PrestaShop MailChimp Integrator– The default installation of PrestaShop does not manage the email capturing functionalities. You can see the email ids and other details of the customers only if they successfully place an order on your store or if they are already registered on your PrestaShop site. So, the only way left to introduce an email capturing functionality is to install a PrestaShop module that uses email capturing agents to build a list of emails on your store.
In the same path, MailChimp is a well-known email marketing and email capturing agent that is used by the merchants across the online world. So, It would be a great idea to integrate a PrestaShop MailChimp integrator addon to perform this useful functionality.
Use the forms on your site to capture email data-The email data we collect from different sources and platforms might not always be useful. In most of the cases, they end up in the spam folder of the recipient. It is a sure case that they will end up in spam because the email data might not always be relevant to what you offer.
Contrasting to this, an email data collected right from the visitors on your site are more relevant and have higher chances of conversion. You can use your PrestaShop MailChimp integrator addon to capture the email ids from different forms on your website. An example of the forms that can be used are:
Account registration form
Guest checkout form
Address form
Newsletter subscription form
Free downloads-form
Event registration form
Use the automatic email capture feature of PrestaShop MailChimp integrator addon– Any effective PrestaShop MailChimp integrator has a unique ability to capture and send the email ids to the MailChimp list as soon as a user enters his email id in the email field and blurs form there. By blurring we mean it syncs the customer’s E-mail Id automatically as soon as the user comes out of Email address field. Now that email fields are used in many types of forms on your site (listed above), you can use these forms wisely to build your own email data that consist of more relevant users. Capturing an email data from your own website makes sure that it is a relevant user who might be interested in a business with you.
Finally,
There are various email capturing agents like MailChimp and Mailigen that can be used for your purpose. You will need to first have a subscription of these agents to use them on your site. Moving ahead with the agents, you will need a smart PrestaShop module that can perform the above-listed functions for you. Prestashop Mailigen and MailChimp Integrator module is a smart choice if you are looking for preparing a huge email list with so much of relevant email ids. Mailigen and MailChimp Integrator is a Prestashop module which permits administrator to subscribe clients to Mailigen and MailChimp lists. It consequently synchronizes the client’s E-mail Id to Mailigen and MailChimp accounts. It has a smart sync feature that captures and syncs the customer’s E-mail Id automatically as soon as he comes out of Email address field.
Checking out has been a pain to the customers for a very long time. I can recall the days when multi-page checkouts were the only option available to both the website owners and the customers on the website. Magento, one of the most popular eCommerce platform; it has a default Magento checkout extension that comes pre-configured with the first installation. However, still, this generic Magento checkout is not enough to reduce that pain for the website owners.
I would not go in detail because, as a website owner you must have the knowledge of how the generic checkout is not a perfect tool to fight the evils like shopping cart abandonment and frequent checkout-bounce-backs. So, here I am going to explain how can you upgrade your existing Magento checkout extension into a fully efficient Magento one page checkout.
Why upgrade your Magento checkout extension?
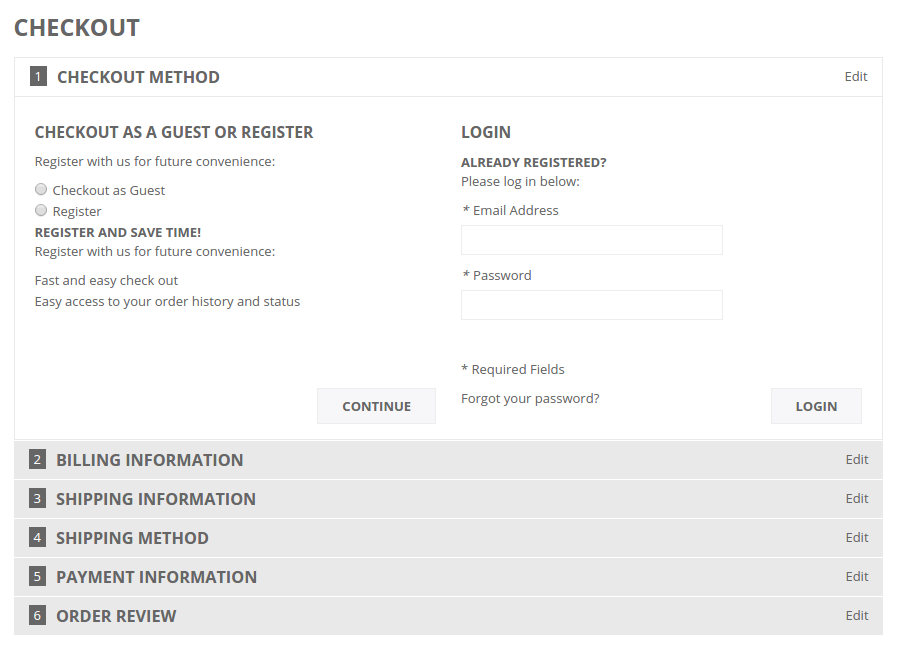
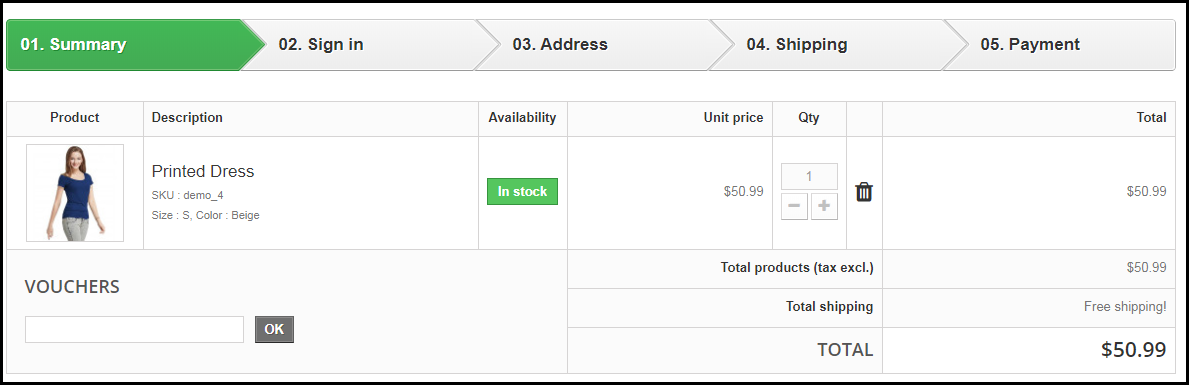
In simple words, your generic Magento checkout extension looks something like this:
It’s a multi-step Magento checkout that continues with the next step only when you complete the process serially. So, it consists of a six-step checkout without an option of social login. This reason is enough to counter the usability of the first steps itself. Moreover, when all your rival sites already provide a better checkout experience, the bounce backs from your checkout page would be a frequently observed phenomenon.
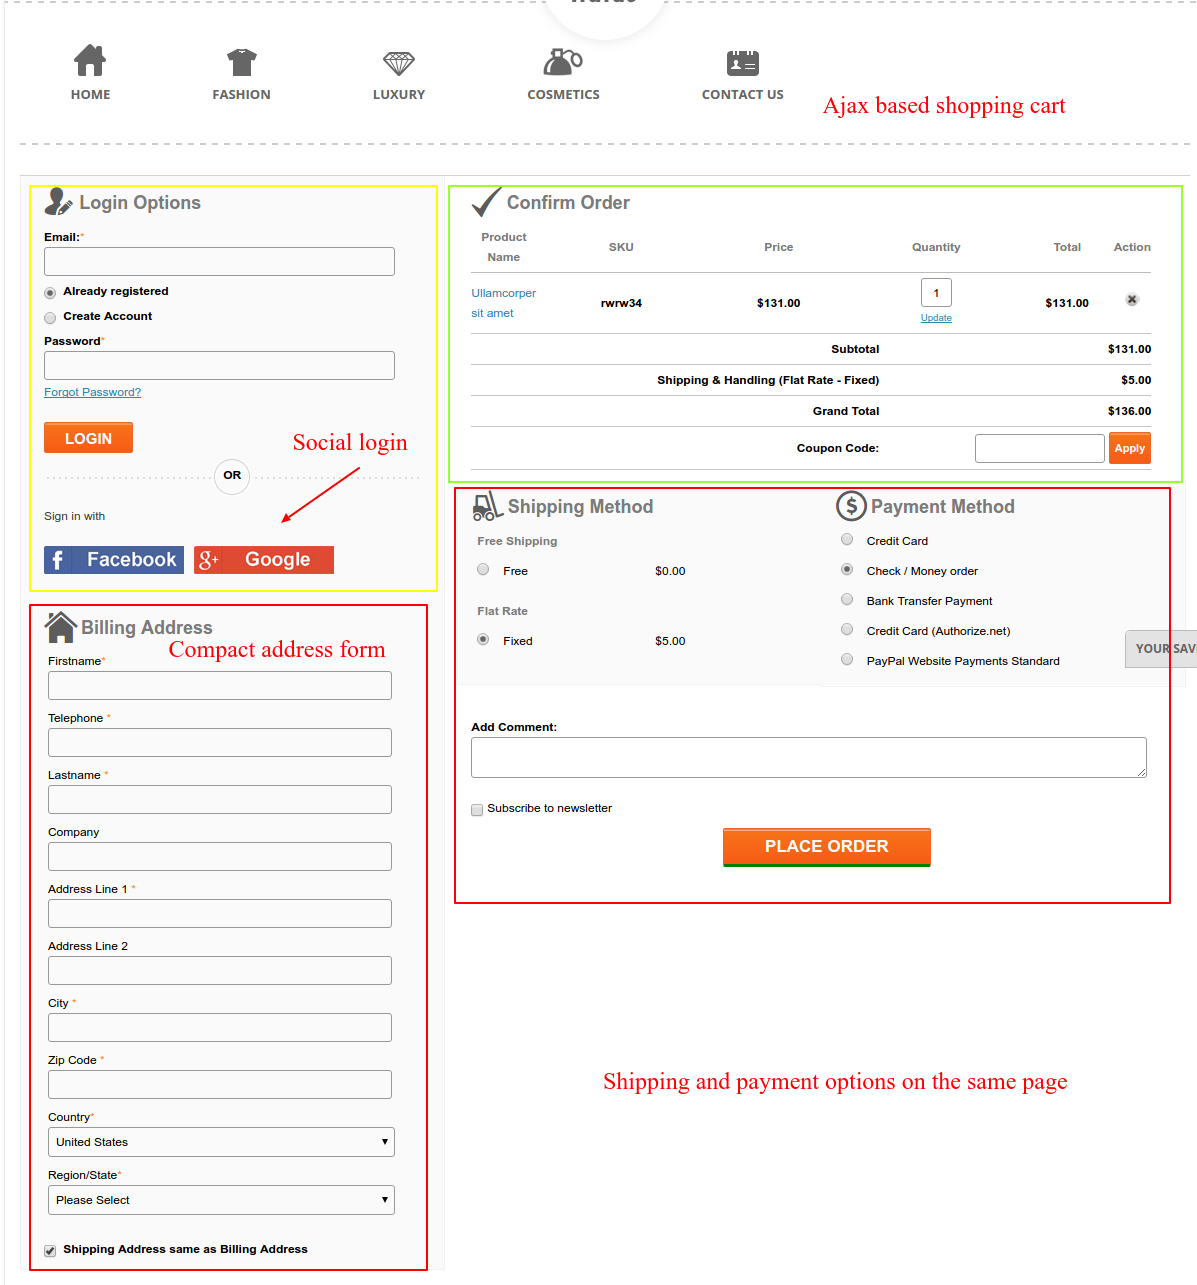
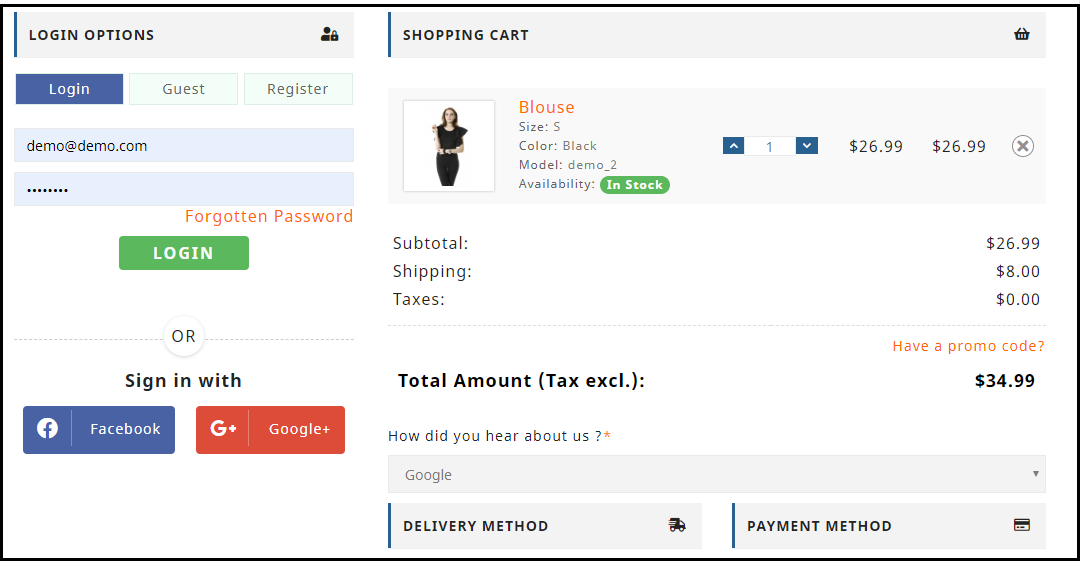
Now look at the example of a custom Magento one page checkout extension in the screenshot below from the Knowband’s Magento one page checkout extension:
A custom Magento one page checkout looks something like the above. A one-page checkout process with the option to login via social account, update the cart and products, select the shipping option and make the payment on the same page. Now, the big question, which one would your customers like better? Which one do you find more user-friendly? I think the answer is simple. So, if you are still using the generic Magento checkout extension and wish to touch the skies with your online business, sticking to the same would not be an advice that I will give here.
So, let’s upgrade your current Magento checkout extension into a usable Magento one page checkout.
How to upgrade your Magento checkout extension?
Like every other eCommerce platform, Magento is a master of great affinity to integrate custom Magento extensions. So, it provides the third party Magento developers from the community a great option to develop custom Magento extensions and install them. Magento one page checkout extension is one such Magento extension which was first introduced to fight with the shopping cart abandonments on a Magento based eCommerce site. Later, the one-page checkout model became so popular that a large number of Magento developers came up with their own versions of the same. Each of them presents the Magento checkout in their own way, but the goal is same; providing a single page checkout experience.
So, Solution is simple, just look out for a proper Magento one page checkout extension and install it on your Magento platform. It seems to be a simple task, but it is not really so. As I have mentioned earlier, a large number of Magento developers have come up with their versions of the same; trust me, all of them are really not useful. So, you have to be very picky when it comes to spending some money in buying a correct Magento one page checkout extension. You have to understand the best practices of a true one-page checkout model and choose accordingly.
There are plenty of websites that sell products that are meant for adults or for a certain age group only. Such websites should ideally be accessible by adults and not by minors. Even the law in various countries does not permit the underage to access explicit content on the websites. It is, therefore, the duty of the website owners to make sure that their website follows the Age verification process.
Why is Age verification necessary?
Just because the new generation of kids is more tech-savvy at the younger ages, does not always mean that their brains are developing at the same rate as their digital awareness. Underage children can put themselves in harm and might become a victim of online harassment, solicitation and cyberbullying before they are ready to respond correctly.
According to the Children’s Online Privacy Protection Act (COPPA) passed in 1998, every child and their personal information, under the age of 13 are protected by the law. Websites are not allowed to leverage their information or share them with anyone, not even the advertisers.
Today, it is the responsibility of the website owners to identify such population on their websites and take appropriate actions, and Prestashop Age Verification addon helps in doing so.
PrestaShop Age Verification addon
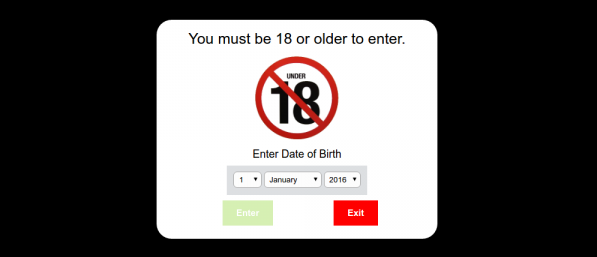
PrestaShop is one of the most popular eCommerce platforms that is being used by many merchants across the world. It is very likely possible that some of the PrestaShop merchants deal with adult products such as alcohol, tobacco, etc. This is why we bring the Prestashop Age Verification addon so that you can restrict the minors from visiting your store. Prestashop Age verification addon confirms whether the users who have visited your site are above the specified age or not: age that you have set from the back-end to allow access to your store. When a user enters your website, a popup is displayed asking them to confirm their age.
Features of Prestashop Age verification
1. Knowband presents the PrestaShop Age Verification addon that is capable of restricting your PrestaShop website’s content to a certain age level. You do not need to hire a PrestaShop webmaster to do any customization. Just install the module on your store and after some configuration, your website is ready to serve as a responsible website.
2. You can set a minimum age for your store visitors in order to access your store.
3. You can customize the look and feel of the Age verification popup. Moreover, you can set a warning image that indicates that your store is not meant to be accessed by the minors. You can also display a message to the visitors as soon as they land on your website.
4. PrestaShop Age verification addon is easy to install and configure.
Benefits of using Prestashop Age Verification addon
1. Prestashop Age verification addon helps to prevent underage from accessing your website content.
2. Website visitors are prompted with an age verification popup. Only after they enter their date of birth and the age is confirmed to be appropriate, they are allowed to browse your website.
3. Your store is browsed by the right audience.
4. Implementing the PrestaShop Age verification addon on your store helps you comply with the laws made for protecting the under-aged population.
Final word
It is a social and legal responsibility of the website owners to make their website age-restricted if it contains the elements that should not be accessed by the underage population. It is not just about the adult explicit contents, but also about caring for the privacy and protection of children from cyber crimes and complying with the law. If your PrestaShop store deals with explicit content, do not forget to implement the PrestaShop Age verification addon on your store.
Knowband has developed an interface for the Prestashop store owners that can help them start selling on the Etsy marketplace. Further, the Prestashop Etsy integration addon saves the time of the sellers. How? By reducing the time involved in the manual listing process. In fact, the Prestashop Etsy marketplace integration module offers them a feature to handle the inventory. In addition, handle orders for the Etsy shop from the Prestashop back office.
Etsy is a marketplace that works as an intermediary between customers and artists. In addition, craftsmen of handmade items, or collectors of vintage products. Furthermore, the Etsy marketplace connector provides a unique platform to sellers to showcase their products. Thus, they can spread awareness regarding their products and services through this platform. It is also important for the marketplace to offer the best services to consumers. In fact, consumers like to have options and alternatives to choose from. Hence, the marketplaces are competing to win the sellers and offer great services to them to connect with their stores. Further, Etsy has more than 25 million visitors each month. Further, which gives sellers a wonderful opportunity to reach a larger audience network.
1.1 Key features of the Prestashop Etsy Integration module:
Simple installation and quick starting: The Etsy Prestashop integration module can install quickly. Further, the user-friendly interface of the Prestashop Etsy integration allows an easy process to list the products on the Etsy marketplace.
Bulk uploading of the products: By using this Prestashop Etsy integration addon, the admin can upload products in bulk.
Mapping of the store category with Etsy category: Sellers can easily map the product attributes and category with the Etsy category. Further, with the profile-based listing of the Prestashop Etsy API integrator.
Shipping template synchronization: Create shipping templates from the back-end of the Prestashop Etsy integration extension. Moreover, sync these templates with Etsy with the help of the cron jobs.
Order Synchronization: Manage and keep track of Etsy orders from the admin interface of the Etsy Prestashop API integration addon.
Order Status update: The Admin can update the order status of the Etsy marketplace orders with the help of the cron jobs. Furthermore, offered by the Prestashop Etsy integration module.
Inventory management: The admin can manage inventory for the Etsy store products from the Prestashop Back Office. The current status of the products can sync with the help of the cron jobs. Further, offered by the Prestashop Etsy synchronization extension. Suppose, they make any changes in the product inventory or attributes in the Prestashop store. Further, they can synchronize with Etsy with a button click with the Etsy Prestashop synchronization module.
Language translations: Prestashop Etsy integrator offers multi-lingual support. The admin can select the second language for the store. Moreover, easily synchronizes it with the Etsy marketplace shop. Further, through the cron job offered by the Etsy Prestashop integrator.
New Features offered by Knowband’s Prestashop Etsy Integrator Version 4.0.1:
OpenAPI Authentication for Etsy APIs: We have updated the module to work with Etsy’s new OpenAPI authentication. Now, all Etsy API requests include the required authentication headers, following Etsy’s latest standards, so your integration continues to work smoothly.
Return Policy Configuration & Mapping: A new return policy feature has been added to the module. Now admins can now create and manage multiple return policies and map them to specific profiles. Any products linked to a profile will automatically update on Etsy with the assigned return policy.
Key Features offered by Knowband’s Prestashop Etsy Integrator Version 2.0.0:
UX-related changes: To improve the user experience the interface of the shipping template has been changed. In addition, all the options for shipping template creation have been merged onto the same page. Furthermore, just like the Prestashop Etsy Marketplace interface.
Code Optimization: Now the admin can sync the products from the Products Listings page. There are 3 options for product sync:
Local Sync: Local Sync option allows the admin to sync the PrestaShop store products to the Etsy PrestaShop Integration module. All the products which are mappable to a Profile will list in the Product Listings. Moreover, the admin can list the individual products on the Etsy Marketplace.
Sync Products: Sync Products option will sync the products to the Etsy Marketplace. All the enabled products will sync to the Etsy Marketplace. To avoid the syncing error, the admin can select the number of products. Further, to sync in one go under the General Settings. Cron setup is available to automate the process to list the products.
Sync Product Status: The admin can get the listing status of the syncing products by using the Sync Product Status.
Products Listings: In case you want to set the products as Inactive, Delete those products from this page only (Instead from the Etsy account). In fact, setting the product as Inactive on the Etsy account directly will relist the item on Etsy. Further, on the next CRON run.
The admin can view the Etsy store products from the Products Listings tab. Further, click on the Listing Id. In addition, it will open the Etsy store listing.
The admin can view the PrestaShop store listing by clicking the Product Name.
The admin can view the product listing page in the back office by clicking the ID.
Store admin can add Etsy store orders with store carriers.
Store admin can add the tracking numbers on Etsy orders.
Stora admin can add a size chart image for each profile and this additional image will be uploaded to Etsy.
Now instead of listing the variations separately on the Products Listings page, all the variations list under the product name.
The admin can sync the individual products to the Etsy Marketplace instead of listing the entire profile.
The admin can Disable/Enable Items before syncing and only enabled items will list to the Etsy store.
Custom Product Information: Now, the Prestashop Etsy Connector addon allows the admin to list the same product with different product details (product title and description) on Etsy Marketplace.
Profile Level Synchronization: We have recently introduced the profile level synchronization feature that allows the store admin to list/update the products from a particular category only instead of all.
Prestashop Etsy Marketplace Integration module
Knowband’s Prestashop Etsy Marketplace Integration module helps Prestashop store owners seamlessly connect their stores with Etsy to expand their reach and increase sales.
Additional features of the Etsy Prestashop Integration module
Attribute Mapping: All the PrestaShop store attributes will sync to the Etsy Marketplace Integration module automatically. In addition, the admin just needs to map these attributes to the Etsy Marketplace.
Etsy Category Attribute: The Etsy Category Attributes are now available in the Etsy Marketplace Integration module. Further, the admin can set the various attributes. For instance, Primary Color, Secondary Color, Holiday, and Accessory Style.
Product or Category Mapping: The PrestaShop Etsy marketplace Integration module enables syncing. Further, the selected products or entire category to the Etsy Marketplace. Furthermore, under the Profile Management tab of the Etsy Marketplace connector module, the admin can select the Product/Category option to sync the store products.
Custom Pricing: Etsy Prestashop integration module allows the admin to list the products on the marketplace at a different price. In fact, the admin can change the price of the products. Further, that displays on the marketplace by a fixed amount or a percentage amount. As per the requirement, the admin can increase or decrease the price of the products. In fact, he can do it from the back-end of the Prestashop Etsy integration addon.
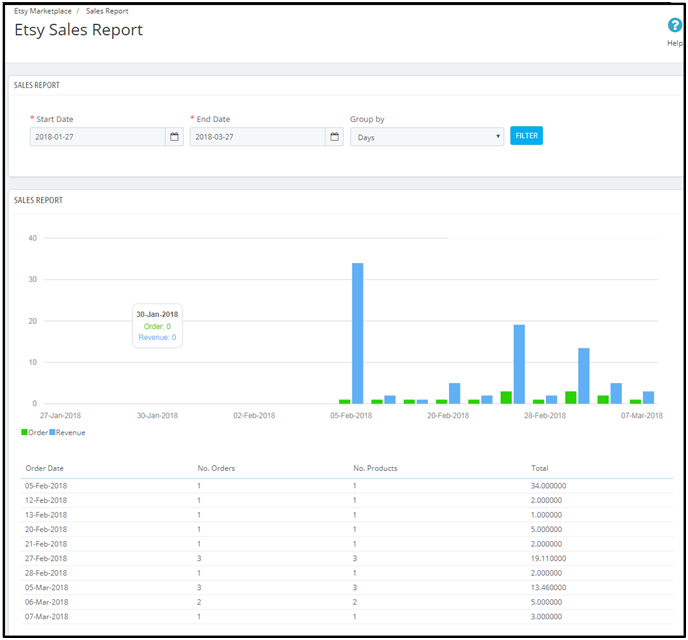
Sales Report: The sales report tab of the Etsy Prestashop integration plugin allows the sellers to check the order and revenue report.
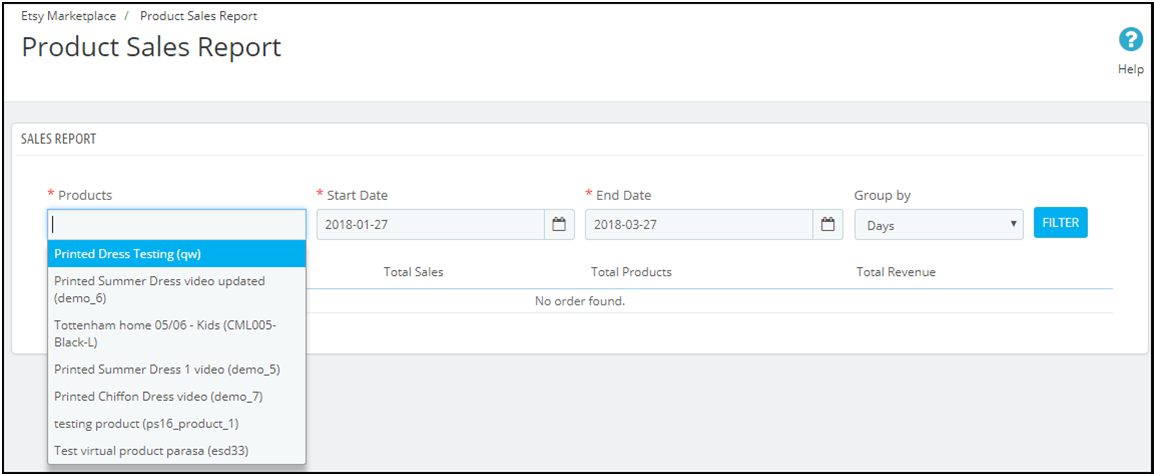
Product Sales Report: The admin can even view the sales report of particular products. In fact, he can do it from the back-end of the Prestashop Etsy integration plugin.
Shop Section: The Prestashop addon offers an option of adding a shop section in the front-end of the Etsy marketplace to the e-sellers. Further, the shop section allows the admin to categorize the products in a particular category. In fact, the created shop section will display at your Etsy shop.
Product Description Template: The e-sellers can use different placeholders for their product description to make them more impactful.
You can also watch the video on “Upgrade Guide – Knowband’s Prestashop Etsy Connector v3.0.4” here:
2.0 Installation
After purchasing the Prestashop Etsy integration extension, you will get the following files as available below:
1. kbetsy.zip (contains source code of the module)
2. User Manual
Follow the following steps to install the Etsy Prestashop integration extension:
Unzip the kbetsy.zip file. It would contain files and folders as shown below –
Copy all the files and folders of the unzipped folder into your store “modules” directory on the path – Root Directory/modules/.
Now module is ready to install on your store. Moreover, you can find that in Store Admin -> Modules and Services. Further, it would be shown as below –
In case, you are not able to find the module in the admin modules list. Further, please try searching the module with the following details –
Keyword – Etsy
Category – Other
Filter By – Installed & Not Installed / Enabled & Disabled
Click on the “Install” button to install the module. It would show a pop-up for your confirmation. Further, click on the “Proceed with the installation” option. In fact, this step will install the module and show a notification – “Module(s) installed successfully”.
3.0 System Setup
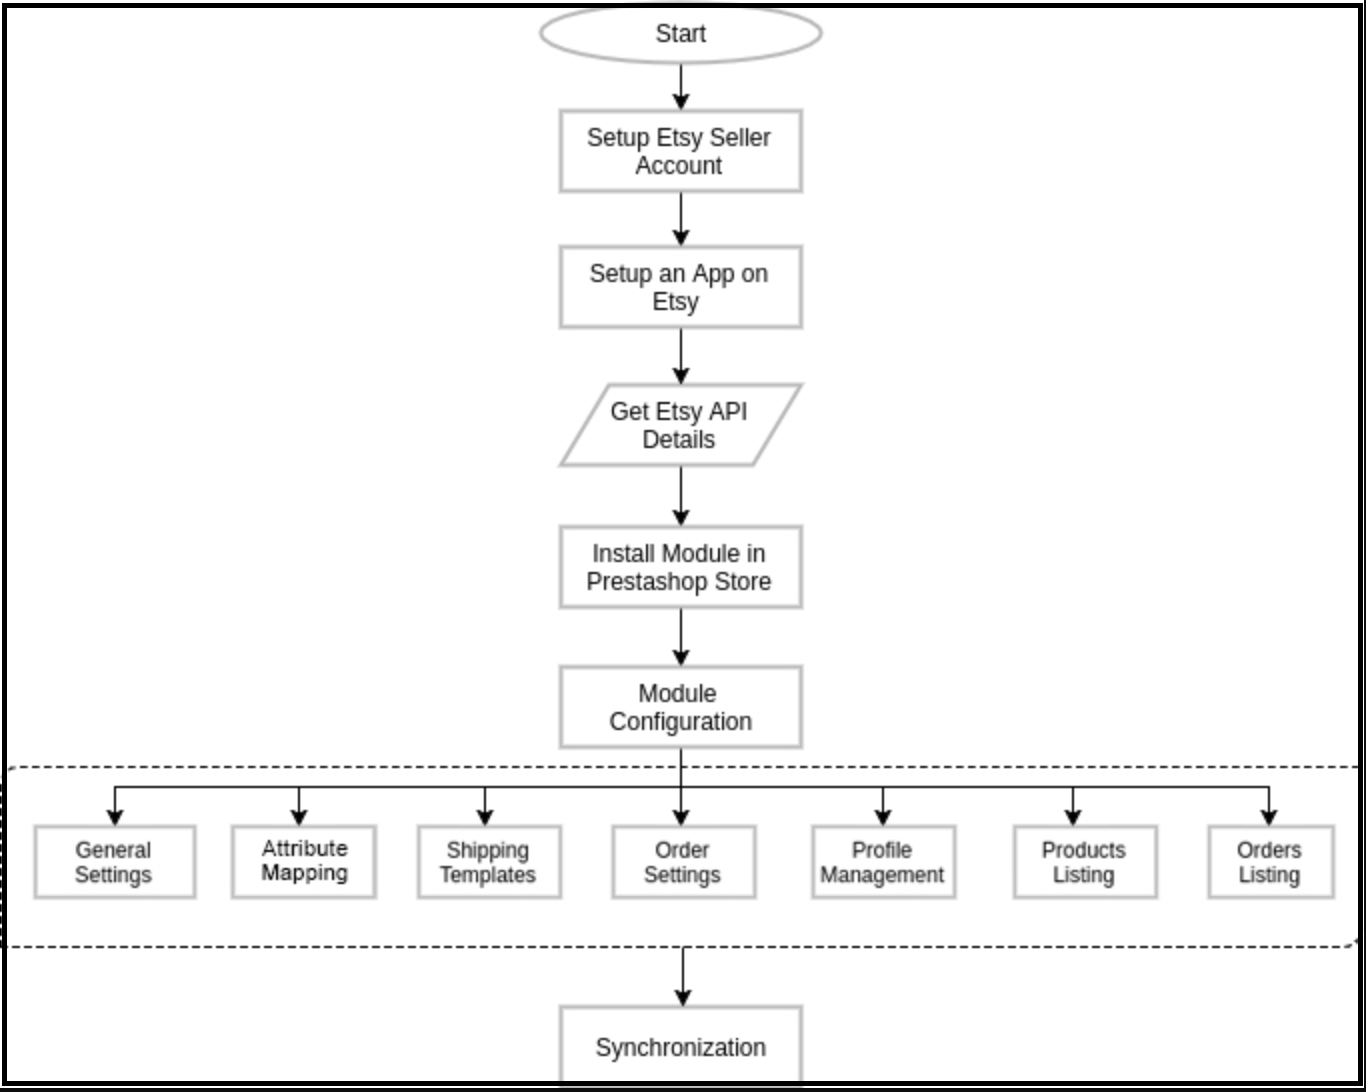
Before proceeding ahead, it is important to know what is the correct flow of actions. Further, to set up this system as several things are dependent on other things. In addition, if we do not take care, then it will become difficult to process smoothly or may be error-prone.
You need a seller account on Etsy to start selling on Etsy Marketplace. Moreover, to configure the Etsy Prestashop integration addon. In this section, we are listing all the steps to create a seller account on Etsy. Please find them below –
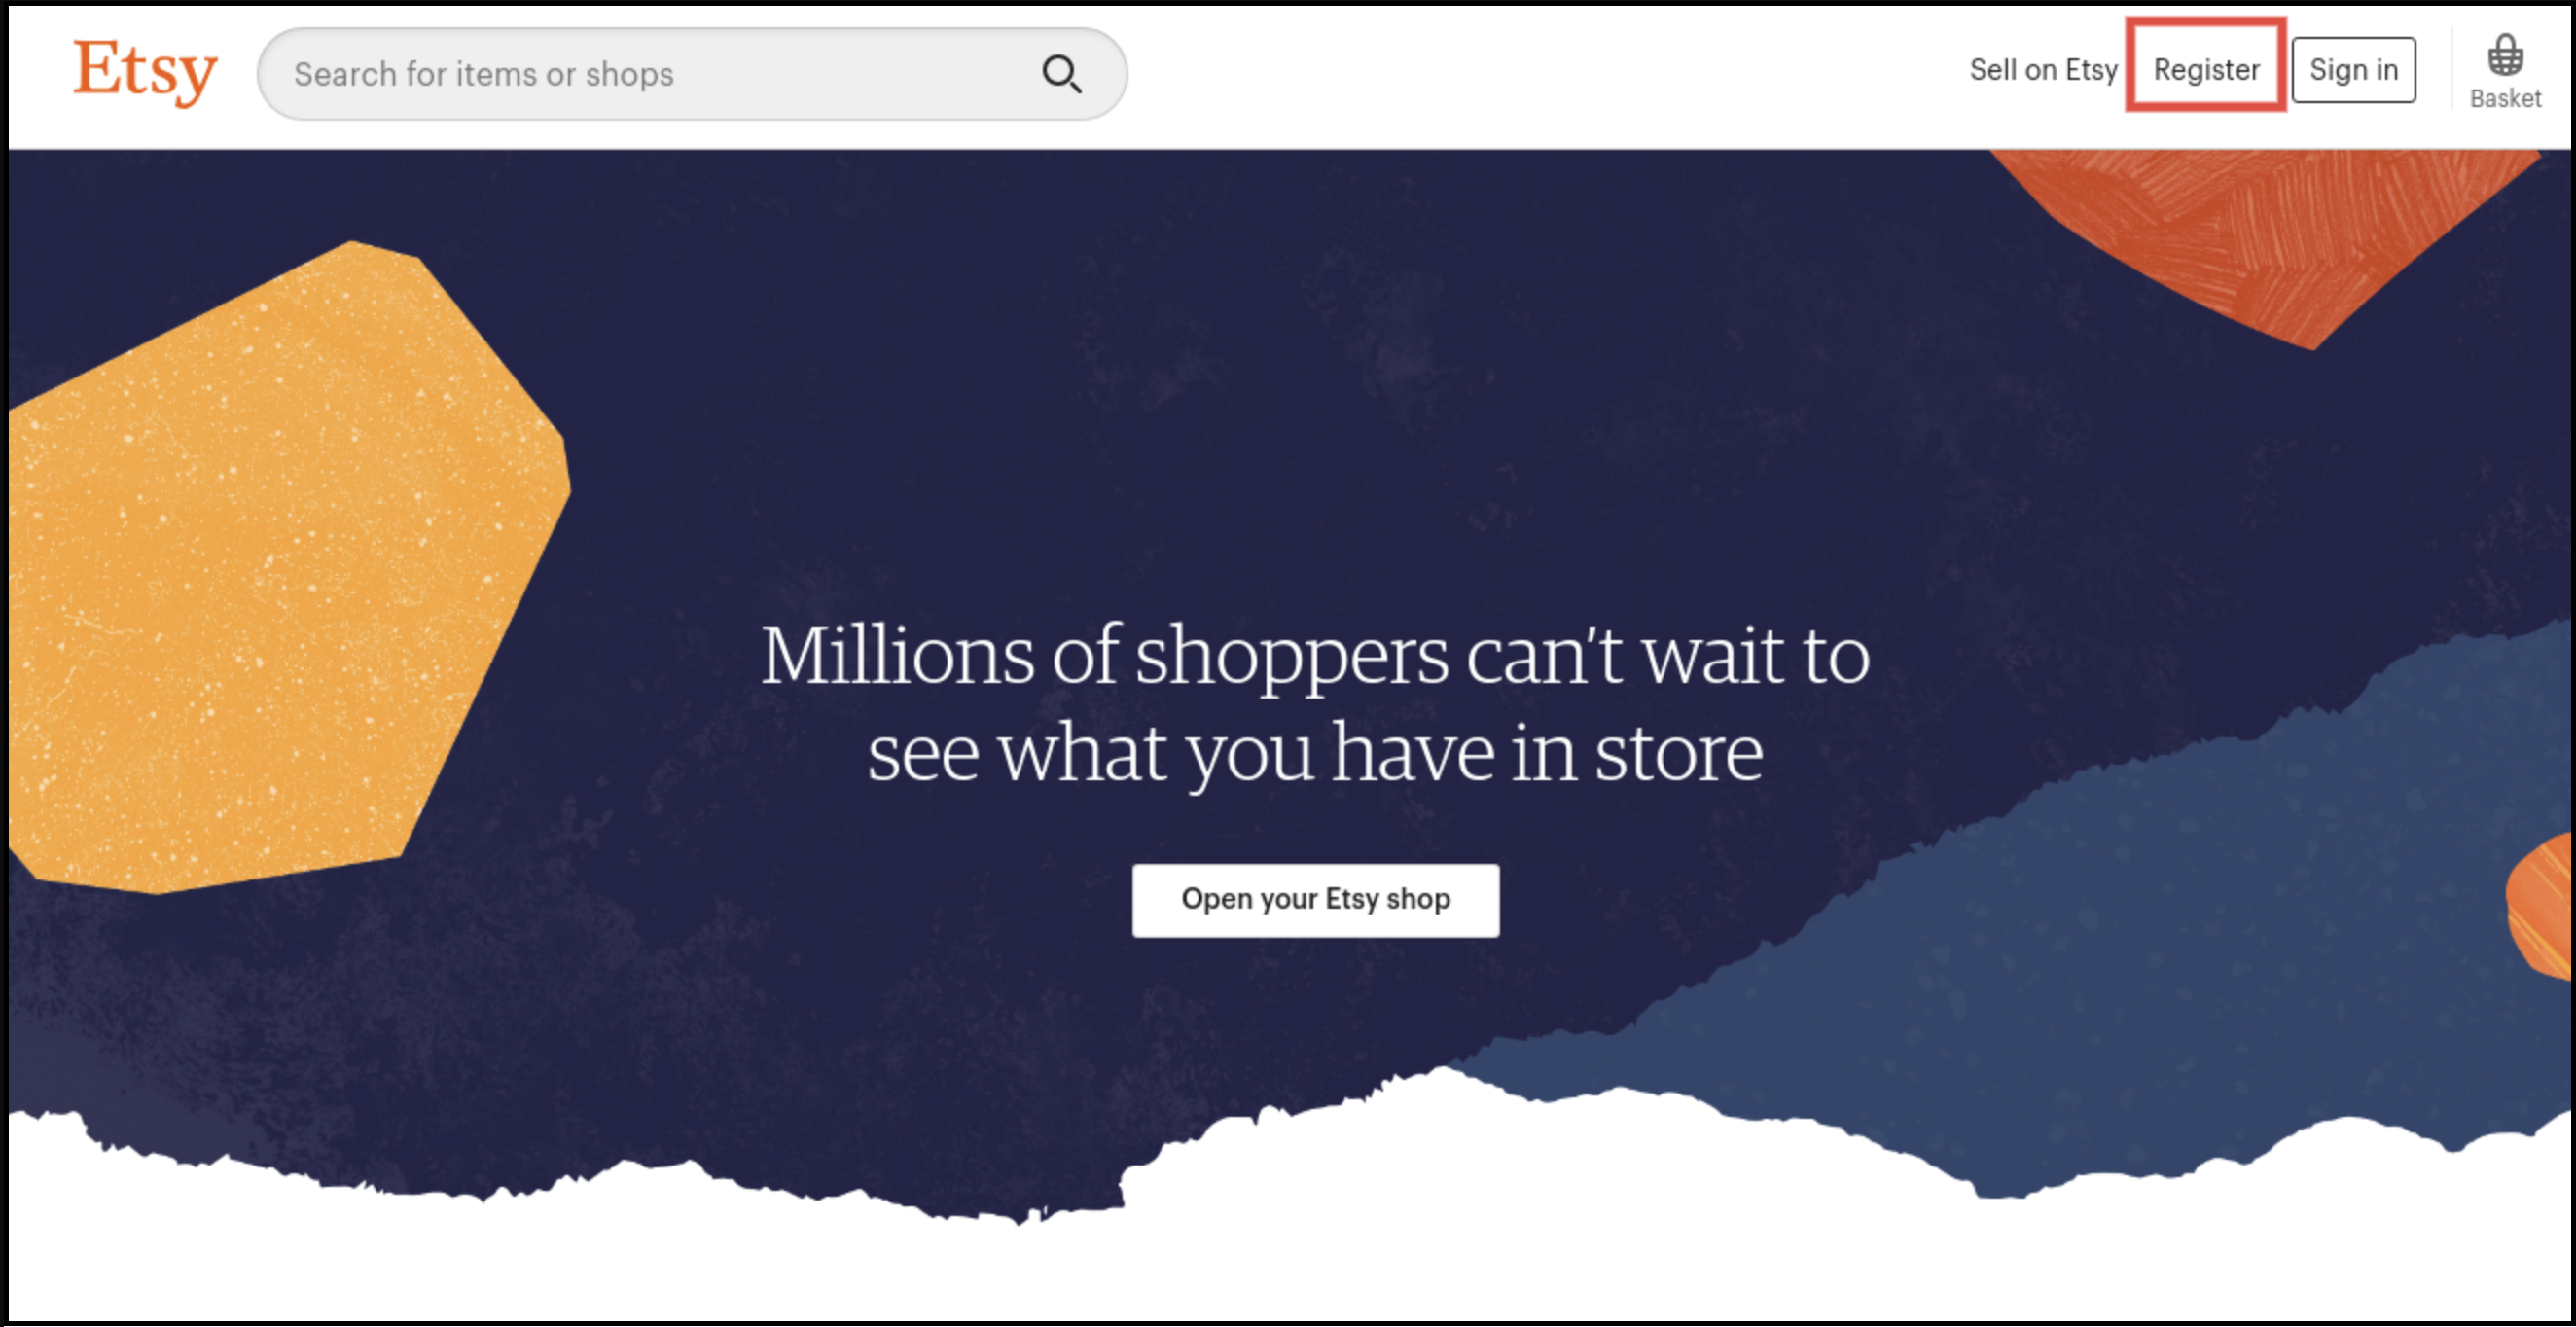
Click on the “Sell on Etsy” button present at the top right corner.
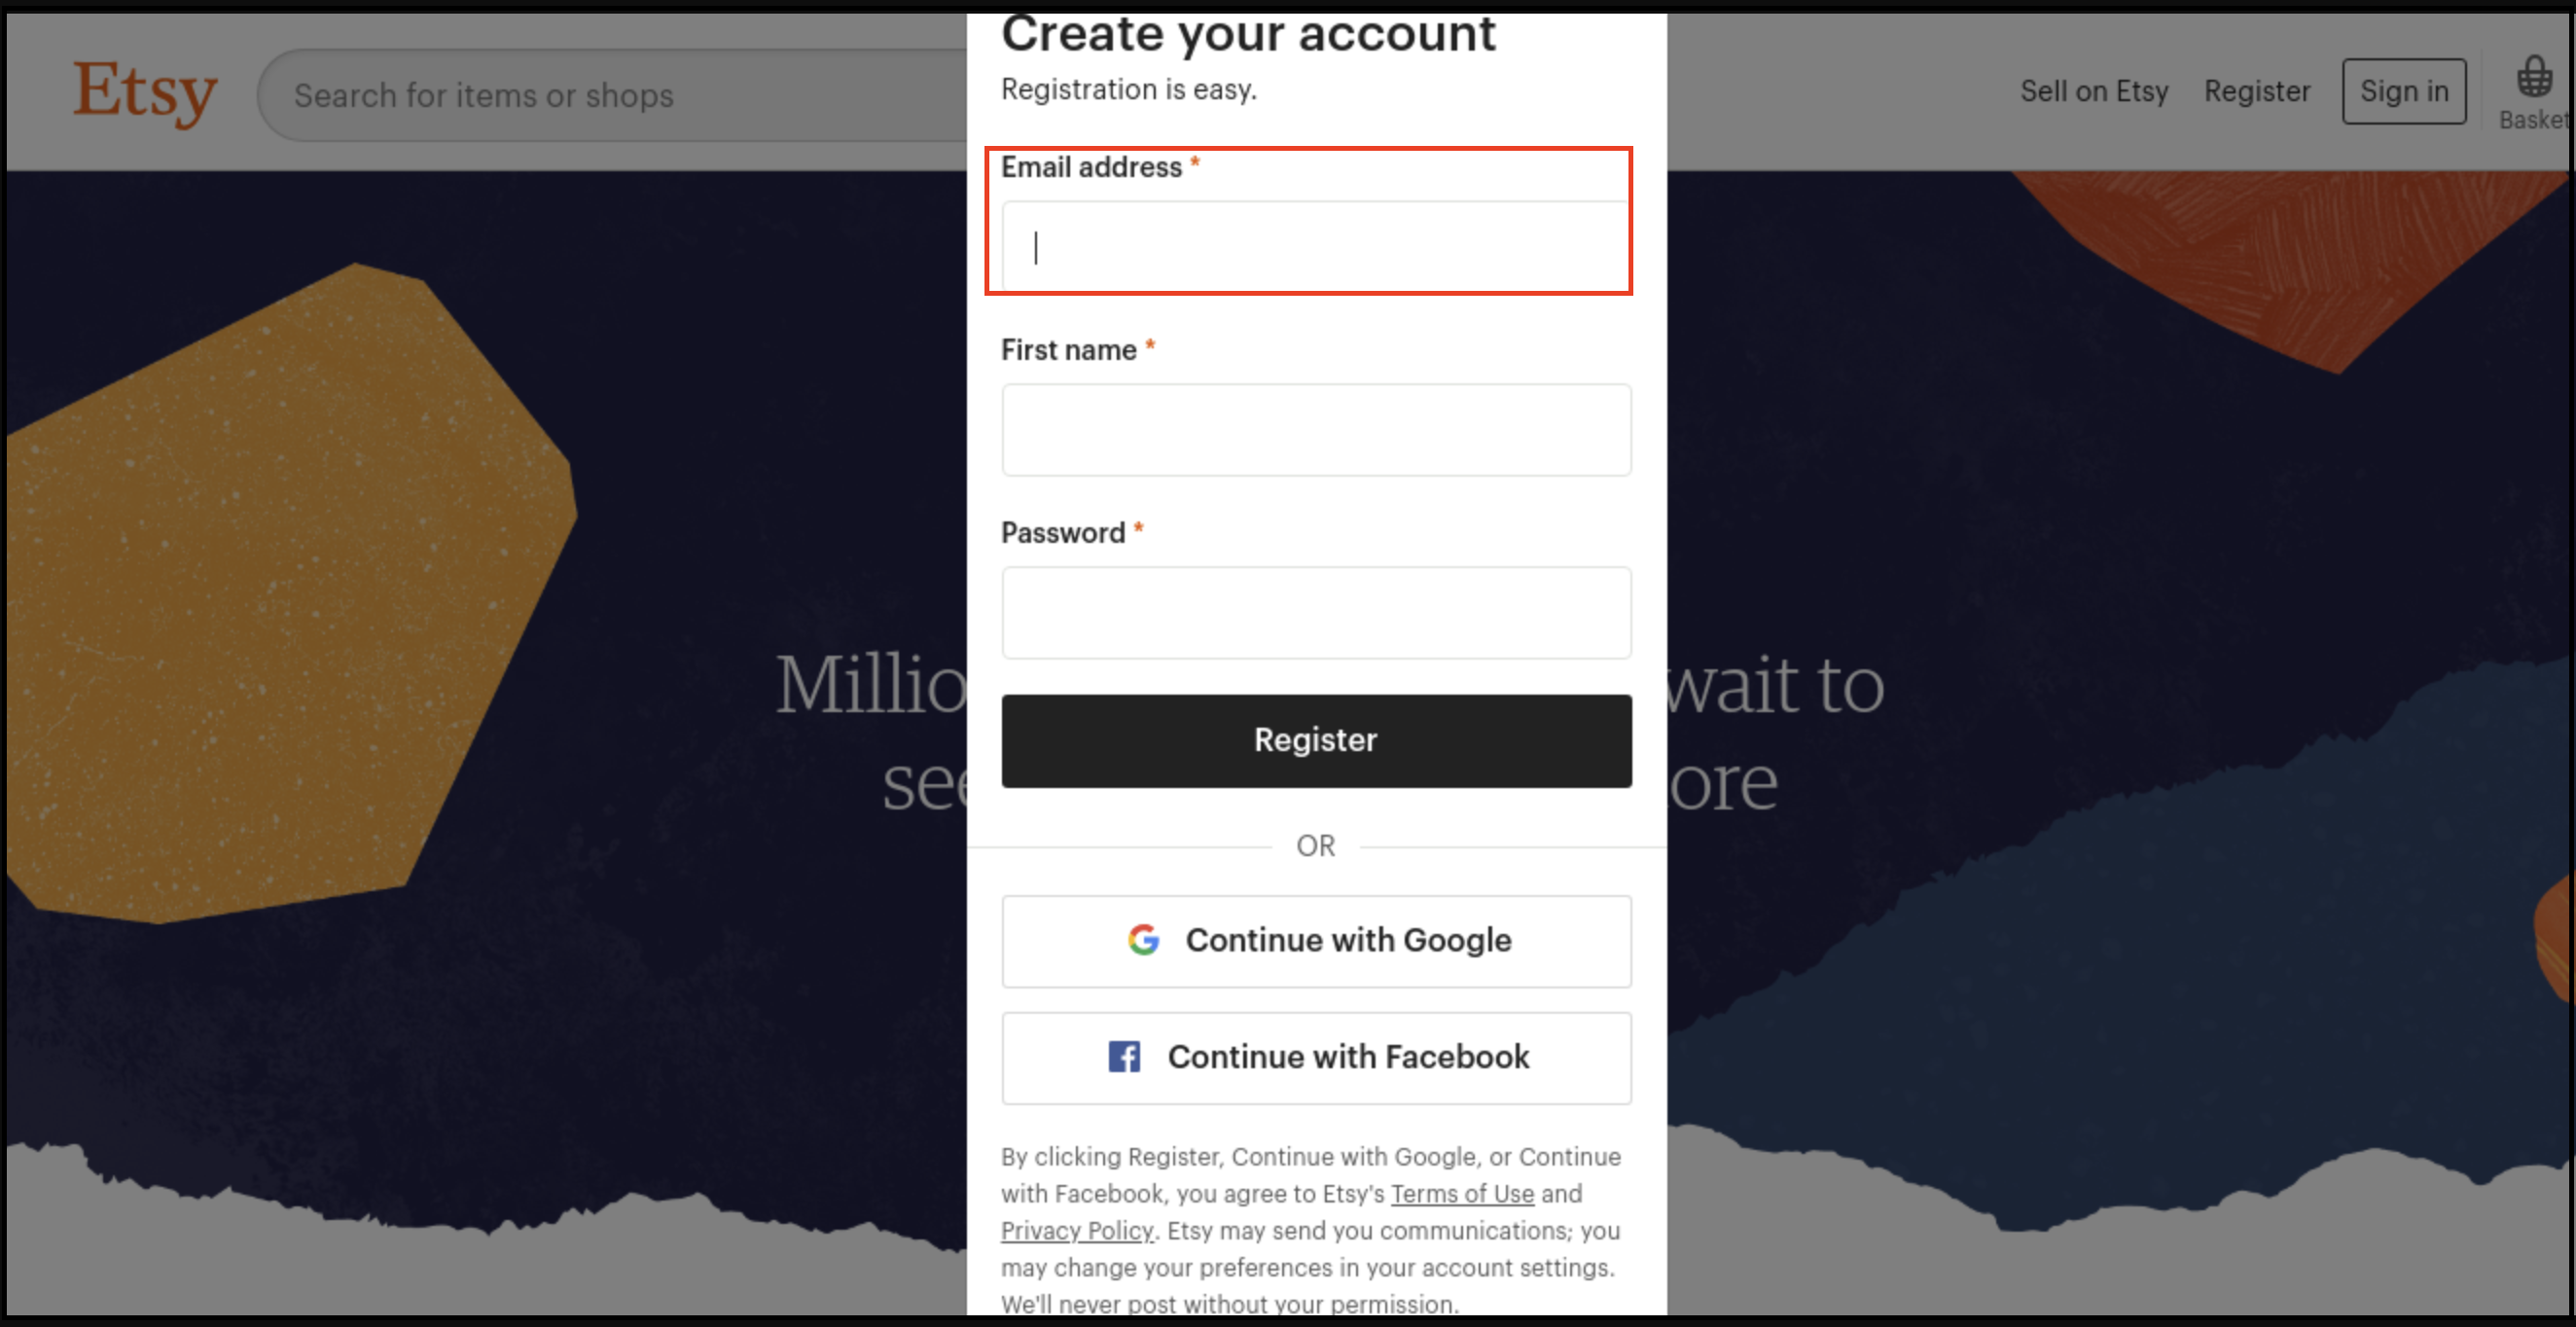
Click on the “Register” button on the page you are visiting now. Further, refer to the screenshot given below.
Fill up the registration form and click on the “Register” button. In fact, it would create your seller account and send a verification email to the provided email address.
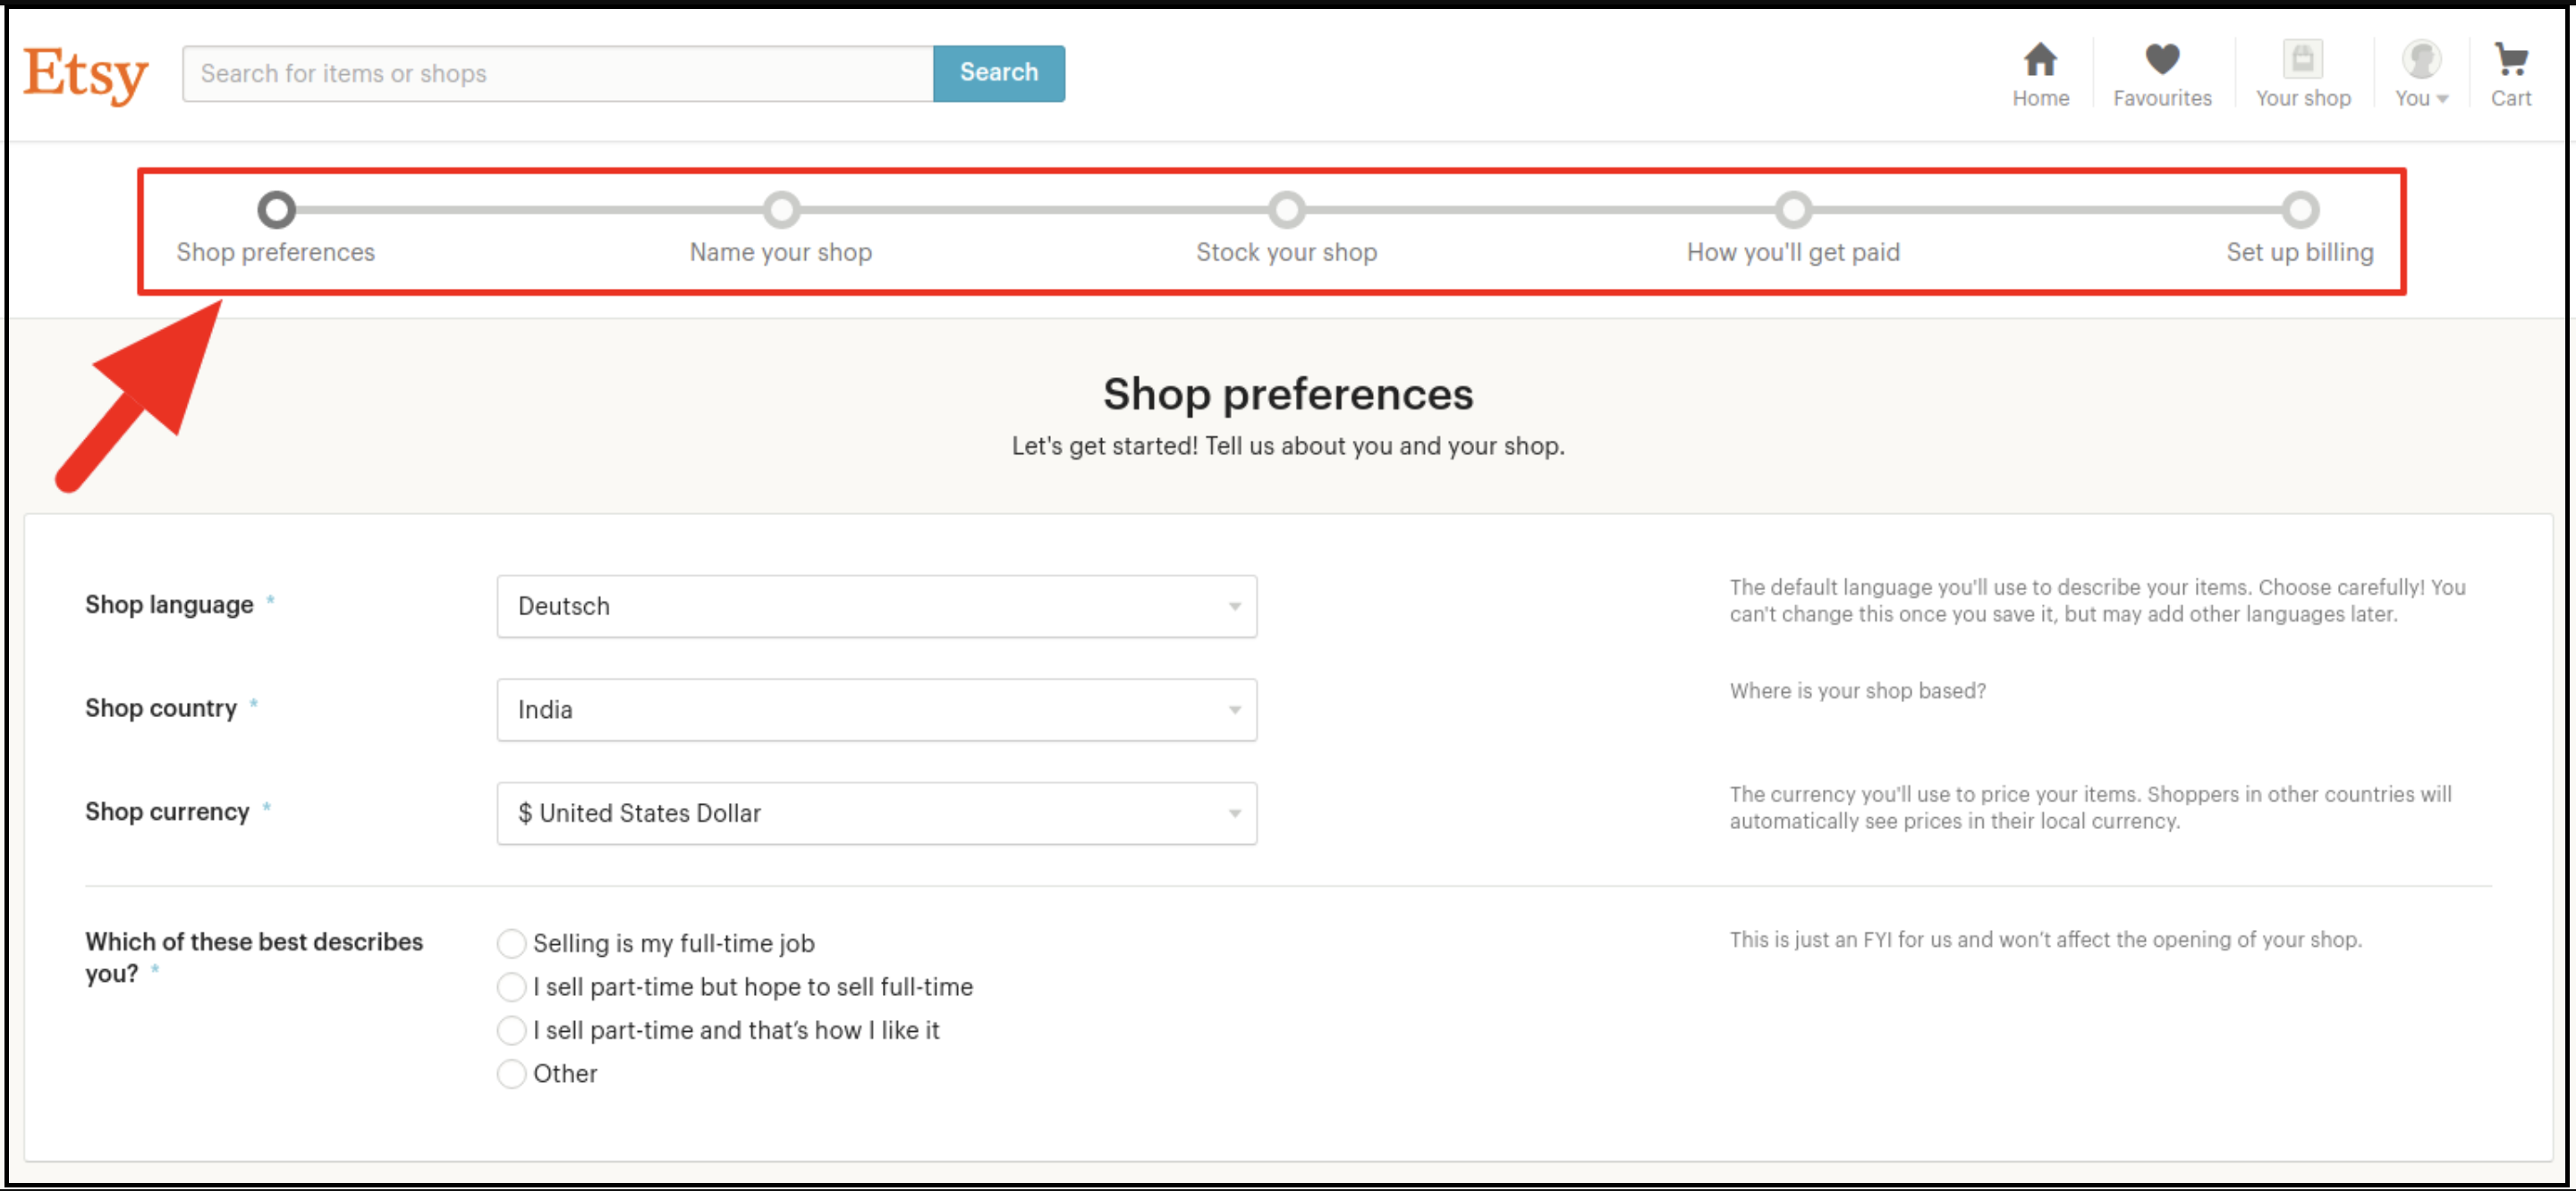
Now, it would also redirect you to another page as shown below.
Now, it is asking to set up your shop preferences. Further, complete all the highlighted sections. For instance, Shop Preferences and Name your shop, Stock your shop, How you will get paid, and Set up Billing.
5.0 Etsy Marketplace Integration- Setup an App
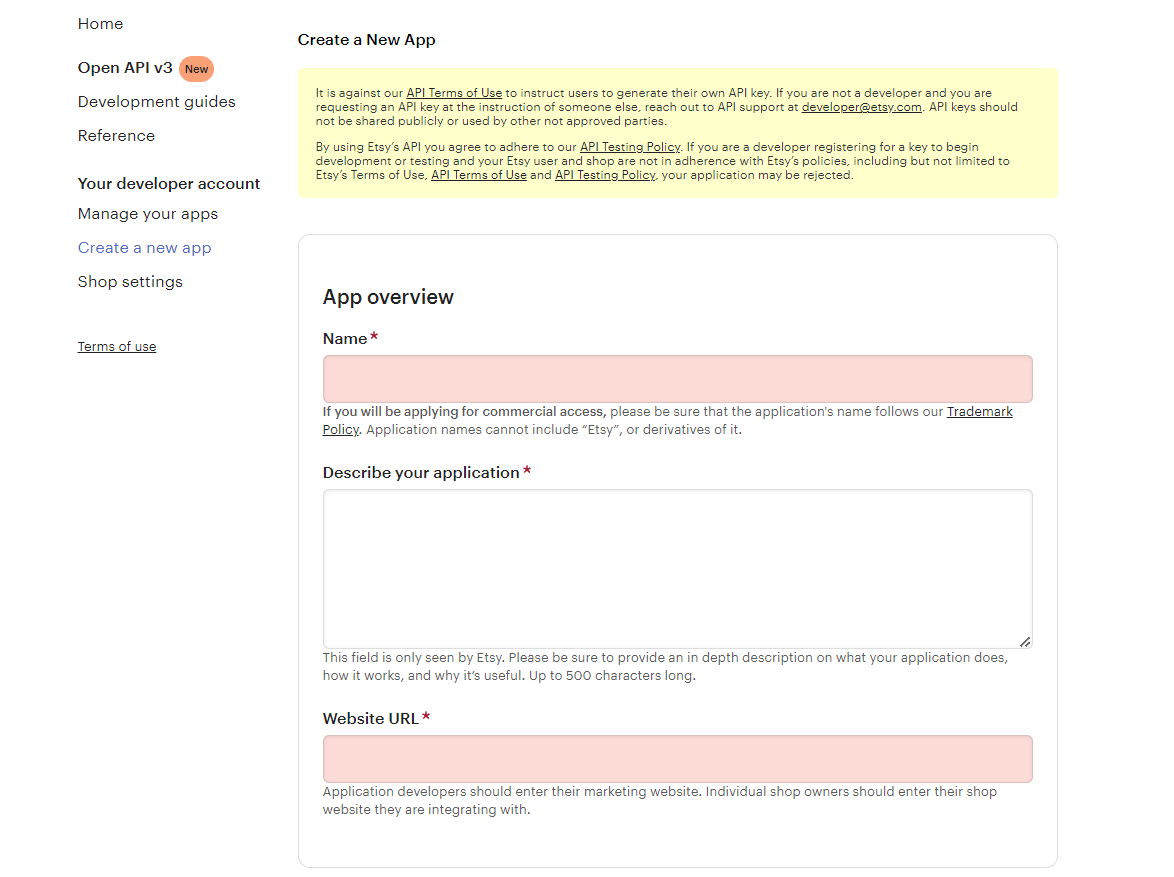
To start communication between Prestashop Store and Etsy Seller Account, you need to create an App on Etsy Marketplace. Further, the following are the steps to create an App on Etsy –
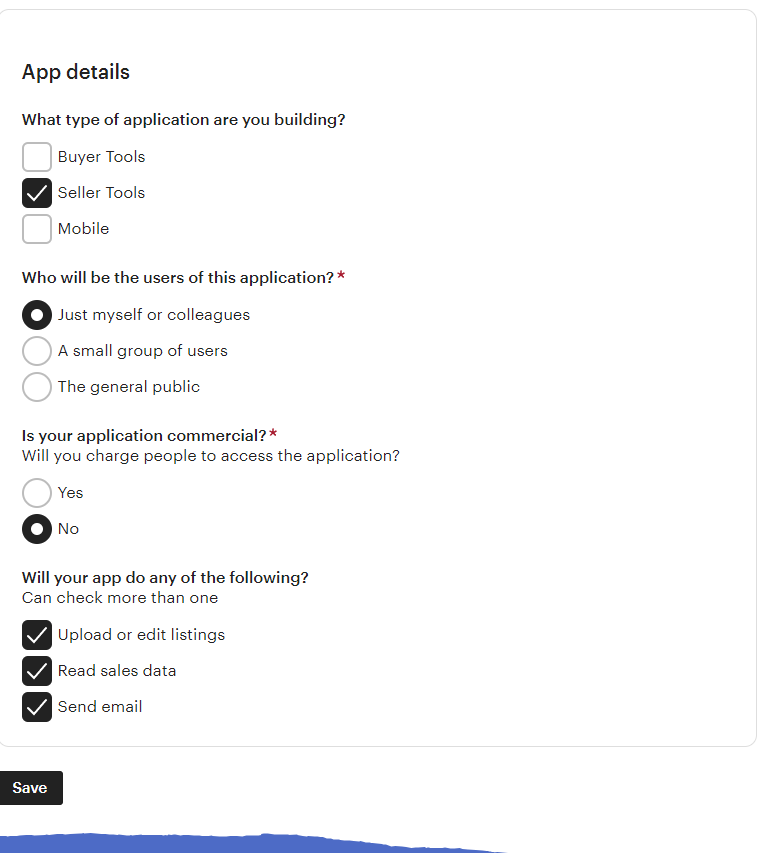
It would open a page where a form will be shown with a few input fields as shown below.
Fill up the form and click on “Read Terms and Create App”. Further, please make sure that you left the “Inventory Management Compatibility” checkbox is checked.
It would ask to accept “terms and conditions”. In fact, accept and click on the “Create App” button.
It would register your App on Etsy Marketplace and provide API details.
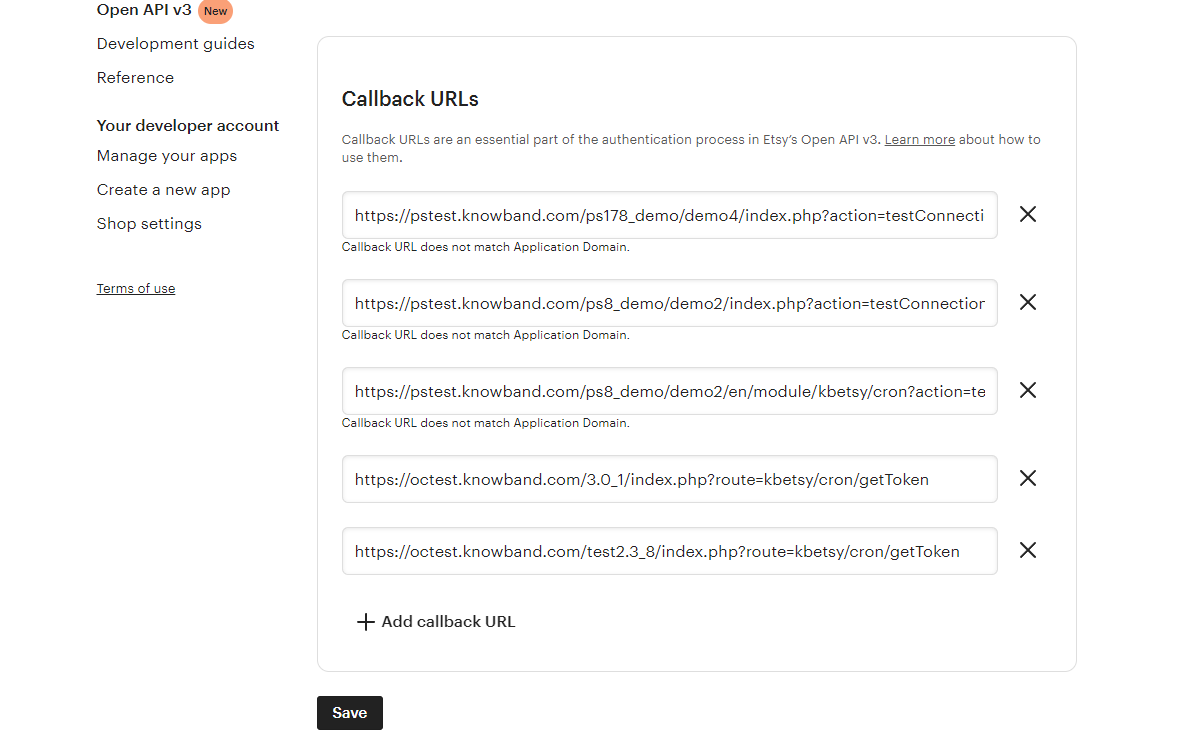
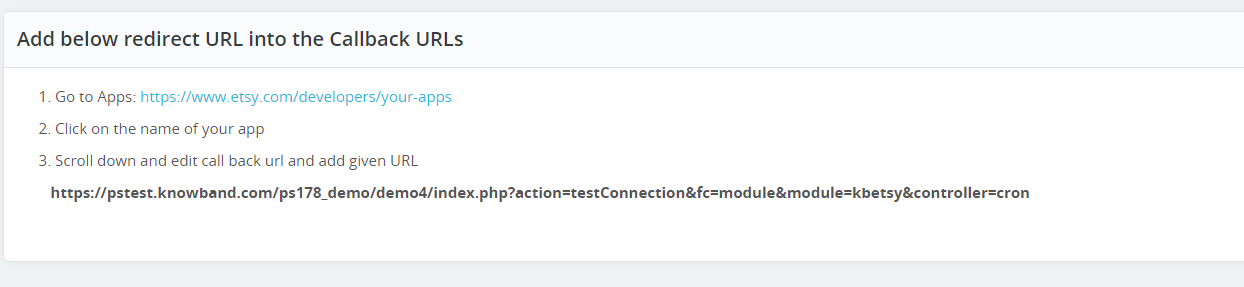
Once you successfully created the API, add the callback URL.
Click on the name of your App
Click on edit your callback URLs. After clicking on the following button, the page shown in the image will appear.
For finding the callback URL, please refer to the general setting section of our Prestashop Etsy Marketplace module. Copy the shown URL in the below image and paste the same on Etsy.
Click on the save button.
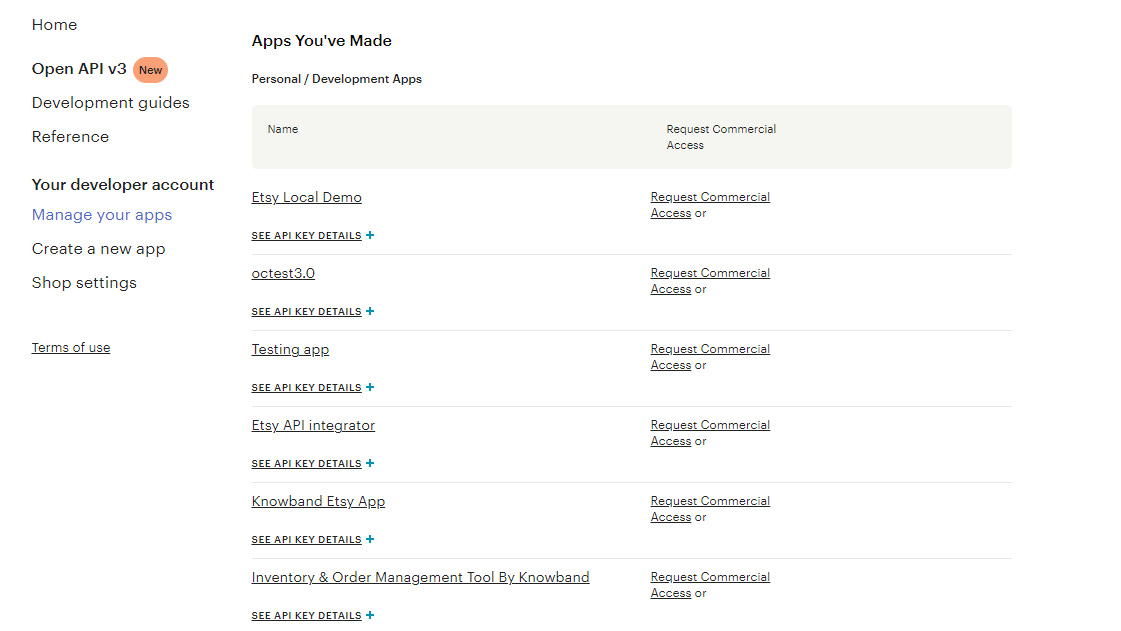
After saving the data, you will find the API page, where you can manage all of your Etsy Apps.
6.0 Admin Interface
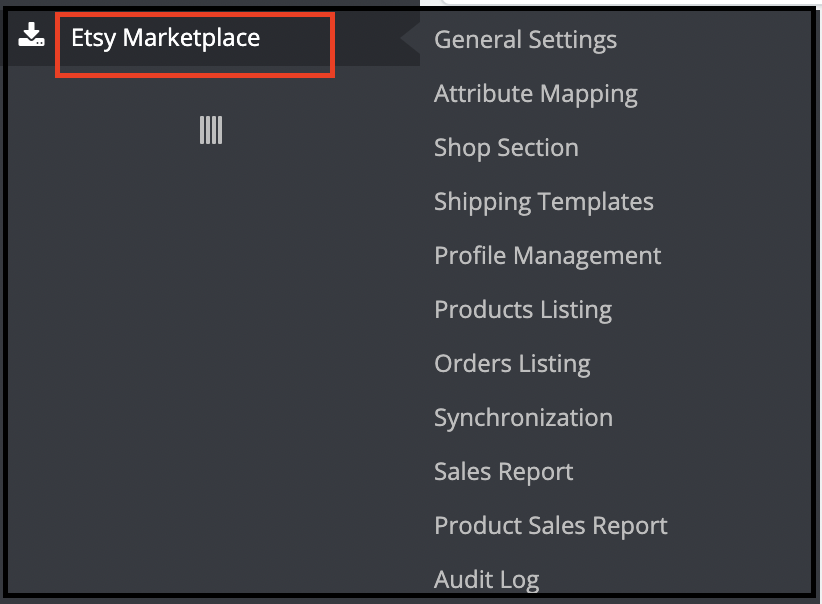
This Prestashop Etsy Integration addon is configurable. Moreover, the configuration settings can be updated via the admin interface. Further, after installation, store admin can find a menu named “Etsy Marketplace” in the left panel of Admin as shown below –
“Etsy Marketplace integration addon” menu contains the following options –
General Settings
Attribute Mapping
Shop Section
Shipping Templates
Profile Management
Products Listing
[New]Return Policy
Orders Listing
Synchronization
Sales Report
Product Sales Report
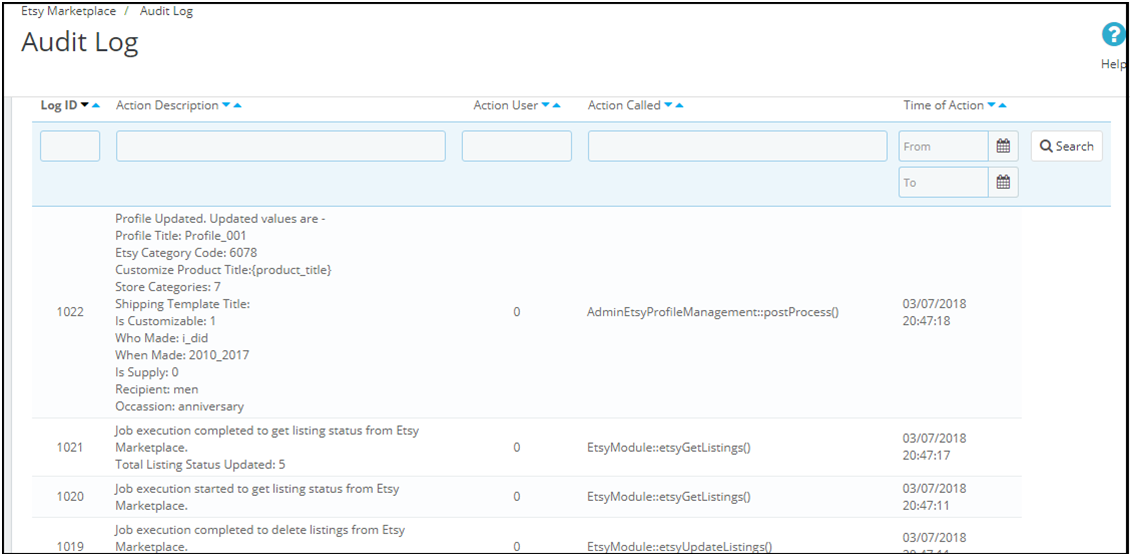
Audit Log
Each tab is explained below.
6.1 General Settings
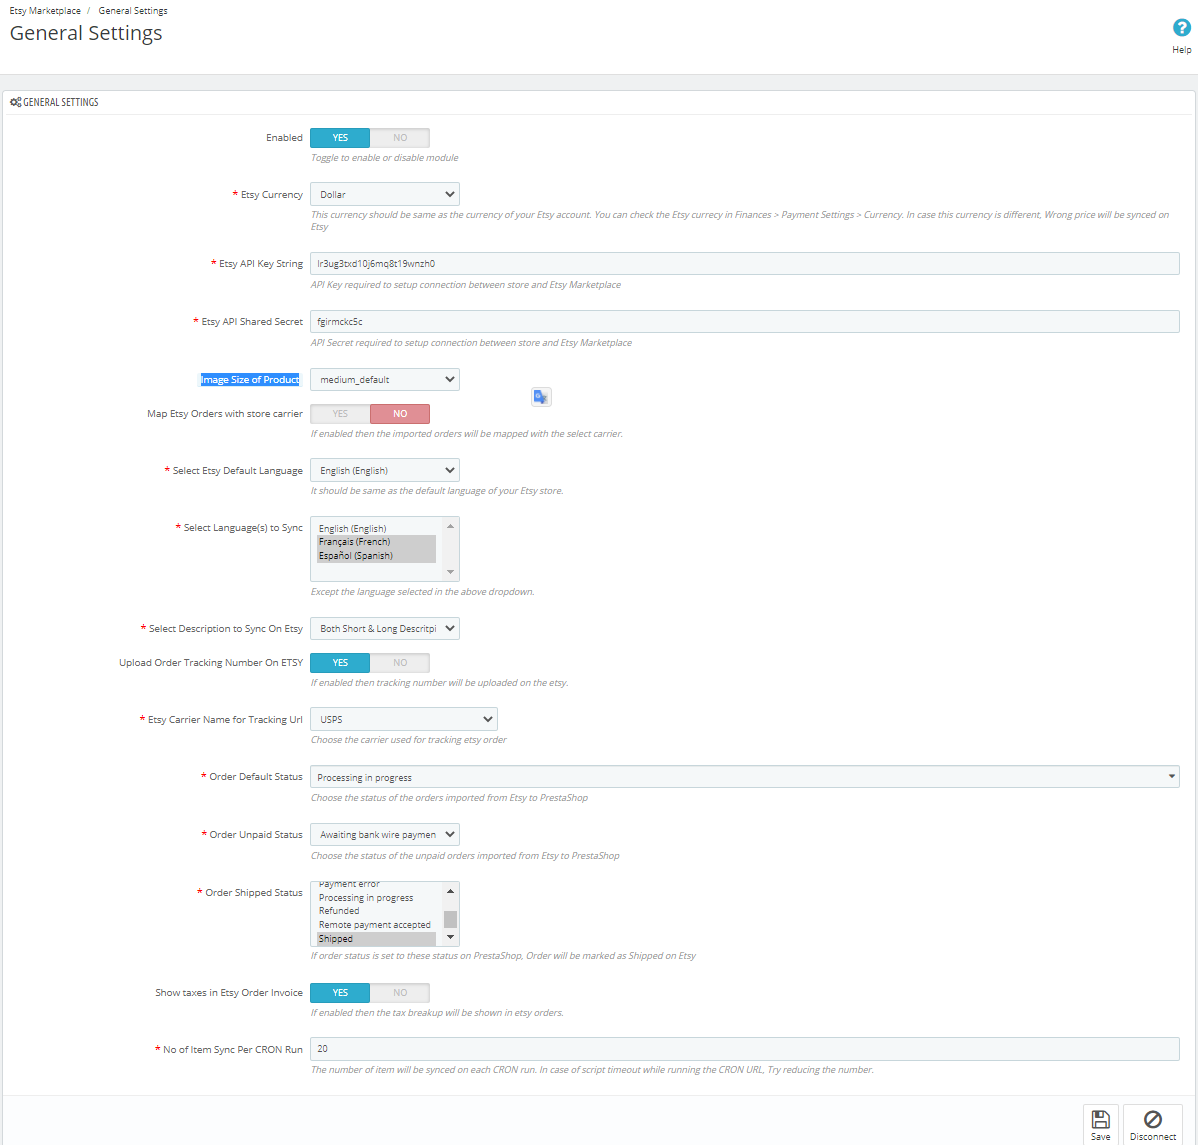
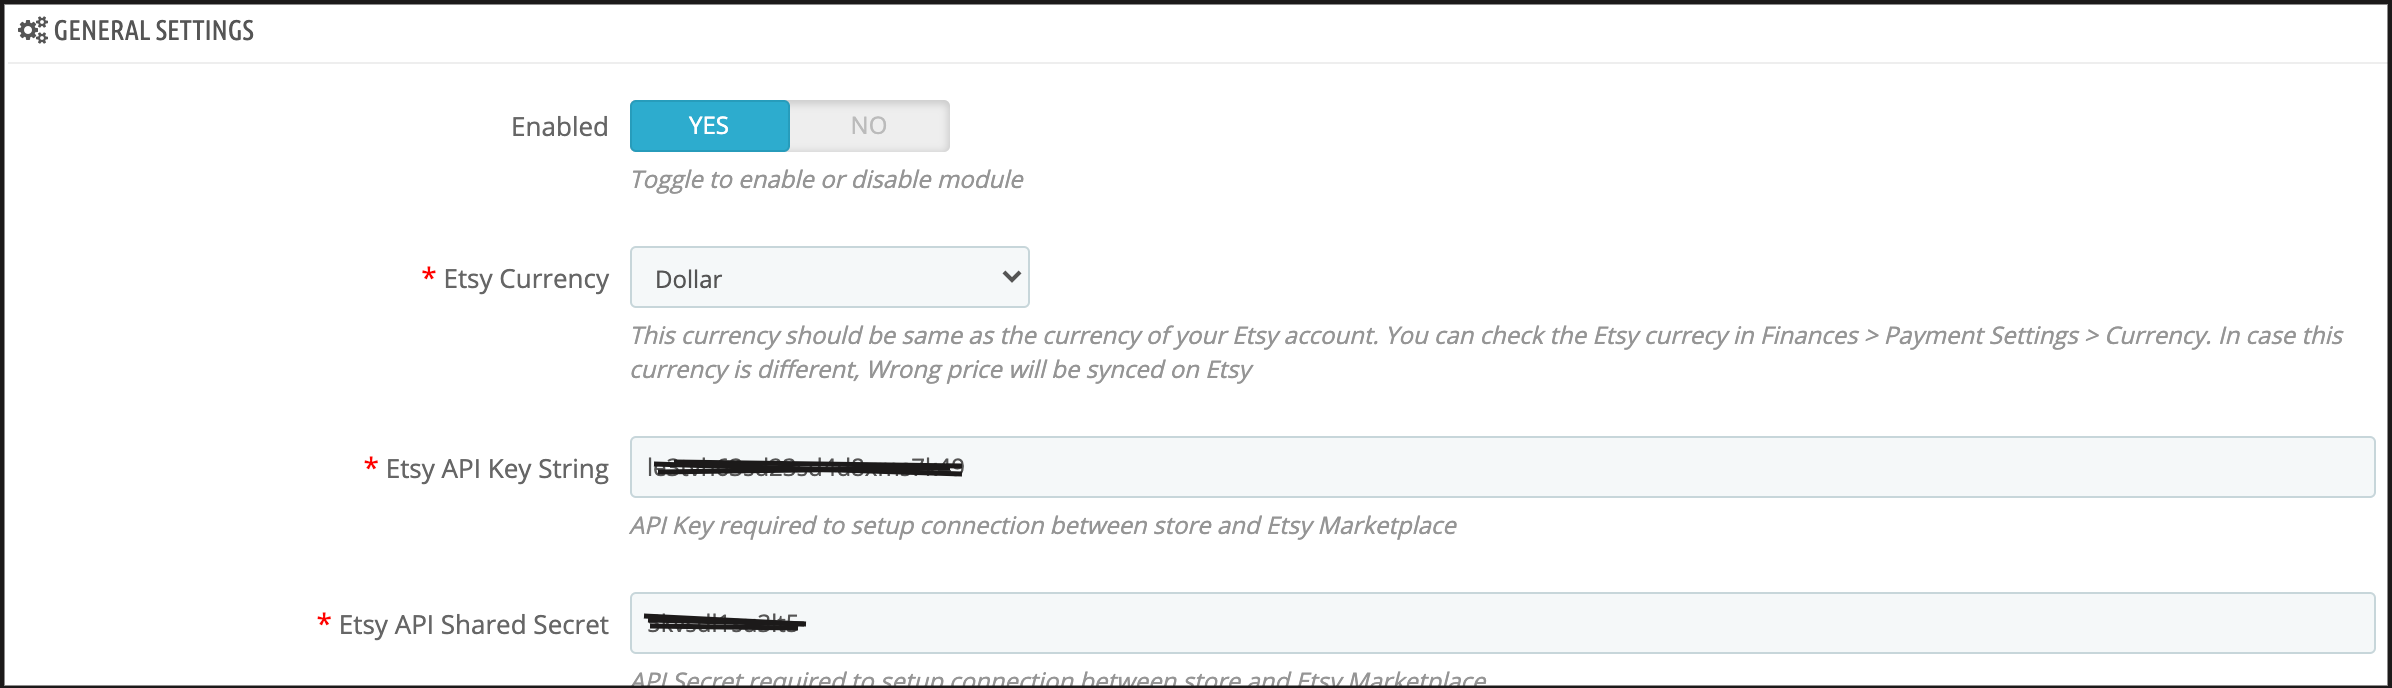
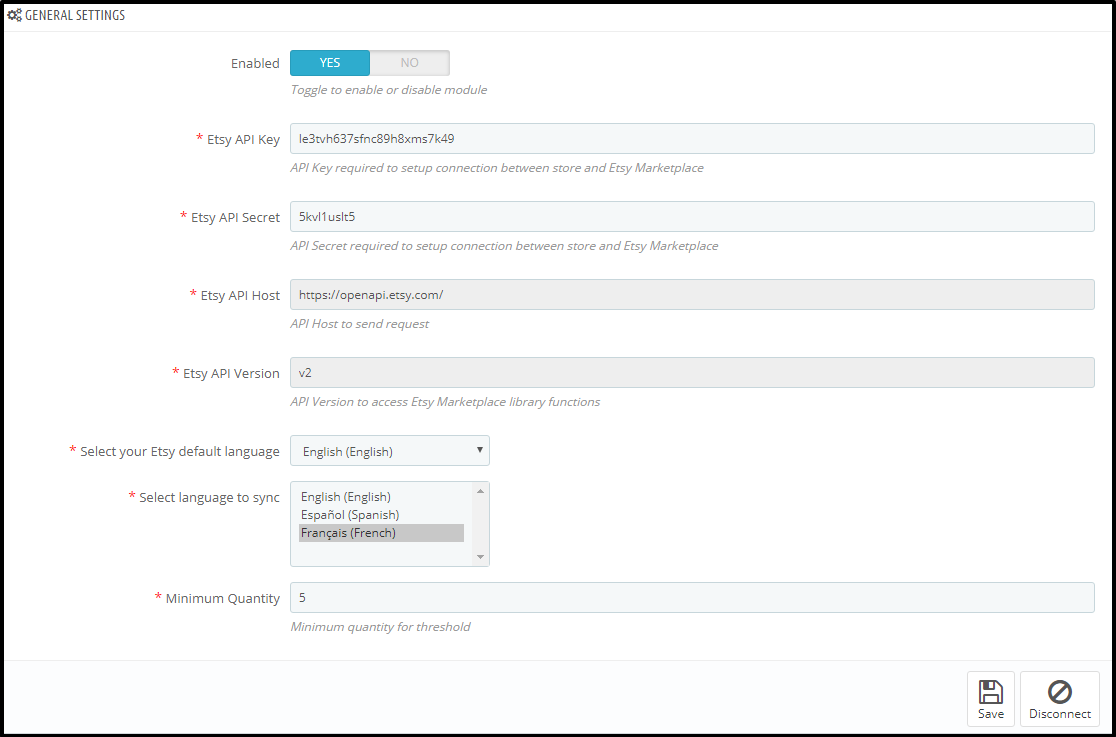
The General Settings tab of the Prestashop Etsy API integrator is there for capturing details. Further, of Etsy Prestashop Marketplace API like API Key, Host, etc. Please find the description of each input field below –
1. Enabled
Admin can Enable/Disable this Etsy Prestashop API integration module by the toggling button. If enabled, the Prestashop Etsy connector and all its settings will be working. Further, otherwise, there will be no impact of this module on the store.
2. Etsy Currency
This is a drop-down where the admin has to choose the appropriate currency. Further, for their which is similar to their Etsy Account.
3. Etsy API Key
This is a text box in which the admin has to enter Etsy API Key. Furthermore, which will authenticate the connection being established between the store and Etsy.
4. Image Size of Product
This feature allows the admin to select the size of the product image. Further, that will sync to Etsy Marketplace from PrestaShop.
5. Etsy API Secret
This is a text box in which the admin has to enter Etsy API Secret Key mandatory for authentication. Furthermore, between the Prestashop store and Etsy Marketplace.
6. Map Etsy Orders with Store Carrier
If enabled then the imported orders will be mappable with the select carrier.
7. Select Shipping Methods for Etsy orders
Store admin can select the shipping methods for Etsy Orders from the given list.
8. Etsy Default Language
The Etsy Prestashop Integration module allows the store admin to select the default language of the store.
9. Select Language to Sync
Admin can select the secondary languages to sync with Etsy Marketplace.
10. Select the Description type to sync on Etsy
This option enables Etsy sellers to the long description and short descriptions. In fact, or both they want to sync with the marketplace. Furthermore, they can select any one option from the descriptions that will sync according to the selection.
11. Upload the Order Tracking Number On Etsy
If enabled then the store admin can add the tracking number on orders and it will be uploaded on Etsy.
12. Etsy Carrier Name for Tracking Url
Store admin can choose the carrier used for tracking Etsy orders.
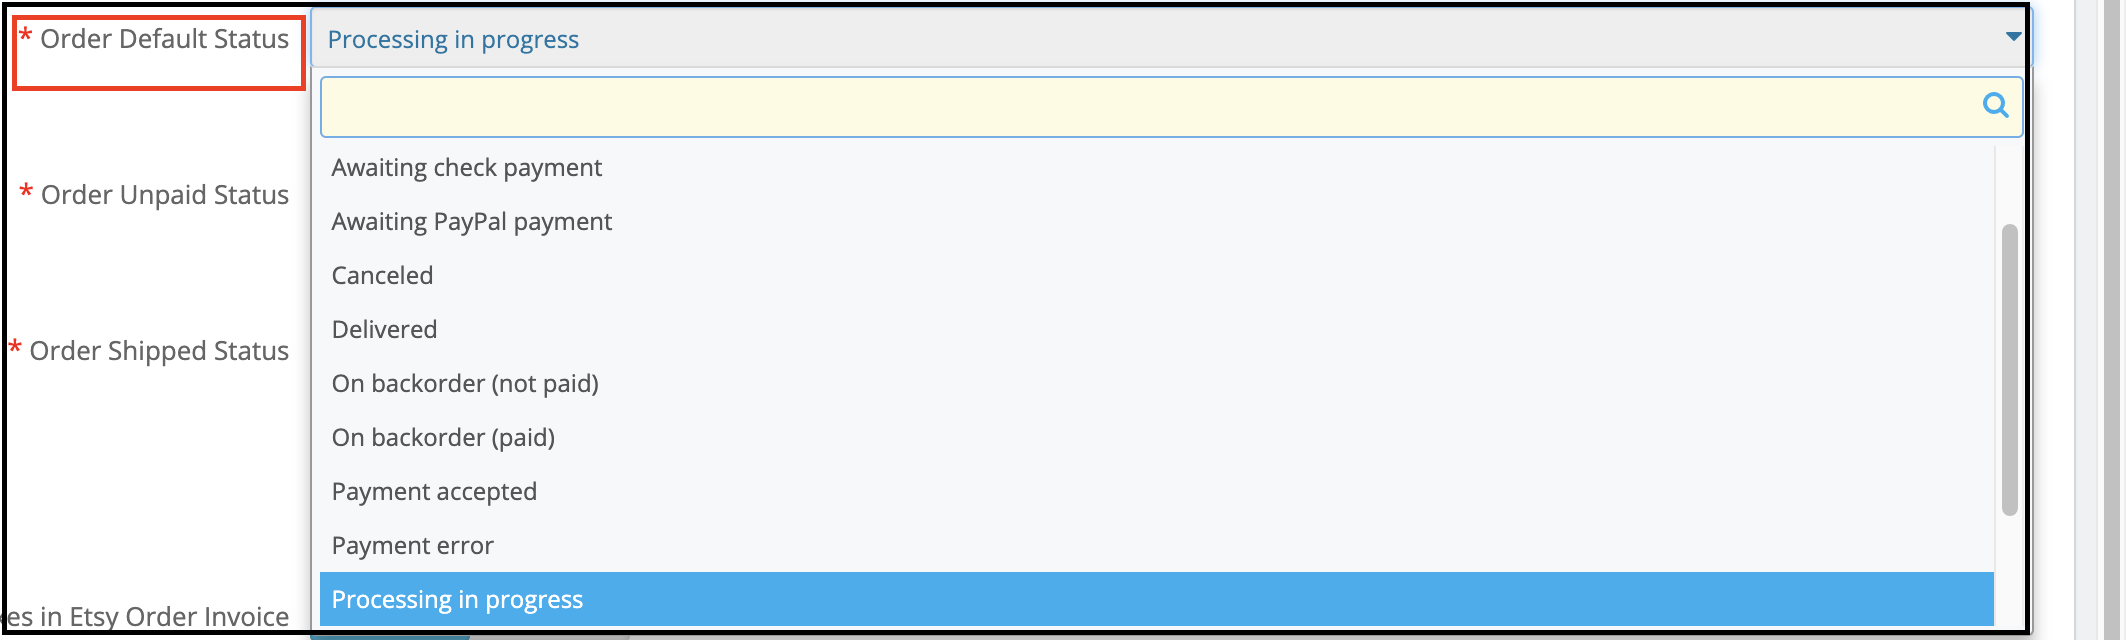
13. Order Default Status
This is a drop-down menu. Moreover, the admin has to choose order default status for orders imported from Etsy to PrestaShop.
14. Order Unpaid Status
This is a drop-down menu. Moreover, the admin has to choose order unpaid status imported for orders imported from Etsy to PrestaShop.
15. Order Shipped Status
This is a drop-down menu and the admin has to choose order shipped status for orders imported. In addition, if the order status is set to this status the orders will be marked as shipped on Etsy.
16. Show taxes in Etsy Order Invoice
If enabled then the tax breakup will be shown in Etsy orders.
17. No. of Items sync per cron
This is a text box and the admin has to define several items that he wants to sync per cron.
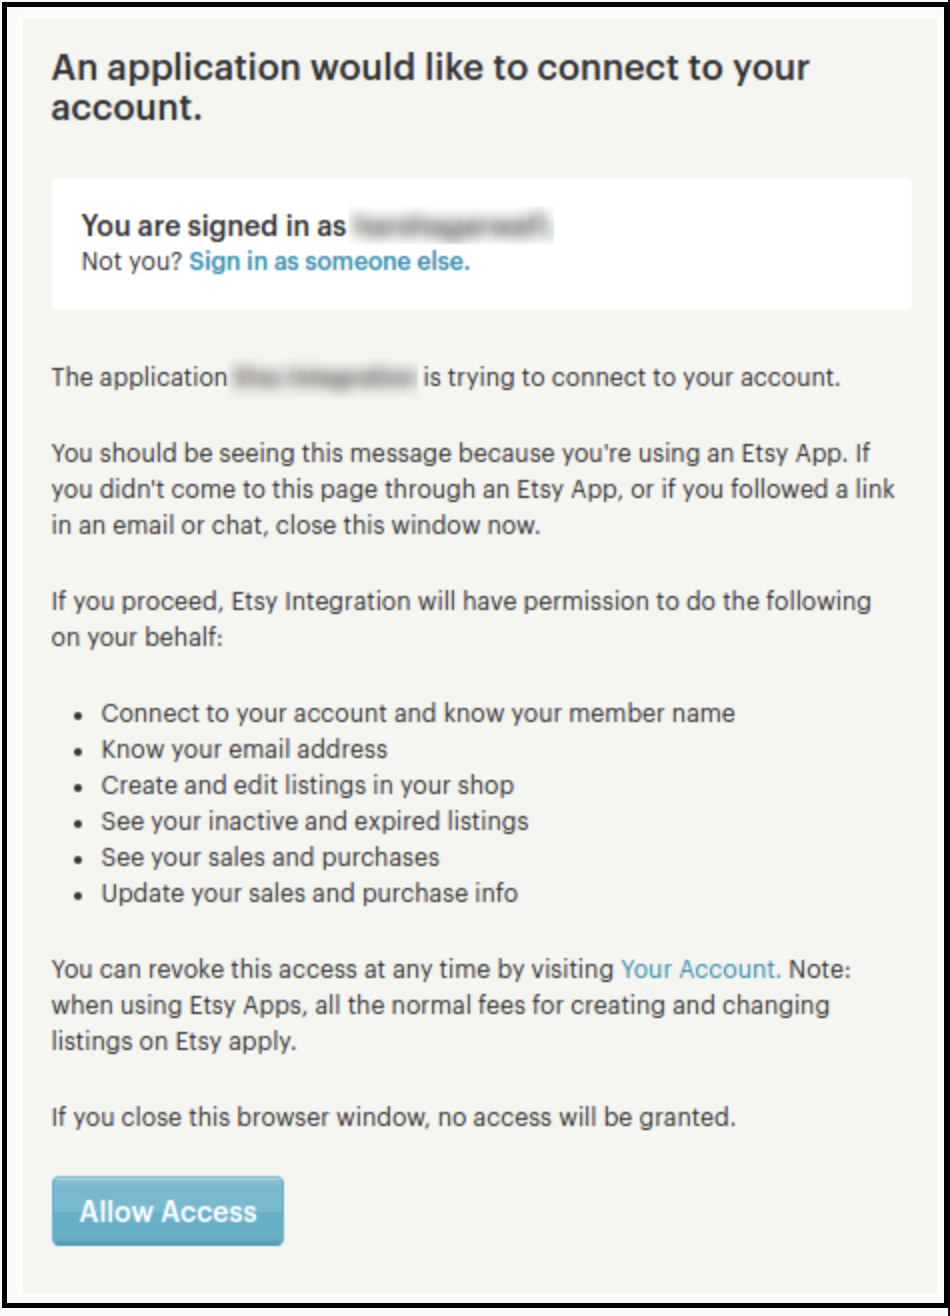
After providing these details or filling up the form, click on the “Connect” button. In fact, it would redirect admin to Etsy Marketplace to allow the App Access to the store. Furthermore, click on the “Allow Access” button as shown below. Moreover, it would establish a connection between the store and Etsy Marketplace.
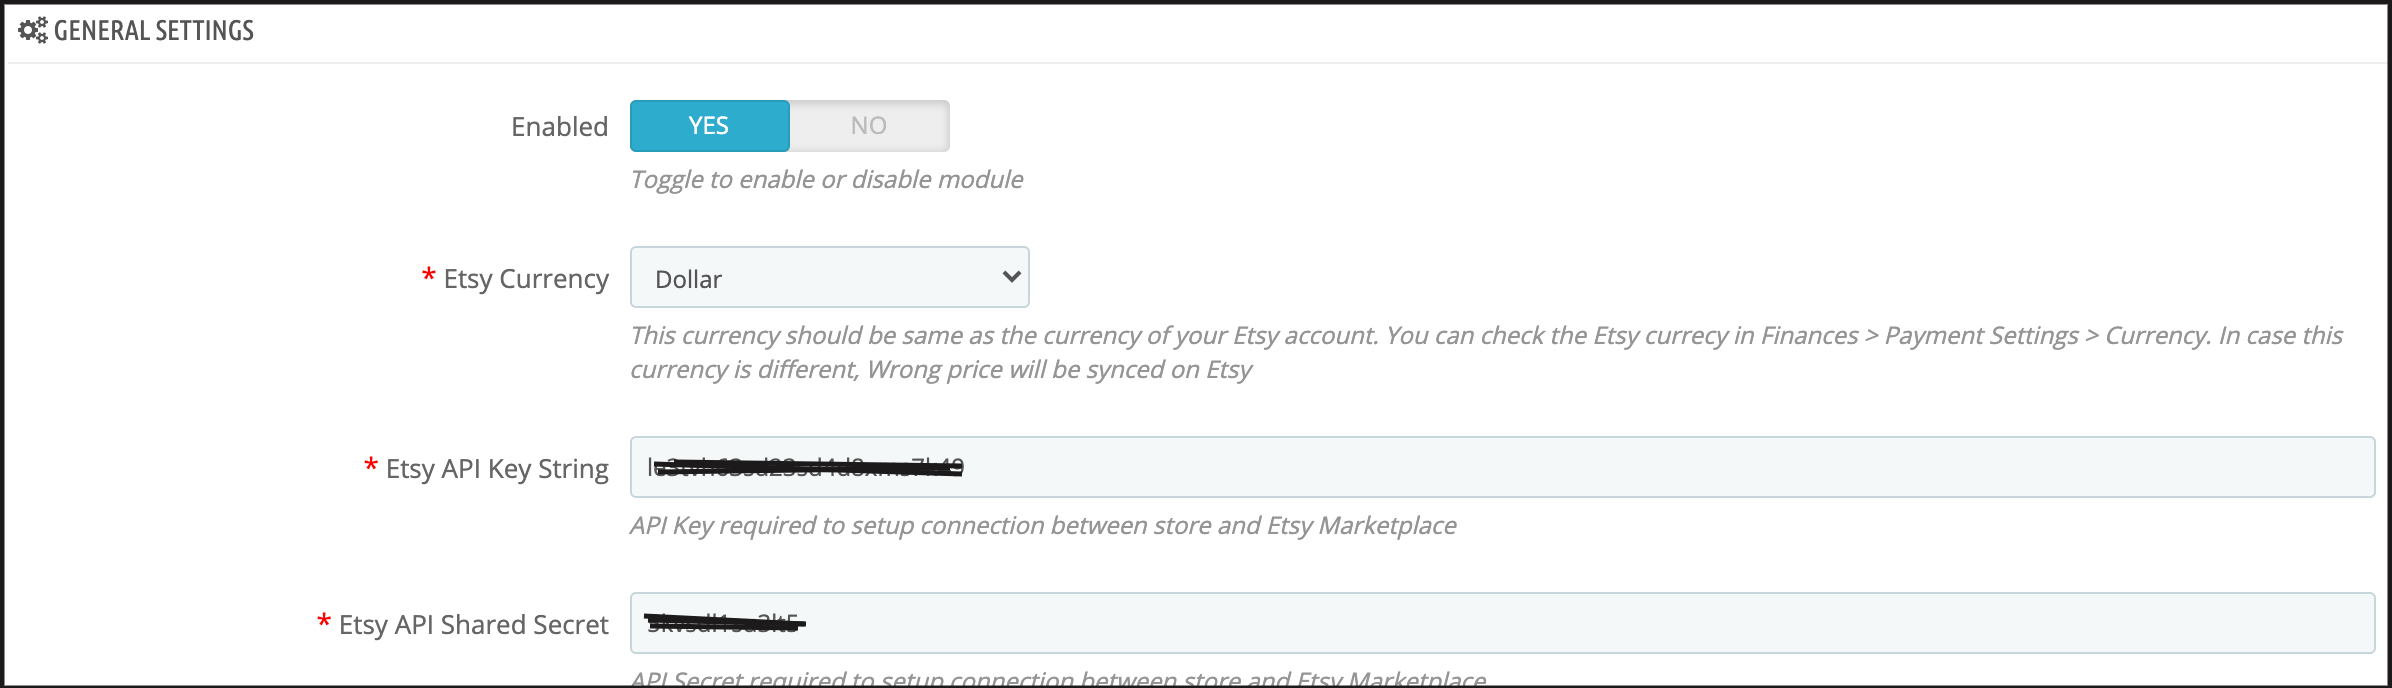
It would also redirect admin back to the same page of “General Settings”. In addition, show the “Disconnect” button instead of “Connect” as the connection has now been set up with Etsy Marketplace. In fact, you can find the screenshot below –
6.2 Attribute Mapping
All the PrestaShop store attributes will sync to the Etsy Marketplace Integration module automatically. Moreover, the admin just needs to map these attributes to the Etsy Marketplace attributes.
6.3 Shop Section
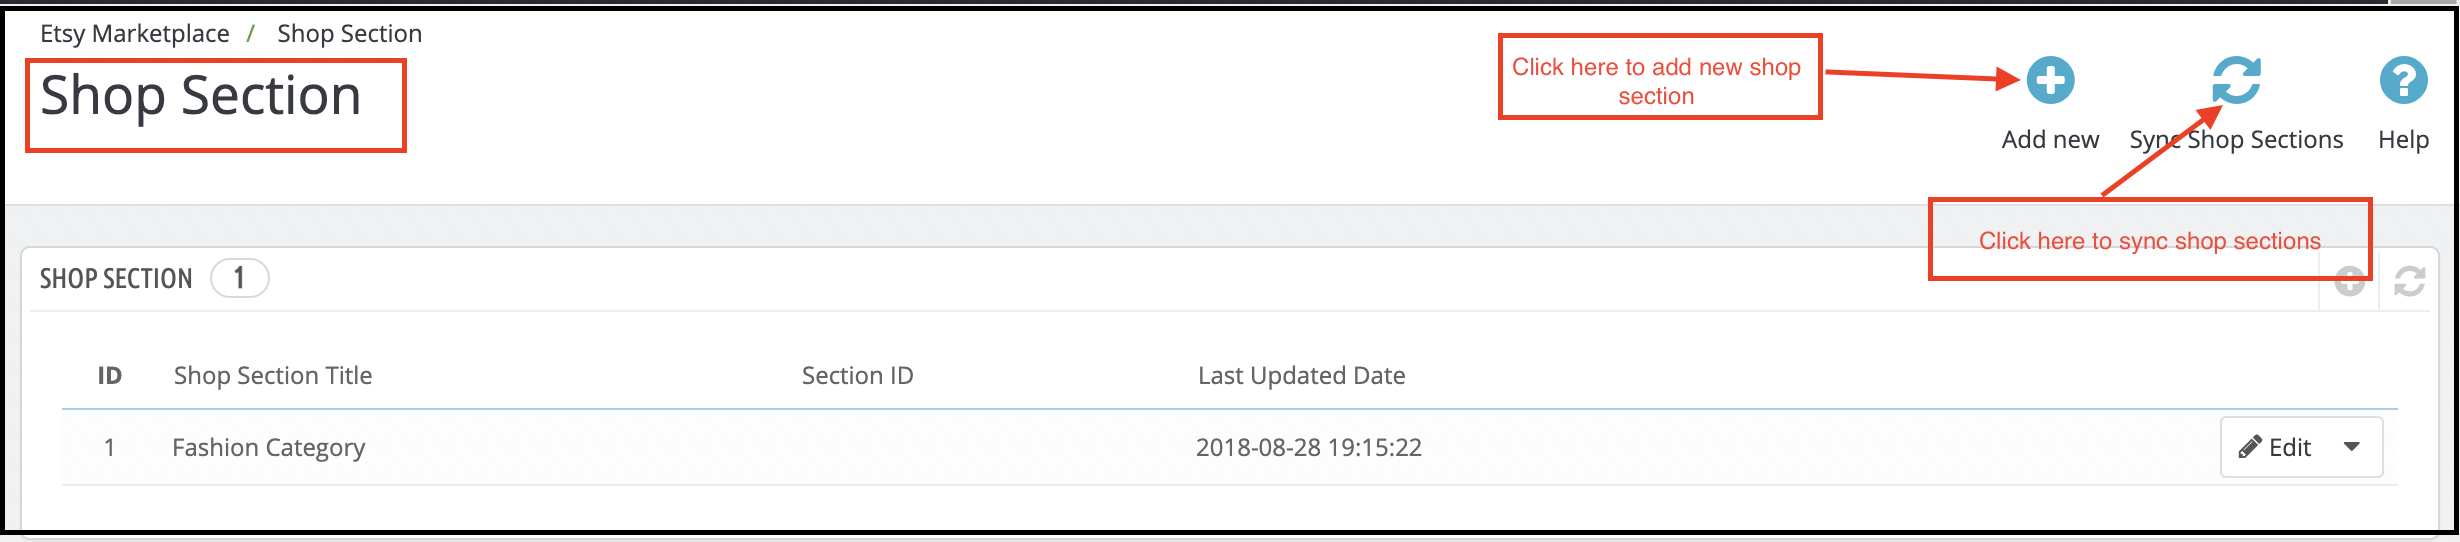
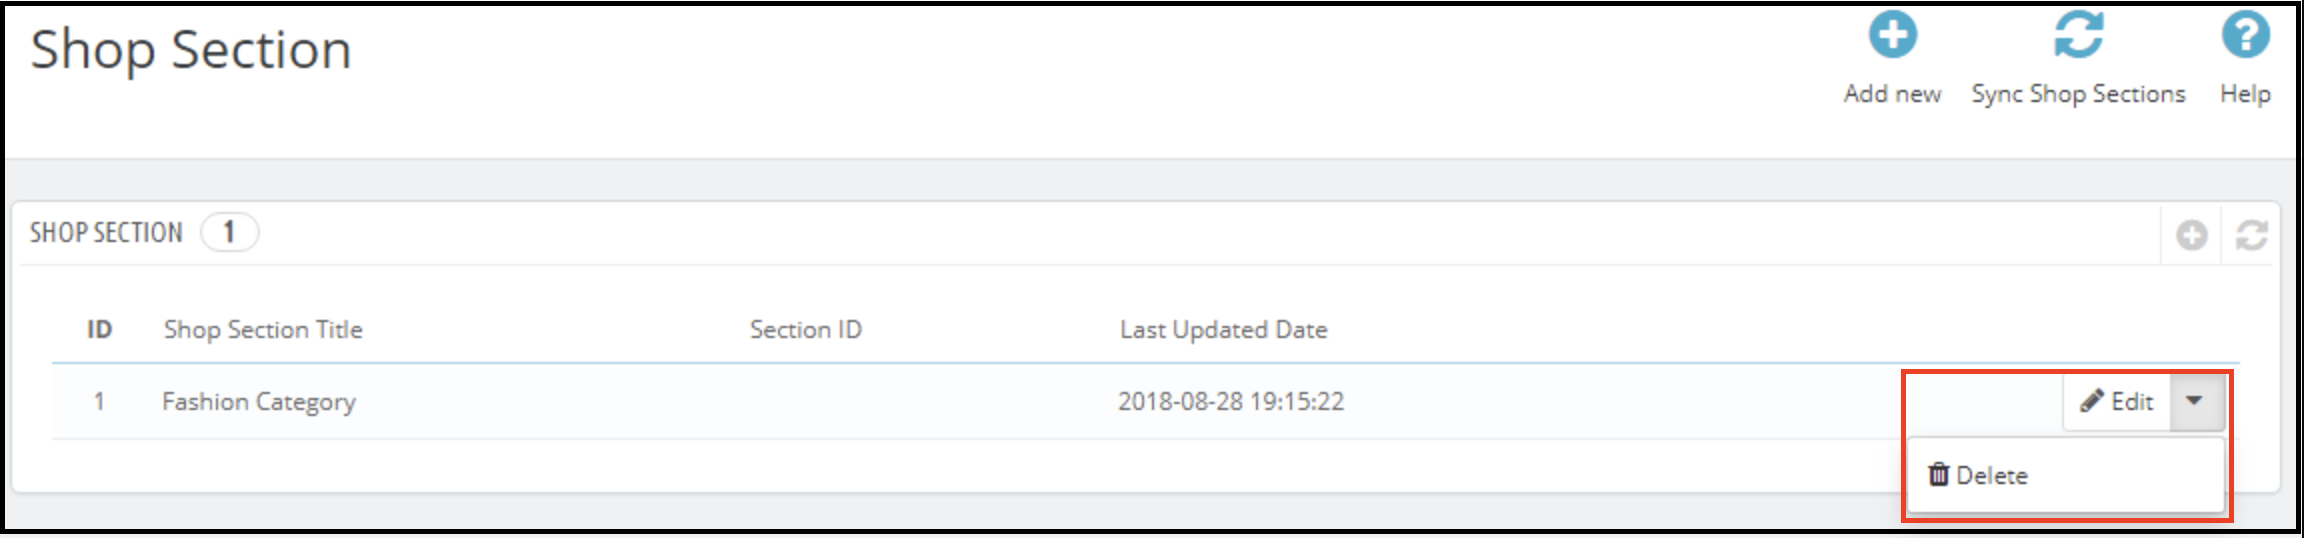
The shop section option offered by the Prestashop Etsy API integrator enables the e-merchants to create separate sections. Further, for the products of the same type. For instance, they can create sections like fashion, sports, and others. In fact, the customers can hit the section of their choice. Moreover, directly land on the products of their choice without browsing the entire assortment.
6.3.1 How to create new shop sections?
To add new shop sections, click on the Add New option at the top right position of the admin interface.
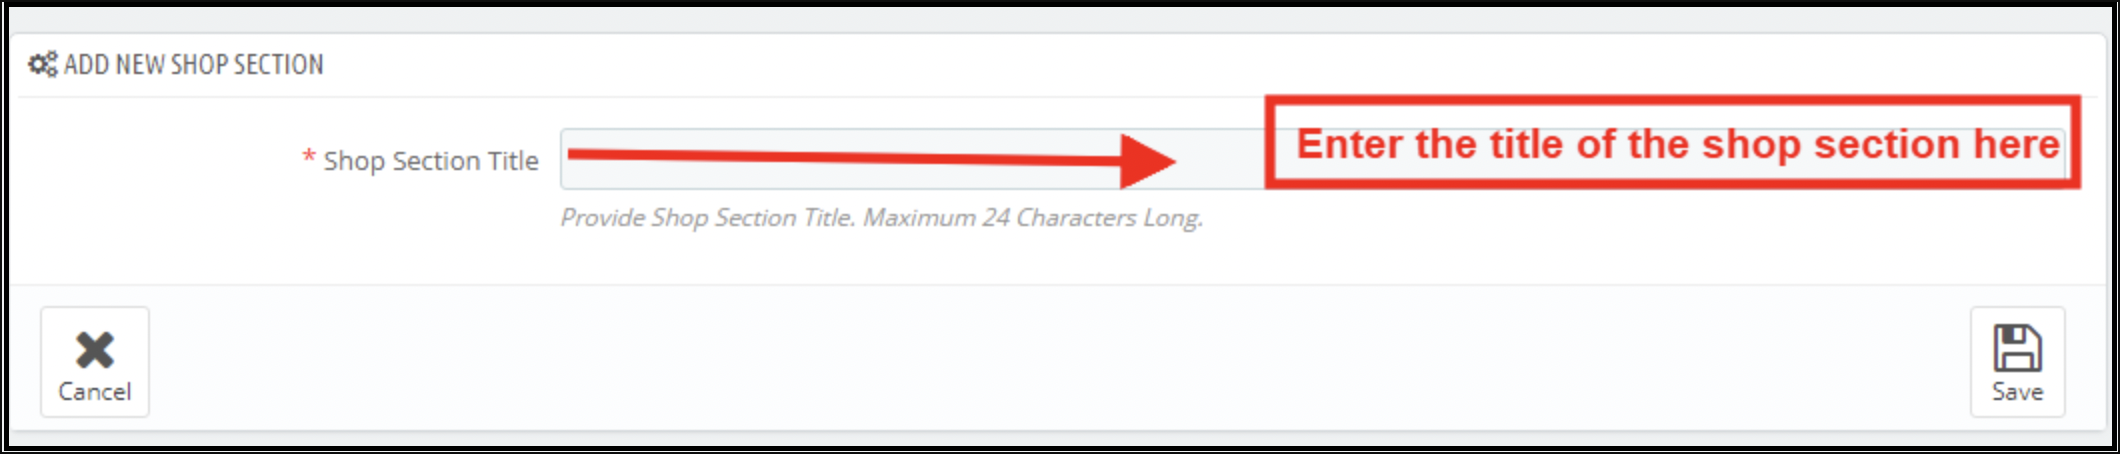
This will redirect you to the shop section creation interface.
Enter the name of the shop section in ‘Shop Section Title’ and save the changes.
To sync the section with the marketplace click on the Sync Shop Sections button at the top right corner of the interface. Further, the cron option will sync all the sections in one go.
The synced sections will display in the ‘Profile Management’ tab. Further, the Prestashop Etsy Integrator is shown in the image below.
The admin can select the shop section and the products of that particular profile will list under the selected section.
6.3.2 How to edit or delete the shop sections?
To edit a particular shop section, click on the ‘Edit’ button corresponding to it. Likewise, to remove the same, click on the corresponding ‘Delete’ button.
The created sections will display at the front-end as shown in the image below:
6.4 Shipping Templates
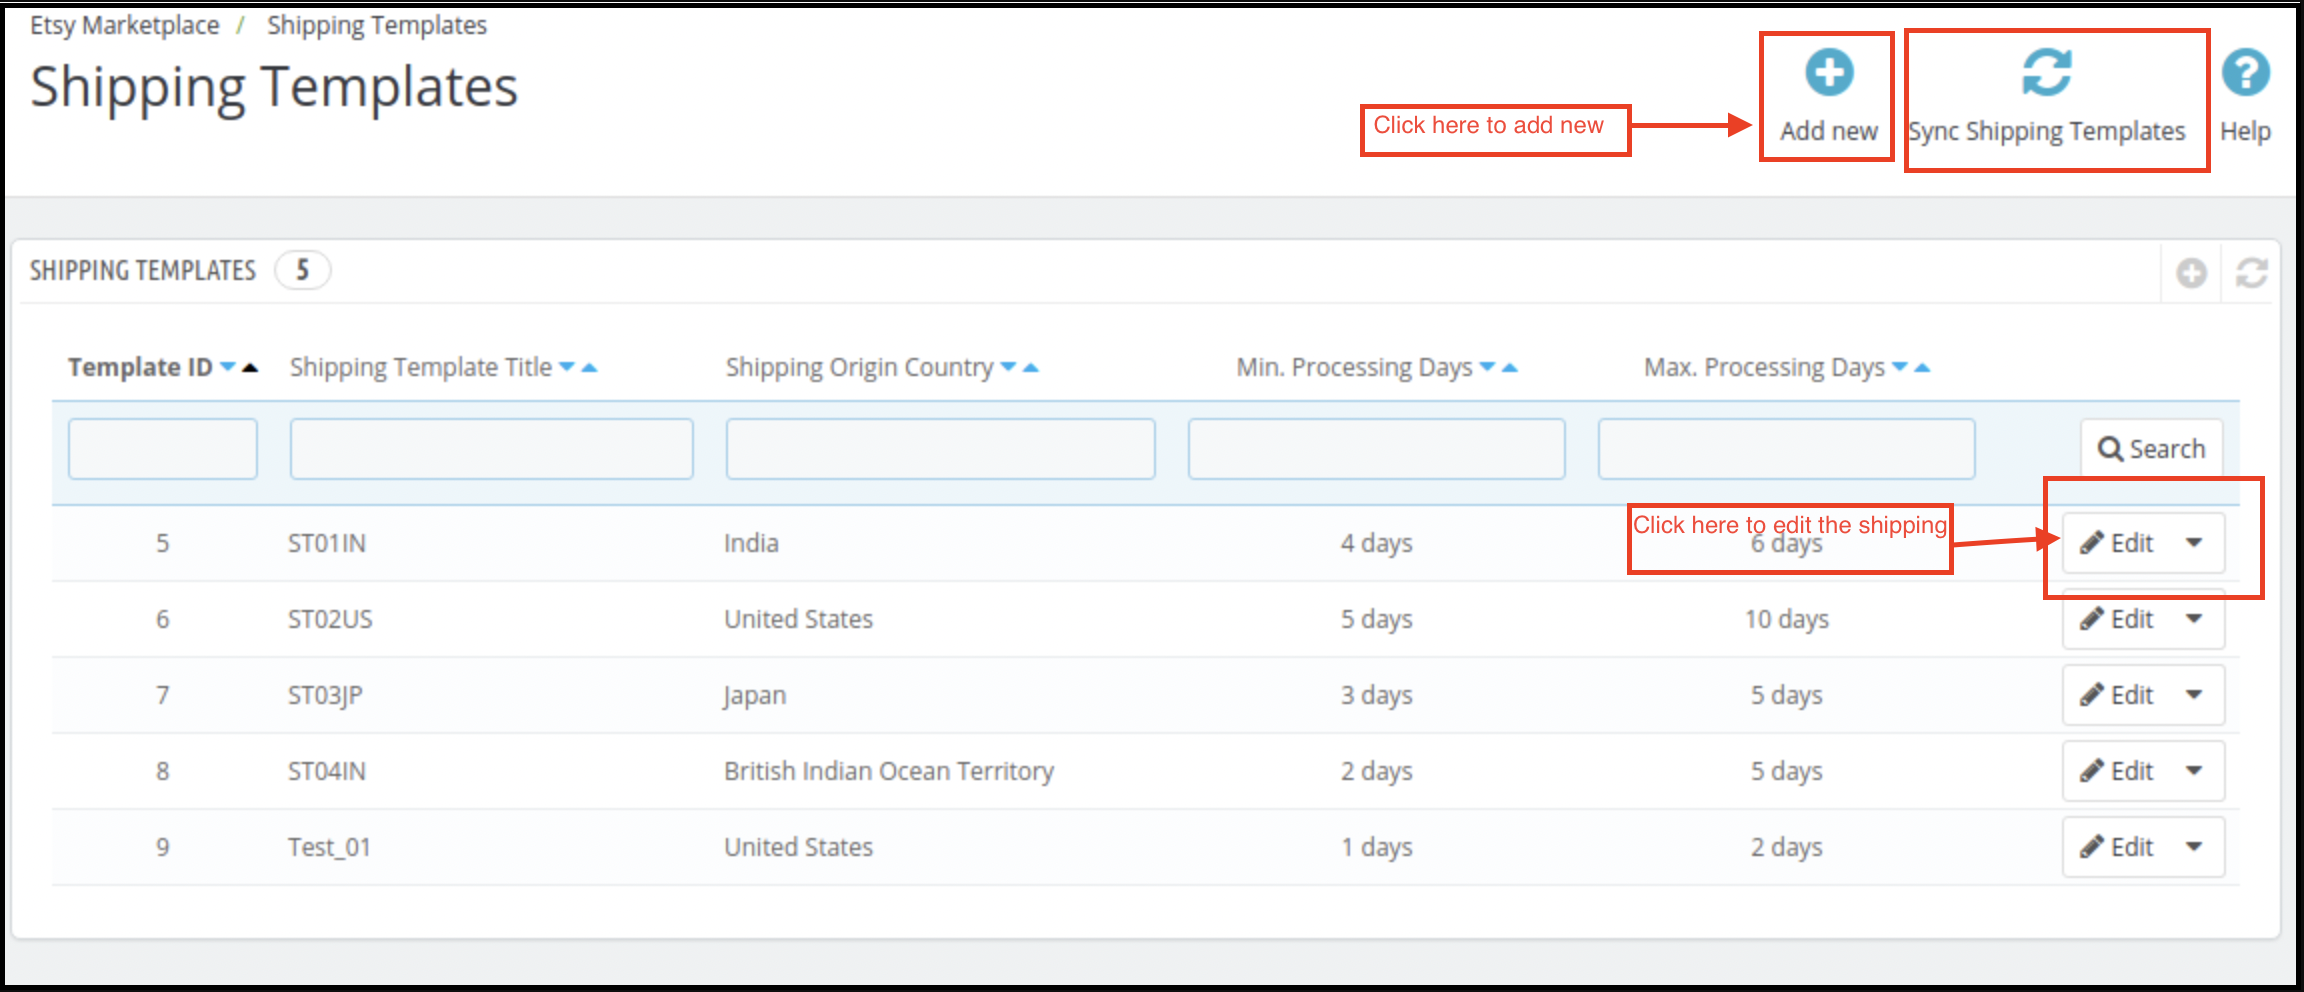
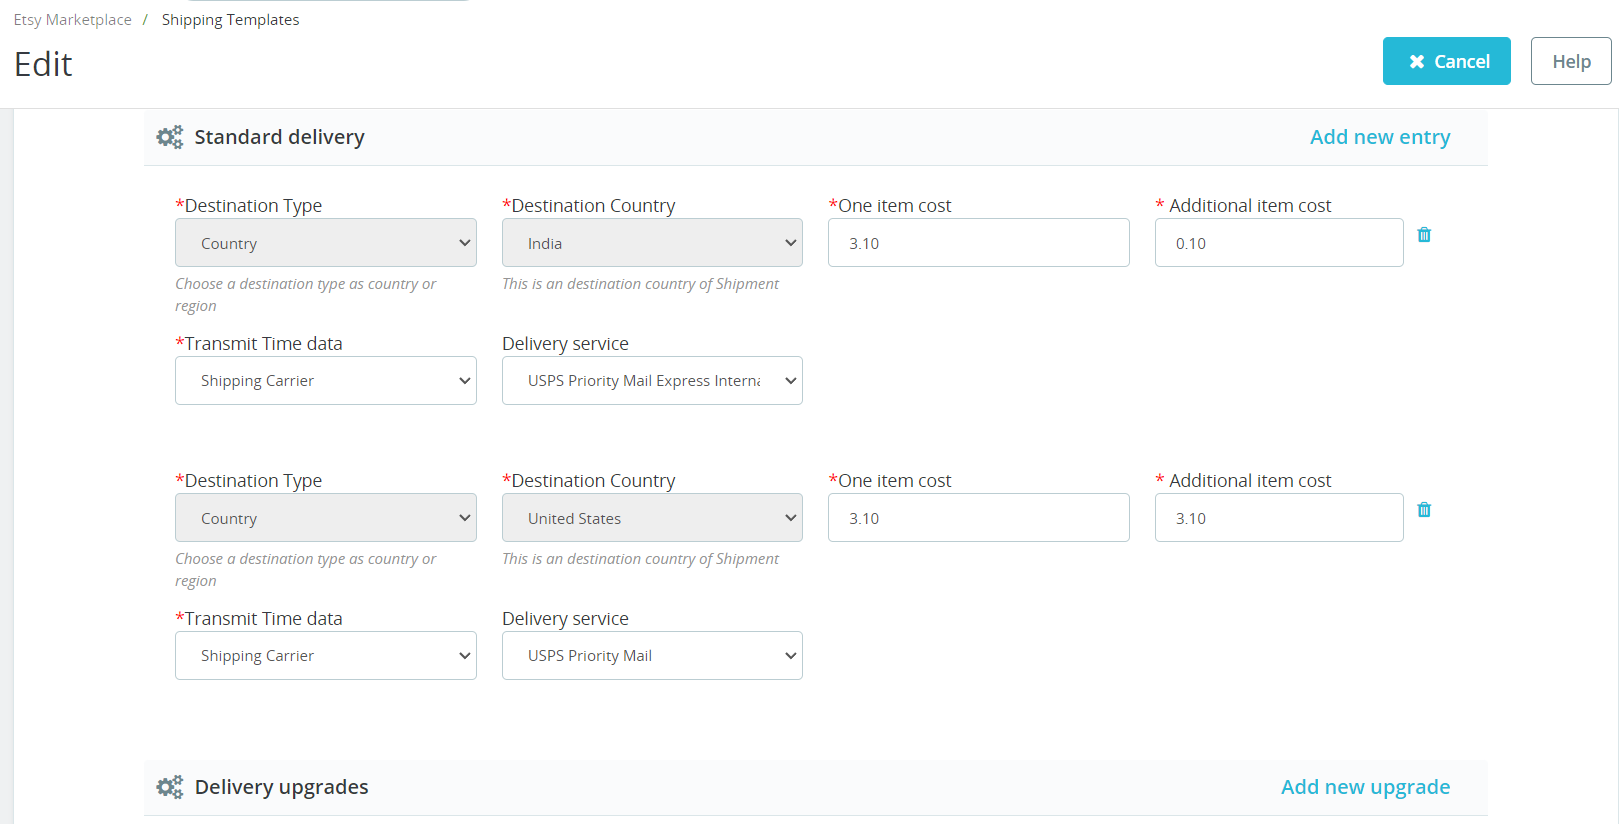
Etsy Prestashop connector allows the store admin to create the Shipping Templates to manage shipping options on the Etsy marketplace. Further, in this tab of the Prestashop Etsy integrator, the admin can create Shipping Templates. Furthermore, that contains shipping details. For instance, Shipping Origin Country, Minimum and maximum processing time for the orders, etc. In fact, the admin can create multiple Shipping Templates as per the need of the system. Further, the admin will have to map Shipping Templates to the Profiles (In Profile Management Tab) to make it work on Etsy Marketplace. This is explained later in this document. Thus, each Shipping Template can have multiple shipping entries. Further, to define shipping destinations and their cost according to the destinations.
Note – One Shipping Template can have one origin. However, multiple destinations with their costs. Further, the admin can add different standard entries and delivery upgrades for the shipping templates.
6.4.1 Steps to Add Shipping Templates
Following are the steps to add a Shipping Template to the system –
Go to the Etsy Marketplace connector addon-> Shipping Templates (Menu Option)
It would display the page where already added Shipping Templates will list (If any). Click on the “+” (Plus Icon – as shown in the above screenshot).
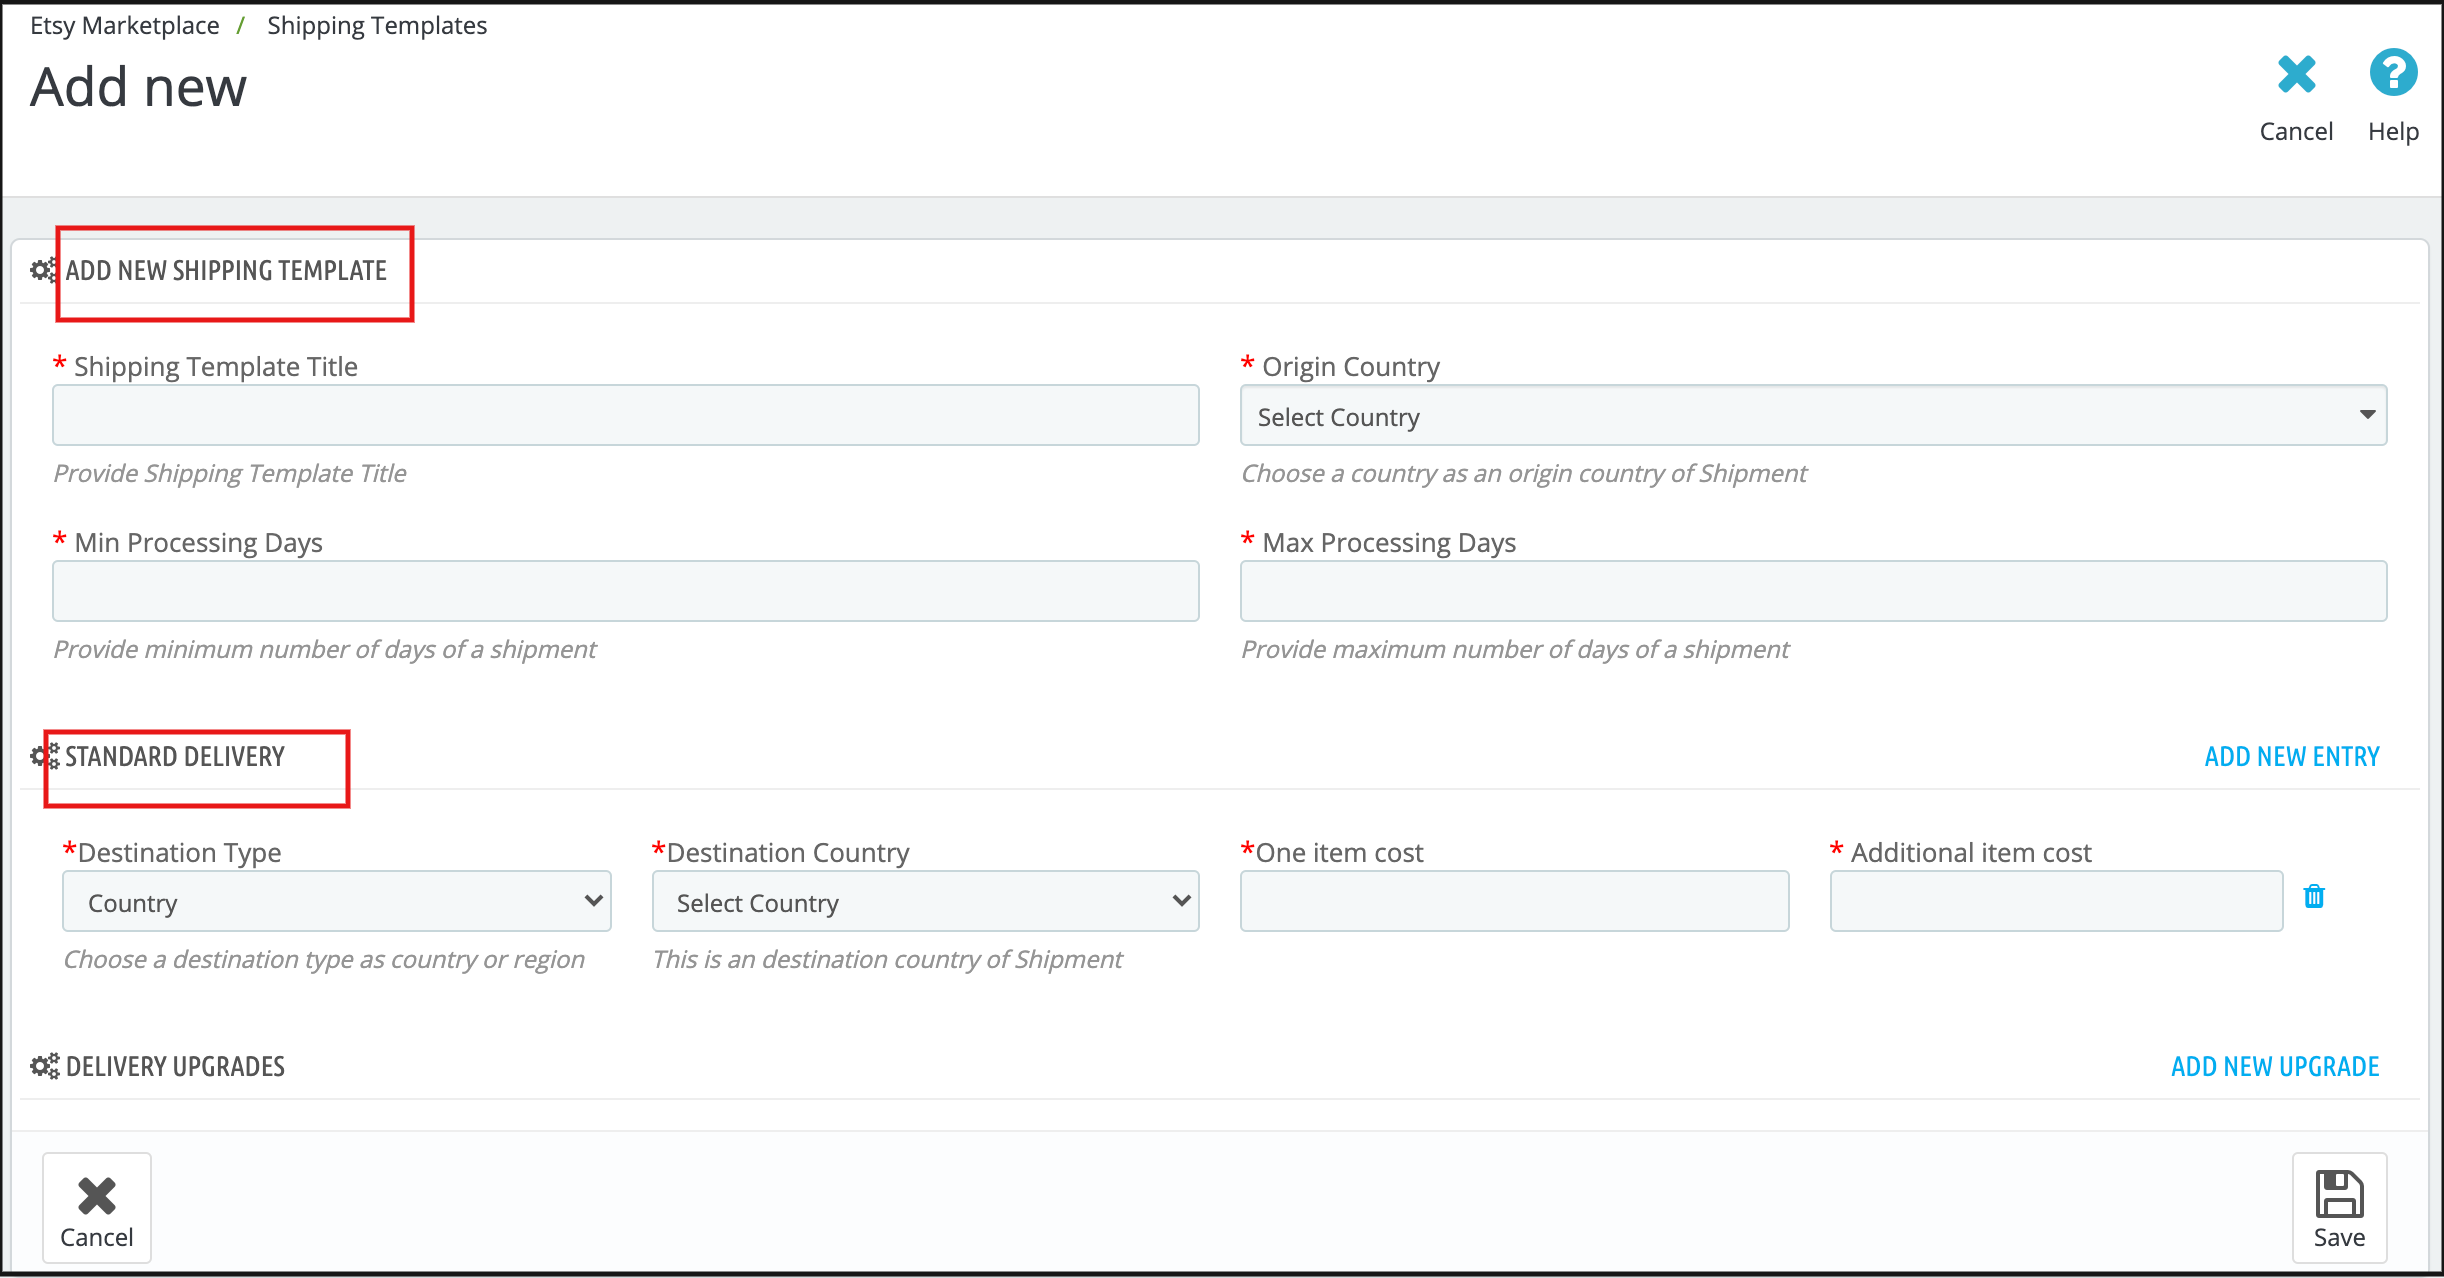
It would redirect the admin to the new page where a form with some input field will be shown (Screenshot is shown below).
Fill up the following input fields of the form –
Shipping Template Title
Origin Country
Origin Post Code
Processing Days (Min and Max)
Destination Type
Destination Country
One Item Cost
Additional Item Cost
Transmit Time Data (Choose Shipping career or add custom Delivery time.)
Choose Delivery Service (If the previous option is selected as a shipping career).
Or Choose Min and Max Processing days (if the previous option is selected as Delivery time).
Click on the “Save” button.
It would validate the provided data and save the details into the system if valid.
6.4.2 Steps to Edit/Delete Shipping Template
Following are the steps to edit/delete Shipping Template from the system –
Go to the Prestashop Etsy Marketplace Integration addon-> Shipping Templates (Menu Option)
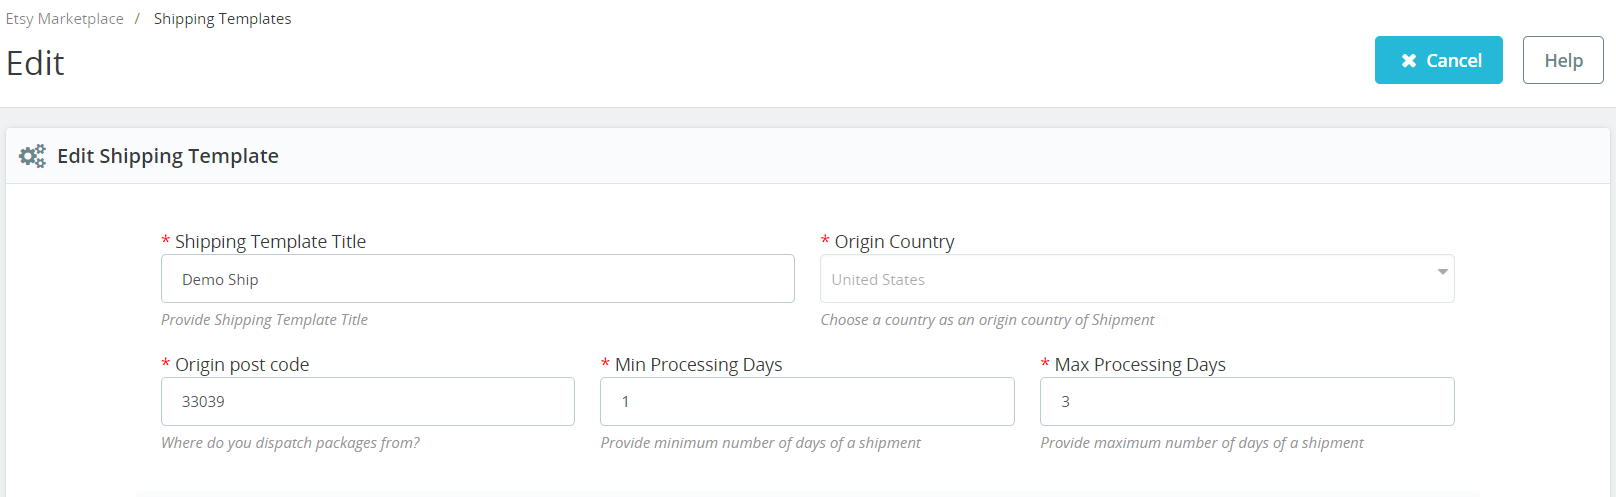
It would display the page where already added Shipping Templates will list (If any). In fact, click on the “Edit/Delete” link given under the drop-down being shown corresponding to each Shipping Template.
If the admin has chosen the “Edit” option then it would redirect the admin to a new page. Further, where a form with an already filled input field will be shown. Admin can simply update values. Moreover, save the details by clicking on the “Save” button.
If the admin has chosen the “Delete” option then it would delete the Shipping Template. In addition, all its Shipping Template Entries are from the system.
After creating shipping templates it is required to synchronize the Shipping Templates. Further, the admin needs to click the “Sync Shipping Templates” button under the “Shipping Templates” tab of the Etsy marketplace integration module. In fact, only after successful synchronization, these shipping templates will appear on the listing page.
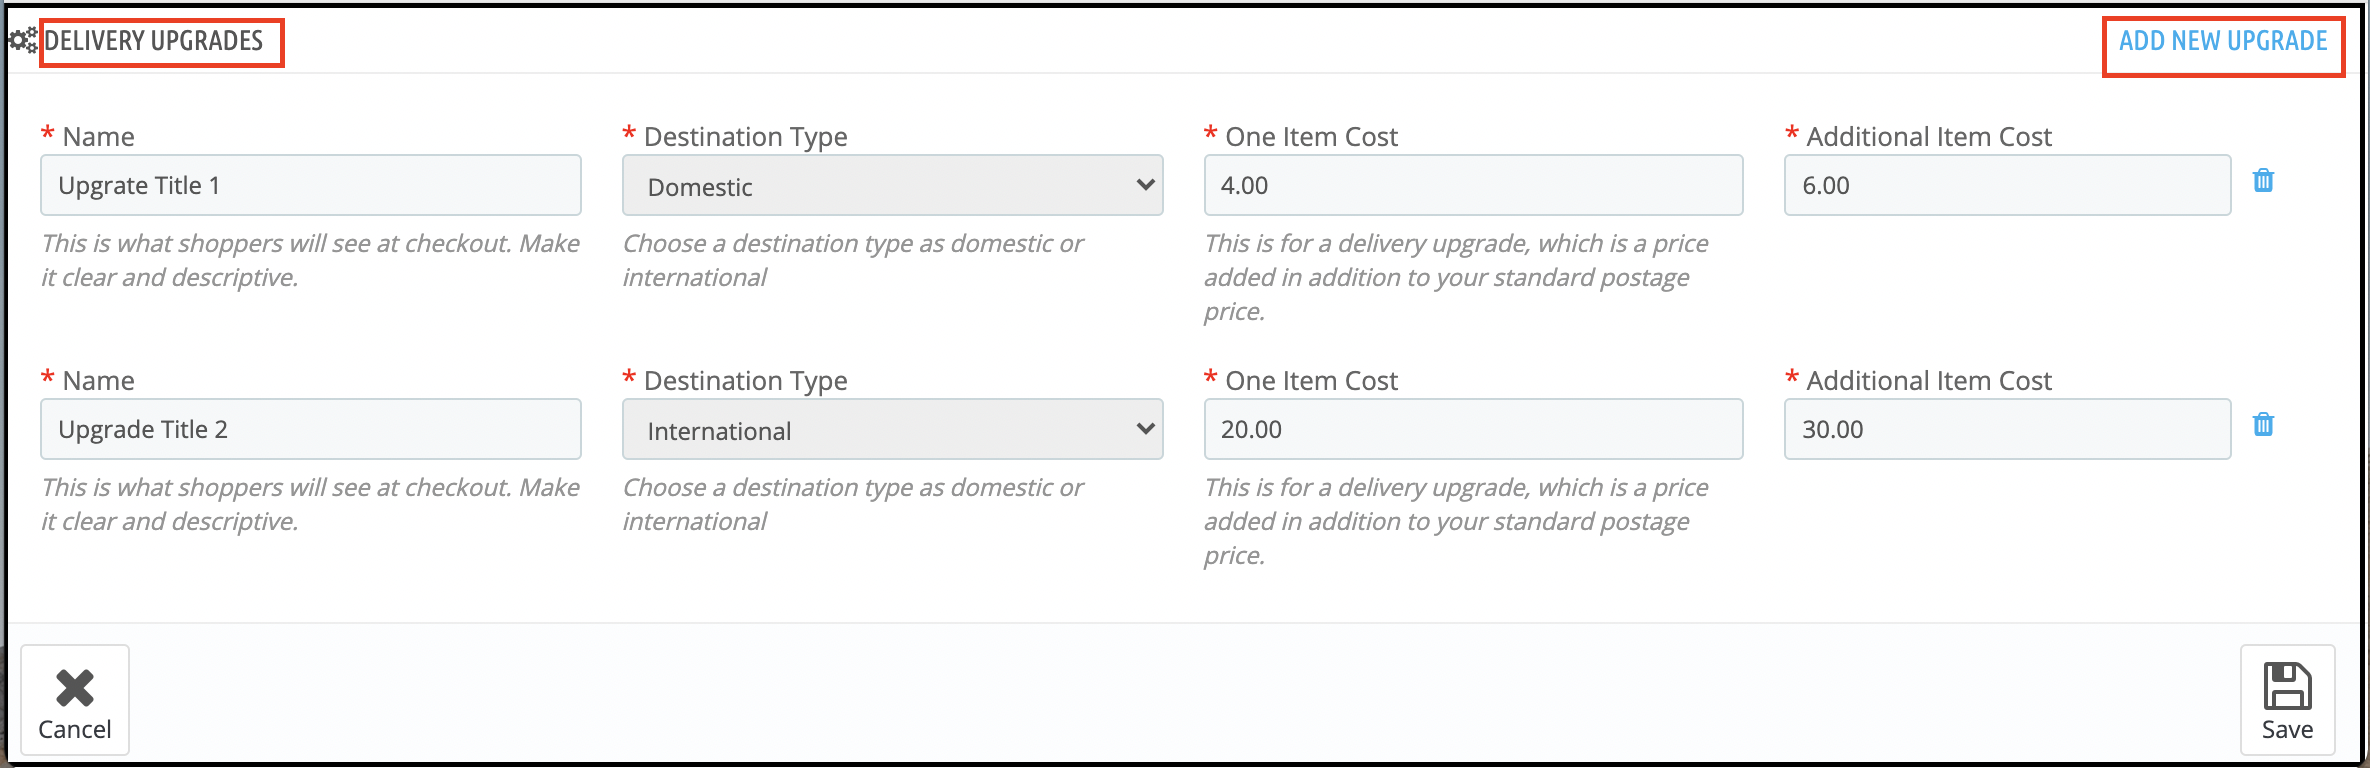
6.4.3 Delivery Upgrades
Admin can add the delivery upgrades to the Shipping Templates from this tab of the Etsy Prestashop integrator. In fact, the Delivery Upgrades tab of the Etsy Prestashop integration module displays the list of the Delivery upgrades added to the shipping templates.
6.4.4 Add Delivery Upgrades for a Shipping Template
Following are the steps to add Delivery Upgrades to the Shipping Templates-
Go to the Prestashop Etsy Integrator -> Shipping Templates (Menu Option)
It would display the page where already added Shipping Templates will list (If any). Click on any of the Shipping Templates in which you want to add Delivery Upgrades.
It would redirect to that particular Shipping Template Page.
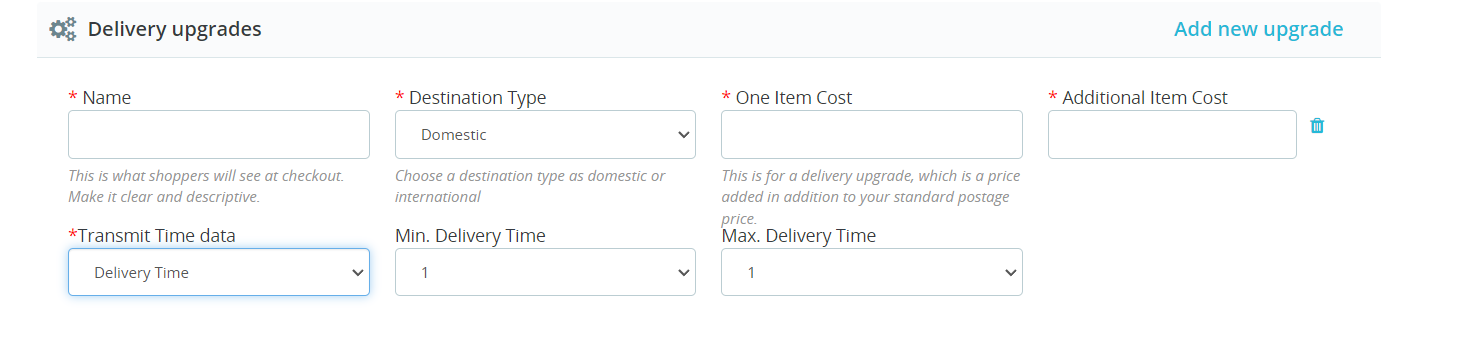
Click on the “Add New Upgrade” at the bottom right side of the Etsy Prestashop Integrator and it would open a drop-down form with, the input field will be shown.
Fill up the following form fields –
Delivery Upgrade Name
Destination Type
One Item Cost
Additional Item Cost
Transmit Time Data (Choose Shipping career or add custom Delivery time.)
Choose Delivery Service (If the previous option is selected as a shipping career).
Or Choose Min and Max Processing days (if the previous option is selected as Delivery time).
Click on the “Save” button.
It would validate and save the details to the system if valid.
6.5 Profile Management
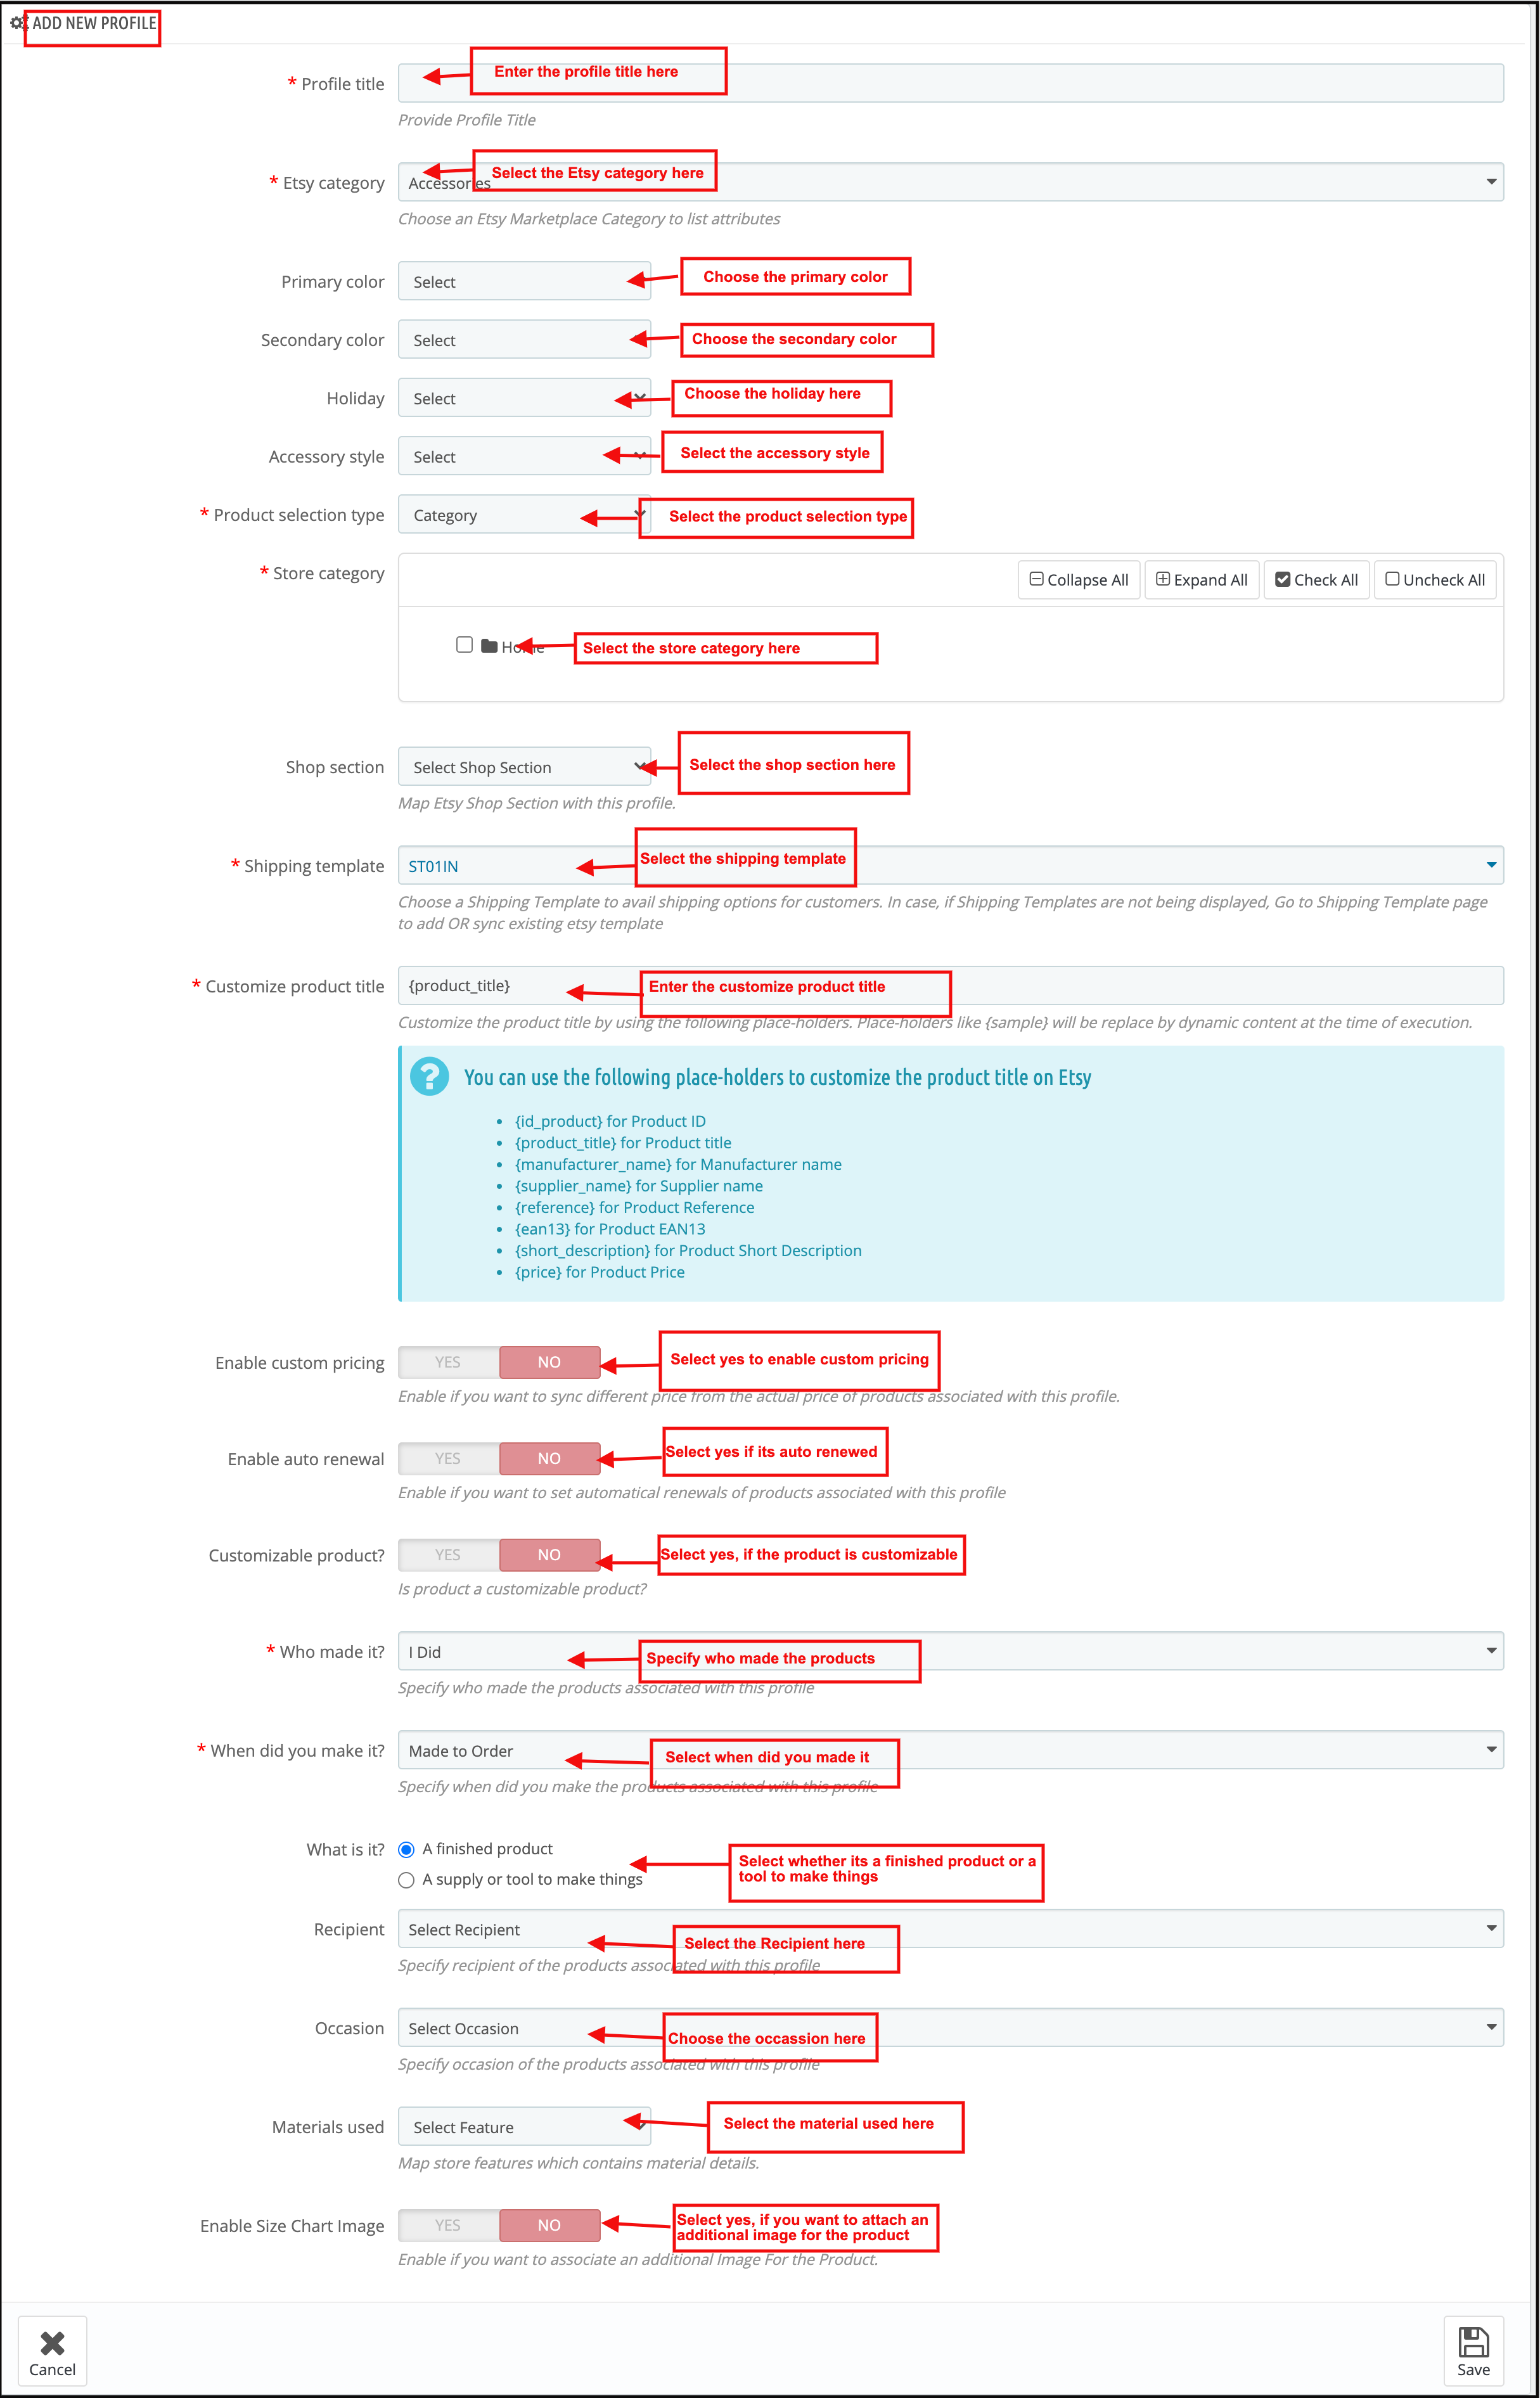
The Profile Management tab provides options to create a profile for product listing. Further, profile-based listing allows the seller to list the attribute and categories of the Prestashop products. Furthermore, with the Etsy marketplace attributes and categories. In fact, the seller can select multiple Prestashop store categories at a time if there is only one category on Etsy for these products.
Under Profile Management admin can select the Shop Section in which he wants to show products for that profile.
In the recent enhancements, we have also provided the option to synchronize products on the profile level. Thus, if you want to update/list products on Etsy for particular profiles only, you can find the crons in the profile management tab itself.
Note: Please make sure to synchronize the Shipping Templates otherwise these details will not reflect in the Profile Management. Go to the Shipping Template tab of Prestashop Etsy Integration Addon and run the “Sync Shipping Templates” cron.
6.5.1 Add Profile to the System
Following are the steps to add Profile into the system –
Go to the Prestashop Etsy Integration Module -> Profile Management (Menu Option)
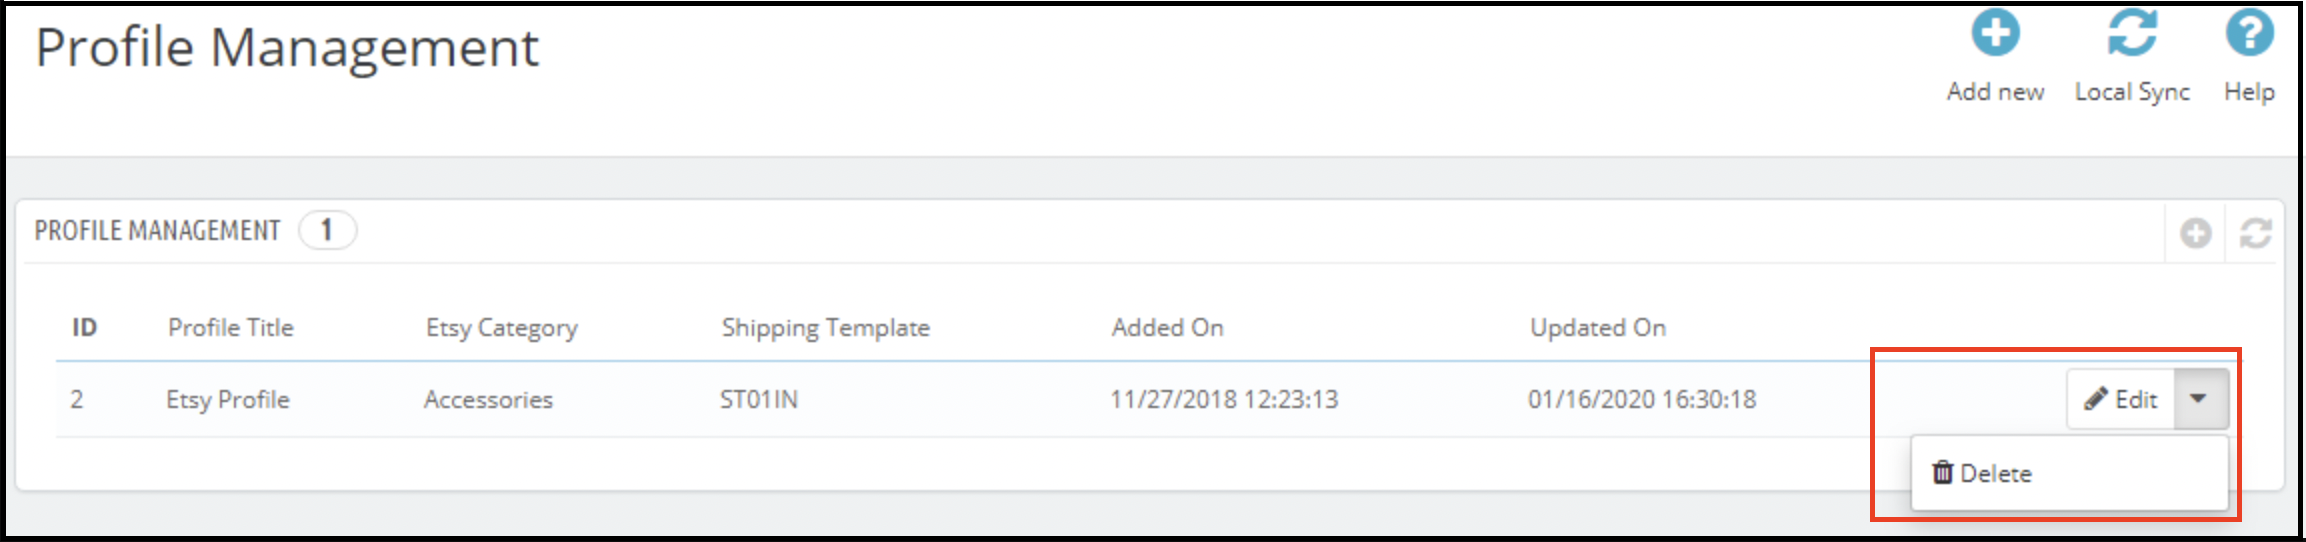
It would redirect the admin to a page where already added profiles will list (If any). Click on the “+” on the top right side of Etsy Prestashop Integrator (Plus icon as shown in the screenshot below) and it would redirect the admin to a new page where a form with some input fields will be shown.
Fill up the following input fields –
Profile Title
Etsy Category (List of Etsy Marketplace categories)
Store Category (List of Store Categories)
Shipping Template (List of Shipping Templates)
Primary Color
Secondary Color
Holiday
Accessory Style
Product Selection Type
Customize Product Title
Enable Custom Pricing
Customizable Product
Alter Quantity
Enable AutoRenewals
Who made it
When did you make it
Recipient
Occasion
Materials Used
Shop Section
Enable Size Chart Image
Size Chart Image
and click on the “Save” button.
It would validate and save the details into the system if valid.
6.5.2 Edit/Delete Profile
Following are the steps to edit/delete a profile from the system created in the Prestashop Etsy Integration plugin-
Go to the Prestashop Etsy Integration plugin -> Profile Management (Menu Option)
It would redirect the admin to a page of the Prestashop Etsy Integration module where already added profiles will list (If any, shown in the screenshot below).
Click on the “Edit/Delete” link given corresponding to each profile as shown in the above screenshot.
If the admin has chosen the “Edit” option then it would redirect the admin to a new page where a form with some already filled input fields will be shown. Admin can simply update values and save the details by clicking on the “Save” button.
If the admin has chosen the “Delete” option then it would delete the selected Profile from the system.
6.5.3 Product Selection Type
This is a drop-down and from this admin can select whether he wants to select the whole category to list or select particular products to add.
6.5.4 Etsy Category Attribute
Etsy Category Attributes are now available in the Etsy Marketplace Connector module. The admin can now choose the Primary Color, Secondary Color, Holiday, and Accessory Style.
6.5.5 Size Chart Image
By using this feature admin can also add an image for the product.
6.6 Products Listing
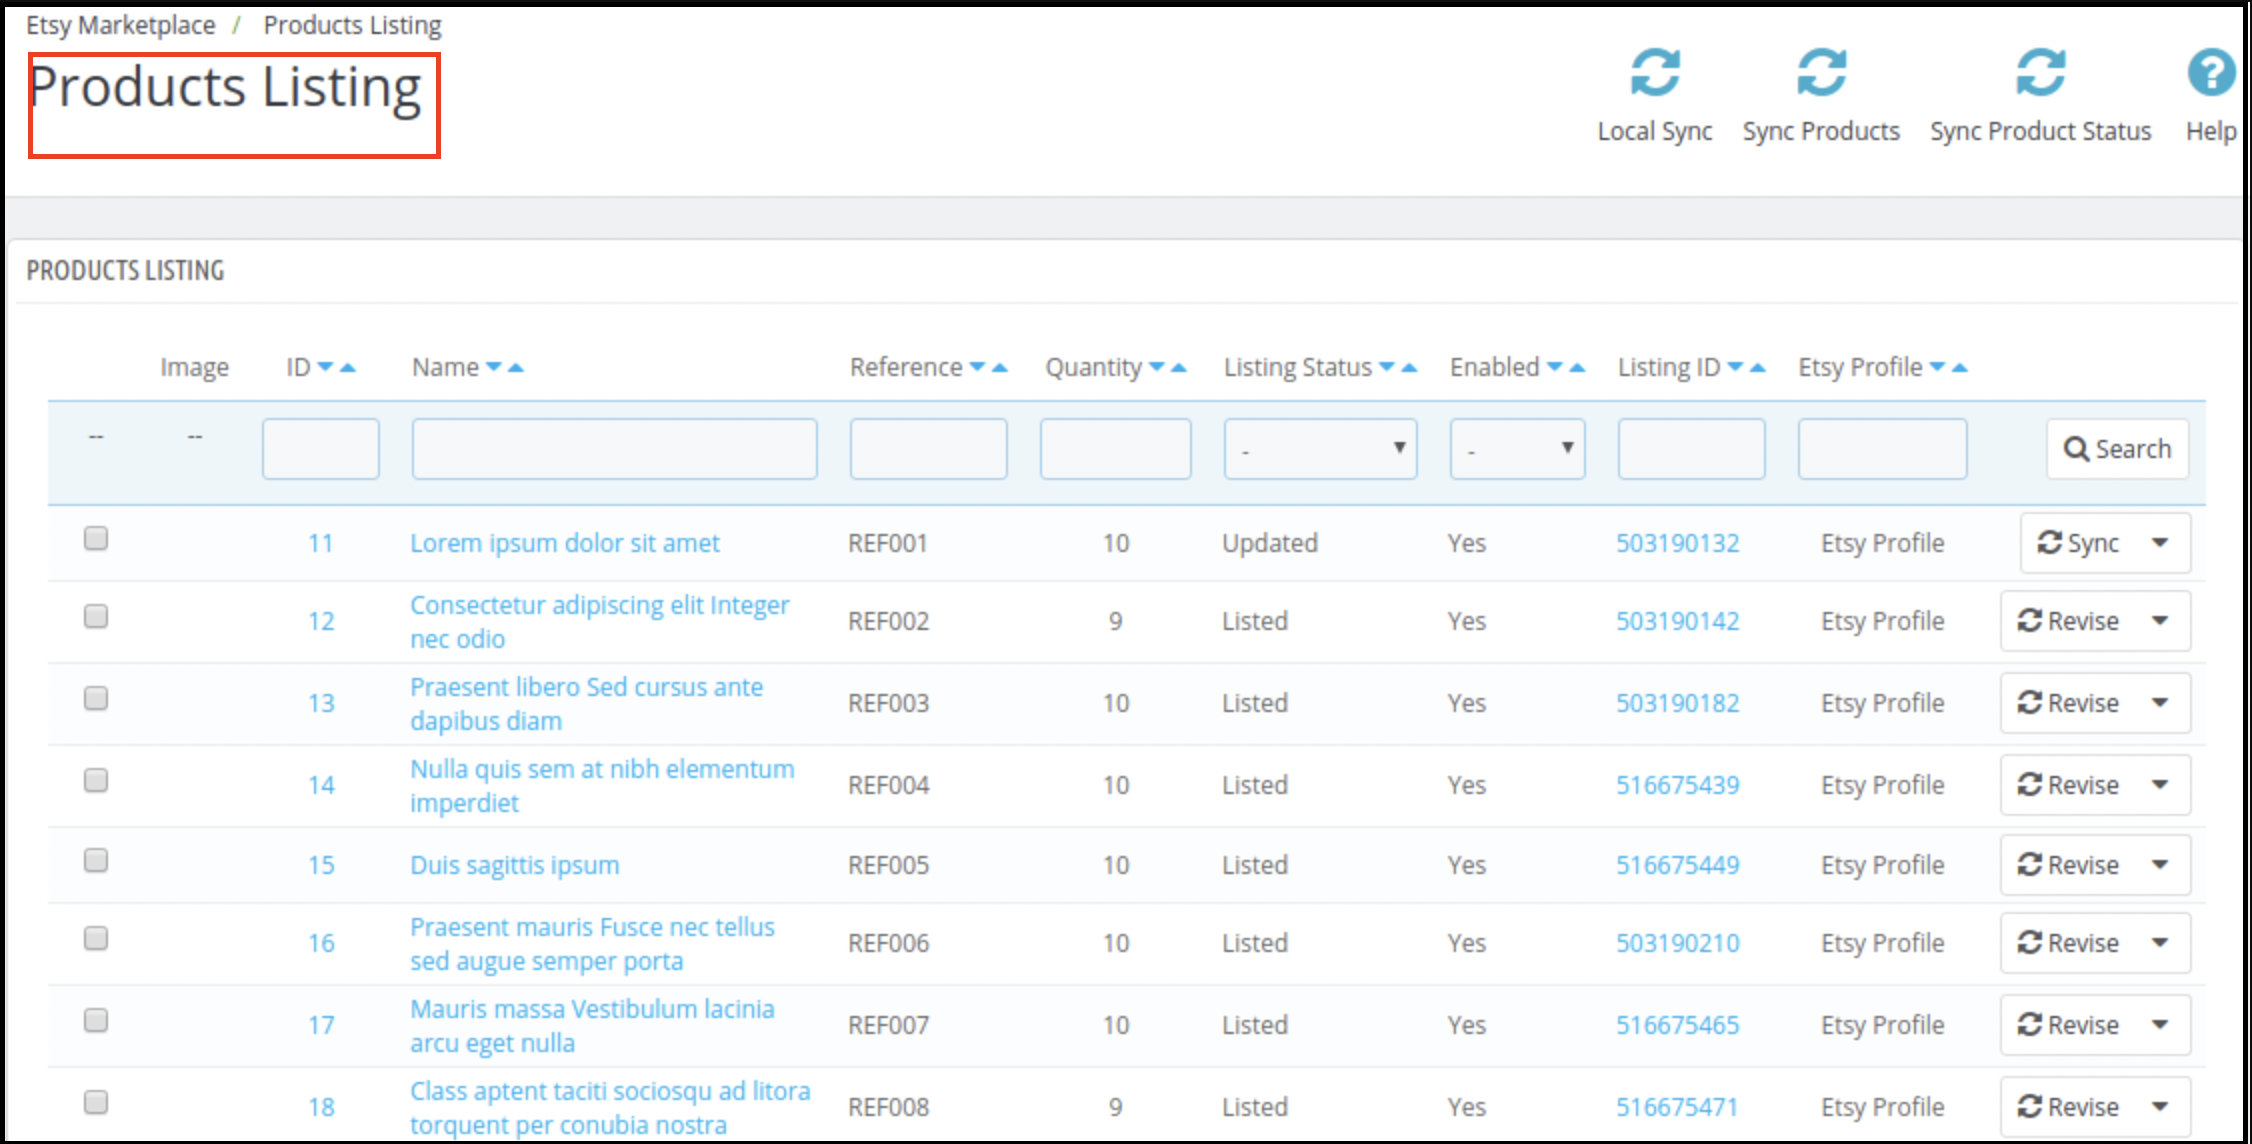
This section of Etsy Prestashop Integrator shows the list of all the products selected to list or listed on the Etsy Marketplace with their listing status and other details as shown in the screenshot below:
There are the following options cron options offered in the product listing tab of the Prestashop Etsy Integration module –
6.6.1 Sync Products
This option syncs the products of the category that was mappable in the profile. As the ‘Sync Products’ is executed, all the products of the profile will be listed at etsy.com.
6.6.2 Sync Product Status
The listing status of the products can sync back from the marketplace to the store by executing this cron of the Prestashop Etsy integrator.
6.6.3 Delete Products
This option allows the admin to delete product listings from Etsy Marketplace in bulk. To delete a product listing, the admin has to select the products that they want to remove and click on “Delete Product”. This will remove all the selected products from the listing.
6.6.4 Renew Products
This option allows the admin to renew the product in case the listing has expired on Etsy Marketplace in bulk. Furthermore, to renew the product, the admin has to select the products that they want to renew and click on the “Renew Product” action.
Along with this, the admin even gets the option to renew or relist one particular product. In fact, there is a Renew option corresponding to each product that has expired.
After setting up a product for renewal or relisting, these actions will be replaced with the “Delete” action.
Note – Product Renewal is chargeable on Etsy Marketplace.
6.6.5 Local Sync
Admin can sync all the products of their profiles using Local Sync and then every profile’s products list on the Product Listing Page. From there, the admin has an option to list individual products or lists in bulk.
6.6.6 Custom Product Details
In this section, the store admin can create different product titles and descriptions for Etsy product listings. Here, we provide an option for using the existing product details or create different ones for Etsy.
6.7 [New Feature] Return Policy Synchronisation
This tab allows the admin to manage and synchronize return policies between the module and Etsy. You can create, edit, and delete multiple return policies and assign them to specific profiles. Once mapped, any category associated with a profile will automatically update on Etsy with the corresponding return policy.
Add New: Create new return policies or modify existing ones directly from the module.
Sync Return Policies: Use the Sync Return Policy cron to fetch all available return policies from Etsy to your PrestaShop store. The synchronization includes details such as accept return/exchange options, the number of allowed returns/exchanges, and return deadline dates.
Profile Mapping: Within profile mapping, you can select a return policy to be assigned to the products in the chosen category.
Automatic Updates: When a product is added or updated in a mapped profile, the assigned return policy is automatically applied on Etsy.
This feature ensures your return policies remain consistent across your store and Etsy listings, saving time and reducing manual effort.
6.8 Order Listing
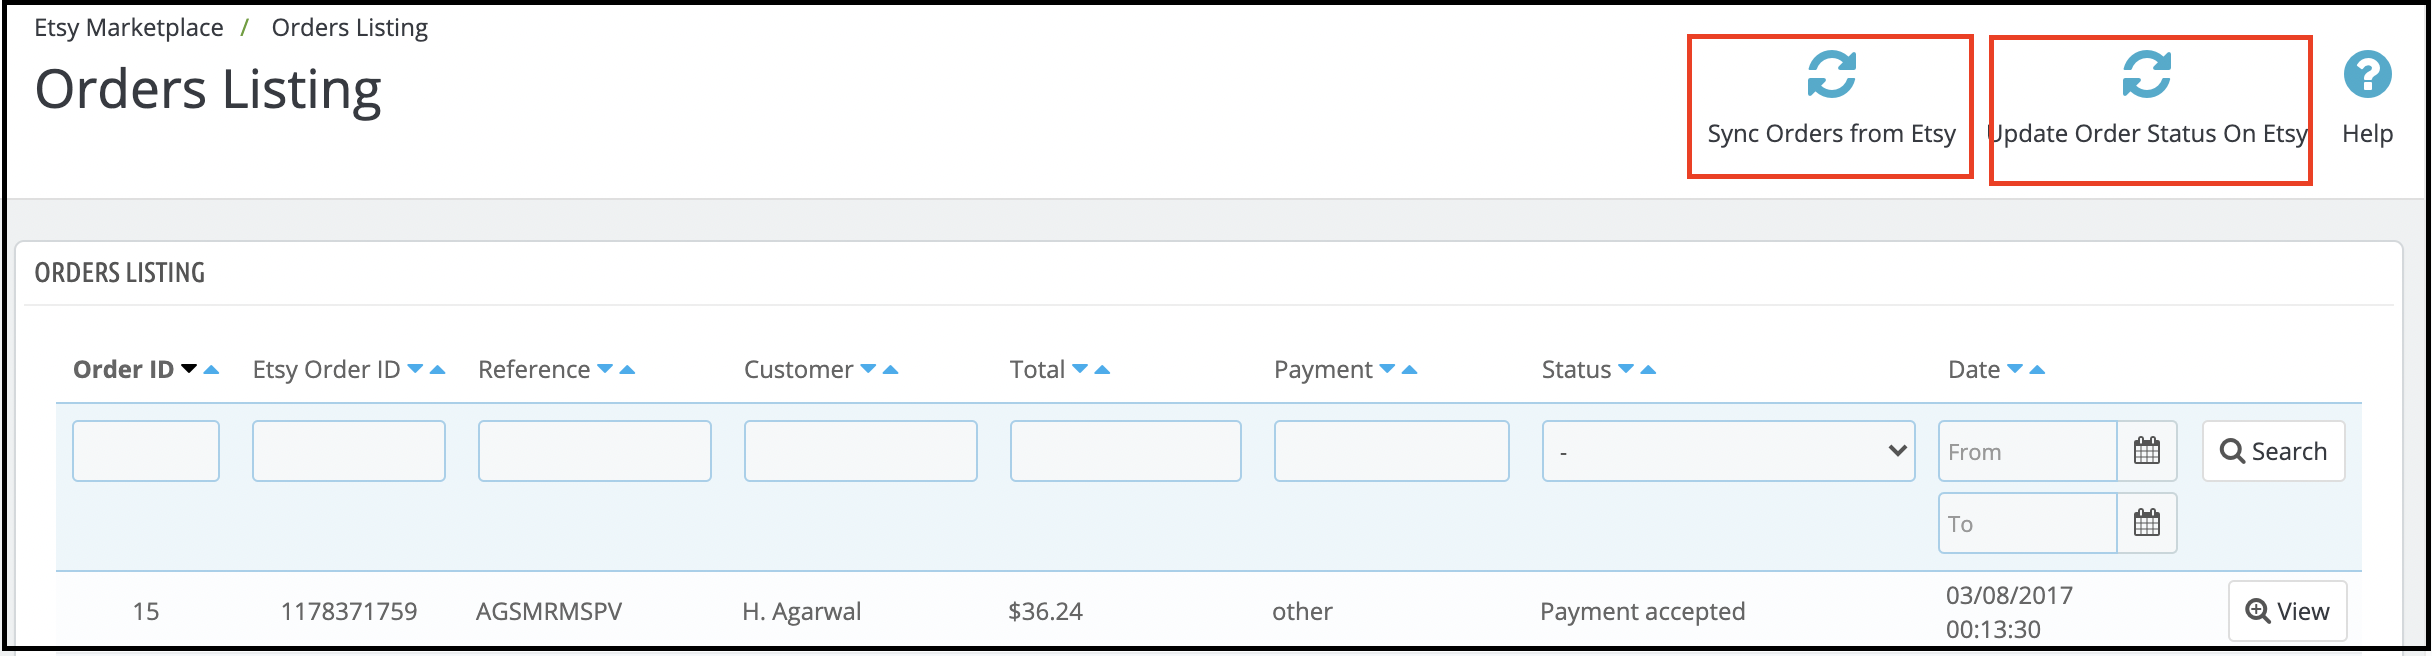
This tab of Etsy Prestashop Integrator shows the list of orders placed on Etsy Marketplace for your store products on Etsy as shown in the screenshot below –
Note: Please make sure to click on the “Sync Orders Listing” option under the Synchronization tab of the Etsy Prestashop integration module. Furthermore, only after successful sync orders will synchronize to the Prestashop back office.
6.9 Synchronization
All tabs offered by the Etsy Prestashop integration addon defined above are basically for saving the settings. Further, also the options in the system are used during synchronization between the Prestashop Store and Etsy Marketplace. In fact, there are the following cron jobs to synchronize content between the Prestashop Store and Etsy Marketplace which you can find below –
6.9.9 Products Listing on Etsy Marketplace
Following are the steps to synchronize Products Listing on Etsy Marketplace –
Go to the Etsy Prestashop Integration addon -> Synchronization (Menu Option)
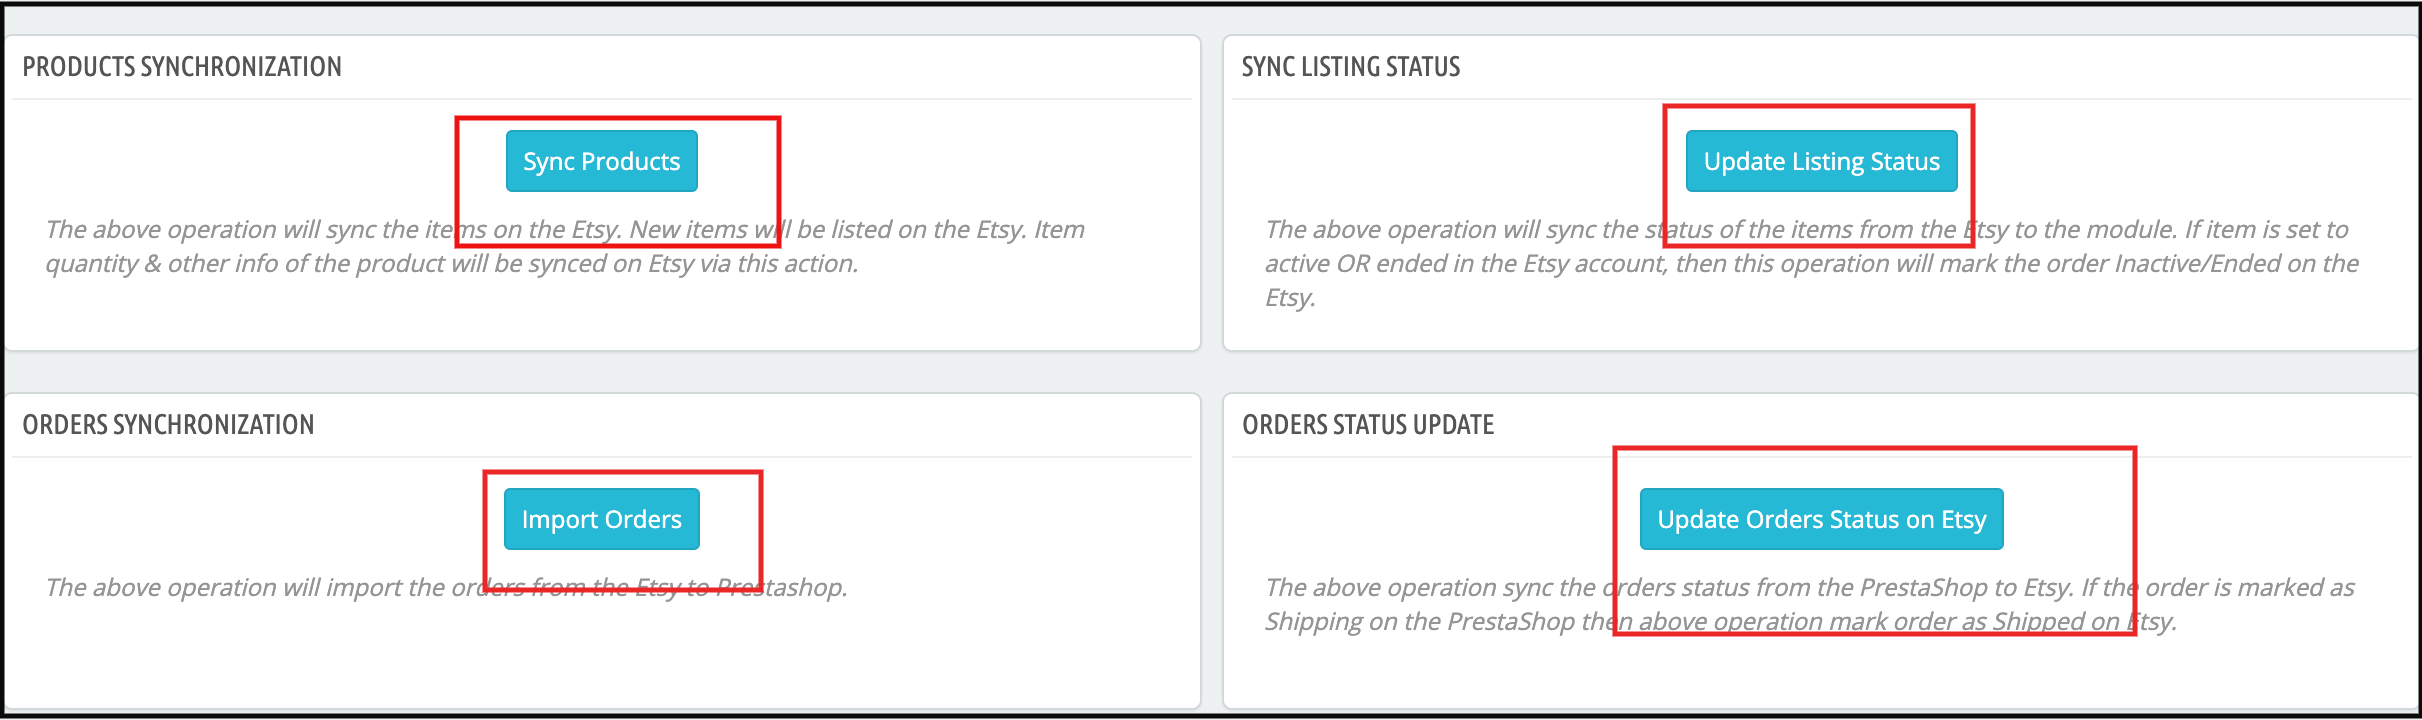
It would redirect the admin to a new page where all synchronization actions are listed as shown in the above screenshot.
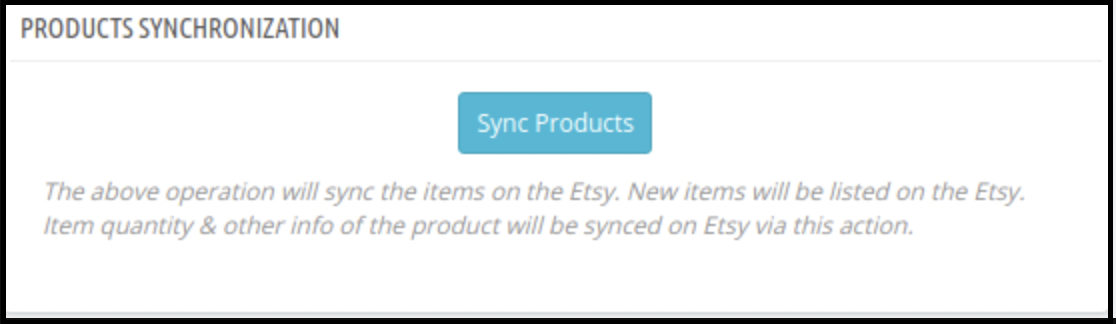
Click on the “Sync Products ” button shown below.
It would perform the following actions –
Update the Product list based on the profiles created in the system.
Add Products to Etsy Marketplace with product details (e.g. Price, Quantity, Image, etc.)
Update Products on Etsy marketplace which are already listed on Etsy Marketplace
Renew Products on Etsy Marketplace for that renewal are enabled.
Delete Products on Etsy Marketplace which are marked deleted on the Store.
Update the Listing Status of each product listed on Etsy Marketplace.
If synchronization completes successfully then it will display a message – “Synchronization completed” else “Synchronization failed”.
6.9.2 Orders Listing from Etsy Marketplace
Following are the steps to synchronize Products Variations Listing on Etsy Marketplace –
Go to the Prestashop Etsy Connector -> Synchronization (Menu Option)
It would redirect the admin to a new page where all synchronization actions are listed as shown in the above screenshot.
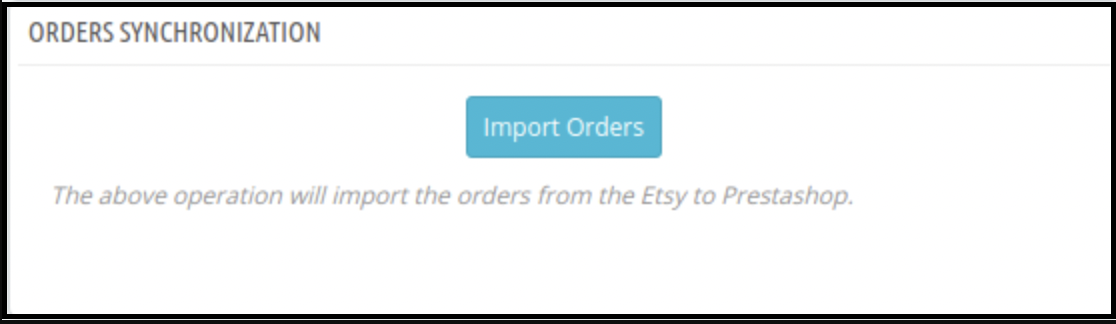
Click on the “Import Orders” button shown below.
It would perform the following actions –
Get Orders and Transaction details from Etsy Marketplace
Create Customers and Shipping Carriers into the Store as per the details that come from Etsy Marketplace
Create Orders into the Store as per the details that come from Etsy Marketplace and set the order status as per the configuration settings updated in the “Order Settings” tab of this module in admin.
If synchronization completes successfully then it would display the message – “Synchronization completed” else “Synchronization failed”.
6.9.3 Orders Status on Etsy Marketplace
Following are the steps to update the status of orders on Etsy Marketplace –
Go to the Prestashop Etsy connector -> Synchronization (Menu Option)
It would redirect the admin to a new page where all synchronization actions are listed as shown in the above screenshot.
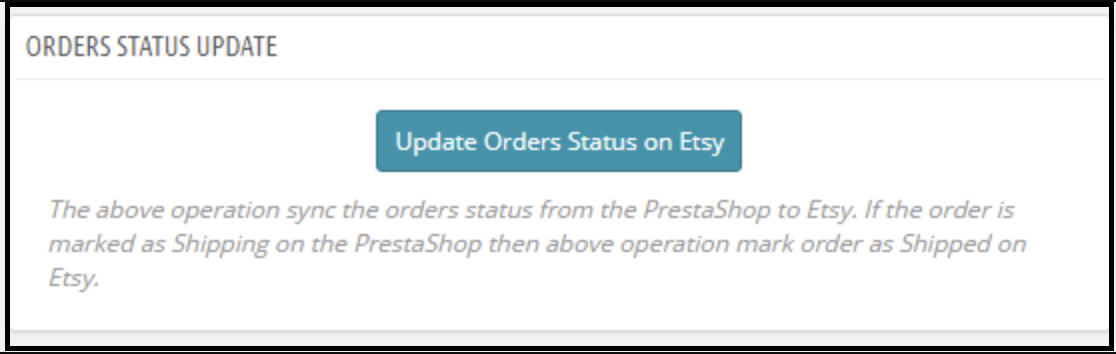
Click on the “Update Orders Status on Etsy” button shown below.
It would perform the following actions –
Check if there is any status update recorded by the module for any Etsy Order.
Update the Status of Orders as per the configuration settings updated in the “Order Settings” tab of this module in the admin
If synchronization completes successfully then it would display the message – “Synchronization completed” else “Synchronization failed”.
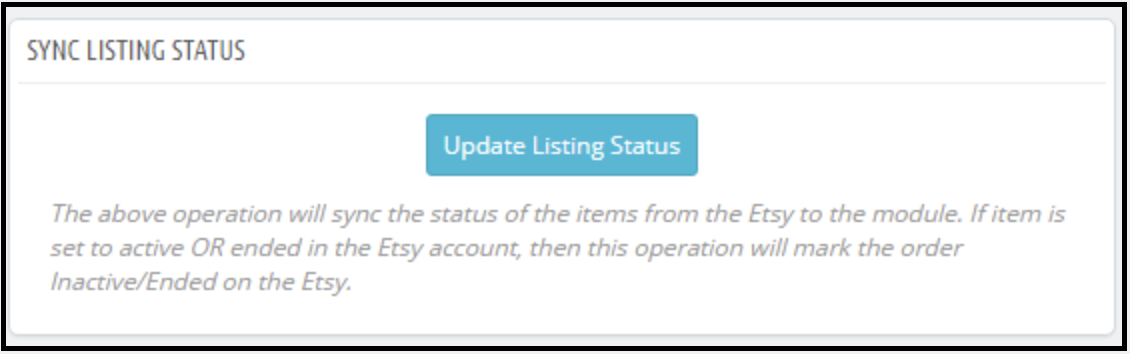
6.9.4 Update Product Listing Status from Etsy Marketplace
Sync the product status from Etsy to the Prestashop store by clicking this cron under the Synchronization tab.
1. Go to the Etsy Integration module -> Synchronization.
2. Click on the Update Listing Status from Etsy Marketplace.
6.10 Sales Report
The Etsy Prestashop integration module allows the store admin to check the sales report for the Etsy shop orders. Admin can use the date filter to check the sales report.
6.11 Product Sales Report
Etsy Prestashop Integration extension allows the store admin to generate the reports product-wise.
6.12 Audit Log
The audit log section of the Etsy PrestaShop connector helps to keep track of all the takes performed by the administrator.
You would have often visited malls for shopping purpose. What did you look for after picking up your items? I am sure your eyes would have been searching for a short checkout line so that you could make a quick checkout.
Let me tell you my case, I went to a store a few days back, picked up some stuff and when it was time to go to the billing counter, I noticed the line was too long. I waited for a few minutes initially but couldn’t keep the patience for long. I left my items there and took an exit from the store.
In e-commerce, this is what we call as Cart Abandonment and a lengthy checkout process is one of the primary reasons for it. This is exactly what happened in my case too. When I realized the checkout would take a lot of time, I dropped the purchase idea.
This is why a simplified and a user-friendly checkout holds very high importance in the eCommerce space. When users find a checkout process lengthy or time-consuming, they abandon their cart and look for better alternatives.
Getting shoppers to your eCommerce store is not difficult, engaging them till the final payment process without disturbing the user experience, is. The checkout page is the most important part of this whole engagement game.
Through this article, I will enlighten you on how to optimize the checkout process and create a user-friendly checkout.
1. Make Account Registration Optional or at least Offer Social Login
Avoiding compulsory account creation is the primary step towards a user-friendly checkout. Do not compel users to signup when they look almost set to make the payment. Making registration process compulsory at the checkout page mostly results in cart abandonment, which causes high conversion loss.
Let the mandatory sign up process not be a hurdle in a successful conversion. Offer Guest checkout or introduce a Social Login option on the checkout page. This would help users in a quick checkout without hampering the checkout experience.
In many of the eCommerce websites, there is no option to update the product quantity right from the checkout page. Hence, if a customer wants to increase or decrease the product quantity, it leaves them with no choice except discarding their current checkout process, going back to the product page, updating the quantity and filling out the entire details again. This spoils the user experience.
So, make sure that you include the option to update the product quantity on the checkout page. Also, ensure that the back button takes the user to the previous page rather than discarding all their information.
3. Add a One Page Checkout
A one-page checkout also called as a single page checkout is also one of the important elements of a user-friendly checkout. Instead of asking users to navigate through multiple steps to fill the checkout form, make it a single step checkout process. It improves user experience, reduces the chances of cart abandonment and eventually leads to increased conversions.
Our One Page Checkout module incorporates all the checkout fields on a single page and helps merchants to allow a quick checkout facility to their customers. The module offers Guest Checkout, Social Login, Multiple Layout Designs, etc. Most importantly, it supports nearly all the major payment methods and shipping services.
4. Display the errors up-front
Mistakes happen very often while filling out the checkout fields and customers are not aware of it until they hit the submit button. They have to submit again and again until the entered inputs are found to be correct. This can be extremely frustrating and become a major barrier in a user-friendly checkout.
Use Inline Validation to counter this hurdle. It identified the inputs in real-time and displays whether the provided details are correct or not when the user switches from one field to another.
5. Display Checkout Progress
Use a progress bar to indicate at which step the customer is present and how many more steps does he or she need to go through before finally placing their order. It is always a good idea to keep visitors updated about their checkout progress.
Many a time, shoppers leave the purchase incomplete because they get tired of filling out the information when they are not aware of the checkout progress. So, give them a clear idea up-front of the number of steps that are needed to make through the checkout.
6. Provide Real-time Customer Support
Customers can have a lot of queries while they are on the checkout page, especially the new visitors. You never know what’s going through a customer’s mind during the purchase.
To assist them with their queries or help them with any trouble they are facing, provide them with real-time support. Adding a live chat option or customer support number would do a great job.
7. Thank Your Customers for Shopping with Your Brand
Leave a “Thank You” note for your customers as soon as they place their order along with the “Order Successful” message, obviously. This is a good sign to appreciate or thank your customers for showing trust in your brand. It improves customer loyalty.
Knowband provides “Better Thank You Page” module that converts a normal order success page into an effective marketing strategy. With the help of this module, the admin can encourage repeat purchases and improve customer retention by offering discounts to their customers for future purchase. It also encourages cross-selling.
The journey from adding the product to the cart to the payment page needs to be smooth and convenient. Having a user-friendly checkout not only ensures more conversions but also keeps you ahead of your competitors. All that a customer craves for is a smooth checkout experience, provide them that.
If you find the above information helpful or have anything to add for a user-friendly checkout, do let me know in the comments below.
Moreover, you can visit our Knowband store and look for a number of checkout modules to help you with an optimized checkout process.