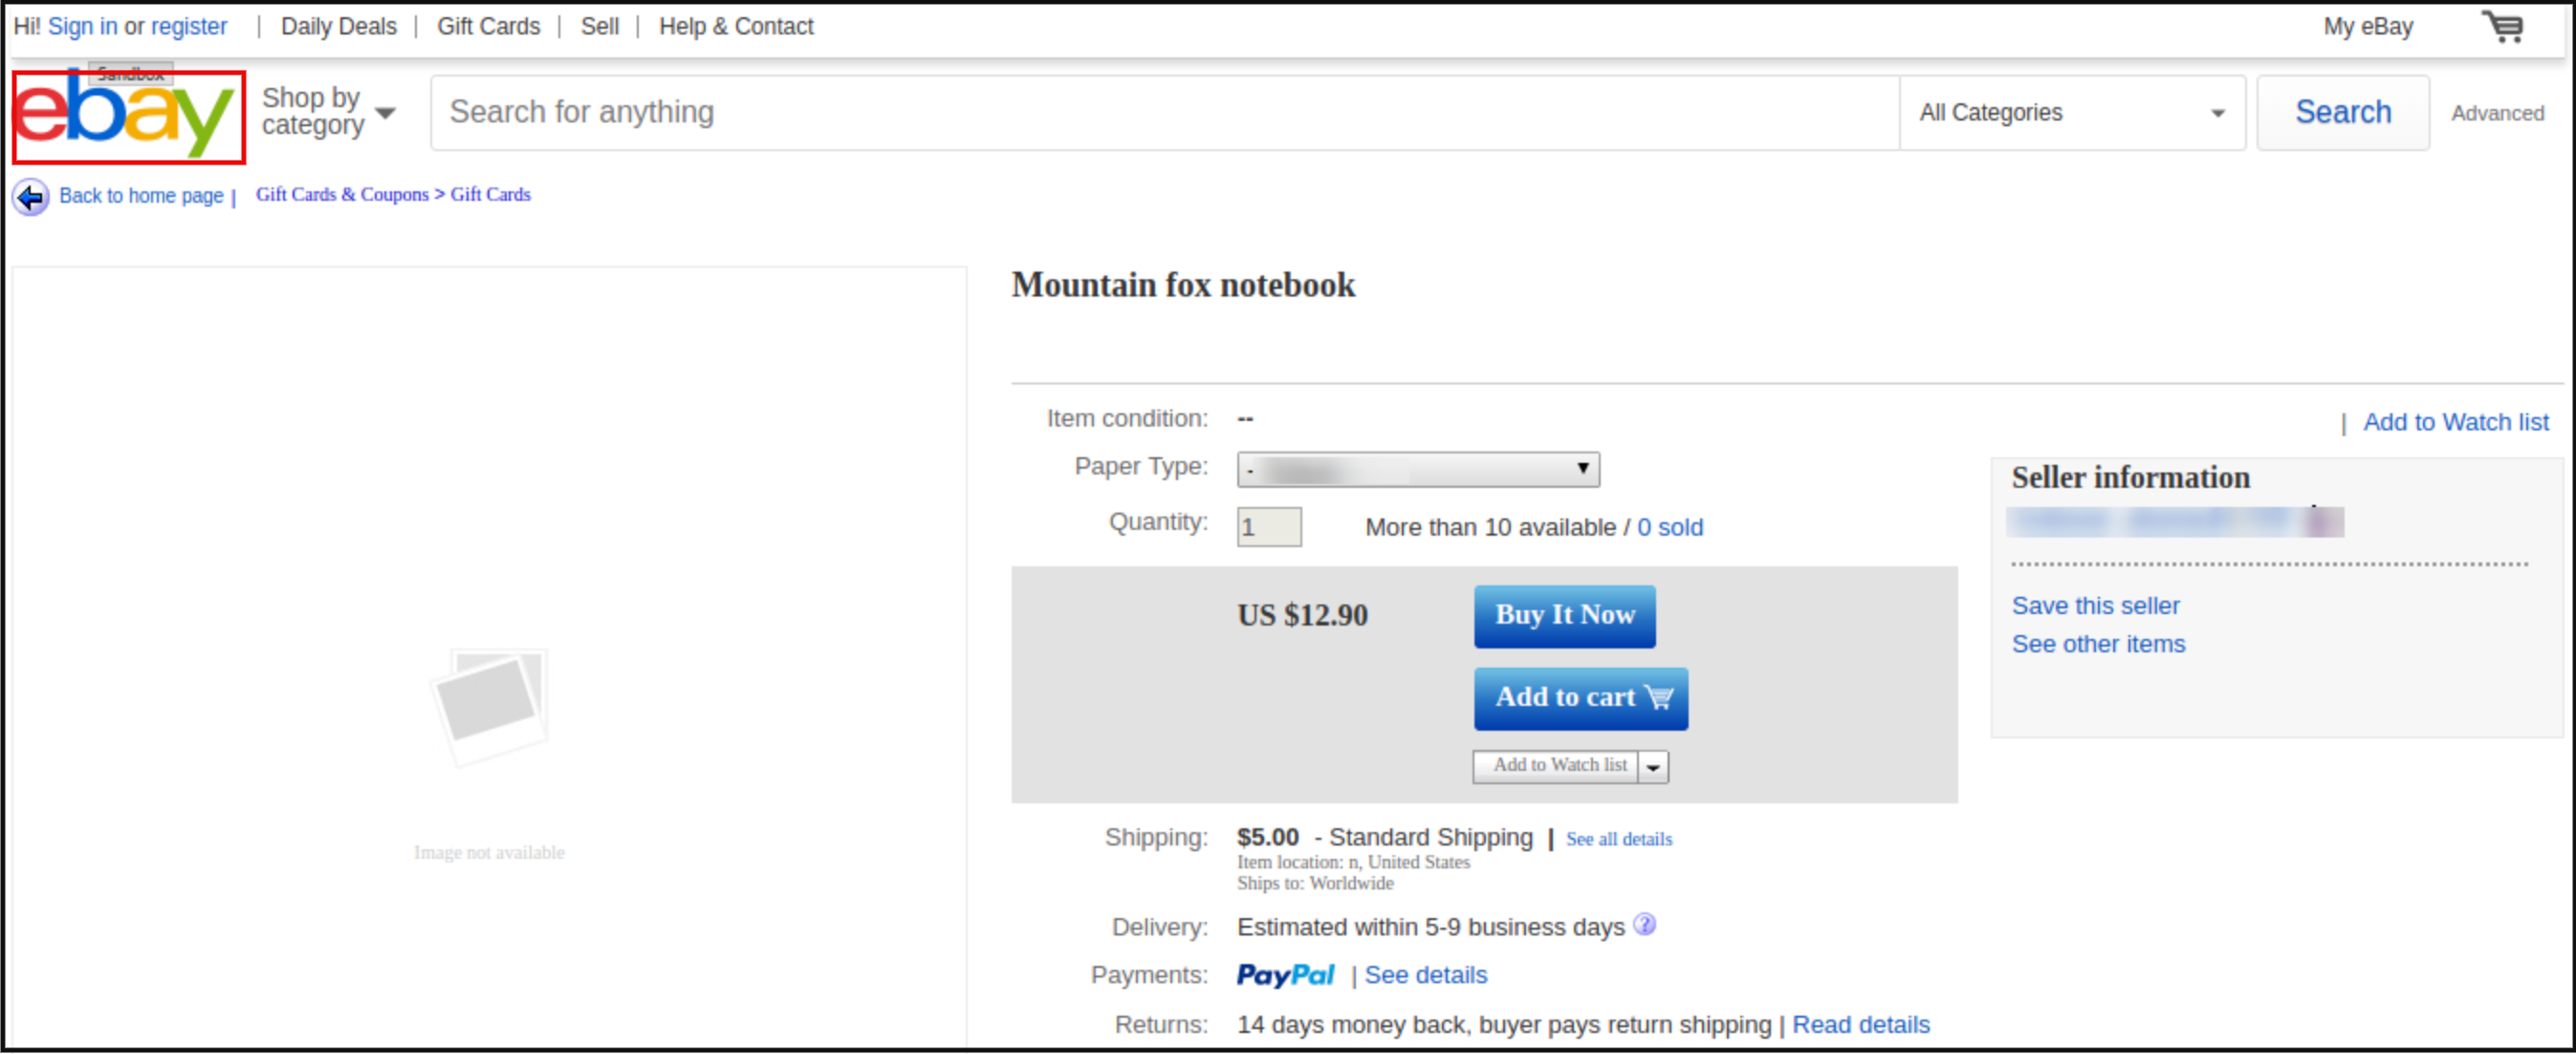
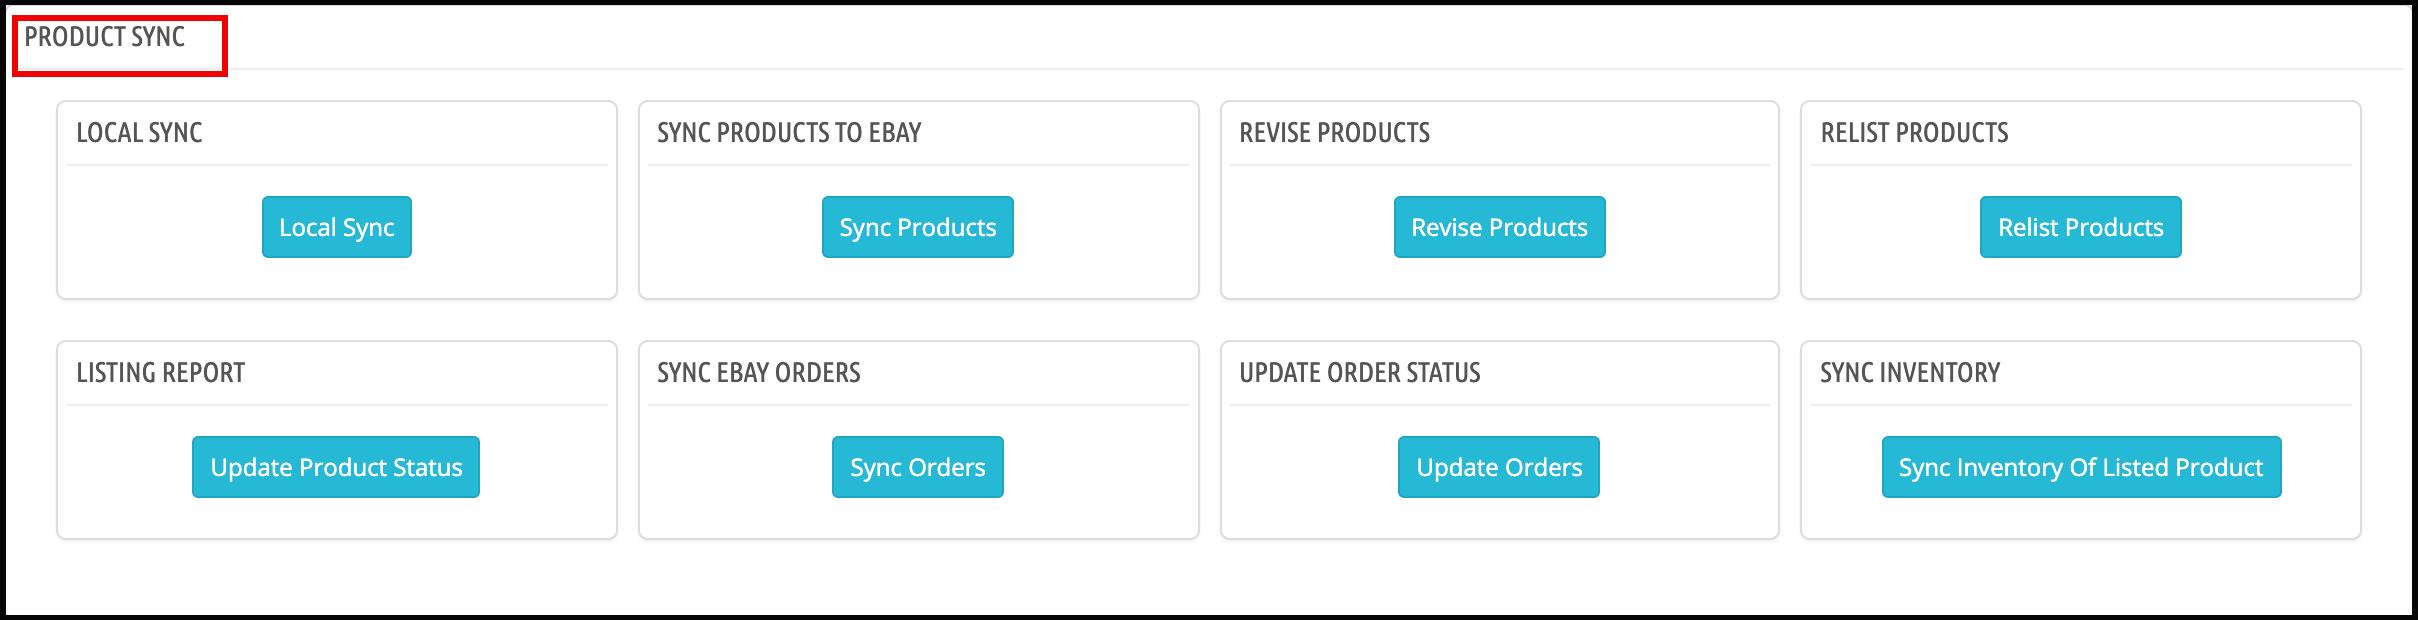
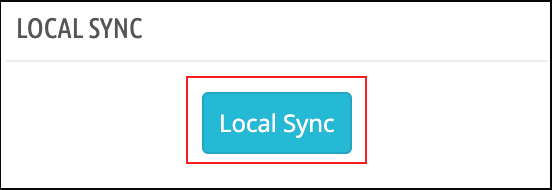
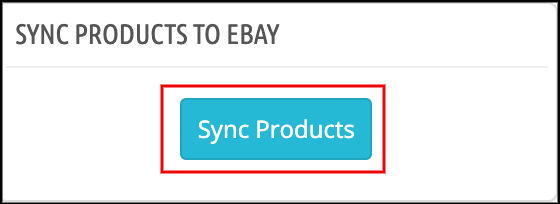
Long after the official partnership between eBay and PrestaShop, the multi-channel trade have become so easy for the business owners. This partnership made a way for various PrestaShop community developers to develop various eBay integration solutions helping store owners to seamlessly expand their market on an established platform like eBay. “Our partnership with PrestaShop corresponds perfectly with eBay’s development strategy in the main European countries. After France and Italy, we are delighted to continue working closely with the PrestaShop team to reach British and Spanish merchants together,” said François Coumau, managing director for continental Europe, eBay.
1. The PrestaShop eBay connection-
Today more than 270,000 websites are using PrestaShop platform, and this statistics is going to increase further in the coming time for sure. It would be redundant to say how big is eBay’s customer base. It’s undoubtedly a huge population of users who trust eBay for selling and purchasing online. This American multinational marketplace is enormously popular and used by millions of people out there.
The PrestaShop-eBay connection is a smooth way to allows users with an eBay seller account export their product catalog to eBay marketplace, making their products accessible to thousands of new customers. Thanks to Prestashop eBay integration that allows the online merchants to select which of their product categories they want to share on eBay. Not just this, they can also customize the product information, and fully manage the store inventory between both platforms with the help of this Prestashop eBay integration module.
2. The PrestaShop eBay integration module-
A PrestaShop eBay integration module is a solution that connects your PrestaShop store with eBay marketplace. Such eBay integration modules are recommended to all those PrestaShop store owners who are interested in selling on eBay but doesn’t want to manage the seller account separately.
The Prestashop eBay integration module by Knowband enables the store owners to add, remove, or update products directly from their PrestaShop site to the eBay marketplace. Further, they can also manage the orders and update the order details from the PrestaShop site itself with the help of this Prestashop eBay integration module. This solution helps in saving the time that would consume in controlling the seller panel on eBay and the PrestaShop separately.
With an aim to provide easy PrestaShop-eBay connection, PrestaShop community offers some seamless integration solutions. The PrestaShop eBay marketplace integration module is one such solution that goes beyond a simple connection. The Prestashop eBay integration module presents a comprehensive control over eBay product listing, shipping, management, Profile management and order management.
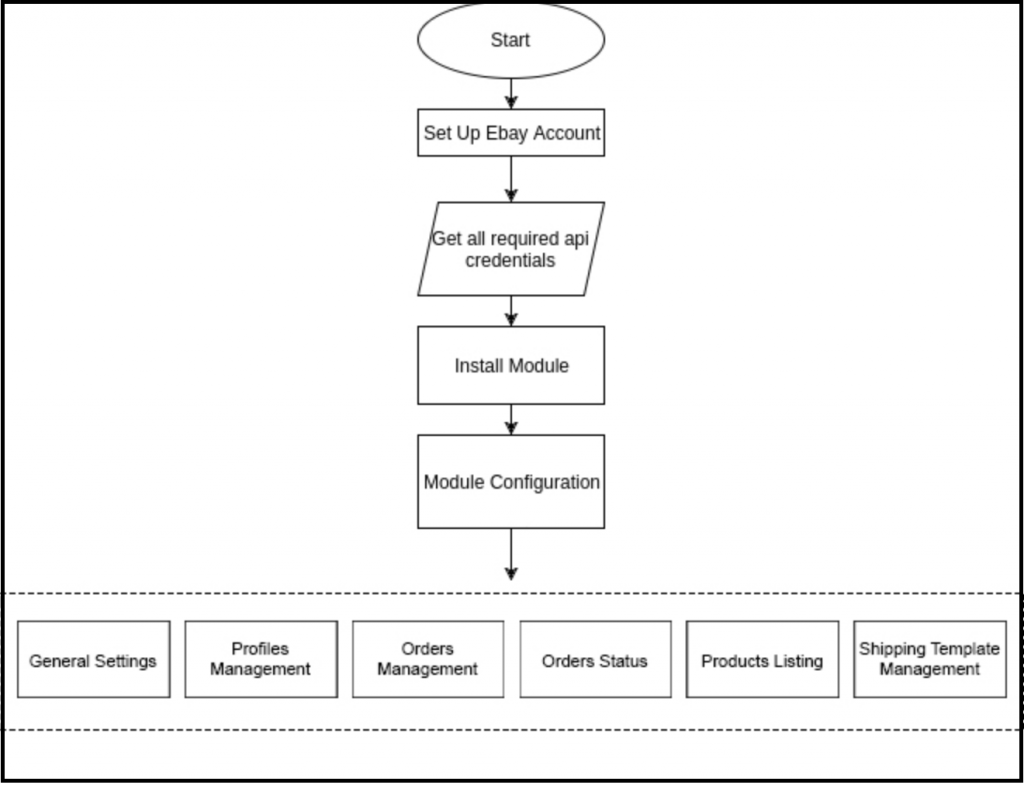
The easy to use interface and module configuration of Prestashop eBay integration module makes the task so easy even for a person with no technical skills. Just:
Set up an eBay Seller account and an eBay developer account
Get the eBay API details
Install the eBay Marketplace Integration module
Configure the Prestashop eBay integration module
Start exporting-importing to and from eBay and your PrestaShop store
3. Benefits of using a PrestaShop eBay integration module-
You do not need to manage the eBay account and your eCommerce store separately.
You have an option to showcase your products on an established marketplace.
You will have the capacity to showcase your products to an expanded population of customers.
Customers will purchase from eBay and you can deal with the orders from your PrestaShop store itself.
The Prestashop eBay integration module will save the time and effort required to manage both entities separately.
It Prestashop eBay integration module will generate more sales and conversions as compared to that on your store only.
Your Prestashop store will act as a centralized system that can manage everything on the store and the marketplace as well.
The Prestashop eBay integration module will automate all the tasks from listing products to syncing inventory and order management.
The Prestashop eBay integration module allows the admin to sync the inventory of products in bulk without updating any other product information (title, description, etc.).
Prestashop eBay integration allows the admin to send modified prices on eBay.
eBay Prestashop integration module allows admin to set a quantity buffer while listing products on eBay.
Finally, eBay is the most popular online auction and marketplace site in the world. With that in mind, your eCommerce business can grow up in parallel to this platform with a simple tie-up between the eCommerce sites and eBay marketplace. So, it’s time to bring more customers to your website by starting an export-import of products and orders through a PrestaShop-eBay integration.
4. Frequently Asked Questions
Question1: What is the best PrestaShop eBay integration?
Answer: The Prestashop eBay integration provided by Knowband is used for connecting your Prestashop website with the eBay selling account. With the help of the Prestashop eBay integration module, you can easily manage your products on both websites through one single dashboard.
Question2: Is it necessary for me to have a dedicated eBay seller account in addition to my PrestaShop account to integrate the eBay module?
Answer: For using this module you will require an eBay seller account as well as an eBay developer account, which is required to obtain the credentials for integrating the module.
Question 3: Would it be possible for me to select my own products to upload to eBay through PrestaShop?
Answer: The owner of the store would have the liberty to export only specific product categories to eBay and can then edit them.
Question 4: Is the PrestaShop eBay integration extension responsible for taking care of order management too?
Answer: The orders placed on eBay can be conveniently managed through PrestaShop backend with the help of Knowband Prestashop eBay Integration Module. (Updated on September 9, 2026)
Question 5: Is PrestaShop eBay integration hard to implement?
Answer: In general, it will be necessary to create a PrestaShop seller and developer accounts, get the API keys and then install the integration module that does not need special knowledge.
Question 6: Would it impact my current business if I sold on eBay using PrestaShop?
Answer: The PrestaShop eBay integration module was developed in such a way that your PrestaShop store would work as the main system while eBay becomes another source of sales for you.
Question 7: Is it possible to synchronize inventory from PrestaShop and eBay without making any changes to product attributes?
Answer: It is possible to do this using the PrestaShop eBay integration module.
Question 8: Explain a Quantity Buffer in eBay Integration. Answer: With Quantity Buffer, admins have the option to list fewer items than they actually have in their PrestaShop because they can avoid overselling when orders are made through both websites simultaneously.
Question 9: Why should a PrestaShop store owner consider eBay Integration?Answer: eBay is one of the most popular established marketplaces out there; hence, eBay integration offers store owners a bigger customer base from which to make sales without having to create the traffic by themselves.
The Prestashop Page Maker module by Knowband will provide a feature to the store owner through which the store owner can make the page(s) look like CMS page according to his need. With the help of this Prestashop create page feature, the store owner can create multiple pages in which he/she can display banners, blogs, products, etc.
Technology for Development
Language: PHP
FrameWork: PrestaShop
Installation
Installation Guide
Follow the following steps for installing Prestashop Page Maker Module:
Copy “pagemaker” module folder under your “root_directory/modules/”of your store via FTP or use prestashop interface to upload the plugin.
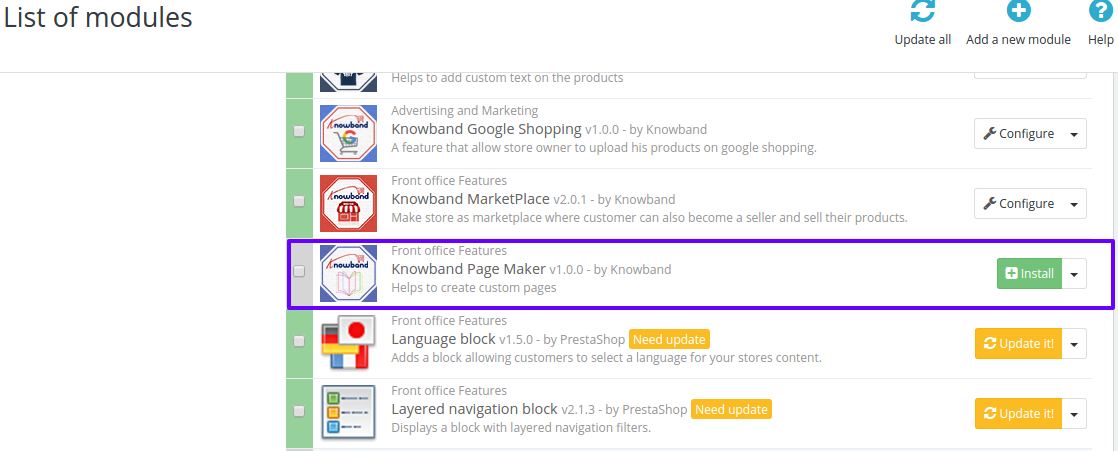
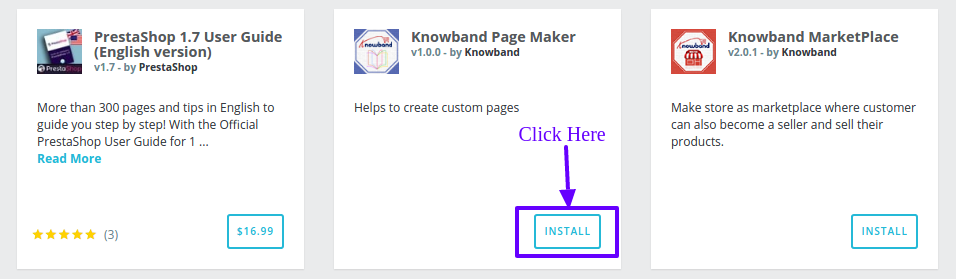
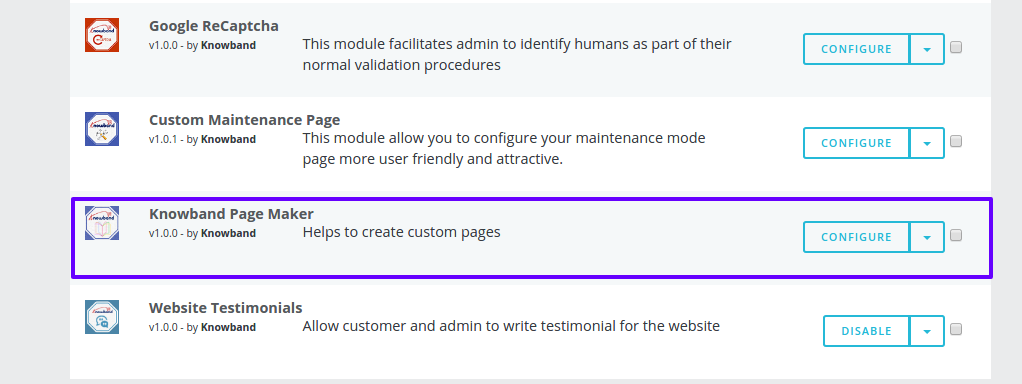
After copying, the Knowband page maker module will be listed on module listing page in admin panel as shown given below screen.
(for Prestashop 1.6)
(for Prestashop 1.7)
In Prestashop 1.6, if you are not able to find module in the admin module list, please try searching the module with following details –
Keyword: pagemaker
Category: front-office feature
Filter by: Installed & Not Installed/Enabled & Disabled
In Prestashop 1.7, you can search the Prestashop page maker module by typing the name of the module in the search box provided in the admin module page.
Note:
When you will click on install button, a pop up box will appear which will display warning messages. You can ignore these messages and move ahead. There will be no negative impact of this warning message on your store.
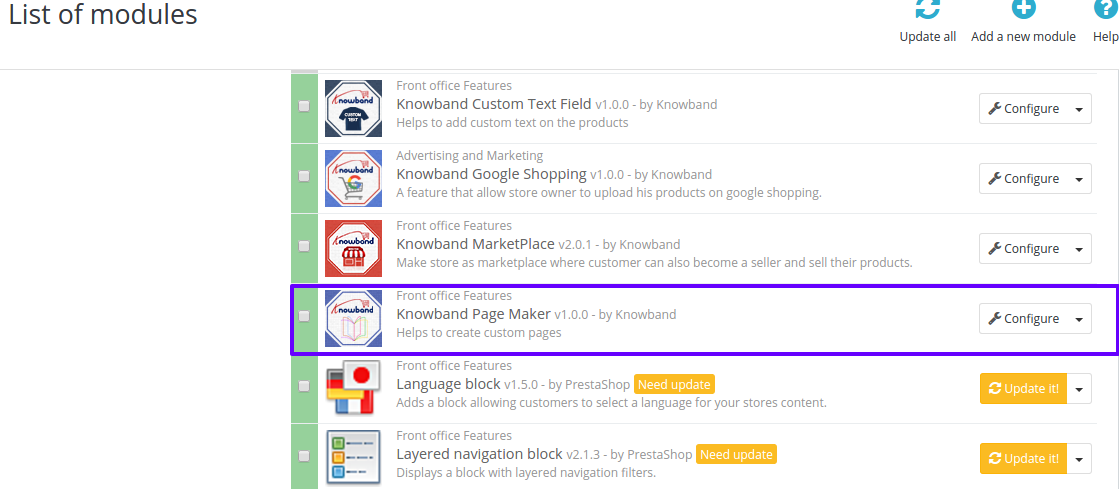
After installing the Prestashop create page module, a “configure” button will be in front of this plugin on module listing page as shown in the screen below:
(for Prestashop 1.6)
(For Prestashop 1.7)
Admin Interface
The Prestashop CMS page creation module is configurable and the configuration settings can be updated via the admin interface.
Configuration
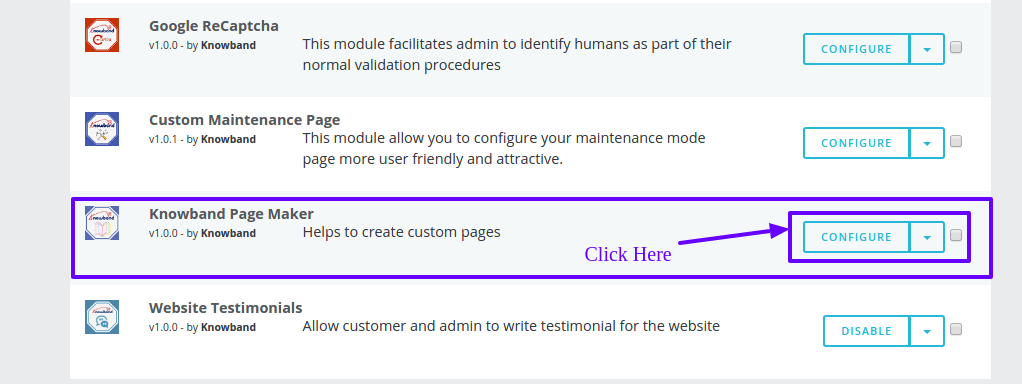
To configure this Prestashop module, click on the “Configure” button in Module listing page as shown below:
(For Prestashop 1.6)
(For Prestashop 1.7)
After clicking the “Configure” button, PageMaker Configuration page will be displayed which have the following blocks:
Configuration
Best Seller
New Arrival
Special Products
Featured Products
You can find below the description of each block:
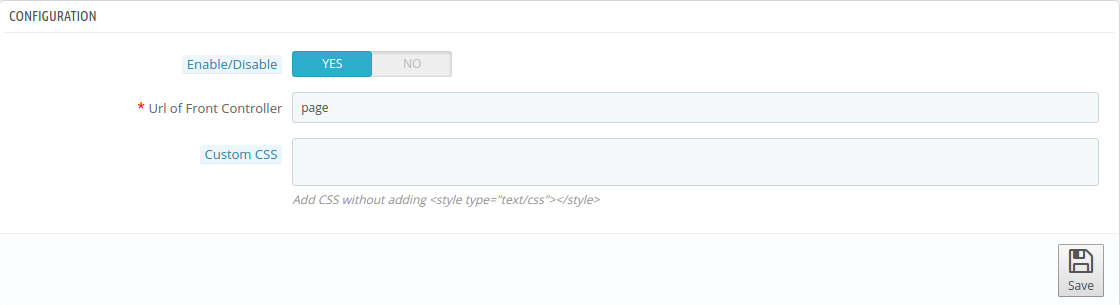
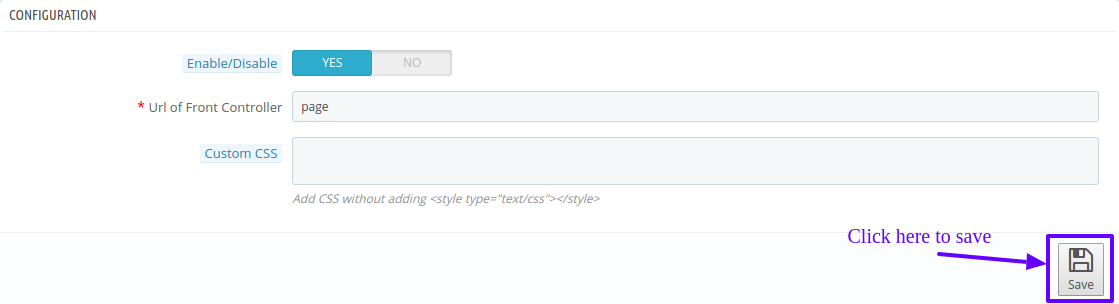
Configuration:In the Configuration block, module settings can be configured. Please find the description of each input below:
Enable/Disable: This is on/off switch. Admin has the option to Enable/Disable the page composer module. If enabled, then only this Prestashop module and its settings will be working otherwise, there will be no impact of this page builder module on the store.
URL of Front Controller: This is for the front controller sub- URL. Admin can set the sub URL of page builder module’s front controller so that page created by admin can be viewed as “yourdomain/URL of Front Controller/Page URL”
Custom CSS: This field of Prestashop landing page maker offers a text box in which admin can add their custom CSS in all pages created by admin.
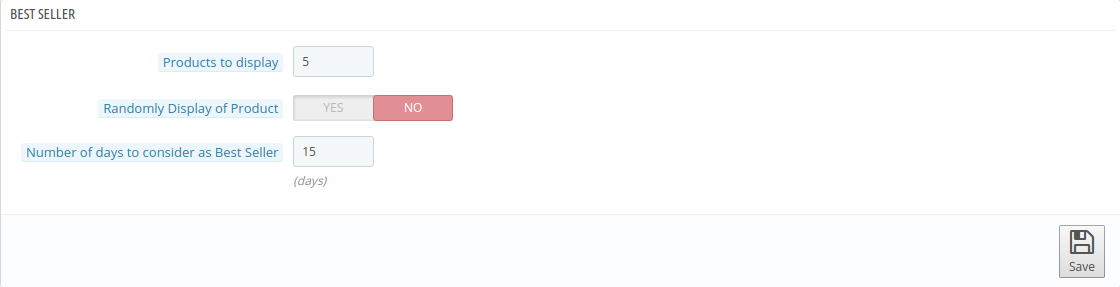
Best Seller:You can configure the settings for “Best Seller” block which will be displayed in the page maker module’s front end. Please find the description of each input field below:
Products to Display: In this field of Prestashop landing page maker, the admin has to enter the number of products to be displayed in “Best Seller block” for front end. By default, this will be 5 Products.
Randomly Display of Product: This is the on/off switch of this Prestashop plugin. Admin has the option to enable/disable this field of page composer module. If enabled, then only products will be displayed randomly otherwise, they will be displayed based on the best seller on the front end.
Number of days to consider as Best Seller: In this field of Prestashop create page, the admin has to enter the number of days from which best seller product to be considered. By default, it will be 15 days.
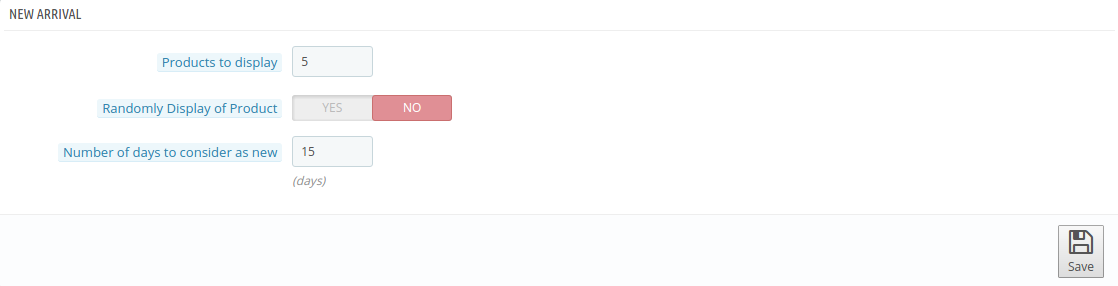
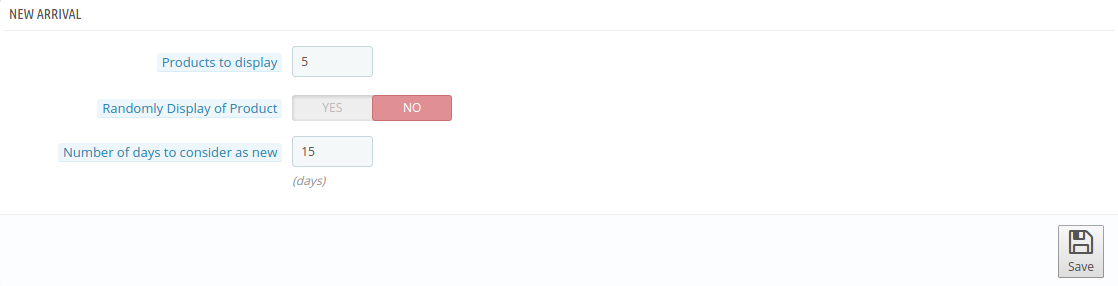
New Arrival:You can configure the setting for “Best Seller” block which will be displayed on the landing page maker module’s front end. Please find the description of each input field below:
Products to display: In this text box of Prestashop CMS page creation module, the admin has to enter the number of products to be displayed in “New Arrival” block for the front end. By default, this will be 5 Products.
Randomly Display of Product: This is on/off switch. Admin has the option to enable/disable this field of the page builder plugin. If enabled, then only products will be displayed randomly otherwise will be displayed based on the arrival date in the front end.
Number of days to consider as New: In this text box of Prestashop create page module, the admin has to enter the number of days from which new product can be considered. By default, it will be 15 days.
Special Product:You can configure the setting for “Special Product” block which will be displayed in this Prestashop addon’s front end. Please find the description of each input field below:
Product to display: In this field of Prestashop page builder module, the admin has to enter the number of products to be displayed in “Special Product” block on the front end. By default, this will be 5 Products.
Randomly Display of Product: This is on/off switch of the Prestashop page builder addon. Admin has the option to enable/disable this field. If enabled, then only products will be displayed randomly otherwise, will be displayed based on arrival date in the front end.
Featured Products:You can configure the setting for “Featured Products” block which will be displayed in the Prestashop module’s front end. Please find the description of each input field below:
Products to Display: This is text box of Prestashop CMS page creation plugin, in which admin has to enter the number of products to be displayed in “Special Product” block for the front end. By default, this will be 5 Products.
Randomly Display of Product: This is the on/off switch of the Prestashop create page plugin. Admin has the option to enable/disable this field. If enabled, then only the products will be displayed randomly otherwise, they will be displayed based on arrival date in the front end.
Product Category:In this field of Prestashop page builder module, the admin has to enter the category id so that products which are mapped to that category id will be displayed in the “Featured Products” block.After filling up the form, click on “Save” button present in any block as shown below.
It will validate each form input before saving into the system. If there is any error/ issue, it will be displayed as shown below:
If there is no error/issue, it will save the form data into system and display the success message as shown below:
Page Maker:
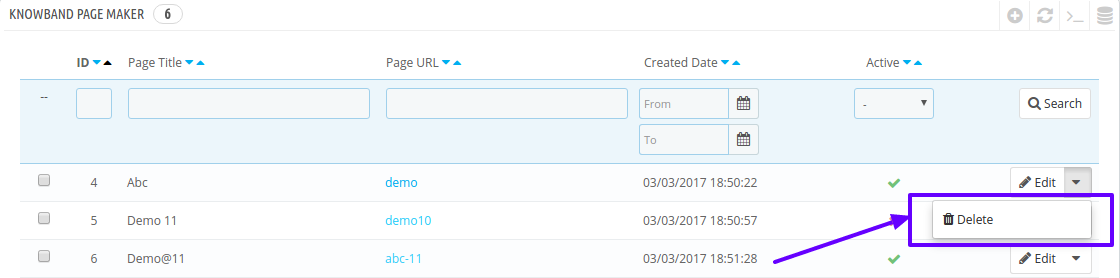
This section of the Prestashop create page module manages the pages. Admin can create new pages, update existing pages and delete pages of Pagemaker. Admin can find a menu named “ Page Maker” in the left panel of Admin as shown below:
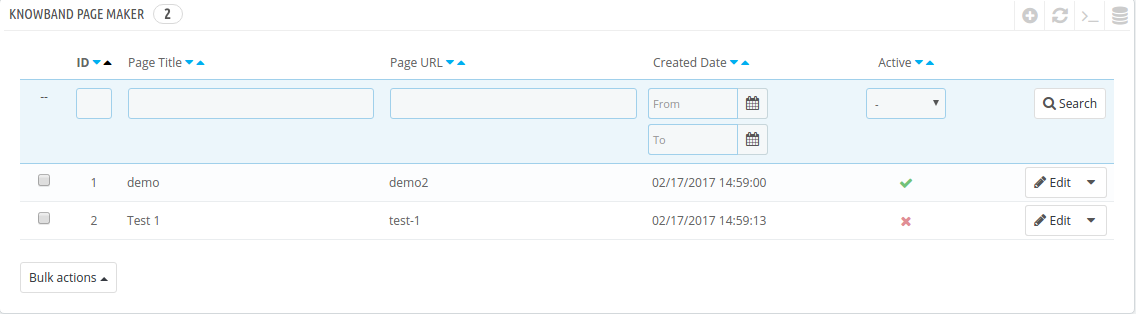
On clicking “ Page Maker” displayed on Admin Menu, the listing of Page Maker added by admin is open as shown below:
There are also several other filters as well to filter the list of the page as shown in the above screenshot.
Admin can also enable or disable pages using the bulk actions. If a page is disabled then that page will not be visible on the store front. Admin can enable/disable page by clicking on “Tick” or “Cross” in the “Active” field of the list for the particular page.
How to create New Page:
Following are the steps to follow to add the new page with the help of this Prestashop addon into the system:
Click on “ Page Maker” menu displaying in the admin menu.
It would display the page where already added Pages will be listed (If any). Click on the “+” (Plus Icon – as shown in above screenshot).
It would redirect admin to the new page where a form with some input field will be shown (Screenshot is shown below).
Fill up the following described input fields of multiple form:
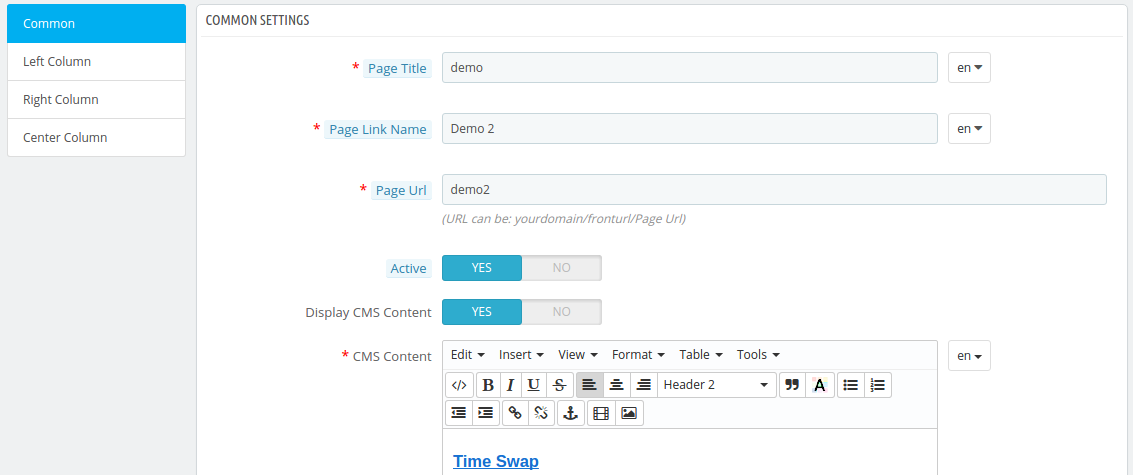
There are four forms displaying in four different tabs as shown above.
Common Settings:
Page Title: Enter the page title which can be displayed on the top of the page.
Page Link Name: Enter the text which can be displayed as link on the menu header of front end.
Page URL: This field of landing page maker allows the admin to enter the valid and distinct sub URL for the page.
Active: By default, it is “ON”. Admin can disable/enable the display of page in front side by turning OFF/ON
Display CMS Content: By default, this field of Prestashop create page is “ON”. Admin can disable/enable the display of page on front side by turning OFF/ON
CMS Content: By default, it is “ON”. Admin can disable/enable the display of CMS content written in “CMS Content” field on the page.
Display on Menu Header: By default, it is “OFF”. Admin can add page link on Header Menu of Front side be enabling the field.
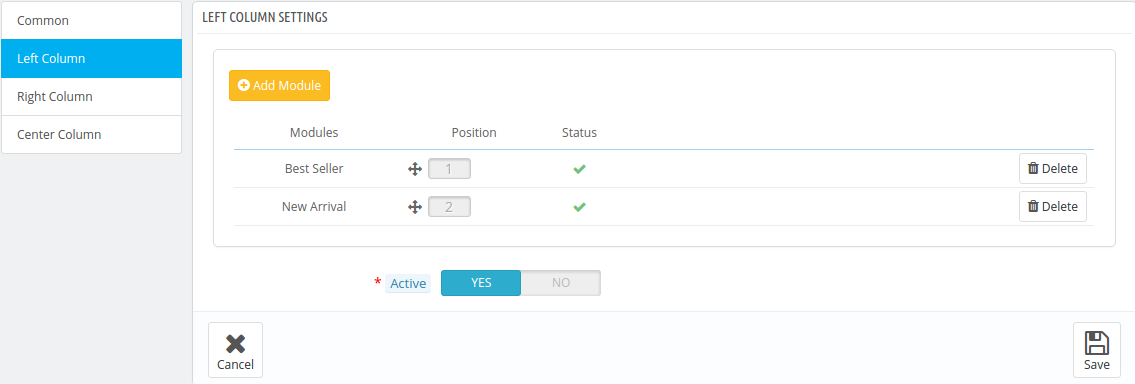
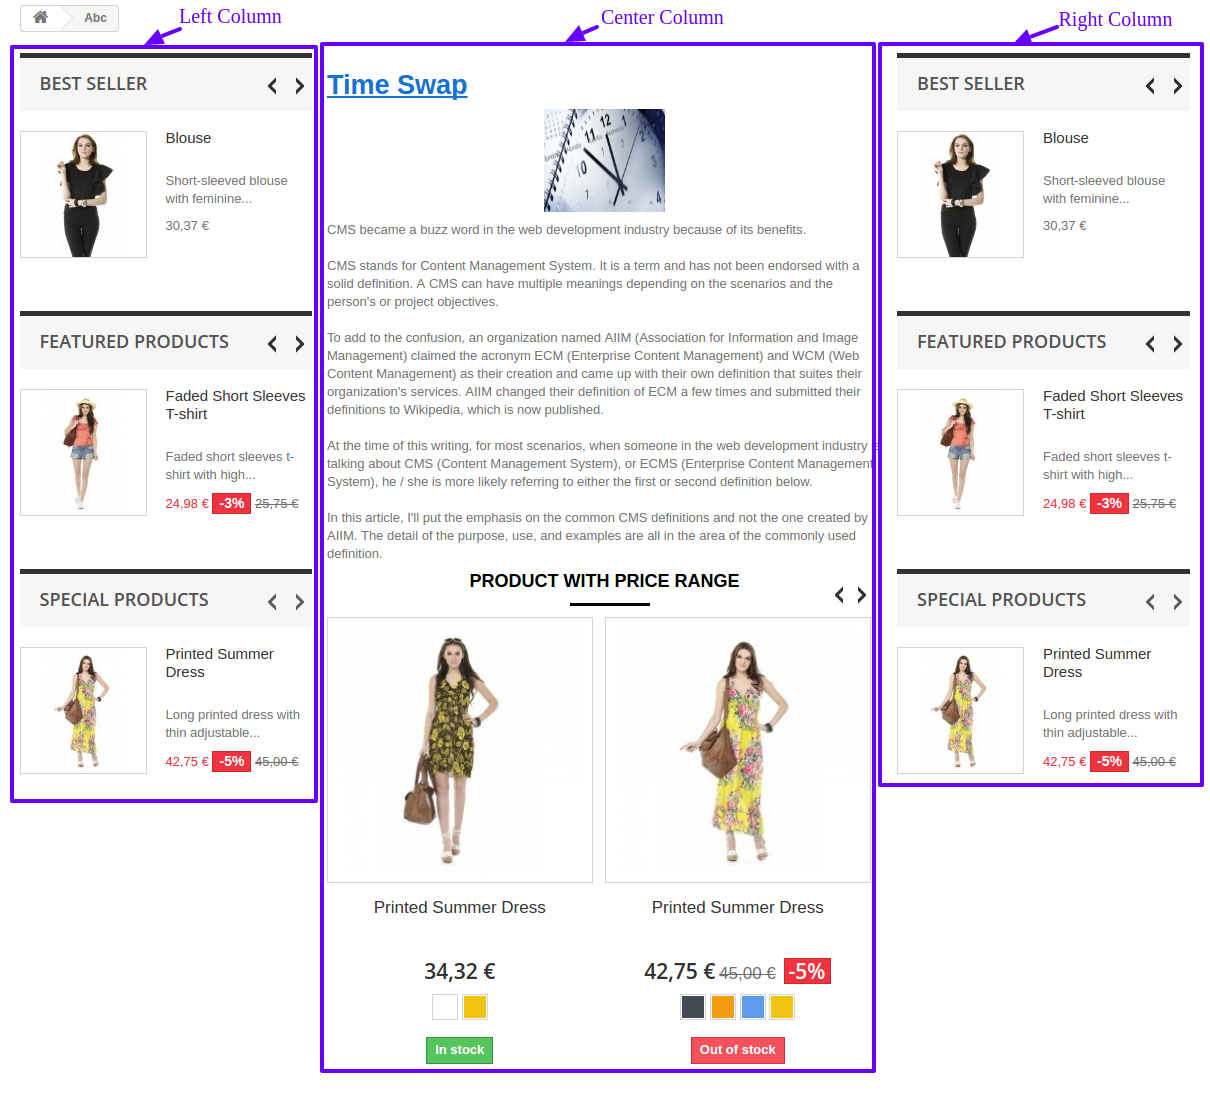
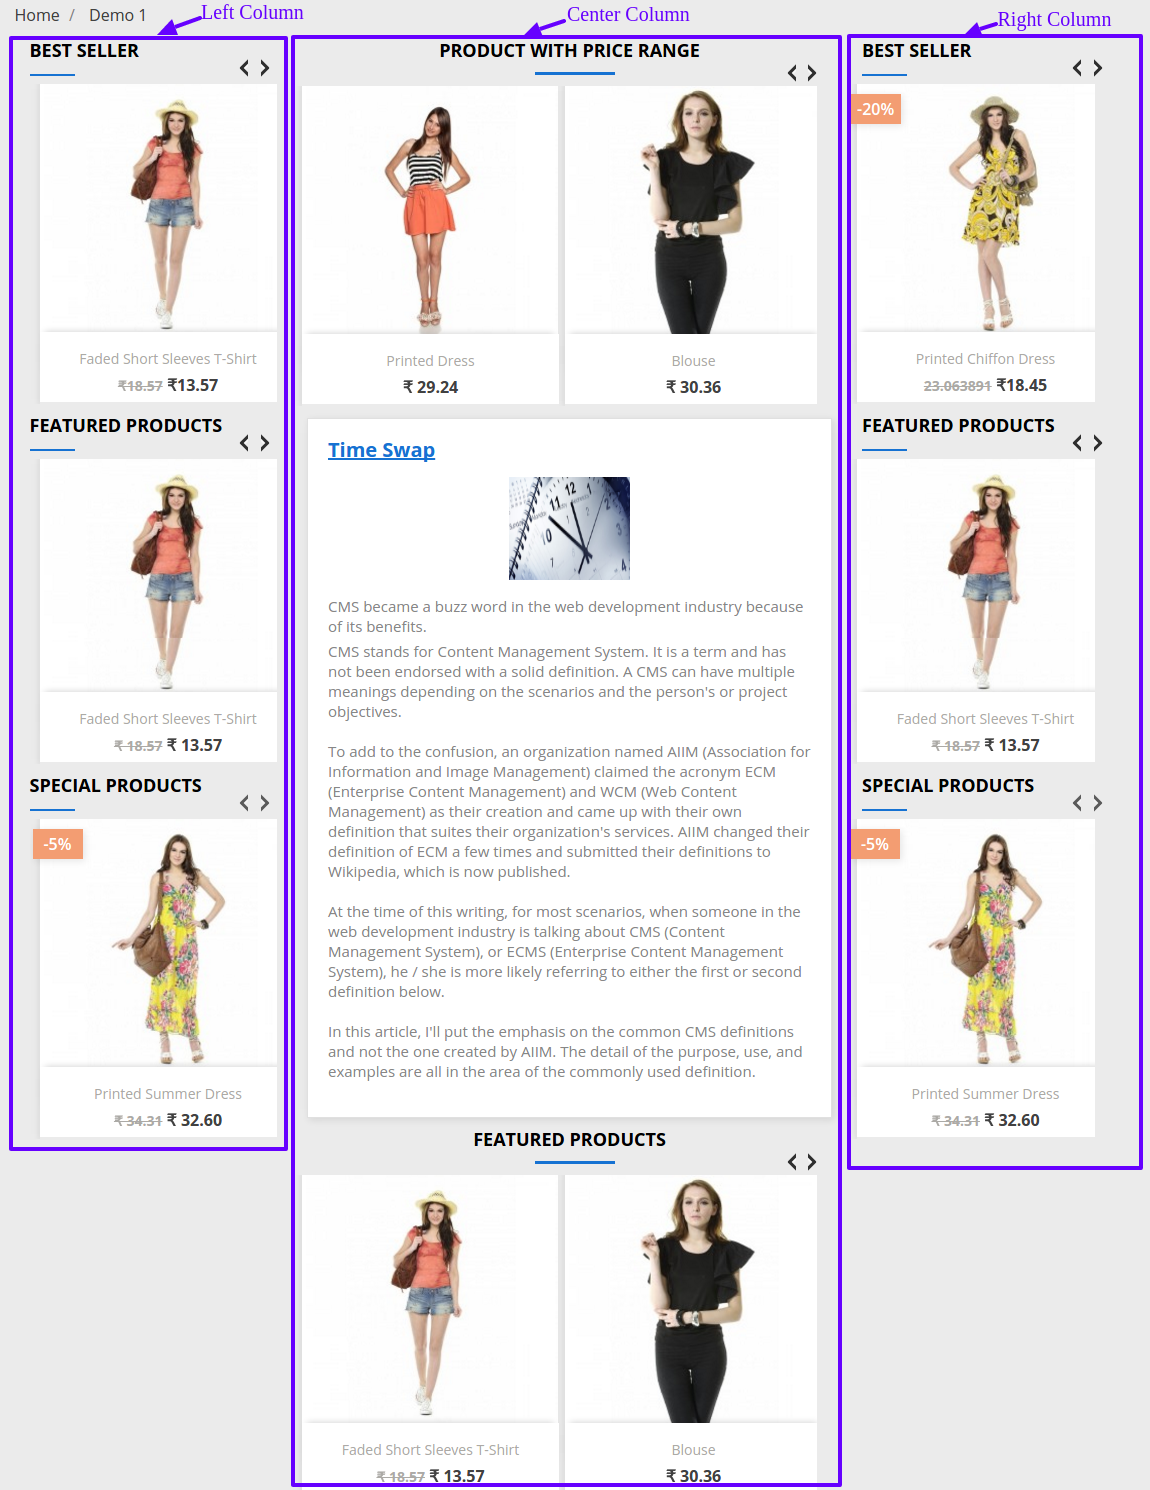
Left Column:
This setting is for Left Column displayed on the page in Front Side as shown below:
There is an block to add “Modules” for left Column which can be displayed after adding the page.
Active: By default, this is “ON”. Admin can add or remove left column displayed on page on front end by turning ON/OFF.
Right Column:
This setting of the Prestashop page builder module is for Right Column displayed on the page on Front Side as shown below:
There is a block to add “Modules” for right column which can be displayed after adding the page.
Active: By default, this is “ON”. Admin can add or remove right column displayed on the page on the front end by turning ON/OFF.
Center Column:
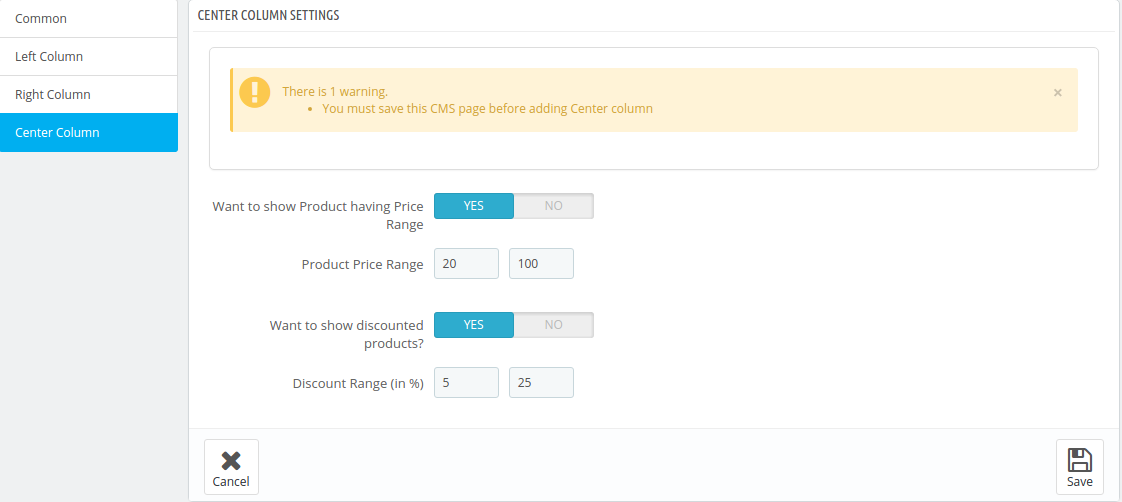
This setting is for Center Column displayed on page in Front Side as shown below:
There is a block to add “Modules” for the right column which can be displayed after adding the page.Want to show
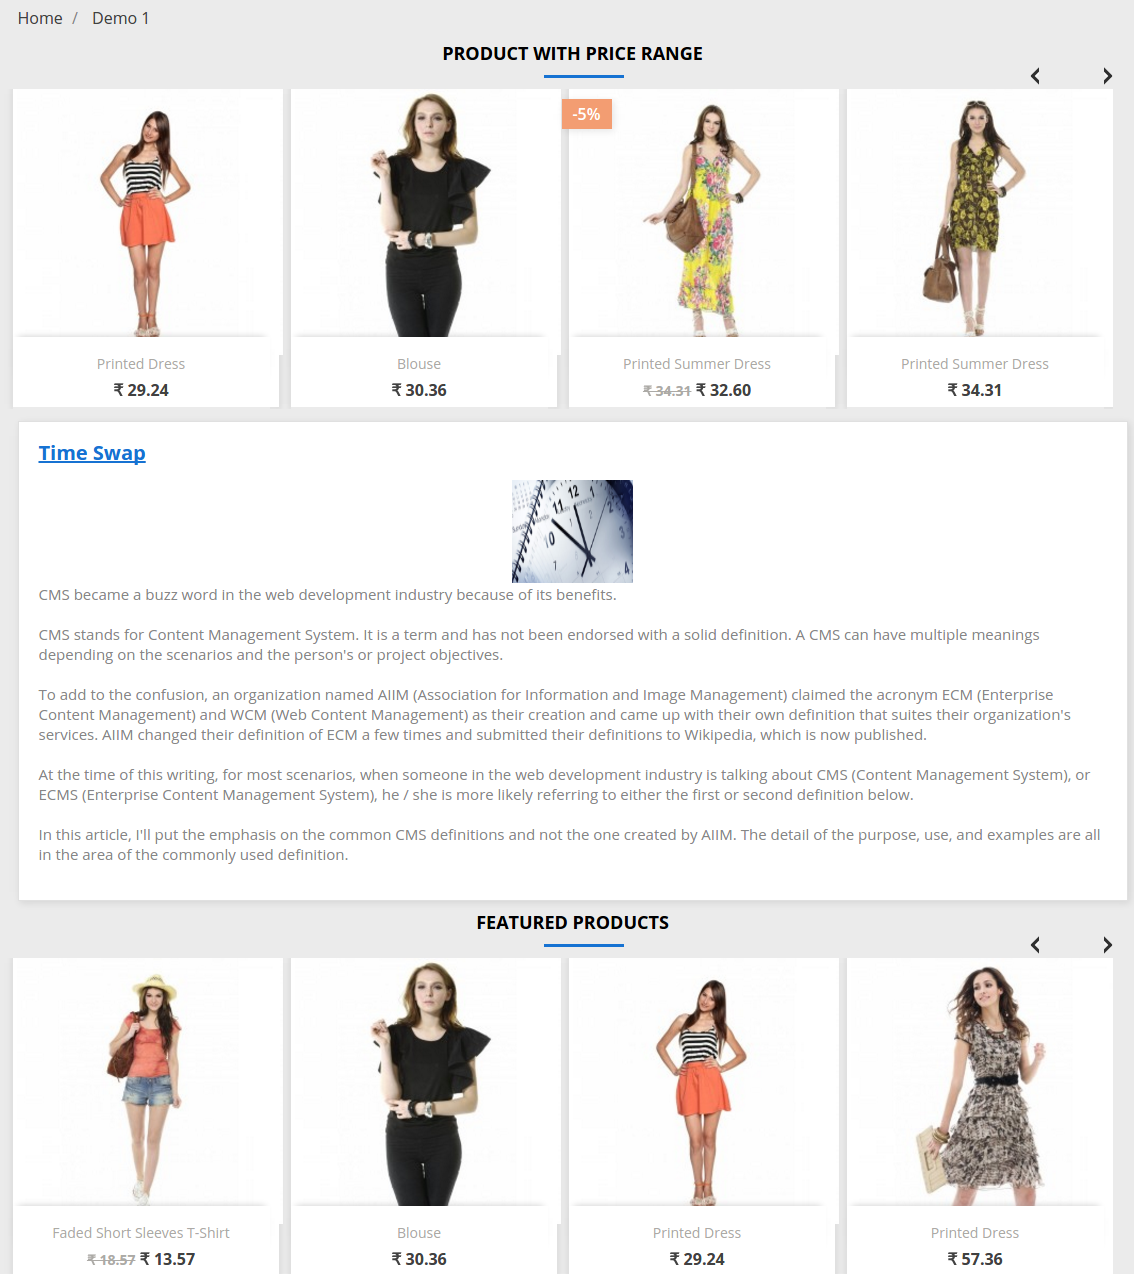
Product having Price Range: By default, this is “ON”. Admin can disable/ enable the display of Price Range Block in the center column.
Product Price Range: By default, the Price Range is 20 to 100. Admin can set the price range for the products to display on Price Range Block in the center column.
Want to show discounted Products: By default, this is “ON”. Admin can disable/ enable the display of Product Discount Block in the center column.
Discount Range: By default, the discount range is 5 to 20%. Admin can set the discount range for the products to display on Product Discount block in center column.
After filling the form, Admin can click on “Save” button to add the new page or click on “Cancel” button to go back to listing page.
If you click on save button, it would validate the provided data and save the details into the system if valid.
How to Edit Page:
Following the steps to follow to edit the page from the system-
Click on the “ Page Maker” menu present in Admin Menu.
It would display the page where already added pages will be listed (if any). Click on the “Edit” link shown corresponding to each page.
It would redirect admin to a new page where forms with already filled input field will be shown. Admin can simply update values and save the details by clicking on “Save” button.
You can find the screenshot of Edit Section below:
Add Module:
Click on any column setting like the left column. It would display column form.
To add module, click on “Add Module” button as shown below:
If more module is available, the select box will then appeared to add module otherwise error message “No More module is available” is displayed.
After selecting the module, click on “Add Module” button. It will add the module with the display of success message.
You can find the scrrenshot to add module in the column setting:
Change Position:
Click on any column setting like Left Column. It would display left column form.
To change the position of any existing row, drag it to the desired position and drop it.
It then updates the current position of each existing modules with the display of success message.
You can find the screenshot as below:
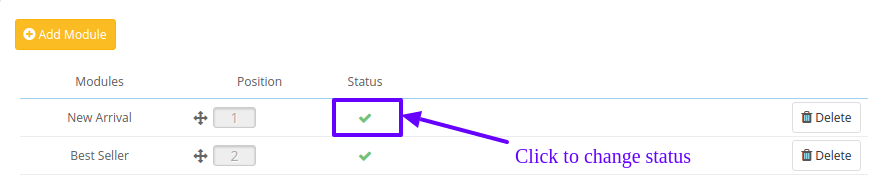
Change Module Status:
Click on any column setting like Left Column. It would display left column form.
If modules are added, tick icon displayed for Enabled and cross icon displayed for Disabled in the Status column.
To change the status of existing modules, click on the icon displayed in “Status” column corresponding to the particular module.
If already enabled, it then changes to “Cross” icon otherwise “Tick” icon with the display of the message.
You can find the screenshot as below:
How to Delete Page:
Click on “ Page Maker” menu present in Admin Menu.
It would display the page where already added pages will be listed (if any). Click on the “Delete” link given under the drop-down being shown corresponding to each page.
It then, the system will confirm the admin before deleting by asking “Delete Selected Item”. If click on “Yes”, it will delete the page.
You can find the screenshot as below:
How to access Page:
Click on “ Page Maker” menu present in Admin Menu.
It would display the page where already added pages will be listed(if any).
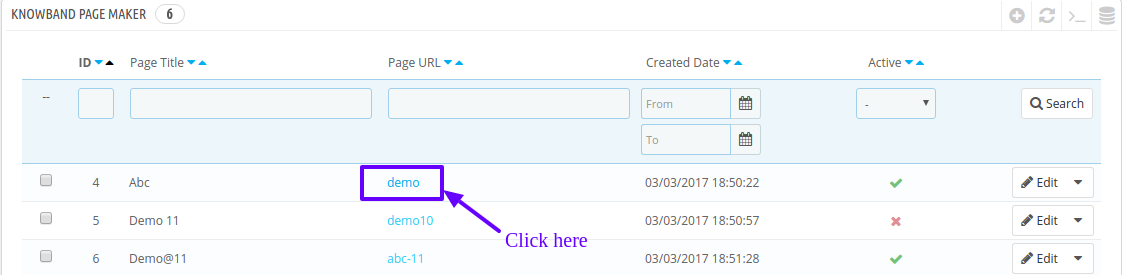
Click on the link in “Page URL” column corresponding to particular page. It then opens the created page for the front side in new tab.
You can find the screenshot as below:
Front End Module
After enabling the Prestashop CMS page creation module, the front-end user can see the added paged by manually entering of URL in Address bar or create a link for the page.
The page with both the column enabled can be displayed as shown below:
(for Prestashop 1.6)
(for Prestashop 1.7)
Page with one column enabled as shown below:
(for Prestashop 1.6)
(for Prestashop 1.7)
Page with no column as shown below:
(for Prestashop 1.7)
Watch how this Prestashop Page Builder plugin by Knowband works in this video tutorial:
Amazon Marketplace Web Service (Amazon MWS) is an API system provided by Amazon marketplace to establish an exchange of information on the product listing, product orders, payments, reports and much more. The Amazon MWS API enables the programmers to develop selling automation solutions which help the store owners to grow their business on the Amazon marketplace.
The solutions developed using Amazon MWS help the sellers to:
Increase selling efficiency
Reduce extra efforts and labor and,
Improve response time to marketplace customers
Earlier, if you had an eCommerce website and also wanted to sell on the Amazon marketplace, you had to create a separate seller account and manage it separately. It was a tough job to manage an eCommerce site and an Amazon seller account separately.
With Amazon MWS, a broader scope of functionalities was introduced to those who have an eCommerce store and also want to sell on Amazon. With the new API, Amazon product listing, order management, payment, and much more functionalities were integrated into various solutions developed for different eCommerce platforms.
The PrestaShop Amazon US connection is one such solution that integrates the Amazon seller functionalities into existing workflow of PrestaShop stores so that selling on Amazon fits seamlessly to the current eCommerce operations.
The PrestaShop integration-
Using the Amazon MWS connection, the PrestaShop Amazon integration module allows product import-export, order management, payment report etc right on a PrestaShop dashboard itself. You do not have to login to your Amazon seller account to manage the product feeds, or product orders anymore. You can manage all these right from your PrestaShop store.
To use this functionality, you need to install the PrestaShop Amazon US Marketplace integration module on your PrestaShop. After that, you need to create a professional seller account at Amazon which you will use to show your product on the Amazon marketplace.
Now, when you have the module and a seller account on Amazon, you need the following API details that you can get from the Amazon MWS and Amazon Seller Central account setup:
1 . Seller or Merchant Id:
You will get this when you create the Amazon seller account. It is mandatory to make connection to Amazon MWS API.
2. AWS Access Key Id:
You will get this when you sign up for Amazon MWS. This information is also mandatory to make connection to Amazon MWS API.
3. Secret Key:
You will get it when you sign up for Amazon MWS.
After configuring these details in your PrestaShop module, your Amazon-PrestaShop connection is ready to use. Now, you can use the profile management, order management, product feed management interfaces to seamlessly carry out your multi-channel trade.
With the PrestaShop Amazon US Integration, you can perform all the functionalities that you can perform in an Amazon Seller Central panel.
You can create profiles for product listing on Amazon
You can manage Amazon product exports from the PrestaShop dashboard itself. You can map and upload your existing PrestaShop products to Amazon product feed.
You can manage the Amazon product orders from the PrestaShop dashboard.
You can map PrestaShop categories with Amazon US Marketplace Categories.
You can map PrestaShop attributes to the corresponding Marketplace attribute
You can view list of orders from Amazon whose status is not pending on Amazon.com.
Amazon MWS can provide you a wider platform to showcase your products. This operation can be further simplified with the platform based solutions like the PrestaShop Amazon US integration module. So, if you run a PrestaShop store and want to expand your reach to a broader section of customers, Amazon Marketplace is one such effective option for you.
Exciting Updates in Knowband’s PrestaShop Etsy Integrator – Version 4.0.1
We’re always looking for ways to make your Etsy integration smoother and more efficient. With the latest Version 4.0.1 of our PrestaShop Etsy Integrator, we’ve added a couple of features that we think you’ll find really useful.
[Alert]Make sure to upgrade before 18 January, as connections may be interrupted if the module isn’t updated by then.
1. Seamless OpenAPI Authentication for Etsy Etsy has updated its API authentication, and we’ve updated our Prestashop Etsy Marketplace Connector Module to match. All your API requests now include the necessary authentication headers, so you don’t have to worry about interruptions. Your PrestaShop store will continue to communicate with Etsy smoothly, exactly as before, just better.
2. Simplified Return Policy Management Handling return policies can be tricky, but we have made it easier. You can now create multiple return policies and assign them to different profiles. Not only you can you create, but you can also sync the existing policies from Etsy Marketplace by running retun policy cron.
Once a profile is linked to a product, the return policy is automatically updated on Etsy. This saves you time and ensures your listings always display the correct information for your customers.
These updates are part of our ongoing commitment to make your PrestaShop-Etsy integration as seamless and hassle-free as possible.
If you run an eCommerce store and not satisfied with your sales, you might be thinking about several ways to improve the same. Starting a shop on some popular marketplace is one such idea that might have surely come into your mind. Well! If so, this is a good decision as it will help you to leverage the traffic and customer base of an already established marketplace and generate some serious sales for your business.
The aim here is to expand the reach so as to generate desired revenue from the business. However, It might be a tough task to manage two shops on different domains at the same time. Therefore, I am going to explain how can you manage to be a seller on a popular marketplace like Etsy and manage your own eCommerce site at the same time.
PrestaShop – Etsy connection
Both your website and selling on Etsy shop are important; managing both the entities separately is not an easy task, though. You need time, effort and manpower to make sure everything goes as planned. It made us realize, if we can integrate your eCommerce site and a marketplace like Etsy, it will curtail a huge burden at once by allowing a store owner to sell on the marketplace directly from his eCommerce store.
A PrestaShop-Etsy connection is a similar approach that works by integrating an interface on the PrestaShop back-office which possess the controls and configurations for:
Synchronizing the updates and changes in the stock
Managing orders received from the Etsy store
Preparing product feed for Etsy listing
Preparing different profiles for Product listing for bulk uploading of the products or selected products of the store
Preparing product Shipping options for Etsy orders
Setting up an Etsy API configuration to establish the connection
1. The connection setup
The PrestaShop-Etsy integration process is simple and you can do it without knowing to code.
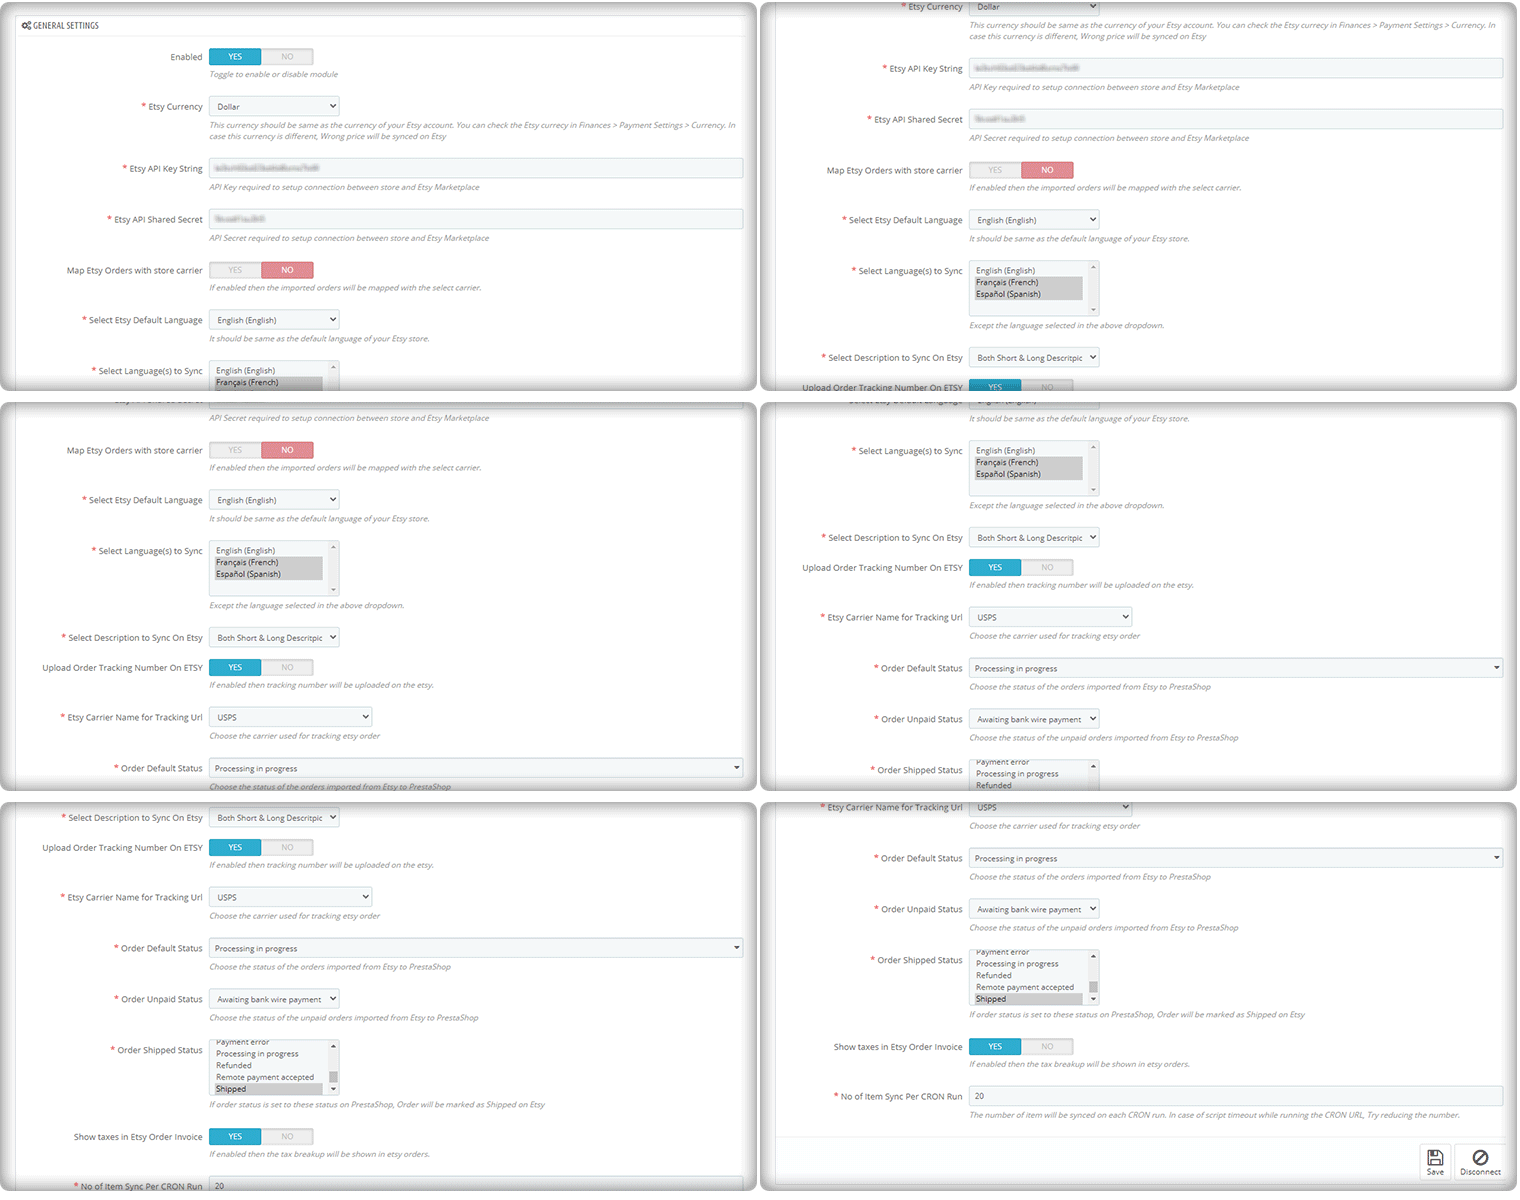
To start selling on Etsy Marketplace you will need a seller account on Etsy. Create a seller account on the Etsy marketplace before you can set up a Prestashop-Etsy connection. After seller account registration, you need to set up an App on Etsy to get the API details. The API details will be used by the PrestaShop-Etsy integration module to set up a connection between the store and the Etsy seller account. The integration allows you to select the default language and the language in which you want to sync the product details, categories, shipping methods, and other features.
The updated version of the Etsy-PrestaShop Integration module allows you to upload the order tracking number for Etsy shoppers and the order status as well. There is an invoice setting that can be enabled if you want to show taxes on the invoice.
The auto cron run feature is the most appealing one and it lets the user select the number of products that can be synced automatically.
2. Shipping management for Etsy
Next, you will need to prepare the product feeds and upload them to the Etsy product listing. However, before your PrestaShop products are visible on your Etsy seller profile, you need to make sure that you have configured the shipping options.
The customers on the marketplace would want to see what shipping options are available with the product and when it is going to be delivered to them.
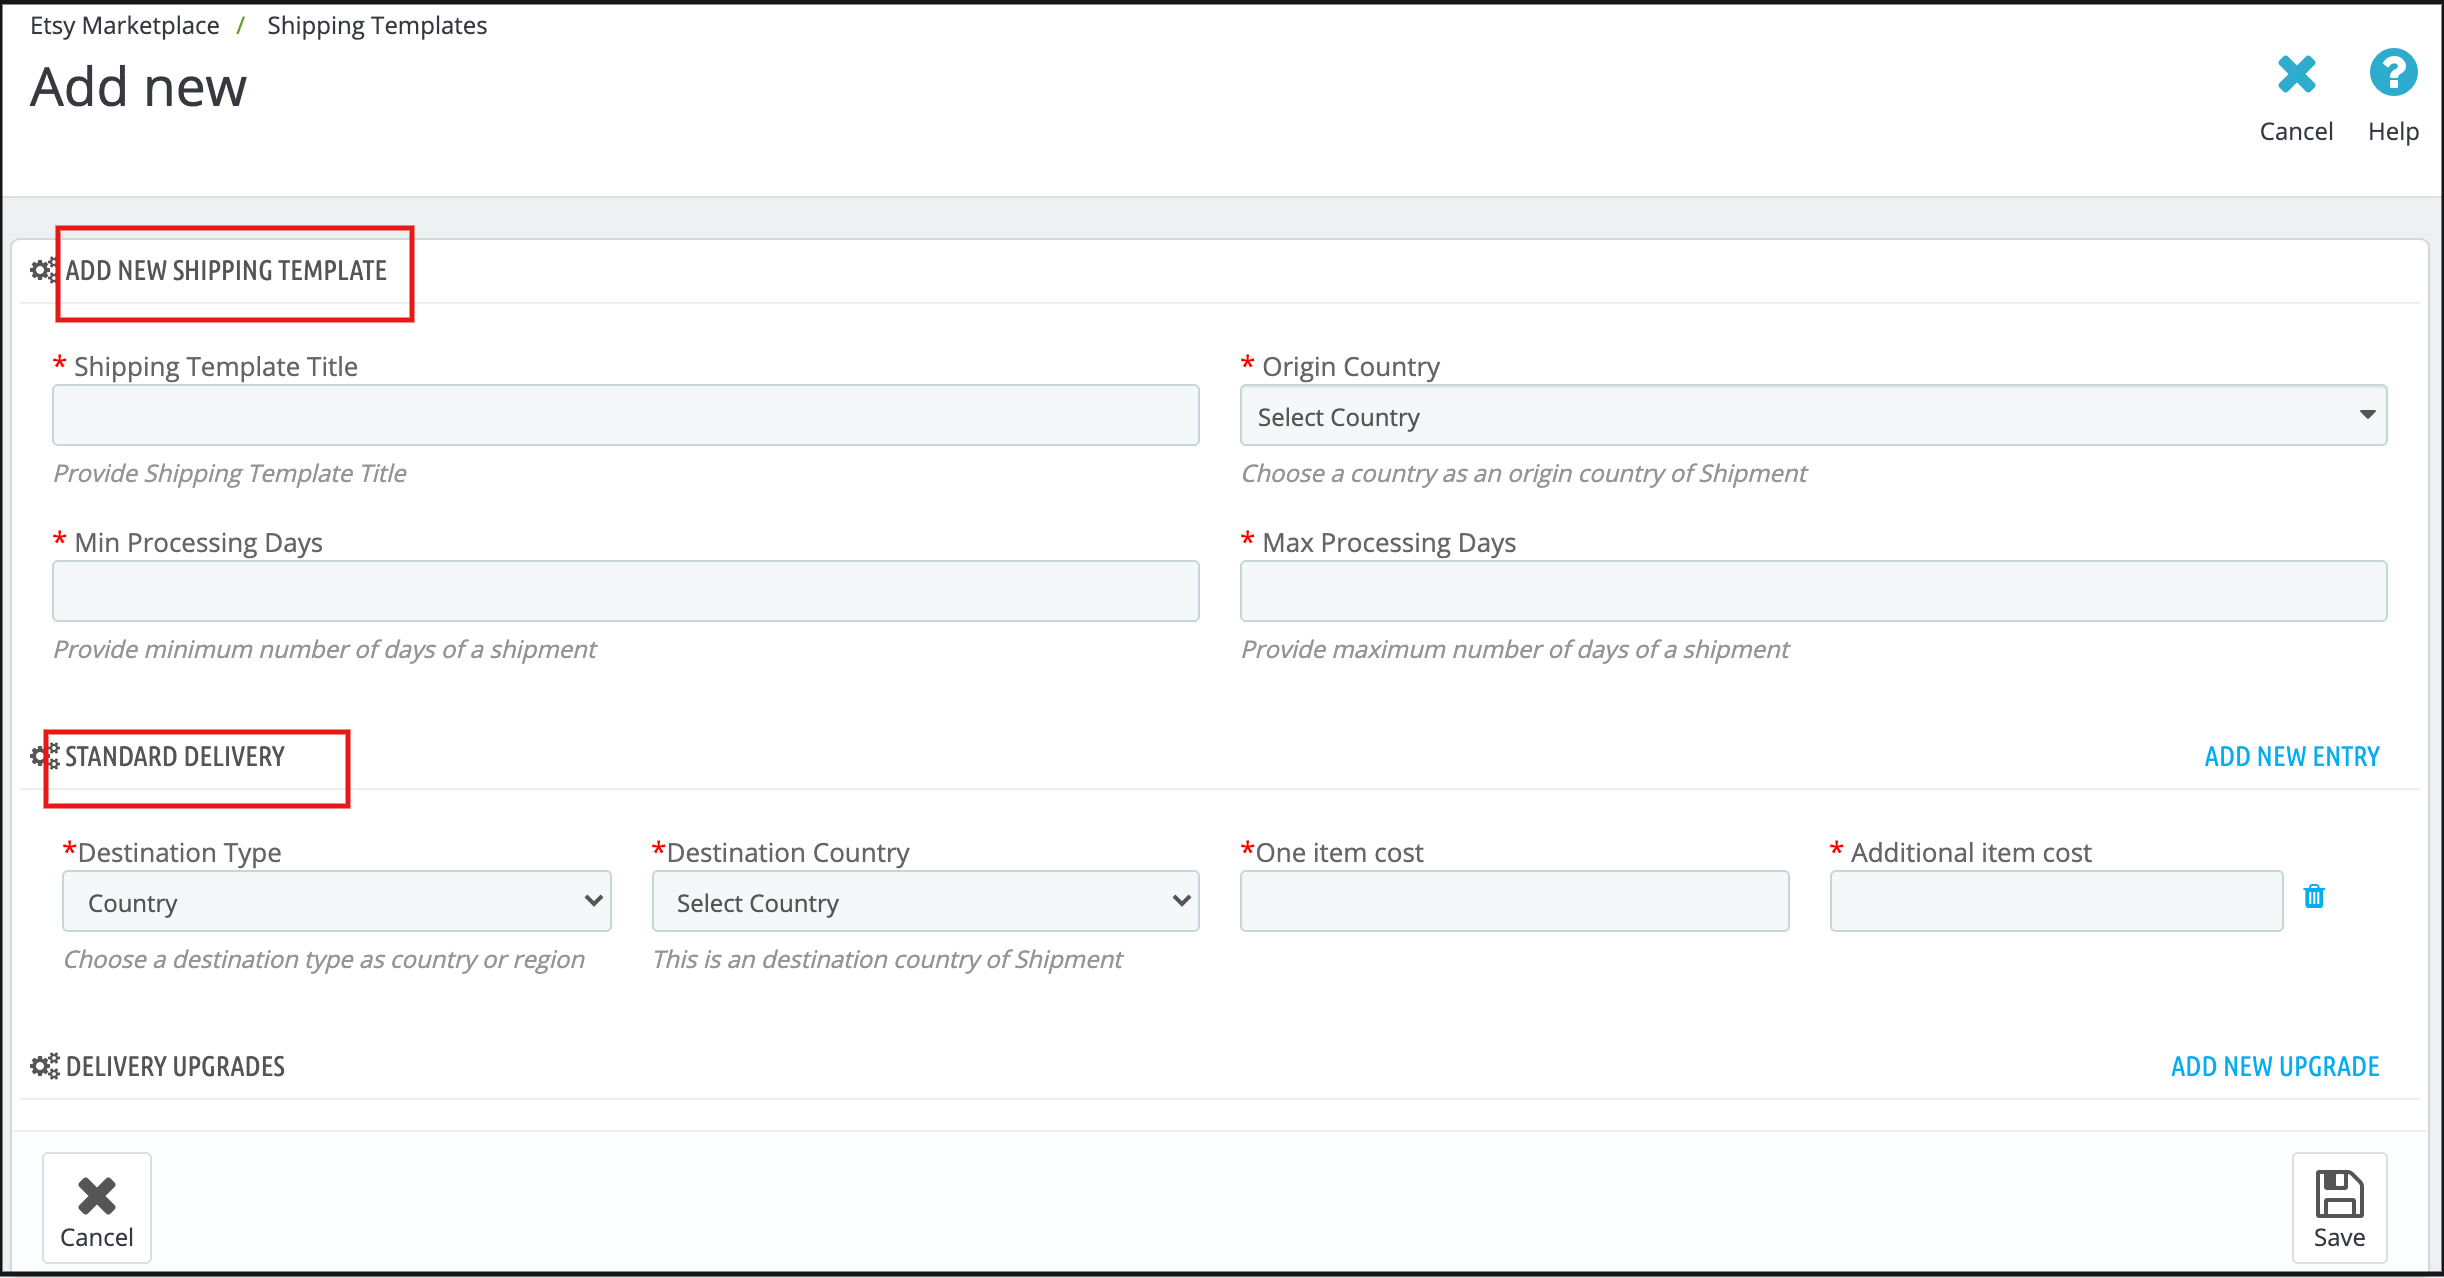
So, you must update the shipping options and let your customers on Etsy stay informed about them. You can add multiple shipping templates and improve your conversion rate because shipping is a major turn-off if a user couldn’t see the expected delivery date.
Prestashop Etsy integration module can be utilized for configuring the shipping templates by updating various information required by the Etsy marketplace. The interface of the shipping templates is the same as the Etsy Marketplace.
3. Product Listing for Etsy
To list the products on Etsy Marketplace the sellers first need to create the profiles. The seller can select the option to map the PrestaShop store category with the Etsy category or can select the products that need to be synced to the Etsy store.
The cron setup will list the goods to the Etsy Marketplace from the PrestaShop Etsy Integration module along with the variants, inventory, and definition of the product. So, this purpose helps list the goods.
4. Local Sync Option
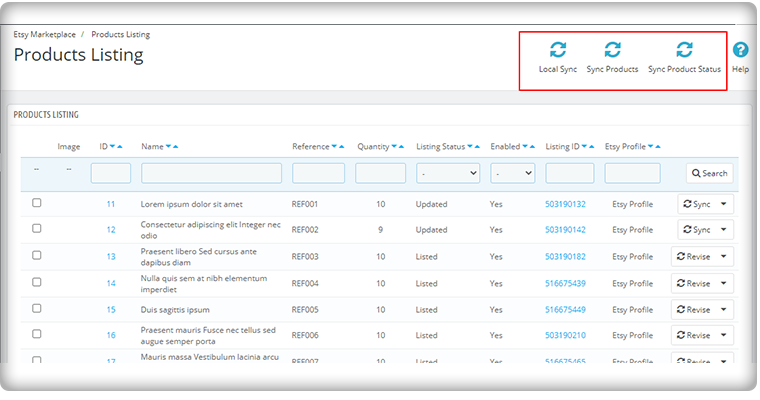
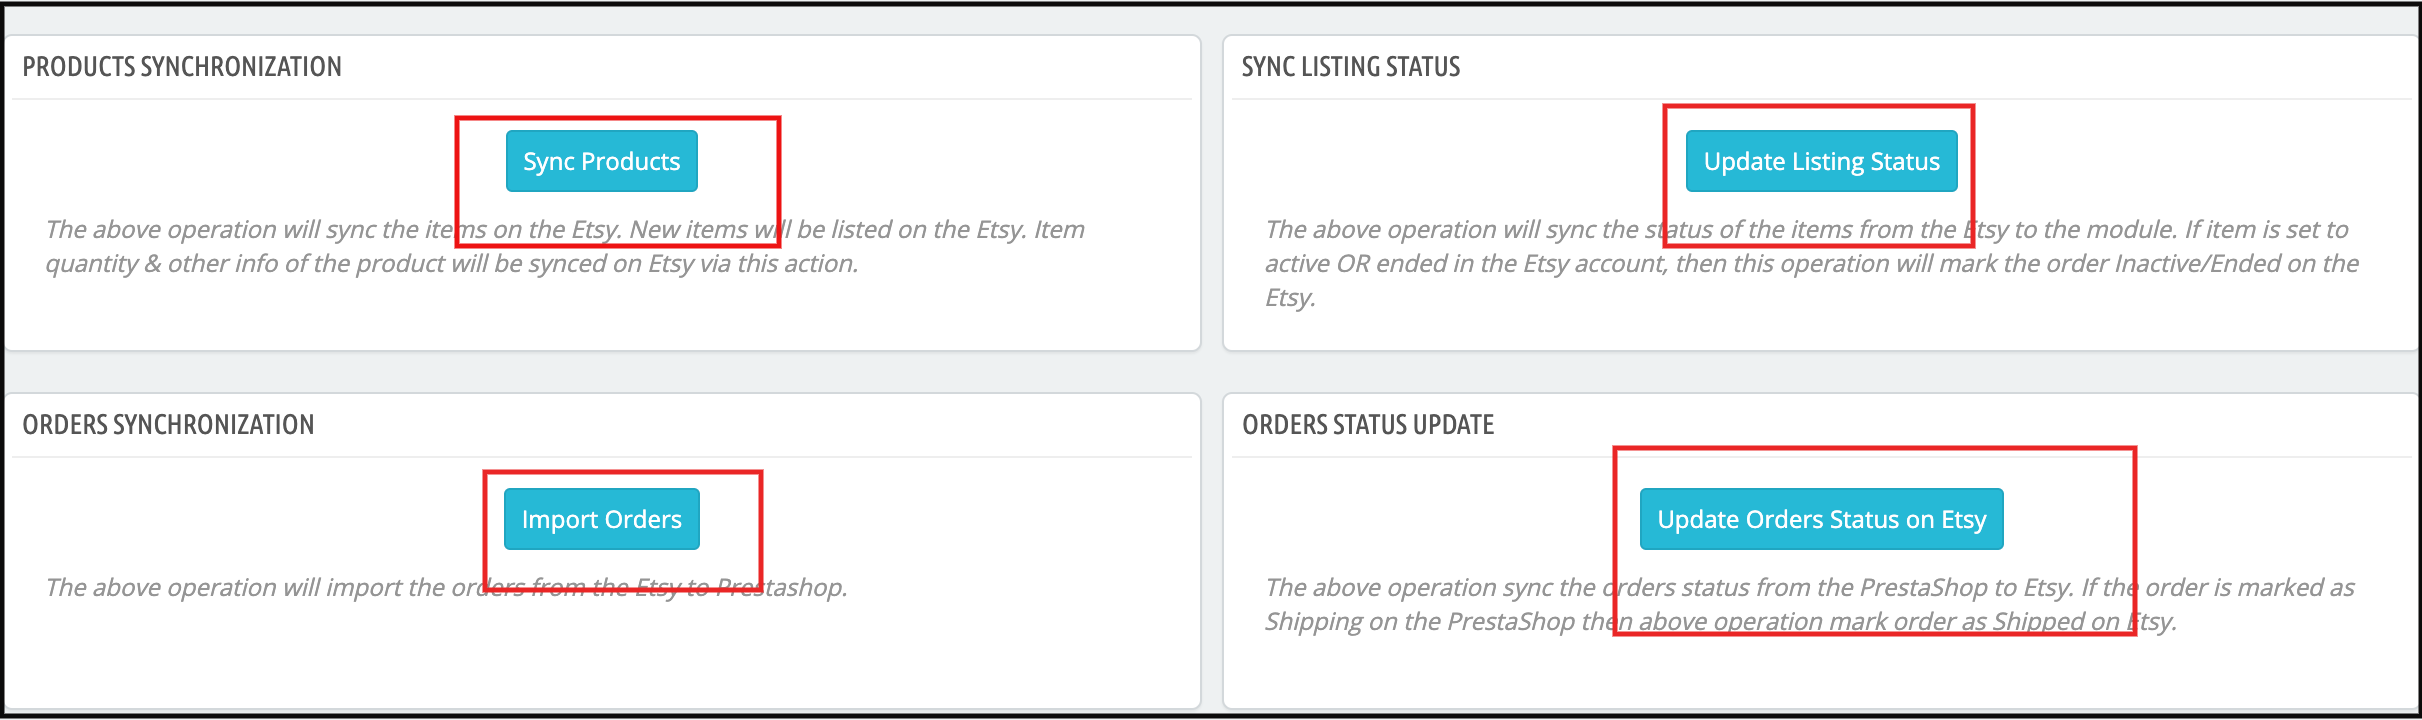
Local Sync synchronizes the product in the PrestaShop store to the Etsy Integration module. Sellers can synchronize their product from the PrestaShop store to an Etsy Integration module with the aid of local sync. This tab is available under the PrestaShop Etsy Integration extension synchronization tab. After syncing the products to the Etsy Integration module, the sellers can sync the products in bulk or sync the selected products as per their choice.
5. Synch Products individually
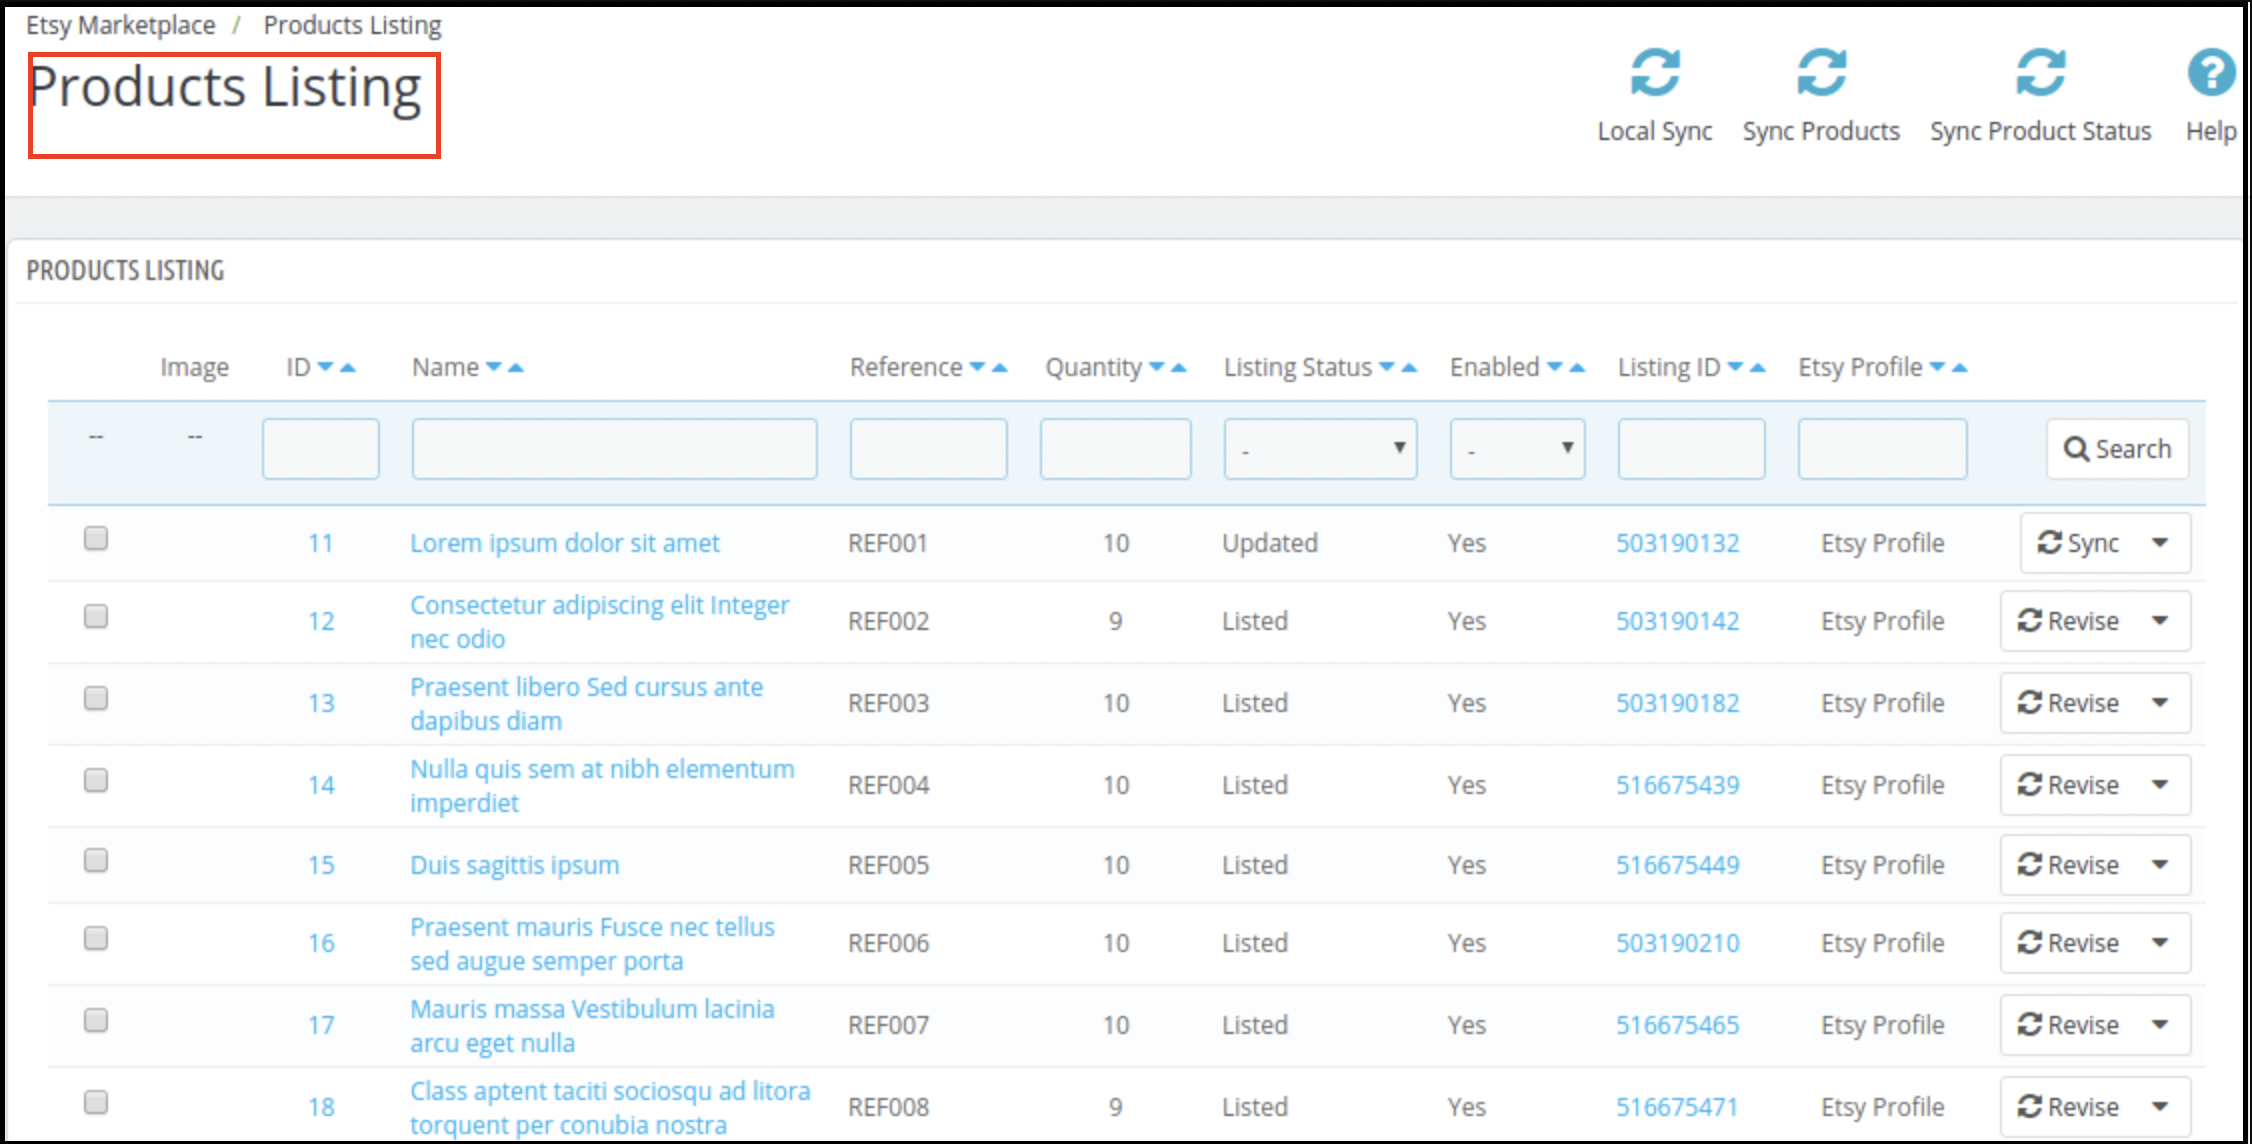
The listing status of the products is shown on the product listing tab of the integration module. The administrator may display items mapped to different profiles under this tab along with their Etsy Name, Listing Status, Etsy (Active, Ended), Activated or Disabled status, and Enable/Disable/Relist/Renew option. By running cron, the administrator may list the individual product or all the items.
Also, the seller can easily remove the product from a specific profile, and it is impossible to add the excluded items to the Etsy marketplace. All of this can be conducted once the cron is executed from the PrestaShop Etsy Integration Extension back-office.
You can update the product status for all the products manually or by running the cron.
6. Product Feed Management for Etsy
When shipping options are configured and ready for mapping with different products, you can prepare product feeds that will be shown in the Etsy marketplace. The product feeds are created based on the profiles, category mapping, and attribute mapping between the store and the marketplace.
Creating a new profile will have the options to perform category mapping and attribute mapping according to which the list of products will be shown. From this list of products, you can select those products on your store which you want to upload on the Etsy marketplace.
7. The order management
In a standard Etsy seller account, when your products become visible on the marketplace, you start receiving the order for them. A PrestaShop Etsy connection works efficiently to let you manage these product orders from the PrestaShop dashboard itself.
Now, based on the order status mapping between the PrestaShop and Etsy marketplace, you can update the order status and perform all the order management tasks from your PrestaShop back office itself.
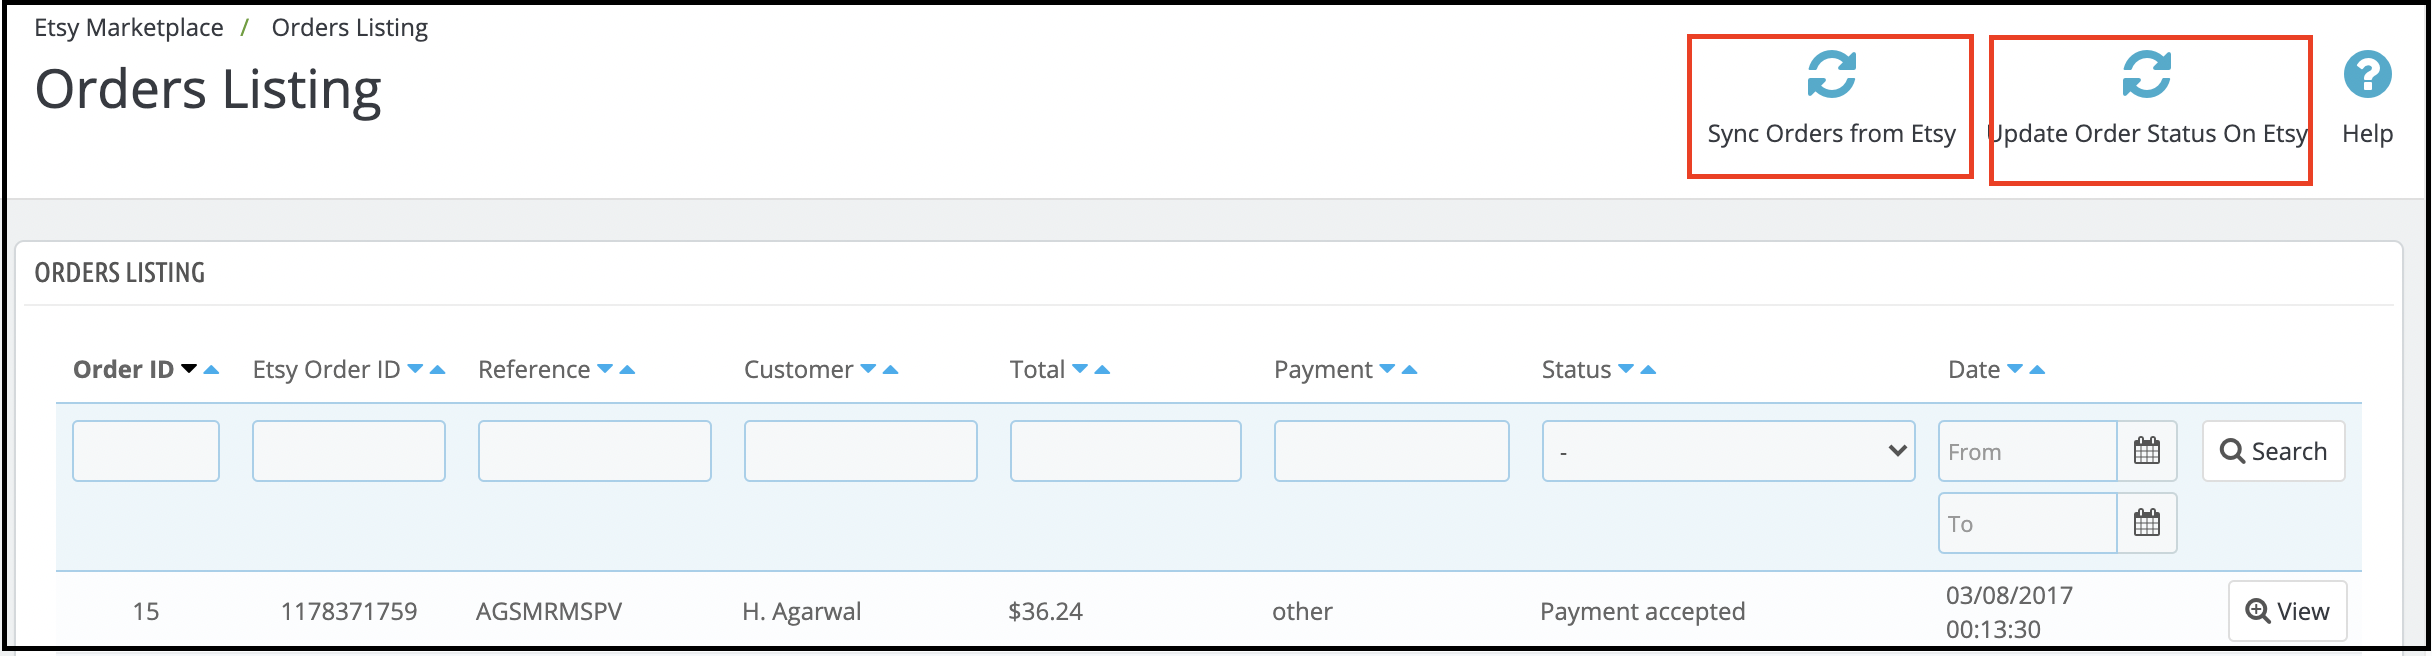
You can see the order ID, Etsy order ID, reference, customer details, total order amount, and payment status of placed orders. Etsy product orders are listed on the PrestaShop dashboard as shown in the figure below:
Other Functionalities of Etsy-PrestaShop Integration Addon that helps you connect the store
Cron set up to automate the process
The admin can set up the cron jobs so that the inventory update, order sync from Etsy to PrestaShop, and order status update from PrestaShop to Etsy will work automatically. Newly added products will also get updated accordingly.
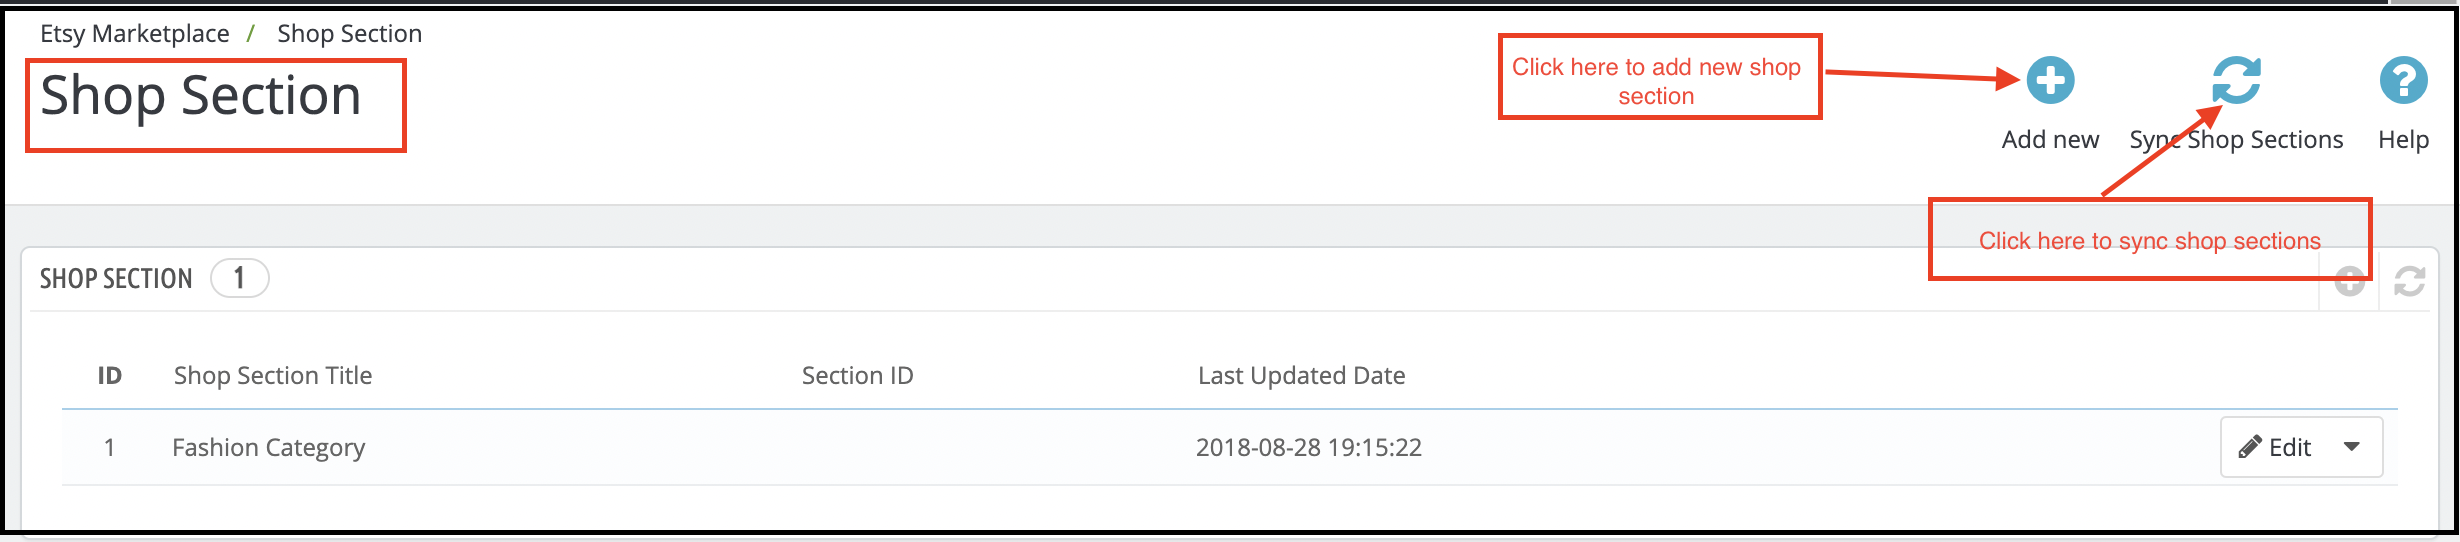
Add Shop Sections
The PrestaShop Etsy Integration add-on provides an option to create the store and the profile can be mapped to the store. Category Wise Mapping
The PrestaShop store administrator needs to map the PrestaShop store category to the most appropriate Etsy Store category to list the items on the Etsy Marketplace, so that all PrestaShop store products can be mapped to the correct Etsy category.
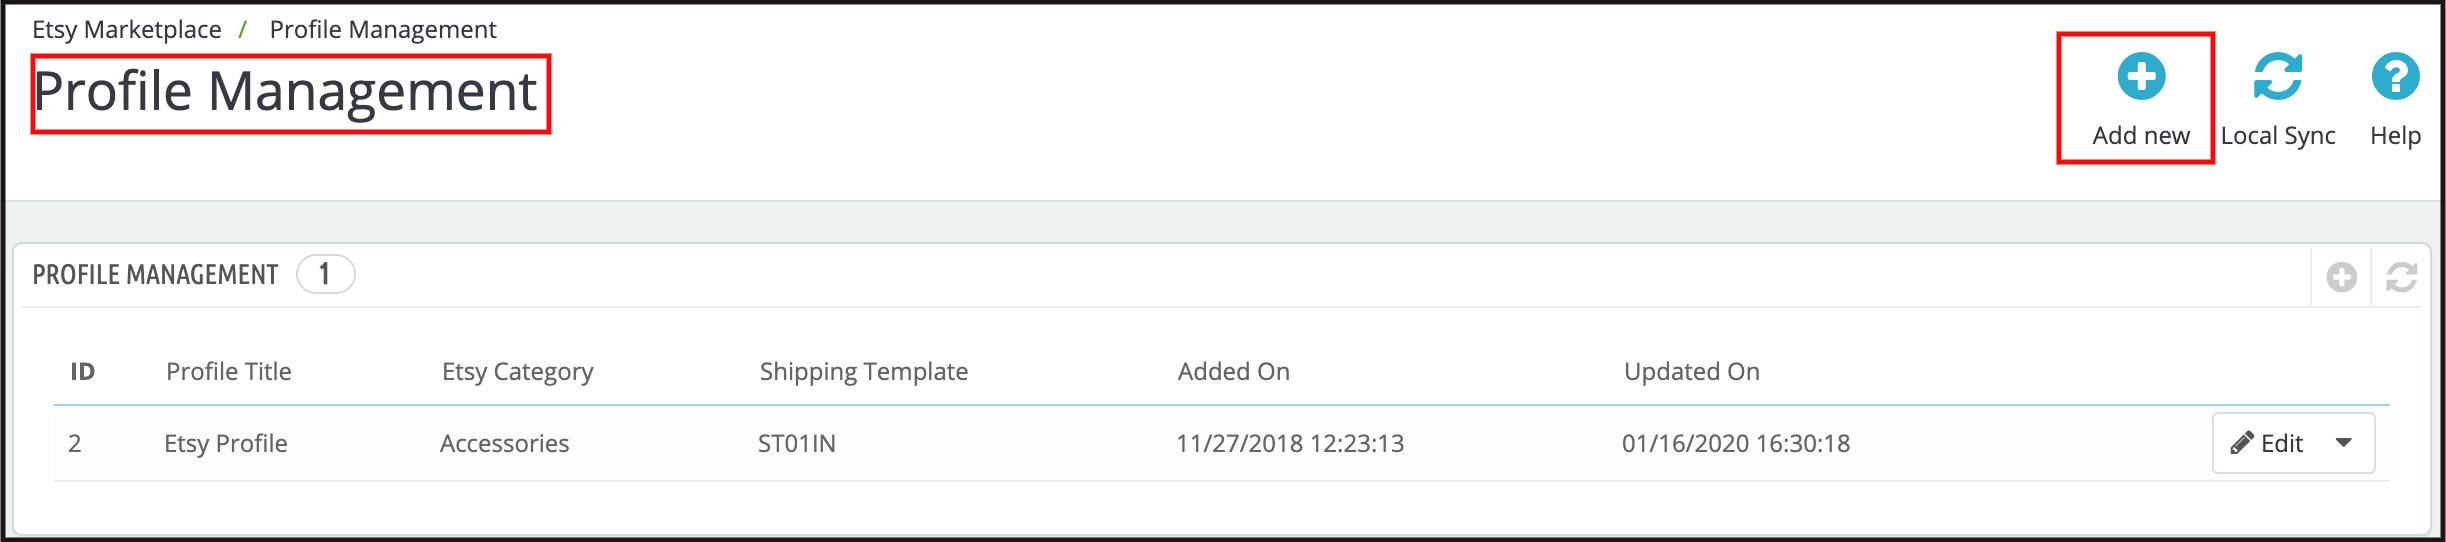
Managing Profiles with Ease
Admin can pick simple settings to list the product with the aid of profile management, such as – Etsy Shop (country-wise), Currency, Language, and Shipping Profile. Using the Size chart image function, Store Admin may add an extra image for each profile. This image will be added as an extra image to the Etsy marketplace.
You can customize the product title by inserting certain details and placeholders with the title. The place-holders like {sample} will be replaced by dynamic content at the time of execution.
The Custom Pricing for Etsy
Integration Extension enables the PrestaShop store administrator to list their goods from the PrestaShop store to the Etsy Marketplace at a price different from the price of the PrestaShop store.
Using PrestaShop Etsy Integration Extension, the admin may increase or decrease the price range at the Etsy Store. The administrator has the option to list the goods at a lower or higher price based on fixed or percentage-wise changes.
Product Image Size
Prestashop Etsy Integration module allows the admin to select the size of the product image in our module to sync the same to Etsy Marketplace.
Alter Quantity
The admin can set a maximum quantity of products that will be synced to Etsy with the products. If a product has 10 quantities on the store but Alter quantity is set as 5 then only 5 quantities will be synced to Etsy for that product.
Sales Data Analytics and Stats
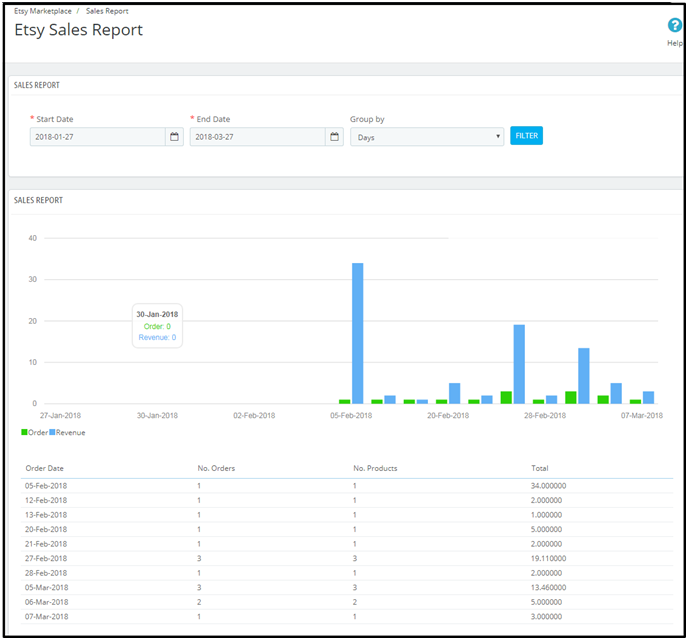
It allows the store owner to use PrestaShop Etsy Integration Extension to monitor the sales report.
The Etsy PrestaShop integration plug-in sales report tab helps the sellers to access the order and revenue report. This helps the administrator to review the sales report for orders from the Etsy store.
Also, a product sales report is displayed that allows you to see the product-wise status.
Watch how to connect Prestashop store with Etsy Marketplace
This is how a PrestaShop-Etsy integration works to allow an eCommerce site to receive orders directly from the Etsy marketplace. An effective PrestaShop-Etsy connection lets you perform all the activities of a seller account from the PrestaShop admin panel itself. Knowband’s PrestaShop Etsy integration module is one such PrestaShop module that you can leverage to generate heightened conversions on your store. It’s time you accept the importance of being a part of a popular marketplace and understand how you can leverage them to generate sales for your business.
UI (User Interface) and UX (User Experience) have an important role in conversion friendly web design. UI makes your website beautiful and UX concentrates on the usability and ease of the website. If any of these two are missing or not balanced, the result is bouncing customers. Website form design is that part of the web design that ensures seamless lead generation and information gathering with proper user satisfaction on a website. In this blog we will be focusing mainly on UX as UI is something which is very subjective and will be defined by your company’s branding guidelines or your choice of colors, banners and fonts.
Wikipedia Says:
“User experience design (UX, UXD, UED or XD) is the process of enhancing user satisfaction with a product by improving the usability, accessibility, and pleasure provided in the interaction with the product.”
We use different forms on our websites on almost every part. From feedback forms to Checkout Page everything has its purpose, and if they are not designed according to what they are meant for, they will fail to serve their purpose.
In this post, I will explain 6 such mistakes in a website form design that you should never commit if you want to avoid bounce backs, and worst user experiences on your website.
1. Requesting too Much Information from the user
“40% of people abandon a website that takes more than 3 seconds to load.” –kissmetrics. This is when the website slowed down by 1 sec, imagine what would be the reaction if your website wastes much more time than that by just asking unnecessary details to fill out on the forms.
So, don’t waste their time and your conversion by asking for ‘not so important’ information. Please note that there is a difference between ‘unnecessary’ information and ‘not so important’ information.
Information like ‘Ethnicity’ or ‘Place of Birth’ of the person may be deemed unnecessary for an eCommerce website but it might be important for a political party’s website. So this is also debatable and subjective, but I believe you got the idea.
‘Not so important’ fields can be:
Additional Email ID
Additional Phone Number
Date of Birth
Fax Number
Security question and answer
Social Security Number etc.
Even if you need these details it’s not necessary to ask at one go, you may always give an option to the user to update his/her profile. Think like Linkedin or Facebook they do not ask everything in one go, instead they first get you signed up with as little as 3-5 fields and then give you an option to update your profile later.
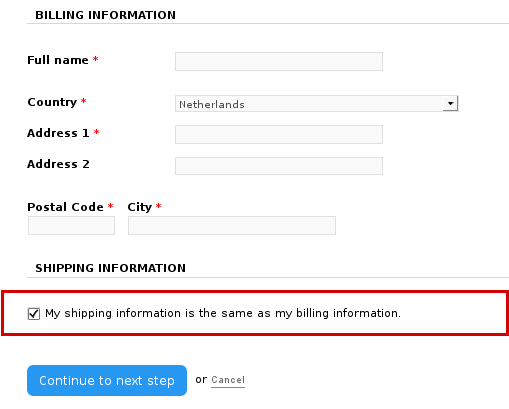
It’s all about presentation, so you should ask only the most crucial details that you need like: If you are using the form for feedback, then ask about their views and comments before asking their name or email id. Similarly, if it’s a checkout form, and you already have certain information about the user, then do not ask for those again, instead have them pre-filled on the form. For example, you can pre-populate the information in billing address from to auto-fill the delivery address form if both addresses are same.
Information pre-population from one form to other can save time and effort of the users
2. Ambiguous or non-responsive label positioning-
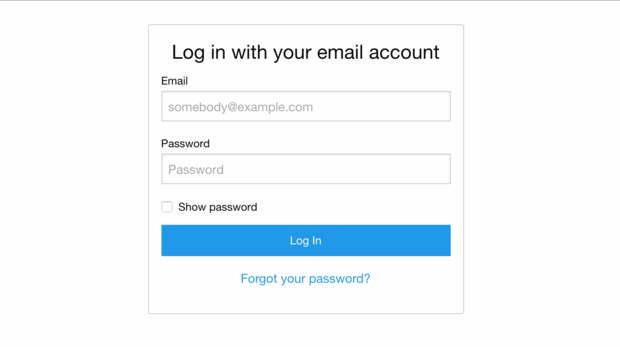
Labels are used in the website forms to make it easy for the user to fill the information required. So ensure that labels are placed at a correct position that doesn’t confuse the user about what to fill in it. A proper label alignment is essentially required when you are designing a responsive form that serves to different screen sizes. Make sure that labels remain correctly aligned on all the screen sizes the form is being opened.
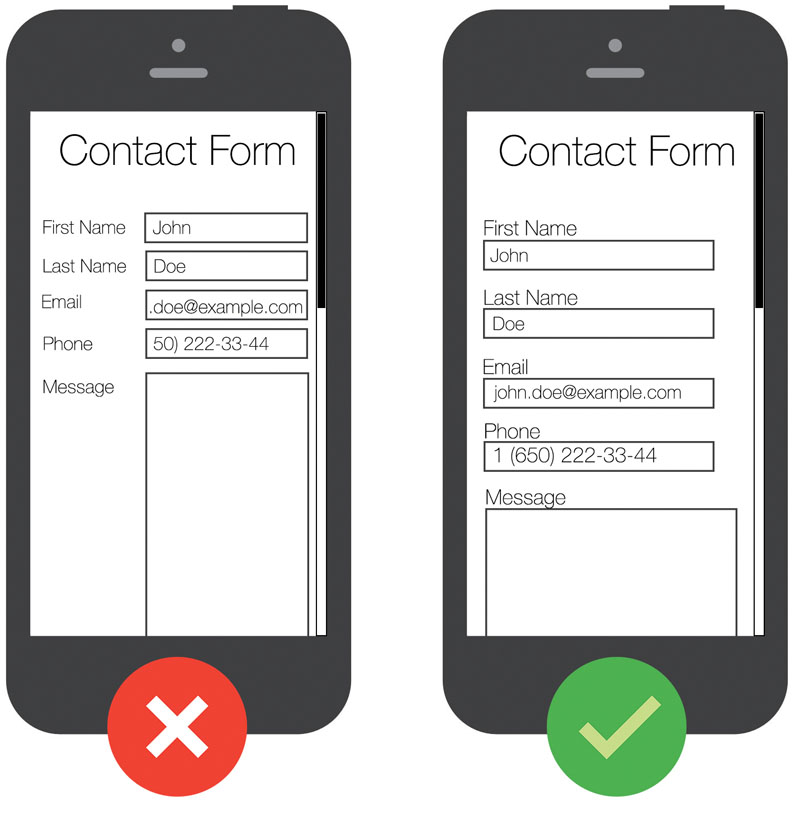
Mobile Contact FormMost website forms use the same label placements on all the screen sizes which is not a recommended choice
Users on mobile use zoom to clearly see the labels on the forms so that they fill the correct information. However, as shown in the image above if you keep the same alignment on both the desktop and mobile versions of the form, it will hide all the labels while clicking on the form in zoom mode. It will force the user to zoom out the form each time he moves to the next entry.
A better option for handle this would be to use two different alignments on desktop and mobile version of the form. Make the labels top-aligned on mobile versions and keep it right aligned on the desktop.
3. Replacing labels with placeholders-
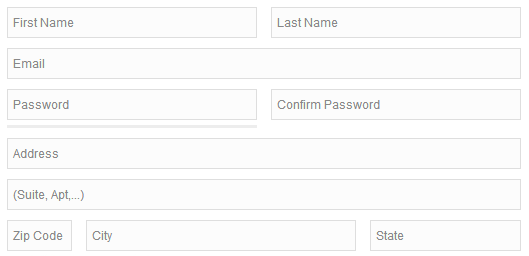
With HTML 5, placeholders in text attribute were a valuable addition. They are effectively used to provide a brief hint about an expected value in the field.
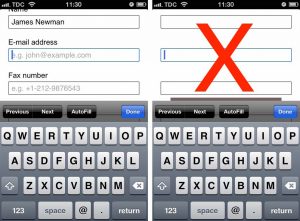
Placeholders provide a short hint about expected values in form field
Typically a placeholder remains visible until the user clicks in the field. As soon as the user clicks in the field to type something, the placeholder vanishes. The usage of placeholders in website form design is highly confused with that of labels. Many designers use these placeholders instead of labels to describe the input fields hoping to get a cleaner design. This is a big mistake that compromises with the user experience.
Let’s take a situation when user fills a lengthy form like a checkout form. After filling the form, he might want to review the details before he can submit the form. Now, if there is no label in the form, he will just get confused about the details he has filled in.
Using placeholders in place of labels will confuse your customers especially in long forms
So, always use a label. Not using labels might be a space saver, but you will surprise to know how easily people forget what the label was once they fill the information in the field.
4. Using insufficient Spacing and distorted layout
Another big mistake we make in website form design is by placing too many elements on a single page. More are the number of elements on a single page more is the competition among them to draw attention.
The solution is to leave some breathing space between the elements by keeping white spaces. A proper flow for your users will be provided only when you keep ample spacing around the fields and different sections.
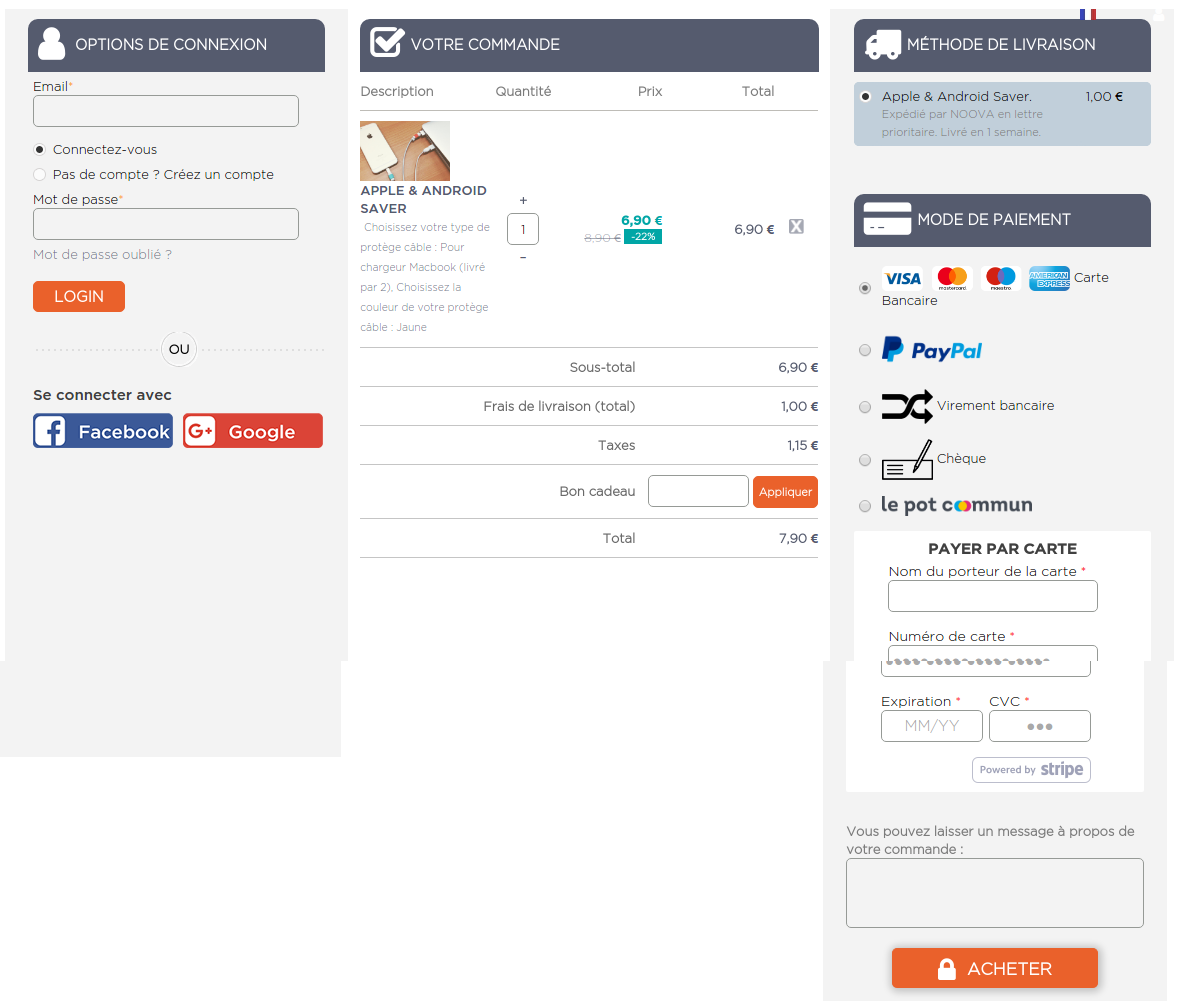
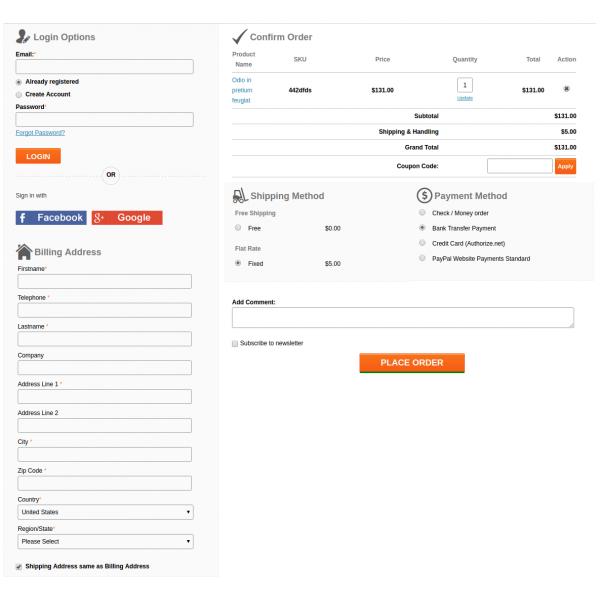
This single page checkout form shows how different sections can be segregated even if there are too many elements on a single page. The form uses section labels to separate different sections like Login Options, Billing Address, Confirm Order, Shipping Method, and Payment Method. Moreover, the three column layout makes the form even cleaner.
Segregating different sections will prevent cluttering between different sections
5. Uncertain error messages and input validations
While filling in the website forms, there are certain chances that users will commit some mistakes due to which form would not be submitted. Errors can occur by missing an entry, or filling an incorrect information etc. To tackle this website, designers use input validations that show the error message(s) while submitting the form. They use server side validations that generally waits for the server’s response to check the errors in the form. This is a bigger mistake that can even frustrate the user when they see an error message after submitting the form.
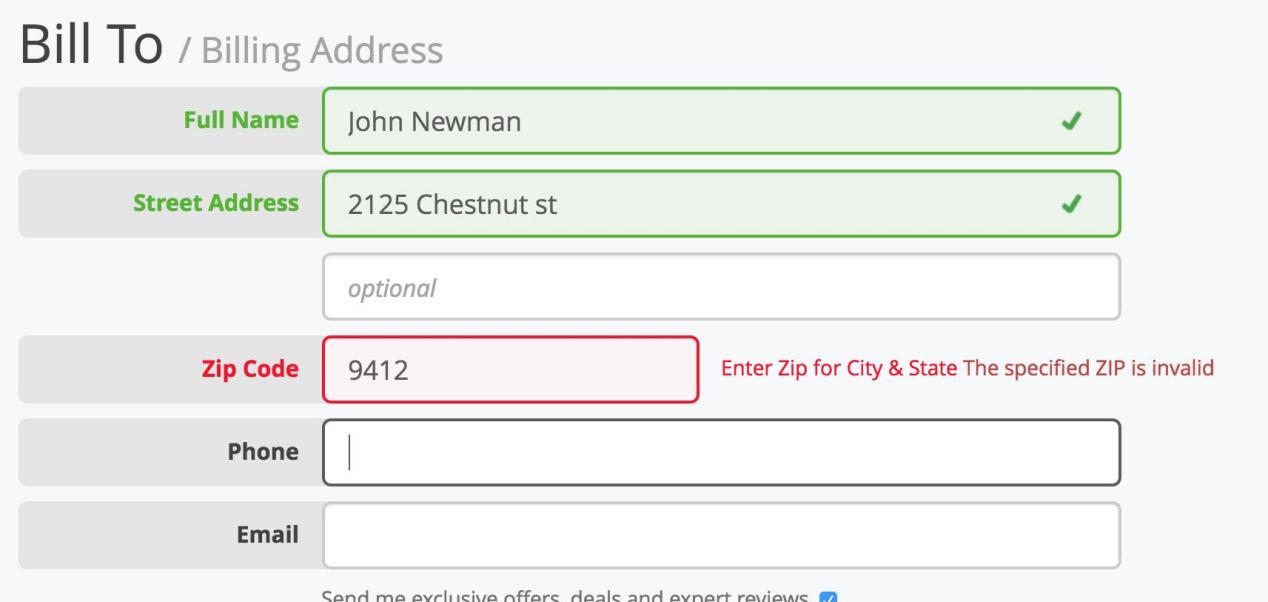
Instead, you can use user-side inline validation that tells on the spot if the user is filling an incorrect entry in a field. By doing so, users won’t miss if they have entered something wrong in a field.
Inline validation to check and show the errors on spot prevent the frustration post form submission
Moreover, do not use confusing statements in the validations messages. Just explain why the entry is wrong by describing how the correct entry would look like.
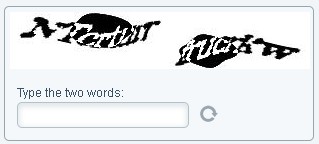
6. Using Captcha that are not designed for humans
Captchas are used by the websites to prevent spam attacks by distinguishing a bot from humans. These captchas are assumed to present a challenge that would be easy for humans while bots cannot pass them. For spam prevention, sometimes, designers become so desperate that they integrate the captchas that are challenging even for the humans.
Captcha that prevent spam but frustrate human users
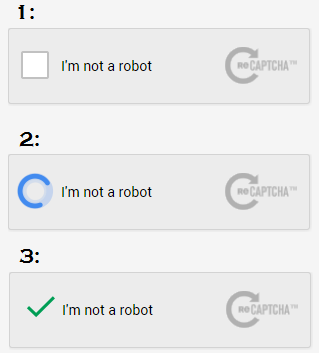
I understand the spam prevention is important, but captcha can be confusing and challenging for the users to decode them. You can use an alternate solution of so-called Google re-Captcha, which is a more advanced and simple version. The new Google re-Captcha just simply asks the user to click in a check box and verification is done without entering a difficult to see the text message.
Google re-Captcha is comparatively more user-friendly despite it is hard on bots
Finally,
User experience improvement is a continuous process that can only be achieved with regular updates using the best methods available. I hope outlining these design mistakes will help you achieve that improvement by not committing these mistakes on any of the forms you use on your website.
Facebook and PrestaShop are the two names that do not require any introduction today. The two have already built a strong identity among their respective audiences and they are growing stronger day by day. A PrestaShop Facebook login extension is a special addition to the PrestaShop’s core login system where the only way to login to a user account was through an account registration. The PrestaShop Facebook login extension enables a PrestaShop store to acquire the capabilities to accept and allow a social login feature through the Facebook credentials.
Facebook is the largest social networking platform today. It is assumed that a user coming to an eCommerce site would surely have an account on this popular social media platform. Now, if the PrestaShop site can leverage the availability of such a huge number of Facebook users for capturing the user’s information required for an account registration, it will spare the users from manually entering that information. As a result, it will reduce a heavy burden of account registration form-filling activity from the customers.
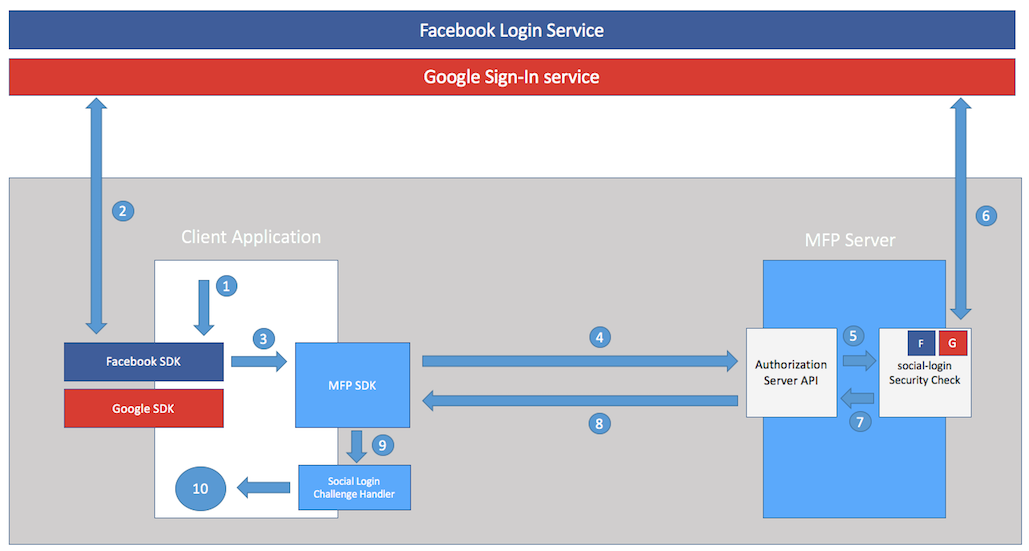
How does a PrestaShop Facebook login work?
How Facebook or any social login works
Installing a PrestaShop Facebook login extension delivers the functionality to accept Facebook social login on the PrestaShop website. Facebook officially provide an API setup that facilitates the information fetching from the Facebook profile of the user to the PrestaShop application.
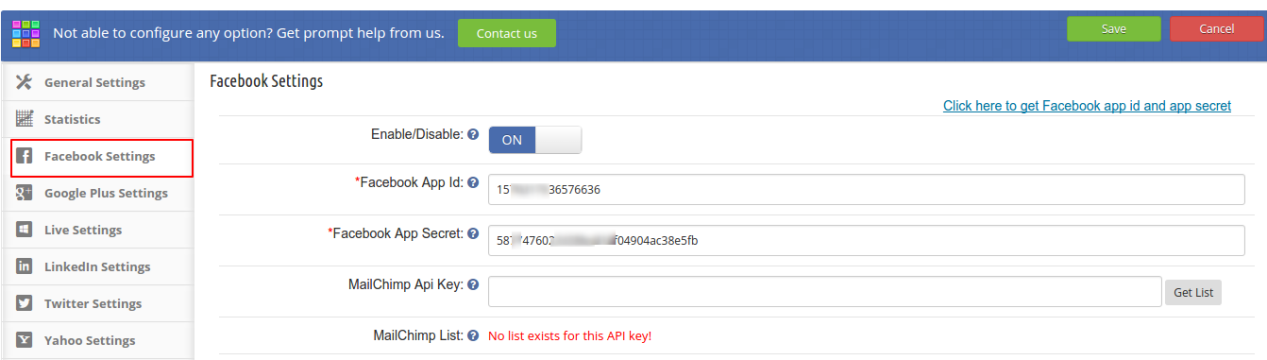
The API configuration is made on the Facebook account and after the configuration, Facebook provides an APP ID and APP secret key that needs to be updated in the PrestaShop Facebook login extension’s configuration setup. By entering the API information in the module’s configuration it authenticates the PrestaShop Facebook login extension to facilitate an information exchange required for a successful social login through Facebook.
Required details to configure a Facebook login
The information acquired through the Facebook is then saved in the PrestaShop database and is utilized by the PrestaShop Facebook login extension to create a user account automatically on the PrestaShop store as well; that too without filling a registration form.
How important is Facebook social login?
1. Facebook has the largest base of users-
Facebook being the largest social networking site poses a huge base of users. It is already a proven fact a large number of shopping carts abandonment occurs due to the requirement of compulsory account registration on the eCommerce sites. So, if you can leverage the huge user base of Facebook and start accepting the PrestaShop social login on your site, you will automatically eliminate a huge reason for shopping cart abandonment. Moreover, a Facebook login will be a great advancement on the usability and conversion optimization front either.
2. Customers do not like to create an account-
An account registration is one of the heaviest tasks that you would ask your customers to do before purchasing anything from you. If you ask them to create an account before they can purchase anything, they will simply abandon your site and look for an alliterative site where account registration is not compulsory. So leveraging a Facebook login will be a good option here. It will allow the customers to create an account with just one click on the Facebook login button and entering their Facebook credentials.
3. It’s tricky for them to remember account credentials-
There are a large number of eCommerce and other websites people use every day. Now, for each of the websites, they would have a user account. So, it becomes very tricky for the users to remember the account credentials for each of the account they possess on the internet. A regular account on your website would be nothing but just an addition to the list of forgotten passwords. A PrestaShop Facebook login extension would spare the customers from this burden very effectively. They do not need to remember the credentials of each account they have. Just the Facebook login credentials are enough to log into any website having Facebook social login facility.
4. Your rival sites have it already-
The most important reason for why you should have a Facebook login is because your competitors already have it on their website. The rival sites will not spare a chance to steal your customers anyhow. They will jump with their Facebook login option in case any customer leaves your site because of any of the above-explained factors. So, you need a similar weapon that will prevent your website from losing customers. PrestaShop Facebook login extension is certainly the one tool for you here.
The role of a PrestaShop Facebook login extension in eCommerce is too huge to explain in a single post. It is just that you need to stay updated with trending techs to acquire customers. Social login through Facebook is one such tech for you which you should not miss.
Customers visit eCommerce websites looking for products. They might just buy something or choose look around, and finally exit from the site. This is the typical work-flow of a whole eCommerce website from customers point of view. Whatever happens in the meantime when a customer is still on the website, drives the modern eCommerce and generation of revenue from the eCommerce business.
The same phenomenon is followed on a website based on Magento platform too. So, if you have a Magento site, you are no different and you have to do whatever you can in that meantime itself. Exit from a website is something that is inevitable and will surely happen at some point in time. The twist comes through what you do to make even the exits from your website engaging. A Magento Exit popup is one tool for you that can even make the exits conversion friendly and fruitful for the business.
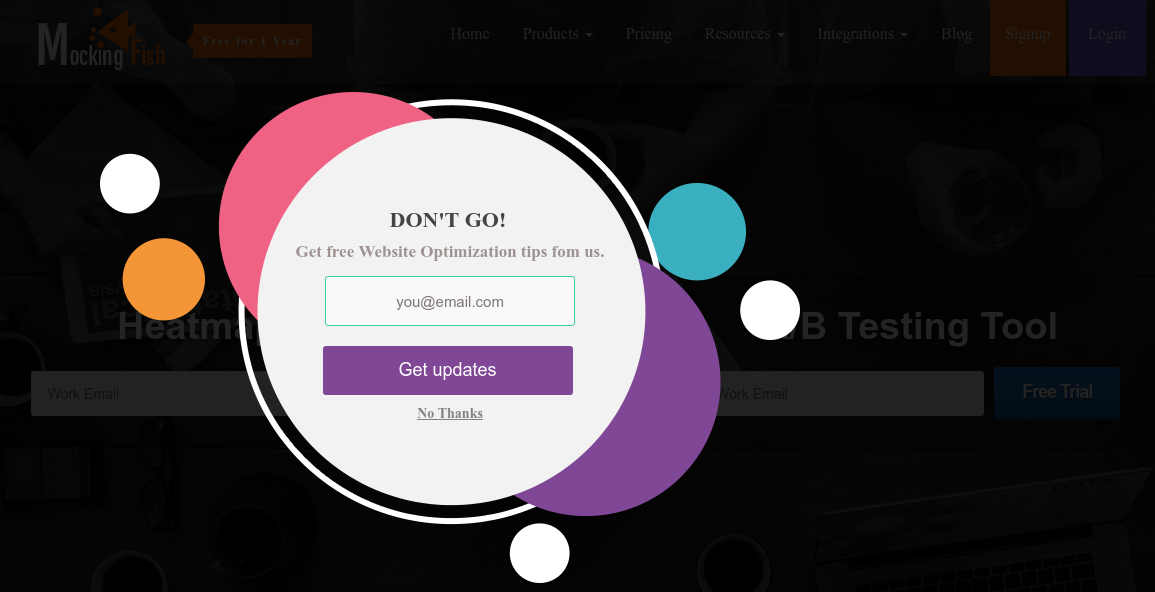
A Magento exit popup extension is a exit overlay that triggers a popup on the browser screen by using the exit-intent technology. An exit-intent technology is used to track the visitor activities on the site in the exit popup. Whenever, an exit or an abandonment is detected, it triggers a exit popup designed to show something that might interest the visitors for not abandoning and grab something. The interests are generally created by offering an enticing deal to achieve a conversion goal by the website owner.
Why should you use a Magento Exit popup?
Customer recovery through Email list Generation
One of the most common uses of a Magento exit popup is to generate an email list data from the website. These email lists are then stored in the database and shown to the website owner which is used to get to the customers with something that can lure them back on the site.
Email list Generation using an Exit-intent technology
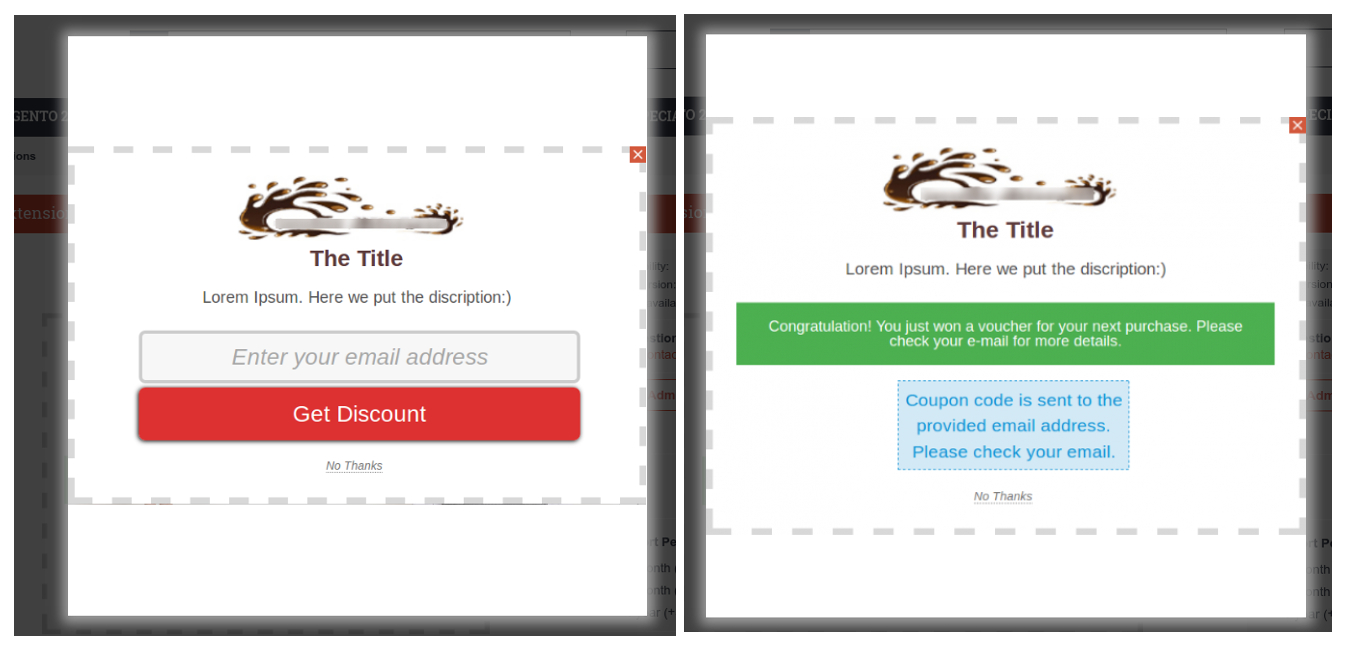
A simple exitpop up with something useful for the customers can convert a good amount of customers that would have anyways left the site without doing anything fruitful for your business. To achieve this kind of implementation of exit popup on your Magento site, you do not need any mass preparation; just install an effective Magento exit popup extension and it’ll do the rest for you. For example, Knowband- Magento exit popup extension has the option to design an effective exit popup for email list generation like the above image. Additionally, this exit popup can even generate coupons for the customers to make it even more engaging for the users.
A view from Knowband-Magento exit popup with discount coupon generation
Abandoned cart recovery
Now, that you have a list of email addresses of your customers, you can easily find out who has abandoned your carts and can contact them using their email addresses. The incentives in your exit popup can be of real use to lure them back. However, you can use this Magento exit popup in the aid to your campaign for abandoned cart serial reminders to the customers. Offers and discounts, free downloads and much more can be used to lure them back when you have their email ids. The above case of exit popup with an offer is a good example of abandoned cart recovery by sending serial reminders.
Direction of the users back to some other content
Not, all the exits from your website consist of an abandoned cart. It might be possible that customers exit the website as they did not find what they were looking for. There are several more reasons for an exit. So, when a customer does not find an item of interest, he/she might not be interested in any coupon at all. You can divert such traffic back on your website to something that might interest the customer other than your coupon or offer. For example, You can use a Magento exit popup to divert the customers to a page of best-selling and trending items on your website. An eCommerce site can use this technique to show alternate offers or products to the visitors not interested in buying the current items.
Finally, an exit popup on your Magento site can prove to be of great use if utilized wisely. You should look for a Magento exit popup extension that provides you enough access to customize a exit popup according to your needs and is flexible to different configurations as discussed above. It should be well enough to capture email ids, re-direct traffic, or generate coupon codes to encourage conversions for your eCommerce business.
With every eCommerce business comes certain perks and challenges. For a Magento based eCommerce store luckily perks are the rulers. However, there are few challenges with the Magento stores where a third party intervention is necessarily required. I am talking about the challenges your customers face in the checkout process.
The default Magento checkout presents an effective interface for checking out on the Magento stores. However, the latest advancement of competition in the eCommerce market does not support the idea of sticking to the default checkout for driving desired macro conversions. There are multiple grounds to which it feels like default Magento checkout needs an upgrade.
Uncountable reasons can be found for replacing the default checkout with One page Magento checkout extension like the above.
The checkout length
Whenever I go to supermarket for shopping, I pray that checkout line should not be crowded. If I find a checkout line very lengthy, I automatically run my eyes to see if any other checkout line would be smaller than this line. That’s human tendency to always look for a better alternative.
Now, let’s consider an eCommerce site, instead of a physical supermarket. Here, the case might not be exactly the same. If a customer finds your checkout process lengthy, he/she will not run his/her eyes immediately to see a smaller checkout process, but it will surely affect the decision making for the next time when he/she decides to shop online. Your store might not be the first choice, just because of the lengthy checkout forms customer filled the last time when he/she was on-board.
While replacing your generic Magento checkout with a one-page checkout structure, it will immediately reduce the number of pages from your checkout process. Moreover, it will also make sure that some not-so-useful fields are disabled from the checkout form to make the process, even further short.
Cart update
The default Magento checkout uses a page refresh to update the information changes in a shopping cart. It uses a separate page where you can update some minor cart details. However, each time you update the cart you will have to go though a necessary page refresh otherwise the information will not be updated.
If you have a one-pagecheckoutMagento extension you may overcome this hurdle very easily. For example the Knowband-One page Magento checkout extension uses an Ajax based update for modifying a shopping cart at the checkout page. It means, if you want to remove a product from the cart, or update the product quantity, you do not need to refresh the whole page. The cart will be automatically refreshed using Ajax requests and without refreshing the whole page.
Sign-up, Login and Social login
Social login has become an integral part of eCommerce websites nowadays. Customers really hate when you ask them to perform a necessary sign-up at the checkout page. The default One page Magento checkout extension does not provide any social login option though. However, guest checkout option is already there that customers can use as an alliterative to account creation.
Problem is, you might not want to allow a guest checkout every time. I mean, a guest checkout is useful to convert a random customer for one, but it will not provide you enough opportunities to make some repeated customers by giving them a personalized user experience. For that reason, a sign-up is very important for your conversion rate optimization (CRO) front. So, you need something that will make the sign-up process so easy that no customer will hate the sign-ups.
It is when social login comes into the picture. A one-page checkout extension with social login option at checkout process is a bonus to your CRO campaigns. It works in multiple ways to deliver a hassle free checkout without a need to fill the lengthy account registration-forms.
Finally
A one-page checkout is the need of hour. The most important reason for adopting the One page Magento checkout extension for you is because your rival sites have already adopted it. You cannot afford to loose against your competitors for something that you can acquire very easily by just installing the a proper One-page Magento checkout extension.
Prestashop eBay Integration addon by Knowband is the solution if you are planning to integrate your Prestashop store with eBay Marketplace.
Headquartered in San Jose, California, eBay is a multinational eCommerce corporation that popular as an online auction and shopping site. It facilitates consumer-to-consumer and business-to-consumer sales and offers an easy. In addition, customizable interface for sellers across the globe to list and sell their products effortlessly. Further, eBay operates in over 30 nations. The product listing of eBay combines 800+ million product listings that are not just unique but are even coupled with great deals. eBay is a marketplace where people around the world connect to sell and buy different seller products which would help store owners to increase the sale and extend the store reach.
The Prestashop store owners can now sell their products in the eBay marketplace with the help of Knowband’s eBay integrator. Prestashop eBay marketplace connector module integrates Prestashop Store with eBay Marketplace. The store admin can now perform various operations in the marketplace which include product listings, category mapping, order listing, etc with the help of Prestashop eBay Marketplace Integration Extension.
1.1 Features offered by Knowband Prestashop eBay integrator:
The eBay Prestashop Integration addon makes it easier for sellers to sell their products on the popular marketplace.
The eBay Prestashop connector module offers a profile-based listing that allows the store admin to list the product in the marketplace in bulk.
The seller can add, remove or relist the products from the back end of the eBay Prestashop integrator.
The automated approach of the eBay Prestashop integration plugin makes inventory management effortless.
The admin gets an option to offer desired shipping methods to the marketplace customers from the back end of the eBay Prestashop integrator module.
The admin can sync the orders received from the marketplace into their Prestashop site. The change in the order status can sync back to ebay.com.
With easy inventory and order management of eBay Prestashop integrator, online merchants get to tap the larger audience base with the least effort.
The eBay Prestashop integrator addon lists the error that occurs while listing the products.
The latest feature of the eBay Connector module will enable the store admin to select the product country while creating their profile.
Now, the online store owner with Action validates the order hook can sync the product inventory data on both eBay and the Prestashop store after an order gets placed at the Prestashop store.
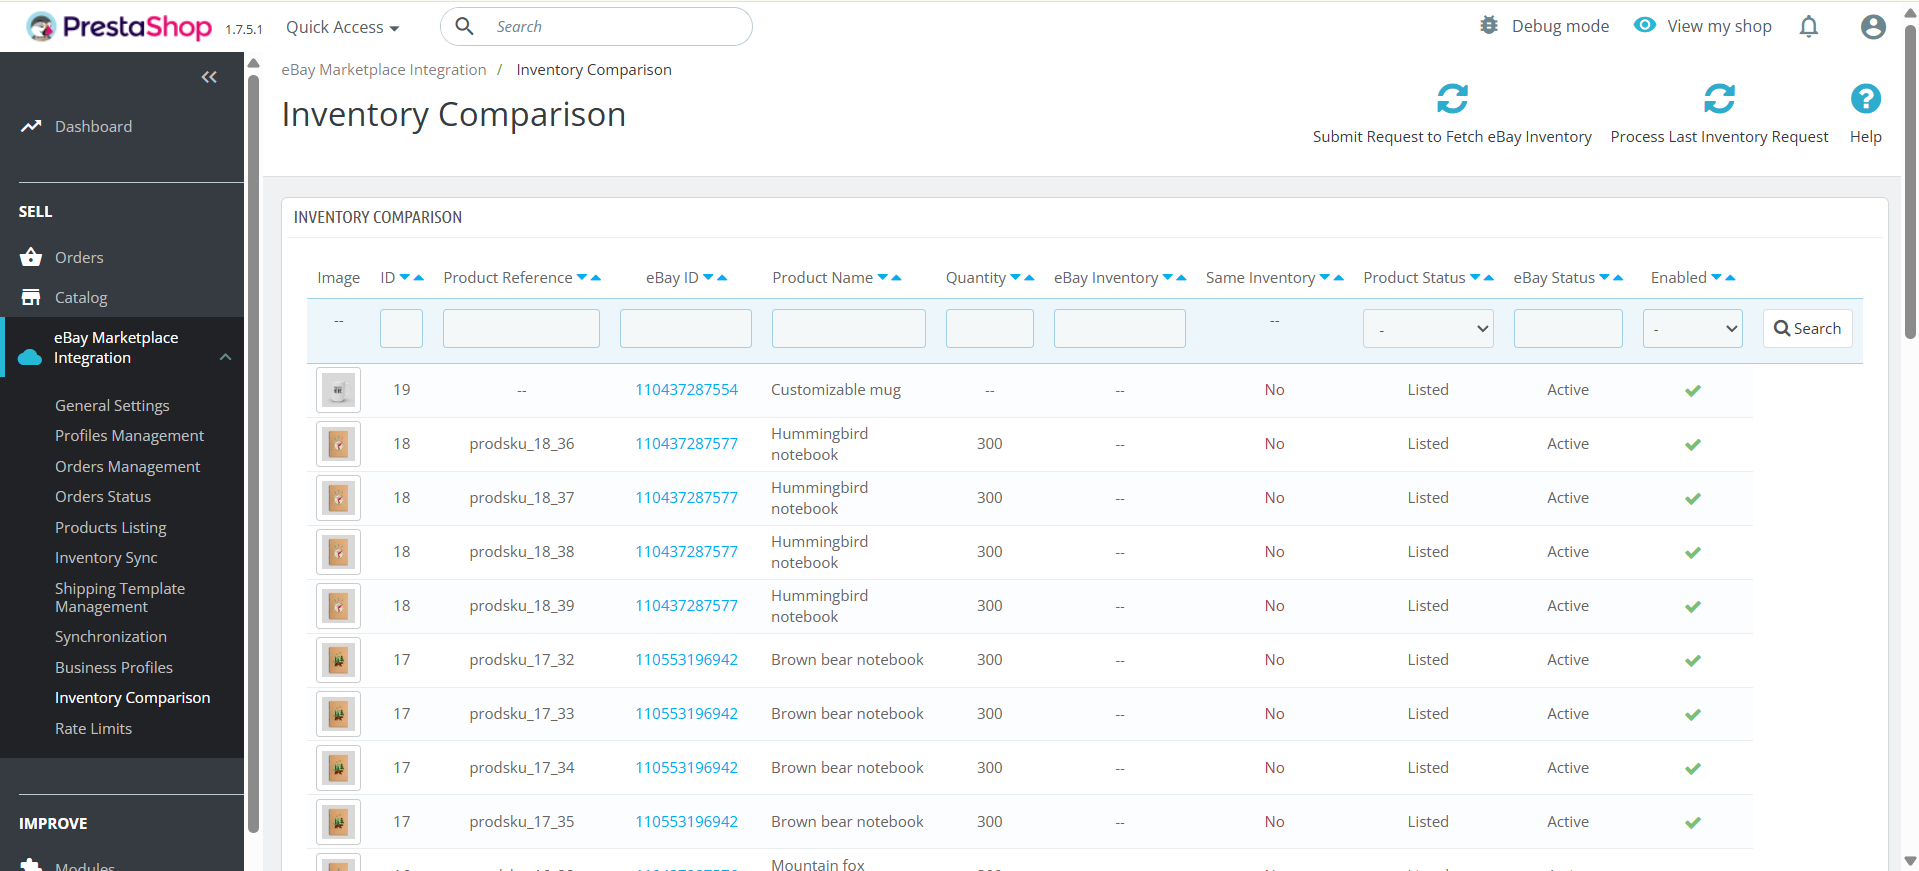
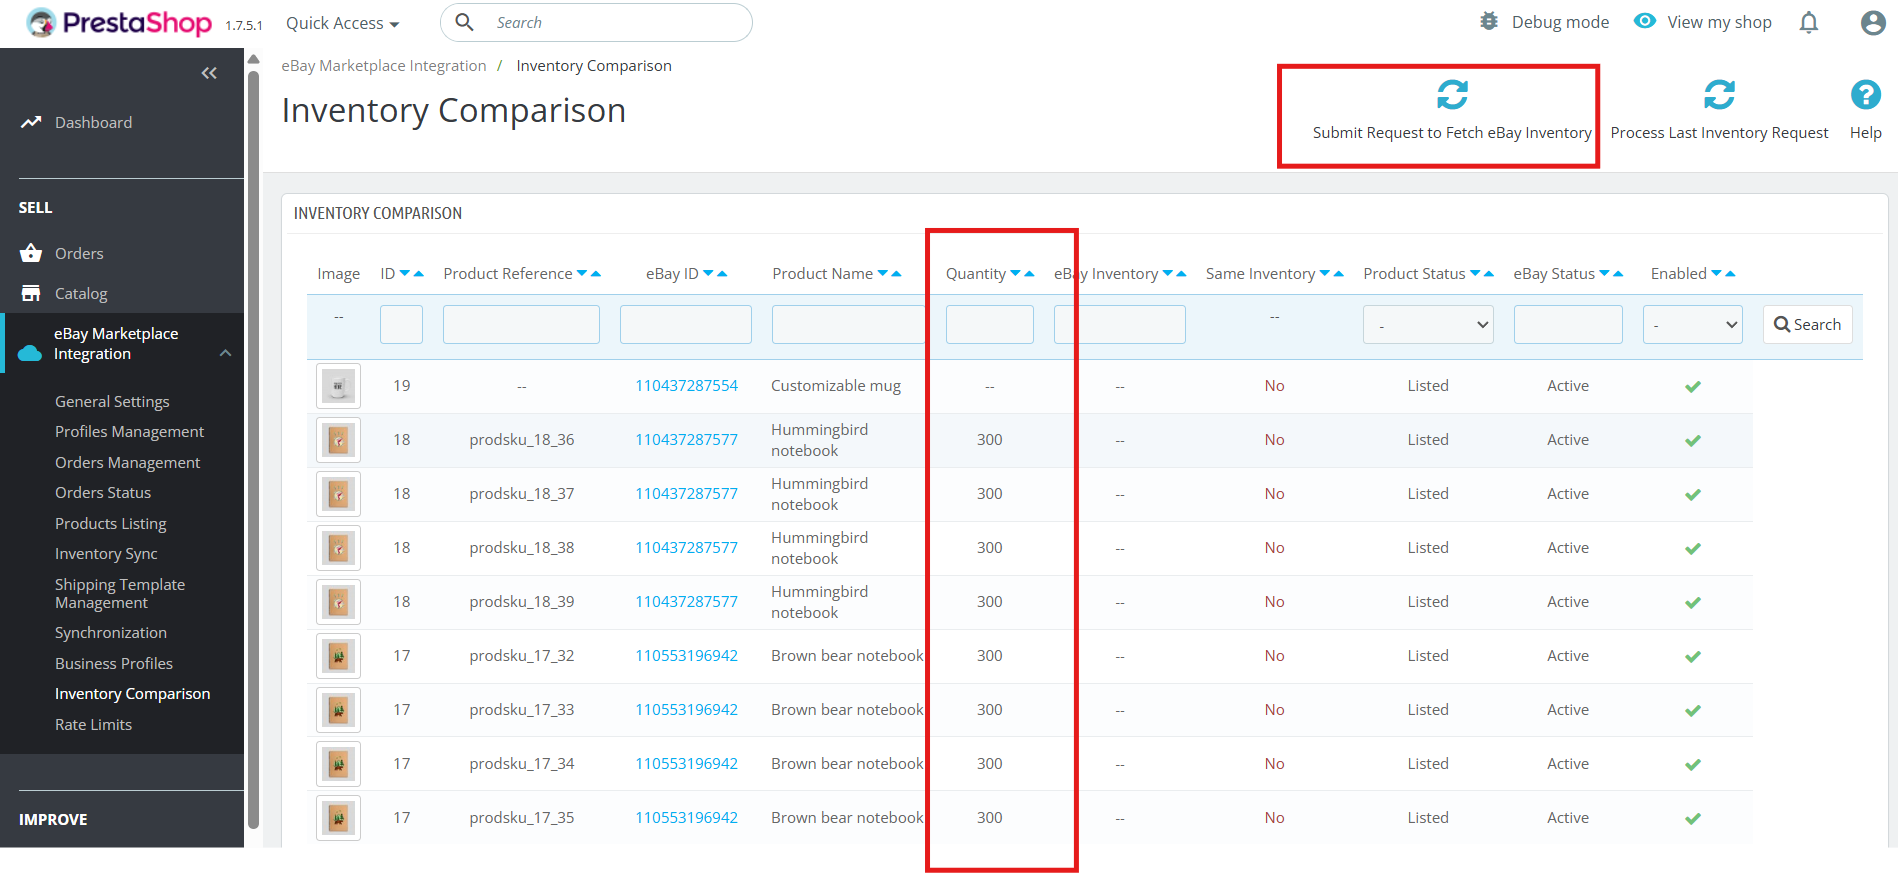
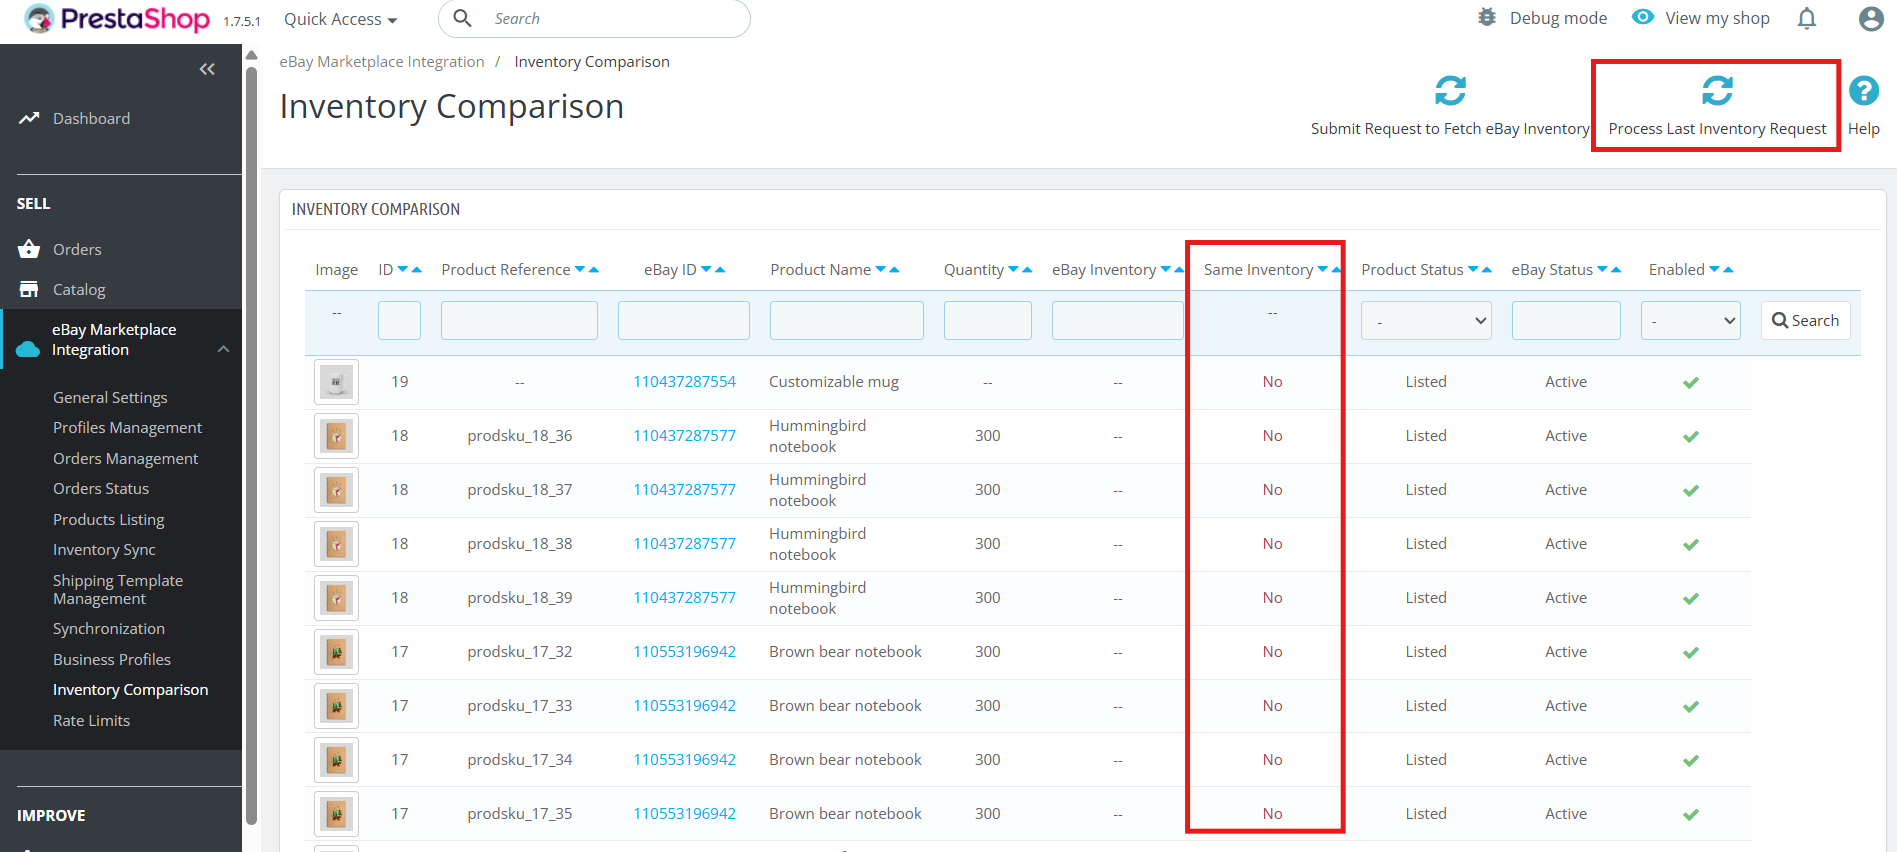
[New] Now store admins can easily compare their eBay inventories with their prestashop store using the Prestashop eBay Marketplace integrator. This enhancement is specially developed to ensure the accurate no. of products available across both the eBay marketplace as well as prestashop store.
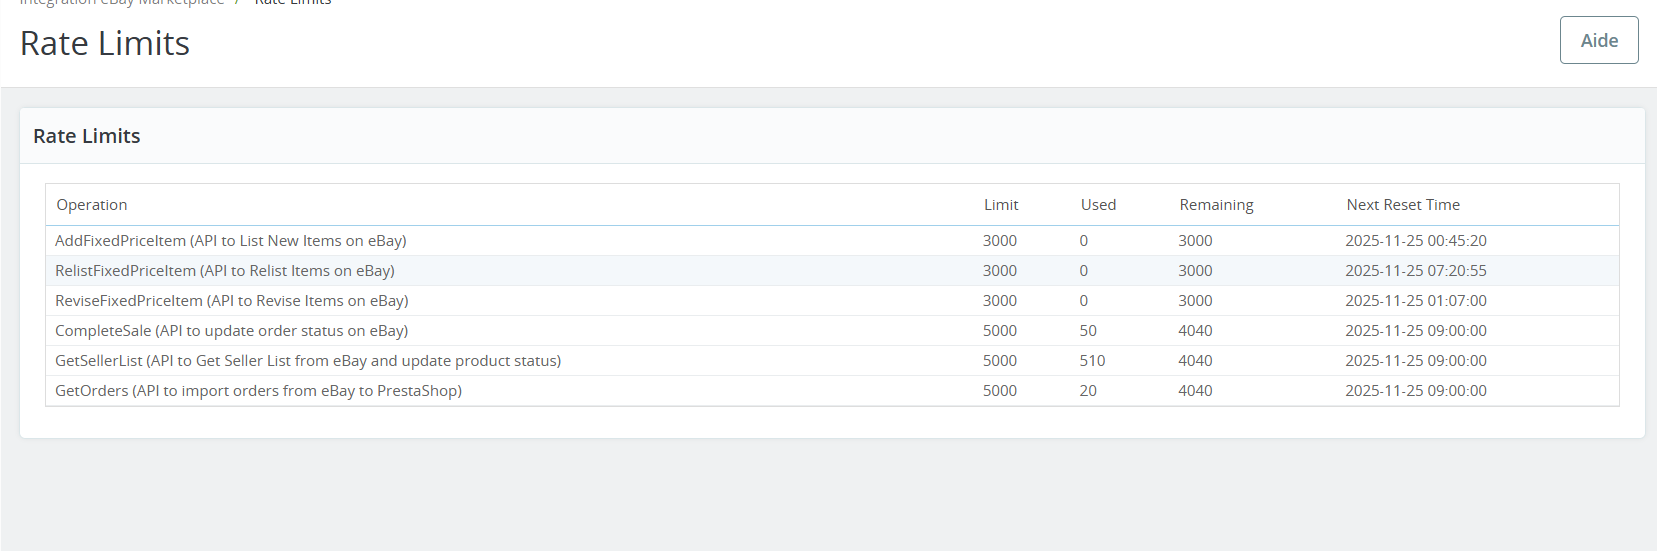
[New] The module now provides the feature to track the rate limits of the APIs that are called. Through this feature, store owners can check the no. of times the APIs have been called.
What’s New in the Recent Enhancements!
Profile Level Product Synchronization:
Knowband’s Prestashop eBay marketplace connector addon now supports profile-level product synchronization. This feature enables merchants to manage and synchronize their product listings more efficiently by categorizing them into profiles. Furthermore, each profile can be customized with specific synchronization settings, streamlining inventory management and ensuring consistency across platforms.
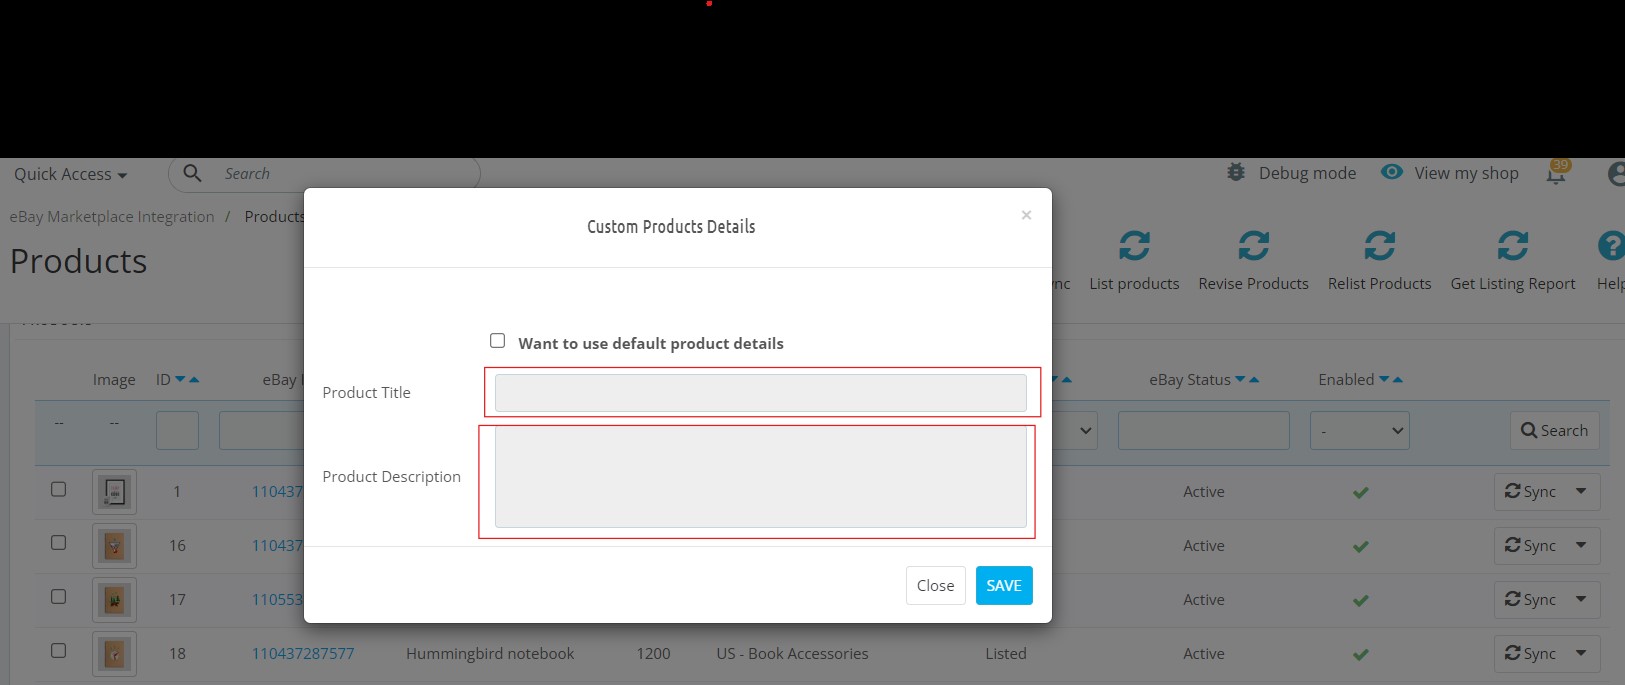
Product Listing with Custom Product Title and Description:
The enhanced eBay Prestashop connector addon allows for product listings with custom titles and descriptions on eBay. Moreover, the merchants can now tailor their product titles and descriptions to better match eBay’s search criteria and buyer preferences. This customization helps improve visibility, attract more potential buyers, and ultimately increase sales.
eBay Business Policy Import:
The latest update to Knowband’s Prestashop eBay marketplace connector includes eBay business policy import. This feature simplifies the process of importing eBay’s business policies into Prestashop, ensuring alignment in shipping, return, and payment policies. It enhances compliance, reduces manual errors, and saves time for merchants managing multiple platforms.
PrestaShop eBay Marketplace Integration Module
The Knowband Prestashop eBay Marketplace Integration Addon enables seamless product synchronization, order management, and automated updates between your Prestashop store and eBay.
You can watch our video on “New Features in Knowband’s eBay marketplace Integration Module v2.1.6 for Prestashop” here:
2.0 Installation
After purchasing the Prestashop eBay Connector module, you will get the following files:
1. Zipped file with the source code of the eBay Prestashop integration module.
2. User Manual
You can upload the module in two ways:
Manual by uploading files from FTP
Automatic by uploading a zip file from the admin
Manual
Follow the following steps to install the extension:
1. Unzip the zip file. It would contain files and folders as shown below –
2. Copy all the files and folders of the unzipped folder into your store “Modules” directory on the path – Root Directory/modules/.
Now Prestashop eBay Connector is ready to install on your store. Moreover, you can find that in Store Admin -> Modules and Services.
Automatic
Login to admin and click on Module & Services from the left-hand column. Go to the Store Admin -> Modules and Services
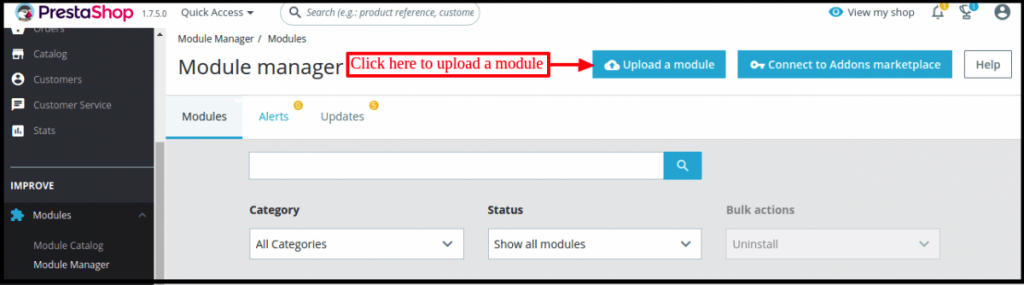
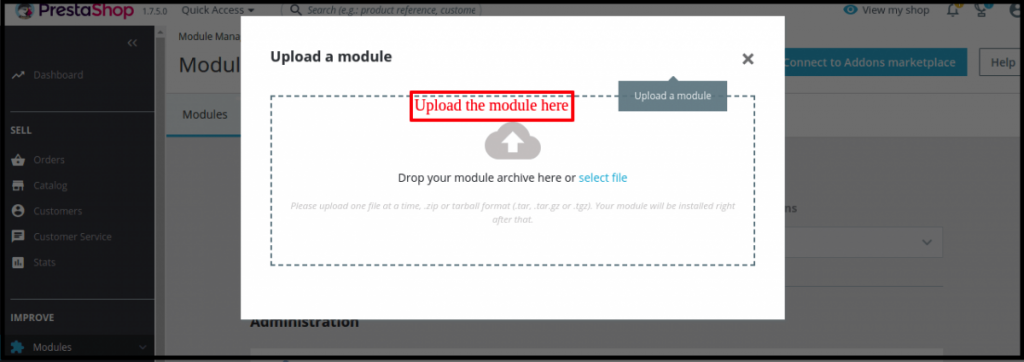
Click on “Upload a module”. Drag the file or simply select the file from the system.
Now module is ready for installation on your store and you can find that in Store Admin -> Modules and Services.
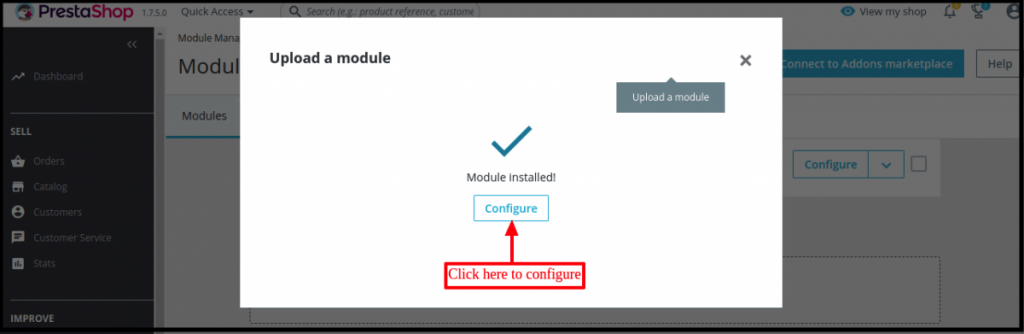
Once the file completely uploads, a notification of “Module(s) successful installation” will display.
After the eBay Prestashop Connector Module installs properly, the Install button will automatically change to Configure.
In case, you are not able to find eBay Prestashop Connector in the admin modules list, please try searching module with the following details
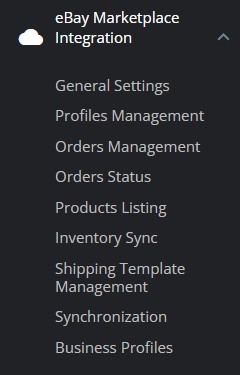
After installation, store admin can find a menu named “eBay Marketplace Integration” in the left panel of Admin as shown below –
3.0 System Setup
Before proceeding ahead, it is important to know that what is the correct flow of actions to set up this system as several things are dependent on other things and if we do not take care of them then it would become difficult to process smoothly or maybe error-prone.
4.0 eBay Marketplace – Seller Account Setup
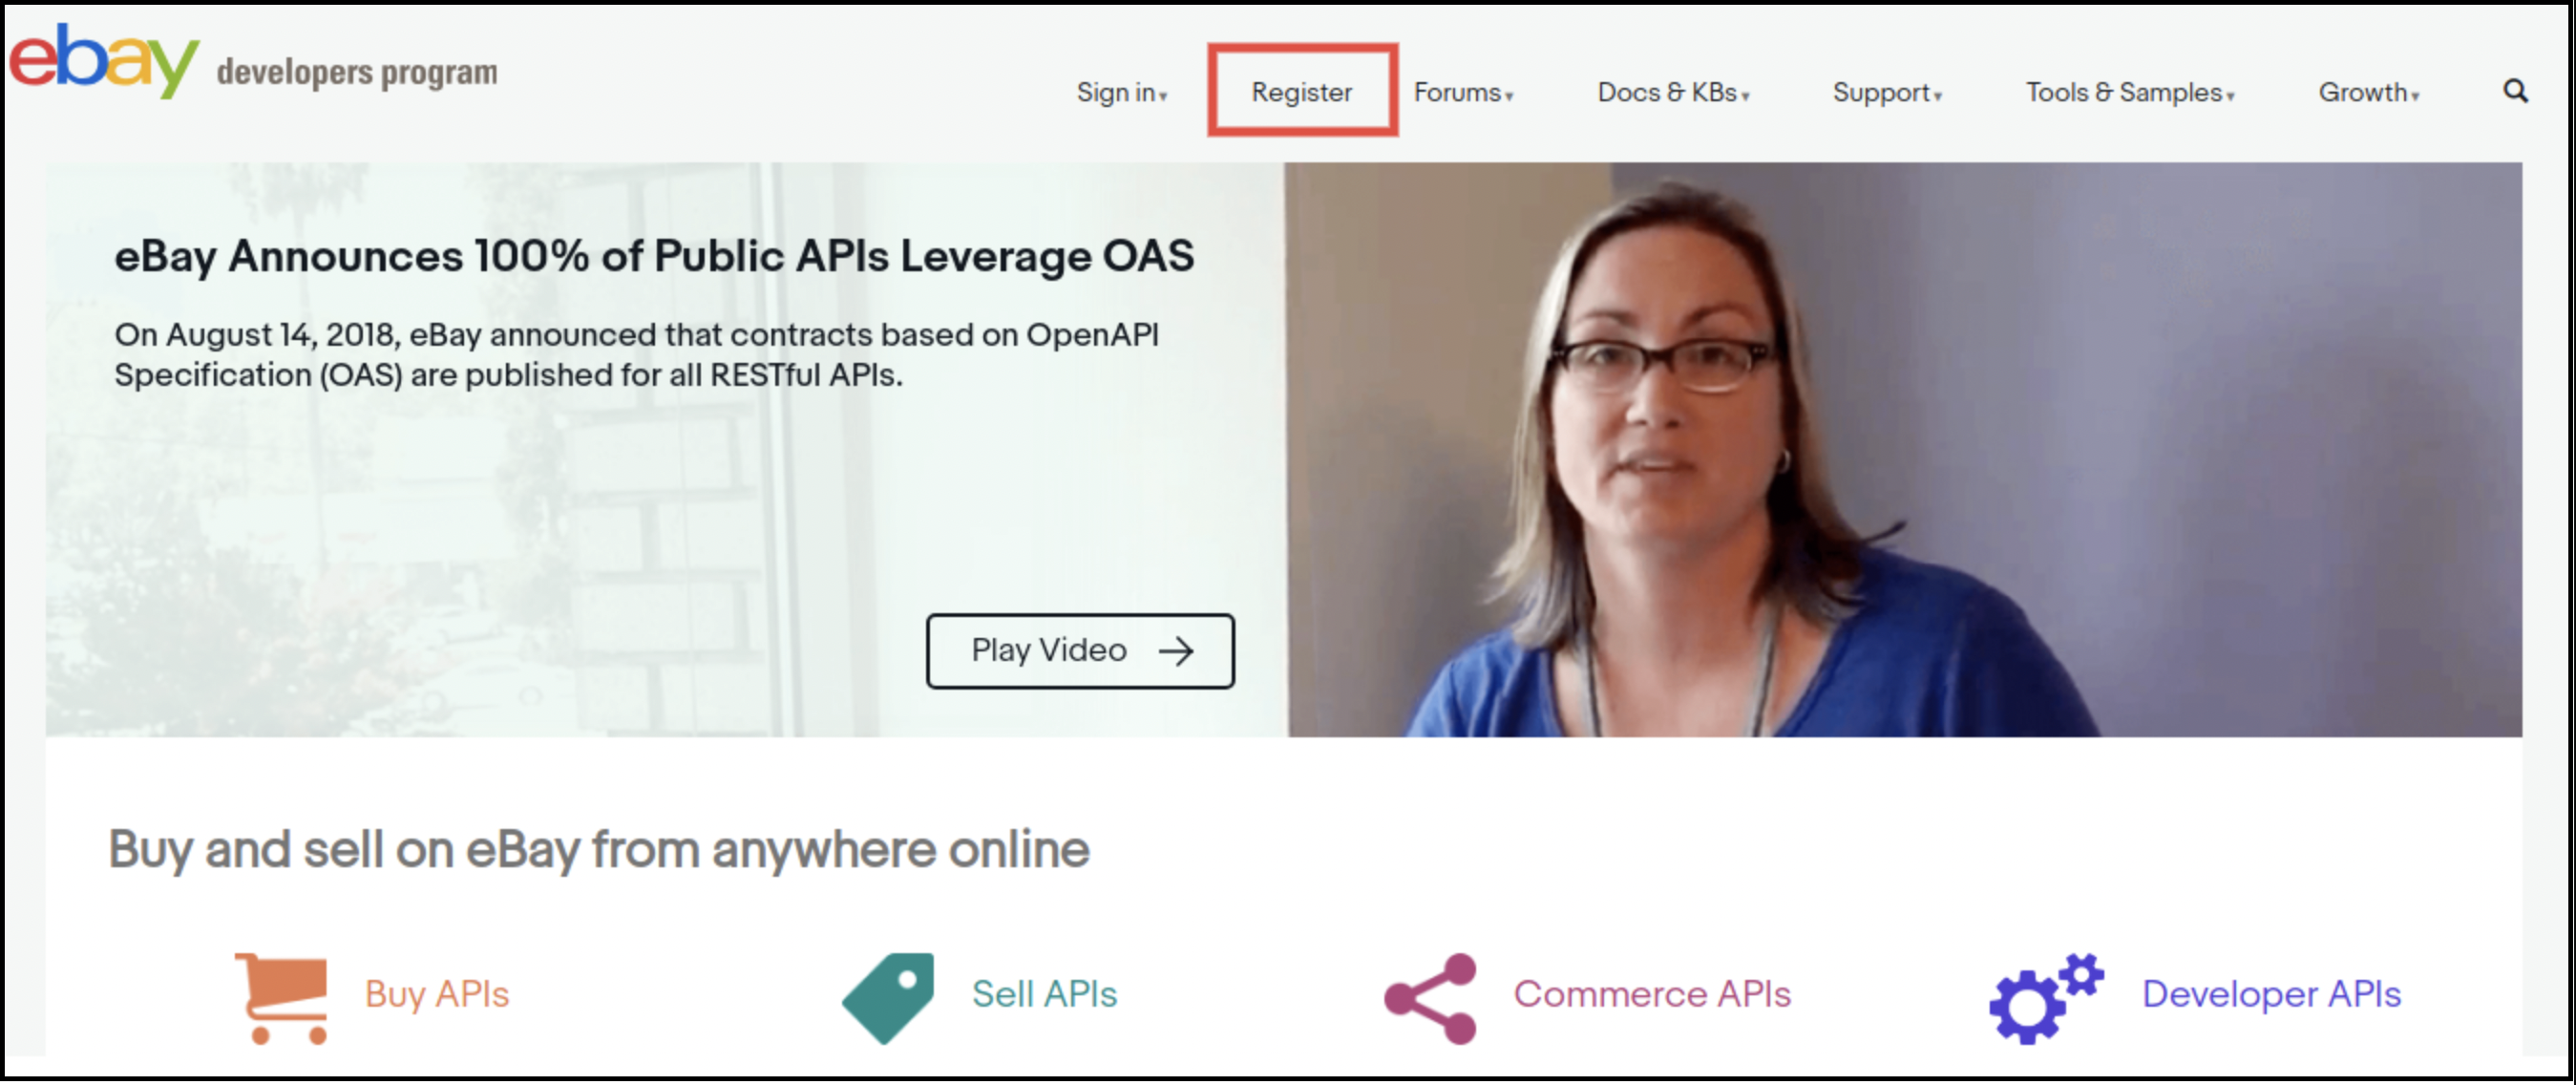
To start selling on eBay Marketplace you need to have a seller account on eBay. In this section, we are listing all the steps to create a seller account on eBay. Please find them below –
After filling in the valid data, click on the “join” button. You will head to the application creation page.
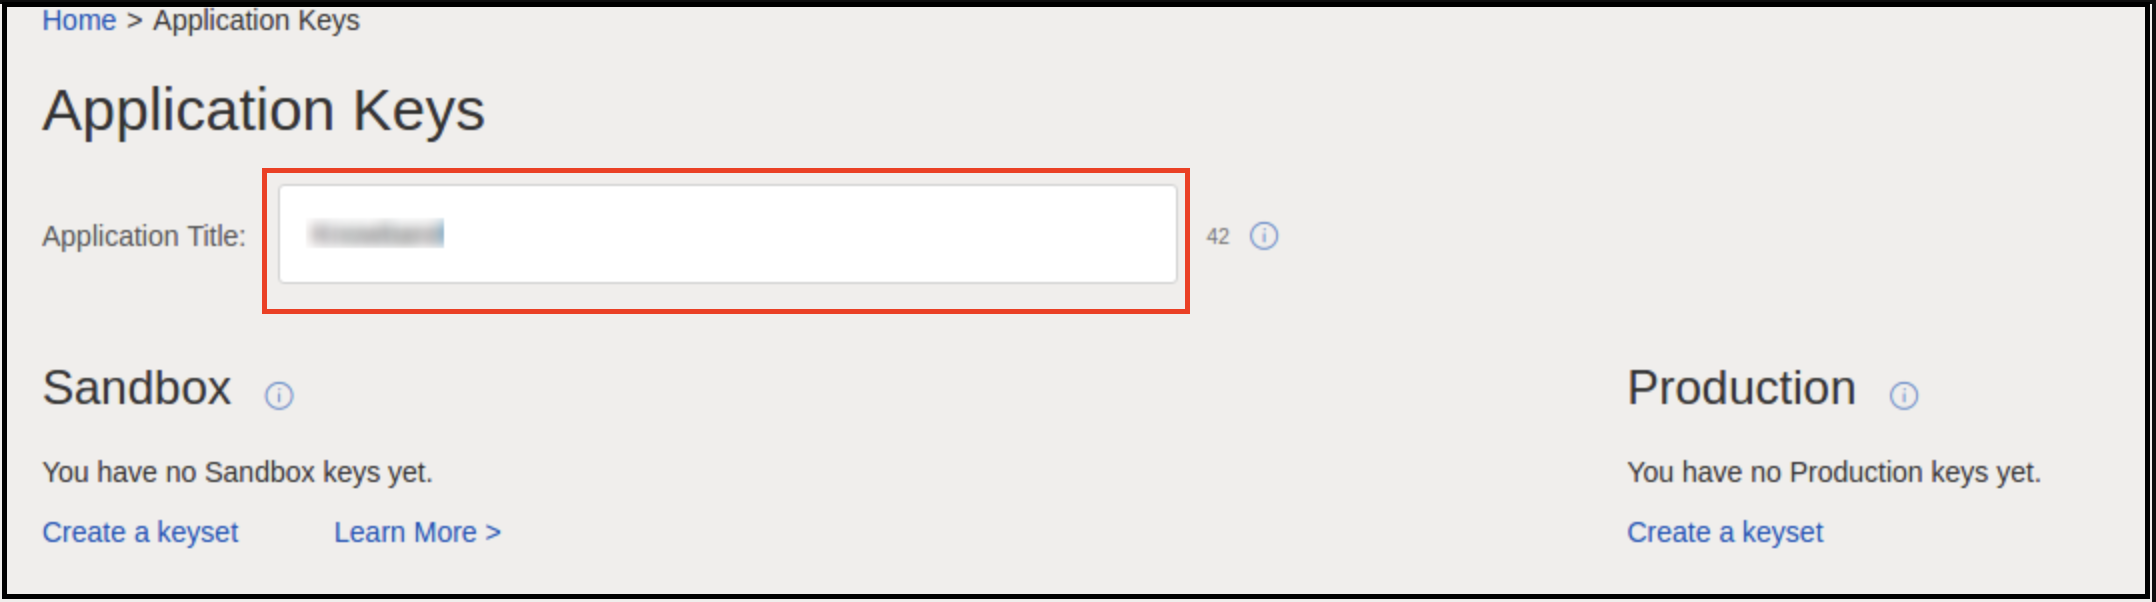
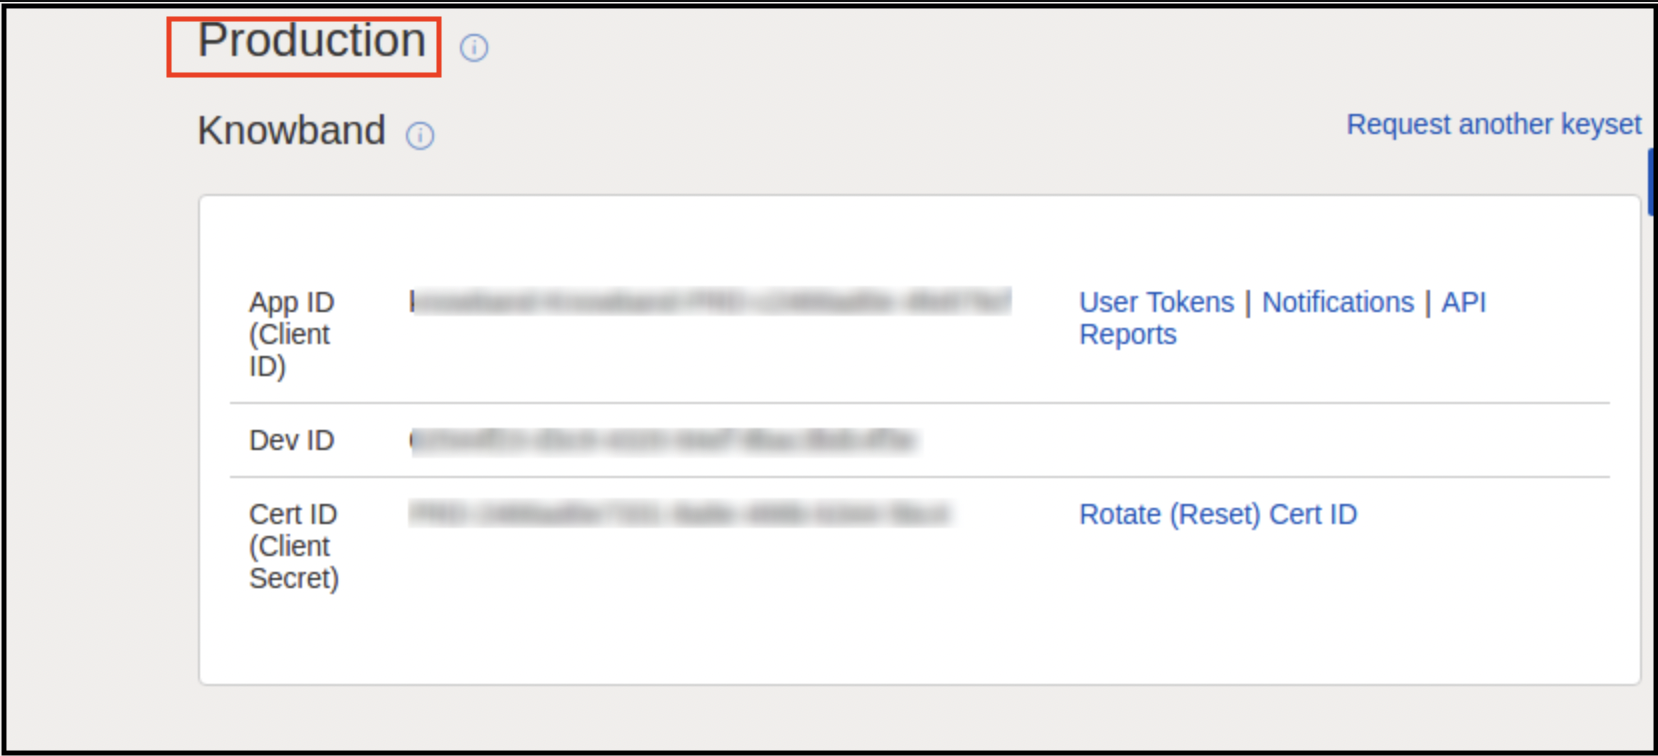
Enter the application name and click on create key set under the Production section, a new form will be opened.
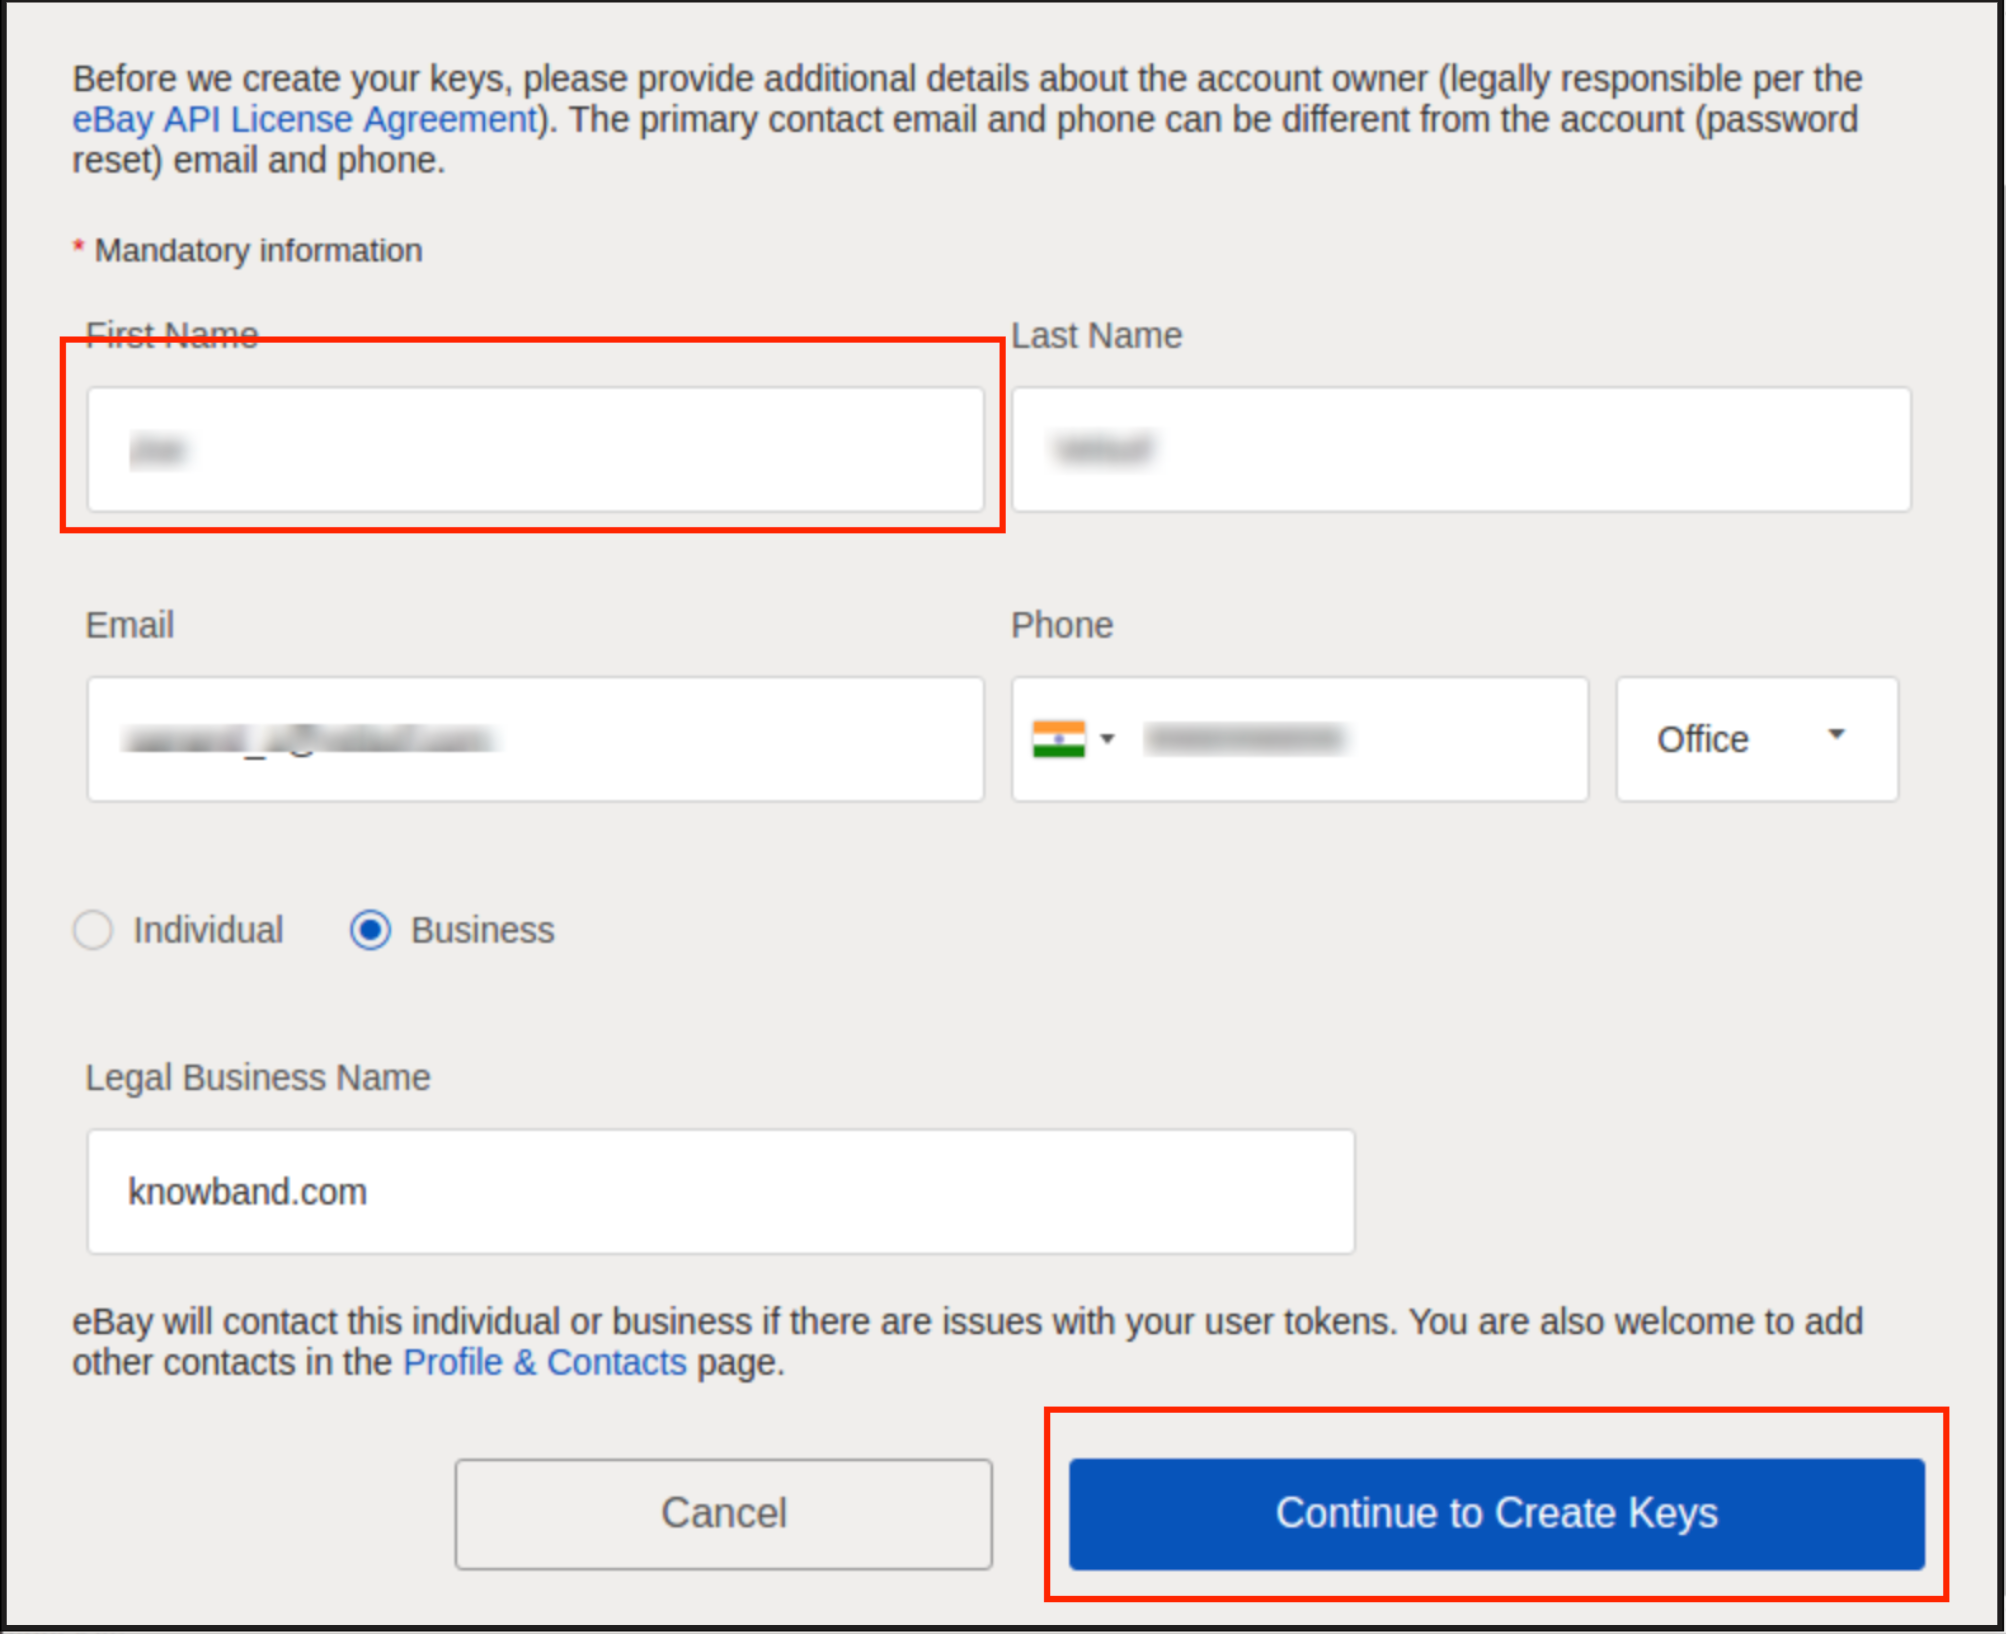
Enter the details and click on Continue to create Keys.
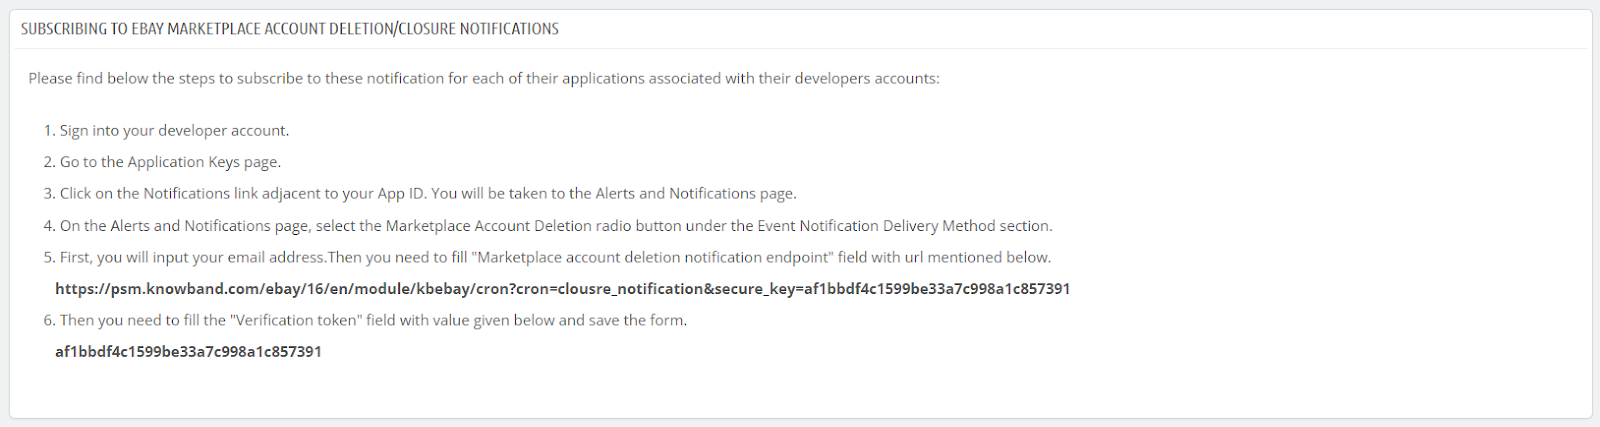
The application keys will be disabled until subscribed to eBay Marketplace Account Deletion/Closure Notifications.
To comply witheBay Marketplace Account Deletion/Closure Notifications follow the steps mentioned in the general setting steps of the Prestashop eBay Marketplace Integrator module.
Once your enrolment to eBay account deletion/closure will be done successfully. You can easily access eBay API keys.
The application keys will be shown.
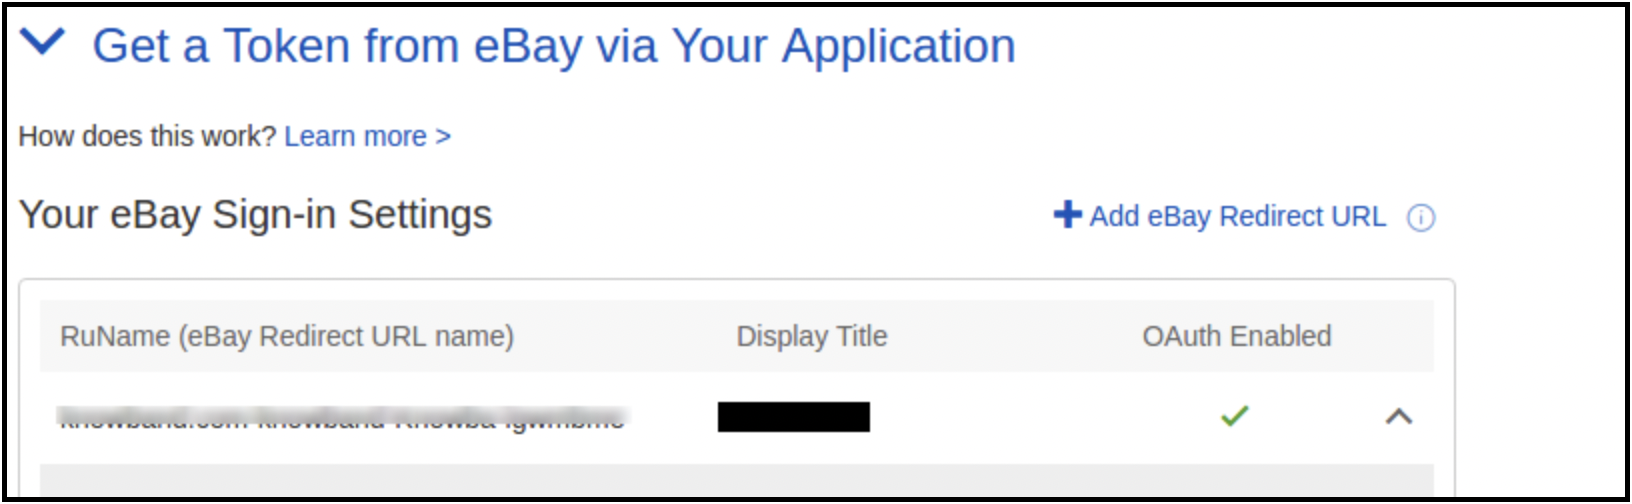
RU Name:
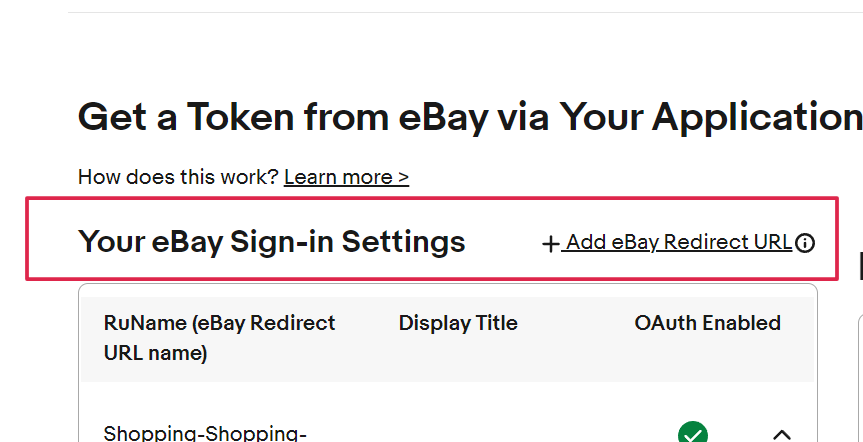
For creating your RU name hit the “Add eBay Redirect URL” button as shown in the below image.
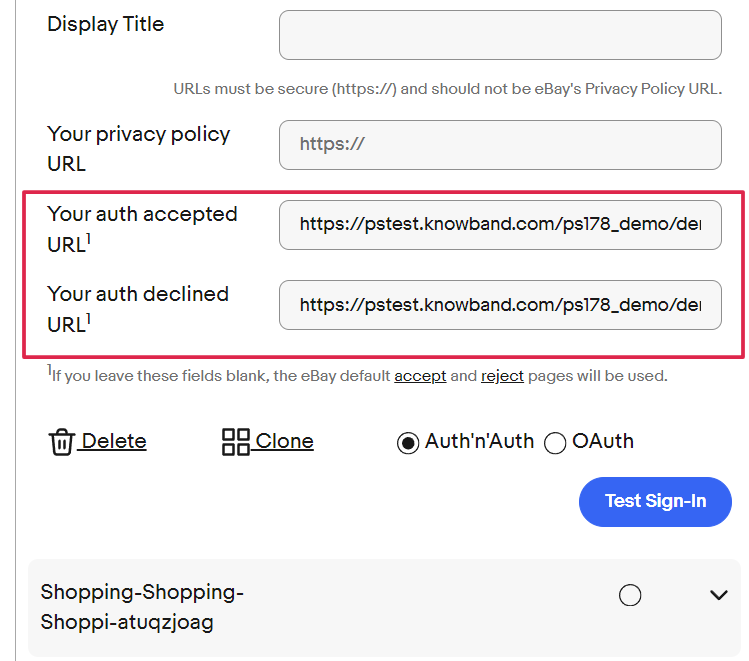
Kindly copy the redirected URL from the module general setting and place it in the “Your auth accepted URL1” and “Your auth declined URL1”.
Click Save and Test Sign-in.
5.0 Assumptions
1. All products having default categories as the selected categories for the profile will list on eBay.
2. By default free shipping will add to products, Shipping details for listing will be
Shipping Service:- UPSGround
Shipping Type:- Flat
It is changeable from the eBay account.
3. By default, the return policy will add. Policy details are:-
RefundOption – MoneyBack
Days – 30 days
Description-If you are not satisfied, return the item for a refund
ShippingCostPaidBy – Buyer
It is also changeable from the eBay account.
4. eBay account of the admin is connected to the PayPal account.
6.0 Admin Interface
The Prestashop eBay Integrator menu contains the following options:
General Settings
Profiles Management
Orders Management
Orders Status
Products Listing
Inventory Sync
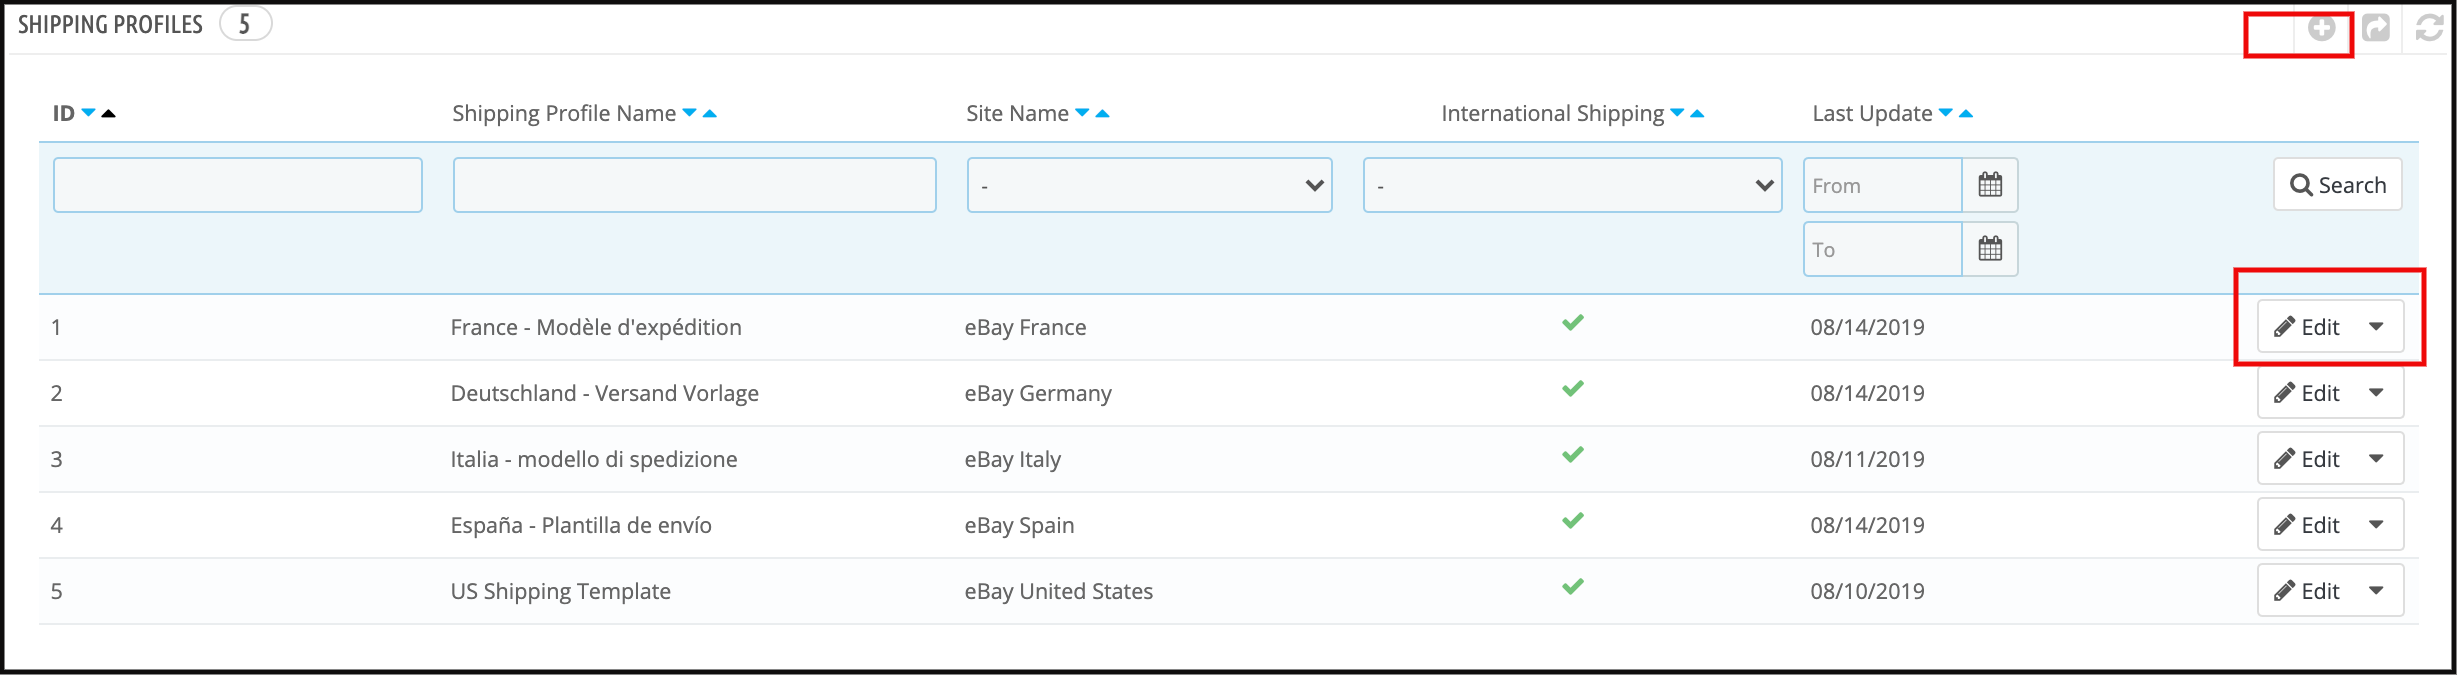
Shipping Template Management
Synchronization
Each tab of the Prestashop eBay integrator module is explained in detail below.
6.1 General Settings
The very steps involve connecting your store with the eBay Marketplace. Go to Module and Settings of the admin interface of the Prestashop eBay API Integration module. You’ll find your module as shown below:
Each field for the configuration panel of eBay Prestashop integrator is explained below:-
Activate
This is an on/off switch. Admin has the option to Activate/Deactivate the module. If enabled, then only this module and all its settings will be working otherwise there will be no impact of this module on the store.
Account Type
This field choice allows the admin to select the account type. The store owner can select the sandbox or live site from the dropdown.
Image Size of Product
In this dropdown option, store owners can select the type of image that will be sent to eBay.
Dev Id
This is a text field. In this field, you will have to input the Dev Id of the eBay account. Dev Id can be found by signing in to the eBay developer account.
App Id
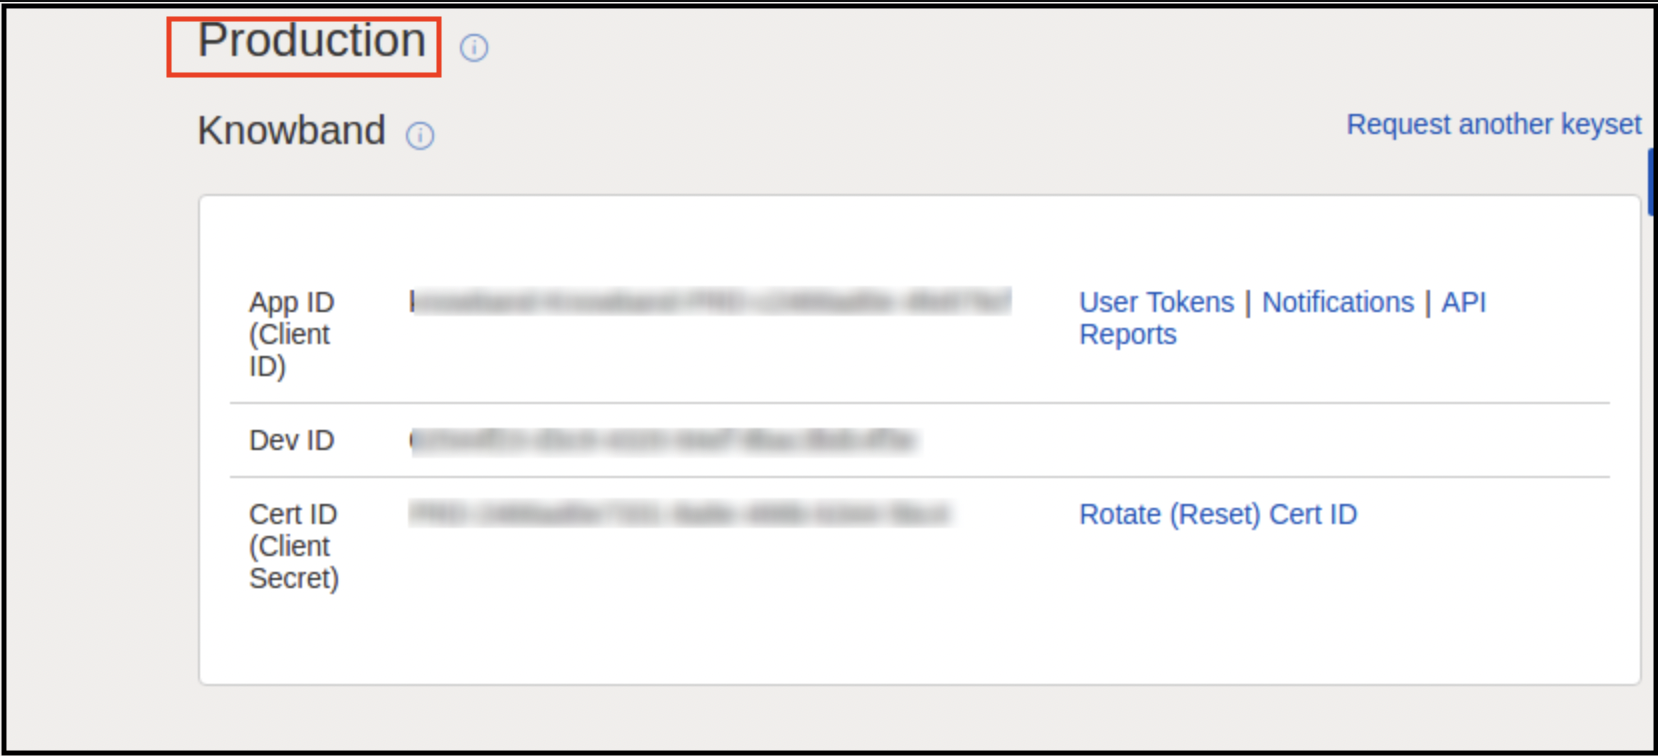
This is a text field. In this field, you will have to input the App id of your eBay account. App ID can be found as shown in the above image.
Cert Id
This is a text field. In this field, you will have to input the Cert Id of the eBay account. Cert Id can be found as shown in the above image.
RU Name
This is a text field. In this field, you will have to input the RU Name of your eBay account. RU name can be found in the tab for Getting a Token from eBay Via Your Application after adding a redirect URL.
Paypal Email
This is a text field. You have to enter a valid PayPal mail id for will all listing will happen.
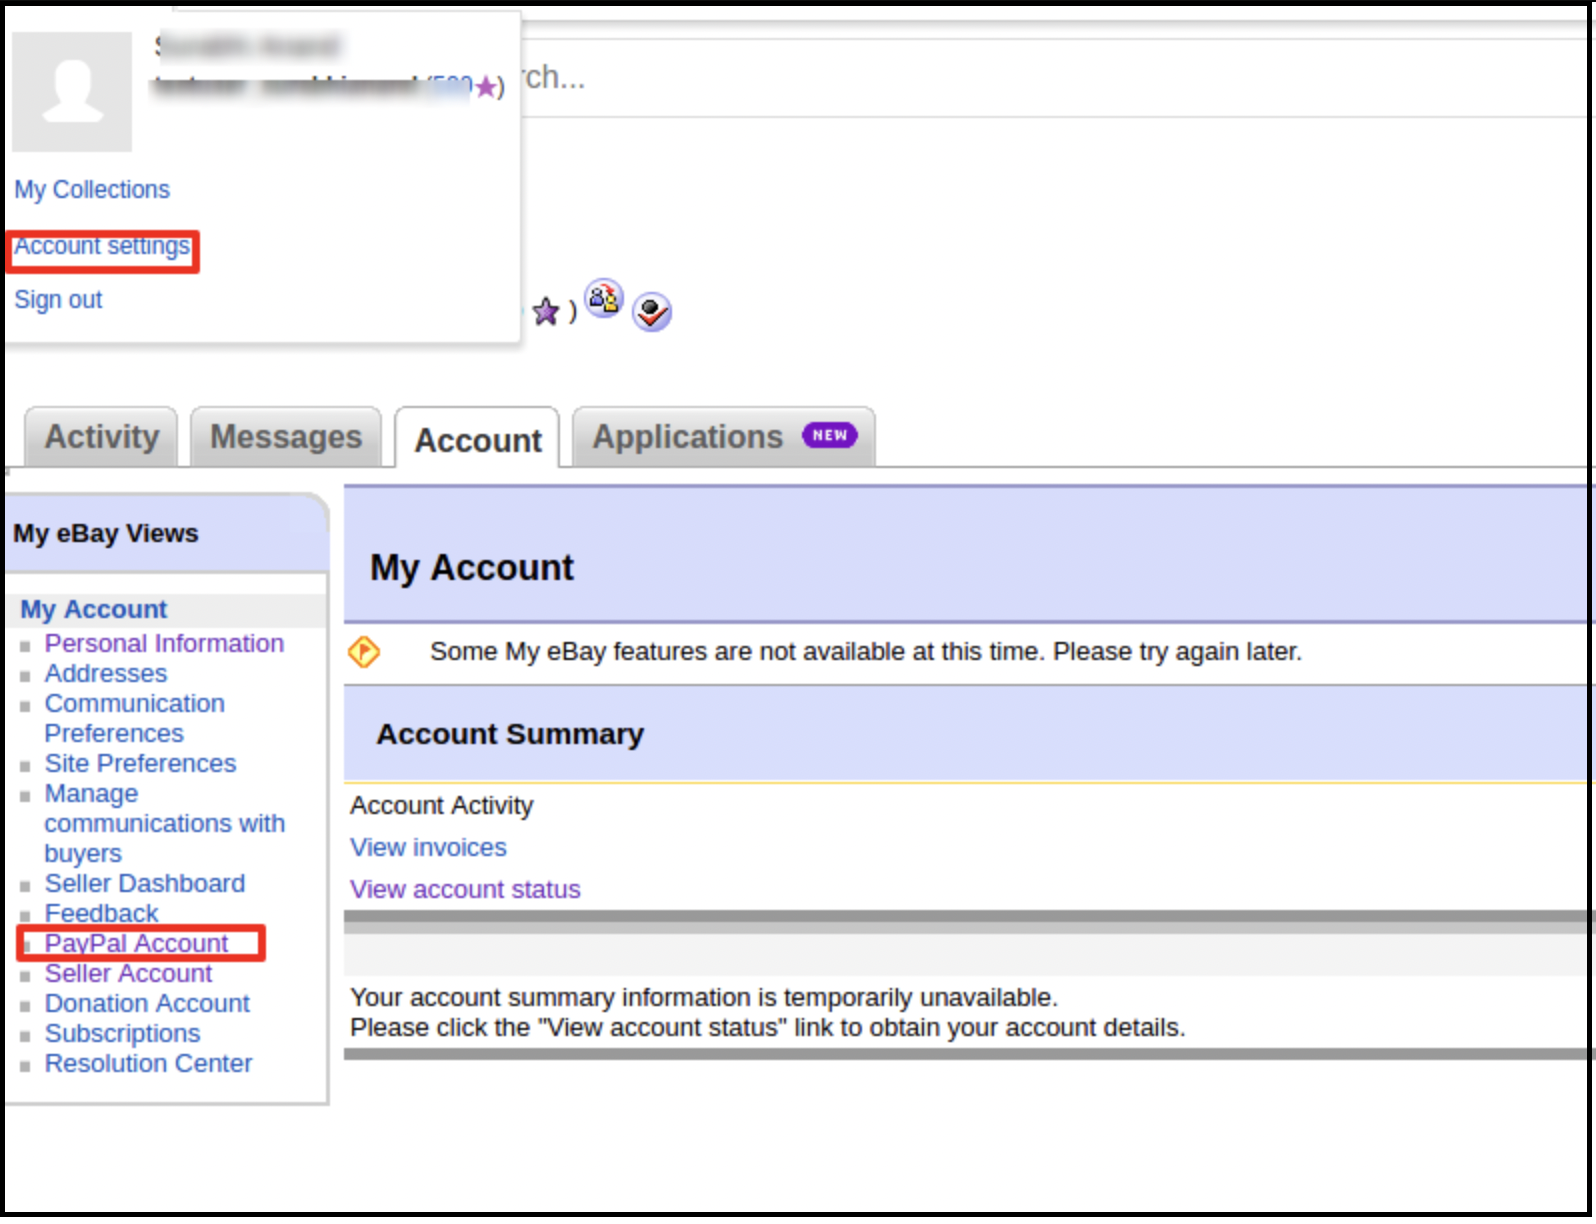
Log in to your eBay seller account.
Click on account settings from the top-left dropdown and click on PayPal account.
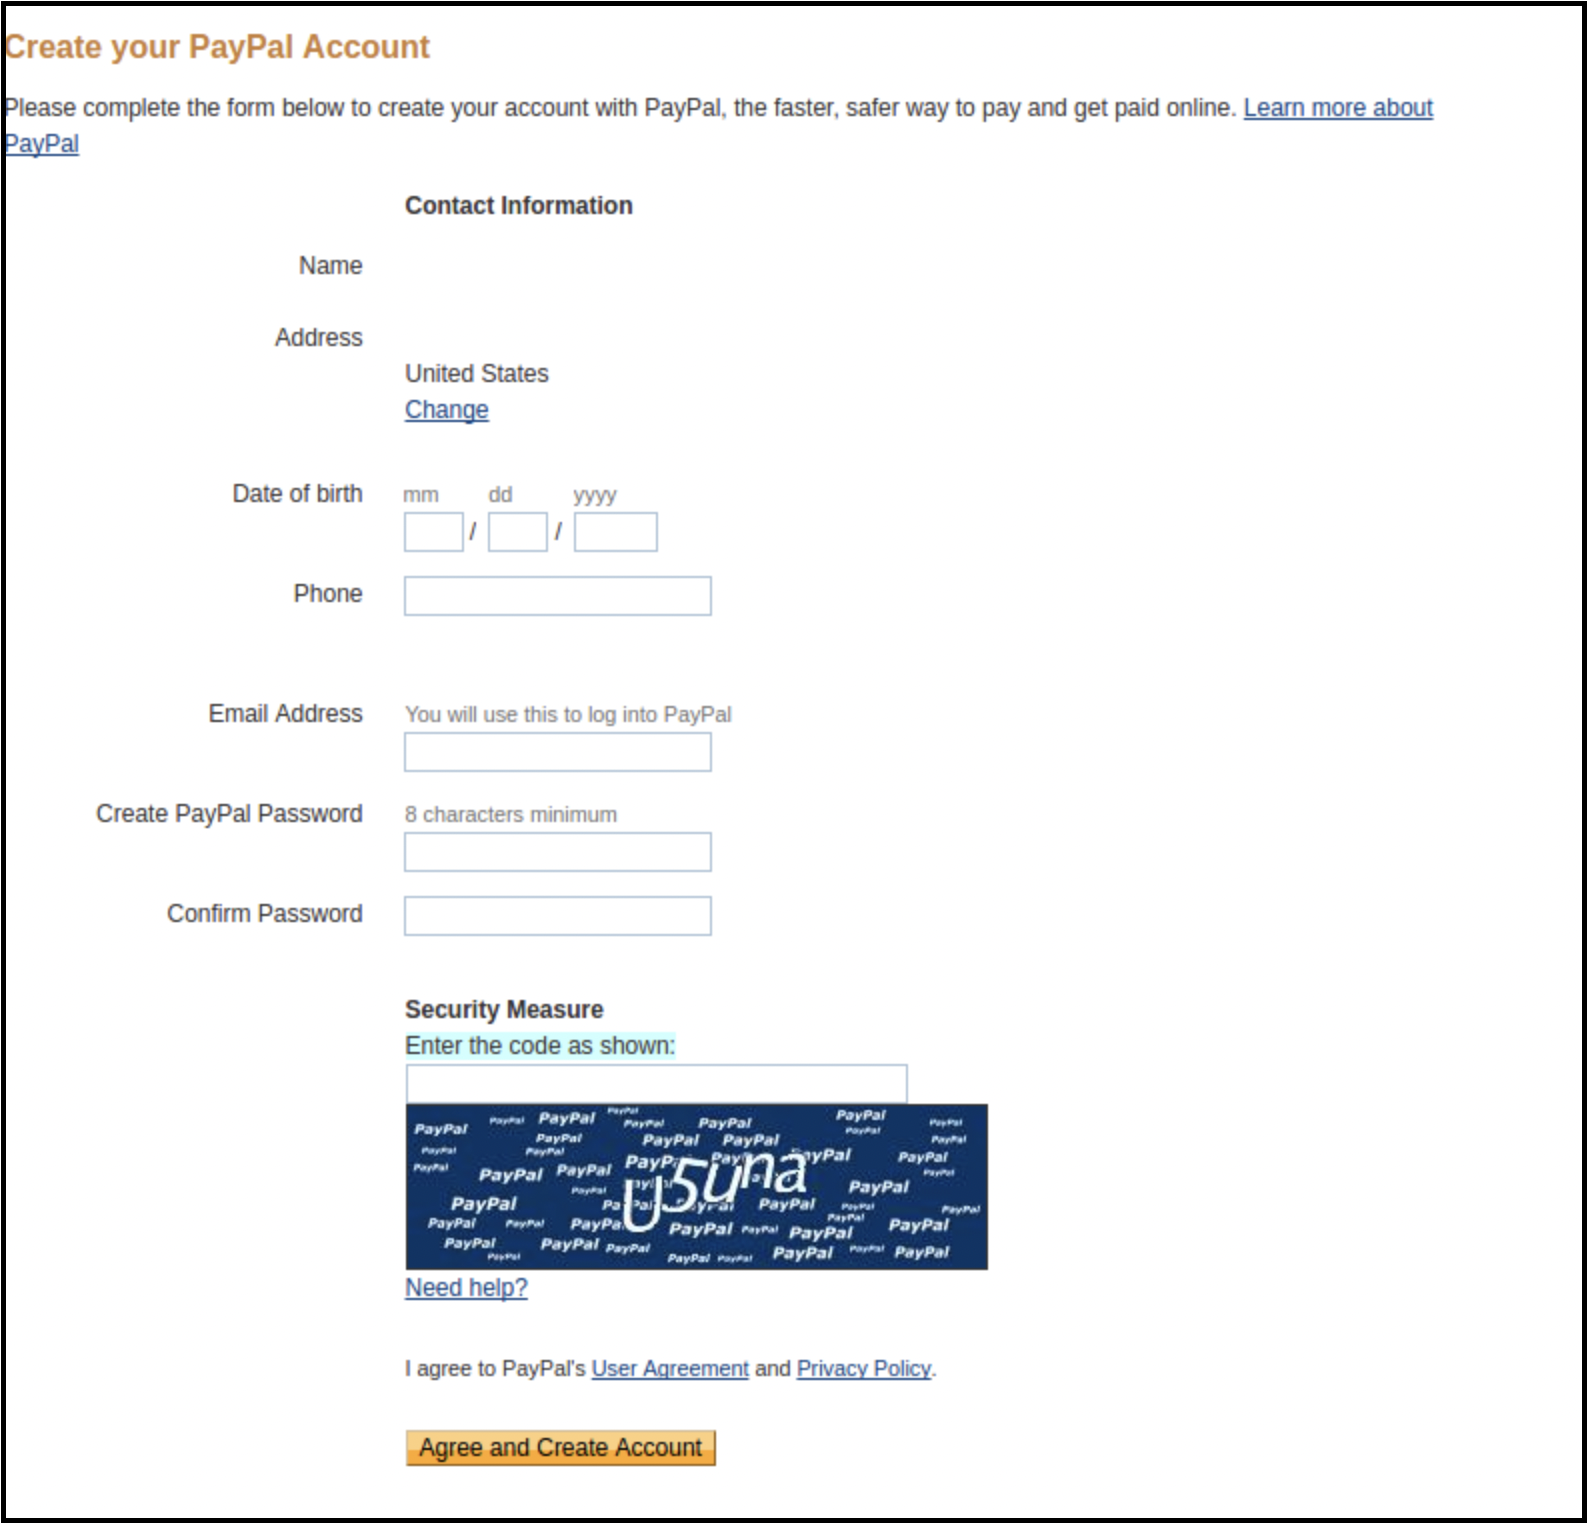
3. Now Sign up or link your already created PayPal account with the eBay seller account.
On clicking Sign Up, you will be redirected to the PayPal account creation page. Just create a profile by filling in details and linking it with your seller account.
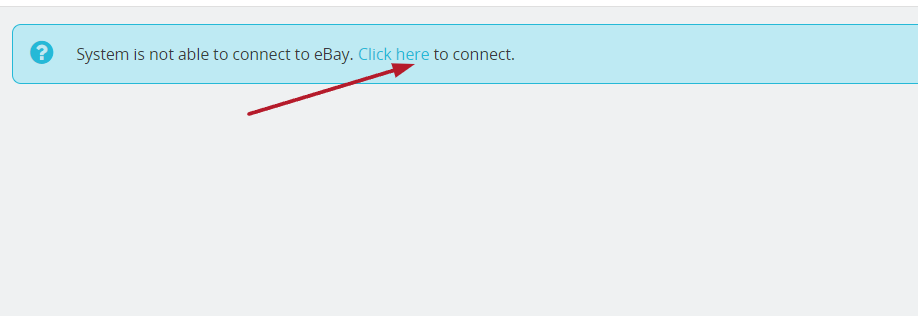
Token listing link
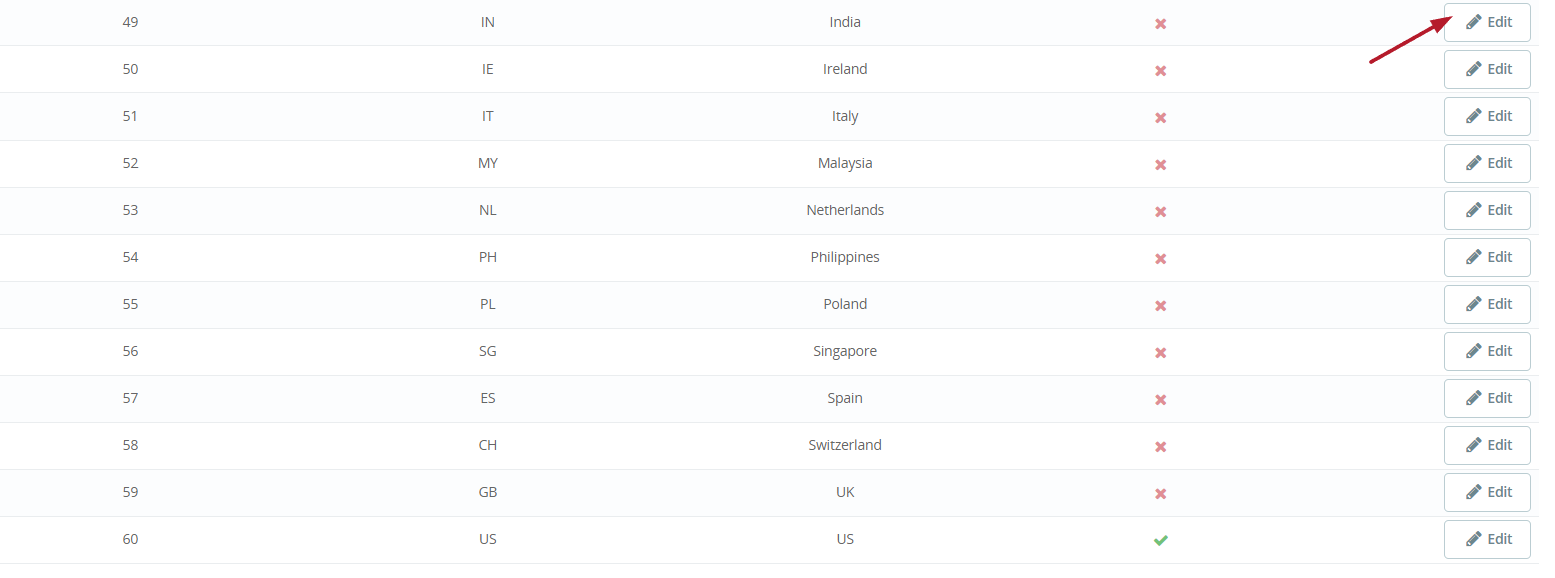
Click on \”Click here to add tokens for all the eBay Countries\” from the general settings of the module.
2. On the next page, click on the Edit button against the country for which you want to generate a token.
3. On the next page, click on the “Click here” to generate a token.
6.2 Profiles Management
The Profile Management tab of the Prestashop eBay integrator provides options to create a profile for product listing. In this section, the admin will be able to map the eBay category with the Prestashop store category and other product listing details can be saved.
6.2.1 How to add Profile to the system?
Following are the steps to add Profile into the system –
Step 1: Go to the eBay Marketplace Integration-> Profiles Management (Menu Option)
Step 2: It would redirect admin to a page where already available profiles will list (If any). Click on the “+” (plus icon as shown in the screenshot below) and it would redirect admin to a new page where a form with some input fields will be shown.
Step 3: There will be two tabs:- General and Specifics. Before adding General and Specifics we need to click on Sync Categories.
Sync Categories will sync the eBay categories. Further, that will be usable in mapping with Prestashop store categories in Profile management > General section.
Now, we need to add the General and Specifics settings of Profile Management.
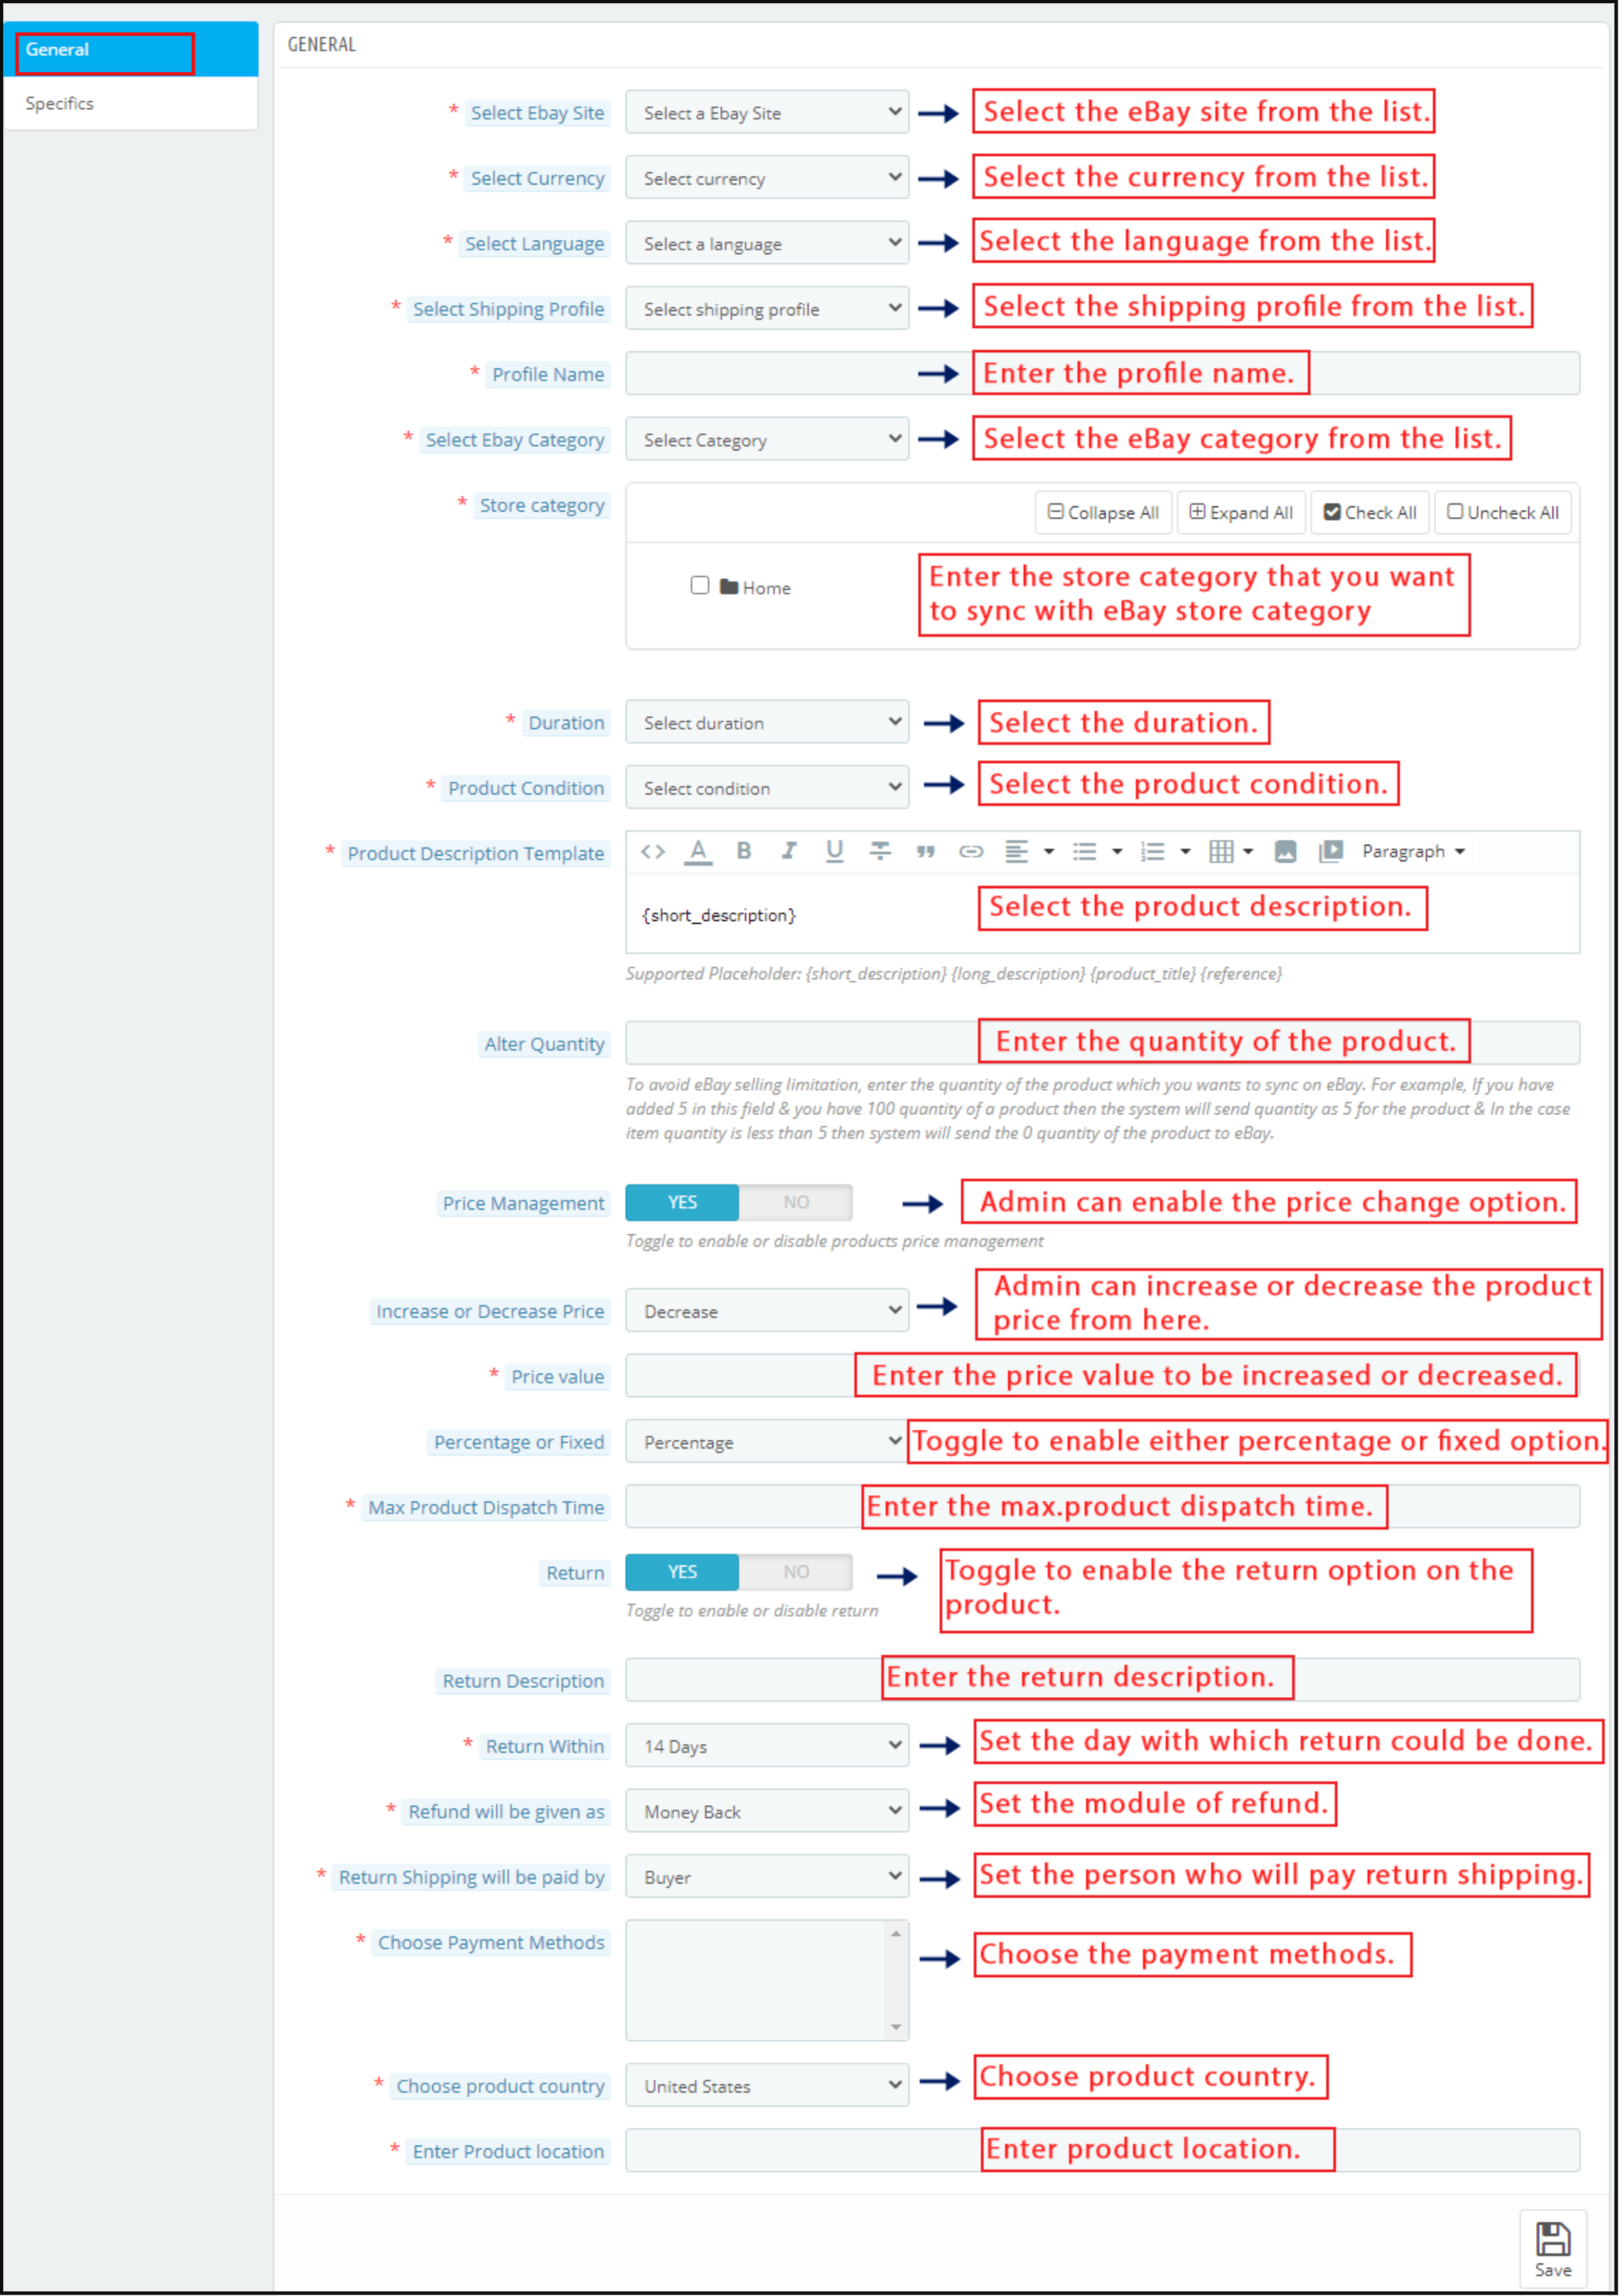
Select eBay Site: The Prestashop eBay API integrator allows you to connect your site with the various eBay marketplace across the globe. Choose the site from the given list.
Choose Language: The Prestashop eBay integrator offers multi-lingual support. Select the desired language from the drop-down menu.
Select Shipping Profile: The shipping profiles created in the Shipping tab will list in this section of the eBay Prestashop API Integrator. Choose the option that suits your requirements.
Profile Name: Enter a unique name for the Profile.
Select the eBay category: The drop-down menu lists out the eBay categories in which the products are to be listed. The Prestashop store admin can select the eBay category. In addition, the products will be mappable in the selected one with the help of Prestashop eBay Marketplace Integration.
Store category: Select store categories that you want to map with the eBay category. All the products of this category will then be mappable in the selected category of eBay with the help of the Prestashop eBay Marketplace Integrator module.
Duration: Select the duration for which the product lists.
Product Condition: Dropdown to select product condition i.e. New or Used etc.
Product Description Template: Enter the product description for the creation of a template.
Alter Quantity: Enter the quantity of the products that list on eBay.
Price Management: Prestashop eBay Integration Plugin enables the admin to sell the products at eBay Marketplace at different prices.
Increase or Decrease price: With eBay Prestashop API Integrator, the online merchant can increase or decrease the price value from the backend of their Prestashop store.
Price Value: The store owner can enter the amount value that he wants to increase or decrease in the price value of products at the Marketplace.
Percentage or Fixed: Prestashop eBay API Integration Module allows the admin to change the price value of the product at the Marketplace by a fixed amount or a percentage value.
Max. Product Dispatch Time: Enter the maximum expected dispatch time of the products that the admin maps.
Return: Enable the button if you want to provide the return option on the products to your customers. In the following section, you get the option to choose from existing eBay business policies or you can also create your own return policy from the module admin settings.
The Return Description: Enter the return description.
Return Within: Enter the days within which the return can happen.
Refund will be given as: Enter the mode of refund.
Return shipping will be paid by: Select the person who will pay for the return shipping from the list.
Choose Payment Methods: Select the payment methods from the various options available in this section.
Choose Product Country: Choose the product country from the list of country choices available.
Enter Product location: Submit the location of the product while creating the admin profile in the admin panel.
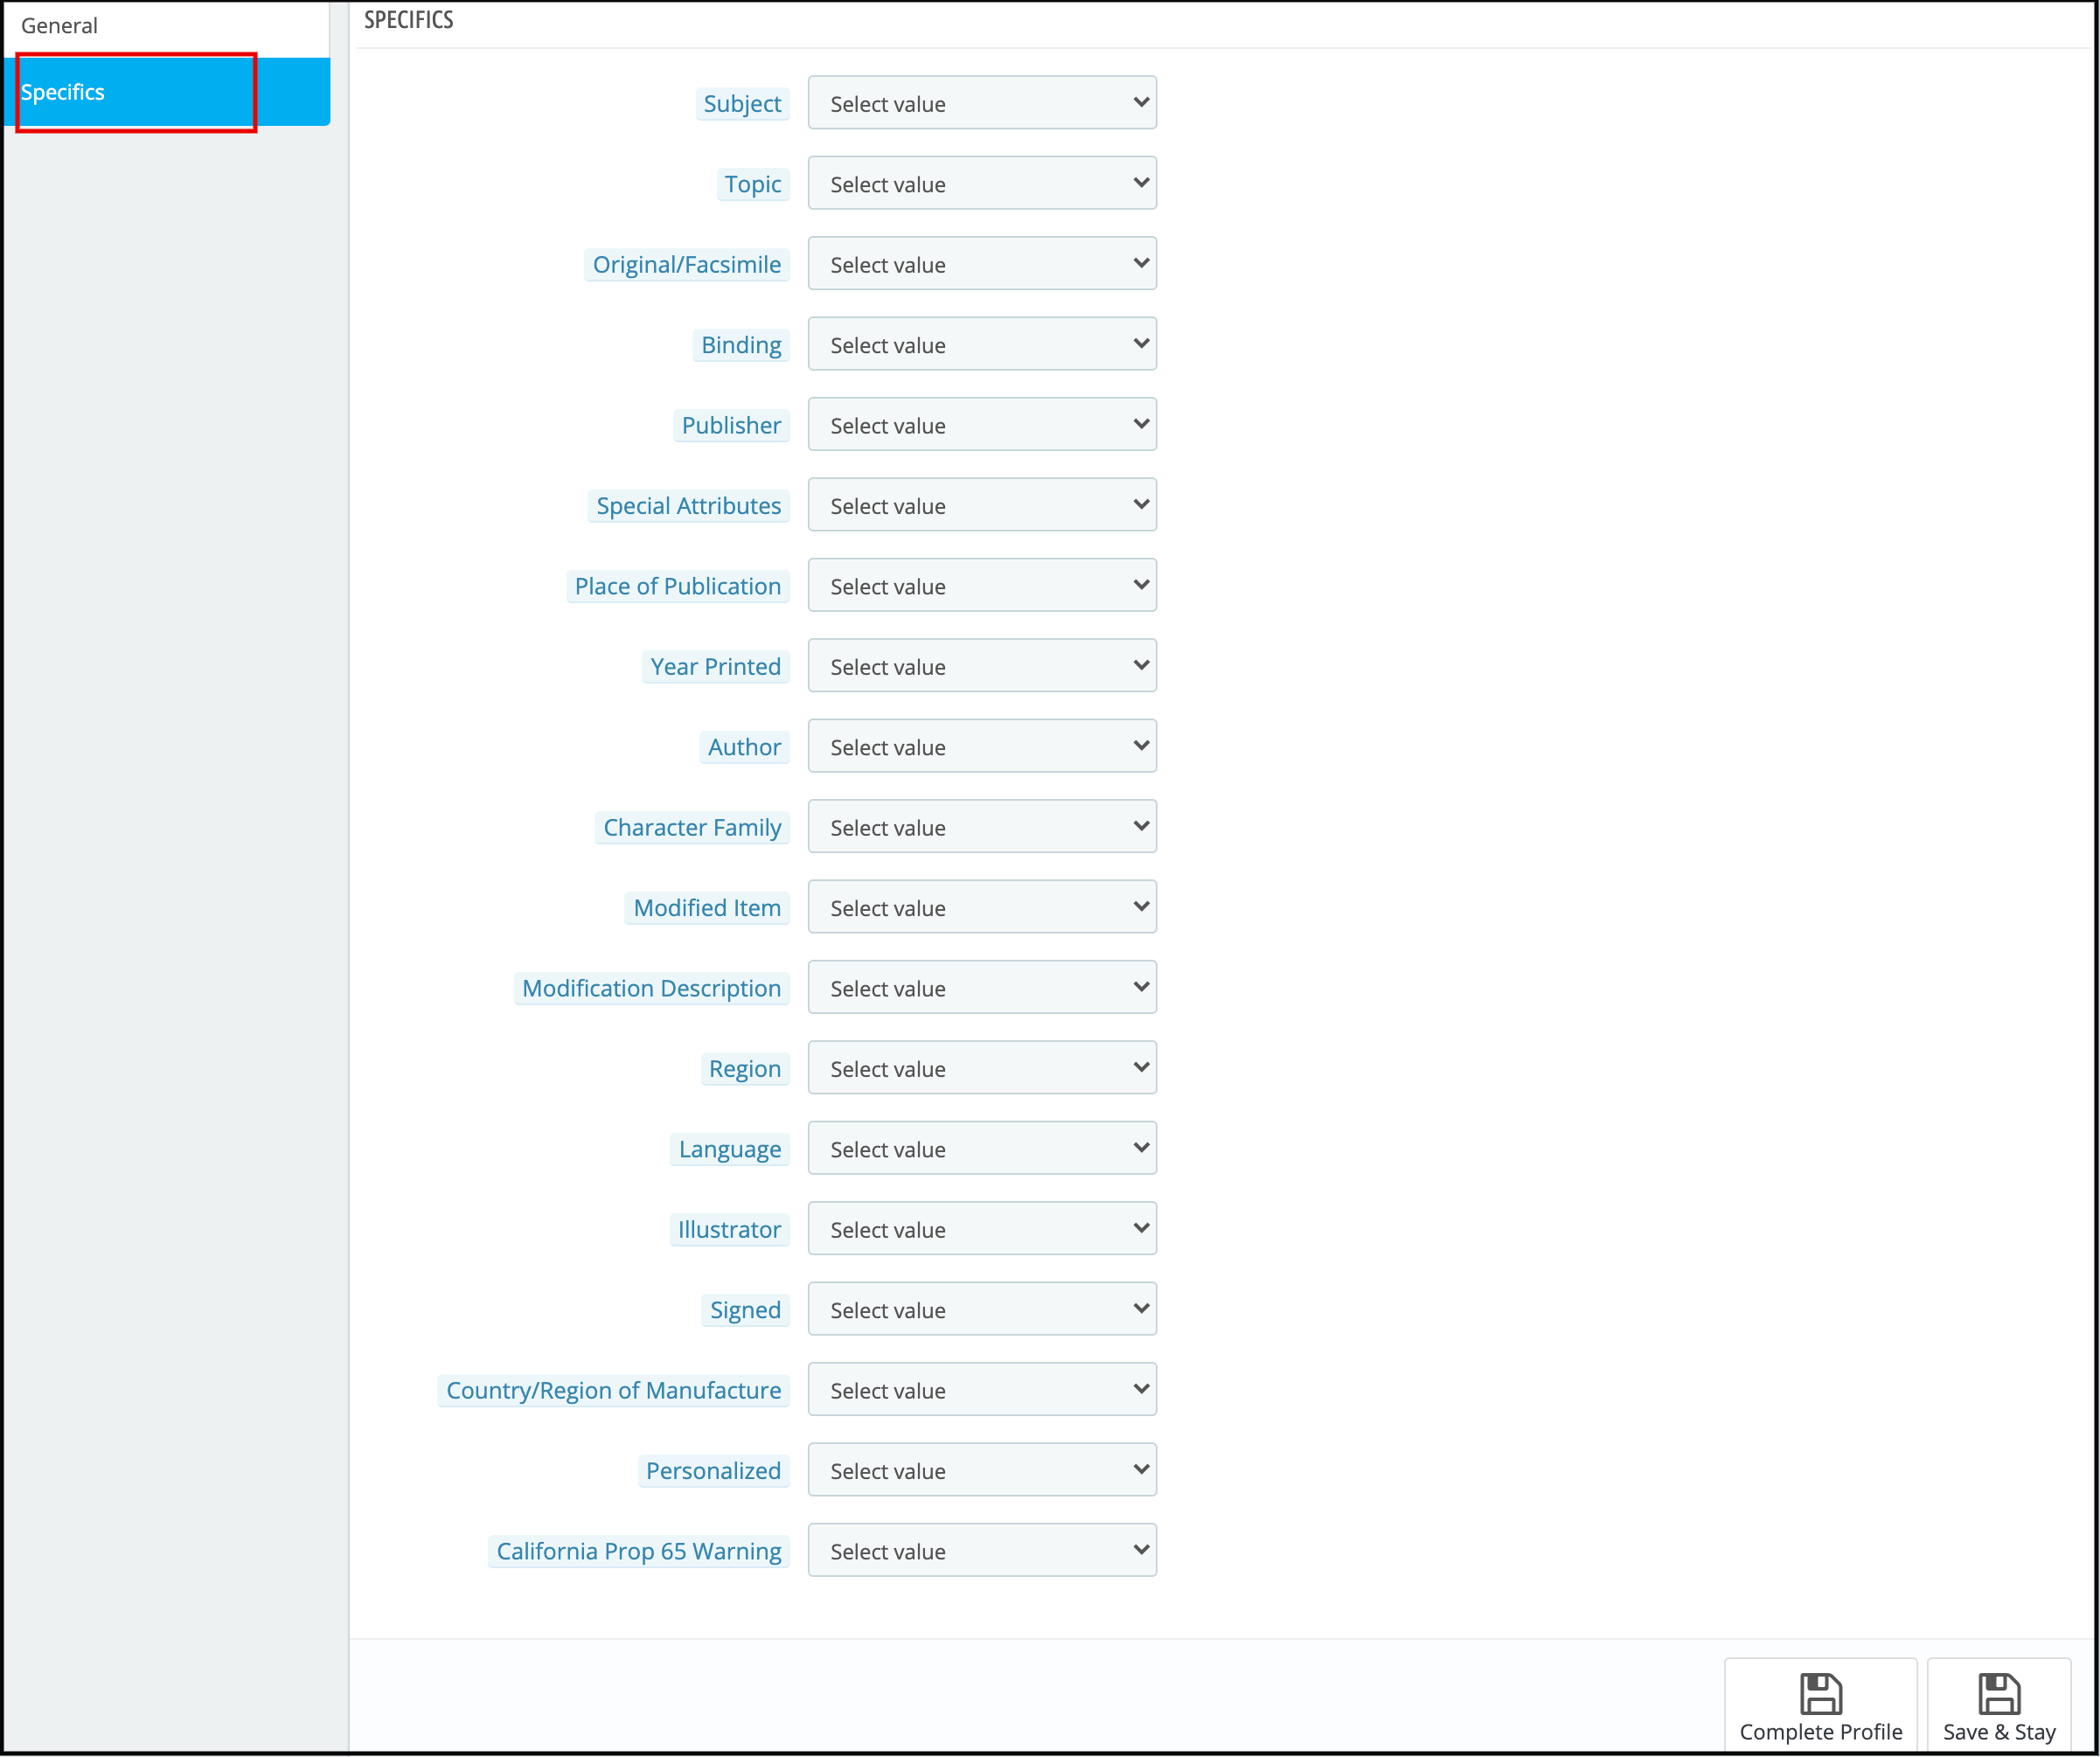
Once you fill-up the form and save the general settings, you need to add the specifications related to the category selected in the Specifics tab. Enter the attributes of the same as shown in the image below and save the changes.
Step 4: Click Save, all data will be validated and saved if valid and Profile will be created in the completed state.
6.2.2 How to Edit the Existing Profile?
Following are the steps to edit profile –
1. Go to the eBay Marketplace connector-> Profiles Management (Menu Option)
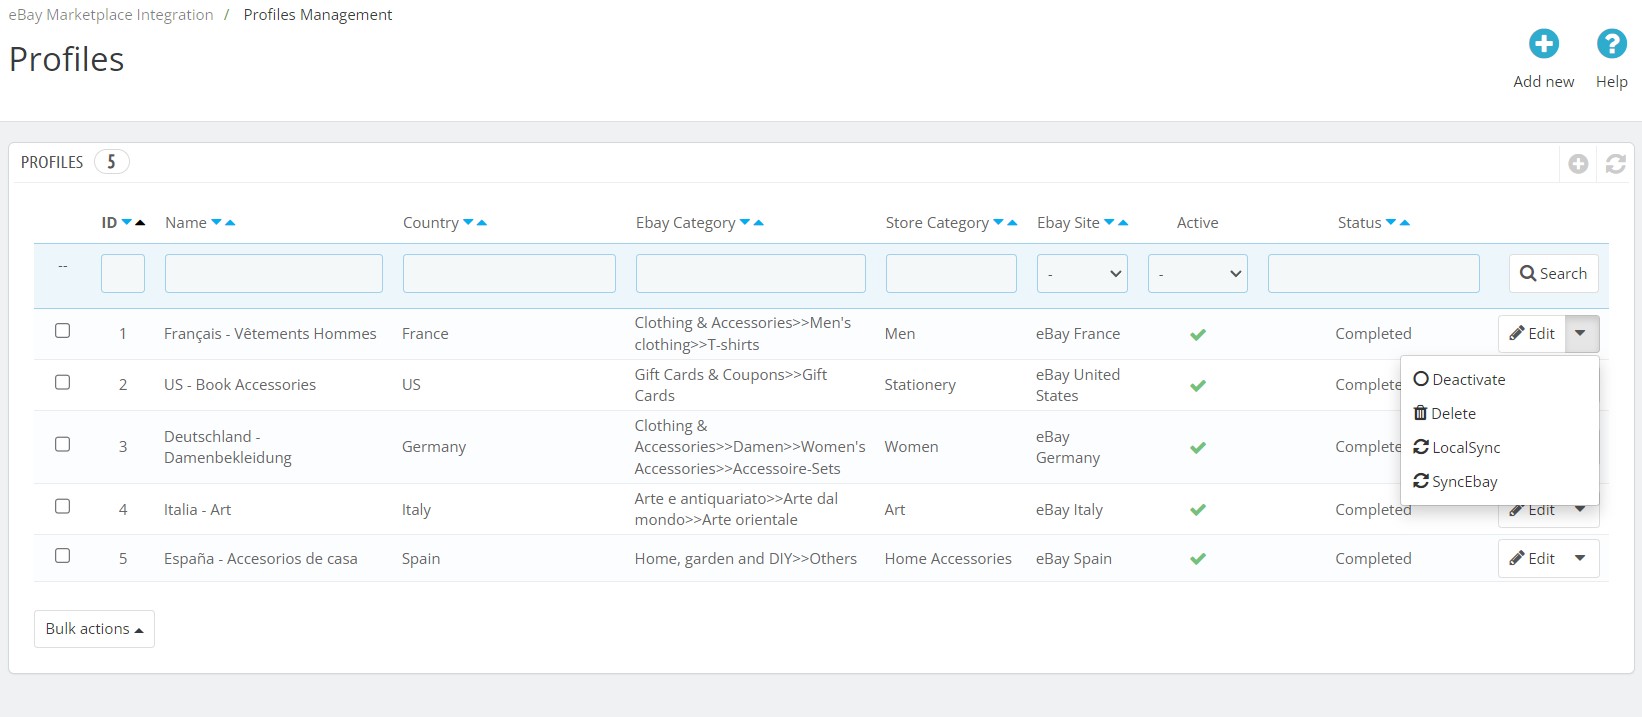
2. It would redirect admin to a page where already available profiles will list (If any, shown in the screenshot below).
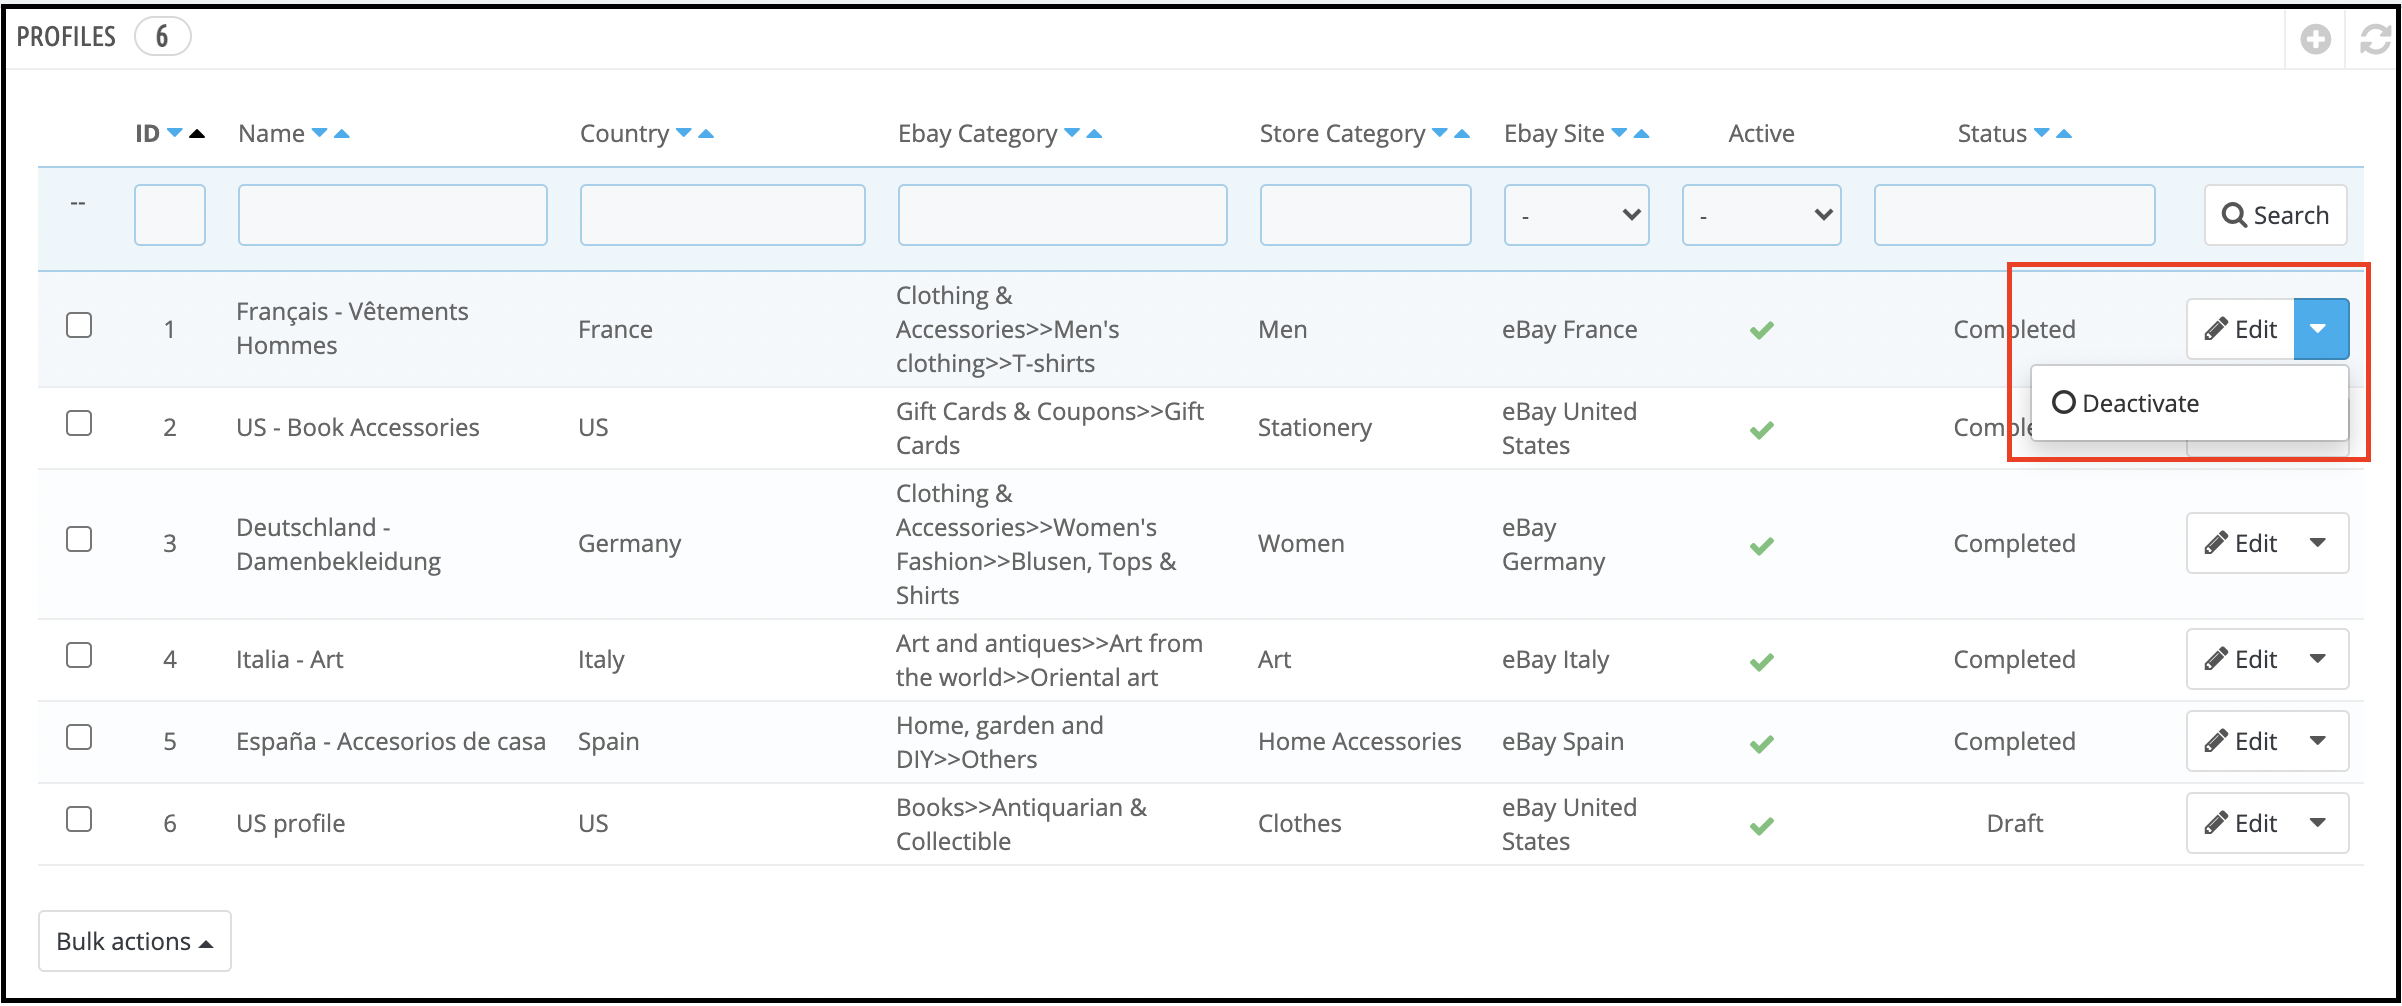
3. Click on the “Edit” button corresponding to each profile as shown in the above screenshot.
4. It would redirect the admin to a new page where a form with some already filled input fields will be shown. Admin can simply update values and save the details by clicking on the “Save” button.
6.2.3 How to Enable/Disable Profile?
Following are the steps to enable/disable profile created in the Prestashop eBay integration extension-
1. Go to the eBay Marketplace connector-> Profiles (Menu Option)
2. It would redirect admin to a page of the Prestashop eBay Marketplace Connector where already available profiles will list.
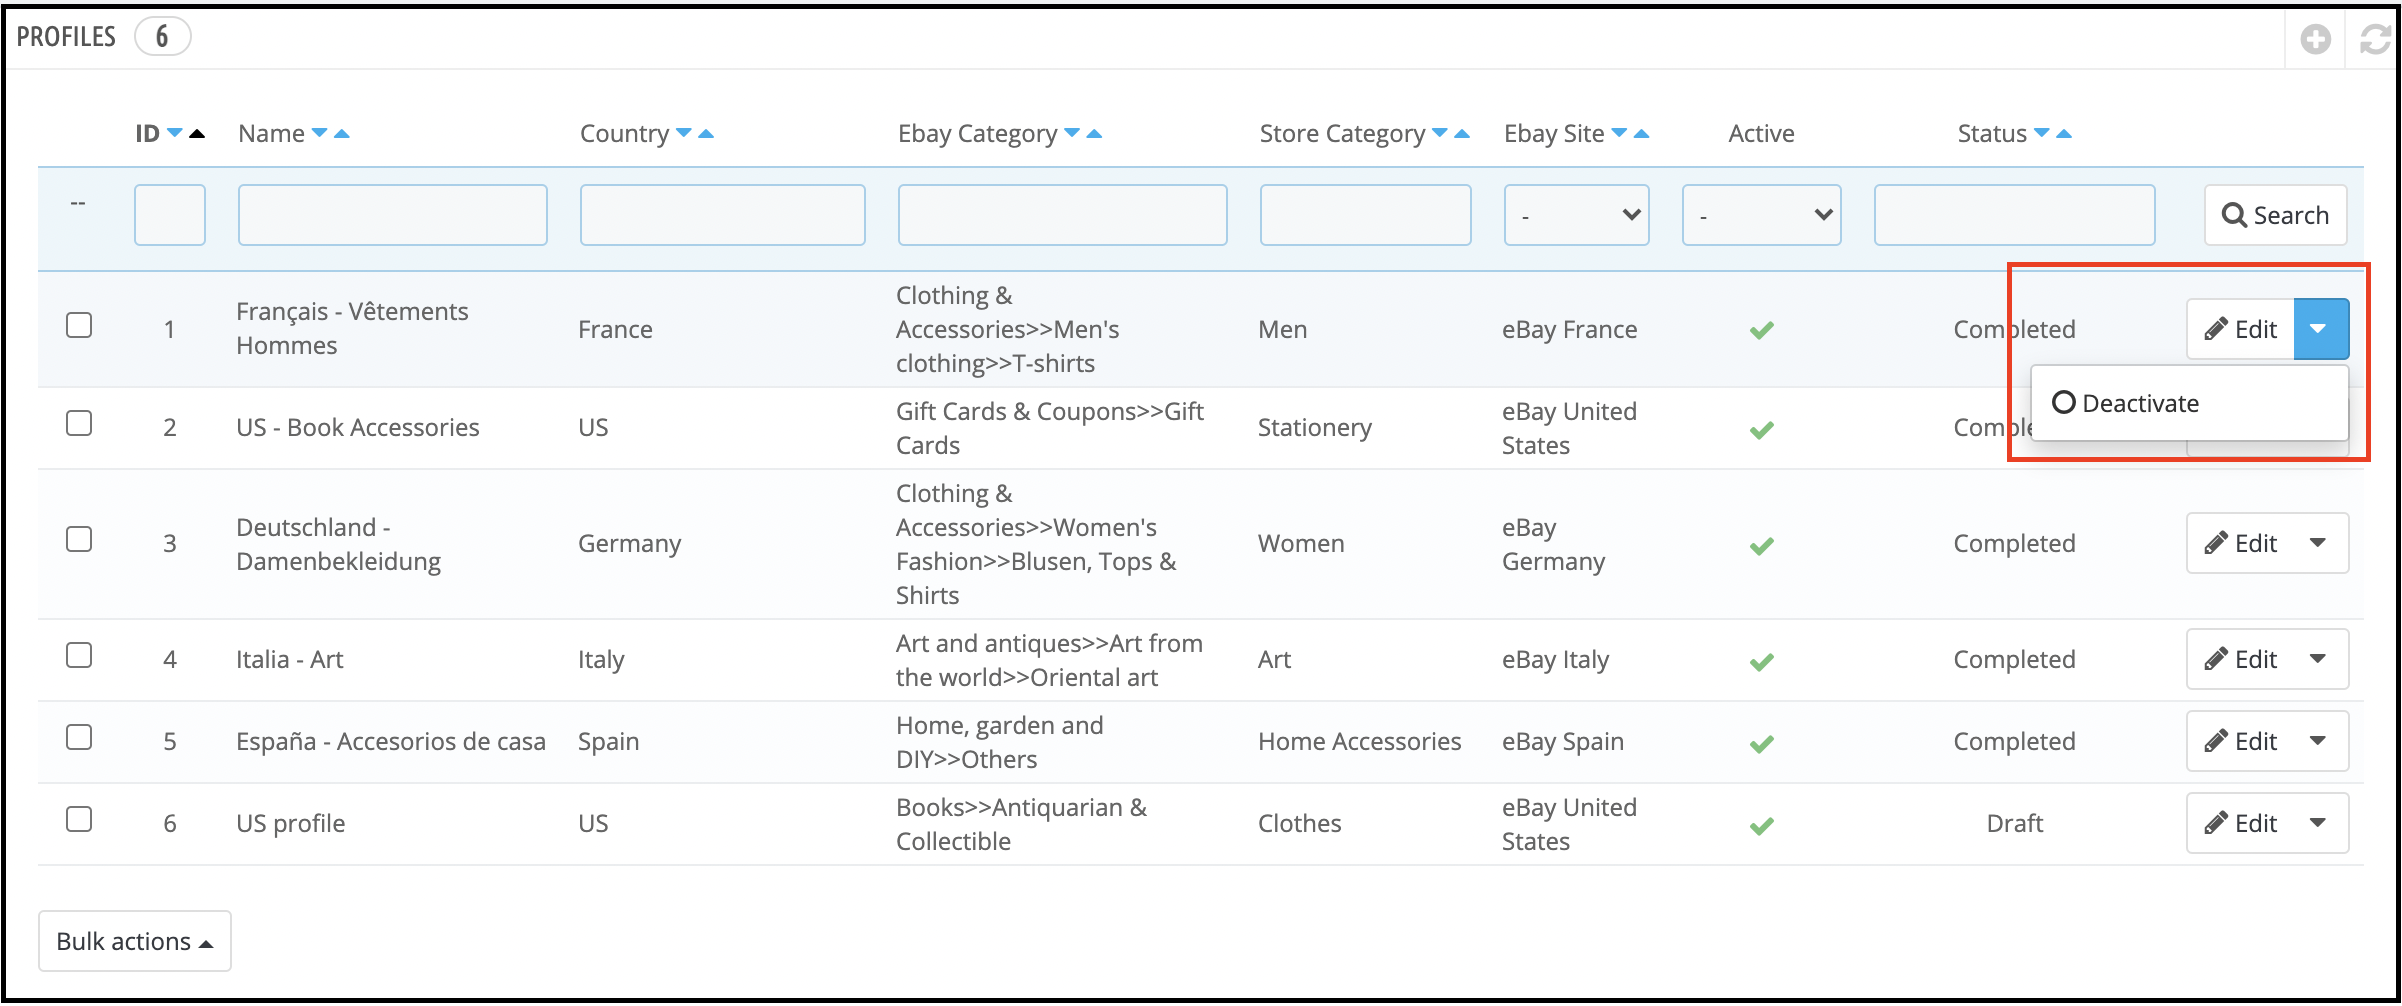
3. To disable the Profile, the admin has to click check the option under the active column for the table.
4. The green check sign shows that the profile is active. To deactivate it, click on the Deactivate button as shown below.
Note:- Disabling profile will end all the listed products from eBay listing and admin will have to relist them once the profile is again enabled.
6.3 Orders Management
Prestashop eBay integration plugin allows the store admin to sync the orders received from the marketplace. Once the orders are imported, they can be processed from the back-end of the Prestashop eBay connector module.
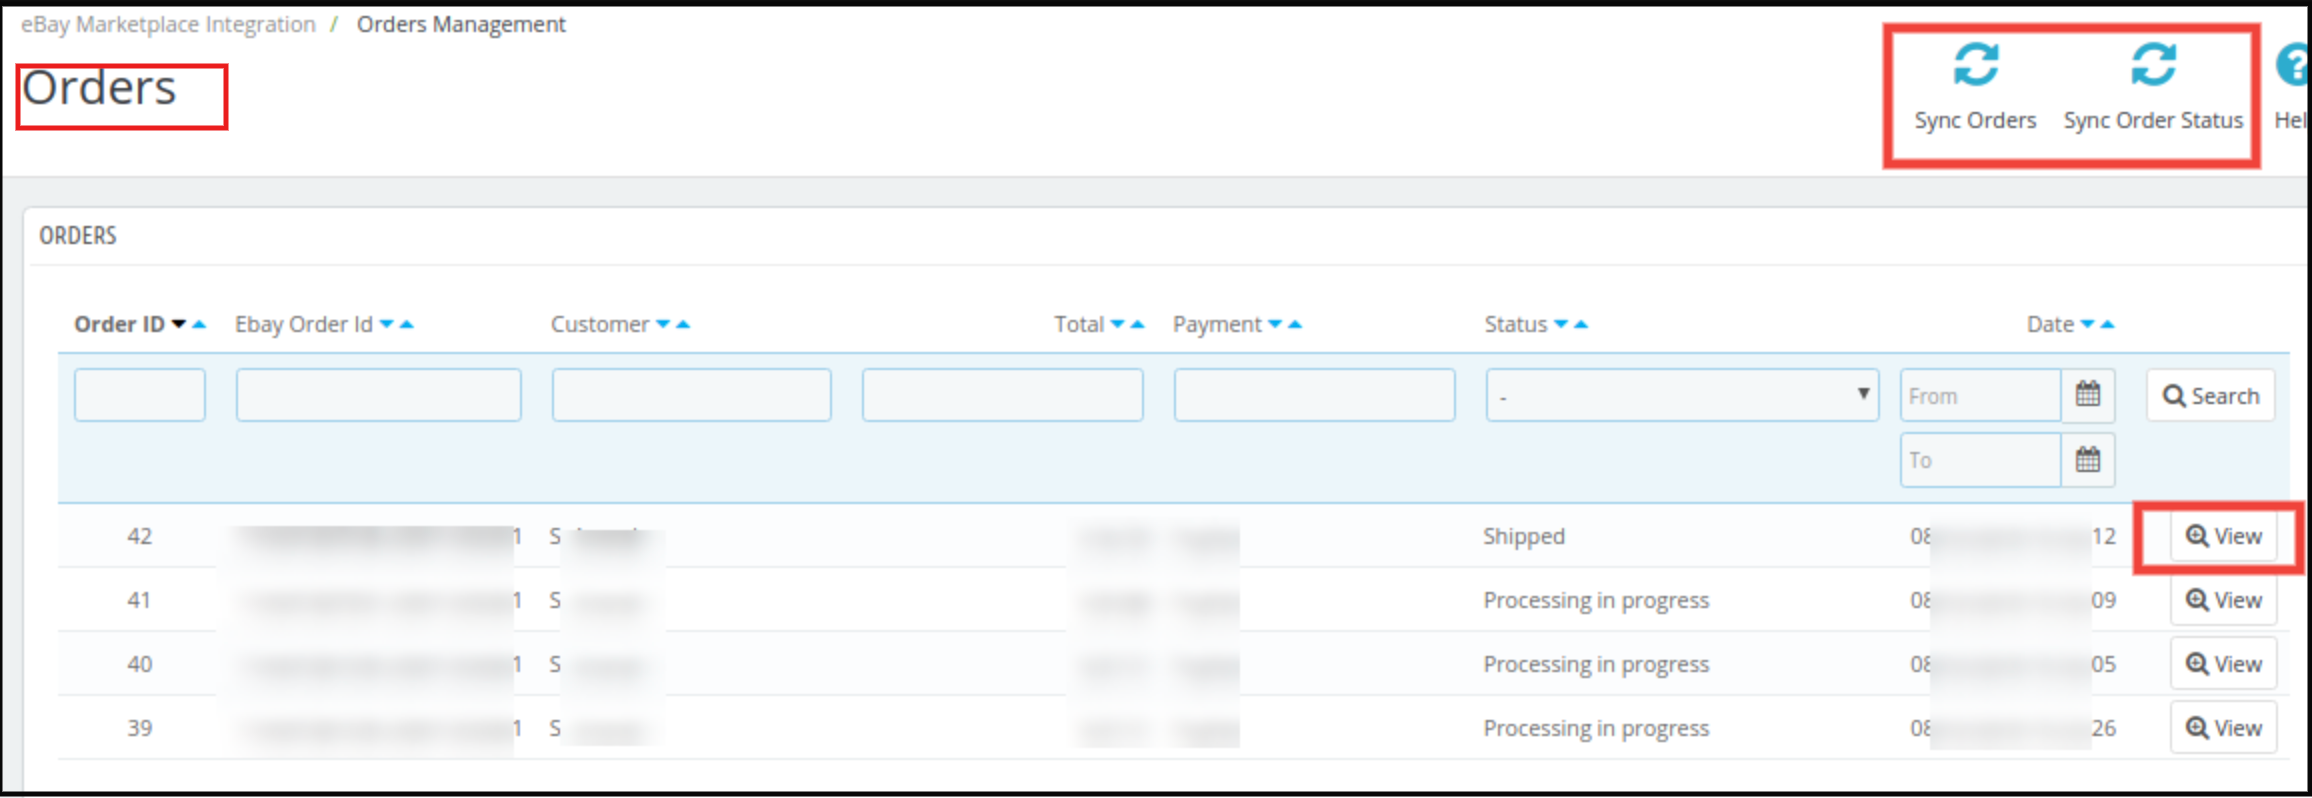
1. Go to the eBay Integration-> Orders Management(Menu Option)
2. All the orders from eBay will be available here.
To sync the orders from the eBay marketplace to the Prestashop store, execute Sync eBay Orders cron present on the top right corner.
3. Click on view to see order details and update the status of the order.
6.4 Order Status
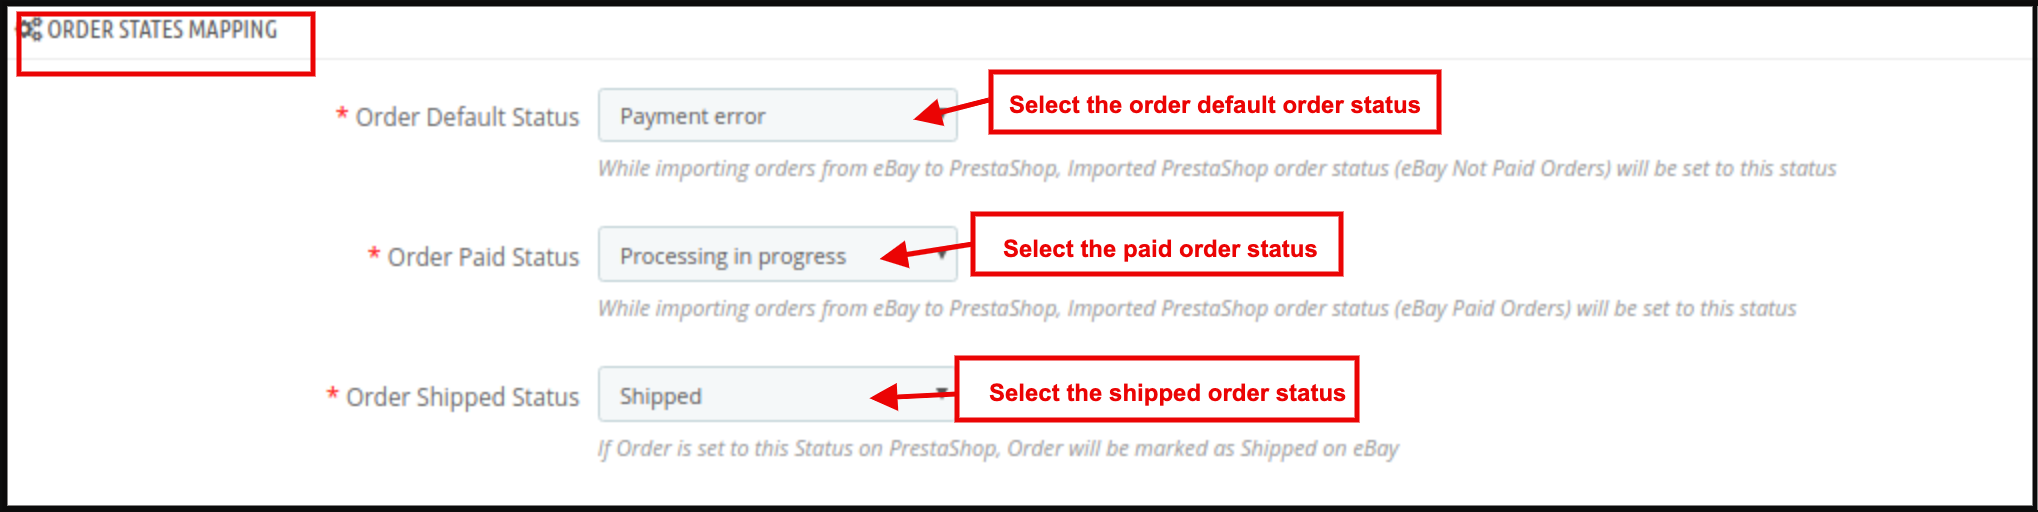
Order Status tab of the Prestashop eBay integration plugin can map the order statuses updated by the store admin with the eBay Marketplace order statuses.
6.4.1 How to map Order Status?
Following are the steps to map order status –
1. Go to the eBay Marketplace integration module-> Order Status (Menu Option)
Once the status changes, execute the Update Order Status cron in the Orders Management tab. The changes will sync in the marketplace as well. (See section 6.3)
Note –
1. Default status means that the first status of an order when it is placed on the store.
2. Paid status means that order payment has been made and accepted.
3. Shipped status means that ordered items have been shipped.
6.5 Products Listing
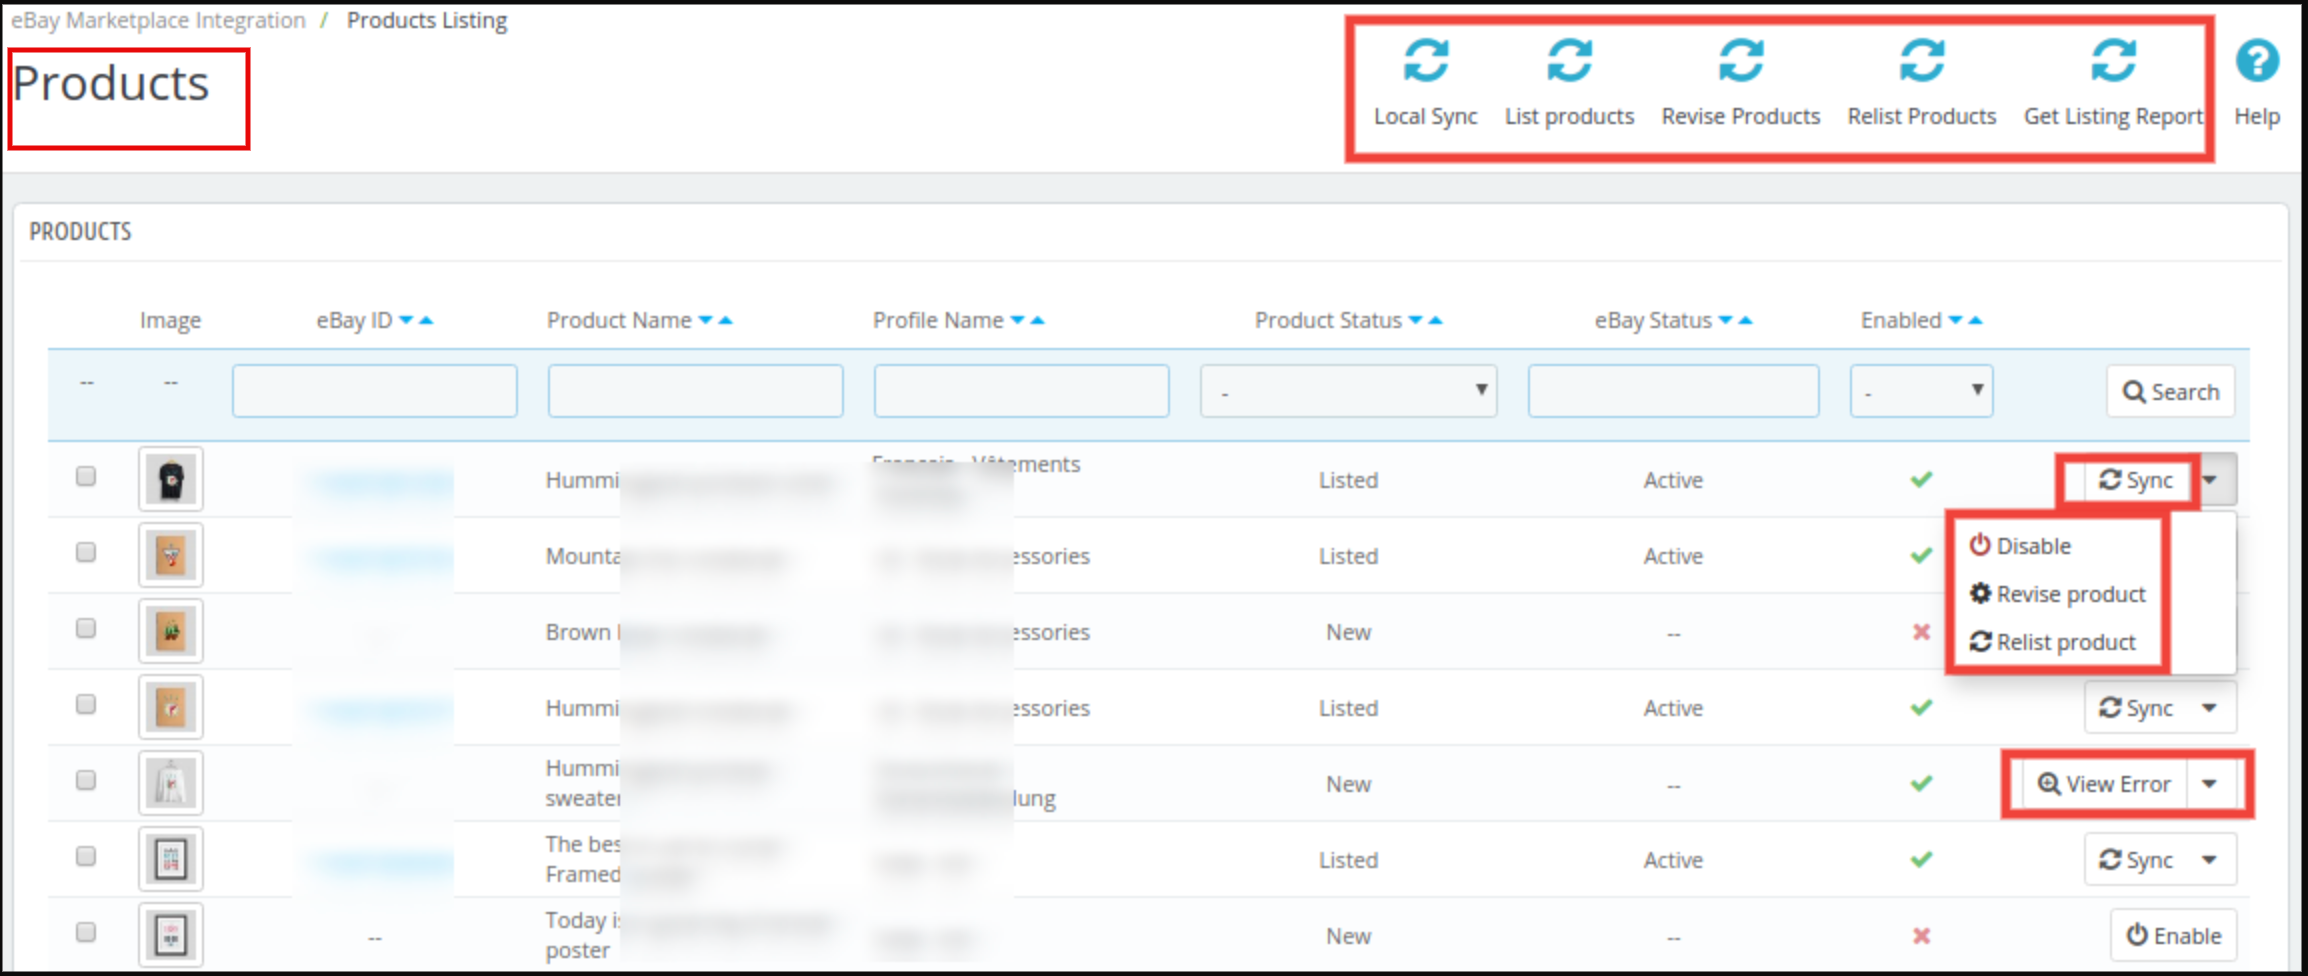
This section of Prestashop eBay integrator addon shows the list of all the products selected to list or listed on eBay Marketplace with their status and values as shown in the screenshot below
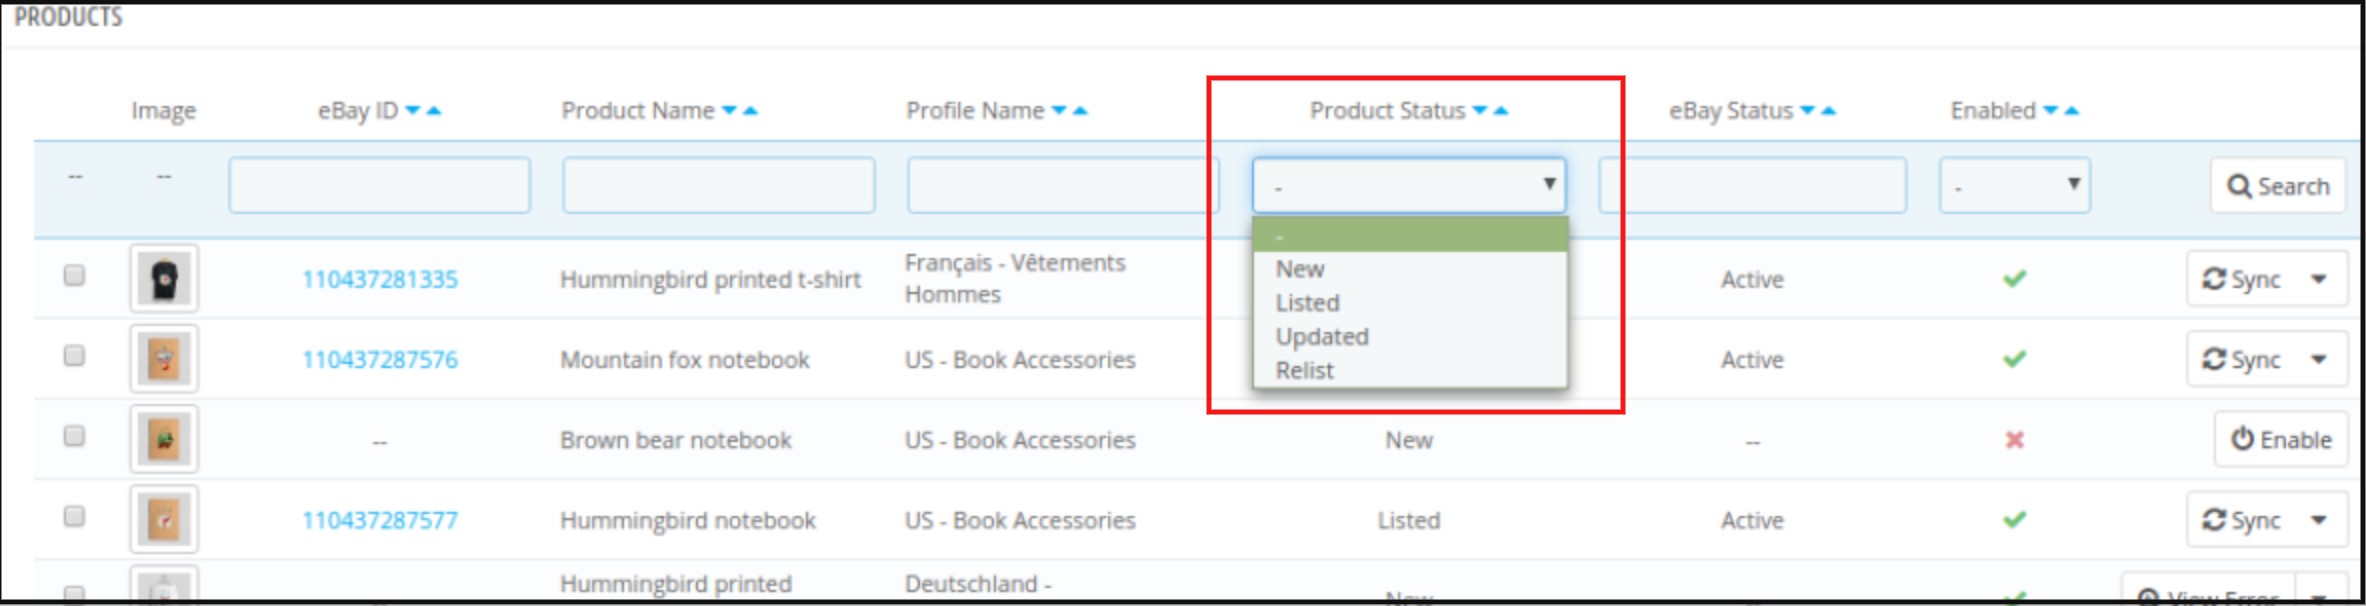
There are the following options available corresponding to each product listing:
Disable the Product
This tab enables the admin to disable the product from the backend of the module. After disabling the product, it will not be shown on the front-end of the Marketplace. It can be only visible after enabling the product from the backend.
Product Listing Relisting
This option offered by eBay Prestashop integrator allows the admin to relist products in case the listing is expired on eBay Marketplace. To relist the product, the admin has to click on the “Relist” action given in bulk actions.
Product Listing Revision
If any update happens in product details, then by default it marks as updated and if cron is set for this action then it will be sent for revision. If the admin manually wants to send products for revision then he can mark the product and click on “revise” from bulk actions.
Individual Product Synchronization
This feature enables the admin to sync the products one by one (Along with the bulk sync option at the top right corner). By this, the admin can filter out the products that need not be shown on the front end of the eBay Marketplace.
View Errors
This feature enables the admin to view errors in the product. Admin can simply click on the View Error button and the error will display on the screen.
Visit eBay Product Page from the backend
This feature provides an option to go to the eBay product page from the module product page directly. For that, the admin has to click on the eBay ID and he would on the eBay Product page as shown below
Adding products from the product listings tab
If you want to add a product to the product listing tab, the admin has to create a profile of the product in the Profile section of the module. (read section 6.2.1) There you will get a step-by-step procedure of creating a profile and adding the product in the products listing tab.
Different statues in the filter of the product listing
Here are some different statuses in the filter of the product listing.
New: After applying this filter, the admin can view the new products on the Marketplace.
Listed: After applying this filter, the admin can view the products on the Marketplace.
Updated: After applying this filter, the admin can view the updated products on the Marketplace.
Relist: After applying this filter, the admin can view the relist products on the Marketplace.
Custom Product Title: The Prestashop store admin can list the same products with different product titles on eBay with this option.
Custom Product Description: This option allows the admin to list the products with different product descriptions on the eBay marketplace.
6.6Shipping Template Management
The Prestashop eBay Integrator allows the Prestashop admin to create an N number of domestic and international shipping methods.
6.6.1 How to Create New Shipping methods?
Click on the ‘+’ sign in the top right portion of the Prestashop eBay connector extension to create a new shipping method.
Once you click here, you’ll head to an interface. For the first time, you need to click on “Import eBay shipping methods” to import shipping methods of eBay to this module.
Now, fill-up the form as mentioned below:
Select eBay Site: Select the eBay site in which you want to include the shipping option.
Service Type: Select the service type for shipping.
Shipping Profile Name: Enter a unique name for the shipping profile.
International Shipping Allowed: Enable the button if you want to allow international shipping with this shipping method.
Exclude Location: Select the location that you want to exclude from availing of the shipping option.
6.6.2 How to Edit/Delete Shipping methods created in the back-end of the Prestashop eBay API Integration Module?
The store admins can even edit or delete the shipping as per the requirement from the backend of the Prestashop eBay Integrator.
To do so, click on the Edit and Delete buttons respectively as shown in the image below.
Once the shipping methods are created admin can either import or export the shipping methods to eBay Marketplace.
6.7 Synchronization
This tab adds the following CRONS to the Control panel/SSH to synchronize data between your store and eBay Marketplace automatically.
You can find all the crons listed in the following tab, however, it is to be noted that these crons will work for all the product listings in a single go. If you want to update any particular profile only, you can find the option for the same in the profile management tab itself.
LocalSync: This cron allow the store admin to list the products locally for a single profile only.
SyncEbay: If you want to list/make changes for the products within a single eBay profile, you can hit the SyncEbay cron shown in the above screenshot.
6.7.1 Local Sync
This action will prepare the PrestaShop products to sync on eBay i.e sync products from the PrestaShop store to eBay Module.
6.7.2 Sync Products To eBay
This action will sync the PrestaShop products to eBay. Products of only those categories will sync on eBay which maps under the profile section of the module.
6.7.3 Revise Products
This action will update the product information (including quantity, price, etc) on eBay which updates into the PrestaShop.
6.7.4 Relist Products
This action will relist those products on eBay which has been ended on eBay and marked to relist on the product listing page of the eBay module.
6.7.5 Listing Report
This action will pull the latest product listing report from eBay and update the listing status of the products into the module.
6.7.6 Sync eBay Orders
This action will pull the orders from eBay and will add them to PrestaShop.
6.7.7 Update Order Status
If eBay orders are marked as shipped on PrestaShop, this order will be marked as shipped on eBay.
Also, the available Action Validate Order hook feature will auto-sync the product inventory on both eBay and the Prestashop store after an order is placed.
6.7.8 Sync Inventory
This action will update the inventory of the list of products.
6.7.9 Update Inventory Status
This Cron will update status of inventory task from eBay to Prestashop.
6.8 Inventory Sync
This section has a button “Sync Inventory of Listed Product” on the top right side to sync the inventory of all the available barcodes to eBay.
It also shows the list of Job IDs corresponding to the profile with the date of the last inventory sync of all products.
On click of Edit button, it will open the log of inventory sync for that Job Id where we can see the barcodes for inventory updates with eBay status.
6.9 [New] Inventory Comparison
This inventory comparison tab in Prestashop eBay Marketplace Integrator allows you to compare your Prestashop inventories with your eBay inventories, quickly identifying discrepancies and ensuring accurate product availability across both platforms.
Moreover, this helps prevent overselling, stockouts, and keeps your inventory perfectly synchronised, saving you time and reducing errors.
The inventory sync provides the two crons including ‘Submit request to fetch eBay Inventory’ and ”Process Last Inventory Request’ Cron.
6.9.1 Submit a Request to fetch eBay Inventory
This cron allows the store owners to fetch the current inventory from your eBay store. Submit a request to fetch eBay Inventory cron add the current inventory in the quantity section in the tab.
6.9.2 Process Last Inventory Request
This cron processes the last inventory request and matches the current inventory, marking discrepancies with Yes or No in the inventory comparison tab
These tabs in the inventory comparison, Knowband’s Prestashop eBay Marketplace connector Addon include the following cron jobs:
Submit Request to Fetch eBay Inventory
This cron fetches the latest inventory data from your eBay store.
Ensures that the system always has the most up-to-date information for comparison.
Process Last Inventory Request
This cron processes the previously fetched eBay inventory data.
6.10 Rate Limit Feature
Additionally, the module provides comprehensive API rate limit tracking, displaying the number of times each API has been called and monitoring all operations, including product and inventory syncing. Furthermore, it highlights when an API call exceeds its limit, offers detailed logs of module activities, and simplifies troubleshooting.
Together, these enhancements give you greater control, transparency, and reliability in managing your prestashop to eBay listings.
6.11 Business Profile:
Knowband’s eBay Connector addon for Prestashop allows the store admin to import eBay business profiles in the module. These profiles included necessary configurations such as return policies, eBay shipping templates, and eBay payment policies.
Once the business profiles are imported, you can use the same while creating your shipping templates and eBay profiles.
Watch the Tutorial of Prestashop eBay Connector Plugin:
To help you set up and use the Prestashop eBay Connector module, we have created a YouTube tutorial. This step-by-step video guide walks you through the installation process, configuration options, and how to list and manage your product listing on eBay from your store through module.
Contact us at support@knowband.com for any query or custom change request as per your business requirement.
When it comes to ensuring the success of an eCommerce business, you need to count on the analytics and sales report. These are effective metrics that help you make more informed decisions. Even if we take the sales report in particular, it is not just a count of the volume of product you sold from your site over time. There are many other positives of the same. It helps you spot pitfalls, trends and ensure you that you are going on the right track.
In order to thrive in the eCommerce industry, you need to keep track of these analytic report and quick informed decisions. With the business matrix at your fingertip, you will be sound enough to figure out where you are going wrong and where you are going on the right track. This is where the sales report can help you. Basically, a sales report shows the real face of your online business where you come to know if your business is increasing or declining. An effective sales analysis helps you analyze and comprehend how to turn data insights into successful business strategies.
If you are an OpenCart eCommerce store owner, then, this blog can be of special help to you. I’ll run you through the basic need for keeping track of the analytical reports and the ways by which you can get the sales report of your OpenCart store. Read on to know.
How can managers use the OpenCart sales report?
Whenever of the financial year, the business managers can break down the patterns in the sales report to locate the best strategy. Managers ordinarily utilize the sales reports to recognize the market patterns and best chances to expand the business volume. For instance, you may find that a client in the history has demonstrated an expanded sales amid certain times. This information can be utilized by you or your sales managers to request extra business during the pinnacle times. So, if your OpenCart site is capable of generating a detailed sales report whenever required, you are going in the right direction.
1. Sales report tells you if you are doing it right
Your OpenCart sales report will show your website’s actual sales for a specific period- daily, weekly, monthly, quarterly, yearly or for any time frame that you feel significant. You can also generate a report for specific divisions of your websites such as product sales, coupon conversions, total revenue, missed orders, discounts etc. Thus, you can utilize these generated reports (actual) and compare them with your projected sales. It will make sure if you are moving in the right direction or you need to check your course of action.
2. New vs old sales scenario
Sales reports can help to compare the new vs old data.
Generation of the current sales report is not enough. Your OpenCart sales report would be more effective if it includes the well-versed comparison between the old and new sales data. An Open cart sales report can include the percentage of revenue coming from different customer groups, and this breakdown will be useful for you to know if you are retaining the business. This new vs old analysis will also be effective in measuring the efficacy of your new, and current advertising, offers, customer targeting strategies and conversion optimization.
3. Current relevance of a product on your site
One of the patterns that your OpenCart sales report can uncover is whether there is an issue with the product demand. A long haul decrease in sales of an item may show a few issues. It could be the competition that is eroding market share, or different items sold being sold on your site might do likewise. A long haul decay implies that it’s an ideal time for quit offering that item. At times, it could likewise be uncovered that clients’ needs are evolving. A single OpenCart sales report can do wonders for you and can spare your from conceivable debacles on the off chance that you use the information appropriately.
4. Shopping Behaviour of the Customers
Along with the sales volume, a deeper insight into the report can help you understand customer behavior. You should be monitoring how they interact with your products and what they like/dislike. By tracking the sales report, you can effortlessly see which product is grabbing the attention of the customers and which one is not. You can, hence, check what’s wrong with the products that are not selling. Additionally, you can even amp the marketing strategies of the popular products.
5. Sale trend with respect to the location
Just tracking the sales is not enough. Your analysis should be location-based. The sales report can provide you a better insight into the purchase behavior of the customers based on their location. This is one of the ways to figure out the demographics of your prospective customers base. In addition to this, you can find out where exactly this audience base is located. This way you know the taste and preferences of the people of that particular location. This can ultimately help you in maintaining a balance between customer retention and acquisition.
How can you implement proper OpenCart sales reporting on your site?
There are a number of tools that can help you retrieve the detailed sales report of your store. Integrating Google Analytics is one of the ways. However, for OpenCart store owners, Knowband has an easier and budget-friendly solution. The OpenCart Birds Eye View Report plugin can be installed on your website that will uncover all the above secrets for you. The admin can have an access to a detailed reporting system results of which can be seen on the OpenCart dashboard itself. Using this OpenCart sales reporting plugin, you can generate and compare yearly, monthly, weekly, and daily reports. The graphical and tabular representation offered by the OpenCart plugin allows you to compare the old vs new data very effectively at a glance.
Finally,
We have seen that how a single sales report analysis can do wonders for your online business. Wouldn’t it be a bad choice to ignore the importance of an efficient OpenCart sales reporting system?