8 Awesome eCommerce checkout examples

A lot of effort goes into building the pages that convert. Content optimization, CTA optimization, navigation streamlining, everything we do is for driving conversions on the store. E-Commerce checkout is one such page whose conversion rate has a direct impact on your revenue generation.

In this post, I have compiled a list of the most inspirational eCommerce checkouts that can inspire you to learn some useful aspects from them. Each of the checkouts in this list consists of something that you take a cue from. It should give you a clear idea of how should you go about making your own checkout page conversion friendly like these websites. So let’s get inspired by these checkouts.

1. Apple’s checkout
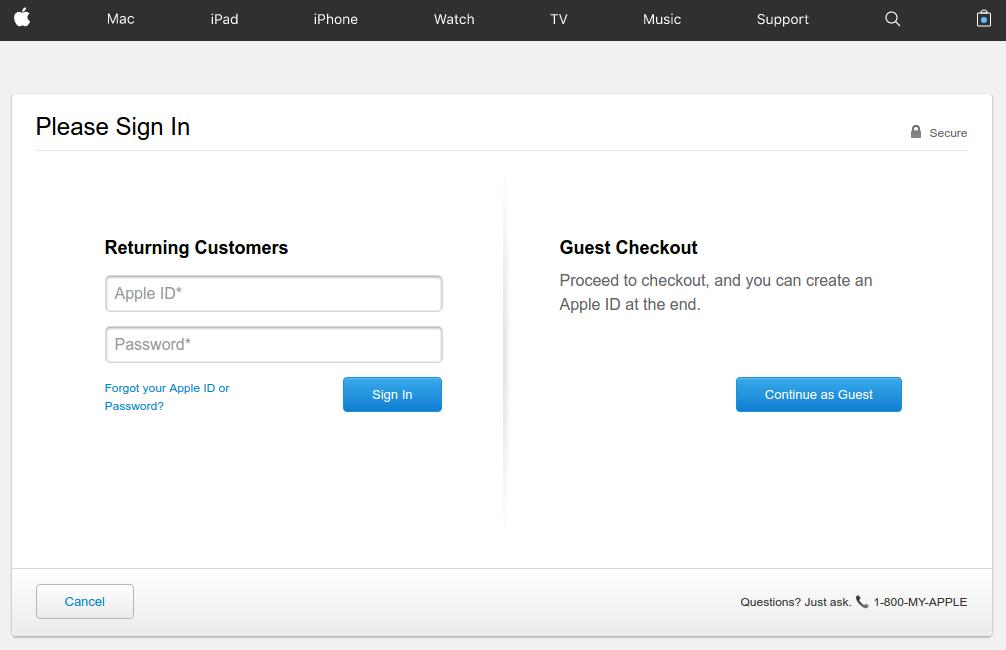
Apple’s checkout is a great example of providing alternate checkout options

Apple provides a very well organized checkout page that lays full attention on the call to action buttons with proper utilization of the white-spaces. The checkout page does a great job of appealing the users to complete the process even as a guest user.

Asking for necessary account registration to complete the checkout process is one of the most common reasons for cart abandonment. To work out this common issue, Apple provides guest check out option where shoppers are not required to necessarily create a user account by filling loads of information in the registration form.

If they already have an account, they can sign-in, and if not have an account, just continue with the guest checkout.

However, there is a flip side of the guest checkout that customer’s information will not be saved for future reference in the database. It means customers won’t be able to track their order. If that is not a problem for the customers, guest checkout is a useful feature to include in your checkout.
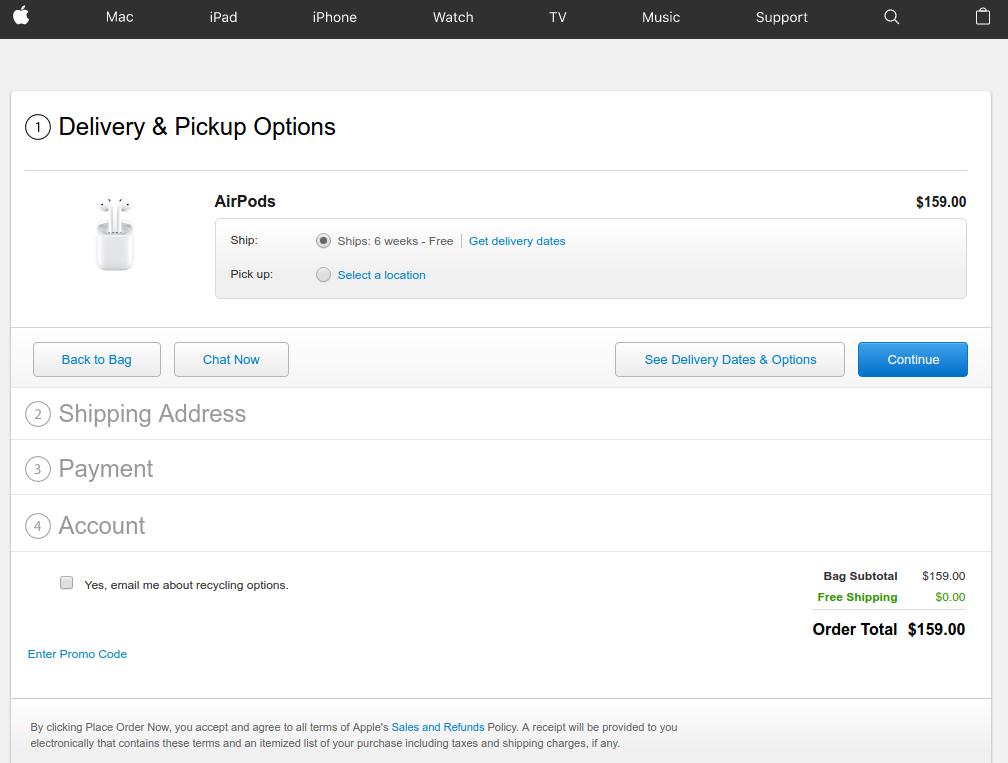
Also the post user login or Guest checkout steps are so simple and interactive. There is a chat option that you can use to clear your doubts right from the Apple’s representative. You can choose the delivery dates and options available, continue with the next steps.

2. Bellroy’s checkout
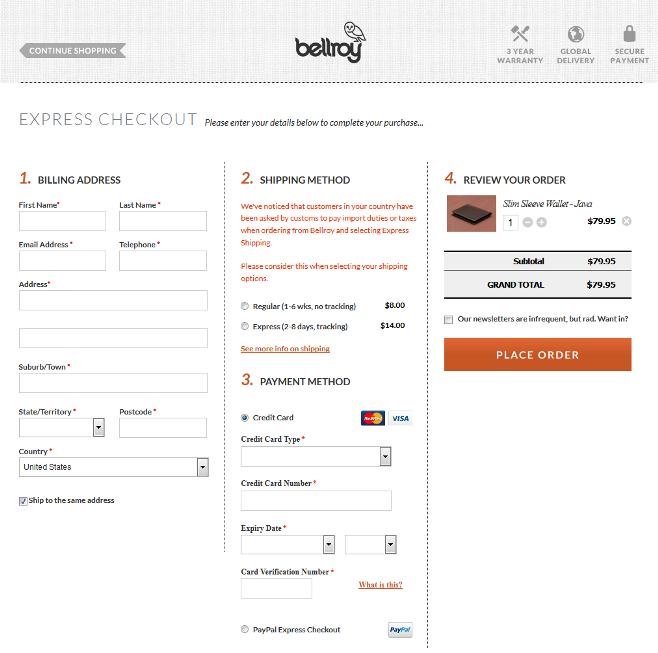
Lengthy checkout is one of the major reason for shopping cart abandonment. According to Baymard institute,

“27% of US online shoppers have abandoned an order in the past quarter solely due to a “too long/complicated checkout process”.

Bellroy handles this big issue a little different as compared to Apple. It provides a one-page checkout to its users compacting the whole checkout steps on a single page only. The one-page checkout structure makes the process smooth and shorter for the customers. Users can fill out the delivery address, billing address, select shipping options and provide payment details right from the same page.

The user experience has been further optimized by including a set of only the necessary details required to be filled-in.

Those eCommerce store owners who want to provide a simple, quick and easy checkout experience to the customers can utilize a one-page checkout structure and save time and efforts of the customers.

3. Myntra’s checkout  Caption:
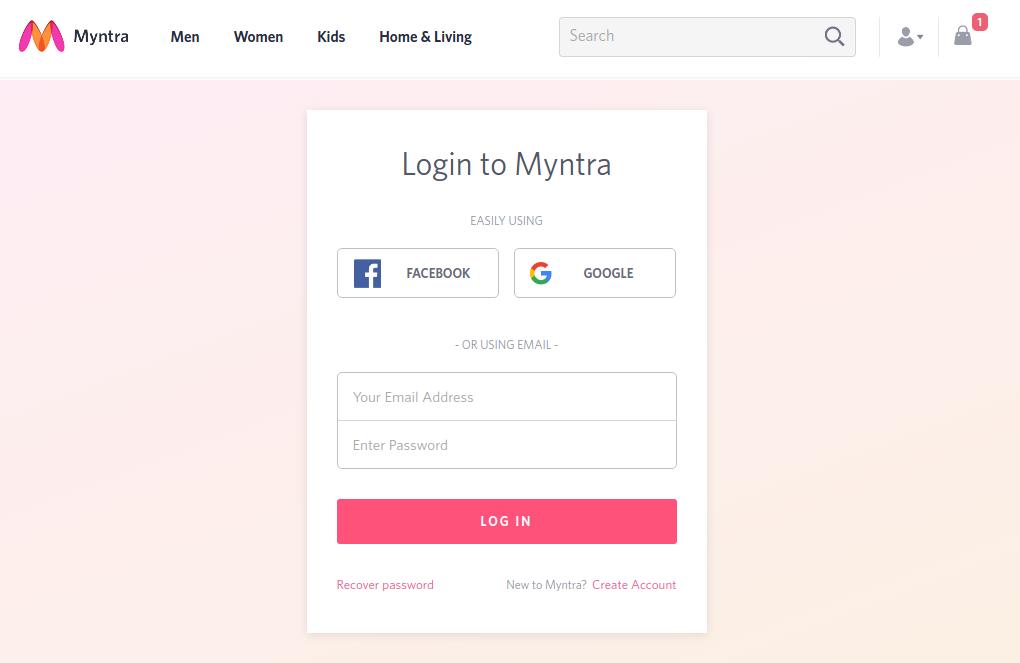
Myntra goes well with its multi-step yet high converting checkout page

In case you are not a supporter of guest checkout or one-page checkout, you should take a cue from Myntra’s checkout page. It presents a perfect example of how you can make a multi-page checkout conversion friendly without guest checkout.

Here, instead of guest checkout, customers can continue as a registered user by logging-in using their Facebook, or Google account credentials without creating an user account on Myntra.

Moreover, when customers are completing the checkout process of Myntra’s multi-page checkout, they are provided with a clear idea of where they are and where they would be in the next step. It provides a transparent process that includes a progress bar on the top of the page, plus a logo of trust, and payment options logo at the footer keep the users well informed.
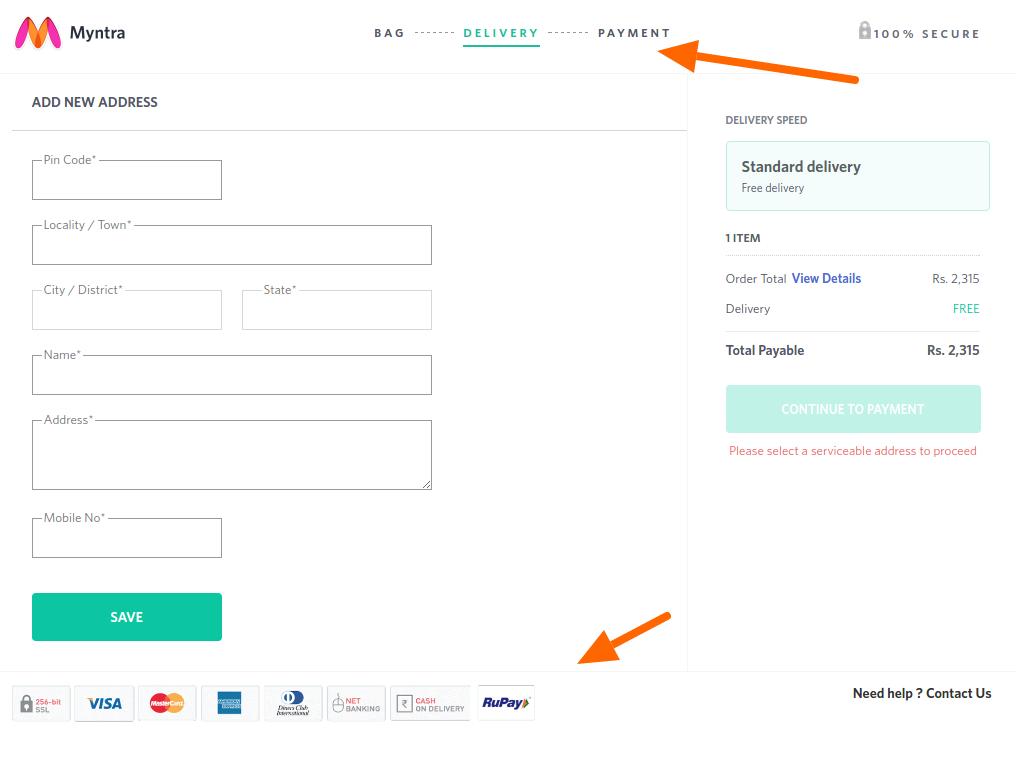
The guest checkout option provides the option to the users to register an account right after the checkout is completed. This is a nice touch to encourage account registrations without giving a burden to the customers.

4. Amazon’s checkout
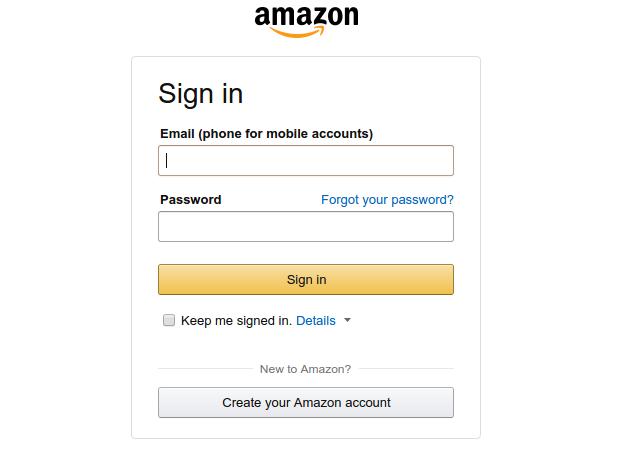
Amazon’s latest checkout emphasizes on account necessary registration

Amazon keeps testing its checkout process now and then. Currently, it is following a unique combination of traditional approach and it’s own peculiar call-to-actions. By highlighting the free two days shipping option on the product page itself, it reduces the task of shipping selection on the checkout page, plus an indirect promotion of Amazon’s prime service.

The common perception of an eCommerce checkout involves providing a lot of options like, Add to wishlist, continue shopping, guest checkout and so on. However, Amazon works on a different principle here. It emphasizes on creating a user account before you can proceed to the checkout page but provides a very quick and compact registration page.
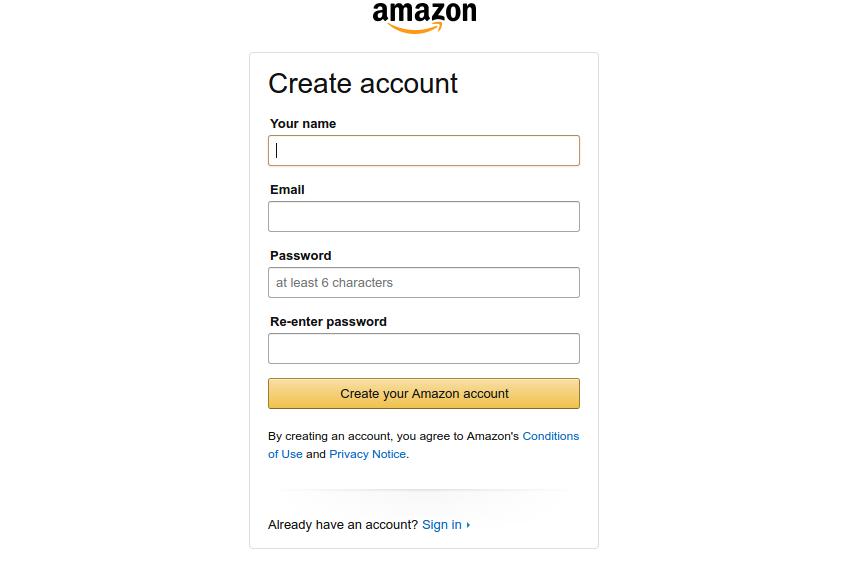
Despite the necessary account registration, Amazon still have a high converting checkout

By doing so, Amazon makes sure that customers entering the checkout funnel are not distracted by the leaks and completes the checkout with a personalized user experience. If your customers do not mind filling a very small registration form, Amazon’s approach is is an inspiration for you.
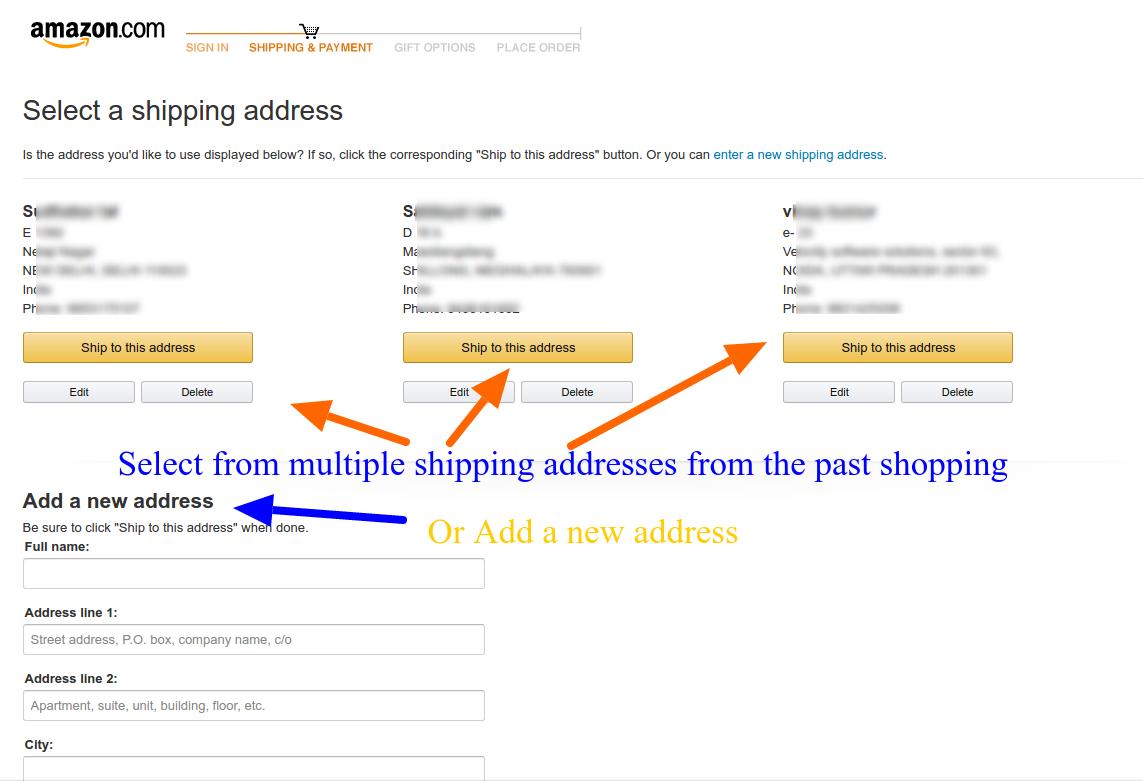
Caution: Amazon acts as almost a monopoly in the eCommerce market for various categories. Customers preferring Amazon won’t find a hard time filing small registration form. It might not be a similar situation in your case. I would suggest a comprehensive A/B testing campaign before finalizing the decision.

5. Mensuas’ checkout
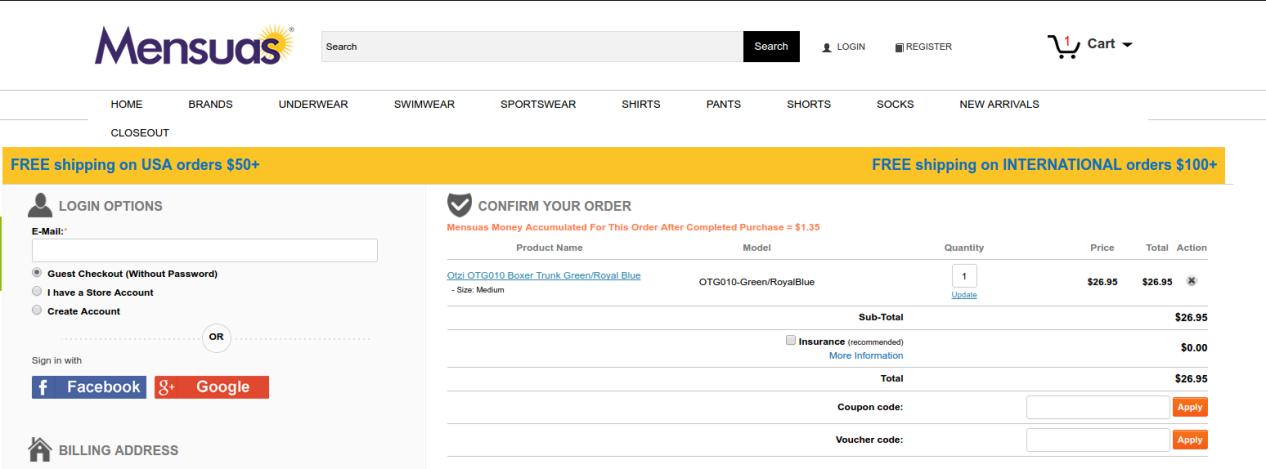
Mensuas have a single page checkout, with social login option

If account creation is not a preference for you, you might want to look at the checkout page of Mensuas. Mensuas is a leading destination in the US for fashionable underwear for men. Similar to Bellroy, Mensuas too provide a single page checkout to it, customers. However, it goes one step further by introducing social login on the checkout page. One can easily notice the emphasis on login options where you have multiple options to continue with the check out process- Guest checkout, User sign-in, and account registration.
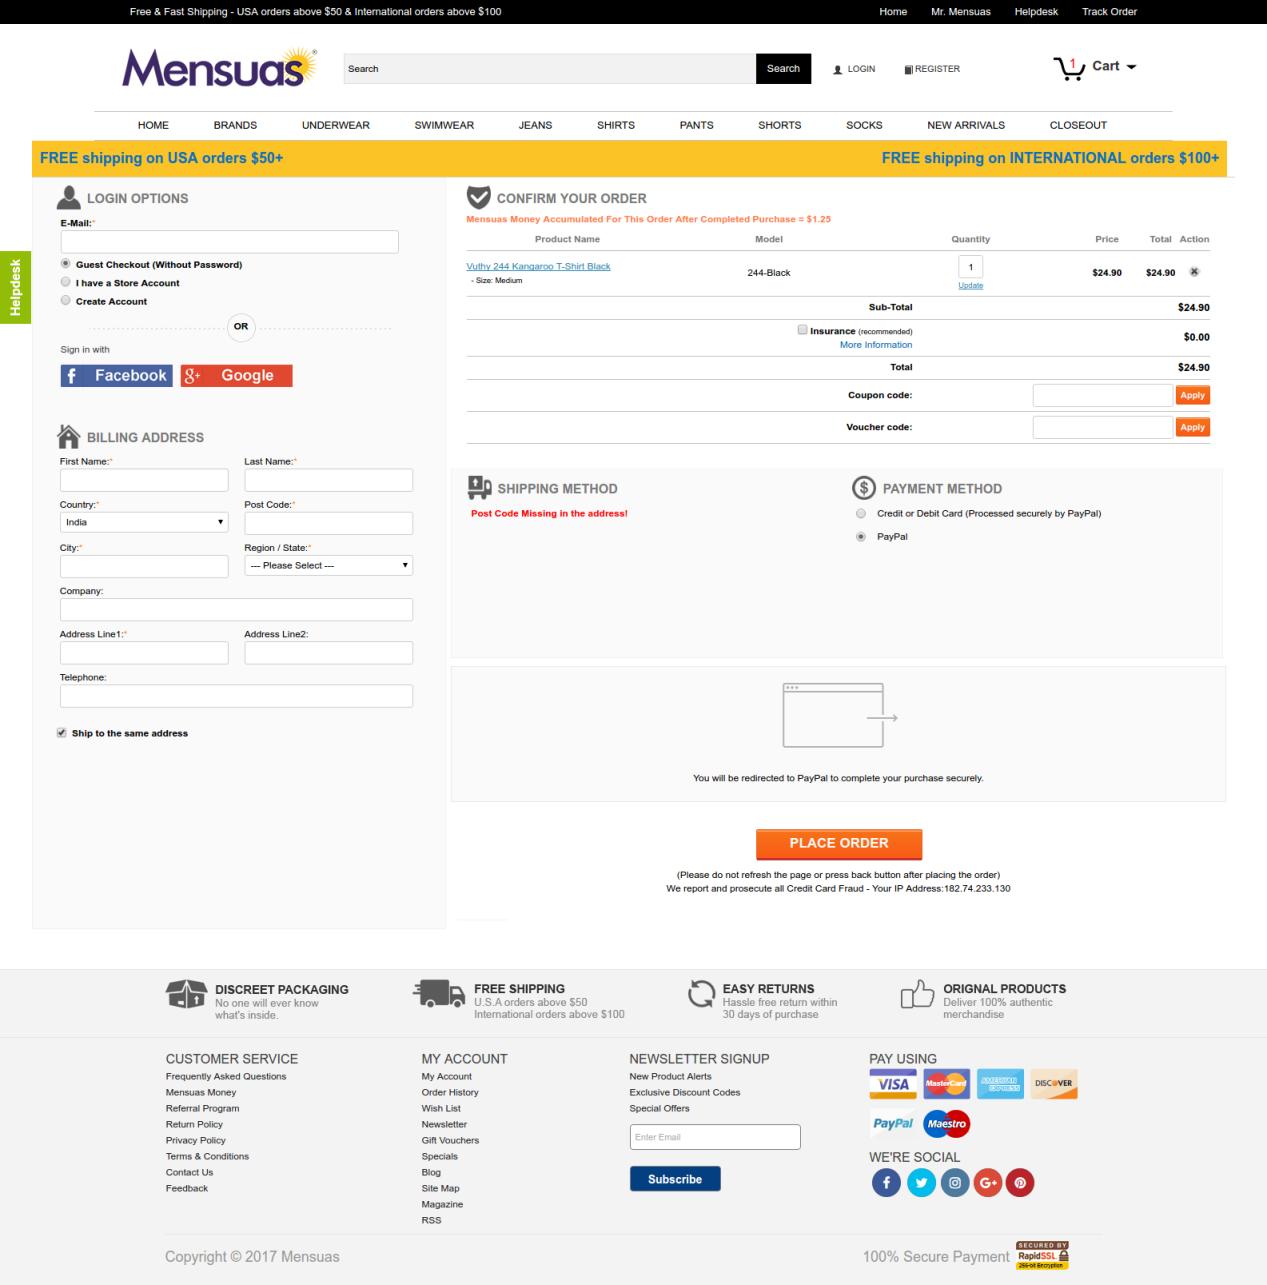
In case you are a new user, you can either checkout as a guest user, create a user account, or just use the Facebook or Google login option for direct login using your social platform credentials. By clicking on any of the social login options, the user can instantly login to the user account without filling a registration form. Thus, saving the customers from a burden to create user accounts manually. Social login makes the checkout experience very smooth and handles multiple reasons for cart abandonment at once.

6. Fab’s checkout
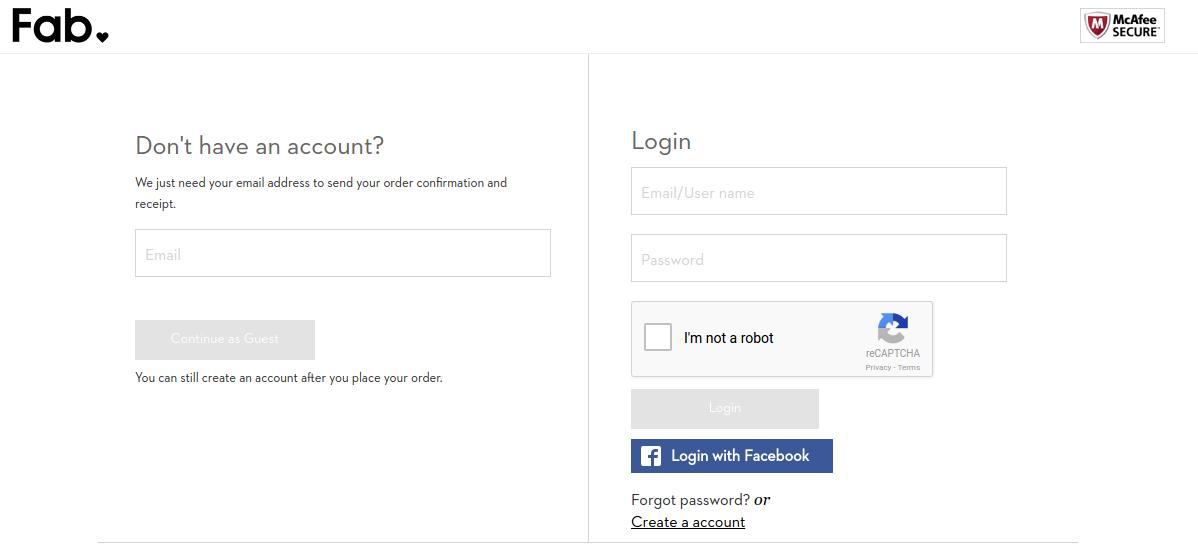
Fab provides a multi-step checkout with Facebook login option

Fab utilizes a well optimized multi-step checkout that can be completed without creating a user account manually. If you don’t have a user account already, you can choose from guest checkout or the Facebook login option.

It efficiently utilizes the Facebook login to encourage user registrations which is an important aspect of learning from Fab’s checkout page. It understands the importance of user accounts and how they can be used to create repeat conversions. So, it pushes the users towards Login option without actually forcing them.

The checkout process after login or continuing as a guest presents some well-optimized forms for providing the billing, shipping and payment information. The forms ask only the necessary information and do not demand secondary information from the users.

7. Nike Store’s checkout
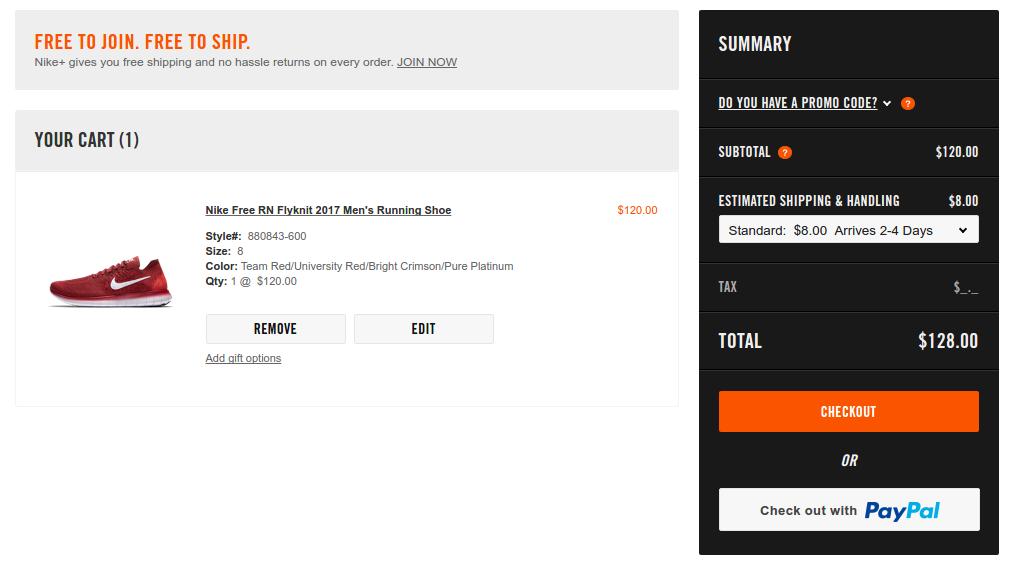
Nike’s checkout is preceded by an optional Paypal express checkout

The speed of the process is a major concern that haunts every store owner. Nike handles the situation by cleverly integrating a PayPal checkout option which provides a more faster and secure checkout. Moreover, for using a Paypal customers need to login using their PayPal account which automatically brings the customers to logged in users’ club.

For the regular checkout interface, Nike goes with a partial one-page checkout structure. I am saying partial because all the steps are not unlocked at once on the page. You have to complete the previous step before moving to the next step.
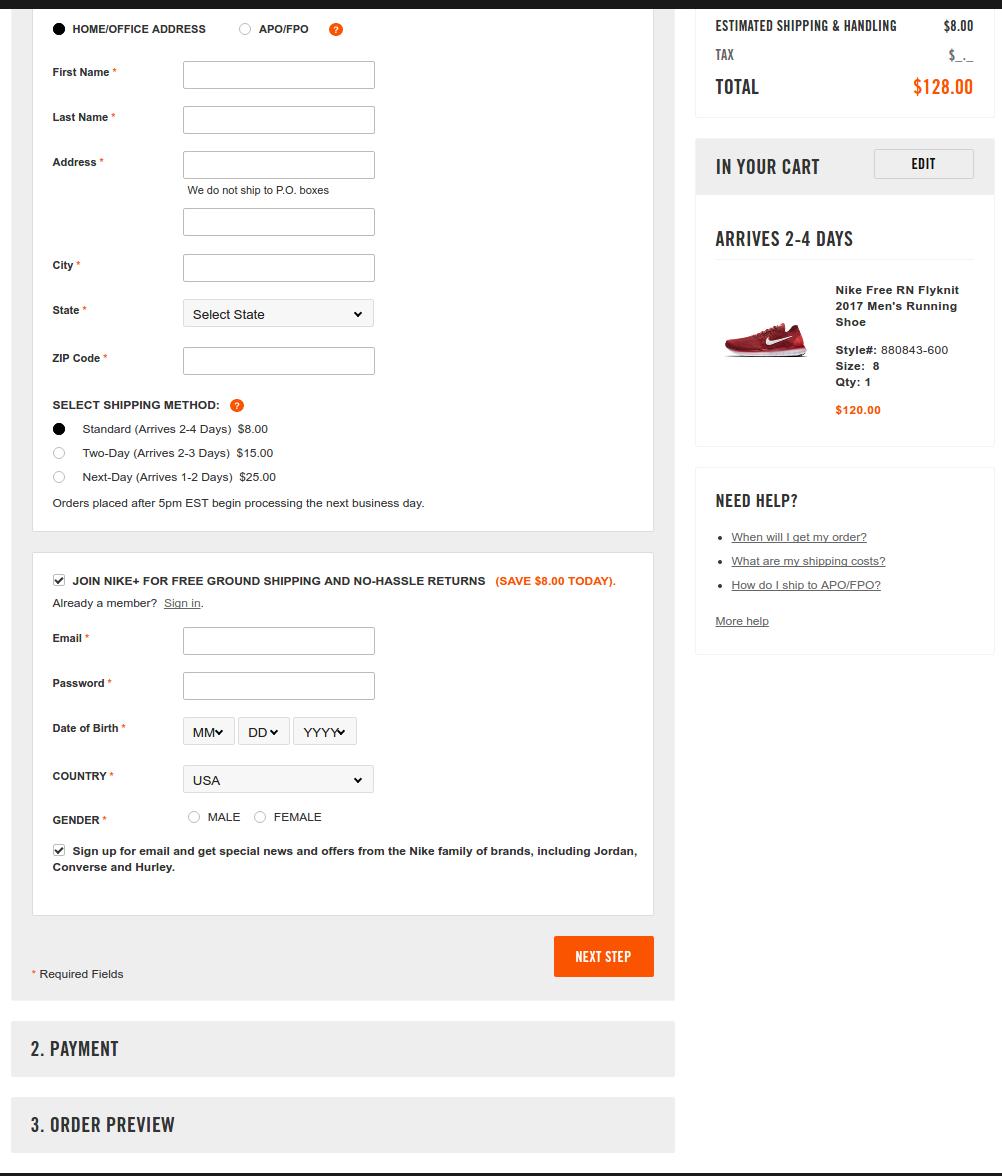
Nike’s regular checkout is inspired by the single page structure

Here users can choose to continue with the checkout without logging in and create the user account at the later part. Furthermore, the shopping cart summary in the right column keeps the users well informed about the miscellaneous costs associated with the cart- Shipping charges, total cost, single item’s cost.

8. Jabong’s checkout
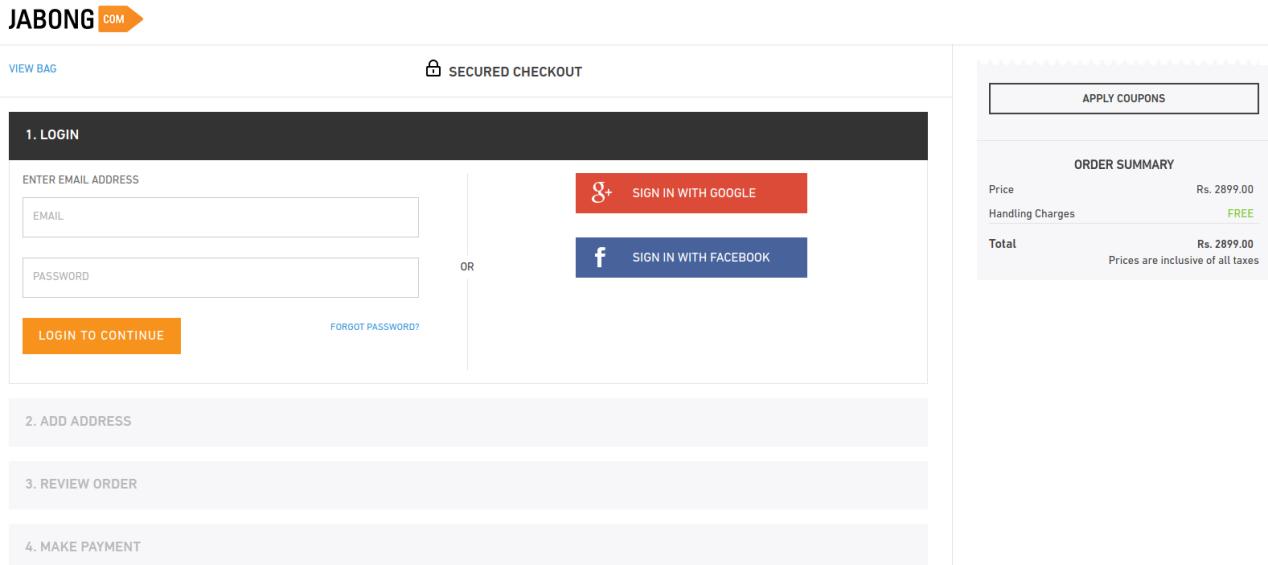
Jabong provides a streamlined check out process that keeps the users informed about the next steps plus allows multiple social login options. The further steps on the checkout page are well optimized to ask only few important details.
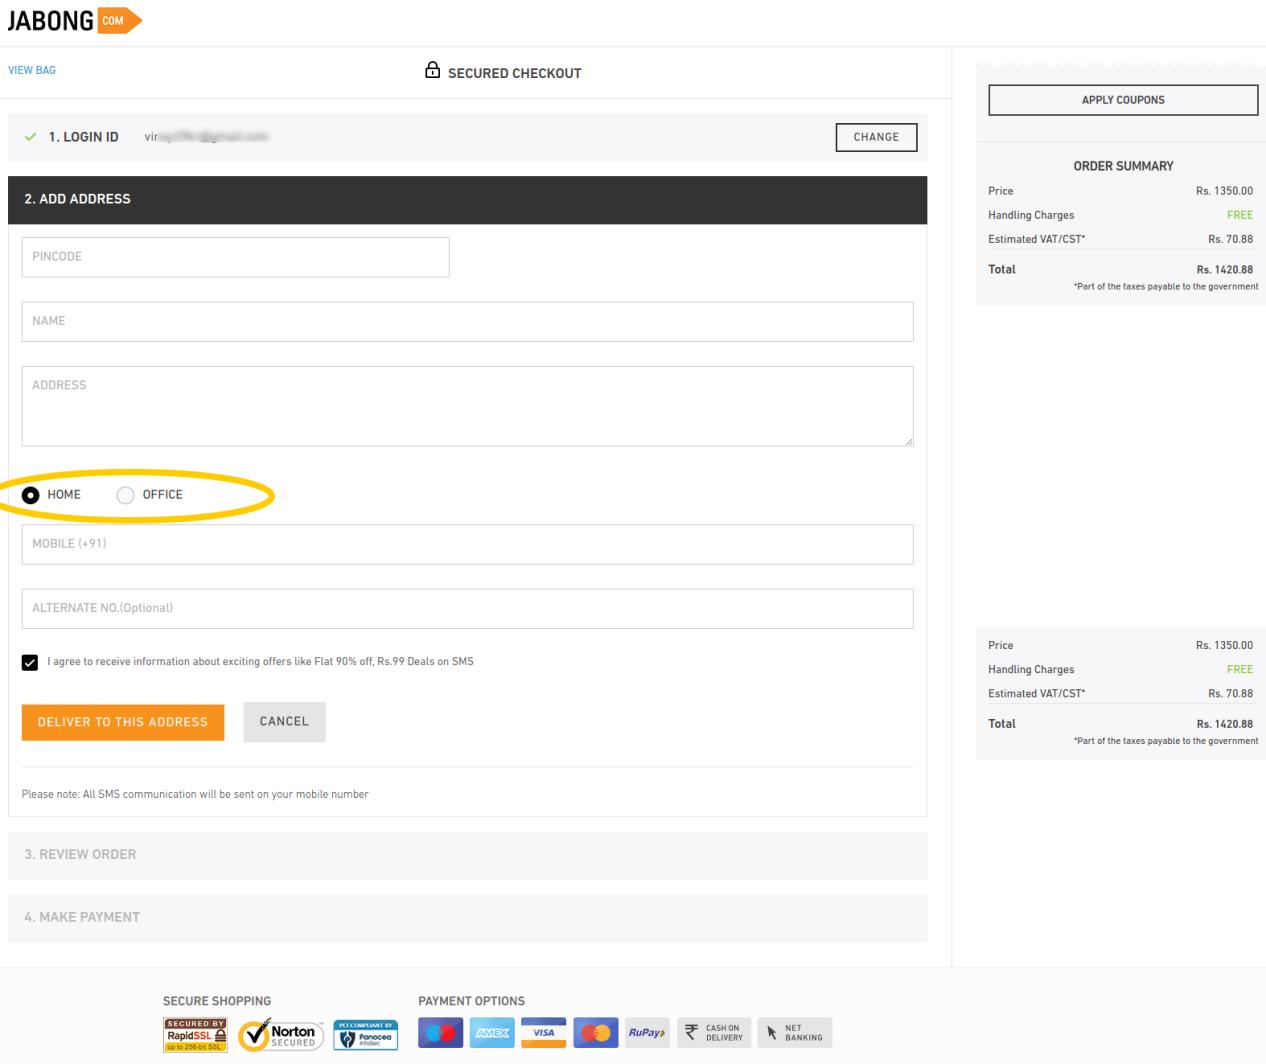
The most inspiring option that I found here was the option to specify if the shipping address is a home or office address. It helps the shopping site to deliver the items on a correct time, minimizing the chances for missing delivery. Furthermore, the alternate phone number field is an optional field which customers can choose to skip or provide. I have found this checkout as one of the fastest among the check outs I inspected.

The final takeaways

Summing up the entire case study, it is evident that whether you take UI or UX as the judging criteria, one page checkout is something that makes the process edgy. I will consolidate the entire features that make these checkouts best-of-their kind.

Single page checkout:

As per Baymard, complicated order processing contributes to around 28% of the cart abandonment. This is when a one page checkout can simplify the process for your customers.

Easy Signups:

Guest login options along with ease of signing up can make the checkout process effective. Along with this, social login options can give the checkout process of your site a notch-up feature. Almost all the eCommerce sites, be it an industry giant or a SME.

Implement upselling and cross-selling:

The check out pages should never provide an exit root and a dead-end to your customers. Instead, it should be used as an opportunity to generate additional revenue through upselling and cross-selling. Offering compelling reasons to the customers to browse the store right back is one of the best ways to achieve customer retention. You can do this by offering customers products related to the one that they ordered, or by giving them discounts on future purchases.

Mobile-friendly checkout:

With the latest Google update that emphasis on mobile-first indexing, it has become mandatory to make the entire mobile-responsive which includes the checkout process as well. Mobile commerce will account for almost 50% of the total online purchases by 2020 as per research. So, it inevitable to ensure that your mobile users get a flawless shopping experience. The checkout process of your site should be mobile-friendly as well. At the same time, it should never exclude any of the capabilities of the desktop site, such as social login option and one-page checkout. The mobile commerce experience should be identical to the desktop one in terms of the ability to browse, purchase and pay for products.
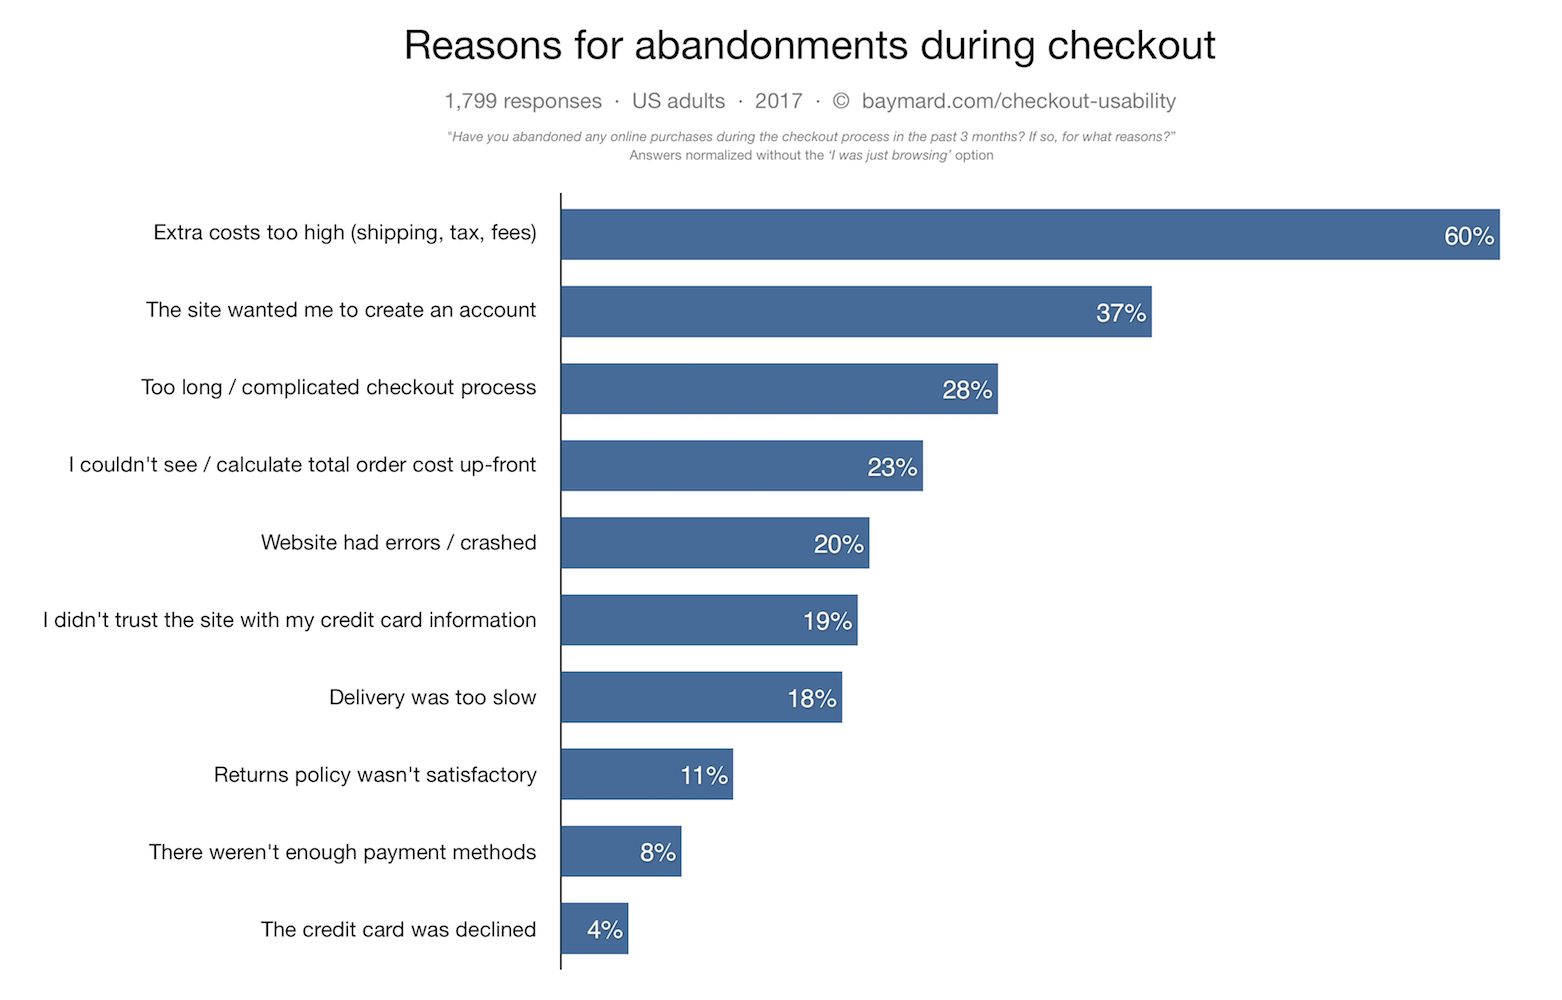
Source: baymard.com

Offer a variety of payment and shipping options:

Meeting your customers’ needs is the key to increasing your checkout’s efficiency. As per the result of Baymard’s studies, lack of shipping and payment options are another reasons for cart abandonment. So, you need to ensure that your prospective customers are able to pay and get the product delivered in whatever way is most convenient for them. Offer them as many payment and shipping methods as possible.

Ensure security:

Cyber security is possibly the biggest concern for the online shopping. The only way to keep the customers assured is by optimizing the UI of your site. The site’s design have a huge impact on the shoppers’ perception of your site’s security. An outdated-looking site will give customers the impression that the site is not reliable and will lead to a lot of them dropping off without purchase.

Conclusion

All these eight check outs are the best ones? It depends. I will leave that on our readers to decide, but I think they all have got something for us to learn from.
All of them do not insist on necessary account creation, except for the Amazon (Which was providing guest checkout a while ago). However, all of them including Amazon do inspire us to handle the first step of checkout wisely. While others handle the situation with guest checkout and social login, Amazon handles it through its compact registration form.

I like the approach of Mensuas, which provides the sign-up, sign-in, guest checkout and social login as well. Moreover, it’s single page checkout is well optimized in terms of form design.

Liked This? You’ll Like These Too
What we know about email marketing and what we don’t know

Email has been in the game for a very long time. It is a valuable resource for marketing of the product and services. Though it seems to be a very simple task to use emails as a marketing tool, there is actually lot more than what it looks on the surface. Despite all these, it is the most simple and most accessible marketing tool one can always have by his side.

Here, I am going to break into points discuss why email marketing is still the kind of digital marketing and what we need to know about emails.

1. Email is comparatively cheaper than other marketing tools-

Companies spend billions on print ads and internet advertising. However, when it comes to email marketing only a small proportion of their budget is specified for emails. It doesn’t mean that companies do not take emails seriously, it’s just email marketing is cheap and you do not have to reserve a huge budget for it.

“compared to other media, email messages are dirt cheap to send. With TV you are spending on ad agencies, creative studios, and cable channels. With print ads, you are helping to keep newspapers and magazines alive. Direct mail costs more than $600 per thousand pieces. With email, there are almost no costs at all. But its low cost only makes the argument stronger that email marketing is the most cost-effective advertising method available today”– hbr.org

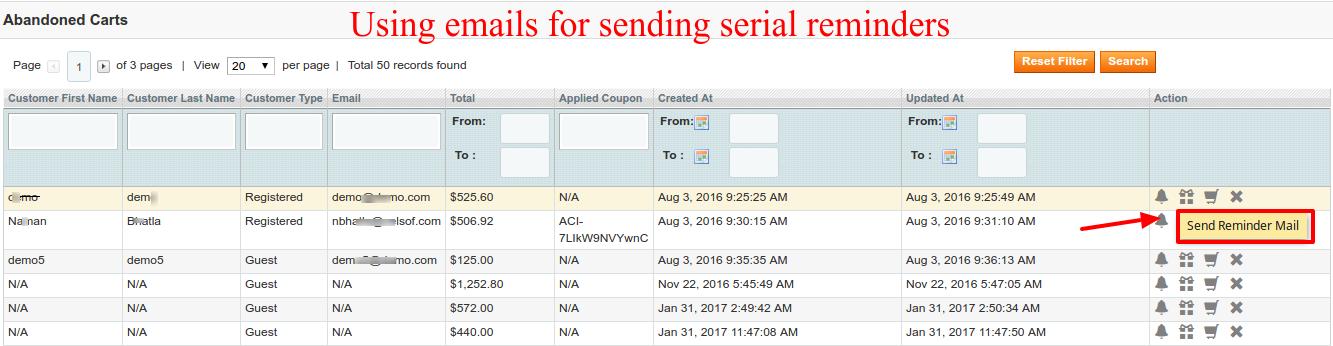
E-Commerce stores use emails to notify customers on various event, send offers and discounts, send account related data, send newsletters and abandoned cart serial reminders. For sending large volume of emails at a time, merchants implement features to integrate email marketing vendors such as MailChimp and Constant Contact on their stores, while some choose to just use these tool independently.

Leveraging emails for sending abandoned cart reminders to the customers

You don’t have to believe my words for it. Just look at this joint study from shop.org and Forrester Research that says ” 85 percent of US retailers consider email as one of the most effective tools for customer acquisition”.

Email might have become the oldest online marketing tactic, but it still remains a vital one. It’s relatively easy to perform an email marketing campaign rather than spending fortunes on print and internet advertisements. Undoubtedly, email marketing cannot replace the print and internet advertising, but it is always something that is more easy and cheaper.

2. Email is a better tutor of Marketing skills-

If you do not have enough experience, you often rely on trial and errors to learn more. Marketing, for example, is a similar field which teaches you various lessons in every success and failure. With some of the means of marketing, you can never be sure whether the money you invested is paying off.

With modern email marketing, there is no need for trial and errors in most of the cases. You have tools backing your marketing campaign which can be used to forecast the trends and requirements. They can suggest the right time to send emails when there would be better chances for better open rates. You can also measure the click-through rates and see if the emails are doing their jobs.

For example, with tools for Abandoned cart reminders, you can send automatic emails with offers, coupons, and simple reminders to those customers who have abandoned your carts for any random reason. It is a handy way to recover lost sales due to shopping cart abandonment.

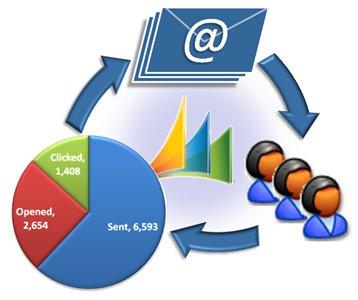
Email analytics to discover the performance of the campaign

In email marketing, you can discover exactly which emails have been clicked, by whom, what links were clicked on, and what part of your message was working. Thus, providing a greater insight into your marketing campaign and teaching you lessons in very campaign.

3. Emails are the mainstream and used by everyone-

If you ask anyone in your market if they use email, they will say yes for sure. Social Media marketing is a widely popular environment, but it cannot be said that every potential customer in your domain in on a social media channel.

With everyone not on a social media channel, email becomes the mainstream. Nearly everyone in your domain is believed to have an email account.

Moreover, 91 % of the email users check their emails at least once daily. It makes clear that ROI from emails could be comparatively as greater than social media marketing which is more costly than email marketing.

4. Emails are more direct way for broadcasting to relevant population-

Social media allows multi-way conversations between many to many users. Most of the time a broadcast through social media ends up with a huge population of audiences who are not even directly relevant.

Email, whereas is a more direct conversation that usually connects relevant people and does not involve additional participants. It might be considered as a drawback of email that limits the audiences for your broadcast. However, considering your efficacy to collect relevant email list and data, it cannot be a limitation. If you have effective tools to collect email data for your marketing, you might see that it is better to connect with few those who will be interested in your business, instead of a huge number of audiences who doesn’t even know about your business.

5. Emails are the driver of online and in-store sales-

Email marketing is so popular not just because it is easy and cheap, but because it is effective and drives sales. A study by Nielsen says that:

“28 percent of online shoppers subscribe to store or product emails simply to stay informed. 27 percent of online shoppers subscribe to store or product emails to save money.” 

A similar stat can be seen in a data from Deloitte that say 65 percent of customers find email coupons important in online grocery shopping.

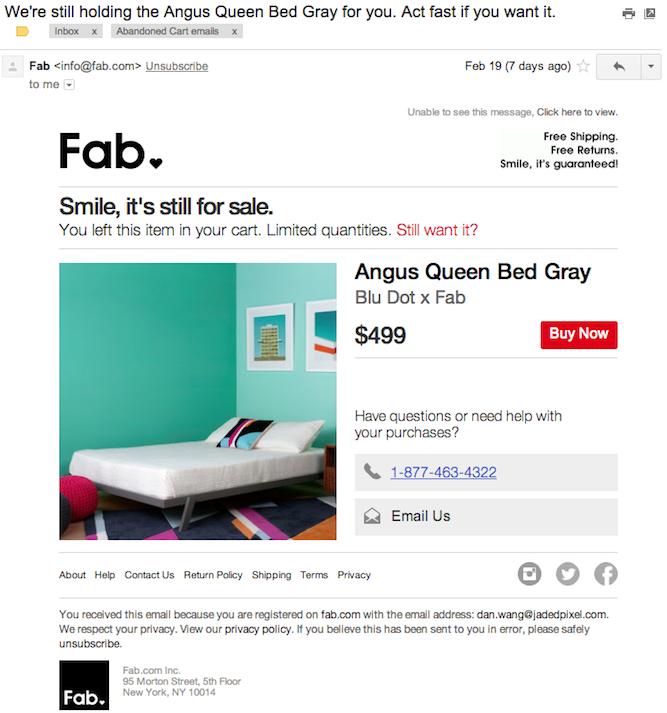
Online stores get a fair chance to attract customers through offers in emails

Email marketing is an effective way of reaching out to the customers and having a chance for bargaining with them. Even the biggest brands believe in email newsletters and reminders to attract customers towards their stores. So, email is everywhere and it cannot be ignored for sure.

Liked This? You’ll Like These Too

Magento 2 Return Manager Extension – User Manual

1.0 Introduction

Magento 2 Return Manager extension by Knowband adds the functionality to manage return requests for any order placed by a customer as well as a guest customer. The Magento 2 order return module adds a link to the front-end through which any customer/guest customer can apply for return of any product contained in an order placed earlier.

This Magento 2 return manager extension is a very flexible plugin and the customer can return any product in a order completely or partially, that means the customer can also return half or less quantity of any product in the order.

For a logged in user (if the Magento 2 product return manager extension is enabled from backend) the return manager link appears in Account options list (near the cart link) and in the quick links shown in the footer and opens a page containing the list of all the orders placed by that particular customer and the products that are eligible for return have a link to apply for return. This page also contains the history of returns applied by the logged in customer.

In case the user is not logged in the return manager link opens a page containing a form to find any order. After finding an order using the form the order detail appear and the products from that particular order that are eligible for return have a link to apply for a return. This page also contains the history of returns applied by the customer who has placed this particular order.

What’s New in the updated version:

In the updated version of the Magento 2 return manager extension, the online merchant gets an option to add custom CSS and JS codes for the look and feel related settings. The e-merchant can also allow online users to cancel their orders and return requests if they wish to do so. Admin just needs to activate the related settings from the admin interface of this Magento 2 return product extension.

Apart from this, admin can also show or hide multiple return methods like a replacement, refund or product return. Online store merchants can add multiple return addresses from the admin interface and also update it as per the requirements.

1.1 Merchant Benefits of the Magento 2 Return Manager Extension

  1. The Magento 2 return manager extension by Knowband allows the store admin to enable/disable the extension as per the desires.
  2. Magento 2 product return module provides an option the merchant to create the own return policy.
  3. With the help of the Magento 2 order refund module, the store merchant to add the N of return reasons.
  4. The Online retailer can view the customer pending request from the back-end of the Magento 2 return manager extension.
  5. The admin allows the Guest customer to initiate the return request for the purchases product from the back-end of the Magento 2 return manager module.
  6. Magento 2 return manager extension by Knowband enables the attachment file option. Apart from this, the admin can limit the size of any attachment.
  7. The Magento 2 product return extension provides an option for the seller to customize the return slip settings and guidelines attached to the customer email.
  8. The eCommerce vendor can customize the email template subject and title from the admin interface of the Magento 2 RMA extension.
  9. The Admin can add the own return policy.
  10. Knowband Magento 2 order return extension allows the store admin to change the return status of the placed request.
  11. With the help of the Magento 2 product return extension, the Magento 2 store admin can create the RMA request on behalf of the customer.
  12. The Magento store merchant can view all pending return request from the back-end of the Magento 2 return extension.
  13. The Online store retailer can be approved or deny the shopper’s return request only just button click.
  14. The Admin can export the all return request via CSV format from the backend of the Magento 2 order return module.
  15. The Admin can also change the success message of the Credit RMA, Refund RMA and Replacement.
  16. The online merchant can allow online users to delete their orders and return requests.
  17. There is an option to add custom CSS and JS codes for the look and feel related customization.
  18. The online merchant can allow online users to return, refund and replace the products.
  19. There is an option to add multiple addresses from the Magento 2 refund order Extension admin interface.

2.0 Technology for Development

Language: PHP

Frame Work: Magento

3.0 Installation Guide

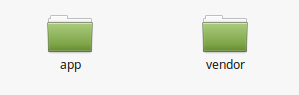
1. The folder structure of the Magento return manager extension folder.

2. Copy all the folders into Magento root directory and clear the cash (if enabled).

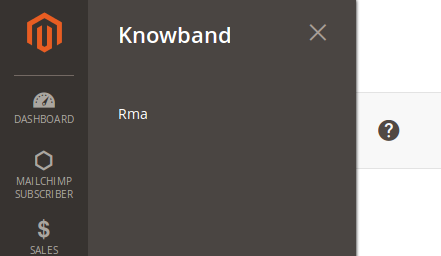
3. You will be able to find the “RMA” option inside the “Knowband” option.

4. Now you need to install tcpdf library (Only if not already installed). TCPDF is a library to generate pdf.

5. Make sure that composer is installed on your device.

6. To install tcpdf library, go to the Magento 2 installation directory root and run following command from the terminal:

Sudo composer require tecnickcom/tcpdf

7. After this command, it will ask for credentials.

8. If you don’t have credentials then go to the following site and create a new account.

“https://www.magentocommerce.com/magento-connect/customer/account/login/”

9. After logging in, go to the Connect tab and click on Developers, then click on the “Secure Keys” option and generate a new key.

10. Now use the public key as the username and private key as password (look step 7). These are the credentials you have to enter.

11. Sit back and relax. TCPDF library will be installed on your device soon.

12. It may ask you to run upgrade command when any page is opened. To do that, go to Magento 2 root folder, open terminal there and run following command

sudo bin/magento setup:upgrade

After this command run next command

sudo bin/magento setup: static-content:deploy

And then provide permissions (read, write, execute) to the all magento directories.

Eg. chmod -R 777 <root_installation_directory>

13. Now you are ready to go.

 4.0 Admin Module

After installing Magento 2 return manager extension into thestore, the Magento 2 return module will provide following interfaces inside “RMA” option:

  1. General Configuration
  2. RMA Configuration
  3. Return Slip Settings
  4. Pending Requests List
  5. Approved Requests List
  6. Archived Requests List
  7. Canceled Requests List

Each interface is in the form of a tab and each tab contains some specific settings/functionality that can be changed according to the need. Each tab is explained below.

4.1 General Configuration

In general settings, there are two different configuration tabs available, both are described below:

4.1.1 General Settings

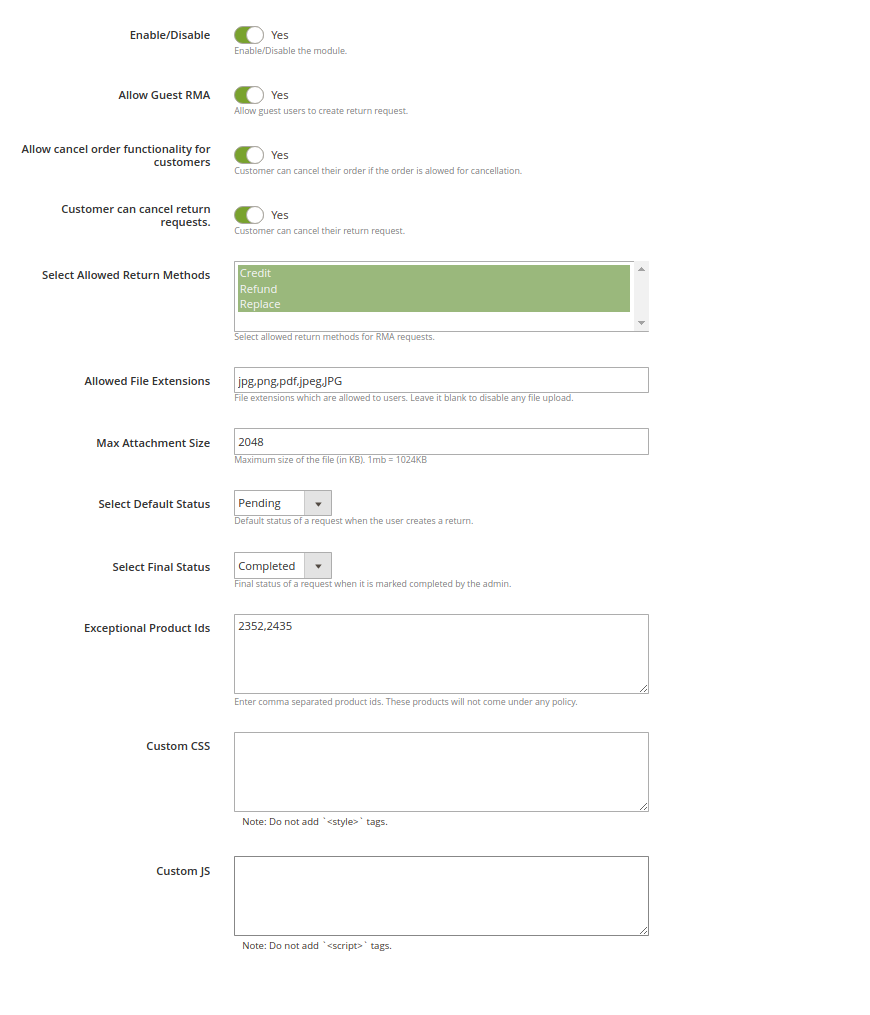
After clicking on the RMA tab, the system will open general settings tabs by default as shown in the screen below:

Initially, fields in the above form will be already filled with their default values.

  • Enable/Disable: Initially, this will be “OFF”. Admin can enable/disable Magento 2 return manager extension by turning ON/OFF in this setting.
  • Allow Guest RMA: This drop-down contains “Yes” and “No” options. Set this as “Yes” to enable the return feature for those users also who are not logged in.
  • Allow Cancel Order Functionality for Customers: Activate this option for allowing the users to cancel their orders.
  • Customers can cancel return requests: Users can cancel the return request if this option is enabled from the admin interface of this Magento 2 order return manager Module.
  • Select Allowed Return methods: Select from the credit, refund and replacement options.
  • Allowed File Extensions: This option accepts the comma (,) separated file extensions (without space) which can be uploaded when customer uploads file related to the return request.
  • Max Attachment Size: In this field maximum allowed file size is accepted. The file size will be in KB. Eg- To allow files up to 1MB set this field as 1024.
  • Select Default Status: Admin can set the default status of the customer’s return requests.
  • Select Final Status: Admin can select the final status of return request.
  • Exception product Ids: Enter the product ids which you don’t want to map with any return policy.
  • Custom CSS: Enter Custom CSS code for the look and feel management.
  • Custom JS: Enter JS codes for the look and feel settings.

To save the settings, click on the “Save” button shown in the right upper area.

4.1.2 Success Messages

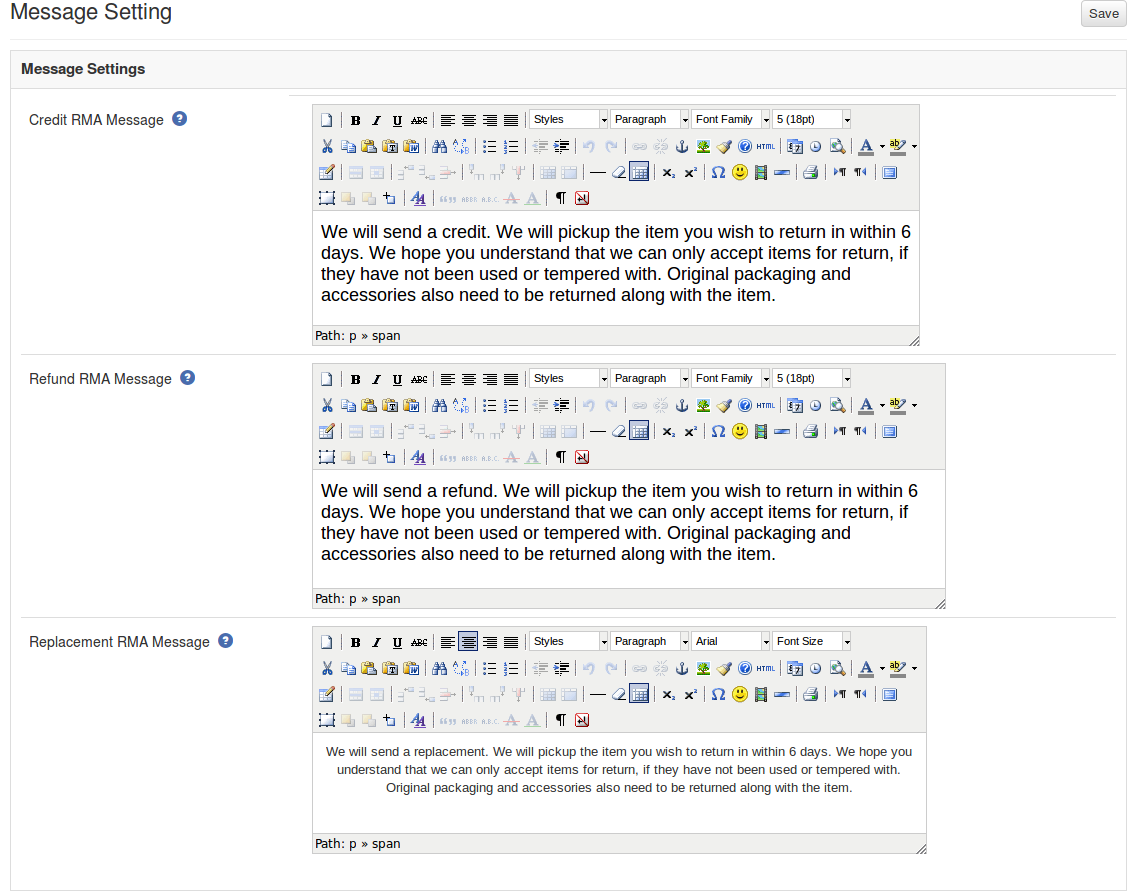
This tab contains three text areas having html editors. Using the editors, the admin can set the style of the success message to be shown in the pop-up whenever the request is successful.

There are three messages.

  1. Credit
  2. Refund
  3. Replacement

 4.2 RMA Configuration

In RMA Configuration, there are multiple configuration options as shown below:

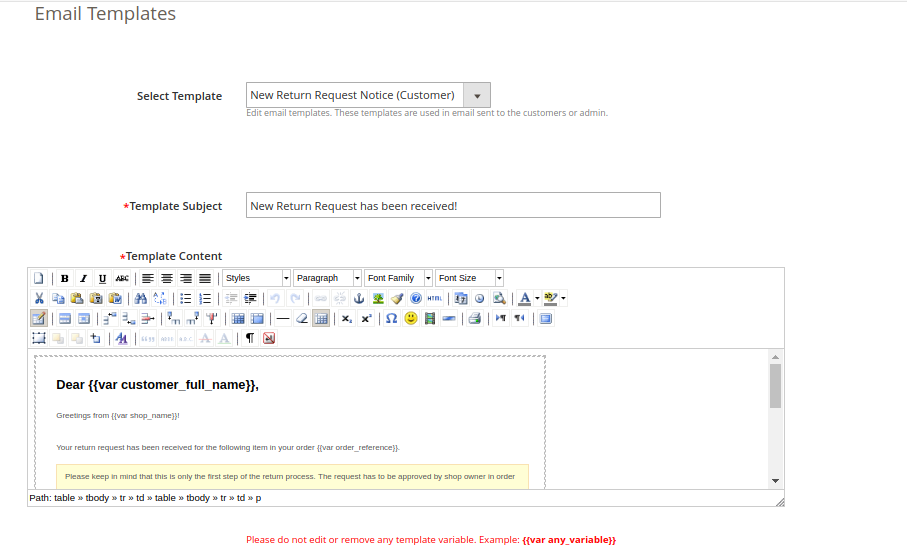
4.2.1 Email Template Settings

This tab contains an interface through which the admin can edit any email template that is used in this system.

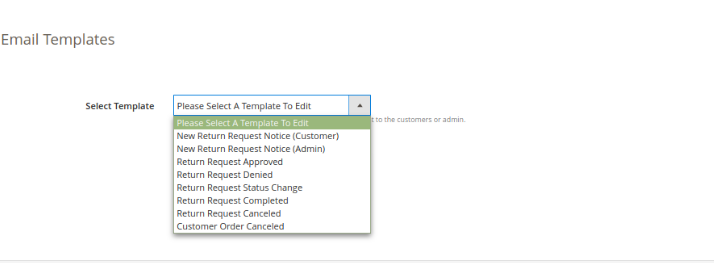
There are 8 email templates available that are used by this plugin:

  • New Return Request Notice (Customer): This mail template is used to notify the customer regarding the new Return Request generated by the customer itself. The customer who has created the return request will only receive this mail.

  • New Return Request Notice (Admin): This mail template is used to notify the Store Owner regarding the new Return Request generated by any customer.
  • Return Request Approved: This mail template is used to notify the customer regarding the Approval of the Return Request that is created by the customer earlier.
  • Return Request Dis-Approved: This mail template is used to notify the customer regarding the Dis-Approval of the Return Request that is created by the customer earlier.
  • Return Request Status Change: This mail template is used to notify the customer regarding the update in status of the Return Request that is created by the customer earlier.
  • Return Request Completed: This mail template is used to notify the customer regarding the completion of the Return Request that is created by the customer earlier.
  • Return Request canceled: This Email Template is available for notifying the online users regarding return request cancelation.
  • Customer Order Canceled: The email template is available for notifying the customers regarding order cancelation.

To edit an email template the admin has to choose the desired email template. On doing the same the email template data will appear in a form below, to save the changes made the admin has to click on the ‘Save’ button.

4.2.2 Policy Settings

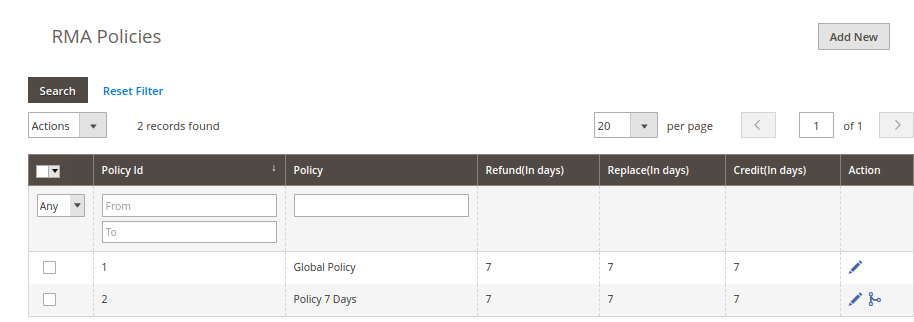
In this Magento 2 return extension, the admin can add new return policies for the plugin and can also edit or delete an existing return policy for the plugin.

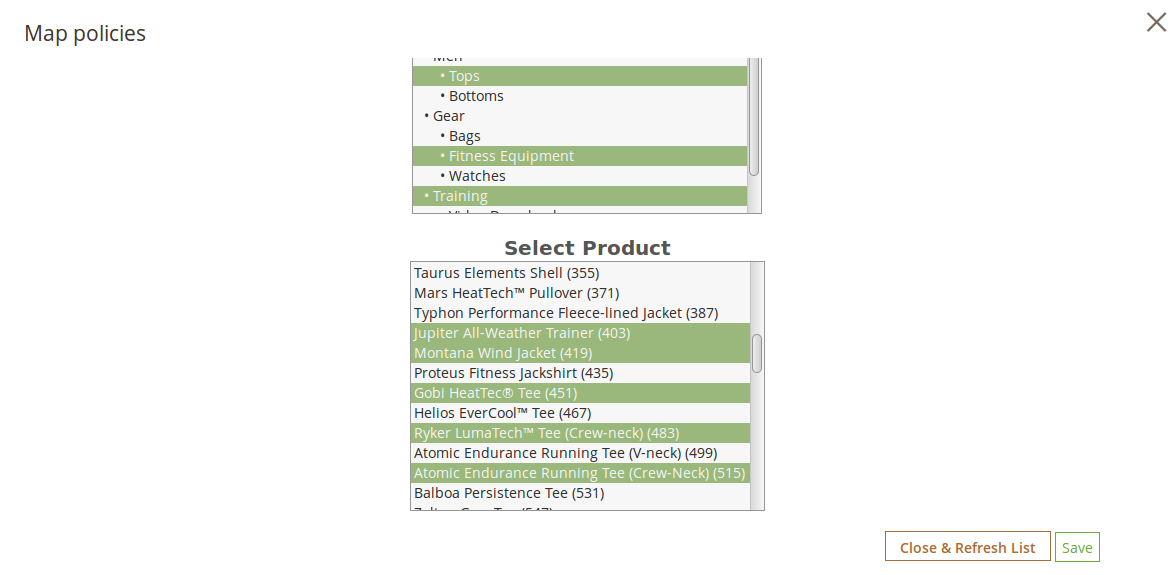
There is also an option to map the return policies to products.

Note: A product can only be mapped to a maximum of one return policy.

This tab contains a list of existing return policies for the plugin. The admin can also create a new return policy using the ‘ Add New ’ button shown near to the “Save Settings” button.

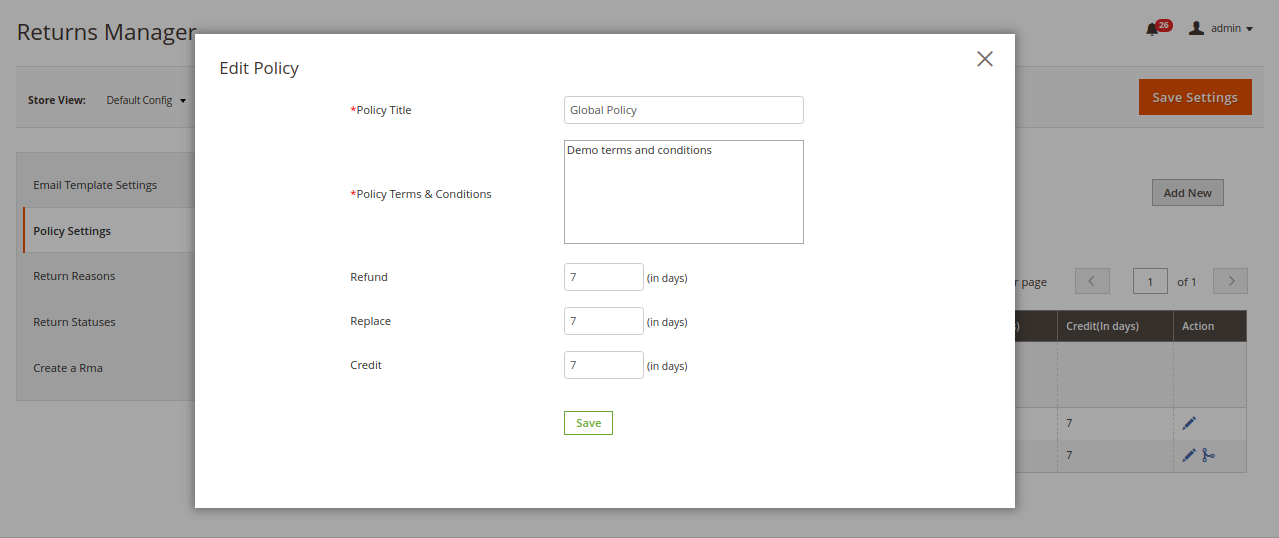
After clicking on the add new button a pop-up appears containing the form to create the return policy.

The form contains several input fields to enter the data of the policy like the name of the policy, terms and condition of the policy and the option to choose the parameters i.e. Credit, Return and Replacement.

The admin can also enter the days applicable to this return policy for different options as shown in the form below.

The add new policy form will look as shown in the screen below:

Actions

1. The admin can edit any policy using the first link in the Action column from the policy listing table. On clicking this link a modal containing the form for the policy will appear and the data for that policy is already filled in the fields. The admin can edit any data and can save the changes made.

2. The second link in the actions column is for mapping products to the policy. On clicking this link a modal will appear containing the options to map the products to that particular policy.

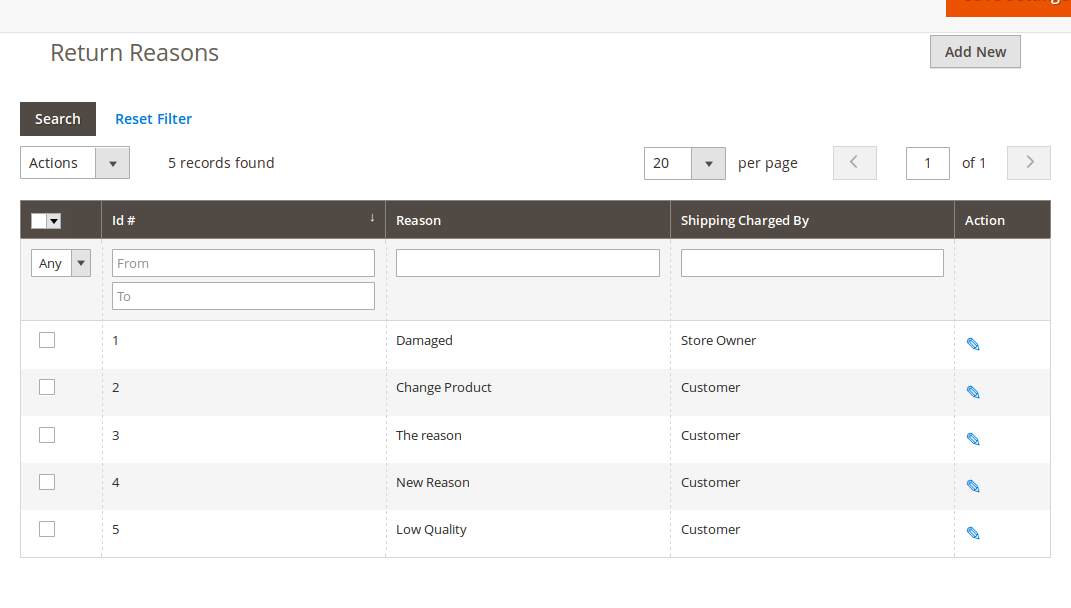
4.2.3 Return Reasons

In this Return Manager for Magento 2 tab, a list of return reasons will appear in the form of a table. By default, there are 2 reasons already added to the system.

In the Action column, there is a link to edit the reason in front of every row.

The admin can add as many reasons as required to the system using the ‘Add New’ button. On clicking on the button a form will appear to add new Return Reason into the system. The form is shown below:

Admin can edit any reason as well by clicking on edit icon shown in front of every reason.

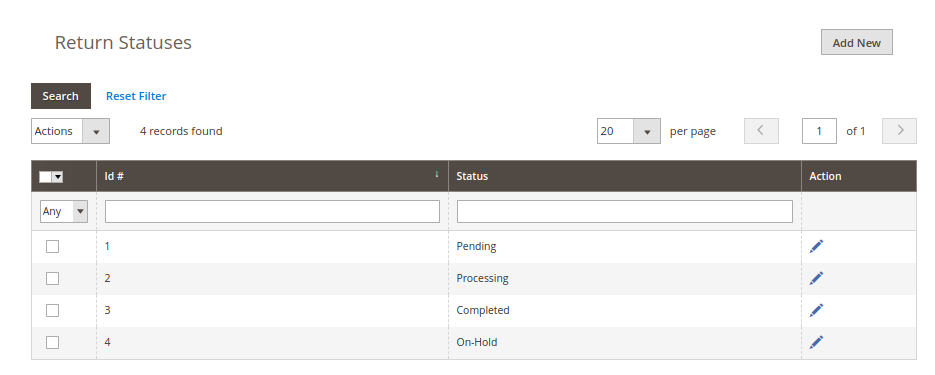
4.2.4 Return Statuses

This Magento 2 return manager tab contains a list of return statuses in the form of a table. By default, there are 4 statuses already added into the system. The admin can further add any numbers of statuses into the system.

The links below the action column in the statuses list is for editing the existing return statuses.

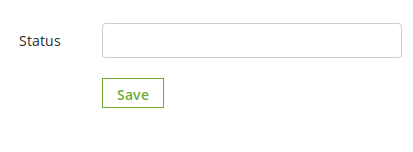
The admin can add as many statuses as required to the system using the ‘Add New’ button. On clicking on the button a form will appear in a modal to add new Return Reason into the system. The form is shown below:

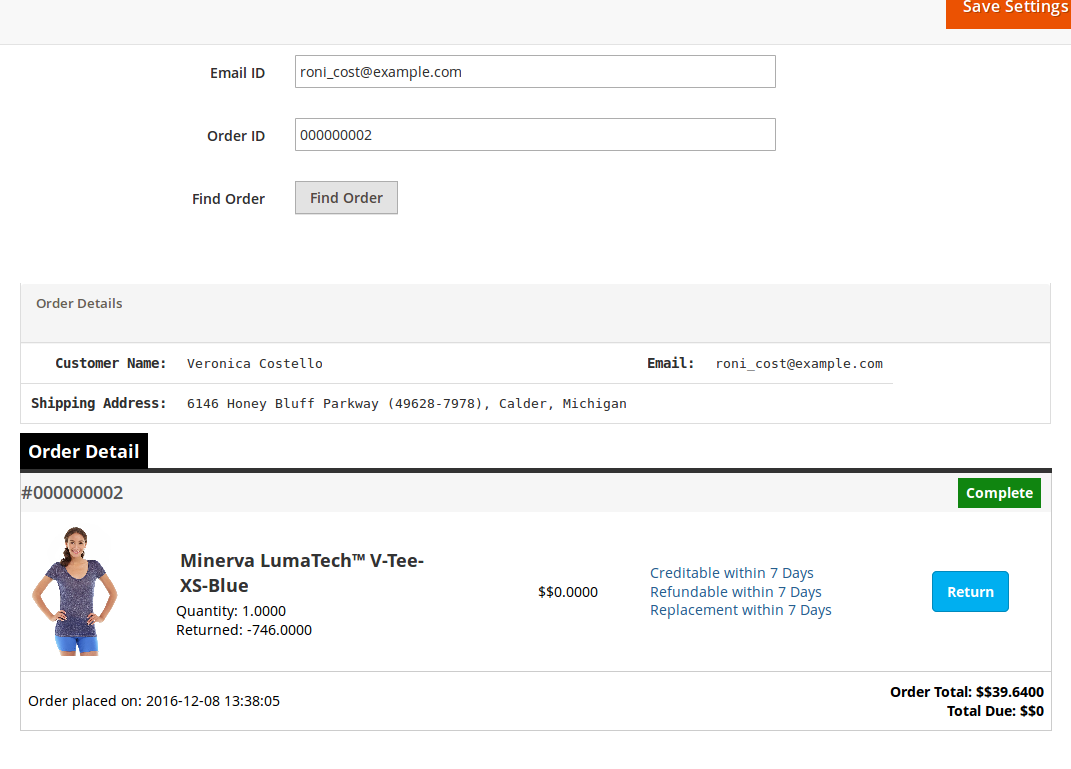
4.2.5 Create a RMA

This tab is used to generate a return request from the admin panel itself. The tab contains a form through which the admin can find any order by simply providing the reference number and the corresponding e-mail and then apply for return accordingly.

Note:

  1. Any return request whether is created by admin or customer is moved to the pending returns and the admin has to approve it first to further change the status of the return request or to take any further action.
  2. The orders that are delivered or completed are only eligible for return.
  3. By default the status of the return request is set to default return status set by the admin in the ‘ Return Statuses ’ tab.

When the admin finds an order using the find order form then the order detail for the respective order will appear containing the list of products and a return button in front of products eligible for return. When the admin clicks on the return button a pop-up will appear containing the return from and enter specific data for the return request.

The admin has to fill the above form and then click on submit then a success form will appear showing the successful submission of the return request as shown below :

4.3 Return Slip Settings

In return Slip settings section, the online merchant will again get two configuration settings:

4.3.1 Return Slip Settings

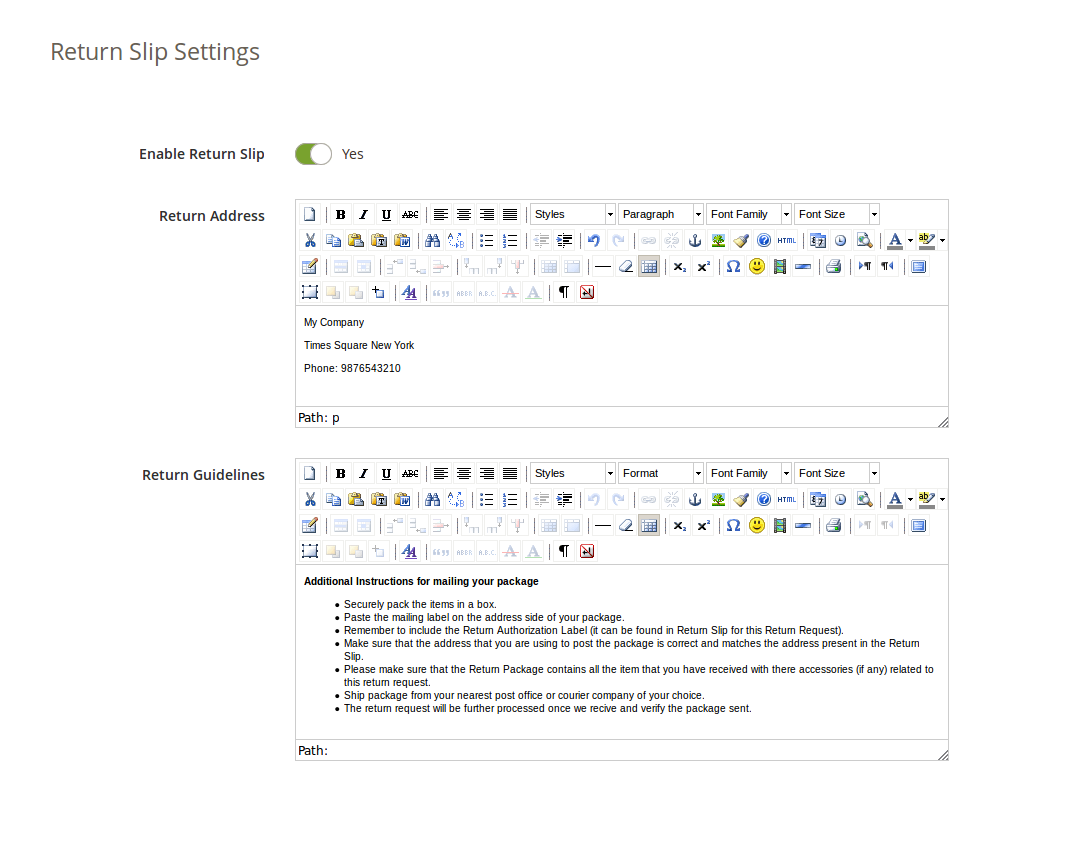
In this Magento 2 RMA module tab, the admin can alter the settings and content of the Return Slip. This return slip is generated automatically when the admin approves any return request (if the feature is enabled). The return slip is generated in ‘.pdf’ format and the link are mailed to the customer in the mail for Return Request Approval Notification.

  1. Enable/Disable Return Slip: Initially, this Magento 2 return manager extension will be “OFF”. Admin can enable/disable the Return Slip feature by turning ON/OFF in this setting. Return slips are only generated when the feature is turned ON.
  2. Return Address: This Magento 2 product return extension has an option to print the address on the return slip and will also be displayed on the return request form.
  3. Return Guidelines: These guidelines will be printed on the return slip.

4.3.2 Return Addresses

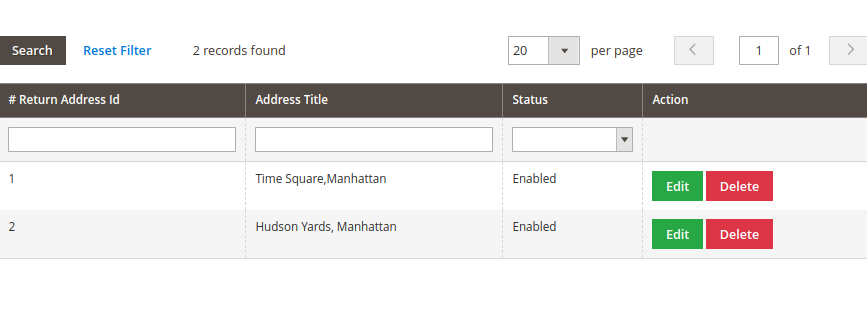
In return addresses section, the online merchant gets an option to add multiple return addresses from the admin interface. Admin can add, update and delete the return addresses easily.

Admin can edit the return address easily as shown below:

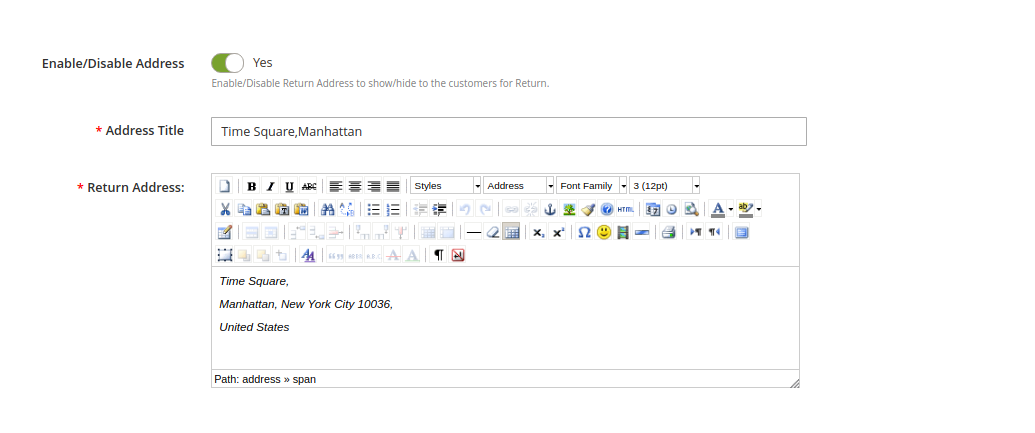
Admin needs to enter these details as shown below:

  • Enable/Disable Address: Activate or deactivate the settings.
  • Address Title: Set Address title from here.
  • Return Address: Enter the return address here.

4.4 Pending Requests

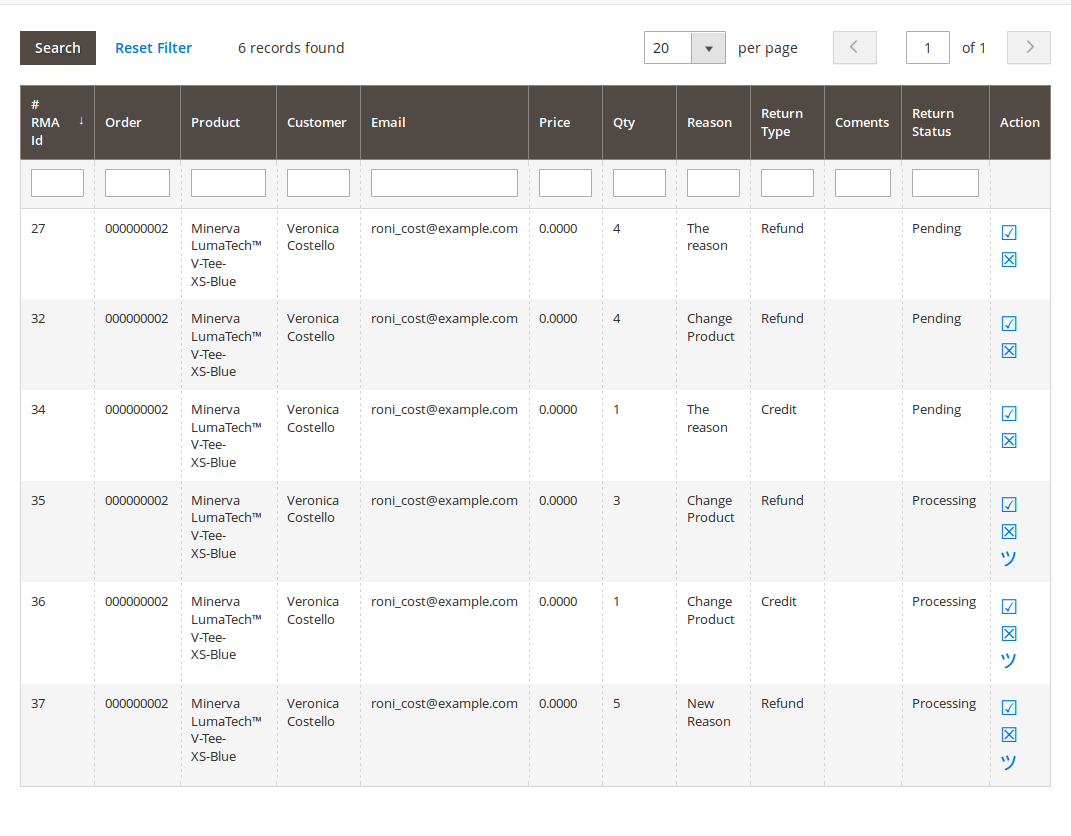
This tab contains a list of all the returns that are pending i.e. are not approved by the admin. The admin has to approve a return request in order to perform several operations on the return request like approve and dis-approve the request or download/view the file uploaded by the customer.

The admin can approve or deny a return request using the actions available in front of the list.

Admin can also download or view the file uploaded by the customer. View option is only available if the customer has uploaded the file.

Once the admin approves a return request then it is moved to the Active Returns List.

On the other hand if the admin denies a return request that it is removed from the list and this action can not be undone.

4.5 Approved Returns List

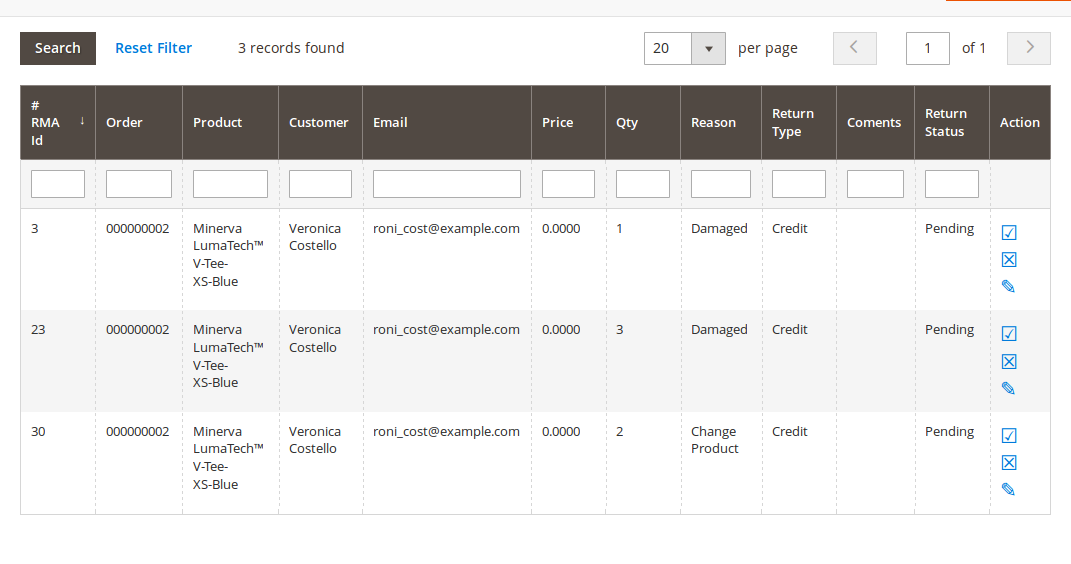
This tab contains a list of all the returns that are approved by the admin. The admin can proceed with the return process after approving the return request using this tab. The admin can change the status of the return request and can also deny a request form this tab and can archive the request as well.

The actions that can be performed from this tab for the active returns are:

  1. Deny the return request.
  2. Change the status of the return request by clicking on the edit icon.
  3. Mark the return request as complete / add to archive.

When the admin marks a return request as complete then it is moved to the archives list.

4.6 Archived Requests

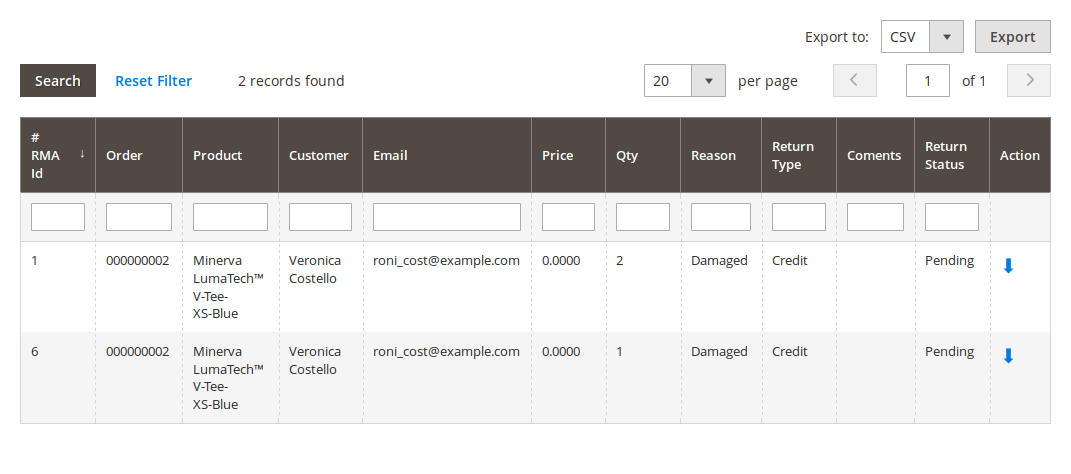
This tab contains all the return requests that are complete. The tab also contains a form through which the admin can filter the archives list.

There are options to export the data into csv file.

Single row can be exported and the whole data can also be exported using mass export option.

4.7 Canceled Return Requests

In the canceled return requests section, all the canceled return requests will be listed.

5.0 Front End Module

After enabling the plugin the front-end user will see a link in the header of the front-end through which the user can navigate to a new page.

The link in the header of the front-end will appear as follows:

When the customer clicks on this link than a new page will open on the basis of logged in status of the customer.

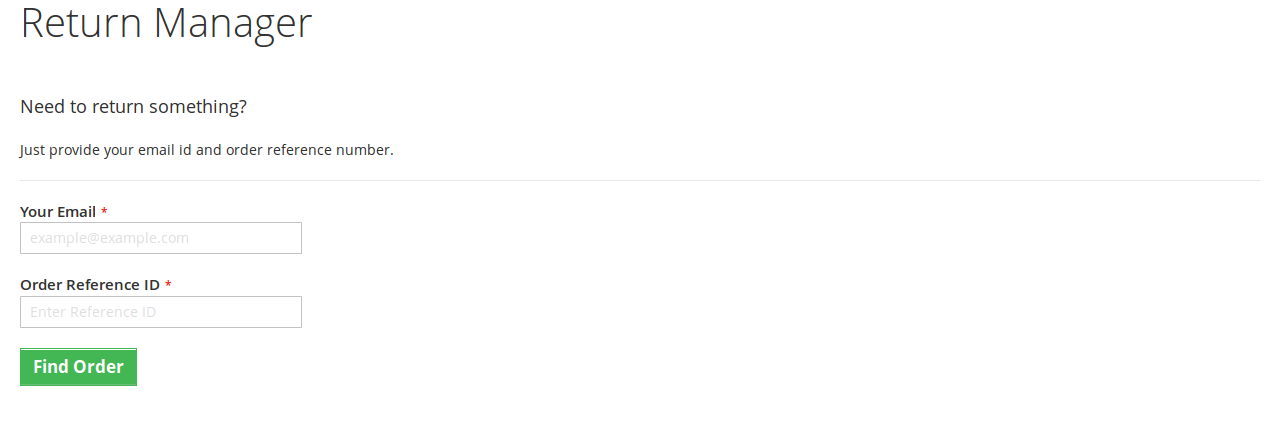
In case the user is a guest and is not logged into the website then the page will contain a form to find the order as follows:

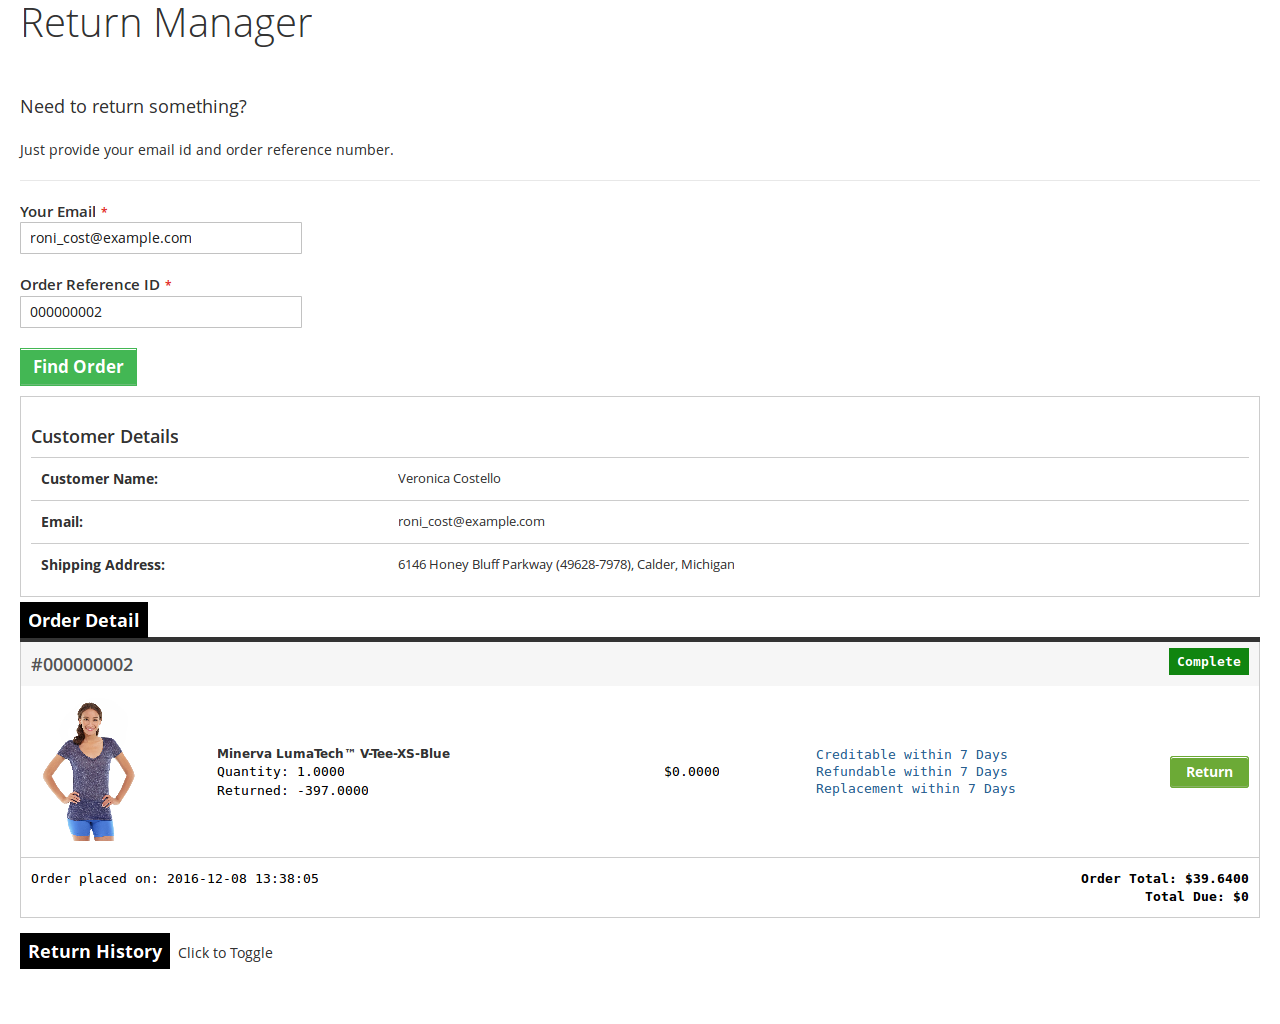
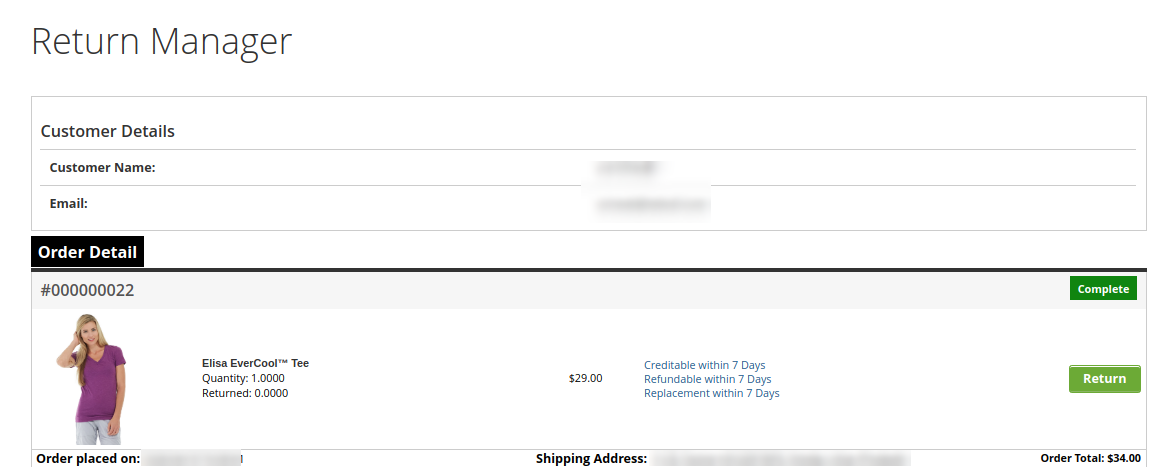
After proving the order reference number and the respective email the details of that order will appear including the return history on the basis of the email provided by the customer. The order details will appear as follows:

The products that are eligible for return in that particular order will have a return button. Through this button the customer can apply for return of that particular product.

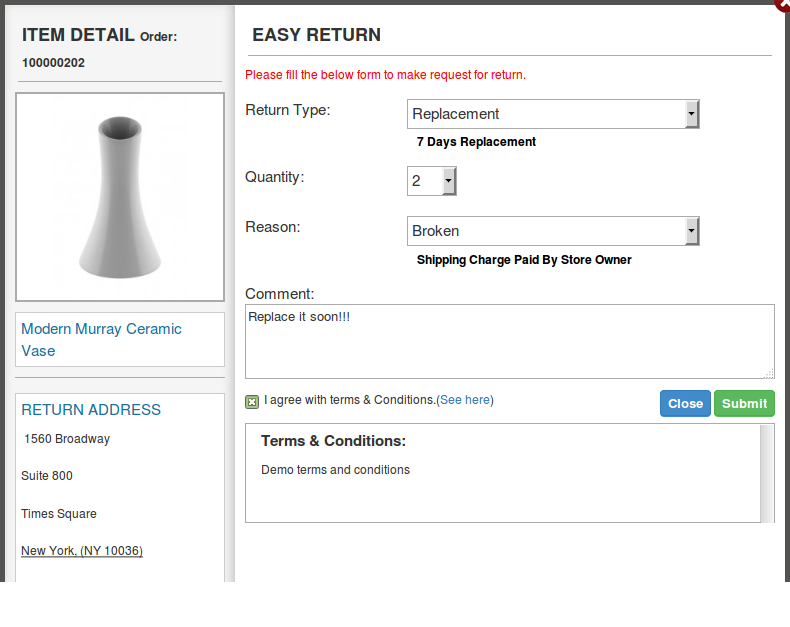
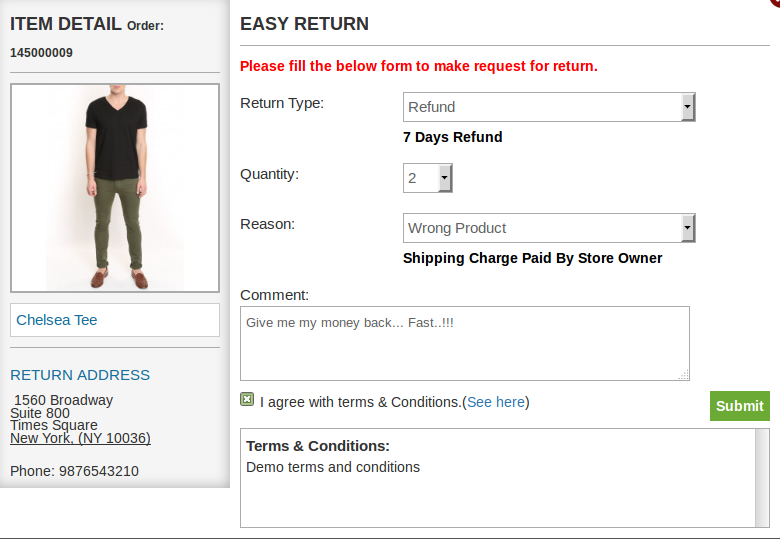
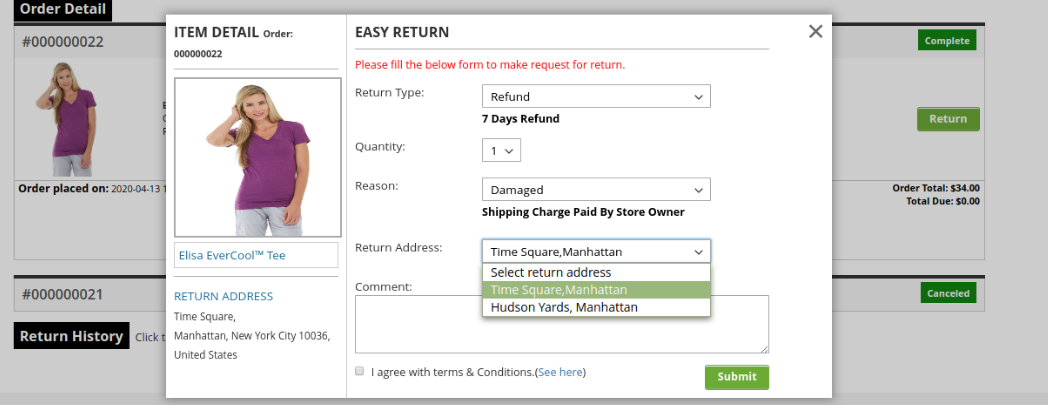
By clicking on the ‘Return’ button a pop-up will appear containing the form for return of that particular order. The form will appear as follows:

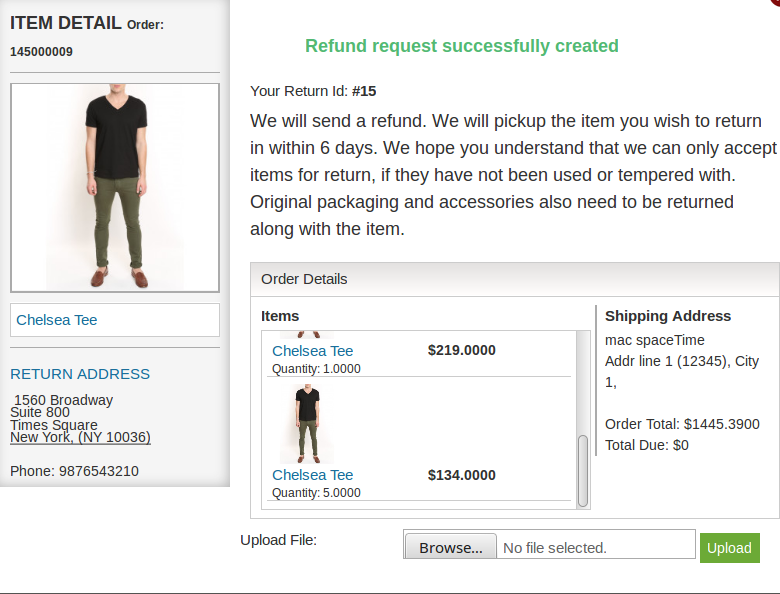
The customer has to fill the above form and then click on submit then a success form will appear showing the successful submission of the return request as shown below :

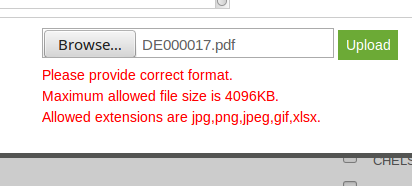
There is as option to upload files in the success page. From where you can upload file and admin can view/download that file from aamin panel. File limitations are set from admin panel.

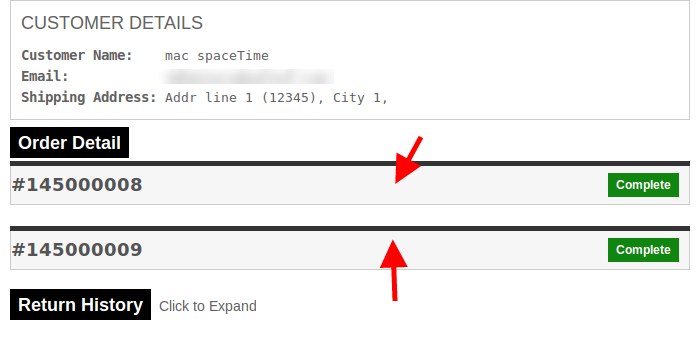
– In case the user is a registered customer and is logged into the website then the page will contain a list of all the orders placed by the customer. The page will appear as follows:

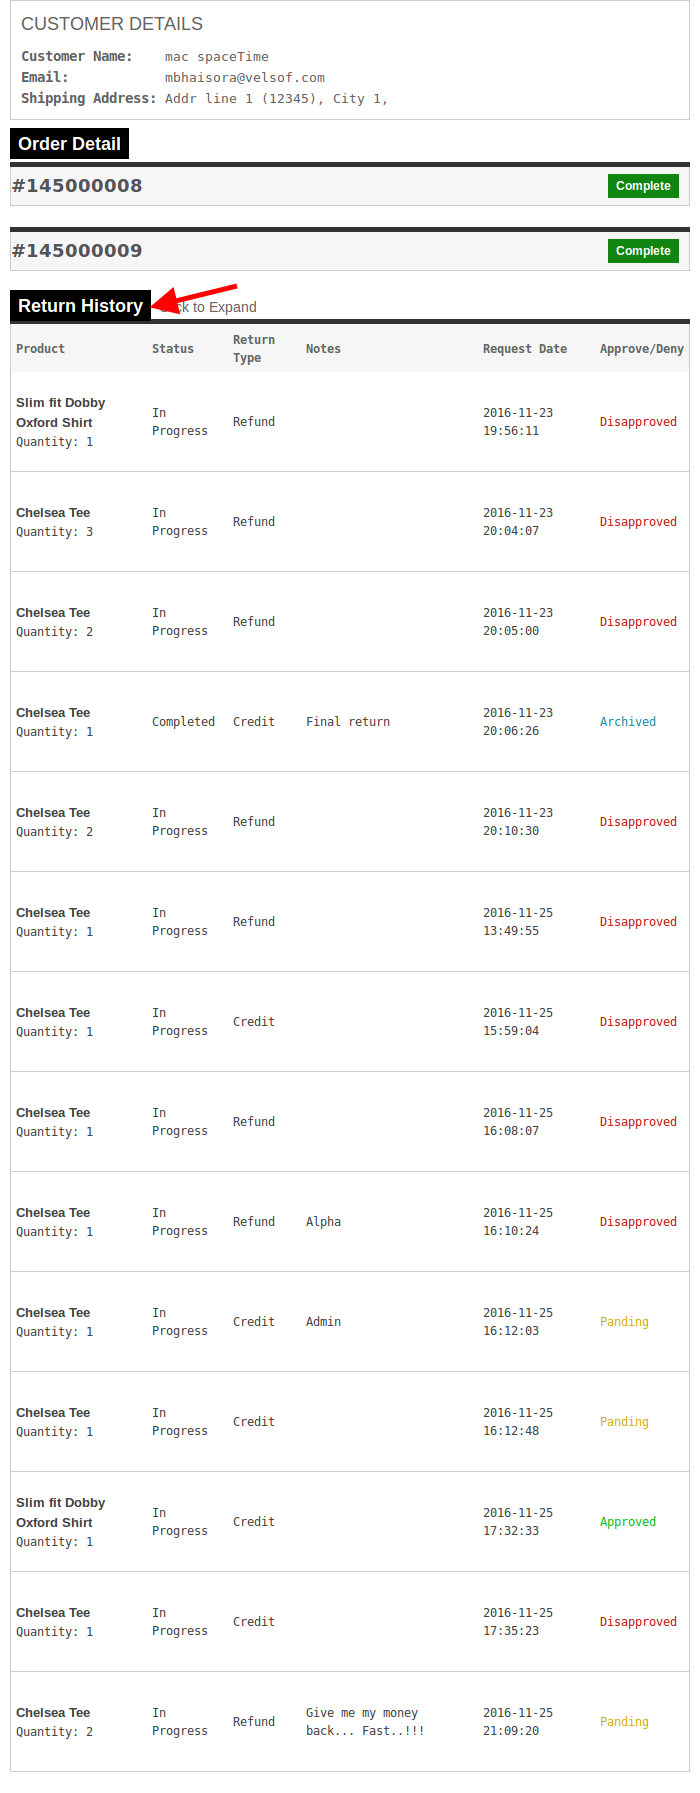
There will be the details of every order. We can expand any of the order division (will have to click where the arrows are pointed). On click the respective order division will be expended.

To view all the history of the return requests, user will have to expand the “Return History” tab.

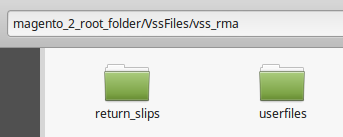
Additional Notes: Please make sure that there is a folder in you magento root directory named VssFiles. Inside VssFiles, one folder called “vss_rma” should exist and two more folders should be created (if not exist) inside “vss_rma” folder. Names of the folders inside “vss_rma” are “return_slips” and “userfiles”.

“magento_2_root_folder” is the same folder (directory) in which other folders like “app”, “bin” etc exist. “return_slips” folder contains all the slips generated during return process and customers can download return slip and the “userfiles” folder is the folder where files uploaded by users are stored.

After creating folders please give all of these folders full permissions. If folders exist already, then also give full permissions (-w-r-x).

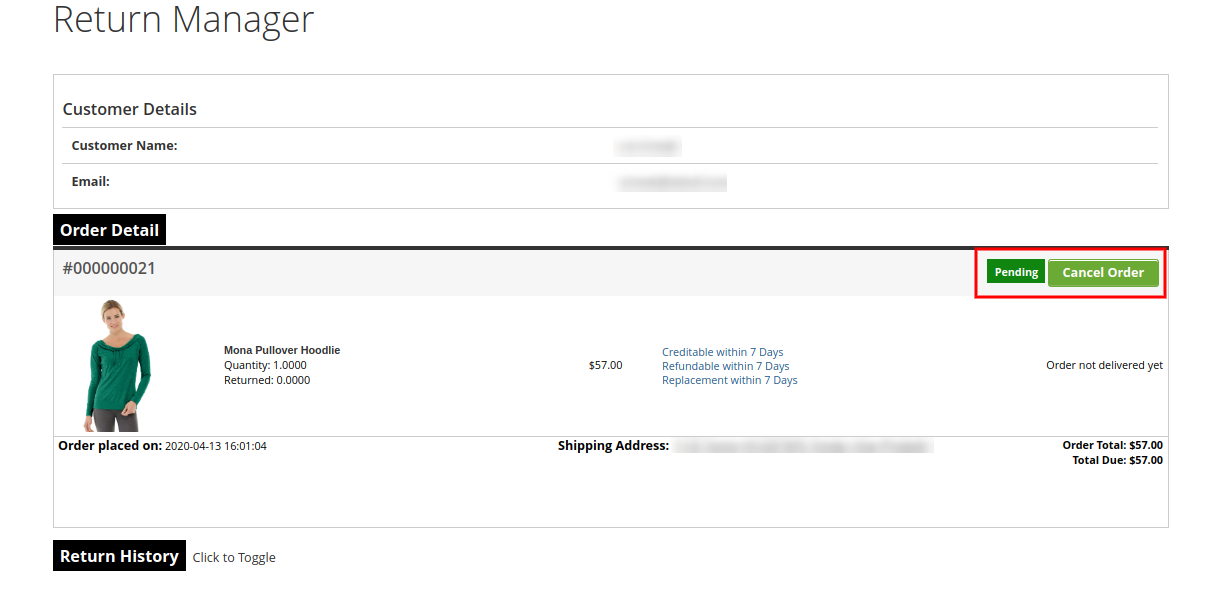
In the updated version of Magento 2 Return Manager module, the online users get an option to cancel their orders:

The online users can also place return request as shown below:

Online users can select from multiple addresses as shown below:

This way, the online merchant can manage product returns easily on the website and make the overall process simple for online users. The Magento 2 return manager extension is highly customizable and offers a user-friendly interface to the users. The Magento 2 order return manager extension is mobile responsive ie. the online users can also view the return related details on their mobile devices. Magento 2 refund order Extension allows adding multiple return reasons, set return policies and default return status from the admin interface. The Magento 2 return product extension makes it easy to check return related details through pending, archive and approved request details.

For more details about this Magento 2 return manager extension, Visit here:

Magento 2 return manager extension link

Magento 2 order return manager extension Admin Demo

Magento 2  order return manager Module Front-end Demo

Youtube Video link for Magento 2 product return module

Return Manager for Magento 2 Marketplace Link

For more support and information, feel free to contact us via email at support@knowband.com anytime.

How to drive eCommerce Conversions through email marketing?

Emails are omnipresent and their impact has been mammoth in the business world due to their high utility. It is still one of the most reliable medium of formal or business communication at the most competitive price. In the course of extending its scope, email marketing is now actively used in the fields like business promotion, product sales, customer targeting and retargeting, customer retention, finding out new prospects and other such critical tasks.

The field of email marketing needs to be utilized in the best manner for grabbing higher conversion rates and sales among your competitors. Let us explore this email marketing in detail with this interactive infographic shown below:

By understanding the role of email marketing in a business environment, it will not be difficult for any business to grab its share of conversion rates and sales. These promotional and marketing emails have the potential to improve your business fortunes without burning a major hole in the pocket of various businesses. Do follow the tips mentioned in the infographic above and reinvent your email marketing strategy for a quick turnaround.

Liked This? You’ll Like These Too

How to avoid Cart Abandonment on an eCommerce store?

Shopping cart abandonment is a global issue that has been creating problems for online retailers all over the world. Cart abandonment has a huge impact on the sales and conversions of any eCommerce store. Even with the passing time, the problem looms large over the eCommerce platforms.

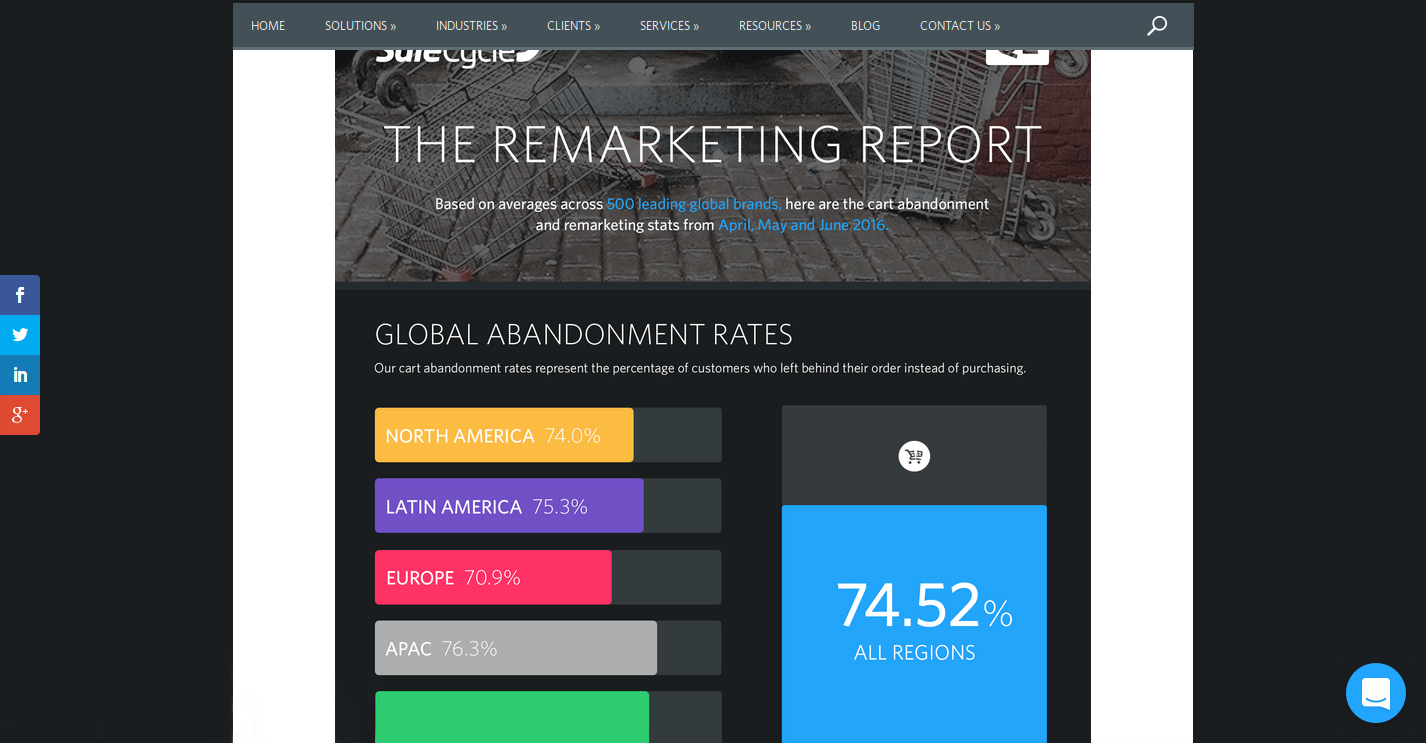
“The Remarketing report” prepared by the SaleCycle, a behavioral marketing company, shows the graveness of the situation. Here are the important insights regarding the same report.

The report shows the shopping cart abandonment trends across regions and industries.

As per the SaleCycle’s research on 500 leading global brands in the second quarter of the year 2016, the following crucial trends were observed.

  • The shopping cart abandonment was seen to be different for different regions of the world. While it was 74.0% for North American countries, the figure went a little higher for Latin American countries with 75.3%. Similarly, for European countries, the cart abandonment rates were found to be 70.9% while it was 76.3% for the APAC countries.
  • The overall cart abandonment rate comprising of all the regions was found to be 74.52%.
  • Apart from the region, the shopping cart abandonment varied considerably as per the industries involved. The rate of shopping cart abandonment for retail was found to be 74.6%, 80.1% for travel related industry and 68.8% for fashion-specific industries.

For the first quarter of 2018, the global cart abandonment rate was found to be 75.6% across all sectors.

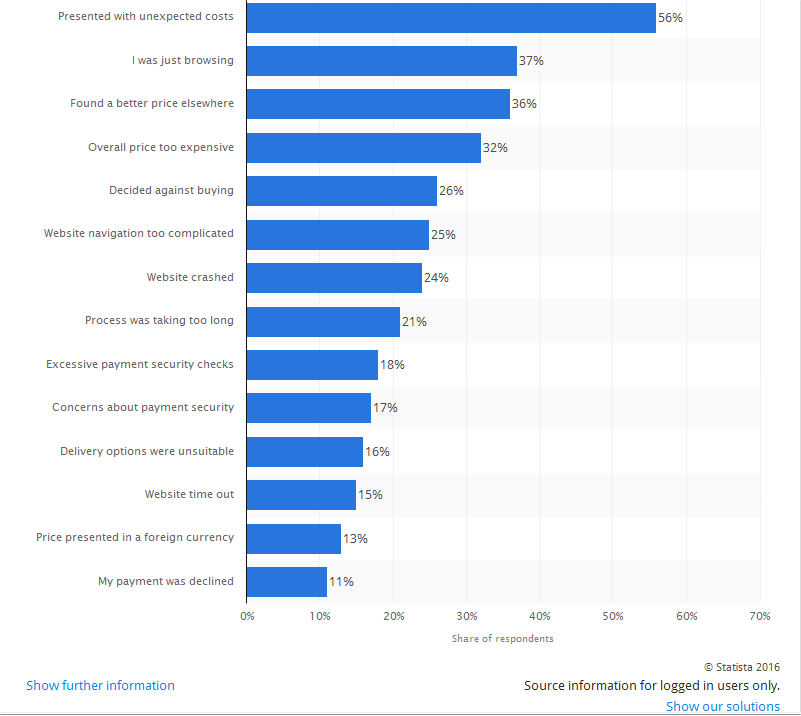
According to another eCommerce report by Statista, a statistics portal company, the shopping cart abandonment is based on a number of factors and problems faced by the online shoppers on an eCommerce store. The list of all the factors that lead to abandoned carts on an online store is explained in the statistical graph as shown below:

Take action against all the factors mentioned in the graph for reducing shopping cart abandonment.

Considering the reasons for shopping cart abandonment and the cart abandonment rate across regions among a wide range of industries, the problem can’t be left ignored at all if a retailer wishes to avoid cart abandonment and improves sales and conversions on their eCommerce store. Here are some of the tips that can help in reducing the shopping cart abandonment on an online store.

1. Reduce overhead expenses on your store

In a competitive business environment, the availability of products at an appealing price is the only thing that can drive conversions and sales in bulk. However, the cost of a product is often increased by the unknown overhead expenses that are present on an eCommerce site.

Some of the common examples of the overhead expenses on an online store are online transaction charges levied by third-party payment gateways, credit card transaction fees, order processing fees, commission amount charged by online marketplaces.

No doubt, it is impossible to run a business on a non-profit basis for any online store but certainly, you can cut down the additional costs in order to avoid cart abandonment. Be precise about the product price. Do not compel your consumers to abandon their cart with hidden charges. Specify your product pricing prominently for grabbing maximum customer engagement and sales.

2. Add Exit-intent popup

Exit popups provide you an excellent opportunity to reduce the cart abandonment rate and maximize conversions. Exit popups work when it is detected that a user is intending to exit the store and presents them a popup containing a deal or an offer.

Let’s say a user is trying to abandon his/her cart and almost ready to take an exit from your store, you can, then, make the user stay by offering them the discount on that product, encouraging them to complete the purchase.

3. Provide Guest checkout

A majority of the consumers bounce back from the store if they are presented a mandatory sign-up during the checkout. This isn’t a great move if you wish to reduce the cart abandonment rate on your store.

Avoid the mandatory sign-up and provide a Guest checkout option to your visitors so that they do not face any hurdle in between their checkout.

4. Establish trust with security badges

When customers provide you their confidential payment details, they put their trust in you. Similarly, you can win their trust by displaying the security badges/logos somewhere on the payment page to give them an assurance that their data is secure.

5. Enhance the functionality of your shopping cart

It is important to have a shopping cart that is capable of performing cart changes in a quick manner. Some of the key features that need to be present in an eCommerce platform for enhancing the functionality of a shopping cart are described below:

  • It needs to offer large, detailed and functional images of the products.
  • Easy and quick navigation facility for a better online shopping experience.
  • Allows quick product purchases through a one page checkout process.
  • Functionality to include product reviews from customers.
  • Ability to apply discount coupons and gift cards.

E-commerce platform like OpenCart offers a wide range of above-mentioned shopping cart functionalities to improve the online shopping experience of customers. Utilize the functionality of this shopping cart for encouraging more customers towards your online store. Take a dashboard view of the OpenCart platform that allows store owners to perform desired functions on their eCommerce store.

Use an eCommerce platform that can improve the functionality of your online store. Try to enhance the experience of your customers. If you are on standard shopping carts, you may use Shopping Cart extensions and Checkout Extensions, or, you may get the custom implementation for your website.

6. Improve the loading time of your online store

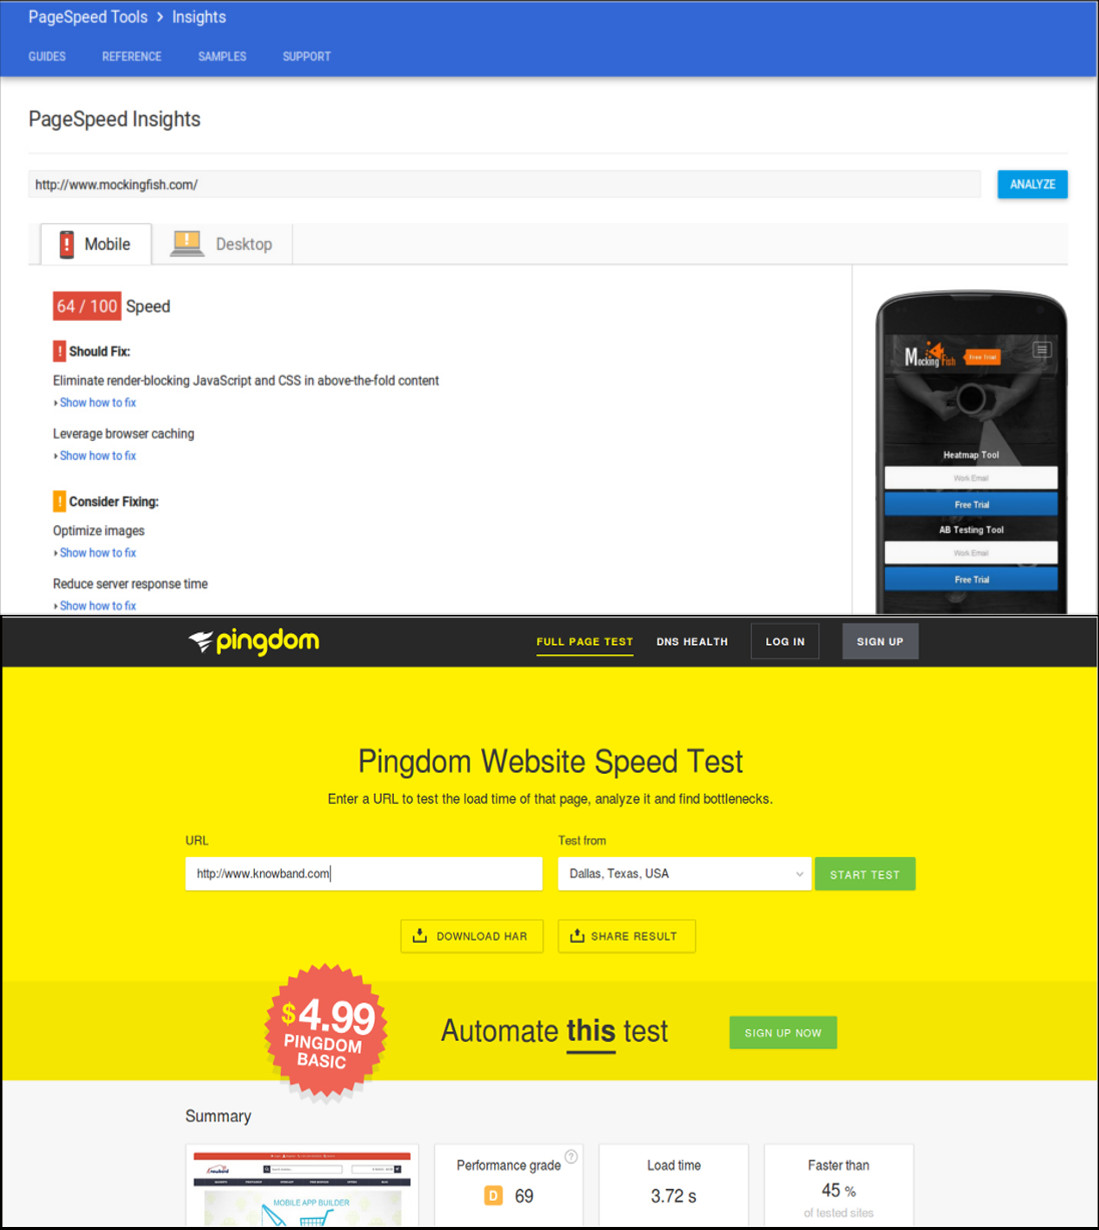
As per the recent report of Hosting Facts, “A single second delay in your website loading time can result in a 7% loss in conversion, and 40% of web users will abandon a website if it takes longer than 3 seconds to load”. This statement itself explains that people are not patient enough when it comes to the website loading time. The average loading time of a website is said to be around 2–3 seconds which can keep the customers engaged, otherwise, the visitor is likely to leave the website.

This is definitely a huge setback for eCommerce store owners as a slow loading website can hurt their conversions and sales. In order to improve the loading time of your eCommerce site, the following site optimization techniques need to be implemented at the earnest level.

  • Minimize the number of HTTP requests to avoid delay in website loading.
  • Compress and optimize large size images for your eCommerce site with the help of image and data compression tools/programs like Gzip, JPEG Optimizer, TinyJPG, Caesium, and such others.
  • Enhance the utility of your CSS files by eliminating browser specific codes and applying shorthand codes.

7. Enhance the website design and accessibility across multiple devices

 The global pattern of online shopping has changed drastically with the more number of purchases on an online store made through mobile devices instead of desktops and laptops.

To understand the above scenario, the number of mobile devices (smartphones and tablets) shipped worldwide is estimated to a total of 343.3 million as per the Worldwide Quarterly Mobile Phone Tracker report of International Data Corporation (IDC) for the second quarter of the year 2016. To target such a huge mobile based users, you need to take the required steps to make your website accessible and user-friendly on various devices and screen types. Below are some of the quick fixes that can make your site more accessible and user-friendly.

  • Use mobile web development technologies like HTML5, CSS3, JavaScript and mobile responsiveness for better site reach and performance.
  • Enhance the usability of the CTA button on mobile devices by selecting an appropriate size and placement.
  • Include optimized and reduced page size for mobile content.

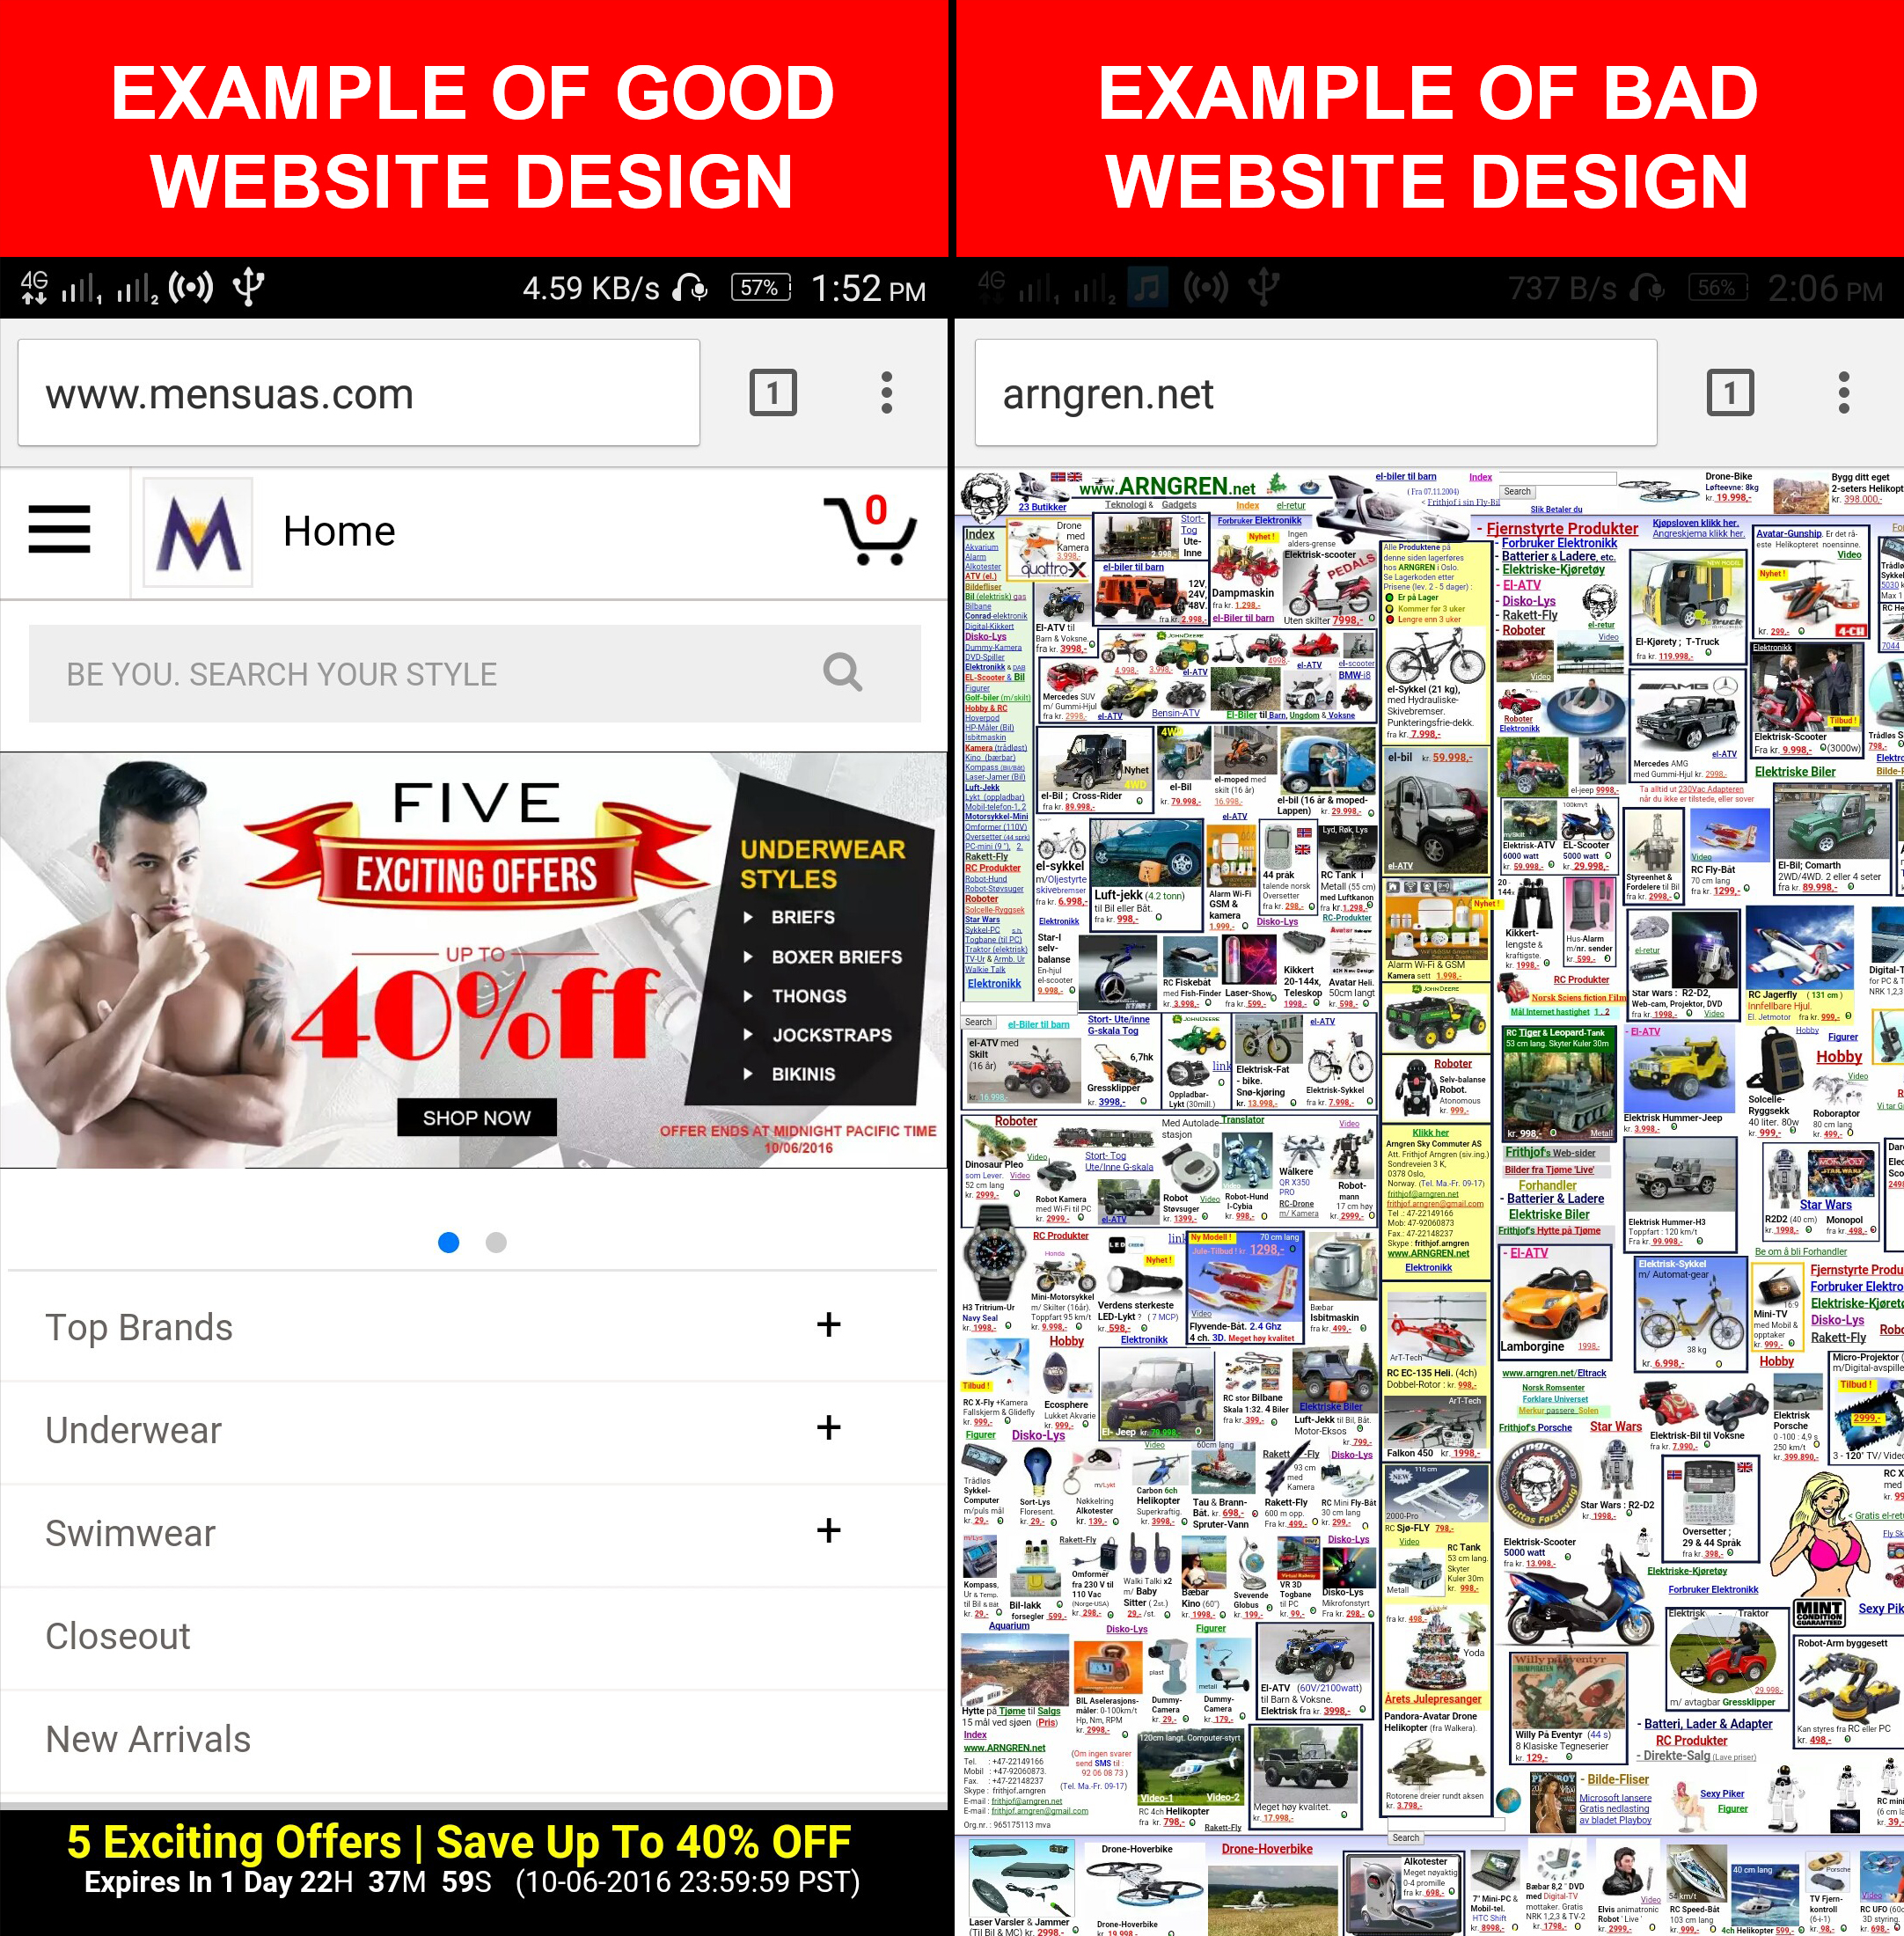
If you want to understand the importance of web design in eCommerce, here is the example for you. Take a look at these two mobile designs that provide a complete insight into a good and bad mobile website design and their impact on the conversions of a website. A good mobile website design encourages customers to browse a website whereas a bad mobile website design completely deviates a visitor and results in shopping cart abandonment along with an increase in the bounce rate.

Focus on the design of your mobile website for grabbing maximum conversions and sales from your customers.

8. Make the checkout process simplified

Make your checkout process more simplified by restricting the number of checkout fields.

People prefer to shop online due to the ease of purchasing products, a variety of options available at a place, the option of product delivery at the customer’s premises and much more. However, if this is robbed from online shoppers, it is certainly going to affect the sales of an online store.

An easy and quick checkout process encourage online shoppers to make a product purchase through a particular eCommerce site. So, ignoring it would be the biggest mistake for any eCommerce store owner.

To improve the checkout process, you need to provide accurate product status, one page checkout process, quick cart customization facility, availability of contact details, easy product return requests, social login facility, the addition of security and trust badges and other such perks to customers.

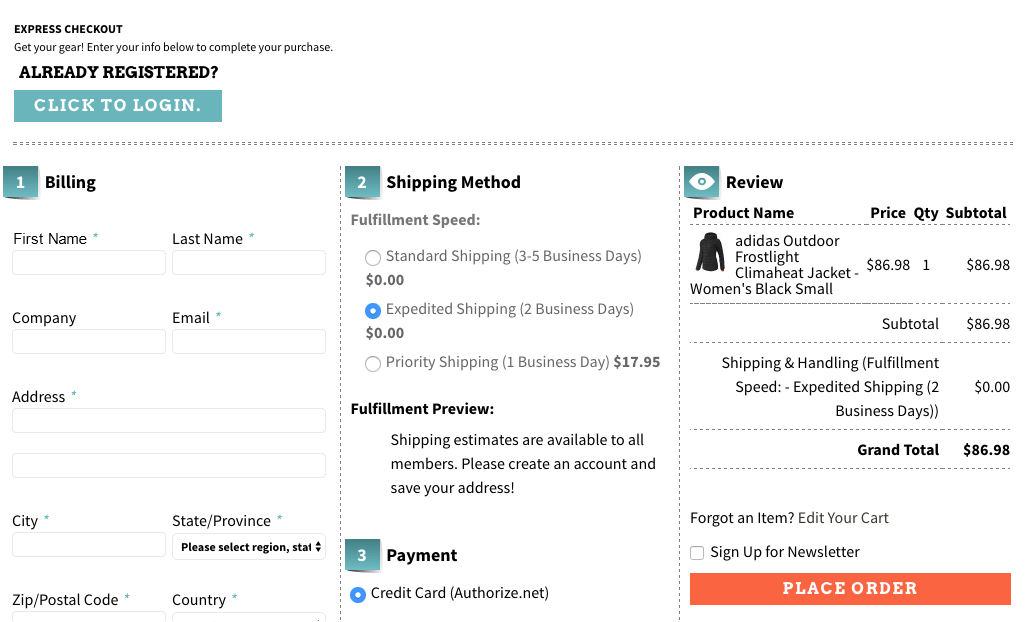
Here is a checkout page of the website Art.com that simplifies the online shopping experience of the customers by providing various features and functionalities.

Offer a simplified checkout process to your customers for improving conversion rates and sales.

9. Bring back abandoned carts through customer re-targeting

Email Marketing can take your business to a long way by encouraging customers to complete their pending shopping orders and can provide you promising results in terms of conversions. These emails are also an important tool for customer re-targeting provided they are engaging, sent at a regular interval of time and provide customers enough reasons to complete their pending shopping orders. E-Commerce store owners need to schedule reminder emails to customers at a regular interval of time in order to remind them about their abandoned shopping carts. They can take the help of email marketing software like MailChimp, ConstantContact, GetResponse, AWeber, etc. that can provide contact details of customers for better customer re-targeting.

10. Offer products at an affordable price

Drive more revenue to your store by pricing your products more effectively. When the competition is too high in a particular business segment, it makes sense to present your products in the most competent manner. You need to have a clear idea about the price of your competitors and should reprice your products accordingly. Once, the customers find your products as most affordable, they will love to buy from your online store irrespective of the competitors available in the market, providing you are not compromising with the quality.

In case, you wish to involve customers directly in the pricing strategies, there are certain eCommerce Extensions that can help customers make a wish about their product price. Make an offer that they can’t resist. In this way, eCommerce store owners can directly know about the interested price segment of their targeted customers.

11. Add multiple payment and shipping options

Include multiple payment and shipping options on your eCommerce store for improved checkout experience.

At the final checkout process, numerous online shoppers leave the site when they are unable to find their required payment and shipping options. This is a serious issue and has reduced the conversion rates and sales on various online stores to a significant level.

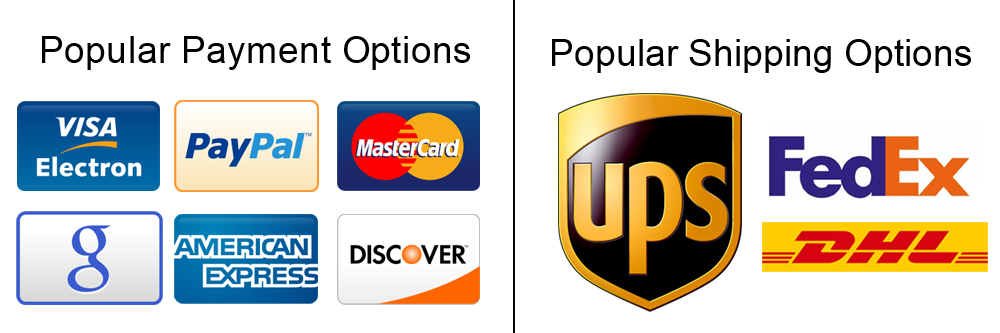
To overcome this critical situation, store owners need to offer multiple payment and shipping options to reduce the rate of eCommerce abandoned carts. Make a list of the popular payment and shipping options by taking insight from the customer surveys and include them in your online store. Some of the well-known payment methods are PayPal, Visa, MasterCard, Google Checkout, Wire Transfer, SagePay, Boleto. Similarly, you need to include these shipping options such as USPS, DHL, FedEx, USPS to improve the online shopping experience of your store visitors.

12. Use Web Push Notifications

Web Push Notifications is the latest approach followed by online businesses to target the users abandoning their cart. With the help of web push notifications, you can send the abandoned cart notifications to the users not completing their purchase and remind them about the items pending in the cart.

Web Push Notification addon for Prestashop, Web Push Notification extension for Magento and Web Push Notification extension for Magneto 2 are the three web push notification module offered by Knowband which you should definitely implement on your eCommerce platform to reduce the cart abandonment.

Conclusion

There are many more ways to avoid the cart abandonment on an e-commerce store, however, you will find the above-mentioned methods as the right approach. Take the proactive steps now and perform some major makeover of your eCommerce site to reduce abandoned carts. It’s difficult to get the customers to your website in the first place, and then seeing them leave without buying is even more painful. The best time to act on Abandoned Carts is now, do not miss it.

Also, read:

5 Checkout optimization that can Reduce Abandoned Carts and Boost Sales

How to use Google Analytics for tracking Shopping cart abandonment?

Methods by which you can minimize cart abandonment on your store

5 Tips to avoid abandoned carts and win conversions through emails

8 PrestaShop Checkout Modules to Improve your Checkout Process

Online shopping is all about ease of a product purchase as people don’t have time to roam every shop in search of a product or service. With the busy lifestyles of people and the option of home product delivery, online shopping has been growing with leaps and bounds. People are continuously involving with eCommerce stores to save themselves from the task of visiting multiple shops and handling multiple shopping bags. There are numerous factors that can act as barriers to your online shopping experience.

Among these factors, a complicated checkout process is seen as one of the prominent reasons that can affect the conversions and sales of an online store. If you are not having an engaging checkout process on your PrestaShop store, it is time to take the help of these Prestashop checkout modules to optimize your checkout page and bring more conversions. Take a quick look below:

1. Prestashop One page Super Checkout

Prestashop one page checkout puts together all the steps of a standard checkout on a single page and allows your consumers to complete their transactions quickly. It speeds up the checkout process and reduces the possibilities of cart abandonment. Prestashop’s one-page checkout helps you boost your sales by a good margin.

  1. Prestashop one-page checkout allows social login options to consumers to make the registration process easy and fast.
  2. Prestashop One page checkout addon provides the option of a Guest checkout for visitors who do not want to get themselves registered on your platform.
  3. This addon has Mailchimp Integrator that sends a visitor’s email address directly to your MailChimp account.
  4. The module offers multiple shipping and payment methods.
  5. Prestashop fast checkout addon allows customers to update the product quantity right from the checkout page.
  6. Prestashop one page checkout offers multiple layouts to display the cart details.
  7. This module also contains the Google auto-address fill feature, enabling your visitors would be suggested the address when they start filling the address field.
  8. One Page checkout addon is GDPR Compatible, Mobile Responsive, and has multi-lingual support.

2. Prestashop One click checkout

Prestashop one-click checkout is a great option for those online shoppers who wish to do an instant purchase without disturbing their existing cart. This addon avoids the process of adding a product to the cart before purchase. Store visitors can simply click on the Buy Now button and buy a product instead of adding the product to the cart and removing the existing cart items.

  1. Prestashop one-click checkout addon displays a “Buy Now” button on your store products to trigger impulse buying, ensuring higher sales.
  2. Prestashop one-click direct checkout is time-saving. By not interfering with the existing shopping cart, visitors can place an order quite comfortably. This improves your conversion rate.
  3. The one-click checkout module is fully responsive and multi-store compatible.

3. PrestaShop Gift the product

If you are unable to entice your visitors to your PrestaShop store, you can take the help of this PrestaShop “Gift the product” module from the Knowband store. Also, this PrestaShop checkout extension is very helpful for improving your conversions as it offers free products based on your cart price. Here are some of the wonderful features of this PrestaShop Gift product module.

  1. Prestashop Gift the Product addon provides a great range of freedom to store admin for accomplishing various tasks like display of products at the front end, ability to show listed gift products, ability to control the display of gift products at the front end, and much more.
  2. The module can be quickly installed and configured without any technical assistance.
  3. Prestashop gift the product module works perfectly with various mobile devices and screen sizes.
  4. The module also provides customers the freedom to choose the free gift as per his/her interest.

4. PrestaShop checkout payment fee addon

It is one of the amazing PrestaShop checkout modules that allows merchants to include various payment fees that are involved with various payment methods on a site. With this clear information, it is now possible to improve the checkout process on your site without any glitches. Apart from this, it will also help in improving customer engagement and conversions on your PrestaShop store. Some of the exciting features of this PrestaShop module for including payment fees are:

  1. Prestashop checkout payment fee addon provides information about the payment methods that charge additional fees.
  2. The checkout payment fee addon comes with a simple installation process and configuration facility.
  3. Displays the percentage or fixed price of the products.
  4. It offers a facility to enable or disable currency conversion.
  5. Prestashop checkout payment fee addon works with various payment methods that charge additional payment fees.
  6. Additionally, it offers free technical support.

5. PrestaShop Cash On Delivery with Fee

To keep up with the trend, you have to offer services that are in demand. Cash on delivery is the most demanding and needful feature for digital commerce. It streamlines the delivery process and reduces abandoned carts. Wondering how? Many customers feel intimidated while sharing their credit/debit card details on a new website. The COD module helps in optimizing the PrestaShop checkout process.

  1. Customers can get COD without any extra fees otherwise store owners can charge extra for the same
  2. Customers do not have to share any bank details with the store owner
  3. The COD option can be applied to selected products or categories
  4. It boosts conversion and overall revenue of the PrestaShop store

6. PrestaShop Store locator

For the PrestaShop Checkout optimization, you can also install the store locator addon. It can help you provide services like Buy Online and Pay In-Store (BOPIS). This is another in-demand facility that customers look forward to. It displays a map to the customer and shows all the nearby stores to visit and shop. below are the features that the module provides:

  1. Easy and effortless to implement buy online and pick up in-store facility
  2. Displays the store locations on google map with the list of nearby stores
  3. The module is multi-store compatible and supports multiple languages

7. PrestaShop Delivery Boy App

Manage your deliveries effortlessly with PrestaShop Delivery Boy Application. This application allows delivery boys to choose their consignments.  Along with the PrestaShop Mobile App Builder, the delivery boy app can provide real-time product tracking to customers. This application makes the delivery process seamless.

  1. It has a separate login option for both the delivery boy and the store owner.
  2.  The app can be published to Google Play Store and the iOS store.
  3. It provides order acceptance and rejection options to the delivery boys but they have to mention the reason for rejecting the order
  4. Customers will receive an email notification when the delivery boy picks up the order. Moreover, they will have to provide OTP to the delivery boy on order delivery
  5. The app is compatible with KnowBand’s Mobile App Builder.

8. Prestashop Checkout page analytics

Keeping a constant track of customer’s activity is important. It can provide you crucial information about the purchasing behavior of your site visitors. Once, you are aware of the checkout journey of the visitors, you can take the required steps to improve conversions on your PrestaShop store. Take a look at the various features that makes this Knowband extension as one of the most popular PrestaShop checkout modules for your online store.

  1. Prestashop checkout page analytics addon provides complete statistical information about your site visitors while making an online purchase.
  2. It helps in maintaining the email addresses and cart details of your customers.
  3. Prestashop checkout page analytics provides seamless recovery of abandoned carts on a PrestaShop store.
  4. Prestashop checkout page analytics provides customer details, cart details, analytical data for ensuring higher conversions and product sales.
  5. Easy search facility through email.

Conclusion

Don’t take your customers for granted while they are making an online purchase from your PrestaShop store. With the help of all these PrestaShop checkout modules, you can remove the various hurdles that may be affecting your conversions to a great extent. It is time to visit our Knowband store and grab your share of conversions with these feature-packed eCommerce modules.

You Might Also Like:

A OpenCart Free Extension to Create Mobile Apps for Your Business

The mobile Commerce has come way ahead than online eCommerce in the past few years. It has proved its worth as the most effective way to drive your business conversions and sales. We can witness today that every individual has access to the smartphones and internet facility, new doors of business opportunities and growth have opened. So, if you are currently running an OpenCart store but have not yet geared up for mobile shopping apps as well, you need to consider KnowBand’s OpenCart Mobile App Builder.

How Mobile App Builder extension is the right solution for you?

The OpenCart Mobile App Builder is an innovative & automated framework through which you can easily create native Android & iOS shopping apps. This extension saves you from any sort of technicalities or coding involvement neither for developing or managing.

This native eCommerce Mobile App Maker keeps your website sync with apps in real-time. Thus, you need not manage the app inventory on a manual basis. All the website details & info will be automatically fetched on apps. Moreover, the friendly module backend allows you to control the designing & workflow of apps on your own. Let’s explore more about how this plugin works.

OpenCart Mobile App Builder: Free Vs Paid Versions

FREE Version – To Test Your Store on Demo Apps:

Want to check how your store will look on mobile apps? Use KnowBand’s OpenCart Mobile App Maker free version & get satisfied even before purchase. Follow these simple steps in order to test the same:

Step 1: Install module on your store

You just need to get a FREE module from here. You will receive a zipped file in your downloads section. Install the same on your store using FTP details. After successful installation, enable the module from backend.

Step 2: Install demo apps on your device

Now, download our demo apps on your testing device from below links:
Android: https://play.google.com/store/apps/details?id=com.velsof.genericapp
iOS: https://apps.apple.com/in/app/opencart-nautica-app-builder/id1290687460

Step3: Open App & Test

Open the app & enter your website URL. That’s it, now your store will run on our apps.

PAID Version – To Build & Publish Your Own Apps:

Creating and getting Android & iOS App was never this easy as it is now with OpenCart Mobile App Builder. Its just a matter of 3 simple steps:

Step 1: Purchase our Module from here.
Step 2: Fill our pre-requisites form.
Step 3: Get final apps in 2-3 days.

Apart from this, the module provides a complete backend control along with 3 months of free support. We would even publish the apps free of cost for you.

Top Features with Mobile App Builder Extension:

1. Customize & Design App Home Screen:

The OpenCart store admin gets the option to customize & create multiple layouts in the module backend. With this functionality, you can design the home screen as per various occasions & festivals. You can even edit the pre-saved layouts whenever required. Here, is the list of available designing elements in the backend:

Top Categories (Square shaped category icons)
Square Banners (Square shaped banners)
Horizontal Sliders (Rectangular sliders)
Grid Banners (Multiple banners in Grid form)
Countdown Timer Banner (Timer-based flash sale banner)
Square Products (Square shaped product listings)
Horizontal Sliders (Rectangular shaped product sliders)
Grid Products (Multiple products in Grid form)
Recent Products (Products which user visited recently)

2. Real-time Synchronization:

Keeping everything synced is a tough yet necessary task for an eCommerce store admin. Our OpenCart Mobile App Builder establishes perfect sync between website & apps which brings the entire inventory on mobile apps.

3. Complete Backend Access:

The OpenCart Mobile App Builder gives you the complete backend control to make the changes in app & manage it on your own. You can easily customize the design of your mobile Apps and other functionalities over a few mouse clicks.

4. Simplified login Process:

The Mobile App Builder for OpenCart comes up with various login options like Google, Facebook, Phone number(OTP) and Fingerprint which makes it easier for the users to enter your app & browse products.

5. Provide Direct Zopim & WhatsApp Chat:

Solving your user queries promptly is much easier with inbuilt Zopim(formerly known as Zendesk) & WhatsApp chat in your mobile apps.

6. Multi-lingual & RTL Support:

It is difficult to develop different Apps in different languages. By developing the Android & iOS apps with OpenCart Mobile App Maker, you can easily expand your reach worldwide. The mobile apps support both multiple languages including RTL ones.

7. Personalized Push Notifications:

You can easily send unlimited manual and automatic push notifications to app users from the backend of OpenCart Mobile App Builder. This promotional tool helps in driving engagement, sales, and revenue on your store.

8. Shipping Methods Support:

The OpenCart Mobile App Builder supports all sorts of website shipping methods on mobile apps. You can offer the same shipping to app users as of website.

9. Complete White Label:

Your OpenCart Mobile Apps will be branded as per your website. You can use your own splash screen, icon etc. on app. The store logo can also be added on the header of mobile apps.

10. Easier Mobile Promotions:

The OpenCart Mobile App Builder module brings personalized push notification feature through which the store admin can send sale & promotional push notifications to the users & improve user retention & revenue.

11. Enhanced Layered Navigation:

The OpenCart Mobile Apps offers the easiest navigation with filter/sort, keyword/voice search. The smooth screen flow guides the users to the desired products in no time.

12. Include Multi-payments:

The OpenCart Mobile App Maker brings all your website payment methods on mobile apps along with Paypal & COD in addition. Furthermore, any other native payment can also be integrated into the app over a fair price. The apps even support multiple currencies as well.

13. Coupons & Vouchers Support:

Every discount/offer coupon or voucher code which is active on your website will also work on mobile apps as well.

14. Simplified Checkout for Easy Orders:

With a single screen checkout process, the OpenCart Android & iOS apps make the order submission seamless for mobile shoppers. This helps in improving the shopping experience of the users & ultimately sales.

15. Real-time Order Tracking:

The Mobile Apps with OpenCart Mobile App Builder have the functionality to view the previous app order delivery status. The order status gets updated on the app as of website automatically.

16. Gamified Spin Win (E-mail Subscription pop-up):

You can offer an e-mail subscription pop-up on your app having a gamified spin-win interface. This helps in capturing the user data which can be used for re-marketing purposes afterward. You need to just install OpenCart Spin & Win extension on your store. The same pop-up will also work on your website as well.

17. Multi-Vendor Marketplace (Custom Integration):

Our mobile apps are even compatible with OpenCart multi-vendor marketplace plugin. The entire marketplace can be brought on the same mobile apps without any effort. You can visit this combo module (Marketplace + Mobile App) for more details:

OpenCart Advanced Marketplace with Mobile App

Conclusion

It’s time to catch up the speed & mobile apps could be the missing accelerator for your website. So, go ahead & launch a full-fledged pair of shopping apps today.

Related Stories:

Prestashop Advanced Wishlist/ Save for Later Addon – User Manual

1.0 Introduction

Today, Online Customers on eCommerce sites browse through multiple products but only make a purchase of a selected product at a particular instance of time because the goal of the shoppers is not to make an immediate purchase always. Sometimes, the customers just visit to have a look at the product and add it to their cart, so that later when they would need the product they can buy it. Moreover, they check the other store prices and checkout. The Prestashop Advanced Wishlist addon by Knowband provides a special feature to display the shortlisted, recently viewed and recommended products/banners into the website. This Prestashop wishlist module allows the customer to shortlist their favorite products so that they can be aware of the products they want to purchase or view later. This Prestashop save for later extension is like a basket in hand where you add whatever you like and can change the quantity at last when making the purchase.

Knowband Prestashop Advanced Wishlist addon is integrated with GDPR hooks. GDPR settings are added in the module using which the Prestashop admin can comply with the rules of the GDPR. Please refer to the General Settings to know more about the GDPR.

The Prestashop advanced wishlist module by Knowband is beneficial for both merchant and the customer. Let us discuss how Prestashop wishlist addon is working.

1.1 Benefits for the Merchant

  1. This Prestashop advanced wishlist addon is a help to the store owners for tracking the Customer requirement.
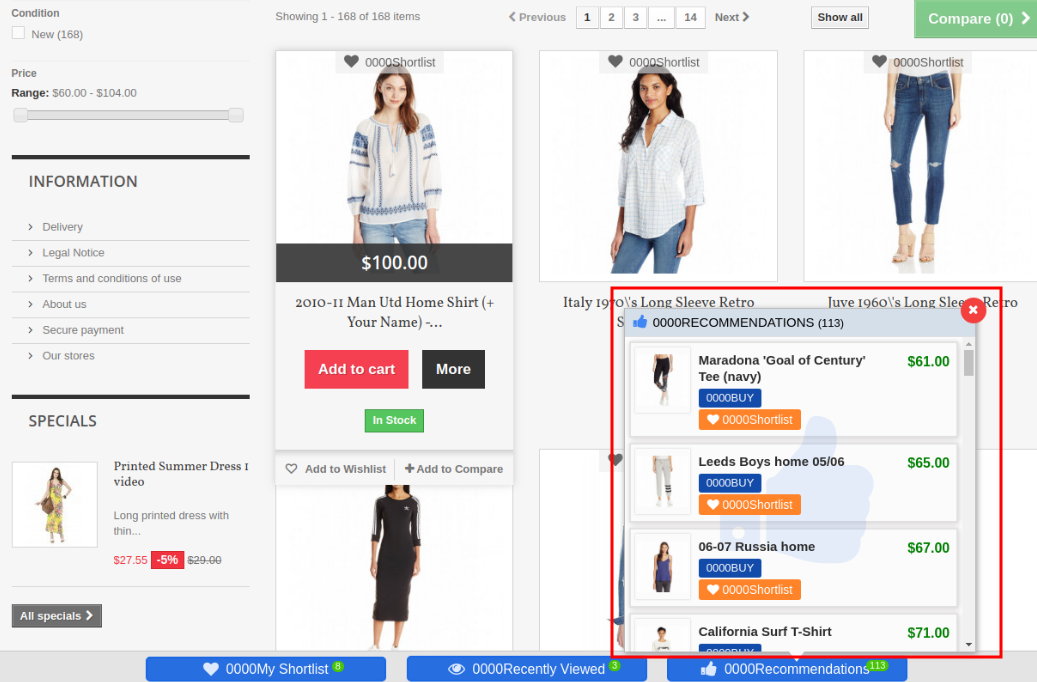
  2. This Prestashop wishlist module shows the bar at the bottom of every page containing three different blocks as ‘My Shortlist’, ‘Recently Viewed’ and ‘Recommendations’. Each block has a pop-up containing respective data. This bar is managed by the admin according to the need.
  3. This Knowband Prestashop advanced wishlist addon shows my wishlist block which is controlled by the online merchant. My Shortlist pop-up shows the products shortlisted by the customer.
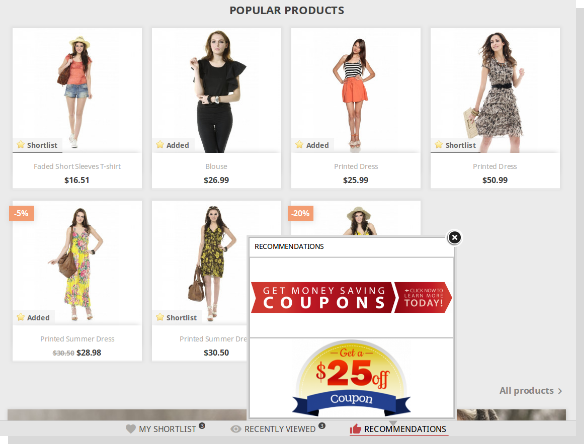
  4. This Prestashop advanced wishlist extension shows the recommendations block which is totally controlled by the Store Owner. Store the admin can choose products or banners as per choice.
  5. This Prestashop save for later extension gives the access to the admin to enable/disable the recently viewed block that shows the products which are recently viewed by the customer.
  6. This Prestashop wishlist addon helps the admin to view the product details which product is high on demand or which product is added in the wishlist the most. The Graph shows the whole information about the wishlist product.
  7. This Prestashop advanced wishlist extension allows the admin to know what customers wish to purchase.
  8. The Prestashop save for later extension helps for re-marketing.
  9. This Prestashop wishlist addon reduces the abandoned cart of the website.
  10. This module helps the admin in boosting sales and conversion rates for your online store.
  11. The admin can easily customize the save for later addon.
  12. The online store admin can set the number of products which he wants to show on the customer’s wishlist page.
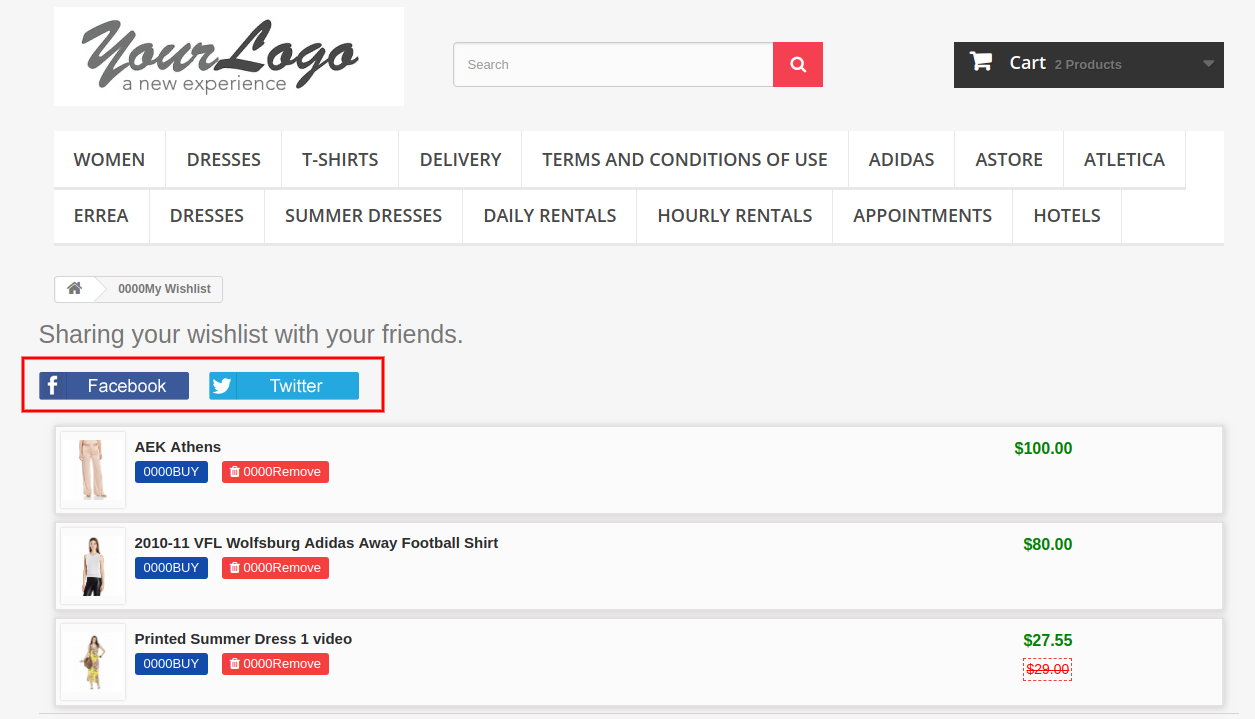
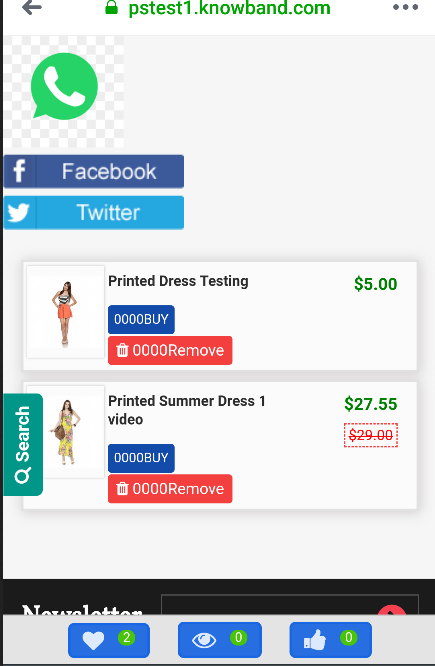
  13. The online store merchant can also provide an option to share wish-listed products on Social media platforms like Facebook, Twitter and WhatsApp.
  14. Customers can view wishlist products, recently viewed products and recommendations.
  15. The Prestashop wishlist module offers a userfriendly and eye-catchy interface.
  16. The Prestashop wishlist addon is mobile responsive, multi-lingual compatible and offers multi-store support.
  17. Admin can show specific Wishlist tab on the website.
  18. The Prestashop plugin shows wishlist on the checkout page.
  19. The customers can add available products from wishlist and move any product from cart to wishlist.

1.2 Benefits for the Customer

  1.  This Prestashop favorite product list addon helps online shoppers to add products to their wishlist and feel free to buy it later.
  2. This Prestashop save for later module by Knowband is mobile responsive and allows the customers to use the Wishlist feature both on their mobile phones and desktop.
  3. Customers can add product from the wishlist while checkout.
  4. The online users can move any product to wishlist by clicking on “Add to Wishlist” button.
  5. The online users can also share their wishlist on Facebook, Twitter and Whatsapp.

2.0 Installation

After purchasing the Prestashop advanced wishlist addon, you will get the following files as listed below:

1. Compressed File in ZIP format (contains source code of the module)
2. User Manual

Follow the following steps to install the Prestashop save for later extension:

1. Unzip the compressed file. It would contain files and folders as shown below –

2.Copy all the files and folders of the unzipped folder into your store “modules” directory on the path – Root Directory/modules/.

3. Now, the module is ready to be installed on your store and you can find that in Store the admin -> Modules and Services. It would shown as below –

PrestaShop 1.6

PrestaShop 1.7

4. Before installing the module, please make sure that ‘Customer.php’ does not exist in ‘Root Directory/override/classes/ folder. If it exists, then please remove it. Also, clear cache before installing the module.

5. Click on “Install” button to install the module. It would show a pop-up for your confirmation. Click on “Proceed with the installation” option. This step will install the module and show notification – “Module(s) installed successfully”.

3.0 How to configure module?

Once the Prestashop wishlist addon is configurable, the Store Owner can setup or configure this Prestashop save for later module through the Admin Panel of the store. There are following sections available to configure this module –

  • Go to Store the admin -> Modules and Services
  • Find “Advanced WishList Addon” and click “configure” button given corresponding to the module i.e. shown below-

After clicking on the “configure” button, you will see a window like the one mentioned below-

4.0 Admin Interface

After installing the Prestashop wishlist addon into the Prestashop store, the admin interface is designed in such a way that a Prestashop store owner can make the changes without any hassles. There are the following sections available on the admin interface: –

  1. General Settings
  2. Save for Later
  3. Recently Viewed
  4. Recommendations
  5. Social Sharing
  6. Recommendations
  7. Product Analysis
  8. Customer Analysis
  9. Order Analysis

Above 5 points are actually one section which comes under “Settings” but as described here as a separate entity for more clarity.

Each section of this Prestashop save for later module is explained below.

4.1 Settings Tab

4.1.1 General Settings

In the General settings tab, we have five options which the admin can use to manage the store;

Below mentioned is the general setting tab image-

This tab contains the following input fields which the Store Owner or the admin can update –

  • Enable/Disable: Initially, this will be notified as “OFF” And the admin can enable/disable the module by turning ON/OFF this option.
  • Compatibility with Prestashop GDPR Module: The Admin can enable the GDPR option. The Customer has an access to request the admin to delete and export the personal data from the back-office. The Admin can also export the customer data from the back-end.

Note: If you are using the official GDPR module then you must need to enable this setting. The main purpose of this feature is export and deletes user data on PrestaShop GDPR module request. It is also compatible with Prestashop GDPR Module developed by Knowband.

  • Pop-up Border Color: This setting enables the admin to change the border color of the pop-ups appearing at the front-end. Initially, it has a default color that best suits the pop-ups.
  • Buy Button Color: This setting enables the admin to change the buy button color appearing at the front-end, in front of every product in the pop-ups. Initially, it has a default color that best suits the button.
  • Button Preview: This option is not a setting, it is just a preview window of the buy-button appearing on the front-end. When the color of the buy button is changed using the above setting, then the color of the button preview will change dynamically displaying the current appearance of the buy button.
  • Bar Background Color: This Prestashop Advanced Wishlist addon enables the admin to change the background color for the bottom bar that appears at every page on the front-end. Initially, it has a default color that best suits the background of the bar.
  • Pagination Limit: The online merchant can set the number of products which he wants to show in a single page.

4.1.2 Save For later

In this section, the Prestashop Save for later addon allows Store Owner or the admin to update the settings of “My Shortlist” section of the Front-end. Through this section, the Store Owner or the admin can do the following things –

1.Enable/Disable “My Shortlist” section in the Store Front.

2.Show/Hide the Buy button

3. Add some text to “My Shortlist” popup which will be shown at the top of popup.

This Prestashop Advanced Wishlist extension form contains the following input fields which the Store Owner can update:

  • Enable Save for Later: Initially, this will be displayed as “OFF”. the admin can enable/disable the shortlist option by toggling the button.
  • Show buy Button : This Prestashop save for later addon allows the admin to choose whether to display the buy button in front of the products in the Shortlist pop-up or not.
  • Text above pop up: This Prestashop advanced wishlist addon allows the admin to enter the text that should be displayed at the front-end as a heading for the shortlist pop-up. the admin can enter the different text for different languages available in the system and can also customize the appearance (i.e. bold, italic and color of text) of the text using the font-style options.

4.1.3 Recently Viewed

Through this section, the Store Owner or the admin can do following things –

1.Enable/Disable “Recently Viewed” section in Store Front.

2.Show/Hide the Buy button

3.Limit the number of products to display

Add some text to the “Recently Viewed” popup which will be shown at the top of pop-up.

This Section contains the following input fields which the Store Owner or the admin can update –

1. Enable Recently Viewed: Initially, this will be OFF. Admin can enable/disable Recently viewed option by turning ON/OFF this setting.

2. Show buy Button : This setting enables the admin to choose whether to display the buy button in front of the products in the Recently viewed pop-up.

3. Limit: Admin can limit the products to display in recently viewed product section.

4. Text above pop up: This setting enables the admin to enter text that should be displayed at the front-end as a heading for the recently viewed pop-up. The admin can enter different text for different languages available in the system and can also customize the appearance (i.e. bold, italic and color of text) of the text using the font-style options.

4.1.4 Recommendations

In this tab, change the settings for the Recommendations block of the plugin. Here, the admin can recommend various things to the customer as per the need. the admin can enable/disable it and can also customize the text above the recommendations popup.

1.Enable/Disable “Recommendations” section in the Store Front.

2.Show/Hide Buy Button

3.Add some text to the “Recommendations” popup which will be shown at the top of pop-up.

This form contains the following input fields which Store Owner or the admin can update –

1. Enable Recommendations : Initially, this will be OFF. Admin can enable/disable Recommendations option by turning ON/OFF this setting.

2. Show buy Button : This setting enables the admin to choose whether to display the buy button in front of the products(if admin wants to recommends products to customers) in the Recommendations pop-up.

3. Text above pop up : This setting enables the admin to enter text that should be displayed at the front-end as a heading for the Recommendations pop-up. The admin can enter different text for different languages available in the system and can also customize the appearance (i.e. bold, italic and color of text) of the text using the font-style options.

4.1.5 Social Sharing

The online store merchant can allow the online buyers to share wish list products in various Social Media Platform.

  • Enable Social Sharing: Enable or Disable social sharing option
  • Enable Facebook: Activate or deactivate to allow users to share wish-listed products on Facebook.
  • Enable Whatapp: Allow/disallow customers to share products on Whatsapp.
  • Enable Twitter: Enable the functionality to allow customers to share wish-listed products on Twitter.

5.0 Recommendations

This Prestashop advanced wishlist addon by Knowband allows the Store Owner or the admin to setup the content of Recommendation pop-up to display at Store Front.

There are 3 options available for Store Owner:

1.Banner

2.Related Products

3.Selected Products.

The admin can only choose one of them to display at Store Front as the content of Recommendations Pop-up.

5.1 Banners

Using this option, the admin can upload a maximum of two banners for the recommendations popup, there is also an option to enter the URls for the banners uploaded.

You have to follow steps given below to show banners in Recommendations Pop-up –

  • Go to the Module and Services -> Module and Services
  • It would list out all the modules of store. Find ‘Save for Later’ in modules list.
  • Now click on the ‘Configure’ button given corresponding to the ‘Save for Later’ module.
  • It would redirect the Store Owner or the admin to a module settings page. Now click on “Recommendations” option listed at left side column.
  • It would open a new section. Choose “Banner” option. It would display the section where you can upload/change banners (Max. 2) with their Title and Link. You can find the screenshot below –

Click on “Save Recommendation Options” button. It would validate the data and submit the form.

5.2 Related Products

You have to follow the steps given below to show the related products in the Recommendations Pop-up –

  • Go to the Module and Services -> Module and Services
  • It would list all the modules of the store. Find ‘Save for Later’ in modules list.
  • Now click on ‘Configure’
  • button given corresponding to the ‘Save for Later’ module.It would redirect the Store Owner or the admin to a module settings page. Now click on “Recommendations” option listed at left side column.
  • It would open a new section. Choose “Related Products” option. You can find the screenshot below –

  • Click on “Save Recommendation Options” button. It would validate the data and submit the form.
    That’s It.

5.3 Selected Products

You have to follow the steps given below to show selected products in Recommendations Pop-up –

  • Go to the Module and Services -> Module and Services
  • It would list all the modules of the store. Find ‘Save for Later’ in modules list.
  • Now click on ‘Configure’ button given corresponding to the ‘Save for Later’ module.
  • It would redirect the Store Owner or the admin to a module settings page. Now click on “Recommendations” option listed at left side column.
  • It would open a new section. Choose “Selected Products” option. You can find the screenshot below –

  • After choosing “Selected Products” option, the module will ask to choose Category and then the Products to display at Store Front. Choose Products and module will list them one by one in a list. The admin can remove selected one from this list if needed.
  • Click on “Save Recommendation Options” button. It would validate the data and submit the form.
    That’s It.

6.0 Product Analysis

This Prestashop save for later addon tab will display the category/product reports in the form of graphs and list. The graph will display top ten categories/products shortlisted by customers in descending order. You can find the screenshot below –

Below is the screen of this Product wishlist module product analysis tab:

1. Filter your analysis: The filter will be used for filtering data. There are folowing parameters on the basis of you can filter report:

  • Analysis Type: This will be the dropdown list. With this filter, you can change the behavior of report such displaying report for top 10 categories or top 10 products.
  • Category(s): Here you can select multiple categories to filter the report. This option will be hidden if you select analysis type as Products.
  • Products: The products will be in this drop-down will be displayed on the basis of categories you have selected. If analysis typeset as Product, it will display all the products.
  • Start and Date: To Specify start and end date.
  • Filter: To display filtered data, the user must have to click on this button.
  • Reset: On clicking this button, the module will reset all parameter and display default report i.e displaying report according to categories.
  • Export: To export the current report in excel.

2. Category(s)/Product(s) Statistics: This Prestashop wishlist addon by Knowband shows a bar graph which will display top 10 categories or top 10 products on the basis of analysis type.

3. Category(s)/Product(s) List: In this, Prestashop advanced wishlist addon will list all the categories/products in descending order. If the analysis type is “Category” the module will display the category name in this list as clickable. On clicking the category, the module will display how many and which products of this category shortlisted by customers in the pop up box as shown in the below screen:

7.0 Customer Analysis

This Knowband Prestashop advanced wishlist addon shows the tab to display the list of customers with their number of shortlisted products. Here, the admin can also view the products list shortlisted by the particular customer.

1. Filter your analysis: The filter will be used for filtering data. There are folowing parameters on the basis of you can filter report:

Category(s): Here you can select multiple categories to filter the report.

Products: The products will be in this drop down will be displayed on the basis of categories you have selected.

Start and Date: To Specify start and end date.

Filter: To display filtered data, the user must have to click on this button.

Reset: On clicking this button, the Prestashop save for later module will reset all parameter and display default report i.e displaying report according to categories.

Export: To export the current report in excel.

2. Customer Analysis Report: In this, the Prestashop wishlist module will list all the registered customers and guest customers (who have placed an order as the guest) with how many products he/she has shortlisted. The customer email in this link will be clickable. On clicking email, a popup will display to showcase which product he/she has shortlisted and among these, which products are bought by corresponding customers as shown below:

8.0 Order Analysis

This tab is for doing analysis on the basis of how many products are ordered after shortlisted by the customer as shown in below screen:

1. Filter your analysis: The filter will be used for filtering data. There are folowing parameters on the basis of you can filter report:

Category(s): Here you can select multiple categories to filter the report.

Products: The products will be in this drop-down will be displayed on the basis of categories you have selected.

Start and Date: To Specify start and end date.

Filter: To display filtered data, the user must have to click on this button.

Reset: On clicking this button, Prestashop save for later addon will reset all parameter and display default report i.e displaying report according to categories.

Export: To export the current report in excel.

2. Order Report: In this, Prestashop advance wishlist addon by Knowband will list all the products which are shortlisted by customers with Purchased status. This Purchased status will tell you that this product is bought after shortlisted by the same customer.

9.0 Front End

After enabling the Prestashop wishlist addon the front-end user will see a bottom bar at every page of the front-end containing the blocks as they are enabled using the admin panel of the plugin.

The bottom bar at the front-end appears as follows:

PrestaShop Advanced Wishlist Addon 1.6

PrestaShop Advanced Wishlist Addon 1.7

The highlighted Shortlist button will allow customers to shortlist corresponding products into the separate bucket. This bucket displays at the bottom of the page as highlighted in above screen.

When the customer clicks on Shortlist button, the product will be added into bucket and button text will be changed from Shortlist to Added.

My Shortlist Pop-up

This Prestashop advanced wishlist addon by Knowband shows pop-up contains the products that are shortlisted by the customer. The customer can also remove the products from the shortlist by using the cross sign in front of products from the pop-up.

PrestaShop Wishlist Addon 1.6

PrestaShop Wishlist Addon 1.7

Recently Viewed Pop-up

This pop-up contains the products that are recently viewed by the customer. They can directly go to the product detail page of any product listed in this pop-up by clicking on the product name or by clicking on the ‘Buy’ button in front of the respective product.

PrestaShop Advanced Wishlist Addon 1.6

PrestaShop Advanced Wishlist Addon 1.7

Recommendations

Content of this pop-up depends upon the choice of the admin. This Prestashop wishlist addon may have a list of selected products, it may have related products based on the browsing history of the customer or it can also have a maximum of two banners with an option of the link over them.

The recommendation pop-up with banners looks as follows:

PrestaShop Advanced Wishlist Addon 1.6

PrestaShop Advance Wishlist Addon 1.7

The online store admin can provide an option to share wish listed products on social media platforms like Facebook, Twitter and Whatsapp:

Online users can view whatsapp sharing option on their mobile devices:

The online users can view a specific tab for viewing wish list.

The online users can view wishlist on checkout page.

The online users get an option to move any cart product in wishlist:

Important Things

  • Refresh home page of your store every time you enable/disable plugin. If Prestashop favorite product list module is not working after installation then please check permissions on modules folder. The folder should be writable. Please make the folder permission to 755.
  • Before Installing Prestashop wishlist module, please check that Customer.php file already exists in root/override/classes/ folder. if yes, then Please remove it and clear the cache. We prefere that if exist, then please contact to our support to doing the same.

Now you can try Prestashop advanced wishlist addon by Knowband for on your Prestashop website. KnowBand Prestashop save for later addon helps you engage more customer to your store & increase the customer base.

Knowband Prestashop Wishlist Module Link: https://www.knowband.com/prestashop-advanced-wish-list

Knowband Prestashop Wishlist Video Link:  https://www.youtube.com/watch?v=sYHaC91d4cc

Knowband Prestashop Wishlist Admin Demo Link: https://ps.knowband.com/demo1/16/admin1/index.php?controller=AdminLogin&token=aea1bb3fb1bab860c86c4db00ce5949e&redirect=AdminModules&demo_lang=en

Knowband Prestashop Wishlist Front Demo Link: https://ps.knowband.com/demo1/16/en/

Addon Store Link: https://addons.prestashop.com/en/wishlist-gift-card/18276-knowband-advanced-wish-list.html

You Might Also Like: