How to Connect your PrestaShop Store to the Etsy marketplace?

Exciting Updates in Knowband’s PrestaShop Etsy Integrator – Version 4.0.1

We’re always looking for ways to make your Etsy integration smoother and more efficient. With the latest Version 4.0.1 of our PrestaShop Etsy Integrator, we’ve added a couple of features that we think you’ll find really useful.

[Alert]Make sure to upgrade before 18 January, as connections may be interrupted if the module isn’t updated by then.

1. Seamless OpenAPI Authentication for Etsy
Etsy has updated its API authentication, and we’ve updated our Prestashop Etsy Marketplace Connector Module to match. All your API requests now include the necessary authentication headers, so you don’t have to worry about interruptions. Your PrestaShop store will continue to communicate with Etsy smoothly, exactly as before, just better.

2. Simplified Return Policy Management
Handling return policies can be tricky, but we have made it easier. You can now create multiple return policies and assign them to different profiles. Not only you can you create, but you can also sync the existing policies from Etsy Marketplace by running retun policy cron.

Once a profile is linked to a product, the return policy is automatically updated on Etsy. This saves you time and ensures your listings always display the correct information for your customers.

These updates are part of our ongoing commitment to make your PrestaShop-Etsy integration as seamless and hassle-free as possible.

If you run an eCommerce store and not satisfied with your sales, you might be thinking about several ways to improve the same. Starting a shop on some popular marketplace is one such idea that might have surely come into your mind. Well! If so, this is a good decision as it will help you to leverage the traffic and customer base of an already established marketplace and generate some serious sales for your business.

The aim here is to expand the reach so as to generate desired revenue from the business. However, It might be a tough task to manage two shops on different domains at the same time. Therefore, I am going to explain how can you manage to be a seller on a popular marketplace like Etsy and manage your own eCommerce site at the same time.

PrestaShop – Etsy connection
Both your website and selling on Etsy shop are important; managing both the entities separately is not an easy task, though. You need time, effort and manpower to make sure everything goes as planned. It made us realize, if we can integrate your eCommerce site and a marketplace like Etsy, it will curtail a huge burden at once by allowing a store owner to sell on the marketplace directly from his eCommerce store.

A PrestaShop-Etsy connection is a similar approach that works by integrating an interface on the PrestaShop back-office which possess the controls and configurations for:

  • Synchronizing the updates and changes in the stock
  • Managing orders received from the Etsy store
  • Preparing product feed for Etsy listing
  • Preparing different profiles for Product listing for bulk uploading of the products or selected products of the store
  • Preparing product Shipping options for Etsy orders
  • Setting up an Etsy API configuration to establish the connection

1. The connection setup
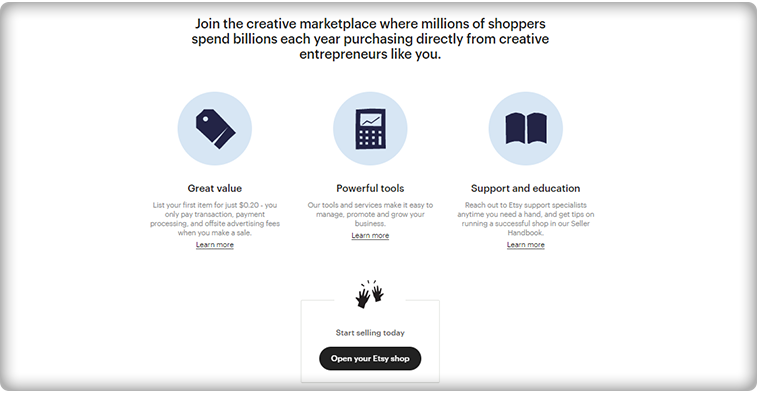
The PrestaShop-Etsy integration process is simple and you can do it without knowing to code.

To start selling on Etsy Marketplace you will need a seller account on Etsy. Create a seller account on the Etsy marketplace before you can set up a Prestashop-Etsy connection. After seller account registration, you need to set up an App on Etsy to get the API details. The API details will be used by the PrestaShop-Etsy integration module to set up a connection between the store and the Etsy seller account. The integration allows you to select the default language and the language in which you want to sync the product details, categories, shipping methods, and other features.
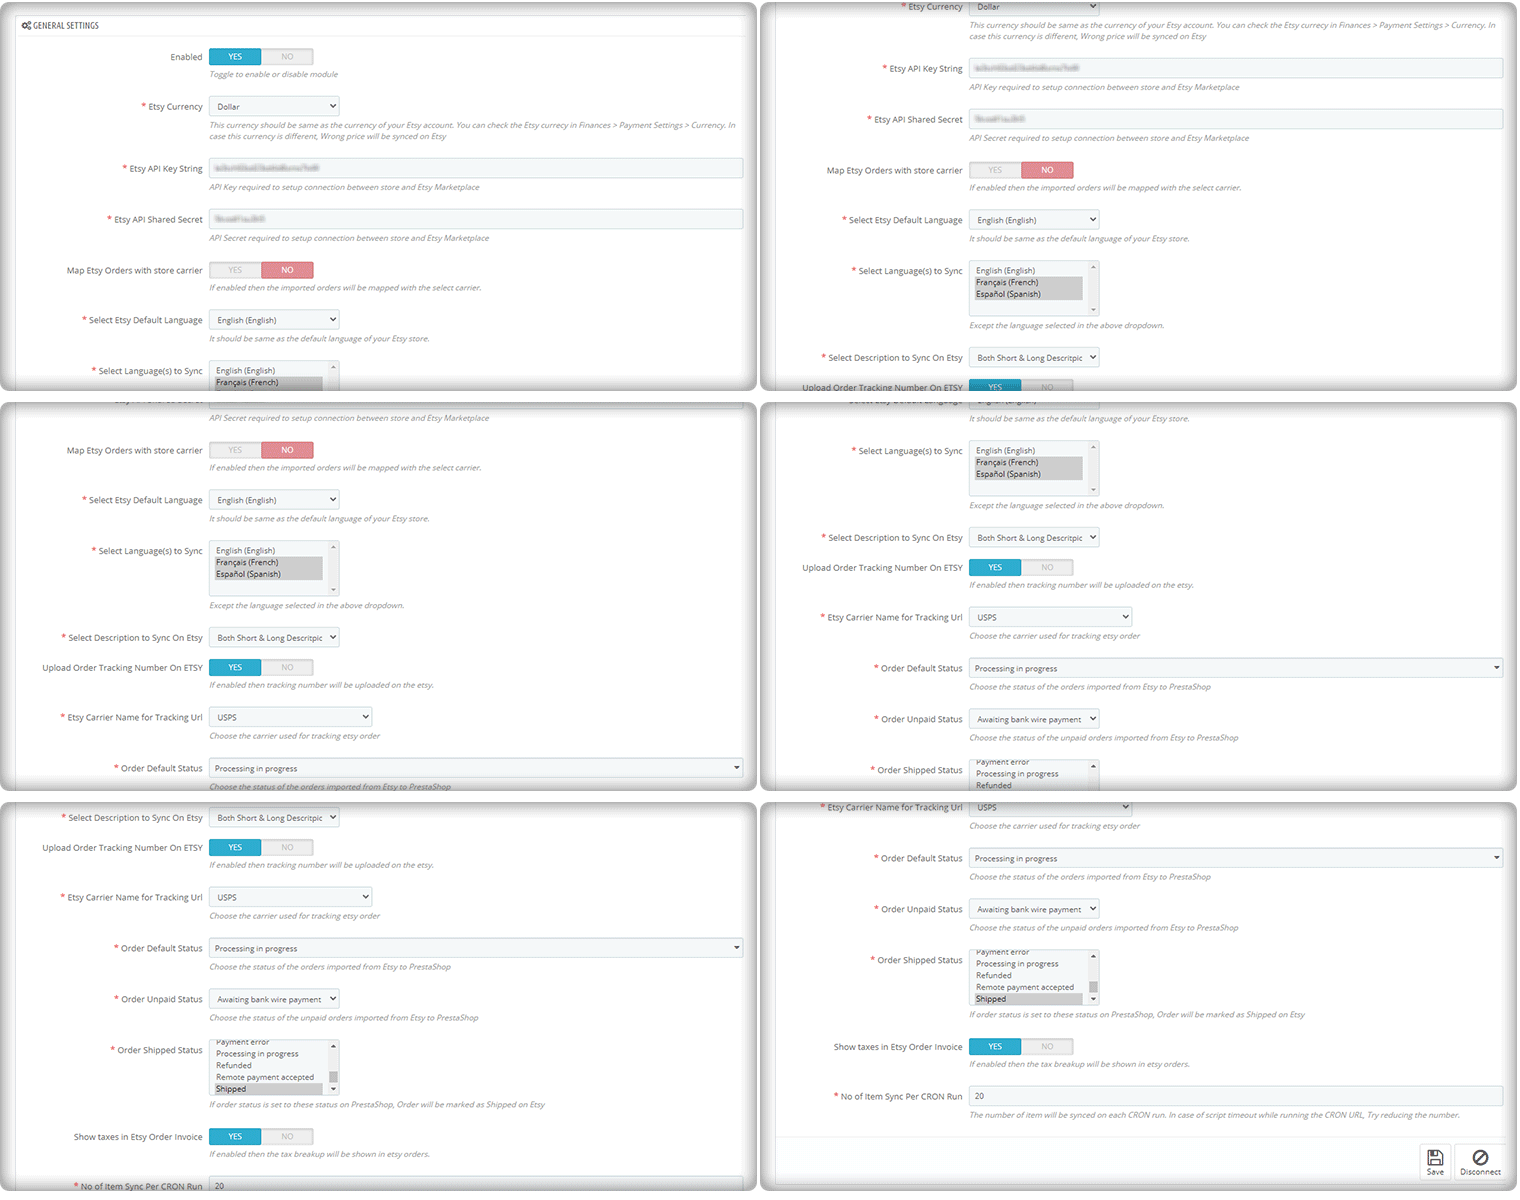
The updated version of the Etsy-PrestaShop Integration module allows you to upload the order tracking number for Etsy shoppers and the order status as well. There is an invoice setting that can be enabled if you want to show taxes on the invoice.

The auto cron run feature is the most appealing one and it lets the user select the number of products that can be synced automatically.

2. Shipping management for Etsy

Next, you will need to prepare the product feeds and upload them to the Etsy product listing. However, before your PrestaShop products are visible on your Etsy seller profile, you need to make sure that you have configured the shipping options.

The customers on the marketplace would want to see what shipping options are available with the product and when it is going to be delivered to them.

So, you must update the shipping options and let your customers on Etsy stay informed about them. You can add multiple shipping templates and improve your conversion rate because shipping is a major turn-off if a user couldn’t see the expected delivery date.
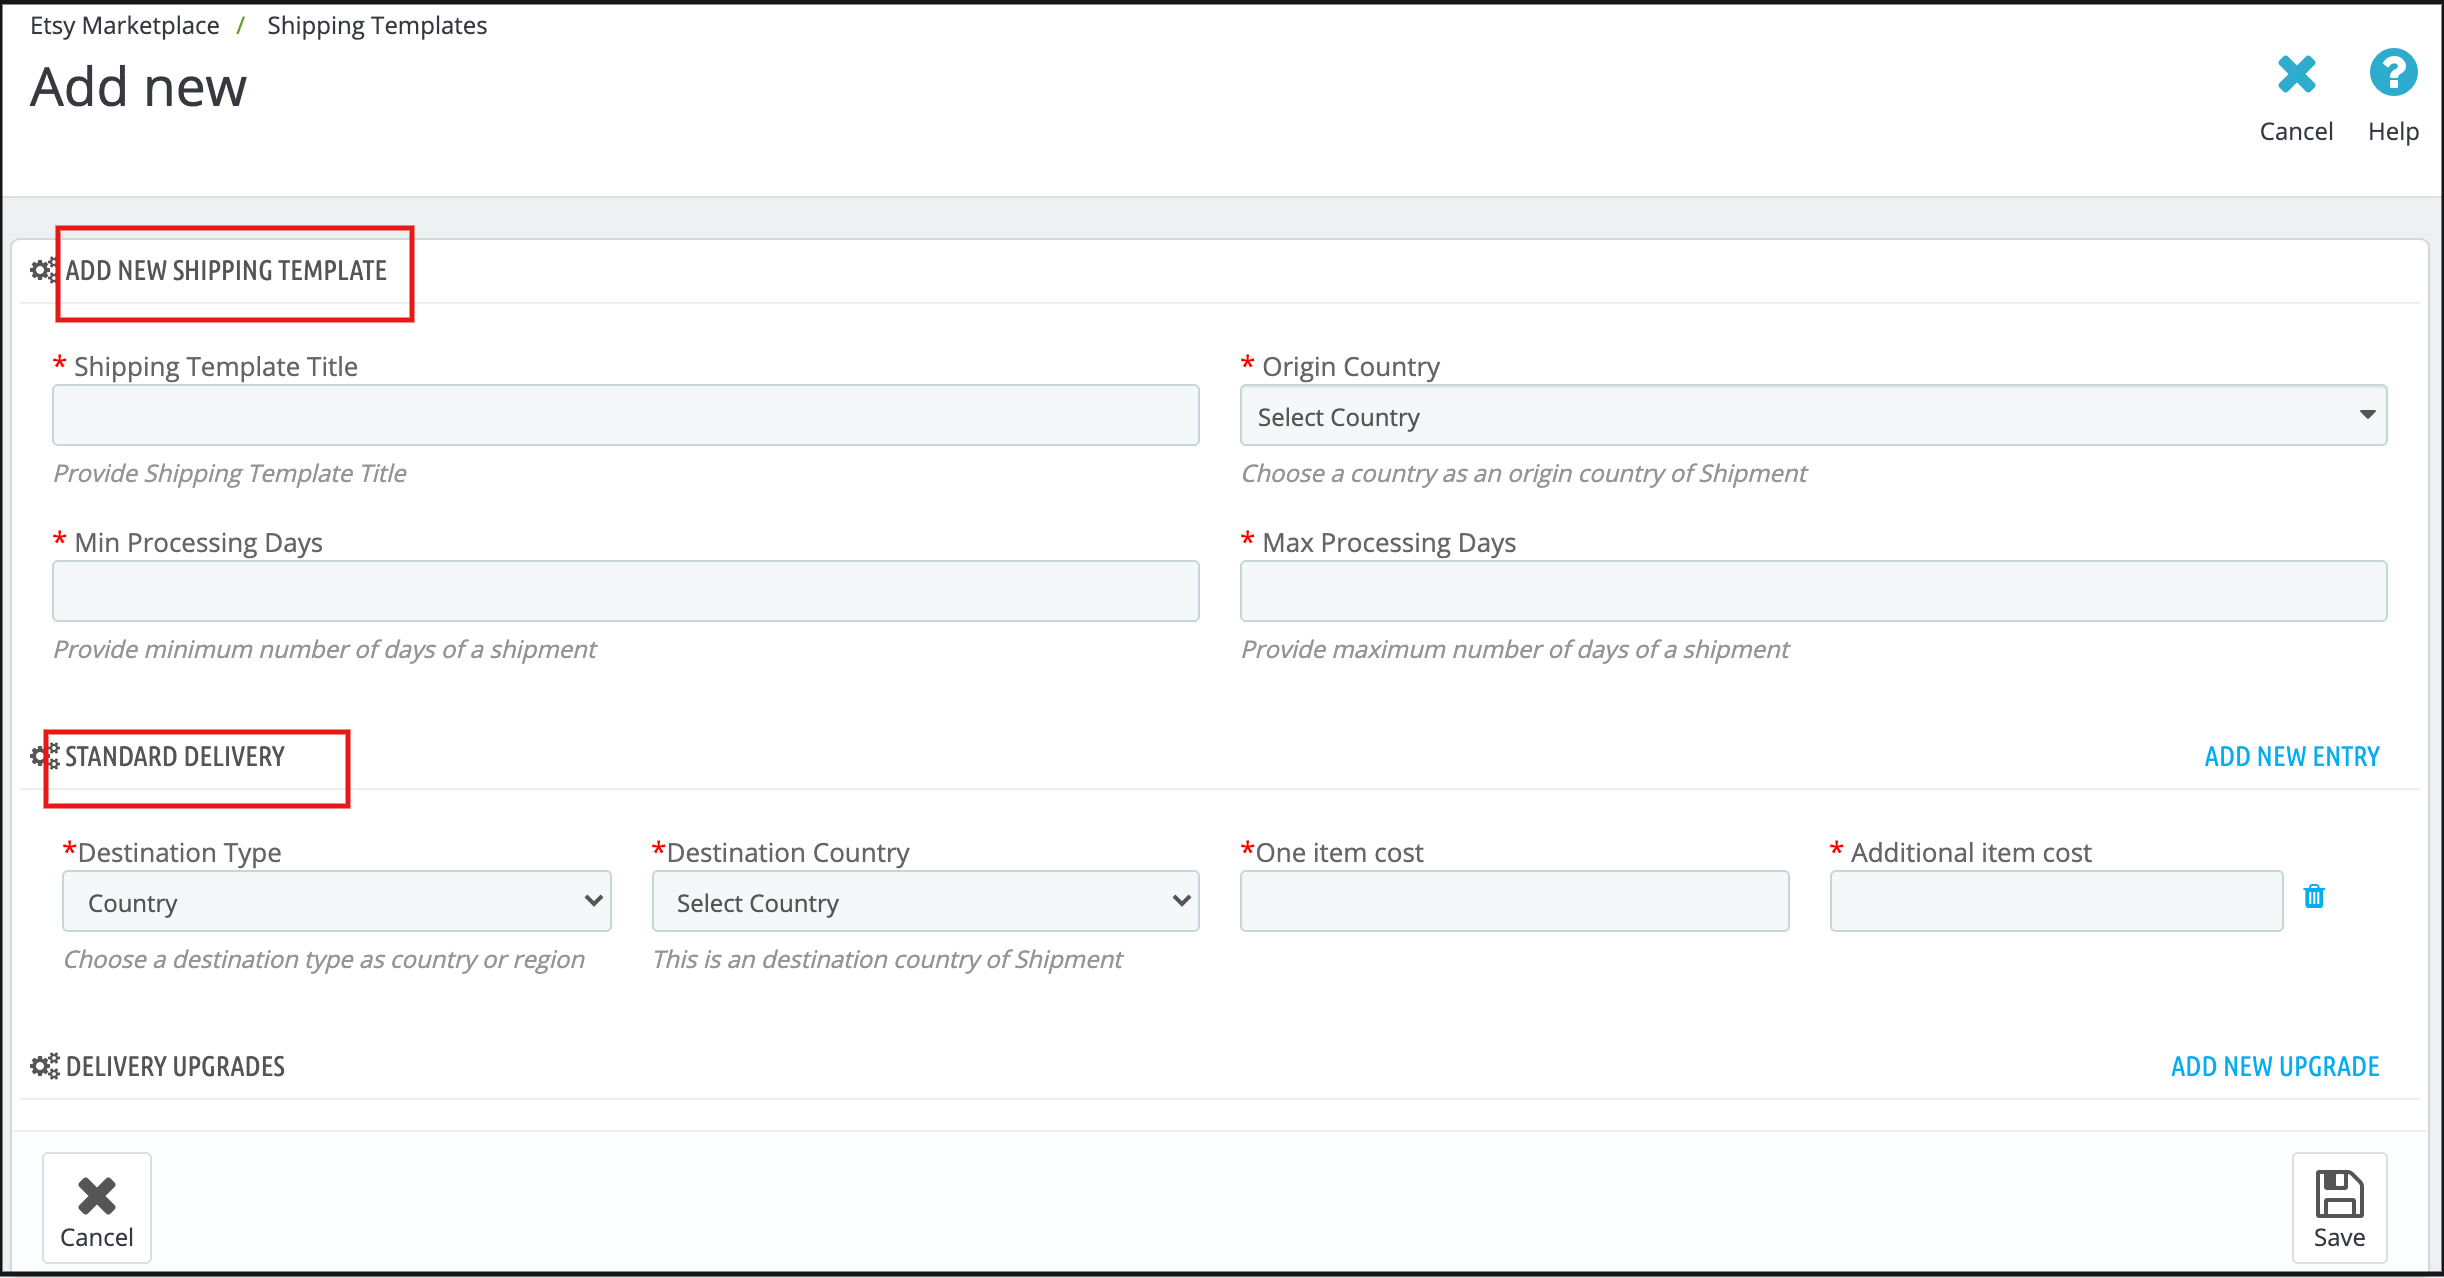
Prestashop Etsy integration module can be utilized for configuring the shipping templates by updating various information required by the Etsy marketplace. The interface of the shipping templates is the same as the Etsy Marketplace.

3. Product Listing for Etsy

To list the products on Etsy Marketplace the sellers first need to create the profiles. The seller can select the option to map the PrestaShop store category with the Etsy category or can select the products that need to be synced to the Etsy store.
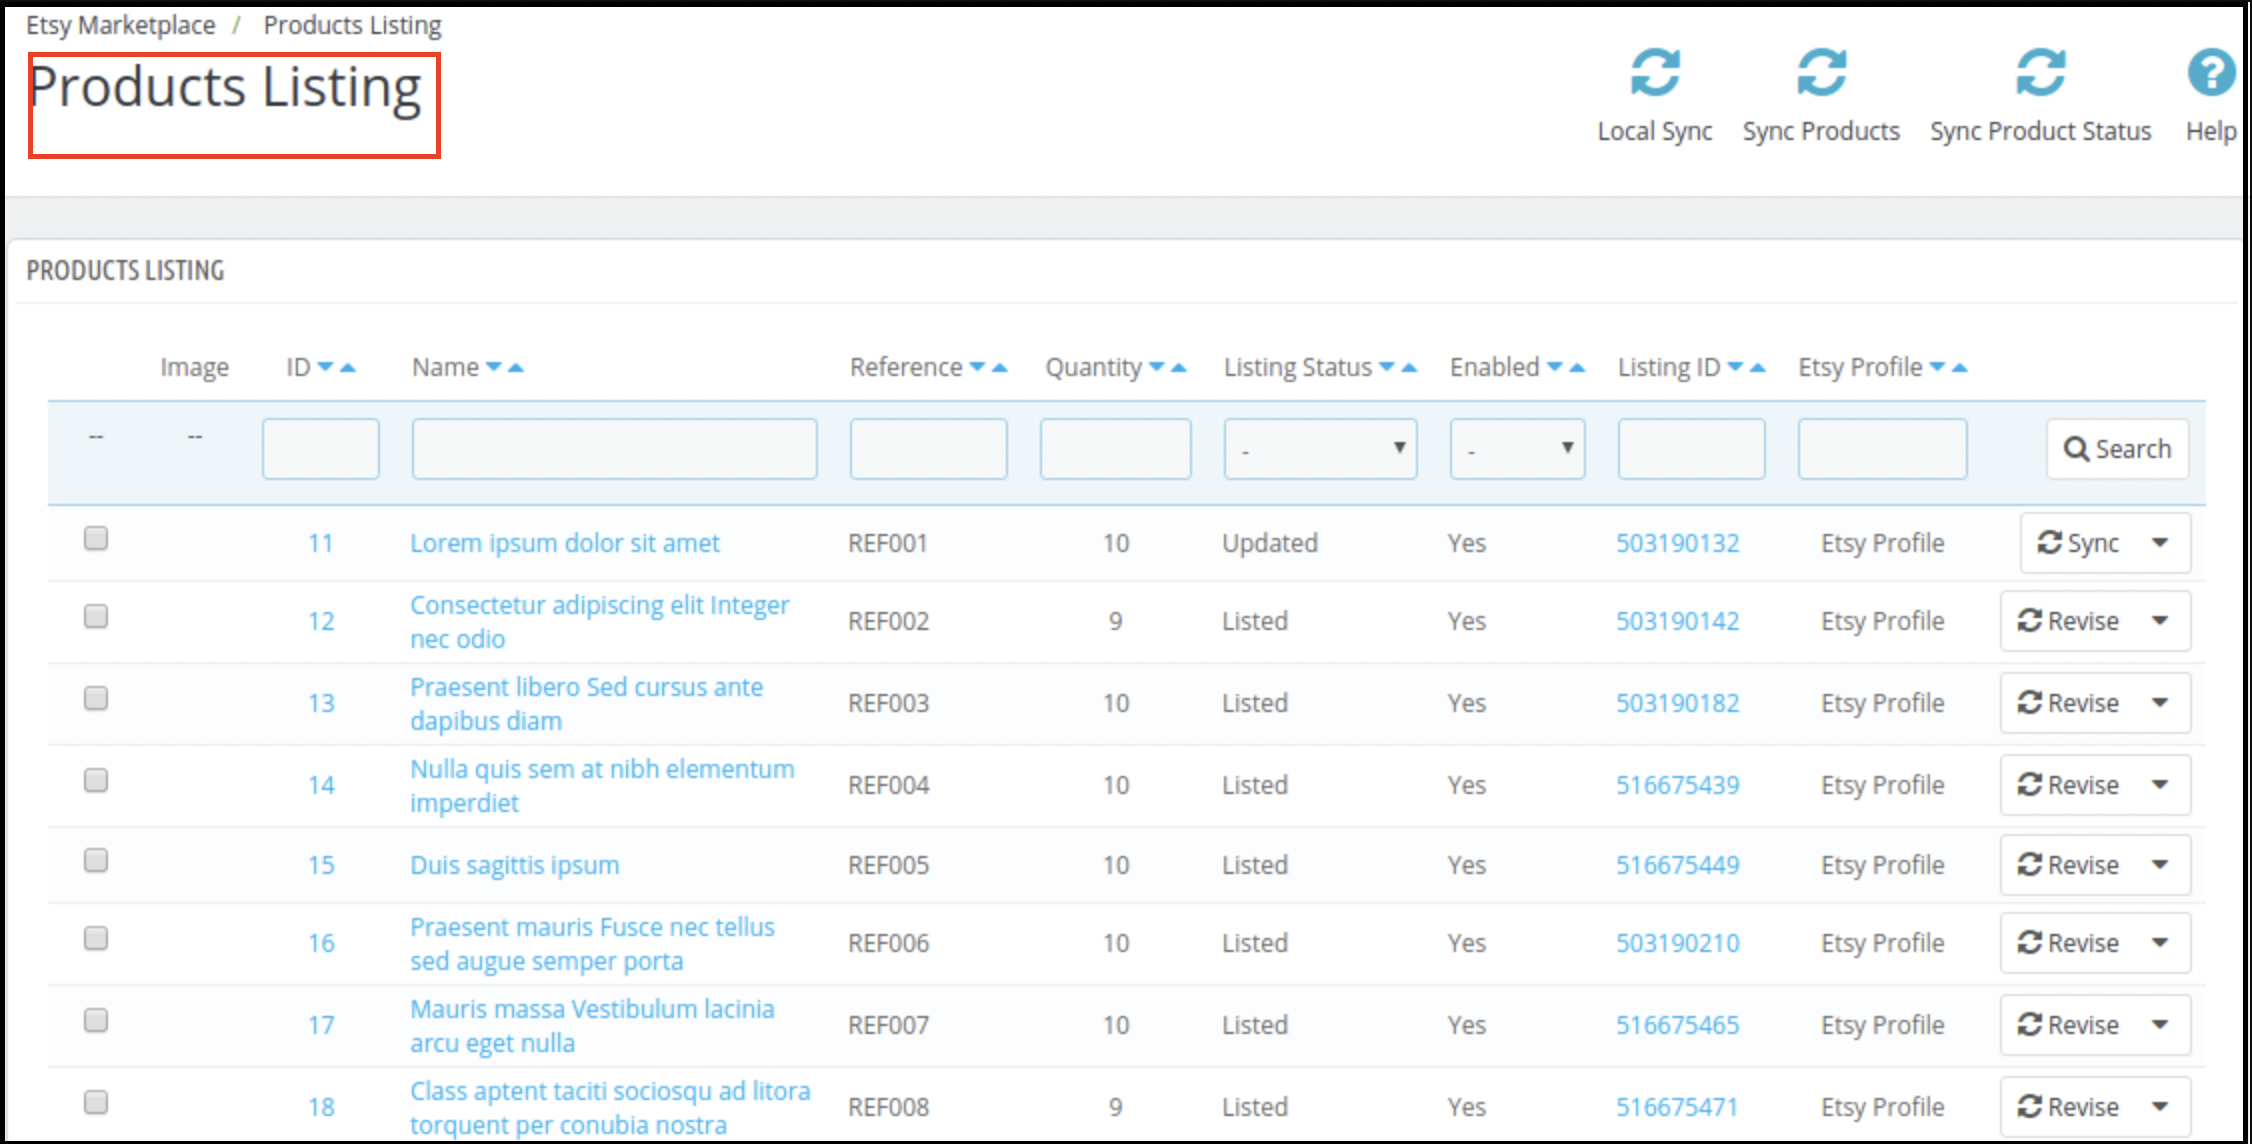
The cron setup will list the goods to the Etsy Marketplace from the PrestaShop Etsy Integration module along with the variants, inventory, and definition of the product. So, this purpose helps list the goods.

4. Local Sync Option

Local Sync synchronizes the product in the PrestaShop store to the Etsy Integration module. Sellers can synchronize their product from the PrestaShop store to an Etsy Integration module with the aid of local sync. This tab is available under the PrestaShop Etsy Integration extension synchronization tab. After syncing the products to the Etsy Integration module, the sellers can sync the products in bulk or sync the selected products as per their choice.

5. Synch Products individually

The listing status of the products is shown on the product listing tab of the integration module. The administrator may display items mapped to different profiles under this tab along with their Etsy Name, Listing Status, Etsy (Active, Ended), Activated or Disabled status, and Enable/Disable/Relist/Renew option. By running cron, the administrator may list the individual product or all the items.
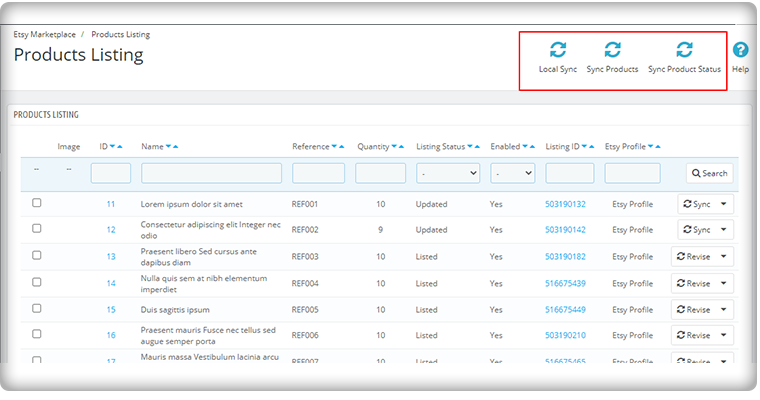
Also, the seller can easily remove the product from a specific profile, and it is impossible to add the excluded items to the Etsy marketplace. All of this can be conducted once the cron is executed from the PrestaShop Etsy Integration Extension back-office.

You can update the product status for all the products manually or by running the cron.

6. Product Feed Management for Etsy

When shipping options are configured and ready for mapping with different products, you can prepare product feeds that will be shown in the Etsy marketplace. The product feeds are created based on the profiles, category mapping, and attribute mapping between the store and the marketplace.

Creating a new profile will have the options to perform category mapping and attribute mapping according to which the list of products will be shown. From this list of products, you can select those products on your store which you want to upload on the Etsy marketplace.

7. The order management

In a standard Etsy seller account, when your products become visible on the marketplace, you start receiving the order for them. A PrestaShop Etsy connection works efficiently to let you manage these product orders from the PrestaShop dashboard itself.

Now, based on the order status mapping between the PrestaShop and Etsy marketplace, you can update the order status and perform all the order management tasks from your PrestaShop back office itself.

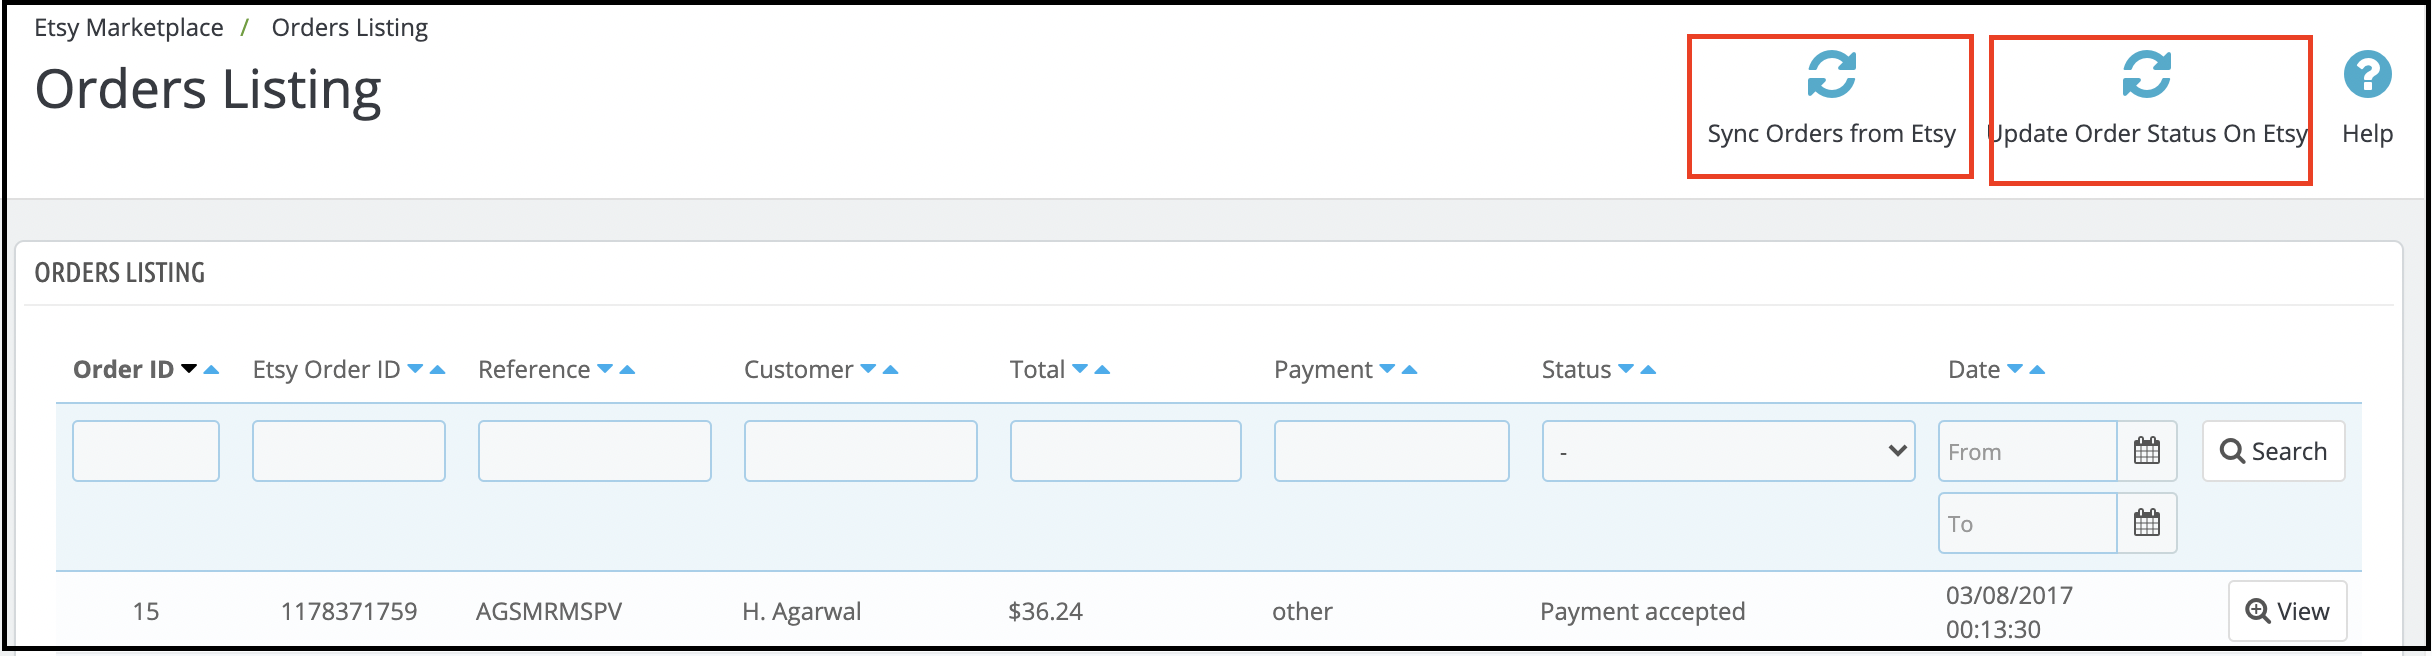
You can see the order ID, Etsy order ID, reference, customer details, total order amount, and payment status of placed orders.
Etsy product orders are listed on the PrestaShop dashboard as shown in the figure below:
Other Functionalities of Etsy-PrestaShop Integration Addon that helps you connect the store

Cron set up to automate the process

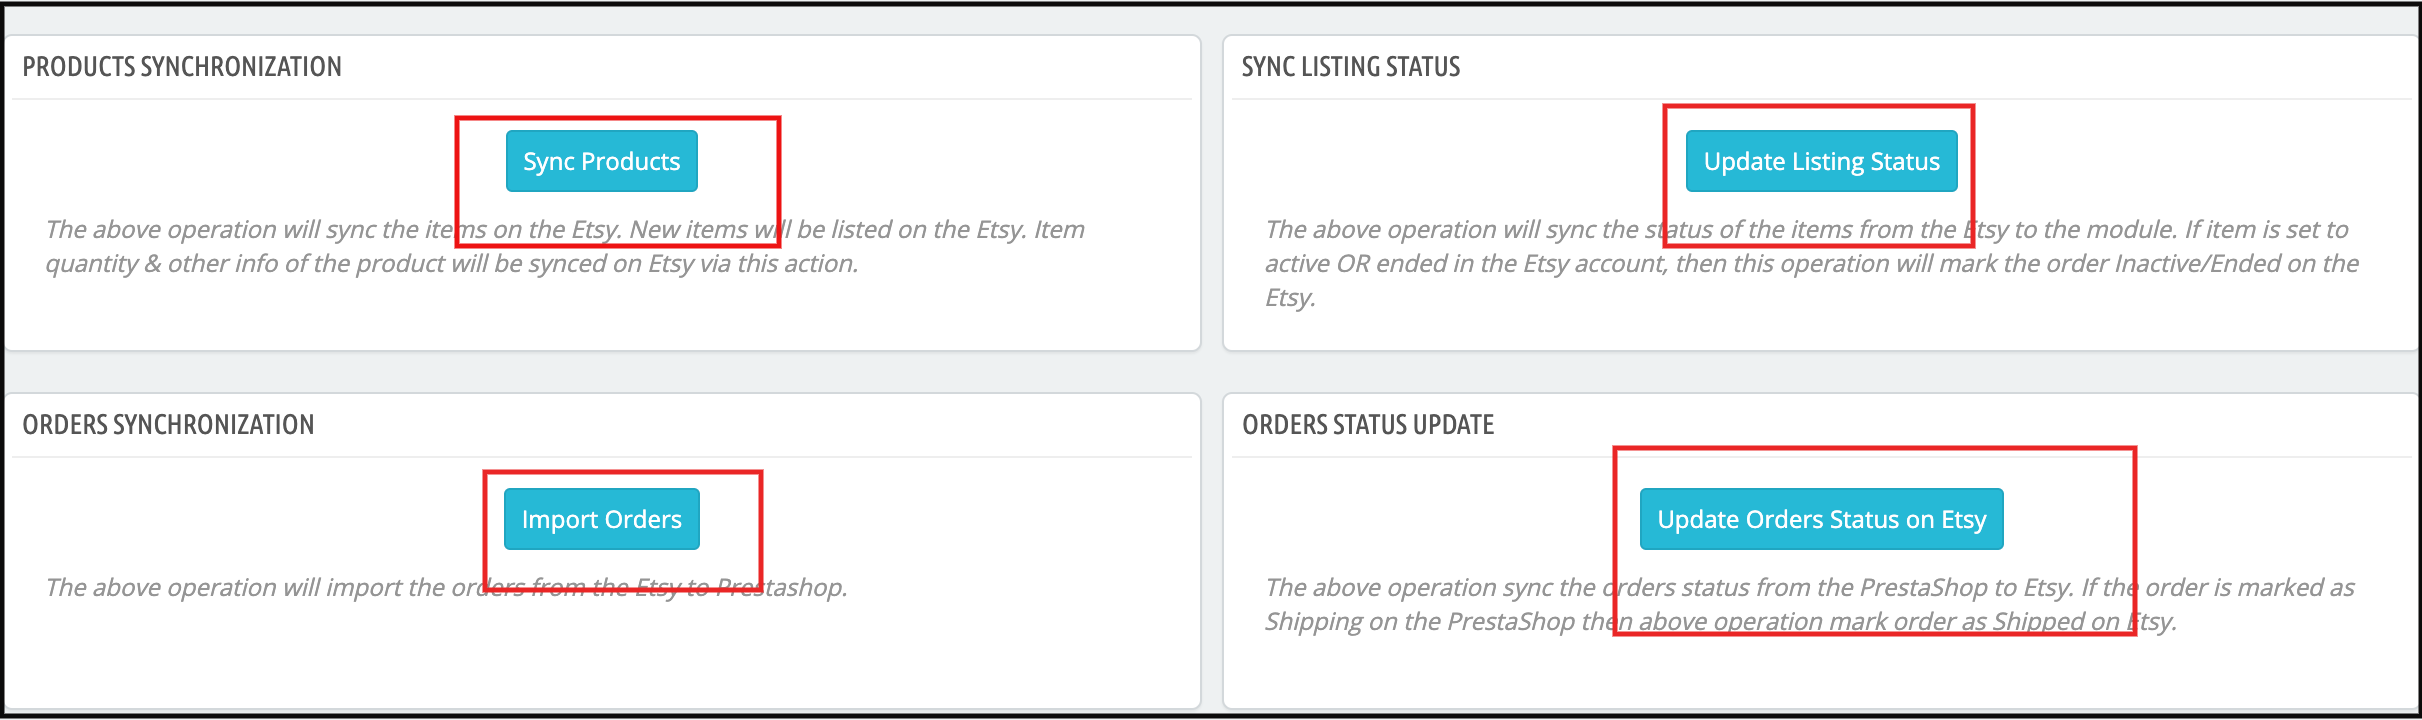
The admin can set up the cron jobs so that the inventory update, order sync from Etsy to PrestaShop, and order status update from PrestaShop to Etsy will work automatically. Newly added products will also get updated accordingly.
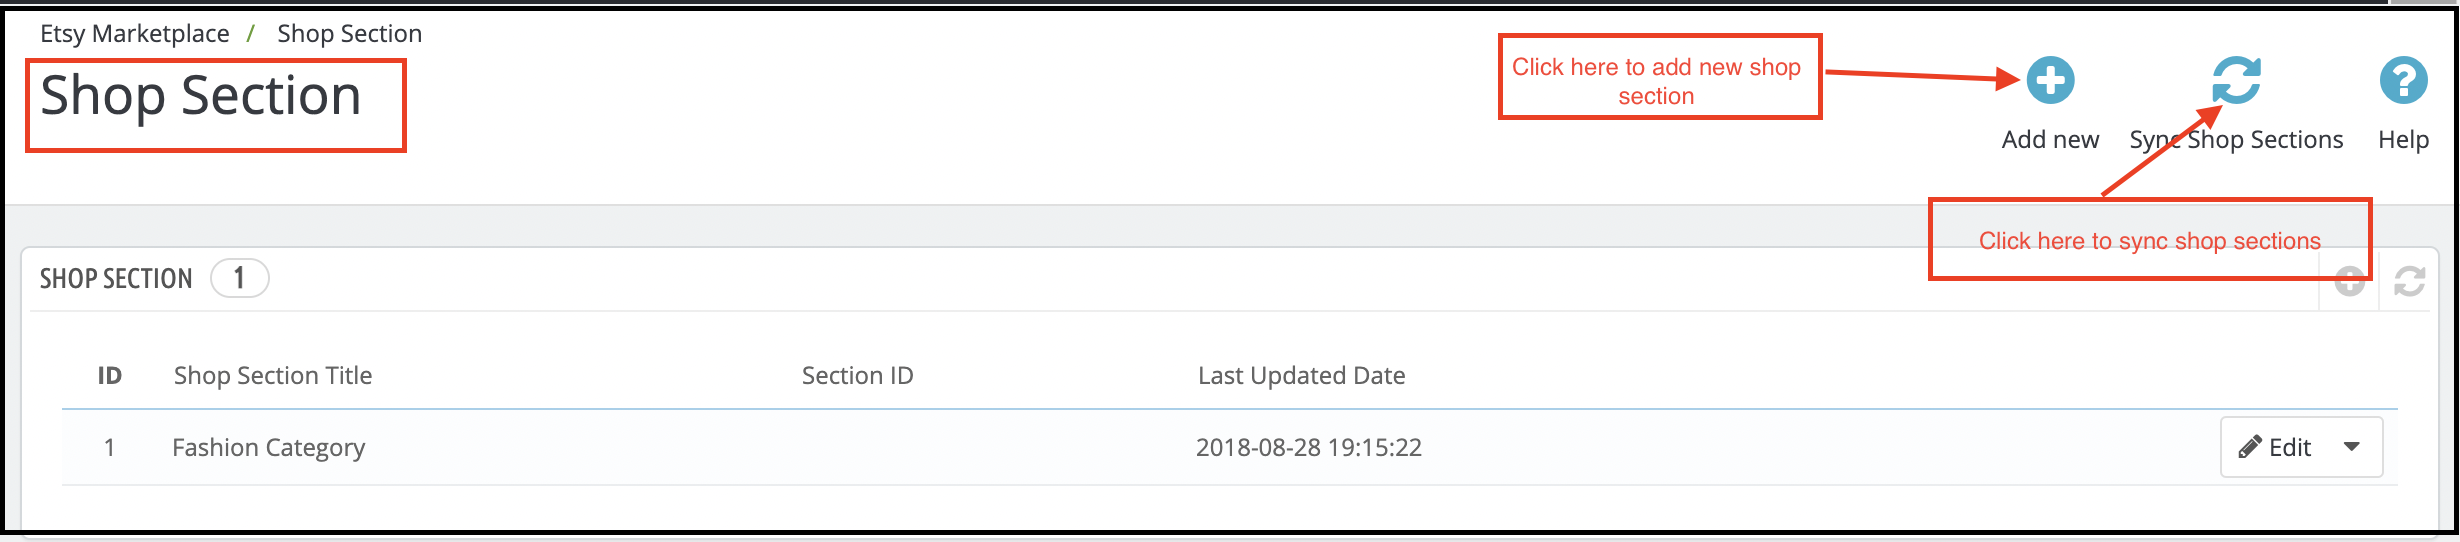
Add Shop Sections

The PrestaShop Etsy Integration add-on provides an option to create the store and the profile can be mapped to the store. Category Wise Mapping
The PrestaShop store administrator needs to map the PrestaShop store category to the most appropriate Etsy Store category to list the items on the Etsy Marketplace, so that all PrestaShop store products can be mapped to the correct Etsy category.

Managing Profiles with Ease

Admin can pick simple settings to list the product with the aid of profile management, such as – Etsy Shop (country-wise), Currency, Language, and Shipping Profile. Using the Size chart image function, Store Admin may add an extra image for each profile. This image will be added as an extra image to the Etsy marketplace.
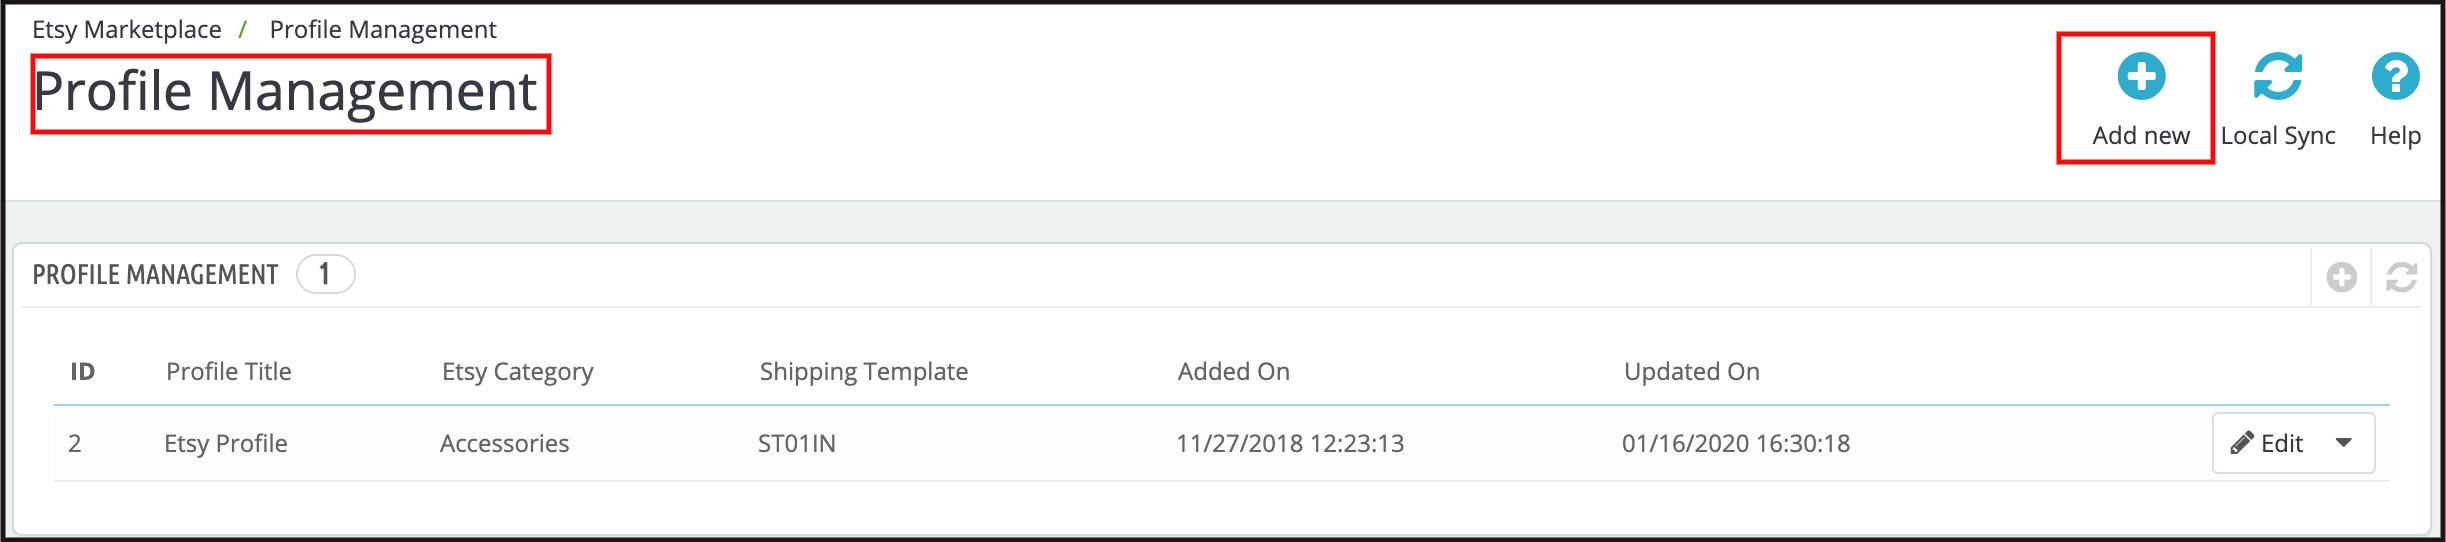
You can customize the product title by inserting certain details and placeholders with the title. The place-holders like {sample} will be replaced by dynamic content at the time of execution.

The Custom Pricing for Etsy

Integration Extension enables the PrestaShop store administrator to list their goods from the PrestaShop store to the Etsy Marketplace at a price different from the price of the PrestaShop store.

Using PrestaShop Etsy Integration Extension, the admin may increase or decrease the price range at the Etsy Store. The administrator has the option to list the goods at a lower or higher price based on fixed or percentage-wise changes.

Product Image Size

Prestashop Etsy Integration module allows the admin to select the size of the product image in our module to sync the same to Etsy Marketplace.

Alter Quantity

The admin can set a maximum quantity of products that will be synced to Etsy with the products. If a product has 10 quantities on the store but Alter quantity is set as 5 then only 5 quantities will be synced to Etsy for that product.

Sales Data Analytics and Stats

It allows the store owner to use PrestaShop Etsy Integration Extension to monitor the sales report.
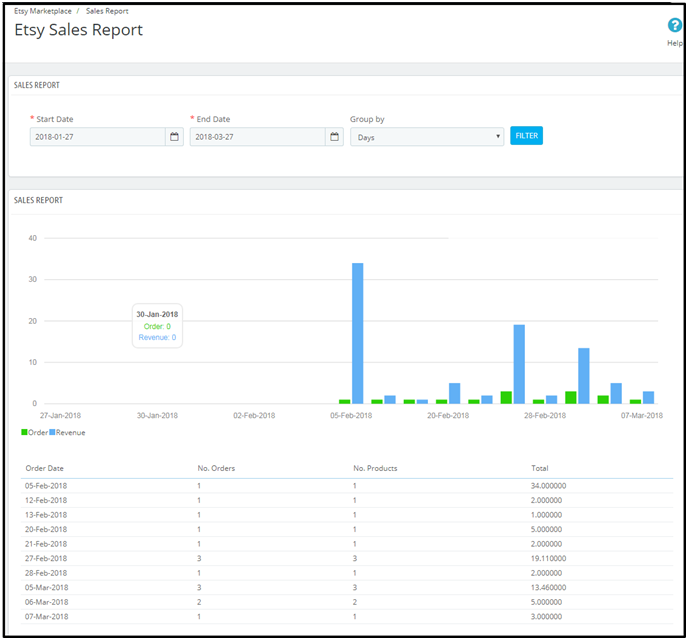
The Etsy PrestaShop integration plug-in sales report tab helps the sellers to access the order and revenue report. This helps the administrator to review the sales report for orders from the Etsy store.

Also, a product sales report is displayed that allows you to see the product-wise status.

Watch how to connect Prestashop store with Etsy Marketplace

This is how a PrestaShop-Etsy integration works to allow an eCommerce site to receive orders directly from the Etsy marketplace. An effective PrestaShop-Etsy connection lets you perform all the activities of a seller account from the PrestaShop admin panel itself. Knowband’s PrestaShop Etsy integration module is one such PrestaShop module that you can leverage to generate heightened conversions on your store. It’s time you accept the importance of being a part of a popular marketplace and understand how you can leverage them to generate sales for your business.

 

Related Stories:

What makes the PrestaShop Facebook Login Extension a necessity?

Facebook and PrestaShop are the two names that do not require any introduction today. The two have already built a strong identity among their respective audiences and they are growing stronger day by day. A PrestaShop Facebook login extension is a special addition to the PrestaShop’s core login system where the only way to login to a user account was through an account registration. The PrestaShop Facebook login extension enables a PrestaShop store to acquire the capabilities to accept and allow a social login feature through the Facebook credentials.

Facebook is the largest social networking platform today. It is assumed that a user coming to an eCommerce site would surely have an account on this popular social media platform. Now, if the PrestaShop site can leverage the availability of such a huge number of Facebook users for capturing the user’s information required for an account registration, it will spare the users from manually entering that information. As a result, it will reduce a heavy burden of account registration form-filling activity from the customers.

How does a PrestaShop Facebook login work?

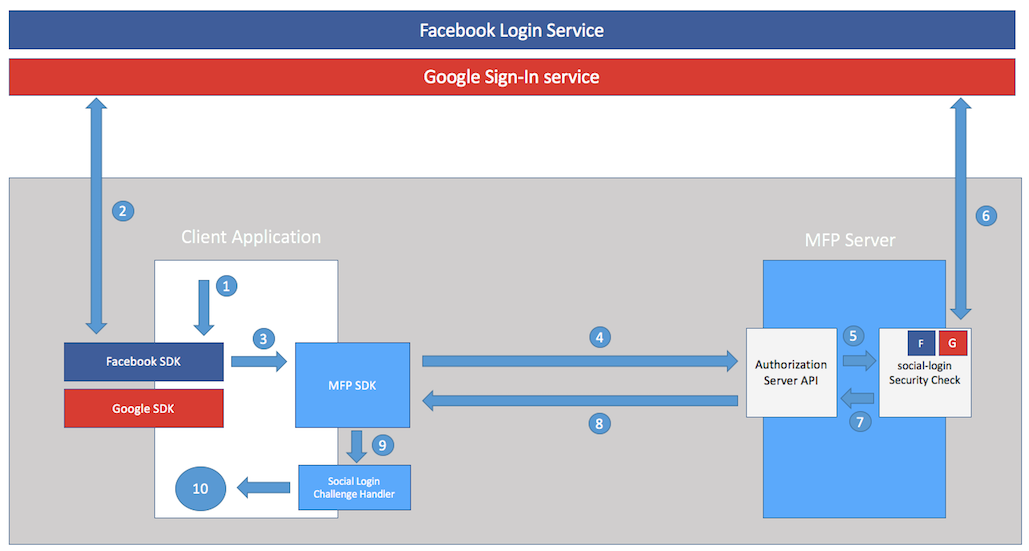
                                                                 How Facebook or any social login works

Installing a PrestaShop Facebook login extension delivers the functionality to accept Facebook social login on the PrestaShop website. Facebook officially provide an API setup that facilitates the information fetching from the Facebook profile of the user to the PrestaShop application.

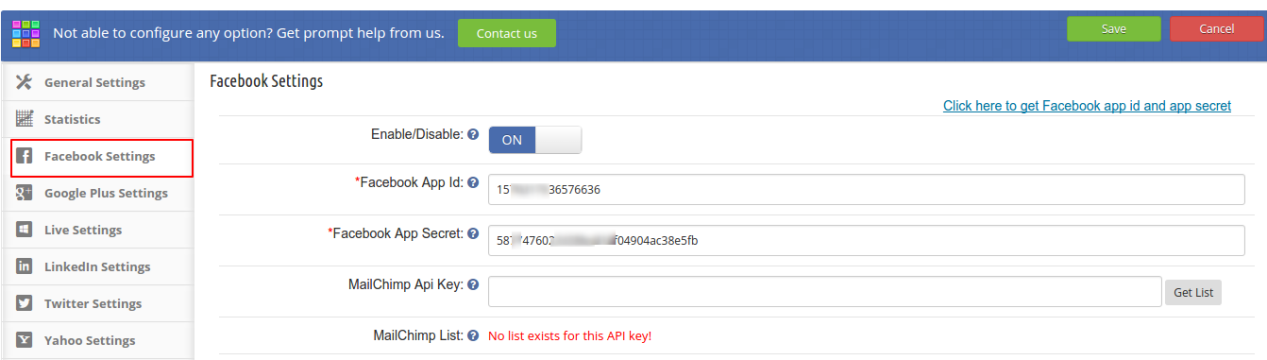
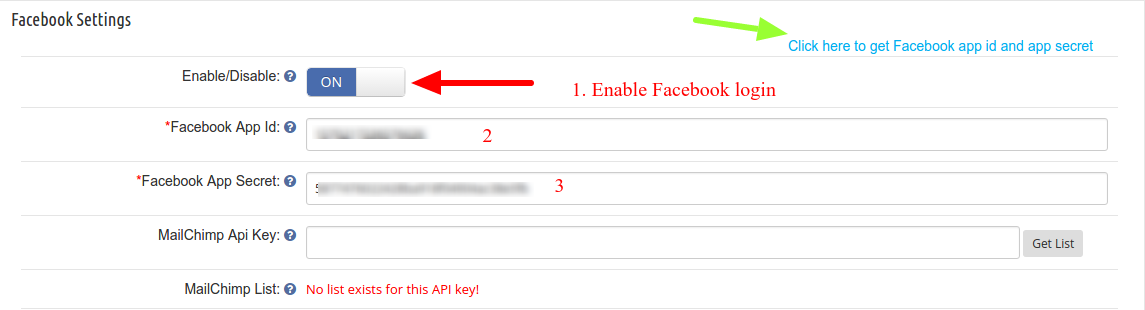
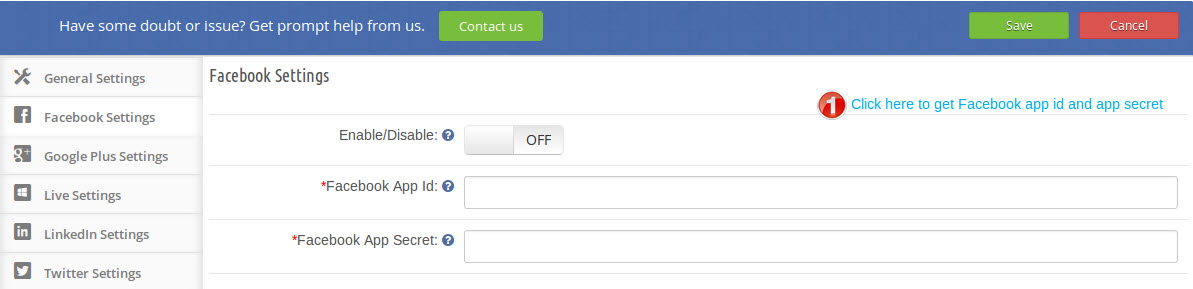
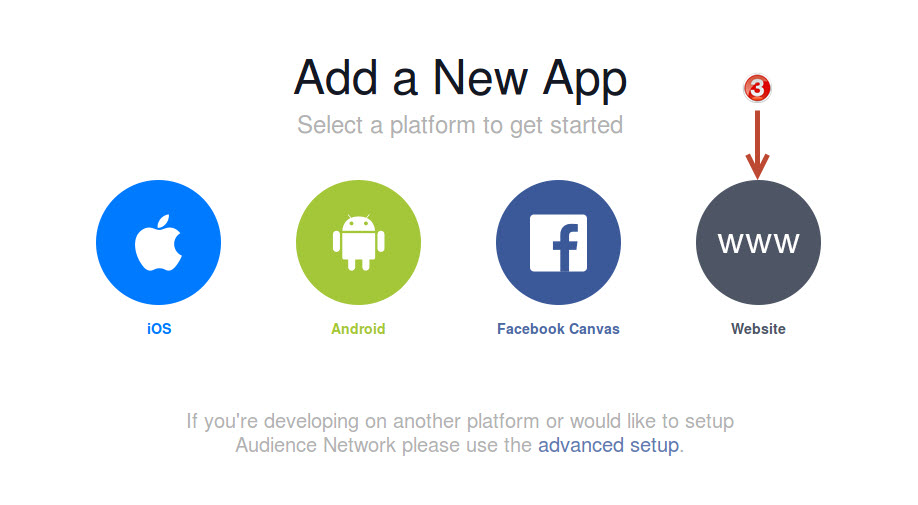
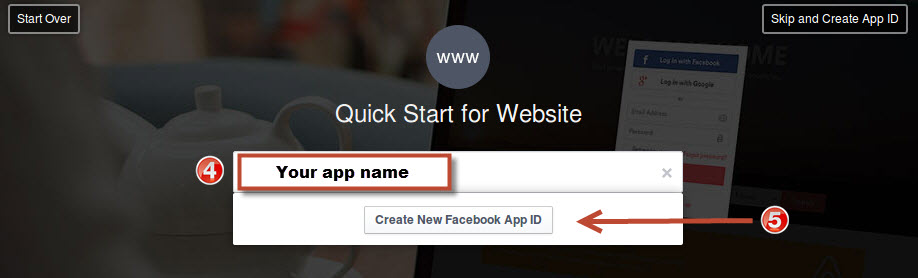
The API configuration is made on the Facebook account and after the configuration, Facebook provides an APP ID and APP secret key that needs to be updated in the PrestaShop Facebook login extension’s configuration setup. By entering the API information in the module’s configuration it authenticates the PrestaShop Facebook login extension to facilitate an information exchange required for a successful social login through Facebook.

Required details to configure a Facebook login

The information acquired through the Facebook is then saved in the PrestaShop database and is utilized by the PrestaShop Facebook login extension to create a user account automatically on the PrestaShop store as well; that too without filling a registration form.

How important is Facebook social login?

1. Facebook has the largest base of users-

Facebook being the largest social networking site poses a huge base of users. It is already a proven fact a large number of shopping carts abandonment occurs due to the requirement of compulsory account registration on the eCommerce sites. So, if you can leverage the huge user base of Facebook and start accepting the PrestaShop social login on your site, you will automatically eliminate a huge reason for shopping cart abandonment. Moreover, a Facebook login will be a great advancement on the usability and conversion optimization front either.

2. Customers do not like to create an account-

An account registration is one of the heaviest tasks that you would ask your customers to do before purchasing anything from you. If you ask them to create an account before they can purchase anything, they will simply abandon your site and look for an alliterative site where account registration is not compulsory. So leveraging a Facebook login will be a good option here. It will allow the customers to create an account with just one click on the Facebook login button and entering their Facebook credentials.

3. It’s tricky for them to remember account credentials-

There are a large number of eCommerce and other websites people use every day. Now, for each of the websites, they would have a user account. So, it becomes very tricky for the users to remember the account credentials for each of the account they possess on the internet. A regular account on your website would be nothing but just an addition to the list of forgotten passwords. A PrestaShop Facebook login extension would spare the customers from this burden very effectively. They do not need to remember the credentials of each account they have. Just the Facebook login credentials are enough to log into any website having Facebook social login facility.

4. Your rival sites have it already-

The most important reason for why you should have a Facebook login is because your competitors already have it on their website. The rival sites will not spare a chance to steal your customers anyhow. They will jump with their Facebook login option in case any customer leaves your site because of any of the above-explained factors. So, you need a similar weapon that will prevent your website from losing customers. PrestaShop Facebook login extension is certainly the one tool for you here.

The role of a PrestaShop Facebook login extension in eCommerce is too huge to explain in a single post. It is just that you need to stay updated with trending techs to acquire customers. Social login through Facebook is one such tech for you which you should not miss.

This Would Also Interest You:

Setting up the PrestaShop Google Login for PrestaShop sites

A PrestaShop social login module can be used to integrate a Google login to your eCommerce site. Social login module constitutes of several other social login options such as Facebook social login, Twitter social login, Drop box social login, etc. When webmasters implemented a social login for the first time, it was believed that most of the customers have an account on at least one of the social sites. So, the webmasters can effectively utilize the customers’ information in these sites to create a user account on their websites, and that too without asking the customers to fill a lengthy registration form.

Why has Google Login been a success?

Google is one of the most used, search engine, email services, and a social network. In parallel to other social sites like Facebook and Twitter, most of the customers have a Google account. So, why not utilize this platform for optimizing the user experience on the websites.

Considering the PrestaShop websites, they are one of the most popular eCommerce platforms today. Everyday, a large number of new PrestaShop websites are coming live and one thing they lack is the Social login option. So, we have found a way to make this platform even more strong in terms of usability and optimization. The PrestaShop Social loginizer module allows a perfect combination of Google login and PrestaShop to be implemented on your eCommerce site. With the availability of other 12 social login options in the same PrestaShop module, this PrestaShop social login module is a wise choice for your pocket.

How does Google login work?

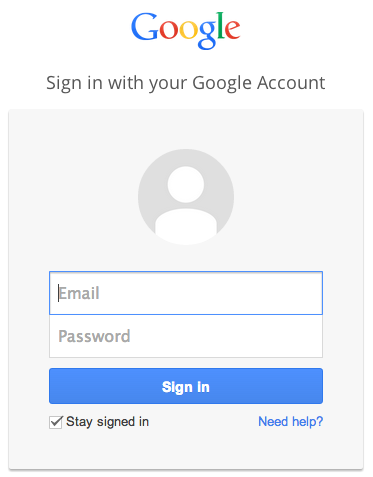
One thing is clear here, you don’t have to worry about the user authentication. Google will handle that for you. When you set up a Google login on your website, the users will see a link to Google page at the Sign in and Sign up page. Something like this:

When the user clicks on the link, if he is already registered on your site, he will be directly logged into the website’s user account page.

If he is there on your website for the first time (User not registered already), he will be asked to provide his Google login credentials in the following pop up:
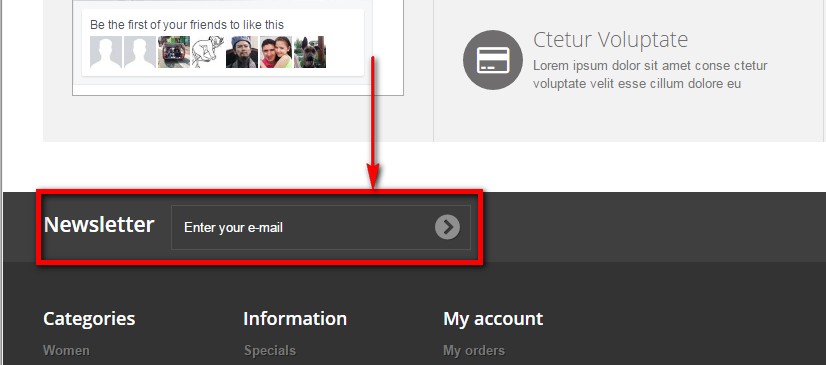
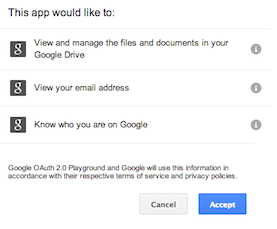
After providing the details, just give the authorization to Google in the next step.

After that, the user will be directed to your website’s user page or any page that you choose. In this way, you will retrieve his/her data that will be used on your website.

Setting up PrestaShop Google login in Social login module

Step 1: You can use any PrestaShop Google login module. However, here I am using the Social Loginizer module here. So, you need to first download and install the PrestaShop social loginizer module (Or any PrestaShop Google login you have ).

Step 2: After you install the module, go to configuration panel from the modules listing page.

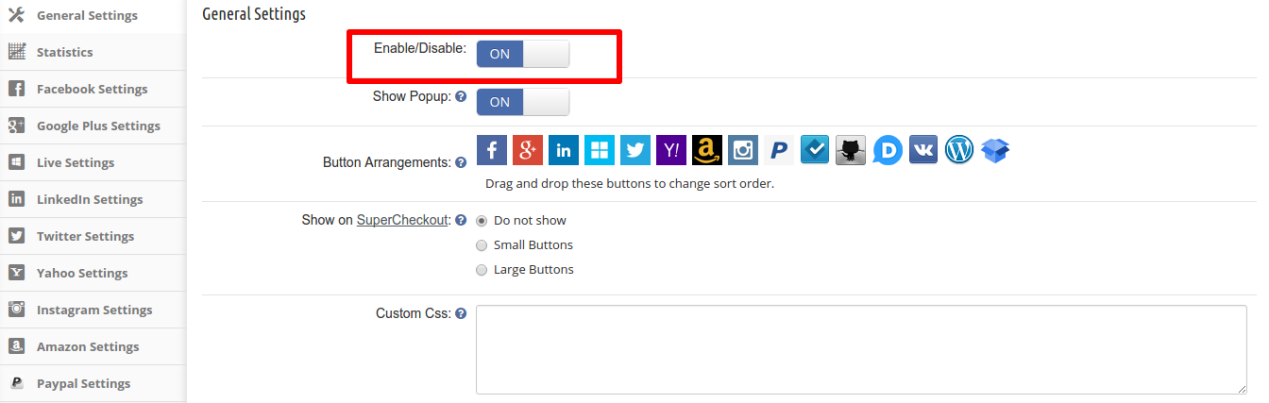
Step 3: Enable the module in the General settings Tab

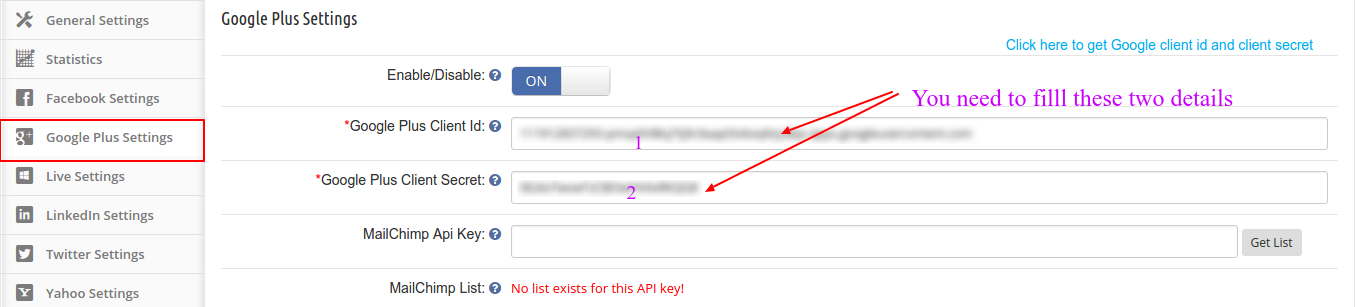
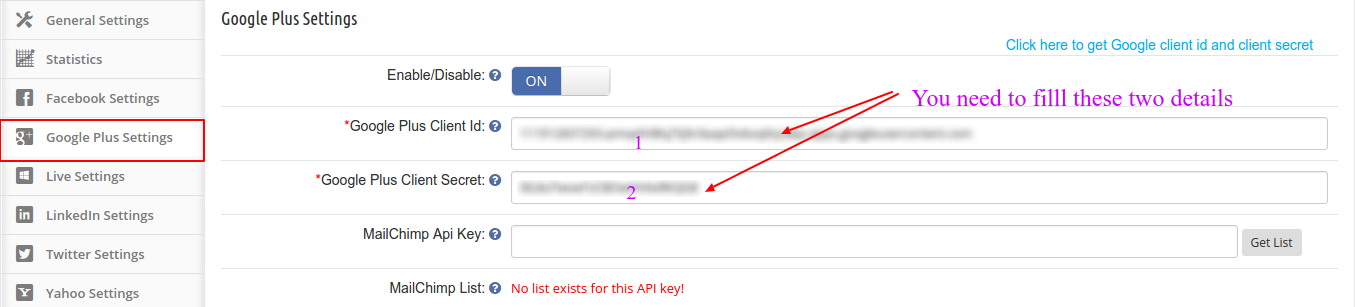
Step 4: Next, navigate to Google Plus Settings, you will find the following interface to setup the Google Login.

To setup the Google Plus login, you need two important details. Google Plus Client Id and Google Plus Client Secret.

How to get the Google Plus Client Id and Google Plus Client Secret?

You can follow these steps to get the Google Plus Client Id and Google Plus Client Secret:

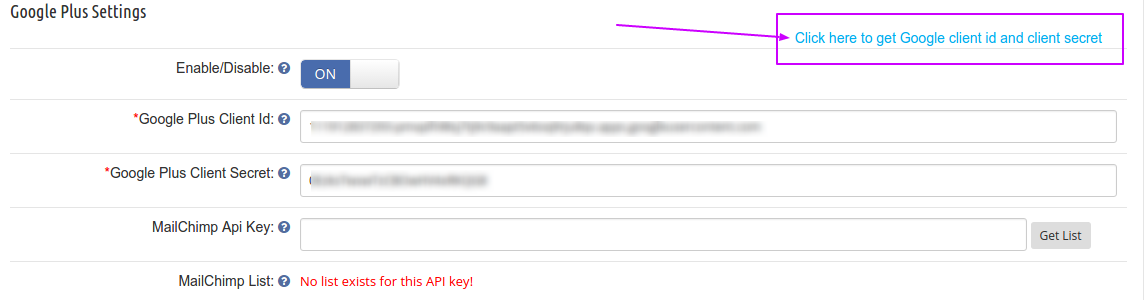
  1. Click on the highlighted link if you are using the Social loginizer module. Otherwise you can directly visit the below URL:

https://console.developers.google.com/project

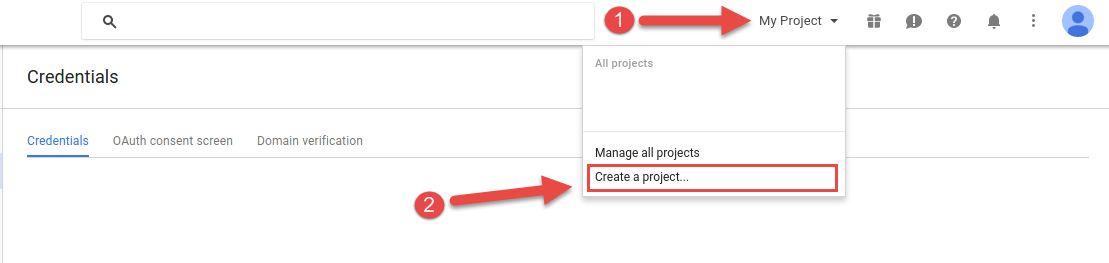
2. Now, Click on My Project and then Create a project

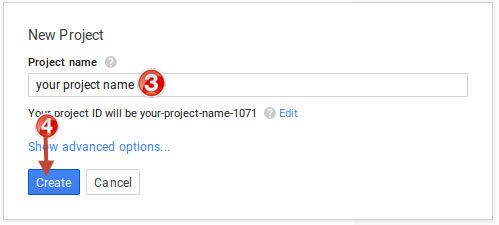
3. Give a Name to your Project and then click Create

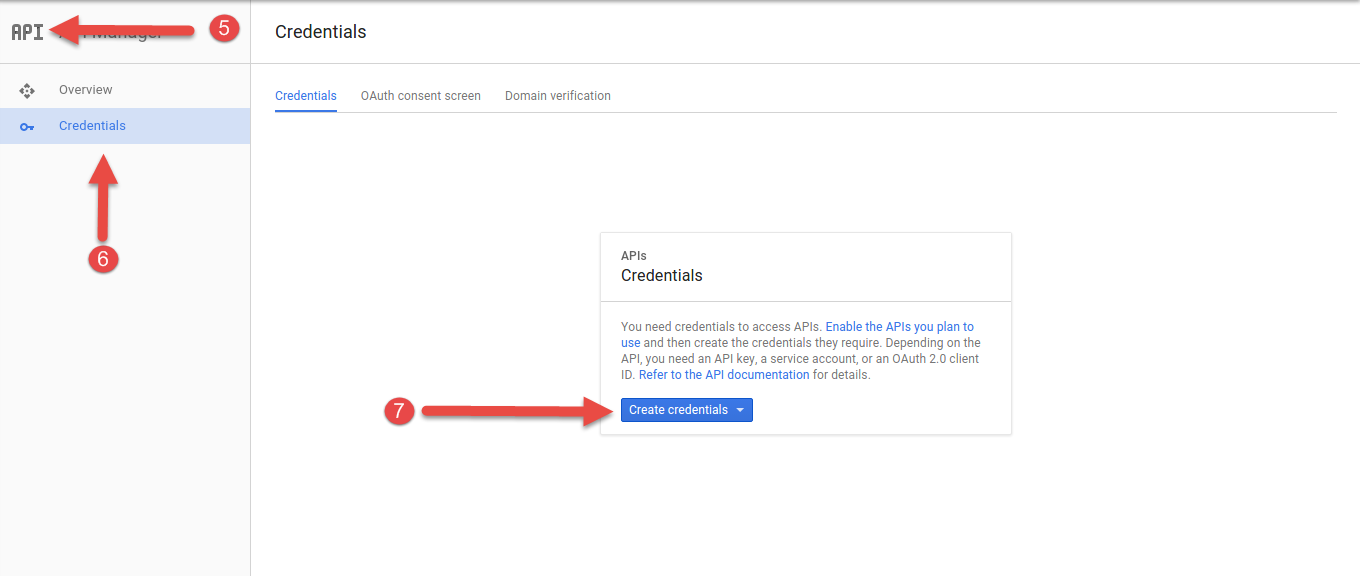
4.In API Setting, go to Credentials and click on Create credentials button.

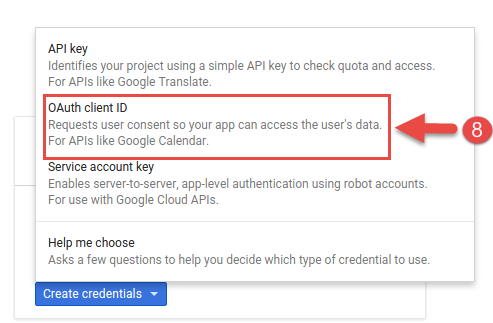
5. In the next step, you will see a pop-up. Click on OAuth client ID

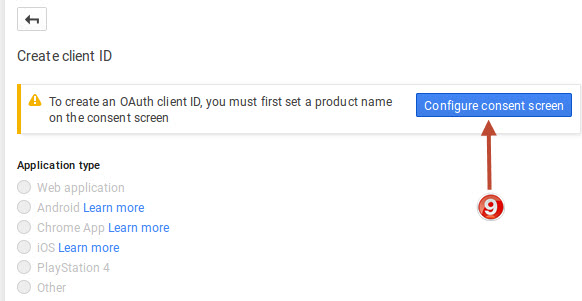
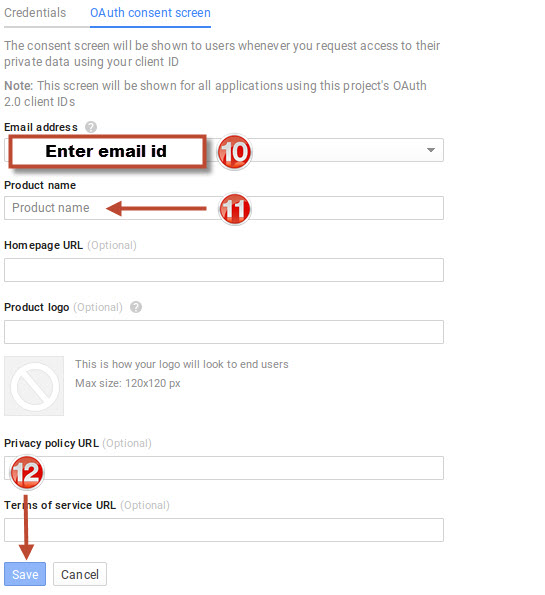
6. To configure the OAuth client ID, you have to first set a product name on the consent screen. So, now, Click on Configure consent screen for the next step.

7. Enter the details as asked in the image below and click Save

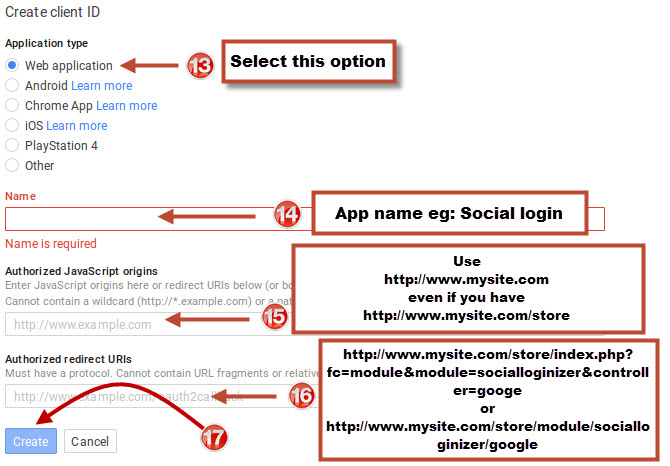
8. In the next screen select Web application. Then provide the App name (say Social login) and enter the URLs as shown in the image below:

Please note:

  • If you have SEO URL enabled on your site then use below redirect URL

https://www. yourstore.com/module/socialloginizer/google

  • If you don’t have SEO URL enabled on your site then use below redirect URL

https://www.yourstore.com/index.php?fc=module&module=socialloginizer&controller=google

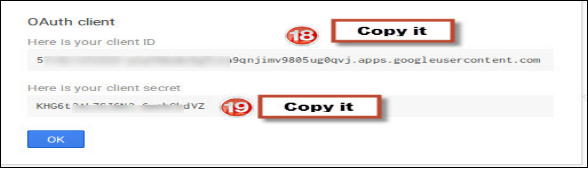
9. Now, your Google Plus Client Id and Google Plus Client Secret are ready. You need to copy and paste these details in the correct field in the module setting.

Finally,

The above-explained method is one of the easiest ways to start accepting the Google plus login on your PrestaShop site. Social login using Google plus can prove to be a milestone in your store’s conversion optimization. In today’s era of huge competition among the eCommerce sites, a site without social login option will not survive. So, you need to adopt a social login for your website from the very beginning itself. PrestaShop social loginizer module could be a wise choice as it has multiple social login options that can be configured very easily. So, start a PrestaShop Google login on your eCommerce site now to tackle your rival sites with a competent weapon.

This Would Also Interest You:

How to acquire relevant email lists through PrestaShop MailChimp Integrator Addon?

For eCommerce store owners, emails have been an effective way to acquire customers. Various merchants take emails as a sufficient tool to reach out their potential customers very easily. Though it was a hype that email marketing has been dead for years, it remains an enormously valuable asset for small and start-up business owners.

Talking about eCommerce start-ups and small-scale businesses, PrestaShop is one of the most popular platforms among them. A large number of eCommerce start-ups, small and medium scale eCommerce businesses are already rocking their ways on PrestaShop platform. So, let’s take this opportunity to enlighten some tips that can be used to acquire relevant email list on a PrestaShop store.

Installing a PrestaShop MailChimp Integrator– The default installation of PrestaShop does not manage the email capturing functionalities. You can see the email ids and other details of the customers only if they successfully place an order on your store or if they are already registered on your PrestaShop site. So, the only way left to introduce an email capturing functionality is to install a PrestaShop module that uses email capturing agents to build a list of emails on your store.

In the same path, MailChimp is a well-known email marketing and email capturing agent that is used by the merchants across the online world. So, It would be a great idea to integrate a PrestaShop MailChimp integrator addon to perform this useful functionality.

Use the forms on your site to capture email data-The email data we collect from different sources and platforms might not always be useful. In most of the cases, they end up in the spam folder of the recipient. It is a sure case that they will end up in spam because the email data might not always be relevant to what you offer.


Contrasting to this, an email data collected right from the visitors on your site are more relevant and have higher chances of conversion. You can use your PrestaShop MailChimp integrator addon to capture the email ids from different forms on your website. An example of the forms that can be used are:

  • Account registration form
  • Guest checkout form
  • Address form
  • Newsletter subscription form
  • Free downloads-form
  • Event registration form

Use the automatic email capture feature of PrestaShop MailChimp integrator addon– Any effective PrestaShop MailChimp integrator has a unique ability to capture and send the email ids to the MailChimp list as soon as a user enters his email id in the email field and blurs form there. By blurring we mean it syncs the customer’s E-mail Id automatically as soon as the user comes out of Email address field. Now that email fields are used in many types of forms on your site (listed above), you can use these forms wisely to build your own email data that consist of more relevant users. Capturing an email data from your own website makes sure that it is a relevant user who might be interested in a business with you.

Finally,

There are various email capturing agents like MailChimp and Mailigen that can be used for your purpose. You will need to first have a subscription of these agents to use them on your site. Moving ahead with the agents, you will need a smart PrestaShop module that can perform the above-listed functions for you. Prestashop Mailigen and MailChimp Integrator module is a smart choice if you are looking for preparing a huge email list with so much of relevant email ids. Mailigen and MailChimp Integrator is a Prestashop module which permits administrator to subscribe clients to Mailigen and MailChimp lists. It consequently synchronizes the client’s E-mail Id to Mailigen and MailChimp accounts. It has a smart sync feature that captures and syncs the customer’s E-mail Id automatically as soon as he comes out of Email address field.

PrestaShop Age Verification addon- Make your PrestaShop website Age Restricted

There are plenty of websites that sell products that are meant for adults or for a certain age group only. Such websites should ideally be accessible by adults and not by minors. Even the law in various countries does not permit the underage to access explicit content on the websites. It is, therefore, the duty of the website owners to make sure that their website follows the Age verification process.

Why is Age verification necessary?

Just because the new generation of kids is more tech-savvy at the younger ages, does not always mean that their brains are developing at the same rate as their digital awareness. Underage children can put themselves in harm and might become a victim of online harassment, solicitation and cyberbullying before they are ready to respond correctly.

According to the Children’s Online Privacy Protection Act (COPPA) passed in 1998, every child and their personal information, under the age of 13 are protected by the law. Websites are not allowed to leverage their information or share them with anyone, not even the advertisers.

Today, it is the responsibility of the website owners to identify such population on their websites and take appropriate actions, and Prestashop Age Verification addon helps in doing so.

PrestaShop Age Verification addon

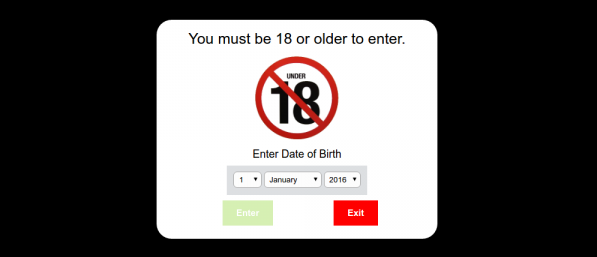
PrestaShop is one of the most popular eCommerce platforms that is being used by many merchants across the world. It is very likely possible that some of the PrestaShop merchants deal with adult products such as alcohol, tobacco, etc. This is why we bring the Prestashop Age Verification addon so that you can restrict the minors from visiting your store. Prestashop Age verification addon confirms whether the users who have visited your site are above the specified age or not: age that you have set from the back-end to allow access to your store. When a user enters your website, a popup is displayed asking them to confirm their age.

Features of Prestashop Age verification

1. Knowband presents the PrestaShop Age Verification addon that is capable of restricting your PrestaShop website’s content to a certain age level. You do not need to hire a PrestaShop webmaster to do any customization. Just install the module on your store and after some configuration, your website is ready to serve as a responsible website.

2. You can set a minimum age for your store visitors in order to access your store.

3. You can customize the look and feel of the Age verification popup. Moreover, you can set a warning image that indicates that your store is not meant to be accessed by the minors. You can also display a message to the visitors as soon as they land on your website.

4. PrestaShop Age verification addon is easy to install and configure.

Benefits of using Prestashop Age Verification addon

1. Prestashop Age verification addon helps to prevent underage from accessing your website content.

2. Website visitors are prompted with an age verification popup. Only after they enter their date of birth and the age is confirmed to be appropriate, they are allowed to browse your website.

3. Your store is browsed by the right audience.

4. Implementing the PrestaShop Age verification addon on your store helps you comply with the laws made for protecting the under-aged population.

Final word

It is a social and legal responsibility of the website owners to make their website age-restricted if it contains the elements that should not be accessed by the underage population. It is not just about the adult explicit contents, but also about caring for the privacy and protection of children from cyber crimes and complying with the law. If your PrestaShop store deals with explicit content, do not forget to implement the PrestaShop Age verification addon on your store.

You Might Also Like:

Everything you need to know about PrestaShop One Page Checkout addon

The PrestaShop Checkout addon also called PrestaShop One Page Checkout is a PrestaShop extension that replaces the conventional multi-page checkout process on your Prestashop store with a single page checkout system.

Having a PrestaShop One Page Checkout is beneficial for your Prestashop store as it helps in improving the conversion rate by optimizing the checkout page and making the checkout process simple and quick.

Check out some live PrestaShop One Page Checkout globally:

This blog listicle will give you a clear idea about the PrestaShop One Page Checkout and how you can customize it for your PrestaShop store.

10 Elite Examples of Checkout for Spain PrestaShop stores

Stunning Live Examples of PrestaShop One Page Checkout Addon by KnowBand

10 on fleek Checkout Page Examples of Poland PrestaShop eCommerce stores

10 Best Checkout Page Examples and Practices for Italian PrestaShop store

Why KnowBand’s PrestaShop One Page Checkout?

Online Shoppers have to go through a number of steps when they are on the checkout page. On top of that, they are presented with a registration form in between, which disturbs their flow. To be very honest, a majority of consumers do not like to fill lengthy registration forms or create an account during the checkout, yet a number of e-commerce stores have made it mandatory on their website.

As a result, some consumers choose to abandon their carts and look at other stores that provide a simpler and better checkout facility. PrestaShop One page checkout addon deals with such scenarios and aims to provide a better checkout experience to your store visitors.

Prestashop One Page Checkout works in different ways to curb various loopholes in a checkout process that may be killing your conversions and increasing shopping cart abandonment. Let’s look at how Prestashop One Page Checkout helps in making your checkout process better.

You Might Also Like:

1. It Offers Guest Checkout

For the consumers who hesitate to create an account on your store or do not like to get registered, you can provide them with the Guest checkout option and encourage them to make a quick purchase.

2. Social login makes the signup quick

Customers can use their Facebook, Google, or PayPal accounts to sign-up on your store. It saves shoppers’ time from lengthy form filling and makes their way easy for the checkout.

3. Customers can Easily Update Cart Quantity on the checkout page

A user who wants to make changes to the product quantity does not need to go back to the product page. He or she can update it right from the checkout page.

4. Google Auto-address fill reduces extra efforts

Enabling this feature automatically fills the address fields at the checkout page. As soon as a user starts typing his/her address fields, the address suggestions are displayed and upon picking an address, the related address fields are filled automatically.

5. Multiple Payment methods and Shipping services support

The PrestaShop One Page Checkout addon supports almost all the major payment modes and shipping services.

Compatible with Mollie Payment Method: The PrestaShop Checkout allows adding several payment methods. The latest version of the module is fully compatible with the Mollie payment method.

6. Variety of Layouts to give an interesting look

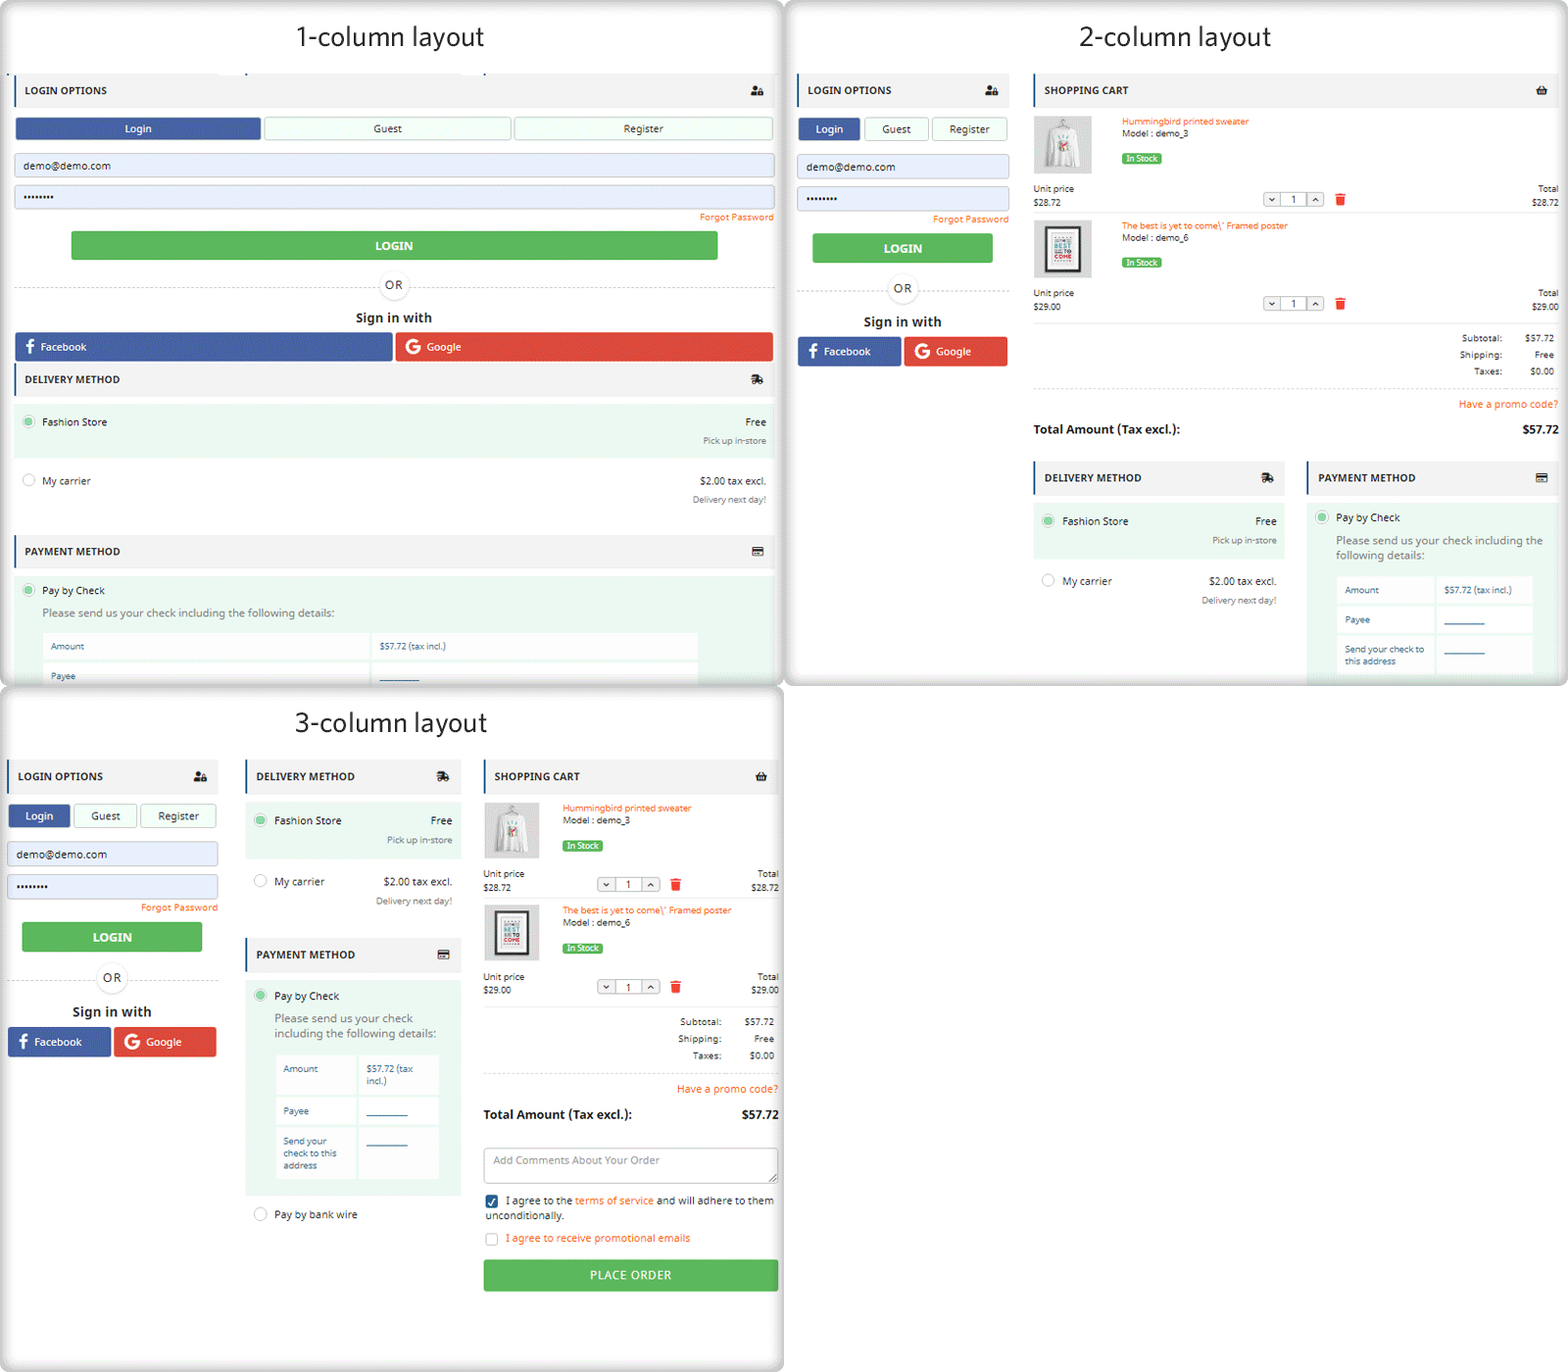
PrestaShop Quick Checkout extension provides 3 layout designs, namely: 1-column layout, 2-column layout, and 3-column layout.

7. MailChimp, SendinBlue, and Klaviyo email Integrator support

Every time an email address is captured, it will be automatically synced to your MailChimp, Klaviyo, or SendinBlue account, provided you have set up the API key from the back-end for the respective platforms.

8. Remove unnecessary fields from the Checkout page

With PrestaShop One Page Checkout, you can choose which checkout fields you want to display on the checkout page. From all the checkout fields, you can specify which fields to show and which fields to hide. Besides, you can also mark fields as mandatory or optional.

9. Arrange Checkout fields through Drag and Drop functionality

Prestashop One Page Checkout module lets you organize checkout fields as per your preference. For example, if you want to place a field above any other field, you can simply do that by picking the field and dropping it to the desired position.

Statistics: Data helps in planning

10. View Abandoned Checkout Statistics [New]

Find out how many abandoned checkouts have taken place in your store, what was the revenue of those abandoned checkouts, and view the checkout conversion rate with the help of PrestaShop One Page Checkout.

11. Examine the user behavior on the Checkout page [New]

Also, explore which checkout fields are hampering the user experience that is leading to checkout abandonment. It displays the percentage for every checkout field. Higher percentage fields mean maximum visitors are facing trouble with those options.

12. Increase average cart value with free shipping tab[New]

The one-page checkout module has a feature that lets you define a minimum amount for displaying the free shipping option. If a visitor is shopping for or above the given amount, he will see a banner that would tell how much more does they need to shop to avail free shipping benefits.

13. Show Product Price With Taxes [New]

With the PrestaShop One Page Checkout addon, the e-merchant gets four options for displaying the total price of the goods. You may choose to display the default PrestaShop price, the price inclusive of tax, the price exclusive of tax, or the price inclusive and exclusive of tax.

14. Display custom fields in invoice [New]

The store owner can also enable the option to display the added custom field in the invoice of the order placed, thanks to a new update in Knowband’s PrestaShop One Page Checkout addon.

15. PrestaShop One Page Checkout is highly compatible with:

  • Compatible for free products (No payment method will be displayed)
  • It is compatible with digital/virtual products (No shipping method will be displayed)
  • Compatible with customizable products and displays entire information on the shopping cart, including all customized details
  • One Page Checkout supports multi-lingual feature
  • Works responsively on all the devices like mobile, tablets, desktop

Steps to set up One Page Checkout on your PrestaShop store?

1. Download and install the PrestaShop one-page checkout extension.

2. After installation, enable the extension by going to modules>SuperCheckout>configure.

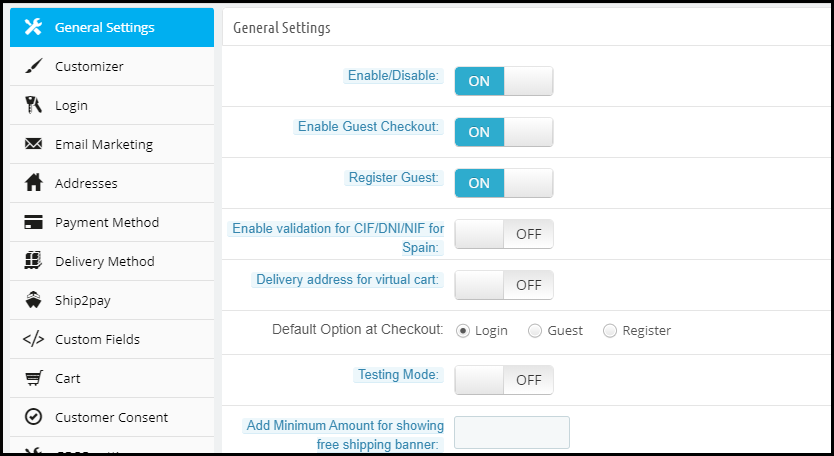
3. After you click configure, the following screen will appear-

The General settings contain the option to enable/disable the one-page checkout module, enable/disable Guest checkout, setting a default checkout option, test mode functionality, CIF/ DNI/ NIF validator for Spain visitors, etc.

Customizer contains the options to adjust the color of the “Place Order” button on the checkout page.

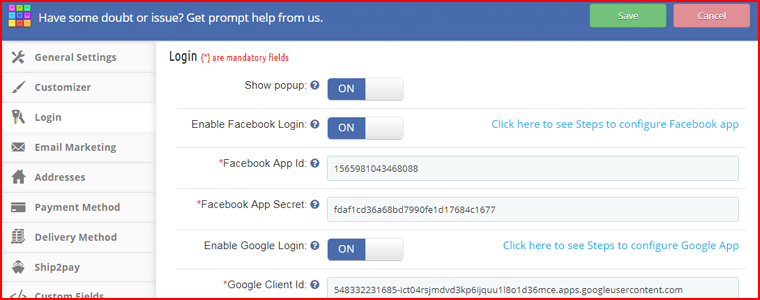
Moreover, the Login tab allows you to add the social login facility to your checkout page.

More features to customize your checkout page on the PrestaShop website

Under Email Marketing settings, you can activate different email marketing tools like MailChimp, SendinBlue, Klaviyo, etc. to collect user information directly in these accounts whenever a user provides his data.

The Addresses tab consists of options like Inline validations, Auto-detect country, Auto address fill. Under the same tab, you can choose which fields you want to keep mandatory for your store visitors and which are optional.

The payment method tab allows you to select the payment modes that you want to provide to consumers.

Similarly, the Delivery method tab lets you choose the shipping services that you want your users to avail.

Ship2Pay provides you with the options to decide which payment modes do you want to provide for a particular shipping service.

Under the Cart tab, you can specify the cart details that you want to display on the checkout page.

In addition, the Design tab lets you design your checkout page in a single-column layout, 2 column layout, or 3 column layout.

2 new features that have been added to this checkout module are Abandoned Checkout Statistics and Checkout behavior report which have already been explained above.

For complete in-depth details regarding the Prestashop one-page checkout addon, please refer to PrestaShop One Page Checkout User Manual.

👉Explore the Module with Our Video Guide

How to start a PrestaShop Twitter login on your PrestaShop store?

Social media has gained so much popularity in today’s era that imagining a life with it is not possible for the users. In fact, there are several usages of Social media platforms that have come out a service product in the market. From Facebook, Google plus, Pinterest to Twitter, everything is social nowadays. From Social media marketing, social media advertisement, to social login(facebook login, twitter login, google plus login), everything is a part of this huge platform. An additional charm to the social media platforms was added when webmasters developed the way to utilize the user’s information on social media sites to be used for user account registration. I am talking about social login feature on the websites.

Utilizing social media data to register a customer on eCommerce sites-

Social login is a way to register a user on any website by using the information stored in the social account with just a click. This feature saves the users from the burden of lengthy account registration forms. Thus, it improves the overall user experience. Especially on eCommerce sites, social login becomes a very important feature when it comes to provide a seamless checkout process. PrestaShop is one of the most used eCommerce platforms that can be introduced to this social login feature. I have also written a similar article that explains how to get a PrestaShop Facebook login on your site. In this article, I have moved forward to an immensely used social media site- Twitter.

So, let’s see how can you implement a PrestaShop Twitter Login on your site and convert the users using this highly active social media site.

How to get PrestaShop Twitter login for your PrestaShop site?

You can implement a PrestaShop Twitter login on your eCommerce site, by just installing a Twitter login module. However, it is always advised to invest in a module by inspecting all the aspects of it. For example, do you want to invest in a separate Twitter login module if you can get an all in one social login module for the same investment?

Considering this, I am here using the PrestaShop Social loginizer module, which can also be used a PrestaShop Twitter Login module. The PrestaShop social login module provides you an option to enable more than 12 social login options which includes, Facebook login, DropBox login, PayPal login, Twitter login and much more.

You need to follow these steps to implement a PrestaShop Twitter Login on your website:

Step 1: Download the PrestaShop social login module and install it on your PrestaShop site.

Step 2: After installing the Social login module, go to the configuration panel of the module by clicking on “Configure“.

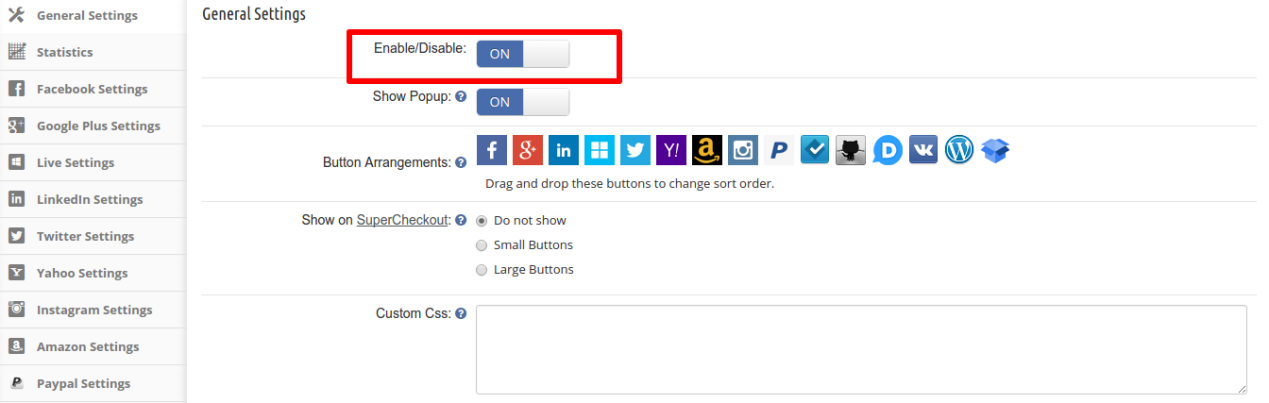
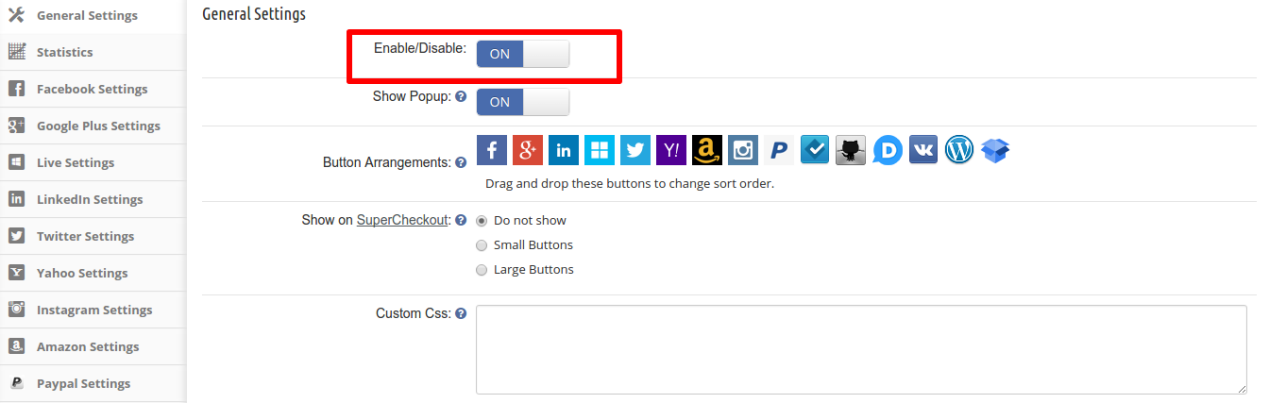
Step 3: Now, it will Open the module configuration page. If the module is not already activated, enable the module by turning the toggle button as “ON”.

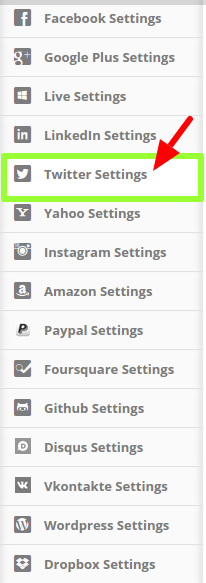
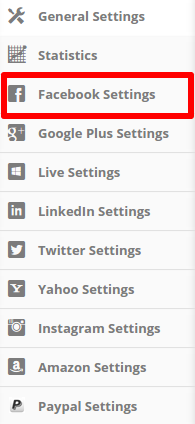
Step 4: The module consists of the settings options for 13 other social login options. But we are concerned with the Twitter login here. So, click on Twitter settings now.

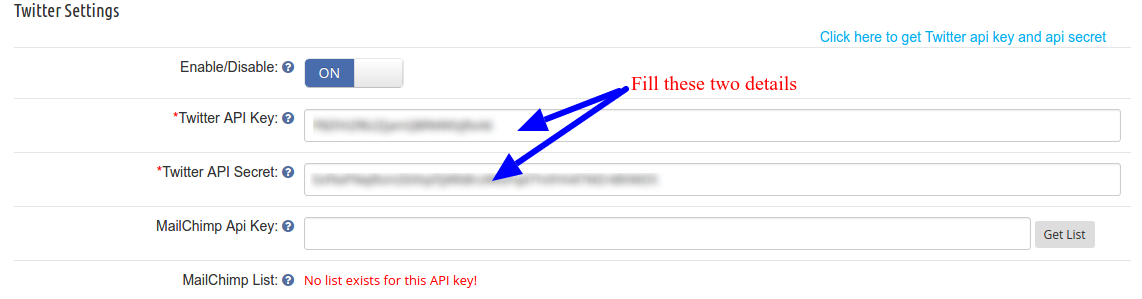
Step 5: On the next screen you will find the following interface. You need to fill the valid details here to enable the PrestaShop Twitter login.

First, enable the Twitter login by clicking on the toggle button. After that, you will need your Twitter API key and Twitter API Secret key. That’s it, your website is ready to receive social login via Twitter now.

How to get the Twitter API key and Twitter API Secret key?

While configuring a Twitter login through any PrestaShop module, you will be asked to enter the Twitter API key and Twitter API Secret key. You can get these two details very easily from your twitter account. You can follow these steps:

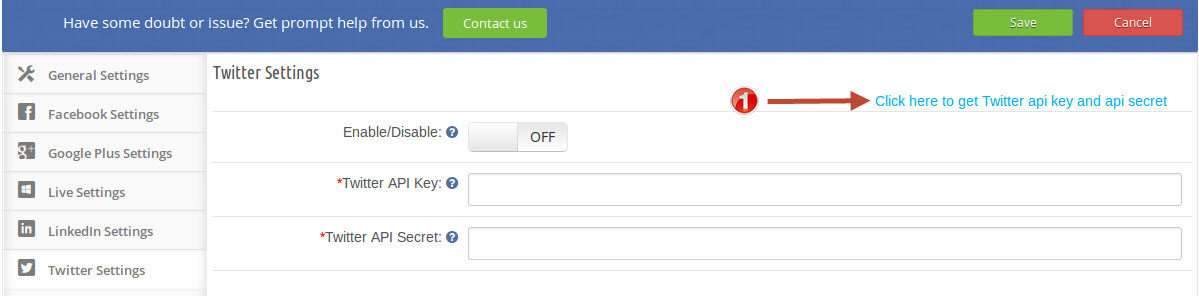
  • If you are using the Knowband-PrestaShop Social loginizer, you can go to the Twitter page by clicking on the link as shown in the image below. Otherwise, you can directly visit this link:

https://dev.twitter.com/apps

  • In next step, on Twitter Application Management, click on the Create New App button as shown in the image below:

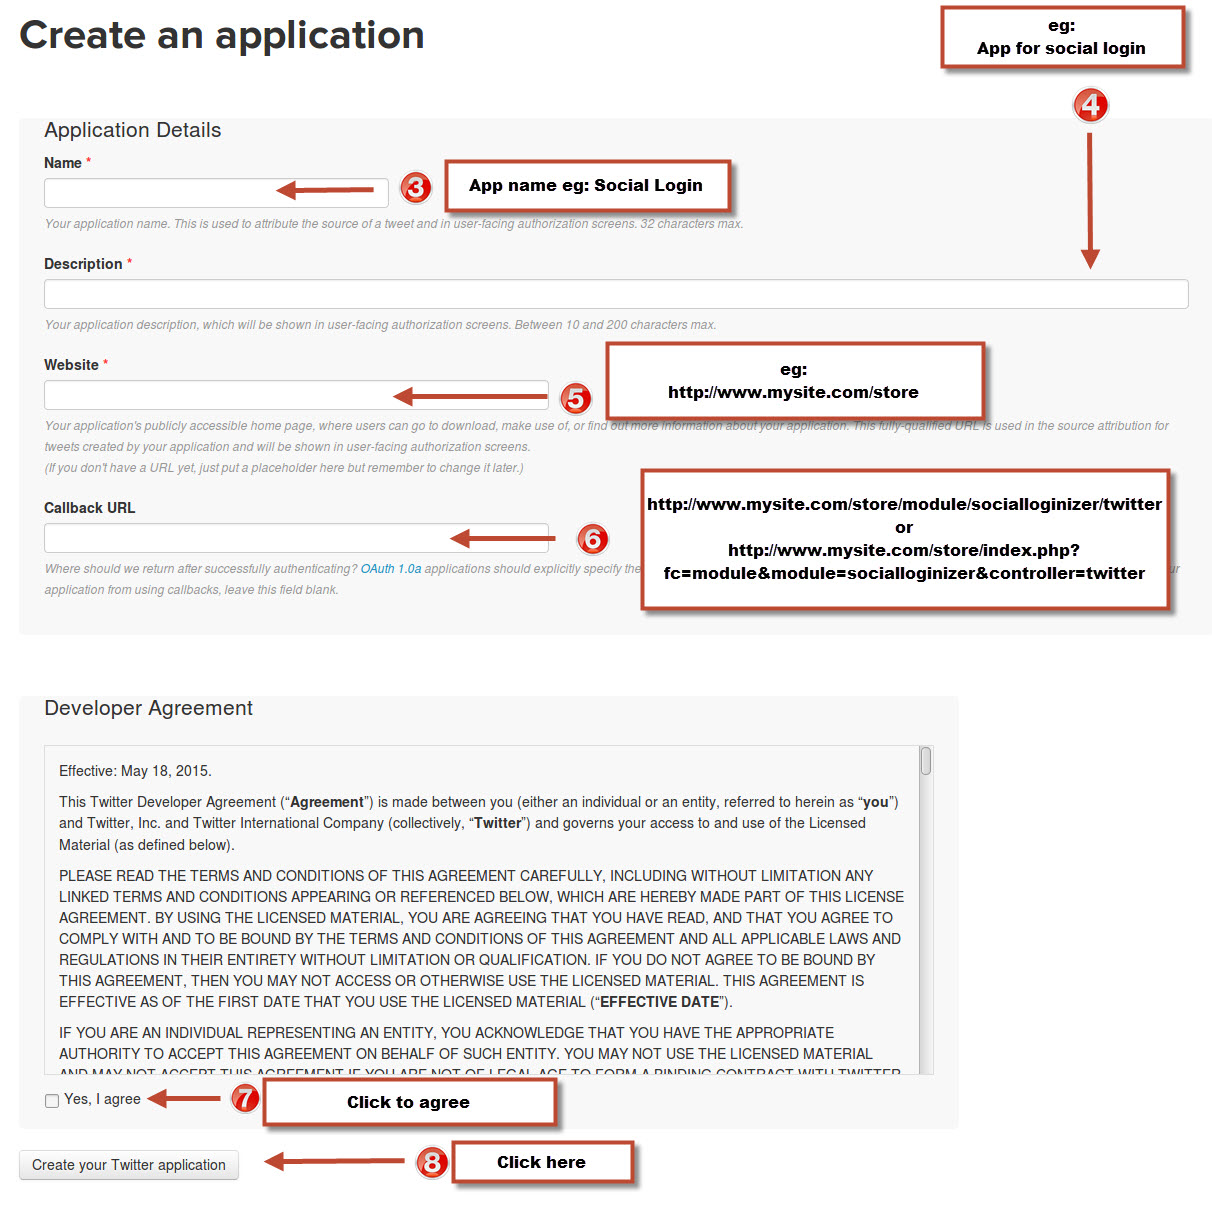
  • In the next step, you will be asked to fill a form to Create an Application. Fill, the details as instructed in the image below:

After filling the form, click on Create your Twitter application button, after accepting the terms and conditions.

Please note:

  • If you have SEO URL enabled on your site then use below callback URL

https://www. yourstore .com/module/socialloginizer/twitter

  • If you don’t have SEO url enabled on your site then use below callback URL

https://www. yourstore .com/index.php?fc=module&module=socialloginizer&controller=twitter

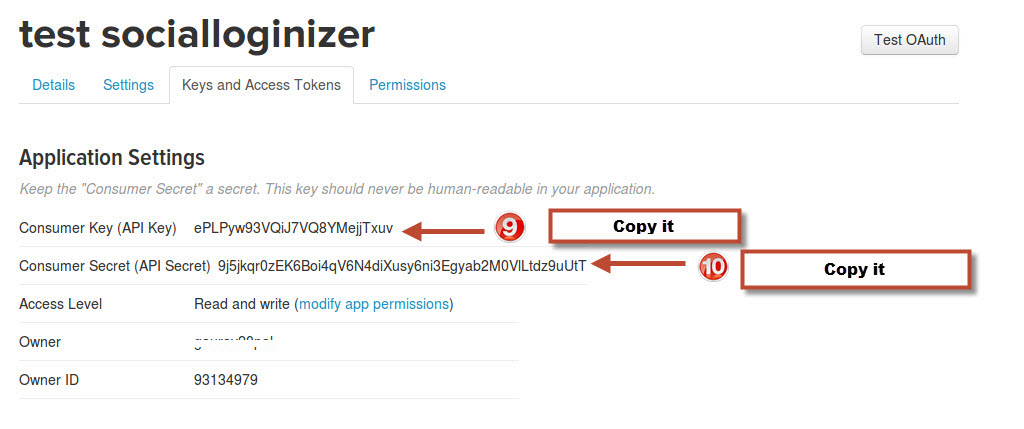
  • In the next step, go to Key and Access Tokens tab. You will find the API key and API secret here as shown in the image below:

Copy both the details.

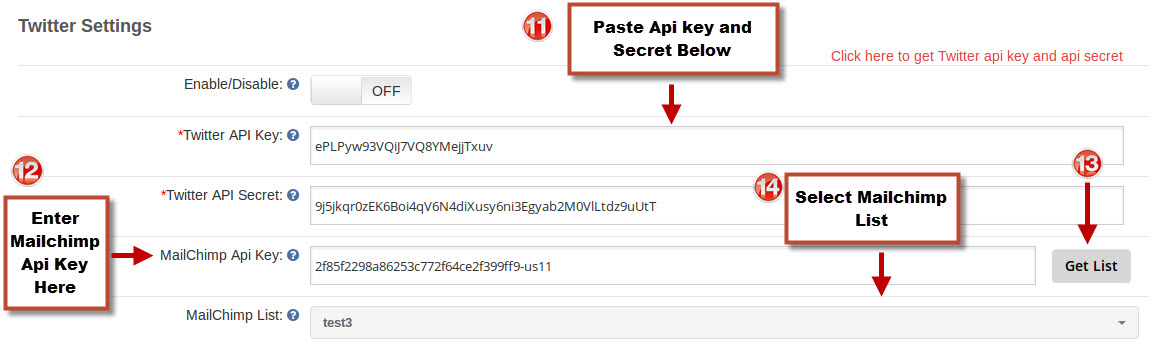
  • Now, paste the copied details in the respective fields in the module’s Twitter Settings tab. Click Save and you are ready to accept PrestaShop Twitter login now on your store.

This is one of the easiest and pocket-friendly approaches to implementing a PrestaShop Twitter login on your eCommerce site. If you want to implement even further more social login options like PrestaShop Facebook login and PrestaShop Google login, then the Social loginizer module would be great and economical for you.

This Would Also Interest You:

Marketplace Module for PrestaShop 1.7

PrestaShop 1.7, the latest offering from PrestaShop platform is a brilliant eCommerce platform in more than one ways. Since its official release on 7th November, 2016, this new PrestaShop version is making great noises everywhere. This PrestaShop 1.7 platform is offering various functionalities such as modified product creation page, the introduction of Symfony 2 framework, newly designed modules page, starter theme, improved back office navigation, default theme, and much more.

If you are trying to take the functionality of your PrestaShop 1.7 store to new heights, it is time to transform it into a marketplace store. In this competitive business environment, marketplaces offer better customer exposure and engagement which can boost conversion rates to a great extent. Here are the various reasons that explain the importance of PrestaShop marketplace extension for your PrestaShop 1.7 store.

Freedom from inventory management-

Managing inventory for any online store is a very critical task that involves a lot of human efforts and patience. By managing your online store on a marketplace store, there is no need to manage the store inventory by third party sellers. In this way, small and medium vendors can offer their products quickly for sale on an eCommerce marketplace store.

Simple seller registration facility-

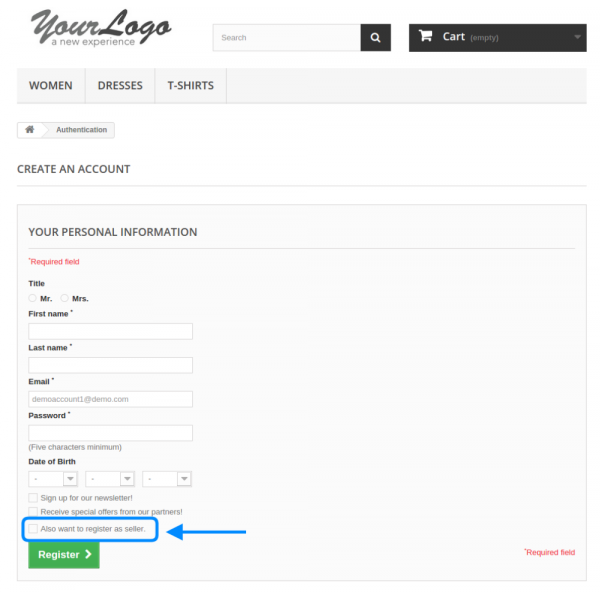
The extension offers a simple registration facility to sellers from front end interface.

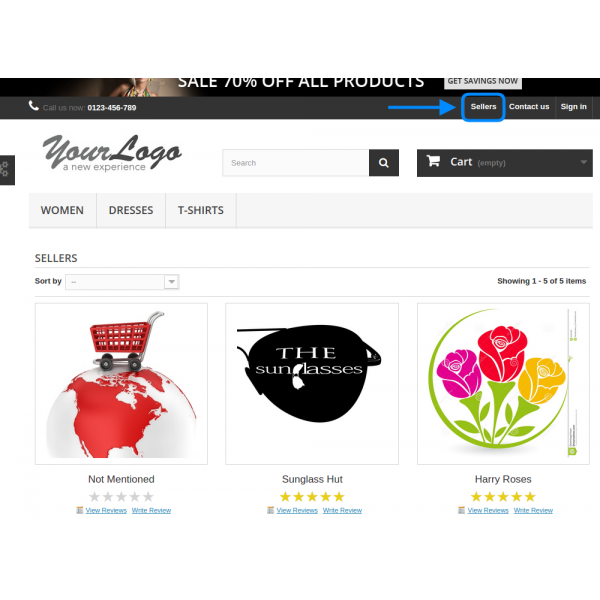
Unlike other marketplace extensions for PrestaShop stores, this Knowband extension is much better in terms of registration facility. There is no back end registration facility for sellers and they can simply register from the front end only like the customer registration process.

Even the admin can add separate seller registration forms and can also add different custom fields for the seller’s profile like text box, radio buttons, etc.

Easy seller management-

The PrestaShop marketplace addon makes the seller management process very easy. Admin can easily approve or disapprove the seller’s request from their admin interface.

Provides timely alerts about your marketplace activity-

In a marketplace store, there are a number of individuals involved such as sellers, buyers, and store admin. All these individuals need to be informed timely about the various activities on a Marketplace store for its efficient performance. This PrestaShop marketplace extension consists of a flexible email notification system that can provide timely alerts and notifications about marketplace events through email notifications.

Does not interfere with other available themes and extensions-

You don’t have to worry about the working of this PrestaShop marketplace extension with your existing PrestaShop 1.7 themes and extensions. It works independently with other PrestaShop themes and extensions for the effective performance of the eCommerce store.

Easy Commission Management-

Handling marketplace is a very tough task and managing commissions for all the sellers is very time taking process but marketplace extension makes it very easier. It offers the admin to set the commission for a global level and individual level and if admin wants he can set the category wise commission as well.

Helps buyers in product purchase-

Presence of multiple sellers on a marketplace store makes it easier to perform product purchase.

There are numerous third-party sellers/vendors on a Marketplace store that makes it difficult for buyers to make the right product purchase. To resolve this problem, this PrestaShop 1.7 Addon shows seller feedback, ratings and reviews on the seller page for better decision making of the customers during product purchase.

Supports a wide range of products-

With this PrestaShop marketplace extension, marketplace owners can support a wide range of products. Now, marketplace store owners can effortlessly add standard, virtual and packed products in a seamless manner for optimizing sales.

Prestashop Marketplace is GDPR Compliant-

Sellers can download their store data in the form of CSV files and admin can view the GDPR request from their admin interface.

Caters to the global customers-

A business model can only be successful if it is capable of addressing the needs and requirements of global customers. To simplify the product purchase for customers residing in different countries, this PrestaShop extension supports all currencies for higher product sales and conversion rates.

Transparency-

Prestashop marketplace provides its customers full transparency. Customers can view the seller’s profile information. And customers can post reviews for the products as well as for the sellers. 

Link Social Accounts-

This module allows the sellers to add different social accounts to their profile page. Sellers can add different social accounts like Facebook, Twitter, Vimeo, etc. Customers can check the social accounts of the sellers by visiting their profile pages.

Conclusion

Don’t lose the opportunity of getting higher sales and conversions for your PrestaShop 1.7 store due to the tough business competition ahead. This Marketplace extension for PrestaShop stores can help in building more customers and sales among your rivals. So, utilize the expertise of this PrestaShop Addon by making a quick purchase on the Knowband store.

This Would Also Interest You: