How to get SQL Server Management Studio 2008 Express installed on a Windows 7?

SQL Server Management Studio (SSMS) is a platform that was launched along side the Microsoft SQL Server 2005 which is meant for configuring, managing and administering all other components present in a Microsoft SQL Server. There are both script editors and graphical tools that are capable to work with different objects and features of the server.

One of the prominent feature of SSMS is the Object Explorer that allows user to browse, select and operate upon the various objects located within the server. As per the version 11 of the SSMS, the entire application has been rewritten in WPF interface which is similar to the one used in Visual Studio 2010. For Windows users who are thinking about utilizing the services of this SQL Server Management Studio 2008 Express can now perform the same in a flawless manner. Here are the installation steps for SSMS on a Windows 7 systems.

Note- Unfortunately, the SQL Server Management Studio (SSMS) is not available on Linux based systems. Certain fixes through platform like Wine are tried but there are still performance issues in this SSMS which makes it ineligible for Linux platform.

You need to first download the Microsoft SQL Server 2008 Management Studio Express and then select either SQLManagementStudio_x64_ENU.exe or SQLManagementStudio_x86_ENU.exe based on the bits supported by a system. This blog explains the installation process for a 64 bit Windows 7 system.

Now, ensure that you are logged into your system as an administrator and not as a secondary user. In order to install the SSMS platform, you need to right click on the exe file and then select on the option “Run as Administrator”. Windows 7 users will get a compatibility issue related warning which needs to be ignored and the installation process should be resumed as it is. Windows users also need to apply latest changes in SQL Server 2008 Service Pack 2.

A window screen about the “SQL Server Installation Center” will be displayed as shown below. You need to select the “Installation” tab there.
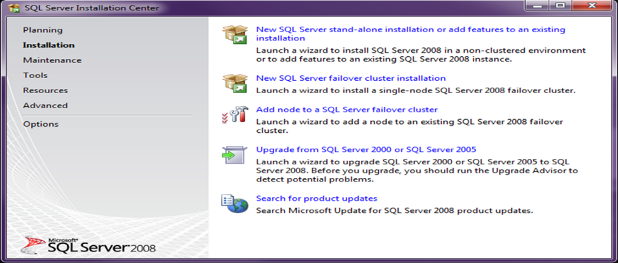
User now needs to select the “New SQL Server stand- alone installation or add features to an existing installation”. The process will initiate the rule check. Ensure that there are no failures in the process and click on the OK button. The window of the process is shown below:
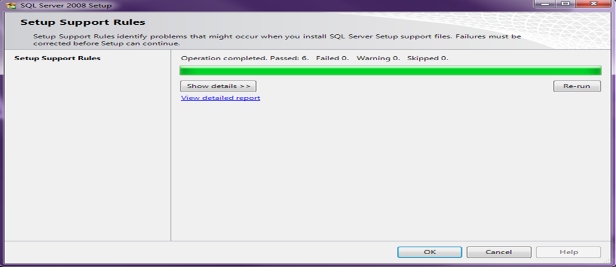
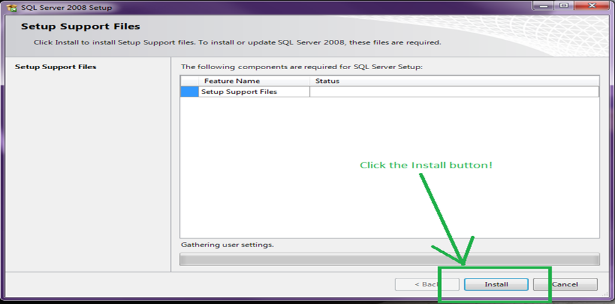
User will now get the screen that says “Gathering user settings” and stays there for a while. After this, the user will get a window screen as shown below where he/she needs to install the Setup Support files.
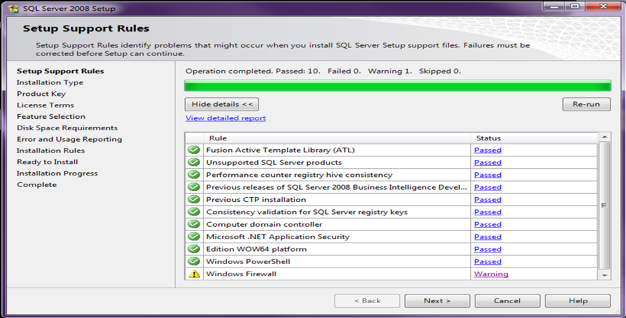
Again, the user will come across a rule check and will have a Firewall warning in the end. In case, the user wishes to enable the remote access to SQL Server, the required Firewall configuration can be done accordingly. Click on the Next button as shown in the window screen below.
While installing the platform, user will have to make a choice between “Perform a new installation of SQL Server 2008” or “Add features to an existing instance of SQL Server 2008”. Make sure that you are selecting the option “New installation” and not “Add features”. Finally, click on the Next button as shown below.
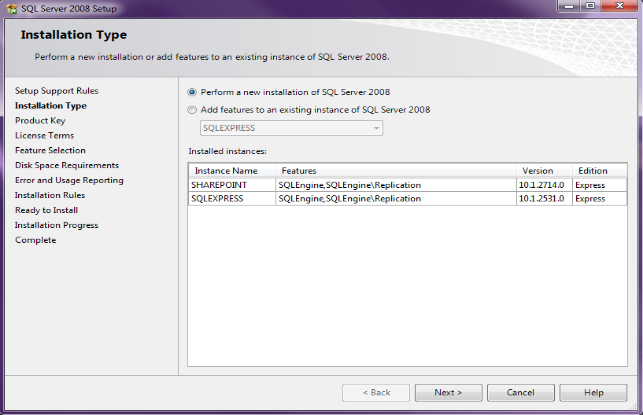
Now, the user would come across a page that asks for Product Key window. As, SQL Server Express is a free product, so you can skip the product key entering field and click on the Next button as shown in the image below.
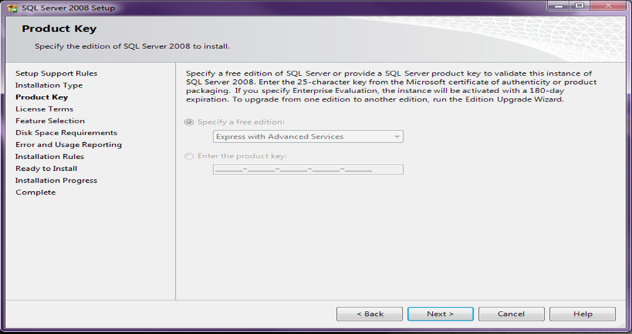
User needs to accept the License Terms and click on the Next button. The window screen is displayed below.
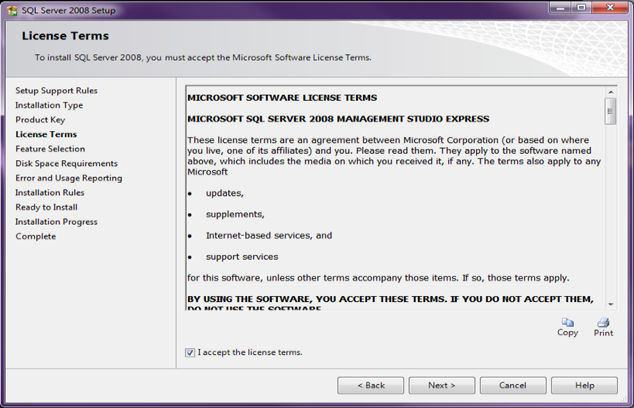
In order to have the desired features in the SSMS platform, it is time for Feature Selection. User needs to check the box as shown in the figure and put a check mark on it that says “Management Tools- Basic”. Click on the Next button in the end.
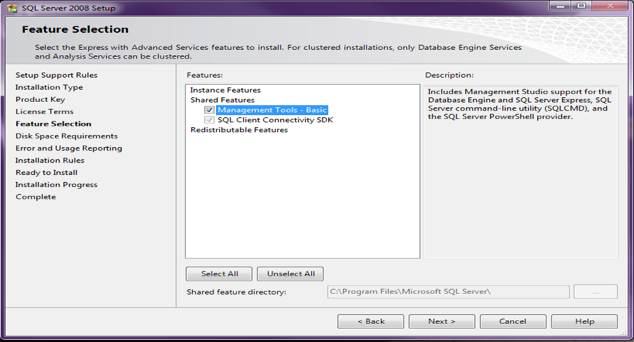
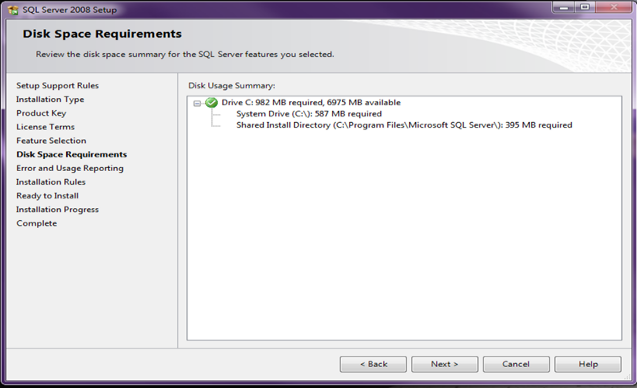
Now, the user needs to verify the disk space requirements and then click on the Next button as shown below.
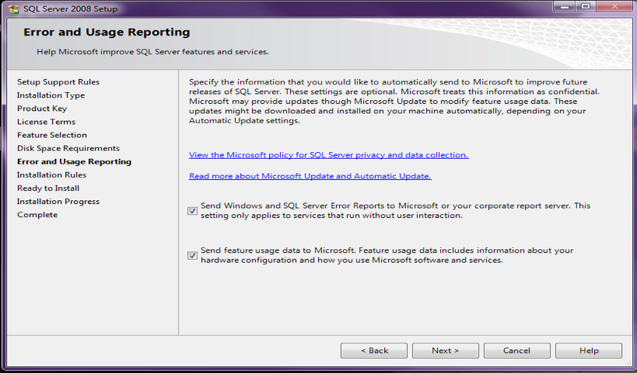
In order to improve the SQL Server features and services by providing the error reporting, you need to put a check mark on the required option and then click on the Next button shown in the image below.
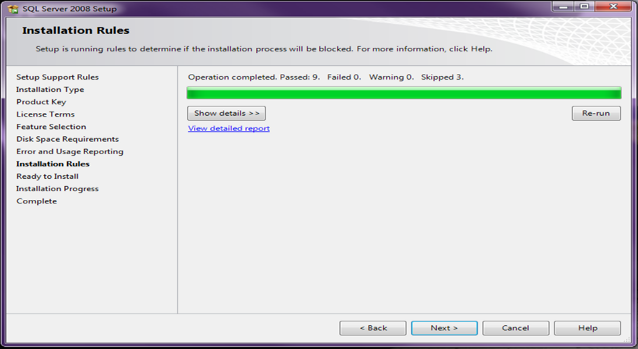
A quick rule check is again started. Now, click on the Next button shown in the window screen displayed below:
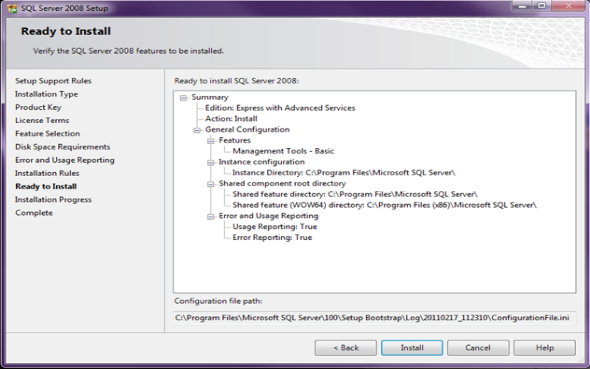
The user will now see a window screen as shown in the figure below that says “Ready to install”. Click on the Install button located on that screen below. The entire installation process will take around 5 minutes for the completion.
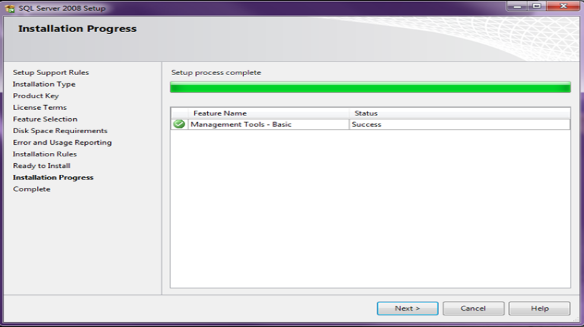
Again, click on the Next button on the “Installation Progress” window as shown below once the installation process is completed.
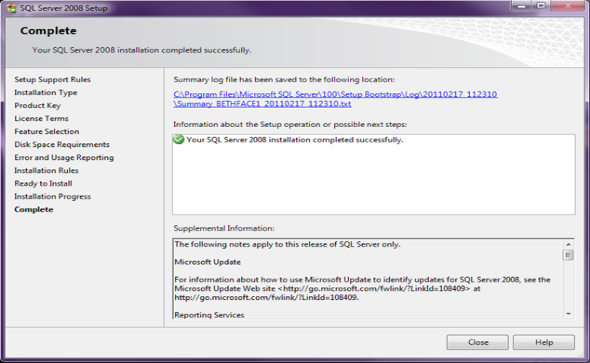
A complete window screen will appear like the one shown below. Users needs to close it and they are all set to use SSMS platform now.
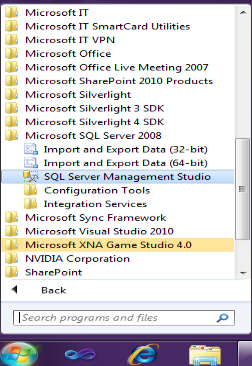
Once the SSMS platform is installed properly, user can now run the SQL Server Management Studio without any problem. The installed platform can be seen in the Programs option as Microsoft SQL Server 2008. You need to ensure that you are running the program as an administrator for accessing all the available features. Here is the image shown below that will provide you a view of the SSMS under Programs.
With these simple steps, it is now easier to install SQL Server Management Studio 2008 Express on Windows 7 systems without any problem. If you are eager to add new functionalities and features in your online store based on eCommerce platforms like Magento, OpenCart and PrestaShop, you can add the customized extensions from Knowband store. Just visit the Knowband store at www.knowband.com and get the various extensions for your online store.

We also provide a No Code Mobile App solution for all the major eCommerce platforms like Prestashop, Opencart, Magento, Magento 2 and Woocommerce. Know more here:

Liked This? You’ll Like These Too

How to install MySQL on Windows and Linux Systems?

MySQL is an open source relational database management system (RDBMS) that is quite popular in various business spheres. The license of this open source project is available for numerous users around the world under the GNU General Public License. It is used by a number of database users around the world due to its OS platform independent feature. This tutorial discusses how to install MySQL on Windows and Linux System.

MySQL open source database system is written in programming languages like C and C++. It can be used with a variety of operating systems like Windows, AIX, FreeBSD, Linux, OS X,  OpenBSD, OpenSolaris and much more. In this blog, we are discussing the installation steps for MySQL on Microsoft Windows and Linux systems. Let us first check out the installation steps for MySQL platform on Windows systems.

Checkpoints to be cleared before the swiftly installing MySQL on Windows and Linux System

If you are one of the Windows users who is looking to install this MySQL, you need to keep in mind certain guidelines for a seamless installation process. Here are the checkpoints for Windows users during the installation process of MySQL.

Keep in mind the size of your database table- In case, the users require a table with a size more than 4GB, it is important to install MySQL platform on a NTFS or new file system. Apart from this, the user needs to use MAX_ROWS and AVG_ROW_LENGTH commands during the creation of a MySQL database table.

Resolve the anti virus scanning issue- There are certain anti virus softwares like Norton/Symantec anti virus that cause problems for directories consisting of MySQL data and temporary tables regarding the performance of MySQL platform. These anti virus softwares read the contents of MySQL files as spam and thus affects the overall performance of the database system.

To handle this situation, it is important to disable the virus scanning feature on the main directory known as datadir which is used to store the MySQL table data. The MySQL users can utilize the inbuilt feature of an anti virus softwares to avoid certain files during the virus scanning process. Apart from this, the temporary files of the MySQL platform can also be exempted from the virus scan program by configuring the separate temporary directory for MySQL temporary files and including this particular directory into the virus scanning exclusion list. For performing this critical task, you need to include a configuration option for the tmpdir parameter in the my.ini configuration file.

How to install MySQL on Windows systems?

If you are a Windows users, it is now easier to download MySQL installer for ensuring a quick installation and configuration of MySQL platform. Here are the simple steps that are involved in the installation process.

  • First, download the MySQL installer from the link and run it on your Windows system.
  • Now, select the appropriate Setup Type for your Windows system. Normally, it is recommended to install MySQL server and other MySQL tools associated with the MySQL development and other helpful tools such as MySQL Workbench by opting for the Developer Default setup method. Otherwise, the user needs to select the Custom setup type for the manual selection of desired MySQL products on their system.
  • It is time to complete the installation process by implementing the various steps mentioned in the MySQL installation wizard. After the completion of the process, all the MySQL products are installed and MySQL server is started.
  • Once, the MySQL platform is installed, it is now easier to configure MySQL to ensure the automatic initialization of MySQL server during the time of system restart.
  • In this way, Windows users can flawlessly install the MySQL installer application on their system. They can use the same application later on to make any configuration or upgradation on the MySQL products.

How to install MySQL on Linux systems?

Being a platform independent database software, MySQL can be easily installed on Linux systems using Ubuntu version. If you are one of the Linux users, you need to perform the following steps for installing MySQL platform on Linux Ubuntu systems.

  • Open the Linux terminal window and run the following command

sudo apt-get install mysql-server

  • During the installation process, Linux users will be asked for the root password.
  • To ensure the proper working and installation of the MySQL server, you need to run the following command

sudo netstat -tap | grep mysql

  • Apart from this, Linux users need to check the lines as mentioned below:

tcp  0     0 localhost.localdo:mysql *:*       LISTEN       13059/mysqld

  • If you are experiencing problems in the working of the SQL server, it is recommended to restart it by executing the following command through Mysql.

sudo /etc/init.d/mysql restart

  • Once, the MySQL is installed, Linux users can start its functioning by running the following command

mysql -u root -p

  • This will change the command prompt to mysql> which will inform the users that they are currently inside the MySQL environment.

Here are the certain set of commands for Linux users in a MySQL environment:

  • For creation of the database, use the following command:

 create database databasename;

  • For accessing the MySQL database, you need to use the following command:

 use databasename;

With the help of the above Linux commands, users can now effortlessly create, insert, update and make other changes in the MySQL database without any assistance.

The above blog is a great help for both Windows and Linux users during the installation of MySQL platform. It will help these operating system users to enjoy the features and functionalities of a MySQL database in a seamless manner. If you are in need to add customized modules or new functionality on your eCommerce store based on Magento, PrestaShop or OpenCart platforms, you need to visit our Knowband store.

Liked This? You’ll Like These Too
How to migrate from MySQL Database to MSSQL Database?

Migration is the crucial and important step in a business environment due to the various restrictions in a platform or a framework and the need to make the data accessible on other required platforms. This migration helps in improving the usability and access to data or content among different available platforms.

Here, we are discussing how to migrate the data of MySQL into Microsoft SQL Server in a flawless manner. There is no “Rocket Science” involved in the entire process and it is as simple as it can be. By performing certain simple steps, it is now much easier to plan the migration from MySQL platform to Microsoft SQL Server environment. Before going further in this direction, let us first discuss the various things that need to be considered while planning a migration process.

Checklists for the data migration from MySQL to MSSQL platform

If you want to perform the data migration task from MySQL to MSSQL platform in a flawless manner, you need to pay attention to various things.

  • It is also important to analyze properly if the SQL Server Management Studio is installed efficiently or not. In the case of the Windows system, you need to perform the certain installation steps for Microsoft SQL Server Management Studio. This platform is restricted to Window users only and is not available for Linux users.

Data Migration Steps from MySQL to MSSQL platform

Here is the step by step instructions for performing the data migration from MySQL platform to MSSQL platform. Take a look below at these simple steps.

  • You need to first download and install the MySQL ODBC Connector, to begin with, the above process. You can also find out the latest release of this extension here.
  • Now, it is time to download and install SQL Server Migration Assistant for MySQL platform. Users can easily download the same from here.
  • On the same page, you need to locate and click on the “Download” button. The action would open up a new page. Once the page is opened, you need to select the file named as “SSMA_MySql\SSMA for MySql.5.3.0.exe”. The user just has to download the required file from there and get it installed on your system.
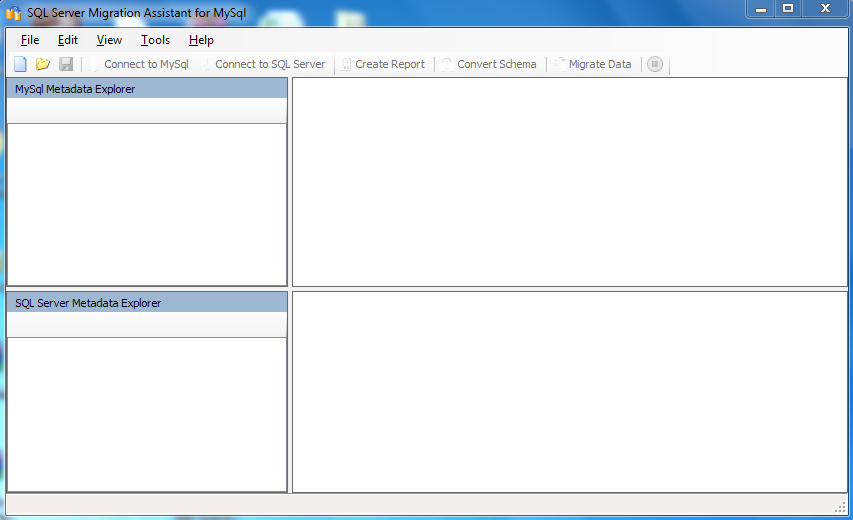
  • The user just has to open the “Microsoft SQL Server Migration Assistant for MySQL” tool that is already installed on your system. In case, the tool is not visible on the desktop, it is time to go to “Start” button and search the same tool over there. You would get the screen as shown below:

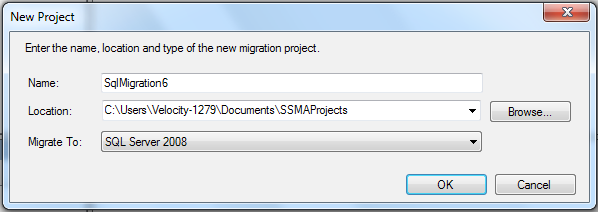
  • To get started with this platform, you need to go to “File -> New Project” and then create a new project for the data migration from MySQL to MSSQL platform. Here is the screenshot of the same process as shown below:

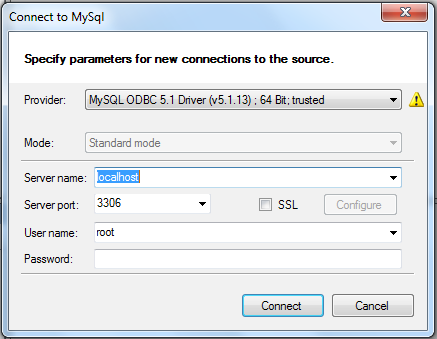
  • Once, the user has created the project successfully, it is time to click on the “Connect to MySQL” option present on the top of the page. A dialog box would be opened known as “Connect to MySQL”. Once, the dialog box is opened, user needs to perform the following functions:
  • First, select the “Provider” as “MySQL ODBC 5.1 Driver”.
  • Now, enter the “Server name” as “localhost”.
  • You need to enter the “Username” and “Password” of localhost which are required for logging into the MySQL.
  • Finally, you need to click on the “Connect” option. This will help in connecting the user to MySQL and contains the list of all the databases that are mapped along with the username that are used for login purposes.

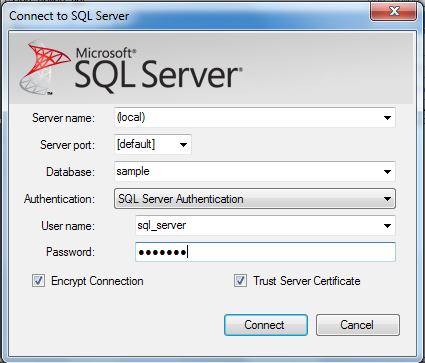
  • After this, you need to click on the “Connect to SQL Server” option provided at the top. This will open up a new dialog box known as “Connect to SQL Server” as shown below. Now, you need to perform the following steps as mentioned below:

  • You need to first select or enter the Server Name.
  • Now, the user needs to select the “Server Port” as “default”.
  • To carry out the data migration of the MySQL platform, it is important to select the right database. This database creation in SQL Server with the help of “SQL Server Management Studio” is an important step before the creation of a database connection.
  • The user needs to select the “Authentication” as Windows or SQL Server.
  • It is required to enter the “Username” and “Password” for connecting the SQL Server.

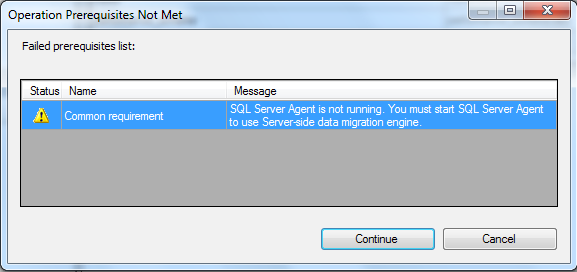
Finally, you need to click on the “Connect” option. It will open up a new dialog box that says “Operation Prerequisite Not Met”, you need to click on “Continue” option. With this step, you would be able to establish a connection with SQL Server along with list of all the databases. Below are the images about the same process.

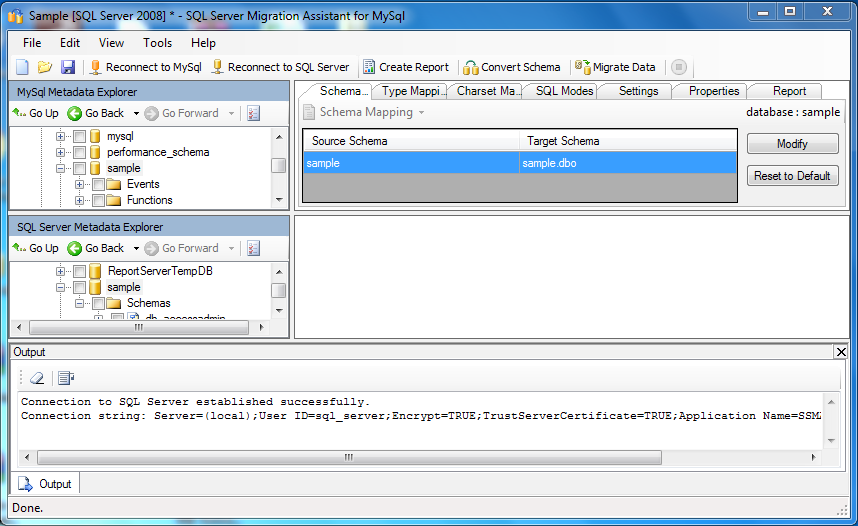
  • Now, you need to select the database from “MySQL Metadata Explorer” sub- window that needs to be migrated to SQL Server. Once, you have made the selection, a “Convert Schema” option is enabled which needs to be clicked. With this step, you can easily convert the MySQL Database Schema into the SQL Server Database Schema. This process changes the data types of all the columns available in database tables into an applicable data type of the SQL Server.
  • Once, the schema has been converted, you need to select the database from the “SQL Server Metadata Explorer” sub-window. The user just have to right click on that and then select “Save as Script” option to save the required script into the desired location of the system. This is an important step before finally accomplishing the data migration as all the tables of your existing MySQL needs to be created on the target database of the SQL Server.
  • Now, it is time to locate the file that you have saved and double click on it. An “SQL Server Management Studio” window will open up asking for the establishment of connection with the SQL Server. You need to enter the required credentials over there and then click on the “Connect” option.
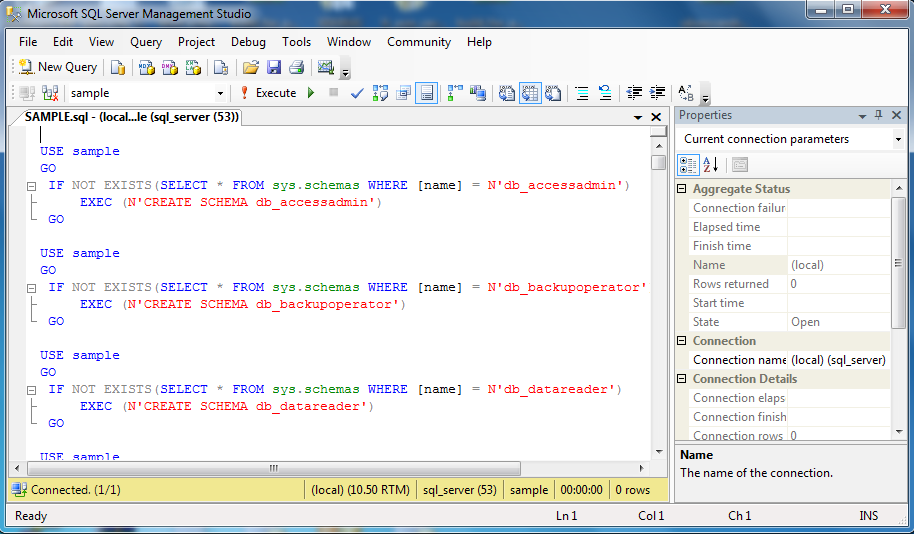
  • Once, the connection has been established, you need to click on the “Execute” option located at the top. This option will help in executing the file and will include all the tables into the selected database as shown in the image below:

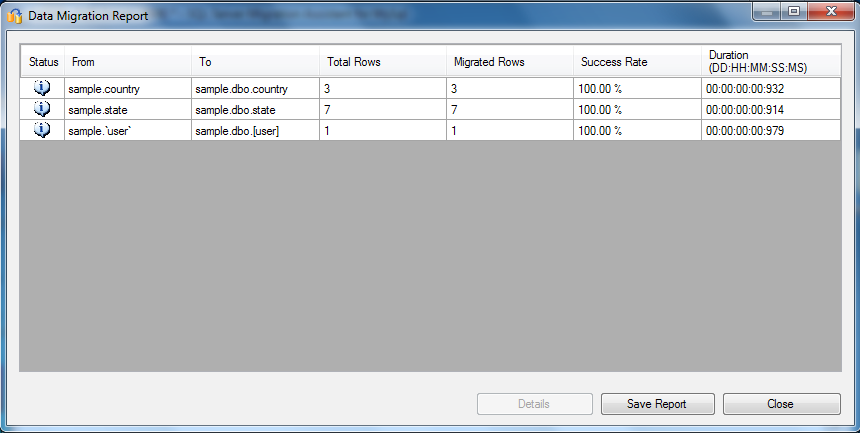
  • Now, you need to move towards the “SQL Server Migration Assistant” tool and then select the required database where you want to perform the migration into the SQL Server. This will help in enabling the “Migrate Data” option provided at the top. By clicking on it, a dialog box will open up asking for the establishment of the connection with MySQL and SQL Server one by one. You need to enter the required credentials over there to establish the connection as shown in the image below:

  • Once, you have successfully established the connection, the system would automatically migrate the data into the targeted database of SQL Server and can also be seen in the “SQL Server Management Studio” for refreshing the above database.

With the implementation of these simple steps, it is now easier to migrate the data of MySQL into the MSSQL platform without any trouble. In this way, websites can migrate their existing database from the MySQL platform to MSSQL Server in a quick and efficient manner. For more information about the useful eCommerce extensions that can help in the data migration services, you can visit our website at knowband for availing our expert custom module development services.

Liked This? You’ll Like These Too
How can Mobile Apps improve your business chances?

With changing landscape of online business, mobile apps have gained much significance than before. The quick surge in the use of mobile devices around the world have made these mobile apps an indispensable part of online business activities. Moreover, as per a recent report of App Annie, a research firm that offers insight about mobile app usage has put forward certain amazing facts regarding utilizing mobile apps for online business. These crucial facts are described below:

  • According to the report, the revenues generated from global mobile apps will surge to $51 billion in the year 2016.
  • The rate of global mobile app downloads will increase significantly and will reach upto 284 billion by year 2020.
  • Mobile app stores will see a significant increase in their growth by the end of year 2020, while Google Play will reach the mark of 166 billion along with the market share of iOS which will raise to the level of 35.2 billion.

The impact of mobile apps on an online business can’t be ignored at all with the above startling facts. If you are still not active in the direction of mobile app development, you will have to bear the harsh business consequences. Let us understand the importance of mobile apps in an online business environment for better conversions and sales.

They offer more value to targeted customers-

Mobile apps comes as a brilliant way to target customers and improve business fortunes without any hassle. Store owners can give more importance to their targeted customers by providing loyalty programs through mobile apps to boost customer engagement and sales. You can also offer dedicated offers and rewards to your mobile customers for improving the sales and revenue of your business. Particularly, eCommerce mobile apps are more capable to bring more sales and customers for their online business.

Mobile apps helps in boosting the brand value of a company-

Due to the increased usage of mobile devices globally, businesses have a higher chances of reaching out to their targeted customers through engaging mobile apps. If you are having a PrestaShop site, it is now easier to transform it into an appealing PrestaShop mobile app through the help of this PrestaShop Mobile App Builder plugin from Knowband store. In this way, by having a deeper reach among your targeted customers, site can enhance their brand value and popularity to a great extent.

Mobile apps offer better user experience to customers-

It is often seen that customers are reluctant to make an online purchase due to the complicated user experience offered on a site. Considering the challenges experienced by customers, mobile apps offer a better user experience due to the presence of numerous features and functionalities in a mobile device. Mobile app developers can take the help of features like GPS, camera, NFC and other such components for providing appealing push up notifications about new offers, deals and products, geo- location based offers for customers, online payment facility and others for providing a better user experience for targeted customers.

It helps in effective marketing of your online business-

The importance of marketing can’t be denied in a business environment due to the increasing competition in every business segment. By creating an amazing OpenCart mobile app with the help of OpenCart Mobile App Builder module, it is now easy to improve the marketing of your OpenCart site. You can easily integrate various social sites like Facebook, Twitter, Linked In  and others with your mobile app for enhancing your marketing and promotional strategies.

Mobile apps helps in building customer engagement and sales-

With the help of mobile apps, it is now much easier to stay engaged with your customers irrespective of the location of your desktop. These apps help in delivering better customer engagement and sales for any business due to ease of mobile connectivity with the company. Especially, in case of eCommerce stores, mobile apps can encourage customers for a quick product purchase and can improve sales to a great extent.

If you are trying to take your business to new level of business engagement, mobile apps need to be included in your business expansion plans. They are helpful in improving the user experience, conversion rates and sales of a business to a great extent. So, create amazing OpenCart mobile app and PrestaShop mobile app for your website to grab higher conversions and sales.

Liked This? You’ll Like These Too
How to Choose the Best Among Various Available eCommerce Platforms?

There is always a crucial question in front of eCommerce store owners regarding which platform to use for carrying out the day- to- day online business activities. With so much of options available, it is difficult to make the right choice to propel your eCommerce business to great heights. It is all about the features, functionalities and user experience provided by your eCommerce platform that makes all the difference in your online business activities.

To help out our eCommerce store owners in making the right decision, we will provide you a clear insight about various eCommerce platforms like OpenCart, WooCommerce, PrestaShop and Magento. Let us explore these eCommerce platforms one by one.

1. OpenCart–

Introduced in year 2008, OpenCart is an amazing eCommerce platform that can handle the diverse business needs of various online stores with great ease. The platform is bundled with large number of eCommerce tools and features that can enhance the online shopping experience of your targeted customers. It is a wonderful platform which offers a great deal of customization features without any steep price. Some of the merits and demerits of this eCommerce platform are as follows:

Merits

  • Offers quick installation and configuration facility for beginners as well as experienced customers.
  •   Comes with a wide range of free extensions and third party extensions or themes to improve store performance.
  • Compatibility with various devices through a responsive web design.
  • Has an interactive admin interface for performing various back end activities.
  • Supports a wide range of payment and shipping methods.
  • Provides customization features in a quick and smooth manner.

Demerits

  • Suitable for small and medium eCommerce stores.
  • Caching and other SEO functions are performed through extensions.

2. WooCommerce-

It is not any standalone CMS platform and is integrated within the WordPress. With this integration, it is now much easier for this platform to work with the WordPress environment and is also capable to utilize various WordPress based themes and extensions. This eCommerce platform is so popular that it is the first choice among various specialized companies who want to grab the maximum out of WordPress and WooCommerce. It comes with a wonderful set of extensions that has the potential to improve the functionality of an online store to a great extent. Here are some of the merits and demerits of this eCommerce platform which are mentioned below:

Merits

  • The platform focuses on WordPress for enhancing the store functionality.
  • It is available for free of cost for downloading purposes.
  • Comes with easy to use feature.

Demerits

  • The store owners need the assistance of premium extensions for improving store functionality.
  • Not of much use if you are not a WordPress user.

3. PrestaShop–

It is a fully open source shopping cart platform which is built for small to medium sized eCommerce stores. No doubt, it is a free software but site owners can purchase additional modules for improving store functionality. Take a close look at some of the merits and demerits of the PrestaShop platform.

Merits

  • Comes with a user friendly or interactive admin panel.
  • It is lightweight in nature and loads quickly.
  • Can be installed easily without any assistance.

  • Offers better search, store functionalities and SEO friendliness.

Demerits

  • Does not contain important eCommerce functions like wishlist, order tracking, product comparison, affiliate marketing, testimonials and other such features.
  • Does not have capability to handle large scale eCommerce stores.

4. Magento–

This eCommerce platform was created in year 2001 but it has gained immense popularity within a short period of time. It is available in two formats namely- the Enterprise version which is a paid premium version and the Community version which can be downloaded free of cost. Some of the various merits and demerits of Magento platform are mentioned below:

Merits

  • Highly scalable and customized eCommerce solution.
  • Support for multiple currencies and online stores.
  • Offers great SEO performance and enhanced payment security.
  • Provides timely issue resolution with the help of a dedicated community of Magento developers and users.
  • Comes packed with a wide range of Magento themes and extensions.

Demerits

  • Extensions and themes are very expensive to purchase.
  • Ideal for big eCommerce stores due to advanced features that comes with a high price.
  • Requires a good hosting service for better store performance.
  • Installation is a difficult task for beginners in the field of eCommerce business.

If you are thinking about making a strong impact in your particular online business segment, you need to embrace the right eCommerce platform for you. However, before making any selection regarding the eCommerce platform, you need to have a better idea about the size of your online business, level of features and customization required, business operational cost available, conversion rates and other such facilities. Wait for a little introspection and you will be better equipped to take the right decision regarding the selection of an eCommerce store.

Liked This? You’ll Like These Too
How is Multi vendor Marketplace module a good bargain for store admin?

Online business is thronged with various activities of online selling and purchase that it is difficult to maintain momentum with so much competition around. With so many players involved in a particular business segment, it seems to be a daunting task to grab the immediate attention of your targeted customers. The eCommerce business is a very unpredictable one and there are no dedicated rules that can help in achieving the higher conversion rates. In this grim scenario, being an eCommerce store owner can be a bit challenging for you in terms of conversion rates and sales. Moreover, with the increasing expectations of customers and the pressure of making bumper sales, it is definitely the right time to start exploring an alternate sales channels. A multi-vendor marketplace extension is the best fit for you.

If you are looking out for away from this grave situation, it is finally time to make amends by utilizing the Multi seller Marketplace extensions for your online store. We are glad to inform you that our company, Knowband has come up with this extraordinary Multi-vendor Marketplace Extensions for various eCommerce platforms like Prestashop, Magento 2, OpenCart and Magento, that has raised new hopes among small and medium vendors in terms of conversions and sales. Marketplace Add-ons provides admin some of the various salient features.

One of the remarkable features of the Multi seller Marketplace module is that it gives store admin the freedom to accept or reject the seller’s requests for adding products on their marketplace store. Every seller registration request is forwarded to store admin for getting it approved or disapproved accordingly. Let us discuss the various ways which make this Marketplace plugins as the most loved and popular choice among the store admin.

Smooth management of commission

With the help of the marketplace extension, store admin can smoothly manage the commission rates for various vendors based on a global percentage basis or can even set commission rates for individual sellers. Everything can be managed seamlessly from the backend of the store.

Restriction on product limit and categories usability for multiple sellers

The number of products and categories that can be used for product addition by multiple sellers is set by the admin. Now, store admin has all the decisive power to make all the decisions regarding restricting the number of product categories for sellers on their marketplace store.

Easy management of the seller’s account through an interactive interface

Although, as a customer, you may have multiple options for selecting the best marketplace module among various available Marketplace plugins. However, this Multi-vendor marketplace extension by Knowband is the best choice due to the presence of an interactive user interface that makes it easy to handle various tasks. You can make quick changes in the seller’s account through this engaging and user-friendly seller dashboard design.

Eliminates the problem of inventory

Handling and keeping the inventory up to date is a very critical and demanding task. It involves a lot of human labor and time which is required during inventory management. However, with the emergence of this Marketplace addon, there is no need for any inventory management for offering your products to online shoppers. It will save your time and money that is involved in this task of inventory management.

Timely alerts and updates about activity on your multi-vendor marketplace store

The Marketplace extension has a powerful email notification system that is capable to provide timely alerts and notifications to all other concerned persons in the marketplace community. It can provide all the information about events that are happening inside your online marketplace to buyers, sellers, and store admin for taking required action at the earnest level. This will help in taking the right business decision without any hiccups.

Provides the required seller information

Buyers often do not have an idea about how to select the right seller for making an online purchase. The Marketplace built by a multi-seller marketplace module can provide the list of all sellers along with their rating on the product page for simplified online purchases. With the help of this critical information, buyers can make the right choice of sellers in a smooth manner. It enables buyers to search for any seller on the marketplace in a quick manner for making the right purchasing decision.

Provides an informative product page to buyers

The marketplace has grabbed the instant attention of global buyers due to the presence of its informative product pages. Buyers can view important information like seller name, seller rating, and other seller details on the product page itself for facilitating quick purchasing decisions. Besides this, buyers can get critical information about various related products from the same seller on the product page for making the quick product purchase.

Offers quick option for buyers to register as sellers

The marketplace extension offers a simple seller registration facility to buyers “Register as Seller” option is available on the frontend of the store. for helping buyers to become sellers in a simple way. Now, you can both purchase products as well as offer products to other people as sellers on this marketplace module. There is no need for back end registration for sellers and everything can be managed from the front end itself.

Final Words

The multi-vendor marketplace module is definitely a remarkable module for buyers community and can boost their online shopping experience to a great extent. This feature-loaded Marketplace extension can be a great help to the buyers and can help in simplifying the online shopping experience to a great extent. Don’t let your business chances be affected due to the absence of an alternate sales channel. A feature-loaded Marketplace plugin from Knowband can boost your conversions and product sales by offering a sales platform to your products and services. Get involved with us now and explore chances of higher conversions and customer engagement with this PrestaShop extension. You just need to visit our site at knowband and can ensure better business prospects for your eCommerce store.

This Would Also Interest You:

In che modo il Multi vendor Marketplace costituisce un buon affare per l'amministratore del negozio?

Il business online è affollato di varie attività di vendita e acquisto online che è difficile mantenere lo slancio con tanta concorrenza in giro. Con così tanti giocatori coinvolti in un particolare segmento di business, sembra essere un compito scoraggiante per catturare l'attenzione immediata dei vostri clienti mirati. Il business dell'e-commerce è molto imprevedibile e non ci sono regole dedicate che possono aiutare a raggiungere i tassi di conversione più elevati. In questo triste scenario, essere proprietario di un eCommerce può essere un po 'impegnativo per te in termini di tassi di conversione e vendite. Inoltre, con le crescenti aspettative dei clienti e la pressione delle vendite di paraurti, è sicuramente il momento giusto per iniziare ad esplorare canale di vendita alternativo.

Se stai cercando una via da questa grave situazione, è finalmente il momento di fare ammenda utilizzando il Mercato multi venditore estensioni per il tuo negozio online. Siamo lieti di informarvi che la nostra azienda, Knowband, ha elaborato questo straordinario Prestashop, Magento 2, OpenCart e Magento, che ha sollevato nuove speranze tra i piccoli e medi venditori in termini di conversioni e vendite.Mercato

Gestione regolare della commissione

Con l'aiuto dell'estensione del marketplace, l'amministratore del negozio può gestire agevolmente i tassi di commissione per vari fornitori in base a una percentuale globale o addirittura impostare tariffe di commissione per i singoli venditori. Tutto può essere gestito senza problemi dal back-end del negozio.

Limitazione del limite del prodotto e dell'usabilità delle categorie per più venditori

Il numero di prodotti e categorie che possono essere utilizzati per l'aggiunta di prodotti da parte di più venditori è impostato dall'amministratore. Ora, l'amministratore del negozio ha tutta la forza decisiva per prendere tutte le decisioni relative alla limitazione del numero di categorie di prodotti per i venditori sul loro negozio sul mercato.

Facile gestione dell'account del venditore tramite un'interfaccia interattiva

Sebbene, come cliente, potresti avere più opzioni per selezionare il miglior modulo di mercato tra i vari plug-in disponibili nel Marketplace. Tuttavia, questa estensione multi market market di Knowband è la scelta migliore grazie alla presenza di un'interfaccia utente interattiva che facilita la gestione di varie attività. È possibile apportare modifiche rapide nell'account del venditore attraverso questo design del cruscotto del venditore accattivante e facile da usare.

Elimina

Gestire e mantenere aggiornato l'inventario è un compito molto critico ed impegnativo. Comporta un sacco di lavoro umano e tempo che è richiesto durante la gestione delle scorte. Tuttavia, con l'emergere di questo componente aggiuntivo del Marketplace, non è necessario alcun tipo di gestione dell'inventario per offrire i tuoi prodotti agli acquirenti online. Risparmierà tempo e denaro coinvolti in questo compito di gestione dell'inventario.

Avvisi tempestivi e aggiornamenti sulle attività nel tuo negozio di mercato

Il

Fornisce le informazioni sul venditore richieste

Gli acquirenti

Fornisce

Il

offerte

Il

Le parole finali

L’ modulo di mercato multi venditore è sicuramente un modulo notevole

Questo ti interesserebbe anche:


What information does add- to- cart rates reveal about your E-Commerce Store?

Every online shopper would be familiar with “Add- to- Cart” button which is present on every eCommerce store while making a product purchase. This extraordinary “call- to- action” button is not just a website element but it is definitely much more than that. You might be thinking that we are exaggerated things now but truly you would be quite amazed by the amount of information it could convey to store owners like you. I know you all must be quite eager to break the suspense and mystery around these “Add- to- Cart” button. Here, we present to you some of the crucial information that is conveyed by this simple looking CTA button.

1. Information about product and pricing-

Add- to- Cart button has a direct relationship with the characteristics and product checkout rate on an eCommerce site. If a particular product on your site is not being added effectively into the shopping carts of customers, there could be a plenty of reasons that may be working behind this non- engagement and ignorance about a product. It could be possible that the reasons for this low product addition can be a cluttered and non- engaging website design and navigation, problem in product selection, presentation of the product on your site, pricing or any other such factor. If you are truly serious about improving all these given areas, you can take the assistance of various amazing eCommerce extensions from Knowband store that can prove to be a big relief.

2. Insight about marketing and promotional strategy-

By analyzing the add- to- cart rates on your eCommerce store, you can have a clear understanding about which product promotion strategy is working for you or not. This will help you in measuring the true potential of your marketing strategies be it email marketing, digital marketing, social media marketing, PPC campaigns and other such mediums. In this way, you can have a clear insight about how can you target your customers in a better way and where you need to invest your time, money and efforts.

3. The performance of your checkout process-

With a clear difference between the add- to- cart rate on your site and the cart completion rate, you can have a clear view about the importance of a business and its rate of expansion in the near future. There are several customers who eventually come onto your site but often don’t turn up as a potential customer. The reason could be plain simple about the absence of an enthralling checkout process on your process which is making the online shopping a bit complicated task. You need to remove the unnecessary checkout fields and formalities that can improve customer engagement and eCommerce conversion rates for a complete business overhaul.

4. Fulfillment of the promises made to the customers-

Customers are eager to add a particular product on their shopping cart only if it fulfills all its requirement criteria. You need to analyze the browsing behavior and shopping pattern of your clients for providing products according to their interest and choice. If you are viewing higher add- to- cart rates on your site, it means that your targeted customers are happy with your business. Don’t turn away your attention from this crucial aspect as it can have a severe dent in the prestige, sales and eCommerce conversion rates for a better business future. Apart from this, higher add- to- cart rates means less bounce rates and higher customer engagement for improving your business fortunes.

It is not a hidden fact now that add- to- cart rates can make a big difference in the fortunes of your business entity. Don’t keep your eyes closed to that add- to cart button on your eCommerce store as it can make a tremendous impact on the overall conversion rates and product sales. If you want to make the optimum use of call- to- action button on your site, you can take the help of unmatched eCommerce extensions of Knowband store that are simply unique in features, functionalities and price.

Liked This? You’ll Like These Too
Want to increase the size of your email lists? Check out these tips

There has been a boom of communication mediums around the world but still emails are the most preferred and popular medium of business- to- business and business- to- consumer engagement for various business entities around the world. They are prompt in delivery, more economical when targeting a large number of users and are more reliable than any other customer engagement mediums. However, gathering email addresses from your customers has become one of the most challenging issues now a days as people are more concerned about their online privacy and security. Due to this, customers are often reluctant while sharing their personal details which causes a strong impact on the conversion rates and customer engagement process. If you want to be a champion in this field, you need to pay heed towards these crucial tips that can help in increasing the count of your email addresses for the growth of your business entity.

1. Ask email addresses of your customers in a logical way than a compulsive one-

There is multiple ways of saying a particular thing and it is your way of communication that actually matters in a business environment. You need to master the art of customer engagement in order to facilitate a seamless access of required details from clients like email address, contact information and other such crucial information. Make it a part of your website so that consumers can feel more connected and can share their personal information in a seamless manner.

2. Simplify your sign up process for effective customer engagement- 

You need to remove the various bottlenecks that are hurting the seamless registration of customer on your site. Include only relevant and important fields that can’t be ignored during registration process for facilitating a seamless account registration. If you can make your “sign up” process more engaging and customer friendly, you will effortlessly achieve more customer engagement and user sign- ins. Apart from this, make your sign up process more compelling and persuasive for your site visitors. If you want, you can also utilize the various OpenCart extensions like OpenCart Social Loginizer, OpenCart Auto Subscribe, OpenCart Newsletter Integrator and such others for helping customers in this crucial sign up process.

3. Utilize the availability of existing email lists-

If you have the access to existing bulk email addresses, you need to make effective use of them for achieving higher sales and conversion rates. It would be in the interest of your business if you can make use of email marketing softwares for higher customer engagement and eCommerce conversions. Some of these wonderful email marketing softwares are ConstantContact, MailChimp, Aweber and others that can help in seamless targeting of consumers through bulk email messages.

4. Decide the appropriate position and location of your “sign up” process-

In order to grab maximum customer attention and account registrations, it is important to place your “sign up” form at the appropriate position and location of your site. If user can find it comfortably, you can expect more account sign ups and can boost your business chances. With the help of our plugin development services company, we can provide you wonderful customization services through our eCommerce social extensions which are available for Magento, OpenCart and PrestaShop store owners. These feature packed modules can provide freedom to decide the appropriate location and placement of your login options for higher customer engagement and sign ins.

By following all these crucial tips, it will not be difficult for you to achieve high customer registrations and have access to increased email addresses. If you have the email addresses of your site visitors, it will not be a herculean task for you to grab high eCommerce conversions and sales on your online store.

Liked This? You’ll Like These Too