Ensure an Infallible Checkout Experience with these PrestaShop Checkout Addons

Checkouts are an important parameter that can make a profound impact on the growth and customer engagement potential of an online store. If it is not simple and engaging, you will definitely face severe losses in terms of customer attention, conversion rates and product sales. Every online shopper wants a simple and seamless checkout experience that can facilitate faster online shopping and can boost your product sales. Store owners are utilizing various techniques and use of checkout extensions are one among them that can instantly grab the attention of your site visitors. If you are facing the same issue on your PrestaShop store, here are the few Prestashop checkout extensions that can save the day for your business.

1. PrestaShop One click checkout–

Sometimes, making changes in a cart during product addition for a purchase can be time consuming and deviates the mind of a shopper from a particular online store. Understanding this grave situation, it is now easy to purchase a single product item quickly with the help of this PrestaShop checkout addon. The module also has the facility to provide the access back to your previous cart in order to ensure a seamless checkout experience to your site visitors. It is available in 17 different languages, can be customized properly, shows compatibility with various themes and is adaptable to various types of devices like desktops, laptops, smart phones, tablets and other such platforms.

2. PrestaShop Smart Checkout–

Lengthy checkout forms often acts as a stalemate for converting site visitors into potential customers. No online shopper would like to engage with a site which does not offer a simplified checkout formalities to its visitors. Keeping your checkout formalities restricted to a single page can effortlessly grab more customer attention and sales for your online store. This PrestaShop checkout addon has got added functionality like quick hiding or revealing of any checkout fields, customization of buttons, integration of  MailChimp software, setting any field as optional, sorting of address fields, language translation, inclusion of custom CSS and much more. Collectively with all these features, it would not be difficult for your visitors to carry out the online shopping process on your eCommerce site.

3. PrestaShop checkout page analysis–

Support of analytical information helps in speedy decision making and reduces the chances of failure. The checkout process is a critical stage for every online store and thus it needs to be much more simplified and engaging for your site visitors. With this PrestaShop checkout addon, you can seamlessly keep a track on your visitor activity regarding the checkout process and can get a clear insight about how customers are behaving on your checkout page. Once, you know the stage from where your customers are leaving, you can effortlessly retarget them for higher conversions and sales.

4. PrestaShop checkout payment fee addon–

Online customers often get irritated when they notice illegitimate taxes and charges at the final checkout process and ultimately abandons the particular site. In order to avoid such situation, here comes this wonderful PrestaShop checkout addon that can reveal all the additional charges to buyers regarding the extra payment fees charged by various payment systems. Thus, there will not be any addition of hidden charges on the final checkout page.

5. PrestaShop One Page Checkout Free version–

When you have to achieve a seamless checkout experience without spending a single penny, you would not find a better alternative than this PrestaShop checkout addon. It allow store owners to make quick changes in their checkout process without costing a single penny. You can utilize it for any type of online store and it works perfectly for every third party theme and extension. It is simply an unmatched eCommerce extension that can be savior for your store.

It is time to invest your efforts and little money on these PrestaShop checkout addon for changing the future of your business entity. This each and every PrestaShop checkout addon is made up of multiple features and functionalities that can take your eCommerce store to new heights. So, explore the amazing world of modules with our Knowband store.

You Might Also Like:

Prestashop Previous Next Buttons Addon by Knowband – User Manual

Introduction of Prestashop Previous Next Buttons Addon:

Make an easier navigation for your customers with the help of the Prestashop Previous Next button addon by Knowband. The Prestashop plugin allows the customer’s to view the previous or next products just by clicking on the respective buttons.

Steps For Installation of Prestashop Navigation Addon

To install this Prestashop Navigation addon, please follow the following steps:

1. Add addon folder under modules folder of your system.

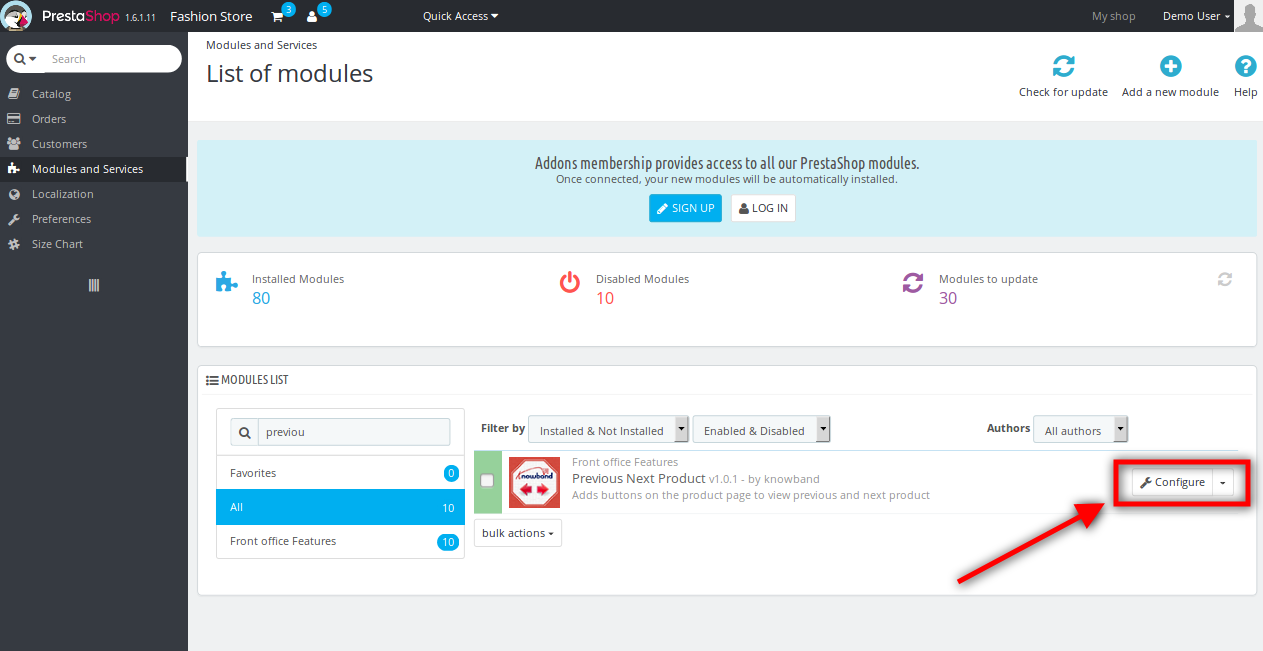
2. After adding this addon folder, system will list the addon on module page under front office feature category as given below:

3. Click on install to install the Prestashop paginator plugin. After installing the Prestashop product scrolling addon, you’ll see the ‘configure’ option at the place of install. (See the image above)

Admin Interface of Prestashop Paginator Addon:

Following features will be provided to the admin interface of this Prestashop Previous Next addon:

1. General Settings

General Settings of Prestashop Navigation Addon:

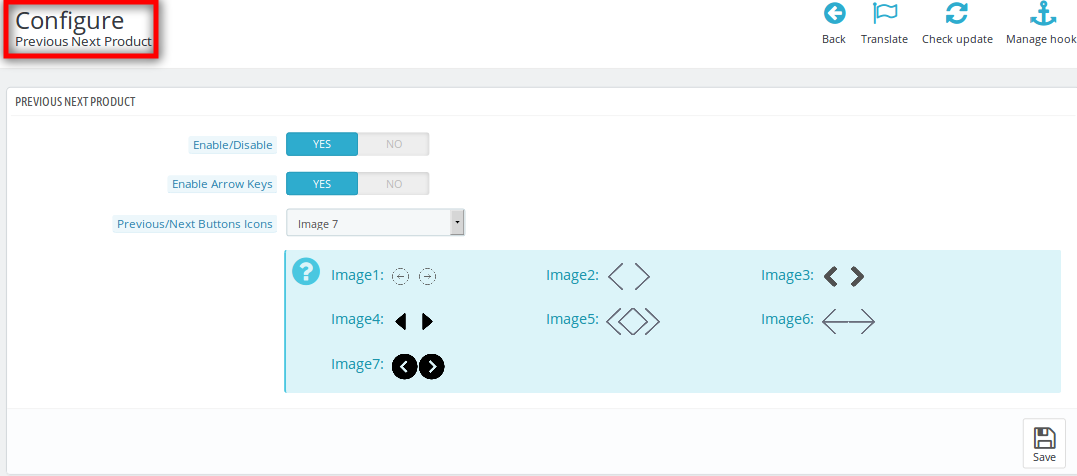
After clicking on configure link of prev next product page module General settings tab will open.

Fields listed will be filled with some default values

GENERAL SETTINGS TAB DETAILS:

  • Enable/Disable: Initially, this field of Prestashop navigation module will be OFF. User can enable/disable this Prestashop addon functionality by turning this ON/OFF.
  • Enable Arrow Keys: This button of the Prestashop product scrolling module lets the the admin to enable or disable the arrow keys navigating feature of the addon. Enabling this feature allows the customers to navigate the products using the arrow keys on the keyboard.
  • Previous Next Button Icons: Here, the admin can select the button images that would be displayed in the front end as the Previous/Next product buttons.

Front End Module:

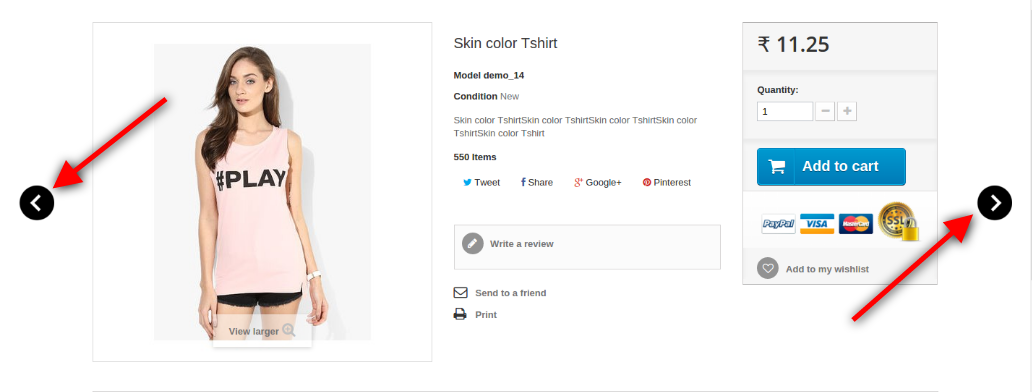
After enabling this Prestashop previous product plugin, the product page in the front of the shop will change a bit as the two buttons will be added in the side of the product.

The previous next button Prestashop module at the front-end appears as follows:

Watch the video tutorial here:

Are you looking to create simple previous/next button navigation on the product pages of your store? Use this customizable addon by Knowband to save the time of your customers and add more convenience to their shopping. Decide the look and feel of the button as per your choices to make it simple and attractive for the users. Buy this module from addon store and give an ultimate shopping experience to your customers.
Click here for Admin Demo and Front Demo as well.

Prestashop Marketplace Seller Vacation Mode Addon – User Manual
Introduction of Prestashop Marketplace Seller Vacation Mode Addon

This module is basically developed for the sellers to let them inform their customers that they will not be available to sell for a particular time duration. In this module, the seller can set a specific time interval during which he will be unavailable on the marketplace. An alert is sent to the customers when a seller goes to vacation and a similar alert is sent once he/she is back from vacation. All these automation is done using the cron instructions.

The admin can also set a cron which will activate and deactivated the vacation mode and also sends an email to the sellers as soon as the vacation mode is activated or deactivated.

Steps for Installation

To install this ad-don, please follow the following steps:

1. Add ad-don folder under modules folder of your system.

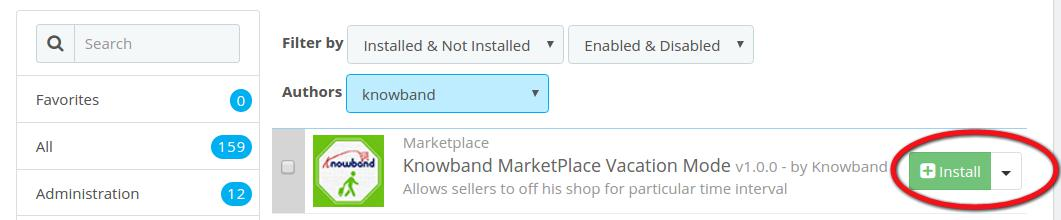
2. After adding this ad-don folder, system will list the ad-don on module page under front office feature category as given below:

3. Click install to install this Prestashop Admin Tool Addon.

Menu Location

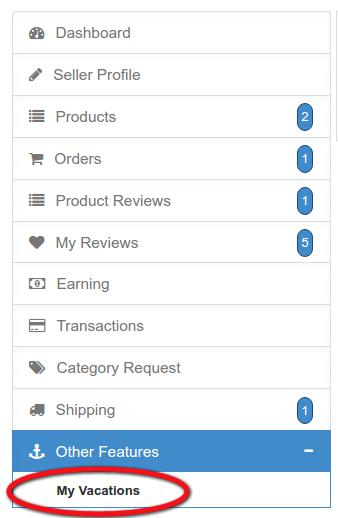
After installation, a menu (My Vacations) will be displayed to the seller in the Other Features Menu tab as shown in below screen:

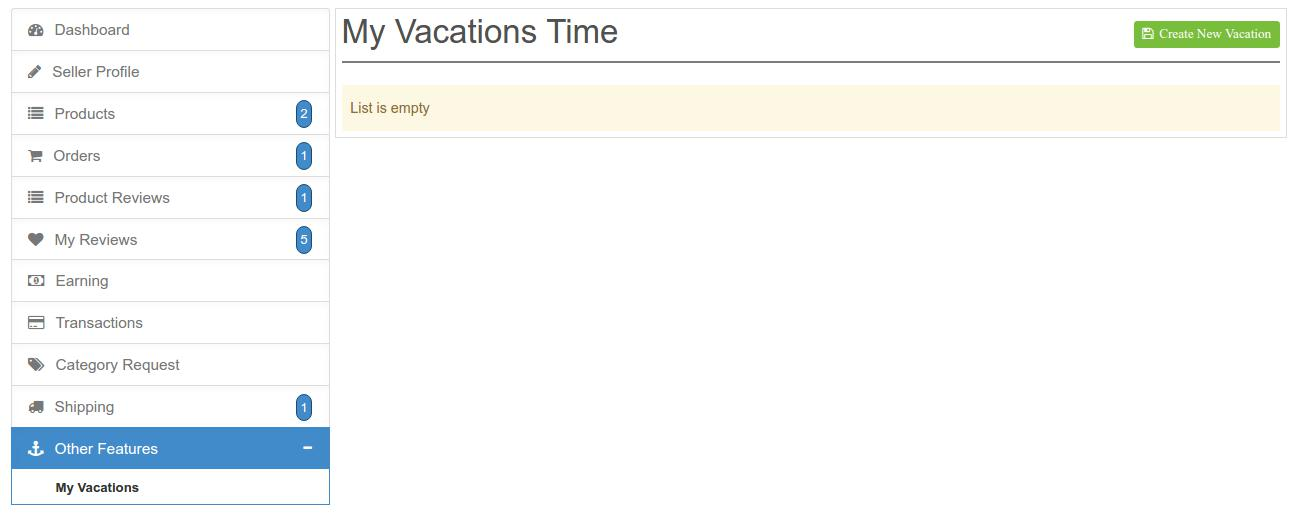
On clicking the highlighted link, the system will redirect seller to his “My Vacations Time” window.

My Vacations time configuration

Here all the menu items and fields of the module are mentioned:

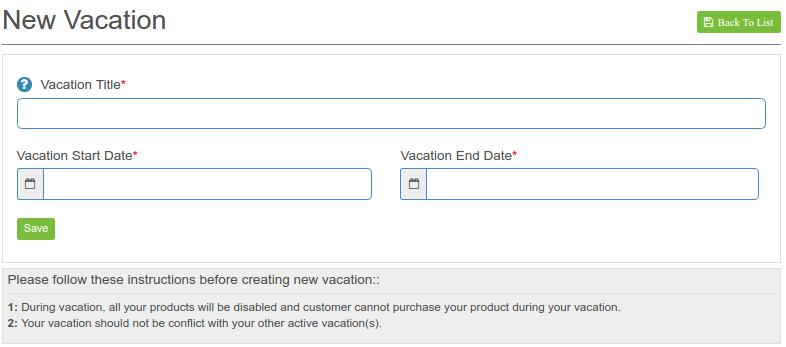
In the above window Click on Create New Vacation at the right top side of the interface. A new window appears for the configuration of your vacation mode.

Settings Description

1. Vacation Title: You need to give a title to your vacation mode. This title is only for your internal use and will not be displayed to any other.

2. Vacation Start Date: In this field, the seller will set the date for which he is going to vacation and will not to available on the marketplace.

Please note : For testing also always mention the present date or date yet to come. Do not enter a past date in this field.

3. Vacation End Date: In this field, the seller will set the date when his vacation ends and will again be available on the marketplace.

4. Save: Click Save button to save all your settings made.

Module Work Flow

When the admin will install this module on his Prestashop marketplace addon, each seller will get a sub menu on their seller account page. Once a seller sets his vacation time through the interface provided to them on their seller’s account, the cron which has been already configured by the seller will start working. The module will automatically start and stop a vacation mode for a particular seller according to the time set by the seller. During the time period of the vacation mode, the particular seller’s profile will be inactive on the marketplace and his products will not be shown to the customers either.

The customers may also receive emails according to the cron set up by the admin on his server but if the seller has disabled the cron settings from his interface then sellers won’t receive any of the emails which will be generated from the cron regarding the starting and stopping of the vacation mode.

An E-Commerce guide towards a seamless Magento 2 Upgrade

Magento 2 platform has arrived in the eCommerce business scenario quite a few days back. With this latest release, there are numerous store owners who might be thinking about making a quick transition on this eCommerce platform. The idea is actually good and a right decision for your store considering the multiple features and functionalities contained by this recent Magento upgrade. However, you need to show certain restraint towards this accomplishing hasty step as it might affect your business chances and conversions. Here are the few things or areas that needs to be handled while taking the first step towards Magento 2 migration.

1. Availability of limited extensions and themes for your store

Due to the recent introduction of this Magento 2 platform, there are limited number of extensions and themes that are created for this recent upgraded platform. There are various important extensions that are still not part of this new eCommerce platform which could affect the performance and productivity of your online store. If you want any specific Magento 2 extensions for any particular task on your site, you can visit our Knowband store and can select the desired plugin for your business.

2. Requirement of an effective hosting environment

If you want to drive maximum output out of this new upgraded Magento platform, it is advised to utilize the services of an optimized hosting platform that can serve the upgraded versions like PHP 7.0.2 and MySQL 5.6. You can also check out Nginx 1.8 web server as well as Apache 2.2 or 2.4 platform for this new Magento 2 platform. This upgraded eCommerce platform achieves higher speed benefits through Redis and Varnish also. Besides this, the Enterprise Edition of Magento platform can utilize web server like Apache Solr 4.x for search purposes and data distribution on three database masters. Don’t overlook these crucial parameters while deciding the appropriate web hosting server for your site.

3. Absence of required technical expertise and assistance

Being the recent upgrade, Magento platform developers don’t have all the finalized certification avenues for the new upgraded platform. There are increased chances that developers who are proficient in Magento 1 may not work properly on this new Magento 2 platform due to the limited exposure and information. It is importance to look out for a superb Magento developers that can carry out the various customization task without any problem. Handing over your Magento site to any inexperienced developers can cost you dearly in terms of conversion rates as they are not following Magento best practices.

4. Amount of cost involved in the migration process

Before planning the migration activity for this new upgraded Magento version, it is important to consider the cost that is involved in this entire critical process. Due to the difference in the platform architecture and theme, it would cost you good bucks while migrating your entire store to this new Magento 2 platform. But, there is a news of respite for you as the platform provides Magento 2 migration guide for a seamless transition.

5. Limited integration services

With the constant expansion and growth of your eCommerce business, it is imperative to add new third party Magento 2 extensions and API (Application programming interface) services. You may require the modules for various tasks like shipping, product management, omni channels sales and other such activities. With the migration of your platform, it may happen that these modules may not work properly with the new upgraded version due to unavailability of custom connectors which could cause problem in the integration services.

Once, you are well aware about the possible roadblocks in the path of migration journey towards Magento 2 platform, there are more chances of successful transition. Remember it is better to “Look before you actually leap” in order to avoid the severe consequences in a particular field. With a clear knowledge about the challenges, store owners can seamlessly upgrade their Magento store towards this new upgraded platform.

You Might Also Like:

PrestaShop Brings YouTube channel for E-Commerce Customers- It is Time for Videos!!!

PrestaShop, an eCommerce platform which started in year 2005 is growing by leaps and bounds. This Open source platform is used by 250,000 shops around the world and is available in 60 different languages for its customers. It has made up of more than 300 hundred built- in features that is crucial for the effective management and maintenance of any eCommerce store. The platform has a huge stock of themes, add- on modules and other such features which has helped in its constant growth and development over the years.

This globally recognized eCommerce platform has again pulled another wonderful feather from its cap by launching their own YouTube channel on 29th March, 2016 which is dedicated entirely for its eCommerce customers. This is definitely a big day for PrestaShop as it has redefined the customer engagement to a new level with its own YouTube channel. It is the end result of several weeks and months of preparations, multiple filming and editing sessions and the constant guidance and recommendations of various dedicated employees. With this initiative, it will be much more easier for online merchants to create, develop and grow their online store for their particular business segment.

This YouTube channel consists of helpful tutorials, advices, tips, best practices and analysis from Protestant experts, feedback, corporate seminars replays and much more. It is definitely a great way to inform your customers about the essence, nature, product USP, how- to- use guide and much more in order to keep them informed about your business and company for boosting your business chances among your rivals.

It is time to get yourself subscribed to this channel in order to stay in constant touch with the ever growing PrestaShop store community. Check out now!!!

In this You Tube video, viewers can get a quick insight about the working, features and back end interface of this PrestaShop single page checkout Addons. Now, you can understand this plugin properly for improving the checkout process of your store.

In this You Tube video, you can get a fair idea about this PrestaShop Abandoned Cart Addons that can reduce abandoned carts on your store and can ensure higher conversions. This tutorial video can provide you insight about how this plugin can be a true savior for your eCommerce store.

With this You Tube video, viewers can understand the various dimensions of PrestaShop Scratch Coupon module in terms of working, features, scratch coupon redemption and much more. This video will explain you why this PrestaShop addon is one of the most popular eCommerce module for numerous PrestaShop store owners.

Liked This? You’ll Like These Too

Prestashop Infinite Scroll Module by Knowband – User Manual

1.0 Introduction

The Prestashop Infinite Scroll Module by Knowband is an integration of scrolling of products on the product listing page in place of pagination.

Pagination on a product listing page is a very common feature that we see on different eCommerce websites but this Prestashop infinite scroll module will make the listing of products on the product listing page a bit more interesting. When this Prestashop list product module will be enabled the customer will just scroll down the page to view more products which are listed in the product listing page.

2.0 Steps For Installation of Prestashop infinite scroll module:

Once you purchase the infinite scroll addon, follow the below steps:

  1. Go to the Store Admin -> Modules and Services.

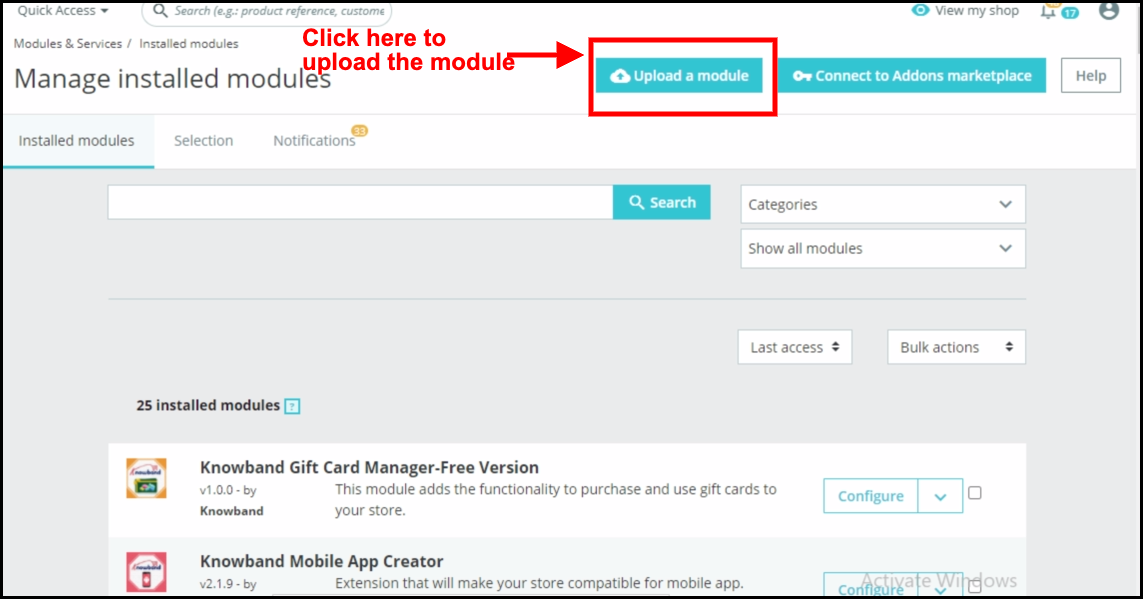
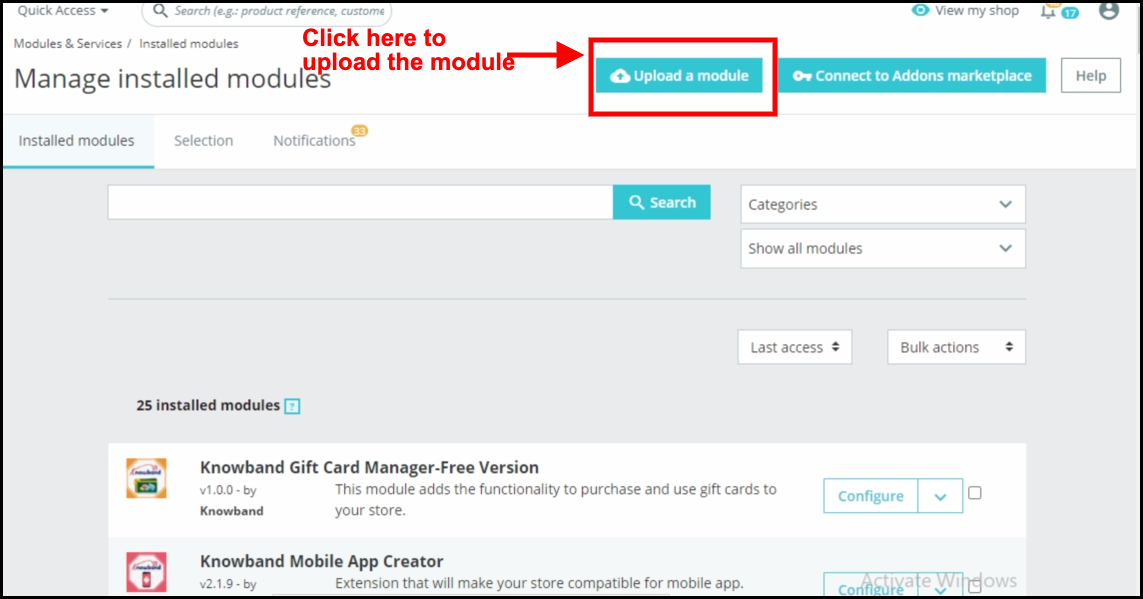
2. Click on “ Upload a module”. You can drag or drop the file or can simply select the file from the system.

Once the file is completely uploaded, a notification of “Module(s) installed successfully” will be displayed. Now you can configure your module.

3.0 Administration Module

In admin interface of the Prestashop infinite scrolling module, there will be following options to configure this Prestashop list view module. The Prestashop dropdown scrolling module includes 4 tabs and they are as follows.

1. General Settings

2. Advance Settings

3. Display Settings

4. Selector Settings

Each section of the Prestashop Infinite Scroll plugin is described in details below.

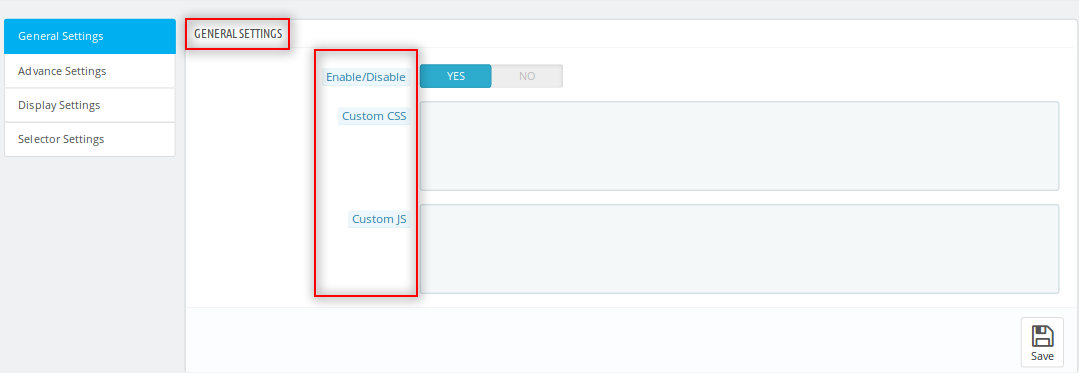
3.1 General Settings of the Prestashop infinite scroll module:

This section of the Prestashop list product module will be having following options to configure this Prestashop infinite scroll module:

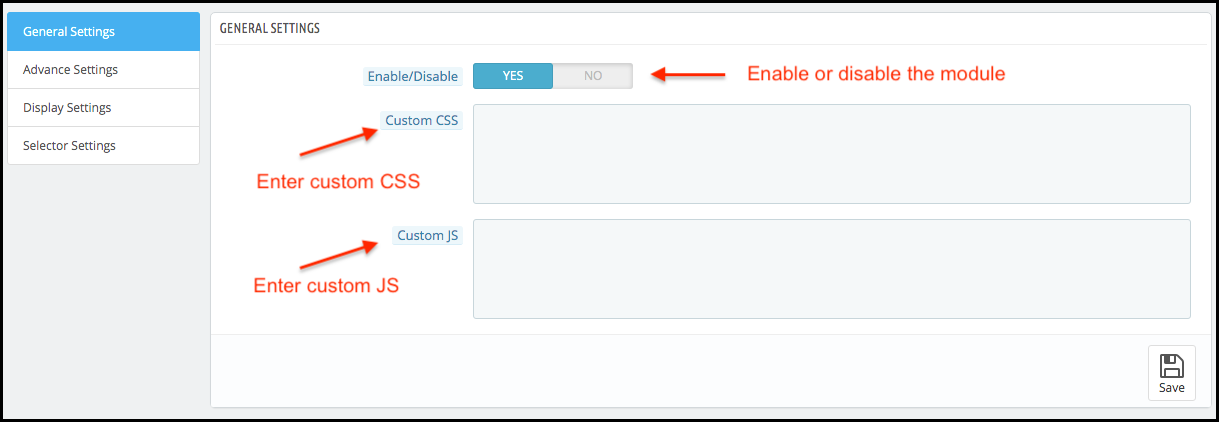
  • Enable/Disable: This option of the Prestashop fast scroll module will be having a toggle button with two specific values ON and OFF. This Prestashop module by Knowband will only work if this is set to ON. If this is set to OFF then none of the feature will be working and not even impacting any other section of website. By default, this option will be OFF.
  • Custom CSS and JS: These fields of the Prestashop Infinite Scroll module have been provided to let the admin change the look and feel of the front end of the Prestashop quick scroll module.

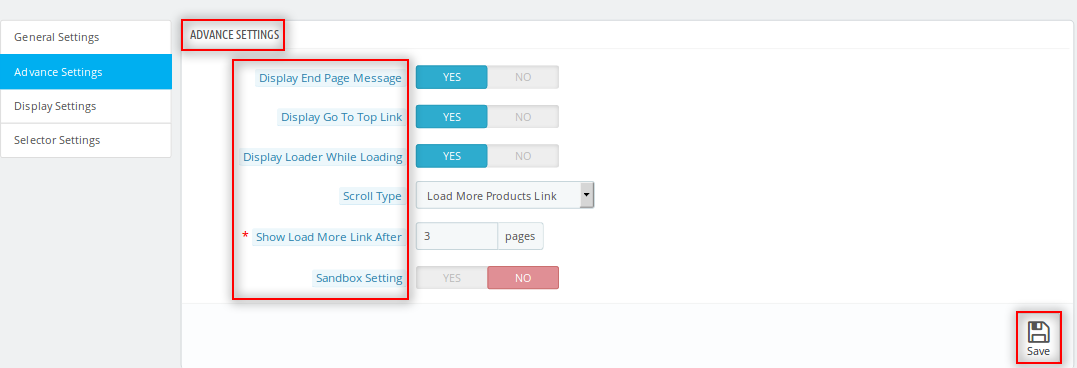
3.2 Advance Settings of the Prestashop infinite scrolling module:

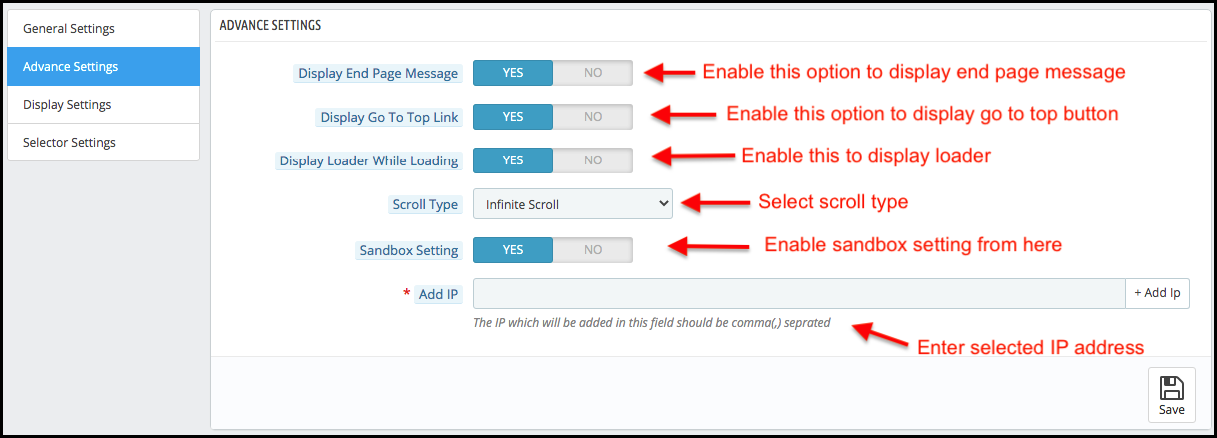
  • Display End Page Message: This field of the Prestashop drop down scrolling module offers the store owner to display the message at the end of product listing page.
    If the Owner enables Display End Page the following option will appear:
  • Display Go To Top Link: This field of the Prestashop Infinite Scroll module lets the store owner to display a link in the front-interface to go to top of the page by displaying a button at the bottom of the page.
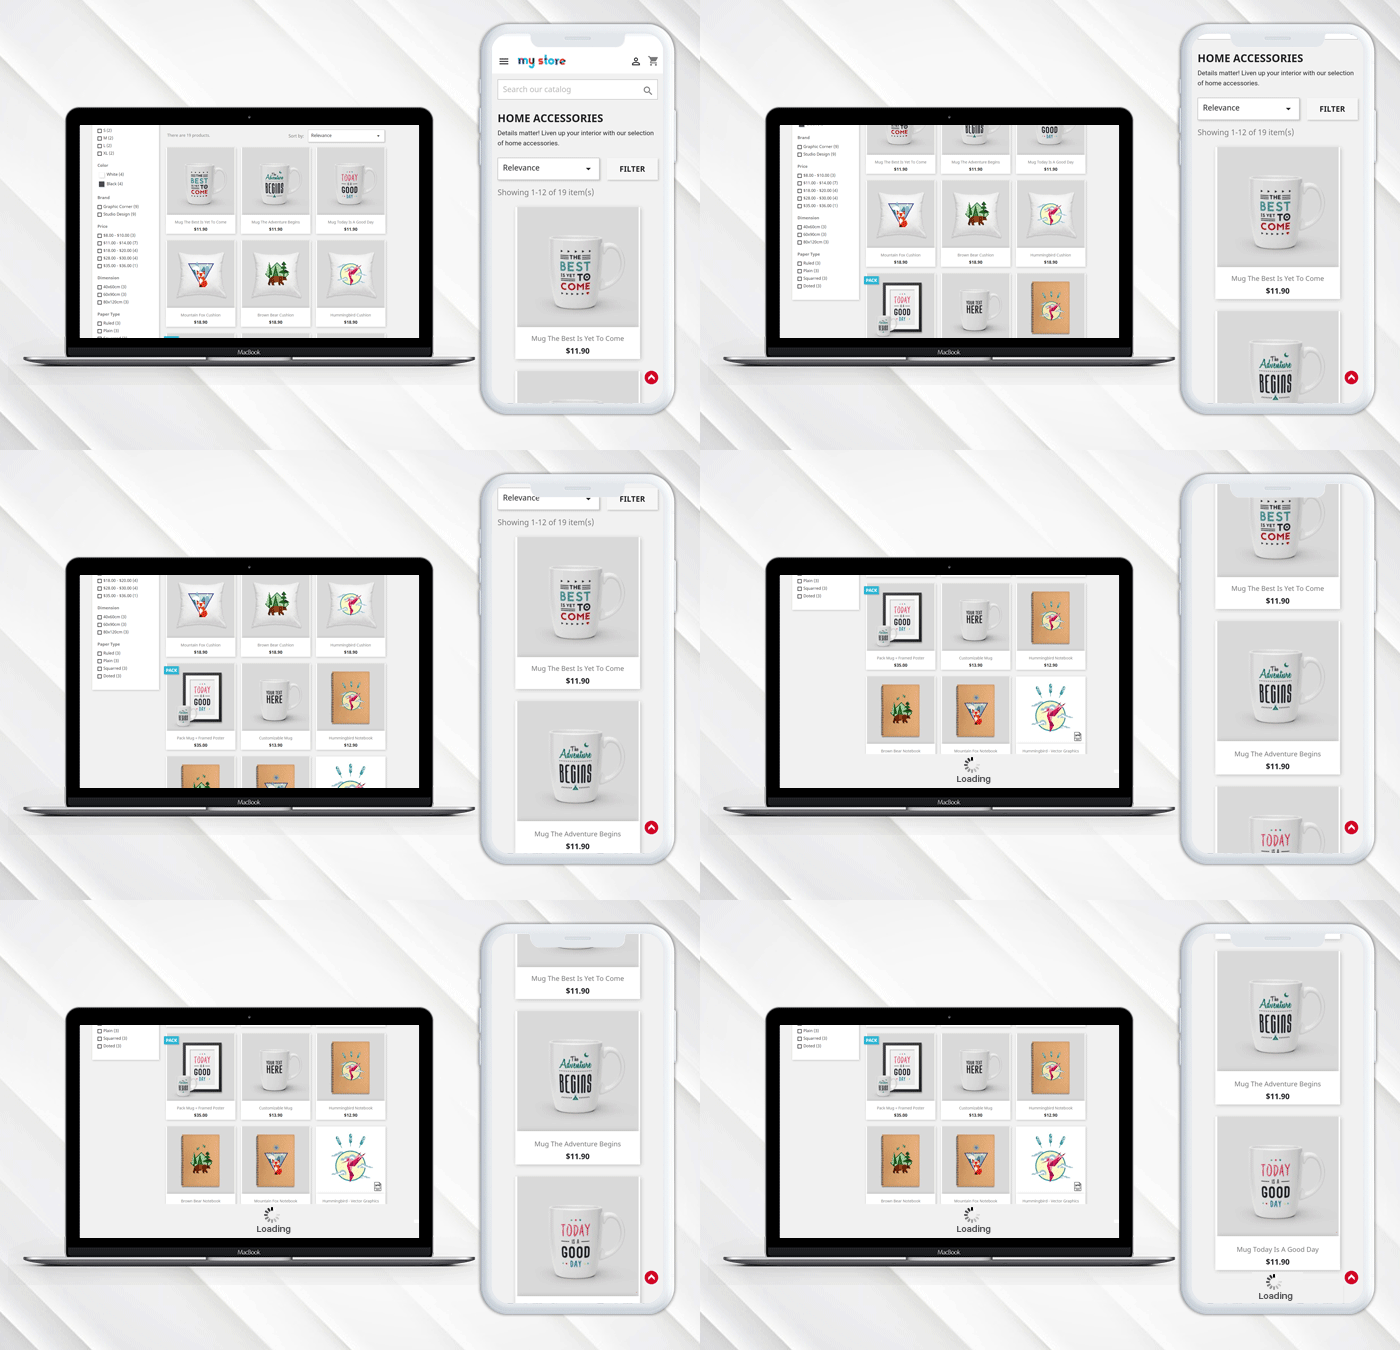
  • Display Loader while Loading: This option of the Prestashop infinite scroll plugin offers the store owner to set display the loader during the loading of the product. So whenever customers scroll the page they can see a loader while loading the
  • Scroll Type: The Prestashop infinite scroll addon allows the store owner to choose between the scrolling option between the infinite scroll and load more products link.
    If the Owner can select the Load More Link then there will be following Option:
    Show More Link After: The owner can set the frequency to show load more link i.e after this many page loads the link will appear.
  • Sandbox Settings: Admin can also test the Prestashop infinite scroll module by enabling this field.
    If the Owner enables Sandbox settings the following option will appear:
  • Add IP: In this field of the Prestashop quick scroll module by Knowband, the admin can add different IP by separating them using a comma and the Prestashop module will work only for these IP addresses only.

3.3 Display Settings of Prestashop infinite scroll module:

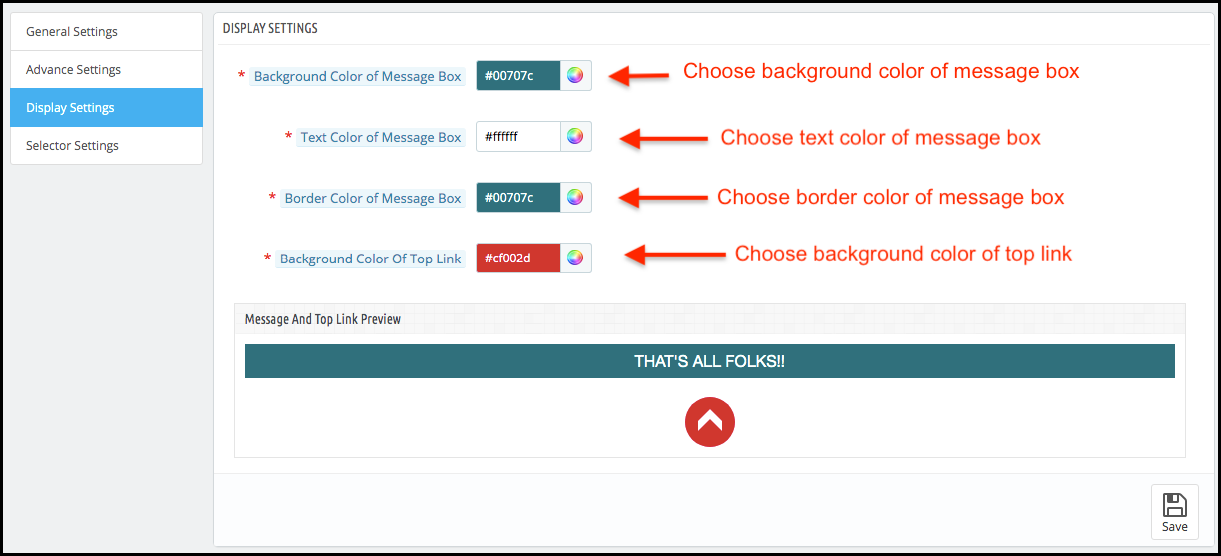
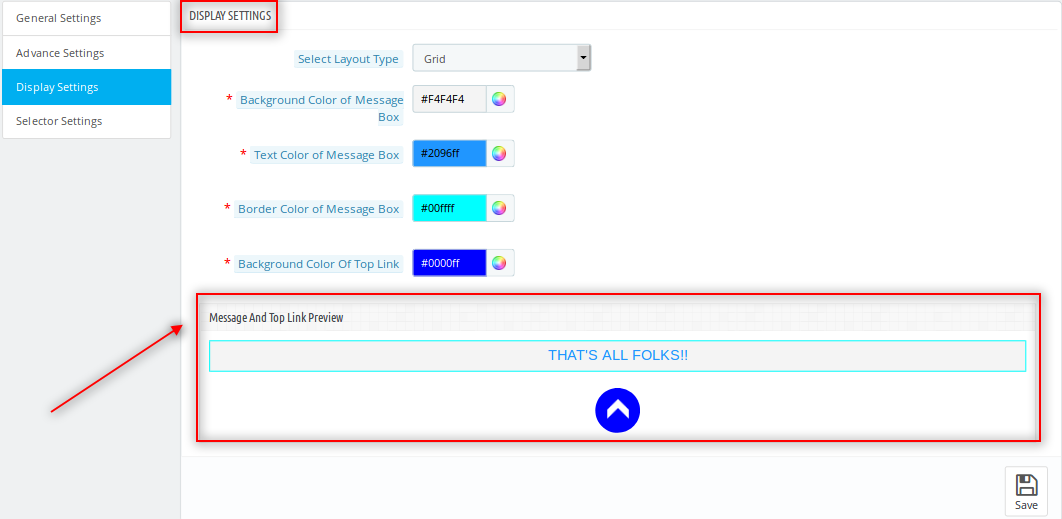
  • Background color of the Message Box: This field of the Prestashop drop-down scrolling module allows the admin to customize the background color of the message box that would be displayed when all the products loading will done.
  • Text color of the Message Box: The Prestashop Infinite Scroll module allows the admin to change the text color of the message box.
  • Border color of the Message Box: The Prestashop infinite scroll module allows the admin to customize the border color of the message box as per his requirement.
  • Background color of Top Link: The admin can customize the background color of the Top Link of the Prestashop list product module.
  • Message and Top link preview: Store admin can preview the end page message and top link button design.

The preview of the changes which will be done are reflected in the preview box given just below the fields of this Prestashop drop down scrolling module.

3.4 Selector Settings of the Prestashop infinite scrolling module:

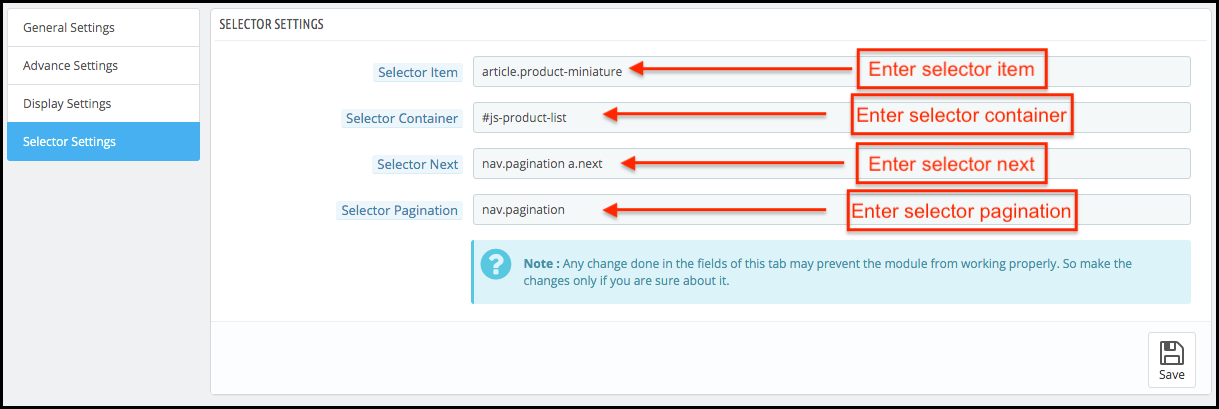
The values in this tab of the Prestashop dropdown scrolling module needs to be correct to let this Prestashop quick scroll module work properly. The values in this tab of the Prestashop Infinite Scroll module may change according to the theme of the Prestashop used in the front.

NOTE: If the selector values in these tabs of the Prestashop infinite scroll module are entered wrong then the Prestashop Infinite Scroll module will surely not work properly.

  • Selector Item: Store admin can enter the selector item value from this tab.
  • Selector Container: Store admin can enter the selector container value from this tab.
  • Selector next: Store admin can enter the selector next value from this tab.
  • Selector pagination: Store admin can enter the selector pagination value from this section.

4.0 Front Interface of the Prestashop Infinite Scroll Module:

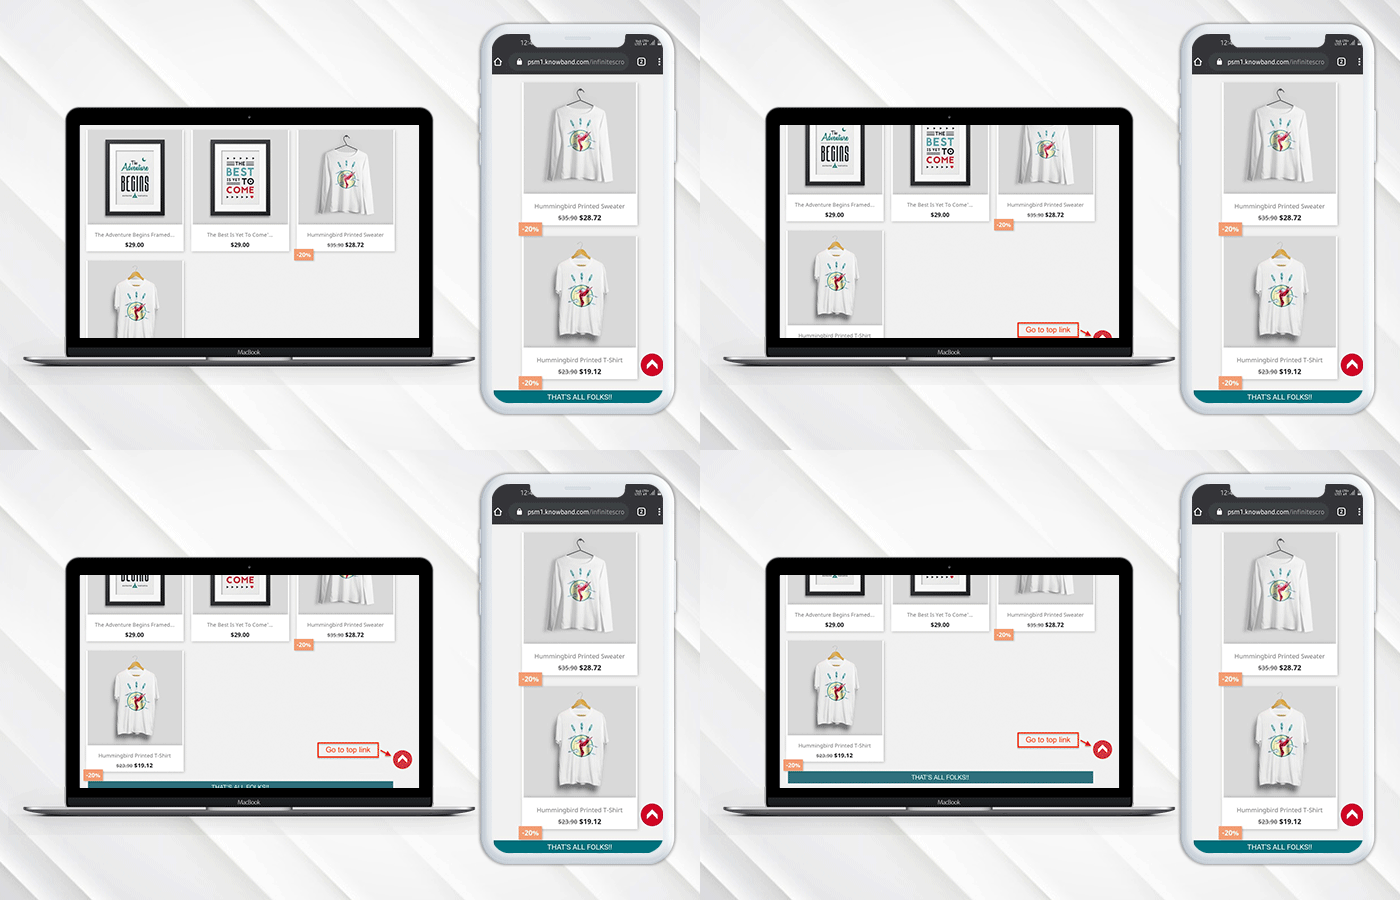
When the Prestashop infinite scroll module by Knowband is enabled from the admin panel then on every product listing page pagination of the products would not appear. The customer will be able to view all the products just by scrolling down on the page and if the display go to top link is enabled then the link will appear on the bottom right of the page to scroll the customer back to the top of the page.

End Page Message:

Go to top button:

When all the pages are loaded a message appears in the bottom which states that all the pages are loaded now.Watch how this Prestashop Infinite Scroll Module by Knowband works:

Know more about this Prestashop Infinite Scroll Plugin here:

Prestashop Infinite Scroll Module Link: https://www.knowband.com/prestashop-infinite-scroll
Prestashop Infinite Scroll Module Admin Demo: https://psm.knowband.com/demo/?module=infinitescroll&demo=admin&referrer=kb&lang=en
Prestashop Infinite Scroll Module Front Demo: https://psm.knowband.com/demo/?module=infinitescroll&demo=front&referrer=kb&lang=en

Get this Knowband’s Prestashop Infinite Scroll Module on Addon Store as well. Visit here: https://addons.prestashop.com/en/navigation-tools/23643-knowband-infinite-scroll.html

“Also, explore more Prestashop modules for your Prestashop e-commece website.”

This Would Also Interest You:

What information does add- to- cart rates reveal about your E-Commerce Store?

Every online shopper would be familiar with “Add- to- Cart” button which is present on every eCommerce store while making a product purchase. This extraordinary “call- to- action” button is not just a website element but it is definitely much more than that. You might be thinking that we are exaggerated things now but truly you would be quite amazed by the amount of information it could convey to store owners like you. I know you all must be quite eager to break the suspense and mystery around these “Add- to- Cart” button. Here, we present to you some of the crucial information that is conveyed by this simple looking CTA button.

1. Information about product and pricing-

Add- to- Cart button has a direct relationship with the characteristics and product checkout rate on an eCommerce site. If a particular product on your site is not being added effectively into the shopping carts of customers, there could be a plenty of reasons that may be working behind this non- engagement and ignorance about a product. It could be possible that the reasons for this low product addition can be a cluttered and non- engaging website design and navigation, problem in product selection, presentation of the product on your site, pricing or any other such factor. If you are truly serious about improving all these given areas, you can take the assistance of various amazing eCommerce extensions from Knowband store that can prove to be a big relief.

2. Insight about marketing and promotional strategy-

By analyzing the add- to- cart rates on your eCommerce store, you can have a clear understanding about which product promotion strategy is working for you or not. This will help you in measuring the true potential of your marketing strategies be it email marketing, digital marketing, social media marketing, PPC campaigns and other such mediums. In this way, you can have a clear insight about how can you target your customers in a better way and where you need to invest your time, money and efforts.

3. The performance of your checkout process-

With a clear difference between the add- to- cart rate on your site and the cart completion rate, you can have a clear view about the importance of a business and its rate of expansion in the near future. There are several customers who eventually come onto your site but often don’t turn up as a potential customer. The reason could be plain simple about the absence of an enthralling checkout process on your process which is making the online shopping a bit complicated task. You need to remove the unnecessary checkout fields and formalities that can improve customer engagement and eCommerce conversion rates for a complete business overhaul.

4. Fulfillment of the promises made to the customers-

Customers are eager to add a particular product on their shopping cart only if it fulfills all its requirement criteria. You need to analyze the browsing behavior and shopping pattern of your clients for providing products according to their interest and choice. If you are viewing higher add- to- cart rates on your site, it means that your targeted customers are happy with your business. Don’t turn away your attention from this crucial aspect as it can have a severe dent in the prestige, sales and eCommerce conversion rates for a better business future. Apart from this, higher add- to- cart rates means less bounce rates and higher customer engagement for improving your business fortunes.

It is not a hidden fact now that add- to- cart rates can make a big difference in the fortunes of your business entity. Don’t keep your eyes closed to that add- to cart button on your eCommerce store as it can make a tremendous impact on the overall conversion rates and product sales. If you want to make the optimum use of call- to- action button on your site, you can take the help of unmatched eCommerce extensions of Knowband store that are simply unique in features, functionalities and price.

Liked This? You’ll Like These Too

Want to increase the size of your email lists? Check out these tips

There has been a boom of communication mediums around the world but still emails are the most preferred and popular medium of business- to- business and business- to- consumer engagement for various business entities around the world. They are prompt in delivery, more economical when targeting a large number of users and are more reliable than any other customer engagement mediums. However, gathering email addresses from your customers has become one of the most challenging issues now a days as people are more concerned about their online privacy and security. Due to this, customers are often reluctant while sharing their personal details which causes a strong impact on the conversion rates and customer engagement process. If you want to be a champion in this field, you need to pay heed towards these crucial tips that can help in increasing the count of your email addresses for the growth of your business entity.

1. Ask email addresses of your customers in a logical way than a compulsive one-

There is multiple ways of saying a particular thing and it is your way of communication that actually matters in a business environment. You need to master the art of customer engagement in order to facilitate a seamless access of required details from clients like email address, contact information and other such crucial information. Make it a part of your website so that consumers can feel more connected and can share their personal information in a seamless manner.

2. Simplify your sign up process for effective customer engagement- 

You need to remove the various bottlenecks that are hurting the seamless registration of customer on your site. Include only relevant and important fields that can’t be ignored during registration process for facilitating a seamless account registration. If you can make your “sign up” process more engaging and customer friendly, you will effortlessly achieve more customer engagement and user sign- ins. Apart from this, make your sign up process more compelling and persuasive for your site visitors. If you want, you can also utilize the various OpenCart extensions like OpenCart Social Loginizer, OpenCart Auto Subscribe, OpenCart Newsletter Integrator and such others for helping customers in this crucial sign up process.

3. Utilize the availability of existing email lists-

If you have the access to existing bulk email addresses, you need to make effective use of them for achieving higher sales and conversion rates. It would be in the interest of your business if you can make use of email marketing softwares for higher customer engagement and eCommerce conversions. Some of these wonderful email marketing softwares are ConstantContact, MailChimp, Aweber and others that can help in seamless targeting of consumers through bulk email messages.

4. Decide the appropriate position and location of your “sign up” process-

In order to grab maximum customer attention and account registrations, it is important to place your “sign up” form at the appropriate position and location of your site. If user can find it comfortably, you can expect more account sign ups and can boost your business chances. With the help of our plugin development services company, we can provide you wonderful customization services through our eCommerce social extensions which are available for Magento, OpenCart and PrestaShop store owners. These feature packed modules can provide freedom to decide the appropriate location and placement of your login options for higher customer engagement and sign ins.

By following all these crucial tips, it will not be difficult for you to achieve high customer registrations and have access to increased email addresses. If you have the email addresses of your site visitors, it will not be a herculean task for you to grab high eCommerce conversions and sales on your online store.

Liked This? You’ll Like These Too

Magento Facebook Posts Feed – User Manual
Introduction

Facebook Post Feed is an addon which when enabled creates a button on every page of the shop which when clicked makes a Facebook page window slide in where the customer can see all the posts of the page which the admin has selected to show them. This helps the admin to advertise any page which he wants and get likes and comment of the customer.

Steps for Installation of Magento Facebook Posts Feed Extension

To install this addon, please follow the following steps:

1. Merge the addon code into the your shop folder structure.

2. After merging this addon folder, system will list the addon in system->vss extensions->facebookpostfeed

General Settings

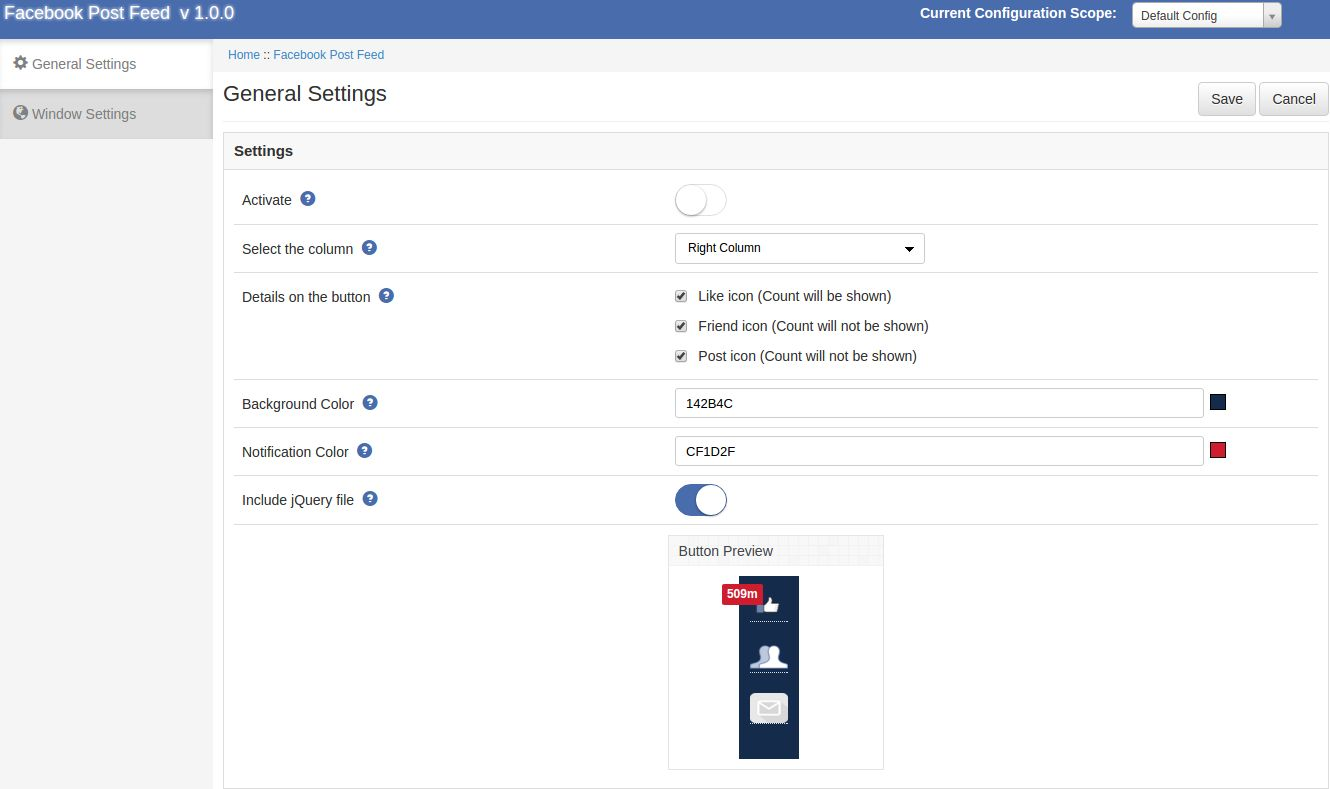
After clicking on configure link of Facebook Post Feed module General settings tab will open.

Fields listed will be filled with some default values

General Settings Tab Details:

1. Enable/Disable: Initially, this will be OFF. User can enable/disable addon functionality by turning this ON/OFF.

2. Show button on: This is a drop down box in which the admin can select that the page button which he has selected should appear in the left column or the right column of the shop.

3. Details on button: Here the admin can select that what details of the page should appear on the page when the page loads he can select his choices between number of likes, number of friend count and number of post

4. Background Color: This is a color picker in which the admin can decide what should be background color of the button appearing on the screen

5. Notification Background Color: This is also a color picker which enabled the admin to deicde the color of the notification box on the screen.

Window Settings

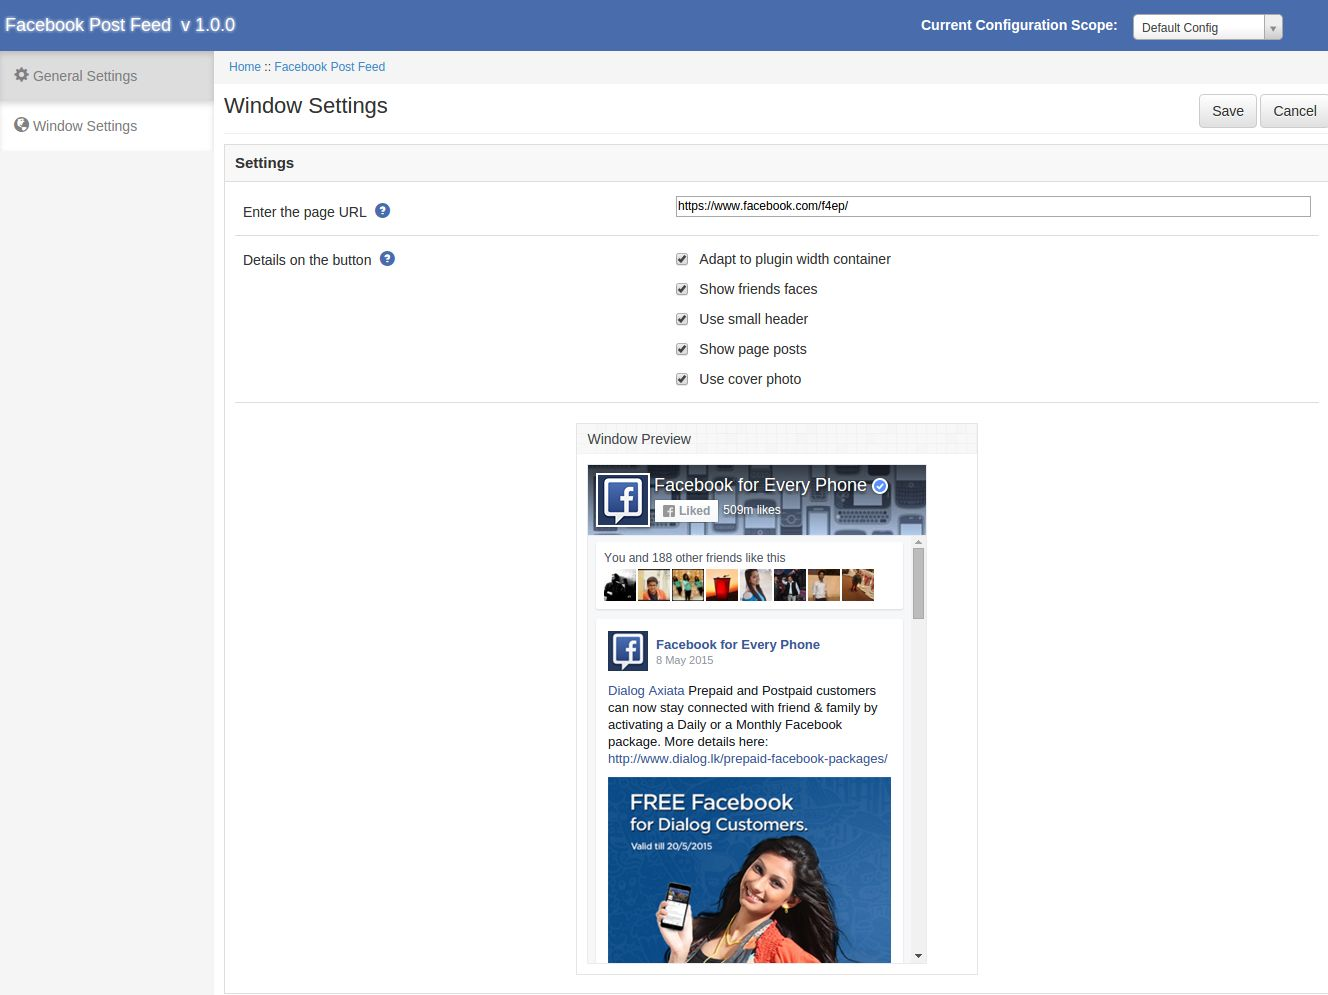
After clicking on the product settings tab the below screen appears.

Window Settings Tab Details:

1. Enter the page link: Here the admin has to enter the page link whose posts he wants to show on the screen by default its the Facebook page which is been shown.

2. Facebook window UI: Here the admin can decide what should be the UI of the window which is appearing on the screen. Such as the cover photo,showing friends faces,number of posts.

Front End Module

After enabling this plugin a button starts to appear on every page of the shop and the appearance of the button is according to the settings done in the back end of the module.

The module at the front-end appears as follows:

We hope that we have covered all the concerns regarding the installation and product guide of this Magento Social Extension. You should also check other Magento Extensions which will help you to improve your eCommerce store.

OpenCart 2.2 is Finally Here!!! Are you E-Commerce Store Owners Listening?

OpenCart store owners has got a reason to cheer up as this OpenCart 2.2 platform is finally released. After several months of trials by developers in Alpha and Beta stages, this much awaited eCommerce platform is now available. You might all be excited about how it is a major breakthrough news and how this recent upgrade is different from the previous OpenCart versions. To unlock the mystery around this eCommerce platform, let us explore some of the amazing features and functionalities that has been incorporated in this new OpenCart upgrade.

  • – Presence of a multi- language installer.
  •  Significant changes and improvements in the events system.
  • Consists of composer based libraries.
  • Improvements in template rendering for avoiding code repetition.
  • Integration with latest version of OpenBay Pro with enhanced support for Amazon fulfillment.
  • Inclusion of 3 brand new payment gateways like LAY-BUY, Cardinity and eWAY.

Among them, some of the features that are seen as a game changer for this OpenCart upgrade are described below. These features can truly act as a guiding light for your OpenCart store to make a strong mark among your rivals.

1. Presence of Composer libraries

The OpenCart development team has introduced the two versions for this latest OpenCart 2.2 extension which are namely- “compiled” and “non- compiled” code. The compiled version of this upgrade consists of all the external libraries that are managed by Composer and are required for the functioning of OpenCart Modules. This Compiled OpenCart version is available for store owners on OpenCart download page. Whereas, the non- compiled version can be downloaded from Github. The Compiled version consists of an additional “vendor” folder in the downloaded package. While uploading the normal “upload” folder into web root, user also need to upload the vendor folder to the folder which is outside the web root.

2. A complete revamped Events System

With this new OpenCart upgrade, Events system is now tightly integrated with engine loader that automatically triggers the Events. This automation feature can be used for Controller, Model, View, Language and Config during “after” and “before” of code execution.

All MVC files that come under OpenCart eCommerce platform along with third party extensions are now automatically included in this new revamped Events System. Due to this recent upgrade, the Events trigger scheme is completely changed. Now, you don’t have to manually add the code “pre.admin.product.add” as the code “admin/model/catalog/product/addProduct/before” is automatically added. Although, all MVC files are automatically covered by the new Events but certain Events can be triggered inside the code. For more information in this regard, you can check out this helpful link.

3. Availability of exciting new theme settings

This new OpenCart 2.2 extension comes up with appealing new theme setting which is available at Extensions > Themes. The theme size which was previously changed under store setting can now be changed at theme setting for individual store. It has facilitated making changes in theme settings much easier than before. However, due to the recent launch of this upgrade, it may not be much compatible with third party extensions.

Start exploring this feature packed OpenCart 2.2 extension by making a quick upgrade of your existing OpenCart eCommerce platform. If you are still not enthusiast about it, you will definitely commit one of the biggest blunders that could hurt your business fortunes to a great extent. Don’t take chances with your business growth and be the ultimate champion in your particular business segment by upgrading your OpenCart store to this latest version.