Introduction of Prestashop Price Alert Notification Extension:
We always have seen that many visitors come to an online store, spend a lot of time and leave without buying anything. Probably they want to buy something but don’t buy just because of the high price. But you never know that high price is one of the reasons for the visitors to leave your store.
This Prestashop Price Alert Addon will help the e-merchants to know about the customer’s requirement in terms of product prices. This Price drop alert extension will let the customers set an optimum price that is being defined at the back end of the admin panel. Our Price Alert Module for Prestashop is also compatible with GDPR now.
Installation Guide of Prestashop Price Alert Addon:
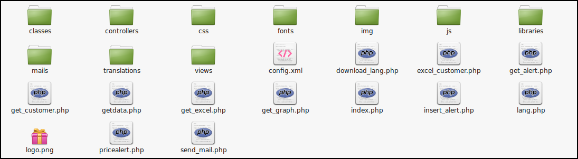
Folder structure of the Prestashop Price Alert plugin folder.
Copy the whole folder named as Price Alert into your module’s folder of the root directory of your PrestaShop store through FTP.
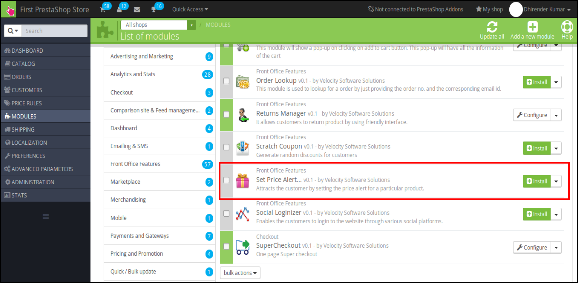
You will be able to find the price alert plug-in ready to be installed in the Modules in your PrestaShop store as shown below.
Click on the Install link to install the plugin.
Admin Module:
Here, the store owner can change the various settings of this plugin according to requirements, which will be reflected on the front end as well as in the admin panel.
To install this plug-in, please follow the following steps:
Add the whole plugin folder to the modules folder into the root directory of the PrestaShop Store.
After adding plug-in files, the system will list the plug-in on the module page.
Click on install/uninstall according to need.
Another way is, you can zip the whole folder and then click on Add New Module link displaying in the top right corner of module listing page as shown in below screen:
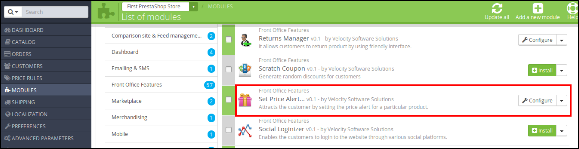
After installing, this Prestashop extension, Configure link will be displayed instead of Install link as shown in below screen:
Now, your module is ready to use and click on Configure link to configure the module.
Admin Interface:
After installing the plug-in into the store, the plug-in will provide the following interfaces:
General Settings
Email Setting
Product Price Alert
Customer Price Alert
Language Translator
Each interface is explained below.
General Settings:
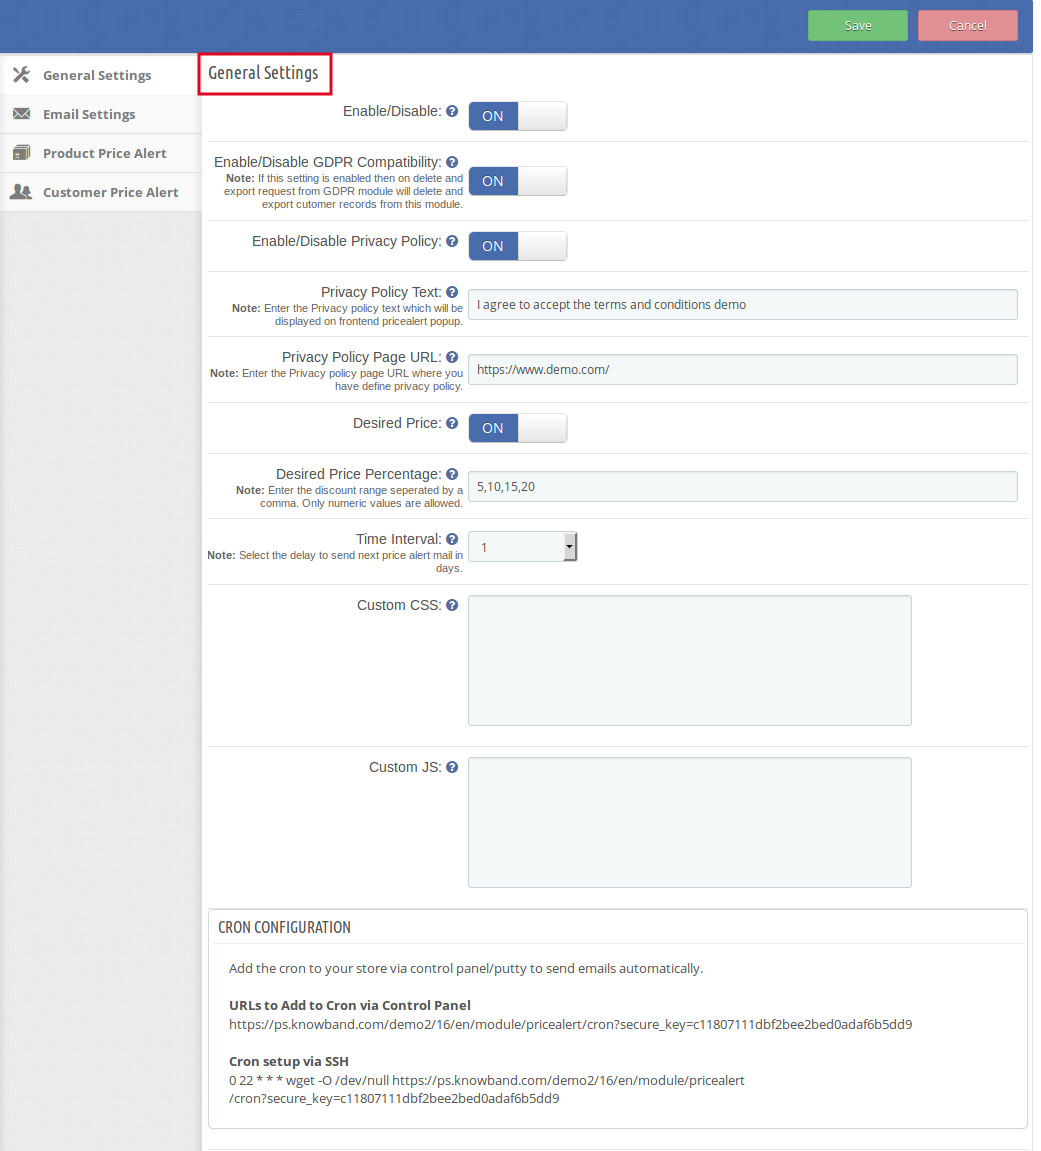
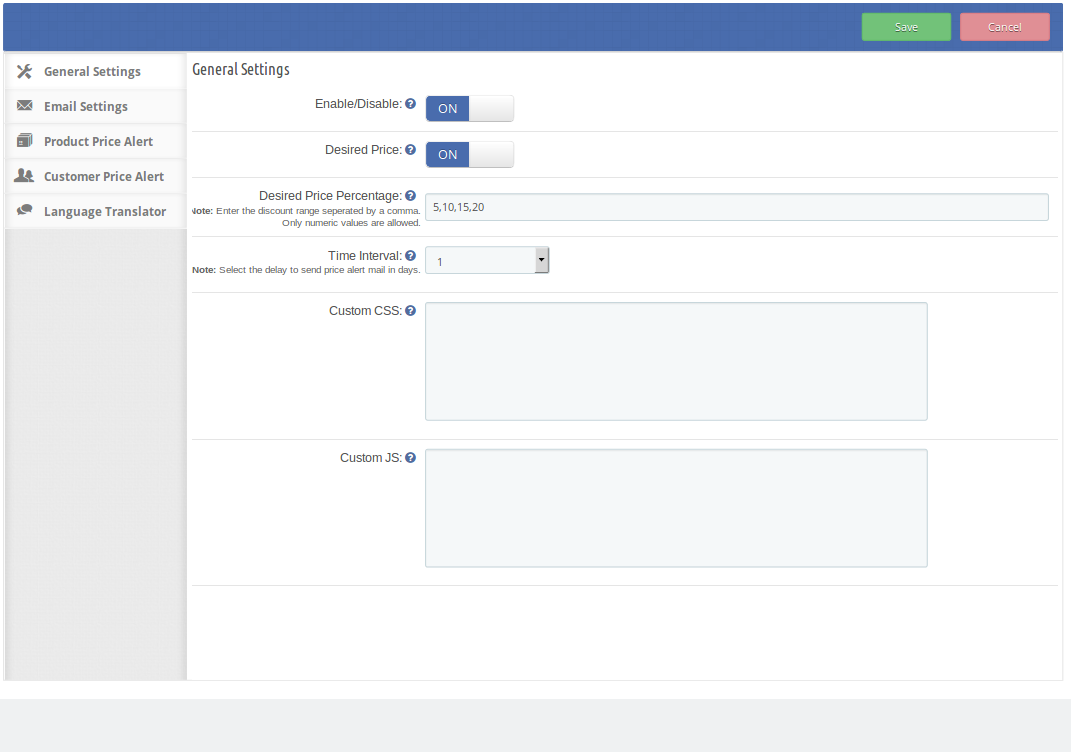
On clicking the configure link on module listing page, the system will open general settings tab by default as shown on the screen below:
Initially, the fields in the above form will be already filled with their default values.
Enable/Disable: Initially, this feature of Price drop alert extension is set to ON. the admin can enable/disable the extension by turning ON/OFF this setting.
Enable/Disable GDPR Compatibility: This field of the Prestashop price alert module allows the admin to enable/disable the GDPR compatibility. If this setting is enabled, then on delete and export request from GDPR module will delete and export the customers record from this module.
Enable/Disable Privacy Policy: This field of the price alert module offers the admin to enable/disable the privacy policy that would be displayed at the front end of the price alert popup if enabled.
Privacy Policy Text: The privacy policy text is fully customizable. The admin can enter his own choice of text.
Privacy Policy Page URL: This field of the Prestashop price alert addon allows the admin to enter the URL of the desired privacy policy page.
Enable/Disable the Desired Price: The admin can enable/disable the desired price option to the price alert block at the front-end by turning ON/OFF this setting.
Desired Price Percentage: Using this option, the admin can set the range of the desired price as they will be displayed at the front-end. The admin has to enter the numbers for the range separated by commas. The admin can enter as many values as desired.
Time Interval: This option sets the delay after which the email to notify the price drop of any product to the user will be sent. The delay has to be selected by the admin from the drop-down menu in days. By default, it will be set to 1 day.
Custom CSS & JS: This Alert for subscription extension allows the admin to change the look and feel of the extension according to his Prestashop store theme.
Email Setting:
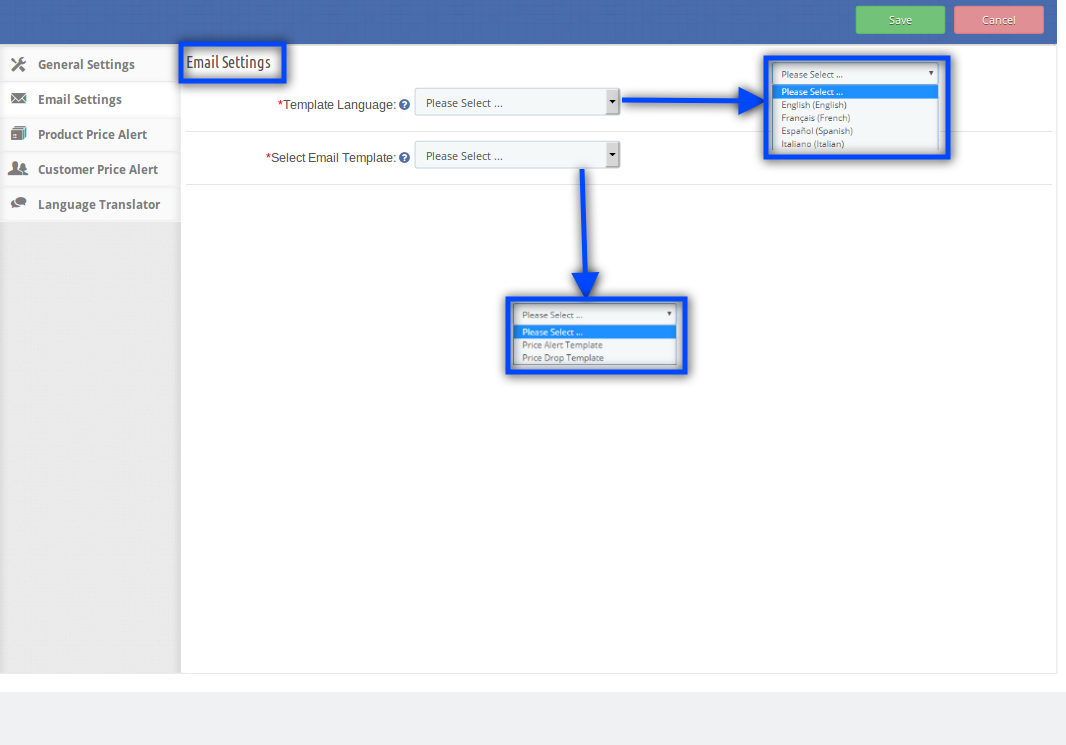
This field allows the admin to set the emails in any selected language for the following email templates:
Price Alert Template
Price Drop Template
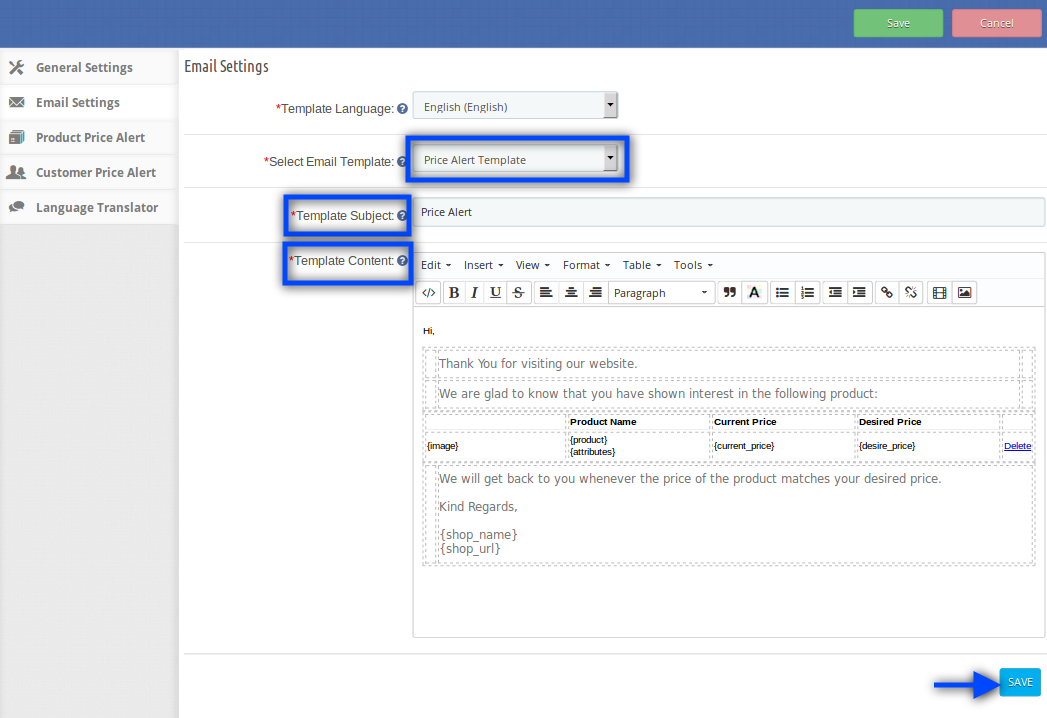
1. Price Alert Template: This field, the price drop alert extension contains ‘Template Subject’ & ‘Template Content’. The admin can edit the template subject and the content as well as per his/her choices. This is the initial email that will be sent to the customers when they set an alert for any particular product.
2. Price Drop Template: This is the email that will be sent to the customers when there is any price drop in the requested products. This field contains ‘Template Subject’ & ‘Template Content’. The admin can edit the respective fields as per his/her preferences.
Product Price Alert:
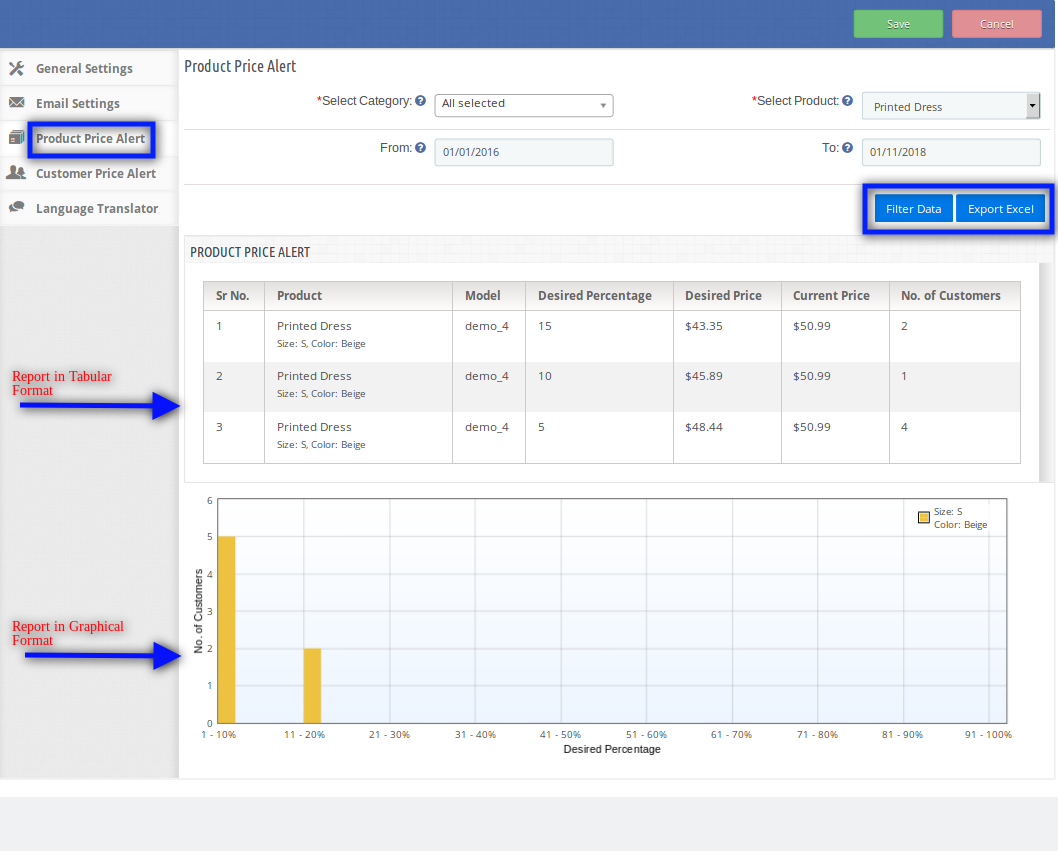
This field of Prestashop follow price extension offers the admin two options to view the product price alert details i.e. Filter Data and Export Excel. By default, the tab will display all the price alerts available in a well-formatted table and a form through which the admin can filter data or export it to an Excel file.
A graph along with the list of price alerts based on the filter data will also be displayed when the user filters the data by selecting the desired product and dates.
In this tab, you can see the on which product how many customers wants how much.
Customer Price Alert:
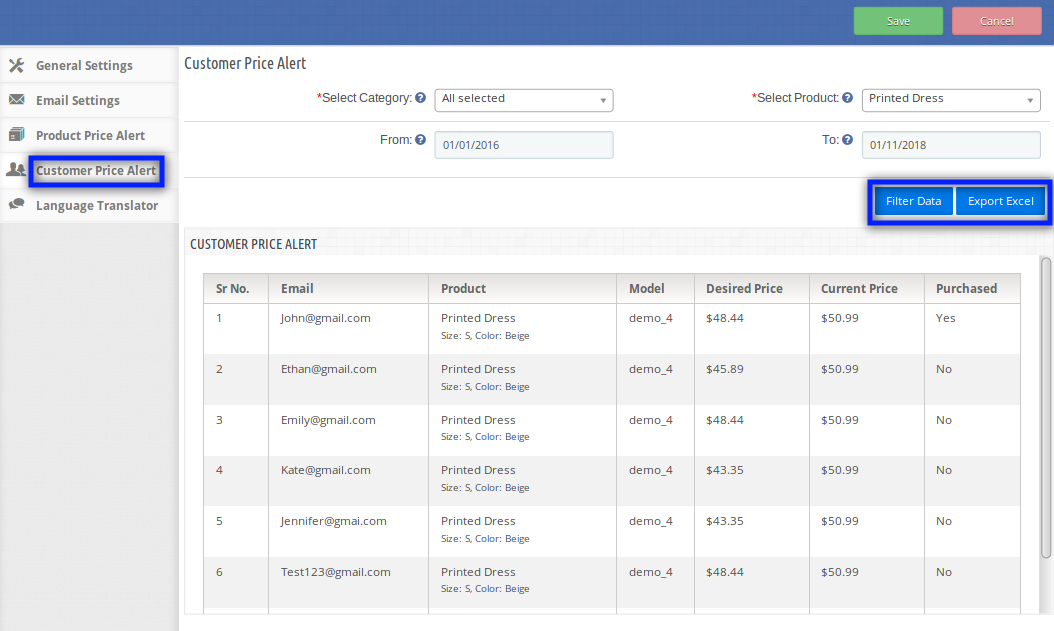
In this tab, the admin has two options i.e. Filter Data and Export Excel. By default the tab will display all the price alerts available in a well formatted table and a form through which the admin can filter data or export it to an Excel file.
The admin can set the filters and when clicks on Export Excel then a new excel file containing the filtered data is downloaded.
Language Translator:
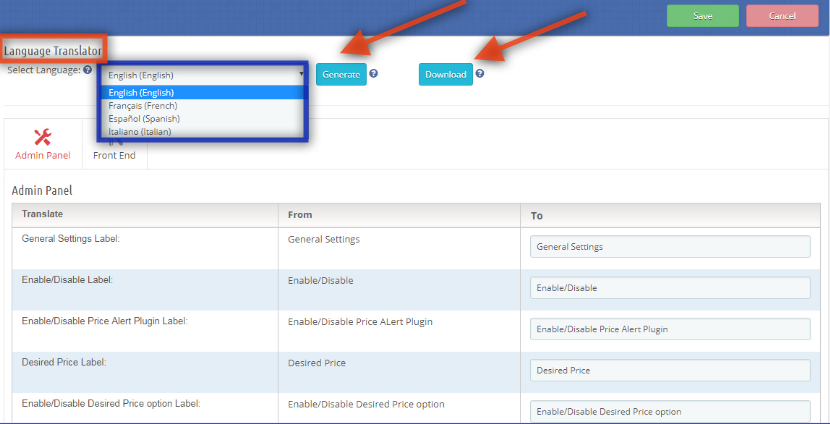
The Prestashop price watch extension offers the admin to translate the language in English, French, Spanish & Italian as well. The admin can generate the selected language and also download the language file just by clicking on ‘Generate’ & ‘Download’ option respectively.
By default, the automatically selected language is English.
Front End Module:
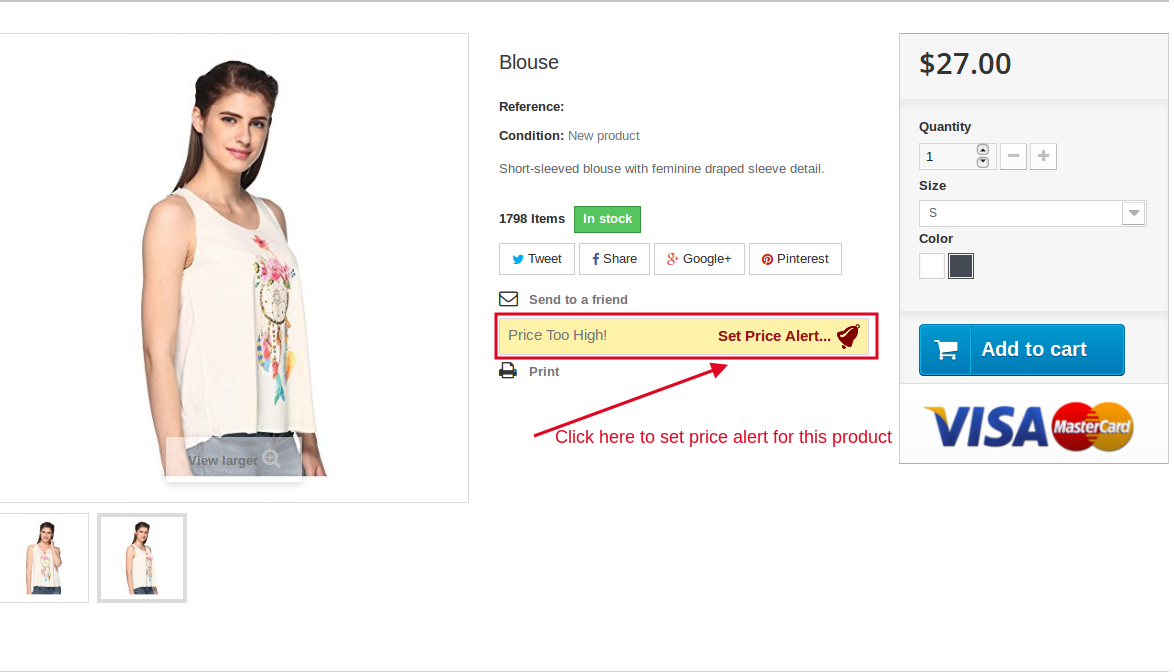
After enabling the Prestashop follow price extension the front-end user will see a price alert block on the product page. The block contains a link through which the user can set the price alert for the respective product.
The price alert block would appear as follows:
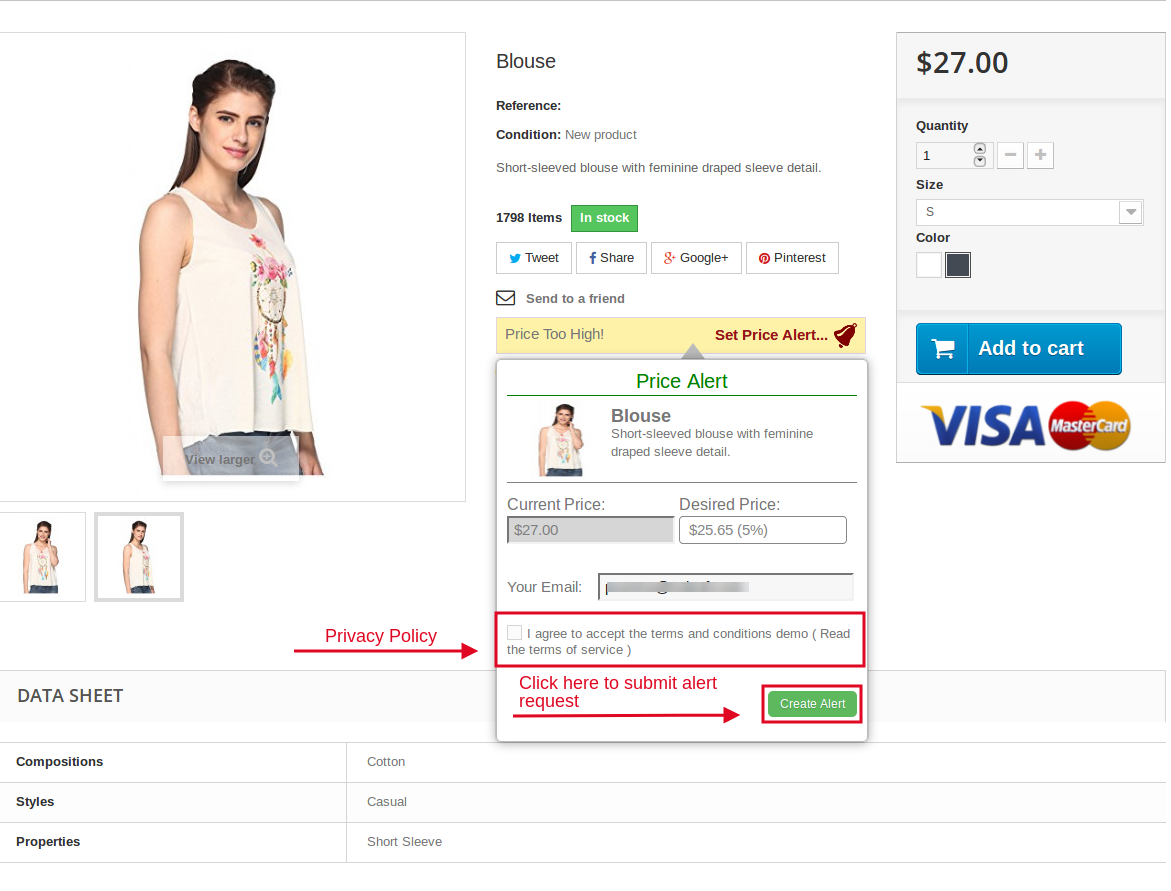
When the customer clicks on the ‘Set Price Alert’, a pop-up will appear with the form through which the price alert can be set by the user. The pop-up will appear as follows:
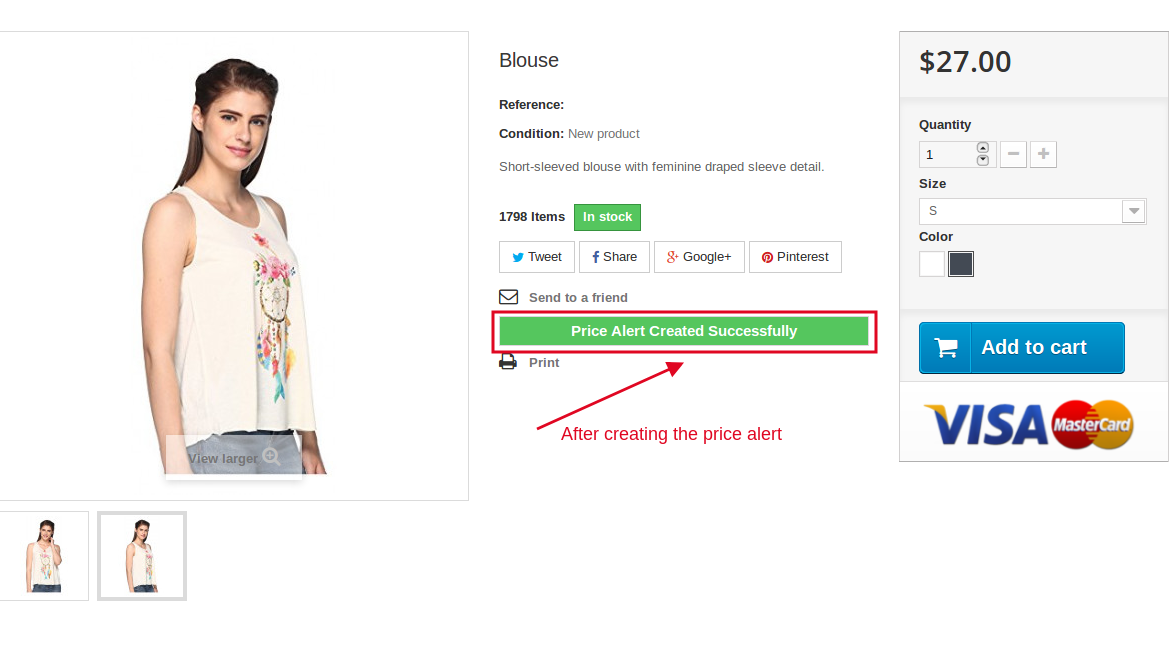
On clicking the ‘Create Alert’ button a price alert will be set for the entered Email on the respective product and the message showing the successful creation of the price alert will be displayed. A notification email will also be sent to the entered email.
There will be a case when a price alert for the entered email and the respective product already exist, in that case, the price alert will be updated and the updated email will be sent again to the email.
With the help of this Prestashop price alert addon, the customer will be able to set the price alert for the desired product. As they will be notified via an email when the subscribed product will be at the desired price. This price drop alert Prestashop module helps the admin in increasing the sale of the store and serves better user experience as well.
Recommendations :
Refresh home page of your store every time you enable/disable plugin. If the plugin is not working after installation then please check permissions on modules folder. The folder should be writable. Please make the folder permission to 755.
Business has always been more about customer engagement rather than implementation of policies for achieving desired business results. You need to be expert in customer handling for directing visitors towards a product purchase. Social media is playing an amazing role in building social rapport and engagement for your eCommerce store in order to grab higher conversion rates. The power and influence of social media can’t be denied due to the large user base that comprises of more than a billion people and thus presents large business opportunities for numerous store owners around the world.
This huge user base can act advantageous for your online store if you can handle the large number of social media customers in a charming manner. It is really a sweet deal for OpenCart store owners as they can engage with their social media customers in a brilliant manner with the help of this OpenCart Social Login module. Now, you can seamlessly grab the attention of your targeted customer with this social login plugin for OpenCart stores. This is definitely a superb eCommerce module from Knowband store that can make the difficult journey of conversion rates and product sales a simplified task for your business entity. Here are some of the excellent features of this social engagement module that can act as a game changer for your store.
User friendly interface for quick customization requirements-
This module is special as it consists of an interactive user interface for making desired changes and customization on a site. Store admin can help in making changes in your site by making required changes according to the business requirements and needs.
Offers facility to make changes in the position of login options-
Social customer engagement is affected by the position of the social login options on a site. The ability to provide customization facility for changing the position of social login options makes it one of the most popular OpenCart plugins for any online store. By selecting the appropriate place for your login options, you can effortlessly get maximum customer attention for higher conversions and sales.
Option to choose the desired button size and type-
Button size and type makes a profound impact on the customer attention as if something is not visible clearly, you can’t expect to make an effective impact on the minds and sales of your customer. Depending on the targeted screen size and customer type, you can choose the large sized or small sized social buttons for your OpenCart site.
Seamless change in the display position of social icons-
This social login plugin for OpenCart store can ensure a seamless change in the display position of social icons for grabbing maximum customer engagement and sales. You can display your social icons vertically or horizontally on your site by making use of drag and drop feature.
Quick installation and configuration facility-
It is now much easier to install and configure this OpenCart social module within few clicks only. There are no more long installation processes that earlier tends to take a long time and everything has become much simplified within few clicks.
Do try out this OpenCart social module for establishing a seamless social communication with your targeted customers. With this social login plugin for OpenCart stores, you can be sure of getting rewarding results in terms of social engagement for your online store. Don’t wait any more now and spend a little amount on this module which is one of the most amazing OpenCart plugins for ensuring a promising future ahead.
This module is basically a Prestashop Marketplace Addon. As we know that, discounts effects the sales of any items on e-commerce store. And every seller on marketplace wants that, he can provide some discount or offers on his items so that his sales increase.
So, This module will provide an interface and functionality to sellers from where each seller can provide some offers and deals on his products on Prestashop Marketplace.
Steps For Installation
To install this ad-don, please follow the following steps:
1. Add ad-don folder under modules folder of your system.
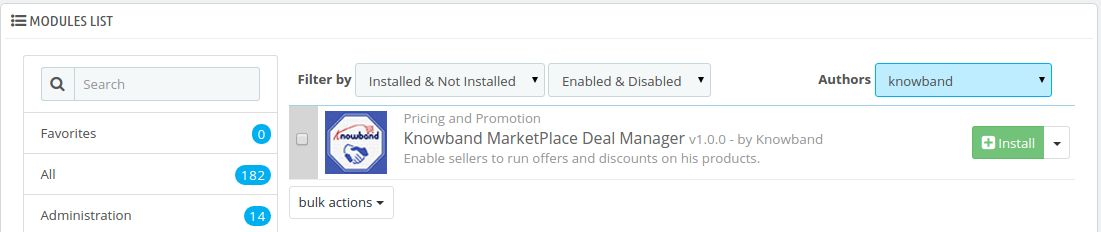
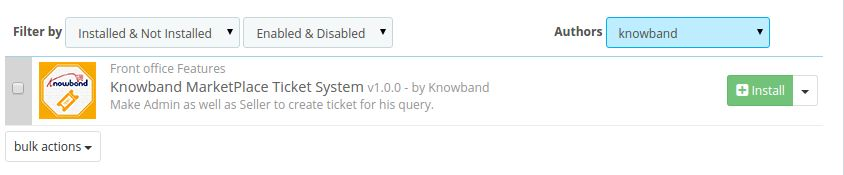
2. After adding this ad-don folder, system will list the ad-don on module page under front office feature category as given below:
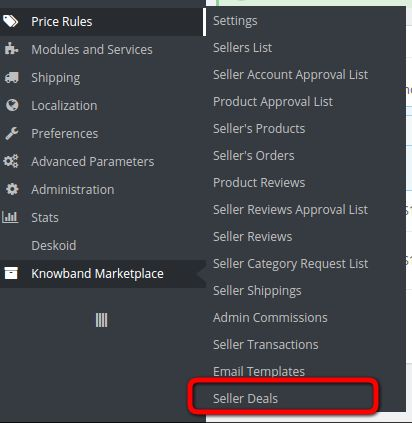
After module installation, a sub menu for Seller Deals will be display in Marketplace menu as shown in below screen:
When admin will click on above highlighted menu, system will open the page where all the deals of sellers are being displayed.
Deal Listing Interface
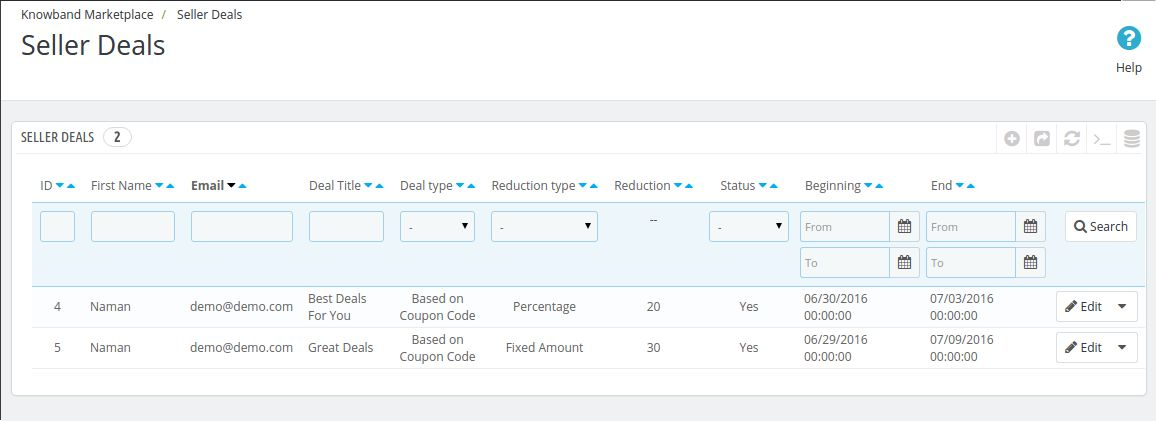
On this page, all the deals will be displayed as shown in below screen:
Table Columns Descriptions
1. Id: This is the unique identifier of any deal.
2. First Name: This field will consist the first name of the seller.
3. Seller Email: Email id of the seller.
4. Deal Title: Name of the deal.
5. Deal Type: Two type of possible values. a) Catalog, b) Coupon Code
6. Start Date: Date from which deal will start.
7. End Date: Date on which deal will be end.
8. Status: Yes or No.
9. Reduction Type: a. Percentage, b. Fixed Amount
10. Reduction Value: Value will be any positive value. For percentage it will be between 0-100%.
11. Action: Edit and Delete
NOTE: Seller also has one more option to add the deal per product which are those deals that can not be viewed by admin in back end.
Add New Deal Interface
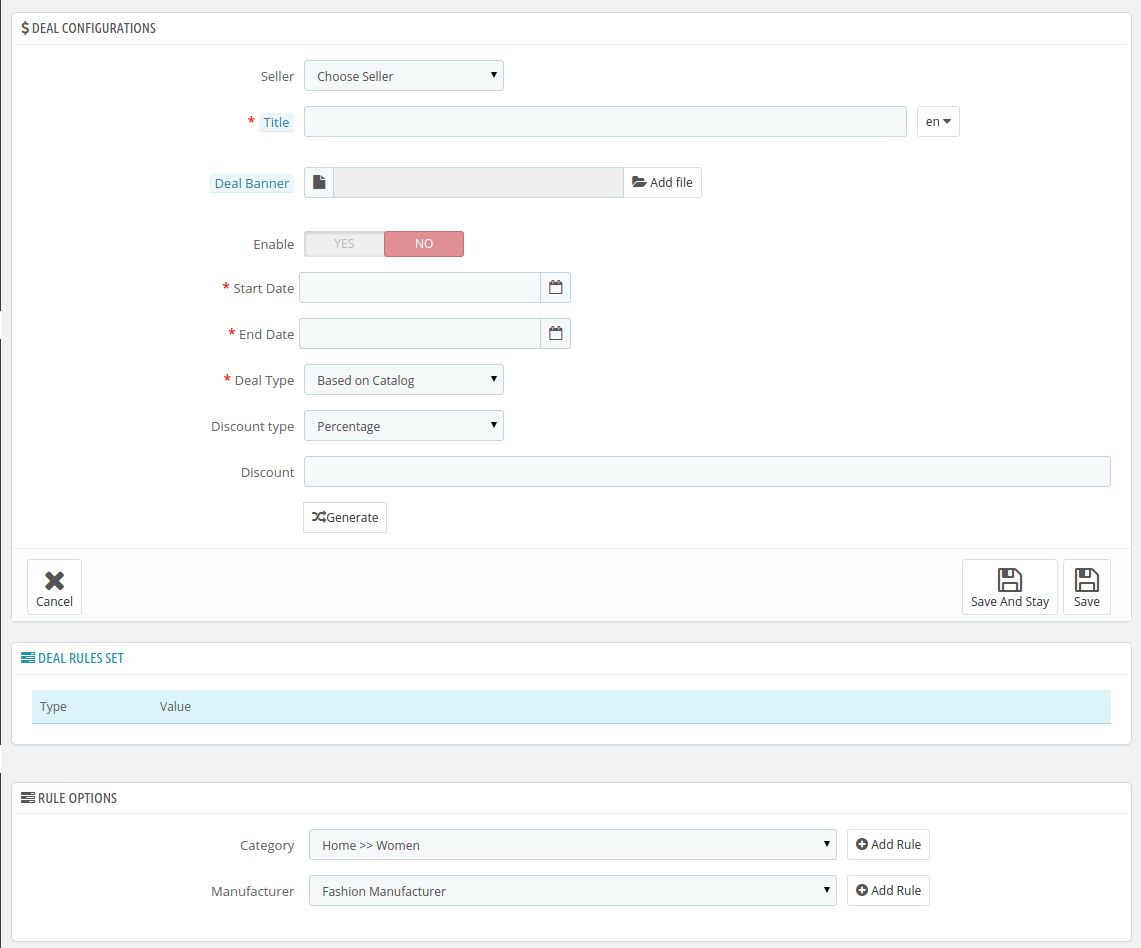
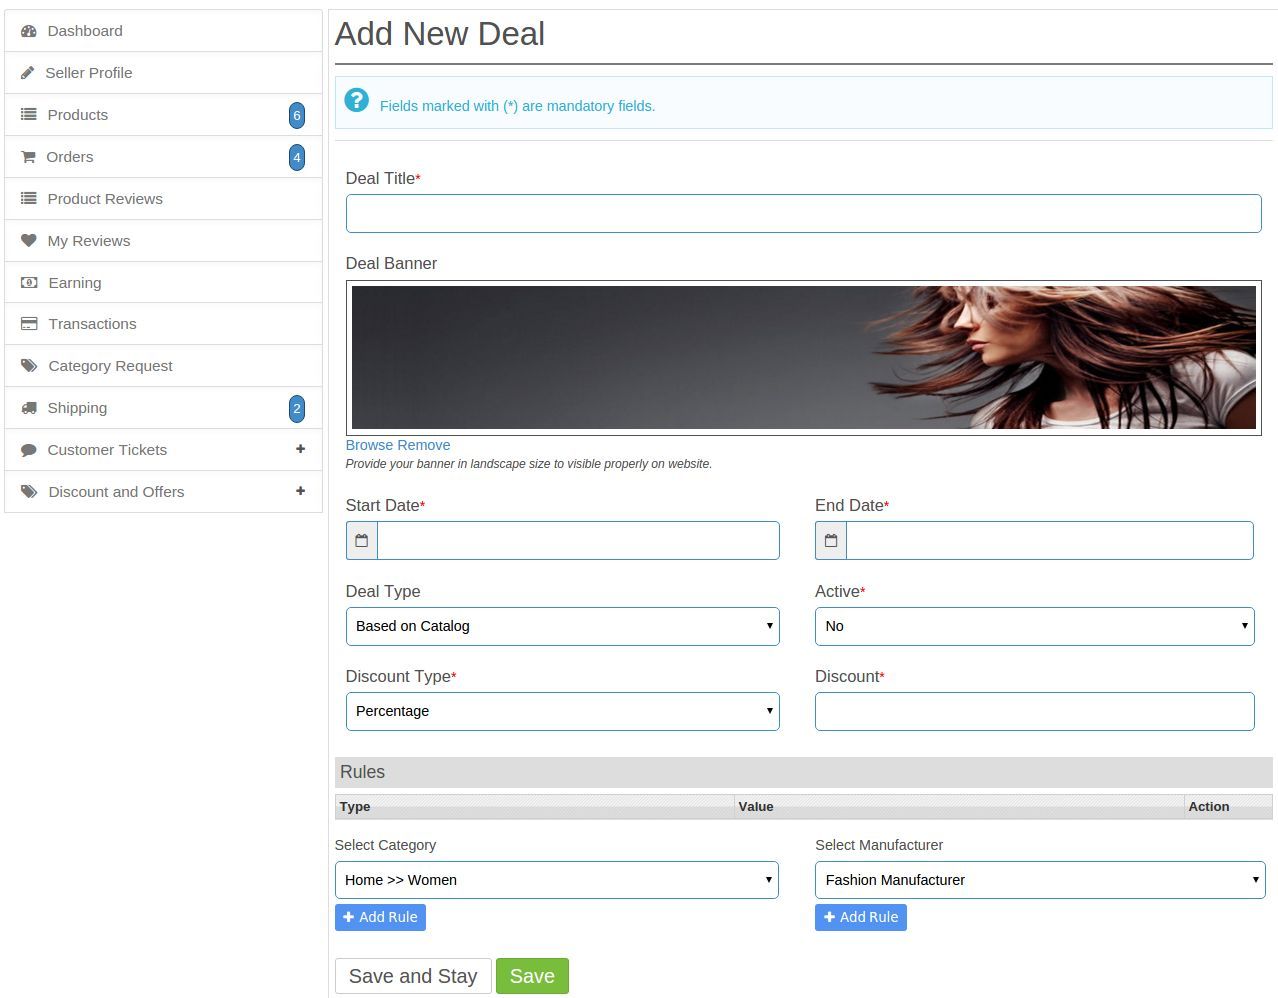
When user click on Add New button, system will open deal form from where admin can create deal for seller behalf as shown in below screen:
Field Description
1. Select Seller: As we mentioned that, admin can created deals only on seller behalf. So, Admin must have to select seller to create new deal.
To see the description of other fields, Please follow the Appendix 1.
Edit Deal Interface
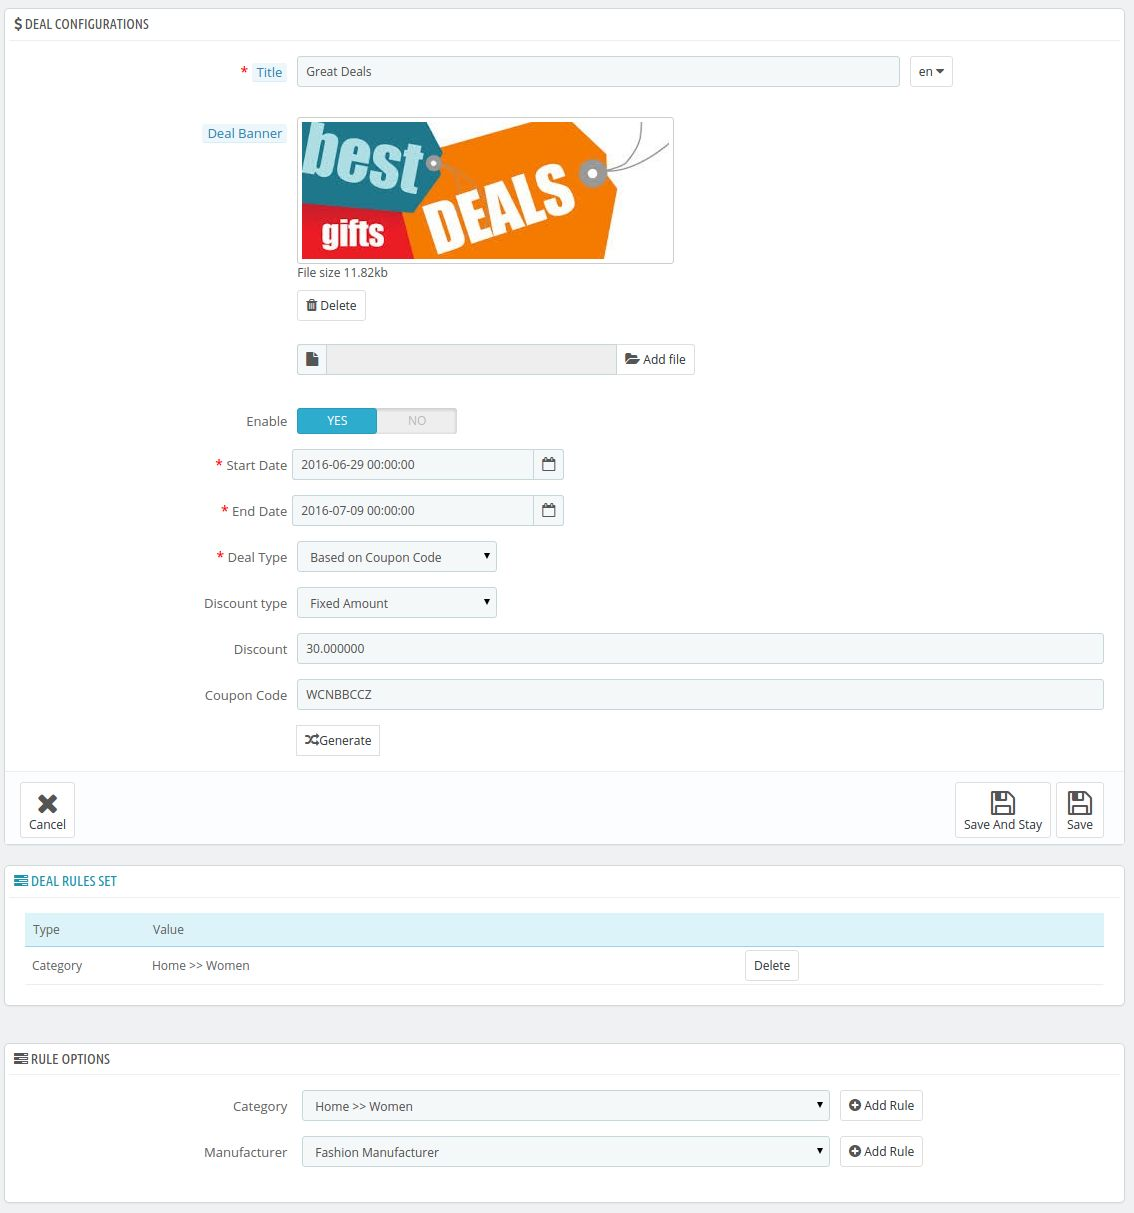
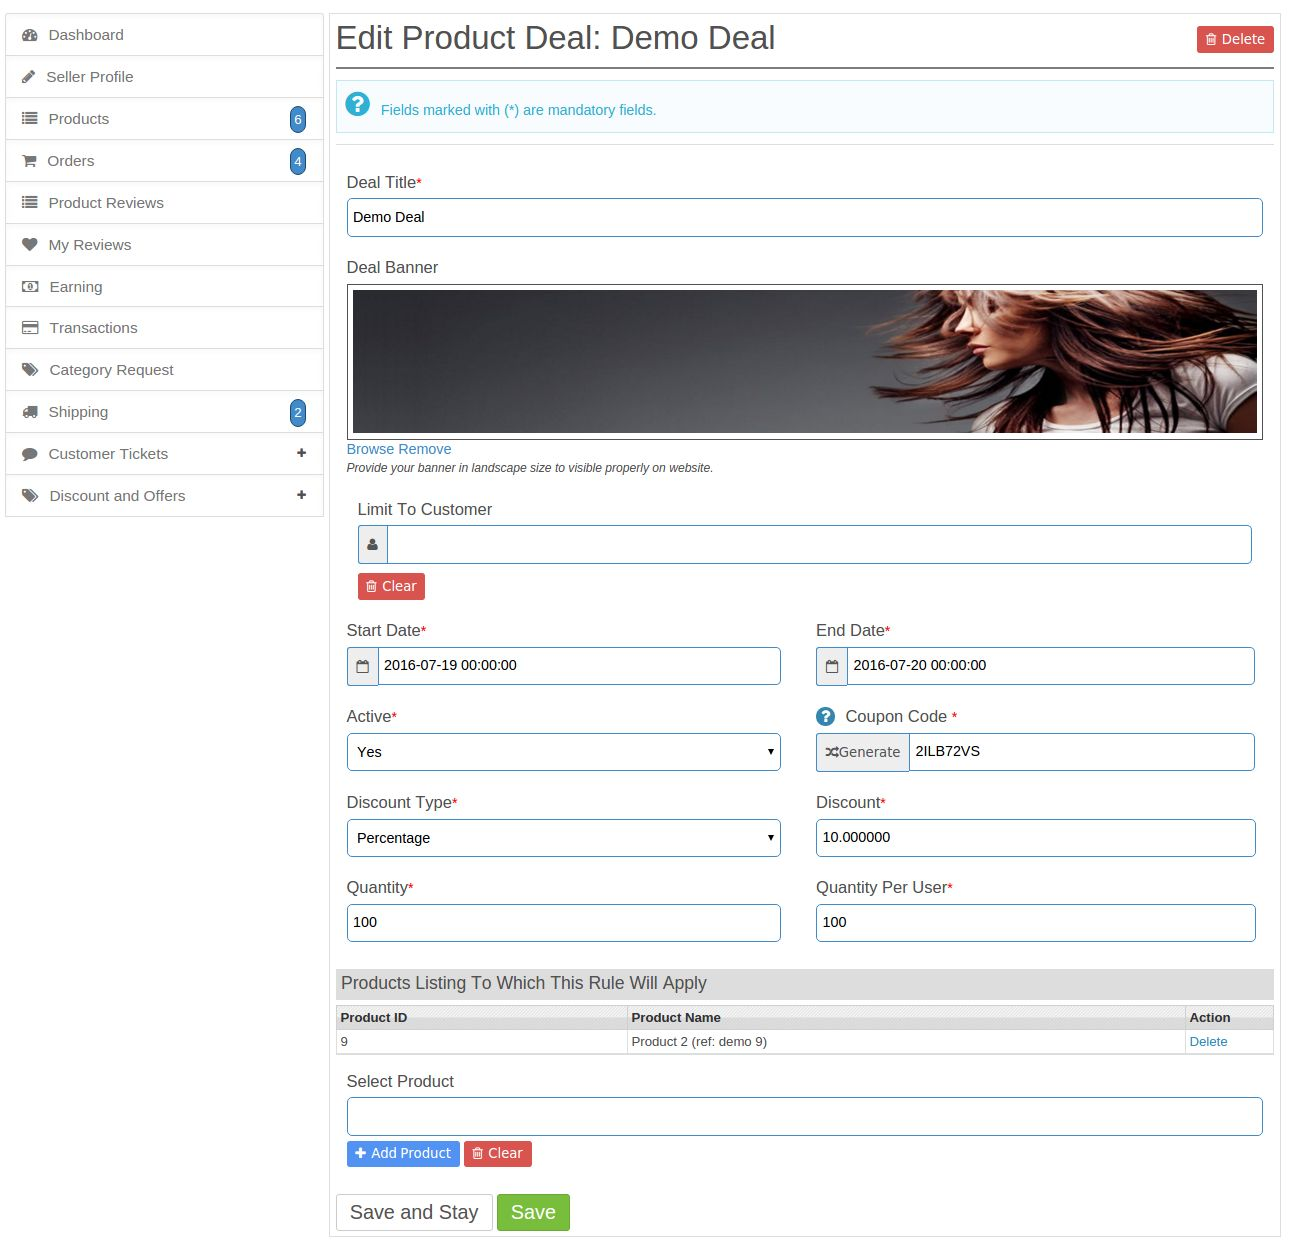
From here, Admin can edit the existing deal of any seller as shown in below screen:
As you can clearly see that there is one option Select Seller on above edit page are missing. So, admin can not change the seller once the deal is created.
To see the description of each field, please follow the Appendix 1.
Menu Location
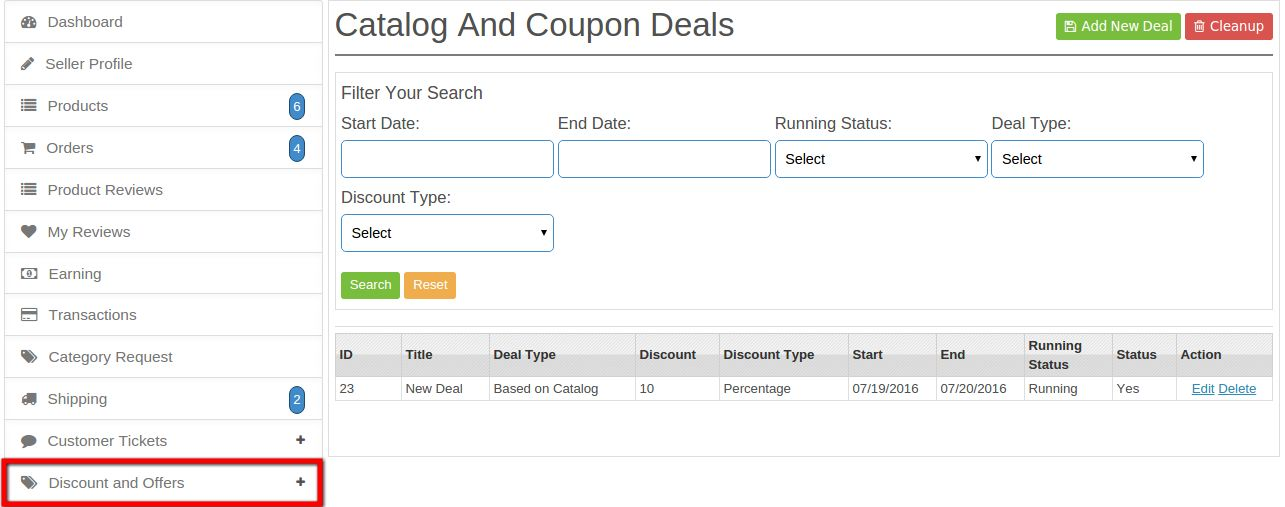
After installation, a menu will be displayed to the seller as shown in below screen:
On clicking the highlighted link, a drop down will appear below the link which will be consisting of two options Catalog and Coupon deals.
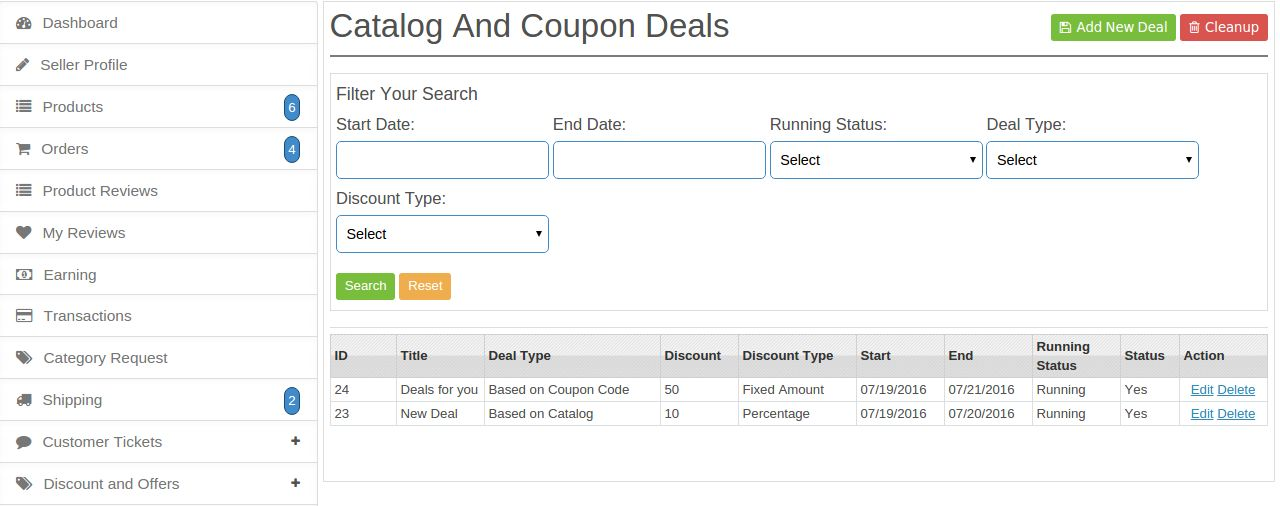
Catalog and Coupon Deal Listing Interface
Here all the deals which were created by corresponding seller will listed as shown in below screen:
Table Description
1. Deal Title: With this filter, seller filter his deals by name
2. ID: This is the ID of the deal which is created.
3. Deal Type : This is the deal type which will be used for the seller products.
4. Discount: This is the discount value which the customer will receive on ordering this seller products.
5. Discount Type: Filter by discount/reduction type.
6. Running Status: Filter deals by its running status.
7. Status: Filter deals by its yes or no to know whether the deal is active or not.
8. Start Date: Filter deals by start date. Start date means, deals which are started from this date.
9. End Date: Filter deals by end date. End date means, deals which will end on this date.
10. Action: Edit or Delete.
Add New Catalog or Coupon Deal Interface
There will be a button Add New Dealon catalog and coupon deal listing page. By Clicking on this link, system will open a form from where seller can create new deal as shown in below screen:
To see the description of each field, please follow the Appendix 1.
Edit or Update Existing Catalog or Coupon Deal Interface
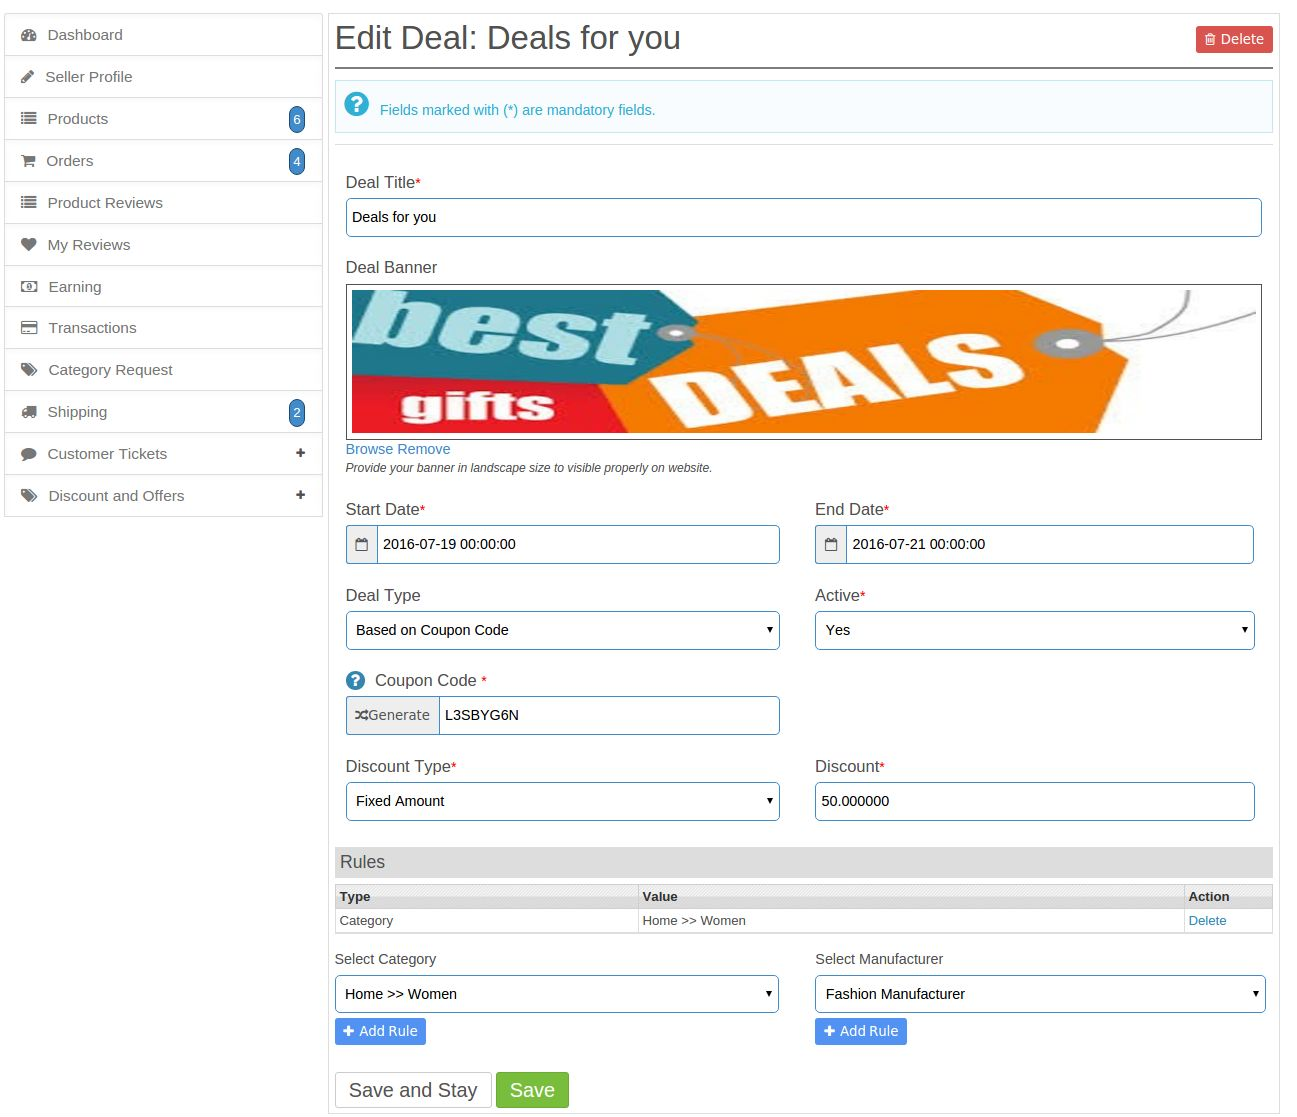
There will be a edit link with deal on deal catalog and coupon listing page in Action column. By clicking on this link, system will redirect seller to deal form with values already filled as shown in below screen:
Delete Any Catalog or Coupon Deal
Every catalog and coupon deal on listing page will have delete option. By clicking on this link, system will delete the corresponding deal permanently.
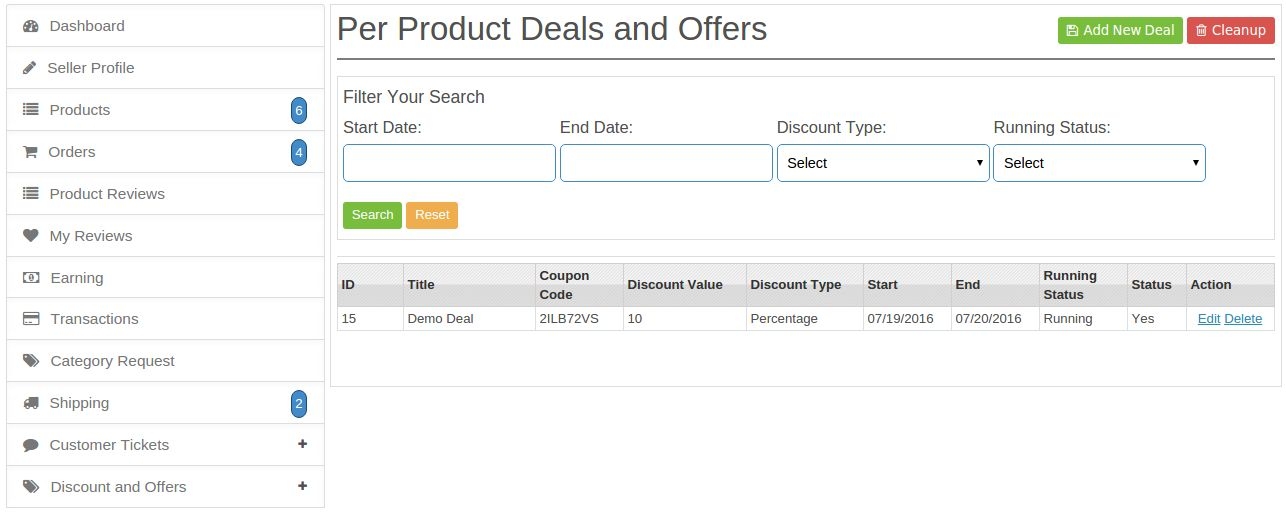
Per Product Deal Listing Interface
Here all the per product deals which were created by corresponding seller will listed as shown in below screen:
Table Description
1. Deal Title: With this filter, seller filter his deals by name
2. ID: This is the ID of the deal which is created.
3. Discount Value: This is the discount value which the customer will receive on ordering this seller products.
4. Discount Type: Filter by discount/reduction type.
5. Running Status: Filter deals by its running status.
6. Status: Filter deals by its yes or no to know whether the deal is active or not.
7. Start Date: Filter deals by start date. Start date means, deals which are started from this date.
8. End Date: Filter deals by end date. End date means, deals which will end on this date.
9. Action: Edit or Delete.
10. Coupon Code: This is the coupon code which will be used to get the discount by the customer.
Add New Per Product Deal Interface
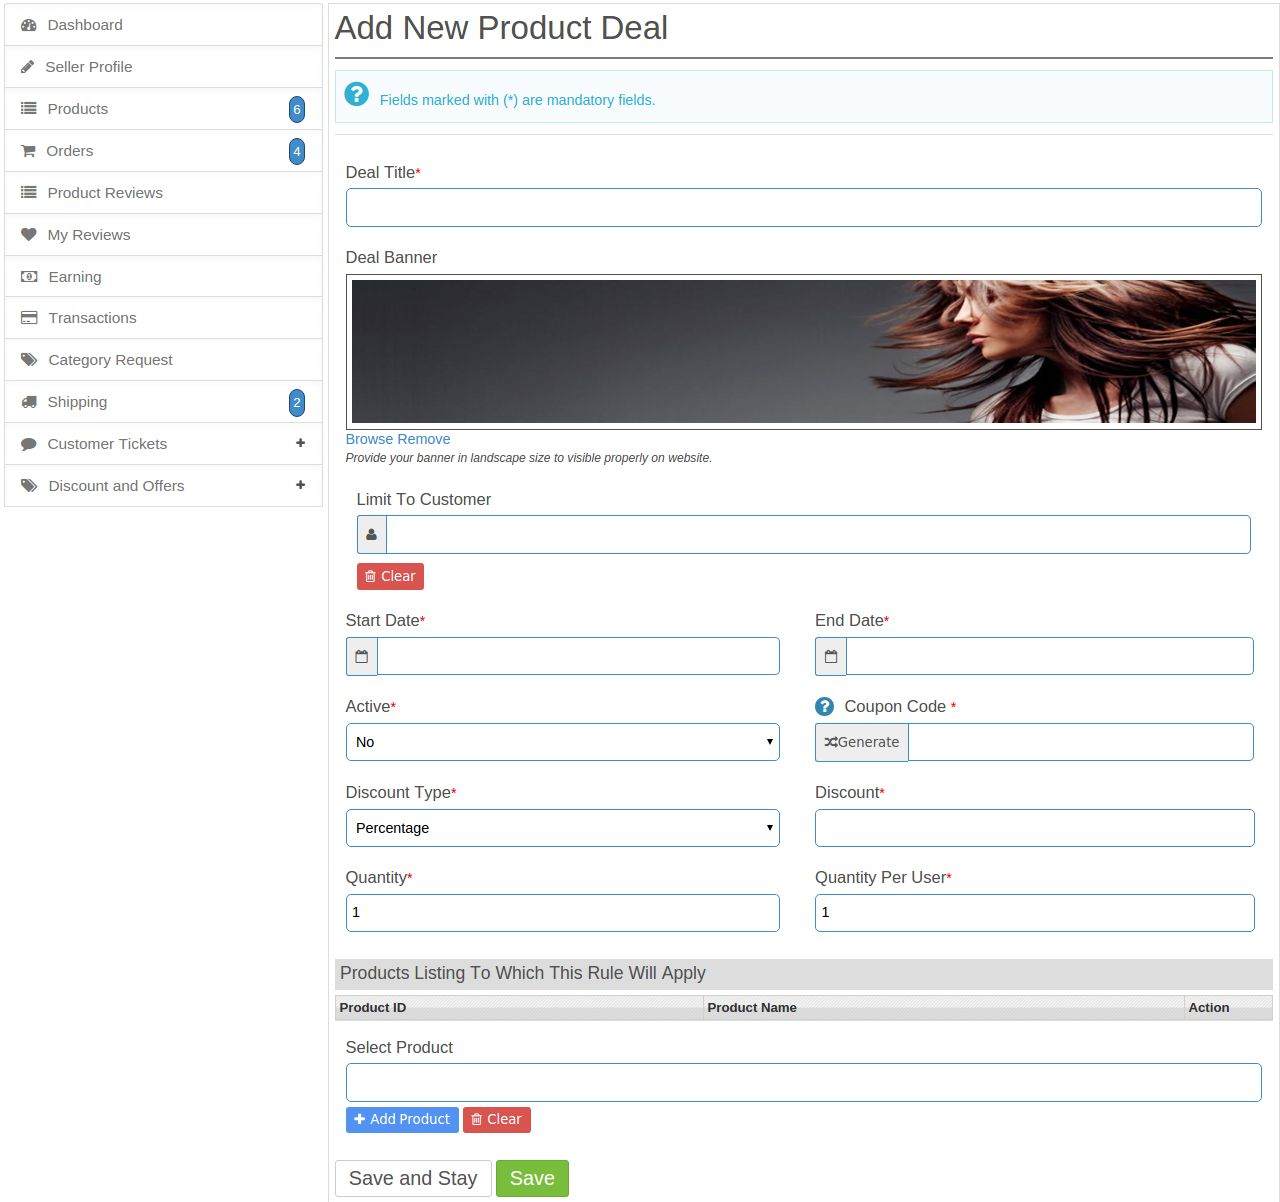
There will be a button Add New Deal on per product deal listing page. By Clicking on this link, system will open a form from where seller can create new deal as shown in below screen:
To see the description of each field, please follow the Appendix 2.
Edit or Update Existing Catalog or Coupon Deal Interface
There will be a edit link with deal on per product deal listing page in Action column. By clicking on this link, system will redirect seller to deal form with values already filled as shown in below screen:
Delete Any Per Product Deal
Every per product deal on listing page will have delete option. By clicking on this link, system will delete the corresponding deal permanently.
Deal Link
This link will be at the top of the page and will be highlighted in red. Customers can click on that link and redirect themselves to the page where all the deals will be listed. Customers can choose any of the deals available in that deals and apply that deal in his/her order.
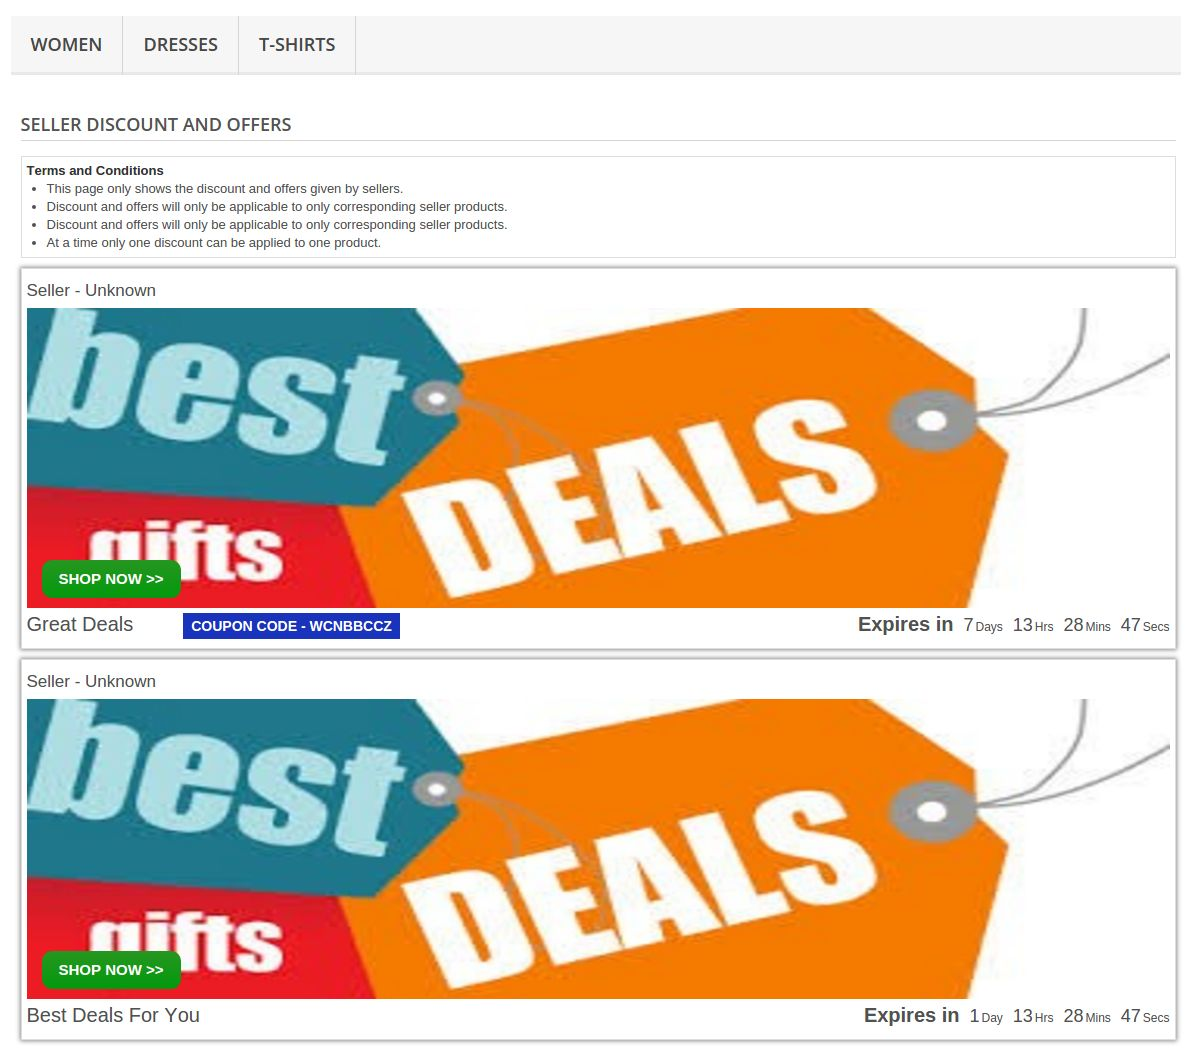
Seller Offers Page
When Customer will click on deal link, system will redirect customer to page where all the available sellers deal will be visible. From here, customer can know the how many and which type of deals are currently running on website. The page is shown below:
Appendix 1
Following are the fields to be configure to properly run deal on website:
1. Deal Title: Seller as well as admin can choose any name to describe deal.
2. Deal Banner: Banner for the deal. On updating banner system will remove old banner to save space on disk.
3. Start Date: Date from which deal will be started. This value will be in date format.
4. End Date: Date on which deal will end. This value will be in date format.
5. Deal Type: There are two type of deal, a seller can run which are following
a) Catalog: This deal will be used to give discount on product which are in that particular category or manufacturer selected in the rule.
b) Coupon Code: In this type of deal the customer will get a coupon code which he/she can apply to achieve the discount which is available
6. Discount/Reduction Type: This will be a drop down list from which seller can select type of discount which are following:
a) Percentage
b) Fixed Amount
7. Discount/Reduction Value : Positive value of discount as per discount type. If the discount is percentage, then the value will be from 0-100%.
8. Conditions/Rules: Here seller can set some criteria to run a deal. Following are the possible criteria:
a) Categories: Seller can choose one or more categories on which he wants to run a deal.
b) Manufacturers: Seller can choose one or more manufacturers to run a deal.
If seller set both the above criteria then system will use AND condition to give a discount on products.
Appendix 2
Following are the fields to be configure to properly run deal on website:
1. Deal Title: Seller as well as admin can choose any name to describe deal.
2. Deal Banner: Banner for the deal. On updating banner system will remove old banner to save space on disk.
3. Start Date: Date from which deal will be started. This value will be in date format.
4. End Date: Date on which deal will end. This value will be in date format.
5. Limit Customer: Here the seller can add a customer who can only use this deal. No one else rather then the customer can use this deal.
6. Discount/Reduction Type: This will be a drop down list from which seller can select type of discount which are following:
a) Percentage
b) Fixed Amount
7. Discount/Reduction Value : Positive value of discount as per discount type. If the discount is percentage, then the value will be from 0-100%.
9. Quantity: Seller will enter the total number of coupon which will be generated for this deal.
10. Quantity Per User: In this field seller will enter the limit for the customer for using this coupon.
11. Conditions/Rules: Here seller can set some products to which this rule will apply.
Customers have now become more selective during online shopping and are not in a mood to compromise with quality, delivery time, and price of the product. They are always looking for a product that is high in terms of quality and performance that is available without any significant delay and comes with the most economical price among other available products.
It may sound to be a hyperbole statement but it is actually what online shoppers are expecting from their eCommerce store owners. On top of it, if they are not getting the required product/services, they will not think twice about leaving a site and will contribute towards shopping cart abandonments.
It could be a severe blow to the reputation of your company if you are unable to control the shopping cart abandonments. If you are not having enough clue about how to check the increasing abandoned carts in your store, it is time to explore this PrestaShop Abandoned Cart module from the Knowband store. Let us explain to you more about the amazing features of this PrestaShop extension for the growth and expansion of your eCommerce store.
Display attractive pop-ups and send endless push notifications-
Many a time, email marketing strategies fail to deliver the expected results because of the frequency of average emails sent or received every day. To combat this situation, the PrestaShop module for Abandoned Cart is integrated with the web-browser push notification feature and entry/exit pop-up for sending a reminder alert to abandoners.
Option to personalize emails in various languages
Personalization makes a tremendous impact on the minds of your customers and can help in effective customer engagement in your store. This PrestaShop Abandoned Cart module provides the facility to create customized emails for your targeted customers by making various personalization attempts. Keep in mind that there are several types of customers and you have to be creative and you have to be creative to entice them.
Functionality to choose CRON jobs as and when required
With this module, it is now possible to manually or automatically update the list of abandoned carts on your store for achieving higher conversion rates and sales. For the orders that are not claimed in the given period of time, the module will mark them abandoned automatically. It allows you to send sequence reminder mails by setting a delay time once a cart is marked abandoned.
Provides facility to include coupon codes in your reminder alerts
Online shoppers are always looking for attractive shopping offers, discounts, and coupon codes that can persuade them to make a quick product purchase. Understanding this mindset, it is now much easier to include engaging discount coupons in your reminder emails for effective targeting of your customers.
Seamless cart recovery for higher customer engagement and sales
One of the main reasons that hamper the conversion of abandoned carts is the ease of cart recovery. This is one of the crucial issues that have been handled effectively by this PrestaShop Abandoned Cart module. Abandoned customers are provided with reminder emails that consist of a direct checkout button that can take users back to their shopping carts with all the added products and cart details. Customers don’t have to scratch their heads anymore for retrieving their abandoned cart due to the presence of this outstanding module.
Boosts decision-making process with analytical reports
This Prestashop extension provides a detailed analytical report about abandoned carts and converted carts in the form of graphs and other statistics. By studying the data of these representation figures, you can seamlessly improve your conversion rates and product sales. The abandoned and converted carts of both logged-in users and guest customers can be tracked with this amazing module.
Wrap-up
If you have been struggling with the sales and conversions on your store, it is time to make amends with the help of this PrestaShop Abandoned Cart module from the Knowband store. In spite of having numerous options in this field, this eCommerce extension has made its own place and mark due to the presence of various unmatched features and functionalities. Don’t be a victim of shopping cart abandonments anymore and take the required action with the support of this extraordinary Knowband module.
Prestashop Social login module by Knowband allows your customers to register and login to your Prestashop store by using their social accounts from 13 social networks such as Facebook, Google Plus, Twitter, Foursquare, Live, WordPress, etc. This social login Prestashop module not only enhances your user’s experience but also increases sales and conversions.
Why use this Prestashop social media login plugin?
Prestashop Facebook login addon reduces the login/registration time of the customer.
This twitter login addon offers 14 social login/registration options.
Prestashop Google+ login addon offers a user-friendly interface.
Social login addon enhances user experience.
Prestashop social media login addon is fully customizable.
Installation steps of Prestashop Social Media Login Plugin:
The folder structure of the Prestashop Social Login plugin folder.
Copy the whole folder named as social loginizer into your modules folder of the root directory of your PrestaShop store through FTP.
You can also upload the zip folder of the module by clicking on Add New Module button, which should appear just in the top right corner of the module listing page.
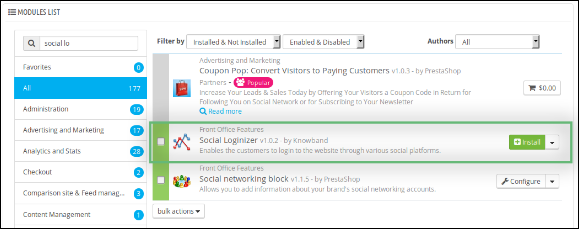
After that, you will be able to find the Prestashop social login plugin ready to be installed in the Modules in your PrestaShop store as shown below.
Click on the Install link to install this Prestashop social media login addon.
Admin Module of Social login Prestashop module
Here, the store owner can change the various settings of this Prestashop twitter login module by Knowband according to the requirements, which will be reflected at the front end as well as in the admin panel of the Prestashop Facebook login plugin.
After installing the social login Prestashop module into the store, this Prestashop plugin will provide the following tabs in the interface:General Settings
Facebook Settings
Google Plus Settings
Live Settings
LinkedIn Settings
Yahoo Settings
Amazon Settings
Paypal Settings
Foursquare Settings
Github Settings
Disqus Settings
Vkontakte Settings
WordPress Settings
Dropbox Settings
FAQs
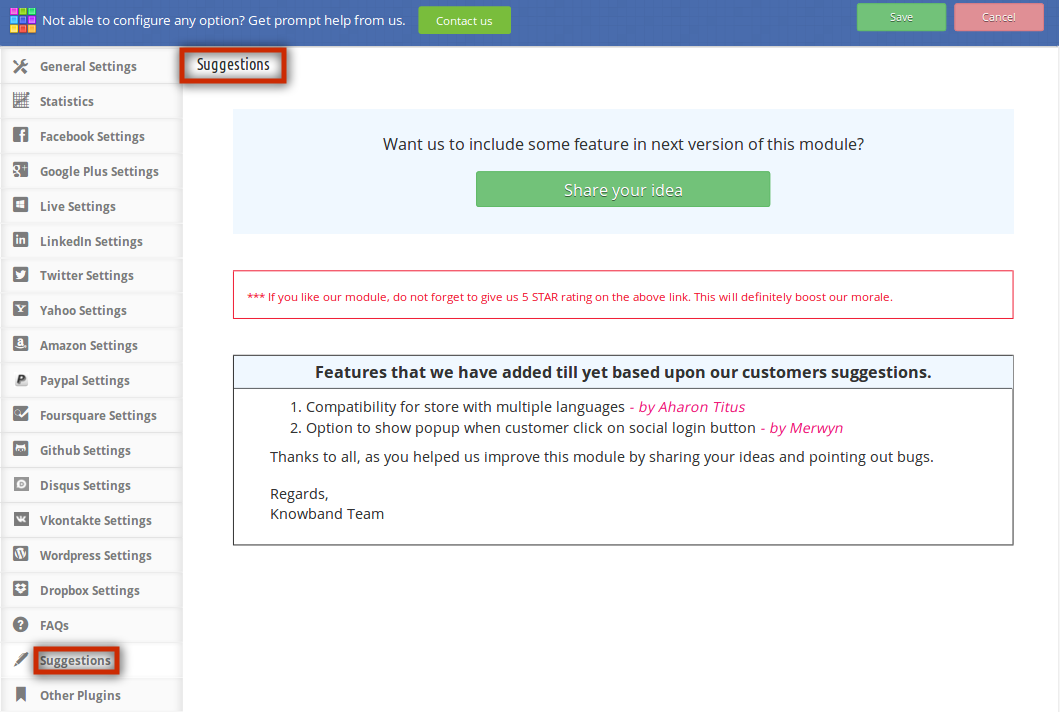
Suggestions
Other Plugins
Each tab is explained below.
General setting of Prestashop social login plugin:
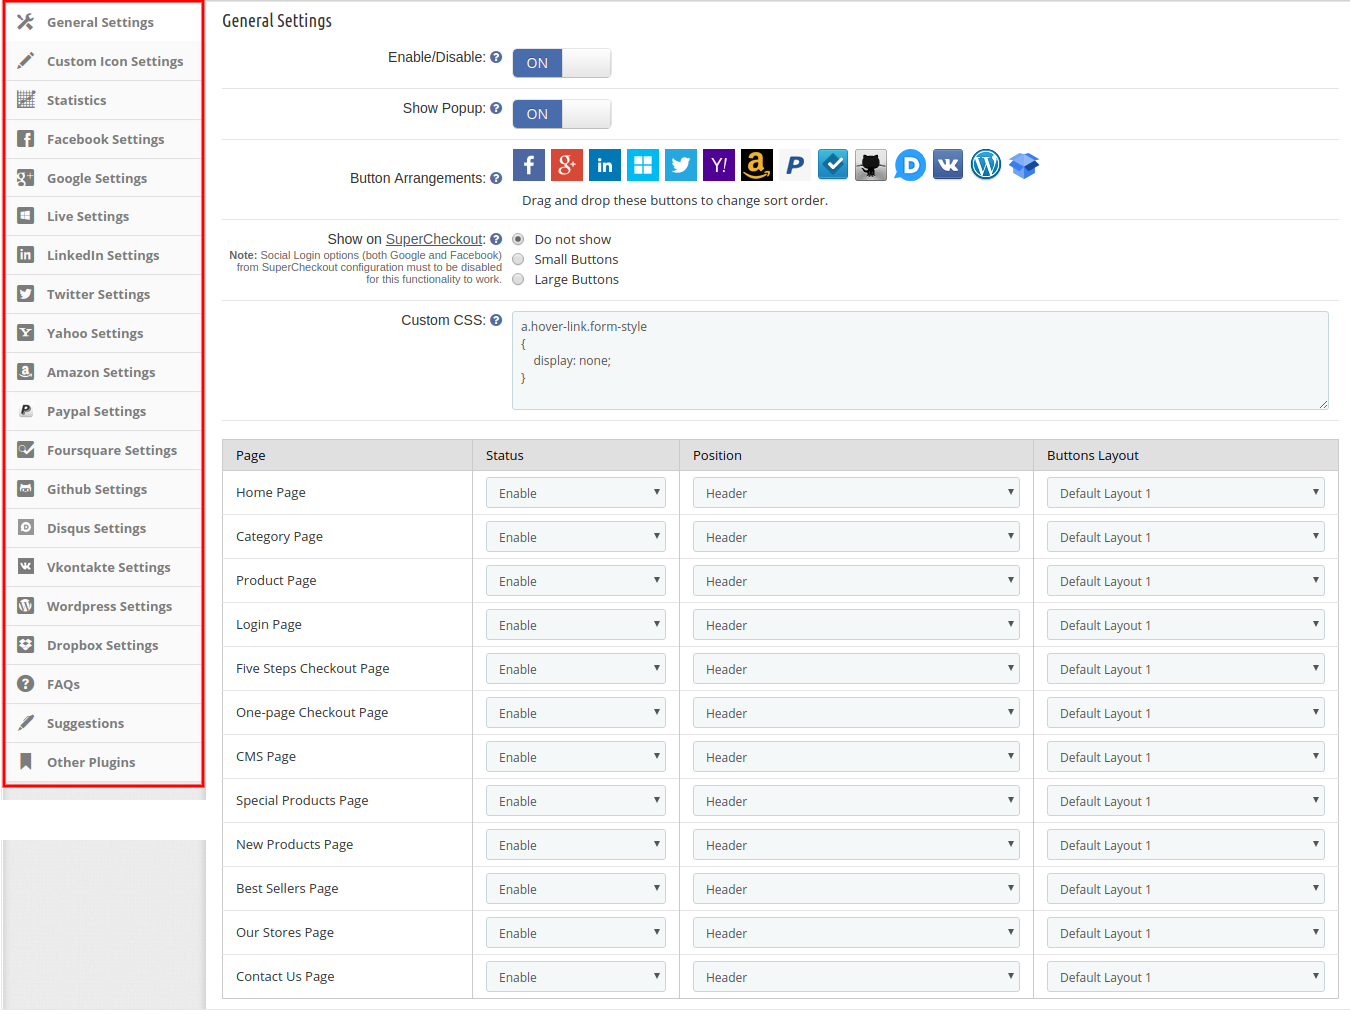
On clicking on the configure link on the module listing page (configure link will automatically appear once you install the plugin), the system will open the general settings tab of the Prestashop google+ login plugin by default as shown in the screenshot below:
Initially, fields in the above form will be already filled with their default values.
Enable/Disable: Initially, this field of the Prestashop social login plugin will be OFF. Admin can enable/disable the Prestashop social media login module by turning ON/OFF in this setting.
show Popup: After enabling this field of the Prestashop social media login plugin by Knowband, it will show the login popup when the customer will click on any of the social login options.
Button Arrangement: Here, in this field of the social login Prestashop module, the admin can change the sequence of the buttons as they appear at the front-end just by dragging and dropping the icon.
show on SuperCheckout: This field of the Prestashop google+ login plugin module allows the admin to show this Prestashop social media login plugin on the SuperCheckout page. The admin can also select the button sizes either small or large. If he doesn’t want to show this social login option, then he can disable this by selecting the “Do Not Show” option.
Custom CSS & JS: The Knowband Prestashop social media login plugin allows the admin to change the look and feel of the social login Prestashop plugin as per his choices.
The admin can also manage the status, position, and button size of the Prestashop social login plugin. Such as, at which page he wants to show the extension (Home Page/Category Page/Product Page/Login Page etc.), what would be the position of this Prestashop extension (Header/Footer/Left Column/Right Column), and what would be the size (Small/Large).
Custom Icon Settings of this Social login options module:
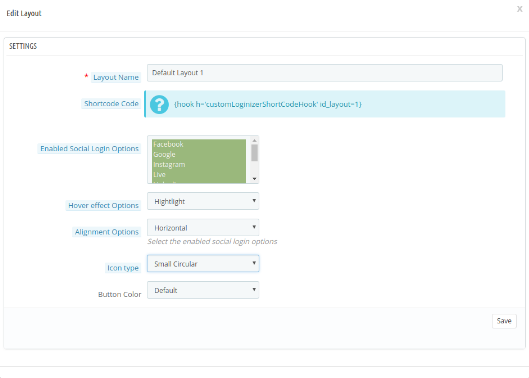
In Custom icon settings, the online store merchant can manage the look and feel of social login icons. There will be a list of layouts that can be added, updated, and deleted at any time as per the requirements. The list is shown below:
There are multiple customization options as shown below:
Layout name: Enter the name of the layout. Admin can also update the name of previously added layouts.
Shortcut code: Admin can copy and paste the shortcode in tpl to show the social login option as per your chosen position.
Enable social login options: Admin can select from various social login options for showing on the website front-end.
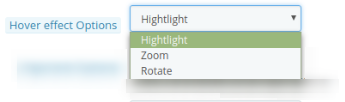
Hover effect option: Admin can select from several hover effects like he can highlight, rotate or zoom the social login icons.
Alignment options: Admin can align the social login options horizontally or vertically.
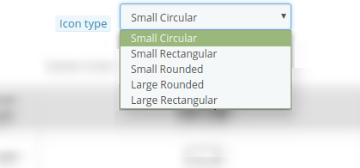
Icon type: Admin can set the icon type as small circular, small rectangular, small rounded, large rounded, and large rectangular.
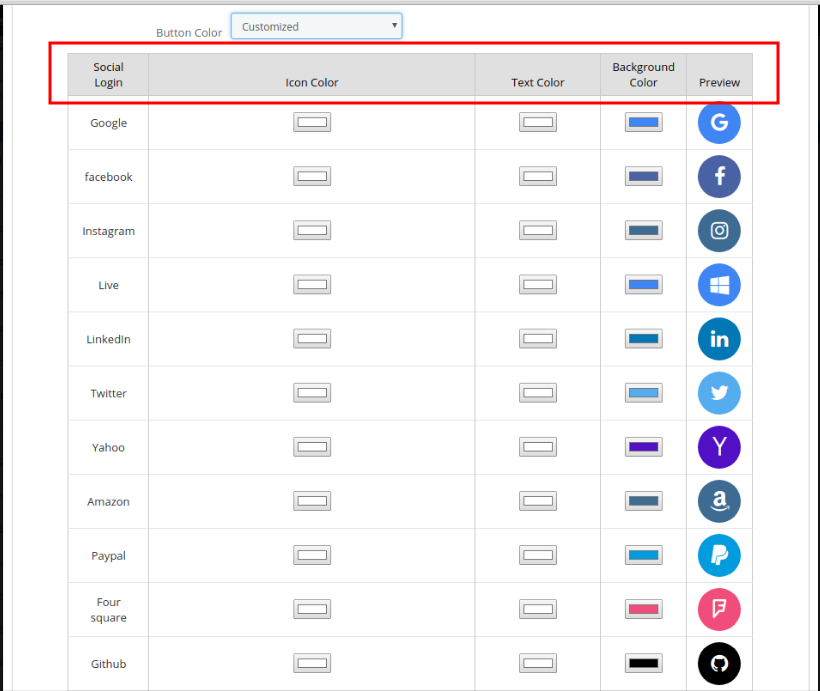
Button color: There are two options for button color. Admin can select the default button color or customize the button colors accordingly. Admin can select different colors from the color picker tool in the advance color selection option.
Statistics of Prestashop social login module
This field of the Prestashop twitter login module allows the store owner to view the report of Login and Registered users in graphical and tabular format. (Whether it is the social login or login with email id and password)
Facebook Settings:
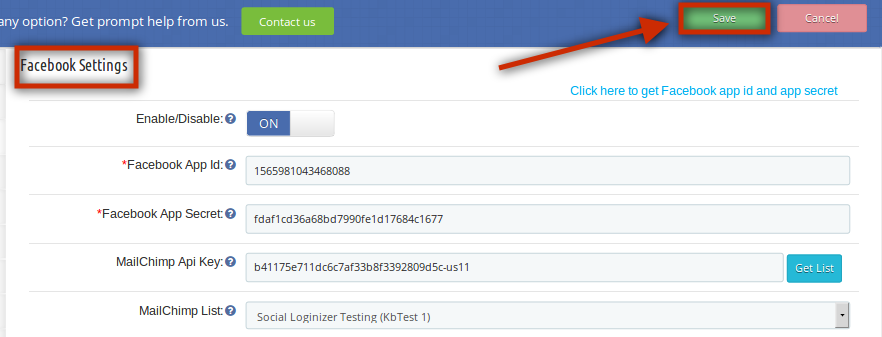
In this tab of the Prestashop Facebook login module, the admin can enable/disable Facebook login at the front end. Fill in the details and click on the ‘Save’ option. The following fields are mandatory:
Facebook App Id
Facebook App secret
The above field values will be available once you create a Facebook App in the respective developer’s console.
Google Plus Settings:
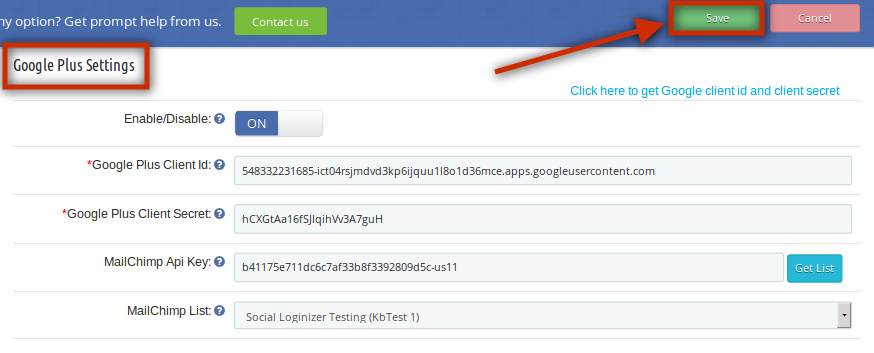
This tab of the Prestashop google+ login plugin allows the admin to enable/disable Google Plus login at the front end. Fill in the details and click on the ‘Save’ option. The following fields are mandatory:
Google Plus Client Id
Google Plus Client Secret:
The above field values will be available once you create a Google Plus App in the respective developer’s console
Live Settings:
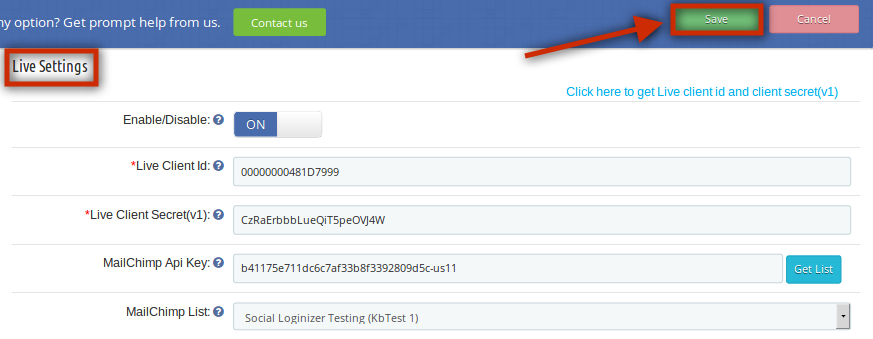
In this tab of the Prestashop social media login plugin, the admin can enable/disable live login at the front end. Fill in the details and click on the ‘Save’ option. The following fields are mandatory:
Live Client Id
Live Client secret(v1)
The above field values will be available once you create a Windows Live App in the respective developer’s console
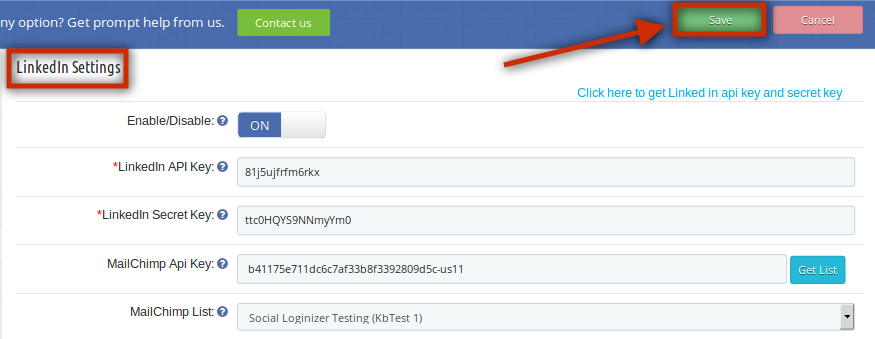
LinkedIn Settings:
In this tab of Prestashop social login extension by Knowband, the admin can enable/disable Linkedin login at the front end. Fill in the details and click on the ‘Save’ option. The following fields are mandatory:
LinkedIn API Key
LinkedIn Secret Key
The above field values will be available once you create a LinkedIn App in the respective developer’s console.
For setup, the admin needs to follow these steps:
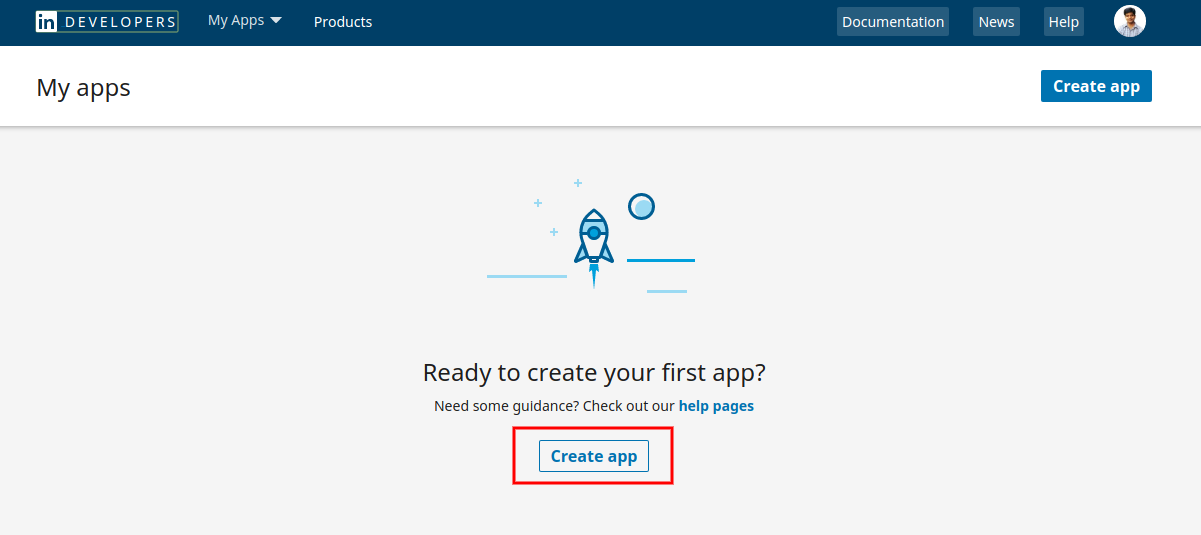
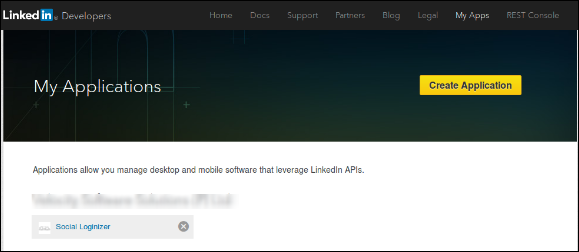
First of all, go to https://www.linkedin.com/developers/apps
Click on Create App option.
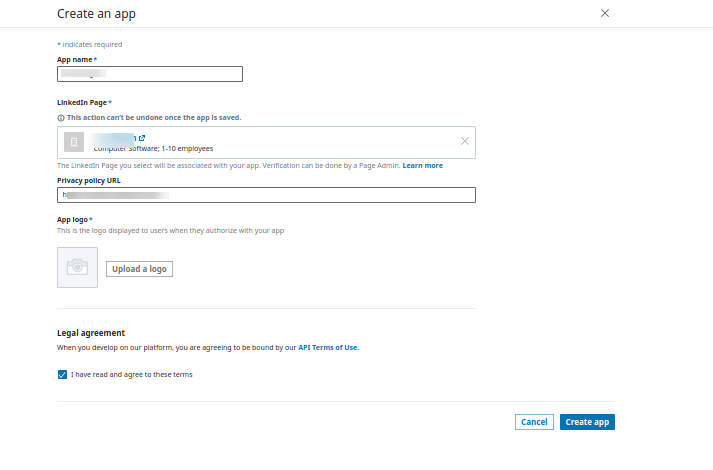
Now, Enter the details on the available form to register a new application. The website URL must be your Store URL like https://www.example.com.
After that, click on the create app button.
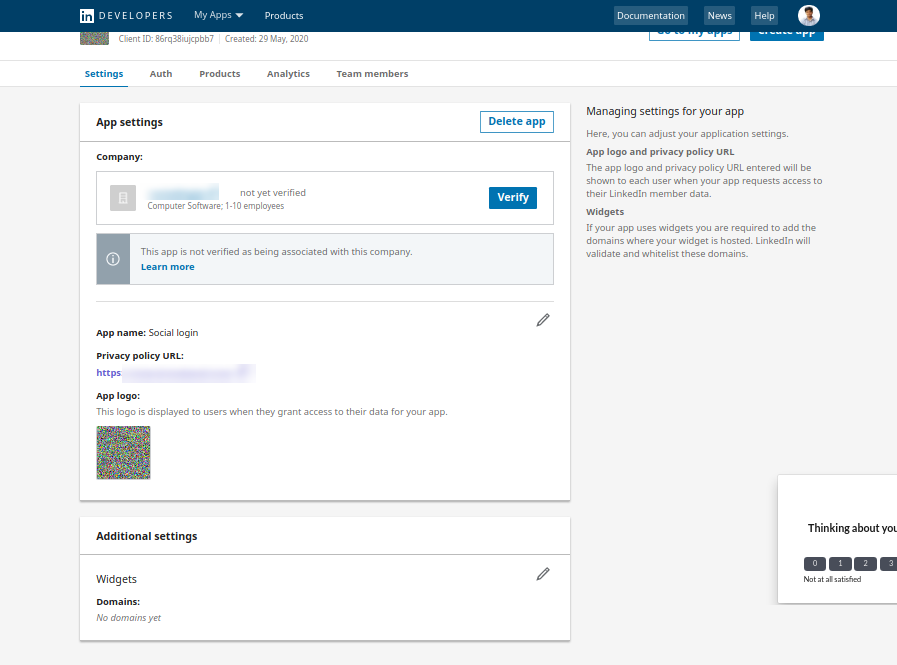
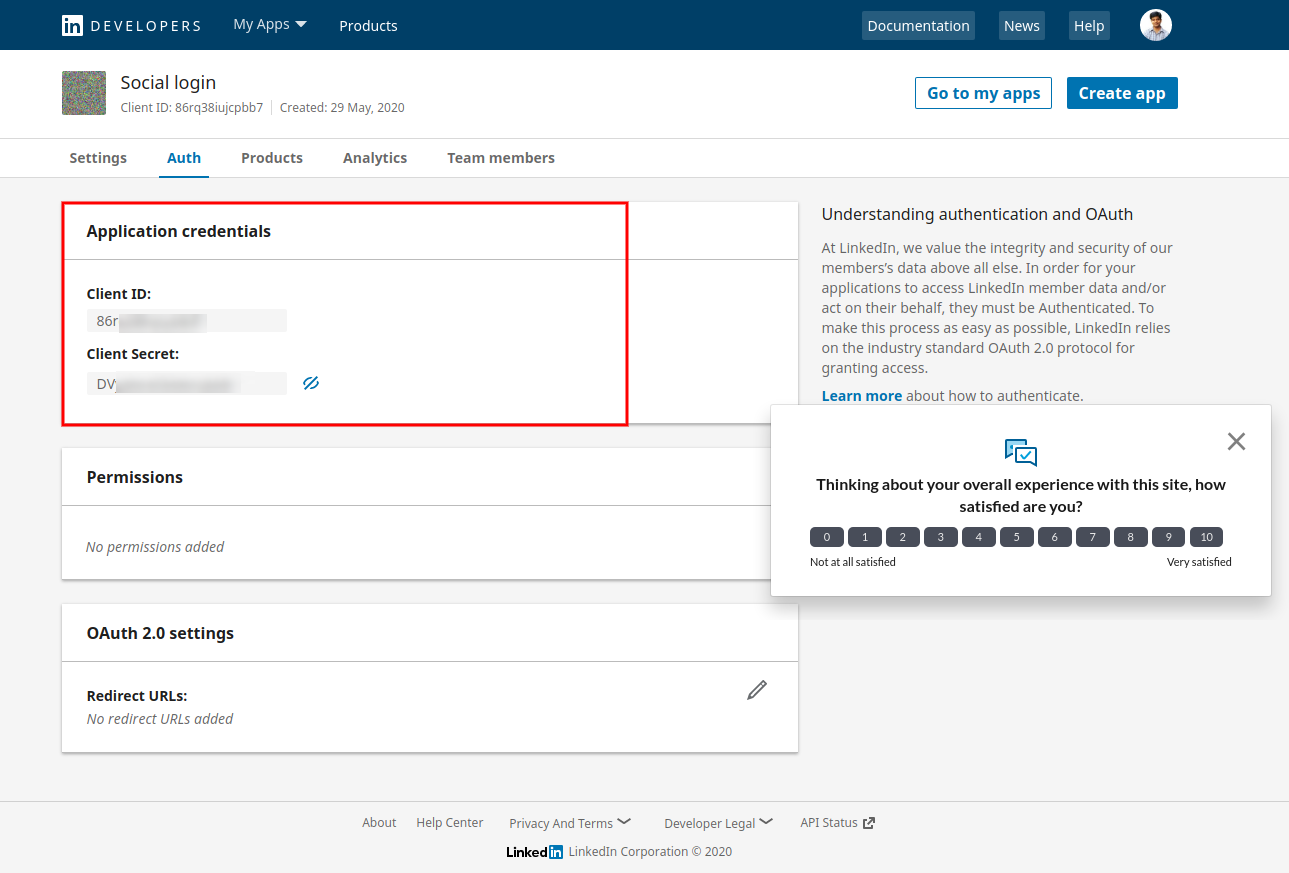
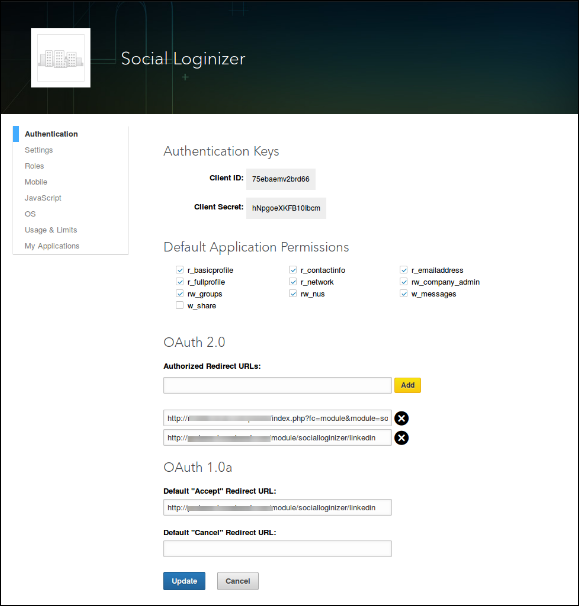
In the second option which is the auth section, the e-merchant can view the app Id and secret as shown below:
Twitter Settings:
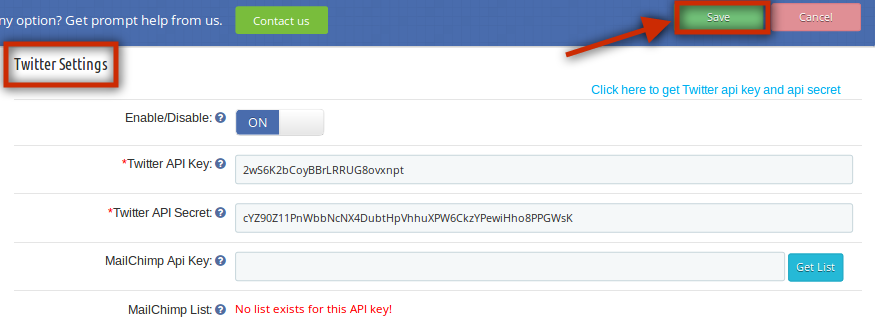
This tab of the Prestashop social media login plugin allows the admin to enable/disable Twitter login at the front end. Fill in the details and click on the ‘Save’ option. The following fields are mandatory:
Twitter API Key
Twitter API Secret
The above field values will be available once you create a Twitter App in the respective developer’s console.
Yahoo Settings:
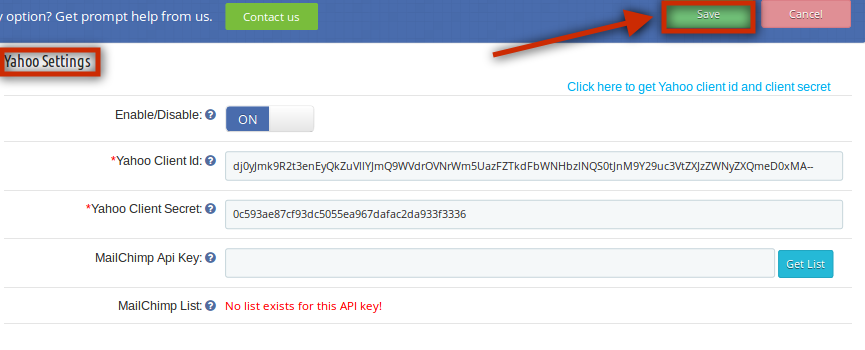
In this tab of the social media login Prestashop plugin, the admin can enable/disable Yahoo login at the front end. Fill in the details and click on the ‘Save’ option. The following fields are mandatory:
Yahoo Client ID
Yahoo Client Secret
The above field values will be available once you create a Yahoo App in the respective developers console.
Amazon Settings:
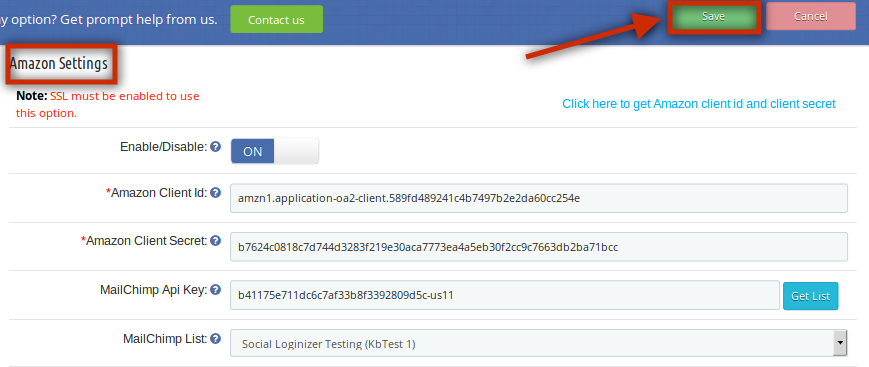
In this tab of the Prestashop social login plugin, the admin can enable/disable Amazon login at the front end. Fill in the details and click on the ‘Save’ option. The following fields are mandatory:
Amazon Client Id
Amazon Client Secret
The above field values will be available once you create an Amazon App in the respective developer’s console.
Paypal Settings:
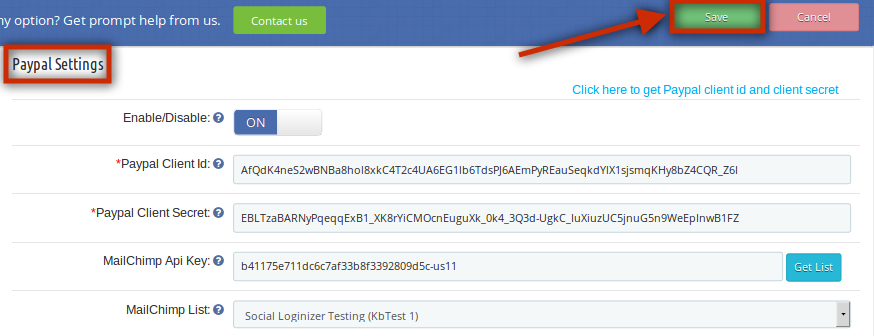
In this tab of Prestashop google+ login addon, the admin can enable/disable Paypal login at the front end. Fill the details and click on the ‘Save’ option. The following fields are mandatory:
Paypal Client ID
Paypal Client Secret
The above field values will be available once you create a Paypal App in the respective developer’s console.
Foursquare Settings:
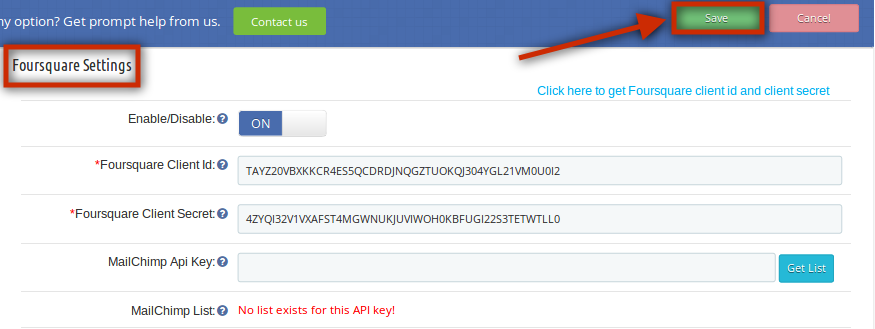
This tab of the Knowband Prestashop social login plugin allows the admin to enable/disable Foursquare login at the front end. Fill in the details and click on the ‘Save’ option. The following fields are mandatory:
Foursquare Client ID
Foursquare Client Secret
The above field values will be available once you create a Foursquare App in the respective developer’s console.
Github Settings:
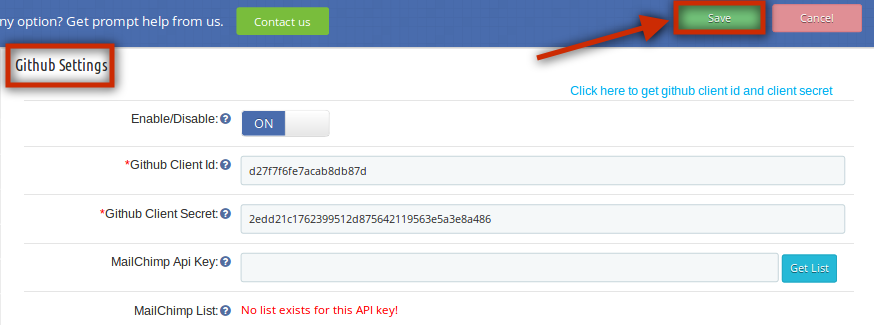
In this tab of the Prestashop social media login module, the admin can enable/disable Github login at the front end. Fill in the details and click on the ‘Save’ option. The following fields are mandatory:
Github Client ID
Github Client Secret
The above field values will be available once you create a Github App in the respective developer’s console.
Disqus Settings:
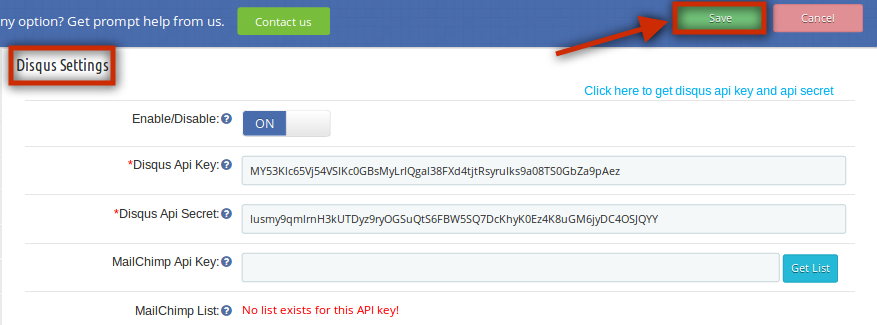
In this tab of the Prestashop social media login plugin, the admin can enable/disable Disqus login at the front end. Fill the details and click on the ‘Save’ option. The following fields are mandatory:
Disqus API Key
Disqus API Secret
The above field values will be available once you create a Disqus App in the respective developer’s console.
Vkontakte Settings:
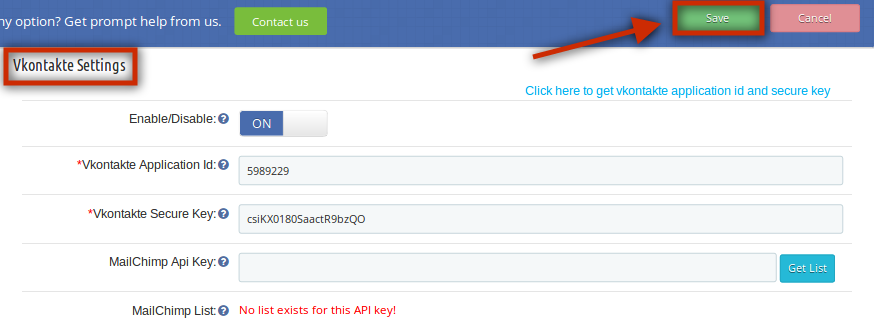
In this tab of the Prestashop social login plugin by Knowband, the admin can enable/disable Vkontakte login at the front end. Fill in the details and click on the ‘Save’ option. The following fields are mandatory:
Vkontakte Application ID
Vkontakte Secure Key
The above field values will be available once you create a Vkontakte App in the respective developer’s console.
WordPress Settings:
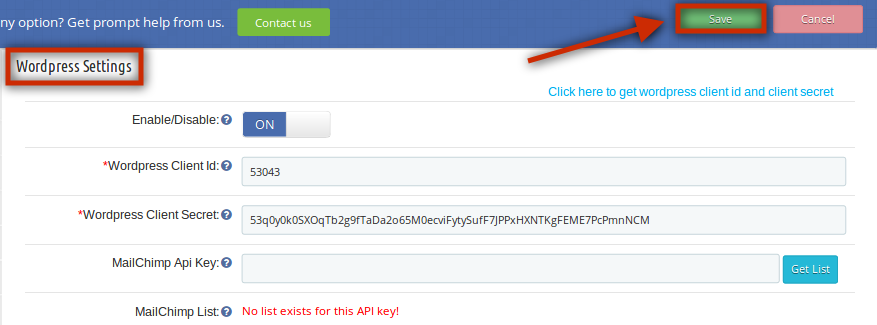
This tab of the Prestashop social login module allows the admin to enable/disable WordPress login at the front end. Fill in the details and click on the ‘Save’ option. The following fields are mandatory:
WordPress Client ID
WordPress Client Secret
The above field values will be available once you create a WordPress App in the respective developer’s console.
Dropbox Settings:
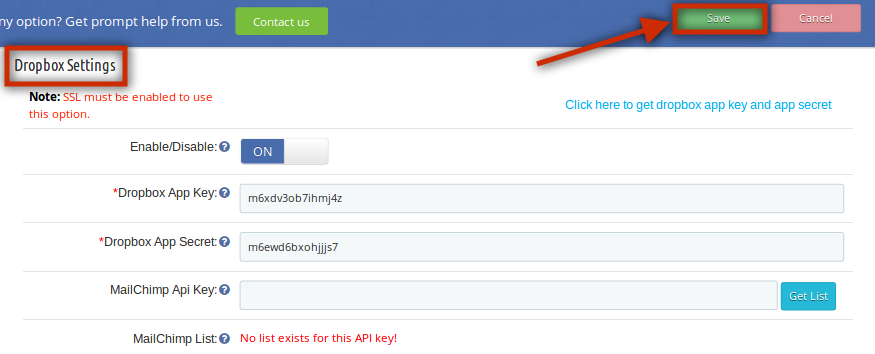
In this tab of the Prestashop Facebook login module, the admin can enable/disable Dropbox login at the front end. Fill the details and click on the ‘Save’ option. The following fields are mandatory:
Dropbox App Key
Dropbox App Secret
The above field values will be available once you create a Dropbox App in the respective developer’s console.
FAQs:
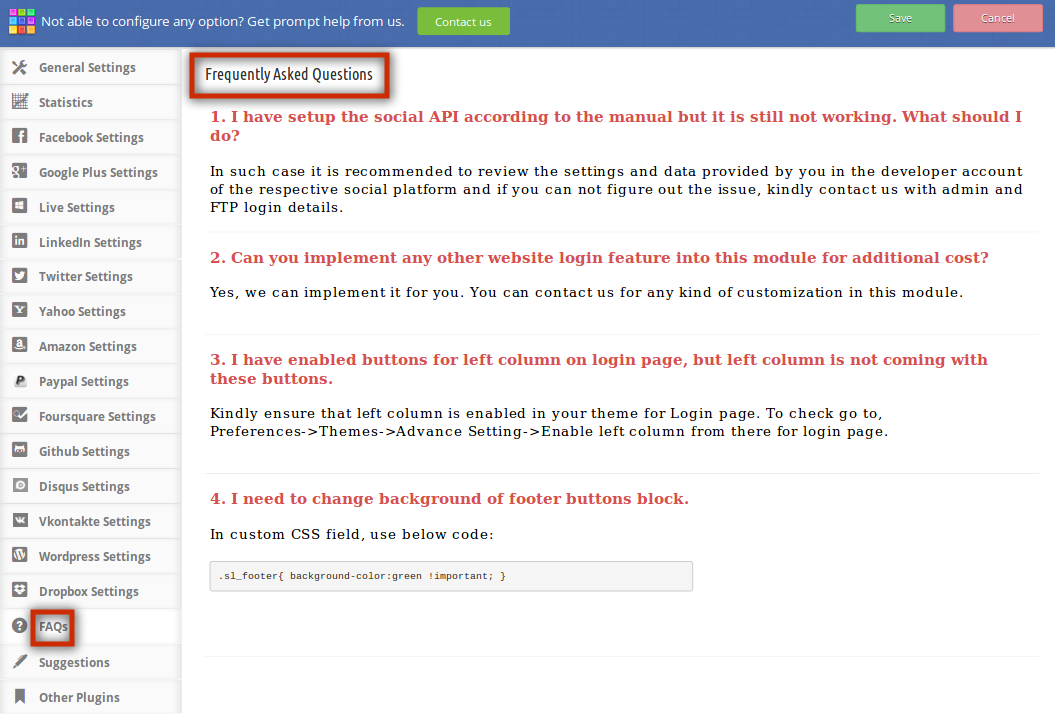
This tab of the social login Prestashop module contains several questions (with answers to them) that are asked by our customers. We recommend you go through the questions before raising any ticket for this Prestashop Facebook login plugin.
Suggestions:
In case you want to give any suggestions for some new features to be included in the new version of this Prestashop Google+ login plugin then you can use this tab.
Other Plugins:
This tab redirects to our developer page having the list of other plugins developed by us. If you like this Prestashop social media login plugin then you can try our other Prestashop plugins as well.
Front End Prestashop social login module:
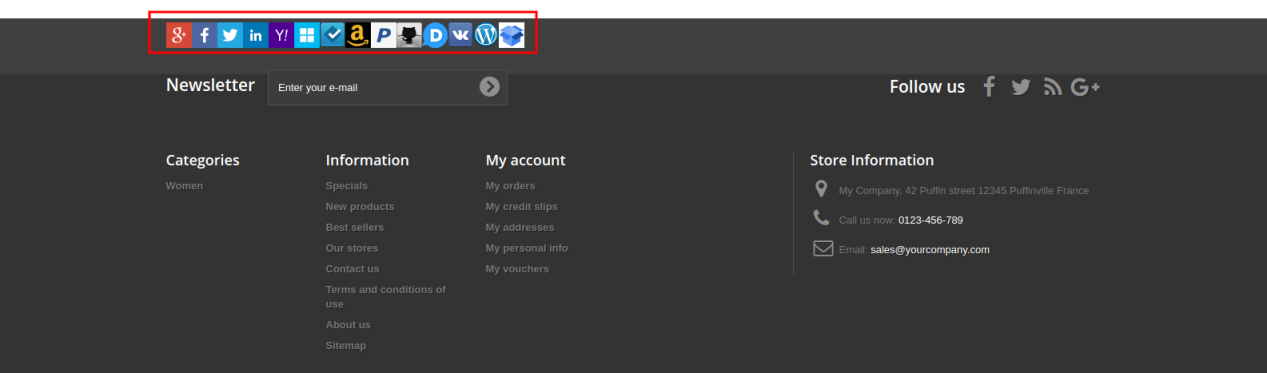
At the footer, the customers can view the social login options as shown below:
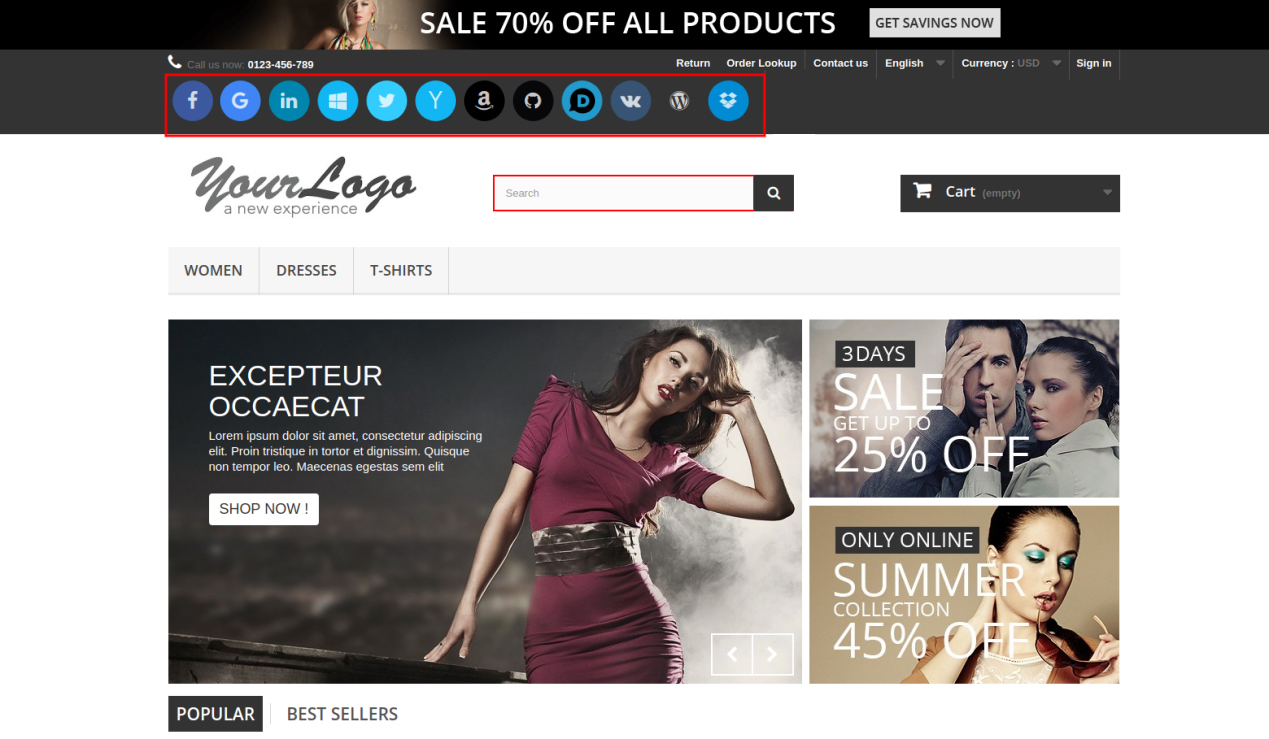
On the front end of this Prestashop social login plugin, customers can see the social login buttons near the ‘Sign in’ option as we have set the small button in the header of the website. Below is the screenshot of the same:
Short Code Functionality
In case you want to display social login buttons somewhere else where the module has no access. So, there is shortcode functionality providing you a way to display social login buttons anywhere throughout your site. To do this, you just have to put a line of code in your respective tpl file accordingly. The line of code is given below:
Code for display small icon: hook h=’customLoginizerShortCodeHook’ size=’small’
Code for display large icon: hook h=’customLoginizerShortCodeHook’ size=’large’
Recommendations:-
Refresh the home page of your store every time you enable/disable social media login Prestashop plugin. If Prestashop social login plugin is not working after installation then please check permissions on the modules folder. The folder should be writable. Please make the folder permission to 755.
How to get Facebook App details?
Facebook App can be created by following the below-mentioned steps:-
Step 1: Go to the given URL: https://developers.facebook.com/apps/
Step 2: Click on the “Add a New App” button.
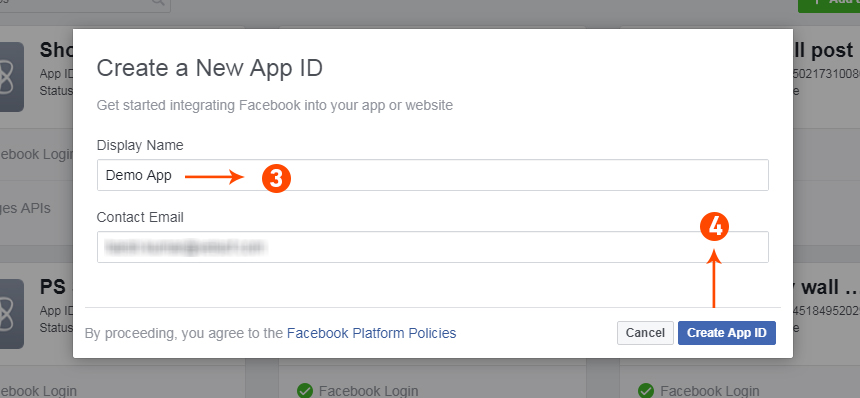
Step 3&4: Enter your App name and email id, then click on “Create App ID” button.
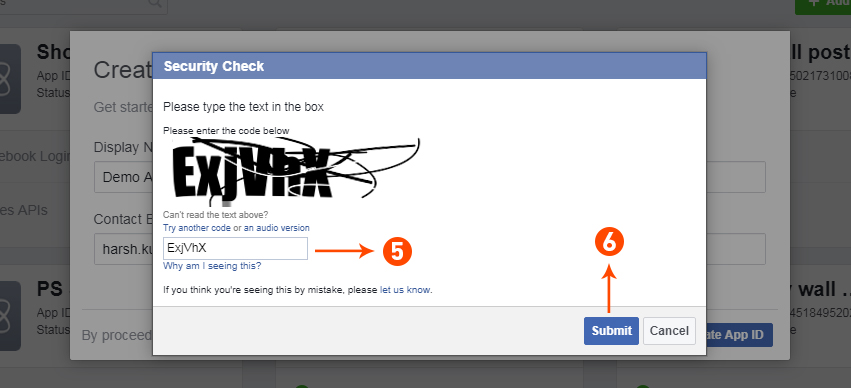
Step 5&6: After clicking on Create App ID you will have to go through a security check as shown:
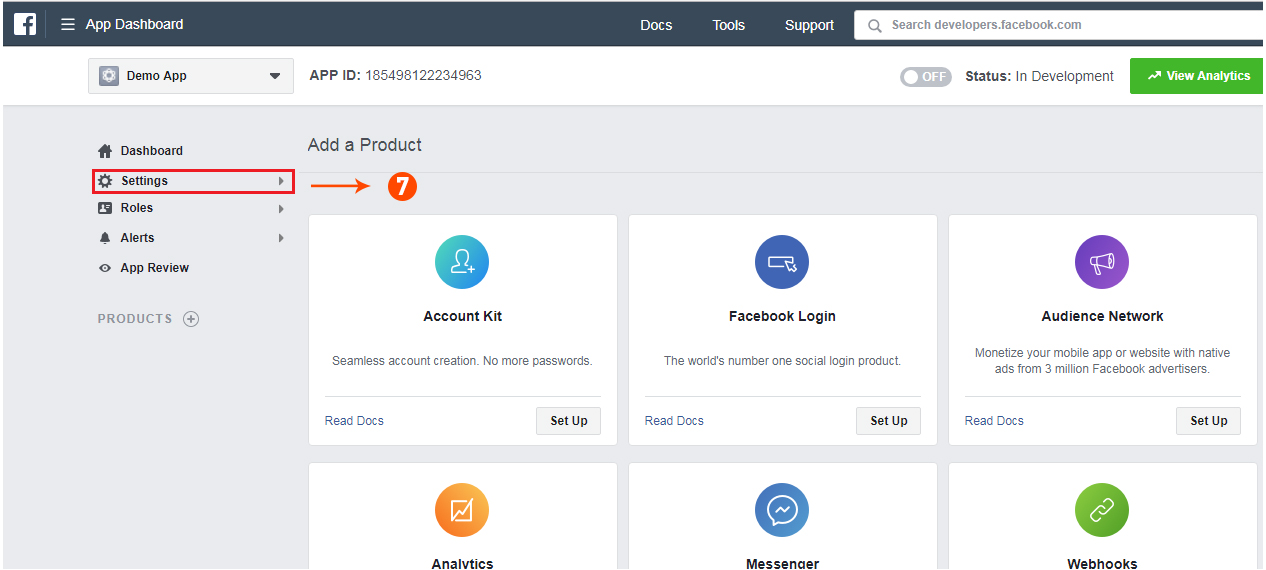
Step 7: Click on “Setting” tab.
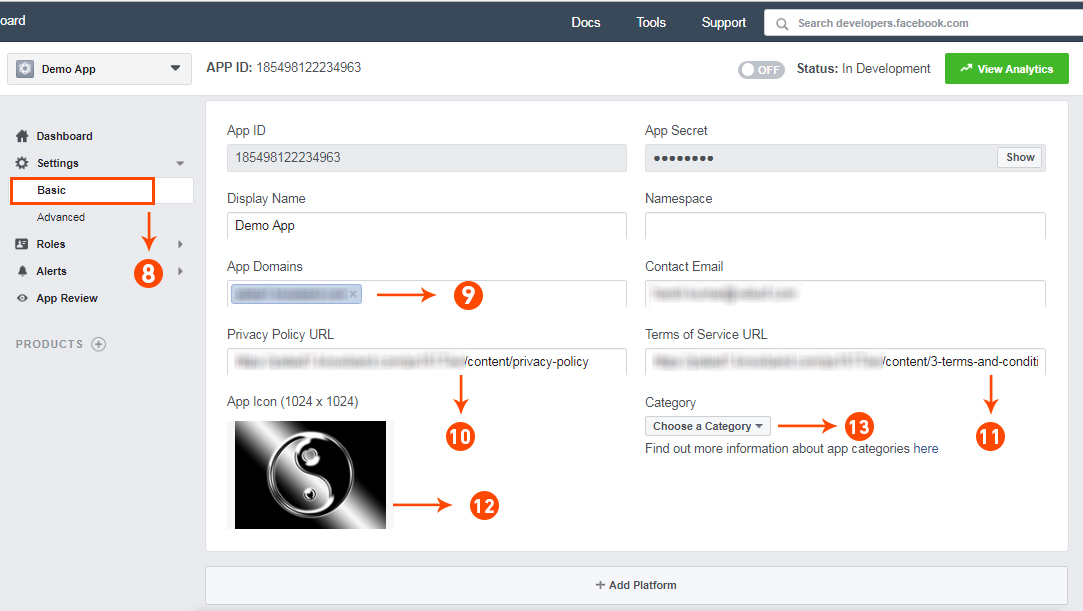
Step 8-13: Two options will be available in the dropdown, Basic and Advanced, click on “Basic”. And then enter your “App Domain”, “Contact Email”, ”Privacy URL”, ”Terms and Conditions URL”, ”Add Logo”, ”Select Category” and click on the “Save Changes” button.
App Domains:
yourdomain.com is correct
yourdomain.com/store is incorrect
www.domain.com is incorrect
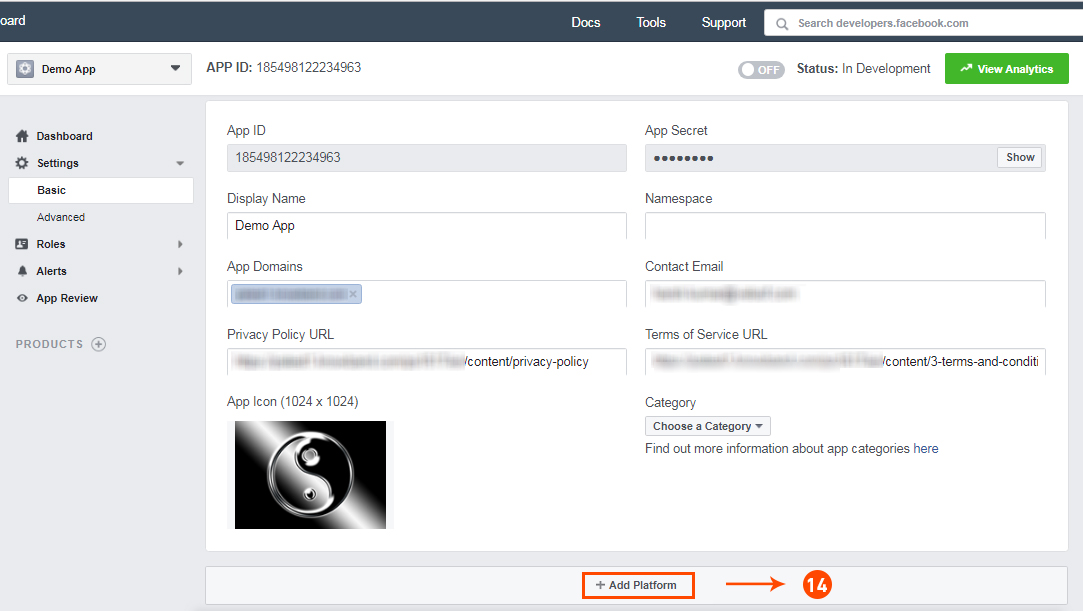
Step 14: Now click on “+Add Platform”.
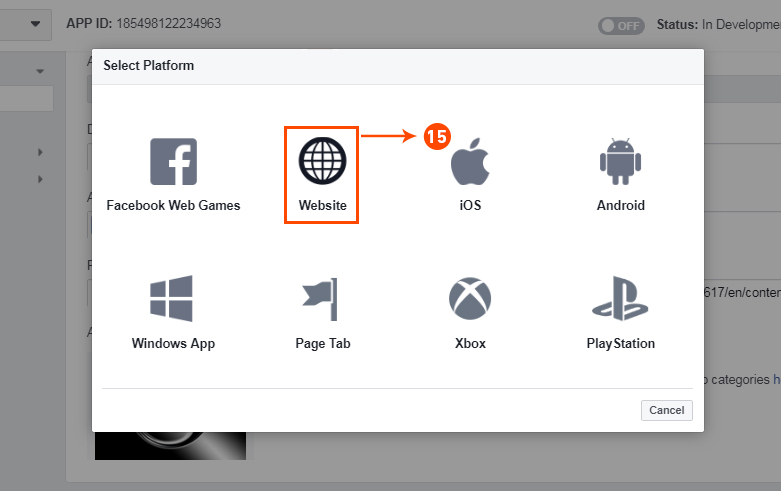
Step 15: And select Website as Platform
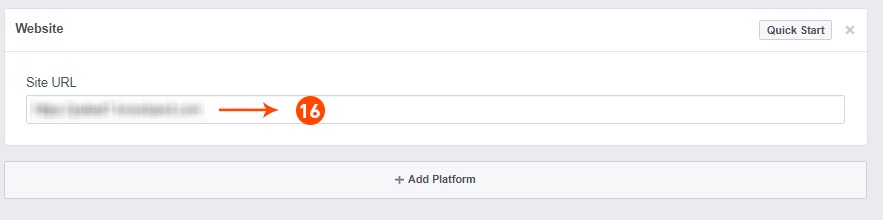
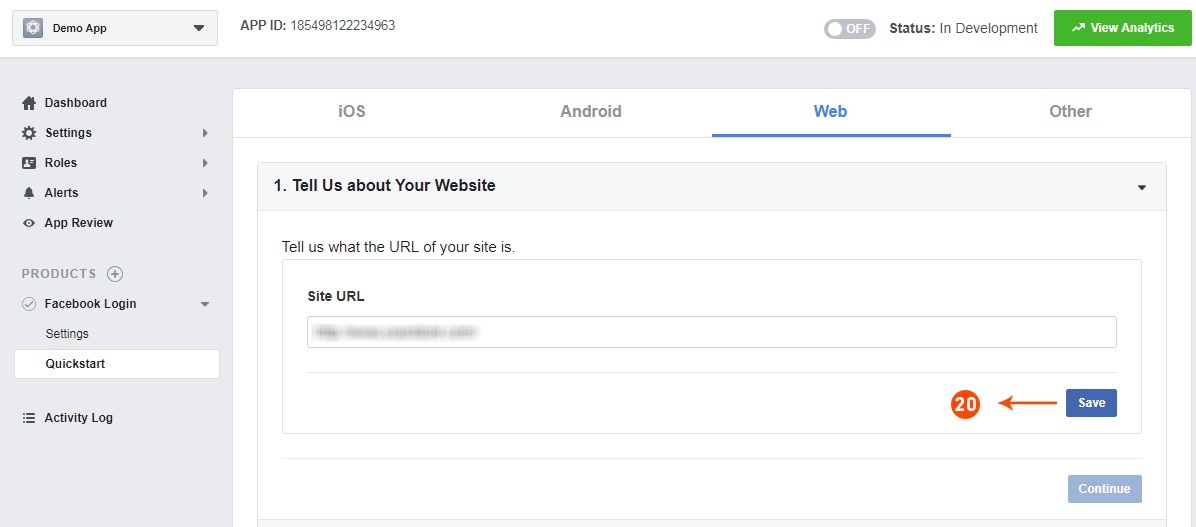
Step 16: Now Enter your site URL.
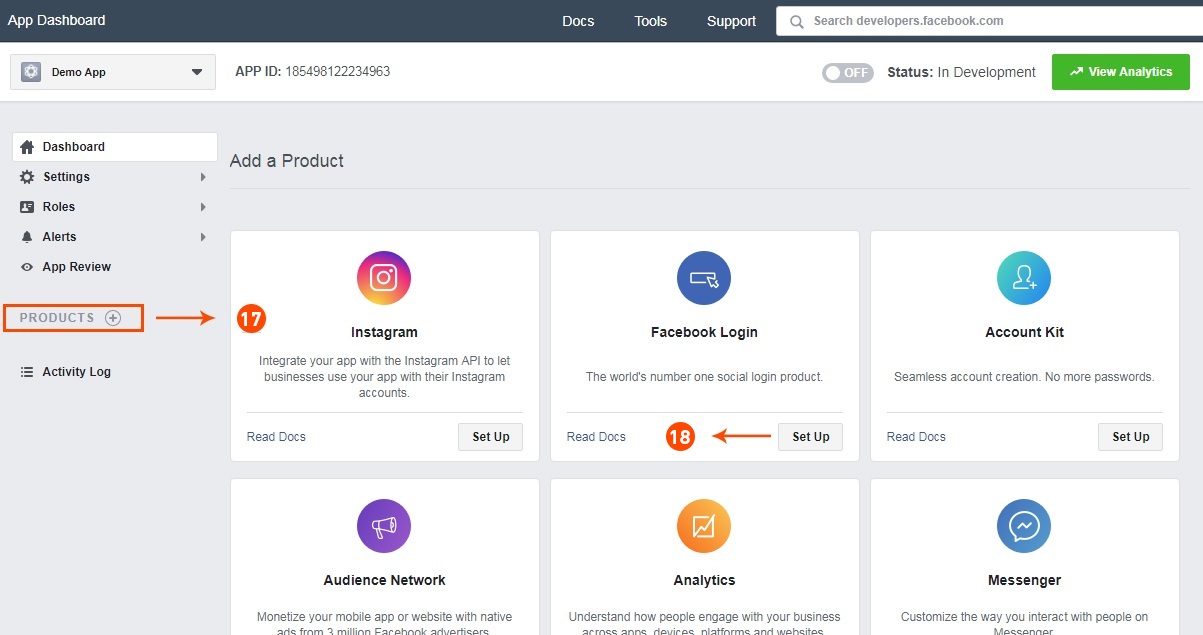
Step 17&18: Click on “Products+” and select Facebook login.
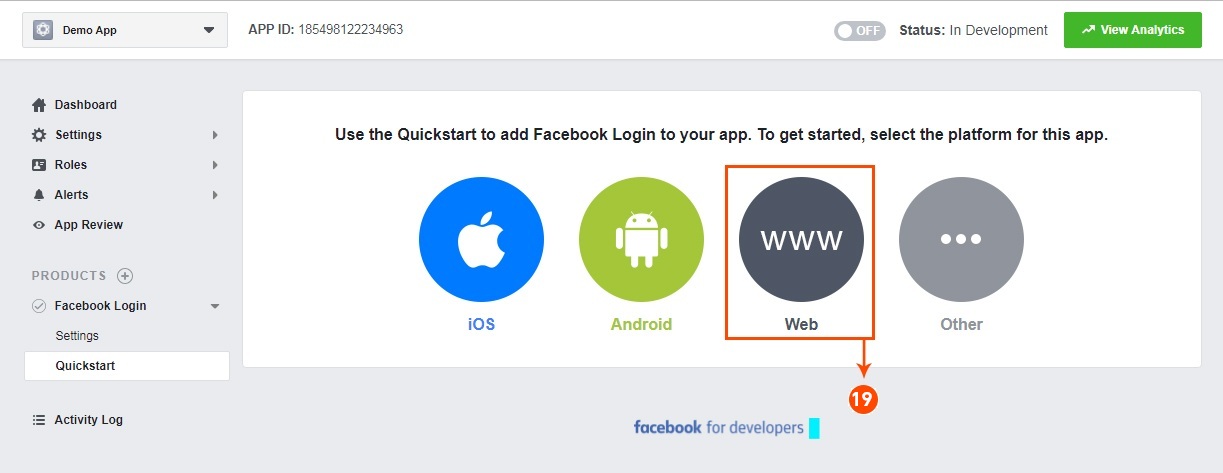
Step 19: Select web as the platform for the app.
Step 20: Now click on save.
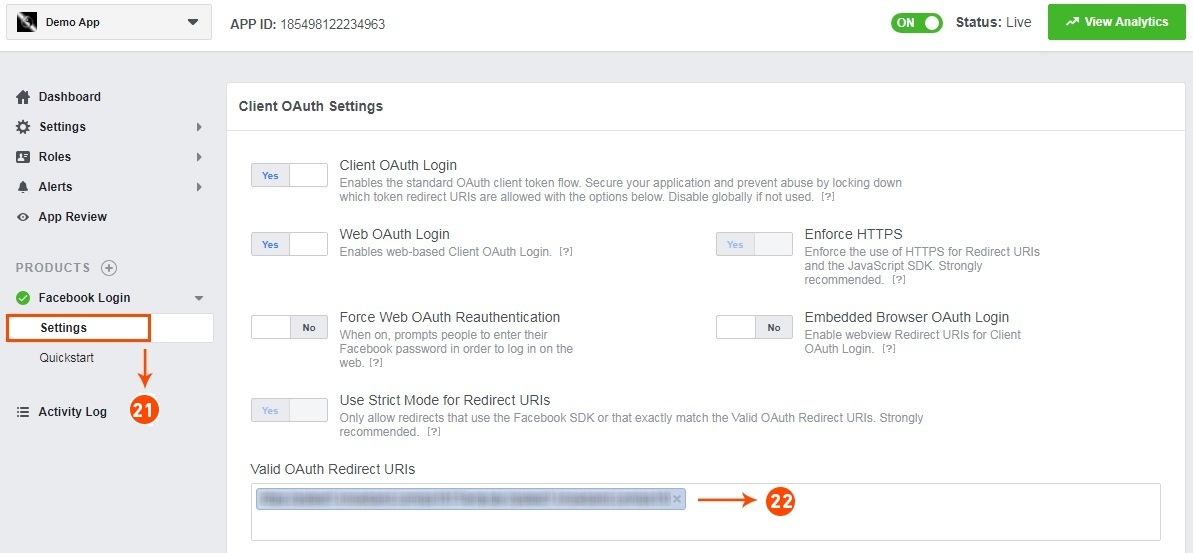
Step 21&22: Click on Settings and add a Valid OAuth Redirect URIs.
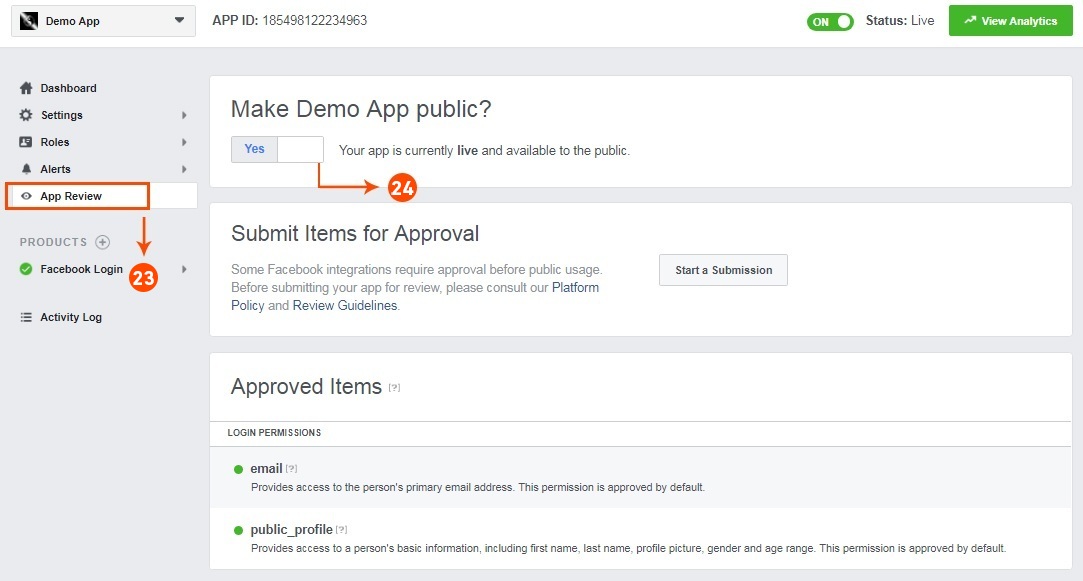
Step 23&24: Click on “App review”. And mark “Make ‘your app name’ Public” to Yes.
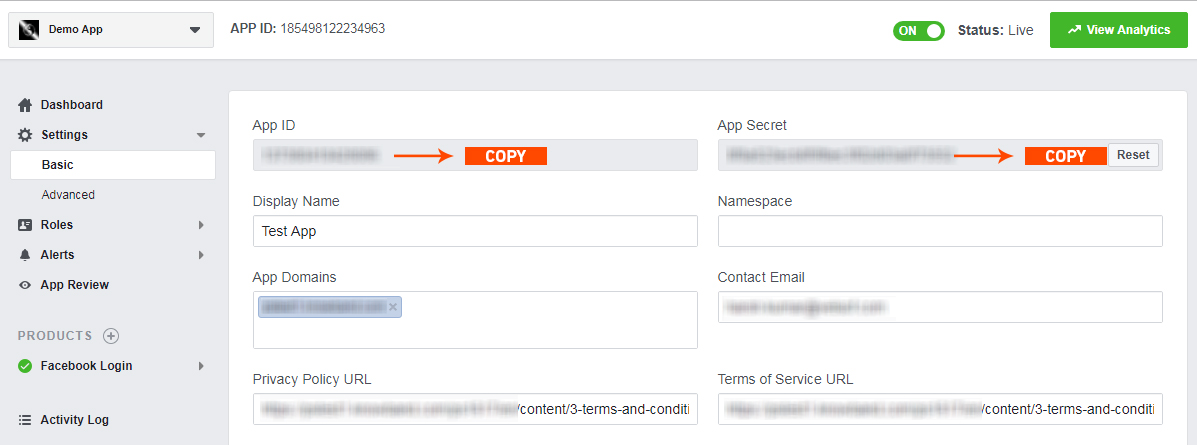
Final Step: Copy the App ID and App Secret and paste it into the fields provided in the module.
How to get Google App details?
Go to Google Developers Console (https://console.developers.google.com/project) or click on the link given top right of the respective tab on the module configuration page.
Now click on Create Project on the left of the page.
Enter a name for your project and proceed to the next step.
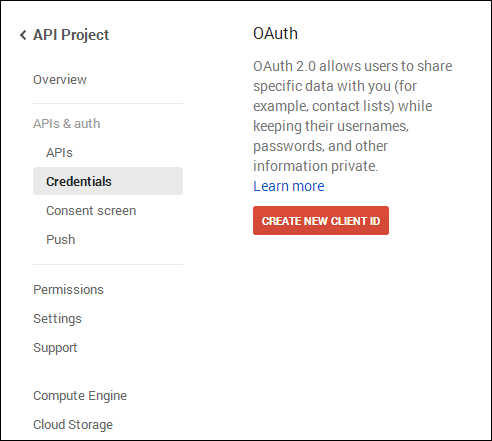
Now click on APIs and auth-> Credentials from the left menu as shown below.
Click Create New Client ID button from the right panel of the screen.
You may have to fill the form for Consent Screen before proceeding. To do so, that you have to click on Consent Screen in the left menu as shown in the image above.
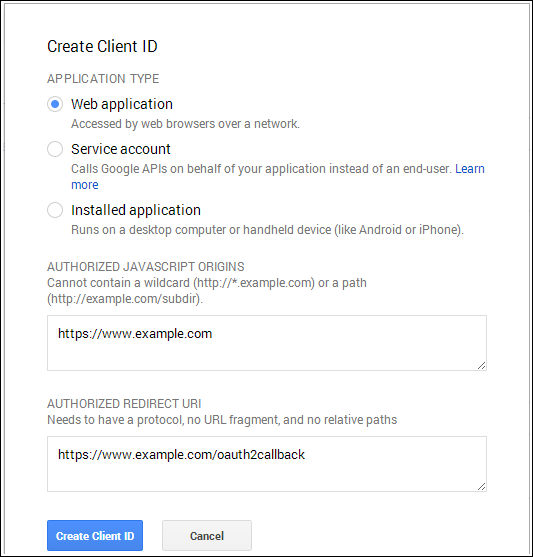
Fill the pop-up form with below details:
Application Type: Web Application.
Authorized JavaScript Origins: Your store domain name (https://www.yourstore.com).
Authorized redirect URI or URI of Loginizer redirect page:
In case you are using SEO Friendly URL for your store then use this –
Please make sure that the Default Application Permissions are selected properly in order to use the app. As shown in the above image.
Now you can use the API details of the app to let your customers login to your store using their linkedIn account.
How to get Live App details?
Go to Microsoft Development Center (https://account.live.com/developers/applications/create) or click on the link given top right of the respective tab on the module configuration page.
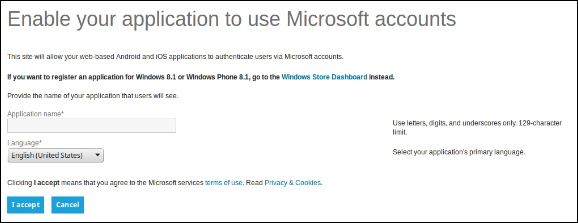
Enter the Application Name and click the I Accept button.
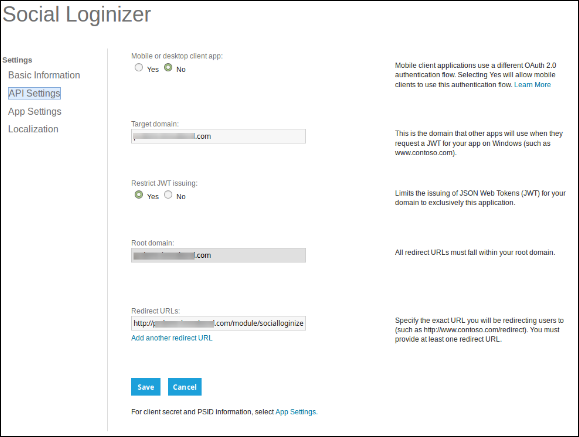
From the left menu select API Settings.
Now provide your store domain and Loginizer Redirect URL as
In Target Domain enter your domain name (example:- https://www.yourstore.com)
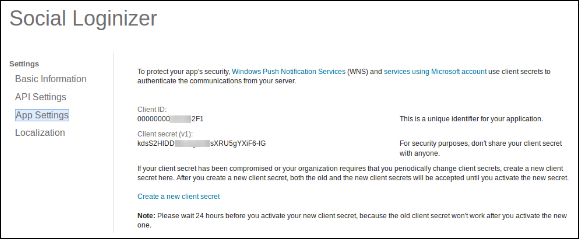
Now from the left menu click App Settings and copy your Client ID and Client Secret.
Now you can use the details of the application to let your customers login to your store using their Live or Microsoft Account.
How to get Twitter App details?
Go to Twitter App Management (https://dev.twitter.com/apps) or click on the link given top right of the respective tab on the module configuration page.
Click Create New App button.
Enter Application Details as follows:
Application Name: Name of your Application.
Description: 10 to 200 characters description of your application.
Website: Your store URL.
Callback URL: Loginizer redirects the page URL of your store.
In case you are using SEO Friendly URL for your store then use this for redirect URL –
Now, Click Yes, I agree, and then click Create your Twitter application.
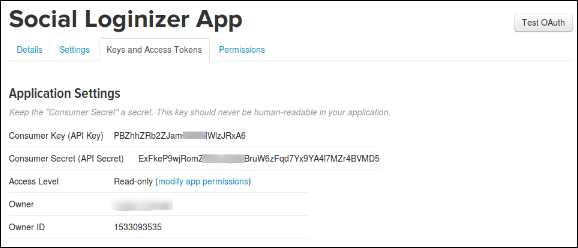
Next, select the Keys and Access Tokens from the menu below your Application Name and copy your API Key and API Secret.
Now you can use the details of the application to let your customers login to your store using their twitter account.
How to get Yahoo App details?
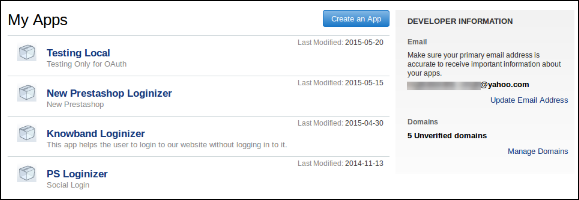
Go to Yahoo Developer Network (https://developer.apps.yahoo.com/projects) or click on the link given top right of the respective tab on module configuration page. Click on Create an App button to proceed.
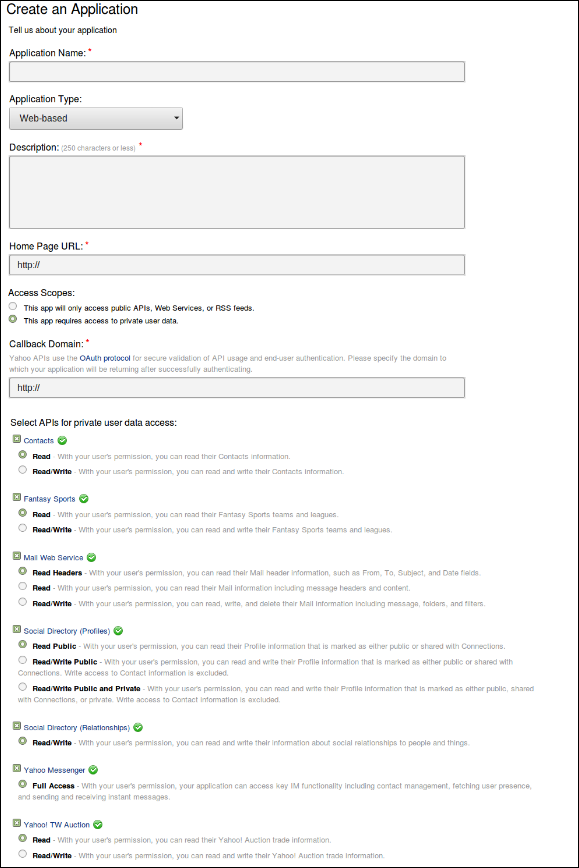
Fill in the required details as per instructions. Home URL will be your Store URL.
In case you are using SEO Friendly URL then use this for the callback domain:
Please make sure that the permissions for the app are properly selected while creating the App as shown in the image above.
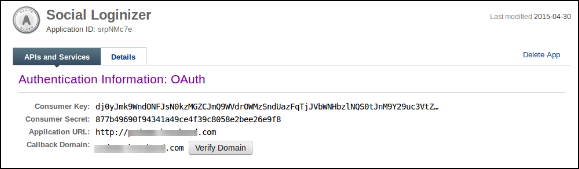
Once the application is created you can copy your Consumer Key and Consumer Secret.
Now you can use the details of the application to let your customers log in to your store using their yahoo account.
How to get Amazon App details?
Go to Amazon Developer Network (https://login.amazon.com/manageApps) or click on the link given top right of the respective tab in the module configuration page.
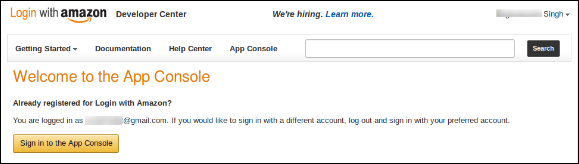
Click on the Sign in to App Console button.
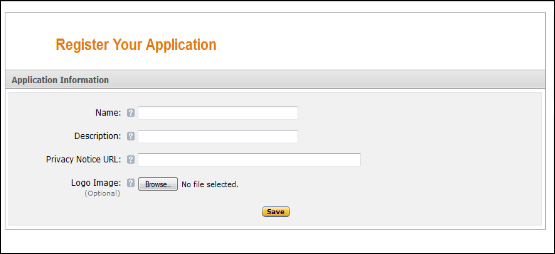
After successful login to App Console click on the Register New Application button in top right of the page and you will be redirected to the following page.
Enter Application Details as follows:
Name: Name of your Application.
Description: Description of your application.
Privacy Notice URL: Url of privacy policy page of your store.
Logo Image: Select the optional logo image of your store.
Click the Save button.
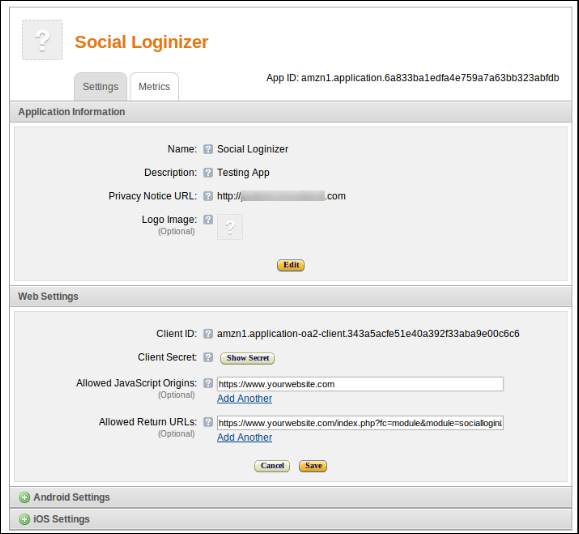
Now click on Web Settings to get your client id and secret.
Allowed Return URL: Loginizer redirects page URL of your store.
In case you are using SEO Friendly URL for your store then use this for redirect URL –
Note: To enable Amazon login into your website, your website must be secure with HTTPS otherwise Amazon login will not work.
Now you can use the client secret and client ID to let your customers login to your store using their amazon account.
How to get Paypal App details?
Go to Paypal Developer Network (https://developer.paypal.com/webapps/developer/applications/myapps) or click on the link given top right of the respective tab on the module configuration page.
Click on Create App button.
Now enter the name of your Application and click Create App Button.
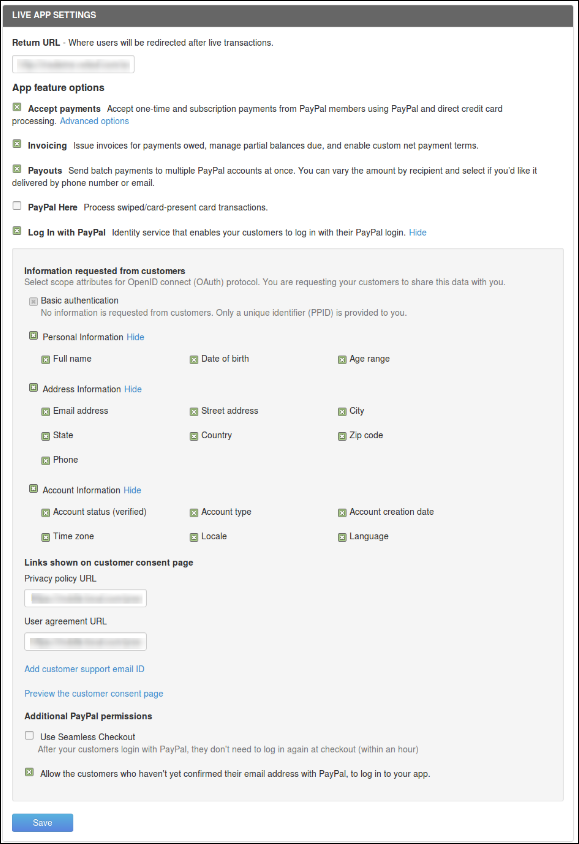
Set App return URL (live) as plugin redirect page URL of your store.
In case you are using SEO Friendly URL for your store then use this for redirect URL –
This plugin will unable seller and admin to contact with each other by raising a ticket. Seller can generate a ticket for any query to admin and get response by admin, in the same way admin also can generate a ticket to seller and also has the right to change the status and priority of raised tickets.
This section of Knowband Marketplace will be having following options to configure the module
1. Enable/Disable: This option will be having a toggle button with two specific values ON and OFF. This option will come under marketplace setting tab.. If this is set to OFF then none of the feature will be working and not even impacting any other section of website. By default, this option will be OFF.
Ticket System
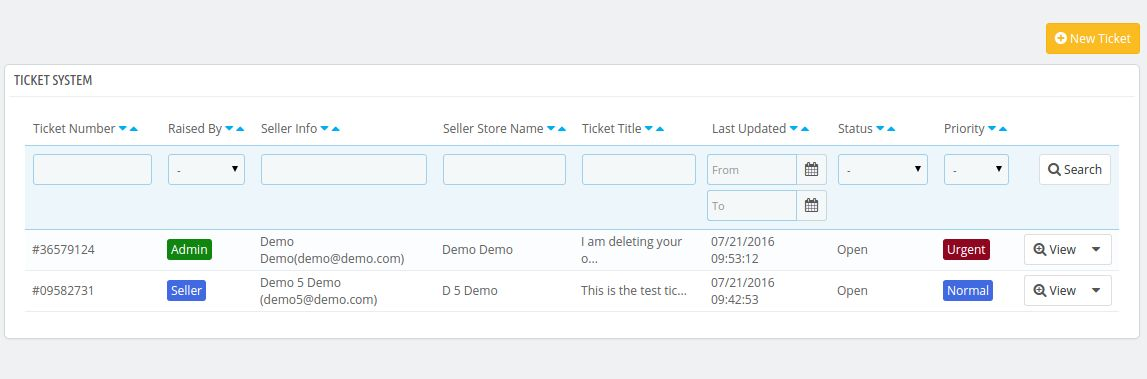
This section of Knowband Marketplace will have a table with following columns-
Ticket Number: This Column consist the unique id or reference number of generated ticket.
Raised By: This column will show whether the ticket is raised by seller or admin.
Seller Info: Shows the email address of seller.
Store Name: Shows the name of store of seller.
Ticket Title: Shows the title of the query.
Last update: Shows the Last update date of ticket.
Status: Shows the current state of ticket.
Priority: Shows the priority of the ticket.
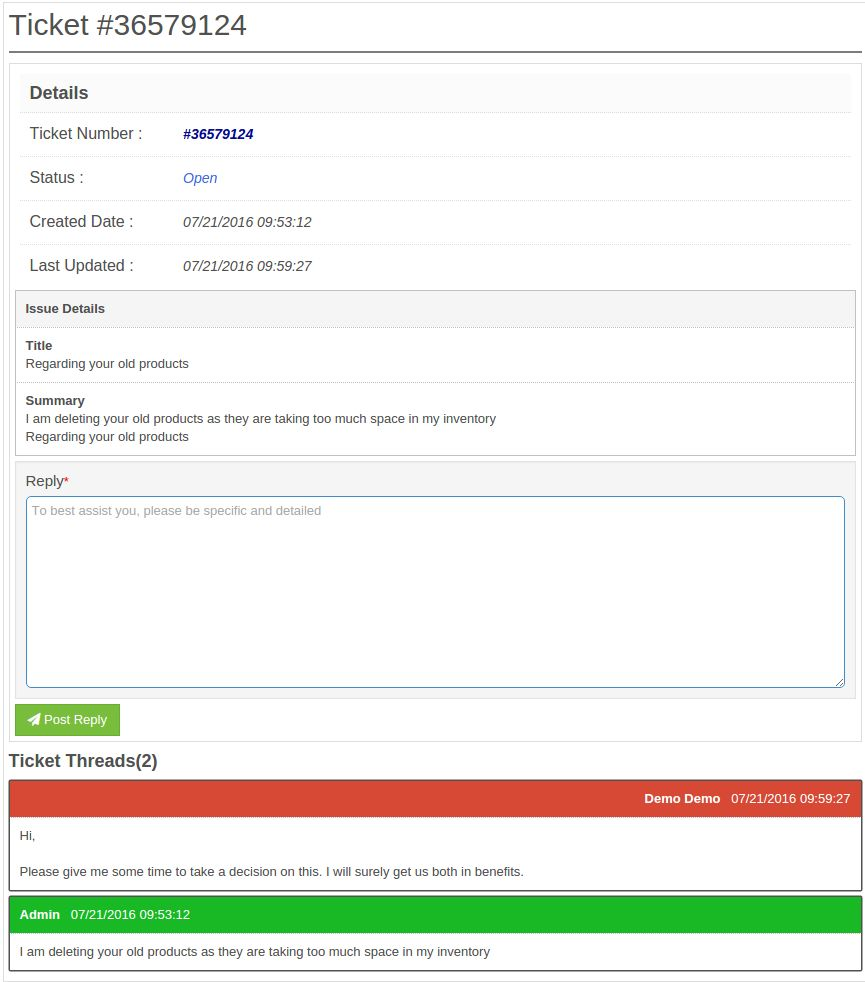
View : Redirect to the new page where all the information is available about the ticket.
Change State: Directly change the state of the ticket.
Change Priority: Directly change the priority of the ticket. View State Changes: Display the list of state changes for that particular ticket.
View Priority Changes: Display the list of priority changes for that particular ticket.
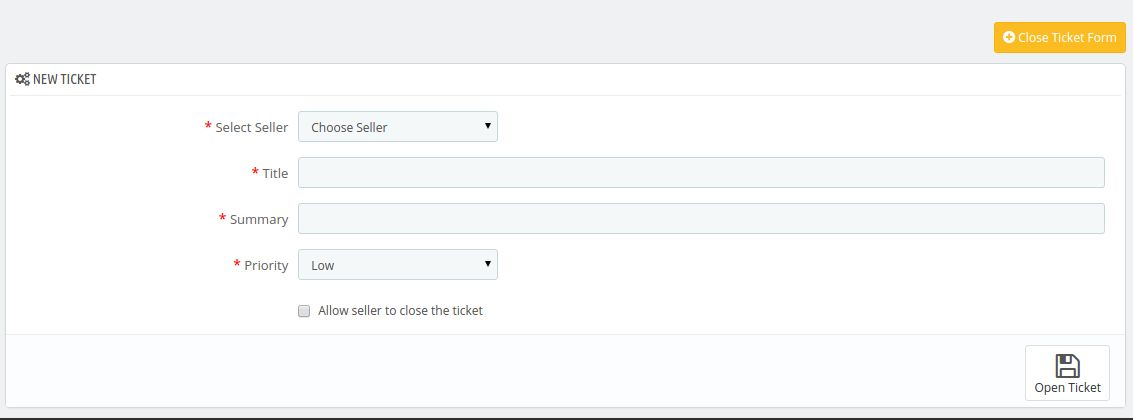
New Ticket: To create a new ticket click on New Ticket button and a form will come up with the following fields:
Select Seller: Select the seller for which the ticket is raised.
Title: Set the appropriate title for ticket.
Summary: Enter the details about the query to the seller.
Priority: Select the priority of the ticket.
When admin click on View link.
Front Office Implementation
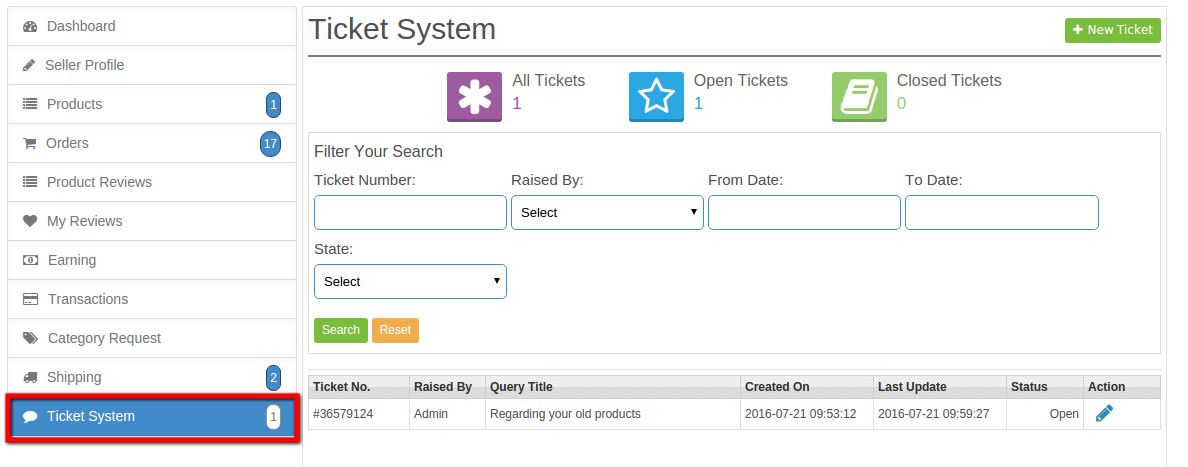
On front office a sub menu Ticket System is added under seller menu.
This tab contains the list of tickets generated by seller and admin to this seller.
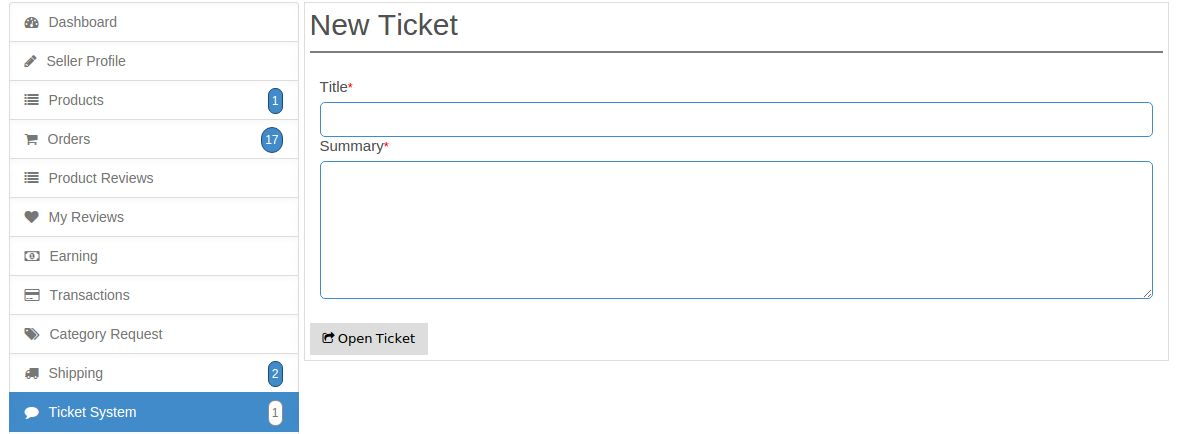
Seller can raise a new ticket by Clicking on New Ticket Button.
Seller can view replies by click on Edit action button
Don’t scratch your head anymore, if you have been facing less customer engagement on your store and your sales have taken a retreat. The reason for this unfavorable winds can be a lengthy, time consuming and non engaging checkout process that may be killing the interest of your site visitors towards your OpenCart store. The checkout process is definitely one of the most important component for any eCommerce site but it is often under- rated by most of the site owners around the world. If you have been facing a drought of customers and sales in your online business, let us discuss these two OpenCart extensions that can be your biggest bet for a promising eCommerce future.
When you want to provide a seamless checkout experience to your customers, you need to show a little attention towards this OpenCart One Page Checkout Pro extension. This amazing OpenCart checkout plugin from Knowband can take your checkout functionality to a new level for ensuring maximum customer engagement and sales. If you are thinking that there might be better alternatives in this category, we will advise you to take a quick look towards the various features and functionalities of this module which are explained below.
Provides language translation feature to cater a large number of global customers.
Offers high customization facility to store admin for making seamless customizations.
Allow store owner to design their checkout process according to the various available design layouts.
Brings social engagement on your store for maximum conversions and sales opportunity.
Comes with responsive design for ensuring accessibility on multiple devices like smart phones, tablets, smart phones and any other such mobile devices.
This is one of the most anticipated Knowband extension that is loved by numerous PrestaShop store owners around the world. It has all the right ingredients that can optimize the performance of your online store by delivering a simplified single page checkout process to your targeted customers. It can help in removing the various barriers from your OpenCart store that may be hampering your overall growth and conversions. Here are some of the powerful features of this OpenCart checkout plugin that are as follows:
Allow seamless addition of HTML content like text, images, links or any other site elements.
Ensure store admin to redesign their checkout process by allowing selected checkout fields to be hidden or revealed.
Provides greater control on your site and checkout process through an interactive admin panel.
Integration of popular social media logins for better customer engagement and conversions.
It is the beginning of a new journey in the field of checkout process with OpenCart checkout plugin that are explained above. They will help in engaging your site visitors on your online store and will persuade them to complete their checkout order for increasing your conversion rates and sales. Go surf our site now and get your million dollar module for your OpenCart store.
Folder structure of the supercheckout payment addon plugin folder.
Copy the whole folder named as supercheckout payment addon into your modules folder of the root directory of your PrestaShop store through FTP.
You can also upload zip folder of module by clicking on Add New Module button, which should appear just in the top right corner of module listing page.
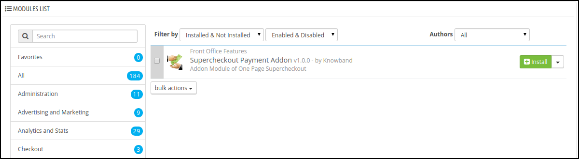
After that you will be able find the plug-in ready to be installed in the Modules in your PrestaShop store as shown below.
Click on the Install link to install the plugin.
General Settings
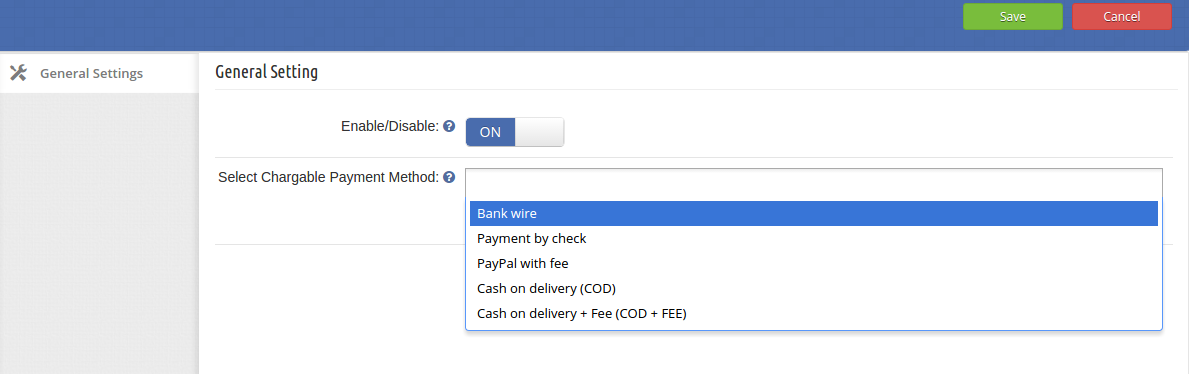
On clicking on configure link on module listing page (configure link will automatically appear once you install the plugin).
The tab consist firstly two options:
Enable/Disable : To enable the plugin, switch the enable button from OFF to ON. Default value will be OFF.
Select Chargable Payment Method : Select those payment method from the dropdown which charges a fee.
Note : After select/deselect the payment method save the settings.
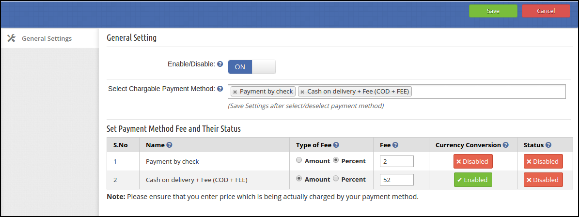
After Save the Settings a table will consist the following details:
Name : This Column will consist the name of payment method which are selected by admin.
Type Of Fee : This Column will give the option to choose the type of fee that the fee is in percentage or in amount.
Fee :This Column will consist the fee of payment method. By default, the value of fee is 0 zero.
Currency Conversion : Here Admin Can Enabled/Disabled the Currency conversion of fee at the front office on supercheckout page.By default, this option will be Enabled.
Status : This Column will be having a button with two specific values Disabled and Enabled. The fee will be shown on the supercheckout page only if the status will be Enabled. If this is set to Disabled then the fee of that payment method will not be displayed on supercheckout page. By default, this option will be Disabled.
Front Module
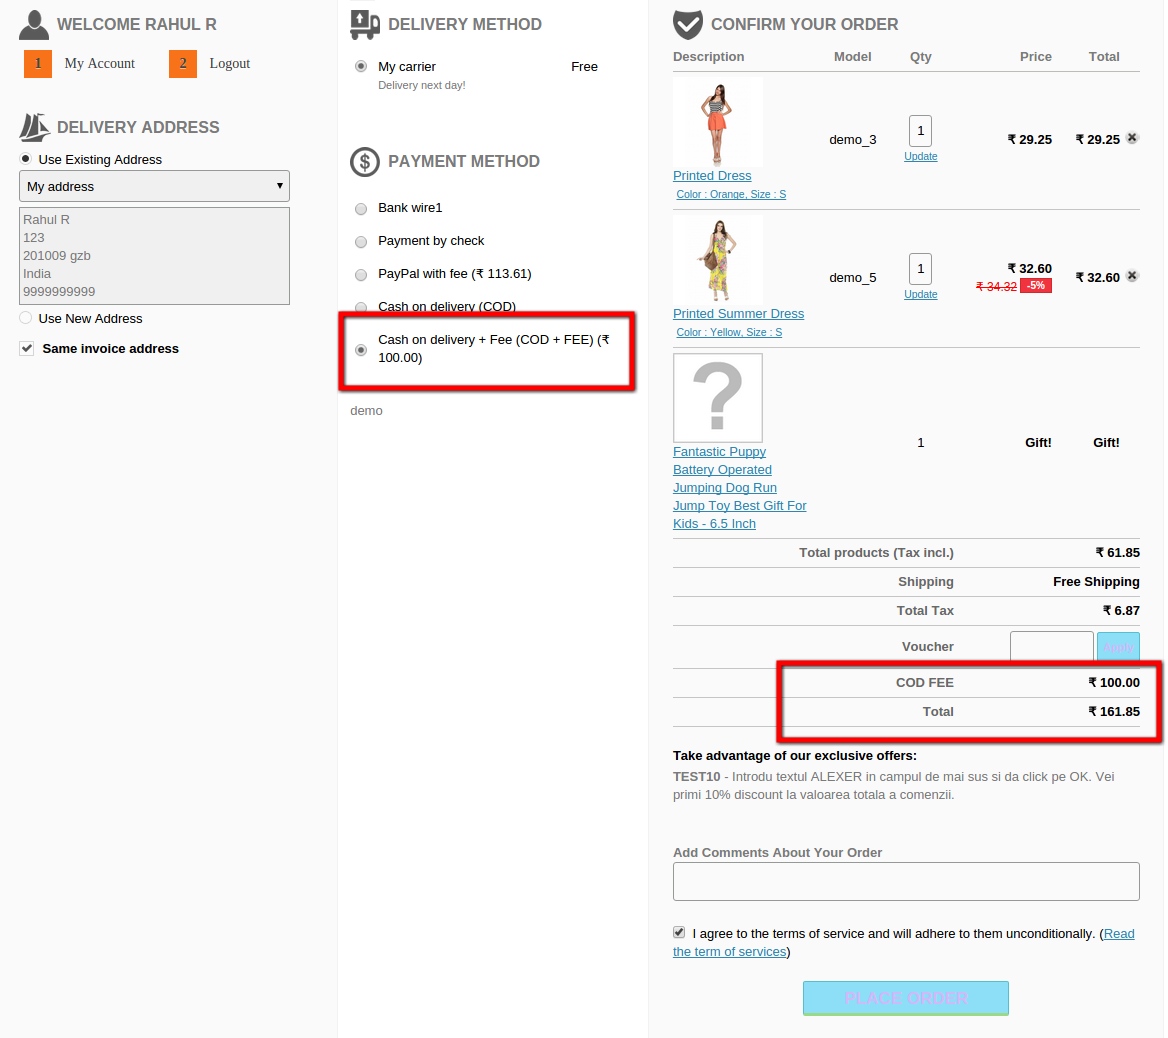
When the admin enables this plugin the payment method which are selected and enabled and have fee greater than zero are shown with their fee at supercheckout page of the front-end of the module. The total in the Cart summary will also updated now the payment fee is included in total.
Recommendations
To use this addon, you must have our one page checkout module.
Save Settings after select/deselect the payment methods.
Please ensure that you enter price which is being actually charged by your payment method.
Enabled currency conversion only if the payment method actually convert fee.
Checkouts are an important parameter that can make a profound impact on the growth and customer engagement potential of an online store. If it is not simple and engaging, you will definitely face severe losses in terms of customer attention, conversion rates and product sales. Every online shopper wants a simple and seamless checkout experience that can facilitate faster online shopping and can boost your product sales. Store owners are utilizing various techniques and use of checkout extensions are one among them that can instantly grab the attention of your site visitors. If you are facing the same issue on your PrestaShop store, here are the few Prestashop checkout extensions that can save the day for your business.
Sometimes, making changes in a cart during product addition for a purchase can be time consuming and deviates the mind of a shopper from a particular online store. Understanding this grave situation, it is now easy to purchase a single product item quickly with the help of this PrestaShop checkout addon. The module also has the facility to provide the access back to your previous cart in order to ensure a seamless checkout experience to your site visitors. It is available in 17 different languages, can be customized properly, shows compatibility with various themes and is adaptable to various types of devices like desktops, laptops, smart phones, tablets and other such platforms.
Lengthy checkout forms often acts as a stalemate for converting site visitors into potential customers. No online shopper would like to engage with a site which does not offer a simplified checkout formalities to its visitors. Keeping your checkout formalities restricted to a single page can effortlessly grab more customer attention and sales for your online store. This PrestaShop checkout addon has got added functionality like quick hiding or revealing of any checkout fields, customization of buttons, integration of MailChimp software, setting any field as optional, sorting of address fields, language translation, inclusion of custom CSS and much more. Collectively with all these features, it would not be difficult for your visitors to carry out the online shopping process on your eCommerce site.
Support of analytical information helps in speedy decision making and reduces the chances of failure. The checkout process is a critical stage for every online store and thus it needs to be much more simplified and engaging for your site visitors. With this PrestaShop checkout addon, you can seamlessly keep a track on your visitor activity regarding the checkout process and can get a clear insight about how customers are behaving on your checkout page. Once, you know the stage from where your customers are leaving, you can effortlessly retarget them for higher conversions and sales.
Online customers often get irritated when they notice illegitimate taxes and charges at the final checkout process and ultimately abandons the particular site. In order to avoid such situation, here comes this wonderful PrestaShop checkout addon that can reveal all the additional charges to buyers regarding the extra payment fees charged by various payment systems. Thus, there will not be any addition of hidden charges on the final checkout page.
When you have to achieve a seamless checkout experience without spending a single penny, you would not find a better alternative than this PrestaShop checkout addon. It allow store owners to make quick changes in their checkout process without costing a single penny. You can utilize it for any type of online store and it works perfectly for every third party theme and extension. It is simply an unmatched eCommerce extension that can be savior for your store.
It is time to invest your efforts and little money on these PrestaShop checkout addon for changing the future of your business entity. This each and every PrestaShop checkout addon is made up of multiple features and functionalities that can take your eCommerce store to new heights. So, explore the amazing world of modules with our Knowband store.
Steps For Installation of Prestashop Navigation Addon
To install this Prestashop Navigation addon, please follow the following steps:
1. Add addon folder under modules folder of your system.
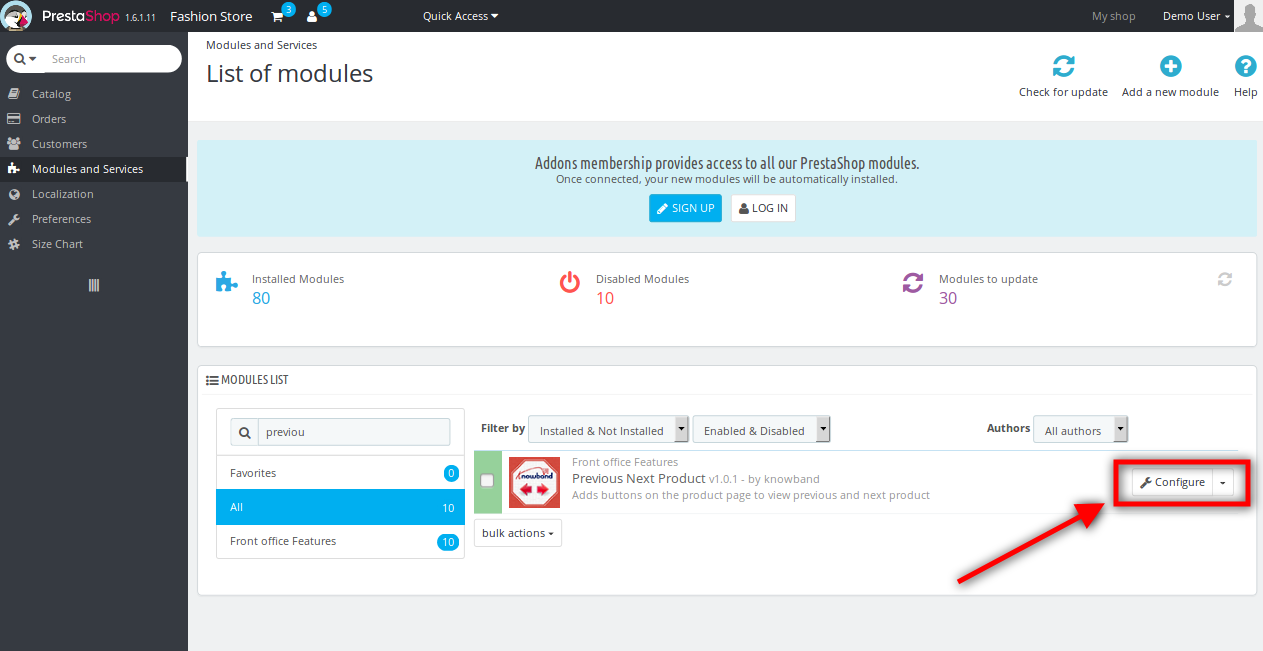
2. After adding this addon folder, system will list the addon on module page under front office feature category as given below:
3. Click on install to install the Prestashop paginator plugin. After installing the Prestashop product scrolling addon, you’ll see the ‘configure’ option at the place of install. (See the image above)
Admin Interface of Prestashop Paginator Addon:
Following features will be provided to the admin interface of this Prestashop Previous Next addon:
1. General Settings
General Settings of Prestashop Navigation Addon:
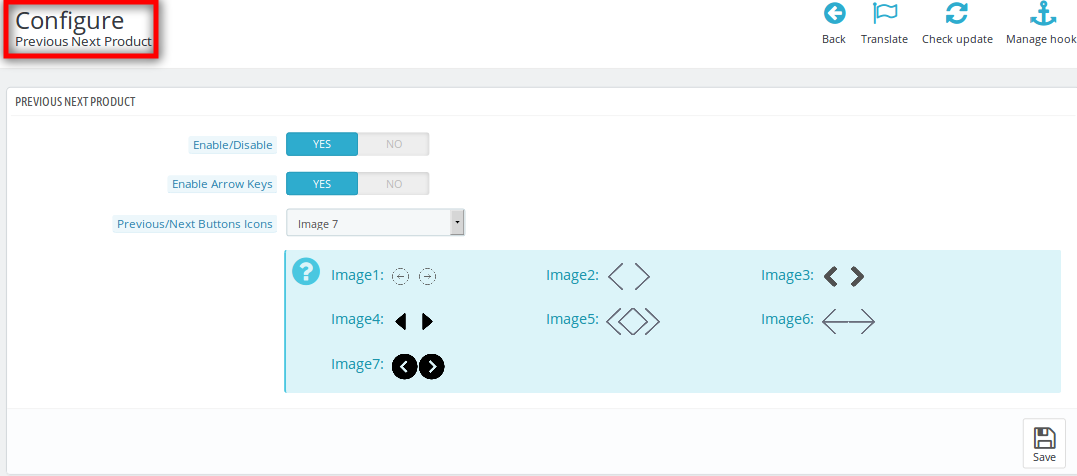
After clicking on configure link of prev next product page module General settings tab will open.
Fields listed will be filled with some default values
GENERAL SETTINGS TAB DETAILS:
Enable/Disable: Initially, this field of Prestashop navigation module will be OFF. User can enable/disable this Prestashop addon functionality by turning this ON/OFF.
Enable Arrow Keys: This button of the Prestashop product scrolling module lets the the admin to enable or disable the arrow keys navigating feature of the addon. Enabling this feature allows the customers to navigate the products using the arrow keys on the keyboard.
Previous Next Button Icons: Here, the admin can select the button images that would be displayed in the front end as the Previous/Next product buttons.
Front End Module:
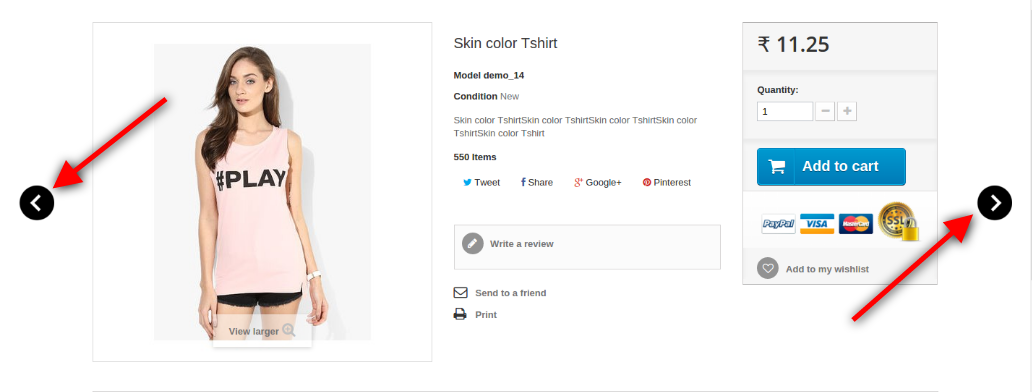
After enabling this Prestashop previous product plugin, the product page in the front of the shop will change a bit as the two buttons will be added in the side of the product.
The previous next button Prestashop module at the front-end appears as follows:
Watch the video tutorial here:
Are you looking to create simple previous/next button navigation on the product pages of your store? Use this customizable addon by Knowband to save the time of your customers and add more convenience to their shopping. Decide the look and feel of the button as per your choices to make it simple and attractive for the users. Buy this module from addon store and give an ultimate shopping experience to your customers.