Our daily lives now mostly revolve around e-commerce. Online retailers see a daily increase in customer purchases. Making an e-commerce site is no longer a challenging task because of the many shopping carts that are currently available on the market. The importance of gauging a site’s effectiveness is growing, meanwhile, as online retailers compete more fiercely. For any online business, the biggest challenge is to increase the conversion rate of their store.
This article has suggestions about Prestashop modules which are very helpful in increasing conversion. It is proven that the Prestashop plugin’s integration and usage when done correctly can bring out the best possible results.
What is the Conversion Rate?
The percentage of visitors who click on your e-commerce website or landing page that converts or completes the desired activity is the e-commerce conversion rate. Conversion actions can be in several categories, such as clicking a link on your website, responding to a survey or form, adding products to an online shopping cart, subscribing to a service, or signing up for an email newsletter.
The portion of an organization’s online purchases that result in sales is the conversion rate percentage. Divide the total number of conversions by the total number of PrestaShop visitors for your e-commerce company, then multiply the result by 100 to find the conversion rate. You can substitute the visitor’s number for the average conversion rate when calculating the conversion rate.
Methods of Boosting the Conversion Rate of PrestaShop Store
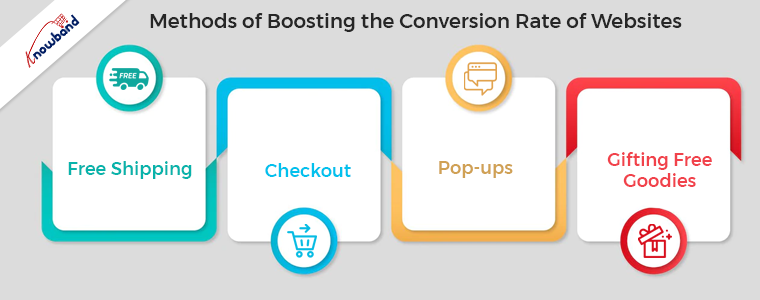
1. Free Shipping
With every transaction, free shipping is a welcome bonus. According to studies, a major proportion of buyers select a delivery-only store. PrestaShop Free shipping is one of the best ways to boost your conversion rate. This is possible to accomplish by including the cost of delivery in the cost of the goods and by using various free shipping manager Prestashop plugins for the same. For example, free delivery on purchases over a certain amount is there to allow users to buy without hesitation. Customers will have the inspiration to shop on your website with that kind of approach. So, the free shipping manager plugin of Prestashop is very important for the store’s success.
2. Pop-ups
The eye-catching nature of pop-up windows tempts website users to click or take particular actions. It is a tool that is useful to increase the length of time visitors stay on a website. Moreover, it is very useful to offer discounts or free delivery for carrying out a small survey, and more. The Prestashop exit pop-up plugin window improvement is possible in terms of both appearance and content. Moreover, it serves as a subtle incentive for visitors to stay on the website. An exit pop-up overload on the website should not happen at all costs and should be there on the website to offer deals. Prestashop exit pop-up is best to increase the conversion of the store.
3. Checkout
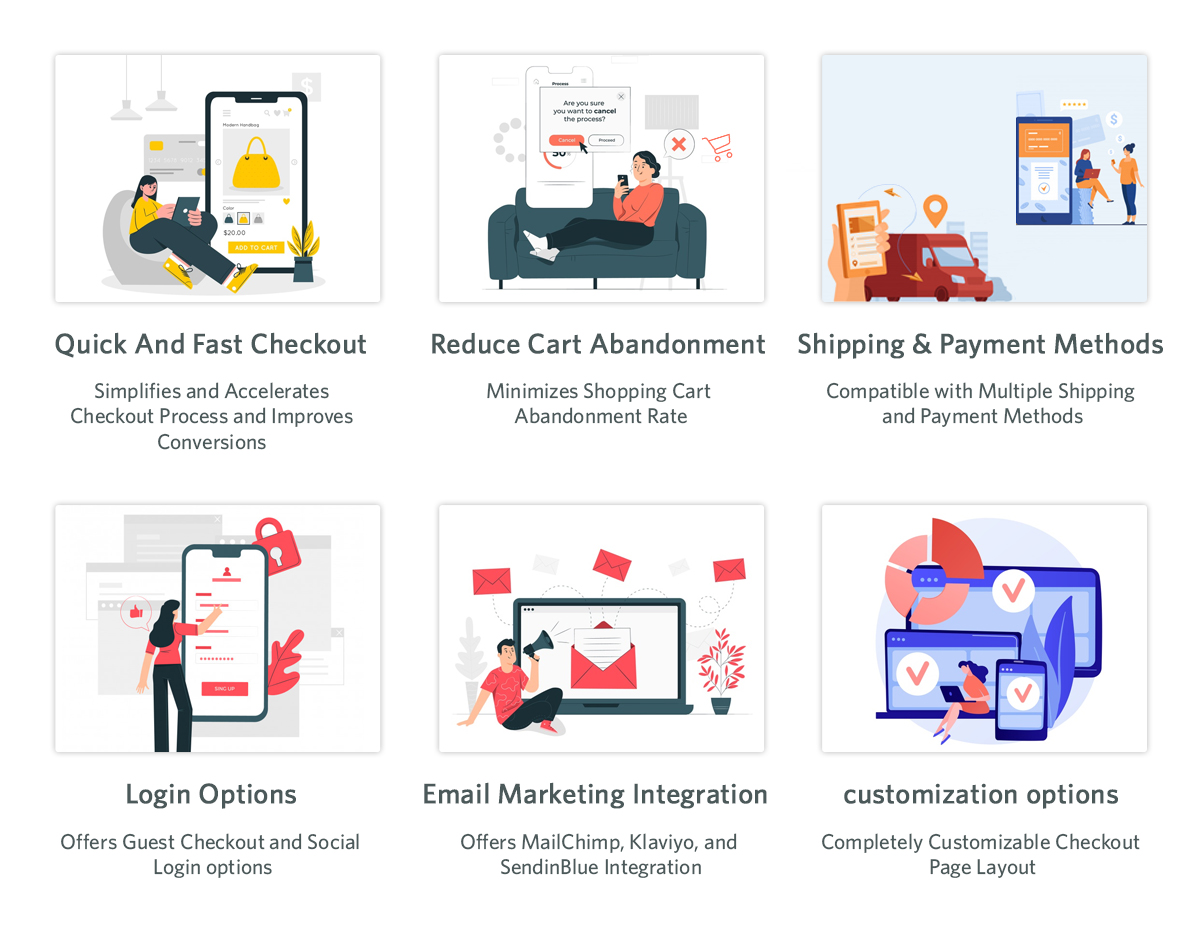
An increase in conversion rates is possible with improvements to the checkout method and the avoidance of default lengthy checkouts. This will result in less cart abandonment and increased conversions. A checkout page should be user-friendly, responsive, and balanced in style and format. The Prestashop one-page checkoutmodule is simple to sign up for and offers full layout customization. It is the best and most distinctive because it accepts a range of payment methods and shipping choices. The number of themes is compatible with the most recent version of the Prestashop One Page Checkout module. Single-Page Checkout of Prestashop speeds up the process, improving the checkout page. Some of the features of a successful checkout method are present below:
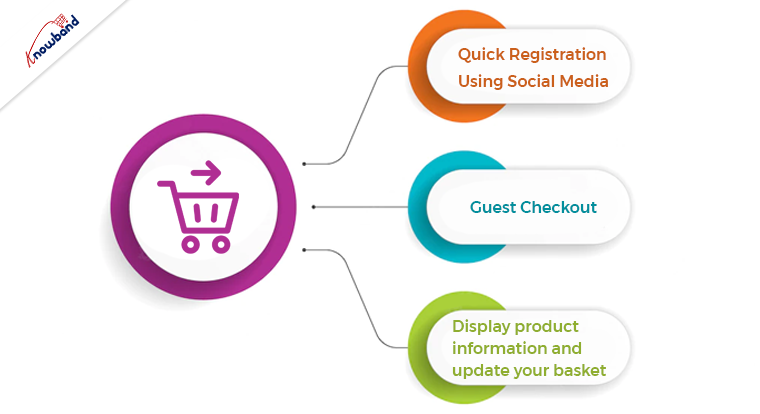
Quick Registration Using Social Media:
The new login fad is “social login,” which greatly boosts registrations. Facebook and Google are present as alternate social login options through the Prestashop one-page checkout plugin. While saving time, the store owner receives more complete information.
Guest Checkout:
This Prestashop one-page checkout module includes the Guest Checkout option. Thanks to this feature, customers won’t need to spend time filling out a lengthy registration form. Instead of leaving the cart empty if a consumer chooses not to sign in, they can finish a guest checkout. The customer can go to the checkout if they have previously registered with the store.
Display product information and update your basket:
The cart fields, like the checkout field, are customizable. With Prestashop’s one-page checkout, you can define which cart components you want customers to see. The administrator can remove the voucher entries from the Cart page. For example, there aren’t many fields that are readily visible to both registered users and visitors.
4. Gifting Free Goodies
Customers love to receive physical gifts, and if they are having them for free, it makes them come back for more. The gifts are for visitors after they purchase a certain fixed amount. The gifting feature of the Prestashop gift the product plugin is very useful for such instances, as it provides gifts depending on various conditions. The e-commerce admin users can set up the Prestashop gift product module for the enhancement of conversion rates. It is duly noticed that if users see gifts are on sale, then they tend to purchase that amount. Implementing the Prestashop Free goodies addon is one of the best conversion-boosting ideas for implementing in eCommerce stores.
Wrapping It Up
In this article, we discussed how to increase eCommerce store conversions. We have other tested methods for boosting conversions on eCommerce sites using Prestashop plugins. Furthermore, if you have an interest in learning more methods, please connect with us at support@knowband.com. Kindly let us know if you need any custom developmentsfor your business or related to our Prestashop modules. We are here to assist you with any concerns or issues related to our Prestashop modules.
As some fashion technology companies are successfully raising more cash and rising, there is another segment struggling to survive. Such online businesses are stalling because they are failing to respond to the change in the consumer’s media consumption habits. If you have a PrestaShop fashion store then you must read this article and find out those important features that you have missed so far.
Your products must have the best presentation possible. Since customers can analyze fabrics for their color and texture in retail fashion stores; they can put clothes on and see how they fit; they can see what color looks best on them instantly is not possible for an online store. To cope-up with that, you must have adapted the practices like size charts, color charts, video presentations, and many more.
Is your fashion store ready?
From launching a clothing store website to digital marketing, it requires several functionalities and you need to focus on various aspects of online business.
Now when you have already created your fashion store, you have to see what more can be added and how you can make more money from it in 2021. The customer experience is always a source to improve customer retention and conversion on your store.
Have a look at the top features that should add to your PrestaShop online fashion store that you should focus on.
Let customers add their favorites to Wishlist
There are people who consider adding products to their wishlist that they can buy sometime later. A wish list helps shoppers to create customized lists of items that they want to purchase and to save them for future reference in their user account. Wishlists signify the interest of a consumer in a commodity without an immediate buying intent.
Offering wish lists is an efficient way of reducing shopping cart abandonment and satisfying consumer sales that have indicated purpose but have not ended up buying.
Make it simple to use the Size Guide
Optimize your size guide: build a map of sizes. Display the corresponding sizes for any continent or country if your store ships internationally. If an individual shows your items, decide what size the model is wearing. This will give individuals a clearer understanding of product sizes.
When customers shop online, fitting remains among their primary concerns. And when not treated properly, as orders with incorrect sizes from consumers translate into service and refund requests, it is a source of extra costs for retailers.
Offer Loyalty Program for customer retention
An eCommerce loyalty program is a customer engagement tool aimed at retaining and engaging your current customers, so they purchase, shop more often, or engage more often with your brand in higher amounts.
The loyalty points or reward points increase customer retention. Simple to understand, the best services show a straightforward path to higher levels and incentives, and deliver a fun experience!
Coupon codes – Review Reminders
Asking for feedback or showing a comment form is to let your customers know that you trust the quality of your goods. And in online shops, where the consumer does not communicate directly with the product, the feedback of other customers is a bonus.
To find out more about your customers at the very moment they visit your site, you can use special optimization tools. Knowing your customers better means giving them exclusive deals according to their needs and personal tastes. The Product review reminder and incentive program provides customers some discount offers on every review they drop on your PrestaShop fashion store.
Have a robust Return Management Tool
Is your fashion store ready to manage return orders? The returns are always a headache for fashion store owners. Your store should have robust software that can manage all the returns, order cancelation, and refunds properly.
The return manager developed by KnowBand helps you manage all of it on your PrestaShop fashion store. It is the only available module that has features to handle the order cancellation as well.
Conclusion:
To optimize the online fashion store for further sales, the whole concept is to make the shopping experience better. Sales are more likely to rise if clients like the goods and find the correct details at the right time.
We hope from this article you have learned something new and that as you start or continue your journey as an online fashion retailer, you use it as a guide.
As more & more businesses are coming online, the competition among eCommerce companies is ever-increasing. To stand out among them while providing the most efficient online shopping experience to the online shoppers, having a professional functioning eCommerce website is a must. The PrestaShop eCommerce platform fits perfectly with that requirement.
Building an eCommerce website isn’t a piece of cake for everyone. A proper functioning store with appealing design doubles the audience and conversions for the business. PrestaShop is an open-source eCommerce solution with all the possible features that an eCommerce business (Start-up or Enterprise) would need. No need to indulge in coding or hiring a developer. Stick to the end of the write-up and you’ll be aware of the best possible way to achieve that.
The first thing that comes in the mind of someone willing to build/ design a PrestaShop website is the hosting space or localhost platform where the PrestaShop website can be installed. The rest is just designing & configuring the site. The options with PrestaShop are endless.
Where Can A PrestaShop Site Be Installed & Hosted?
You can either buy a domain & choose a hosting plan of your choice (shared/ VPS/ dedicated/ cloud hosting etc.). In the alternative, you can install your PrestaShop website on a web server solution stack package (like XAMPP, WAMP, MAMP) to design your PrestaShop website offline on your local computer. It can later be transferred & hosted to your choice of domain & server.
Websites Types To Build Using PrestaShop Platform:
You can opt to build an eCommerce PrestaShop website (with all the payments & shipment configurations set in place) or you can also make a catalog website to simply display your brick & mortar shop (with no payment & shipment options). Being a brick & mortar shop owner, if you also sell on sites like Amazon, you can also equip your catalog site with your products’ affiliate links.
This article will give you a deep insight into efficiently making an eCommerce PrestaShop website. Follow along until the end of this article for step-by-step guidance.
Main Steps For Building A PrestaShop eCommerce Website:
Step 1: Download PrestaShop from the official PrestaShop website. Step 2: Name your store & choose from a pre-existing theme template or create your own. Step 3: Upload your website logo or a sample image for your logo. Step 4: Add products to your catalog & add a relevant product description. Step 5: For your PrestaShop eCommerce site, set up the payment methods of your choice. Step 6: Set up the shipment configuration. Step 7: Activate your PrestaShop website & it will be live on your domain. Step 8: Start to sell online. You can manage the orders, customers’ data & even edit your site later on whenever needed.
How To Design A PrestaShop eCommerce Website?
1. Choose A Customizable Theme:
You can choose a PrestaShop theme that fits your needs but make sure that it is customizable to a good extent as well. Design an elegant & professional looking PrestaShop website aligning with business model & customers’ needs. You can customize your theme colors, change fonts, layouts & typography. If you plan to design your theme, ensure that it is responsive on mobile devices too.
2. Set Up Your Product Catalog:
On the website backend, in the catalog section, add & list the products on your website. If you are a bit experienced with the eCommerce industry, you must be aware that products can be easily bulk uploaded using mediums like ‘.csv’ files. PrestaShop allows that & makes cataloging convenient. Make sure to use a unique product ID for each product because when the same ids are encountered, the older products get overwritten.
3. Set Up Payment Methods:
The easiest payment option to configure on PrestaShop is PayPal. You can add more such as debit/ credit cards, e-Wallets, Net Banking/ Mobile Banking, Pay-On-Delivery, etc. to make it easier for website visitors to use their preferred method of payment. You can also configure multiple currencies if you are serving in multiple countries. Make sure to have secure payment gateways. Keep your whole PrestaShop website secure by installing an SSL certificate.
4. Shipment & Order Delivery:
Based on the location of your business & the location of the potential customers you are serving, choose the right shipment company. Some of the worldwide popular ones are FedEx, DHL, etc.
These are the basic things to get your PrestaShop site up and running. Later on, you can add more customization, add admins & editors with selective privileges, add support for multiple languages, add CMS pages for information like the ‘about us’ page, ‘contact-us’ page, etc. Install 3rd party modules to add more functionalities to your website, transform your site into a Mobile App, & a lot more.
If you need any expert assistance while PrestaShop development and designing, reach out to us at support@knowband.com. Our experts at KnowBand, a leading eCommerce Solutions Company, would be more than happy to assist you.
We, at KnowBand, offers everything for PrestaShop Stores along with development services. Check our best-in-class extensions and add more functionalities on your website:
Creating a PrestaShop website with your choice of theme is just the beginning of your business idea. To make it available for the front-end online shoppers & stand out from fellow competitors, you must add some additional modifications. These enhancements/additions are to make your e-store uniquely tailored to serve your customers in a better way.
No matter what modifications we make & what marketing strategy we follow, it is always worthy to have certain PrestaShop store customizations that can boost your sales & optimize your conversion rates. In this write-up, we will be seeing many such ways for the growth of the online eCommerce business.
#1. Home-Page Customization:
Use in-built features offered by PrestaShop eCommerce platforms to add relevant banners & attract more customers by showcasing new offers, discounts. Utilize action & display hooks to showcase products along with engaging graphics to lure your customers. Home-page is the face of a website so customize it according to the customer-centric approach. Also, keep your footer content relevant & useful for customers because the same is visible on multiple pages.
#2. Seamless Navigation:
Keep the user navigation efforts to be minimum & efficient. Set navigation bar as a sticky menu on both desktop & mobile website. Out of all categories on websites, make sure that the user doesn’t need to make more than 4 to 5 clicks to reach their choice of sub-categories or products.
#3. Language Support For Cross Border Business:
If you target internationally, make sure to serve your customers in their preferred languages. You can set it based on the location of your visitor or can manually let your customers set their choice of language while initial onboarding.
#4. Allow Personalized Recommendations:
You can instantly improve customer satisfaction, user experience & hence boost your sales by simply introducing personalization. These personalizations can also be made holistic by implementing them in ‘on-site’ browsing, personalized triggered emails, web/ push notifications, loyalty programs, advertisements. Some examples of triggered emails are welcome emails, abandoned cart emails, wishlist products’ price-drop emails, reactivation emails sent after inactivity, etc.
#5. Add A Chatbot:
More & more netizens are starting to prefer communicating to a company via chatbots. These chatbots could be a static one or even dynamic. Many chatbots can be easily automated to serve customers in a personalized way. You can also add live chat options or timed automated responses. Now, social messenger platforms are also offering static chatbots like Facebook messenger icon.
#6. Display Complementary Products:
Whenever a customer visits any product page, you can also recommend him/her with other products that are complementary to the initially visited product. This can be done for any category of products for instance, for apparels category, it can be made in the form of a lookbook.
#7. Pre-Fill The Checkout Entries:
Allow users to save the addresses. Use that data to prefill the checkout options. Similarly, payment preferences can also be pre-filled. Such options aid the checkout procedures & improve the overall customer experience.
#8. Loyalty Programs:
Treat your frequent shoppers with extra discounts like loyalty credit points, special coupons, etc. Having loyal & frequently returning shoppers are the best kind of customers an eCommerce business can have. They are usually also responsible for referring their friends to your shopping site/app. So, it’s good to offer them loyalty credits & awards to encourage them to shop more.
#9. Custom PrestaShop Module Development:
A lot of customizations can be made via simply using the pre-existing Prestashop modules. Such as ‘Returns Manager’ Module, ‘Spin & Win Discount Wheel’ Module, Lookbook Module, etc. The best thing about PrestaShop is being an open-source platform, any kind of module can be custom developed according to any kind of business needs.
#10. Mobile-Friendly Design:
Whichever thing you design in your PrestaShop website, make sure to make it responsive. This means that those designs should appear properly aligned on mobile devices & should be visually appealing with all its functionalities intact.
#11. Marketplace Integrations:
You can integrate other platforms on your PrestaShop site. Some examples are Amazon Integrations, Etsy Integration, etc. KnowBand offers various marketplace integrators for eCommerce. Check all of them from here.
Be sure to test all your customizations for quality assurance & debug wherever necessary. If you require any sort of PrestaShop Customization or any module on your site, feel free to speak to us at support@knowband.com.
1. Introduction to Prestashop Abandoned cart addon
Have you ever gone shopping for products online? Further, have there been times when you add the products to your cart and leave? Moreover, leave the store without buying them. Further, the process of leaving the cart without completing the purchase refers to as shopping cart abandonment. In fact, as per the report from Baymard, the average online shopping cart abandonment rate is 69.23%. Therefore, let us not talk about the Prestashop Abandoned cart (Email Follow up) Addon
Converting abandoned carts is a tough task. However, what if we can convince the owners of 20% of those abandoned carts to come back? Moreover, complete their purchases. Yes, it is difficult but possible.
Prestashop Abandoned cart addon by Knowband helps PrestaShop store owners to convert these abandoned carts. Further, into sales by regular email follow-up. Additionally, the “Abandon Cart Serial Reminders” addon sends automated emails with discount coupons. Furthermore, to the customers who abandoned their carts, thereby increasing the chances of conversion.
Prestashop Abandoned cart email follow up addon is very effective. Furthermore, when it comes to shopping cart abandonment. In fact, this Prestashop email follow up module by Knowband sends automated or manual follow up emails. Further, to the customers who abandoned their shopping carts. The Prestashop abandoned cart addon allows Prestashop store owners to create N number of Discounted and Non – Discounted Email templates. Further, they are for sending to the customers. The Admin can set the number of days after which the shopping cart is assumed abandoned. Moreover, the follow up email triggers.
Prestashop abandoned cart addon is now compliant with the GDPR. Further, the GDPR settings are available in the module. In fact, using which the Prestashop admin can comply with the rules of the GDPR. Additionally, please refer to the General Settings to know more about the GDPR.
What’s New?
Prestashop abandoned cart reminder provides the store owners to enable a reminder popup. Further, the customers will see as soon as they sign in to the store. Further, the display popup will contain the list of the abandoned cart items. Additionally, a discount coupon code so that the customers make purchases.
PrestaShop Reduce Cart Abandonment addon allows the store owner to send web browser push notifications to the visitors. In fact, even if they are not present on your website.
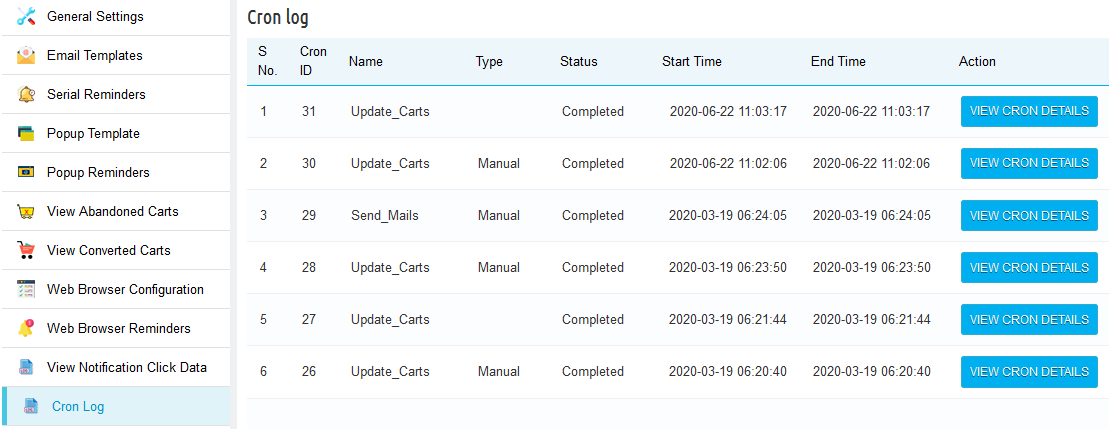
With the additional cron log functionality, the PrestaShop admin can check if the cron executes or not. In addition, they can also look for the abandoned cart details as well.
1.1 Prestashop Abandoned Cart Email Follow up- How it works
1. A customer visits your PrestaShop store.
2. He browses your store and adds products to his shopping cart.
3. During Checkout (sometimes before) the customer has to give the name and email address.
4. But due to some reason, they left your store without completing the purchase.
5. After some time their shopping cart, the admin assumes it to be abandoned.
6. After a defined time, you will send them the follow-up email. Further, reminding them about their left items in their shopping carts.
7. Some will visit your PrestaShop store again and convert, and some will ignore your follow up email.
8. After a few days of sending the first follow up email, you will send another email with the discount this time.
9. The customer proceeds to checkout and completes the purchase.
1.2 Key Features of Prestashop Abandoned cart addon:
The Knowband Prestashop abandoned cart reduces shopping cart abandonment.
Boost sales and conversion by convincing the owners of up to 30% of abandoned shopping carts on your PrestaShop store.
The Prestashop abandoned cart addon tracks abandoned carts of both Guest as well as Registered customers.
The Admin can send the abandoned cart to follow up emails with discount coupon codes. Further, all the changes can be done from the backend of the Prestashop email follow up addon.
Prestashop store admin can set the time after which the shopping cart abandons.
Admin can view details of the customers. For instance, their name, email id, IP Address, Time & Date from the back office.
The Prestashop abandoned cart addon by Knowband provides the test mode option for the admin to test the module. Furthermore, before making it live on the Prestashop store.
With the help of the Prestashop abandoned cart addon, the merchants can send the trigger to follow up emails. In fact, he can send them Manually or Automatically using cron.
The Prestashop email follow up module offers readymade email templates to the admin. In fact, the Prestashop store Admin can add and customize many more.
The Prestashop Abandoned cart recovery email addon facilitates the seller to view the abandoned and converted carts with ease.
Prestashop store admin can view the abandoned products in the shopping cart of the customers. Further, he can do it from the backend of the Prestashop reduce cart abandoned extension.
The Prestashop abandoned cart extension by Knowband enables the store merchant to analyze the store conversion rates. How? By analyzing the converted carts.
Prestashop Admin can analyze which products result in most shopping cart abandonment from the Prestashop email follow up addon backend.
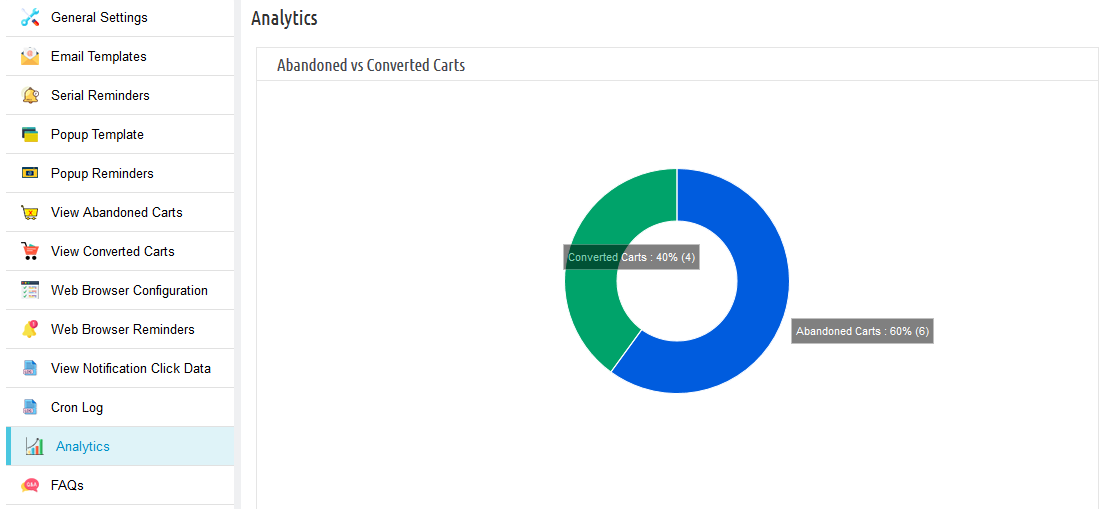
The Prestashop Abandoned cart has an interactive pie chart to compare the Abandoned and Converted carts.
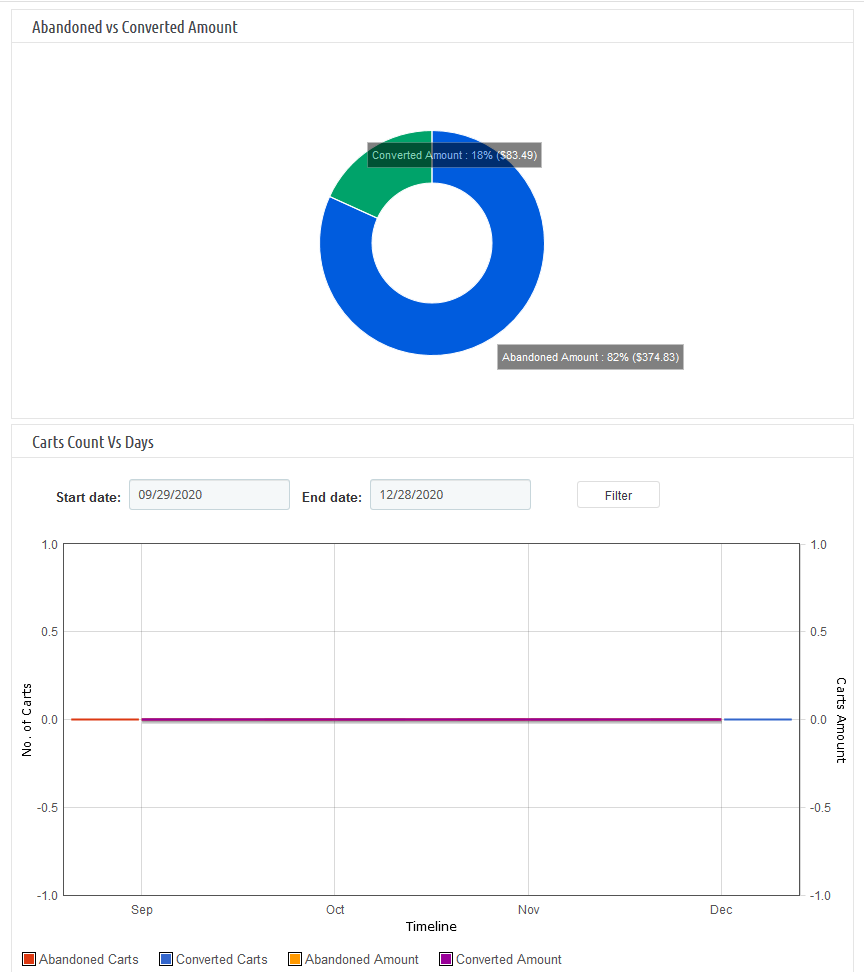
Interactive pie charts to compare the Abandoned and Converted amounts.
This Prestashop abandoned cart module by Knowband supports Multiple languages.
Prestashop email follow up addon is compatible with every theme.
The Prestashop cart abandoned addon is desktop, mobile, and desktop responsive design.
Prestashop email follow up addon is compatible with the GDPR module.
With the Prestashop abandoned cart module, the store owner can now display a popup reminder to the customers. Further, as soon as they visit the website. In fact, in this popup, the store admin can highlight the products. Furthermore, the ones that they left in the cart and can also highlight coupon codes.
The store owner can send the customers web browser notification reminders to customers to remind them about their incomplete purchase.
2. Installation Guide of Prestashop Abandoned cart addon
Extract the “abandonedcart” zip file.
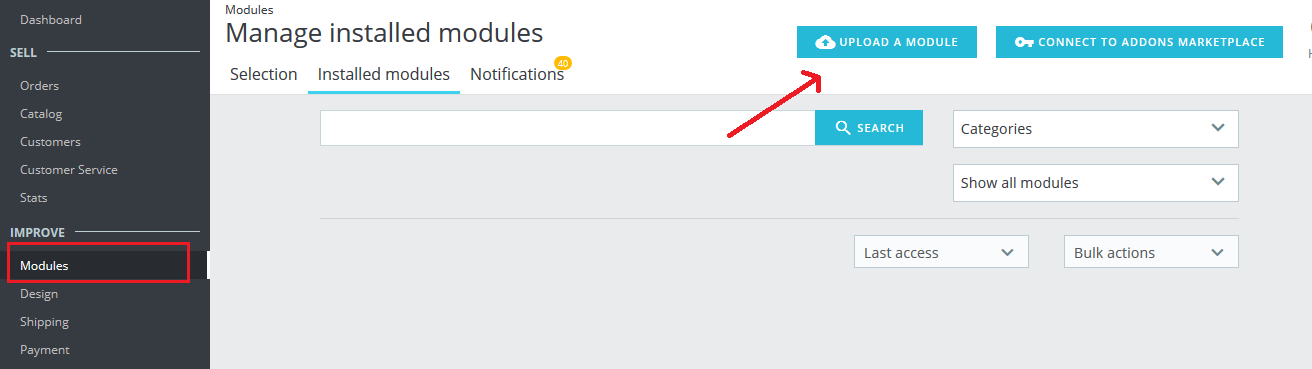
Go to the “Modules” section and click on the “Upload a Module” button. Select the “abandonedcart” file. Moreover, the Prestashop abandoned cart addon will be ready for installation in the “Modules” (Module Listing Page) in your Prestashop store admin panel as shown below.
After successful installation, the system will redirect you to the module configuration page. Moreover, when you come back to the module listing page, the “install” button will be replaced by the “Configure” button.
Suppose, you don’t see the plugin displaying on your module listing page. Further, search it by filtering the module with the following details:
Keyword: Prestashop Abandoned Cart
Author: Knowband
Category: Checkout
Filter by: Installed & Not Installed/Enabled & Disabled
3. Useful Cron Instructions
3.1 Reasons/Cases when the email is not sent to the customers
A. Email Id is not available(Guest customer)
B. If the cart does not satisfy the condition of serial reminders
If the minimum cart value is greater than the abandoned cart value. For example, the minimum cart amount is $50 and the abandoned cart amount is $45. It will not send a reminder in this case.
If the delay is set to one day, the reminders will not be sent to the customers. Further, whose carts are abandoned for less than a day.
C. The Prestashop Abandoned cart email follow-up addon will not add the abandoned carts with the cart amount 0.00.
D. If you have not set up the Cron properly or if the Cron is not working.
3.2 Types of Crons
There are two types of cron that run every hour.
1. Cron to update the Abandoned cart: This cron runs every hour.
For instance, the cron runs at 11:05, 12:05… and so on. In addition, you have set “Mark Abandoned Cart” as 1 hour. When cron runs at 11:05 it will add all the abandoned carts created between 9:05 to 10:05. For instance, you have set “Mark Abandoned Cart” as 0 hours. Further, it will add all the abandoned carts created between 10:05 to 11:05.
2. Cron to send a reminder email: This cron also runs after every hour.
For example, suppose the cron runs at 11:11, 12:11…..and so on and you have set the Reminder for 1 day. Suppose, the cron runs at 11:11. Further, the emails will be sent to all the abandoned carts between 10:11 to 11:11 of the previous day. In fact, if you have set Reminder for 2 days then the emails will be sent to all the abandoned carts. Moreover, between 10:11 to 11:11 of the day before yesterday.
3. Cron to send reminder notifications: This cron also runs after every hour.
For instance, if you have set marked abandoned cart as 1 hour. Moreover, suppose the cron runs at 3:14. Further, all the visitors who have created abandoned carts between 1:14 to 2:14 will get a reminder notification.
3.3 Procedure to configure CRON job
3.3.1 What is a cron?
A cron is a service that allows a user to automatically execute a script at a specific time.
For instance, you can set a particular PHP script to automatically executes every day at midnight.
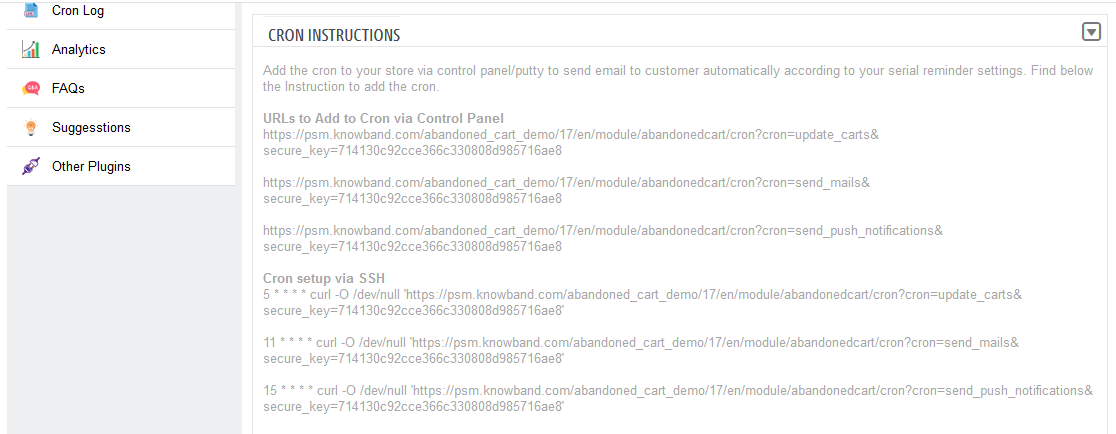
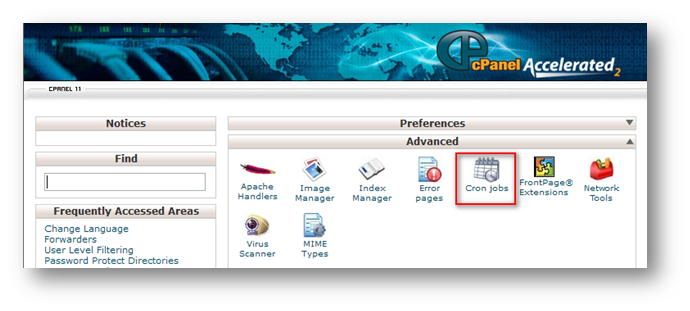
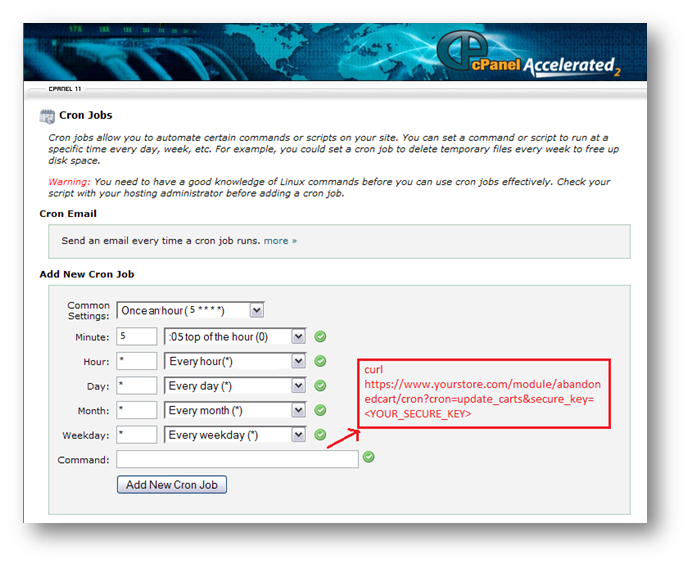
To set CRON for Abandoned Carts the following 2 URLs are supposed to add to the crontab of your server:
Note: Make sure to enter the proper command and the full path to the file.
2. By adding the CRON instructions to the crontab of your server (through Terminal/SSH)
For this method to work you are supposed to have crontab on your server. In fact, in case it is not installed then please contact the hosting provider.
– Login to the terminal (or SSH) of your server
– Run the following command: crontab -e
– It will list all the CRON jobs on the server in editing mode.
These lines will execute the desired CRON Jobs every hour.
– Save the crontab file.
4. Workflow of Prestashop Abandoned cart (Email Follow up) Addon
The Knowband Prestashop cart abandoned module configuration page will display the following tabs to configure the module as desired:
1. General Settings
2. Email Templates
3. Serial Reminders
4. Popup Templates
5. Popup Reminders
6. View Abandoned Carts
7. View Converted Carts
8. Web browser Configuration
9. Web browser reminders
10. View Notification Click Data
11. Cron Log
12. Analytics
13. FAQs
14. Suggestions
15. Other Plugins
Each interface is in form of a tab and each tab contains some specific settings that can be changed according to the need. In fact, each tab is explained below.
4.1 General Settings of Prestashop Abandoned cart addon
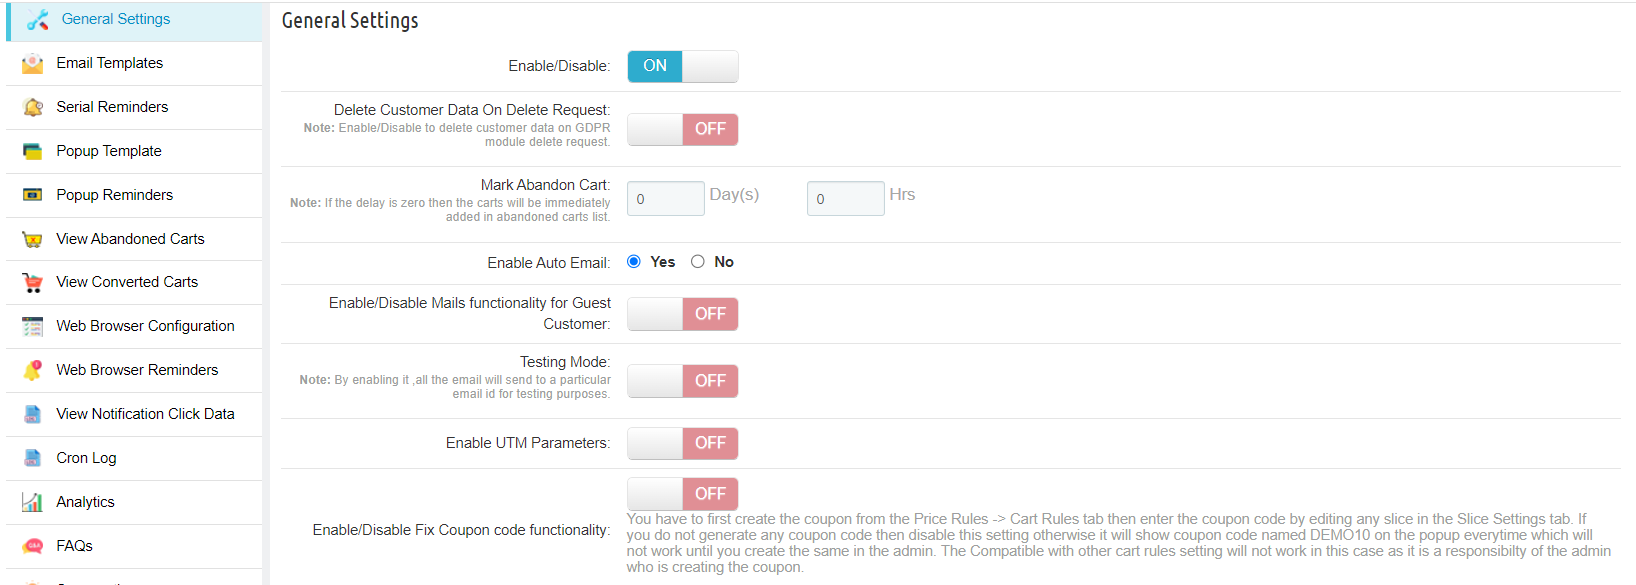
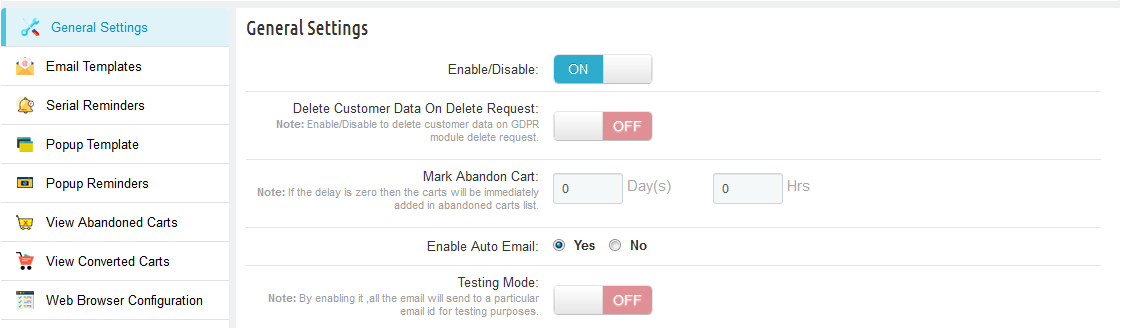
The General Settings tab of Prestashop abandoned cart module has the following options:
Enable/Disable: Prestashop store admin can Enable or Disable Abandoned cart module. In fact, if disabled, the cart abandonment will not be tracked and no coupon codes will be sent to the customers. Further, apart from this, the user can not see the content in other tabs.
Delete Customer Data on Delete Request: The Admin can enable the GDPR option. Furthermore, after enabling this option, the customer requests the admin to delete the data from their store. Therefore, the Module deletes the subscriber details automatically.
Note: If you are using the official GDPR module then you must need to enable this setting. Furthermore, the main purpose of this feature is to export and delete user data on PrestaShop GDPR module requests. In fact, it is also compatible with Prestashop GDPR Module developed by Knowband.
Mark Abandon Cart: The Delay time of Prestashop abandoned cart email follow up extension by Knowband is the period after which the cart considers to be abandoned. Further, the admin can mark the days after which the addon is assumed abandoned.
Enable Auto Email: This feature of Prestashop Abandoned cart recovery email addon will allow admin to schedule (Cron Setup) coupon email sending task or not.
Enable/Disable Mails functionality for Guest Customer: The functionality in question allows the administrator to share non-discount emails with guest customers when enabled.
Enable Testing Mode: Admin also has a Test mode feature to test the working of the module before making it live. Furthermore, add an email to the test mode section. In addition, mark the abandoned cart to 0 days and 0 hours to see the working of the Prestashop abandoned cart email follow up addon.
Enable UTM Parameters: Enable this by adding the UTM parameter in the module links so that customers can track the performance of the mail Google Analytics.
Enable/Disable Fix Coupon code functionality: The administrator can establish a fixed coupon code paired with a specific discount value. This ensures that each time a discount is shared via email, the system will exclusively consider the associated coupon code in the shared discount mail.
4.2 Email Templates- Readymade Email Templates
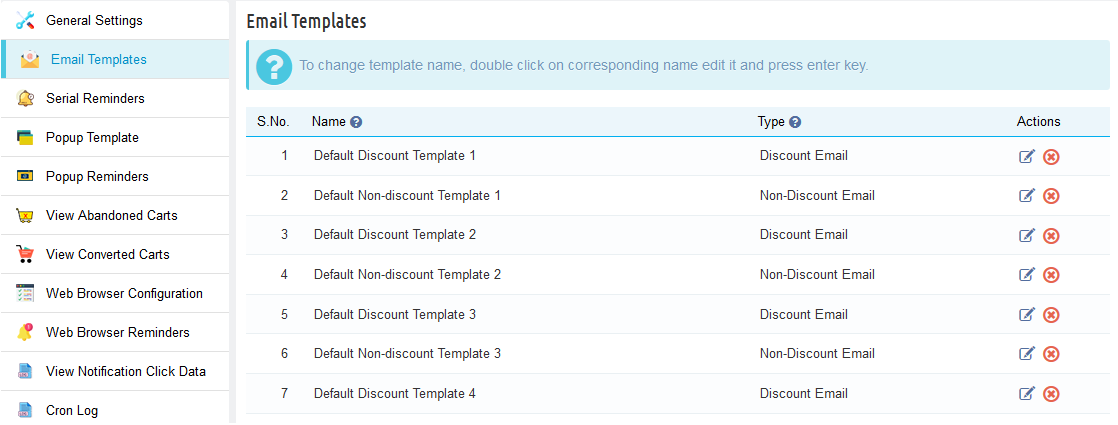
The Email Template tab of the Prestashop abandoned cart addon by Knowband has is the format of the email that will be sent to the customers. Further, this field of Prestashop reduces cart abandoned module contains some placeholders. In fact, whose values will be replaced when the email will be sent.
Prestashop abandoned cart addon offers 20 readymade email templates. Further, that can be sent to the customers. In fact, 10 with discount and 10 without discount.
Prestashop store admin can even add and customize N number of email templates. In fact, he can do it from the back-end of the Prestashop email follow up module.
4.2.1 Discount Email Template
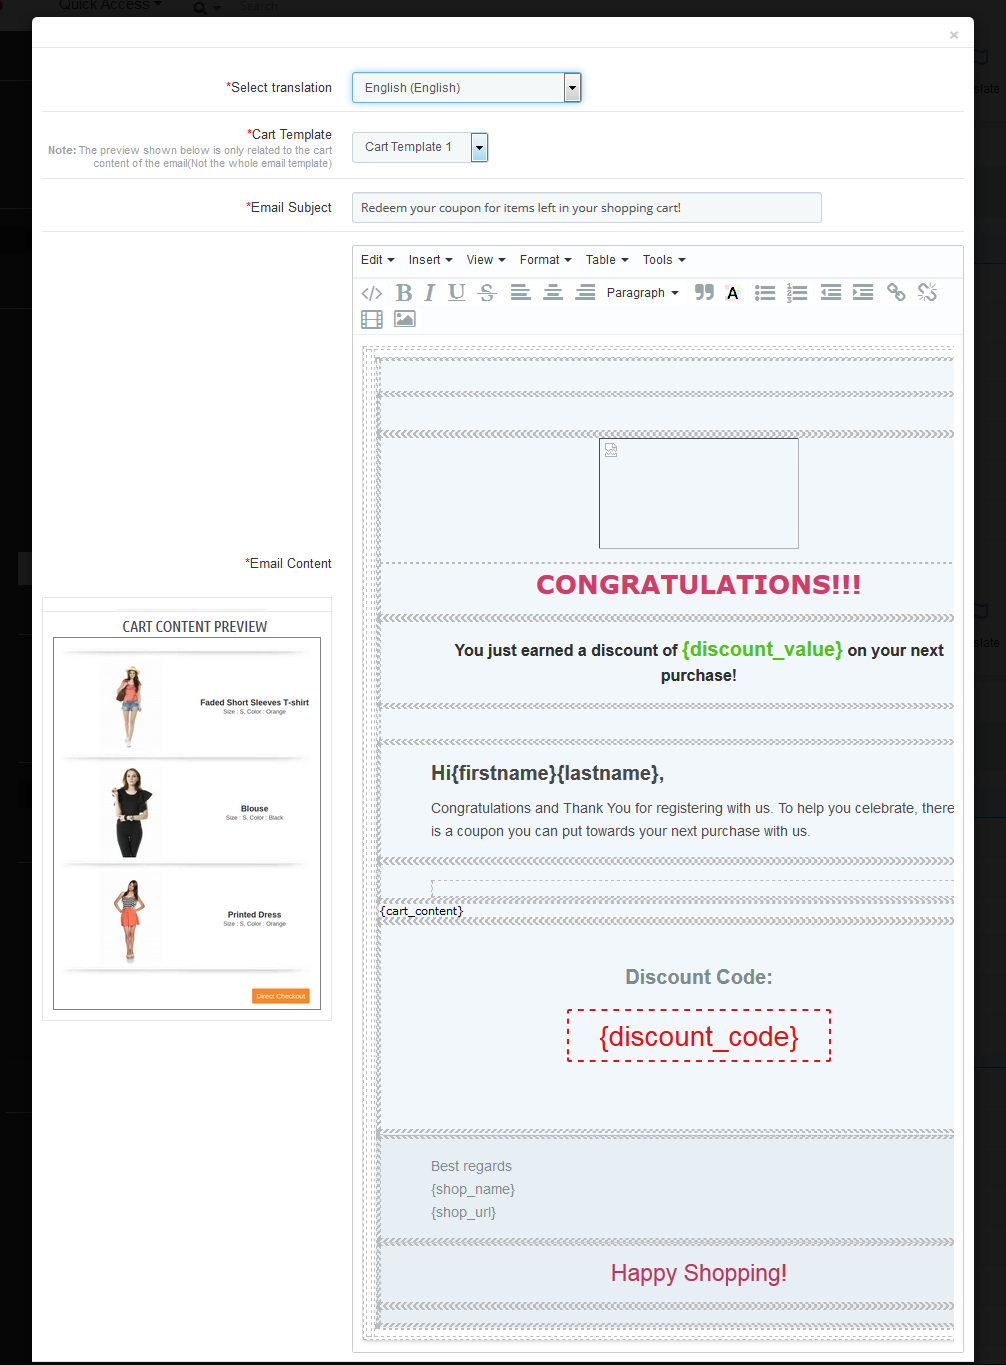
Discount Follow up Email Template will contain the information about the Abandoned products along with the coupon details like coupon discount, Coupon code, validity, etc.
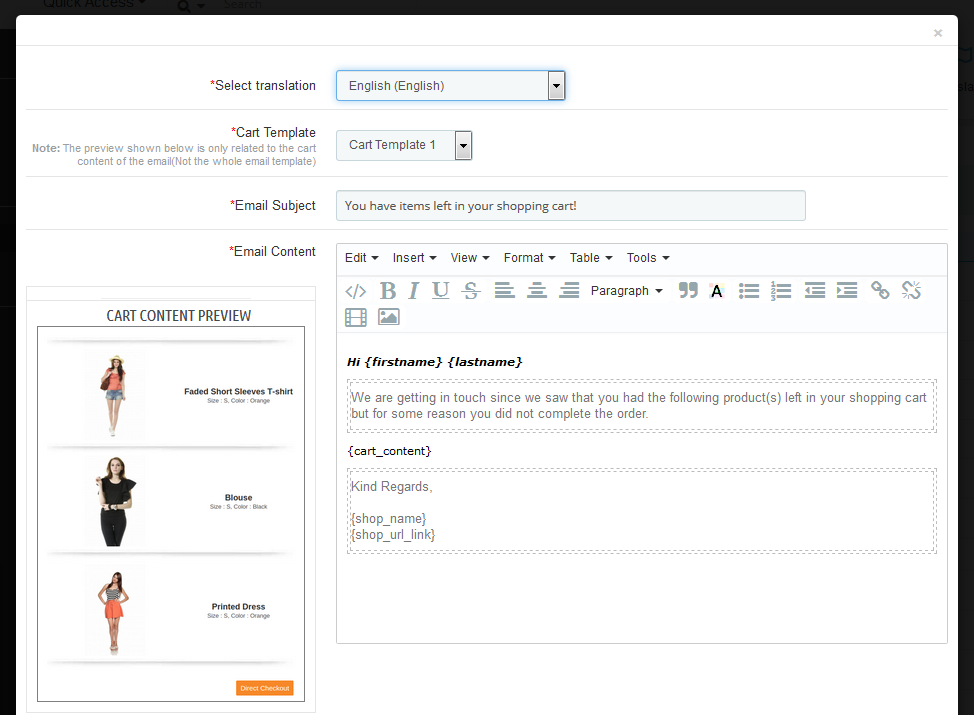
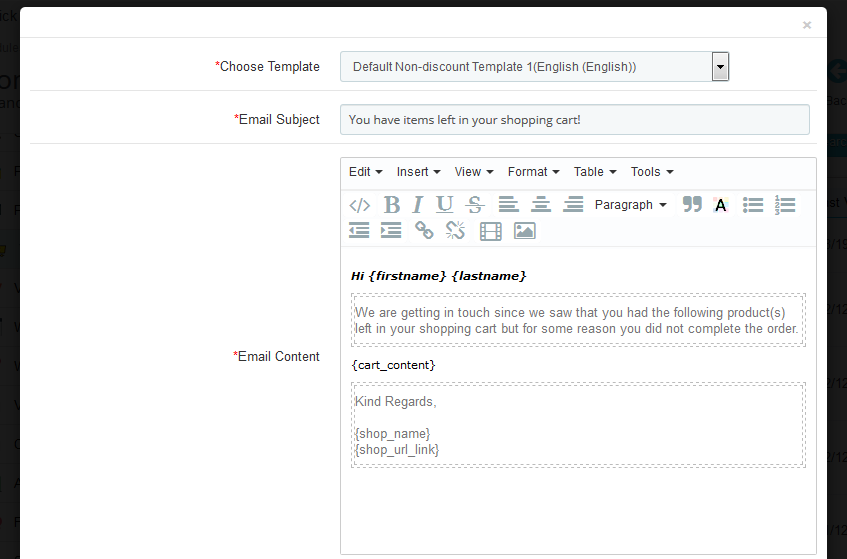
On choosing the template type the form for the email template will appear, this form will have the default template content by default and the Prestashop admin can change it as desired and then click on the “Save” button to save the changes.
Prestashop Admin can also choose the type of cart template which he/she wants to use the email template. This Prestashop cart abandoned addon are 10 different cart templates which the admin can use to make the templates look good.
4.2.2 Non-discount Email template
Non Discount Email Template will contain information about the Abandoned products. These emails are used as a follow up to the customers who abandon the shopping carts.
After saving the email template, it will appear at the bottom of the list of email templates, and to edit or translate the same the Prestashop admin has to click on the edit link in front of that email template.
Once the admin adds the email template, he has to translate it if there are any other languages (other than English) in the system by clicking on the edit button in front of the email template and choosing the desired translation language.
Note:
The Prestashop abandoned cart addon by Knowband provides an only English translation of the email templates, the admin has to manually translate the templates to any other language that is required.
4.3 Serial Reminders
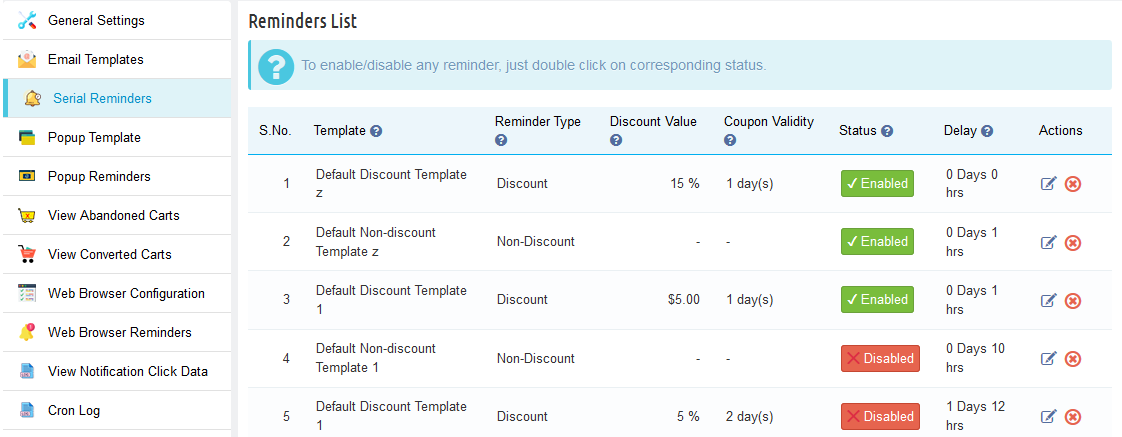
There are two types of reminders that are addable to the Knowband Prestashop cart abandoned cart addon:
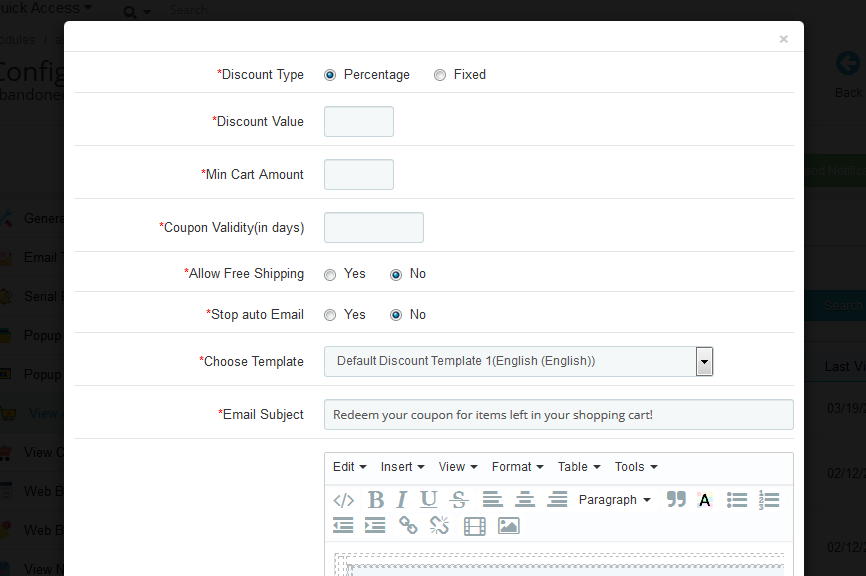
Reminder with a discount (This type of reminder contains a discount coupon with a discount type email template attached to it).
Reminder without discount (This type of reminder is just a regular follow-up to the customer about the abandoned cart. In addition, have a non-discount type email template attached to it).
In the “Serial Reminders” tab the Prestashop admin can add various reminders (both discount and non-discount) as desired. This tab contains a list of all the serial reminders present in the system.
Prestashop store admin can edit or remove any reminder by clicking on the Edit or Remove action button in front of the reminder.
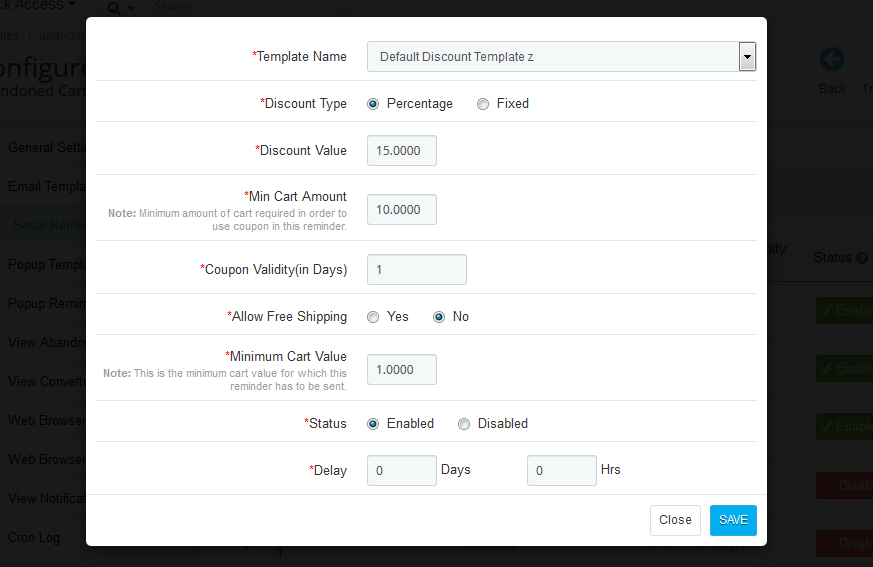
On clicking on the button, you’ll get a pop-up as shown below:
Non-Discounted Serial Reminder Template:
Template Name: The templates created in the Email Template tab of the Prestashop abandoned cart module by Knowband will list here. Select anyone from the drop-down list.
Discount Type: This field of Prestashop abandoned cart email follow up extension allows the admin to select any one option from, Percentage or Fixed type.
Discount Value: This field of Prestashop abandoned cart addon by Knowband enables the admin to enter the discount amount or percentage that you want to offer.
Min. Cart Amount: In this field of Prestashop cart abandoned addon by Knowband, the store seller will have to enter the minimum cart amount required to avail of the offer.
Coupon Validity: This field of the Prestashop abandoned cart module offers the admin to enter the number of days for which the coupons will be valid.
Allow Free Shipping: Select whether you want to allow free shipping or not.
Minimum Cart Value: This tab allows you to add a minimum cart value to use the coupon code in the reminder.
Status: Select Enabled this option of Prestashop abandoned cart addon, if you want to enable this serial reminder.
Delay: This field of Prestashop email follow up extension provides the admin to enter some details. For instance, the number of days, from the day when the customer adds the product in his/her cart, and, after which this reminder will be sent.
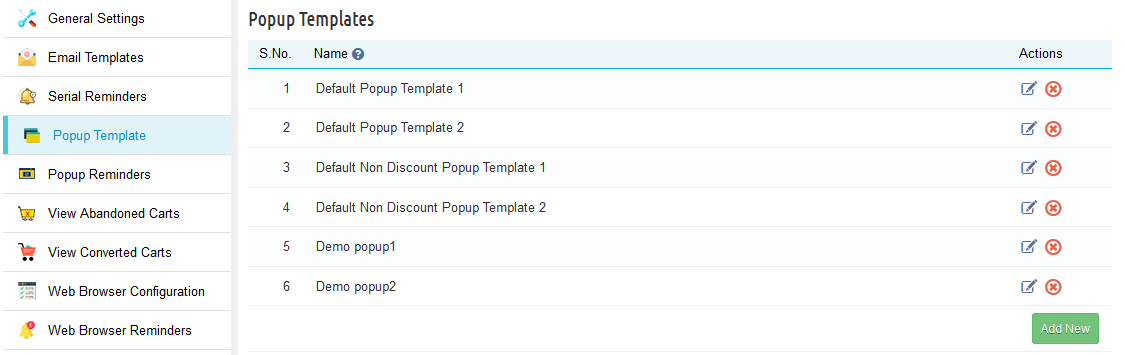
4.4 Popup Templates
The Popup Template tab of the Prestashop abandoned cart addon by Knowband has is the format of the popup reminder that will display to the customers when they are on the site.
Prestashop Abandoned cart addon allows the PrestaShop admin to create as many popup templates as they want. They get in total 4 templates, out of which 2 are default templates and the other 2 are non-discounted templates.
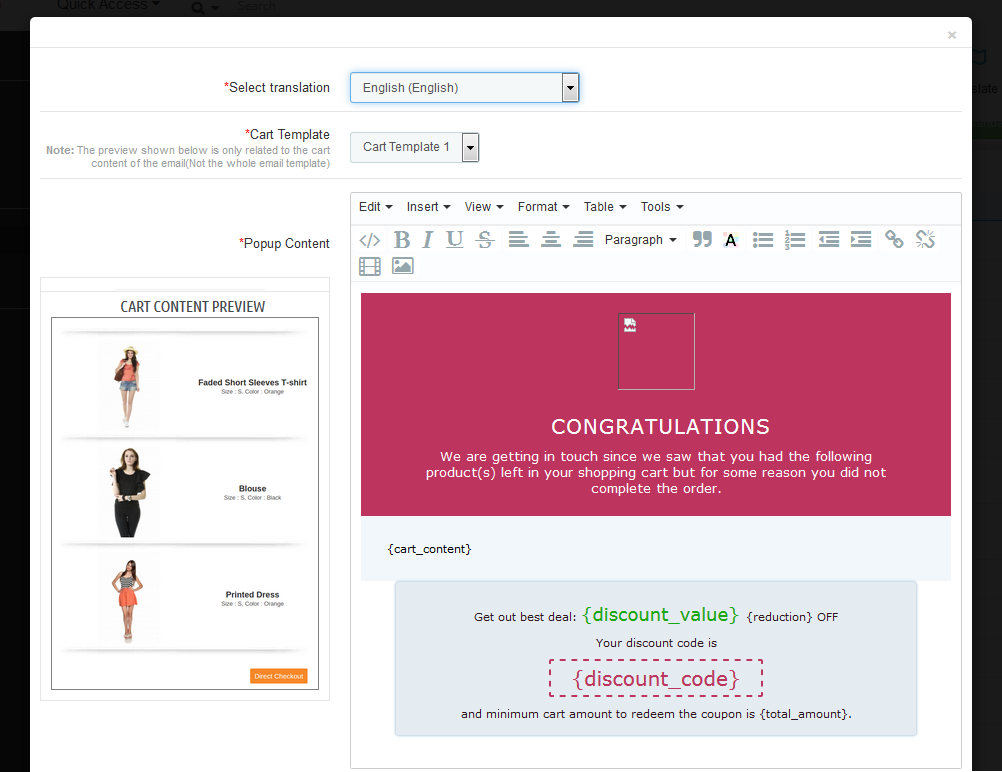
4.4.1 Discounted Template:
On selecting the discounted template, a template form will appear, in which the admin will have to choose a translation language and cart template which he wants to display on the store. They can also customize the content of the popup the way they like.
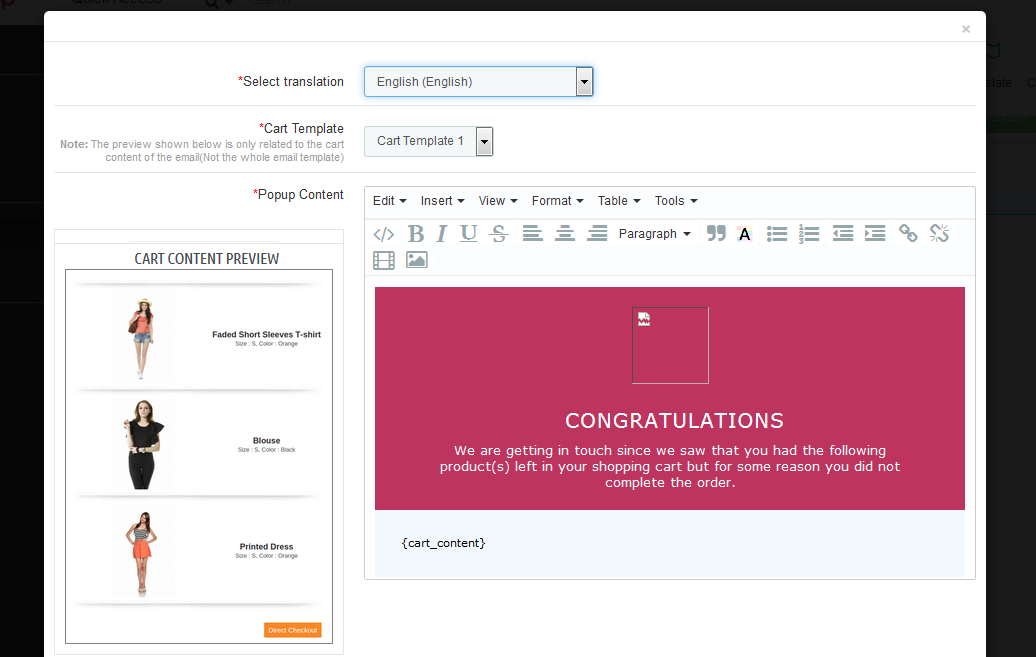
4.4.2 Non-Discounted Template
If the admin wants to send a non-discounted popup reminder then he can select the non-discounted template and customize it accordingly.
4.5 Popup Reminders
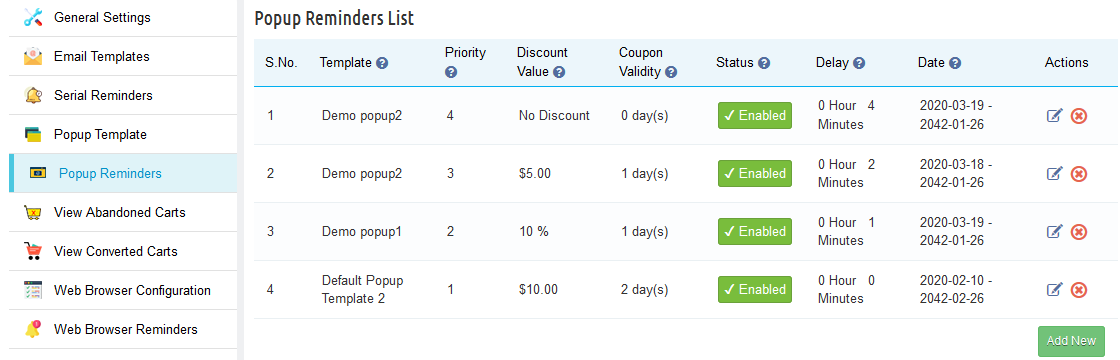
Prestashop abandoned cart reminder addon offers to track the popup reminders templates active on the store front end. Here the admin can create as many popup reminders as they want.
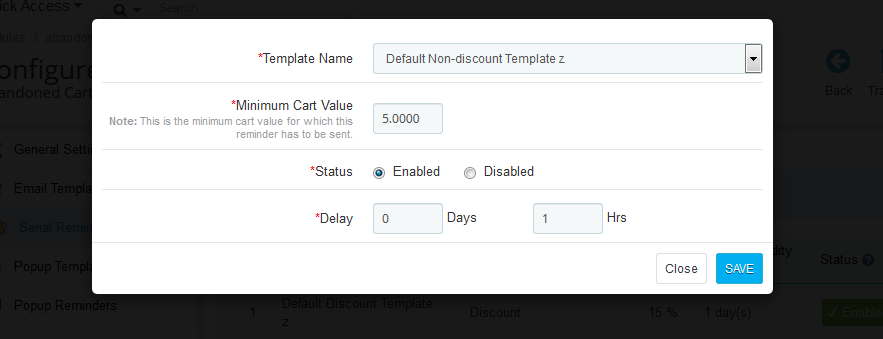
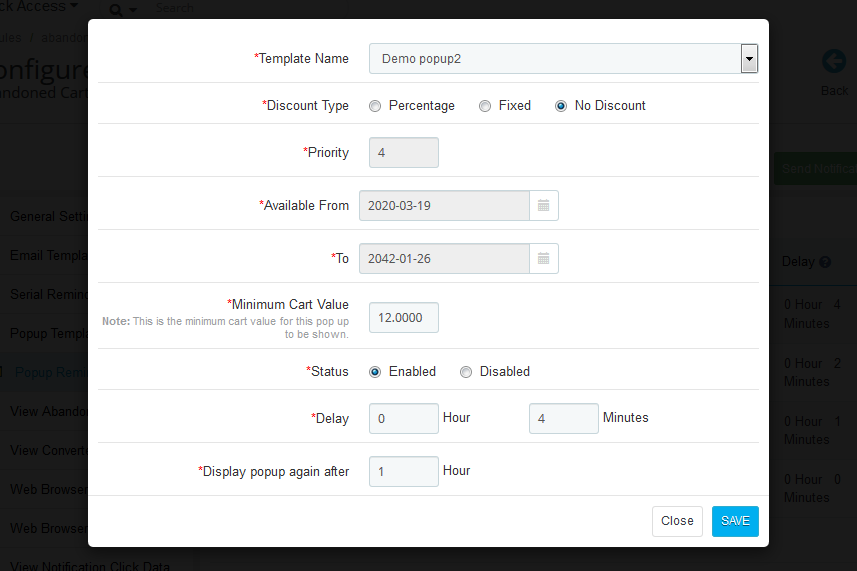
On clicking the add new button, the admin will see a popup as shown below:
To create a popup reminder, the admin has to click on add new after which he has to fill in the following criteria
Template Name: The templates created in the Popup Template tab of the Prestashop abandoned cart module will list here. Select anyone from the drop-down list.
Discount Type: This field of Prestashop Abandoned cart addon allows the admin to select any one option from, Percentage, Fixed, or no discount type.
Discount Value: This field of Prestashop abandoned cart addon by Knowband enables the admin to enter the discount amount or percentage that you want to offer.
Priority: The admin can set the priority value of the reminder as well. For example, if they set the priority as 1 then this popup reminder will display 1st to the customers.
Available from and to: In here, the PrestaShop admin has to enter the validity period of the discount.
Coupon Validity: This field of the Prestashop abandoned cart module offers the admin to enter the number of days for which the coupons will be valid.
Allow Free Shipping: The admin can customize whether you want to allow free shipping or not.
Min. Cart Amount: In this field, the store seller will have to enter the minimum cart amount required to avail of the offer.
Status: Select Enabled if you want to enable the popup reminder otherwise disable it.
Delay: This field of PrestaShop email follow up extension provides the admin to enter the number of days, from the day when the customer adds the product to his/her cart, after which the popup reminder will display to the customers when they visit the store.
Display popup again after: The admin can choose to display the popup to the same customer after a certain number of hours. Further, by filling it in this field.
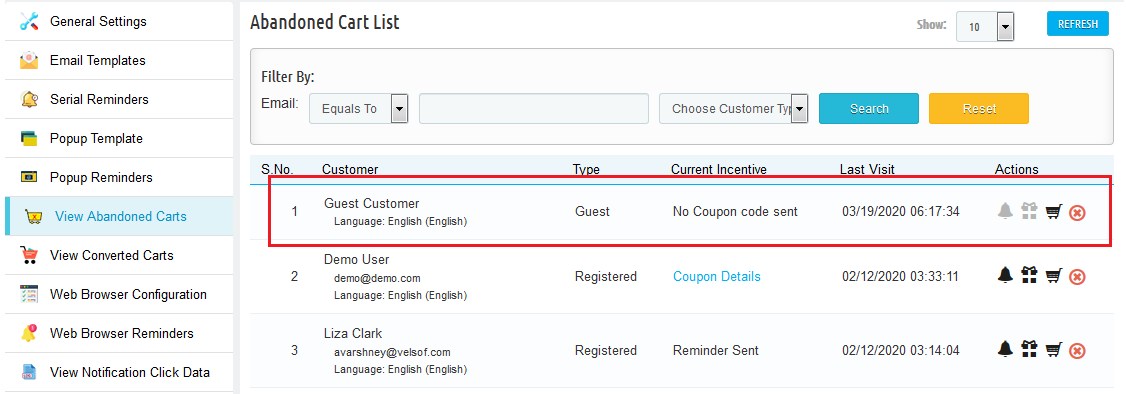
4.6 View Abandoned Carts
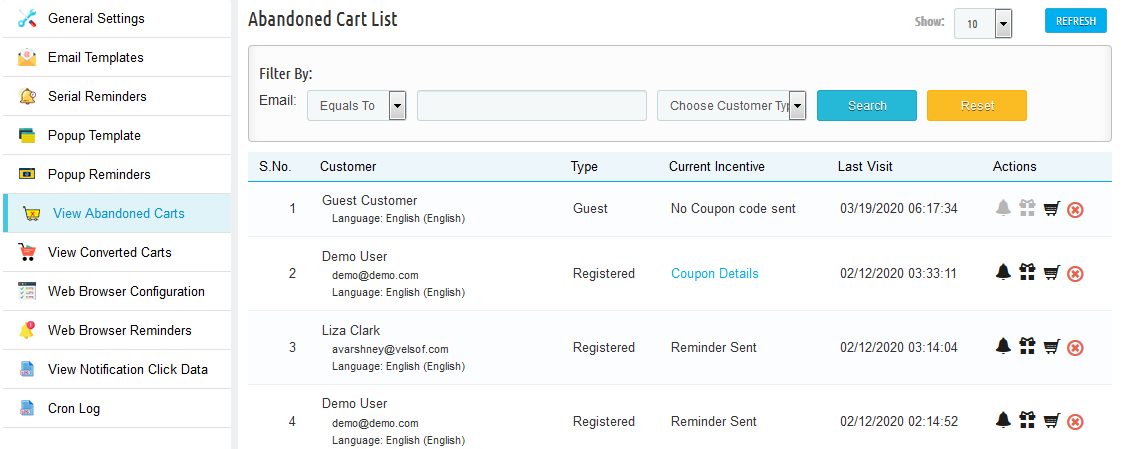
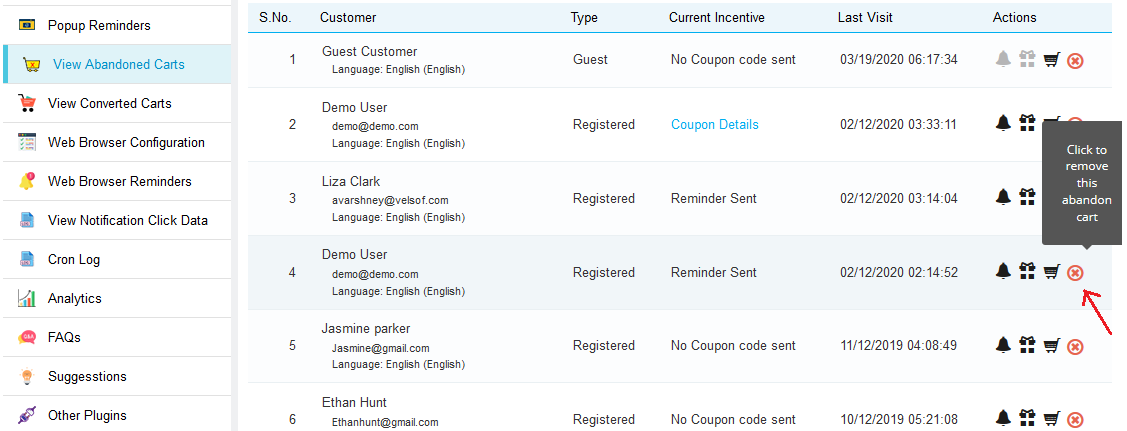
The abandoned cart tab contains a list of all the abandoned shopping carts in your store. Furthermore, the syncing of the list is done through Cron Instruction. Further, based on the delay time set for abandoned cart by the admin.
The list can also sync by clicking on the “Refresh” button at the top of the list.
The list contains pagination and several filters as well to sort and view the list more efficiently.
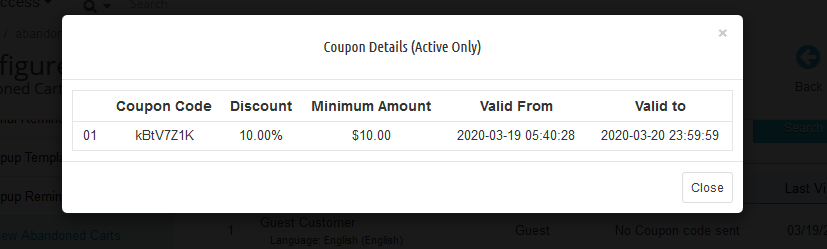
View Coupon Details
The details of the coupon sent to the customer are visible by clicking on the “Coupon Details” link in front of the abandoned cart.
Send Follow up EMail without Coupon
Click on the bell icon of this Prestashop abandoned cart addon. Furthermore, the admin can send reminders regarding the products saved in the cart of the customers. In fact, on clicking the same a pop-up will appear having all the fields that will be sent in the follow-up email.
Send follow up Email with Coupon
To send the follow-up email to the customer regarding the shopping cart abandonment with a discount coupon the admin has to click on the “Gift Icon” in front of the desired abandoned cart. In fact, on clicking the same a pop-up will appear having all the fields that will be sent in the follow-up email.
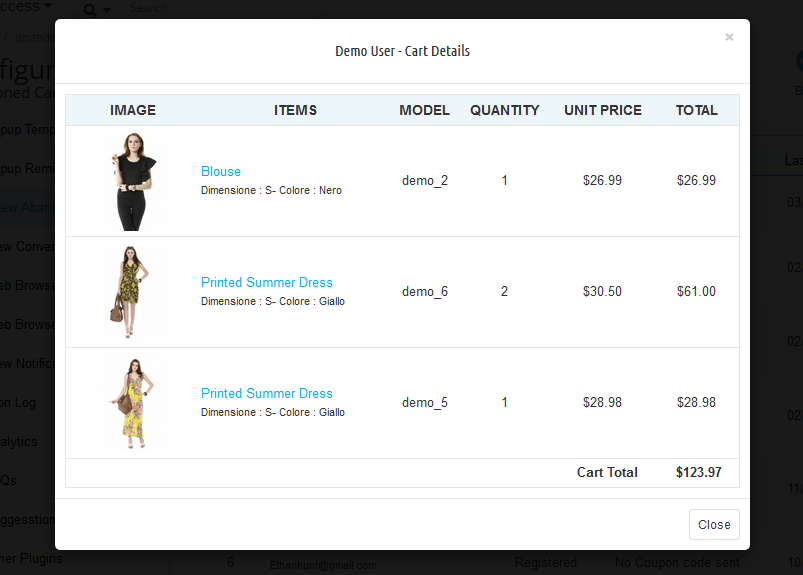
View Cart Details
To view the details about the abandoned cart the admin has to click on the “Cart Icon” in front of the desired cart. Further, a pop-up will appear having all the details of the cart.
Delete Abandoned Cart
To delete any abandoned cart, the admin has to click on the “Remove Button” in front of the desired cart. Therefore, a confirmation pop-up will appear asking for confirmation of the deletion. Further, once confirmed the abandoned cart will be gone forever.
4.7 Converted Carts
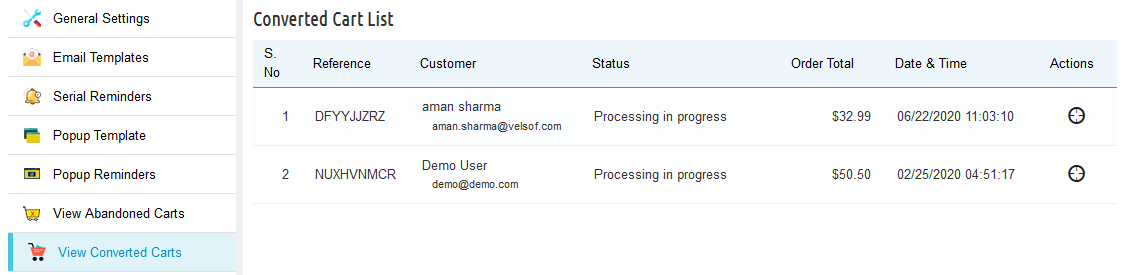
The Conversion Rate tab of Prestashop abandoned cart addon by Knowband enlists all converted orders for registered customers. Further, or we can say that the abandoned carts for whom the order has been placed after the reminder mail are sent.
Note: The abandoned cart is considered as converted only if the customer places an order for that cart after a reminder mail has been sent.
4.8 Web Browser Configuration
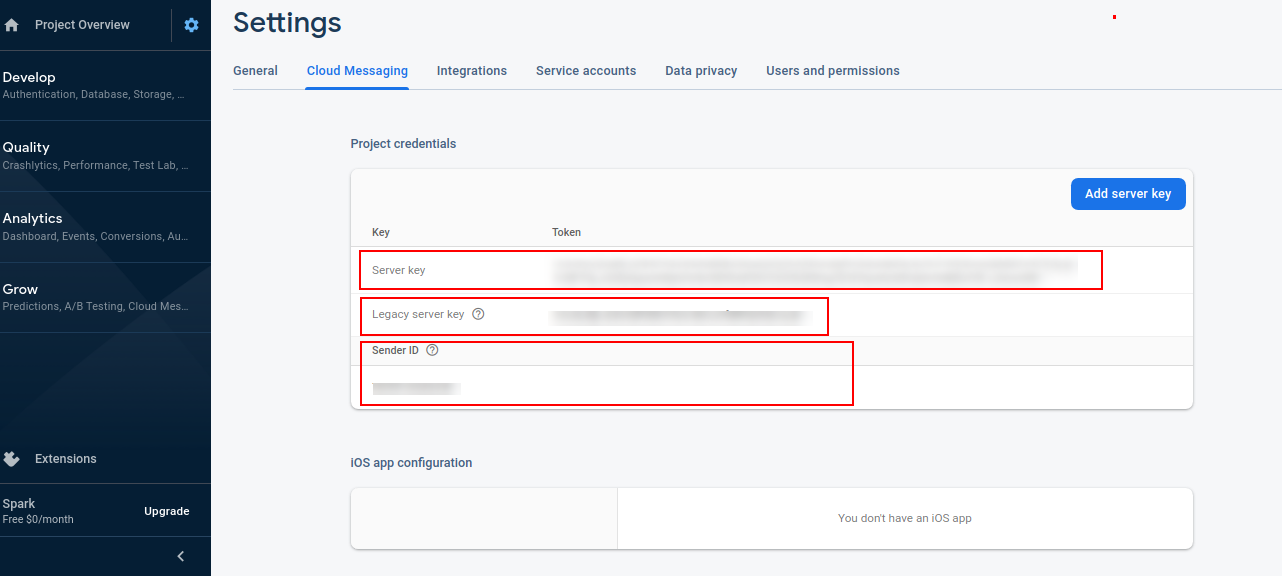
Abandoned Cart Serial Reminder module offers to configure a web browser reminder. The admin can integrate a web browser reminder by generating an API Key. To configure a firebase API following are the steps:
1. Visit the URL: https://console.firebase.google.com/u/0/?pli=1
2. Click on ‘Create a Project’
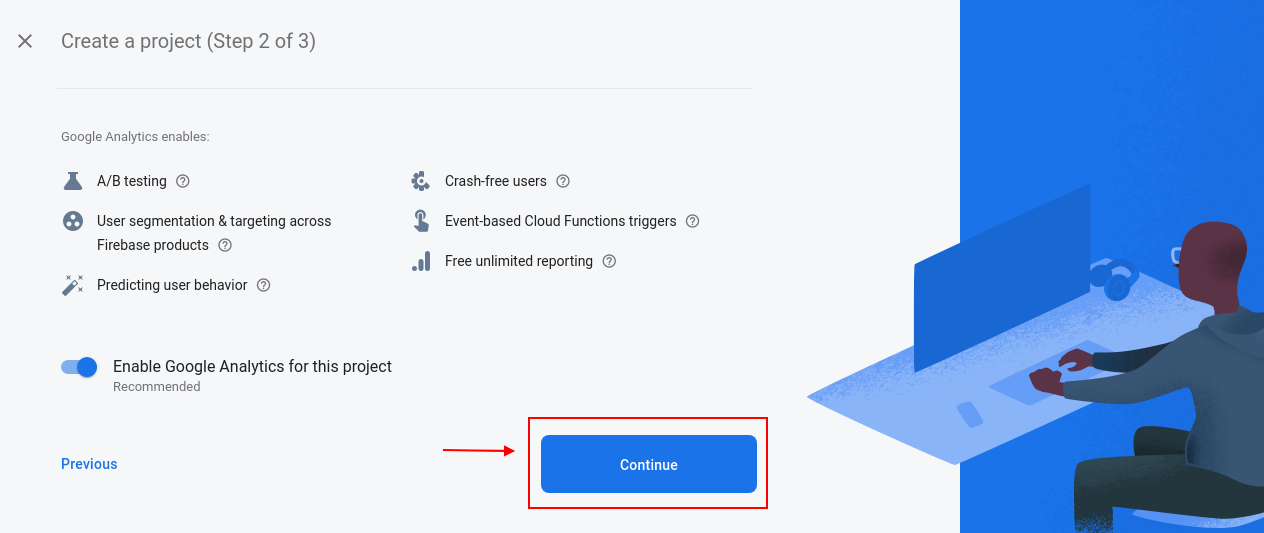
3. Enter your project name, check the terms and conditions. In addition, click on the continue button as pointed in the below screenshot.
4. Click again on the continue buttons pointed in the screenshot below.
5. Select your location. Further, hover on the? Mark to display the description and click on the continue button as pointed in the below screenshot.
6. Click on continue again
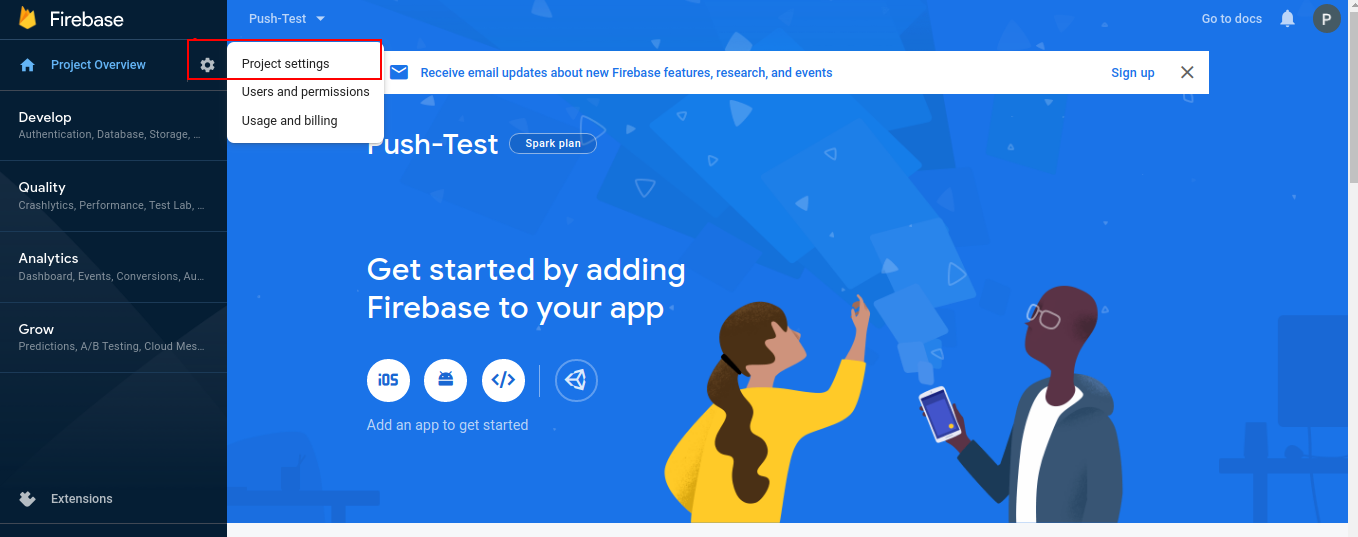
7. Click on the Project Setting button as pointed in the screenshot below.
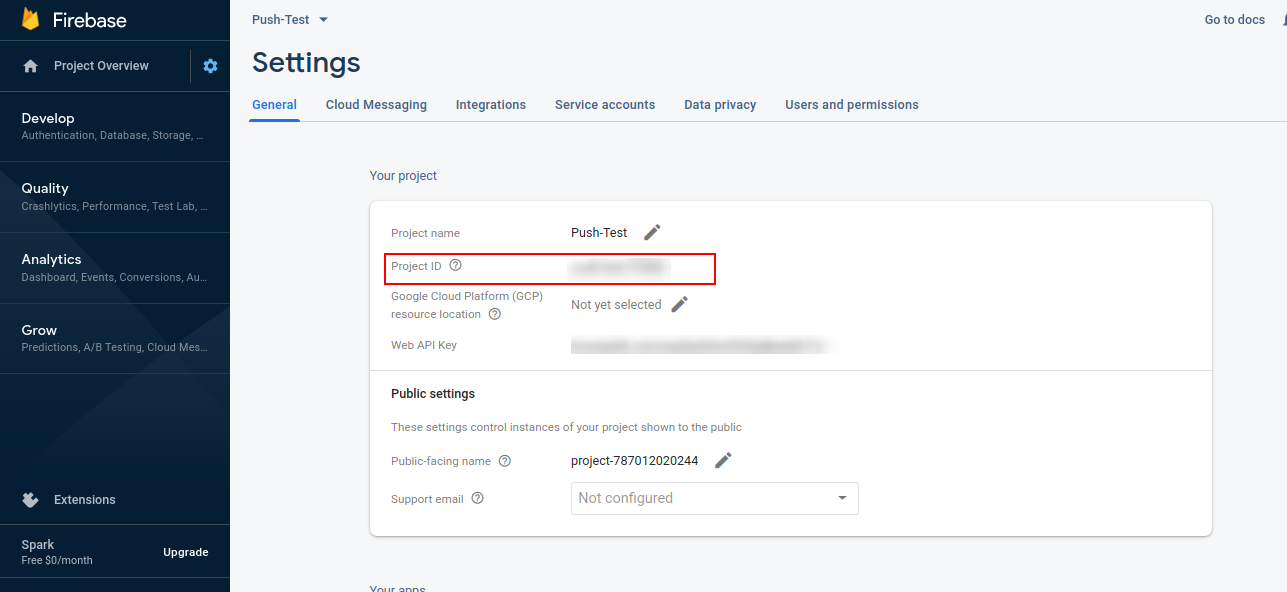
8. Copy the project ID from here and paste it into [ Web browser configuration Project ID ]
9. Copy the server key and paste it into [ web browser configuration- server key]
10. Copy the legacy server key from here and paste it into [ web browser configuration- API Key]
11. Copy the sender ID from here and paste it into [ Web browser configuration- Messaging sender ID]
4.9 Web Browser Reminders
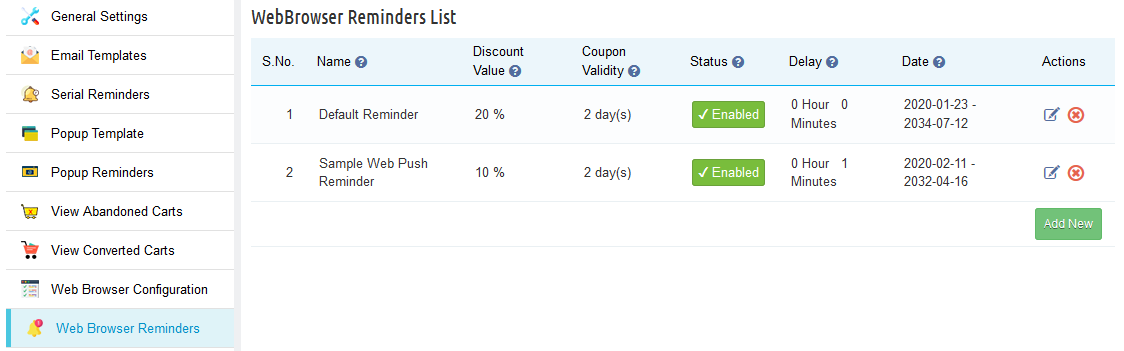
In the “Web Browser Reminders” tab the Prestashop admin can add various reminders (both discounted and non-discounted) as desired. In fact, this tab contains a list of all the web browser reminders present in the system.
Furthermore, the Prestashop store admin can edit or remove any reminder by clicking on the Edit or Remove action button in front of the reminder.
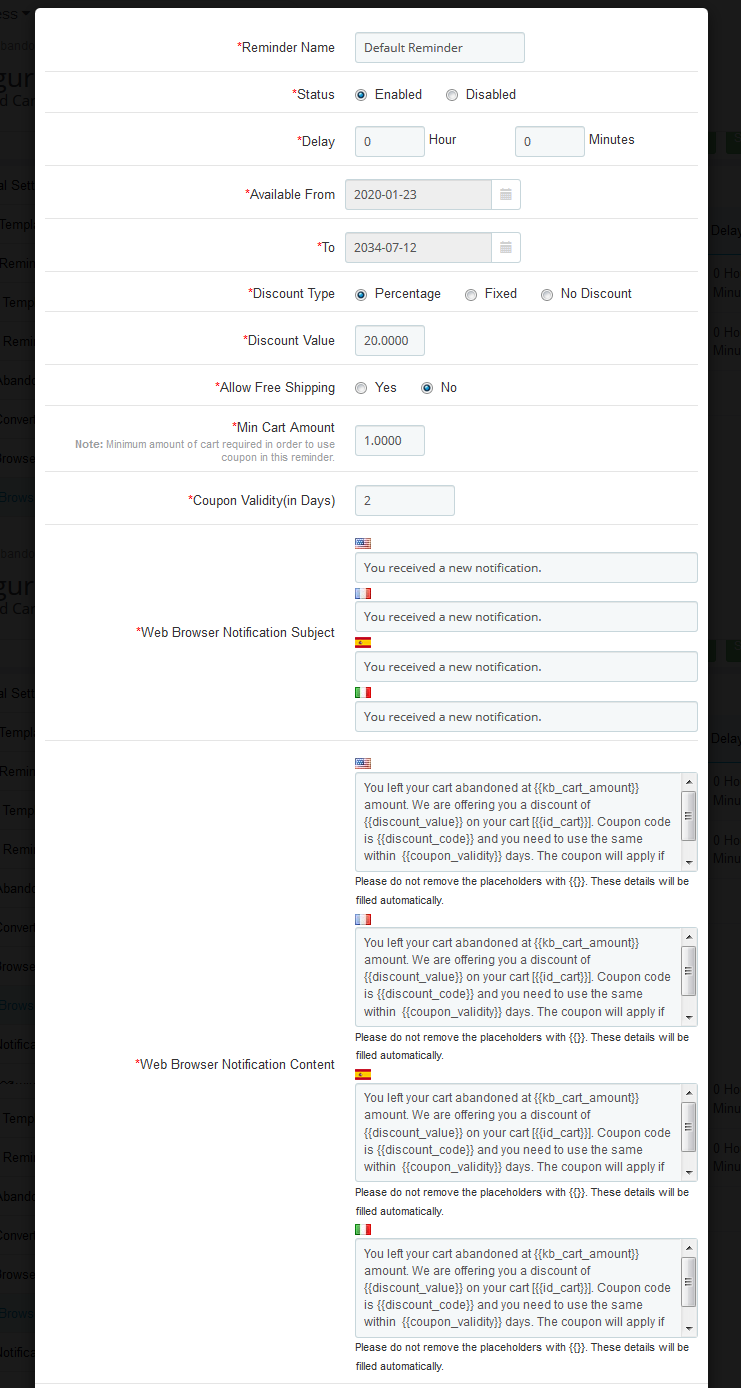
On clicking on the button, you’ll get a pop-up as shown below:
On choosing a reminder list form will appear. Further, the admin has to choose a reminder name. In fact, this form has the default notification subject and notification content. Moreover, the Prestashop admin can change it as desired. Furthermore, then click on the “Save” button to save the changes. Therefore, the Prestashop Abandoned cart addon offers multi-lingual support to the merchants. In fact, they can customize the subject and content in 3 different languages.
4.10 View Notification Click Data
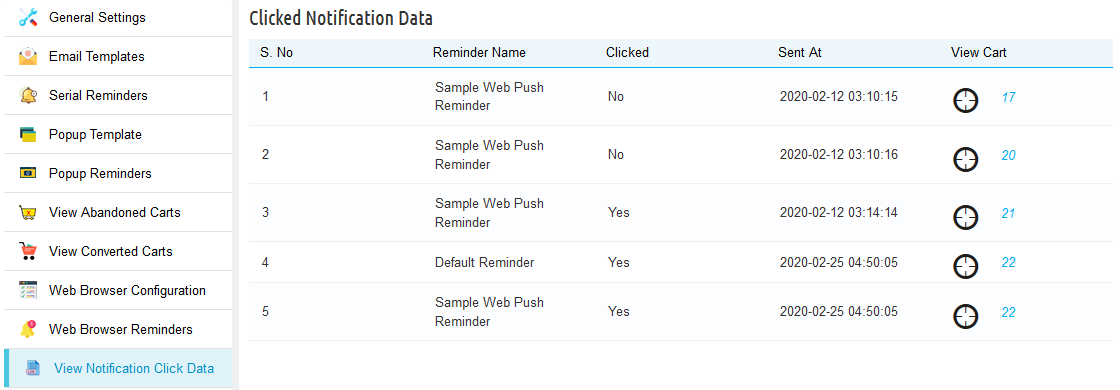
Here, the admin can view if the customers have taken any action on seeing the browser popup. Further, they can check if the customers have clicked on the reminder popup or not, and more. For instance, the time of sending the popup, and the cart summary which will include customer information, products in their cart.
4.11 Cron Log
Prestashop abandoned cart reminder provides a cron log functionality to check if the cron executes successfully or not. In fact, they can also check the cart details of the customers as well.
4.12 Analytics – Shopping cart abandonment
The Analytics tab of the Prestashop email follow up module shows the overall insights of the store in a graphical interface.
4.12.1 Abandon cart vs Converted cart and Amount
This graph of Prestashop Abandoned cart recovery email addon by Knowband shows a do-nut chart which will display the information. For instance, the percentage of abandoned shopping carts on the store. Moreover, the percentage of abandoned shopping carts converted into orders.
4.12.2 Number of Carts and Cart Amount VS Time Interval
This chart of Prestashop abandoned cart addon by Knowband gives the overview of the total abandoned carts vs the carts converted. In addition, the amount abandoned vs the amount converts in the given period.
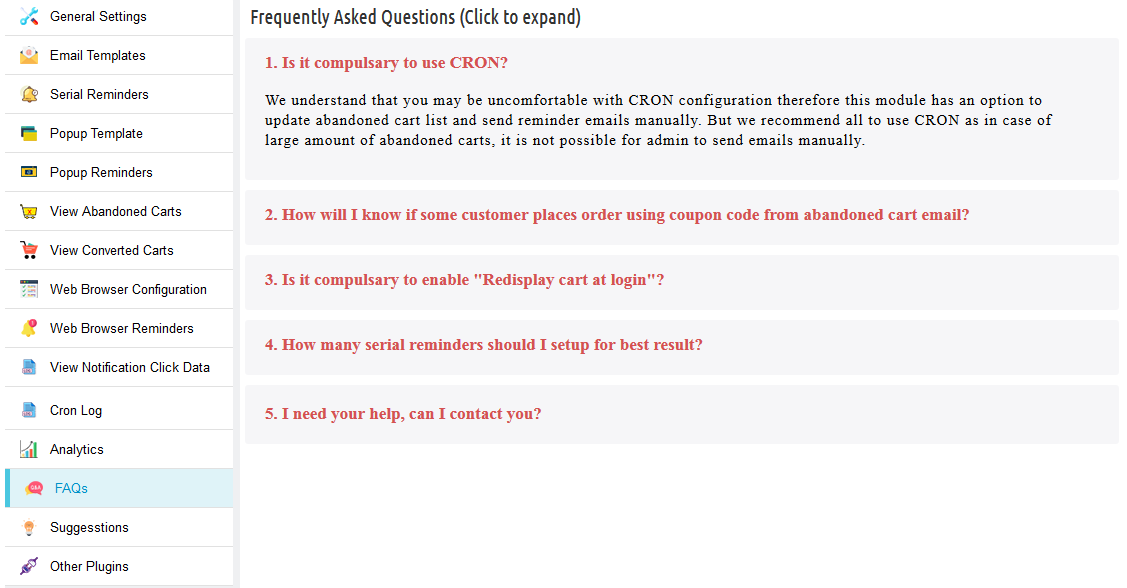
4.13 FAQs
This Prestashop abandoned cart addon by the Knowband tab contains several questions (with answers to them) that the customers ask. In fact, we recommend you go through the questions before raising any ticket for this addon.
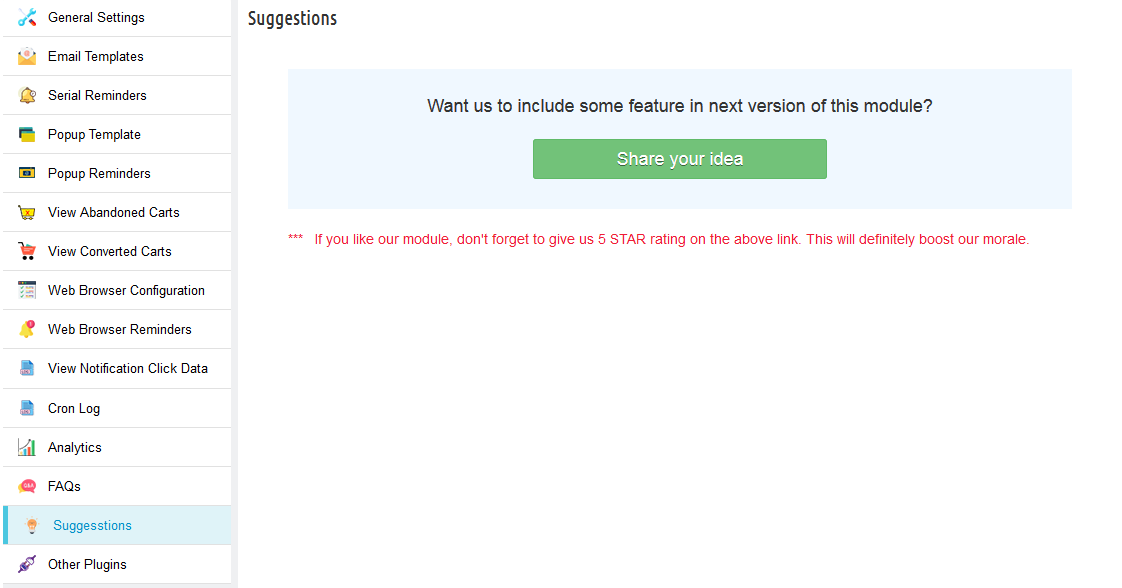
4.14 Suggestions
In case you want to give any suggestions for some new features to be included in the new version of this Knowband Prestashop cart abandoned module then you can use this tab.
4.15 Other Plugins
This Prestashop email follow up by the Knowband tab redirects to our developer page having a list of other plugins developed by us. In fact, if you like this Knowband Prestashop abandoned cart addon then you can try our other addons as well.
5. Recommendations
– If Prestashop Abandoned cart email follow-up addon is not working after installation then please check permissions on modules folder. Further, the folder should be writable. Please make the folder permission to 755.
– It is necessary to add the CRON instructions to your cron without that this Prestashop abandoned cart addon is not as useful.
– Make sure that the Cart Re-Display Setting (Preferences -> Customers -> Cart re-display at login) is ON otherwise the Prestashop email follow up addon will not work as expected.
Amazon Marketplace Web Service (Amazon MWS) is an API system provided by Amazon marketplace to establish an exchange of information on the product listing, product orders, payments, reports and much more. The Amazon MWS API enables the programmers to develop selling automation solutions which help the store owners to grow their business on the Amazon marketplace.
The solutions developed using Amazon MWS help the sellers to:
Increase selling efficiency
Reduce extra efforts and labor and,
Improve response time to marketplace customers
Earlier, if you had an eCommerce website and also wanted to sell on the Amazon marketplace, you had to create a separate seller account and manage it separately. It was a tough job to manage an eCommerce site and an Amazon seller account separately.
With Amazon MWS, a broader scope of functionalities was introduced to those who have an eCommerce store and also want to sell on Amazon. With the new API, Amazon product listing, order management, payment, and much more functionalities were integrated into various solutions developed for different eCommerce platforms.
The PrestaShop Amazon US connection is one such solution that integrates the Amazon seller functionalities into existing workflow of PrestaShop stores so that selling on Amazon fits seamlessly to the current eCommerce operations.
The PrestaShop integration-
Using the Amazon MWS connection, the PrestaShop Amazon integration module allows product import-export, order management, payment report etc right on a PrestaShop dashboard itself. You do not have to login to your Amazon seller account to manage the product feeds, or product orders anymore. You can manage all these right from your PrestaShop store.
To use this functionality, you need to install the PrestaShop Amazon US Marketplace integration module on your PrestaShop. After that, you need to create a professional seller account at Amazon which you will use to show your product on the Amazon marketplace.
Now, when you have the module and a seller account on Amazon, you need the following API details that you can get from the Amazon MWS and Amazon Seller Central account setup:
1 . Seller or Merchant Id:
You will get this when you create the Amazon seller account. It is mandatory to make connection to Amazon MWS API.
2. AWS Access Key Id:
You will get this when you sign up for Amazon MWS. This information is also mandatory to make connection to Amazon MWS API.
3. Secret Key:
You will get it when you sign up for Amazon MWS.
After configuring these details in your PrestaShop module, your Amazon-PrestaShop connection is ready to use. Now, you can use the profile management, order management, product feed management interfaces to seamlessly carry out your multi-channel trade.
With the PrestaShop Amazon US Integration, you can perform all the functionalities that you can perform in an Amazon Seller Central panel.
You can create profiles for product listing on Amazon
You can manage Amazon product exports from the PrestaShop dashboard itself. You can map and upload your existing PrestaShop products to Amazon product feed.
You can manage the Amazon product orders from the PrestaShop dashboard.
You can map PrestaShop categories with Amazon US Marketplace Categories.
You can map PrestaShop attributes to the corresponding Marketplace attribute
You can view list of orders from Amazon whose status is not pending on Amazon.com.
Amazon MWS can provide you a wider platform to showcase your products. This operation can be further simplified with the platform based solutions like the PrestaShop Amazon US integration module. So, if you run a PrestaShop store and want to expand your reach to a broader section of customers, Amazon Marketplace is one such effective option for you.
Exciting Updates in Knowband’s PrestaShop Etsy Integrator – Version 4.0.1
We’re always looking for ways to make your Etsy integration smoother and more efficient. With the latest Version 4.0.1 of our PrestaShop Etsy Integrator, we’ve added a couple of features that we think you’ll find really useful.
[Alert]Make sure to upgrade before 18 January, as connections may be interrupted if the module isn’t updated by then.
1. Seamless OpenAPI Authentication for Etsy Etsy has updated its API authentication, and we’ve updated our Prestashop Etsy Marketplace Connector Module to match. All your API requests now include the necessary authentication headers, so you don’t have to worry about interruptions. Your PrestaShop store will continue to communicate with Etsy smoothly, exactly as before, just better.
2. Simplified Return Policy Management Handling return policies can be tricky, but we have made it easier. You can now create multiple return policies and assign them to different profiles. Not only you can you create, but you can also sync the existing policies from Etsy Marketplace by running retun policy cron.
Once a profile is linked to a product, the return policy is automatically updated on Etsy. This saves you time and ensures your listings always display the correct information for your customers.
These updates are part of our ongoing commitment to make your PrestaShop-Etsy integration as seamless and hassle-free as possible.
If you run an eCommerce store and not satisfied with your sales, you might be thinking about several ways to improve the same. Starting a shop on some popular marketplace is one such idea that might have surely come into your mind. Well! If so, this is a good decision as it will help you to leverage the traffic and customer base of an already established marketplace and generate some serious sales for your business.
The aim here is to expand the reach so as to generate desired revenue from the business. However, It might be a tough task to manage two shops on different domains at the same time. Therefore, I am going to explain how can you manage to be a seller on a popular marketplace like Etsy and manage your own eCommerce site at the same time.
PrestaShop – Etsy connection
Both your website and selling on Etsy shop are important; managing both the entities separately is not an easy task, though. You need time, effort and manpower to make sure everything goes as planned. It made us realize, if we can integrate your eCommerce site and a marketplace like Etsy, it will curtail a huge burden at once by allowing a store owner to sell on the marketplace directly from his eCommerce store.
A PrestaShop-Etsy connection is a similar approach that works by integrating an interface on the PrestaShop back-office which possess the controls and configurations for:
Synchronizing the updates and changes in the stock
Managing orders received from the Etsy store
Preparing product feed for Etsy listing
Preparing different profiles for Product listing for bulk uploading of the products or selected products of the store
Preparing product Shipping options for Etsy orders
Setting up an Etsy API configuration to establish the connection
1. The connection setup
The PrestaShop-Etsy integration process is simple and you can do it without knowing to code.
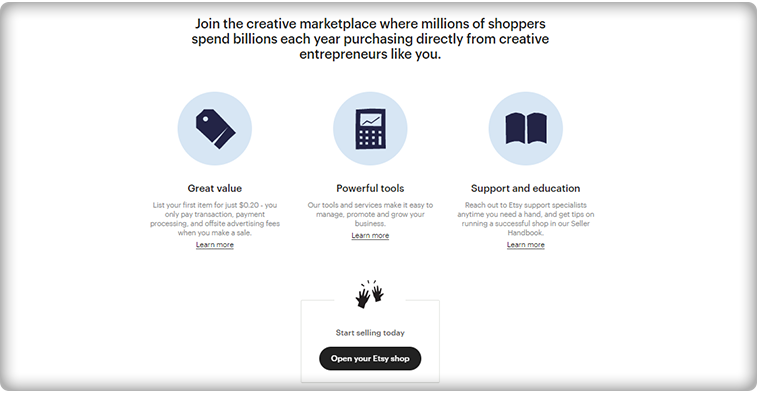
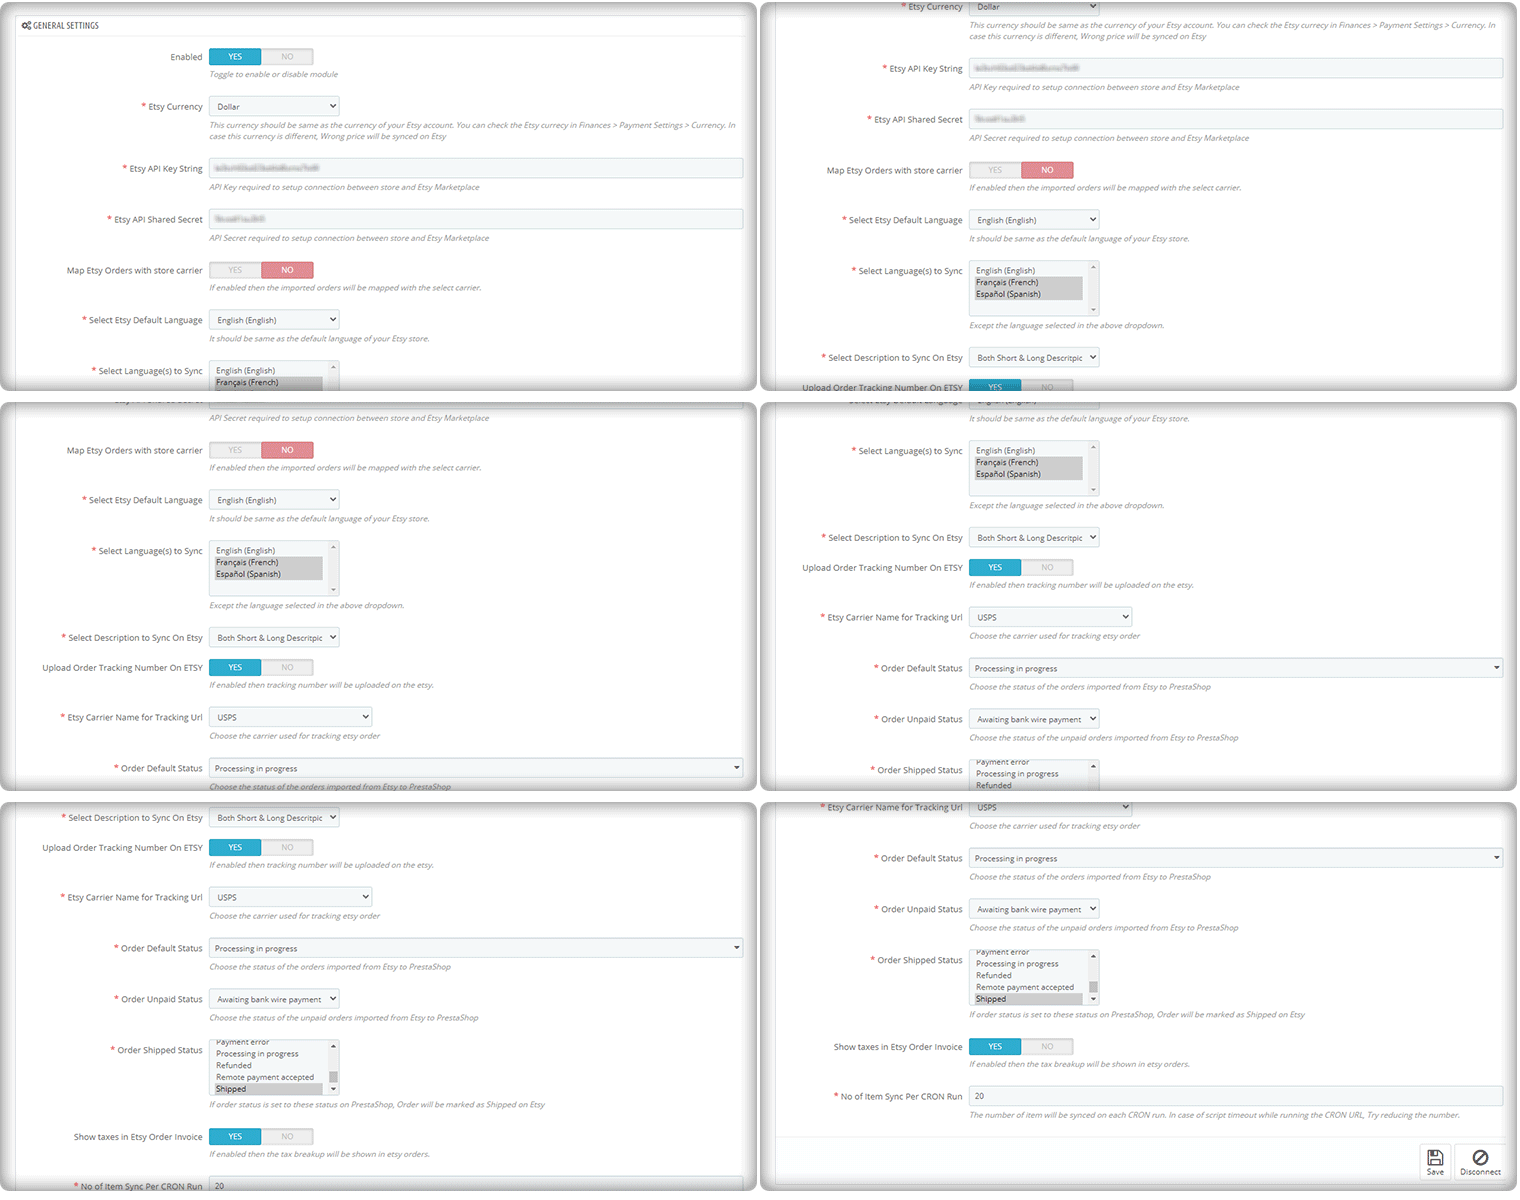
To start selling on Etsy Marketplace you will need a seller account on Etsy. Create a seller account on the Etsy marketplace before you can set up a Prestashop-Etsy connection. After seller account registration, you need to set up an App on Etsy to get the API details. The API details will be used by the PrestaShop-Etsy integration module to set up a connection between the store and the Etsy seller account. The integration allows you to select the default language and the language in which you want to sync the product details, categories, shipping methods, and other features.
The updated version of the Etsy-PrestaShop Integration module allows you to upload the order tracking number for Etsy shoppers and the order status as well. There is an invoice setting that can be enabled if you want to show taxes on the invoice.
The auto cron run feature is the most appealing one and it lets the user select the number of products that can be synced automatically.
2. Shipping management for Etsy
Next, you will need to prepare the product feeds and upload them to the Etsy product listing. However, before your PrestaShop products are visible on your Etsy seller profile, you need to make sure that you have configured the shipping options.
The customers on the marketplace would want to see what shipping options are available with the product and when it is going to be delivered to them.
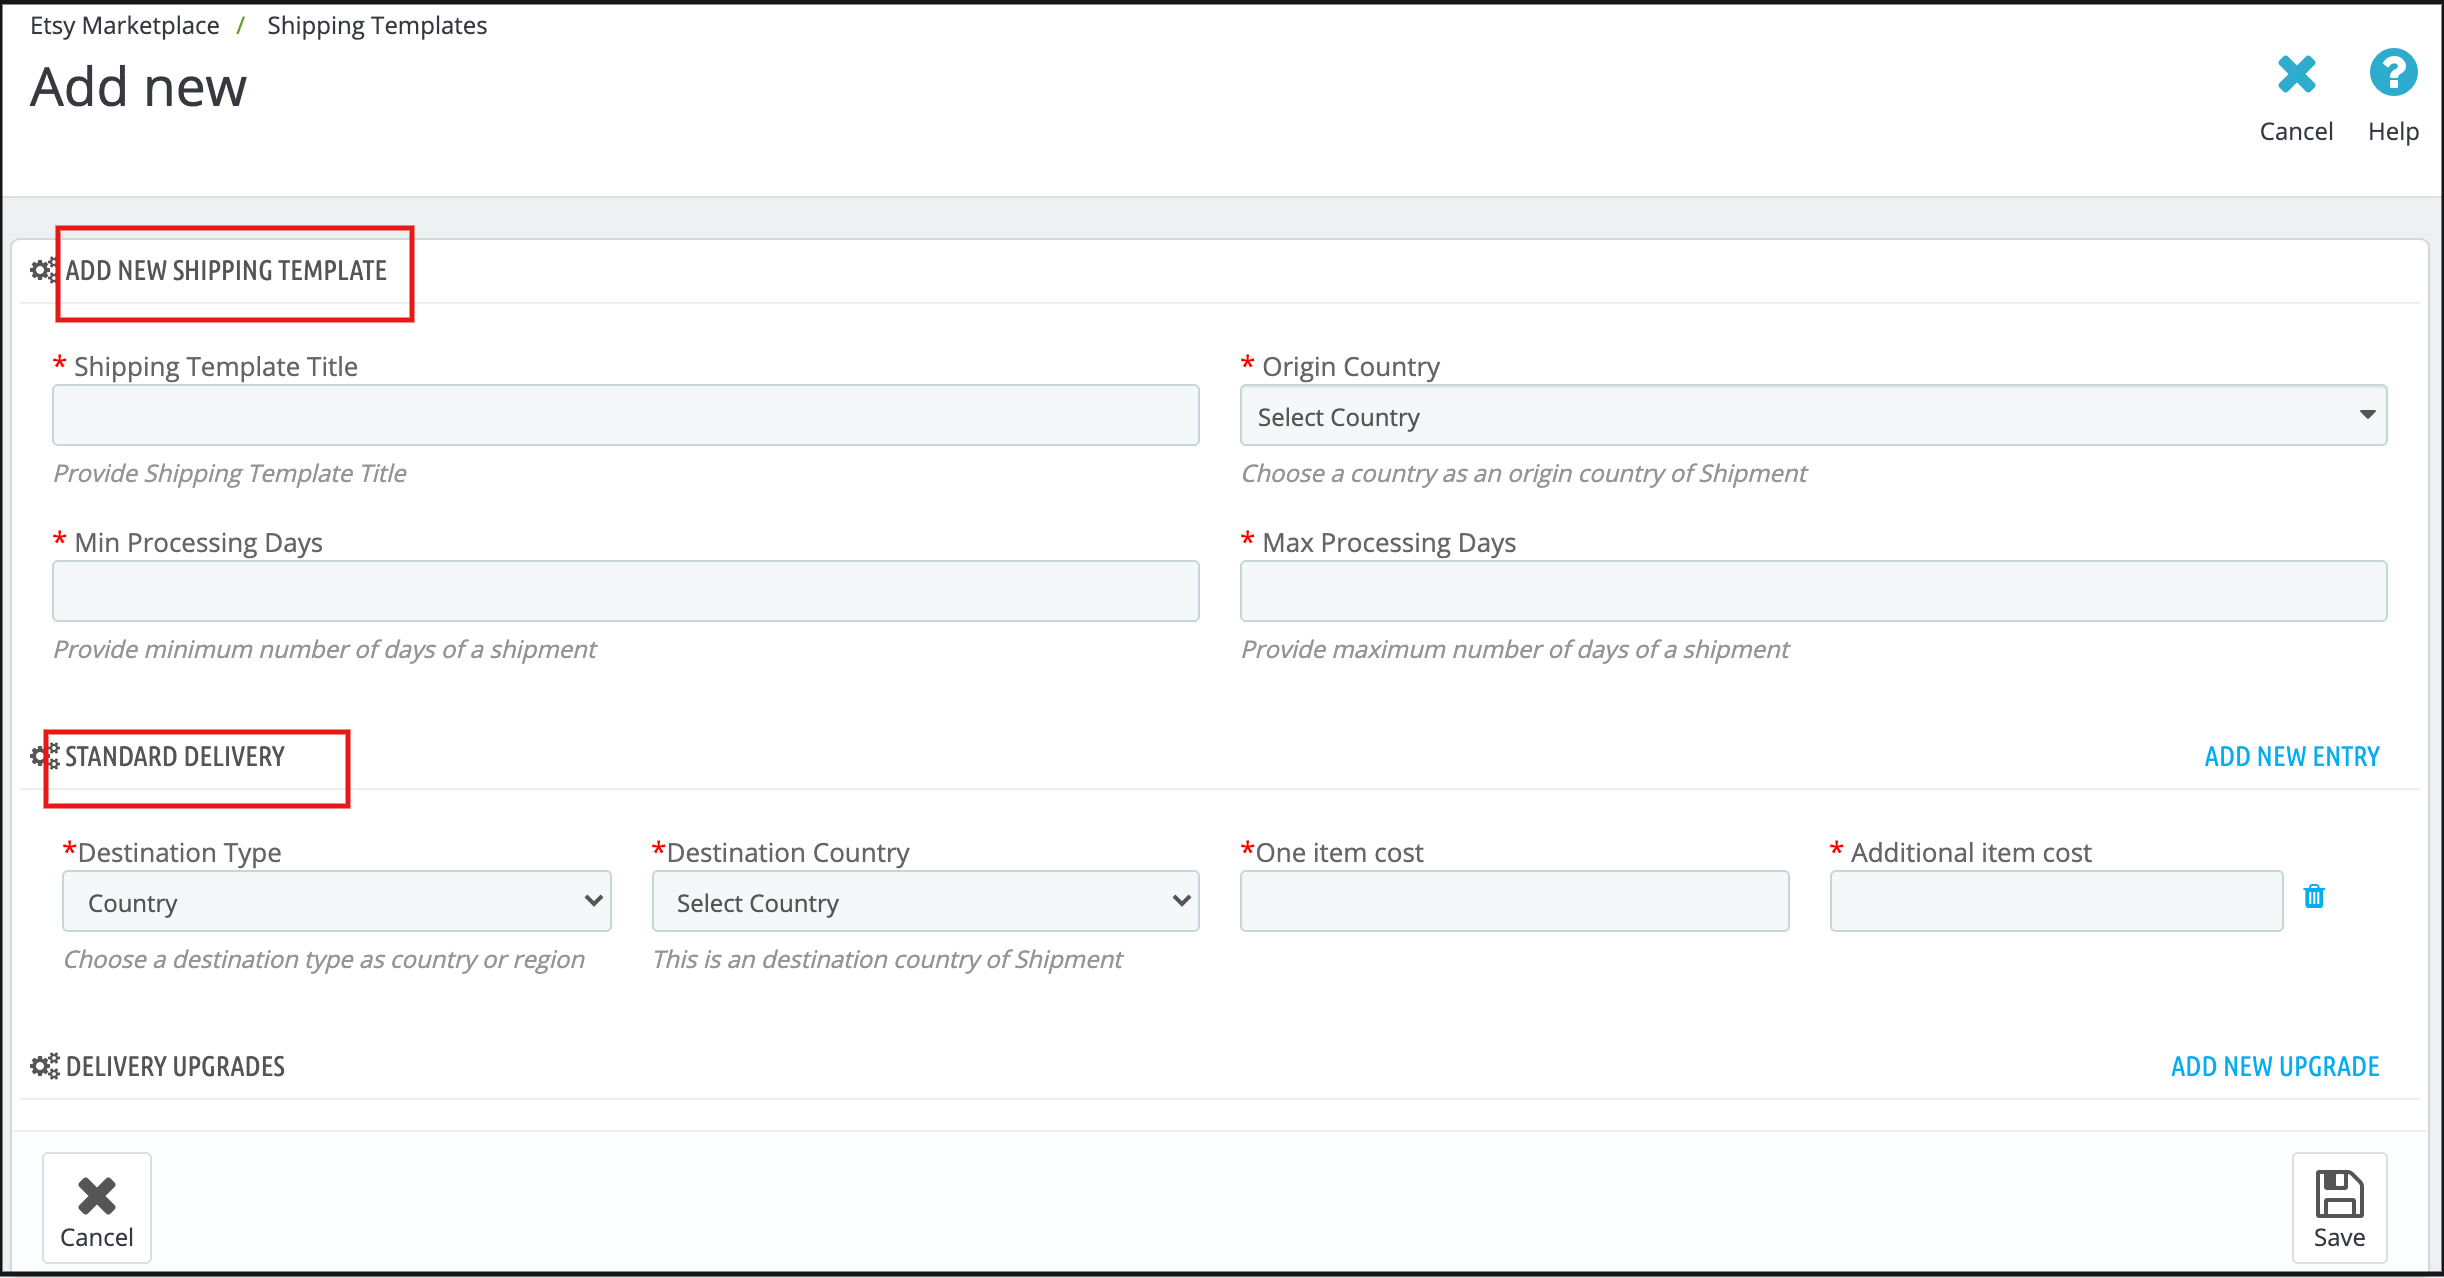
So, you must update the shipping options and let your customers on Etsy stay informed about them. You can add multiple shipping templates and improve your conversion rate because shipping is a major turn-off if a user couldn’t see the expected delivery date.
Prestashop Etsy integration module can be utilized for configuring the shipping templates by updating various information required by the Etsy marketplace. The interface of the shipping templates is the same as the Etsy Marketplace.
3. Product Listing for Etsy
To list the products on Etsy Marketplace the sellers first need to create the profiles. The seller can select the option to map the PrestaShop store category with the Etsy category or can select the products that need to be synced to the Etsy store.
The cron setup will list the goods to the Etsy Marketplace from the PrestaShop Etsy Integration module along with the variants, inventory, and definition of the product. So, this purpose helps list the goods.
4. Local Sync Option
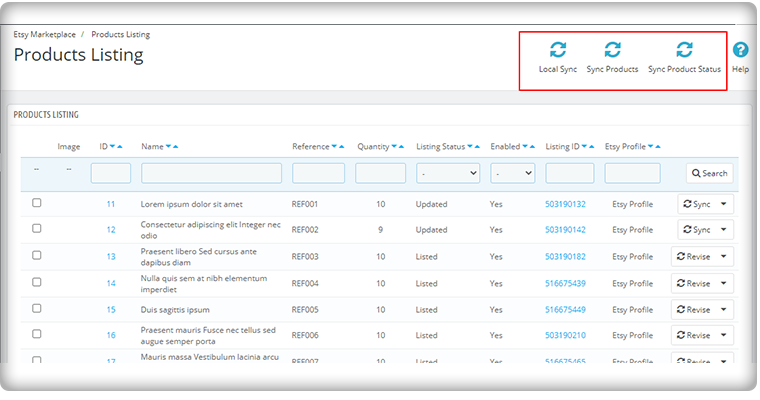
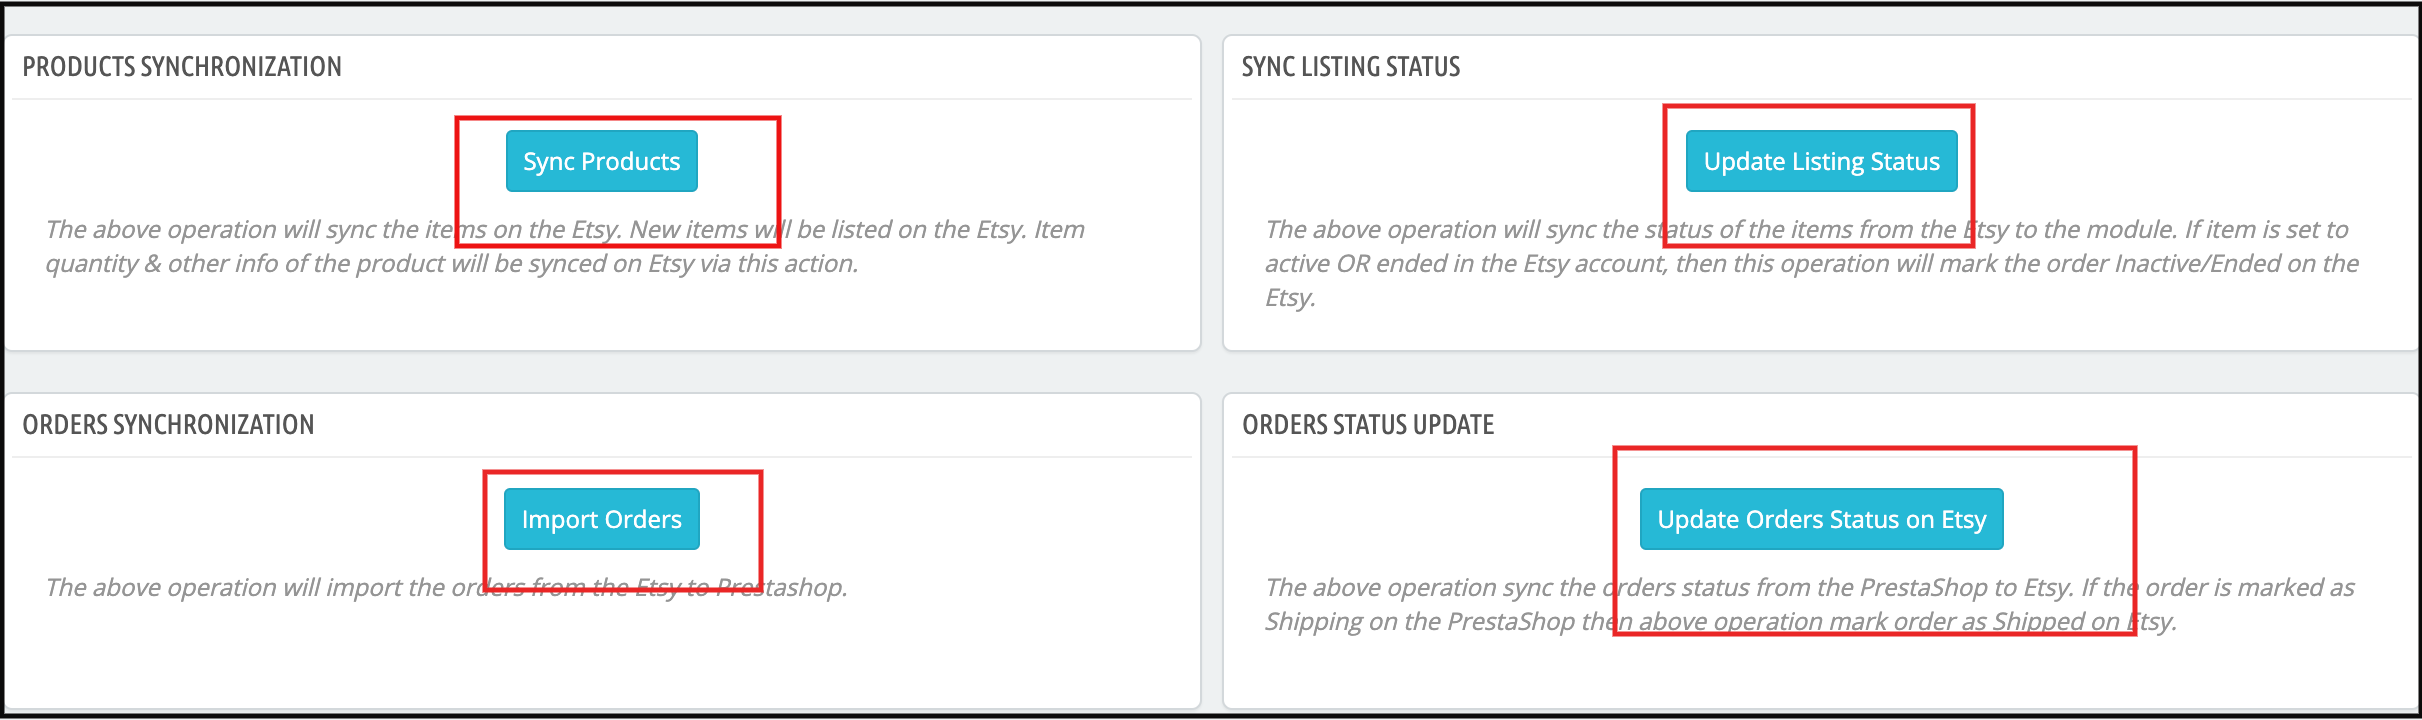
Local Sync synchronizes the product in the PrestaShop store to the Etsy Integration module. Sellers can synchronize their product from the PrestaShop store to an Etsy Integration module with the aid of local sync. This tab is available under the PrestaShop Etsy Integration extension synchronization tab. After syncing the products to the Etsy Integration module, the sellers can sync the products in bulk or sync the selected products as per their choice.
5. Synch Products individually
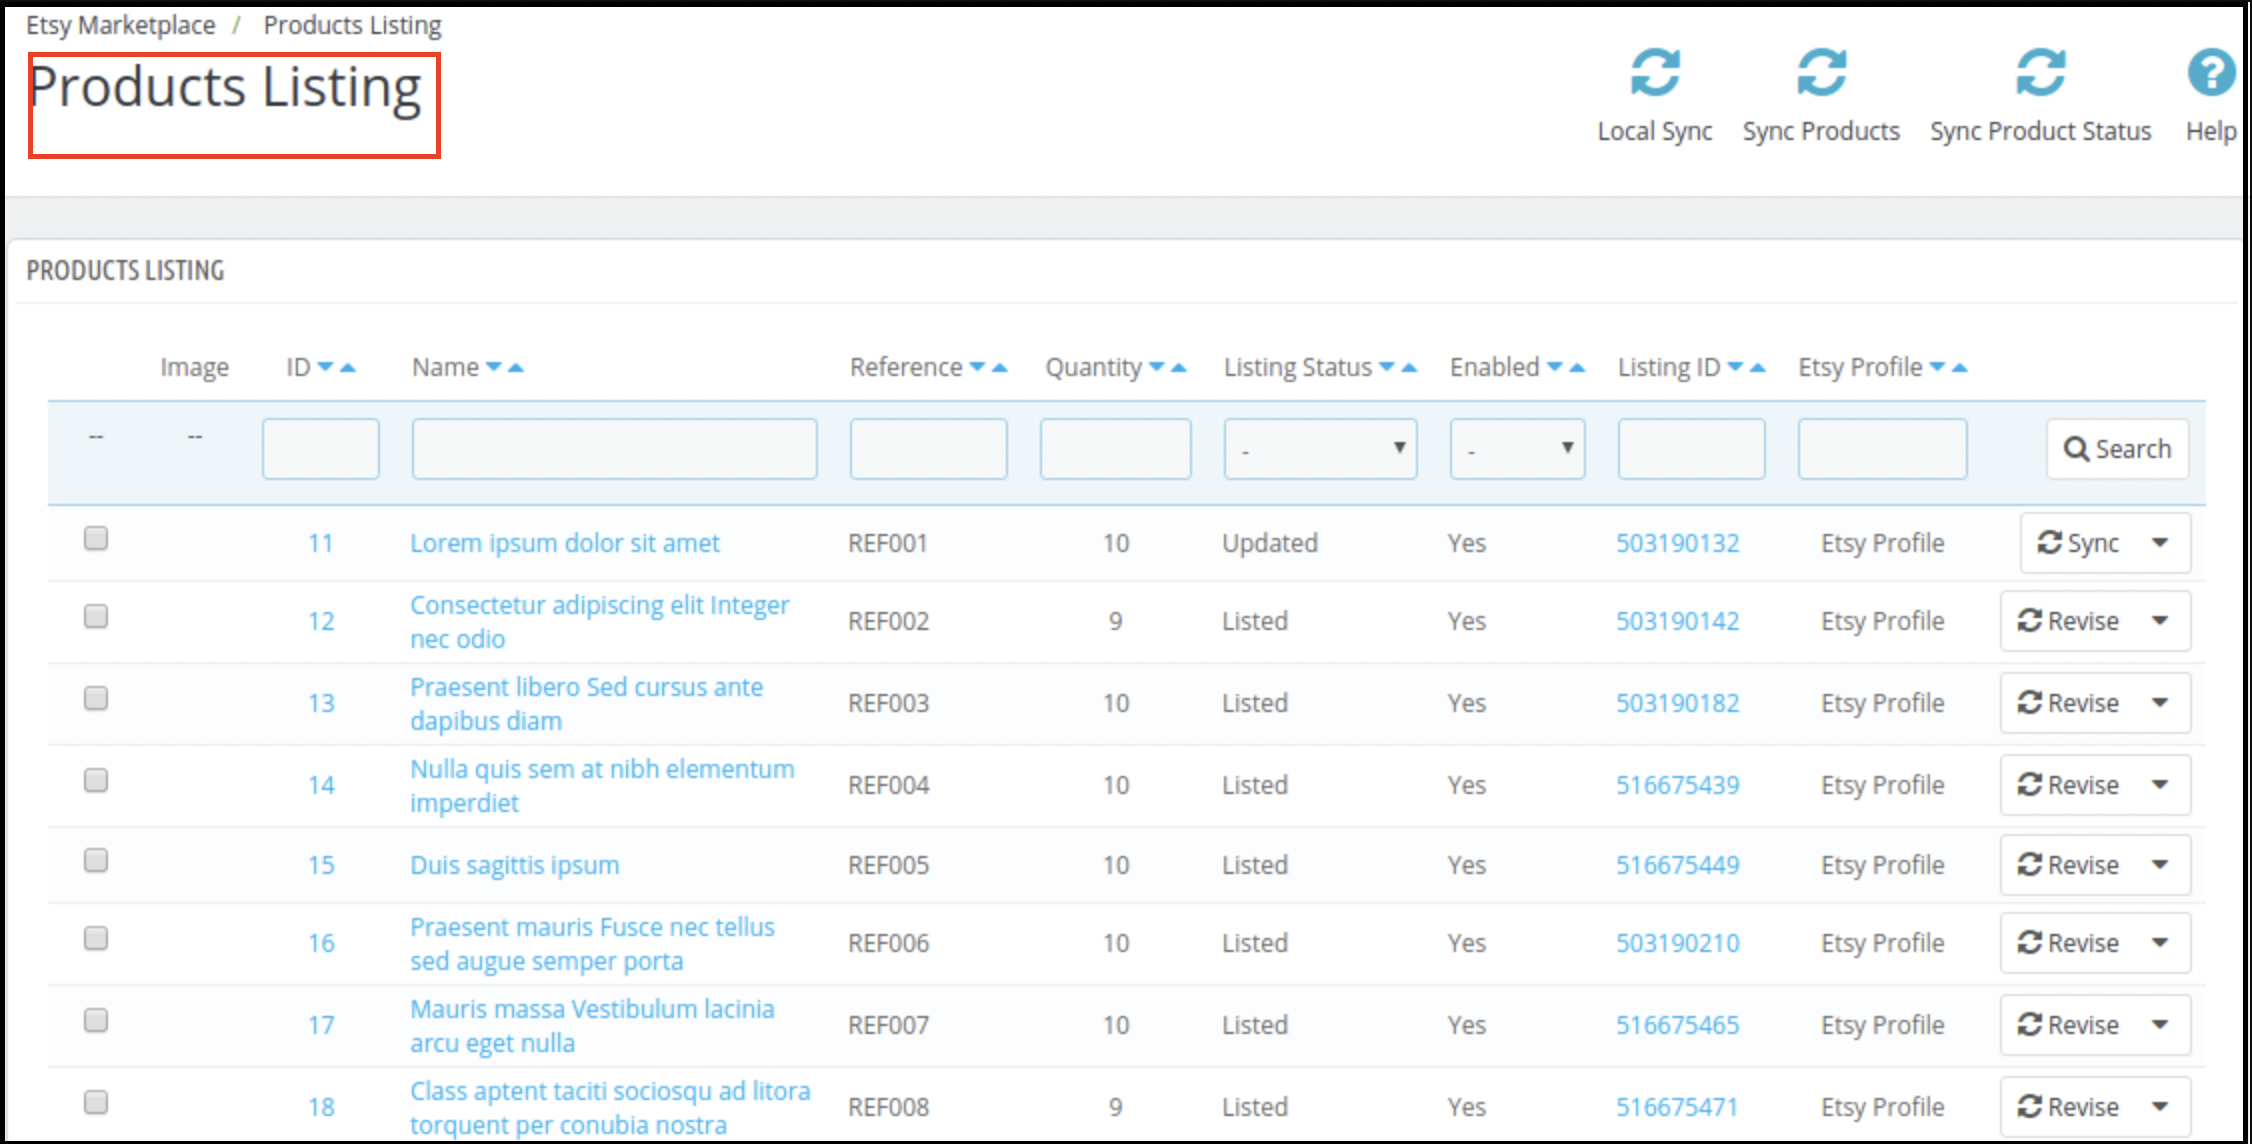
The listing status of the products is shown on the product listing tab of the integration module. The administrator may display items mapped to different profiles under this tab along with their Etsy Name, Listing Status, Etsy (Active, Ended), Activated or Disabled status, and Enable/Disable/Relist/Renew option. By running cron, the administrator may list the individual product or all the items.
Also, the seller can easily remove the product from a specific profile, and it is impossible to add the excluded items to the Etsy marketplace. All of this can be conducted once the cron is executed from the PrestaShop Etsy Integration Extension back-office.
You can update the product status for all the products manually or by running the cron.
6. Product Feed Management for Etsy
When shipping options are configured and ready for mapping with different products, you can prepare product feeds that will be shown in the Etsy marketplace. The product feeds are created based on the profiles, category mapping, and attribute mapping between the store and the marketplace.
Creating a new profile will have the options to perform category mapping and attribute mapping according to which the list of products will be shown. From this list of products, you can select those products on your store which you want to upload on the Etsy marketplace.
7. The order management
In a standard Etsy seller account, when your products become visible on the marketplace, you start receiving the order for them. A PrestaShop Etsy connection works efficiently to let you manage these product orders from the PrestaShop dashboard itself.
Now, based on the order status mapping between the PrestaShop and Etsy marketplace, you can update the order status and perform all the order management tasks from your PrestaShop back office itself.
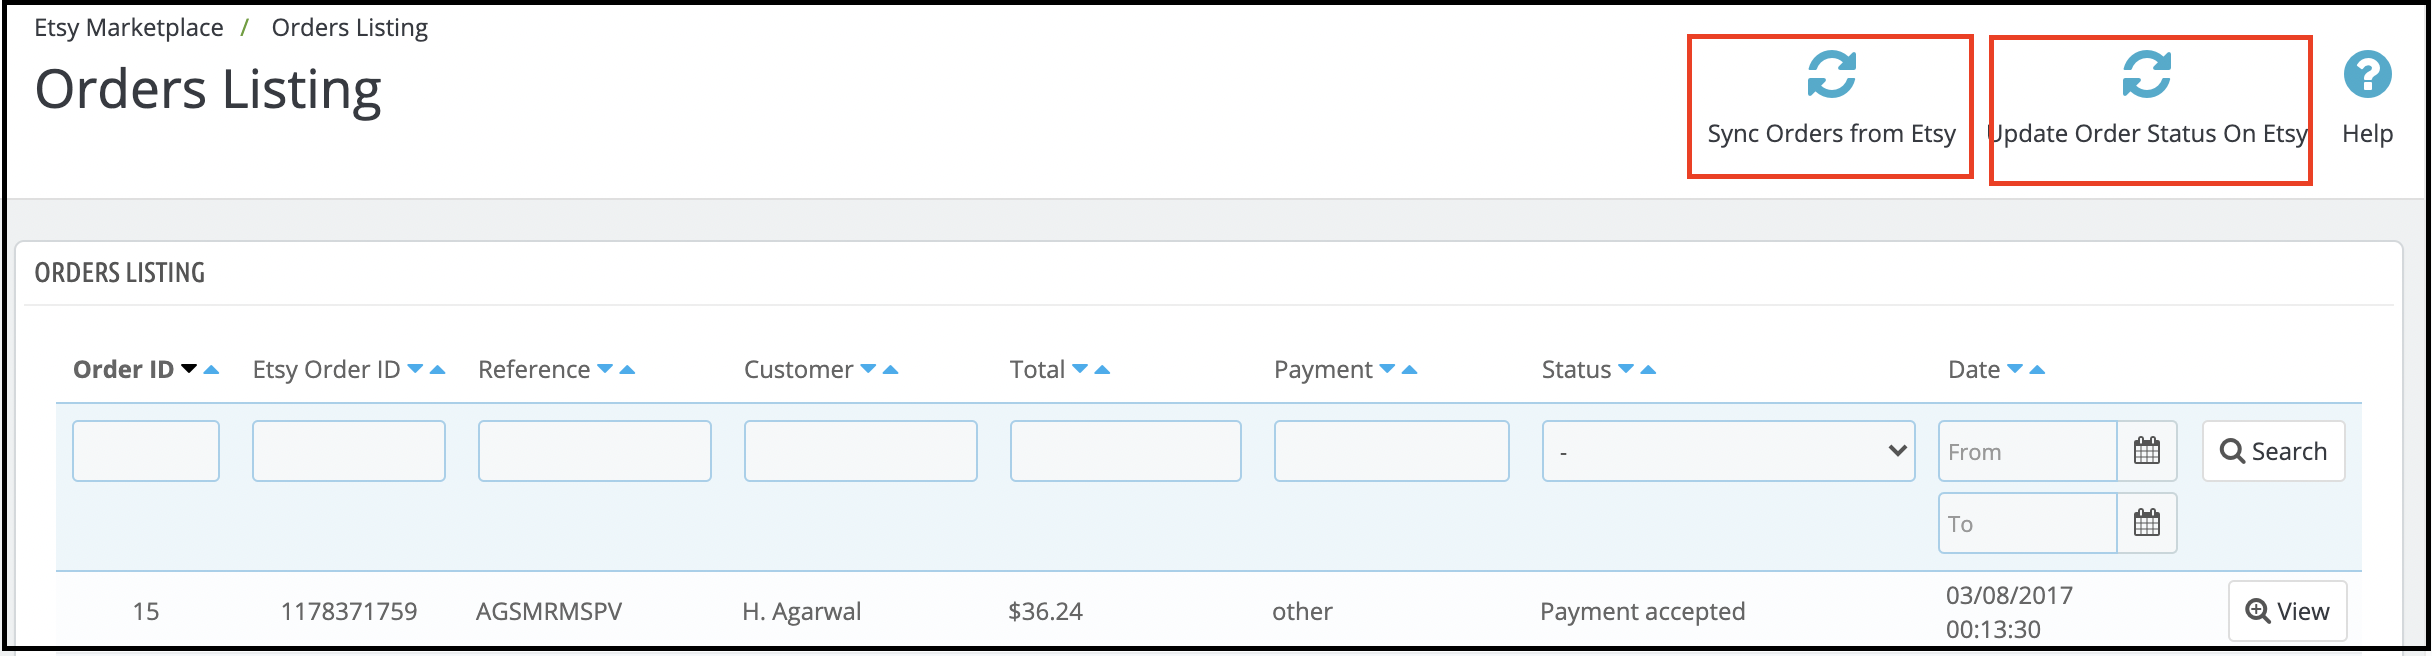
You can see the order ID, Etsy order ID, reference, customer details, total order amount, and payment status of placed orders. Etsy product orders are listed on the PrestaShop dashboard as shown in the figure below:
Other Functionalities of Etsy-PrestaShop Integration Addon that helps you connect the store
Cron set up to automate the process
The admin can set up the cron jobs so that the inventory update, order sync from Etsy to PrestaShop, and order status update from PrestaShop to Etsy will work automatically. Newly added products will also get updated accordingly.
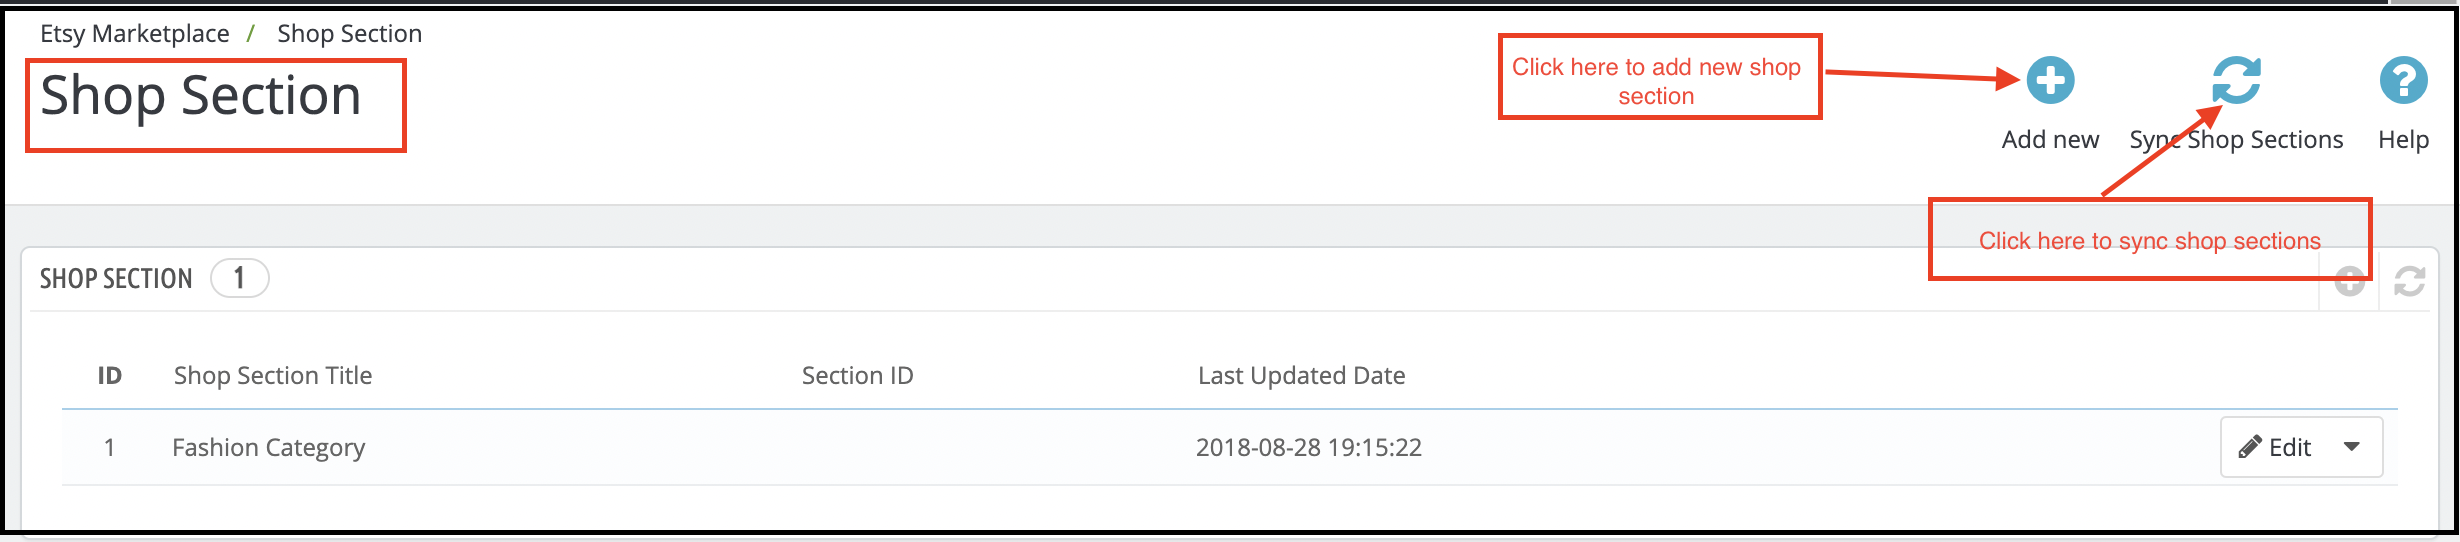
Add Shop Sections
The PrestaShop Etsy Integration add-on provides an option to create the store and the profile can be mapped to the store. Category Wise Mapping
The PrestaShop store administrator needs to map the PrestaShop store category to the most appropriate Etsy Store category to list the items on the Etsy Marketplace, so that all PrestaShop store products can be mapped to the correct Etsy category.
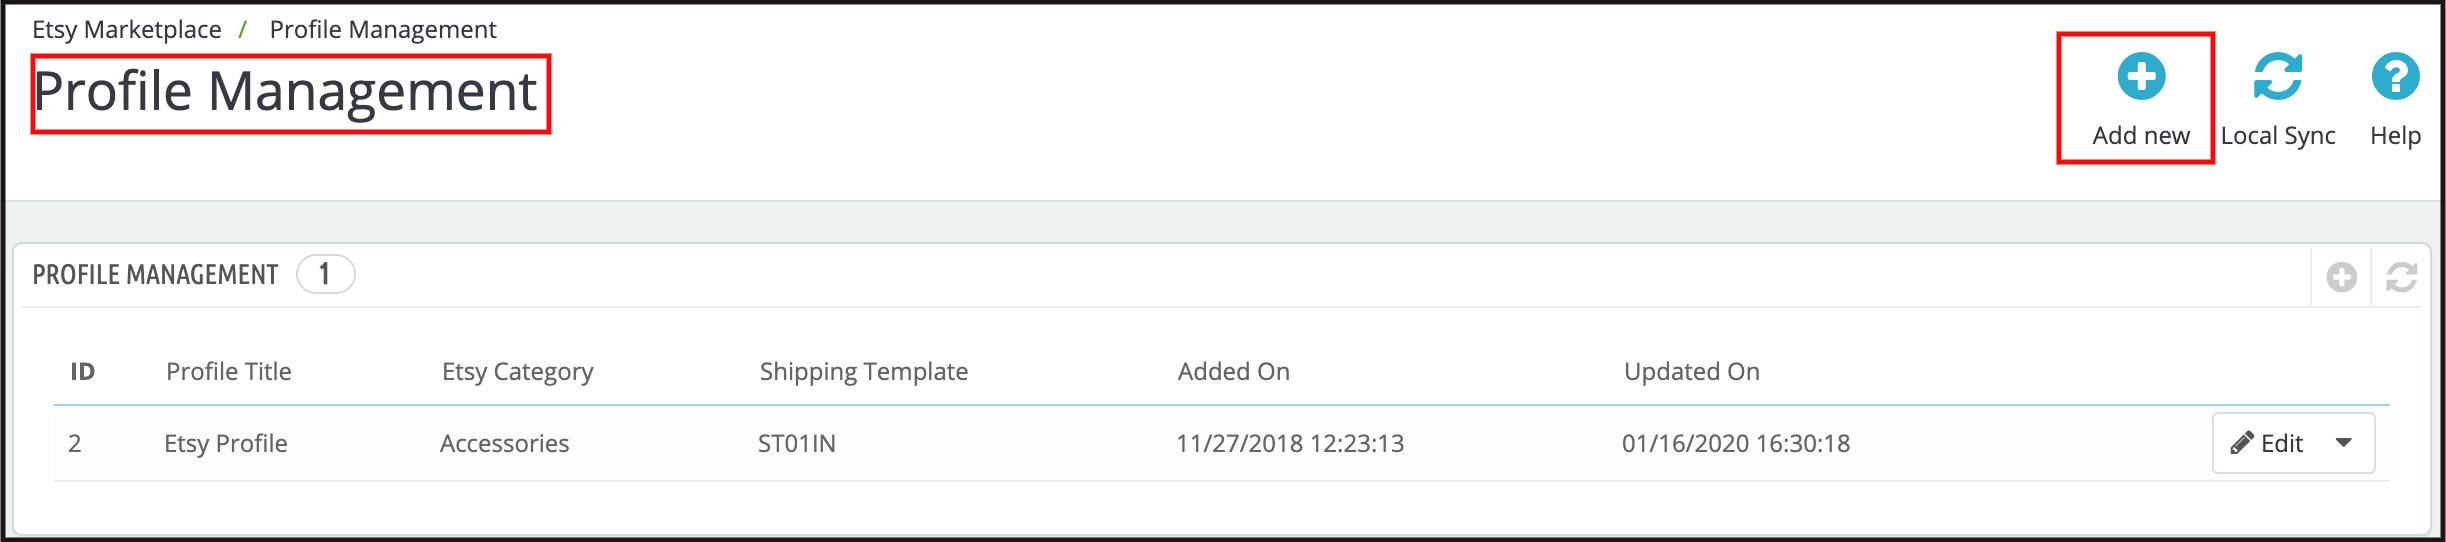
Managing Profiles with Ease
Admin can pick simple settings to list the product with the aid of profile management, such as – Etsy Shop (country-wise), Currency, Language, and Shipping Profile. Using the Size chart image function, Store Admin may add an extra image for each profile. This image will be added as an extra image to the Etsy marketplace.
You can customize the product title by inserting certain details and placeholders with the title. The place-holders like {sample} will be replaced by dynamic content at the time of execution.
The Custom Pricing for Etsy
Integration Extension enables the PrestaShop store administrator to list their goods from the PrestaShop store to the Etsy Marketplace at a price different from the price of the PrestaShop store.
Using PrestaShop Etsy Integration Extension, the admin may increase or decrease the price range at the Etsy Store. The administrator has the option to list the goods at a lower or higher price based on fixed or percentage-wise changes.
Product Image Size
Prestashop Etsy Integration module allows the admin to select the size of the product image in our module to sync the same to Etsy Marketplace.
Alter Quantity
The admin can set a maximum quantity of products that will be synced to Etsy with the products. If a product has 10 quantities on the store but Alter quantity is set as 5 then only 5 quantities will be synced to Etsy for that product.
Sales Data Analytics and Stats
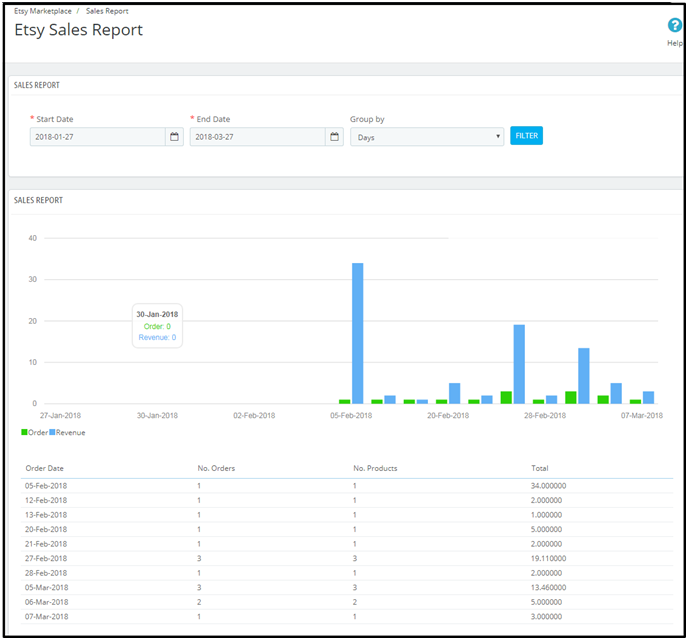
It allows the store owner to use PrestaShop Etsy Integration Extension to monitor the sales report.
The Etsy PrestaShop integration plug-in sales report tab helps the sellers to access the order and revenue report. This helps the administrator to review the sales report for orders from the Etsy store.
Also, a product sales report is displayed that allows you to see the product-wise status.
Watch how to connect Prestashop store with Etsy Marketplace
This is how a PrestaShop-Etsy integration works to allow an eCommerce site to receive orders directly from the Etsy marketplace. An effective PrestaShop-Etsy connection lets you perform all the activities of a seller account from the PrestaShop admin panel itself. Knowband’s PrestaShop Etsy integration module is one such PrestaShop module that you can leverage to generate heightened conversions on your store. It’s time you accept the importance of being a part of a popular marketplace and understand how you can leverage them to generate sales for your business.