OpenCart Private Shop Extension – User Manual

1.0 Introduction

As a shopper, you must have seen many of the online stores now don’t allow you to browse through the website or do any purchases unless you create an account with them. This is the way to make your website secure and safe from anonymous users. So, there are several tools out there to provide login security but most of them are like they only apply the login security to the complete site. But with the Knowband OpenCart Private Shop Extension, you can even customize the way you want to secure the website. You can either secure the complete store or you can select from the list of Categories, Products, Pages, and IPs to secure separately instead of securing the complete storefront.

2.0 Salient Features of OpenCart Private Shop Module

  1. Using this module admin can force the users to login to visit the webstore.
  2. Admin can update the login/Signup page element changes as per requirement, he/she can add title and show hide the store logo.
  3. The admin can set if he wants to enable the signup process from the secured page or not..
  4. OpenCart admin can set if the newly registered customer can view the store directly or he/she must be approved first.
  5. Store admin can change the content of the thank you page which will be only visible if the verify new customers option is enabled.
  6. Admin can set the position of the forms on the secure pages, like, left, right, or center.
  7. Store owner can add custom CSS and JS to add on the secure pages.
  8. Private Shop Admin can either secure the complete web store or he/she can set the categories, products, and pages on which he wants to add security.
  9. OpenCart shop admin can add IP to allow them to view everything on the web store with logging in.
  10. Private shop admin can change the opacity of the forms on the secure pages.
  11. Admin can change the background of the forms as per his/her requirement, he/she can choose from the plain color background, image background, or video background.

What’s New in the Recent Enhancements!

Customer Listing:

With Knowband’s Opencart Private Shop Extension, store admins can enable a private login pop-up for specific sections, restricting access to products, categories, and CMS pages for general customers. This new enhancement lists customers who are registered through the private shop login pop-up in a separate tab, providing admins with control to approve, disapprove, or delete private customer accounts as needed.

Email Templates:

The email template section in Knowband’s Opencart Private Shop Extension allows admins to customize private account registration emails. Admins can set the subject line in the template subject text field and modify email content with text or HTML. This ensures personalized and professional communication with registered customers.

Opencart Private Shop Extension

Transform your OpenCart store into an exclusive Private Shop with restricted access for select customers. Customize visibility and create a VIP shopping experience effortlessly!

SHOP NOW

3.0 Installation Guide

  • Before starting the installation process, you have to buy the Private Shop by the Knowband store. Once purchased, you will receive the following files in your registered email.
  • Source code of OpenCart Private Shop extension in zipped file format.
  • User Manual of OpenCart Private Shop extension.
  • Now in order to install this on your online shop, follow the given steps:

Step 1:

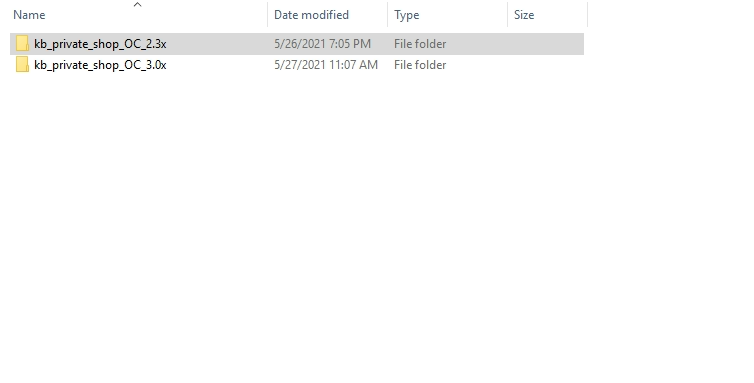
Unzip the zip file. You will get the folders as shown in the image below

opencart-private-shop

Step 2:

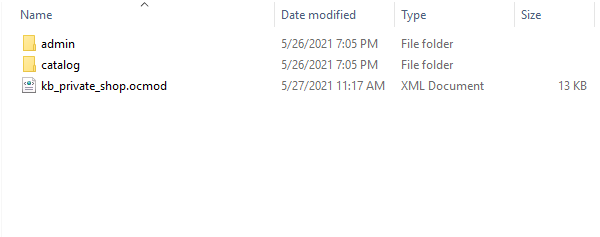
Copy the content of one of the folders as per your OpenCart version as shown in the below image
Step 3:

You can copy these folders to the root folder of your website.

Step 4:

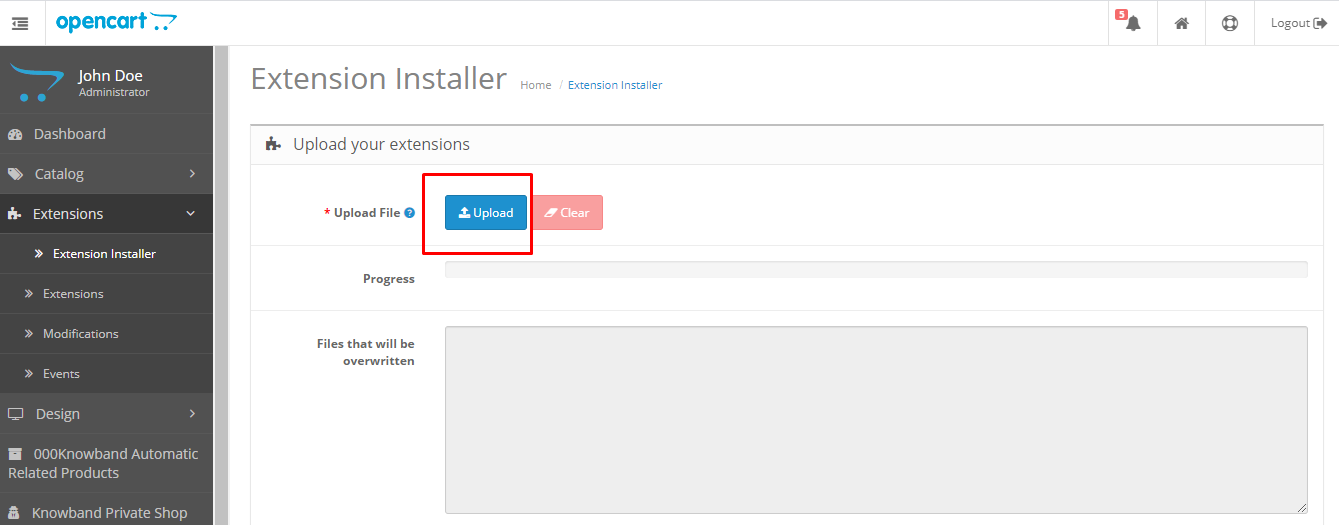
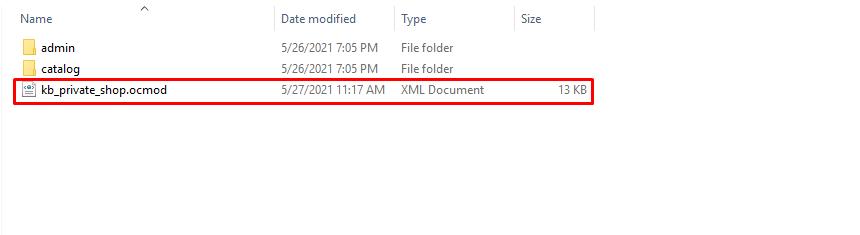
After copying this go to your admin panel and install the module with the modification file.
Step 5:

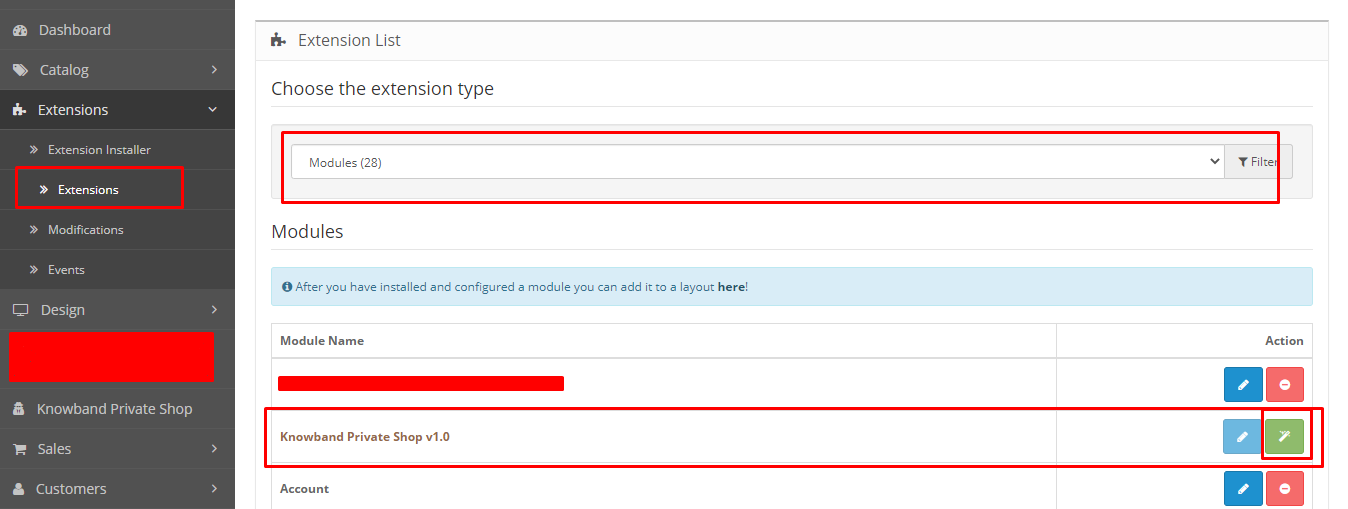
After uploading the OCMOD file your module will be ready to use. You can go to the extensions and install and configure the module as per your need.
4.0 Admin Interface of OpenCart Private Shop Extension

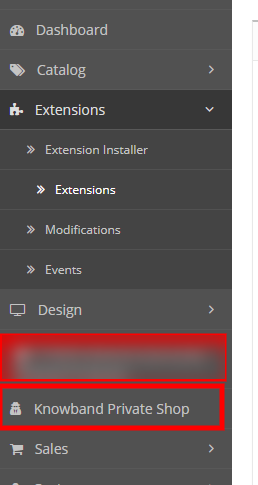
To configure the OpenCart Private Shop extension you can navigate to the module configuration page either by clicking on the Knowband Private Shop link in the side menu.
Or you can go to the Extensions > Modules > Knowband Private Shop.
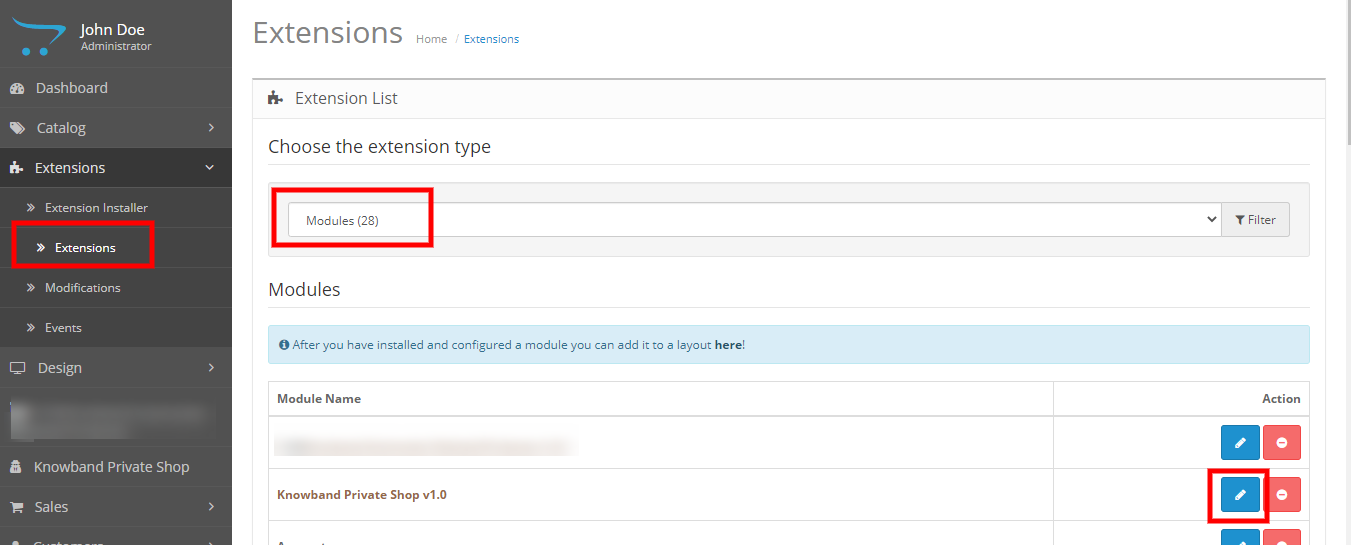
In the admin you will see the following main settings tabs those are:

  1. General Settings
  2. Access Settings

4.1 General Settings

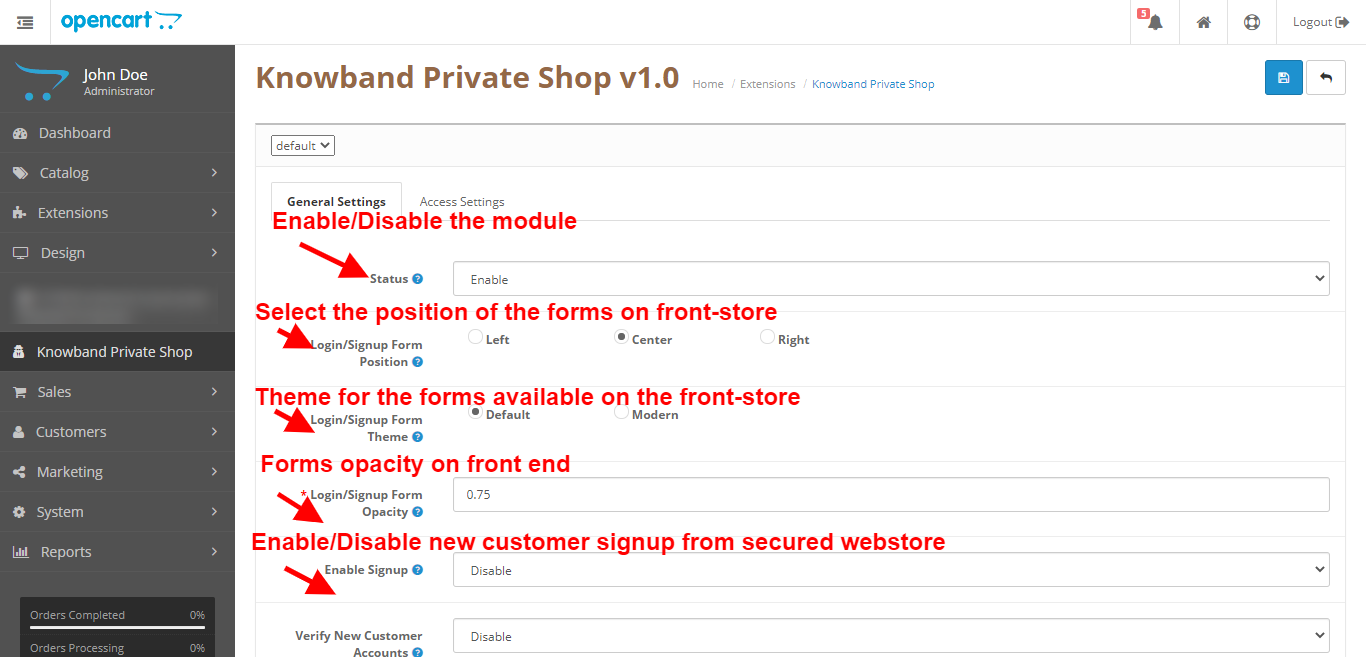
These are the basic settings that you can apply on the front-end forms and views. Here you have the option to enable or disable the module and much more:

  1. Status: Enable/Disable this module.
  2. Login/Signup Forms Position: Select the position where you want to display the login/signup form on the front-end store.
  3. Login/Signup Forms Theme: Select the theme which you want to apply on the login/signup form. The default theme will use your store theme.
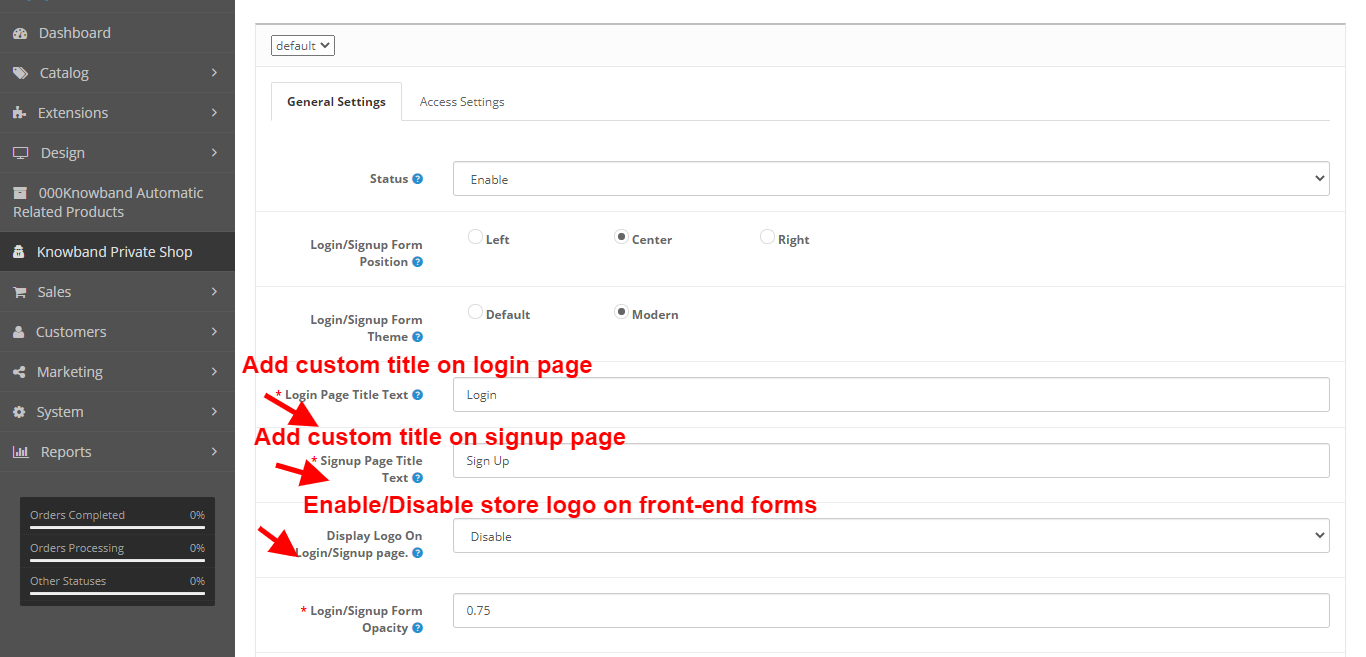
  4. Login/Signup Form Opacity: Enter the form opacity value for login/signup form. Values should be between 0 and 1 For example 0.5 or 0.75
  5. Enable Signup: Enable this to allow the customer to register a new account.
  6. Login Page Title Text: Input login page title text which will be displayed on the frontend login page. Only work if the theme is selected as modern.
  7. Signup Page Title Text: Input signup page title text which will be displayed on the frontend signup page. Only work if the theme is selected as modern.
  8. Display Logo on Login/Signup page: Enable this setting if you want to display the logo on the Login/Signup page. Only work if a theme is selected as modern.
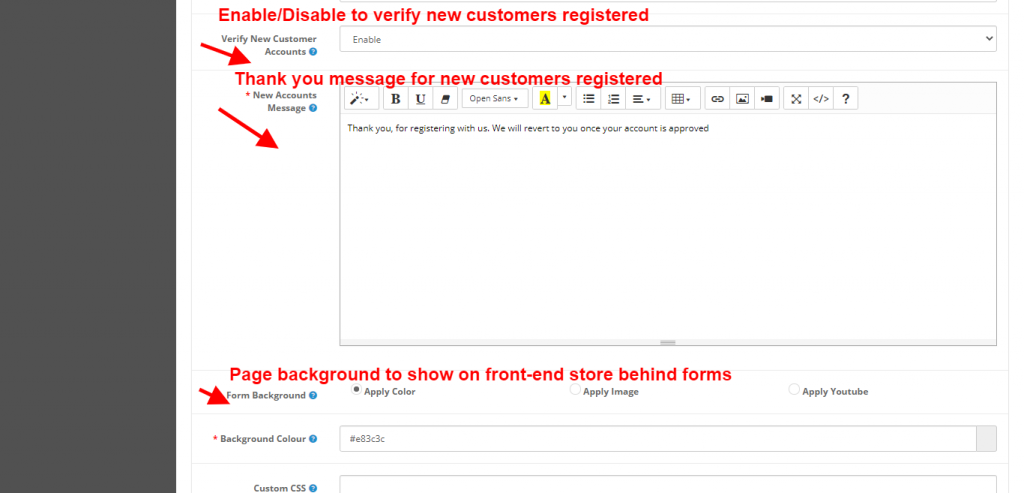
  9. Verify new customer accounts: Enable this setting if you want to validate new accounts.
  10. New Accounts Message: This message will be displayed after the registration of restricted customers. Only visible if the verify new customer accounts is enabled, if disabled default functionality of OpenCart will get triggered.
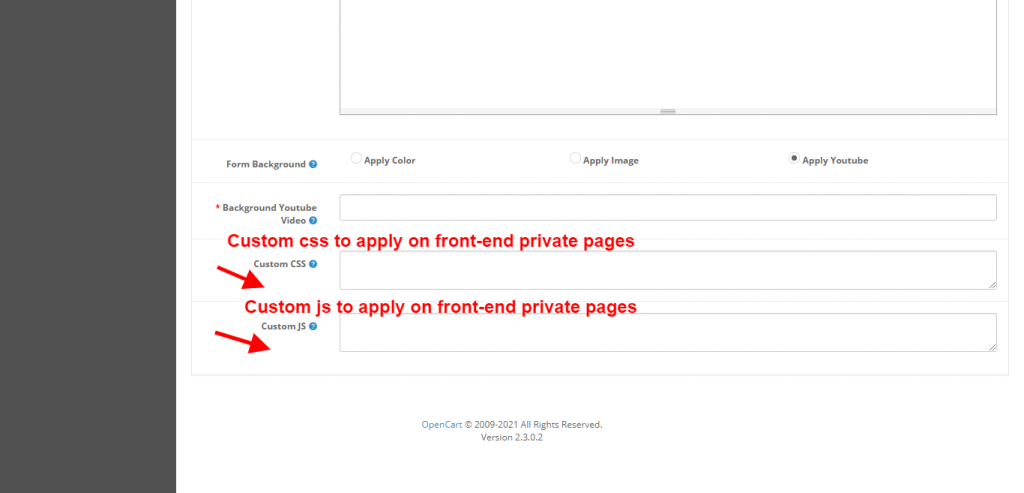
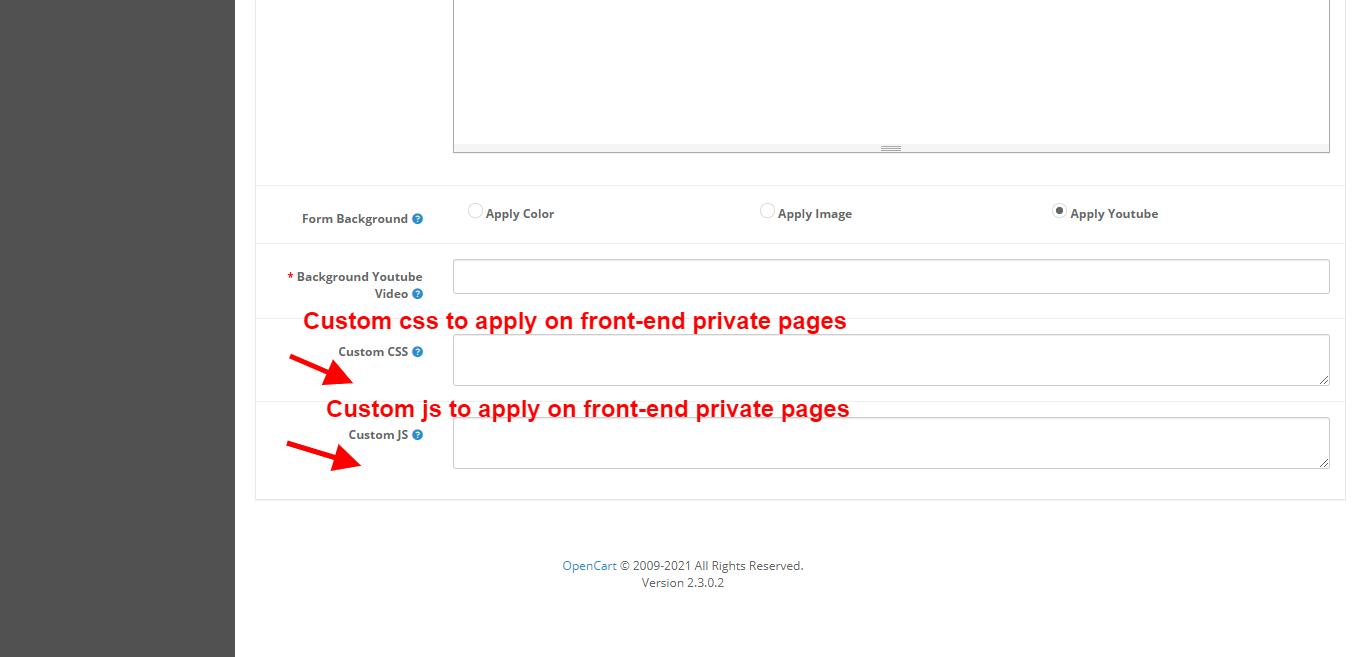
  11. Custom CSS: You can add custom CSS to render it on the front end. Further, from the forms that are visible on the secure pages of the front-end.
  12. Custom JS: You can add custom JS to render it on the front end. Furthermore, from the forms that are visible on the secure pages of the front-end. Do not add script tags.
  13. Form Background: Select the background type which you want to apply on the Login/Signup form. In this you the option of three types.
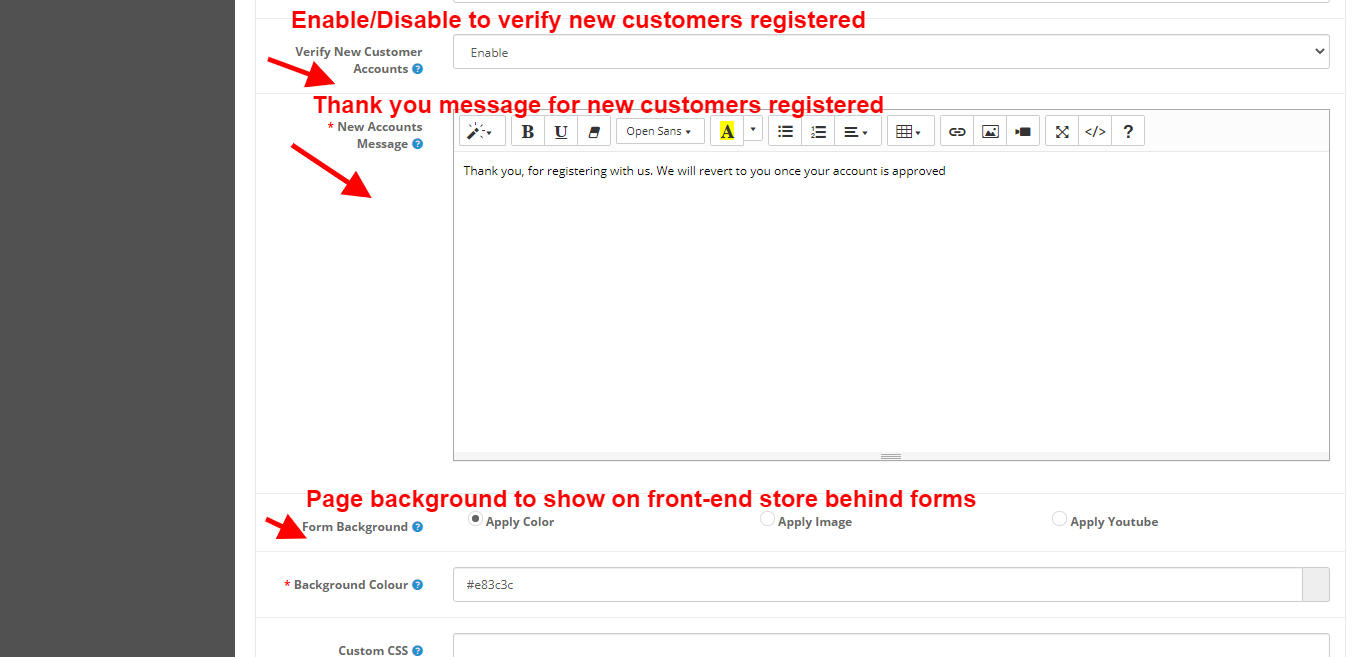
  • Solid color: Choose a color to display on the front end.
  • Image: This image will display as the background image of the Login/Signup page. Only .png or .jpg file format accepted.
  • YouTube video: Copy and paste the YouTube video URL here Which you want to display on the front end. Note: YouTube video link needs to be changed to embedded.

4.2 Access Settings

These are the access settings that the admin can use to secure the front-end store. Further, to save it from unauthorized users.

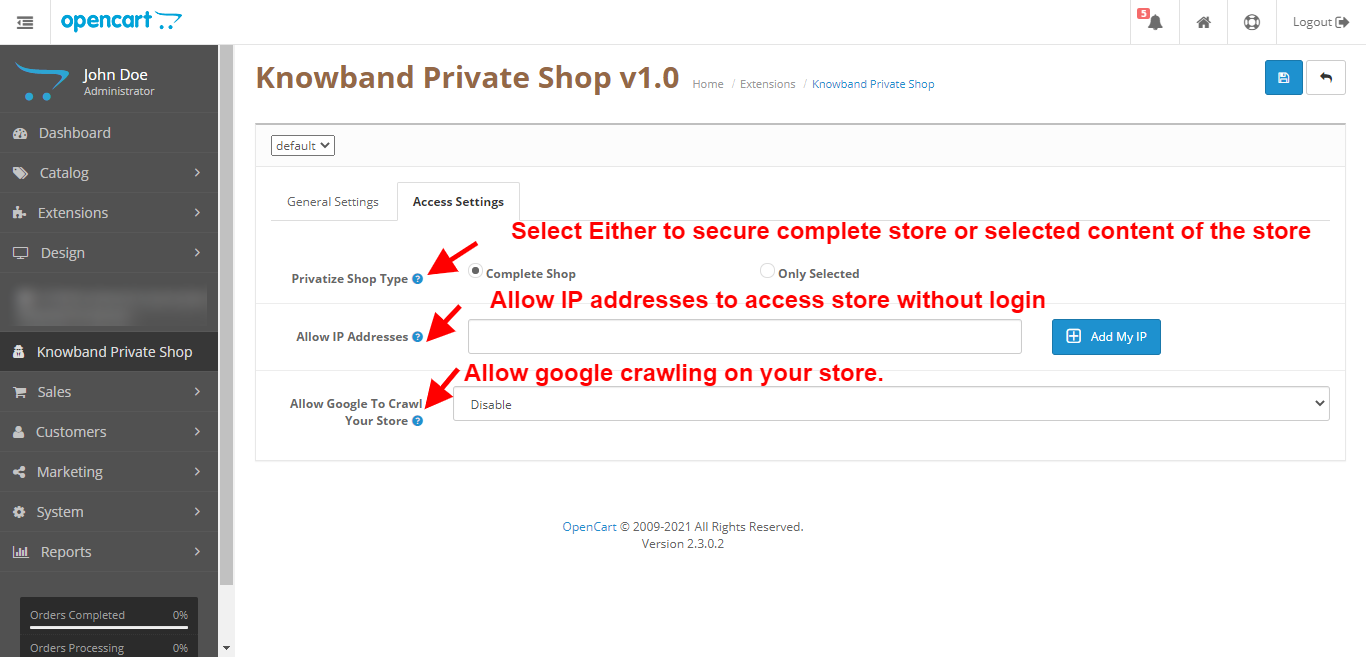
  1. Privatize Shop Type: Admin can select the type of privatization, either the admin wants to secure the complete webstore or the admin wants to secure the selected part of the webstore.
  2. Allow IP Addresses: Admin can add the public IP’s of the users to whom the user wants to give access to the front-end store without creating an account.
  3.  Allow Google to Crawl Your Store: Admin can enable or disable the google crawling option to apply settings on google crawling.
  4. Choose Private Products: Admin can select the products individually by searching for their name and add them to the list of private products which will add security to those products on the front-end store. This only works when the admin selects the “Only Selected” option in privatize type.
  5. Select Private Categories: Admin can select the categories individually by searching for their name and add them to the list of private categories which will add security to those categories on front-end store.This only works when the admin selects the “Only Selected” option in privatize type.
  6. Choose Private Pages: Admin can select the pages individually by searching for their name and add them to the list of private pages which will add security to those pages on the front-end store.This only works when the admin selects the “Only Selected” option in privatize type.

4.3 Private Customers:

With the help of Knowband’s Opencart Private Shop Extension, the store admin can enable the private login pop-up on particular sections of the shop. For example, you can restrict products, categories, and CMS pages from the general customers. 

In this section, the module shows the list of customers who have registered via the private shop login pop-up. Furthermore, the module provides complete control to the admin by providing approve/disapprove or deleting the private customers’ accounts in this section. 

4.4 Email Templates:

The email template section allows the admin to customize the private account registration email.

Template Subject: You can add the email subject for the customer registration email in the template subject text field. 

Email Template: The email template section allows the store admin to modify the email content by providing the option to add text/HTML content to the emails.

5.0 Front End Interface for the OpenCart Private Shop Module

On the front end, you will see the design changes and content on the basis of options selected in the admin basic settings configurations.

  1. If the admin applies the Default theme, the background image is visible without the logo and login from the title.

  2. When form position set as left.
  3.  If the admin applies the Default theme, the background image is visible without the logo and login from the title.
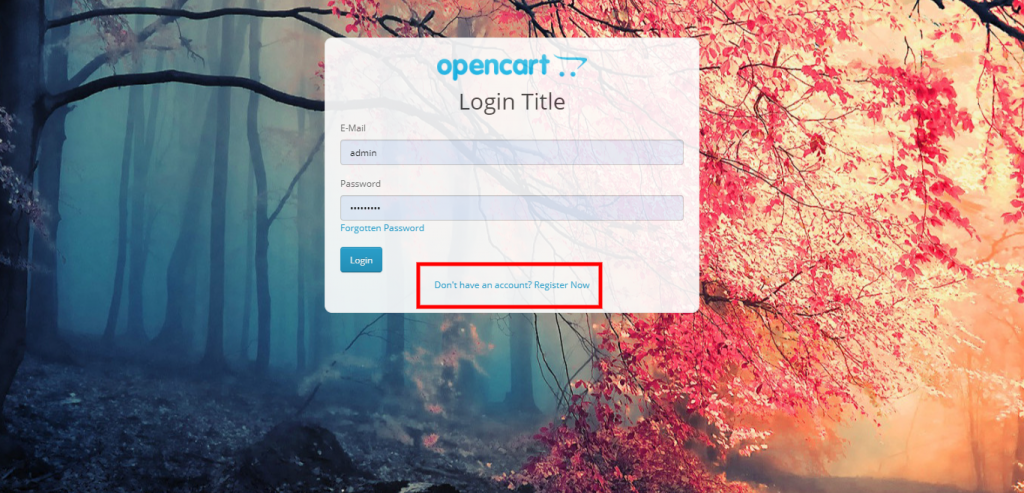
  4. The admin can enable new customer signup. Furthermore, the opacity of the form sets to 1 from the admin panel.

  5. A thank you message screen appears after the verification of the new customer account.

6.0 Check out our Tutorial Guides for the OpenCart Private Shop Extension 

Learn how to restrict store access, manage customer groups, configure private shop settings, set custom login and registration rules, control product visibility, and provide a seamless private shopping experience for your customers.

Buy OpenCart Private Shop Module: https://www.knowband.com/opencart-private-shop

Admin Demo: https://opencartdemo.knowband.com/3.0/privateshop/admin/

Front Demo: https://opencartdemo.knowband.com/3.0/privateshop/

Recommended Read: Why Do Businesses need a ‘Private Shop’?
Extension de boutique priv e OpenCart – Manuel de l’utilisateur


1.0 Apresentação

En tant qu’acheteur, vous devez avoir vu que de nombreux magasins en ligne ne vous permettent d sormais plus de naviguer sur le site Web ou d’effectuer des achats, sauf si vous cr ez un compte avec eux. C’est le moyen de s curiser votre site Web et de le prot ger des utilisateurs anonymes. Ainsi, il existe plusieurs outils pour assegure la s curit de connexion, mais la plupart d’entre eux sont comme s’ils n’appliquaient la s curit de connexion qu’ l’ensemble du site. Mais avec le Extension of boutique priv e Knowband OpenCart, vous pouvez m me personnaliser la fa on dont vous souhaitez s curiser le site Web. Vous pouvez soit s curiser la boutique compl te, soit s lectionner dans la liste des categorias, produits, pages et adresses IP s curiser s par ment au lieu de s curiser la vitrine complte .

2.0 Caract ristiques principales de Módulo de boutique priv e OpenCart

  1. L’utilisation de ce module admin peut forcer les utilisateurs se connecter pour visiter la boutique en ligne.
  2. L’administrateur peut mettre jour les changes apport es aux l ments de la page de connexion / d’inscription selon les besoins, il peut ajouter un titre et masquer le logo du magasin.
  3. L’administrateur peut d finir s’il souhaite activer ou non le processus d’inscription from la page s curis e.
  4. L’administrateur peut d finir si le client nouvellement enregistr peut voir le magasin directement ou s’il doit d’abord tre approuv .
  5. L’administrateur peut modifier le contenu de la page de remerciement qui ne sera visible que si l’option V rifier les nouveaux clients est active.
  6. L’administrateur peut d finir la position des formulaires sur les pages s curis es, comme gauche, droite ou au center.
  7. L’administrateur peut ajouter des CSS et JS personnalis s ajouter sur les pages s curis es.
  8. L’administrateur peut soit s curiser la boutique en ligne compl te, soit d finir les cat prodgories, les produits et les pages sur lesquels il souhaite ajouter de la s curit .
  9. L’administrateur peut ajouter une adresse IP pour lui permettre de tout voir sur la boutique en ligne en se connectant.
  10. L’administrateur peut modifier l’opacit des formulaires sur les pages s curis es.
  11. L’administrateur peut modifier l’arri re-plan des formulaires selon ses besoins, il peut choisir parmi l’arri re-plan de couleur unie, l’arri re-plan de l’image ou l’arri re -plan vid o.

Guia de instalação 3.0

Avant de commencer le processus d’installation, você devez acheter la boutique priv e par le magasin Knowband. Une fois achet , vous recevrez les fichiers suivants dans votre e-mail enregistr . Código fonte da extensão OpenCart Private Shop au format de fichier zipp . Manuel d’utilisation de l’extension OpenCart Private Shop. Mantido, pour l’installer sur votre boutique en ligne, suivez les tapes indiqu es :

tape ​​1: D compressez le fichier zip. Vous obtiendrez les dossiers comme indiqu dans l’image ci-dessous

tape ​​2: Copie o conteúdo de um dos dossiês para a sua versão OpenCart. Vous obtiendrez les fichiers suivants l’int rieur.

tape ​​3: Copie os dossiês no dossiê racine de votre site Web. En cas de problems, vous pouvez nous joindre.

tape ​​4: Apr s avoir copi cela, all in your panneau d’administration et installlez le module avec le fichier de modificação.

tape ​​5: Apr s avoir t l charg le fichier ocmod, votre module sera pr t tre utilis . Vous pouvez acede às extensões e instalador e configurador do módulo selon vos besoins.

4.0 Interface d’administration de l’extension de boutique priv e OpenCart

Pour configurer l’extension OpenCart Private Shop, você pode acessar a página de configuração do módulo e clicar em lien Knowband Private Shop no menu lat ral.

Ou vous pouvez aller dans Extensões> Módulos> Loja privada da Knowband.

Dans l’administrateur, vous verrez les principaux onglets de param tres suivants :

  1. Param tres g n raux
  2. Param tres d’acc s

Param tres g n raux 4.1

Il s’agit des param tres de base que vous pouvez appliquer aux formulaires et vues frontaux. Ici, vous avez la possibilit d’activer d sactiver le module et bien plus encore :

  1. Status: Módulo de ativação / desativação.
  2. Formulaires de connexion / inscrição Poste : S lectionnez la position o vous souhaitez afficher le formulaire de connection / inscription sur le front-end store.
  3. Th me des formulaires de connexion / inscription : S lectionnez le th me que vous souhaitez appliquer sur le formulaire de conexão / inscrição. Le th me par d faut utilisera le th me de votre magasin.
  4. Opacit du formulaire de connexion / inscription : Entrez la valeur d’opacit du formulaire pour le formulaire de conexão / inscrição. Les valeurs doivent tre compreende entre 0 e 1 Par exemplo 0.5 ou 0.75
  5. Ativador de inscrição : Activez cette option pour permettre au client d’enregistrer un nouveau compte.
  6. Texto do título da página de conexão : Saisissez le texte du titre de la page de connexion qui sera affich sur la page de connexion frontale. Ne fonctionne que si le th me est s lectionn comme moderne.
  7. Texte du titre de la page d’inscription :Entrez le texte du titre de la page d’inscription qui sera affich sur la page d’inscription frontale. Ne fonctionne que si le th me est s lectionn comme moderne.
  8. Afficher le logo na página de conexão / inscrição : Activez ce param tre si vous souhaitez afficher le logo na página de conexão / inscrição. Ne fonctionne que si un th me est s lectionn comme moderne.
  9. V rifiez les nouveaux comptes clients : Activez ce param tre si vous souhaitez valider de nouveaux comptes.
  10. Message des nouveaux comptes :Ce message s’affichera apr s l’enregistrement des clients restreints. Uniquement visível si la v rification des nouveaux comptes clients est active, si elle est d sactiv e, la fonctionnalit par d faut d’OpenCart sera d clench e.
  11. CSS personnalis :Vous pouvez ajouter un CSS personnalis pour le rendre sur le front-end from des formulaires qui seront visibles sur les pages scuris es du front-end. N’ajoutez pas de balises de style
  12. JS personnalis : Vous pouvez ajouter un JS personnalis pour le rendre sur le front-end from des formulaires qui seront visibles sur les pages scuris es du front-end. N’ajoutez pas de balises de script.
  13. Arri re-plan du formulaire : S lectionnez le type d’arri re-plan que vous souhaitez appliquer sur le formulaire de conexão / inscrição. En cela, vous avez le choix entre tipos trois.
  • Couleur unie: Choisissez une couleur afficher sur le frontend.
  • Imagem: Cette image s’affichera comme image d’arri re-plan da página de conexão / inscrição. Veja o formato de arquivo .png ou .jpg está aceito .
  • Vídeo Youtube: Copiez et collez ici l’URL de la vid o YouTube that vous souhaitez afficher sur le frontend. Remarque : le lien vid o YouTube doit tre remplac par int gr , c’est- -dire https://www.youtube.com/watch?v=rN6nlNC9WQA pour https://www.youtube.com/embed/rN6nlNC9WQA

4.2 Param tres d’acc s

Ce sont les param tres d’acc s qui seront utilis s pour prot ger votre boutique frontale contre l’acc s d’utilisateurs non autoris s.

  1. Type de boutique privatis e :L’administrateur peut s lectionner le type de privatization, soit l’administrateur souhaite s curiser la boutique en ligne compl te, soit l’administrateur souhaite s curiser la partie s lectionn e de la boutique en ligne.
  2. Autoriser les adresses IP :L’administrateur peut ajouter les adresses IP publiques des utilisateurs auxquels l’utilisateur souhaite donner acc s au magasin frontal sans cr er de compte.
  3. Autorisez Google explorer votre boutique : L’administrateur peut activer ou d sactiver l’option d’exploration google pour appliquer les param tres d’exploration google.
  4. Choisissez des produits priv s :L’administrateur peut s lectionner les produits individuellement en recherchant leur nom et les ajouter la liste des produits priv s, ce qui renforcera la s curit de ces produits sur le magasin frontal. Ne fonctionne que si l’option “Seulement s lectionn ” est s lectionn e dans le type privatiser.
  5. Choisissez les cat gories priv es :L’administrateur peut s lectionner les cat gories individuellement en recherchant leur nom et les ajouter la liste des cat gories priv es, ce qui ajoutera de la s curit ces categorias sur le magasin frontal. Ne fonctionne que si l’option “Seulement s lectionn ” est s lectionn e dans le type privatiser.
  6. Choisissez les pages priv es :L’administrateur peut s lectionner les pages individuellement en recherchant leur nom et les ajouter la liste des pages priv es, ce qui renforcera la s curit de ces pages sur le magasin frontal. Ne fonctionne que si l’option “Seulement s lectionn ” est s lectionn e dans le type privatiser.

5.0 Interface frontale para o módulo de boutique priv e OpenCart

No front-end, você verá as modificações de concepção e o conteúdo na base das opções de seleção nas configurações dos parâmetros de base do administrador.

  1. Lorsque le th me par d faut est appliqu , seuls le formulaire et l’image d’arri re-plan sont visibles sans le logo et la connexion from du titre.
  2. Lorsque la position du formulaire est d finie sur la gauche.
  3. Lorsque le th me du formulaire de connexion est s lectionn comme tant plus moderne que le logo du magasin, le titre du formulaire est visible.
  4. Lorsque l’inscription d’un nouveau client est active et that l’opacit des formulaires est d finie sur 1 dans le panneau d’administration.
  5. cran de message de remerciement lorsque le nouveau compte client v rifi est activ .

comprar Módulo de boutique priv e OpenCart: https://www.knowband.com/opencart-private-shop

D mo administrateur : https://opencartdemo.knowband.com/3.0/privateshop/admin/

D mo avant: guerrahttps://opencartdemo.knowband.com/3.0/privateshop/


Build Responsive Single Page Checkout for OpenCart in Few Clicks

Various statistics and practices suggest that it is not convenient to order on the OpenCart platform. Extra clicks and steps to order the products just make the ordering process harder. Most customers would give up their items in a shopping cart and leave your web. This adversely affects the conversion rate of your online shop.

To solve this dilemma, the “KnowBand” team of developers has built an excellent One Page Checkout module. This module offers versatile features and has a strong device setup. With only a few taps, you can simplify the checkout registration page to only 1-3 fields, or render it as you need to consider the module’s capabilities.

This responsive checkout module is one of the modules that any store should have to thrive and not lose its customers.

Options for Fast Login

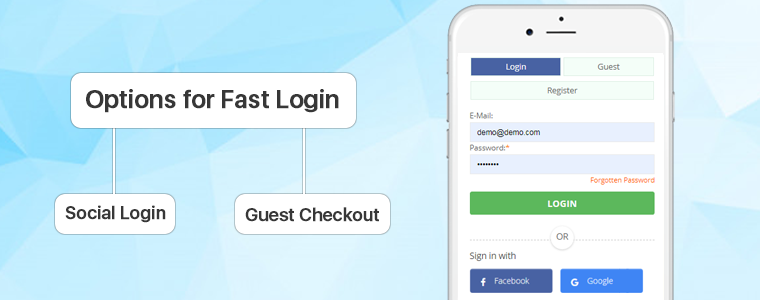
A long registration form is a key reason behind the abandonment of the cart. But with One Page Checkout, users can register in a few easy steps.

Social Login: Fast Checkout allows users to log in via their Facebook, Google or PayPal accounts via a social login feature. These login options save a lot of time that could have been spent on a lengthy registration process. It enhances the experience of the customer and increases the number of registrations.

Guest Checkout: One Page Fast Checkout Module, let users check out as a guest if they don’t feel comfortable logging in. Social login, on the other hand, improves user engagement and offers up-to-date customer information.

Autofill Address and Auto-detection Country

This alluring feature of a one-page checkout module makes it a good choice as it extracts the address from existing data in your Google browser and auto-detects the customer’s country using a geolocation integration function. It decreases the time for the address to be filled.

The layout of the Checkout Page

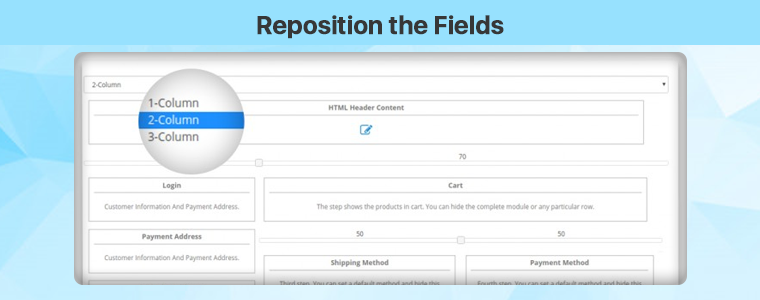
The responsive One Page Checkout Extension for OpenCartallows the store administrator to pick the Interface Template for the Checkout Page. The admin may choose the 1-Column, 2-Column, or 3-Column layout for the checkout tab. The admin will determine the width of the columns to optimize the checkout page.

Reposition the Fields

The OpenCart Checkout page layout has this special option of drag and drop. You can place any field on any column by dragging it. It is simple to reposition the fields with this module and you can customize the layout look.

Reduction of Entries

Fast Single Page Checkout is a compacted version of a multi-step checkout with a reduced number of entries. A one-page checkout module with minimal mandatory fields and no additional data input options. Any of the areas could be left optional to minimize time.

Email Integration

The OpenCart Fast Checkout Module provides integration with MailChimp, Klaviyo, and SendinBlue that enables you to automatically synchronize the database of your users with your accounts without any manual effort.

Ship2Pay

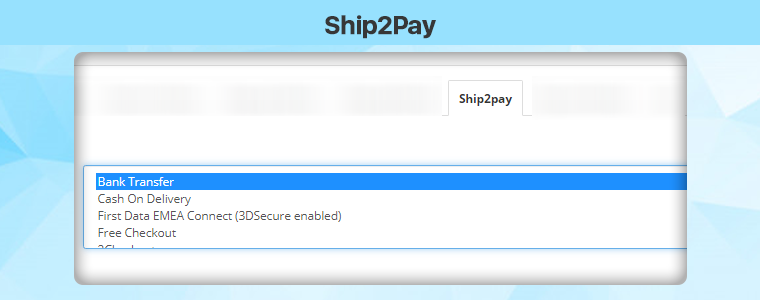
The OpenCart Simplified Checkout module provides the Ship2Pay functionality, which allows the store owner to map unique payment methods using selected delivery methods. It hides all other payment methods when choosing a specific method of delivery and displays only those payment methods which are mapped to the chosen method of delivery to the customer.

Free shipping bars

Offering free shipping has many advantages, such as improved sales and increased average order for carts. It allows more consumers to buy as many users have quit the cart due to additional shipping charges. A free shipping bar will be shown at the top of the eligibility list. It allows consumers to buy more to get a free shipping deal.

Responsive Single Page Checkout

Responsive checkout page helps to increase the conversion rate & also improves the user experience on mobile devices. The Single Page Checkout extension for  OpenCart is mobile responsive.

Conclusion: A long and bulky type of checkout is one of the key reasons for the abandonment of a shopping cart. When a shopper is on the checkout tab, the process needs to be finished as quickly as possible. The longer you get your customers to sit down, the higher the chances of leaving the cart. The KnowBand developer team offers you an excellent solution for your business: a module that every OpenCart web store requires. Don’t waste time – just buy the smart and responsive One Page Checkout module and evaluate all its benefits.

Get Single Page Checkout Extension for your OpenCart store: https://www.knowband.com/opencart-one-supercheckout-pro

This extension is also available at the Official OpenCart Marketplace: https://www.opencart.com/index.php?route=marketplace/extension/info&extension_id=15353

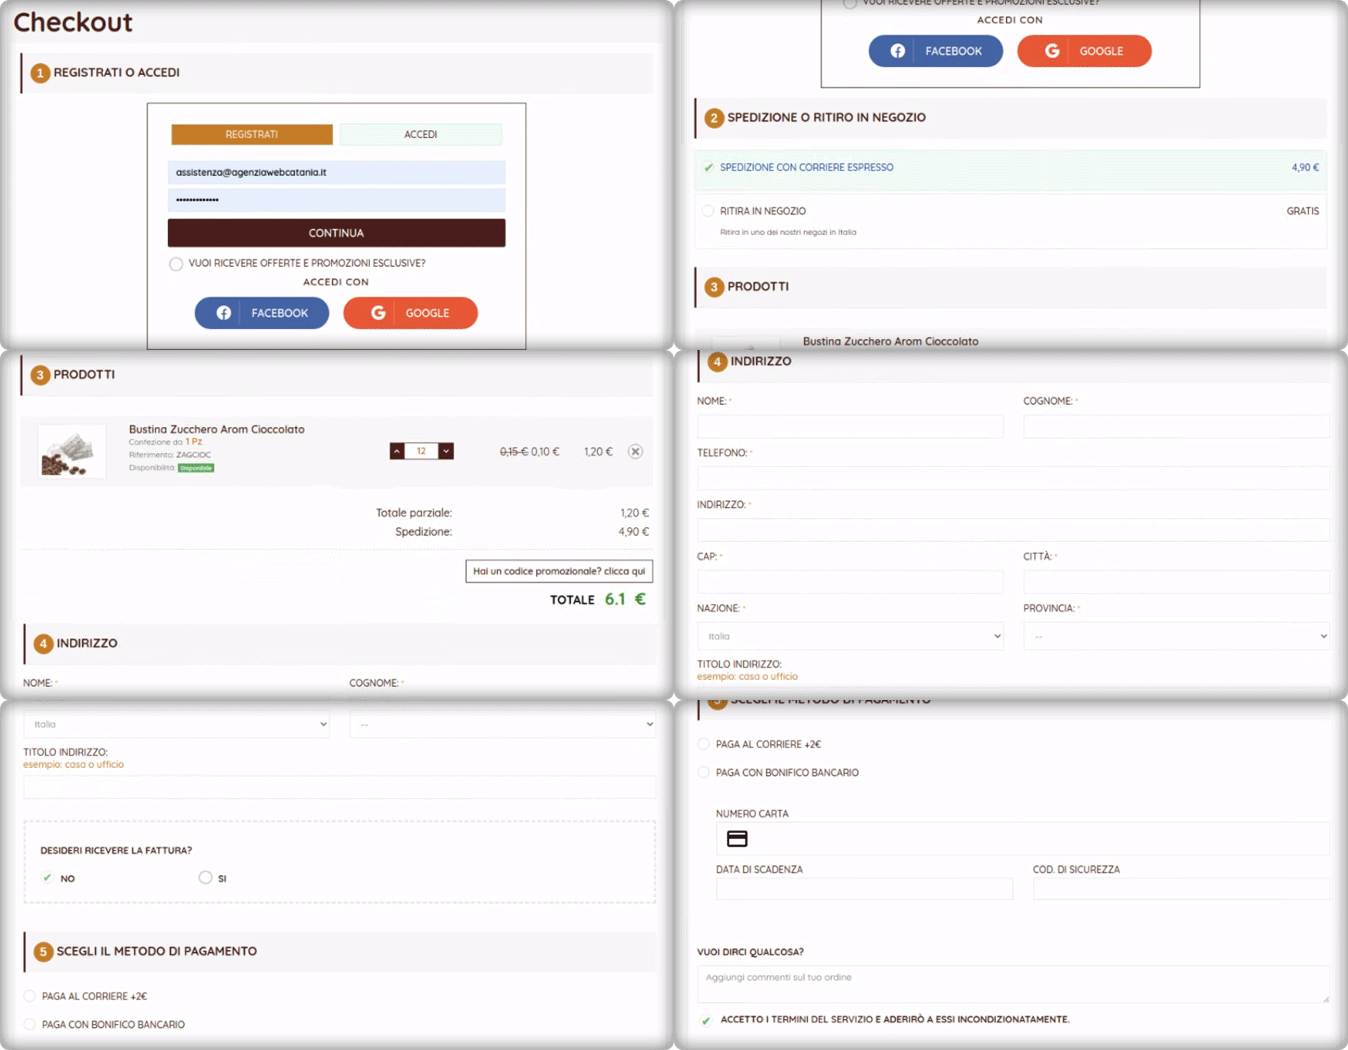
10 Elite Examples of Checkout for Spain PrestaShop stores

Shopping cart abandonment and conversion rate drops on the checkout page appear to many website owners to be a harsh reality of e-commerce life. It doesn’t have to be that way, though. In reality, giving your shopper all they need to make an educated, confident decision will help you improve conversion rates on your checkout page. Take some notes from the checkout pages listed in this article used by Spain eCommerce websites developed on the PrestaShop platform.

Some elite examples of checkout for Spain eCommerce website:

The PrestaShop One Page Checkout module designed and developed by Knowband replaces your website’s default checkout with a swift and smooth One Page Checkout that improves your customer’s checkout experience. This module helps to reduce cart abandonment on the checkout page by allowing customers to easily fill out all of the necessary information and finish their orders.

There have been multiple features that make the checkout page more engaging and influence the buyer’s decision. Some of the best checkout practices followed on the Checkout page of these Spain-based online shopping websites will give you a clear idea about the dos and don’ts of a checkout page.

Design and Layout

At first, this would determine a large part of the buyer’s decision to purchase or not buy. Best shopping cart design practices, such as adequate whitespace, a simple delineation of various steps in the order process should be structured properly.

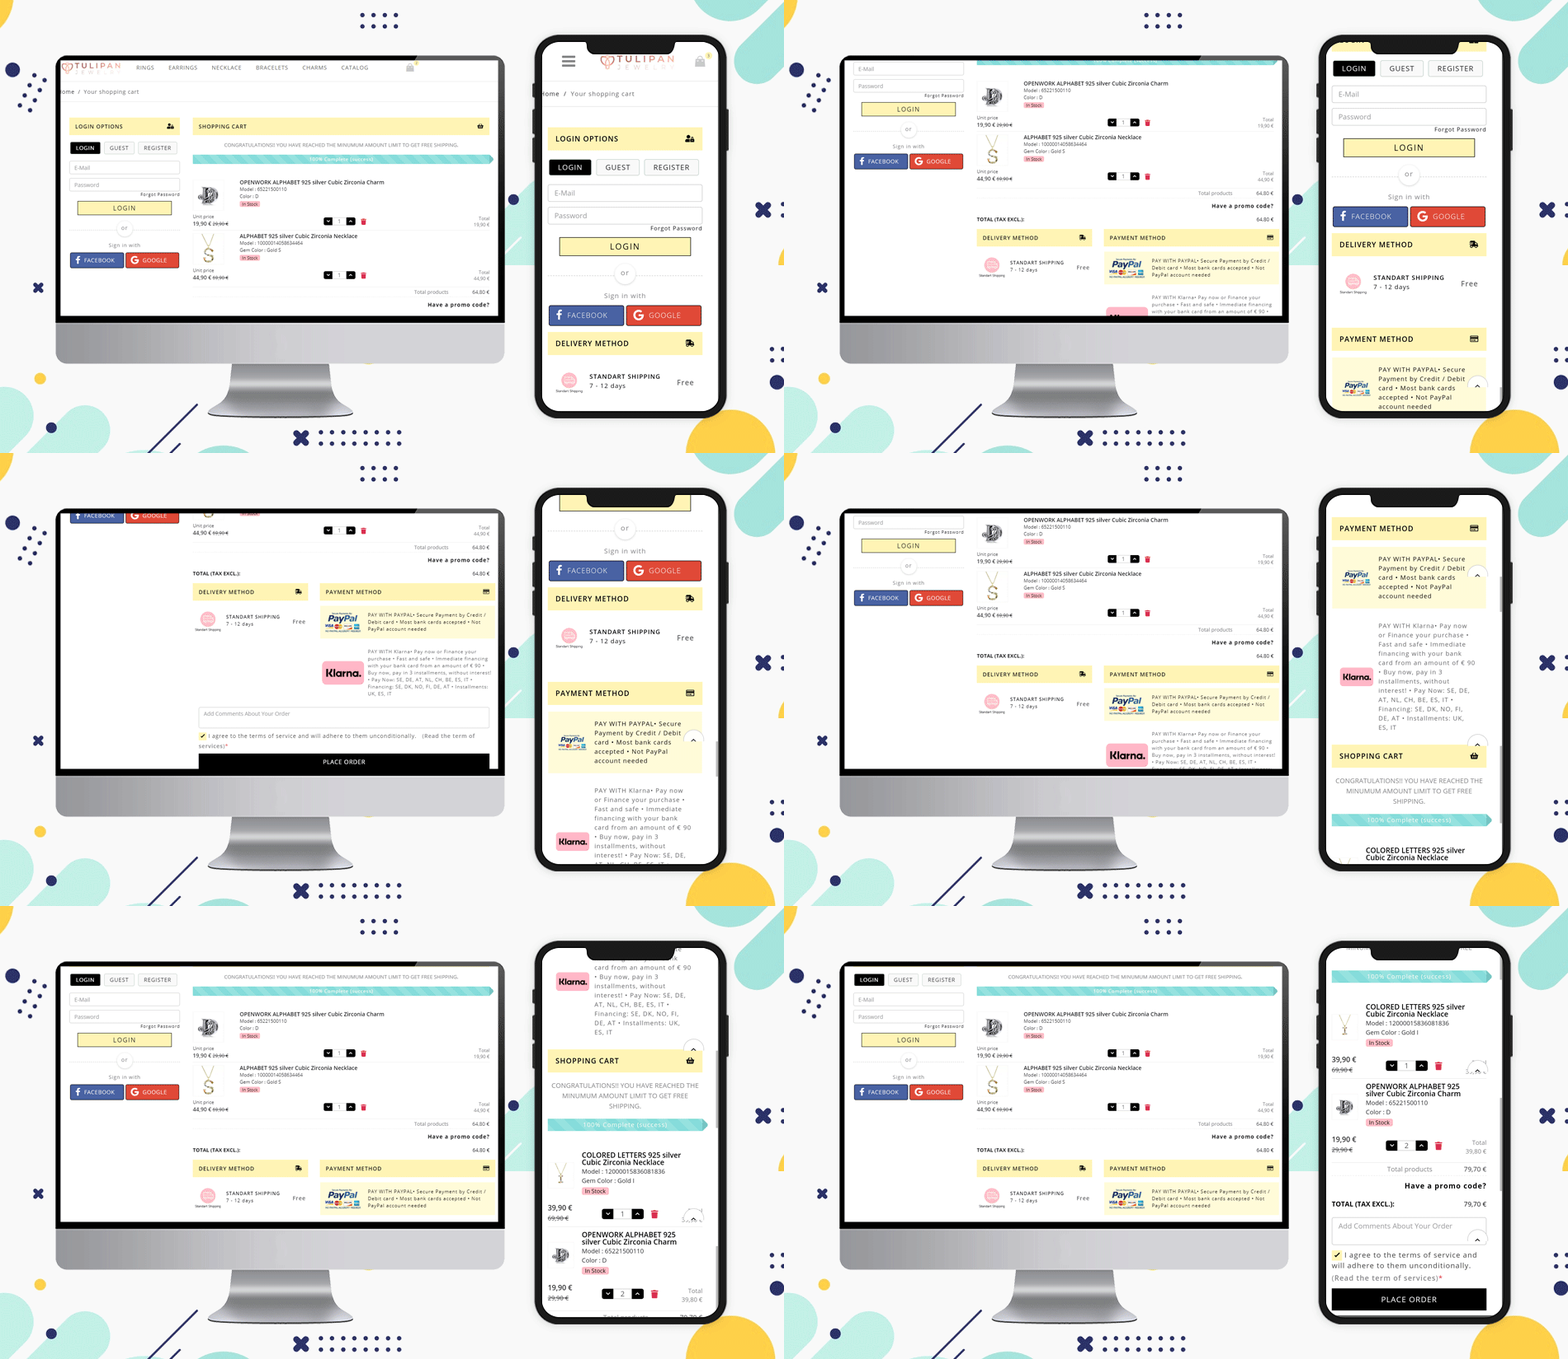
We have designed the checkout for the Spain-based website ‘Tulipan Jewelry Store’. Have a look at this clean and visually ideal checkout page.

Allow Social Login and Guest Checkout

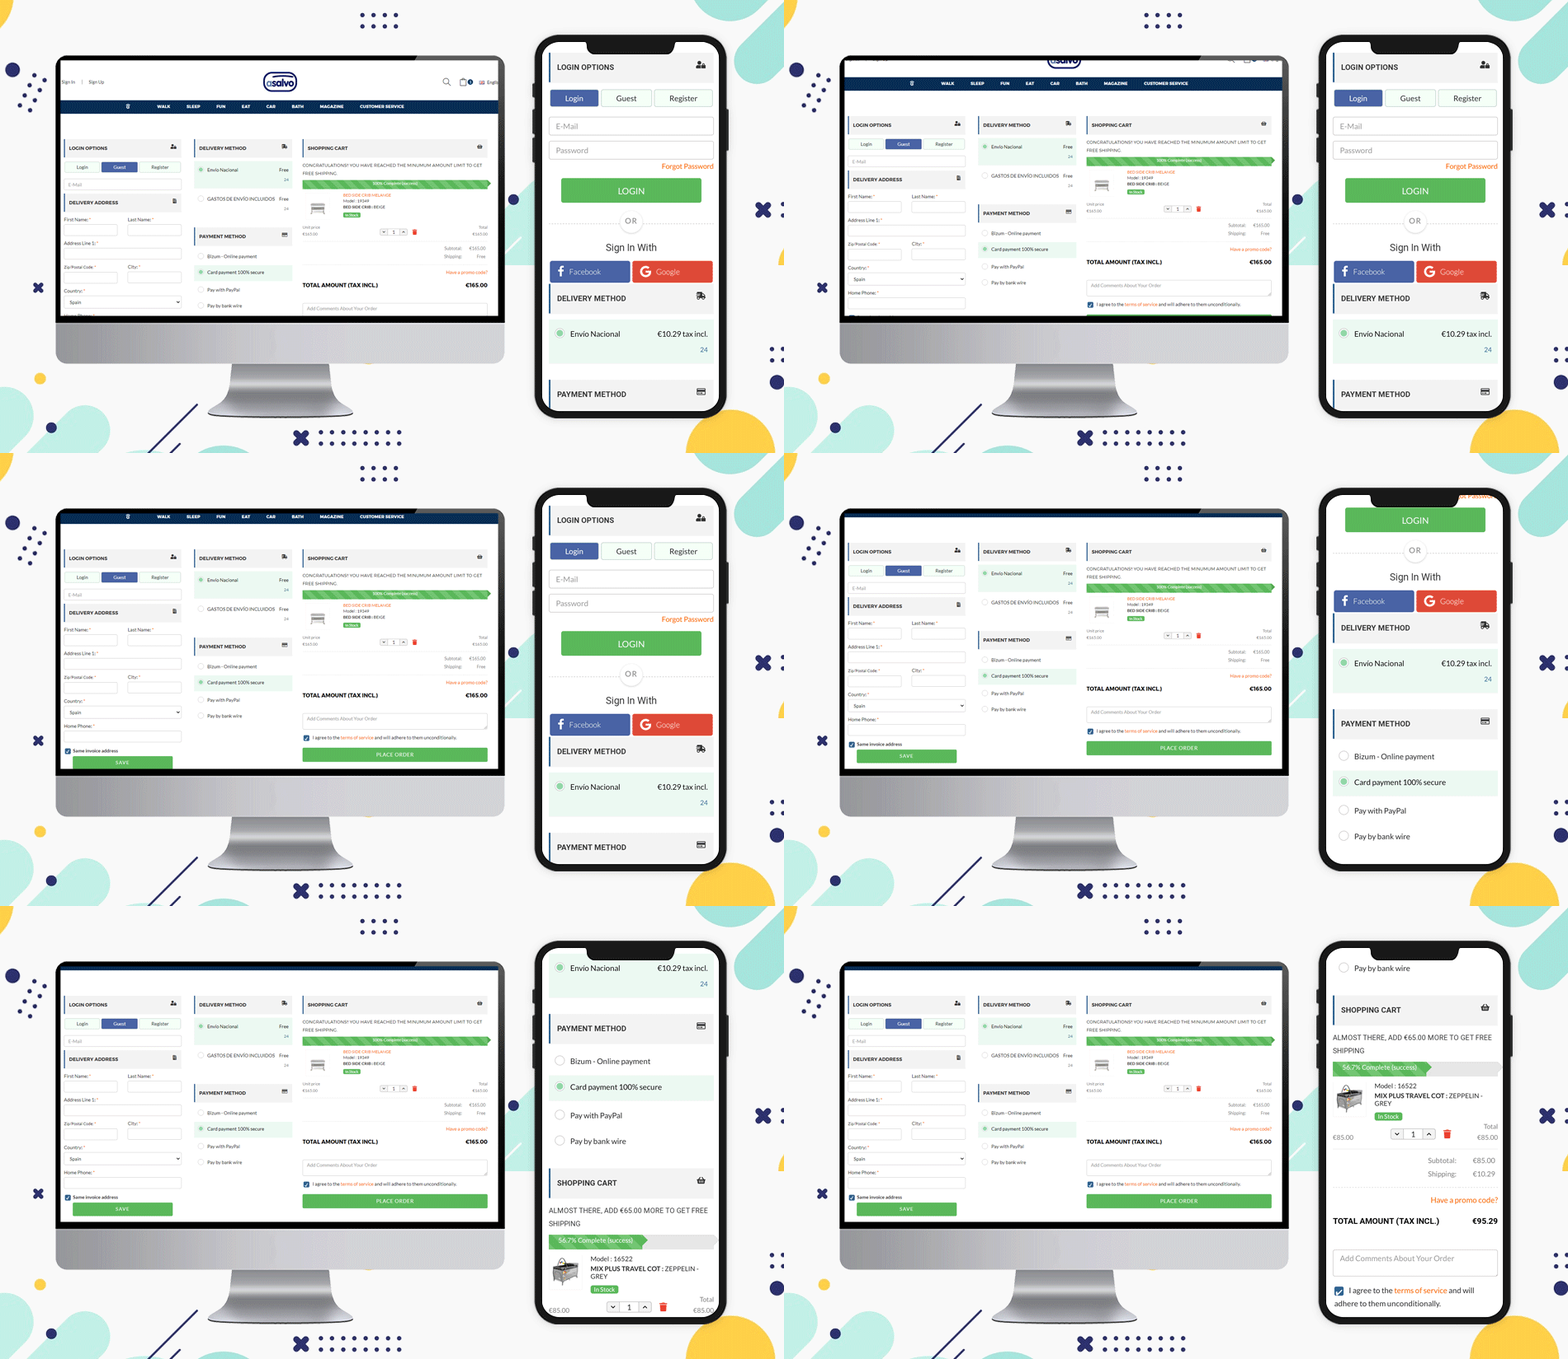
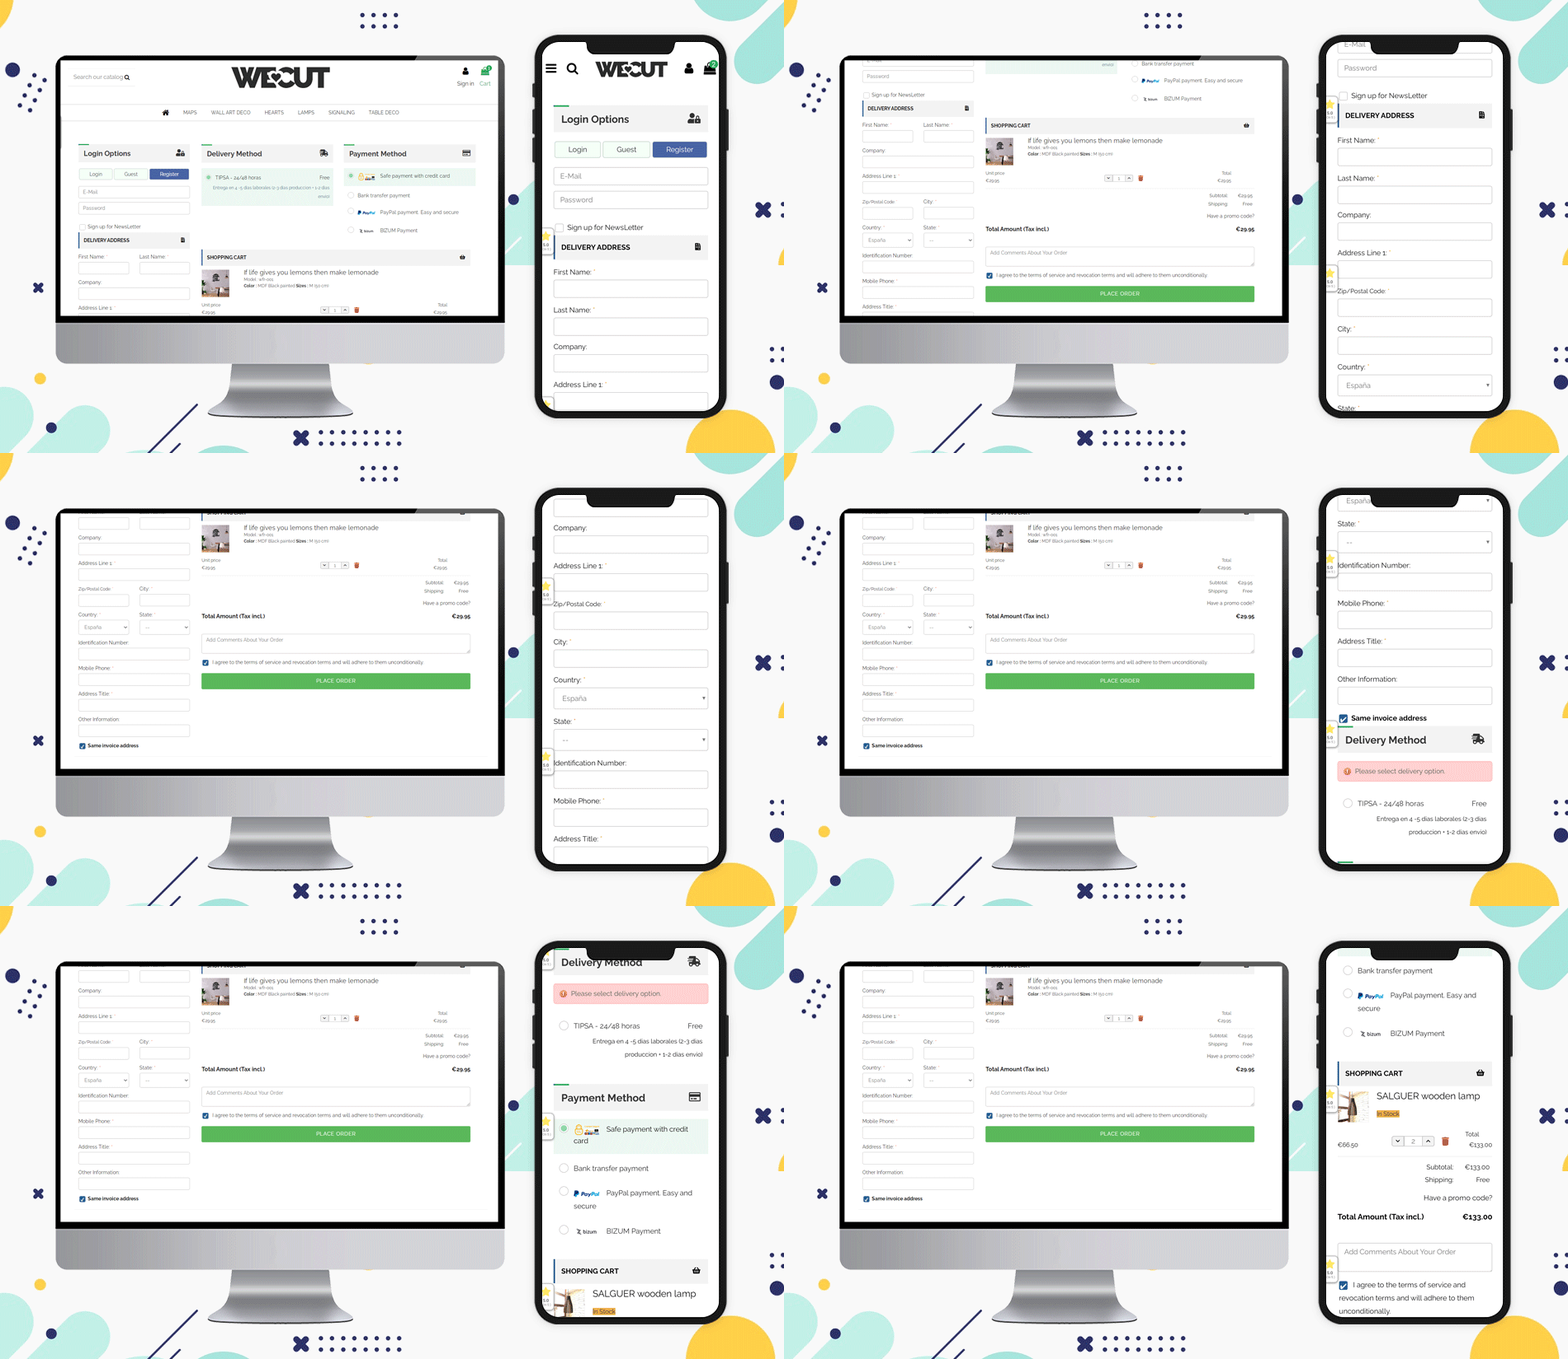
When a customer visits your website, give them choices to sign-up and log in. You can provide social login options by Facebook or Gmail account. The eCommerce website Asalvo is delivering products in Spain and it is having the social login option and Guest Checkout feature for the customers on their Checkout Page.

Inline validation and Google Auto address fill features

This is another feature that can help your customer while filling the billing address or delivery address form. Some fields can be made optional, and inline validation can be provided if a customer makes a wrong entry.

The Prestashop One Page Checkout addon by Knowband has a feature that auto-fills the address from the Google browser.

Include a product description

on the vendor’s end, having only a name and a number can suffice, but letting the customer know what size, color, and other customization options are available will help them ensure they’ve made the best decision for their needs.

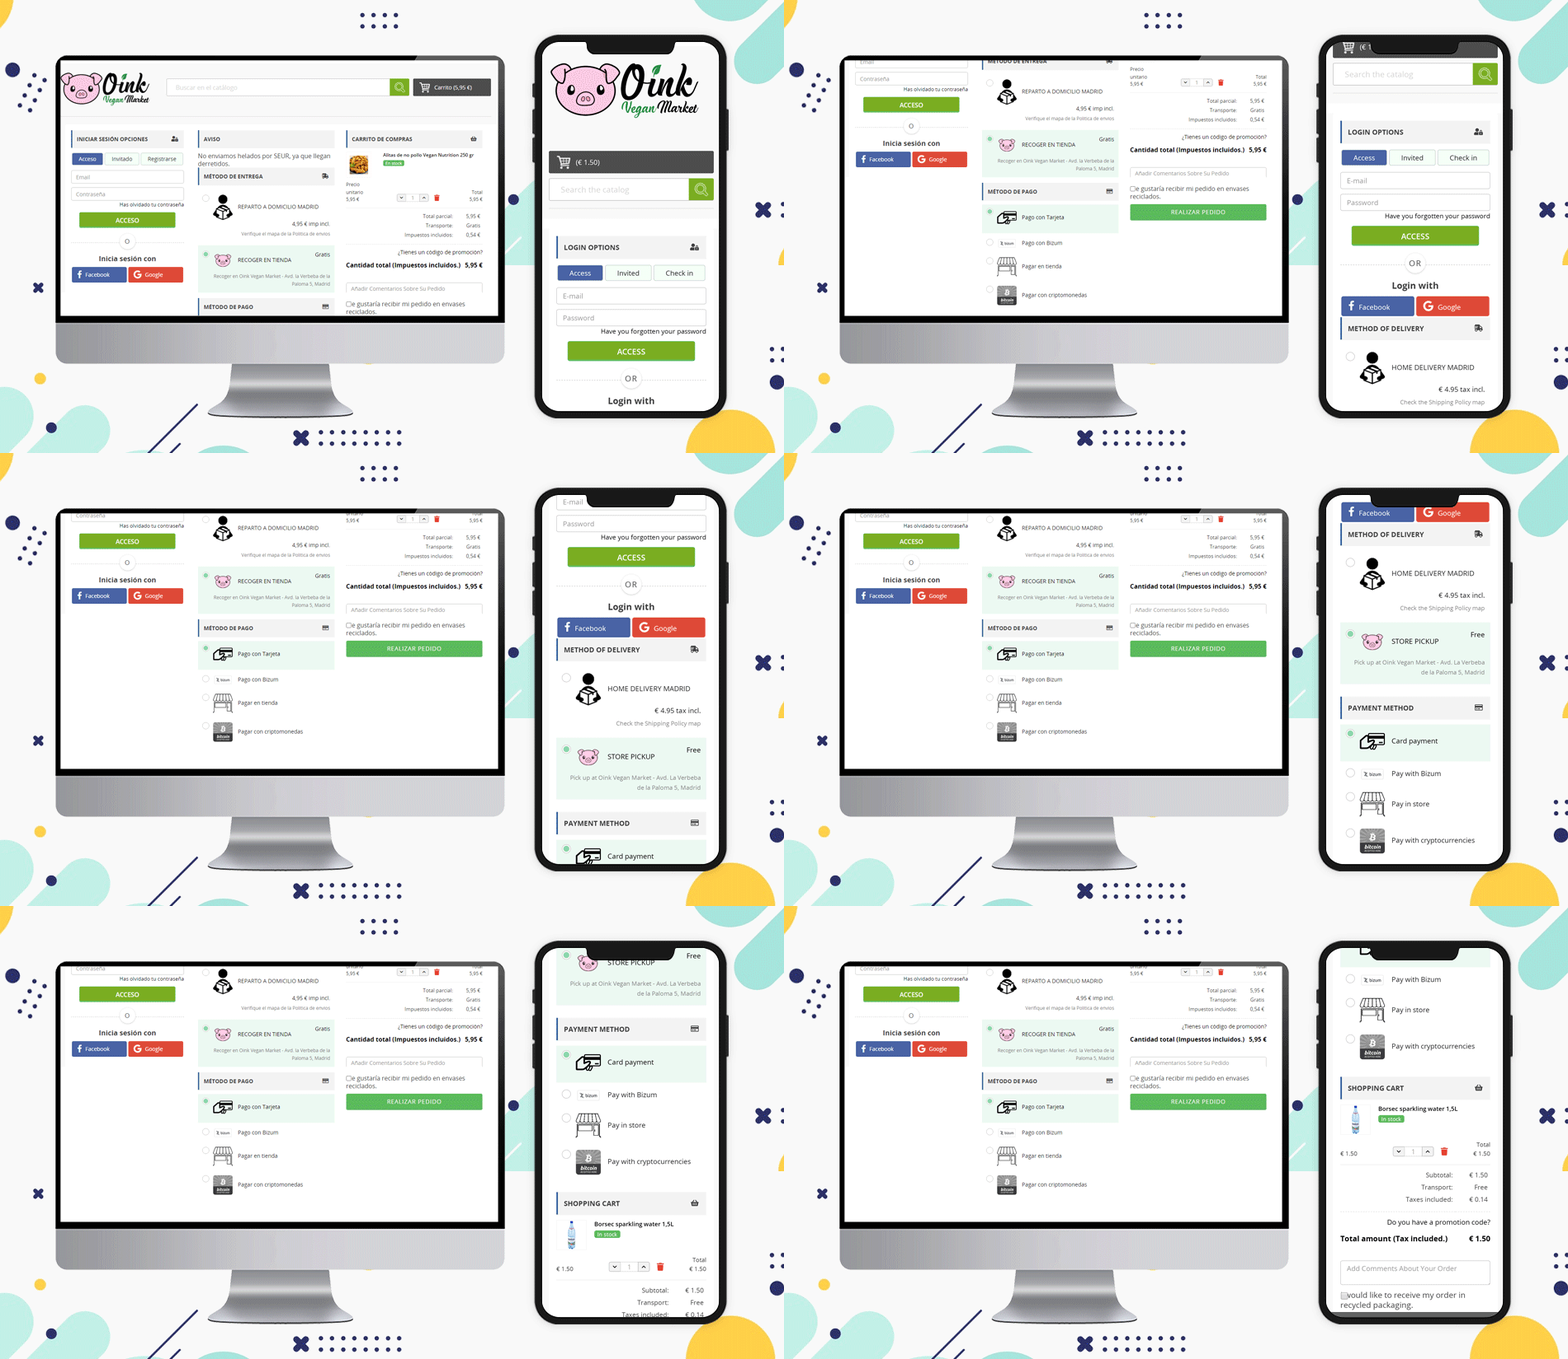
Here is an example of checkout for Spain eCommerce website Oink created on the PrestaShop platform. They have shown the product image with a description on the one-page checkout.

Oink is a store that accepts cryptocurrency and they have added this method on their PrestaShop One Page Checkout.

Update product quantity

Allow the user to change the quantity or delete an item from their cart while still on the checkout page. The more times they have to hit the back button (or look for the cart icon) to get to where they want to go, the more likely they are to give up and abandon the operation.

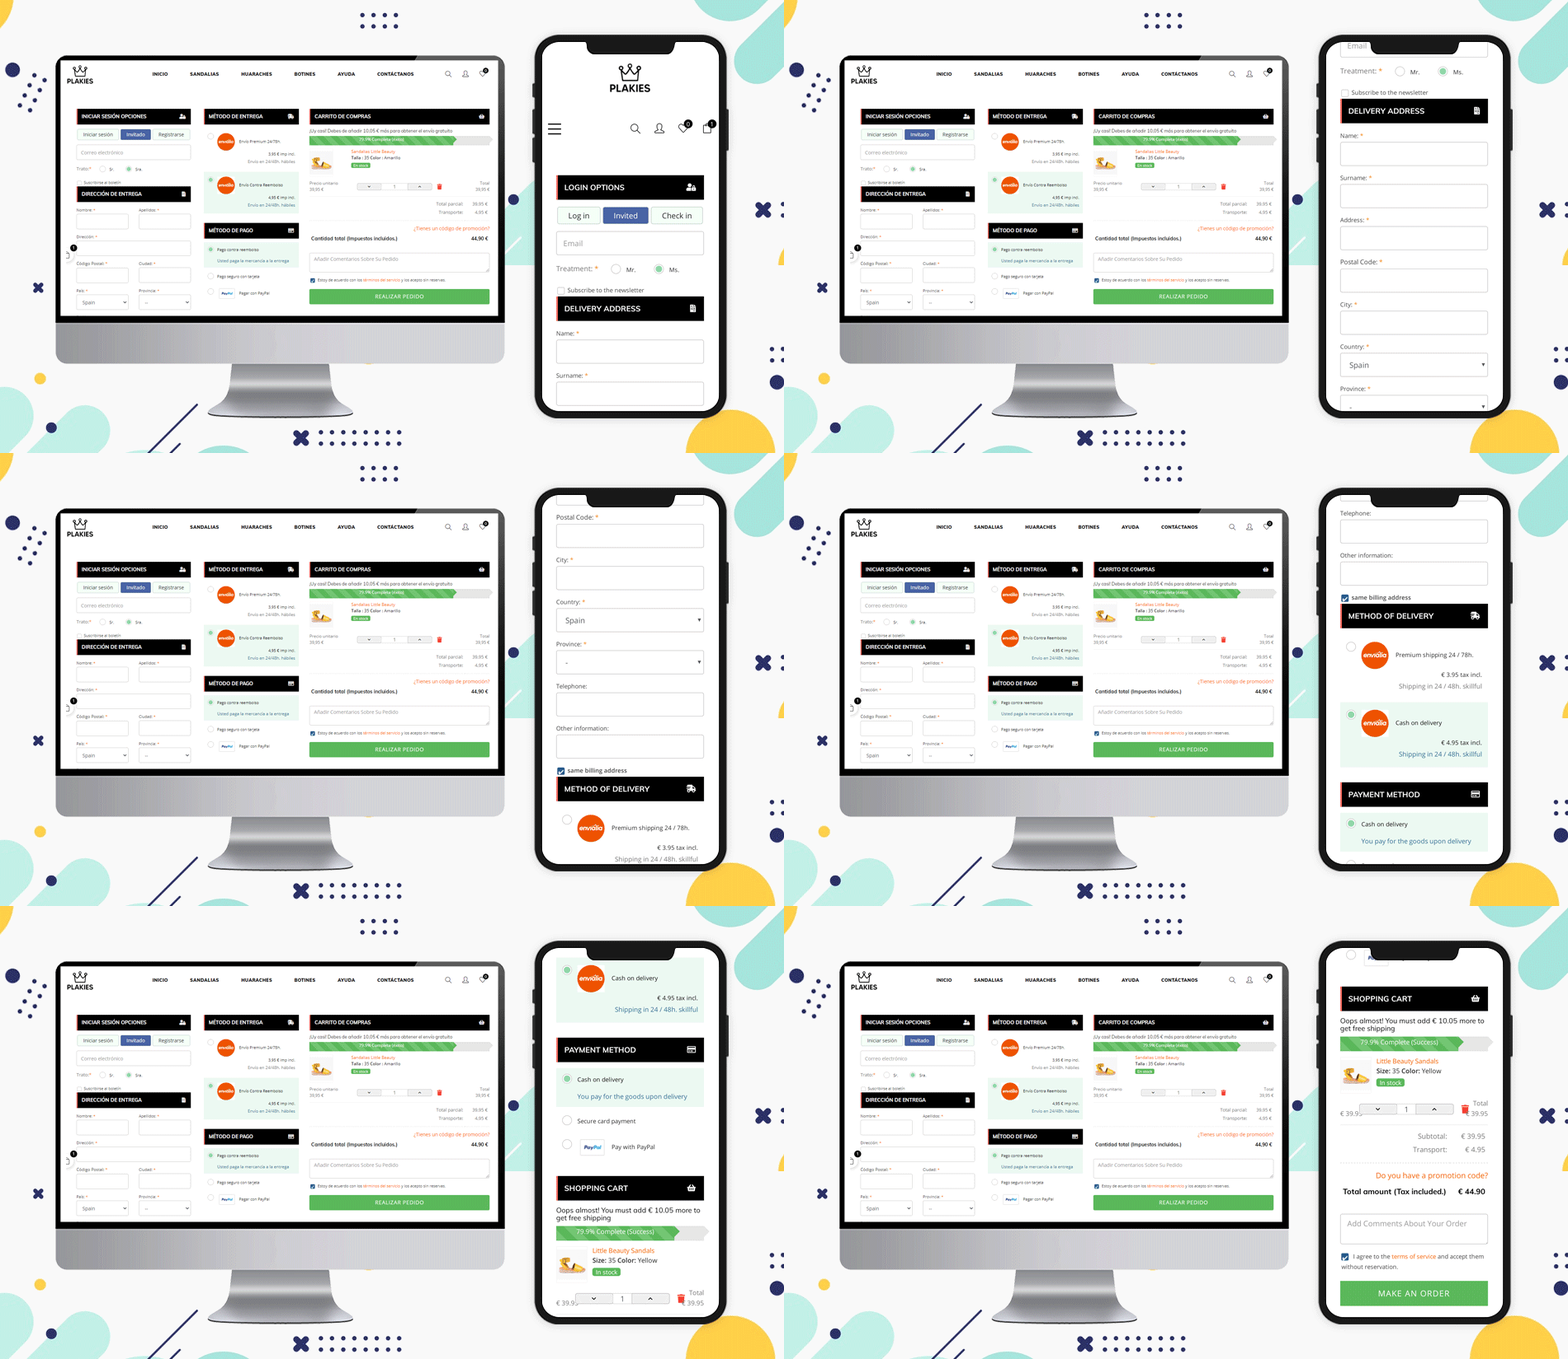
Look at this PrestaShop eCommerce website ‘Plakies’ based in Spain and its checkout page:

Various Shipping Methods

On the checkout page, you can see a list of shipping options. Allow them to know which choices you consider before they enter their shipping address.

The shipping methods that are used in Spain for checkout are:

GLS Business, GLS Economy, home delivery option, pickup in-store, and various courier services working in Spain can be listed.

Before you check out, show the final price

More and more e-commerce sites are implementing this function to help avoid orders from being lost as a result of the customer’s perception of a price rise in the form of shipping/handling/tax fees.

Include credit card logos and security seals to reassure customers that your website is a safe and secure place to conduct business.

Design a Customized Layout

The layout of the checkout page should be sleek and clean. As a single-page checkout displays all the fields and information on one page, you have to keep the layout more appealing and less clumsy.

See the layouts of these checkout page designs for Spain based eCommerce:

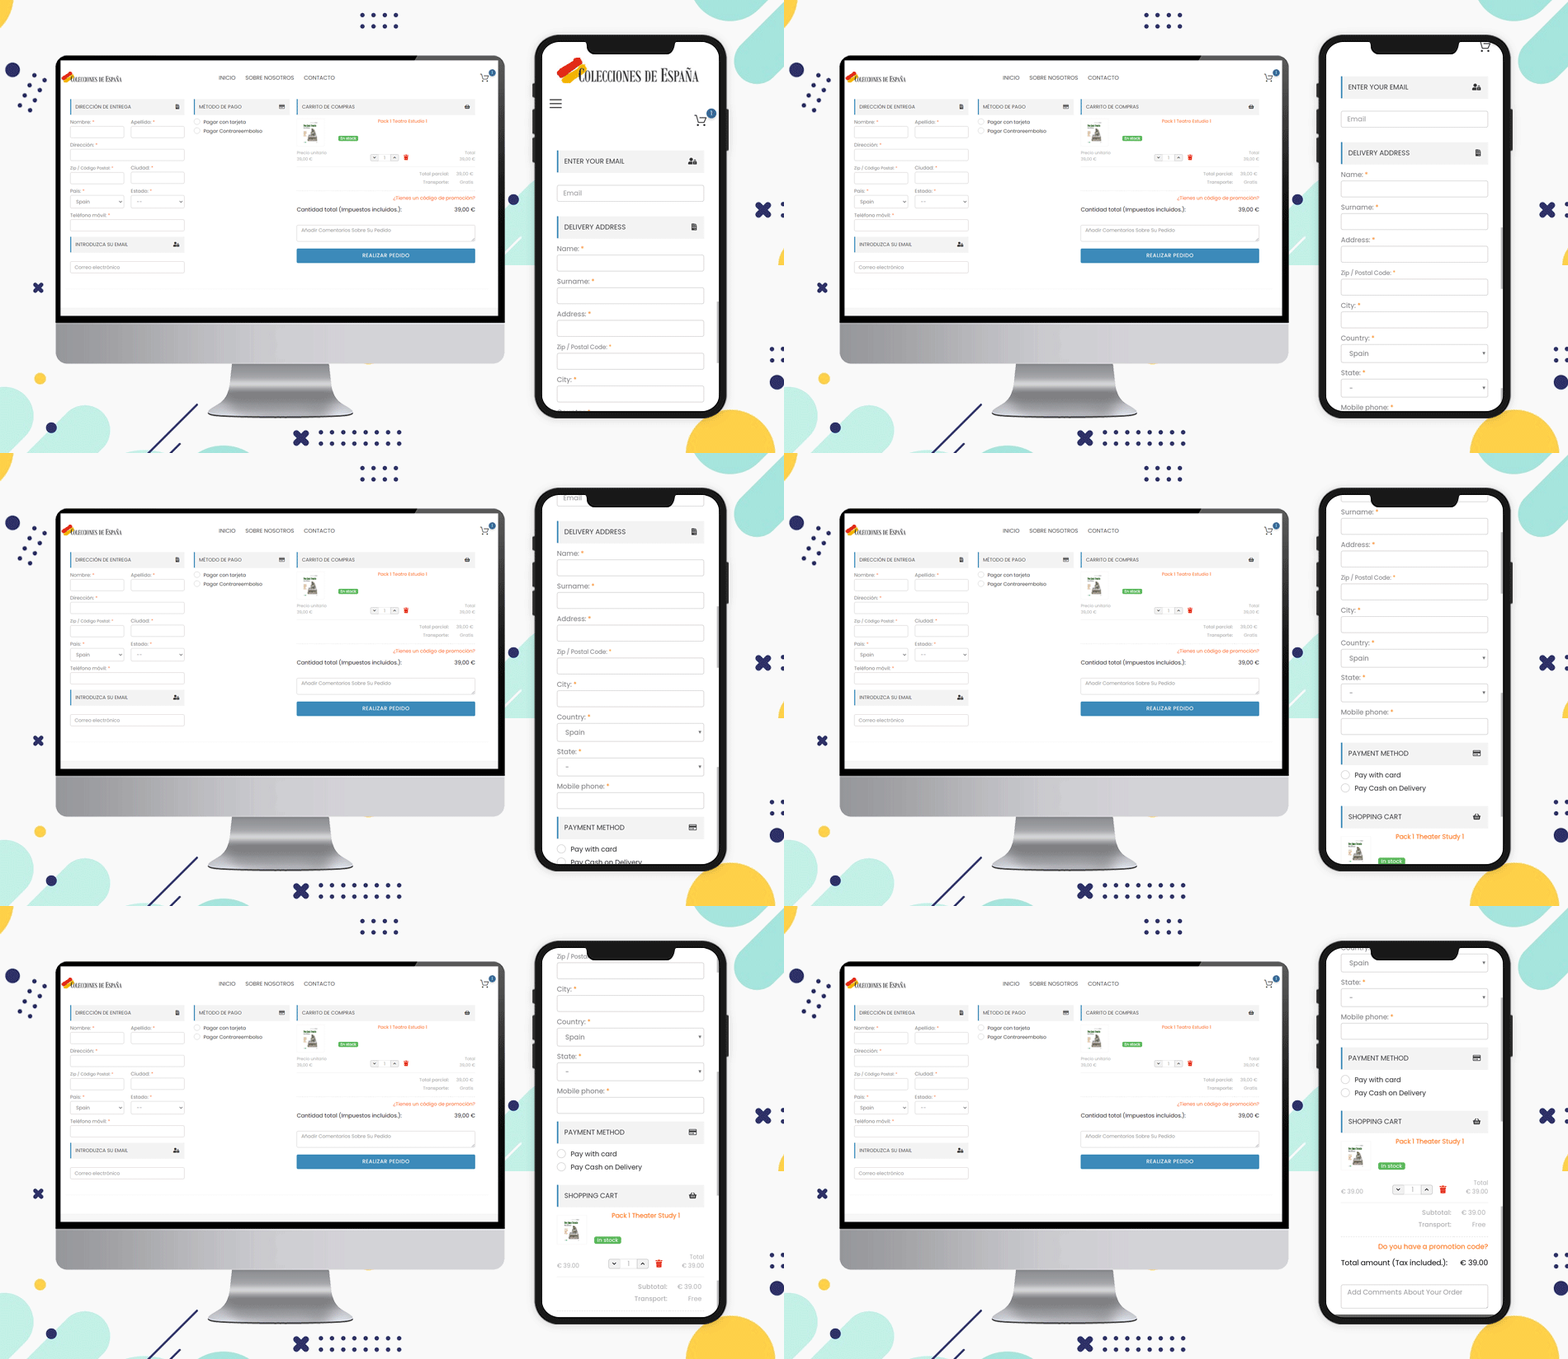
Colecciones de Espana

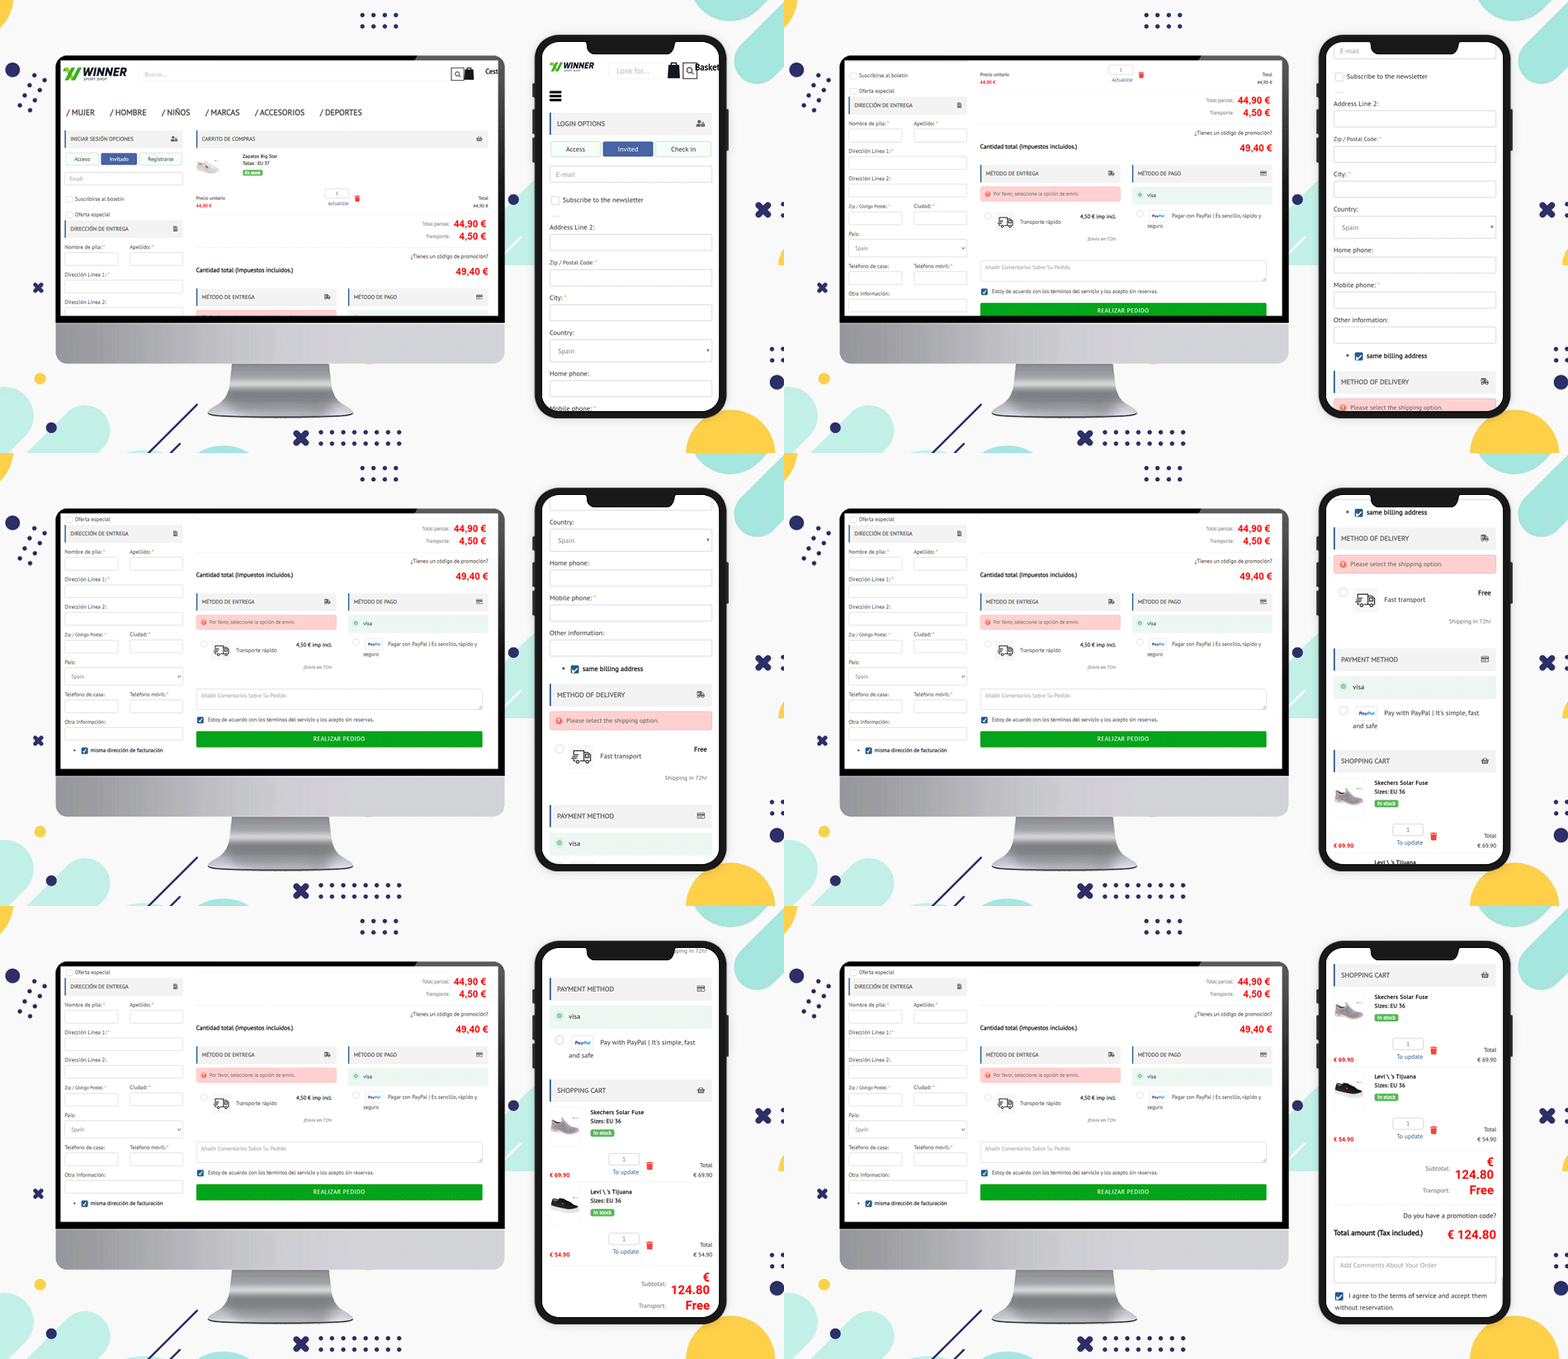
Winner Sport Shop

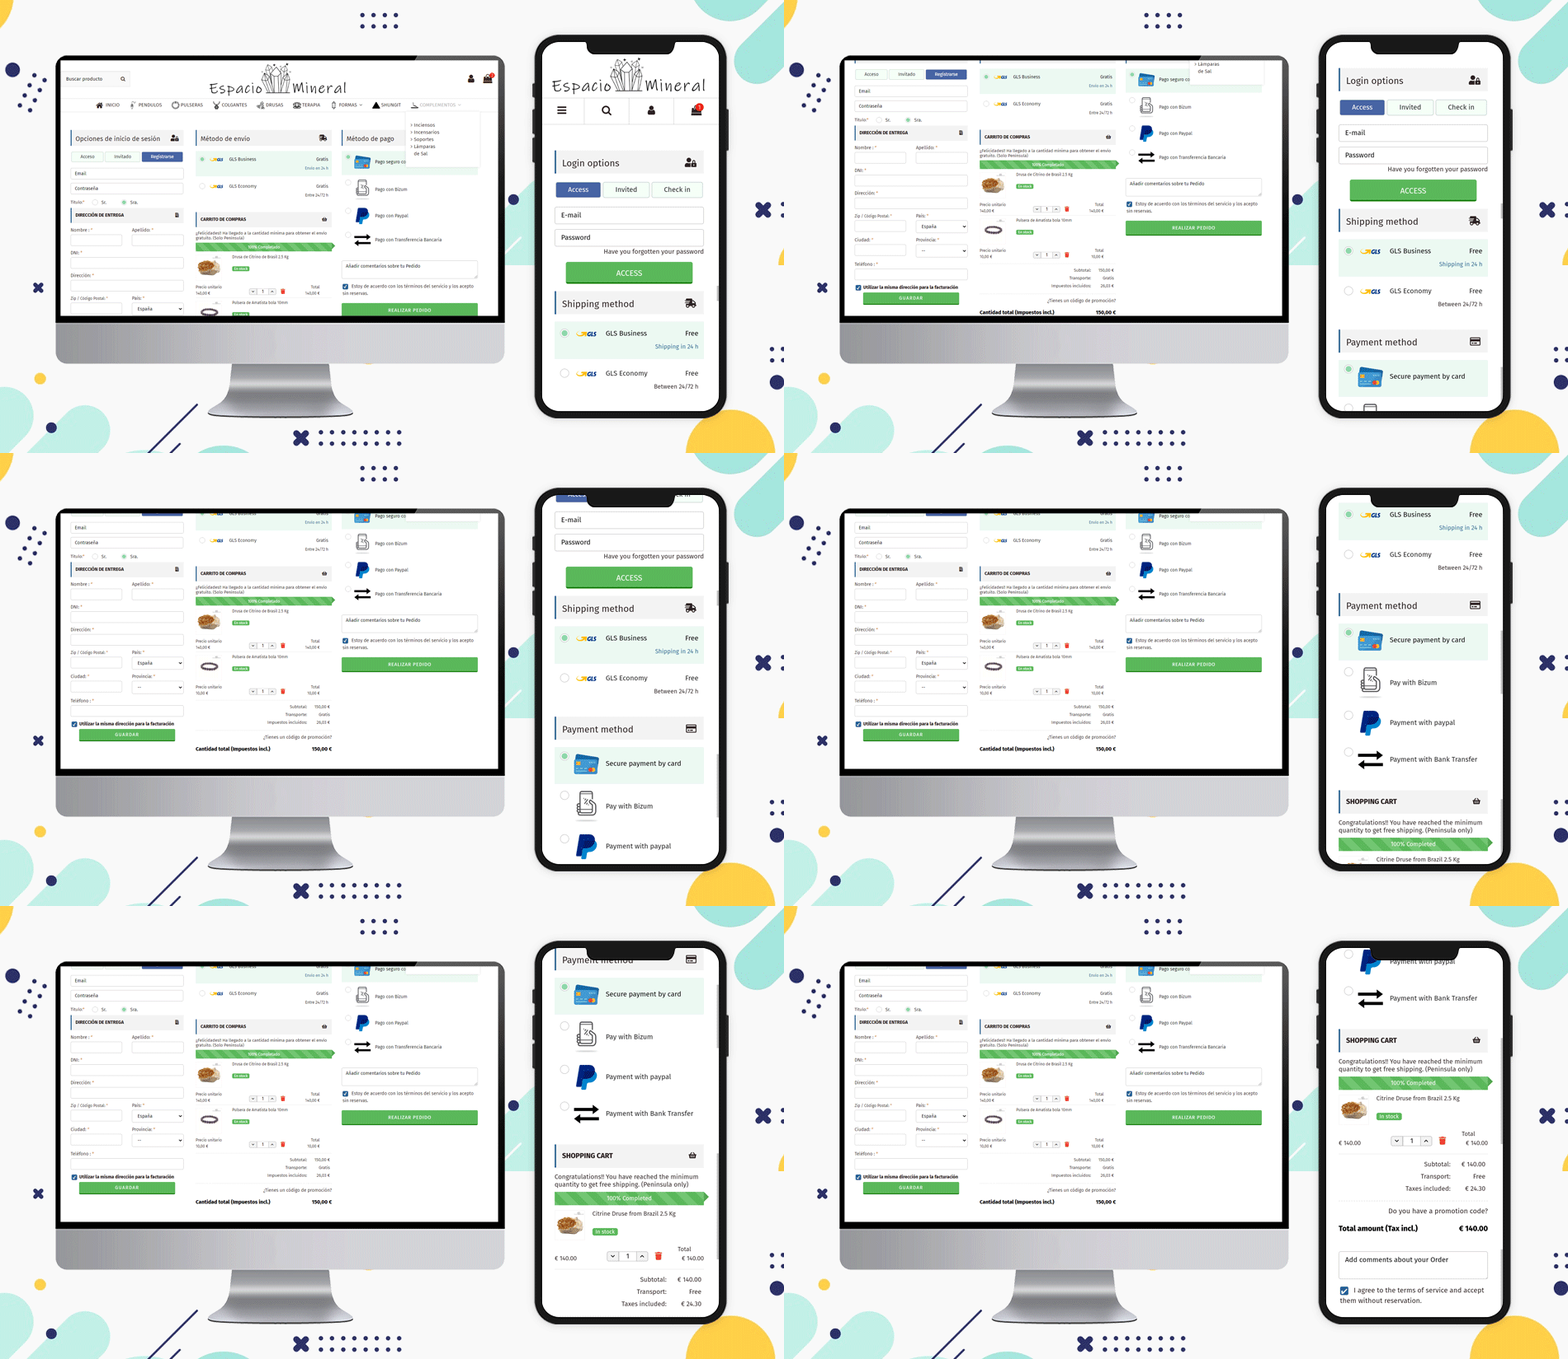
Espacio Mineral

All are using a 3-column layout but if a seller wants, then they can use single-column or 2-column layouts to make it look more structured. You can check out some of the examples of Poland-based online shopping websites and Italian websites that are using various layout patterns on their store’s billing page.

It is preferable to show the progress bar as well as the Free Shipping options

There are various types of customers and many are always looking for deals and discounts. Offering free shipping is one of the ways you can attract such buyers.

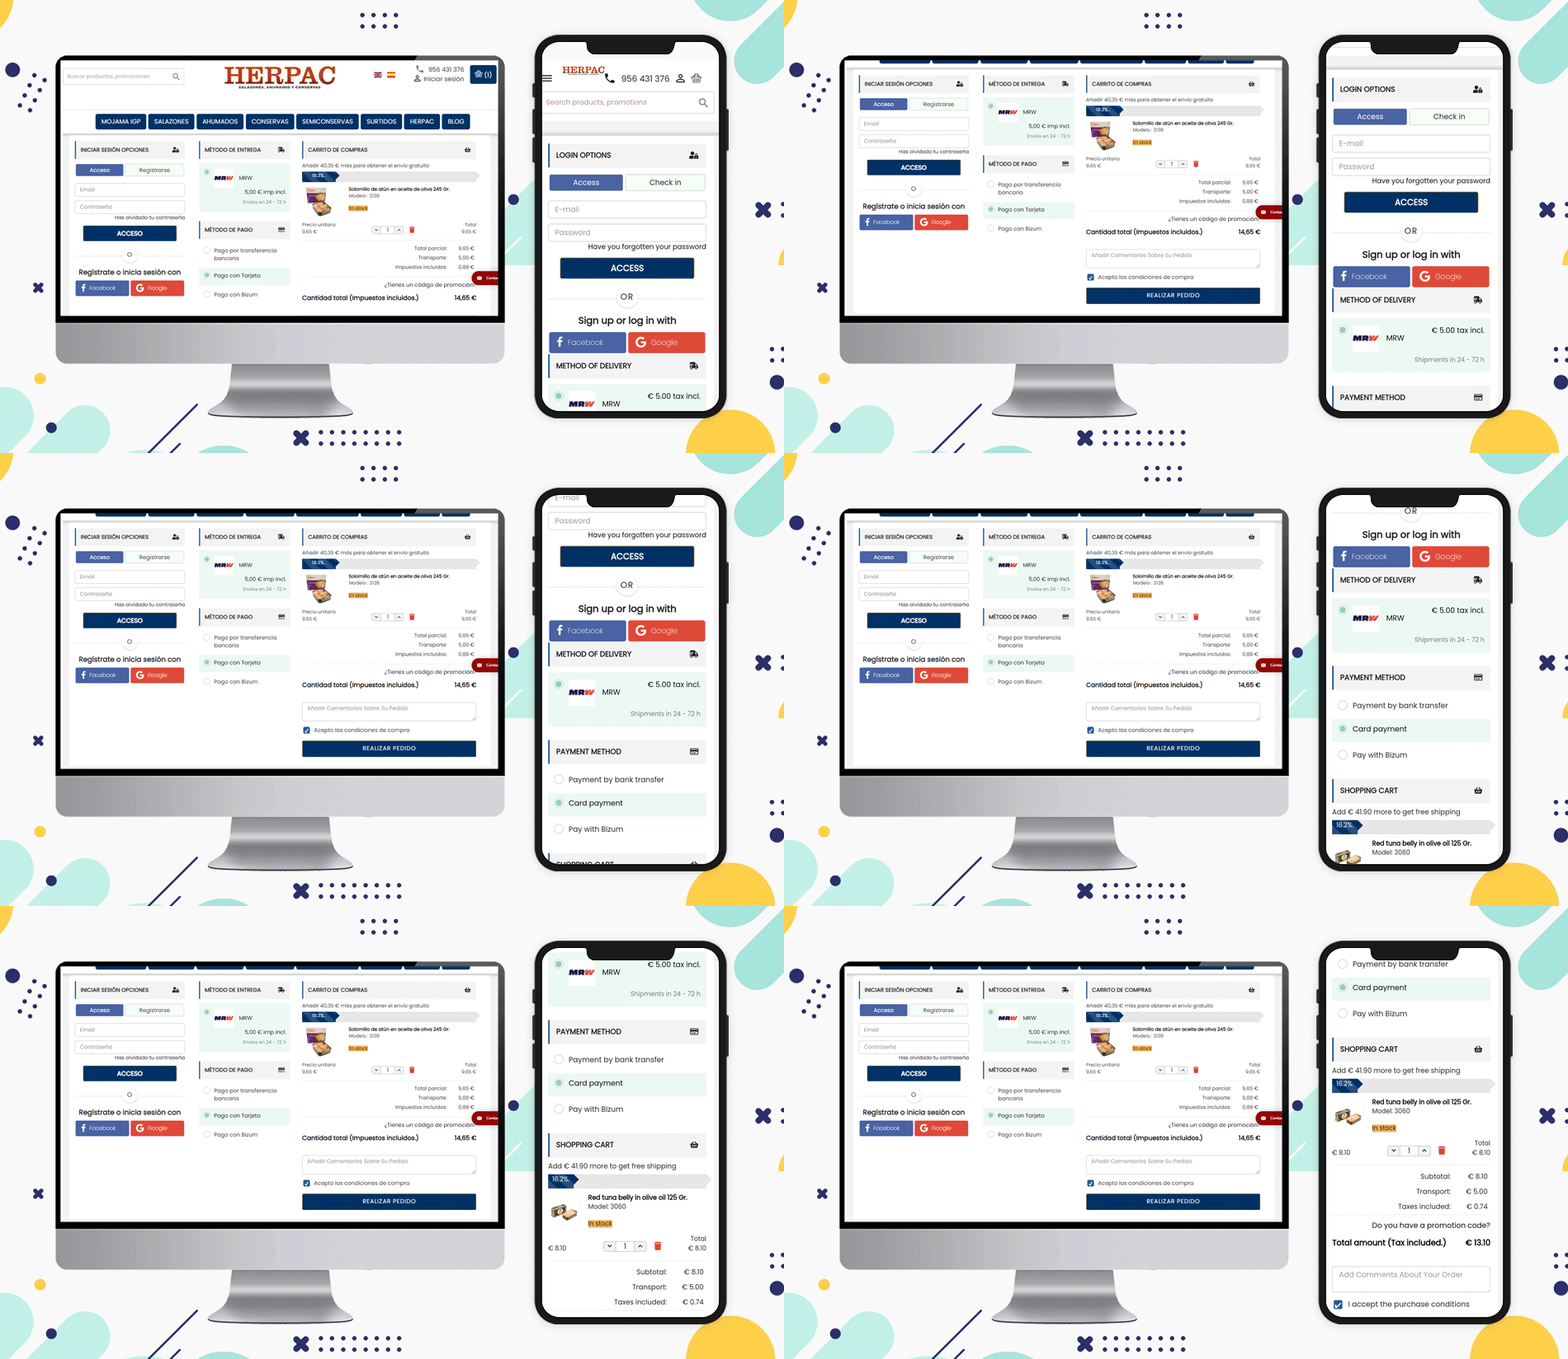
A free shipping bar at the top of the page or the bottom of the checkout page can increase the average cart value. The Herpac store has a website that delivers in Spain. They are using a Free shipping bar in their store.

Attach more fields and ask for their feedback

It is a good practice to ask your customers for their feedback and reviews and this creates a bond between the seller and the customer.

Can you ask something on the checkout page?
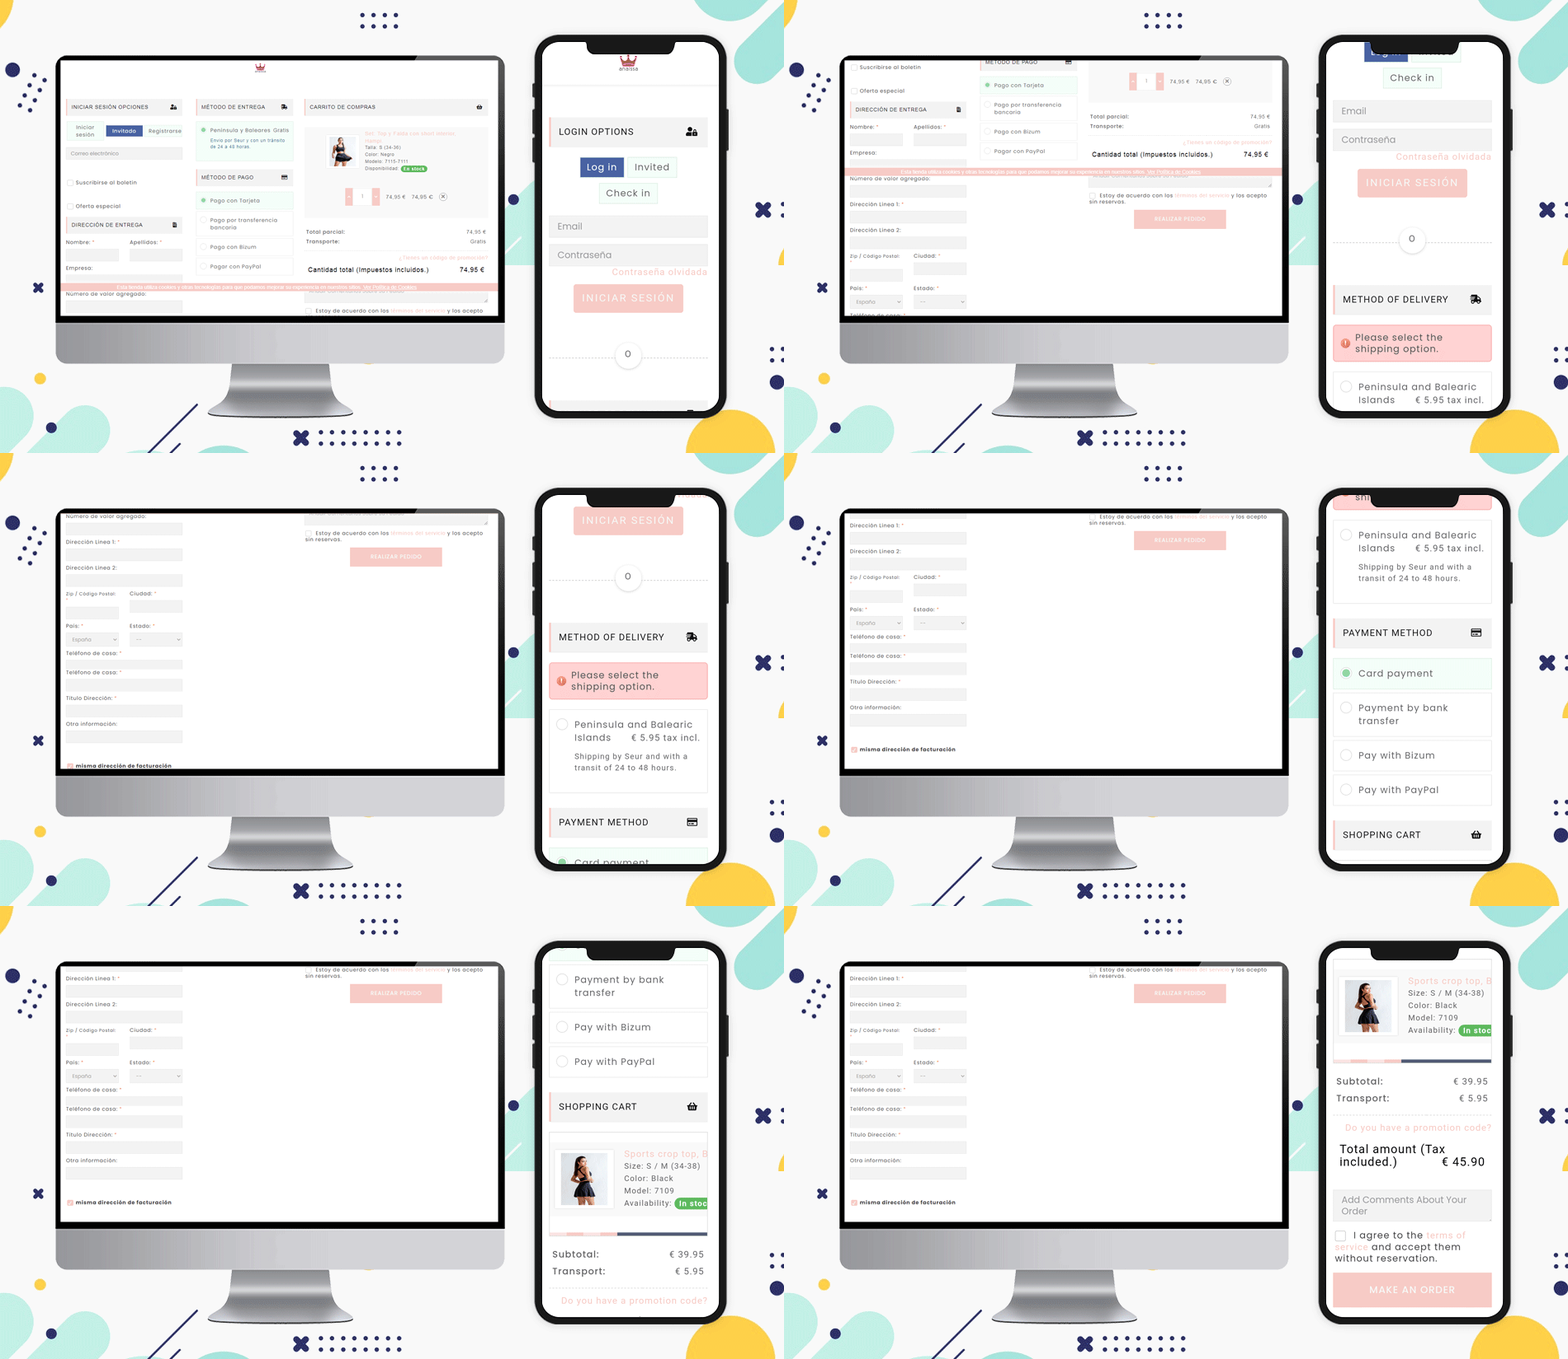
Of course, you can collect information about the order on the checkout page. If they want to add any message or comment, add an additional comment section at the bottom of the page before final checkout just like the Anaissa store.

Popular Payment Methods for Checkout in Spain:

Bizum, Paypal, Klarna., Bitcoin cryptocurrency, Card payments, Stripe are some of the most used payment methods of Spain for checkout.

Shipping Methods Popular in Spain eCommerce:

Integra 2, tipsa, GLS Business, GLS Economy, home delivery option, Pick-up in-store, and various courier services working in Spain can be listed.

Note: The PrestaShop One Page Checkout module allows the store owner to add multiple payment and shipping gateways from the backend of the module.

Why KnowBand’s PrestaShop One Page Checkout Addon?

Without a doubt, Knowband’s One Page Checkout is the superior choice. Knowband is an eCommerce module development company that PrestaShop considers to be a Superhero seller. It is also a PrestaShop Premium Gold Partner Agency.

Customers can become frustrated if they have to navigate to several pages to purchase a product. Separate pages for billing, address, order quantity, and product details. Instead, provide them with PrestaShop One Page Checkout that offers multiple features that benefit the customer as well as the seller.

Explore PrestaShop Super Checkout and you will know why this is best!

Recommended Reads:

10 on fleek Checkout Page Examples of Poland PrestaShop eCommerce stores

An organized and structured checkout page can help you reduces the checkout bounce rate and cart abandonment. Multiple reasons affect the final checkout and cause you potential buyers and revenue loss. This article is a guide for eCommerce sellers to use their One Page Checkout page in the best possible manner. We have gathered some of the best examples that are using PrestaShop One Page Checkout for Poland eCommerce and making the best out of it. Let us understand why we need a smooth and customizable checkout page by understanding the common issues.

Common checkout page problems and their solutions

It is always a tedious task to figure out a problem on your website that is responsible for driving customers away from your online store. Some of these issues are:

  • A clumsy page with unnecessary fields
  • Mandatory sign-up that takes several minutes
  • Limited Payment options
  • Not offering suitable shipping methods
  • Poor UI and slow loading pages

These checkout page snags are faced by every eCommerce store owner but when it comes to a problem there is always a solution!

Some of the Poland-based stores have overcome these barriers using One Page checkout on their PrestaShop store. Let’s see how it works!

Social Login and Guest Checkout

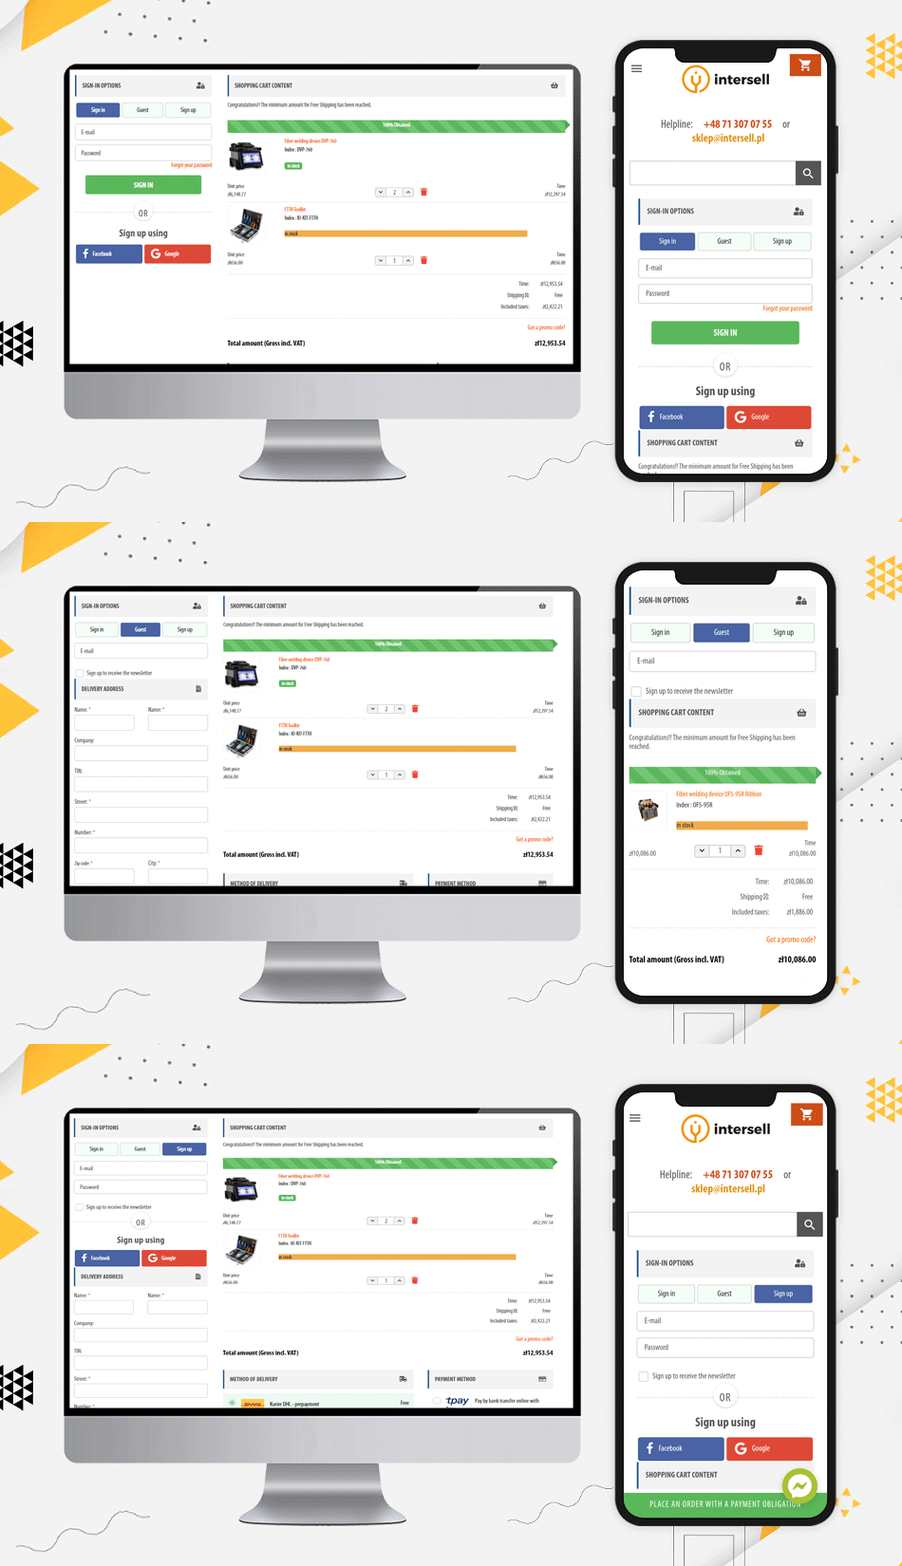
The InterSell

Any website asking for mandatory registration and sign-up faces a lot of abandoned carts. The Poland-based eCommerce store, the Inter Sell is working in the ICT equipment market and they are using PrestaShop One Page Checkout for the checkout process.

The main reason for highlighting this website is its easy Sign-up and login options. To the frequent buyers, they are offering guest checkout and social login via Facebook and Google+ options.

It is easy to track the abandoned cart from the backend of this module and it gives the store owner a detailed report as well. The checkout page supports all the popular payment methods and shipping methods.

Customized Layout design

Poland has a lot of potential in eCommerce and will flourish remarkably in the coming years. Let’s see some checkout page examples that has a wonderful design and customized layout:

The layout of this PrestaShop One Page Checkout is unique. They have been using a single column view and as you move forward in the checkout process, you can observe a 2-column layout.

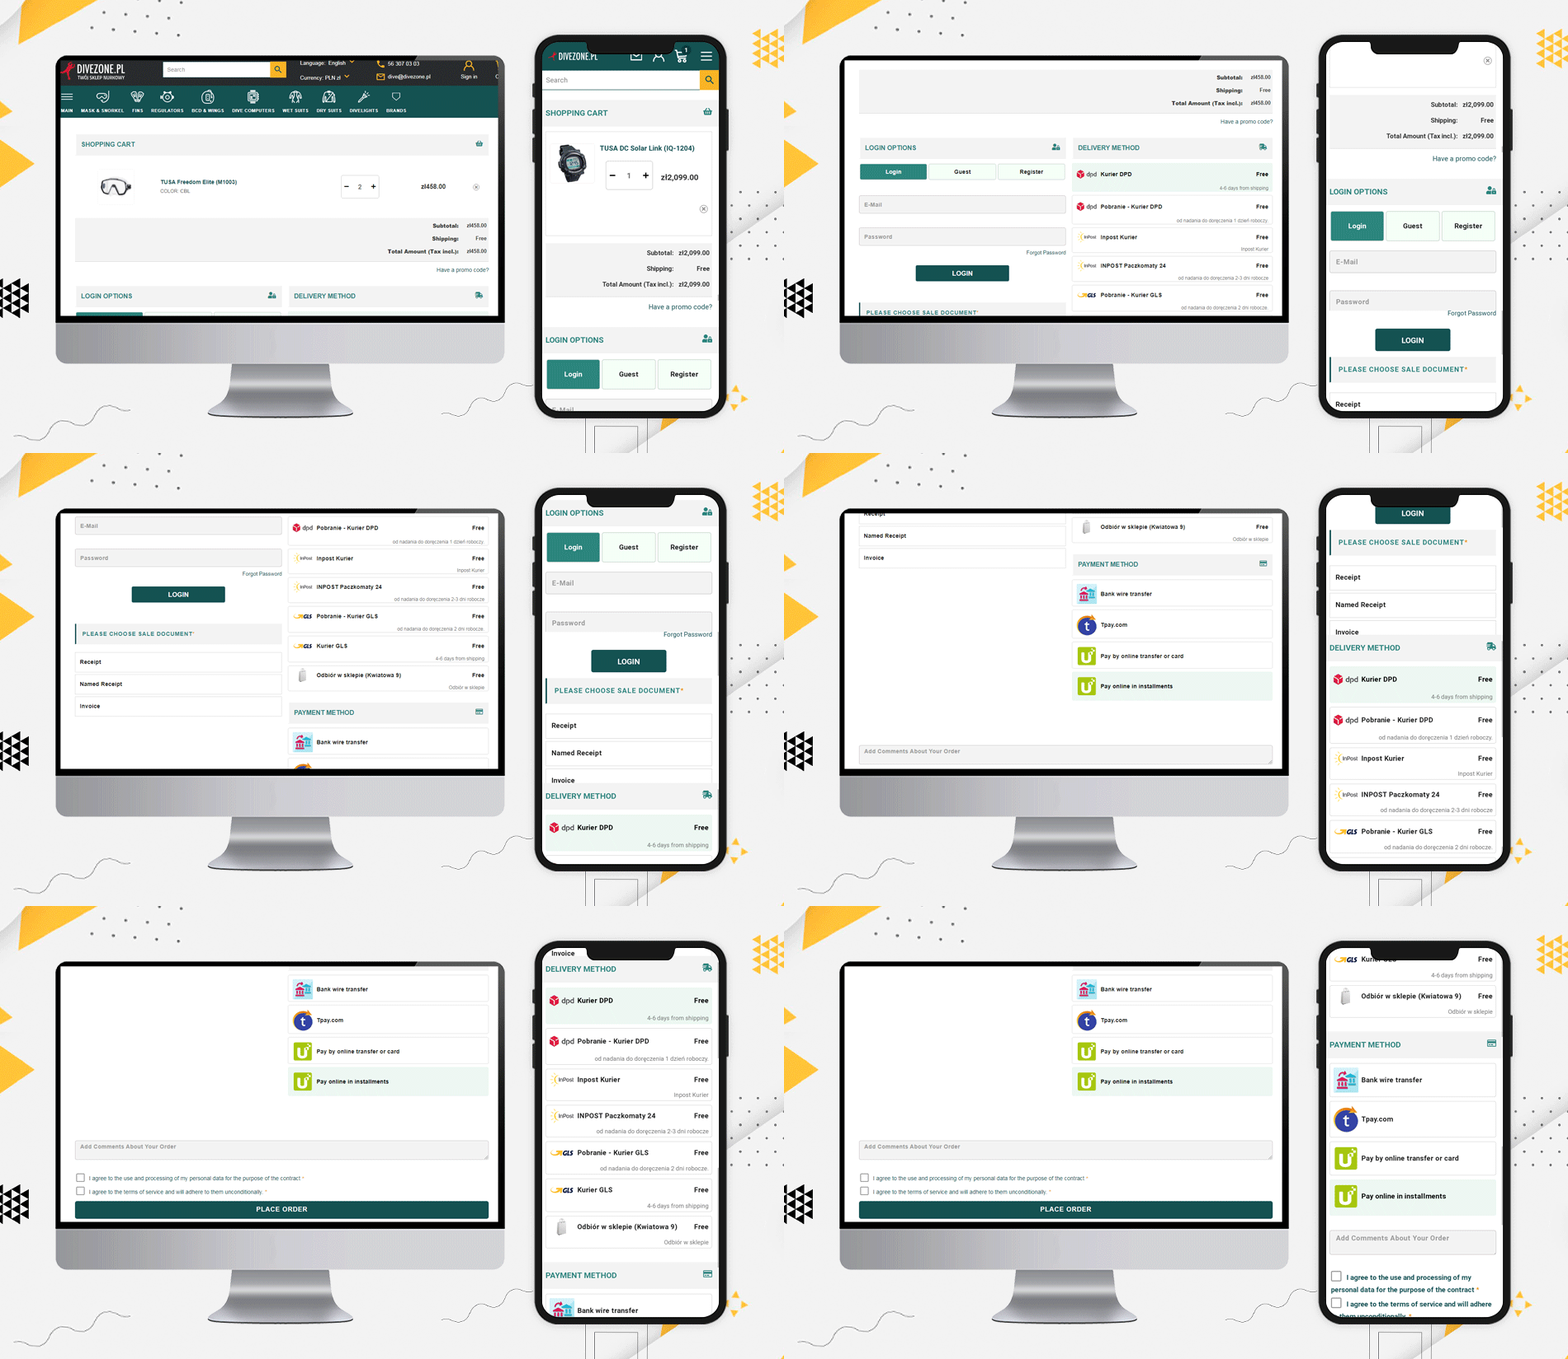
Dive Zone

The Poland store Dive Zone is offering more than 7 shipping methods along with 5 payment methods including TPay, PayU, Bank transfer, Card payments, and Cash On Delivery option.

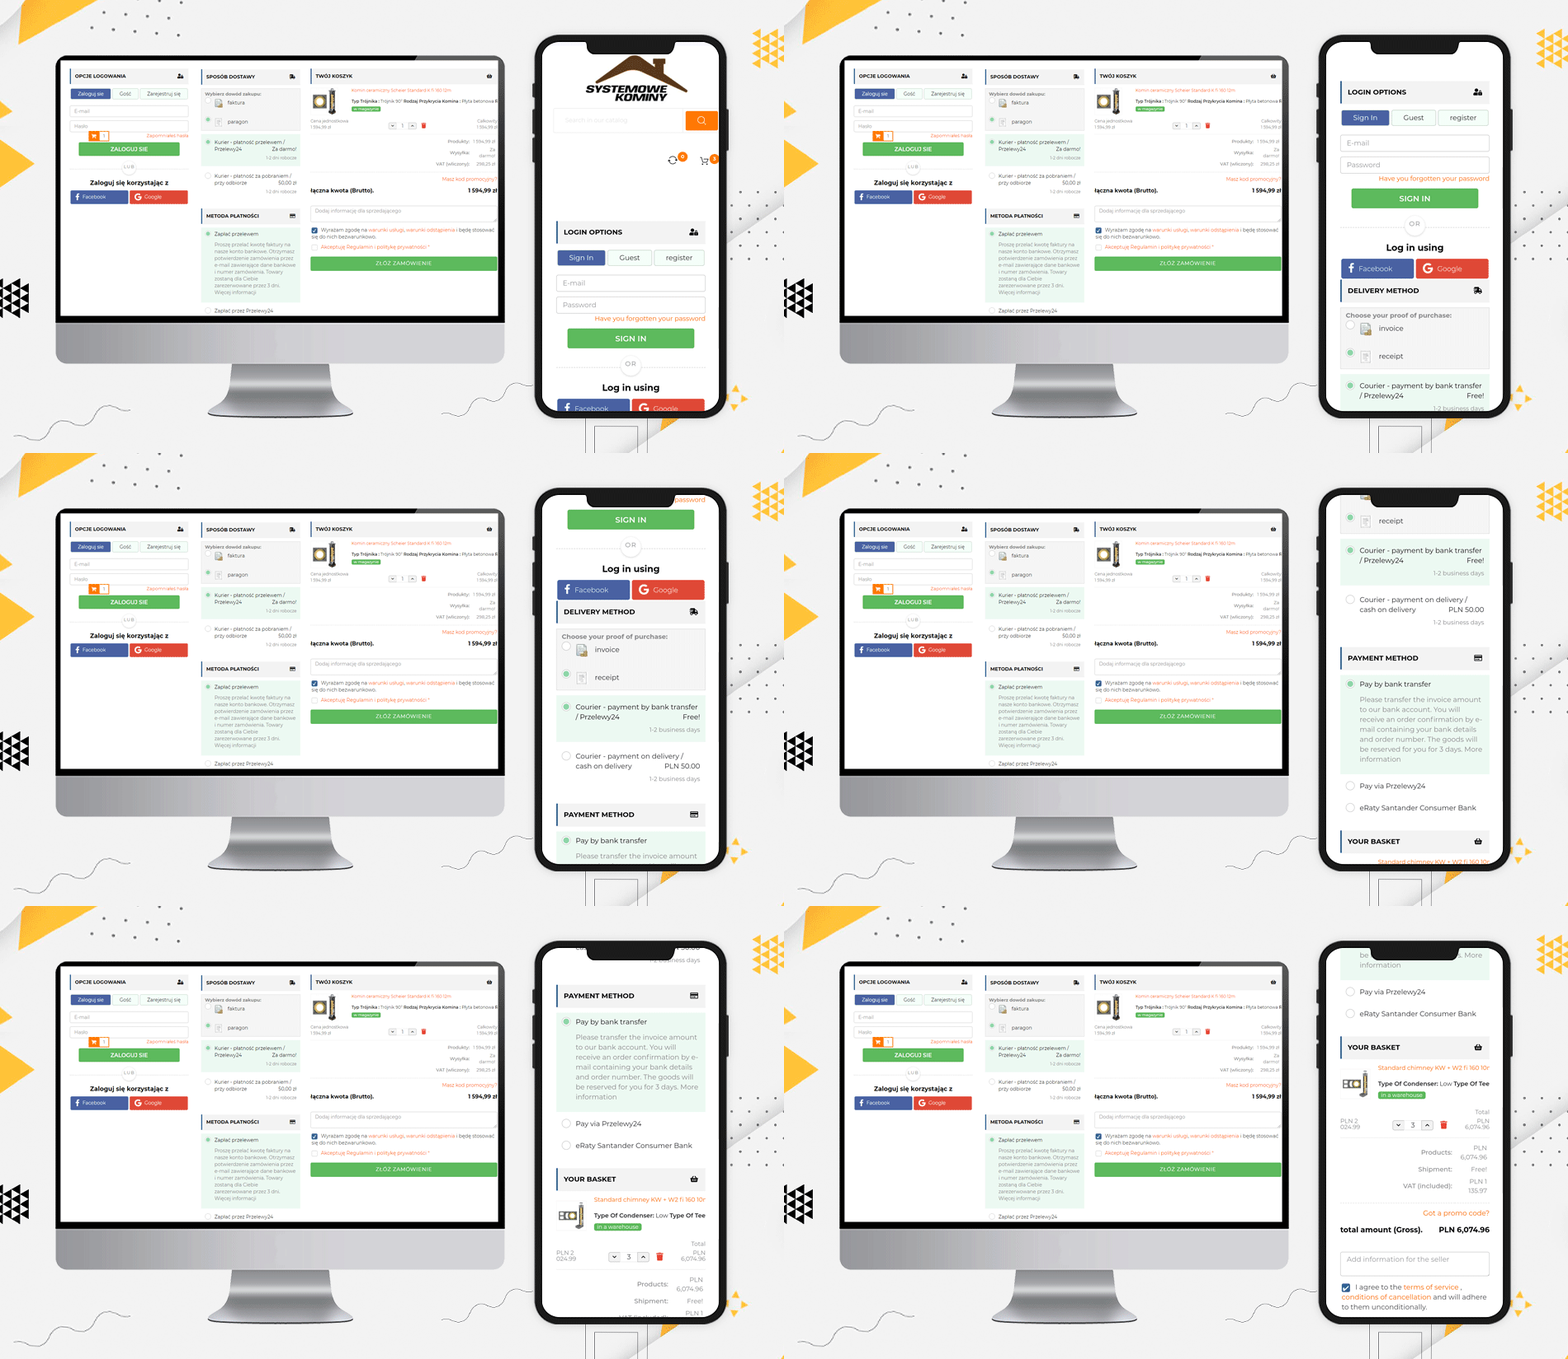
Systemowe Kominy

Since we have been talking about the layout, Systemowe Kominy also has a wonderful layout design. They are using social login, guest checkout, and all the fields are displayed in a structured manner that could fit the desktop size and the user does not have to scroll much.

Such layout encourages customers to complete the process as it appears to be quick and simple.

Dev.tuppi

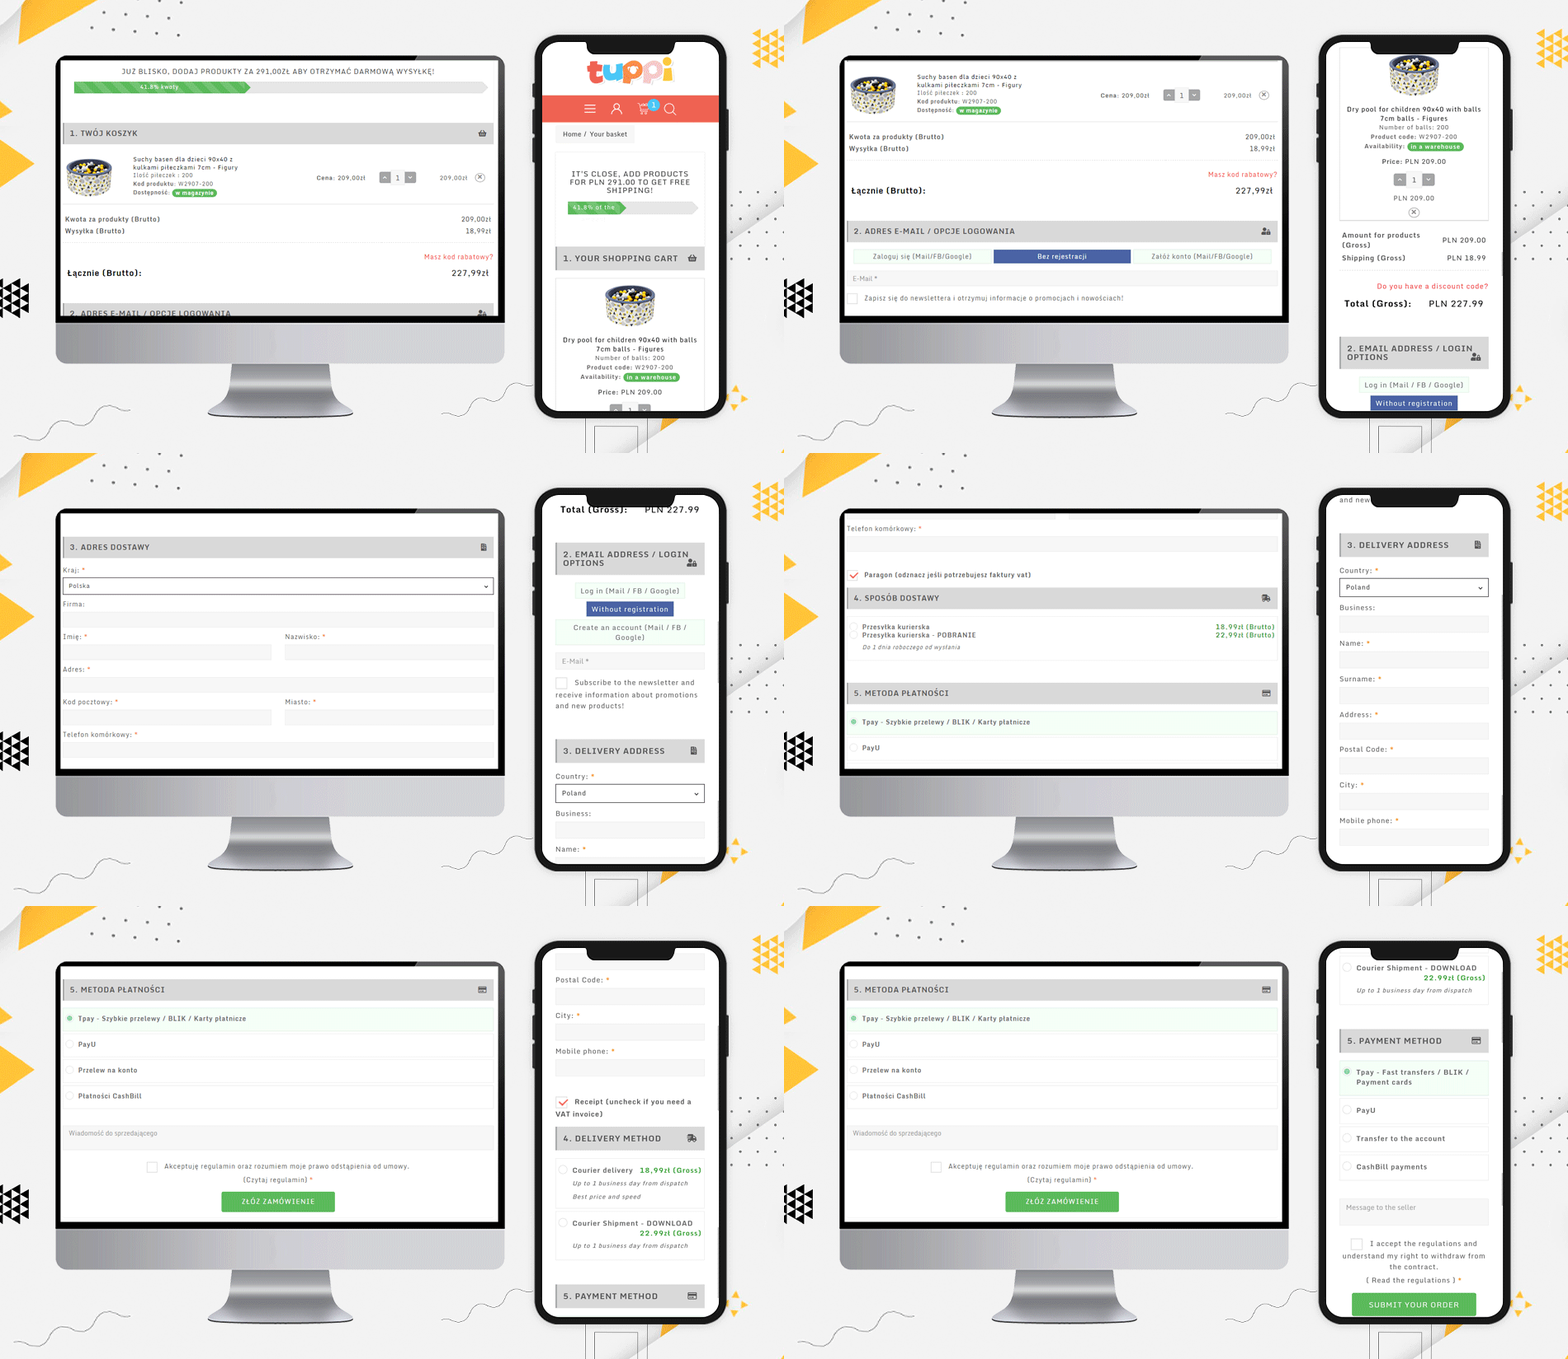
Another layout design for a checkout page can be a single column view as used by Dev.tuppi store. This Poland-based store is using almost every feature on the checkout page. The layout looks sleek and more appealing.

It is better to show the progress bar and Free Shipping options

Another checkout practice that every eCommerce should follow is showing the process progress. Be it a multi-page checkout or single-page checkout, the progress bar allows users to see their current position in the entire task.

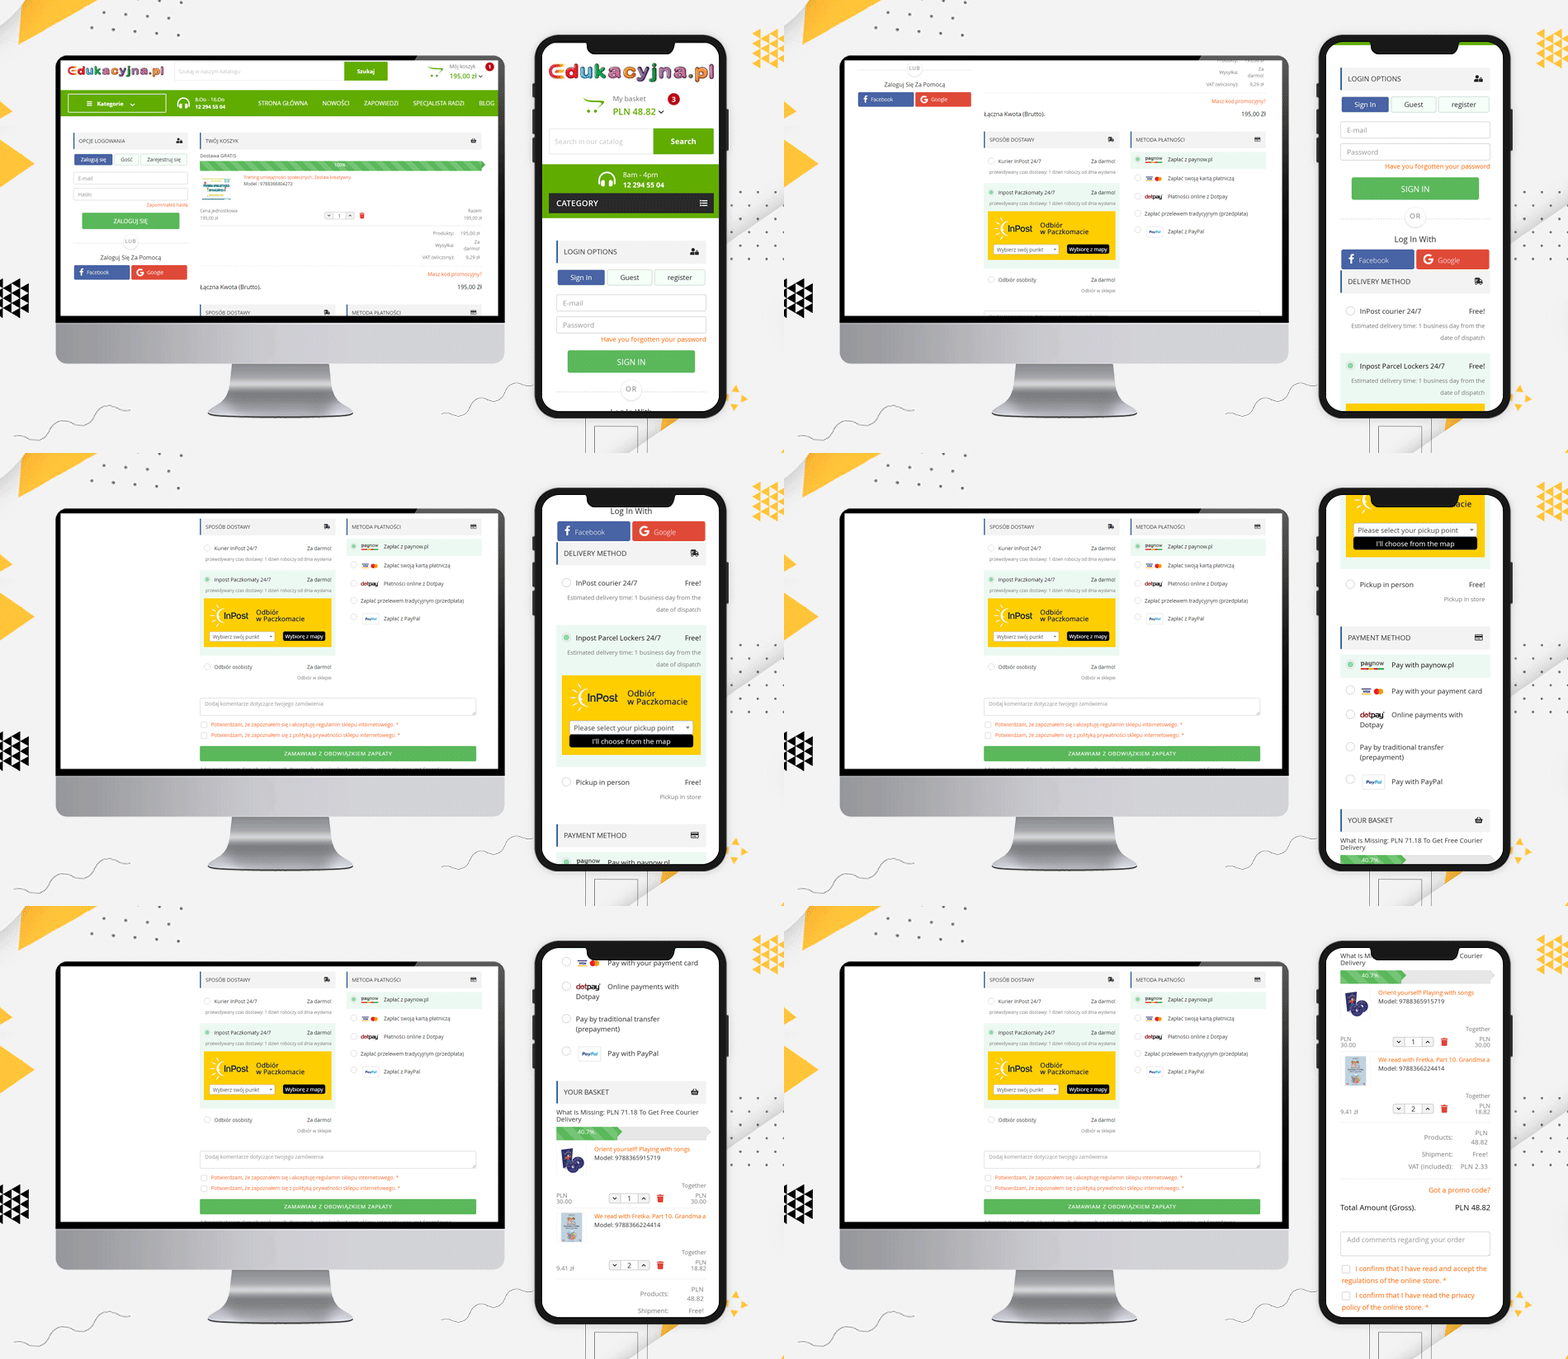
Edukacyjna

Edukacyjna is also offering free shipping to customers if they fulfill the eligibility criteria. This free shipping bar increases the average cart value. Hence, it is always good to add such a feature to your checkout page.

Display Products and Cart details on Checkout Page

When a customer visits a retail store, they can see and observe the products they are buying. Providing this very same experience on an online store is now possible.

A shopping cart contains the entire selected product that you are going to purchase and once you are done choosing, you can place your order. Prestashop One Page Checkout displays the complete order on the final checkout page.

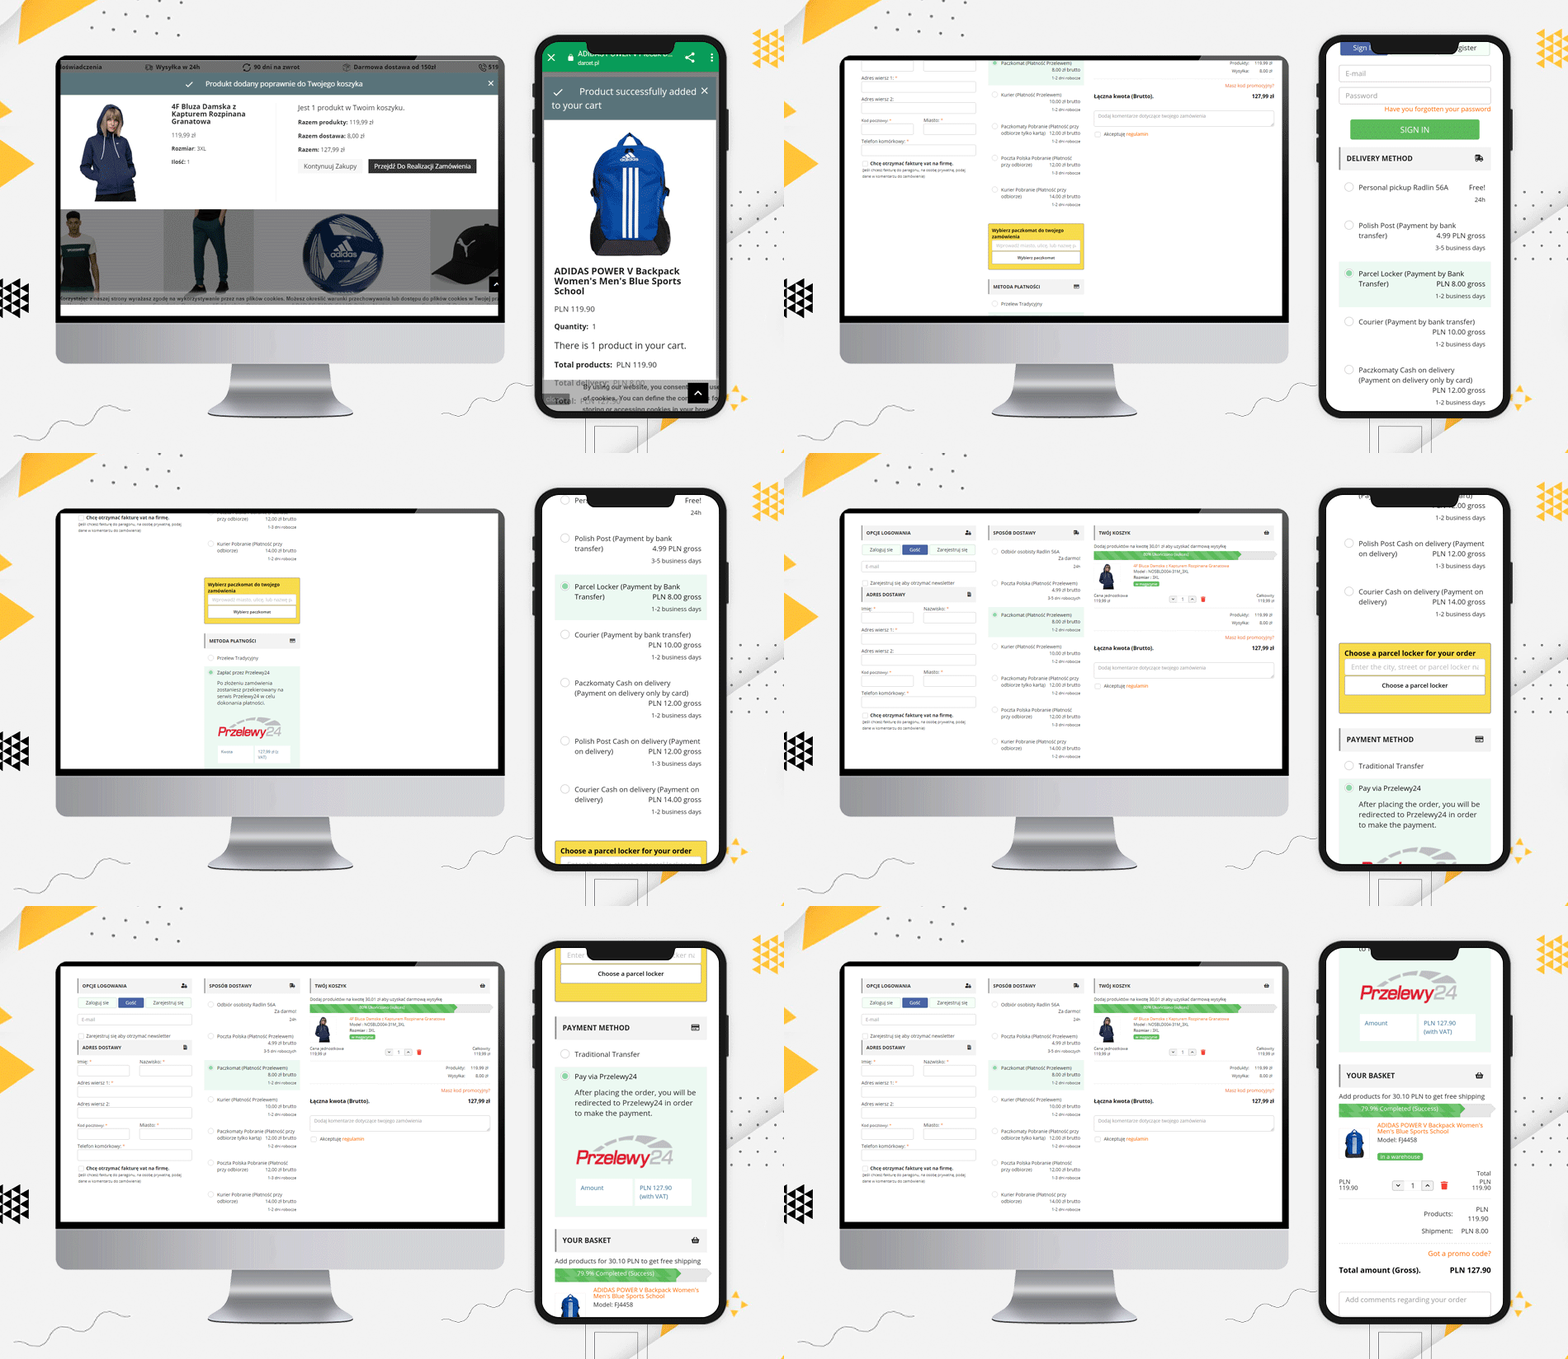
Darcet store

Even a user can update the product quantity if they want. The Darcet store’s checkout page has used it quite well.

Add additional fields and ask for their comments

edenta

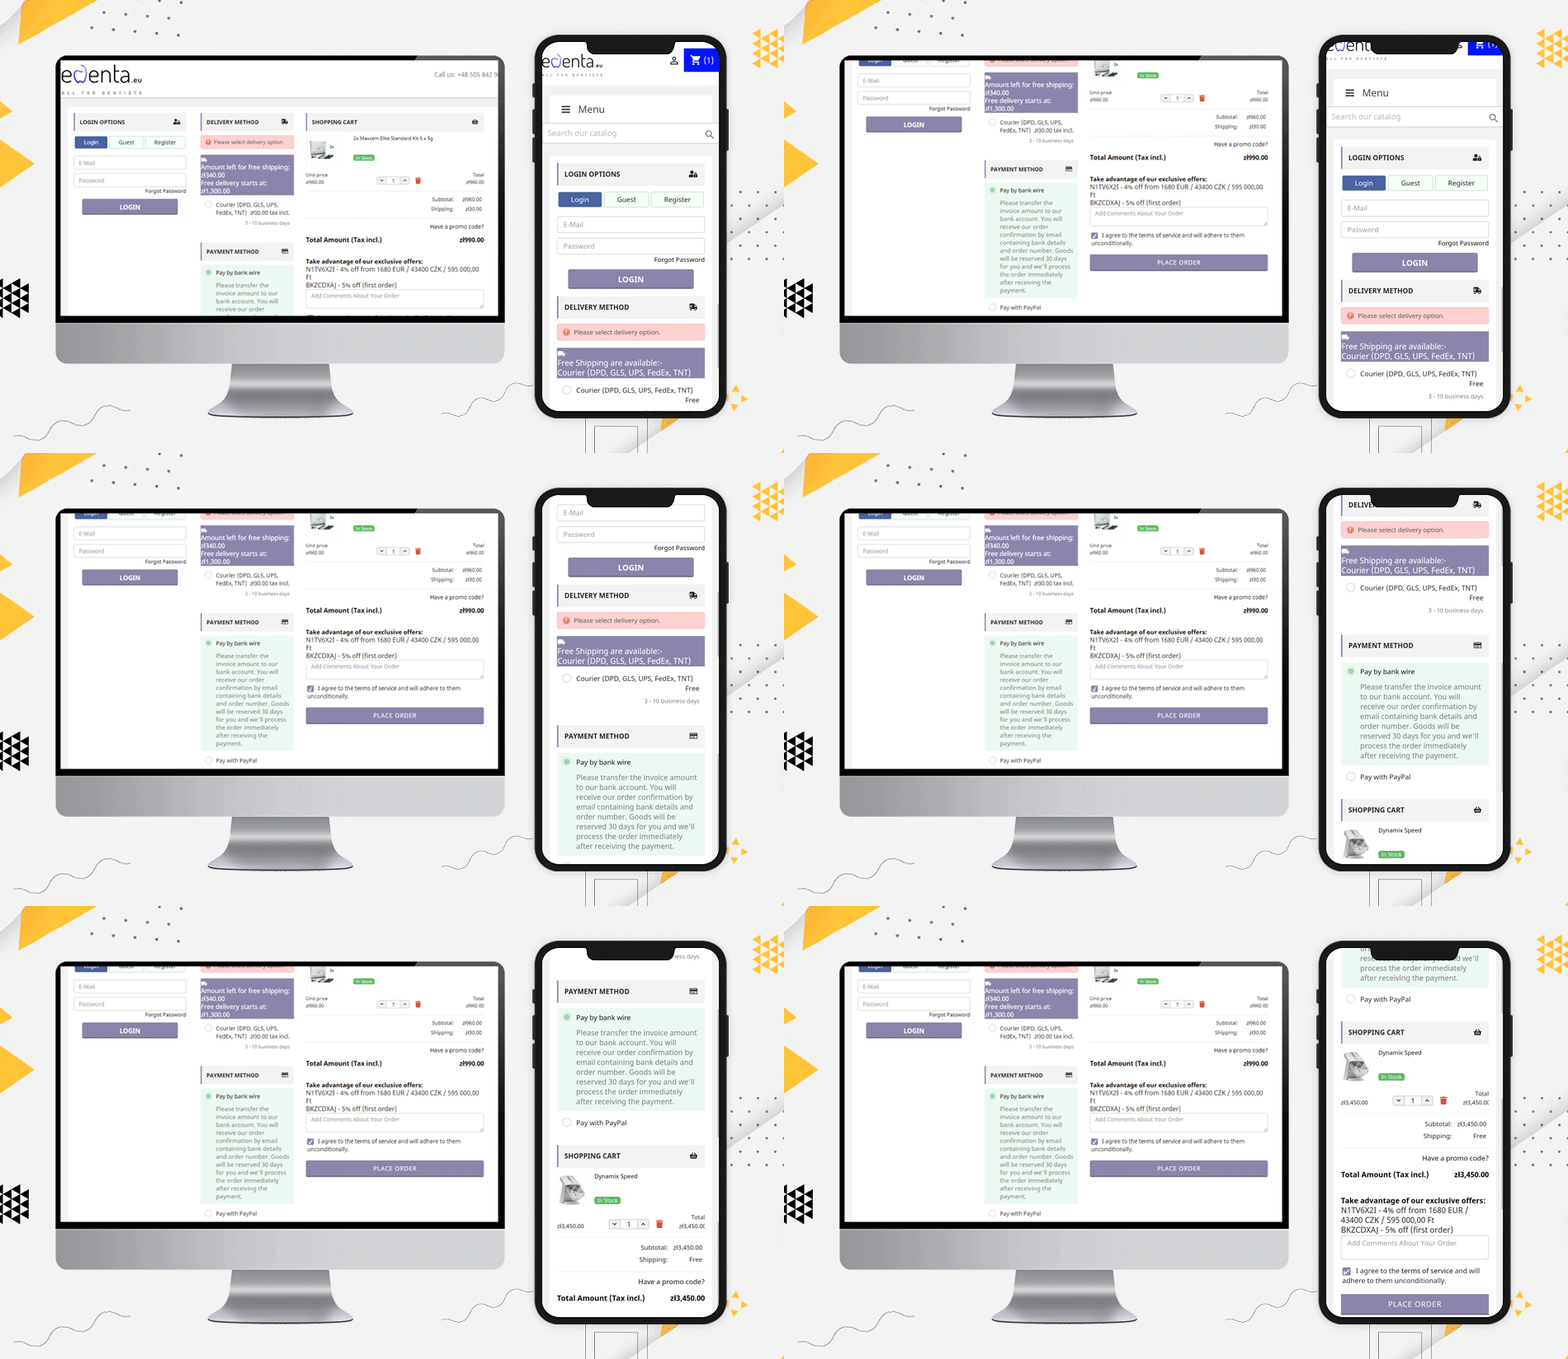
Like Edenta, checkout page should have field for their customers if they have any comments regarding the order they are placing. Also, it is an amazing checkout page practice to show the coupons and deals on the checkout page.

 “Take advantage of our exclusive offers:

N1TV6X2I – 4% off from 1680 EUR / 43400 CZK / 595 000,00 Ft

BKZCDXAJ – 5% off (first order)”

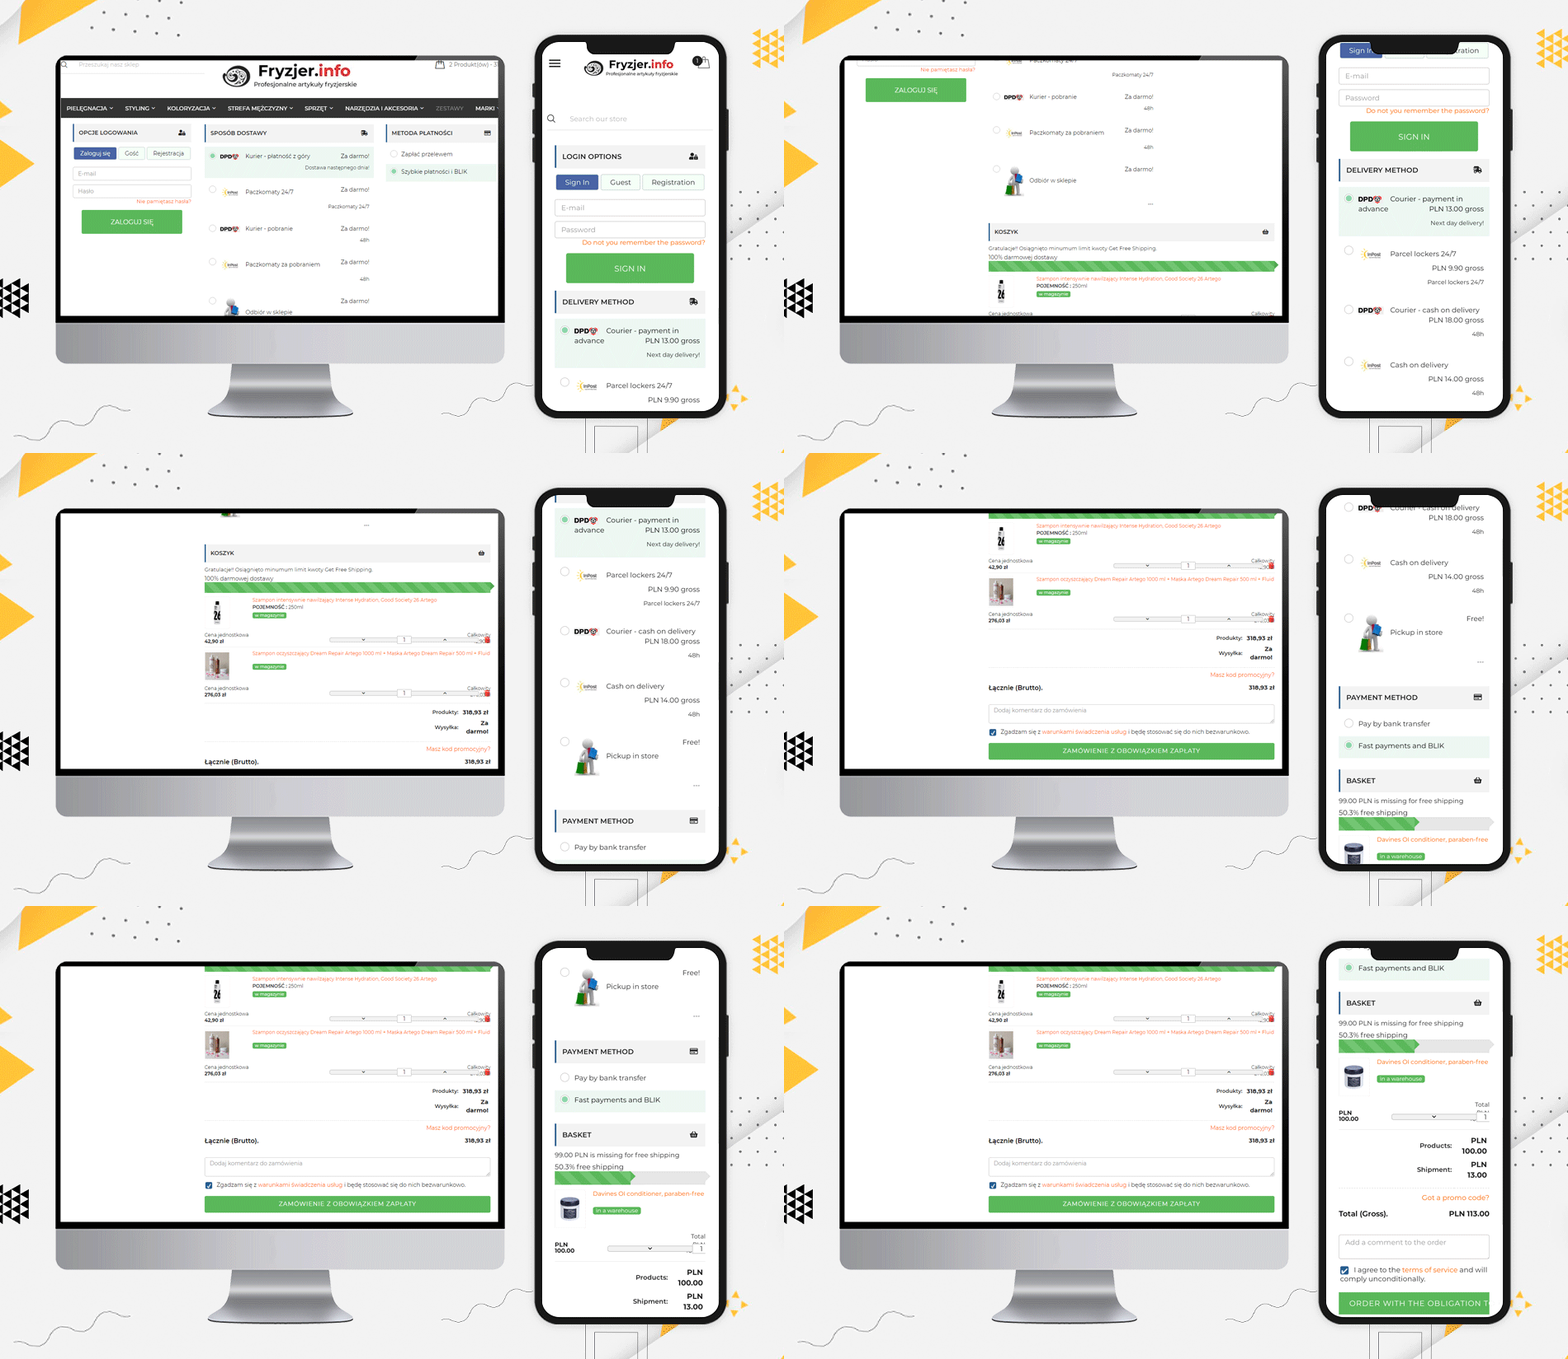
Fryzjer is a PrestaShop eCommerce store with various features on its website. Every page is very well designed and gives a satisfactory user experience.

For checkout page user experience, they have used KnowBand’s PrestaShop One Page Checkout for Poland-based eCommerce store, and look how it appears!

Fobya’s

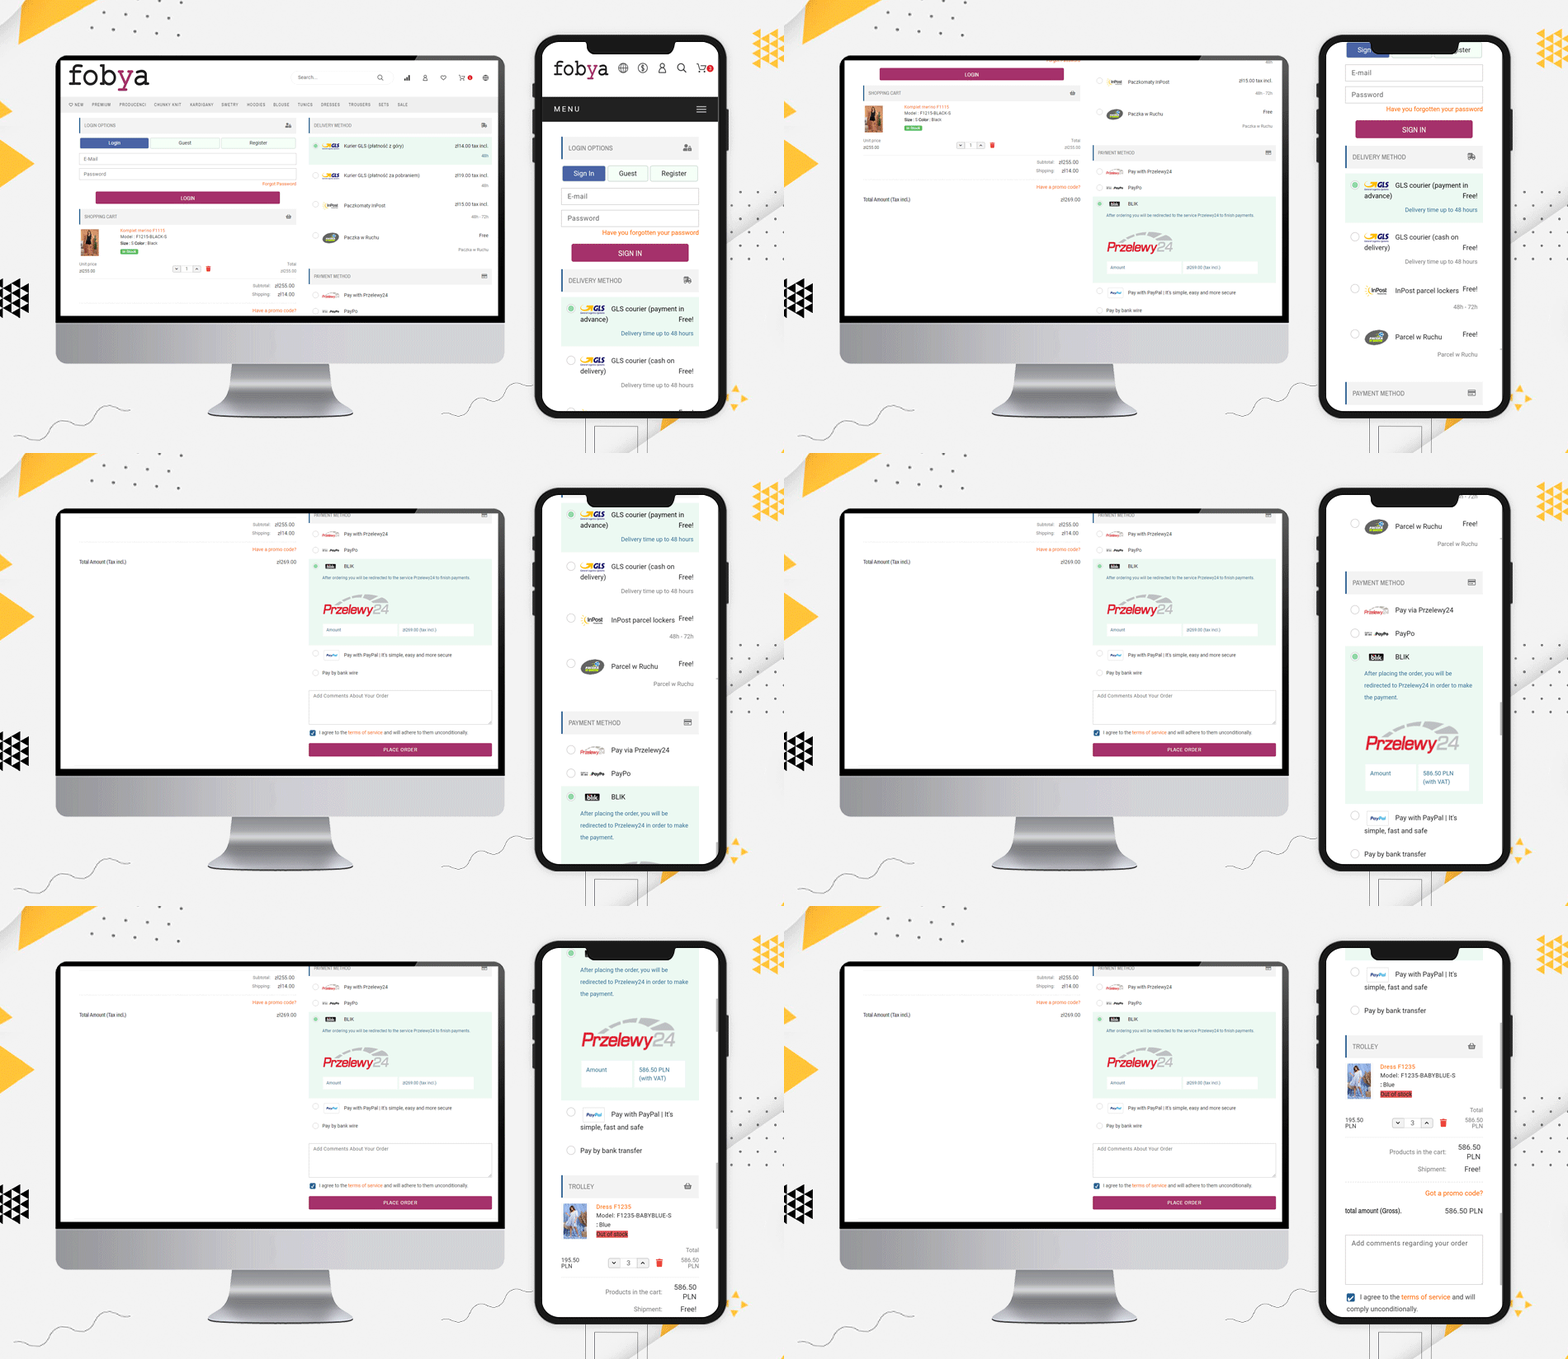
Another best example of Checkout for Poland’s eCommerce store is Fobya’s website. The checkout page has several shipping options listed on it and most of the popular payment methods of Poland are listed.

Laser

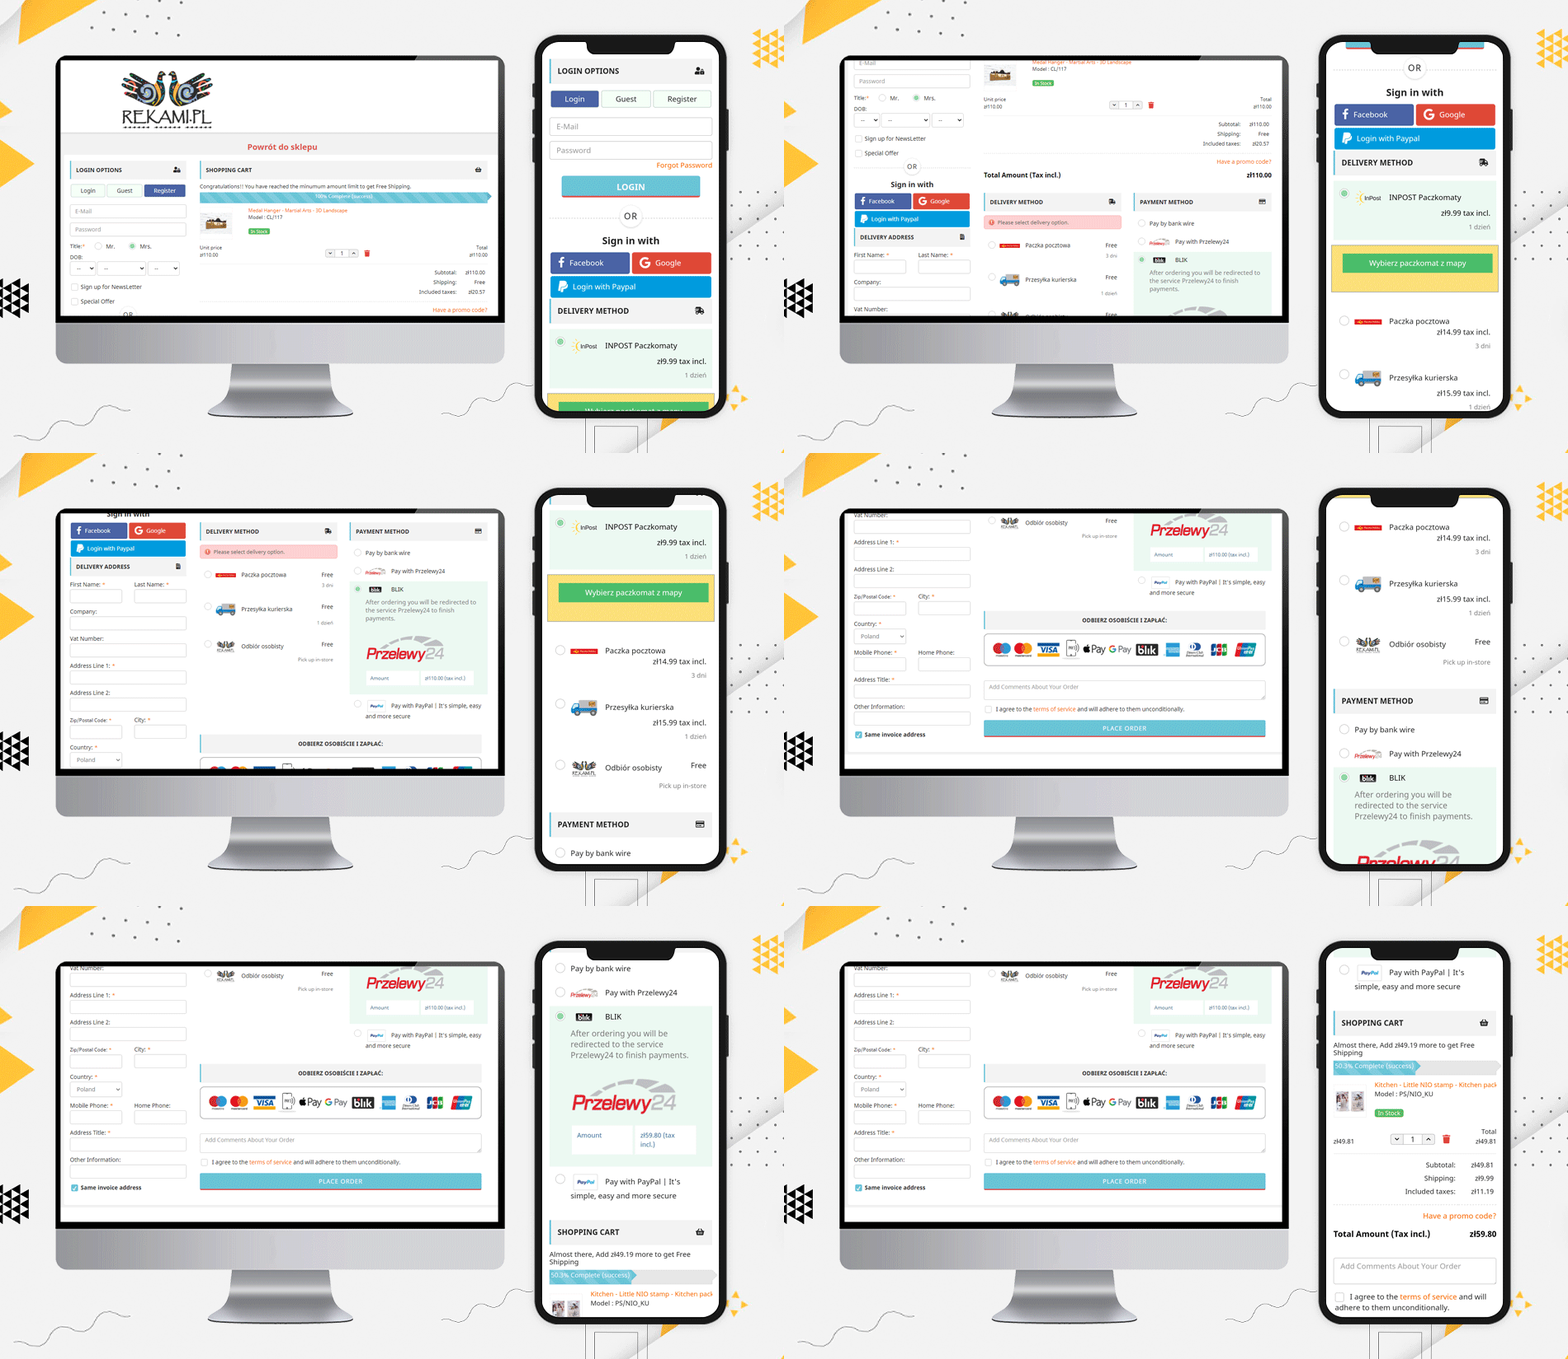
Moving on, let us see this beautiful checkout page example of Laser. On this checkout page, along with all the above-mentioned features, they have displayed the icons of all the accepted payment methods on the checkout page.

This clear view of available payment methods assures users that their transactions will be secured.

Popular Payment methods in Poland:

From the above checkout page examples, we have compiled the list of popular payment gateways of Poland.

Przelewy24, PayPo, PayPal, Pay by bank transfer, blik, Zobacz na, bank wire, Payu, Card, Tpay, Paynow, Dot Pay, COD are the most accepted payment methods of Poland.

Popular Shipping Methods used in Poland:

Here is a list of Shipping methods that are famous and most used in Poland:

Kurier DHL – prepayment, Paczkomat InPost – przedpłata, Kurier DHL – pobranie, Paczkomat InPost – pobranie, płatność kartą,  Odbiór z magazynu – przedpłata,  Odbiór z magazynu – płatność przy odbiorze, GLS courier, Cash on delivery – Kurier GLS, INPOST Parcel lockers 24, Inpost Courier, DPD courier, Pickup at the store (Kwiatowa 9), Polish Post (Payment by bank transfer), Parcel Locker (Payment by Bank Transfer), Courier (Payment by bank transfer, Paczkomaty Cash on delivery, Polish Post Cash on delivery (Payment on delivery), Courier Cash on delivery (Payment on delivery), Courier (DPD, GLS, UPS, FedEx, TNT)

Read: Best eCommerce Payment Gateways for Poland

Note: The PrestaShop One Page Checkout module allows the store owner to add multiple payment and shipping gateways from the backend of the module.

More about PrestaShop One Page Checkout Addon:

This addon allows you to track the abandoned cart in your store and analyze the reasons for the same. The explicit features make it different from every other popular PrestaShop checkout page module available.

You can see these stunning checkout pages developed for PrestaShop globally and they are one-of-a-kind. The PrestaShop one-page checkout addon is a best seller on Knowband and PrestaShop addon store.

Finally, The KnowBand store is a PrestaShop Gold partner agency! The PrestaShop one-page checkout has 11000+ downloads! You can check out the admin panel and front-end module demonstrations at the KnowBand shop.

You’ll find solutions for all other eCommerce services in our shop. From both the seller’s and the customer’s viewpoints, all of the modules are well-designed.

Recommended Reads:

Top Examples of Robust Progressive Web Apps (PWAs) developed by KnowBand

Are you looking for a Progressive Web Applications (PWA) solution for your eCommerce website? PWA app looks very similar to mobile applications but they are certainly different. In reality, they work on browsers and provide us with an app-like experience. You’ve most likely visited PWAs before without even realizing it.

Progressive web apps are all designed to work with any browser that sticks to the relevant web standards. The aim, as with other cross-platform solutions, is to make it easier for developers to create cross-platform apps than native apps.  Google Developers claims that!

This article is a compilation of some exclusive examples of Progressive Web App (PWA) developed by KnowBand. The PWA uses as little data as possible to provide a smooth and quick browsing experience.

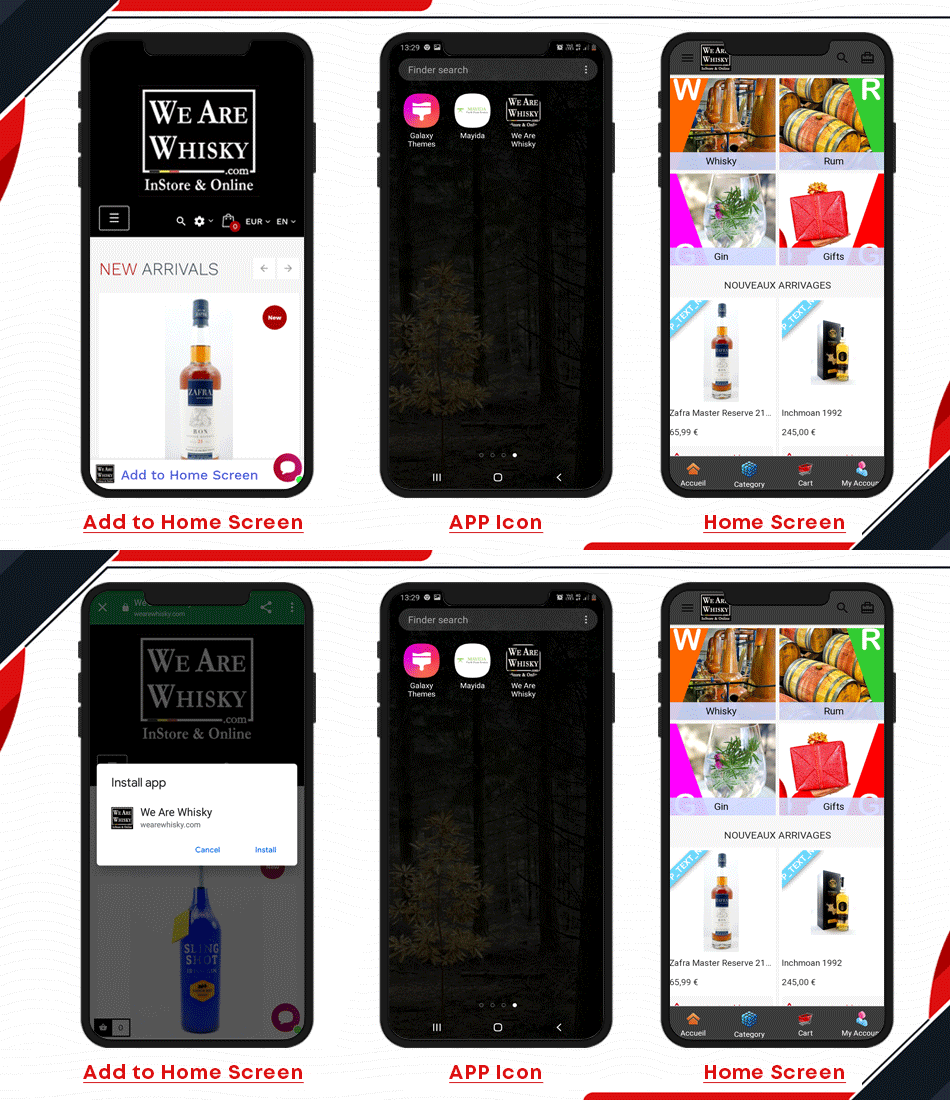
1. We Are Whisky

The We Are Whisky website has an App-like interface. To the user, it feels like an app, with app-style interactions and navigation. PWA employs progressive improvement concepts that work with all users, regardless of browser preference.

The Progressive Web App developed using KnowBand Plugin is responsive! It works on every computer, including desktop, mobile, tablet, and future types.

The website URL has HTTPS which is used to avoid snooping and ensure that the content isn’t tampered with.

2. Betty fresh

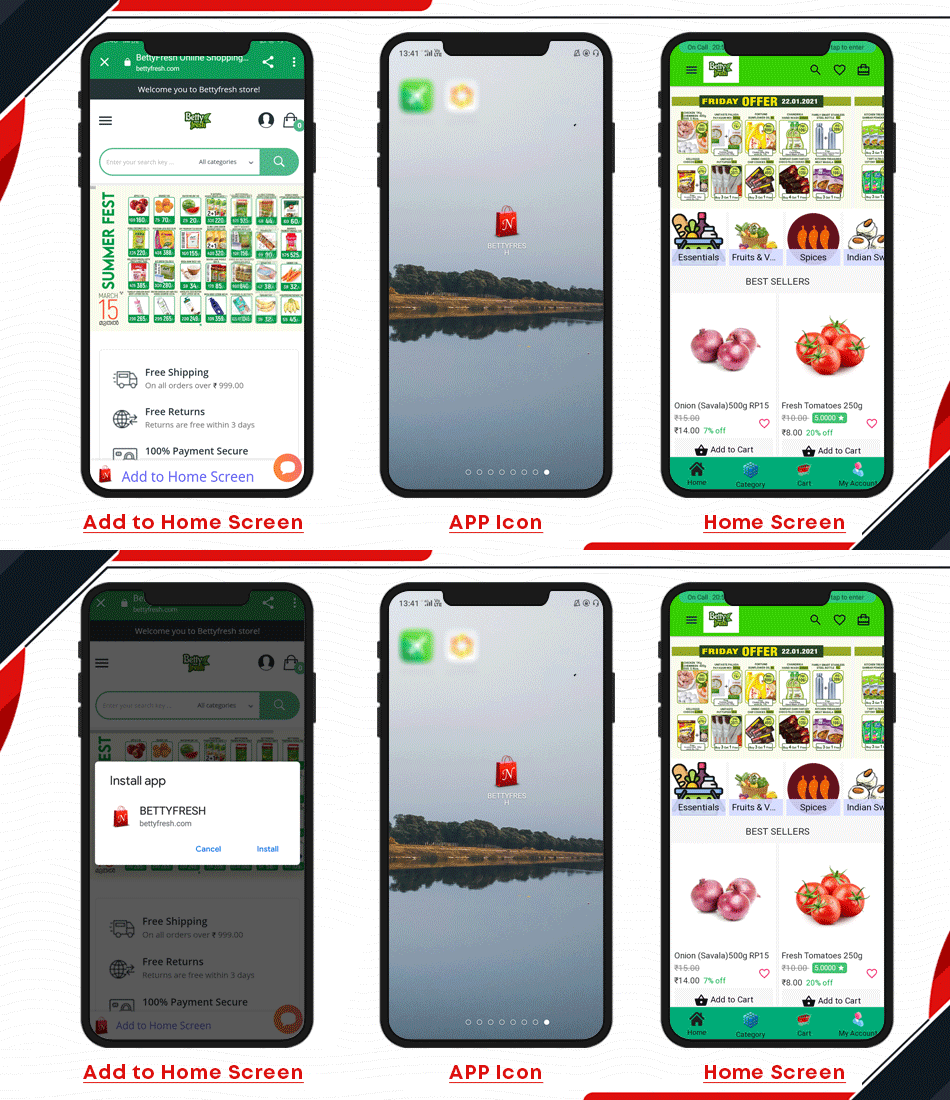
For a PWA, after the initial loading is complete, the same content and page elements do not need to be re-downloaded each time. Web caching in browsers, on the other hand, will prevent redundant loading of static elements on standard HTML-based pages.

Admins can easily add desired graphics and redirects to their banners and sliders using the KnowBand Progressive Web App. By strategically highlighting certain items and banners, you can improve the user experience.

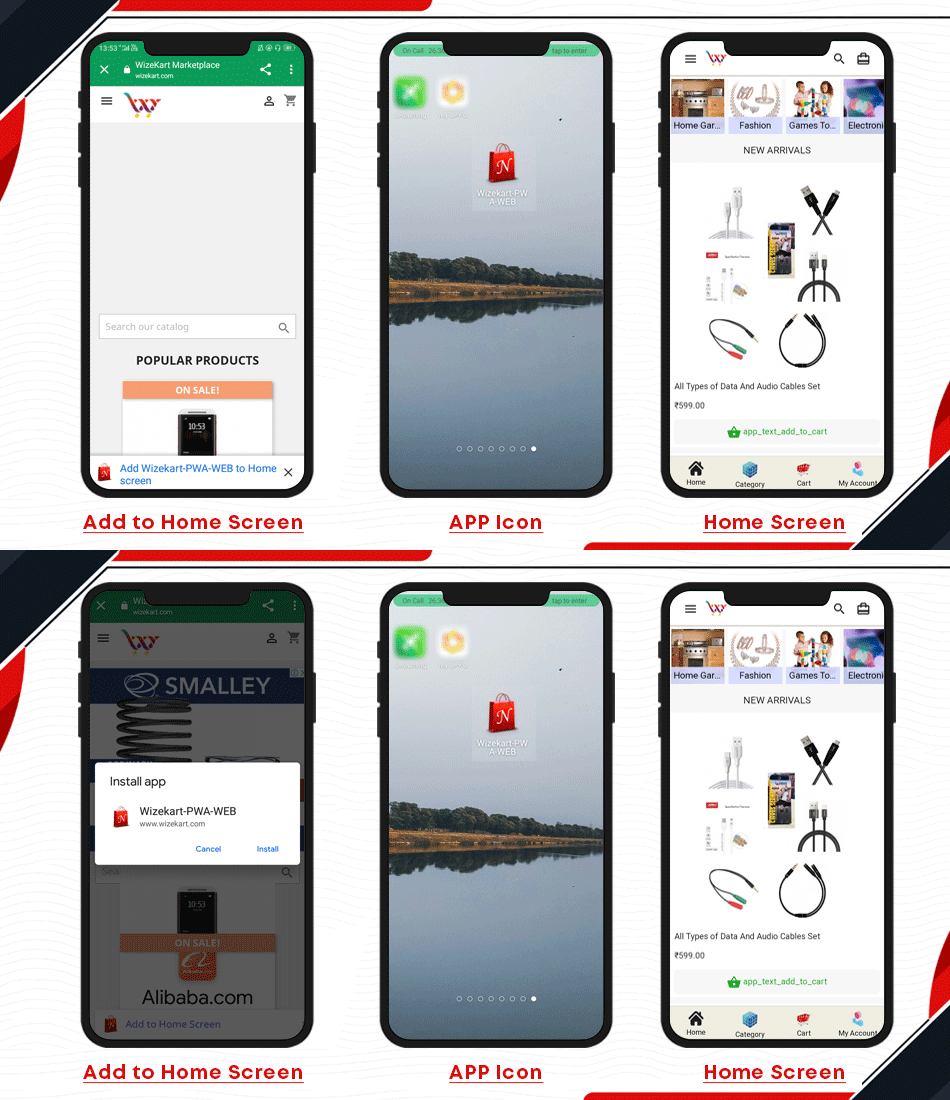
3. Wize kart

It provides home screen icons without requiring an App Store subscription.

Thanks to the upgrade process, the app be always up to date.  The ability to use push alerts to keep users engaged.

And when there is no or slow internet connection, the PWA apps function flawlessly. The app is available to app users even while they are offline due to cached data and previously loaded pages. Push notifications, for example, are useful tools for re-engaging app users.

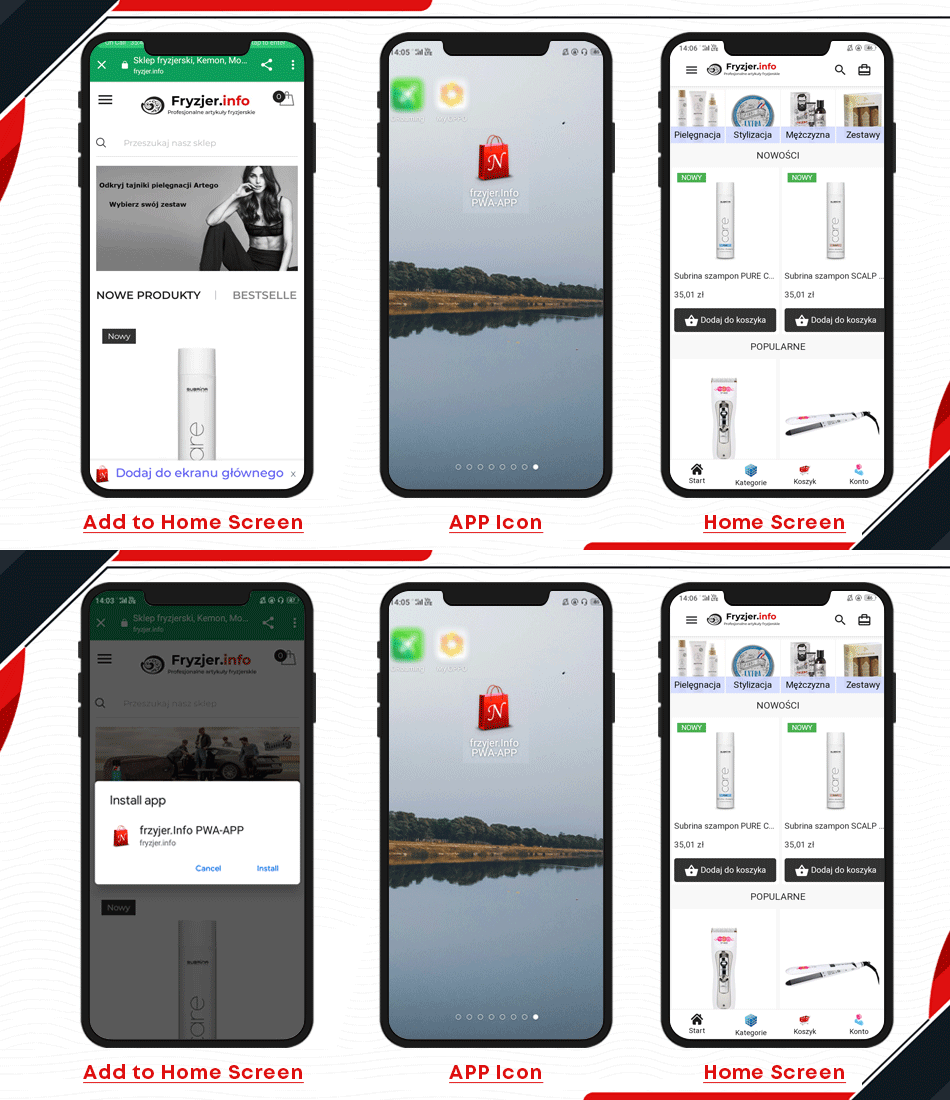
4. Fryzjer

Users of the KnowBand PWA App will log in easily using their Google or Facebook accounts. Such one-tap onboarding options save time and effort while improving the user experience. The most basic form, namely registration/login via email, is also included.


Run several sales and discounts focused on current events, holidays, and so on. On the home screen, use intuitive campaign graphics to enable users to make more purchases. The administrator may also use a countdown banner to run timer-based sales and generate a sense of urgency for the sale.

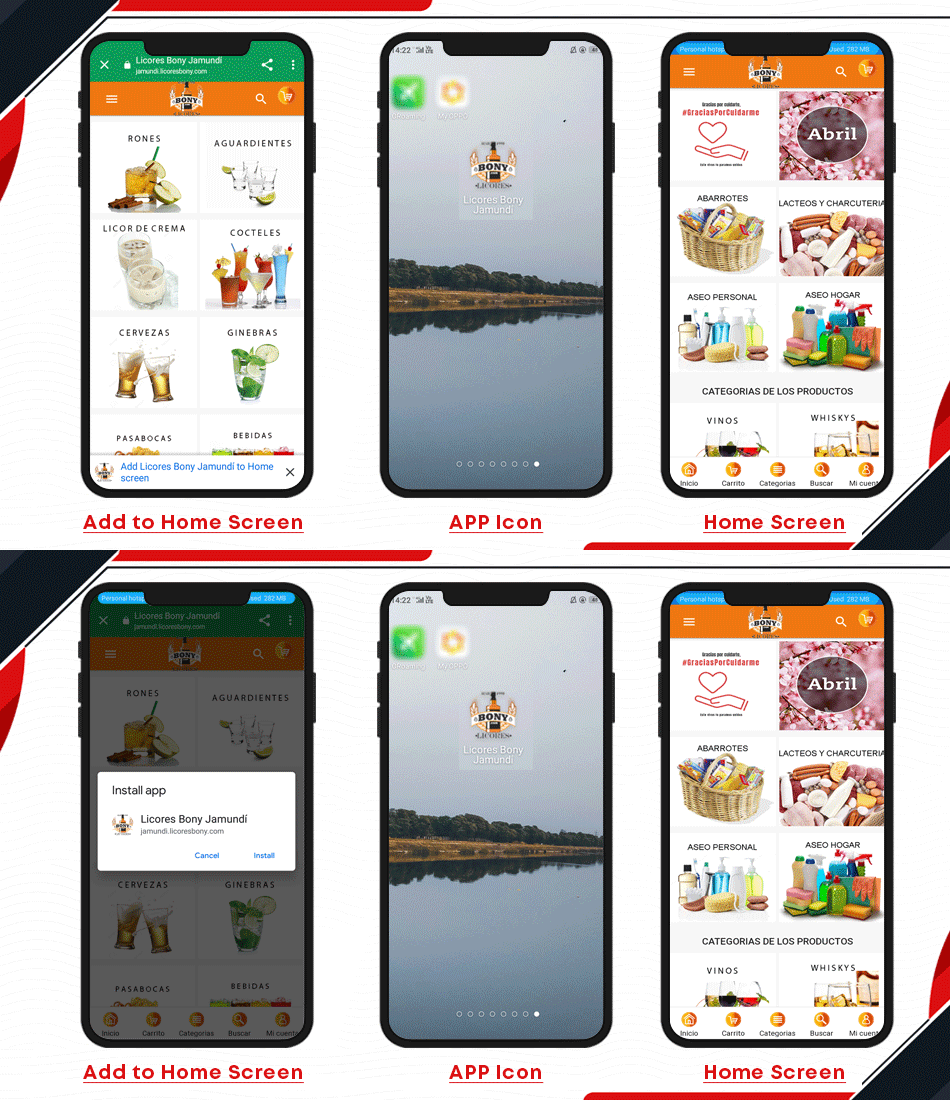
5. Bony Licores

The Progressive Web App developed for Bony Licores allows app users to share their favourite items with their friends and family. Also, provide incentives when sharing on various social media platforms.

Offer a more refined product search and category views with in-built sorting and filtering options to meet the needs of each Progressive Web App user. The user-friendly navigation bar is also well-organized to make surfing easier.

The PWA App users can keep track of previous app orders with real-time order status updates. The order status is automatically synced with the store and modified as required.

The PWA developed by licores bony is multi-store compatible!

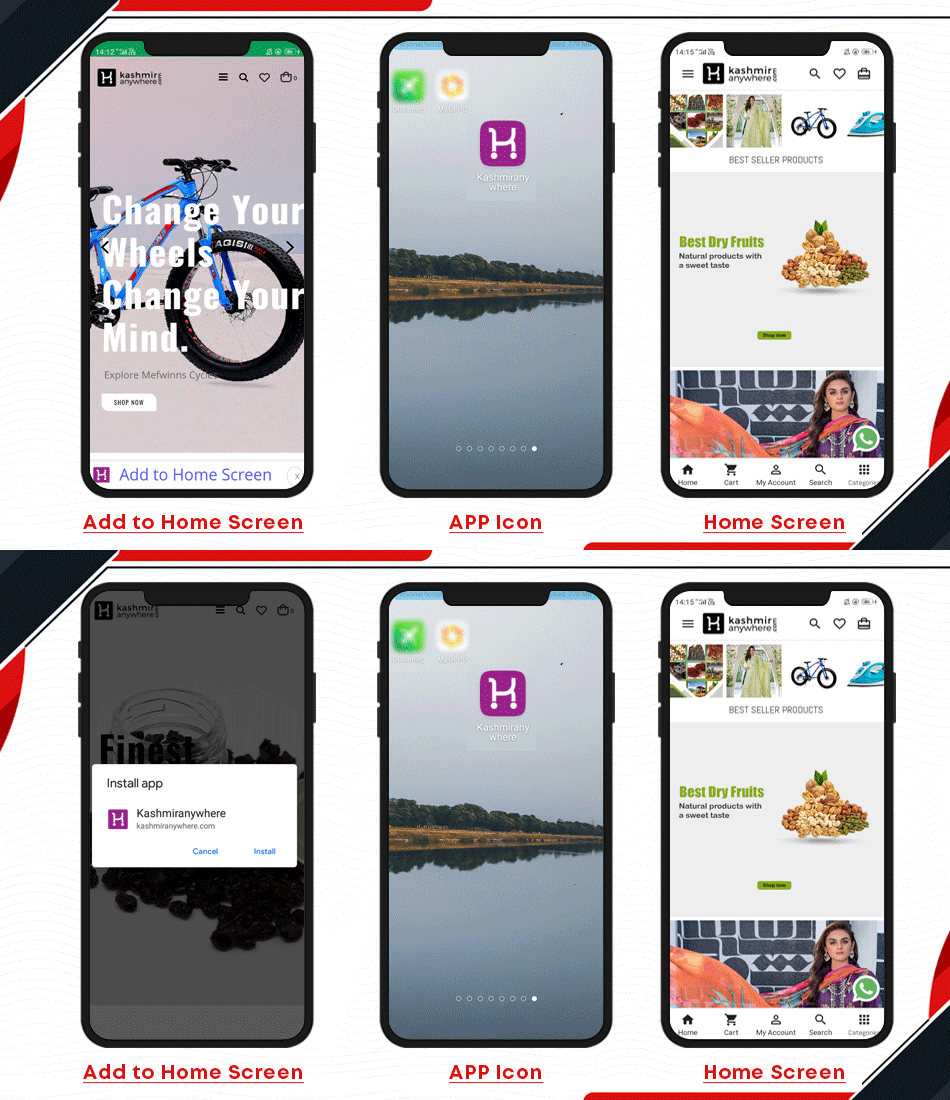
6. Kashmir anywhere

The App Shell Model is an architectural approach used by some radical web applications. In this model, PWA saves the sensitive web design web application’s Basic User Interface, or “shell,” in the browser’s offline cache.

All Payment Options Are Accepted: All of your website’s payment options will work with KnowBand Progressive Web App as well. All PWA app transactions are synced with the order section of your website.

The PrestaShop Progressive web application includes a built-in single-screen checkout page that only asks for the information that is needful.

Do you have more queries regarding PWA App?

The Progressive Web App automatically syncs the entire inventory/catalogue of the website. Moreover, there is no need for manual application maintenance. All inventory adjustments are in real-time synchronization. Some of the best features of the PWA app are as follows:

  • No secret fees or subscriptions | One-time payment Validity for a Lifetime
  • It is to be noted that it can be shared easily via a URL and does not require a complicated setup.
  • You can showcase similar goods to increase cross-selling and up-selling opportunities.
  • Showcase product reviews to help mobile shoppers make better purchasing decisions.
  • Zendesk and WhatsApp chat is built-in, allowing users to communicate directly with the admin.
  • There is no reliance on Google Play or the Apple App Store. Start shopping after a quick PWA installation with just one tap.
  • KnowBand PWA is compatible with KnowBand’s Multi-vendor Marketplace addon.

Support:

Convert your eCommerce website into a PrestaShop PWA Mobile App and enable your mobile visitors to shop with ease. Fully customizable DIY editor to adjust the look and feel of the live home screen!

If you were looking forward to a PWA that can be reliable, responsive, and robust, we are ready to help! Contact our expert team at support@knowband.com and discuss your requirements.

Recommended Reads:

5 Best Practices and Examples for WooCommerce Android App development

The differences between designing for desktop and mobile devices are as stark as chalk and cheese. While we use similar methods for both, they need a different approach from us. Particularly when it comes to native apps, which involve much better use of the device’s capabilities than responsive websites. When it comes to developing a mobile app, there are a few things to keep in mind, and here are some of my recommendations.

I have explained 5 of the most important practices and examples you need to follow when creating your WooCommerce Android App.

1.     Simple Navigation yet discoverable

The app must be packed with features that make shopping a breeze for everyone. Every phase of your WooCommerce Android app, from the landing page to the checkout page, is meticulously configured and checked by professional app developers. The products can be filtered by gender, size, price, color, and other factors, and they can be sorted by common, most important, lowest price first, and so on. Mobile Product page, shopping cart, search and every part of the app should have clear CTAs.

Shoppinger WooCommerce Android App

1.     Clutter-free Design

Get rid of the excess. Getting rid of something in a mobile design that isn’t completely required would increase comprehension. One primary action per screen is a good rule of thumb. Make the product page impressive but do not put extra. Login barriers can be avoided. Instead of forcing early registration, slowly collect data.

You can offer a Social Login option, quick signup with minimal details like email and contact number, Mobile login with OTP, or Fingerprint login option in your WooCommerce Android App.

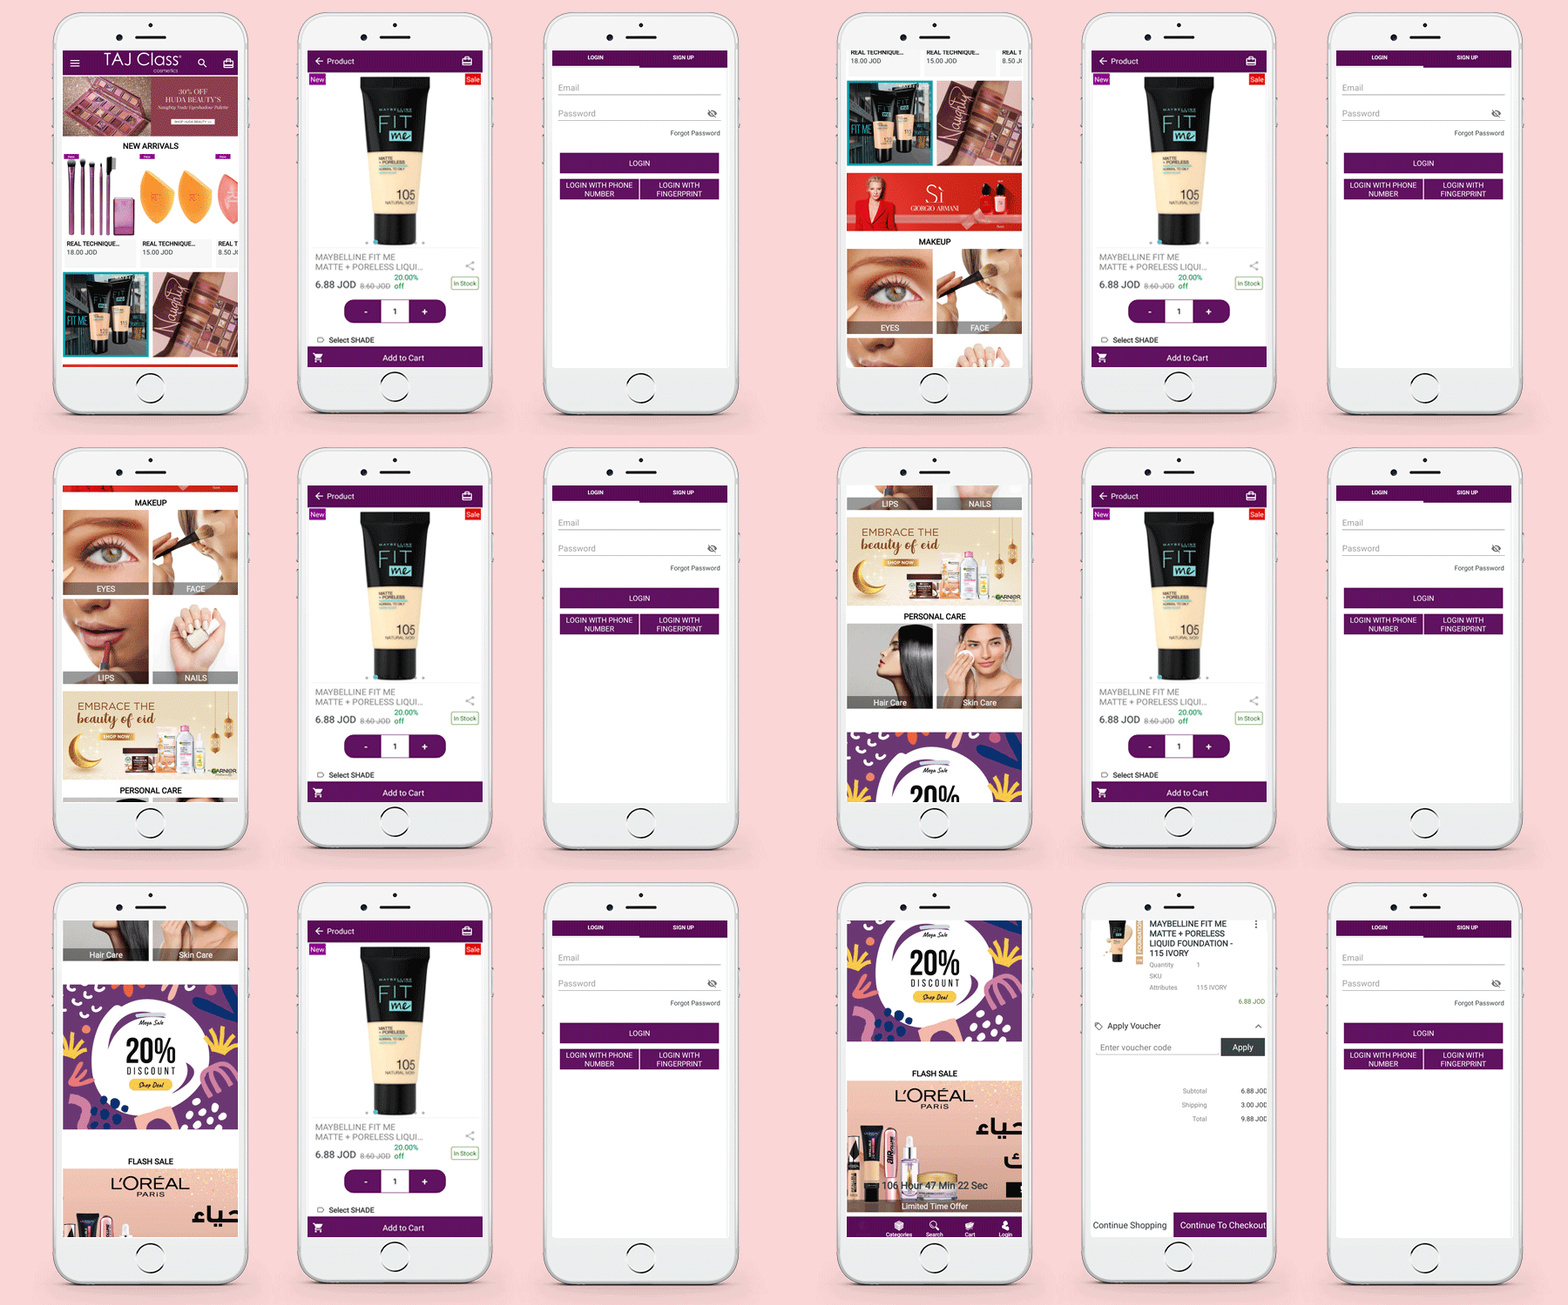
Taj Class Cosmetics WooCommerce Mobile App

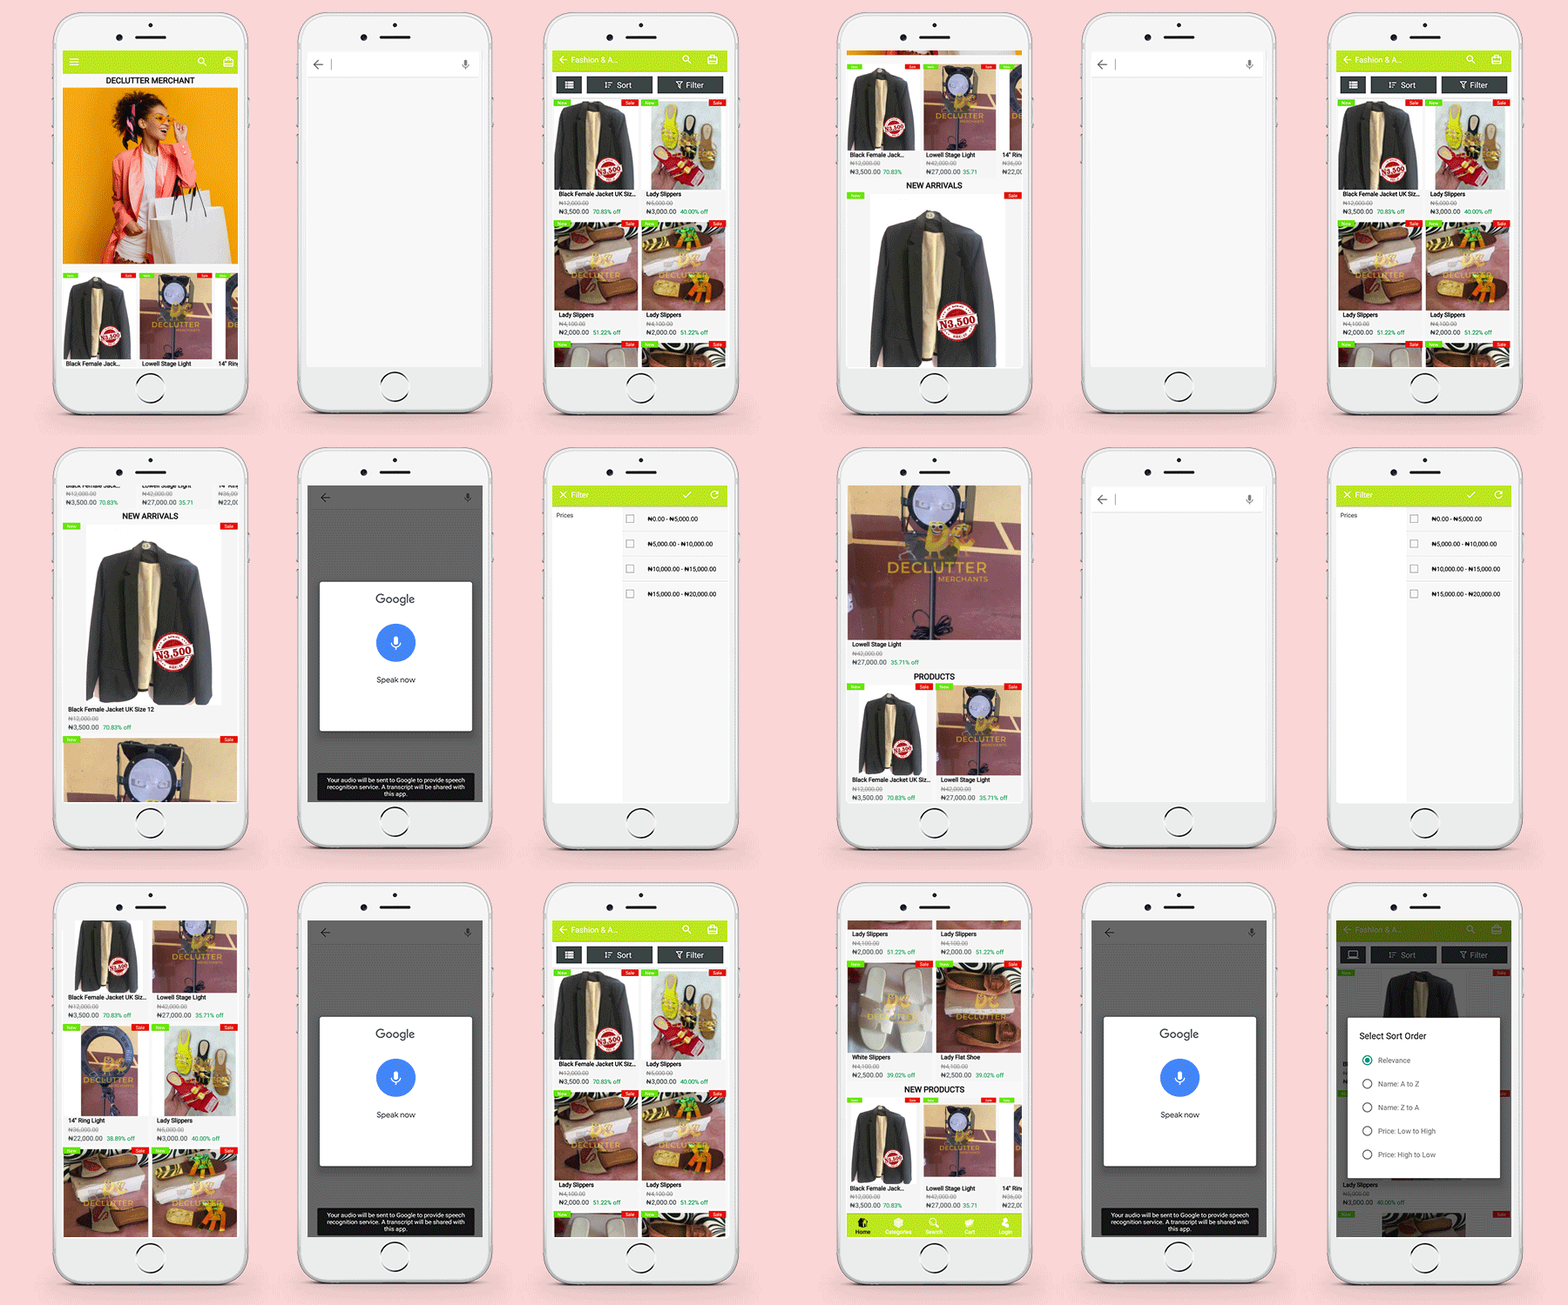
2.     Design it for voice search

On Google, voice search is already popular. Voice search, also known as voice-enabled search, is a method of searching that employs human speech as the most natural input channel. Through incorporating voice into existing websites and mobile apps, eCommerce businesses can tap into the growing voice market while maintaining complete control over their data and the customer experience.

The WooCommerce Android App builder can be customized for voice search.

Declutter Shop WooCommerce Android App

3.     Create a Content Map and a User Flow

Work on research and designs are inextricably linked. Developers, for example, can quickly sketch user flows based on their research and understanding. Note, starting with a prototype will help you better understand the user experience between content and action.

Clear call-to-action and structured navigation play a pivotal role in the app development process. Certain WooCoomerce mobile app builders provide you the freedom of customization.

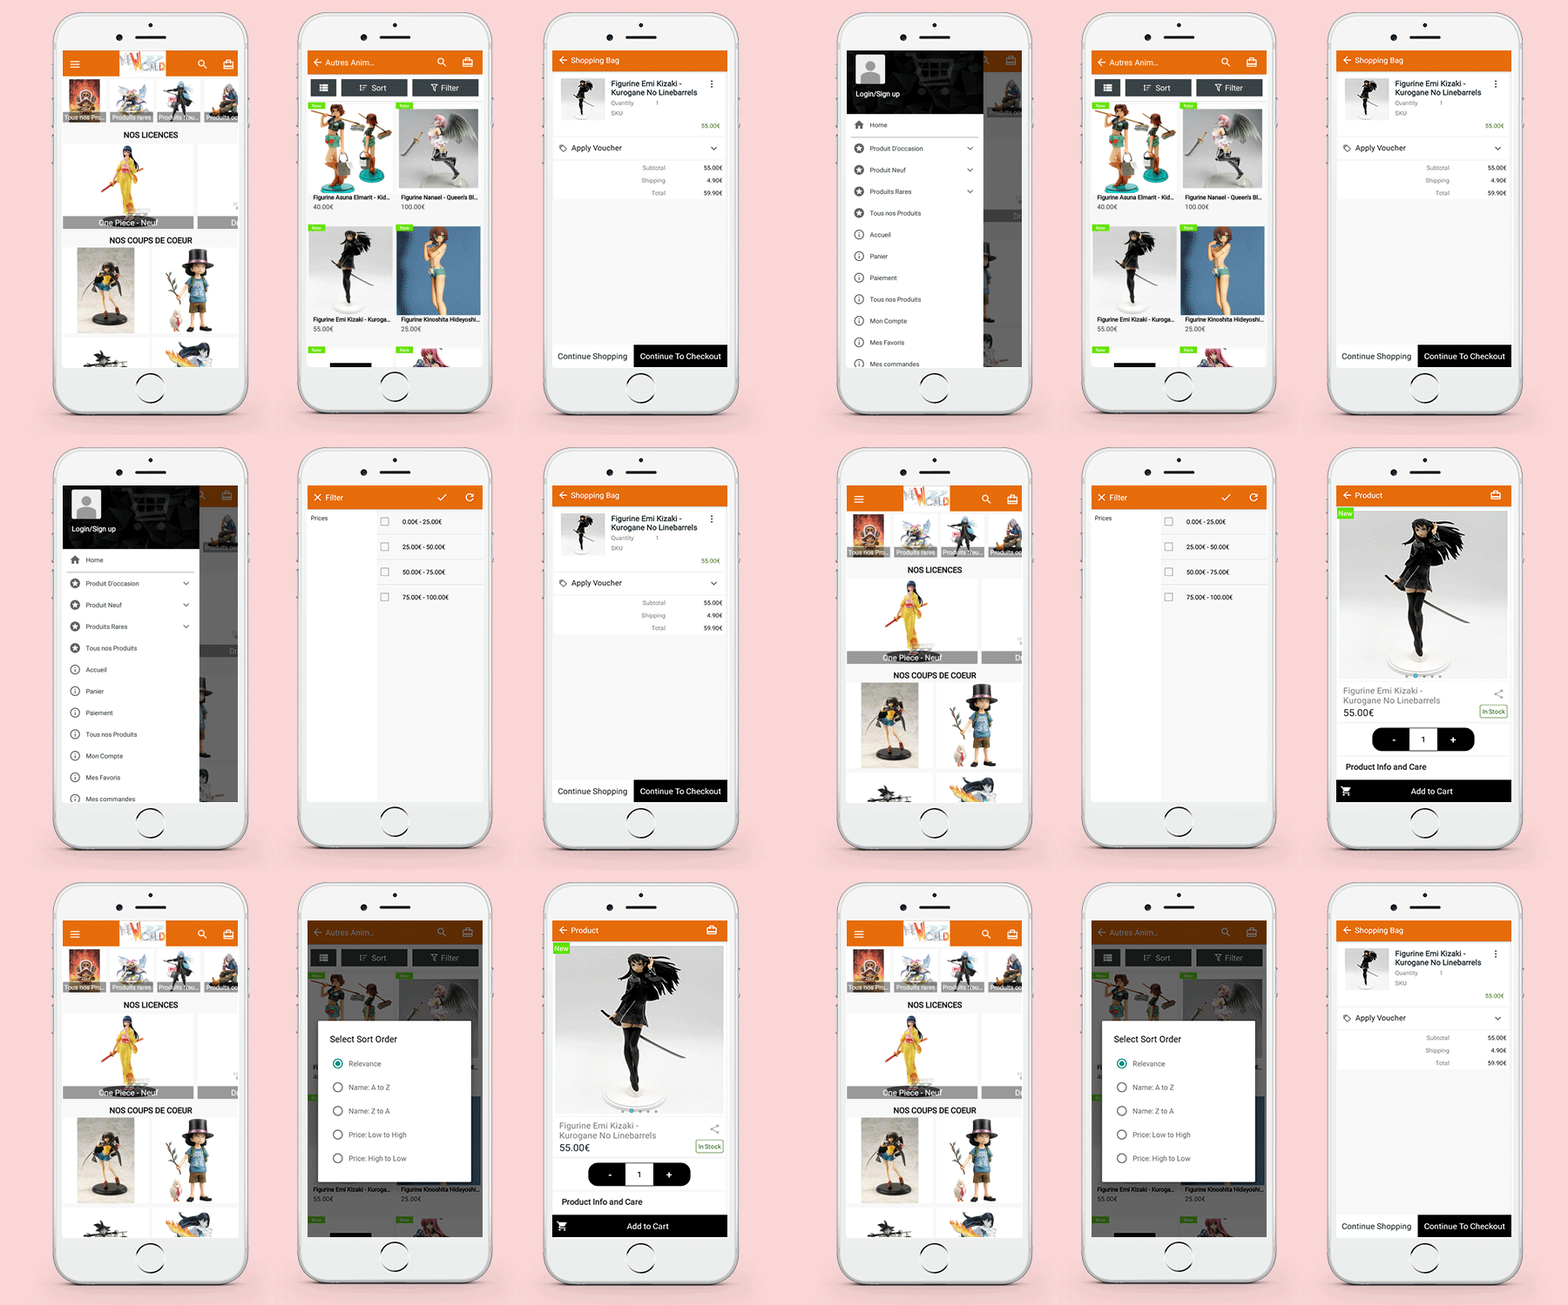
NeWorld Anime WooCommerce Mobile Application

4.     Live chat provides a competitive advantage

Businesses are constantly looking for low-cost customer support options. One of them is undoubtedly live talk. Live chat tools are relatively inexpensive to set up, and they come with a slew of additional features that make them a superior communication medium.

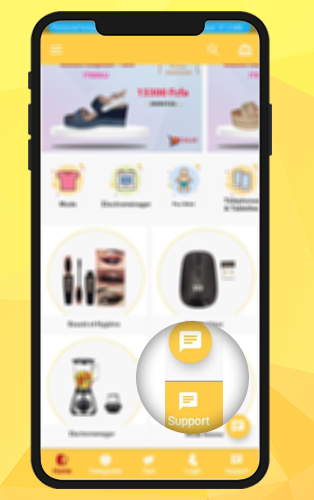
Look at this App here developed on the WooCommerce Platform. They have implemented live WhatsApp chat support. Real-time customer support and the ability to respond to several requests at once save time, effort, and money.

Kevajo WooCommerce Mobile app (1k downloads on Playstore)

We Provide Ongoing support

Know before you finalize your WooCommerce Mobile App Builder!

Few things you have to consider before buying a WooCommerce Mobile App Builder plugin and how KnowBand Mobile App Builder works for those

  1. What Android and iOS versions does this software support? Is the UI of the mobile app have backward compatibility?

The WooCommerce Android app builder by KnowBand is compatible with all Android versions, beginning with Android 4.2 (Jelly Beans) and ending with Android 8.0. (Oreo). The software creator is also iOS compliant, and it runs on iPhones 4 and up.

  1. What is the difficulty level of the app installation? The answer is just 3 simple steps:

There are only three basic steps in the Mobile App Builder module:

  1. Purchase and install our Paid version of the module on your website.
  2. Create a Pre-requisite form with all app-related details.
  3. Submit APK/IPA files for analysis and publication on the Google Play and Apple App Stores.

Have more queries?

You can contact our expert team for any kind of App development support or visit the FAQ section of the Mobile App for a better understanding.

If you are using Dokan Marketplace, then WooCommerce mobile App builder is the best choice for you as it is compatible with Dokan Marketplace.

To see how it works for your store you can use the free demo available for the mobile Apps on the KnowBand store.

The Mobile app builder is available for WooCommerce, Magento, Magento 2, Opencart, and PrestaShop platforms.

Read these WooCommerce Mobile App stories before you make any decision. We have created many successful mobile apps for various platforms and here is the portfolio.

Conclusion:

As you might be aware, Knowband assists eCommerce businesses in the entire process of creating a website, modules, and apps. We not only advise all parties in the mobile app development process, but we also mediate between them and reduce the risks associated with mobile app development projects.

To get the assistance of our pro-active support team, drop your message at support@knowband.com, and will mentor you throughout.

Success stories that inspire!

10 Best Checkout Page Examples and Practices for Italian PrestaShop store

You need a great checkout page template to get traction for an online store. It’s not always easy to know where to begin or which features are most relevant. With so many competing recommendations for creating an eCommerce experience, identifying trends and best practices for checkout page design and implementation can be difficult.

One Page Checkout PrestaShop 1.6V and One Page Checkout PrestaShop 1.7V developed by Knowband, a PrestaShop Gold Partner Agency provide some of the exciting custom features that our Italian clients have been using in their stores.

Product Demo Available: PrestaShop One Page Supercheckout

What defines a Checkout Page?

A checkout page is a page(s) on an eCommerce store that deal with payment and shipping/billing details. Customers can enter payment information and complete their orders on the checkout tab. The customer’s shipping information, billing information, shipping method, and payment method will be collected during the checkout process, and the customer will be given the option to request the order.

Why use One Page Checkout?

There are several benefits of using one-page checkout on an eCommerce website. Your checkout should be improved regularly, to make it as fast, effective, and frictionless as possible. Customers would have a better shopping experience if you create a simple, easy-to-use, and high-performing checkout. This will reduce checkout abandonment and increase conversions.

Adopt best checkout page practices for ending cart abandonment on the checkout page. These best practices used by various Italian PrestaShop One Page Checkout users for designing, developing, and managing your checkout page will assist you in creating a user-friendly checkout that will improve sales. Additionally, we have analyzed these Italian store’s payment and shipping methods and drawn some conclusions that are discussed in this article.

10 examples of One Page Checkout PrestaShop created by our clients following best practices for best results

1.     Tuttii caffe Che Vuoi

It is an Italian website that has a structured design and navigation for every page. For the checkout page, the website is using the One Page Checkout PrestaShop module with additional customized settings. Social login, single-column layout, simple and clean design of the checkout page reduce bounce rate and cart abandonment rate.

They are offering an In-store pickup facility to their customers. There are several benefits of BOPIS shipping method as it saves money and saves the seller from failed or delayed delivery.

The PrestaShop One Page Checkout by KnowBand is compatible with the PrestaShop Store locator and Pick up module and it has several exciting features that make the process smooth.


2.     Preziosa Di Valentina

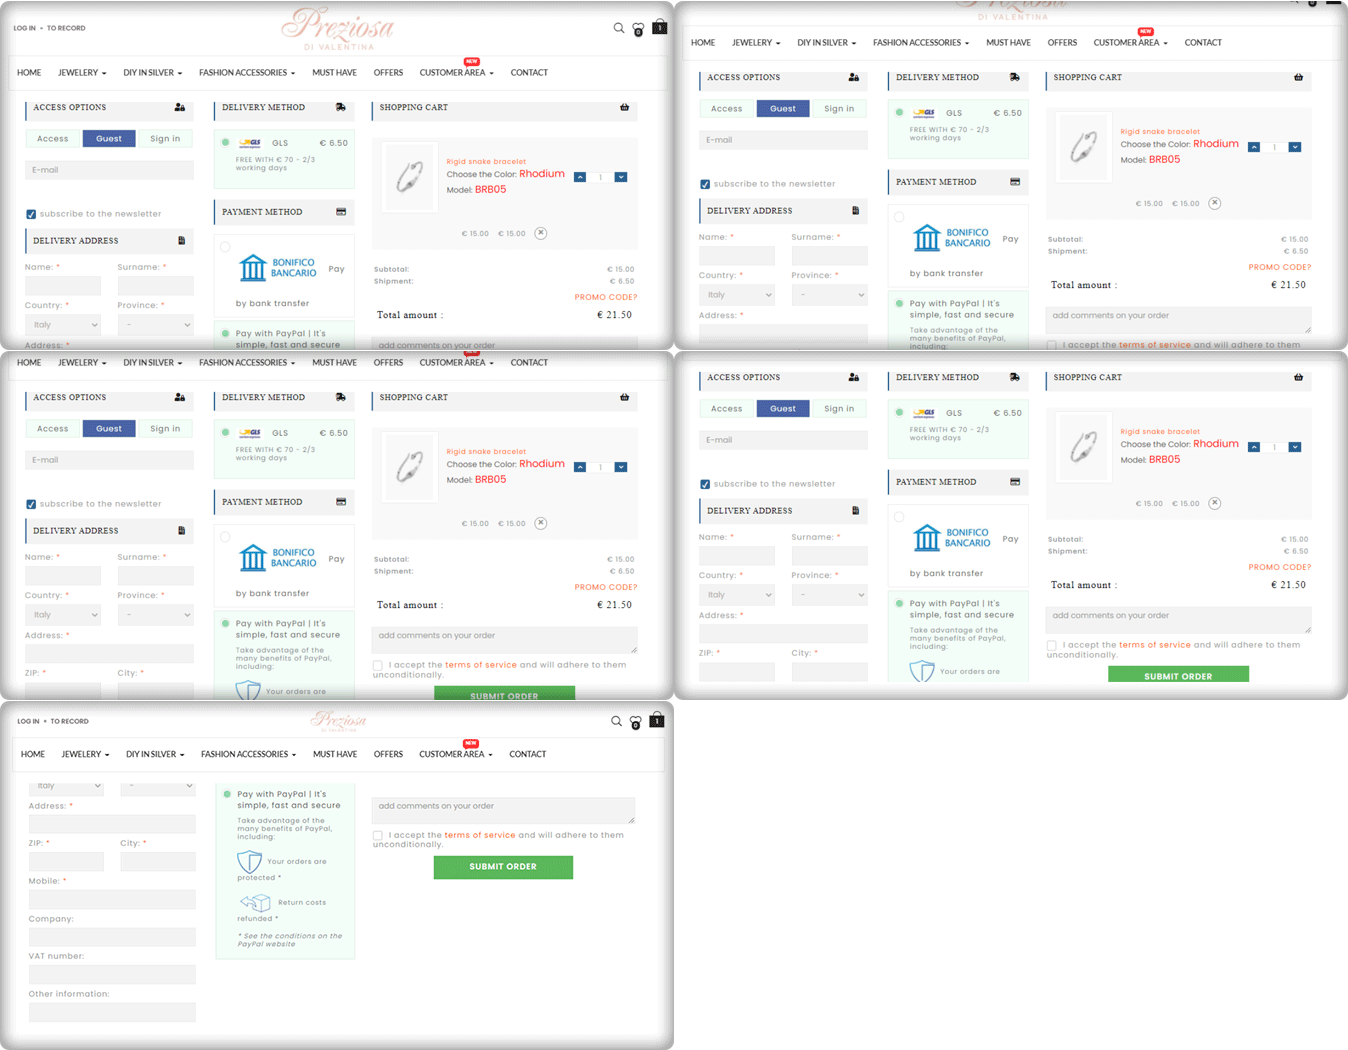
Consumers should never be forced to build an account or register before completing a transaction. Customers are inconvenienced by the additional step (or steps), which slows them down and causes them to question whether or not they want to proceed. Here comes the Guest Checkout to save you from cart abandonment. Preziosa Di Valentina checkout page has guest checkout options so that customers aren’t slowed down and can continue by simply entering their email addresses.

The delivery method used: GLS

Payment methods used: PayPal, Bank Transfer

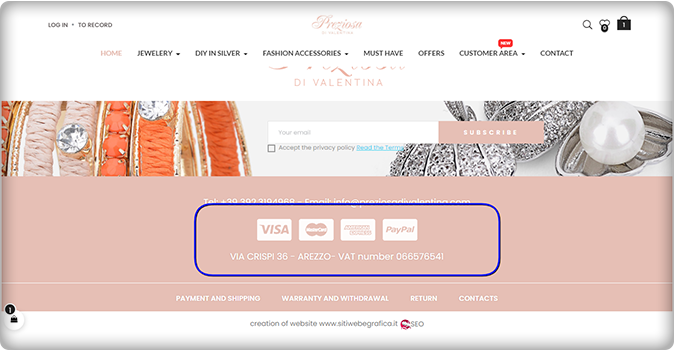
Have a look at the home page of the Preziosa. Displaying available payment methods on the home page of the website could be a great home page design idea! More than one payment gateway is an eCommerce approach that provides convenience to clients.

3.     Toven

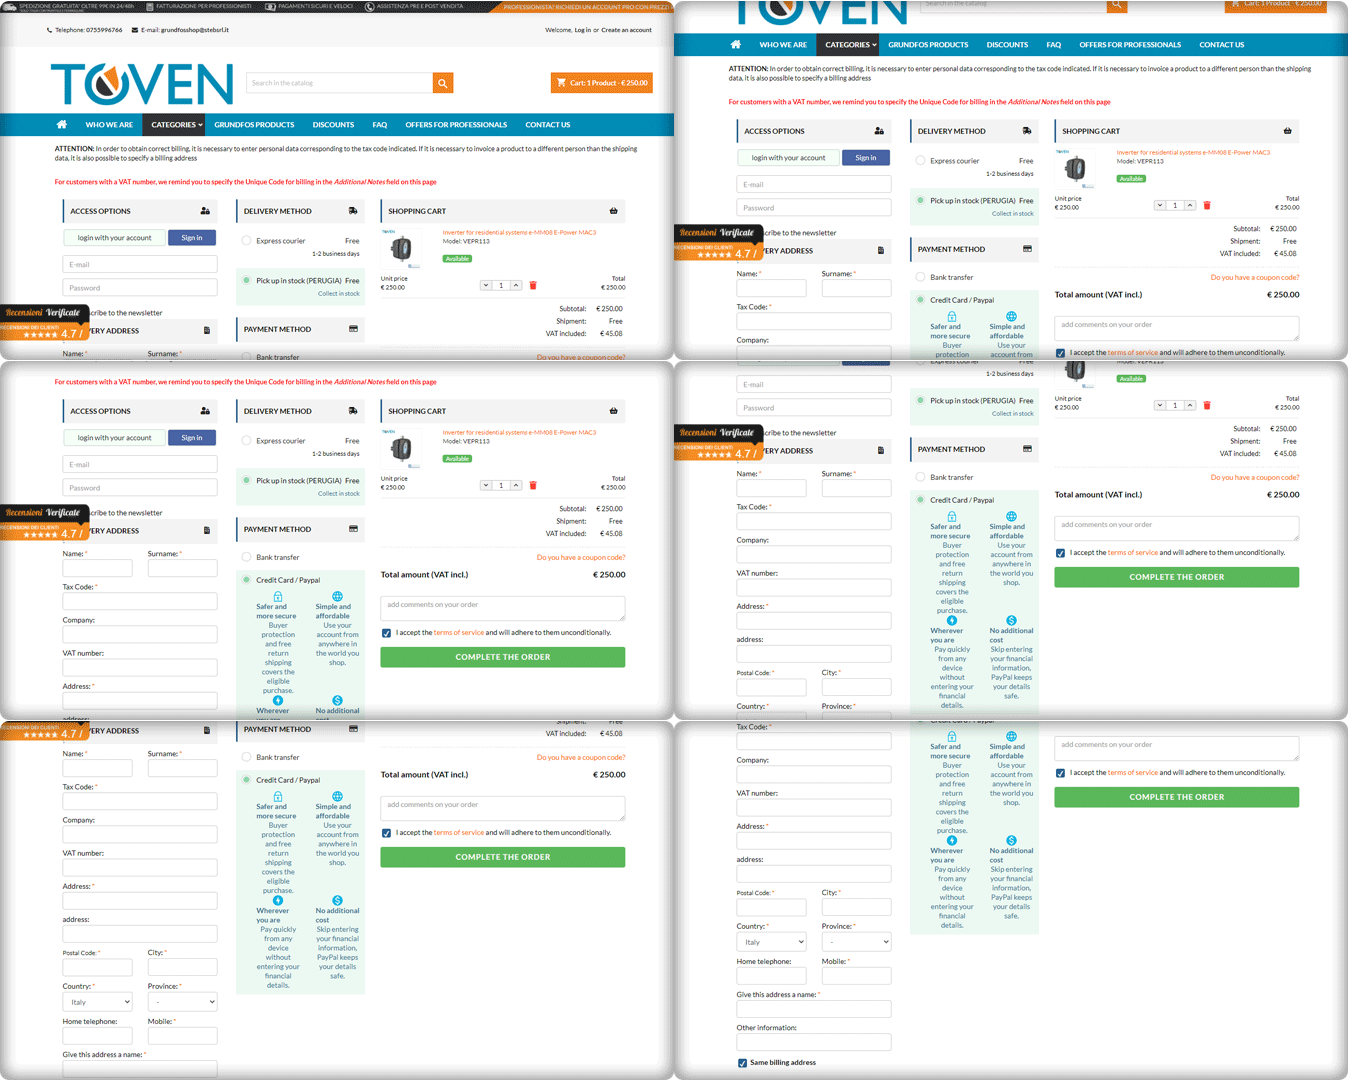
The easier you can make your customers’ checkout process, the more attractive it will be. Always keep in mind that providing an easy, straightforward, and usable process is your primary goal. Continuously improve the process by eliminating unnecessary steps, removing unnecessary form fields, and streamlining it to make it as quick and productive as possible.

Have a look at the Website’s PrestaShop One Page Checkout and its clear CTA. It has a 3-column layout that provides customers with a streamlined user experience.

4.     Kraken

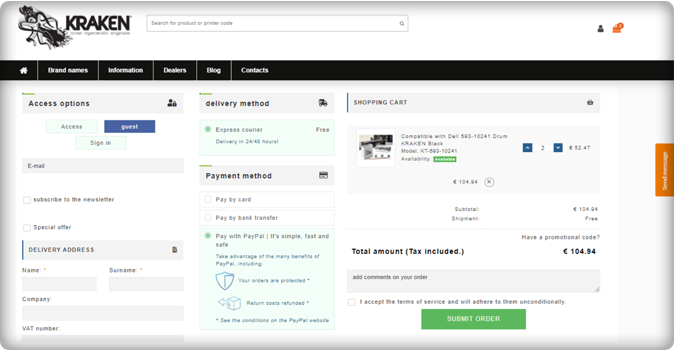
The Italian store Kraken sells premium quality toners. Kraken needed software that enables users to get an exclusive checkout experience and they chose the One Page Checkout PrestaShop plugin to achieve their goal.

The checkout page has a 3-column view that allows Guest Checkout. They have listed express courier delivery options for shipping and payment methods like PayPal, Bank transfer, and credit and debit card options.

Unlike other software where order details are not present on the checkout page, Kraken used half of the page to display the cart information, which is quite appealing gives the user a satisfactory experience.

5.     Zoo Mega Shop

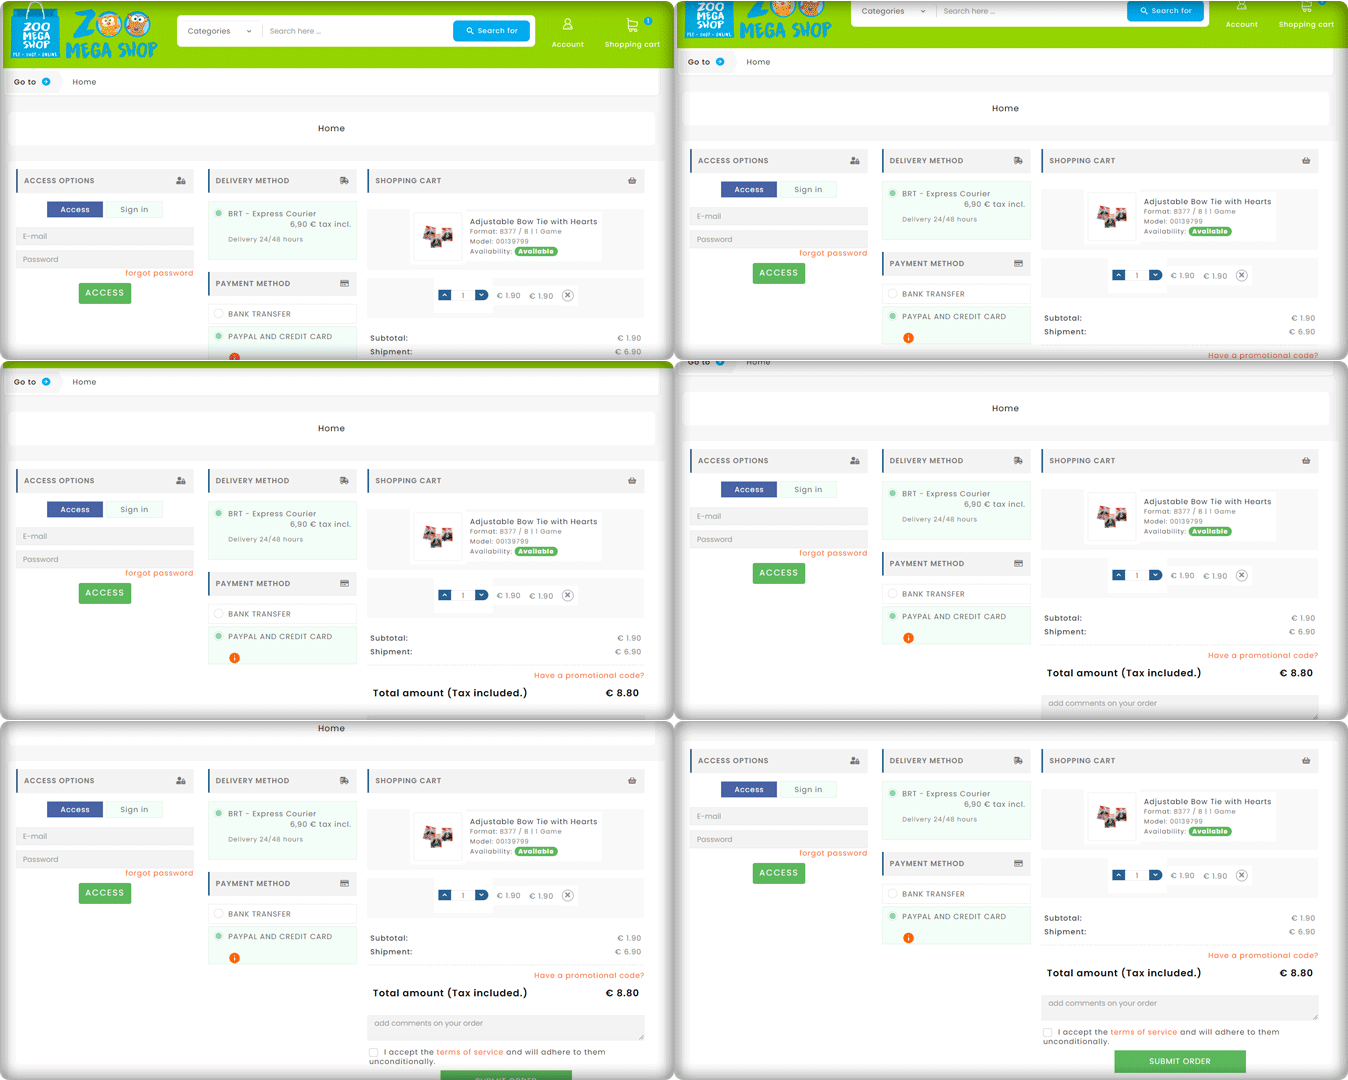
Look at this Checkout page customized by Zoo Mega Store! They used the same module (One Page Checkout PrseatShop 1.6v) with a super clean layout.

Customers can update the product quantity from their checkout page without switching any tab. Isn’t this handy!

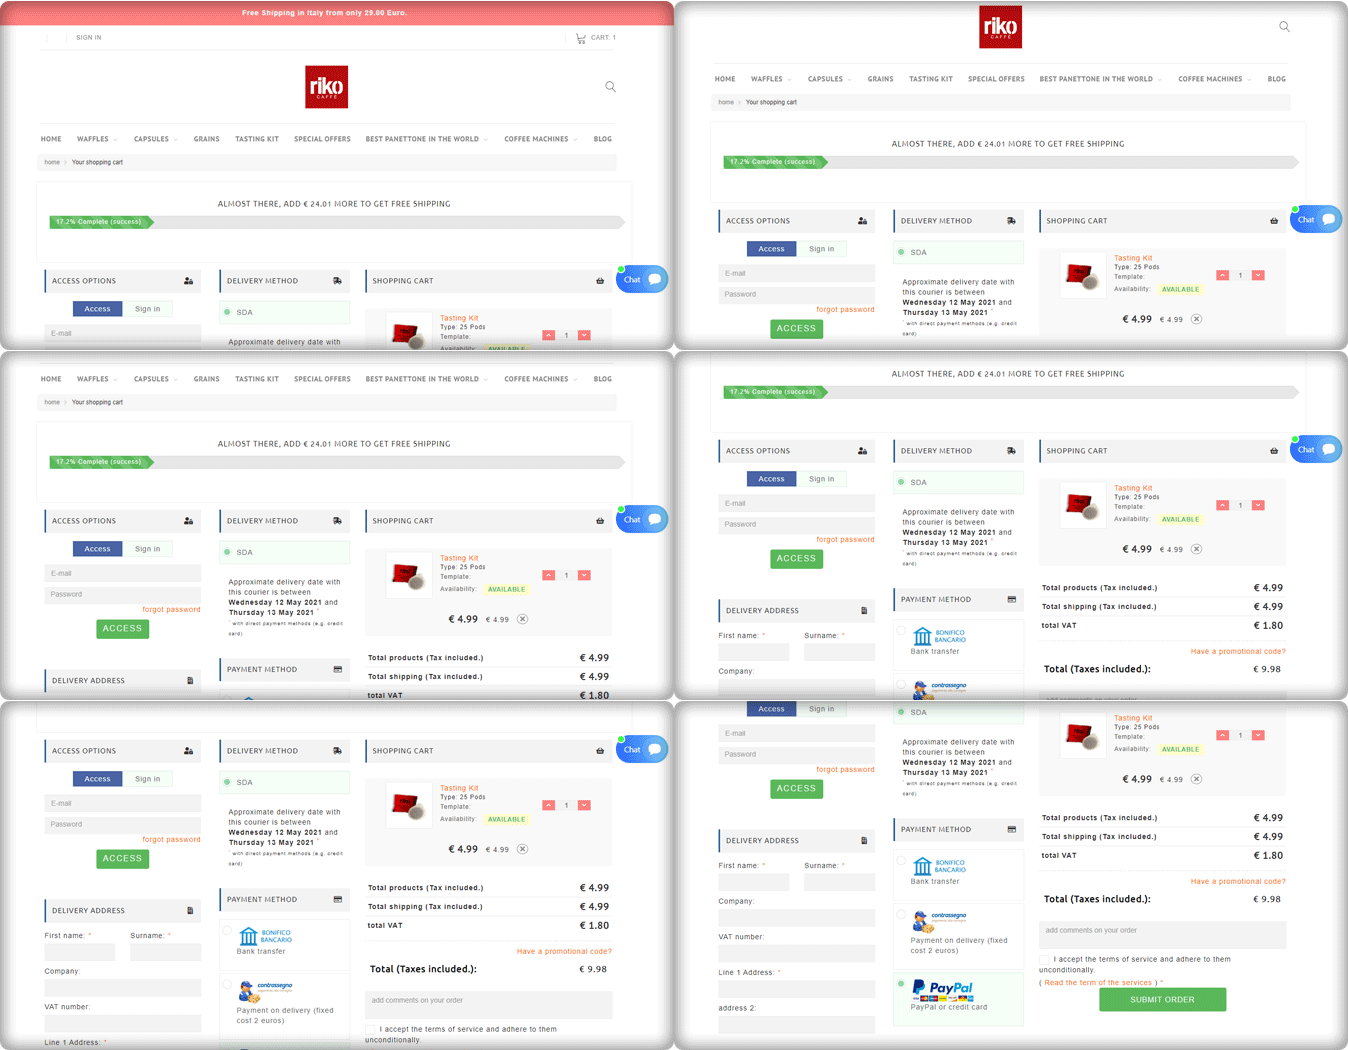
6.     Riko café

A progress indicator shows you where you are in the checkout phase while still outlining all of the steps. This allows consumers to see where they are in the process, how many steps are left, and how long the process will take in general.

Riko Café is using the progress bar feature of the One Page Checkout PrestaShop module. To provide a much richer user experience, progress bars show users how close they are to completing a collection of… details or performing activities.

They have shown the delivery method along with the details of the expected delivery date. Popular payment methods used in Italy like PayPal, Bank transfer are listed in the Payment section. They are allowing Cash on delivery as well.

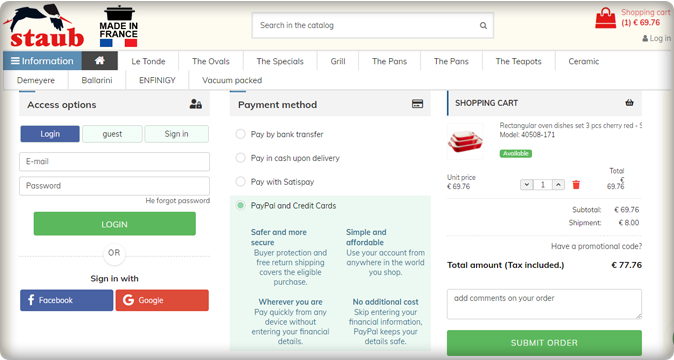
7.     Staub: Made in France

We have a number of things to remember in our everyday life and adding another password to this is something we are least interested in.  Save your customers from this misery with the Social login option.

Social login promotes easy and quick registration with an increased number of signups. Staub store is using Social login on their PrestaShop checkout page and providing comfort to their customers.

The collected email addresses and social media information of the customers can be further used in target marketing.

Italy’s popular payment methods listed in the Staub store are Bank transfer, PayPal, Credit card options, Pay with Satispay, and COD.

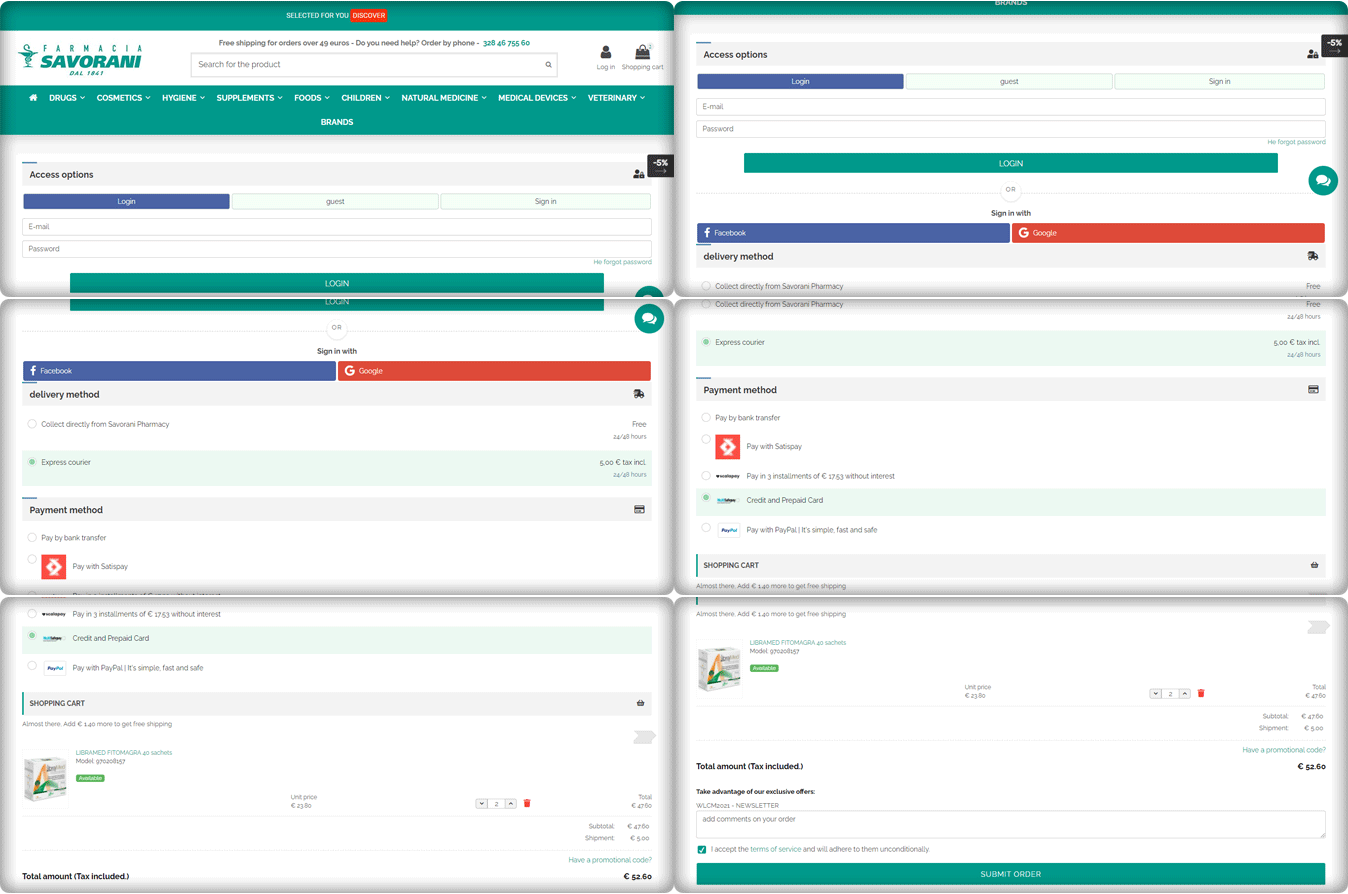
8.     Farmacia Savorani

Farmacia Savorani’s checkout page has a simple, clean design that is easy to use. Their checkout follows several best practices. With many templates to choose from, the One Page Checkout PrestaShop layout can easily be customized for the use you need.

This checkout page design has a single-column checkout page. Every part of the process looks structured and clean. They have guest checkout, social login option with Facebook and Google+, several payments and delivery methods used widely in Italy.

The cart products can be seen and updated with ease. Also, customers can add a custom message to the order.

They are providing buy online and pick up in-store options to their customers. This is something that can work magic if you are using the right plugin like KnowBand’s PrestaShop store locater and pickup. Another shipping method is Express courier.

The One Page checkout PrestaShop module by Knowband is compatible with Store locater and pickup addon.

Payment gateways used by Farmacia Savorani are PayPal, Satispay, bank transfer, credit and debit card options, and EMI options.

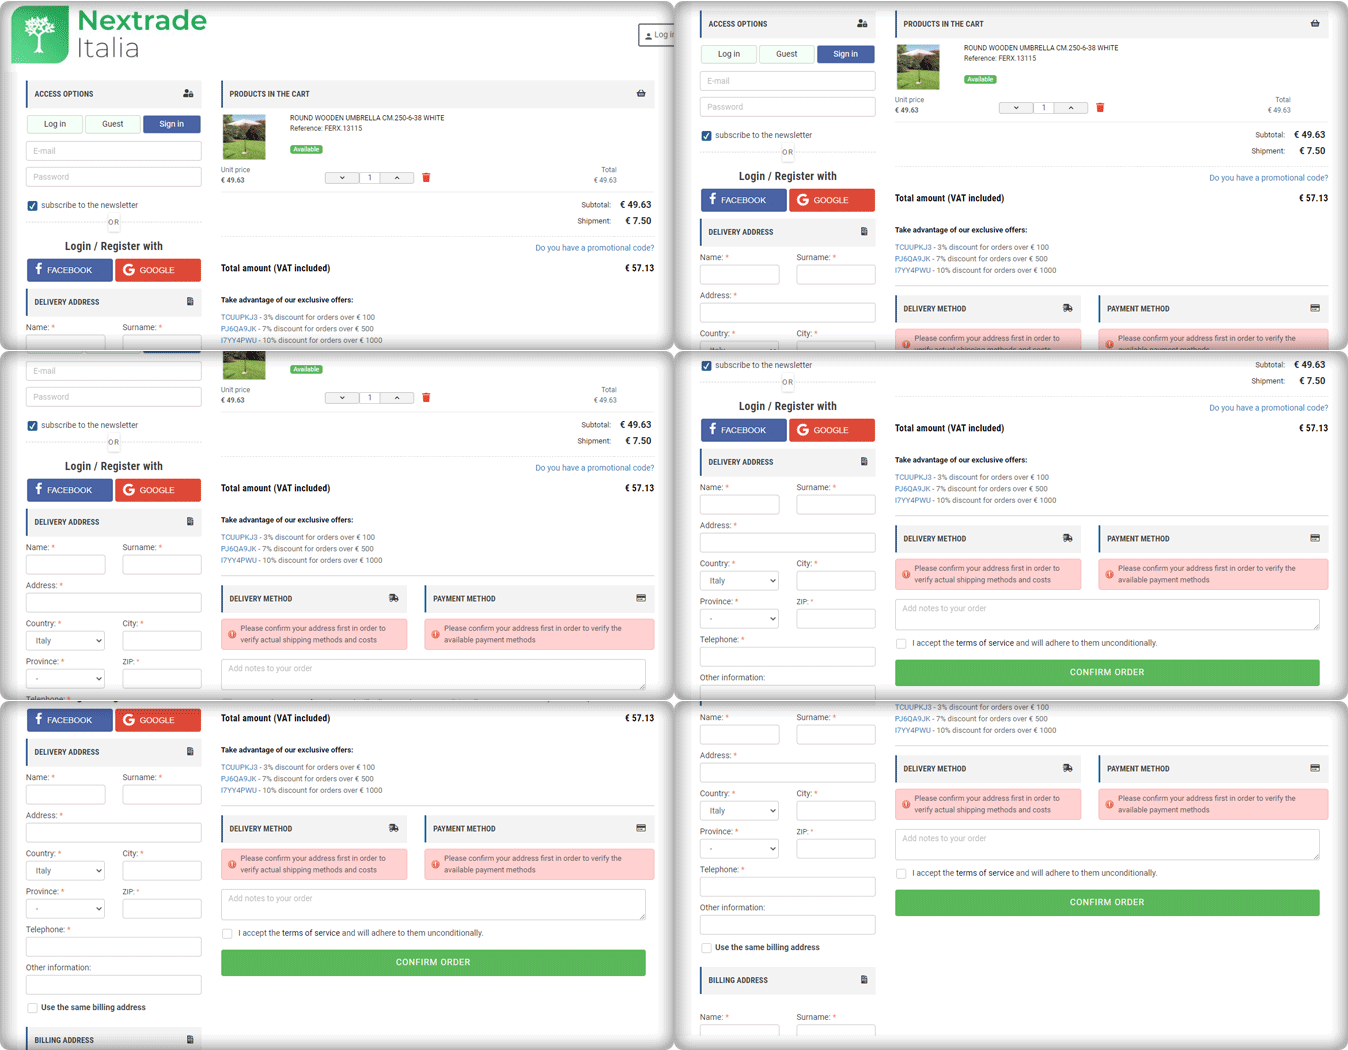
9.     Nextrace Italia

The One Page Checkout PrseatShop module allows the seller to display the delivery methods and payment methods only after they provide their address details. The seller can show specific payment methods for specified shipping methods.

Nextrace Italia is using this feature on their PrestaShop website’s checkout page.

10.           Un mondo di mobile

Un Mondo Di Mobile’s website’s checkout page is another best example of a clean and sleek checkout design. This is again created using the One Page Checkout PrestaShop plugin. All the necessary features are used on this page and are fully customized.

With PrestaShop One Page Checkout addon, users can add security badges in the payment section as it builds customer trust.

Conclusions are drawn from the above data for famous Payment gateways and Shipping methods in Italy

We can deduce from the above-mentioned Italian store checkout page details that there are a few commonly used and suitable payment methods.

  1. Every store has a PayPal option listed as their payment gateway.
  2. Along with that, they are accepting payments through Satispay, credit card, debit card, bank transfer, and scalepay.
  3. Some of the stores accepting installments for the orders with ScalePay.
  4. One Page Checkout PrestaShop plugin is compatible with PayPal, Satispay, and other common payment gateways like the card and bank transfer.
  5. For shipping or delivery methods, Italian stores are using GLS Express courier Italy, BRT express delivery Italy, SDA Express Courier Italy, etc.
  6. Out of 10 stores, three are offering an In-store pick-up option. Looks like it is gaining popularity!
  7. One Page Checkout PrseatShop module is compatible with all the famous shipping methods like GLS Express courier, BRT express delivery, SDA Express Courier, etc.

Final thought:

You shouldn’t have to choose between offering high-quality security and fraud prevention and optimizing for the best customer experience. KnowBand’s PrestaShop One Page Checkout 1.6v and 1.7v module is designed with best practices in mind, providing customers with a frictionless user experience, lightning-fast processing, and unrivaled security.

The module facilitates multi-lingual compatibility that allows you to use it in any region of the world. It is compatible with all the other PrestaShop modules like Social Loginizer, Store Locator, etc. developed by KnowBand.  The One Page checkout extension is also available for major eCommerce platforms like Magento, Magento 2, OpenCart,  etc.

For any eCommerce development services or module, requirements visit Knowband store or drop an email at support@knowband.com to discuss.

Maroth Jewels- a WooCommerce Android and iOS App created by KnowBand │ Success Story

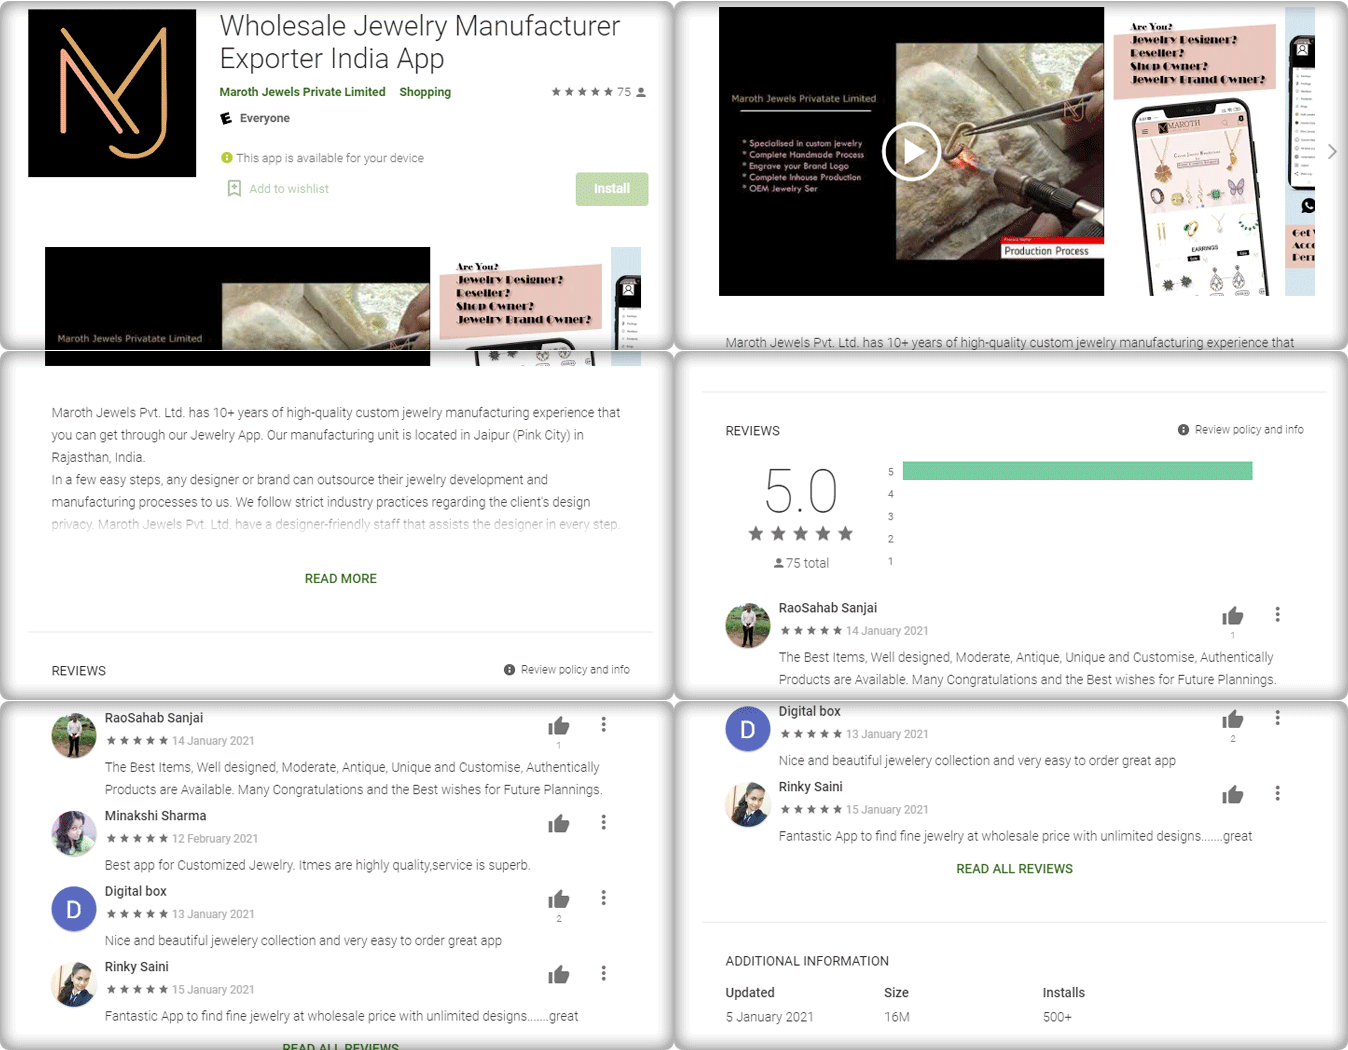
Maroth Jewels is a wholesale jewelry manufacturer and exporter in Jaipur, India. With the increased mobile users, every business is making their website mobile responsive. Nothing is better than a Robust Application. Maroth Jewels have created their mobile app for Android and iOS using the WooCommerce Mobile App builder plugin developed by KnowBand.

A great mobile app gives customers something they can’t get from a desktop or mobile website. An app can improve loyalty by providing a customer with an immediate portable solution that provides quick knowledge and easy access to goods. Consumers and brands will benefit greatly from a well-designed app that is part of a larger integrated multichannel retail strategy.

The Maroth Jewels WooCommerce Mobile app has 500+ play store downloads with 70+ excellent reviews and 5-star ratings. The app can be downloaded quickly from the play store.

Let us explore the Maroth Jewels WooCommerce Mobile App and its features:

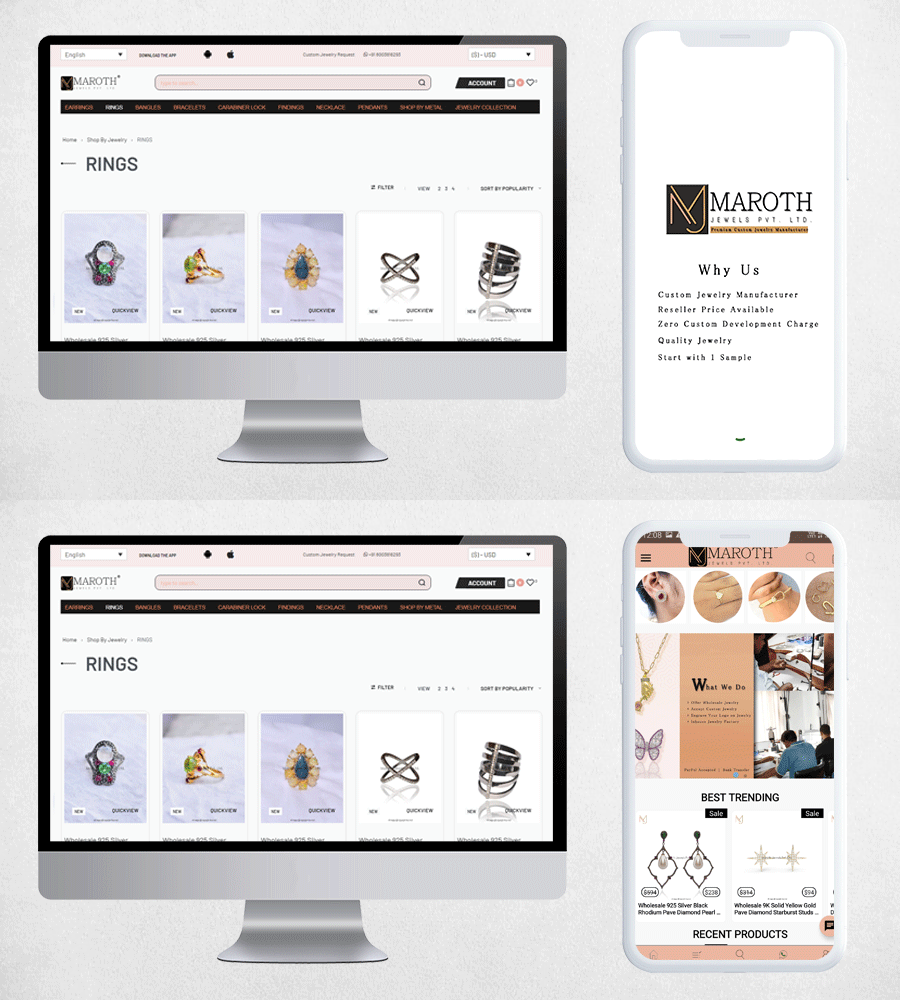
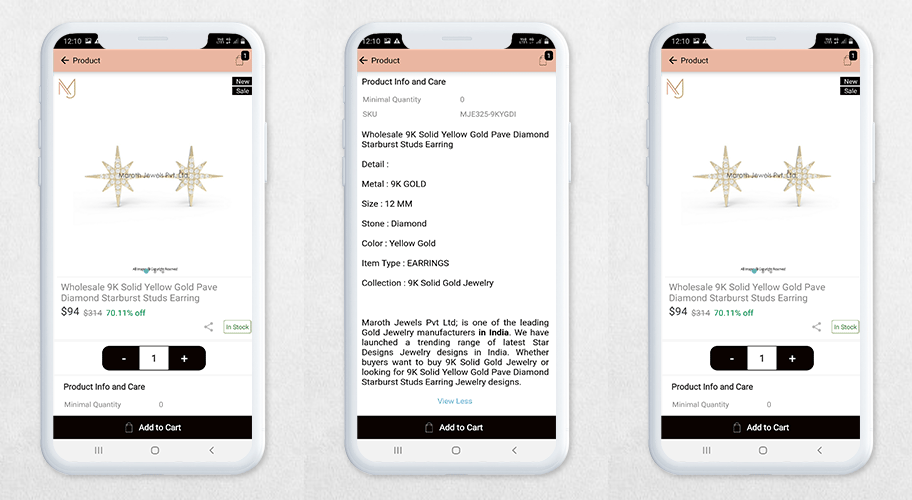
Customers can shop the entire Jewelry range quickly with the Maroth Jewels WooCommerce mobile app, which is a simpler alternative to the department store’s desktop and mobile pages.

The WooCommerce mobile app for Maroth Jewelry allows users to browse the entire product catalog and make purchases while on the go.

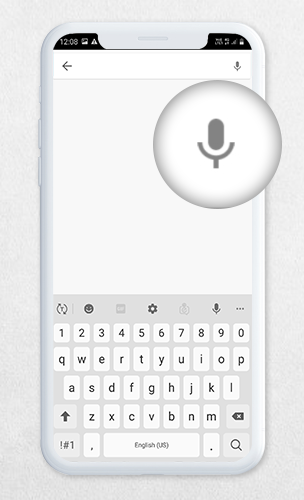
The app enables the use of voice search while shopping in-store to check for sizes and prices as well as read other customer’s reviews of the item.

Live WhatsApp chat support enables users to get their issues solved immediately. This increases customer trust and loyalty.

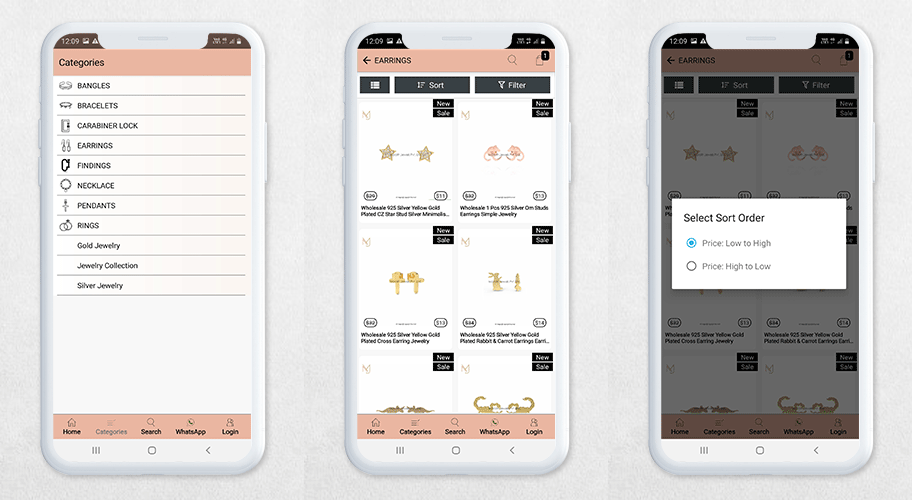
While shopping on the WooCommerce Android App, the customer can see the categories and choose what they want to buy.

A great product description can help users convert as it increases transparency and building trust in your brand. Every product has a great and tailored product description.

Read: 10 Majestic Examples of WooCommerce Android and iOS Mobile App by KnowBand

On the shopping bag, a customer can apply their vouchers and coupon codes to avail of the discount. This app is custom-made and has all the necessary features.

Easy login and Signup Process:

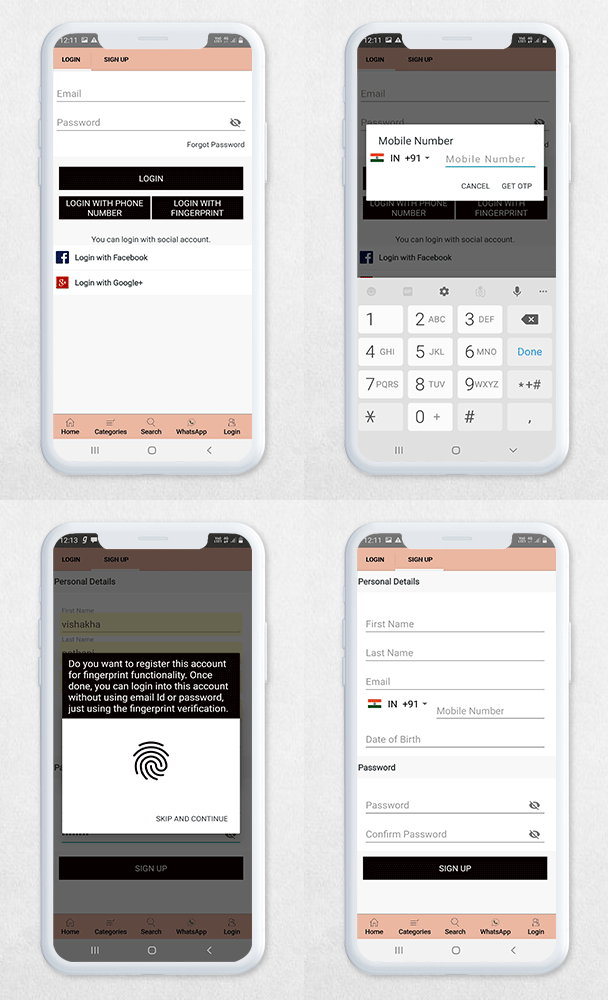
There are various options to login to the Maroth Jewels WooCommerce mobile app:

A simple sign-up form that requires basic details like name, email address, and password.

A customer can log in with the following methods:

  1. Email address and password
  2. Login via OTP with registered mobile number
  3. Login with fingerprint
  4. Social Login using Facebook or Google+

Quick checkout process:

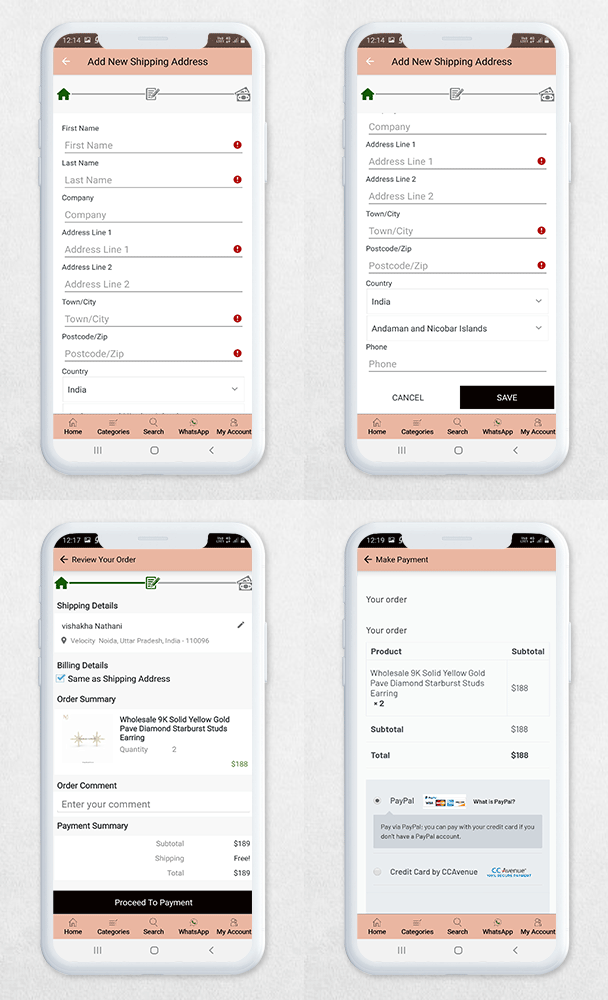
The Maroth Jewels WooCommerce mobile app (Android and iOS) allows quick checkout as displayed in the below image. A user has to fill in the delivery address and make the payments.

Your purchase is completed!!

It’s time to wear your jewels and shine bright!

Conclusion:

The best apps are part of a comprehensive marketing and operations strategy. So, when developing an app for your company, it’s critical to make sure it’s compatible with other domains of the company. Knowband helps businesses to create a robust app for various eCommerce platforms and has thousands of clients worldwide.

We have a mobile app portfolio where you will find all the successful applications developed by KnowBand.

The WooCommerce Mobile App Builder plugin can help you convert your website into a mobile app and our experts will help you in this entire process. Mobile App Builder plugin is also available for OpenCart, PrestaShop, Magento, and Magento 2.

Android and iOs Mobile App Success Stories that inspires: