This tutorial discusses how you can upgrade Magento community version to upper/latest version. There are number of new features in upper/latest version which can help you out in your management system.
Upgrade Magento tutorial will tell you to upgrade without loosing any data.
Prerequisites
It is highly recommended to install Magento on VPS with at least 2GB of RAM, if you have less then 2GB of RAM, we recommend you to create a swap file.
Step 1: Pre-Upgrade Magento Tasks
Complete the tasks discussed in the following sections in the order shown:
Enabling Exception Logging
Disabling cron jobs (EE 1.13.0.2 or later)
Flushing the Cache
Backing Up the Database
Archiving Customizations and Extensions
Restoring Configuration Settings
Enabling Exception Logging
Before you start upgrading, we recommend to enable exception logging. With exception logging enabled, it will be easier to diagnose errors during upgrade. After up-gradation you can disable the same.
To enable exception logging, you need to follow these steps-
Log in to the Admin Panel as an administrator.
Click System > Configuration.
In the ADVANCED group, click Developer.
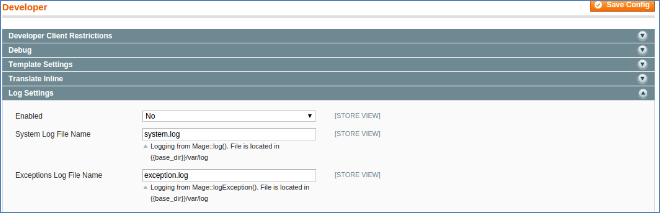
In the right pane, click Log Settings to expand it.
The following figure shows an example.
From the Enabled list, click Yes.
Optionally change the names of the log files.
Click Save Config button(right top).
Disabling cron jobs (EE 1.13.0.2 or later)
Disable all running cron jobs,
Enter the following commands in terminal
Ubuntu:
CentOS:
Flushing the Cache
Clear the Magento Cache with following steps-
Log in to your admin panel.
System > Cache Management
Click Flush Magento Cache.
Backing Up the Database
You need to back up your database, you can use mysqldump or any other tool.
Mysql dump command are are as follows
Archiving Customizations and Extensions
You can archive all your customized themes and extensions
Archive the Magento media and all sub-directories.
Archive any custom themes in the following directories:
Archive any customizations or extensions in the following directories:
Transfer the archives you just created to the development environment.
Copy [your Magento install directory]/app/etc/local.xml to your development environment.
Restoring Configuration Settings
After you have exported the magento database and extensions, you can roll back all the configuration settings which you changed earlier.
Step 2: Replace setup files
You need to replace all the current version setup files with latest version setup files.
Download latest version setup (.zip)file, extract all the files and replace them with current magento setup files in root directory.
We recommend you not run back-end or front-end while the files are copying.
Run back-end and front-end after completion of copying of files, magento will automatically update the system.
A Marketplace site is all that every eCommerce business owner is wishing to have by his side. Marketplace model of eCommerce has a name for providing loads of opportunities and choices to everyone who is involved in it. From Website Owner, Marketplace Seller to Marketplace customers, everyone gets something enlarged as compared to an inventory model of eCommerce.
Having a marketplace website is not a big task, having a successful marketplace is. You cannot just develop a marketplace site without considering some situations that need to be fulfilled. Here, I am enlisting some questions and factors that you should consider before starting a Magento Marketplace. In fact, you must consider this situation in almost all the eCommerce platforms.
Magento was originally developed as an inventory based eCommerce site
A marketplace site comes out as providing a burden-free experience in most of the cases for a marketplace owner. He/she does not need to worry about maintaining an inventory of products, shipping the products to the customers, etc. Everything seems to be so perfect. However, shifting from an inventory model to a Magento marketplace would not be an easy task.
Magento eCommerce platform has been originally designed to serve as an inventory based eCommerce site. So, it is required to extend its original functionalities by developing a Magento Marketplace extension that delivers the functionalities required by a marketplace site. So, when you are thinking of getting a Magento Marketplace extension, you should essentially look into these factors. You should look if your Magento Marketplace extension is able to handle the below core functionalities of a marketplace:
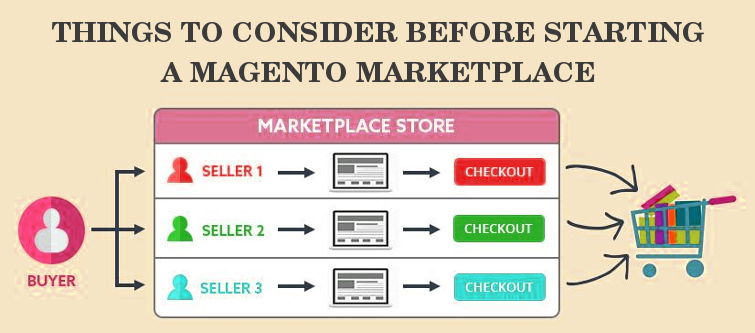
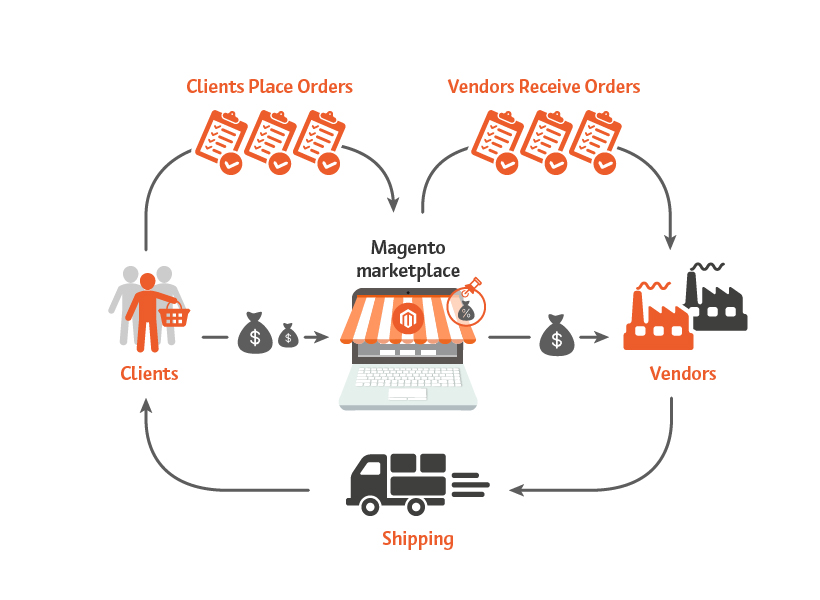
A basic Magento marketplace organization will look like this.
Magento Marketplace – Seller registration
Sellers are the most important part of any marketplace site. Without sellers, it is just a regular eCommerce site. So, in your Magento marketplace extension, you should essentially look if it can manage the seller registrations. Look for the following features for managing seller registrations:
Sellers should be able to register a separate seller account.
There should be an option for Marketplace admin to approve/disapprove a seller account request.
Sellers should be able to upload products only in allowed categories
Approved sellers should be able to access a seller panel from where they can:
Update their shop profile and seller details
Input their shop policies
Upload the products is allowed categories
If they wish to sell products from new categories, they should be able to request a new category access from the admin
Receive orders from customers
Manage orders and update the order statuses
Track the report of sales made
Track the amount of commission paid to admin
Communicate with the marketplace admin
Marketplace Admin–Seller management
The marketplace admin is the owner of the website or is a representative of the owner. Admin should have all the ethical accesses that will make sure that everything is going smoothly on his website. A Magento marketplace admin should have the following accesses to manage his website properly:
Admin should be able to approve/disapprove a seller account request.
Admin should be able to view the details of the sellers.
Admin should be able to activate/deactivate a seller anytime he wishes to.
Admin should be able to add a shipping option for the sellers to use.
Admin should be able to approve/disapprove a new category request.
Admin should be able to approve/disapprove a product uploaded by a seller.
Admin should be able to track the sales made by a seller.
Admin should be able to track the commissions earned on different sales made.
A Magento Marketplace from the customers point of view
Customers are the inseparable part of any business activity. Without having a proper scope for customer management, no eCommerce site can even survive for a day. Even a marketplace site needs a proper system to manage the customers. Lucking Magento being a very efficient platform provides inbuilt functionalities to manage the customers. So, you don’t have to worry much about customer management in your Magento Marketplace. However, you should tally that if:
Customers can browse all the approved products from all the sellers.
Customers can see the basic Seller information like Seller or shop name.
Customer can place orders for the products from any seller on the site
Sellers can receive the order placed for their product.
Sellers can check if payment for the order had been made.
Sellers can update an order’s status.
Finally,
These are the basic Marketplace functionalities that you should look in a marketplace extension. Even in your search for a Magento Marketplace extension, these features are equally important to look for.
The PrestaShop Checkout addon also called PrestaShop One Page Checkout is a PrestaShop extension that replaces the conventional multi-page checkout process on your Prestashop store with a single page checkout system.
Having a PrestaShop One Page Checkout is beneficial for your Prestashop store as it helps in improving the conversion rate by optimizing the checkout page and making the checkout process simple and quick.
Check out some live PrestaShop One Page Checkout globally:
This blog listicle will give you a clear idea about the PrestaShop One Page Checkout and how you can customize it for your PrestaShop store.
Online Shoppers have to go through a number of steps when they are on the checkout page. On top of that, they are presented with a registration form in between, which disturbs their flow. To be very honest, a majority of consumers do not like to fill lengthy registration forms or create an account during the checkout, yet a number of e-commerce stores have made it mandatory on their website.
As a result, some consumers choose to abandon their carts and look at other stores that provide a simpler and better checkout facility. PrestaShop One page checkout addon deals with such scenarios and aims to provide a better checkout experience to your store visitors.
Prestashop One Page Checkout works in different ways to curb various loopholes in a checkout process that may be killing your conversions and increasing shopping cart abandonment. Let’s look at how Prestashop One Page Checkout helps in making your checkout process better.
For the consumers who hesitate to create an account on your store or do not like to get registered, you can provide them with the Guest checkout option and encourage them to make a quick purchase.
2. Social login makes the signup quick
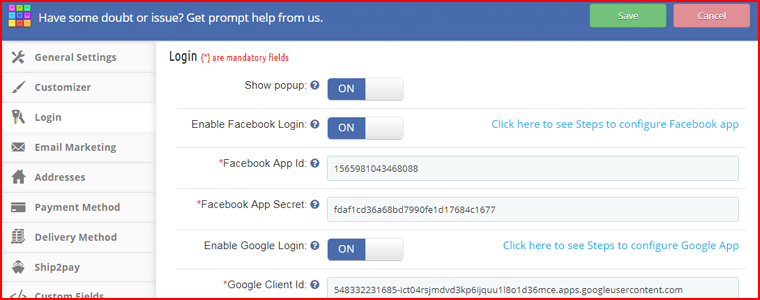
Customers can use their Facebook, Google, or PayPal accounts to sign-up on your store. It saves shoppers’ time from lengthy form filling and makes their way easy for the checkout.
3. Customers can Easily Update Cart Quantity on the checkout page
A user who wants to make changes to the product quantity does not need to go back to the product page. He or she can update it right from the checkout page.
4. Google Auto-address fill reduces extra efforts
Enabling this feature automatically fills the address fields at the checkout page. As soon as a user starts typing his/her address fields, the address suggestions are displayed and upon picking an address, the related address fields are filled automatically.
5. Multiple Payment methods and Shipping services support
The PrestaShop One Page Checkout addon supports almost all the major payment modes and shipping services.
Compatible with Mollie Payment Method: The PrestaShop Checkout allows adding several payment methods. The latest version of the module is fully compatible with the Mollie payment method.
7. MailChimp, SendinBlue, and Klaviyo email Integrator support
Every time an email address is captured, it will be automatically synced to your MailChimp, Klaviyo, or SendinBlue account, provided you have set up the API key from the back-end for the respective platforms.
8. Remove unnecessary fields from the Checkout page
With PrestaShop One Page Checkout, you can choose which checkout fields you want to display on the checkout page. From all the checkout fields, you can specify which fields to show and which fields to hide. Besides, you can also mark fields as mandatory or optional.
9. Arrange Checkout fields through Drag and Drop functionality
Prestashop One Page Checkout module lets you organize checkout fields as per your preference. For example, if you want to place a field above any other field, you can simply do that by picking the field and dropping it to the desired position.
Statistics: Data helps in planning
10. View Abandoned Checkout Statistics [New]
Find out how many abandoned checkouts have taken place in your store, what was the revenue of those abandoned checkouts, and view the checkout conversion rate with the help of PrestaShop One Page Checkout.
11. Examine the user behavior on the Checkout page [New]
Also, explore which checkout fields are hampering the user experience that is leading to checkout abandonment. It displays the percentage for every checkout field. Higher percentage fields mean maximum visitors are facing trouble with those options.
12. Increase average cart value with free shipping tab[New]
The one-page checkout module has a feature that lets you define a minimum amount for displaying the free shipping option. If a visitor is shopping for or above the given amount, he will see a banner that would tell how much more does they need to shop to avail free shipping benefits.
13. Show Product Price With Taxes [New]
With the PrestaShop One Page Checkout addon, the e-merchant gets four options for displaying the total price of the goods. You may choose to display the default PrestaShop price, the price inclusive of tax, the price exclusive of tax, or the price inclusive and exclusive of tax.
14. Display custom fields in invoice [New]
The store owner can also enable the option to display the added custom field in the invoice of the order placed, thanks to a new update in Knowband’s PrestaShop One Page Checkout addon.
15. PrestaShop One Page Checkout is highly compatible with:
Compatible for free products (No payment method will be displayed)
It is compatible with digital/virtual products (No shipping method will be displayed)
Compatible with customizable products and displays entire information on the shopping cart, including all customized details
One Page Checkout supports multi-lingual feature
Works responsively on all the devices like mobile, tablets, desktop
Steps to set up One Page Checkout on your PrestaShop store?
1. Download and install the PrestaShop one-page checkout extension.
2. After installation, enable the extension by going to modules>SuperCheckout>configure.
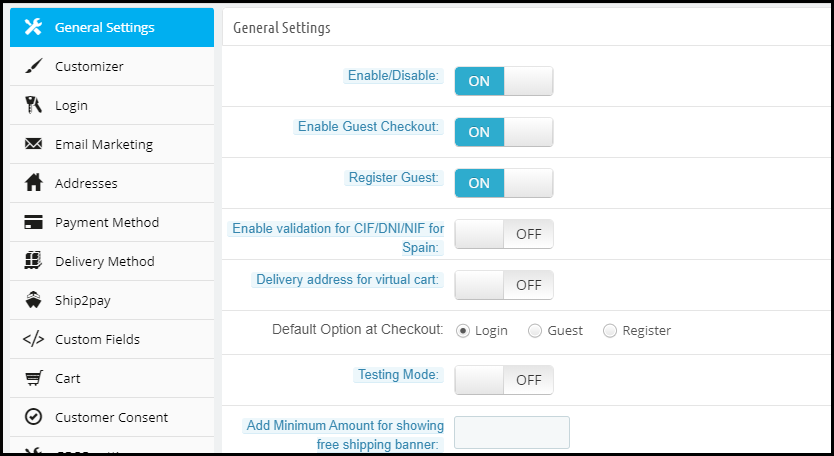
3. After you click configure, the following screen will appear-
The General settings contain the option to enable/disable the one-page checkout module, enable/disable Guest checkout, setting a default checkout option, test mode functionality, CIF/ DNI/ NIF validator for Spain visitors, etc.
Customizer contains the options to adjust the color of the “Place Order” button on the checkout page.
Moreover, the Login tab allows you to add the social login facility to your checkout page.
More features to customize your checkout page on the PrestaShop website
Under Email Marketing settings, you can activate different email marketing tools like MailChimp, SendinBlue, Klaviyo, etc. to collect user information directly in these accounts whenever a user provides his data.
The Addresses tab consists of options like Inline validations, Auto-detect country, Auto address fill. Under the same tab, you can choose which fields you want to keep mandatory for your store visitors and which are optional.
The payment method tab allows you to select the payment modes that you want to provide to consumers.
Similarly, the Delivery method tab lets you choose the shipping services that you want your users to avail.
Ship2Pay provides you with the options to decide which payment modes do you want to provide for a particular shipping service.
Under the Cart tab, you can specify the cart details that you want to display on the checkout page.
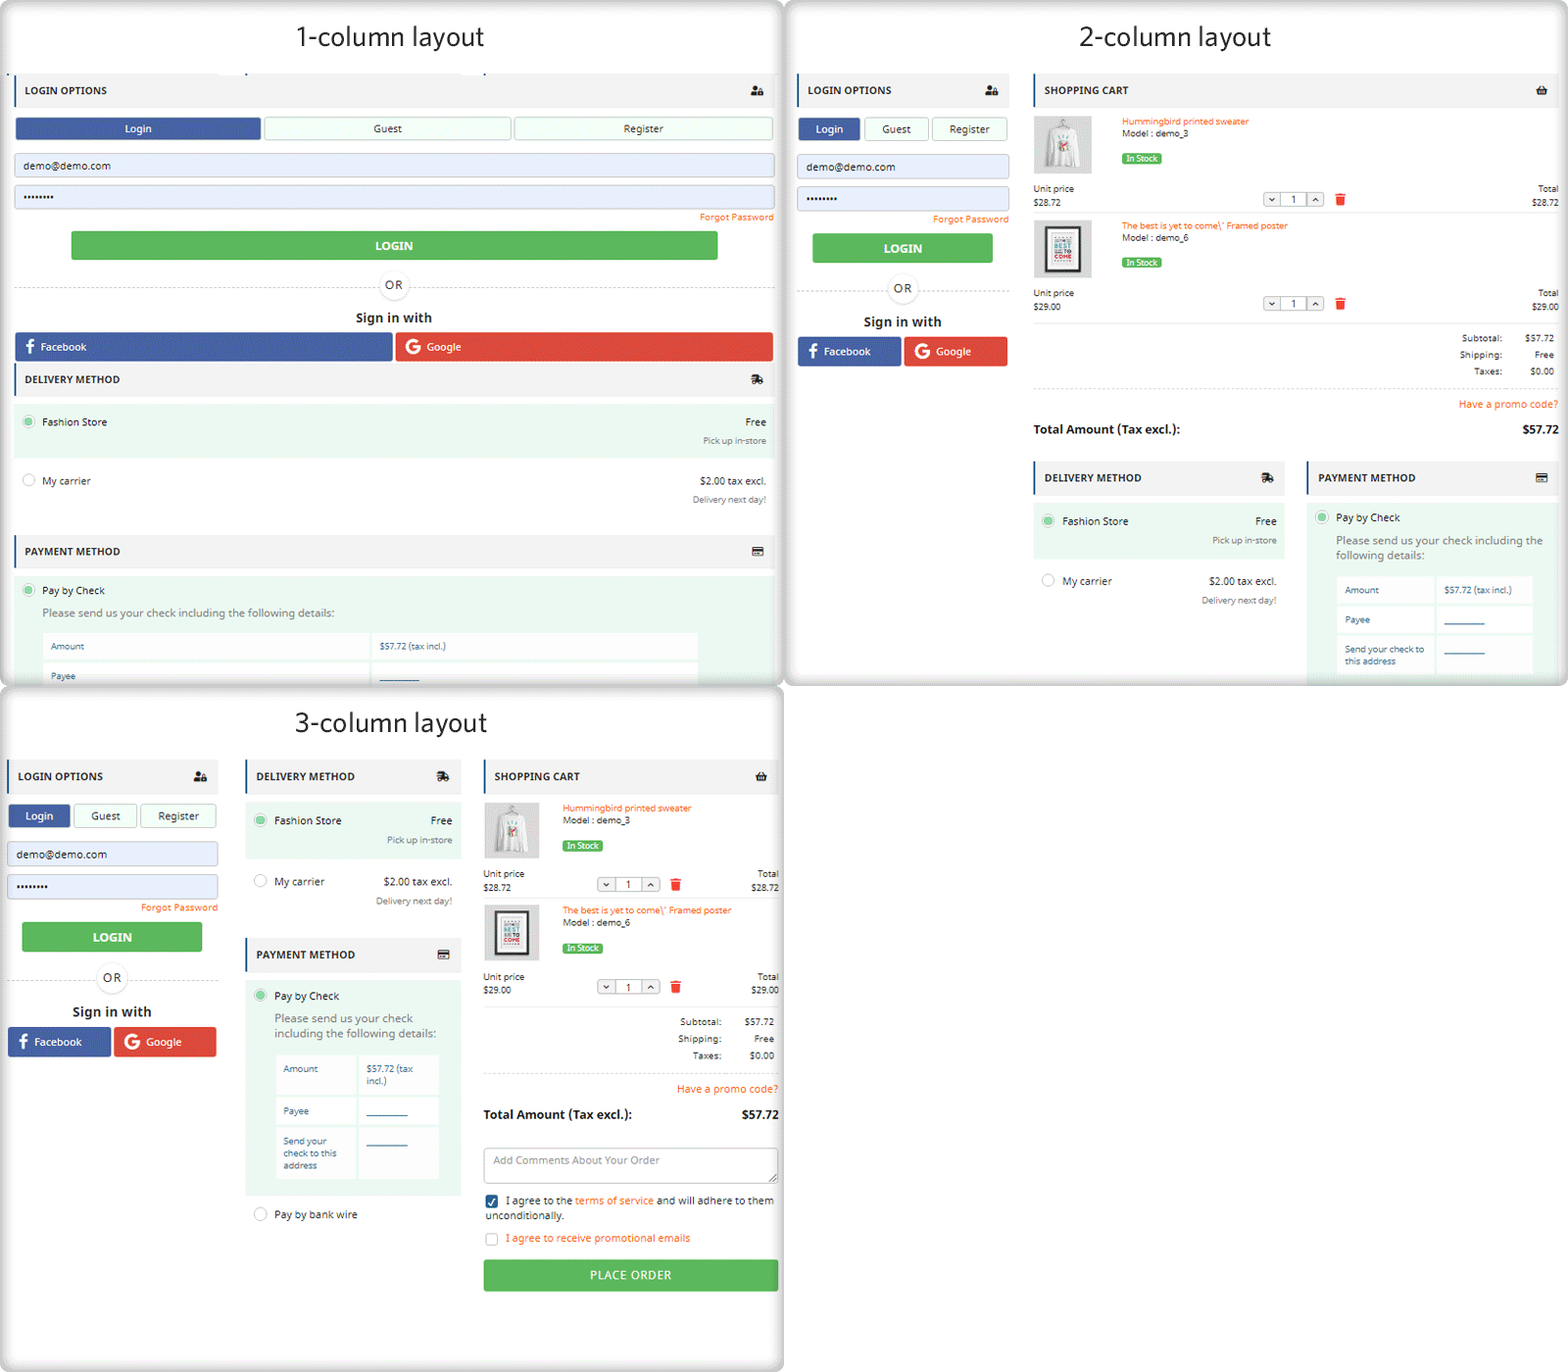
In addition, the Design tab lets you design your checkout page in a single-column layout, 2 column layout, or 3 column layout.
2 new features that have been added to this checkout module are Abandoned Checkout Statistics and Checkout behavior report which have already been explained above.
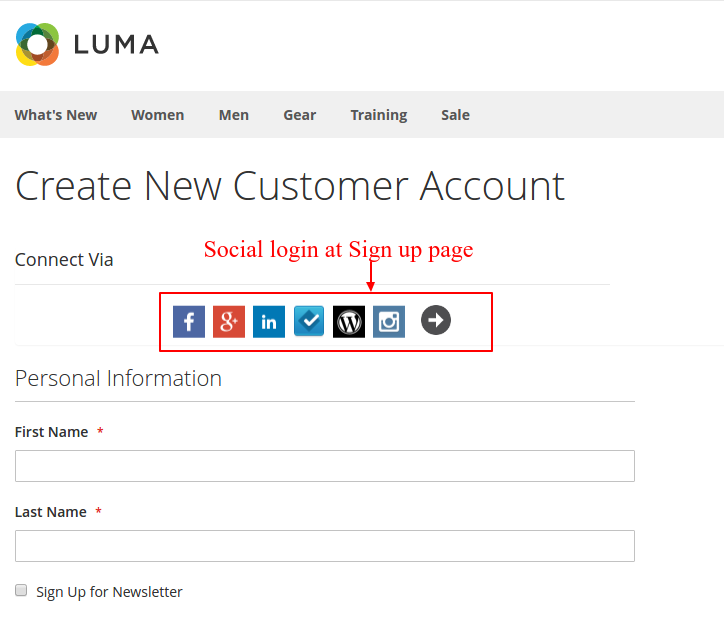
You can easily create a social login option on your Magento 2 website by installing the Knowband- Magento 2 social loginizer extension. This Magento 2 social login extension can integrate 13 different social login options that will be shown on your website’s sign in and sign up pages. Something like this:
How to install and configure the Magento 2 social login extension?
A. Installing Magento 2 Social login extension
First, you need to purchase and download the zip-file of the extension for Magento 2 social loginizer.
After downloading the zip-file, unzip it.
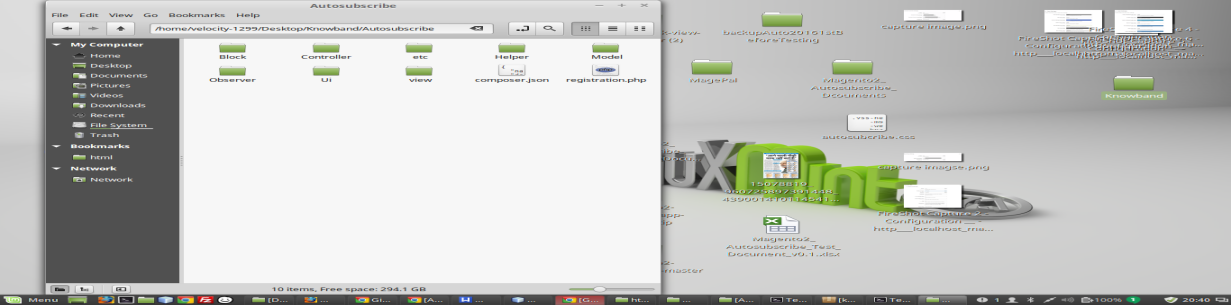
Now, open the extracted directory & you will see following folder structure.
Create a folder in the {Magento root}/app/code/Knowband/Socialloginizer.
Copy the extracted content in the above folder.
B. Enabling the Magento 2 social login extension
After installing the extension, you need to enable it so that you can configure the social login options.
Run the following commands in your terminal to enable Social Loginizer extension
C. Configuring the Magento 2 social login extension
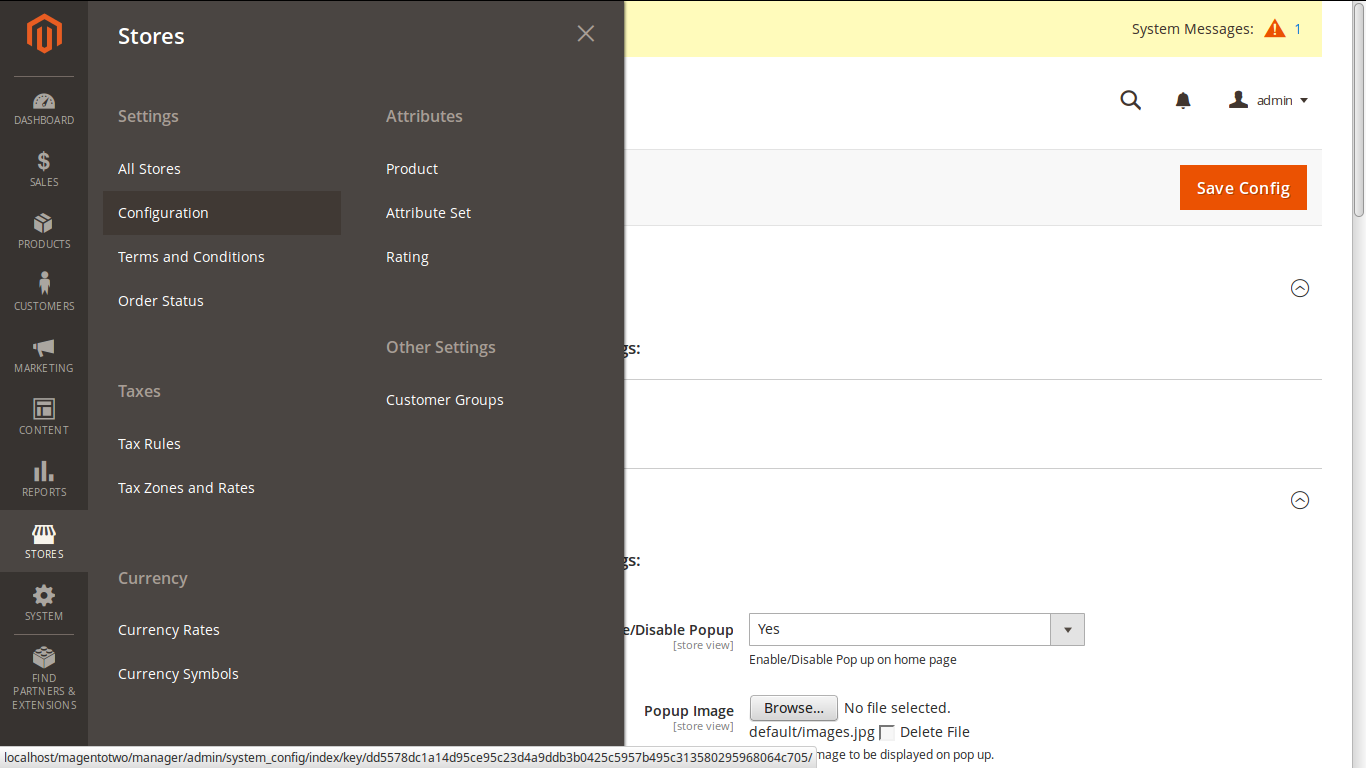
Log into your Magento Admin, then go to Stores -> Configuration -> Knowband -> Social Loginizer and configure the plugin as shown below:
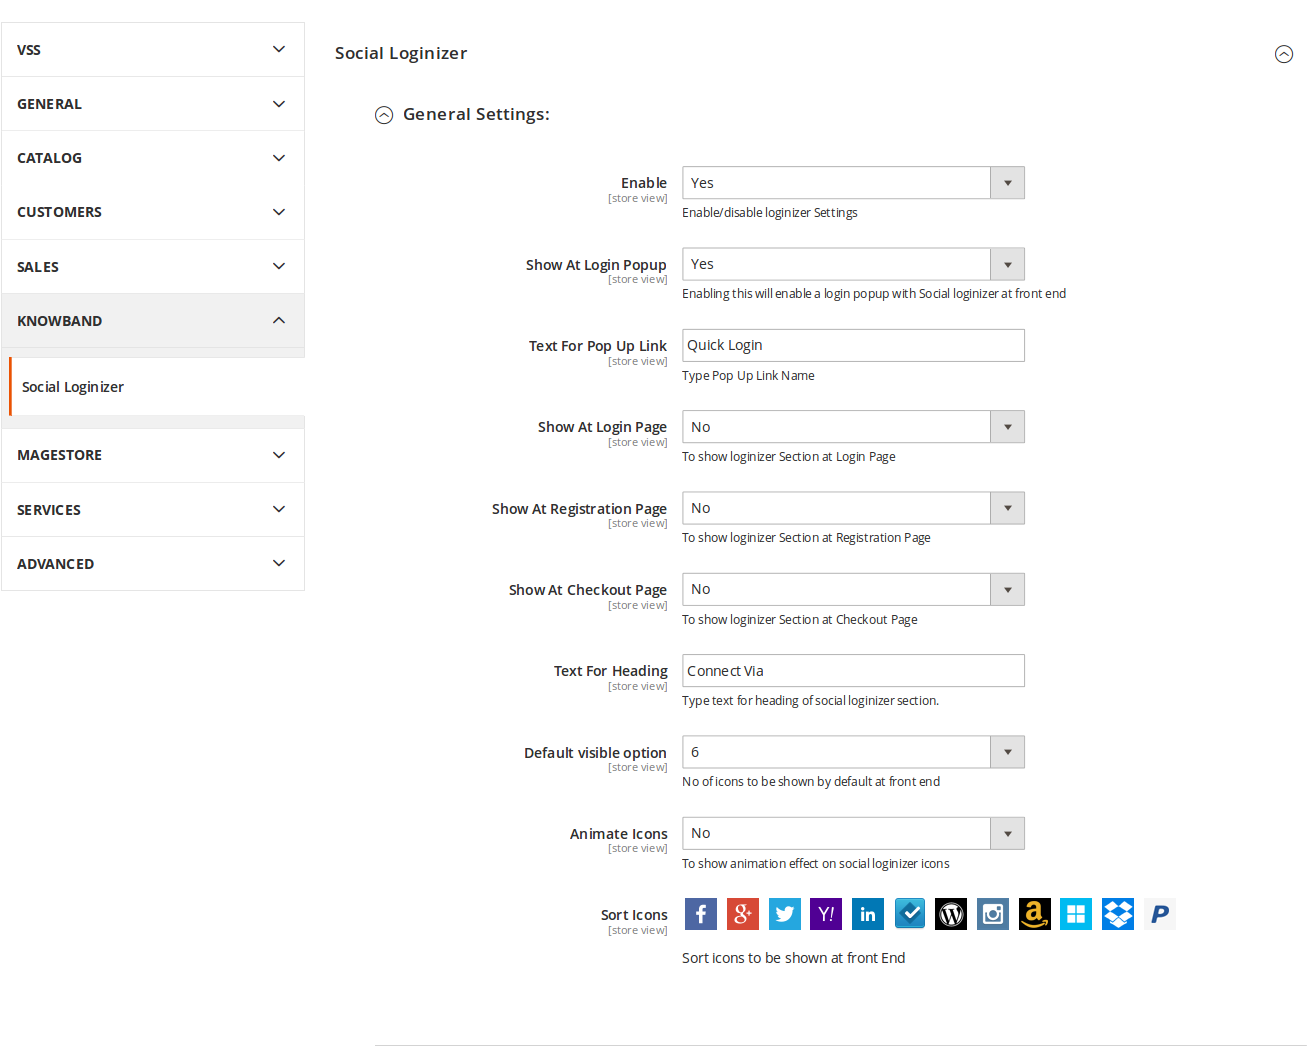
The next interface you will see for the configuration of this Magento 2 social login module. You can perform the general configuration of the module from the General settings tab. The general setting tab consist of the following options and look like this;
Enable: You can enable or disable the extension by choosing Yes/No from the drop down menu.
Show At Login Pop-up: Enabling it will create a link in the login pop-up saved in “Text for popup link”. When you click this link, a pop-up will show up with login and a social login section.
Text for Pop Up Link: This text will appear as link for login pop-up at the header in the front end.
Show At Login Page: Enabling it will show the social login block at the login page.
Show At Registration page: Enabling it will show social login block at account registration page.
Show At Checkout Page: Enabling this option will show social login block at checkout page in Sign-in section.
Text For Heading: This text appears before social login block.
Default Visible Option: This option specifies the number of social login icons that will be shown by default at any social login block of this Magento 2 social login extension.
Animate Icons: Enabling this option will add an animation effect on social login block icons.
D. Configuring a Social login option
There are total 13 social login options that can be configured using this Magento 2 social login extension. Each social login requires some details to be filled in the spaces provided for them in the module configuration. For example, for configuring a Social login using Facebook, you need two important details from your Facebook profile- App id and App Secret key.
Similarly, all the social login options require such details. In this article, I am going to explain how can you get the Facebook App id and Secret key.
Get the Facebook App id and App Secret key-
To get the Facebook app id and App secret key follow these steps
Visit the following URL:
https://developers.facebook.com/apps/
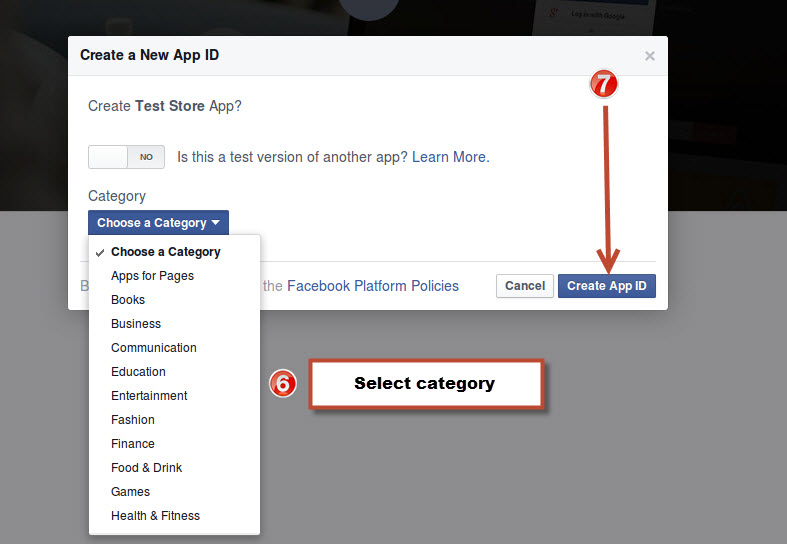
2. In the next interface in my Apps section click on “Add a New App”
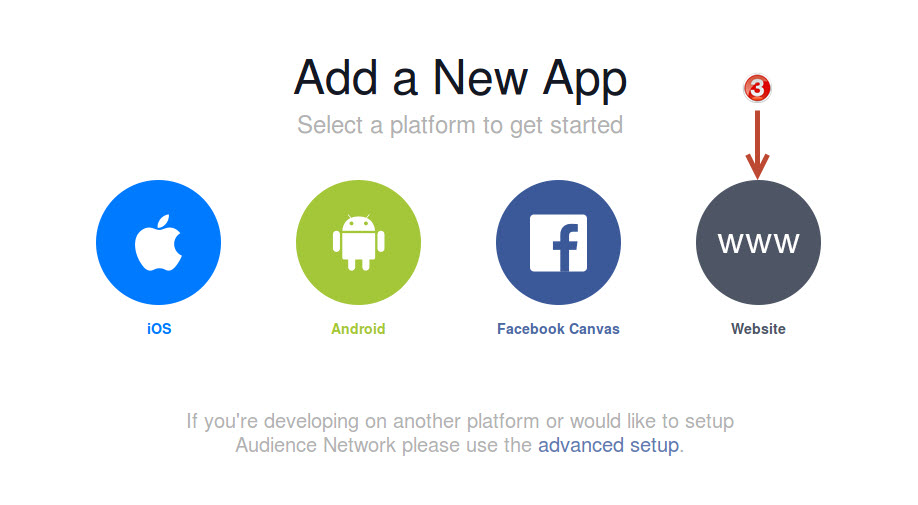
3. Here, you have to Click on “Website” option in the Add a New App interface
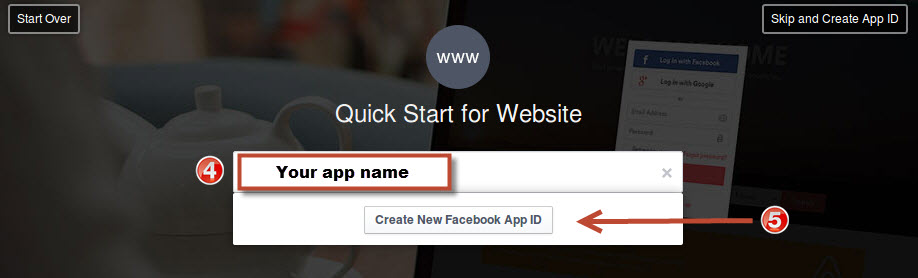
4. Enter the desired app name that you want for your app. eg: Store name social login. Now, click on “Create new Facebook App ID”
5. In Category section, you need to choose a category for your app, and then click on “Create App ID”
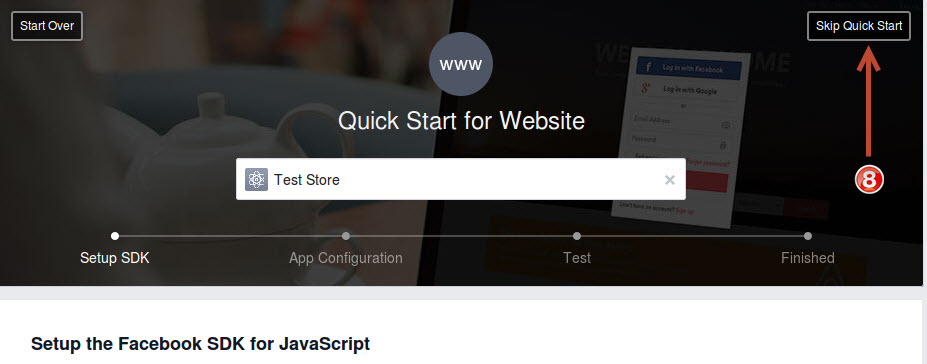
6. Here, Skip Quick Start
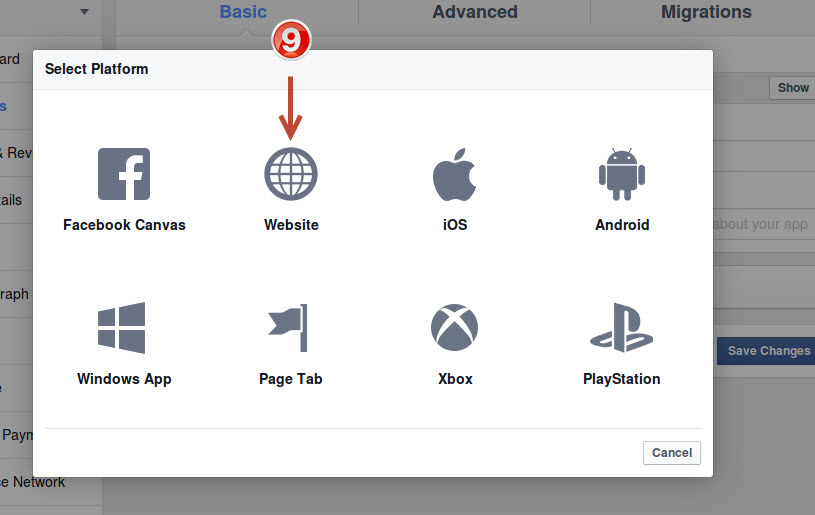
7. In next page, Click on Website link from the pop-up.
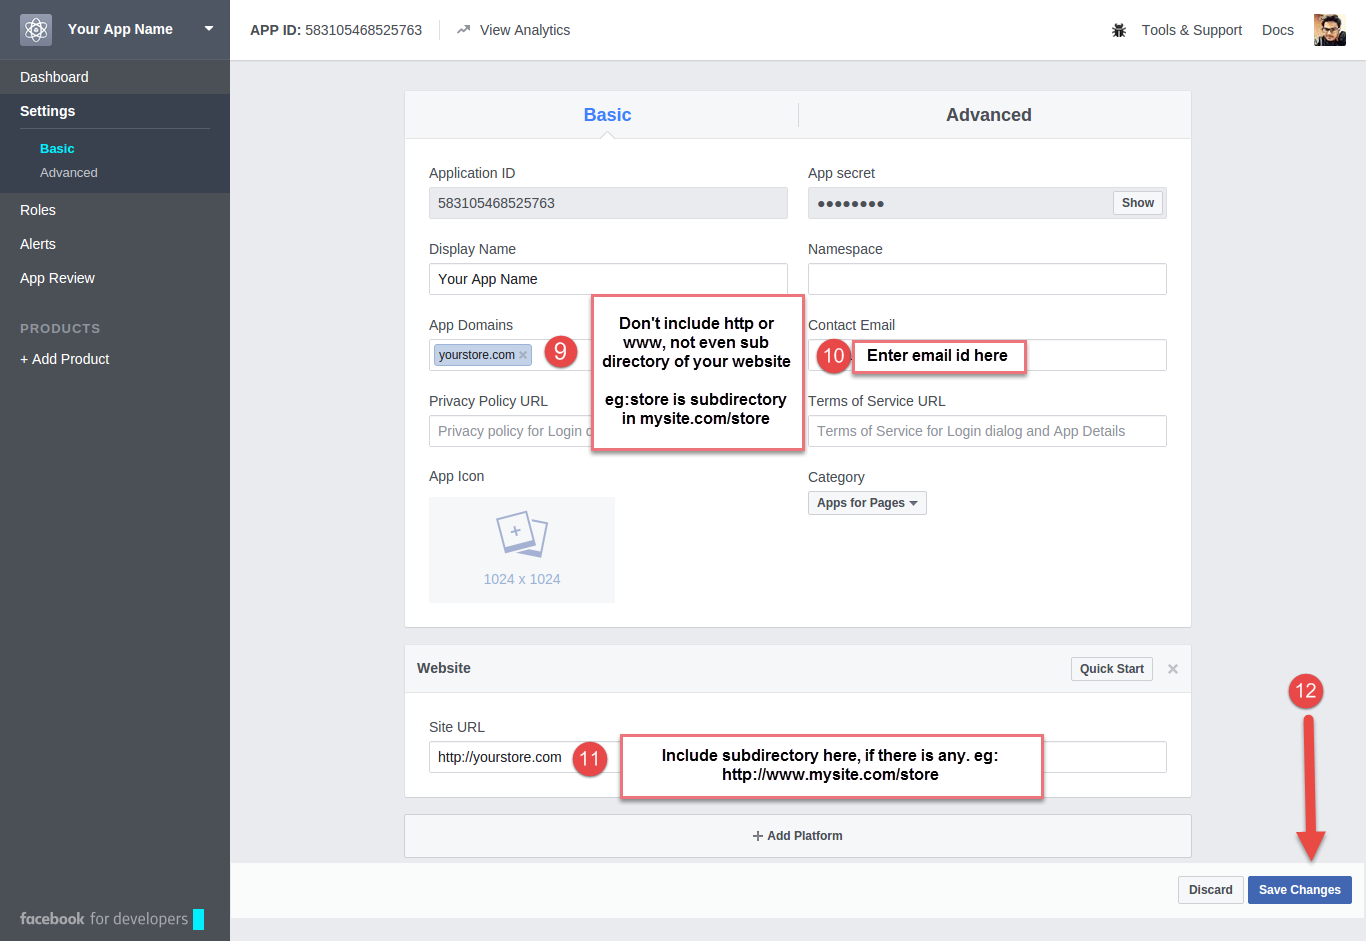
Fill in the form as instructed in the image below:
App Domains:
Yourdomain.com is correct
Yourdomain.com/store is incorrect
www.domain.com is incorrect
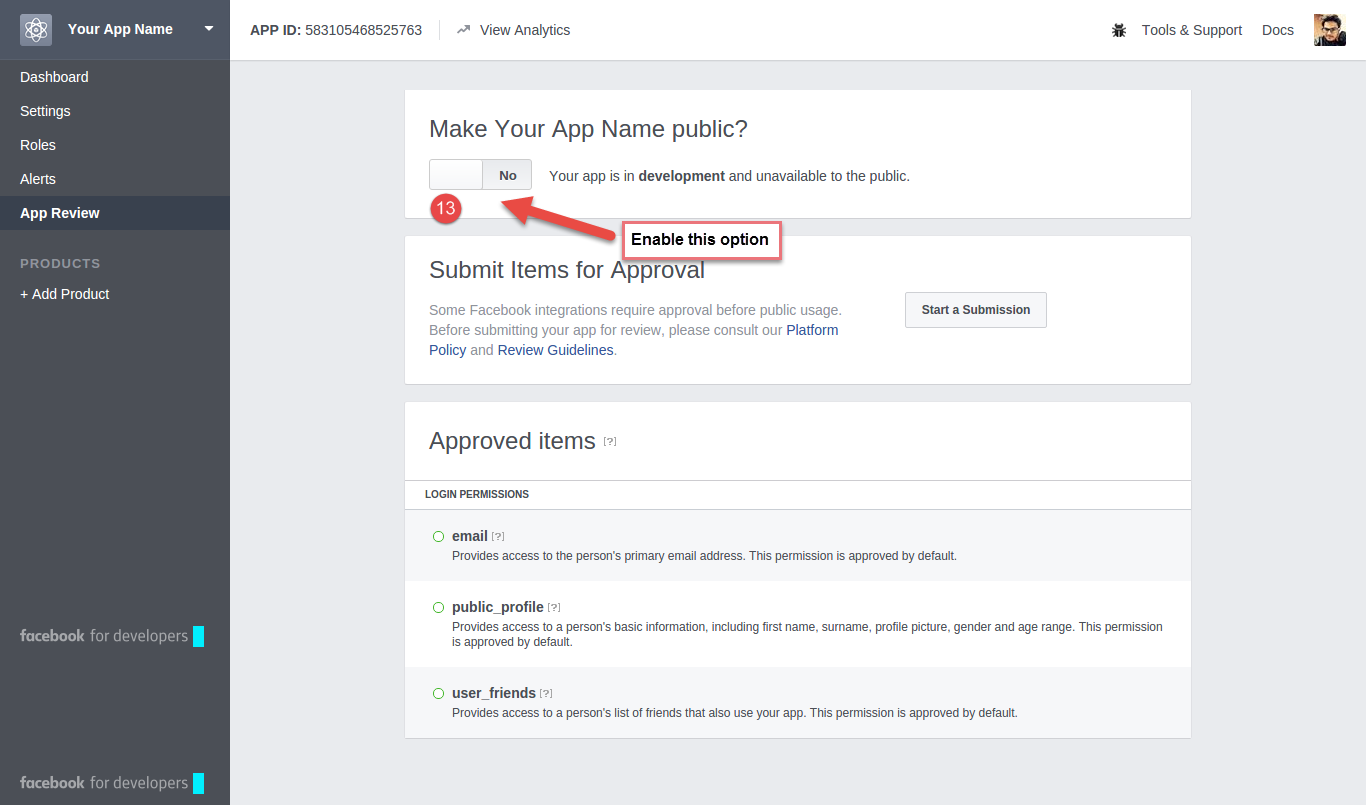
9. Under the status and review tab, you need to enable it’s live feature as shown in the image below:
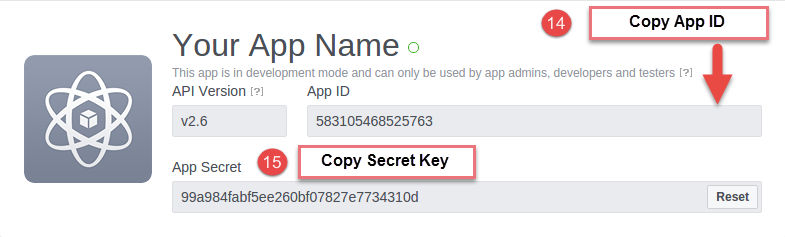
10. After that, you will see your App ID and Secret Key. Copy both the details. And use them to fill in the Facebook configuration of Magento 2 social login extension.
So, in this way you can setup a Facebook plugin on your Magento 2 website using this Magento 2 Social login extension. Implementing the social login option through a Magento 2 social login extension is one of the easiest approaches to start accepting the social login.
The time has come when no one can deny the role of eCommerce websites in making the life of customers easier. Additionally, eCommerce has provided loads of opportunities for business owners for reaching out even to the remotest places on the planet. B2B eCommerce is one such opportunity provided by the eCommerce world. Although B2B eCommerce market is quite new, it has a very promising future as estimated by the experts. Forrester said in 2009 that B2B eCommerce will grow its value as twice the value of the B2C market, and that’s a huge share.
Since B2B market is having a very promising future, it’s a fact that competition in this segment is also toughest. So, the first question that comes to our mind in this situation is regarding choosing the best eCommerce platform for facilitating a hassle-free B2B business in long run.
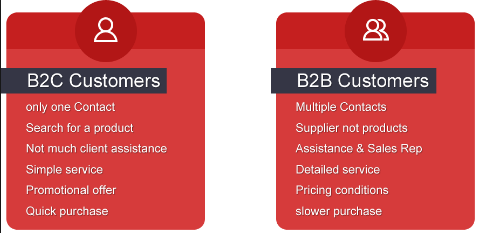
The modus operand of B2B and B2C are quite different from each other
Magento B2B eCommerce
B2B websites are quite different from regular eCommerce sites and they possess quite complex functionalities for facilitating a hassle free system in long run. If not chosen wisely, it will certainly be a great challenge to shift to any other solution as it involves a large number of direct participants at all levels- Business to Business level as well as Business to Customers level.
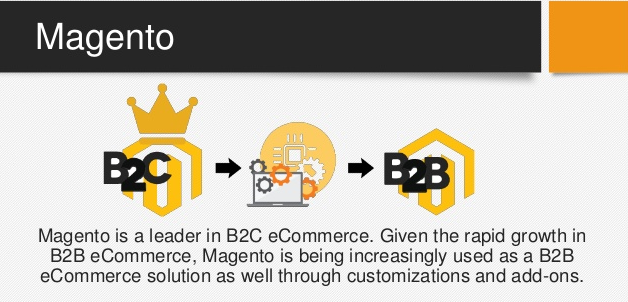
Magento was originally originated a B2C platform. Gradually, it was evolved to fulfill the B2B functionalities. Later, the Magento platform acquired even the most complex B2B features that make it a perfect tool to even compete against B2B specific platforms. Let’s take out some very important features of Magento for B2B and find out how it is a wise choice for B2B websites.
Magento fits in the B2B model because of multiple reasons
Extensive Flexibility for customization
Magento possesses a very high affinity for the customizable features. Being an Open source platform and built on very popular PHP programming language, it has a wide base of Magento professionals who can work to customize it in many ways. This affinity and strong base of Magento experts make Magento a perfect option for B2B specific developments.
Magento B2B is comparatively economical than other B2B platforms
Magento is comparatively less expensive when it comes to leveraging its implementation cost and Enterprise license. Other enterprise-level B2B solutions like IBM and Oracle come out as far more expensive than Magento for B2B solutions. Moreover, due to a massive base of Magento developers, freelancers, and Magento development companies Magento provides a good bargain power to the Magento services seekers.
Large number of already developed Magento B2B solutions
Now, it’s known that Magento is a master of a huge community of users, developers, freelancers and business owners, third party Magento developers are always ready with pre-developed solutions to make the customization quick, and less expensive. For example, Magento multi-vendor marketplace extension is a third party Magento extension that converts a Magento store into a marketplace site. This is a perfect example to explain that most of the advanced B2B features can be achieved in Magento without going for customization services. You can always find most of the Magento extensions and install them to extend the functionalities in minutes.
Complex pricing system of B2B market
The B2B market also consists of the wholesalers and manufacturing companies who require a more complex and advanced pricing system. The pricing system includes individual and group discounts, location and tire-oriented rates, prices based on sales volume etc. This massive flexibility in pricing system cannot be handled by a simple eCommerce platform. Therefore Magento for B2b fits the best here as it provides a wide flexibility to decide the pricing based on all these factors. It is a perfect platform to handle the business from Wholesale and Manufacturer market.
Order fulfillment in B2B websites
Magento possesses a very robust order management system which allows the admin to track every order in a single view. Clicking on each individual orders show a detailed information including order status, payment information, pending payment details, pending order details, processed orders and much more. The invoicing system is also highly flexible and you can send invoices to your customers from the back end order management interface itself. On, the whole Magento for B2B gives you the control and flexibility to showcase a very strong and error free B2B experience to your customers.
Anyway, the nearest future is looking forward to growing exponentially in terms of B2B eCommerce business. For this, you will need a tool by your side that will support your business in a long run. Magento for B2B is a solution that is worth paying attention to.
This tutorial will guide you how to upgrade magento using the Connect Manager. Always create a back-up of magento files and of the database used by the application.
Things to do before you upgrade magento
Create a back-up of magento files (mandatory).
Create a back-up of the database used by the application (mandatory).
Flush the cache (mandatory).
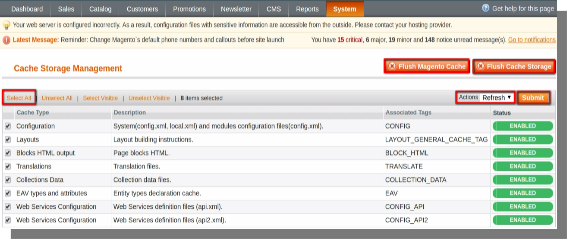
Open the back-end of your store and hover your cursor on the System menu and click on cache management option.
System Menu(menu bar)>>Cache Management Option
Select cache types using Select all option and opt Refresh option on the Action drop-down and click on submit.
After refreshing, again select cache types using select all option and opt for Disable option on the Action drop-down and click on submit.
Upgrade Magento
To upgrade magento follow the below mentioned steps:
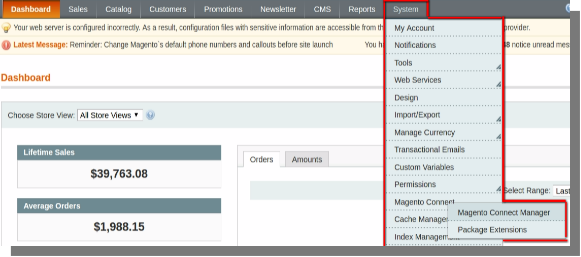
Open the back-end of your store and hover your cursor on the System menu and then on Magento Connect option and then click on the Magento Connect Manager option.
System Menu(menu bar)>>Magento Connect>>Magento Connect Manager.
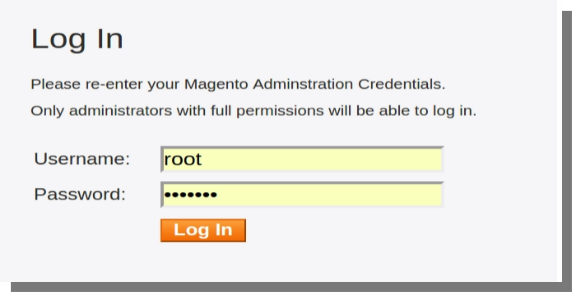
On the page that opens type your admin Username and Password and click on login to access the Connect Manager.
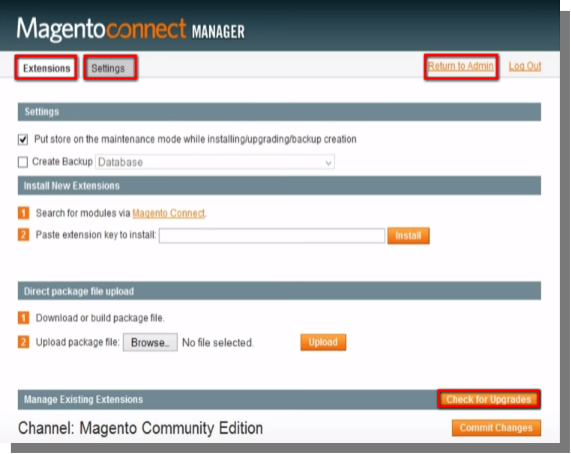
After logging-in you will see two tabs Extensions and Settings tab.
Under Extensions Tab
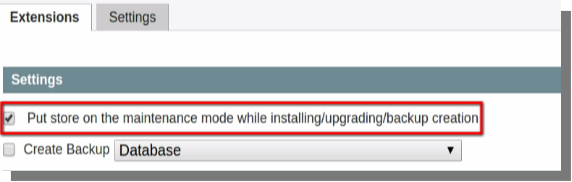
Make sure that the check-box for “put store on the maintenance mode while installing/upgrading” is marked.
Next, click on the “Check for Upgrades” option, the extensions list will be updated and those who have the latest version will be colored in yellow.
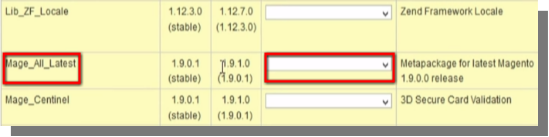
In the list find Maze_All_Latest and from its drop-down select the latest stable version.
Click on the Commit Changes button at the bottom of the page.
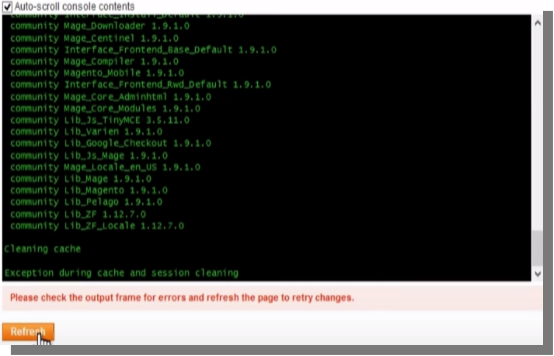
Wait until the Upgrade is complete, when this happens click on the Refresh button below the command window at the bottom of the page.
Then click on Return to admin at the top of the page.
After Performing the above steps magento will be upgraded.
Follow the below mentioned steps for upgrade extension:
Open the back-end of your store and hover your cursor on the System menu and then on Magento Connect option and then click on the Magento Connect Manager option.
System Menu(menu bar)>>Magento Connect>>Magento Connect Manager.
Under Extensions Tab:
Make sure that the check-box for “put store on the maintenance mode while installing/upgrading” is marked.
Next, click on the “Check for Upgrades” option, the extensions list will be updated and those who have the latest version will be colored in yellow.
In the list find the extension which you wish to update and from its drop-down select the latest extension.
Click on the Commit Changes button at the bottom of the page.
Wait until the Upgrade is complete, when this happens click on the Refresh button below the command window at the bottom of the page.
The Extension will be upgraded after completion of the above mentioned steps.
A research says that out of every 10 eCommerce customers, 7 of them abandon a cart for different reasons. It means those 70% percentage of lost sales were certain to get converted but for some reason(s) they could not. OpenCart websites too are not spared from this evil and each day a large number of customers abandon these sites.
There are ways using which OpenCart websites can minimize the possibilities of getting abandoned. However, none of the ways can guarantee that they can prevent all the cent percent carts from getting abandoned. That is why the OpenCart abandoned module was introduced to the picture to deal with those carts which get abandoned despite all the efforts to prevent them.
Let’s see some facts about the OpenCart Abandoned Cart Module, and understand how it works to minimize the losses occurred due to shopping cart abandonments.
Facts about OpenCart abandoned Cart Module:
OpenCart abandoned Cart Module uses the order id generated by the OpenCart during Checkout Process to capture the carts: The OpenCart platform generates an Order id for all the orders right at the checkout process itself. This order id used by the OpenCart abandoned Cart Module to uniquely identify the carts and capture them with the cart information. The cart information consists of details of the products like product name, Product quantity, date added etc. This information is used by the customers to restore a cart in just one click without manually re-adding the products back in the cart.
OpenCart abandoned Cart Module uses the time limit mentioned in the module configuration to identify an abandoned cart: The OpenCart abandoned Cart Module can capture each and every cart – abandoned or not. However, we are only concerned about the abandoned carts that are left orphaned by the customers. So, there is an option in the OpenCart abandoned Cart Module Configuration where the admin can mention a time limit after which a cart will be considered as abandoned. This option is used by the module to identify an abandoned cart from all the carts captured by the module.
OpenCart abandoned Cart Module sends manual/automatic serial reminders to the abandoned customers on their email ids: The module is capable of capturing all the carts on your OpenCart site. However, an abandoned cart reminder to the customers can only be sent on their email id- that’s logical! So the abandoned carts where customers have provided an email id are selected to send the serial reminders. These reminders can be sent either manually by the admin to each customer, or he can just curb this burden by setting a cron to send automatic serial email reminders. Admin can set different email templates for each message to be sent to the customers.
OpenCart abandoned Cart Module sends email reminders with or without offers: As already mentioned in the former point that admin can send email reminders using different emails templates already stored in the modules database. There are two types of email templates that can be sent to the customers here. One is a general reminder mail to just remind the customer about his abandoned cart.
Serial reminders without offers can also be wise option for start
Other is a reminder with some offers to lure back the customer. For example, the reminder mail in the screenshot below says that the customer can grab an offer of 25 % discount if he completes the purchase.
Abandoned cart serial reminders with offers and deals
OpenCart abandoned Cart Module allows the customers to recover the abandoned cart in just one click: Despite all your offers and discounts in the serial reminders, some customers might feel lazy to come back because they have to add back the products again in the cart and then start the checkout process again. This OpenCart recover abandoned Cart Module eliminates this hurdle by allowing the customers to directly go to the checkout page with all the products in the cart already restored. This is done by clicking on a CTA button that is provided in each reminder email. The customer will recover all the products in just one click and can directly checkout without even a need to log in again.
Finally,
the OpenCart abandoned Cart Module is a perfect OpenCart recover abandoned Cart tool if used wisely. That is, you must additionally follow the best practices for writing an abandoned cart email so that it ensures the success of your emails. The success of OpenCart recover abandoned Cart is totally dependent on the success of your emails. The tool provides you a hassle free way to connect with your lost customers who can still be earned back with a proper recovery approach.
This tutorial contains two sections, first section will guide you how to activate the Sale promotions on Magento and the second section will guide you how to setup discount coupon codes on Magento. Activating sales promotions and setting discount coupon codes is an important task as they attract the attention of the user, you can use them in order to boost your sale and increase traffic on your site.
Activating Sale Promotions
To activate the sale promotions you can follow the steps mentioned below:
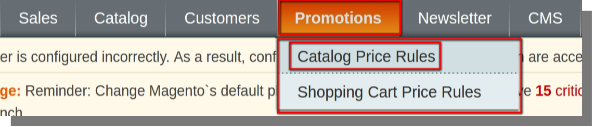
Open the back-end of your store and hover your cursor on the Promotions menu and then click on the Catalog Price Rules option.
Promotions Menu(menu bar)>>Catalog Price Rules.
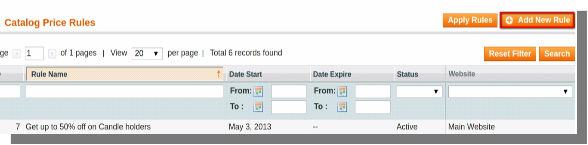
On the page that opens, click on the Add New Rules button available on the top right corner of the page.
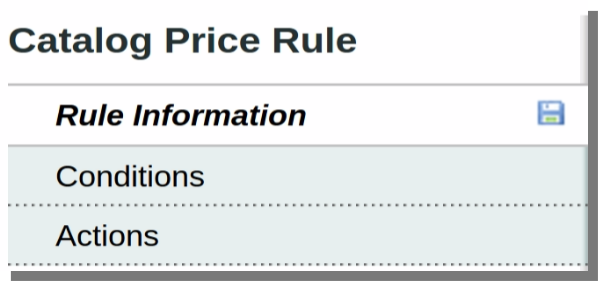
You will be directed to a page where you will see three options on the left side of the page:
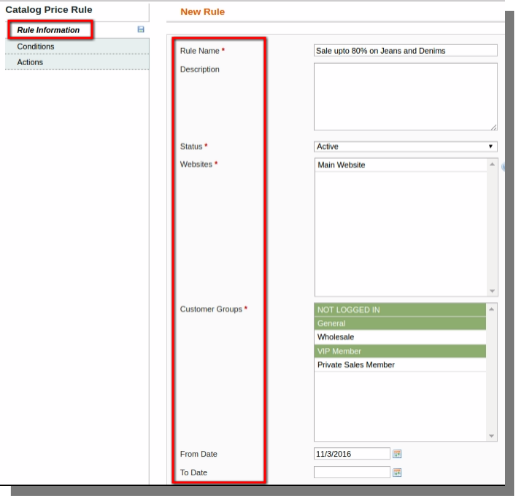
Rule Information
Conditions
Actions
Expand Rule Information tab:
Enter the Rule Name (mandatory).
Description
Set Status (mandatory).
Websites (mandatory).
Select your Customer Groups (mandatory).
Enter From Date and To Date
Priority
After entering the above mentioned details, click on the save and continue edit option.
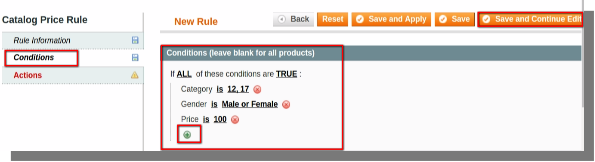
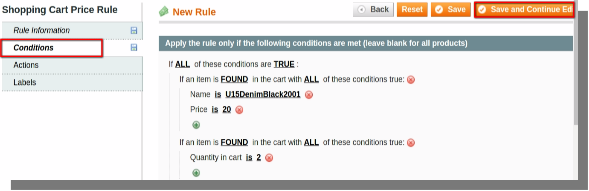
Now expand Conditions tab:
Here you can set sale conditions on different products, categories, price, size, type etc.
You can set conditions using the + (plus) sign and choose a condition to add.
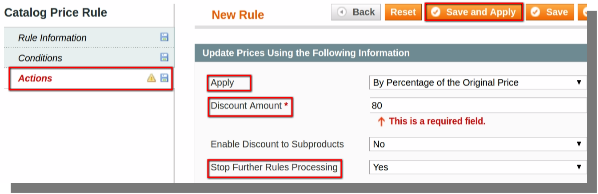
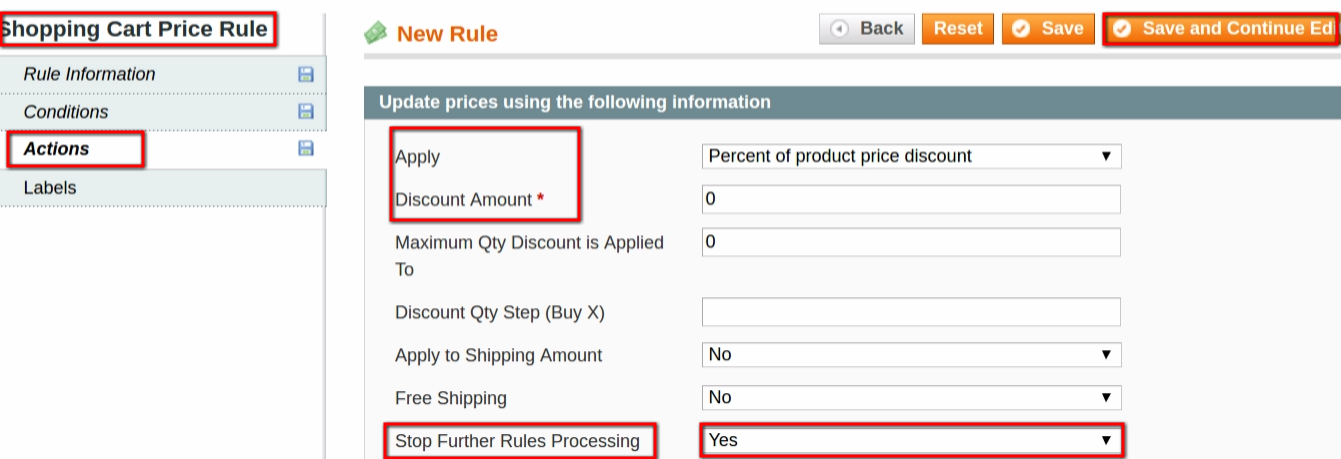
Now Expand the Action Tab:
Choose the desired option from the apply drop-down menu.
Set the discount amount.
Choose Yes option from the stop further rules processing drop-down menu.
Now click on the save and apply button to save and apply the changes you have made and that’s it you have set the sale promotion on your store.
Setup Discount Coupon Codes
To setup discount coupon codes on magento follow the steps mentioned below:
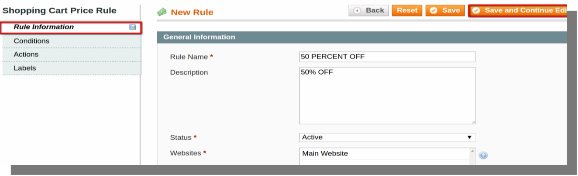
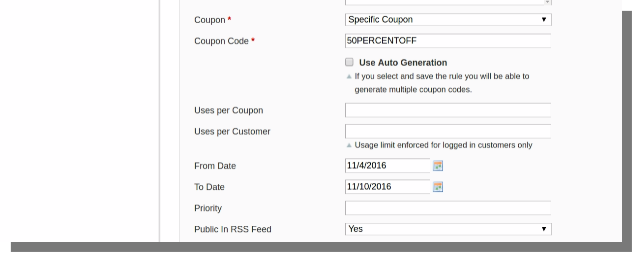
Open the back-end of your store and hover your cursor on the Promotions menu and then click on the Shopping Cart Price Rules option.
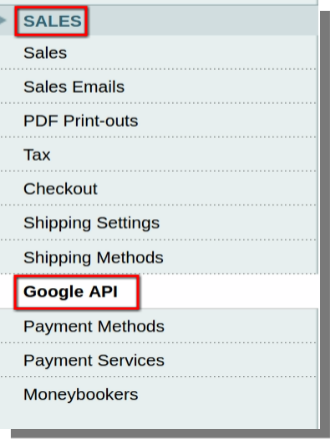
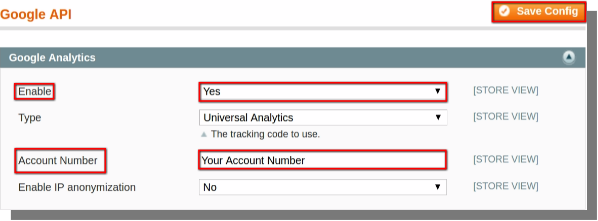
Google Analytics is a free Google service that allows the webmasters and site administrators to monitor their websites traffic and conversion rates. Magento supports two type of tracking:
Page View tracking: List the origin from which your store visitors linked to your store.
E-commerce tracking: List the customers that make purchase and they buy.