Magento 2 Return Manager, also referred to as Magento 2 RMA extension helps you manage your store returns comfortably.
Product returns take place in massive numbers in an eCommerce website and managing those return requests require a flexible returns management system. Failing to provide easy return facility to the customers may degrade your brand reputation.
1. Three types of return choices: Replacement, Refund, and Credits
2. Image upload option for customers to highlight the defect
3. Easy returns for even Guest customers
4. Set up return policies and return guidelines
5. Create returns on customers’ behalf
6. View pending, approved and successful returns
7. Email customization
8. Responsive, multi-lingual, multi-store compatible, SSL compatible, and compatible with all browsers
Features offered by Magento 2 Return Manager Extension (detailed)-
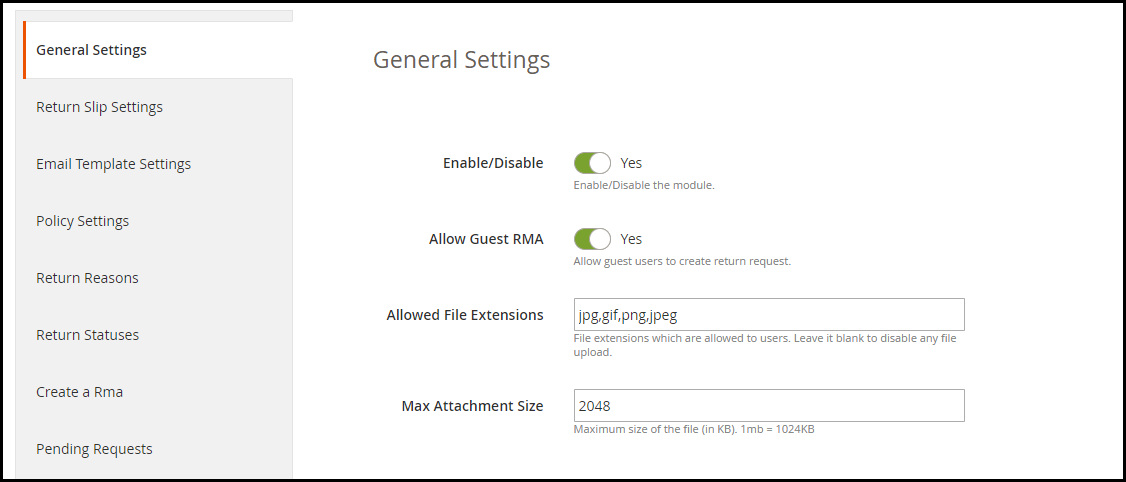
1. Enable or disable the module anytime within a single click.
2. Allow even guest users to raise a return request.
3. Magento 2 RMA extension allows customers to upload the image of the product to be more specific about the issue in the product. The supported file formats for image upload are jpg, jpeg, png, gif, and the image size cannot be more than 2 MB.
4. Make customers aware of the return guidelines while they return their item. A return slip is generated when a customer’s return request is approved that contains your return guidelines.
5. Magento 2 Returns Management extension allows you to set up your store addresses to make it convenient for your customers to send their return item. The store addresses are displayed when a customer is creating a return request. They can choose their desired nearby store.
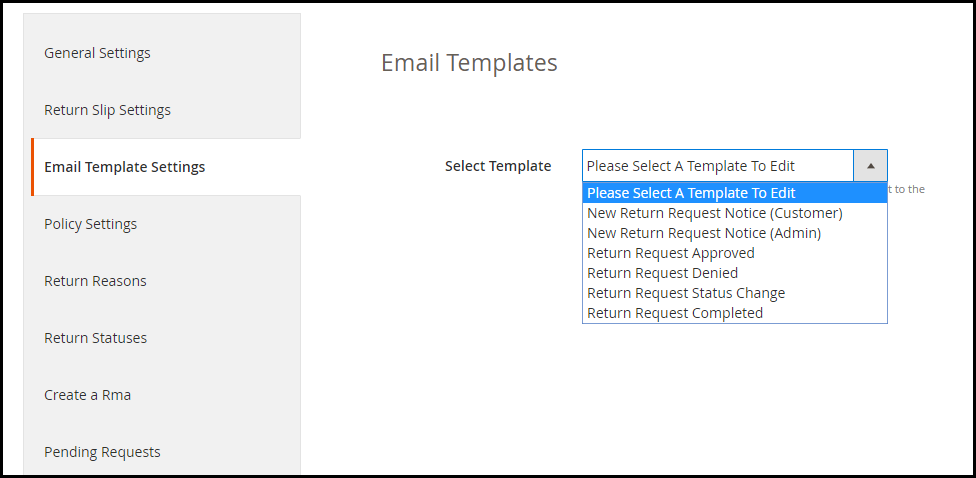
6. Magento 2 Returns and Refund Management extension provides multiple email templates for different order return status. You can customize these email templates as per your way.
7. You can create your return policies with the help of the Magento 2 Product Return extension. It will be displayed to the users while they create a return. For different return type, you can highlight different return policies. You can specify when can a customer expect the solution for his return, and also specify what should be the condition of the item to submit it for return. You can also map products for particular return policy.
8. Add some of the common return reasons to make it easier for the customers to pick their return cause from the drop-down list.
9. You can create different order return statuses through Magento 2 Return Manager module.
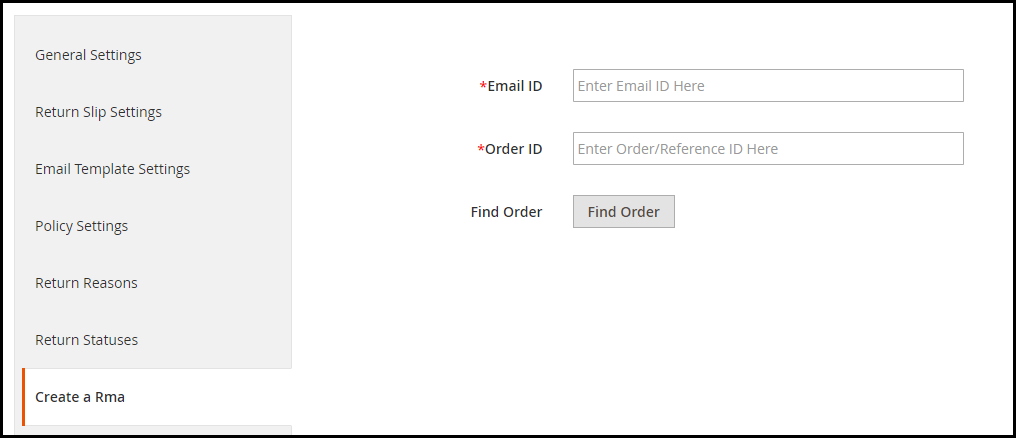
10. This RMA extension also allows you to create a return request on your customer’s behalf.
11. You can track your pending (non-approved) return requests and approved return requests from the back end. It displays the Order ID, product info, product quantity, customer’s name and email address, return reason, return type, and the return status. All the successful return orders are displayed under the Archives list.
12. A success message is displayed to the user every time a return request is placed.
Benefits of Magento 2 RMA Extension
Improve Returns management on your Magento 2 store.
Provide a hassle-free return facility to your customers.
Improve customer retention (because of store credits)
If you need any assistance with the Magento 2 Return Manager module, feel free to ask it in the comment section below or you can submit your query at support@knowband.com and our team will reach out to you shortly.
OpenCart Product Customization module also referred to as OpenCart Product Customizer and OpenCart Product Designer lets you add customization services on your website for your store products.
Today, the demand for customized products has increased exponentially. Many people are looking to purchase products that can be personalized and designed as per their choice. While some businesses are running it offline, some have taken it on the online platform and have set up the whole business on product customization.
If you have a website set up on the OpenCart platform and looking to provide online product customization services to your store visitors/customers, OpenCart Product Customization Extension is all you need.
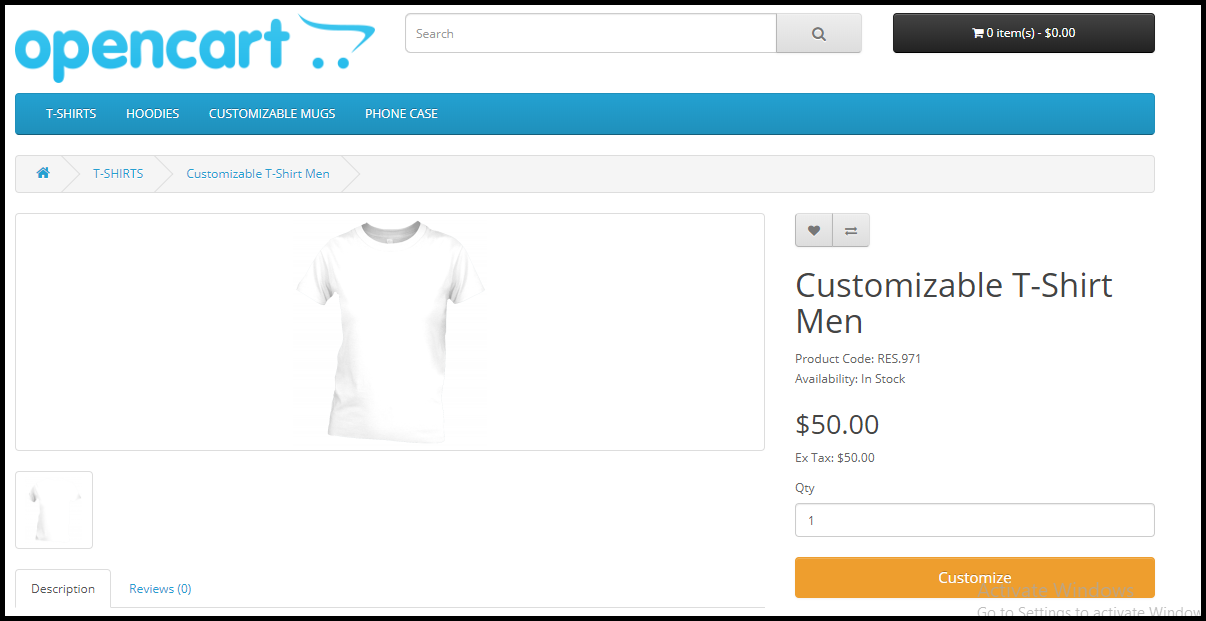
Once installed, the OpenCart custom product designer extension will add a customization panel on your product pages and will offer free-hands to your customers to make the desired changes.
Overview
Adds Customize tab on your product pages
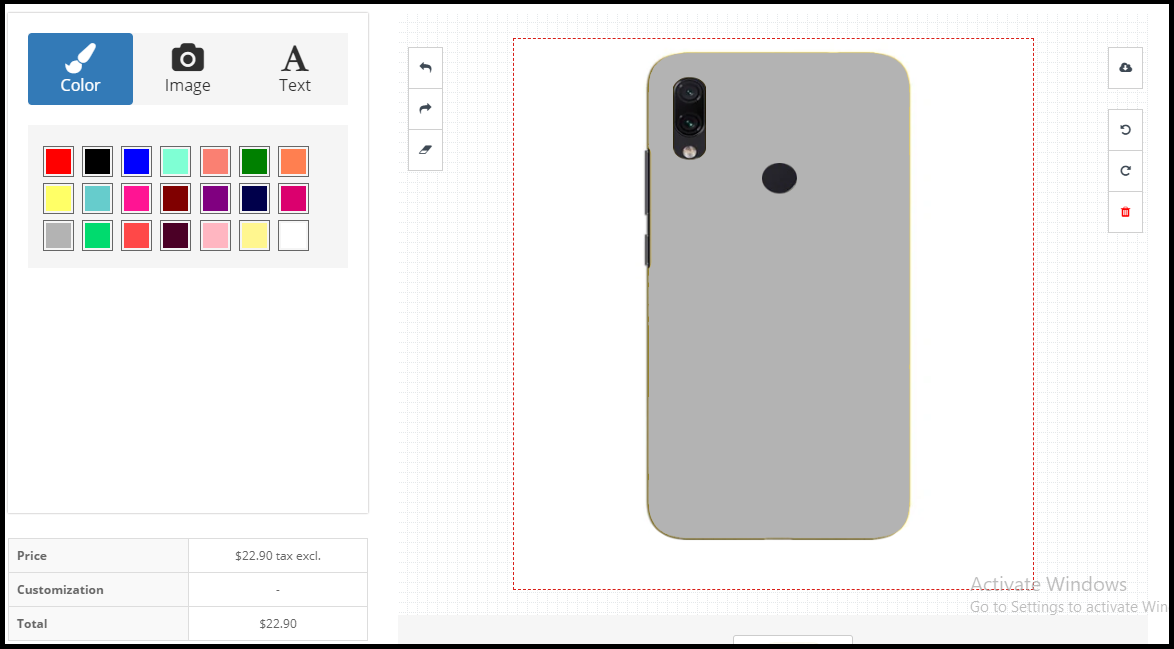
Lets your customers add desired colour, image, texts, QR code, etc. on the product
Set up different fonts, colours and templates from the back end.
Features of OpenCart Product Customization extension [Detailed]-
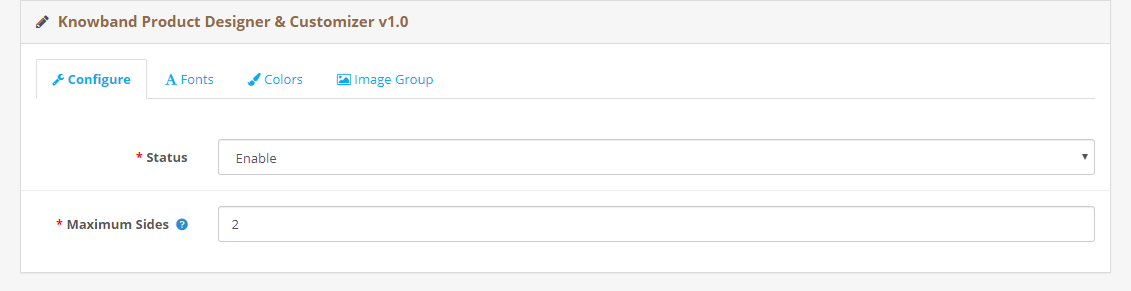
1. Enable/Disable the entire module functionality in a single click.
2. Specify how many sides of the product you want to make available for customization. This is mostly in the cases of t-shirt customization where a user can make the desired changes on the front as well as the back. This is why it is also called as OpenCart t-shirt designer module.
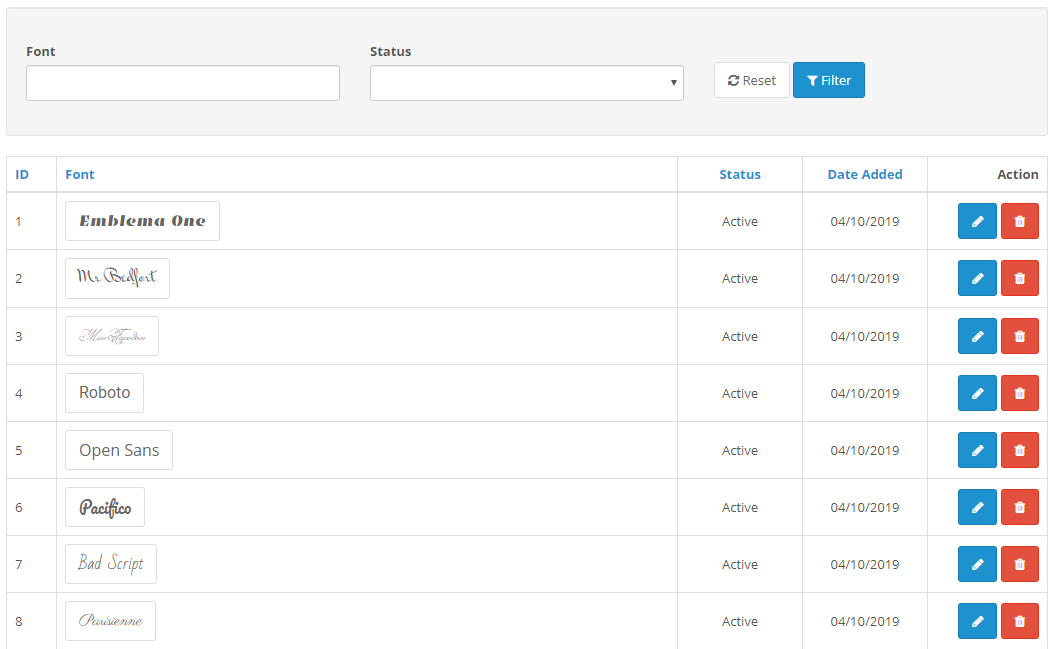
3. You can add as many fonts as you want from the backend to provide customers with text customization facility. You can also disable any font anytime.
4. Through OpenCart print-on-demand extension, you can add multiple colours from the back end to help customers choose the desired colour from a number of colour variants.
5. OpenCart Product customization module also comes with pre-existing templates which an admin can edit or delete as per his choice.
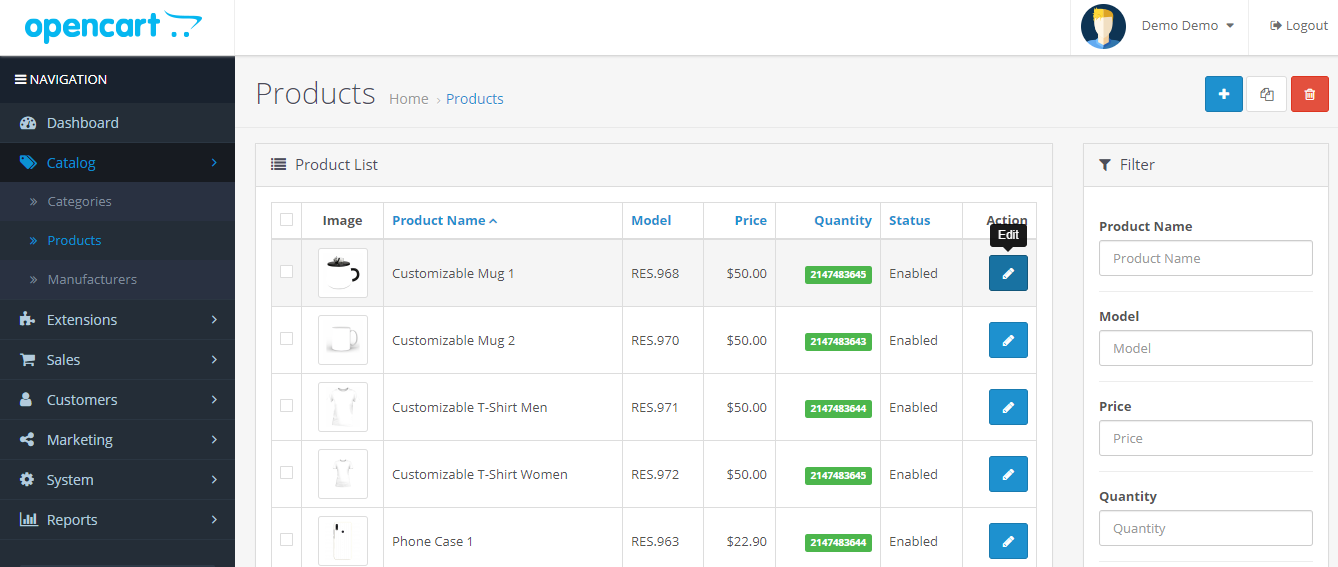
For advanced settings, head over to Catalog and then Products. Select a product, click on edit and then Product Designer.
From there,
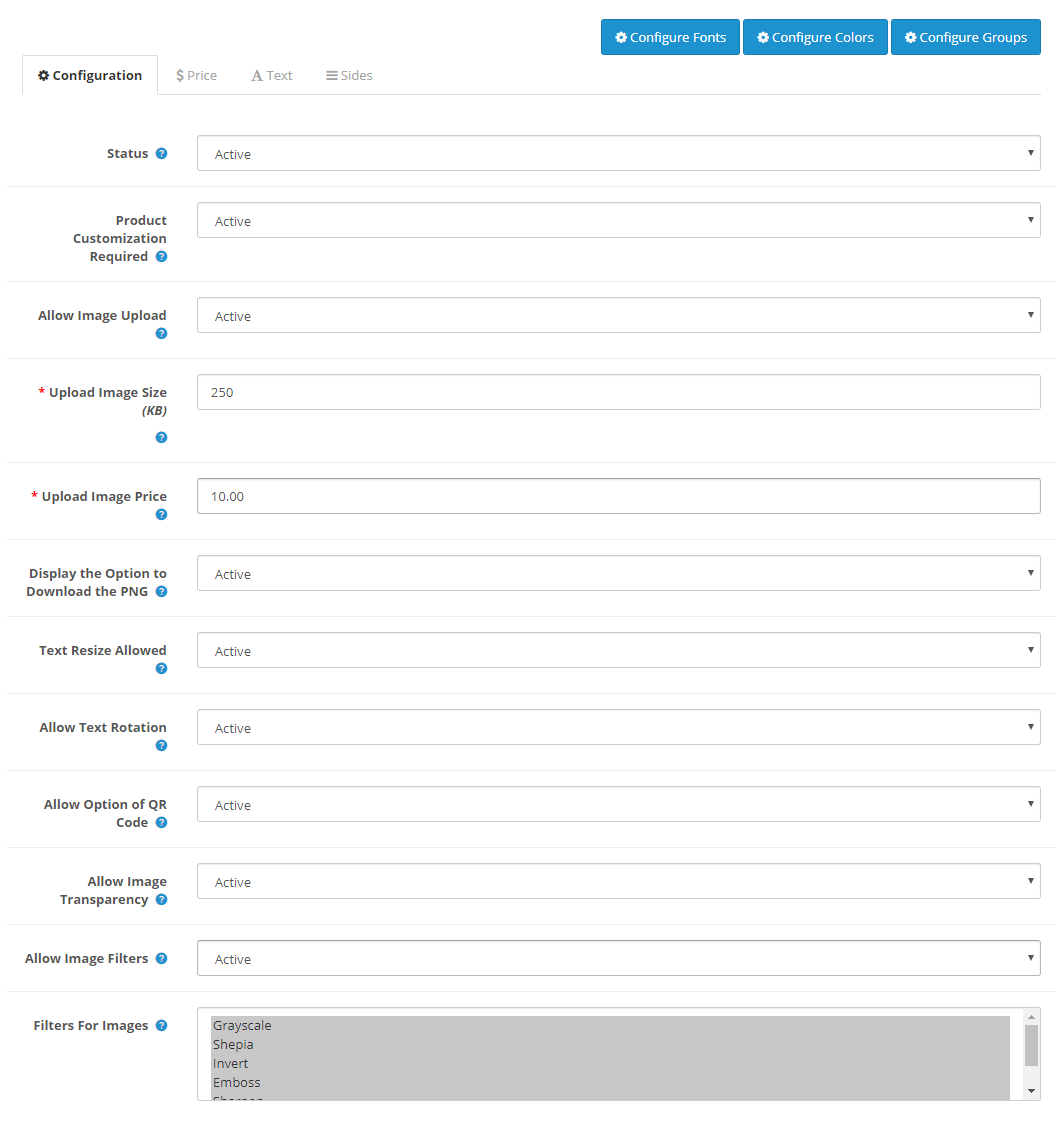
6. You can specify the maximum image upload size.
7. You can specify the image upload price.
8. Provide customers with the option to download the customized product image in the PNG format.
9. Allow text resizing and text rotation for customized texts with OpenCart custom product designer. You can also specify the minimum and maximum text length.
10. Display/hide the QR code option from the customization panel.
11. Specify the filters that would be available for use during customization.
12. Set up a fixed price for text customization. You can also charge customers per character.
13. Similarly, you can set up a QR code price and also specify a fixed price for complete customization with the help of OpenCart custom product builder.
If you need any assistance in the OpenCart Product Customization extension, you can submit your query at support@knowband.com
For any eCommerce business, it’s a prior thing to make the entire online purchasing procedure to be glitch-free. Online payment gateways play a vital role in this. It won’t be wrong to say that reliable payment gateways open the door to improved shopping experience and revenue growth. Converting a website visitor into a successful buyer requires a lot of key factors and efforts from store admin, offering active payment methods in the specific targeted location would make the job more facile. UAE is a huge market with tons of opportunities for eCommerce Businesses. If you are looking for guidance on the top eCommerce Payment Gateways for UAE, then the below-listed ones will be of aid for you.
Whether it’s an online shop or an eCommerce mobile app, an efficient payment method will help you in gaining a user’s trust. Modern shoppers tend to choose the one offering shopping ease in every possible way including payments. It has been forecasted that eCommerce sales in UAE will reach around $27B. This growth can be estimated to increase by 23% every year. This data is enough to prove the potential of online business in the UAE.
Nowadays, online shoppers are way more alert & conscious even about data security while making online payments. So, e-retail businesses must choose the right ones to avoid any sort of further hindrance in online payments and transactions. Let’s discuss each one in detail:
1. TELR:
Telr (formerly known as Innovative Payments) is one of the prominent payment gateways in the UAE. With its expansion to around 120 countries worldwide, it got enough favoring the audience to prove its credibility. The eCommerce store merchants get to choose either of 3 account levels:
Entry Level: AED 349 pa Small Level: AED 99 pa + Transaction Charges Medium Level: AED 49 pa + Transaction Charges
The payment gateway even offers a monthly subscription package to start with. Get to know more from here.
2. CCAVENUE:
Another big name is widely used payment gateways in the UAE region. With origin in India, it has covered a long journey in simplifying online transactions for the eCommerce industry.
The good thing is that the setup fee involved with this is 0. Although, the monthly charges are $54.45 + an additional 3% on every transaction. This might seem to be quite expensive but it becomes worth it along with FREE offerings like prevention from fraud & 24/7 instant support. Get to know more from here.
3. Amazon Payment Services:
With no required setup fee in starter packages, Amazon Payment Services has become one of the most widely preferred payment gateways in the United Arab Emirates.
For mid-tier accounts, eCommerce merchants just need to pay a monthly charge of AED 200. Along with that, commission rates are 2.8%, which are comparatively low. It also provides custom packages based on monthly transaction volume.
Recently, the gateway has launched an installment option that allows customers to buy more. It also allows businesses to check business growth in real-time empowering data-driven decision making. Get to know more from here.
4. CHECKOUT:
This payment gateway has recently reached the UAE online retail industry in the year 2014, 4 years after origination. With its PCI compliance, 15 languages & 87 currencies, it becomes a globally used payment gateway.
E-merchants need to pay a one-time setup fee of $500. Additional Transaction charges also apply based on the card types:
European Cards: 0.95% + 2 cents per transaction Non-European Cards: 2.9% + 20 cents per transaction
2CheckOut further expands the international reach of e-merchants being currently available in 211 nations across the globe. It provides a complete PCI Compliance & merchant account. Likewise, checkout, it also supports 15 languages & 87 currencies.
It provides ultimate fraud detection with address verification & 300+ rules & CVV checks. The rates for transaction charges are 3.9% + 45 cents on each transaction. Get to know from here.
These were a few top payment gateways active in UAE eCommerce. Combining them would cover almost entire online transactions in the Arab Emirates.
Want to Integrate Custom Payment Method in eCommerce App?
We, KnowBand, offer native eCommerce mobile apps for the following eCommerce platforms:
The module is an automated no-code tool to launch eCommerce shopping apps. Along with endless customization possibilities, the apps can have the desired payment method added as per the requirement.
Talk to us at support@knowband.com. Get any of the above listed or other native payment integrated into an online store or eCommerce apps with KnowBand.
Conclusion:
The right payment gateway can boost e-Commerce business growth to a huge extent. A secure, speedy & user-friendly payment gateway ensures no errors during checkouts. It also reduces the cart abandonment rate (arisen due to payment issues).
Both eCommerce websites and applications can make the best out of it if used wisely. Considering the productivity of mobile app users in online product purchases, make sure to choose a functional & responsive payment gateway on mobile devices too.
“Set up a gift card section on your PrestaShop website effortlessly to provide the online gift cards facility to your store visitors with PrestaShop Gift Card module.”
The demand for gift cards has increased over the years and it has become a go-to option for people whenever they want to gift something to their close ones. It is difficult to come up with a gift idea that everyone likes. People are too busy to explore and buy something and if the recipient doesn’t like that gift, the efforts and time will go in vain.
Thus, gift certificates have become the most effortless and easy gifting option. You can now easily add Gift Vouchers as a product on your Prestashop store using Knowband’s PrestaShop Gift Voucher Module.
On occasions like Father’s Day, Mother’s Day, and on the holiday season when we have Halloween, Black Friday, Christmas, etc, Gift Cards are sold in huge numbers.
The holiday season is approaching and it is the best opportunity for you to start selling personalized gift cards in your store. With our Gift Card module, it becomes easy to put up different types of gift cards on your website.
Create Gift Cards to sell on PrestaShop Store
How do PrestaShop Digital Gift Card works?
Place gift card Product link on multiple places
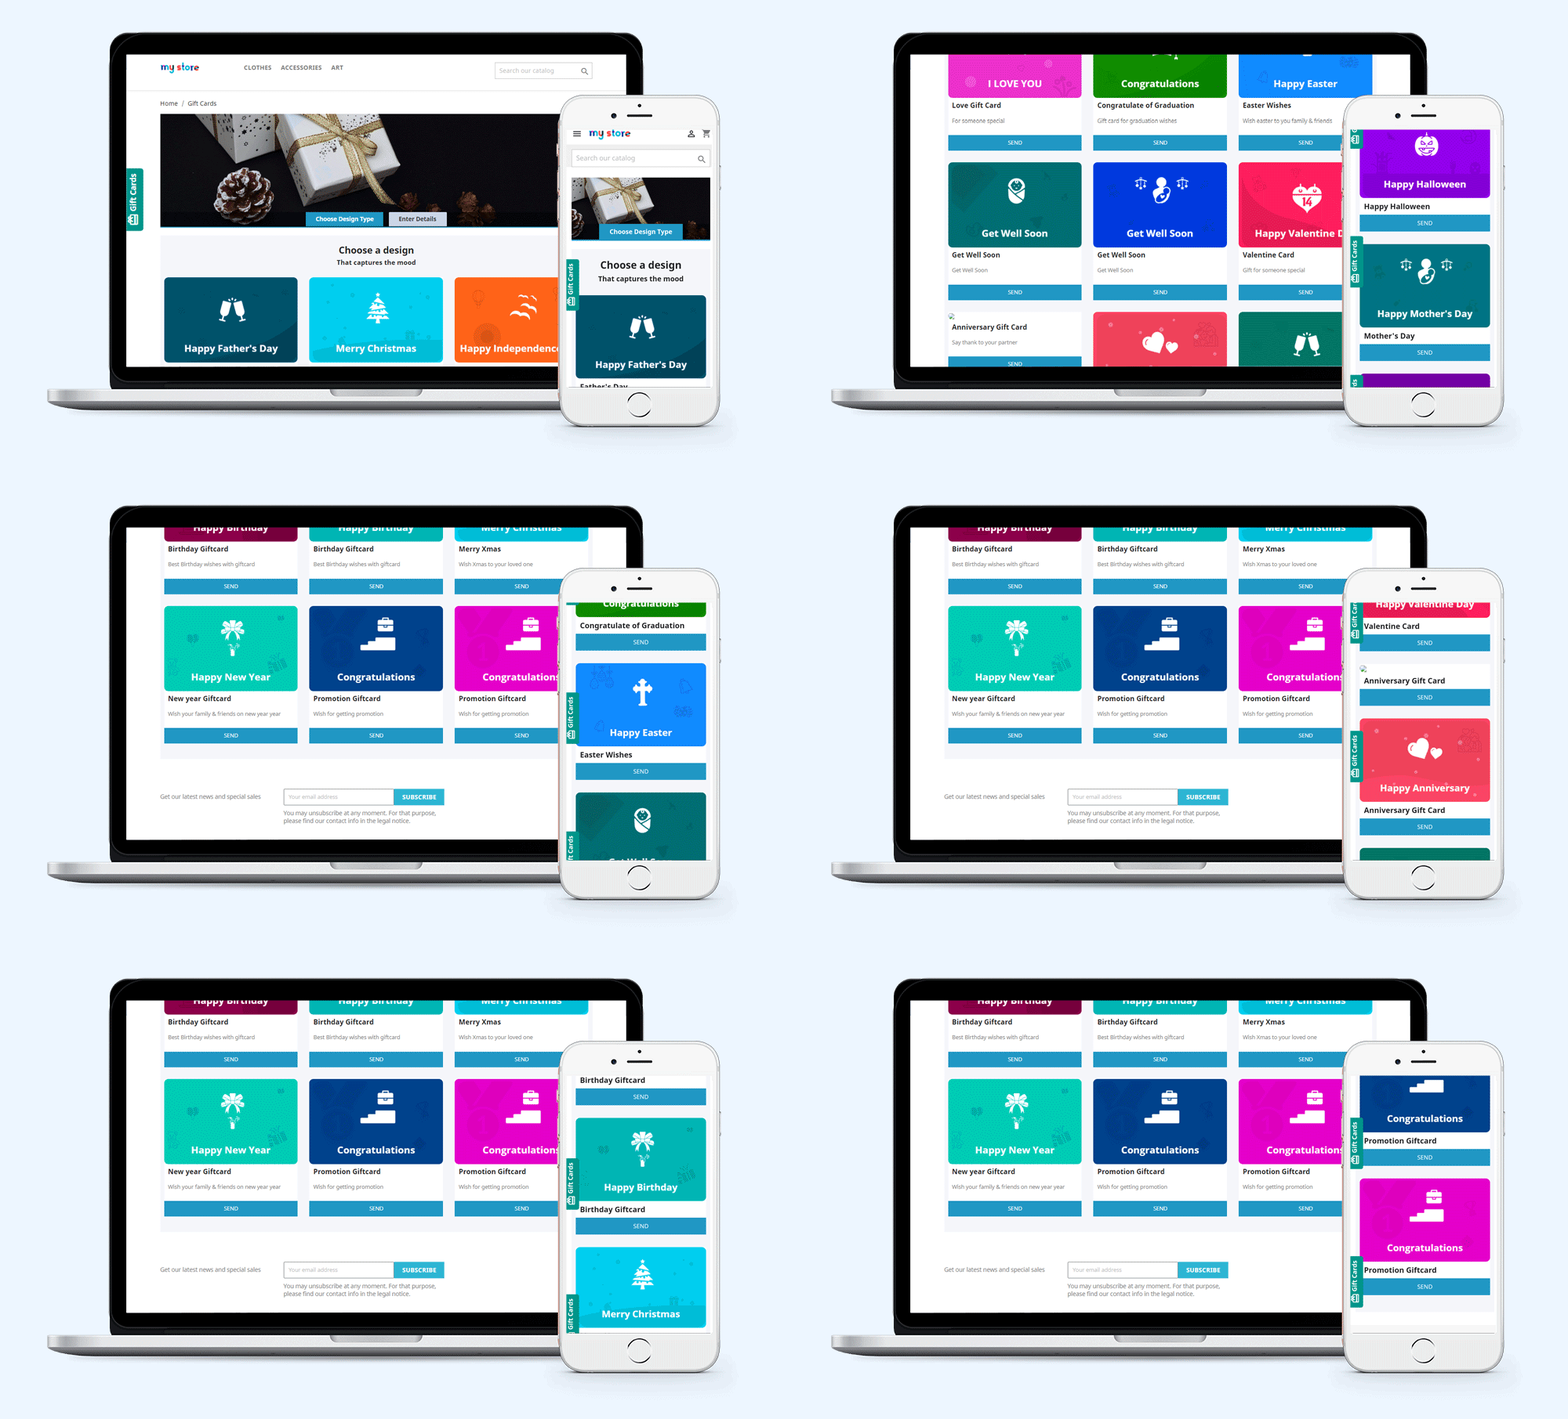
Pre-existing customizable gift card templates for the Birthday Gift Voucher, multiple festivals, etc.
Allow Print or email customized Photo Gift Cards
Set up multi-priced gift certificates
Set gift cards validity
Allow gift cards purchase in multiple currencies
Allow partial usage of gift cards
Customize Gift card emails to send a gift certificate
Track your gift card orders
Multi-lingual, multi-store, and GDPR compatible
Benefits of Selling Gift Cards on your PrestaShop Store
A gift card is not just an easy-to-buy alternative gifting option but it gives you more than that.
Boost your sales and revenue
This module is responsible for increasing sales and revenue as many indecisive shoppers get a chance to buy a product that does not require much effort. Customers can add the Gift Card product to the cart, customize and buy.
Grow Brand Awareness
Moreover, it adds value to your brand identity. Word of mouth plays a crucial role to increase brand awareness. Every gift card contains a prefix and the Gift Card templates can have the logo and brand name on them.
Acquire New Customers
By selling Gift Card on the PrestaShop store, you attract several customers who were not really your direct visitors. The Gift Card buyer will give the card to a friend or a family member and eventually, they will shop from your store to claim that.
Advance sales
The gift cards also generate advance revenue as the customer buys them in advance for a specific amount and later the recipient will buy products from the store by using the digital card.
Features of PrestaShop Gift Card Addon [Detailed]-
Create Gift Card
Default Gift Card Templates:
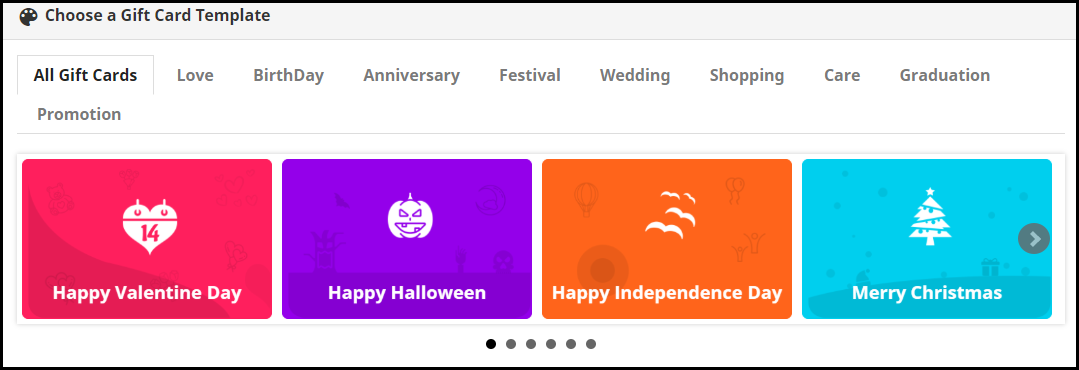
PrestaShop Gift Card Manager offers gift vouchers for multiple occasions like Birthdays, anniversaries, Halloween, New Year, Mother’s Day, Father’s Day, Valentine’s Day, etc. These gift card templates can be easily customized. Besides, you can add new gift cards if you want.
Customized Photo Gift Cards
The customer can add a picture to their gift card and give it a personal touch. This unique way of printing digital gift cards with custom images attracts more new shoppers to your store as personalization is a major branding factor these days.
Advanced Admin Control
Add Gift Card Link to Multiple Places
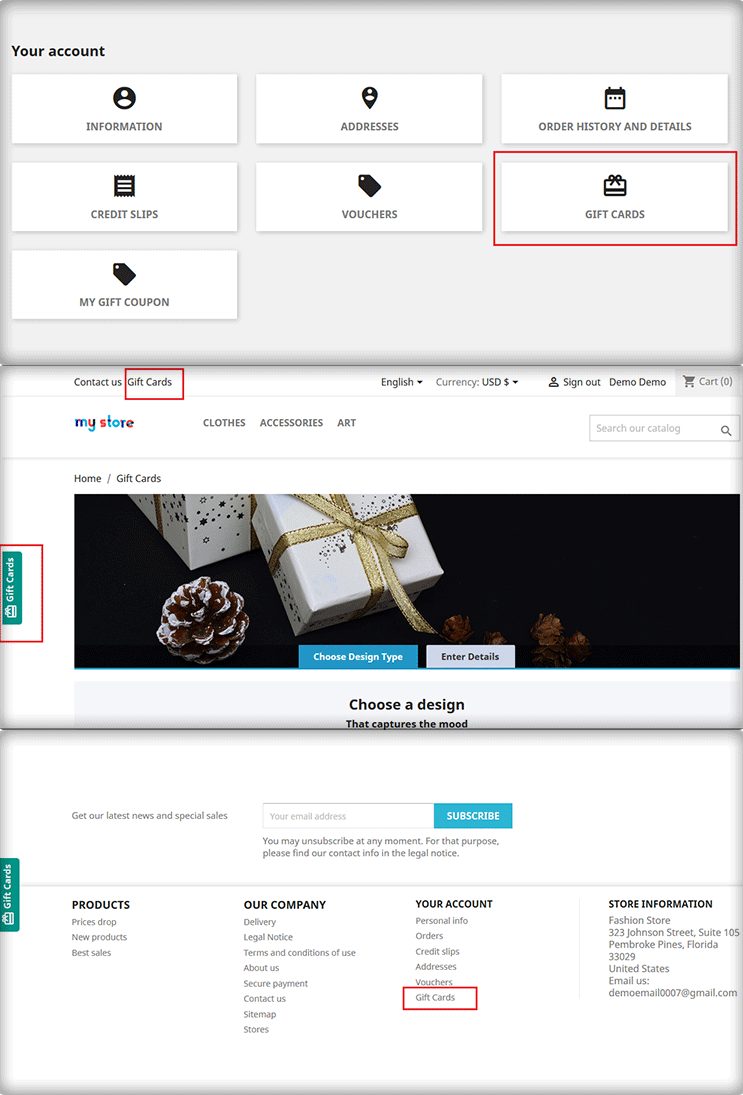
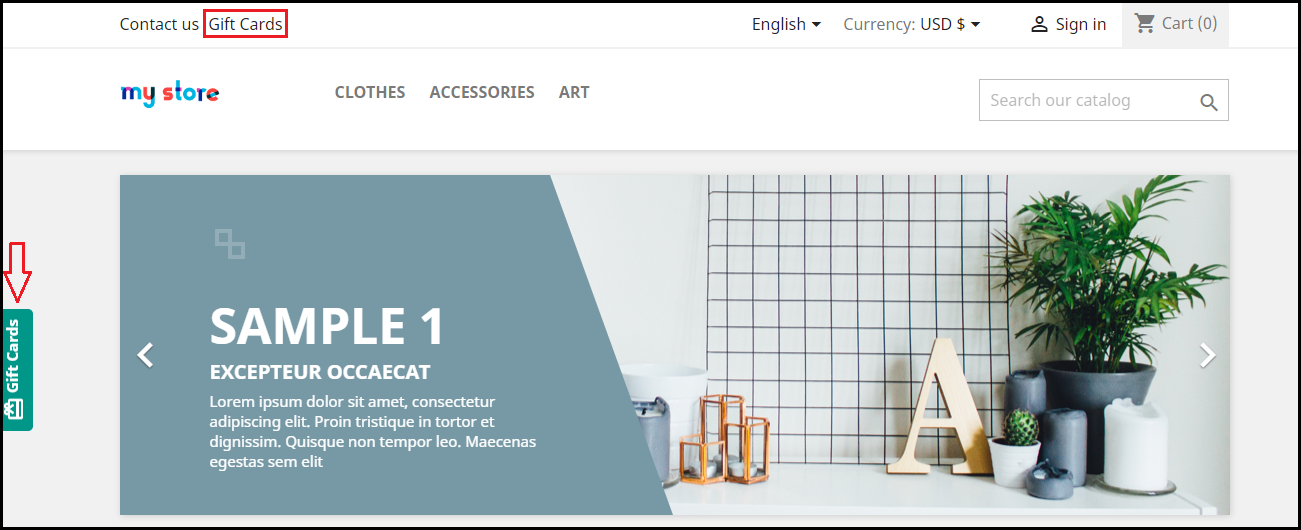
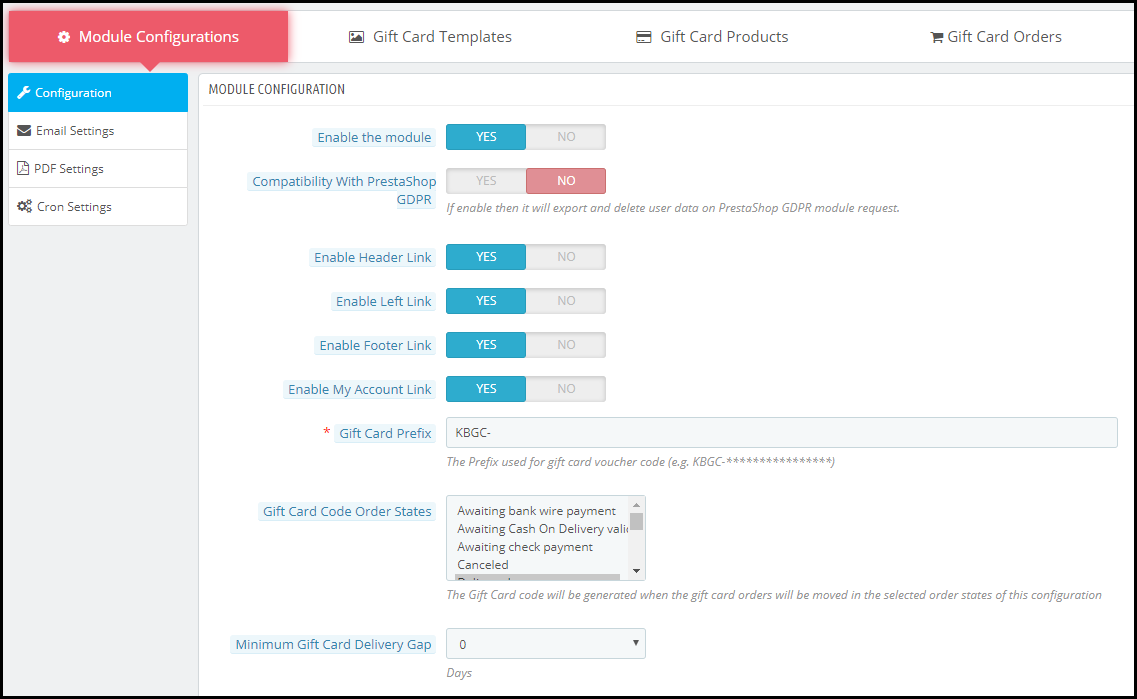
PrestaShop KnowBand Gift card plugin lets you display the gift card link in multiple places to highlight your gift card section in front of your store visitors. It can be placed on the header, footer, my account section, and on the center-left of the screen.
Gift Card Delivery Settings
Set a date to deliver. You can define a minimum delivery gap for the PrestaShop gift certificate to reach the recipient or a date to send an email including the gift card details
Type of delivery
For a particular gift type, you can choose whether it should be allowed for physical delivery and virtual delivery. If a card is virtual then there is no point in charging a shipping fee. Hence, the seller can decide the shipping charges for the type of delivery.
Flexible Pricing Scheme
PrestaShop Gift Card Manager Addon lets you set up multi-range gift cards on your website so that customers can choose a gift card as per their budget.
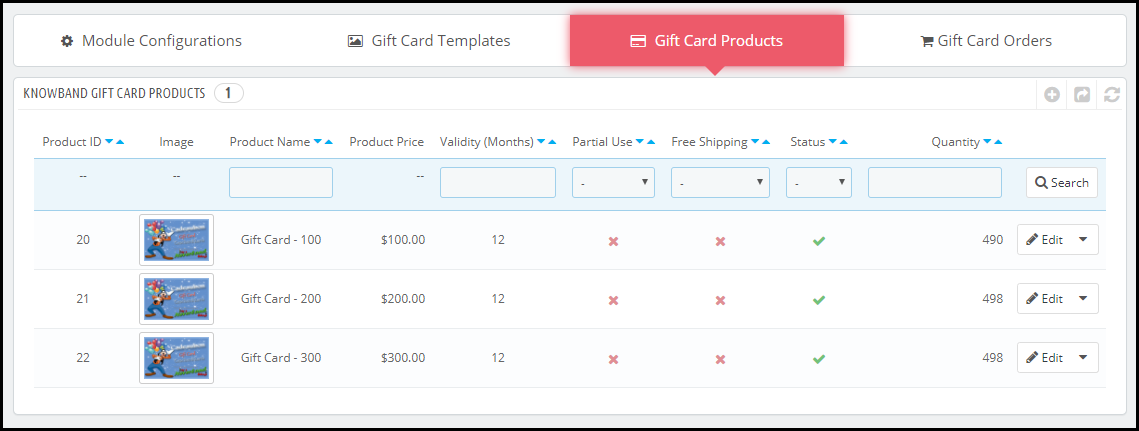
For a gift card of a specific value, you can define its quantity, make it available for multiple currencies, set the gift card validity, and allow free shipping and partial usage.
Unique Branding Techniques
Set up a prefix for your Gift cards that does your Brand promotion. To create a unique card template, it provides options like adding a name, category, keyword, etc. You can make your own templates by using an image with the logo and brand name.
How to Generate Gift Card Code?
With this PrestaShop premium gift card, you can specify the order status. It can be the payment status like awaiting payment, awaiting COD, Canceled, delivered, etc. For the gift card voucher code generation, the seller will have to define ar specific order status.
Notify with Email Alerts and PDF
PrestaShop Gift voucher module lets you customize the emails that would be delivered to the sender and the receiver. Customers can download the Gift card in PDF format.
Categorize the Gift Cards
You can define categories for gift cards and put the relevant ones under them. For example, gift cards related to Christmas, New Year, and Cyber Monday can be put under the “Holiday Gift Cards” category and say if you have multiple gift cards for Birthdays, all of them can be displayed under the “Birthday Gift Cards” category. This makes it easy and quick for a customer to choose the desired gift card.
Track your gift card orders easily
Tracking the orders and keeping their record is a great business practice. The section comprising of gift certificate orders displays the order reference, recipient’s email address, sending date, and the gift card status.
PrestaShop Gift Card Module Compatibility
PrestaShop Gift Card Module is multi-store compatible, has multi-lingual support, and also provides GDPR compatibility. It is also compatible with every PrestaShop version from 1.6 to 1.7.
Finally, The holiday season is approaching and it is the best opportunity for you to start selling personalized gift cards in your store. With our Gift Card module, it becomes easy to put up different types of gift cards on your website.
For any assistance or query regarding this module, reach out to us at support@knowband.com
Imagine if WhatsApp could only be used on a browser! Every time you have to browse it, you open Google, type the URL and then access it.
This would have created immense frustration among users. Thankfully, it is not the case. It was launched as an app and all it requires is just a single tap to open the application.
Today, the count of smartphone users having access to the Internet is huge and in this rapidly evolving eCommerce world, the demand for mobile apps has increased significantly.
Consumers look for convenience. For every small need, they demand a mobile app and this is the reason why mobile apps have gained huge popularity.
In this write-up, I have talked about mobile app marketing and put forward my views on some effective ways to promote your mobile app. Before we begin, let’s check a few stats around the mobile app.
– The number of mobile app downloads, worldwide, in the year 2019 crossed the 200 billion mark and the revenue generated through mobile apps was found to be 462 billion USD.
– As of the last quarter of 2019, the number of apps available on the Google Play Store and the iOS store was 257 million and 1.8 million respectively.
According to the reports shared by App Annie, the mobile app downloads are expected to hit the 258 billion mark by 2022.
Mobile App Marketing Strategy
If you have set up a mobile app for your business, here is how you can promote your mobile app and boost your downloads.
1. Create Awareness
Just like when the shooting of a movie starts and the news related to it circulates to the fans, you should follow a similar approach to promote your mobile app.
When your app is in the development stage and is ready to be rolled out soon, create awareness about it in advance. Let your target audience know what they can expect from your mobile app. Give a sneak peek of its UI and features. Put simply, you need to arouse curiosity in your target audience.
Highlight the mobile app download link on your website, and it should definitely be on the Home page. You can display it through a header strip or a footer strip. Just make sure that it is easily noticeable but at the same time, not hampering the user experience.
Besides, you can make use of popups as well for its promotion. Design a clean and appealing popup with a compelling call-to-action.
3. Promote through your Blog
Having a blog keeps your visitors updated about any news, information, or launch related to your brand. And for your mobile app marketing strategy, a blog is a useful asset.
Let the readers know that you have launched or about to launch a mobile app to make their experience even better and smoother. Inform them about the journey of your mobile app development, tell them how convenient it would be for the users.
4. Reach out to your Email Subscribers
One of the best strategies for mobile app marketing would be to promote it in front of your email subscribers. Informing them about the launch of your mobile app can boost its downloads. Communicate with them at regular intervals to make them familiar about your mobile app.
You can also ask your email subscribers to drop feedback about your mobile app. No one can provide you with better feedback than your loyal subscribers. Ask them about its performance, their experience with the app, or if there is something that they feel should have been added or needs to be improved.l
5. Mobile App Marketing using Video
Videos are powerful in capturing user attention. And this is why you should create a video for your mobile app as well. Keep it short and crisp and up to the point.
Do not stretch the video to a point where it becomes boring. You only have a few seconds time to impress the users, try to make the best use of it.
Can there be a better platform these days for promotion than social media? Facebook and Instagram are two of the largest social media platforms and have a huge audience base with people of all age categories. If you have a business page set up on those networks, you can leverage them to promote your mobile app.
Your target audience is probably waiting for you on social media to hear the news of your mobile app launch. Let them know it has arrived.
7. Start Advertising
I wonder if this point would be valid for all businesses as advertising can be a bit expensive and not every business can afford this mobile app marketing strategy.
You can advertise your app on YouTube or if you have a high budget, you can also approach a channel broadcasting unit to display ads on their channel. For budget-friendly marketing, you can take the help of social media ads.
8. Reach out to Influencers/YouTubers
You would have often seen YouTubers indirectly promoting an app in between their videos. Many brands are following this approach to promote their app. They contact a YouTuber who has a good number of subscribers and whose videos get huge hits on the platform. When people watch that video, they get to know about the app.
You too should give it a try. Get in touch with an Influencer or a YouTuber and ask them to promote your app.
9. Submit on App Review Websites
You will find a number of websites on the Internet where you can submit your app and ask the team behind the website to review it. People often visit app review websites to read about the most useful, latest and trending apps.
Once approved and listed on the website, you can expect a handful of downloads from there.
10. Reward
No matter how amazing your mobile app is, making users download it is a challenging task in the initial phase.
You need to entice people to download your app, not through any click-bait but by offering them something for doing that favour. For example, if your business is into food delivery, you can offer them free delivery or 50% discount on the first three orders, exclusively from the app, or like first three rides for free if it is into on-demand booking apps like Ola and Uber.
Plan rewards as per your business.
Final Word
Make sure that your mobile app is perfectly optimized and provides a rich user experience. Keep the app size as minimum as possible. Many users avoid downloading an app just by seeing the app size.
Need an eCommerce Mobile App? Try our native Mobile App Builder; a fully no-code framework to launch shopping apps. Check out:
For any assistance regarding installation and the module functinality, reach out to us at support@knowband.com
Follow the above-mentioned tips related to mobile app marketing and it will surely bring fruitful results. Feel free to express your views by leaving a comment below.
Remember going to the movie theatres and finding out that the show is sold out? Today, we have the facility where we can check out the show timings and book seats accordingly in advance. You make the payment, book the seat and then it doesn’t matter whether the show is houseful or not. You will get your seat for sure. This has been made possible through the online booking system.
The online booking system has facilitated the lifestyle of people. From booking an appointment to booking a hotel room, everything requires only a few finger taps.
There are multiple businesses set up today that provide online booking facilities whether it is about an appointment booking, home cleaning, car or bike rental booking, etc. If you also run a booking business but offline, you should strongly consider taking it online.
What exactly is an Online Booking System?
In simplest of words, an online booking system adds booking facility on your website and lets you provide your customers with hassle-free booking. Having said that, if they want to book a service, they do not need to call and get an appointment, they can simply choose the desired date and time and confirm the booking after successful payment.
The need for an Online Booking System
In this rapidly evolving world where almost everything seems to go digital, not having an online platform could put you far away from your competitors who are providing the same sort of facilities but through an online medium.
You might not be getting too many bookings initially but if the number increases in the future, managing your bookings manually could be quite a challenging task. On the other hand, people have started moving towards online bookings due to shortage of time. So there will be some concerns for you if you do not adopt the online booking system.
Having an online booking system will put an end to the manual work and save a lot of time for you as well as your potential customers.
Benefits of Online Booking System
Here is why you should consider having an online booking system-
1. Time-saving
As I mentioned above, the online booking system saves you a lot of time since you are not required to perform anything manually. You can track your bookings, send regular email follow-ups and most importantly, you can customize your booking system as per your availability.
2. Scale-up your bookings
One of the major benefits of having an online booking system is that your prospects do not need to wait for defined hours to make a booking. All they need to do is open your website, select the day and time for which they want to have a booking and that’s it. All this happens while you are taking a peaceful nap.
With 24×7 online booking service, you can increase your bookings significantly. The unavailability of an online booking platform may compel even your regular or loyal customers to look for other alternatives, and you may lose them to your online competitors that are growing at a rapid rate.
3. Online booking system cuts down your workload
The efficiency that the online booking system provides cannot be achieved with the manual booking process. There will be no headache of receiving calls for booking, you do not need to chase your potential customers over call and get the booking confirmation. Everything would be done in a systematic manner.
4. Boost Your Revenue
You will witness a sharp increase in your bookings if you take your booking system online, which will provide you with more revenue. If you want to dominate your competitors, now is the time to mark your presence.
How to create an Online Booking System?
There are some technical ways to set up your online booking system but I would not go into the technical stuff. Instead, I would suggest installing a plugin to make your task easy.
Depending on the eCommerce platform you choose for your online booking system, you will find a number of eCommerce development services providers that will do the needful for you.
We, at Knowband, also offer online booking system facility for PrestaShop and OpenCart platform. So, if you are having a website on either of these platforms, you can have a look at-
The booking and rental system module lets you add appointment bookings, hotel bookings and rental booking facilities to your website. It is a feature-packed module that ensures that your potential customers enjoy a hassle-free booking experience on your website.
From adjusting the booking price as per different days and timing to turning off booking facility for specific days in a weekend, the module provides you with lots of configurations.
For PrestaShop store merchants, we have a special module which is a combo of PrestaShop Mobile App Builder and PrestaShop Booking and Rental System. Check out-
No tiredness, no workload, easy bookings, and almost double revenue, that’s what an online booking system does for you. And you can manage your bookings comfortably with Knowband’s booking and rental system module.
One important suggestion- Make sure that your booking website is responsive. Do not shift your entire focus on optimizing it particularly for desktop, it should be mobile-friendly so that your mobile users do not find any trouble while creating a booking.
For any assistance, you can reach out to us at support@knowband.com
Often while online shopping, we all end up praising a few applications whereas uninstalling some of them. There might be various factors behind the satisfaction but, next-level creativity to serve users better is one of the primes. Worldwide mobile shoppers prefer to choose that eCommerce mobile app only with whom they feel comfortable and reliable.
That’s where user engagement comes into the picture for a shopping app. Be it credits awarded for shopping or money cashback, the mobile apps have all such necessary tactics to improve user connectivity & brand reputation.
Further, most eCommerce stores have already acknowledged that user engagement via the Mobile App channel is much better when compared to their website. This might make you wonder about the ways to achieve it for your eCommerce Mobile App? Well, this article covers all such tips and tricks. Just give it a read and you’ll get to know all the secrets.
TIP: User On-Boarding & Welcoming
The majority of newbie mobile app users either come to know about the app via website or directly from app store. In both cases, they expect to have a friendly & un-complicated first impression of the app. Hence, to improve the user onboarding, you can have:
1. Social Logins/ Signups:
It makes easier for the users to register/sign-in to your shopping app. The cluttered login process might annoy customers. The most common and better approach is to offer various social login options like Facebook, Google, etc. Also, various modern apps come up with inbuilt Fingerprint & Phone No (OTP) login.
2. Quick Tutorials For New App:
A simple 3-5 step tutorial screens help to guide new users about the basic functionalities of the apps. Though everyone is aware of the basic shopping app working, yet the tutorials will do no harm. Instead, they will save precious time for users.
3. Welcome E-mails & Messages:
During signup in an eCommerce mobile app, you can set up an automated sending of welcome E-mail & SMS. This might sound like very common but have been proven to be much helpful in gaining users’ trust and reliability.
TIP: User-friendly Navigation:
The tab bar, navigation menu & other countless features in an app must be made to function in accordance with the dimensions & features of smartphones/tablets.
1. Sticky Menu:
In mobile devices, the toggle menu on the navigation bar should be a ‘sticky menu’ so that the user needn’t scroll all the way to the top in order to access the menu.
2. Product List & Grid View:
As per their preferences, mobile shoppers get to choose either a list view or grid view to browse products. Both of them should offer a more precise & detailed view of the products.
3. Browse Products Horizontally:
It’s a common style for shopping apps to have vertical swiping in order to browse products. Along with that, an additional feature can also be added offering left & right swipes. It further enhances the user experience & engagement especially for the millennials who are fond of quick & seamless browsing.
TIP: Personalization Of Apps:
As per various survey reports, millennials are frustrated with the irrelevant emails & notifications being shared with them. They, being a major percentage of e-shoppers, must be served with personalized newsletters & notifications.
1. Push Notifications:
Push notifications on the mobile devices are quite an efficient tool to drive sales for your store. The personalized notifications have proved to boost user retention & conversion rates by 3 times when compared to email campaigns & web notifications. Using your creative and design skills, leading users to a successful purchase is more facile.
2. Newsletter Subscriptions:
Out of all categories available on shopping websites/apps, users may want to opt-in for selective newsletters. For example, the female app audience on a clothing e-store may want to follow up with the newsletters of only the ‘Women Apparels’ section. Hence, to have better user engagement, such personalized opt-in newsletters popup forms must be configured on a Shopping App.
3. Multi-Lingual & Multi-Currency Support:
For personalization of the app & catering to international customers in a better way, multiple languages & currencies should be available in the apps. For Arabic, Persian & similar languages that follow right to the left pattern (RTL), should be made compatible as well.
TIP: Simpler Product Search:
1. Layered Navigation (Filter & Sort):
Easy navigation has always been a prime requirement for eCommerce apps. With filtering and sorting of products, it is just a matter of moments for users to find their desired product. This feature improves user-experience by narrowing down the time spent on successful purchases.
2. Wishlist:
Wishlist functionality aids customers with shortlisting the favorite products that they are willing to buy. Certainly, this saves the user time by displaying the bookmarked products on a single screen.
3. Social Sharing Of Products:
The users get to share eCommerce mobile app products on social media channels like Facebook, Google, etc. This way, the existing users can lure the potential audience available on various social networks.
TIP: Offers/ Discounts & Banners:
1. Flash Sale (Time Based):
Most shopping websites & apps use the strategy to create an urgency for online product purchases. This has been already proven quite helpful for online retail biggies. Offer timer-based countdown sale on your app & encourage customers to buy products as soon as possible. With the limitation, online shoppers tend to purchase more quickly.
2. Discount Vouchers & Coupons:
Discounts are everyone’s favorite and play a huge role in increasing sales. All such vouchers & coupons running on your website should work seamlessly in your eCommerce mobile app as well.
3. Gamified Email Subscription:
You would have observed a gamified ‘Spin & Win’ wheel-like interface on some eCommerce websites. The user who spins its digital wheel wins a discount mentioned in the pie. Some sections may even state ‘try your luck next time’. Whether the user gets a desirable discount or not, either way, he/she ends up submitting E-mail address. The outcome here is solely beneficial for remarketing purposes. The users also get an interactive interface to gain offers.
TIP: Feedback, Loyalty & Reward Points:
1. Feedback:
Often, we all receive in-app feedback popups that ask-
‘How would you rate us out of 5 stars?’
‘From a scale of 1 to 10, how likely will you recommend us to your friends?’
Such surveys help the e-business to be aware of their weak areas are opens the doors to improvisation and improvement. It also ensures to serve customers in a better way.
2. Customer Loyalty:
You can award frequent shoppers with loyalty cards that can be used as a discount coupon while next purchase. Improving customer loyalty in your eCommerce mobile app can be a direct boon for your sales.
3. Reward Points:
On each online purchase, an eCommerce mobile app rewards its customers with some points. Upon accumulating such points & reaching a limit of say 1000 points, customers receive major cashback & offers. This encourages customers to shop more from the app.
4. Referral Points:
You can provide a unique referral code to each of your app users. When the user encourages another newbie user for signup using his/her referral code, you can award the former one with relevant reward points.
TIP: Live Chat For Instant Support:
1. Social Chat Options:
Your mCommerce shopping app with inbuilt chat support will allow users to communicate in case of any issue. For instance, WhatsApp & Zopim (Zendesk) chat in the mobile app is more likely for customers to get the required assistance.
2. ChatBots:
Many applications also have a chatbot integrated with them. It further offers more opportunities to even set automated messages for certain types of pre-defined user queries.
TIP: Checkout & Payments:
1. Favorable Payment & Shipping:
We all prefer our favorite payment method when it comes to making online transactions. That too in online shopping, the users tend to leave products in the cart without successful purchases in case of unavailable payment options. The store admin should keep in mind to add all necessary shipping & payment methods on the eCommerce shopping app. This can be a prime measure to reduce the rate of cart abandonment.
2. Handy Checkout Process:
Ask only the necessary details on the checkout screen. The one-page checkout in eCommerce mobile apps requires only essential order related entries before leading to the payment screen. This way, the user even gets to review the complete order before the final purchase. Having a single screen checkout aids the users from backing out of lengthy form fillings. It engages better with the users & helps in achieving high conversion rates.
3. Order Tracking:
The order tracking feature in mobile apps must allow the customers to be aware of the whereabouts of the placed orders. The mobile shoppers can keep an eye on the delivery of the previous purchase items. Keeping a potent tracking option will also motivate users to prefer your app again & make more purchases to increase revenue.
Summing Up:
For eCommerce Shopping Apps, these are some of the trendy ways to engage more users in an organic way. It not only improves the sales but also builds a good brand reputation. These days, most of the shopping apps are built using a readymade tool like eCommerce Mobile App Builder. It handles the complexities and burden of e-store owners for the creation and management of shopping applications. Having listed all the prominent mobile app user engagement tips, I hope you find this article helpful.
Check out Mobile App Builder for various eCommerce platforms:
Going by the name, PrestaShop Mobile App Builder is a readymade tool to convert your online eCommerce store into mobile apps. The plugin offers a chance for all PrestaShop store merchants to switch their website business on mobiles.
Every eCommerce business is somewhere in the struggle to improve their online presence among the surrounding competition. Having a mobile commerce application can simply help in targeting the huge audience & boost sales.
Creating Native Apps With This Extension
You will be amazed to know that PrestaShop Mobile App Maker is completely code-free. If you’re not a coder or more of a technical person, this is the perfect solution. The PrestaShop Mobile App extension allows anyone with a running PrestaShop website to own a pair of native apps. All you need to follow these 3 steps:
Step 3: Review apps & get them published on app stores.
Easy, right? Free of cost initial support & one-time payment with this plugin are cherry on the cake.
Other Compatible Modules
Every online business has a different set of audiences with separate requirements. This thought has been well kept in mind while designing the PrestaShop Mobile App Creator. The result of this is the module comes with endless possibilities of customization and integration. All you need is to just ask & our developers will make that work in apps.
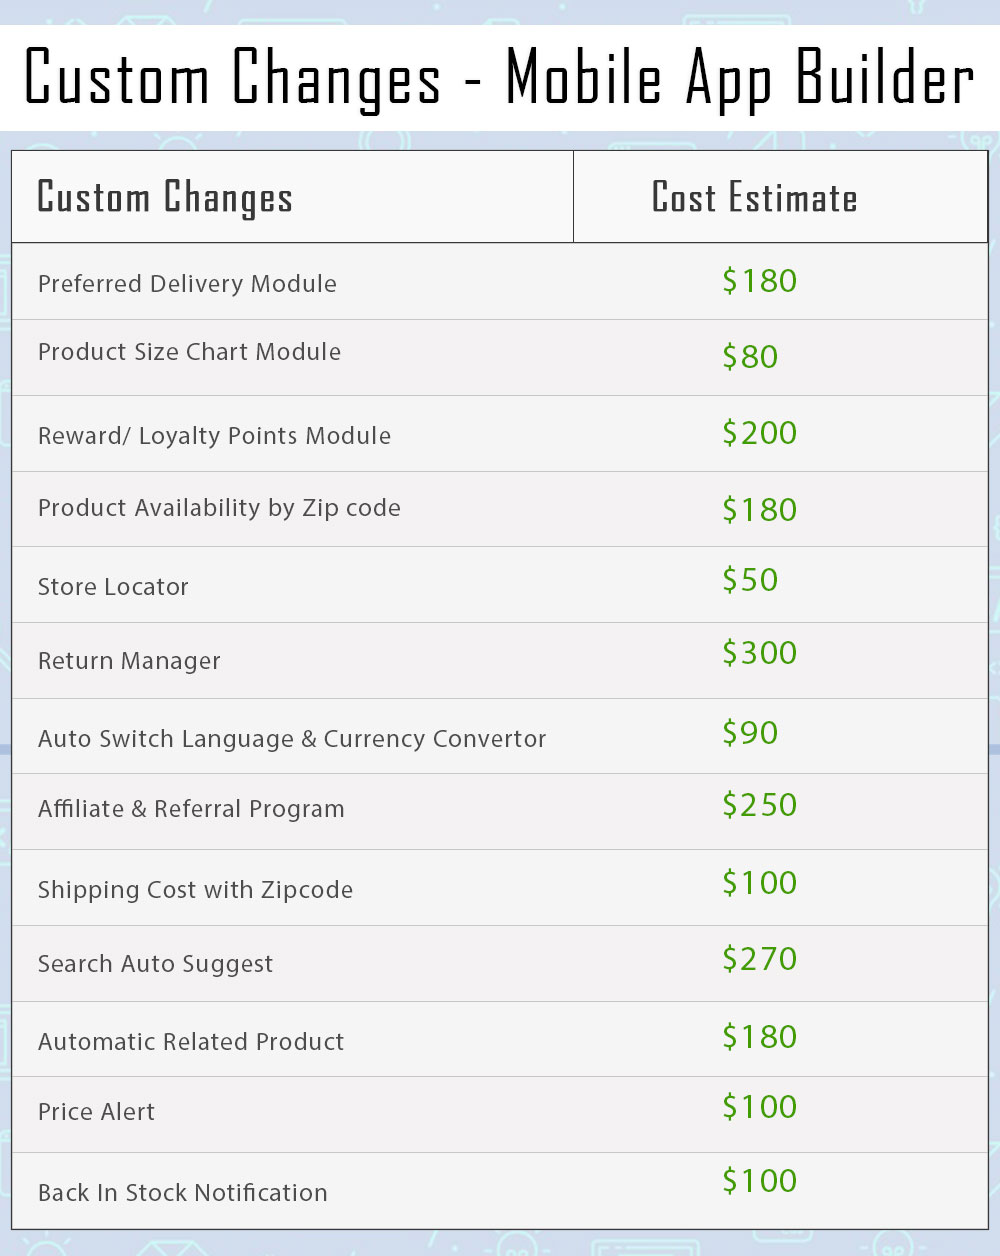
Note: All sorts of custom changes are subject to additional costs based on the involved time & efforts. Although, the prices will be kept as reasonable and fair as possible.
Here is the list of a few modules which can be made compatible with PrestaShop Mobile App-
1. Product Size Chart
When it comes to purchasing a clothing item, online shoppers often have doubts regarding product size. They are not sure which size would be a perfect fit for them. This eventually leads to customers placing a return request later because of the size issue.
Let finding the appropriate size product not be a problem anymore for your visitors. The Product Size module adds a “View Size Chart” section on your product pages, with the help of which shoppers can check the measurements of a product for every size type. This ensures that your customers do not face trouble with the product size.
One of the major concerns for eCommerce businesses is product returns. They cannot be eradicated, however, if managed well, can be reduced by a significant margin. Manage your returns without any hassle with the Return Manage module.
The module offers three types of return choices to your customers: Store Credits, Refund and Replacement. You can set up the return policies, set up the return terms and conditions, track your returns and do much more. The module not only helps you reduce your eCommerce return rate but also improves customer retention.
E-commerce businesses benefit a lot from cross-selling. It is one of the effective strategies implemented by them to increase their store sales. If you run an online business, you should follow it too.
Encourage cross-selling on your website with Related Products module. The module lets you display top-visited products, best sellers, new products and products based on a user’s history. You can customize the display position and filter the products to be displayed as per keywords and attributes.
Many times customers demand the product to be delivered at a specific date and time. Allow this facility to your customers with Preferred Delivery Time module.
The module lets you define a minimum delivery gap to allow customers to choose the preferred date and time. You can specify the time slots, the time cycle for delivery, and also exclude days on which the delivery won’t take place.
A majority of online businesses run loyalty programs today. Loyalty Points module aims to improve customer retention on your website and also builds customer loyalty. It lets you provide loyalty points to your customers on some certain tasks like when they have shopped for more than the specified amount, when they have chosen a specific payment or shipping method, when a user successfully registers, or when a user places an order, etc.
Let customers check right on the product page whether the product they desire to purchase is available for delivery at their location or not.
The module adds a Zip Code verification check on your product pages, using which the visitors can enter their area zip code and verify whether the item is eligible for delivery for the specified Zip Code.
The store locator module encourages the self pick up facility on your website. Many a time, a product reaches the shipping centre on time but takes too long for the delivery. In such cases where customers want the product to reach them as soon as possible, they can choose for a self pick up.
The module lets you add your store addresses from the back-end which are available to the customers on the checkout page. They can filter the stores as per the distance and choose the nearby store accordingly.
If your business is set up internationally or you are planning to do so, the Auto Switch Language and Currency module is a must-have module for you.
The Auto Switch Language and Currency module change the language and currency as per the visitor’s location. It tracks the IP address of the visitors and automatically converts the website content into the native language.
The module helps you expand your business on a global level and makes it easy for outsiders to shop from your website.
Affiliate and Referral Marketing has helped brands gain a lot of new customers and sales. What’s exciting about these programs is that they create a win-win situation for both the customer and the brand. The affiliate brings you customers and you offer them some incentives in return.
With Affiliate and Referral Program module, you can start a similar program on your store. The module allows users to register as an affiliate on your website. Once successfully registered, they can start referring your website to others and earn some exciting incentives for a successful referral. The affiliate can share the referral code, share a direct link, share the link via email, share the link on social media or share the voucher code with other people.
This module lets you charge different shipping prices for different zones. The admin can specify the shipping price for different countries from the back-end. When a shopper enters the zip code in the address fields, he or she will be charged the shipping cost as per defined by the merchant.
The Search Auto Suggest module enhances the search functionality of your website. With the help of this module, you can display the product price right in the search suggestions (in the drop-down list) and also the product category under which the product falls.
You can customize the search bar and also track the searches performed by the user. You can also limit the number of products to be shown on the search results and also specify the minimum letters that need to be entered for the search system to work.
Many times it happens that customers drop the purchase idea because they feel the product price is too high. Now with Price Alert module, the customers can specify the desired price for that product on the product page and get price alert over their email whenever there is a reduction in the product price as per what they wanted.
Online shoppers often get disappointed when they visit a website to purchase a product but find it out of stock. And they have to keep checking back multiple times to check its availability. Reduce this hassle with Back in stock notification module.
The module allows shoppers to subscribe to the product availability alert. Hence, if subscribed, the user will be immediately alerted about the product availability that it is back in stock so that they do not miss out on the purchase.
Did you ever go to any fashion store and started walking out later without purchasing anything because you couldn’t find what you were looking for or the price was too high?
This has happened with almost everyone.
And as soon as the shopkeeper realized that you are on your way without purchasing anything, he tries to stop you either with some discount game or some offers. Sometimes, you agree and sometimes you don’t.
This is exactly what an Exit Pop up does in eCommerce. A majority of the online businesses leverage exit pop-ups to increase conversions on their website.
What is an Exit Pop up?
An exit popup also referred to as an exit-intent pop up is a popup that appears on a visitor’s screen when they intend to take an exit from your website. It is basically a last-minute effort made by website owners to stop visitors from leaving.
For example, if a user is trying to leave your website after abandoning the cart, you can make an attempt and try making him stay and complete that purchase by displaying some enticing offers through the exit pop up.
I usually find exit pop-ups better than any other kind of popup, the reason being they do not irk visitors. They do not disturb the flow and are displayed only when a visitor tries to exit.
Exit popups ensure that the user experience is maintained until the very last moment, unlike other popups that can appear at any point of time.
How does an Exit pop up work?
The exit popup or the exit-intent technology tracks the mouse movement of the visitors and triggers the popup when it captures that the user is heading towards the exit button. It is usually in the form of an overlay pop up.
One thing to mention here is that the popup is not displayed only when the cursor has moved towards the exit button, it is triggered when the user leaves the browsing area.
An exit popup is not always used to display offers. You can customize it as per your requirements depending on what actions do you want your visitors to take after seeing it or what results do you want to achieve through it.
Exit Popup Examples
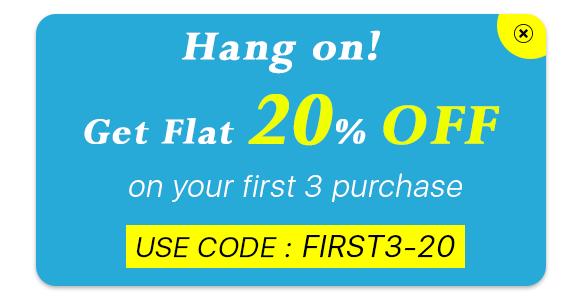
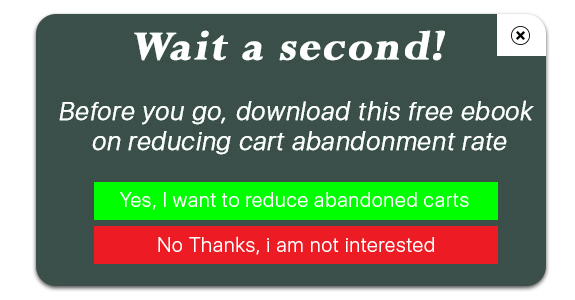
Through an exit intent pop up, website owners primarily aim to capture the email address of the visitors so that they remain in touch with the brand and are often brought back on the website. Brands then try to build communication over email and persuade the subscribers to become their customer.
In most of the cases, an exit popup is used in two ways-
1. To induce visitors to make a purchase using an exclusive coupon code
2. To make visitors download a free guide or an eBook
Exit Pop up Best Practices
Let’s take a look at some of the best practices for an exit popup to achieve good results.
1. Provide Irresistible Offers
The best way to stop your visitors from leaving your website is by offering them something which they can’t resist to grab.
Offer something exciting. It should be worth their attention and should encourage them to claim that offer instantly. If the offer doesn’t excite them, the pop up will fail to bring conversions.
2. Make it Visually Appealing
If you want to make an impact with the exit intent pop up, make sure it is highly appealing and designed in such a way that users are not disturbed by it and feel the need to check it out even when they have decided to leave.
Use attractive colour combinations, pay attention to what font you are using, write tempting content and most importantly, make your CTA, i.e. call to action stand out. Do not use common CTAs like Sign Up or Subscribe, use the ones that create urgency.
3. Use it to Collect Feedback
Exit Popups are also used to collect the feedback of the visitors. Ask them if they have any suggestions to provide or have any complaints or anything that they feel is missing or needs to be improved.
Benefits of an Exit Popup
An exit pop up provides you with some amazing benefits.
1. Boost Conversions
No other pop up draws the visitor’s attention as much as an Exit Pop up. The effectiveness of pop up doubles when it is displayed to the user when they are only focused on taking an exit. It is not the same when the user is browsing some stuff and is interrupted by a pop-up.
Through exit popups, you can reduce the cart abandonment possibility and eventually increase your conversions.
2. Reduce Bounce Rate
If a user lands on your website and does not find anything helpful, most likely they will bounce off. And while they try to leave, an exit pop up could be of some help and it can encourage them to check out your website.
3. Exit Popups are not annoying (Usually)
Pop-ups have mostly been an annoyance for users. They hamper the user experience. But this is not the case with Exit Popups because they appear only when the user has already decided to leave your website and there is no harm in making a try to stop them from leaving.
Exit Pop up Module by KnowBand
The Exit Pop up module by KnowBand is a feature-packed module that allows you to make tons of customizations to the pop-up and adjust the popup functionality. For example, you can set up the pop-up frequency, hide the pop up after a few seconds automatically, and do much more.
The interesting thing about this module is that it not only works as an exit pop up but also as entry pop up. You have the option to disable it anytime and can use it particularly when users try to exit. Check out-
Did you know approximately 148 million travel bookings are made every year and the sales made through travel bookings are expected to hit an $817 billion mark? [Source: Condor Ferries]
The market is expanding rapidly and more and more people are entering into the business of travel niche. And if you are also looking to open a hotel chain, it could be worth a move.
People love going on vacations and exploring places with their family and friends. Once the plan is confirmed, the first thing that they look for is some of the best hotels around that region.
They open Google, type their query and a list of hotel booking websites appear in front of them. Then they check out a few websites and choose the best one.
How does a visitor decide which is the best hotel booking website? Well, there are a number of factors based on which the user comes to a conclusion. And this is what I would be covering in this blog post.
In this write-up, we will discuss the best practices for a hotel booking website like what should be the basic steps that you should follow if you are thinking to open a hotel chain.
1. User-Friendly Interface
A clunky, cluttered website will leave a highly negative impression of your brand. As soon as people enter your website and find it too difficult to browse, they would take an exit within a fraction of seconds.
For a hotel booking website to capture the immediate attention of visitors, make sure you have given it an attractive look. The use of eye-catching visuals, high-quality hotel images, appealing home page layout, can make a strong first mark.
It should be designed in such a way that users feel irresistible to leave your website. This is why having a user-friendly interface becomes highly important here. Everything should look clean and organized.
2. Make it easy to search Hotels
Your site search functionality should make it extremely easy for the visitors to search for their query. Primarily, allow users to enter their destination, check-in and check-out date, number of guests, number of rooms so that they have a relevant list of hotels to choose from.
The search bar in your hotel website should be made large and clearly visible so that it is immediately noticed by the visitors. Apart from the home page, it should be visible on every page that the user navigates. Do not compel users to come to the home page to conduct a search.
3. Display Hotel Ratings
When I say display hotel ratings, I do not mean the ratings given by the customers to a particular hotel but the star rating of that hotel. For example, some budget-friendly hotels can be 1-star or 2-star, average hotels can be 3-star. 4-star and 5-star hotels are slightly expensive with more facilities.
Highlight the hotel star rating clearly even on the search results and let customers choose what kind of a hotel type they want for their stay.
Besides, you can also mention the ratings defined by the customers. This gives the user an overview of whether a particular hotel is worth booking or not. People will usually ignore hotels that do not have positive ratings. This can save a lot of time for the visitors.
4. Sorting and Filtering
When a user has made the search, make their task more easy by providing with them with the sort and filter option.
A hotel booking website might display a lot of hotels to users with different sort of booking price and ratings. Let them sort the hotels as per the price (low to high and vice versa) and filter the hotel type and hotel ratings. It will present a more specific and relevant list in front of the users.
5. Display Room Category, Room Type and Hotel Amenities
Most of the hotel website owners list the hotels into a few categories such as Budget hotels, Premium hotels, etc. And you should do the same. A visitor looking for a stay at a reasonable price would look for budget-friendly hotels whereas someone who wants more services would go with a premium one.
Similarly, you can categorize the room type as well, for example, specify if it is a single bedroom, double bedroom, Queen sized bedroom, King-sized bedroom, twin bedroom, etc.
Lastly, display hotel amenities. Let the customers know what they can expect from your hotel and rooms. Hotel amenities could be like parking facility, swimming pool, etc. and for rooms, in particular, it could be whether the room as AC or Geyser installed, television, etc.
6. Let the Hotel pictures speak for themselves
It is all about visuals when it comes to a hotel booking website. People want to book hotels where they can expect hygiene and comfort. There can be some other factors as well but these two are usually the top priorities.
Most of the people book a hotel by checking the hotel conditions through pictures. Only if they find the look comforting, they make the booking.
Visuals leave a significant impact and this is why adding amazing pictures of the hotel is one of the best practices for a hotel website. Hotel pictures should contain the look of the hotel from outside, pictures of reception, sitting area, floor, rooms, washrooms, etc.
The more satisfying the hotel looks, the more will be the chances of a user making a booking. If there are some hangout spots nearby, you can include them too.
7. Show what Customers have to say
Help your visitors in choosing the best hotel by displaying hotel reviews. Let the prospects know what the previous customers think about the property, how has been their experience, what did they find good, what did they find bad.
Reviews influence people in their decision. And if the hotels listed on your website have good reviews, it would hardly take time for a user to make a booking.
8. Integrate Google Maps for Easy Navigation
Instead of just displaying the hotel address and expecting the potential customers to search for the location on Google Maps themselves, wouldn’t it be great if you could add the location through Google Maps on the booking page itself?
Visitors would not have to leave your website and then open Google Maps and enter the address. They just have to turn on their location and the destination would be already added. This makes it convenient for people to reach the hotel without any hassle.
9. Provide Hassle-free booking
Make it easy for your visitors to book a hotel. Have all the major payment options on your payment page including e-wallets. A majority of the people are taking the help of digital wallets for conducting a transaction.
You can also allow users to pay the amount at the time of check-in, and to avoid any cancellation at the last minute, you can ask for a little payment in advance for confirmation.
10. Optimize your website for Mobile
Today, any website, be it a hotel booking website or any eCommerce website, needs to be responsive. Most of the transactions are taking place through mobile devices. So it’s vital that your hotel website is mobile-friendly else you may face a heavy downfall in your mobile conversions.
Your mobile users should be able to enjoy the same browsing experience as your desktop users, in fact, more than that. Therefore, it is highly recommended to optimize your hotel website for mobile if you want to double your sales.
Add the Hotel Booking Facility on your website with Knowband’s Booking and Rental System Module
The Booking and Rental System module by Knowband lets you provide the online hotel booking facility to your customers. In fact, this module is not restricted to hotel bookings specifically, you can also add an appointment booking facility or rental facility through it.
But since this write-up focuses on a hotel booking website, let’s check out what this module has in offer for you.
With the Hotel Booking System, you can
– Specify the hotel name and add a description about it
– Set up an upfront booking price
– Specify the hotel rating
– Display hotel location via maps
– Add hotel images
– Specify the booking period
– Adjust the price as per days and time slots
– Specify the minimum and maximum days for which a booking can be made
– Set the check-in and checkout time
– Specify the room type and room category
– Specify the maximum number of children and adult allowed for a particular room type.
And there’s much more you can do with this module. Try out this module for PrestaShop and OpenCart
That’s it. These are some of the best practices that you should follow if you are thinking to set up a hotel website and want to know what all elements it should have to make it a perfect fit for you as well as your visitors.
Once you have tick marked all the mentioned points, find out how you can promote your hotel website to bring it to the notice of your target audience. Do proper SEO, promote your business on social media or whatever it takes to reach out to your visitors and bring traffic to your website.
All the best!
If you liked this write-up, do leave a comment below, and for any assistance with the module, you can contact us at support@knowband.com