Reduce Abandoned Cart Rate with OpenCart Abandoned Cart Extension

“Due to higher abandonment rates, websites loose quite huge revenue on a regular basis. High shipping costs, product unavailability, payment security concerns etc can be some of the defined reasons people abandon their shopping cart. Well, there are multiple ways you can implement to bring abandoners back to your site but the one which is discussed here will work superfast to help recover abandoned carts. What if you get an opportunity to communicate with your customers just to remind them to complete their purchase. Will it work? Yes or No..? Okay, so to find answer shall we proceed?

OpenCart Abandoned Cart Plugin functions to help you recover abandoned cart issues by sending email reminders to customers who abandoned their shopping carts for one or the other reason.

Why You Should Install OpenCart Abandoned Cart?

For Increasing Conversions

Abandoned cart reminder emails help capture the lost sales by allowing web store owners to re-target their customers. A reminder mail can be sent to the customer that will have information related to pending orders. Regardless of the reason why your shopper left the cart abandoned, you probably have some time to get him/her back. Therefore, your first email must be sent within an hour of cart abandonment.

For retaining/pulling back customers

OpenCart Abandoned Cart plugin gives you an option to design your own email template. While designing templates, you need to be as descriptive as possible in providing order details. Make sure to include the item, name, description, price, link as well as image for products that remained behind while abandoning the cart.

Increase customer retention by offering tempting discounts

This extension allows store owners to customize email templates by providing discounts on certain purchase. This plugin comes with features to add customized variables like discounts. People love discounts and if you sent emails that notifies them of attractive offers, it is likely that customers will definitely return for completing their purchase.

Personalization

OpenCart Abandoned Cart allows you to customize your emails based on the relevant choice of shopper. By sending such personalized mails, you remind customers of what they were doing, bringing your brand back to their mind. For doing so, you can attach product images along with text and description with links back to see product on your site.

Reducing cart abandonment rate is one of the popular ways to recover lost revenue and maximize customer retention for your eCommerce store. So, install this plugin and convert your abandoned carts into customers via a single email notification.

This Would Also Interest You:

Opencart Amazon Payment – User Manual
How to install Opencart Amazon Payment plugin on your server

Follow the following steps for installung Amazon Payment Method:

1. Install VQmod (if not yet installed, visit
https://code.google.com/p/vqmod/wiki/Install_OpenCart).

2. Unzip the archive and find Upload folder.

3. via FTP manager (like Filezilla or WinSCP – download here: https://filezilla-project.org/)
upload to you main directory the files and folders in the Upload folder.

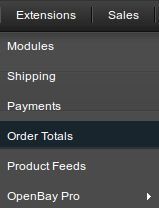
4. In Admin Panel go to Menu > Extensions > Payments > Amazon Payments v1.0.

5. Install Abandoned Cart.

6.That is all – Your system is ready. Click on Edit and configure it.

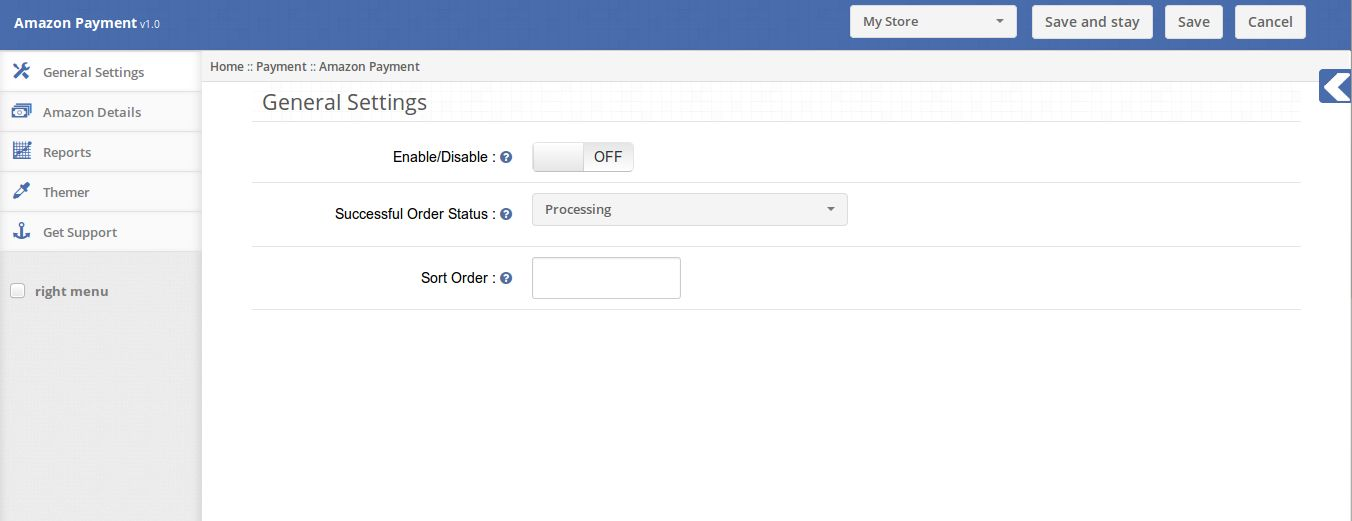
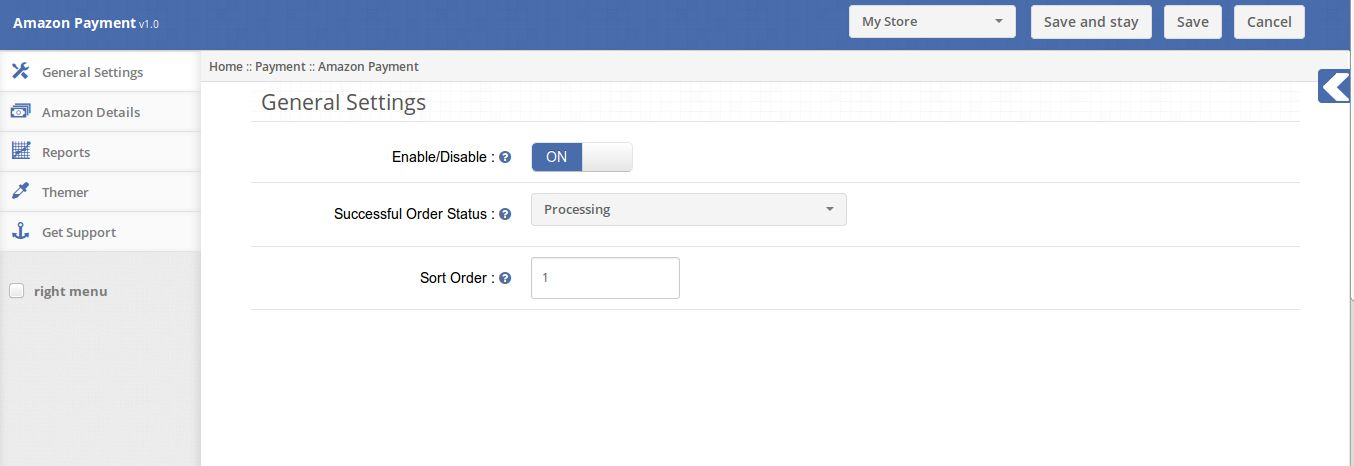
1. General Settings tab

The General Settings tab has following options:

1. Enable/Disable: Enables or Disables the plugin on the store front. If disabled, Pay viaAmazon will not be listed in Payment Methods on checkout page.

2. Successful Order Status: The successful order status will be the status of the order onsuccessful payment from Amazon.

3. Sort Order: The Sort Order is the position on which the Pay via Amazon will be listed inPayment Methods list on checkout page.

2. Amazon Details tab

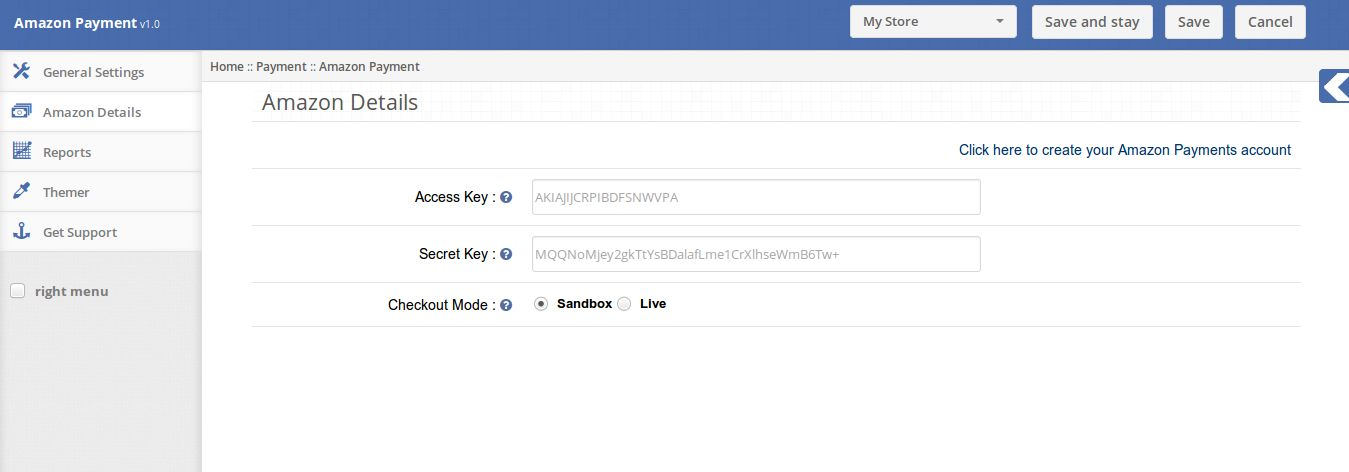
The Amazon Details Tab lets the Admin to provide their Amazon Payment Credentials.

For registering, new Amazon Payment Account click on the Click here to create your AmazonPayments account link and create your Amazon Payment Account.

1. Access Key: The Access Key is provided by the Amazon Payments.

2. Secret Key: The Secret Key is also provided by the Amazon Payments.

3. Checkout Mode: The Checkout will set whether the Amazon Payment acccount which isbeing used is in Sandbox mode or in Live mode.

3. Reports tab

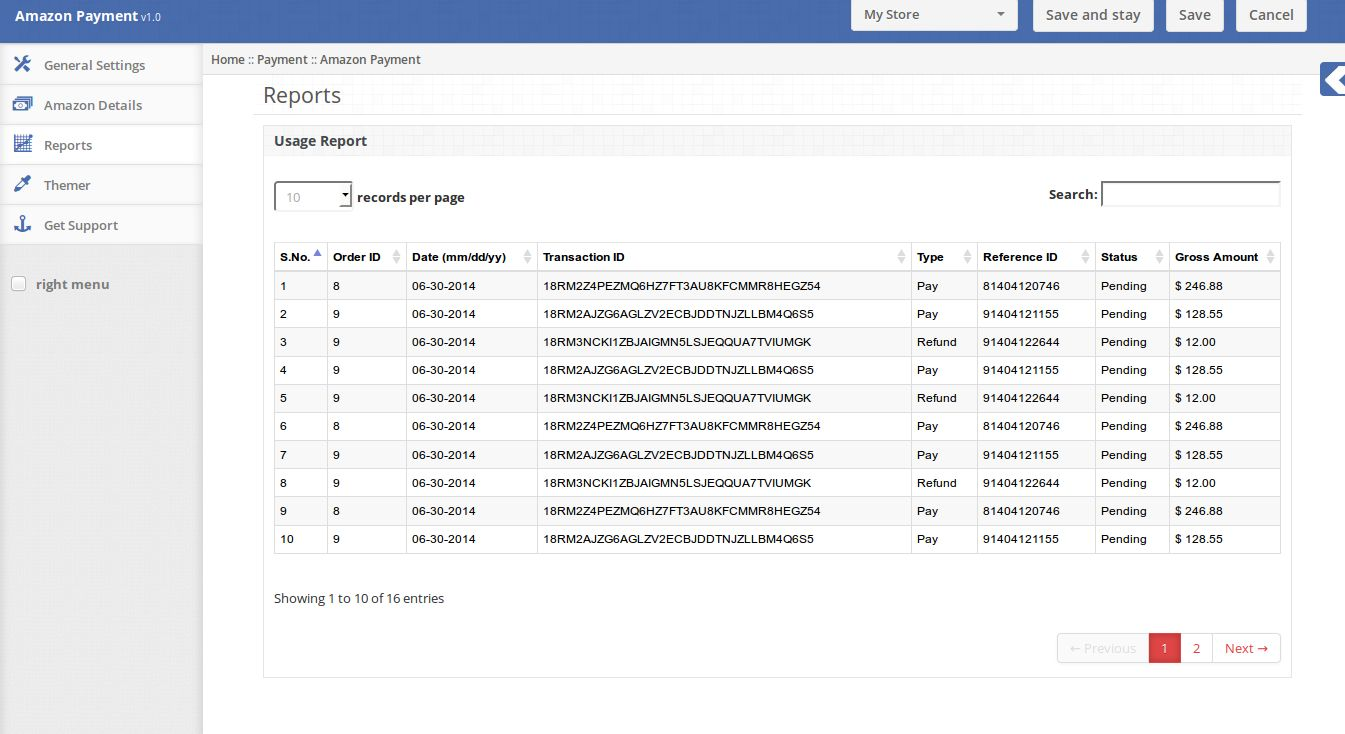
The Report section of the Admin Module shows the list of the orders placed using AmazonPayment Method.

4. Refund Option

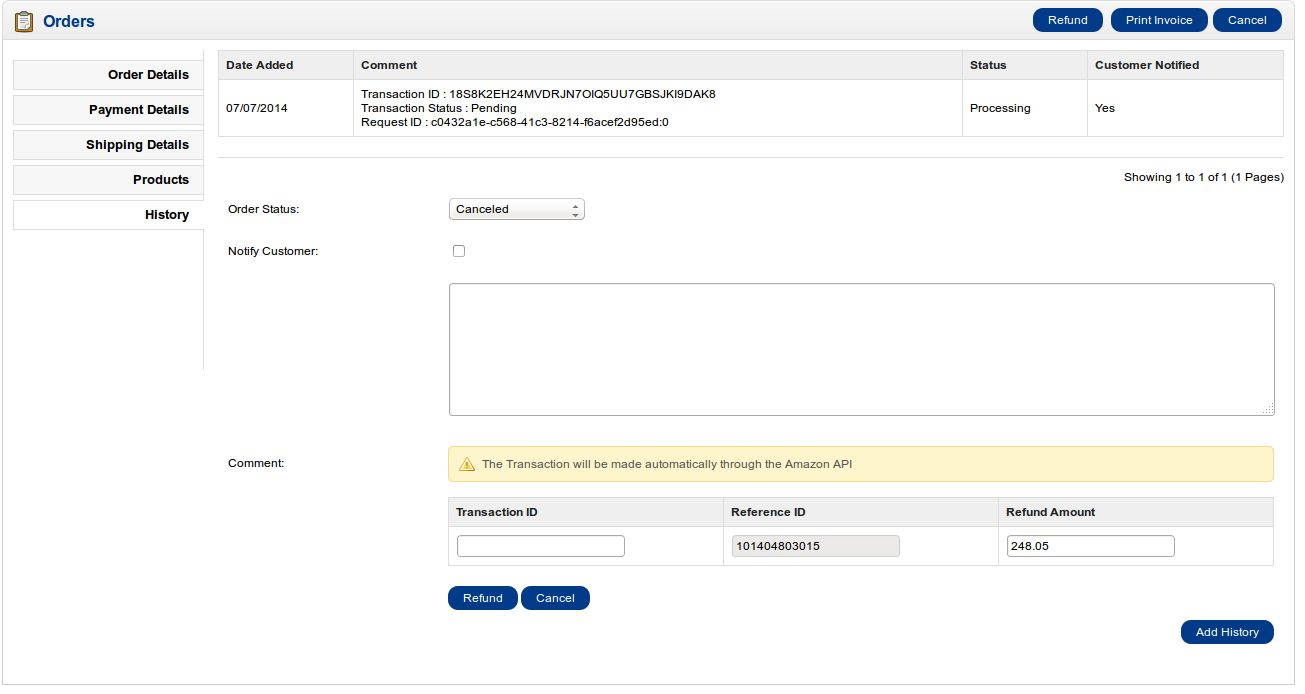
On View Order page in Admin Section of the module the Admin is also able to refund thepayment if the payment is made through Amazon Payment method.

On clicking the Refund button the refund form is visible in which the Admin has to copy pastethe Transaction ID from the order comment table placed above the Refund Form.

Description

Store Front

In the Store Front End the Pay via Amazon method is listed in the Payment Methods list onthe checkout page. When users clicks on Confirm the user will be redirected to AmazonPayments for making payments.

This Would Also Interest You:

Opencart Slideup Promotion – User Manual
How to install Opencart Slideup Promotion plugin on your server

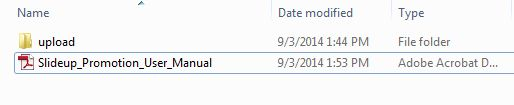
1. Folder structure of the Slideup Promotion plug-in folder.

2. Open the upload folder and you will find the following folder structure:

You must have VQMOD installed for this plug-in to work. If VQMOD is not installed please download and install from the URL below:
https://code.google.com/p/vqmod/

3. Select all the folder and drag and drop them to the root directory of your OpenCart store throughFTP.

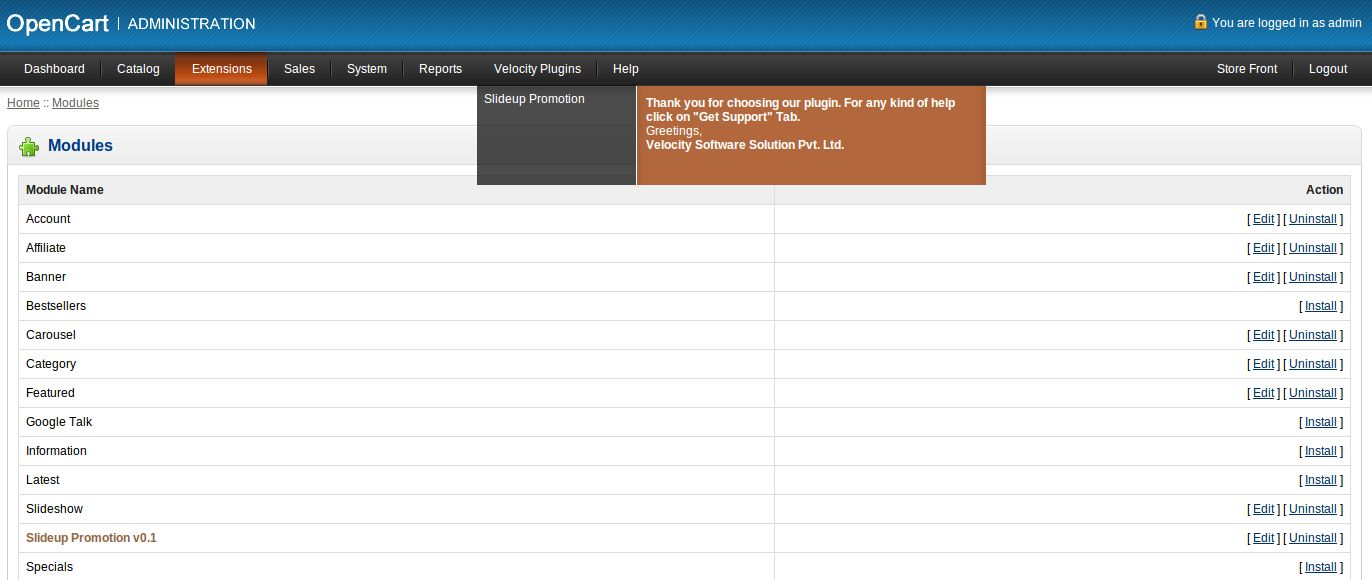
4. You will be able find the plug-in ready to be installed in the Modules in your OpenCart storeas shown below.

5. Click on the Install link to install the plug-in. This will also add a dropdown option in your menu bar which will list all plug-ins by Velocity installed on your store for fast navigation. Thisdropdown also has a message box, using which we can inform you about new launched plug-in ornew update.

6. Delete the Vqcache files from the vqmod/vqcache folder.

7. To access Slideup Promotion plug-in click on edit button in module section as shown below:

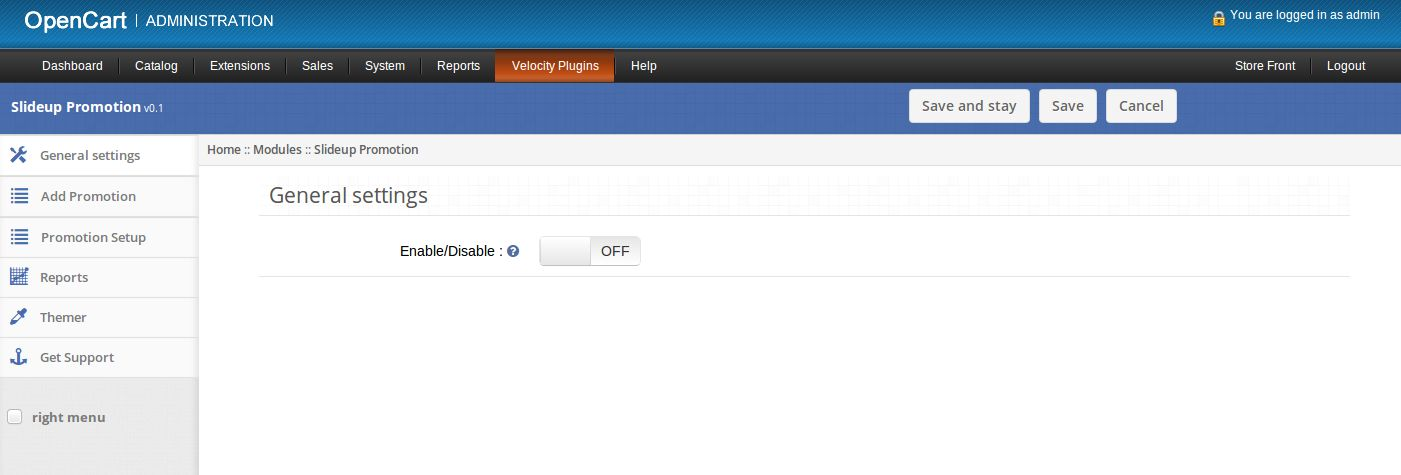
8. On clicking edit button the module for plug-in will open. It contains navigational bar at top, menu at left and main content at center as shown below.

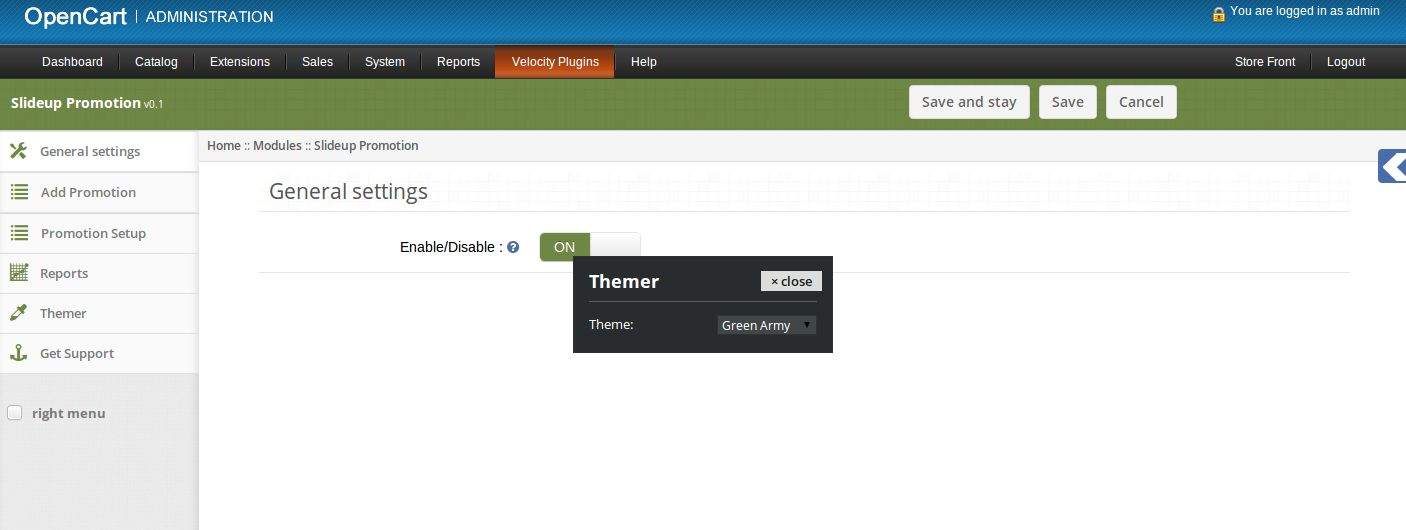
1. General Settings tab

Enable/Disable: Enable or disable plug-in as shown below.

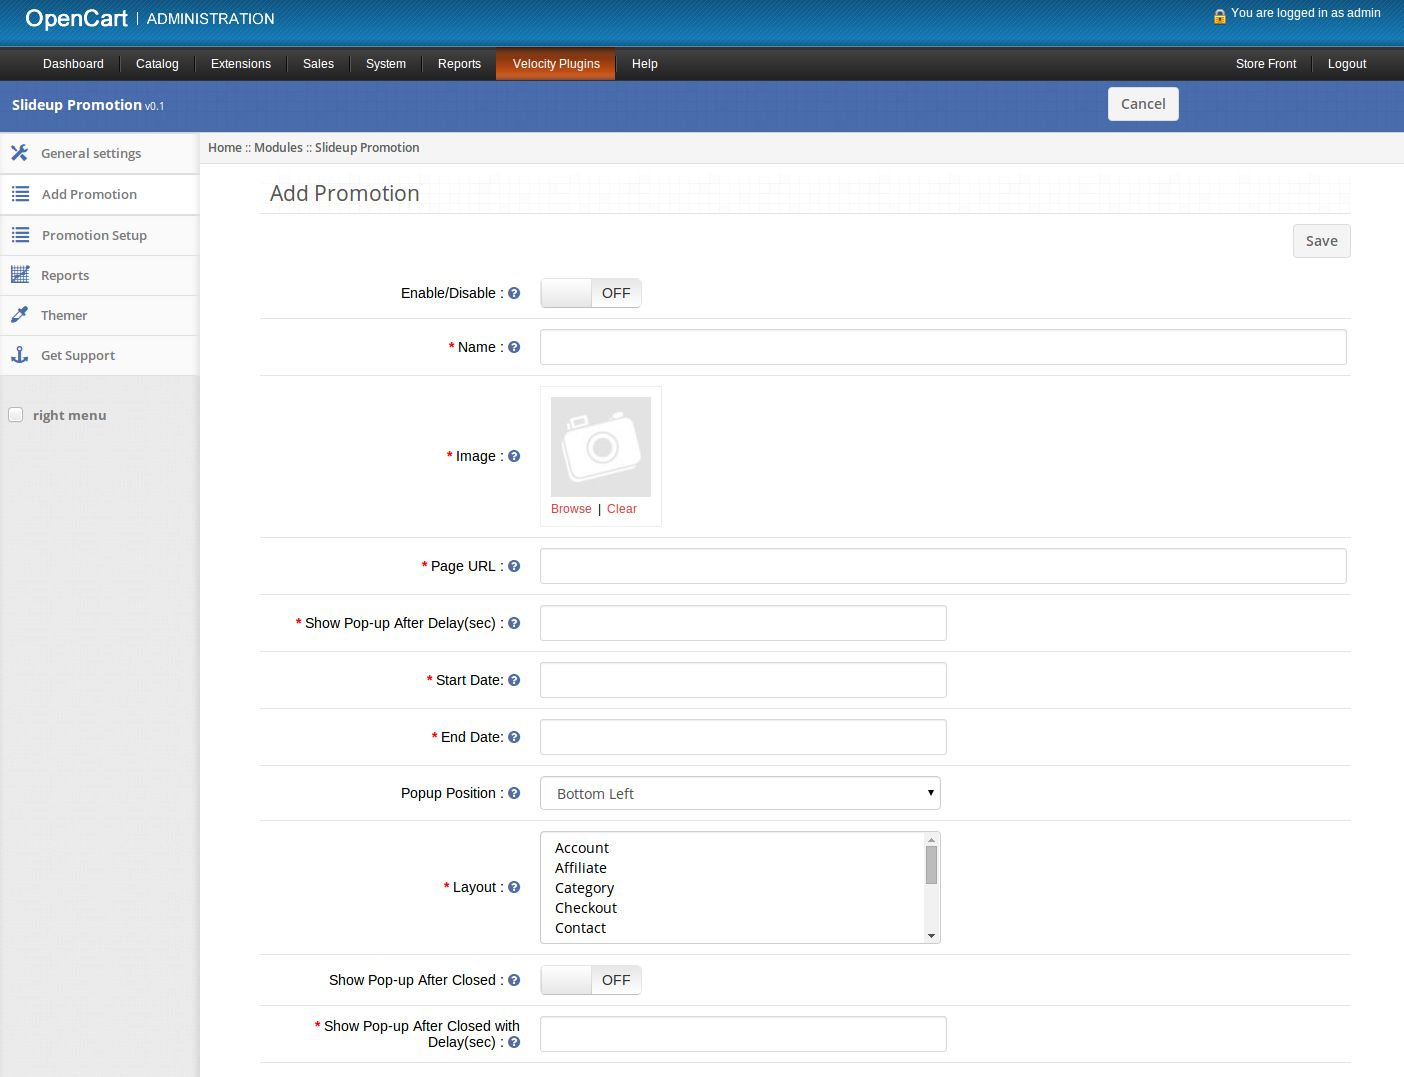
2. Add Promotion tab

1. Here admin can create a new promotion.

2. Enable/Disable: Enable or disable promotion.

3. Name: Set name of promotion.

4. Image: Set image to show on front end in the promotion popup.

5. Page URL: Set url of webpage which should be opened on clicking the promotion popup.

6. Show Pop-up After Delay: Set the delay time in seconds for the popup to appear after page load in
front end.

7. Start Date: Set start date for promotion.

8. End Date: Set end date for promotion.

9. Popup Position: Set the position of promotion popup to appear on front end.

10. Layout: Select one or multiple layouts on which you wish to show the promotion popup.

11. Show Popup after closed: Set on to show promotion popup again after closing the popup in front end.

12. Show popup after closed with delay: Set the time in seconds for promotion popup to appear again
after being closed by customer.

3. Promotion Setup tab

1. Here admin can see list of saved promotions.

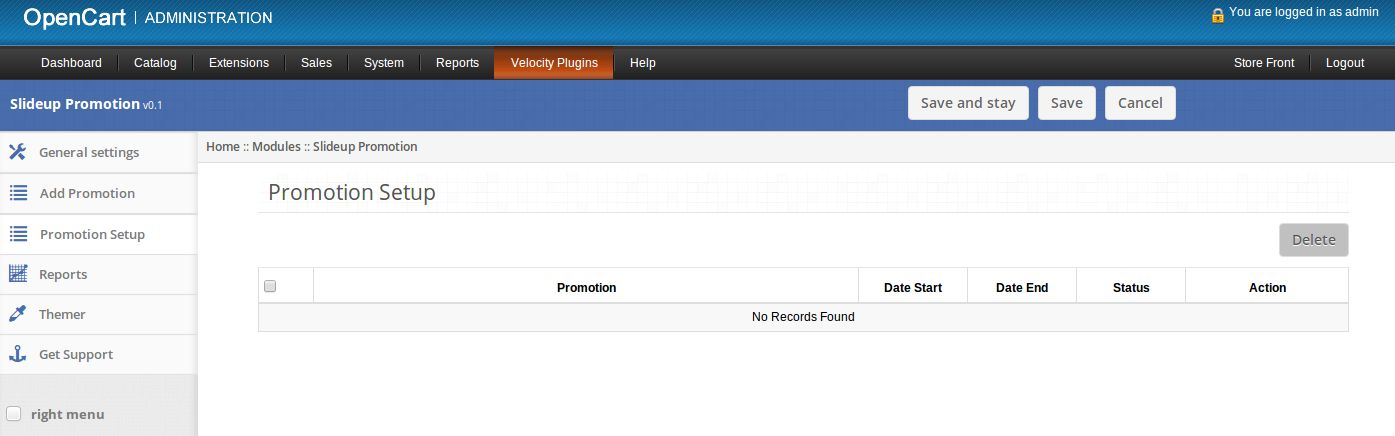
2. If their are no saved promotions then this tab will look as follows:

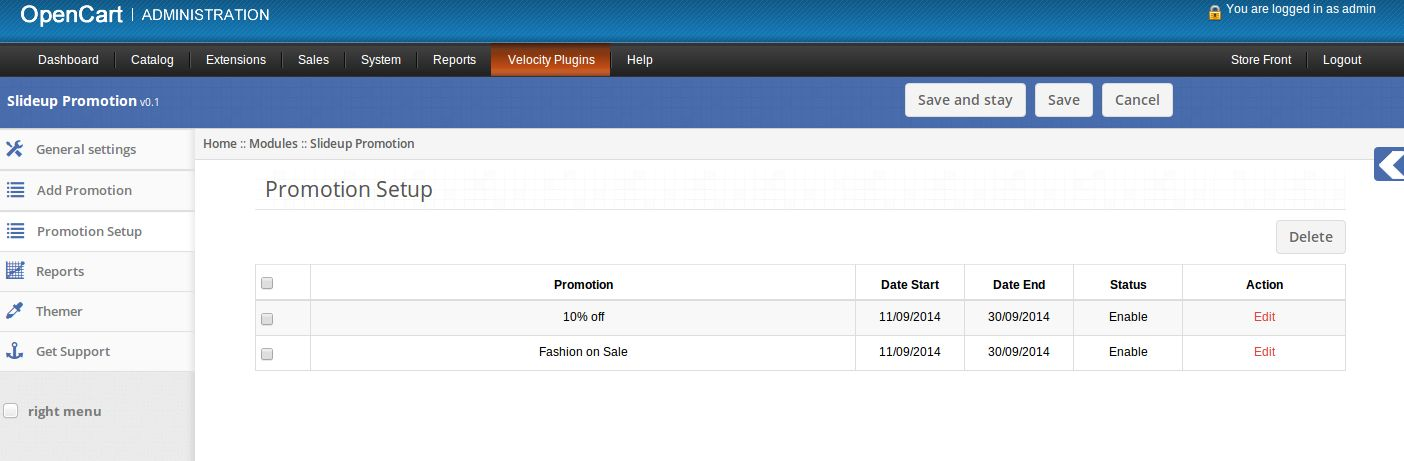
3. If their are some saved promotions then this tab will look as follows:

4. Click on Edit link provided in front of every promotion to edit that promotion.

5. Click on Delete button to delete selected promotions.

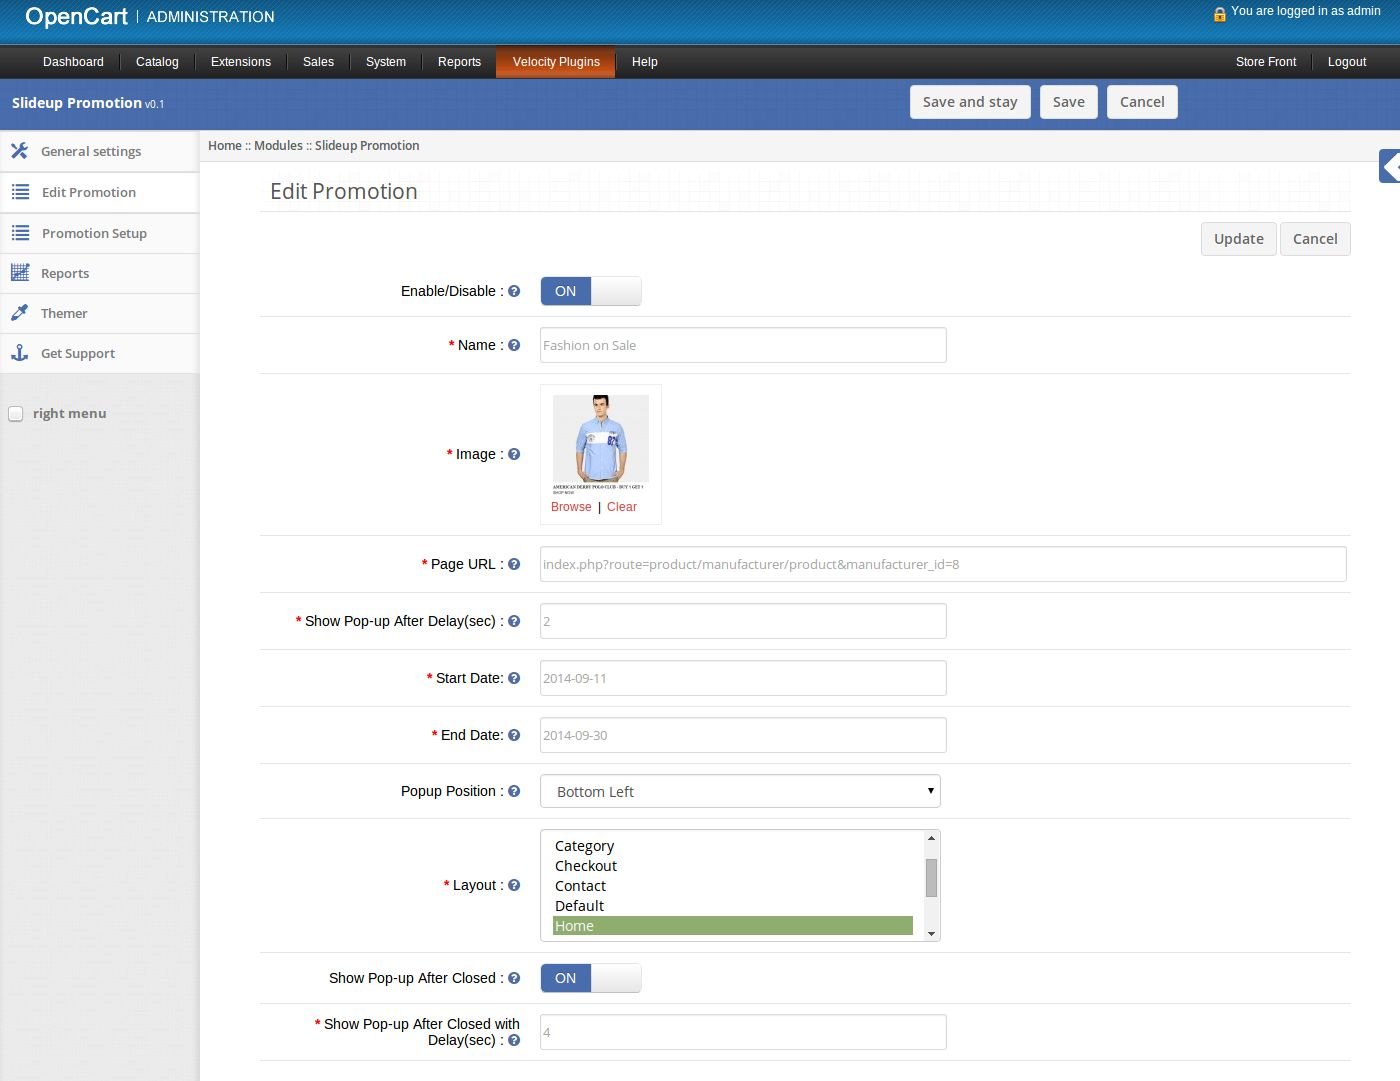
6. On clicking the edit link a form will appear to edit the promotion.

7. Enable/Disable: Enable or disable promotion.

8. Name: Set name of promotion.

9. Image: Set image to show on front end in the promotion popup.

10. Page URL: Set url of webpage which should be opened on clicking the promotion popup.

11. Show Pop-up After Delay: Set the delay time in seconds for the popup to appear after page load in
front end.

12. Start Date: Set start date for promotion.

13. End Date: Set end date for promotion.

14. Popup Position: Set the position of promotion popup to appear on front end.

15. Layout: Select one or multiple layouts on which you wish to show the promotion popup.

16. Show Popup after closed: Set on to show promotion popup again after closing the popup in front end.

17. Show popup after closed with delay: Set the time in seconds for promotion popup to appear again
after being closed by customer.

4. Reports tab

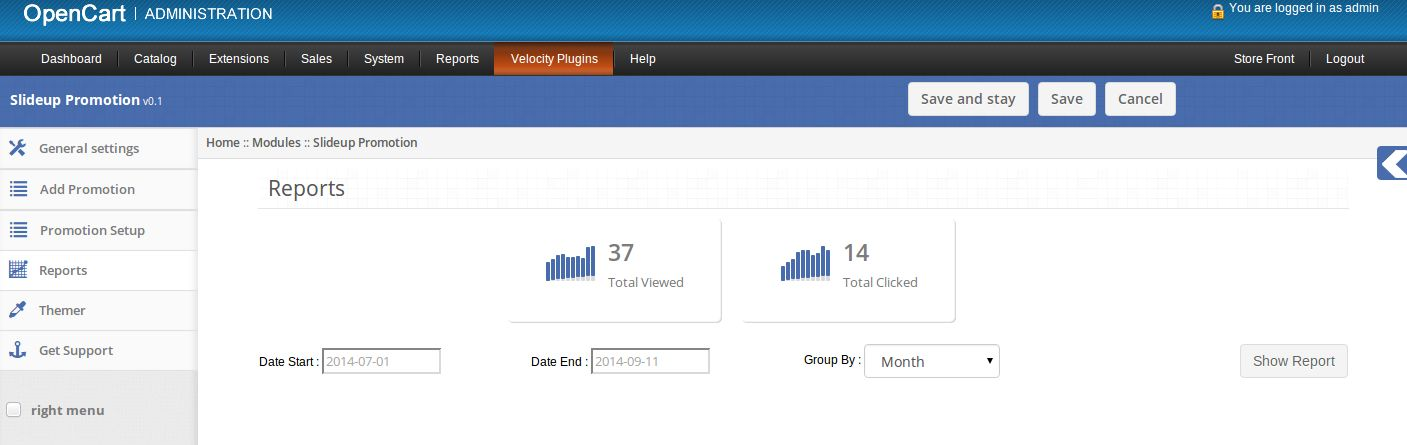
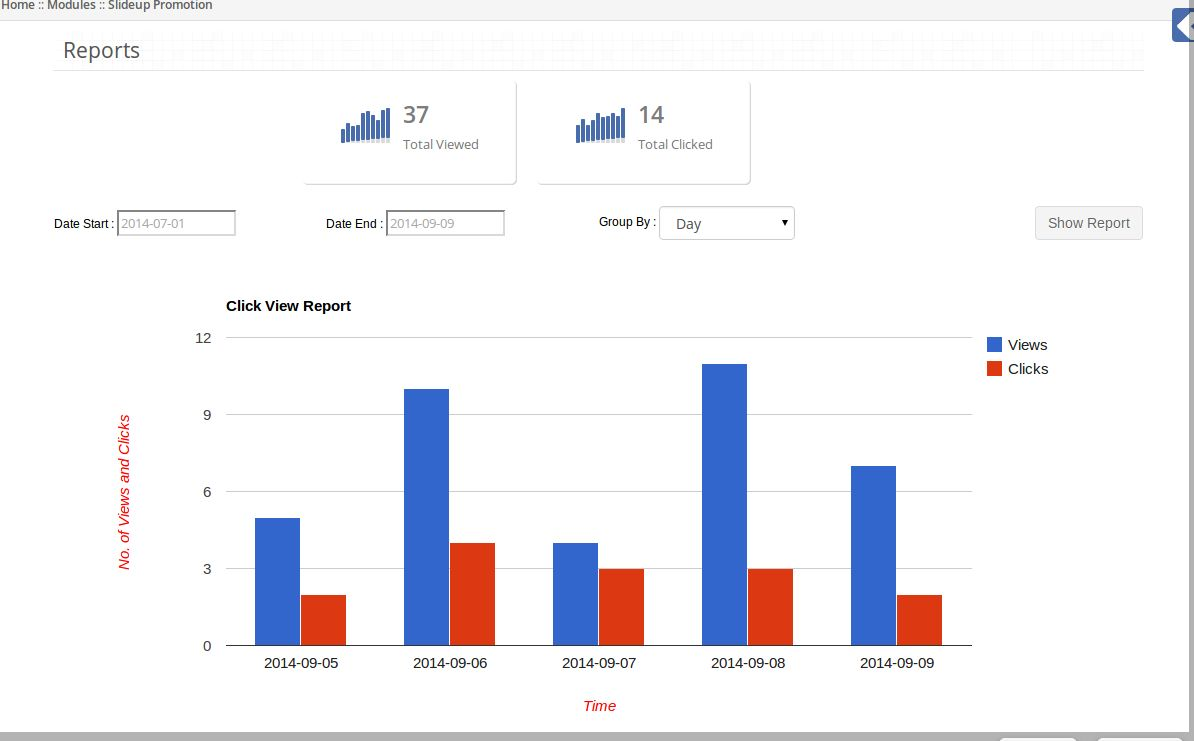
1. Here admin can see reports related to promotions.

2. On the top of this tab total number of promotion viewed and total number of promotions clicked by
customers is displayed.

3. On clicking Show Report button graphical report will appear as per values of filter.

5. Themer tab

By clicking on themer tab, you will have an option to change the theme of Slideup Promotion admin
panel.

6. Get Support tab

By clicking on Get Support tab, you will be redirected to our support website, where you can contact
our support for help. Use this tab in case you some query/issue or found some bug.

Screenshots

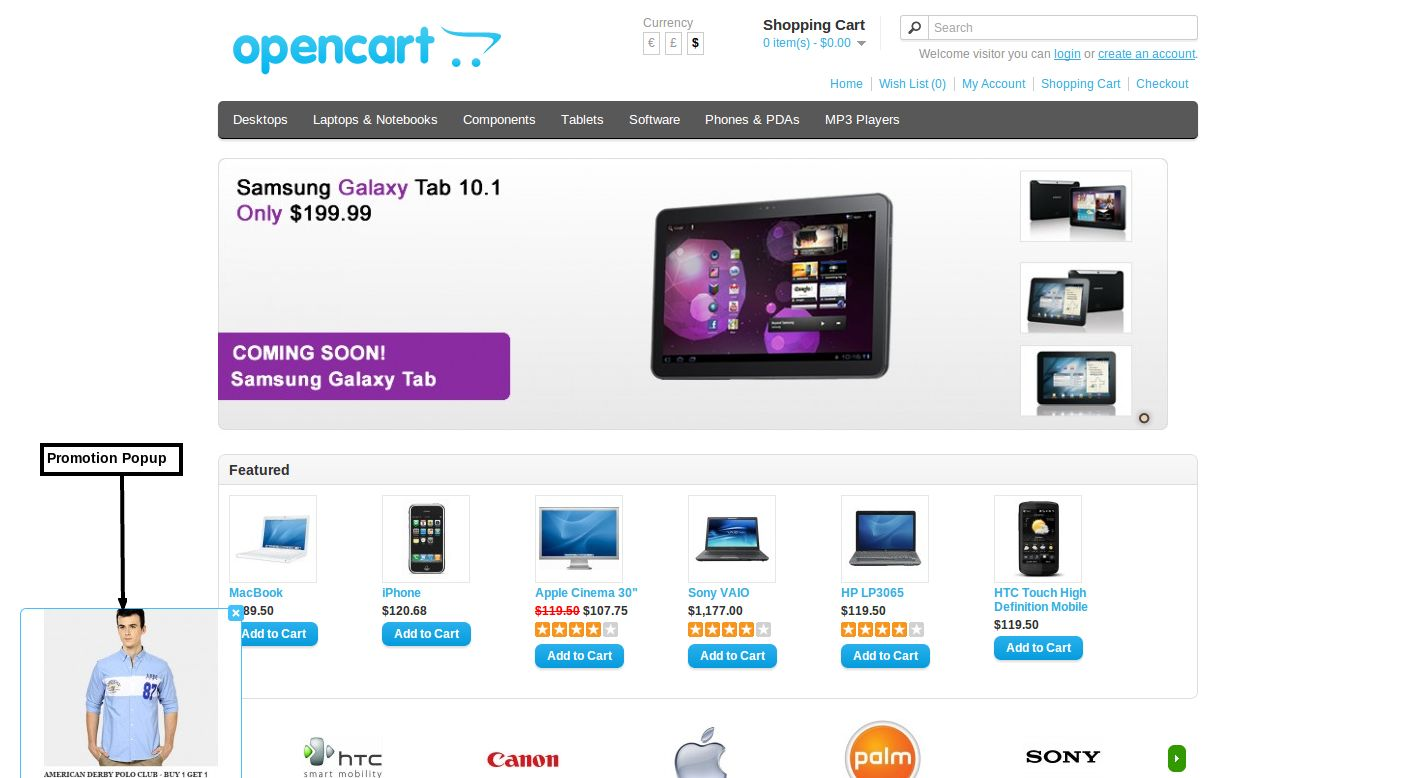
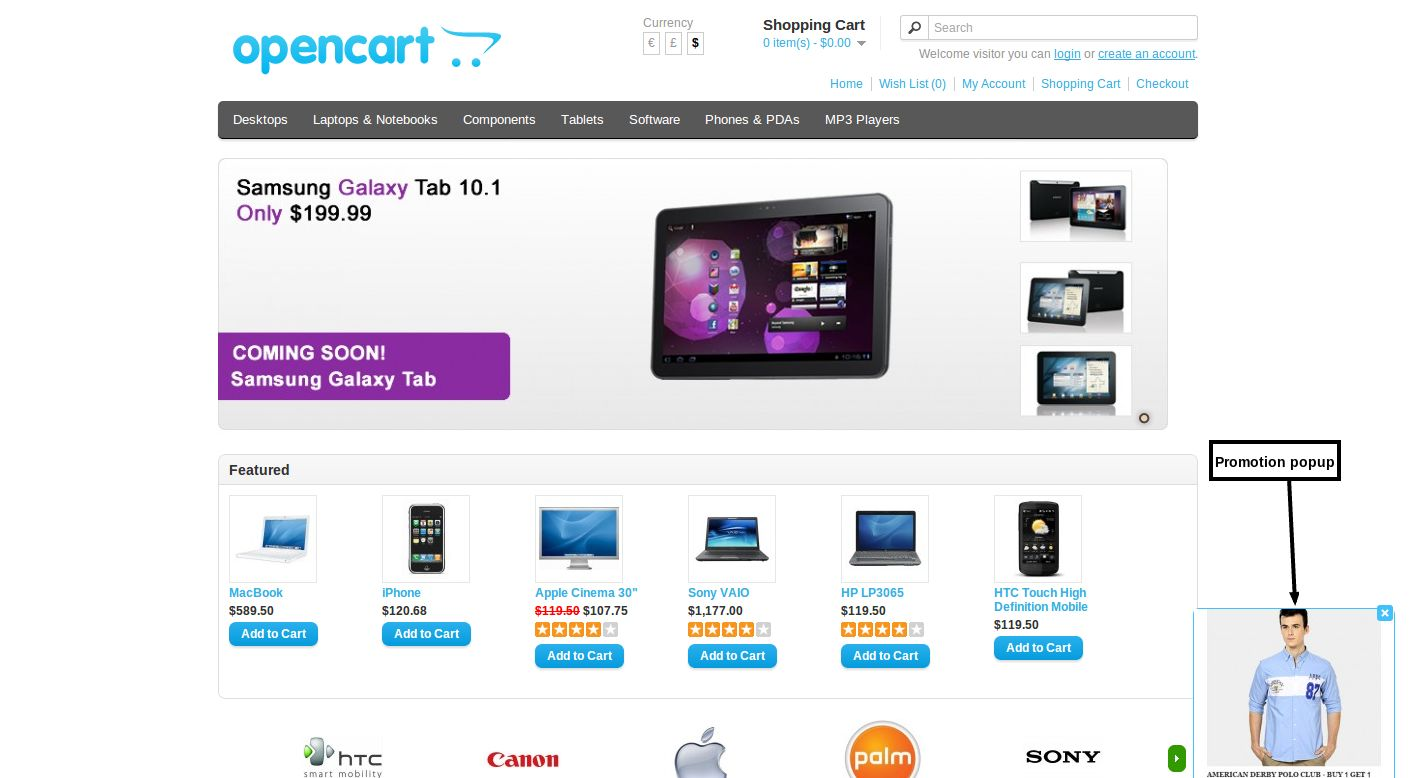
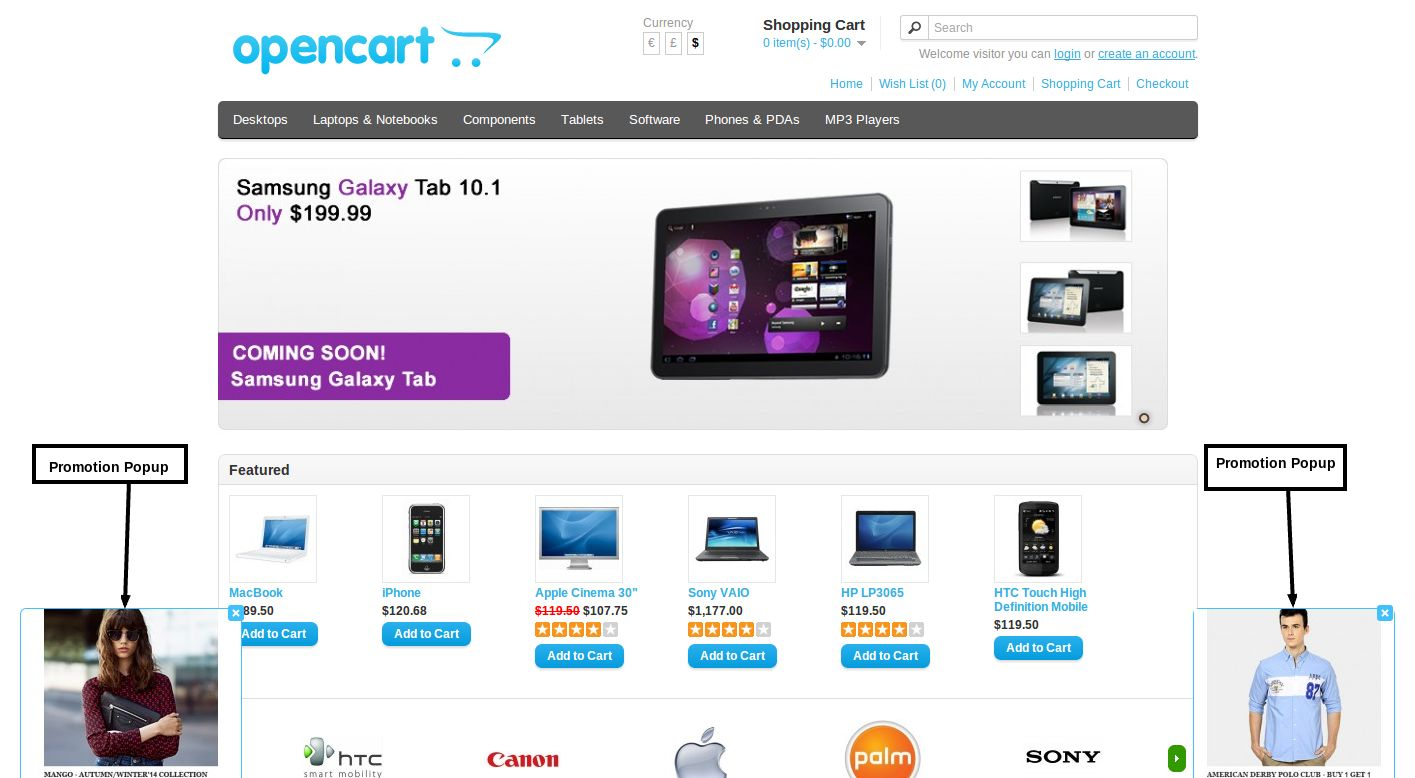
Promotion Popup at bottom-left position.

Promotion Popup at bottom-right position.

Multiple Promotion Popup on same page.

Magento Abandoned Cart Module – User Manual
1.0 Introduction

Magento Abandoned Cart module helps the Magento store admin retain their customers. The Magento shopping cart email alert is one of the ways to boost the loyalty of the online shoppers and even attract them back to the store. The Magento Abandoned Cart extension focuses on the customers who visited the site, but left without completing their transaction. The Magento plugin keeps a track of the abandoned carts of the site. Not just, it allows the store admin to send personalized emails and promotional triggers from the back-end of the Magento Abandoned Cart plugin. The alerts and notifications give compelling reasons to the customers to return back to the store and complete their transaction.

1.1 Admin Benefits of Magento Abandoned Cart Extension:

  • Magento abandoned carts extension tracks the store visitors who saved the product in their cart and left the site without placing the order.
  • The list of the abandoned carts in the back-end of the Magento abandoned cart notifications module can be updated by executing cron.
  • The admin can track incomplete orders and send reminders to the customers with the help of Magento abandoned cart alerts.
  • Magento abandoned cart emails allows the store admin to send offers discounts or send the reminder without any discounts.
  • The store admin can send a notification to a particular customer just by clicking a button from the back-end of the Magento abandoned carts module.
  • Or else, the admin can even send automatic serial reminders by executing cron in the back-end of the Magento abandoned carts extension.
  • The coupons sent to the customers can be used to get the discount on the checkout page.
  • The admin can view the statistical report of the abandoned cart and the conversions happened after the email triggers are sent from the back-end of the Magento abandoned cart module.
  • The Magento abandoned cart extension offers a number of default email templates to the store admin. The merchants can even customize them as per their wish.
  • The email sent to the customers allows them to directly to the checkout page by clicking a button.

2.0 Steps For Installation of Magento Abandoned Cart Module

Follow the following steps for installing Magento Abandoned Cart extension:

  • Download the Magento extension package.
  • Unzip the package on your root folder of Magento setup via FTP manager (like Filezilla or WinSCP – download here: https://filezilla-project.org/).
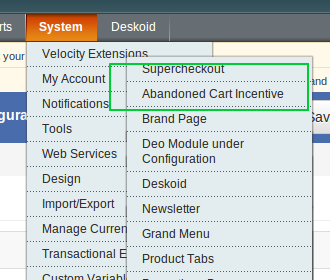
  • In Admin Panel go to System > Velocity Extensions > Abandoned Cart Incentive.

  • That is all – Your system is ready.

3.0 Magento Abandoned Cart Extension – Admin Module

The Admin Module of Magento abandoned cart notifications module contains 6 tabs, namely:

  • General Settings
  • Email Templates
  • Serial Reminders
  • View Abandoned Cart
  • View Conversion Rate
  • Analytics

They are discussed in detail below:

3.1 General Settings of Magento Abandoned Cart Extension

The General Settings tab of Magento abandoned cart module has following options:

  • Activate: Enables or Disables the Magento abandoned cart extension on the store front. If disabled, the cart abandonment will not be tracked and no coupon codes will be sent to the customers. Apart from this, user can not see the content in other tabs.
  • Create abandoned cart after: The Delay time of Magento Abandoned Cart Extension is the time period after which the cart will be assumed to abandoned.
  • Enable auto email: This feature of Magento Abandoned Cart Extension will allow admin to schedule (Cron Setup) coupon email sending task or not.

The General Setting tab of Magento Abandoned Cart Extension includes two more options. They are:

Run Update List Cron Manually: Execute this cron to update the list of the abandoned cart and their details in the ‘View Abandoned Cart’ tab. Any cart changes done by the customers in the front-end will be updated in the Magento Abandoned Cart Extension’s database once the cron is executed.

Run Send Mail Cron Manually: By executing this cron, the admin can send auto emails to all the customers whose abandoned shopping cart is listed.

3.2 Email Templates of Magento Abandoned Cart Extension

The Email Template tab of the Magento abandoned cart plugin has is the format of the email that will be send to the customers. This field of Magento Abandoned Cart Extension contains some place holders whose values will be replaced when the email will be sent.

The place holders are:

  • {{name}}-This is for the name of the customer
  • {{cart_content}}-This is for the cart content of the customer
  • {{shop_name}}-This is for the shop name
  • {{shop_url}}-This is for the shop url
  • {{discount_code}}-This is for the discount code given to the customer
  • {{discount_value}}-This is for the discount value given to the customer
  • {{total_amount}}-This is for the min amount of the cart for the discount to apply
  • {{date_end}}-This is the last date of the dicount validity

Keep these place holders as it is.

The admin can edit/delete the email template by clicking on the Edit or Delete button respectively as shown in the image below:

In order to create new templates, click on the Add New button as shown below:

On clicking the button, the admin will get a pop-up. Fill up the required fields in order to create new template.

Select Type: Select the type of the email template of Magento Abandoned Cart Extension from the drop-down list.
Template Name: Enter the name of the template.
Email Subject: Enter the email subject here.
Email Content: Enter the email content here.

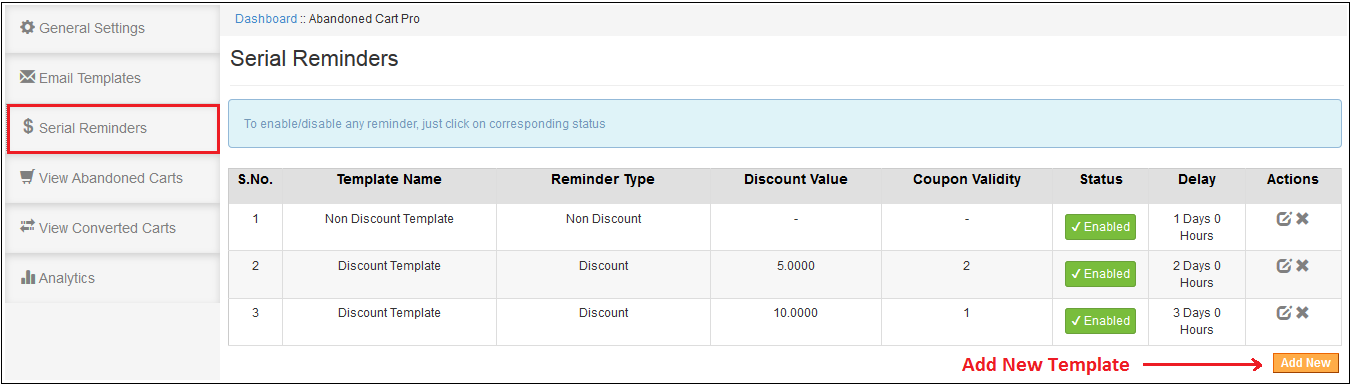
3.3 Serial Reminders of Magento Abandoned Cart Extension

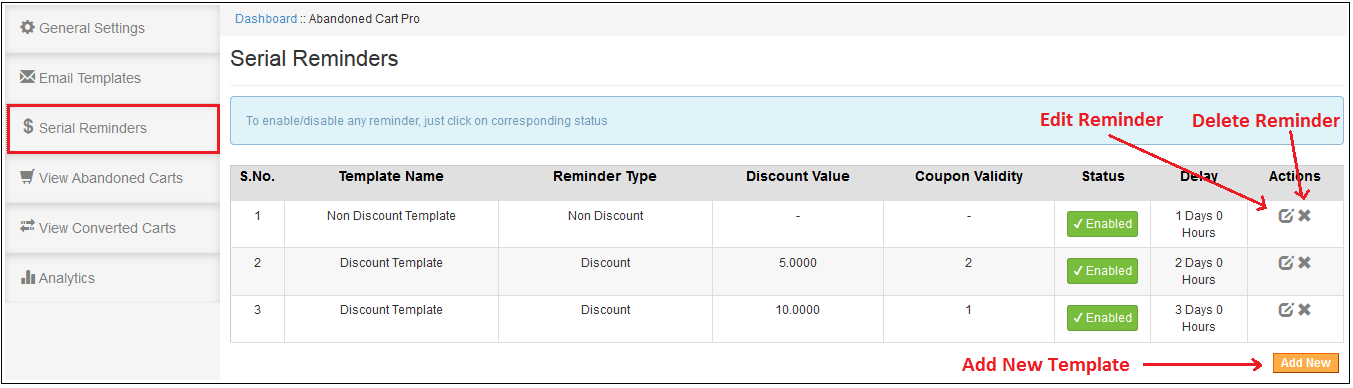
The serial reminder to be sent to the customers are listed here in this tab of Magento Abandoned Cart extension.

The admin can Enable/Disable and Edit or Delete the serial reminder at a button click as shown in the image below:

In order to create new serial reminder, click on the Add New button as shown below:

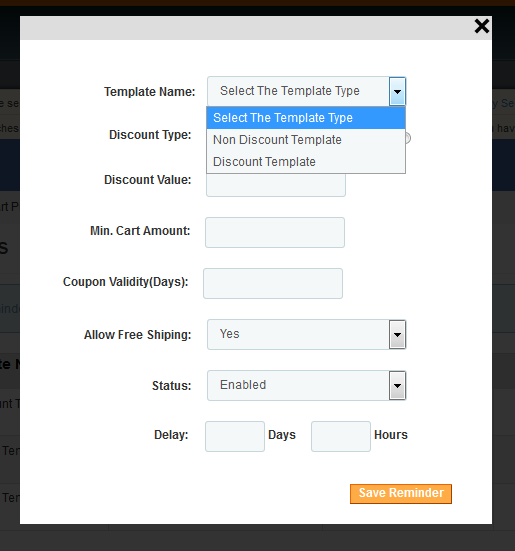
On clicking on the button, you’ll get a pop-up as shown below:

Template Name: The templates created in the Email Template tab of Magento Abandoned Cart extension will be listed here. Select any one from the drop-down list.

Discount Type: This field of Magento Abandoned Cart Extension allows the admin to select any one option from, Percentage or Fixed type.

Discount Value: This field of Magento Abandoned Cart Extension offers the admin enter the discount amount or percentage that you want to offer.

Min. Cart Amount: In this field of Magento Abandoned Cart Extension, the admin will have to enter the minimum cart amount required to avail the offer.

Coupon Validity(Days): This field of Magento Abandoned Cart Extension offers the admin to enter the number of days for which the coupons will be valid.

Allow Free Shipping: Select whether you want to allow free shipping or not.

Status: Select Enabled this option of Magento Abandoned Cart Extension, if you want to enable this serial reminder.

Delay: This field of Magento Abandoned Cart Extension provides the admin to enter the number of days, from the day when the customer added the product in his/her cart, after which this reminder will be sent.

3.4 View Abandoned Cart

This tab of the Magento Abandoned cart module enlists all carts which will be assumed to abandoned.

The action tab corresponding to every cart details offers following options:

Send Reminder Email: By clicking on the bell icon of this Magento Abandoned Cart Extension, the admin can send reminder email regarding the products saved in the cart of the customers.

Send Discount Email: By clicking on this action of Magento Abandoned Cart Extension, the admin can send emails triggers with the discount coupon to the concerned customer directly from the back-end of the Magento abandoned cart module.

View Cart: The admin can view the cart details of the customers by clicking on this action of Magento Abandoned Cart Extension.

Delete: The store admin can delete the cart by clicking on this action of Magento Abandoned Cart Extension.

3.5 View Conversion Cart

The Conversion Cart tab of Magento abandoned cart plugin, enlists all converted orders for registered customers.

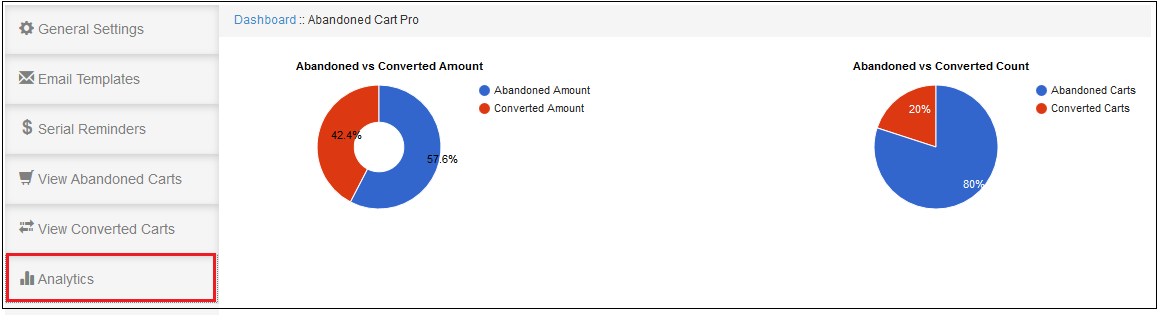
3.6 Analytics

The Analytics tab of Magento abandoned cart extension shows the overall insights of the store in graphical interface.

This tab of Magento Abandoned Cart Extension contains following graphs –

3.6.1 Abandoned Amount vs Converted Amount:

This chart of Magento Abandoned Cart Extension gives an overview of the total abandoned amount and the amount converted by the coupons provided by the abandoned cart module.

Abandoned Cart vs Converted Cart:

This chart of Magento Abandoned Cart Extension gives the overview of the total abandoned carts and the carts converted by the coupons provided by the abandoned cart module.

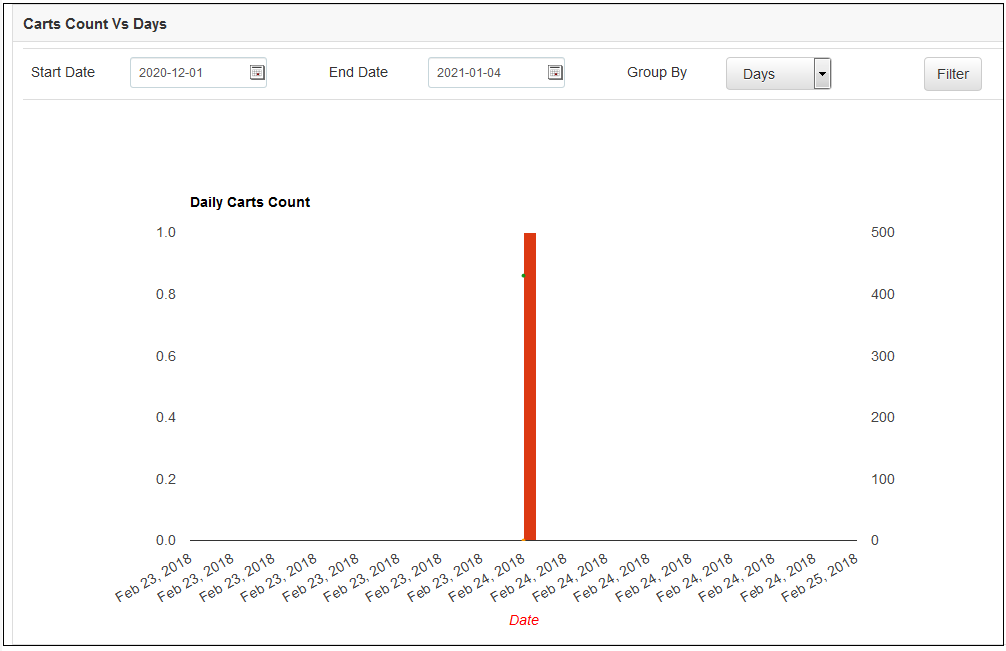
Carts Count Vs Days Vs Amount:

This chart of Magento Abandoned Cart Extension gives the overview of the total abandoned carts vs the carts converted and the amount abandoned vs the amount converts in the given time span.

This chart also contains filters on the basis of data to filter out and group the data for a concise view of store sales.

4.0 Store Front

From the front-end, you can check the functionality of the extension. You can add a product to the shopping cart and then go to the checkout page. You need to leave the checkout page without completing the order and you will receive an abandoned cart email on your given email address after the specified time-delay.

Magento Abandoned Cart extension: https://www.knowband.com/magento-abandonedcart

Admin Demo: https://mademo1.knowband.com/index.php/AbandonedCartPro/adminhtml_index/index/key/1ef1b7b5af1b7d63b8ea8d6ea276f10b/

Front Demo: https://mademo1.knowband.com/

Liked This? You’ll Like These Too

Magento Auto Subscribe Extension– User Manual
Introduction:

Knowband offers Magento Auto Subscribe extension which allows the store admin to showcase a subscription form on the eCommerce store. This Auto Subscribe integration addon helps the store admin for collecting mail id for the newsletter and also sends it to the customers. Newsletters are one of the best ways to improve the brand awareness of a website.

Magento mail chimp extension automatically subscribes customers when they register or place an order. Magento newsletter subscribe is highly customizable and it offers an easy and effective way of improving subscribers. It automatically synchronizes admin’s Magento newsletter list with one of his/her Constant Contact list and MailChimp account.

Features:

  • Magento newsletter subscribe is easy to install configure.
  • This MailChimp Integration is highly customizable.
  • It offers simple and hassle-free implementation.
  • Magento mail chimp extension subscribes customers for newsletter while checkout or registration.
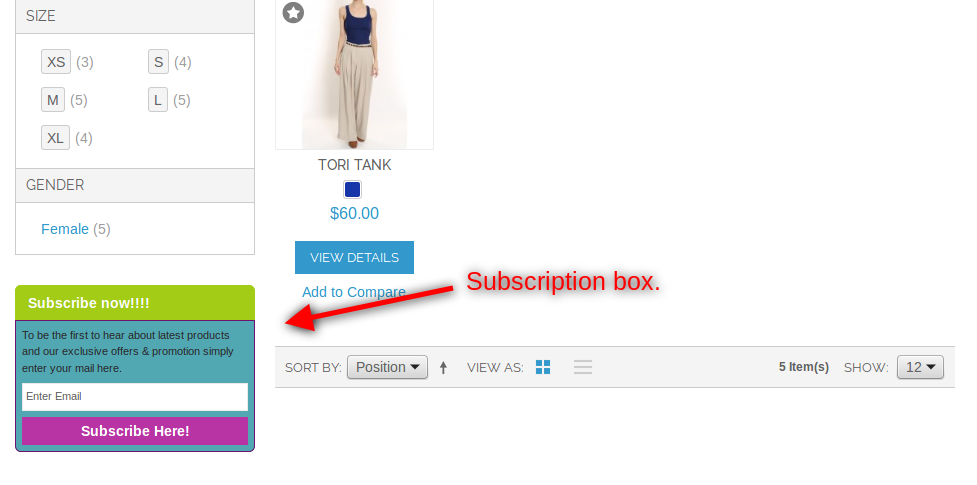
  • The store admin can set the position of the subscription form in left sidebar box or right sidebar box.
  • The store admin can create his/her own form by setting title, description, border width, button text etc.
  • Magento newsletter pop up allows admin to manage the look and feel of the subscription pop-up.
  • The subscription module allows admin to design personalize mail templates.
  • email newsletter addon is device compatible.
  • The admin can showcase subscription form as a pop-up or contact form.
  • This module supports MailChimp and Constant Contact API.
  • It updates the mailing list when a new user subscribes
  • Magento email subscribes plugin is compatible with all themes.
  • The store admin can enter jQuery.

Steps For Installation of Magento Auto Subscribe

  • Download the zip from our Magento Plugin Store & unzip into a folder.
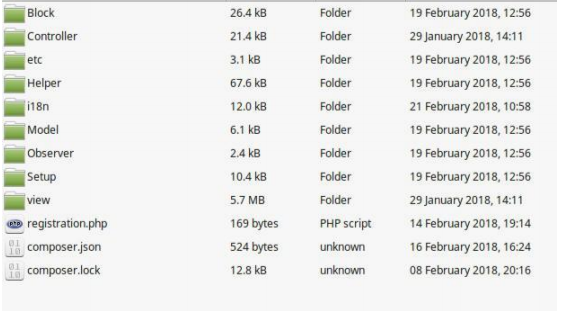
  • Open the upload directory & you will see following folder structure.

  • Login via FTP & Drag drop all the folders into your server root directory.
  • In Admin Panel go to System > FilterPro. In case you are not able to see the link under System, please clear Magento Cache first then check again.

  • That is all – Extension is installed on your system.

Admin Settings

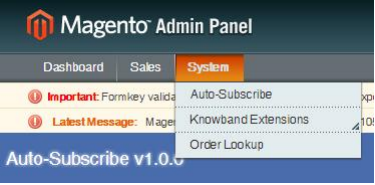
To access Autosubscribe plug-in, go to System->Auto-Subscribe link.

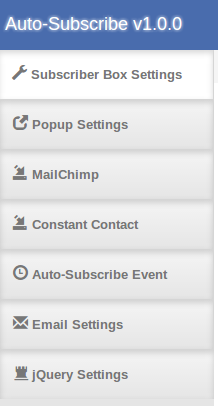
Store admin will have various settings options categorized in the left column as follows:

Subscriber Box Settings

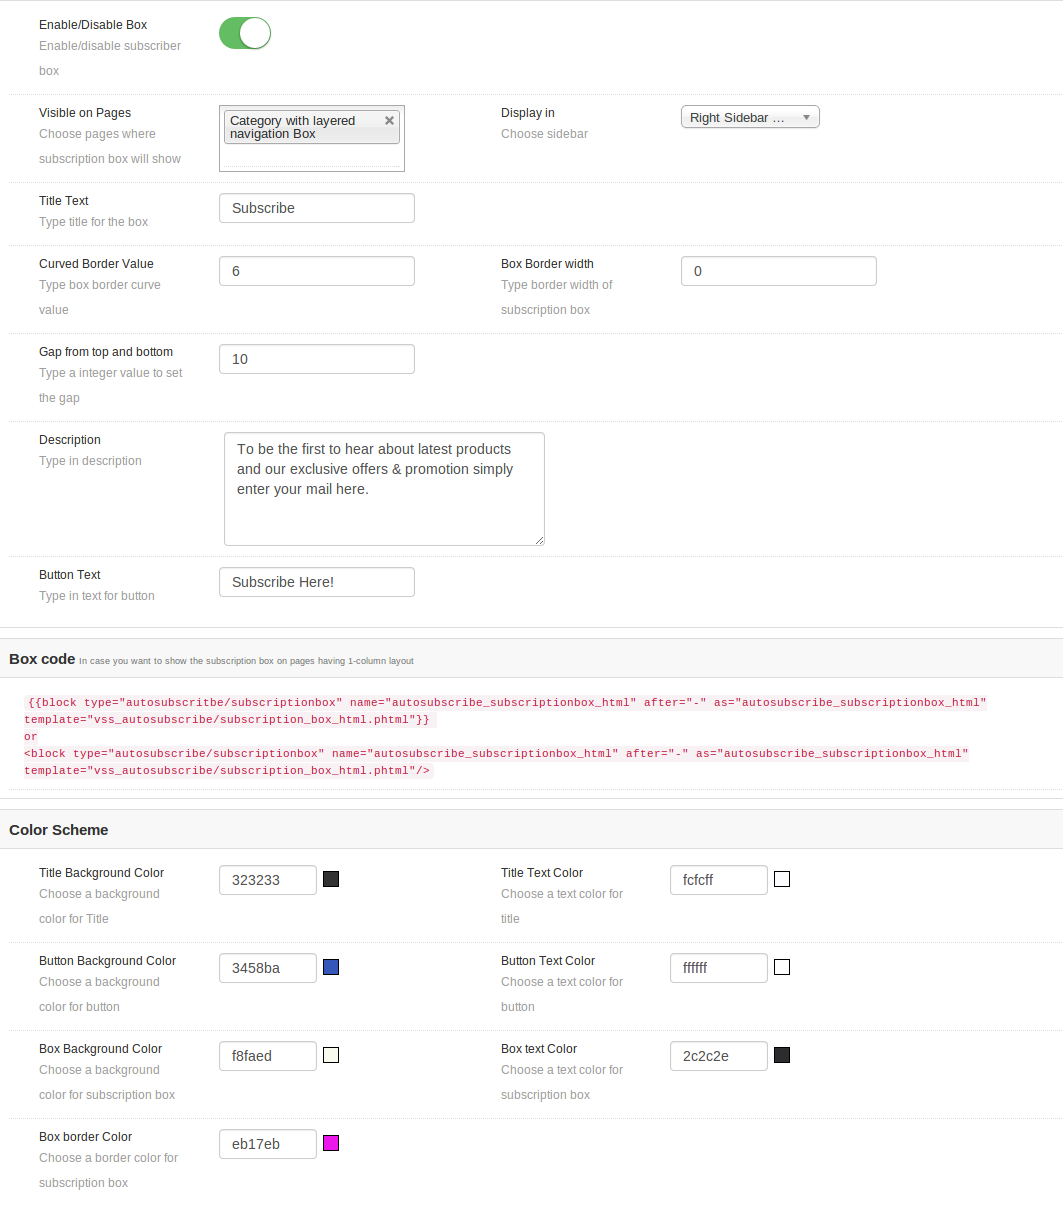
Admin can customize the subscription box to be displayed in store front by using the following settings option available.

  • Enable/Disable: Admin can choose to enable or disable the subscription box by turning this button on or off. One cannot view subscription box on front.
  • Visible on Pages: Admin can select on which pages this subscription box will show.
  • Display In: Admin can select the position of box. We can show the box either on left or right side.
  • Title Text: You can enter the radius of the title of box. By default, it is set to Subscribe.
  • Curve Borders Value: You can enter the radius for curve borders. This value will be applied to the four corners of the subscription box on front.
  • Box Border Width: You can set the border width for box.
  • Description: You can enter the text for describing to visitors, the advantages of subscribing to your email list here.
  • Button text: You can change the text for button in this text box.

We have also added the code snippet of module in case admin wants to add the subscription box manually on CMS or any other page.

Color Scheme

We have added the color picker option to set the background color and text color for different sections of subscription box.

Pop up Settings

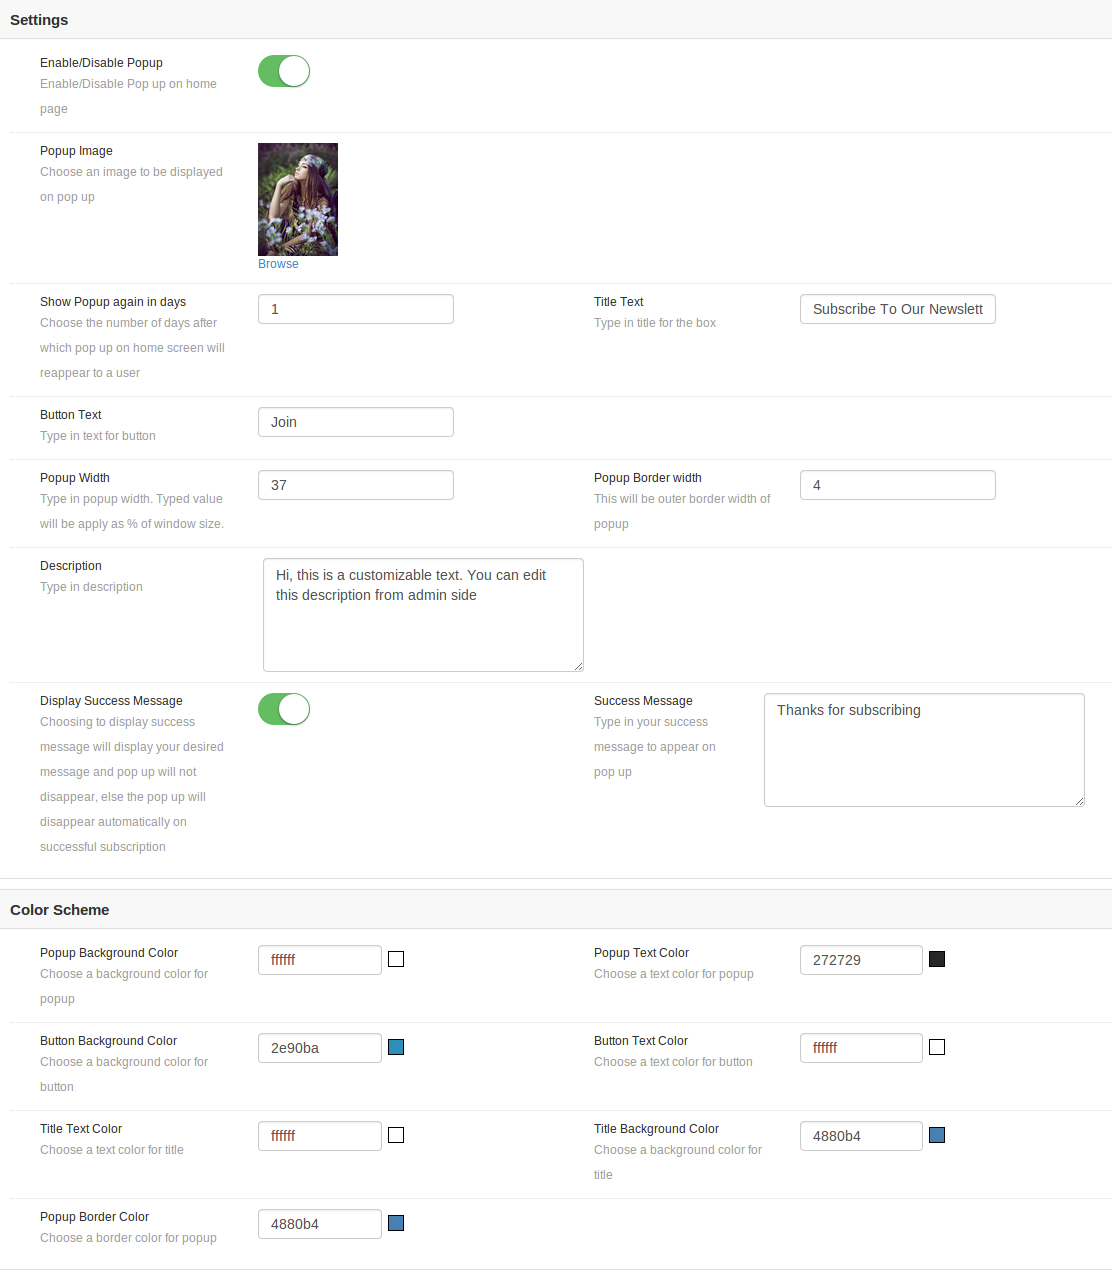
Admin can customize the pop up box too. If this box is enabled then it will show on home page only.

  • Enable/Disable Pop up: Admin can choose to enable or disable the pop up display on home page. One cannot view subscription pop up on front until this is enabled.
  • Pop up Image: Admin can choose to show any image on the pop up box, or choose to not show any image at all.
  • Show pop up again in (days): You can choose the duration (in days) for which the pop up will not reappear from the day the pop up appeared first time on a users system. If you want pop up to appear only once in a lifetime, type in a large number of days, for say 999. If you want it to appear every time a user lands home page, you should choose to type value as 0.
  • Title Text: You can change title of your pop-up from this option.
  • Description Text: Description appearing on the pop up can also be customized by adding desired text .
  • Button Text: Button text and its font color can also be set from admin panel.
  • Button background color: You can also change the background color of your button to go with your theme.
  • Display Success Message: Turning it off means that the moment a successful subscription takes place through this pop up, it will get automatically closed without showing any success message to the user. Turning it on will display a customized success message on the pop up box after successful subscription.
  • Success Message: Here you must enter the text to be displayed and choose the desired color for the text.
  • Color Scheme: We have added the color picker option to set the background color and text color for different sections of popup box.

MailChimp Settings

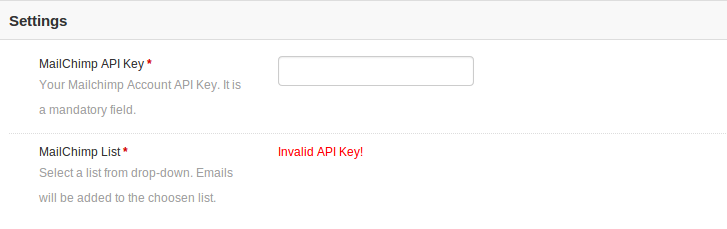
In this tab, admin can choose from the lists in his/her MailChimp account where emails should be added. Initially a message will be displayed like Invalid API Key! .

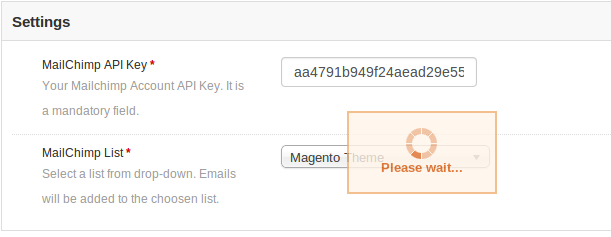
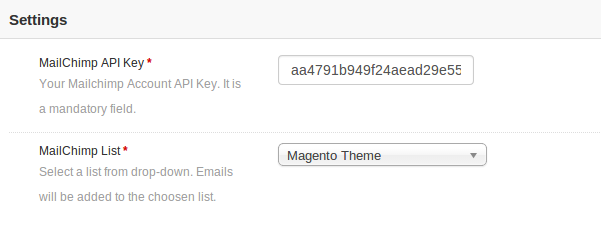
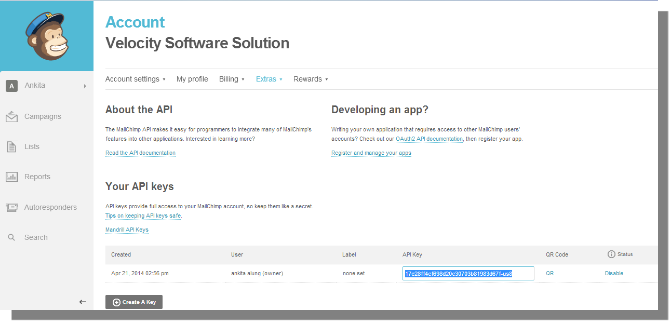
MailChimp API key: Admin needs to enter API key to fetch lists from his/her account. As soon as admin enters the key and clicks outside the text box or press enter button, request is sent and lists (if any) are fetched and displayed in a drop down box.

Constant Contact Settings

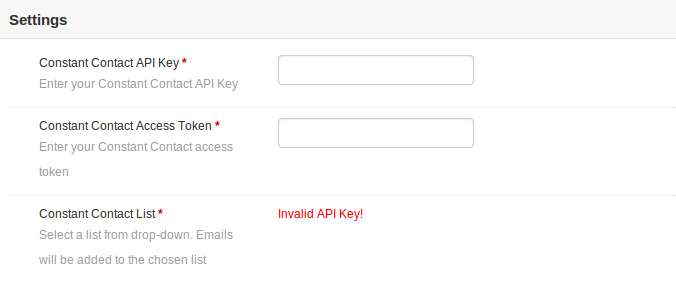
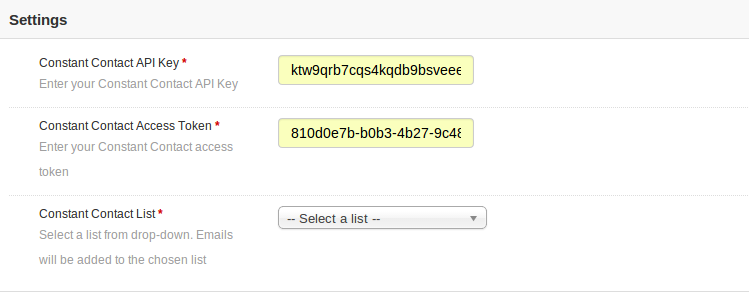
In this tab, admin can choose from the lists in his/her Constant Contact account where emails should be added. Initially a message will be displayed like Invalid API Key! .

Constant Contact API key: Admin needs to enter API key. As soon as admin enters the key and clicks outside the text box, request is sent and lists (if any) are fetched and displayed in a drop down box.

Constant Contact Access Token: Admin needs to enter access token along with API Key. As soon as admin enters the token and clicks outside the text box, request is sent and lists (if any) are fetched and displayed in a drop down box.

Auto Subscribe Events

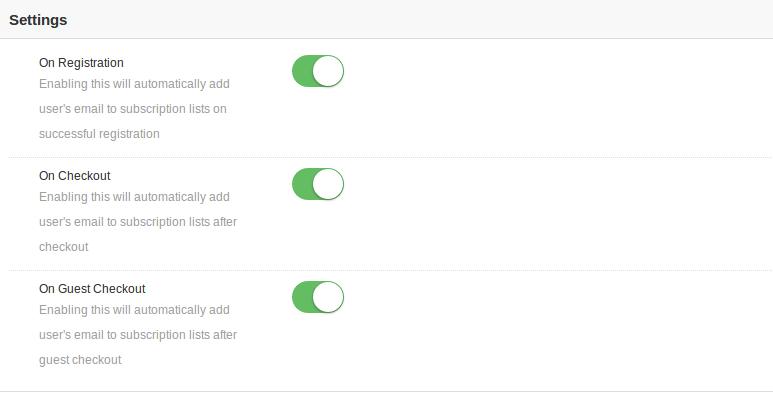
Auto-subscribe events are the events on which the users can be subscribed to the configured lists in admin automatically. On such events, user will not be notified of being added to the subscription lists you have chosen in admin.

Register: Turn Register to on, if you want a user to be automatically added to your list on successful registration.

Checkout: Turn Checkout to on, if you want a user to be automatically added to your list on successful checkout.

Guest Checkout: Turn Guest Checkout to on, if you want a user to be automatically added to your list on successful guest checkout.

Email Settings

Email settings will be used to set the email template that will send to customer after successful subscription. Admin can disable/enabled the email if he don’t want to send the email to customer.

JQuery Settings

Admin can disable the plugin jQuery file in case jQuery is already included by any other plugin or store theme.

Auto-subscribe Module

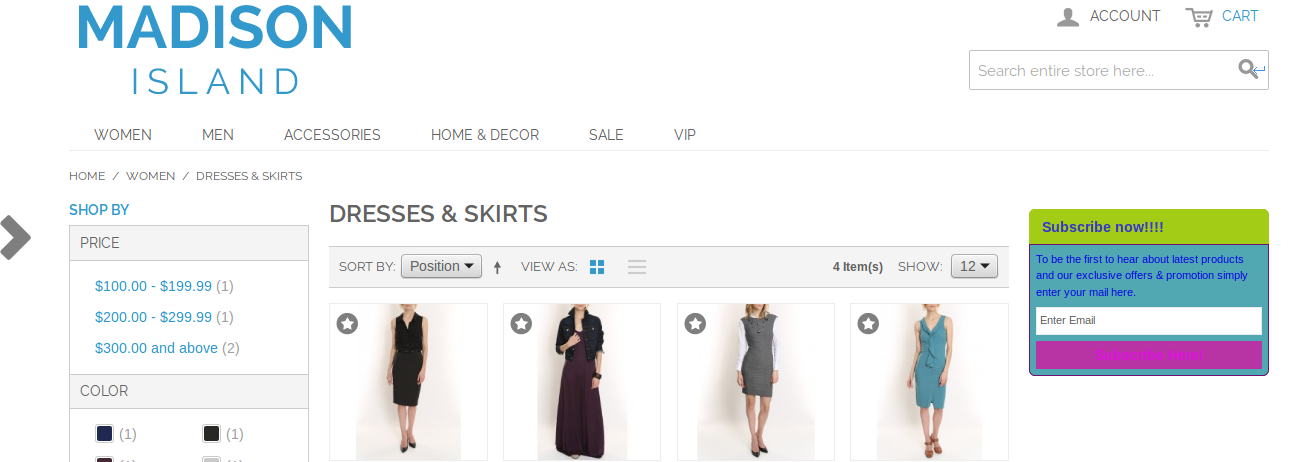
On the front end, users will have the option to subscribe themselves by clicking on subscribe button. The module will look like following screen with default settings.

In Right Column

In left column

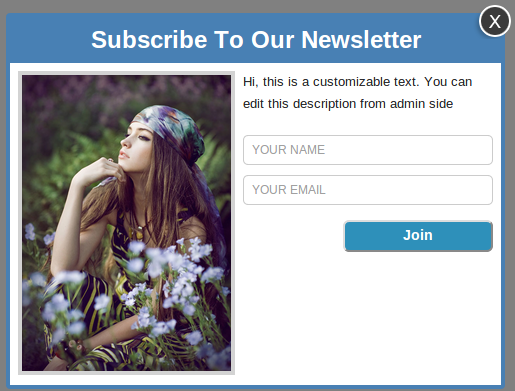
Pop up

On the users end, pop up will appear something like this screen below, depending upon your chosen display settings.

To subscribe through this pop up, type in your email (required) and name (optional), and then click on the button below. On successful subscription, either the pop up will disappear automatically or a custom message provided by you in admin settings will start appearing on the pop up.

PHP version

Php version 5.3 or greater

To access the API of constant contact, one must use the php version equal or higher than 5.3 . Unless your server is running the required php version, you will not be able to successfully install this plugin.

Mail Chimp

Before you may use this module, you must have a valid account with MailChimp and one or more lists created into it. Note that, you must also have the access right to alter your email subscribers list. Below we have mentioned the data which plugin needs for successful installation –

API Key: You can obtain your API key from your MailChimp dashboard, or you can create one if you don’t have one already. To create a new API key for MailChimp go to Account->Extras->API Keys.

Constant Contact

You need to have a valid account with constant contact and one or more lists created into it. Note that, you must also have the access right to alter your email subscribers list. You will need to provide these for this module to work.

  • API Key: You get an API key from constant contact via email as soon as you register your application.
  • Access Token: In addition to API key, you also needed access token to grant permission to access API.

In case you are still facing problem with getting your API Key and Access Token, please follow the instructions as mentioned in link https://developer.constantcontact.com/api-keys.html

Note that, this plug-in works for constant contact API version 2 since version 1 is deprecated and will soon be discontinued.

Liked This? You’ll Like These Too


Module Link: https://www.knowband.com/magento-auto-subscribe

Admin Demo Link:
https://mademo1.knowband.com/index.php/autosubscribe/adminhtml_index/index/key/ac91efaa6d652ee58a922da7896dbb33/

Front Demo Link: https://mademo1.knowband.com/

Watch Video: https://www.youtube.com/watch?v=8zc2UzdI5yM&feature=youtu.be

Please contact us at support@knowband.com for any query or custom change request as per your business requirement.

Prestashop Custom JS And CSS Module- User Manual
Introduction:

Prestashop custom CSS and JS module is a simple module that allows you to style the pages individually. The module allows the site owners to add more features to CSS and JS of the website. You don’t require any FTP access to edit the existing code files. The addon helps you to add the CSS and JS code from the admin panel. The module helps in eliminating the dependency on the developer for making small custom changes and you can simply do that on your own using backend panel of the module.

The Prestashop Custom CSS & JS module allows the Prestashop store admin to change the user interface of any page of the Prestashop website. The Prestashop plugin offers the admin to do the same for mobile devices or desktops or both.

Steps For Installation of Prestashop Custom JS And CSS Addon:

To install this custom CSS and JS Prestashop plugin addon, please follow the following steps:

1. Add addon folder under modules folder of your system.

2. After adding this addon folder, system will list the Prestashop addon on module page under front office feature category as given below:

3. Click on install to install the Prestashop Custom JS And CSS plugin.

Admin Interface

Following features will be provided to admin in this custom CSS Prestashop module:

1. General Settings

2. Advance Settings

General Settings of the custom JS Prestashop module:

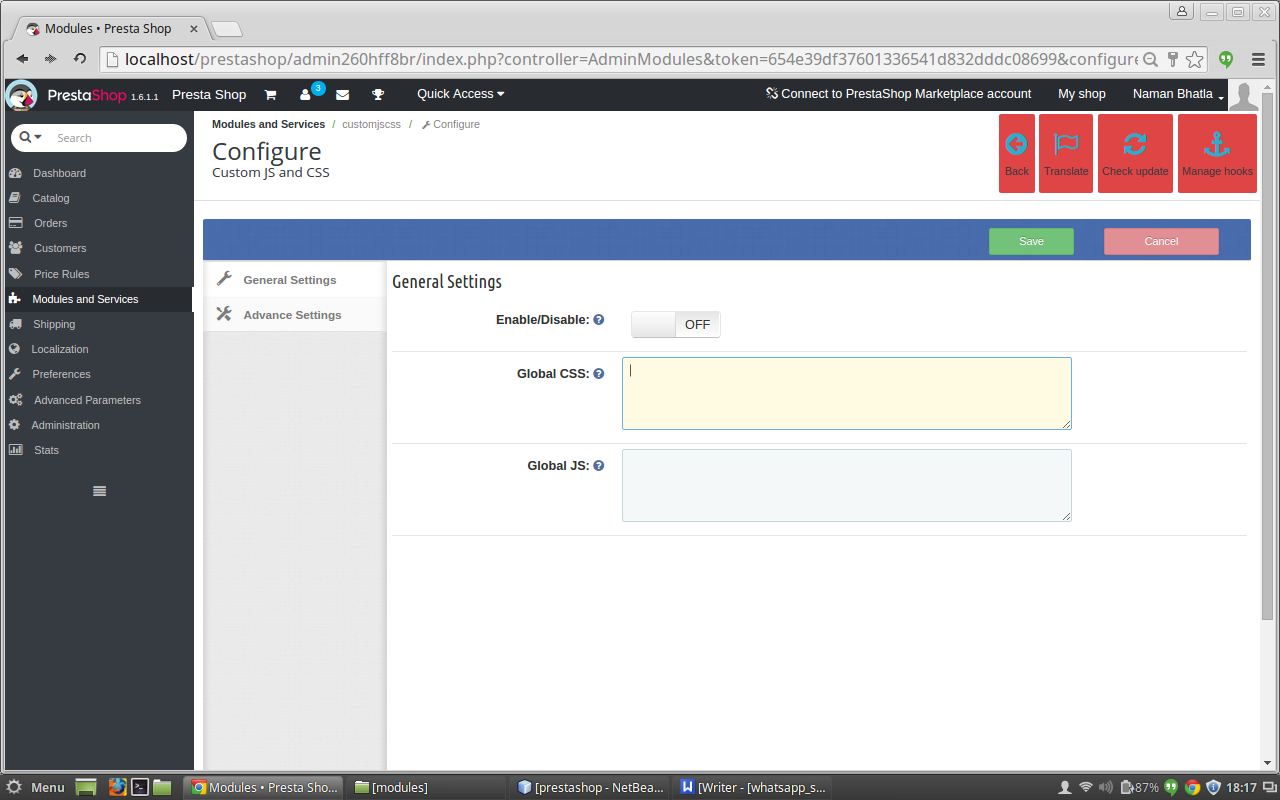
After clicking on configure link of Custom JS and CSS addon on module listing page, system will open general settings tabs by default as shown in screen below:

Fields listed will be filled with some default values

GENERAL SETTINGS TAB DETAILS:

1. Enable/Disable: Initially, this field of custom CSS Prestashop module will be OFF. The admin can enable/disable addon functionality by turning this ON/OFF.
2. Custom CSS: The CSS content which needs to be displayed on every page of the website has to be entered in the text area of custom CSS and JS Prestashop plugin given with field named Custom CSS.
3. Custom JS: The JS content which needs to be displayed on every page of the website has to be entered in the text area of custom JS Prestashop module given with field named Custom JS.

Advance Settings of the custom CSS and JS Prestashop plugin:

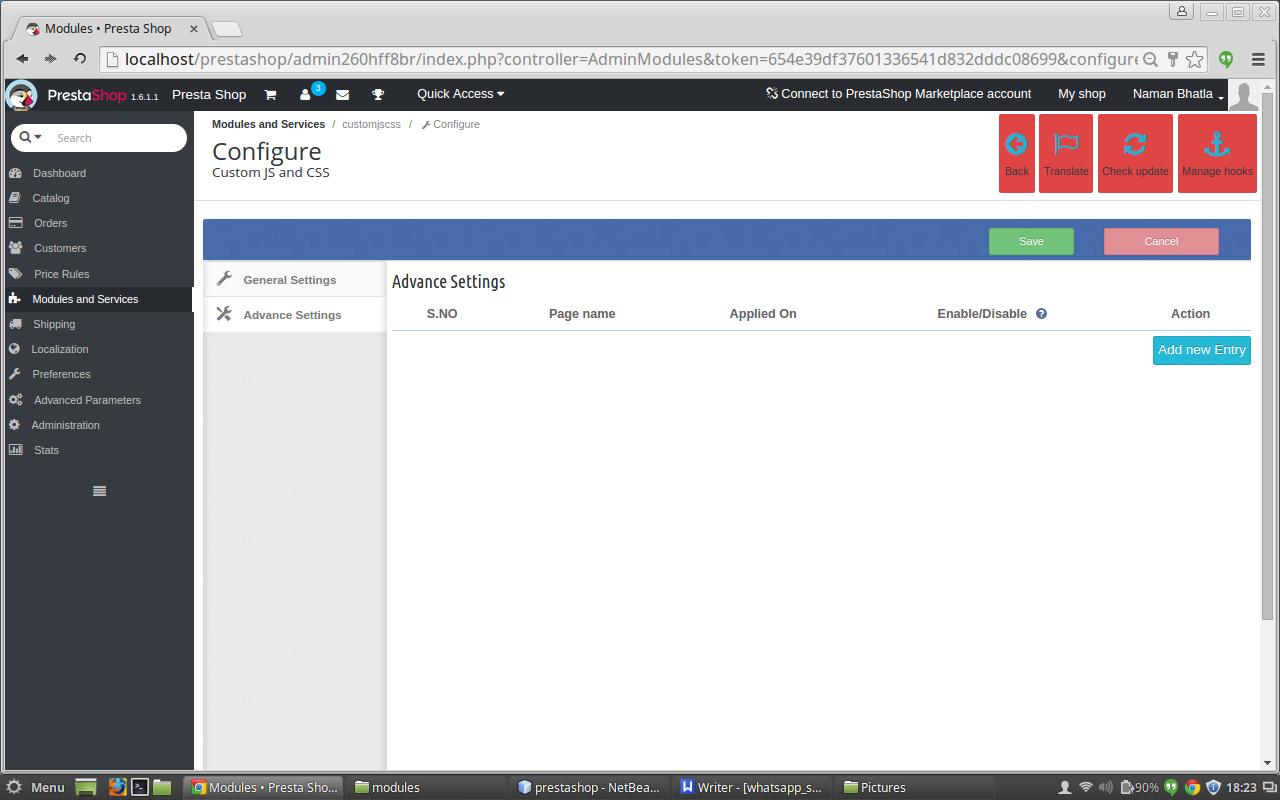
After clicking on the advance settings tab of the custom CSS and JS Prestashop plugin, the below screen appears.

ADVANCE SETTINGS TAB DETAILS:

  • Add new entry: Initially, there will be no entry in the advance tab table of the Prestashop Custom JS module, so click on new entry button to add on the details of the CSS and JS file with the page name and device type on it.
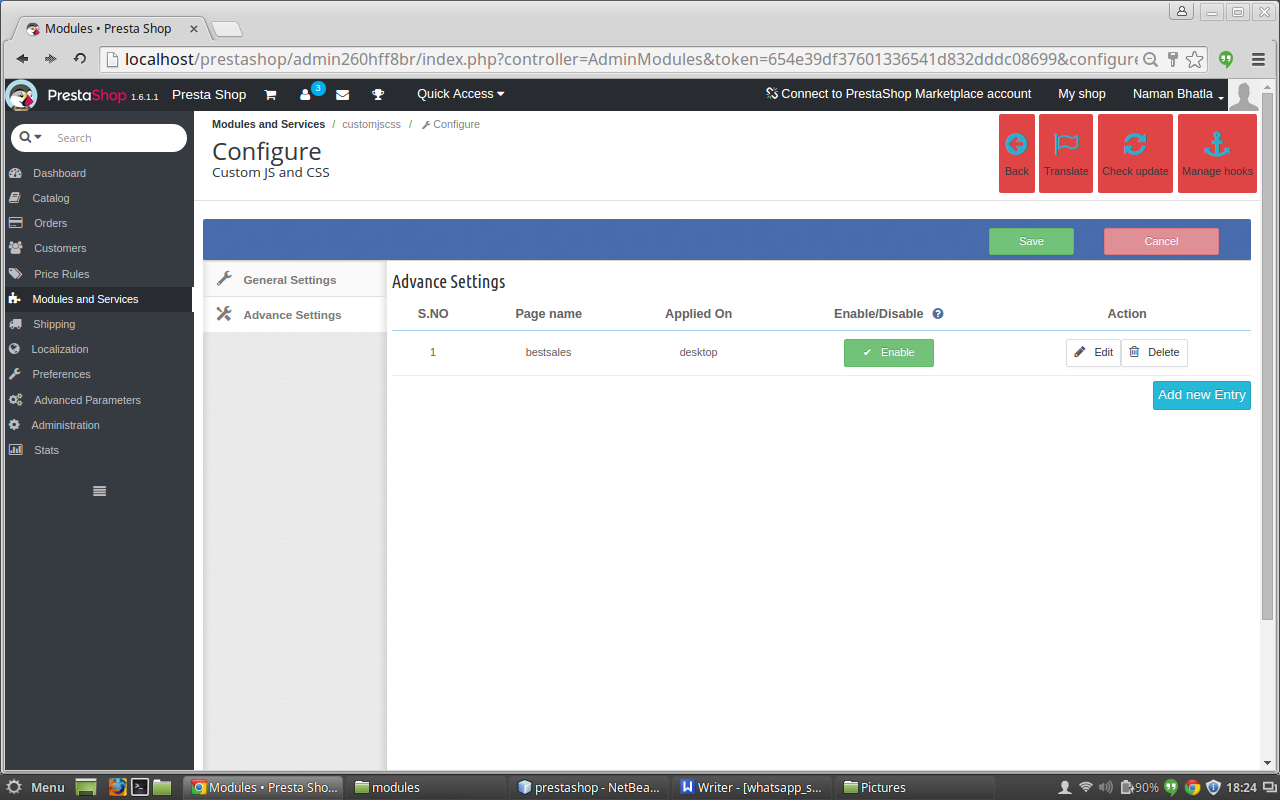
  • Table : When the entry is done then the row is added to the table of the Prestashop custom CSS module with details of the entry such as page name device type enable or disable button and edit and delete button.
  • Enable or Disable button : When the entry is done in the custom CSS Prestashop module, then the user can enable the file added by clicking on the enable button once which changes to the disable button after the user clicks on the enable button now the user can disable the entry by clicking on the disable button which is appearing in the table and the opposite happens .
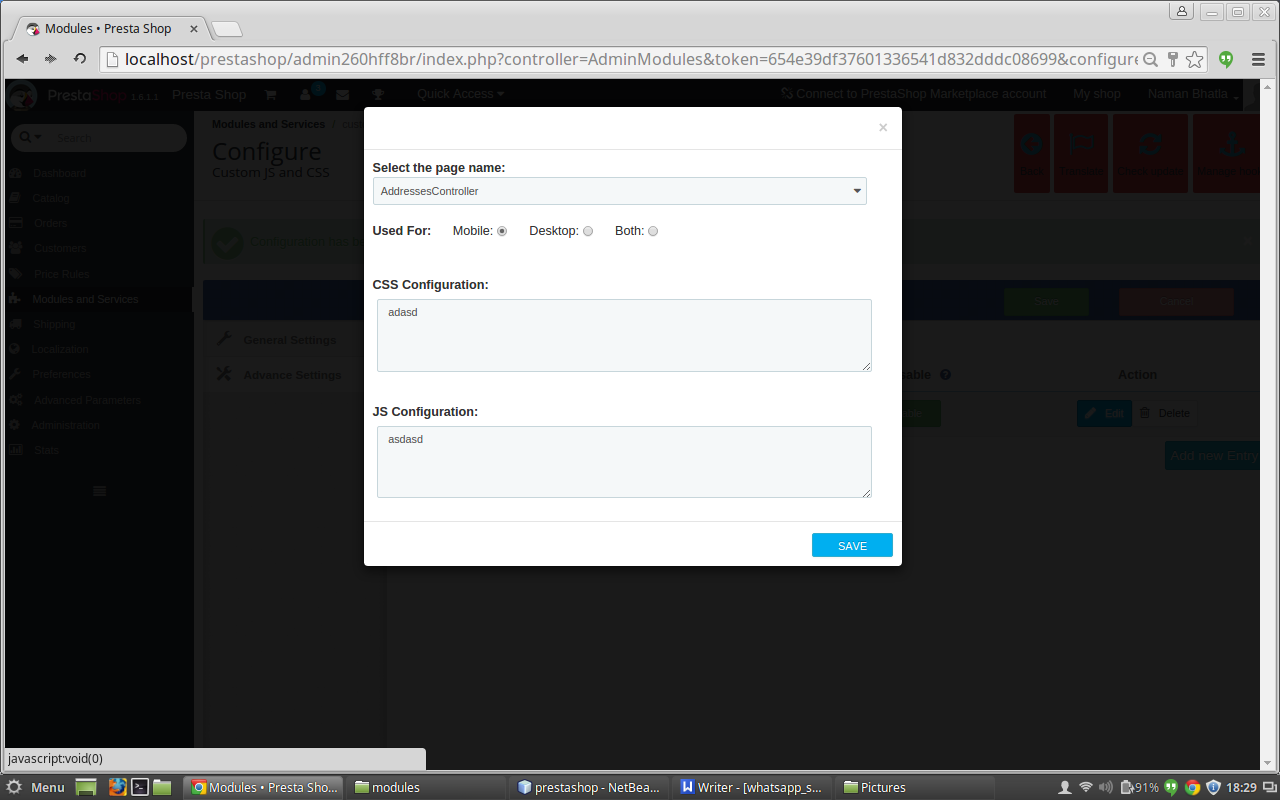
  • Edit : In the action column of the table, there is edit button on clicking on it a pop up appears which is same as the one which appears after we click on the add new entry button. But, the difference is that now the fields of the custom JS Prestashop module are filled with all the details which were entered earlier by the user in that row. Now the user can edit the entries of the custom CSS and JS Prestashop plugin which were done in the files or can change the device type or can add the entry to the page name.
  • Delete : In the action column of the table, there is delete button on clicking on this button of the Prestashop Custom JS module, we can delete the entry which were made in that row.
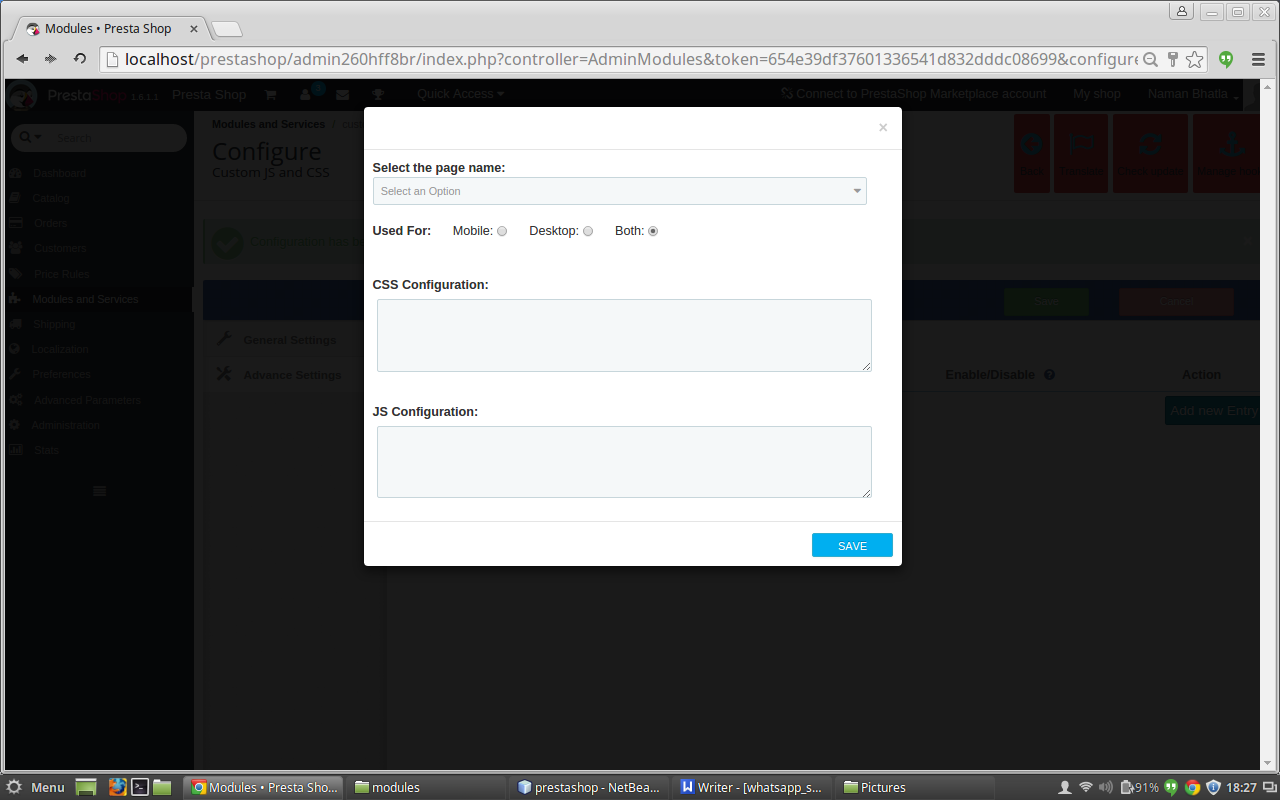
  • Interface box: This is the box which will appear after clicking on the add new button if we have to add a new entry to the advance settings table. It will also appear if we will click on the edit button after the entry is done but the difference is that now the fields in thepop up box will be field with the details of that particular row to which the edit button belongs. Fields in the Pop up box are :

A. Select the page drop down: The first field of the ‘Add New’ field is a drop down menu which has all the names of the pages which are currently available in Prestashop. You can select the page in which the entry is to be done.
B. Choose Device Type: This field of Prestashop custom CSS contains of three radio buttons Mobile, Desktop and both. You can select the type of device for which you are going to add the css and js.
C. CSS configuration: In this text area of the Prestashop plugin by Knowband, you have to add the css code which has to added on the page which you have selected earlier.
D. JS configuration: In this text area of the custom CSS Prestashop module, you have to add the js code which has to added on the page which you have selected earlier.

INTERFACE AFTER CLICKING ON ADD NEW ENTRY

AFTER ADDING THE ENTRY

INTERFACE AFTER CLICKING ON EDIT BUTTON

Front End Module

After enabling the Prestashop Custom JS plugin by Knowband, the front-end user will see the CSS and JS which are added globally to the website and the user will also see the CSS and JS which is added to that particular page only in the advance settings tab.

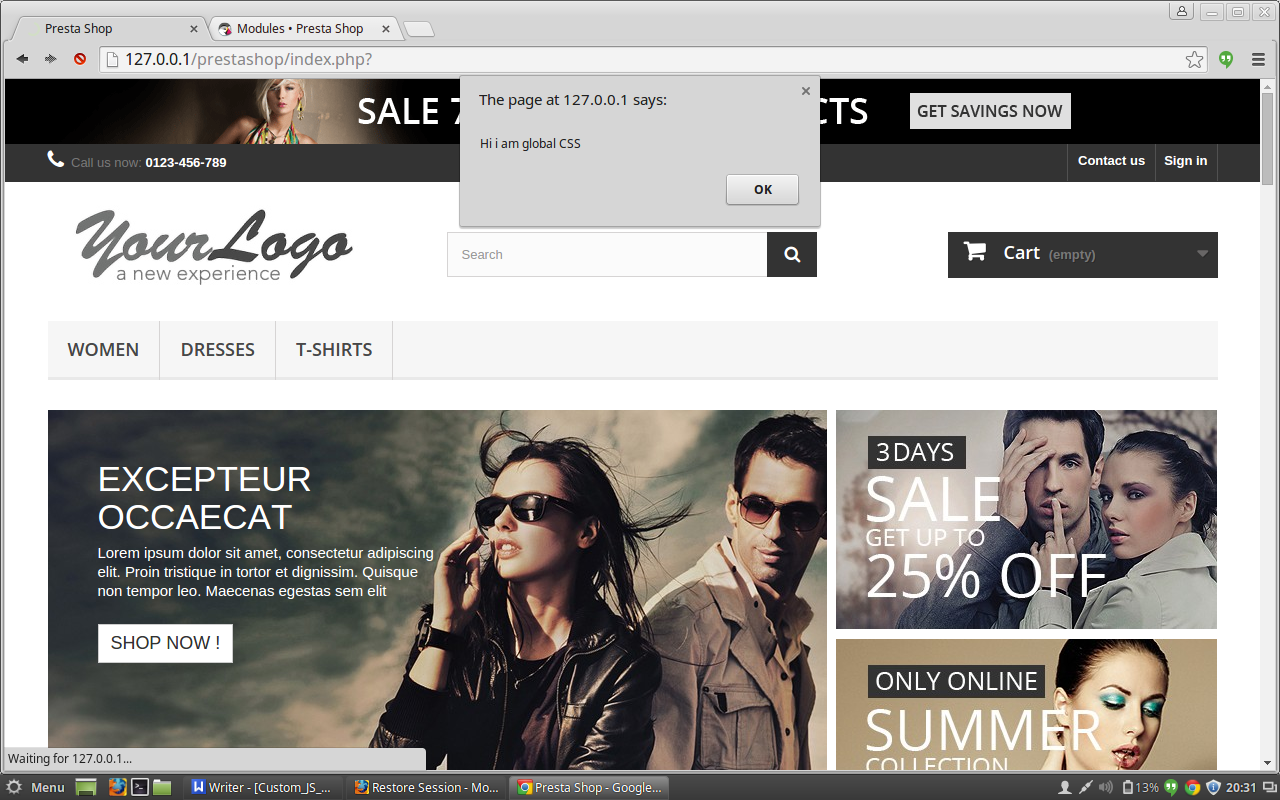
The CUSTOM CSS and JS at the front-end appears as follows:

Recommendations

Refresh home page of your store every time you enable/disable plugin. If plugin is not working after installation then please check permissions on modules folder. The folder should be writable. Please make the folder permission to 755.

We hope that we have covered all the concerns regarding the installation and product guide of this Prestashop Addon. You should also check our blog on Give Multiple Reasons to your Customers for Completing their Online Payment Process – Here

Watch the Video Tutorial here:

Module Link: https://www.knowband.com/prestashop-custom-css-and-js
User Manual: https://www.knowband.com/blog/user-manual/prestashop-custom-js-and-css/
Admin Demo: https://ps.knowband.com/demo1/16/admin1/index.php?controller=AdminLogin&token=aea1bb3fb1bab860c86c4db00ce5949e&redirect=AdminModules&demo_lang=en
Front Demo: https://ps.knowband.com/demo1/16/en/

Buy this addon now >> Knowband – Custom CSS and JS – PrestaShop Addons

OpenCart Follow Up Email – User Manual
How to install OpenCart Follow Up Email plugin on your server

1. Folder structure of the Follow Up Email plug-in folder.

2. Open the upload folder and you will find the following folder structure:

You must have VQMOD installed for this plug-in to work. If VQMOD is not installed please download and install from the URL below:
https://code.google.com/p/vqmod/

3. Select all the folder and drag and drop them to the root directory of your OpenCart store throughFTP.

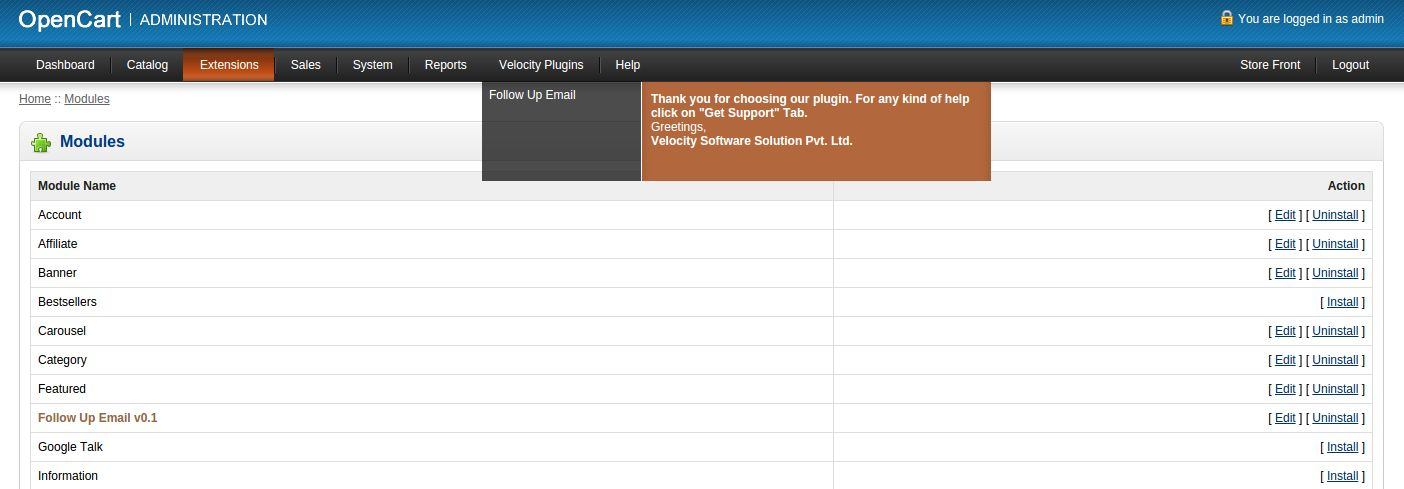
4. You will be able find the plug-in ready to be installed in the Modules in your OpenCart store as shown below.

5. Click on the Install link to install the plug-in. This will also add a dropdown option in your menubar which will list all plug-ins by Velocity installed on your store for fast navigation. Thisdropdown also has a message box, using which we can inform you about new launched plugin or new update.

6. Delete the Vqcache files from the vqmod/vqcache folder.

7. To access Follow Up Email plug-in click on edit button in module section as shown below:

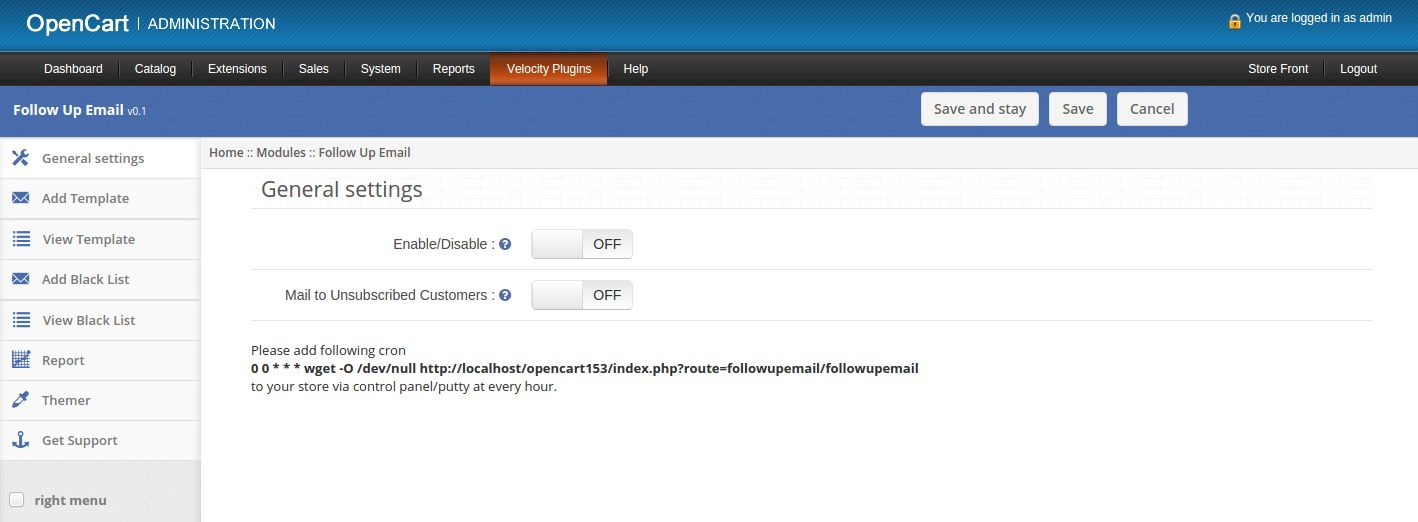
8. On clicking edit button the module for plug-in will open. It contains navigational bar at top, menu at left and main content at center as shown below.

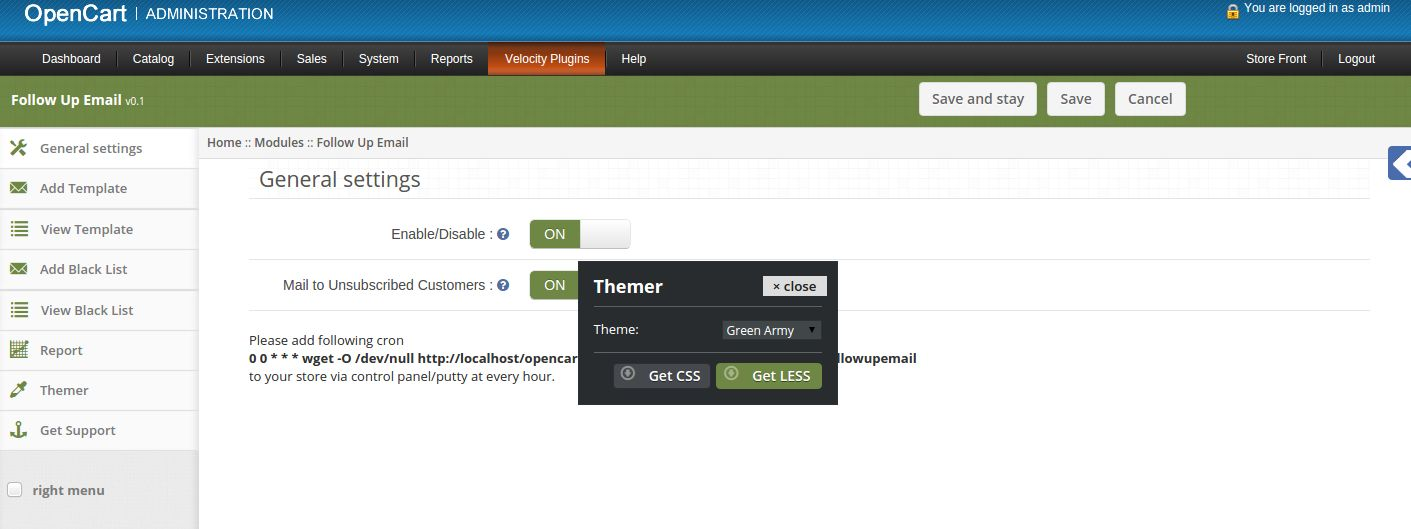
1. General Settings tab

1. Enable/Disable: Enable or disable plug-in.
2. Mail to Unsubscribed Customers: Enable or Disable sending mails to unsubscribed customers.

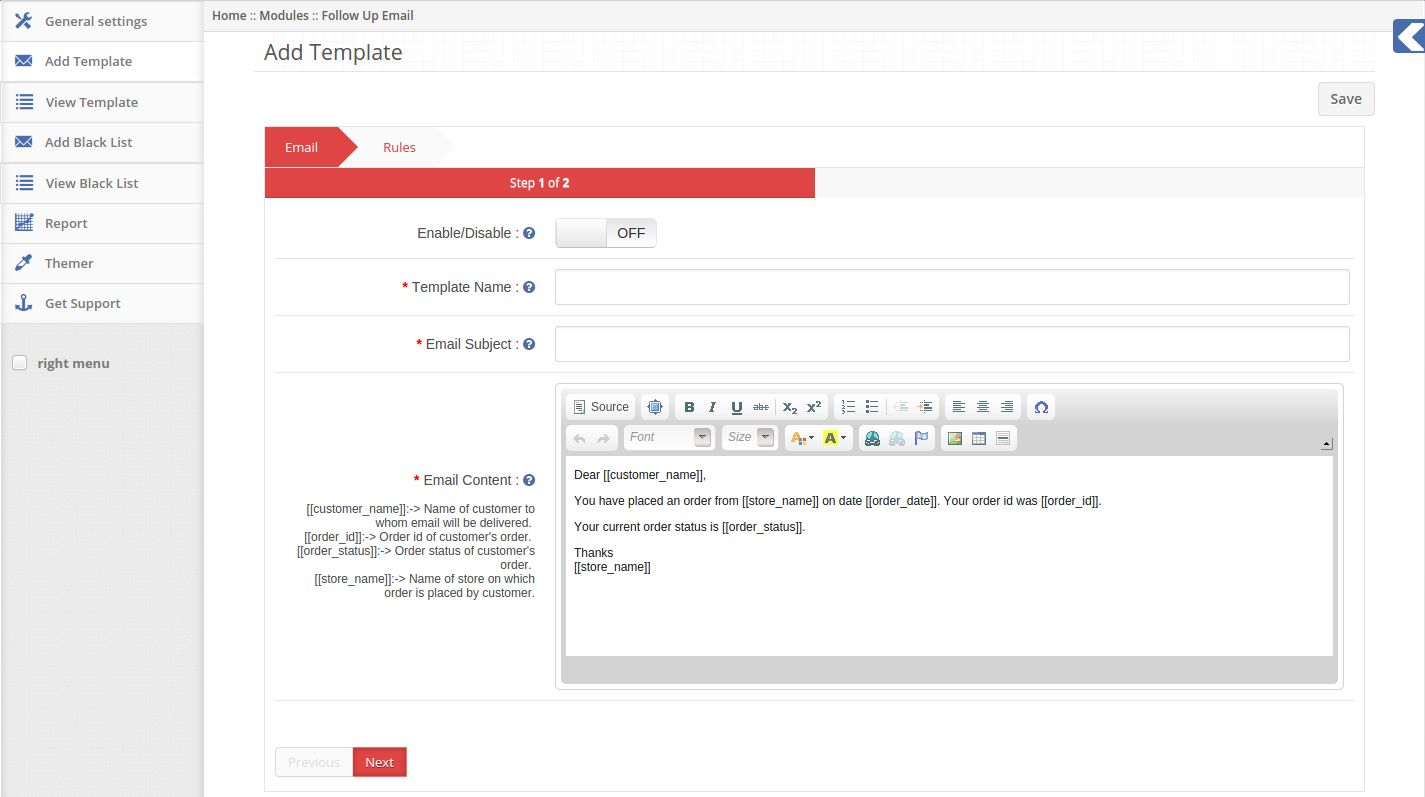
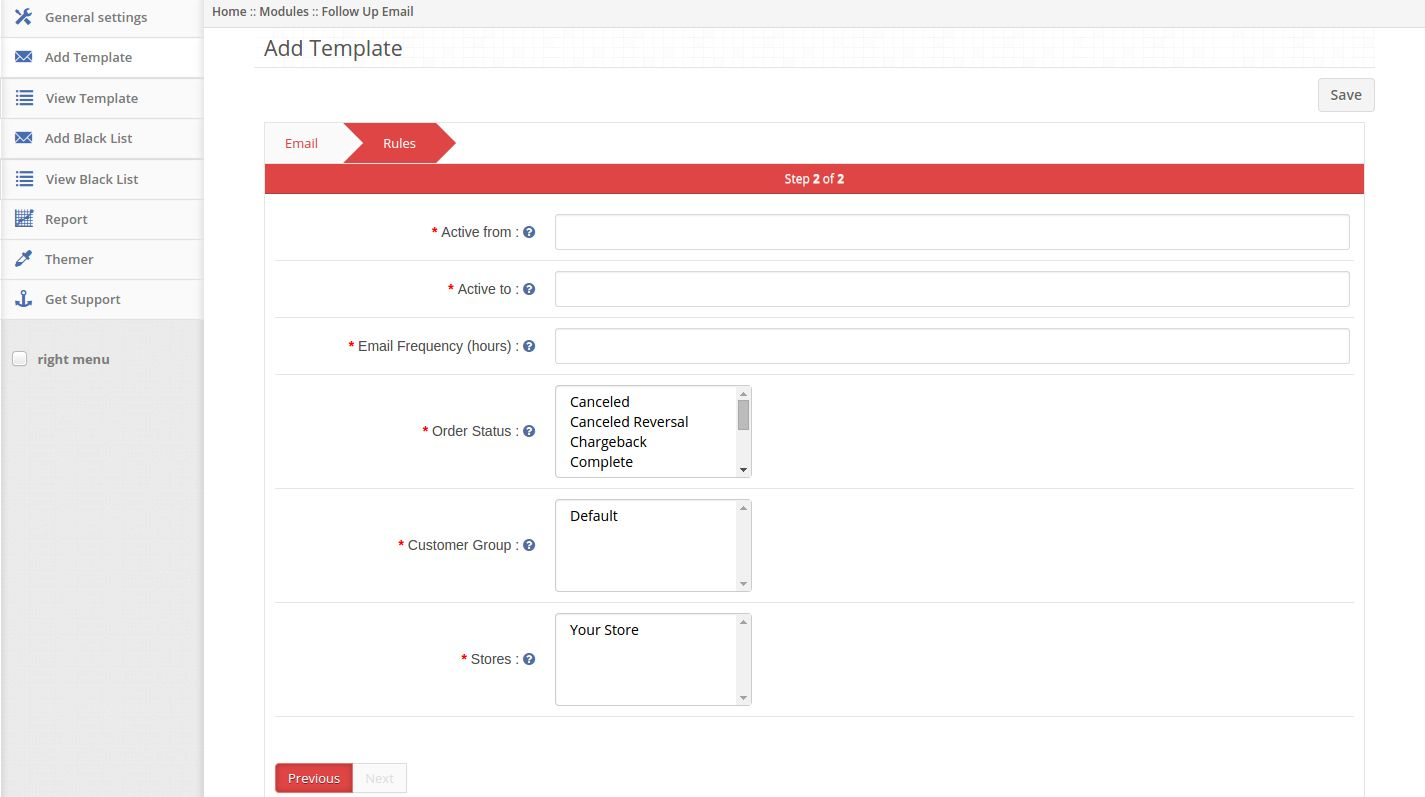
2. Add Template tab

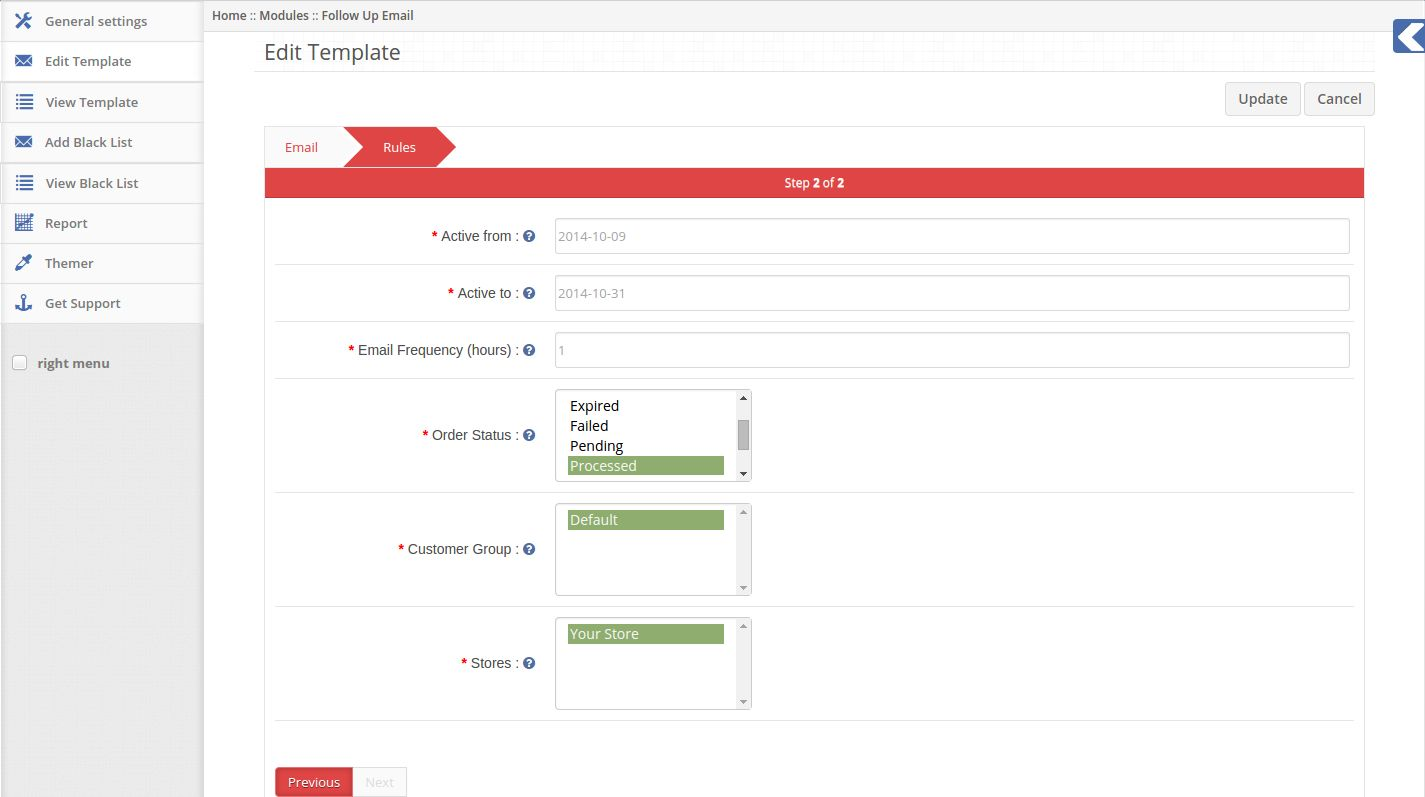
1. Here admin can create a new template.

2. Enable/Disable: Enable or disable template.

3. Template Name: Set name of template.

4. Email Subject: Set subject of email to be sent.

5. Email Content: Set content of email to be sent.

6. Active from: Set start date of sending emails of this template.

7. Active to: Set end date of sending emails of this template.

8. Email Frequency: Set delay time (in hours) for sending emails.

9. Order Status: Select one or multiple order statuses after which you wish to send emails.

10. Customer Group: Select one or multiple customer groups. Email will be sent to customers belonging
to selected customer groups.

11. Stores: Select one or multiple stores. Email will be sent to customers who placed orders from
selected stores.

12. Email will be sent to customers belonging to any of the selected customer groups who placed order
from any of the selected stores, after selected (email frequency) hours of their order reaching any of
the selected order statuses.

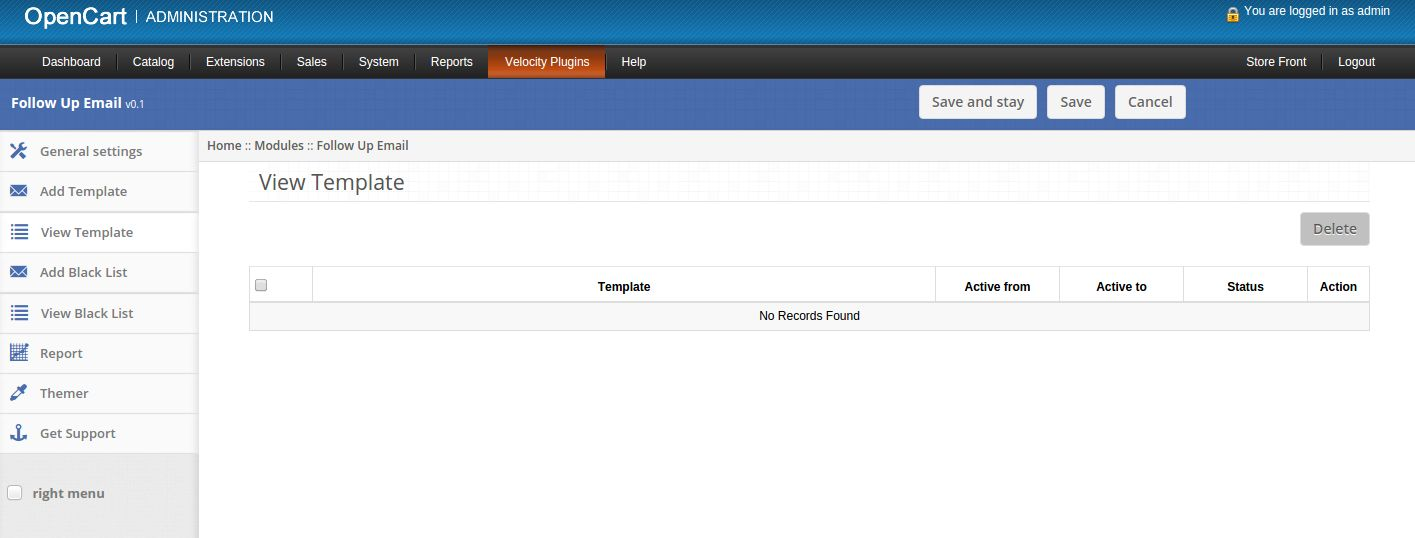
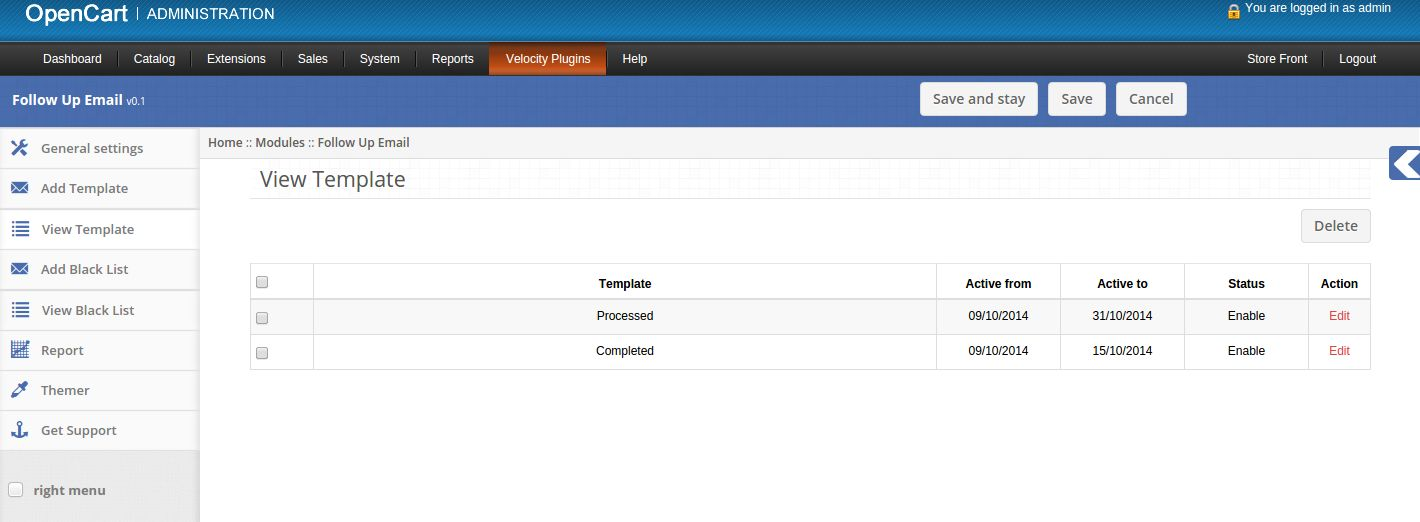
3. View Template tab

1. Here admin can see list of saved templates.

2. If their are no saved templates then this tab will look as follows:

3. If their are some saved templates then this tab will look as follows:

4. Click on Edit link provided in front of every template to edit that template.

5. Click on Delete button to delete selected templates.

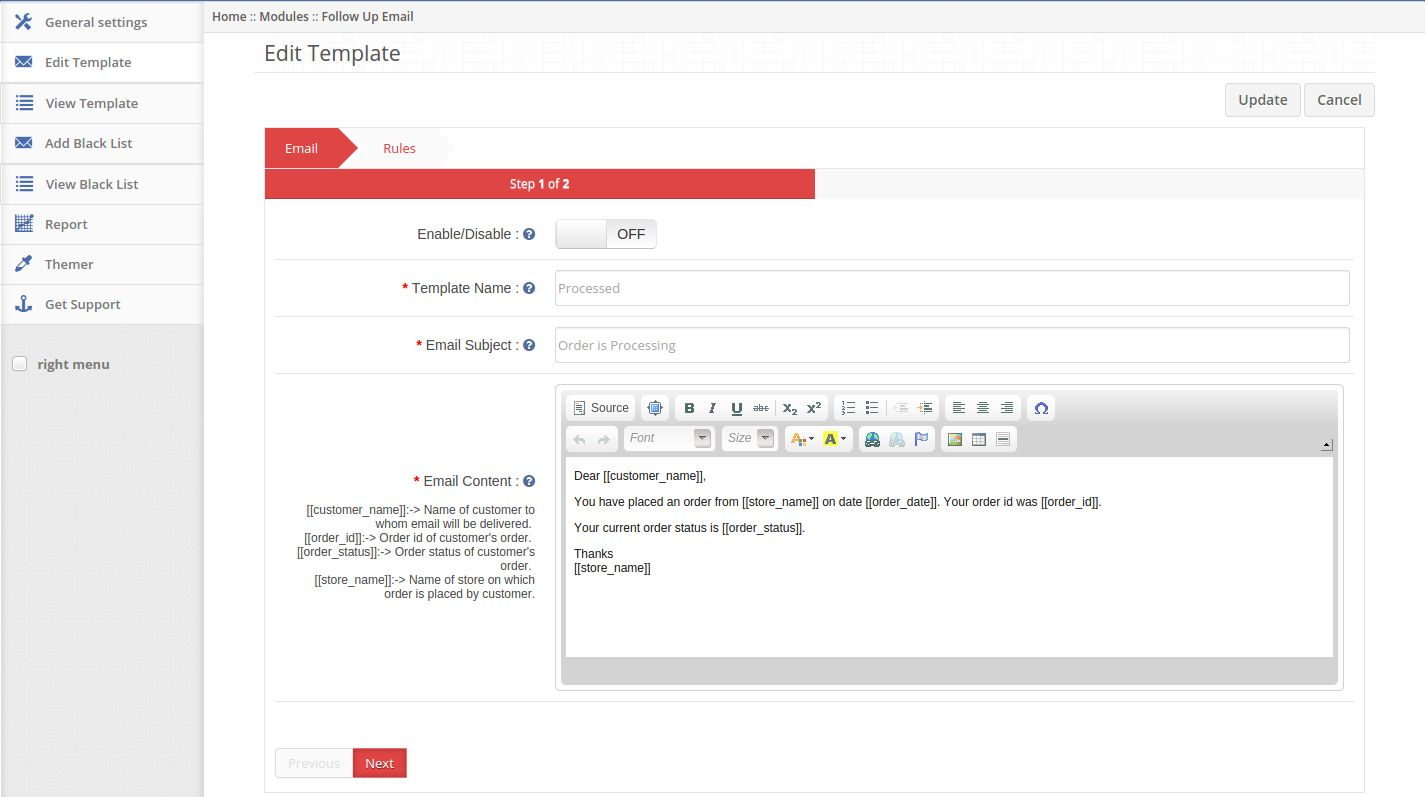
6. On clicking the edit link a form will appear to edit the promotion.

7. Enable/Disable: Enable or disable template.

8. Template Name: Set name of template.

9. Email Subject: Set subject of email to be sent.

10. Email Content: Set content of email to be sent.

11. Active from: Set start date of sending emails of this template.

12. Active to: Set end date of sending emails of this template.

13. Email Frequency: Set delay time (in hours) for sending email.

14. Order Status: Select one or multiple order statuses after which you wish to send emails.

15. Customer Group: Select one or multiple customer groups. Email will be sent to customers belonging
to selected customer groups.

16. Stores: Select one or multiple stores. Email will be sent to customers who placed orders from
selected store.

4. Add Black List tab

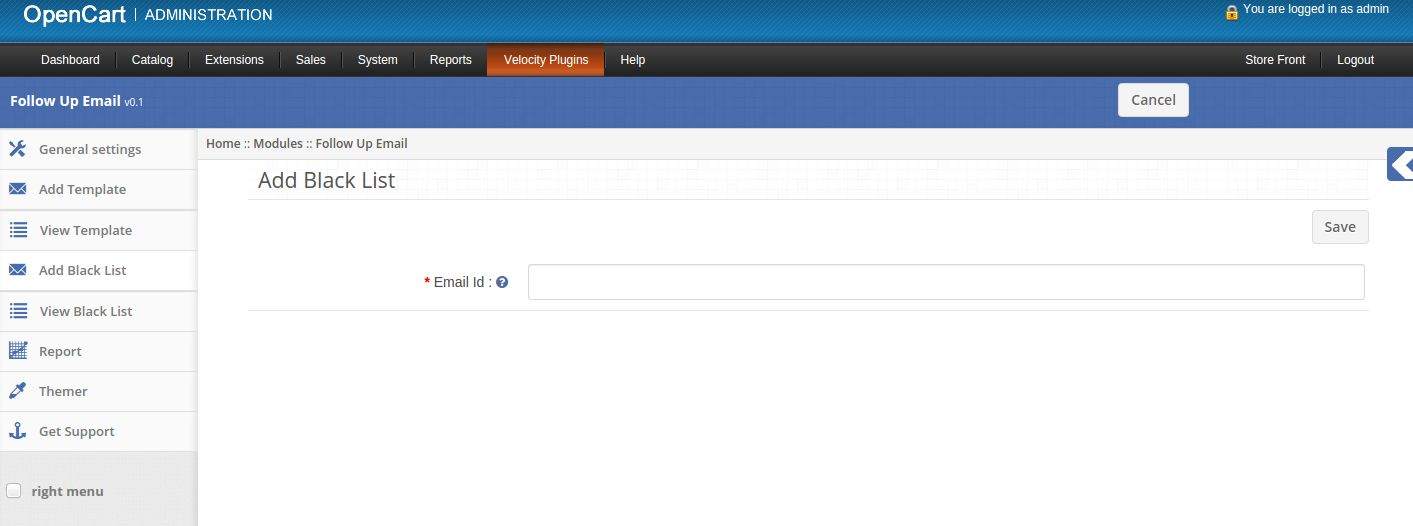
1. Here admin can add email id in black list.

2. Email Id: Enter email id to which you do not wish to send emails.

3. No email will be sent to email ids listed in black list.

5. View Black List tab

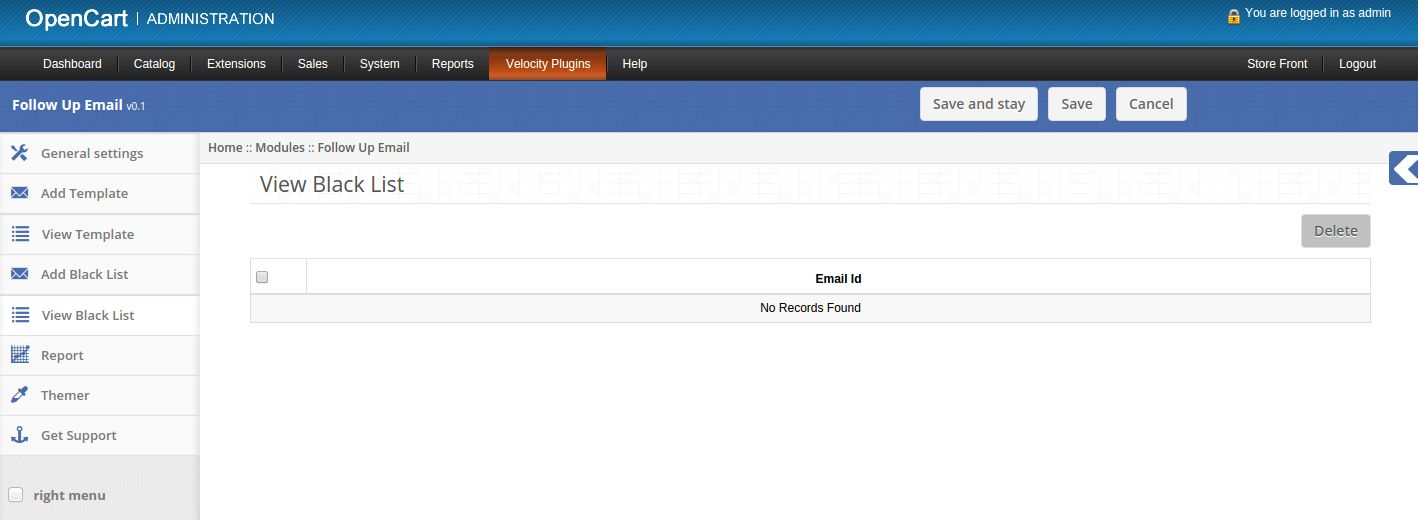
1. Here admin can see black listed email ids.

2. If there are no saved black listed email id then this tab will look as follows:

3. If their are some saved black listed emails then this tab will look as follows:

4. Click on Delete button to delete selected email ids from black list.

6. Reports tab

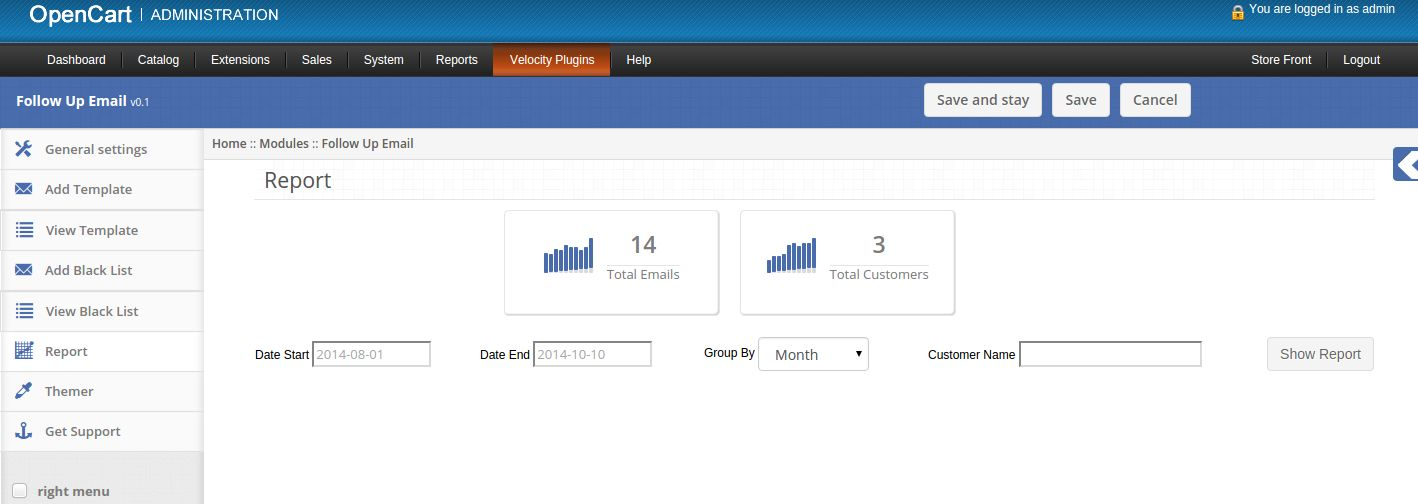
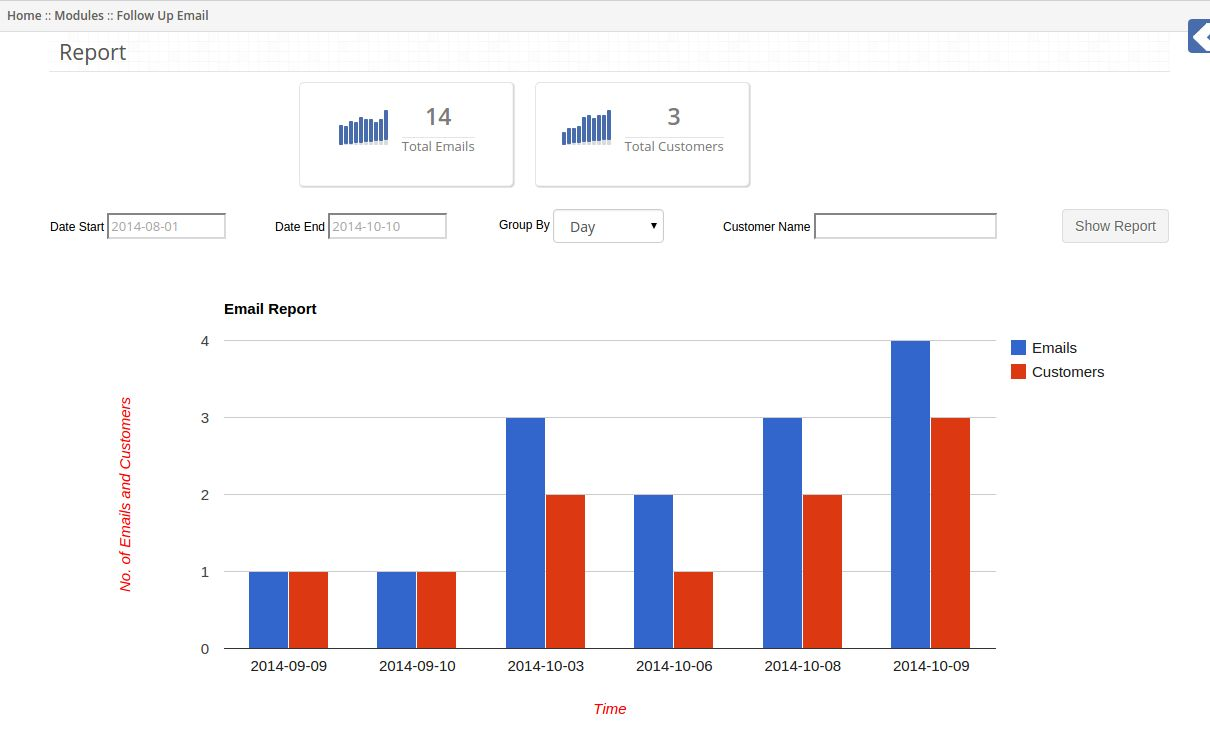
1. Here admin can see reports of emails sent to customers.

2. On the top of this tab total number of emails sent and total number of customers received email is
displayed.

3. On clicking Show Report button graphical report will appear as per values of filter.

4. You can also see report of email sent to particular customer by writing his name in filter.

7. Themer tab

By clicking on themer tab, you will have an option to change the theme of Follow Up Email admin
panel.

8. Get Support tab

By clicking on Get Support tab, you will be redirected to our support website, where you can contact
our support for help. Use this tab in case you some query/issue or found some bug.

Cron Setup

After installation of plug-in please add following cron to your store via control panel/putty. This cron should run once in every hour.
0 0 * * * wget -O /dev/null https://yourstore.com/index.php?route=followupemail/followupemail
Replace yourstore.com with url of your default store.

Recommendations

Set cron file to run once in every hour.

Magento Google Analytic Enhanced ECommerce – User Manual

Steps For Installation of Magento Google Analytic Enhanced

  • After unzip, following files/folders will be extract as shown in below screen:

  • Login via FTP & Drag drop all the folders into your server root directory.
  • You will find the extension link will be displayed under System >> Google Analytic.

Google Analytic User Manual

This module will basically work and visible in administration panel. There is no interaction of customers with this module and only administrator has access of this module.After copy this module, a link to access this module will be displayed under System >> Google Analytic menu as shown below screen:

After clicking on this link, module page will be open as shown in below screen: There are following tabs are displaying on left side in above screens. Each tab has different functionality which are described below in details:

General Settings

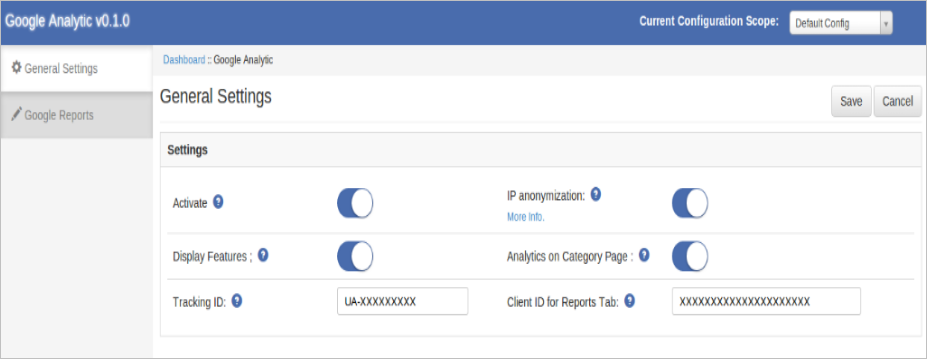
On clicking the module link, this tab will be open by default as shown as above screen. This tab has setting of this module. Each setting is explained below:

  • Activate: This setting will enable/disable the working of this module. There is switch button to ON/OFF this module. By default, it will be turn OFF.
  • IP Anonymization: This setting will enable/disable the IP Anonymization feature .The IP Anonymization feature in Google Analytic sets the last octet of IPv4 user IP addresses and the last 80 bits of IPv6 addresses to zeros in memory shortly after being sent to the Google Analytic Collection Network. The full IP address is never written to disk in this case.
  • Display Features: This setting will enable/disable the Display feature in Google Analytic.

  • Analytic on Category Page: This setting will allow you to enable/disable the analytic code to be execute on category page or not. By enabling this setting page speed may slow down depends on the no. of products . If you are using some ajax based 3rd party plugin for loading products. Then turn off this setting and add analytic code manually. To add code manually please refer to Appendix-1.
  • Tracking ID: Provide the Tracking Id provided in Google Analytic account.
  • Client Id : Provide the Google client Id of the same account associated with Google analytic with auth API and Analytic API .

NOTE: During Google API Configuration for client id , add ANALYTIC API in Google project . In javascript origin add url : https://www.example.com and in Redirect Url add url https://www.example.com/index.php/googleanalytic/adminthml_index/index

Google Dashboard

This tab will display following some Google Analytic reports . On clicking this tab screen will look like following:

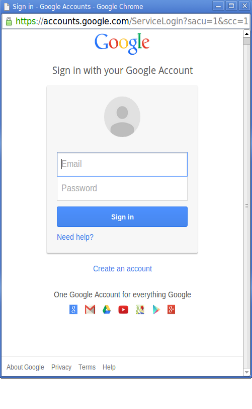
Initially this tab will show blank above orange colored login strip and blank report sections . On click of the above orange strip a browser window will open for login into Google Account. Enter the credentials of your account associated with Google Analytic.

After successfully login , you will see View Selector Options as shown below.

Using these options you can select select your analytic account and its corresponding property and its view.

On the top right there is widget displaying Active users count i.e. No of users currently present on your selected website at that time. By selecting a view reports will be displayed in their sections as shown below:

  • Overview Report: This is overview report which will display: a)No. Of sessions , b) No. Of New Users, c) Percentage of new Sessions, d) No. Of page views , d) No. Of unique page views , e) Pages per session , f) Exit Rate and g) Bounce Rate of Past 7 days including current day. This report will be displayed in tabular form.

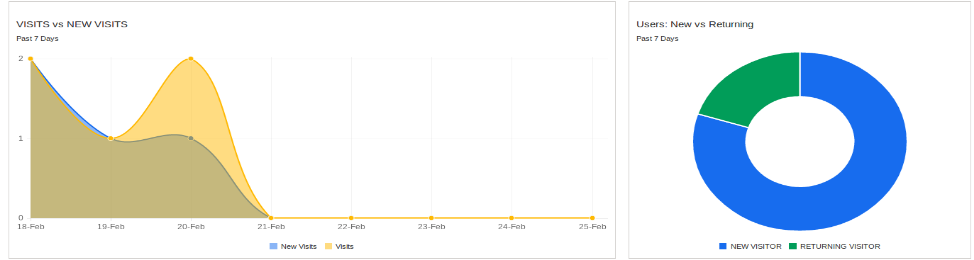
  • Visits vs New Visits: This report will display date-wise trend between visits i.e. Total sessions .and New Visits i.e. New Sessions.
  • New Users vs Returning Users: This report will pie chart between New Users and Returning Users.

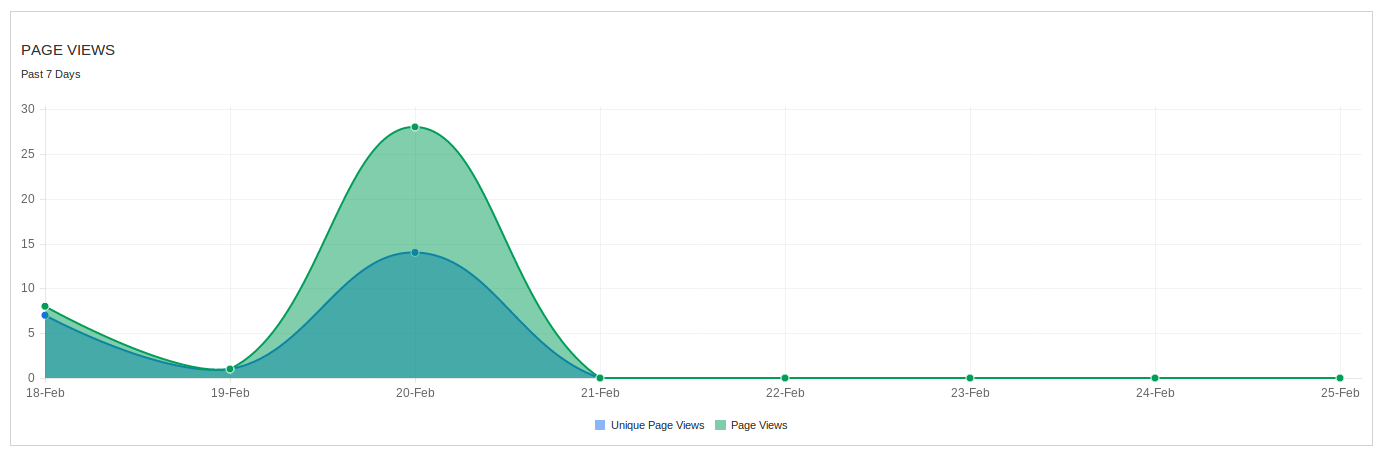
  • Page Views Report : This report will date-wise trend between Total page views and Unique page views of past 7 days.

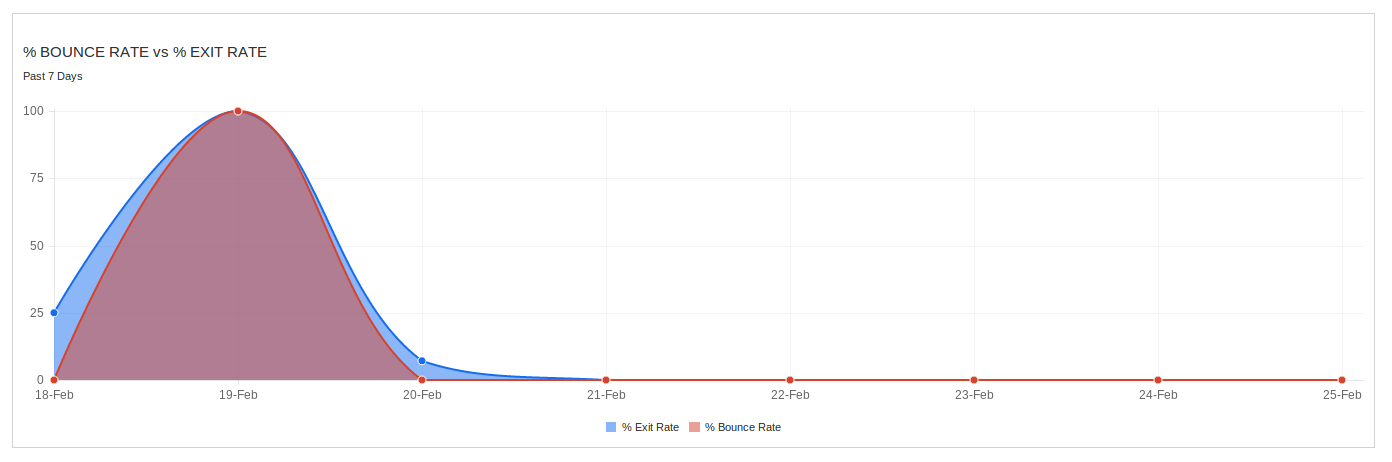
  • Bounce Rate vs Exit Rate: This report will display date-wise trend between Bounce Rate percentage and Exit Rate Percentage for past 7 days.

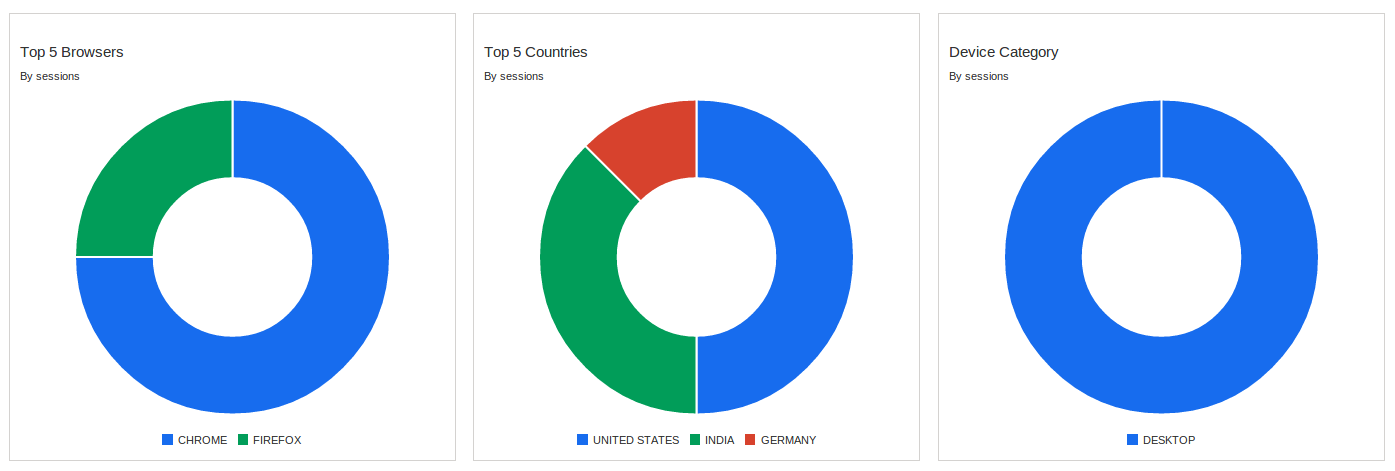
  • Top 5 Browsers : This report will display pie chart for 5 most used browsers in past 7 days by sessions . You can see no of sessions per browser on hover pie chart.
  • Top 5 Countries: This report will display pie chart for top 5 countries by sessions in past 7 days. You can see no of sessions per country on hover pie chart.
  • Device Category : This report will display pie chart for device category like desktop , Tablet or mobile used in past 7 days by sessions. You can see no of sessions per device category on hover pie chart.
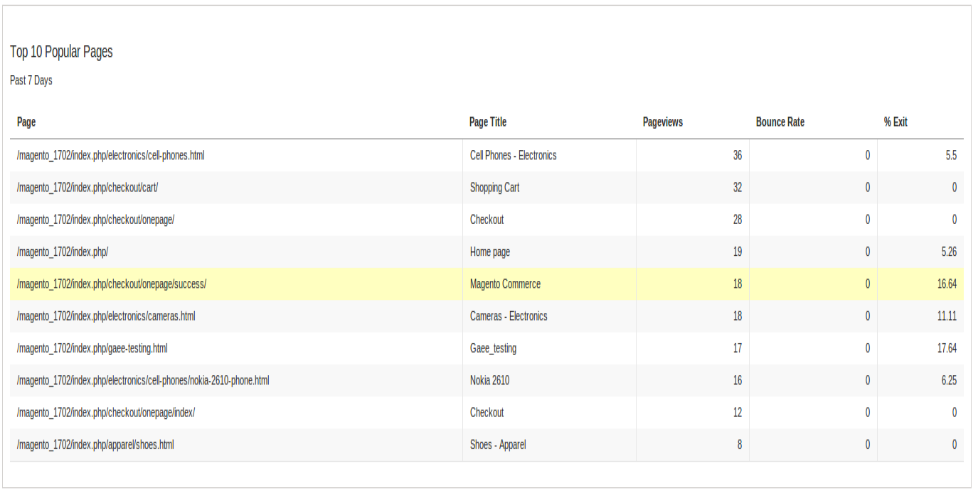
  • Top 10 Popular Pages : This report will display top 10 popular page by pageviews from past 7 Days with their Name, Path , Page views count , Bounce Rate(%) and Exit rate(%).

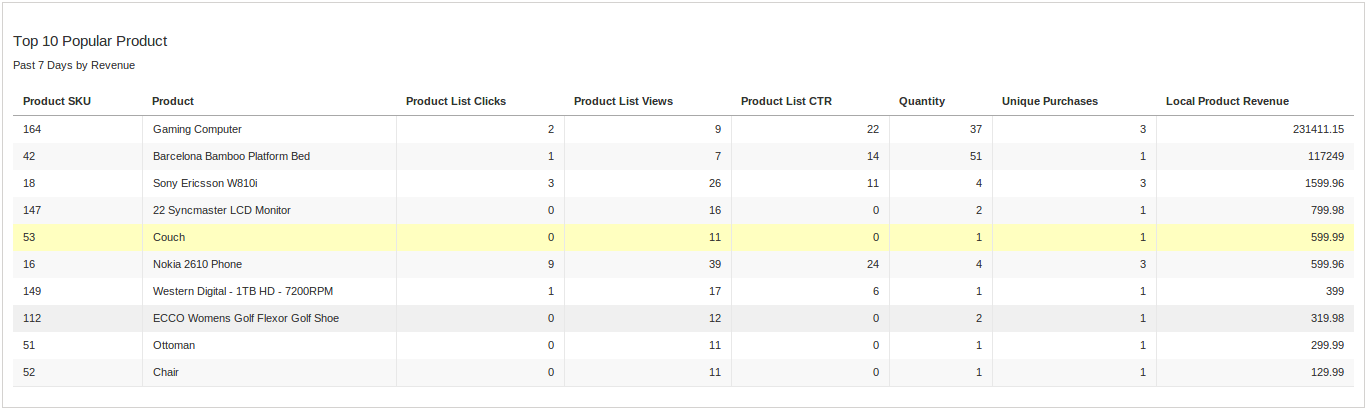
  • Top 10 Popular Product : This report will display top 10 popular products by revenue with their SKU, Name, Product List clicks , Product List CTR , Quantity , Unique Purchases, Local Product Revenue.

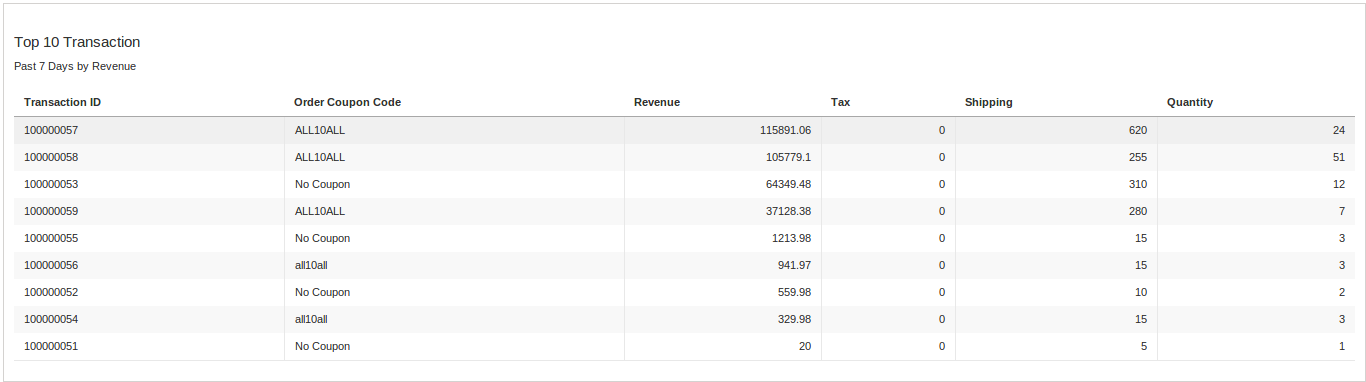
  • Top 10 Transactions: This report will display top 10 Transaction of past 7 days by revenue with their Transaction Id, Order Coupon Code, Revenue, Tax, Shipping , Quantity.

Appendix-I

In Magento when a category page is loaded an event is dispatched carrying information about the products. On the basis of that information our code works. But if you are using any extension to load products on category page then you have to manually add the analytic code.

Following is the example analytic code for category page:

ga(“create”, “UA-XXXXX-Y”);

ga(“require”, “ec”);

ga(“ec:addImpression”, { “id”: “9bdd2”, “name”: “Compton T-Shirt”, “price”: “44.00”, “brand”: “Compton”, “category”: “T-Shirts”, “position”: 0, “list”: “homepage”});

ga(“send”, “pageview”);

Details:

In 1st line replace UA-XXXXX-Y with your tracking id. Repeat 3rd line for each product come up with Ajax call to add impression of each product.

In 3rd line there are various field for data to send for analysis following are list of field with their meaning:

A. id=> product id

B. name=> name

C. price=> Product price

D. brand=> products manufactuter

E. category=> product category

F. position=> product position or you can give array index or any sequence no.

G. list => name of list or current page title which is suitable and easy to identify in analytic reports .

Liked This? You’ll Like These Too

Opencart Shipworks – User Manual
Demo to Setup OpenCart Shipworks Plugin Instructions

1. Download & Install the shipworks from https://www.shipworks.com/shipworks/download.php
2. After completion of installation of Shipworks, login into shipworks.

3. Go to Manage -> Stores & Add New Store to add new store if you have added any store in shipworks else shipworks automatically open the Add New Store screen.

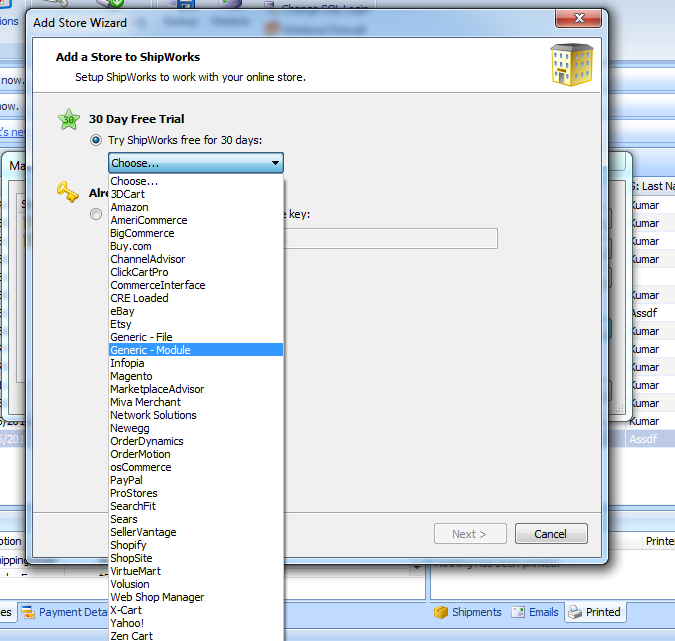
4. Select Generic Module from the cart list as shown below & click Next.


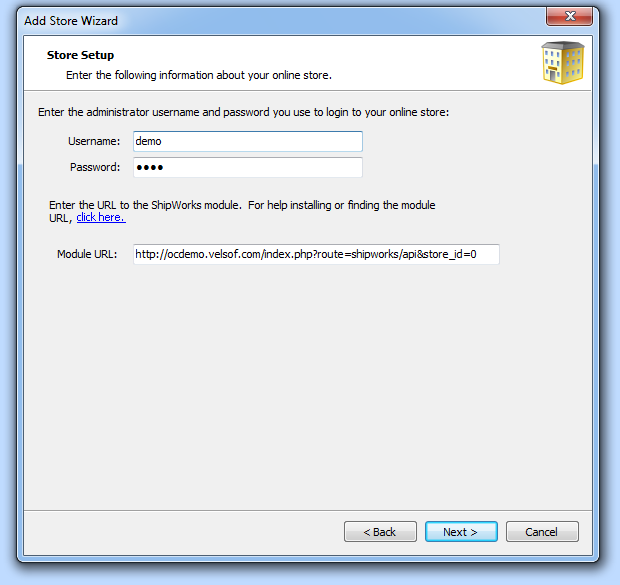
5. On the next screen, enter the following details.
Username: demo
Password: demo
Module URL: https://ocdemo.knowband.com/index.php?route=shipworks/api&store_id=0


6. After adding the Module URL, Click on the Next button & follow the instructions on Shipworks
screen.

7. When Shipworks ask for license key, provide the following license key & click next.

FZQ5K-EGRA2-ENMFT-55XKB-GENERIC-NSRIVASTAVA2@VELSOF.COM

8. After that click Finish button. Now shipworks is ready to download the orders from the server.

9. Click on the Download button to download the orders. System will download the orders into
shipworks from the server.

10. You can test by creating new order on the site i.e. https://ocdemo.knowband.com