Introduction:
Prestashop custom CSS and JS module is a simple module that allows you to style the pages individually. The module allows the site owners to add more features to CSS and JS of the website. You don’t require any FTP access to edit the existing code files. The addon helps you to add the CSS and JS code from the admin panel. The module helps in eliminating the dependency on the developer for making small custom changes and you can simply do that on your own using backend panel of the module.
The Prestashop Custom CSS & JS module allows the Prestashop store admin to change the user interface of any page of the Prestashop website. The Prestashop plugin offers the admin to do the same for mobile devices or desktops or both.
Steps For Installation of Prestashop Custom JS And CSS Addon:
To install this custom CSS and JS Prestashop plugin addon, please follow the following steps:
1. Add addon folder under modules folder of your system.
2. After adding this addon folder, system will list the Prestashop addon on module page under front office feature category as given below:

3. Click on install to install the Prestashop Custom JS And CSS plugin.
Admin Interface
Following features will be provided to admin in this custom CSS Prestashop module:
1. General Settings
2. Advance Settings
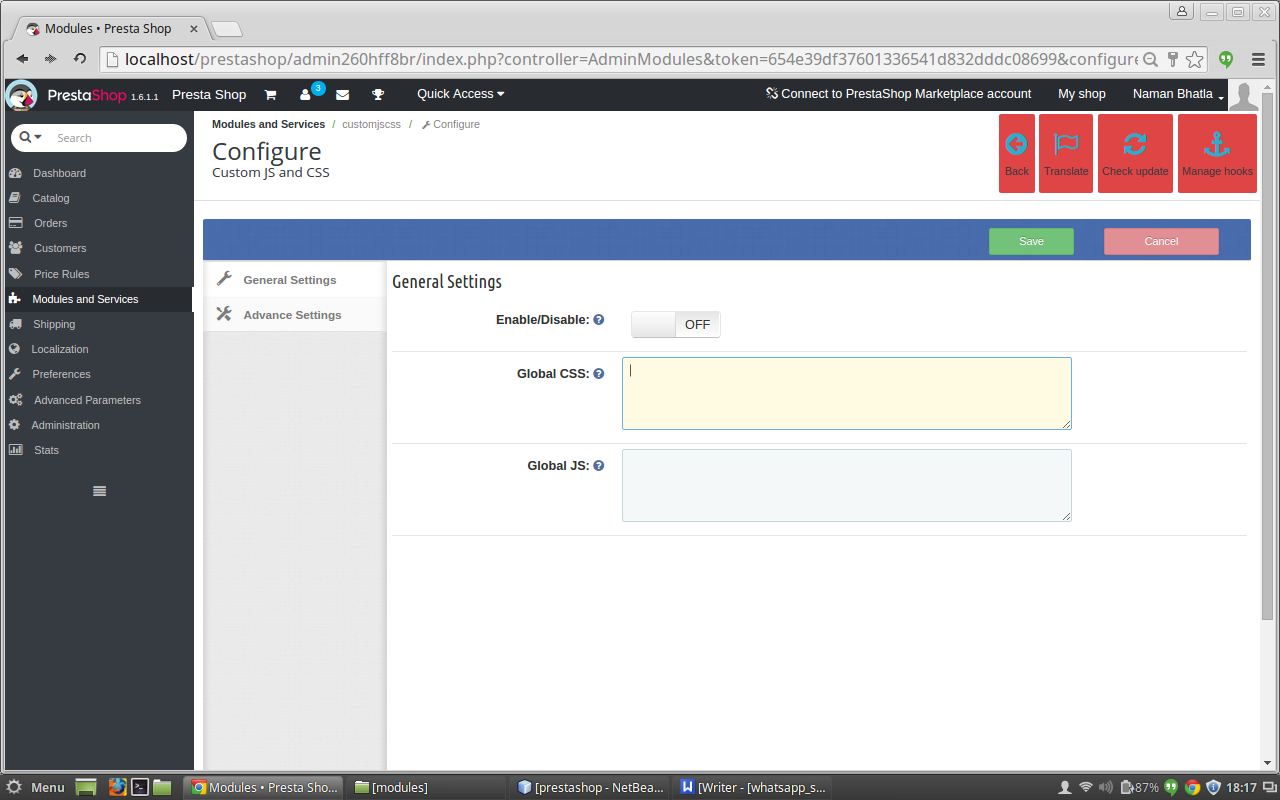
General Settings of the custom JS Prestashop module:
After clicking on configure link of Custom JS and CSS addon on module listing page, system will open general settings tabs by default as shown in screen below:
Fields listed will be filled with some default values
GENERAL SETTINGS TAB DETAILS:
1. Enable/Disable: Initially, this field of custom CSS Prestashop module will be OFF. The admin can enable/disable addon functionality by turning this ON/OFF.
2. Custom CSS: The CSS content which needs to be displayed on every page of the website has to be entered in the text area of custom CSS and JS Prestashop plugin given with field named Custom CSS.
3. Custom JS: The JS content which needs to be displayed on every page of the website has to be entered in the text area of custom JS Prestashop module given with field named Custom JS.
Advance Settings of the custom CSS and JS Prestashop plugin:
After clicking on the advance settings tab of the custom CSS and JS Prestashop plugin, the below screen appears.

ADVANCE SETTINGS TAB DETAILS:
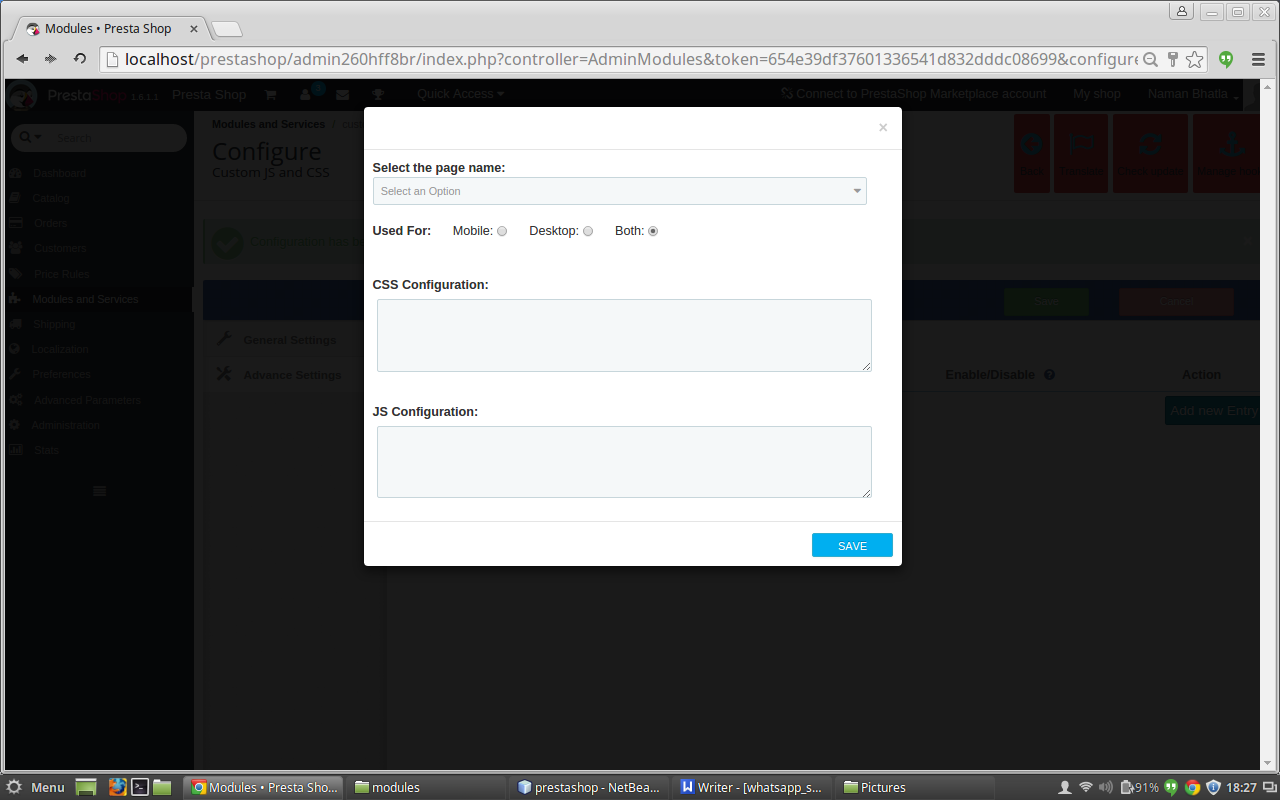
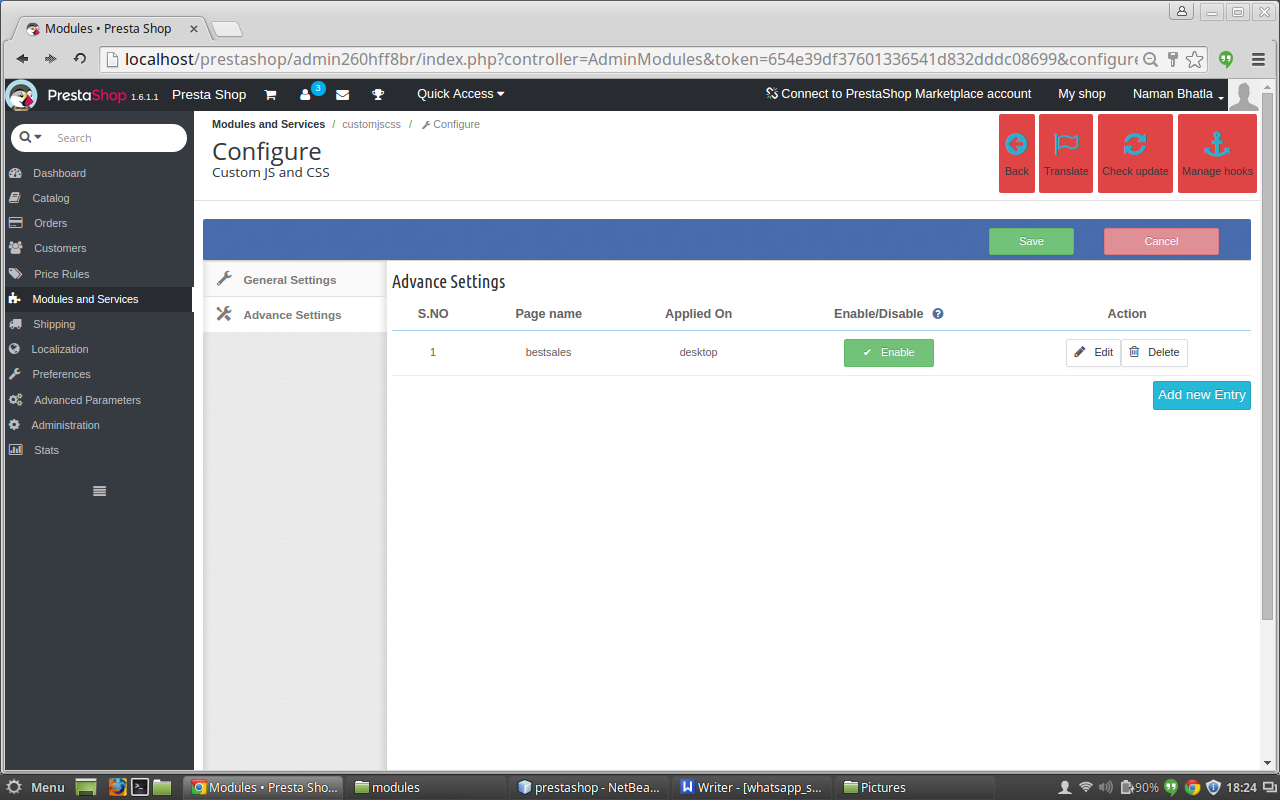
- Add new entry: Initially, there will be no entry in the advance tab table of the Prestashop Custom JS module, so click on new entry button to add on the details of the CSS and JS file with the page name and device type on it.
- Table : When the entry is done then the row is added to the table of the Prestashop custom CSS module with details of the entry such as page name device type enable or disable button and edit and delete button.
- Enable or Disable button : When the entry is done in the custom CSS Prestashop module, then the user can enable the file added by clicking on the enable button once which changes to the disable button after the user clicks on the enable button now the user can disable the entry by clicking on the disable button which is appearing in the table and the opposite happens .
- Edit : In the action column of the table, there is edit button on clicking on it a pop up appears which is same as the one which appears after we click on the add new entry button. But, the difference is that now the fields of the custom JS Prestashop module are filled with all the details which were entered earlier by the user in that row. Now the user can edit the entries of the custom CSS and JS Prestashop plugin which were done in the files or can change the device type or can add the entry to the page name.
- Delete : In the action column of the table, there is delete button on clicking on this button of the Prestashop Custom JS module, we can delete the entry which were made in that row.
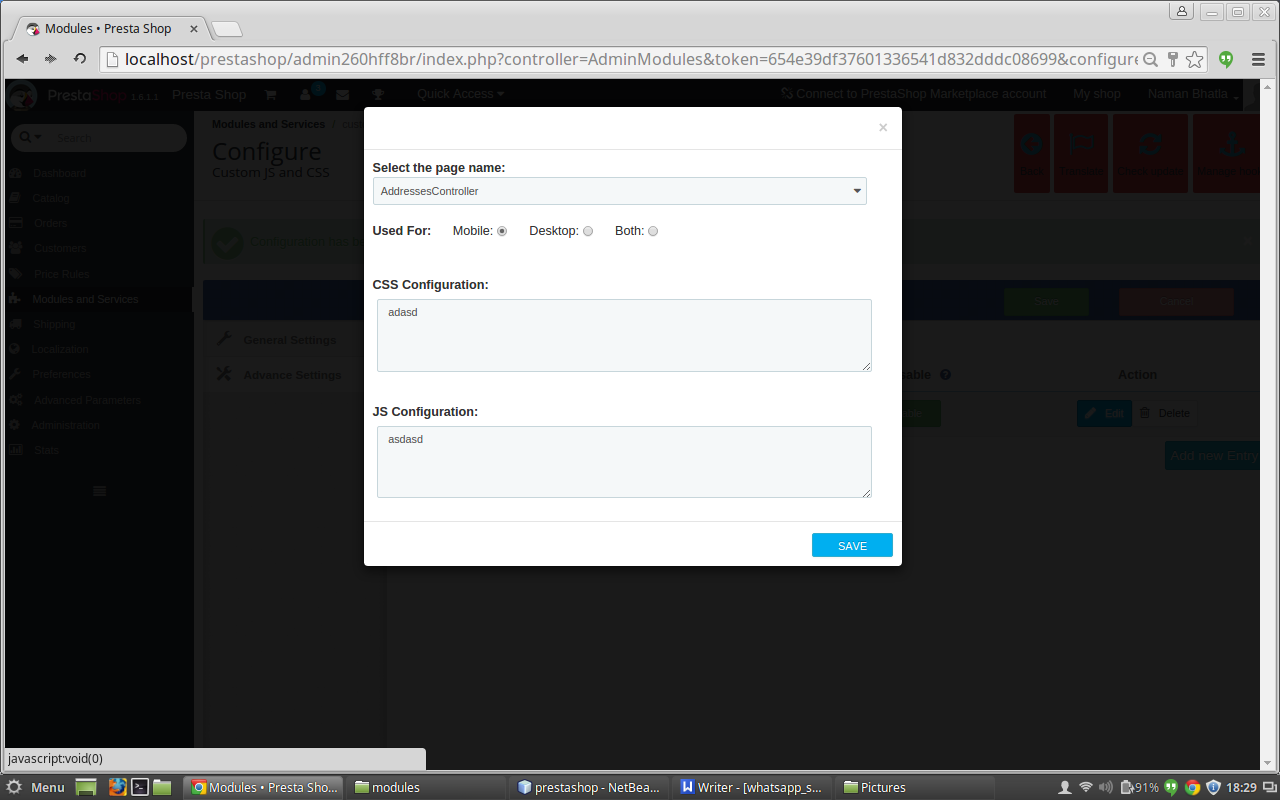
- Interface box: This is the box which will appear after clicking on the add new button if we have to add a new entry to the advance settings table. It will also appear if we will click on the edit button after the entry is done but the difference is that now the fields in thepop up box will be field with the details of that particular row to which the edit button belongs. Fields in the Pop up box are :
A. Select the page drop down: The first field of the ‘Add New’ field is a drop down menu which has all the names of the pages which are currently available in Prestashop. You can select the page in which the entry is to be done.
B. Choose Device Type: This field of Prestashop custom CSS contains of three radio buttons Mobile, Desktop and both. You can select the type of device for which you are going to add the css and js.
C. CSS configuration: In this text area of the Prestashop plugin by Knowband, you have to add the css code which has to added on the page which you have selected earlier.
D. JS configuration: In this text area of the custom CSS Prestashop module, you have to add the js code which has to added on the page which you have selected earlier.
INTERFACE AFTER CLICKING ON ADD NEW ENTRY
AFTER ADDING THE ENTRY
INTERFACE AFTER CLICKING ON EDIT BUTTON
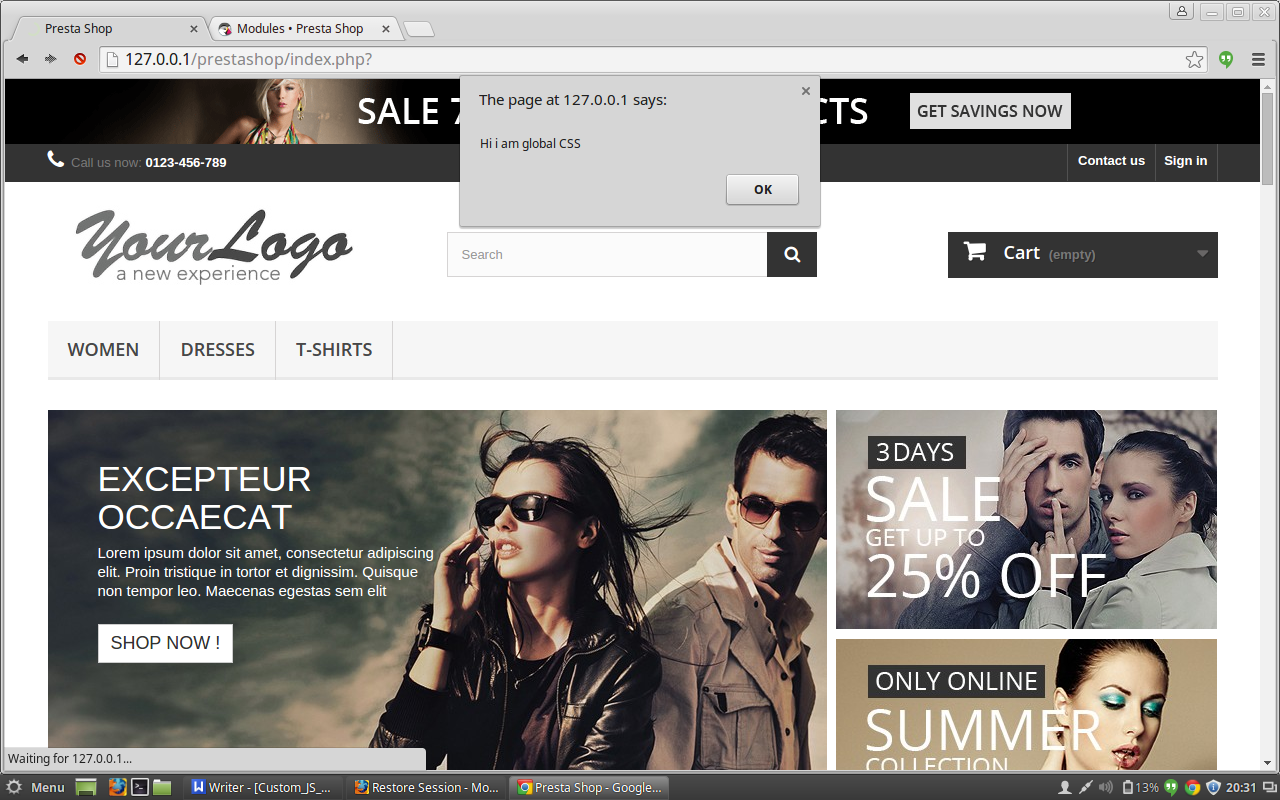
Front End Module
After enabling the Prestashop Custom JS plugin by Knowband, the front-end user will see the CSS and JS which are added globally to the website and the user will also see the CSS and JS which is added to that particular page only in the advance settings tab.
The CUSTOM CSS and JS at the front-end appears as follows:
Recommendations
Refresh home page of your store every time you enable/disable plugin. If plugin is not working after installation then please check permissions on modules folder. The folder should be writable. Please make the folder permission to 755.
We hope that we have covered all the concerns regarding the installation and product guide of this Prestashop Addon. You should also check our blog on Give Multiple Reasons to your Customers for Completing their Online Payment Process – Here
Watch the Video Tutorial here:
Module Link: https://www.knowband.com/prestashop-custom-css-and-js
User Manual: https://www.knowband.com/blog/user-manual/prestashop-custom-js-and-css/
Admin Demo: https://ps.knowband.com/demo1/16/admin1/index.php?controller=AdminLogin&token=aea1bb3fb1bab860c86c4db00ce5949e&redirect=AdminModules&demo_lang=en
Front Demo: https://ps.knowband.com/demo1/16/en/
Buy this addon now >> Knowband – Custom CSS and JS – PrestaShop Addons
