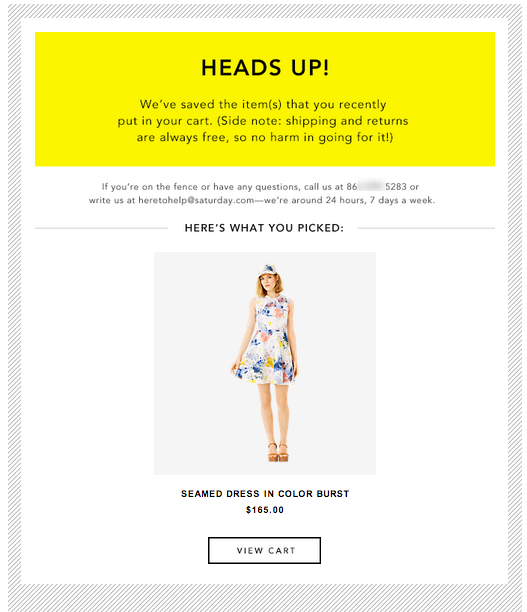
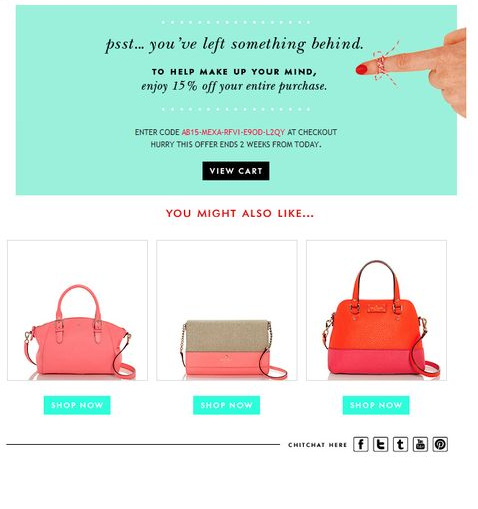
Abandoned cart is the biggest revenue killer for all those e-commerce websites that are operating out there. With an average cart abandonment rate of over 50% for almost all e-commerce websites, the question arises, what is the reason behind it? To get a deeper look at the problem, we need to look upon the issue from the perspective of a customer to understand it better. Here, we will discuss those points which annoy the customer to abandon the cart.
Why customer abandons a cart?
Lack of details: Most of the customers point out that due to lack of certain information like return and shipment policy, they are forced to abandon the cart. This information is crucial as they contribute in promoting transparency and builds a customer connect instantly, as the customer knows what to expect from your side.
Website crash/slow loading: This is another major reason which customers find very annoying. Since the whole meaning of e-commerce is quick, easy and seamless transaction for the customer, unnecessary delay in loading and unwanted crashes of your website would give a huge blow to this seamless experience. Thus, you must ensure that your website is bug-free, responsive and up to date so as to cater the needs of the customers. You need to work on your website loading speed immediately if it is having any such speed issue.
Lack of payment options: Limited payment options during checkouts act as final nail on your conversion rates coffin. Nowadays, customers want to avail the benefits offered by various payment modes so as to avail the discount on their purchase. Restricting the customer to a particular payment mode not only results in cart abandonment but also restricts your customer base. Because, some customers may not want to use that payment method or they do not have an access to the payment mode which you are offering.
Lengthy checkout process: Long checkout process with lots of unnecessary details to be filled often forces the customer to opt out. Nobody likes to wait for loading of 5-10 pages to fill a detail information when his/her motive is a fast and easy transaction. In this regard, you need to update your e-commerce website with any of the One page checkout modules based on your CMS platform. PrestaShop One page checkout is one such addon which you can opt for your e-commerce website.
Shipping charges: Asking for shipping charges act as a great diverge for your conversions. Most of the customer that transact online prefer to purchase from a website that offers free shipping or a minimum charge for shipment. Customers generally don’t like to pay charges over and above the product price and when certain shipment charges are added they make the product costly from the customers perspective. Moreover, customers can easily find an alternative to your site which might offer free shipping on the same kind of purchase.
Conclusion
Looking at the problems from the customer’s perspective has an optimum chance to deliver you with certain positive solutions. Cart abandonment is one such problem which requires itself to be analyzed from the customer’s perspective. The points discussed above would certainly help you in getting a deeper insight into the problem.
Testimonials are a very powerful yet underutilized internet marketing tool that helps businesses build credibility, alleviate concerns, and convert prospects into clients. Adding customer testimonials to your website can be an extremely effective way to establish trust and strengthen your company’s reputation. The Prestashop Website Testimonial Plugin is developed for providing the valuable customer the opportunity to give there positive and useful feedback as a written testimonial. Testimonial will helps the seller and customer to build a strong relationship with each other. Prestashop Website Testimonial addon also proves to be a good marketing tool for the website.
With this Prestashop review addon, the store owner has the right to allow customers to write their testimonials. The store owner can take back the permission from the allowed customer any time. The testimonials which are approved by the store owner are displayed on the website.
1.1 Features offered by Prestashop comment plugin
The store admin can manage the testimonials to display on the website with the help of the Prestashop rating addon by Knowband.
The Prestashop store admin can control all the things starting from allowing the customers to write the testimonials to displaying the same on the page and position where it will be displayed on the website.
The Prestashop rating addon allows the admin to approve or decline the testimonials posted by the customers.
The customers can add images to their testimonials if they wist to.
The Prestashop Website Testimonial addon has a mobile responsive interface.
It’s very easy to install and configure this Prestashop review addon.
The e-merchant can display the testimonials at Homepage, Left Column, and Right Column as per the requirement.
The Prestashop rating addon shows random testimonial from the approved list.
The Prestashop rating addon has a write testimonial permission feature also.
This Prestashop comment addon offers SSL compatibility.
The rating addon is multi-store compatible also.
The Prestashop addon offers multi-lingual compatibility.
2.0 Installation Guide
After purchasing the Prestashop Website Testimonial addon from the store and you’ll get these files:
1. The zipped file that consists of the source code of this Prestashop addon.
2. User Manual
Follow the following steps to install the Prestashop gift card manager extension:
First of all, unzip the zipped file. It includes some files and folders.
After that copy the overall content of the folder and paste them into “Modules” folder of the store’s directory. Follow the path – Root Directory/modules/.
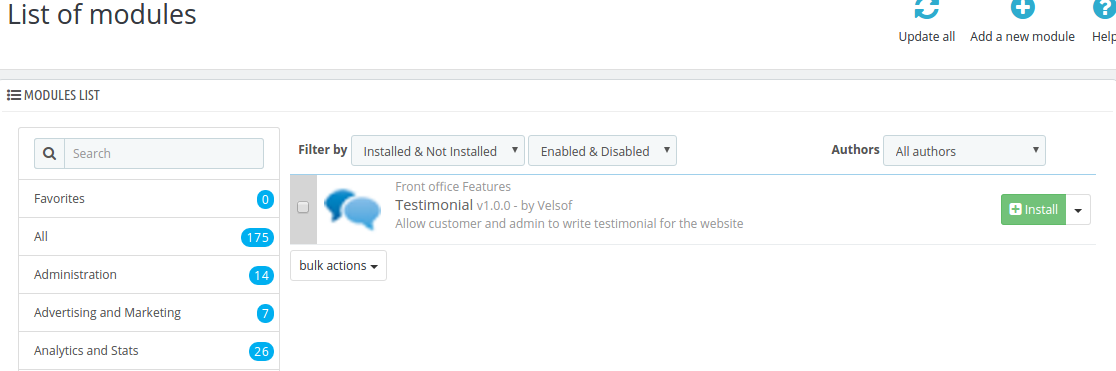
3. Now you can install the Prestashop rating addon. You can find that in Store Admin -> Modules and Services. It would be shown as below –
You just need to click on “Install” button to install this Prestashop module. A confirmation pop-up will be shown. Click on “Proceed with the installation” option. This step will install the module and show notification – “Module(s) installed successfully”.
3.0 Admin Interface
This User Manual will guide you through the Admin Module/Store Front settings and various features of this Prestashop Website Testimonial Module by Knowband.
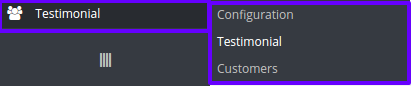
In the main menu of the admin panel of Prestashop, you will get the following configuration options as shown below:
Configuration
Testimonial
Customers
3.1 Testimonial Configuration
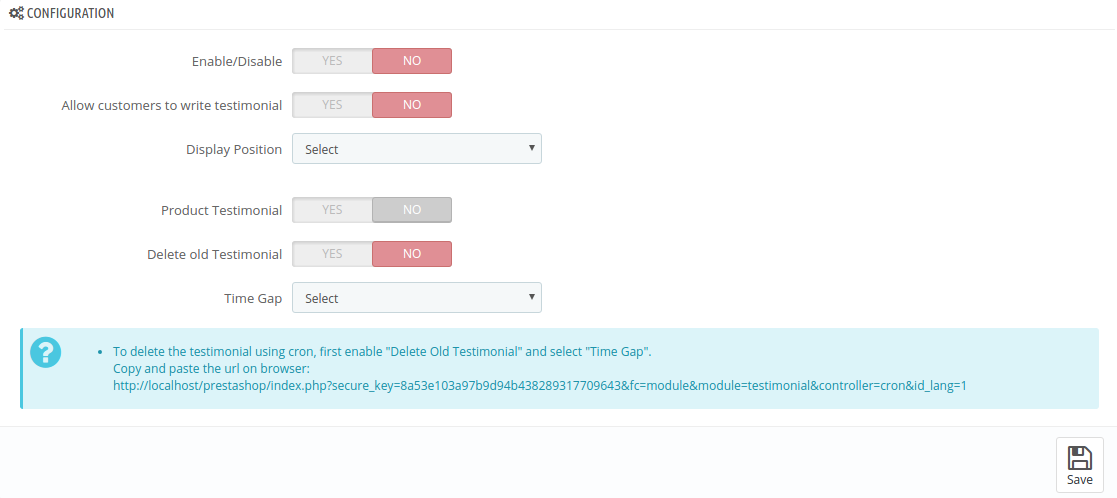
On the Configuration Page, there are various settings which are shown as below:
The configuration page consists of the following fields:
Enable/Disable: By Default, the Prestashop Website Testimonial addon is disabled. This setting will enable/disable all the functionality of this Prestashop review addon on the front end.
Allow customers to write testimonial: By default, this is disabled. In order to allow your customers to write testimonials for you, you have to enable it. This can allow the customers who are under as “Testimonial Customer” to write the testimonial for the store.
Display Position: To display the testimonials on the store, there are various positions such as “Left Column”, “Right Column” and “Home Page”.
If “Left/Right” column is selected then, a select box to choose page type appears which have page type such as “Category”, “Product”, “CMS” and “All” to display the testimonials.
Delete Old Testimonial: By default, this is disabled. If this is enabled then the Prestashop addon will delete all those testimonials which have been set by time gap field.
Time Gap: This can provide the time gap used for deleting the old testimonials. There are following time gap options: a) 1 Month Ago, b) 2 Months Ago, c) 1 Week Ago, d) 2 Weeks Ago.
After modifying the configuration, click on the “Save” button to save the configuration.
There is an “Information” which is displayed below the “Time Gap”.
There is a link provided to delete the testimonial. To delete the testimonial(s), copy and paste the link into the browser and press enter.
3.2 Testimonial
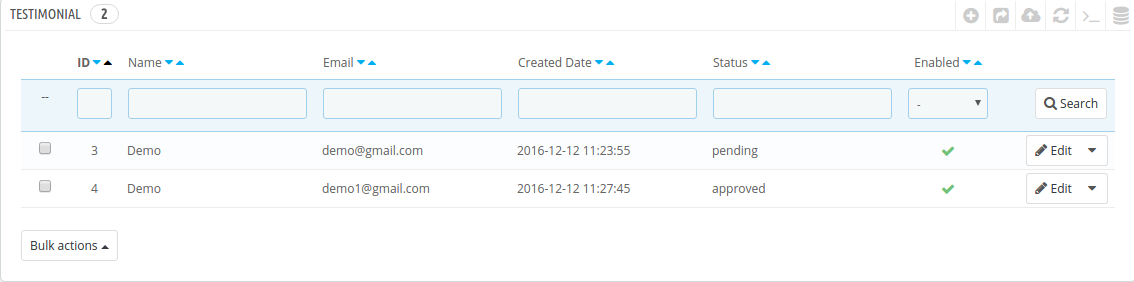
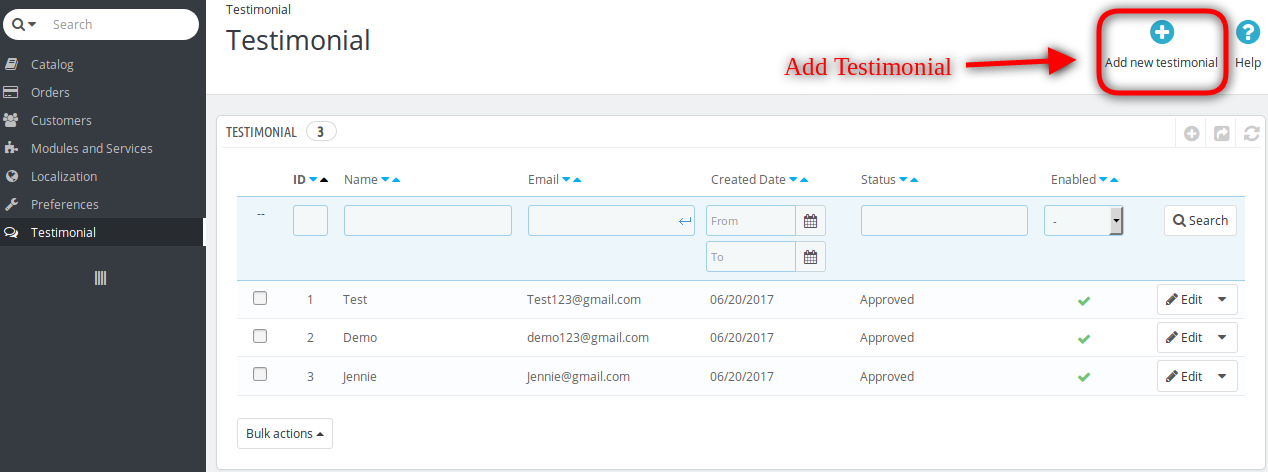
This page has the listing of all testimonials added by “Admin” or “Customer” as shown below:
There are also several other filters as well to filter the list of sellers as shown in the above screen shot.
The Prestashop store admin can also enable or disable a testimonial in this list using the bulk actions of the grid. If a testimonial is disabled then that testimonial will not be visible on the storefront. Admin can enable/disable testimonial by clicking on “Tick” or “Cross” in the Enabled field of the list for the particular testimonial.
3.2.1 How to add Testimonial from the admin panel
To add testimonial on the front-end, click on the “Add new testimonial” button shown above the list of testimonial in the Prestashop comment.
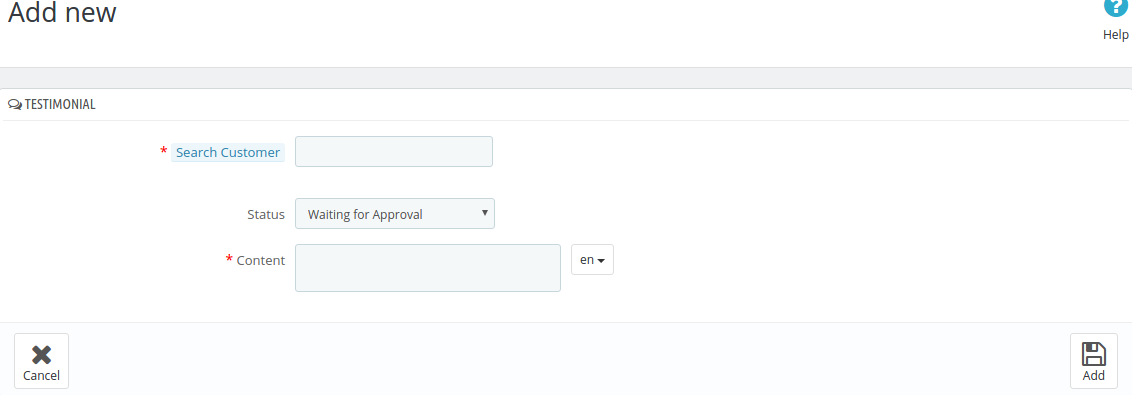
A blank form will open to add testimonial for the particular “Allowed Customer” as shown below:
Search Customer: First, search the customer from the “Testimonial Customers” to add the testimonial. By typing the name of the customer, the list of customers will appear in the select box. Then, choose the customer.
Status: By default, the status is “Waiting for Approval”. Set the permission for the testimonial.
Content: In this field of the Prestashop rating addon, add the content to display on the testimonial. The admin can select the language from the drop-down list. Content can be added for the multiple allowed languages. The length of content should be greater than 100 characters.
Click on the “Add” button to add the testimonial or “Cancel” button to go the previous page.
After adding the testimonial, the admin can see the testimonial in the Testimonial list.
3.2.2 How to Edit Testimonial from the admin panel
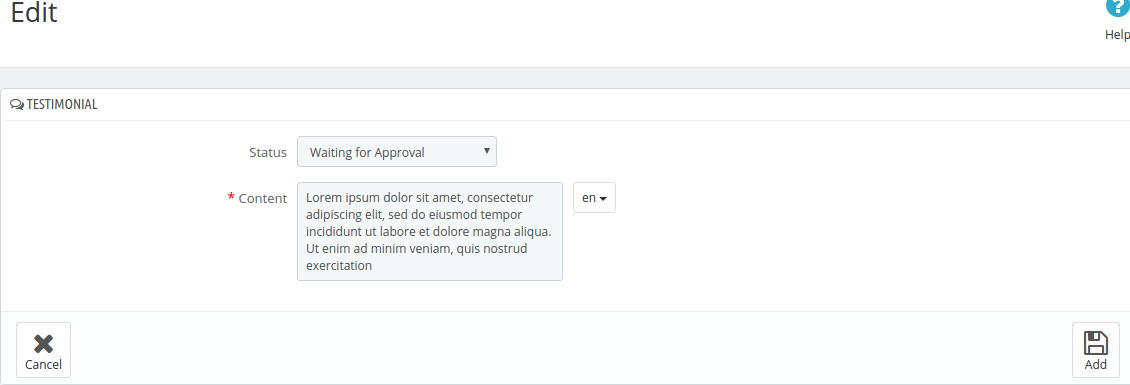
To edit the particular testimonial, click on the “Edit” button of that testimonial displayed on the list. A form appears as shown below:
The testimonials which are added by the customers and are waiting for approval can be allowed to appear on the designated page or declined by changing the status of the testimonial.
Content can be modified for the multiple languages.
Then, Click on the “Add” button to update the testimonial or “Cancel” button to go to the previous page.
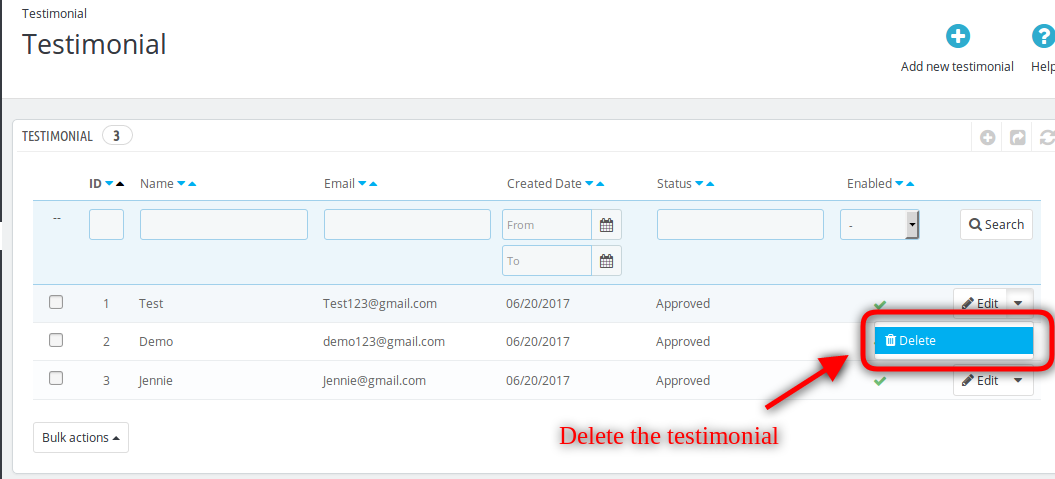
3.2.3 How to Delete Testimonial from the admin panel
Tha admin can easily delete the testimonial just by cicking “delete” option. After confirmation the store owner can delete any testimonial.
3.3 Customers
To view “All Customer” and “Testimonial Customer”, click on the Customers tab of the testimonial menu. This page will provide the display of all existing customer and allowed testimonial customer as shown below:
Choose the page view as “All Customer” or “Testimonial Customer”.
3.3.1 All Customer
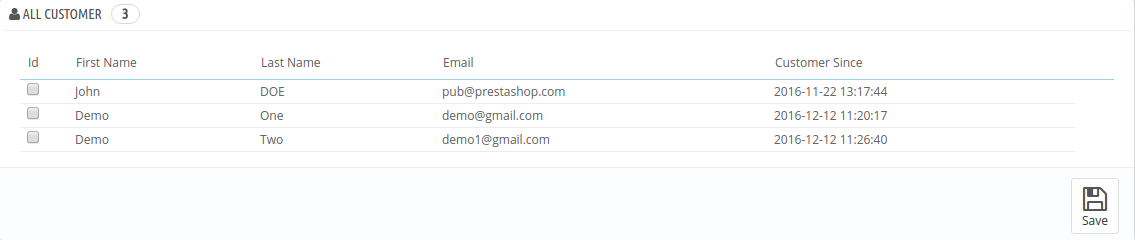
On choosing the “All Customer” from the list, a list will appear which have the details of all existing customers as shown below:
To add the existing customers, click on the checkbox of the customer and click “Save” button to add the customer in the “Testimonial Customer”.
3.3.2 Testimonial Customer
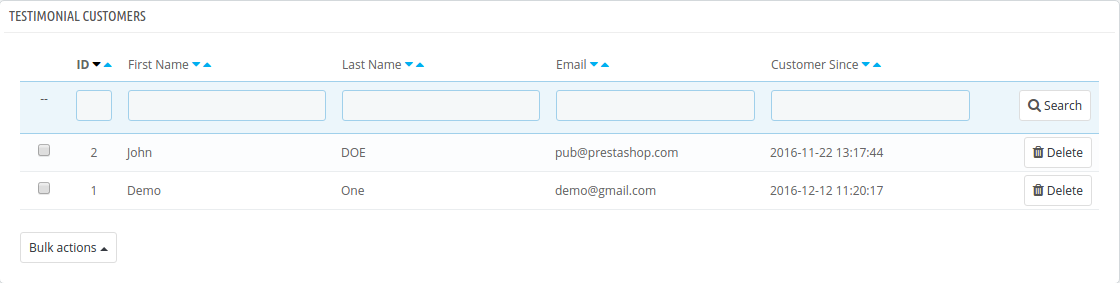
On choosing the “Testimonial Customer” from the page view list, the list of all the allowed customers will be displayed as shown below:
Only the allowed customers can write a testimonial for the store.
The admin can delete the customer by clicking on corresponding “Delete” button or delete the customers from the “Bulk Action” tab.
4.0 Store Front
If the customer is allowed, then user can see the“My Testimonial”link in “My Account” page as shown below:
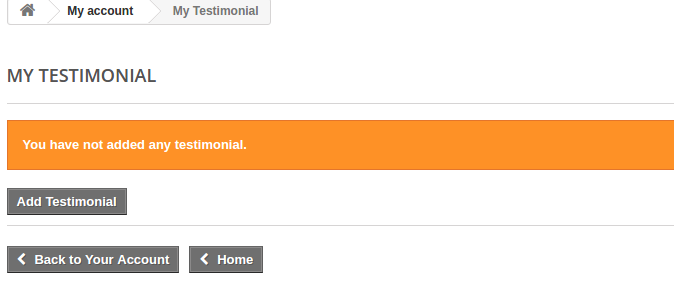
On Clicking the “My Testimonial” link of the Prestashop comment addon, a page is open as shown below if no testimonial is added:
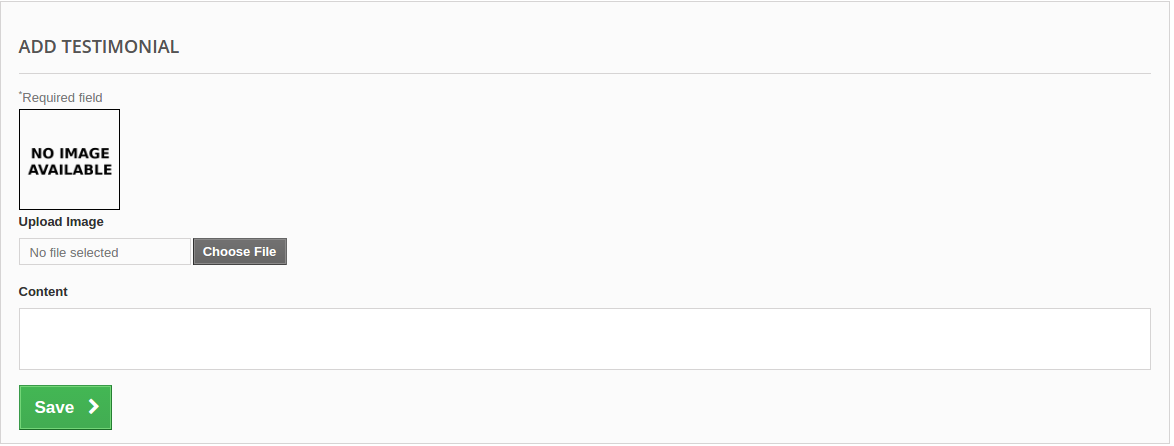
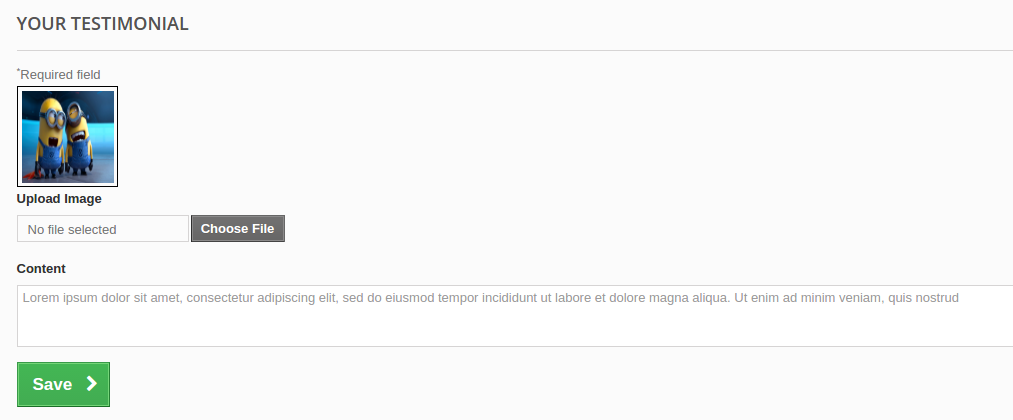
Add Testimonial: To add testimonial, click on the “Add Testimonial” link and a new blank form will open as shown below:
Upload Image: Add the testimonial image in jpg, jpeg, png format. On adding the image, the image preview can be seen in the box provided above.
Content: Add the testimonial description to display on the testimonial.
On clicking the “Save” button, the form will validate and if no error occurs form data is added. On adding the testimonial, notification is sent to the admin for the permission change.
With this, the page is redirected to “My testimonial” page and the added testimonial is displayed as shown below:
Edit: On clicking the edit button, a form is opened as shown below:
Add image before clicking the “Save” button to update the testimonial.
Delete: To delete the testimonial, click on the delete button and it will prompt you before deleting the testimonial to verify whether to delete or not. If the store admin clicks “Yes” then testimonial is deleted and notification is sent to the admin.
Do you know your users want to hear from other customers before making a purchase from your store? Quickly help them to clear all their doubts with this testimonial addon and guide them towards finalizing a purchase from your Prestashop store. Displaying a positive review or feedback from your customer powerfully impacts the minds of the potential customers. So let’s see who all are thinking to buy from your store? Buy the product now from addon store
Competition is the eCommerce market is never a new concept. Sites keep experimenting with their site elements to impress their customers and score better conversion than their rivals. Checkout module is one such element in any eCommerce site which decides the fate of conversion and revenue generation on the whole. Considering this, Magento is one of those eCommerce platforms which is most popular in eCommerce entrepreneurs. It’s generic that Magento too has its own default checkout extension which handles the order processing on the websites effectively.
Question is why custom checkout extensions are so popular even for this highly popular platform? If Magento is so popular with for its efficiency, then why one goes for custom checkout extension for his eCommerce site?
For any eCommerce platform (let it be PrestaShop, OpenCart or Magento), the checkout pages are designed keeping in mind the requirements of a complete package. By complete package, we mean everything that is required for the eCommerce site to process an order successfully. Now let’s look at some reasons for why website owners choose to go for a custom checkout extension rather than sticking to the default checkout.
1. It would all be identical
Every eCommerce website developed on Magento would look exactly the same like any other Magento site. For delivering a unique user experience and providing a USP, entrepreneurs choose custom themes and templates. However, the checkout processes will still look the same like any other Magento site.
To differentiate checkout of one Magento site with another, custom checkout extensions play a great role. These Magento checkout extensions, provide the features to easily customize their look and feel so that no site possess an identical checkout process.
2. Multi-page checkout in default
The default checkout of Magento possesses a multiple page structure. The users are directed from pages to pages to complete a checkout process. I need not tell that how multi-page structure is often seen as a loophole in your conversions. Customers visiting your website for shopping would not like to keep moving from pages to pages. They just want to complete the checkout process ASAP.
Considering this, A Magento one page checkout extension helps website owners by providing a single page checkout structure. The compact structure makes sure that no unnecessary re-directions are given to the customers and the whole process is completed in a single step. The key USP of your sales strategy is your checkout process. Once the customers are on the checkout page, it takes few clicks to convert it into a sale. While some eCommerce sites involve the users so much in the process itself which deviates the users from being a potential customer to a shopping cart abandoned.
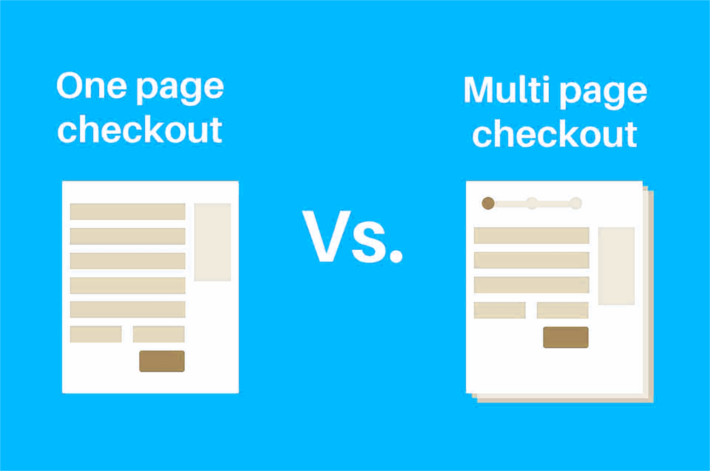
A one page Magneto checkout extension would look something like this and would make sure the conversion funnel is focused on completing the checkout process rather than getting too much involved and tangled:
Compacting a multi-page checkout to a one-page checkout structure in Magento
3. Extra clicks and extra steps would cost you conversions
Despite default checkout in Magento is undoubtedly efficient, one cannot afford to loose the customers just because of some extra clicks and steps required. If you do not use a compact or one-page checkout, there are certain chances on your Magento store that you might loose the customers because of extra clicks they have to do.
Let’s take an example of checkout queue in a supermarket. What do you do there? If you find a queue longer than expected, you start looking for the other queue which is comparatively shorter. Shame goes to a Magento checkout. If a customer finds your checkout process lengthy, he starts looking for an alternative and he gets that too. None, of the eCommerce sites, would waste the chance to steal your customers. If you cannot provide a suitable checkout experience, somebody else will.
4. Checkout speed is critical
In default checkout extension, the users are asked to fill so much of details that are not even required necessarily. For example, Fax number and telephone number need not be filled necessarily if mobile number is already provided. There many other fields in the default Magento checkout extension which can be omitted in the custom checkout extensions, and would still complete the process successfully. Making the checkout process as smooth as possible would make sure the conversion funnel filters all the potential customers as customers.
Conclusion
When a customer starts checkout process in a one-page checkout extension, nothing distracts him on the page. These checkout extensions are developed keeping in mind the conversion funnel and information requirement for the website admin. The concept is, a simple and hassle-free checkout process can provide you better conversions and competitive advantages against those sites which are still stuck with the generic checkout process. If you are looking for a such Magento checkout extension for your site, Knowband can help you with its one-page checkout-Magento extension.
La concorrenza è il mercato dell'e-commerce non è mai un nuovo concetto. I siti continuano a sperimentare con i loro elementi del sito per impressionare i loro clienti e ottenere una migliore conversione rispetto ai loro rivali. Modulo di verifica è uno di questi elementi in qualsiasi sito di eCommerce che decide il destino della conversione e della generazione di entrate nel complesso. Considerando questo, Magento è una di quelle piattaforme di eCommerce che è più popolare negli imprenditori eCommerce. È generico che anche Magento abbia la propria estensione di pagamento predefinita che gestisce efficacemente l'elaborazione degli ordini sui siti web.
La domanda è: perché le estensioni di pagamento personalizzate sono così popolari anche per questa piattaforma molto popolare? Se Magento è così popolare per la sua efficienza, allora perché si va per l'estensione di checkout personalizzato per il suo sito eCommerce?
Per qualsiasi piattaforma di eCommerce (sia PrestaShop, OpenCart o Magento), le pagine di checkout sono progettate tenendo presente i requisiti di un pacchetto completo. Per pacchetto completo, intendiamo tutto ciò che è necessario per il sito eCommerce per elaborare correttamente un ordine. Ora vediamo alcuni motivi per cui i proprietari di siti Web scelgono di andare per un'estensione di checkout personalizzata invece di attenersi al checkout predefinito.
1. Sarebbe tutto identico
Ogni sviluppato il sito eCommerce su Magento sarebbe esattamente lo stesso come qualsiasi altro sito Magento. Per offrire un'esperienza utente unica e fornire un USP, gli imprenditori scelgono temi e modelli personalizzati. Tuttavia, i processi di checkout saranno sempre gli stessi di qualsiasi altro sito Magento.
Per differenziare il checkout di un sito Magento con un altro, le estensioni di pagamento personalizzate svolgono un ruolo importante. Queste Estensioni di verifica Magento, fornire le funzionalità per personalizzare facilmente il proprio aspetto e aspetto in modo che nessun sito possieda un processo di checkout identico.
2. Pagamento multipagina in modo predefinito
Il checkout predefinito di Magento possiede una struttura a più pagine. Gli utenti sono indirizzati da pagine a pagine per completare un processo di checkout. Non ho bisogno di dire che la struttura multi-pagina è spesso vista come una scappatoia nelle tue conversioni. I clienti che visitano il tuo sito Web per lo shopping non vorrebbero continuare a spostarsi dalle pagine alle pagine. Vogliono solo completare il processo di checkout AL PIÙ PRESTO.
Considerando questo, A Estensione di controllo di una pagina Magento aiuta i proprietari di siti Web fornendo una struttura di checkout a pagina singola. La struttura compatta fa in modo che ai clienti non vengano fornite indicazioni non necessarie e l'intero processo venga completato in un unico passaggio. L'USP chiave della tua strategia di vendita è la procedura di checkout. Una volta che i clienti sono nella pagina di pagamento, sono necessari pochi clic per convertirli in una vendita. Mentre alcuni siti di e-commerce coinvolgono così tanto gli utenti nel processo stesso che devia gli utenti dall'essere un potenziale cliente a un utente carrello della spesa abbandonato.
Un'estensione per il pagamento di una pagina Magneto sarebbe simile a questa e si assicurerebbe che la canalizzazione di conversione fosse focalizzata sul completamento della procedura di checkout anziché essere troppo coinvolta e intricata:
[Caption id = "attachment_2947" align = "alignCenter" width = "471"] Compattare un controllo su più pagine su una struttura di pagamento di una pagina in Magento [/ caption]
3. Clic aggiuntivi e passaggi aggiuntivi ti costerebbero le conversioni
Nonostante il checkout predefinito in Magento sia indubbiamente efficiente, non ci si può permettere di perdere i clienti solo a causa di alcuni clic e passaggi aggiuntivi richiesti. Se non utilizzi un pagamento compatto o di una sola pagina, ci sono alcune possibilità sul tuo negozio Magento che potresti perdere i clienti a causa dei clic in più che devono fare.
Facciamo un esempio di coda di checkout in un supermercato. Cosa fai lì? Se trovi una coda più lunga del previsto, inizi a cercare l'altra coda che è comparativamente più corta. La vergogna va a un checkout Magento. Se un cliente trova il tuo processo di check-out molto lungo, inizia a cercare un'alternativa e ottiene anche quello. Nessuno, dei siti di e-commerce, sprecherebbe la possibilità di rubare i tuoi clienti. Se non è possibile fornire un'esperienza di checkout adeguata, lo farà qualcun altro.
4. La velocità di checkout è fondamentale
Nell'estensione di checkout predefinita, agli utenti viene chiesto di riempire così tanti dettagli che non sono nemmeno richiesti necessariamente. Ad esempio, il numero di fax e il numero di telefono non devono essere necessariamente riempiti se il numero di cellulare è già fornito. Ci sono molti altri campi nell'impostazione predefinita Estensione di Magento checkout che può essere omesso nelle estensioni di pagamento personalizzate e completerebbe comunque il processo. Facendo in modo che il processo di checkout sia il più semplice possibile, assicurati che la canalizzazione di conversione filtri tutti i potenziali clienti come clienti.
Conclusione
Quando un cliente inizia la procedura di checkout in un'estensione di controllo di una pagina, nulla lo distrae sulla pagina. Queste estensioni di checkout vengono sviluppate tenendo presente la canalizzazione di conversione e i requisiti di informazione per l'amministratore del sito web. Il concetto è che un processo di checkout semplice e senza problemi può fornirti conversioni migliori e vantaggi competitivi contro quei siti che sono ancora bloccati con il processo di checkout generico. Se stai cercando un'estensione di controllo Magento per il tuo sito, Knowband può aiutarti con l'estensione Magento a pagamento in un'unica pagina.
Concorrência é o mercado de comércio eletrônico nunca é um novo conceito. Os sites continuam experimentando os elementos do site para impressionar os clientes e conseguir uma conversão melhor do que os concorrentes. Módulo de check-out é um desses elementos em qualquer site de comércio eletrônico que decide o destino da conversão e geração de receita em geral. Considerando isso, o Magento é uma das plataformas de comércio eletrônico mais popular entre os empresários de e-commerce. É genérico que o Magento também tenha sua própria extensão de checkout padrão, que lida com o processamento de pedidos nos sites de forma eficaz.
A pergunta é por que as extensões de checkout personalizadas são tão populares até mesmo para essa plataforma altamente popular? Se o Magento é tão popular por sua eficiência, então por que um vai para a extensão de checkout personalizado para o seu site de comércio eletrônico?
Para qualquer plataforma de comércio eletrônico (seja PrestaShop, OpenCart ou Magento), as páginas de checkout são projetadas tendo em mente os requisitos de um pacote completo. Por pacote completo, queremos dizer tudo que é necessário para o site de comércio eletrônico para processar um pedido com sucesso. Agora, vamos analisar algumas razões pelas quais os proprietários de sites optam por uma extensão de checkout personalizada, em vez de aderir ao checkout padrão.
1. Tudo seria idêntico
Cada site de comércio eletrônico desenvolvido no Magento seria exatamente o mesmo como qualquer outro site do Magento. Para oferecer uma experiência única ao usuário e fornecer uma USP, os empresários escolhem temas e modelos personalizados. No entanto, os processos de checkout continuarão parecidos com os outros sites do Magento.
Para diferenciar o checkout de um site Magento com outro, as extensões de checkout personalizadas desempenham um grande papel. Estes Extensões de checkout do Magento, forneça os recursos para personalizar facilmente sua aparência para que nenhum site possua um processo de checkout idêntico.
2. Check-out de várias páginas em padrão
O checkout padrão do Magento possui uma estrutura de múltiplas páginas. Os usuários são direcionados de páginas para páginas para concluir um processo de checkout. Não preciso dizer que a estrutura de várias páginas costuma ser vista como uma brecha nas suas conversões. Os clientes que visitam seu site para fazer compras não gostariam de continuar mudando de páginas para páginas. Eles só querem concluir o processo de check-out o mais rápido possível.
Considerando isso, A Extensão de pagamento de uma página do Magento ajuda os proprietários de sites, fornecendo uma estrutura de checkout de página única. A estrutura compacta garante que nenhuma re-orientação desnecessária seja dada aos clientes e todo o processo seja concluído em uma única etapa. O principal USP de sua estratégia de vendas é o seu processo de checkout. Quando os clientes estão na página de checkout, são necessários alguns cliques para convertê-los em uma venda. Enquanto alguns sites de e-commerce envolvem tanto os usuários no próprio processo, o que desvia os usuários de um cliente em potencial para um carrinho de compras abandonado.
Uma extensão de checkout do Magneto de uma página seria semelhante a essa e garantiria que o funil de conversão estivesse focado em concluir o processo de checkout, em vez de se envolver e se envolver demais:
[Caption id = "attachment_2947" align = "aligncenter" width = "471"] Compactando um checkout de várias páginas para uma estrutura de checkout de uma página no Magento [/ caption]
3. Cliques extras e etapas extras custariam suas conversões
Apesar de checkout padrão no Magento é, sem dúvida, eficiente, não se pode dar ao luxo de perder os clientes apenas por causa de alguns cliques extras e etapas necessárias. Se você não usar um checkout compacto ou de uma página, há certas chances na sua loja Magento de perder os clientes por causa dos cliques extras que eles precisam fazer.
Vamos dar um exemplo de fila de checkout em um supermercado. O que você faz ai? Se você encontrar uma fila mais longa do que o esperado, você começará a procurar a outra fila, que é comparativamente mais curta. A vergonha vai para um checkout do Magento. Se um cliente encontra o seu processo de checkout demorado, ele começa a procurar uma alternativa e ele também consegue isso. Nenhum dos sites de e-commerce desperdiçaria a chance de roubar seus clientes. Se você não puder fornecer uma experiência de pagamento adequada, alguém o fará.
4. A velocidade de checkout é crítica
Na extensão de checkout padrão, os usuários são solicitados a preencher muitos detalhes que nem sequer são obrigatórios. Por exemplo, o número de fax e o número de telefone não precisam ser preenchidos necessariamente se o número de celular já tiver sido fornecido. Existem muitos outros campos no padrão Extensão de checkout do Magento que pode ser omitido nas extensões de checkout personalizadas e ainda concluir o processo com êxito. Tornar o processo de checkout o mais suave possível garante que o funil de conversão filtre todos os clientes em potencial como clientes.
Conclusão
Quando um cliente inicia o processo de checkout em uma extensão de checkout de uma página, nada o distrai na página. Essas extensões de check-out são desenvolvidas tendo em mente o funil de conversão e o requisito de informações para o administrador do site. O conceito é, um processo de checkout simples e sem problemas pode fornecer-lhe melhores conversões e vantagens competitivas contra aqueles sites que ainda estão presos ao processo de checkout genérico. Se você está procurando por uma extensão de checkout do Magento para o seu site, a Knowband pode ajudá-lo com sua extensão de checkout Magento de uma página.
Prestashop Google Shopping Integration addon offers a way to upload the products of the store on Google Shopping. Further, displaying the product ads on the search result is one of the ways to get thousands of visitors to your site.
In fact, Google Shopping allows e-merchants to display its product on Google’s search result page. Further, it is powered by AdWords and Google Merchant Center. In fact, this is one of the ways to allow users to search for the products. Further, on online shopping websites. Moreover, compare prices between different vendors. Therefore, the Prestashop Google Shopping Integration makes it easier for store owners to display their products on Google’s SERP.
The Prestashop Google Shopping Integration module automatically syncs feed from the Prestashop store to the Google Merchant Center Account. Additionally, the store admin can sync the product status back to the store’s database. How? By executing cron in the back-end of the Google Shopping Prestashop Feed Synchronization plugin.
Features that Knowband’s Prestashop Google Shopping integrator offers are:
The Prestashop Google Shopping Integration addon automates the entire process of listing the products. Further, on Google Shopping from the eCommerce site.
The store admin can automatically update the product inventory between the two stores. In fact, this happens from the back-end of the Google Shopping Prestashop Integration extension.
The store admin gets an option to create an N number of profiles. Further, this happens in the back-end of the Prestashop module.
The profile-based upload allows the admin to list the products in bulk. Moreover, any changes in the product details happen by making changes in the profile. Further, this happens in the back-end of the Google Shopping Prestashop API integration addon.
The store admin gets an easy option to keep a track of the products listed in the Google merchant center. Further, in the ‘Product Listing’ tab of the Prestashop Google Shopping connector.
The expired products are renewable just by executing cron in the back-end of the Prestashop Shopping Integration plugin.
Prestashop Google Shopping Feed synchronization plugin even allows the admin to delete the products. In addition, view the errors that occurred while product listing.
Every time a cron executes, it creates a feed. Additionally, the status of the feed is visible from the backend of the Google Shopping Prestashop Integration plugin.
The real-time synchronization offered by the Prestashop Google Shopping Integration module makes tracking easier. Moreover, it also makes feed management easier for the store admin.
The status of the actions that the admin performs is visible in the audit log section. In fact, they’re available in the backend of the Google Shopping Prestashop Integrator.
What’s New in the Recent Updates!
[Important]Google Merchant API Update (July 1, 2026)
What Changed in PrestaShop Google Shopping Integration
The PrestaShop Google Shopping module has been updated to use the Google Merchant API for product synchronisation and your store authentication on Google Merchant, replacing the previous API integration of the Content API.
Why This Update Matters for Users Who Are Using Knowband’s Prestashop Google Shopping Integration
Improved reliability – Product sync with Google Merchant Centre is faster and more stable Modern authentication – Uses Google’s current API standards for connecting your store to Google Merchant Centre Continued compatibility – keeps the module aligned with Google’s supported integration methods, avoiding disruptions from older/deprecated APIs
Automatic Feed Upload on Google: The new “automatic feed upload” button lets the store admin choose between automatic and manual feed submission. If disabled, feeds won’t sync automatically with Google Merchant. Instead, the admin can copy the feed URL or download the feed and manually submit it to Google Shopping.
Copy Feed URL/Download Feed: The updated Prestashop Google Shopping Integration addon includes features to copy the feed URL or download it in JSON, XML, or CSV formats. This gives admins flexibility in managing their merchant console feed.
Product Type Selection: Store admins can now specify product types within Feed Profiles, making feed management more flexible.
Promotion ID: To track the performance of listings in the Google Merchant console, we’ve added a Promotion ID section in the profile management tab of the Prestashop addon.
Custom Product-Level Specifications: Admins can list products using universal feed specifications or configure them at the product level, found under the product listing tab. This gives more control over how products are presented.
1.1. Project Objectives
Listed below are the project objectives:
1. The Prestashop Google Shopping Integration module installation and configuration.
2. The method of the Prestashop Google Shopping Integration extension connection with the Google Merchant Center.
3. The profile management, category mapping, and feed management.
4. Product listing and synchronization.
2.0 Installation
Purchase the Prestashop Google shopping integration plugin from the Knowband store. Further, you will get the zipped file along with the user manual. Moreover, please follow the below steps to install it:
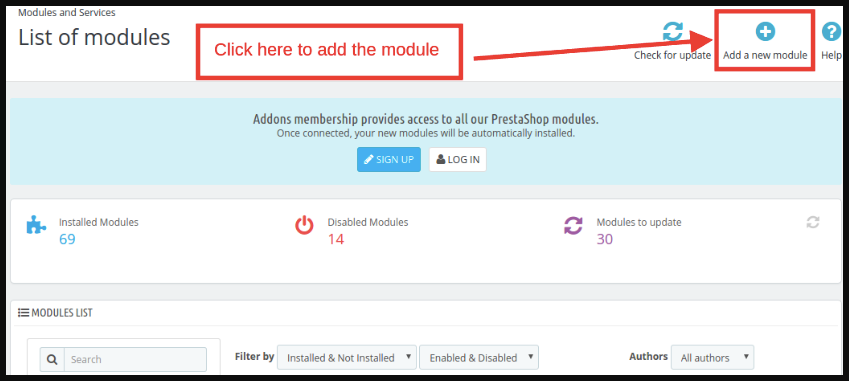
1: Go to the Module listing page and the “Add New Module” button.
2: Upload the downloaded zipped file of the module.
3: After uploading, the system will list the module on the module listing page as shown below screen:
4: Click on the install button. Further, the Google Shopping Prestashop Integration module will install in your Prestashop store.
Note: Please set the read/write permission on the module folder before installing the addon into the system.
3.0 Admin Interface
After installing the Prestashop Google Shopping Integration extension, it will list on the module listing page. Further, kindly see the screen below:
Now, the Prestashop Google Shopping Integration extension add-on is installed. Further, it will display 7 tabs in the main menu of the admin interface. In fact, each tab explains one by one in the next section.
3.1. Connection Setting
This section of the Prestashop plugin allows the store admin to connect their store with the Google Merchant. Here are the information fields that you need to mention for setting up the connection.
Automatic Upload Feed on Google: If you want to upload the feeds manually on the Google merchant console, keep this option disabled. Or, if you want to get the feeds managed automatically with APIs, enable this option and enter the other connection details.
Google Application Name: Enter the name of the project/application that you created for Google Shopping.
Google Client ID: Enter the Client ID that will authenticate the connection between the store and Google Merchant. By default empty but required field. (See Appendix A)
Google Client Secret: Enter the client’s secret to set up the connection. By default empty but required field. (See Appendix A)
Google Merchant ID: By default empty but required field. Here, you will provide the merchant ID of your Google merchant center account.
3.2. General Settings
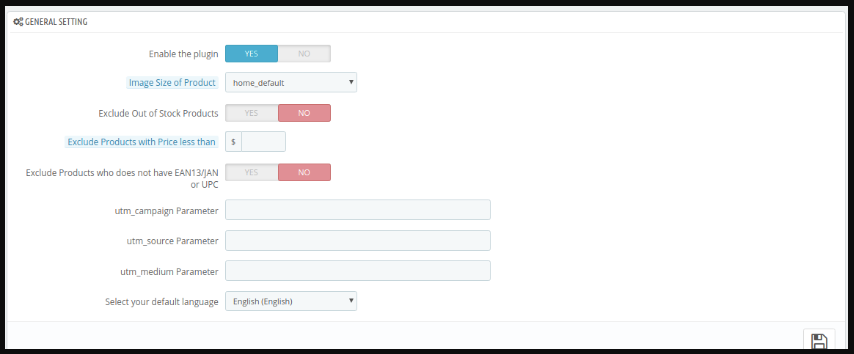
This section of the Prestashop Google Shopping API integration allows the store admin to set up the basic features.
Enable the plugin: By default, this setting will be OFF. In fact, the Prestashop Google Shopping Integration module will sync the products to Google Shopping if this setting will be ON.
Image Size of Product: Select the size of the product from the drop-down list. Further, the admin can enter the image size option in the Main Menu -> Preference -> Images.
Exclude Out of Stock Products: If disabled, only the in-stock product will be displayed in Google search results. Additionally, enable the display of out-of-stock products.
Exclude Products with Price less than Enter a fixed amount. Further, the products below this amount will not display in the search results only.
Exclude Products that do not have EAN13/JAN or UPC: If the admin disables this, the products that don’t have the EAN13/JAN or UPC will not display.
utm_campaign Parameter, utm_source Parameter, utm_medium Parameter: Enter the UTM for tracking the traffic received via Google Shopping.
Select your default language: The module offers multi-lingual support. Further, select the default language from this section.
3.3. Profile Management
The admin can create, edit or delete profiles from this tab of the Prestashop Google Shopping Integration extension
3.3.1 How to Create a New Profile?
Click on the ‘Add New Profile’ or ‘+’ sign to create a new profile.
You’ll be redirected to the profile creation page of the Google Shopping Prestashop Integrator.
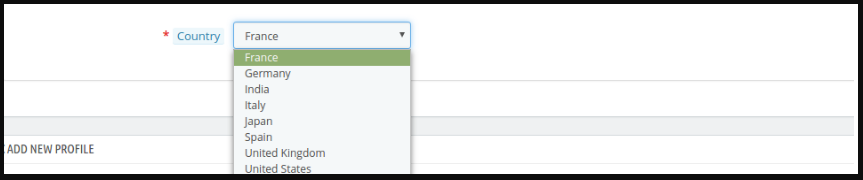
Select the Country from the drop-down list.
Language: Select the language for profile creation.
Currency: Select the desired currency for the selected location.
Project Title: Enter the name of the project.
Google Category: Select the Google category where you want to map the category of the store.
Store Category: Expand the category and check the categories that you want to map in Google Shopping.
GTIN: Here, you will map the product’s unique field. Further, the Prestashop Google Shopping Connector module can identify products according to the mapped attribute. In fact, you must also have to provide unique field mapping for product attributes as well. Furthermore, the various options to choose from include: Reference No., UPC, EAN13. Thus, the mapping can then be done based on the selected attribute.
Product Listing Method: The store admin can select the product listing method by Feed or by API under this section. If the feed is selected, the products will be updated at the time of the feed schedule. However, if the API is selected, all the products can be updated once the admin hit the synchronization cron.
Customize Product Title: Customize the product title by using the following place-holders.
{id_product} for Product ID
{product_title} for Product title
{manufacturer_name} for Manufacturer name
{supplier_name} for Supplier name
{reference} for Product Reference
{ean13} for Product EAN13
{short_description} for Product Short Description
{price} for Product Price
Place-holders like {sample} will be replaced by the dynamic content at the time of execution.
Product Type: Enter the product type in this text field.
Product Condition: Select the product condition.
Promotion ID: The Prestashop Google Shopping Connector provides the admin with the option to enter the Promotion ID in this text field. This can be used for tracking the performance of various Google events.
Material: Select the material of the product.
Pattern: Choose the pattern from the drop-down menu.
Gender: Select the Gender for which the product is intended. Further, the options are Male, Female, or Unisex.
Age Group: Select the age group that is expected to use the product.
Adult Content: Specify if the product has any adult content or not.
Color: Use the color attribute to describe your product’s color. Further, this information helps create accurate filters, which users can use to narrow search results.
Size: The size attribute describes the standardized size of your product. Your product ad will appear in the results that are filtered by size.
Size Type: The attribute describes the cut of your product. Further, the supported value for this field includes a variety. For instance, regular, petite, plus, big, tall, and others. Therefore, this helps create accurate filters.
Size System: With this attribute, you can explain which country’s sizing system your product uses.
Product Shipping: Select the shipping method for the particular product.
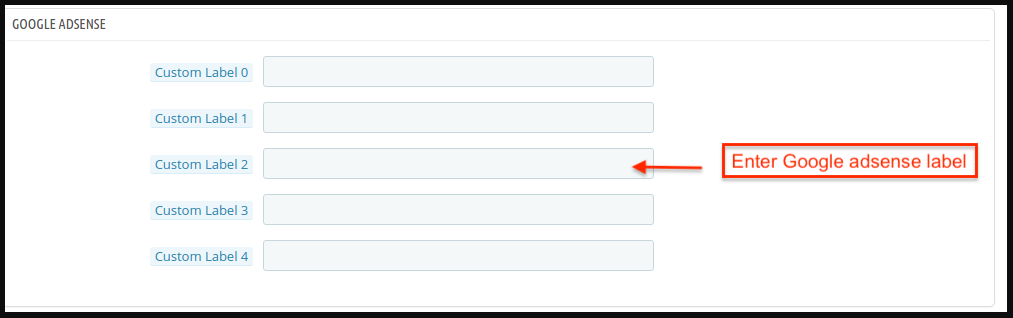
Google Adsense
Google Adsense refers to the campaign that you’ll run on Google Adwords. Further, Custom Labels, Custom Label 0 through Custom Label 4, allows you to create specific filters to use in your Shopping campaigns. In fact, use these filters for reporting and bidding on groups of products. Furthermore, the information you include in these attributes won’t be shown to users.
3.3.2 How to Edit the Existing Profile?
The created profile in the Prestashop Google Shopping Synchronization addon can be viewed in the admin interface. Further, click on ‘Edit’ to edit the profile. In fact, you can even enable/disable by changing the status as shown below.
The category mapped can even be viewed by clicking the ‘View Mapped Category’ button shown in the above image.
3.3.3 How to Edit the Mapped Category?
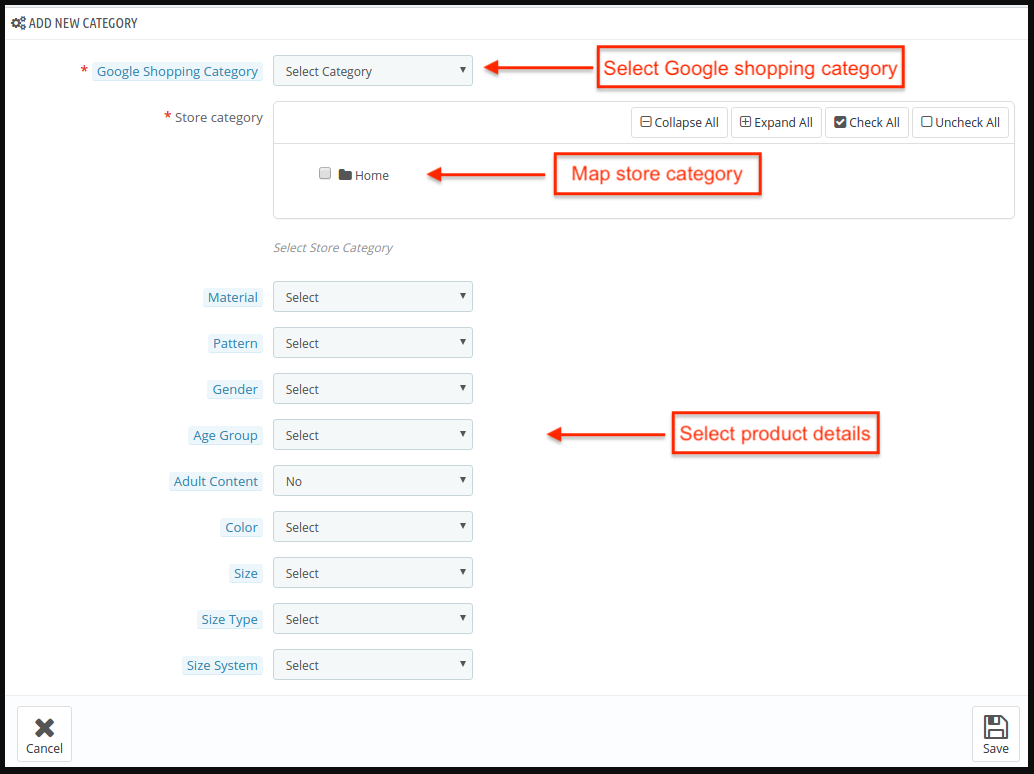
To map a new category, click on ‘Add New Category’.
Fill in the information as shown below:
Google Shopping Category: Select the category that you want to map.
Store Category: Select the category of your store that you want to map with the Google Shopping Category.
Material: Select the material of the products in the selected category.
Pattern: Choose the pattern from the drop-down menu.
Gender: Select the Gender for which the category is intended. Furthermore, the options are Male, Female, or Unisex.
Age Group: Select the age group that is expected to use the products of the category.
Adult Content: Specify if the category has any adult content or not.
Color: Use the color attribute to describe your product’s color. Further, this information helps create accurate filters, which users can use to narrow search results.
Size: The size attribute describes the standardized size of your products being mapped along with the category. In fact, your category ad will appear in the results that are filtered by size.
Size Type: The attribute describes the cut of your product of the category.
Size System: With this attribute, you can explain which country’s sizing system the product of the category uses.
The mapped category will be shown as below:
To edit the mapped category, click the ‘Edit’ button.
To delete the mapped category, click the ‘Delete’ button.
3.3.4 How to Download the Feed to Submit Manually on the Merchant Console?
The Prestashop Google Shopping provides the admin with the option to download and submit the feeds manually on the merchant console.
The store admin can export the feed in JSON, XML, and CSV format, providing enhanced control over feed submission.
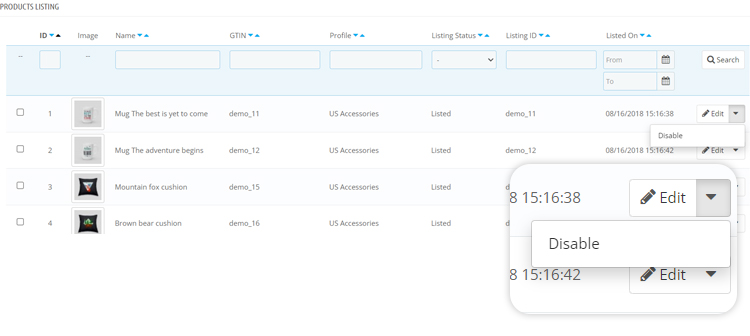
3.4. Product Listing
The listed products can be viewed in this section. Further, the Google Shopping Prestashop Connector is shown in the image below.
The admin can remove the product by clicking on ‘Delete’.
The admin can view the Error that occurred while uploading the product.
The Renew button can relist the products whose listing has expired.
3.5. Feed Management
In this tab of the Google Shopping Prestashop Integrator, the admin will get the feature to configure a schedule on which the module can upload products on Google without any manual interference.
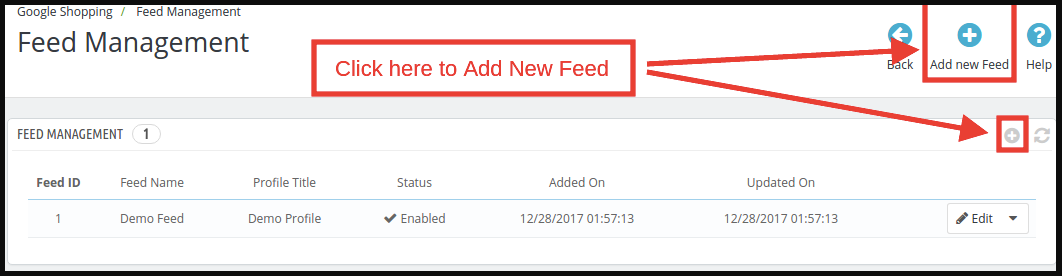
Click on the ‘Add New Feed’ or ‘+’ sign to create a new profile.
The configurations options in this tab of the Prestashop Google Shopping Integration addon are shown below:
Select Profile: The list will show the created profiles. Furthermore, select the one whose product you want to sync with Google shopping.
Feed Label: Enter the name of the Feed.
Feed Upload Schedule: Select the frequency when you want to upload the feed.
Set Hour: Select the number of hours in which you want to schedule the feed.
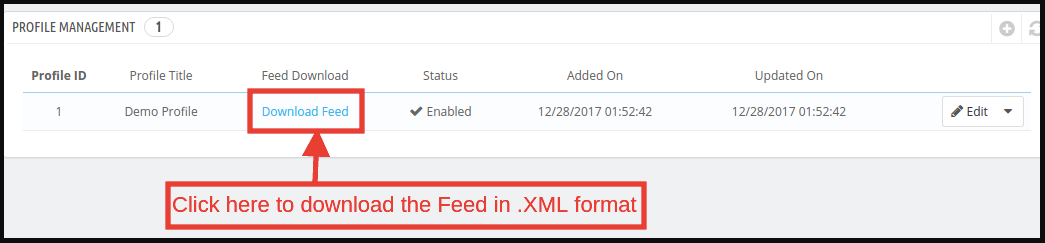
To download the created Feeds, go to Profile Management and click on ‘Download Feed’ as shown in the image below.
3.6. Synchronization
The Synchronization tab of the Prestashop Google Shopping Integration extension offers easy integration with the help of cron jobs. Additionally, the Prestashop Google Shopping Feed synchronization allows the admin to sync the feeds to Google Merchant. Moreover, syncs the product status back to the store.
Local Sync: This cron loads the products in the module’s local listing tab.
Sync Feed on Google Shopping: ‘Sync Feed’ cron will synchronize the feed on Google Shopping.
Sync Products Status from Google Shopping: This button can sync the product status from Google shopping to the web store.
3.7. Audit Log
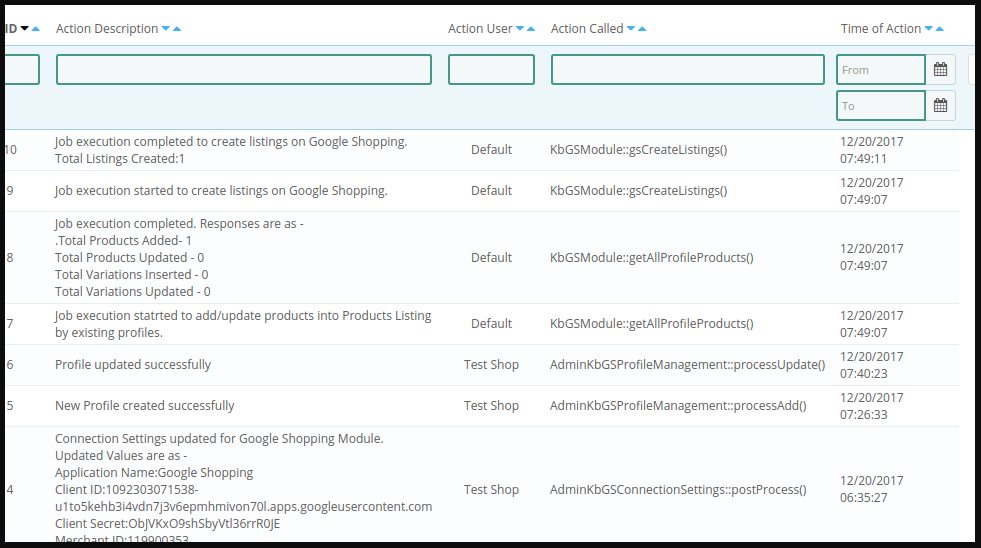
The admin can view all the jobs running and the errors that occurred in the same. Furthermore, the status of the jobs is visible in this tab of the Prestashop Google Shopping Integration plugin.
4.0. Appendix
How to Create Google Shopping Account?
Before uploading your products on Google shopping, you must have your Google merchant account. In fact, if you don’t have then please follow the below URL:
Follow the instructions given on the above URL and create your account.
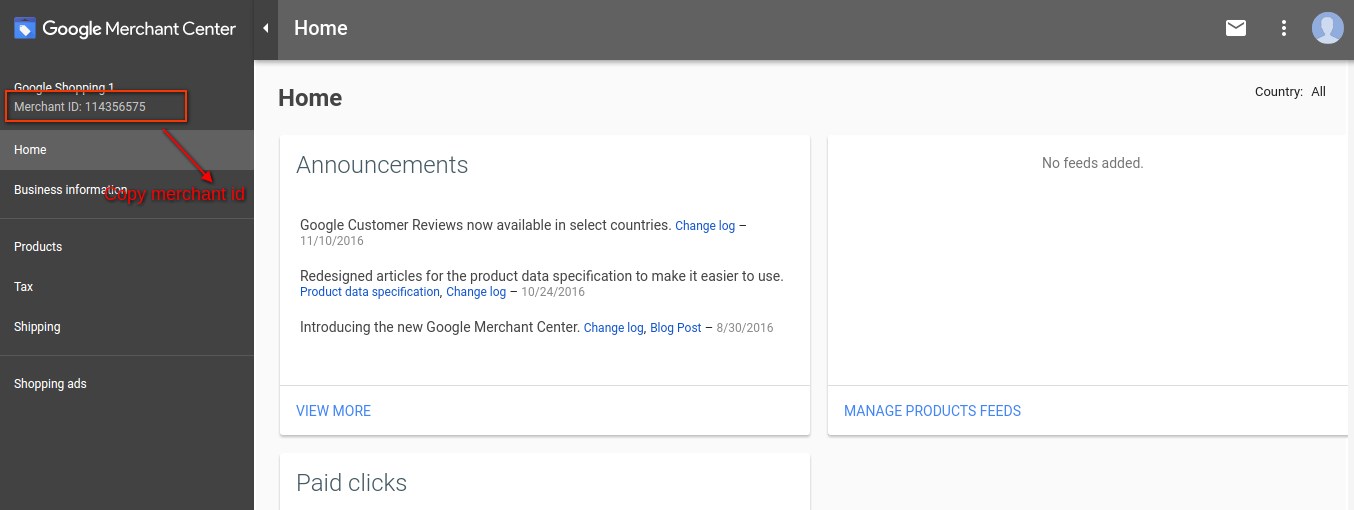
After creating your account, you will be redirected to your merchant center homepage as shown in below screen:
Copy your merchant id highlighted in the above screen and save it in module configurations.
After this, click on the Connect button so that your module gets integrated with your PrestaShop store, In addition, you will be able to fetch the report details.
Verify your Website for Google Merchant Account
This verification process is a compulsory process to upload your products to Google Shopping. In fact, if you do not verify your site then the module will not be able to upload products and may result in an error.
To verify your website, please follow the below instructions:
Step 1: Go to the “Business Information” tab in your Google Merchant Account.
Step 2: Under the “About Your Business” tab, provide the URL of your store. For instance, https://www.example.com. Save URL.
Step 3: After saving a website URL, Under the “Website” tab, click on the “Claim Your Website” link. In fact, this will show you the link to an HTML file. Hence, download this file. In addition, upload it to your root directory of the store.
Step 4: After uploading the HTML file, execute the URL given by Google in step 3.
Step 5: Click on the “Verify & Claim” link.
After this, you can fetch your products report under the product tab of your Merchant store.
How to get Client ID and Secret
To get a Google client id and secret you need to create a project in a Google developer account. In fact, please go to the below URL to sign in to the Google developer account.
https://console.developers.Google.com
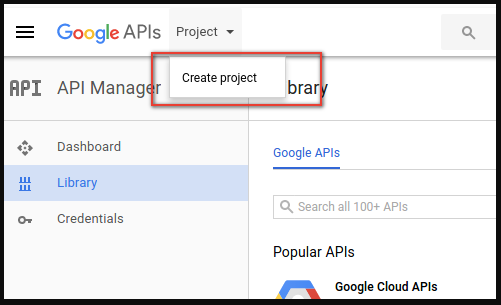
On the above URL, create a project by clicking the link shown in below screen:
1: Name your Project Name. Moreover, click on the “Create” link. In fact, after creating a project, Google will redirect to the same page and your new project will be selected.
2: Go to the library tab, search for “Content API for Shopping ”. Further, enable this API for this project.
3: Click on the “Credentials” tab. This tab will show 3 tabs.
4: Set your application name in “OAuth Consent Screen” and save it.
5: Click on the “Credentials” tab and click on the “Create Credentials” button.
6: After clicking the “Create Credentials” button, Google will be shown credentials type options. Therefore, choose “OAuth client ID”.
Step 7: Set application type as “Web Application”.
Step 8: Set the “Authorized Redirect URIs” field. Additionally, your redirect URI is given on the module configuration page. Further, please copy from there and paste it into this field.
Step 9: Click on the “Create” button. Further, after saving credentials, Google will generate the client id and secret for you. In fact, copy and paste them into the corresponding field in module configuration.
Note: For more detailed instructions, follow URL https://developers.Google.com/identity/sign-in/web/devconsole-project
Note: If you are getting an error while getting your refresh token. Further, please also try after “Allowing Less Secure App” in your Google account.
In fact, for more values, please follow the below URL and read the documentation:
Checking out from eCommerce sites is something that lets a business owner have an interface for monetary transaction with the customers. The word monetary is enough to tell you how serious a checkout page is in the eCommerce world. For any reason, if a customer does not find your checkout page convenient, an immediate thought comes to his mind is about abandoning the site and find an alternate solution with a better checkout page optimization. Whatever be the cause, the immediate effect is seen in your online business because you are losing a customer here.
E-Commerce platforms like Magento, PrestaShop, OpenCart have a standard set of the checkout process. For example, the standard Magento checkout extension provides all the required accessibility for a complete eCommerce checkout page. However, considering the latest advancement in checkout pages of different eCommerce platforms, a standard checkout process is not expected to have the desired success rate. In fact, most of the standard checkout pages have now been transformed into more convenient processes with the introduction of one-page checkouts or quick checkout extensions on eCommerce sites. Need for an optimized checkout page
To survive the competition from other eCommerce platforms or the rival sites, switching to a custom one-page checkout extension is definitely a wise idea. I am not being biased here. In fact, all the quick one-page checkout extensions are optimized from the standard checkout extensions itself. It is just that these checkouts modules or extensions present the same process in a more compact and more convenient way. The site’s owners can utilize the checkout page optimizations done in these custom checkout extensions to have an upper hand against the rival eCommerce sites or to improve their conversion rates.
Upper hands of checkout page optimization in a one-page checkout process
Removes distractions-
The standard checkout page includes few elements that might distract the users and trigger a bounce back from the checkout page. Moreover, these elements might ask the users to fill some details that customers might not want to share. You might be surprised to know, those information were actually not even required by you.
To eliminate such redundant or unwanted elements, quick one-page checkout modules act by providing the site admin some additional customization access. These accesses for site admin allow him to either mark those fields as optional or to remove them from the process at all. An example of such element could be the fax number which is neither required by the admin nor the most customers have it.
Reducing the number of steps-
In default checkout modules the checkout page is spread across multiple pages for each kind of entries. For example, the default PrestaShop checkout module is a 5 step process. It includes the customer information, payment information, shipping information and all miscellaneous entries in separate pages. I do not need to tell that how lengthy the whole process becomes like that. Customers do not like that for sure.
To optimize the default checkout module, one-page checkout modules for PrestaShop have been developed which compact the whole process in a single page. So, that the customers do not have to redirect from pages to pages to complete the online shopping.
Pre-populating information-
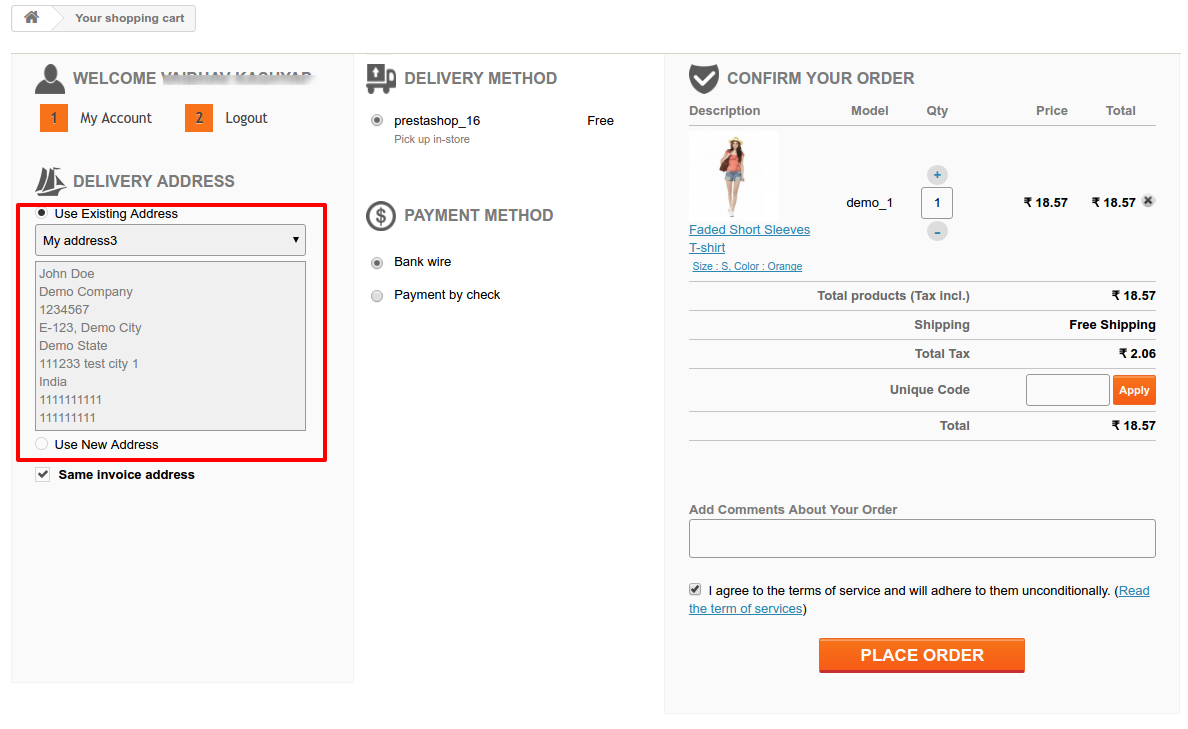
There are certain cases when a customer is prompted to fill a particular data more than single time. For example, if the customer is already registered on the site, asking for filling the email id and name of custom in checkout page is definitely not a good idea.
The checkout best practices say Pre fill the data in checkout form already if the customer has already provided it with the sign-up. Asking the customer to fill a redundant data, again and again, would definitely encourage him to abandon the site.
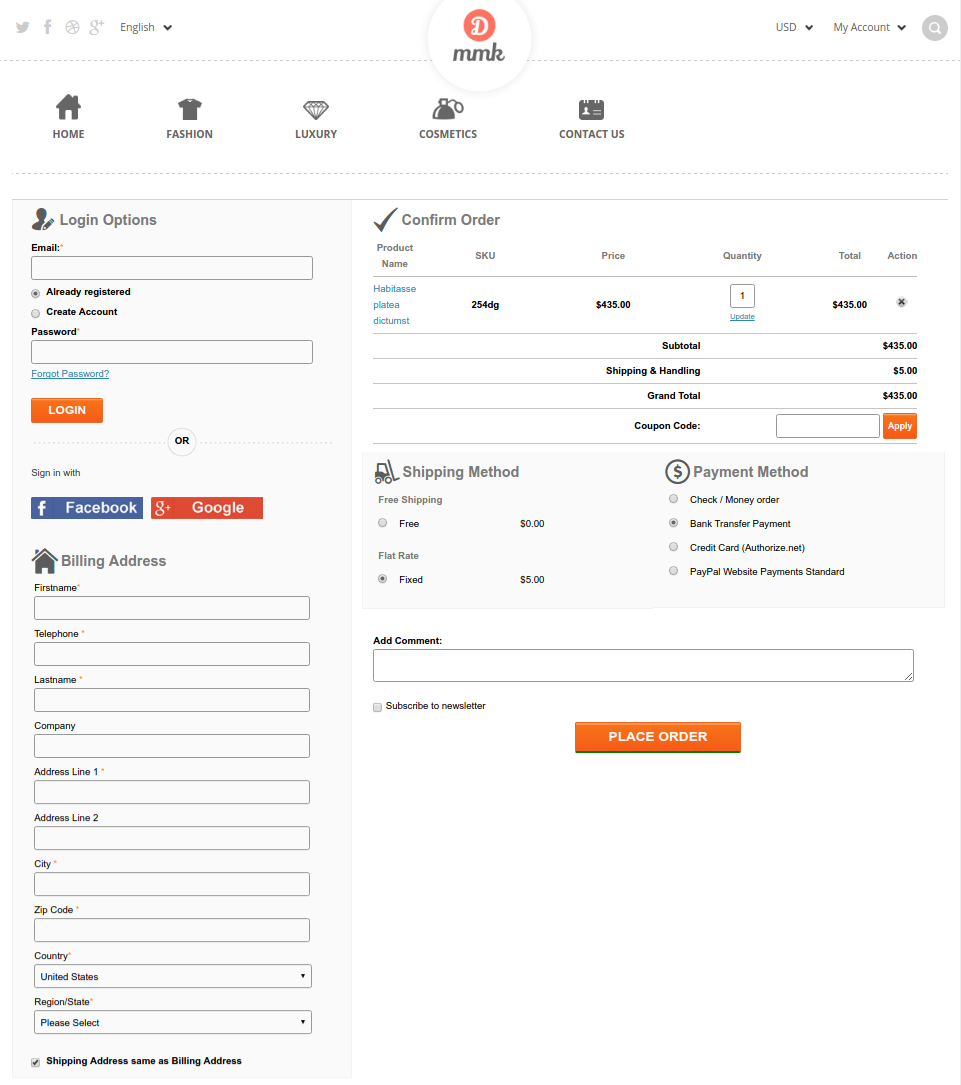
A quick checkout extension works here the same way as suggested by the checkout best practices. For example, the checkout optimization in below one-page checkout module pre-populate the data from the customer information given at sign up process.
Pre-population of information from customer data
Social login at checkout page-
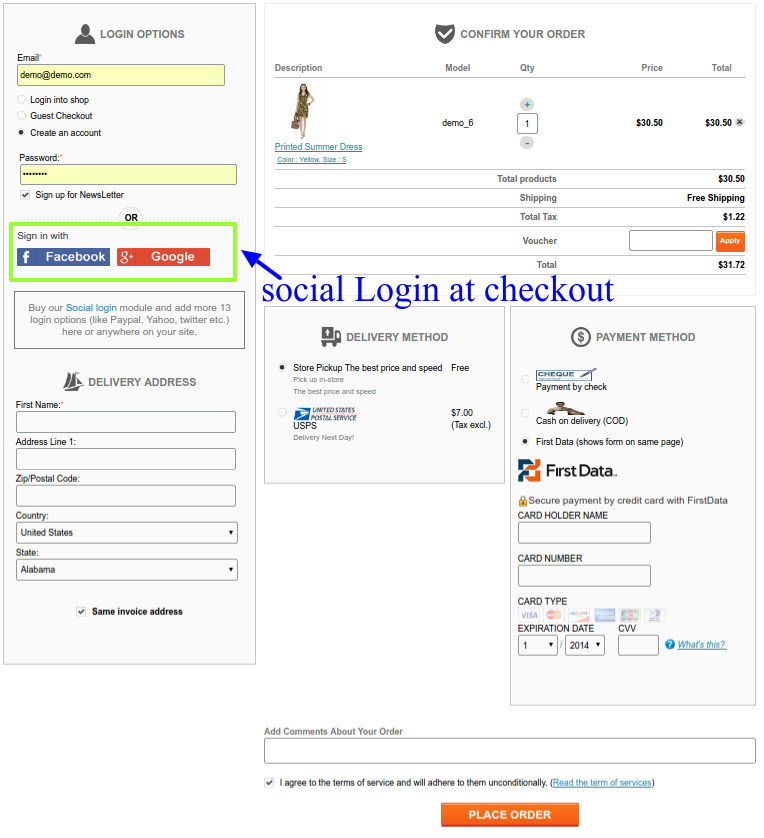
One of the mistakes is to ask the customers to make an account before checkout is complete. For most of the default, checkout pages have already done the necessary checkout page optimization by proving the customer to checkout as a guest customer. However, there are certain conditions when a guest checkout might not be an option for the site owners.
In these certain cases when you only want to allow the registered customers to checkout on our site, the one-page checkout extensions are equipped with social login options. The social login on these quick checkout modules allows the customers to either log in to the site or create an account on the site with the social media credentials itself. Thus, saving the customers from a necessary form filling for account registration.
The default checkout processes are undoubtedly a complete package. However, when sometimes you need to develop an upper hand against your rival sites, they might not be an ideal weapon. The custom one-page checkout extensions with the checkout best practices explained above can help you gain the same upper hand. A little investment of time and money in one-page checkout modules is surely a wise idea provided, you choose the right one from the market. The Knowband’s one-page checkout modules and extensions for PrestaShop, Magento and OpenCart could be a better suggestion if you are looking for one.
Online businesses typically flourish with the decent conversion rates on the website. For any eCommerce site, shopping cart abandonment comes as a great threat to the regular efficiency of the website. Seasonal drifts in the sales could be once ignored as a regular tremor in the sales, but one cannot just simply discard the growing number of abandoned carts on his eCommerce site.
To tackle with the shopping cart abandonment, companies deploy various abandoned cart modules and extensions which help the site owner to win back the lost sales. These abandoned cart extensions work by tracking the carts and customers and then notifying the site owner whenever as cart is abandoned by the users. Emails play a great role in working of such abandoned cart extensions. The emails sent by the cron or manually by the site admin allows the website to communicate with the users and then win them back. However, one cannot just simply send any kind of email to the customers. These are specific emails whose conversion is directly dependent on the reduction of abandoned cart on your stores. These email include:
Confirmation mail to the customers whenever an account is created.
Notification mail to the customers alerting them for the procedures of performing a certain a task, for example, how to redeem a coupon or a voucher.
Confirmation emails for the special event like flash sales.
Notification mails from wait lists.
Emails to notify about the saved carts in their account.
Abandoned cart messages with our without offers and discounts.
Any many more email that directly affects the conversion rates.
If we talk about preventing shopping cart abandonment on your store, most eCommerce sites focus on the abandoned cart emails. Simply, these mails include an appeal from the eCommerce site to complete a purchase initiated by the user. To make these mails conversion friendly, you might include some non-resistible offers or discounts for completing the purchase. However, focusing on just converting the existing abandoned cart would not be enough to prevent the future abandonments.
When writing this kind of messages, make sure you remain on the topic and say only what’s needed to be conveyed. Do not forget to personalize the message so that the email do not end up in the spam folder. For example, an email consisting of notification regarding an account creation should consist of the customer’s details with the account information and a direct link to the user account. Another example is, a saved cart email should include the product details with a product image, clear price and quantity of the product.
An easily accessible abandoned cart email consist of some basic elements
I have followed these tips in my OpenCart abandoned cart emails and they have worked for me always. I think, these tips are not limited to the OpenCart abandoned carts, but you can use it for any of the eCommerce sites.
Sharp subject line-
The emails should be clearly identified with its subject line and the user should be able to guess the kind of email in just a single glance at the subject line.
Personalization and to the point-
Each message should clearly specify its purpose. To do this, the mails should stay on topic and use the links when providing excessive details. An email indicating towards the customer specific purpose would be more successful.
Specific marketing-
If you are relying on coupons or vouchers to lure the customers, make sure the coupons are specifically deployed for the particular group of customers and products. For example, in my OpenCart abandoned cart emails, I focus on the customers from specific group of products and allot the coupons for that particular product only. Doing so will make sure that customer feels honored with an exclusive coupon.
Offer only when it’s necessary-
When I have to deal with OpenCart abandoned carts on my site, I do not treat every email with the coupon or voucher. We should understand that, for any kind of eCommerce site the bargaining power with the customers is almost nil. This makes your profit margins to the maximum without hitting your head with the bargaining customers. So, providing offers and discounts in every other mail will let the customers know about how desperate you are. Also, it will degrade the value of your already provided discounts. So, it’s better if you focus on the need of coupons only when it’s necessary.
Marketplace model of eCommerce has been in the business for a long time now. However, the fights between marketplace giants still remains a fresh news each day. Each day comes with something new and something exciting for the eCommerce world when we look into their efforts to grab the market share by these marketplace giants.
Amazon and Walmart need not any introduction in the marketplace world. Currently, both the companies are busy in a new battleground of Indian eCommerce market. While the local eCommerce site Flipkart remains on the top of the list, Amazon is steadily moving towards the top by securing the 2nd position in the current scenario. Not only that, amazon has also announced the further investment of $3 billion to the Indian market. This additional investment would now reach the Amazon’s total investment in Indian eCommerce market to $5 billion.
Reports say Walmart is not going to leave this chance of extending its market to Indian online consumers and is all set to join the share. Buzz says the e-tail giant has been in talks with local marketplaces such as Snapdeal and Shopclues. The strong indications point towards its inclination towards the top most marketplace site- Flipkart. Considering the current expansion of Amazon in India, Walmart’s alliance with Flipkart would not be a surprise at all.
What’s the buzz in B2B market?
While the giant’s of marketplace model are all set to grab the opportunity to rule the to be on the top online market- India. the local business startups are not in a mood to let them snatch their share so easily. With 100 % FDI in the Indian marketplace, foreign industries are being attracted, the local eCommerce market is also all set to give a tough competition.
Local Indian Marketplace is all set too-
As Knowband, we have been providing eCommerce solutions to the B2B clients across the globe. In the past year, we have noticed that the demand for our modules like PrestaShop Multivendor marketplace, Magento Multivendor marketplace, has increased exponentially. These modules are provided by Knowband to convert the PrestaShop and Magento based eCommerce sites into a fully functional marketplace site. Each day, we get hundreds of queries about how these modules can convert their existing eCommerce store into a marketplace site?
Surprisingly, most of these queries are from India itself. The Indian eCommerce business start-ups are so aware of the growing importance of marketplace model of eCommerce. They are looking for the ways to give these marketplace giants a tough competition in the local market. Knowband is too all set to provide these business aspirants with all they need to survive this battle of Indian Marketplace market.
With the PrestaShop Multivendor marketplace and Magento Multivendor marketplace, we have developed a series of Marketplace addons that will further extend the capabilities of these Multivendor marketplace modules and extensions. The addons are developed keeping in mind the requirements of any typical marketplace site to make it competitive with the rising giants. So, even Knowband is set to provide the business startups with all they need to grab their share in the local market. From Prestashop multivendor marketplace modules to android apps, everything the startups need to join the marketplace model of eCommerce.
Finally,
The marketplace giants are all set to grab the faster growing Indian eCommerce market. However, they should not ignore the importance of local eCommerce entrants who are also all set to give them a tough competition. Each of these small yet full of potential marketplace sites are not in a mood to let them take away their local shares. Indications are, the foreign giants have to be in coordination with these local setups if they really want a flawless penetration to the deepest level of Indian online consumers.
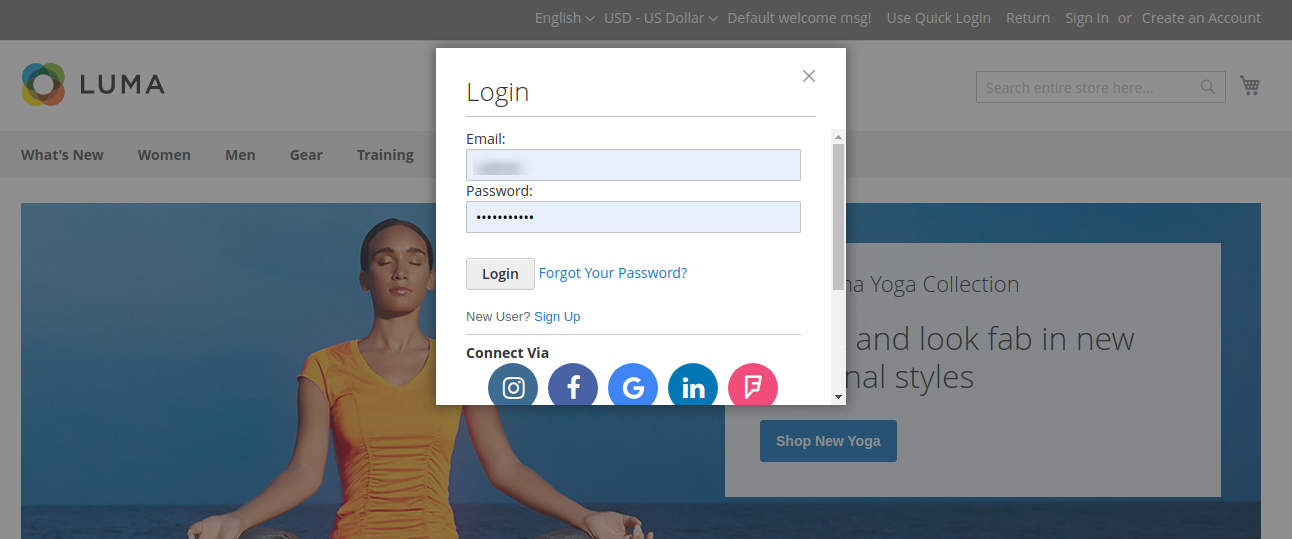
Magento 2 Social Login extension allows the customers to login/signup using their social media accounts like Facebook, Google, Yahoo and 9 other options. This Magento 2 Social Login module will add a new link ‘Quick Log In’ next to the default login link. This text can be customized. On the click of this link, a login popup will be opened.
The Magento 2 Social Login plugin gives the freedom to the eCommerce store admin to enable or disable login through several platforms, the admin can also change the behavior of the Magento 2 Social Media Login extension at the front-end and also enables or disable login through any available social platform.
1.1 Features offered by Magento 2 Social Login Extension
With this Magento 2 Social Login extension, admin can offer a simple and hassle-free login/signup option to the customers.
Using this Magento 2 Social Login module, the store merchant can set up 12 different social media buttons for offering simple login/registration to the customers.
The store admin can select small/large and circular/rectangular icons for showing social login options.
The Magento 2 Social Login module allows setting different animation in social login buttons like zoom/highlight/rotate.
The store merchant can set a header link on the website for providing a popup login/signup option.
Facebook login, Google login, Yahoo login, Paypal log in, Instagram login, Twitter login, Amazon login, Linkedin login, Live login, Dropbox login, Foursquare and WordPress login options are available for login/signup.
By offering a simple and hassle-free way, the store merchant can increase customer registration on the website.
The store merchant can also change the position of social login buttons by the following drag and drop function.
Admin can set up API for various social login options from the admin interface of this Magento 2 Social Login extension.
The Magento 2 Social Login module is mobile responsive and offers smooth functioning.
Magento 2 Social Media Login extension is multi-lingual compatible and offers hassle-free implementation.
2.0 Installation
After purchasing Magento 2 Social Login extension, the store admin will get the following files:
1. zip which has the source code of this Magento 2 Socialloginizer program plugin.
2. User Manual, with all the basic details and information.
The steps to install the Magento 2 Social Loginizer Program Extension are mentioned below:
Buy the Magento 2 Social Loginizer Program module from Knowband. You can download the extension package.
The package has a zipped file that contains the user manual and the source code of the Magento 2 Social Loginizer Program module. Now, Unzip this package.
Create a folder {Magentoroot}/app/code/Knowband/Socialloginizer
Upload the extracted content in the above folder via FTP manager (like Filezilla or WinSCP – download here: https://filezilla-project.org/).
Now run below commands to install the plugin:1. php bin/magento module:enable Knowband_Socialloginizer2. php bin/magento setup:upgrade3. php bin/magento setup:di:compile
The extension is now installed and ready for use. In Admin Panel go to “Knowband Extensions -> Social Loginizer ”.
You can now configure and use the Knowband Magento 2 Social Login extension.
3.0 Admin Settings
Log into your Magento Admin, then goto Stores -> Configuration -> Knowband -> Social Loginizer and configure the plugin.
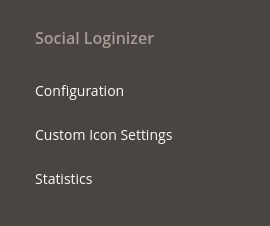
To access Knowband plug-in, go to Stores -> Configuration -> Knowband -> Social Loginizer. Store admin will have various settings options categorized as follows:
Admin can easily configure the Magento 2 Social Login module and show social login options on the website easily.
3.1 Configuration
In configuration section, the store admin can configure the module and apply basic settings. Admin can also apply website settings from this section.
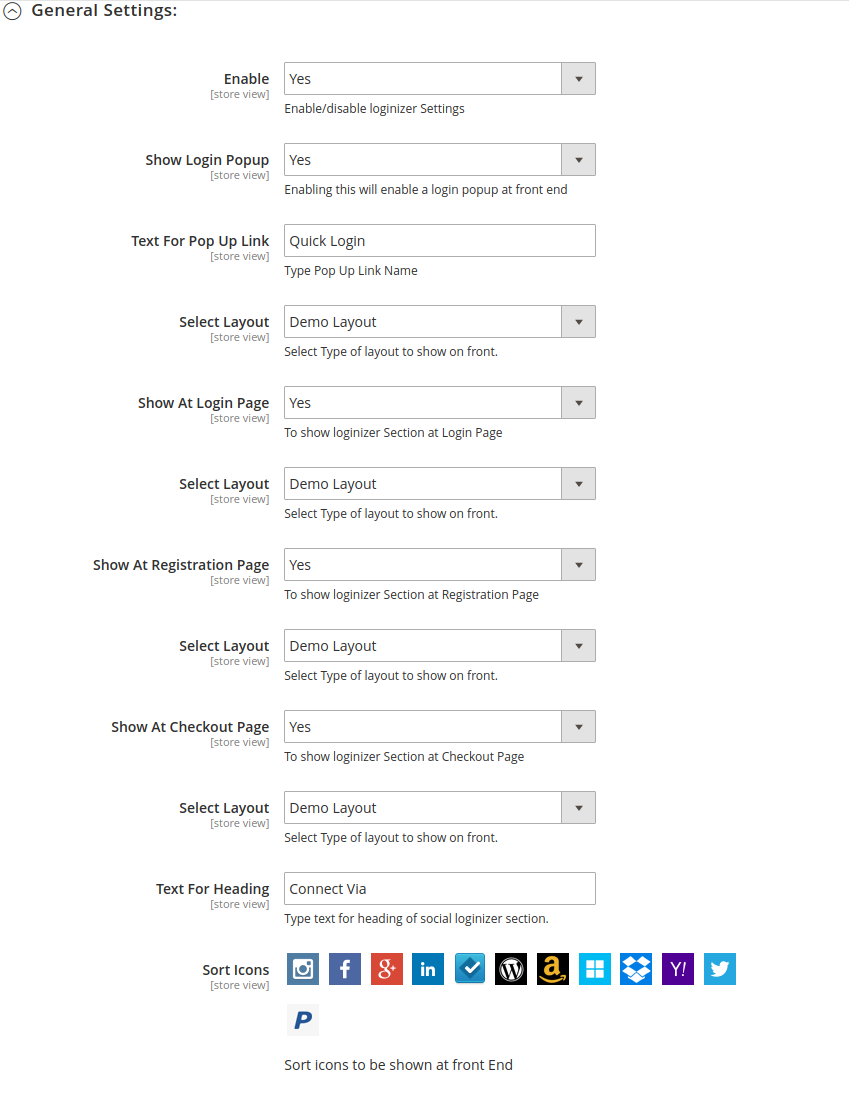
3.1.1 General Settings
Admin can customize the general settings by using the following settings options:
Enable: Activate or deactivate the Social Login Magento 2 module functionality from here.
Show Login Popup: Enabling it will create a link saved in “Text for popup link”. On clicking this link, a popup will appear with a login option and a social loginizer section.
Text for Pop Up Link: This text will appear as a link for login popup at the header in the front end.
Select Layout: Admin can select a layout for showing login buttons in the popup.
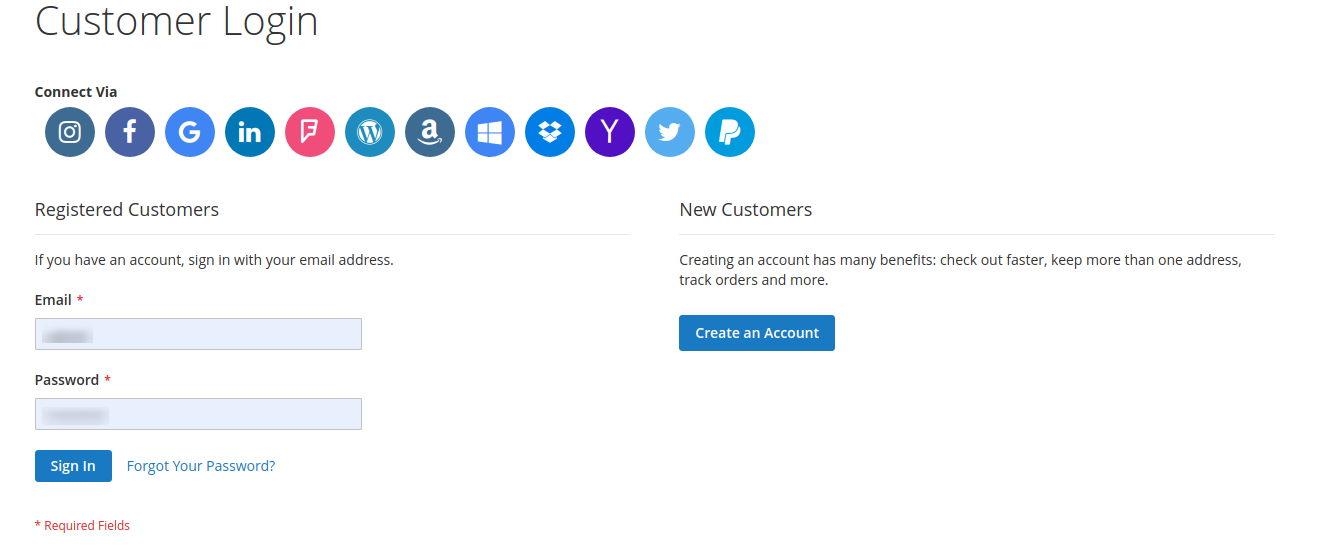
Show At Login Page: By enabling this configuration option, admin can show social login buttons on the login page.
Select Layout: Admin can select the layout for showing social login options on the login page.
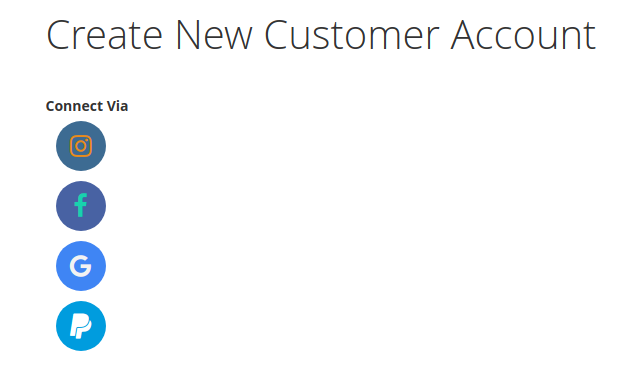
Show At Registration Page: By activating this option, admin can show social login buttons on the customer registration page.
Select Layout: The store merchant can choose from available layouts for showing social login buttons at the registration page.
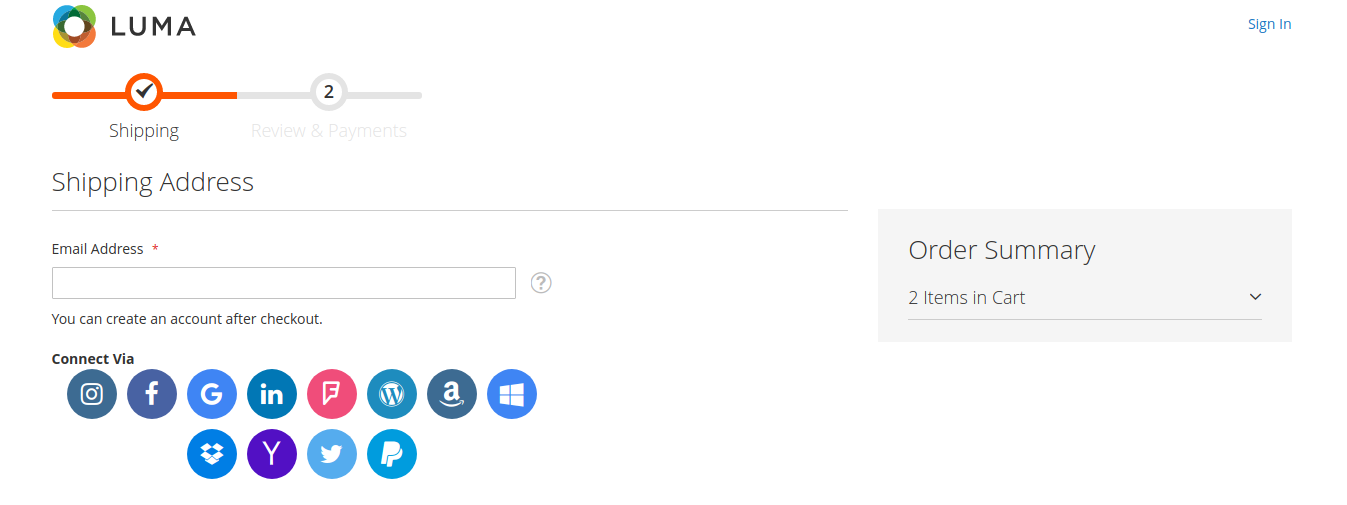
Show At Checkout Page: Admin can also show social login options at the checkout page.
Select Layout: Admin can choose from available layouts for showing social login options on the checkout page.
Text For Heading: This text will appear before the social organizer block.
Default Visible Option: It will be the no of icons that will be shown by default at the social loginizer block.
3.1.2 Websites Settings
Admin can add websites setting here.For each website, there will be similar settings like as below:-
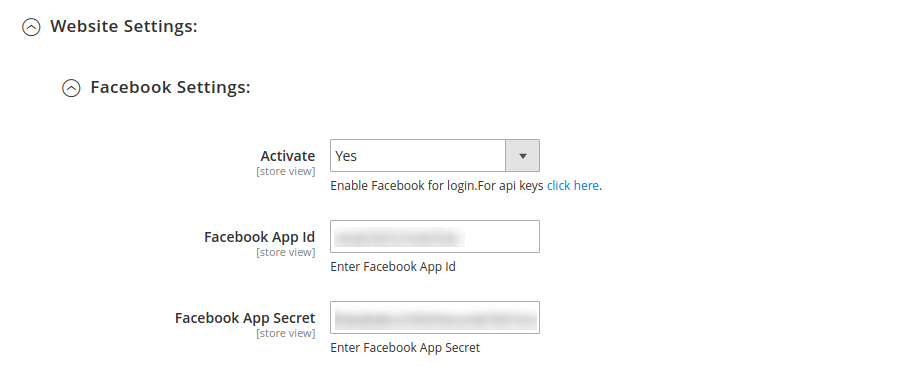
Active: To enable the website for login and signup, select Yes.
App ID (eg. for Facebook: Facebook App Id) : Enter your Application ID/Client. ID/Consumer ID is provided by corresponding website.
App Secret (eg. for Facebook: Facebook App Secret) : Enter your Application Secret/Client .Secret /Consumer Secret is provided by the corresponding website.
3.2 Custom Icon Settings
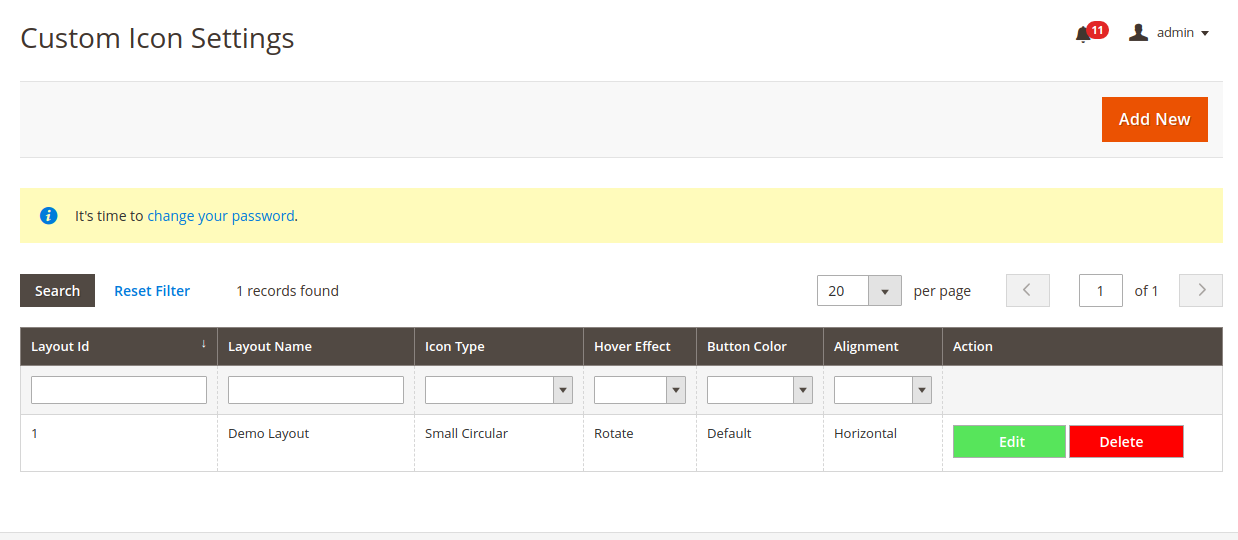
In the custom icon set, the admin can add, edit and delete the social login button layout. The Magento 2 Social Login extension allows the store admin to apply layout settings and show social login options in an attractive manner.
3.2.1 How to Add New Layout?
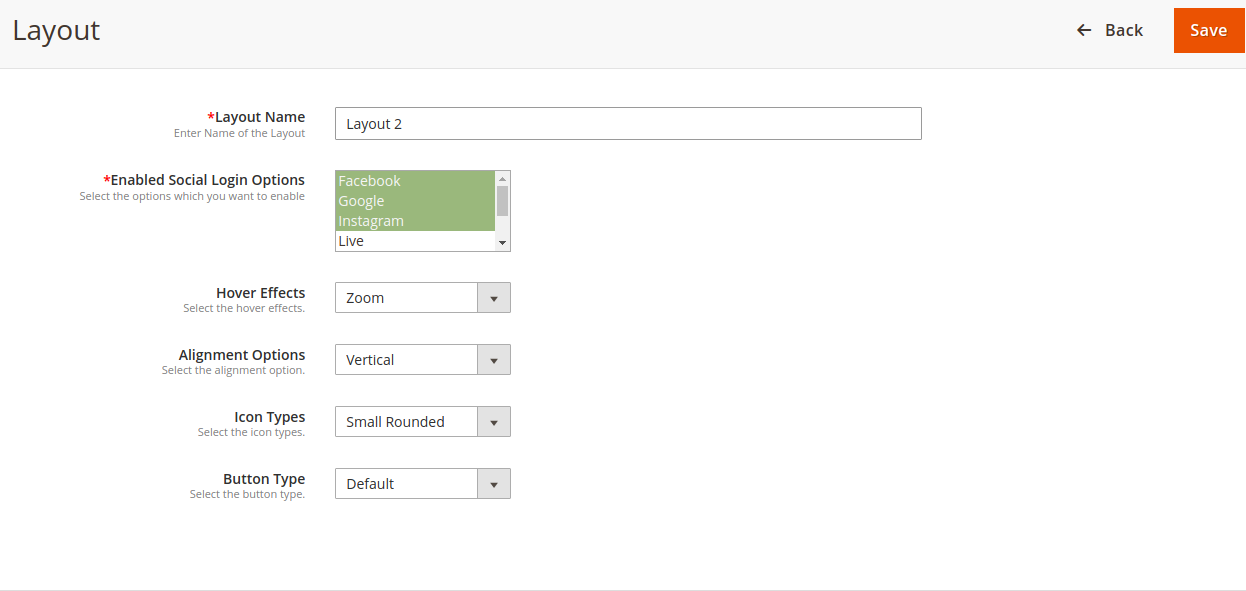
Admin can click on add new button and apply these settings for adding new layout:
Layout Name: Admin can set layout names from here.
Enable Social Login Options: Select the social login options from the available list which you want to show in this layout.
Hover Effects: Admin can select from different hover effects like highlight, zoom and rotate.
Alignment Option: The online merchant can set login option alignment as vertical or horizontal.
Icon Types: Admin can select icon type as small circular, small rectangular, small rounded, large rounded and large rectangular.
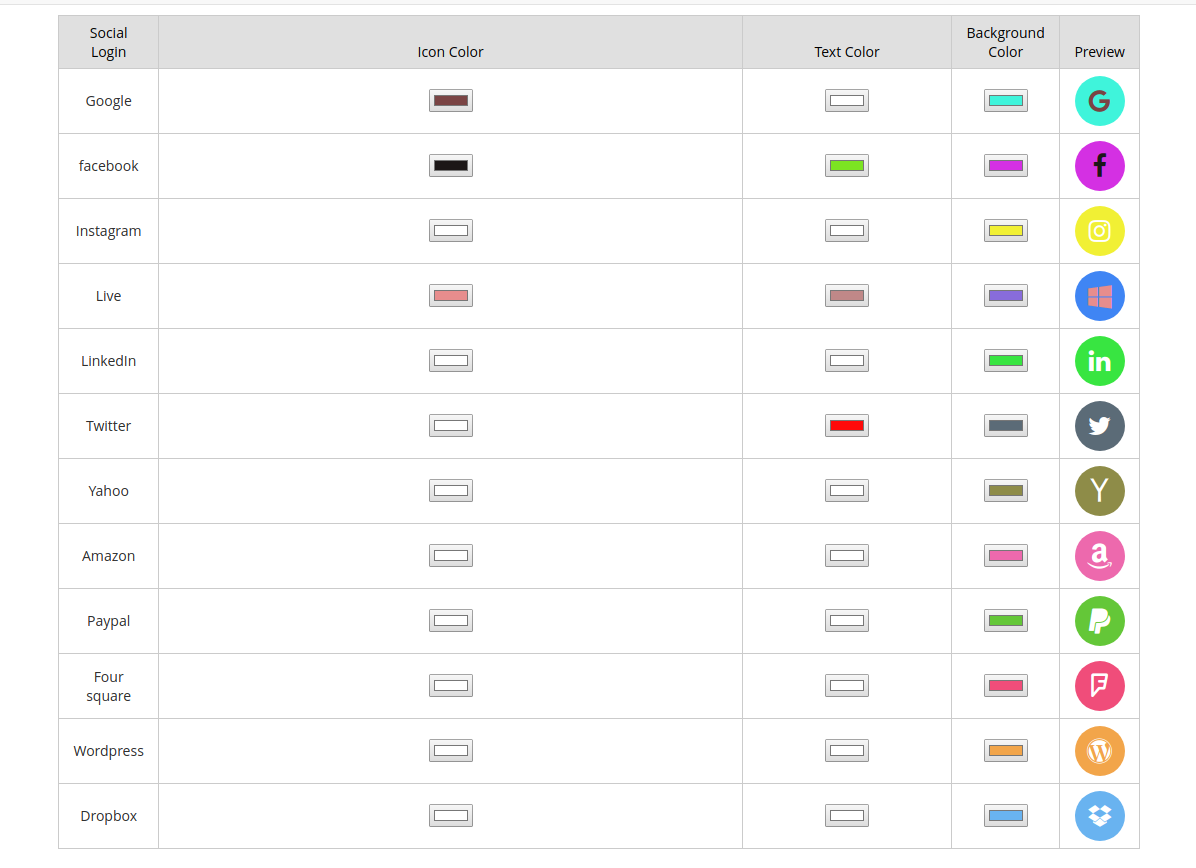
Button Type: Admin can select button type as default or customized.
In Customizable option, admin can apply these settings:
3.2.2 How to Edit Layout?
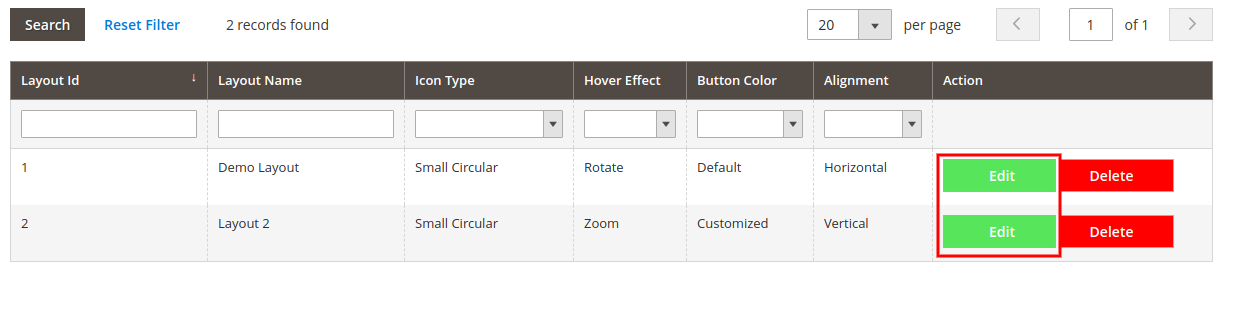
Admin can click on the edit button for editing the layout settings.
3.2.3 How to Delete Layout?
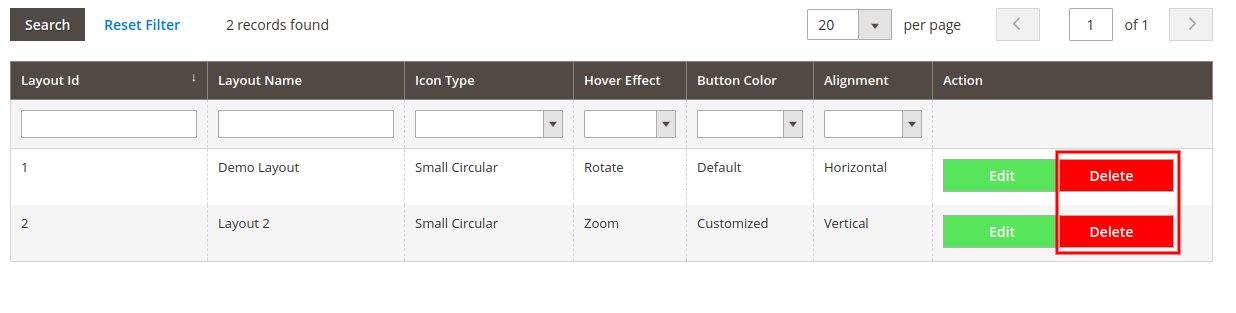
For deleting any layout admin just need to click on the delete button.
3.3 Statistics
There is a “Statistics” tab in the menu from where admin can view the report.
3.3.1 Website Graphical Report
It shows social login and registration data in graphical form.
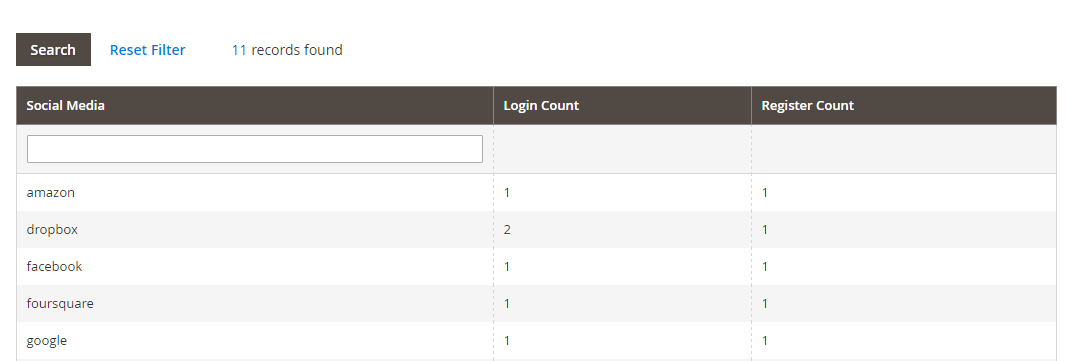
3.3.2 Social Login report
It shows a table containing data related to each social login website like login count, registration count etc.
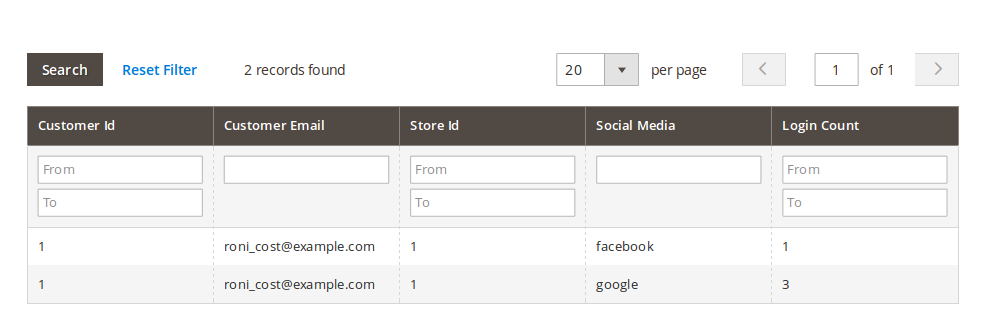
3.3.3 Social Login User Report
It shows a table containing data related to customer and social login sites like customer email, login count etc.
Reset Database:- There is a “Reset Database” Button. On clicking this button all the social login plugin related data will be deleted.
4.0 Front-end Interface
Login Popup: On enabling login Pop Up a link will appear with text as fixed in the admin interface.
On clicking this link a popup appears with a social login option.
Login Page: If enabled Social Login Block will appear at Customer Login Page.
Registration Page: If enabled Social Login Block will appear at Customer Account creation Page.
Checkout Page:- If enabled Social Login Block will appear at checkout Sign In Popup.
Appendix
How to set Redirect Url?
Let your website URL be ‘www.example.com’. and social login site is “Facebook”.
If Url Rewrite is enabled in your website then redirect URL will be
Go to Facebook Developers Website (https://developers.facebook.com) or click on the link given top right of respective tab in the module configuration page.
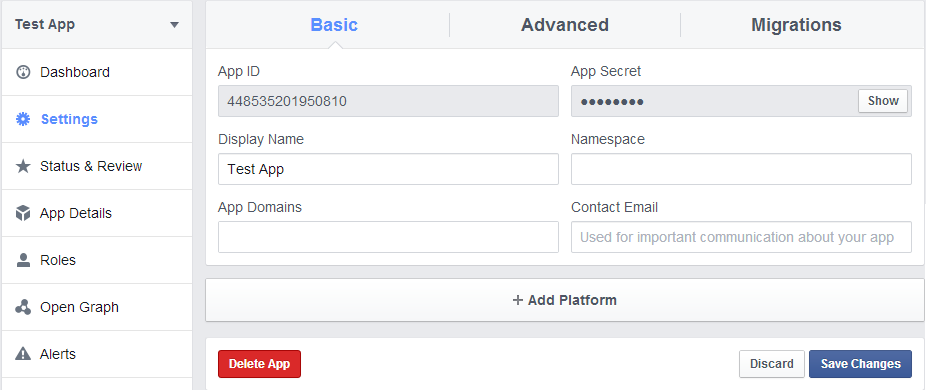
Click on Apps -> Create a new App.
Follow the instructions on the screen.
You will get the App ID and App Secret (Click “Show” button).
Now, go to Settings from left menu.
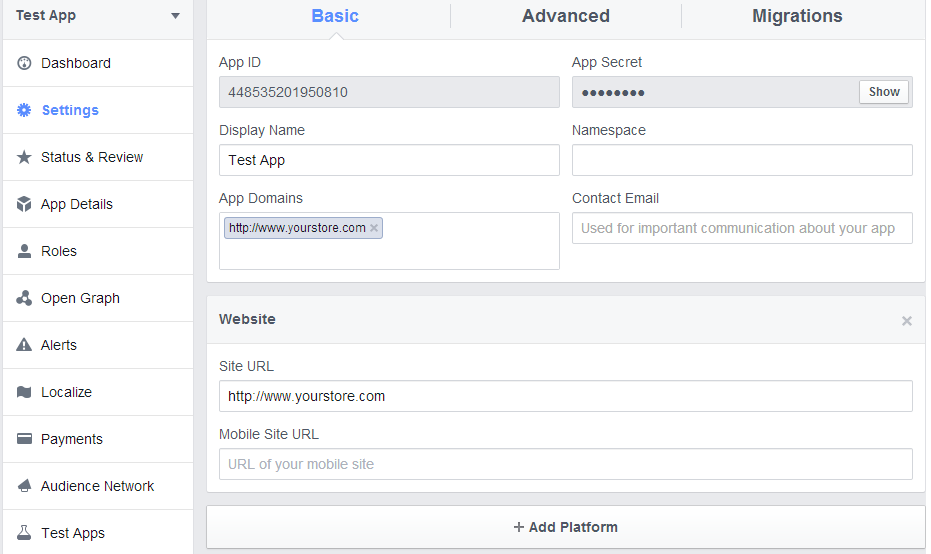
Click on “Add Platform” button.
Select Website.
Enter your App Domain and Site URL.
Application Type: Web Application.
Authorized JavaScriptorigins: Your store domain name. (https://www.example.com)
Click the “Save Changes” button.
Now, go to the “Status & Review” tab from the left menu and make the Application Live.
2. How to get Google App details?
Steps:
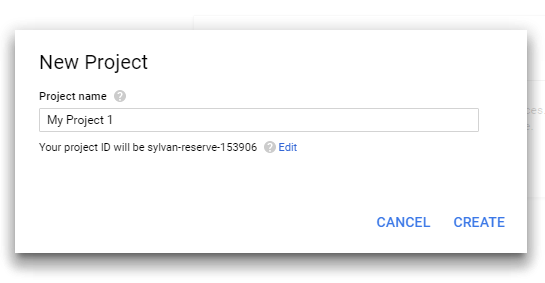
Go to Google Developers Console (https://console.developers.google.com/projectselector/apis/library)or click on create project link given top left dropdown of the page or at the center of the page.
Provide name of the project.
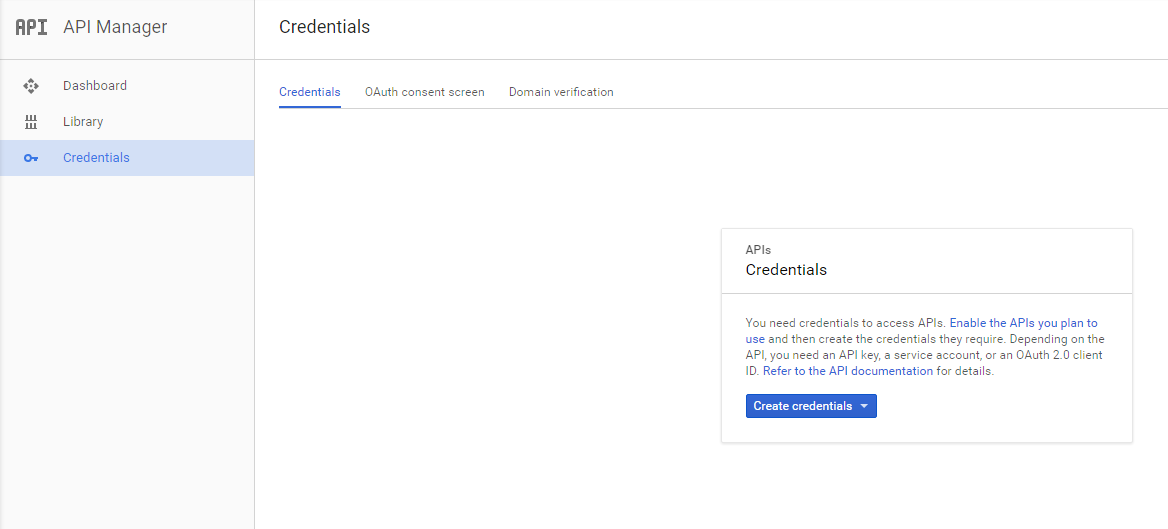
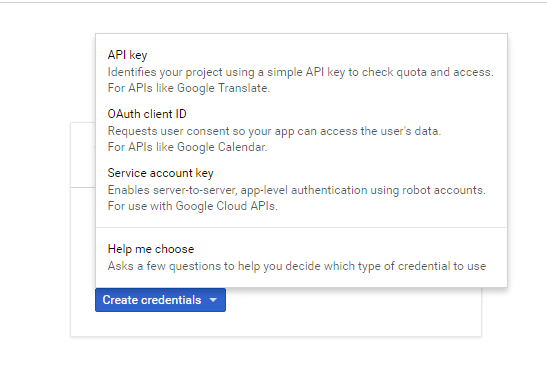
Create credentials by clicking on “Create Credentials” Button and selection oAuth client id.
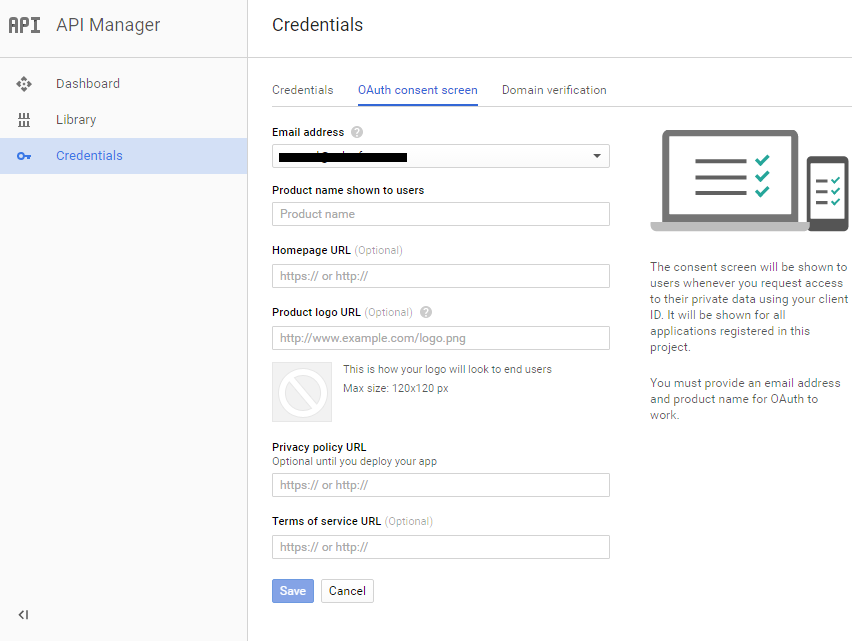
Credentials can be created only after providing details in oAuth form. Click same and now credentials can be found.
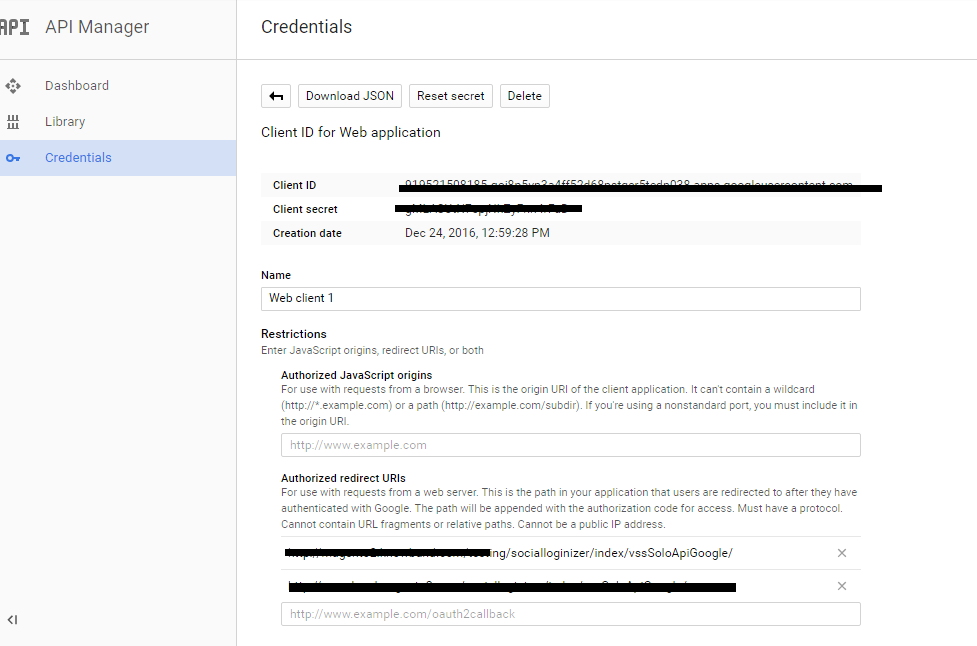
Redirection URL can be set at credentials screen
3. How to get LinkedIn App details?
Steps:
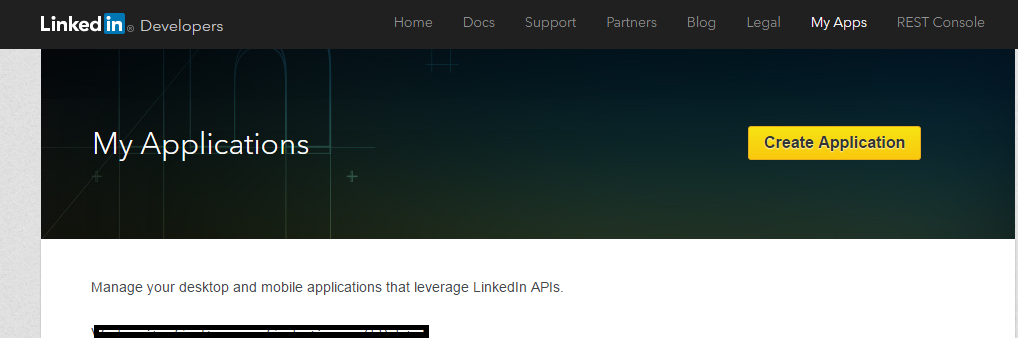
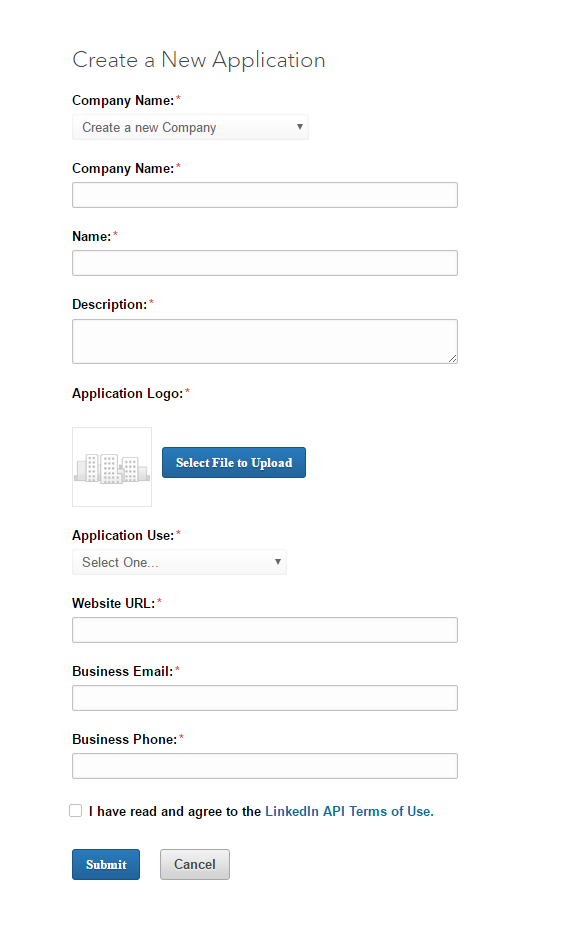
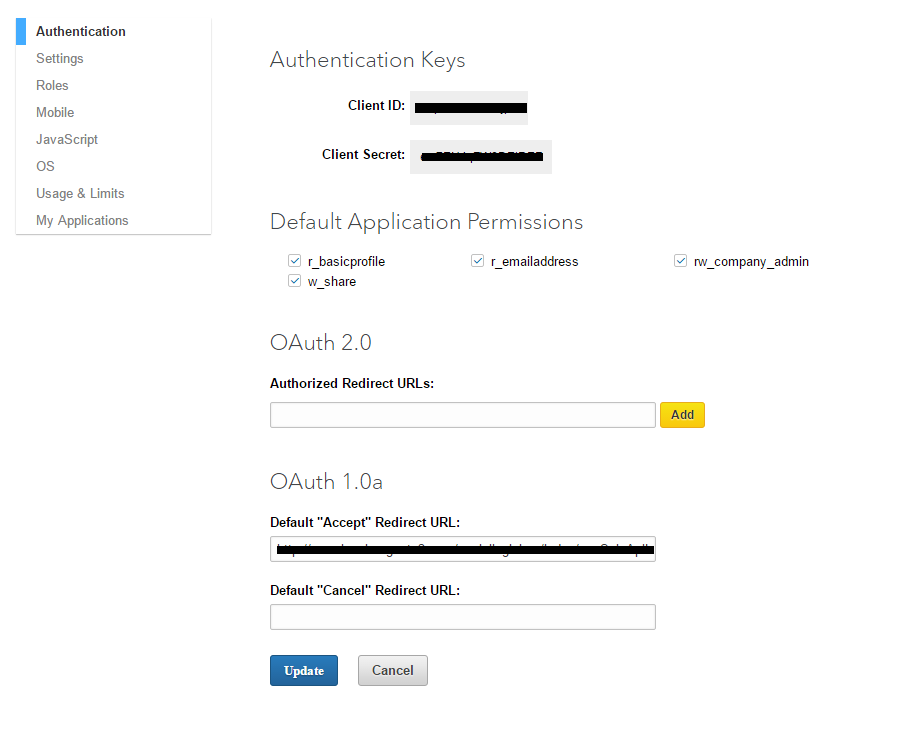
Go to LinkedIn Developers (https://www.linkedin.com/developer/apps) or click “Create Application” and follow the steps.
Authentication details can be added in authentication tab.
4. How to get Live App details?
Steps:
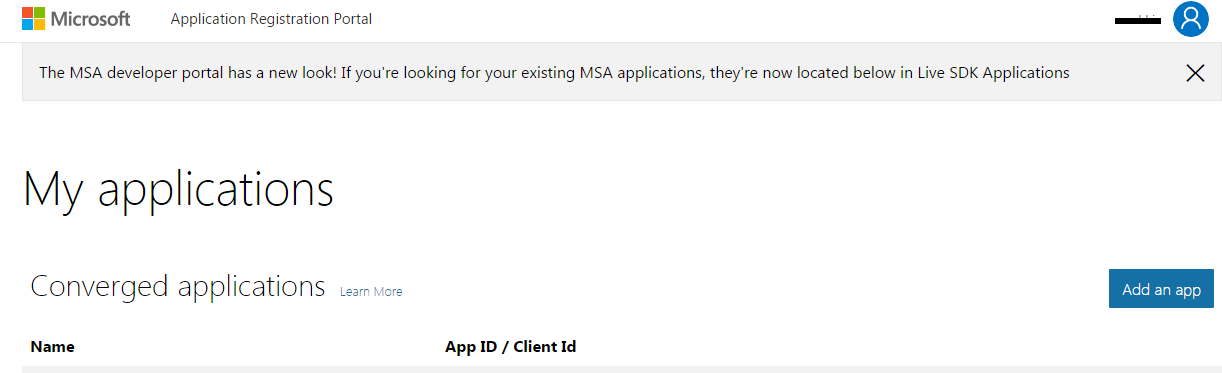
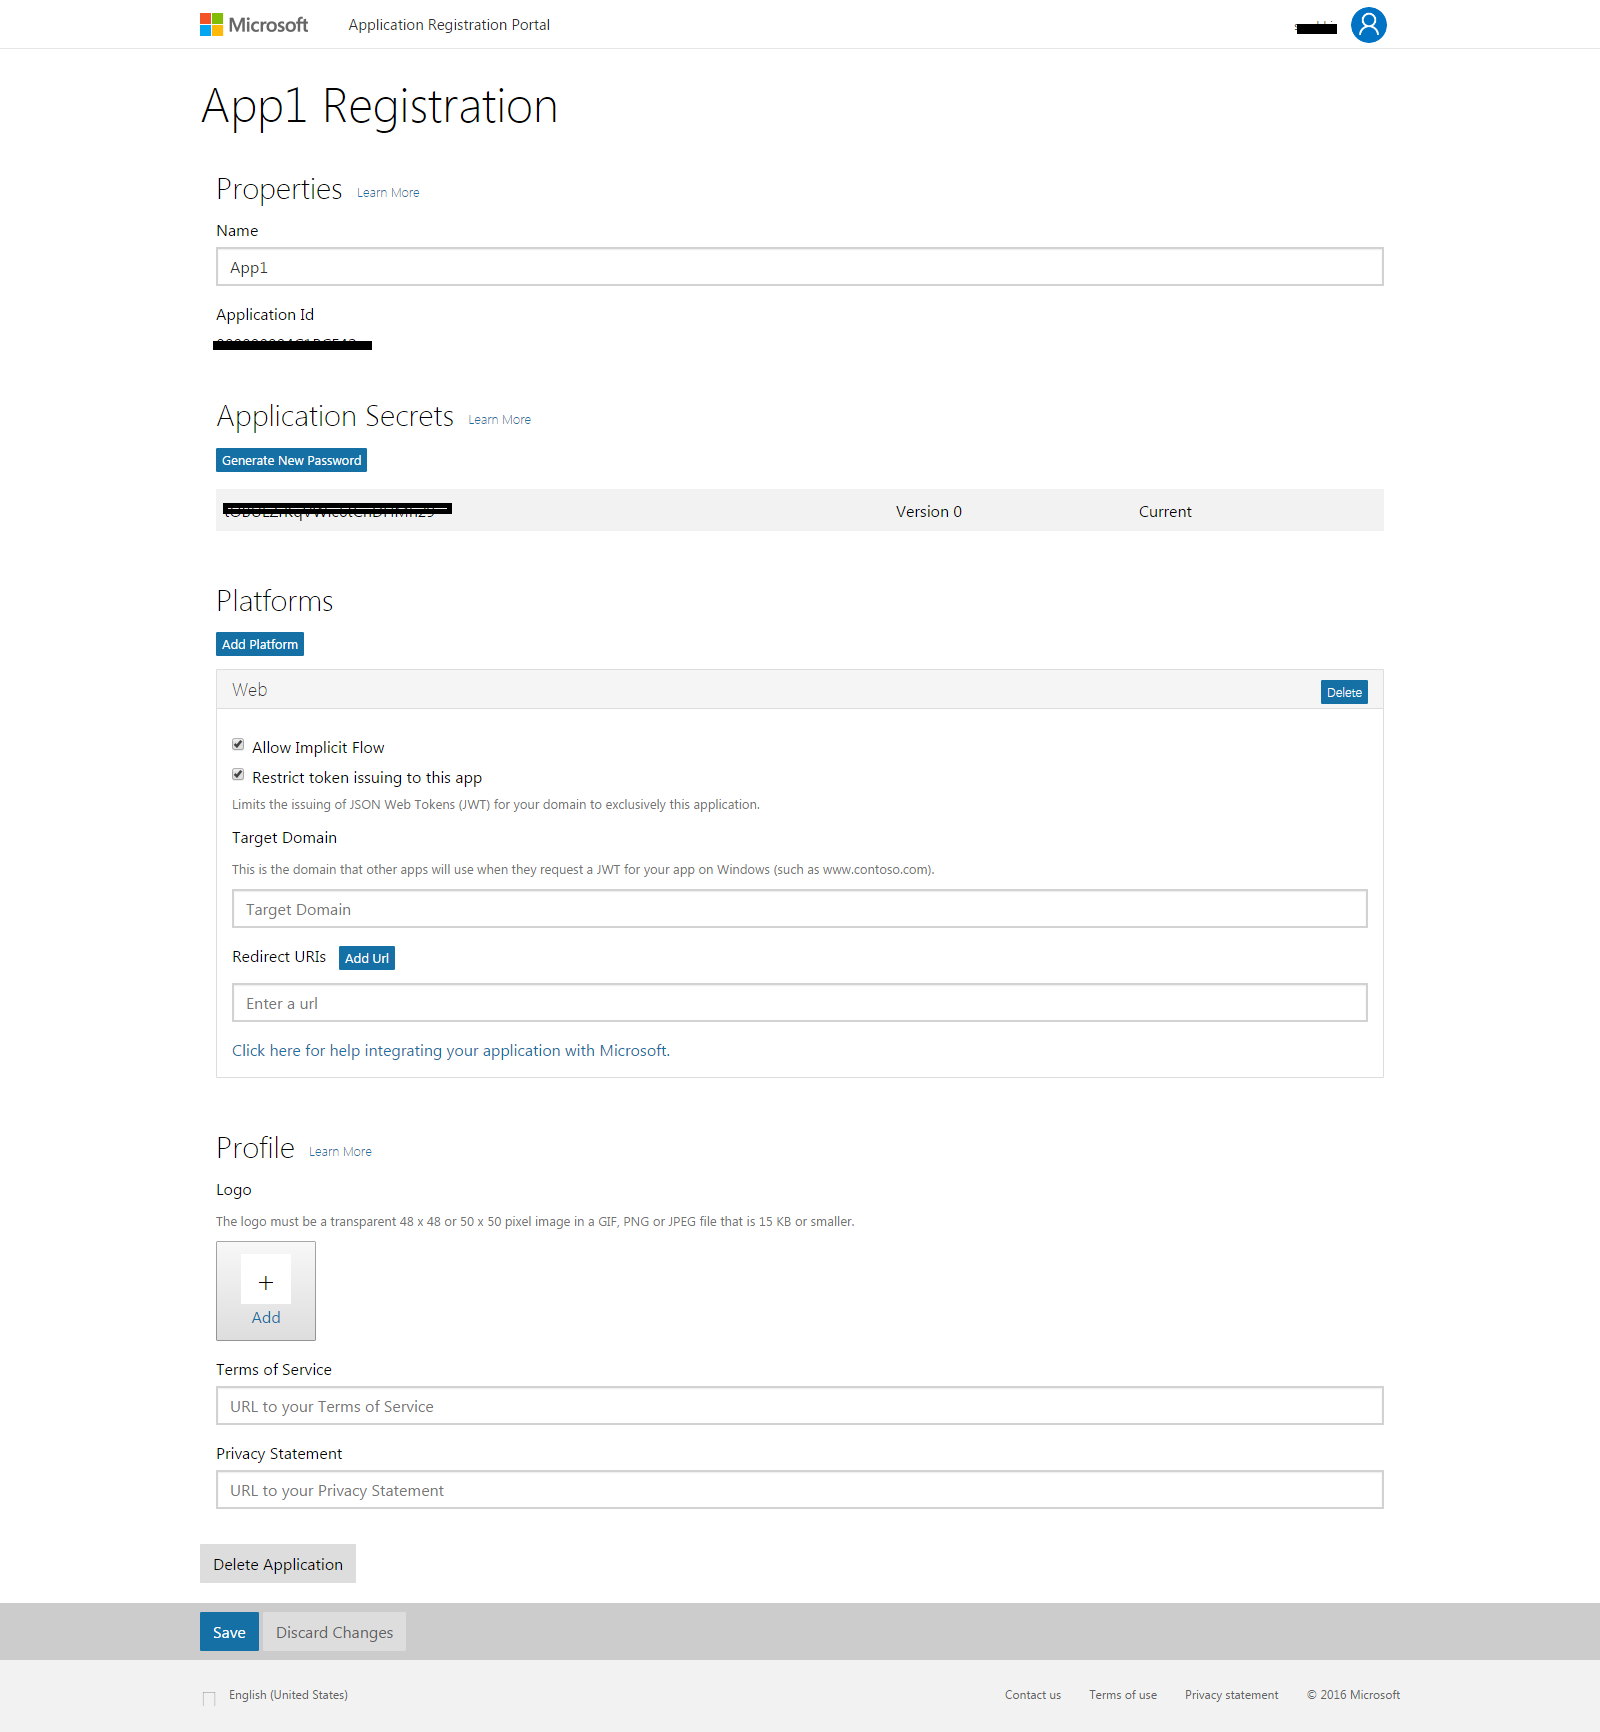
Go to Microsoft Development Center (https://apps.dev.microsoft.com/#/appList) or click on Add an App.
Fill details in form and click on save.
5. How to get Twitter App details?
Steps:
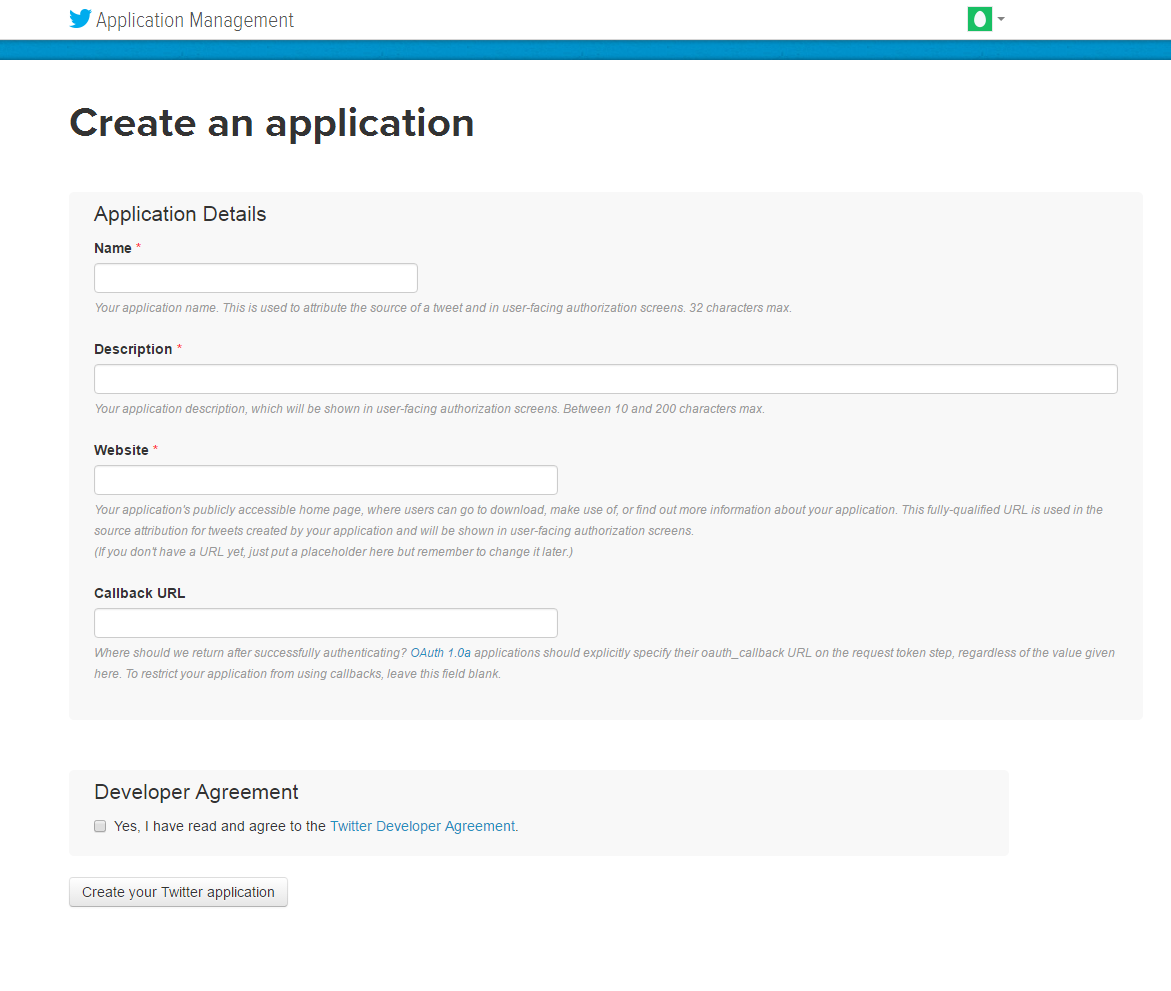
Go to Twitter App Management (https://apps.twitter.com/) or click on the link given top right of respective tab in the module configuration page.
Click the “Create New App ”button.
Enter the Application Details as follows:
Application Name: Name of your Application.
Description: 10 to 200 characters description of your application.
Website: Your store URL.
Callback URL: Loginizer redirects the page URL of your store.
Now, Click “Yes, I agree” and then click “Create your Twitter application”.
Now, select the “API Keys” from the menu below your Application Name and copy your API Key and API Secret.
6. How to get Yahoo App details?
Steps:
Go to Yahoo Developer Network (https://developer.yahoo.com/apps/) and click on the “My Apps” link given top right and header menu of the configuration page.
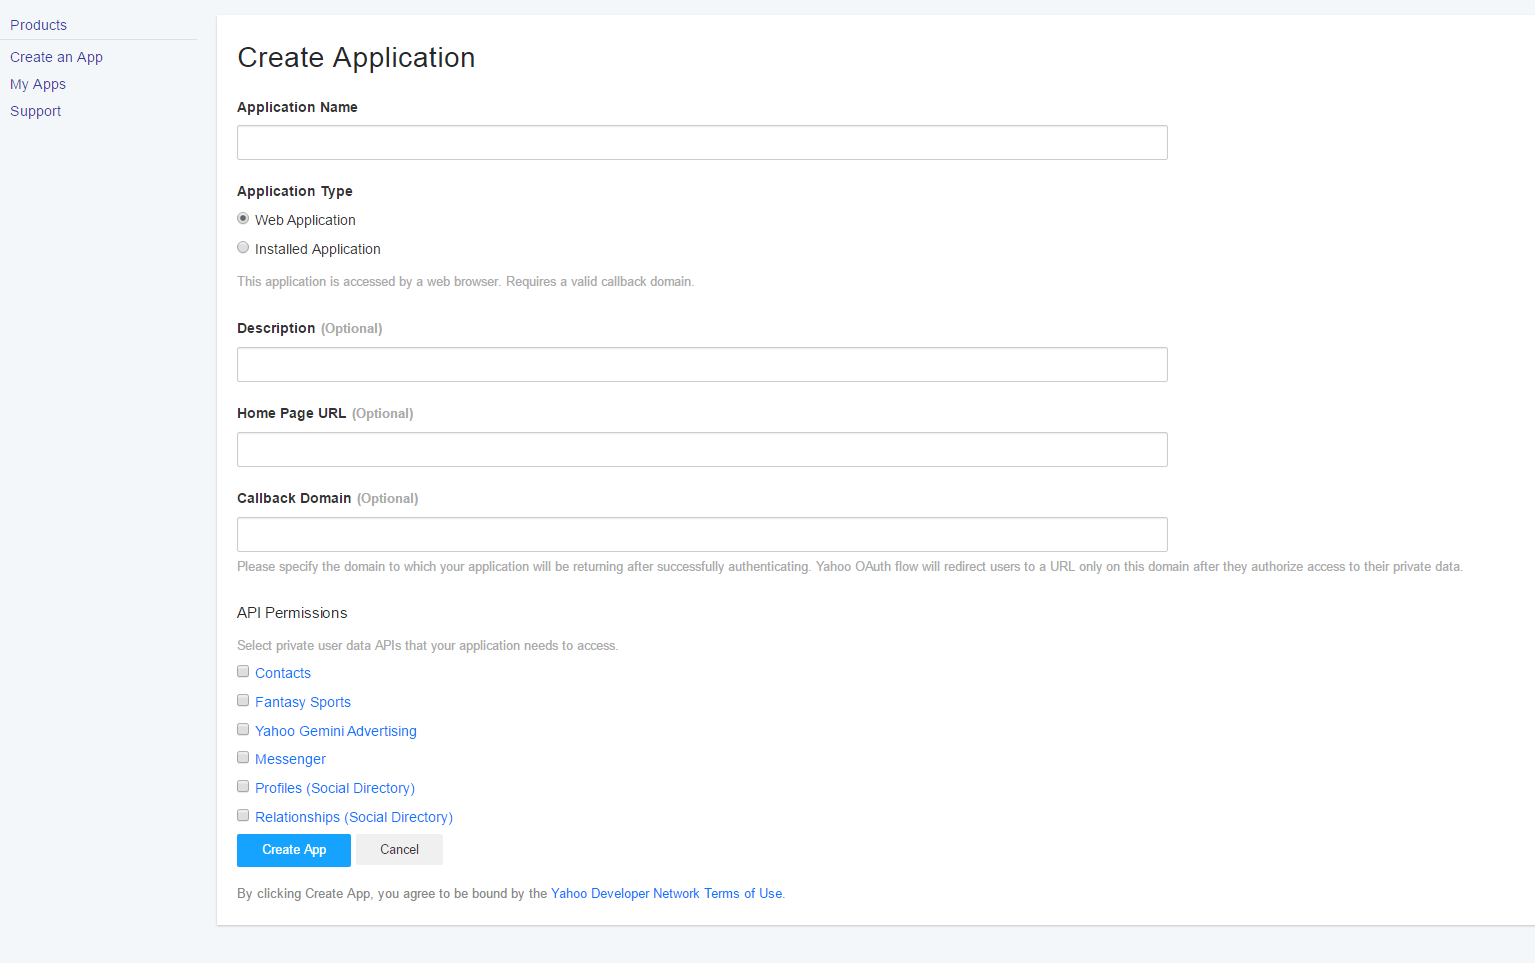
Click “Create An App”.
Fill the required details as per instructions
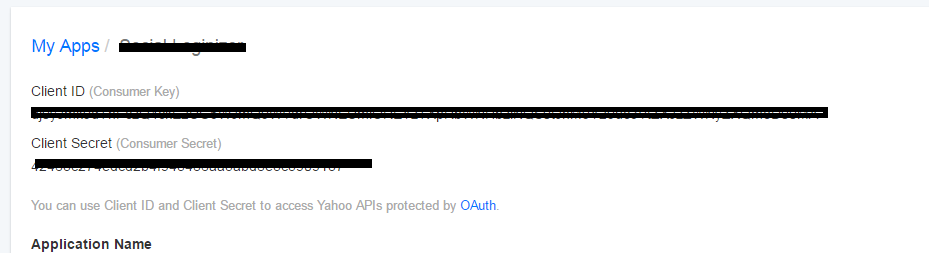
Copy your “Client Id” and “Client Secret”.
7. How to get Amazon App details?
Steps:
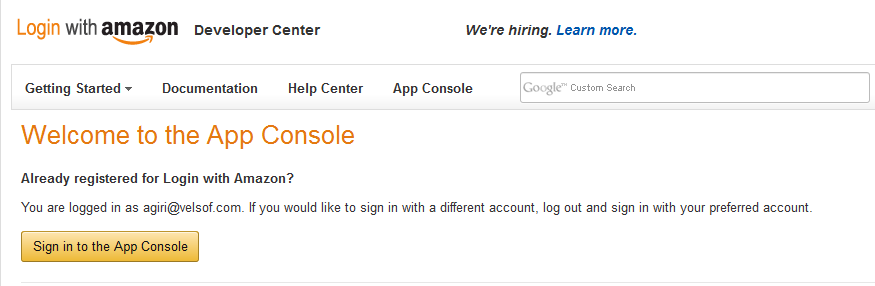
Go to Amazon Developer Network (https://login.amazon.com/manageApps) or click on link given top right of respective tab in module configuration page.
Click on Sign in to App Console button.
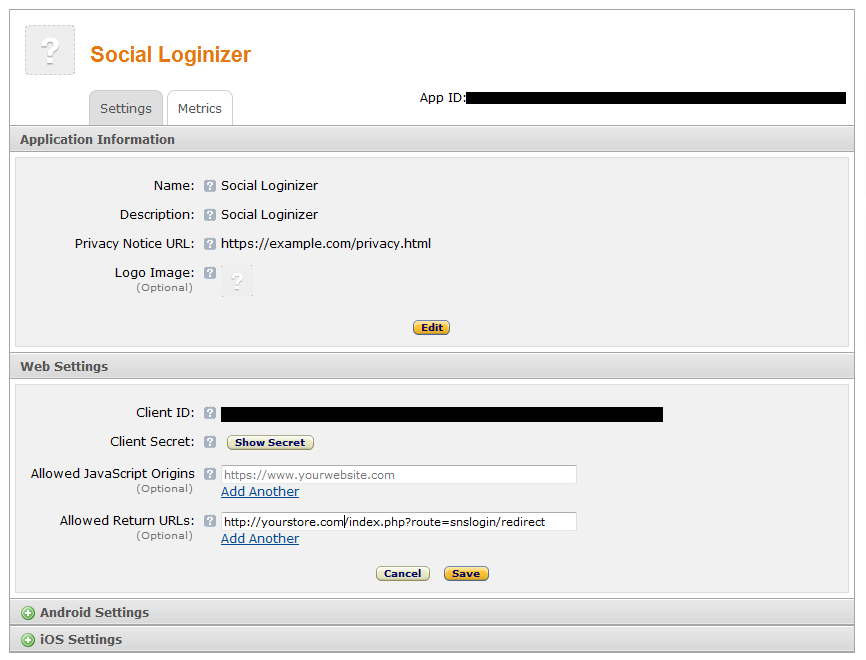
After successful login to App Console click on Register’s new application button in the top right of the page and you will be redirected to the following page.
Enter the Application Details as follows:
Name: Name of your Application.
Description: Description of your application.
Privacy Notice URL: Url of privacy policy page of your store.
Logo Image: Select the optional logo image of your store.
Click the Save button.
Now click on Web Settings to get your client id and secret.
Allowed Return URL: Loginizer redirects the page URL of your store.
Note: To enable Amazon to login into your website, your website “must be secure with HTTPS” otherwise Amazon login will not work.
8. How to get Instagram App details?
Steps:
Go to Instagram Developer Network (https://instagram.com/developer/clients/manage/#) or click on the link given top right of respective tab in the module configuration page.
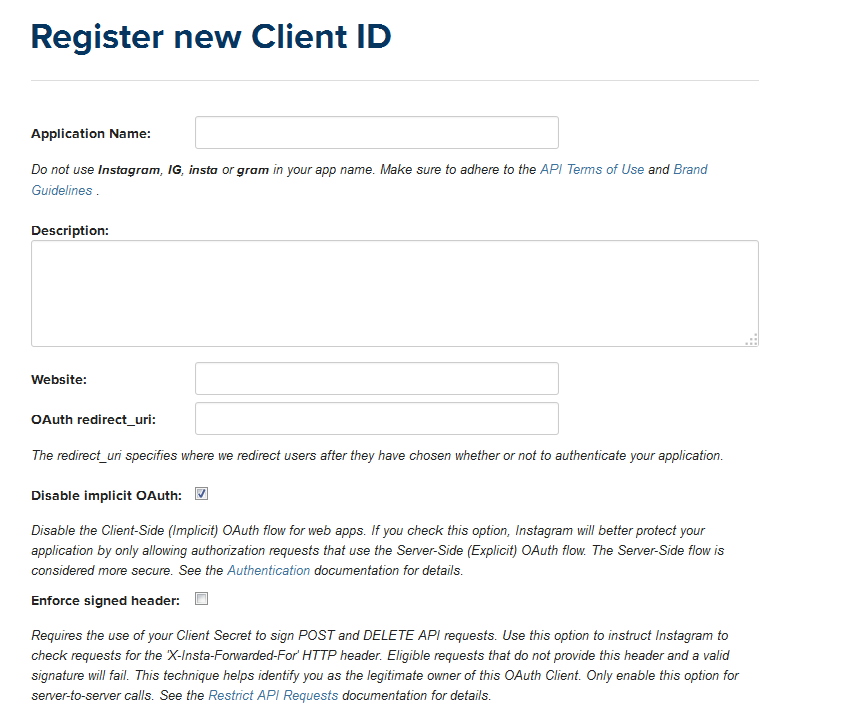
Click on Register a New Client button on the top right of the page.
Fill the following form
Set OAuth redirect_uri as Loginizer redirect page URL of your store. (https://www.example.com/module/socialoginizer/index/vssSoloApiInstagram).
Click Create button then copy and paste Client Id and Secret in the admin panel of the plug-in.
9. How to get Paypal App details?
Steps:
Go to Paypal Developer Network (https://developer.paypal.com/developer/applications/) and log in.
Click My Apps and Credentials.
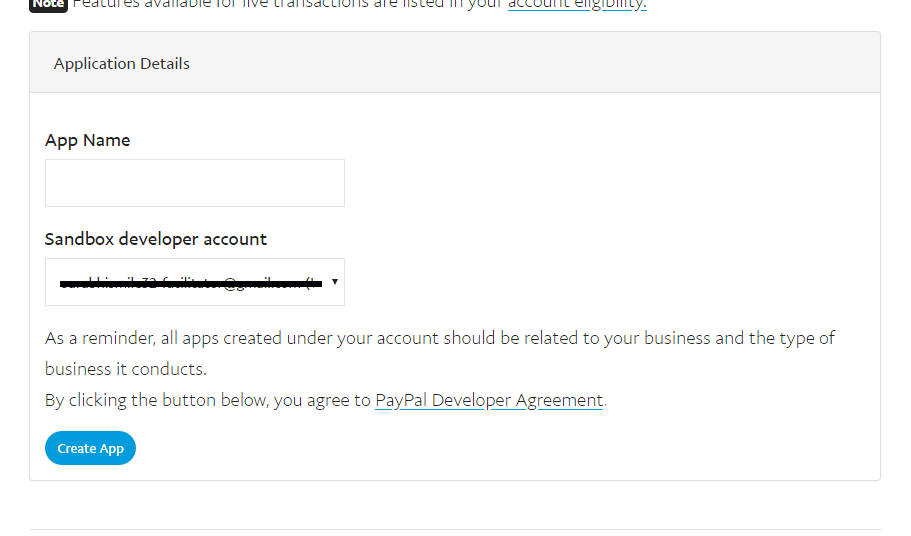
Now enter name of your Application and click Create App Button.
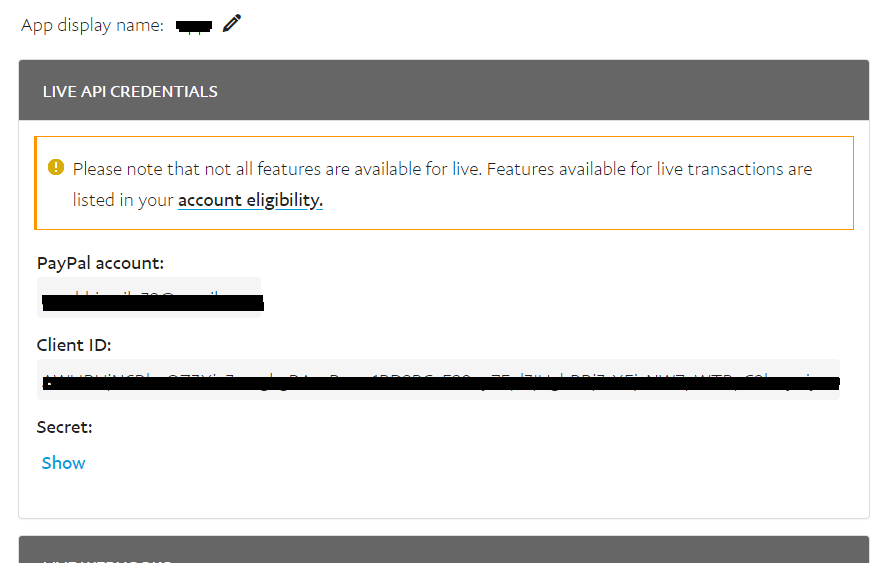
By default sandbox details is selected, switch it to live and input other app details.
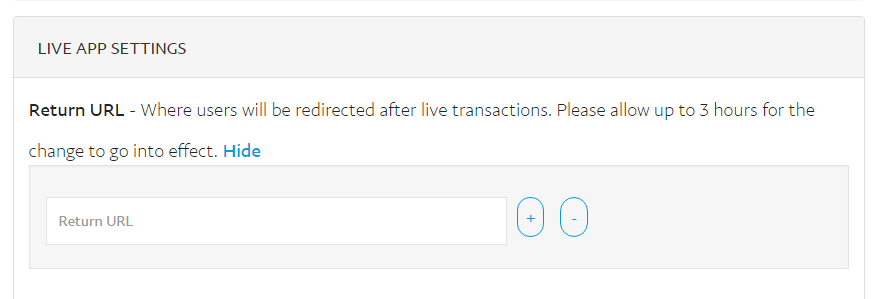
Now set the redirection URL in live App Settings.
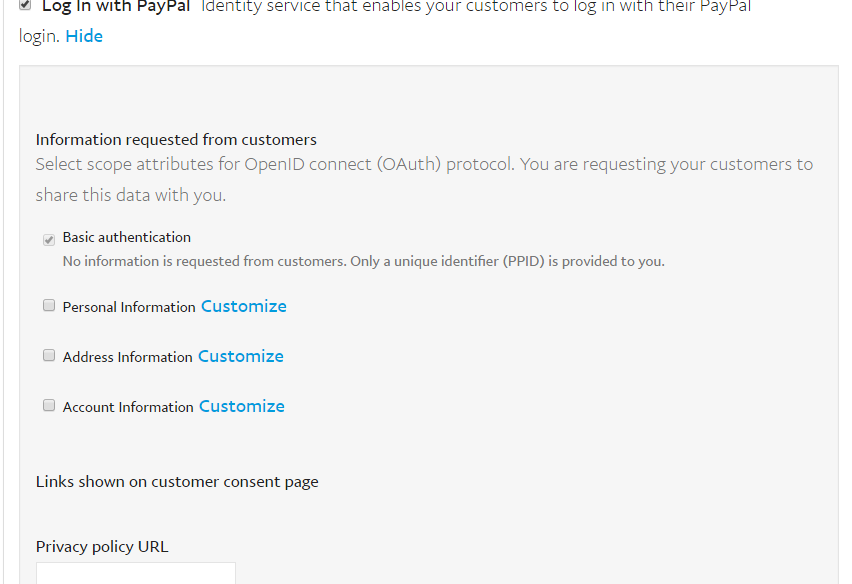
Check Login with PayPal and save details.
10. How to get Dropbox App details?
Go to Steps:
Note: To enable Dropbox login into your website, your website “must be secure with HTTPS” otherwise Dropbox login will not work.
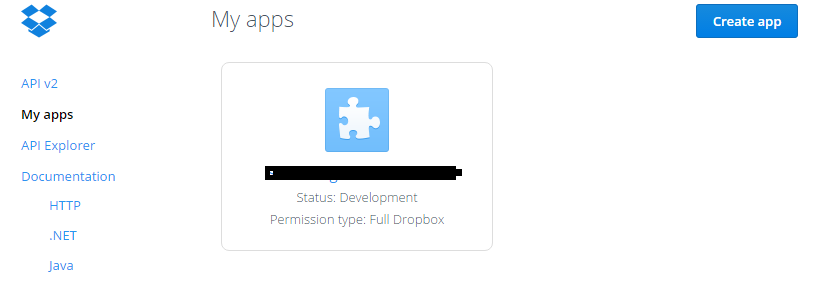
Go to Dropbox Developer Website (https://www.dropbox.com/developers/apps) or click on link given bottom of the respective tab in the module configuration page.
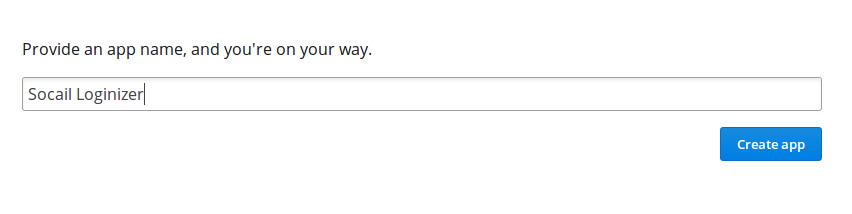
Click On the Create App button and provide a name for Application.
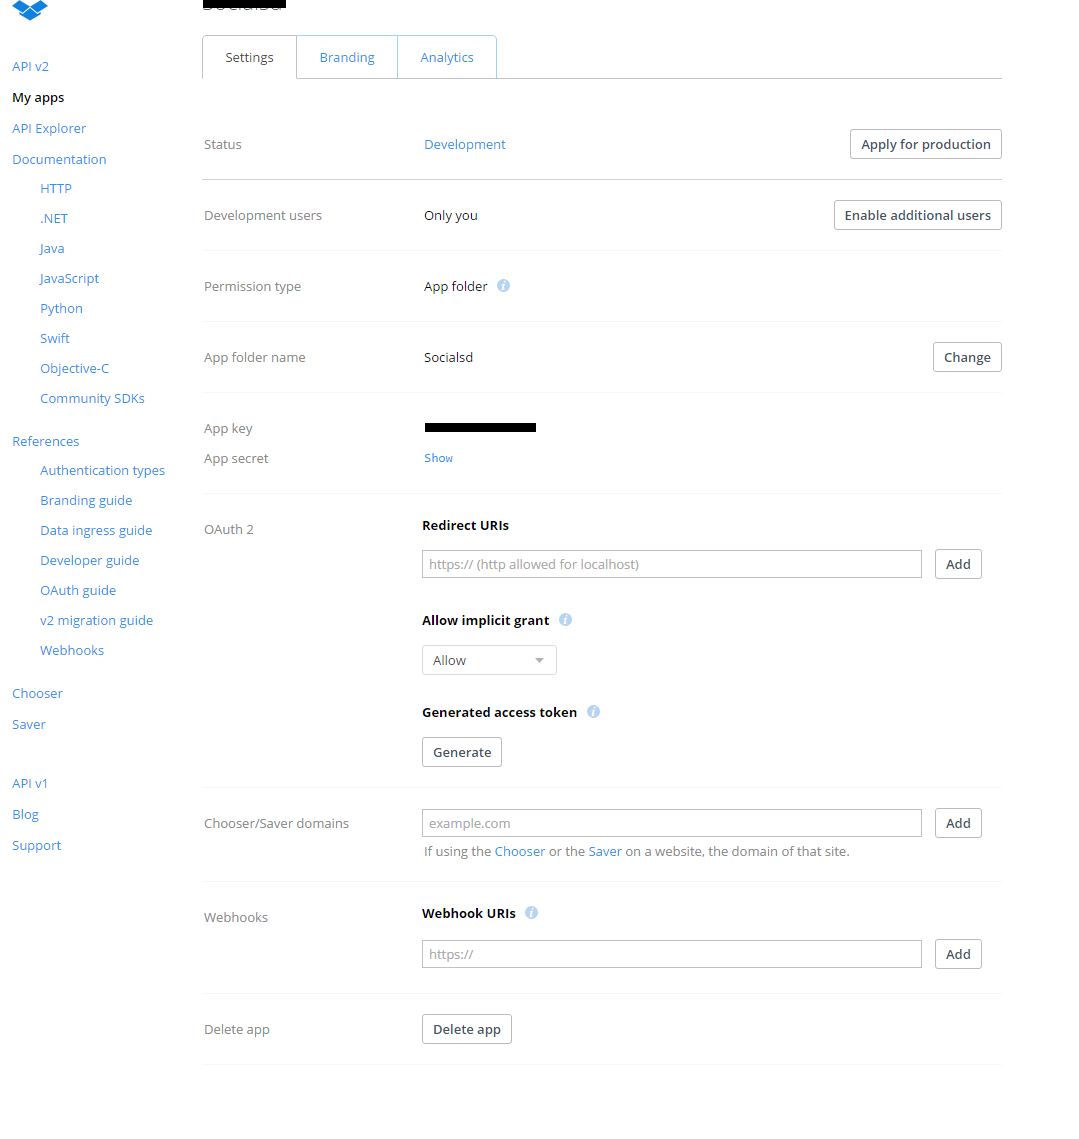
Fill up the details , set redirect url and save the settings.
Copy and paste the key and secret in plugin admin panel.
11. How to get WordPress App details?
Steps:
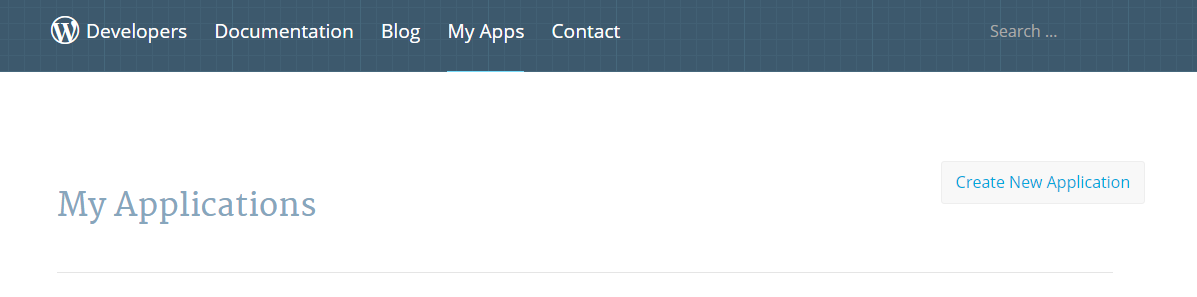
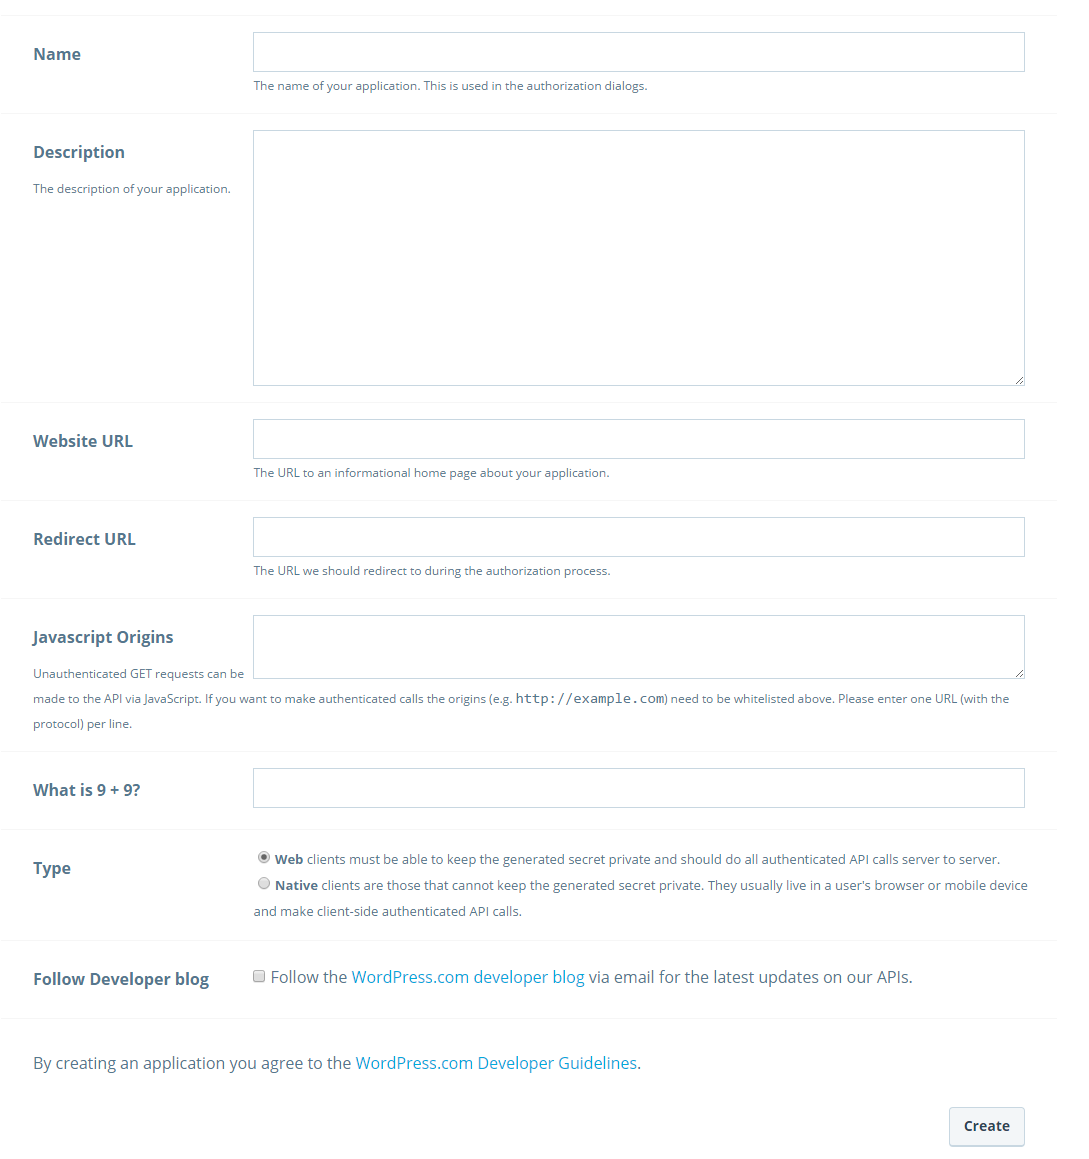
1. Go to WordPress Developer Website (https://developer.wordpress.com/apps/) or click on link given bottom of respective tab in module configuration page.
2. Click On the “Create New Application” button and provide a name for Application.
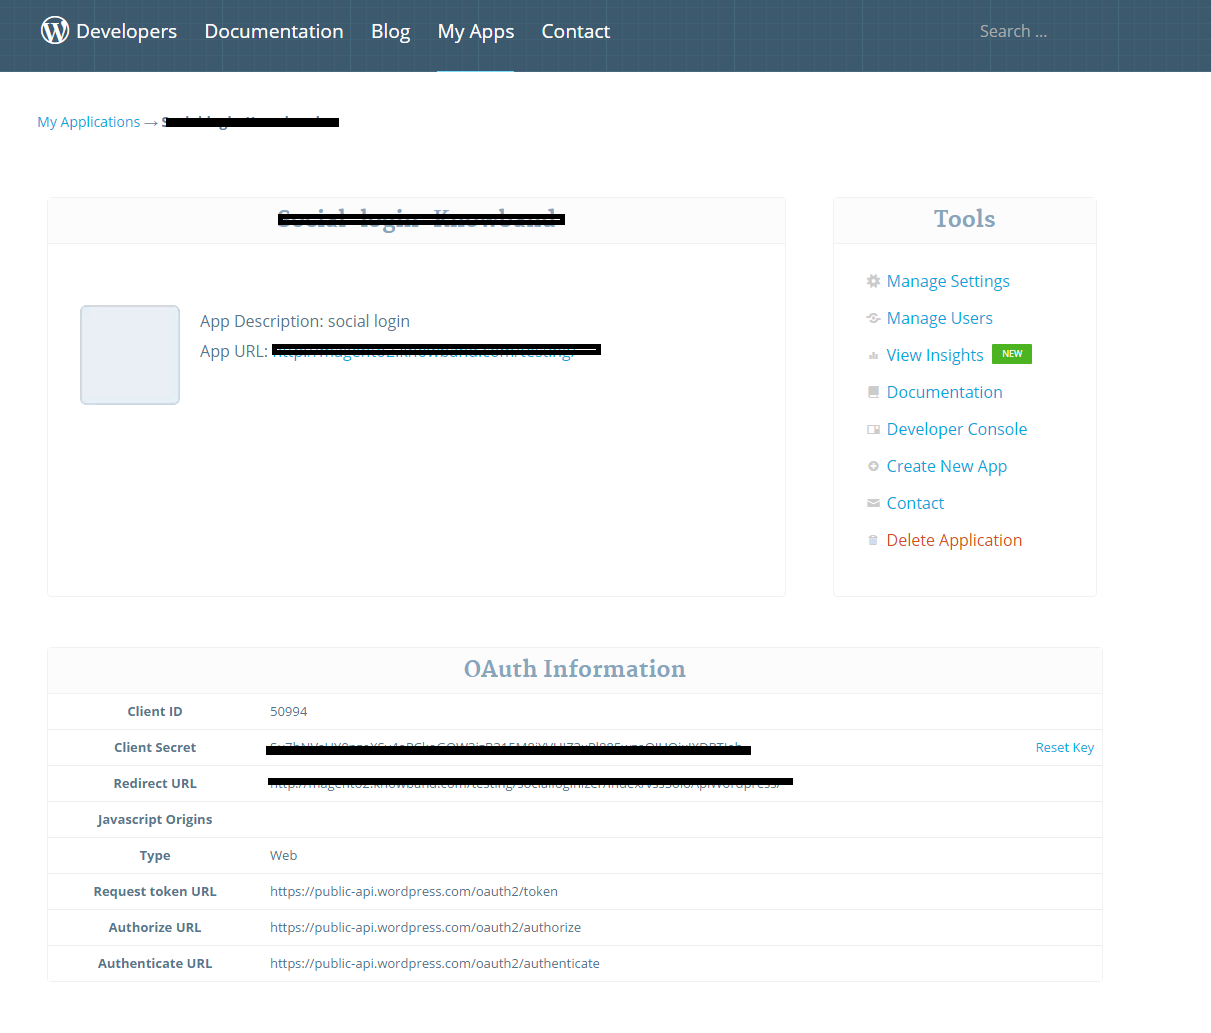
Fill up the details and save the application.
Copy and Paste the credentials in plugin admin console.
12. How to get FourSquare App details?
Steps:
Go to the foursquare developer website(https://foursquare.com/developers/apps) or click on the bottom link in the Plugin admin console.
Click on the ‘Create a new app’ button.
Fill the details , set the redirect URL and save the application.
Copy the credentials.
For more details about this Magento 2 Facebook Login plugin, visit here: