1.0 Introduction
Prestashop Google Shopping Integration addon offers a way to upload the products of the store on Google Shopping. Further, displaying the product ads on the search result is one of the ways to get thousands of visitors to your site.
In fact, Google Shopping allows e-merchants to display its product on Google’s search result page. Further, it is powered by AdWords and Google Merchant Center. In fact, this is one of the ways to allow users to search for the products. Further, on online shopping websites. Moreover, compare prices between different vendors. Therefore, the Prestashop Google Shopping Integration makes it easier for store owners to display their products on Google’s SERP.
The Prestashop Google Shopping Integration module automatically syncs feed from the Prestashop store to the Google Merchant Center Account. Additionally, the store admin can sync the product status back to the store’s database. How? By executing cron in the back-end of the Google Shopping Prestashop Feed Synchronization plugin.
Features that Knowband’s Prestashop Google Shopping integrator offers are:
- The Prestashop Google Shopping Integration addon automates the entire process of listing the products. Further, on Google Shopping from the eCommerce site.
- The store admin can automatically update the product inventory between the two stores. In fact, this happens from the back-end of the Google Shopping Prestashop Integration extension.
- The store admin gets an option to create an N number of profiles. Further, this happens in the back-end of the Prestashop module.
- The profile-based upload allows the admin to list the products in bulk. Moreover, any changes in the product details happen by making changes in the profile. Further, this happens in the back-end of the Google Shopping Prestashop API integration addon.
- The store admin gets an easy option to keep a track of the products listed in the Google merchant center. Further, in the ‘Product Listing’ tab of the Prestashop Google Shopping connector.
- The expired products are renewable just by executing cron in the back-end of the Prestashop Shopping Integration plugin.
- Prestashop Google Shopping Feed synchronization plugin even allows the admin to delete the products. In addition, view the errors that occurred while product listing.
- Every time a cron executes, it creates a feed. Additionally, the status of the feed is visible from the backend of the Google Shopping Prestashop Integration plugin.
- The real-time synchronization offered by the Prestashop Google Shopping Integration module makes tracking easier. Moreover, it also makes feed management easier for the store admin.
- The status of the actions that the admin performs is visible in the audit log section. In fact, they’re available in the backend of the Google Shopping Prestashop Integrator.
1.1. Project Objectives
Listed below are the project objectives:
1. The Prestashop Google Shopping Integration module installation and configuration.
2. The method of the Prestashop Google Shopping Integration extension connection with the Google Merchant Center.
3. The profile management, category mapping, and feed management.
4. Product listing and synchronization.
2.0 Installation
Purchase the Prestashop Google shopping integration plugin from the Knowband store. Further, you will get the zipped file along with the user manual. Moreover, please follow the below steps to install it:
1: Go to the Module listing page and the “Add New Module” button.
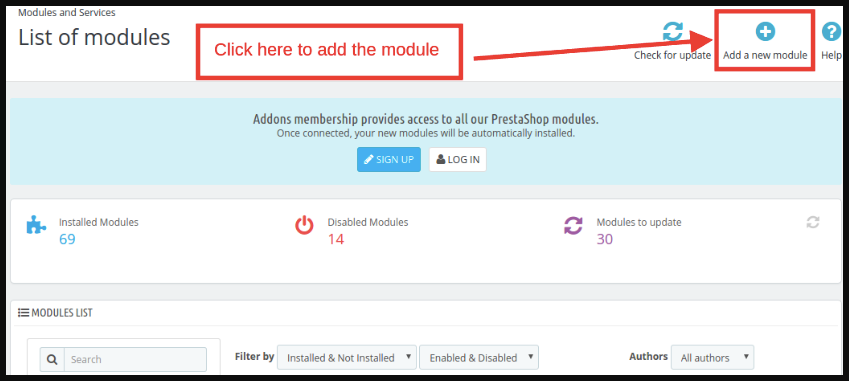
2: Upload the downloaded zipped file of the module.
3: After uploading, the system will list the module on the module listing page as shown below screen:

4: Click on the install button. Further, the Google Shopping Prestashop Integration module will install in your Prestashop store.
Note: Please set the read/write permission on the module folder before installing the addon into the system.
3.0 Admin Interface
After installing the Prestashop Google Shopping Integration extension, it will list on the module listing page. Further, kindly see the screen below:
Now, the Prestashop Google Shopping Integration extension add-on is installed. Further, it will display 7 tabs in the main menu of the admin interface. In fact, each tab explains one by one in the next section.
3.1. Connection Setting
This section of the Prestashop plugin allows the store admin to connect their store with the Google Merchant. Here are the information fields that you need to mention for setting up the connection.
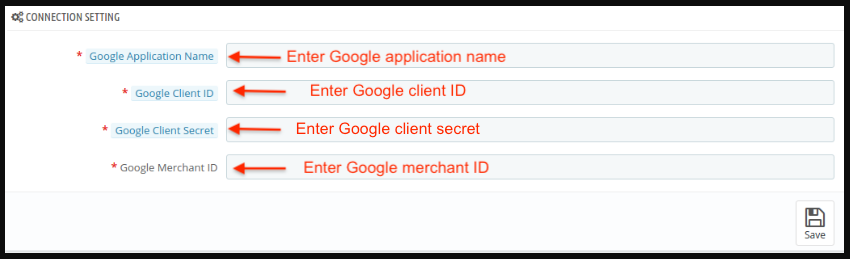
Google Application Name: Enter the name of the project/application that you created for Google Shopping.
Google Client ID: Enter the Client ID that will authenticate the connection between the store and Google Merchant. By default empty but required field. (See Appendix A)
Google Client Secret: Enter the client’s secret to set up the connection. By default empty but required field. (See Appendix A)
Google Merchant ID: By default empty but required field. Here, you will provide the merchant ID of your Google merchant center account.
3.2. General Settings
This section of the Prestashop Google Shopping API integration allows the store admin to set up the basic features.
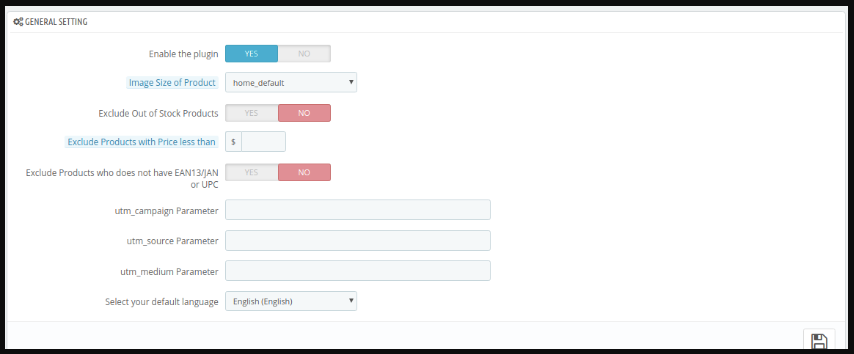
Enable the plugin: By default, this setting will be OFF. In fact, the Prestashop Google Shopping Integration module will sync the products to Google Shopping if this setting will be ON.
Image Size of Product: Select the size of the product from the drop-down list. Further, the admin can enter the image size option in the Main Menu -> Preference -> Images.
Exclude Out of Stock Products: If disabled, only the in-stock product will be displayed in Google search results. Additionally, enable the display of out-of-stock products.
Exclude Products with Price less than Enter a fixed amount. Further, the products below this amount will not display in the search results only.
Exclude Products that do not have EAN13/JAN or UPC: If the admin disables this, the products that don’t have the EAN13/JAN or UPC will not display.
utm_campaign Parameter, utm_source Parameter, utm_medium Parameter: Enter the UTM for tracking the traffic received via Google Shopping.
Select your default language: The module offers multi-lingual support. Further, select the default language from this section.
3.3. Profile Management
The admin can create, edit or delete profiles from this tab of the Prestashop Google Shopping Integration extension
3.3.1 How to Create a New Profile?
Click on the ‘Add New Profile’ or ‘+’ sign to create a new profile.

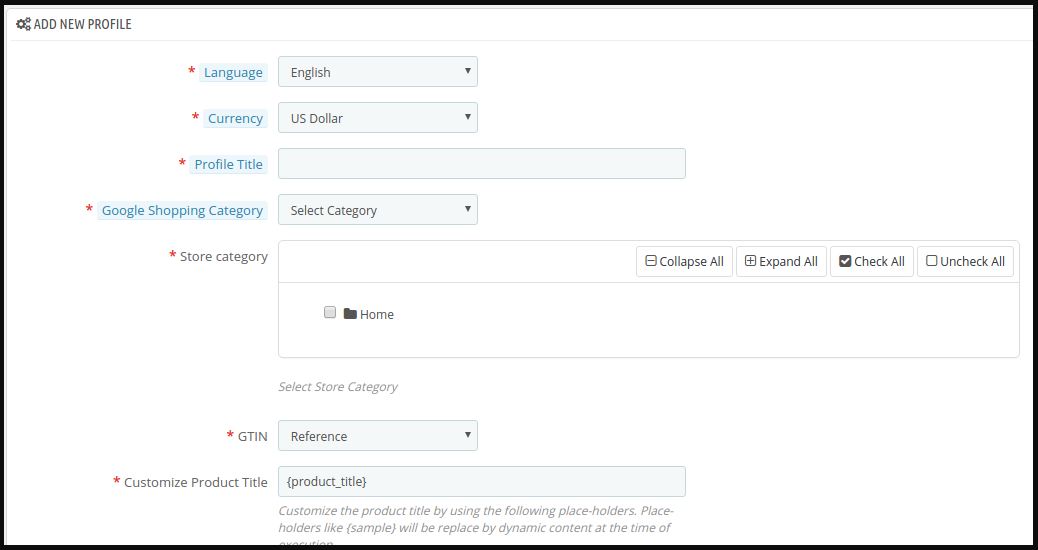
You’ll be redirected to the profile creation page of the Google Shopping Prestashop Integrator.
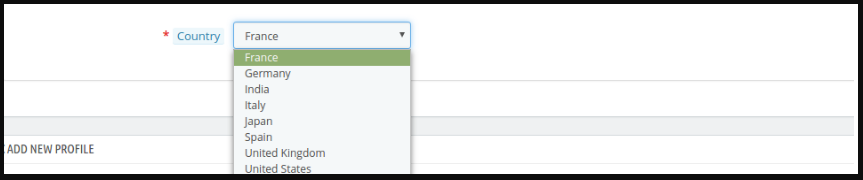
Select the Country from the drop-down list.
Language: Select the language for profile creation.
Currency: Select the desired currency for the selected location.
Project Title: Enter the name of the project.
Google Category: Select the Google category where you want to map the category of the store.
Store Category: Expand the category and check the categories that you want to map in Google Shopping.
GTIN: Here, you will map the product’s unique field. Further, the Prestashop Google Shopping Connector module can identify products according to the mapped attribute. In fact, you must also have to provide unique field mapping for product attributes as well. Furthermore, the various options to choose from include: Reference No., UPC, EAN13. Thus, the mapping can then be done based on the selected attribute.
Customize Product Title: Customize the product title by using the following place-holders.
- {id_product} for Product ID
- {product_title} for Product title
- {manufacturer_name} for Manufacturer name
- {supplier_name} for Supplier name
- {reference} for Product Reference
- {ean13} for Product EAN13
- {short_description} for Product Short Description
- {price} for Product Price
Place-holders like {sample} will be replaced by the dynamic content at the time of execution.
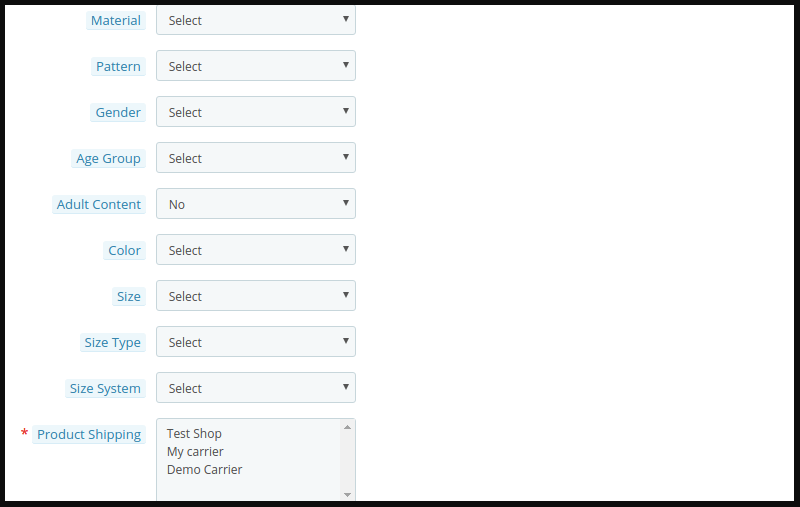
Material: Select the material of the product.
Pattern: Choose the pattern from the drop-down menu.
Gender: Select the Gender for which the product is intended. Further, the options are Male, Female, or Unisex.
Age Group: Select the age group that is expected to use the product.
Adult Content: Specify if the product has any adult content or not.
Color: Use the color attribute to describe your product’s color. Further, this information helps create accurate filters, which users can use to narrow search results.
Size: The size attribute describes the standardized size of your product. Your product ad will appear in the results that are filtered by size.
Size Type: The attribute describes the cut of your product. Further, the supported value for this field includes a variety. For instance, regular, petite, plus, big, tall, and others. Therefore, this helps create accurate filters.
Size System: With this attribute, you can explain which country’s sizing system your product uses.
Product Shipping: Select the shipping method for the particular product.
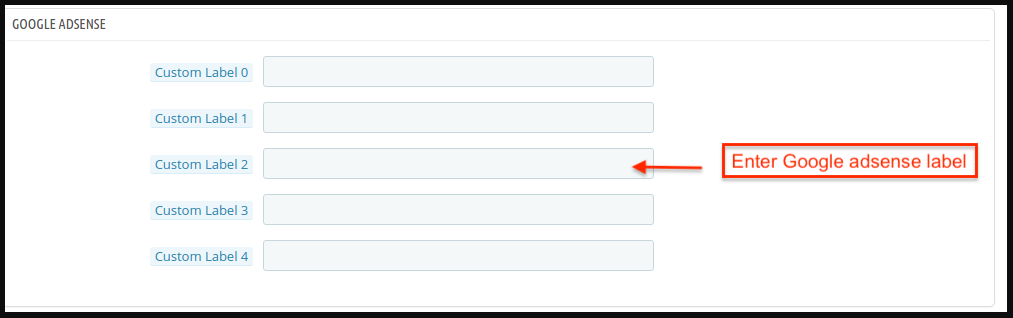
Google Adsense
Google Adsense refers to the campaign that you’ll run on Google Adwords. Further, Custom Labels, Custom Label 0 through Custom Label 4, allows you to create specific filters to use in your Shopping campaigns. In fact, use these filters for reporting and bidding on groups of products. Furthermore, the information you include in these attributes won’t be shown to users.
3.3.2 How to Edit the Existing Profile?
The created profile in the Prestashop Google Shopping Synchronization addon can be viewed in the admin interface. Further, click on ‘Edit’ to edit the profile. In fact, you can even enable/disable by changing the status as shown below.

The category mapped can even be viewed by clicking the ‘View Mapped Category’ button shown in the above image.
3.3.3 How to Edit the Mapped Category?
To map a new category, click on ‘Add New Category’.

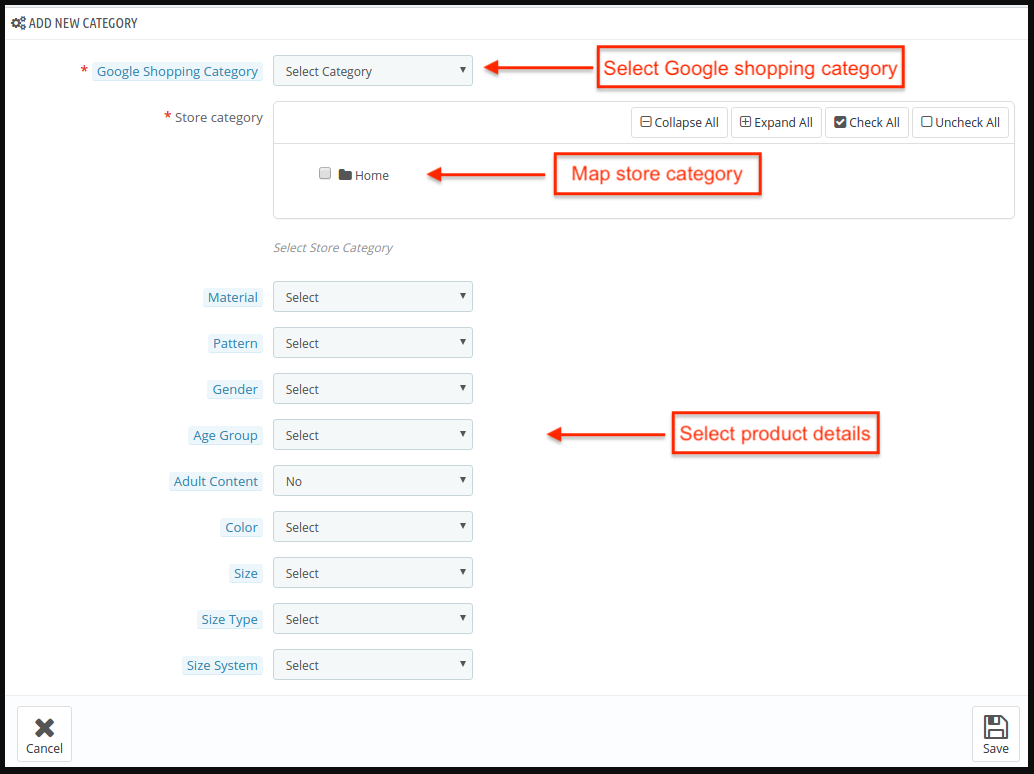
Fill in the information as shown below:
Google Shopping Category: Select the category that you want to map.
Store Category: Select the category of your store that you want to map with the Google Shopping Category.
Material: Select the material of the products in the selected category.
Pattern: Choose the pattern from the drop-down menu.
Gender: Select the Gender for which the category is intended. Furthermore, the options are Male, Female, or Unisex.
Age Group: Select the age group that is expected to use the products of the category.
Adult Content: Specify if the category has any adult content or not.
Color: Use the color attribute to describe your product’s color. Further, this information helps create accurate filters, which users can use to narrow search results.
Size: The size attribute describes the standardized size of your products being mapped along with the category. In fact, your category ad will appear in the results that are filtered by size.
Size Type: The attribute describes the cut of your product of the category.
Size System: With this attribute, you can explain which country’s sizing system the product of the category uses.
The mapped category will be shown as below:

To edit the mapped category, click the ‘Edit’ button.
To delete the mapped category, click the ‘Delete’ button.
3.4. Product Listing
The listed products can be viewed in this section. Further, the Google Shopping Prestashop Connector is shown in the image below.
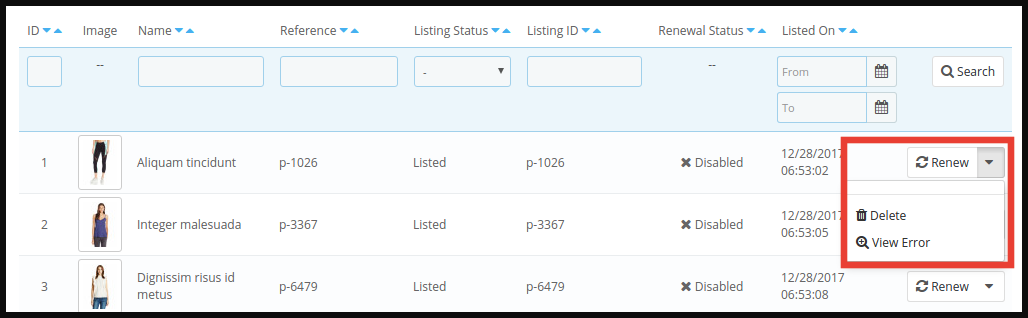
The admin can remove the product by clicking on ‘Delete’.
The admin can view the Error that occurred while uploading the product.
The Renew button can relist the products whose listing has expired.
3.5. Feed Management
In this tab of the Google Shopping Prestashop Integrator, the admin will get the feature to configure a schedule on which the module can upload products on Google without any manual interference.
Click on the ‘Add New Feed’ or ‘+’ sign to create a new profile.

The configurations options in this tab of the Prestashop Google Shopping Integration addon are shown below:

Select Profile: The list will show the created profiles. Furthermore, select the one whose product you want to sync with Google shopping.
Feed Label: Enter the name of the Feed.
Feed Upload Schedule: Select the frequency when you want to upload the feed.
Set Hour: Select the number of hours in which you want to schedule the feed.
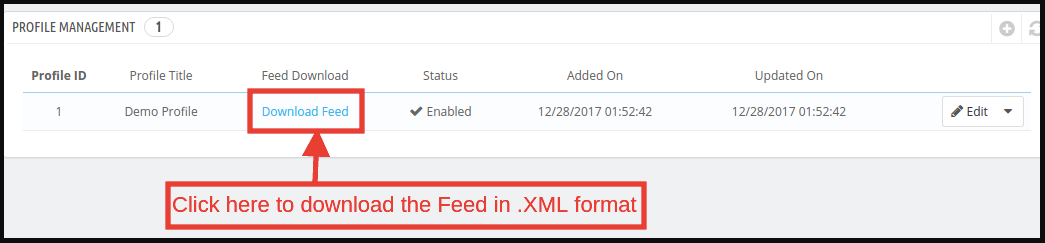
To download the created Feeds, go to Profile Management and click on ‘Download Feed’ as shown in the image below.
3.6. Synchronization
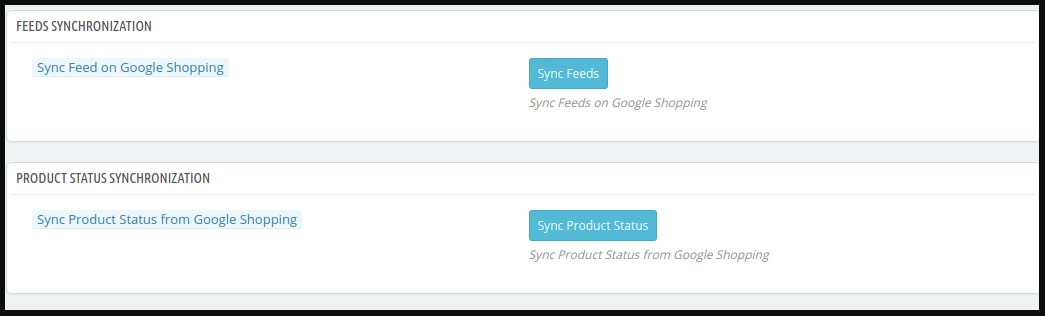
The Synchronization tab of the Prestashop Google Shopping Integration extension offers easy integration with the help of cron jobs. Additionally, the Prestashop Google Shopping Feed synchronization allows the admin to sync the feeds to Google Merchant. Moreover, syncs the product status back to the store.
Sync Feed on Google Shopping: ‘Sync Feed’ cron will synchronize the feed on Google Shopping.
Sync Products Status from Google Shopping: This button can sync the product status from Google shopping to the web store.
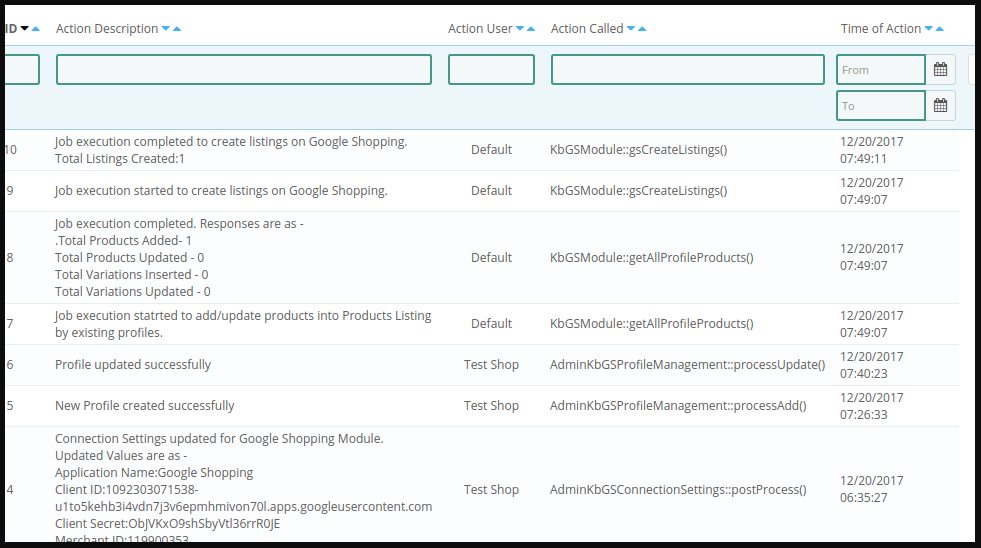
3.7. Audit Log
The admin can view all the jobs running and the errors that occurred in the same. Furthermore, the status of the jobs is visible in this tab of the Prestashop Google Shopping Integration plugin.
4.0. Appendix
How to Create Google Shopping Account?
Before uploading your products on Google shopping, you must have your Google merchant account. In fact, if you don’t have then please follow the below URL:
Follow the instructions given on the above URL and create your account.
After creating your account, you will be redirected to your merchant center homepage as shown in below screen: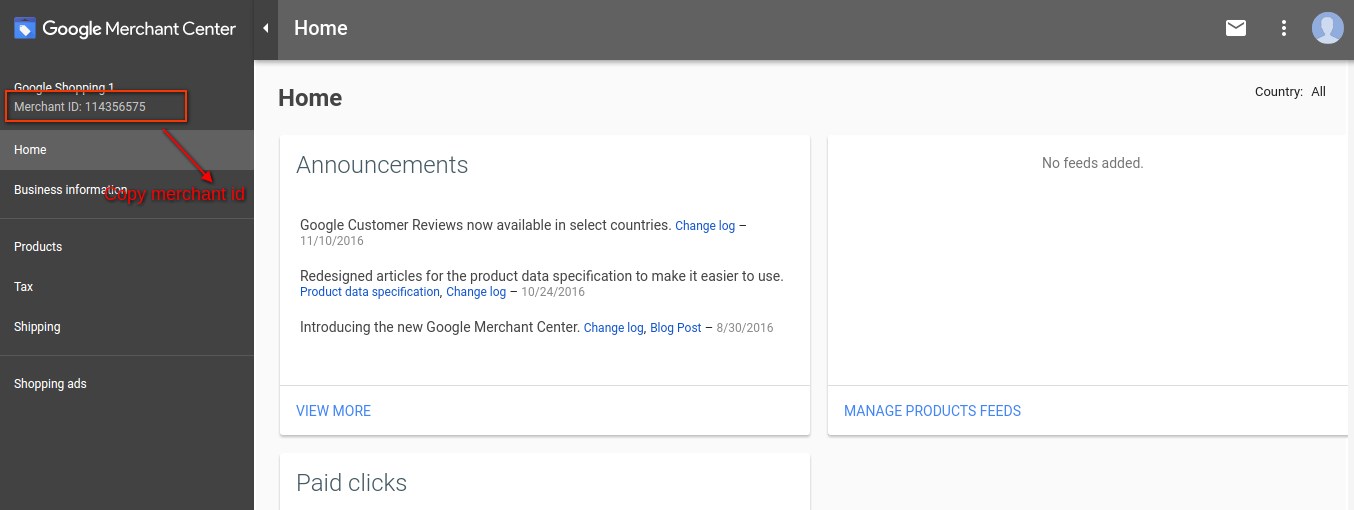
Copy your merchant id highlighted in the above screen and save it in module configurations.
After this, click on the Connect button so that your module gets integrated with your PrestaShop store, In addition, you will be able to fetch the report details.
Verify your Website for Google Merchant Account
This verification process is a compulsory process to upload your products to Google Shopping. In fact, if you do not verify your site then the module will not be able to upload products and may result in an error.
To verify your website, please follow the below instructions:
Step 1: Go to the “Business Information” tab in your Google Merchant Account.
Step 2: Under the “About Your Business” tab, provide the URL of your store. For instance, https://www.example.com. Save URL.
Step 3: After saving a website URL, Under the “Website” tab, click on the “Claim Your Website” link. In fact, this will show you the link to an HTML file. Hence, download this file. In addition, upload it to your root directory of the store.
Step 4: After uploading the HTML file, execute the URL given by Google in step 3.
Step 5: Click on the “Verify & Claim” link.
After this, you can fetch your products report under the product tab of your Merchant store.
How to get Client ID and Secret
To get a Google client id and secret you need to create a project in a Google developer account. In fact, please go to the below URL to sign in to the Google developer account.
https://console.developers.Google.com
On the above URL, create a project by clicking the link shown in below screen:
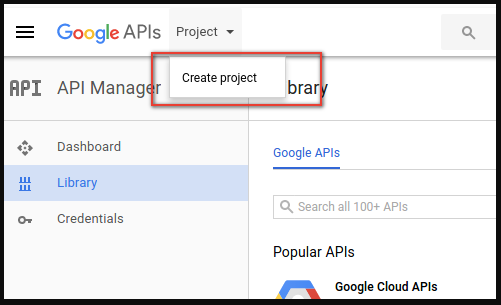
1: Name your Project Name. Moreover, click on the “Create” link. In fact, after creating a project, Google will redirect to the same page and your new project will be selected.
2: Go to the library tab, search for “Content API for Shopping ”. Further, enable this API for this project.
3: Click on the “Credentials” tab. This tab will show 3 tabs.
4: Set your application name in “OAuth Consent Screen” and save it.
5: Click on the “Credentials” tab and click on the “Create Credentials” button.
6: After clicking the “Create Credentials” button, Google will be shown credentials type options. Therefore, choose “OAuth client ID”.
Step 7: Set application type as “Web Application”.
Step 8: Set the “Authorized Redirect URIs” field. Additionally, your redirect URI is given on the module configuration page. Further, please copy from there and paste it into this field.
Step 9: Click on the “Create” button. Further, after saving credentials, Google will generate the client id and secret for you. In fact, copy and paste them into the corresponding field in module configuration.
Note: For more detailed instructions, follow URL https://developers.Google.com/identity/sign-in/web/devconsole-project
Note: If you are getting an error while getting your refresh token. Further, please also try after “Allowing Less Secure App” in your Google account.
In fact, for more values, please follow the below URL and read the documentation:
https://support.google.com/merchants/answer/7052112?hl=en
Prestashop Google Shopping Integration Module Link: https://www.knowband.com/prestashop-google-shopping
Prestashop Google Shopping Integrator Admin Demo Link: https://psm.knowband.com/googleshopping/16/admin1/index.php?controller=AdminLogin&token=ffa17b0c72ff8c0ab7cf3e344c5ae4fc&redirect=AdminModules
You can even get Google Shopping Prestashop Integrator on the Addon Store: https://addons.prestashop.com/en/price-comparison/25953-knowband-google-shopping-google-merchant-centre.html?pab=1&
