Things to consider before starting a Magento Marketplace

A Marketplace site is all that every eCommerce business owner is wishing to have by his side. Marketplace model of eCommerce has a name for providing loads of opportunities and choices to everyone who is involved in it. From Website Owner, Marketplace Seller to Marketplace customers, everyone gets something enlarged as compared to an inventory model of eCommerce.

Having a marketplace website is not a big task, having a successful marketplace is. You cannot just develop a marketplace site without considering some situations that need to be fulfilled. Here, I am enlisting some questions and factors that you should consider before starting a Magento Marketplace. In fact, you must consider this situation in almost all the eCommerce platforms.

Magento was originally developed as an inventory based eCommerce site

A marketplace site comes out as providing a burden-free experience in most of the cases for a marketplace owner. He/she does not need to worry about maintaining an inventory of products, shipping the products to the customers, etc. Everything seems to be so perfect. However, shifting from an inventory model to a Magento marketplace would not be an easy task.

Magento eCommerce platform has been originally designed to serve as an inventory based eCommerce site. So, it is required to extend its original functionalities by developing a Magento Marketplace extension that delivers the functionalities required by a marketplace site. So, when you are thinking of getting a Magento Marketplace extension, you should essentially look into these factors. You should look if your Magento Marketplace extension is able to handle the below core functionalities of a marketplace:
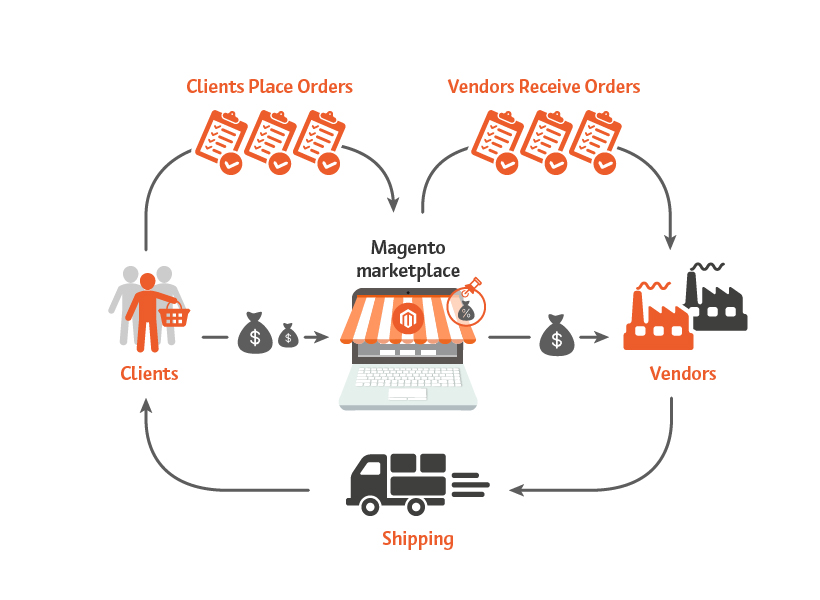
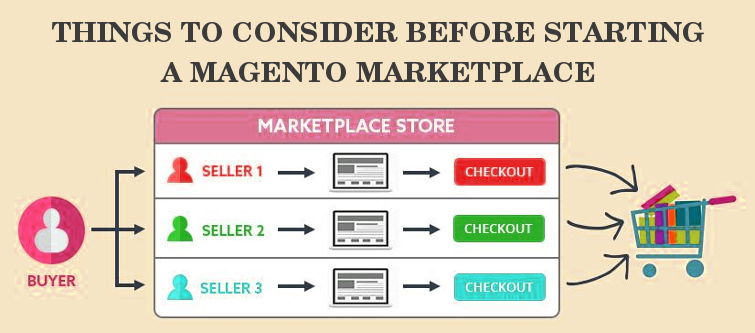
A basic Magento marketplace organization will look like this.

Magento Marketplace – Seller registration

Sellers are the most important part of any marketplace site. Without sellers, it is just a regular eCommerce site. So, in your Magento marketplace extension, you should essentially look if it can manage the seller registrations. Look for the following features for managing seller registrations:

  • Sellers should be able to register a separate seller account.
  • There should be an option for Marketplace admin to approve/disapprove a seller account request.
  • Only approved sellers should be allowed to sell on the marketplace.
  • Sellers should be able to upload products only in allowed categories
  • Approved sellers should be able to access a seller panel from where they can:
    • Update their shop profile and seller details
    • Input their shop policies
    • Upload the products is allowed categories
    • If they wish to sell products from new categories, they should be able to request a new category access from the admin
    • Receive orders from customers
    • Manage orders and update the order statuses
    • Track the report of sales made
    • Track the amount of commission paid to admin
    • Communicate with the marketplace admin

Marketplace Admin–Seller management

The marketplace admin is the owner of the website or is a representative of the owner. Admin should have all the ethical accesses that will make sure that everything is going smoothly on his website. A Magento marketplace admin should have the following accesses to manage his website properly:

  • Admin should be able to approve/disapprove a seller account request.
  • Admin should be able to view the details of the sellers.
  • Admin should be able to activate/deactivate a seller anytime he wishes to.
  • Admin should be able to add a shipping option for the sellers to use.
  • Admin should be able to approve/disapprove a new category request.
  • Admin should be able to approve/disapprove a product uploaded by a seller.
  • Admin should be able to track the sales made by a seller.
  • Admin should be able to track the commissions earned on different sales made.

A Magento Marketplace from the customers point of view

Customers are the inseparable part of any business activity. Without having a proper scope for customer management, no eCommerce site can even survive for a day. Even a marketplace site needs a proper system to manage the customers. Lucking Magento being a very efficient platform provides inbuilt functionalities to manage the customers. So, you don’t have to worry much about customer management in your Magento Marketplace. However, you should tally that if:

  • Customers can browse all the approved products from all the sellers.
  • Customers can see the basic Seller information like Seller or shop name.
  • Customer can place orders for the products from any seller on the site
  • Sellers can receive the order placed for their product.
  • Sellers can check if payment for the order had been made.
  • Sellers can update an order’s status.

Finally,

These are the basic Marketplace functionalities that you should look in a marketplace extension. Even in your search for a Magento Marketplace extension, these features are equally important to look for.

You can check out this Magento Multi-Vendor Marketplace extension to know how a proper Magento Marketplace extension works for you.

Liked This? You’ll Like These Too

Magento Product Update Extension by Knowband – User Manual

Introduction of Magento Product Update Extension

The Magento product update notification extension by Knwoband adds an attractive functionality to your Magento website, which is beneficial for both the store owner and the customers. This Magento extension helps the customers to subscribe for product updates i.e. if product price or stock availability changes customer will be notified by an email. Magento back in stock module adds a simple block to the product page of Magento store through which the user can subscribe by entering the email id for the respective product.

The subscribed customers for product will be visible to store owner and helps in updating the product according to requirement so that customer can buy those products.

The Magento stock alert provides simple input field to enter email Id and a notify button that will be displayed on the product page itself. Customers can easily get subscribed to the product by entering email id and start getting email corresponding to that.

Installation

After purchasing this Magento extension, you will get following files as shown below:

  1. magentoproductupdatenotification.zip(contains source code of the extension)
  2. User Manual

Follow the following steps to install the Magento extension by Knowband:

  1. Unzip the magentoproductupdatenotification.zip file.
  2. Copy all the files and folders of unzipped folder into your store root directory.
  3. After copying all the files and folders, clear the cache.
  4. Open any page of your store. Magento will install the Magento module at the time of loading any page.
  5. After installing, please login into your admin panel and go to the below menu:

System > Configuration > Advanced

Here you will see that “Vss_Productupdate” module is listed.

Extension Interfaces

There are two interfaces in this Magento price alert notification extension. Each interface have different functionality according to its use. These interfaces are:

  1. Admin Panel Interface(Only be accessible by admin/store owner)
  2. Front End Interface(accessible to front end user)

Each interface of this Magento product update extension has been described in separate section.

Admin Panel Interface

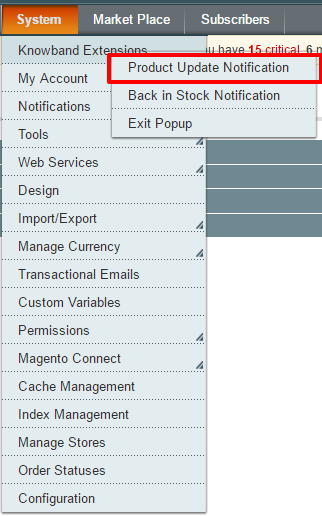
This part of the plug in will be for admin user, through which the admin can configure the settings. After installing Magento extension, Product Update Notification menu will be visible under System > Knowband Extensions menu in the menu bar as shown in below screen:

On clicking above mentioned menu, admin panel interface of the Magento stock alert extension will open.

There are four tabs in the admin panel of this Magento price alert through which the admin will be able to manage the functionality of the Magento plugin. These are listed below:

  1. General Settings
  2. Request for Notification Email Settings
  3. Notification Email Settings
  4. Analysis

General Settings

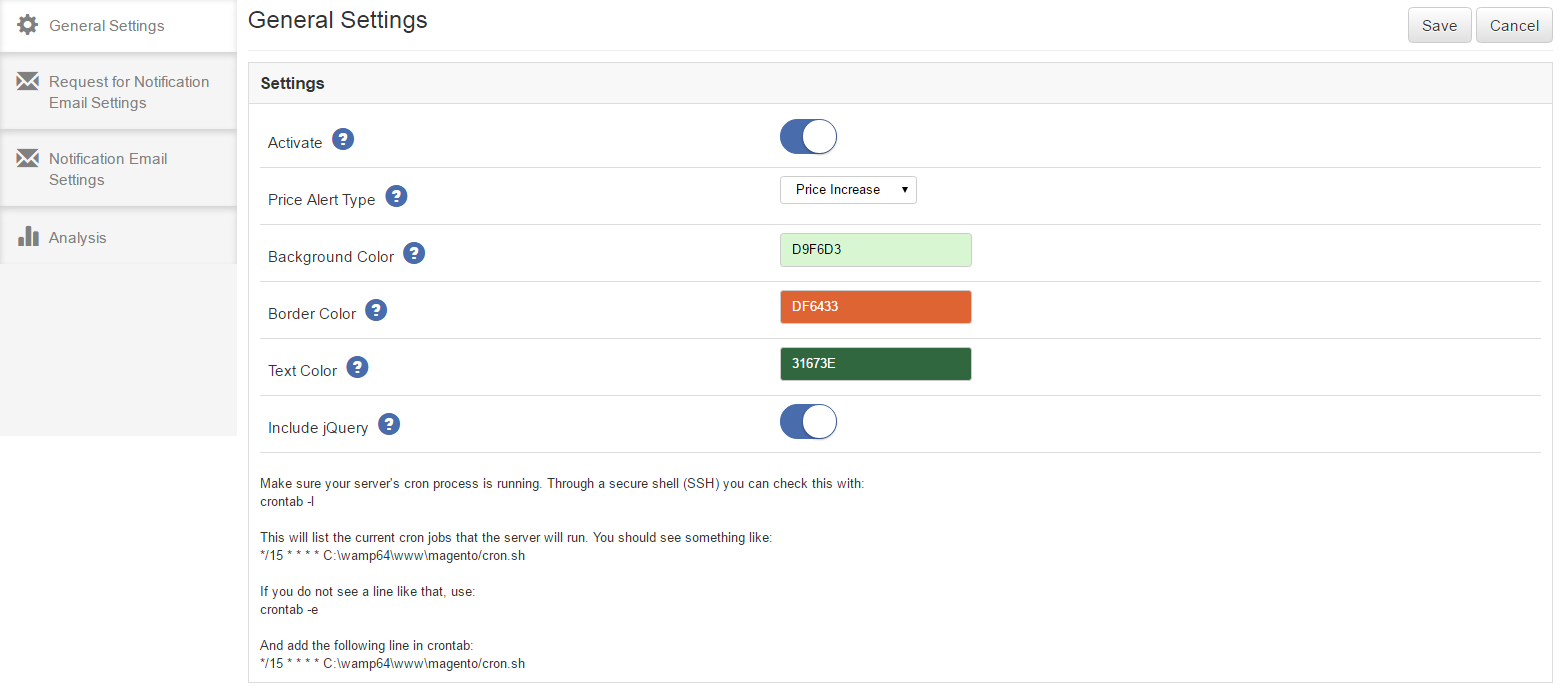
This tab will be opened by default when you click on the menu. General Settings tab will have following options:

  • Activate – This will be an on/off switch. Admin will have the option to Enable/ Disable the Magento back in stock extension. If enabled Magento stock alert will be enabled on front end product page otherwise not.
  • Price Alert Type – This will be a drop down list having options “Price Decrease”, “Price Increase” and “both”. It means if “Price Decrease” is set then mail will be triggered to customer only when price of subscribed product decreases. If “Price Increase” is set then mail will be triggered when price of subscribed product increases. And if “both” is set then mail will be triggered in both cases. Default value of this Magento price alert notification extension will be set to “Price Decrease”.
  • Background Color – This will be a color picker palette. It will set the background color of Magento product update extension block on the product page.
  • Border Color – It will also be a color picker palette. It will set the border color of Product update extension block on the product page.
  • Text Color – This will also be a color picker palette. It will set the text color in the Magento stock alert extension block on the product page.
  • Include j-Query – This field of Magento price alert will also be an on/off switch. By default it will set to off but if you are using Magento version lower than 1.9 then turn it on. It will include required j-Query files.

*Note 1: Stock notification mail will be sent to the customers at every time when product goes in stock from out of stock.

*Note 2: You have to make sure that Magento CRON process is running on your server to get notified your customers when any subscribed product comes in stock. Through a secure shell(SSH), you can check this with:

crontab -l

This will list the current CRON jobs that the server will run. You should see something like:

*/15 * * * * /home/user/public_html/magento/cron.sh

If you do not see a line that, use:

crontab -e

And add the following line in crontab:

*/15 * * * * /home/user/public_html/magento/cron.sh

Below is the screen shot of the this tab :

Request for Notification Email Settings

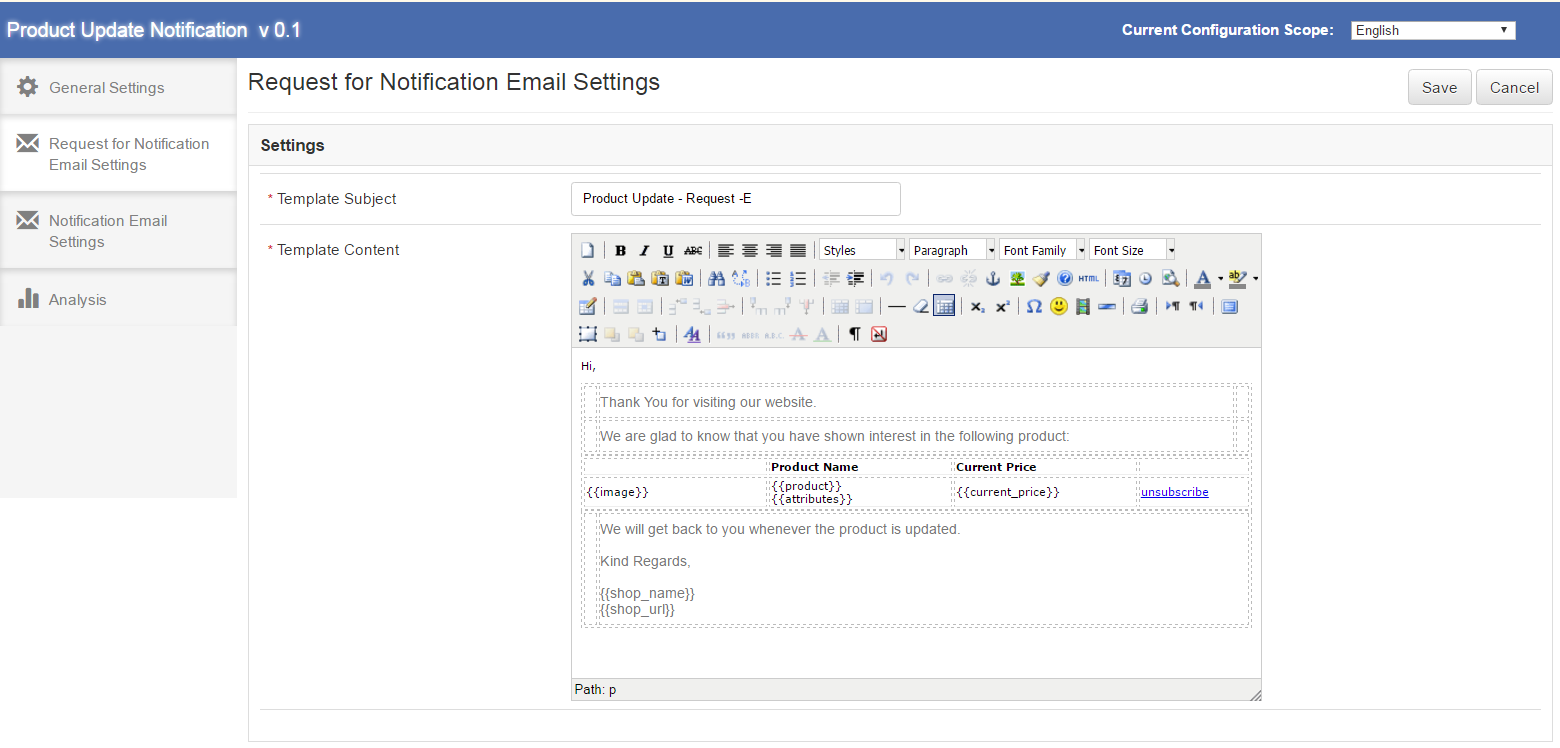
This tab of product update notification Magento will have the Email settings which will be sent when customer subscribes himself for notifications for a particular product. This tab will have the following options:

  • Template Subject – It will be the subject of the mail which will be sent. This field of the Magento product update will be mandatory and default value will be ‘Product Update – Request’.

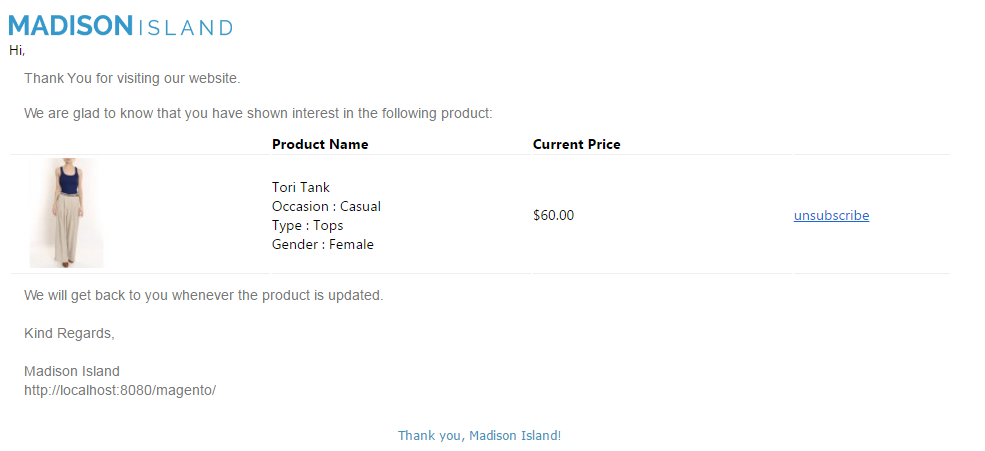
  • Template Content – This will be the content of the mail which will be sent initially to the customer. This field will also be mandatory. The default content of the Magento back in stock plugin will be as shown in the proposed screen below. The content enclosed in {{}}, will be the variables which will be used when sending actual mail. Other than these all content would be static. There will also be “Unsubscribe” link against the product clicking on which customer will be redirected to a page on store showing “You have been unsubscribed successfully”.

Below is the screen shot of the this tab :

Notification Email Settings

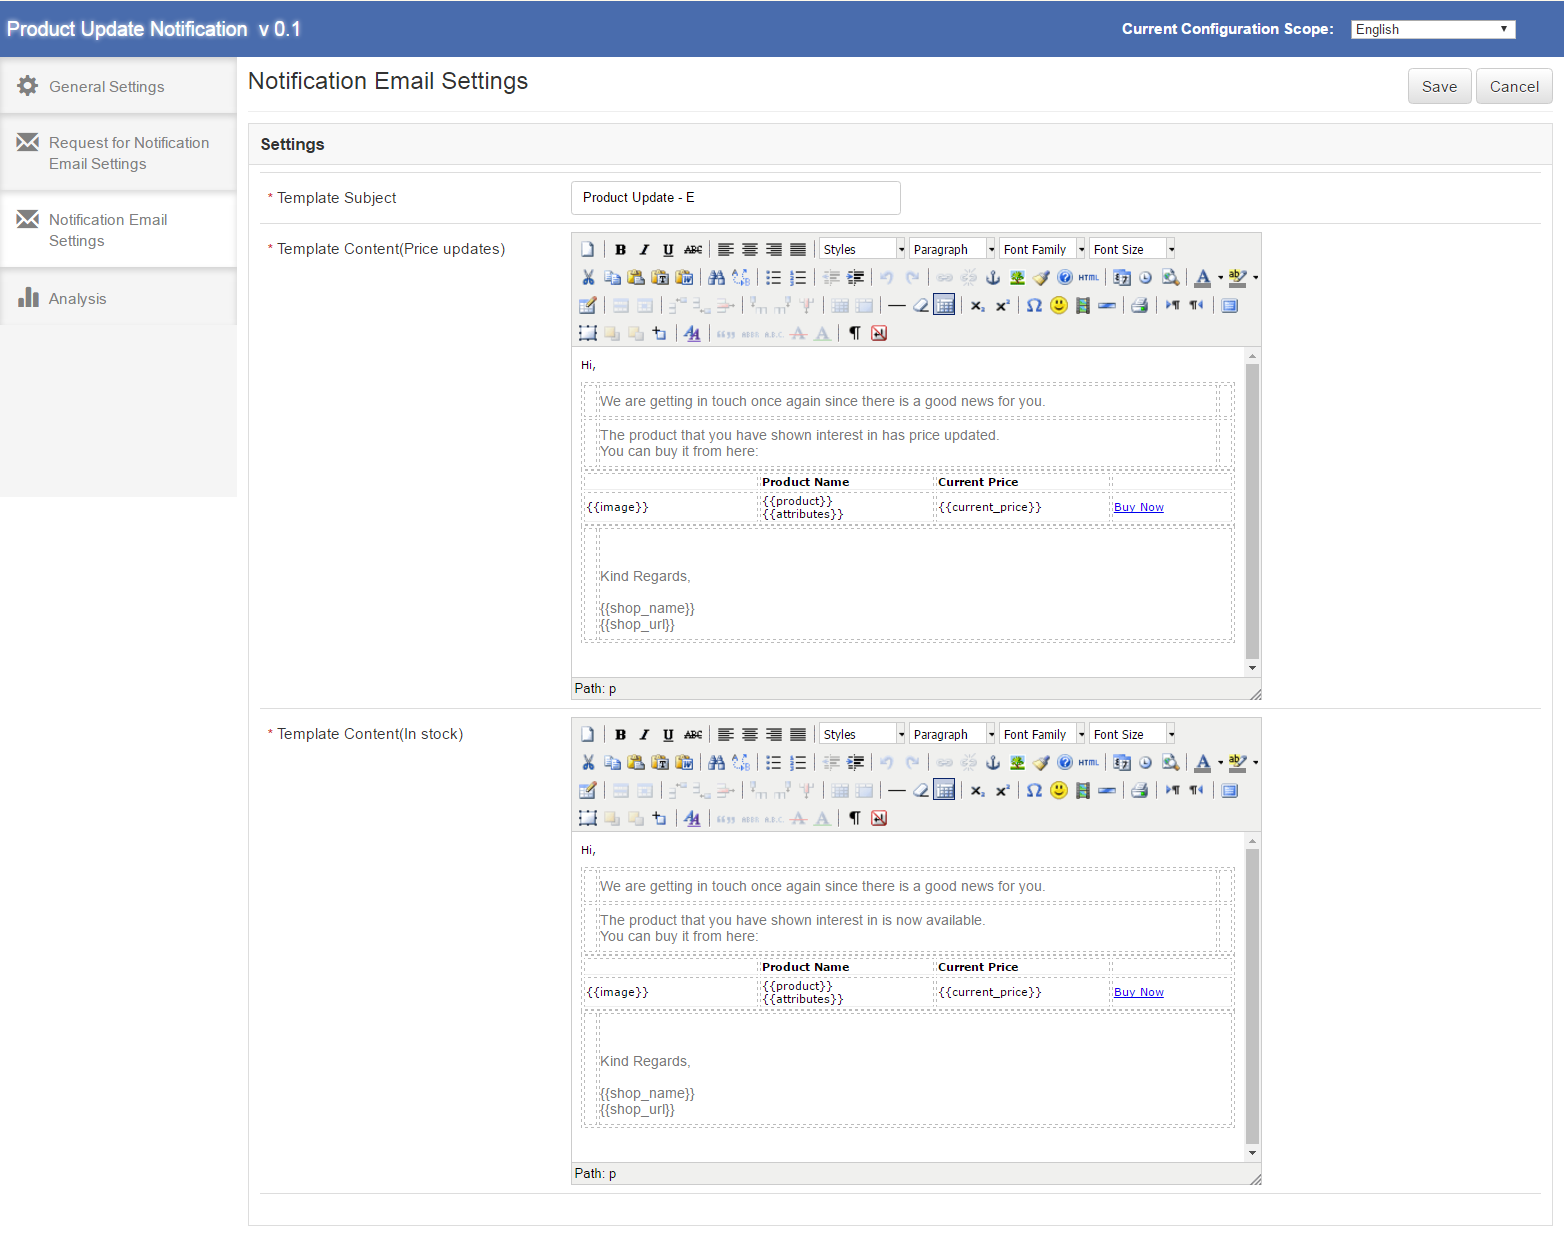
This tab of Magento stock alert extension will have the Email settings which will be sent to the subscribed customers for a particular product and that product gets updated i.e. either price updated or comes in stock from out of stock. This tab of Magento price alert extension will have the following options:

  • Template Subject – It will be the subject of the mail of the Magento product update extension which will be sent to the customer when product gets updated. This field will be mandatory and default value will be ‘Product Update’.
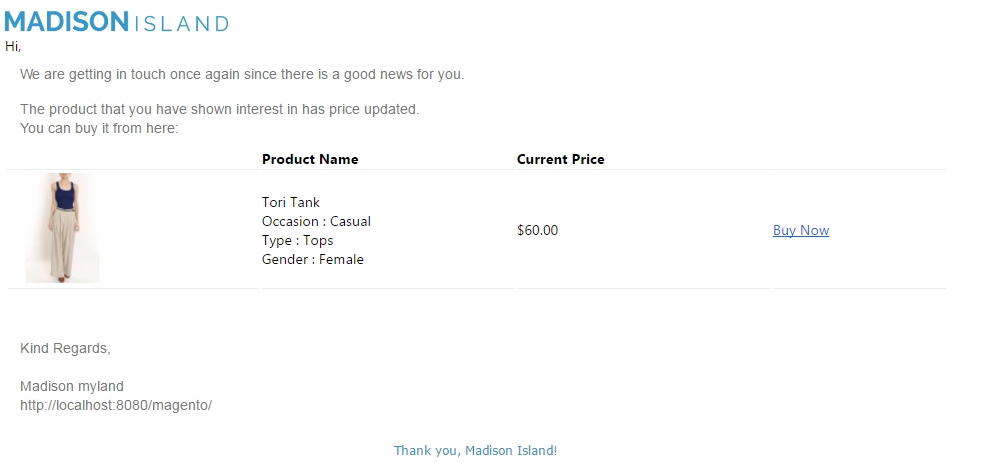
  • Template Content(Price Updates) – This will be the content of the mail of product update notification extension which will be sent finally to the customer when a particular subscribed product gets price update. This field of Magento price alert notification extension will also be mandatory. The default content will be as shown in the proposed screen below. The content enclosed in {{}} will be the variables which will be used when sending actual mail. Other than these all content would be static.
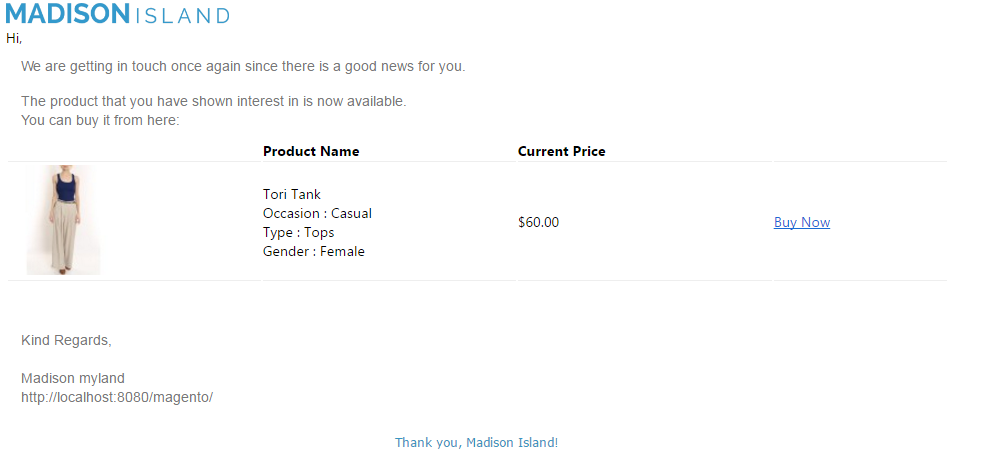
  • Template Content(In Stock) – This will be the content of the mail which will be sent finally to the customer when a particular subscribed product comes in stock. This field will also be mandatory. The default content of the Magento stock alert will be as shown in the proposed screen below. The content enclosed in {{}} will be the variables which will be used when sending actual mail. Other than these all content would be static.

Below is the screen shot of the this tab :

Analysis

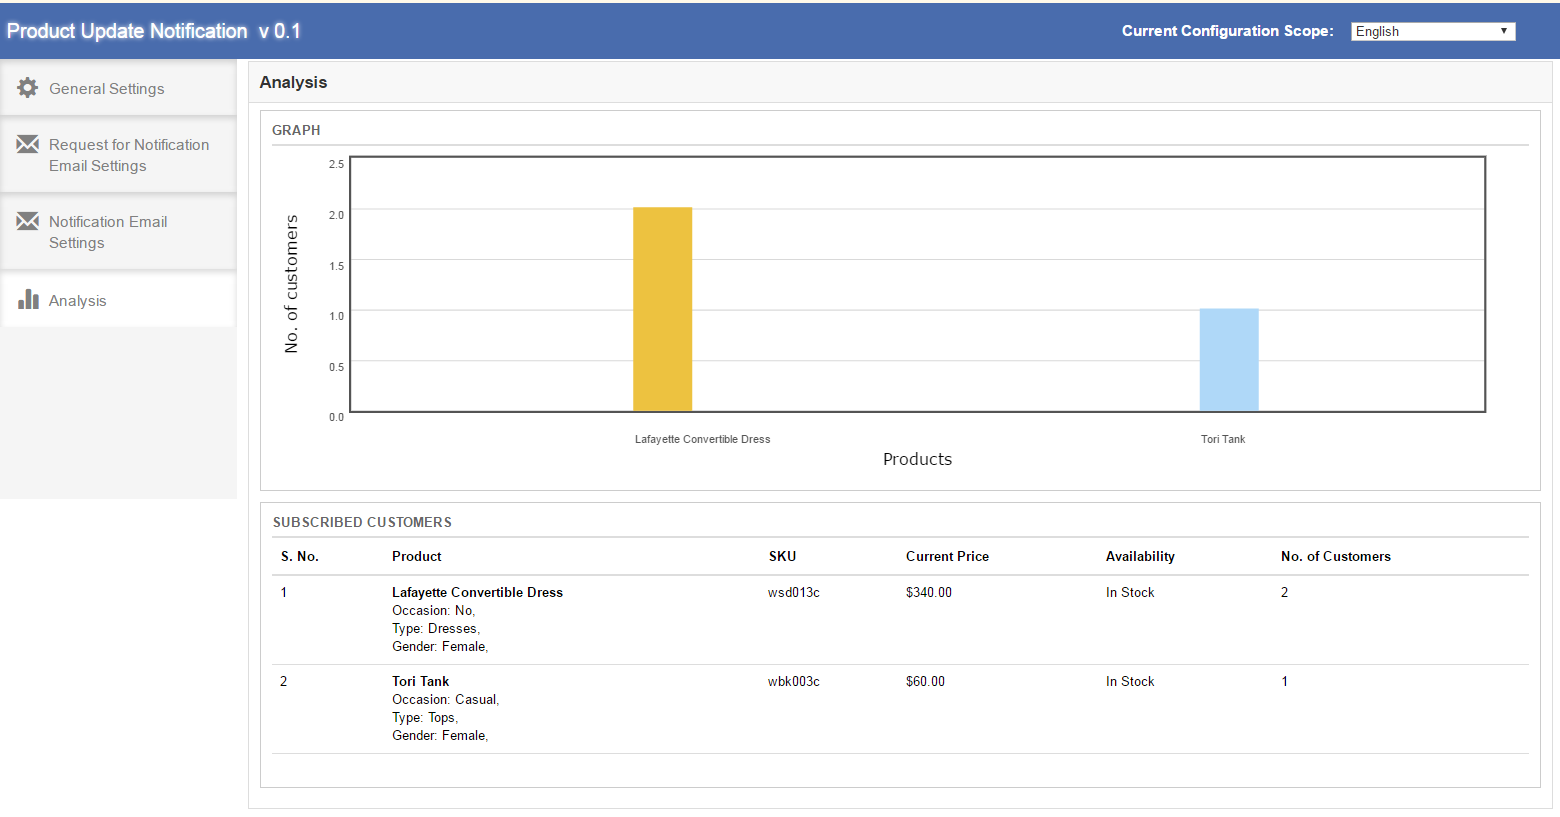
In this tab of product update notification extension, complete analysis of the subscribed customers can be found. This analysis would be in form of graph and in form of detailed list. It will be the analysis of top 10 products. Also, this list would only include the customers who are waiting for the notification email(either price update mail or stock availability mail). This tab of Magento product update extension will have two sections, which are described below:

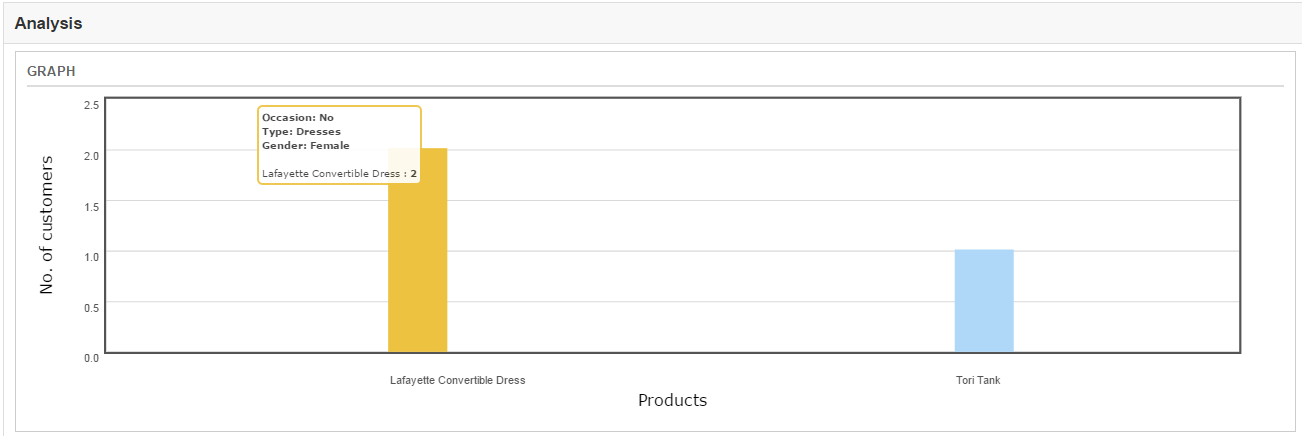
  • GRAPH – The graph of the Magento stock alert will show the analysis of top 10 products. Horizontally products would be shown and vertically number of customers would be shown. On hovering a bar in the graph name of the product, product attributes and number of customers which have subscribed for this product will be shown in a pop up.
  • SUBSCRIBED CUSTOMER – Subscribed customer would be a product wise detailed list. In first column of the list S. No., in second column product name and product attributes, in third column SKU of the product, in fourth column current price and in fifth column availability of the product(In stock or out of stock) and in sixth column number of customers that have subscribed for this product would be shown. This list of Magento price alert notification extension would also show top 10 products.

Below is the screen shot of the this tab :

On hovering a bar in the graph a small pop up will come as below:

Front End Interface

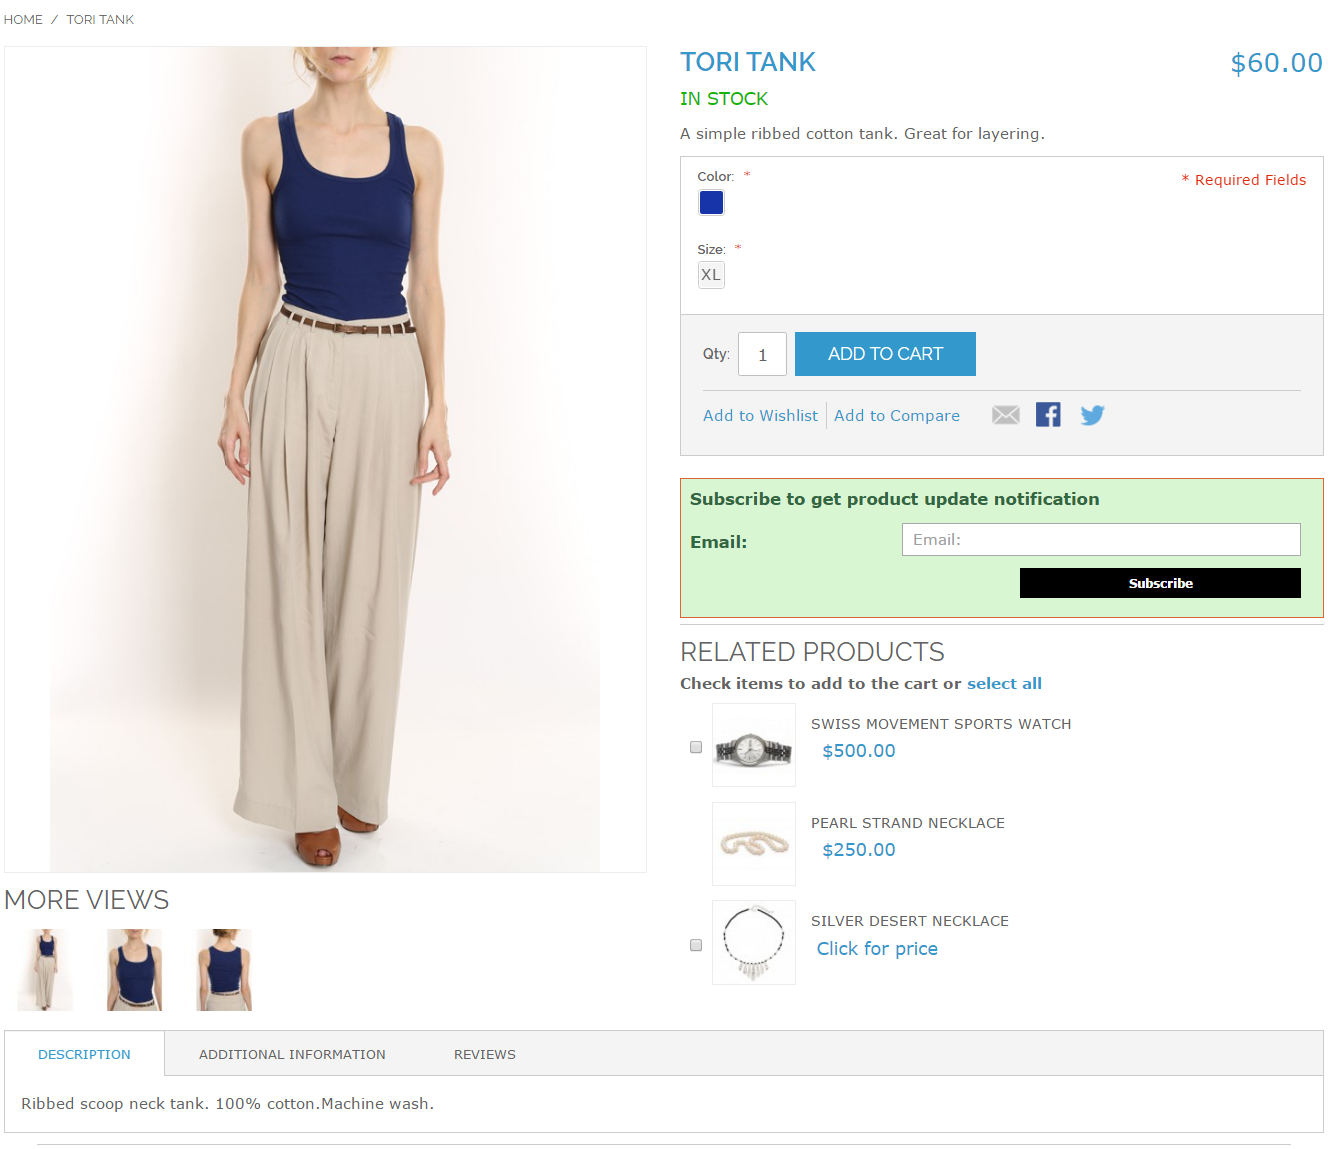
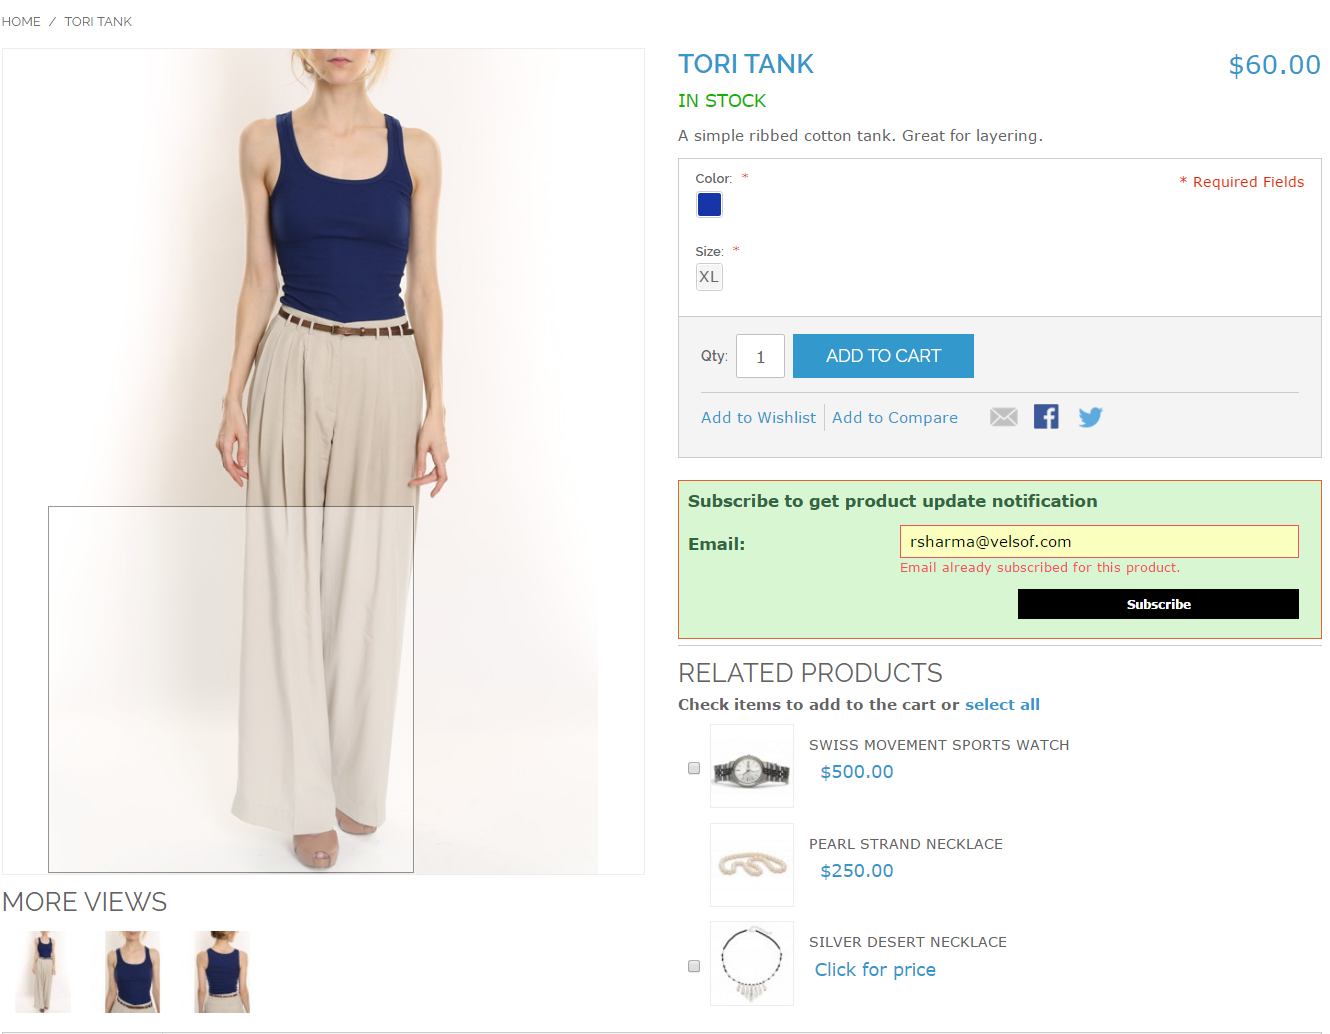
After enabling the Magento product update extension, the front end user will see a subscribe box at the product page. This block will contain an input field as to enter email id and a notify button through which the user will get subscribed for the respective product.

The front end of product update extension would appear as follows:

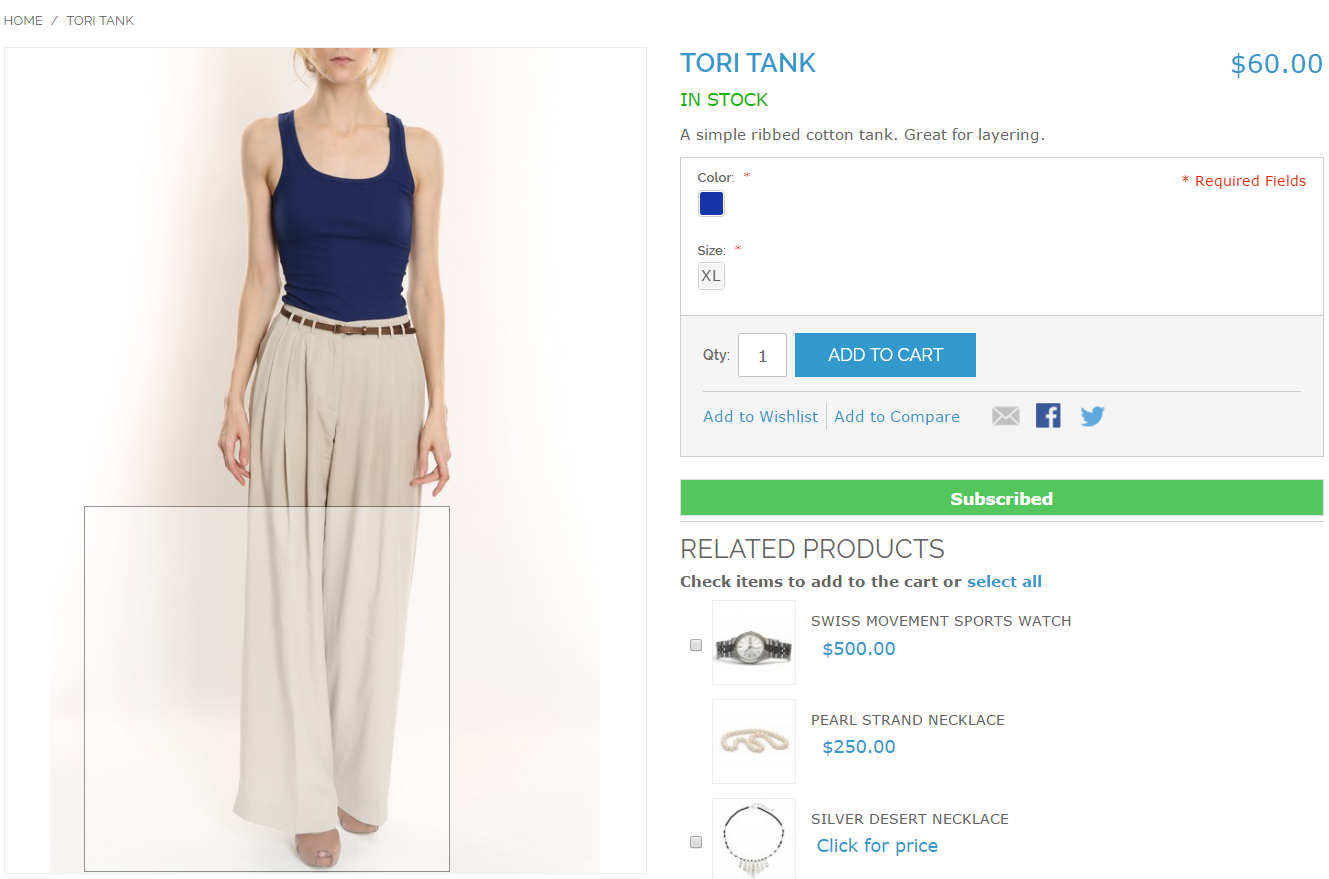
When customer enters the email id and click to the button “Subscribe” the initial mail will be sent to the entered email address and the message showing subscribed as below.

Note*

If a customer who has already subscribed for a particular product for Product Update tries to subscribe again with same email id for the same product then a message will appear showing “You have already subscribed for this product.”.

The screen shot is as following:

The initial email of the Magento stock alert extension by Knowband that will be triggered to the entered email id is as following:

* Whenever the price of the product changes from admin panel and CRON for the module runs, the product update mail that will be triggered will be as following –

* Whenever product goes In stock from Out of stock and CRON for the module runs, the product update mail that will be triggered will be as following –

Module Link: https://www.knowband.com/magento-product-update-notification

Admin Demo: https://marketplace.knowband.com/index.php/productupdate/adminhtml_index/index/key/fd6d3b2be24a5975616043cdc671eca5/

Front Demo: https://marketplace.knowband.com/

Magento Exit Popup Extension – User Manual

1.0 Introduction

Magento Exit Popup module is an extension by Knowband which when enabled shows a popup in the front-end of the website whenever the customer tries to leave the webpage. The features and functionalities of responsive pop-up can be changed from the admin panel of Magento exit pop-up extension. The admin can also set the terms and conditions offered by the Magento exit intent pop-up module as well as cookie life for the popup.

1.1 Merchant Benefits of Magento exit popup plugin:

  • The Magento exit intent pop-up module can be installed and used with least effort and difficulty.
  • The Magento exit intent pop-up extension monitors the mouse movement of the users and displays a subscription pop-up when they are about to exit the site.
  • The look and feel of the front-end UI can be changed from the back-end of the Magento subscription pop-up module.
  • The Magento exit intent subscription pop-up allows the admin to set the discounts being offered to the customers.
  • The store admin can view the complete stats of the Magento exit intent pop-up.
  • The customers get alluring discounts just when they intend to leave the site. Thus, the Magento exit pop-up extension can change their intention and motivate them to complete the transaction.
  • The Magento newsletter subscription pop-up module can even increase the subscribers of the site.
  • The Magento exit intent pop-up is one of the ways to reduce the cart abandonment and exit rate of the site.
  • The easy customization options of the Magento exit pop-up makes it easier for the pop-ups to blend with the theme of the site.
  • Set visibilty of exit intent popup among selected customer groups and geolocations.
  • New attractive themes for exit-intent email subscription popup benefits e-merchants in getting increased user engagement for their store.
  • Email Marketing services like Mailchimp, Klaviyo and Constant Contact boost the subscription rate of the store.

2.0 Installation

Follow the following steps for installing Magento Exit Popup Module:

  • Download the Magento exit intent pop-up extension package.
  • Unzip the package on your root folder of Magento setup via FTP manager (like Filezilla or WinSCP – download here).
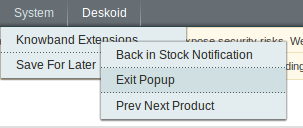
  • In Admin Panel go to “System > Knowband Extensions > Exit Popup”.

That is all – Your system is ready.

User Manual

This User Manual Guide users through the Admin Module/Store Front settings and features of the Magento Exit Popup Module.

3.0 Admin Module

The Admin Module contains the 4 tabs for settings and view.

3.1 General Settings 

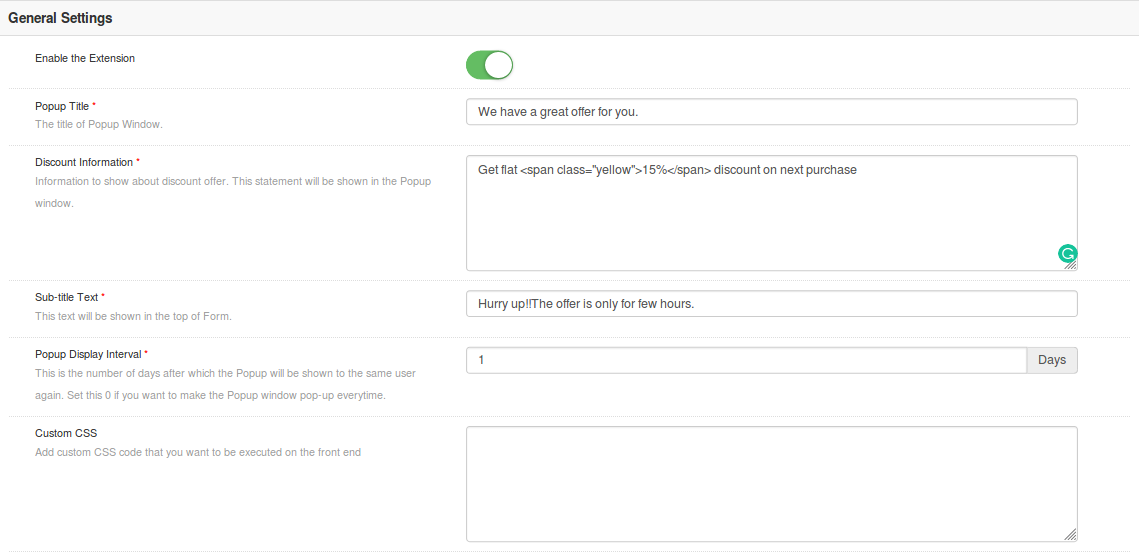
The General Settings of Magento responsive pop-up module has following options:


  • Enable extension: Enables or Disables the Magento exit pop-up plugin by toggling this button.
  • Popup Title: Set the title text that will be displayed on the subscription popup shown in front-end of the site.
  • Discount Information: Set text on the popup to show the details about the discount.
  • Sub-title Text: Admin can set the sub title text for the exit popup window.
  • Popup Display Interval: Set the time interval(in days) after which the exit popup will be shown to the same user. Set this 0 if you want to make the Popup window pop-up every time.
  • Custom CSS: Add custom CSS code that will reflect on front-end.
  • CMS page for Conditions of use: Admin can select the CMS page to which the user/visitor is redirected as they click on Terms and Conditions provided on exit popup.
  • Include jQuery: This option lets admin include jQuery for the front-end.

3.2 Display Settings

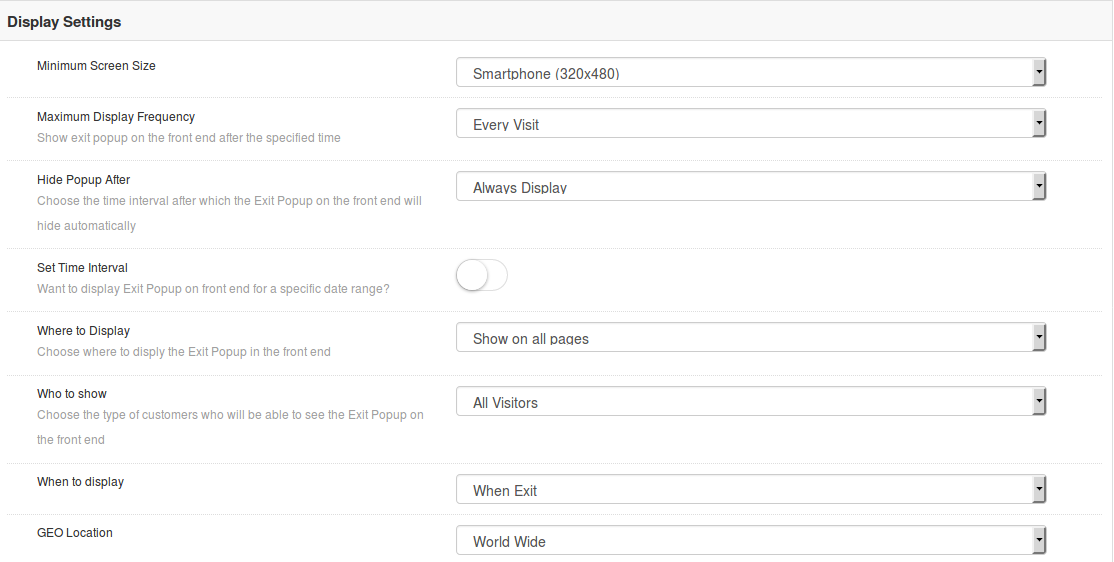
The display settings of Magento Exit Intent pop-up module offers the following configuration options:

  • Minimum Screen Size: This options sets the minimum screen size over which the exit popup will be shown like mobile and tablet devices.
  • Maximum Display Frequency: This option shows exit popup on the front end after the specified time.
  • Hide Popup After: You can choose the time interval after which the Exit Popup on the front end will hide automatically. You can set the time in seconds or select Always Display option.
  • Set Time Interval: This option lets you set the visibility of Exit Popup on front end for a specific date range. You can choose start and end date for the display of popup.
  • Where to Display: This option lets you choose where to display the Exit Popup in the front end.
  • Who to Show: Select the customer group who will be able to see the Exit Popup on the front end
  • When to Display: This option sets the exact instant of time when the popup displays: immediately, on exit, or after the user scroll downs the screen.
  • Geo-location: Admin can set the geolocation for the visibility of exit popup. It can be set to all locations or to selected areas.

3.3 Look and Feel Settings

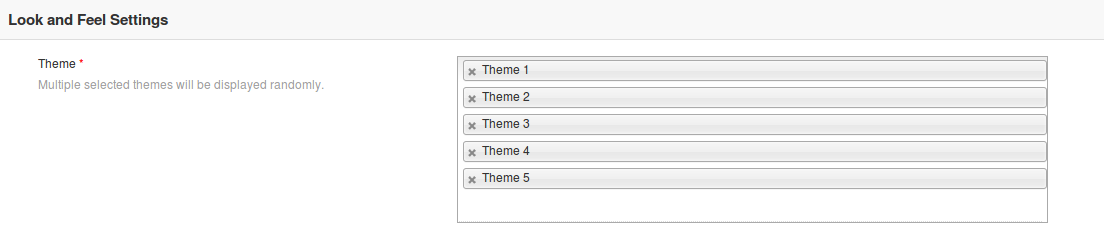
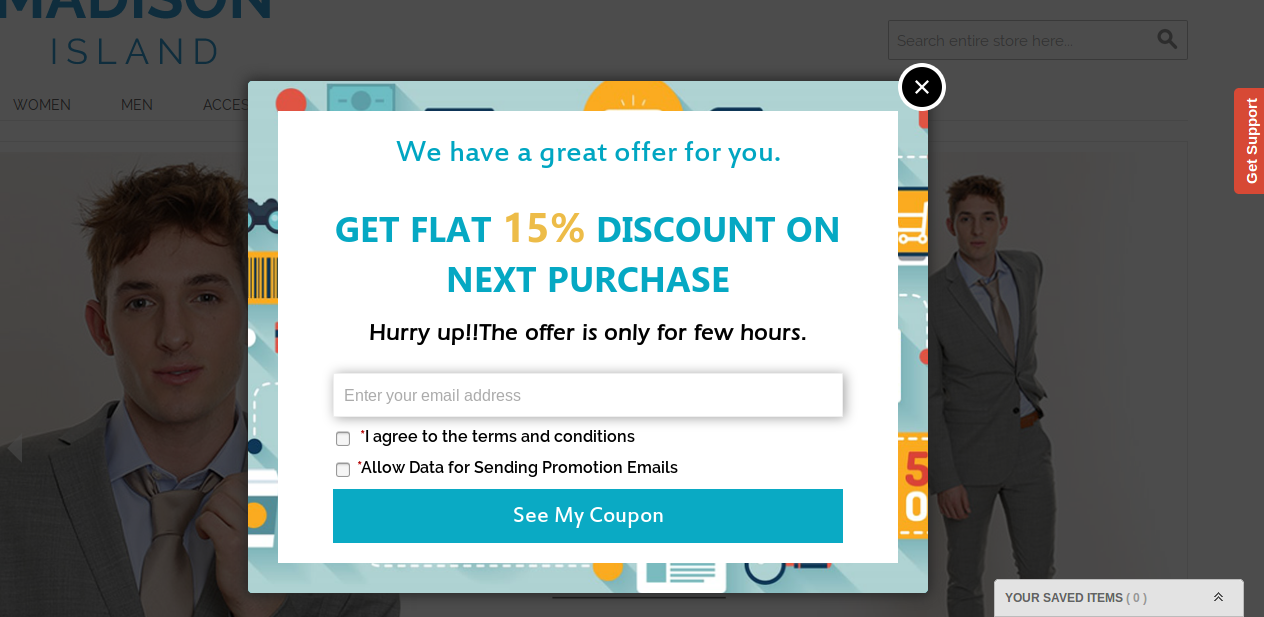
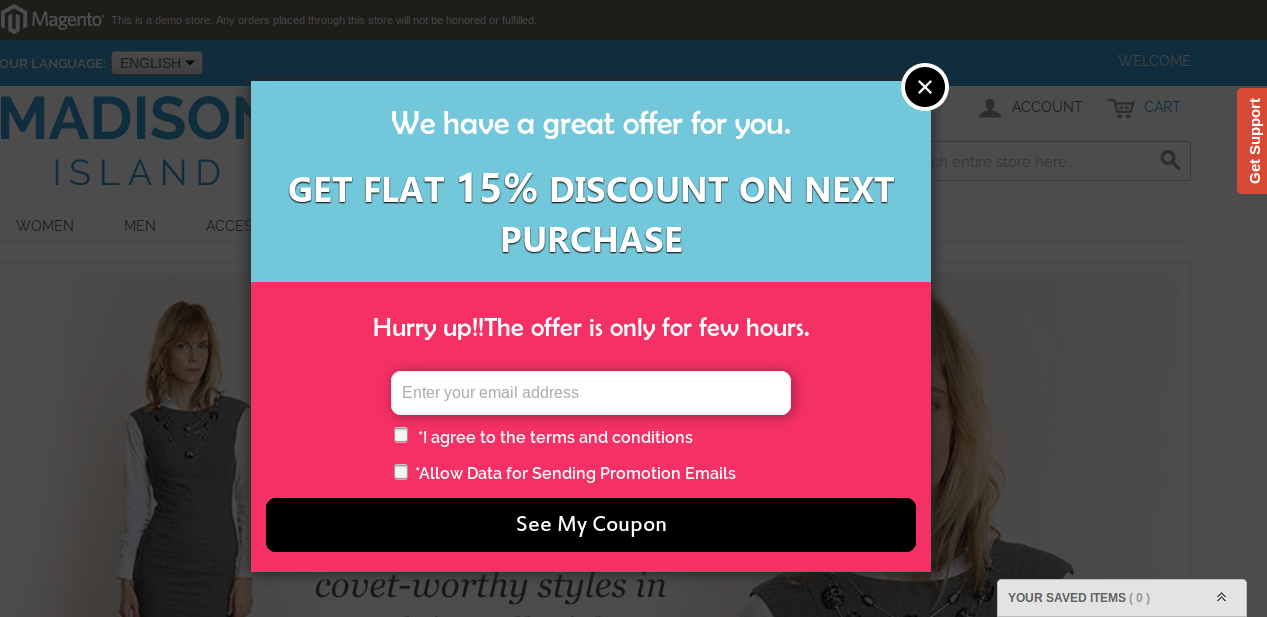
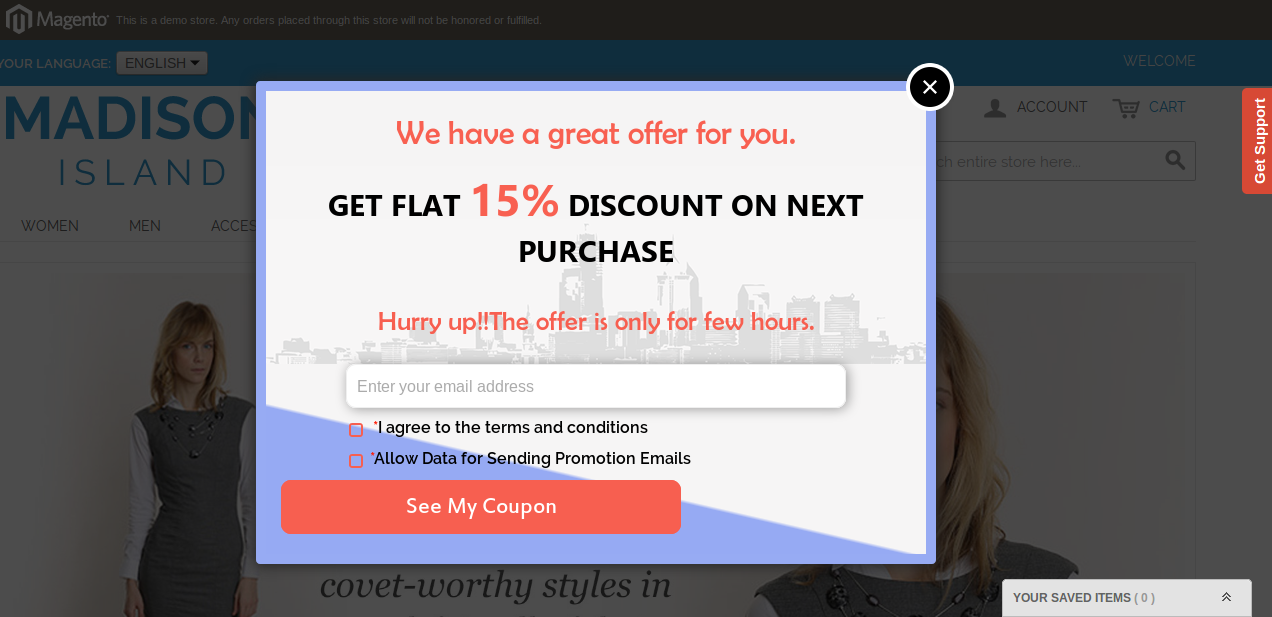
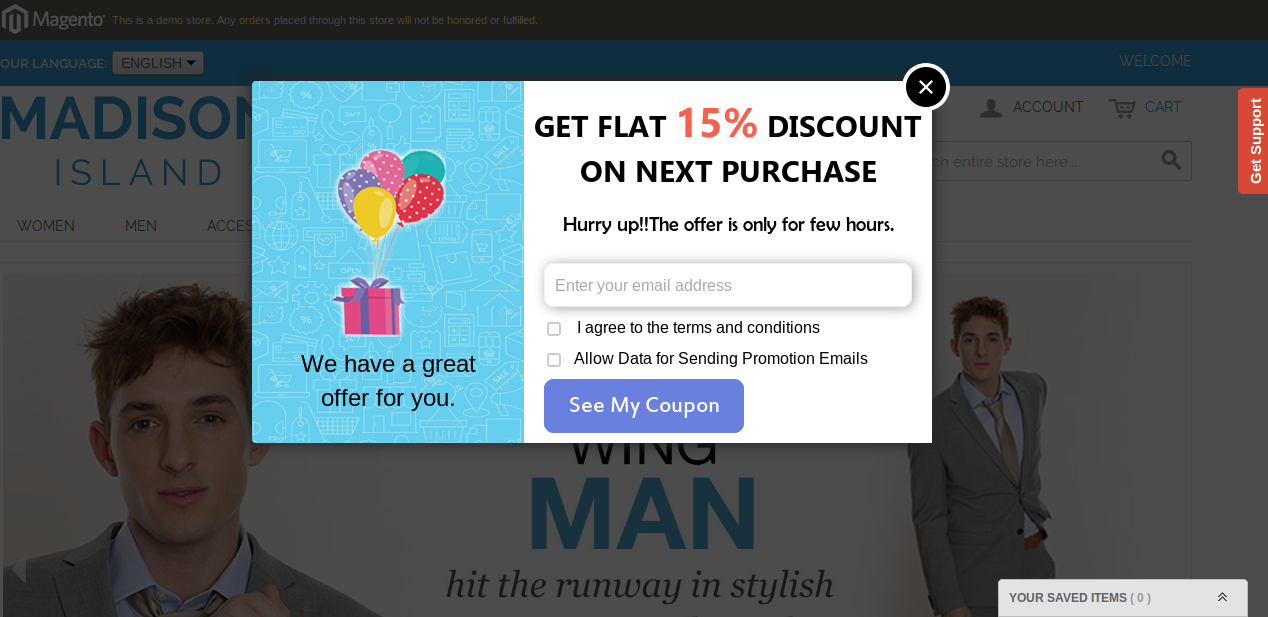
The Look & Feel tab of Magento exit pop-up module allows the admin to change the appearance of popup window. It has following theme options.

Admin need not to modify or style the title text and background color separately. Everything comes readymade with Magento Exit Pop-up Plugin. The plugin offers you different theme options out of which you can set a particular theme or you can choose multiple themes at a time. If you select multiple themes then the themes are displayed in the random order.

Theme 1

Theme 2

Theme 3

Theme 4

Theme 5

3.4. Discount Settings

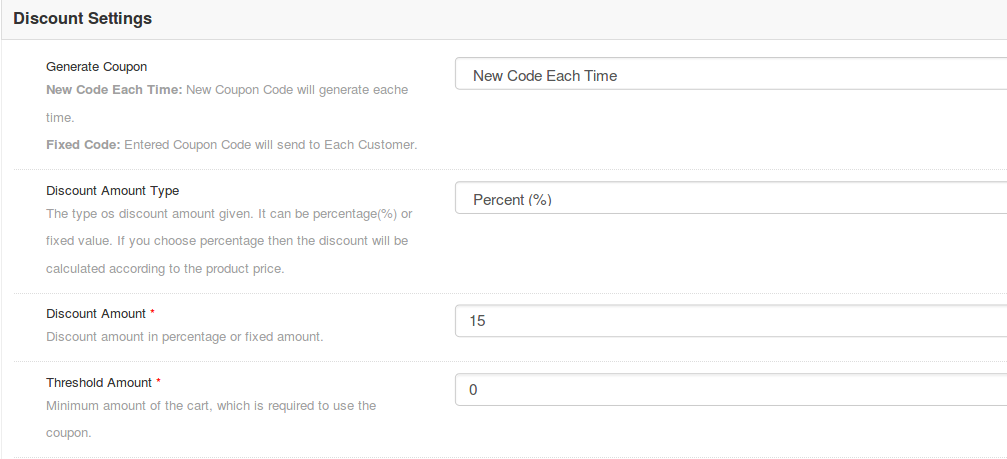
The Discount settings tab of Magento exit pop-up extension has the following options:

  • Discount Amount Type: Using this option, we can set the type of discount given to the customer(s) using Exit Popup front end. There two options to choose. By default Fixed option is selected if Magento Exit intent pop-up module values are not saved yet. Percentage discount will deduct the total cart balance by given percentage. Another option is the Fixed amount. The fixed amount will be deducted from the cart.
  • Discount Amount: This field is used to give the amount of discount for the generated coupon. The value validations work according to the selected option in Discount Amount Type.
  • Threshold Amount: The Magento Exit pop-up module allows the admin to fix the minimum cart value required to avail the offer. This field is used to set the minimum required cart amount to use the coupon. The coupon will not work if the cart amount is less than Threshold Amount. By default, the value is set to ‘0’ which means there is no restriction at all.

3.5 Email Marketing Settings

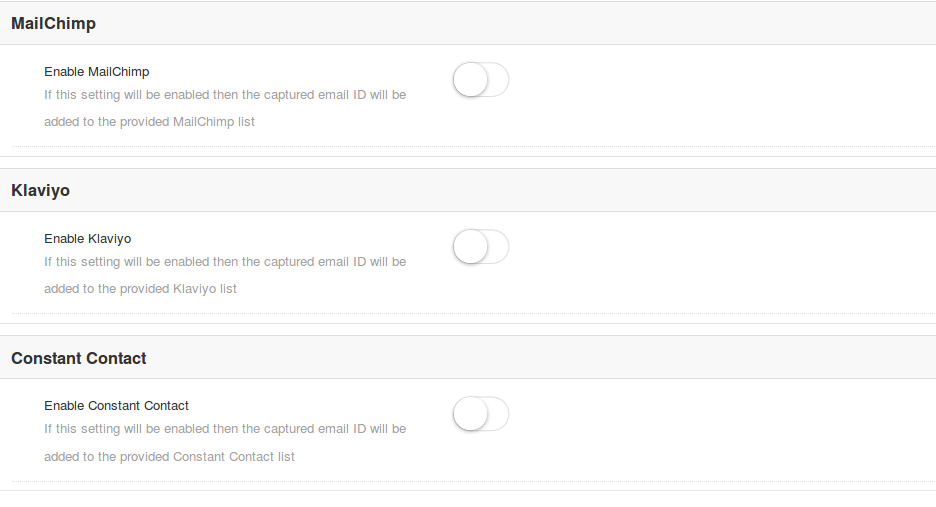
Magento Exit Pop-up Extension offers you three email marketing options as:

  • MailChimp
  • Klaviyo
  • Constant Contact

Each of these marketing services can be separately configured, enabled and disabled. For configuring them, you just need to set the API keyof that connected account. Once configured, the customer email is automatically synced to the connected subscriber list.

3.6 Email Settings

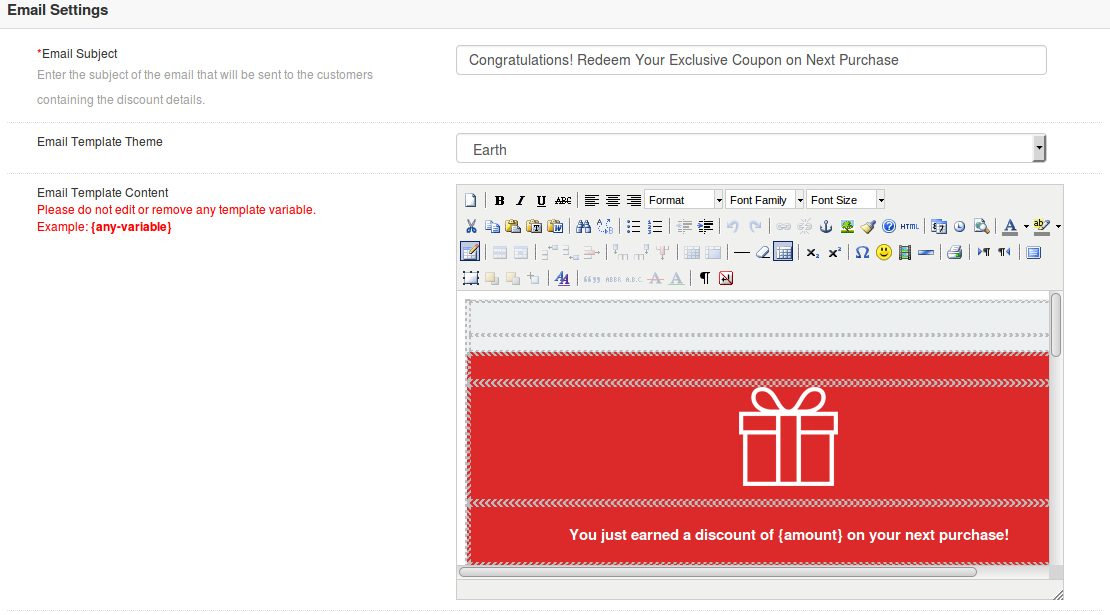
  • Email Subject: This option sets the subject line for the email which is automatically sent to the discount winners stating the discount information they have won on the store.
  • Email Template: You can set a desired template for your email to make it look appealing to users.
  • Email Content: This specifies the body of the email. Here, you can give the rich text content of email along with images and required links.

3.7 Statistics

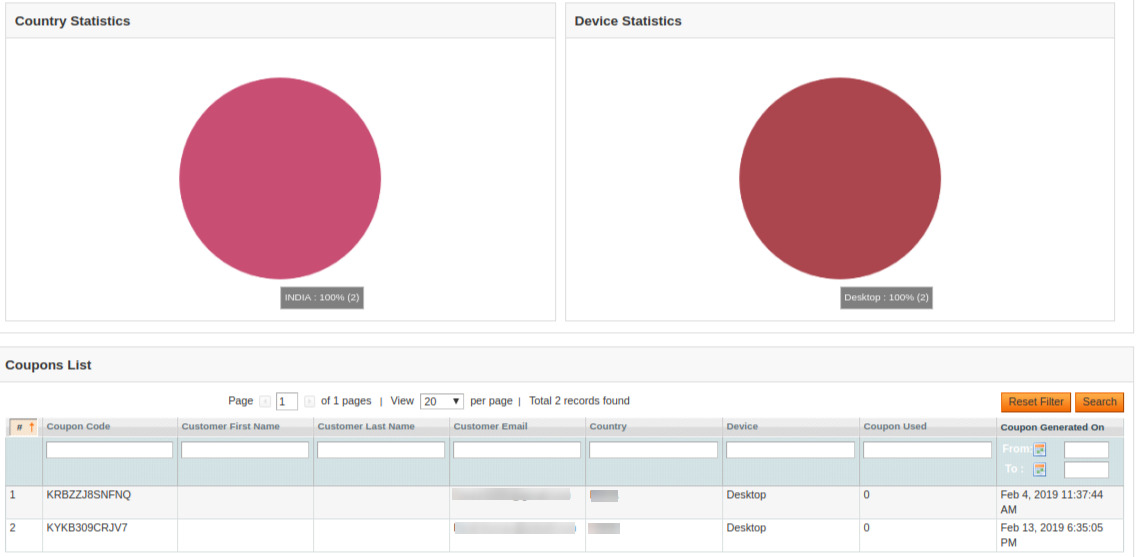
The Statistics feature tab of Magento Exit pop-up extension is to view all the details (in graphical form) about the number of visited customers, generated coupons, customers visiting again etc. There are two filters to filter the data which is getting displayed and one more button to reset all the filters. By default, all of the data is shown.

  • Date Range Filter: In this filter, there are two datepickers and one filter button. From date and to date are given using datepicker and when the Filter button is clicked, all the data between those two dates is shown. If no date is provided in datepicker then the default date is taken. The default date is 1970-01-01 00:00:00 (YYYY-MM-DD Hours:Minutes:Seconds) and the data is processed according to this date.
  • Month filter: This filter contains one button. When we click on this button, then all the data of current month is displayed starting from the first date of the current month upto the present date.
  • Reset Filters: This option is used to reset all the filters and to show the default data. When this button is clicked, then all the filters are reset and the values inside datepickers are also removed.

There is one more division/component in the admin panel of Magento Exit pop-up. This division is displayed just below the header of the Exit Popup admin panel. This division is used to show total visitors, Used By, Used Again By and Total Coupons Generated.

Store Front

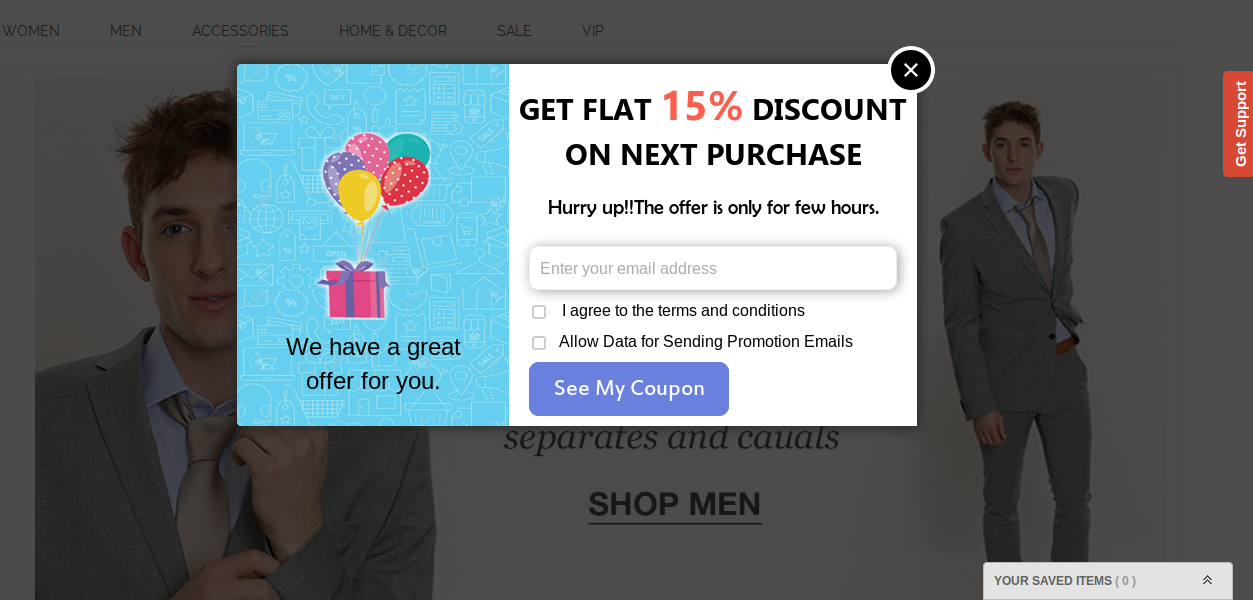
After enabling this Magento Exit pop-up plugin, the offer and subscription popup is shown in the front website whenever the customer tries to leave the webpage from the upper side.

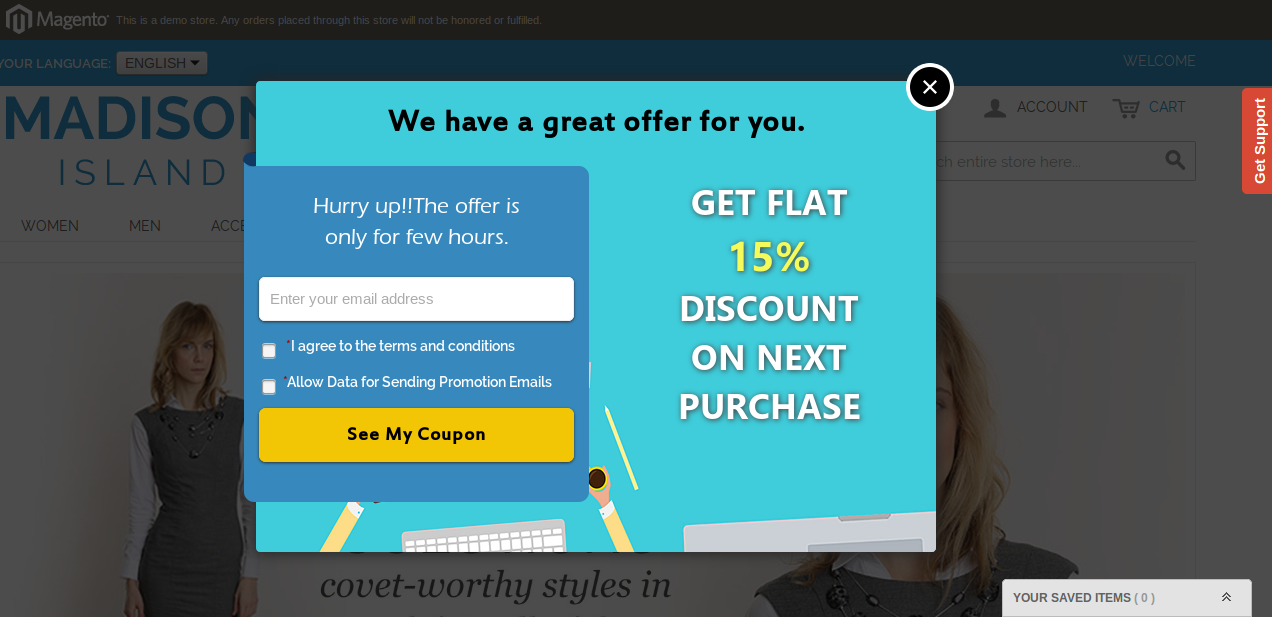
The Magento Exit pop-up module at the front-end appears as follows:

User has to enter the email id and click on the button.

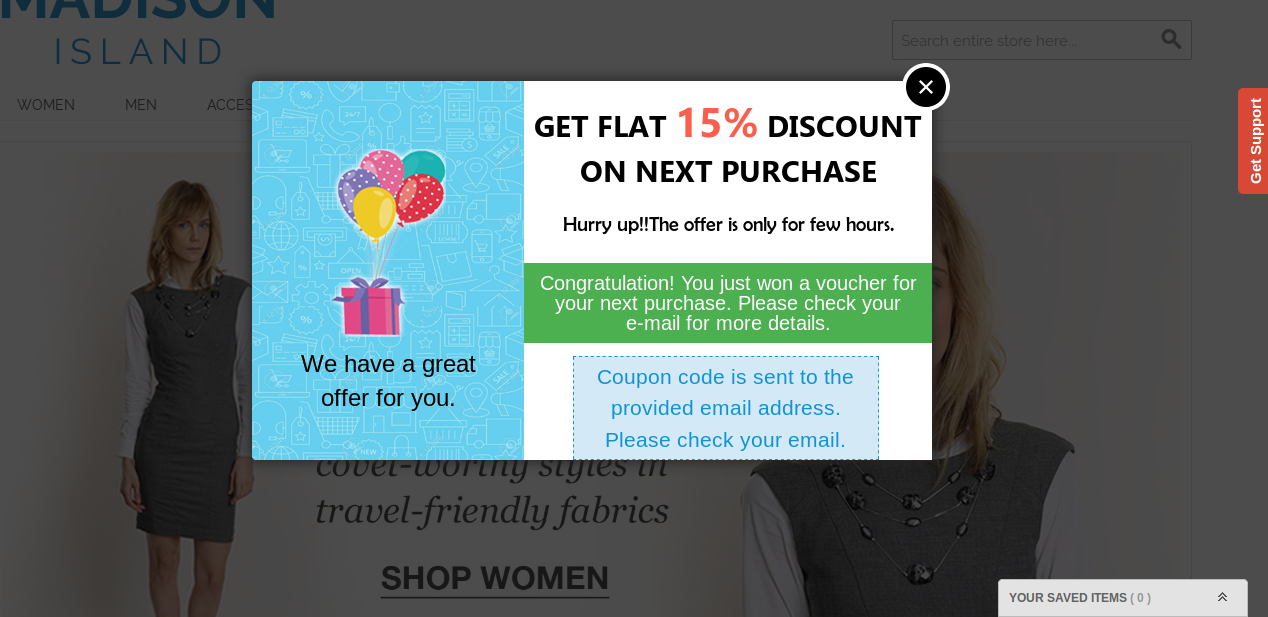
A coupon is generated and the message is shown in the popup window and an email is sent to the provided email id.

Disclaimer: In case the “Exit” popup does not display at the front, kindly clear the cache or delete the cookies. Sometimes cookies prevent the popup from displaying at front.

Watch Video: https://www.youtube.com/watch?v=O7q-7q9YXSM&feature=youtu.be

Related Stories:

Magento Ajax Cart Extension – User Manual

Introduction of Magento Ajax Cart Extension:

Ajax Cart is an addon which (when enabled) replaces the default “Add To Cart” action with the module’s custom action. After enabling this Magento Ajax Cart Extension, whenever a customer clicks on the “Add To Cart” button, the user is not redirected to the view cart page instead a popup is displayed. In the popup, items are shown. Cart items can be removed, updated, edited from the Ajax add to cart extension. Coupons can be also applied on Magento popup cart extension and user can checkout from there. The merchant can also show his/her banners or show the best-selling products on Magento popup cart page with the help of this Magento plugin.

Installation of Magento Ajax Cart Extension:

  • Follow the following steps for installing Magento Ajax Cart Extension:
  • Download the extension package.
  • Unzip the package on your root folder of Magento setup via FTP manager (like Filezilla or WinSCP – download here)

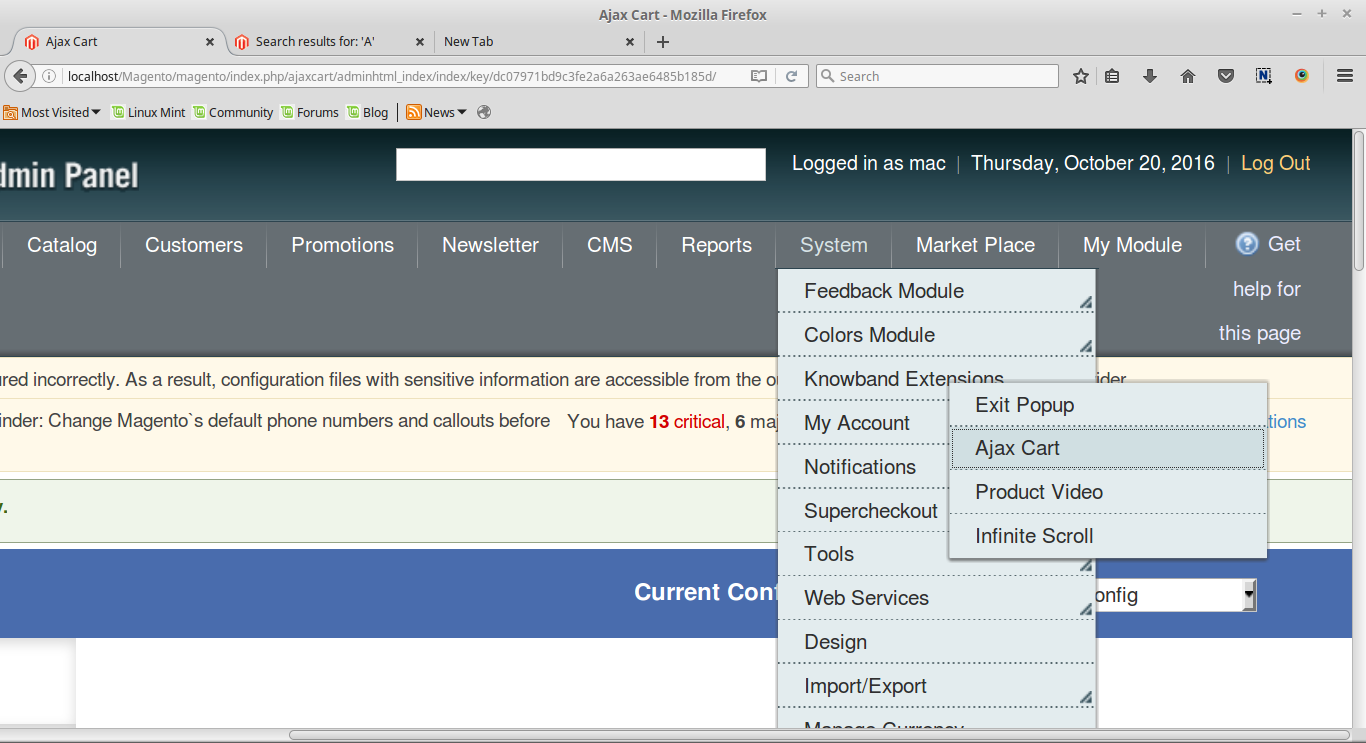
  • In Admin Panel go to “System > Knowband Extensions > Ajax Cart”.
  • That is all – Your system is ready.

User Manual

This User Manual Guide users through the Admin Module/Store Front settings and features of the Magento Ajax Cart Extension by Knowband.

Admin Panel Setting of Magento Ajax Cart Extension

Admin Panel Settings of the Magento ajax cart popup extension contains the 3 tabs for settings.

1. General Settings of Magento Ajax Cart Extension

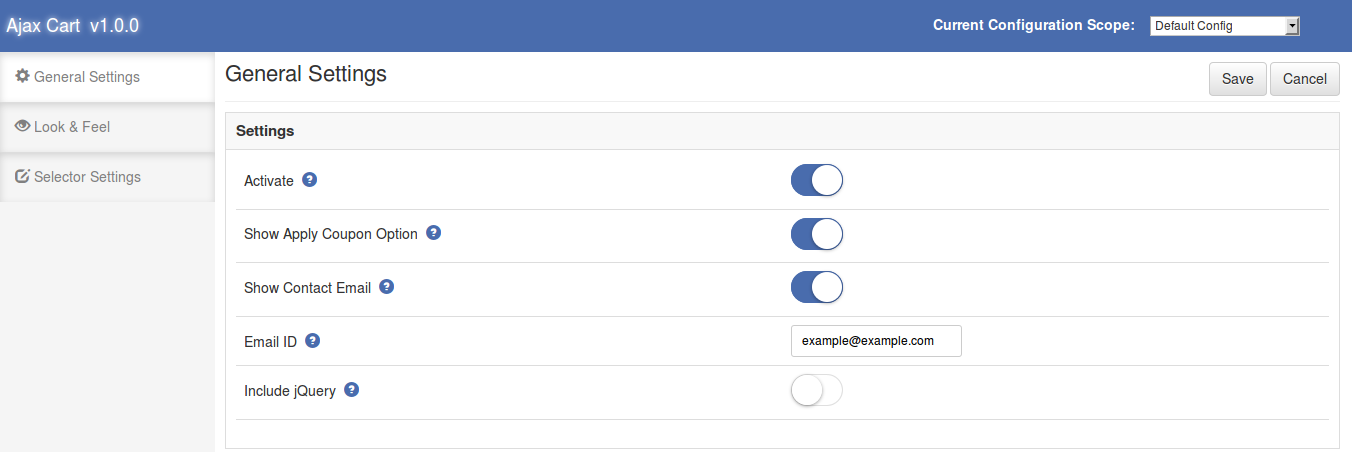
The General Settings of the Magento popup cart module has following options:

  • Activate: Enables or Disables the Magento plugin. Switch it on to enable the Magento pop-up cart module.
  • Show Apply Coupon Option: This option of the Magento ajax cart extension allows the admin to show or hide the apply coupon division on the pop-up window shown on the front website.
  • Show Contact Email: Switch on this option of Magento Ajax Cart Extension to show the Contact Email option on the pop-up cart.
  • Email ID: This field of Magento add to cart popup extension offers the admin to set the default email id for the contact email option shown on the front. By default, the email id of the store admin will be filled in the field.
  • Include jQuery: This option of the Magento add to cart ajax popup allows us to include jQuery in our Magento module.

2. Look and Feel of Magento Ajax Cart Extension

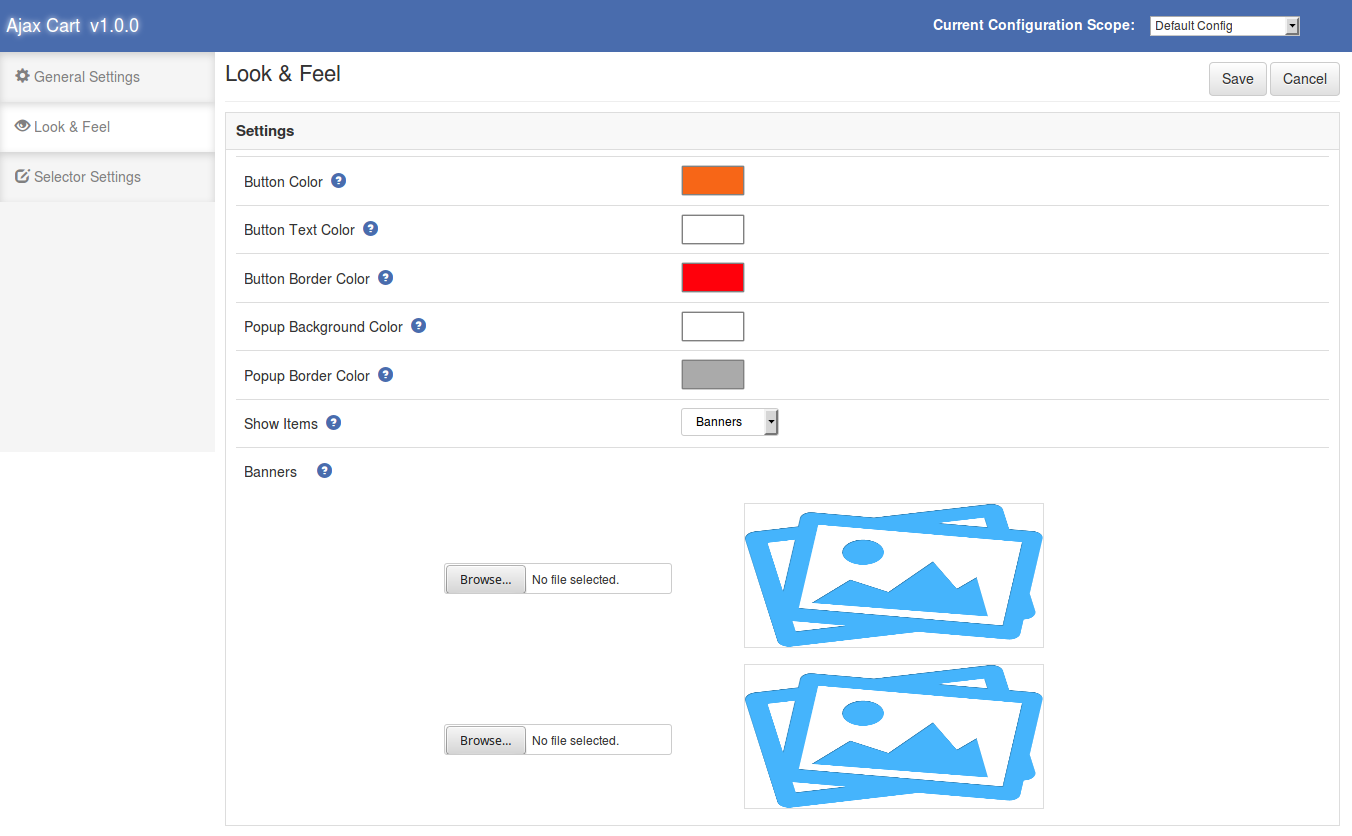
This tab of Ajax add to cart extension is used to customize the pop-up window shown in the front.

  • Button Color: This option of Magento cart popup extension changes the background color of the checkout button.
  • Button Text Color: Color of the text shown inside the checkout button on the pop-up. The admin can change the text color of this Magento ajax cart popup extension button.
  • Button Border Color: Color of the border of the button can be changed using this option of Magento add to cart popup extension.
  • Popup Background Color: Background color of the main pop-up window is set from this Magento add to cart ajax popup module.
  • Popup Border Color: Background color of the main pop-up window is set from this field of Ajax add to cart extension.
  • Show Items: This option of the Magento Ajax Cart Extension is to show the banners or the top selling items on the front pop-up window. When this option is selected as “None”, no item is shown on the pop-up. If this option is selected as “Top Selling” then 4 most top-selling products are shown on the right panel on pop-up window and if selected as “Banners” then a decision is shown from where we can choose the banners to show on the front of this Magento extension.

3. Selector Settings of Magento Ajax Cart Extension

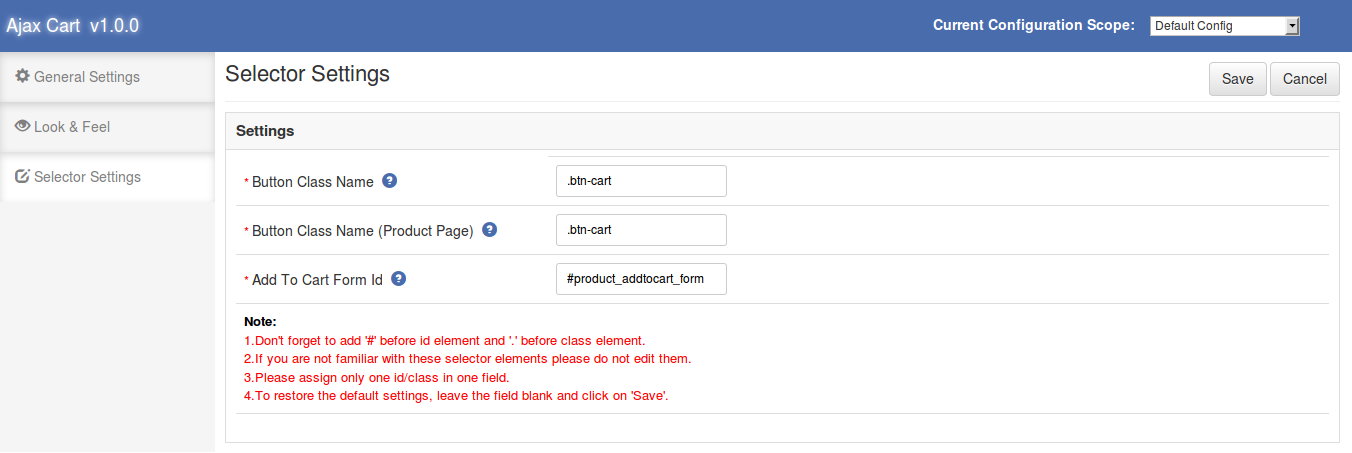
Selector Settings tab of the Magento add to cart ajax popup is used to make the module work in case checkout buttons have different class names. The field of Magento plugin has the following options:

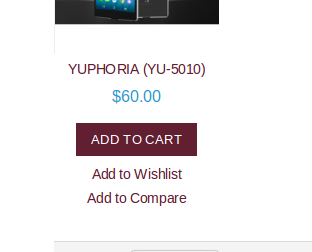
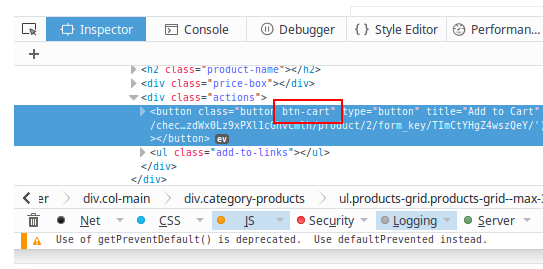
Button Class Name: By default this field of Magento pop-up cart extension is auto-filled. If the Magento module still does not work then we have to enter the correct class name for the checkout buttons shown on the front site (except product view page). To get the class name of the button right click on the “Add to cart” button and click on “Inspect Element”.

When the inspector opens find the class name inside “button” tag.

Take a look at following image.

  • Button Class Name (Product Page): This field of Magento popup cart is also filled by default. To get the class name of the “Add to cart” button shown on product view page. Go to the product view page of Magento Ajax Cart Extension and follow the same process as shown above.
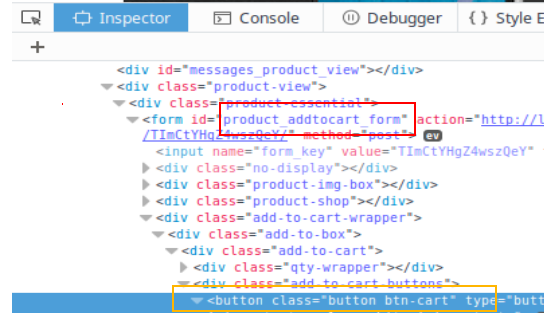
  • Add To Cart Form Id: This field of Magento Ajax Cart Extension is also filled by default. To change the form id of the Magento Ajax Cart Extension, Go to the product view page and right click on the “add to cart” button then click on the “Inspect Element”. When inspector opens to find the form as shown in the below image.


Yellow box is the location of the “Add to cart” button and the red box is the location to find the id of the form.

Store Front End of Magento Ajax Cart Extension:

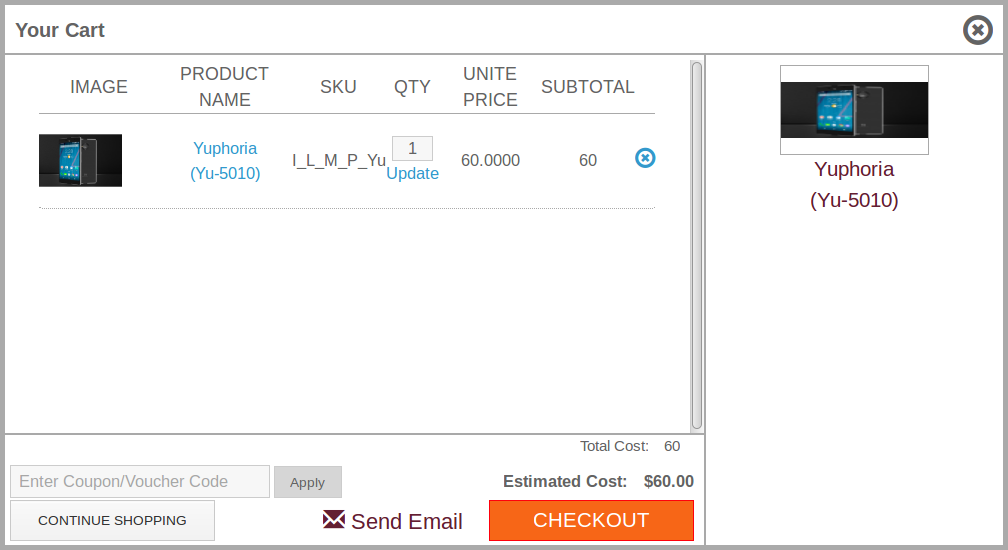
When the Magento add to cart ajax popup module is enabled and the user clicks on the “Add to cart” button, a pop-up is opened. The product is added to the cart and sown in the pop-up. The Magento Ajax Cart Extension allows us to update product quantity or remove them from the cart. From the popup, the user can go to checkout and apply for the coupon also.

  • To update the quantity of the product enter the quantity in the input field and click on the update link of the Magento Extension.
  • To remove a product from the pop-up, click on the cross icon shown in front of every product row.
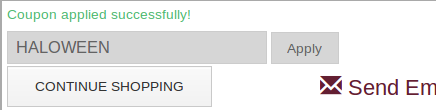
  • To apply the coupon, switch on the “Show Apply Coupon” option from admin panel of the Magento cart popup extension and the coupon division will be visible on the front pop-up cart. Enter the coupon code in the input field of the Magento Ajax Cart Extension and click on the “Apply” button.

To send mail for any help or suggestions, click on the “Send Email” option. A window will open, from where the user can send email to the admin.

Watch the video tutorial of Magento Ajax Cart Extension here:

Click here for Admin Demo of Magento Ajax Cart Extension and Front Demo of Magento Ajax Cart Extension.

Magento One Click Checkout(Buy Now) Extension- User Manual

Introduction of Magento One Click Checkout (Buy Now) Extension

1.0 Introduction

The Knowband Magento one click checkout (Single Checkout) extension is a module which when enabled allows the online shoppers to buy product instantly without modifying their exiting cart. A new button “Buy Now” will be shown at product detail page. On clicking this button, the old cart will be hidden and the new product will be added to the cart for instant checkout.

On successful order confirmation, old cart will be resumed.

Old cart can also be resumed along with the new product, if after clicking on “Buy Now” button customer navigates to any other page.

This Magento Quick checkout extension will also provide an option to track the number of times the users clicked and bought from the “Buy Now” button.

Also, the Google analytic code can be inserted through this Magento single click checkout extension which will be helpful in Google tracking on click of “Buy Now” button.

1.1 How Merchant will benefit from Magento One Click (Single click) Checkout Extension?

  • The Magento quick checkout extension allows the store admin to adds a ‘Buy Now’ button on Product pages, clicking on which will directly take the user to the checkout page with only the current product in the cart.
  • The Magento one click checkout extension enables the store admin to customize the One click checkout (Buy Now) button if they require.
  • The Magento instant checkout extension allows the e-merchant to include the jQuery if required.
  • The Store admin can track the One click checkout (Buy Now) button clicks by adding the Google analytics script code.
  • With the help of the Statistics tab, the admin can view the visited product page and also the conversion mapping of those who clicked on “Buy Now” button and placed a successful order.
  • The Magento single button checkout extension boosts the direct sales.
  • The Online retailers have a chance to increase the conversion rate of the website.
  • With the use of this Magento one click checkout (Buy now) extension, the store admin can make the UI and UX of the site appealing and responsive.
  • This Magento instant checkout extension is easy to use.
  • This Magento single click checkout extension reduces the cart abandoned rate of the website.

1.2 How Customer will benefit from Magento One Click (Single click) Checkout Extension?

  • The Customer can easily make the checkout process without editing the old shopping cart.
  • The Online consumers will get a quick and hassle-free way to directly checkout.
  • The Online shoppers can checkout in a single click.
  • The Buyers always love the easy and fast checkout process.

2.0 Installation

After purchasing the Magento single click checkout extension, you will get the following files as listed below:

1. magentocustommaintenancepage.zip (contains source code of the extension)
2. User Manual

Follow the following steps for installing Magento One Click Checkout Module:

Download the Magento extension package.

1.Unzip the package on your root folder of Magento setup via FTP manager (like Filezilla or WinSCP – download here: https://filezilla-project.org/).

2. Copy all the files and folders of unzipped folder into your store root directory.

3. After copying all the files and folders, clear the cache.

4. Open any page of your store. Magento will install the module at the time of loading any page.

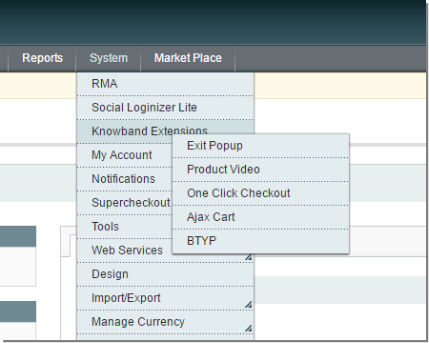
5. In the Admin Panel go to “System > Knowband Extensions > One Click Checkout”.

3.0 Extension Interface

There are two interfaces in this extension. Each interface has a different functionality according to its use. These interfaces are:

A.Admin Panel Interface (Only be accessible by admin/store owner)
B.Front End Interface (accessible to front end user)

Each interface has been described in separate section.

4.0 Admin Panel Settings

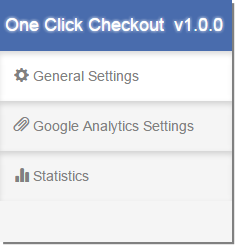
Admin Panel Settings contains the 3 tabs for settings.

4.1 General Settings

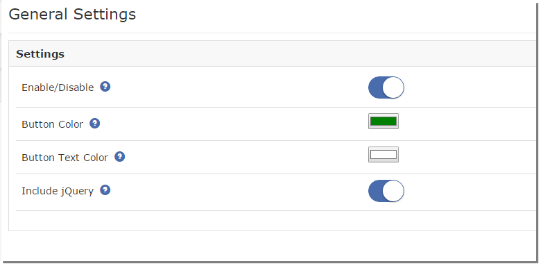
From here, Admin can enable/disable this plugin. Also look and feel of Button can be controlled here. Initially the fields in form will be already be filled with their default values.

Setting will have options as:-

  1. Enable/Disable: This option allows user to enable or disable the Magento one click checkout extension. By default this option will be disabled.
  2. Button Color: “Buy Now” Button color at product detail page of front end will be changed by this option.
  3. Button Text Color: “Buy Now” Button text color will be changed by this option.
  4. Include jQuery: This option allows us to include jQuery in our Magento single click checkout extension so that the module can work for other versions of the Magento also.

4.2 Statistics

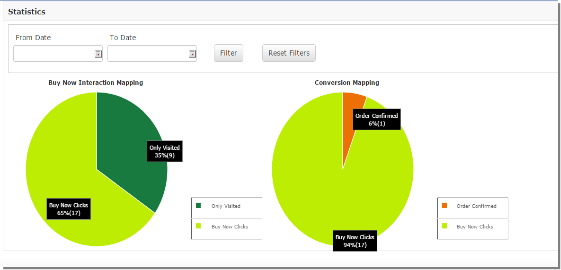
From here the store owner can see the no. of customers who visited product page and also the conversion mapping of those who clicked on “Buy Now” button and placed successful order.

  1. Statistics: Two pie charts will be shown here. There will be a filter to select the start date and the end date to create the pie chart.

a. Buy Now Interaction mapping: It will show mapping between the number of visitors to Product details page and number of visitors who clicked “Buy Now” Button.

b. Conversion Mapping: It will show mapping between No of clicks on “Buy Now” Button and no of order placed by this this options to show actual conversion rates.

5.0 Store Front

After enabling this Magento one click checkout extension, a new “Buy Now” button will be shown at product details page along with “Add To Cart” Button.

The Magento direct checkout extension at the front-end will appear as follows:

  • This “Buy Now” button allows user to order product instantly. On clicking “Buy Now” button, a new cart with this product will be created and it is redirected to checkout page.
  • On successful Order confirmation, old cart will be resumed.
  • After clicking “Buy Now” button, if customer will navigate to any other page then old cart will be resumed along with this new product.

You can try Knowband’s Magento One Click Checkout extension for on your Magento store. KnowBand’s Magento single click checkout module helps you increase customer engagement to your store and give the better user experience to your eCommerce customer. It also reduces the exit rate of the store by minimizing the checkout overhead involved in purchasing a single product. Moreover, the implementation of single button checkout feature doesn’t affect the product page design and layout. As the customer opts for a single buy, the existing cart items remain unaltered. Additionally, if the customer skips the single buy checkout, the product is automatically added to the cart.

Module Link: https://www.knowband.com/Magento-one-click-checkout

Admin Demo: https://mademo3.knowband.com/index.php/oneclickcheckout/adminhtml_index/index/key/3d77b3a591113336177dead9ce8e2016/

Front Demo: https://mademo3.knowband.com/

Please contact us at support@knowband.com for any query or custom change request as per your business requirement.

How could you select the best module among various Magento Marketplace Extensions?

When you are experiencing less sales and conversions on your online store, you need to go for alternate medium of sales for improving the site performance. The continuous drop in conversion rates and sales can have catastrophic effect on the growth chances of your online business. It is important to revive sales and conversions for your online store if you are looking to make a mark among your competitors.

There can’t be a better option for sales improvement other than a Magento Marketplace Extensions that can improve conversions and sales to a great extent. No doubt there are plenty of options available as Magento Marketplace extensions but it is difficult to get the right Marketplace module for your Magento store at the most competent price. Here are the features that you need to look out while selecting the best Magento Marketplace extension.

Choose a module that does not require any need for inventory management

Inventory management is the most difficult aspect in an eCommerce store which requires constant attention and management. It is the USP of this Magento Marketplace extension that can eliminate inventory management related issues. Store admin can effortlessly create their exclusive marketplace store for boosting the growth chances of multiple small and medium eCommerce vendors. The whole process of online selling and purchase has become much simplified due to the absence of an inventory management system.

Supports an amazing email notification system for timely updates

It is important in an online business environment to provide timely alert and updates about various events that are happening on a marketplace store. The Magento marketplace module has an effective email notification system  that can ensure alerts to all involved participants of an online store like sellers, buyers and store admin regarding various activities. You can constantly track the eCommerce activities on your Marketplace store with the help of this Knowband extension.

Work independently with other available themes

The performance of an eCommerce Module is judged by the adaptability it offers with various available themes on an eCommerce platform like Magento. This feature loaded Magento Marketplace plugin is built with such a web design that makes Magento marketplace module compatible with various Magento themes (responsive and non responsive).

Offers easy registration facility for buyers

It is now possible for buyers on an online marketplace to register themselves as sellers for a quick online product selling opportunity. This Magento marketplace extension has a simple front end registration facility for buyers which helps in providing a quick online purchasing facility. There is no need for back end registration for the seller community. This Magento multi vendor marketplace extension for easy registration facility has brought a major change in the eCommerce business environment.

It does not make any sense if you are still losing out sales and conversions to your rivals due to limited sales opportunity. Come and explore the benefits of online marketplaces for the growth of your online business with the help of this Magento Marketplace Extensions for better sales. By analyzing all these features, you will find out this Knowband extension is undeniably the best among various available Magento Marketplace extensions.

This Would Also Interest You:

Magento Prev Next Product Exension by Knowband – User Manual

The Magento Previous next product is an addon which when enabled makes changes in the product page by adding two buttons at each side of the product to let the customer navigate to the previous and the next product of the current product. It also has the feature of navigating from the keyboard arrow keys and in case of mobile has the feature of the swiping in the product page and then navigating through the products.
Steps for Installation of Magento previous next product navigation Extension:

Follow the following steps for installing Magento paginator Module:

1. Download the Magento Marketplace extension package.

2. Unzip the package on your root folder of Magento setup via FTP manager (like Filezilla or WinSCP – download here: https://filezilla-project.org/).

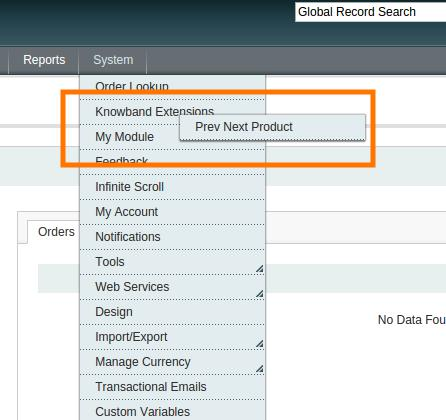
3. In Admin Panel go to System > Knowband Extensions > Prev Next Product.

4. That is all – Your system is ready.

General Settings

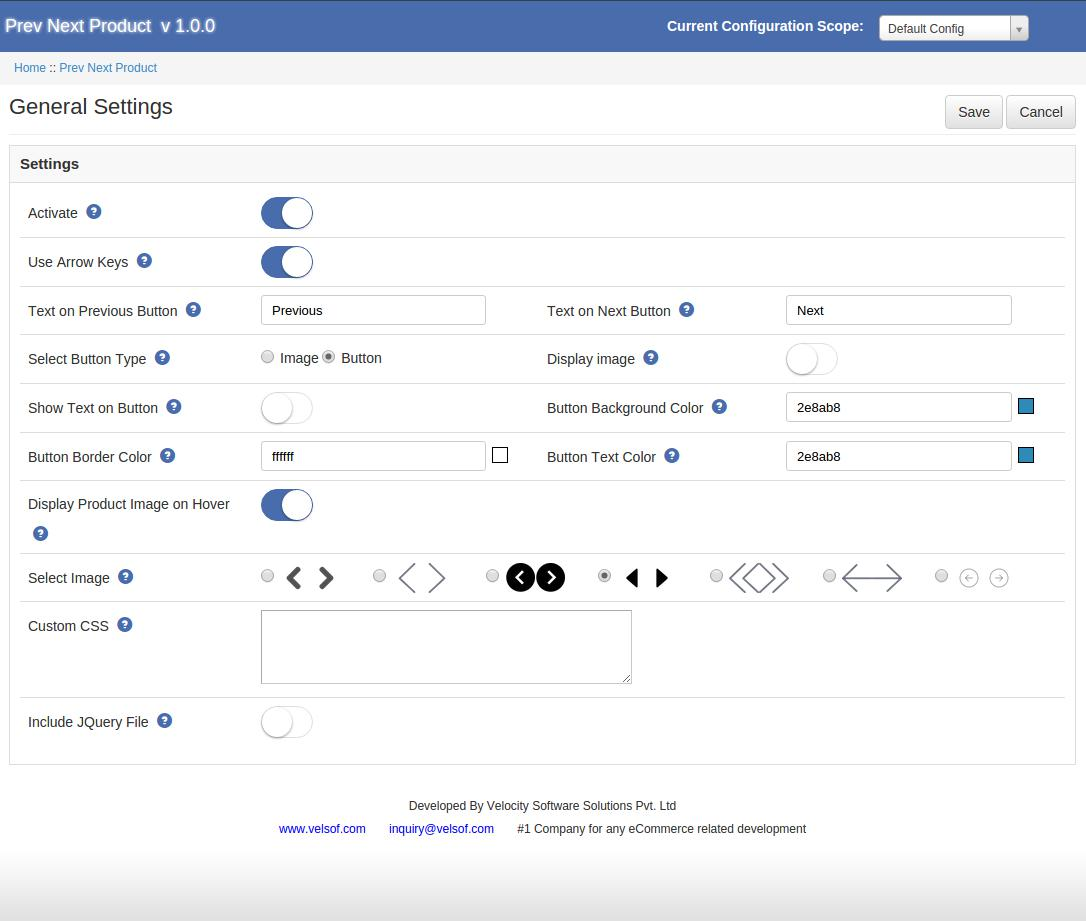
The General Settings of the Magento navigation has following options:

  • Active: This field of the Magento previous product enables or disables the plugin on the store front.
  • Use arrow keys: This option of Magento next product is to enable for the navigation by using keyboard keys.
  • Text on Previous Button: In this field of Previous next product Magento, the admin can set text which is to be displayed on previous button.
  • Text on Next Button: This field of Magento extension allows the admin to set the text which is to be displayed on next button.
  • Select Button Type: The admin can choose the type of button of the Magento previous next product navigation whether the image or button.
  • Display Image: This feature of Magento previous next product Enable to display image on button.
  • Show Text on button: Enable to show the text on button of the Magento paginator.
  • Button Background Color: Set the background color of the Magento navigation button.
  • Button Border Color: This field of Magento previous product, sets the border color of the button.
  • Button Text Color: Set the text color of the Magento Extension.
  • Display product image on hover: This feature of Magento next product is to enable the display previous/next product image on hover.
  • Custom CSS: The previous next product Magento extesnion has the option to add their own css code.
  • Include JQuery File: This field of Magento previous next product navigation offers the admin to enable if the current theme does not have the jquery file.

Store Front:

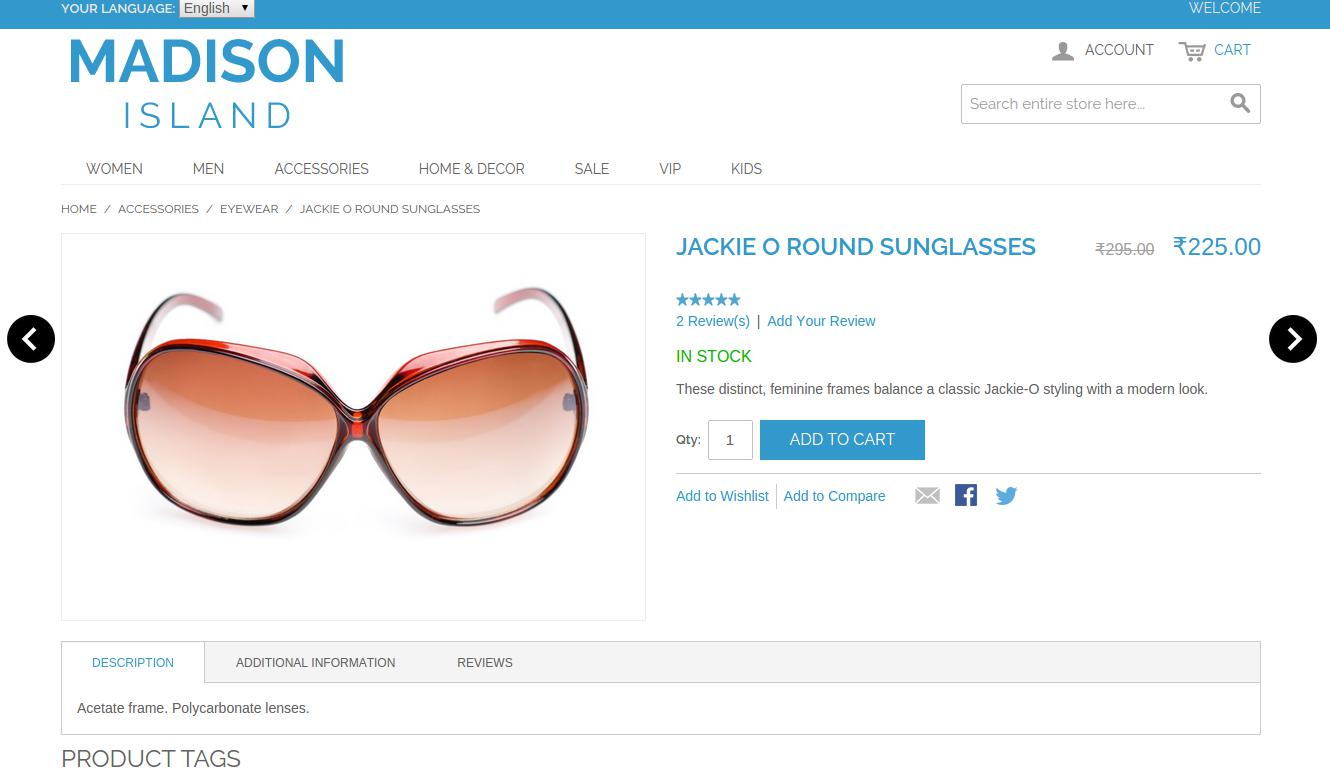
After enabling this Magento previous next product plugin the product page in the front of the shop will change a bit as the two buttons will be added in the side of the product.

The Magento paginator module at the front-end appears as follows:

Find more details about this Prestashop plugin by Knowband below:

Module Link: https://www.knowband.com/magento-prev-next-buttons

Admin Demo: https://mademo2.knowband.com/admin

Front Demo: https://mademo2.knowband.com/elizabeth-knit-top-596.html

Magento Advanced Wish List Extension- User Manual

Installation Steps of Magento Advanced Wish List Extension

1.0 Introduction

Most of the time eCommerce store visitors have to plan their shopping in advance – they may need certain products regularly (e.g. consumer goods or food, clothes); for special occasions, to make sure they will have all they need, etc. For this purpose making the easy, they save the favorite product to their wishlist. The Magento Advanced wishlist extension makes this process much more comfortable – with it customers can save the favorite products, they are planning to buy in the future, etc.

This Magento advanced order list extension motivates the customer to come back to your website as well as attract the new shoppers and they place more orders. This Magento extension shows the popup of the wishlist product at the bottom of the webpage with the help of this, they can transform wishlist products into checkout with just a click of a button.

1.1 Benefits of the merchant:

  • The Magento advanced wishlist extension allows the customer to maintain the private wishlist of the product that can help for future reference.
  • The Magento extension provides an option to the store admin can view the complete list of products saved by the customer on their wishlist.
  • The Magento Advance order list extension allows the e-merchant to change the look and feel of the wishlist and add to cart button and they can also allow the default. color settings as per requirement.
  • The Magento advance purchase list has an option to include the jQuery file if required.
  • The online retailers can set the expiry of the saved product in days.
  • With the help of this Magento advanced wishlist extension, the store admin can view the which product is most popular and high demanded.
  • The store admin can analysis the sales report.
  • The Admin can Re-Price the products to increase sale.
  • This Magento saves for later extension compatible with all themes.
  • Mobile responsive.
  • Easy installation and use.

2.0 Installation Guide

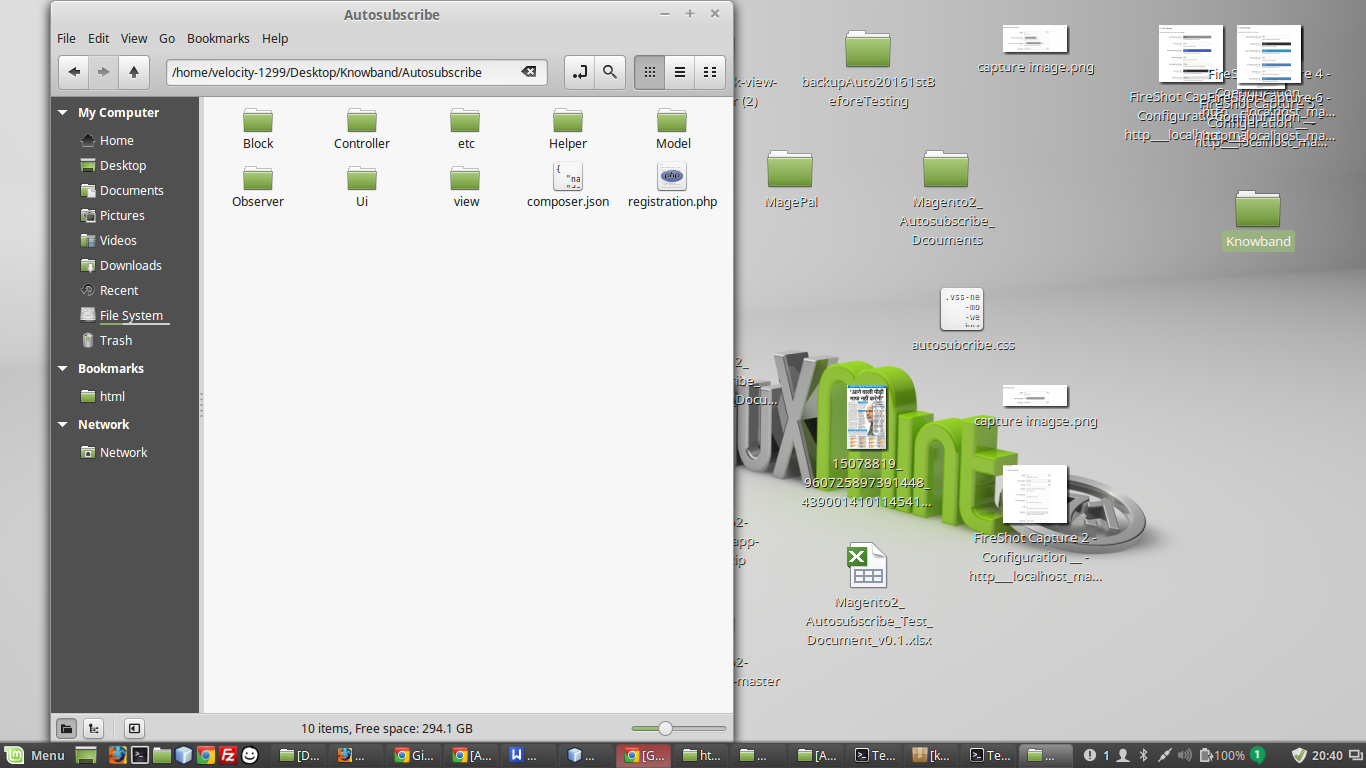
1. Folder structure of the Magento Return Manager module.


2. Copy all the above folders into Magento root directory and clear the cache (if enabled).

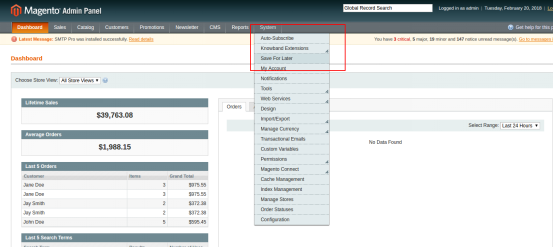
3. Now, login to the admin panel of your Magento store. You will be able find the “Save for Later” option inside the “System > Knowband Extensions > Save for Later” menu.

2. On clicking menu Save For Later the module for plugin will open. It contains navigational bar at the top, Tab menu at the left and in main content the first general setting tab will display.

4. You can now configure the Magento Save for Later Extension as per your requirements and check its working in the front end at following URL:

https://pstest2.knowband.com/mage1932

3.0 Admin Module

After installing the Magento advanced wishlist plugin into magento store, the module will provide following options inside “Save For Later” menu:

1- Genereal Settings
2- Category Analysis
3- Product Analysis
4- Customer Analysis

Above 4 points are actually one section comes under “Settings” but described here as separate entity for more clarity.

Each interface is in form of a tab and each tab contains some specific settings/functionalities that can be changed according to the need. Each tab is explained below.

3.1 General Settings

1. Active: Initially, this will be “OFF”. The e-merchant can enable the module, select enable present under the label Activate.

2. Remove Wishlist : Check this option to remove the default wishlist from the website.

3. Use Default Color Setting: This option will allow the store admin to reset your color setting to default. The default color values will display by default. Remember if you wish to change the color setting then this option must be disabled.

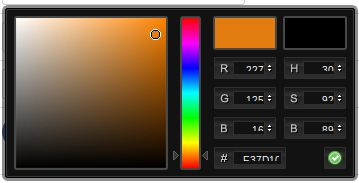
4. View All Button Color: To Select a color for the view all button color in the saved product list. See below image:

5. View All Button Text Color: Select the color value for text over the view all button color.

6. Add To Cart Button Color: Select the color for add to cart button visible on the page open on the click of view all button.

7. Add To Cart Button Text Color: Select the color for the text over the add to cart button.

8. Days to Store guest Product: For guest users the product will be saved in the cookies. Using this option you can set the expiry days for cookies.By Default cookies will stored for 10 days.

9. Jquery File: jQuery i.e. a javascript framework is required for this plugin to work. Sometimes themes used in magento already includes it but sometime they do not. If jquery is already included in your theme select no else select yes to include it.

3.2 Category Analysis

This Magento advanced wishlist extension allows the admin to make an analysis on the Categories. Here the store merchant can view the graph for the categories using the dropdown menu and date filters. When the admin opens the tab, by default last week report will display. If there is no product saved in last week then no record found message will display instead of the graph.

Below the graph a grid is provided. This grid will display the categories of the product saved.

On the top of the grid there is an export button , that will export the grid data into csv file. You can find particular record for category by using its id and search button available on top left of the grid.

In the Grid you can see an action column, on click of it a new grid will open in another browser tab displaying the products saved under that category.

NOTE: The No. of Product will be display according to configuration scope.

3.3 Product Analysis

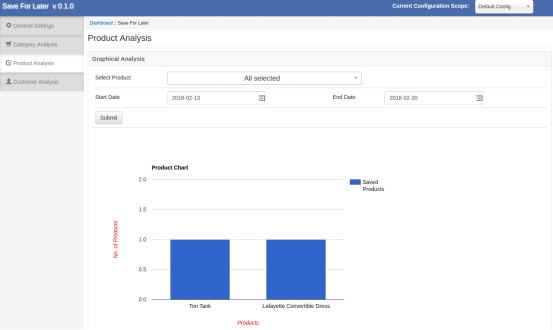
This Magento advance purchase list allows the admin to make an analysis on the Products. The Product analysis tab the online retailers can view the graph for the product using the dropdown menu and date filters. When the admin opens the tab, by default last week report will display. If there is no product saved in last week then no record found message will display instead of the graph. Below the graph a grid is provided. This grid will display the categories of the product saved.

On the top of the grid there is an export button , that will export the grid data into CSV file. You can find particular record for category by using its id and search button available on top left of the grid.

NOTE: The No. of Product will be display according to configuration scope,

3.4 Customer Analysis

This Magento advance order list allows the Magento store owners to make an analysis on the the online customer. The Online store owner can view the use count of the SAVE FOR LATER option for each user in the grid.

Also, there is a column view saved products, on click a new grid will open in new tab displaying the products saved by that customer.

NOTE: The no. of use count and no of product can be different. When you click on view saved product , only those product will be displayed which are saved in customers list that time.

Hope that we have covered all the concerned regarding the installation of Magento Extension. If you are new on Magento then you can also check our blog of Top Magento themes of 2015.

4.0 Front End Module

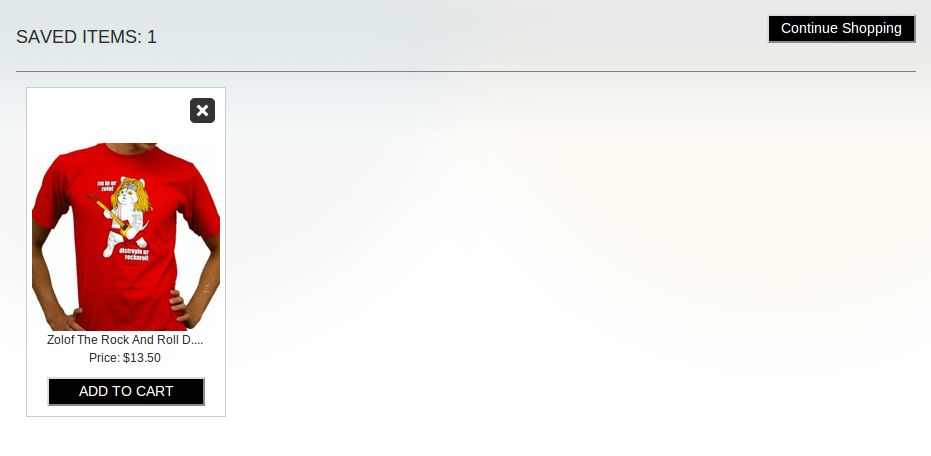
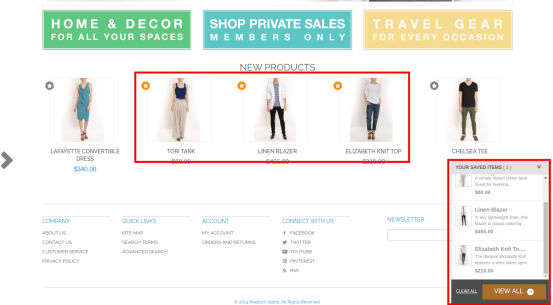
After enabling the Magento save for later module, customers will be able to see a bottom bar on every page of the store containing the “Your Saved Item block” enabled through configuration panel of the magnto extension.

The bottom bar at the front-end appears as shown below:

The highlighted “Shortlist” button will allow customers to shortlist corresponding products into a separate bucket. This bucket is displayed at the bottom of the page as highlighted in above screen.

When the customer clicks on “Shortlist” button, a product gets added to bucket and button text will get changed from “Shortlist” to “Added”.

You can try Knowband’s Magento Advanced Wishlist extension for on your Magento store. Magento advance order module helps you increase customer engagement to your store & you can
Provide the option to the online shoppers to save the favorite product to their wishlist.

Module Link: https://www.knowband.com/magento-advanced-wish-list

Admin Demo Link: https://mademo2.knowband.com/index.php/saveforlater/adminhtml_index/index/key/82709c277afb627112ae78e2c850dae4/

Front Demo Link: https://mademo2.knowband.com/

Please contact us at support@knowband.com for any query or custom change request as per your business requirement.