Are you facing the hurdles when it comes to managing the multi-store from the single admin interface? Prestashop offers the easiest way to handle multiple stores from the single admin interface. Here’s how you can do it:
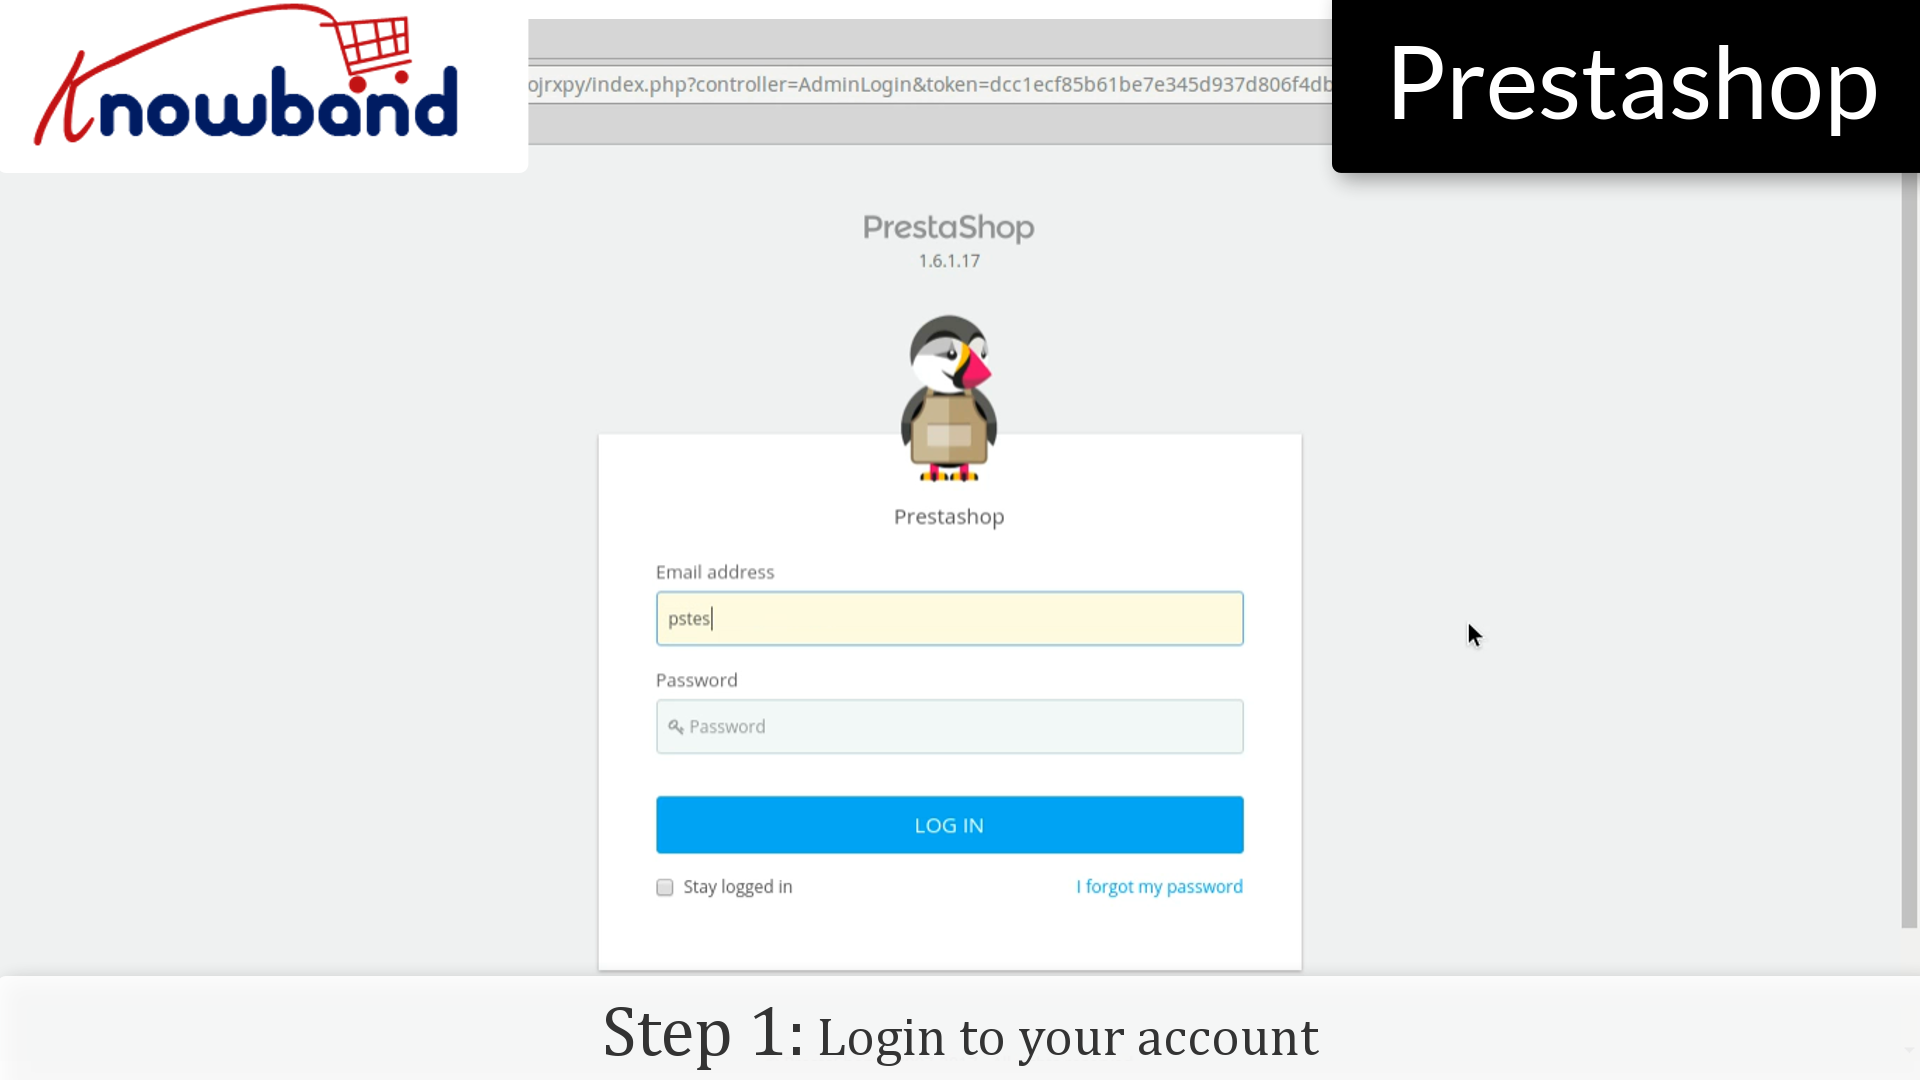
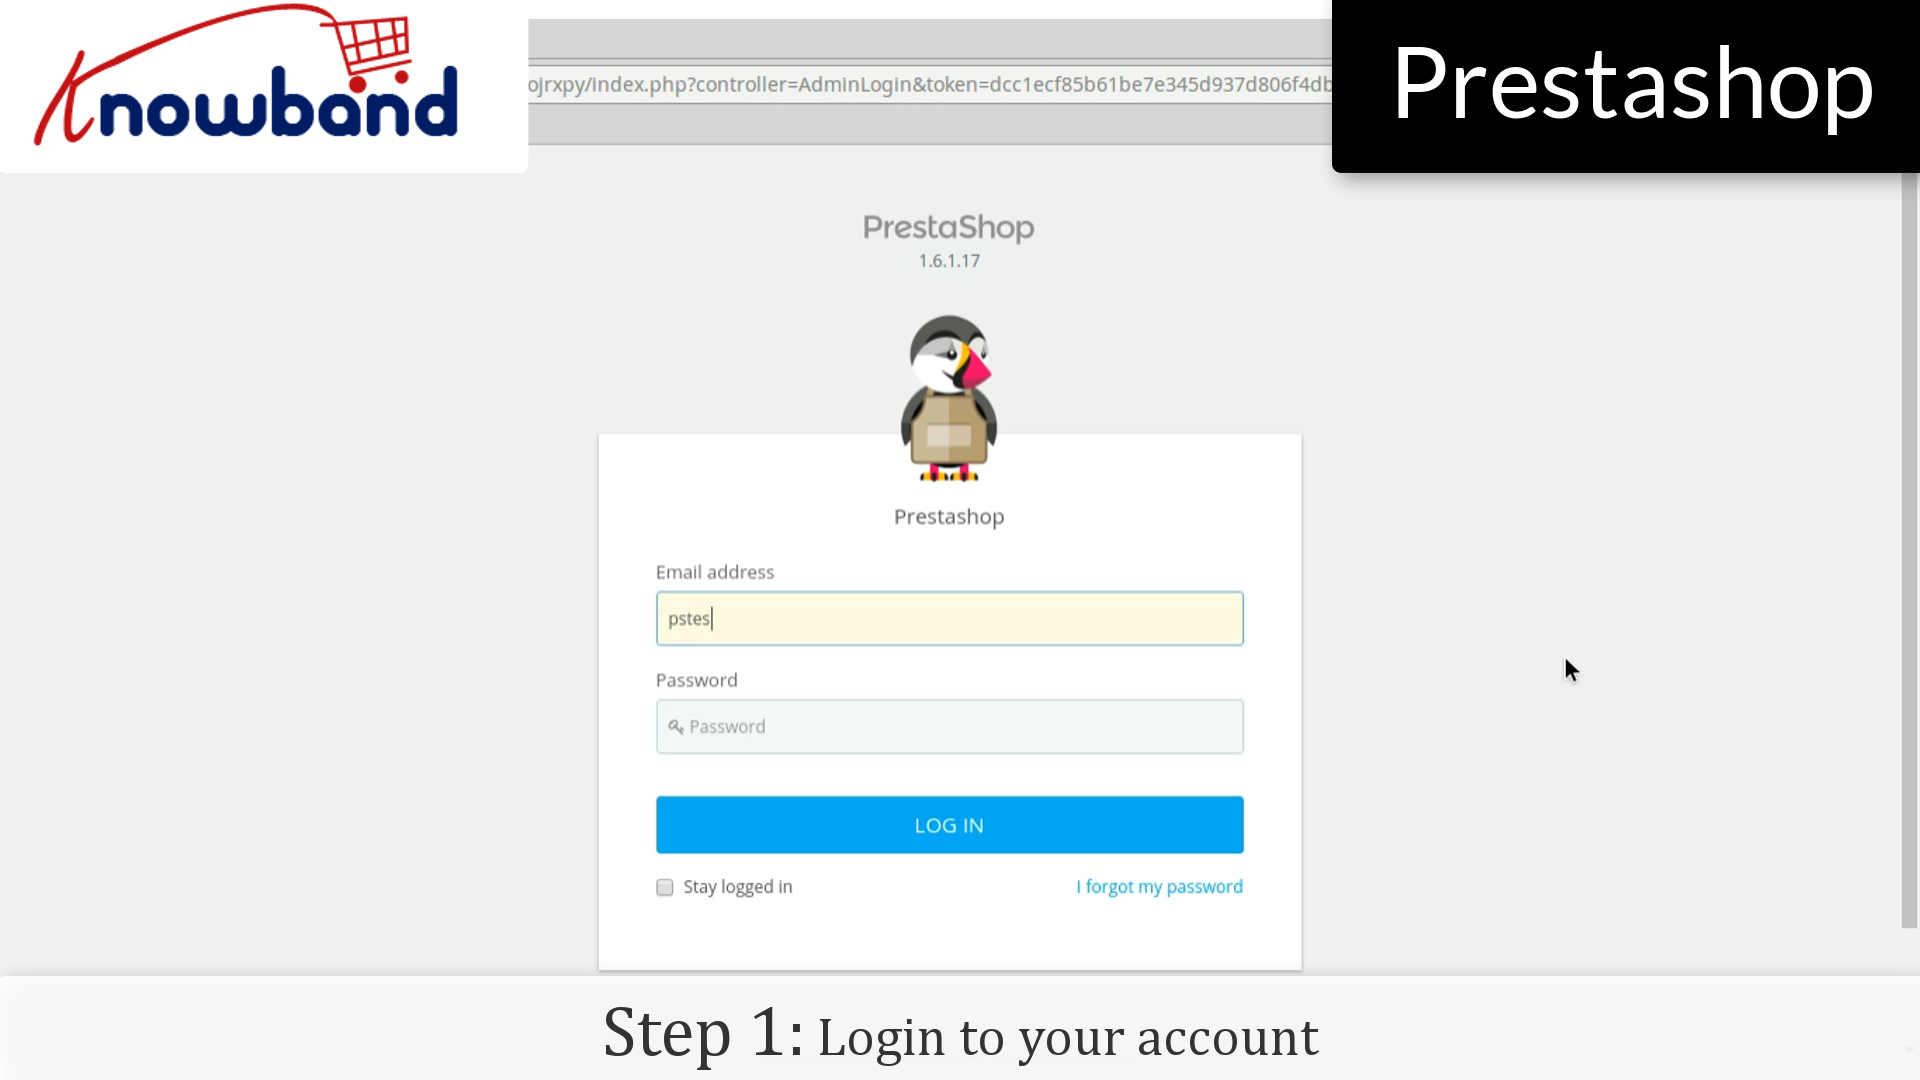
Step 1: Login to your admin panel.
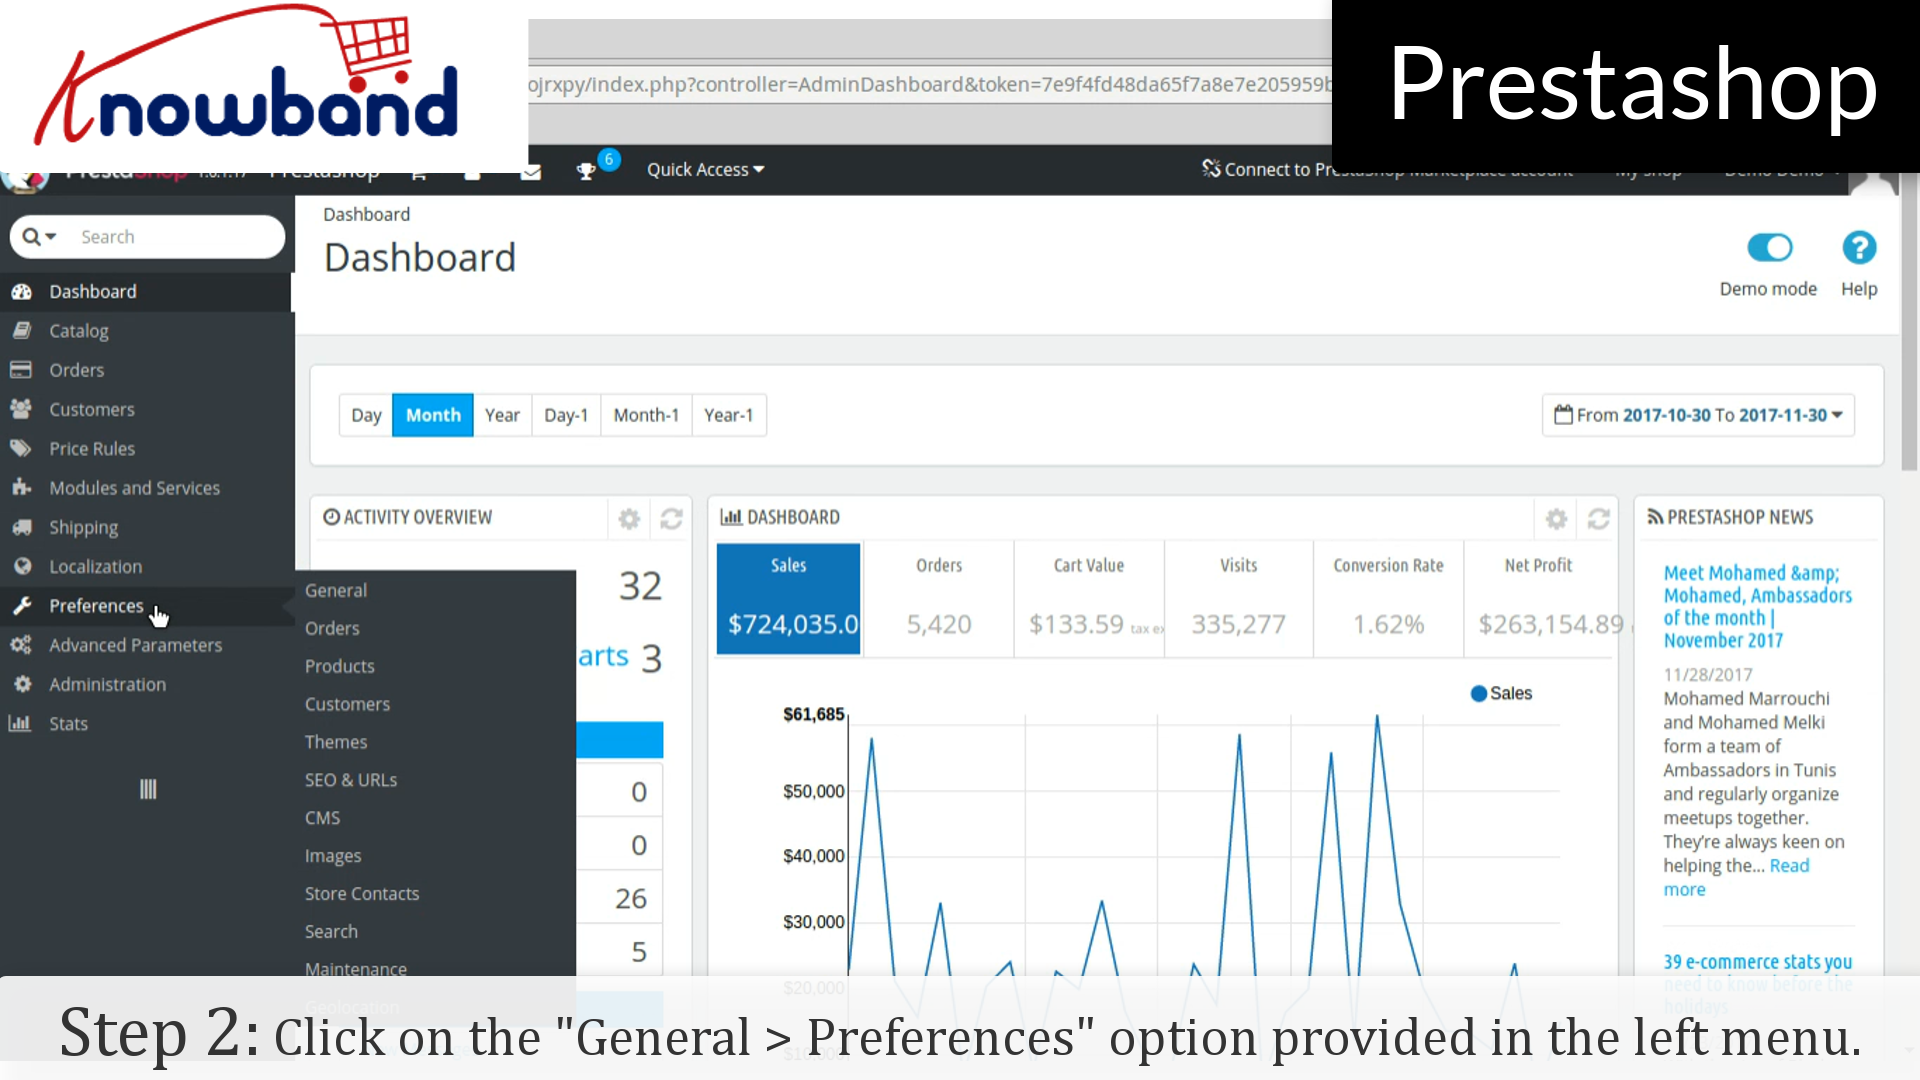
Step 2: After you have successfully logged in, click on the Preferences->General option provided in the left menu.
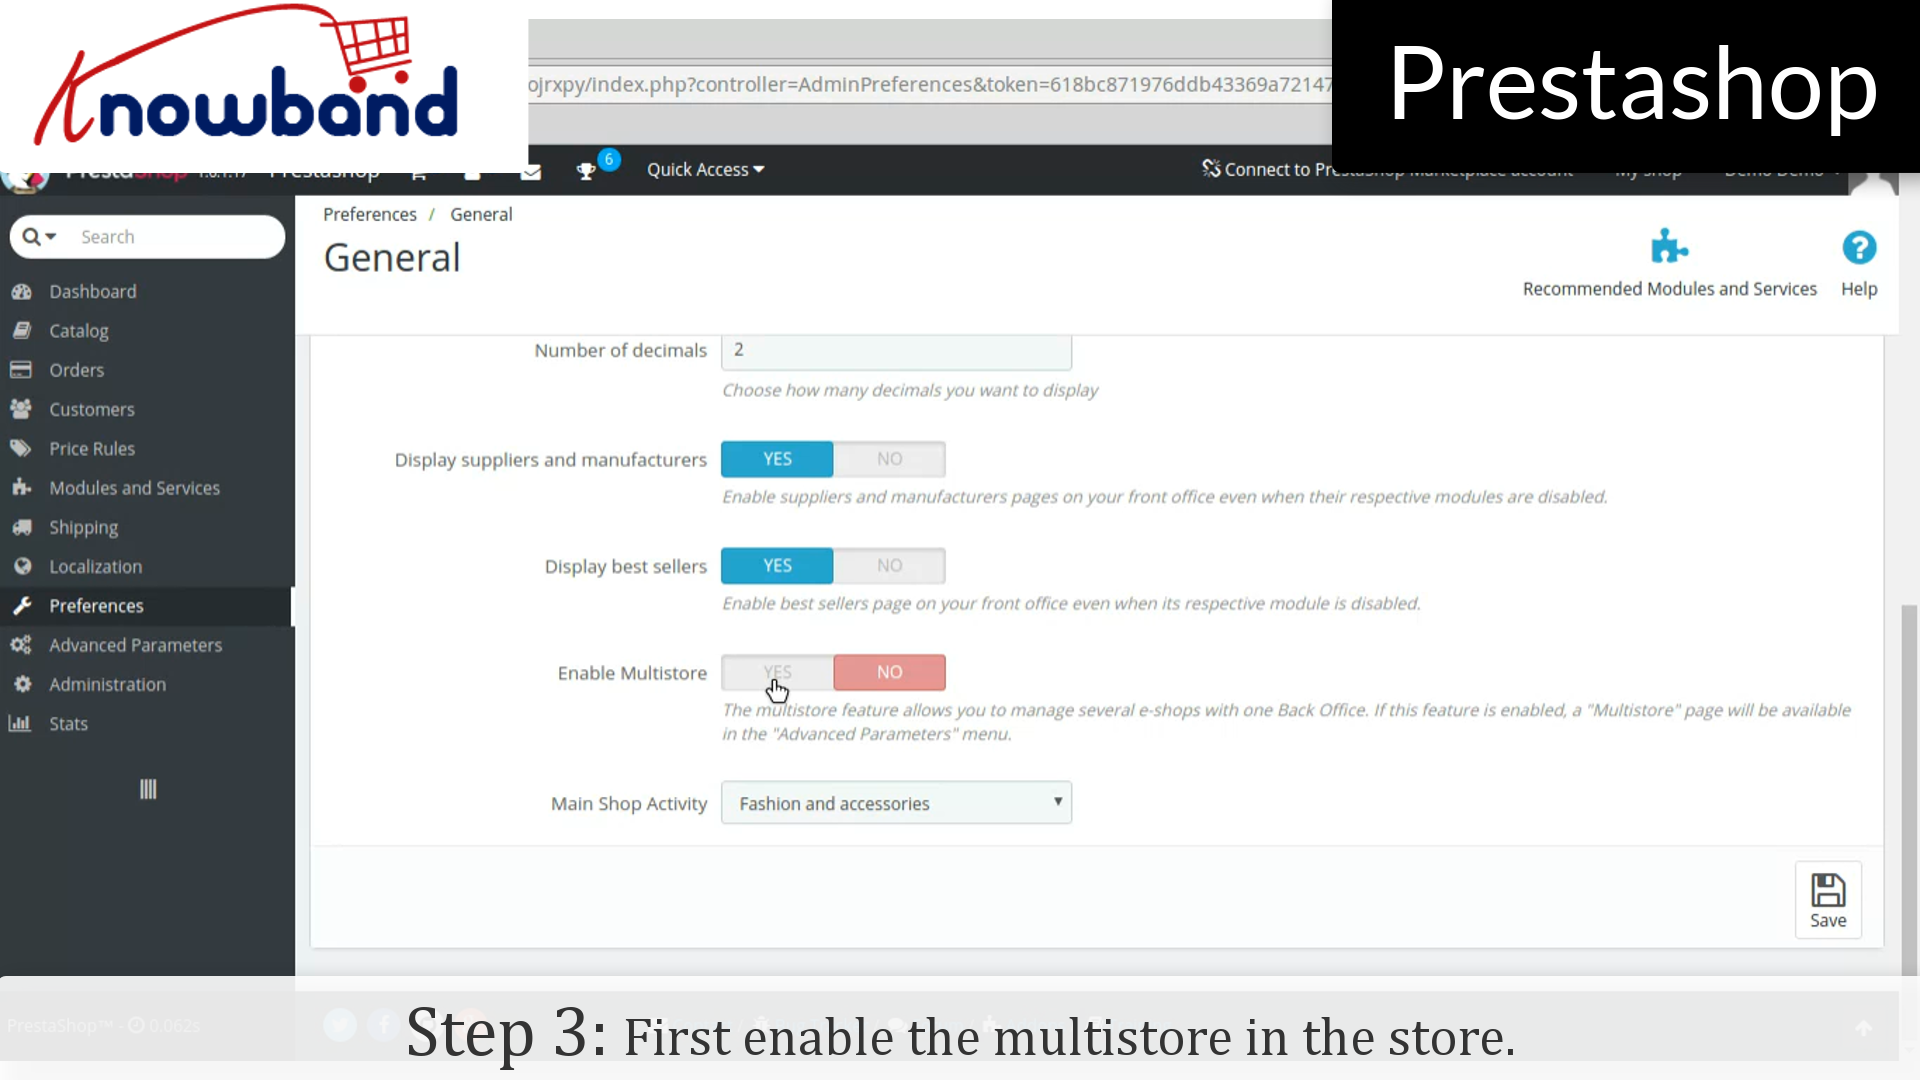
Step 3: Now, enable the Multistore in the store.
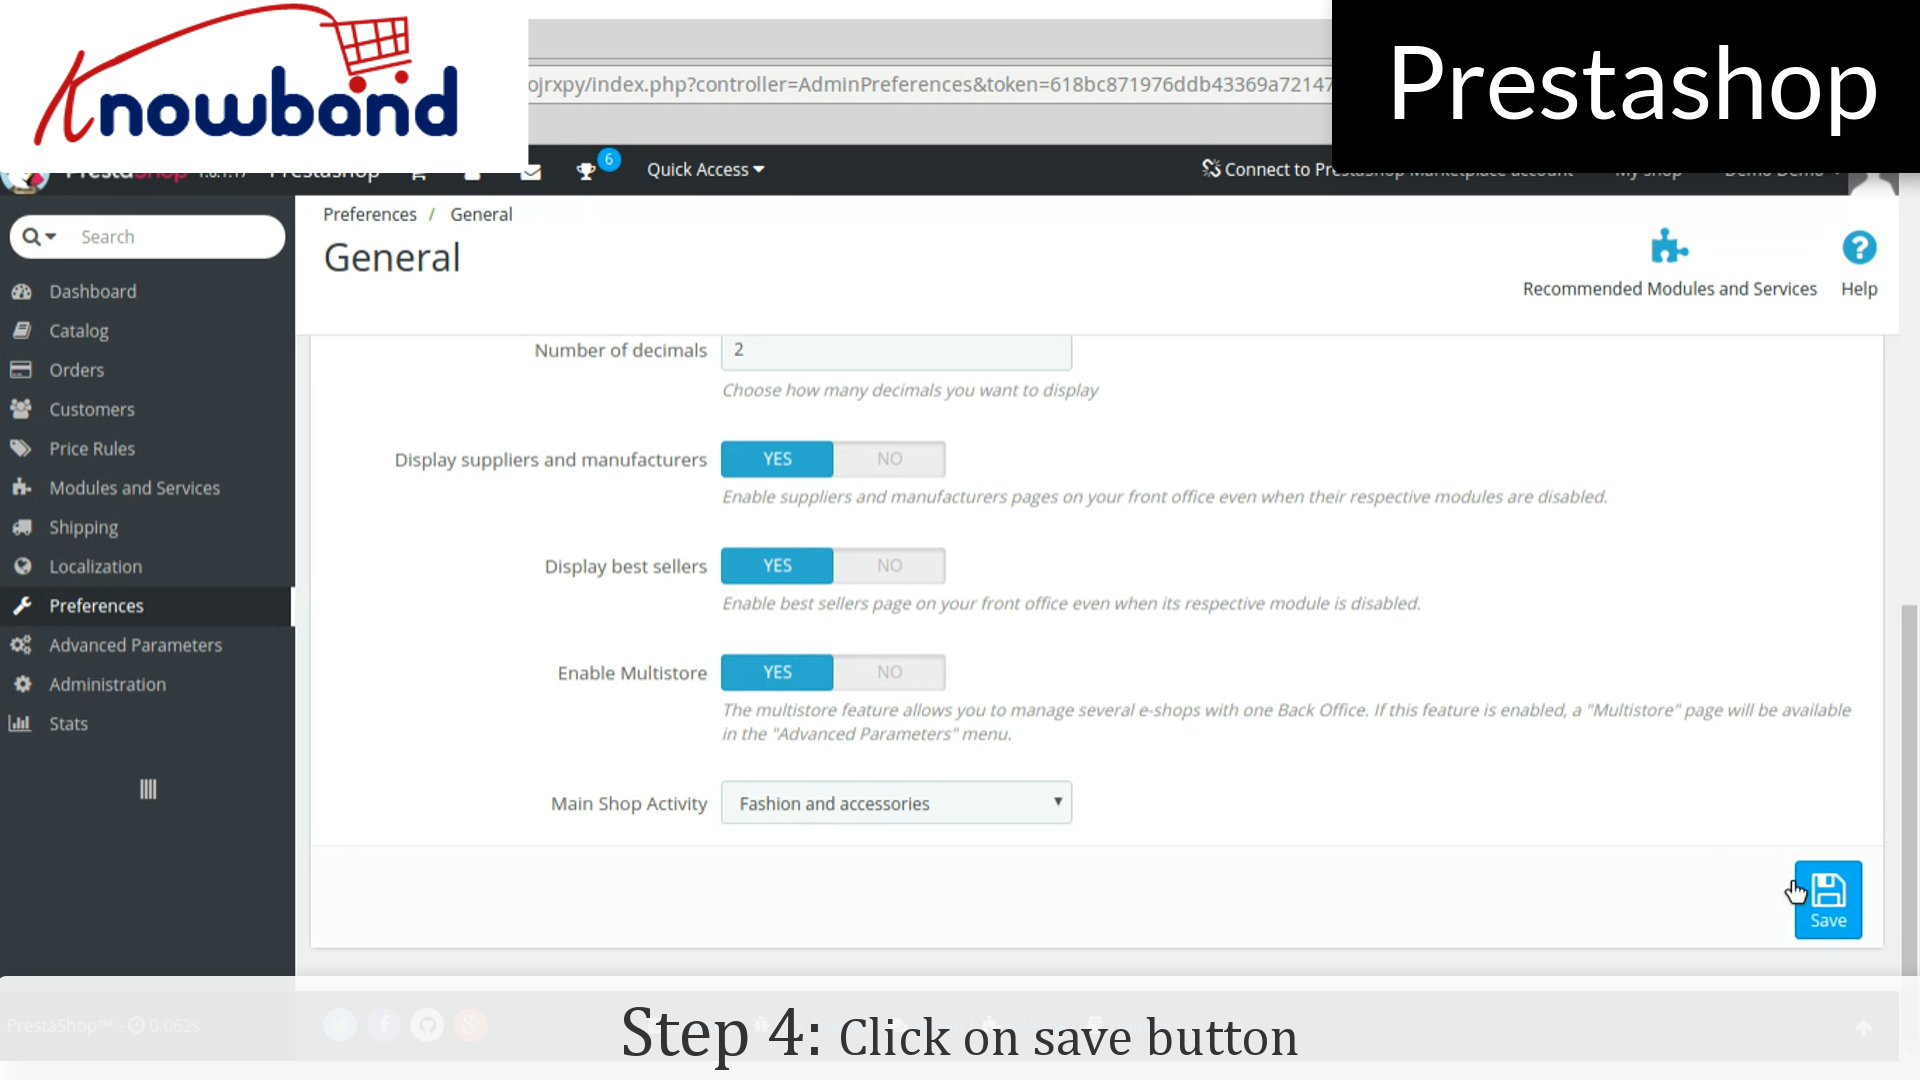
Step 4: Then, click on the save button.
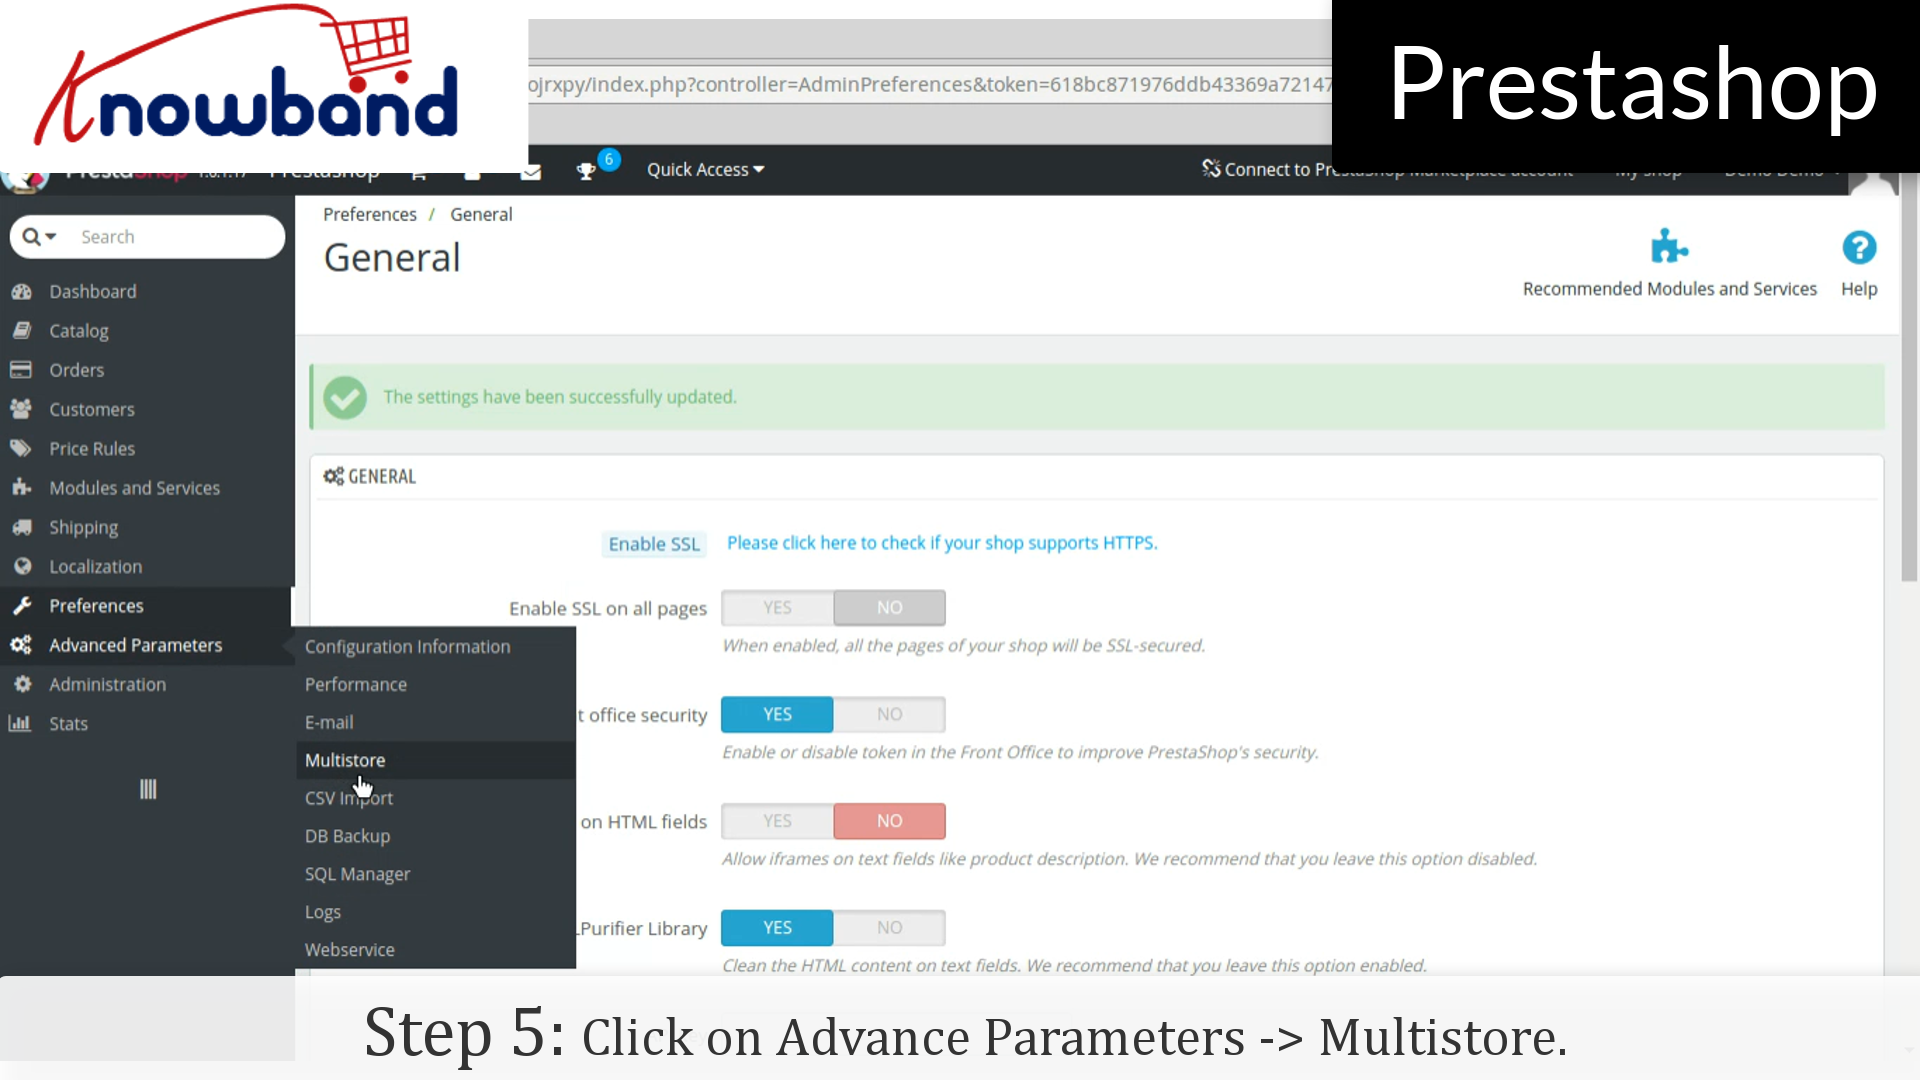
Step 5: After that, click on Advance Parameters->Multistore option provided in the left menu and add multistore.
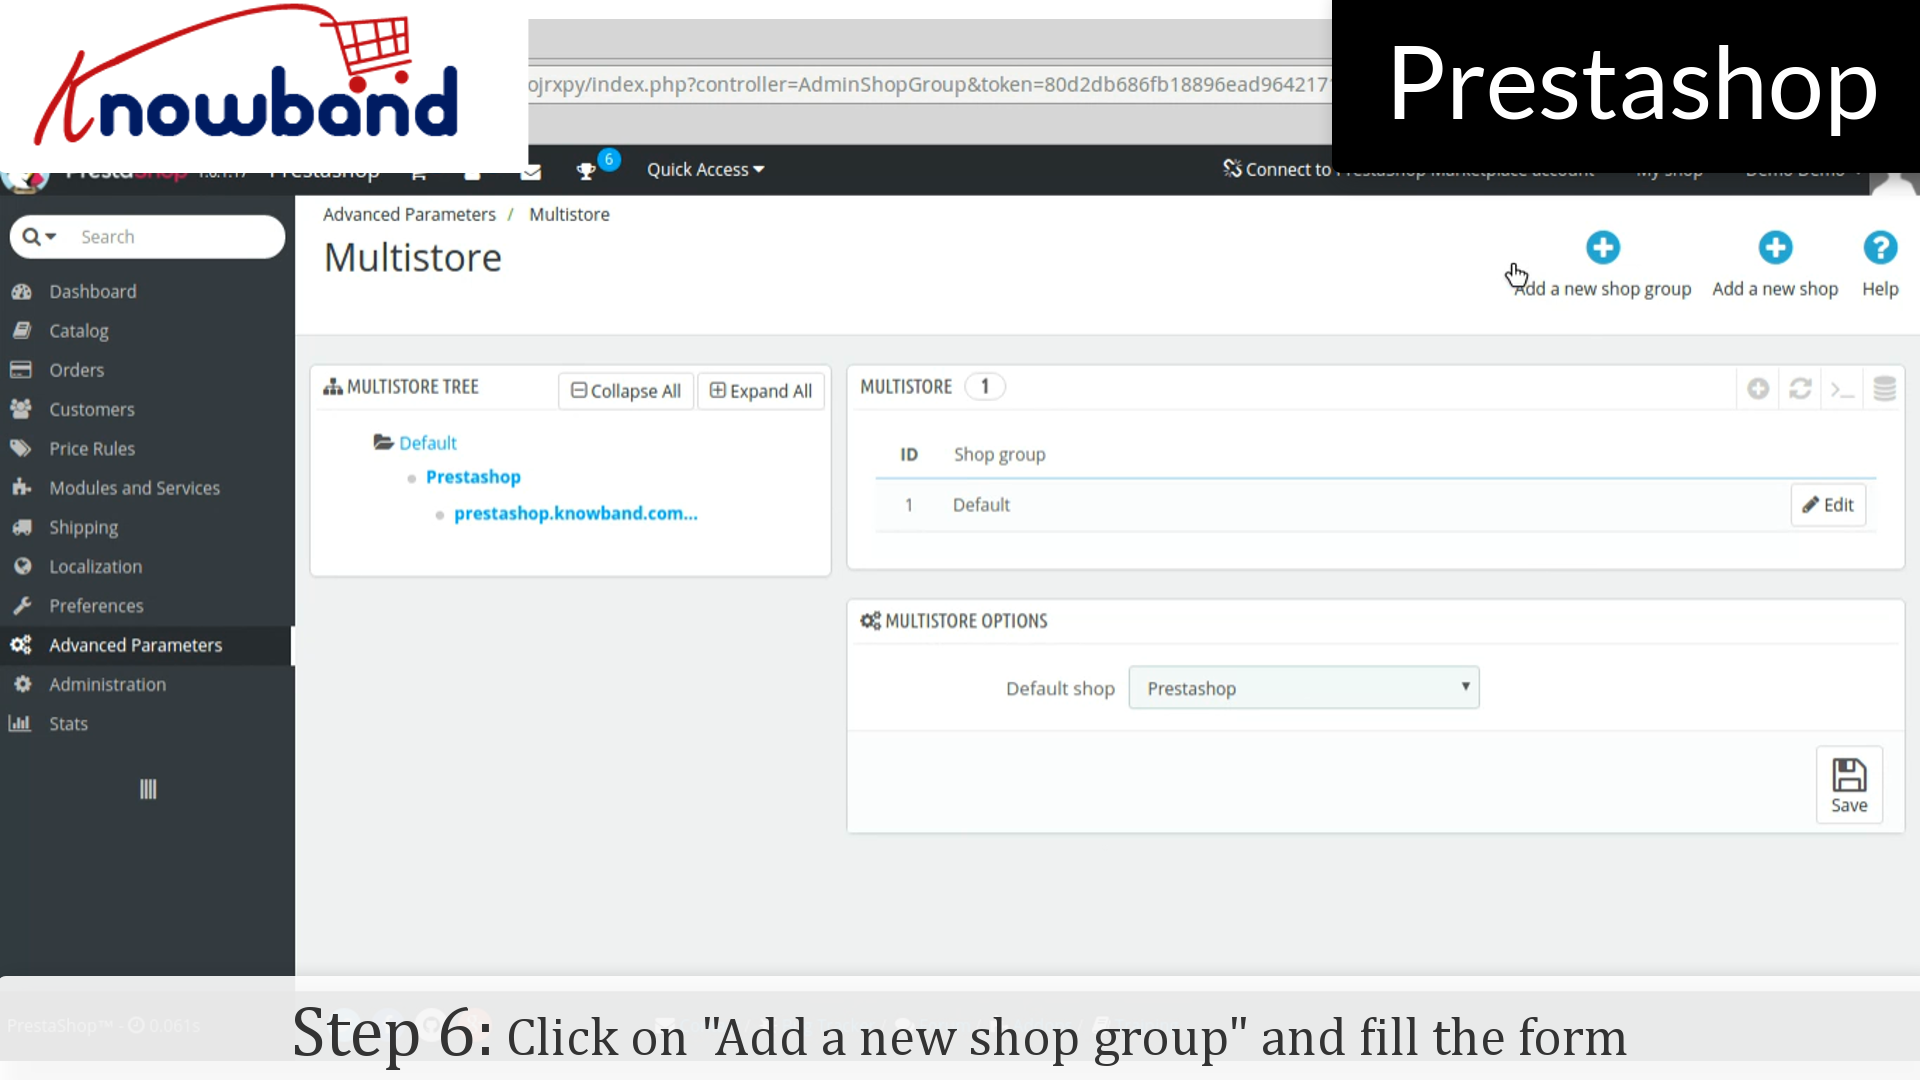
Step 6: Click on “Add a new shop group” button in the top right corner on the dashboard. Fill the form and save the form to create new shop group.
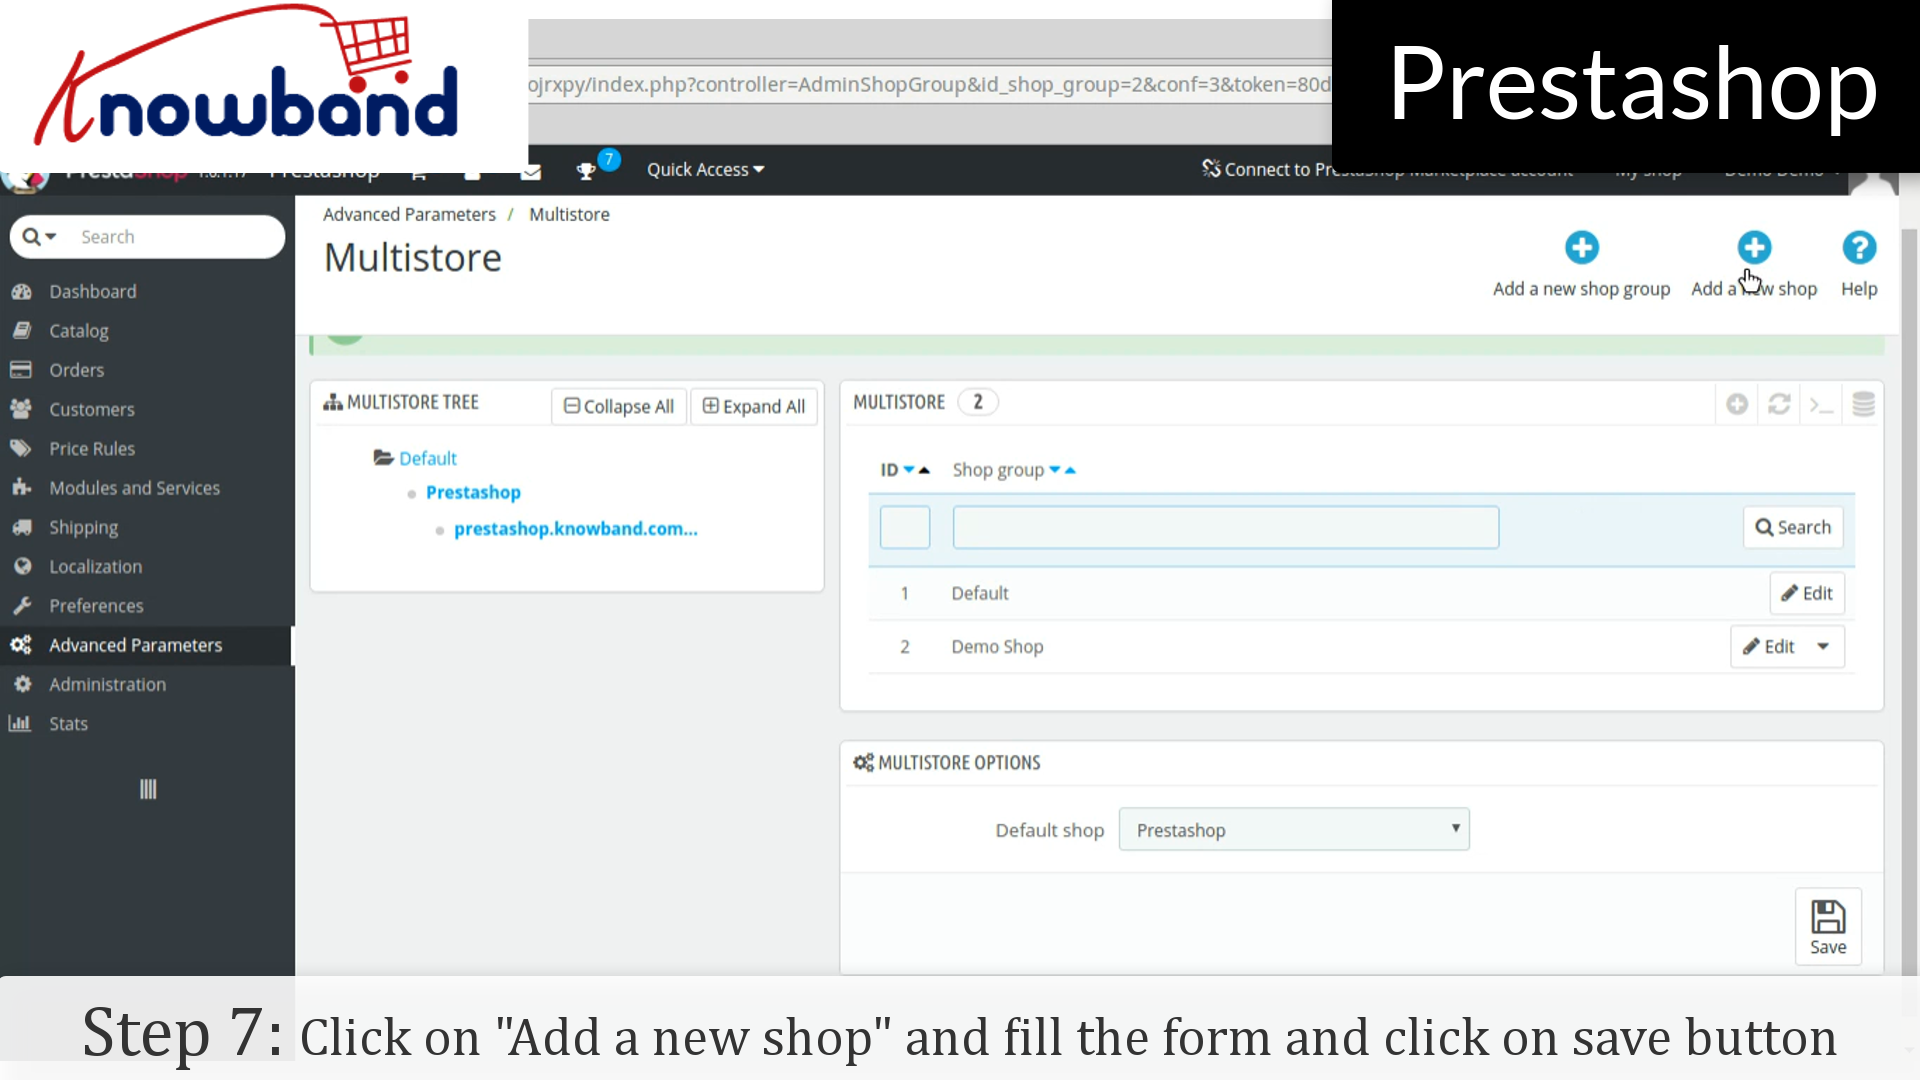
Step 7: After that, click on “Add a new shop” button next to the “Add a new shop group”. Fill the form and click on save button.
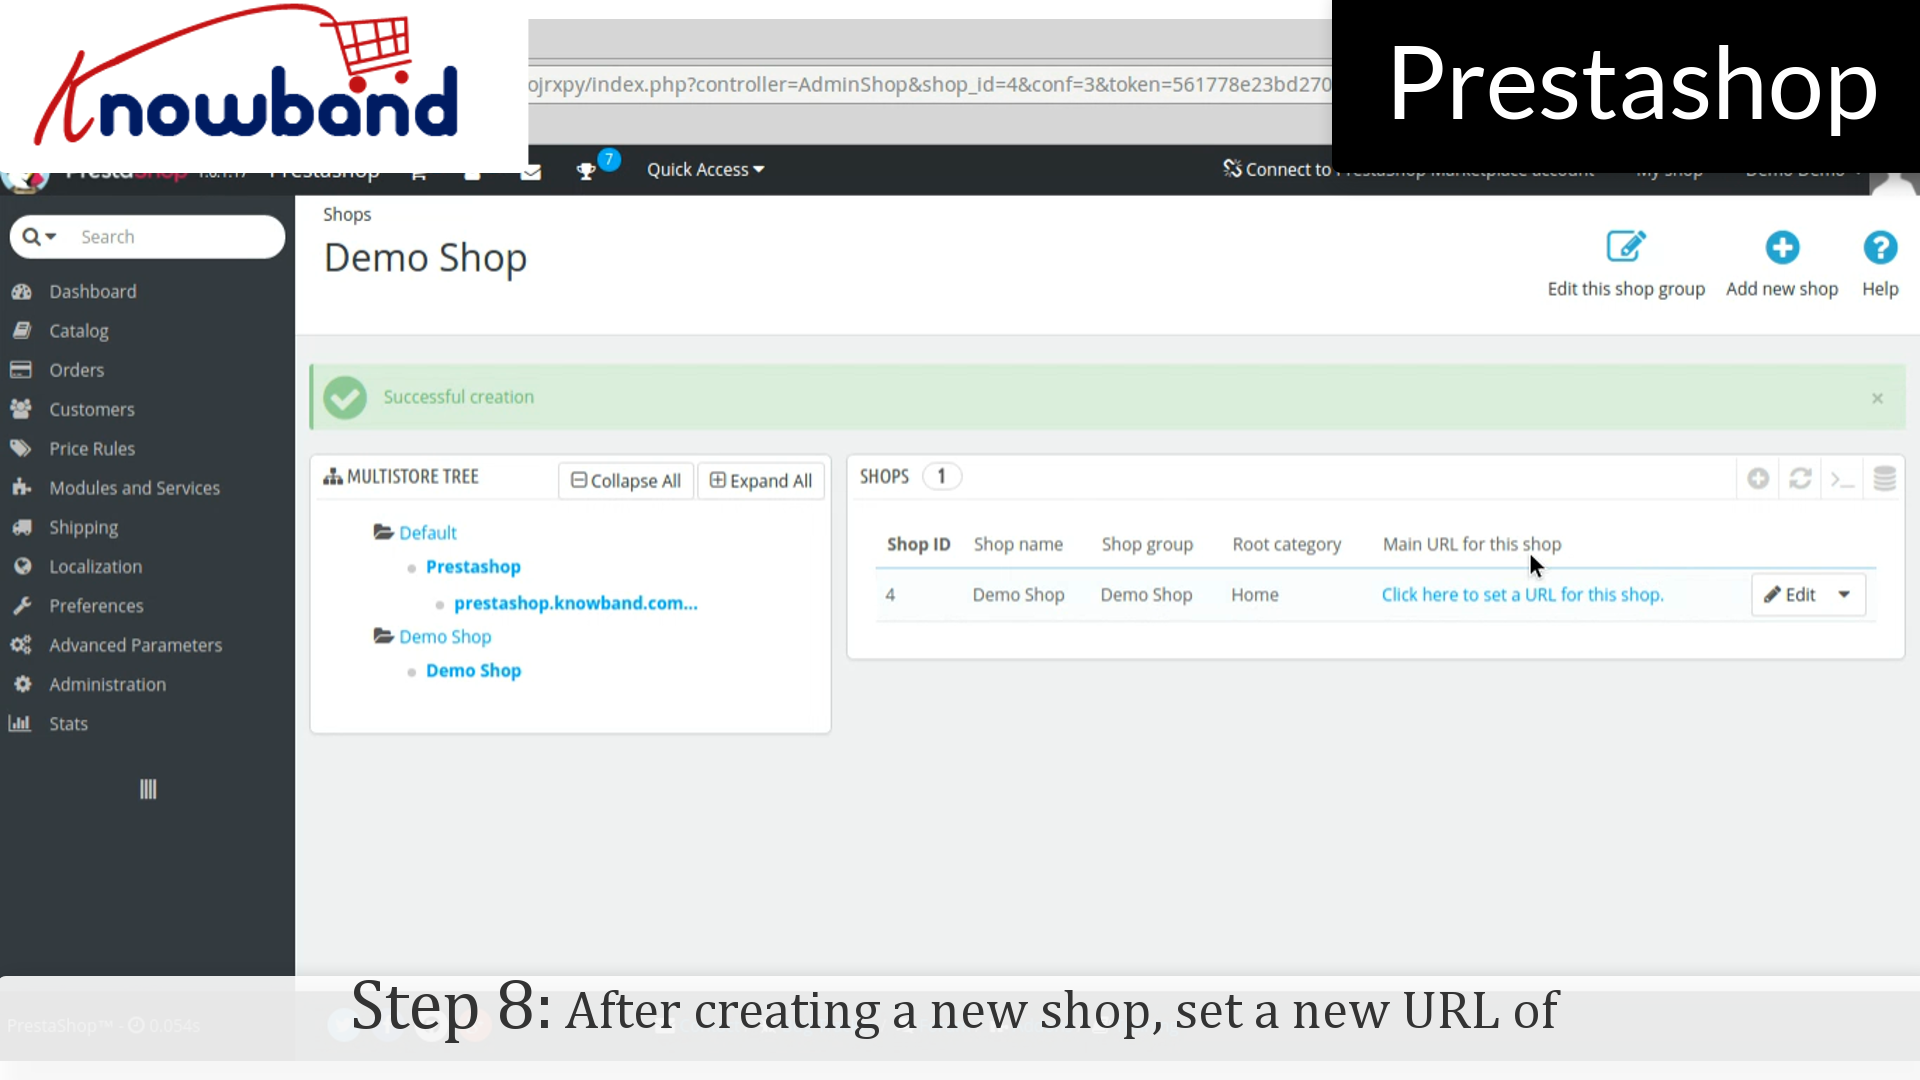
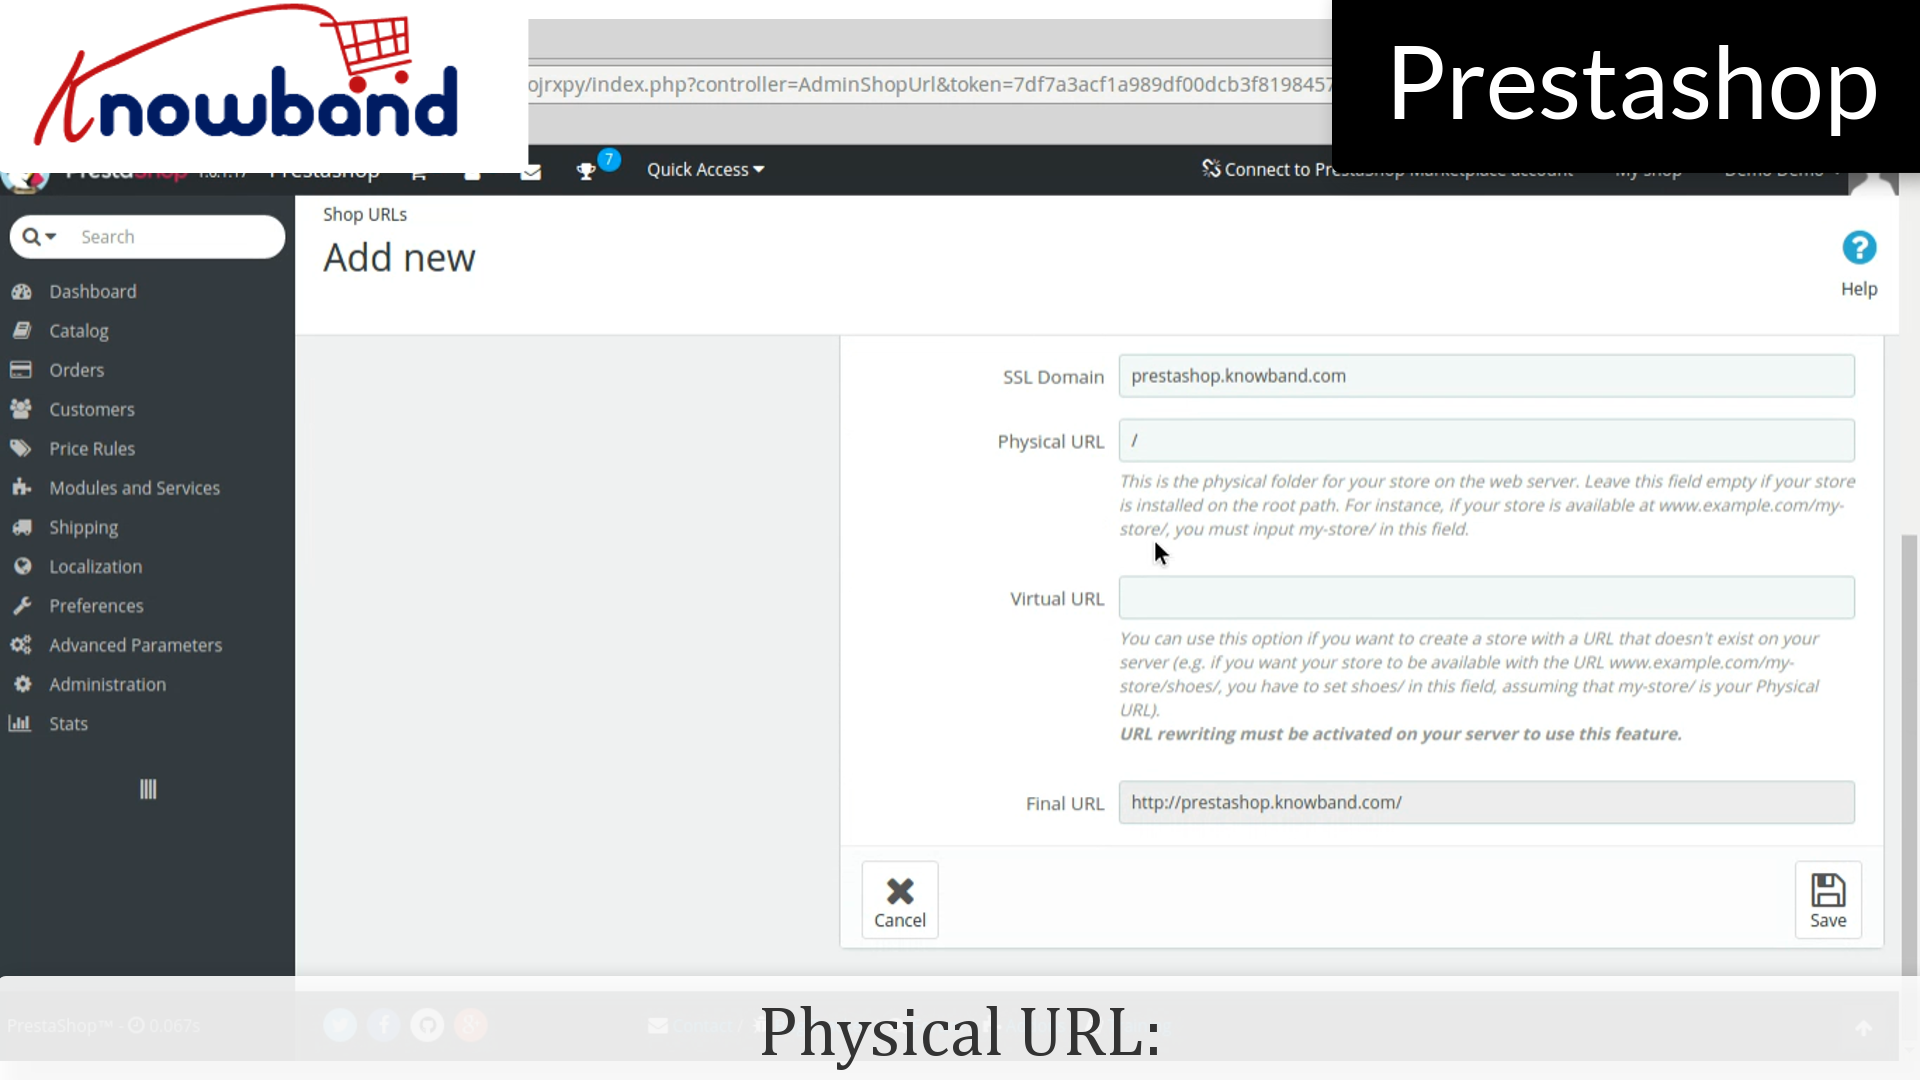
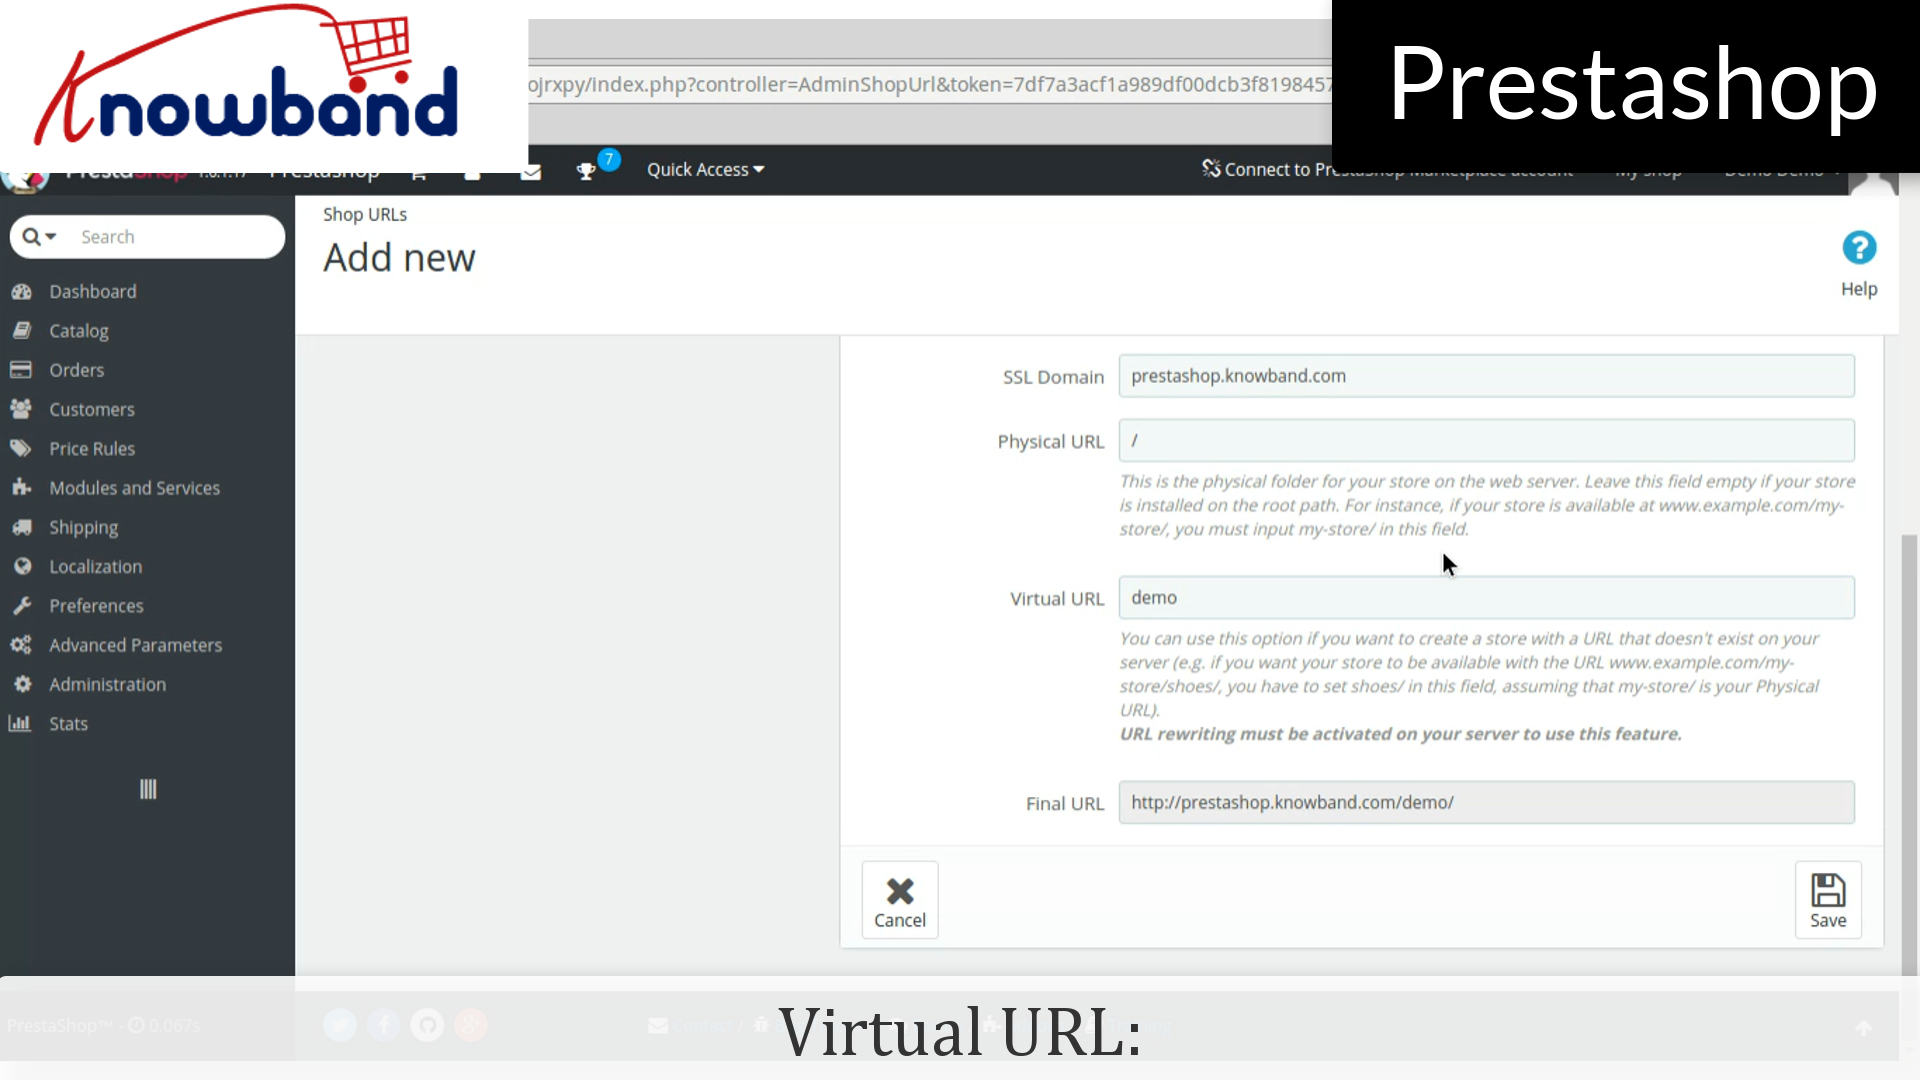
Step 8: After creating a new shop, set a new URL of the shop by clicking on “Click here to set a new URL for this shop”. A new form is open in which enter the desired url.
Physical URI: You must set the physical path to your actual installation on your server. If the shop is at the root of the domain or subdomain, leave this field empty. Example: / or /kids/.
Virtual URI: URL rewriting must be enabled in PrestaShop (meaning Friendly URLs, Preferences->SEO & URLs). Example: /shoes/. Note that this only works for subfolder shops, not subdomain shops.
If 404 error is occured then, enable mod_rewrite.
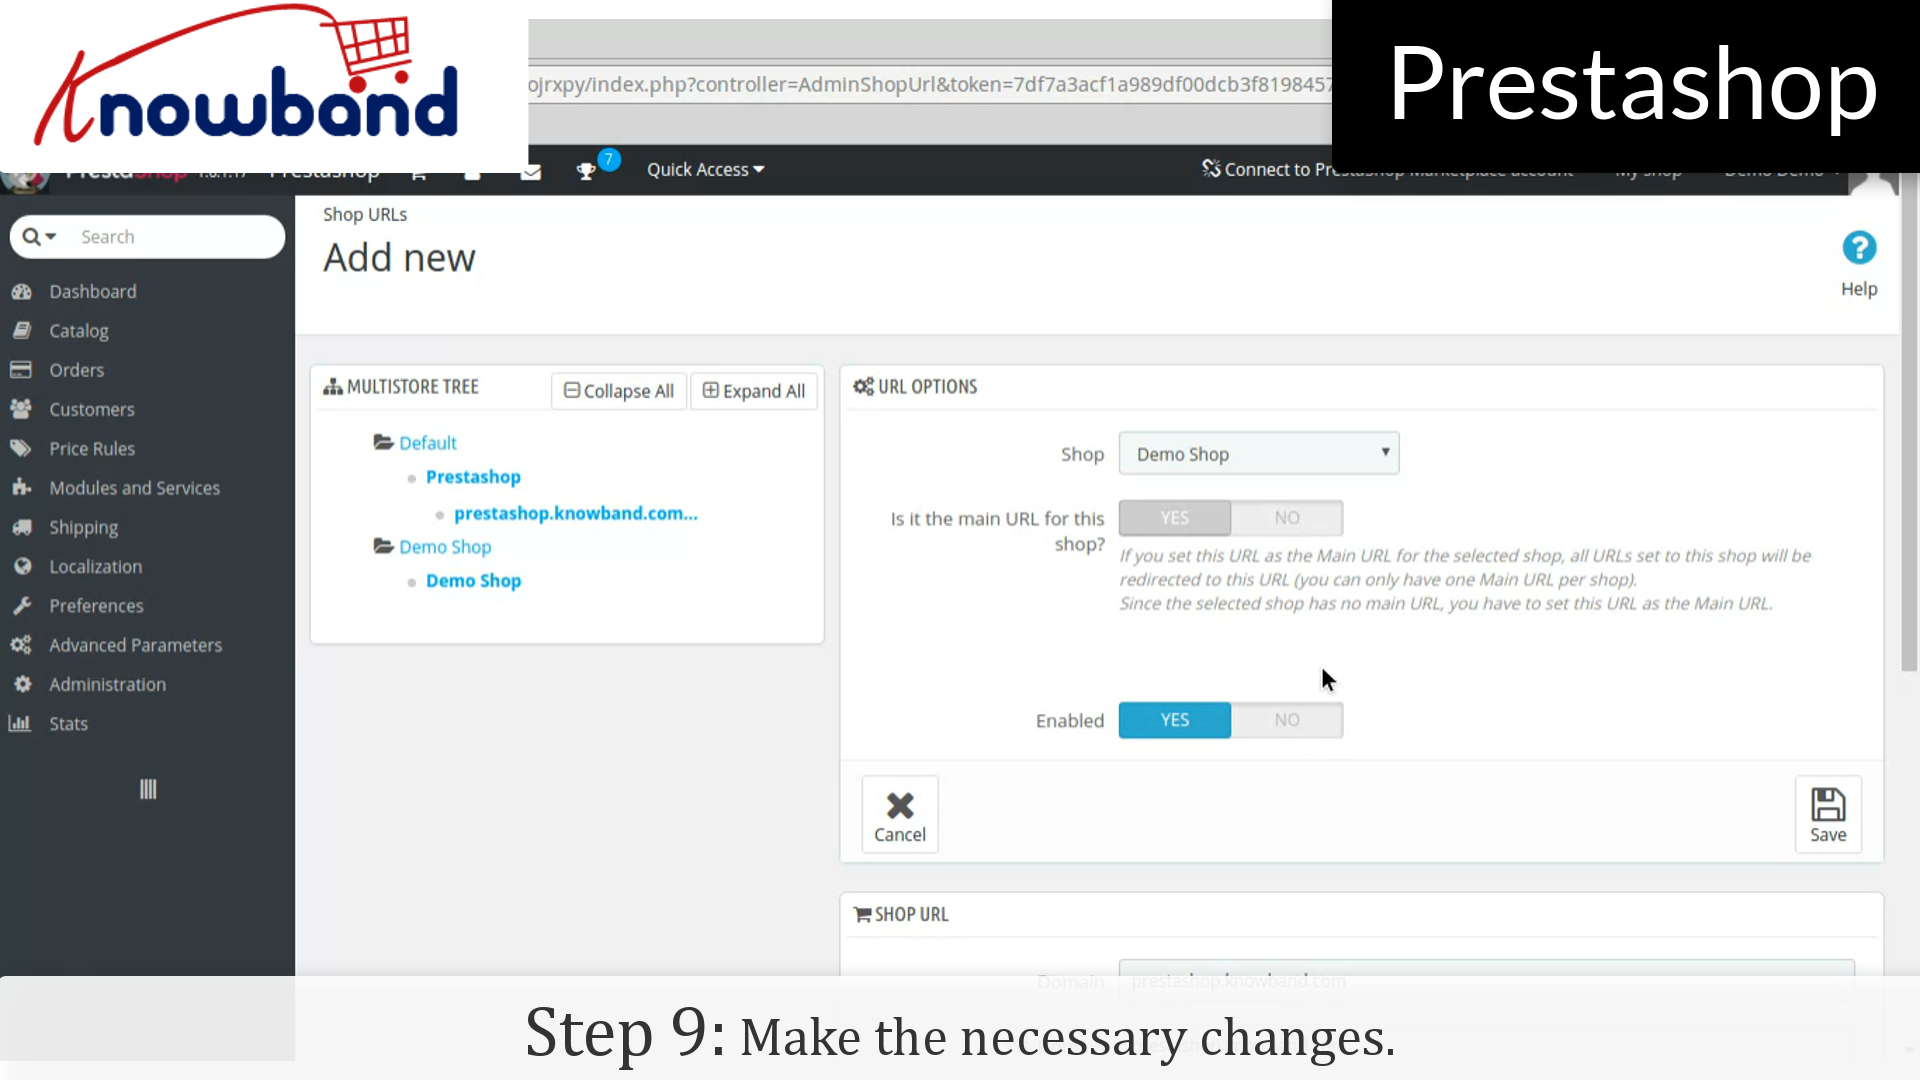
Step 9: Make the necessary changes.
That’s it, now you can manage the multiple store just following the above mentioned steps.
Shipping methods is one of the most important factor for the customers when it comes to online shopping. Adding shipping profile in Prestashop store is the easy and simple process. Here’s how you can do it in just a few simple steps:
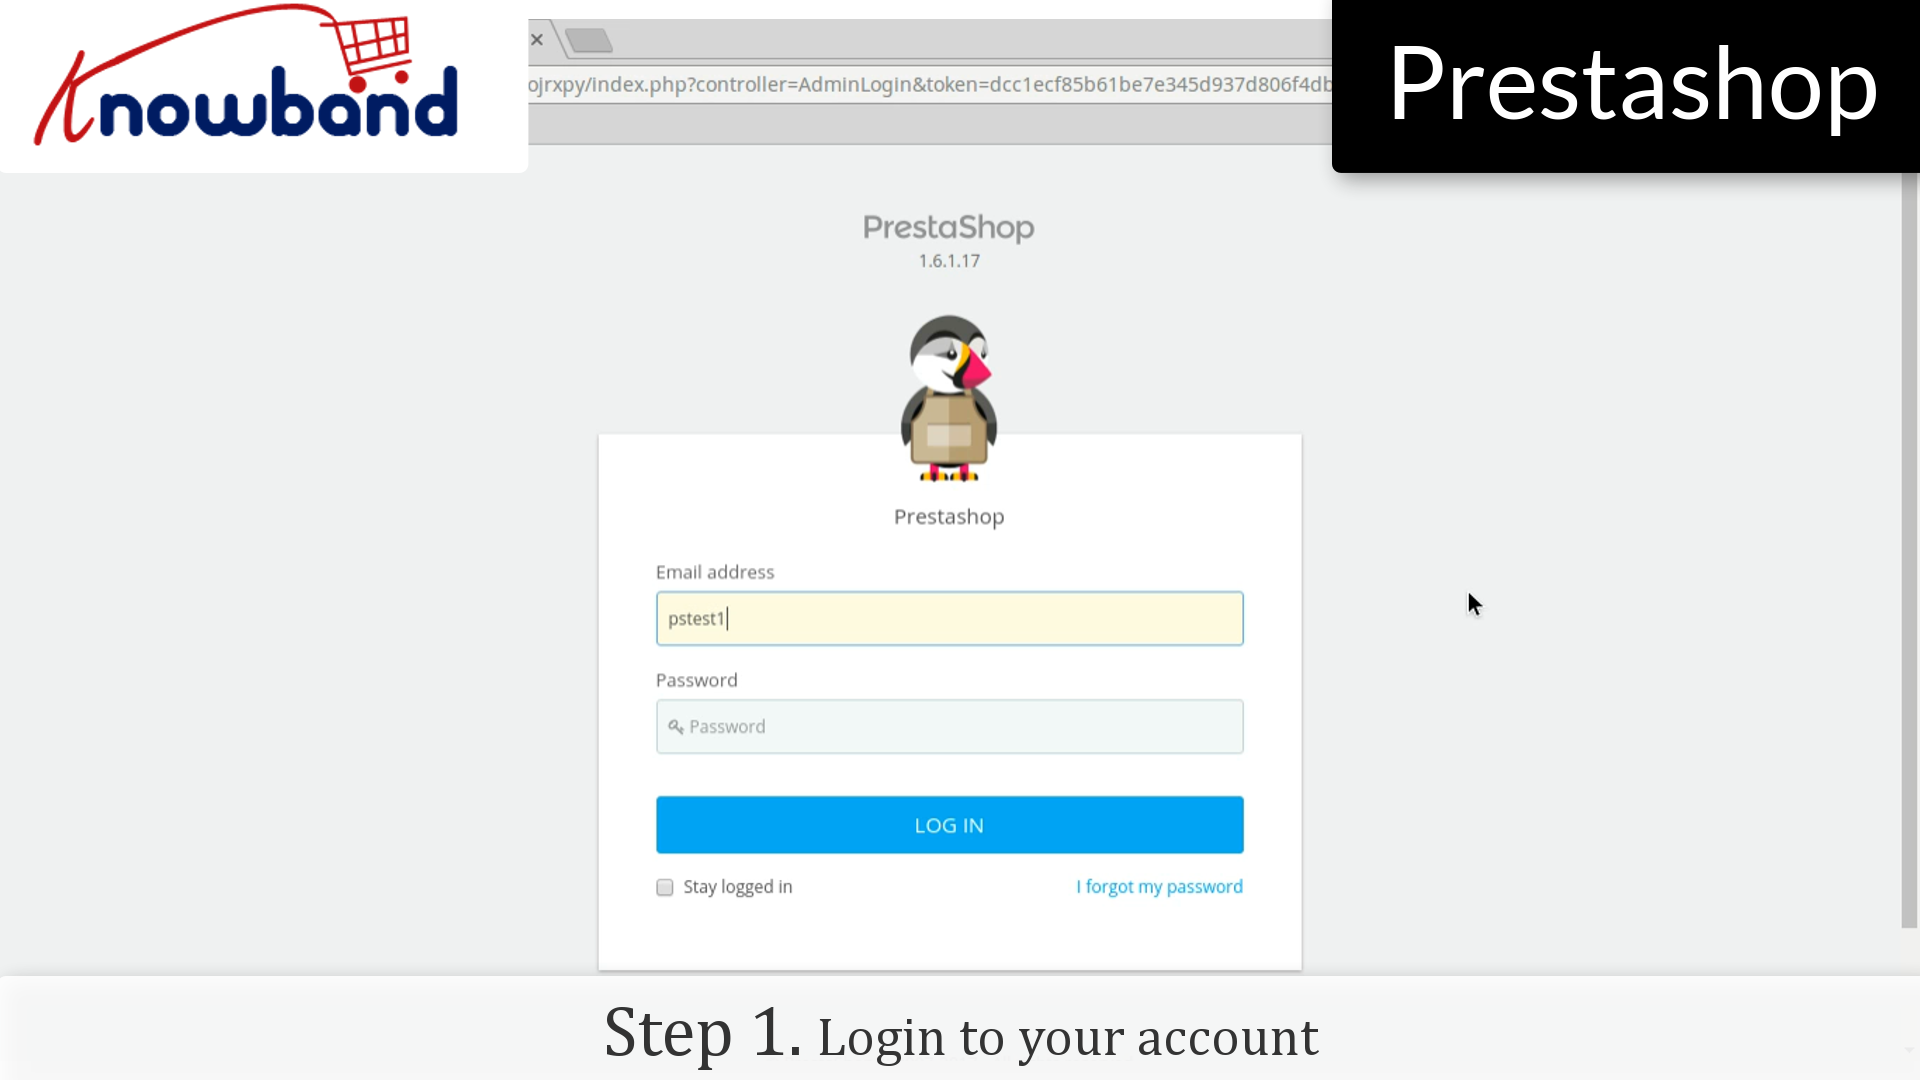
Step 1: Login to your admin panel.
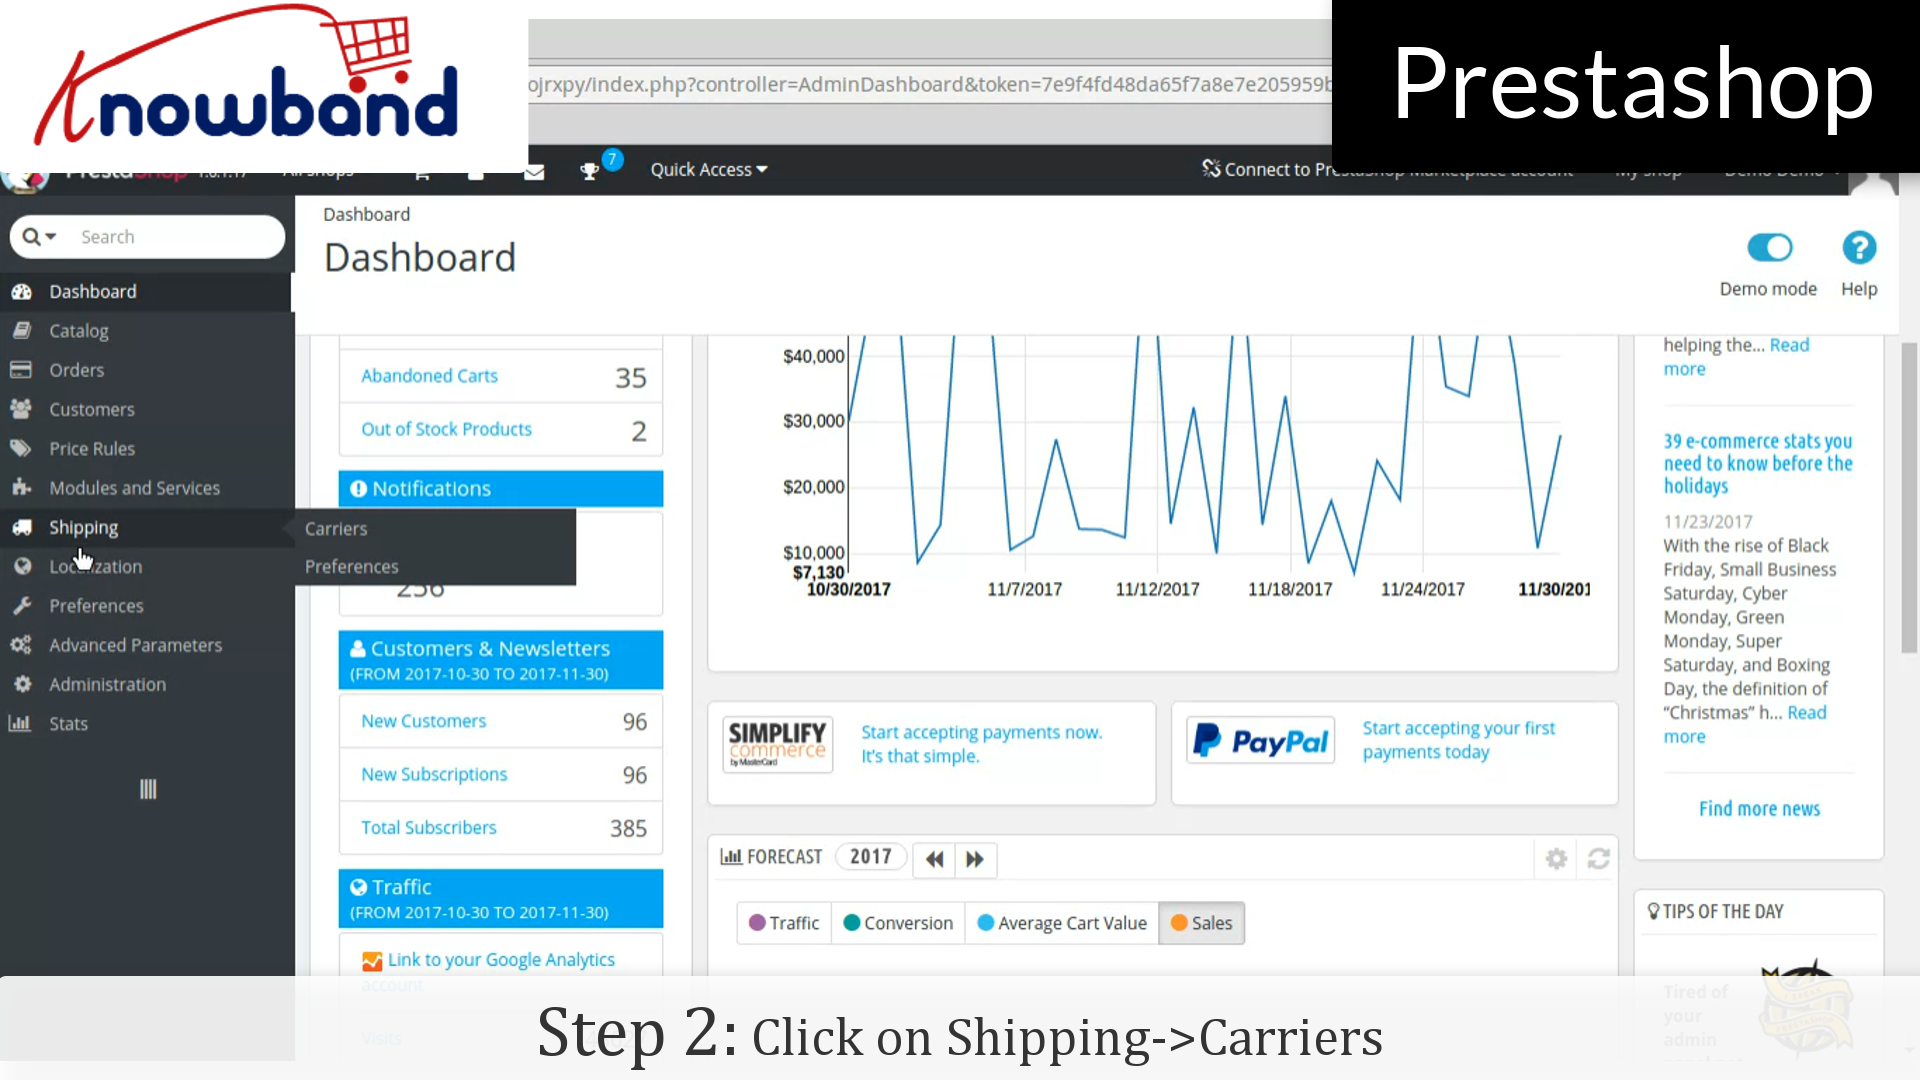
Step 2: After you have successfully logged in, click on the “Shipping->Carriers” option provided in the left menu.
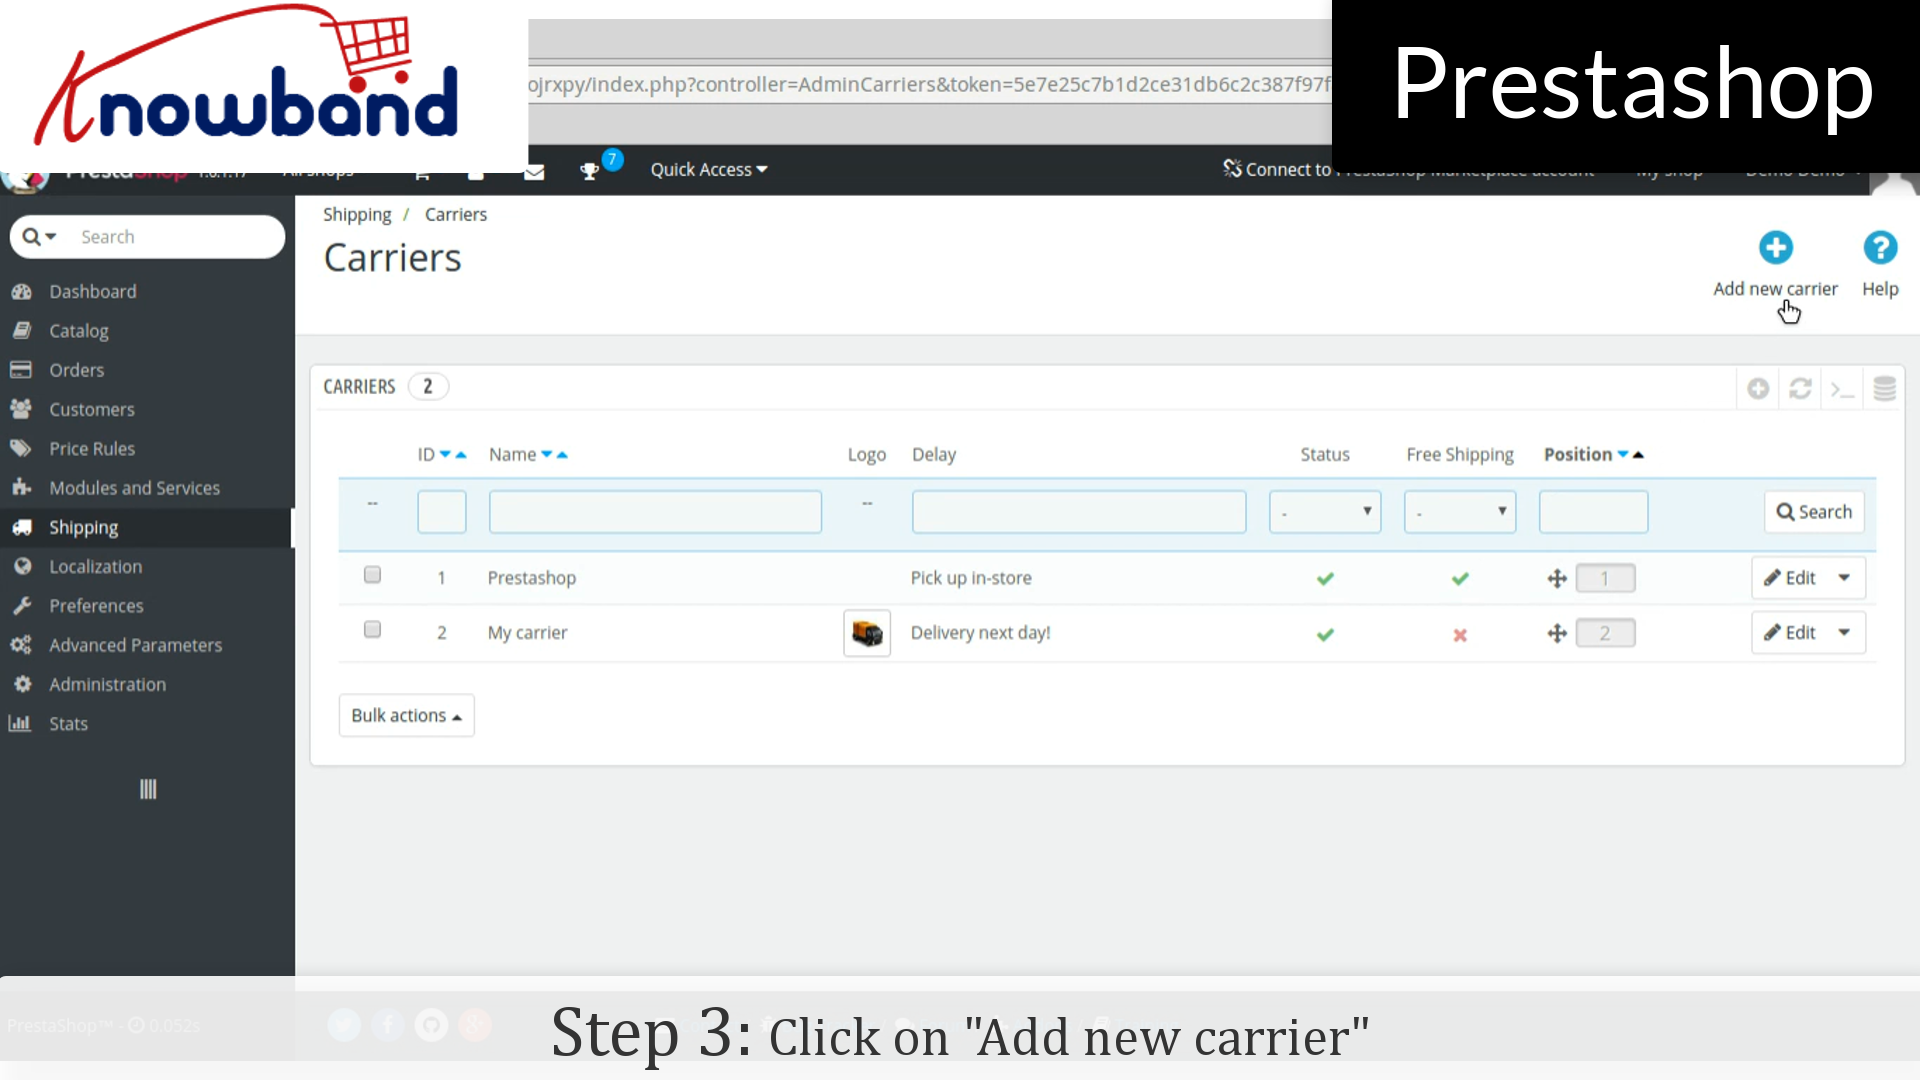
Step 3: After that, click on the “Add new carrier” button in the top right corner of the dashboard.
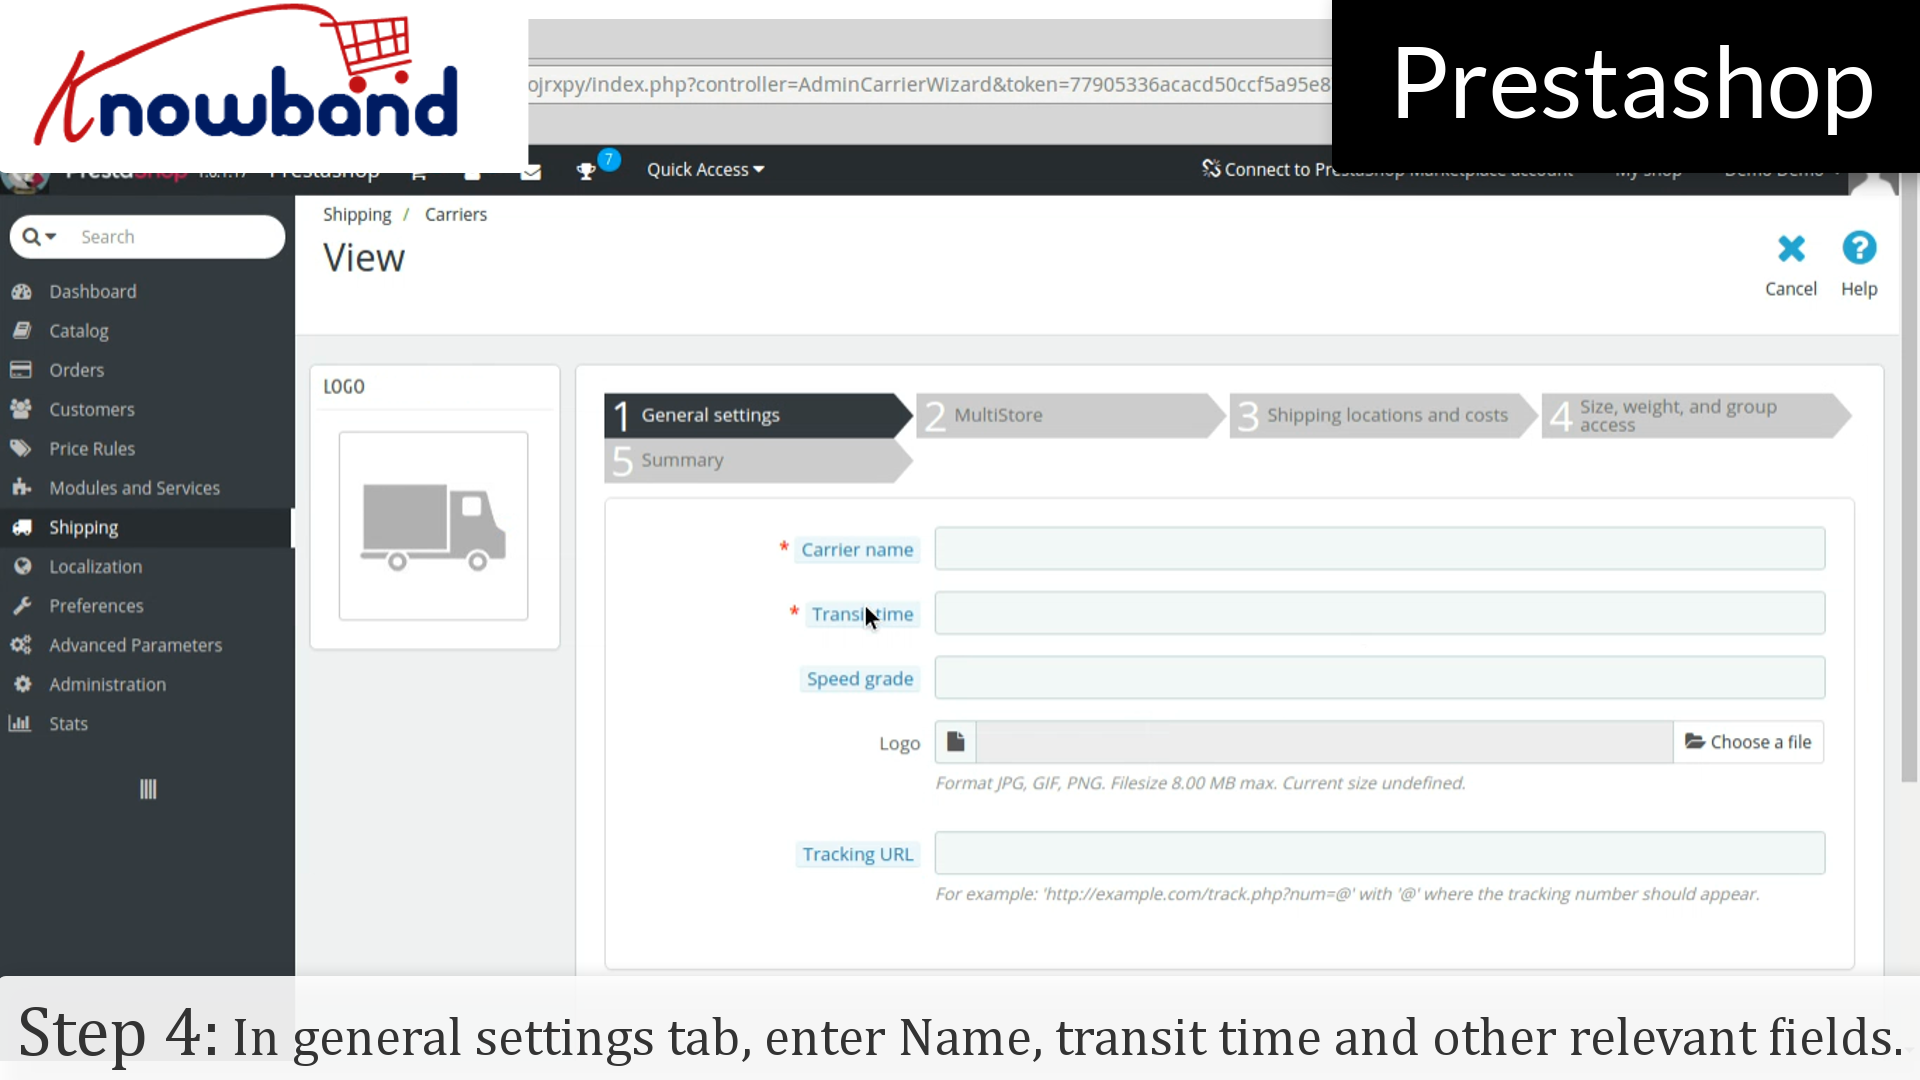
Step 4: In “General Settings” tab, fill out all the required details like Name, Transit time and other relevant fields. Click on the next button.
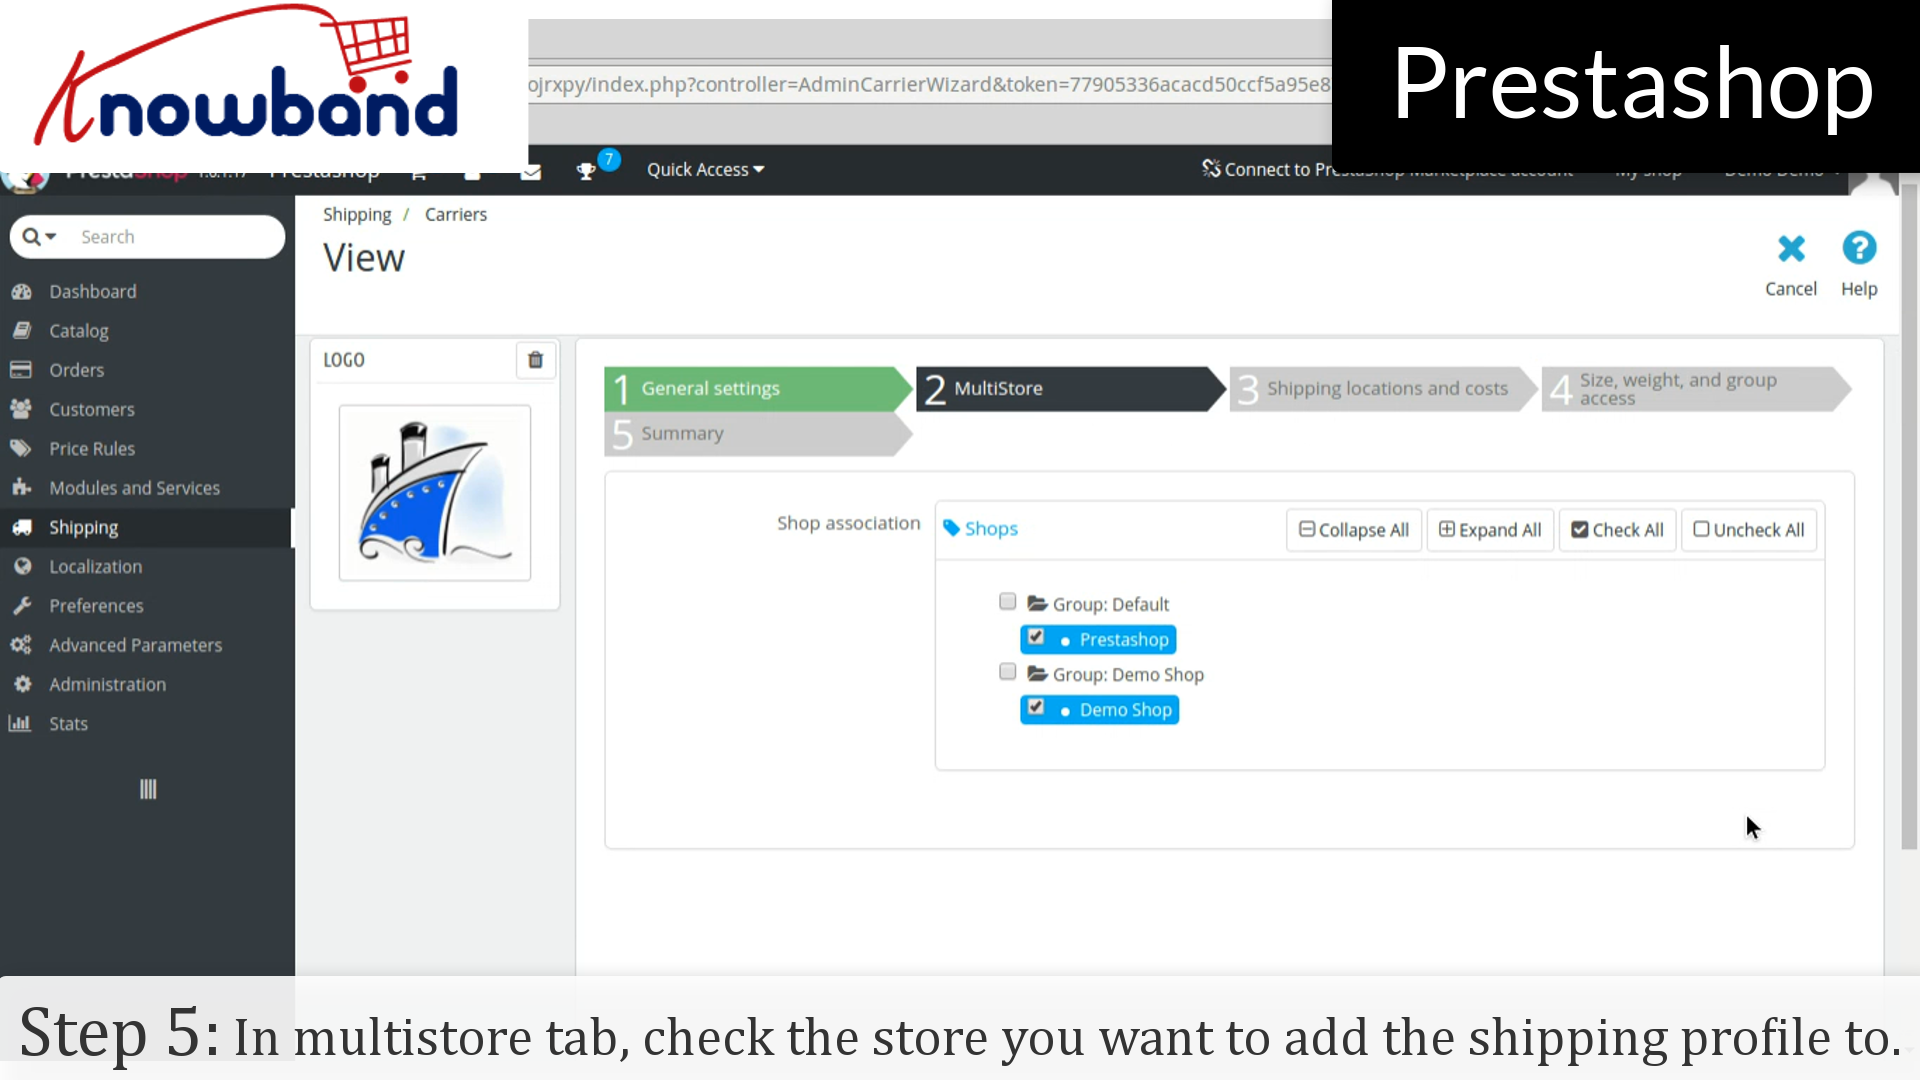
Step 5: In “Multistore” tab, check the store in which you want to add the shipping profile and click on the next button.
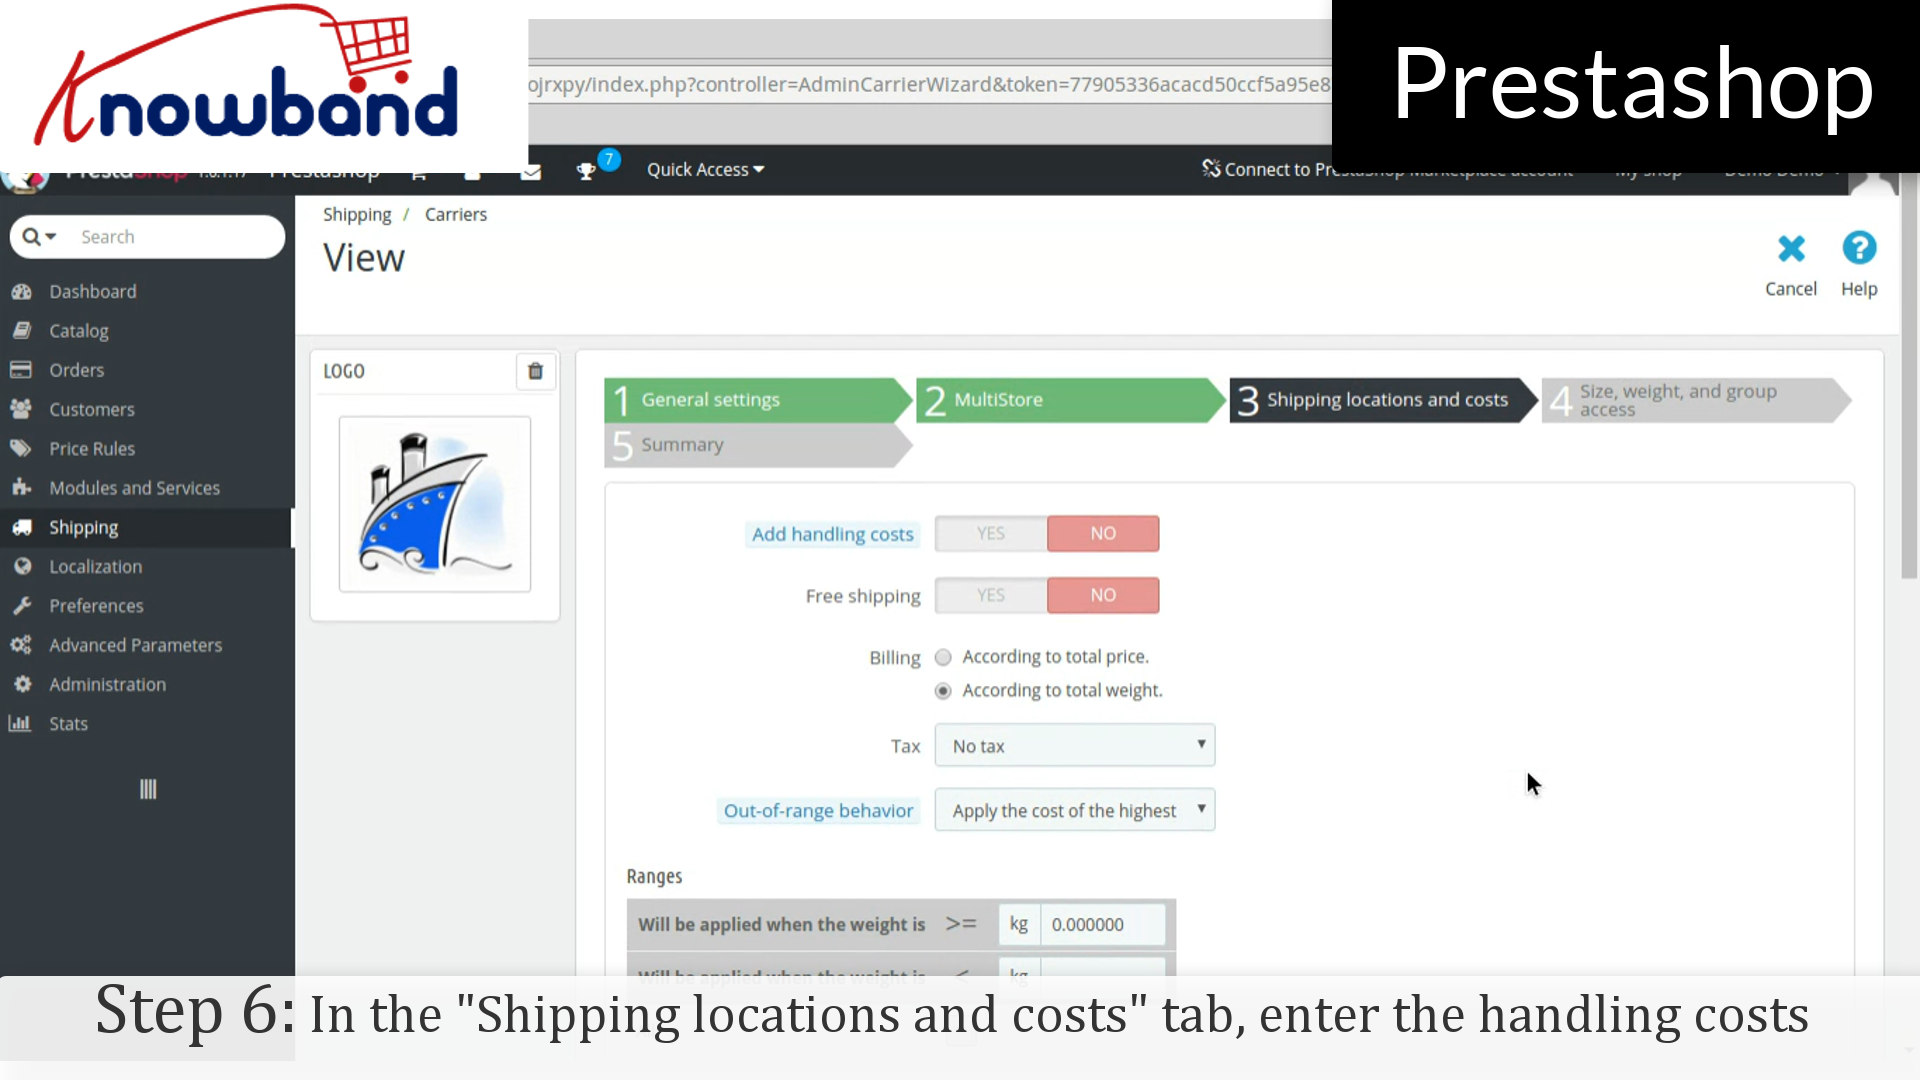
Step 6: In the “Shipping locations and costs” tab, enter the handling costs and other required details and click on the next button.
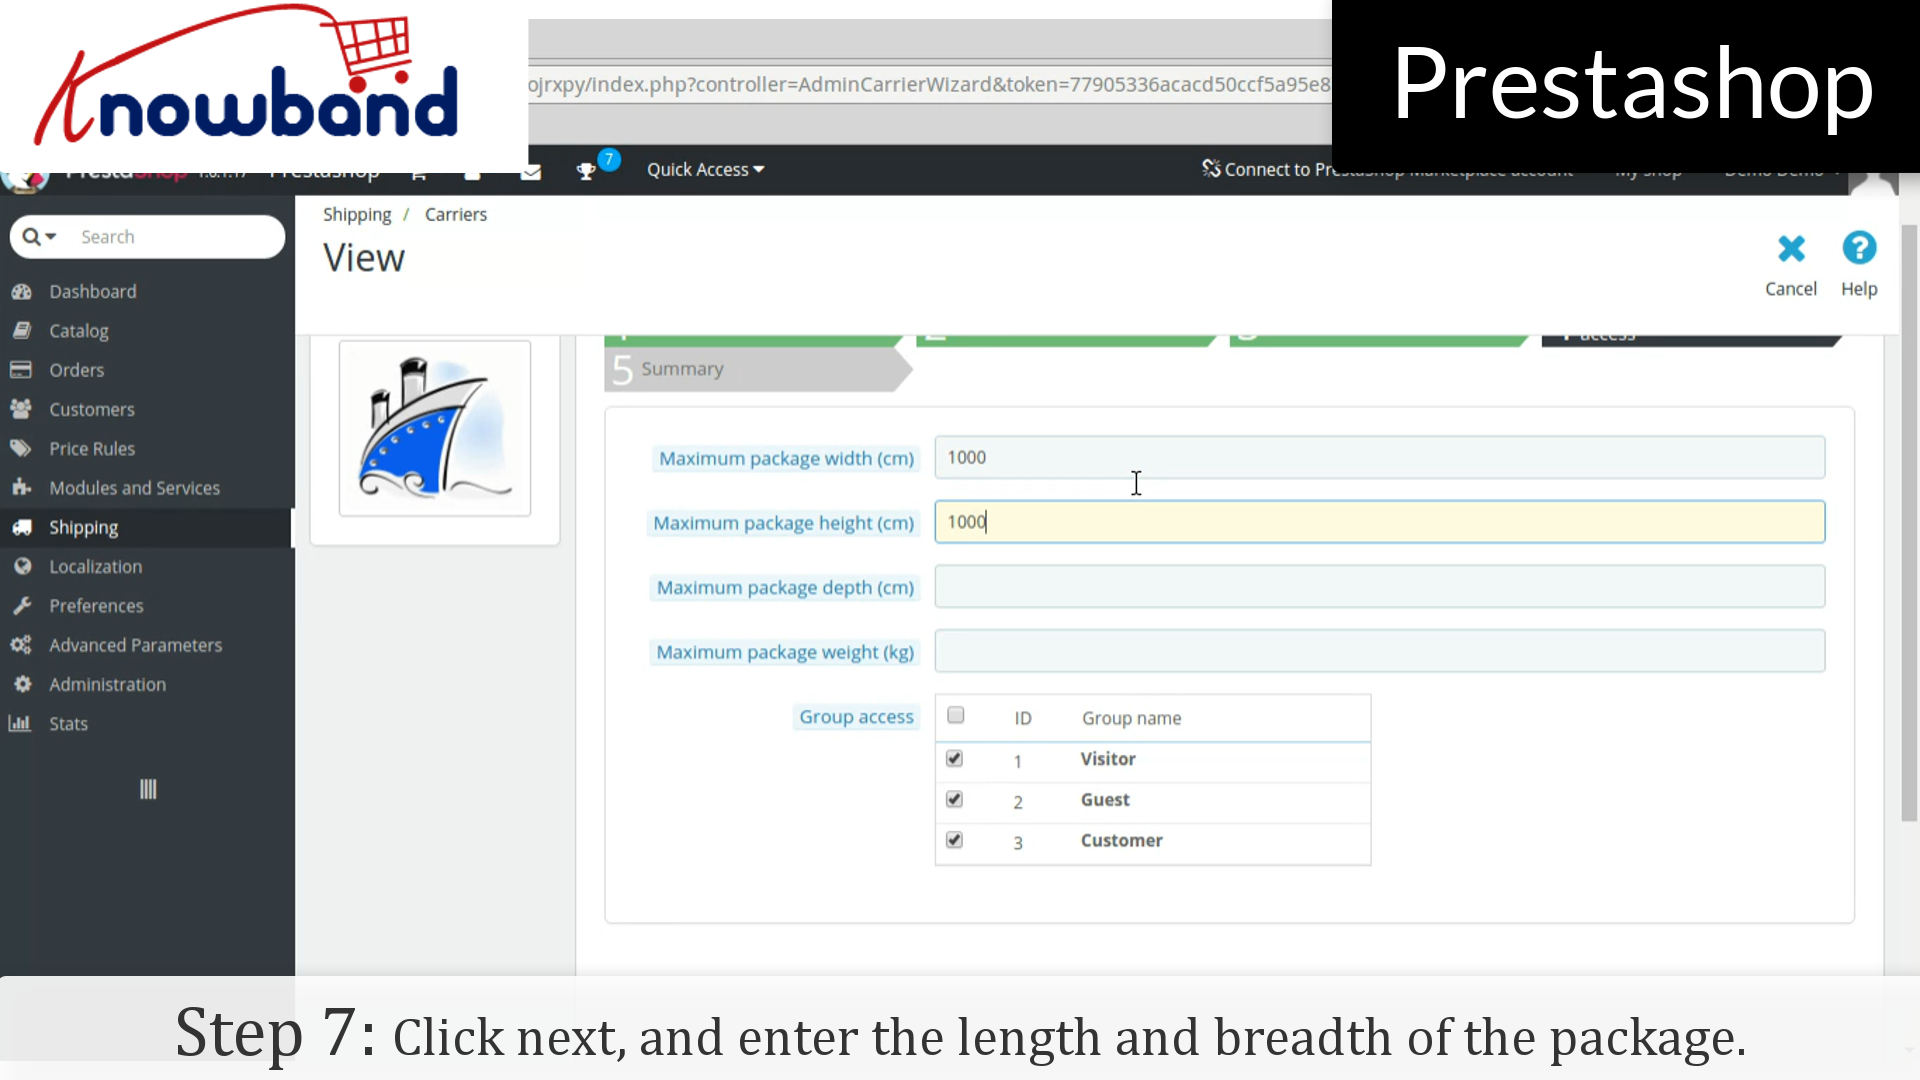
Step 7: In the next tab, enter the length and breadth of the package and click on the next button.
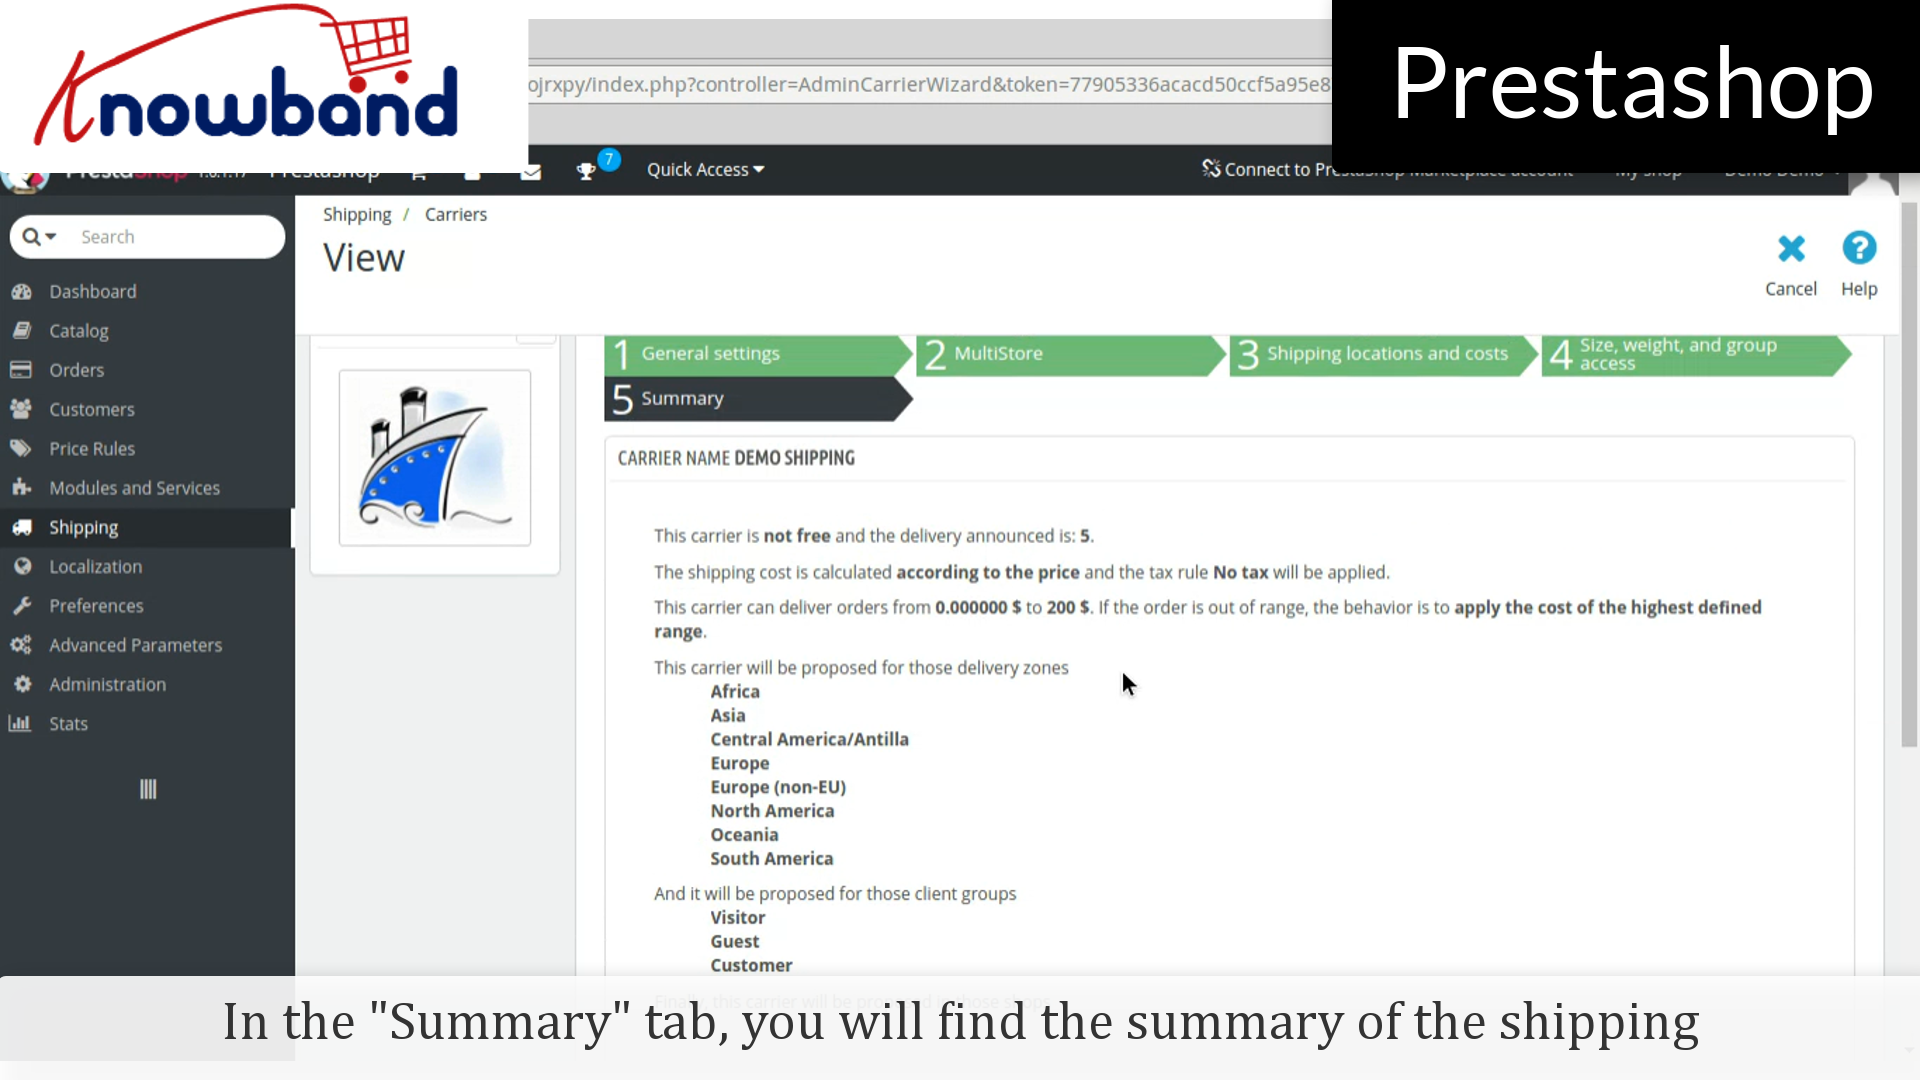
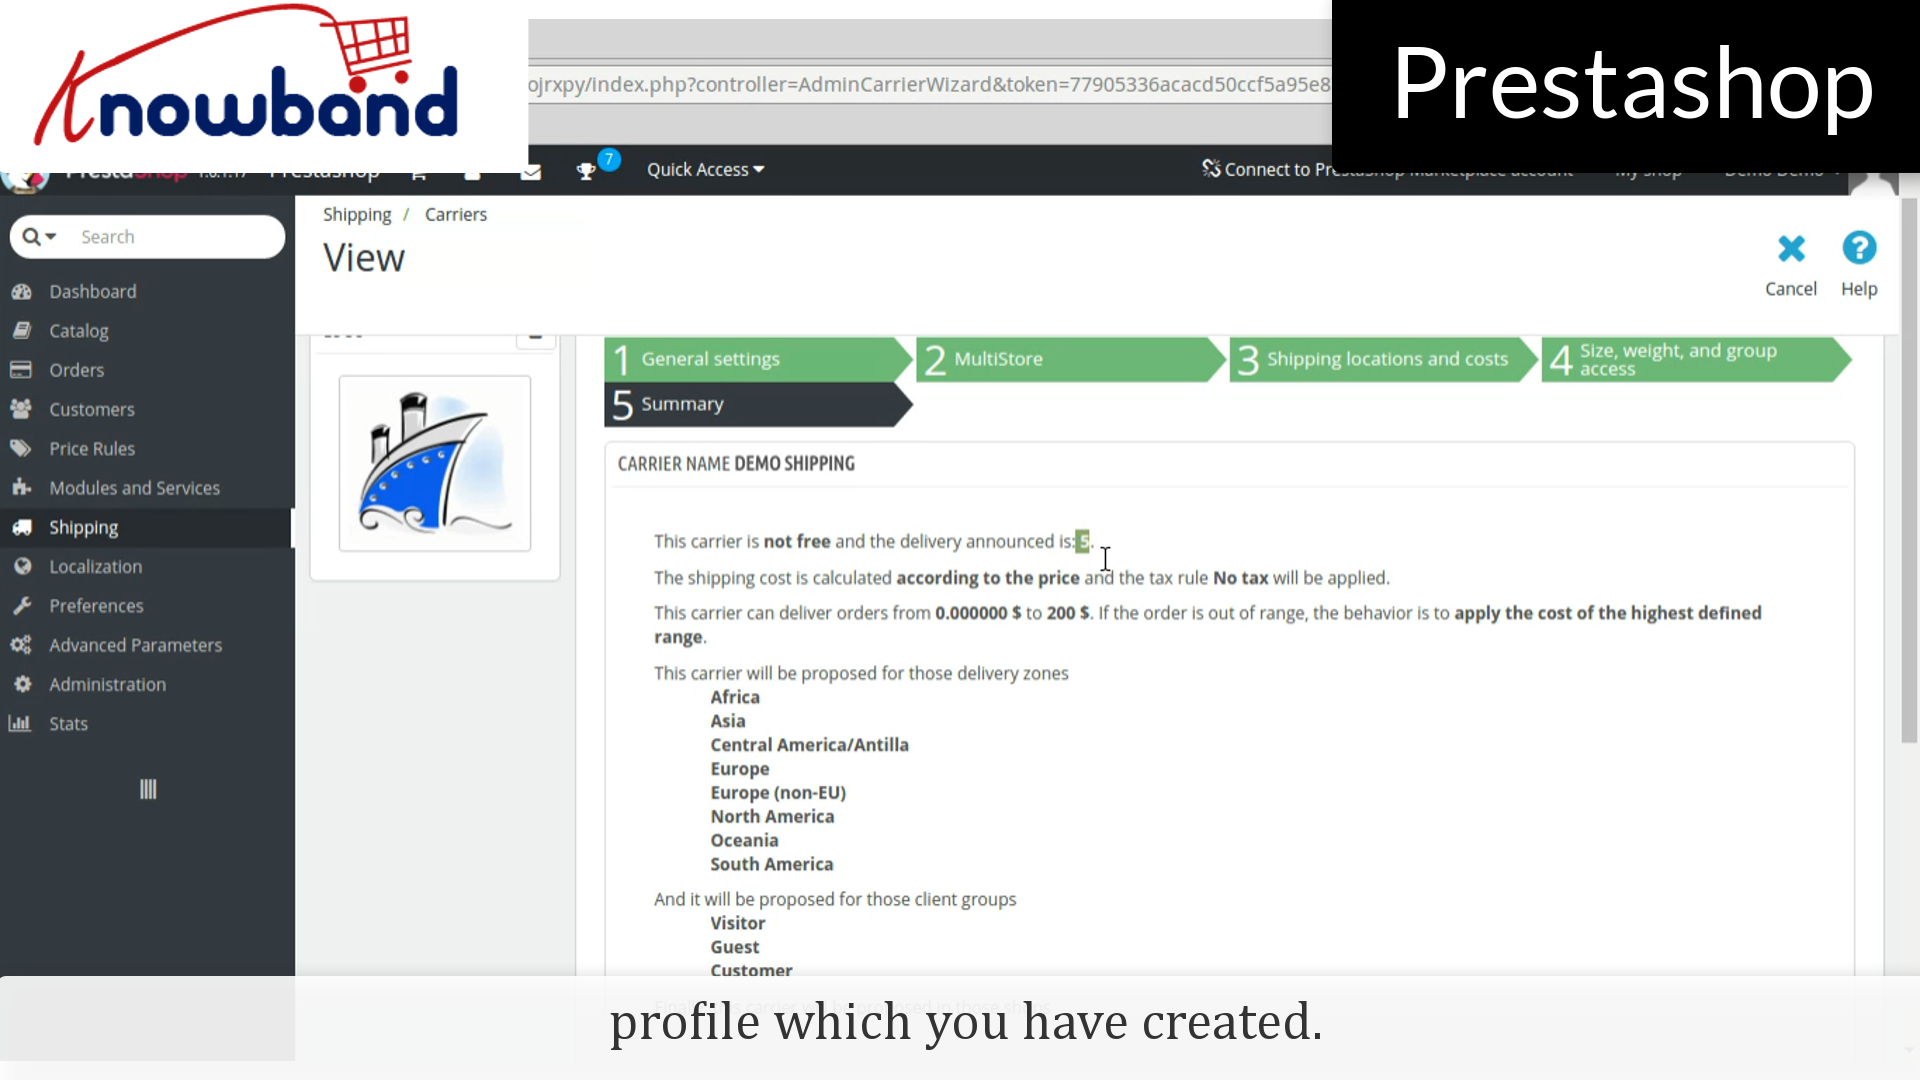
In the summary tab, you will find the summary of the shipping profile which you have created.
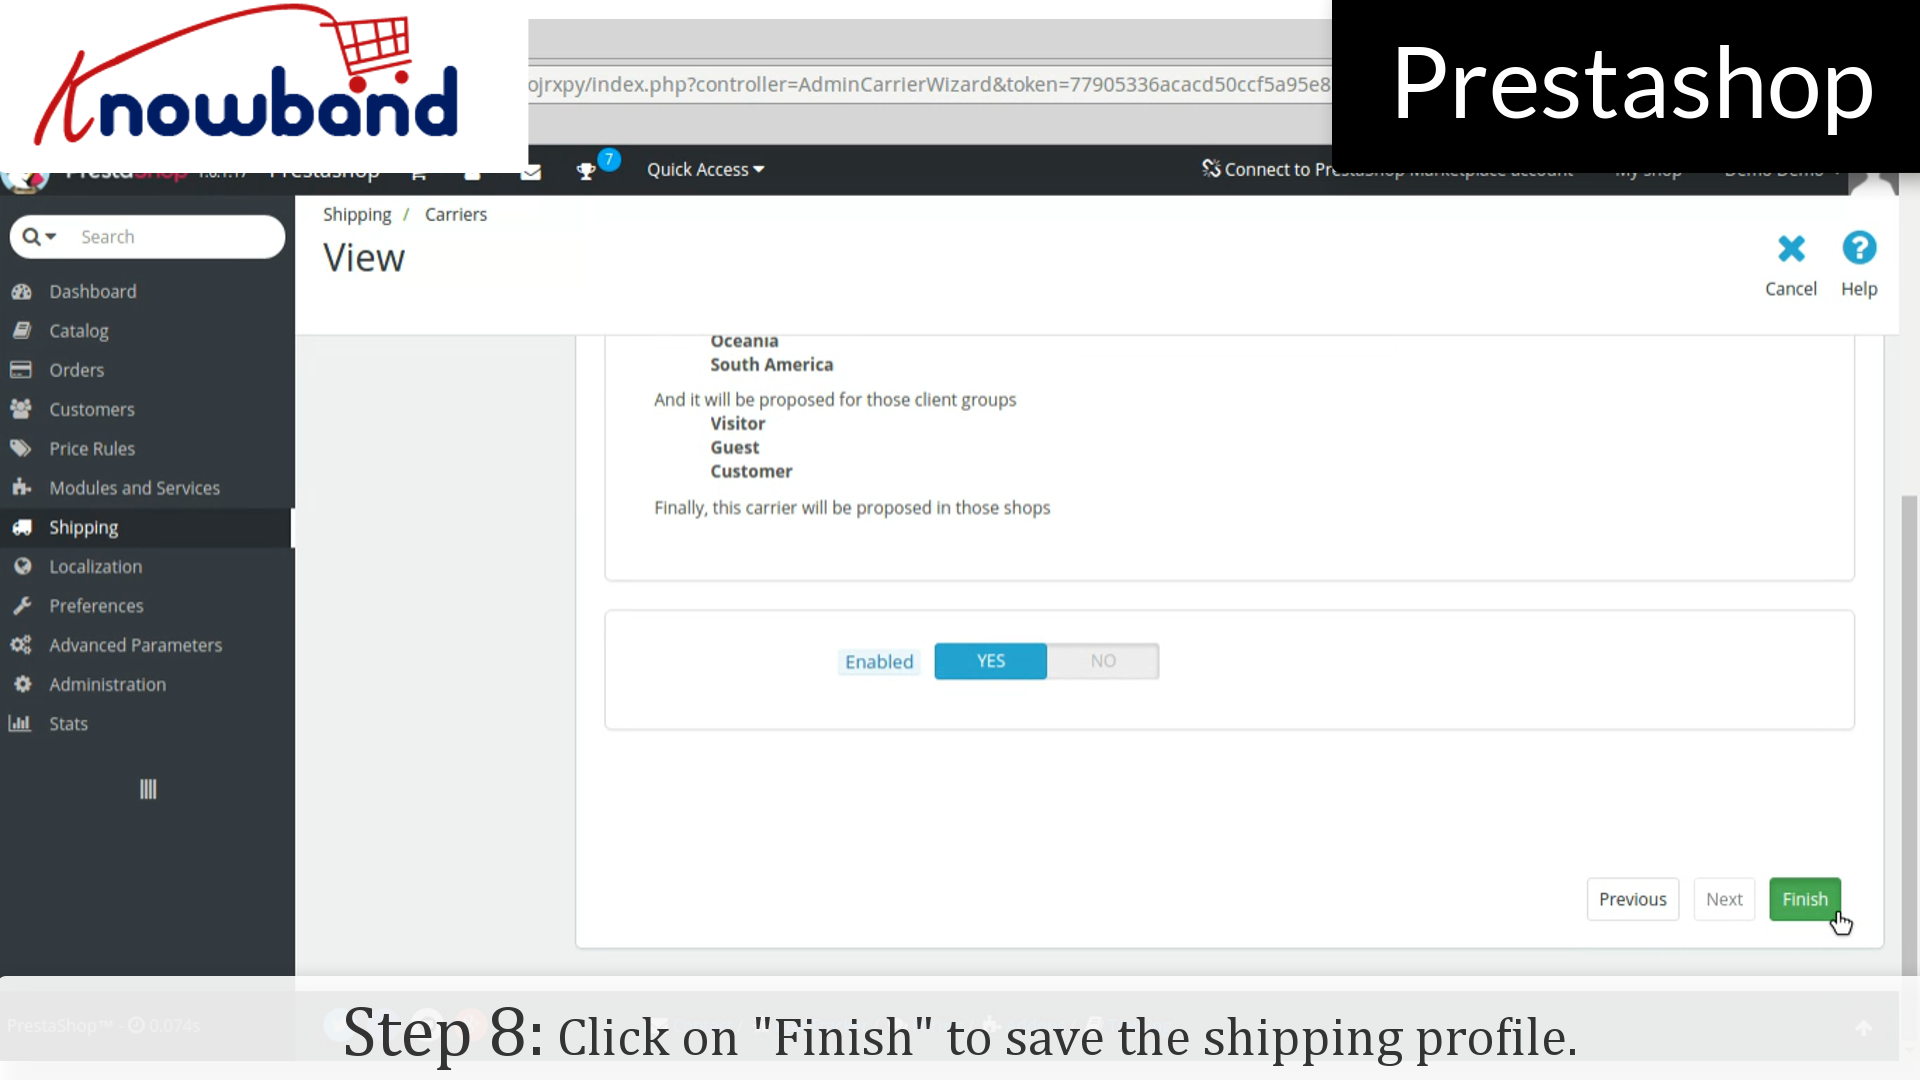
Step 8: Hence, click on the Finish button in the bottom right corner to save the shipping profile.
That’s it, the shipping profile has been created.
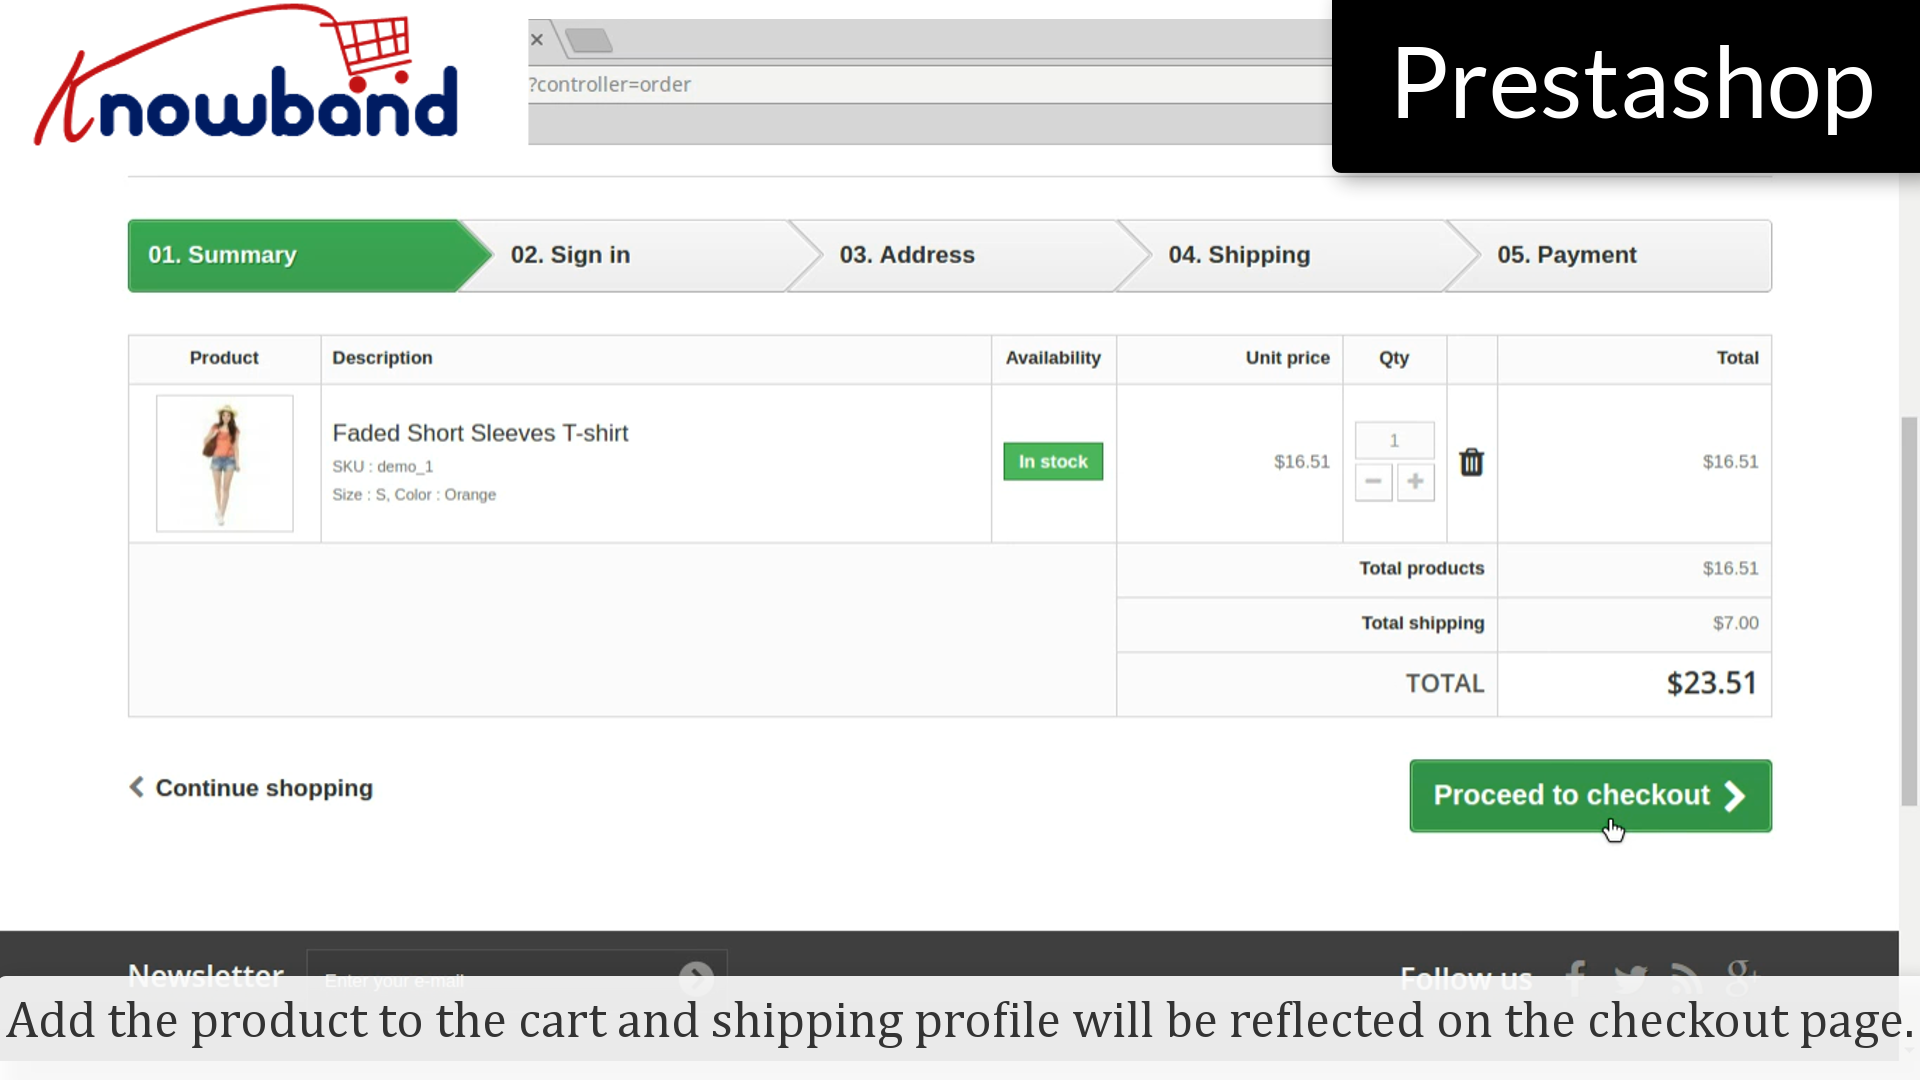
Add the product to the cart and shipping profile will be reflected on the checkout page.
It’s been an inevitable task for the store owners to add categories on their store for the new launching/existing products. Here’s how you do it in just a few simple steps:
Step 1: Login to your admin panel.
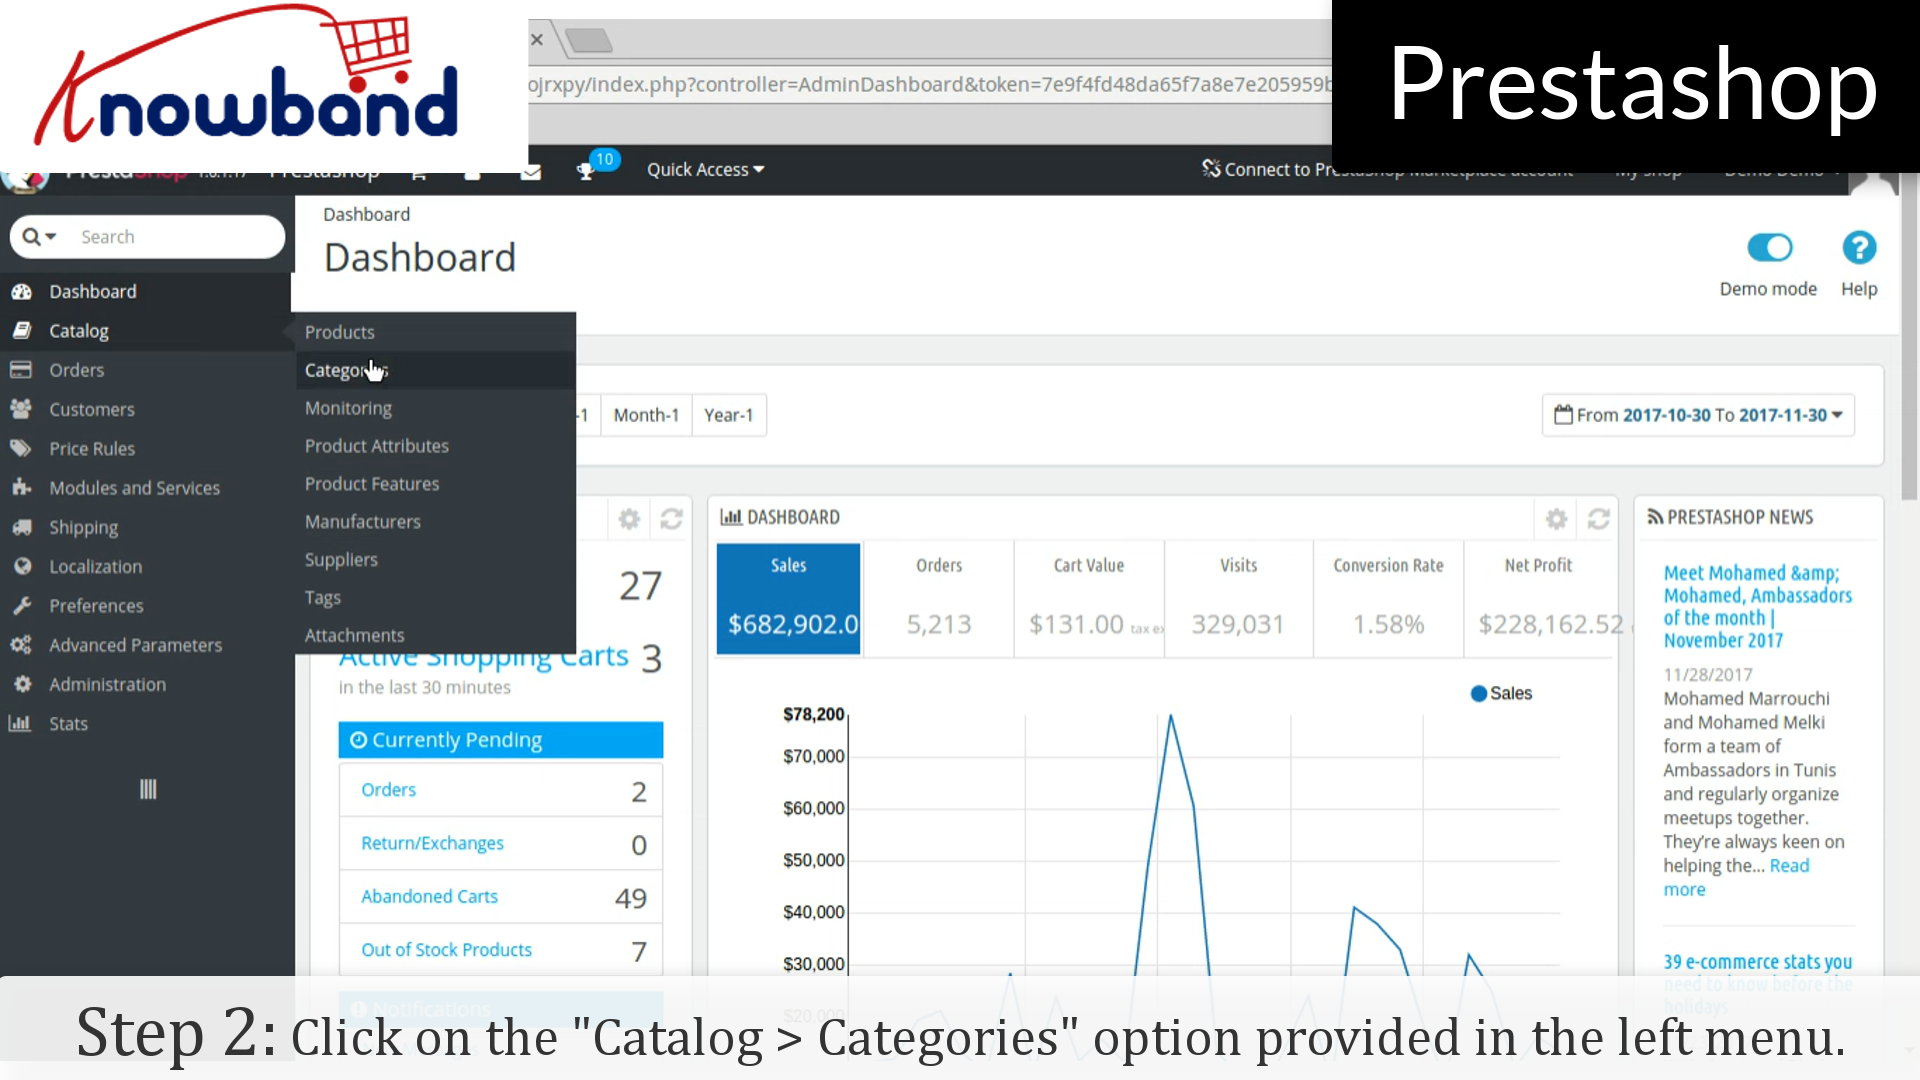
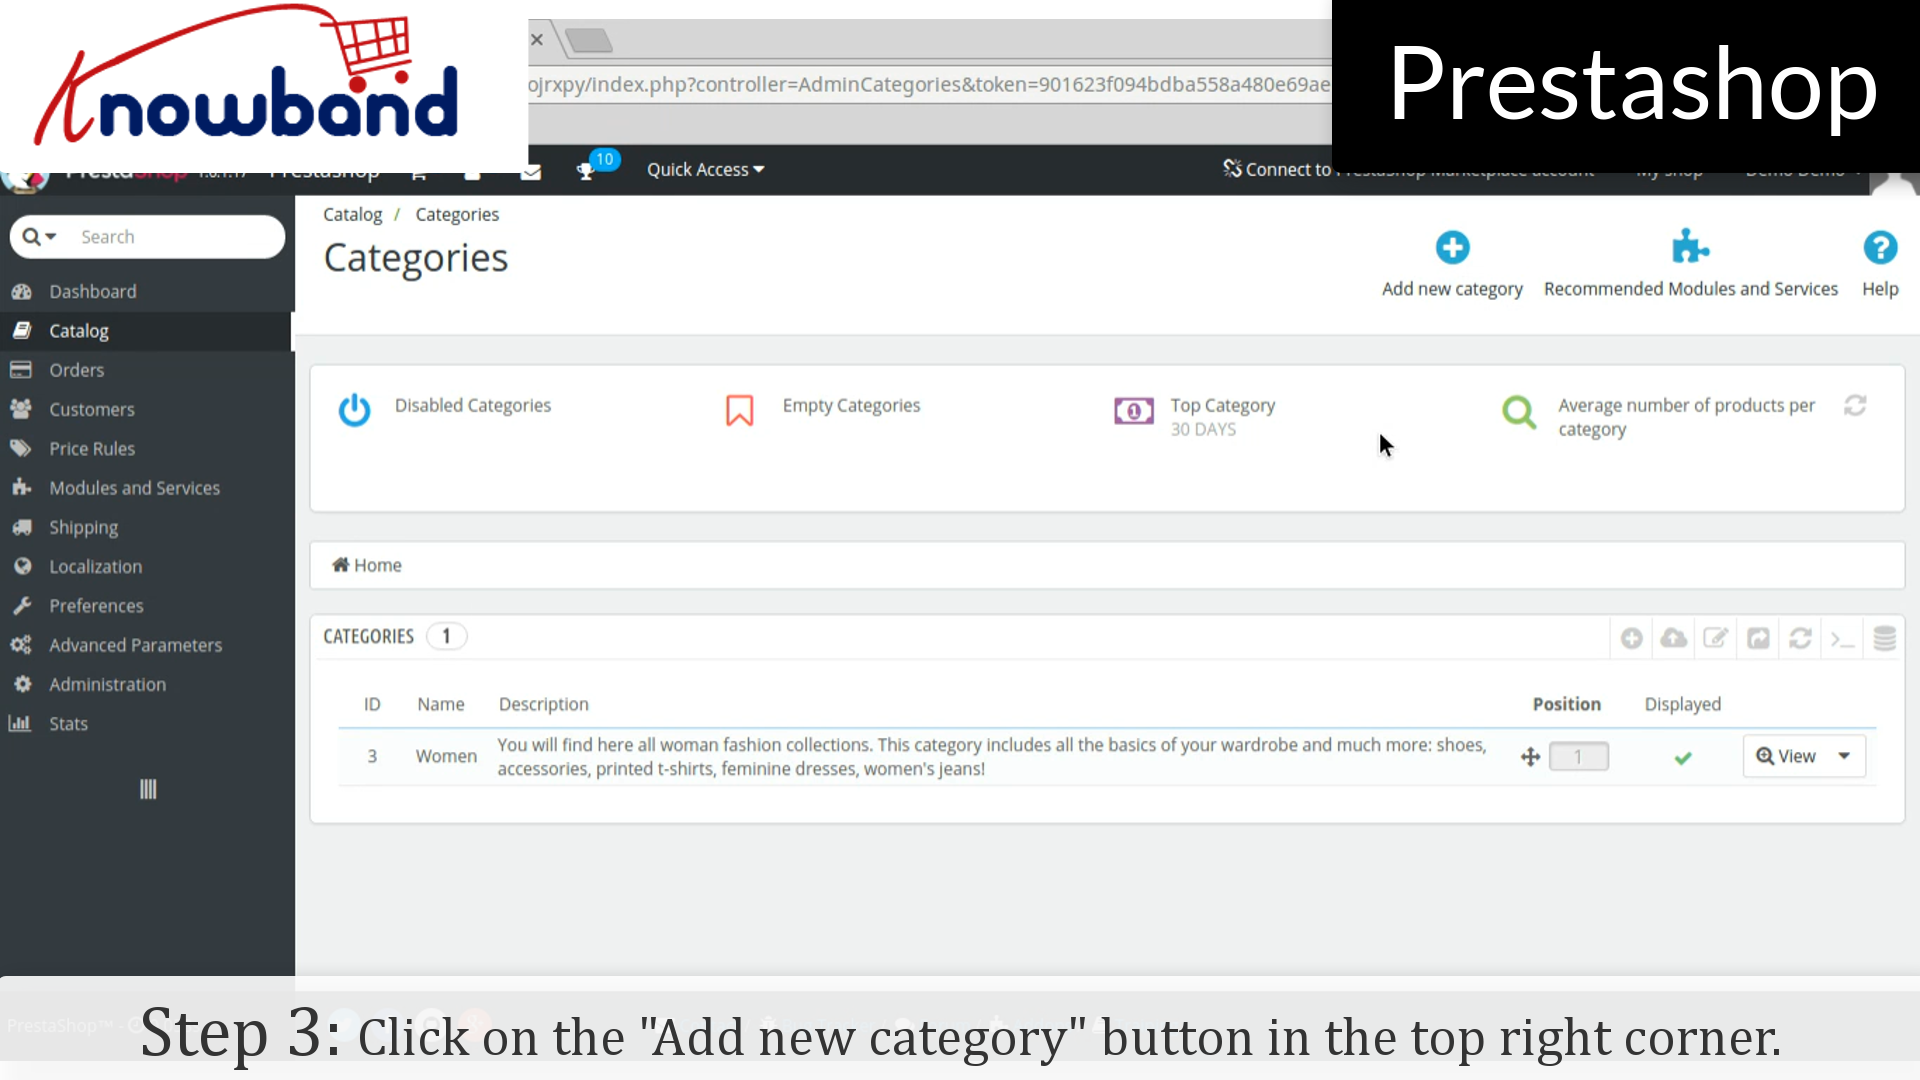
Step 2: After you have successfully logged in, click on the “Catalog > Categories” option provided in the left menu.
Step 3: After that, click on the “Add new category” button in the top right corner of the dashboard.
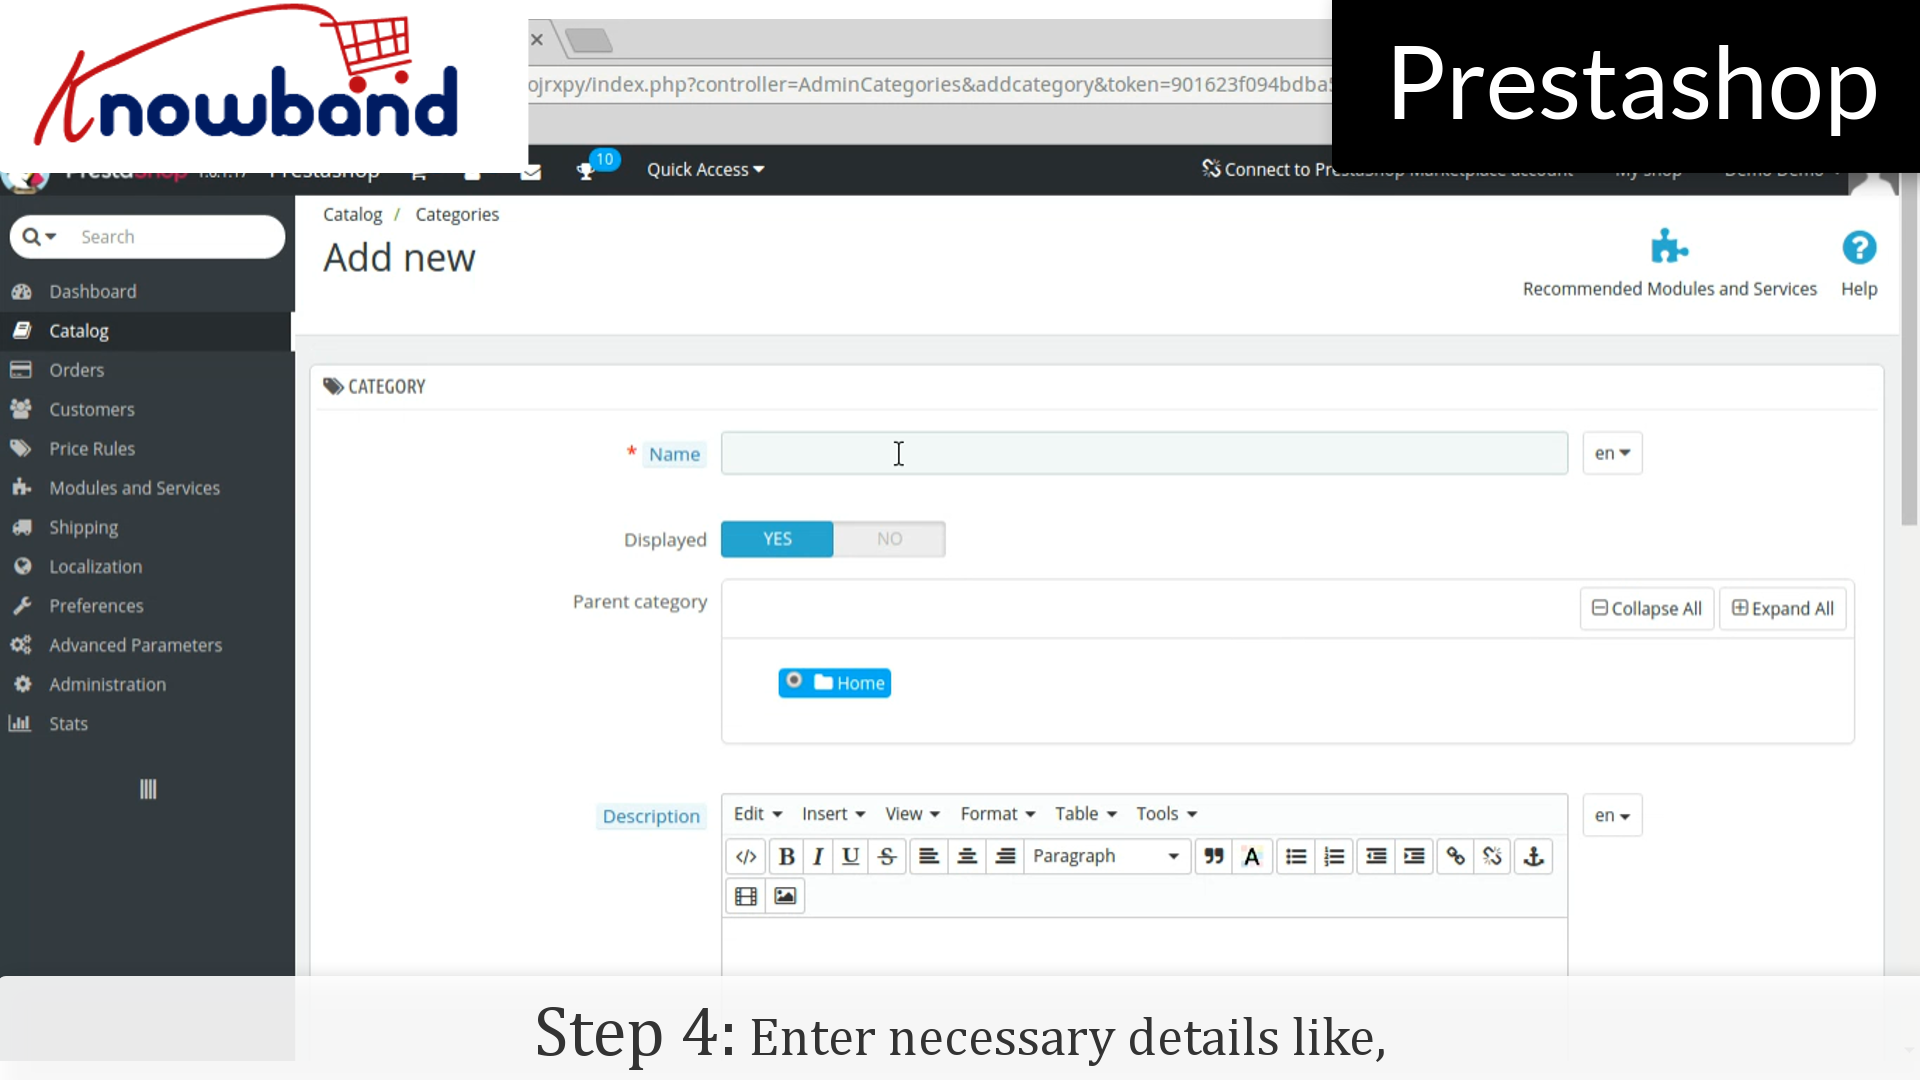
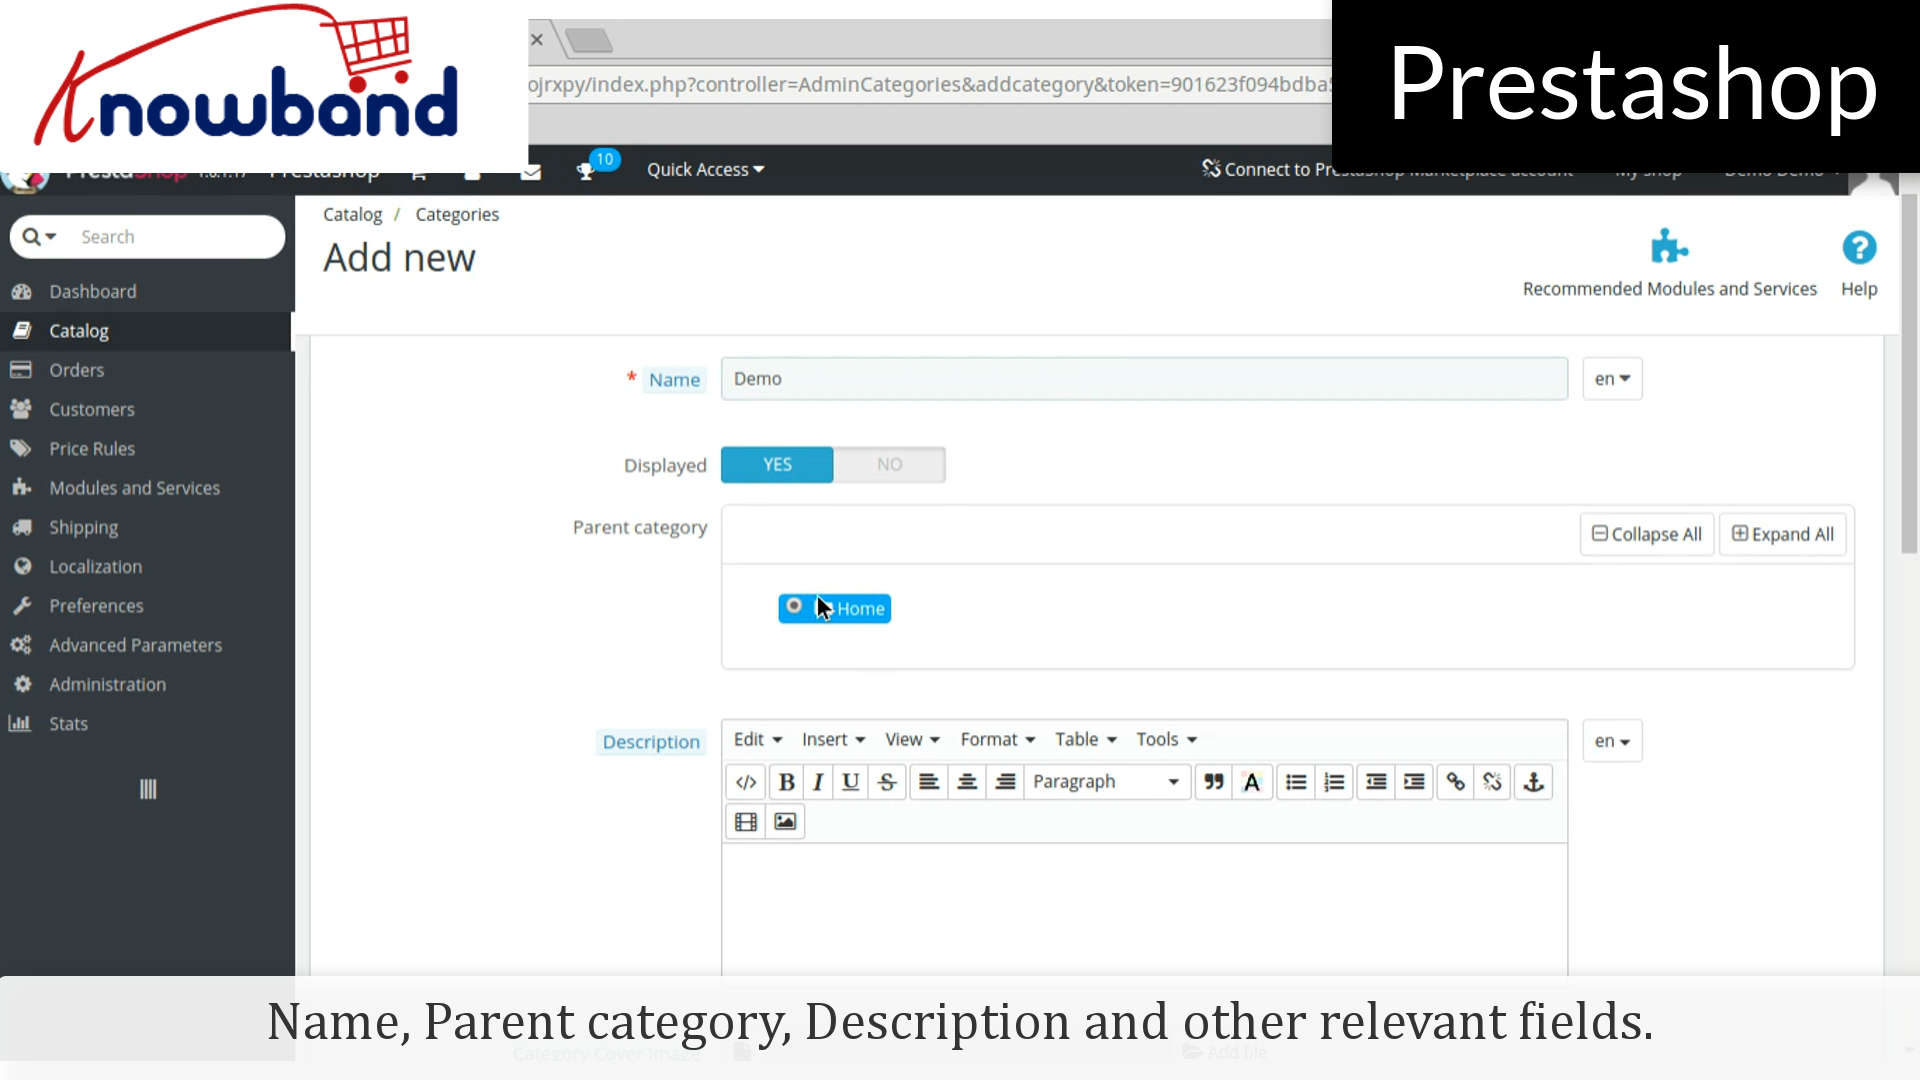
Step 4: Then, enter the required details like, Name, Parent category, Description and other relevant fields.
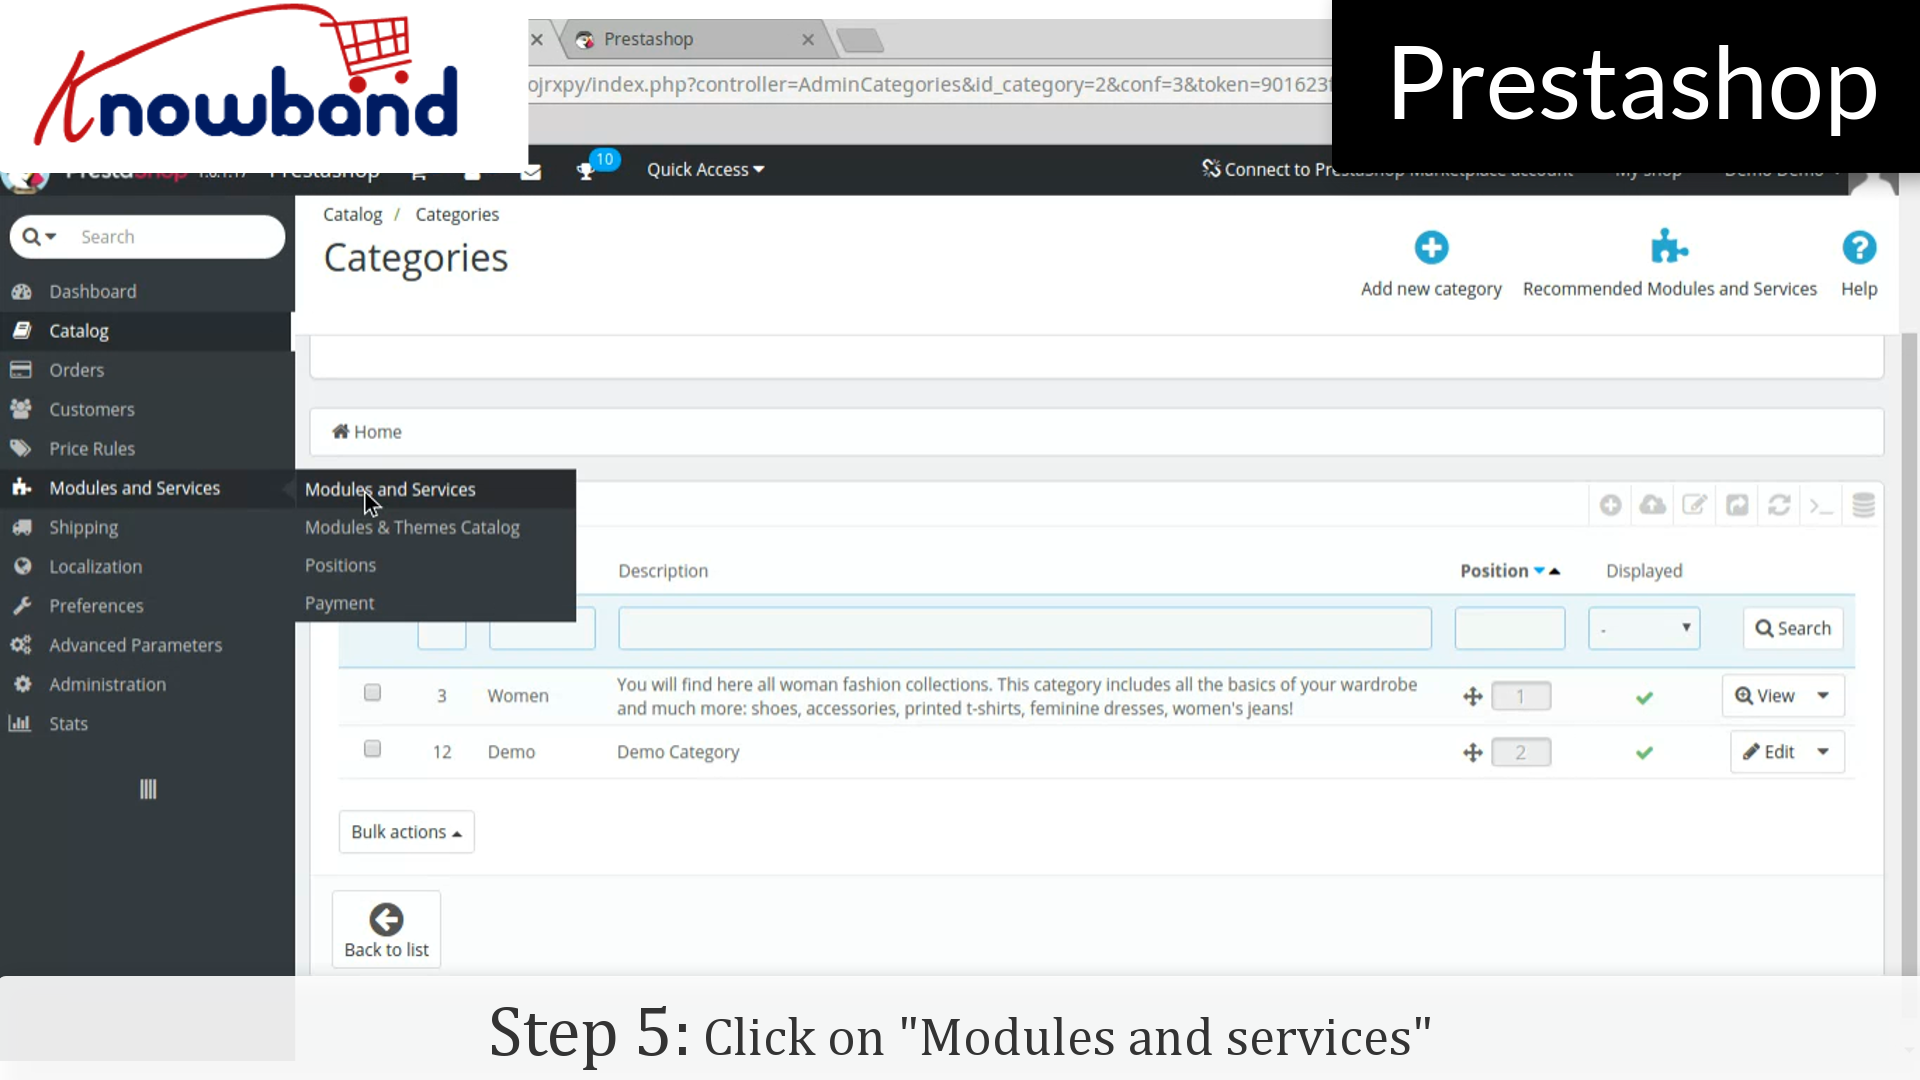
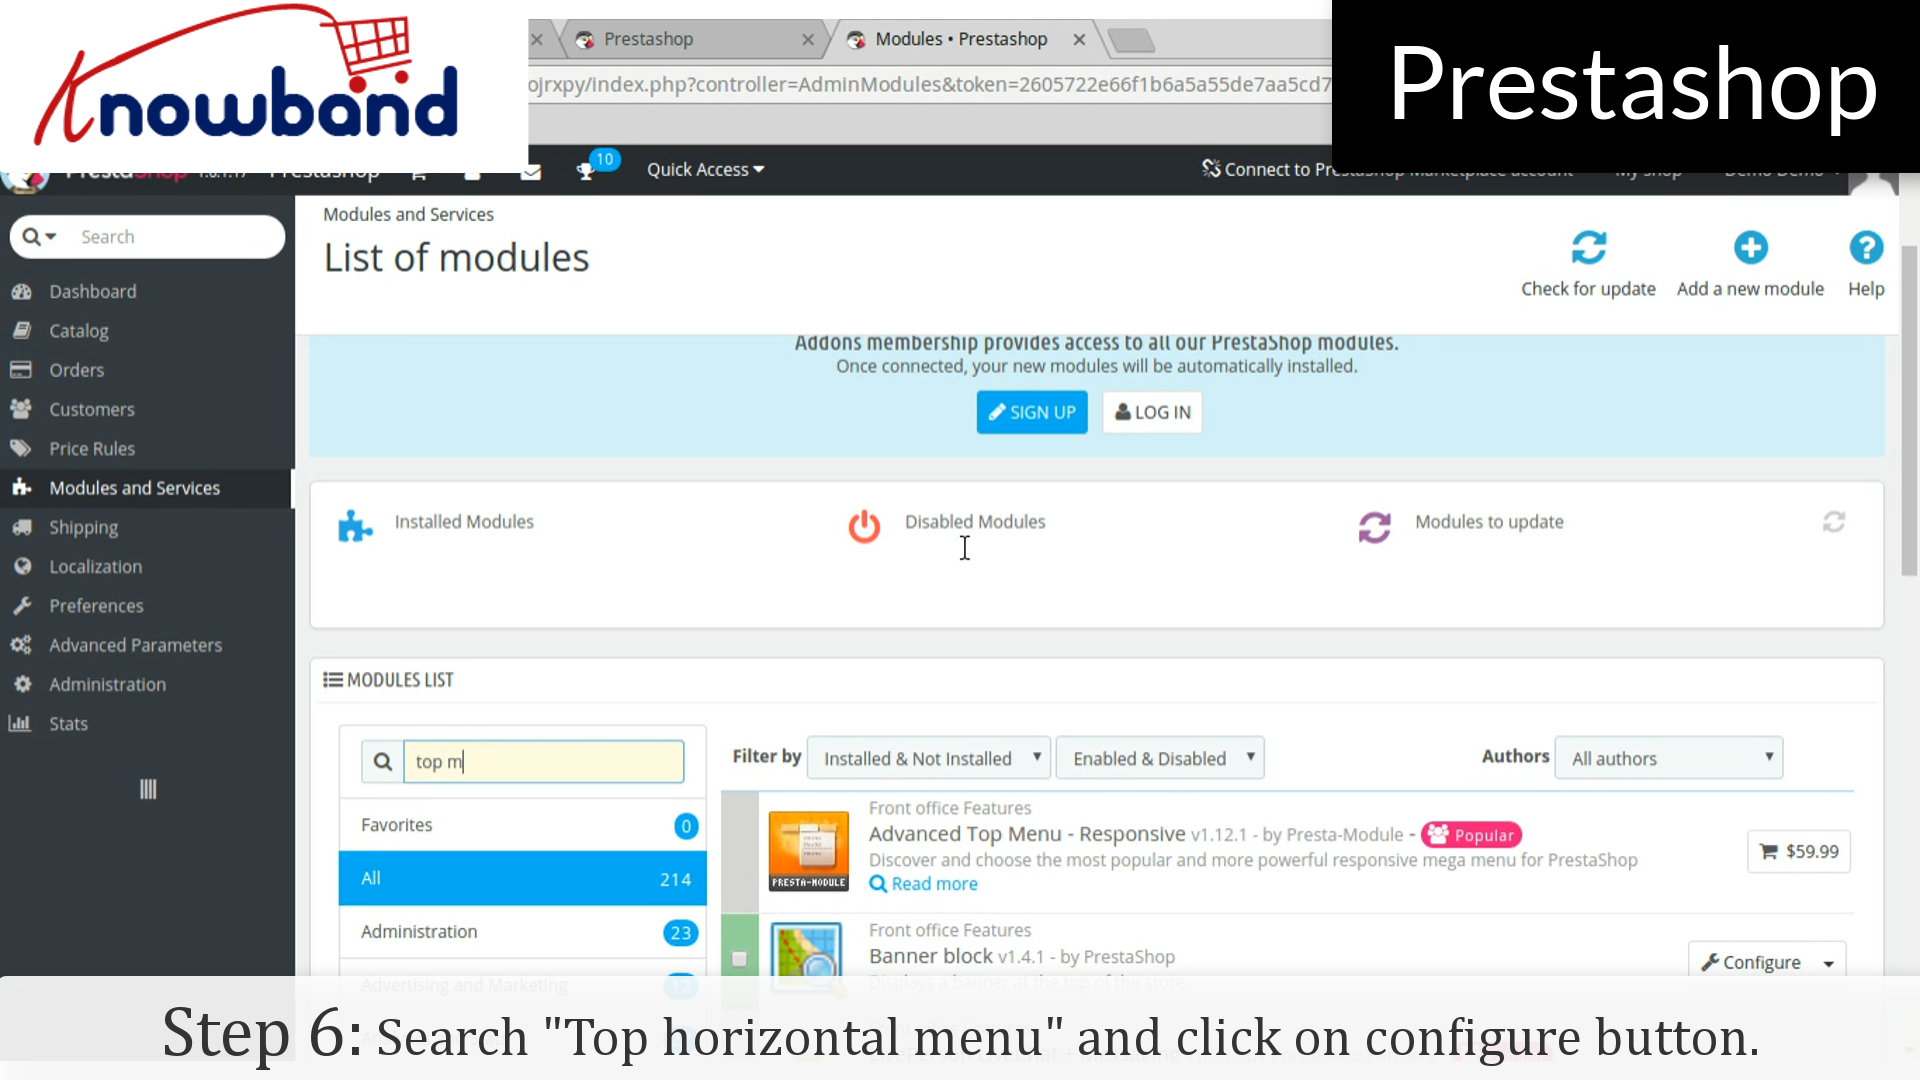
Step 5: Click on “Modules and services” on the left side menu.
Step 6: In the module list, search “Top horizontal menu” and click on the configure button.
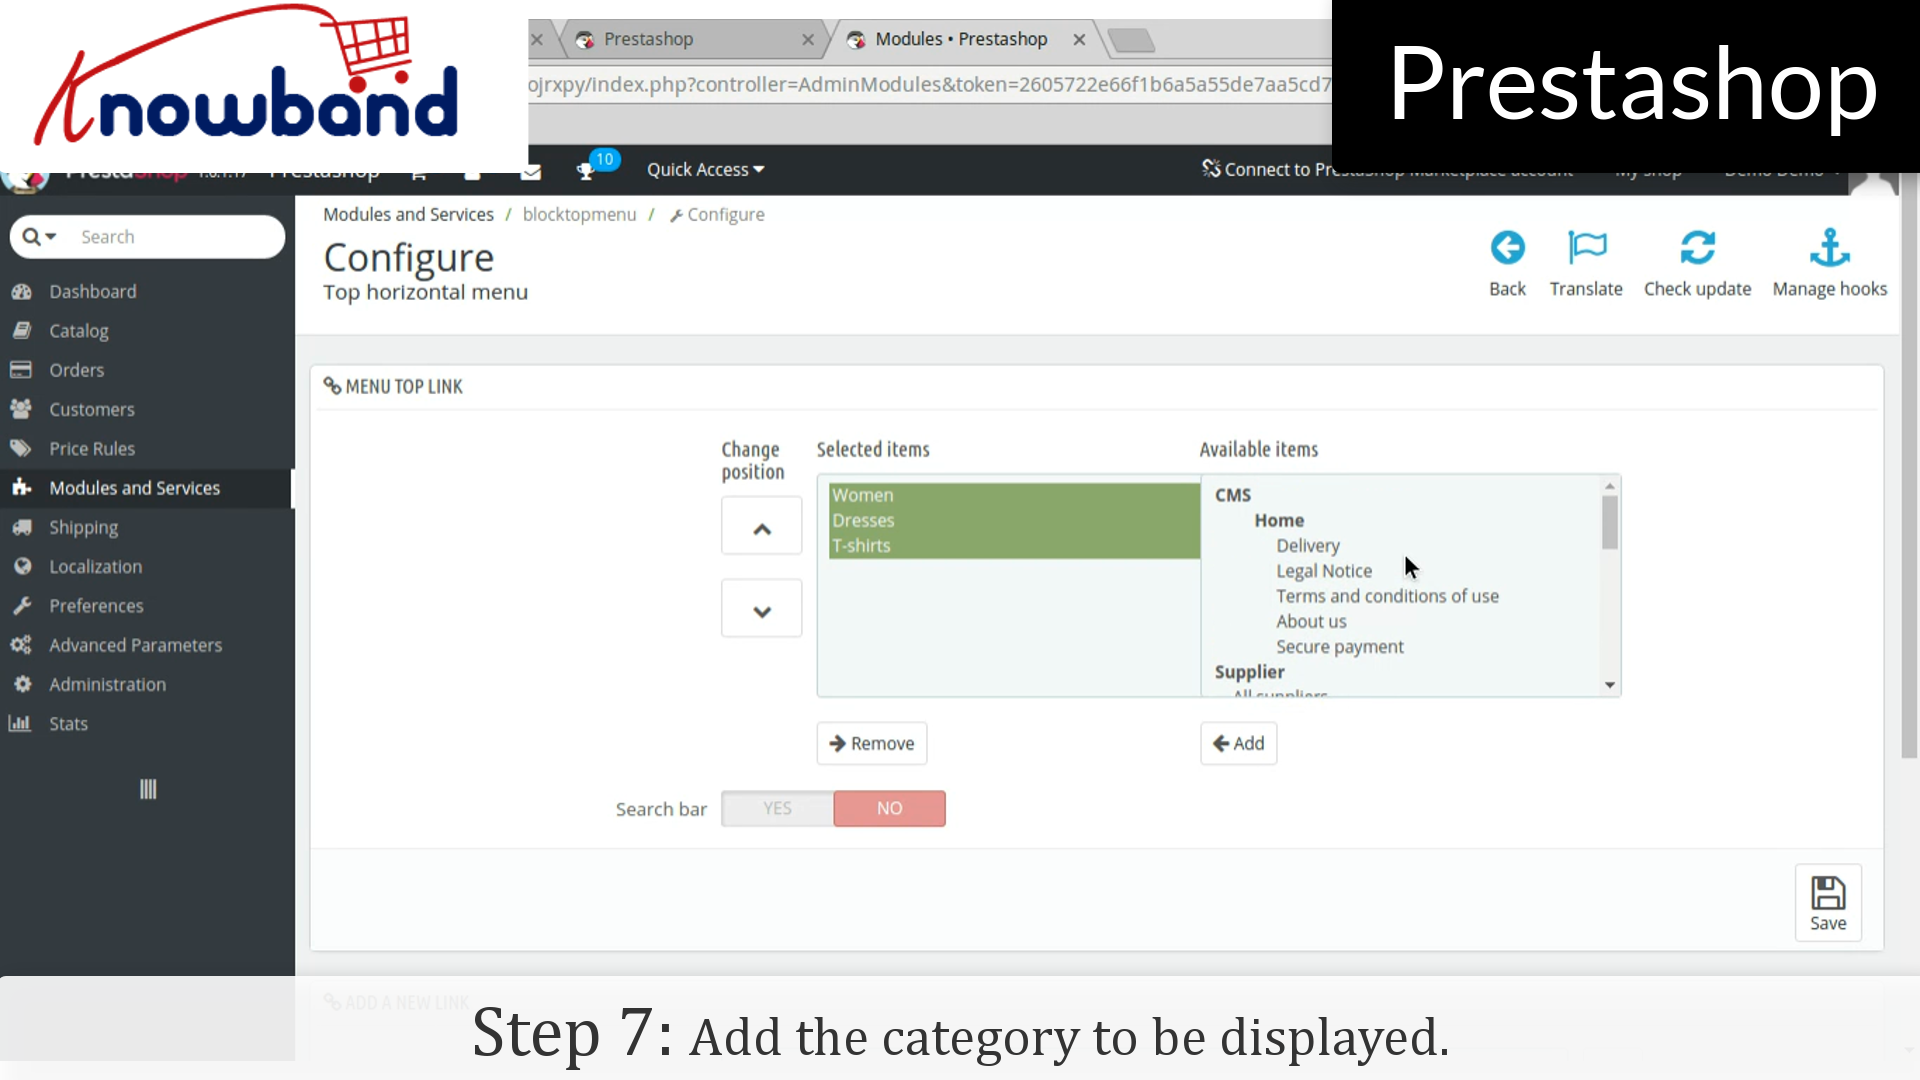
Step 7: After that, add the category to be displayed.
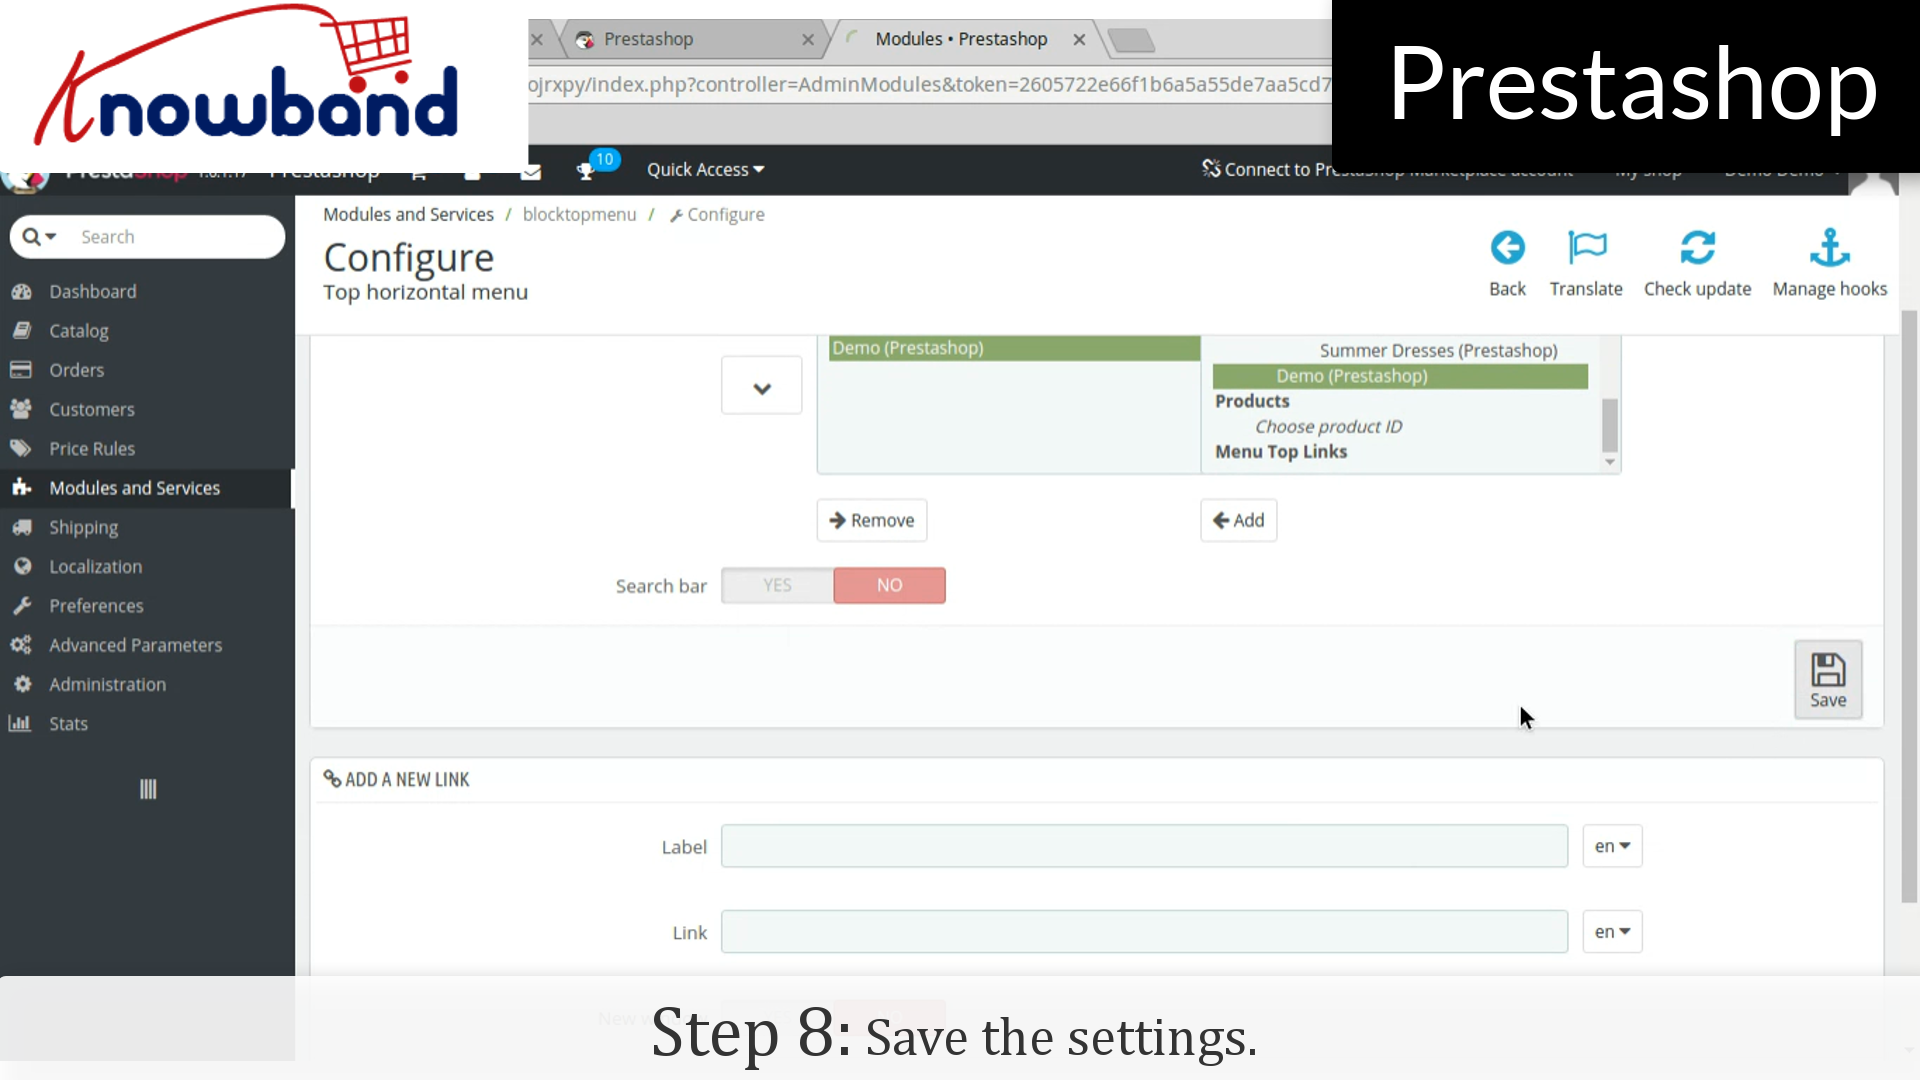
Step 8: Hence, click on the save button in the right corner on the dashboard and save the settings.
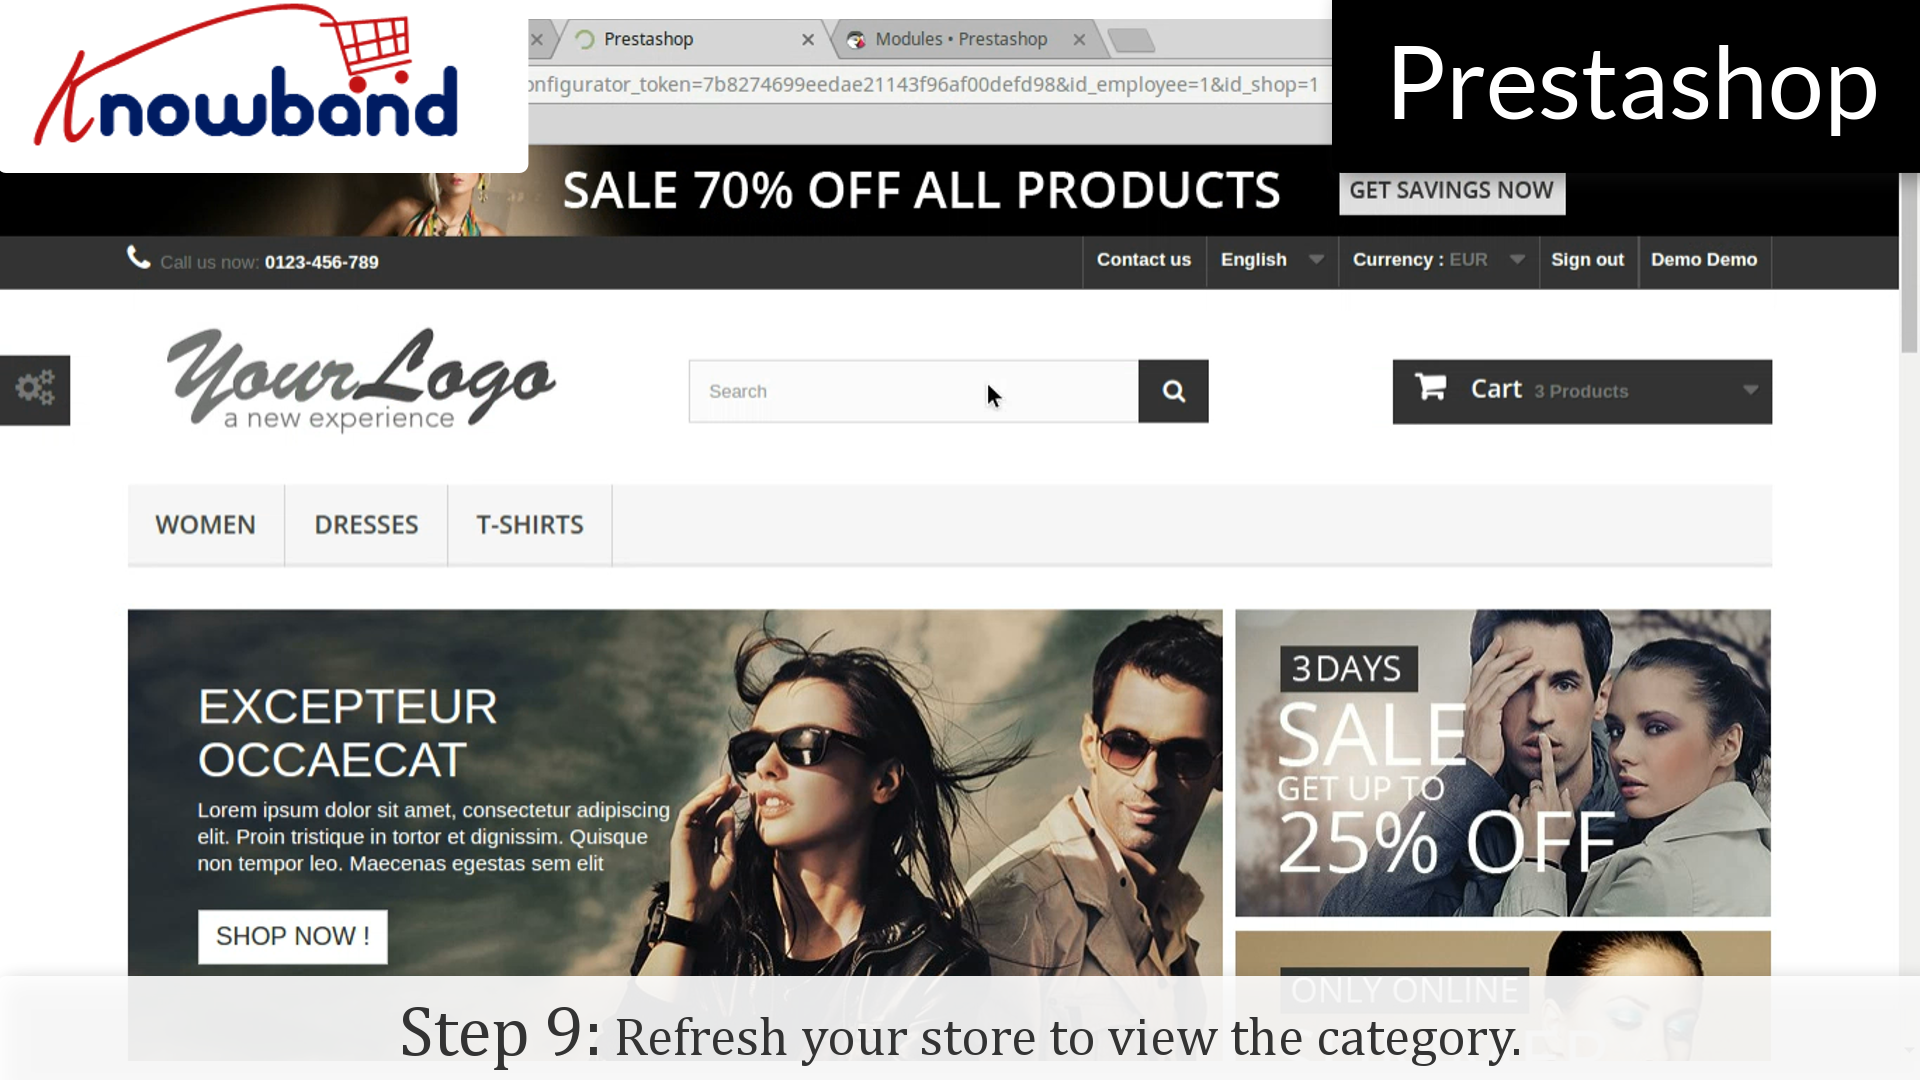
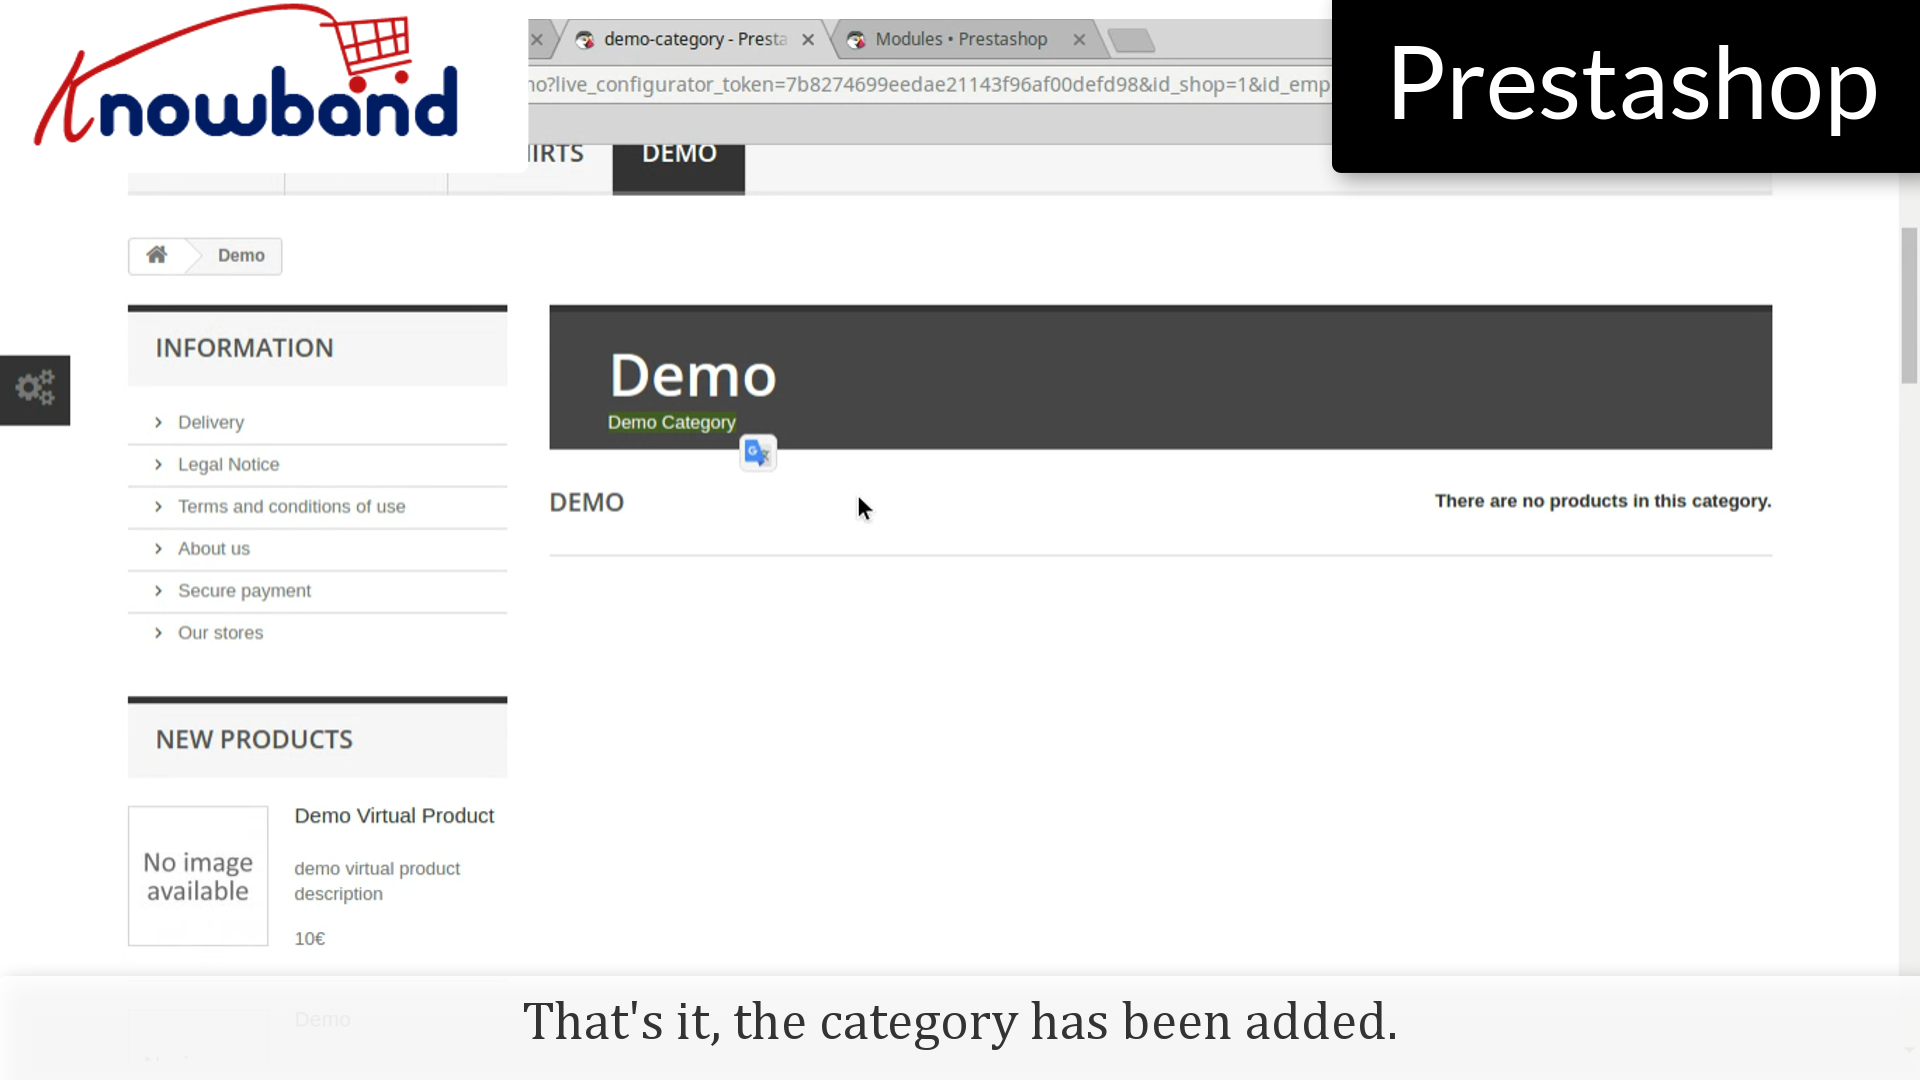
Step 9: Refresh your store to view the category which you have added.
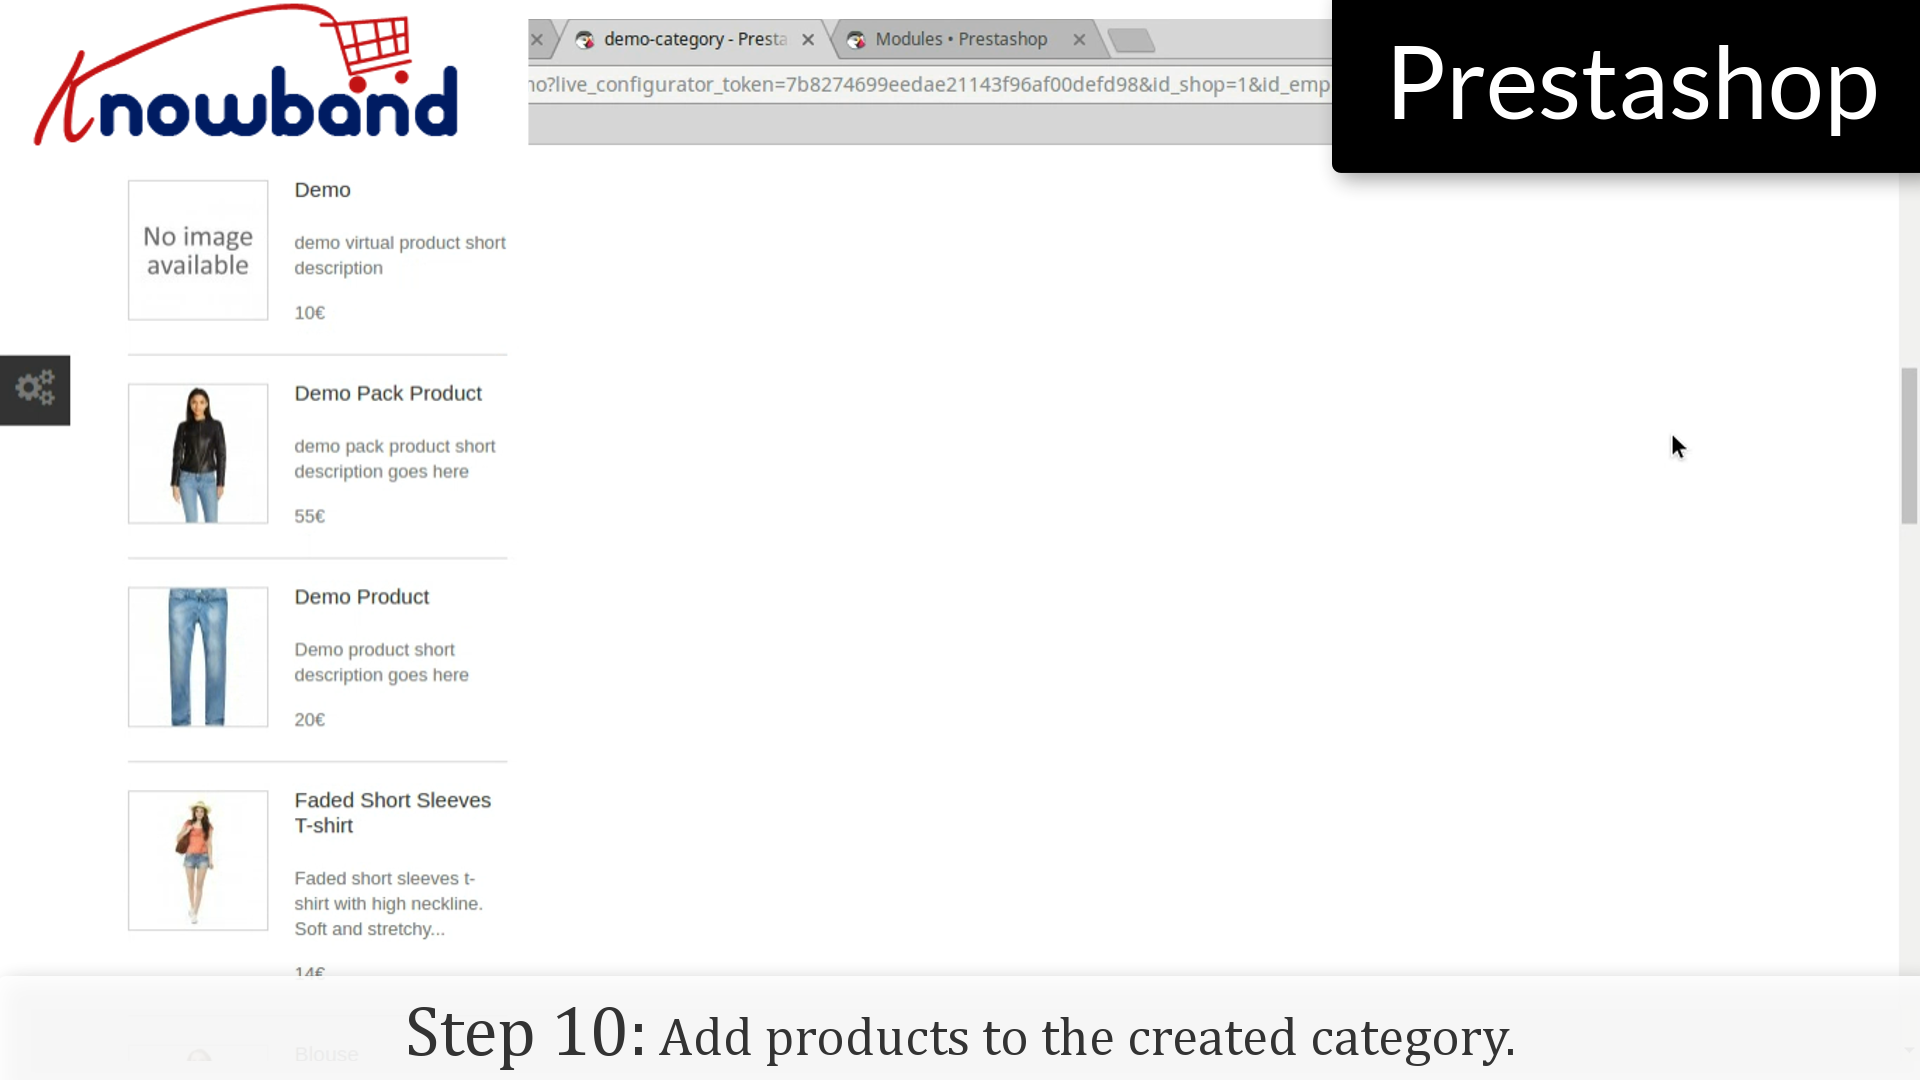
That’s it, the category has been added. However, you will see that the products are not showing in the category.
Step10: Add products to the created category.
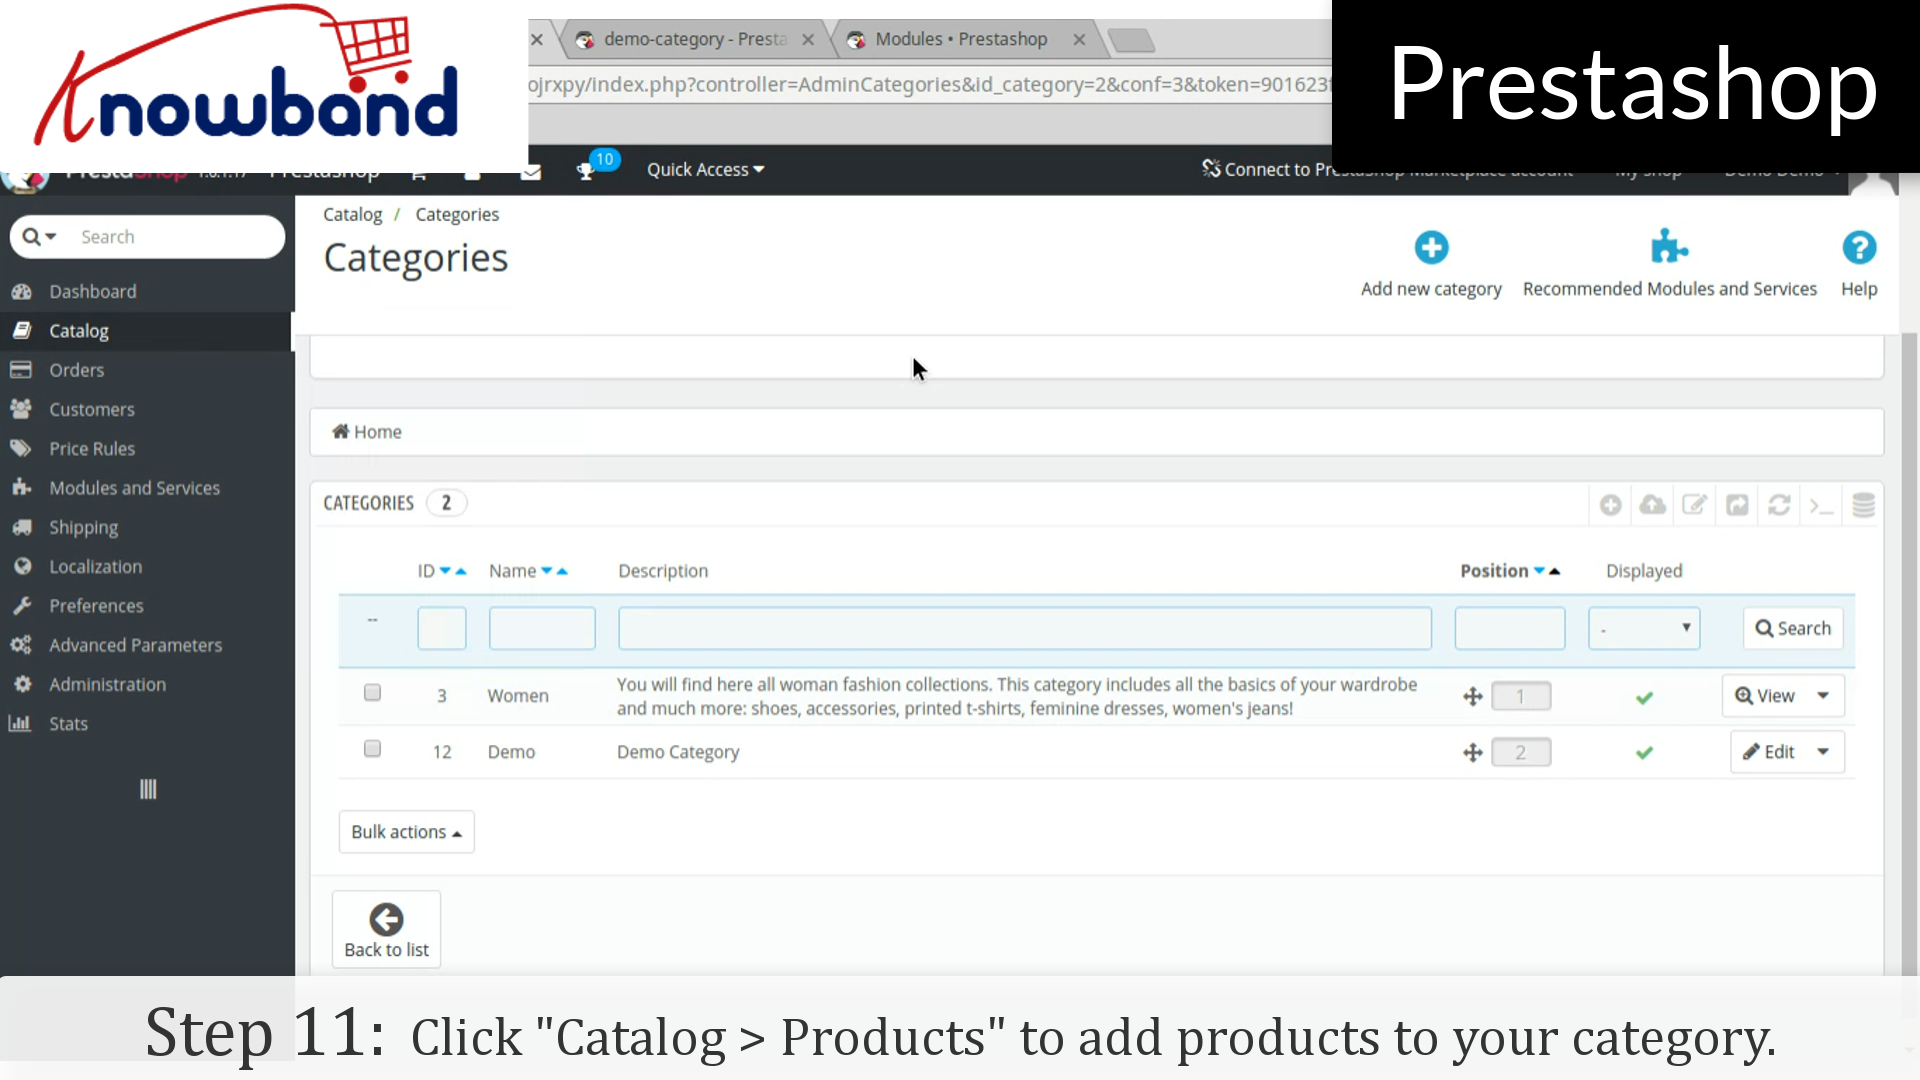
Step 11: Go to the dashboard in admin panel and click on “Catalog > Products” to add products to your category.
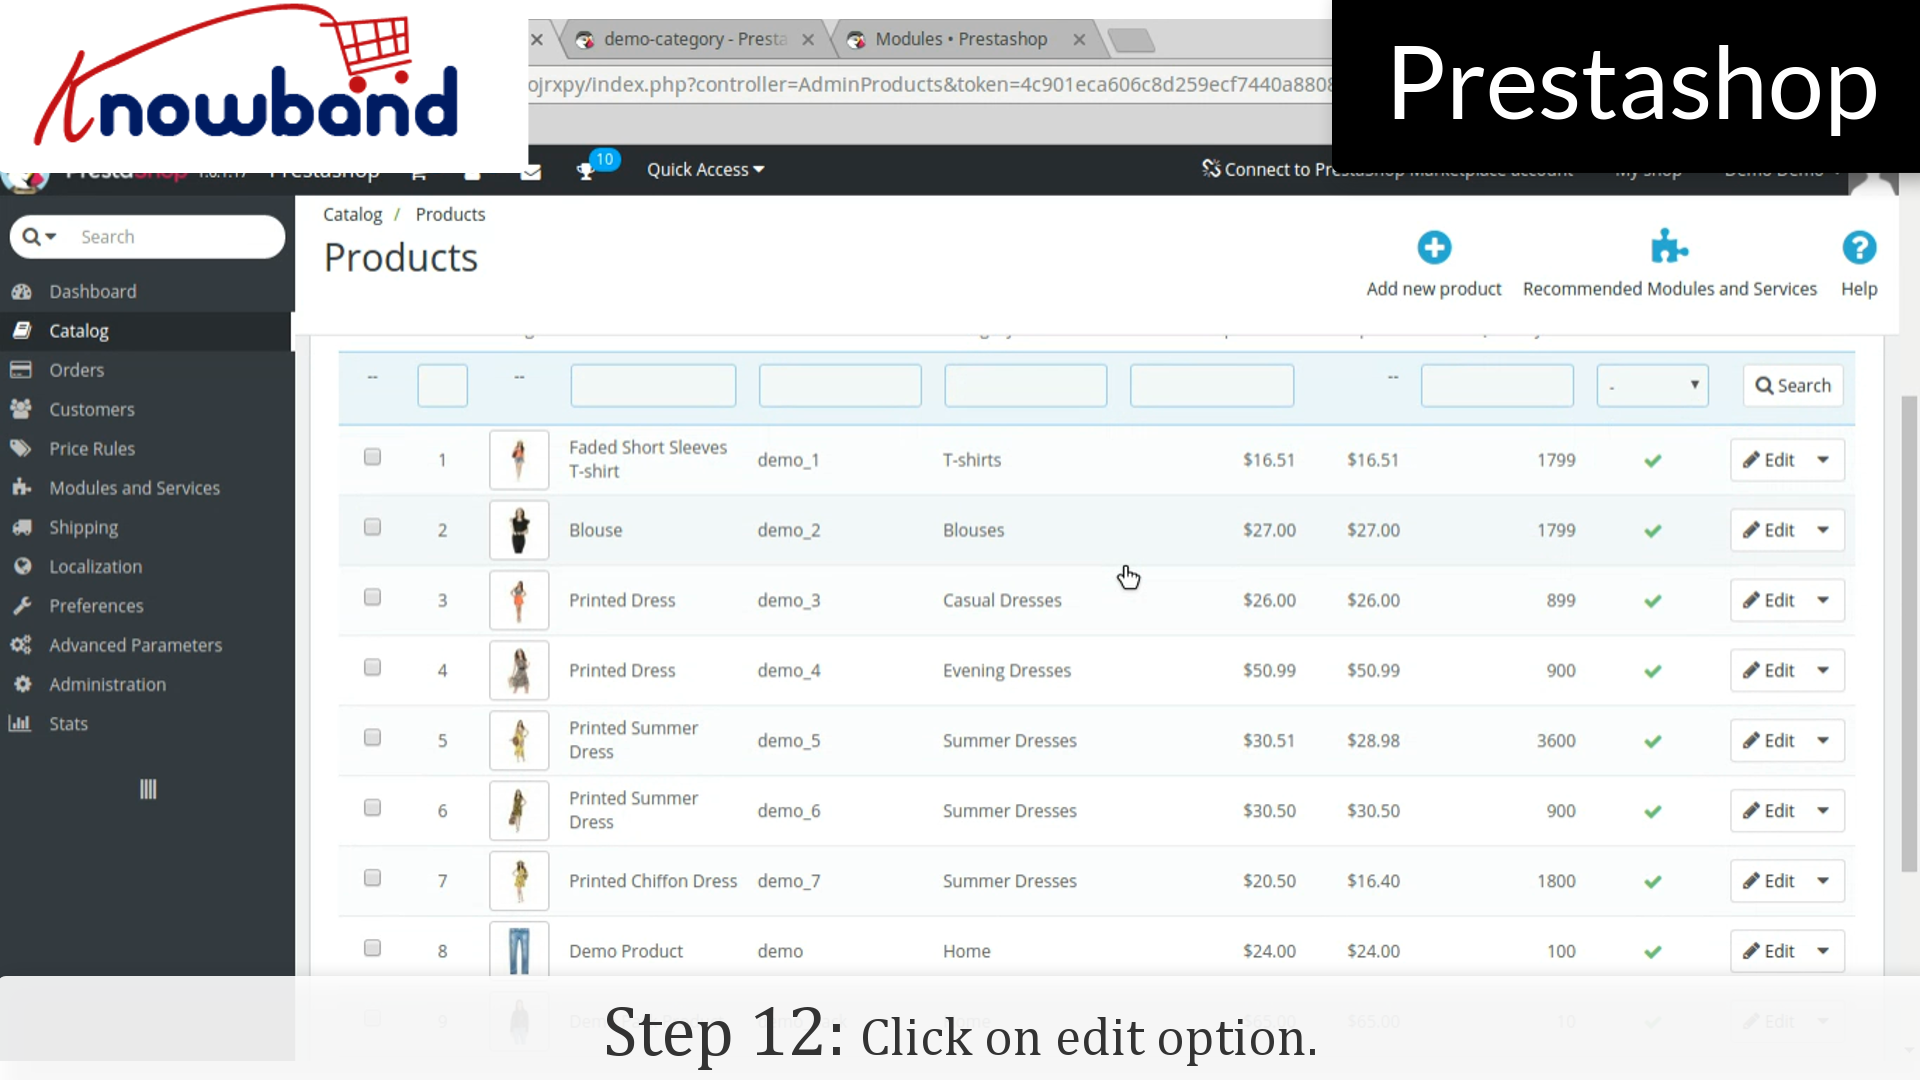
Step 12: Click on “Edit” option of the products which you want to add in the category.
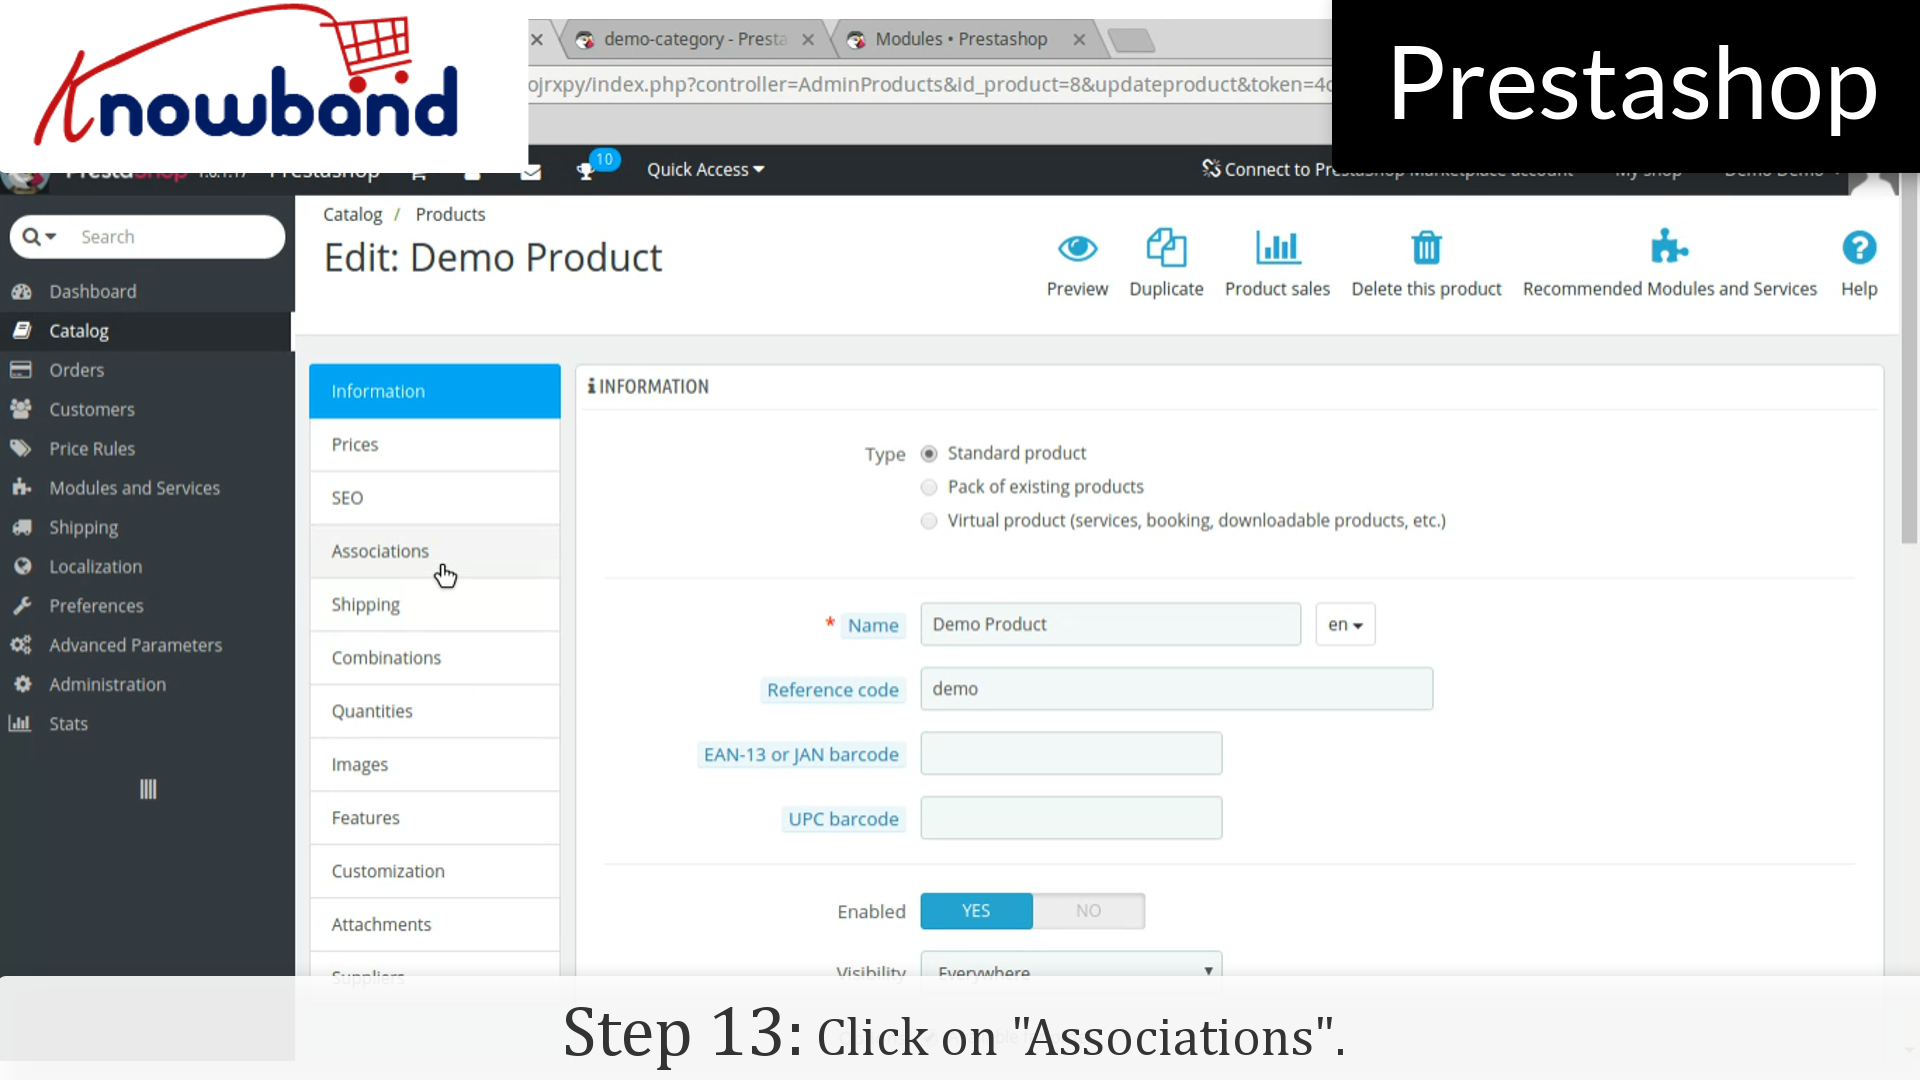
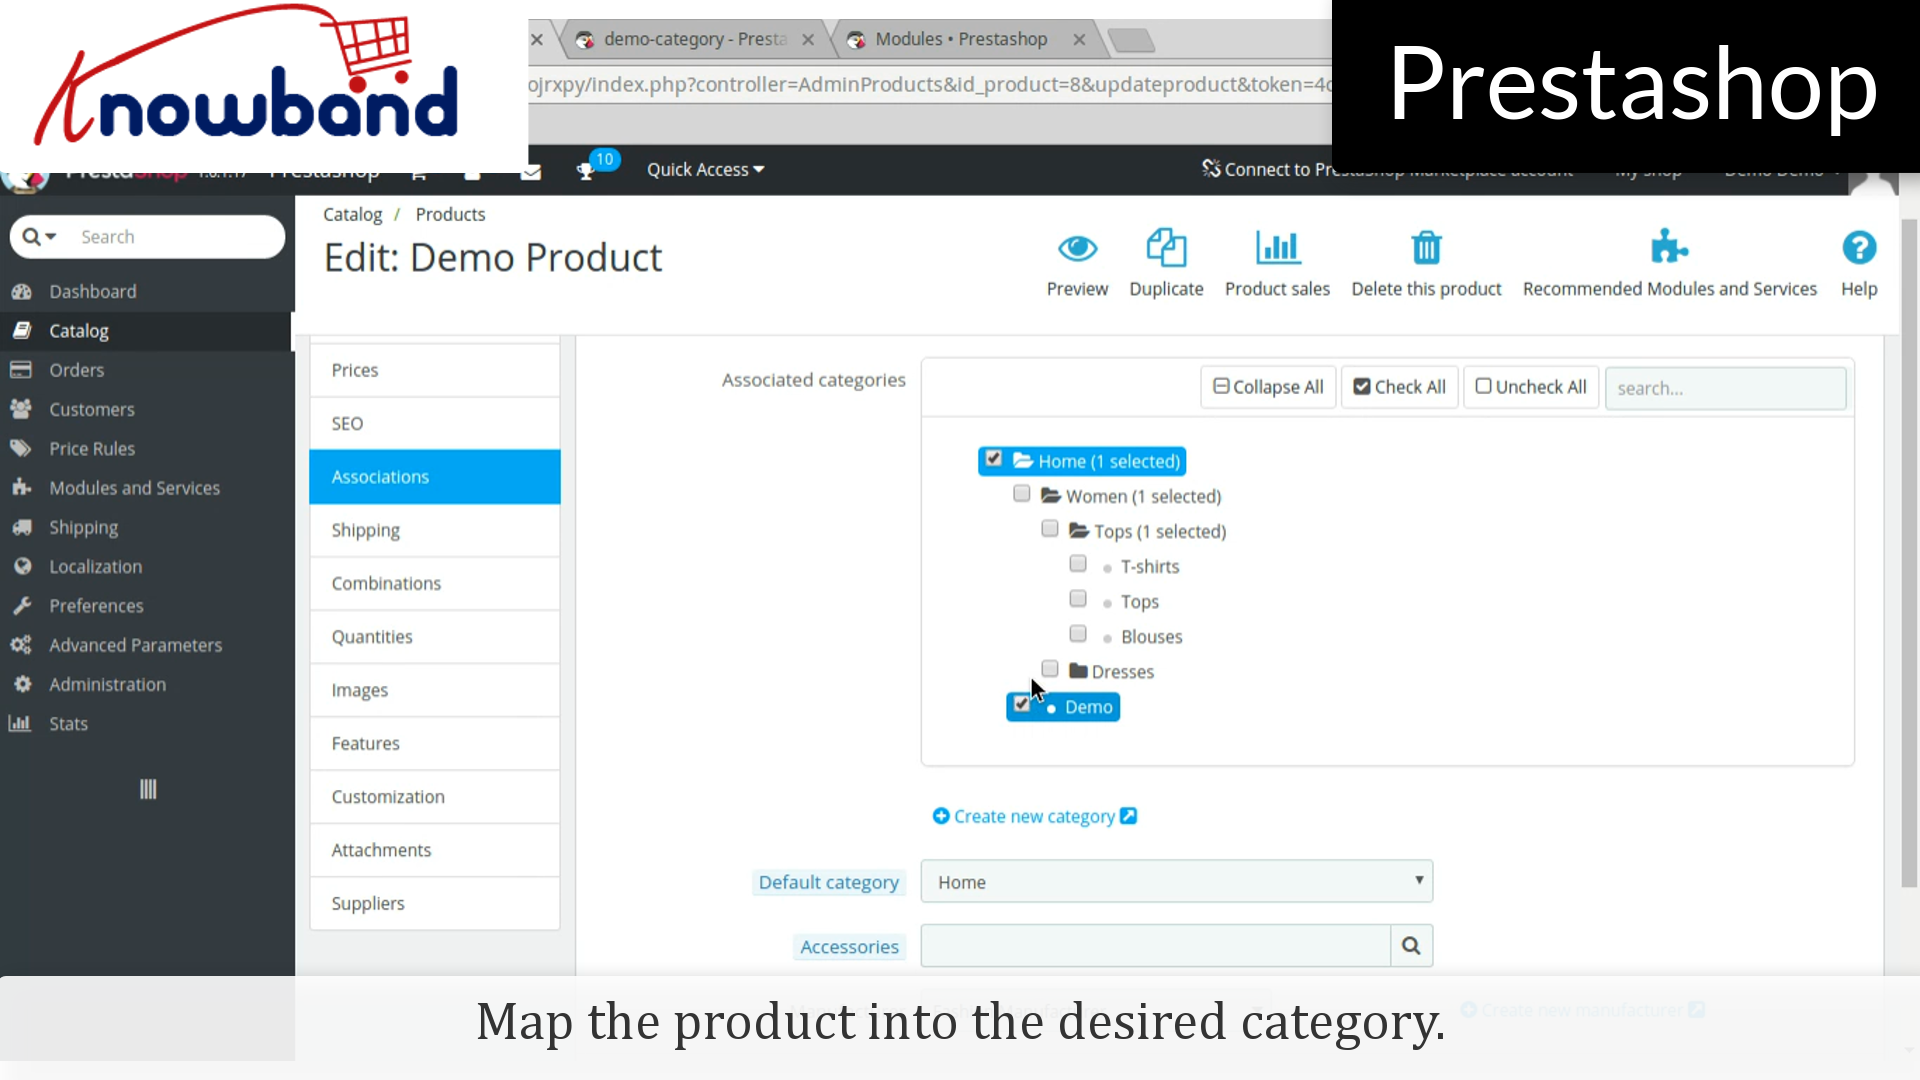
Step 13: Click on “Associations” in the product details and map the product into the desired category.
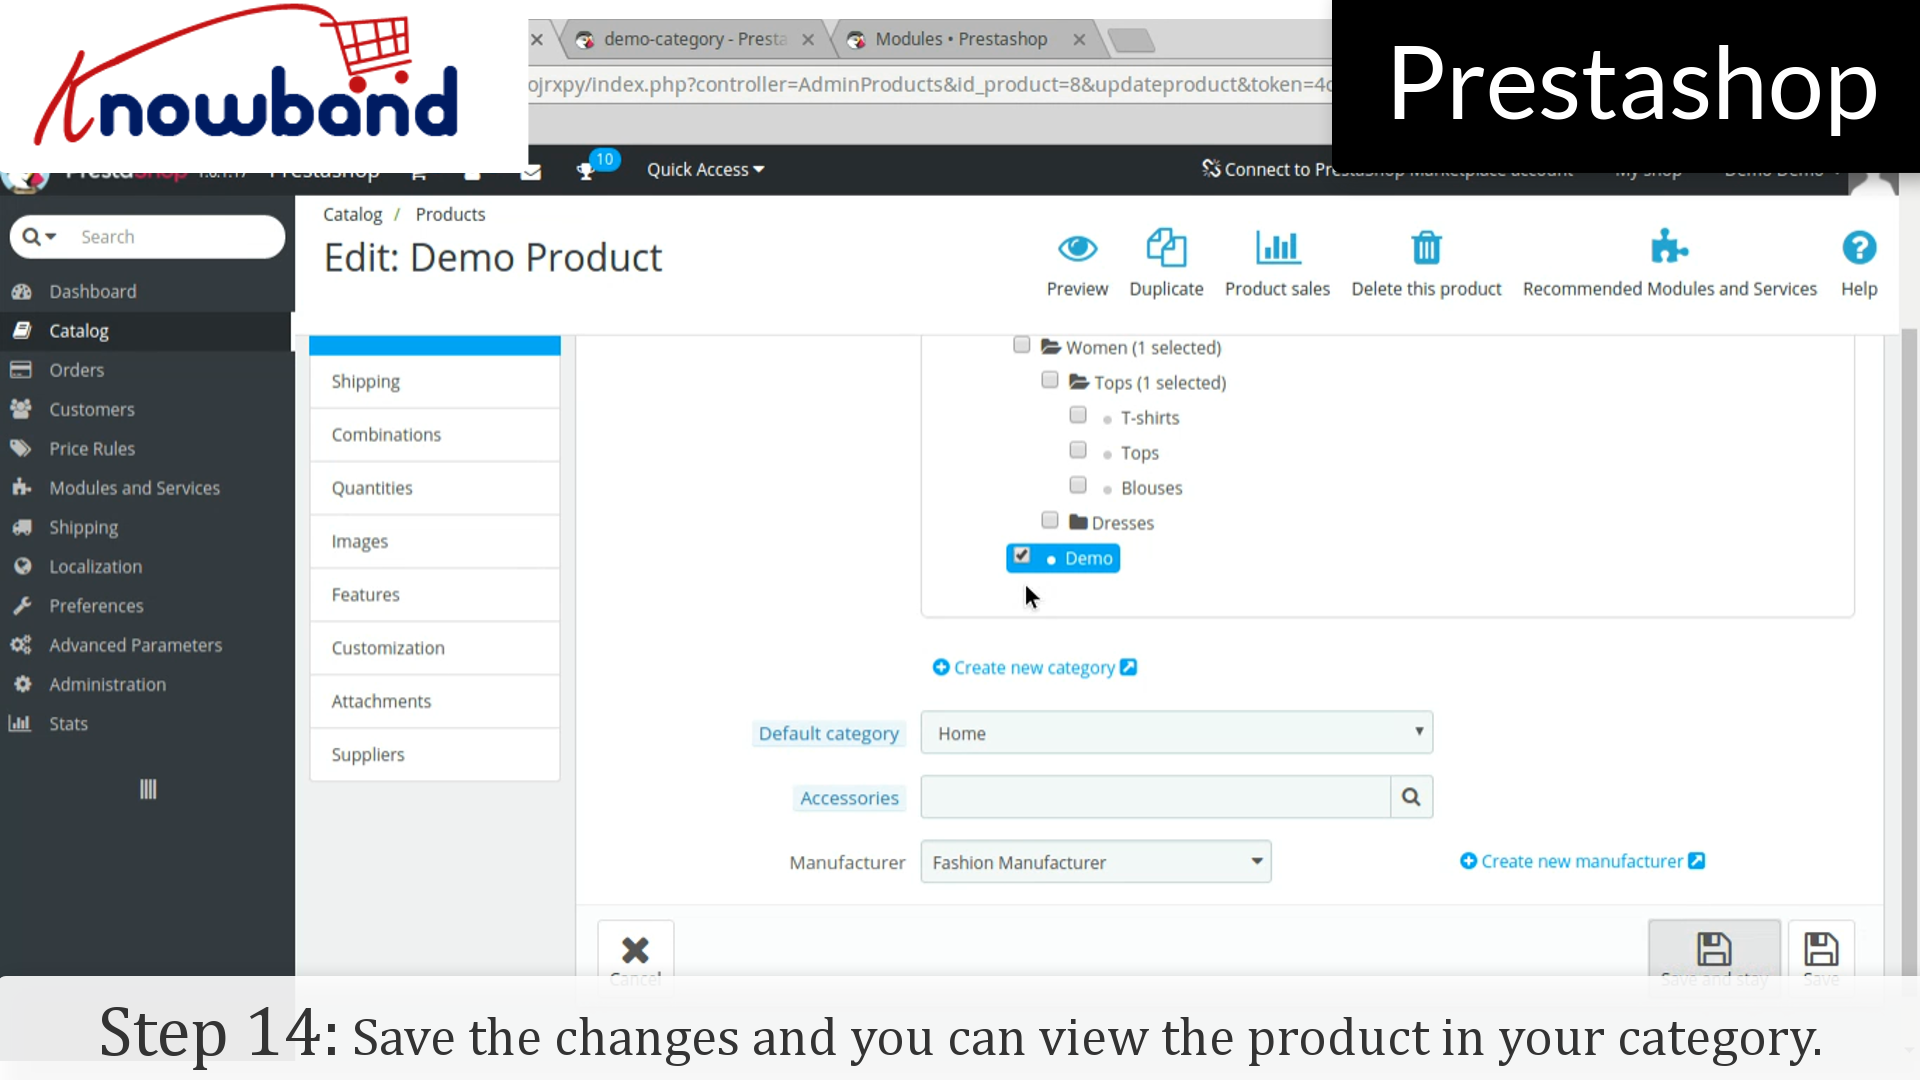
Step 14: Click on the save button to save the changes and you can view the product in your category.
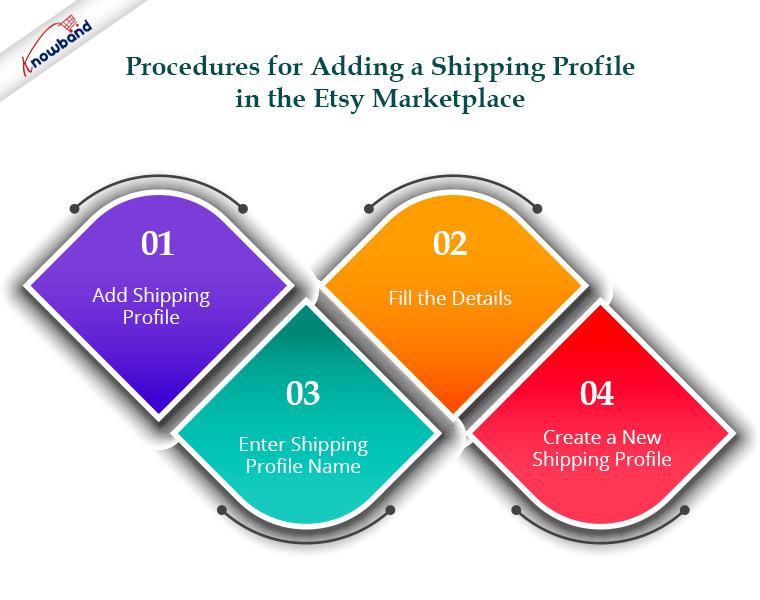
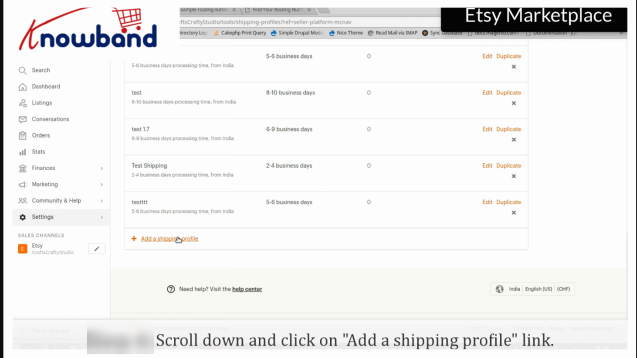
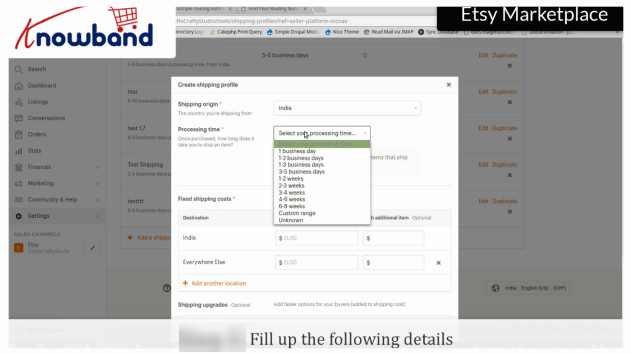
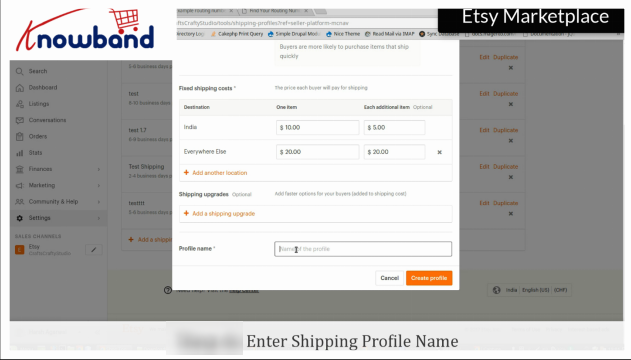
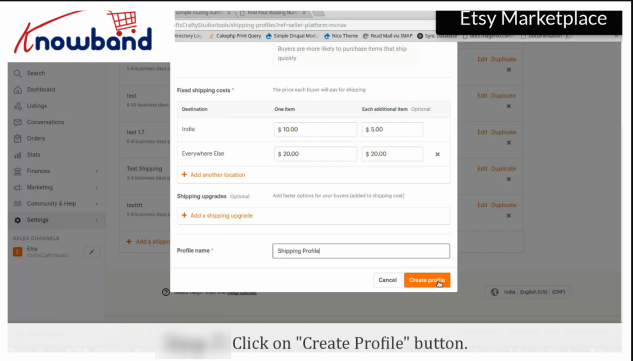
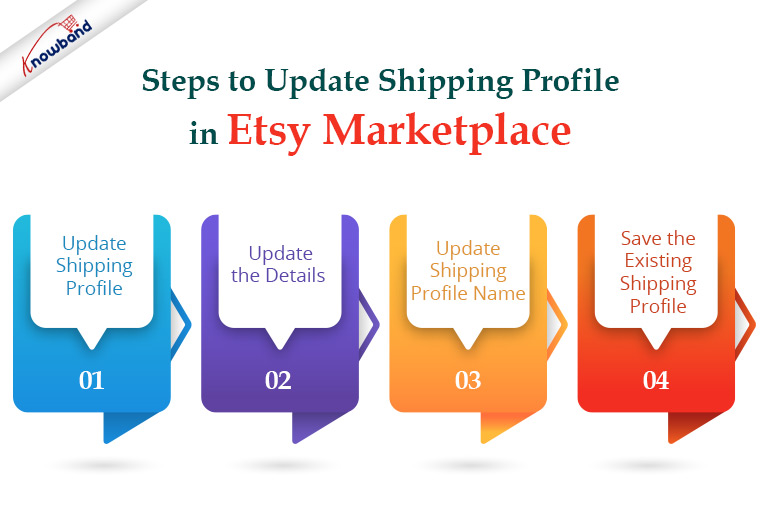
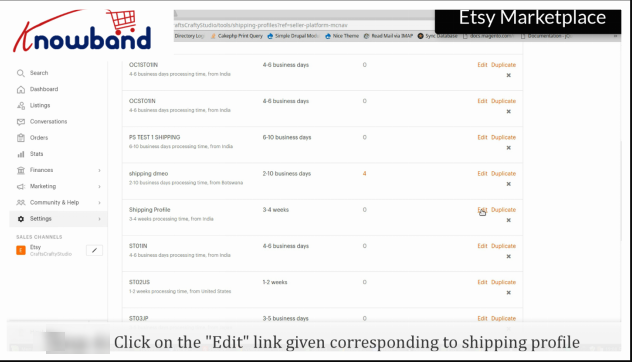
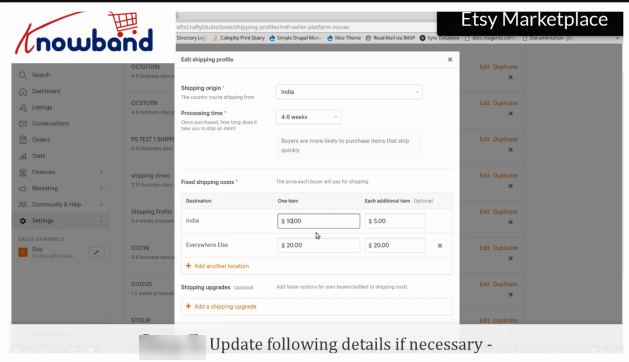
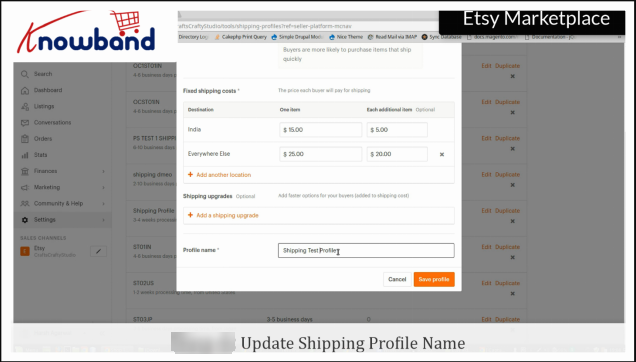
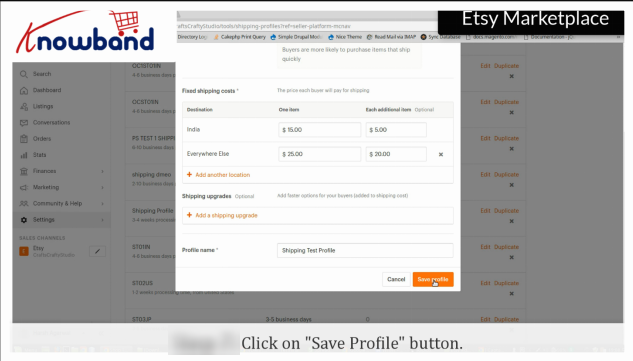
The shipping method varies from time to time, let it be cost or time duration, which is why Etsy Marketplace provides you with an option to add a new shipping profile or update the existing one free of cost. This will help your customers to have their products shipped with the most desirable and convenient method.
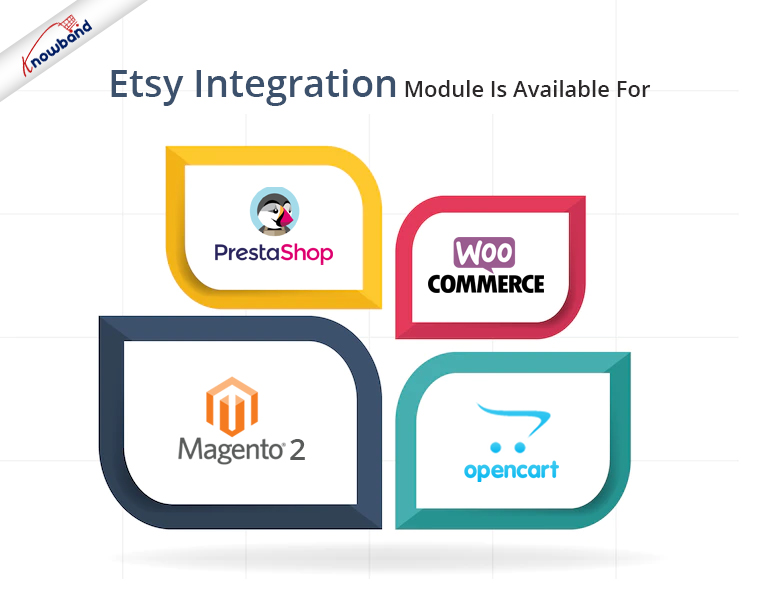
Are you looking to integrate your store with the Etsy marketplace? Knowband offers Etsy Marketplace Integrators for various CMS platforms like Prestashop, OpenCart, Magento 2 and WooCommerce. This helps in showcasing your products among the larger audiences and enhances brand awareness as well.
From the backend, the admin can establish shipping profiles, which can then be mapped to the various profiles generated under the Profiles Management. All of the cron settings can be automated using the synchronisation tab’s cron settings. Therefore, an online owner may quickly sync product status, order status, language sync, order status update, etc. utilising the Synchronization tab.
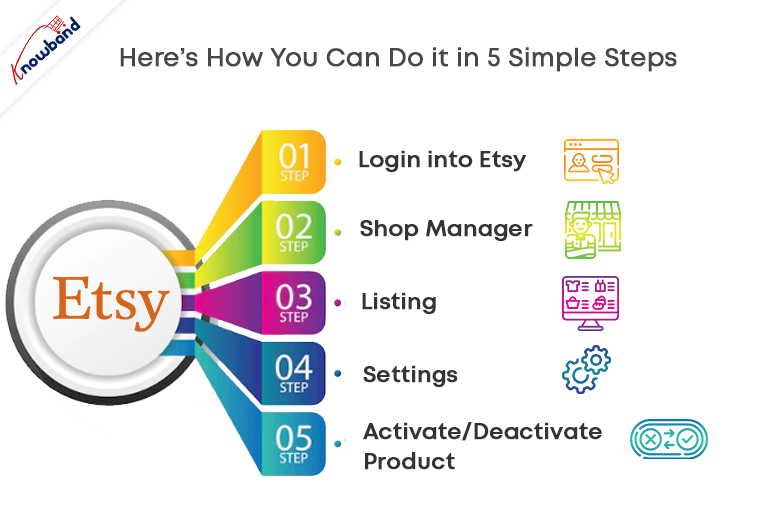
Etsy offers sellers the access to renew/hide and activate/deactivate items from the Etsy Marketplace.There are times when you add product to your store and you can’t have enough supply to deliver. That is when, Etsy lets you deactivate your listings for items you can’t provide to your customers and then reactivate them later.
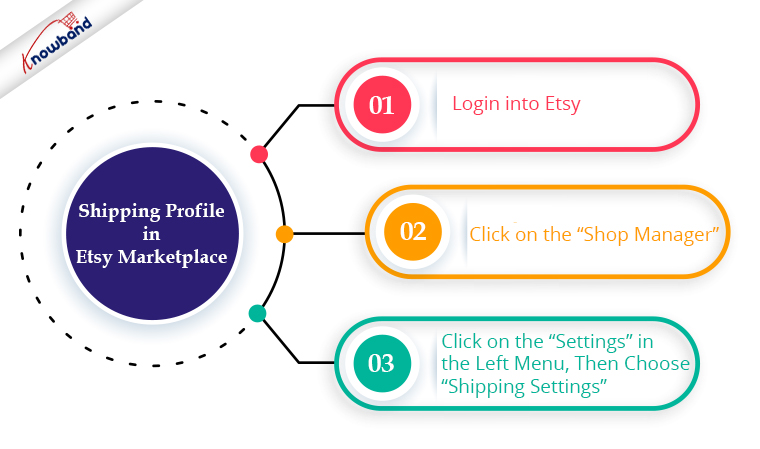
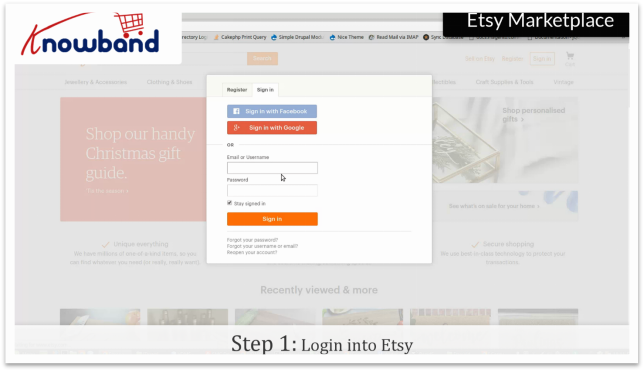
Login to your Etsy account by clicking the “Sign in” option provided in the top right corner.
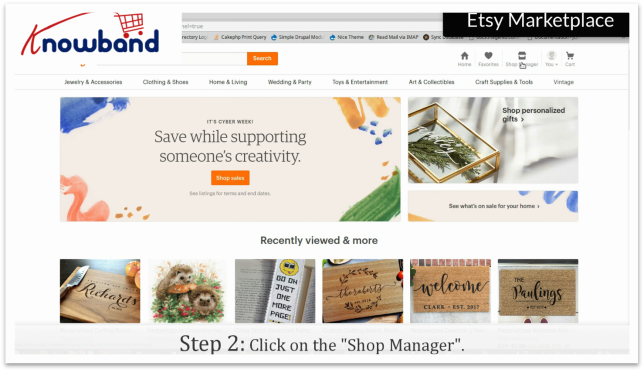
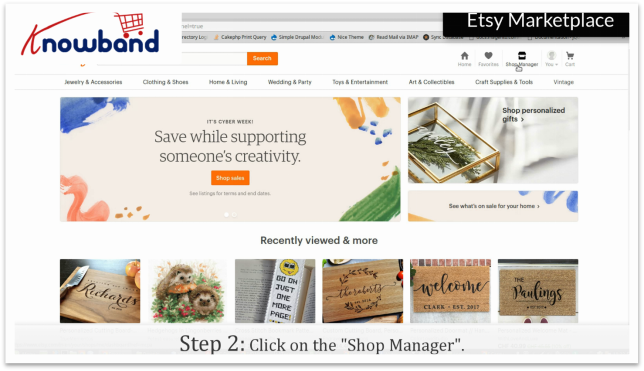
Step 2: Shop Manager
After you have successfully logged in, click on the “Shop Manager” in the top right corner.
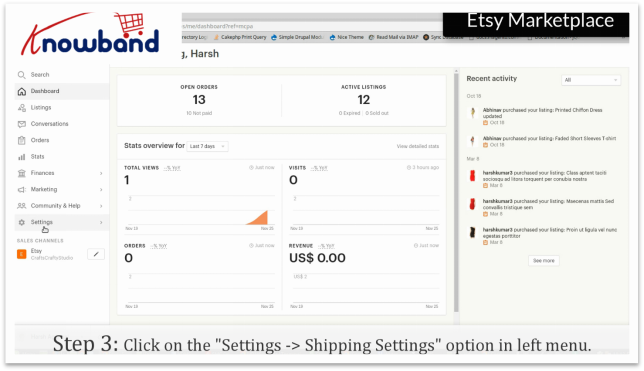
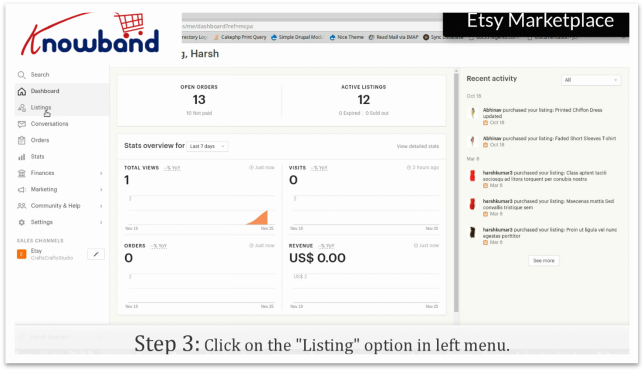
Step 3: Listing
In the “Shop Manager”, you will find an option “Listings” in the left menu. The option displays all the products you have added in your marketplace.
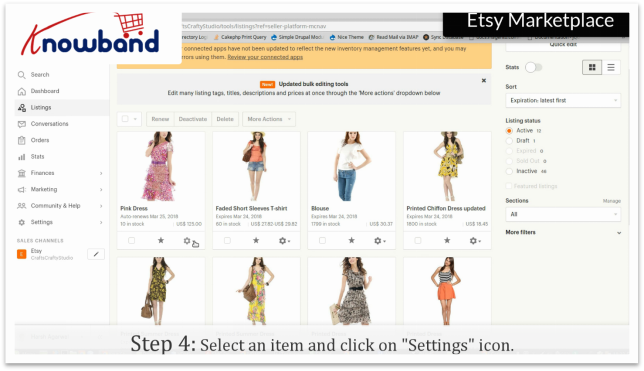
Step 4: Settings
In the listing, there is a “Settings” option, which will give you options to manage the product.
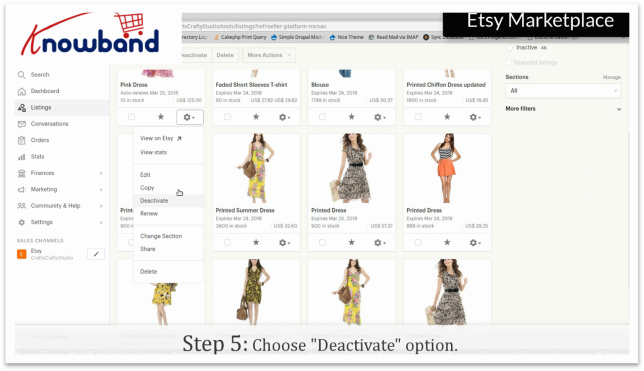
Step 5:Activate/Deactivate Product
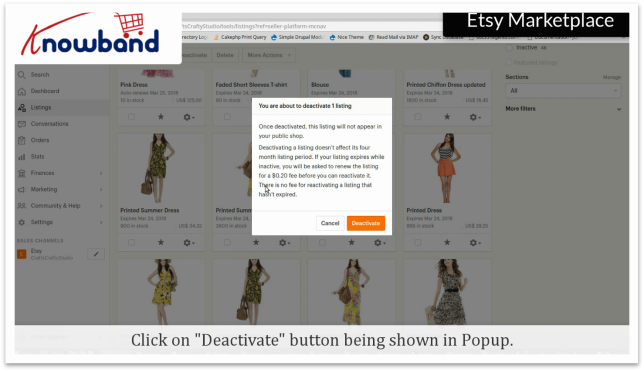
Click on the “Activate/Deactivate”. The store will ask for confirmation, on confirming the same, the store will activate/deactivate the product. Once deactivated, the listing will not appear in your public shop.
For reactivating the items, seller needs to check the whether the listed item is expired or not.For expired items,seller needs to pay 0.20 USD to renew the item.For inactive items who has n’t expired, reactivating is free of cost.
Watch how to Activate/Deactivate listing at Etsy Marketplace?
When working with APIs, you will often need to have different configurations. For example, your local machine, the development server, or the production API. Environments provide the ability to customize requests using variables. This way, you can easily switch between different settings without changing your requests. You won’t have to worry about remembering all these values once they’re in Postman. Environments can be downloaded and saved as JSON files and loaded later.
Steps to Create a New Environment
Click the Environments section in the left menu.
Click the Add button or Create Environment to create a new environment.
Click the Add button to create a new environment.
Provide the environment name such as local/development or production.
Each environment is a set of key-value pairs, with the key as the variable name.
for example, here we create two keys that can be used when triggering APIs
API_URL
APP_VERSION
We can also define global variables that can be accessible in all environments. Click on the global button.
Set the key values as previously defined when creating an environment and click the save button.
Steps to Use Environment
Select an active environment
Click the drop-down menu in the top right corner of the Postman app to select an active environment, or type the environment name. After selecting an environment, you can access variables in the scope of the active environment.
Access Environment Variables
Once you’ve chosen the platform, you can easily access the variable in the Body, Headers, or Request URL.
Note: The variable name will be enclosed in double braces. for example, {{API_URL}}. You can also get the variable suggestion by typing simple braces ‘{‘
In the screenshot below, we have used variables in Request Url and Body parameters.
Note: Global and environment variables will always be stored as strings. If you are storing objects/arrays, be sure to JSON.stringify() before storing them and JSON.parse() during retrieval.
For any queries, please feel free to reach us at support@knowband.com.
You can also take a look at the best eCommerce modules provided by Knowband for Prestashop, Opencart, Magento, and Magento 2.
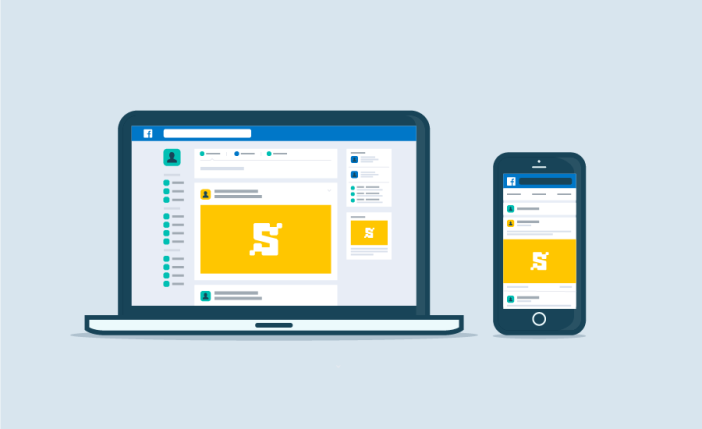
If you are an active Facebook user, you probably would have seen brands promoting their store’s products through their Facebook page and when you open those pages, you will see they have a “Shop Now” option, which we call it as a “Facebook Store.” For an e-commerce store, a Facebook store is a part of their actual eCommerce store that allows them to sell their products directly through their Facebook page.
“Social media is important for online retailers!”
If you are looking to take your eCommerce business to new heights, social media is the trump card today. The vast engagement of the users on social media platforms has proved to be an important aspect for the online sellers to use them for effective marketing. Amongst all the social media platforms, Facebook is one of the most widely used. That is why it is an inevitable aspect for the merchants to establish their web store on the world’s largest social media platform and make more sales. All they need is a facebook page with a few followers to start with.
Facebook provides a platform for eCommerce store owners in the form of a facebook shop to assist them to market their business. It helps online retailers to expand their business in front of a large audience of Facebook.
It is a proven fact that customers tend to purchase a product when it comes to their notice. For this matter, a Facebook shop proves effective. Sellers can create some amazing content on their Facebook business pages and grab users’ attention towards their store. You can easily link your e-commerce store to your Facebook page with the help of some plugins.
Prestashop Facebook store addon by Knowband is one such addon for Prestashop owners that helps them incorporate their own shop on Facebook. It allows them to manage their Facebook shop quite comfortably. A merchant can adjust the look and feel of their shop with multiple color combinations, feature selected categories and products on the shop and do much more.
Let us briefly discuss how a Facebook store can help you grow your web store and get better conversions.
1. Drives the traffic from Facebook to the website
The number of Facebook users is hitting a new count every day. It is estimated that the number will reach 3 billionin in the next couple of years. With such numbers, retailers get a huge advantage of making people aware of their brand and achieve higher sales. This creates a good opportunity for e-commerce store owners to redirect a good portion of page traffic to their website directly. The Facebook store can create a significant impact on your store conversions
2. Social sharing
Facebook store ensures social sharing. Many times, if a product posted by a seller is liked by the visitors, there are certain chances that they will suggest that product to some of their family members or friends. The Facebook store enables the feature of social sharing where the visitors can share the products with their known ones. The Facebook shop helps the seller in many ways. Firstly, the seller is able to promote the products on a free platform. Secondly, the visitors who share the product can lead it to a potential buyer which helps in making the sales of the product quite easy.
3. Better product visibility
One of the best advantages of the Facebook store is that it is easy to reach for users. Most people do own a Facebook account. Therefore, it becomes quite easy for the seller to reach out to potential buyers. One of the major encountered problems by the seller is to find a good and well-known platform in order to promote the product. With a Facebook store, this problem gets minimized and the chances of conversions increase considerably. In addition to this, the merchants can even increase the number of followers on their Facebook shop with some amazing discounts and offers. Prestashop Superfan addon is one such way to compel the visitors to follow you on Facebook.
4. Ease of shopping
What could be a better option for the users than browsing for their favorite products on the same platform which they use generally for entertainment purposes? The Facebook store ensures that the customer doesn’t have to leave the platform while browsing some stuff on your store. It improves the customer’s experience and helps the seller to improve sales performance.
5. Easy access to the website’s product
Most of the people who use the Internet have easy access to Facebook. Thus, establishing a Facebook store helps the seller to make their e-commerce store easily accessible to Facebook users.
People can access Facebook through mobiles, tablets and other devices. Therefore, the idea of accessing the web store just by using the desktop site becomes obsolete. Users can browse the Facebook store using any mode. Using the Facebook shop approach removes the barrier of a limited form of access to the web store, ensuring better coverage to get more visibility and a better conversion rate.
6. Easy to track the traffic coming through Facebook
Having a Facebook shop makes it easy to track your Facebook community members. When you link your store to your Facebook page, then with the help of Google Analytics, you can get an overview of the traffic coming through Facebook. You can check where your customers are coming from, you can track conversions and optimize your shop accordingly.
7. More user Engagement
Selling products on Facebook isn’t difficult if you know how to engage users. For this to happen, you need to make a friendly relation with your community. Make them feel that you care for them. Announce exciting prizes, sales, discounts, solve their queries in the comment section, use facebook stories, organize quizzes, etc. This way, you will find more user engagement on your facebook shop and it will help you understand your community better.
8. Facebook ads
Facebook ads help you get more customers and increase brand awareness. It presents your brand to a new set of people so that more and more people get to know about it. Facebook provides a “Boost post” option by which you can take your brand visibility to the next level. You can target a specific audience with a specified budget.
Conclusion
Most of the eCommerce stores are shifting to social media for better growth. One simply can’t ignore the power of social media if they wish to take their business to the next level.. Not having a Facebook shop might result in losing a large portion of potential buyers. So, go and open your facebook shop today!
If you have any more points to add, do let us know by leaving a comment below.
Popups still work if you know how to use them effectively to capture your visitors’ email addresses or generate more sales. But while incorporating popups on your website, you should know which mistakes to avoid and which strategies to put ahead to make your popup stand out.
Popup is one such marketing tool that can either prove to be a boon or a curse for your online business. This is why, for any retailer, it is important to understand the upsides and downsides of a popup.
How are good popups different from bad popups?
Good pop-ups do not irk your visitors. They contain relevant information and are well-designed to capture user attention. Bad pop-ups, on the other hand, contain a messy look, disturb the user flow and compels your visitors to take an instant exit.
The old and classical form of providing offers via email subscription pop up us has become obsolete. Moreover, it becomes quite annoying for the customers to deal with the subscription and email to redeem the offer every time and most of the time, customers are unlikely to avail offers through this approach. Therefore, the e-retailers need to change their approach in order to reach out to potential buyers.
In this article, I am going to discuss the top 5 mistakes that you should avoid while incorporating popups on your website.
Mistake 1- No defined time of the popup appearance
Timing is the key for popups to deliver good results. Do not trigger them too early or too late. If your popup appears too early, it will leave a negative impact on your visitors and distract them from their purpose in the very beginning. If your popup appears too late, you may lose out on your potential subscribers. Well, what would be the point anyway of setting up a popup on your site if you display it too late? Get the timing right.
Although there’s no specific time to argue upon for a popup to work the best, you can initially analyze the average time spent by the visitors on your store and then define the time for your pop up appearance accordingly. Moreover, you can choose to trigger the popup after a user has scrolled down the page to a certain percentage or when they are trying to exit. This way, your pop-up won’t be annoying and you can expect better results.
Mistake 2- Asking for too much information
For an eCommerce store owner, increasing the subscribers’ list depends mainly on how much information the visitors have been asked to provide. Some eCommerce platforms ask for too much information like first name, surname, email address, date of birth, etc. while some just stick to asking email address only. Yes, I agree that asking for much information helps to launch the email marketing campaign in a better way but to create a successful campaign in the first place, you need to have a list of sufficient subscribers.
Asking for less and relevant information can be the solution for you to get more subscribers and drive more conversions and sales.
Mistake 3- Hard to dismiss pop-ups
This is a very important aspect as far as your conversions are concerned. There are many websites where a user finds it difficult to dismiss the popup. Do not let this mistake happen in your store. Simply provide your visitors with an easy option to close the popup if they are not interested. A hard-to-dismiss popup can result in an increased bounce rate.
Mistake 4- Too much frequency of the popup
Do not ever get misguided into believing that displaying popups frequently will bring more leads and conversions. If you keep showing your popup again and again on almost every page, I am sorry to say but you will lose a great number of potential subscribers by making them extremely frustrated.
Try to display your popup like on every visit by the customer, in every one hour or one day. It will minimize the bounce rate on your store and ensure customer retention.
Mistake 5- No innovation
Pop-ups require creativity. The more creative a popup, the more the chances of a visitor turning into your subscriber. Unfortunately, the lack of innovation in the pop-ups has resulted in a downfall in the conversion rate. How can one expect better customer engagement and conversion, if the approach to interact with the visitors is very conventional? Therefore, the eCommerce store owners must use innovative ideas like Spin and Win pop up to create more user engagement. Spin and Win popup provides a gamifying experience to your visitors.
You should definitely check out the Spin and Win popup module by Knowband.
Your popup means nothing if it doesn’t serve a valid purpose to your visitors. Well, no one is actually interested to become your subscriber unless you provide them something beneficial. Why should a user subscribe to you if your offers aren’t relevant to him or her? This is why your offers must be enticing enough to encourage your customers to subscribe to your newsletters or marketing programs.
Unwanted offers lead to low conversions and eventually lesser sales. So make sure to provide your best offers, or some amazing discounts and coupons through your popup to increase your email subscribers list and reduce conversions.
Conclusion
Popups are powerful. They serve a great purpose in binding the visitors towards your store. It is just that they aren’t used in the right manner. To get more conversions, avoid the above-mentioned top 6 mistakes while incorporating popups on your website. Design your popup well, make them appear at the right time, provide some exciting offers and most importantly, do not use them too frequently.
Every business, no matter small or big, needs to have its presence on the social media platforms today, especially Facebook. Apart from conventional marketing strategies, businesses should know how to market and target online shoppers on Facebook as well. Facebook is the most widely connected social media platform with over 2.38 billion active monthly users worldwide as of April 2019. With its effective advertising options, it has become the go-to marketing tool for e-retailers to find potential customers and grow their business. The growing popularity of Facebook is a positive sign for e-commerce merchants to try out new strategies and ideas for customer acquisition.
All you need is a Facebook Business page. It brings your brand to the attention of a wide facebook audience. Most of the time the seller fails to reach the customer not because there is anything wrong in their business structure and products, but due to lack of proper marketing approach. With the help of social media marketing, sellers can ensure that their offerings are well received by the customer. The eCommerce merchants can now increase their product’s visibility with the help of Facebook. Most people prefer to make a purchase after being able to connect themselves with the products. Facebook helps the seller to increase the interaction between their customers and the products by spreading the word-of-mouth.
Thus, the eCommerce store owners need to use different features on Facebook. Let us discuss some of the ways that might help the eCommerce sellers to boost their goodwill and increase their conversions.
1. Facebook Store
A Facebook store is a small part of your actual online store, that allows the Facebook audience to shop for your store products directly through the FB store. The FB Store is one of the most trending approaches followed by marketers to gain higher traffic and increase user engagement. It helps them increase their brand awareness and drive more sales.
Prestashop Facebook store addon allows e-retailers to integrate their Facebook business page to their eCommerce store. Businesses can analyze the insights of the sale through their Facebook store by enabling the Google Analytics option within this module, and eventually, retarget that audience to drive more revenue. They can also customize each and every aspect of their FB shop as per their needs. You can try out the FB store extension for Magento as well.
If you want to bring more audience to your store, use Facebook ads. According to a survey, “Facebook ads are more likely to get a response by 26% in comparison to the ads on any other platform”. With Facebook ads, you can promote your posts or products and make them reach a larger audience. Moreover, you can decide on your target audience and boost your products accordingly. You can target people based on location, age, gender, interest, etc. Though it will cost some money, you can expect a good ROI. Just make sure that your post or product is worth your audience’s attention.
3. Facebook Video
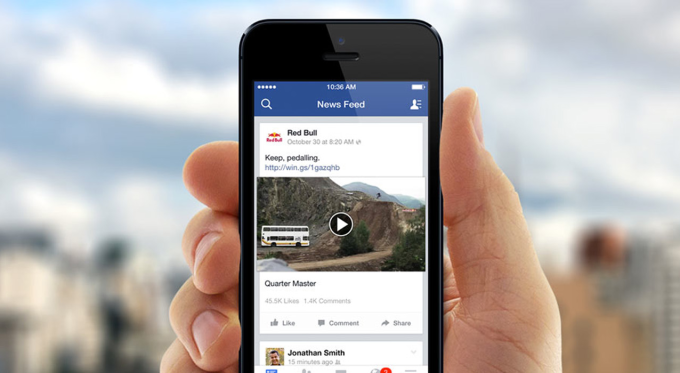
Today, videos are more effective than words to capture user attention. If you want people to pay attention to your brand or products while they scroll through their newsfeed, a video would be a great idea. Most of the visitors on Facebook would love to give a look at the products that are being presented in the form of a video rather than reading out the post. Research shows that “Products which were provided with video descriptions were 4% more likely to be purchased in comparison to the products which were not”. This alluring fact makes the importance of videos evident. Somehow, if your video gets viral, you gain an automatic increase in your store traffic. People start talking about your brand. You gain popularity.
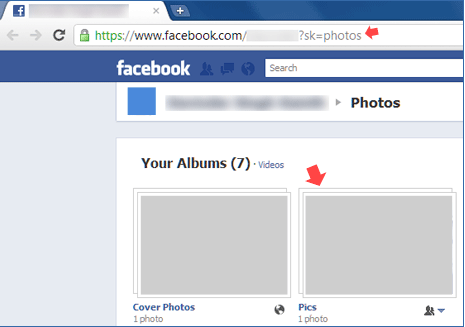
4. Facebook Album
The idea of promoting an online eCommerce store with the help of a Facebook album has been an age-long trend. The usage of photo album prior to providing deep insight into the product also enables the customer to get a better look at the product. Most of the time, if an image is not attached to the product, the customer might not get the proper description of the product, leaving the purchase intention in between. Therefore, providing image assistance with the product helps in the proper promotion of the product and at the same time encourages users to buy the product. Products with images attached are more likely to be purchased than the ones without images. With the help of Prestashop Facebook Album addon, the Prestashop seller can now post their album in minimum time.
E-commerce store owners can run online surveys asking visitors about their opinion or feedback on current products, offers or deals. A positive response can help them understand their products better, while a negative response can make them identify what’s lacking in their approach. Facebook surveys are important as visitors of different interests and fields take part in these surveys. Who knows you come up with some suggestions that may actually be beneficial for your online business.
Conclusion
The trend of using Facebook as a source of selling products is gaining popularity every day. One can’t simply ignore the power of Social media platforms like Facebook to promote their business to a larger scale. Failing to do so can lead to losing potential buyers. Try out the above-mentioned 5 effective ways to target online shoppers on Facebook. If you find the information useful, drop down a comment below.
According to a report by Pew Research Center, it is revealed that almost 93% of teens aged between 12–17 have access to the Internet. With such huge numbers of teens going online regularly, online businesses have started taking the responsibility to prevent children from seeing explicit content. Hence, they do so by setting up the age verification process on their websites. Online age verification is important to restrict the underage from browsing age-restricted content and prevent any law-breaking.
The easy access to age-restricted content by children has become a major concern for parents, teachers, and e-retailers. Many e-commerce platforms deal with alcohol selling, and tobacco selling. If a minor gets access to such websites/stores, it can create serious problems.
Why does Your Store need Age Verification Module?
It is more crucial than ever to safeguard our children. While age-restricted commerce continues to expand, keep the goods and services meant for adults out of reach of kids. Hence, strong online age verification is essential to weed out people who are underage and stop any illegal activity.
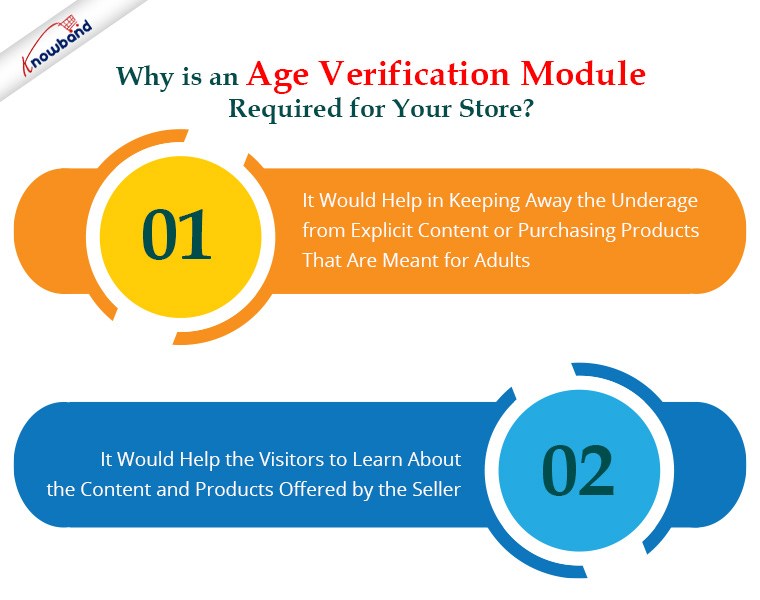
Online businesses can stop children from viewing sexual information or buying things intended for adults by strictly enforcing the Age-verification set up on the web store. It would help in keeping away the underage from such stores.
Most of the time, it is unavoidable to block access for users under a certain age if a site owner offers age-oriented products or has some explicit content on their website. Hence, it becomes a concern for the site owners to inform the visitors about the site content before their access. It would help the visitors to learn about the content and products offered by the seller. Also, they can redirect them accordingly.
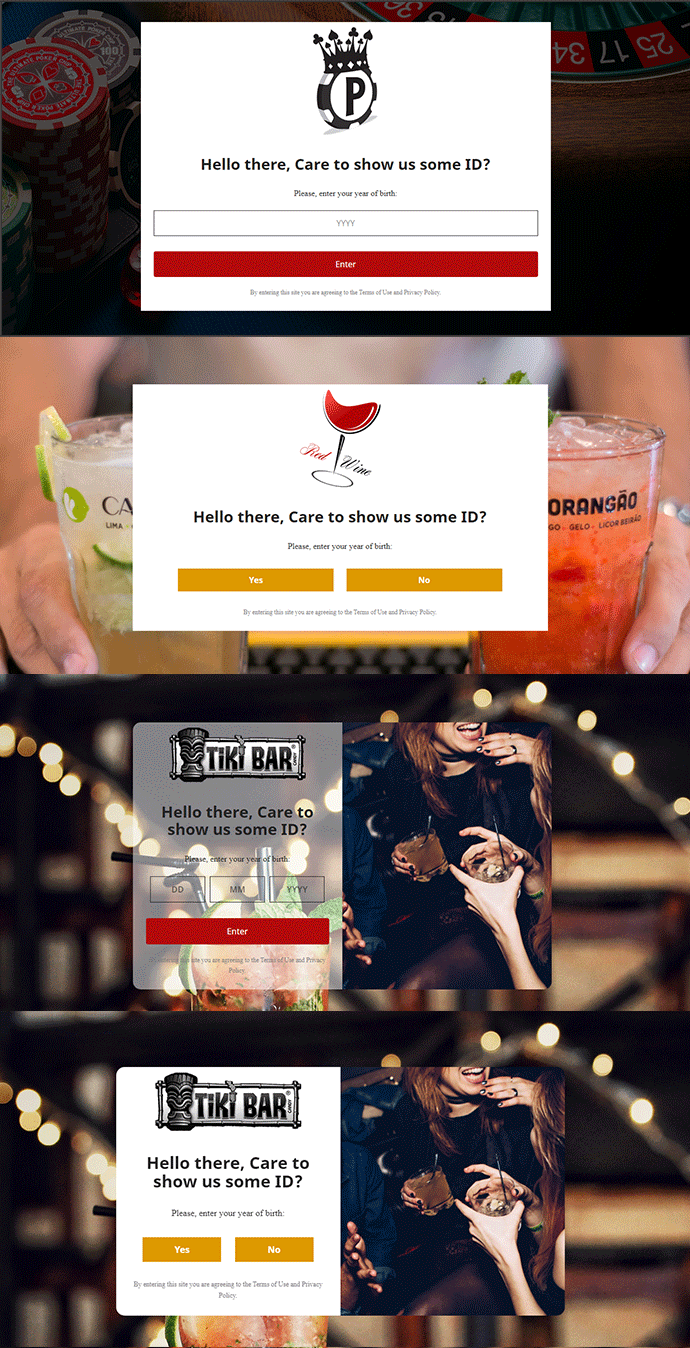
If your eCommerce store contains any explicit content you can try out the Age Verification module by Knowband. This module presents an age verification popup as soon as a visitor enters your store and asks them to confirm their age. Only after the age entered is found suitable to browse the store, permission is granted. Knowband offers the Age verification module for Prestashop and OpenCart eCommerce platforms. Do visit to check their complete features and benefits. that you wish to display to people of a certain age only,
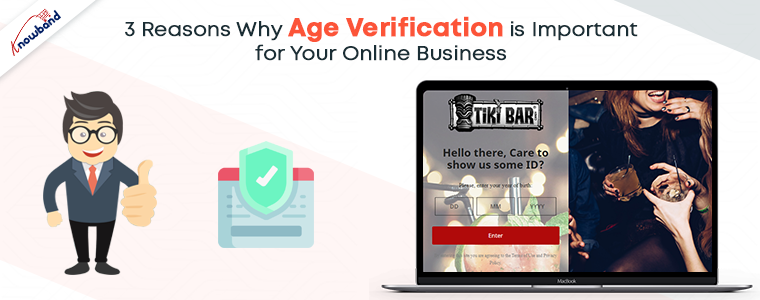
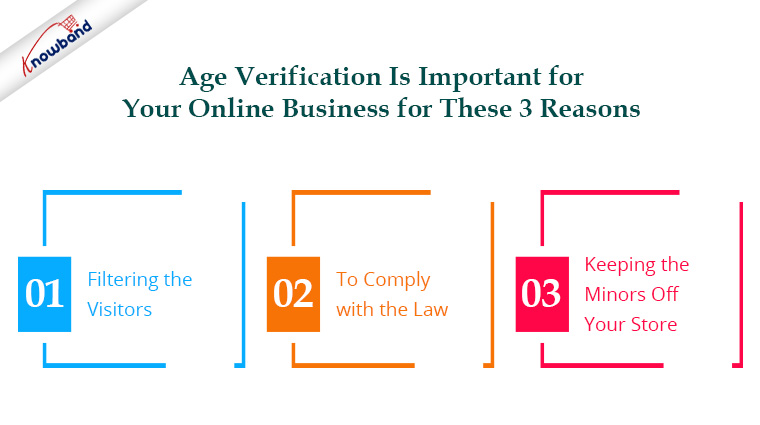
Top 3 Reasons Why Age Verification is Important for your Online Business.
1) Filtering the Visitors
By setting up the Age verification process on your online store, you can filter out the eligible visitors for your product. When visitors are asked to confirm their age, it gives a clear message that the content they are trying to view is age-restricted. A wise teen would understand this and leave your store.
2) To comply with the law
The age verification procedure must be in place in your store if you deal with goods that must only be purchased by those who are over a certain age. This is by the law. Failing to follow the age verification system can result in legal penalties, worse can be imprisonment.
3) Keeping the minors off your store
With a high rise in Internet users, e-merchants must keep minors away from their store, if it contains adult products. Online access to improper products for children can hurt their thinking. Thus could get worse down the road. Hence, this is why age verification becomes mandatory today.
Age Verification Module by Knowband
The Age Verification module developed by Knowband is one of the best solutions available to restrict accessibility. You can keep away underage users from exploring explicit content. It is not the only feature, but it lets you customize the entire age verification popup. Along with the custom title and content, it also helps the user to read the privacy policy before entering your website.
It lets you verify age in 3 ways. It has DOB verification, Year of Birth verification, and a Yes/No option for the users if they are adults or not. The business owner can apply a filter to the website visitors based on their age with the aid of this Age Verification Popup module. Installing and configuring the popup 18+ module is quite simple. Technical expertise is not necessary.
Conclusion
An essential component of online safety is the urgent necessity to notify users about the site’s content and offerings. So, online businesses that contain explicit content but do not follow the age verification process on their store can find themselves in big trouble for allowing underage, access to age-restricted content. Thus, it will not only create law-related problems but would also damage the reputation of your store. Additionally, you can receive a fine.
For any eCommerce assistance, drop an email at support@knowband.com.