We boast of the best in the industry plugins for eCommerce systems and has years of experience working with eCommerce websites.
We provide best plugins for platforms like - Magento, Prestashop, OpenCart and Shopify. We also provide custom module development and customization services for the website and modules.
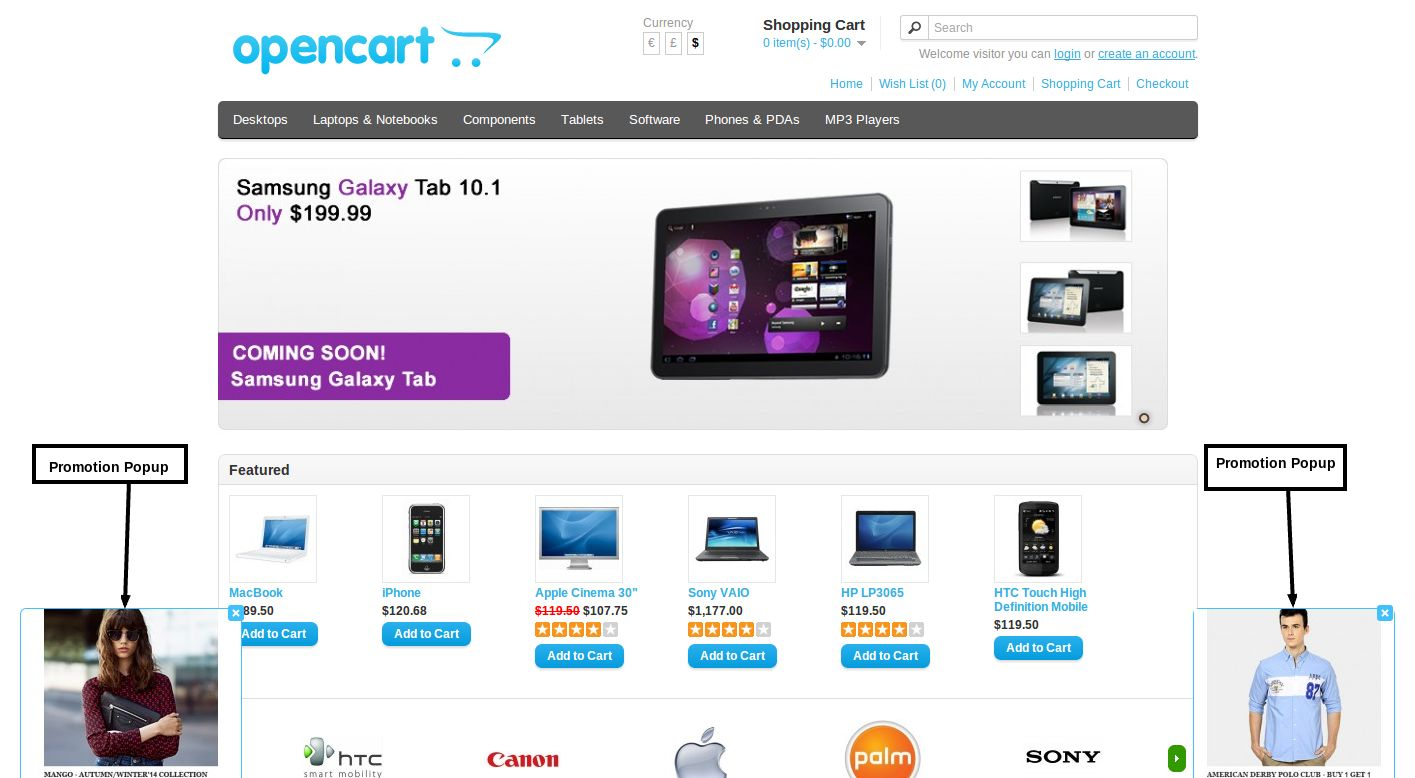
How to install Opencart Slideup Promotion plugin on your server
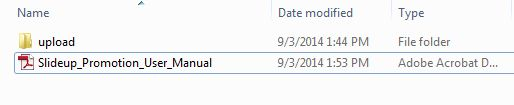
1. Folder structure of the Slideup Promotion plug-in folder.
2. Open the upload folder and you will find the following folder structure:
You must have VQMOD installed for this plug-in to work. If VQMOD is not installed please download and install from the URL below:
https://code.google.com/p/vqmod/
3. Select all the folder and drag and drop them to the root directory of your OpenCart store throughFTP.
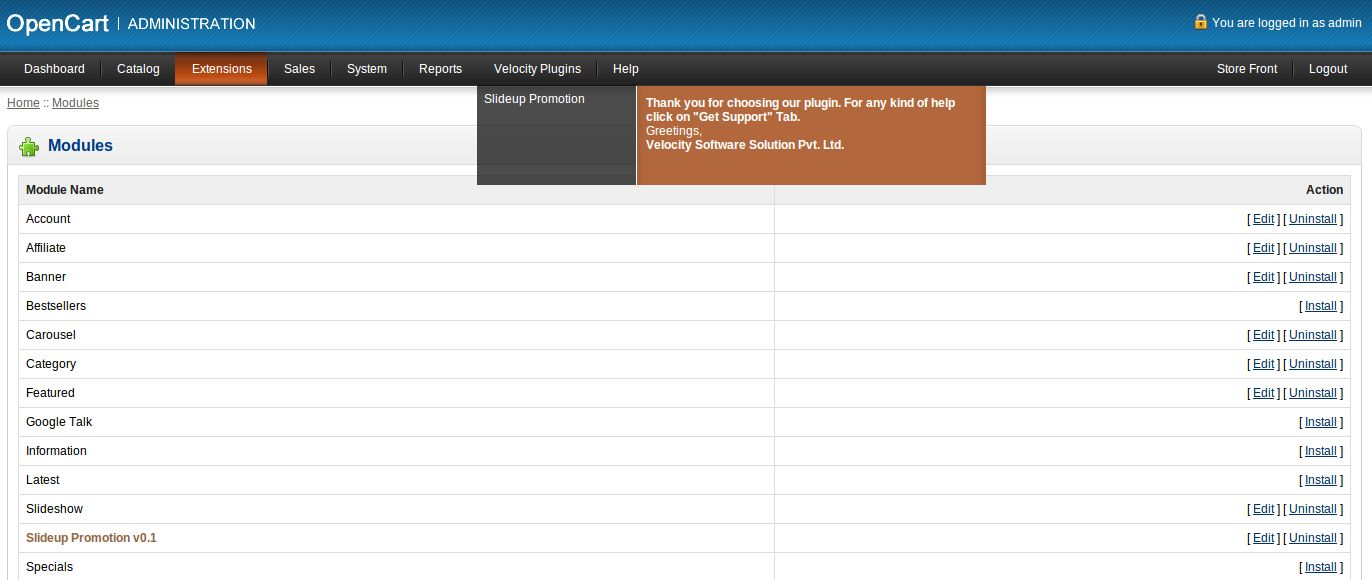
4. You will be able find the plug-in ready to be installed in the Modules in your OpenCart storeas shown below.
5. Click on the Install link to install the plug-in. This will also add a dropdown option in your menu bar which will list all plug-ins by Velocity installed on your store for fast navigation. Thisdropdown also has a message box, using which we can inform you about new launched plug-in ornew update.
6. Delete the Vqcache files from the vqmod/vqcache folder.
7. To access Slideup Promotion plug-in click on edit button in module section as shown below:
8. On clicking edit button the module for plug-in will open. It contains navigational bar at top, menu at left and main content at center as shown below.
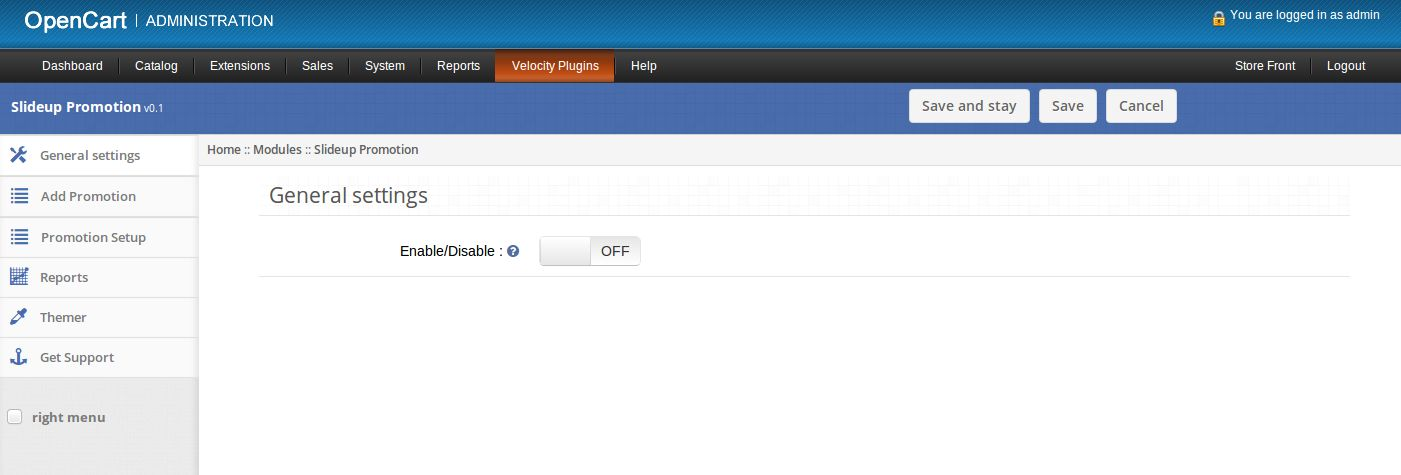
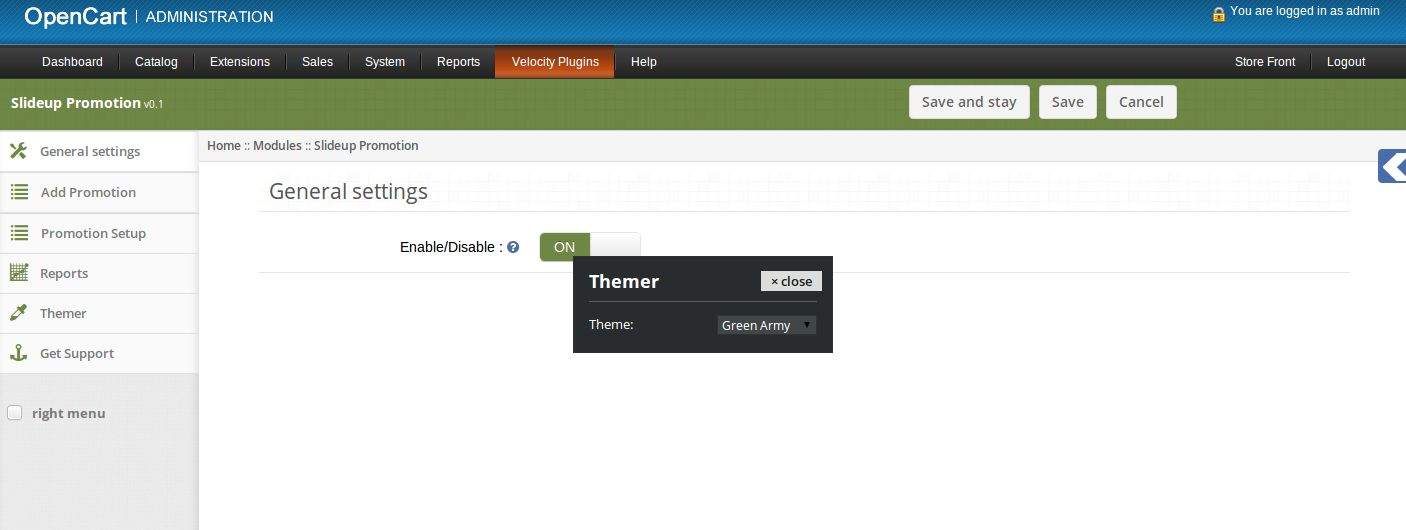
1. General Settings tab
Enable/Disable: Enable or disable plug-in as shown below.
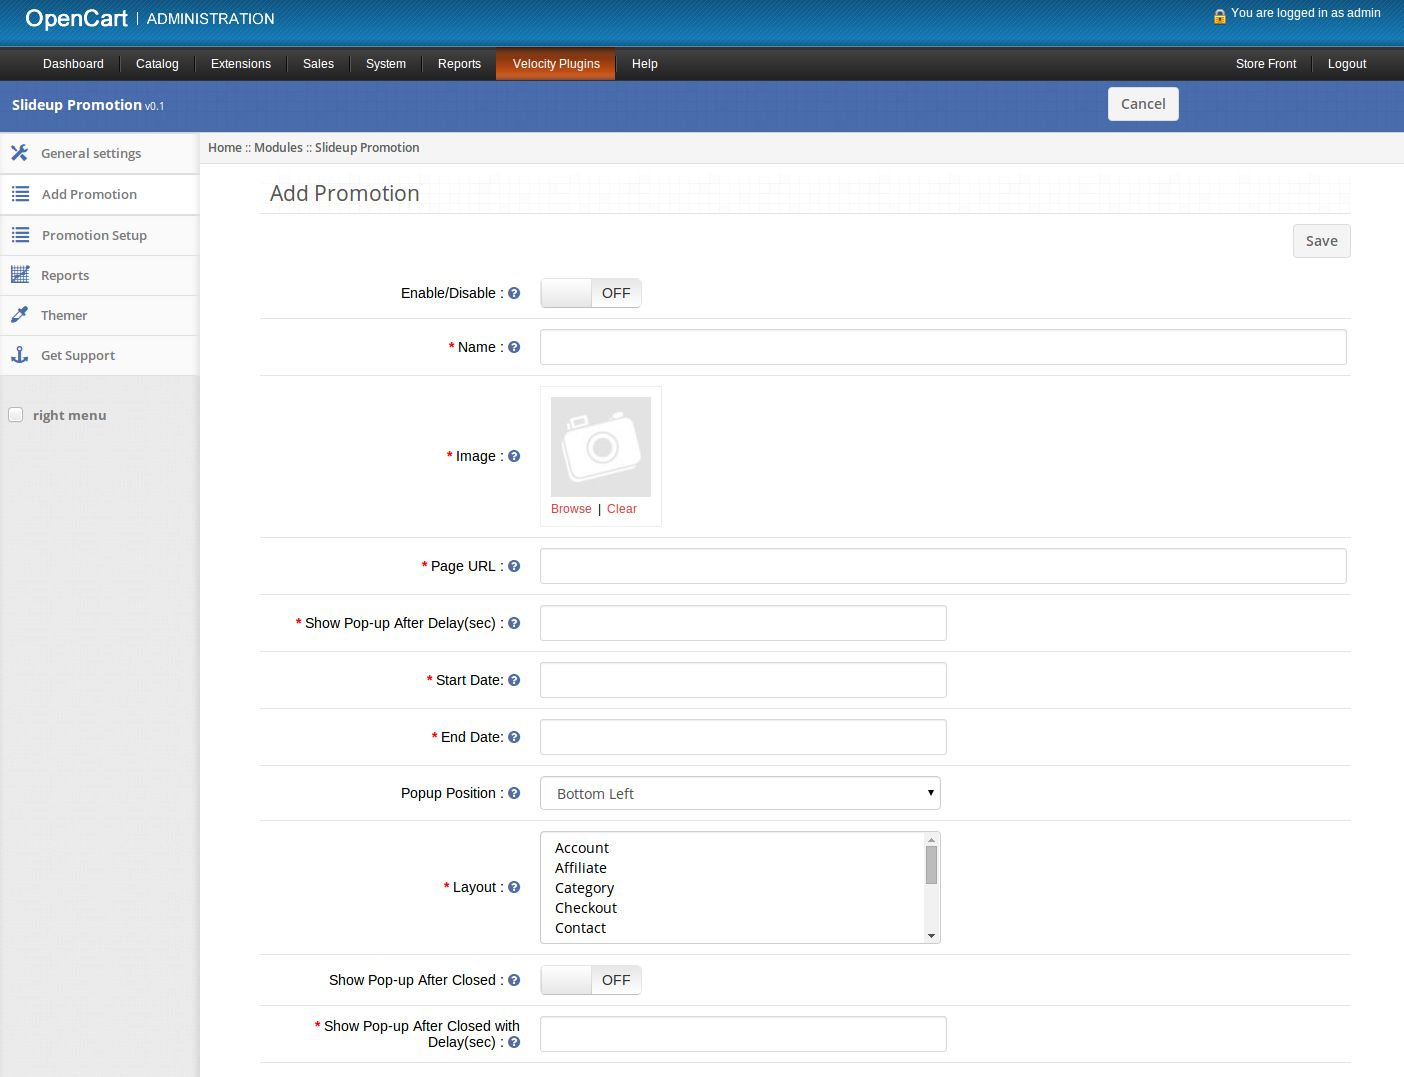
2. Add Promotion tab
1. Here admin can create a new promotion.
2. Enable/Disable: Enable or disable promotion.
3. Name: Set name of promotion.
4. Image: Set image to show on front end in the promotion popup.
5. Page URL: Set url of webpage which should be opened on clicking the promotion popup.
6. Show Pop-up After Delay: Set the delay time in seconds for the popup to appear after page load in
front end.
7. Start Date: Set start date for promotion.
8. End Date: Set end date for promotion.
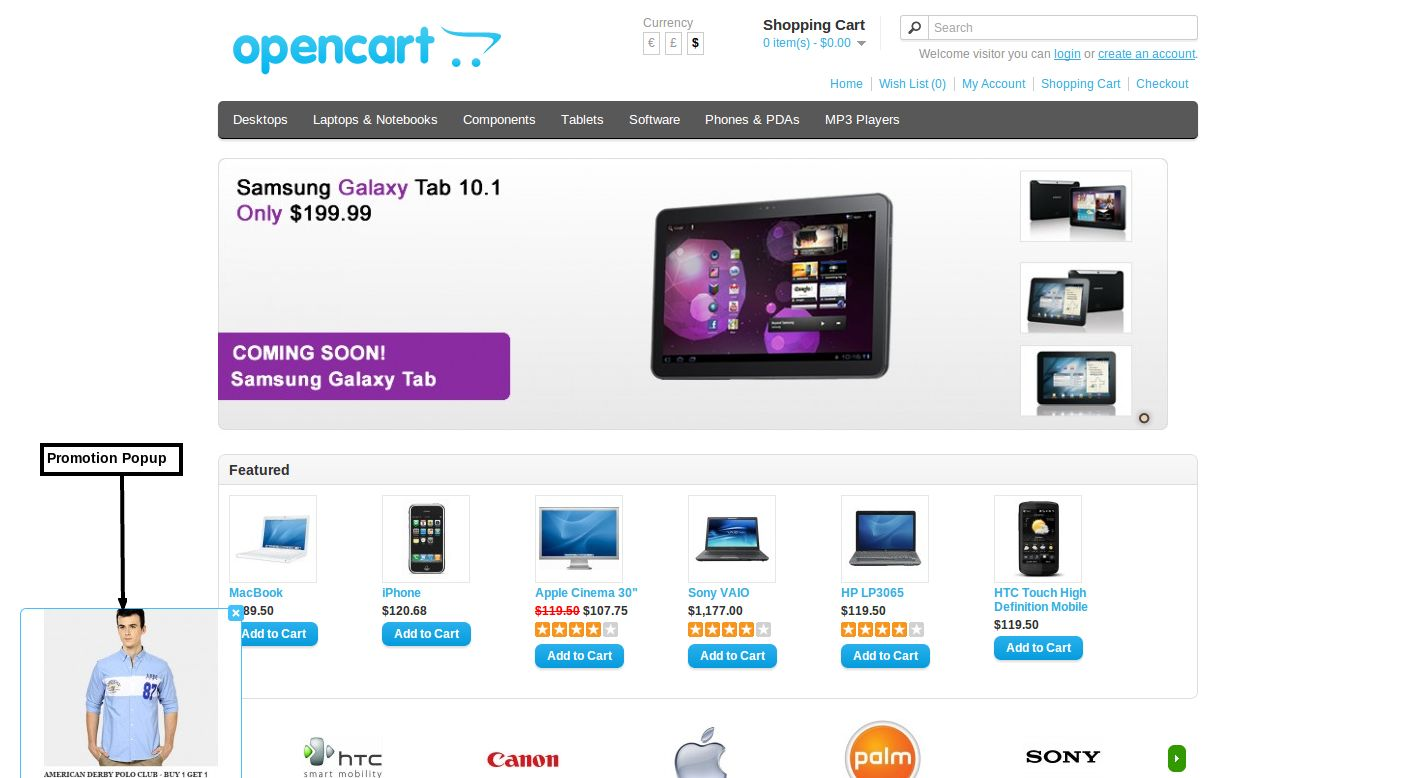
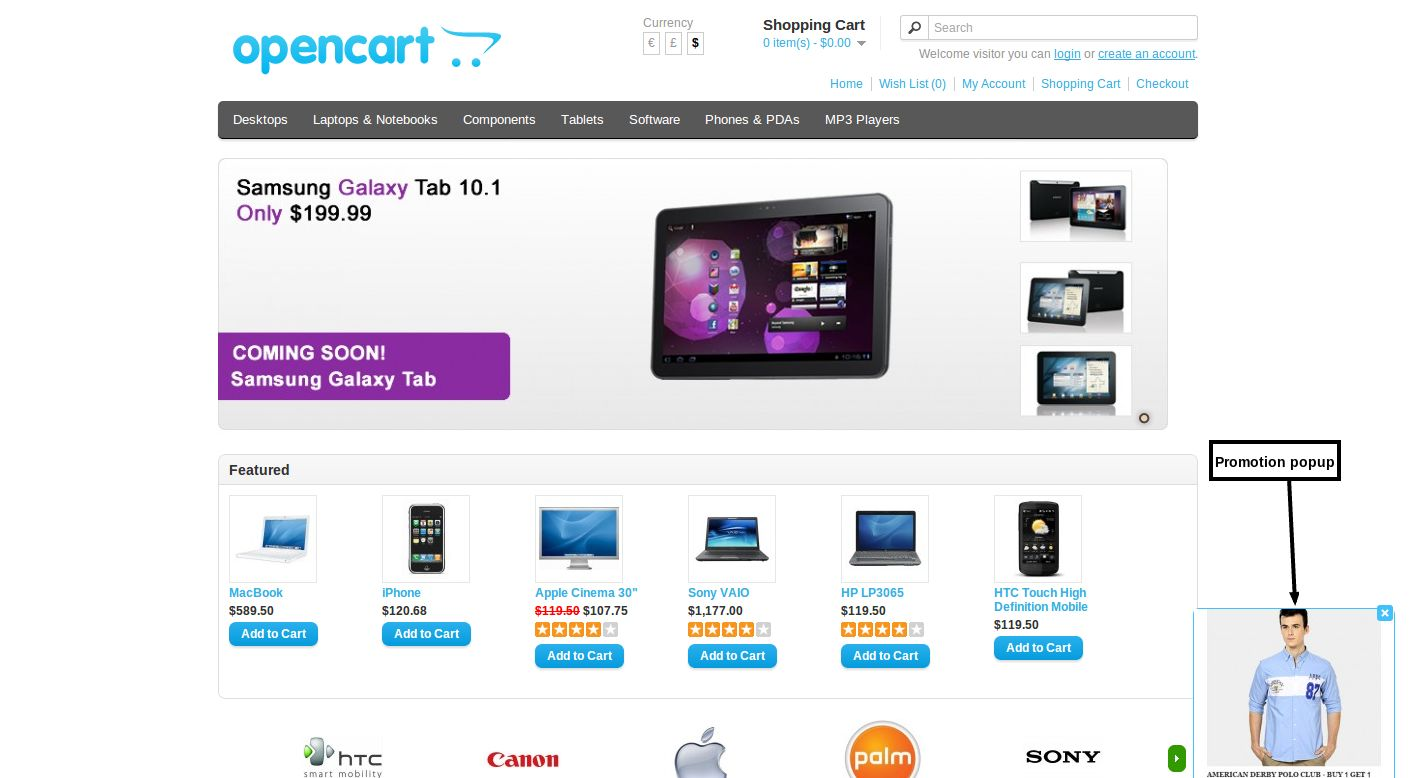
9. Popup Position: Set the position of promotion popup to appear on front end.
10. Layout: Select one or multiple layouts on which you wish to show the promotion popup.
11. Show Popup after closed: Set on to show promotion popup again after closing the popup in front end.
12. Show popup after closed with delay: Set the time in seconds for promotion popup to appear again
after being closed by customer.
3. Promotion Setup tab
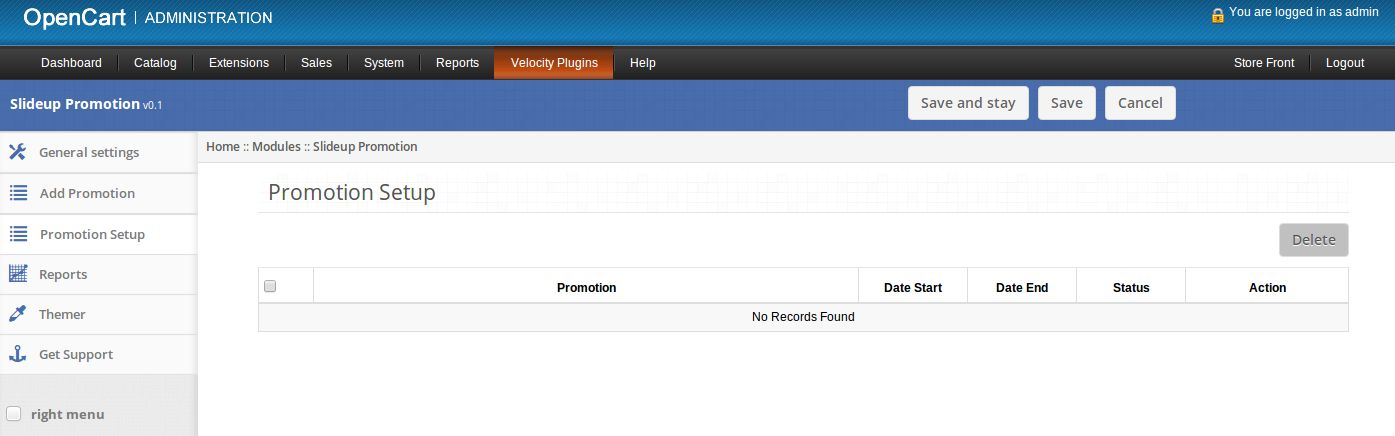
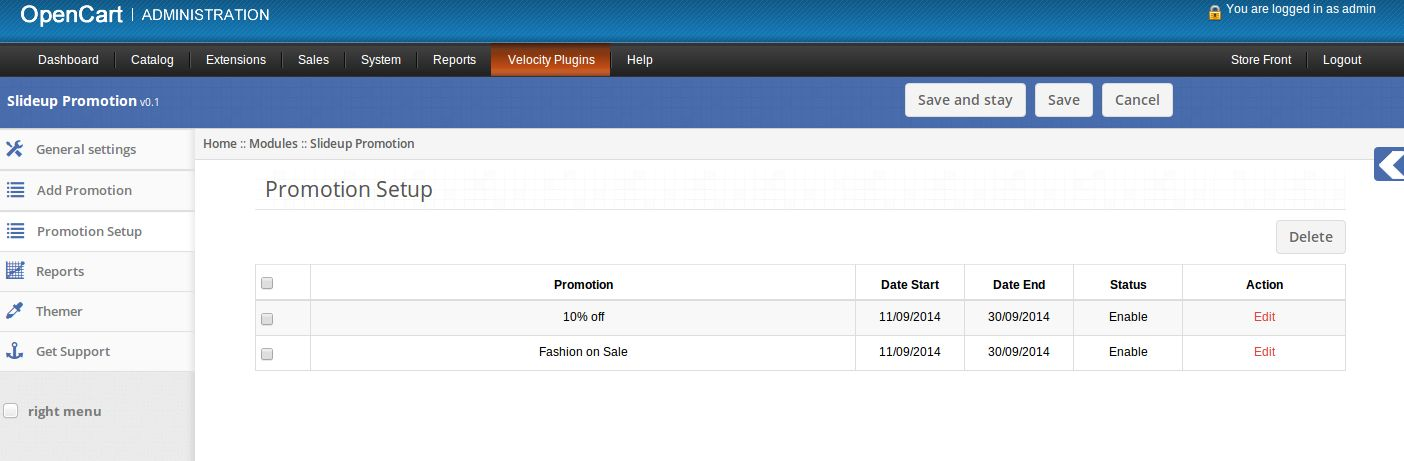
1. Here admin can see list of saved promotions.
2. If their are no saved promotions then this tab will look as follows:
3. If their are some saved promotions then this tab will look as follows:
4. Click on Edit link provided in front of every promotion to edit that promotion.
5. Click on Delete button to delete selected promotions.
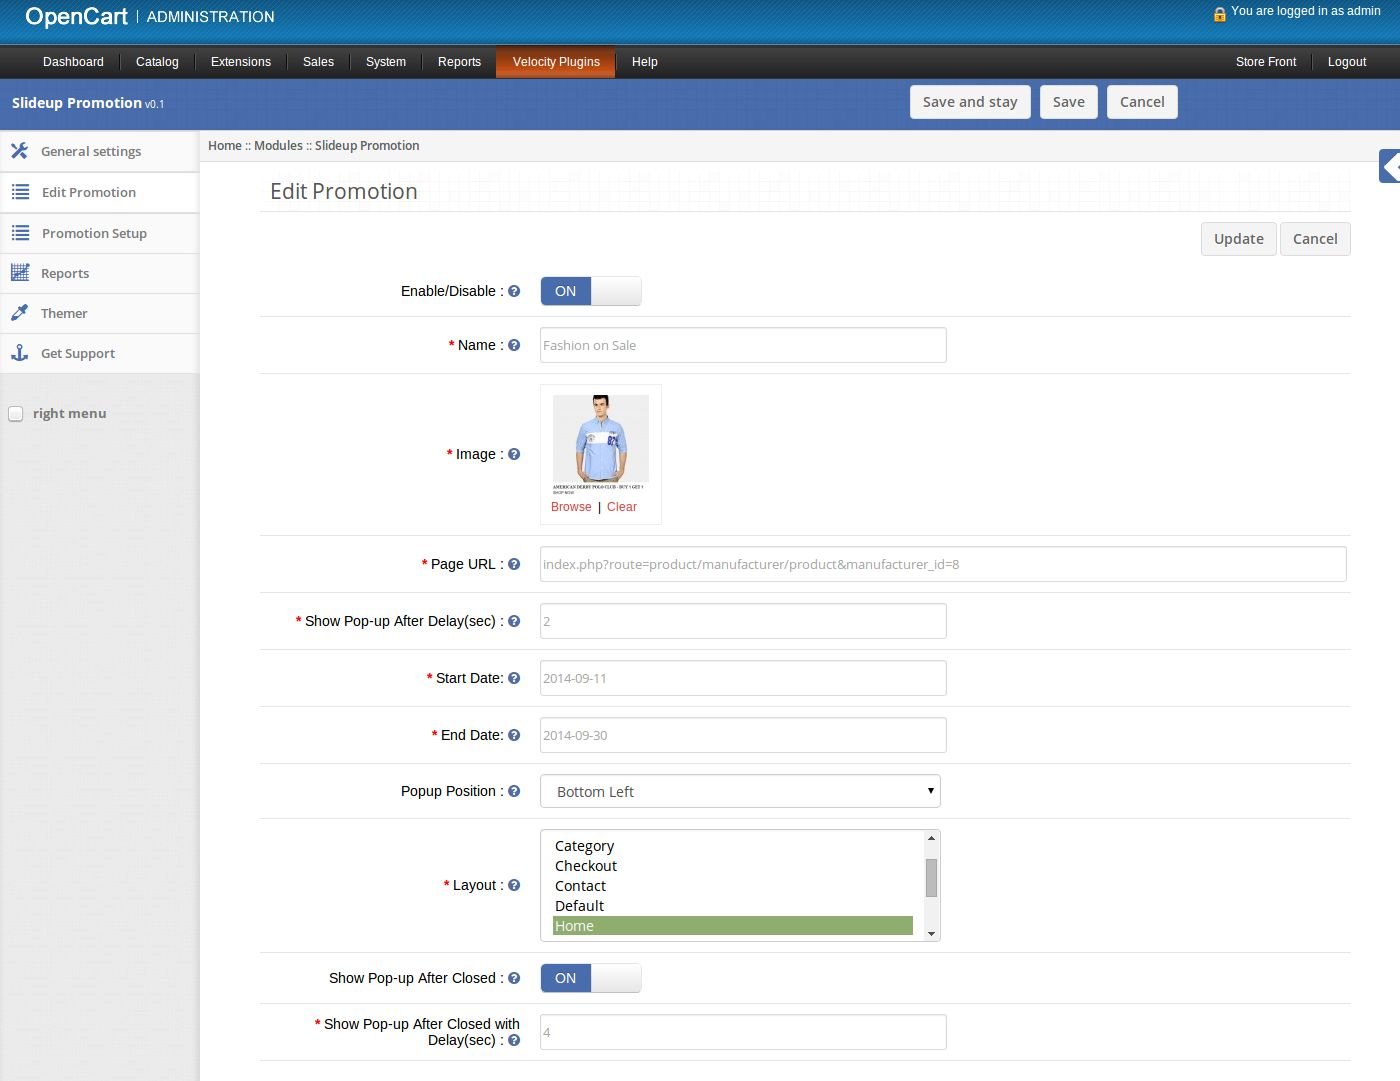
6. On clicking the edit link a form will appear to edit the promotion.
7. Enable/Disable: Enable or disable promotion.
8. Name: Set name of promotion.
9. Image: Set image to show on front end in the promotion popup.
10. Page URL: Set url of webpage which should be opened on clicking the promotion popup.
11. Show Pop-up After Delay: Set the delay time in seconds for the popup to appear after page load in
front end.
12. Start Date: Set start date for promotion.
13. End Date: Set end date for promotion.
14. Popup Position: Set the position of promotion popup to appear on front end.
15. Layout: Select one or multiple layouts on which you wish to show the promotion popup.
16. Show Popup after closed: Set on to show promotion popup again after closing the popup in front end.
17. Show popup after closed with delay: Set the time in seconds for promotion popup to appear again
after being closed by customer.
4. Reports tab
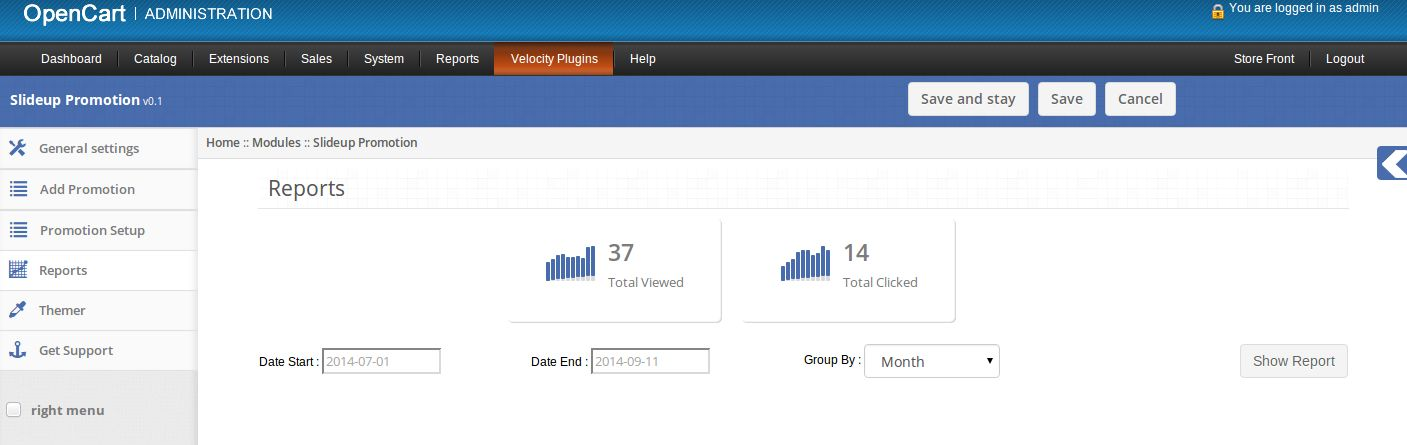
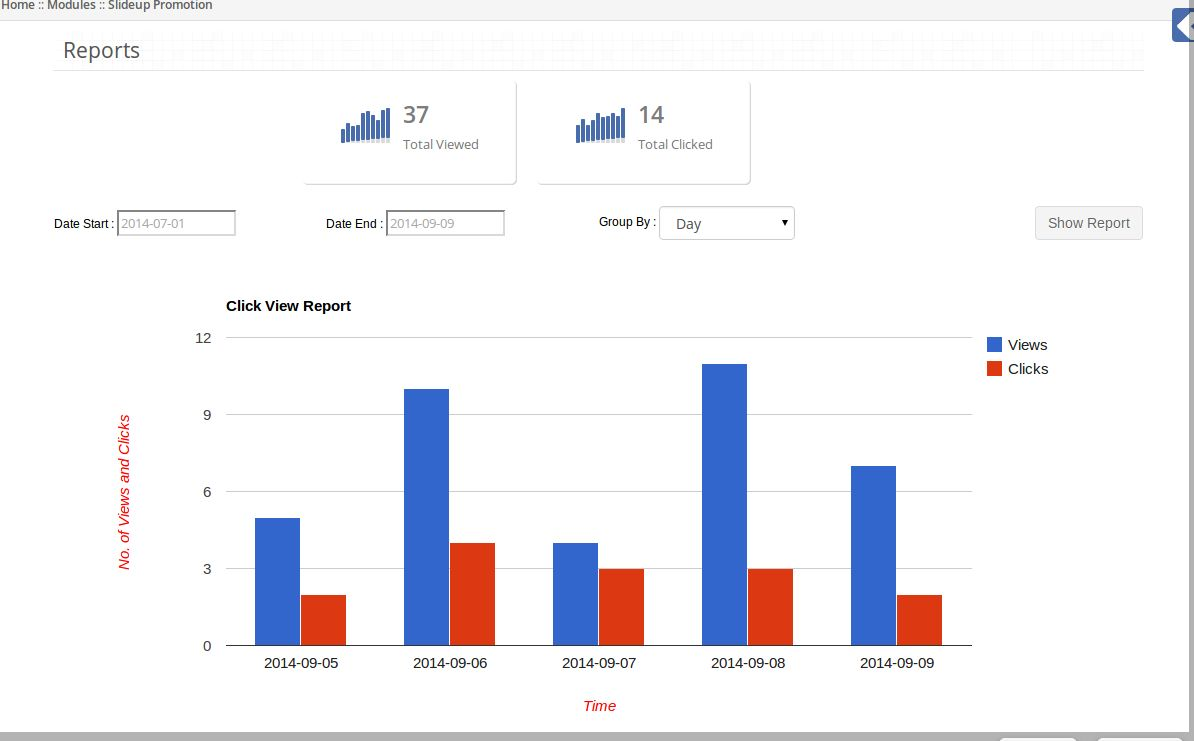
1. Here admin can see reports related to promotions.
2. On the top of this tab total number of promotion viewed and total number of promotions clicked by
customers is displayed.
3. On clicking Show Report button graphical report will appear as per values of filter.
5. Themer tab
By clicking on themer tab, you will have an option to change the theme of Slideup Promotion admin
panel.
6. Get Support tab
By clicking on Get Support tab, you will be redirected to our support website, where you can contact
our support for help. Use this tab in case you some query/issue or found some bug.
Magento Abandoned Cart module helps the Magento store admin retain their customers. The Magento shopping cart email alert is one of the ways to boost the loyalty of the online shoppers and even attract them back to the store. The Magento Abandoned Cart extension focuses on the customers who visited the site, but left without completing their transaction. The Magento plugin keeps a track of the abandoned carts of the site. Not just, it allows the store admin to send personalized emails and promotional triggers from the back-end of the Magento Abandoned Cart plugin. The alerts and notifications give compelling reasons to the customers to return back to the store and complete their transaction.
1.1 Admin Benefits of Magento Abandoned Cart Extension:
Magento abandoned carts extension tracks the store visitors who saved the product in their cart and left the site without placing the order.
The list of the abandoned carts in the back-end of the Magento abandoned cart notifications module can be updated by executing cron.
The admin can track incomplete orders and send reminders to the customers with the help of Magento abandoned cart alerts.
Magento abandoned cart emails allows the store admin to send offers discounts or send the reminder without any discounts.
The store admin can send a notification to a particular customer just by clicking a button from the back-end of the Magento abandoned carts module.
Or else, the admin can even send automatic serial reminders by executing cron in the back-end of the Magento abandoned carts extension.
The coupons sent to the customers can be used to get the discount on the checkout page.
The admin can view the statistical report of the abandoned cart and the conversions happened after the email triggers are sent from the back-end of the Magento abandoned cart module.
The Magento abandoned cart extension offers a number of default email templates to the store admin. The merchants can even customize them as per their wish.
The email sent to the customers allows them to directly to the checkout page by clicking a button.
2.0 Steps For Installation of Magento Abandoned Cart Module
Follow the following steps for installing Magento Abandoned Cart extension:
Download the Magento extension package.
Unzip the package on your root folder of Magento setup via FTP manager (like Filezilla or WinSCP – download here: https://filezilla-project.org/).
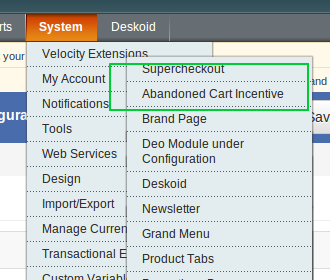
In Admin Panel go to System > Velocity Extensions > Abandoned Cart Incentive.
The Admin Module of Magento abandoned cart notifications module contains 6 tabs, namely:
General Settings
Email Templates
Serial Reminders
View Abandoned Cart
View Conversion Rate
Analytics
They are discussed in detail below:
3.1 General Settings of Magento Abandoned Cart Extension
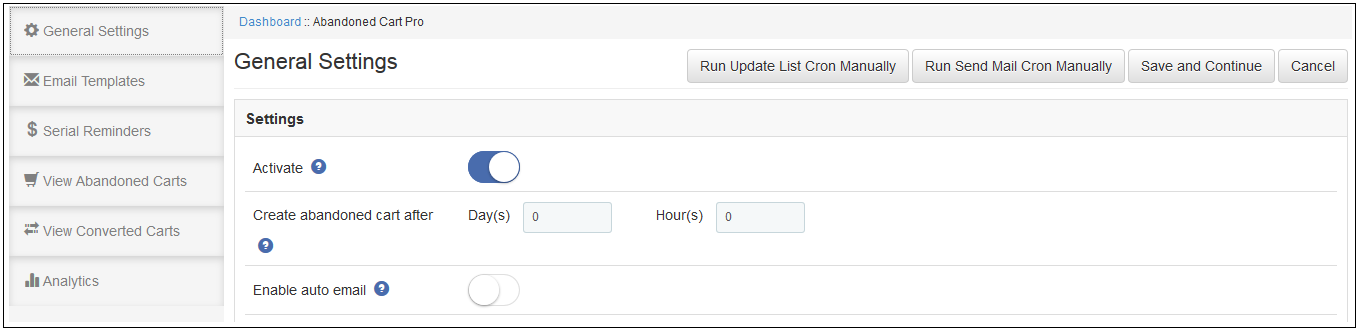
The General Settings tab of Magento abandoned cart module has following options:
Activate: Enables or Disables the Magento abandoned cart extension on the store front. If disabled, the cart abandonment will not be tracked and no coupon codes will be sent to the customers. Apart from this, user can not see the content in other tabs.
Create abandoned cart after: The Delay time of Magento Abandoned Cart Extension is the time period after which the cart will be assumed to abandoned.
Enable auto email: This feature of Magento Abandoned Cart Extension will allow admin to schedule (Cron Setup) coupon email sending task or not.
The General Setting tab of Magento Abandoned Cart Extension includes two more options. They are:
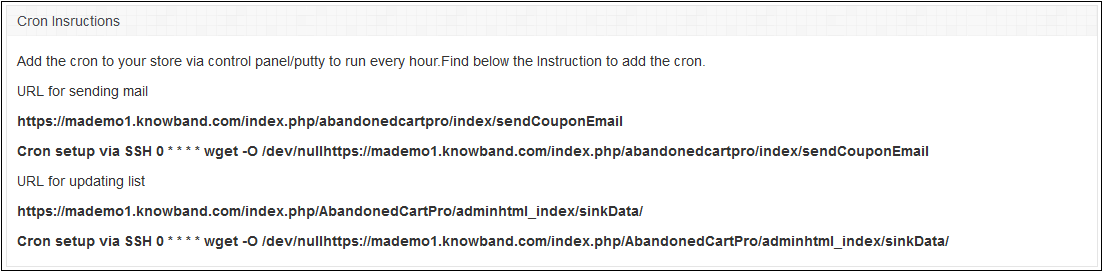
Run Update List Cron Manually: Execute this cron to update the list of the abandoned cart and their details in the ‘View Abandoned Cart’ tab. Any cart changes done by the customers in the front-end will be updated in the Magento Abandoned Cart Extension’s database once the cron is executed.
Run Send Mail Cron Manually: By executing this cron, the admin can send auto emails to all the customers whose abandoned shopping cart is listed.
3.2 Email Templates of Magento Abandoned Cart Extension
The Email Template tab of the Magento abandoned cart plugin has is the format of the email that will be send to the customers. This field of Magento Abandoned Cart Extension contains some place holders whose values will be replaced when the email will be sent.
The place holders are:
{{name}}-This is for the name of the customer
{{cart_content}}-This is for the cart content of the customer
{{shop_name}}-This is for the shop name
{{shop_url}}-This is for the shop url
{{discount_code}}-This is for the discount code given to the customer
{{discount_value}}-This is for the discount value given to the customer
{{total_amount}}-This is for the min amount of the cart for the discount to apply
{{date_end}}-This is the last date of the dicount validity
Keep these place holders as it is.
The admin can edit/delete the email template by clicking on the Edit or Delete button respectively as shown in the image below:
In order to create new templates, click on the Add New button as shown below:
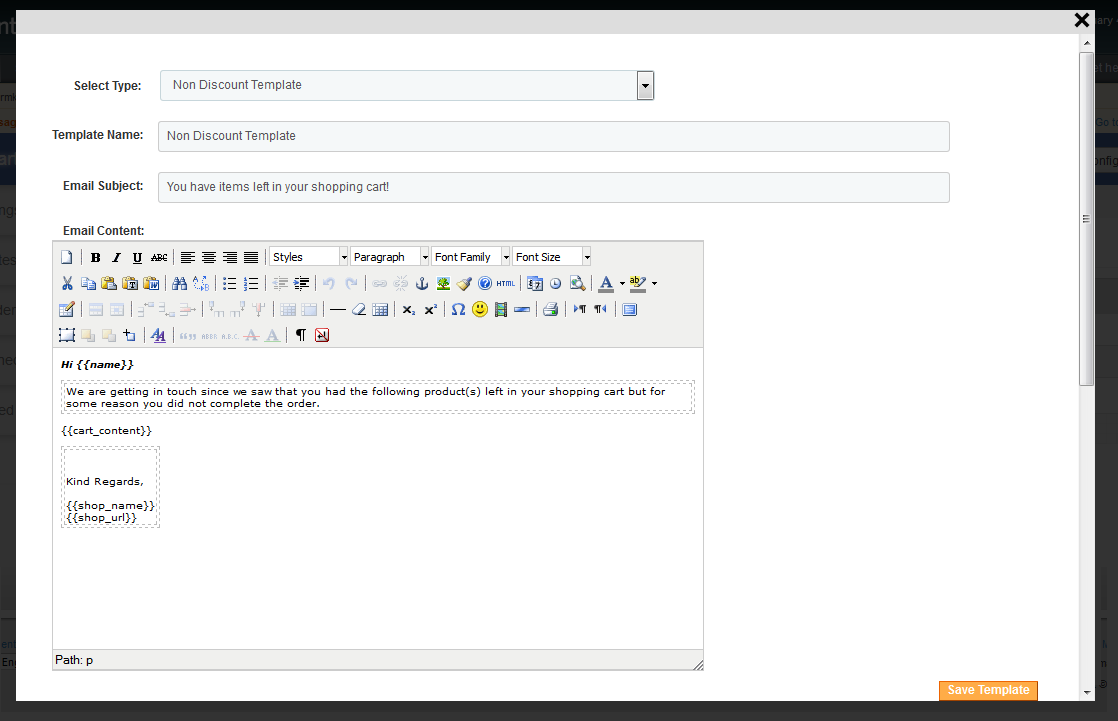
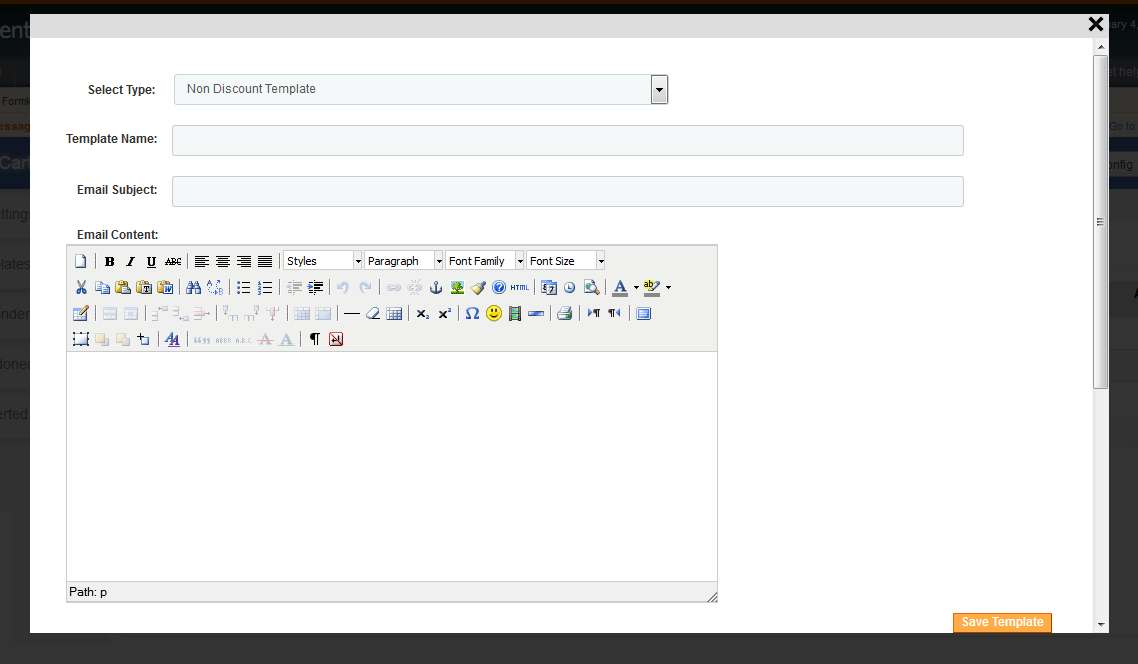
On clicking the button, the admin will get a pop-up. Fill up the required fields in order to create new template.
Select Type: Select the type of the email template of Magento Abandoned Cart Extension from the drop-down list. Template Name: Enter the name of the template. Email Subject: Enter the email subject here. Email Content: Enter the email content here.
3.3 Serial Reminders of Magento Abandoned Cart Extension
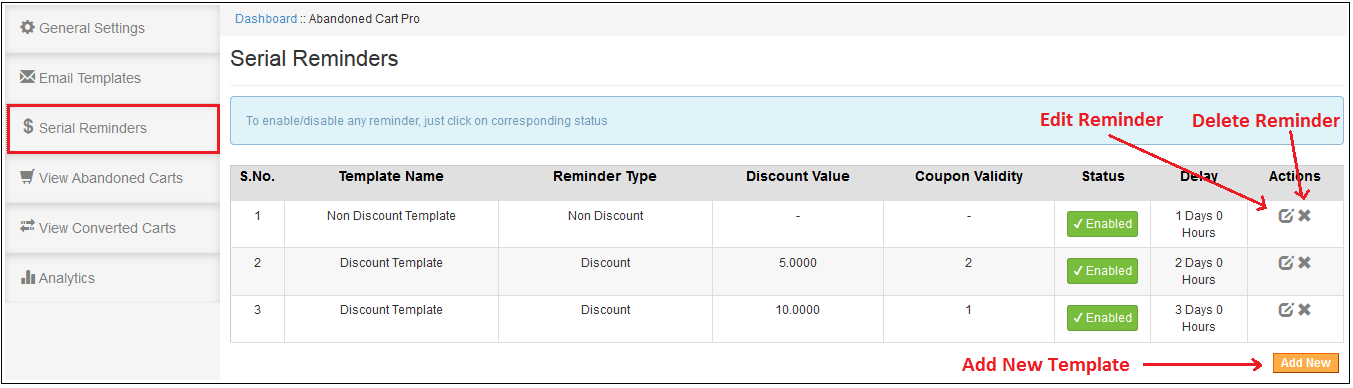
The serial reminder to be sent to the customers are listed here in this tab of Magento Abandoned Cart extension.
The admin can Enable/Disable and Edit or Delete the serial reminder at a button click as shown in the image below:
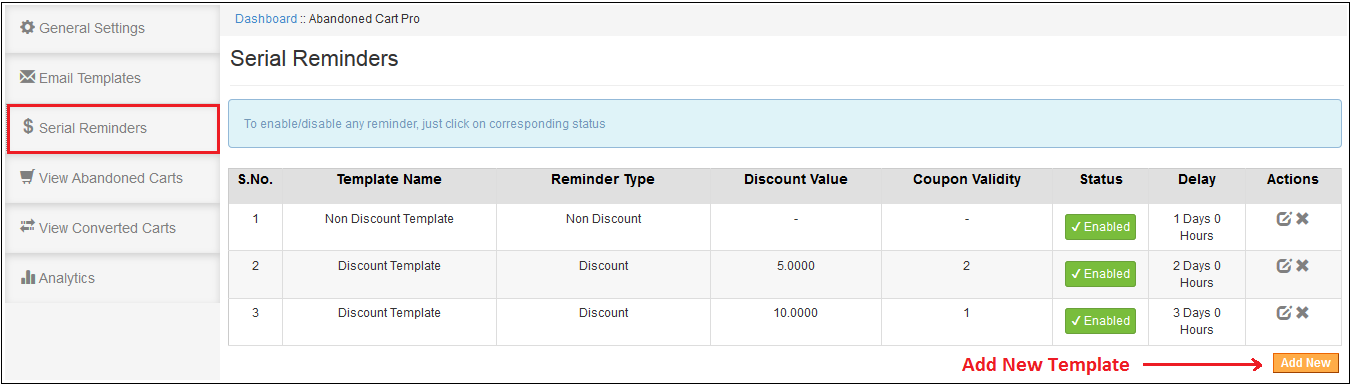
In order to create new serial reminder, click on the Add New button as shown below:
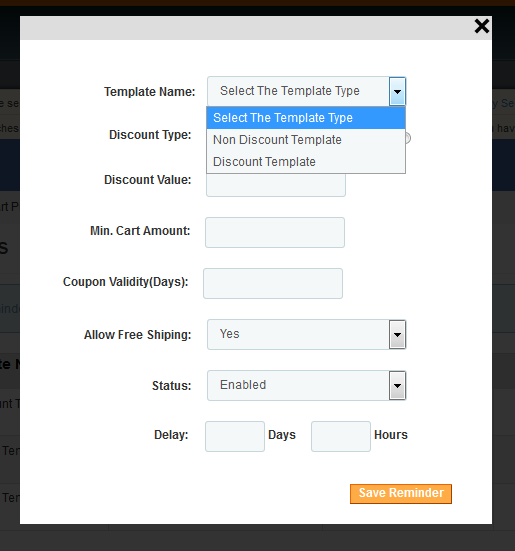
On clicking on the button, you’ll get a pop-up as shown below:
Template Name: The templates created in the Email Template tab of Magento Abandoned Cart extension will be listed here. Select any one from the drop-down list.
Discount Type: This field of Magento Abandoned Cart Extension allows the admin to select any one option from, Percentage or Fixed type.
Discount Value: This field of Magento Abandoned Cart Extension offers the admin enter the discount amount or percentage that you want to offer.
Min. Cart Amount: In this field of Magento Abandoned Cart Extension, the admin will have to enter the minimum cart amount required to avail the offer.
Coupon Validity(Days): This field of Magento Abandoned Cart Extension offers the admin to enter the number of days for which the coupons will be valid.
Allow Free Shipping: Select whether you want to allow free shipping or not.
Status: Select Enabled this option of Magento Abandoned Cart Extension, if you want to enable this serial reminder.
Delay: This field of Magento Abandoned Cart Extension provides the admin to enter the number of days, from the day when the customer added the product in his/her cart, after which this reminder will be sent.
3.4 View Abandoned Cart
This tab of the Magento Abandoned cart module enlists all carts which will be assumed to abandoned.
The action tab corresponding to every cart details offers following options:
Send Reminder Email: By clicking on the bell icon of this Magento Abandoned Cart Extension, the admin can send reminder email regarding the products saved in the cart of the customers.
Send Discount Email: By clicking on this action of Magento Abandoned Cart Extension, the admin can send emails triggers with the discount coupon to the concerned customer directly from the back-end of the Magento abandoned cart module.
View Cart: The admin can view the cart details of the customers by clicking on this action of Magento Abandoned Cart Extension.
Delete: The store admin can delete the cart by clicking on this action of Magento Abandoned Cart Extension.
3.5 View Conversion Cart
The Conversion Cart tab of Magento abandoned cart plugin, enlists all converted orders for registered customers.
3.6 Analytics
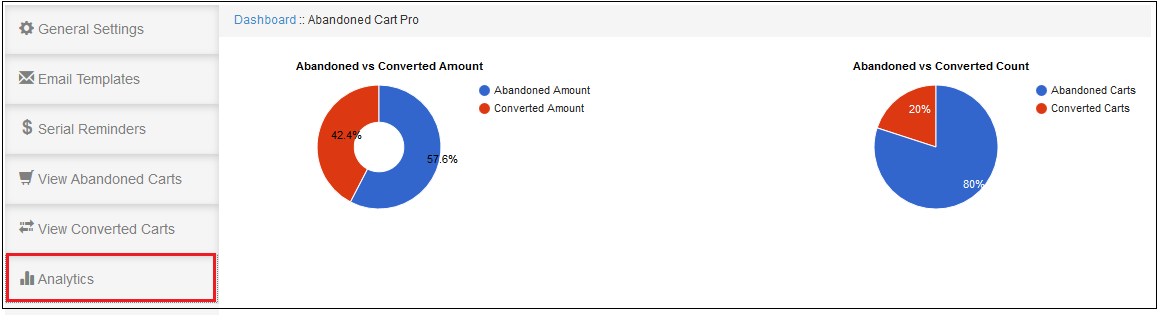
The Analytics tab of Magento abandoned cart extension shows the overall insights of the store in graphical interface.
This tab of Magento Abandoned Cart Extension contains following graphs –
3.6.1 Abandoned Amount vs Converted Amount:
This chart of Magento Abandoned Cart Extension gives an overview of the total abandoned amount and the amount converted by the coupons provided by the abandoned cart module.
Abandoned Cart vs Converted Cart:
This chart of Magento Abandoned Cart Extension gives the overview of the total abandoned carts and the carts converted by the coupons provided by the abandoned cart module.
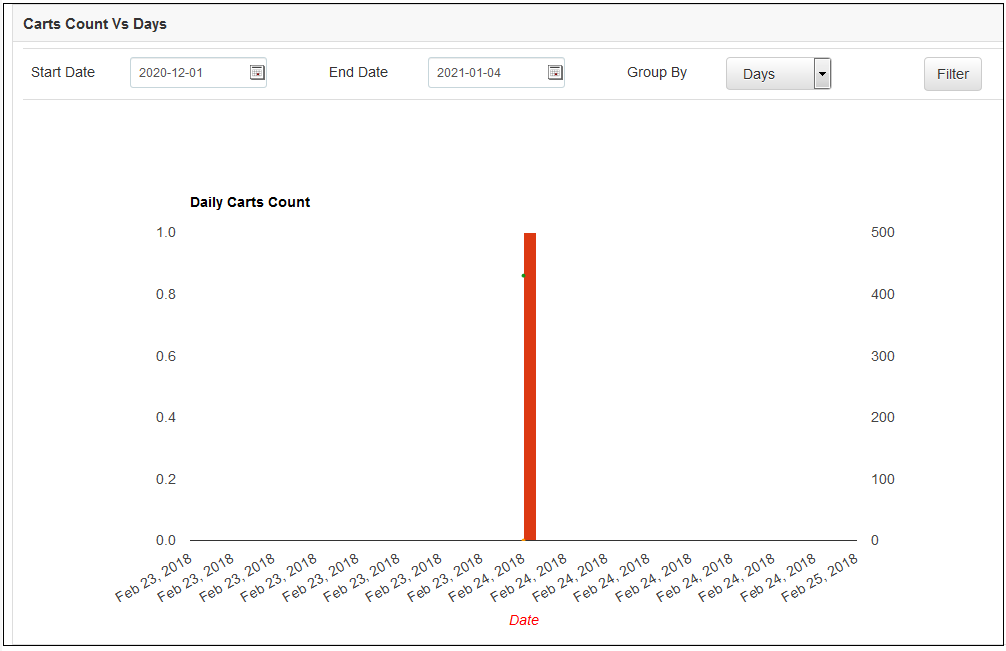
Carts Count Vs Days Vs Amount:
This chart of Magento Abandoned Cart Extension gives the overview of the total abandoned carts vs the carts converted and the amount abandoned vs the amount converts in the given time span.
This chart also contains filters on the basis of data to filter out and group the data for a concise view of store sales.
4.0 Store Front
From the front-end, you can check the functionality of the extension. You can add a product to the shopping cart and then go to the checkout page. You need to leave the checkout page without completing the order and you will receive an abandoned cart email on your given email address after the specified time-delay.
Knowband offers Magento Auto Subscribe extension which allows the store admin to showcase a subscription form on the eCommerce store. This Auto Subscribe integration addon helps the store admin for collecting mail id for the newsletter and also sends it to the customers. Newsletters are one of the best ways to improve the brand awareness of a website.
Magento mail chimp extension automatically subscribes customers when they register or place an order. Magento newsletter subscribe is highly customizable and it offers an easy and effective way of improving subscribers. It automatically synchronizes admin’s Magento newsletter list with one of his/her Constant Contact list and MailChimp account.
Features:
Magento newsletter subscribe is easy to install configure.
This MailChimp Integration is highly customizable.
It offers simple and hassle-free implementation.
Magento mail chimp extension subscribes customers for newsletter while checkout or registration.
The store admin can set the position of the subscription form in left sidebar box or right sidebar box.
The store admin can create his/her own form by setting title, description, border width, button text etc.
Magento newsletter pop up allows admin to manage the look and feel of the subscription pop-up.
The subscription module allows admin to design personalize mail templates.
email newsletter addon is device compatible.
The admin can showcase subscription form as a pop-up or contact form.
This module supports MailChimp and Constant Contact API.
It updates the mailing list when a new user subscribes
Magento email subscribes plugin is compatible with all themes.
Download the zip from our Magento Plugin Store & unzip into a folder.
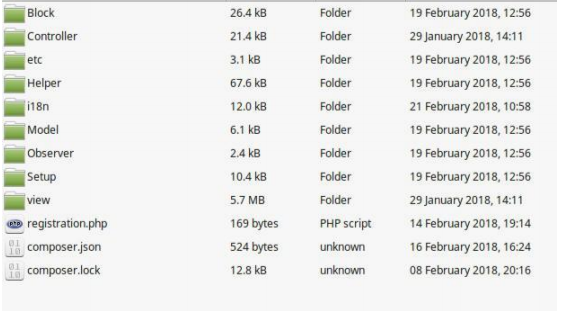
Open the upload directory & you will see following folder structure.
Login via FTP & Drag drop all the folders into your server root directory.
In Admin Panel go to System > FilterPro. In case you are not able to see the link under System, please clear Magento Cache first then check again.
That is all – Extension is installed on your system.
Admin Settings
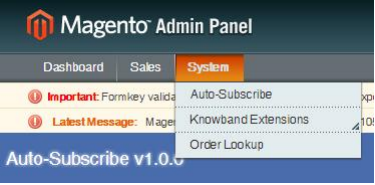
To access Autosubscribe plug-in, go to System->Auto-Subscribe link.
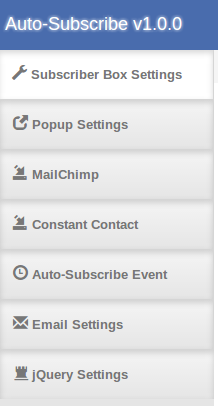
Store admin will have various settings options categorized in the left column as follows:
Subscriber Box Settings
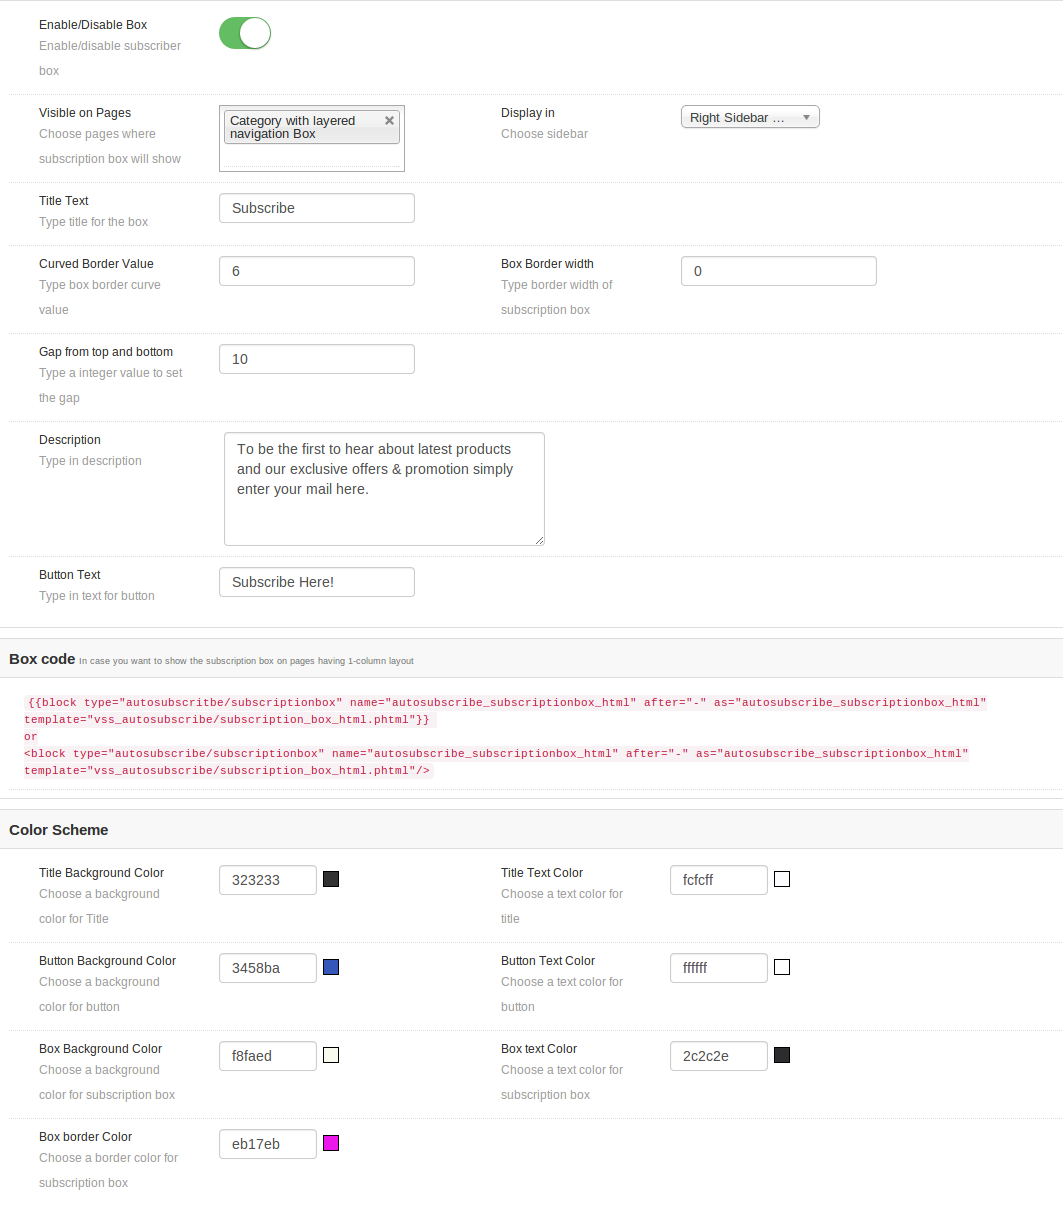
Admin can customize the subscription box to be displayed in store front by using the following settings option available.
Enable/Disable: Admin can choose to enable or disable the subscription box by turning this button on or off. One cannot view subscription box on front.
Visible on Pages: Admin can select on which pages this subscription box will show.
Display In: Admin can select the position of box. We can show the box either on left or right side.
Title Text: You can enter the radius of the title of box. By default, it is set to Subscribe.
Curve Borders Value: You can enter the radius for curve borders. This value will be applied to the four corners of the subscription box on front.
Box Border Width: You can set the border width for box.
Description: You can enter the text for describing to visitors, the advantages of subscribing to your email list here.
Button text: You can change the text for button in this text box.
We have also added the code snippet of module in case admin wants to add the subscription box manually on CMS or any other page.
Color Scheme
We have added the color picker option to set the background color and text color for different sections of subscription box.
Pop up Settings
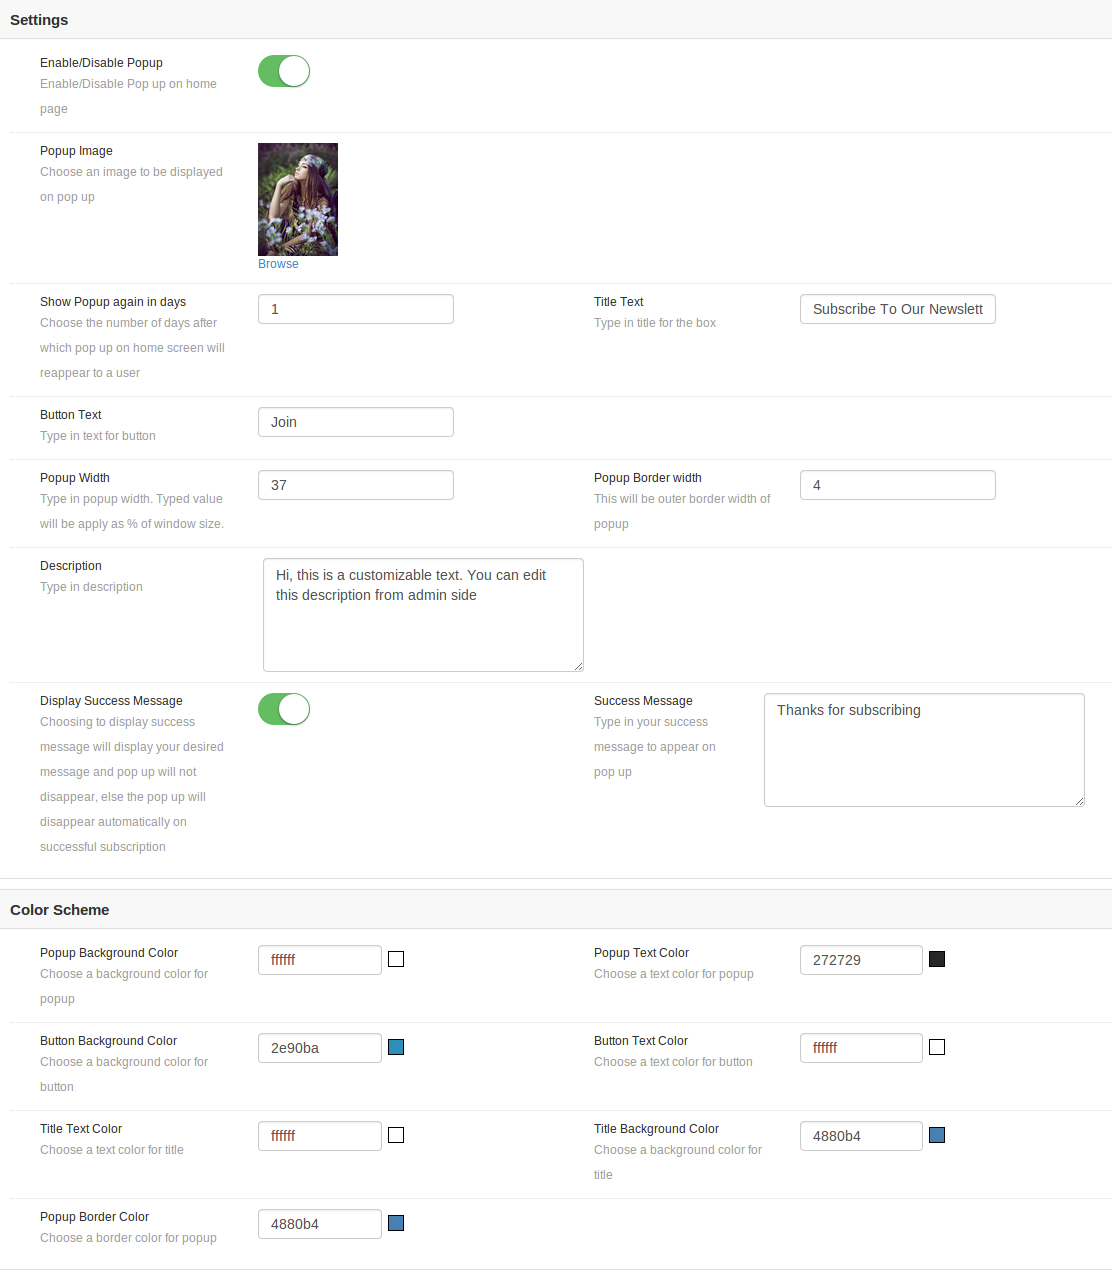
Admin can customize the pop up box too. If this box is enabled then it will show on home page only.
Enable/Disable Pop up: Admin can choose to enable or disable the pop up display on home page. One cannot view subscription pop up on front until this is enabled.
Pop up Image: Admin can choose to show any image on the pop up box, or choose to not show any image at all.
Show pop up again in (days): You can choose the duration (in days) for which the pop up will not reappear from the day the pop up appeared first time on a users system. If you want pop up to appear only once in a lifetime, type in a large number of days, for say 999. If you want it to appear every time a user lands home page, you should choose to type value as 0.
Title Text: You can change title of your pop-up from this option.
Description Text: Description appearing on the pop up can also be customized by adding desired text .
Button Text: Button text and its font color can also be set from admin panel.
Button background color: You can also change the background color of your button to go with your theme.
Display Success Message: Turning it off means that the moment a successful subscription takes place through this pop up, it will get automatically closed without showing any success message to the user. Turning it on will display a customized success message on the pop up box after successful subscription.
Success Message: Here you must enter the text to be displayed and choose the desired color for the text.
Color Scheme: We have added the color picker option to set the background color and text color for different sections of popup box.
MailChimp Settings
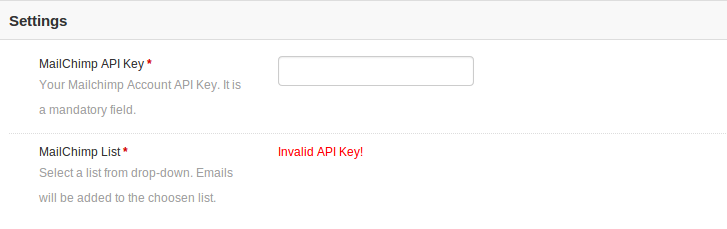
In this tab, admin can choose from the lists in his/her MailChimp account where emails should be added. Initially a message will be displayed like Invalid API Key! .
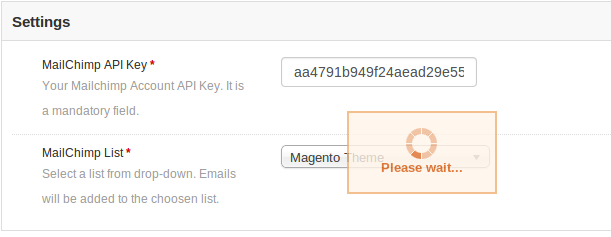
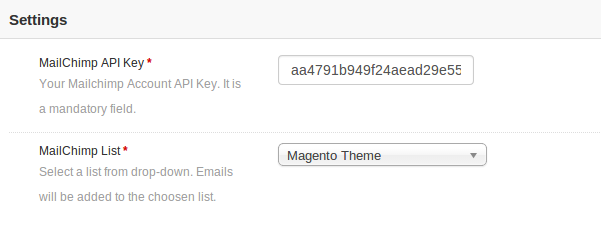
MailChimp API key: Admin needs to enter API key to fetch lists from his/her account. As soon as admin enters the key and clicks outside the text box or press enter button, request is sent and lists (if any) are fetched and displayed in a drop down box.
Constant Contact Settings
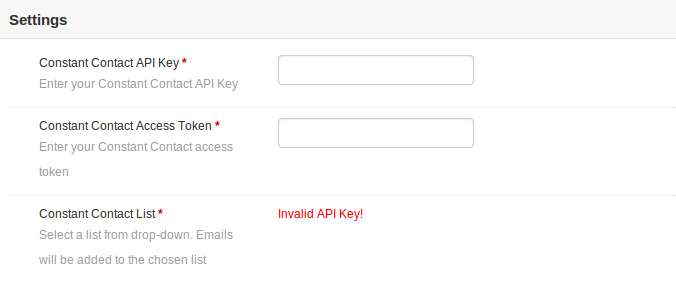
In this tab, admin can choose from the lists in his/her Constant Contact account where emails should be added. Initially a message will be displayed like Invalid API Key! .
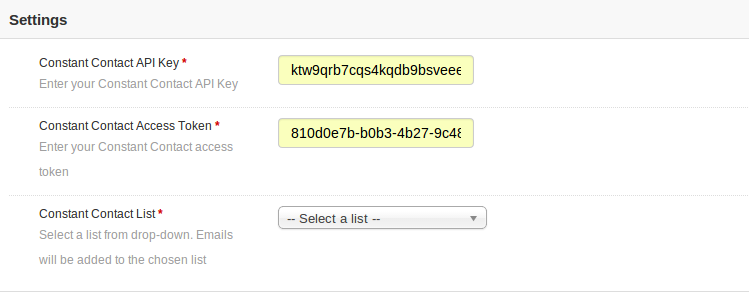
Constant Contact API key: Admin needs to enter API key. As soon as admin enters the key and clicks outside the text box, request is sent and lists (if any) are fetched and displayed in a drop down box.
Constant Contact Access Token: Admin needs to enter access token along with API Key. As soon as admin enters the token and clicks outside the text box, request is sent and lists (if any) are fetched and displayed in a drop down box.
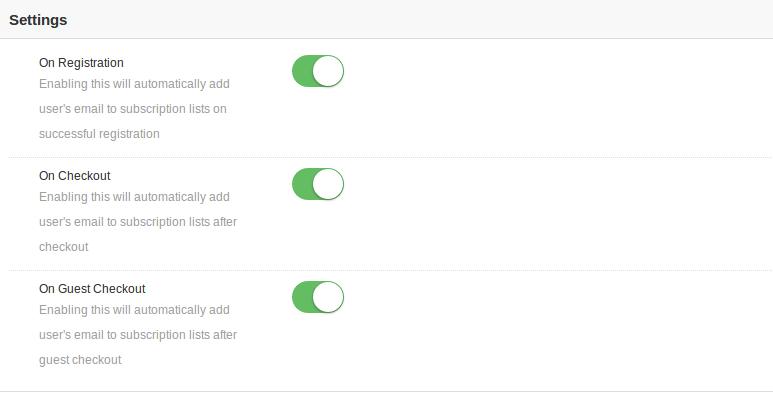
Auto Subscribe Events
Auto-subscribe events are the events on which the users can be subscribed to the configured lists in admin automatically. On such events, user will not be notified of being added to the subscription lists you have chosen in admin.
Register: Turn Register to on, if you want a user to be automatically added to your list on successful registration.
Checkout: Turn Checkout to on, if you want a user to be automatically added to your list on successful checkout.
Guest Checkout: Turn Guest Checkout to on, if you want a user to be automatically added to your list on successful guest checkout.
Email Settings
Email settings will be used to set the email template that will send to customer after successful subscription. Admin can disable/enabled the email if he don’t want to send the email to customer.
JQuery Settings
Admin can disable the plugin jQuery file in case jQuery is already included by any other plugin or store theme.
Auto-subscribe Module
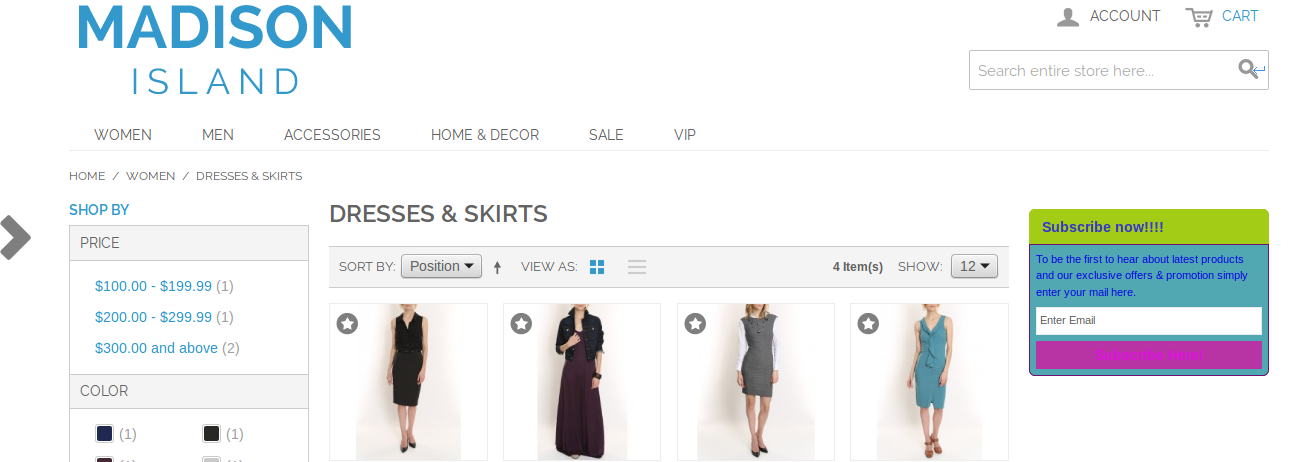
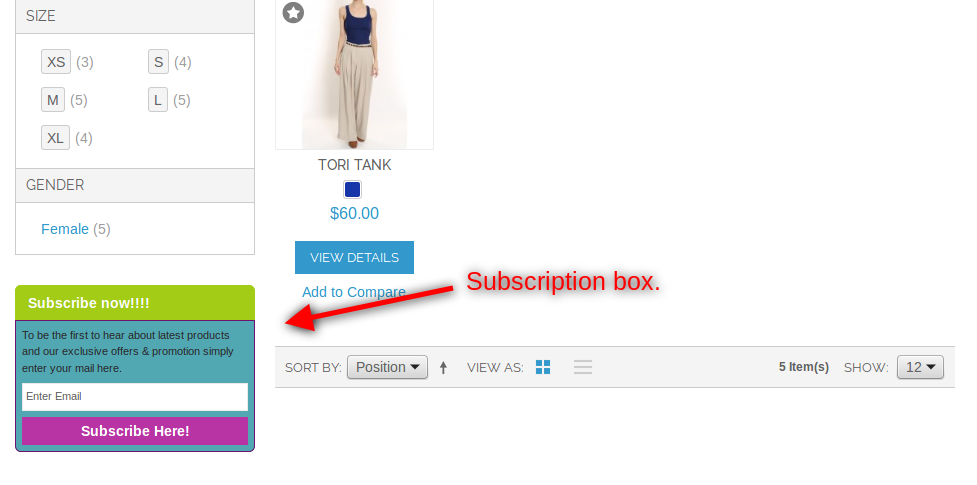
On the front end, users will have the option to subscribe themselves by clicking on subscribe button. The module will look like following screen with default settings.
In Right Column
In left column
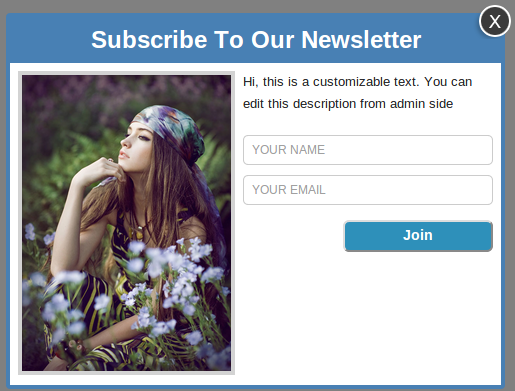
Pop up
On the users end, pop up will appear something like this screen below, depending upon your chosen display settings.
To subscribe through this pop up, type in your email (required) and name (optional), and then click on the button below. On successful subscription, either the pop up will disappear automatically or a custom message provided by you in admin settings will start appearing on the pop up.
PHP version
Php version 5.3 or greater
To access the API of constant contact, one must use the php version equal or higher than 5.3 . Unless your server is running the required php version, you will not be able to successfully install this plugin.
Mail Chimp
Before you may use this module, you must have a valid account with MailChimp and one or more lists created into it. Note that, you must also have the access right to alter your email subscribers list. Below we have mentioned the data which plugin needs for successful installation –
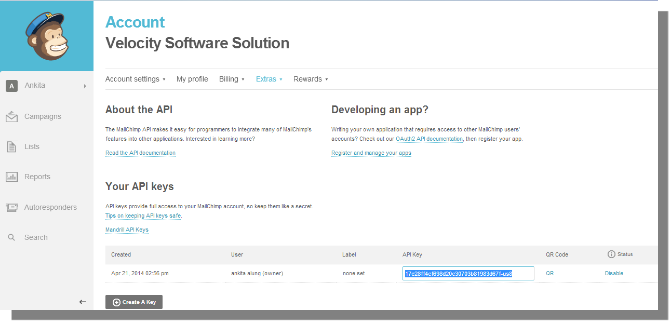
API Key: You can obtain your API key from your MailChimp dashboard, or you can create one if you don’t have one already. To create a new API key for MailChimp go to Account->Extras->API Keys.
Constant Contact
You need to have a valid account with constant contact and one or more lists created into it. Note that, you must also have the access right to alter your email subscribers list. You will need to provide these for this module to work.
API Key: You get an API key from constant contact via email as soon as you register your application.
Access Token: In addition to API key, you also needed access token to grant permission to access API.
In case you are still facing problem with getting your API Key and Access Token, please follow the instructions as mentioned in link https://developer.constantcontact.com/api-keys.html
Note that, this plug-in works for constant contact API version 2 since version 1 is deprecated and will soon be discontinued.
Prestashop custom CSS and JS module is a simple module that allows you to style the pages individually. The module allows the site owners to add more features to CSS and JS of the website. You don’t require any FTP access to edit the existing code files. The addon helps you to add the CSS and JS code from the admin panel. The module helps in eliminating the dependency on the developer for making small custom changes and you can simply do that on your own using backend panel of the module.
The Prestashop Custom CSS & JS module allows the Prestashop store admin to change the user interface of any page of the Prestashop website. The Prestashop plugin offers the admin to do the same for mobile devices or desktops or both.
To install this custom CSS and JS Prestashop plugin addon, please follow the following steps:
1. Add addon folder under modules folder of your system.
2. After adding this addon folder, system will list the Prestashop addon on module page under front office feature category as given below:
3. Click on install to install the Prestashop Custom JS And CSS plugin.
Admin Interface
Following features will be provided to admin in this custom CSS Prestashop module:
1. General Settings
2. Advance Settings
General Settings of the custom JS Prestashop module:
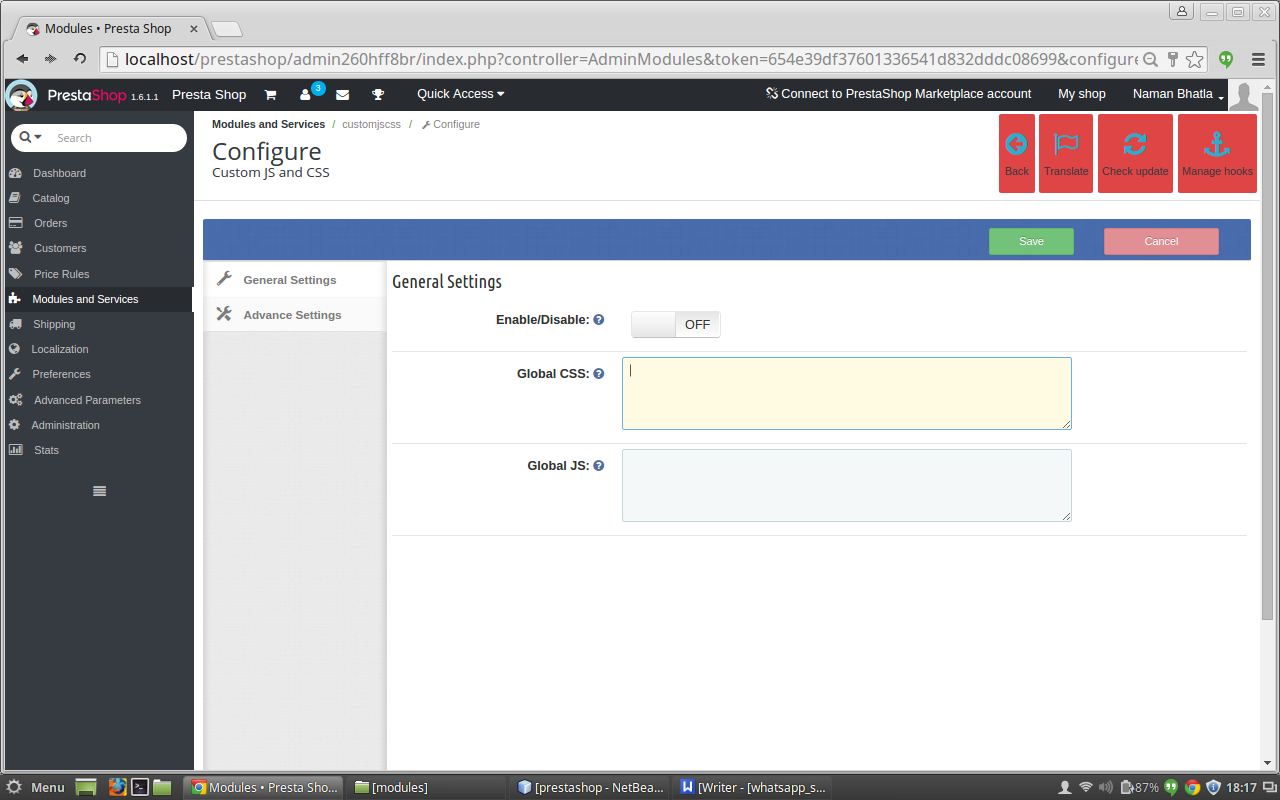
After clicking on configure link of Custom JS and CSS addon on module listing page, system will open general settings tabs by default as shown in screen below:
Fields listed will be filled with some default values
GENERAL SETTINGS TAB DETAILS:
1. Enable/Disable: Initially, this field of custom CSS Prestashop module will be OFF. The admin can enable/disable addon functionality by turning this ON/OFF. 2. Custom CSS: The CSS content which needs to be displayed on every page of the website has to be entered in the text area of custom CSS and JS Prestashop plugin given with field named Custom CSS. 3. Custom JS: The JS content which needs to be displayed on every page of the website has to be entered in the text area of custom JS Prestashop module given with field named Custom JS.
Advance Settings of the custom CSS and JS Prestashop plugin:
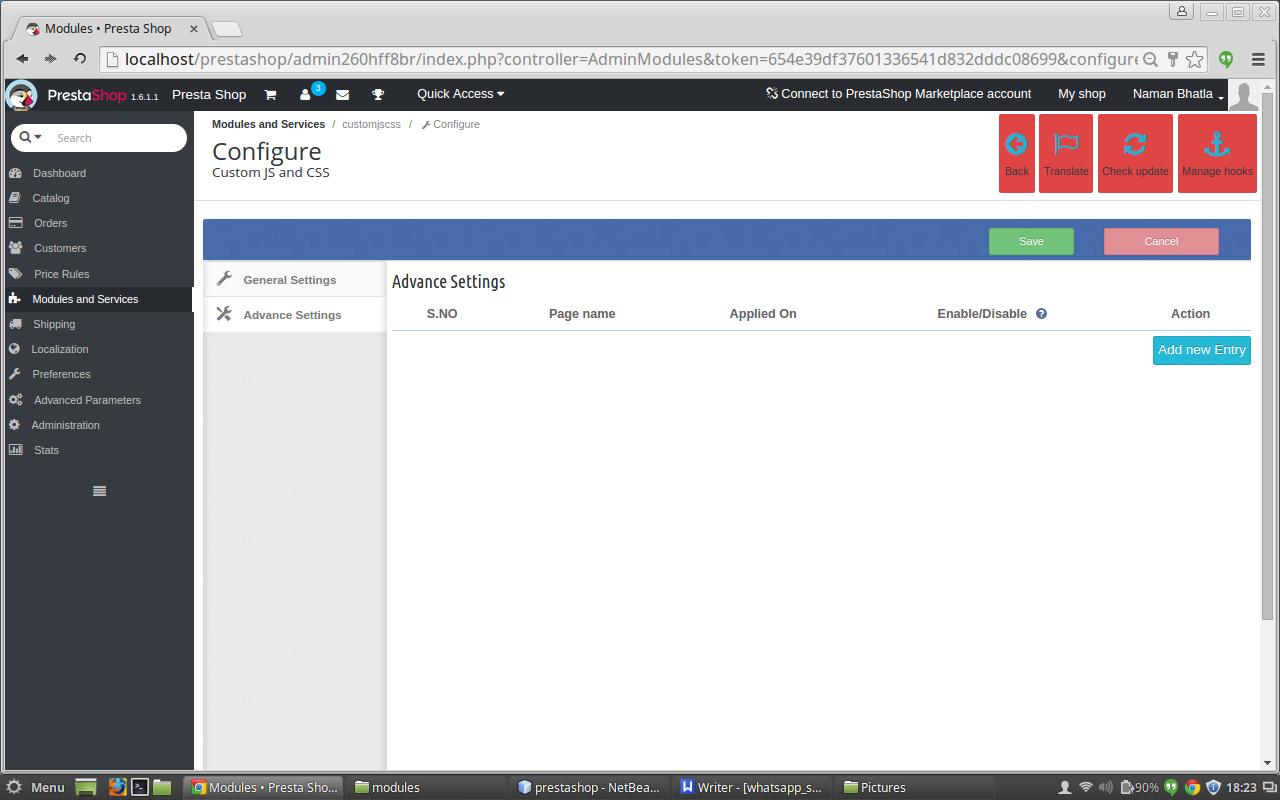
After clicking on the advance settings tab of the custom CSS and JS Prestashop plugin, the below screen appears.
ADVANCE SETTINGS TAB DETAILS:
Add new entry: Initially, there will be no entry in the advance tab table of the Prestashop Custom JS module, so click on new entry button to add on the details of the CSS and JS file with the page name and device type on it.
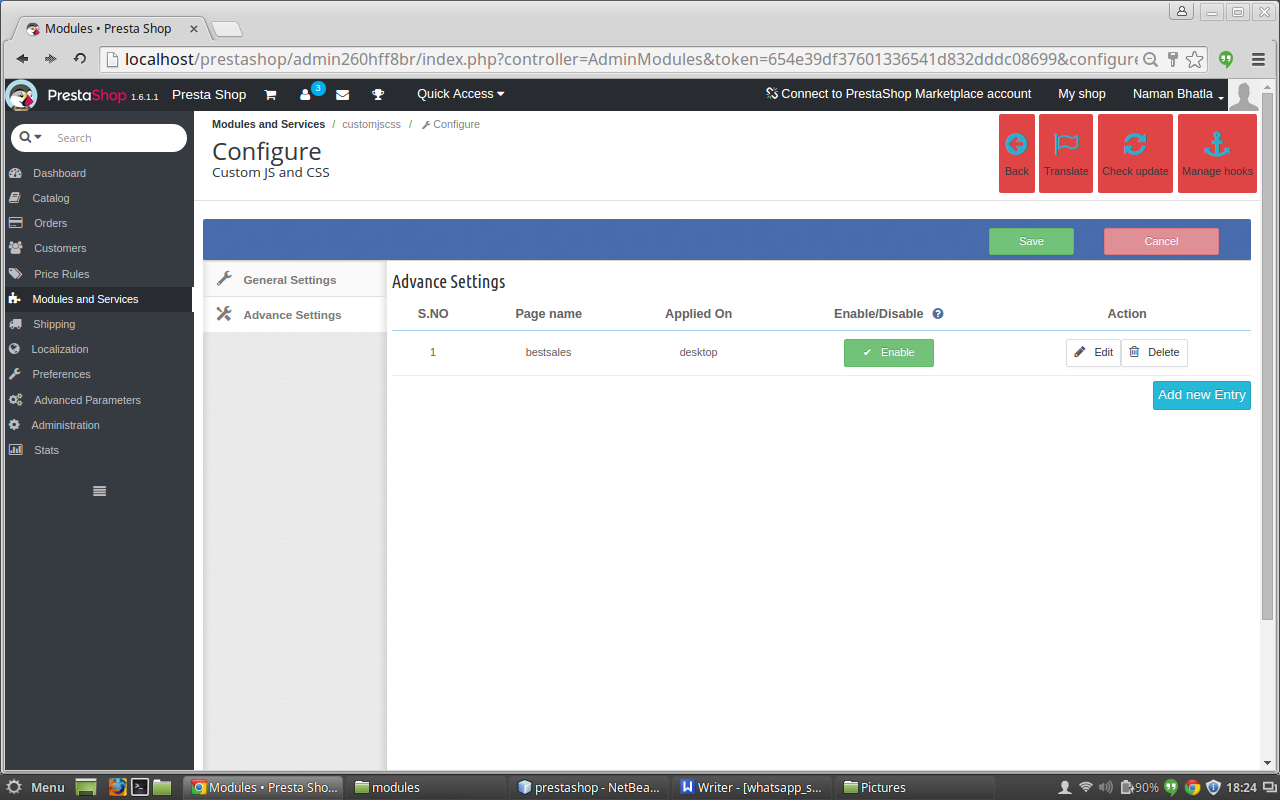
Table : When the entry is done then the row is added to the table of the Prestashop custom CSS module with details of the entry such as page name device type enable or disable button and edit and delete button.
Enable or Disable button : When the entry is done in the custom CSS Prestashop module, then the user can enable the file added by clicking on the enable button once which changes to the disable button after the user clicks on the enable button now the user can disable the entry by clicking on the disable button which is appearing in the table and the opposite happens .
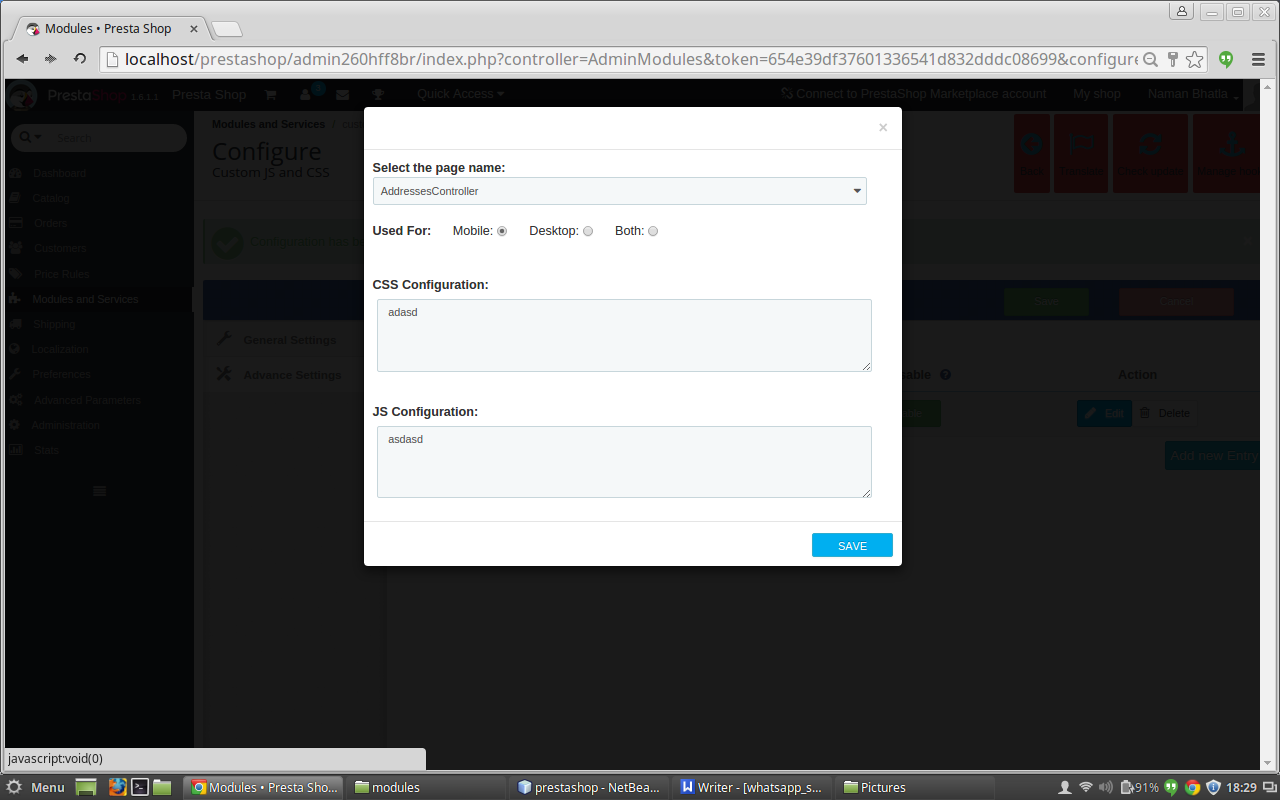
Edit : In the action column of the table, there is edit button on clicking on it a pop up appears which is same as the one which appears after we click on the add new entry button. But, the difference is that now the fields of the custom JS Prestashop module are filled with all the details which were entered earlier by the user in that row. Now the user can edit the entries of the custom CSS and JS Prestashop plugin which were done in the files or can change the device type or can add the entry to the page name.
Delete : In the action column of the table, there is delete button on clicking on this button of the Prestashop Custom JS module, we can delete the entry which were made in that row.
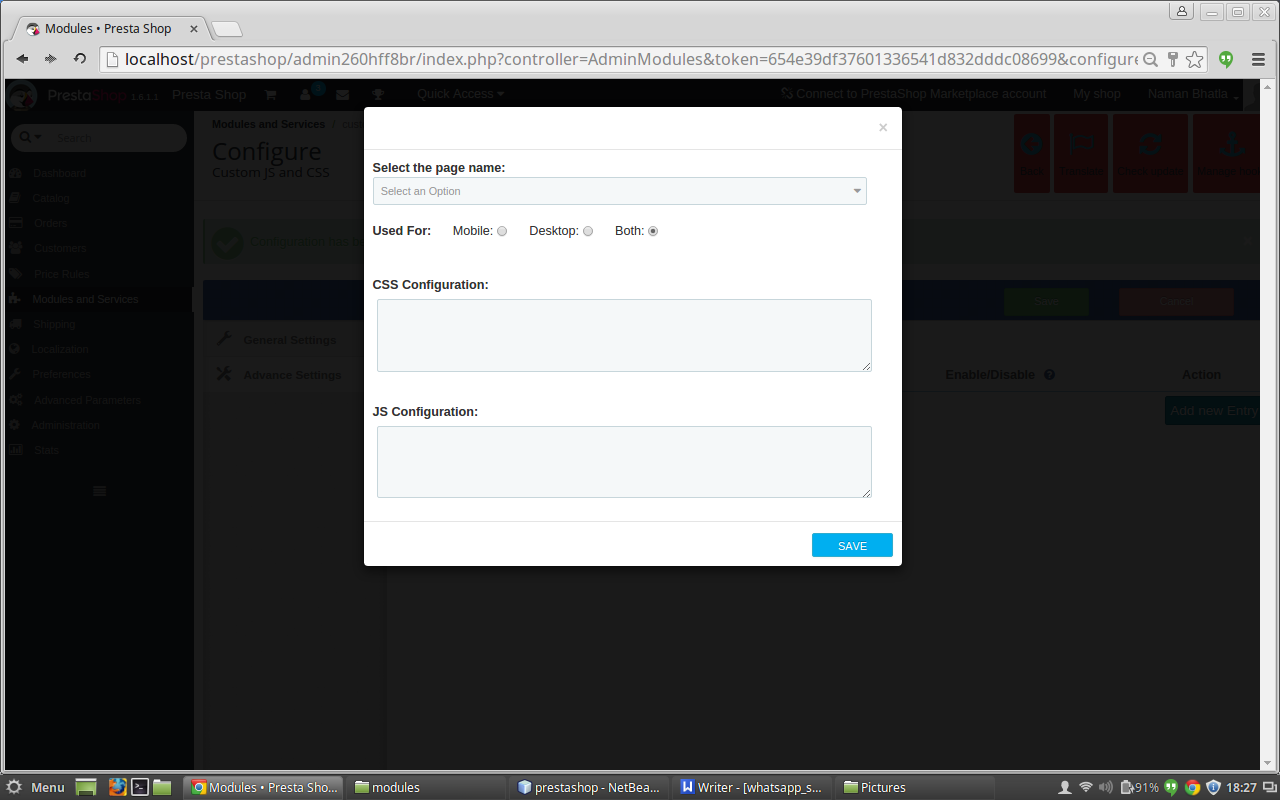
Interface box: This is the box which will appear after clicking on the add new button if we have to add a new entry to the advance settings table. It will also appear if we will click on the edit button after the entry is done but the difference is that now the fields in thepop up box will be field with the details of that particular row to which the edit button belongs. Fields in the Pop up box are :
A. Select the page drop down: The first field of the ‘Add New’ field is a drop down menu which has all the names of the pages which are currently available in Prestashop. You can select the page in which the entry is to be done. B. Choose Device Type: This field of Prestashop custom CSS contains of three radio buttons Mobile, Desktop and both. You can select the type of device for which you are going to add the css and js. C. CSS configuration: In this text area of the Prestashop plugin by Knowband, you have to add the css code which has to added on the page which you have selected earlier. D. JS configuration: In this text area of the custom CSS Prestashop module, you have to add the js code which has to added on the page which you have selected earlier.
INTERFACE AFTER CLICKING ON ADD NEW ENTRY
AFTER ADDING THE ENTRY
INTERFACE AFTER CLICKING ON EDIT BUTTON
Front End Module
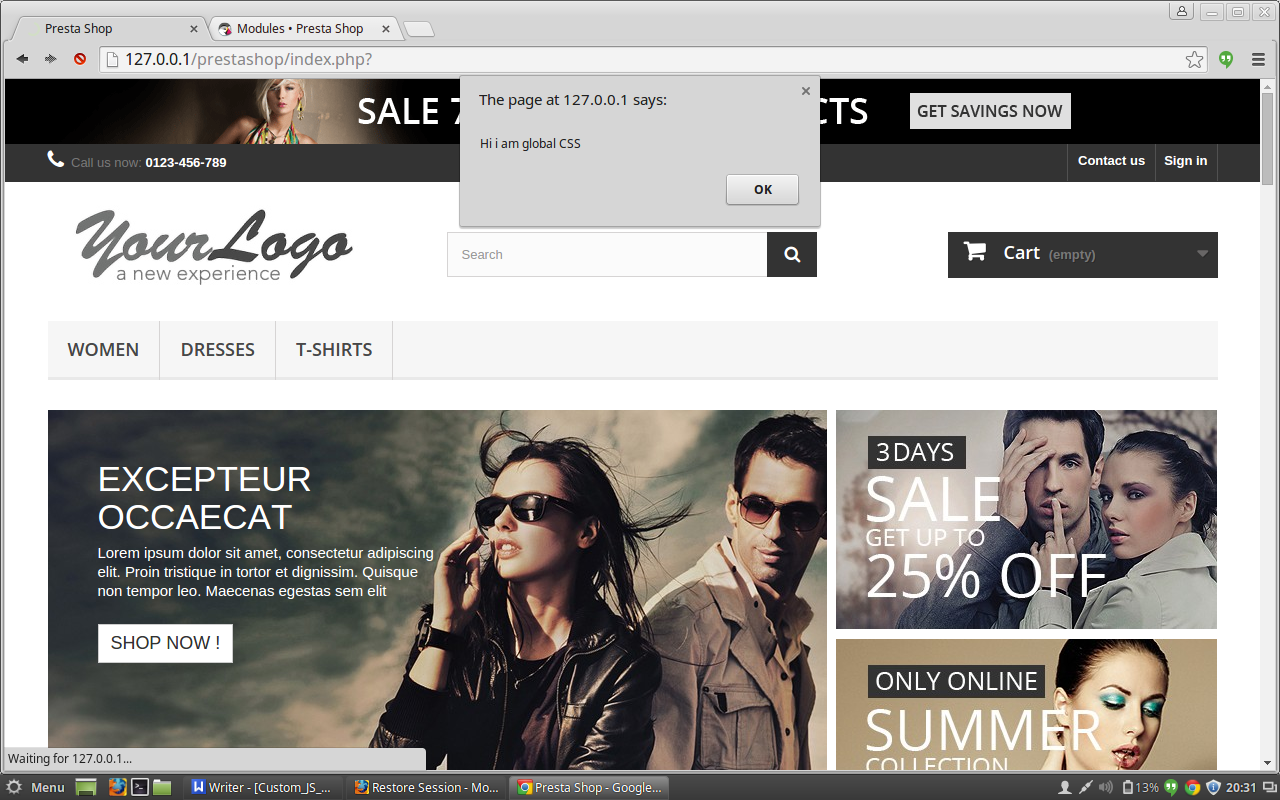
After enabling the Prestashop Custom JS plugin by Knowband, the front-end user will see the CSS and JS which are added globally to the website and the user will also see the CSS and JS which is added to that particular page only in the advance settings tab.
The CUSTOM CSS and JS at the front-end appears as follows:
Recommendations
Refresh home page of your store every time you enable/disable plugin. If plugin is not working after installation then please check permissions on modules folder. The folder should be writable. Please make the folder permission to 755.
We hope that we have covered all the concerns regarding the installation and product guide of this Prestashop Addon. You should also check our blog on Give Multiple Reasons to your Customers for Completing their Online Payment Process – Here
How to install OpenCart Follow Up Email plugin on your server
1. Folder structure of the Follow Up Email plug-in folder.
2. Open the upload folder and you will find the following folder structure:
You must have VQMOD installed for this plug-in to work. If VQMOD is not installed please download and install from the URL below:
https://code.google.com/p/vqmod/
3. Select all the folder and drag and drop them to the root directory of your OpenCart store throughFTP.
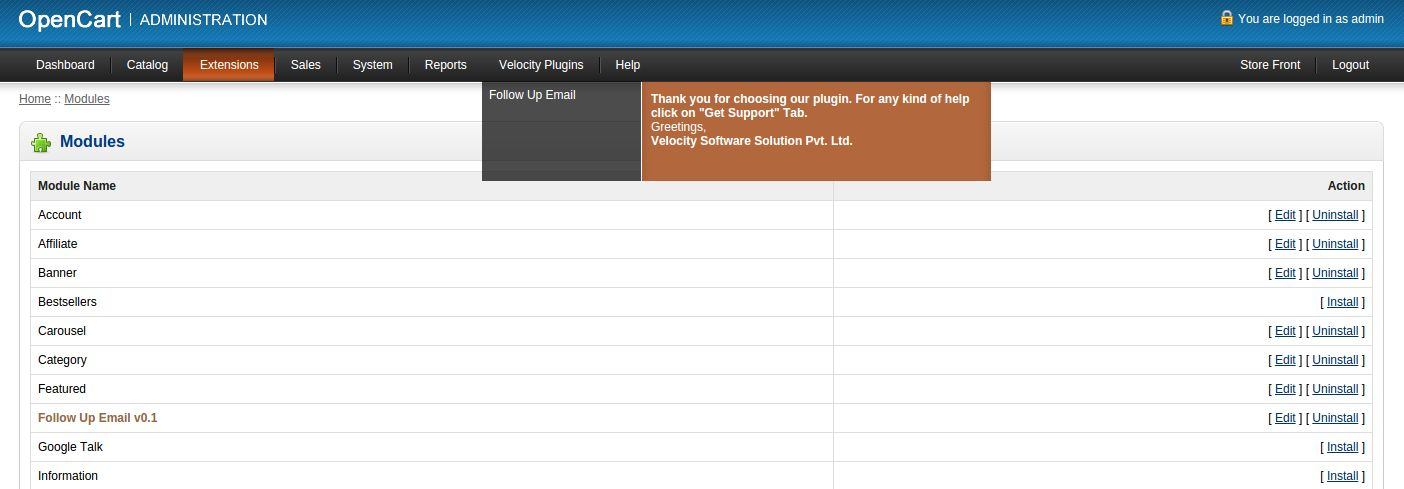
4. You will be able find the plug-in ready to be installed in the Modules in your OpenCart store as shown below.
5. Click on the Install link to install the plug-in. This will also add a dropdown option in your menubar which will list all plug-ins by Velocity installed on your store for fast navigation. Thisdropdown also has a message box, using which we can inform you about new launched plugin or new update.
6. Delete the Vqcache files from the vqmod/vqcache folder.
7. To access Follow Up Email plug-in click on edit button in module section as shown below:
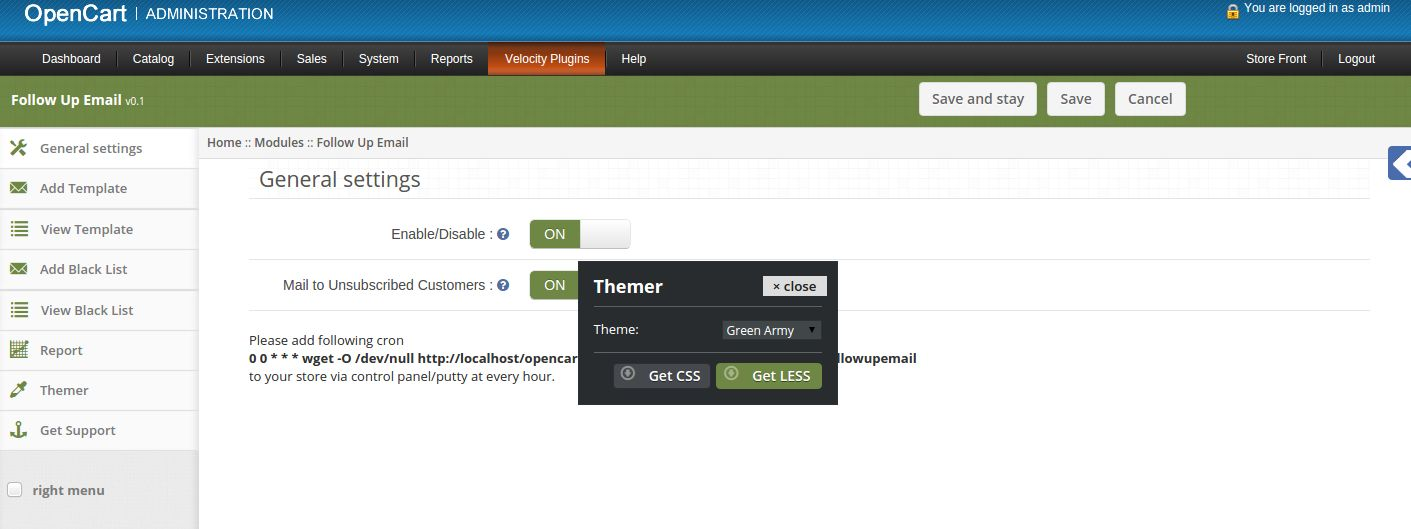
8. On clicking edit button the module for plug-in will open. It contains navigational bar at top, menu at left and main content at center as shown below.
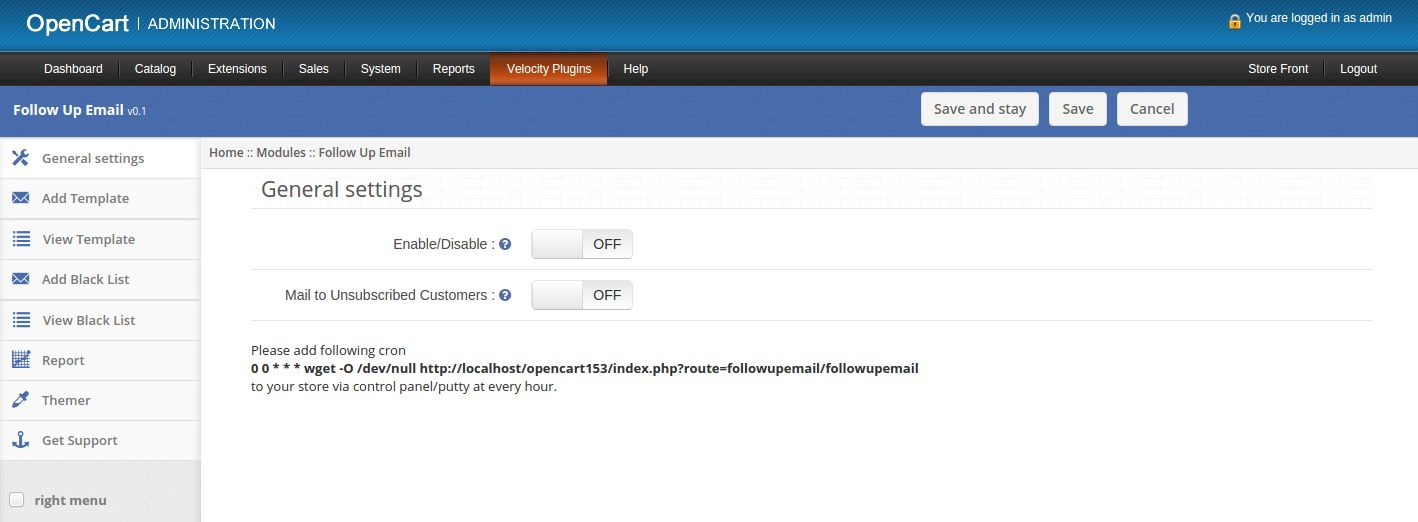
1. General Settings tab
1. Enable/Disable: Enable or disable plug-in. 2. Mail to Unsubscribed Customers: Enable or Disable sending mails to unsubscribed customers.
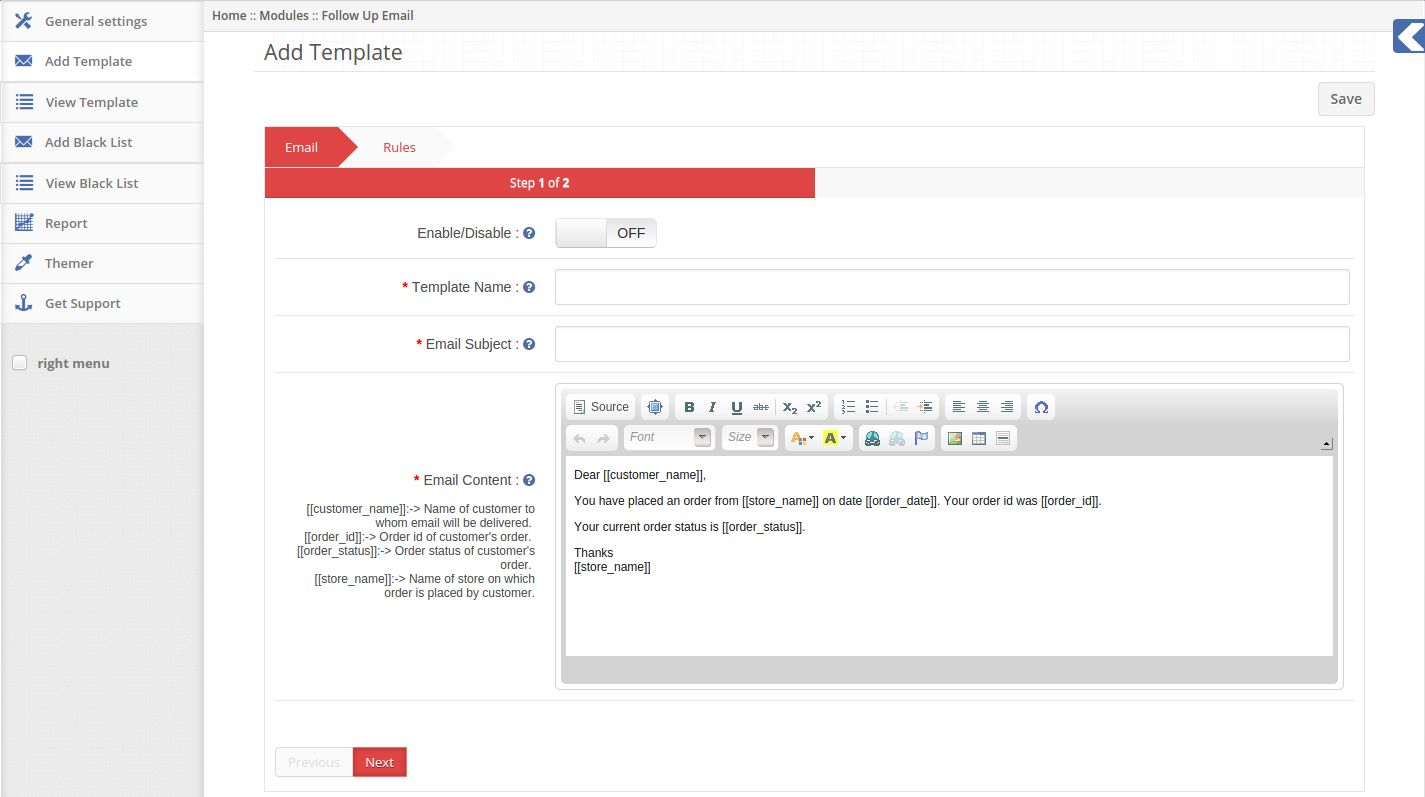
2. Add Template tab
1. Here admin can create a new template.
2. Enable/Disable: Enable or disable template.
3. Template Name: Set name of template.
4. Email Subject: Set subject of email to be sent.
5. Email Content: Set content of email to be sent.
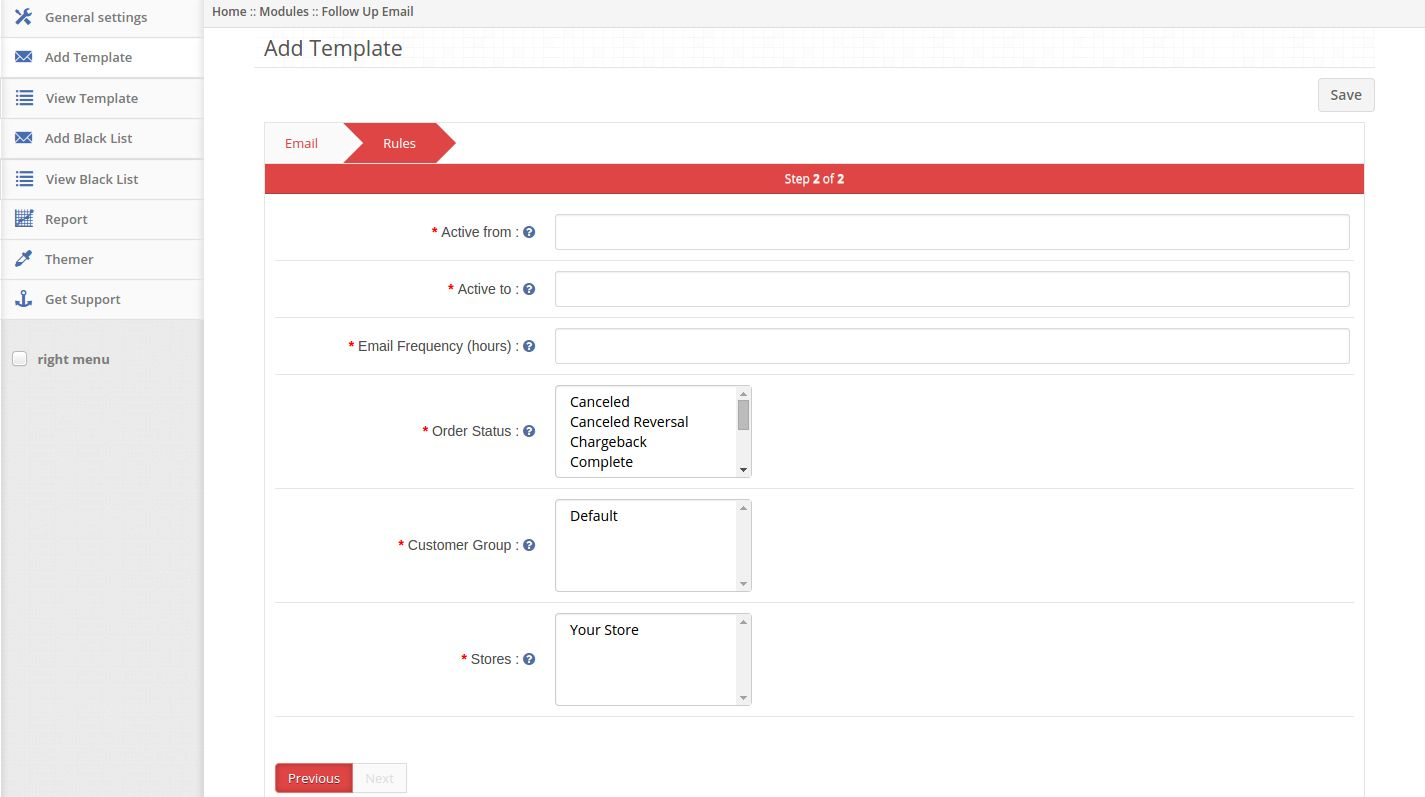
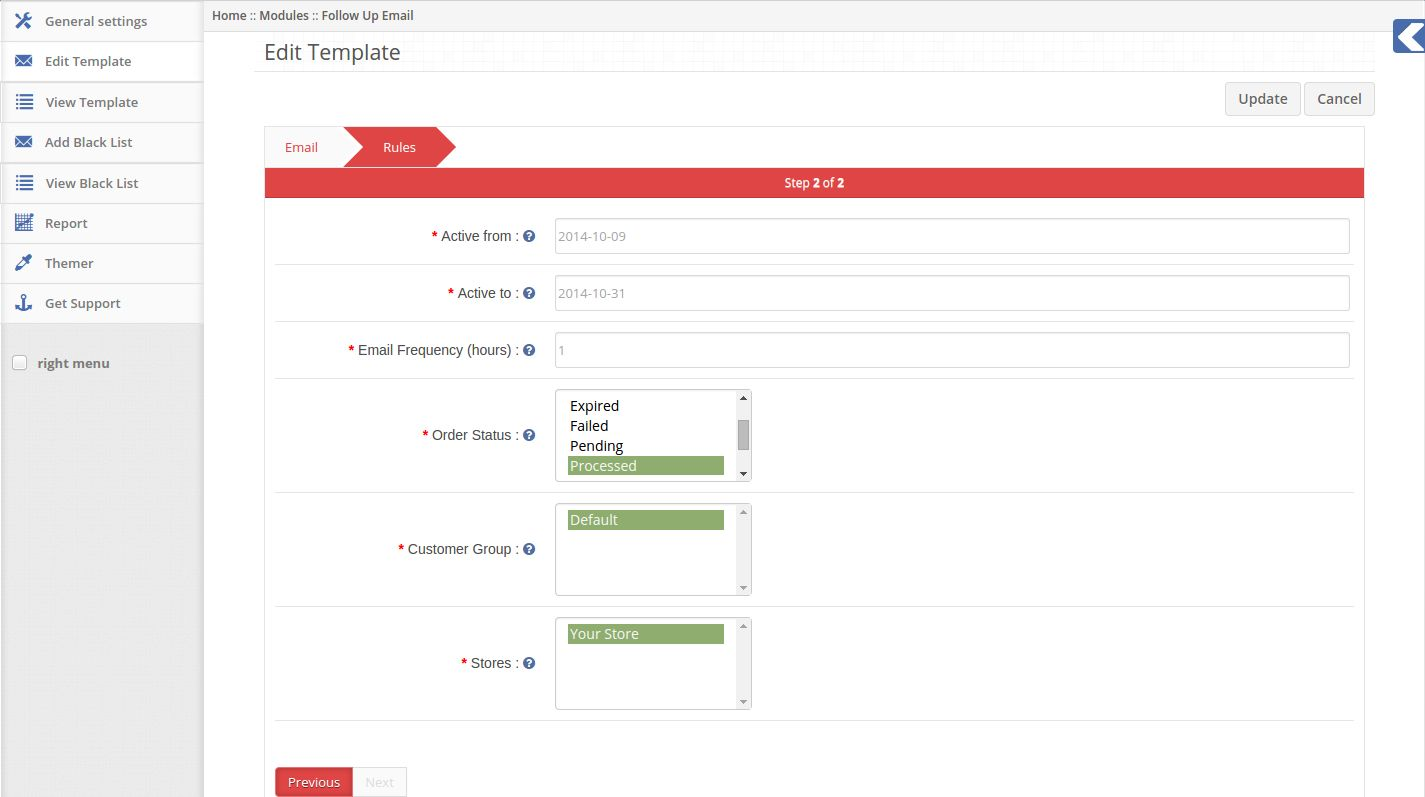
6. Active from: Set start date of sending emails of this template.
7. Active to: Set end date of sending emails of this template.
8. Email Frequency: Set delay time (in hours) for sending emails.
9. Order Status: Select one or multiple order statuses after which you wish to send emails.
10. Customer Group: Select one or multiple customer groups. Email will be sent to customers belonging
to selected customer groups.
11. Stores: Select one or multiple stores. Email will be sent to customers who placed orders from
selected stores.
12. Email will be sent to customers belonging to any of the selected customer groups who placed order
from any of the selected stores, after selected (email frequency) hours of their order reaching any of
the selected order statuses.
3. View Template tab
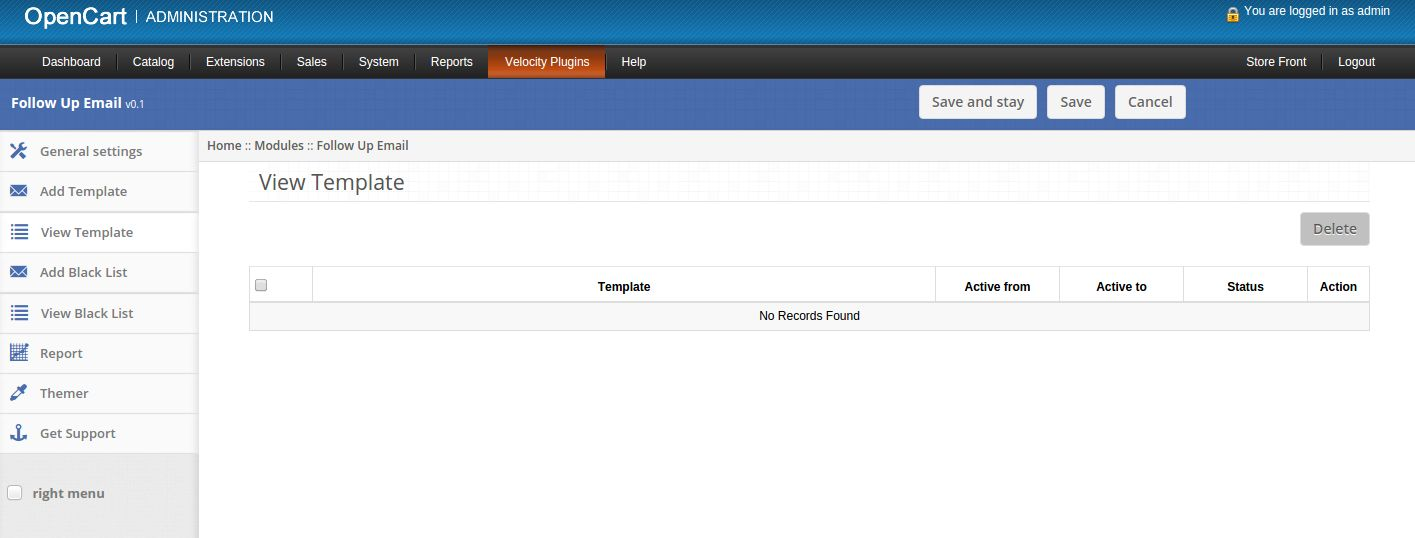
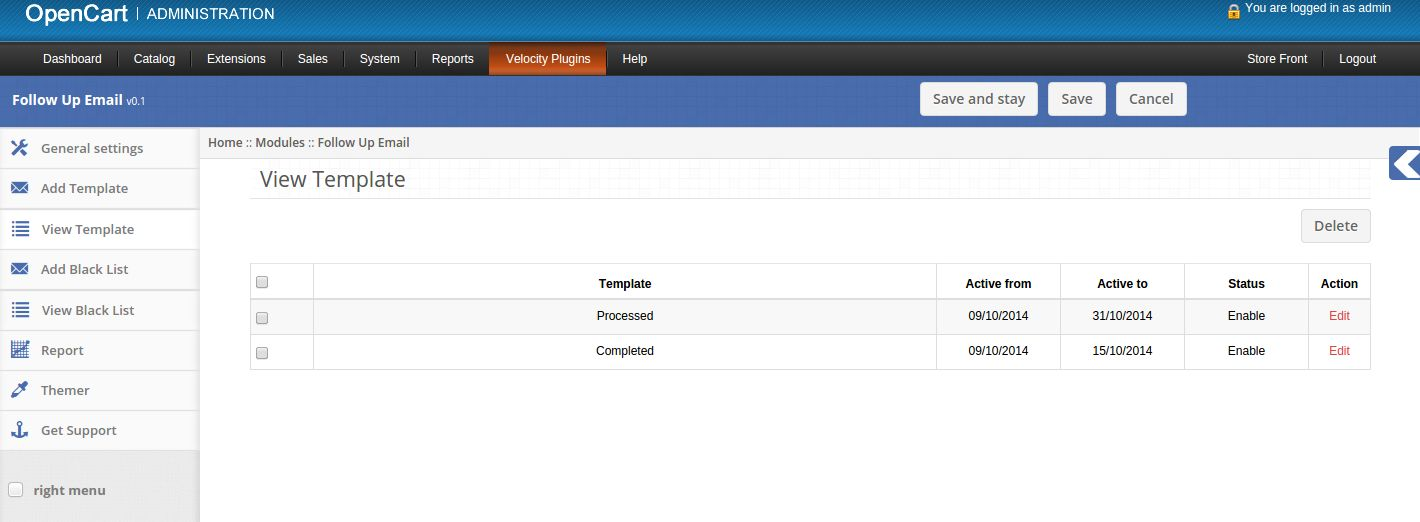
1. Here admin can see list of saved templates.
2. If their are no saved templates then this tab will look as follows:
3. If their are some saved templates then this tab will look as follows:
4. Click on Edit link provided in front of every template to edit that template.
5. Click on Delete button to delete selected templates.
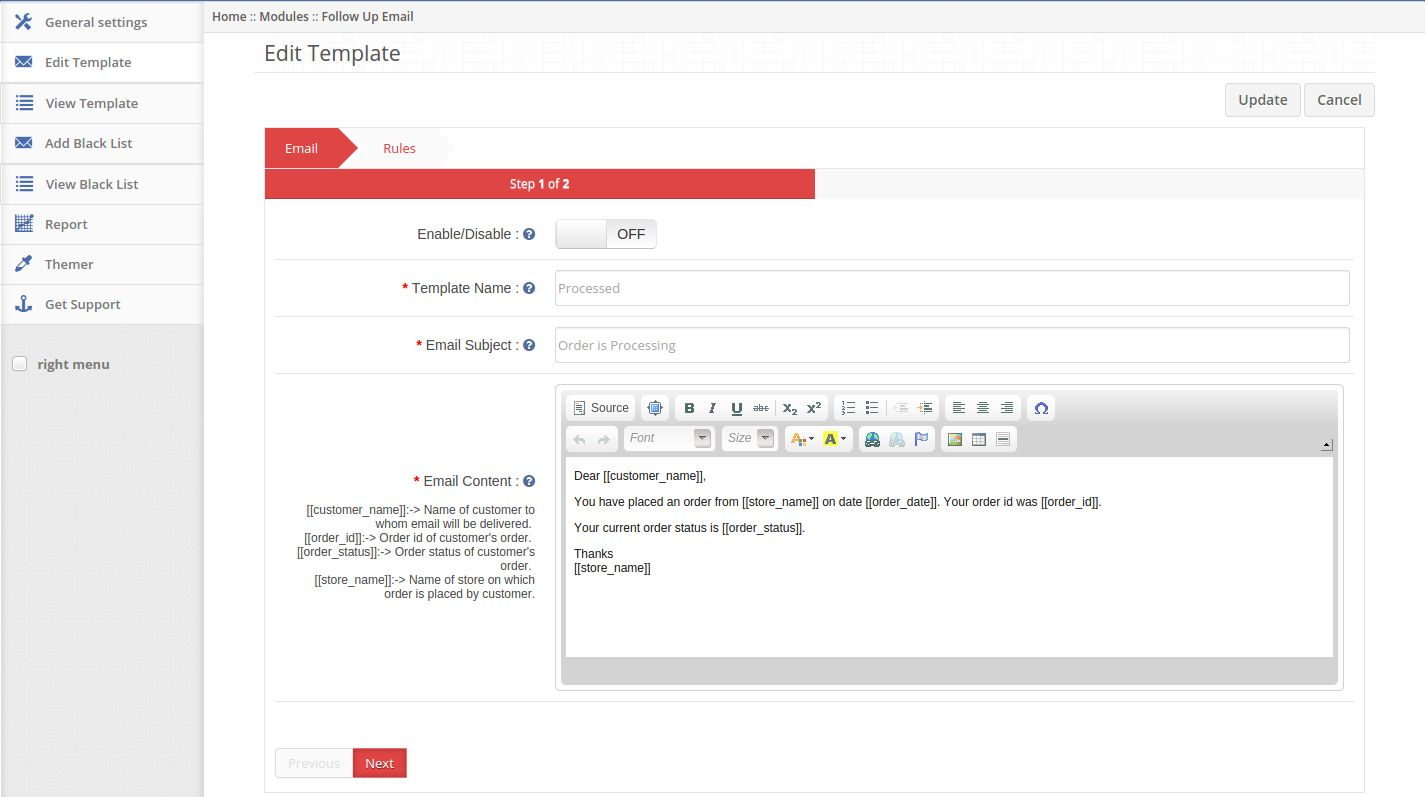
6. On clicking the edit link a form will appear to edit the promotion.
7. Enable/Disable: Enable or disable template.
8. Template Name: Set name of template.
9. Email Subject: Set subject of email to be sent.
10. Email Content: Set content of email to be sent.
11. Active from: Set start date of sending emails of this template.
12. Active to: Set end date of sending emails of this template.
13. Email Frequency: Set delay time (in hours) for sending email.
14. Order Status: Select one or multiple order statuses after which you wish to send emails.
15. Customer Group: Select one or multiple customer groups. Email will be sent to customers belonging
to selected customer groups.
16. Stores: Select one or multiple stores. Email will be sent to customers who placed orders from
selected store.
4. Add Black List tab
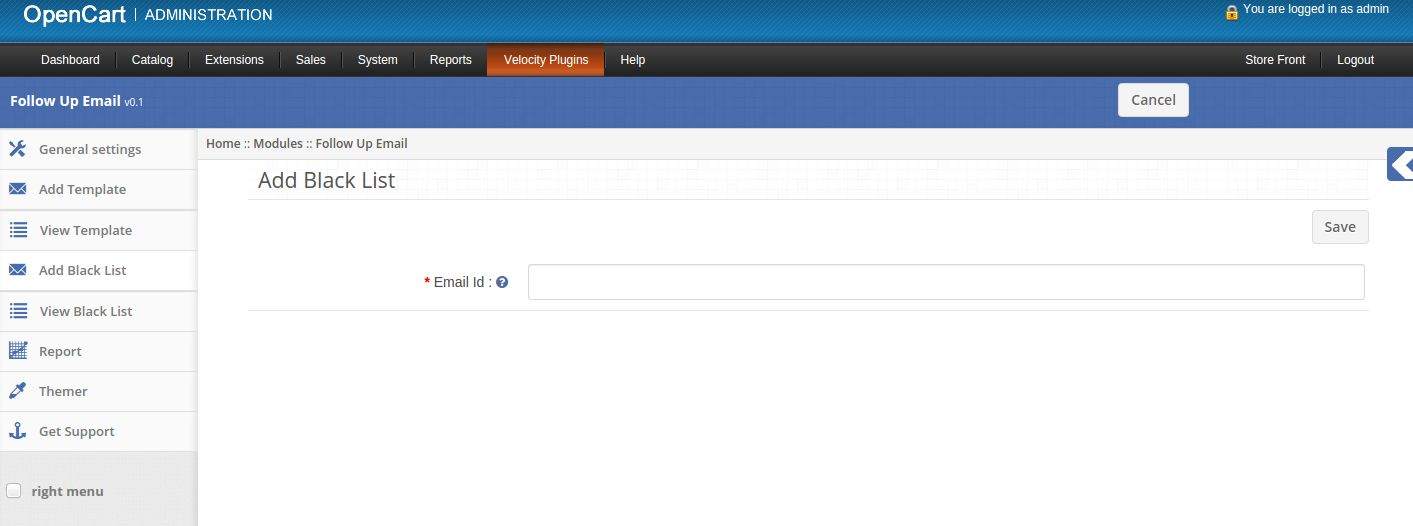
1. Here admin can add email id in black list.
2. Email Id: Enter email id to which you do not wish to send emails.
3. No email will be sent to email ids listed in black list.
5. View Black List tab
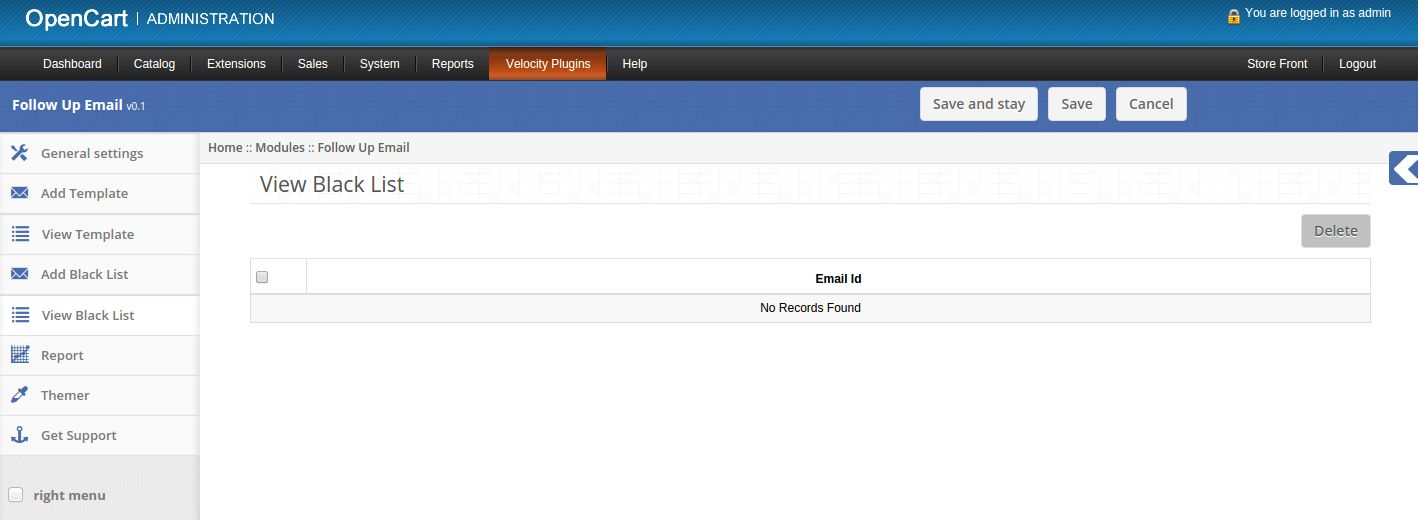
1. Here admin can see black listed email ids.
2. If there are no saved black listed email id then this tab will look as follows:
3. If their are some saved black listed emails then this tab will look as follows:
4. Click on Delete button to delete selected email ids from black list.
6. Reports tab
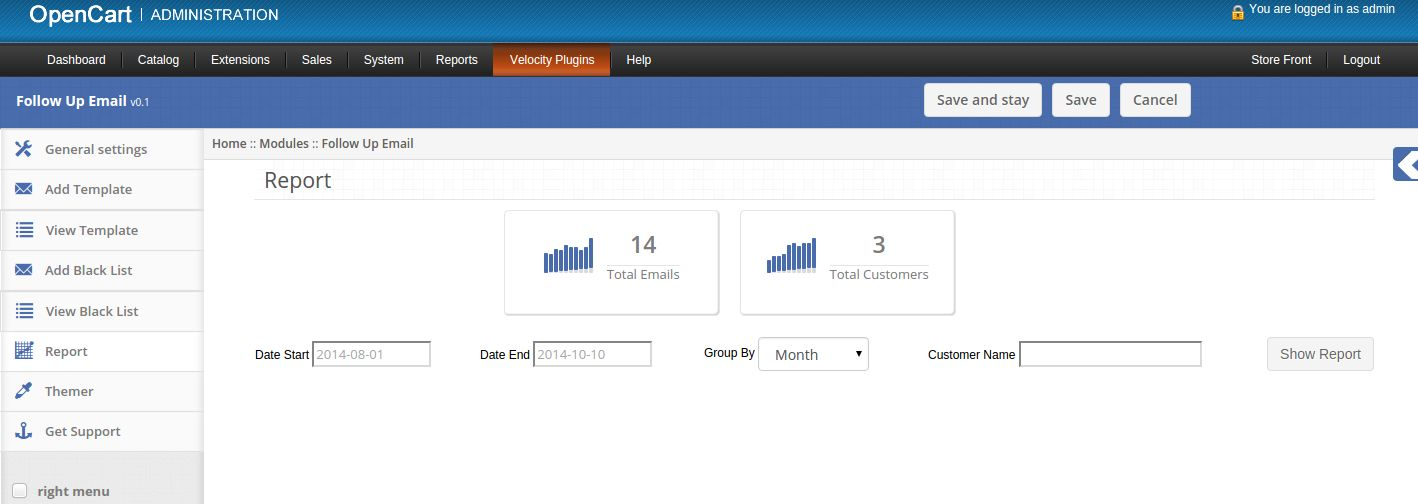
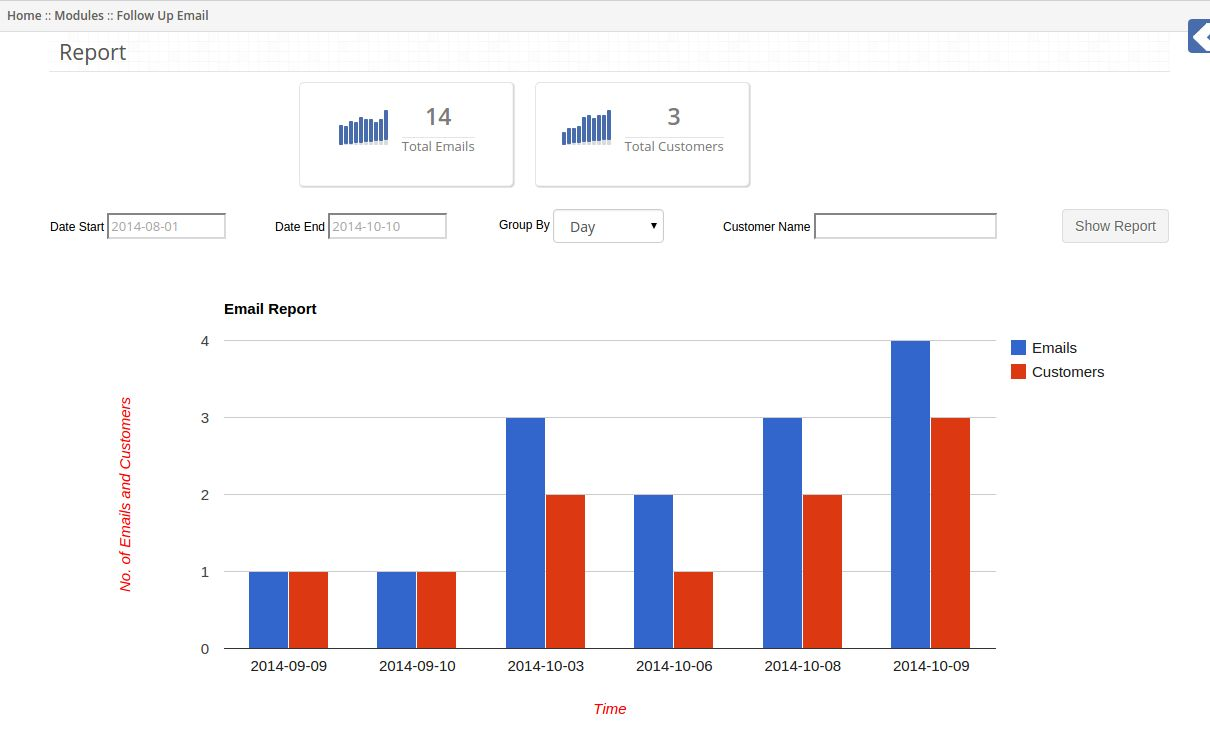
1. Here admin can see reports of emails sent to customers.
2. On the top of this tab total number of emails sent and total number of customers received email is
displayed.
3. On clicking Show Report button graphical report will appear as per values of filter.
4. You can also see report of email sent to particular customer by writing his name in filter.
7. Themer tab
By clicking on themer tab, you will have an option to change the theme of Follow Up Email admin
panel.
8. Get Support tab
By clicking on Get Support tab, you will be redirected to our support website, where you can contact
our support for help. Use this tab in case you some query/issue or found some bug.
Cron Setup
After installation of plug-in please add following cron to your store via control panel/putty. This cron should run once in every hour. 0 0 * * * wget -O /dev/null https://yourstore.com/index.php?route=followupemail/followupemail
Replace yourstore.com with url of your default store.
Download the zip from Magento store & unzip into a folder.
After unzip, following files/folders will be extract as shown in below screen:
Login via FTP & Drag drop all the folders into your server root directory.
You will find the extension link will be displayed under System >> Google Analytic.
Google Analytic User Manual
This module will basically work and visible in administration panel. There is no interaction of customers with this module and only administrator has access of this module.After copy this module, a link to access this module will be displayed under System >> Google Analytic menu as shown below screen:
After clicking on this link, module page will be open as shown in below screen: There are following tabs are displaying on left side in above screens. Each tab has different functionality which are described below in details:
General Settings
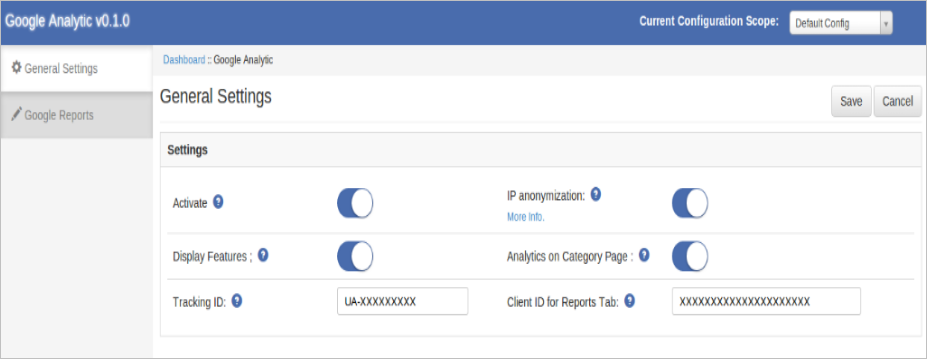
On clicking the module link, this tab will be open by default as shown as above screen. This tab has setting of this module. Each setting is explained below:
Activate: This setting will enable/disable the working of this module. There is switch button to ON/OFF this module. By default, it will be turn OFF.
IP Anonymization: This setting will enable/disable the IP Anonymization feature .The IP Anonymization feature in Google Analytic sets the last octet of IPv4 user IP addresses and the last 80 bits of IPv6 addresses to zeros in memory shortly after being sent to the Google Analytic Collection Network. The full IP address is never written to disk in this case.
Display Features: This setting will enable/disable the Display feature in Google Analytic.
Analytic on Category Page: This setting will allow you to enable/disable the analytic code to be execute on category page or not. By enabling this setting page speed may slow down depends on the no. of products . If you are using some ajax based 3rd party plugin for loading products. Then turn off this setting and add analytic code manually. To add code manually please refer to Appendix-1.
Tracking ID: Provide the Tracking Id provided in Google Analytic account.
Client Id : Provide the Google client Id of the same account associated with Google analytic with auth API and Analytic API .
NOTE: During Google API Configuration for client id , add ANALYTIC API in Google project . In javascript origin add url : https://www.example.com and in Redirect Url add url https://www.example.com/index.php/googleanalytic/adminthml_index/index
Google Dashboard
This tab will display following some Google Analytic reports . On clicking this tab screen will look like following:
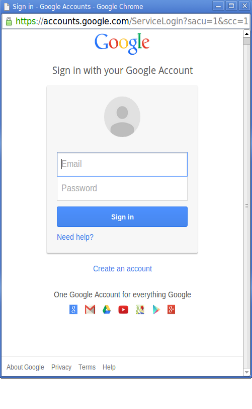
Initially this tab will show blank above orange colored login strip and blank report sections . On click of the above orange strip a browser window will open for login into Google Account. Enter the credentials of your account associated with Google Analytic.
After successfully login , you will see View Selector Options as shown below.
Using these options you can select select your analytic account and its corresponding property and its view.
On the top right there is widget displaying Active users count i.e. No of users currently present on your selected website at that time. By selecting a view reports will be displayed in their sections as shown below:
Overview Report: This is overview report which will display: a)No. Of sessions , b) No. Of New Users, c) Percentage of new Sessions, d) No. Of page views , d) No. Of unique page views , e) Pages per session , f) Exit Rate and g) Bounce Rate of Past 7 days including current day. This report will be displayed in tabular form.
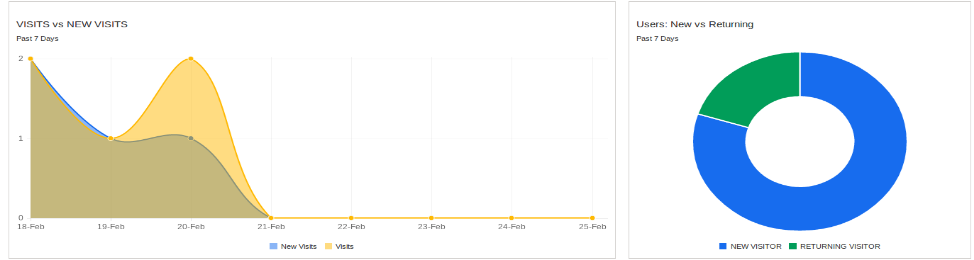
Visits vs New Visits: This report will display date-wise trend between visits i.e. Total sessions .and New Visits i.e. New Sessions.
New Users vs Returning Users: This report will pie chart between New Users and Returning Users.
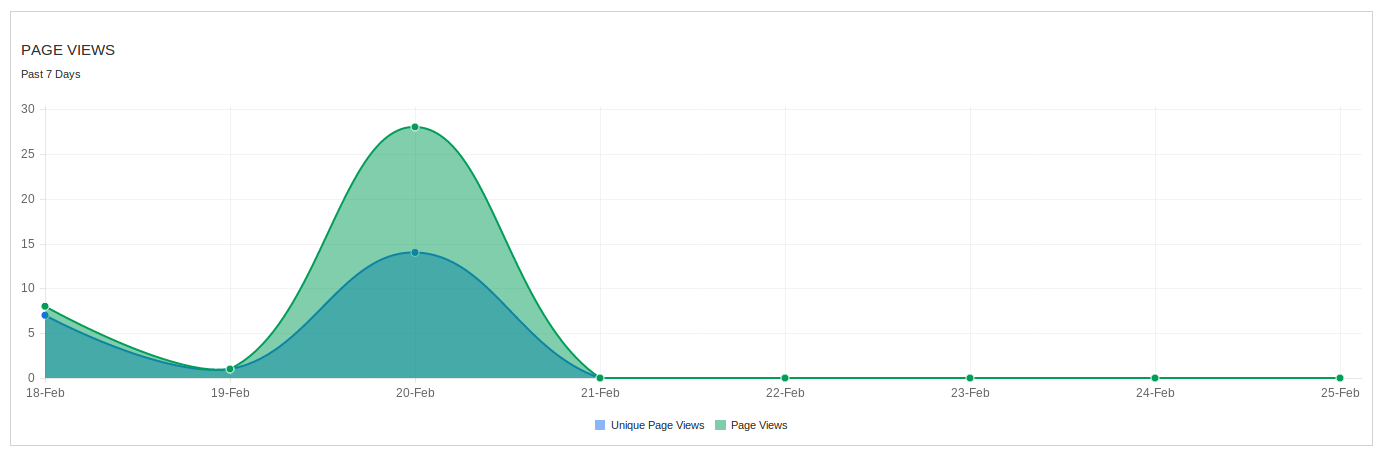
Page Views Report : This report will date-wise trend between Total page views and Unique page views of past 7 days.
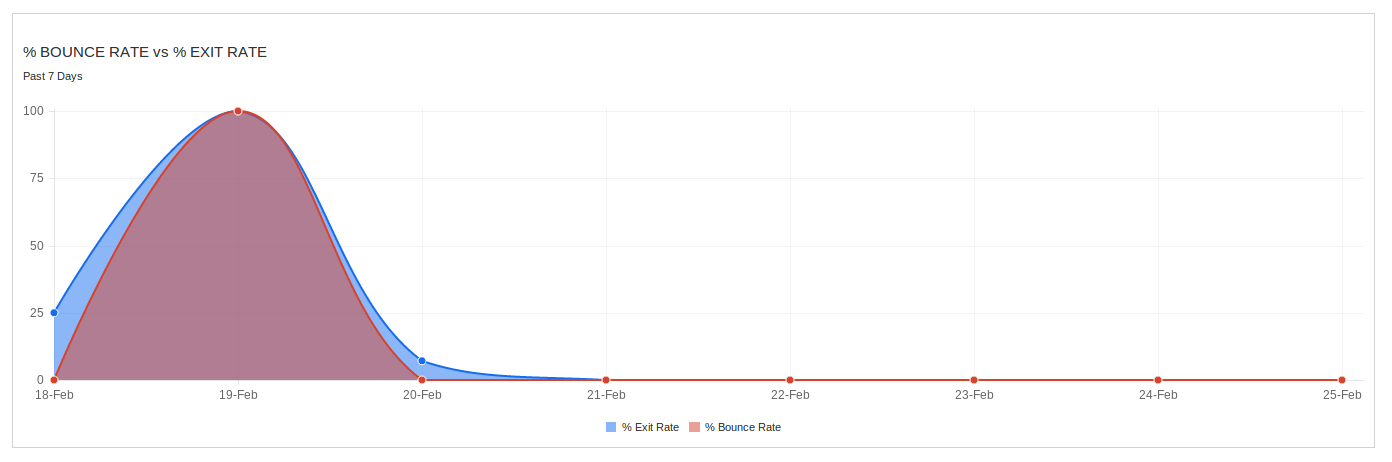
Bounce Rate vs Exit Rate: This report will display date-wise trend between Bounce Rate percentage and Exit Rate Percentage for past 7 days.
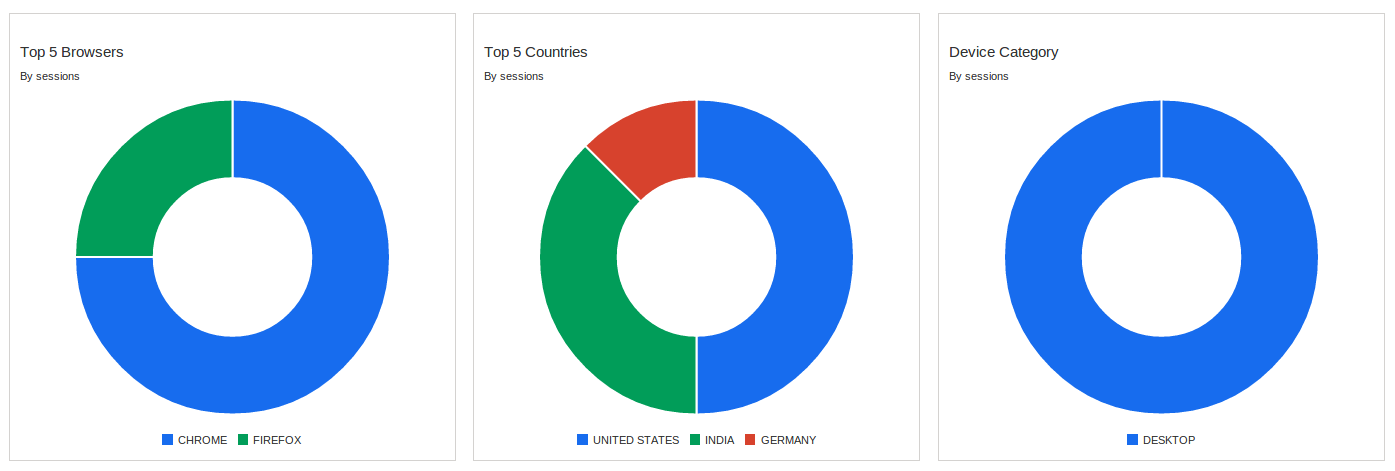
Top 5 Browsers : This report will display pie chart for 5 most used browsers in past 7 days by sessions . You can see no of sessions per browser on hover pie chart.
Top 5 Countries: This report will display pie chart for top 5 countries by sessions in past 7 days. You can see no of sessions per country on hover pie chart.
Device Category : This report will display pie chart for device category like desktop , Tablet or mobile used in past 7 days by sessions. You can see no of sessions per device category on hover pie chart.
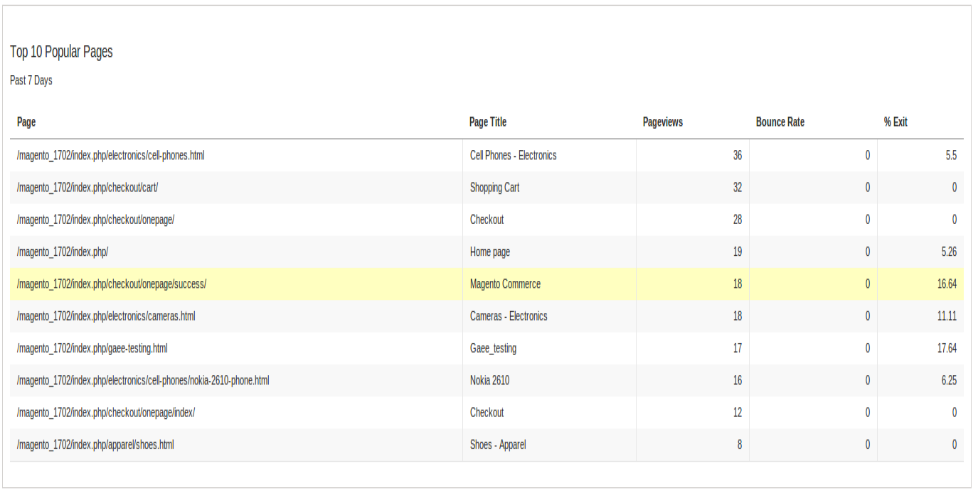
Top 10 Popular Pages : This report will display top 10 popular page by pageviews from past 7 Days with their Name, Path , Page views count , Bounce Rate(%) and Exit rate(%).
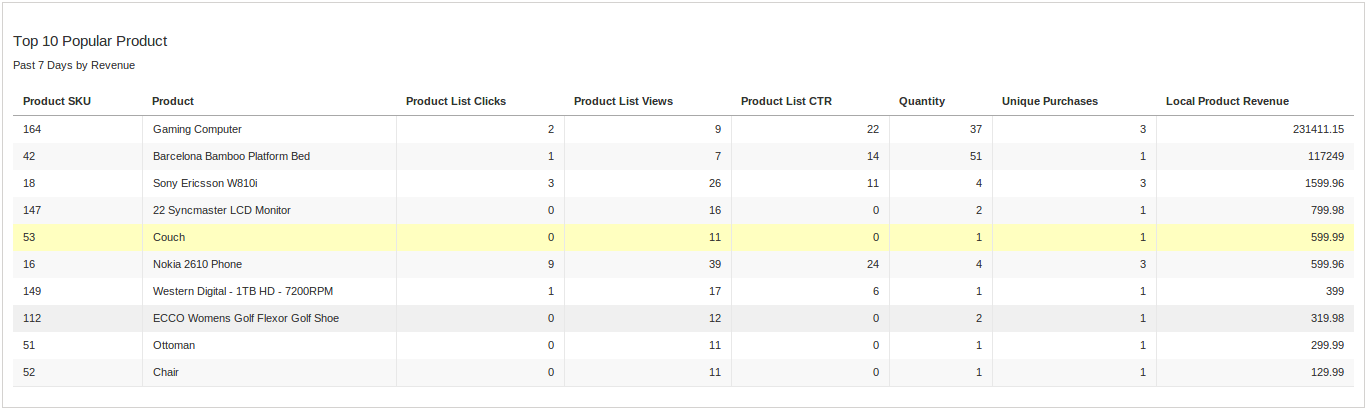
Top 10 Popular Product : This report will display top 10 popular products by revenue with their SKU, Name, Product List clicks , Product List CTR , Quantity , Unique Purchases, Local Product Revenue.
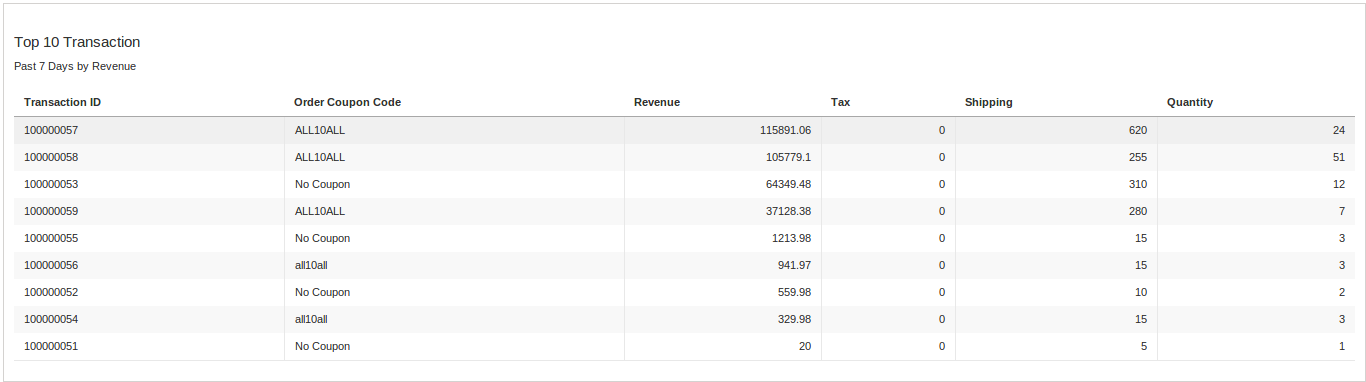
Top 10 Transactions: This report will display top 10 Transaction of past 7 days by revenue with their Transaction Id, Order Coupon Code, Revenue, Tax, Shipping , Quantity.
Appendix-I
In Magento when a category page is loaded an event is dispatched carrying information about the products. On the basis of that information our code works. But if you are using any extension to load products on category page then you have to manually add the analytic code.
Following is the example analytic code for category page:
1. Download & Install the shipworks from https://www.shipworks.com/shipworks/download.php
2. After completion of installation of Shipworks, login into shipworks.
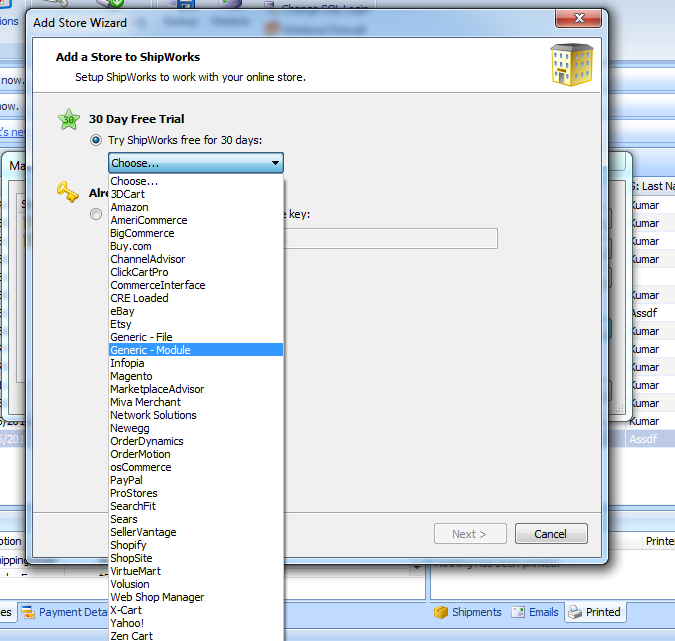
3. Go to Manage -> Stores & Add New Store to add new store if you have added any store in shipworks else shipworks automatically open the Add New Store screen.
4. Select Generic Module from the cart list as shown below & click Next.
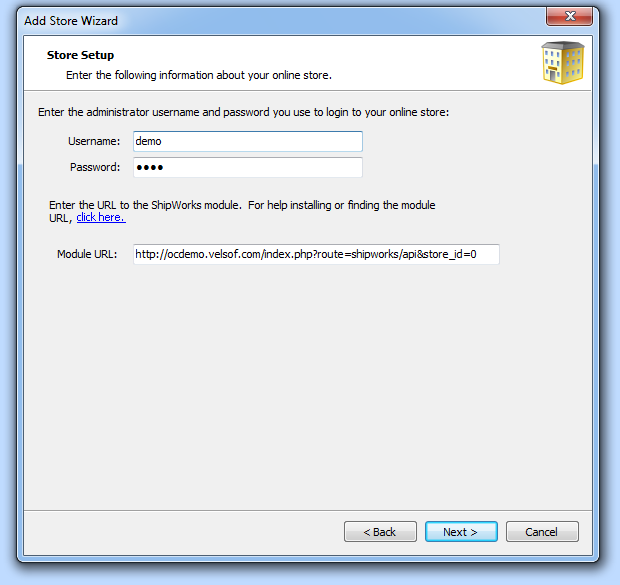
5. On the next screen, enter the following details.
Username: demo
Password: demo
Module URL: https://ocdemo.knowband.com/index.php?route=shipworks/api&store_id=0
6. After adding the Module URL, Click on the Next button & follow the instructions on Shipworks
screen.
7. When Shipworks ask for license key, provide the following license key & click next.
Magento multi-vendor Marketplace module by Knowband is one of the easiest ways to transform your eCommerce site into a thriving Multi vendor marketplace. A Multi vendor marketplace is an online space where different sellers and vendors can list their products, manage their inventory and sell at the same platform. The Magento Multi vendor marketplace plugin converts your online shop into a fully functional online marketplace.
1.1 Features offered to the store admin by Magento Multi-vendor Marketplace extension:
The admin can approve/reject the seller’s profile with the help of the Magento marketplace plugin.
The Magento marketplace module makes it easier to set and manage the commission charged to the sellers.
The admin can add/remove the products from the back-end of the Magento marketplace multi-vendor module.
The store admin can create and manage the product categories from the back-end of the Magento marketplace extension.
The Magento store owner can track the transaction and earn at the button click.
The Magento marketplace multivendor is compatible with the latest Magento version and supports all themes.
The admin can approve/reject product and seller reviews from the backend of Magento Multi seller Marketplace plugin.
Email templates offered by the Magento Multi-vendor Marketplace module can be used by the admin to notify the sellers.
Store admin has the access to approve or disapprove the seller vacation request from the backend of Magento Multi seller Marketplace module.
1.2 Features offered to the seller by Magento Multi-vendor marketplace extension:
The Magento Multi-vendor marketplace allows the sellers to register from the front end of the online marketplace.
The sellers can easily map the categories from the seller dashboard.
Also, the sellers can request including a new category to keep the products. The marketplace admin can approve/reject the category request with the help of the Magento multi-vendor marketplace plugin.
The seller’s dashboard makes it easier for them to track and manage their products, profile as well as sales.
Magento multi-vendor marketplace allows the sellers to add sale banners, shop logo and custom HTML content. These banners will be displayed on Seller’s Page with separate product collection.
Sellers can send the payout requests and Vacation request to the admin from the seller dashboard.
Sellers can generate coupons from the seller dashboard to lure the customers and enhances the chances of conversion.
Sellers can display the Upsell and Cross-Sell products at the product page and checkout page to enhances the sale.
To distinguish taxable and Non- taxable items, sellers can add the products in different tax classes.
1.3 Customer Benefits offered by Magento Multi-vendorMarketplace:
The Magento multi-vendor marketplace extension allows multiple sellers/vendors to sell their products on the same platform. Thus, customers can choose the perfect product from a wide assortment.
Magento marketplace extension allows the customers to shop the products at competitive prices.
The customers can send product reviews. These reviews can be approved/disapproved from the back-end of the Magento marketplace plugin.
Online shoppers can review the sellers. The seller reviews can be monitored from the back-end of the Magento multi-vendor marketplace module.
The Magento multi seller marketplace module even offers an option with the help of which the buyers can become a seller.
Customers can directly contact the sellers from the frontend of the store. A ticket will be generated every time a customer contacts the seller.
2.0 Steps For Installation of Magento Multi-Vendor Marketplace
Download the Magento Multi-vendor Marketplace extension package.
Unzip the package on your root folder of Magento setup via FTP manager (like Filezilla or WinSCP – download here: https://filezilla-project.org/).
In Admin Panel you will see a new Menu Market Place next to the System menu. In case you are not able to see the link under System, please clear Magento Cache first then check again.
With this, the Magento multi-vendor marketplace extension gets installed on your system.
3.0 Admin Panel
In the admin panel of Magento Multi seller, marketplace extension adds a separate menu (named MarketPlace) right next to the system menu and also adds a new tab to the customer create/edit page.
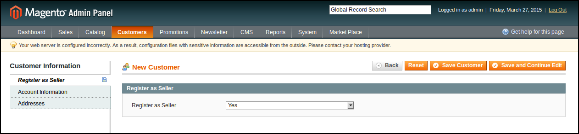
3.1 Register as Seller Option (Add New Customer Page)
If the admin is creating a new Customer from the admin side then a new tab appears on that page asking for the Register as Seller field.
The Path to the Customer page:
Go to Customers -> Manage Customers and Click on Add New Customer on the right side of the page.
The admin can set the field to Yes to register the customer as a seller. By default, the field is set to No.
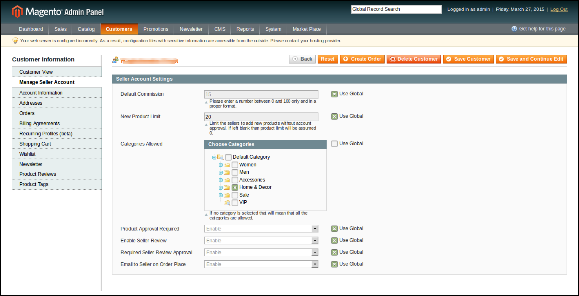
3.2 Manage Seller Settings (Customer Edit Page)
In case of editing a customer if the customer is also a seller than a new tab (named Manage Seller Account) appears to change the seller level settings for the current customer who is a seller as well.
Path to the above page:
Go to Customers -> Manage Customers and click on any customer who is also a seller.
The settings are stored when the admin submits the edit form for the customer.
When this page loads for the first time the fields are filled with the default settings pre-defined for the extension.
4.0 Marketplace Menu
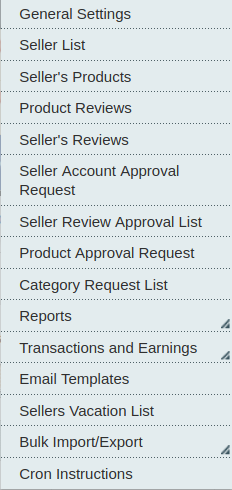
The Magento marketplace extension consists of a total of 15 sub-menu options which redirect to several pages for the Magento multi-vendor marketplace Extension.
Some of the menu options of the Magento multi-vendor marketplace module have further sub-menus to navigate to some of the related pages.
All the 15 configuration options offered by the Magento multi-vendor marketplace plugin are described below in details:
4.1 General Settings
The General settings tab of the Magento multivendor marketplace module is divided into 2 main levels i.e. Seller Level Settings and Global Level Settings. This page only controls the Global level settings for the Magento Marketplace Extension.
This page has all the settings that control the Magento Marketplace plugin and its several features.
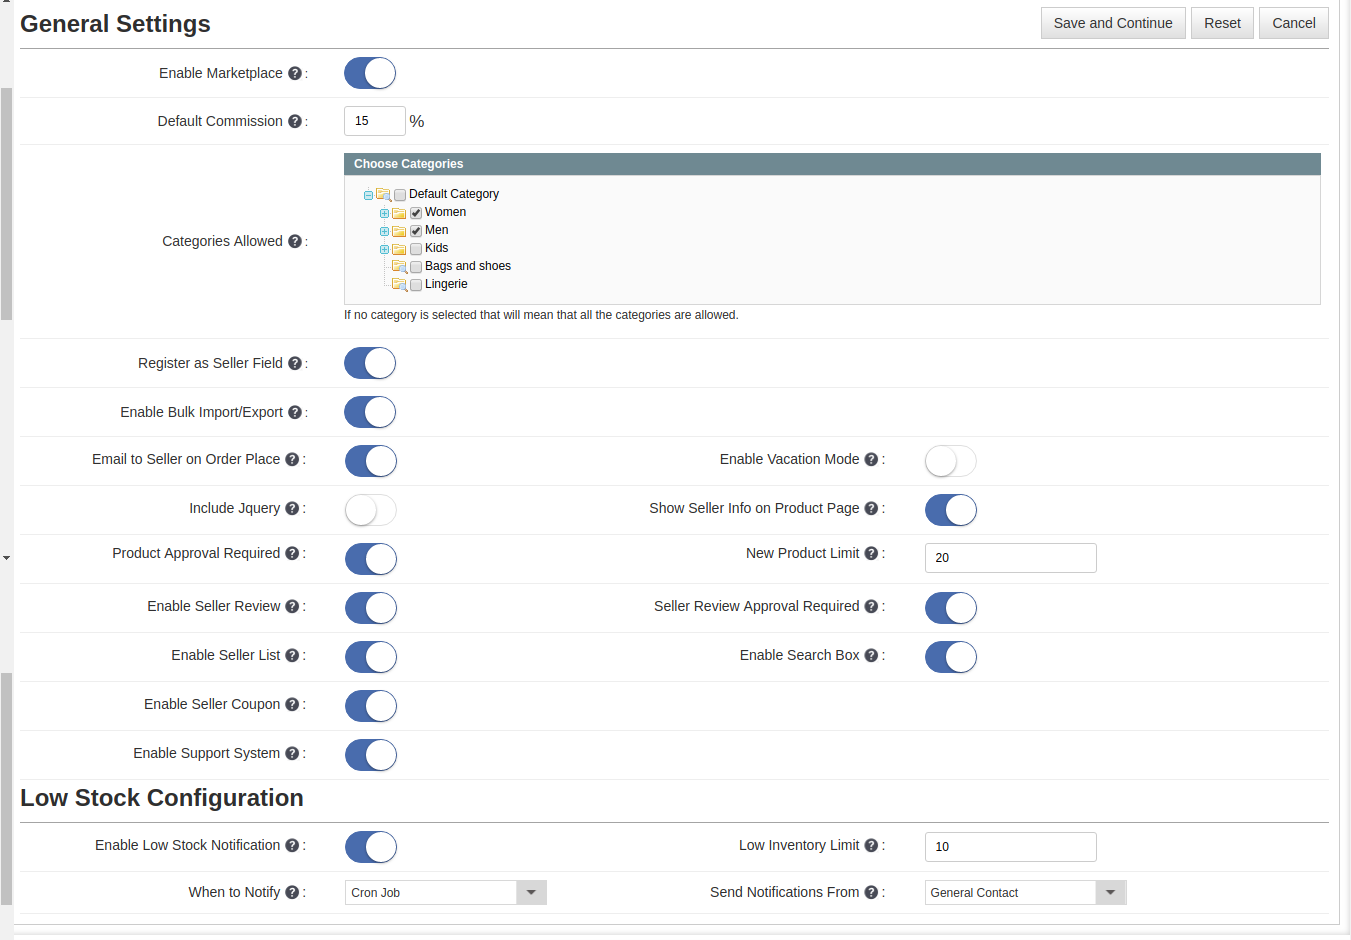
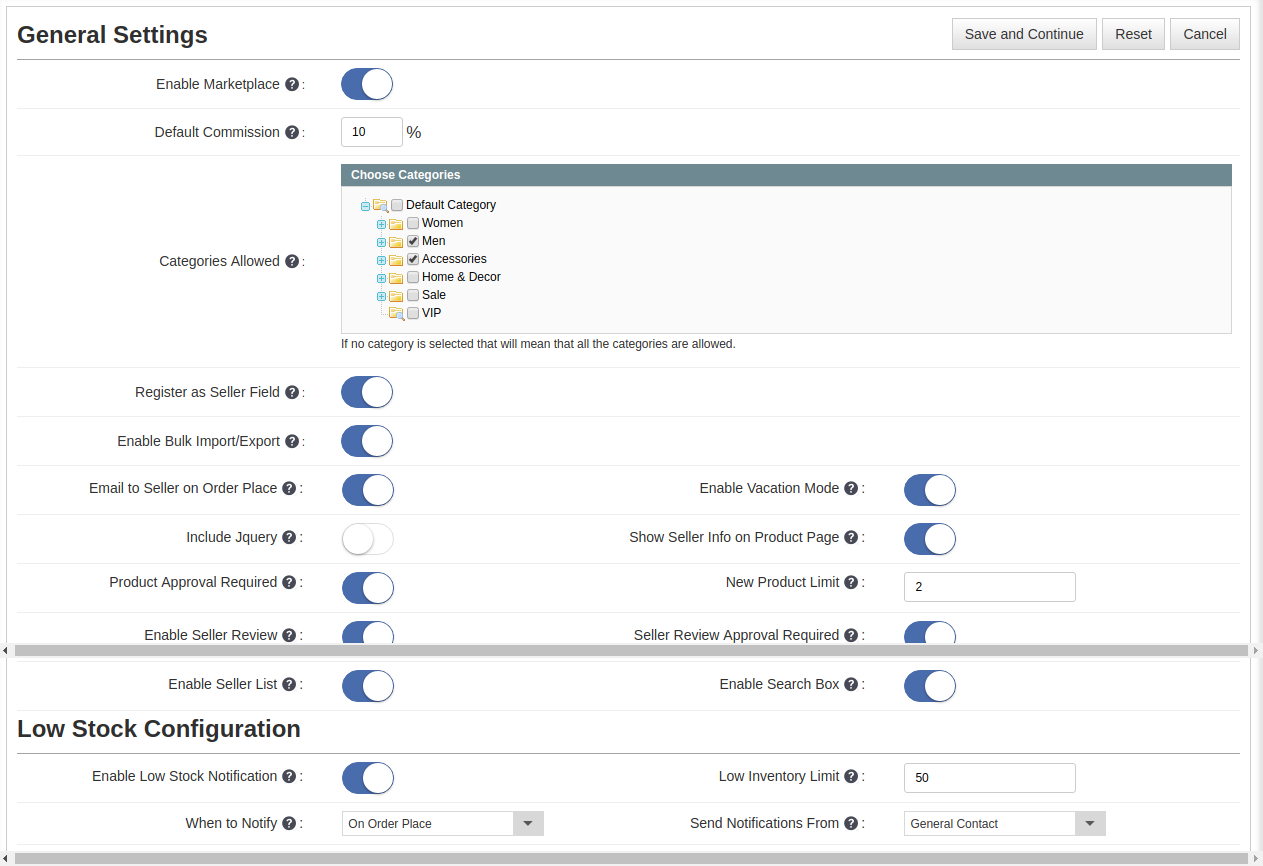
The general settings page of Magento multi-vendor marketplace plugin consists of the following fields:
1. Enable Marketplace: Enables or Disables the Magento Multi-vendor Marketplace extension on the storefront. If disabled, no page or feature of the extension is accessible on the storefront.
2. Default Commission: Sets the default commission percentage that is taken by the store owner from the total sale made by the seller.
3. Categories Allowed: The categories that are allowed for the sellers to add products. If no category is selected then all the categories are allowed and if some of the categories are selected that means that only the selected categories are allowed.
4. Register as Seller Field: Enables or Disables the Register as Seller field on the Create Account page of the storefront.
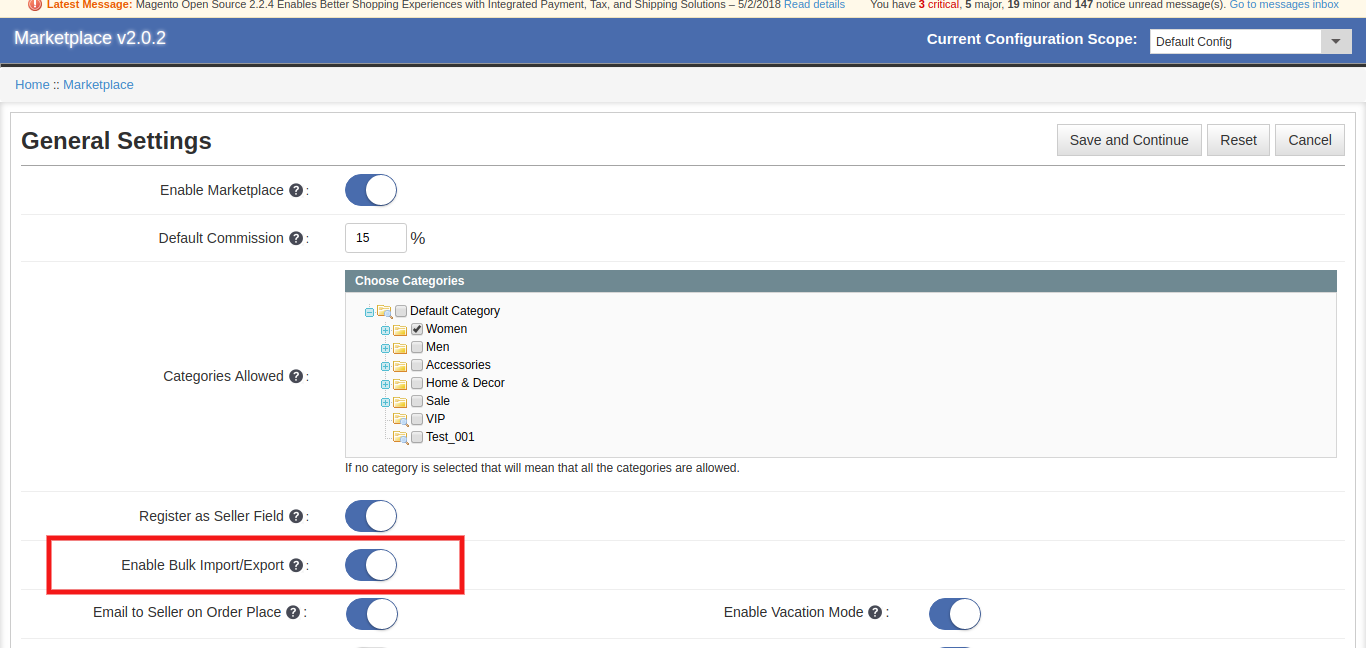
5. Enable Bulk Import/Export: Enable the button to allows the third-party vendors to use bulk import/export feature.
6. Email to Seller on Order Place: Enable this field to send an email to the seller in case an order is placed for the sellers’ product(s).
7. Include JQuery: Disable this field in case JQuery is already included in the front by another plugin or your theme.
8. Product Approval Required: Enable this field in case approval for the product added by any seller is required before it gets to your store.
9. Enable Seller Review: Enable this field in case you want the customers can review the seller.
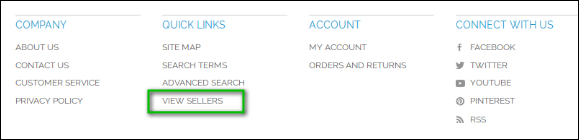
10. Enable Seller List: Enable this field in case you want to show a link in the footer of the storefront to the seller listing page. If this setting is disabled then the seller listing page cannot be accessed anyhow.
11. Enable Vacation Mode: Enable this button to allow the sellers to set the vacation mode for their shop for a particular period.
12. Enable seller Coupon: Enable this feature to allow the sellers to generate coupons for their products.
13. Show Seller Info Product Page: Enable the button to show the seller’s info on the product page.
14. New Product Limit: Enter the maximum number of products that a new seller can add before the seller account is approved.
15. Seller Review Approval Required: Enable this field in case you want the seller review to be approved before it becomes visible in the storefront.
16. Enable Search Box: Enable this field in case you want a search box on the seller listing page to search the sellers.
17. Enable Support System: Once this feature is enabled from the backend of the Magento Multi seller Marketplace module, the customer can directly contact the seller.
Low Stock Configuration
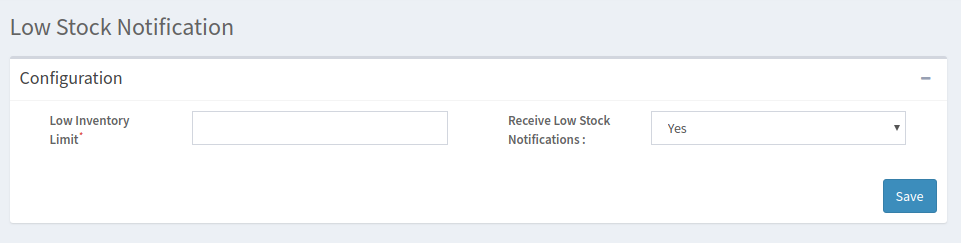
1. Enable Low Stock Notification: Enable the button to notify the sellers regarding the low stock notification. 2. Low Inventory Limit: Enter the stock level below which the seller will be notified regarding low stock. 3. When to Notify: Select when you will send the notification. It may be sent when the order is placed or after executing cron. 4. Send Notification From Select the email ID from which you want to send the notification.
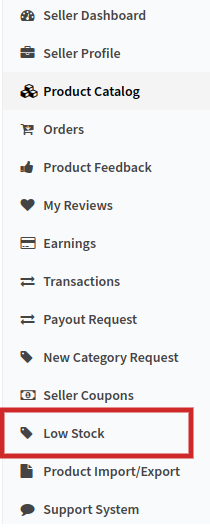
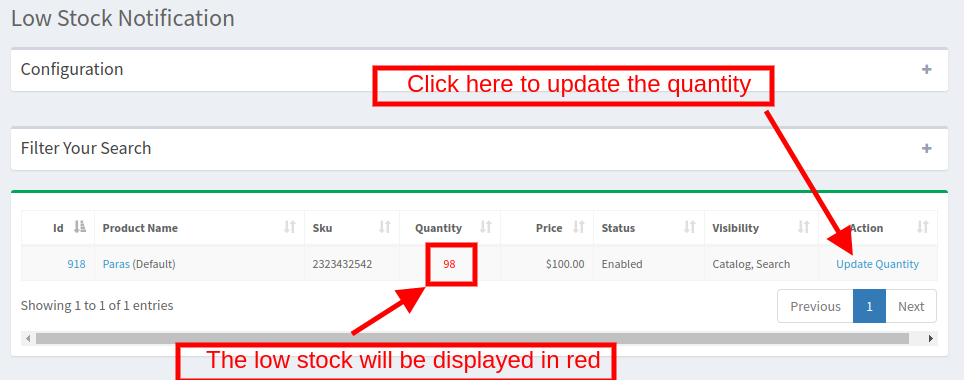
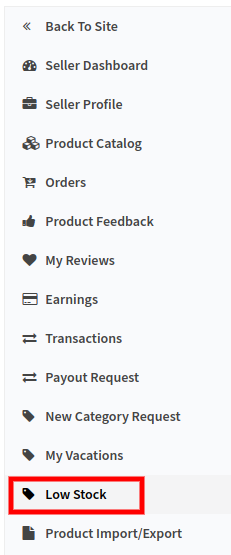
Once this functionality is enabled from the back-end of the Magento Marketplace module, the vendors can configure the low-stock setting from the Low-stock section of their dashboard.
Go to the configuration section of the Low Stock tab of the dashboard.
Low Inventory Limit: The sellers can enter the inventory limit below which they want to get notified. Receive Low Stock Notification: Select whether you want to receive the low stock notification or not.
4.2 Seller List
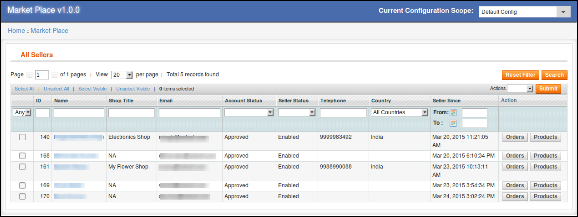
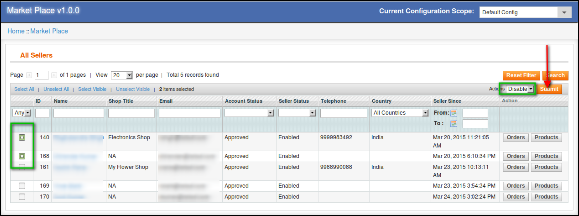
This page of the Magento marketplace extension has a list of all the sellers that are approved by the store owner.
The above list contains a list of all the sellers that are approved. There are buttons to go to the seller’s products and orders in front of each seller.
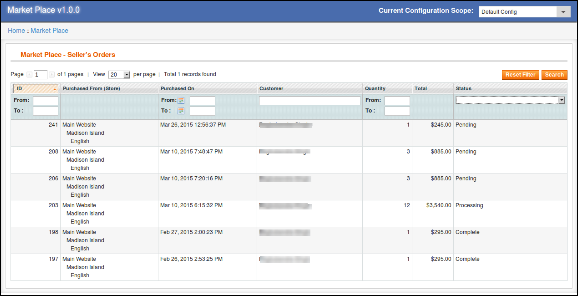
When you click on the Orders button than a new page opens consisting of the list of all the orders for that particular seller opens.
When you click on the Products button than a new page opens consisting of the list of all the products for that particular seller opens.
The is also a feature to enable or disable any seller using the Mass Actions feature of the Grid. To enable/disable any seller select the seller(s), choose the action (i.e. Enable or Disable) then click on the submit button to complete the action.
If a seller is disabled then all the products of that seller are also disabled and will not be visible at the storefront.
4.3 Sellers Products
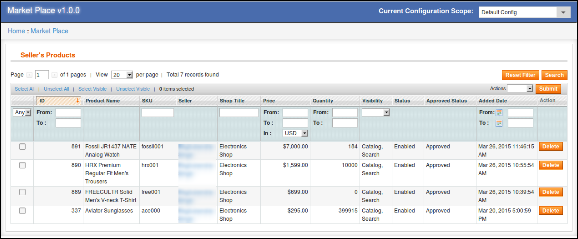
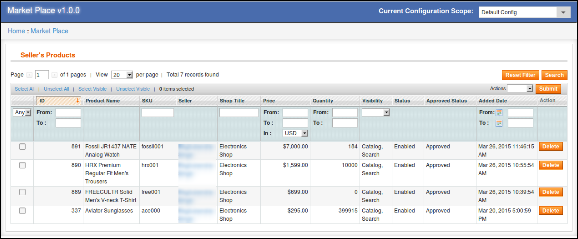
This page of the Magento multi-vendor marketplace extension consists of all the approved products added by the seller(s) to the store.
If the settings (i.e. Product Approval Required) is disabled, then, a product is approved directly when it is added by the seller and appears in this list. Otherwise, the product first appears in the Product Approval list.
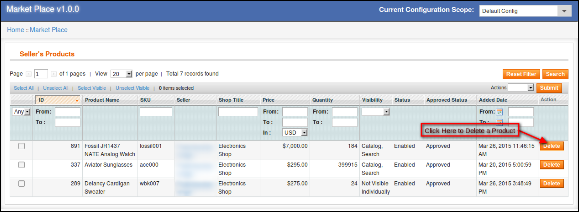
Delete Product: To delete a product, you have to click on the delete button in front of that product.
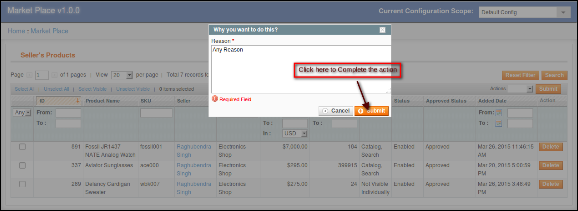
A pop-up will appear asking for the reason for the deletion of the product. To complete the action fill the reason and click submit.
A mail will be sent to the seller to notify the deletion of the product. The mail also contains the reason you provided for the deletion of the product.
Note:- The product delete action cannot be undone. Please use this feature carefully.
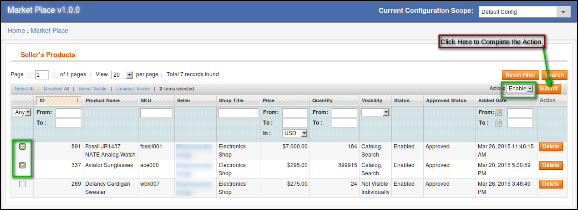
Enable/Disable Product: To change the status of any product, you have to use the Mass Action feature of the Grid. To enable/disable any product select the product(s), choose the action (i.e. Enable or Disable), then, click on the submit button to complete the action.
Note:- Once a product is disabled from the back-end of the Magento Multi-vendor Marketplace plugin, it will not be visible at the front. Avoid disabling products, only disable a product if it is very necessary.
4.4 Product Reviews
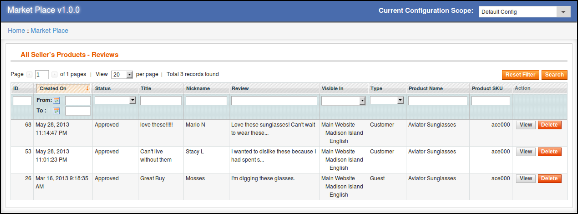
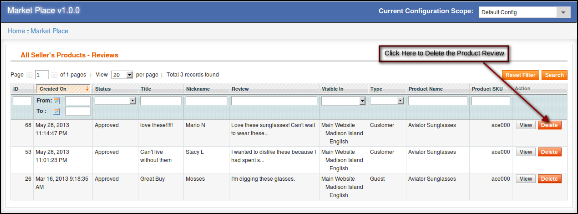
This page of the Magento multi seller marketplace extension contains a list of all the reviews done by customers on the seller’s products.
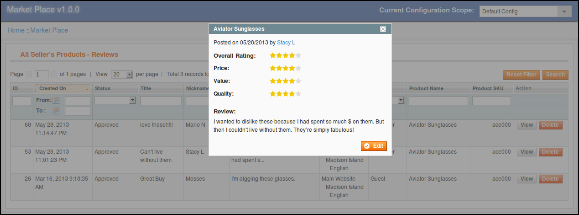
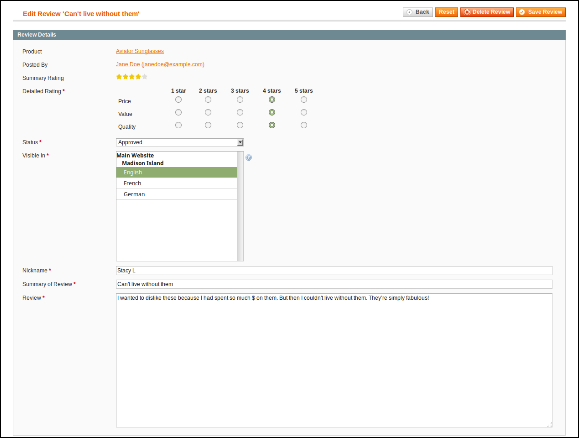
View Product Review: Most of the details of the product review are already mentioned in the grid but some of them are not. To view, all the details of any Product Review click on View Button in front of that review. A pop-up will appear in the back-end of the Magento multi-vendor marketplace plugin having all the details of the product review.
To edit the review you can click on Edit Button on the pop-up that will redirect you to the edit review page.
Delete Product Review: The Magento multi-vendor marketplace extension allows the store admin to delete the product reviews. To delete a product review, you have to click on the delete button in front of that product review on the list.
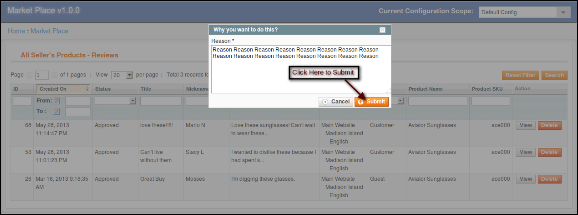
A pop-up will appear asking for the reason for the deletion of the product review. To complete the action fill the reason and click submit.
Note:- The product review delete action cannot be undone. Please use this feature carefully.
4.5 Sellers Reviews
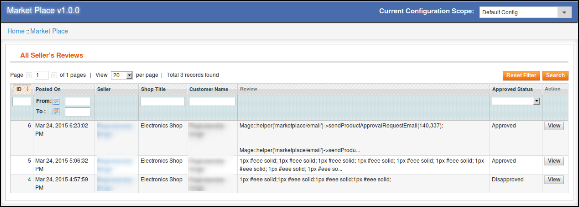
This list contains a list of all the Sellers Reviews done by customers in the store.
If the settings (i.e. Seller Review Approval Required) is disabled then a seller review is approved directly when it is added by the customer and appears in this list. Otherwise, the review first appears in the Seller Review Approval list.
Note:- The Seller Reviews that are disapproved by the store owner also appear in this list.
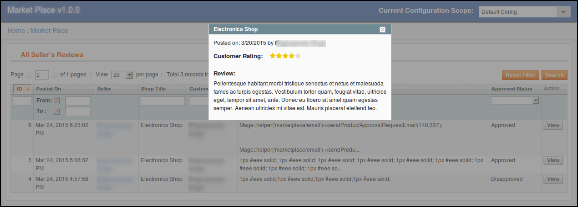
View Seller Review: To view all the details of a seller review you have to click on the View button in front of that review in the list.
On clicking the View button a Pop-up will appear having all the details of the corresponding seller review.
4.6 Seller Account Approval Request
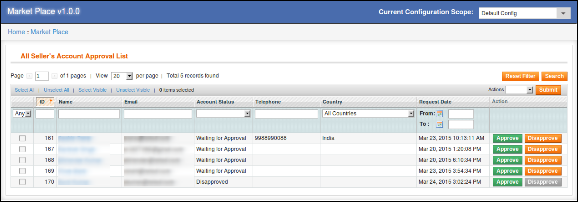
When a seller registers as a seller on your store than it first appears in this list of the Magento multi-vendor marketplace extension as shown in the image below. Then it is up to the store admin to approve or disapprove the seller account request.
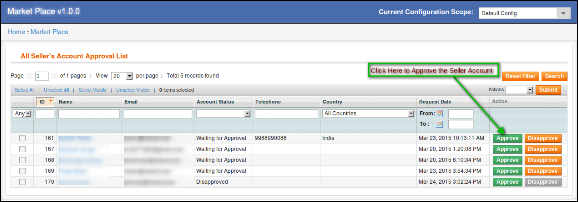
Approve Seller Account: To approve a seller account, you have to click on the Approve button in front of that seller on the list.
Once the Seller account is approved, it directly moves to the Sellers List and all the limits to the seller account are released.
A mail will be sent to the seller to notify the approval of the seller account.
Note:- The Seller Accounts that are approved by the store owner cannot be undone. Please use this feature carefully.
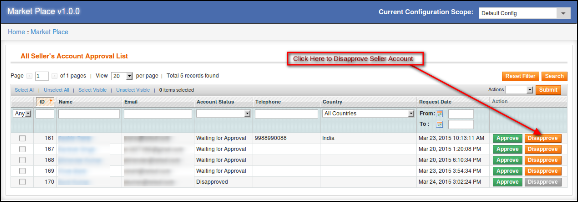
Disapprove Seller Account: To disapprove of a seller account, you have to click on the Disapprove button in front of that seller on the list.
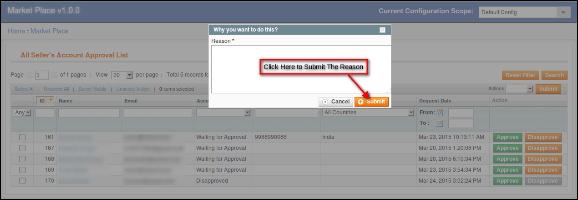
A pop-up will appear asking for the reason for the disapproval of the seller account. Fill the reason and then submit the form to complete the action.
A mail will be sent to the seller notifying the disapproval of the seller account. The reason provided in the pop-up will also be sent in this mail.
Note:- Once a seller is disapproved then he can again apply for the seller account and whenever a seller do this the store owner is notified through a notification email.
4.7 Seller Review Approval List
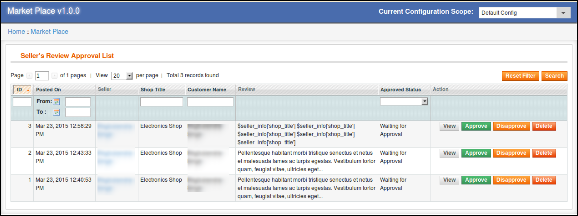
This list of Magento multi-vendor marketplace contains all the Seller Reviews that are just posted by the customers and no action is taken on them.
If the settings (i.e. Seller Review Approval Required) is enabled then only any seller review posted by any customer appears in this list otherwise it directly appears in the Seller Reviews list.
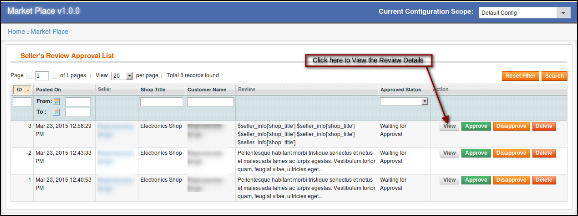
View Seller Review: To view all the details of a seller review you have to click on the View button in front of that review in the list.
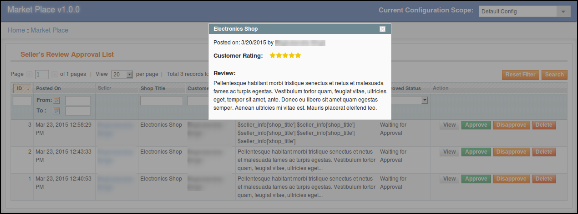
On clicking the View button a Pop-up will appear having all the details of the corresponding seller review.
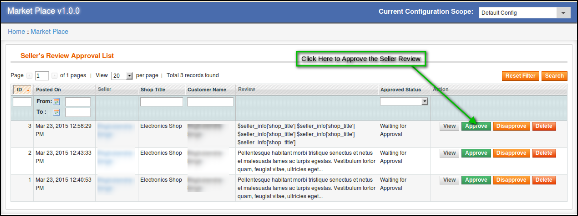
Approve Seller Review: To approve a seller review, you have to click on the Approve button in front of that review on the list.
Once a seller review is approved it becomes visible in the front end and is transferred to the seller review list.
Note:- This action cannot be undone. Please use it carefully.
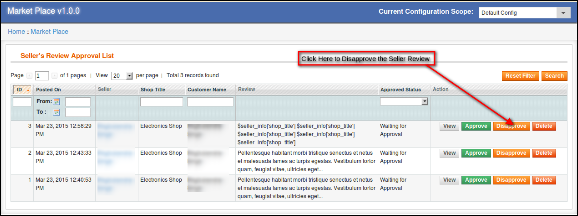
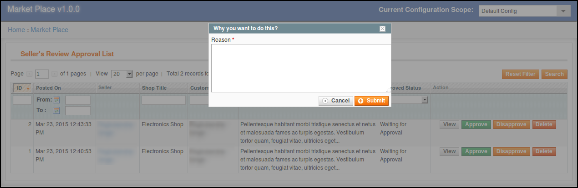
Disapprove Seller Review: To disapprove of a seller review, you have to click on the Disapprove button in front of that review on the list.
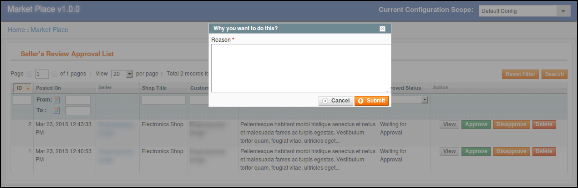
A pop-up will appear asking for the reason for the disapproval of the seller review. Fill the reason and then submit the form to complete the action.
Once a seller review is disapproved it is transferred to the seller reviews list and cannot be found anywhere else.
Note:- This action cannot be undone. Please use it carefully.
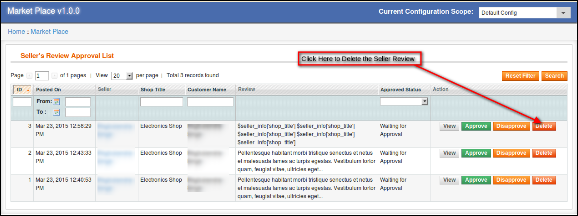
Delete Seller Review: To delete a seller review, you have to click on the Delete button in front of that review on the list.
A pop-up will appear asking for the reason for the deletion of the seller review. Fill the reason and then submit the form to complete the action.
Once a seller review is deleted it is completely removed from everywhere.
Note:- This action cannot be undone. Please use it carefully.
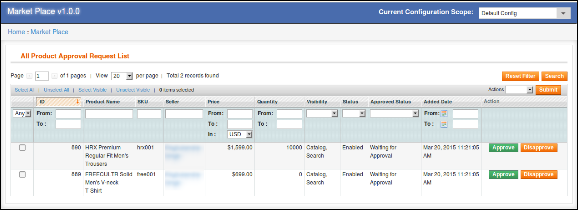
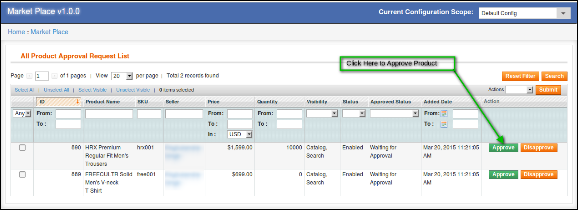
4.8 Product Approval Request
When a seller adds a product then, first of all, it appears here and the store owner is also notified for the same through the mail. Then it is up to the store owner to approve or disapprove the product.
If the setting (i.e. Product Approval Required) is on then only a new product is added appears in this list otherwise it directly appears in the Product List and is automatically approved and enabled.
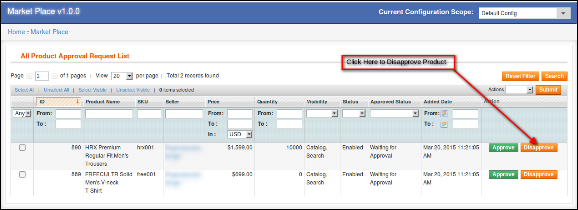
Disapprove Seller Product: To disapprove of a product, you have to click on the Disapprove button in front of that review on the list.
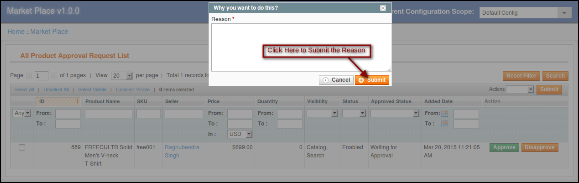
A pop-up will appear asking for the reason for the deletion of the seller review. Fill the reason and then submit the form to complete the action.
Once a product is disapproved a mail will be sent to the seller notifying the disapproval of the product. The disapproved products also appear on the same list. The Store admin can approve them anytime.
Approve Seller Product: To approve a product, you have to click on the Approve button in front of that review on the list.
Once a product is approved it transfers from this list to the Sellers Products list.
Note:- This action cannot be undone. Please use it carefully.
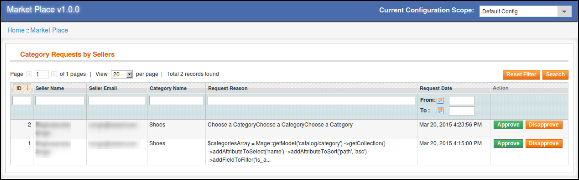
4.9 Category Request List
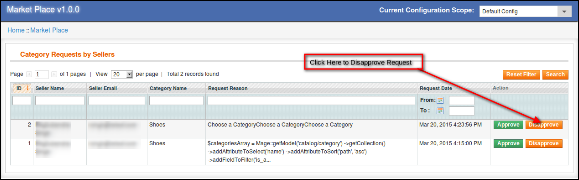
A seller can add the product to categories that are allowed to that seller. In case, the seller needs to add a product to a category that is not allowed, then, the seller can request for the same. All those category requests appear in the Category Request by Seller list of the Magento multivendor marketplace module as shown below. A mail is also sent to the store owner to notify the Request for Category. Then it is up to the store owner to approve or disapprove the request.
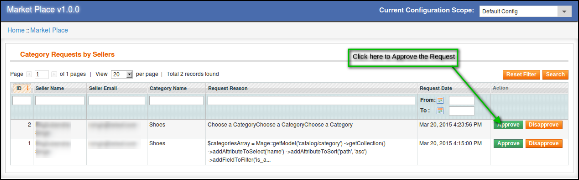
Approve Category Request: To approve a category request, you have to click on the Approve button in front of that category request on the list.
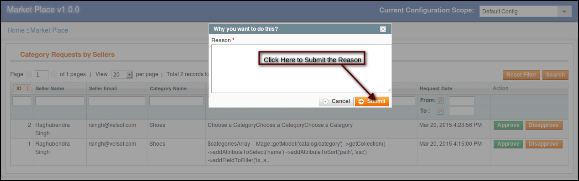
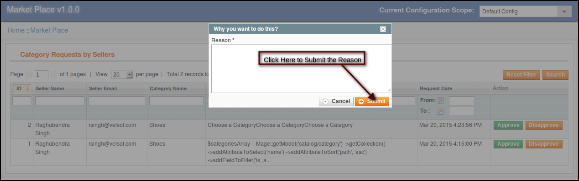
A pop-up will appear in the back-end of the Magento multi-vendor marketplace extension asking for the reason for approving the category request. Fill the reason and then submit the form to complete the action.
Note: This action cannot be undone. Please use it carefully.
Disapprove Category Request: To disapprove of a category request, you have to click on the Disapprove button in front of that category request on the list.
A pop-up will appear asking for the reason for disapproving the category request. Fill the reason and then submit the form to complete the action.
Note:- This action cannot be undone. Please use it carefully.
4.10 Reports
4.10.1 Reports -> Best Selling Products
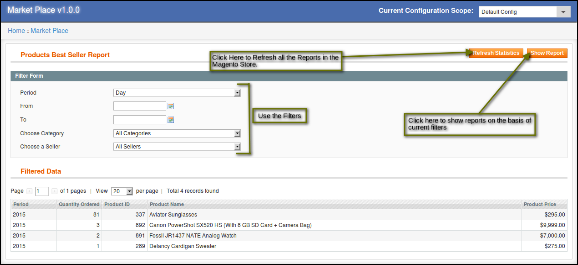
The Report tab of the Magento multi-vendor marketplace helps the store owner to identify the best selling products added by the sellers. The store owner can also use multiple filters for the best selling product reports.
The filters help the store owner identify best selling product :
For a date range.
For a specific category.
For a specific seller.
Note:- Sometimes you may be unable to find any data in this report. In that case, you have to refresh the report statistics and to do that you have to do the following:
Go To Reports -> Refresh Statistics -> Select The Desired Reports to Refresh -> Submit
Or
Click on the Refresh Statistics Button on the top of this page.
4.11 Transactions and Earnings
4.11.1 Transactions and Earnings -> Commissions
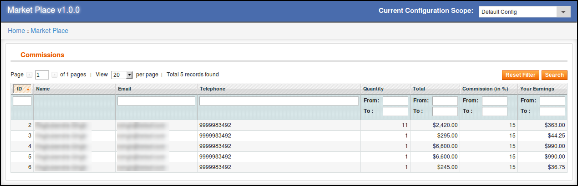
The Commission list of the Magento multi-vendor marketplace extension contains all the commissions earned by the store owner on several orders with commission percentage and total sale of the seller.
4.11.2 Transactions and Earnings -> Category wise commissions
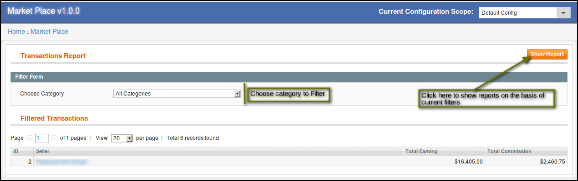
The Transactions and Earnings page of the Magento multivendor marketplace module shows the report for the commissions earned by the store owner. This report shows the total commission earned by the store owner from a seller. The store owner can also use filters to filter the commission reports category wise.
This feature offered by the Magento multi-vendor marketplace extension helps the store owner to identify commissions from different categories and which category has produced how much commission.
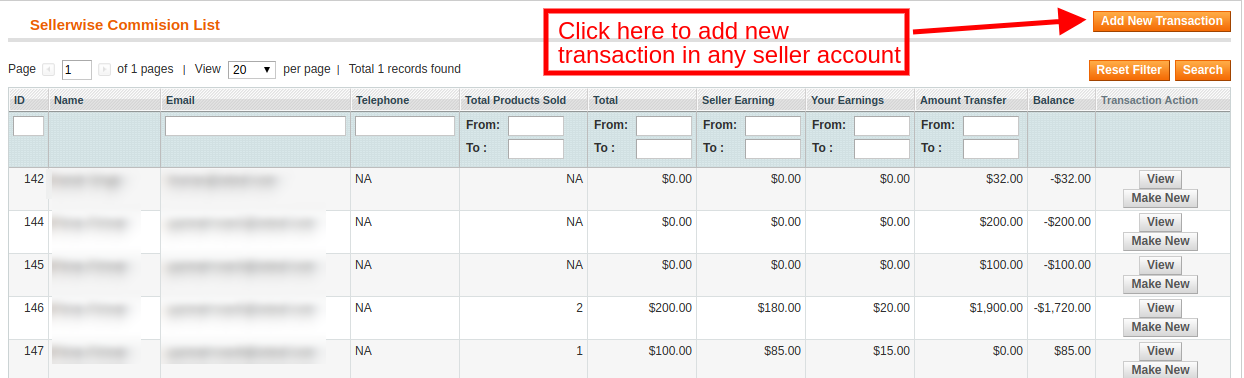
4.11.3 Transactions and Earnings -> Seller wise transaction
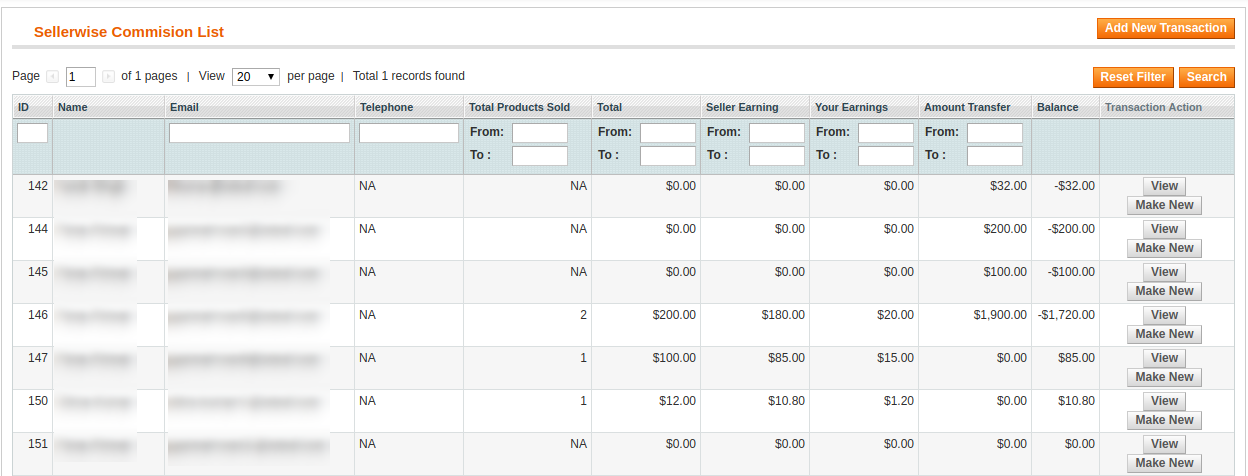
The system does not automatically transfer the amount in the seller’s account. Hence the store owner has to keep records of the balance for all the sellers and manually transfer money to the seller and then enter the details of the transaction to keep a record of the same.
This list contains all the balance variations for all the sellers in the system. The list shows total sales of the seller, seller earning, your commission. This list helps the store owner to identify the earning and categorize them seller wise.
4.11.3.1How to View Transactions Details?
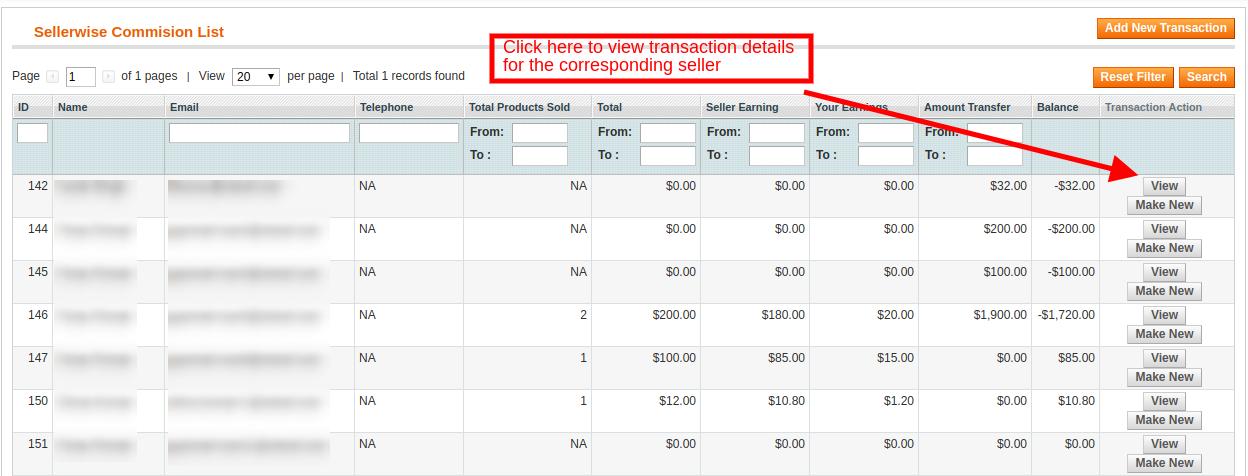
To view the details of the transactions done for a particular seller, you have to click on the View button in front of that seller.
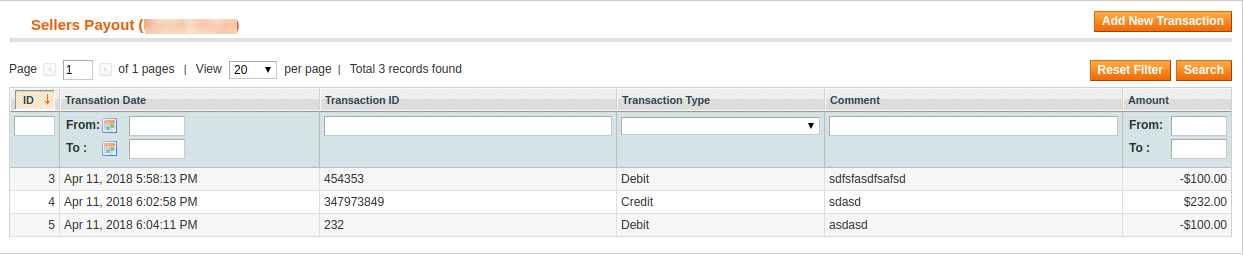
On clicking on the View button in front of any seller a new page will open having a list of all the transactions done for the corresponding seller.
You can also add a new transaction for the current seller by clicking on the Add New Transaction button on the top right portion of the Magento multi-vendor marketplace plugin.
4.11.3.2 How to Add New Transactionin the seller’s payout details?
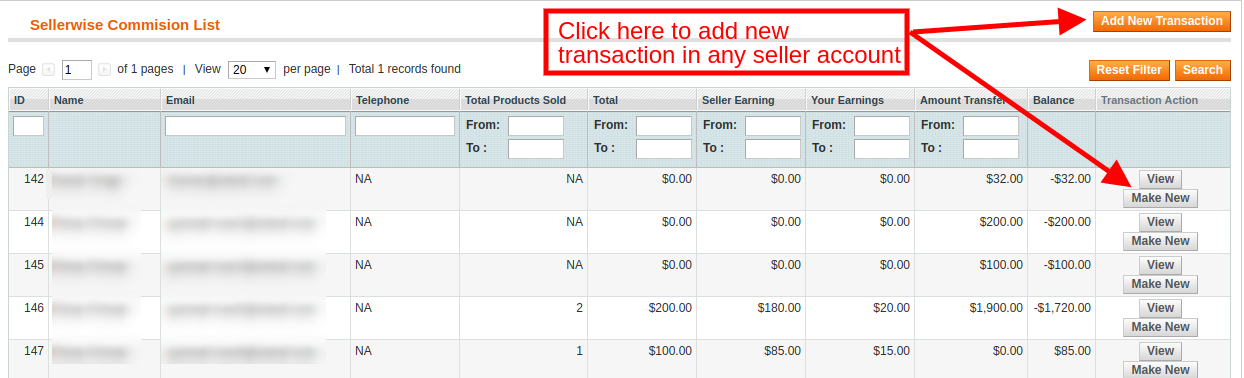
To add a new transaction detail for any seller, you have to either click on the Add New Transaction button corresponding to respective sellers.
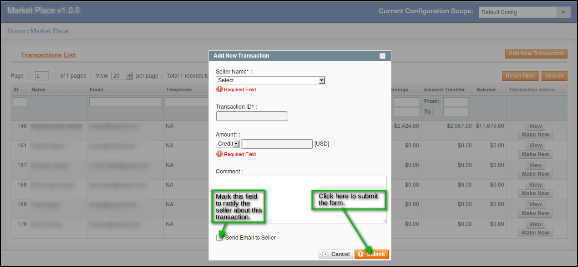
On clicking the button a pop-up appears asking for the details of the transaction. Fill the form and submit the form to complete the action.
The various fields of the pop-up are discussed:
Seller Name: Select the name of the seller from the drop-down list. Transaction ID: Enter the transaction ID here. Amount: Select whether the amount was debited or credited and then enter the amount. Comment: Enter a comment regarding the transaction.
Additionally, the admin can even add a new transaction in the seller’s account by clicking on the Make New button corresponding to each seller account.
Note:- This action cannot be undone. Please use it carefully.
4.11.4 Transactions and Earnings -> Seller Payout
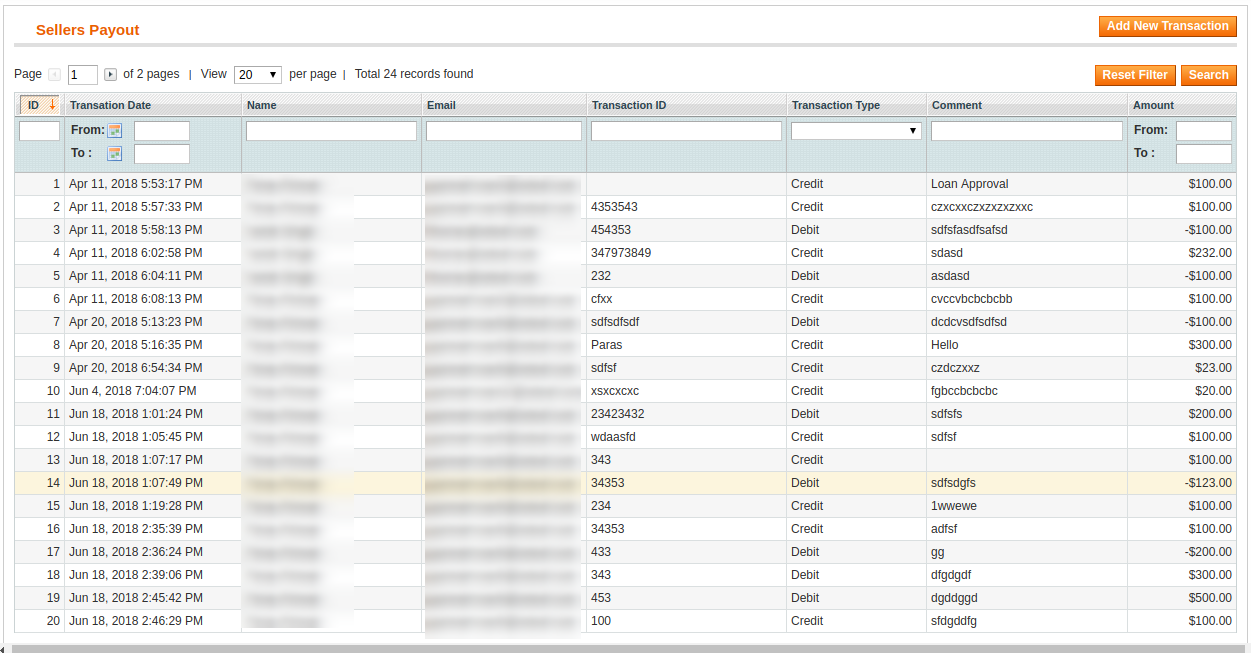
This page contains a list of all the transactions done to date to all the sellers available in the system.
You can also add a new transaction for any seller by clicking in Add New Transaction button on the top right of the above page.
4.11.5 Transactions and Earnings -> Seller Payout Request
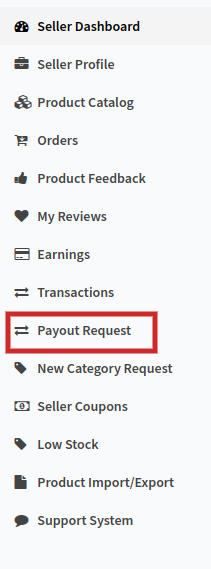
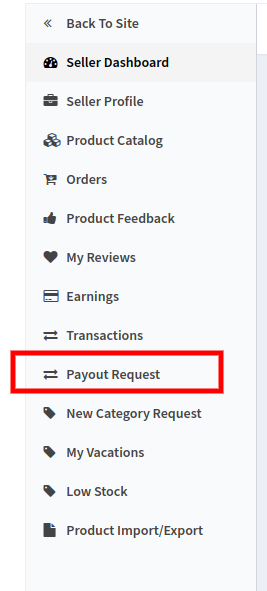
The seller can send a payout request to the store admin from their dashboard. The seller’s request is viewed by the admin from this tab of the Magento Marketplace extension. The Dashboard of the seller includes an option of Payout Request.
On clicking this link, the seller will be redirected on the section of the dashboard as shown in the image below:
4.11.5.1 How can the sellers add a new payout request from their dashboard?
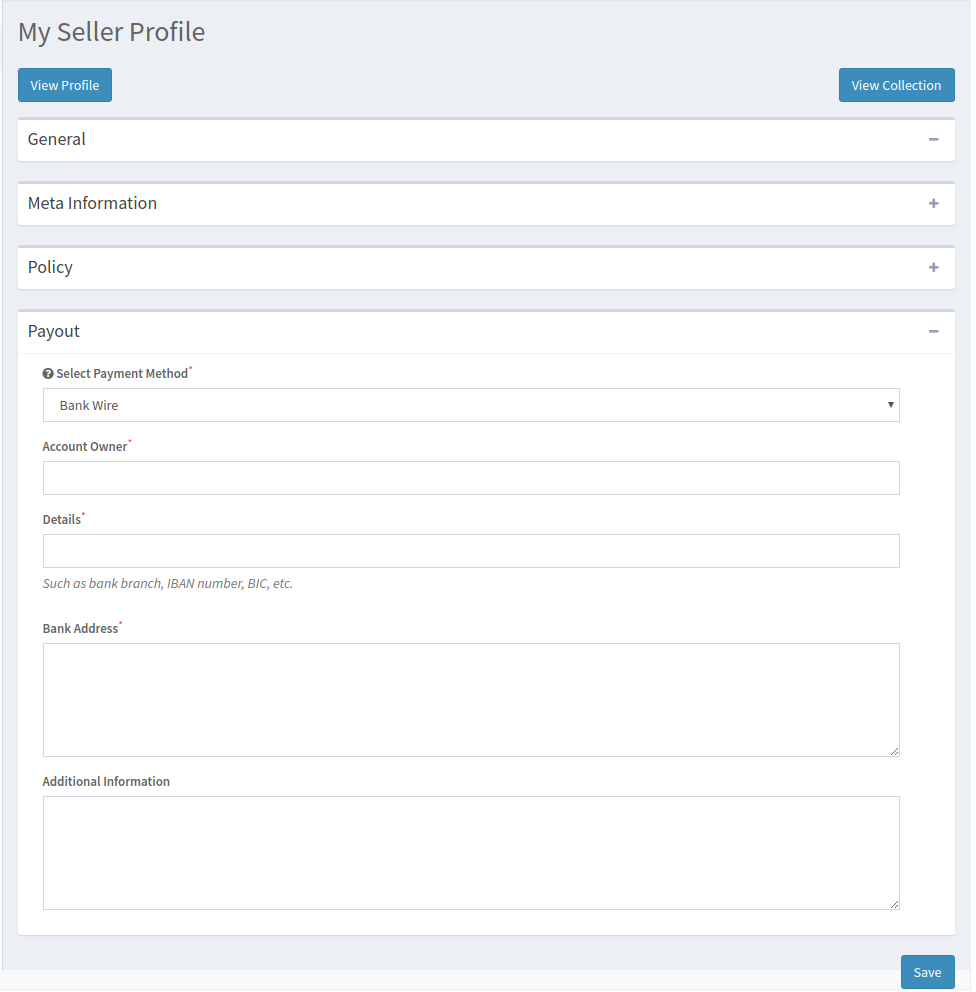
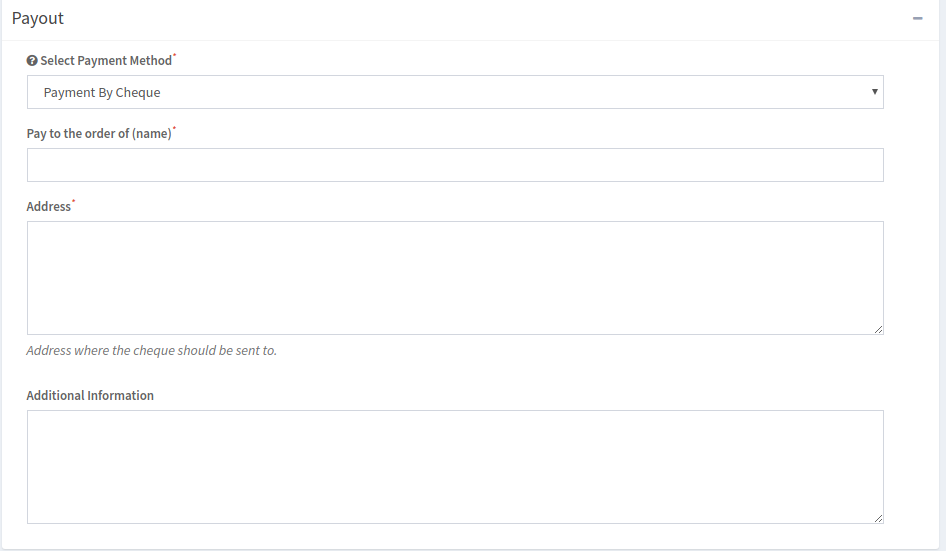
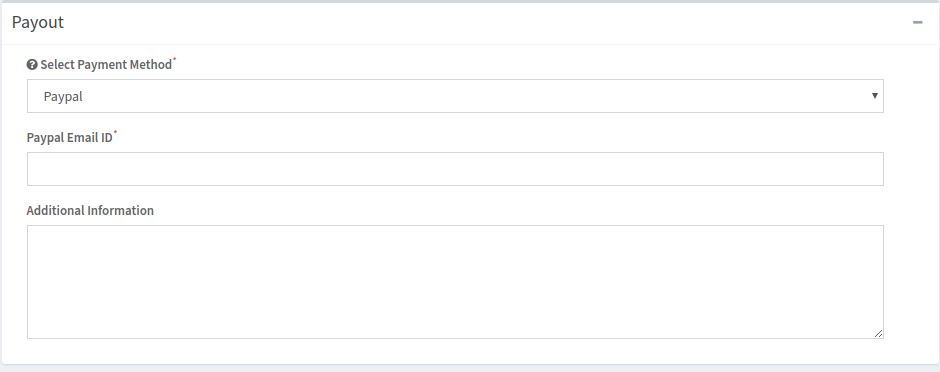
Before the seller can request for the payout, he needs to configure the payout the Profile menu of the Dashboard. The various fields required to be filled in this section are discussed below:
Select Payout Method: The various payout methods in the drop-down menu. Select the method that you want to use for the payout. There are three options available by default:
Bank Wire
Payment By Cheque
PayPal
1. Bank Wire:
On selecting, Bank Wire options, you’ll be required to provide the following information.
Account Owner: Enter the name of the owner of the account in which the amount is to be transferred. Details: This section includes the bank details such as bank branch, IBAN, BIC, etc. Bank Address: Enter the address of the bank. Additional Information: Provide any information that you would like to share with the store admin.
2. Payment By Cheque
Pay to the order of entering the name to which the cheque is to be issued. Address: Provide the address for sending the cheque in this section. Additional Information: Provide any information that you would like to share with the store admin.
3. PayPal
In case you select, PayPal, you will be required to enter your PayPal Email ID. The additional information section allows you to provide any information that you would like to share with the store admin.
Once the payout method is configured in the seller’s profile, the vendor becomes eligible to send the payout requests.
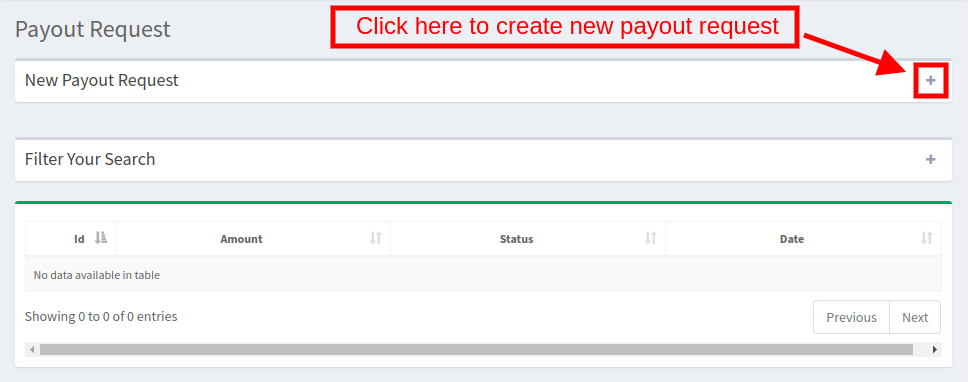
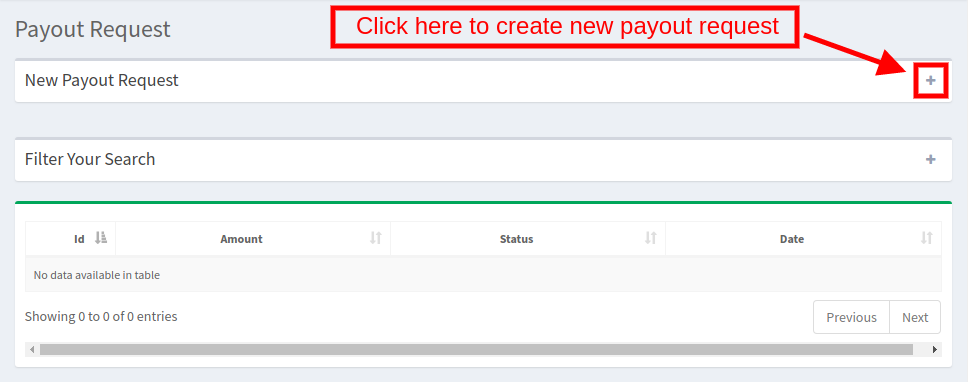
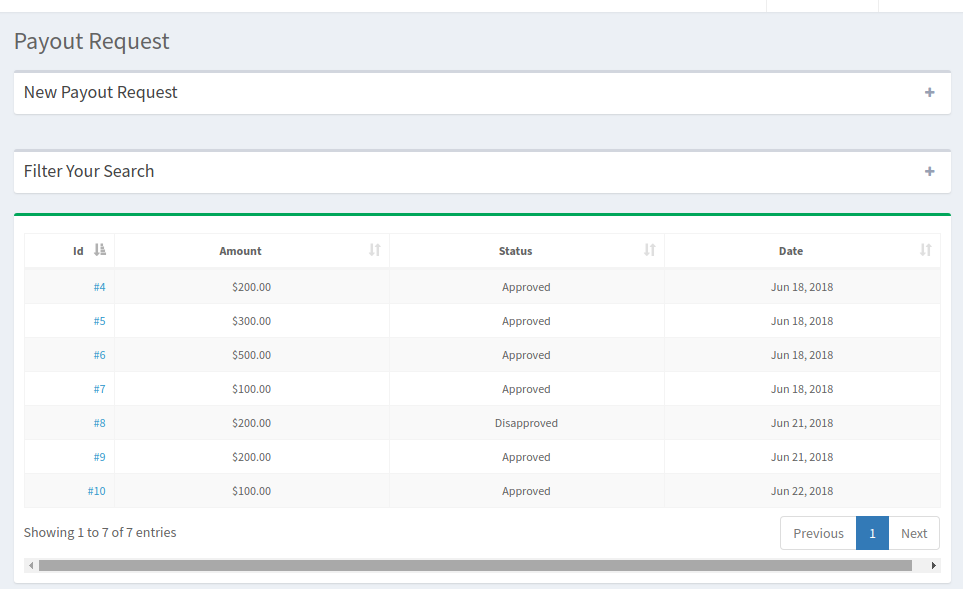
To add new payout request click on the ‘+’ in the New Payout Request section as shown in the image below:
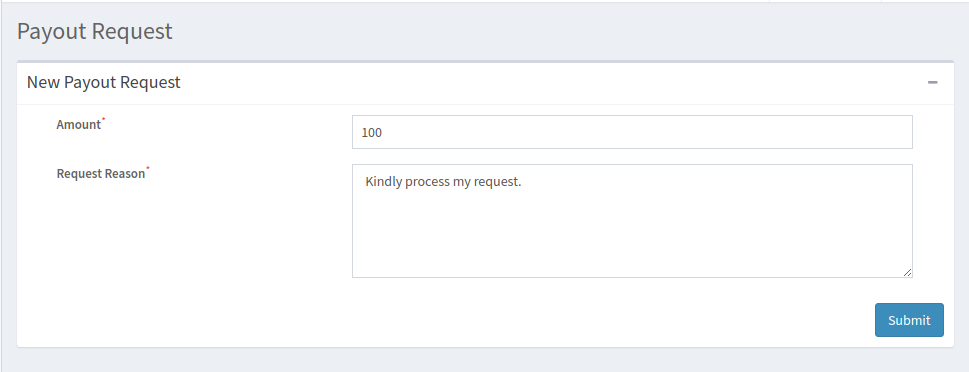
Fill up a small form to send the request.
Amount: Enter the amount of the payout request. Request Reason: Enter the reason for the payout request.
The payout request is, then, send to the admin for approval.
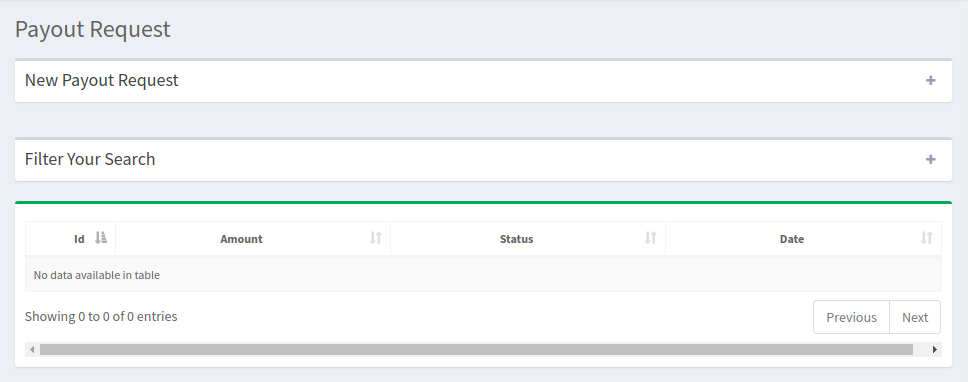
The payout requests that are approved or disapproved or waiting for approval can be viewed in the payout request section as shown below:
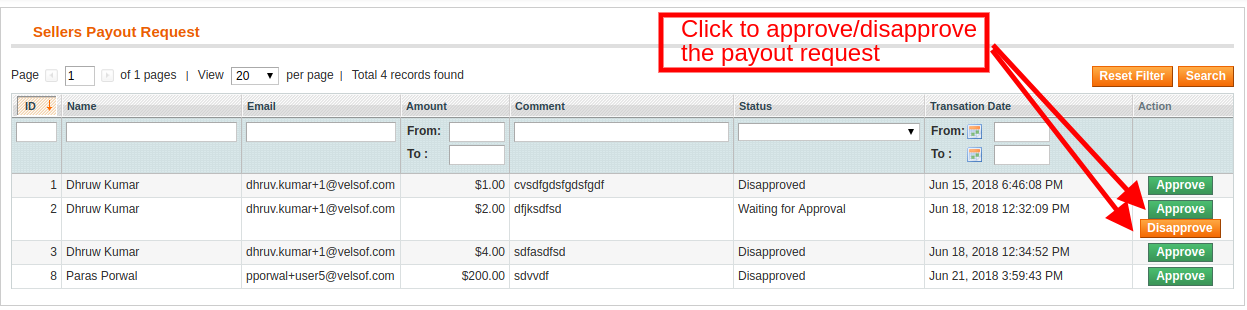
The store admin can view all the payout requests of the sellers of the marketplace in the back-end of the Magento Multi-vendor marketplace extension.
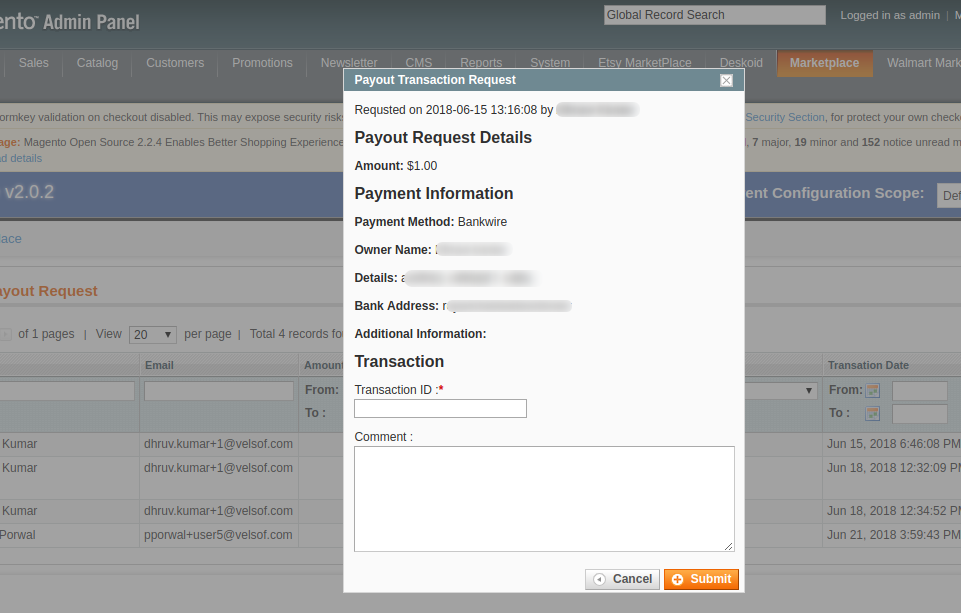
On clicking on the Approve button, a popup will be shown. Enter the transaction ID and comment to approve the request of the seller.
4.11.6 Transactions and Earnings -> PayPal Payout Settings
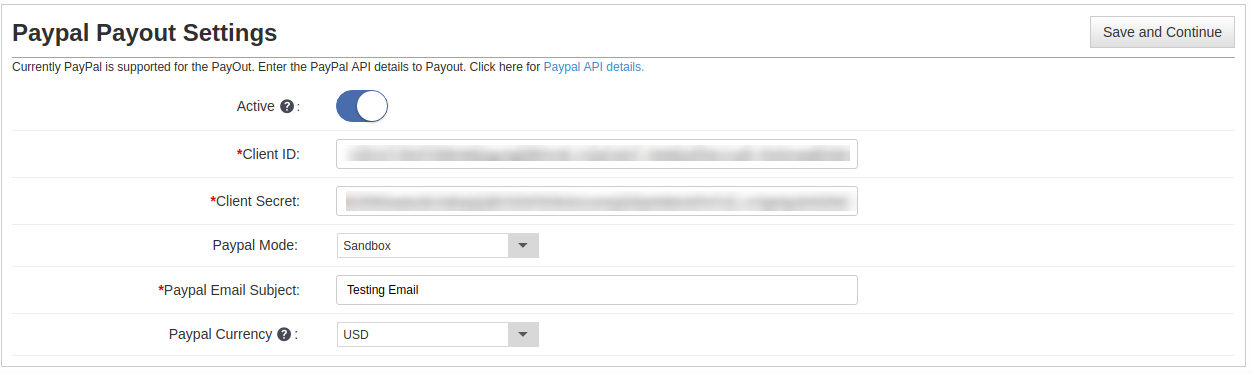
The PayPal Payout Settings of the Magento Multi seller Marketplace extension allows the store admin to enable the PayPal methods for the payout. Enter the required details as discussed below:
Active: Toggle the button to activate the PayPal payment method. Client ID: Enter the Client ID of your PayPal account. Client Secret: Enter the Client Secret of the PayPal account. PayPal Mode: Select the PayPal mode from the drop-down menu. PayPal Email ID: Enter the email ID used in your account. PayPal currency: Select the default currency for the PayPal transaction.
4.12 Email Templates
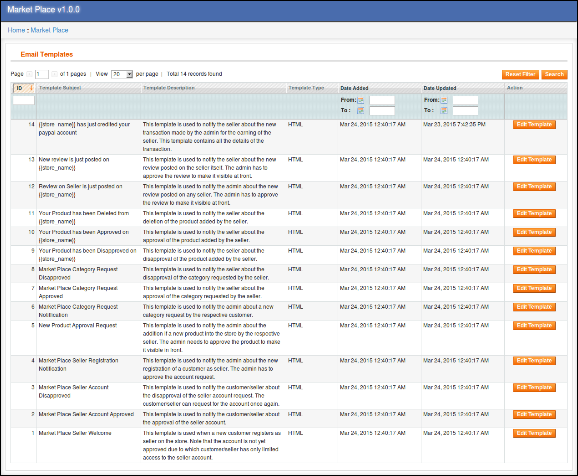
The Email Templates tab of the Magento multi-vendor marketplace module contains a list of all the email templates that are used in the system with all the details of the email templates.
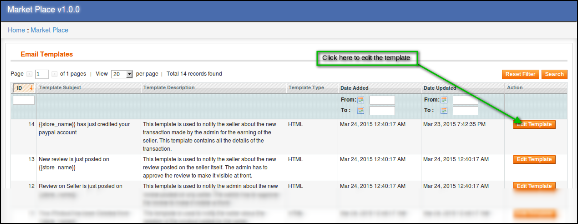
Edit Email Template: To edit an email template click on the Edit Template button in front of any email template.
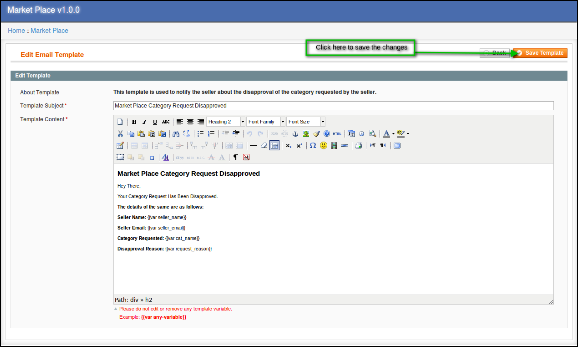
On clicking on the Edit Template button a new page opens having a form for the email template. You can change the email template as desired from the admin interface of the Magento multivendor marketplace.
To save the changes made in the email template click on the Save Template button on the top right of the above page.
Note:- While editing the email template please keep in mind that you don’t edit any text inside the curly brackets (i.e. {{var any_var}}).
4.13. Vacation Mode
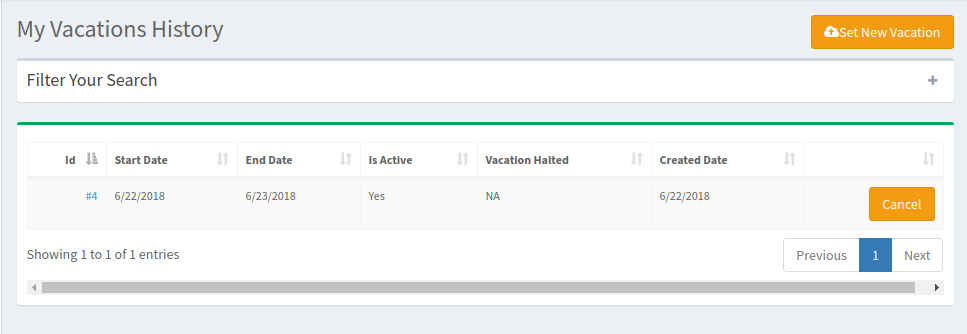
The sellers get an option to disable their shop from the marketplace for a particular period. The request of the sellers to go on vacation mode can be viewed in this section of the Magento Marketplace module.
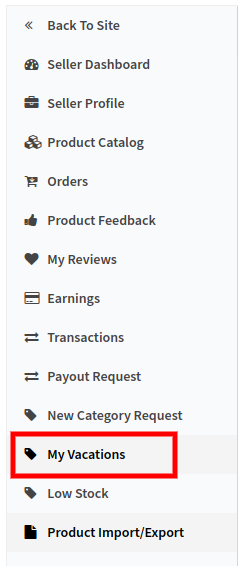
To set the vacation mode, the sellers can go to the Vacation mode tab of their dashboard.
The tab shows the entire vacation history of the seller as shown in the image below:
4.13.1 How to Set the Vacation Mode?
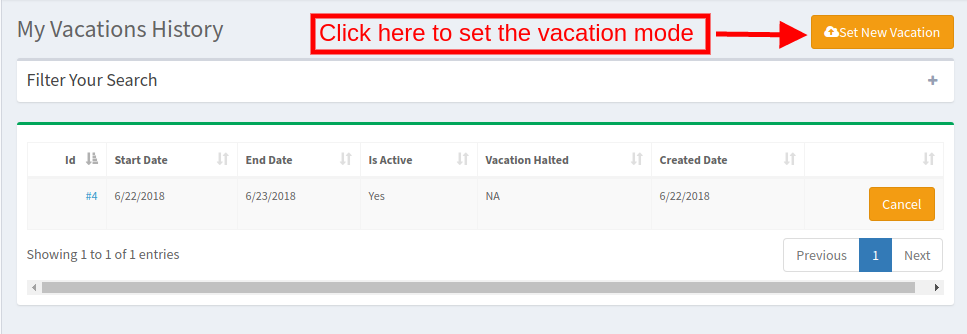
To set the vacation mode, click on the ‘Set New Vacation’ button.
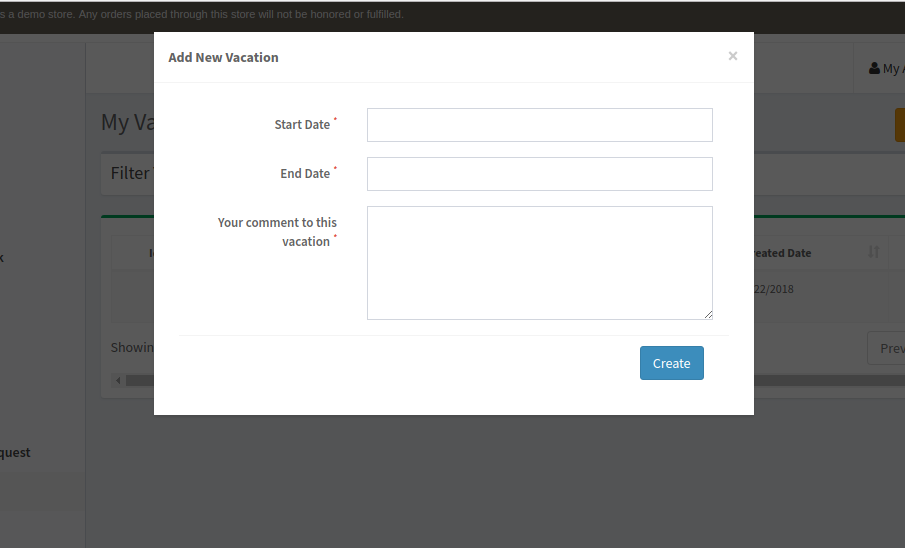
On clicking the button, a popup will appear as shown in the image:
Start and End Date: Enter the start and end date of the vacation. Your comment to this Vacation: Enter a comment for the vacation mode.
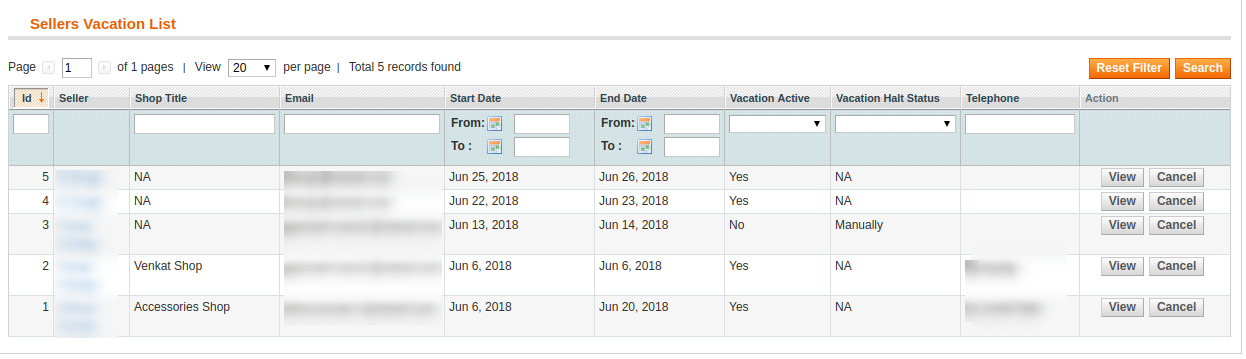
The admin can view the list of the seller who is on vacation in the Vacation tab of the Magento Marketplace plugin.
To see the details of the vacation, click on the View button.
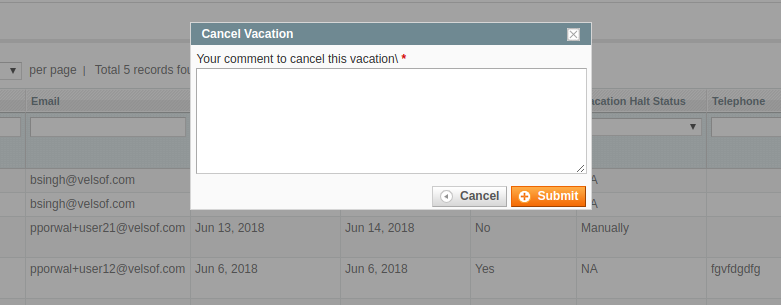
The admin can cancel the request by clicking on the Cancel button.
A popup will be displayed. Enter the reason for canceling the vacation mode and submit.
An email notification is sent to the seller informing them about the cancellation of the vacation.
4.14. Bulk Import/Export
The admin can offer this feature of bulk import and export to the sellers by enabling the same from the back-end.
If enabled the seller can import or export of the products in bulk from their dashboard.
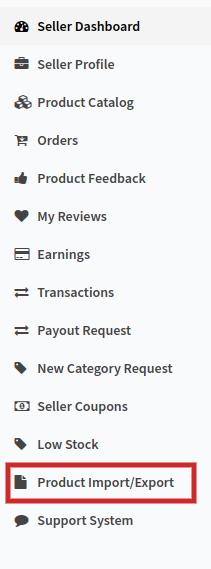
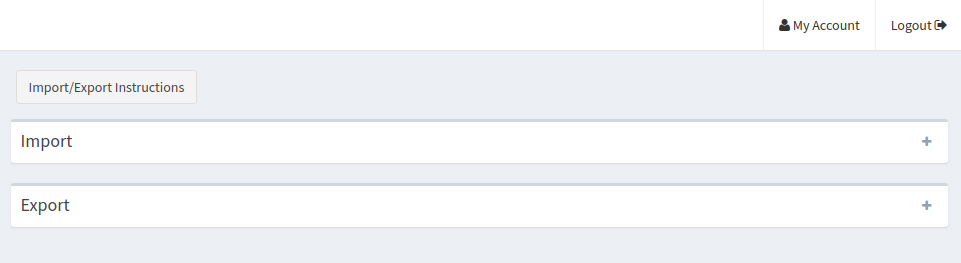
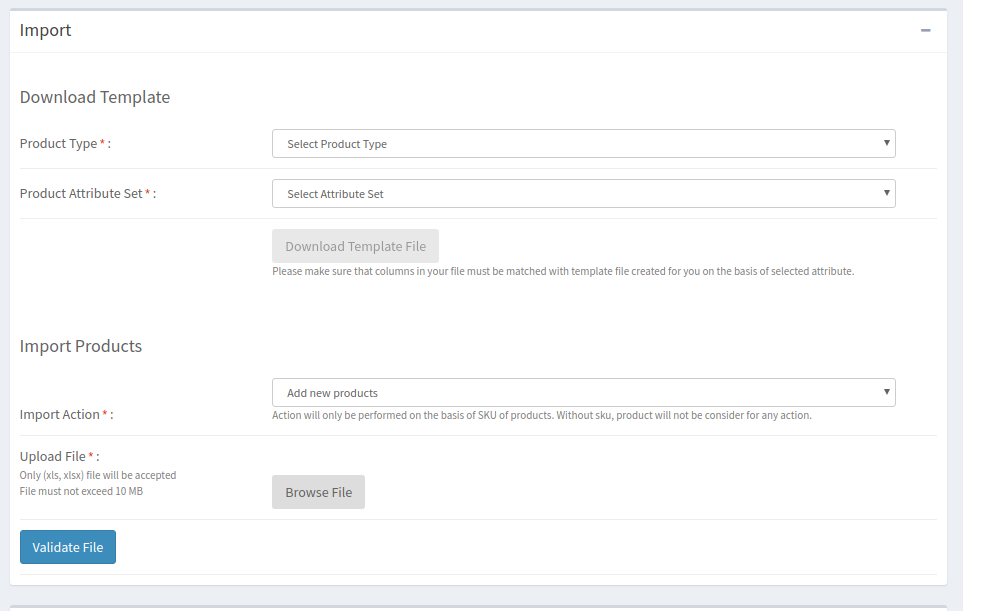
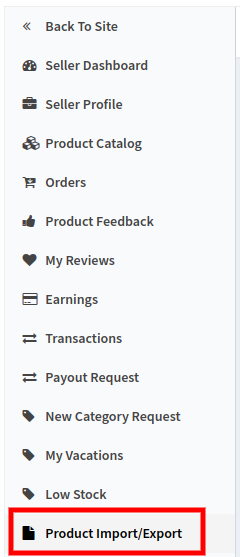
The vendors can import/export the products in bulk from the Product Import/Export tab as shown below:
4.14.1How to Import the products inbulk?
Product Type: Select the type of product that you are uploading. The Magento Multi seller Marketplace Plugin supports all type of products, that is, simple, configurable, virtual and others.
Product Attribute Set: Select the attribute set of the products from the drop-down list.
Download Template File: You can download the template file in an excel sheet for the selected attribute by clicking on this button.
Please make sure that columns in your file must be matched with the template file created for you based on the selected attribute.
Import Action: Select the import action from the drop-down list. Action will only be performed based on the SKU of products. Without SKU, the product will not be considered for any action.
Upload File: Upload the file with the product details here.
Click on the Validate File to complete the import.
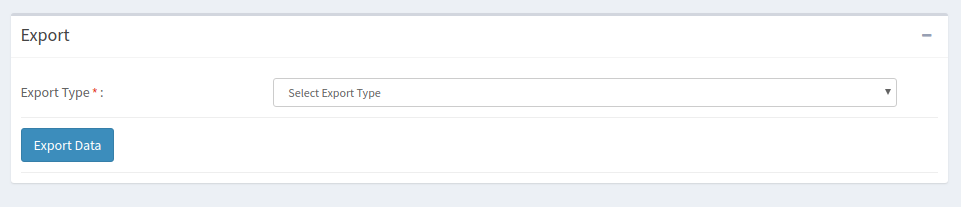
4.14.2 How to Export the Products in Bulk?
The seller can export the product details listed in the marketplace from this section. Select the Export Type from the drop-down menu and click on Export.
The details will be exported in an excel sheet.
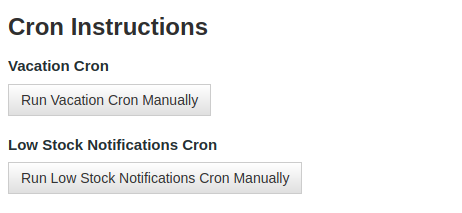
4.15. Cron Instruction
This tab offers two cron options. Execute vacation cron to implement the changes made in the Vacation tab of Magento Multi-vendor Marketplace module in the front-end of the marketplace.
Run Low Stock Notification Cron to send the low stock notifications email to the sellers.
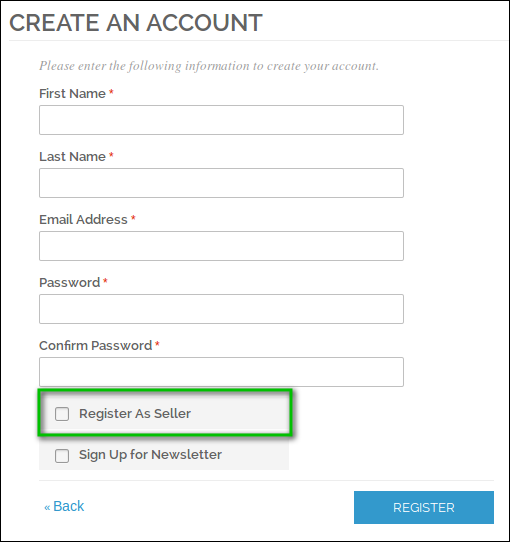
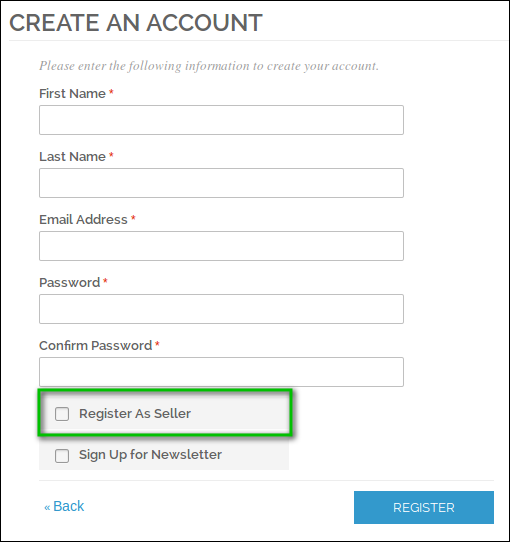
5.0 Register As Seller Field – Register Page
If a new customer is registering in the Magento marketplace store, then, there is an additional field on the Register Page. If the customer wants to Register as Seller than the customer has to mark this field.
Once the account is created, the sellers get access to the dashboard.
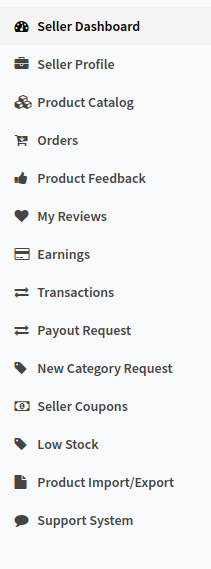
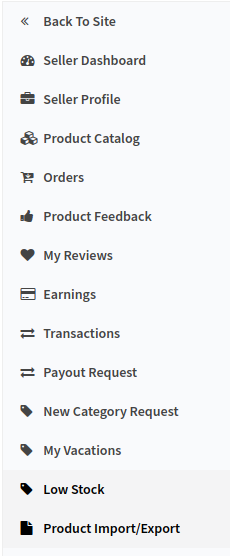
The dashboard of the seller offers several options to the sellers as shown in the image below:
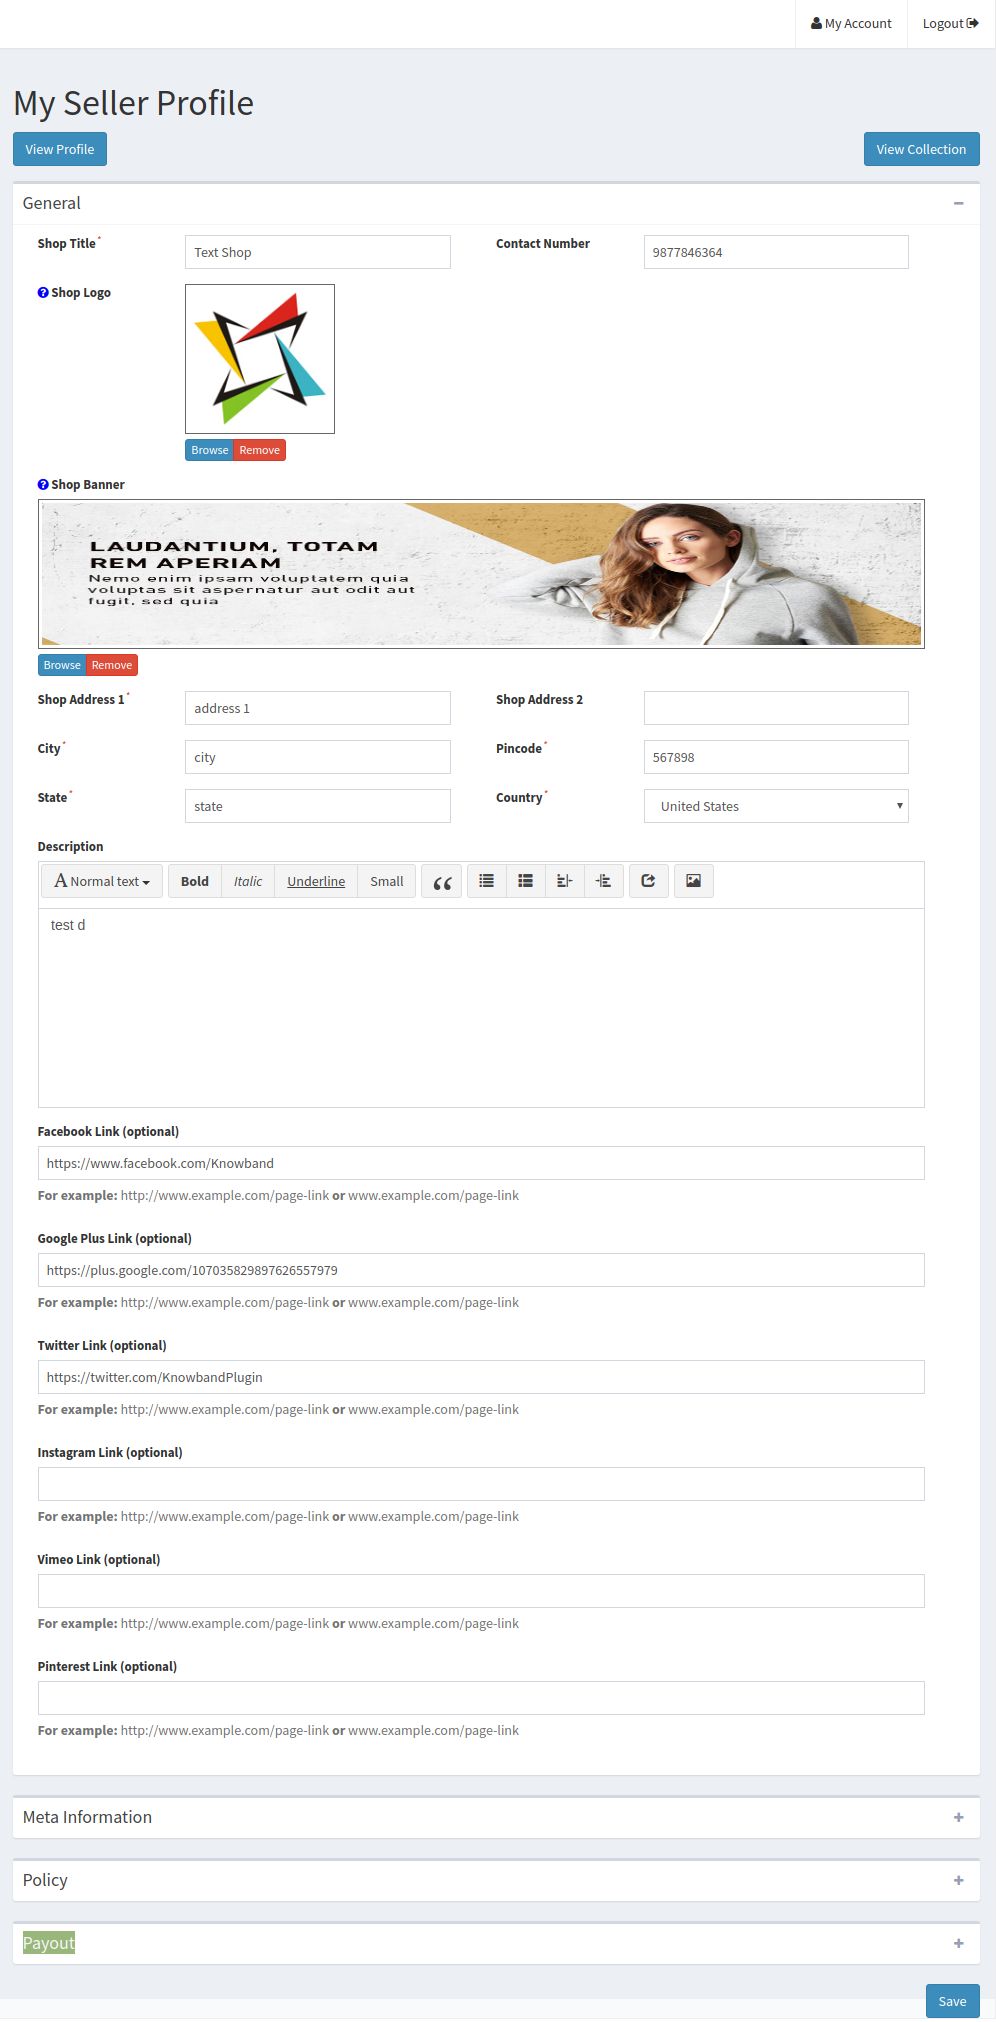
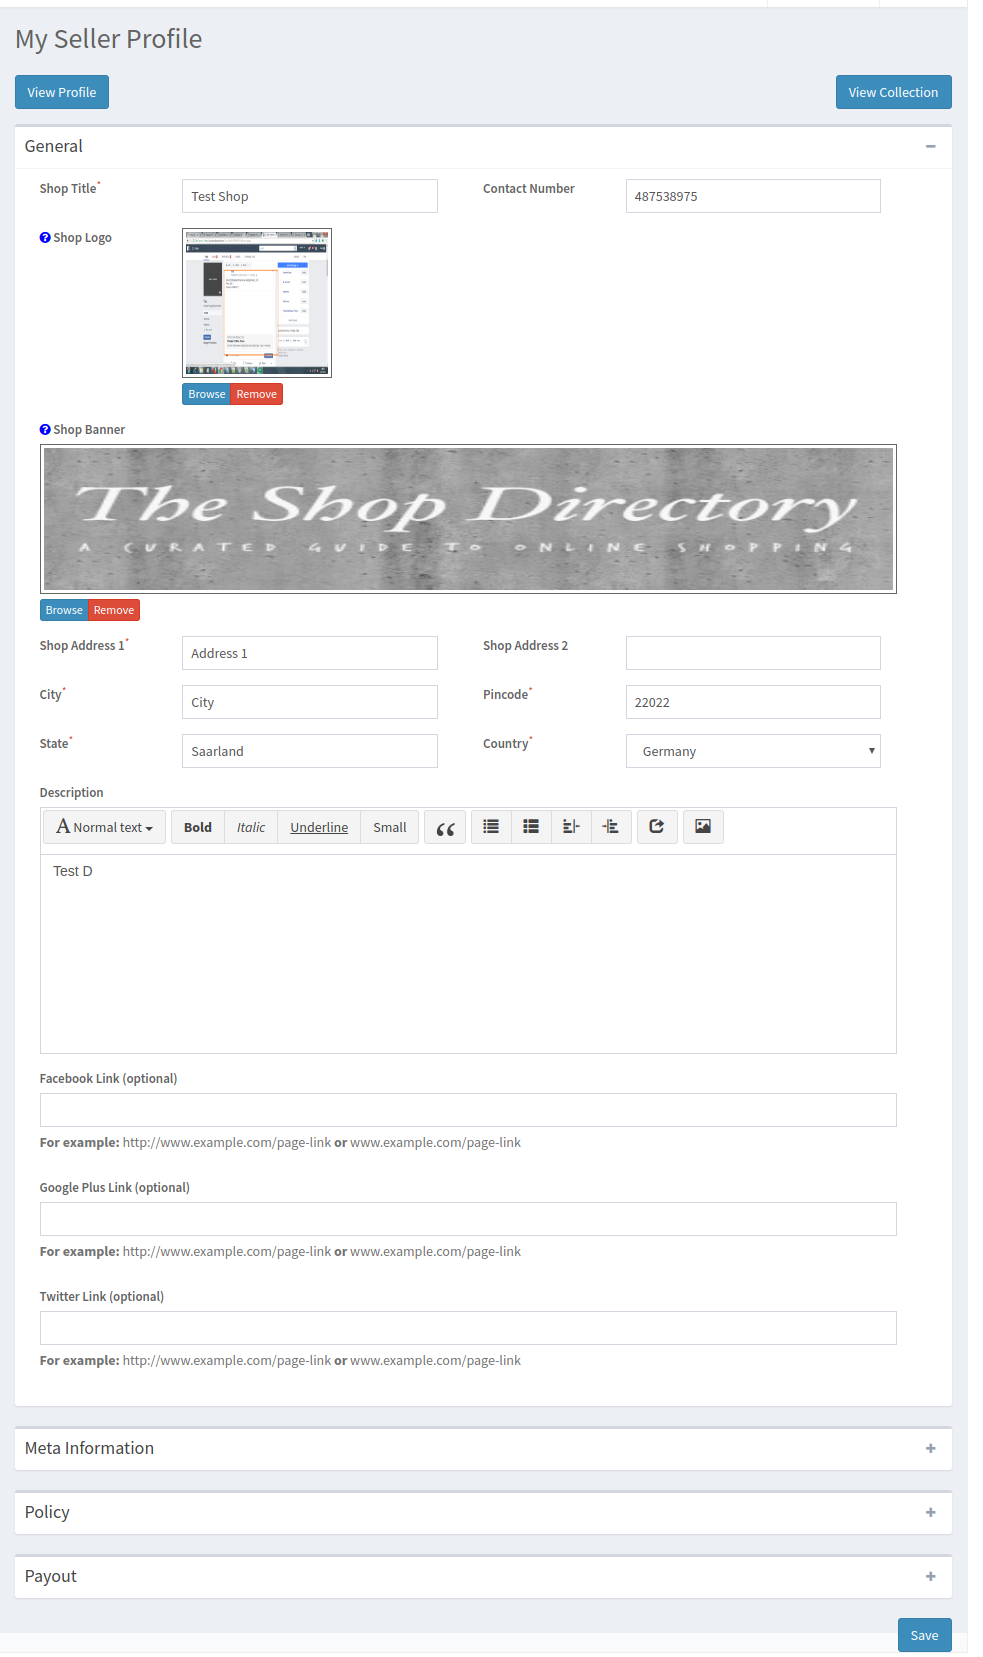
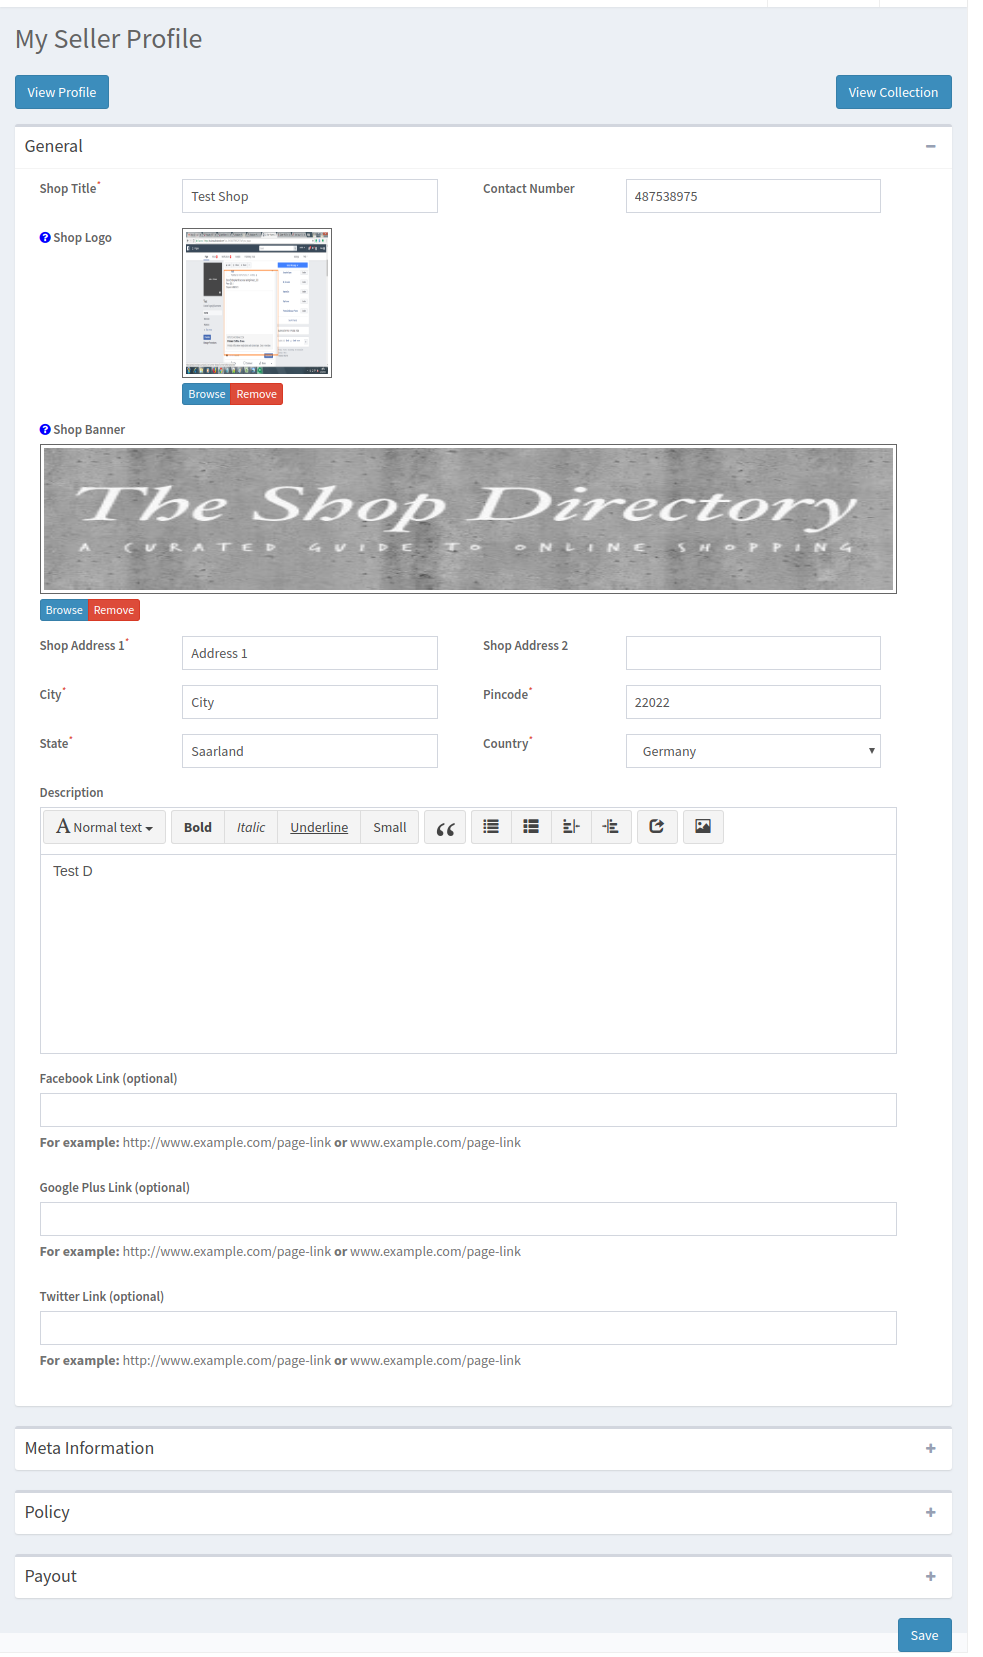
They can configure their profile by clicking on the Seller Profile tab.
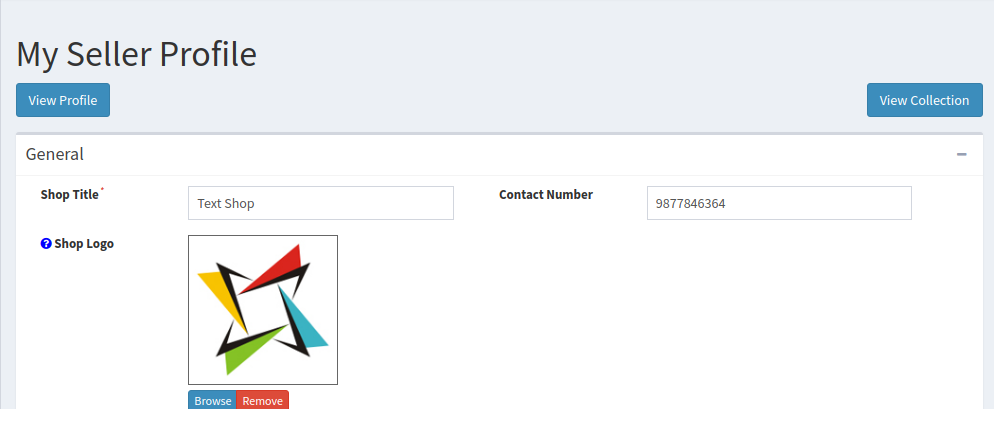
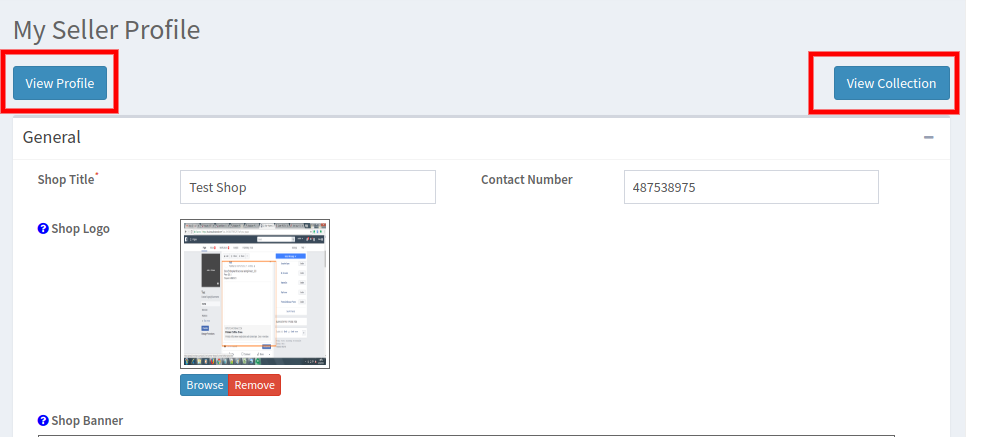
The sellers can view their profile by clicking on the ‘View Profile’ button. Additionally, they can even see their collection by clicking on the ‘View Collection’ Button.
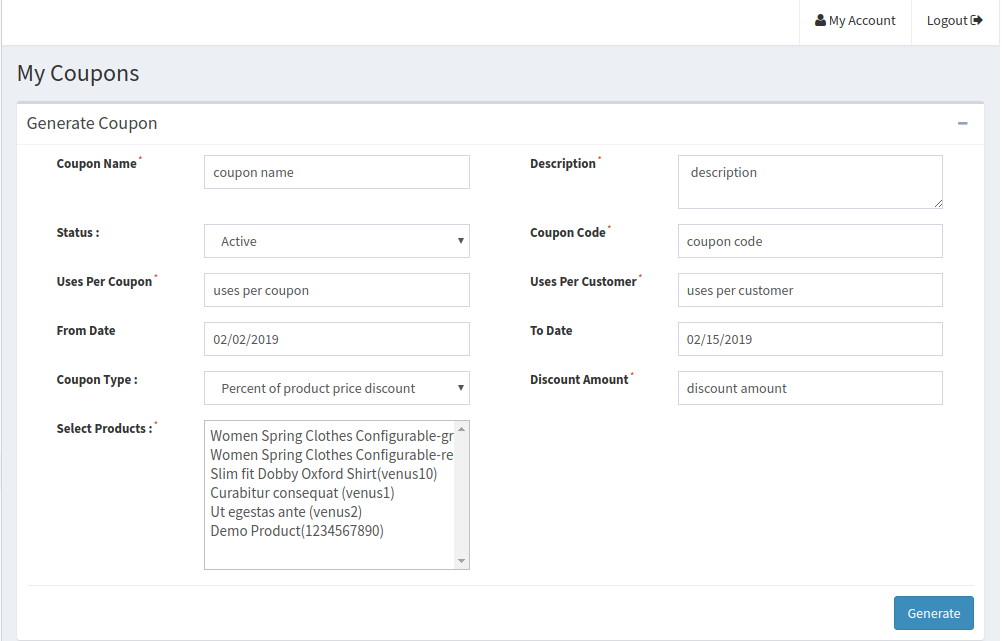
5.1 How sellers can generate a coupon?
Steps to follow to generate a coupon:
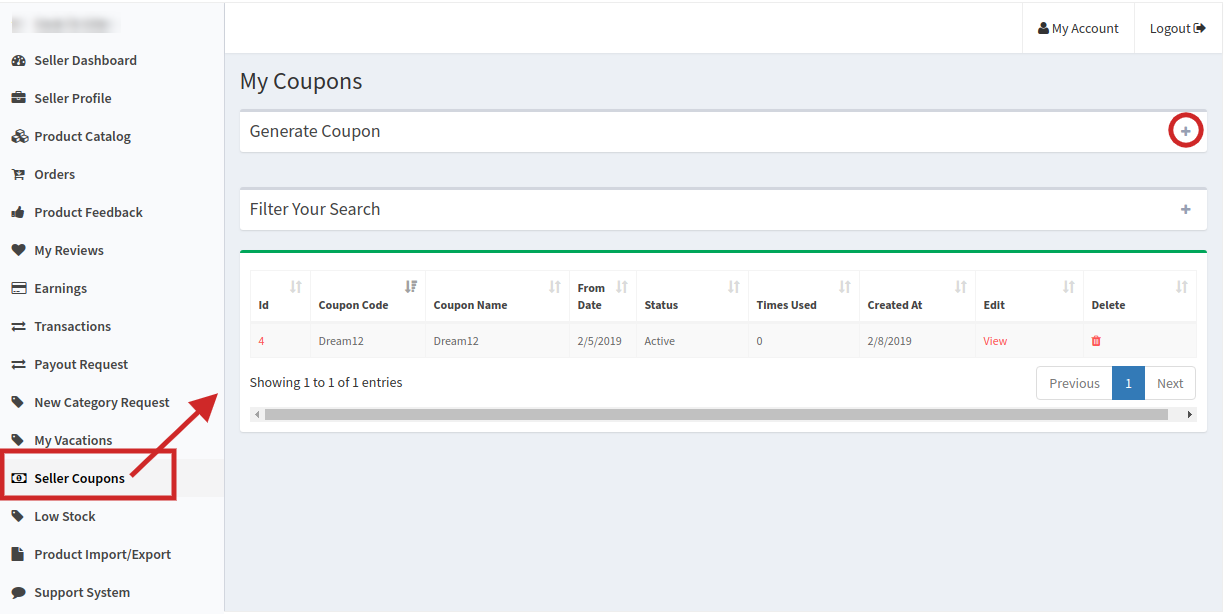
Click on the seller coupon tab available in the seller dashboard.
Click on the “+” icon and fill the following fields in the form and following form will appear in front of you:
Coupon Name: Enter the name of Coupon here.
Description: Fill the Coupon description here.
Status: Select the status of coupon here.
Coupon Code: Set the coupon code here. Customers can use this coupon to avail of the discount.
Uses per Coupon: Set the number of times a coupon can be used.
Uses per Customer: Maximum number of times customers can use the coupon.
From Date to To Date: Set the time for which the coupon will be valid.
Coupon Type: Select the type of coupon here. Coupons can be fixed type and percentage type.
Discount Amount: Enter the amount value of the discount here.
Select Products: Select the products on which the seller wants to offer the discount coupon.
Click on the “Generate” button to generate a coupon.
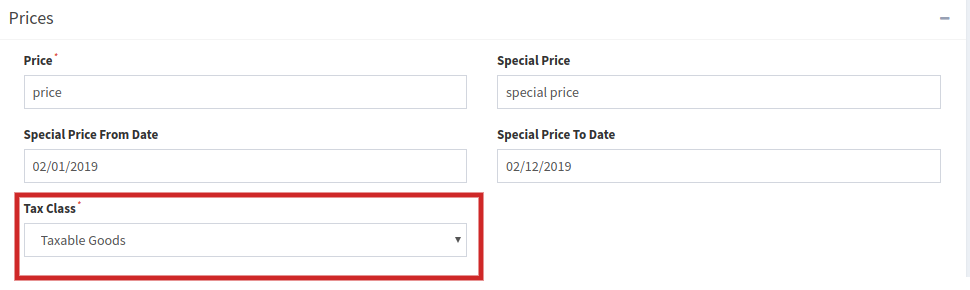
5.2 Tax Class
A tax class is a class assigned to a product by the sellers. Tax class helps in distinguishing between taxable goods and non-taxable goods. In the product Catalog, while filling the product details for a new product, the seller can select the tax class, in price tab of the Product Catalog, that he wants to assign to the items/services.
5.3 Customer Support System
For the seller ticket system, the Marketplace admin needs to enable the seller ticket system feature in the General setting tab in the backend.
Once the feature is enabled at the backend, the customer can directly contact the sellers. Whenever a customer will contact a seller, a ticket will be generated, the seller can view the ticket in the customer support system of the seller dashboard.
5.3.1 How customer can contact a seller?
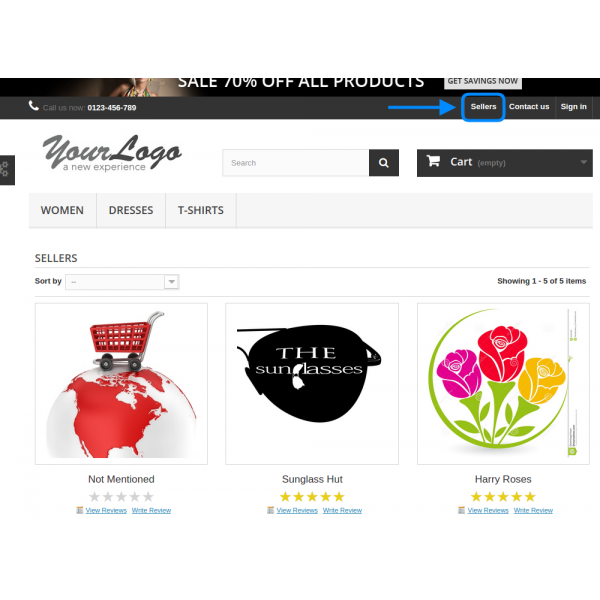
Click on the seller tab at the frontend of the store.
A seller list will appear before you.
Click on the seller will take the customer to the seller profile page.
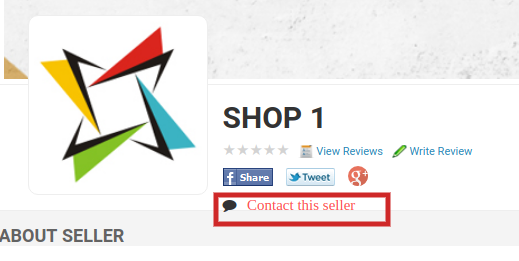
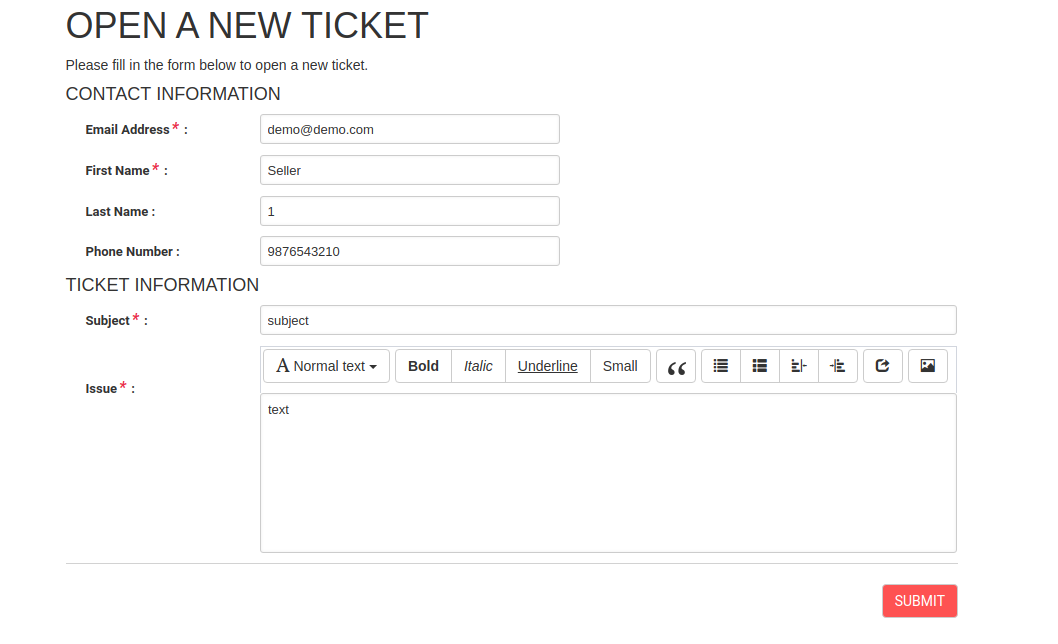
The customer needs to click on the contact the seller link and a form will appear before them.
Once the customer will submit the form, the respective seller will receive a ticket.
Watch how Magento Multi seller Marketplace module works?
For further information, refer to the following links:
Magento Multi-Vendor-Marktplatz-Modul by Knowband ist eine der einfachsten Möglichkeiten, Ihre E-Commerce-Site in einen blühenden Multi-Vendor-Marktplatz zu verwandeln. Ein Multi-Vendor-Marktplatz ist ein Online-Bereich, in dem verschiedene Verkäufer und Anbieter ihre Produkte auflisten, ihre Bestände verwalten und verkaufen. Das Magento Multi-Vendor Marketplace Plugin verwandelt Ihren Onlineshop in einen der voll funktionsfähigen Online-Marktplätze.
1.1-Funktionen, die dem Shop-Administrator von der Magento Multi-Vendor-Marktplatz-Erweiterung angeboten werden:
Der Shop-Administrator kann die Produktkategorien vom Back-End der Magento-Marktplatz-Erweiterung erstellen und verwalten.
Der Admin kann das Profil des Verkäufers mit Hilfe des Magento Marketplace Plugins genehmigen / ablehnen.
Das Magento Marketplace-Modul erleichtert die Festlegung und Verwaltung der den Verkäufern in Rechnung gestellten Provisionen.
Der Administrator kann die Produkte aus dem Backend des Magento Marktplatz-Moduls mit mehreren Anbietern hinzufügen / entfernen.
Der Besitzer des Magento-Geschäfts kann die Transaktion und die Einnahmen beim Klick auf die Schaltfläche verfolgen.
Der Magento Multi-Vendor-Marktplatz ist mit der neuesten Magento-Version kompatibel und unterstützt alle Themen.
Der Administrator kann Produkt- und Verkäuferbewertungen genehmigen / ablehnen.
1.2 Features, die dem Verkäufer von Magento Multi vendor Marktplatz Erweiterung angeboten werden:
Der Magento Multi-Vendor-Marktplatz ermöglicht es den Verkäufern / Verkäufern, sich im Online-Marktplatz zu registrieren.
Die Verkäufer können die Kategorien und Produkte leicht mit dem Marktplatz abbilden.
Darüber hinaus können die Verkäufer die Aufnahme einer neuen Kategorie beantragen. Der Marketplace-Administrator kann die Kategorie mit Hilfe des Magento Multi-Vendor Marketplace-Plugins genehmigen / ablehnen.
Das Dashboard des Verkäufers erleichtert es ihnen, ihre Produkte, ihr Profil und ihren Verkauf zu verfolgen und zu verwalten.
Magento Multi-Vendor-Marktplatz ermöglicht es den Verkäufern, Verkaufsbanner, Shop-Logo und benutzerdefinierten HTML-Inhalt hinzuzufügen. Diese Banner werden auf der Verkäuferseite mit einer separaten Produktsammlung angezeigt.
1.3 Kundenvorteile des Magento Multivendor Marktplatzes:
Die Magento-Multi-Vendor-Marktplatz-Erweiterung ermöglicht es mehreren Verkäufern / Verkäufern, ihr Produkt auf derselben Plattform zu verkaufen. So können die Kunden aus einem breiten Sortiment das perfekte Produkt auswählen.
Magento Marketplace Extension ermöglicht es den Kunden, die Produkte zu wettbewerbsfähigen Preisen zu kaufen.
Die Kunden können eine Produktbewertung senden. Diese Bewertungen können vom Backend des Magento Marketplace Plugins genehmigt / abgelehnt werden.
Die Online-Käufer können die Verkäufer überprüfen. Die Verkäuferbewertungen können über das Backend des Magento Multi Vendor Marketplace Moduls verwaltet werden.
Das Magento Multi Seller Marketplace Modul bietet sogar eine Option, mit deren Hilfe die Käufer zum Verkäufer werden können.
2.0 Schritte zur Installation von Magento Multi Vendor Marketplace
Laden Sie das Erweiterungspaket Magento Multi vendor Marketplace herunter.
Entpacken Sie das Paket in Ihrem Stammordner von Magento Setup per FTP-Manager (wie Filezilla oder WinSCP – hier herunterladen: https://filezilla-project.org/).
Im Admin-Panel sehen Sie neben dem System-Menü einen neuen Menü-Marktplatz. Falls Sie den Link unter System nicht sehen können, löschen Sie zuerst Magento Cache und überprüfen Sie dann erneut.
Mit diesem Magento
3.0 Admin Panel
Im Admin-Panel der Magento Multi-Seller-Marktplatz-Erweiterung wird neben dem Systemmenü ein separates Menü (MarketPlace genannt) hinzugefügt und der Seite zum Erstellen / Bearbeiten eines Kunden ein neues Tab hinzugefügt.
3.1 Registrierung als Verkäufer Option (Neue Kundenseite hinzufügen)
Wenn der Administrator einen neuen Kunden auf der Administratorseite erstellt, wird auf dieser Seite eine neue Registerkarte angezeigt, in der Sie nach dem Feld "Als Verkäufer registrieren" gefragt werden.
Der Pfad zur Kundenseite:
Gehen Sie zu Kunden -> Kunden verwalten und klicken Sie auf Neuen Kunden hinzufügen auf der rechten Seite der Seite.
Der Administrator kann das Feld auf Ja setzen, um den Kunden als Verkäufer zu registrieren. Standardmäßig ist das Feld auf Nein eingestellt.
3.2 Verkäufereinstellungen verwalten (Kundenbearbeitungsseite)
Wenn ein Kunde bearbeitet wird, wenn der Kunde auch ein Verkäufer ist, erscheint ein neuer Tab ("Verkäuferkonto verwalten"), der die Verkäufereinstellungen für den aktuellen Kunden, der auch Verkäufer ist, ändert.
Pfad zur obigen Seite:
Gehen Sie zu Kunden -> Kunden verwalten und klicken Sie auf einen Kunden, der auch ein Verkäufer ist.
Die Einstellungen werden gespeichert, wenn der Administrator das Bearbeitungsformular für den Kunden sendet.
Wenn diese Seite zum ersten Mal geladen wird, werden die Felder mit den Standardeinstellungen gefüllt, die für die Erweiterung vordefiniert sind.
4.0-Marktplatzmenü
Die Magento-Marktplatz-Erweiterung besteht aus vollständigen 15-Untermenüoptionen, die auf mehrere Seiten für die Magento Multi-Vendor Marketplace Extension umleiten.
Einige der Menüoptionen des Magento Multi Vendor Marketplace-Moduls verfügen über weitere Untermenüs, um zu einigen verwandten Seiten zu navigieren.
Alle 15-Konfigurationsoptionen, die vom Magento Multi Vendor Marketplace-Plugin angeboten werden, werden nachfolgend im Detail beschrieben:
4.1 Allgemeine Einstellungen
Die Registerkarte Allgemeine Einstellungen des Magento Multivendor Marketplace-Moduls
Diese Seite enthält alle Einstellungen, die das Magento Marketplace-Plugin steuern
Die Seite Allgemeine Einstellungen des Magento Multi Vendor Marketplace Plugins besteht aus folgenden Feldern:
1. Marktplatz aktivieren: Aktiviert oder deaktiviert die Magento Multivendor Marketplace-Erweiterung im Geschäft. Wenn diese Option deaktiviert ist, ist keine Seite oder Funktion der Erweiterung auf der Vorderseite des Geschäfts verfügbar.
2. Standardauftrag: Legt den Standardprovisionsprozentsatz fest, der vom Geschäftsinhaber vom Gesamtverkaufswert des Verkäufers abgezogen wird.
3. Kategorien erlaubt: Die Kategorien, die den Verkäufern erlaubt sind, Produkte hinzuzufügen. Wenn keine Kategorie ausgewählt ist, dann alle
4. Als Verkäufer registrieren Aktiviert oder deaktiviert das Feld "Als Verkäufer registrieren" auf der Seite "Konto erstellen" des Geschäftsbereichs.
5. Massenimport / -export aktivieren: Aktivieren Sie die Schaltfläche, damit Drittanbieter die Bulk-Import / Export-Funktion verwenden können.
6. E-Mail an den Verkäufer auf Bestellplatz: Aktivieren Sie dieses Feld, um eine E-Mail an den Verkäufer zu senden, falls eine Bestellung für die Produkte des Verkäufers erfolgt.
7. JQuery einschließen: Deaktivieren Sie dieses Feld, falls JQuery bereits auf der Vorderseite von einem anderen Plugin oder Ihrem Theme enthalten ist.
8. PProduktzulassung erforderlich: Aktivieren Sie dieses Feld, wenn die Genehmigung für das von einem Verkäufer hinzugefügte Produkt erforderlich ist, bevor es in Ihr Geschäft gelangt.
9. Verkäuferbewertung aktivieren: Aktivieren Sie dieses Feld, wenn Sie möchten, dass die Kunden den Verkäufer überprüfen können.
10. Verkäuferliste aktivieren: Aktivieren Sie dieses Feld für den Fall, dass Sie einen Link in der Fußzeile des Store Front auf der Verkäuferseite anzeigen möchten. Wenn diese Einstellung deaktiviert ist, kann die Verkäuferlistenseite trotzdem nicht aufgerufen werden.
11. Urlaubsmodus aktivieren: Aktivieren Sie diese Schaltfläche, damit die Verkäufer den Urlaubsmodus für ihren Shop für einen bestimmten Zeitraum festlegen können.
12. Verkäufer Info Produktseite anzeigen: Aktivieren Sie die Schaltfläche, um die Informationen des Verkäufers auf der Produktseite anzuzeigen. 13. Neues Produktlimit:?Enter the maximum numbers of products that a new seller can add before the seller account is approved.
14. Verkäufer Überprüfung Genehmigung erforderlich:Aktivieren Sie dieses Feld, wenn Sie möchten, dass die Verkäuferbewertung genehmigt wird, bevor sie im Geschäft sichtbar wird.
15. Suchfeld aktivieren: Aktivieren Sie dieses Feld, wenn Sie ein Suchfeld auf der Verkäuferseite suchen möchten, um die Verkäufer zu suchen.
Niedrigbestandskonfiguration
1. Niedrigbestandsmitteilung aktivieren: Aktivieren Sie die Schaltfläche, um die Verkäufer über die Benachrichtigung über niedrige Bestände zu informieren. 2. Niedrige Inventargrenze: Geben Sie den Lagerbestand ein, unter dem der Verkäufer bei niedrigem Lagerbestand benachrichtigt wird. 3. Wann zu benachrichtigen: Wählen Sie, wann Sie die Benachrichtigung senden möchten. Es kann gesendet werden, wenn die Bestellung aufgegeben wird oder nachdem cron ausgeführt wurde. 4. Benachrichtigung senden Von: Wählen Sie die E-Mail-ID aus, von der Sie die Benachrichtigung senden möchten. Sobald diese Funktionalität vom Backend des Magento Marketplace-Moduls aus aktiviert wurde, können die Anbieter die Niedrigbestandseinstellung über den Bereich Niedrigbestand ihres Dashboards konfigurieren.
Niedrige Inventargrenze: Die Verkäufer können das Inventarlimit eingeben, unter dem sie benachrichtigt werden möchten. Erhalten Sie Benachrichtigung über niedrige Bestände: Wählen Sie aus, ob Sie die Benachrichtigung über niedrige Bestände erhalten möchten oder nicht.
4.2 Verkäuferliste
Diese Seite der Magento-Marktplatz-Erweiterung enthält eine Liste aller Verkäufer, die vom Ladenbesitzer genehmigt wurden.
Die obige Liste enthält eine Liste aller Verkäufer, die genehmigt wurden. Es gibt Schaltflächen, um zu den Produkten und Bestellungen des Verkäufers vor jedem Verkäufer zu gehen.
Wenn Sie auf die Schaltfläche "Bestellungen" klicken, wird eine neue Seite geöffnet, in der die Liste aller Bestellungen für diesen bestimmten Verkäufer angezeigt wird.
Wenn Sie auf die Schaltfläche Produkte klicken, wird eine neue Seite geöffnet, in der die Liste aller Produkte für diesen bestimmten Verkäufer angezeigt wird.
Dies ist auch eine Funktion zum Aktivieren oder Deaktivieren von Verkäufern mit der Funktion Massenaktionen des Gitters. Um einen Verkäufer zu aktivieren / deaktivieren, wählen Sie den / die Verkäufer, wählen Sie die Aktion (zB Aktivieren oder Deaktivieren) und klicken Sie dann auf Senden, um die Aktion abzuschließen.
Wenn ein Verkäufer deaktiviert ist, sind alle Produkte dieses Verkäufers ebenfalls deaktiviert und nicht im Ladengeschäft sichtbar.
4.3 Verkäufer Produkte
Diese Seite der Magento Multi Vendor Marketplace Extension besteht aus allen zugelassenen Produkten, die der Verkäufer dem Laden hinzugefügt hat.
Wenn die Einstellungen (z. B. Produktzulassung erforderlich) deaktiviert sind,
Produkt löschen: Um ein Produkt zu löschen, müssen Sie auf die Löschen-Schaltfläche vor dem Produkt klicken.
Es erscheint ein Popup-Fenster, in dem Sie nach dem Grund für die Löschung des Produkts gefragt werden. Um die Aktion abzuschließen, füllen Sie den Grund und klicken Sie auf Senden.
Eine E-Mail wird an den Verkäufer gesendet, um die Löschung des Produkts zu melden. Die E-Mail enthält auch den Grund, den Sie für die Löschung des Produkts angegeben haben.
Hinweis: – Die Löschaktion für das Produkt kann nicht rückgängig gemacht werden. Bitte verwenden Sie diese Funktion sorgfältig.
Produkt aktivieren / deaktivieren: Um den Status eines Produkts zu ändern, müssen Sie die Massenaktionsfunktion des Rasters verwenden. Um ein Produkt zu aktivieren / deaktivieren, wählen Sie die Produkte aus, wählen Sie die Aktion (z. B. Aktivieren oder Deaktivieren) und klicken Sie dann auf Senden, um die Aktion abzuschließen.
Hinweis: – Sobald ein Produkt vom Backend des Magento Multi Vendor Marketplace Plugins deaktiviert wurde, ist es nicht mehr auf der Vorderseite sichtbar. Vermeiden Sie die Deaktivierung von Produkten, deaktivieren Sie ein Produkt nur, wenn es sehr notwendig ist.
4.4 Produktbewertungen
Diese Seite der Magento-Multi-Seller-Marktplatz-Erweiterung enthält eine Liste aller Bewertungen, die von Kunden zu den Produkten des Verkäufers gemacht wurden.
Bewertungen ansehen: Die meisten Details der Produktrezension sind bereits im Raster aufgeführt, einige jedoch nicht. Um alle Details einer Produktübersicht anzuzeigen, klicken Sie auf die Schaltfläche Ansicht vor dieser Überprüfung. Ein Pop-up-Fenster erscheint im Backend des Magento Multi Vendor Marketplace Plugins mit allen Details zur Produktbewertung.
Um die Bewertung zu bearbeiten, klicken Sie im Pop-up-Fenster auf Bearbeiten-Schaltfläche, um zur Bearbeitungsseite zu gelangen.
Produktbewertung löschen:Die Magento Multi Vendor Marketplace Extension ermöglicht es dem Store-Administrator, die Produktbewertungen zu löschen. Um eine Produktbewertung zu löschen, klicken Sie auf die Löschen-Schaltfläche vor der Produktbewertung in der Liste.
Es erscheint ein Popup-Fenster, in dem Sie nach dem Grund für die Löschung der Produktbewertung gefragt werden. Um die Aktion abzuschließen, füllen Sie den Grund und klicken Sie auf Senden.
Hinweis :- Die Aktion zum Löschen der Produktprüfung kann nicht rückgängig gemacht werden. Bitte verwenden Sie diese Funktion sorgfältig.
4.5 Verkäufer Rezensionen
Diese Liste enthält eine Liste aller Verkäuferbewertungen, die von Kunden im Geschäft durchgeführt wurden.
Wenn die Einstellungen deaktiviert sind (z. B. Überprüfung der Lieferantenprüfung erforderlich), wird eine Verkäuferbewertung direkt genehmigt, wenn sie vom Kunden hinzugefügt und in dieser Liste angezeigt wird. Andernfalls wird die Überprüfung zuerst in der Genehmigungsliste für die Verkäuferüberprüfung angezeigt.
Hinweis: – Die Verkäuferbewertungen, die vom Geschäftsinhaber abgelehnt wurden, werden ebenfalls in dieser Liste angezeigt.
Verkäuferbewertung anzeigen: Um alle Details einer Verkäuferbewertung einzusehen, müssen Sie auf die Ansicht-Schaltfläche vor dieser Überprüfung in der Liste klicken.
Wenn Sie auf die Schaltfläche Anzeigen klicken, wird ein Pop-up mit allen Details der entsprechenden Verkäuferbewertung angezeigt.
4.6-Verkäuferkonto-Genehmigungsanfrage
Wenn sich ein Verkäufer in Ihrem Geschäft als Verkäufer registriert, erscheint er zunächst in dieser Liste der Magento Multi-Vendor-Marktplatz-Erweiterung, wie in der Abbildung unten gezeigt. Dann ist es Aufgabe des Store-Administrators, die Verkäufer-Account-Anfrage zu genehmigen oder abzulehnen.
Verkäuferkonto genehmigen: Um ein Verkäuferkonto zu genehmigen, müssen Sie in der Liste auf die Schaltfläche Genehmigen vor diesem Verkäufer klicken.
Sobald das Verkäuferkonto genehmigt wurde, wird es direkt in die Verkäuferliste verschoben und alle Beschränkungen für das Verkäuferkonto werden freigegeben.
Eine E-Mail wird an den Verkäufer gesendet, um die Zustimmung des Verkäufers zu bestätigen.
Hinweis :- Die Verkäufer-Accounts, die vom Store-Eigentümer genehmigt wurden, können nicht rückgängig gemacht werden. Bitte verwenden Sie diese Funktion sorgfältig.
Verkäuferkonto ablehnen: Um ein Verkäuferkonto abzulehnen, müssen Sie in der Liste auf die Schaltfläche Ablehnen vor diesem Verkäufer klicken.
Es erscheint ein Popup-Fenster, in dem Sie nach dem Grund für die Ablehnung des Verkäuferkontos gefragt werden. Füllen Sie den Grund aus und reichen Sie das Formular ein, um die Aktion abzuschließen.
Eine E-Mail wird an den Verkäufer gesendet, um die Ablehnung des Verkäufers zu melden. Der Grund, der im Pop-up angezeigt wird, wird ebenfalls in dieser Mail gesendet.
Hinweis :- Sobald ein Verkäufer abgelehnt wurde, kann er erneut das Verkäuferkonto beantragen. Wenn ein Verkäufer dies tut, wird der Ladenbesitzer durch eine Benachrichtigungs-E-Mail benachrichtigt.
4.7-Verkäuferüberprüfungs-Genehmigungsliste
Diese Liste der Magento Multi-Vendor-Marktplatz enthält alle Verkäufer Bewertungen, die nur von den Kunden gebucht werden und keine Maßnahmen auf ihnen vorgenommen werden.
Wenn die Einstellungen aktiviert sind (z. B. Genehmigung für die Genehmigung des Verkäufers), wird nur eine von einem Kunden veröffentlichte Verkäuferbewertung in dieser Liste angezeigt, andernfalls wird sie direkt in der Liste der Verkäuferrezensionen angezeigt.
Verkäuferbewertung anzeigen: Um alle Details einer Verkäuferbewertung einzusehen, müssen Sie auf die Ansicht-Schaltfläche vor dieser Überprüfung in der Liste klicken.
Wenn Sie auf die Schaltfläche Anzeigen klicken, wird ein Pop-up mit allen Details der entsprechenden Verkäuferbewertung angezeigt.
Verkäuferbewertung genehmigen: Um eine Verkäuferbewertung zu genehmigen, müssen Sie vor dieser Überprüfung in der Liste auf die Schaltfläche Genehmigen klicken.
Sobald eine Verkäuferbewertung genehmigt wurde, wird sie im Frontend sichtbar und in die Verkäuferübersicht übertragen.
Hinweis: – Diese Aktion kann nicht rückgängig gemacht werden. Bitte benutze es sorgfältig.
Verkäuferbewertung ablehnen: Um eine Verkäuferbewertung abzulehnen, müssen Sie auf die Schaltfläche Ablehnen vor dieser Überprüfung in der Liste klicken.
Es erscheint ein Popup-Fenster, in dem Sie nach dem Grund für die Ablehnung der Verkäuferbewertung gefragt werden. Füllen Sie den Grund aus und reichen Sie das Formular ein, um die Aktion abzuschließen.
Sobald eine Verkäuferbewertung abgelehnt wurde, wird sie auf die Verkäuferbewertungsliste übertragen und kann nirgendwo anders gefunden werden.
Hinweis: – Diese Aktion kann nicht rückgängig gemacht werden. Bitte benutze es sorgfältig.
Verkäuferbewertung löschen: Um eine Verkäuferbewertung zu löschen, müssen Sie auf die Schaltfläche Löschen vor dieser Überprüfung in der Liste klicken.
Es erscheint ein Popup-Fenster, in dem Sie nach dem Grund für die Löschung der Verkäuferbewertung gefragt werden. Füllen Sie den Grund aus und reichen Sie das Formular ein, um die Aktion abzuschließen.
Sobald eine Verkäuferbewertung gelöscht wurde, wird sie von jedem Ort entfernt.
Hinweis: – Diese Aktion kann nicht rückgängig gemacht werden. Bitte benutze es sorgfältig.
4.8 Produktzulassungsanfrage
Wenn ein Verkäufer ein Produkt hinzufügt, dann erscheint er zuerst hier und der Ladenbesitzer wird ebenfalls per Post benachrichtigt. Dann ist es Sache des Geschäftsinhabers, das Produkt zu genehmigen oder abzulehnen.
Wenn die Einstellung (dh Produktzulassung erforderlich) aktiviert ist, wird nur ein neues Produkt in dieser Liste hinzugefügt, andernfalls wird es direkt in der Produktliste angezeigt und automatisch genehmigt und aktiviert.
Produkt des Verkäufers ablehnen: Um ein Produkt abzulehnen, müssen Sie auf die Schaltfläche Ablehnen vor dieser Überprüfung in der Liste klicken.
Es erscheint ein Popup-Fenster, in dem Sie nach dem Grund für die Löschung der Verkäuferbewertung gefragt werden. Füllen Sie den Grund aus und reichen Sie das Formular ein, um die Aktion abzuschließen.
Sobald ein Produkt abgelehnt wurde, wird eine E-Mail an den Verkäufer gesendet, die die Ablehnung des Produkts mitteilt. Die abgelehnten Produkte werden ebenfalls in derselben Liste angezeigt. Der Store-Administrator kann sie jederzeit genehmigen.
Produkt des Verkäufers genehmigen: Um ein Produkt zu genehmigen, müssen Sie vor dieser Überprüfung in der Liste auf die Schaltfläche Genehmigen klicken.
Sobald ein Produkt genehmigt wurde, wird es von dieser Liste in die Liste der Verkäuferprodukte übertragen.
Hinweis: – Diese Aktion kann nicht rückgängig gemacht werden. Bitte benutze es sorgfältig.
4.9 Kategorie Anfrageliste
Ein Verkäufer kann das Produkt zu Kategorien hinzufügen, die für diesen Verkäufer zulässig sind. Falls der Verkäufer ein Produkt zu einer Kategorie hinzufügen muss, die nicht erlaubt ist, kann der Verkäufer dies anfordern. Alle diese Kategorieanforderungen erscheinen in der Kategorie Anfrage nach Verkäuferliste des Magento Multivendor Marketplace-Moduls wie unten gezeigt. Eine E-Mail wird auch an den Geschäftsinhaber gesendet, um die Anforderung nach Kategorie zu benachrichtigen. Dann ist es Sache des Geschäftsinhabers, die Anfrage zu genehmigen oder abzulehnen.
Kategorieanfrage genehmigen: Um eine Kategorieanfrage zu genehmigen, müssen Sie auf die Schaltfläche Genehmigen vor dieser Kategorieanfrage in der Liste klicken.
Ein Popup-Fenster erscheint im Backend der Magento Multi-Vendor-Marktplatz-Erweiterung und fragt nach dem Grund für die Genehmigung der Kategorie-Anfrage. Füllen Sie den Grund aus und reichen Sie das Formular ein, um die Aktion abzuschließen.
Hinweis:?This action cannot be undone. Please use it carefully.
Kategorieanfrage ablehnen: Um eine Kategorieanforderung abzulehnen, müssen Sie auf die Schaltfläche Ablehnen vor dieser Kategorieanforderung in der Liste klicken.
Es wird ein Popup-Fenster angezeigt, in dem Sie nach dem Grund für die Ablehnung der Kategorieanforderung gefragt werden. Füllen Sie den Grund aus und reichen Sie das Formular ein, um die Aktion abzuschließen.
Hinweis: – Diese Aktion kann nicht rückgängig gemacht werden. Bitte benutze es sorgfältig.
4.10
4.10.1 Berichte -> Meistverkaufte Produkte
Die Registerkarte Bericht des Magento Multi-Vendor-Marktplatzes
Die Filter helfen dem Ladenbesitzer, das meistverkaufte Produkt zu identifizieren:
Für einen Datumsbereich.
Für eine bestimmte Kategorie.
Für einen bestimmten Verkäufer.
Hinweis :- Manchmal ist es möglich, dass Sie in diesem Bericht keine Daten finden können. In diesem Fall müssen Sie die Berichtsstatistik aktualisieren und dazu müssen Sie Folgendes tun:
Gehen Sie zu Berichte -> Statistiken aktualisieren -> Wählen Sie die gewünschten Berichte zum Aktualisieren -> Senden
Or
Klicken Sie auf die Schaltfläche Statistik aktualisieren oben auf dieser Seite.
4.11 Transaktionen und Einnahmen
4.11.1 Transaktionen und Einnahmen -> Provisionen
Die Kommissionsliste der Magento Multi Vendor Marketplace Extension enthält alle Provisionen, die der Ladenbesitzer bei mehreren Bestellungen mit Provisionsprozentsatz und Gesamtverkauf des Verkäufers erzielt hat.
4.11.2 Transaktionen und Einnahmen -> Kategorieweise Provisionen
Die Seite "Transaktionen und Einnahmen" des Magento Multivendor Marketplace-Moduls zeigt den Bericht für die Provisionen, die der Geschäftsinhaber verdient hat. Dieser Bericht zeigt die Gesamtprovision an, die der Geschäftsinhaber von einem Verkäufer erhalten hat. Der Geschäftsinhaber kann auch Filter verwenden, um die Provisionsberichte kategorieweise zu filtern.
Diese Funktion, die von der Magento Multi-Vendor Marketplace Extension angeboten wird, hilft dem Ladenbesitzer Kommissionen aus verschiedenen Kategorien zu identifizieren und welche Kategorie hat wie viel Provision produziert.
4.11.3?TransaktionenSeller?wisstransAktion
Das System überträgt den Betrag auf dem Konto des Verkäufers nicht automatisch. Daher muss der Geschäftsinhaber Aufzeichnungen über den Saldo für alle Verkäufer führen und manuell Geld an den Verkäufer überweisen und dann die Einzelheiten der Transaktion eingeben, um eine Aufzeichnung über den gleichen zu führen.
Diese Liste enthält alle Saldenvariationen für alle Verkäufer im System. Die Liste zeigt den Gesamtumsatz des Verkäufers, des Verkäufers, Ihrer Provision. Diese Liste hilft dem Geschäftsinhaber, das Verdienen zu identifizieren und sie Verkäufer weise zu kategorisieren.
4.11.3.1?Wieo?Aussicht?
Um die Details der getätigten Transaktionen für einen bestimmten Verkäufer anzuzeigen, müssen Sie auf die Schaltfläche Anzeigen vor diesem Verkäufer klicken.
Wenn Sie auf die Schaltfläche "Ansicht" vor einem Verkäufer klicken, öffnet sich eine neue Seite mit einer Liste aller getätigten Transaktionen für den entsprechenden Verkäufer.
Sie können auch eine neue Transaktion für den aktuellen Verkäufer hinzufügen, indem Sie oben rechts im Magento Multi Vendor Marketplace-Plugin auf die Schaltfläche Neue Transaktion hinzufügen klicken.
Um für einen Verkäufer ein neues Transaktionsdetail hinzuzufügen, müssen Sie entweder auf klicken?Add New Transaction?buuton corresponding to respective sellers.
Wenn Sie auf die Schaltfläche klicken, wird ein Popup-Fenster angezeigt, in dem Sie nach den Details der Transaktion gefragt werden. Füllen Sie das Formular aus und senden Sie das Formular, um die Aktion abzuschließen.
Die verschiedenen Felder des Pop-ups werden diskutiert:
Name des Verkäufers: Wählen Sie den Namen des Verkäufers aus der Dropdown-Liste. Transaktions-ID: Tragen Sie hier die Transaktions-ID ein. Menge: Wählen Sie, ob der Betrag abgebucht oder gutgeschrieben wurde, und geben Sie den Betrag ein. Kommentar: Geben Sie einen Kommentar zur Transaktion ein. Darüber hinaus kann der Administrator sogar neue Transaktionen im Verkäuferkonto hinzufügen, indem er auf die Schaltfläche Neu erstellen für jedes Verkäuferkonto klickt.
Hinweis :- Diese Aktion kann nicht rückgängig gemacht werden. Bitte benutze es sorgfältig.
4.11.4?Transaktionen und Erträge ->Verkaufener?Payaus
Diese Seite enthält eine Liste aller Transaktionen, die bisher für alle im System verfügbaren Verkäufer durchgeführt wurden.
Sie können auch eine neue Transaktion für einen Verkäufer hinzufügen, indem Sie auf klicken Neue Transaktion hinzufügen Schaltfläche oben rechts auf der obigen Seite.
4.11.5 Transaktionen und Einnahmen -> Verkäuferauszahlungsanfrage
Der Verkäufer kann eine Auszahlungsanforderung von seinem Dashboard an den Geschäftsadministrator senden. Die Anfrage des Verkäufers wird vom Administrator auf dieser Registerkarte der Erweiterung Magento Marketplace angezeigt.
Wenn Sie auf diesen Link klicken, wird der Verkäufer auf den Bereich des Dashboards umgeleitet, wie in der Abbildung unten gezeigt:
4.11.5.1 Wie können die Verkäufer eine neue Auszahlungsanforderung über ihr Dashboard hinzufügen?
Bevor der Verkäufer die Auszahlung anfordern kann, muss er die Auszahlung des Profile-Menüs des Dashboards konfigurieren. Die verschiedenen Felder, die in diesem Abschnitt ausgefüllt werden müssen, werden im Folgenden erläutert:
Wählen Sie Auszahlungsmethode: Die verschiedenen Auszahlungsmethoden im Dropdown-Menü. Wählen Sie die Methode aus, die Sie für die Auszahlung verwenden möchten. Standardmäßig sind drei Optionen verfügbar:
Banküberweisung
Zahlung per Scheck
PayPal
1. Banküberweisung:
Wenn Sie Bankleitzahloptionen auswählen, müssen Sie folgende Informationen angeben.
Kontoinhaber: Geben Sie den Namen des Kontoinhabers ein, in den der Betrag übertragen werden soll. Details: Dieser Abschnitt enthält die Bankdaten wie Bankfiliale, IBAN-Nummer, BIC usw. Bank Adresse: Geben Sie die Adresse der Bank ein. Zusätzliche Information: Geben Sie alle Informationen an, die Sie mit dem Store-Administrator teilen möchten.
2. Zahlung per Scheck
Bezahlen Sie in der Reihenfolge: Geben Sie den Namen ein, für den der Scheck ausgestellt werden soll. Adresse: Geben Sie die Adresse für das Senden der Überprüfung in diesem Abschnitt an. Zusätzliche Information: Geben Sie alle Informationen an, die Sie mit dem Store-Administrator teilen möchten.
3. PayPal
Wenn Sie PayPal auswählen, müssen Sie Ihre PayPal-E-Mail-ID eingeben. Im Bereich für zusätzliche Informationen können Sie Informationen bereitstellen, die Sie mit dem Store-Administrator teilen möchten.
Sobald die Auszahlungsmethode im Profil des Verkäufers konfiguriert ist, kann der Anbieter die Auszahlungsanforderungen senden. Um eine neue Auszahlungsanforderung hinzuzufügen, klicken Sie auf das "+" im Abschnitt Neue Auszahlungsanforderung, wie im Bild unten gezeigt:
Füllen
Menge: Geben Sie den Betrag der Auszahlungsanforderung ein. Anfrage Grund: Geben Sie den Grund für die Auszahlungsanforderung ein. Die Auszahlungsanforderung wird dann zur Genehmigung an den Administrator gesendet. Die Auszahlungsanforderungen, die genehmigt oder abgelehnt wurden oder auf Genehmigung warten, können im Auszahlungsanforderungsabschnitt wie folgt angezeigt werden:
Der Shop-Administrator kann alle Auszahlungsanfragen der Verkäufer des Marktplatzes im Backend der Magento Multi-Vendor-Marktplatz-Erweiterung einsehen.
Wenn Sie auf die Schaltfläche Genehmigen klicken, wird ein Popup angezeigt. Geben Sie die Transaktions-ID und den Kommentar ein, um die Anfrage des Verkäufers zu bestätigen.
4.11.6 Transaktionen und Einnahmen -> PayPal Auszahlungseinstellungen
Mit den PayPal-Auszahlungseinstellungen der Magento Multi seller Marketplace-Erweiterung kann der Geschäftsadministrator die PayPal-Methoden für die Auszahlung aktivieren. Geben Sie die erforderlichen Details wie unten beschrieben ein:
Aktiv: Aktivieren Sie die Schaltfläche, um die PayPal-Zahlungsmethode zu aktivieren. Kunden ID: Geben Sie die Kunden-ID Ihres PayPal-Kontos ein. Kundengeheimnis: Geben Sie das Kundengeheimnis des PayPal-Kontos ein. PayPal-Modus: Wählen Sie den PayPal-Modus aus dem Dropdown-Menü. PayPal E-Mail-ID: Geben Sie die E-Mail-ID ein, die in Ihrem Konto verwendet wird. PayPal-Währung: Wählen Sie die Standardwährung für die PayPal-Transaktion.
4.12
Die Registerkarte "E-Mail-Vorlagen" des Magento Multi-Vendor-Marktplatz-Moduls enthält eine Liste aller E-Mail-Vorlagen, die im System mit allen Details der E-Mail-Vorlagen verwendet werden.
E-Mail-Vorlage bearbeiten: Um eine E-Mail-Vorlage zu bearbeiten, klicken Sie auf die Schaltfläche Vorlage bearbeiten vor einer E-Mail-Vorlage.
Wenn Sie auf die Schaltfläche Vorlage bearbeiten klicken, wird eine neue Seite mit einem Formular für die E-Mail-Vorlage geöffnet. Sie können die E-Mail-Vorlage wie gewünscht über die Admin-Oberfläche von Magento Multivendor Marketplace ändern.
Um die Änderungen in der E-Mail-Vorlage zu speichern, klicken Sie auf die Schaltfläche Vorlage speichern oben rechts auf der obigen Seite.
Hinweis :- Beachten Sie beim Bearbeiten der E-Mail-Vorlage, dass Sie keinen Text innerhalb der geschweiften Klammern bearbeiten (zB {{var any_var}}).
4.13. Urlaubsmodus
Die Verkäufer erhalten eine Option, ihren Shop für einen bestimmten Zeitraum vom Marktplatz zu deaktivieren. Die Anfrage der Verkäufer, in den Urlaubsmodus zu wechseln, kann in diesem Abschnitt des Magento Marketplace Moduls eingesehen werden. Um den Urlaubsmodus festzulegen, können die Verkäufer auf ihrem Dashboard auf die Registerkarte Urlaubsmodus wechseln.
Die Registerkarte zeigt die gesamte Urlaubsgeschichte des Verkäufers wie in der folgenden Abbildung dargestellt:
4.13.1 Wie stelle ich den Urlaubsmodus ein?
Um den Urlaubsmodus einzustellen, klicken Sie auf 'Legen Sie neue Ferien fest' Taste.
Start- und Enddatum: Geben Sie das Start- und Enddatum des Urlaubs ein. Ihr Kommentar zu diesem Urlaub: Geben Sie einen Kommentar für den Urlaubsmodus ein.
Der Administrator kann die Liste der Verkäufer, die sich im Urlaub befinden, auf der Registerkarte "Urlaub" des Magento Marketplace-Plugins anzeigen. Um die Details des Urlaubs zu sehen, klicken Sie auf Ansehen Taste. Der Administrator kann die Anfrage abbrechen, indem er auf die Schaltfläche klickt Abbrechen Taste.
Ein Popup wird angezeigt. Geben Sie den Grund für die Stornierung des Urlaubsmodus ein und senden Sie ihn. Eine E-Mail-Benachrichtigung wird an den Verkäufer gesendet, um sie über die Stornierung des Urlaubs zu informieren.
4.14. Massenimport / -export
Der Administrator kann diese Funktion des Massenimports und -exports den Verkäufern anbieten, indem er sie vom Backend aus aktiviert.
Wenn aktiviert, kann der Verkäufer die Produkte in großen Mengen von seinem Dashboard importieren oder exportieren.
Die Anbieter können die Produkte auf der Registerkarte "Produktimport / -export" wie folgt importieren / exportieren:
4.14.1?Wie?ImHafene?proKanäle?in?bUlk?
Produkttyp: Wählen Sie den Typ des Produkts, das Sie hochladen. Das Magento Multi seller Marketplace Plugin unterstützt alle Arten von Produkten, dh einfache, konfigurierbare, virtuelle und andere.
Produktattributsatz: Wählen Sie die Attributgruppe der Produkte aus der Dropdown-Liste.
Vorlage herunterladen: Sie können die Vorlagendatei im Excel-Arbeitsblatt für das ausgewählte Attribut herunterladen, indem Sie auf diese Schaltfläche klicken. Stellen Sie sicher, dass die Spalten in Ihrer Datei mit der für Sie erstellten Vorlagendatei auf der Grundlage des ausgewählten Attributs übereinstimmen müssen.
Aktion importieren: Wählen Sie die Importaktion aus der Dropdown-Liste. Die Aktion wird nur auf der Grundlage der SKU der Produkte durchgeführt. Ohne SKU wird das Produkt für keine Aktion berücksichtigt.
Datei hochladen: Laden Sie die Datei mit den Produktdetails hier hoch. Klicken Sie auf Datei validieren um den Import abzuschließen.
4.14.2 Wie können die Produkte in großen Mengen exportiert werden?
Der Verkäufer kann die auf dem Marktplatz aufgeführten Produktdetails aus diesem Abschnitt exportieren. Wählen Sie den Exporttyp aus dem Dropdown-Menü und klicken Sie auf Exportieren. Die Details werden in ein Excel-Blatt exportiert.
4.15. Cron-Anweisung
Diese Registerkarte bietet zwei Cron-Optionen. Führen Sie Vacation cron aus, um die Änderungen zu implementieren, die auf der Registerkarte "Vacation" des Magento Multi-Vendor Marketplace-Moduls im Frontend des Marktplatzes vorgenommen wurden. Führen Sie Low Stock Notification Cron aus, um die Benachrichtigung per E-Mail an die Verkäufer zu senden.
5.0 Registrieren als Verkäufer Feld – Registrieren Seite
Wenn sich ein neuer Kunde im Magento-Marktplatz registriert, gibt es auf der Registrierungsseite ein zusätzliches Feld. Wenn der Kunde sich als Verkäufer registrieren möchte, muss der Kunde dieses Feld markieren.
Sobald das Konto erstellt wurde, erhalten die Verkäufer Zugriff auf das Dashboard. Das Dashboard des Verkäufers bietet den Verkäufern eine Reihe von Optionen, wie in der folgenden Abbildung gezeigt:
Magento multi marketplace module by Knowband è uno dei modi più semplici per trasformare il tuo sito eCommerce in un fiorente mercato multi-vendor. Un mercato multi-vendor è uno spazio online in cui venditori e venditori diversi ed elencano i loro prodotti, gestiscono il loro inventario e vendono. Il plug-in per marketplace multi-vendor Magento converte il tuo negozio online in uno di quei marketplace online pienamente funzionanti.
1.1 Funzioni offerte all'amministratore del negozio di Magento Multi estensione del marketplace:
L'amministratore del negozio può creare e gestire le categorie di prodotti dal back-end dell'estensione del marketplace di Magento.
L'amministratore può approvare / rifiutare il profilo dei venditori con l'aiuto del plugin di mercato Magento.
Il modulo del marketplace Magento semplifica l'impostazione e la gestione della commissione addebitata ai venditori.
L'amministratore può aggiungere / rimuovere i prodotti dal back-end del modulo multi-vendor del marketplace di Magento.
Il proprietario del negozio Magento può tracciare la transazione e guadagnare con il clic del pulsante.
Il multi-vendor del marketplace Magento è compatibile con l'ultima versione di Magento e supporta tutti i temi.
L'amministratore può approvare / rifiutare recensioni di prodotti e venditori.
1.2 Funzioni offerte al venditore dall'ampliata del marketplace di Magento Multi:
Il mercato multi vendor Magento consente ai venditori / venditori di registrarsi nel mercato online.
I venditori possono facilmente mappare le categorie e i prodotti con il mercato.
Inoltre, i venditori possono richiedere di includere una nuova categoria. L'amministratore del marketplace può approvare / rifiutare la categoria con l'aiuto del plugin per il marketplace multi-vendor Magento.
La dashboard del venditore facilita il monitoraggio e la gestione dei prodotti, del profilo e della vendita.
Il mercato multi-vendor di Magento consente ai venditori di aggiungere banner di vendita, logo del negozio e contenuti HTML personalizzati. Questi banner verranno visualizzati nella Pagina del venditore con una raccolta di prodotti separata.
1.3 Customer Benefits del mercato di Magento Multivendor:
L'estensione del marketplace multi vendor Magento consente a più venditori / venditori di vendere i loro prodotti su una stessa piattaforma. Pertanto, i clienti possono scegliere il prodotto perfetto da un vasto assortimento.
L'estensione del marketplace Magento consente ai clienti di acquistare i prodotti a prezzi competitivi.
I clienti possono inviare la recensione del prodotto. Queste recensioni possono essere approvate / disapprovate dal back-end del plugin del marketplace Magento.
Gli acquirenti online possono rivedere i venditori. Le recensioni dei venditori possono essere gestite dal back-end del modulo del marketplace di Multi vendor Magento.
Il modulo di mercato multi venditore Magento offre anche un'opzione con l'aiuto di cui gli acquirenti possono diventare venditori.
2.0 Passi per l'installazione di Magento Multi Vendor Marketplace
Scarica il pacchetto di estensione del Marketplace di Magento Multi.
Decomprimere il pacchetto nella cartella principale di Magento setup tramite FTP manager (come Filezilla o WinSCP – scarica qui: https://filezilla-project.org/).
Nel Pannello di amministrazione vedrai un nuovo Menu Market Place accanto al menu Sistema. Nel caso in cui non si riesca a vedere il collegamento sotto Sistema, cancellare prima Magento Cache e poi ricontrollare.
Con questo il Magento
Pannello di amministrazione 3.0
Nel pannello di amministrazione di Magento l'estensione del marketer multi-venditore aggiunge un menu separato (denominato MarketPlace) proprio accanto al menu di sistema e aggiunge anche una nuova scheda alla pagina di creazione / modifica del cliente.
3.1 Registra come opzione venditore (Aggiungi nuova pagina cliente)
Se l'amministratore sta creando un nuovo cliente dal lato amministratore, in quella pagina viene visualizzata una nuova scheda che richiede il campo Registra come venditore.
La pagina Percorso per il cliente:
Vai a Clienti -> Gestisci clienti e clicca su Aggiungi nuovo cliente sul lato destro della pagina.
L'amministratore può impostare il campo su Sì per registrare il cliente come venditore. Per impostazione predefinita, il campo è impostato su No.
3.2 gestisce le impostazioni del venditore (pagina Modifica cliente)
In caso di modifica di un cliente se il cliente è anche un venditore di una nuova scheda (denominato Gestisci account venditore) sembra modificare le impostazioni del livello venditore per il cliente corrente che è un venditore pure.
Percorso della pagina sopra:
Vai a Clienti -> Gestisci clienti e fai clic su qualsiasi cliente che sia anche un venditore.
Le impostazioni vengono memorizzate quando l'amministratore invia il modulo di modifica per il cliente.
Quando questa pagina viene caricata per la prima volta, i campi vengono riempiti con le impostazioni predefinite predefinite per l'estensione.
Menu 4.0 Marketplace
L'estensione del marketplace Magento è composta da opzioni di sottomenu 15 totali che reindirizzano a più pagine per l'estensione del marketplace multi-vendor Magento.
Alcune delle opzioni di menu del modulo del marketplace Multi Vendor Magento hanno ulteriori sottomenu per navigare ad alcune delle pagine correlate.
Tutte le opzioni di configurazione 15 offerte dal plug-in multi-market di Magento sono descritte di seguito in dettaglio:
4.1 Impostazioni generali
La scheda Impostazioni generali del modulo del marketplace multivendor Magento
Questa pagina ha tutte le impostazioni che controllano il plugin di Magento Marketplace
La pagina delle impostazioni generali del plug-in per marketplace di Multi vendor Magento è composta dai seguenti campi:
1. Abilita il mercato: Abilita o disabilita l'estensione del Marketplace di Magento Multivendor sul fronte del negozio. Se disabilitato, nessuna pagina o funzione dell'estensione è accessibile sul fronte negozio.
2. Commissione predefinita: Imposta la percentuale di commissione predefinita che viene presa dal proprietario del negozio dalla vendita totale effettuata dal venditore.
3. Categorie consentite: Le categorie consentite per i venditori di aggiungere prodotti. Se nessuna categoria è selezionata, tutto il
4. Registrati come venditore: Abilita o disabilita il campo Registra come venditore nella pagina Crea account di fronte negozio.
5. Abilita importazione / esportazione collettiva: Abilita il pulsante per consentire ai fornitori di terze parti di utilizzare la funzione di importazione / esportazione di massa.
6. Invia per email al venditore al posto dell'ordine: Abilita questo campo per inviare una email al venditore nel caso in cui venga effettuato un ordine per i prodotti del venditore.
7. Includi JQuery: Disabilita questo campo nel caso in cui JQuery sia già incluso nella parte anteriore da un altro plugin o dal tuo tema.
8. Papprovazione del rodotto richiesta: Abilita questo campo in caso sia richiesta l'approvazione per il prodotto aggiunto da qualsiasi venditore prima che arrivi al tuo negozio.
9. Abilita recensione venditore: Abilita questo campo nel caso in cui desideri che i clienti possano recensire il venditore.
10. Abilita elenco venditori: Abilita questo campo nel caso in cui desideri mostrare un link nel piè di pagina del negozio alla pagina di elenco del venditore. Se questa impostazione è disabilitata, la pagina di elenco del venditore non è accessibile in alcun modo.
11. Abilita modalità vacanza: Abilita questo pulsante per consentire ai venditori di impostare la modalità vacanza per il proprio negozio per un determinato periodo di tempo.
12. Mostra la pagina del prodotto Info del venditore: Abilita il pulsante per mostrare le informazioni del venditore sulla pagina del prodotto. 13. Nuovo limite di prodotto:?Enter the maximum numbers of products that a new seller can add before the seller account is approved.
14. Approvazione recensione del venditore richiesta:Abilita questo campo nel caso in cui desideri che la recensione del venditore sia approvata prima che diventi visibile nella parte anteriore del negozio.
15. Abilita casella di ricerca: Abilita questo campo nel caso in cui desideri una casella di ricerca nella pagina di elenco del venditore per cercare i venditori.
Configurazione scorte limitate
1. Abilita notifica scorte basse: Abilitare il pulsante per informare i venditori in merito alla notifica di scorte basse. 2. Limite di inventario basso: Inserisci il livello delle scorte al di sotto del quale il venditore riceverà una notifica in caso di scorte basse. 3. Quando notificare: Seleziona quando invierai la notifica. Può essere inviato al momento dell'ordine o dopo l'esecuzione di cron. 4. Invia notifica Da: selezionare l'ID e-mail dal quale si desidera inviare la notifica. Una volta abilitata questa funzionalità dal back-end del modulo Magento Marketplace, i fornitori possono configurare l'impostazione low-stock dalla sezione Low-stock del loro dashboard.
Limite di inventario basso: I venditori possono inserire il limite di inventario sotto il quale vogliono essere avvisati. Ricevi notifica scorte basse: Selezionare se si desidera ricevere la notifica di scorte basse o no.
Elenco venditori 4.2
Questa pagina dell'estensione del marketplace Magento ha un elenco di tutti i venditori che sono approvati dal proprietario del negozio.
L'elenco sopra riportato contiene un elenco di tutti i venditori approvati. Ci sono pulsanti per andare ai prodotti e agli ordini del venditore di fronte a ciascun venditore.
Quando fai clic sul pulsante Ordini di una nuova pagina si apre, si apre l'elenco di tutti gli ordini per quel particolare venditore.
Quando fai clic sul pulsante Prodotti, si apre una nuova pagina che consiste nell'apertura dell'elenco di tutti i prodotti per quel particolare venditore.
È anche una funzione per abilitare o disabilitare qualsiasi venditore utilizzando la funzione Azioni di massa della griglia. Per abilitare / disabilitare qualsiasi venditore, selezionare il / i venditore / i, scegliere l'azione (es. Abilita o Disabilita), quindi fare clic sul pulsante Invia per completare l'azione.
Se un venditore è disabilitato, anche tutti i prodotti di quel venditore sono disabilitati e non saranno visibili in negozio.
Prodotti 4.3 per venditori
Questa pagina dell'estensione del marketplace multi vendor Magento è composta da tutti i prodotti approvati aggiunti dal / i venditore / i al negozio.
Se le impostazioni (es. Approvazione prodotto richiesta) sono disabilitate,
Elimina prodotto: Per eliminare un prodotto, devi fare clic sul pulsante Elimina di fronte a quel prodotto.
Apparirà un pop-up che chiederà il motivo della cancellazione del prodotto. Per completare l'azione, inserisci il motivo e fai clic su Invia.
Una mail sarà inviata al venditore per notificare la cancellazione del prodotto. La mail contiene anche il motivo per cui hai fornito la cancellazione del prodotto.
Nota: – L'azione di eliminazione del prodotto non può essere annullata. Si prega di utilizzare questa funzione con attenzione.
Abilita / Disabilita prodotto: Per cambiare lo stato di qualsiasi prodotto, devi usare la funzione Mass Action della Grid. Per abilitare / disabilitare qualsiasi prodotto selezionare i prodotti, scegliere l'azione (es. Abilita o Disabilita), quindi fare clic sul pulsante di invio per completare l'azione.
Nota: – Una volta che un prodotto è disabilitato dal back-end del plugin del Marketplace di Magento Multi, non sarà visibile in primo piano. Evitare di disabilitare i prodotti, disabilitare solo un prodotto se è molto necessario.
Recensioni dei prodotti 4.4
Questa pagina dell'estensione del marketplace multi venditore Magento contiene un elenco di tutte le recensioni fatte dai clienti sui prodotti del venditore.
Visualizza la recensione del prodotto: La maggior parte dei dettagli della recensione del prodotto sono già citati nella griglia, ma alcuni non lo sono. Per visualizzare tutti i dettagli di qualsiasi recensione del prodotto, fare clic sul pulsante Visualizza di fronte a tale revisione. Un pop-up apparirà nel back-end del plug-in multi-market del fornitore Magento con tutti i dettagli della recensione del prodotto.
Per modificare la recensione, puoi fare clic sul pulsante Modifica sul popup che ti reindirizzerà alla pagina di revisione della modifica.
Elimina recensione prodotto:L'estensione del marketplace multi vendor Magento consente all'amministratore del negozio di eliminare le revisioni del prodotto. Per eliminare una recensione di un prodotto devi fare clic sul pulsante Elimina di fronte alla recensione del prodotto nell'elenco.
Apparirà un pop-up che chiederà il motivo della cancellazione della recensione del prodotto. Per completare l'azione, inserisci il motivo e fai clic su Invia.
Nota :- L'azione di eliminazione della recensione del prodotto non può essere annullata. Si prega di utilizzare questa funzione con attenzione.
Recensioni dei venditori 4.5
Questo elenco contiene un elenco di tutte le recensioni dei venditori fatte dai clienti sul negozio.
Se le impostazioni (es. Approvazione recensione venditore richiesta) sono disabilitate, una recensione del venditore viene approvata direttamente quando viene aggiunta dal cliente e appare in questo elenco. In caso contrario, la recensione viene prima visualizzata nell'elenco Approvazione recensione venditore.
Nota: – Anche le recensioni dei venditori che non sono state approvate dal proprietario del negozio vengono visualizzate in questo elenco.
Visualizza la recensione del venditore: Per visualizzare tutti i dettagli di una recensione del venditore devi fare clic sul pulsante Visualizza di fronte a quella recensione nell'elenco.
Facendo clic sul pulsante Visualizza apparirà una finestra popup con tutti i dettagli della recensione del venditore corrispondente.
Richiesta di approvazione dell'account venditore 4.6
Quando un venditore si registra come venditore nel tuo negozio di quanto non appaia prima in questo elenco dell'estensione del marketplace multi-vendor Magento come mostrato nell'immagine qui sotto. Quindi spetta all'amministratore del negozio approvare o disapprovare la richiesta dell'account venditore.
Approva l'account del venditore: Per approvare un account venditore, devi fare clic sul pulsante Approva davanti a quel venditore nell'elenco.
Una volta che l'account venditore è stato approvato, passa direttamente all'elenco dei venditori e vengono rilasciati tutti i limiti all'account venditore.
Una mail verrà inviata al venditore per notificare l'approvazione dell'account venditore.
Nota :- Gli account venditore approvati dal proprietario del negozio non possono essere annullati. Si prega di utilizzare questa funzione con attenzione.
Disapprova l'account del venditore: Per disapprovare un account venditore, devi fare clic sul pulsante Disapprova davanti a quel venditore nell'elenco.
Apparirà un pop-up che chiederà il motivo della mancata approvazione dell'account venditore. Compila il motivo e quindi invia il modulo per completare l'azione.
Una mail sarà inviata al venditore notificando la disapprovazione dell'account venditore. La ragione fornita nel pop-up verrà inviata anche in questa mail.
Nota :- Una volta che un venditore non è stato approvato, può nuovamente richiedere l'account del venditore e ogni volta che un venditore lo fa, il proprietario del negozio viene avvisato tramite un'e-mail di notifica.
Elenco di approvazione per la recensione del venditore 4.7
Questo elenco del marketplace multi vendor di Magento contiene tutte le recensioni dei venditori che sono state appena pubblicate dai clienti e non viene loro intrapresa alcuna azione.
Se le impostazioni (es. Approvazione recensione venditore richiesta) sono abilitate, solo la recensione di qualsiasi venditore pubblicata da qualsiasi cliente viene visualizzata in questo elenco, altrimenti viene visualizzata direttamente nell'elenco Recensioni venditore.
Visualizza la recensione del venditore: Per visualizzare tutti i dettagli di una recensione del venditore devi fare clic sul pulsante Visualizza di fronte a quella recensione nell'elenco.
Facendo clic sul pulsante Visualizza apparirà una finestra popup con tutti i dettagli della recensione del venditore corrispondente.
Approva la recensione del venditore: Per approvare una recensione del venditore, devi fare clic sul pulsante Approva davanti a quella recensione nell'elenco.
Una volta che la recensione di un venditore viene approvata, diventa visibile nel front-end e viene trasferita all'elenco di recensioni del venditore.
Nota: – Questa azione non può essere annullata. Si prega di usare con attenzione.
Disapprova la recensione del venditore: Per disapprovare una recensione del venditore, devi fare clic sul pulsante Disapprova davanti a quella recensione nell'elenco.
Apparirà un pop-up che chiederà il motivo della mancata approvazione della recensione del venditore. Compila il motivo e quindi invia il modulo per completare l'azione.
Una volta che la recensione di un venditore non è stata approvata, viene trasferita nell'elenco di recensioni dei venditori e non può essere trovata da nessun'altra parte.
Nota: – Questa azione non può essere annullata. Si prega di usare con attenzione.
Elimina recensione del venditore: Per eliminare una recensione del venditore, devi fare clic sul pulsante Elimina di fronte a quella recensione nell'elenco.
Apparirà un pop-up che chiederà il motivo della cancellazione della recensione del venditore. Compila il motivo e quindi invia il modulo per completare l'azione.
Una volta che la recensione del venditore viene cancellata, viene completamente rimossa da ogni dove.
Nota: – Questa azione non può essere annullata. Si prega di usare con attenzione.
Richiesta di approvazione del prodotto 4.8
Quando un venditore aggiunge un prodotto, prima di tutto appare qui e anche il proprietario del negozio riceve una notifica per lo stesso tramite la posta. Quindi spetta al proprietario del negozio approvare o disapprovare il prodotto.
Se l'impostazione (vale a dire Approvazione del prodotto richiesta) è attiva, viene aggiunto solo un nuovo prodotto in questo elenco, altrimenti viene visualizzato direttamente nell'elenco dei prodotti e viene automaticamente approvato e abilitato.
Disapprova il prodotto del venditore: Per disapprovare un prodotto, devi fare clic sul pulsante Disapprova davanti a quella recensione nell'elenco.
Apparirà un pop-up che chiederà il motivo della cancellazione della recensione del venditore. Compila il motivo e quindi invia il modulo per completare l'azione.
Una volta che un prodotto non è approvato, verrà inviata una mail al venditore che notifica la disapprovazione del prodotto. I prodotti non approvati appaiono anche nella stessa lista. L'amministratore del negozio può approvarli in qualsiasi momento.
Approva il prodotto del venditore: Per approvare un prodotto, devi fare clic sul pulsante Approva davanti a quella recensione nell'elenco.
Una volta approvato, il prodotto trasferisce da questo elenco all'elenco di prodotti del venditore.
Nota: – Questa azione non può essere annullata. Si prega di usare con attenzione.
Elenco di richieste per la categoria 4.9
Un venditore può aggiungere il prodotto alle categorie consentite al venditore. Nel caso in cui il venditore debba aggiungere un prodotto a una categoria che non è consentita, il venditore può richiedere lo stesso. Tutte le richieste di queste categorie vengono visualizzate nell'elenco Richieste di categoria per venditore del modulo del marketplace multivendor Magento, come mostrato di seguito. Viene inviata anche una mail al proprietario del negozio per notificare la Richiesta di Categoria. Quindi spetta al proprietario del negozio approvare o disapprovare la richiesta.
Approva richiesta di categoria: Per approvare una richiesta di categoria devi fare clic sul pulsante Approva davanti a quella richiesta di categoria nell'elenco.
Un pop-up apparirà nel back-end dell'estensione del marketplace di Multi vendor Magento chiedendo il motivo per l'approvazione della richiesta di categoria. Compila il motivo e quindi invia il modulo per completare l'azione.
Nota:?This action cannot be undone. Please use it carefully.
Disapprova la richiesta di categoria: Per disapprovare una richiesta di categoria, devi fare clic sul pulsante Disapprova davanti a quella richiesta di categoria nell'elenco.
Apparirà un pop-up che chiederà il motivo per cui disapprova la richiesta di categoria. Compila il motivo e quindi invia il modulo per completare l'azione.
Nota: – Questa azione non può essere annullata. Si prega di usare con attenzione.
4.10
Rapporti 4.10.1 -> I prodotti più venduti
La scheda Report del marketplace multi vendor Magento
I filtri aiutano il proprietario del negozio a identificare il prodotto più venduto:
Per un intervallo di date.
Per una categoria specifica.
Per un venditore specifico.
Nota :- A volte è possibile che non si riesca a trovare alcun dato in questo rapporto. In tal caso è necessario aggiornare le statistiche del report e per farlo è necessario effettuare quanto segue:
Vai a Rapporti -> Aggiorna statistiche -> Seleziona i rapporti desiderati da aggiornare -> Invia
Or
Fare clic sul pulsante Aggiorna statistiche nella parte superiore di questa pagina.
Transazioni e guadagni 4.11
Transazioni e guadagni 4.11.1 -> Commissioni
L'elenco della Commissione dell'estensione del marketplace multi vendor Magento contiene tutte le commissioni guadagnate dal proprietario del negozio su più ordini con percentuale di commissione e vendita totale del venditore.
Transazioni e guadagni 4.11.2 -> commissioni per categoria
La pagina Transazioni e guadagni del modulo del marketplace multivendor Magento mostra il report per le commissioni guadagnate dal proprietario del negozio. Questo rapporto mostra la commissione totale guadagnata dal proprietario del negozio da un venditore. Il proprietario del negozio può anche utilizzare i filtri per filtrare la categoria di report delle commissioni.
Questa funzionalità offerta dall'estensione del marketplace multi-vendor di Magento aiuta il proprietario del negozio a identificare commissioni da diverse categorie e quale categoria ha prodotto la commissione.
4. 11.3?Le transazioniSeller?wisetransazione
Il sistema non trasferisce automaticamente l'importo nell'account del venditore. Quindi il proprietario del negozio deve tenere un registro del saldo per tutti i venditori e trasferire manualmente i soldi al venditore e quindi inserire i dettagli della transazione per mantenere un registro dello stesso.
Questo elenco contiene tutte le variazioni di saldo per tutti i venditori nel sistema. L'elenco mostra le vendite totali del venditore, il guadagno del venditore, la commissione. Questo elenco aiuta il proprietario del negozio a identificare il guadagno ea categorizzarlo come venditore saggio.
4. 11.3.1?Comeo?vista?
Per visualizzare i dettagli delle transazioni effettuate per un determinato venditore, è necessario fare clic sul pulsante Visualizza di fronte a quel venditore.
Facendo clic sul pulsante Visualizza di fronte a qualsiasi venditore si aprirà una nuova pagina con un elenco di tutte le transazioni effettuate per il venditore corrispondente.
Puoi anche aggiungere una nuova transazione per il venditore corrente facendo clic sul pulsante Aggiungi nuova transazione nella parte in alto a destra del plug-in del marketplace di Multi vendor Magento.
Per aggiungere un nuovo dettaglio della transazione per qualsiasi venditore, è necessario fare clic su?Add New Transaction?buuton corresponding to respective sellers.
Facendo clic sul pulsante viene visualizzato un popup che richiede i dettagli della transazione. Compila il modulo e invia il modulo per completare l'azione.
Vengono discussi i vari campi del pop-up:
Nome del venditore: Seleziona il nome del venditore dall'elenco a discesa. ID transazione: Inserisci qui l'ID della transazione. Quantità: Seleziona se l'importo è stato addebitato o accreditato e inserisci l'importo. Commento: Inserisci un commento riguardante la transazione. Inoltre, l'amministratore può anche aggiungere nuove transazioni nell'account venditori facendo clic sul pulsante Rendi nuovo corrispondente a ciascun account venditore.
Nota :- Questa azione non può essere annullata. Si prega di usare con attenzione.
4.11.4?Transazioni e guadagni ->Vendereer?Paysu
Questa pagina contiene un elenco di tutte le transazioni effettuate fino alla data a tutti i venditori disponibili nel sistema.
Puoi anche aggiungere una nuova transazione per qualsiasi venditore facendo clic su Aggiungi nuova transazione pulsante in alto a destra nella pagina sopra.
Transazioni e guadagni 4.11.5 -> Richiesta di pagamento del venditore
Il venditore può inviare la richiesta di pagamento all'amministratore del negozio dalla sua bacheca. La richiesta del venditore viene visualizzata dall'amministratore da questa scheda dell'estensione di Magento Marketplace.
Facendo clic su questo link, il venditore verrà reindirizzato nella sezione della dashboard come mostrato nell'immagine seguente:
4.11.5.1 Come possono i venditori aggiungere nuove richieste di pagamento dalla loro bacheca?
Prima che il venditore possa richiedere il pagamento, deve configurare il pagamento nel menu Profilo della Dashboard. I vari campi che devono essere compilati in questa sezione sono discussi di seguito:
Seleziona il metodo di pagamento: I vari metodi di pagamento nel menu a discesa. Seleziona il metodo che desideri utilizzare per il pagamento. Ci sono tre opzioni disponibili per impostazione predefinita:
Bonifico bancario
Pagamento tramite assegno
PayPal
1. Bonifico bancario:
Selezionando, Opzioni bonifico bancario, ti verrà richiesto di fornire le seguenti informazioni.
Titolare dell'account: Immettere il nome del proprietario dell'account in cui deve essere trasferito l'importo. Dettagli: Questa sezione include i dettagli bancari come il ramo bancario, il numero IBAN, il BIC, ecc. Indirizzo della banca: Inserire l'indirizzo della banca. Informazioni aggiuntive: Fornisci tutte le informazioni che desideri condividere con l'amministratore del negozio.
2. Pagamento tramite assegno
Paga all'ordine di: Inserire il nome al quale deve essere emesso il controllo. Indirizzo: Fornire l'indirizzo per l'invio del controllo in questa sezione. Informazioni aggiuntive: Fornisci tutte le informazioni che desideri condividere con l'amministratore del negozio.
3. PayPal
Se selezioni, PayPal, ti verrà richiesto di inserire il tuo ID email PayPal. La sezione delle informazioni aggiuntive ti consente di fornire qualsiasi informazione che desideri condividere con l'amministratore del negozio.
Una volta configurato il metodo di pagamento nel profilo del venditore, il venditore diventa idoneo a inviare le richieste di pagamento. Per aggiungere una nuova richiesta di pagamento, fai clic su "+" nella sezione Nuova richiesta di pagamento, come mostrato nell'immagine seguente:
Riempire
Quantità: Inserisci l'importo della richiesta di pagamento. Motivo della richiesta: Immettere il motivo della richiesta di pagamento. La richiesta di pagamento è, quindi, inviata all'amministratore per l'approvazione. Le richieste di pagamento che sono approvate o non approvate o in attesa di approvazione possono essere visualizzate nella sezione delle richieste di pagamento, come mostrato di seguito:
L'amministratore del negozio può visualizzare tutte le richieste di pagamento dei venditori del mercato nel back-end dell'estensione del marketplace di Magento Multi.
Facendo clic sul pulsante Approva, verrà mostrato un popup. Immettere l'ID della transazione e commentare per approvare la richiesta del venditore.
Transazioni e guadagni 4.11.6 -> Impostazioni pagamento PayPal
Le impostazioni di pagamento PayPal dell'estensione del Marketplace di Magento Multi seller consentono all'amministratore del negozio di abilitare i metodi PayPal per il pagamento. Inserisci i dettagli richiesti come descritto di seguito:
Attivo: Attiva o disattiva il pulsante per attivare il metodo di pagamento PayPal. Identificativo cliente: Inserisci l'ID cliente del tuo account PayPal. Client Secret: Inserisci il segreto del cliente dell'account PayPal. Modalità PayPal: Seleziona la modalità PayPal dal menu a discesa. Email ID PayPal: Inserisci l'ID email utilizzato nel tuo account. Valuta PayPal: Seleziona la valuta predefinita per la transazione PayPal.
4.12
La scheda Modelli di posta elettronica del modulo del marketplace di Multi vendor Magento contiene un elenco di tutti i modelli di email che vengono utilizzati nel sistema con tutti i dettagli dei modelli di email.
Modifica modello email: Per modificare un modello di email, fai clic sul pulsante Modifica modello davanti a qualsiasi modello di email.
Facendo clic sul pulsante Modifica modello si apre una nuova pagina con un modulo per il modello di email. È possibile modificare il modello di posta elettronica desiderato dall'interfaccia di amministrazione del marketplace multivendor Magento.
Per salvare le modifiche apportate nel modello di posta elettronica, fai clic sul pulsante Salva modello in alto a destra nella pagina in alto.
Nota :- Durante la modifica del modello di email, tieni presente che non modifichi alcun testo all'interno delle parentesi graffe (es. {{Var any_var}}).
4.13. Modalità vacanza
I venditori hanno un'opzione per disabilitare il loro negozio dal mercato per un particolare periodo di tempo. La richiesta dei venditori di andare in modalità vacanza può essere visualizzata in questa sezione del modulo Magento Marketplace. Per impostare la modalità vacanza, i venditori possono accedere alla scheda Modalità vacanza della loro dashboard.
La scheda mostra l'intera cronologia delle ferie del venditore, come mostrato nell'immagine qui sotto:
4.13.1 Come impostare la modalità Vacanza?
Per impostare la modalità vacanza, fare clic su 'Imposta una nuova vacanzaPulsante '.
Data di inizio e fine: Inserisci la data di inizio e di fine della vacanza. Il tuo commento a questa vacanza: Inserisci un commento per la modalità vacanza.
L'amministratore può visualizzare l'elenco dei venditori in vacanza nella scheda Vacanze del plug-in Magento Marketplace. Per vedere i dettagli della vacanza, clicca su Vedere ordine pulsante. L'amministratore può annullare la richiesta facendo clic sul Annullare pulsante.
Verrà visualizzato un popup. Immettere il motivo per annullare la modalità vacanza e inviare. Una e-mail di notifica viene inviata al venditore per informarla dell'annullamento della vacanza.
4.14. Importazione / esportazione collettiva
L'amministratore può offrire questa funzionalità di importazione e esportazione di massa ai venditori abilitando la stessa dal back-end.
Se abilitato, il venditore può importare o esportare i prodotti in blocco dalla loro dashboard.
I fornitori possono importare / esportare i prodotti alla rinfusa dalla scheda Importa / Esporta prodotto come mostrato di seguito:
4.14.1?Come?Importae?procondotti?in?bULK?
Tipo di prodotto: Seleziona il tipo di prodotto che stai caricando. Il plug-in Marketplace Magento Multi seller supporta tutti i tipi di prodotti, cioè semplici, configurabili, virtuali e altri.
Set di attributi del prodotto: Seleziona il set di attributi dei prodotti dall'elenco a discesa.
Scarica il file di modello: È possibile scaricare il file modello nel foglio Excel per l'attributo selezionato facendo clic su questo pulsante. Assicurati che le colonne nel tuo file debbano essere abbinate al file modello creato per te sulla base dell'attributo selezionato.
Importa azione: Seleziona l'azione di importazione dall'elenco a discesa. L'azione verrà eseguita solo sulla base di SKU dei prodotti. Senza SKU, il prodotto non sarà considerato per alcuna azione.
Caricare un file: Carica il file con i dettagli del prodotto qui. Clicca sul Convalida file per completare l'importazione.
4.14.2 Come esportare i prodotti alla rinfusa?
Il venditore può esportare i dettagli del prodotto elencati sul mercato da questa sezione. Seleziona il tipo di esportazione dal menu a discesa e fai clic su Esporta. I dettagli saranno esportati in un foglio Excel.
4.15. Istruzione Cron
Questa scheda offre due opzioni di cron. Esegui cron vacanza per implementare le modifiche apportate nella scheda Vacanza del modulo Magento Multi vendor Marketplace nel front-end del marketplace. Esegui la notifica di scorte basse Cron per inviare l'e-mail di notifica di scarsa disponibilità ai venditori.
5.0 Registrati come venditore – Pagina di registrazione
Se un nuovo cliente si registra nel negozio di mercato di Magento, quindi, c'è un campo aggiuntivo nella pagina di registro. Se il cliente desidera registrarsi come venditore, il cliente deve contrassegnare questo campo.
Una volta creato l'account, i venditori ottengono l'accesso al dashboard. La dashboard del venditore offre una serie di opzioni per i venditori, come mostrato nell'immagine qui sotto: