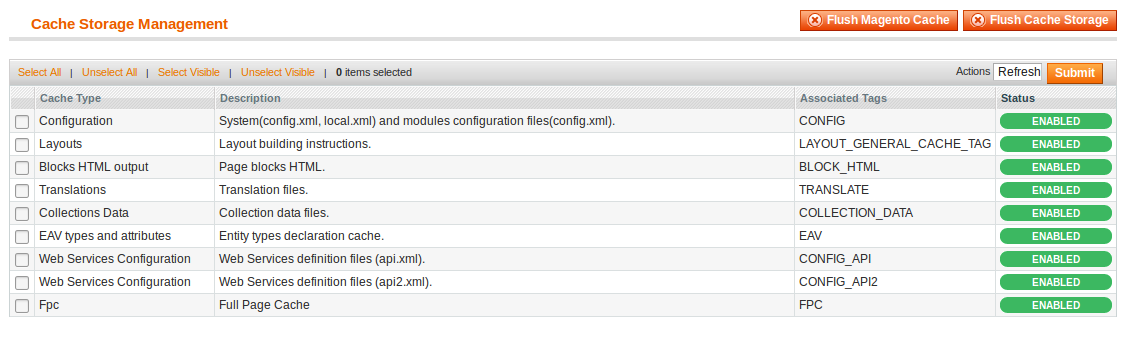
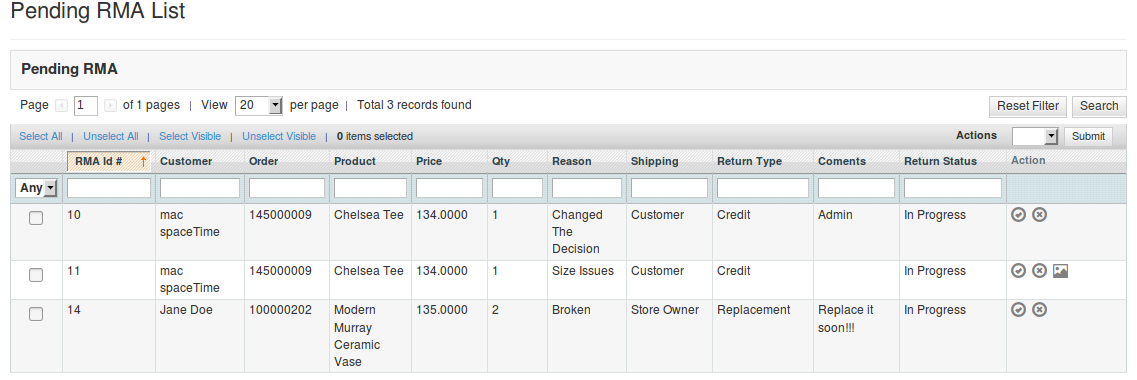
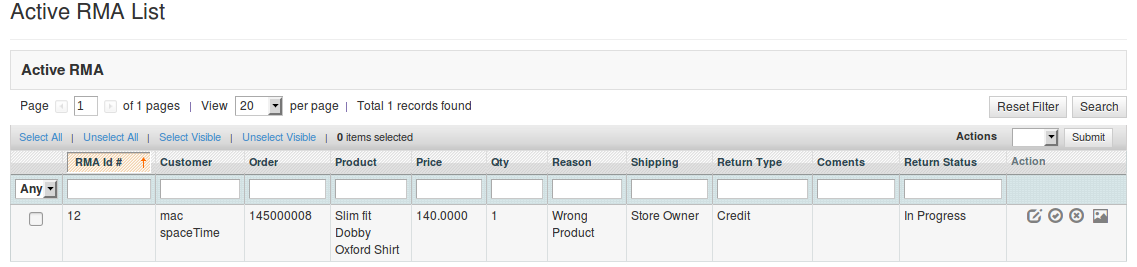
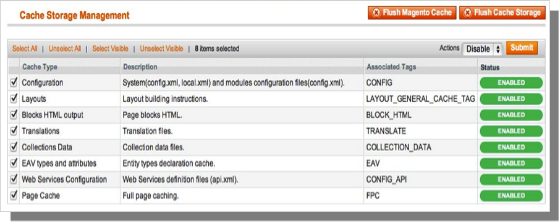
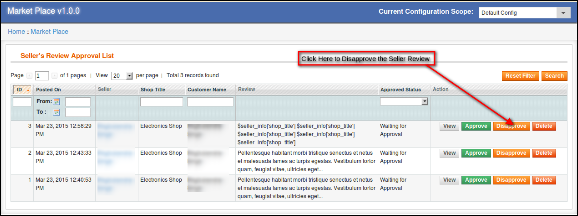
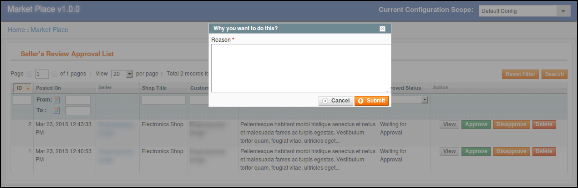
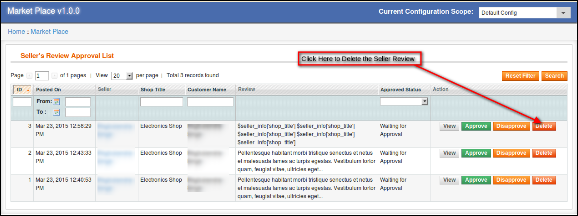
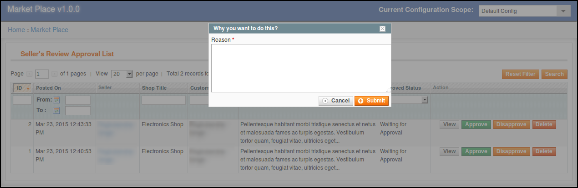
The Magento front end relies heavily on caching to provide a faster experience to customer. This is a wonderful tool, but can wreak havoc during the installation process. To ensure that the cache is not the cause of any problems, we should turn it off. This can be done from the admin console by navigating to the cache management page (System->Cache Management), selecting all caches, clicking disable from the drop-down menu, and submitting the change. 2. Disable the Compilation Mode
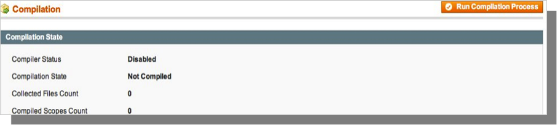
This may not be an issue for many readers, but if you are using Magentos compilation mode on your store, it is important that you remove it.Without going into to many details, compilation mode takes many files spread out over the system and condensing them into a single file that can be run very quickly. If an extensions files are not in the system when this single file is compiled, they will not be included. To check that this is disabled, go to System->Tools->Compilation. If the compiler status is Disabled, you are ready to go. If not, simply click the Disable button on the right hand side of the screen.
3. Required Material
All files used by the extension.
FTP access to your website.
The connect manager is a useful tool for installing extensions, but prefer hands-on method when it comes to installations. It feels more comfortable when you are personally in control of the process.
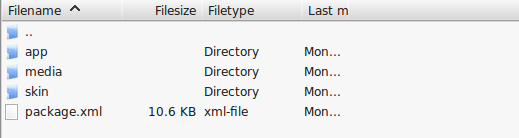
Do you see an app-code directory there, what about app-etc-modules? If you dont see these directory paths and files contained within them, chances are that the extension download was faulty. Take a look at the package.xml file, this is the blueprint used by Magento Connect to arrange the files in the proper places. You may need to use this to ensure that everything is as it should be. Once you have reviewed the extension files you are ready to perform the last step.Using your ftp client, drag all of the files onto the store root of the magento instance.
Depending on the number of files in the extension, this may take a few moments. Now go to the admin console and click Flush Cache Storage. This is the requirement for any extension that adds pages to the admin console. Logging out and back in is also required to ensure thateverything loads properly. If you cannot clear the cache via the admin console for any reason, you will need to clear the cache manually via your FTP client (see the first FAQ question for assistance). That is the final step. Congratulations on a successful installation.
NOTE In extension there is folder named as “knowband_wordpress”.You can rename this folder as per your choice.
4. Access Magento Blog in Admin-Console
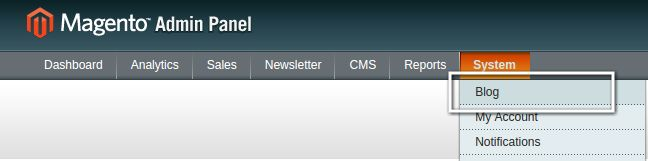
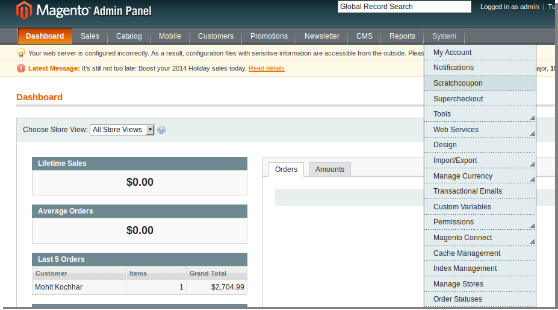
1.To excess Magento Blog plugin, Click on Blog Menu appearing in System Menu navigation menu as shown below.
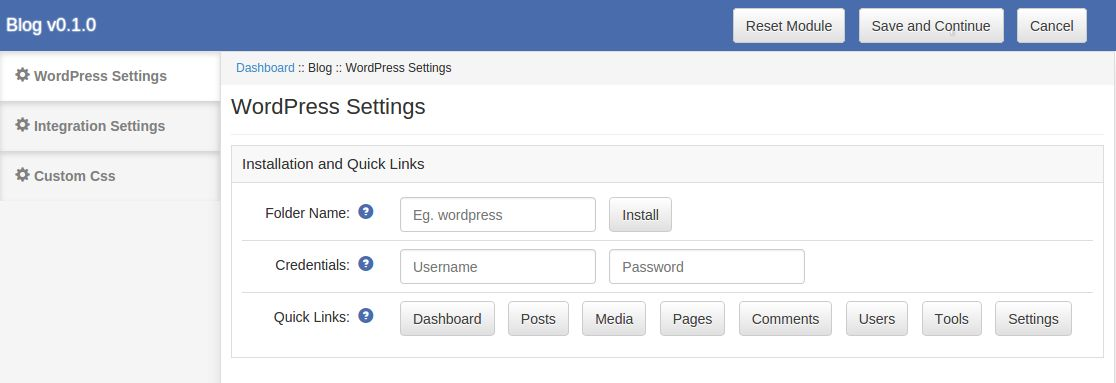
2. On clicking menu Blog the module for plugin will open. It contains navigational bar at the top, Tab menu at the left and in main content the first general setting tab will display.
Troubleshooting & FAQs
“I loaded all files onto my Magento store, and now get a white screen for some or all of the admin console.”
This is a fairly common problem, and 99% of the time it is cache related. If you can get to it, go
to System->Cache Management and click Flush Cache Storage. This will ensure that
everything cached by Magento is deleted and will to be regenerated. Log out and back in to
complete the process.
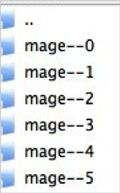
If you are completely cut off from the admin console, navigate to the var-cache directory of
your website. You should see a series of directories named mage*. Delete all of these
directories (DO NOT DELETE var-cache). This is the equivalent of flushing the cache storage
from the admin console.
“I am receiving a Magento error when accessing certain pages. How can I debug this?”
This question really deserves a blog post all to itself, but a good start would be to go into the
errors directory of your store. Locate the local.xml.sample file and rename it local.xml. The
next time you see the error detailed information will be provided explaining where the error took
place. Dont forget to change this back when you are finished troubleshooting!
I have a critical error with my webstore and need to turn off an extension I cannot access the admin console.What do I do?
Go to the app-etc-modules directory and open the file that goes with your extension. The naming
convention is generally DeveloperName_ExtensionName.xml. In this case it would beVss_Blog.xml.Look for the active tags in the file, change the value from true to false and save your changes.This tells Magento that the extension is disabled and not to run any code associated to it.Deleting the Magento cache is recommended (and most likely required) for this change to take
effect.
WordPress Settings
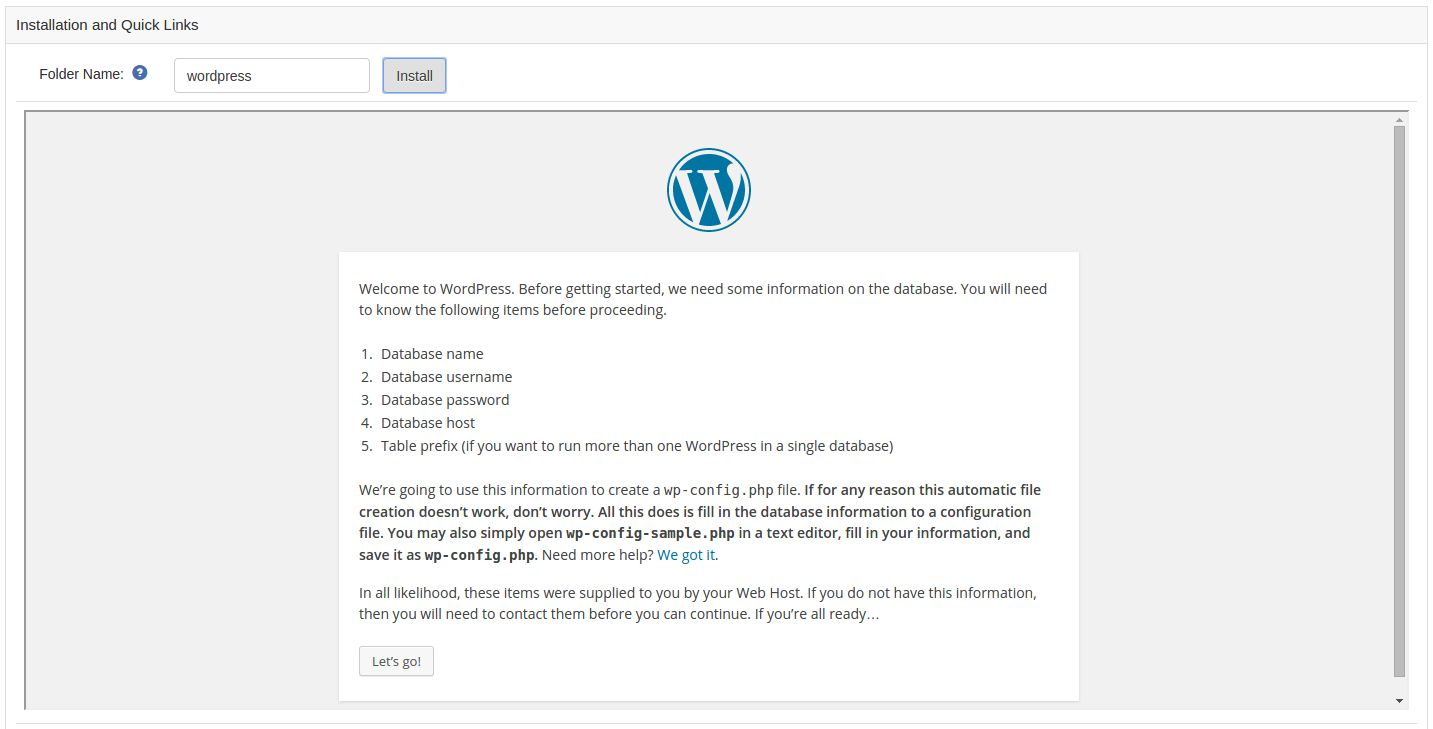
This tab provide interface for installing WordPress and Quick links for WordPress Admin Panel. Before beginning the installation copy the WordPress folder in magento root directory and make sure it have write permission as WordPress need to write a file during installation . If Write permission is not given to WordPress folder then you have to manually write a file. After copying folder open WordPress Setting Tab.
1. Folder Name : Enter the name of the root directory of WordPress by default its wordpress.
Note: Dont add any slash before and after folder name. Simply enter the folder name.
Eg: wordpress.
2. Install : After entering the folder name click install button. When you click the install
button a frame will open below and follow the instructions. The frame will look like as shown below:
WordPress Installation
Step 1: Welcome Screen. Click button labeled as Lets Go.
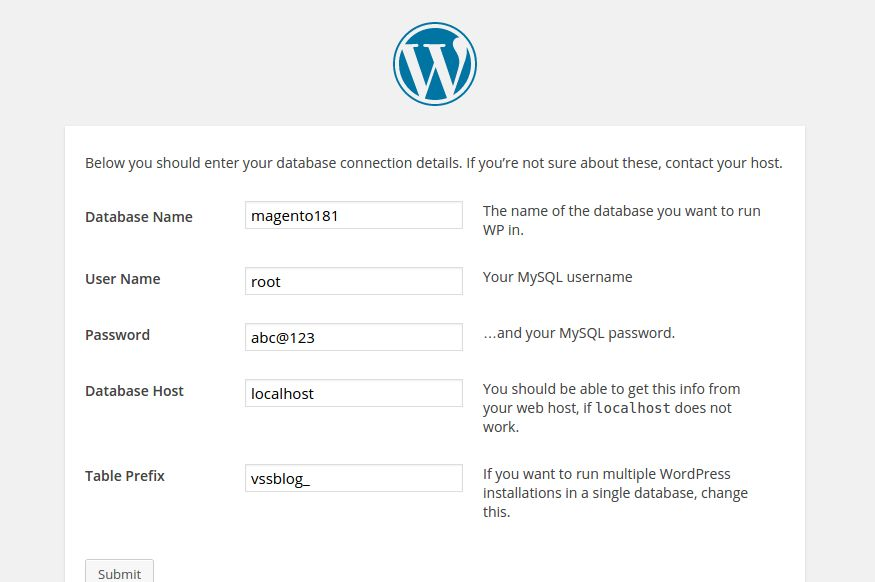
Step 2: Database Configuration. Here you will get all fields automatically filled. You just need to click submit. The WordPress database will be created in your magento database.
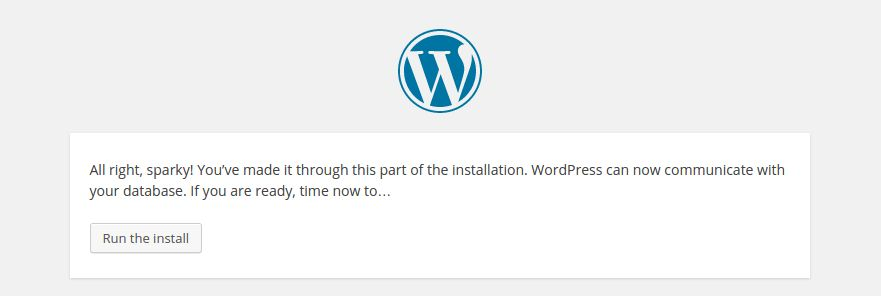
Step 3: Run Installaer. Click button Run Installer.
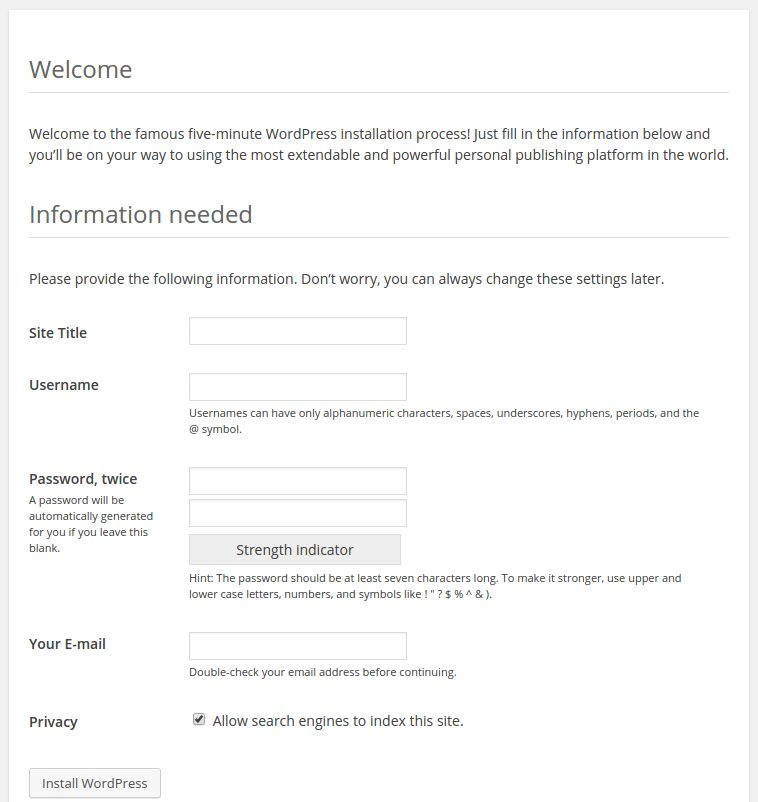
Step 4: Configure WordPress Account. Setup your WordPress account details and click install. That it you just successfully installed
WordPress.
3.Credentials: Enter your WordPress username and password and click save and continue.
4. Quick Links: Once you saved the WordPress credentials you can use these links to access WordPress controls automatically without logging in.
Integration Settings
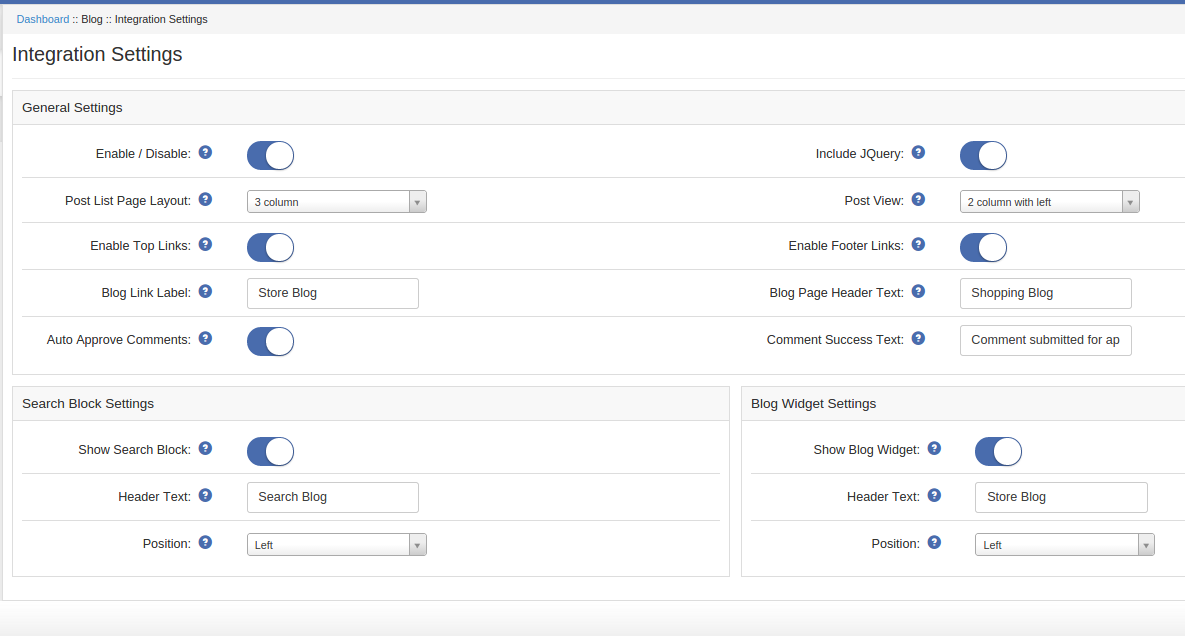
In this tab you can configure the magento- wordpress integration setting.Following is the details
for each option:
General Settings:
1. Enable/Disbale: To enable the Magento Blog Module for your store.
2. Include JQery: jQuery is a java framework which is required for this module. Many
magento themes and extension inlcude jQuery store frontend. Enable if your theme or other
extension is not using jQuery.
3. Post List Page Layout: Select a page layout for page on which all blog post will be listed.
4. Post View Page Layout: Select a page layout for page on which blog complete content of post will be display with comments if allowed.
NOTE: In one page layout Search block and Blog Widget will not display as they both can be set only either left column or Right column.
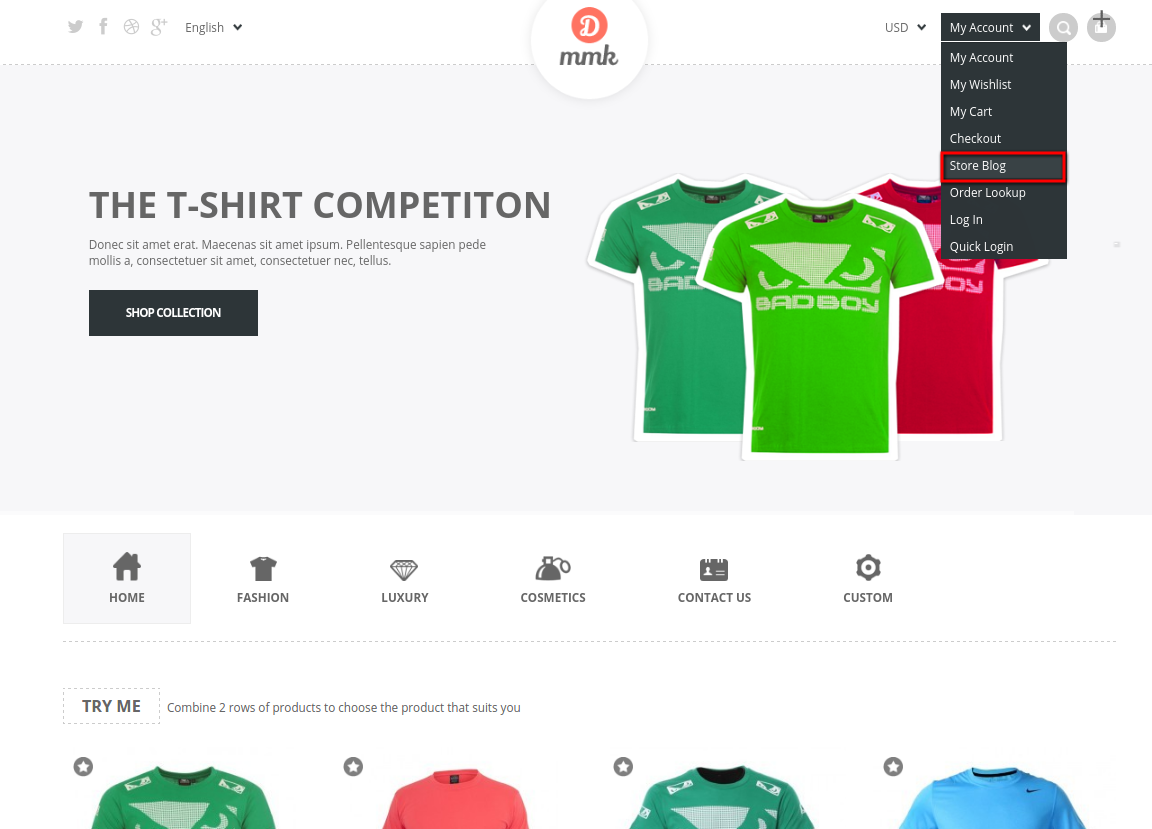
5. Blog Link Label: Set the text label for top links and footer links.
6. Blog page Header Text: Set the text for header of blog page .
7. Enable Top links: Add a link in top links which allow users to access the Blog Pages.
8. Enable Footer links: Add a link in Footer links which allow users to access the Blog Pages.
NOTE: Disabling both link will make user unreachable to Blog pages.
9. Auto Approve comments: Enable this to automatically approve the comments on the blog.
10. Comment Success Text: Set a text to be display when a comment is successfully posted and submitted for approval.
Search Block Settings:
1. Show Search Block: A block containing a text field that allow user to search the blog post.
2. Header Text : Set a header text for search block.
3. Position : Set the position of search block.
Blog Widegt Settings:
1. Show Blog Widget: A block containing 5 recent post and all parent category of blogs. When user click any on recent post that post will open. When a user click any of category then all posts of that category will listed.
2. Header Text: Set a header text for blog widget.
3. Position: Set the position of blog widget.
Custom CSS Settings
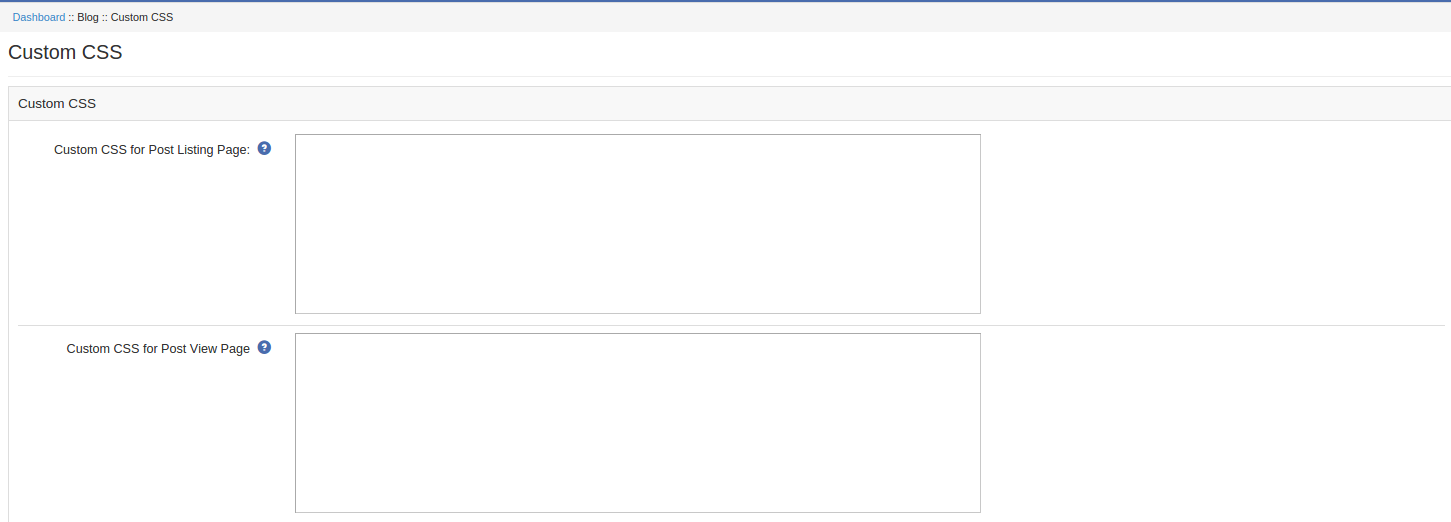
In this tab you can get CSS for blog list page , blog view page , search block and blog widget also. Following is the details of each option:
1. Custom CSS for Post Listing Page: Enter the CSS code you want to apply on blog list page.
2. Custom CSS for Post View Page: Enter the CSS code you want to apply on blog view page.
3. Custom CSS for Search Block: Enter the CSS code you want to apply on Search Block.
4. Custom CSS for Blog Widget: Enter the CSS code you want to apply on blog widget.
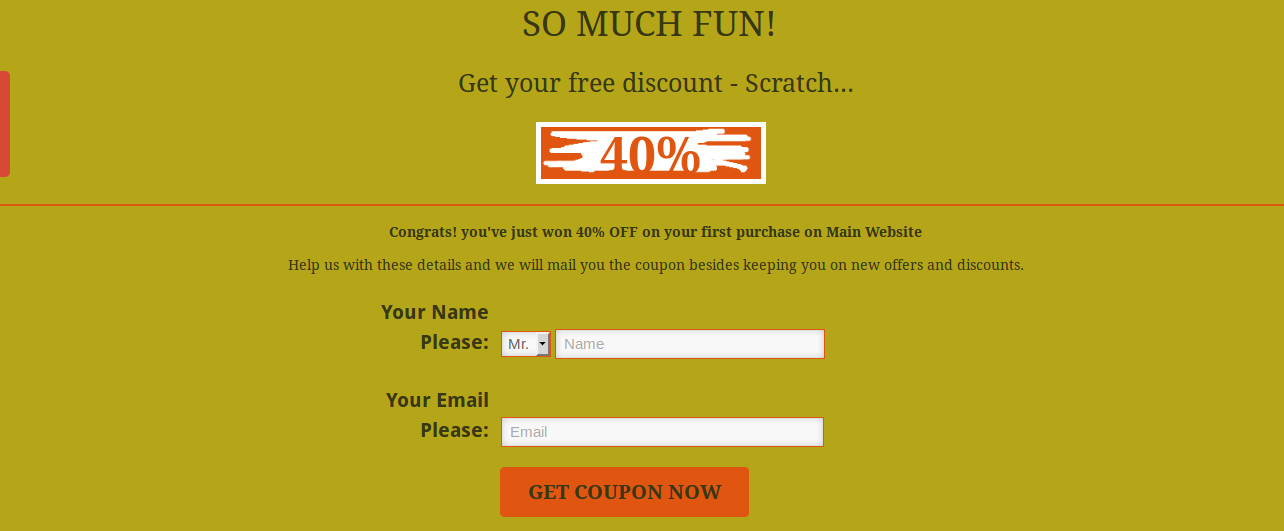
Knowband offers scratch coupon module will enable store owner to allow the system to give discount coupons to endpoint customers and analyze the customer’s need by tracking discount coupons. As we know that customers attract to any shopping sites on the base of attractive offers and various type of discounts. So, keeping these points in mind, this plug-in will generate discount coupon on the front end to all visited customers, based on defined discount criteria by the store owner.
Features:
The Magento email subscription module is fully customizable.
The Magento subscription module is fully compatible with all themes.
The scratch coupon Magento extension is easy to install and configure.
The Magento scratch game offers hassle-free implementation.
The store admin can allow free shipping.
The store admin can fix coupon code length.
The store admin can include JQuery if needed.
Expiry date of the coupon can be fixed in the admin panel.
The Magento scratch game offers mobile responsive layout.
The store admin can choose the page to show scratch coupon.
The store owner doesn’t need to change codes on the back-end.
It is so easy to enable/disable the module just by a button toggle.
The Magento scratch card offers fixed or percentage based coupon code.
The Magento scratch game allows look and feel settings on the admin panel.
There are coupon statistics represented in the form of a pie chart or via graphical figures to track an overall view.
The Magento scratch pop up offers an analysis report for monitoring the performance of this functionality from the admin end.
User Guide
1. To excess Scratch Coupon plugin, Click on scratch coupon option appearing as a sub-menu in navigation menu under System main menu as shown below.
2. On clicking sub-menu “Scratchcoupon” the module for the plugin will open. It contains navigational bar at the top, the menu at the left and main content in the center.
General Settings
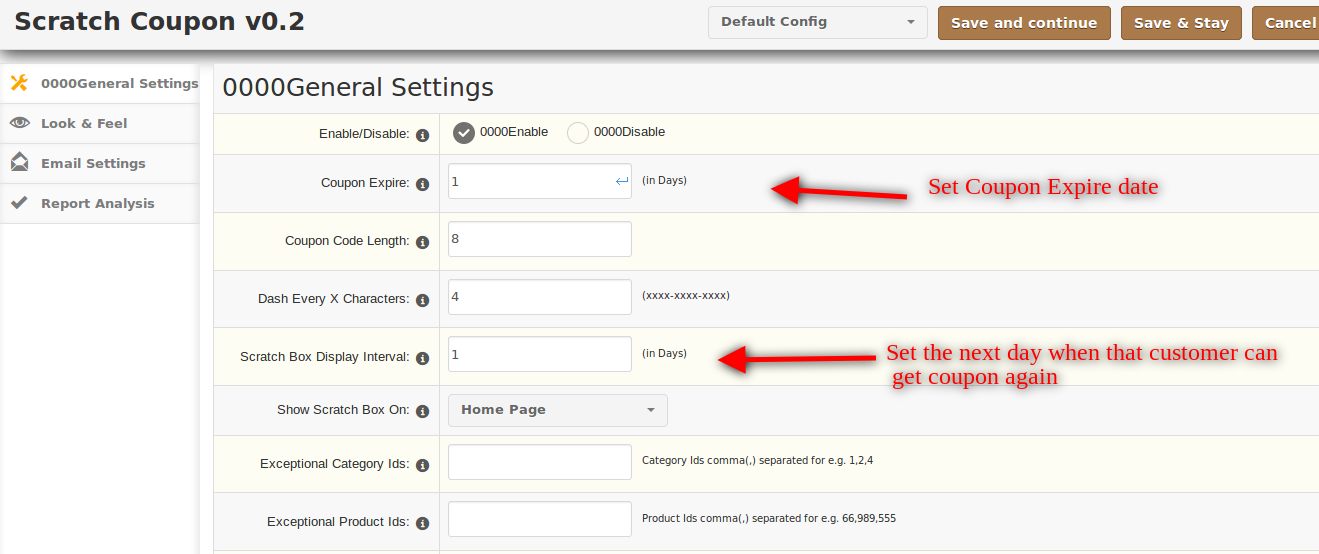
1. Enable/Disable: To enable the plugin, select enable present right to the label of “Enable/Disable”.
2. Coupon Expire: Enter coupon expire(in days) in the text-box present to the right of the label “Coupon Expire”. This will create a coupon which will expire in the days entered by you in the text-box.
3. Coupon Code Length: This will create coupon code of exactly that length which is entered by you in the text-box present to the right of label “Coupon Code Length”.
4. Dash every X characters: To create the coupon with code containing “-” i.e. xxx-xxx-xxx enter the value after which the dash will appear in the code. In case you don’t want a dash in the code, enter 0.
5. Scratch Box Display Interval: Scratch Box will be available again to a particular user after a certain period of time, this period depends on the value entered by the user in the text-box present.
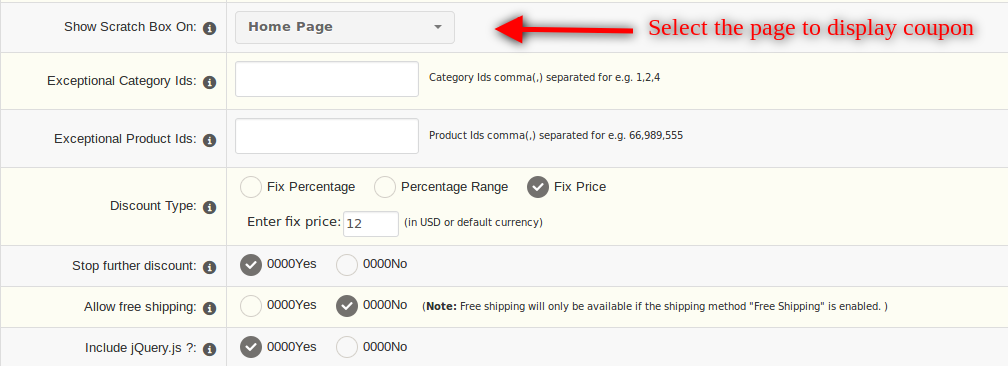
6. Show Scratch Box on: Here admin can select the page on which the scratch coupon will be shown.
7. Exceptional Category ID/Product ID: The store admin can enter the product and category ID to which he/she wants to exclude the scratch coupon box.
8. Discount Type: Three different types of discount can be provided to users.
Fix Percentage: In this fix, percentage value has to be entered in the textbox present.
Percentage Range: Random percentage range will be provided as a discount if this is selected.
Fix price: In this fix, the price will be provided as a discount, value has to be entered in the text-box.
9. Stop further discount: On enabling this option further discount to shop cart won’t be allowed if a coupon is applied.
10. Allow Free Shipping: Coupons created should allow free shipping or not is controlled by this option. If selected yes, free shipping will be provided. If selected no, free shipping won’t be provided.
11. Include jQuery: jQuery is a javascript framework which is required to make this plugin work. Sometimes themes used already contain this framework, in such cases, this should be selected as “No” otherwise it should be “Yes”.
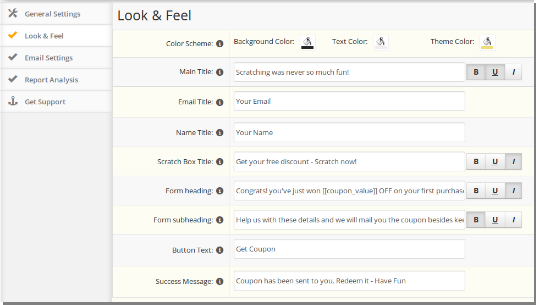
Look and Feel
This tab basically contains setting for how the scratch box will appear in the catalog.
1. Color Scheme: This contains the color appearance of the scratch box.
Background Color: This will control the background color of the box which will be shown in the catalog.
Text Color: This will control the color of the text being shown in the scratch box.
Theme Color: This will control the color of other options like border color, button color and etc.
2. Main Title: This will control the title shown at the top of the scratch box. Options to make the title Bold, Italic and underline are available. 3. Email Title: This will control the label shown in the scratch box form. 4. Name Title: This will control the label shown in the scratch box form. 5. Scratch Box Title: This will control the secondary title present just below the Main title. Options to make the title Bold, Italic and underline are available. 6. Form Heading: This will control the title present at the top of the scratch box form.Options to make the title Bold, Italic and underline are available. 7. Form Subheading: This will control the title present below the Form Heading in the scratch box form.Options to make the title Bold, Italic and underline are available. 8. Button Text: This will control the text shown in the button which is present the scratch box form section. 9. Success Message: This will control the success message which is shown after coupon is successfully dispatched to the user.
Email Settings
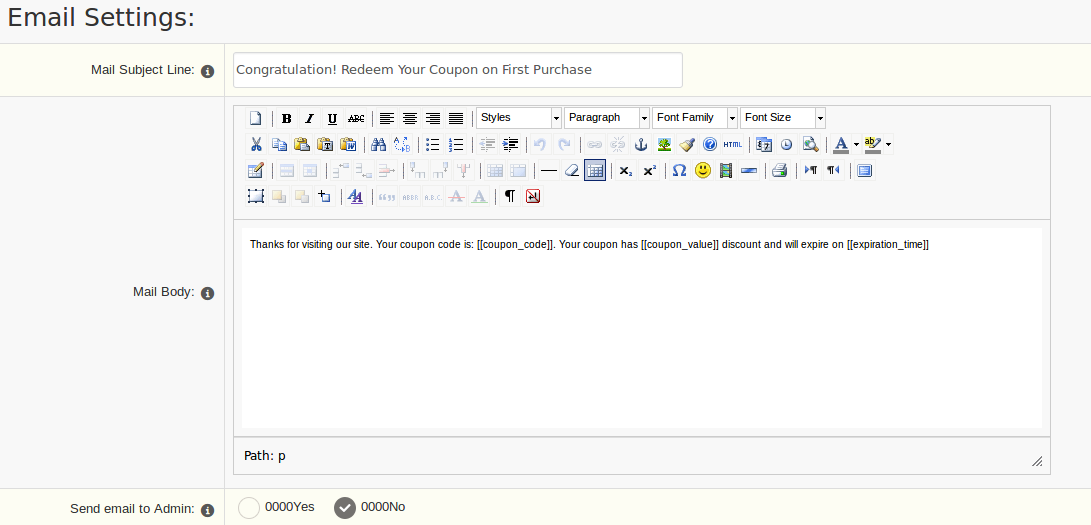
This tab contains setting for email which is sent the customer after scratching the coupon.
1. Mail Subject Line: This will control the text of the subject in the email which is sent to the customer after scratching coupon.
2. Mail Body: This will control the text of the main message which is sent to the customer after scratching coupon.
3. Send the email to Admin: If a copy of the email which is being sent to the customer is also required by admin, then this option should be selected as “Yes”. In case a copy is not required by admin, this should be selected as “No”.
Report Analysis
This tab contains reports related to coupons and discount being generated from the scratch coupon.
It is divided into four sections:
Discount Statistics
Coupon Statistics(Generate vs Used)
Coupon Statistics(Coupon used within days)
Coupon Statistics(Coupon Status)
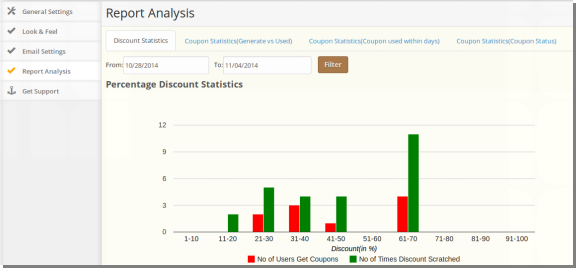
1. Discount Statistics:
This tab will show the statistics related to the type of discount i.e. Fixed or Percentage. Also, it shows statistics related to no of times coupons were scratched and no of users that actually received a coupon.
2. Coupon Statistics-Generate vs Used:
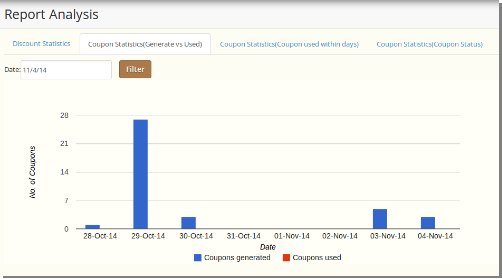
This tab will show the statistic related to no of coupon generated and no of coupon that was used. By selecting a date, you can get statistics related to that particular day.
3. Coupon Statistics-Coupon used within days:
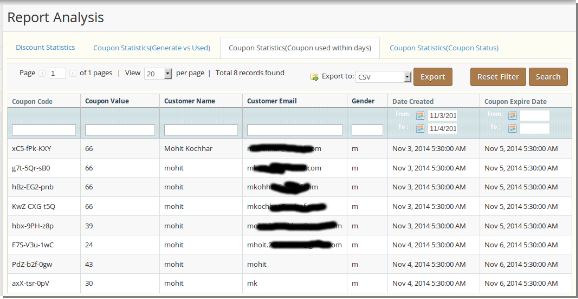
This tab will show the statistic related to coupons generated within particular days. It also contains list of all coupons generated and assigned to customers as shown below:
4. Coupon Statistics-Coupon status:
This tab will show the statistic related to coupons generated, coupons used and coupons expired between given interval of time in form of a pie chart as shown below.
The Magento master deal extension by Knowband is one of the best promotional modules that allows the admin to create deals to provide discounts on several products and list them all on one single page so that a customer can view all of the discounted products on one single page instead of browsing on the whole website. Magento deal timer extension allows the store admin to offer time-limited promotion. The Online retailers can now put forward a master deal and enhance the chances of conversions with the help of this boost sale plugin. The Magento deal promotion extension timer increases the effectiveness of the promotions and enables you to sell more.
1.1 Benefit of the Store Admin:
The Magento master deal module enables the Magento store admin to enable/disable the deal as his/her need.
The Admin can include jQuery if required.
The Magento master deal module enables the e-merchant to select the banner position to display the discount product.
The Magento product discount extension enables the e-merchant to select the banner type to display the discount product.
The Magento deal promotion extension by Knowband allows the store admin to enter the deal text to display on the deal.
The Online retailers can customize the look and feel of the deal banner or products.
The Magento master deal extension allows the store admin to set the discount amount and expiry duration, (that is, the start and end date) of the sale.With the help of this Magento extension, the admin to create N number of the deal if they want.
The Magento deal timer extension enables the store admin to set the priority of the deals.
The Admin can set the fixed percentage or fix the price of the master deal.
In the statistics tab of this Magento master deal extension, the admin can view the no. of deal products and no of deal product sale.
This Magento deal timer extension helps the online retailers to increase the sale of the website.
The Magento master deal module is multi-shop supported.
The multi-lingual support allows the admin to set the title in multiple languages.
This Magento deal promotion extension works flawlessly.
This Magento master deal extension is mobile responsive, the customer can view the deal banners or product on the mobile device.
This Magento extension reduces the cart abandoned rate of the website.
2.0 Installation
After purchasing the Magento single click checkout extension, you will get the following files as listed below:
1. magentocustommaintenancepage.zip (contains source code of the extension)
2. User Manual
Follow the following steps for installing Magento One Click Checkout Module:
Download the Magento extension package.
1.Unzip the magentocustommaintenancepage.zip file.
2. Copy all the files and folders of unzipped folder into your store root directory.
3. After copying all the files and folders, clear the cache.
4. Open any page of your store. Magento will install the module at the time of loading any page.
5.In the Admin Panel, go to “System > Knowband Extensions > Masterdeal”
To access Magento master deal extension, click on MasterDeal Menu appearing in System Menu navigation menu as shown below.
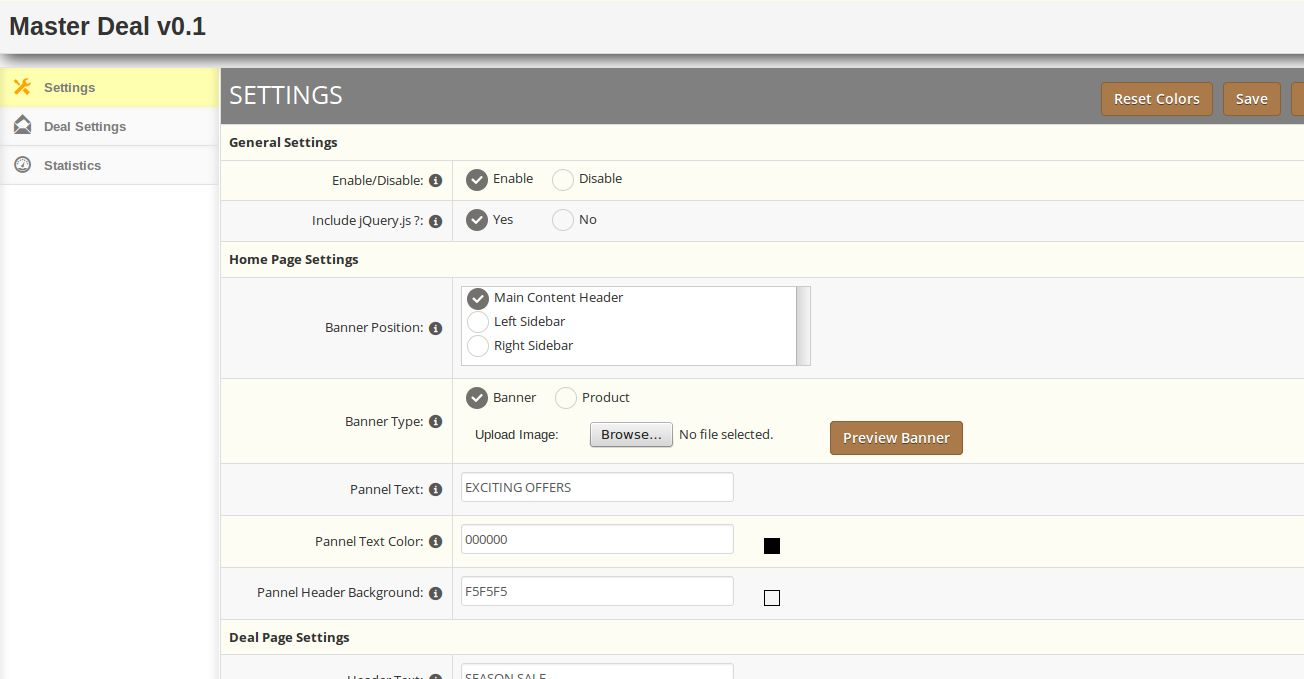
On clicking menu Masterdeal the module for plugin will open. It contains navigational bar at the top, Tab menu at the left and in main content the first Setting tab will display.
3.0 Extension Interfaces
There are two interfaces in this extension. Each interface has a different functionality according to its use. These interfaces are:
A.Admin Panel Interface (Only be accessible by admin/store owner)
B.Front End Interface (accessible to front end user)
Each interface has been described in separate section.
4.0 Admin Panel Settings
Admin Panel Settings contains the 3 tabs for settings.
4.1 General Settings
1. Enable/Disable: To enable the Magento Master Deal Extension, select enable option.
2. Include jQuery File: jQuery i.e. a javascript framework is required for this Magento deal timer extension to work.
Sometimes themes used in Magento already includes it but sometime they do not. If jquery is already included in your theme then deactivate else activate to include it.
4.1.1 Home Page Settings
1. Banner Position: Select a Banner Position on homepage according to your layout. To show banner in main content of homepage then select Main Content Header , for left column select left sidebar and for right column select Right Sidebar.
2. Banner Type : Select Banner type as Banner to set a banner image in home page panel. Otherwise select Product to display some deal products in home page panel.
NOTE: Preview of Banner Image will be available after saving the setting.
3. Panel Text : Enter the text to be display on the header of Home page Panel.
4. Panel Text Color: Select a color for above stated Text.
5. Panel Header Background : Select a color for background of Home Page panels Header.
4.1.2 Deal Page Settings
1. Header Text : Set a text for the header of Deal Page listing all the deal products.
2. Header Text Color: Select Color for the header text.
3. Header Text Background: Select Color for the header text background.
4.1.3 Product Panel Settings:
1. Timer Color: Set a color for the timer on the product panel.
2. Timer Background Color: Select Background Color for the Timer.
3. Hover Effect : Adds a special effect on product panel when mouse hovers on them . To enable this effect select yes.
4. Timer Color: Select color for timer text during hover effect.
5. Background: Select color for Product Panel during hover effect.
4.2 Deal Setting Tab
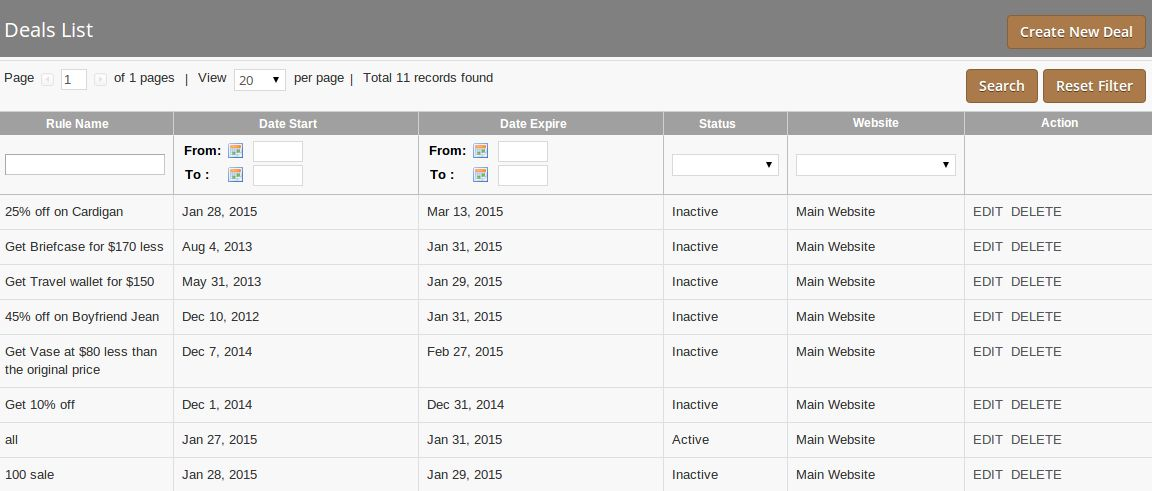
In this tab you can create, view , edit, delete the deals (i.e. Magento Catalog Price Rules.). You can also use Magento’s default interface to setup the price rules. When you click on the Deal Setting Tab , at first a grid will display listing all the deals. In grid the last column ACTION provide two options:
1. EDIT : On Click of this, the details of deal will displayed where you can also edit the deal.
2. DELETE: On click of this, the corresponding deal will be deleted.
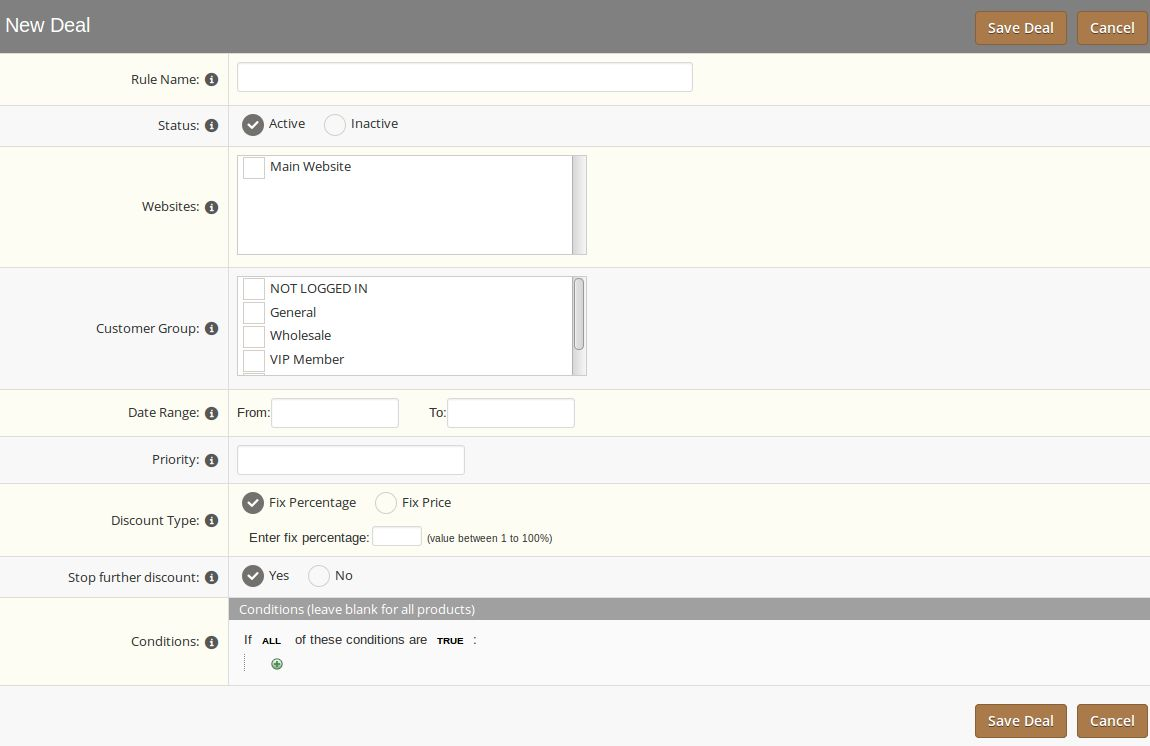
On the right top of the grid , there is button labeled as Create New Deal . On clicking , a form will display to create new deal(i.e Catalog Price Rule).
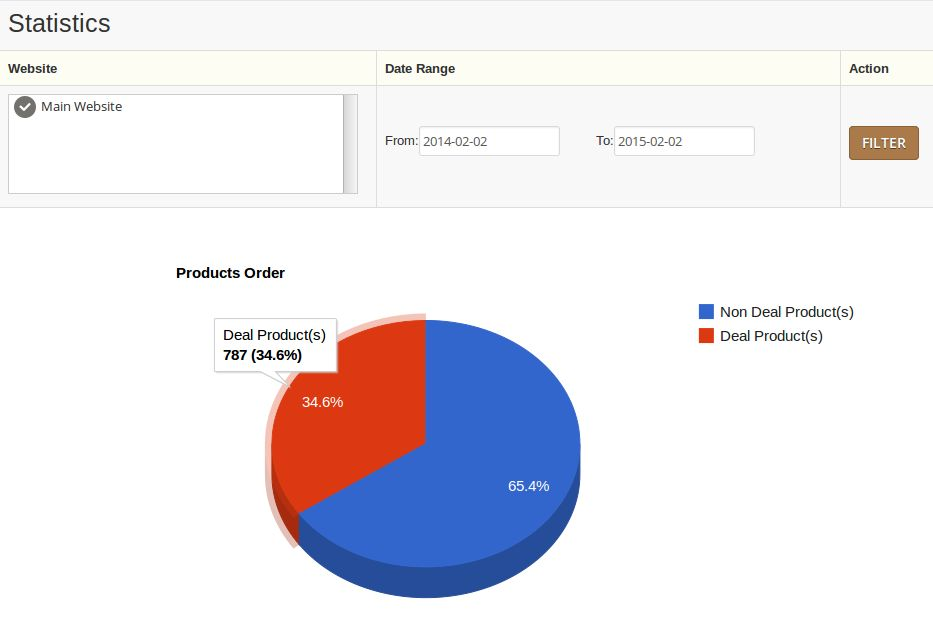
4.3 Statistics Tab
This Tab show a pie chart describing the no. of deal products(i.e the product having discount under any deal) ordered among all orders during the selected date range.
You can try Knowband’s Magento Master Deal Extension for on your Magento store. KnowBand’s Magento single click checkout module helps you increase customer engagement to your store and boost the sale in youre eCommerce store.
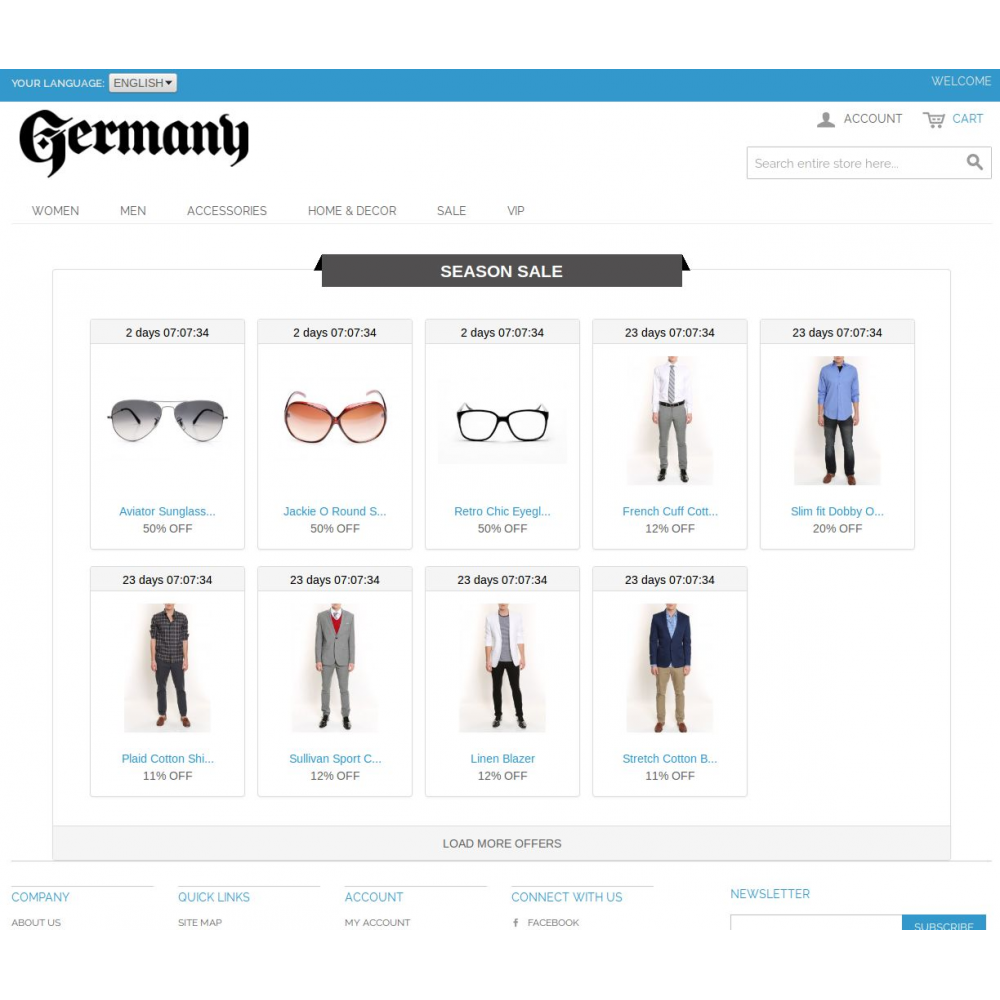
5.0 Front End
Front End Interface will show the master deal extension with configured settings set through the admin panel of this Magento master deal extension. You can find screenshot below-
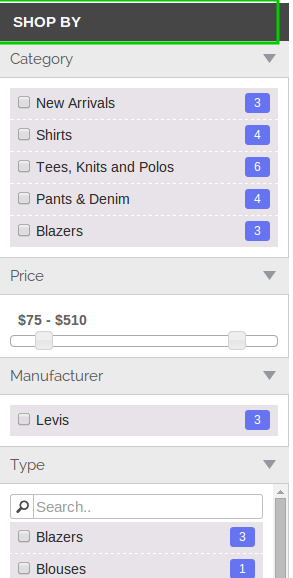
Knowband offers Magento Filter Pro Extension which allows the store admin to display advance filtering options on the eCommerce store. It helps the customers to add filter narrow down search result so that they can find their desired price with fewer efforts. Now the Magento store owner can decrease bounce rates and increase sales by making the navigation to the products quite easily. The Magento product filter extension is highly customizable. The store admin can show multiple filtering options. Look and feel of the product pages can be managed easily from the admin panel.
Features:
Magento filter pro extension module is very easy to install and configure.
Product filter extension can be enabled/disabled easily.
Offers simple and hassle-free implementation.
Magento custom filter module allows managing the look and feel of filters.
Magento advance filter module is highly customizable.
No technical skills are required to implement this functionality.
No need to change the codes in back-end for implementation.
The checkbox layered navigation extension is multi-store compatible.
AJAX-based navigation makes product search faster.
Customers can specify their own custom ranges for weight, price, size and other search attributes.
Admin can hide or display attributes for product categories.
Admin can choose the type of filter options and it’s positioning also.
Follow the following steps for installing Filter Pro extension:
Download the extension package.
Unzip the package on your root folder of Magento setup via FTP manager (like Filezilla or WinSCP – download here: https://filezilla-project.org/).
In Admin Panel go to System > FilterPro. In case you are not able to see the link under System, please clear Magento Cache first then check again.
That is all – Extension is installed on your system.
Admin Module
The Admin Module contains 3 tabs as mentioned below:
General Settings
Attributes Settings
Color Scheme
General Settings
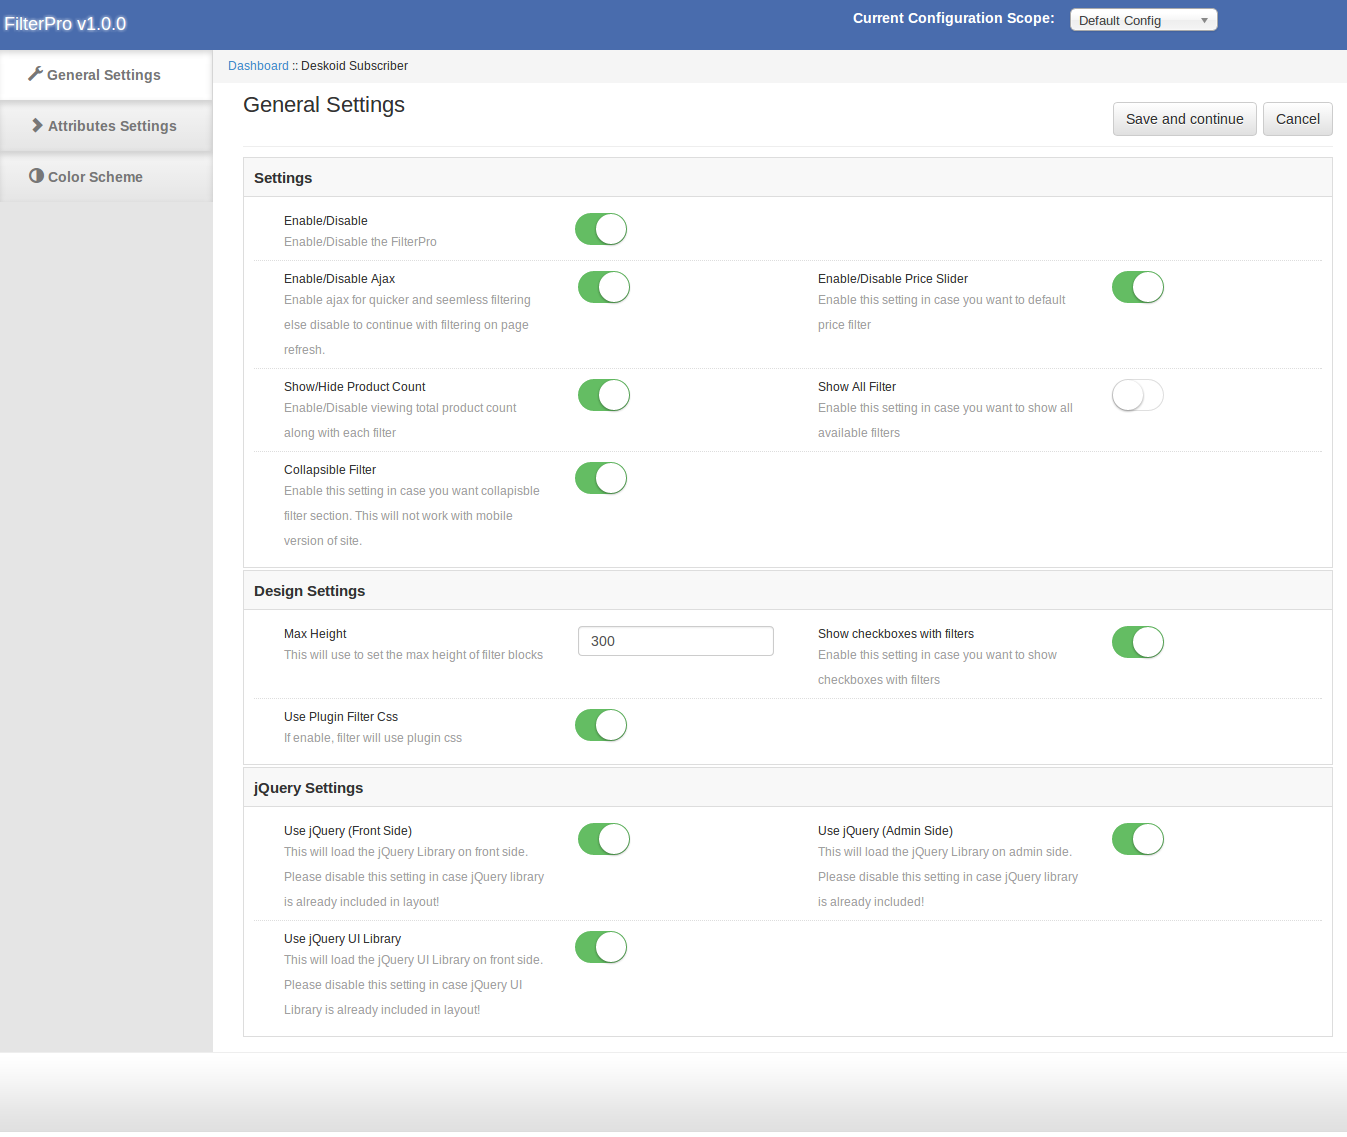
The General Settings tab has following options:
Enable/Disable: Enables or Disables the extension on the storefront. If disabled, default layered navigation will show.
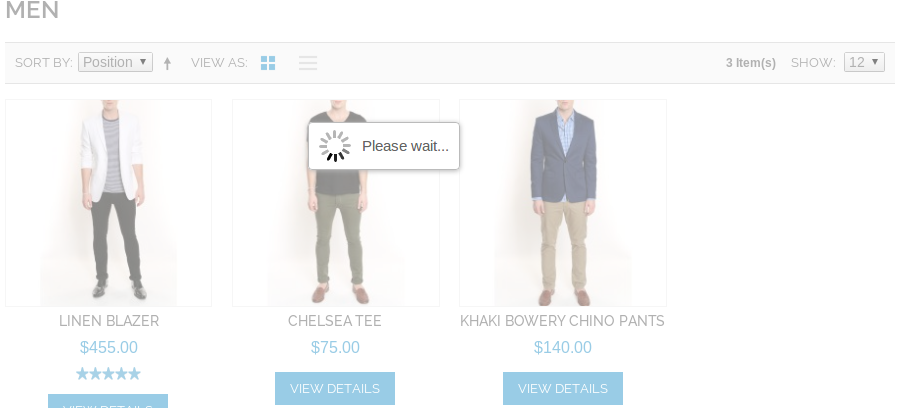
Enable/Disable Ajax: This will enable the product filtering without page refresh. This setting will be applicable to left-hand filters, sorting, paging, product view type etc.
Enable/Disable Price Slider: This will replace the default price filter with price slider.
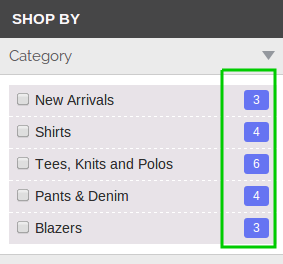
Show/Hide Product Count: In case you want to hide/show the product count.
Show All Filter: On the front side by default filters will hide/show as per the first selected filter section e.g. If we choose color first then all colors will available for selection but other filters will hide/show as per product available.
If this setting is enabled, the extension will show all the filters permanently.
Collapsible Filter: This will enable the collapsible filter.
Max Height: In case we need to increase the height filter section, we can do that by this setting. This field supports numbers only.
Show Checkbox with Filters: Show/hide checkboxes with filter, price and categories.
Use jQuery (Front Side): Disable jQuery in case it is already included on front by another plugin or theme.
Use jQuery (Admin Side): Disable jQuery from admin side in case it is already included in admin by another plugin.
Use jQuery Ui Library: Disable jQuery UI from admin side in case it is already included on front by another plugin.
Attributes Settings
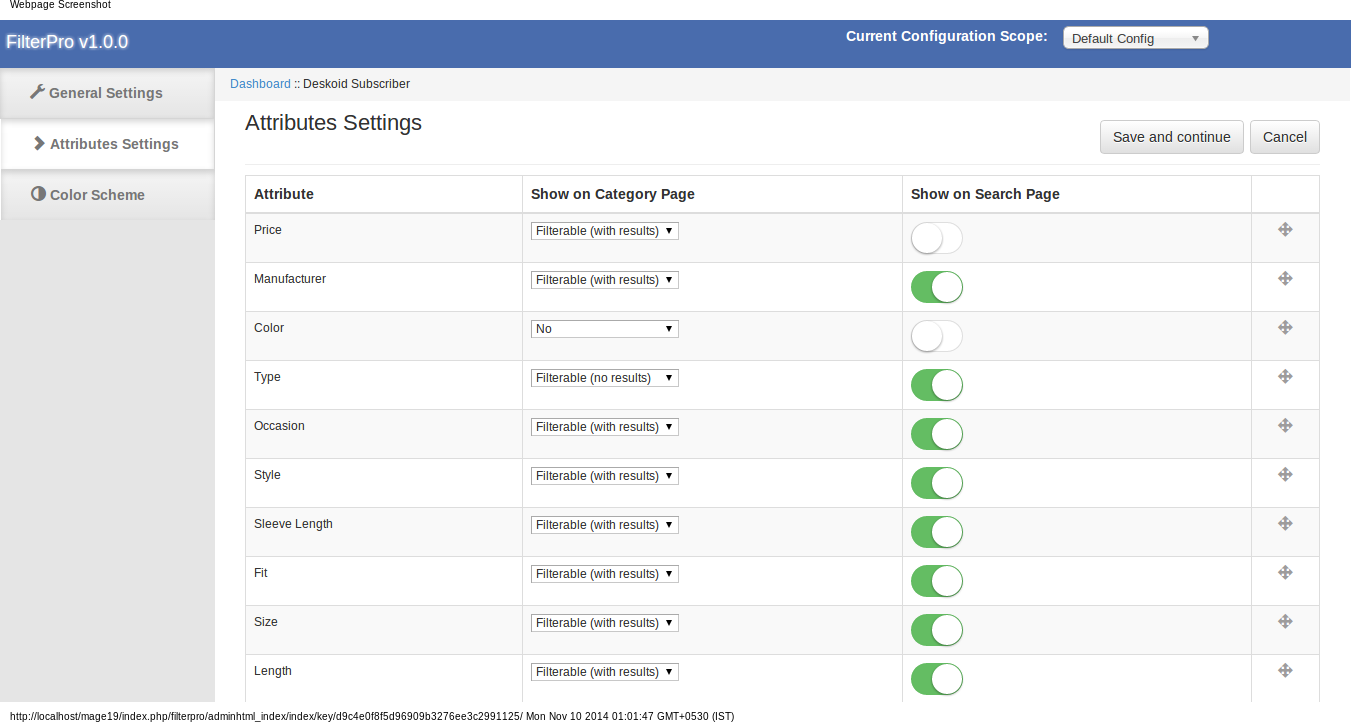
This tab shows the list of all attributes of drop-down/Multiple Select/Price along with disable/enable option from category & search page and sorting option.
To change filter position, we need to drag the filter to the new position.
Color Scheme
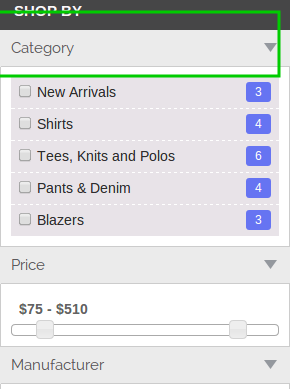
In this module, we have also provide the option to change the color of filter. These settings will apply if Use Plugin Filter CSS setting is enabled.
Plugin has the color picker to choose the appropriate color for filter.
Filter Header:
Selected Filter Header:
Filter Heading Box:
Product Count Box:
Filter List Box:
Store Front
If extension is enabled, layered navigation will apply on category page. In case, extension layered navigation is not working, there can be 2 possible reasons as mentioned below –
Another extension overriding Magento Layered Navigation – If this is the possibility then we need to disable that extension.
Category is not set as anchor – Layered navigation work with categories of anchor type. To mark a category as anchor please edit that category.
To edit a category go to Catalog -> Manage Category page.
How to optimize the checkout process for your Magento store to make it responsive yet simple for the online users? By reducing the multiple checkout steps involved in a checkout process of a website, customers are more likely to purchase and thereby increase the conversion rate for your store. To simplify the checkout process of your Magento store, Knowband offers Magento One Page Checkout extension which incorporates a single step checkout page on your website, referred to as Magento Supercheckout. This supercheckout page gathers and displays all the checkout fields on a single page easing customers to fill information and complete checkout for their product.
The checkout page and layout has been optimized to show all necessary steps needed to complete the order on a single page to the customer. Magento one step checkout is fully responsive for desktop, tablet, and mobile views and is perfectly compatible with all native Magento payment and shipping methods which are configurable from the backend interface.
Features of Responsive checkout for Magento
1. Magento one page checkout extension simplifies the multi-step checkout process by incorporating a single step checkout on the store.
2. Ajax based loading of Magento one step checkout eliminates the delayed loading time consumed by multiple checkout pages.
3. Magento quick checkout extension gathers and merges all the checkout field information into a single page checkout form which is convenient to fill for the customers while performing order checkout.
4. The mobile responsive feature of Magento one page supercheckout makes it compatible with all kinds of devices(mobiles or tablets), screen sizes and designs.
5. Store merchant can also enable the guest registration option for their customers which automatically generates and sends a random password to the user for further account use.
6. If guest registration with password is enabled, admin can allow their customers to fill the desired password for their account while performing guest checkout.
7. Magento one page checkout extension offers an option to enable or disable newsletters for the eCommerce store.
8. Magento fast checkout extension offers two easy social login options like Google and Facebook so that the customers can conveniently login and perform checkout on the store.
9. This one step checkout Magento extension offers customizable address fields for payment address and shipping address. Admin can show or hide the fields differently to guest and logged in customers of the store.
10. With Magento one step checkout module, admin can configure and display multiple payment and shipping methods for their shop on the frontend.
11. This Responsive checkout for Magento offers a configurable cart to the store merchants. Admin can show/hide any cart description field as per their site needs.
12. Magento one page checkout extension offers two intuitive and appealing layouts including 2-column and 3-column which are fully customizable from backend panel of the module.
The Magento front end relies heavily on caching to provide a faster experience to customer. This is a wonderful tool, but can wreak havoc during the installation process. To ensure that the cache is not the cause of any problems, we should turn it off. This can be done from the admin console by navigating to the cache management page (System->Cache Management), selecting all caches, clicking disable from the drop-down menu, and submitting the change.
2. Disable Compilation Mode
This may not be an issue for many readers, but if you are using Magentos compilation mode on your store, it is important that you remove it. Without going into to many details, compilation mode takes many files spread out over the system and condensing them into a single file that can be run very quickly. If an extensions files are not in the system when this single file is compiled, they will not be included. To check that this is disabled, go to System->Tools->Compilation. If the compiler status is Disabled, you are ready to go. If not, simply click the Disable button on the right hand side of the screen.
Choose An Installation Method
There are two different methods used to install extensions.The first involves taking advantage of the Magento Connect Manager, while the second involves manually installing the files via ftp or command line. The first option is generally used by store owners and is a relatively automated process, the problem is that if there is a problem with this process, you are at the mercy of the connect manager to tell you where the problem is coming from. Option two involves getting your hands on the files yourself and manually dropping them into the Magento installation.
Option 1: Using Magento Connect
Required Materials:
User account for Magento Connect
Magento Admin account with access to Magento Connect Manager
As stated before, this option is relatively easy to implement. The first step is finding the link on Magento Connect for the extension you wish to install. Once there click install now. If you are not currently logged into the site you will be prompted to do so. Next, select the version of Magento connect you are using (if in doubt, select 2.0), accept the extensions license agreement, and copy the extension key.
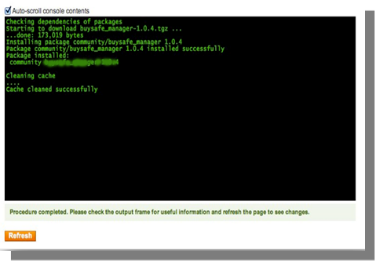
Log into your stores admin console and navigate to System->Magento Connect->Magento Connect Manager. At this point you will be prompted to re-enter your administrator credentials. In order to install an extension from the connect manager; you must have an account with full access to the administration console. If you were given limited access, Magento will not allow you to proceed. Once you are logged into the manager, simply paste the extension key into the text box and click install. A system window will appear towards the bottom of the page that will display the progress of your installation.
Congratulations, you have successfully installed the extension on your store. Be sure to test thoroughly before re-enabling the cache/compilation. If you found no problems both before and after these features have been re-enabled, you should be ready to repeat the installation process on your live site. DONT FORGET TO BACKUP ALL FILES AND DATABASES BEFORE INSTALLATION!
Option 2: Manual Installation
Required Materials:
All files used by the extension.
FTP access to your website.
The connect manager is a useful tool for installing extensions, but prefer hands-on method when it comes to installations. It feels more comfortable when you are personally in control of the process.
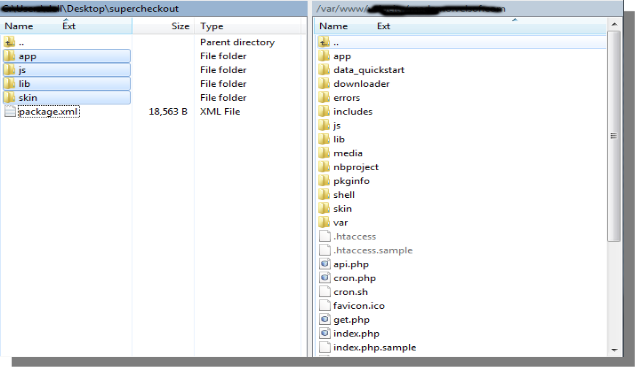
Do you see an app-code directory there, what about app-etc-modules? If you dont see these directory paths and files contained within them chances are that the extension download was faulty. Take a look at the package.xml file, this is the blueprint used by Magento Connect to arrange the files in the proper places. You may need to use this to ensure that everything is as it should be. Once you have reviewed the extension files you are ready to perform the last step. Using your ftp client, drag all of the files onto the store root of the Magento instance. Depending on the number of files in the extension, this may take a few moments.
Now go to the admin console and click Flush Cache Storage. This is the requirement for any extension that adds pages to the admin console. Logging out and back in is also required to ensure that everything loads properly. If you cannot clear the cache via the admin console for any reason, you will need to clear the cache manually via your FTP client (see the first FAQ question for assistance). That is the final step. Congratulations on a successful installation.
Troubleshooting & FAQs
I loaded all files onto my Magento store, and now get a white screen for some or all of the admin console.
This is a fairly common problem, and 99% of the time it is cache related. If you can get to it, go to System->Cache Management and click Flush Cache Storage. This will ensure that everything cached by Magento is deleted and will to be regenerated. Log out and back in to complete the process.
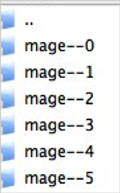
If you are completely cut off from the admin console, navigate to the var-cache directory of your website. You should see a series of directories named mage*. Delete all of these directories (DO NOT DELETE var-cache). This is the equivalent of flushing the cache storage from the admin console.
I am receiving a Magento error when accessing certain pages. How can I debug this?
This question really deserves a blog post all to itself, but a good start would be to go into the errors directory of your store. Locate the local.xml.sample file and rename it local.xml. The next time you see the error detailed information will be provided explaining where the error took place. Dont forget to change this back when you are finished troubleshooting!
I have a critical error with my webstore and need to turn off an extension I cannot access the admin console. What do I do?
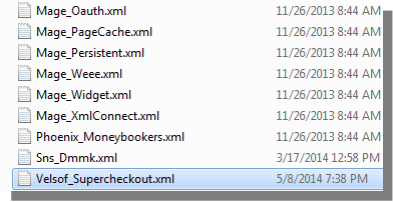
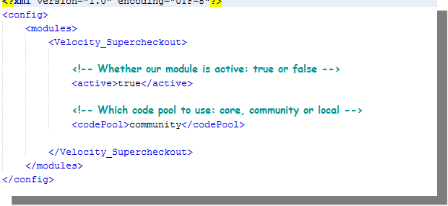
Go to the app-etc-modules directory and open the file that goes with your extension. The naming convention is generally DeveloperName_ExtensionName.xml. In this case it would be Velsof_Supercheckout.xml.
Look for the active tags in the file, change the value from true to false and save your changes. This tells Magento that the extension is disabled and not to run any code associated to it. Deleting the Magento cache is recommended (and most likely required) for this change to take effect.
General Settings
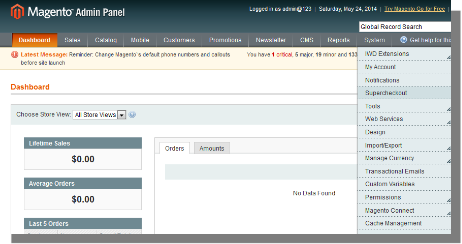
To excess Super Checkout plugin, Click on supercheckout option appearing as a sub menu in navigation menu under System main menu as shown below.
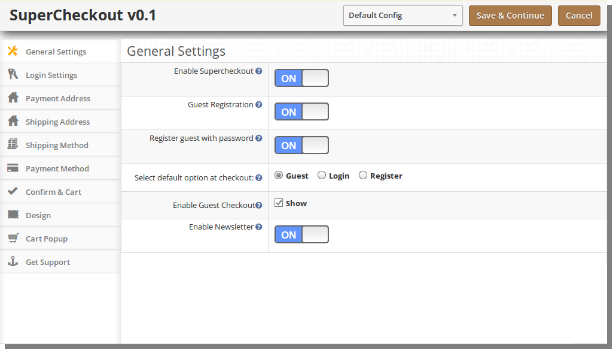
On clicking sub menu Supercheckout the module for plugin will open. It contains navigational bar at the top, menu at the left and main content in the center as shown below. To enable the plugin, switch the enable button from OFF to ON which is just to the right of Enable/Disable label.
To enable guest registration, switch the button from OFF to ON which is just to the right of Register Guest Automatically label. Enabling this would result in registering the guest to your store and an automatically generated password would be mailed to that user.
To enable registration, switch the button from OFF to ON which is just to the right of Register Guest With Password label. On enabling this password and confirm password fields will appear so that customer can register from the checkout page itself.
To change the default option from Guest, Login or Register in Login section of checkout page, select an option from given radio button. The selected option will be set as chosen option by default.
To enable or disable guest checkout by the user check/uncheck the checkbox which is just to the right of Display Guest label.
Login Tab
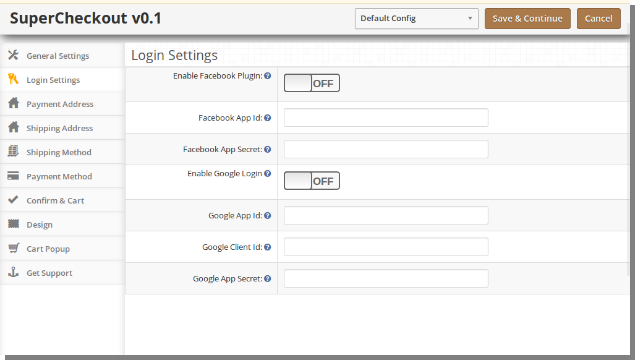
This tab of Magento One Page Checkout basically contains setting to enable /disable Facebook and Google registration & login as shown below.
To enable Facebook Registration & Login switch the button from OFF to ON which is just to the right of Enable Facebook Login label. But before you do that do get facebook APP ID and APP SECRET from https://developers.facebook.com.
Enter the APP ID and APP SECRET in their respective fields and save. You will find Facebook login button on your checkout page.
To enable Google Registration & Login switch the button from OFF to ON which is just to the right of Enable Google Login label. But before you do that do get Google APP ID, CLIENT ID and APP SECRET from https://code.google.com/apis/console. For detailed instructions to get the APP ID, download the Facebook & Google Setup guide from oepncart accout.
Enter the APP ID, CLIENT ID and APP SECRET in their respective fields and save. You will find Google login button on your checkout page.
Payment Address Tab
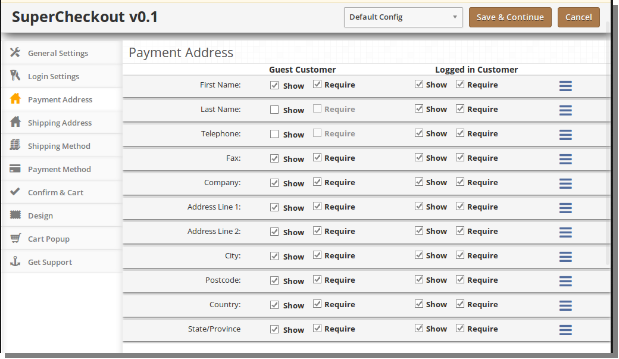
This tab of Magento One Page Checkout contains setting for the fields which is to be shown in Payment or Billing Address section in checkout page as shown below.
It consists of two sections. The one in the left is for Guest Customers and the right one for registered customers.
To make a field display/hide in the checkout page check the checkbox just to the left of Show label.
To make a field as mandatory (required field) check the checkbox just to the left of Require Label.
The fields can also be rearranged according to the requirement. To rearrange just move the cursor to the drag icon and drag & drop the field wherever it is required as shown below.
On saving, the fields will be rearranged as per the changes.
Shipping Address Tab
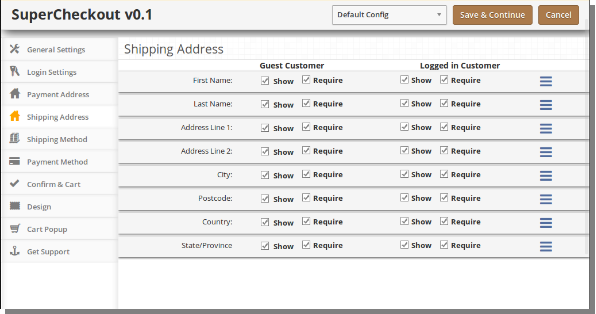
This tab of Magento One Page Checkout contains setting for the fields which is to be shown in Shipping Address section in checkout page as shown below.
It consists of two sections. The one in the left if for Guest Customers and the right one for registered customers.
To make a field display/hide in the checkout page check the checkbox just to the left of Show label.
To make a field as mandatory (required field) check the checkbox just to the left of Require Label.
The fields can also be rearranged according to the requirement. To rearrange just move the cursor to the drag icon and drag & drop the field wherever it is required which is same as payment address.
Shipping Method Tab
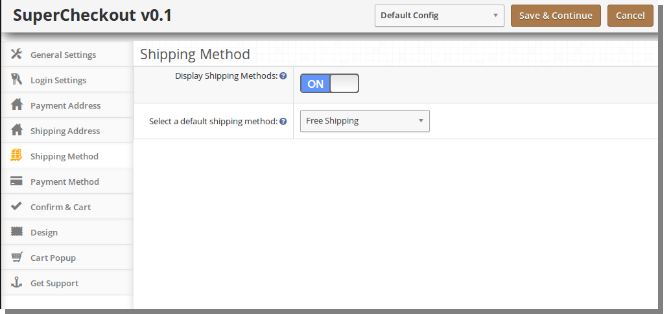
This tab of Magento One Page Checkout contains settings for shipping method which is shown in checkout page. It basically contains settings for enabling/disabling and setting the default shipping method as shown below:
To Enable/Disable the shipping methods from the checkout page switch the button from ON to OFF or vice-versa. This will disable the shipping method block from checkout page. But you should select a default shipping method (if any installed) to apply shipping charges to the order.
To get a default shipping method selected in the checkout page select the default shipping method from the dropdown. If the selected shipping method is not installed it will automatically select from installed shipping method.
Payment Method Tab
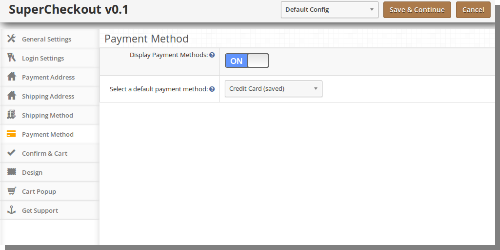
This tab of Magento One Page Checkout contains settings for payment methods shown in checkout page like enabling/disabling or selecting a default method.
To Enable/Disable the payment methods from the checkout page switch the button from ON to OFF or vice-versa. This will disable the payment method block from checkout page. But you should select a default payment method (if any installed) to get a payment method in the checkout page.
Confirm Tab
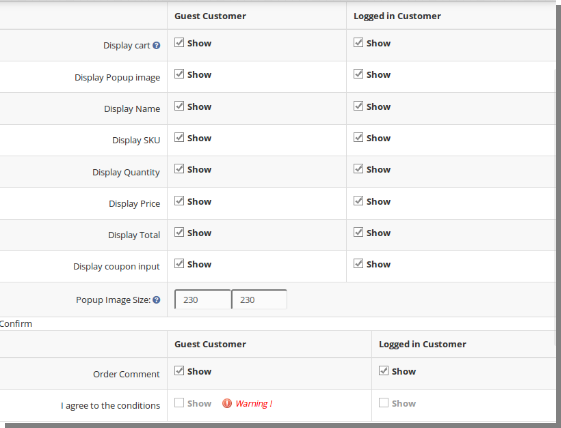
This tab contains setting of Magento One Page Checkout is for the cart and confirming the order as shown below:
Its divide in two section
a. Cart
b. Confirm
Cart
1. This tab is again divided into two sections, the left one is for Guest Customers and Right one for Registered or Logged in customers.
2. To Display/Hide cart from the checkout page check uncheck the checkbox present in front of Display Cart label.
3. To enable/ disable any column in the cart check/uncheck the checkbox in front of that respective column.
4. To enable/disable the popup images for the product check/uncheck the checkbox in front of that respective column.
5. To change the size of popup for images Enter the width and height of the popup in textbox in front of Pop Image Size label.
6. Coupon and Voucher options can also be disabled or enable by checking/unchecking the checkbox in front of that respective field.
Confirm
1. This tab is again divided into two sections, the left one is for Guest Customers and Right one for Registered or Logged in customers.
2. To enable the comment box for the order by customer check the checkbox in front of that Leave a comment for the order label & to disable uncheck the same checkbox.
3. To enable agree to the term or any other information saved in the admin for the store check/uncheck the checkbox in front of I agree to the conditions label.
Design Tab
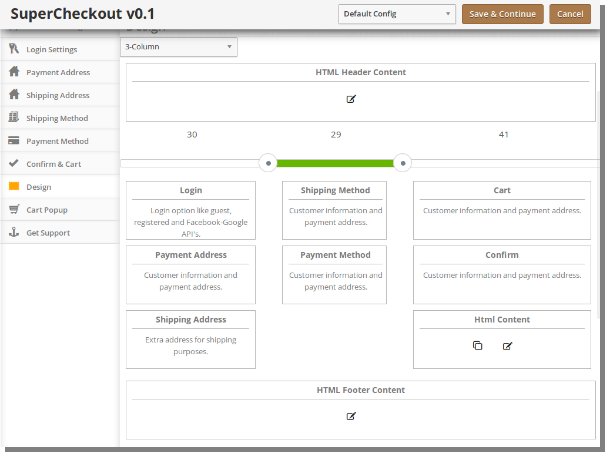
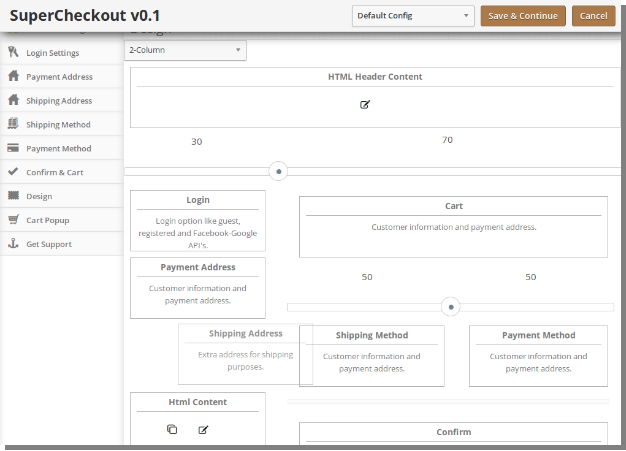
This tab contains the settings for the design of checkout page in the catalog as shown below
To change the width of any column adjust the slider present at the top as shown below :
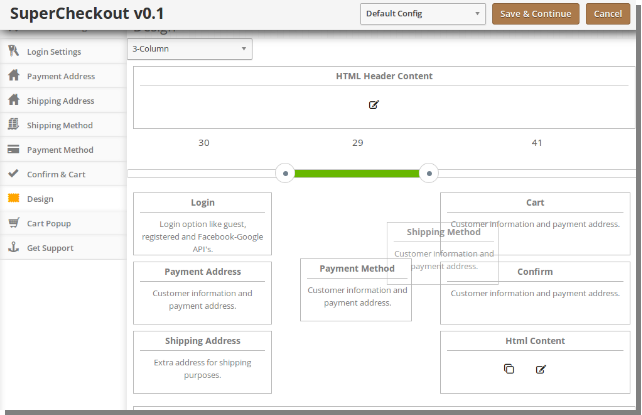
Block of different steps can also be rearranged from one column to the other or in the same column as shown below:
On saving, the block will be rearranged in the checkout page as per the changes
The same goes for layout with two columns as shown below:
Confirm and Cart Tab
This tab contains the settings for pop up cart that appear on adding any product to the cart.
To enable the popup cart on frontend, you can show/hide the complete cart or you can show/hide the selected cart fields only.
Admin can select and unselect the different cart fields for logged in and guest users of the store.
Admin can also set the Popup Image Size which is shown over the product shown in the cart section of the checkout.
Store merchants can also grab cutomer’s comment regarding the product by enabling and disabling the order comment field on supercheckout page.
Magento Abandoned Cart module helps the Magento store admin retain their customers. The Magento shopping cart email alert is one of the ways to boost the loyalty of the online shoppers and even attract them back to the store. The Magento Abandoned Cart extension focuses on the customers who visited the site, but left without completing their transaction. The Magento plugin keeps a track of the abandoned carts of the site. Not just, it allows the store admin to send personalized emails and promotional triggers from the back-end of the Magento Abandoned Cart plugin. The alerts and notifications give compelling reasons to the customers to return back to the store and complete their transaction.
1.1 Admin Benefits of Magento Abandoned Cart Extension:
Magento abandoned carts extension tracks the store visitors who saved the product in their cart and left the site without placing the order.
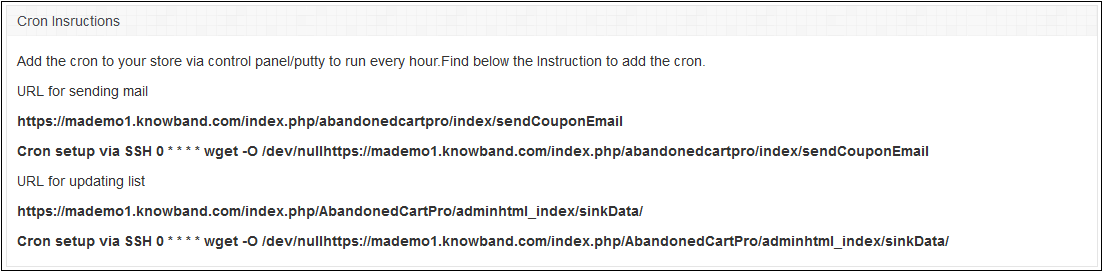
The list of the abandoned carts in the back-end of the Magento abandoned cart notifications module can be updated by executing cron.
The admin can track incomplete orders and send reminders to the customers with the help of Magento abandoned cart alerts.
Magento abandoned cart emails allows the store admin to send offers discounts or send the reminder without any discounts.
The store admin can send a notification to a particular customer just by clicking a button from the back-end of the Magento abandoned carts module.
Or else, the admin can even send automatic serial reminders by executing cron in the back-end of the Magento abandoned carts extension.
The coupons sent to the customers can be used to get the discount on the checkout page.
The admin can view the statistical report of the abandoned cart and the conversions happened after the email triggers are sent from the back-end of the Magento abandoned cart module.
The Magento abandoned cart extension offers a number of default email templates to the store admin. The merchants can even customize them as per their wish.
The email sent to the customers allows them to directly to the checkout page by clicking a button.
2.0 Steps For Installation of Magento Abandoned Cart Module
Follow the following steps for installing Magento Abandoned Cart extension:
Download the Magento extension package.
Unzip the package on your root folder of Magento setup via FTP manager (like Filezilla or WinSCP – download here: https://filezilla-project.org/).
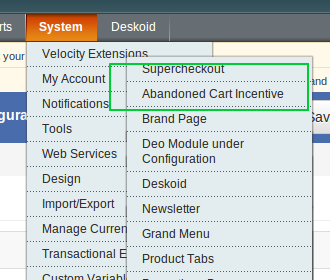
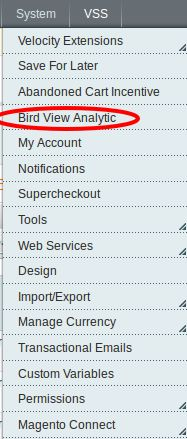
In Admin Panel go to System > Velocity Extensions > Abandoned Cart Incentive.
The Admin Module of Magento abandoned cart notifications module contains 6 tabs, namely:
General Settings
Email Templates
Serial Reminders
View Abandoned Cart
View Conversion Rate
Analytics
They are discussed in detail below:
3.1 General Settings of Magento Abandoned Cart Extension
The General Settings tab of Magento abandoned cart module has following options:
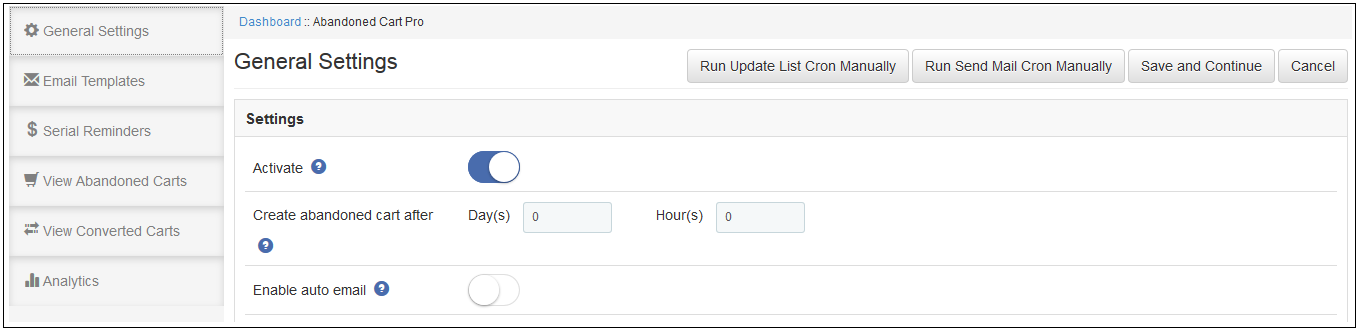
Activate: Enables or Disables the Magento abandoned cart extension on the store front. If disabled, the cart abandonment will not be tracked and no coupon codes will be sent to the customers. Apart from this, user can not see the content in other tabs.
Create abandoned cart after: The Delay time of Magento Abandoned Cart Extension is the time period after which the cart will be assumed to abandoned.
Enable auto email: This feature of Magento Abandoned Cart Extension will allow admin to schedule (Cron Setup) coupon email sending task or not.
The General Setting tab of Magento Abandoned Cart Extension includes two more options. They are:
Run Update List Cron Manually: Execute this cron to update the list of the abandoned cart and their details in the ‘View Abandoned Cart’ tab. Any cart changes done by the customers in the front-end will be updated in the Magento Abandoned Cart Extension’s database once the cron is executed.
Run Send Mail Cron Manually: By executing this cron, the admin can send auto emails to all the customers whose abandoned shopping cart is listed.
3.2 Email Templates of Magento Abandoned Cart Extension
The Email Template tab of the Magento abandoned cart plugin has is the format of the email that will be send to the customers. This field of Magento Abandoned Cart Extension contains some place holders whose values will be replaced when the email will be sent.
The place holders are:
{{name}}-This is for the name of the customer
{{cart_content}}-This is for the cart content of the customer
{{shop_name}}-This is for the shop name
{{shop_url}}-This is for the shop url
{{discount_code}}-This is for the discount code given to the customer
{{discount_value}}-This is for the discount value given to the customer
{{total_amount}}-This is for the min amount of the cart for the discount to apply
{{date_end}}-This is the last date of the dicount validity
Keep these place holders as it is.
The admin can edit/delete the email template by clicking on the Edit or Delete button respectively as shown in the image below:
In order to create new templates, click on the Add New button as shown below:
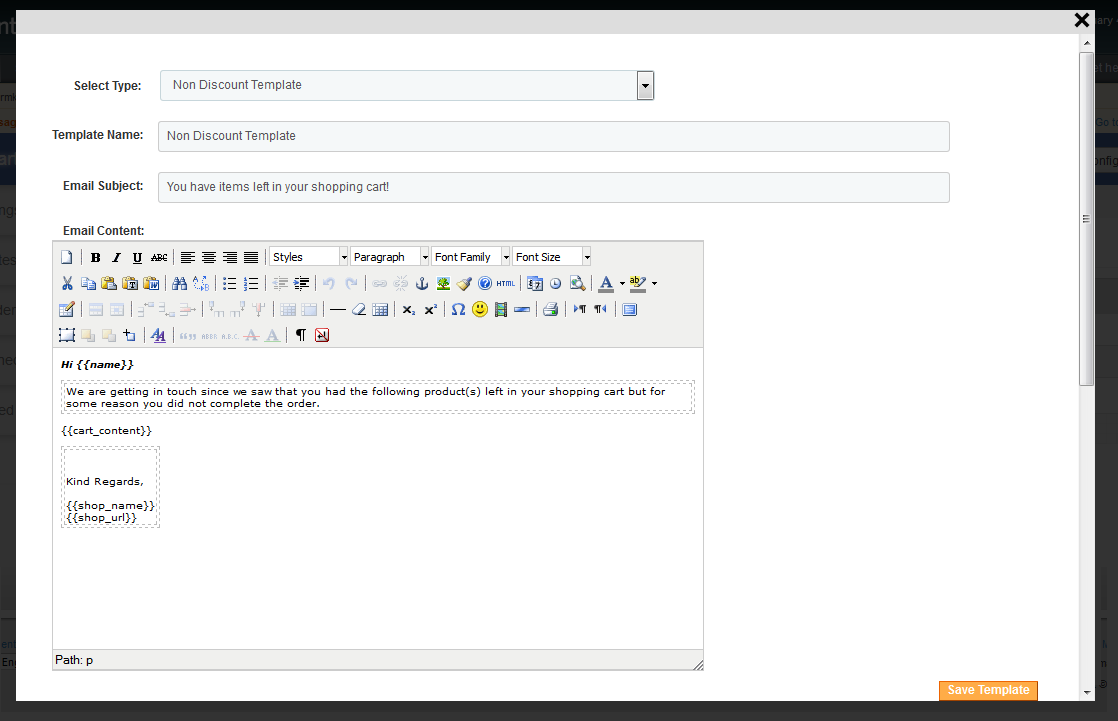
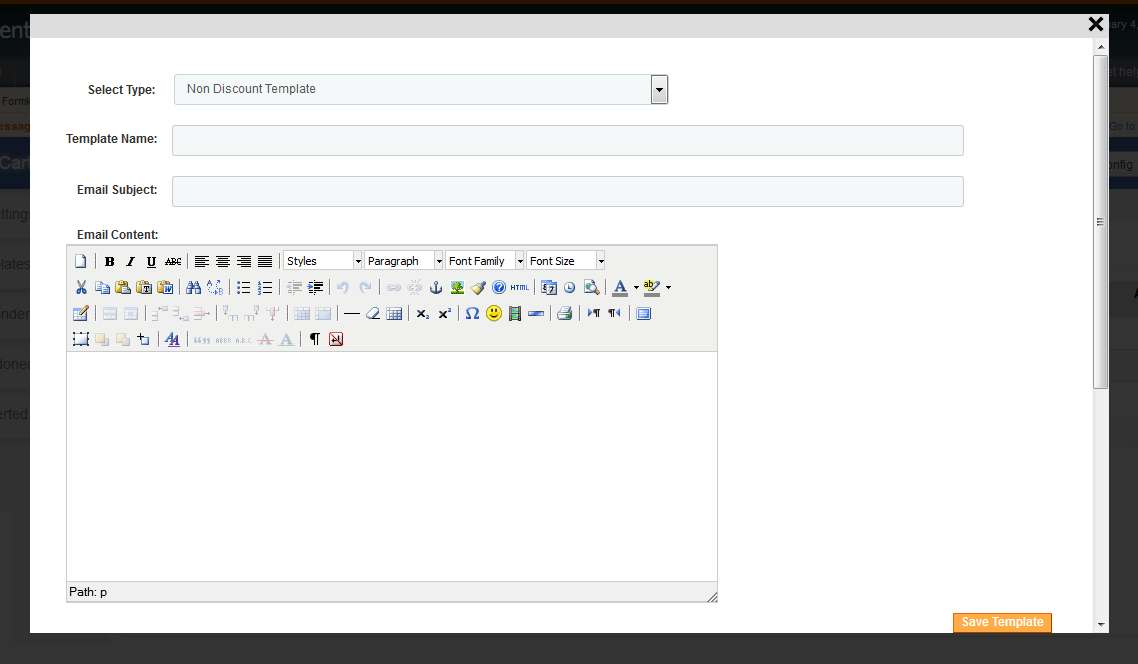
On clicking the button, the admin will get a pop-up. Fill up the required fields in order to create new template.
Select Type: Select the type of the email template of Magento Abandoned Cart Extension from the drop-down list. Template Name: Enter the name of the template. Email Subject: Enter the email subject here. Email Content: Enter the email content here.
3.3 Serial Reminders of Magento Abandoned Cart Extension
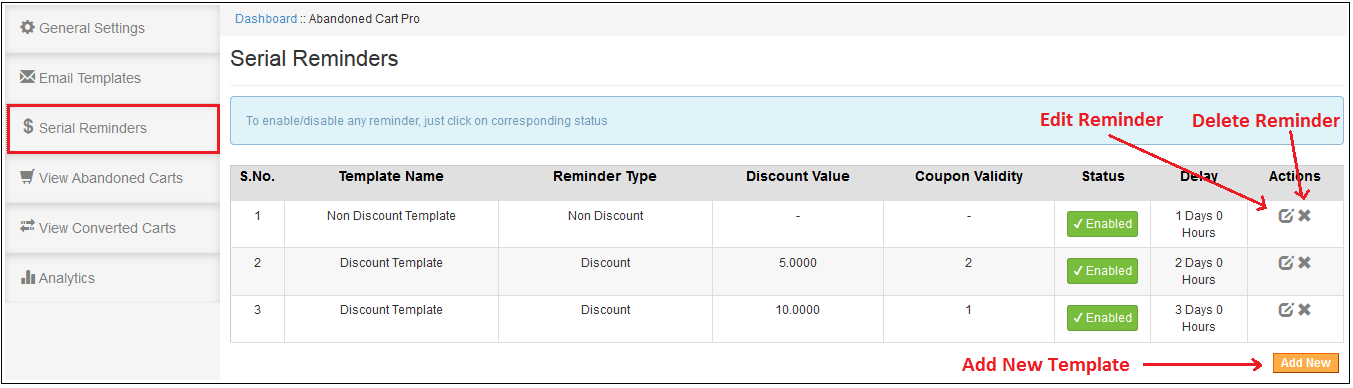
The serial reminder to be sent to the customers are listed here in this tab of Magento Abandoned Cart extension.
The admin can Enable/Disable and Edit or Delete the serial reminder at a button click as shown in the image below:
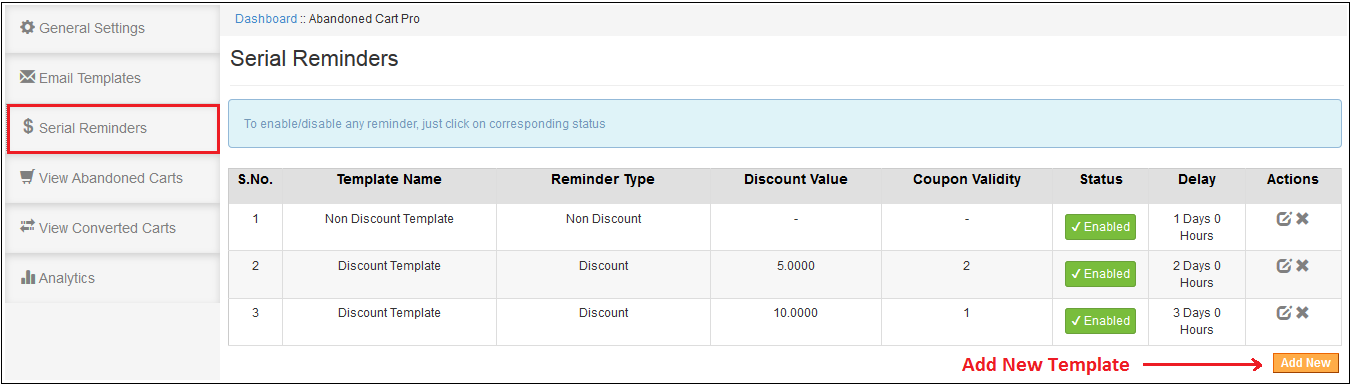
In order to create new serial reminder, click on the Add New button as shown below:
On clicking on the button, you’ll get a pop-up as shown below:
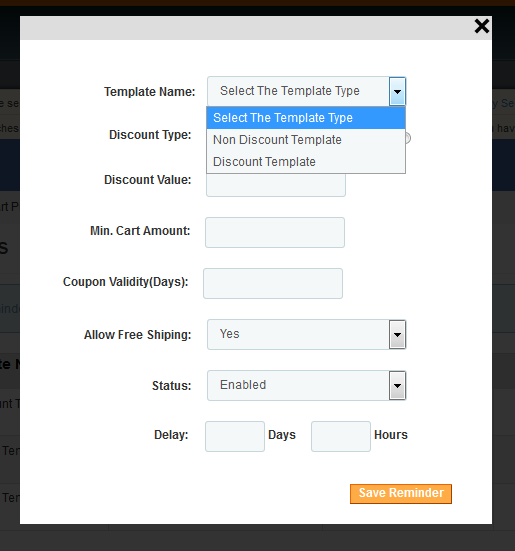
Template Name: The templates created in the Email Template tab of Magento Abandoned Cart extension will be listed here. Select any one from the drop-down list.
Discount Type: This field of Magento Abandoned Cart Extension allows the admin to select any one option from, Percentage or Fixed type.
Discount Value: This field of Magento Abandoned Cart Extension offers the admin enter the discount amount or percentage that you want to offer.
Min. Cart Amount: In this field of Magento Abandoned Cart Extension, the admin will have to enter the minimum cart amount required to avail the offer.
Coupon Validity(Days): This field of Magento Abandoned Cart Extension offers the admin to enter the number of days for which the coupons will be valid.
Allow Free Shipping: Select whether you want to allow free shipping or not.
Status: Select Enabled this option of Magento Abandoned Cart Extension, if you want to enable this serial reminder.
Delay: This field of Magento Abandoned Cart Extension provides the admin to enter the number of days, from the day when the customer added the product in his/her cart, after which this reminder will be sent.
3.4 View Abandoned Cart
This tab of the Magento Abandoned cart module enlists all carts which will be assumed to abandoned.
The action tab corresponding to every cart details offers following options:
Send Reminder Email: By clicking on the bell icon of this Magento Abandoned Cart Extension, the admin can send reminder email regarding the products saved in the cart of the customers.
Send Discount Email: By clicking on this action of Magento Abandoned Cart Extension, the admin can send emails triggers with the discount coupon to the concerned customer directly from the back-end of the Magento abandoned cart module.
View Cart: The admin can view the cart details of the customers by clicking on this action of Magento Abandoned Cart Extension.
Delete: The store admin can delete the cart by clicking on this action of Magento Abandoned Cart Extension.
3.5 View Conversion Cart
The Conversion Cart tab of Magento abandoned cart plugin, enlists all converted orders for registered customers.
3.6 Analytics
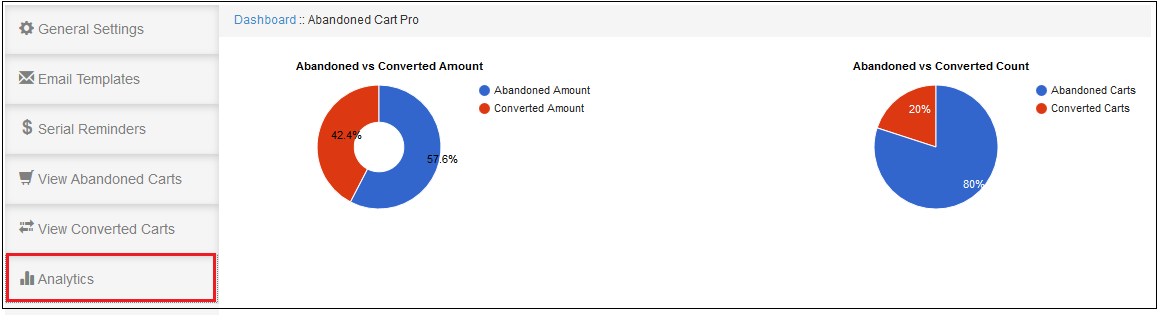
The Analytics tab of Magento abandoned cart extension shows the overall insights of the store in graphical interface.
This tab of Magento Abandoned Cart Extension contains following graphs –
3.6.1 Abandoned Amount vs Converted Amount:
This chart of Magento Abandoned Cart Extension gives an overview of the total abandoned amount and the amount converted by the coupons provided by the abandoned cart module.
Abandoned Cart vs Converted Cart:
This chart of Magento Abandoned Cart Extension gives the overview of the total abandoned carts and the carts converted by the coupons provided by the abandoned cart module.
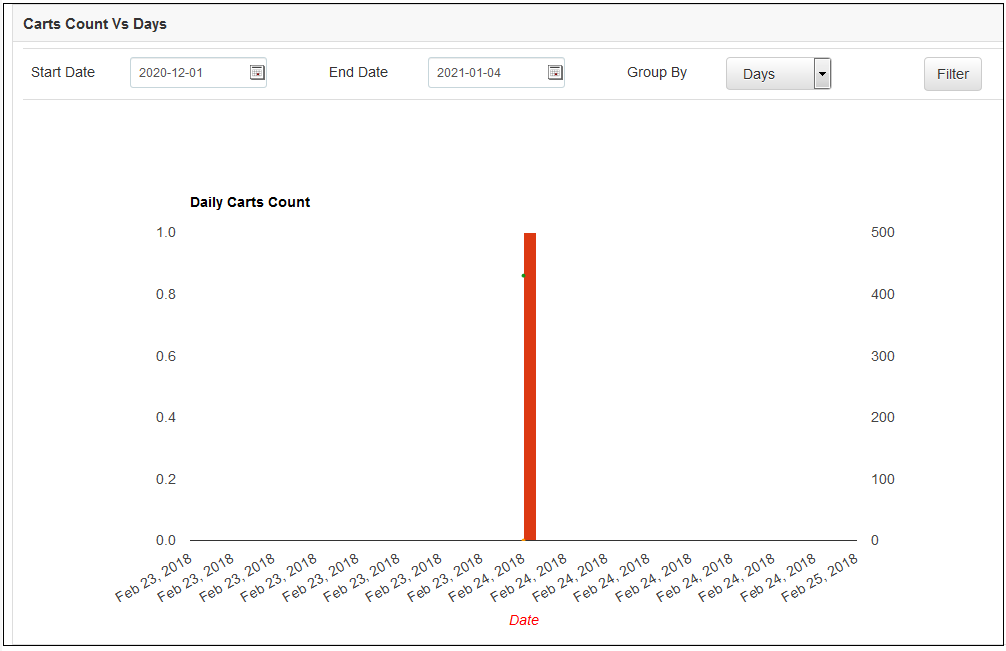
Carts Count Vs Days Vs Amount:
This chart of Magento Abandoned Cart Extension gives the overview of the total abandoned carts vs the carts converted and the amount abandoned vs the amount converts in the given time span.
This chart also contains filters on the basis of data to filter out and group the data for a concise view of store sales.
4.0 Store Front
From the front-end, you can check the functionality of the extension. You can add a product to the shopping cart and then go to the checkout page. You need to leave the checkout page without completing the order and you will receive an abandoned cart email on your given email address after the specified time-delay.
Knowband offers Magento Auto Subscribe extension which allows the store admin to showcase a subscription form on the eCommerce store. This Auto Subscribe integration addon helps the store admin for collecting mail id for the newsletter and also sends it to the customers. Newsletters are one of the best ways to improve the brand awareness of a website.
Magento mail chimp extension automatically subscribes customers when they register or place an order. Magento newsletter subscribe is highly customizable and it offers an easy and effective way of improving subscribers. It automatically synchronizes admin’s Magento newsletter list with one of his/her Constant Contact list and MailChimp account.
Features:
Magento newsletter subscribe is easy to install configure.
This MailChimp Integration is highly customizable.
It offers simple and hassle-free implementation.
Magento mail chimp extension subscribes customers for newsletter while checkout or registration.
The store admin can set the position of the subscription form in left sidebar box or right sidebar box.
The store admin can create his/her own form by setting title, description, border width, button text etc.
Magento newsletter pop up allows admin to manage the look and feel of the subscription pop-up.
The subscription module allows admin to design personalize mail templates.
email newsletter addon is device compatible.
The admin can showcase subscription form as a pop-up or contact form.
This module supports MailChimp and Constant Contact API.
It updates the mailing list when a new user subscribes
Magento email subscribes plugin is compatible with all themes.
Download the zip from our Magento Plugin Store & unzip into a folder.
Open the upload directory & you will see following folder structure.
Login via FTP & Drag drop all the folders into your server root directory.
In Admin Panel go to System > FilterPro. In case you are not able to see the link under System, please clear Magento Cache first then check again.
That is all – Extension is installed on your system.
Admin Settings
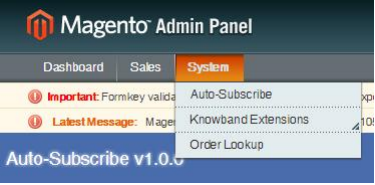
To access Autosubscribe plug-in, go to System->Auto-Subscribe link.
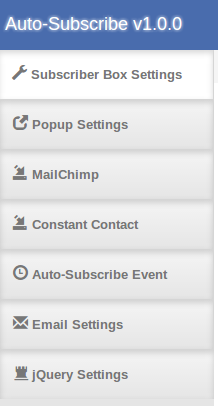
Store admin will have various settings options categorized in the left column as follows:
Subscriber Box Settings
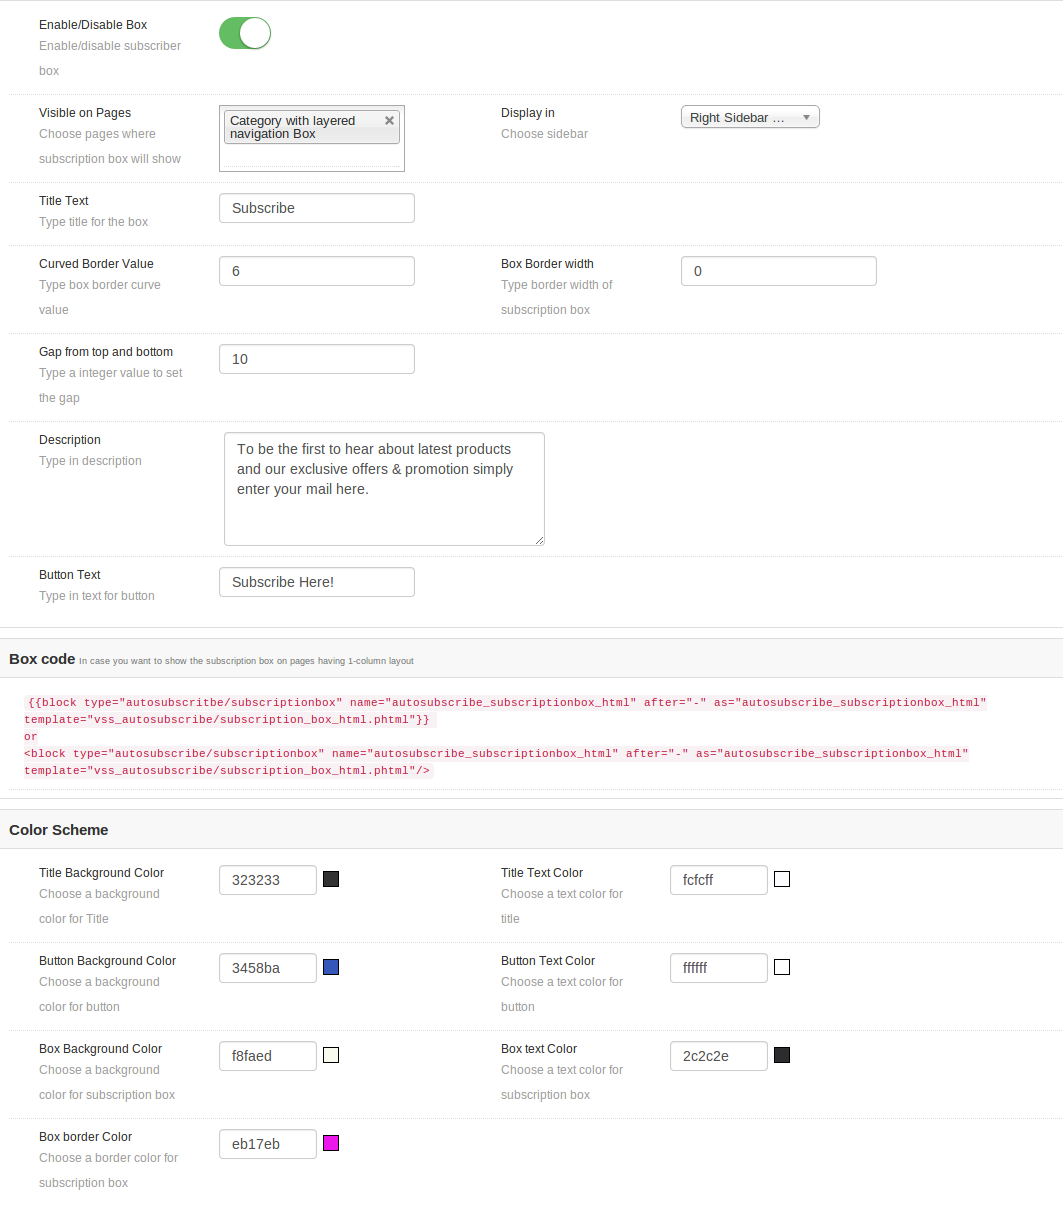
Admin can customize the subscription box to be displayed in store front by using the following settings option available.
Enable/Disable: Admin can choose to enable or disable the subscription box by turning this button on or off. One cannot view subscription box on front.
Visible on Pages: Admin can select on which pages this subscription box will show.
Display In: Admin can select the position of box. We can show the box either on left or right side.
Title Text: You can enter the radius of the title of box. By default, it is set to Subscribe.
Curve Borders Value: You can enter the radius for curve borders. This value will be applied to the four corners of the subscription box on front.
Box Border Width: You can set the border width for box.
Description: You can enter the text for describing to visitors, the advantages of subscribing to your email list here.
Button text: You can change the text for button in this text box.
We have also added the code snippet of module in case admin wants to add the subscription box manually on CMS or any other page.
Color Scheme
We have added the color picker option to set the background color and text color for different sections of subscription box.
Pop up Settings
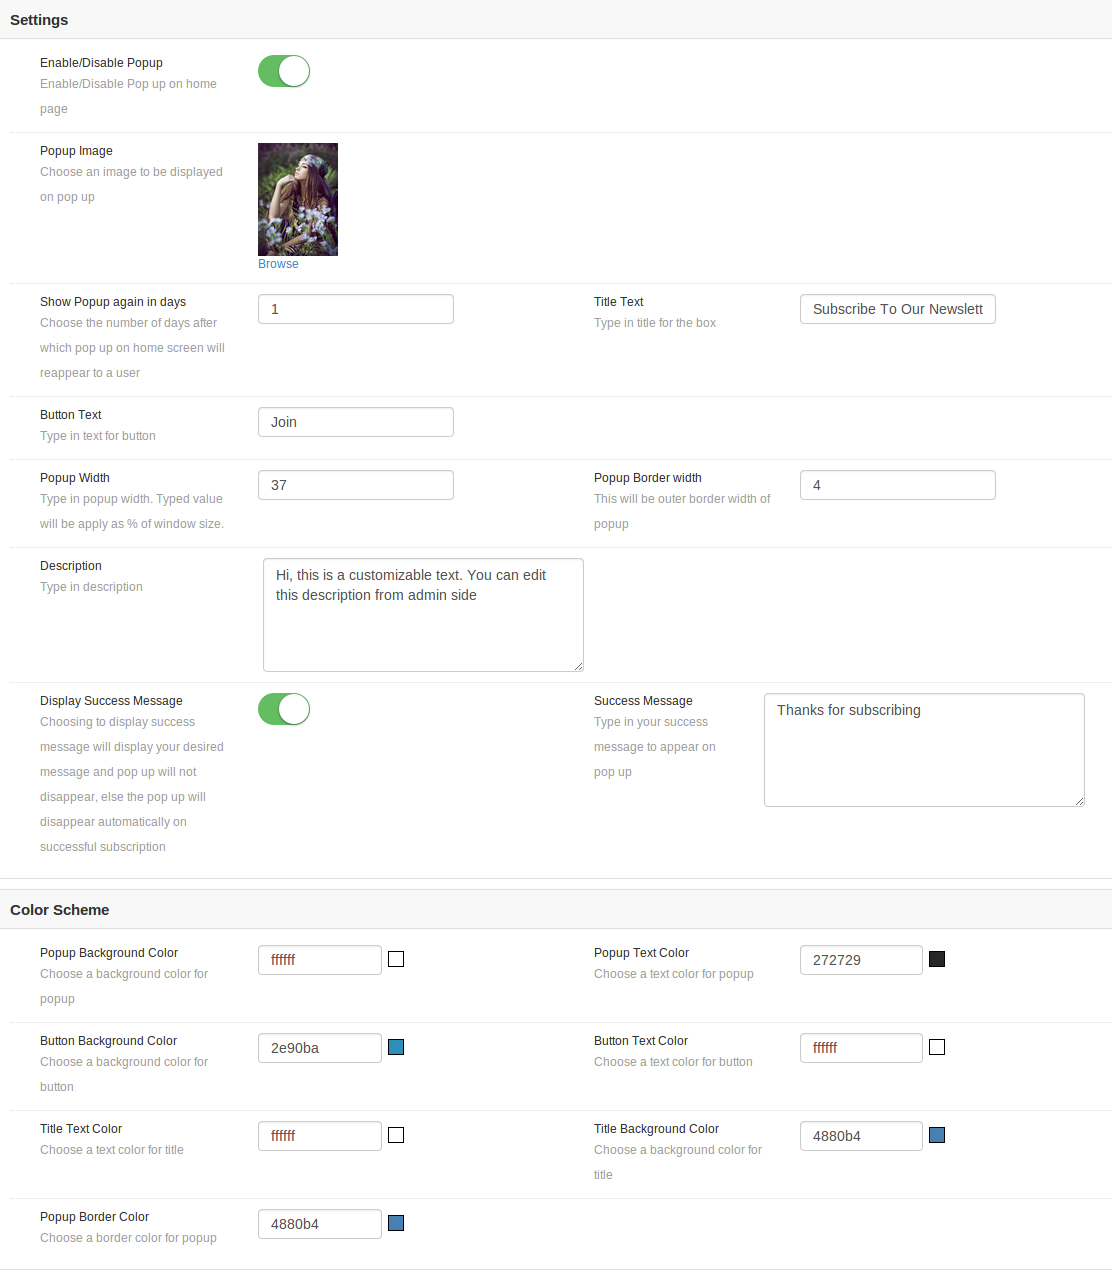
Admin can customize the pop up box too. If this box is enabled then it will show on home page only.
Enable/Disable Pop up: Admin can choose to enable or disable the pop up display on home page. One cannot view subscription pop up on front until this is enabled.
Pop up Image: Admin can choose to show any image on the pop up box, or choose to not show any image at all.
Show pop up again in (days): You can choose the duration (in days) for which the pop up will not reappear from the day the pop up appeared first time on a users system. If you want pop up to appear only once in a lifetime, type in a large number of days, for say 999. If you want it to appear every time a user lands home page, you should choose to type value as 0.
Title Text: You can change title of your pop-up from this option.
Description Text: Description appearing on the pop up can also be customized by adding desired text .
Button Text: Button text and its font color can also be set from admin panel.
Button background color: You can also change the background color of your button to go with your theme.
Display Success Message: Turning it off means that the moment a successful subscription takes place through this pop up, it will get automatically closed without showing any success message to the user. Turning it on will display a customized success message on the pop up box after successful subscription.
Success Message: Here you must enter the text to be displayed and choose the desired color for the text.
Color Scheme: We have added the color picker option to set the background color and text color for different sections of popup box.
MailChimp Settings
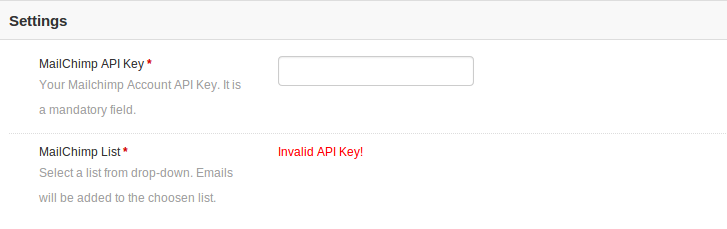
In this tab, admin can choose from the lists in his/her MailChimp account where emails should be added. Initially a message will be displayed like Invalid API Key! .
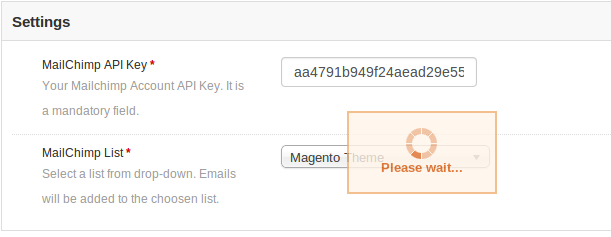
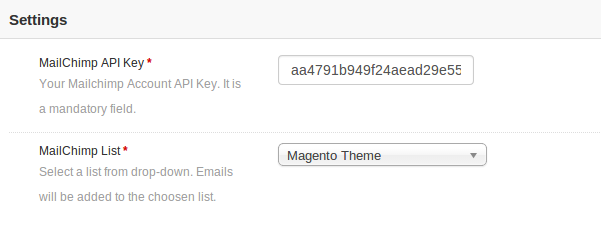
MailChimp API key: Admin needs to enter API key to fetch lists from his/her account. As soon as admin enters the key and clicks outside the text box or press enter button, request is sent and lists (if any) are fetched and displayed in a drop down box.
Constant Contact Settings
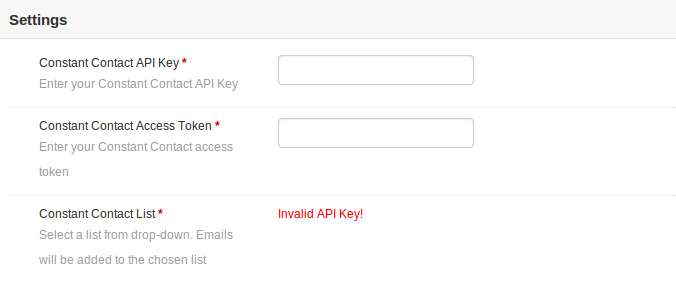
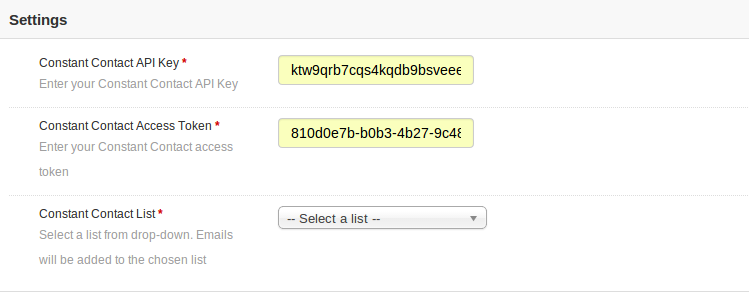
In this tab, admin can choose from the lists in his/her Constant Contact account where emails should be added. Initially a message will be displayed like Invalid API Key! .
Constant Contact API key: Admin needs to enter API key. As soon as admin enters the key and clicks outside the text box, request is sent and lists (if any) are fetched and displayed in a drop down box.
Constant Contact Access Token: Admin needs to enter access token along with API Key. As soon as admin enters the token and clicks outside the text box, request is sent and lists (if any) are fetched and displayed in a drop down box.
Auto Subscribe Events
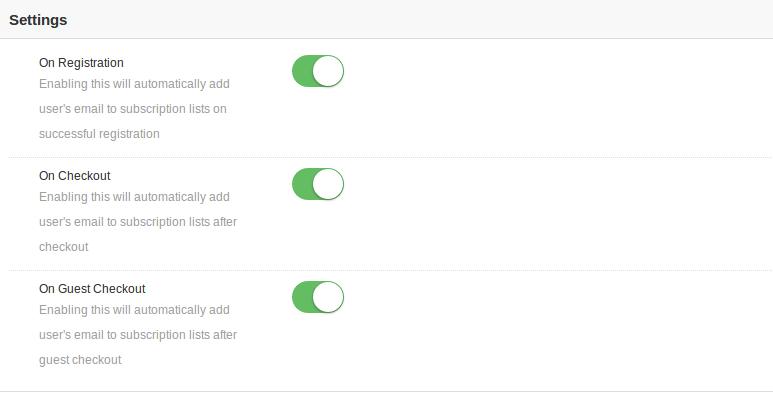
Auto-subscribe events are the events on which the users can be subscribed to the configured lists in admin automatically. On such events, user will not be notified of being added to the subscription lists you have chosen in admin.
Register: Turn Register to on, if you want a user to be automatically added to your list on successful registration.
Checkout: Turn Checkout to on, if you want a user to be automatically added to your list on successful checkout.
Guest Checkout: Turn Guest Checkout to on, if you want a user to be automatically added to your list on successful guest checkout.
Email Settings
Email settings will be used to set the email template that will send to customer after successful subscription. Admin can disable/enabled the email if he don’t want to send the email to customer.
JQuery Settings
Admin can disable the plugin jQuery file in case jQuery is already included by any other plugin or store theme.
Auto-subscribe Module
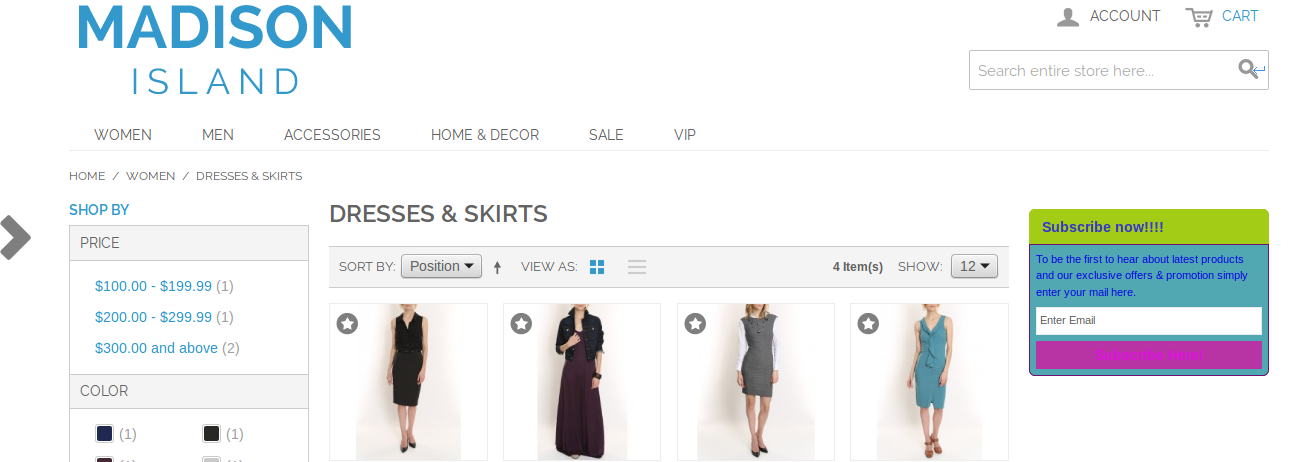
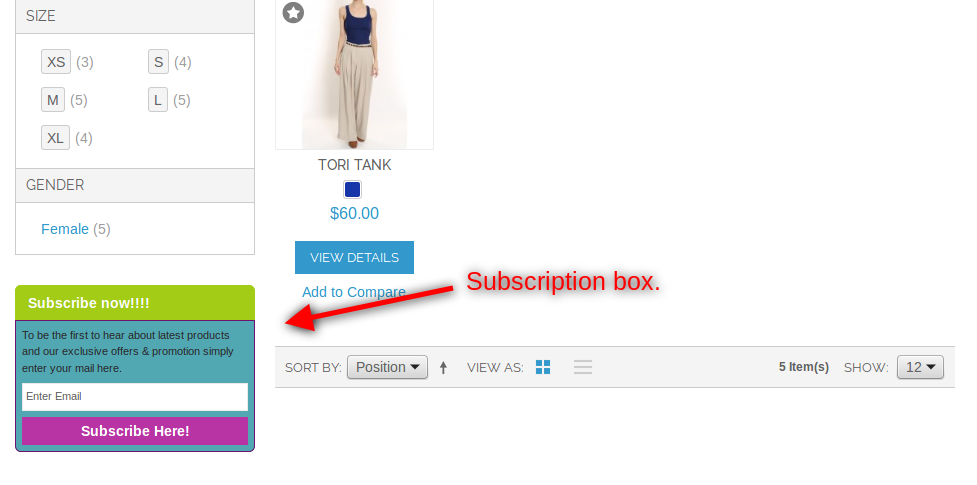
On the front end, users will have the option to subscribe themselves by clicking on subscribe button. The module will look like following screen with default settings.
In Right Column
In left column
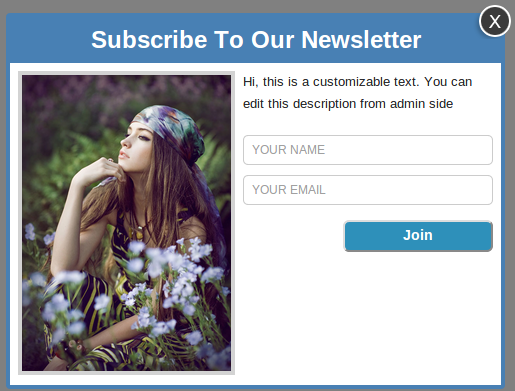
Pop up
On the users end, pop up will appear something like this screen below, depending upon your chosen display settings.
To subscribe through this pop up, type in your email (required) and name (optional), and then click on the button below. On successful subscription, either the pop up will disappear automatically or a custom message provided by you in admin settings will start appearing on the pop up.
PHP version
Php version 5.3 or greater
To access the API of constant contact, one must use the php version equal or higher than 5.3 . Unless your server is running the required php version, you will not be able to successfully install this plugin.
Mail Chimp
Before you may use this module, you must have a valid account with MailChimp and one or more lists created into it. Note that, you must also have the access right to alter your email subscribers list. Below we have mentioned the data which plugin needs for successful installation –
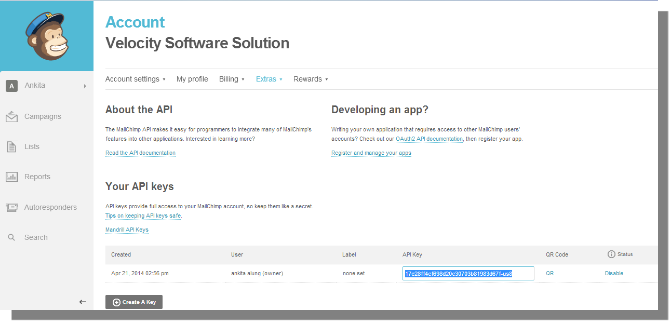
API Key: You can obtain your API key from your MailChimp dashboard, or you can create one if you don’t have one already. To create a new API key for MailChimp go to Account->Extras->API Keys.
Constant Contact
You need to have a valid account with constant contact and one or more lists created into it. Note that, you must also have the access right to alter your email subscribers list. You will need to provide these for this module to work.
API Key: You get an API key from constant contact via email as soon as you register your application.
Access Token: In addition to API key, you also needed access token to grant permission to access API.
In case you are still facing problem with getting your API Key and Access Token, please follow the instructions as mentioned in link https://developer.constantcontact.com/api-keys.html
Note that, this plug-in works for constant contact API version 2 since version 1 is deprecated and will soon be discontinued.
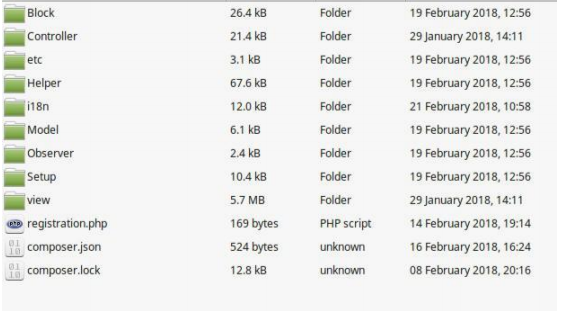
Download the zip from Magento store & unzip into a folder.
After unzip, following files/folders will be extract as shown in below screen:
Login via FTP & Drag drop all the folders into your server root directory.
You will find the extension link will be displayed under System >> Google Analytic.
Google Analytic User Manual
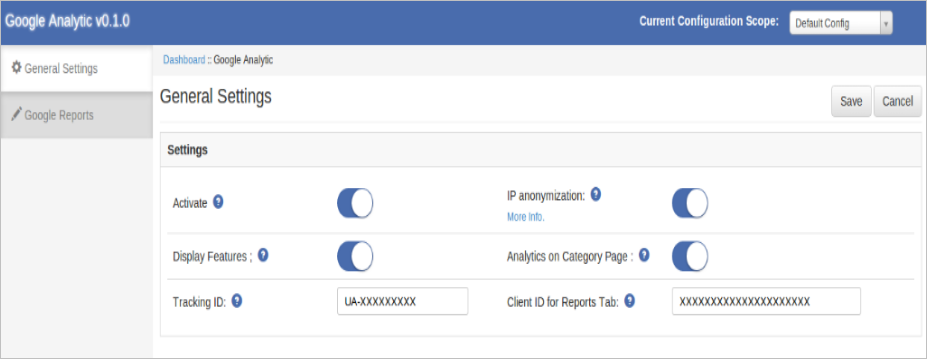
This module will basically work and visible in administration panel. There is no interaction of customers with this module and only administrator has access of this module.After copy this module, a link to access this module will be displayed under System >> Google Analytic menu as shown below screen:
After clicking on this link, module page will be open as shown in below screen: There are following tabs are displaying on left side in above screens. Each tab has different functionality which are described below in details:
General Settings
On clicking the module link, this tab will be open by default as shown as above screen. This tab has setting of this module. Each setting is explained below:
Activate: This setting will enable/disable the working of this module. There is switch button to ON/OFF this module. By default, it will be turn OFF.
IP Anonymization: This setting will enable/disable the IP Anonymization feature .The IP Anonymization feature in Google Analytic sets the last octet of IPv4 user IP addresses and the last 80 bits of IPv6 addresses to zeros in memory shortly after being sent to the Google Analytic Collection Network. The full IP address is never written to disk in this case.
Display Features: This setting will enable/disable the Display feature in Google Analytic.
Analytic on Category Page: This setting will allow you to enable/disable the analytic code to be execute on category page or not. By enabling this setting page speed may slow down depends on the no. of products . If you are using some ajax based 3rd party plugin for loading products. Then turn off this setting and add analytic code manually. To add code manually please refer to Appendix-1.
Tracking ID: Provide the Tracking Id provided in Google Analytic account.
Client Id : Provide the Google client Id of the same account associated with Google analytic with auth API and Analytic API .
NOTE: During Google API Configuration for client id , add ANALYTIC API in Google project . In javascript origin add url : https://www.example.com and in Redirect Url add url https://www.example.com/index.php/googleanalytic/adminthml_index/index
Google Dashboard
This tab will display following some Google Analytic reports . On clicking this tab screen will look like following:
Initially this tab will show blank above orange colored login strip and blank report sections . On click of the above orange strip a browser window will open for login into Google Account. Enter the credentials of your account associated with Google Analytic.
After successfully login , you will see View Selector Options as shown below.
Using these options you can select select your analytic account and its corresponding property and its view.
On the top right there is widget displaying Active users count i.e. No of users currently present on your selected website at that time. By selecting a view reports will be displayed in their sections as shown below:
Overview Report: This is overview report which will display: a)No. Of sessions , b) No. Of New Users, c) Percentage of new Sessions, d) No. Of page views , d) No. Of unique page views , e) Pages per session , f) Exit Rate and g) Bounce Rate of Past 7 days including current day. This report will be displayed in tabular form.
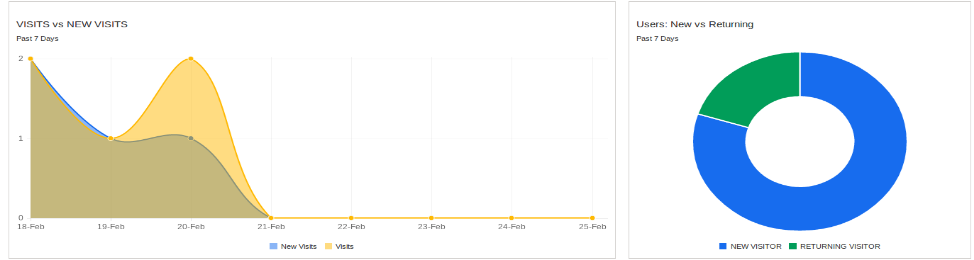
Visits vs New Visits: This report will display date-wise trend between visits i.e. Total sessions .and New Visits i.e. New Sessions.
New Users vs Returning Users: This report will pie chart between New Users and Returning Users.
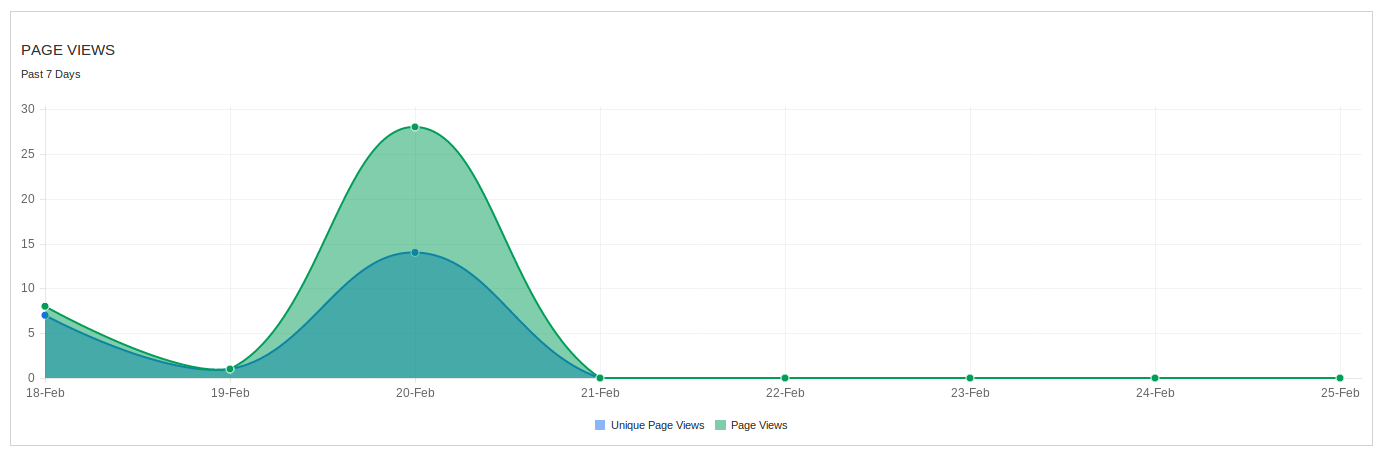
Page Views Report : This report will date-wise trend between Total page views and Unique page views of past 7 days.
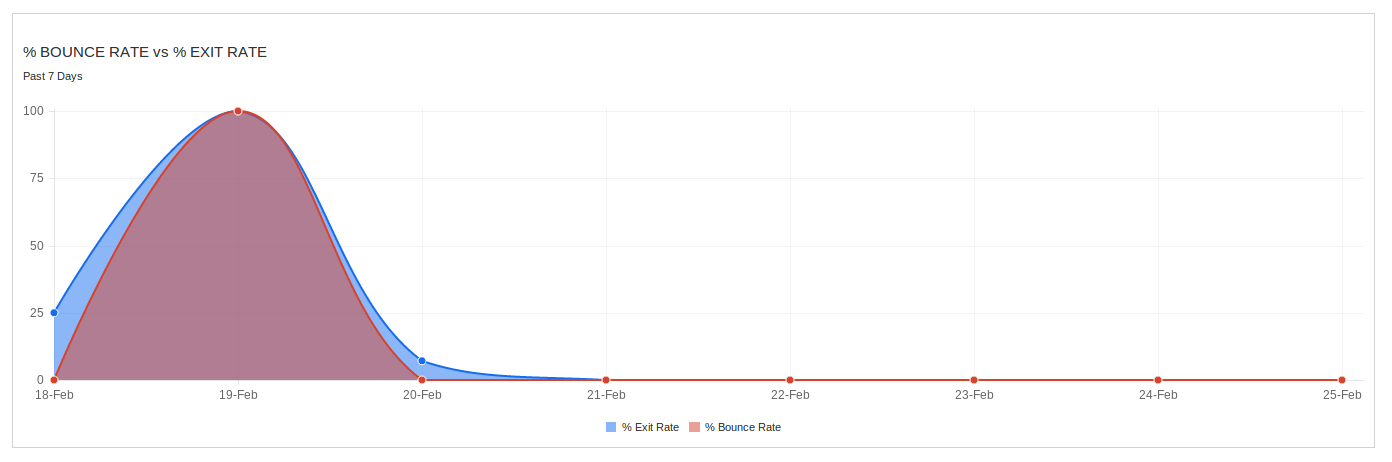
Bounce Rate vs Exit Rate: This report will display date-wise trend between Bounce Rate percentage and Exit Rate Percentage for past 7 days.
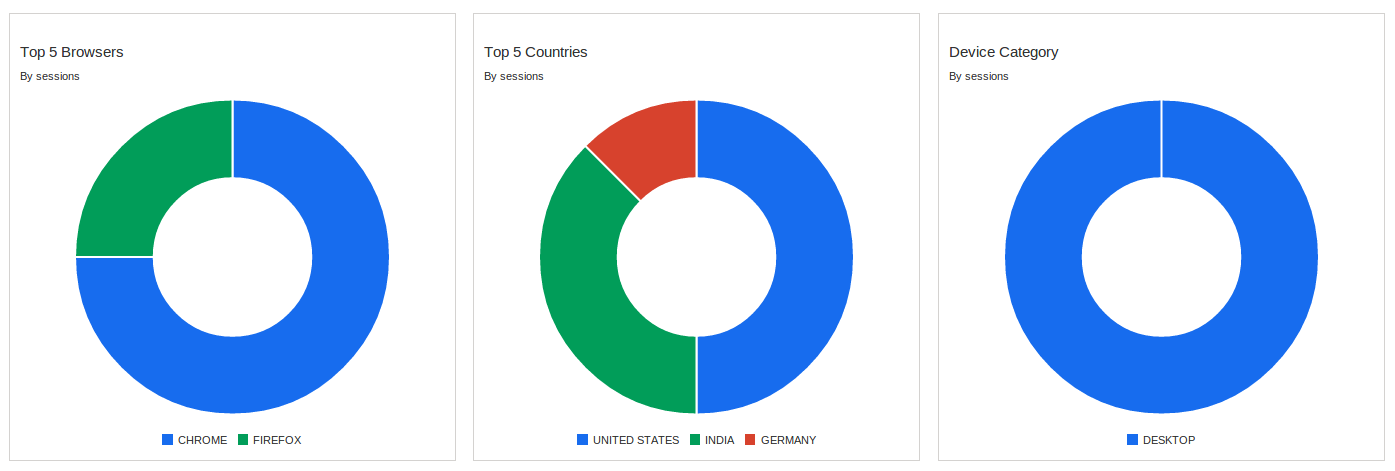
Top 5 Browsers : This report will display pie chart for 5 most used browsers in past 7 days by sessions . You can see no of sessions per browser on hover pie chart.
Top 5 Countries: This report will display pie chart for top 5 countries by sessions in past 7 days. You can see no of sessions per country on hover pie chart.
Device Category : This report will display pie chart for device category like desktop , Tablet or mobile used in past 7 days by sessions. You can see no of sessions per device category on hover pie chart.
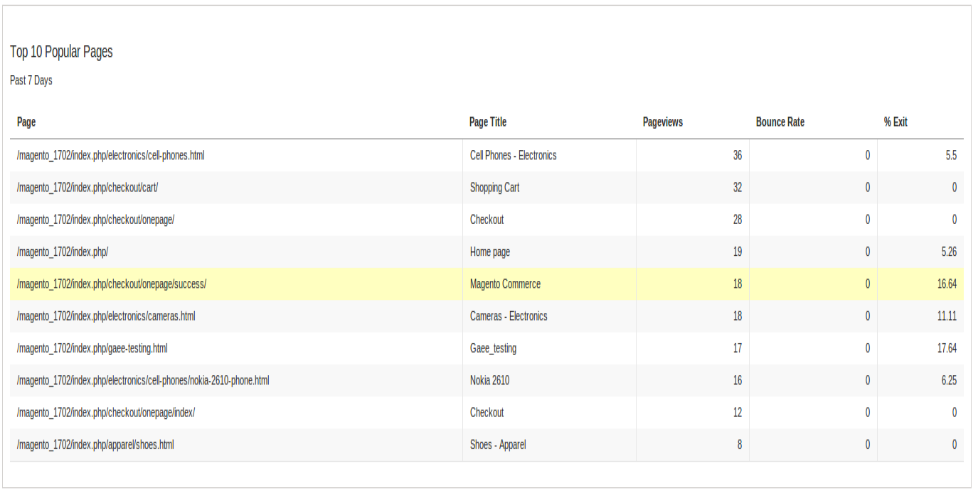
Top 10 Popular Pages : This report will display top 10 popular page by pageviews from past 7 Days with their Name, Path , Page views count , Bounce Rate(%) and Exit rate(%).
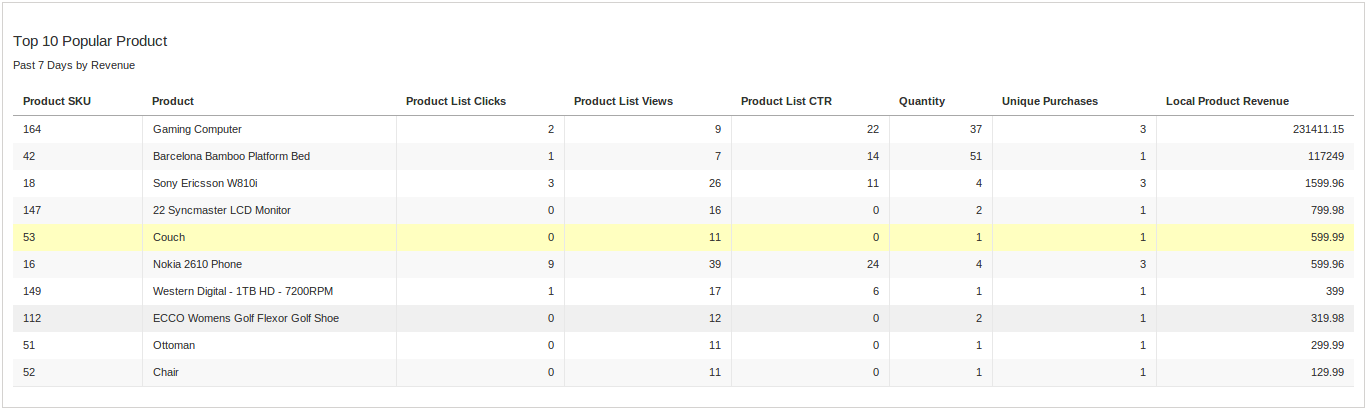
Top 10 Popular Product : This report will display top 10 popular products by revenue with their SKU, Name, Product List clicks , Product List CTR , Quantity , Unique Purchases, Local Product Revenue.
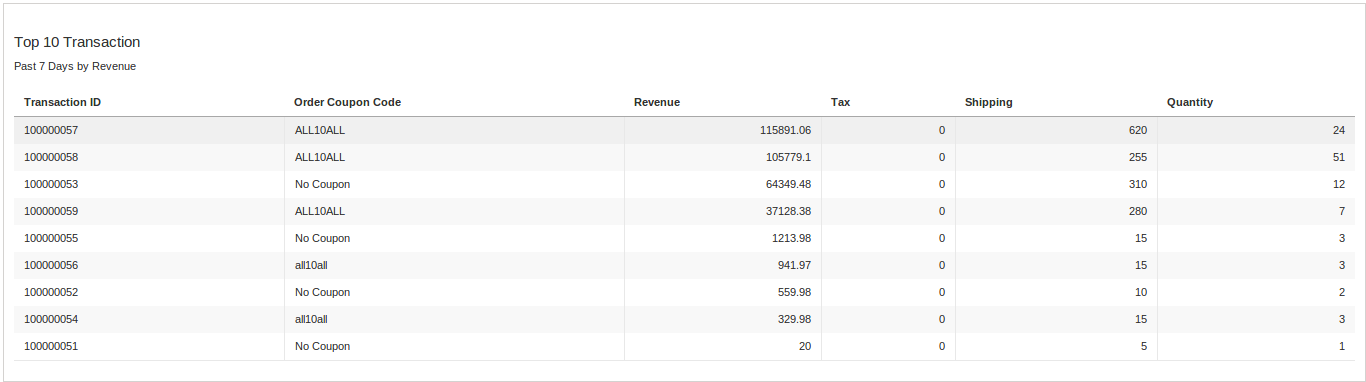
Top 10 Transactions: This report will display top 10 Transaction of past 7 days by revenue with their Transaction Id, Order Coupon Code, Revenue, Tax, Shipping , Quantity.
Appendix-I
In Magento when a category page is loaded an event is dispatched carrying information about the products. On the basis of that information our code works. But if you are using any extension to load products on category page then you have to manually add the analytic code.
Following is the example analytic code for category page:
Magento multi-vendor Marketplace module by Knowband is one of the easiest ways to transform your eCommerce site into a thriving Multi vendor marketplace. A Multi vendor marketplace is an online space where different sellers and vendors can list their products, manage their inventory and sell at the same platform. The Magento Multi vendor marketplace plugin converts your online shop into a fully functional online marketplace.
1.1 Features offered to the store admin by Magento Multi-vendor Marketplace extension:
The admin can approve/reject the seller’s profile with the help of the Magento marketplace plugin.
The Magento marketplace module makes it easier to set and manage the commission charged to the sellers.
The admin can add/remove the products from the back-end of the Magento marketplace multi-vendor module.
The store admin can create and manage the product categories from the back-end of the Magento marketplace extension.
The Magento store owner can track the transaction and earn at the button click.
The Magento marketplace multivendor is compatible with the latest Magento version and supports all themes.
The admin can approve/reject product and seller reviews from the backend of Magento Multi seller Marketplace plugin.
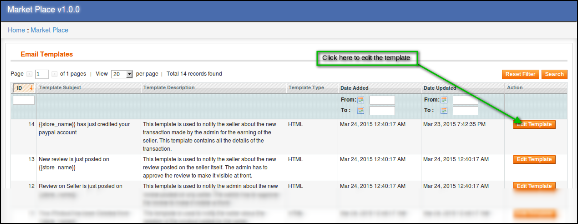
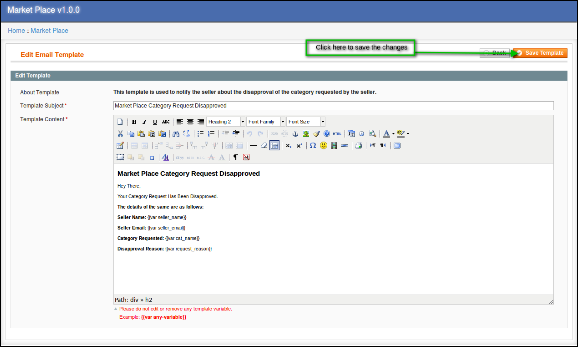
Email templates offered by the Magento Multi-vendor Marketplace module can be used by the admin to notify the sellers.
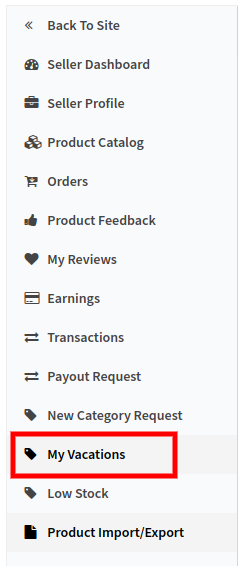
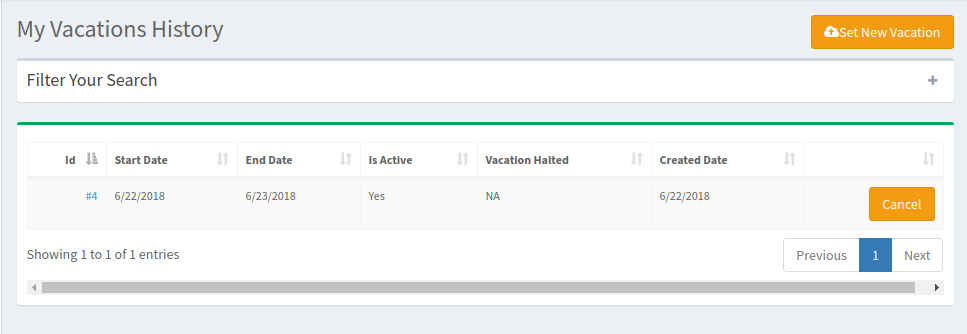
Store admin has the access to approve or disapprove the seller vacation request from the backend of Magento Multi seller Marketplace module.
1.2 Features offered to the seller by Magento Multi-vendor marketplace extension:
The Magento Multi-vendor marketplace allows the sellers to register from the front end of the online marketplace.
The sellers can easily map the categories from the seller dashboard.
Also, the sellers can request including a new category to keep the products. The marketplace admin can approve/reject the category request with the help of the Magento multi-vendor marketplace plugin.
The seller’s dashboard makes it easier for them to track and manage their products, profile as well as sales.
Magento multi-vendor marketplace allows the sellers to add sale banners, shop logo and custom HTML content. These banners will be displayed on Seller’s Page with separate product collection.
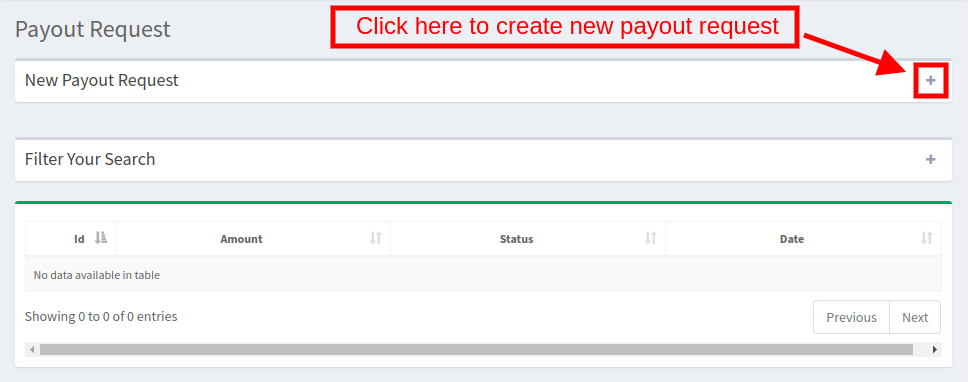
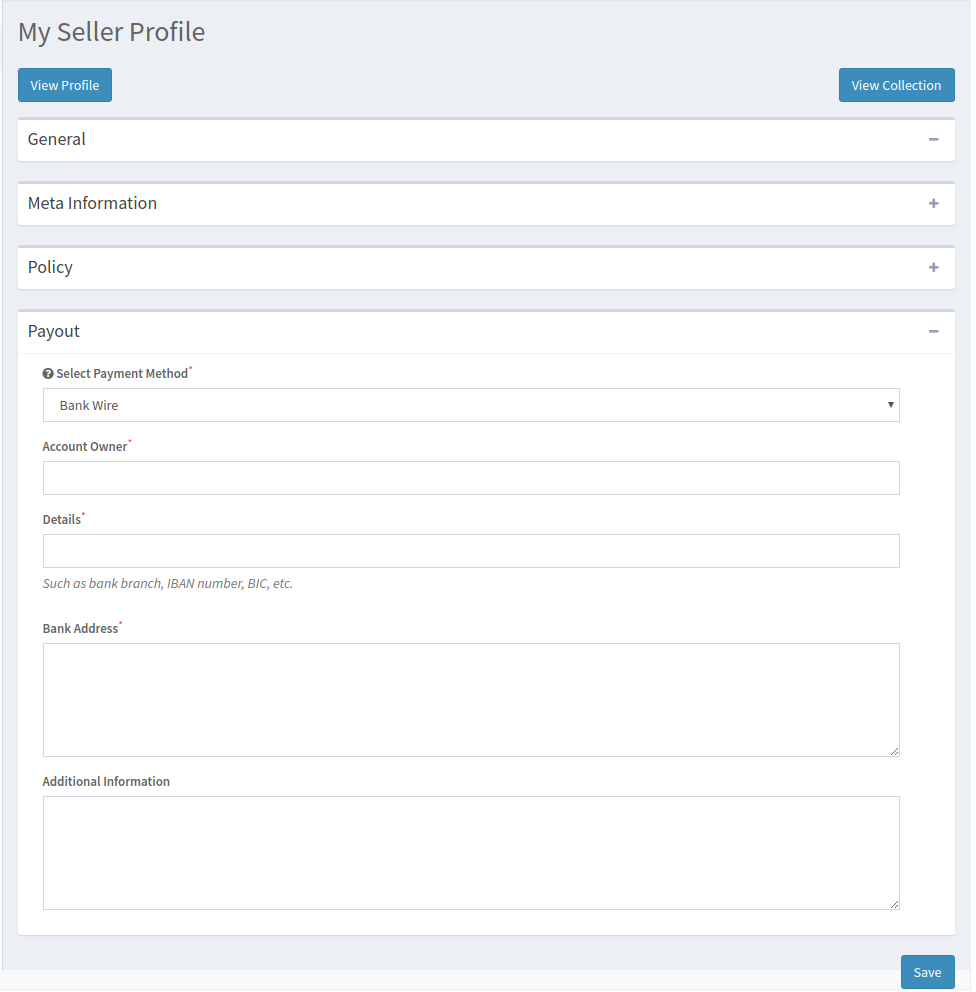
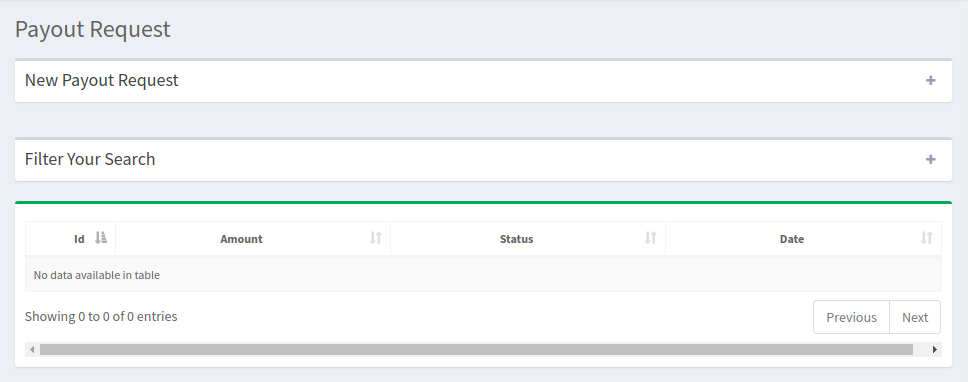
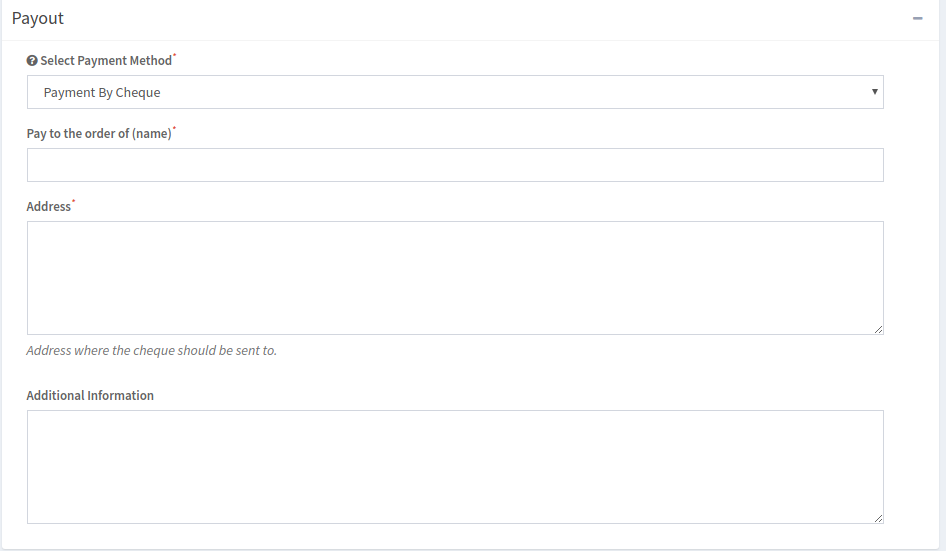
Sellers can send the payout requests and Vacation request to the admin from the seller dashboard.
Sellers can generate coupons from the seller dashboard to lure the customers and enhances the chances of conversion.
Sellers can display the Upsell and Cross-Sell products at the product page and checkout page to enhances the sale.
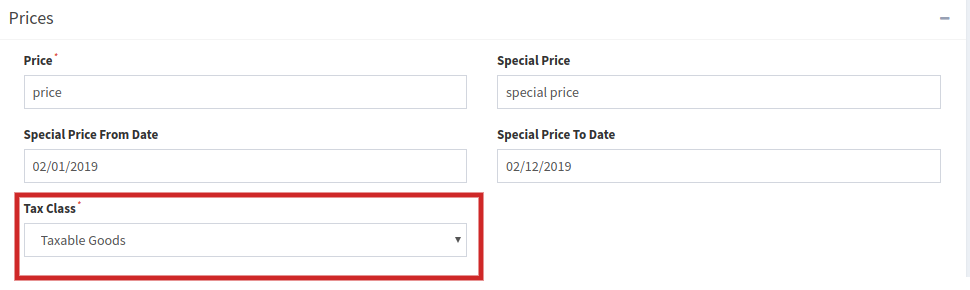
To distinguish taxable and Non- taxable items, sellers can add the products in different tax classes.
1.3 Customer Benefits offered by Magento Multi-vendorMarketplace:
The Magento multi-vendor marketplace extension allows multiple sellers/vendors to sell their products on the same platform. Thus, customers can choose the perfect product from a wide assortment.
Magento marketplace extension allows the customers to shop the products at competitive prices.
The customers can send product reviews. These reviews can be approved/disapproved from the back-end of the Magento marketplace plugin.
Online shoppers can review the sellers. The seller reviews can be monitored from the back-end of the Magento multi-vendor marketplace module.
The Magento multi seller marketplace module even offers an option with the help of which the buyers can become a seller.
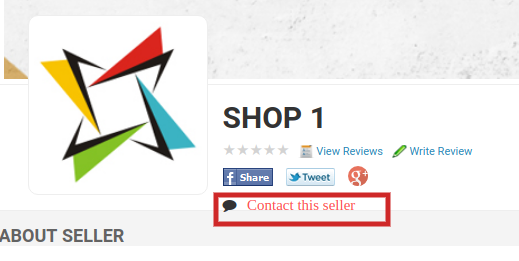
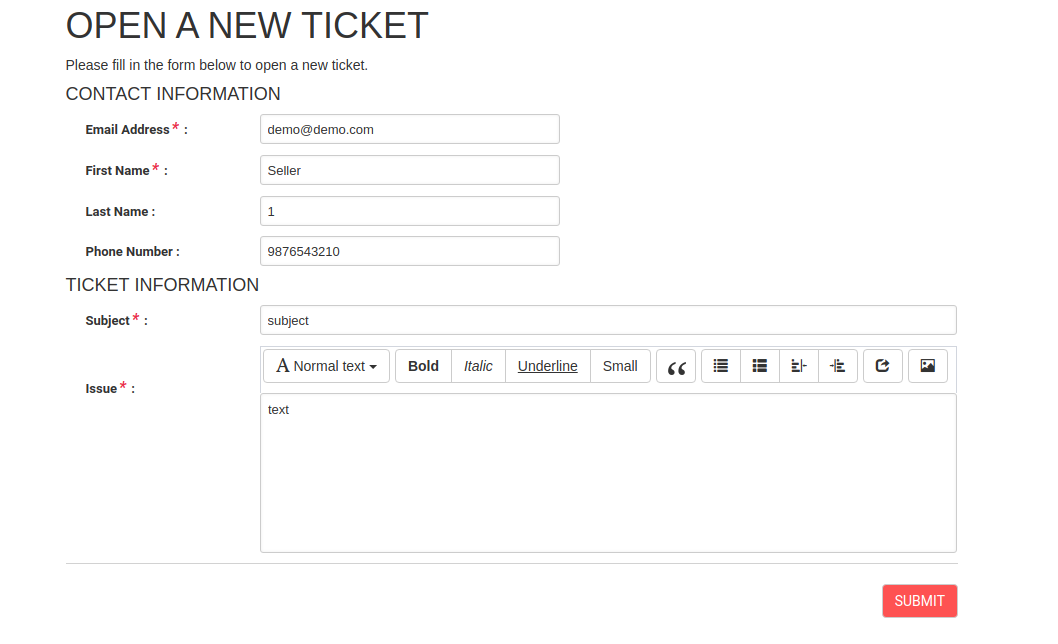
Customers can directly contact the sellers from the frontend of the store. A ticket will be generated every time a customer contacts the seller.
2.0 Steps For Installation of Magento Multi-Vendor Marketplace
Download the Magento Multi-vendor Marketplace extension package.
Unzip the package on your root folder of Magento setup via FTP manager (like Filezilla or WinSCP – download here: https://filezilla-project.org/).
In Admin Panel you will see a new Menu Market Place next to the System menu. In case you are not able to see the link under System, please clear Magento Cache first then check again.
With this, the Magento multi-vendor marketplace extension gets installed on your system.
3.0 Admin Panel
In the admin panel of Magento Multi seller, marketplace extension adds a separate menu (named MarketPlace) right next to the system menu and also adds a new tab to the customer create/edit page.
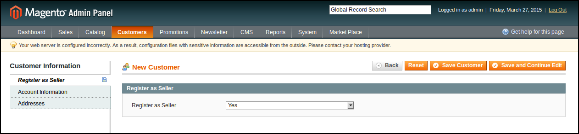
3.1 Register as Seller Option (Add New Customer Page)
If the admin is creating a new Customer from the admin side then a new tab appears on that page asking for the Register as Seller field.
The Path to the Customer page:
Go to Customers -> Manage Customers and Click on Add New Customer on the right side of the page.
The admin can set the field to Yes to register the customer as a seller. By default, the field is set to No.
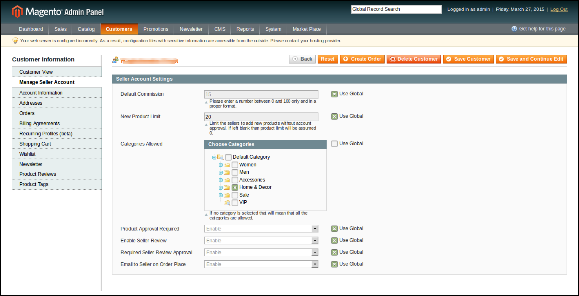
3.2 Manage Seller Settings (Customer Edit Page)
In case of editing a customer if the customer is also a seller than a new tab (named Manage Seller Account) appears to change the seller level settings for the current customer who is a seller as well.
Path to the above page:
Go to Customers -> Manage Customers and click on any customer who is also a seller.
The settings are stored when the admin submits the edit form for the customer.
When this page loads for the first time the fields are filled with the default settings pre-defined for the extension.
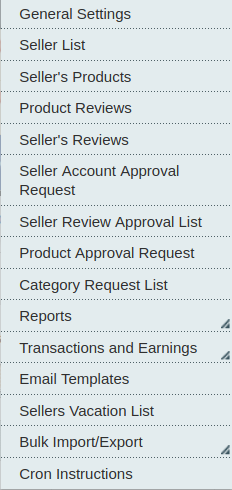
4.0 Marketplace Menu
The Magento marketplace extension consists of a total of 15 sub-menu options which redirect to several pages for the Magento multi-vendor marketplace Extension.
Some of the menu options of the Magento multi-vendor marketplace module have further sub-menus to navigate to some of the related pages.
All the 15 configuration options offered by the Magento multi-vendor marketplace plugin are described below in details:
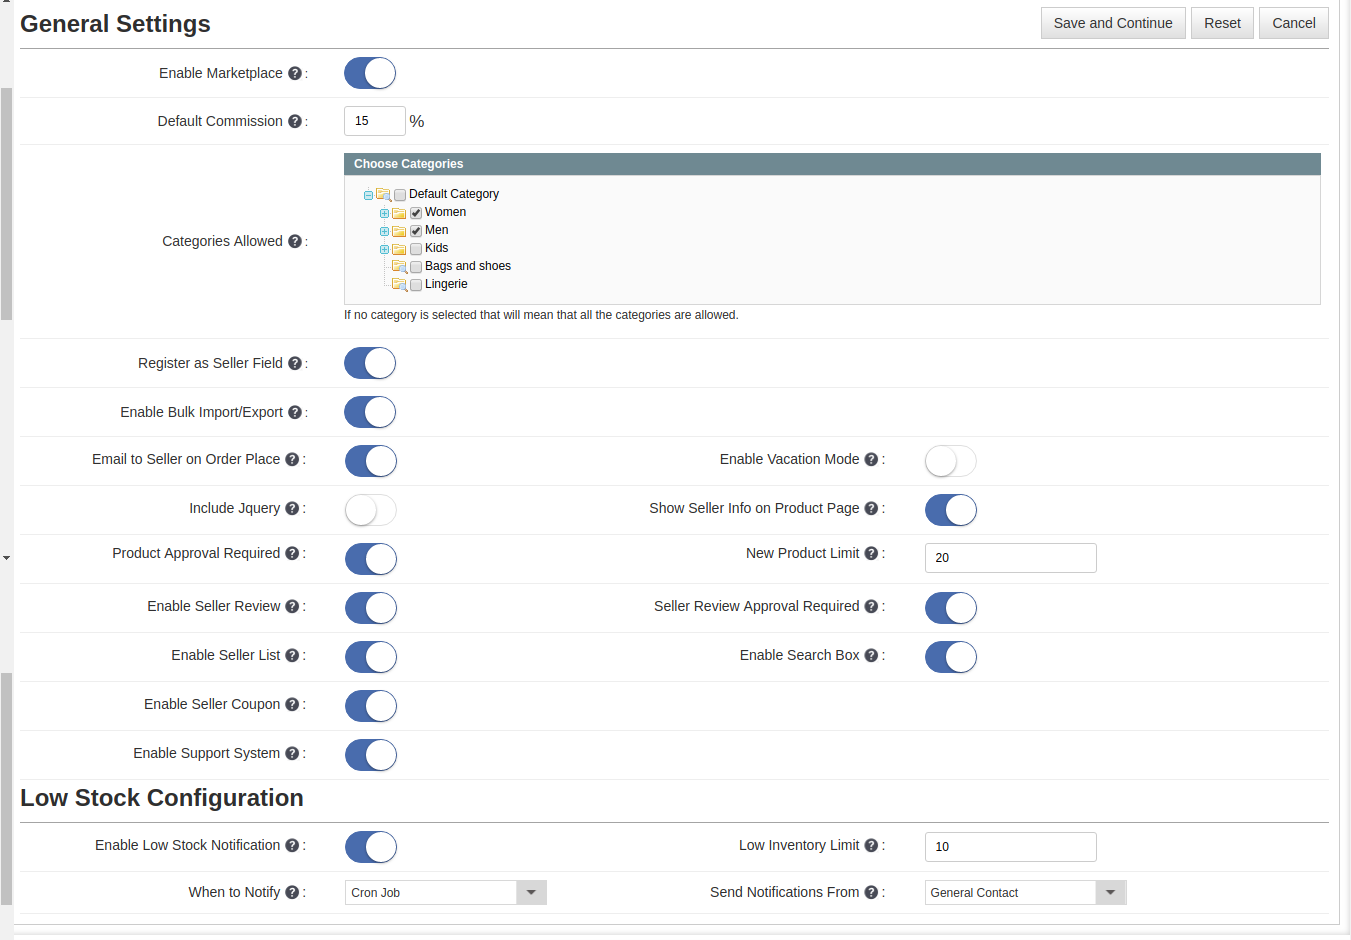
4.1 General Settings
The General settings tab of the Magento multivendor marketplace module is divided into 2 main levels i.e. Seller Level Settings and Global Level Settings. This page only controls the Global level settings for the Magento Marketplace Extension.
This page has all the settings that control the Magento Marketplace plugin and its several features.
The general settings page of Magento multi-vendor marketplace plugin consists of the following fields:
1. Enable Marketplace: Enables or Disables the Magento Multi-vendor Marketplace extension on the storefront. If disabled, no page or feature of the extension is accessible on the storefront.
2. Default Commission: Sets the default commission percentage that is taken by the store owner from the total sale made by the seller.
3. Categories Allowed: The categories that are allowed for the sellers to add products. If no category is selected then all the categories are allowed and if some of the categories are selected that means that only the selected categories are allowed.
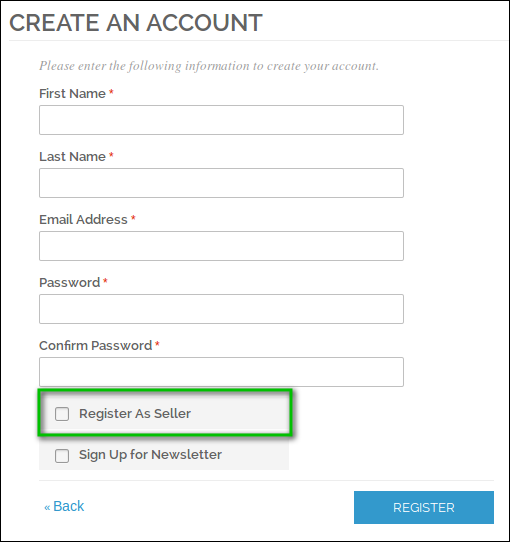
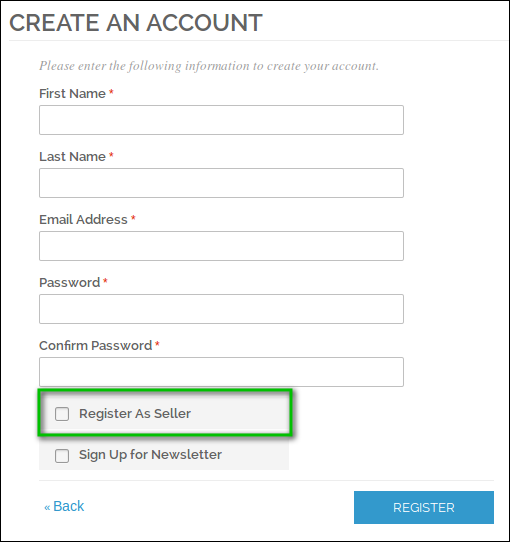
4. Register as Seller Field: Enables or Disables the Register as Seller field on the Create Account page of the storefront.
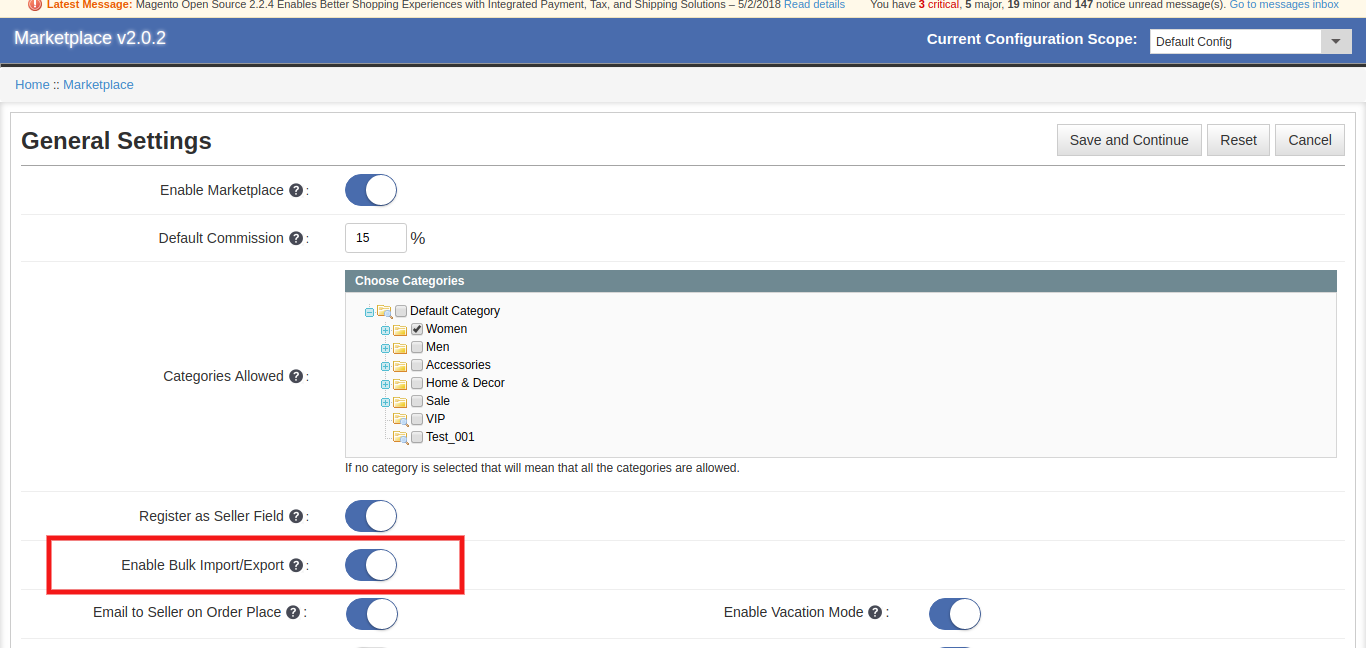
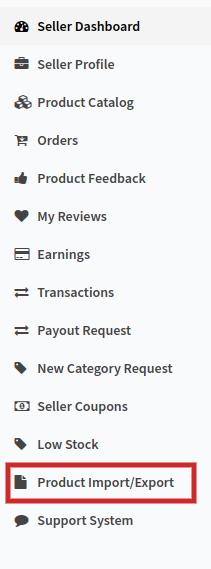
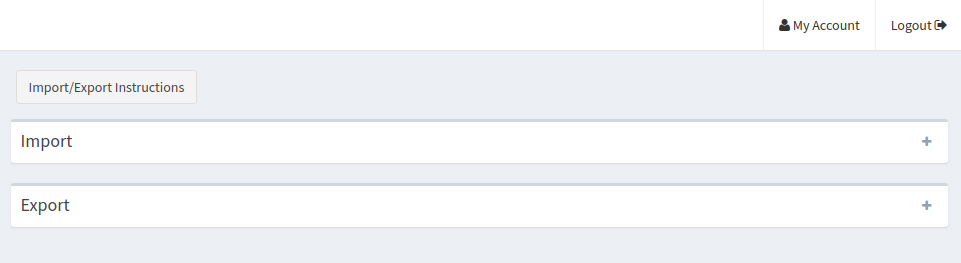
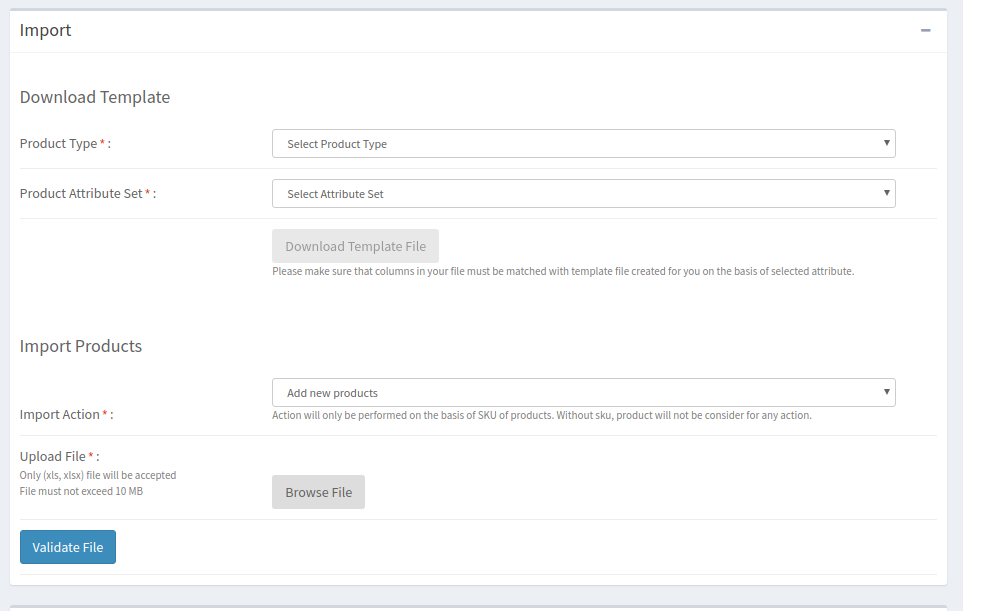
5. Enable Bulk Import/Export: Enable the button to allows the third-party vendors to use bulk import/export feature.
6. Email to Seller on Order Place: Enable this field to send an email to the seller in case an order is placed for the sellers’ product(s).
7. Include JQuery: Disable this field in case JQuery is already included in the front by another plugin or your theme.
8. Product Approval Required: Enable this field in case approval for the product added by any seller is required before it gets to your store.
9. Enable Seller Review: Enable this field in case you want the customers can review the seller.
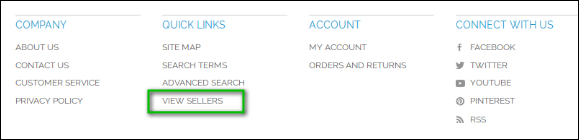
10. Enable Seller List: Enable this field in case you want to show a link in the footer of the storefront to the seller listing page. If this setting is disabled then the seller listing page cannot be accessed anyhow.
11. Enable Vacation Mode: Enable this button to allow the sellers to set the vacation mode for their shop for a particular period.
12. Enable seller Coupon: Enable this feature to allow the sellers to generate coupons for their products.
13. Show Seller Info Product Page: Enable the button to show the seller’s info on the product page.
14. New Product Limit: Enter the maximum number of products that a new seller can add before the seller account is approved.
15. Seller Review Approval Required: Enable this field in case you want the seller review to be approved before it becomes visible in the storefront.
16. Enable Search Box: Enable this field in case you want a search box on the seller listing page to search the sellers.
17. Enable Support System: Once this feature is enabled from the backend of the Magento Multi seller Marketplace module, the customer can directly contact the seller.
Low Stock Configuration
1. Enable Low Stock Notification: Enable the button to notify the sellers regarding the low stock notification. 2. Low Inventory Limit: Enter the stock level below which the seller will be notified regarding low stock. 3. When to Notify: Select when you will send the notification. It may be sent when the order is placed or after executing cron. 4. Send Notification From Select the email ID from which you want to send the notification.
Once this functionality is enabled from the back-end of the Magento Marketplace module, the vendors can configure the low-stock setting from the Low-stock section of their dashboard.
Go to the configuration section of the Low Stock tab of the dashboard.
Low Inventory Limit: The sellers can enter the inventory limit below which they want to get notified. Receive Low Stock Notification: Select whether you want to receive the low stock notification or not.
4.2 Seller List
This page of the Magento marketplace extension has a list of all the sellers that are approved by the store owner.
The above list contains a list of all the sellers that are approved. There are buttons to go to the seller’s products and orders in front of each seller.
When you click on the Orders button than a new page opens consisting of the list of all the orders for that particular seller opens.
When you click on the Products button than a new page opens consisting of the list of all the products for that particular seller opens.
The is also a feature to enable or disable any seller using the Mass Actions feature of the Grid. To enable/disable any seller select the seller(s), choose the action (i.e. Enable or Disable) then click on the submit button to complete the action.
If a seller is disabled then all the products of that seller are also disabled and will not be visible at the storefront.
4.3 Sellers Products
This page of the Magento multi-vendor marketplace extension consists of all the approved products added by the seller(s) to the store.
If the settings (i.e. Product Approval Required) is disabled, then, a product is approved directly when it is added by the seller and appears in this list. Otherwise, the product first appears in the Product Approval list.
Delete Product: To delete a product, you have to click on the delete button in front of that product.
A pop-up will appear asking for the reason for the deletion of the product. To complete the action fill the reason and click submit.
A mail will be sent to the seller to notify the deletion of the product. The mail also contains the reason you provided for the deletion of the product.
Note:- The product delete action cannot be undone. Please use this feature carefully.
Enable/Disable Product: To change the status of any product, you have to use the Mass Action feature of the Grid. To enable/disable any product select the product(s), choose the action (i.e. Enable or Disable), then, click on the submit button to complete the action.
Note:- Once a product is disabled from the back-end of the Magento Multi-vendor Marketplace plugin, it will not be visible at the front. Avoid disabling products, only disable a product if it is very necessary.
4.4 Product Reviews
This page of the Magento multi seller marketplace extension contains a list of all the reviews done by customers on the seller’s products.
View Product Review: Most of the details of the product review are already mentioned in the grid but some of them are not. To view, all the details of any Product Review click on View Button in front of that review. A pop-up will appear in the back-end of the Magento multi-vendor marketplace plugin having all the details of the product review.
To edit the review you can click on Edit Button on the pop-up that will redirect you to the edit review page.
Delete Product Review: The Magento multi-vendor marketplace extension allows the store admin to delete the product reviews. To delete a product review, you have to click on the delete button in front of that product review on the list.
A pop-up will appear asking for the reason for the deletion of the product review. To complete the action fill the reason and click submit.
Note:- The product review delete action cannot be undone. Please use this feature carefully.
4.5 Sellers Reviews
This list contains a list of all the Sellers Reviews done by customers in the store.
If the settings (i.e. Seller Review Approval Required) is disabled then a seller review is approved directly when it is added by the customer and appears in this list. Otherwise, the review first appears in the Seller Review Approval list.
Note:- The Seller Reviews that are disapproved by the store owner also appear in this list.
View Seller Review: To view all the details of a seller review you have to click on the View button in front of that review in the list.
On clicking the View button a Pop-up will appear having all the details of the corresponding seller review.
4.6 Seller Account Approval Request
When a seller registers as a seller on your store than it first appears in this list of the Magento multi-vendor marketplace extension as shown in the image below. Then it is up to the store admin to approve or disapprove the seller account request.
Approve Seller Account: To approve a seller account, you have to click on the Approve button in front of that seller on the list.
Once the Seller account is approved, it directly moves to the Sellers List and all the limits to the seller account are released.
A mail will be sent to the seller to notify the approval of the seller account.
Note:- The Seller Accounts that are approved by the store owner cannot be undone. Please use this feature carefully.
Disapprove Seller Account: To disapprove of a seller account, you have to click on the Disapprove button in front of that seller on the list.
A pop-up will appear asking for the reason for the disapproval of the seller account. Fill the reason and then submit the form to complete the action.
A mail will be sent to the seller notifying the disapproval of the seller account. The reason provided in the pop-up will also be sent in this mail.
Note:- Once a seller is disapproved then he can again apply for the seller account and whenever a seller do this the store owner is notified through a notification email.
4.7 Seller Review Approval List
This list of Magento multi-vendor marketplace contains all the Seller Reviews that are just posted by the customers and no action is taken on them.
If the settings (i.e. Seller Review Approval Required) is enabled then only any seller review posted by any customer appears in this list otherwise it directly appears in the Seller Reviews list.
View Seller Review: To view all the details of a seller review you have to click on the View button in front of that review in the list.
On clicking the View button a Pop-up will appear having all the details of the corresponding seller review.
Approve Seller Review: To approve a seller review, you have to click on the Approve button in front of that review on the list.
Once a seller review is approved it becomes visible in the front end and is transferred to the seller review list.
Note:- This action cannot be undone. Please use it carefully.
Disapprove Seller Review: To disapprove of a seller review, you have to click on the Disapprove button in front of that review on the list.
A pop-up will appear asking for the reason for the disapproval of the seller review. Fill the reason and then submit the form to complete the action.
Once a seller review is disapproved it is transferred to the seller reviews list and cannot be found anywhere else.
Note:- This action cannot be undone. Please use it carefully.
Delete Seller Review: To delete a seller review, you have to click on the Delete button in front of that review on the list.
A pop-up will appear asking for the reason for the deletion of the seller review. Fill the reason and then submit the form to complete the action.
Once a seller review is deleted it is completely removed from everywhere.
Note:- This action cannot be undone. Please use it carefully.
4.8 Product Approval Request
When a seller adds a product then, first of all, it appears here and the store owner is also notified for the same through the mail. Then it is up to the store owner to approve or disapprove the product.
If the setting (i.e. Product Approval Required) is on then only a new product is added appears in this list otherwise it directly appears in the Product List and is automatically approved and enabled.
Disapprove Seller Product: To disapprove of a product, you have to click on the Disapprove button in front of that review on the list.
A pop-up will appear asking for the reason for the deletion of the seller review. Fill the reason and then submit the form to complete the action.
Once a product is disapproved a mail will be sent to the seller notifying the disapproval of the product. The disapproved products also appear on the same list. The Store admin can approve them anytime.
Approve Seller Product: To approve a product, you have to click on the Approve button in front of that review on the list.
Once a product is approved it transfers from this list to the Sellers Products list.
Note:- This action cannot be undone. Please use it carefully.
4.9 Category Request List
A seller can add the product to categories that are allowed to that seller. In case, the seller needs to add a product to a category that is not allowed, then, the seller can request for the same. All those category requests appear in the Category Request by Seller list of the Magento multivendor marketplace module as shown below. A mail is also sent to the store owner to notify the Request for Category. Then it is up to the store owner to approve or disapprove the request.
Approve Category Request: To approve a category request, you have to click on the Approve button in front of that category request on the list.
A pop-up will appear in the back-end of the Magento multi-vendor marketplace extension asking for the reason for approving the category request. Fill the reason and then submit the form to complete the action.
Note: This action cannot be undone. Please use it carefully.
Disapprove Category Request: To disapprove of a category request, you have to click on the Disapprove button in front of that category request on the list.
A pop-up will appear asking for the reason for disapproving the category request. Fill the reason and then submit the form to complete the action.
Note:- This action cannot be undone. Please use it carefully.
4.10 Reports
4.10.1 Reports -> Best Selling Products
The Report tab of the Magento multi-vendor marketplace helps the store owner to identify the best selling products added by the sellers. The store owner can also use multiple filters for the best selling product reports.
The filters help the store owner identify best selling product :
For a date range.
For a specific category.
For a specific seller.
Note:- Sometimes you may be unable to find any data in this report. In that case, you have to refresh the report statistics and to do that you have to do the following:
Go To Reports -> Refresh Statistics -> Select The Desired Reports to Refresh -> Submit
Or
Click on the Refresh Statistics Button on the top of this page.
4.11 Transactions and Earnings
4.11.1 Transactions and Earnings -> Commissions
The Commission list of the Magento multi-vendor marketplace extension contains all the commissions earned by the store owner on several orders with commission percentage and total sale of the seller.
4.11.2 Transactions and Earnings -> Category wise commissions
The Transactions and Earnings page of the Magento multivendor marketplace module shows the report for the commissions earned by the store owner. This report shows the total commission earned by the store owner from a seller. The store owner can also use filters to filter the commission reports category wise.
This feature offered by the Magento multi-vendor marketplace extension helps the store owner to identify commissions from different categories and which category has produced how much commission.
4.11.3 Transactions and Earnings -> Seller wise transaction
The system does not automatically transfer the amount in the seller’s account. Hence the store owner has to keep records of the balance for all the sellers and manually transfer money to the seller and then enter the details of the transaction to keep a record of the same.
This list contains all the balance variations for all the sellers in the system. The list shows total sales of the seller, seller earning, your commission. This list helps the store owner to identify the earning and categorize them seller wise.
4.11.3.1How to View Transactions Details?
To view the details of the transactions done for a particular seller, you have to click on the View button in front of that seller.
On clicking on the View button in front of any seller a new page will open having a list of all the transactions done for the corresponding seller.
You can also add a new transaction for the current seller by clicking on the Add New Transaction button on the top right portion of the Magento multi-vendor marketplace plugin.
4.11.3.2 How to Add New Transactionin the seller’s payout details?
To add a new transaction detail for any seller, you have to either click on the Add New Transaction button corresponding to respective sellers.
On clicking the button a pop-up appears asking for the details of the transaction. Fill the form and submit the form to complete the action.
The various fields of the pop-up are discussed:
Seller Name: Select the name of the seller from the drop-down list. Transaction ID: Enter the transaction ID here. Amount: Select whether the amount was debited or credited and then enter the amount. Comment: Enter a comment regarding the transaction.
Additionally, the admin can even add a new transaction in the seller’s account by clicking on the Make New button corresponding to each seller account.
Note:- This action cannot be undone. Please use it carefully.
4.11.4 Transactions and Earnings -> Seller Payout
This page contains a list of all the transactions done to date to all the sellers available in the system.
You can also add a new transaction for any seller by clicking in Add New Transaction button on the top right of the above page.
4.11.5 Transactions and Earnings -> Seller Payout Request
The seller can send a payout request to the store admin from their dashboard. The seller’s request is viewed by the admin from this tab of the Magento Marketplace extension. The Dashboard of the seller includes an option of Payout Request.
On clicking this link, the seller will be redirected on the section of the dashboard as shown in the image below:
4.11.5.1 How can the sellers add a new payout request from their dashboard?
Before the seller can request for the payout, he needs to configure the payout the Profile menu of the Dashboard. The various fields required to be filled in this section are discussed below:
Select Payout Method: The various payout methods in the drop-down menu. Select the method that you want to use for the payout. There are three options available by default:
Bank Wire
Payment By Cheque
PayPal
1. Bank Wire:
On selecting, Bank Wire options, you’ll be required to provide the following information.
Account Owner: Enter the name of the owner of the account in which the amount is to be transferred. Details: This section includes the bank details such as bank branch, IBAN, BIC, etc. Bank Address: Enter the address of the bank. Additional Information: Provide any information that you would like to share with the store admin.
2. Payment By Cheque
Pay to the order of entering the name to which the cheque is to be issued. Address: Provide the address for sending the cheque in this section. Additional Information: Provide any information that you would like to share with the store admin.
3. PayPal
In case you select, PayPal, you will be required to enter your PayPal Email ID. The additional information section allows you to provide any information that you would like to share with the store admin.
Once the payout method is configured in the seller’s profile, the vendor becomes eligible to send the payout requests.
To add new payout request click on the ‘+’ in the New Payout Request section as shown in the image below:
Fill up a small form to send the request.
Amount: Enter the amount of the payout request. Request Reason: Enter the reason for the payout request.
The payout request is, then, send to the admin for approval.
The payout requests that are approved or disapproved or waiting for approval can be viewed in the payout request section as shown below:
The store admin can view all the payout requests of the sellers of the marketplace in the back-end of the Magento Multi-vendor marketplace extension.
On clicking on the Approve button, a popup will be shown. Enter the transaction ID and comment to approve the request of the seller.
4.11.6 Transactions and Earnings -> PayPal Payout Settings
The PayPal Payout Settings of the Magento Multi seller Marketplace extension allows the store admin to enable the PayPal methods for the payout. Enter the required details as discussed below:
Active: Toggle the button to activate the PayPal payment method. Client ID: Enter the Client ID of your PayPal account. Client Secret: Enter the Client Secret of the PayPal account. PayPal Mode: Select the PayPal mode from the drop-down menu. PayPal Email ID: Enter the email ID used in your account. PayPal currency: Select the default currency for the PayPal transaction.
4.12 Email Templates
The Email Templates tab of the Magento multi-vendor marketplace module contains a list of all the email templates that are used in the system with all the details of the email templates.
Edit Email Template: To edit an email template click on the Edit Template button in front of any email template.
On clicking on the Edit Template button a new page opens having a form for the email template. You can change the email template as desired from the admin interface of the Magento multivendor marketplace.
To save the changes made in the email template click on the Save Template button on the top right of the above page.
Note:- While editing the email template please keep in mind that you don’t edit any text inside the curly brackets (i.e. {{var any_var}}).
4.13. Vacation Mode
The sellers get an option to disable their shop from the marketplace for a particular period. The request of the sellers to go on vacation mode can be viewed in this section of the Magento Marketplace module.
To set the vacation mode, the sellers can go to the Vacation mode tab of their dashboard.
The tab shows the entire vacation history of the seller as shown in the image below:
4.13.1 How to Set the Vacation Mode?
To set the vacation mode, click on the ‘Set New Vacation’ button.
On clicking the button, a popup will appear as shown in the image:
Start and End Date: Enter the start and end date of the vacation. Your comment to this Vacation: Enter a comment for the vacation mode.
The admin can view the list of the seller who is on vacation in the Vacation tab of the Magento Marketplace plugin.
To see the details of the vacation, click on the View button.
The admin can cancel the request by clicking on the Cancel button.
A popup will be displayed. Enter the reason for canceling the vacation mode and submit.
An email notification is sent to the seller informing them about the cancellation of the vacation.
4.14. Bulk Import/Export
The admin can offer this feature of bulk import and export to the sellers by enabling the same from the back-end.
If enabled the seller can import or export of the products in bulk from their dashboard.
The vendors can import/export the products in bulk from the Product Import/Export tab as shown below:
4.14.1How to Import the products inbulk?
Product Type: Select the type of product that you are uploading. The Magento Multi seller Marketplace Plugin supports all type of products, that is, simple, configurable, virtual and others.
Product Attribute Set: Select the attribute set of the products from the drop-down list.
Download Template File: You can download the template file in an excel sheet for the selected attribute by clicking on this button.
Please make sure that columns in your file must be matched with the template file created for you based on the selected attribute.
Import Action: Select the import action from the drop-down list. Action will only be performed based on the SKU of products. Without SKU, the product will not be considered for any action.
Upload File: Upload the file with the product details here.
Click on the Validate File to complete the import.
4.14.2 How to Export the Products in Bulk?
The seller can export the product details listed in the marketplace from this section. Select the Export Type from the drop-down menu and click on Export.
The details will be exported in an excel sheet.
4.15. Cron Instruction
This tab offers two cron options. Execute vacation cron to implement the changes made in the Vacation tab of Magento Multi-vendor Marketplace module in the front-end of the marketplace.
Run Low Stock Notification Cron to send the low stock notifications email to the sellers.
5.0 Register As Seller Field – Register Page
If a new customer is registering in the Magento marketplace store, then, there is an additional field on the Register Page. If the customer wants to Register as Seller than the customer has to mark this field.
Once the account is created, the sellers get access to the dashboard.
The dashboard of the seller offers several options to the sellers as shown in the image below:
They can configure their profile by clicking on the Seller Profile tab.
The sellers can view their profile by clicking on the ‘View Profile’ button. Additionally, they can even see their collection by clicking on the ‘View Collection’ Button.
5.1 How sellers can generate a coupon?
Steps to follow to generate a coupon:
Click on the seller coupon tab available in the seller dashboard.
Click on the “+” icon and fill the following fields in the form and following form will appear in front of you:
Coupon Name: Enter the name of Coupon here.
Description: Fill the Coupon description here.
Status: Select the status of coupon here.
Coupon Code: Set the coupon code here. Customers can use this coupon to avail of the discount.
Uses per Coupon: Set the number of times a coupon can be used.
Uses per Customer: Maximum number of times customers can use the coupon.
From Date to To Date: Set the time for which the coupon will be valid.
Coupon Type: Select the type of coupon here. Coupons can be fixed type and percentage type.
Discount Amount: Enter the amount value of the discount here.
Select Products: Select the products on which the seller wants to offer the discount coupon.
Click on the “Generate” button to generate a coupon.
5.2 Tax Class
A tax class is a class assigned to a product by the sellers. Tax class helps in distinguishing between taxable goods and non-taxable goods. In the product Catalog, while filling the product details for a new product, the seller can select the tax class, in price tab of the Product Catalog, that he wants to assign to the items/services.
5.3 Customer Support System
For the seller ticket system, the Marketplace admin needs to enable the seller ticket system feature in the General setting tab in the backend.
Once the feature is enabled at the backend, the customer can directly contact the sellers. Whenever a customer will contact a seller, a ticket will be generated, the seller can view the ticket in the customer support system of the seller dashboard.
5.3.1 How customer can contact a seller?
Click on the seller tab at the frontend of the store.
A seller list will appear before you.
Click on the seller will take the customer to the seller profile page.
The customer needs to click on the contact the seller link and a form will appear before them.
Once the customer will submit the form, the respective seller will receive a ticket.
Watch how Magento Multi seller Marketplace module works?
For further information, refer to the following links:
1. Download the zip from Magento store & unzip into a folder.
2. After unzip, following files/folders will be extract as shown in below screen:
3. Login via FTP & Drag drop all the folders into your server root directory.
4. You will find the extension link will be displayed under System >> Bird View Analytic.
Admin Module
This module will basically work and visible in admin panel. There is no interaction of customers with this module and only admin has access of this module.
After copy this module, a link to access this module will be displayed under System >> Bird View Analytic menu as shown below screen:
After clicking on this link, module page will be open as shown in below screen:
There are following tabs are displaying on left side in above screens. Each tab has different functionality which are described below in details :
General Settings
On clicking the module link, this tab will be open by default as shown as above screen. This tab has setting of this module. Each setting is explained below:
Extension Settings
1. Activate: This setting will enable/disable the working of this module. There is switch button to ON/OFF this module. By default, it will be turn OFF.
2. Show on Dashboard: This setting will be used for display following reports on dashboard.
a) Order report
b) Today report.
c) This Week report
d) This Month report
e) This Year report
This setting will display/hide all the above reports. By default, this setting will be ON.
Default Dashboard Reports
This section has for configure settings for dashboard reports.
1. Order Report: Display/hide report on dashboard. By default, this will be ON.
2. Today Report: Display/hide report on dashboard. By default, this will be ON. Admin can also set order of this report.
3. This Week Report: Display/hide report on dashboard. By default, this will be ON. Admin can also set order of this report.
4. This Month Report: Display/hide report on dashboard. By default, this will be ON. Admin can also set order of this report.
5. This Year Report: Display/hide report on dashboard. By default, this will be ON. Admin can also set order of this report.
Report Interval Settings
Here admin can set time interval for reports for which he/she wants to display initially. There are various time interval which will be displayed in dropdown list with each report. These time interval are:
1. Last 7 Days
2. Last 15 Days
3. Current Month
4. Last Month
5. Current Year
Admin can set time interval for various below reports:
1. Dashboard Order Report
2. Sales by catalog
3. Mostly Viewed Items
4. Sales by Time
5. Sales by Customer Group
6. Sales by Country
Dashboard Statistics
This tab will display all those reports which will be displayed on dashboard. There will be no impact of dashboard report settings on this tab. On clicking this tab, following report will be displayed as shown in below screen:
1. Order Report: This is sales report which will display:
a)Total Revenue, b) Total Orders, c) Total Tax, d) Total Shipping and e) Total Product Sold. This report will be displayed in graphical form.
2. Today Report: This report will display today report. The percentage parameter will show the percentage increase/decrease in corresponding parameter after comparing with previous day.
3. This Week Report: This report will display this week report. The percentage parameter will show the percentage increase/decrease in corresponding parameter after comparing with previous week.
4. This Month Report: This report will display this month report. The percentage parameter will show the percentage increase/decrease in corresponding parameter after comparing with previous month.
5. This Year Report: This report will display this year report. The percentage parameter will show the percentage increase/decrease in corresponding parameter after comparing with previous year.
Report from point 2 to 3 will display following parameters:
1. Orders
2. Revenue
3. Product Sold
4. Discounts
On hovering any percentage value, module will display corresponding parameter values with previous value as shown in below screen:
If the previous value of any parameter is 0, then module will display N/A label instead of displaying percentage increase/decrease as shown in below screen:
Sales By Catalog
Here admin can see product sold report as well as category report according to selected report type. By default, module will display sales by product report as shown in below screen:
Admin can also filter the report by selecting following parameters in filter option:
1. Report Type: This will be a drop down list which has two options: a) Product and b) Category. With this option, module will display report accordingly. By default, product type will be selected.
2. Status: This will be a drop down list which will display all the order status.
3. Start Date: Required field. This will be a date field. Module will display report onwards of this date. Initially, module will calculate start date according to saved time interval in general setting.
4. End Date: Required field. This will also be a date field. Module will display report before of this date. Initially, module will calculate end date according to saved time interval in general setting.
5. Reset Button: This action will display corresponding report according to default values.
6. Export as CSV: Export and download report according to filter parameters in CSV format.
Graphical Report
Tabular ReportThis section will display top 20 products/category report in graphical form. The graph will display report according to sale in percentage. X-axis label will display product SKU (in case of product type) and category name (in case of category type) report. And Y-axis show sales in percentage.
Tabular Report
In this section, Product/category report will be displayed in tabular format. There are following columns will be displayed in this table :
1. Product/Category Name
2. SKU(in case of product type report)
3. Sale (in %)
4. Quantity (Number of quantity sold)
5. Total Sale (in money)
Mostly Viewed Items Report
Here admin can see mostly viewed/popular report of products as well as category according to selected report type and date interval. By default, module will display mostly viewed products report as shown in below screen:
Filter Parameters
Admin can also filter the report by selecting following parameters in filter option:
1. Report Type: This will be a drop down list which has two options: a) Product and b) Category. With this option, module will display report accordingly. By default, product type will be selected.
2. Category List: This will be a drop down list which will display all active category in the system. Here admin can select multiple categories to filter report. By default, all active categories will be listed. Required field incase of report type of category.
3. Product List: This will also be drop down list which will display all the simple type products. Here admin can select multiple products as well as search the product in drop down. On selecting category, module will refresh this product list and display only selected category products. If the report type is Category then this list will be hide. By default, module will display all simple type products and report will be display for all products. Required field in-case of report type of product.
4. Start Date: Required field. This will be a date field. Module will display report onwards of this date. Initially, module will calculate start date according to saved time interval in general setting.
5. End Date: Required field. This will also be a date field. Module will display report before of this date. Initially, module will calculate end date according to saved time interval in general setting.
6. Reset Button: This action will display corresponding report according to default values.
7. Export as CSV: Export and download report according to filter parameters in CSV format.
Graphical Report
This section will display top 20 products/category report in graphical form. The graph will display report according to number of views. X-axis label will display product SKU (in case of product type) and category name (in case of category type) report. And Y-axis show number of views.
Tabular Report
In this section, Product/category report will be displayed in tabular format. There are following columns will be displayed in this tab:
1. Product/Category Id
2. Product/Category Name
3. Product type (in case of product type report):
4. SKU(in case of product type report)
5. Views (in %)
6. Number of views
Sales By Time
In this tab, admin can see sales report according to time. This tab will display 3 types of report as per time. Here time have been divided into following category:
1. Days of Week (Display report for only days of week i.e Monday to Sunday)
2. Months of Year (Display report for only months of year i.e January to December)
3. By Years (Display year report)
By default, module will display days of week report as shown in below screen:
Filter Parameters
Admin can also filter the report by selecting following parameters in filter option:
1. Start Date: Required field. This will be a date field. Module will display report onwards of this date. Initially, module will calculate start date according to saved time interval in general setting.
2. End Date: Required field. This will also be a date field. Module will display report before of this date. Initially, module will calculate end date according to saved time interval in general setting.
3. Type: This will be a drop down list, which will display following options: a) Days of Week, b) Months of Year and c) By Years. By default, Days of Week will be selected.
4. Reset button: This action will display corresponding report according to default values.
5. Export as CSV: Export and download report according to filter parameters in CSV format.
Graphical Report
This section will display report according selected type in graphical form. The graph will display report according to sale(in money). X-axis label will display day name (in case of days of week type), month name (in case of Months of Year type) and year (in case of By Year type) report. And Y-axis show sales (in money).
Tabular Report
In this section, sales report will be displayed in tabular format. There are following columns will be displayed in this tables:
1. Label:
a) Day name(Monday – Sunday) in case of Days of Week report.
b) Month Name(January – December) in case of Months of Year report.
c) Year (2014, 2015 etc) in case of By Years report.
2. Sale (in %)
3. Total Orders
4. Quantity (Product Sold)
5. Total Sale (in money)
Sales By Customer Group
In this tab, admin can see sales report for each customer group. By default, module will display report according to saved time interval as shown in below screen:
Filter Parameters
Admin can also filter the report by selecting following parameters in filter option:
1. Start Date: Required field. This will be a date field. Module will display report onwards of this date. Initially, module will calculate start date according to saved time interval in general setting.
2. End Date: Required field. This will also be a date field. Module will display report before of this date. Initially, module will calculate end date according to saved time interval in general setting.
3. Reset button: This action will display corresponding report according to default values.
4. Export as CSV: Export and download report according to filter parameters in CSV format.
Graphical Report
This section will display report according selected type in pie chart. In pie chart, each section will highlight the corresponding sales data in percentage as shown in above screen.
Tabular Report
In this section, sales report will be displayed in tabular format. There are following columns will be displayed in this tables:
1. Group name
2. Tax class name (currently applicable)
3. Sale (in %)
4. Total Orders
5. Quantity (Product Sold)
6. Total Sale (in money)
Sales By Country
In this tab, admin can see sales report for each country. By default, module will display report according to saved time interval as shown in below screen:
Filter Parameters
Admin can also filter the report by selecting following parameters in filter option:
1. Start Date: Required field. This will be a date field. Module will display report onwards of this date. Initially, module will calculate start date according to saved time interval in general setting.
2. End Date: Required field. This will also be a date field. Module will display report before of this date. Initially, module will calculate end date according to saved time interval in general setting.
3. Reset button: This action will display corresponding report according to default values.
4. Export as CSV: Export and download report according to filter parameters in CSV format.
Graphical Report
This section will display report in world graph map. Each country will be highlighted with different color as per sale range. On hovering country, module display country name and sale(in money) from that country.
Sale Range
Sale is divided into 4 range as follow:
1. 1 Range: This range will indicate sale range above 60%.
2. 2 Range: Indiacate range between 35% to 60%.
3. 3 Range: Indicate range between 15% to 35%.
4. 4 Range: Indicate range less than 15%
5. The last one is not range. It will indicate only not found country.
Tabular Report
In this section, sales report will be displayed in tabular format. There are following columns will be displayed in this tables:
1. Country Code
2. Country Name
3. Sale (in %)
4. Total Orders
5. Quantity (Product Sold)
6. Total Sale (in money)
Dashboard Item
If any report is enabled to display on dashboard from general settings, then module will display them on dashboard. The report which will be displayed on dashboard is identical to report displaying in Dashboard Statistic Tab. For example, if all dashboard items are enabled then module will display reports on dashboard as shown in below screen:
Front End
There is no interaction of this module with users on front end. Only one functionality will work internally on front end which does not affect any other part of system.