We boast of the best in the industry plugins for eCommerce systems and has years of experience working with eCommerce websites.
We provide best plugins for platforms like - Magento, Prestashop, OpenCart and Shopify. We also provide custom module development and customization services for the website and modules.
This addon is basically an Prestashop Marketplace Addon. The Marketplace admin can create seller badges based on the various parameter to be satisfied by a seller to obtain one. Seller badges are displayed to the customers once they visit the seller profile page or product page of a particular seller. Admin can create Seller Badges for his sellers like Best Seller, Best Customer Support, Best New Seller etc. Parameters to obtain one can be set from the back-end panel of admin.
So, keeping this in mind, this ad-don will provide features to customer through which customer can see a seller badge and interprete the kind of seller on the marketplace.
This interface will have two fields for the admin in the back end. Both of the fields are listed below-:
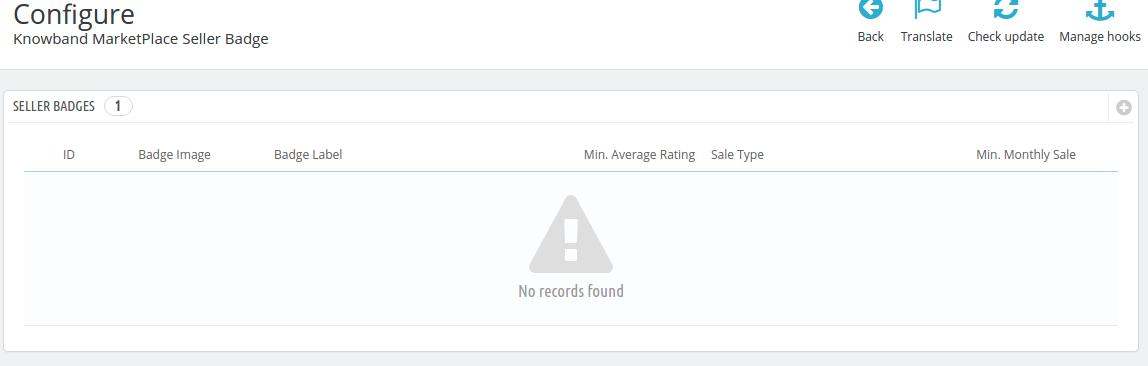
List of seller badges
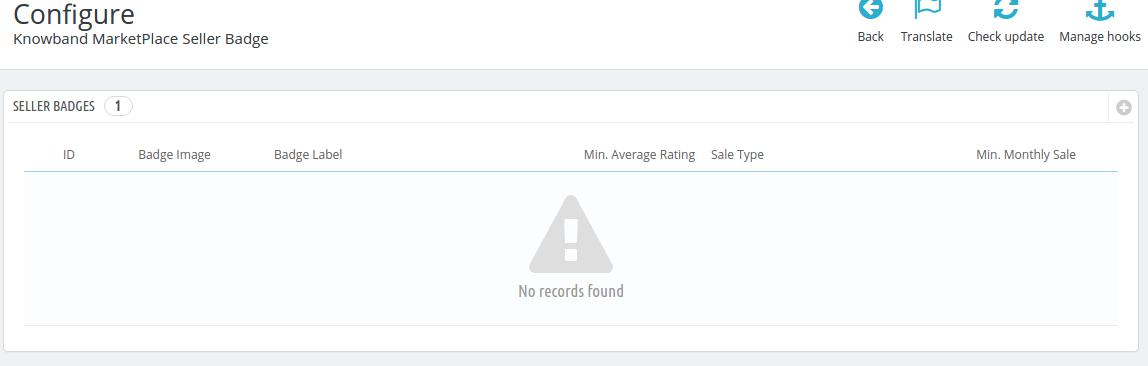
The list of seller badges already applied can be found in the Configuration settings in inside Modules and Services >> Modules and Services on the admin panel.
Add new Seller Badge:
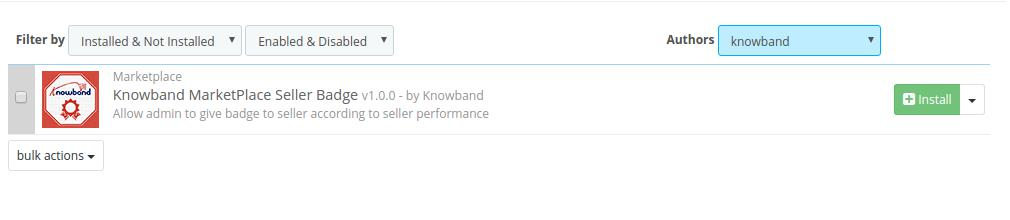
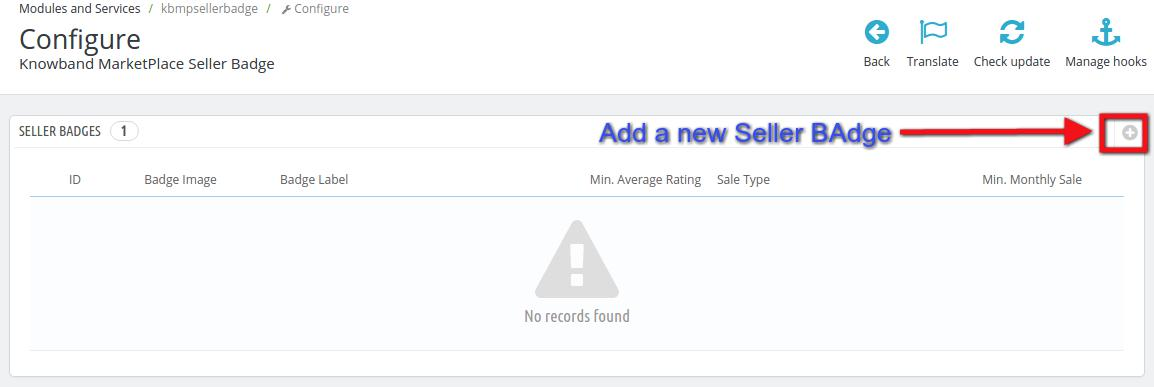
Admin can add a New Seller Badge on his marketplace site by navigating to Modules and Services >> Modules and Services >> Knowband Marketplace Seller Badge >> Add New (Plus Icon)
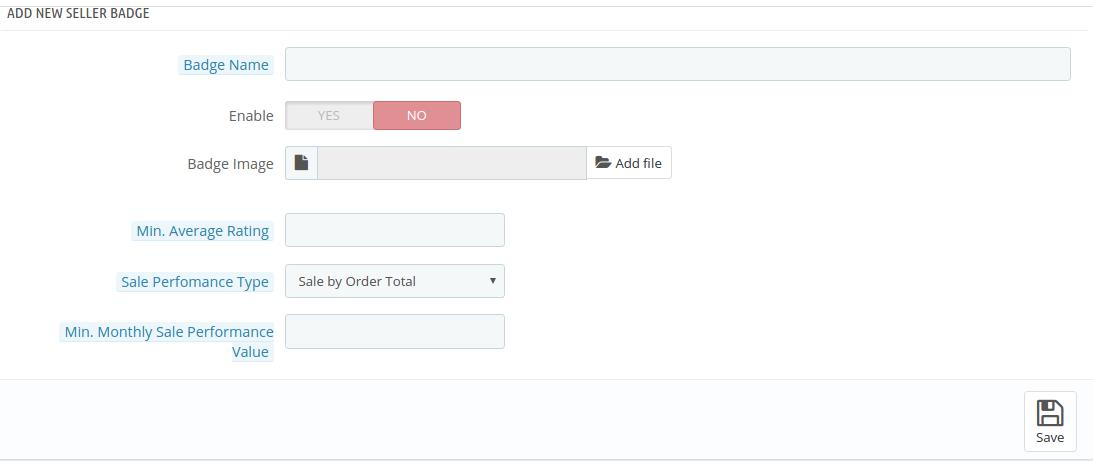
1. Badge Name: Give a name to your seller badge. This name is for admins personal reference, it will not be displayed to any one else.
2. Enable: Select the status as Yes if you want the badge to be active on the marketplace.
3. Badge Image: Upload an image for the badge that will be visible to the customers on the sellers profile page or the product page of the particular seller.
4. Min. Average Rating: Provide the Rating Parameter to achieve the particular badge. For example, you can decide seller has to get at least 3 stars to obtain this badge.
5. Sale Performance Type: Provide a parameter that will be used to decide if a seller is eligible for the particular badge. You can select from two types of parameters, Sale by Order Total or Sale by Product Sold.
If you select Sale by Order total, then the eligibility of seller will be checked on the basis of total orders processed by him on his store.
If you select the Sale by Product Sold, then the eligibility will be tested on the basis of the total products sold by a seller on his store.
6. Min. Monthly Sale Performance Value: Enter the minimum Monthly sale required for a seller to be eligible for the particular badge.
7. Save : Save once your settings are done.
Customer Interface
Here the customers can see the badges acquired by the sellers on two types of interfaces.
Product page Interface
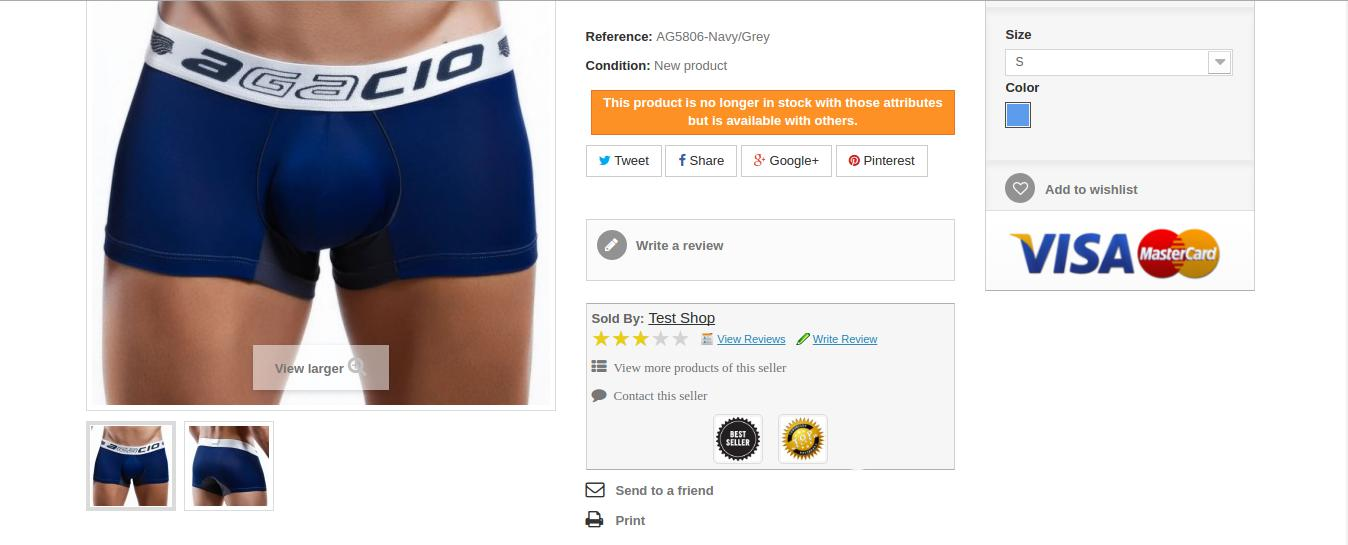
1. The Product Page of the particular seller as shown in the screen shot below:
Seller Profile interface
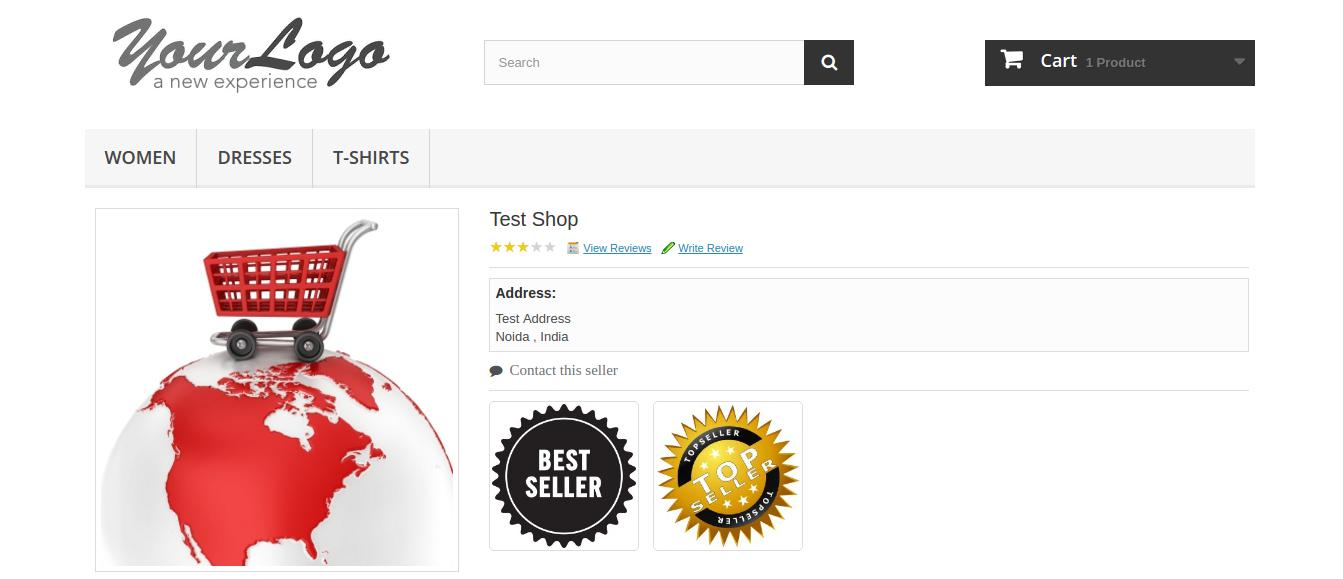
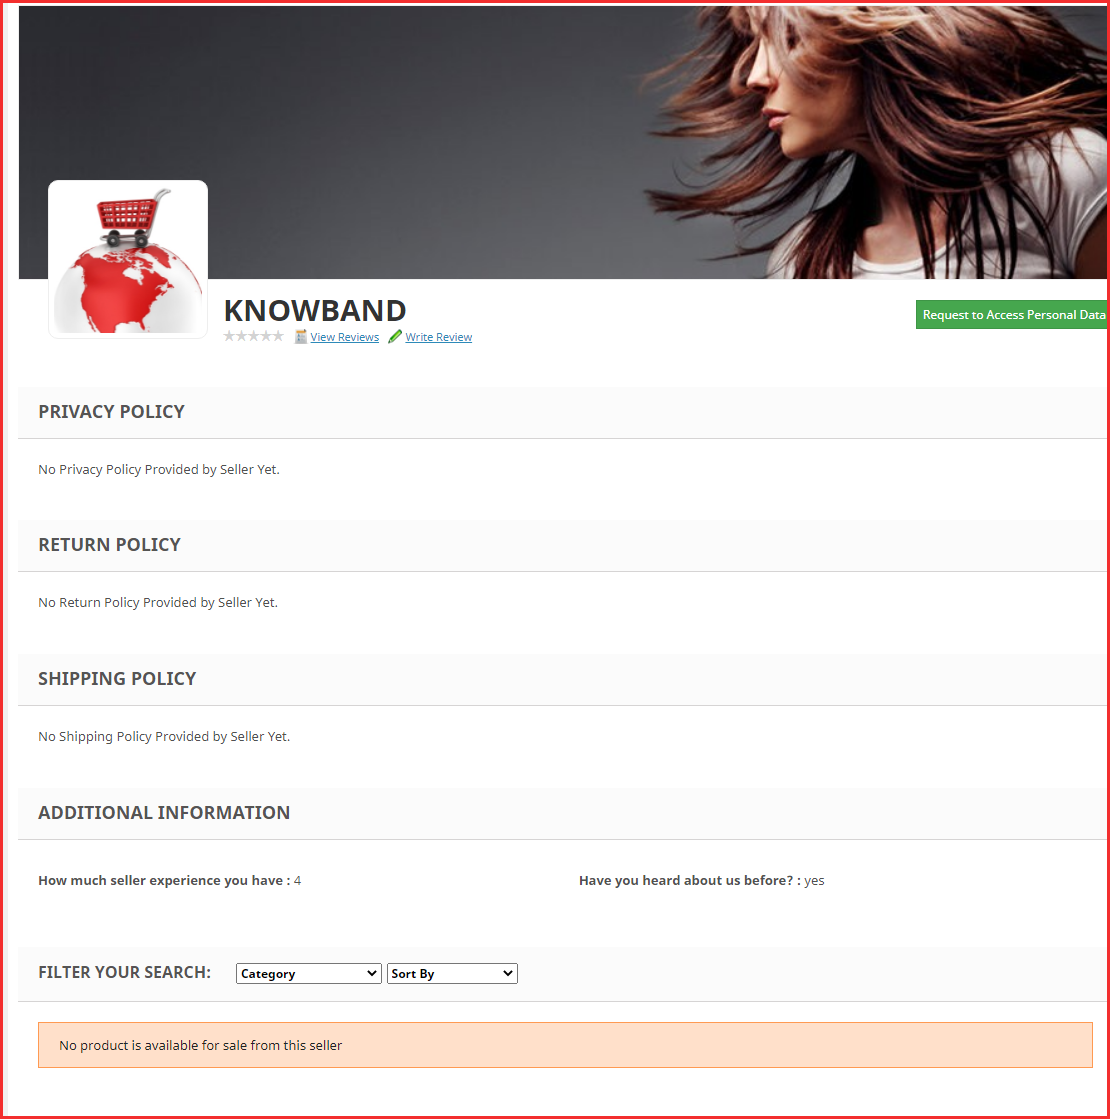
2. The seller profile Page on the front end of the store.
Configuration Page
This is a page where seller can enable/disable this feature from customers. After disabling this, customer cannot see the Seller Badges on the marketplace. Also, Admin can configure the badges from the same interface.
Businesses around the world are thriving on the basis of customer and social engagement which helps in building the trust and loyalty around your company. You need to be in the “good books” of your customers so that they can swear in the name of your product when it comes to quality and performance. It is important to give time and attention to social engagement as the business potential of sites like Facebook, Twitter, Google+, Instagram, LinkedIn and others are known all across the globe.
With gradual time and technological advancements, social media sites are the new growth engines for various businesses around the world. It would be completely naive to stay away from this global platform of business promotion due to its widespread usage and popularity. If you have understood the importance of these social platforms for business promotion and higher conversions, it is time to pay attention to this social login extension for OpenCart stores. The Opencart extension is an excellent OpenCart social extension that can optimize your chances of business engagement among your rivals. Here are some of the reasons that will force you to give a try to this OpenCart Social Login module from Knowband store.
Eliminates chances of frequent customer redirects and time consuming customer login process-
Online shoppers are often much irritated due to the time consuming customer login process on an online store which affect their customer engagement to a great extent. With the help of this Opencart social login extension, you can offer multiple social login options to your targeted customers. In this way, it increases customer engagement on your site which can optimize your chances of conversion rates and sales.
Quick installation and configuration facility-
This Opencart social login extension is a superb Opencart extension as it can be easily installed and configured by any individual having the basic computer skills. There is no need for any special hardware and software requirement for its effortless installation. You can manage and control the entire process with the help of few clicks only.
Allows store admin to choose positions of login options-
The placement of site elements do have a strong impact on the customer attention and can affect your business chances. The back end interactive admin panel of this Opencart social login extension provides store admin freedom to make changes in their login link as well as social bar heading. Apart from this, they can also choose the location to place their social login options on site like at the top, bottom, left or right.
Option to choose the desired button sizes-
With this one Opencart social login extension stores, it is now much easier to perform the right button size for your site. Depending upon the layout, design and nature of your targeted customers, store admin can select the small or large size social media buttons for grabbing maximum conversions and sales.
You would commit the biggest blunder in the eCommerce business scenario if you are still not serious about utilizing the features and functionalities of this Opencart social login extension. Don’t be a loser in your business domain and make the right move by purchasing this Opencart social login extension from our Knowband store.
Mobile Apps are the recent trends that have boosted the businesses around the world due to their ease of functionality, quick purchasing capability and their seamless installation on various mobile platforms. These apps are especially playing a bigger role in the eCommerce business due to their tried and tested potential in online shopping facility. Furthermore, the growing presence of mobile phones around the world has made apps an important medium of customer engagement for various businesses. They are going to rule the global business landscape in the times to come ahead.
If you are having an eCommerce store and thinking about its expansion among your rivals, you need to go towards engaging mobile apps that are the ultimate business future. In order to make your OpenCart store journey towards mobile apps a seamless task, you need to go for this OpenCart Mobile App Builder module from Knowband store for achieving mind blowing apps for your business. This app can definitely give a big boost to your business chances and can help you stay ahead from your rivals in a seamless manner. Here are some of the ways by which your mobile apps can stand out from other rival apps.
It can be accessed on multiple devices and platforms
These mobile apps are in built in such a way that they can be installed and accessed on multiple Android devices like smart phones and tablets. They come with a responsive design that makes their use much wider and global in reach for expanding your business reach. With the help of this OpenCart extension, you can effortlessly get a wonderful mobile app whose functionality and use is beyond any particular Android device.
Makes account login facility a hassle free experience
No doubt, account login is an important constituent for every online store and plays a crucial role in customer targeting approach. In order to tackle this critical situation, this OpenCart Android App Builder plugin comes with various social media login options to facilitate an effortless account login facility. Thus, it saves the precious time of customer and improves chances of conversions for your OpenCart store.
Provides option to improve the look and feel of the app
This wonderful Knowband OpenCart extension has a bundle of amazing interactive themes that can provide an all together different look and feel to your mobile app. You can use these appealing themes to increase the worth and acceptance of your mobile app among your customers. In this way, you can improve your chances of conversions and sales for your OpenCart store without any hassle.
Implement the advanced searching facility
Searching has seen a major transformation over the years and it is currently governed by voice based search facility. Keeping this trend in focus, Knowband has implemented the voice based searching facility for its customers with the help of this OpenCart Mobile App Builder module for making searching more interactive than before. You just have to speak for the desired items to be searched and the search engine will provide you required results based on your voice based search inputs.
Reflects store changes automatically on your mobile app
With this OpenCart extension, you can make an effective synchronization of your OpenCart store with your mobile app. It is definitely a wonderful approach as you don’t have to make required store changes on your mobile app again due to this synchronization facility. Everything needs to be done for once without consuming more time and efforts.
What are you thinking about now? Do you still need more reasons to adopt this OpenCart Mobile App Builder module for getting those power packed mobile apps? Don’t wait anymore and visit our Knowband site to purchase this OpenCart module that is within your pocket range. It is your passport to a brilliant mobile app for your OpenCart store.
This online shoppers is always in the search of exciting offers, reward points and deals. This is one of the ways to encourage them to purchase the products. If your eCommerce store is unable to trigger the purchase decision of the customers, then, it is certainly going to hurt your business in the long run. Knowband’s Prestashop Reward Points Addon will prove to be a great bonus to the merchants store as it can motivate the customer purchase more and more products. The customers can win reward points in return of the purchases.
Knowband’s Prestashop Loyalty Points Module enables the customers to win reward points after he/she has placed any order. The reward points allows the customers to shop even more at discounted prices. Once the customer has won enough reward points, they can get discount in return of the points.
All the settings regarding the Prestashop reward points addon and the discount values will be given to the merchant in the backed of the extension. Now the Prestashop Reward Points addon is compliant with GDPR. The online mercant can activate the settings to delete the customer details on GDPR data deletion request. The admin can also display a privacy policy consent on the website and also set it’s text and URL in different languages.
1.1 Benefit of Merchant Prestashop Reward Points Addon
Knowband’s Prestashop Loyalty Points Module enables the admin to give the loyalty points to customer when they place their order.
This Prestashop Reward Points Addon allows the admin can set rules for guest as well as registered customer.
The admin can set the N number of discount and reward points rules according to the need.
The Prestashop Reward Points extension allows the admin to view the list of customers used rewards points and remaining rewards points.
This Prestashop Addon helps the admin to engage more the customer to the website.
This Prestashop reward points addon motivate the customer to place another order to use reward points.
It helps the admin to reward the loyal customer by giving them loyality points.
With help of this Prestashop reward points addon, the admin can increase revenue and conversion of website.
Presatashop Loyality Points Extension helps you to improve your popularity by letting the customers share the reward points with others.
The online merchant can also set the GDPR related settings from the admin interface of this Prestashop Reward Points Module.
The Prestashop product purchase reward extension allows the admin to set the privacy policy consent, it’s text and links in different languages.
The e-merchant can also activate the settings for deleting the customer data on GDPR data deletion request.
1.2 Benefit of Customer Prestashop Reward Points Addon
Customer can use the reward points to they make purchase in the future.
This Prestashop Loyalty Points Module allows the customer to share the loyalty points with their friends.
Customer can view the reward points his/her profile.
2. Installation
To install this Prestashop Purcharse points addon, please follow the following steps:
Add addon folder under modules folder of your system.
After adding this Prestashop addon folder, system will list the addon on module page under “front office feature”category as given below:
In admin module, there will be following options to configure this Prestashop Reward Points addon. The Prestashop Addon includes 7 tabs and they are as follows
1. General Settings.
2. Guest Reward Points Settings.
3. Guest Discount Settings.
4. Registered Customer Reward Points Settings.
5. Registered Customer Discount Settings.
6. Email Settings.
7. Statistics.
Each section is described in details below.
3.1 General Settings
This section will be having following options to configure the Prestashop loyalty points addon.
1. Enable/Disable: This option will be having a toggle button with two specific values ON and OFF. This module will only work if this is set to ON. If this is set to OFF then none of the feature will be working and not even impacting any other section of website. By default, this option will be OFF.
2. Delete customer data on Delete request for GDPR: The online store admin can enable the settings to delete the customer details on GDPR deletion request.
3. Enable/disable privacy policy: The online merchant can activate or deactivate the settings for showing privacy policy consent check-box.
4. Privacy policy Text: The online merchant can set the privacy policy text from the admin interface in different languages.
5. Privacy policy URL: The online store owner can set the privacy policy URL from the admin interface of this reward point module.
6. Custom CSS and JS: These fields have been provided to let the admin change the look and feel of the front end of the module. So if he feels to add certain CSS or JS in the front the he can enter those into these field respectively.
3.2 Guest Reward Points Settings
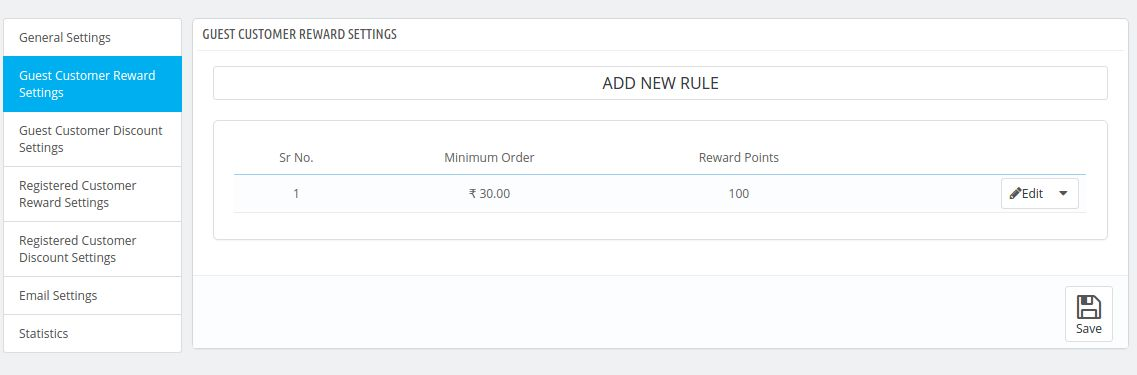
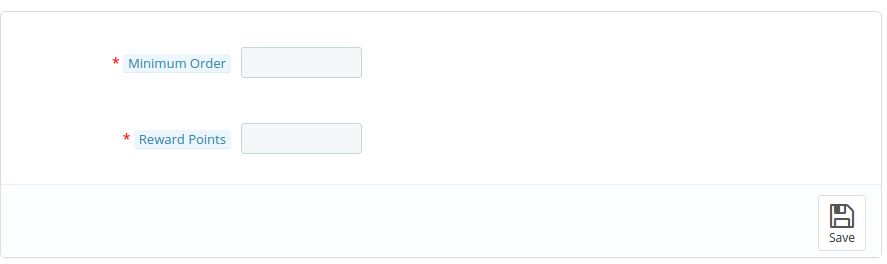
In this tab the merchant will enter the rules according to which a guest customer will win the reward points. When the merchant will click on the add new button available in the tab then a pop up will appear which will have the following fields in it-
1. Minimum Order : Here the admin will enter the minimum amount of the order which has to be their to give the customer certain reward points.
2. Reward Points : Here the admin has to enter the number of reward points which a customer will be awarded after placing the order if he satisfies the above two conditions.
Admin can even edit or delete the created rule by clicking on the action buttons which will be available in the same row where the rule will be listed.
Form which will appear after clicking on add new button-
3.3 Guest Discount Settings
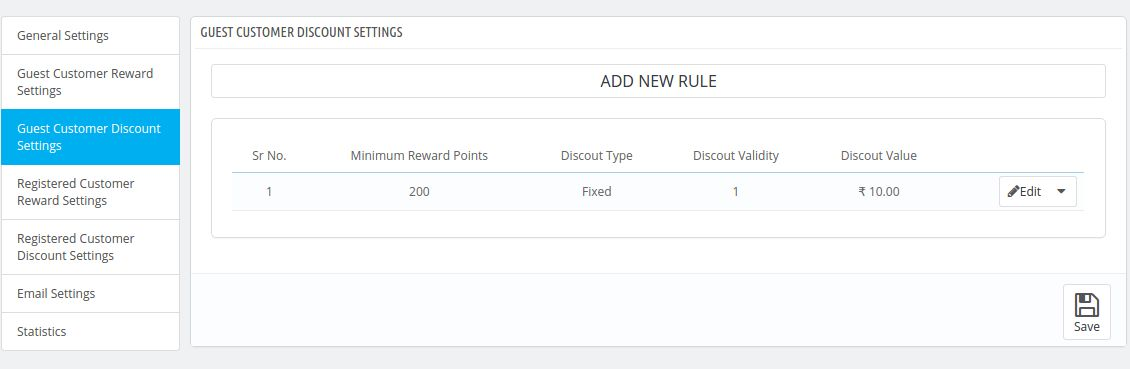
The settings done in this tab will only work for guest customers.In this tab the merchant will have to enter the discount and reward points settings i.e after how many reward points the customer will get discount. Fields which will be available in these tab are-
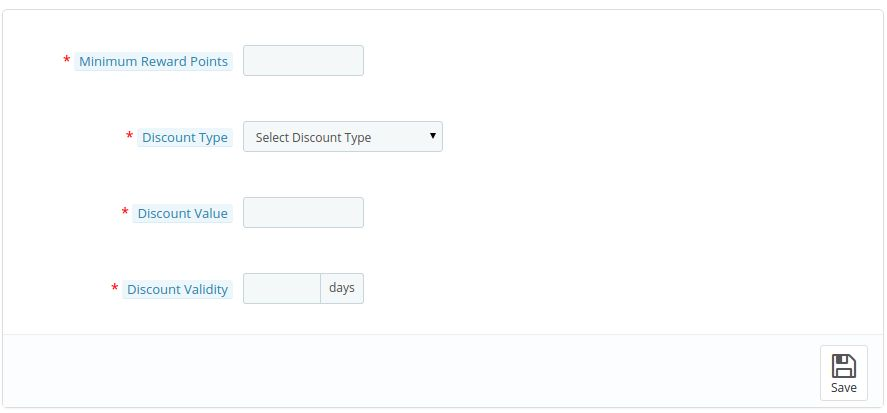
1. Minimum Reward Points : In this field he admin will enter the minimum amount of reward points which a customer should have to satisfy this rule.
2. Discount Type : In this field the admin will select the type of discount which will be given to customer if he satisfies the above conditions. It may be percentage or fixed discount.
3. Discount Value : In this field the admin has to enter the discount value which the customer will get after applying the minimum reward points.
4. Discount Validity : In this field the admin will enter the discount validity of the discount which will be generated
Form which will appear after clicking on add new button.
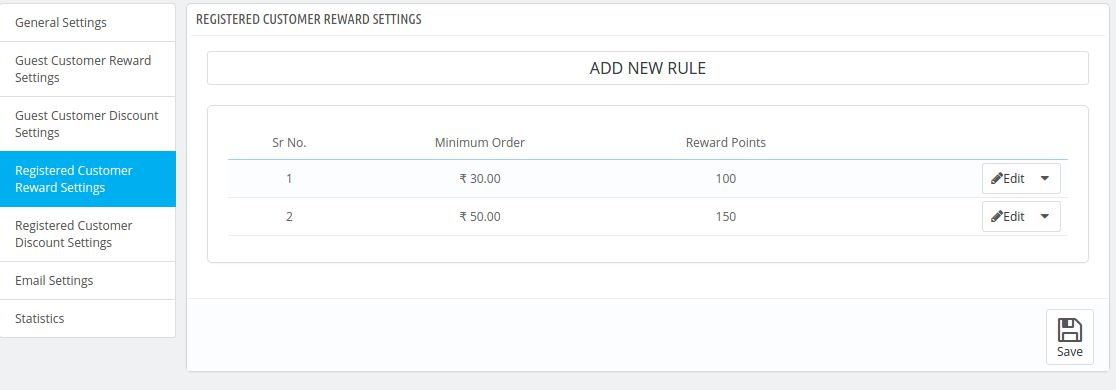
3.4 Registered Customer Reward Settings
This tab will be same as the guest reward settings tab. But the only difference in this tab is that it will work only for the customers who are registered.
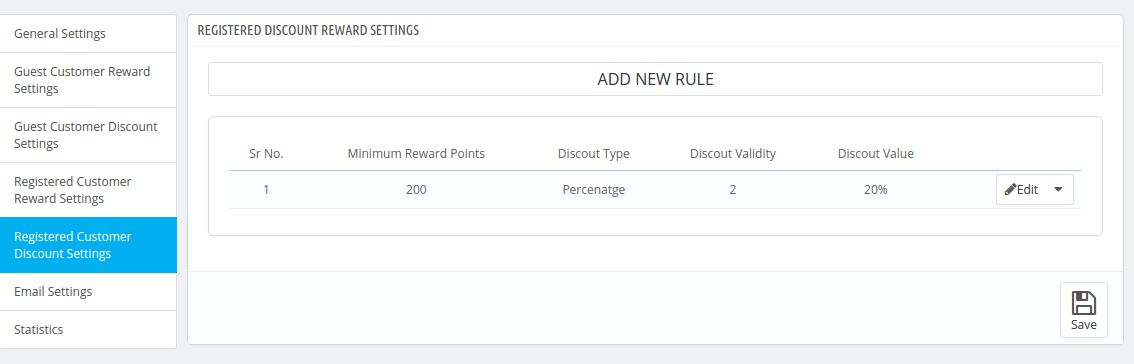
3.5 Registered Customer Discount Settings
This tab will be same as the settings for the guest discount settings tab. But the only difference in this tab is that it will work only for the customers who are registered.
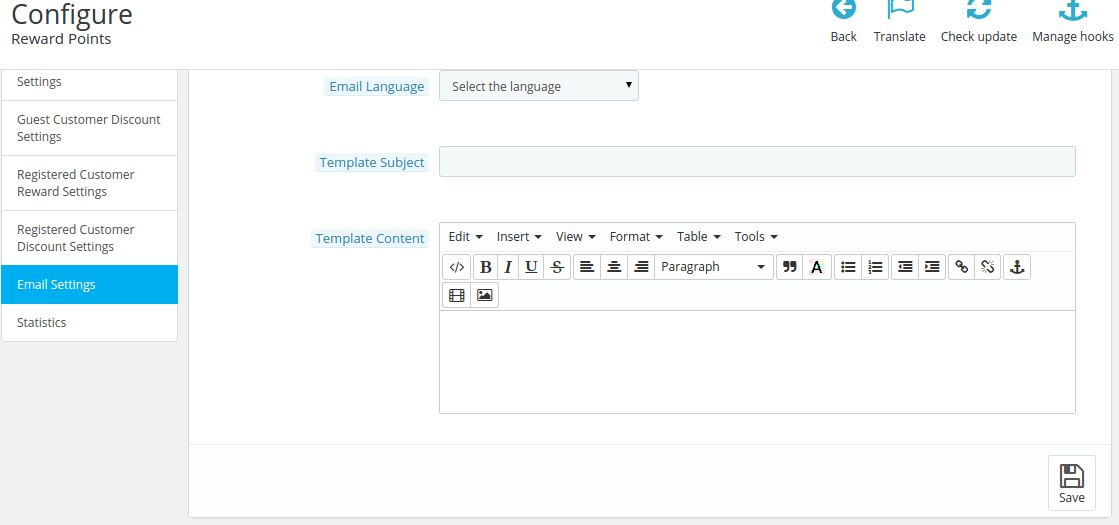
3.6 Email Settings
When the customer will share its reward points with other customer from the front end then the customer to whom the reward points are shared will get a mail from the store end to let them know about the reward points added to their account.
1. Select Language: Here the admin will select the email language using which he will send the email to the customers who have won the jackpot
2. Email Subject: Here the admin can enter the email subject. What ever subject the admin will enter in this email field will be used as the subject of the email sent to the customer whenever they will win any jackpot in the front.
3. Email Content: Here the admin can enter the email content which will be sent to the customers who will win the jackpot in the front..
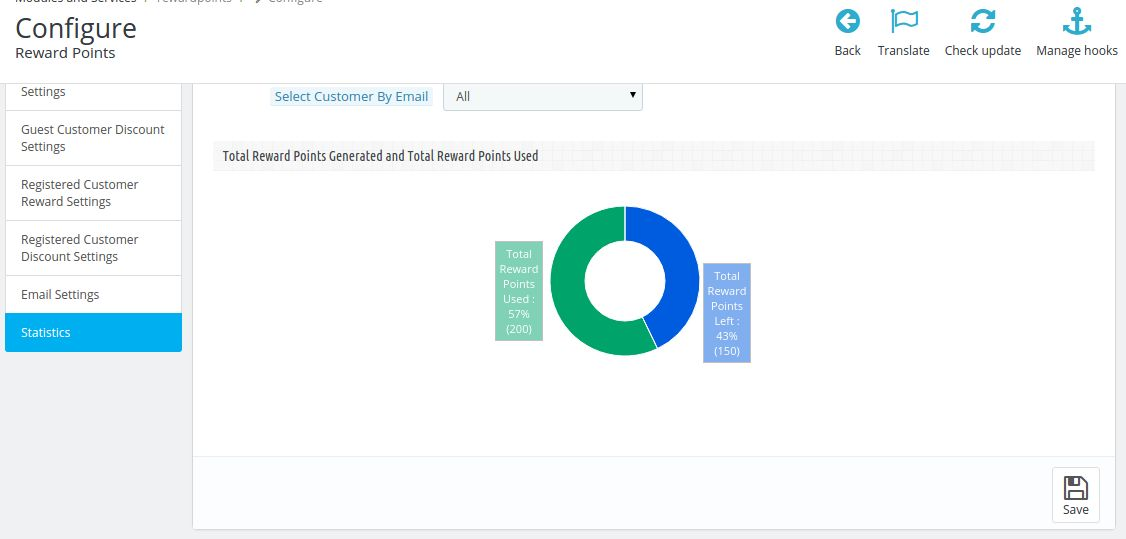
3.7 Statistics
In this tab admin can view the stats of the reward points which are generated till date. The admin may also view the total number of reward points generated and used and may also filter the reward points according to the customer those who have used this module to get reward points.
4. Front End Module
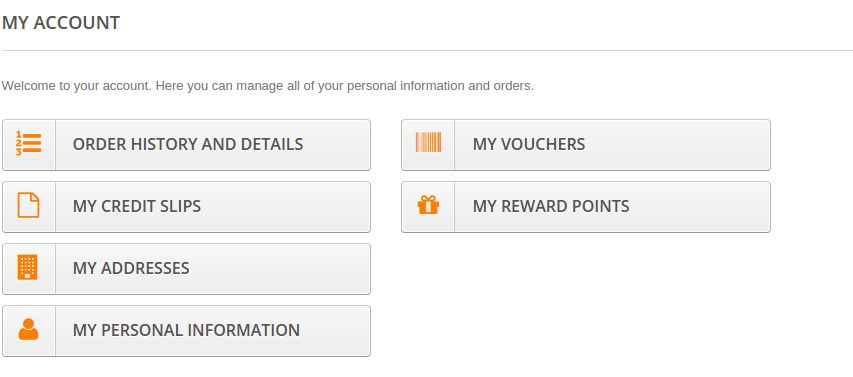
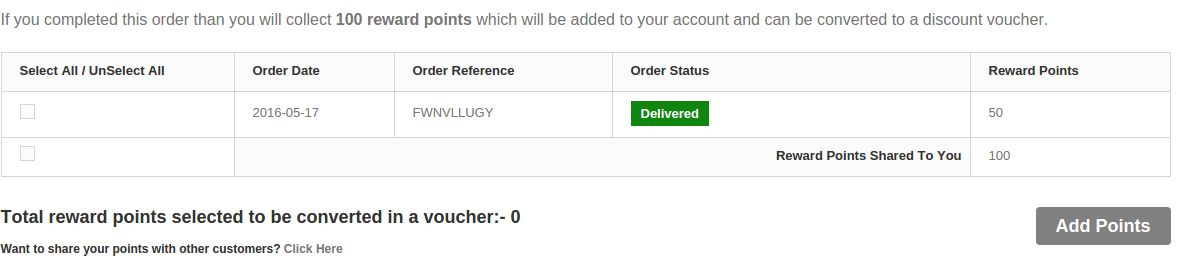
When the module is enabled from the admin panel then it will first appear in the account of the customers. A link stating My Reward Points starts appearing in the account of the customers, On clicking the link the customer will be directed to the list of reward points which they have won by placing different orders. If the order of the particular reward points is delivered then those reward point will be available for use to the customer.
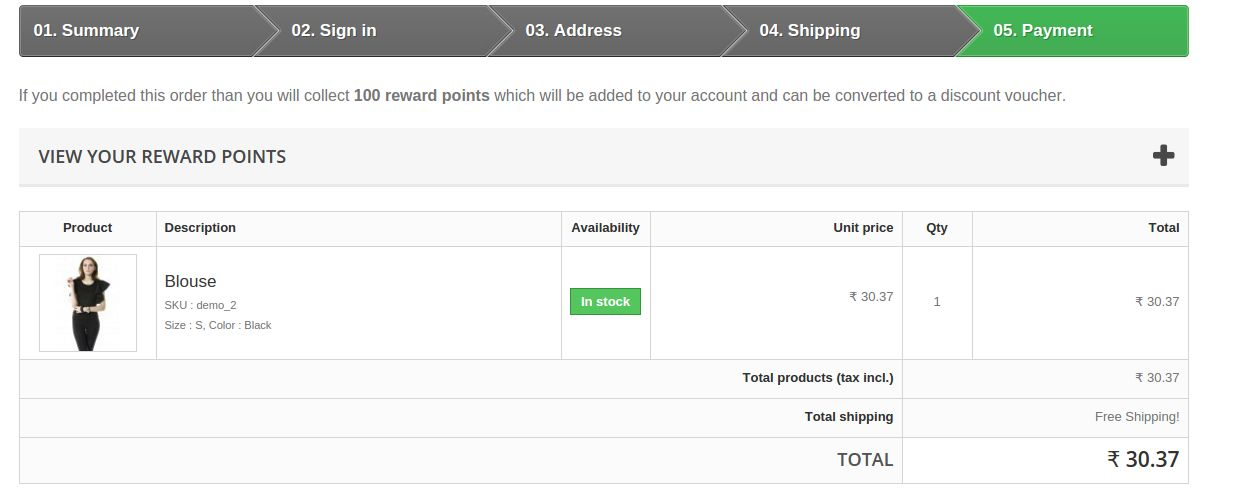
The Prestashop Loyalty Points Addone will also appear above the cart when the customer is about to do the payment for the order. The customer can view his/her reward points and add those reward points to the cart.
You can try Prestashop reward points addon for on your Prestashop website. KnowBand’s Prestashop Loyalty Points extension helps you reward the loyal customer to your store & increase the revenue of website.
The Prestashop Mobile Order Lookup Addon by Knowband is designed for the Prestashop eCommerce businesses and enables the customer to view order info or order status without logging into the account. The Prestashop order details module also allows the store owner to keep a track of the orders and view the customer status.
Merchant Benefits of the Prestashop Mobile Order Lookup Addon:
The Prestashop mobile order lookup module by Knowband lets the customers track their order status without logging into the account in the store.
Use of Prestashop order details addon, the store merchant can track the customer details from the back-office of the module.
Knowband’s Prestashop Order Lookup addon gives store admin the option to monitor the number of customers who viewed their order status.
The Online store merchant can customize the look and feel of the Order Lookup button text and color from the back-end of the Prestashop shipping details module.
Prestashop mobile order lookup module by Knowband allows the admin to change or add the new test which are shown above order lookup result.
This Prestashop order lookup module supports the multiple themes.
Prestashop order details addon by Knowband reduces the burden on manual support system through real-time tracking.
Knowband’s Prestashop mobile order lookup addon admin interface extremely easy to use.
2.0 Installation
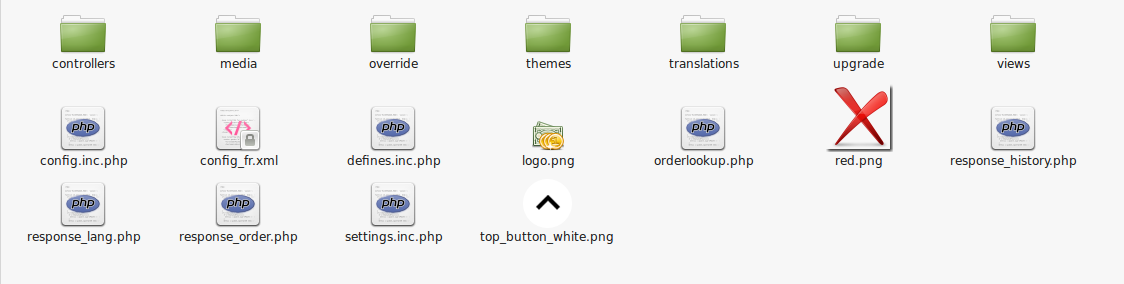
The screenshot below shows the folder structure of the Order Lookup plugin folder.
Folder structure of the Order Lookup plugin folder.
Copy the whole folder named as order lookup into your modules folder of the root directory of your PrestaShop store through FTP.
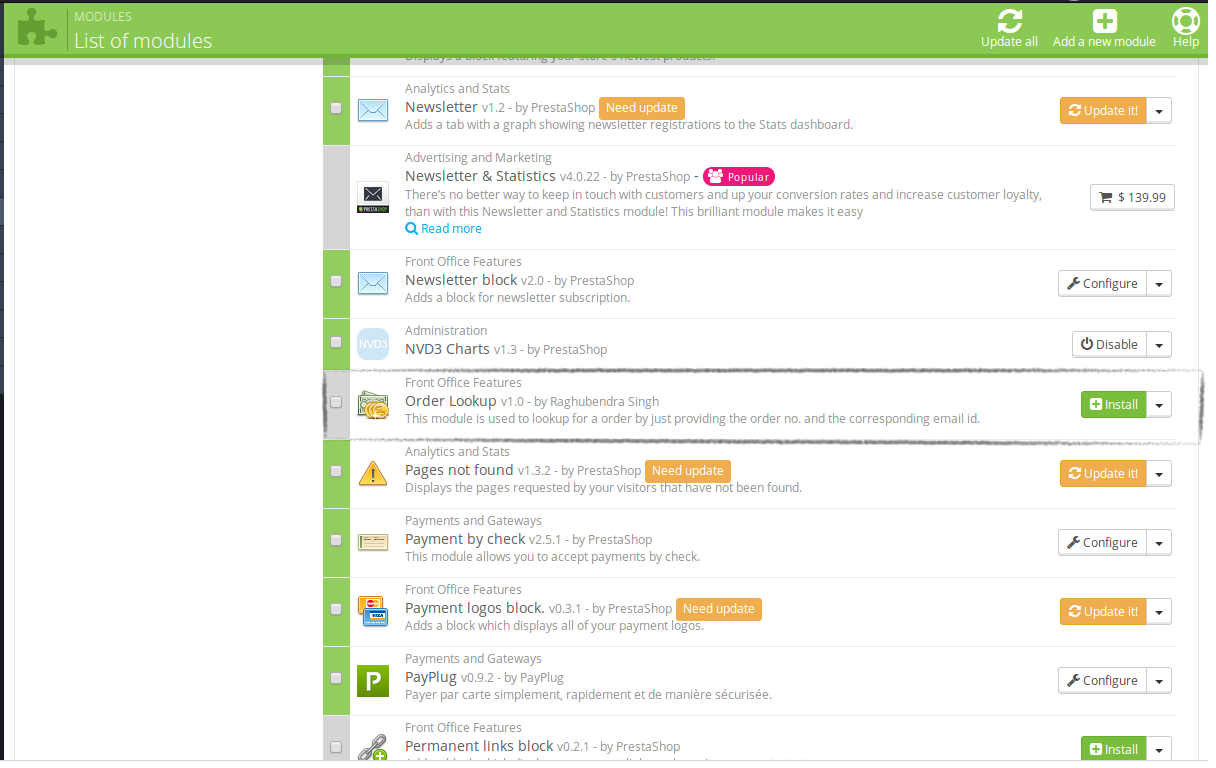
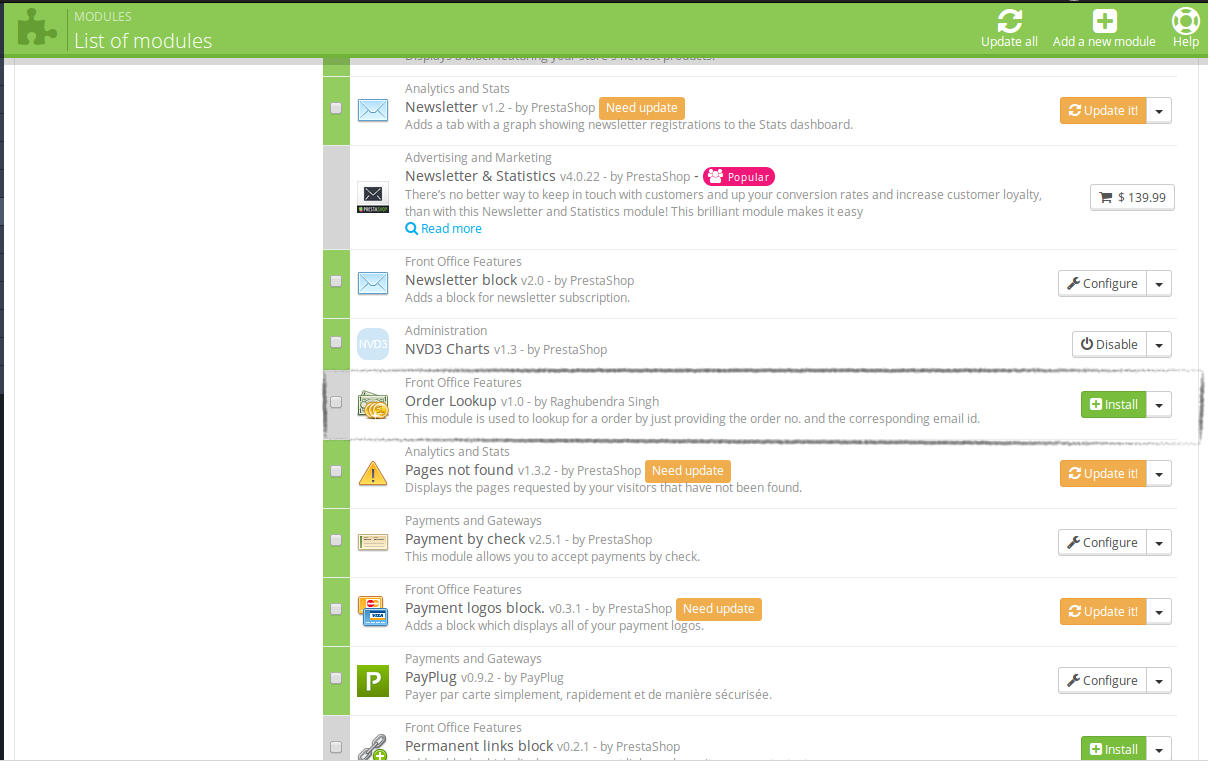
You will be able to find the Prestashop order details addon ready to be installed in the Modules in your PrestaShop store as shown below.
Click on the Install link to install the Mobile order lookup Prestashop addon.
3.0 Admin Module
Here, the Prestashop store owner can change the various settings of this plugin according to the requirements which will be reflected on front-end as well as in the admin panel.
To install this plug-in, please follow the following steps:
Add all whole plugin folder to the modules folder into the root directory of the PrestaShop Store.
After adding the plug-in files, then the system will list the plug-in on the module page.
Click on install/uninstall according to the need.
3.0.1 Admin Interface
After installing Prestashop order details module into the store, it will provide the following interface:
General Settings
Lookup Statistics
Language Translator
Get Support
Each interface is explained below.
3.0.1.1 General Settings
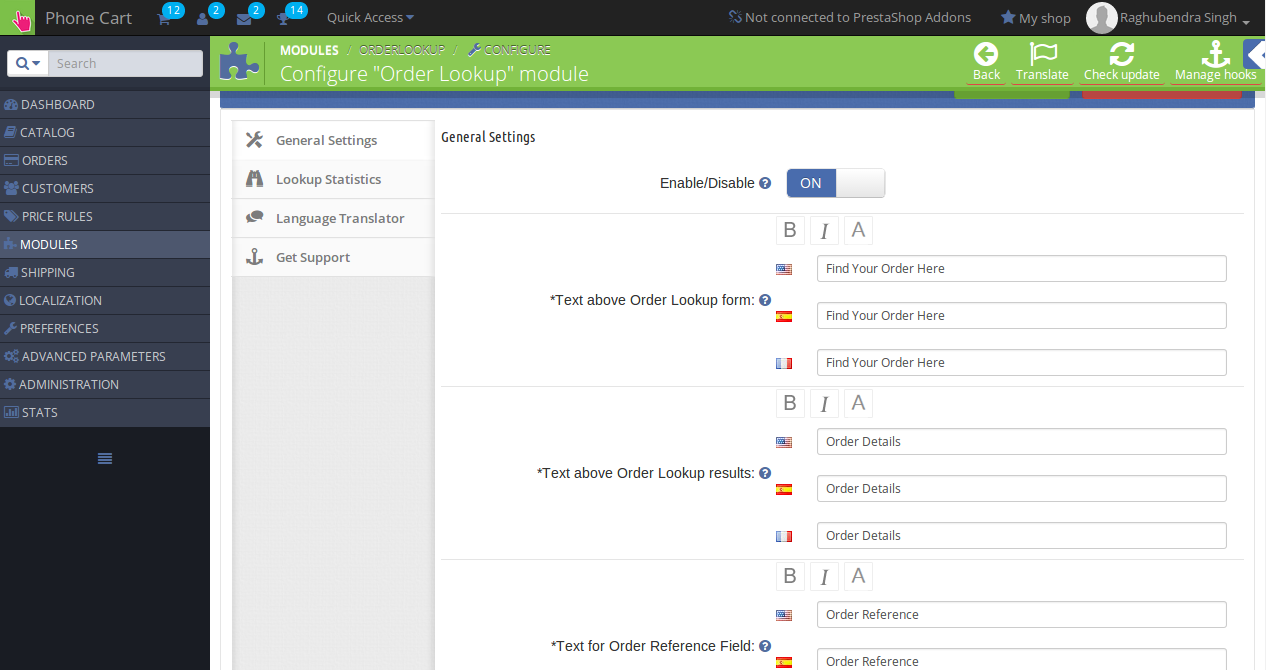
On clicking the configure link on the module listing page (configure link will automatically appear once you install the plugin), the system will open general settings tabs by default as shown in the screen below:
Initially, the fields in the above form will be already filled with their default values.
Enable/Disable: Initially, this will be OFF. The Prestashop store Admin can enable/disable plug-in by turning ON/OFF this setting.
Text control: Here, the admin can control text which would be shown on Order Lookup page and on the result page. Admin can also set different text, text layout and text color for all the languages available in the system. The type of format and text set by the admin in these controls are visible at front-end for the corresponding language selected.
Color control: Here, the admin can control colors of the buttons which would be shown on Order Lookup page and on the result page.
3.0.1.2 Lookup History
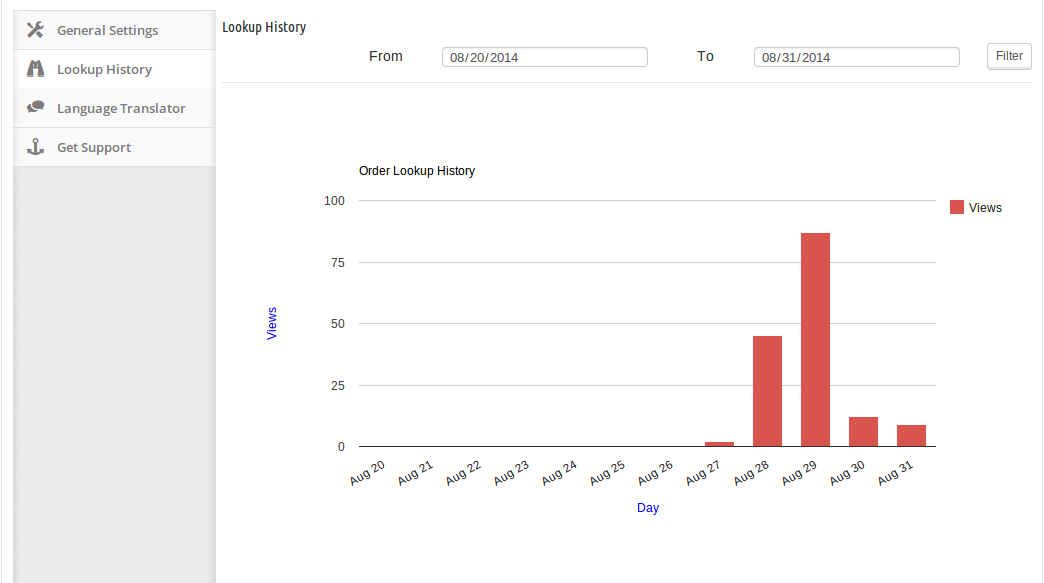
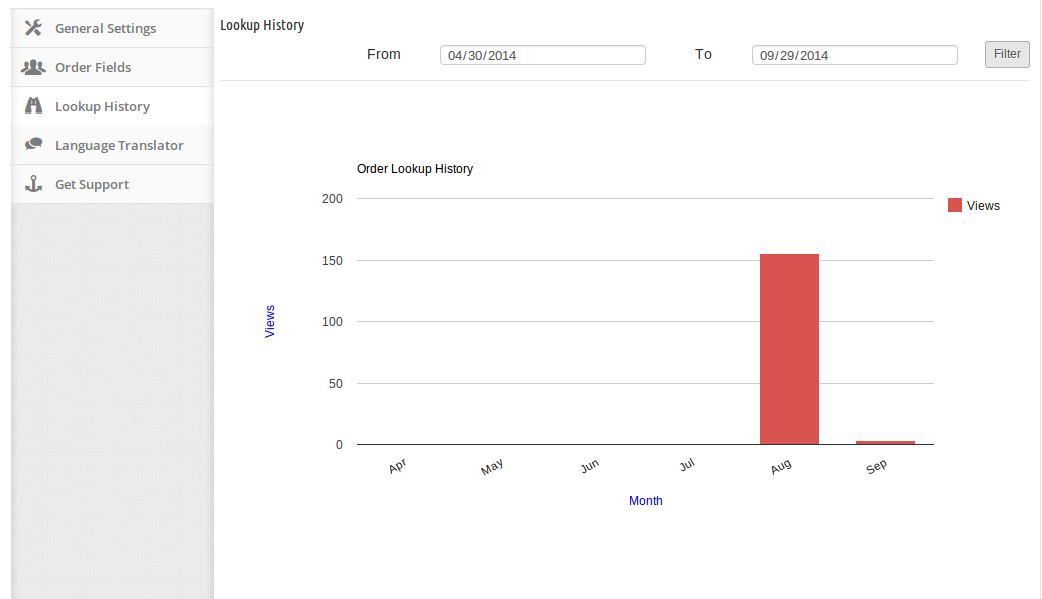
In this tab, Prestashop order status plugin will show the statistics of Lookup page view in terms of number. Reports will be displayed in the form of graphs. With the help of these statistics, the admin will be able to know at which time, Order Lookup page opened most. The store owner can enter any range and the system will show the results accordingly. By default, the graph will show the stats for the current week. The lookup stats are shown as follows:
3.0.1.3 Language Translator
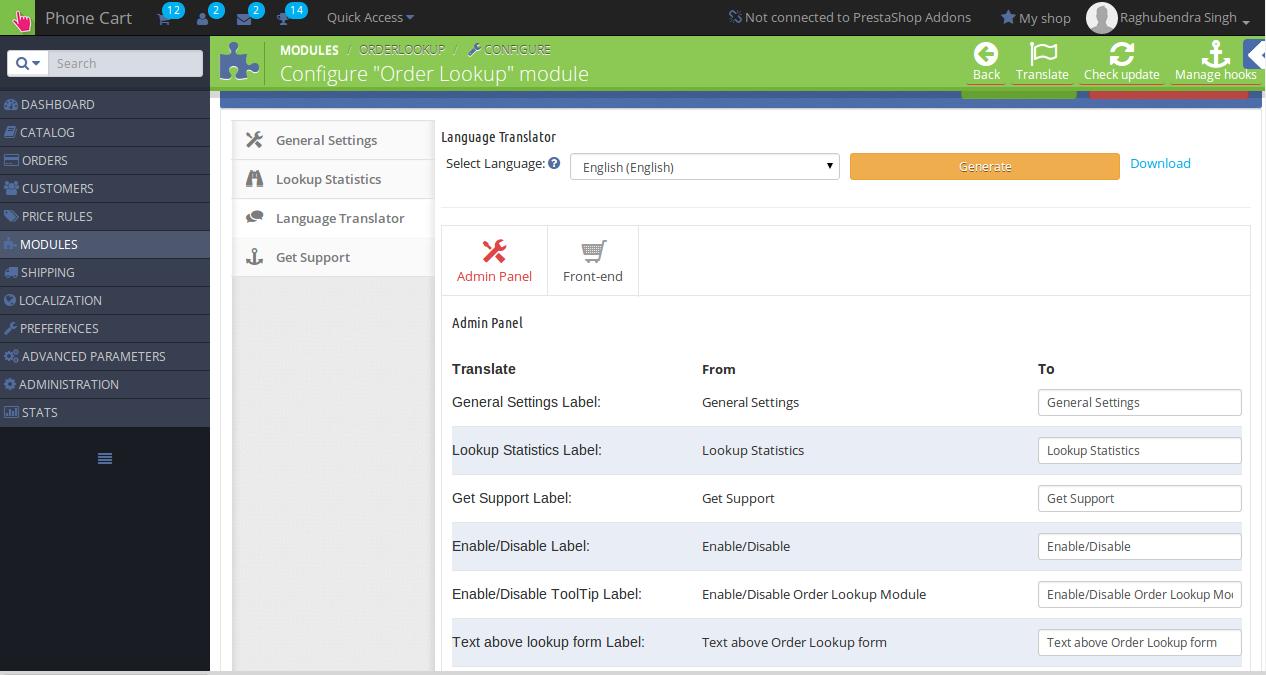
In this section, the admin can enter the text and can also change the texts that are displayed in the admin panel as well as front-end for the Mobile order lookup Prestashop addon. The interface for the language translator consists of two tabs through which the admin can enter the language texts for the admin panel and front-end. The admin can also download the language file generated. The language translator looks like the following:
3.0.1.4 Get Support
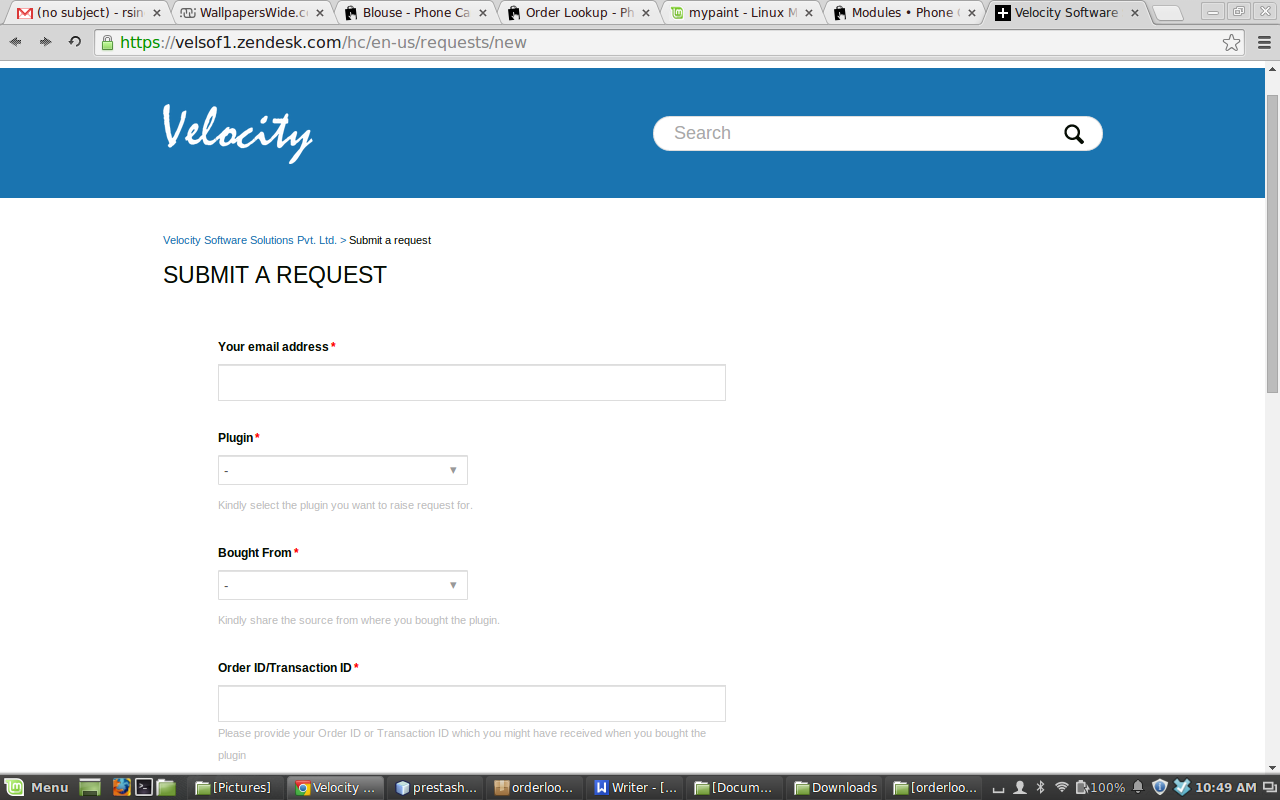
If the admin has found any issue regarding the Prestashop plugin and wants any type of support, then via this link, he/she can create a ticket for any query on our help desk support. On clicking this link, a new tab open with where the admin can generate the ticket for support.
4.0 Front End Module
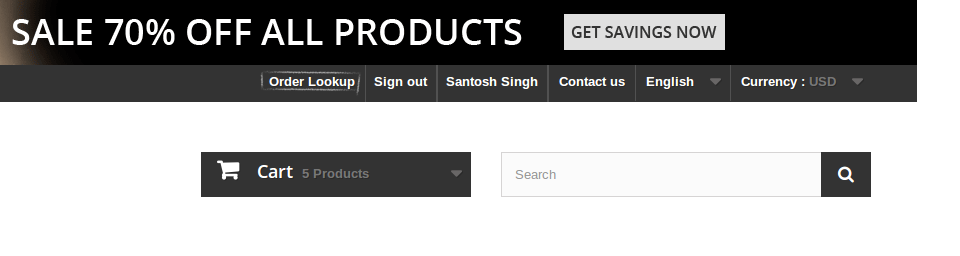
At the front end, the customer will see a link on top menu which will redirect the customer to Order lookup form page.
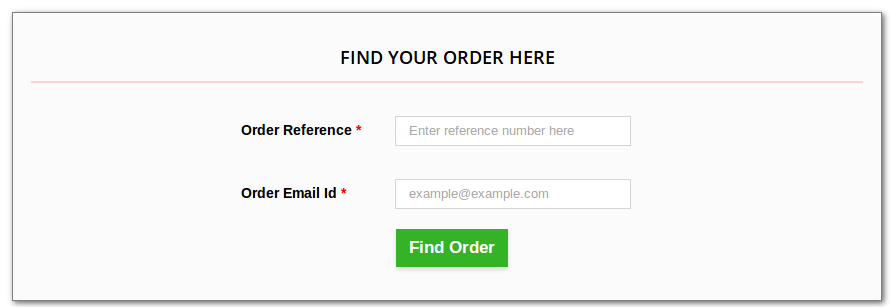
When the customer will click on the link, a new page would open which will ask for Order reference and email id.
The link to the order lookup page will appear as follows:
When the customer clicks on the link, a new page would open which will ask Order reference and email id.
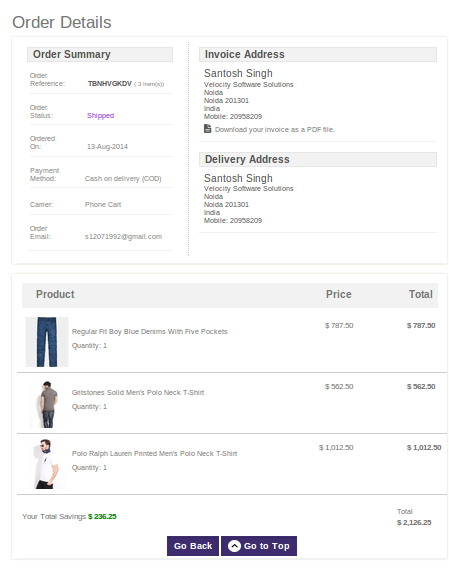
After entering correct details, the customer will be shown the corresponding Order data.
Recommendations :
Refresh home page of your store every time you enable/disable plugin. If the Prestashop extension is not working after installation then please check permissions on modules folder. The folder should be writable. Please make the folder permission to 755.
For more information about Prestashop Mobile Order Lookup:
Customers are often having a hard time while accessing their order details due to various complexities involved in the entire process. They have to provide multiple information before they can finally get an access to their order details. This is definitely the most annoying moment for any customer and can affect the business chances of an eCommerce site in the long run. Order details are one of the crucial aspect of an online purchase and it is an important parameter that can affect the customer engagement on your site.
This has been a long standing concern for numerous online business owners and they are looking for an effective solution for their customers. With continuous efforts and years of expertise in the eCommerce Module development services, Knowband has come up with this amazing Magento Mobile Order Lookup extension that has bring a major change in the area of accessing customer order details. It has removed the various barriers that were earlier involved in providing a quick access to customer order details. Let us take a plunge into the wonderful features and functionalities of this Magento Extensions by taking a quick look below:
Ensures quick access to customer order details
Unlike the previous requirement of logging into your site account for accessing your order details, this Knowband extension is definitely much way ahead from its rival modules. This is because customers just have to use their email address and order ID for getting complete information about their order due to this feature loaded Magento Order Lookup extension. There is no need of customer login and everything can be accessed in a much seamless manner.
Provides a clear idea about the number of visiting customers regarding the order status
Now, with the help of this Magento Mobile Order Lookup extension, it is now much easier to get a fair idea about the number of customers that are visiting your Magento site to access their order details. Once, you have the required information about the order detail seeking customers, you can target them in a much better way for future business engagement.
Compatible with various devices
This Magento extension is built on a mobile responsive layout that makes it perfect for various devices like desktops, laptops, smart phones, tablets and much more. It means that there is no conflict of performance and functionality of this Magento Order Lookup extension irrespective of the screen size used by the customers. It offers same level of user experience on multiple devices without any hitch.
Supports a user friendly admin panel
Magento site owners can now perform various changes and customizations on their site due to the presence of this user friendly and interactive admin panel. It makes implementation of changes much simpler than before and does not require any technical knowledge by store admin at all. The admin panel consists of various interactive features and options that makes the entire customization process a seamless task.
Can be installed and configured without any trouble
We know that we are not dealing with highly technically skilled customers and thus we have tried to make our Magento Order Lookup extension a mass module. It can be easily installed and configured by any individual with basic technical know how and does not require any specialized knowledge for these tasks. Due to the ease of operations, this Knowband extension has become much favorite among numerous Magento store owners around the world.
So, don’t make things complicated for your customers by making them struggle very hard during the process of accessing order details. This Magento Order Lookup extension has emerged as a supporter to introduce big bang reforms in the online shopping experience by providing an easy way to offer customer order details in a seamless manner. So, visit our Knowband store at www.knowband.com and install this Magento extension for a revamped user experience and for boosting higher conversions on your online store.
Prestashop Multi-vendor Marketplace addon by Knowband is an effective way to convert your PrestaShop eCommerce store into a fully functional online marketplace. PrestaShop Marketplace Module provides store admin with the opportunity to enhance the reach of their store and offer a variety of items and services to customers. The PrestaShop Multi-Seller Marketplace module can turn your eCommerce site into a complete marketplace. The store admin can manage the inventories, orders, products, and shipping methods at the Marketplace from the backend of the PrestaShop Multi-seller Marketplace Module. The PrestaShop marketplace owner can charge a commission to the sellers/vendors on the products they sell. Sellers will get the chance to promote their brand and serve the audience of Marketplace in return for the commission they are paying to the admin.
Prestashop Multi-Seller Marketplace is now GDPR compliant.
1.1 Admin Benefits of Prestashop Multi-vendor Marketplace Module:
The store admin can convert their eCommerce store into a marketplace with a few button clicks.
The store admin can now make their marketplace compliant with the GDPR EU laws. The compliance enables by toggling a button in the admin interface of the Etsy clone for PrestaShop.
Admin can add custom fields for the seller’s profile. moreover, the admin can add new custom fields or remove already added fields.
Admin can show custom fields in the seller’s front profile page using Multivendor Marketplace Module.
The admin can also add a separate seller registration form under the general settings tab.
Admin can select the custom field type which he wants to add like a radio button, checkbox, etc.
Admin can make these custom fields required using the “Required” tab button.
The store owner can map any custom field under a particular section in which he wants to show that custom field.
The admin can even disallow the seller to view the email ID of the customers. If the admin enables it, the sellers can request to close their shop from the marketplace.
Also, the admin can fix the commission that he wants to charge to the sellers from the back-end of the PrestaShop Multi-vendor Marketplace extension.
The admin gets complete access to approve/disapprove the products available on the marketplace. Moreover, can even fix the quantity of the new products that a seller can add to the marketplace with the help of this PrestaShop Marketplace plugin.
The admin can even auto-approve functionality just at a button toggle from the back-end of the PrestaShop Seller Marketplace extension.
Admin gets an option to approve/disapprove the seller’s profile at a button click.
The PrestaShop Multi-seller Marketplace add-on allows the store admin to track and manage the sellers operating in the marketplace easily.
The PrestaShop admin can add/remove the product or category as per the requirement from the admin interface of the PrestaShop Multi-vendor Marketplace extension.
When sellers request to add a new category to the front-end of the marketplace, the admin can view and accept/reject them accordingly.
The admin can see the seller transaction from a single tab of the PrestaShop Seller Marketplace addon. Thus, the performance of the sellers are traceable.
Store admin can view the report of the commission earned from the PrestaShop marketplace plugin.
The admin can accept/reject the reviews on the products or sellers with the help of the PrestaShop Marketplace extension.
Additionally, the PrestaShop marketplace module offers an option to create custom shipping methods.
The seller can either select the default shipping method or create custom methods from their dashboard.
The PrestaShop multi-seller marketplace addon allows the sellers to initiate payout requests from their dashboard. The admin can approve or disapprove the payout request from the back-end of the PrestaShop addon.
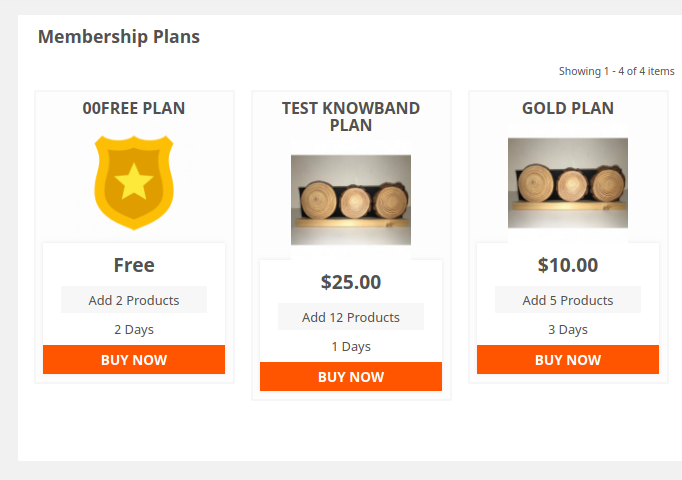
Admin can create various membership plans for the sellers.
Admin can also enable a free membership plan feature for the sellers for one-time use.
Store admin can send warning emails to the sellers from upgrading their membership plans.
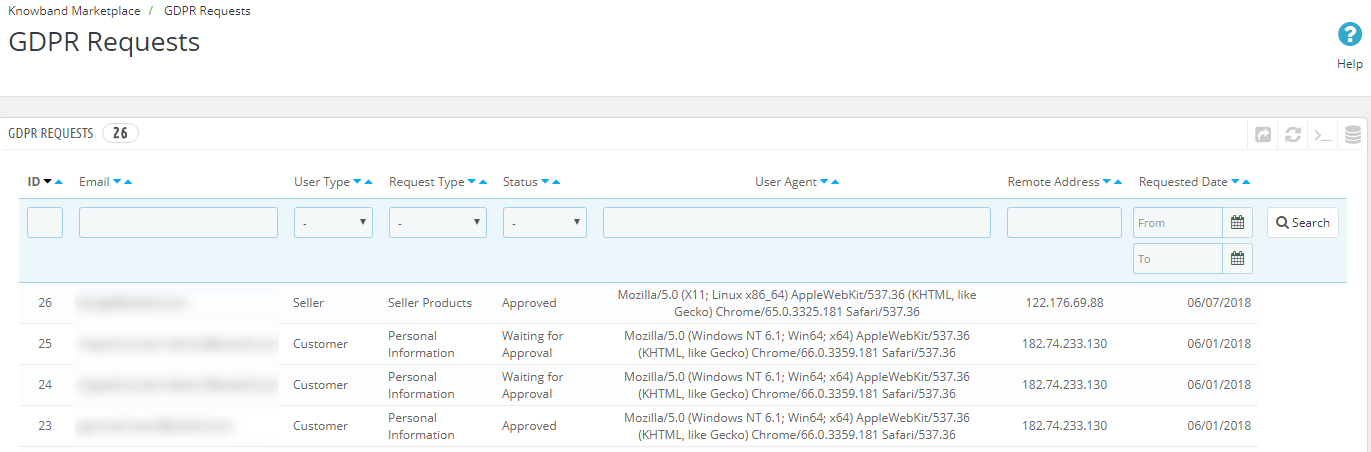
The GDPR requests raised by the sellers are available from the back-end of the PrestaShop Multi-Seller marketplace addon.
The shop closure request of the sellers is approvable/disapproval from the admin interface of the PrestaShop marketplace extension.
Admin gets an option to automate the transaction payout request process which helps the admin to automate all the payment requests of the sellers.
Admin can add a particular amount from the panel which will always be kept on hold for the sellers.
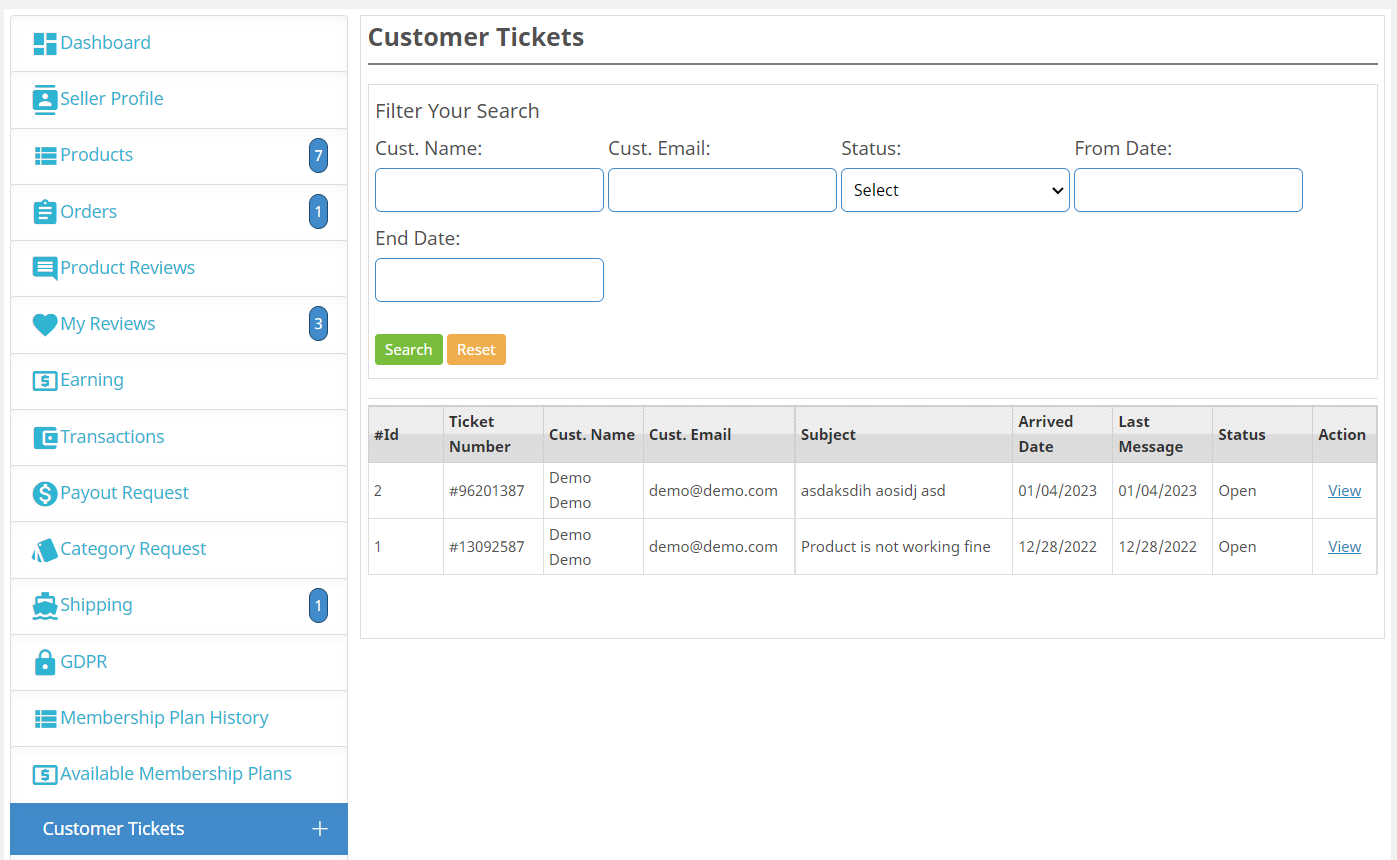
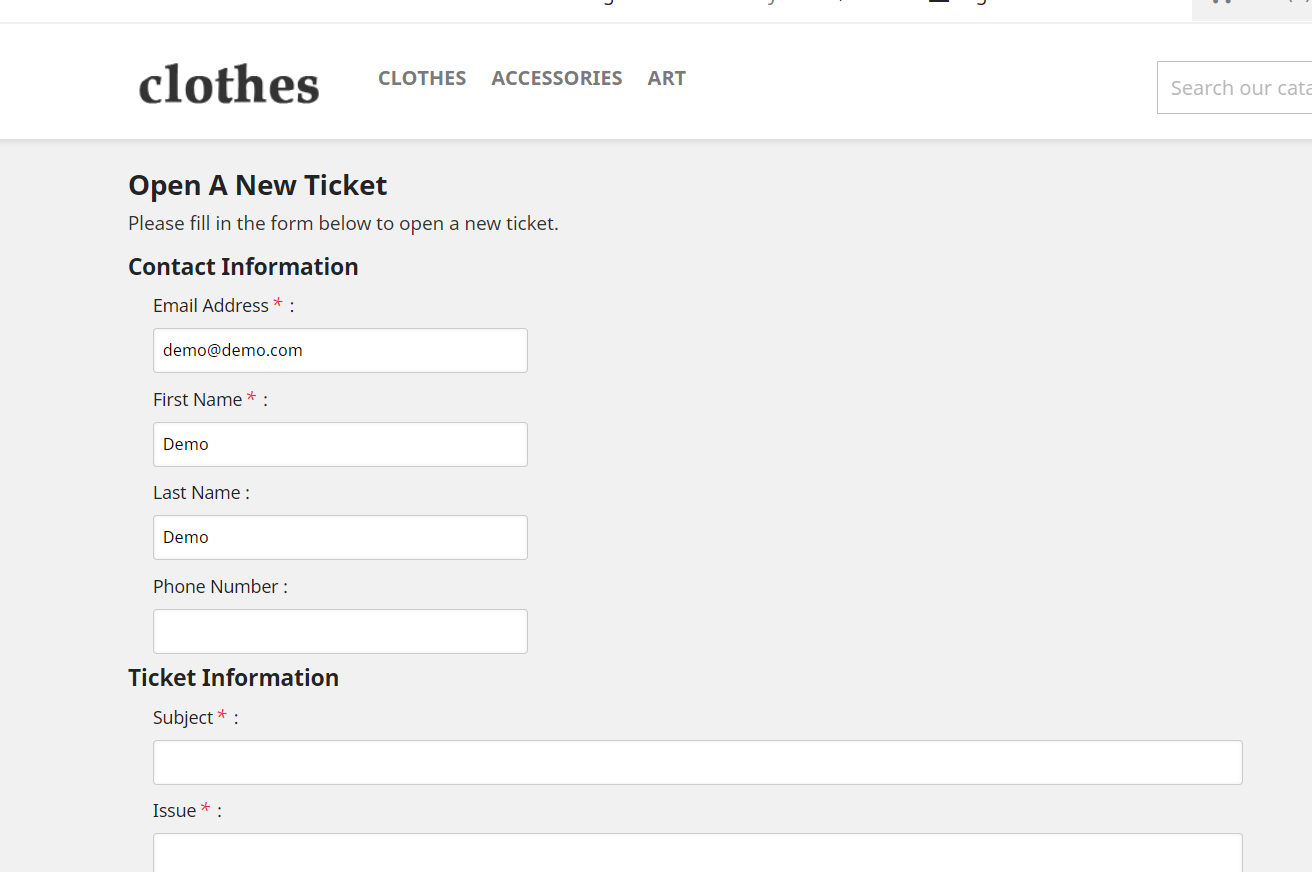
Now, the Knowband Customer seller Ticketing System module is by default available in the PrestaShop Multi-Vendor Marketplace module.
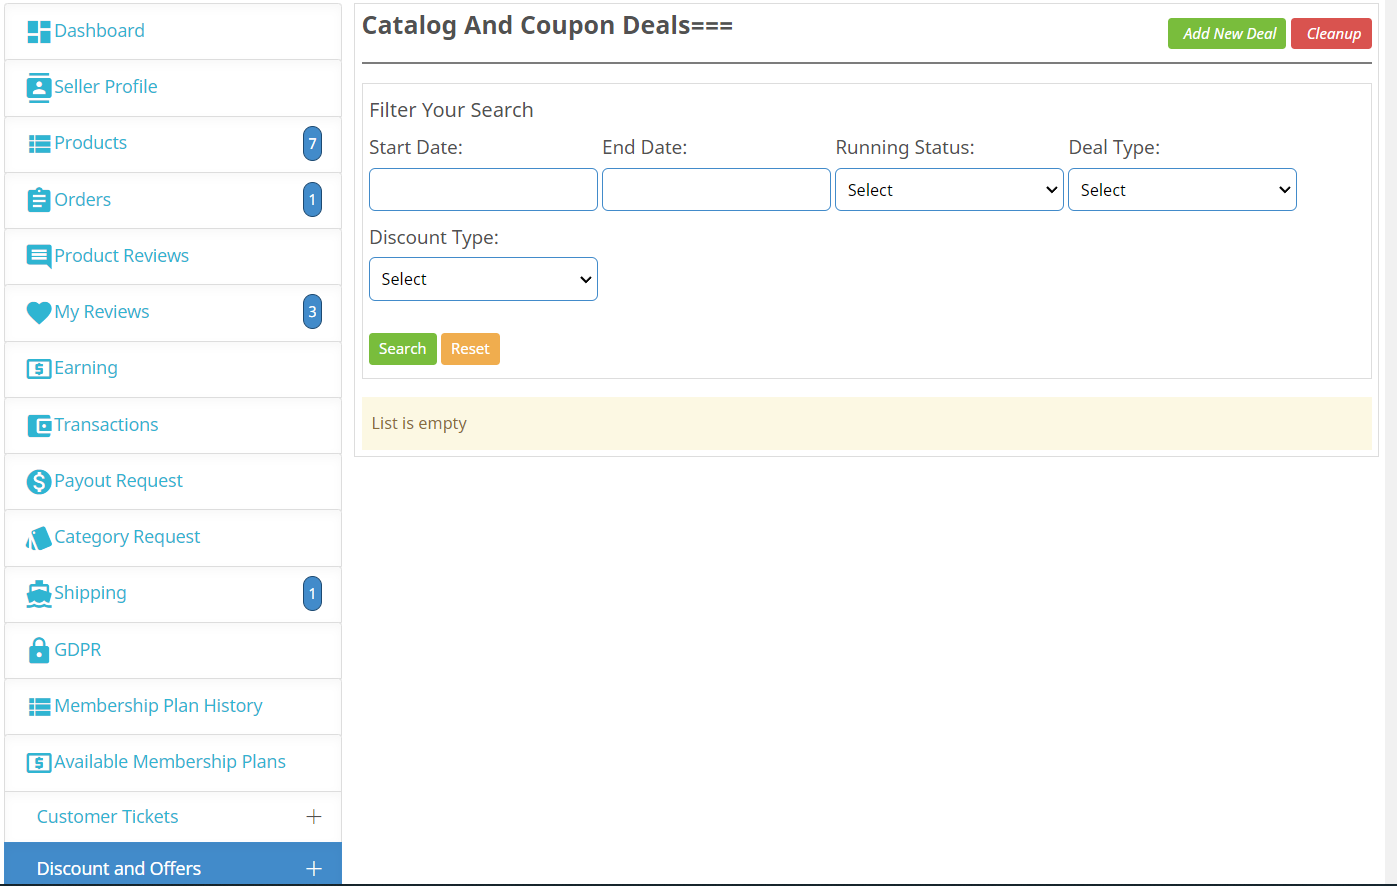
Seller Deal Management at ease with Knowband Deal Manager Addon (available by default in PrestaShop Multi-Seller Marketplace).
The admin can choose whether free shipping is created at the time of seller registration or any other admin carrier clone is created.
1.2 Seller Benefits of the Prestashop Multi-Seller Marketplace Module:
Sellers can add any type of product to the marketplace. PrestaShop Multi-seller Marketplace extension supports all types of products, right from the simple, configurable to the virtual and bundled products.
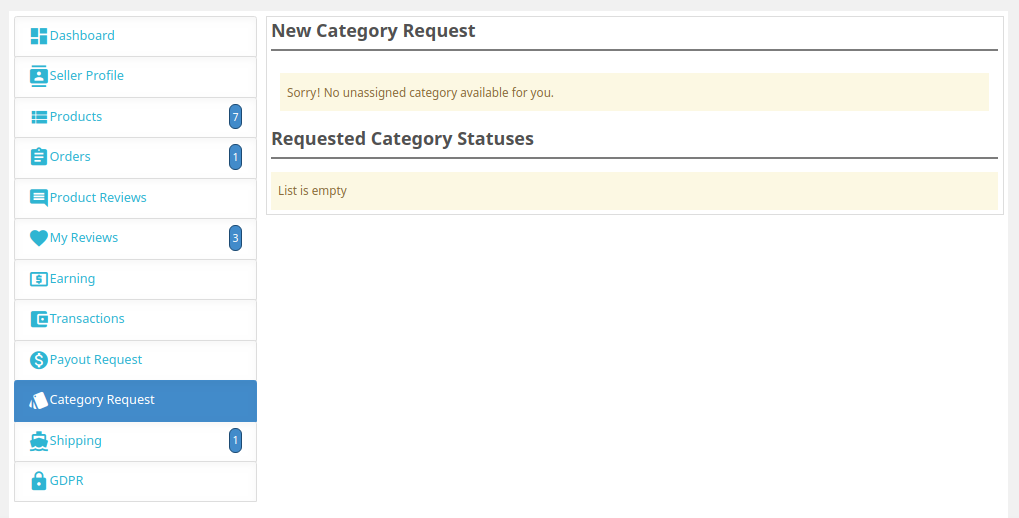
The sellers can even request the admin to add new categories.
Also, the commission charges are fixed, so, the entire transaction is transparent.
The PrestaShop Multi-Vendor Marketplace module makes it easier for sellers to sell their products to a larger customer base.
The dashboard allows the vendors to view their profiles, products, and orders.
A separate seller’s page makes it easier for the vendors to promote their business.
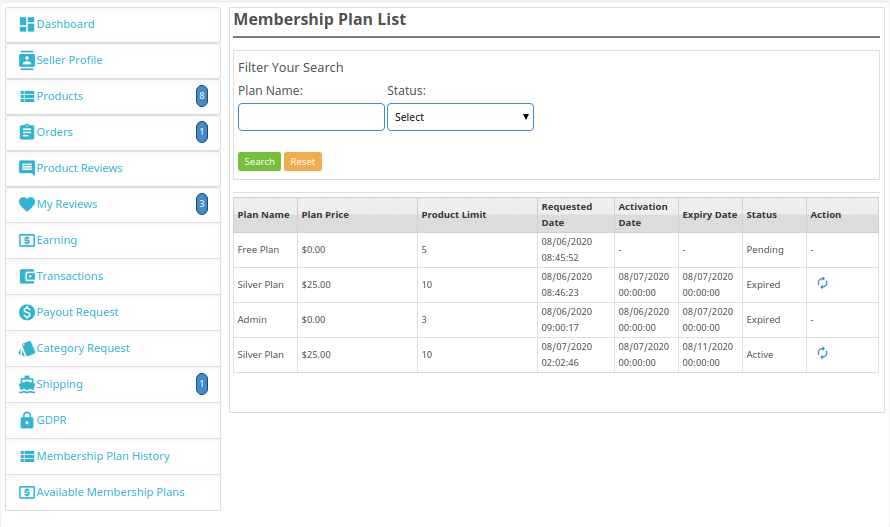
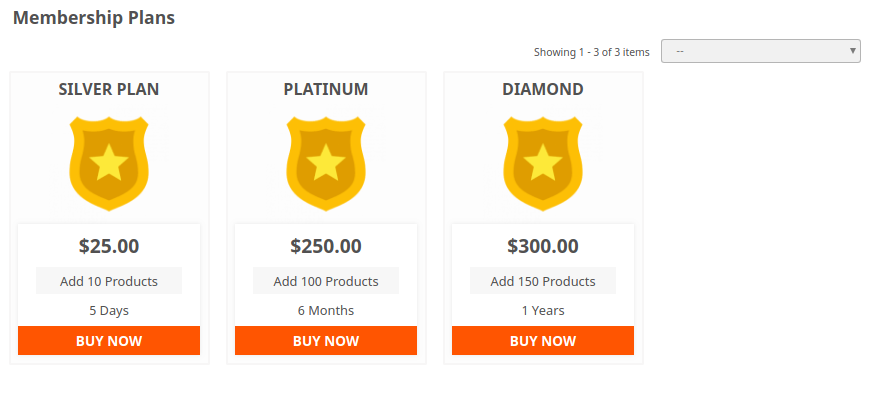
Sellers can choose from various membership plans as per the requirements.
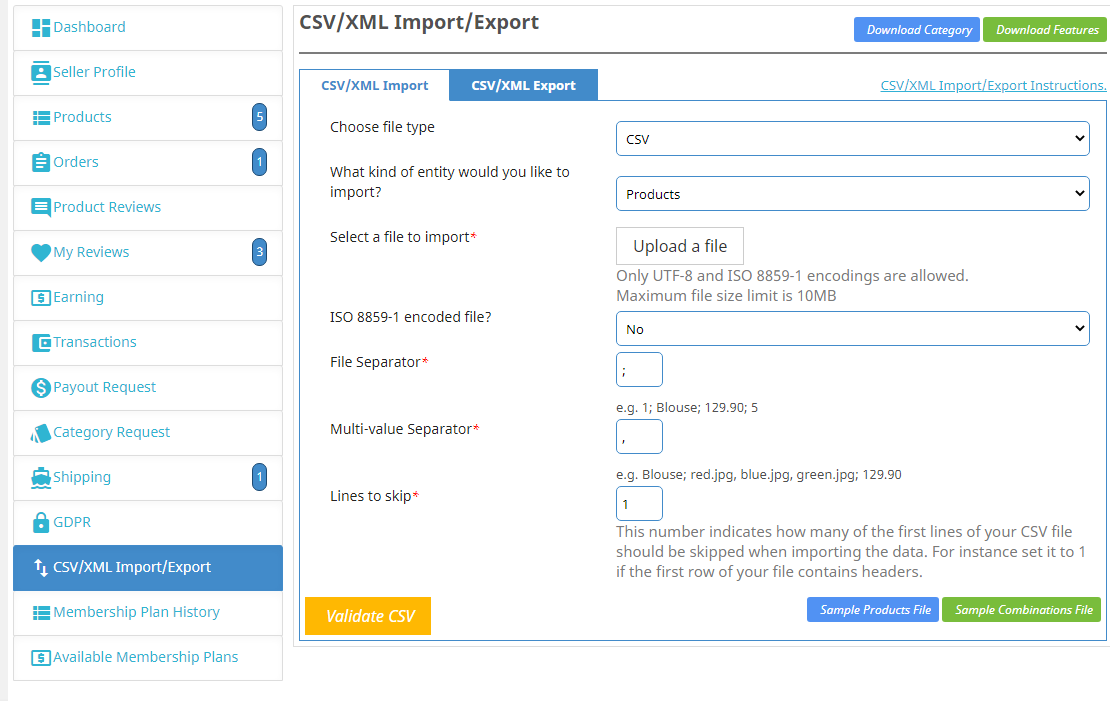
The seller can import the CSV file for products and inventory from the seller interface
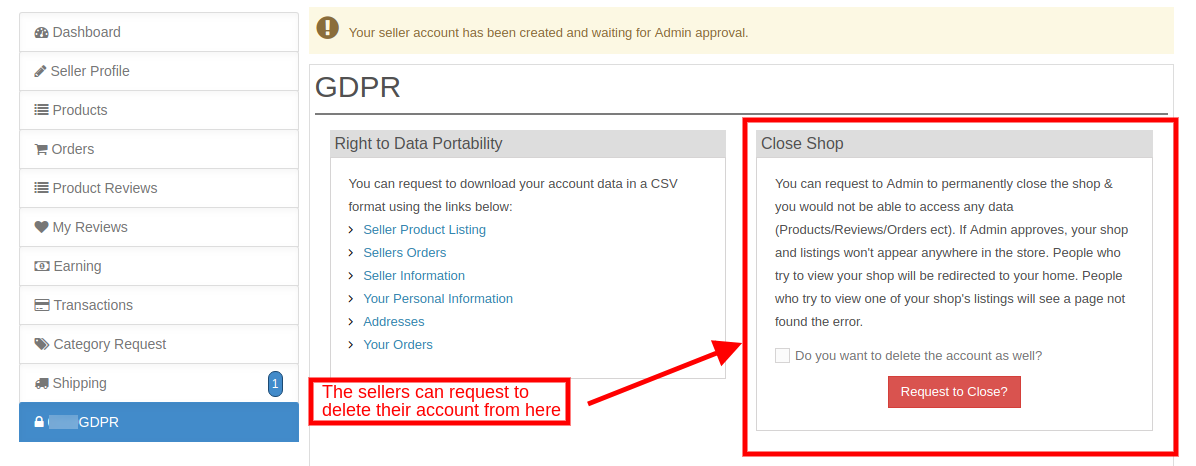
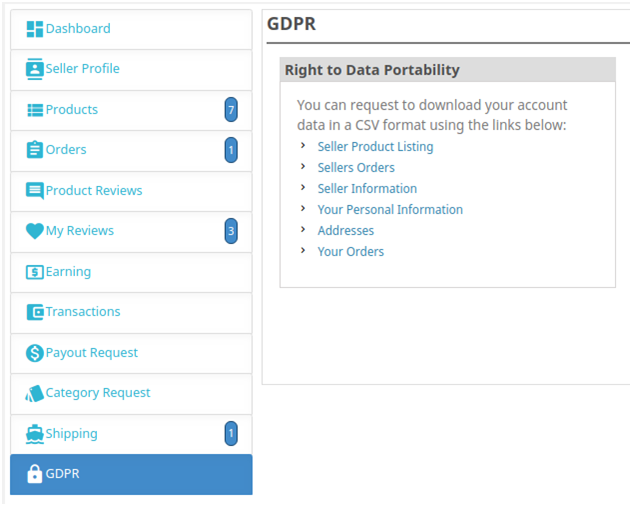
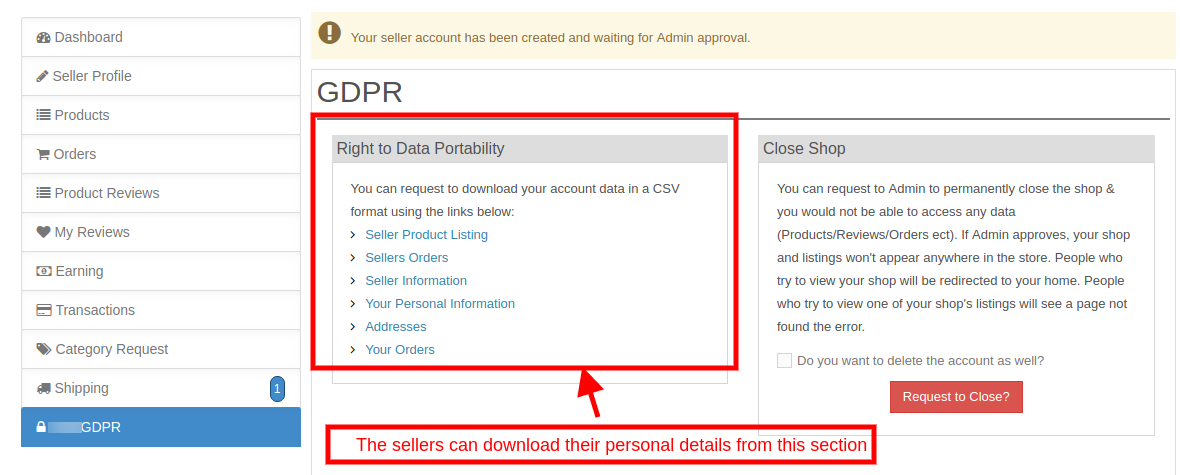
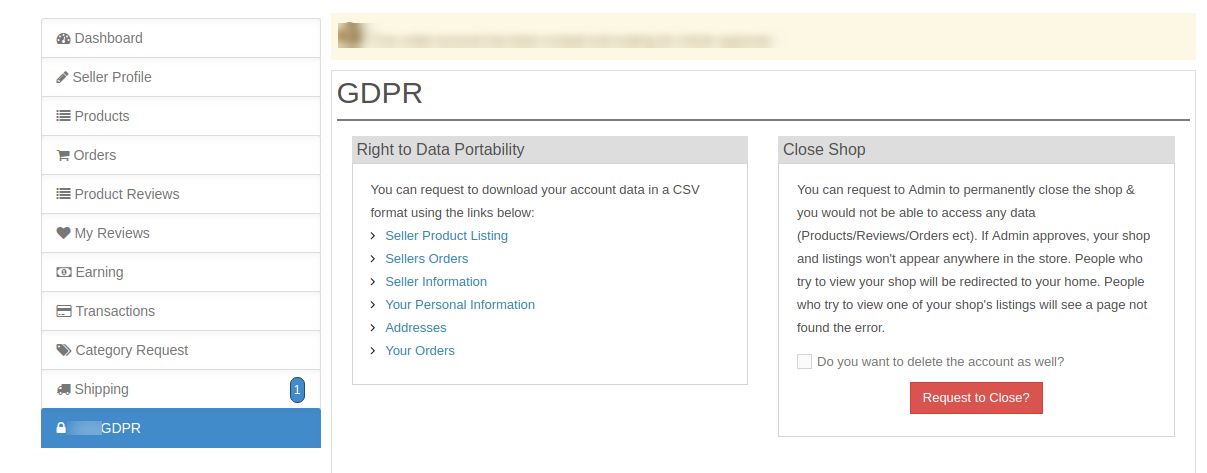
Under GDPR compliance, the sellers get an option to download their details in CSV format by clicking a button.
The sellers can even request the admin to remove their shop from the marketplace. This request is processed from the back-end of the PrestaShop marketplace addon.
Now the sellers can save the images while adding the products to their shops.
1.3 Buyer Benefits
The store visitors can now choose the ideal products from a wider range of product options.
Customers get an option to review the sellers. Customers can also review the products by using our Product Review Reminder or Default Product Comment Addon.
The seller reviews aid them in their purchase decision.
Online shoppers can select the product by visiting the seller’s page.
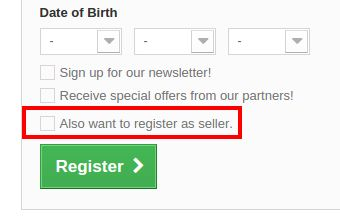
Buyers can also become a seller in PrestaShop Multi-Seller Marketplace. They can also register as sellers.
2.0 Installation
Follow the following steps for installing the Prestashop Marketplace module:
1. Download the Prestashop Multi-vendor Marketplace add-on package.
2. Unzip the package in /modules directory of your Prestashop store via FTP manager (like Filezilla or WinSCP – download here: https://filezilla-project.org/). The folder structure for the Prestashop Marketplace addon is shown in the image below:
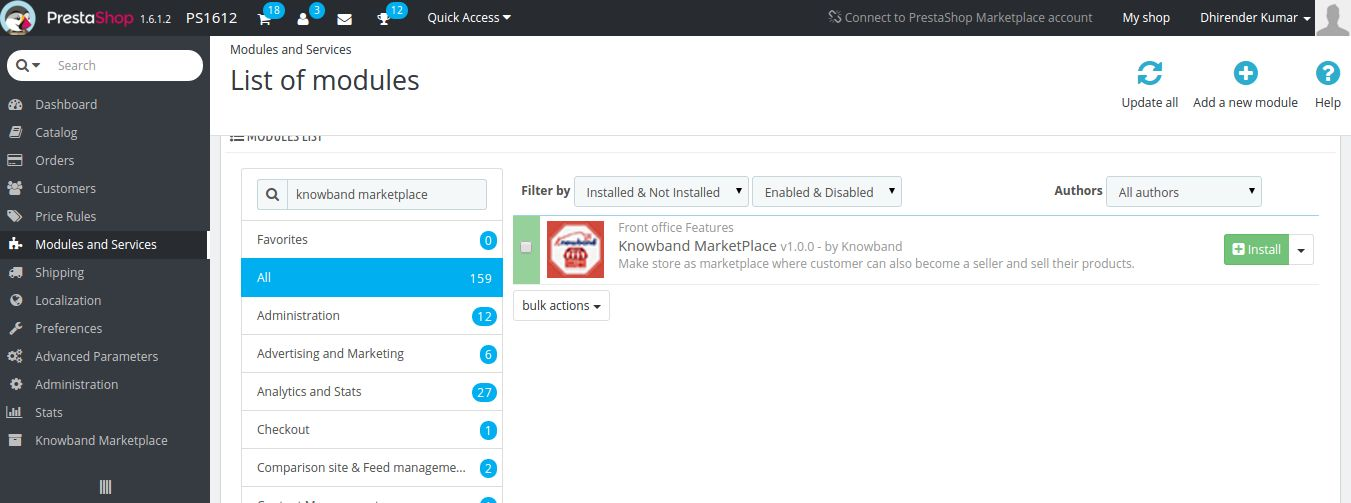
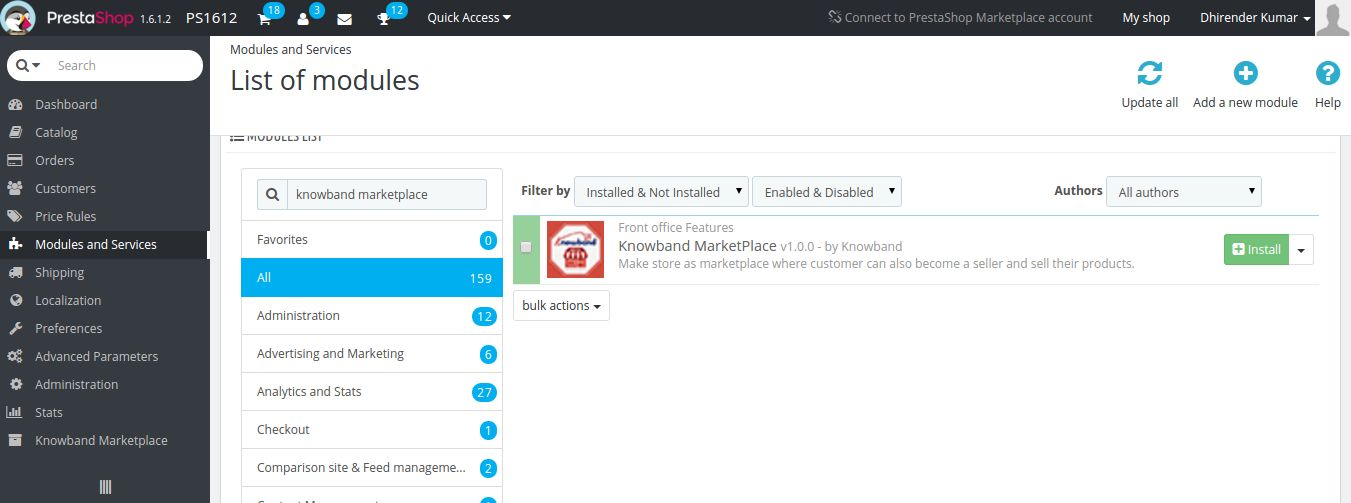
3. You will be able to find the Prestashop Marketplace addon, which is, ready to be installed in the Modules List in your PrestaShop store as shown below.
4. Click on the Install link to install. Once the Prestashop Multi-Seller Marketplace module is set up properly the Install button will convert to Configure.
3.0 Module Configuration of Admin Interface
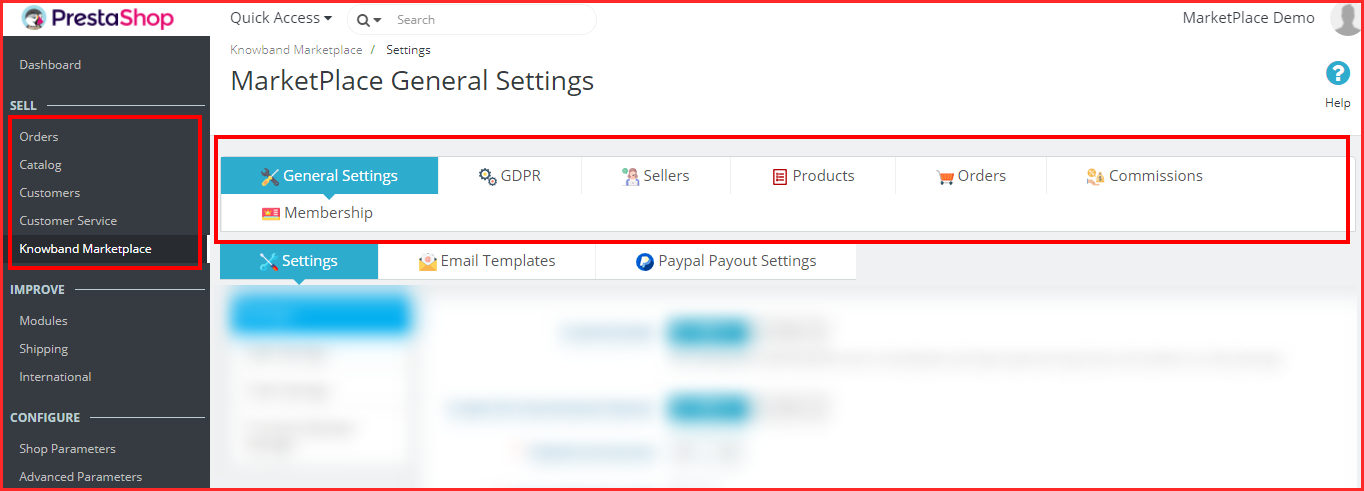
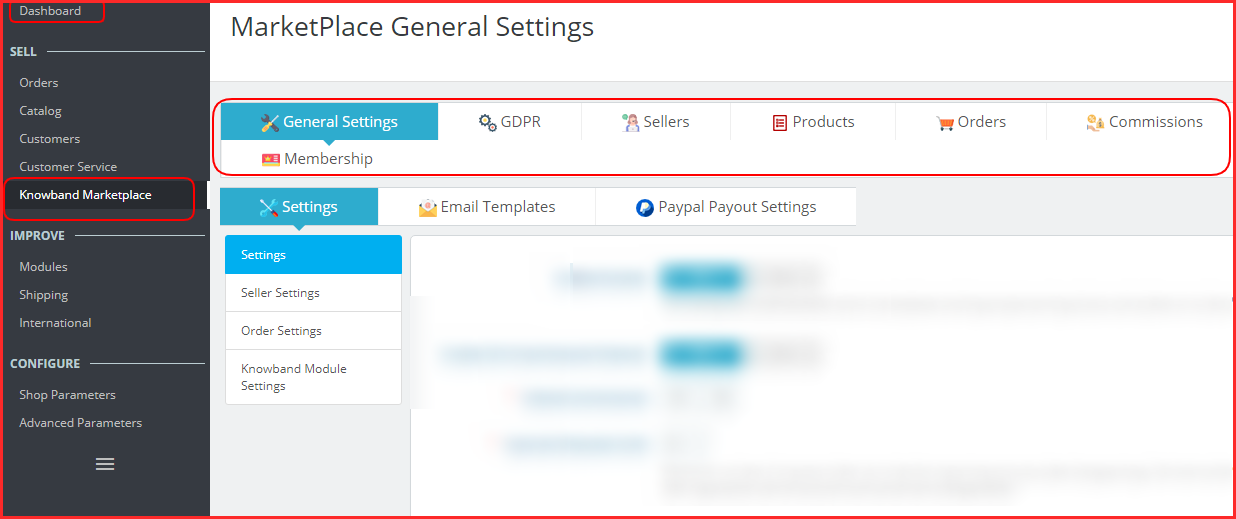
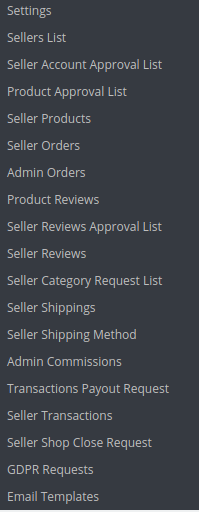
In the admin panel of the PrestaShop Marketplace module, you’ll find a separate menu (named Knowband Marketplace) at the end of the menu as shown below.
3.1 How to Add Seller from the back-end of the Prestashop Marketplace?
The PrestaShop store admin can even add new sellers from the back end just by following these simple steps:
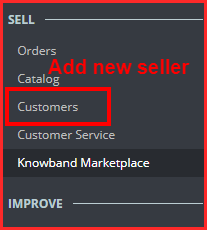
In the Main Menu of the PrestaShop store
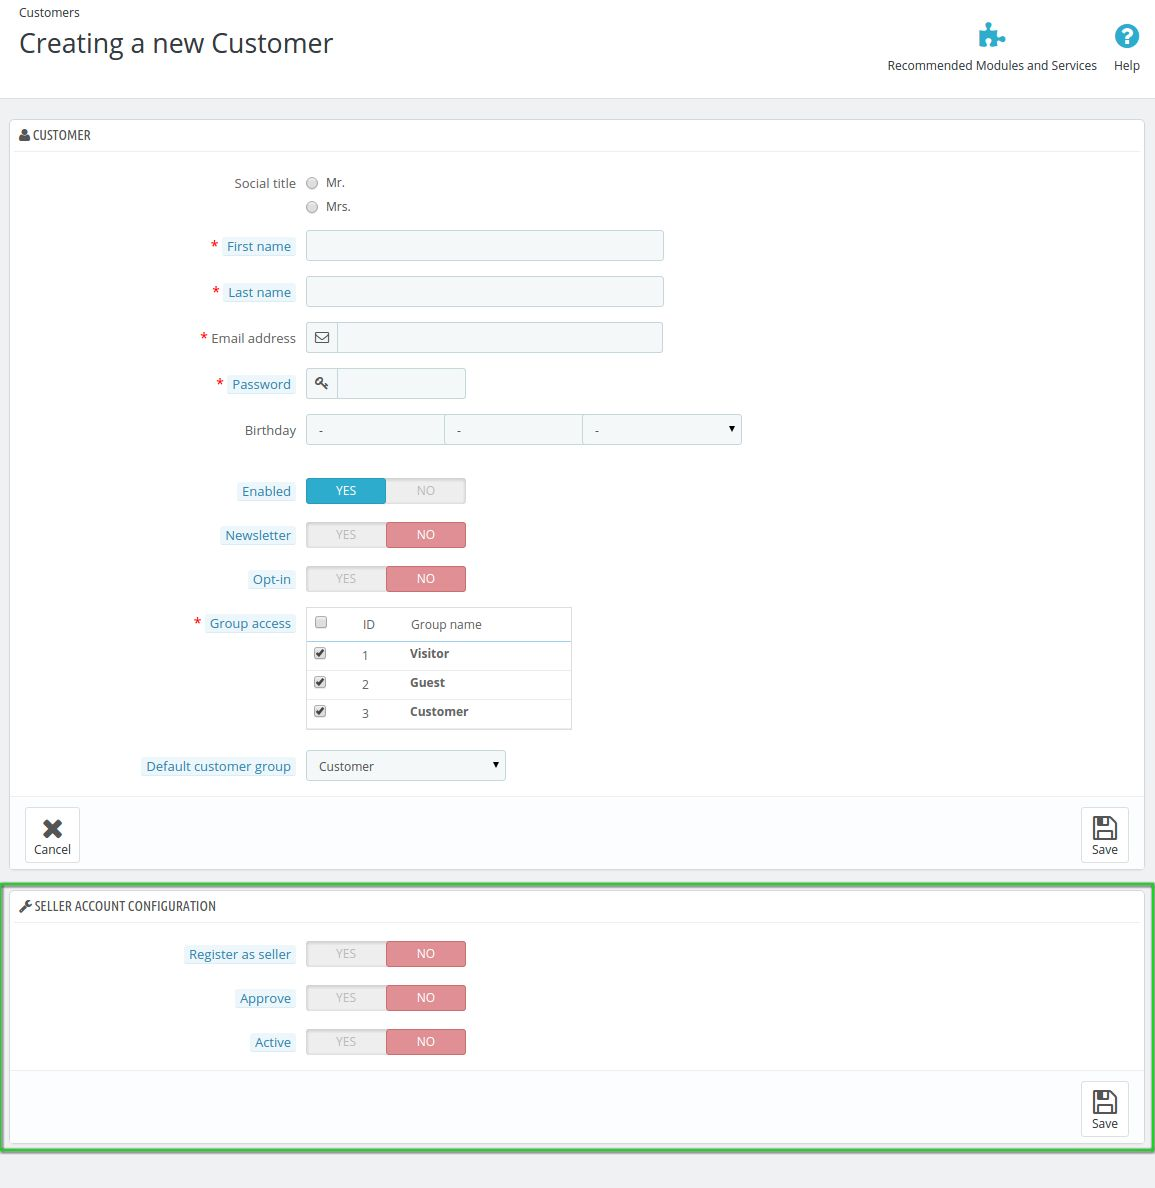
Go to Customers -> Go to Add New Customer on the right side of the page or click on the ‘+’ sign on the top right side of the page as shown below.
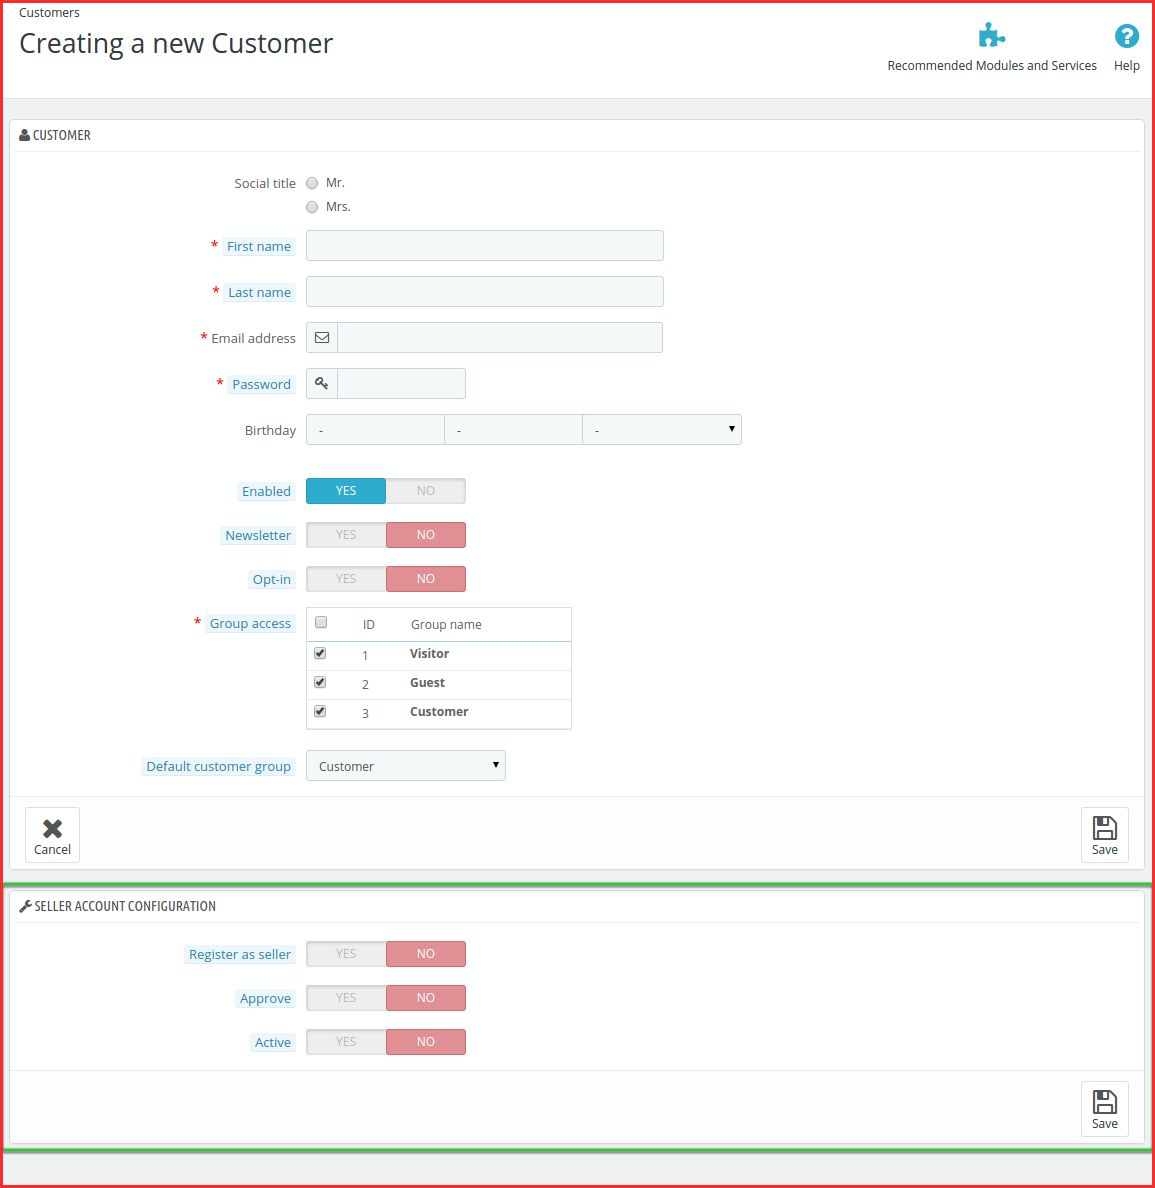
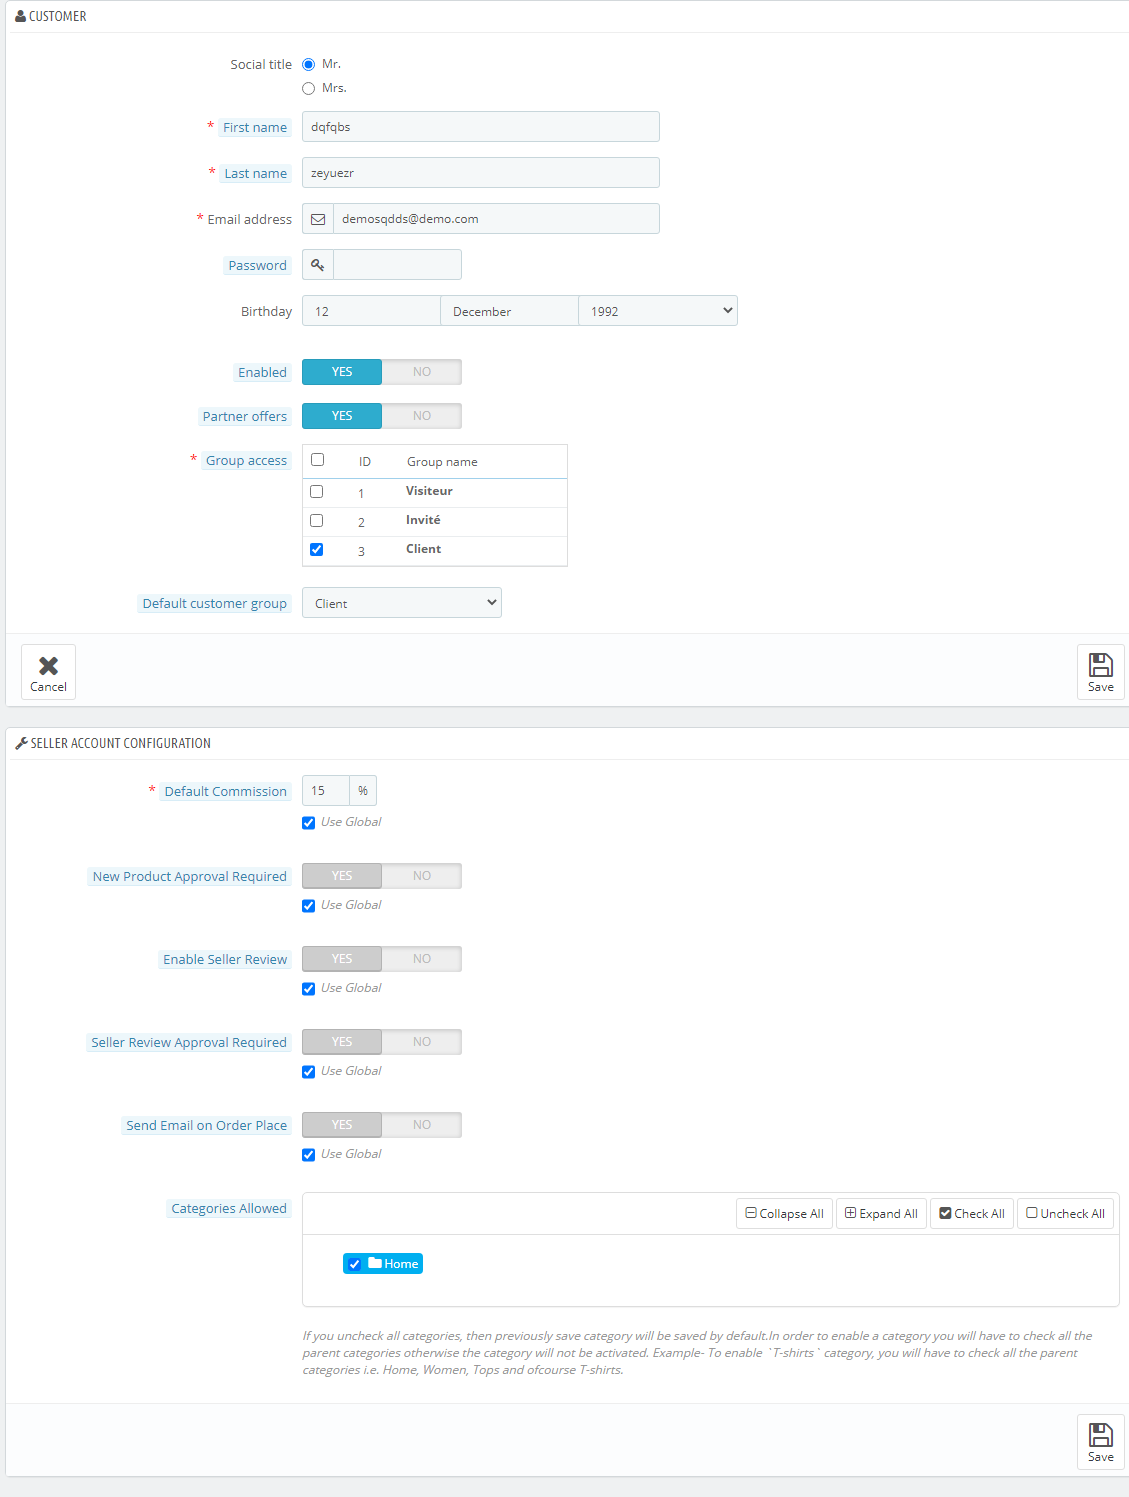
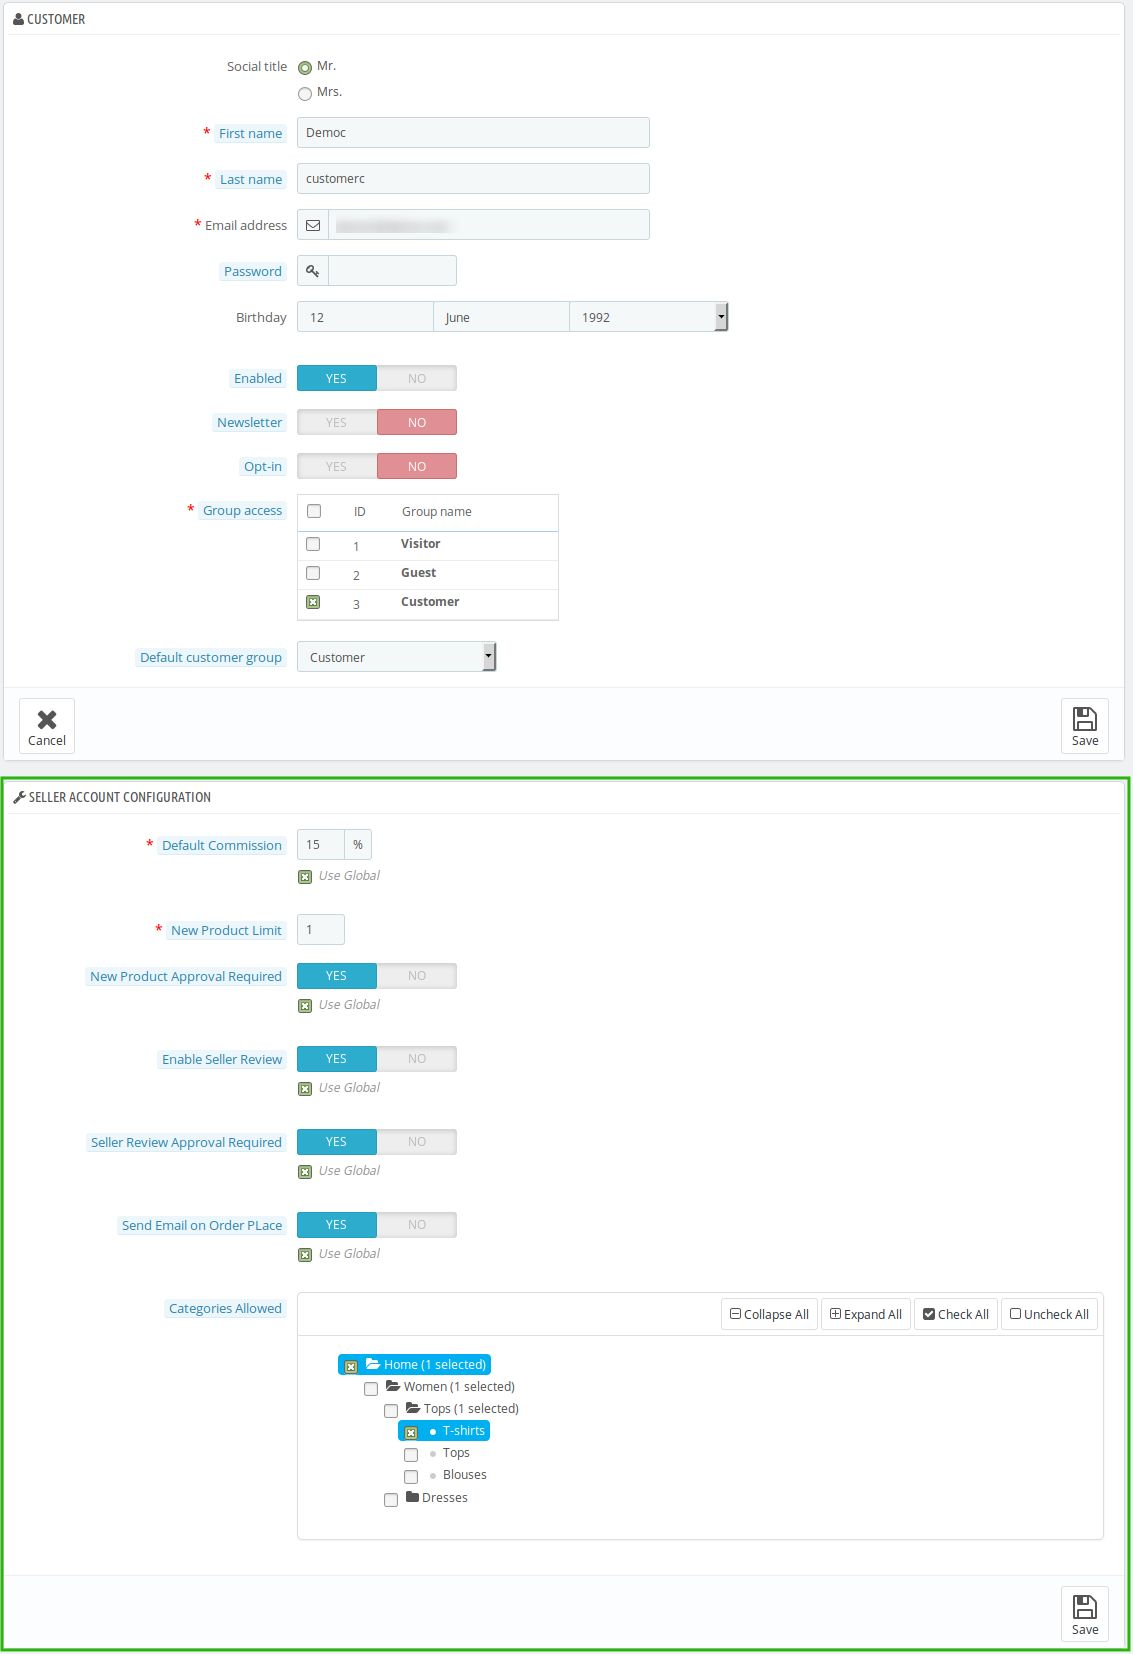
You’ll go to the Customer creation page. A new block will appear at the bottom asking for the Seller Account Configuration.
The admin can add a new seller by filling up the form and a new information block that appears right below. From here a new customer can register as a seller as shown in the image below.
Prestashop Marketplace Menu
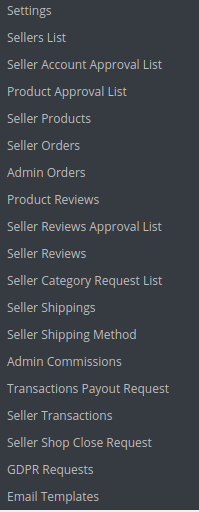
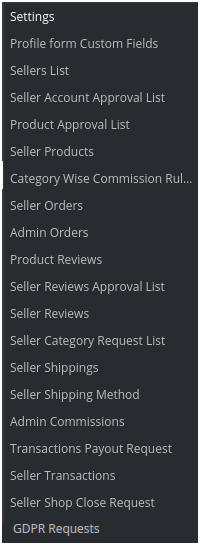
The PrestaShop Multi-vendor Marketplace Menu consists of several sub-menu options that direct the users to several pages in the PrestaShopMulti-Seller Marketplace Addon. Here is the list of sub-menus options shown in the image below: All the configuration options are available below in detail:
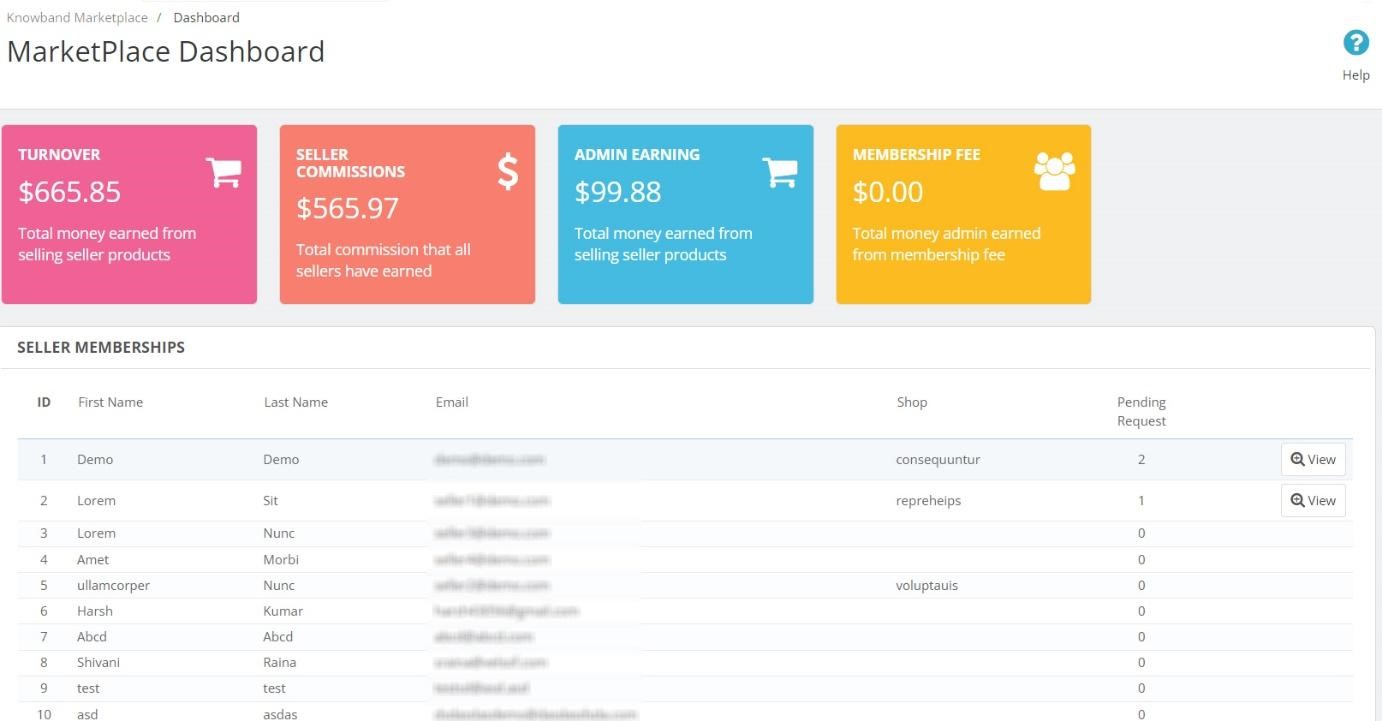
Marketplace Dashboard:
We have recently added the dashboard section in the PrestaShop Multi-Seller Marketplace addon. In the following section, the PrestaShop admins can track all sales, orders, commissions, and much more.
Instance, the PrestaShop store admins can have a glance at total sellers’ earnings, admin commissions, and other details.
4.0 General Settings
The PrestaShop Multi-seller Marketplace Module’s Settings tab divides into 2 levels i.e. Seller Level Settings and Global Level Settings. This page below only controls the Global level settings for the PrestaShop Marketplace Module.
4.1Settings
This page has all the common settings that control the PrestaShop Multi-seller Marketplace extension and its several other features.
4.1.1 Settings
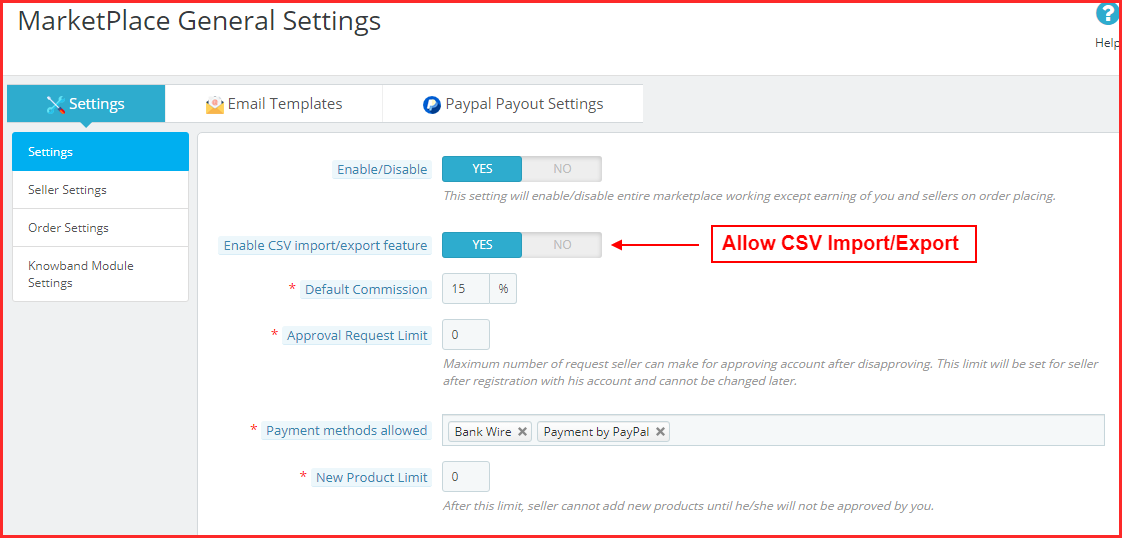
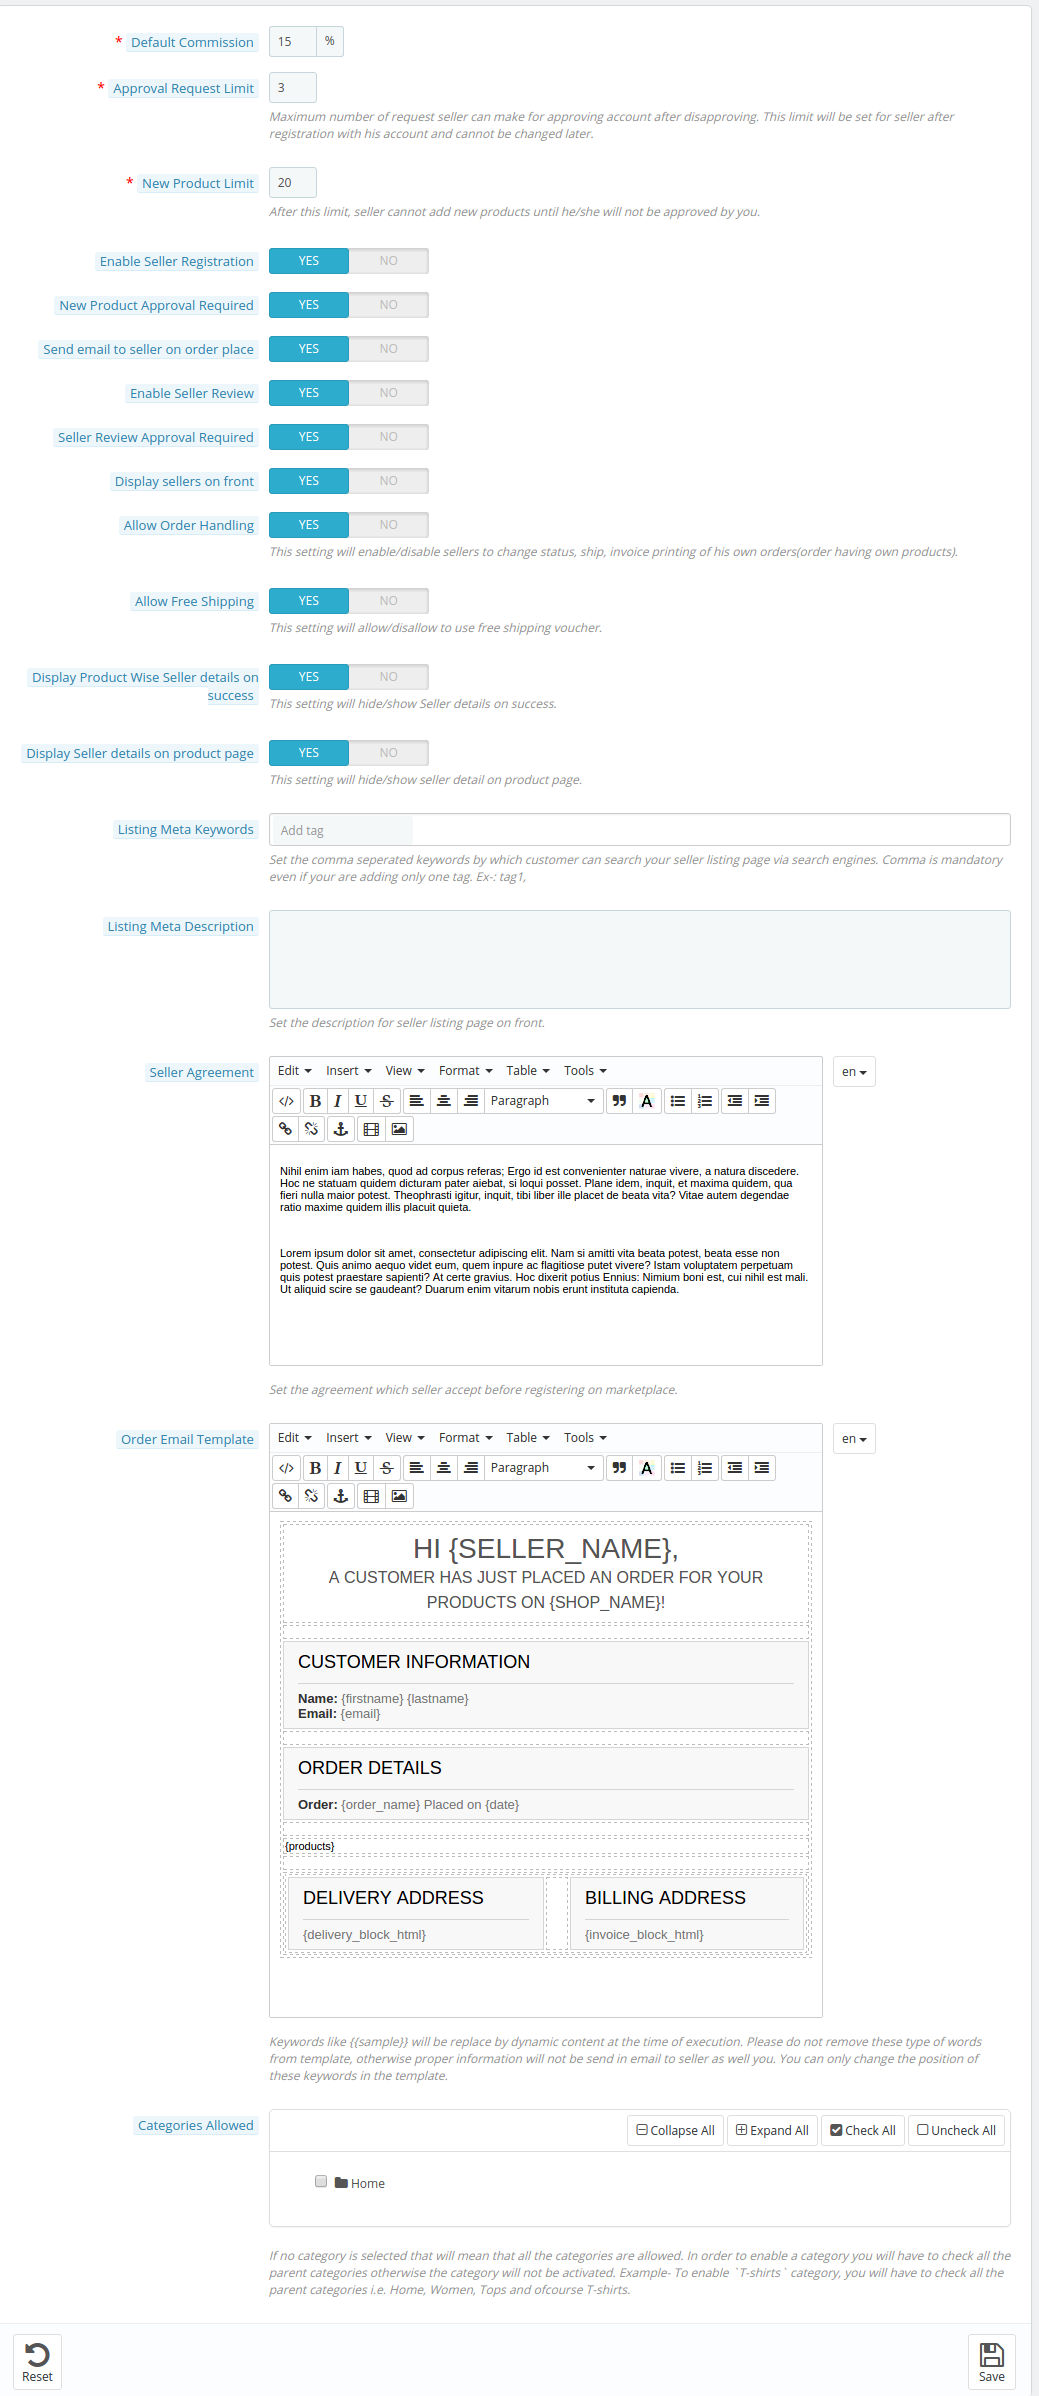
The general settings page consists of the following fields:
Firstly, the admin can Enable/Disable the module.
Enable CSV Import/Export– Allow sellers to import/export the CSV files for the products and combination.
Default Commission: The PrestaShop Multi-vendor Marketplace Extension allows the admin to fix and change the commission being charged to the sellers. This section sets the default commission percentage that will charge from the sellers from the total sales made by them.
Enable/Disable Seller Registration Message: The following setting will enable/disable the seller registration message (welcome message at the time of registration).
Approval Request Limit: It is the maximum number of requests that a seller can make to get a new seller account. This limit will be set for each seller after registration with his account and cannot be changed later.
Payment Methods Available: Select the payment methods you want to allow for transactions.
New Product Limit: Here admin can enter the maximum number of new products that a seller can add. After this limit, the seller cannot add any new product without the approval of the admin.
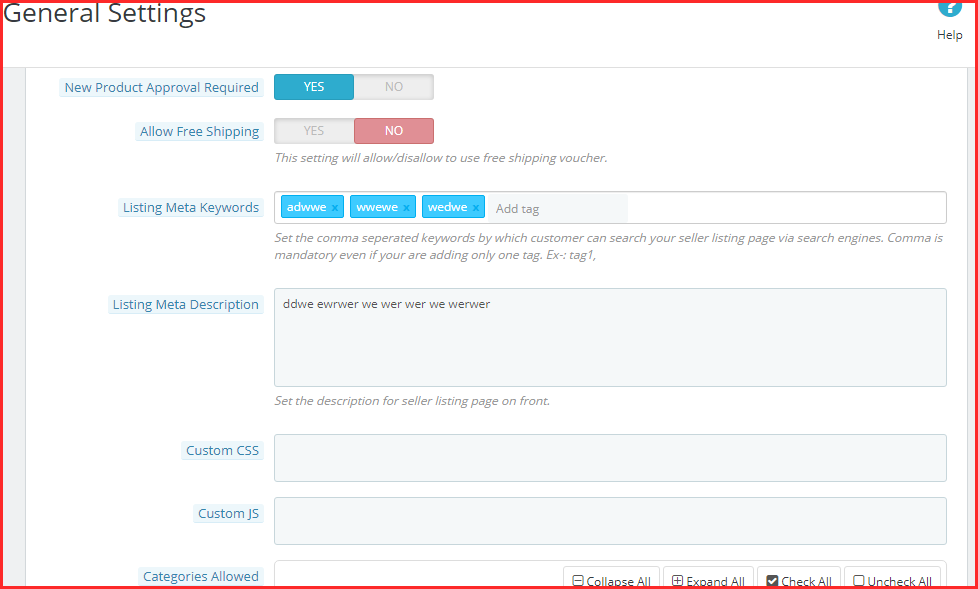
Allow Free Shipping: This setting will allow/disallow to use of a free shipping voucher.
Listing Meta Keywords: Add all the meta tags (separated by comma) by which your customers can search the Seller Listing Page via Search Engines.
Listing Meta Description: Add the description to the meta tags added in the above field.
Custom CSS:
In the following text field, the admins can add the customized CSS they want to show on the front end.
Custom JS:
The Custom JS text field offers the admin to add Java Script Manually for the front end.
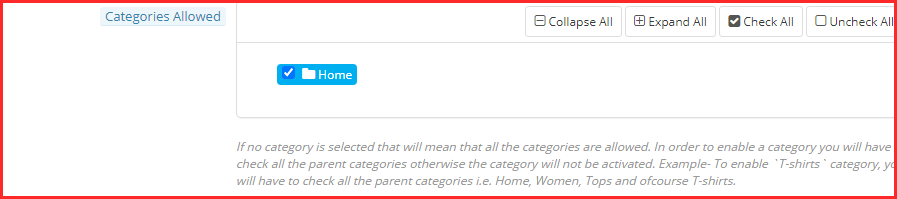
Categories Available: This option shows the categories that the admin allows for the sellers to add products. If the admin selects no category, all the categories are there. In addition, if he selects some of the categories, it means that only those categories are there.
4.1.2 Seller Settings
Admin can control many features for the seller profile.
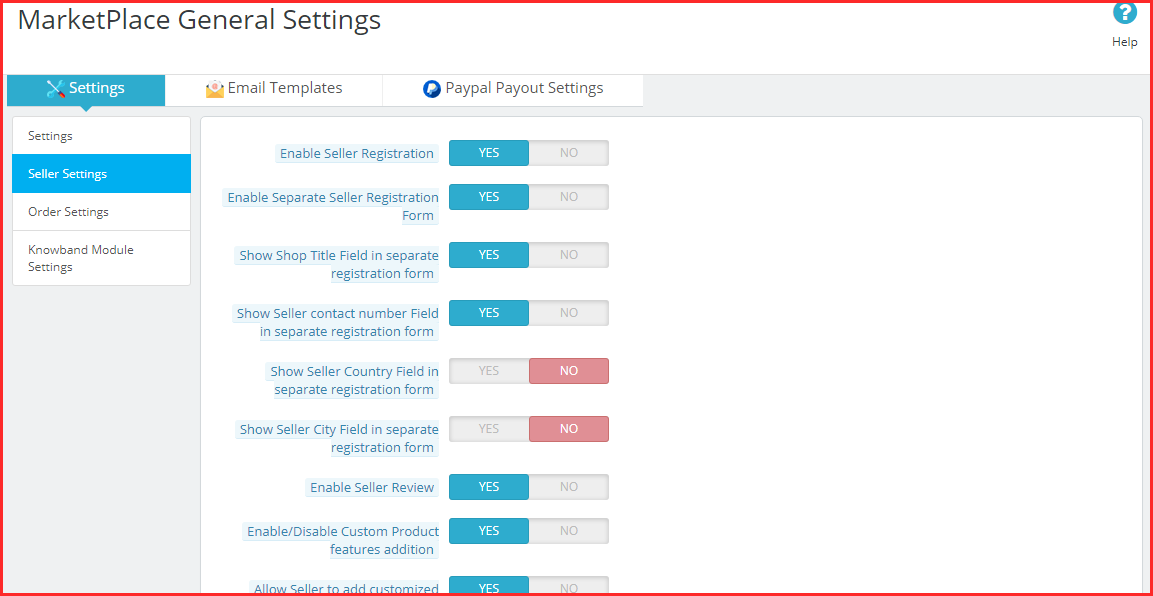
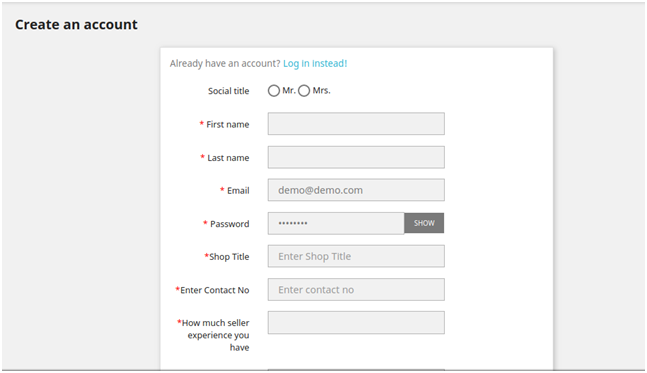
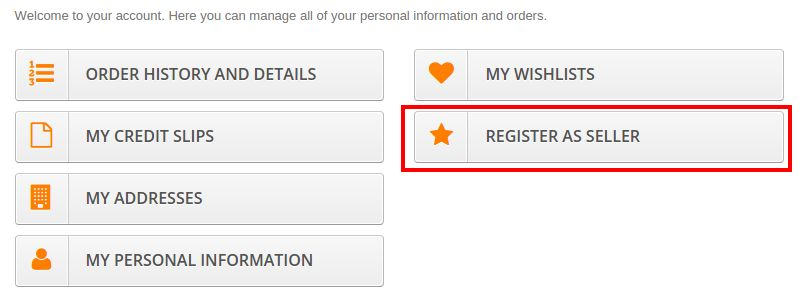
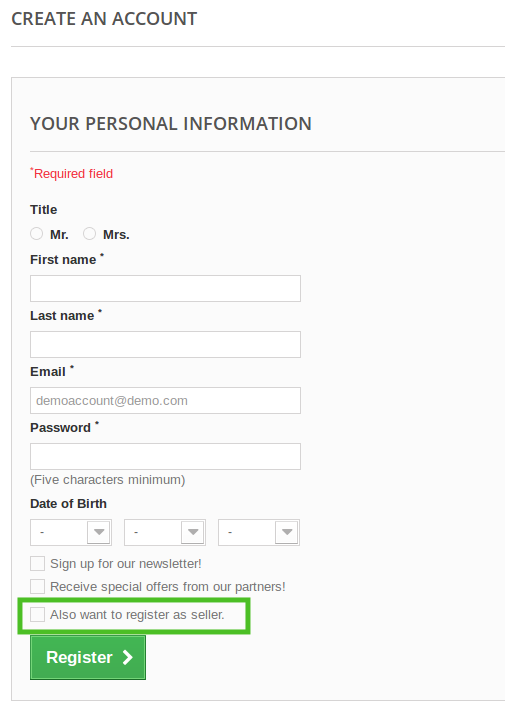
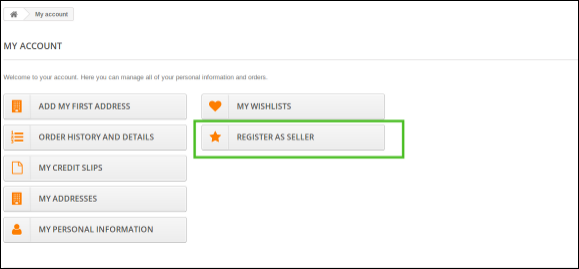
Enable Seller Registration: By enabling this button, the admin can allow the new or existing customer who is not a seller to register as a seller. The same ‘Register as Seller’ option is available in the Customer Tab of the PrestaShop store as well as in the front-end of the marketplace.
Separate Seller Registration Form:
Admin can add a separate seller registration form under the “General Setting” tab of the PrestaShop Multivendor Marketplace. By allowing this functionality admin is also able to add more custom fields in the seller registration form like shop title, seller contact details, seller country, etc.
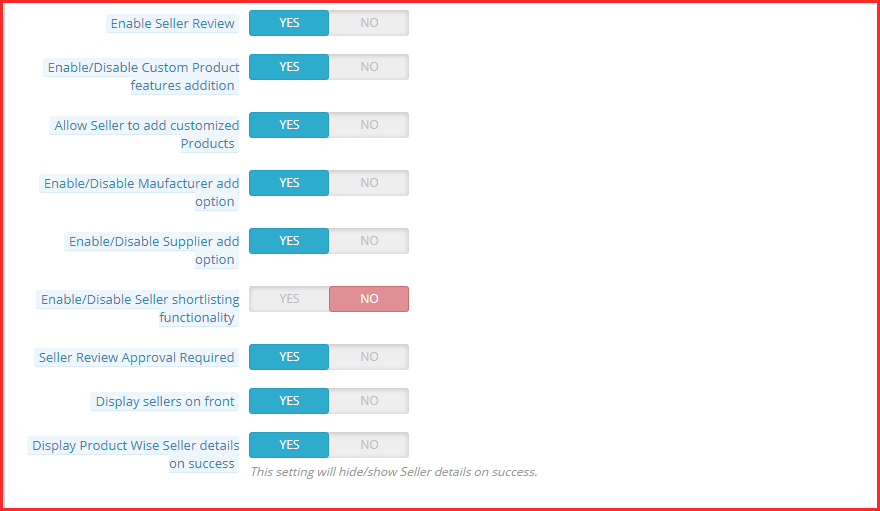
Enable Seller Review: Enable this field, in case you want the customers to review the seller.
Enable/Disable Custom Product features addition: Enable this field, in case you want to add custom product features.
Allow Seller to add customized Products: Enable this field, in case you want to allow sellers to add customized products.
Enable/Disable Manufacturer add option: Enable this field, in case you want to add the manufacturer option.
Activate/Disable Supplier add option: Enable this field, in case you want to add the supplier option.
Enable/Disable Seller shortlisting functionality: Enable this field, in case you want to add seller shortlisting functionality.
Seller Review Approval Required: Enable this field in case you want the seller review to approve before it becomes visible on the storefront.
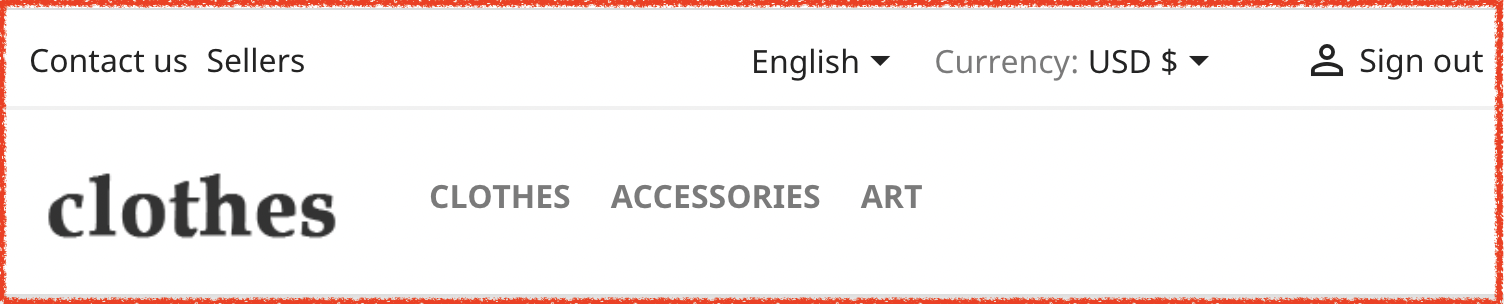
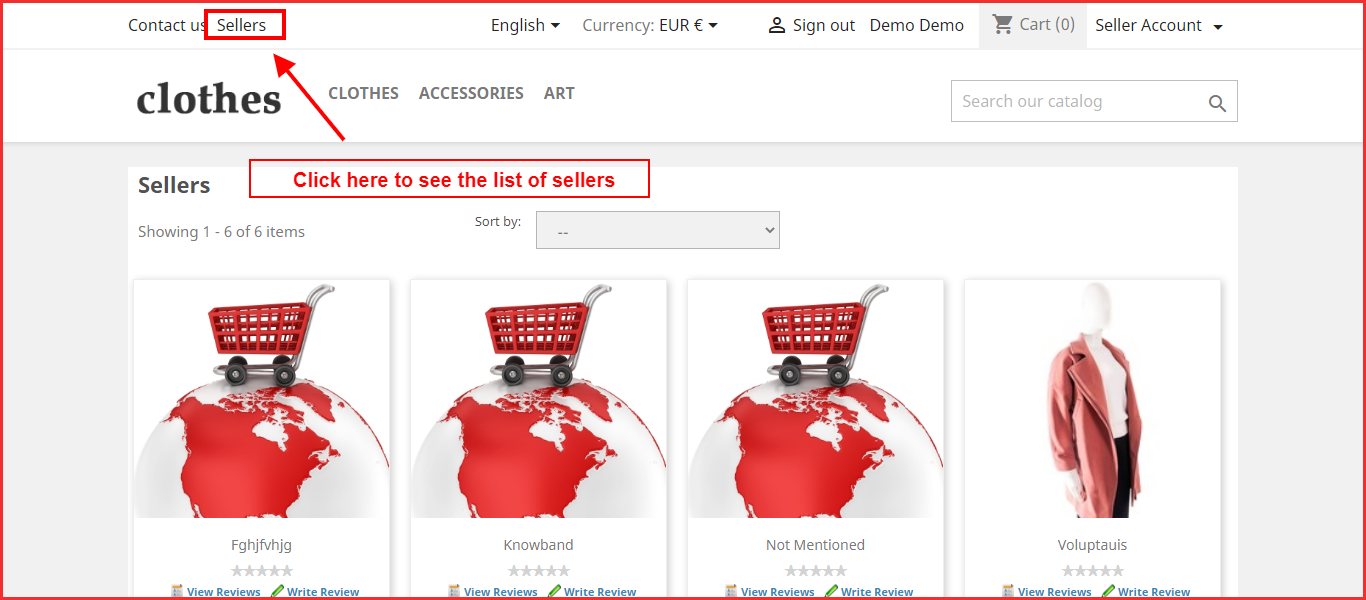
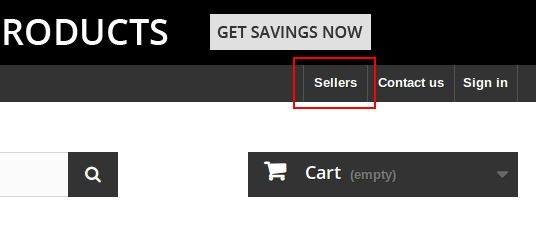
Display sellers on the front: Enable this field in case you want to show a link in the header of the PrestaShop marketplace front-end about the seller’s listing page. If this setting is on disable then the seller listing page. In fact, the Sellers listing options will display in the front-end as below:
Display Product Wise Seller Details on Success: If the admin enables this feature, the seller details will be shown on the order confirmation page.
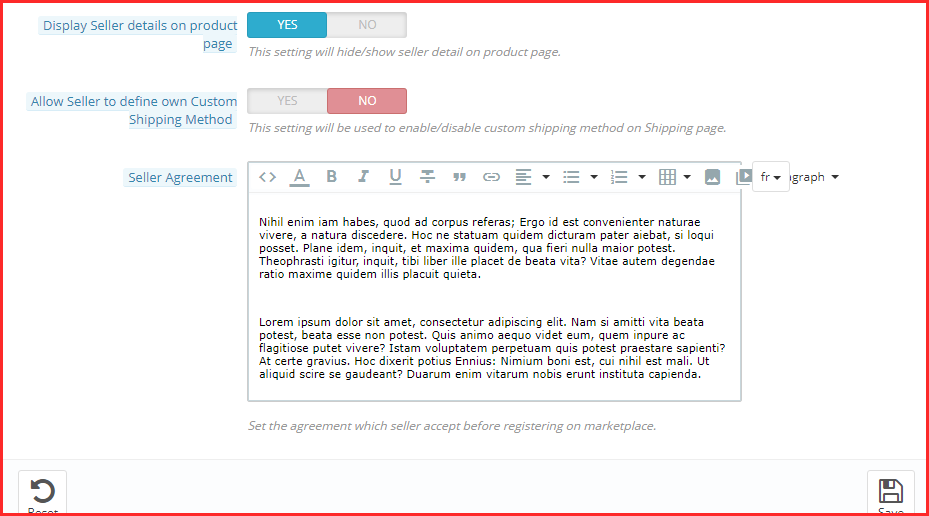
Display Seller Details on Product Page: When the option is on enable, the seller’s detail displays on the product page.
Allow Seller to define own Custom Shipping Method: Enable this functionality to allow the sellers to define their shipping methods. In case, this feature is off, then, only the default shipping methods defined by the admin be shown in the Shipping tab of the seller’s dashboard.
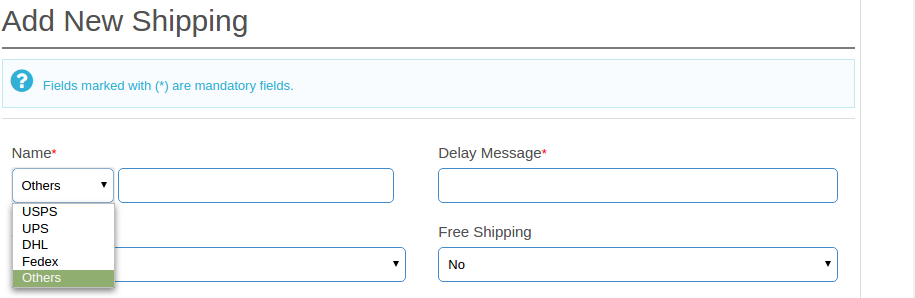
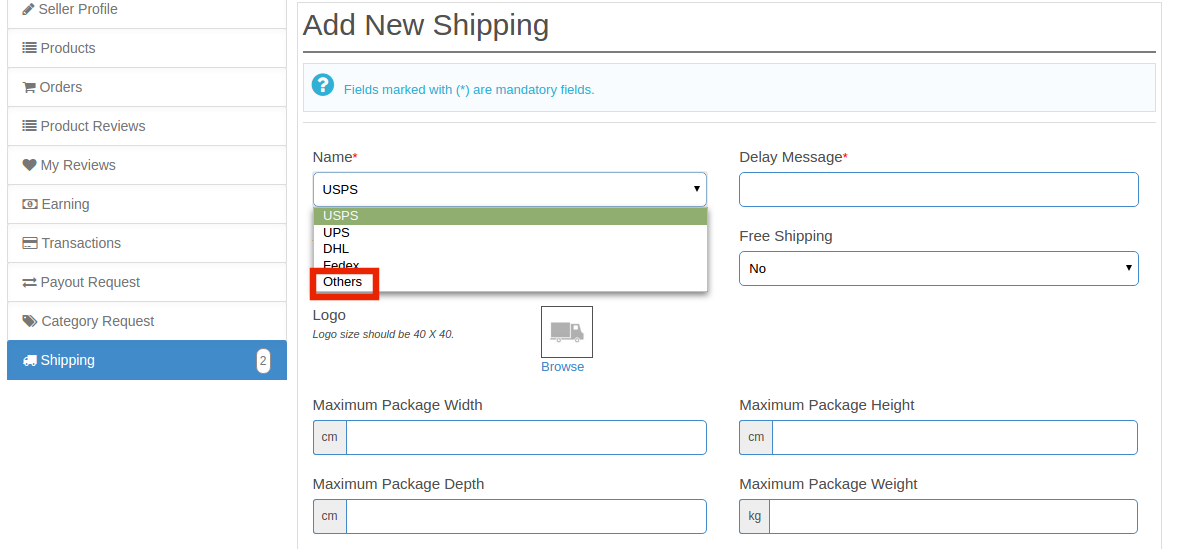
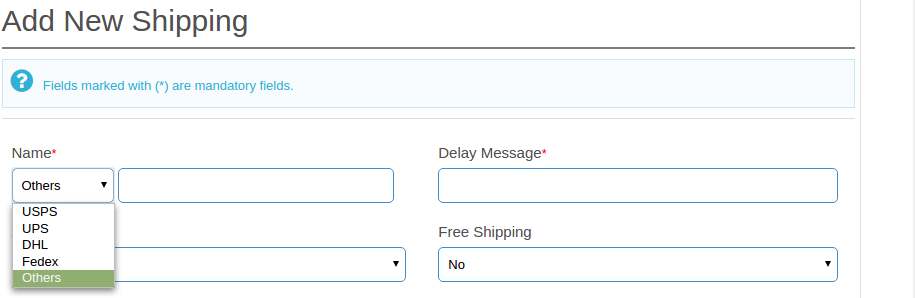
In case, this feature is on, then, the seller will get an ‘Others’ option in the front-end as shown in the image below:
The seller can select ‘Others’ to add his custom shipping methods.
Seller Agreement: The seller agreement is customizable from this section of the PrestaShop Multi-vendor Marketplace plugin. The same agreement is visible to the sellers once they register themselves in the PrestaShopMulti-Seller Marketplace.
Enable/Disable Product Type Selection:
This setting will allow the admin to enable/disable the product type selection functionality for seller on the front.
Use Admin Career as Seller Default Career:
This setting will allow using the admin carrier as the seller’s default carrier which was automatically created for the seller.
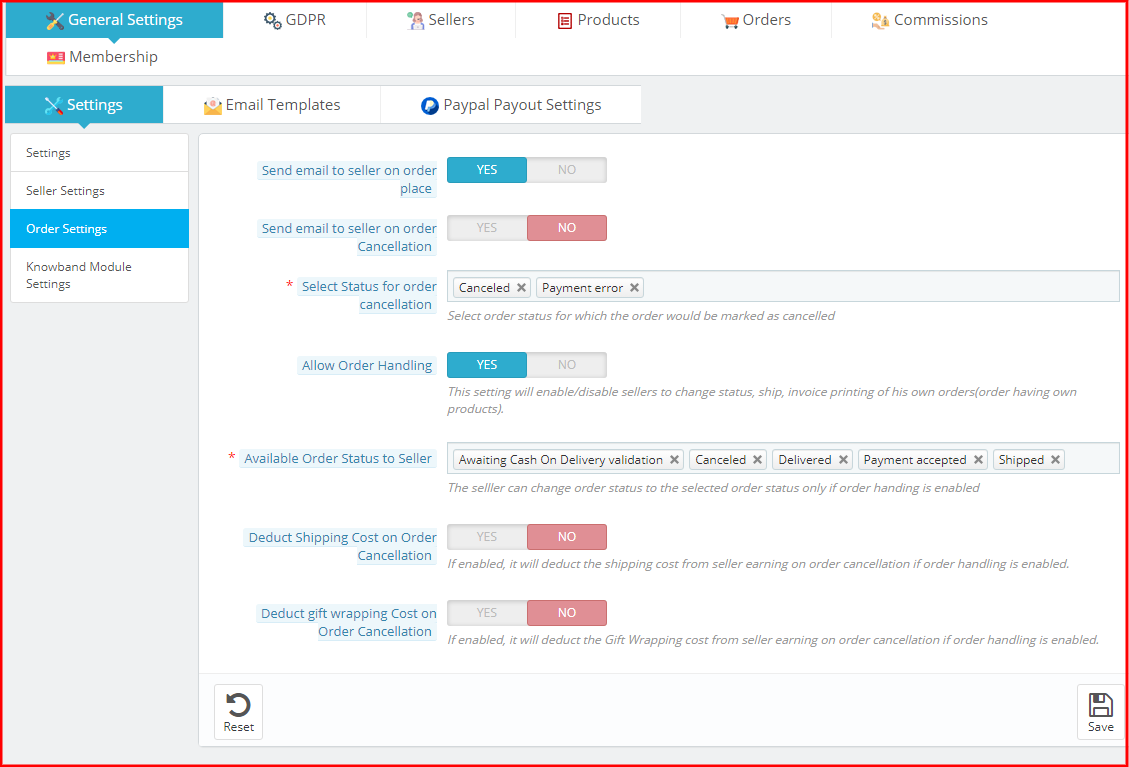
4.1.3 Order Settings
Admin can configure the order setting, email alert options for orders, and many more.
Send Email to Seller on Order Place: Enable this field to send an email to the seller in case an order comes for the seller’s product(s).
Send Email to Seller on Order Cancellation: Enable this field to send an email to the seller in case an order cancels for the seller’s product(s).
Select Status for order cancellation: Select the order status for which the order marks as canceled.
Allow Order Handling: This setting will enable/disable the sellers to manage and change the order status, manage the shipment of the orders and generate the invoice for their products.
Available Order Status to Seller: The seller can change the order status to the selected order status only if order handling enables.
Deduct Shipping Cost on Order Cancellation: If the admin enables this feature, it will deduct the shipping cost from the seller earnings on order cancellation if order handling enables.
Deduct gift wrapping Cost on Order Cancellation: If the admin enables this feature, it will deduct the Gift Wrapping cost from the seller’s earnings on order cancellation if order handling enables.
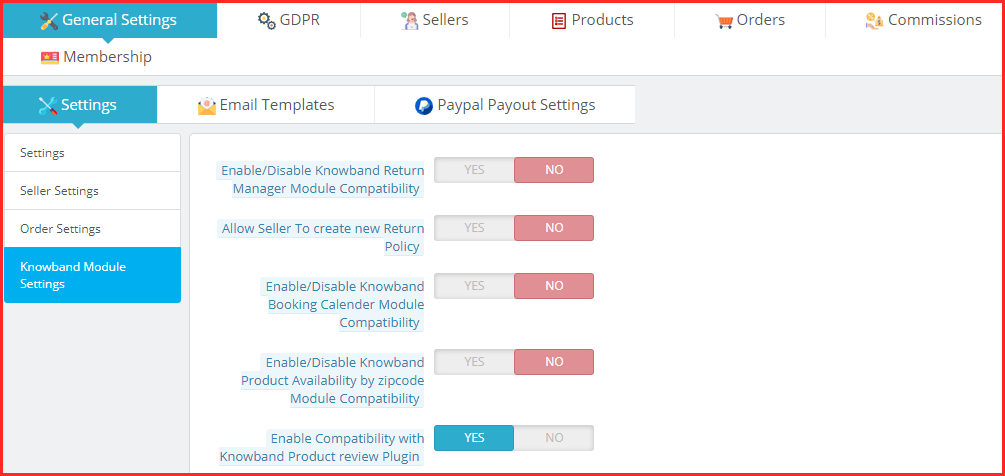
4.1.4 KnowBand Module Settings
Here, the admin can enable/disable the Knowband modules.
Enable/Disable Knowband Return Manager Module Compatibility: Enable this field, in case you want to add Knowband Return Manager Module Compatibility.
Allow Seller to create a new Return Policy: Enable this field, in case you want to allow the seller to create a new return policy.
Enable/Disable Knowband Booking Calendar Module Compatibility: Enable this field, in case you want to add Knowband Booking Calendar Module Compatibility.
Enable/Disable Knowband Product Availability by zipcode Module Compatibility: Enable this field, in case you want to allow zipcode module compatibility.
Enable Compatibility with Knowband Product review Plugin: Enable this field, in case you want to allow compatibility with the product review plugin.
Enable Seller Ticket System: Knowband Multi-vendor marketplace now have an option for enabling/disabling the seller customer ticketing system. You can turn on the module by choosing the yes or no option.
Enable Deal Manager: Likewise, seller ticketing system, we have also added Knowband Deal Manager Module with the Knowband Multi-Vendor Marketplace module. You can enable/disable the same from the yes/no buttons provided in the general setting panel.
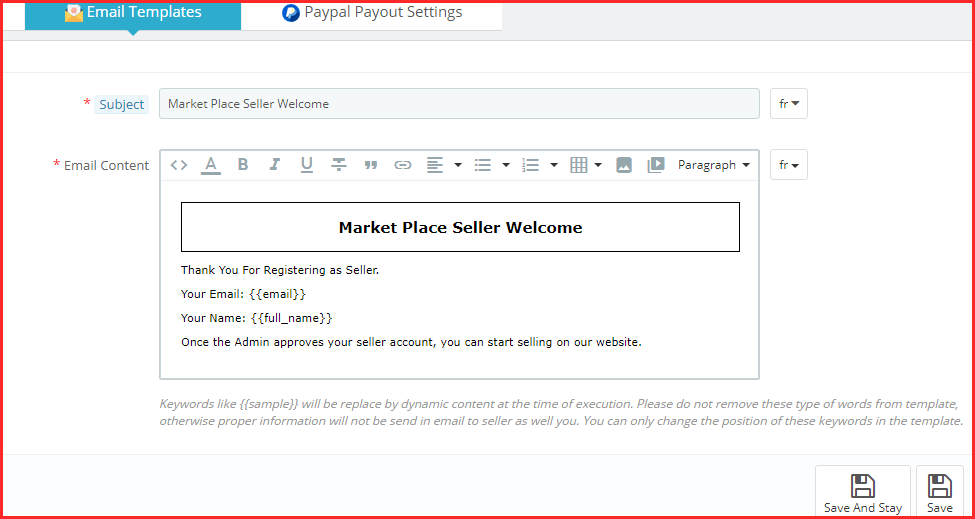
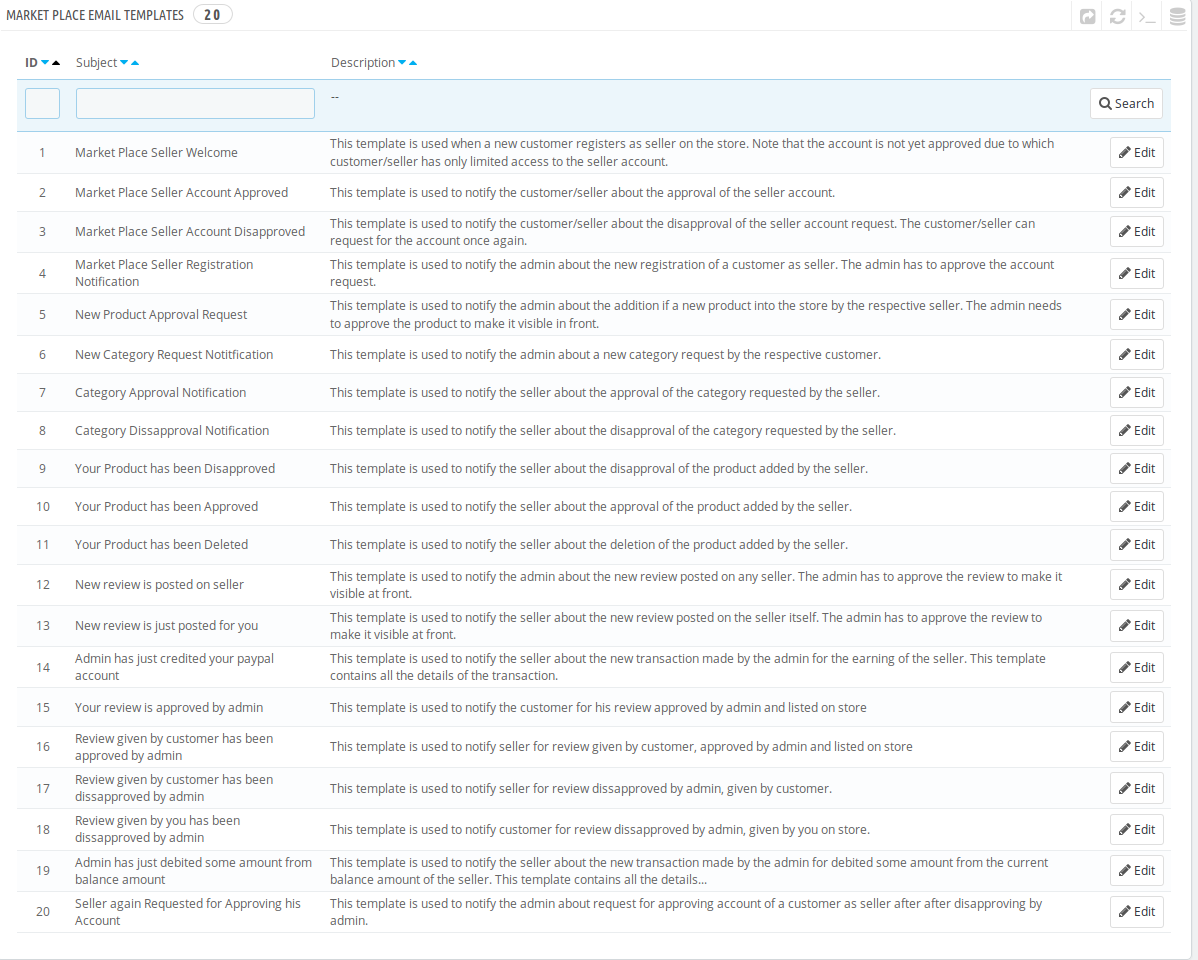
4.2 Email Templates
Various email templates are available for multiple actions. There is a total of 30+ default email templates which include subjects like welcome email, seller account approval, approval notifications, transaction emails, order status templates, etc.
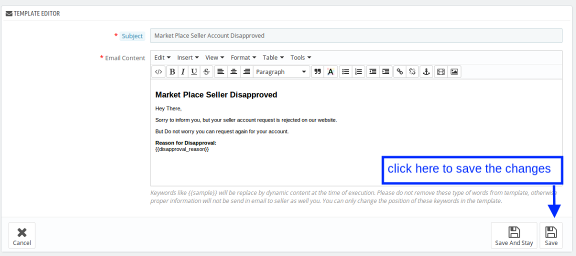
Edit the email template
Admin can edit the default email templates.
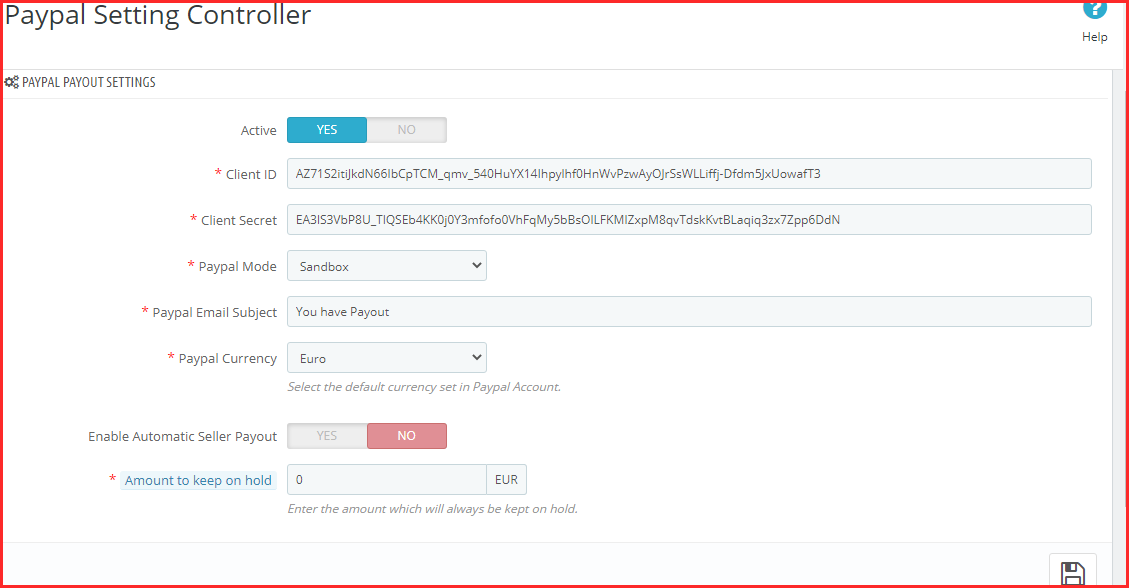
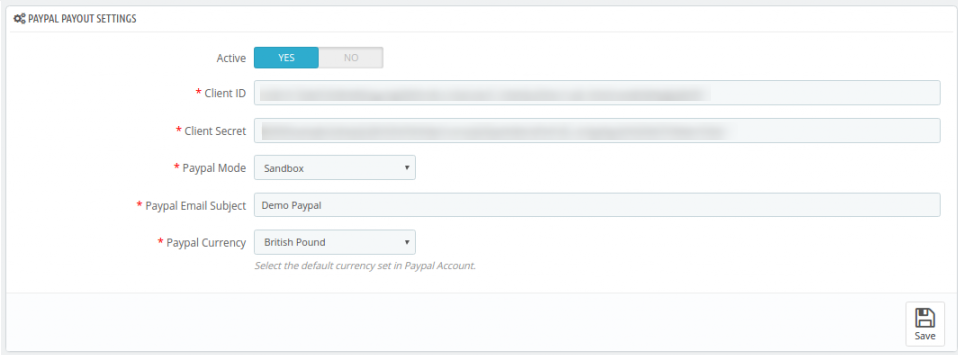
4.3 PayPal Payout settings
The admin can use PayPal if sellers opt for this payment method.
Admin has to add the PayPal details in PayPal Payout Settings.
Enter the API details of the PayPal details as shown in the image below:
Active: Toggle the button to activate the PayPal payout settings.
Client ID: Enter the Client ID of your PayPal account here.
Client Secret: Enter the secret key here.
PayPal Mode: Select the mode, that is, Sandbox or Live from the options drop-down menu.
The PayPal Email Subject: Enter the email subject for PayPal here.
PayPal Currency: Select the default currency set in your PayPal account.
Enable Automatic Seller Payout: Toggle the button to activate automatic seller payout.
Amount to keep on hold: Enter the amount which will always be kept on hold for sellers.
5.0 GDPR
Since GDPR is mandatory in many countries, the admin can configure the PrestaShop marketplace module with GDPR.
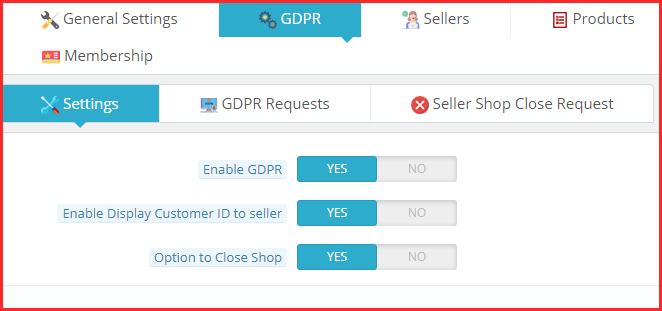
5.1 GDPR Settings
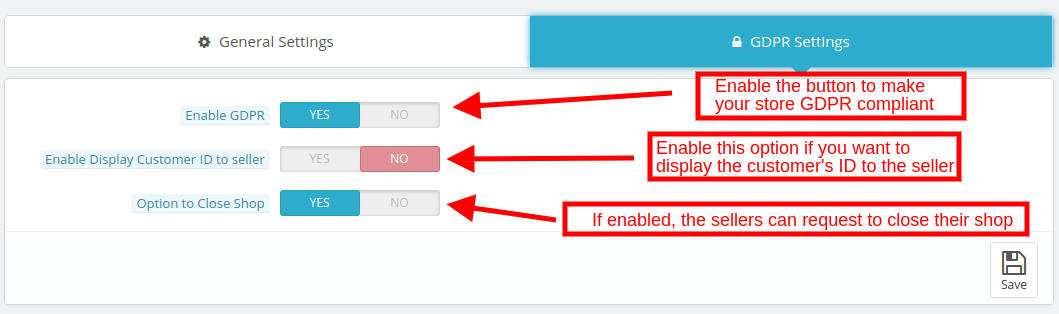
The store admin can enable the GDPR settings by clicking a few buttons in this section of the Prestashop marketplace addon. The various fields are visible below:
Enable GDPR: Toggle this button enables GDPR compliance.
Enable Display Customer ID to seller: Enable this feature if you want to display the customers’ ID to the third-party sellers.
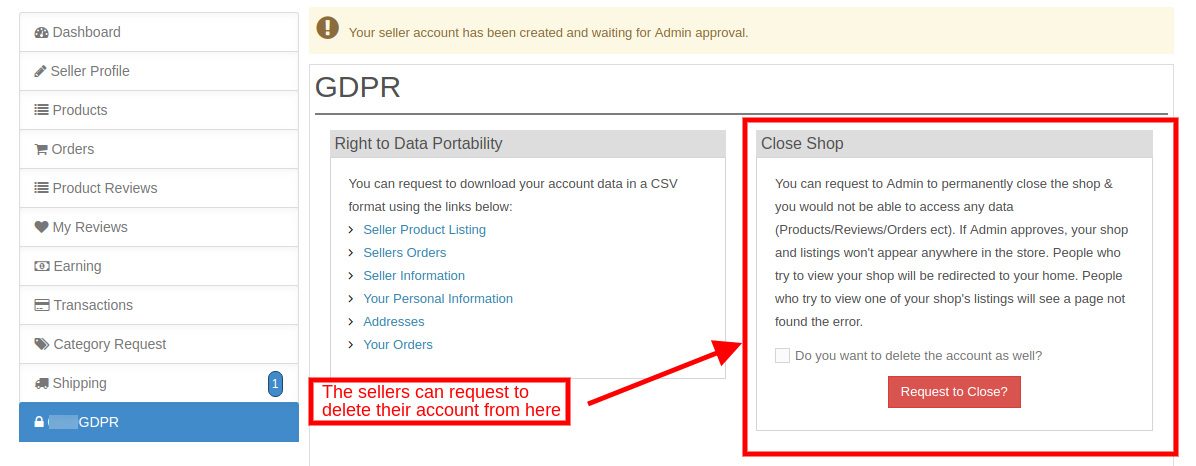
Option to close Shop: If this feature enables, then, the sellers will get options to request for the shop closure. It displays a section in the tab in the dashboard of the sellers from where the request raises.
5.2 GDPR Requests
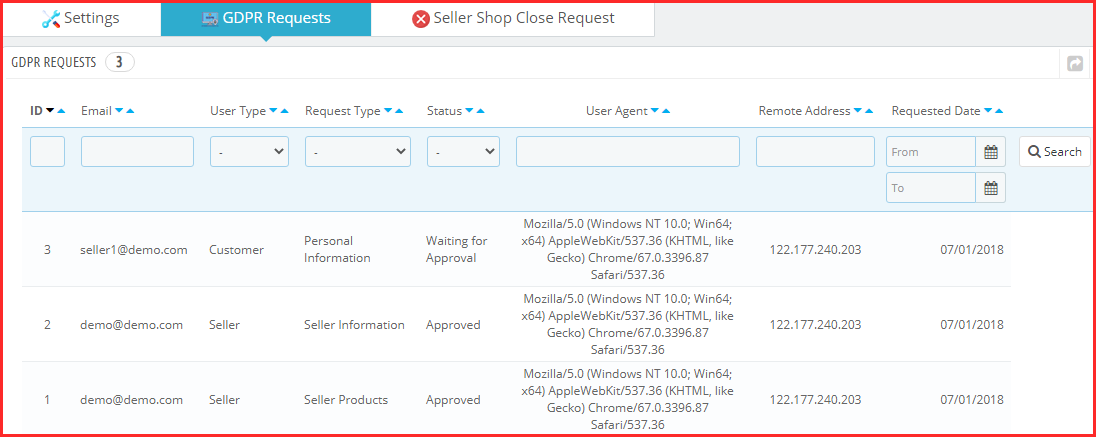
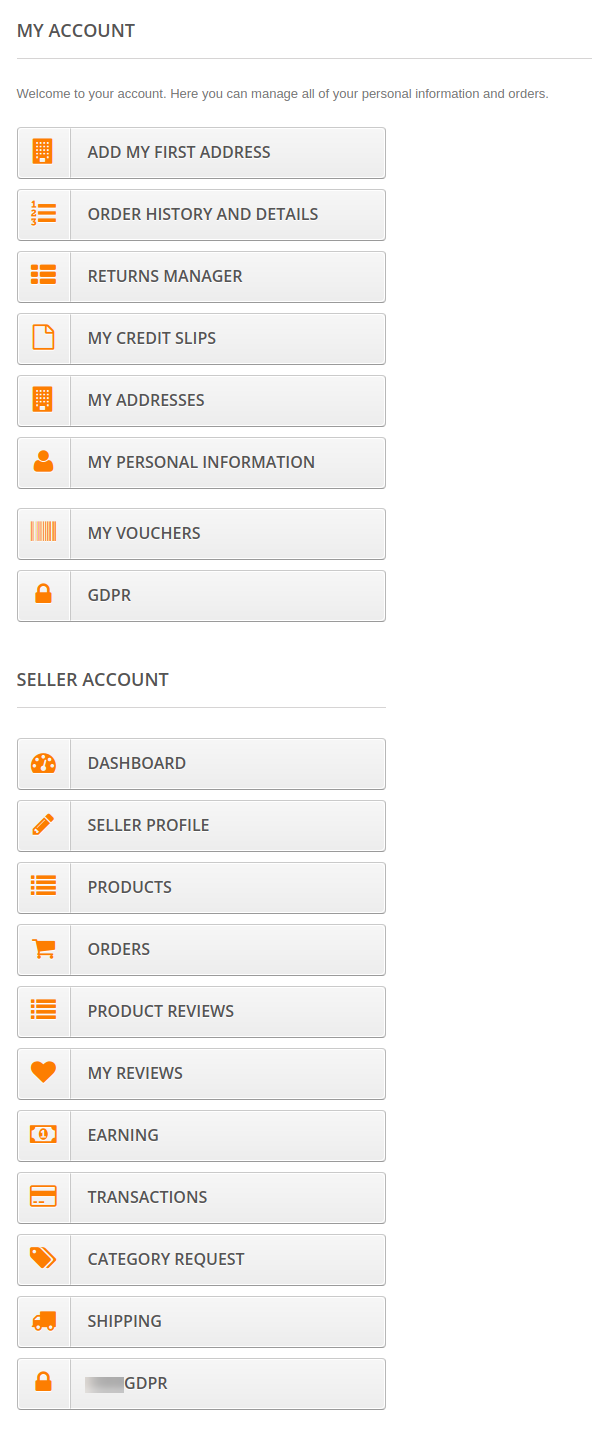
The sellers can download their data in CSV format just by clicking the links provided in the GDPR section of the dashboard.
The admin can view the GDPR requests initiated from this section in the back-end of the Prestashop multi-vendor marketplace module as shown in the image below:
5.3 Seller Shop Close request
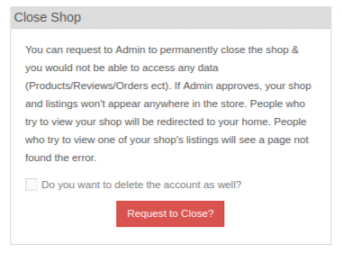
Ifthe admin enables this feature from the back-end of the Prestashop multi-vendor Marketplace plugin, the sellers can request the admin to close their shop.
The request to delete the sellers’ account initiates by just clicking a couple of buttons from the dashboard. The image of the front-end interface is shown below:
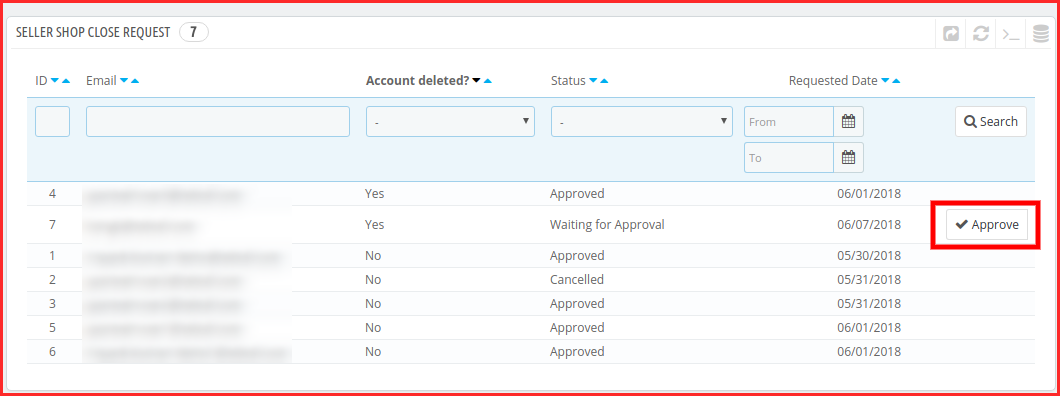
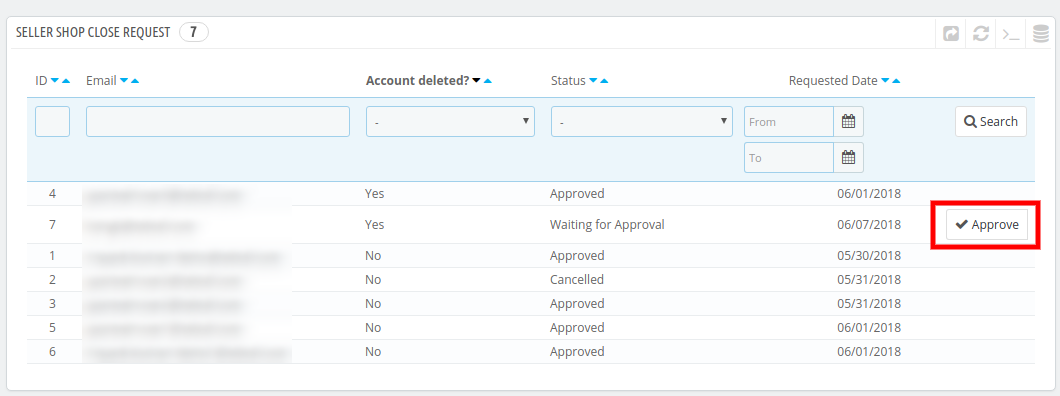
Once the request is sent, the admin can view the same from the Seller Shop CloseRequest tab of the Prestashop multi-seller marketplace extension.
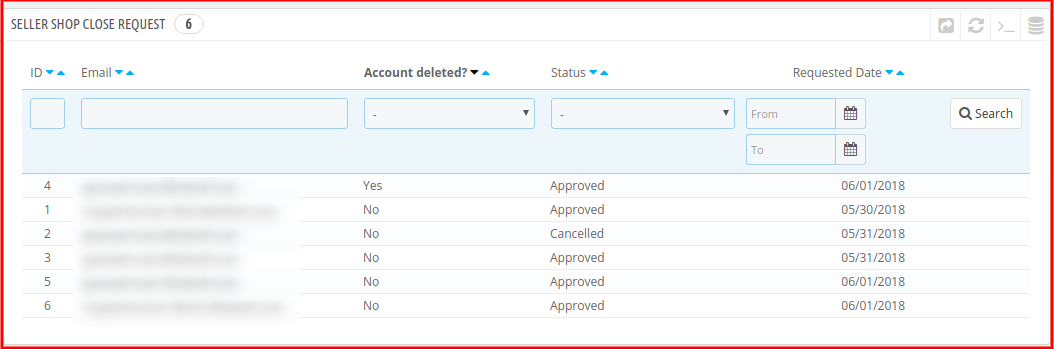
The confirmation mail is sent to the seller. Once the sellers provide the confirmation, an ‘Approve’ button displays corresponding to the request. The admin can click the same and complete the request.
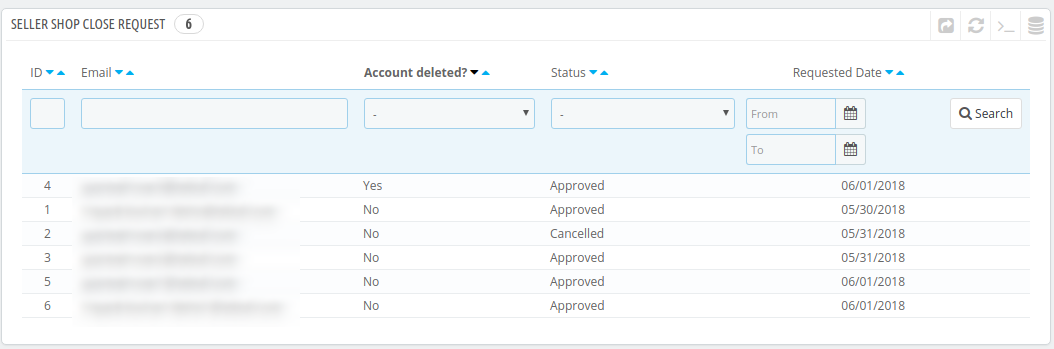
The entire list of the shop closure request and their status is displayed in this section of the Prestashop multi-seller marketplace plugin as shown in the image below:
6.0 Sellers
6.1 List of Sellers
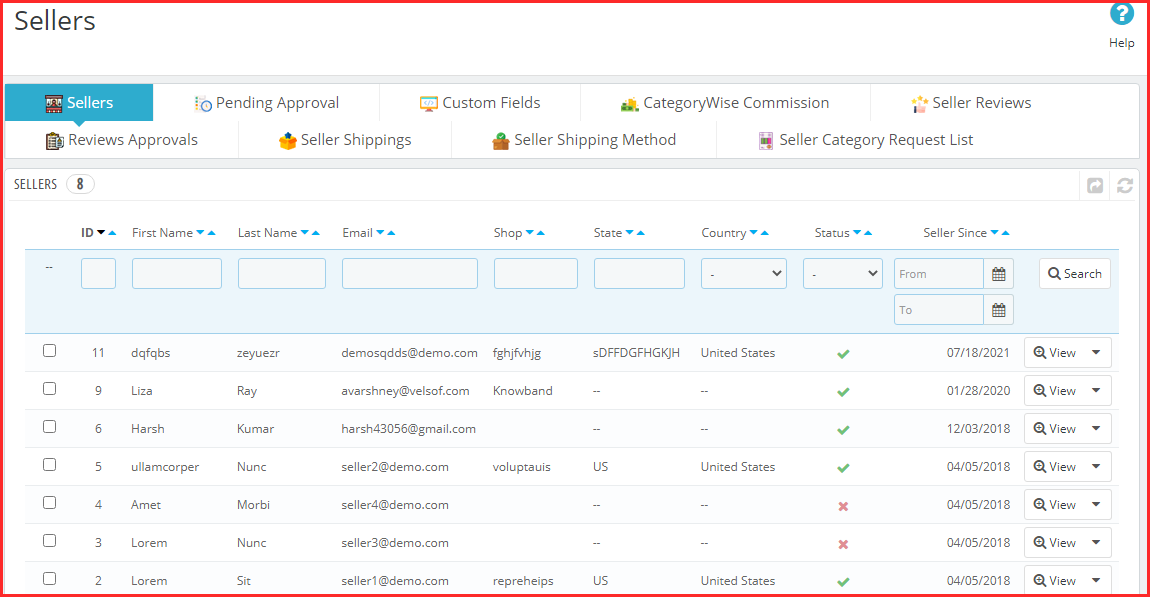
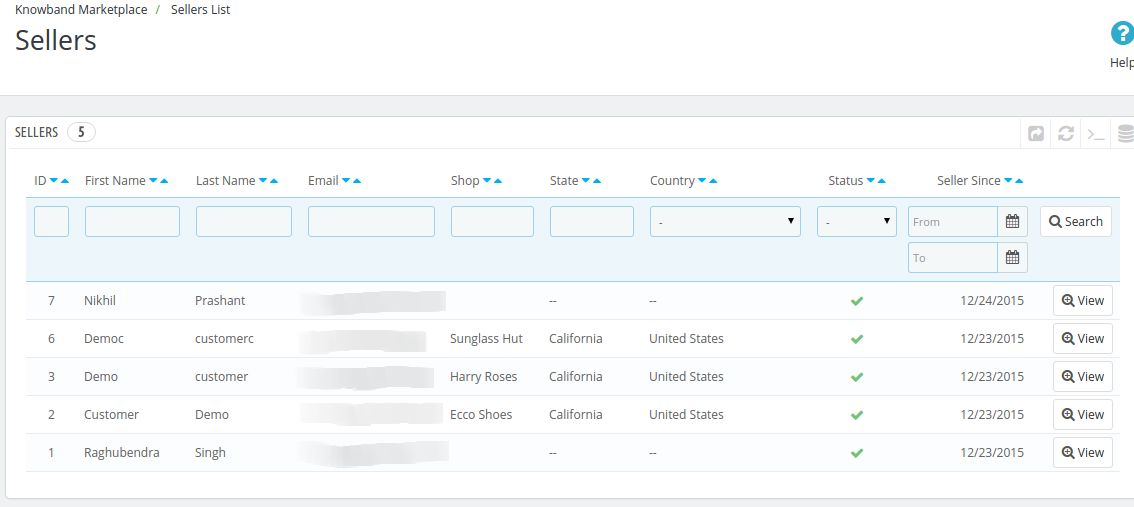
This page of the Prestashop Multi-seller Marketplace extension has a list of all the sellers that the store owner approves.
There are several filters as well to filter the list of sellers as shown in the above screenshot.
The above figure consists of a list of all the sellers that clear the approval.
The admin can also enable or disable a seller in this list using the bulk actions of the grid.
If a seller disables, then, all the products of that seller also disable. Moreover, will not be visible on the storefront.
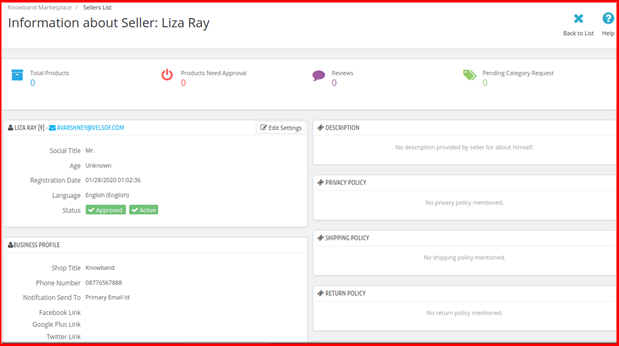
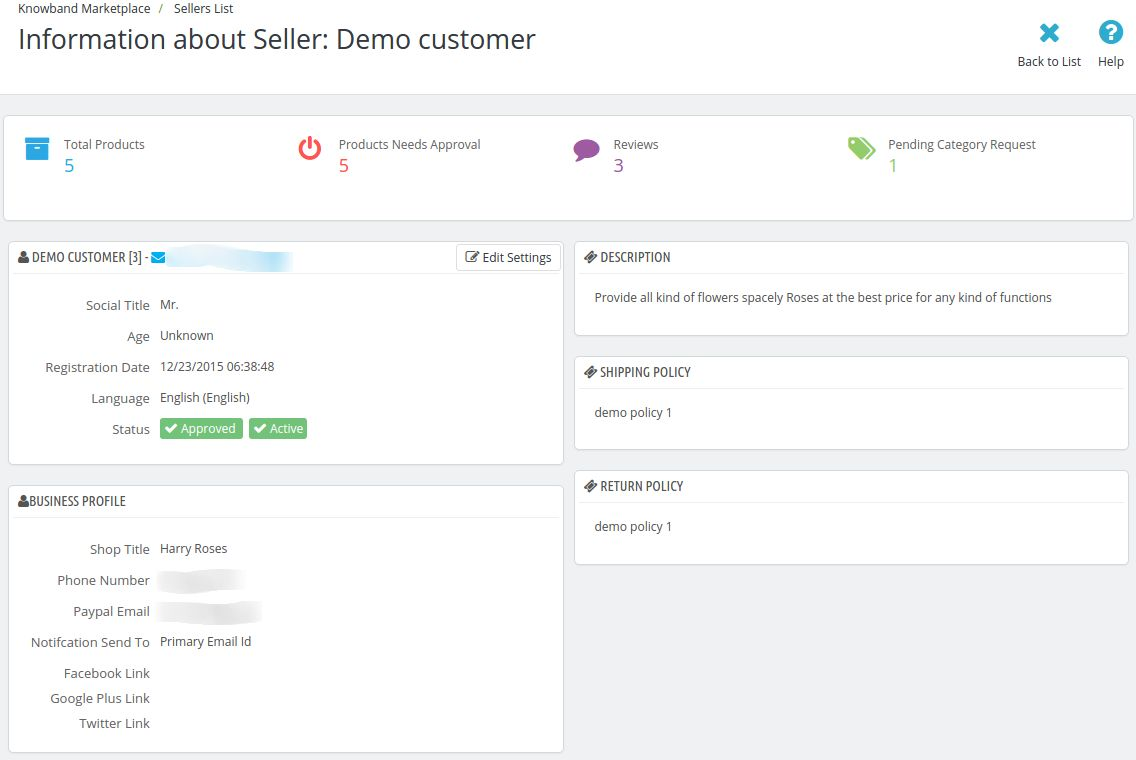
When you click on the view button, a new page opens up consisting of information about the seller.
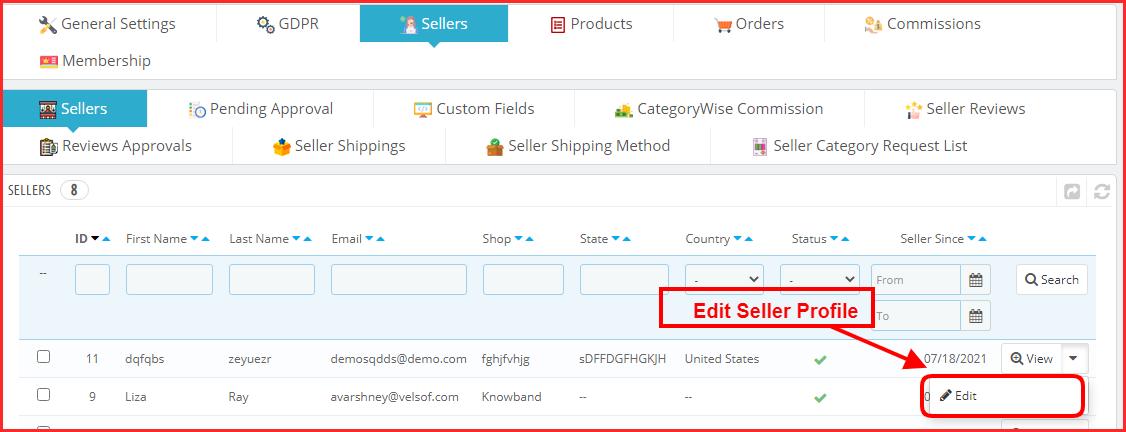
6.1.1 How can the admin edit the Sellers Profile from the backend?
To edit the seller’s profile, follow the below-mentioned profile:
Go to Customers -> Select a Customer who is also a seller -> Click on Edit link on the Customer Information Page
In case, the store admin can edit a seller’s profile just by clicking on the Edit button corresponding to the profile. The admin can edit the profile just as they edit the customer’s profile.
When this page loads for the first time the fields have the default settings that are pre-defined for the addon.
6.2 Pending Seller Approval
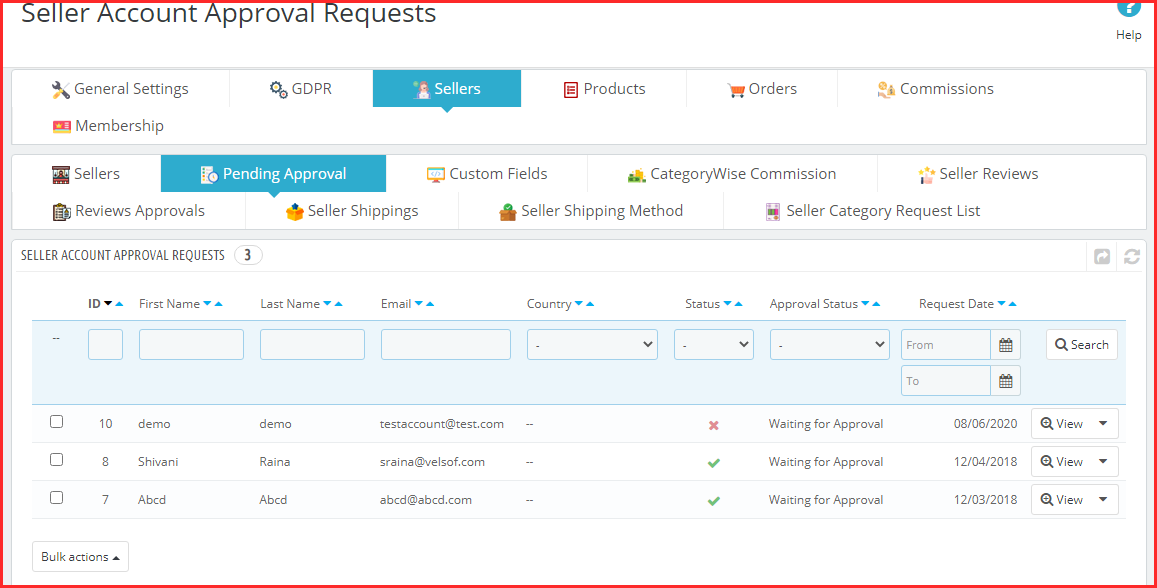
Seller Account Approval Request
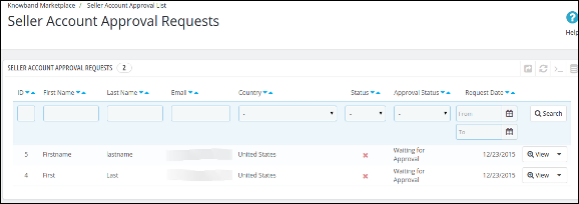
When a seller registers or any customer registers as a seller on the Prestashop marketplace, then, it first appears in this tab of the Prestashop Multi seller Marketplace module. The store admin can approve or disapprove of the seller account request.
Approve Seller Account: To approve a seller’s account, you have to click on the “Cross” button corresponding to that seller on the list from the backend.
Once the Seller account approves it directly moves to the Sellers List. Moreover, all the limits to the seller account release.
A mail will be sent to the seller to notify him about the approval of the seller account.
Note:- The Seller Accounts that the store owner approves cannot be undone. Please use this feature carefully.
Disapprove Seller Account: To disapprove of a seller account, you have to click on the “tick” button in front of that seller on the list.
A pop-up will appear asking for the reason for disapproval of the seller account. Fill out the reason and then submit the form to complete the action.
A mail will be sent to the seller notifying the disapproval of the seller’s account. The reason provided in the pop-up will also be sent in this mail.
Note:- Once a seller request disapproval then he can again apply for the seller account. In addition, whenever a seller does this the store owner gets a notification email.
6.3 Custom Fields
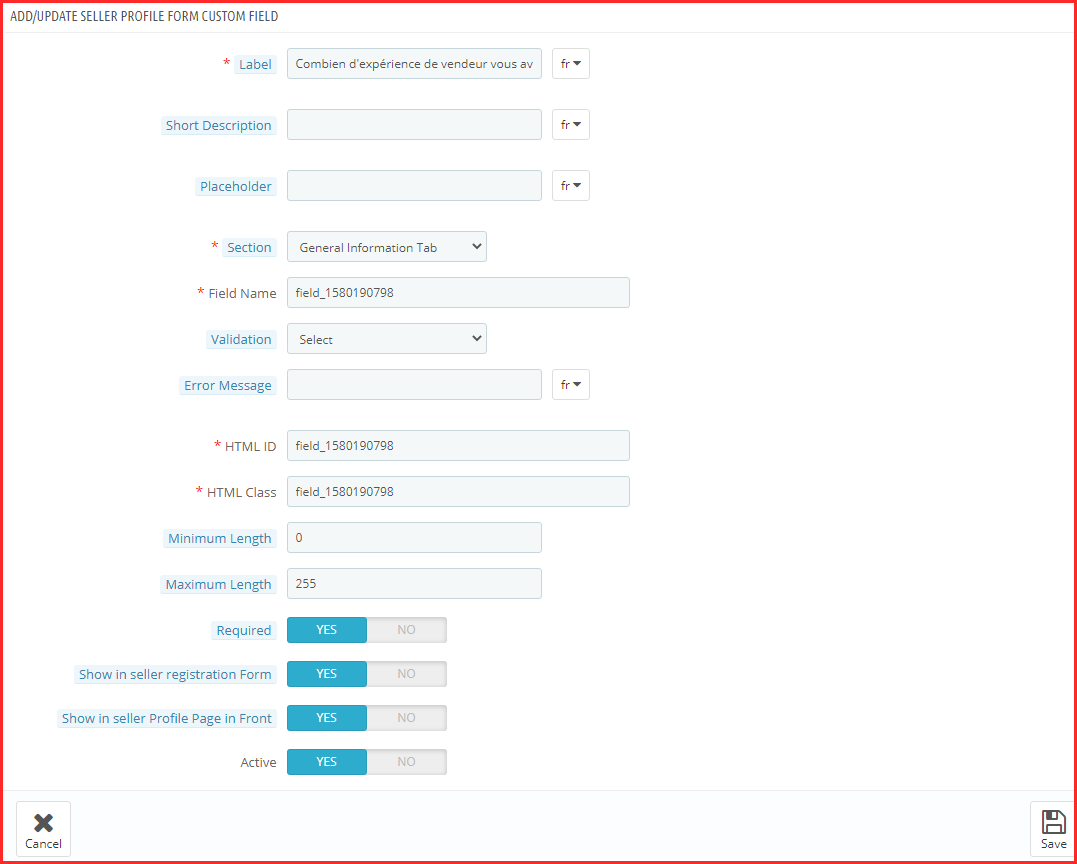
Now admin can add custom fields for the seller profile page and even make them required for the sellers to fill out.
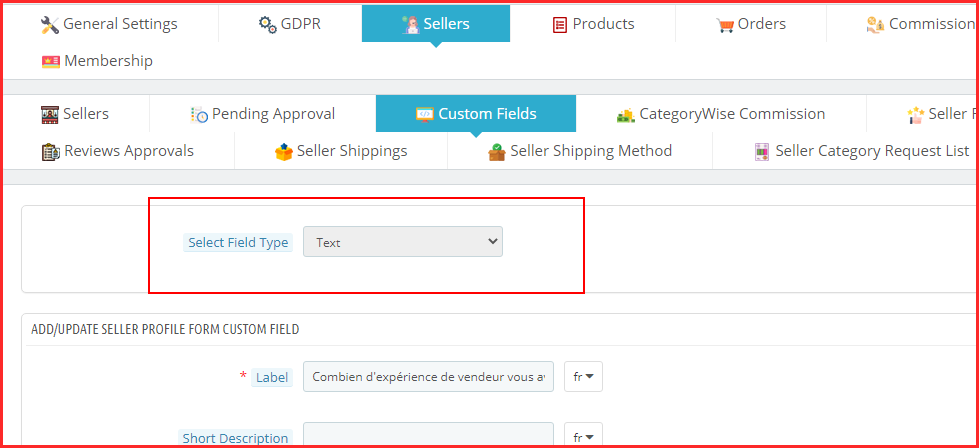
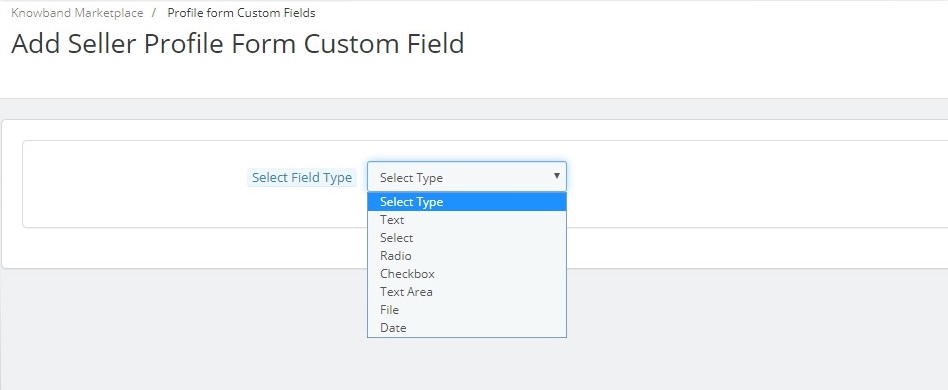
Custom Fields Type Selection:
Admin can select the custom field type that he wants to add on the seller profile page. Further, the admin gets lots of options. For instance, checkbox, radio button, text box, etc.
6.3.1 How to Add New Custom Fields for Seller Profile in PrestaShop Multi-vendor marketplace?
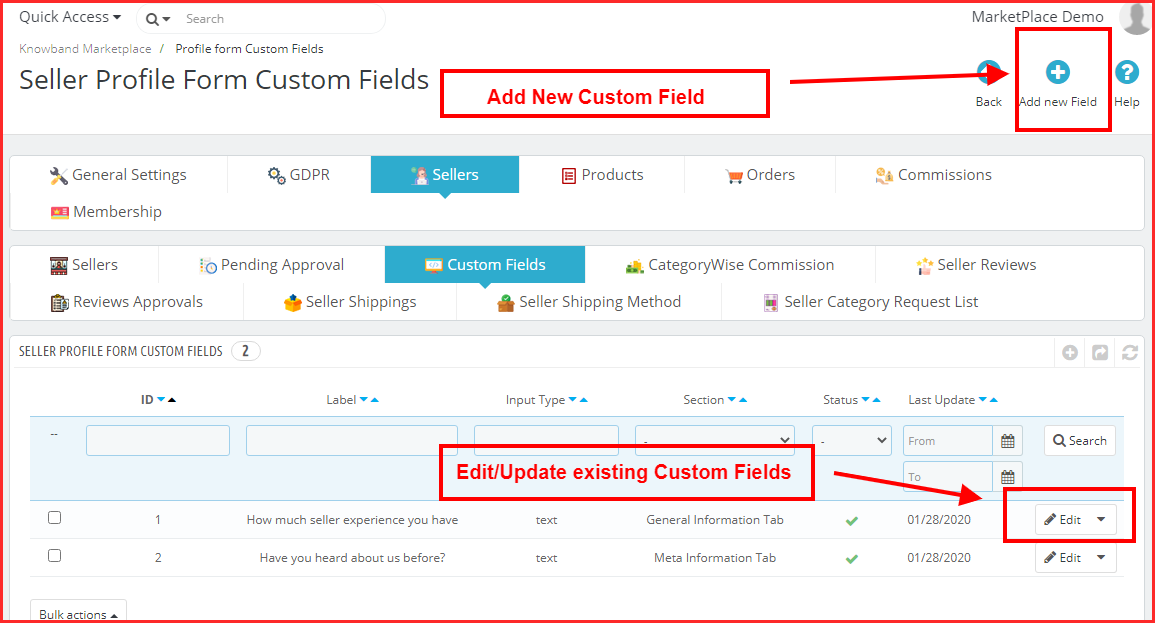
Custom Fields for Seller Profile:
Admin can add new custom fields for the seller’s profile under the “Profile Form Custom Fields” tab. In fact, with the help of this tab, the admin can add new custom fields or delete already added custom fields for sellers’ profiles using PrestaShop Multivendor Marketplace.
Custom Fields Type Selection:
Admin can select the custom fields type which he wants to add on the seller profile page. Further, the admin gets lots of options. For instance, checkbox, radio button, text box, etc.
Category-wise Custom Fields:
Admin can map the custom fields in a particular category using the “Section” tab under Profile Form Custom Fields. Thus, with the help of this admin can map the custom fields category-wise.
Make Custom Fields Required:
Admin can make these custom fields required using the “Required” tab.
Show Custom Fields on Seller Front Page:
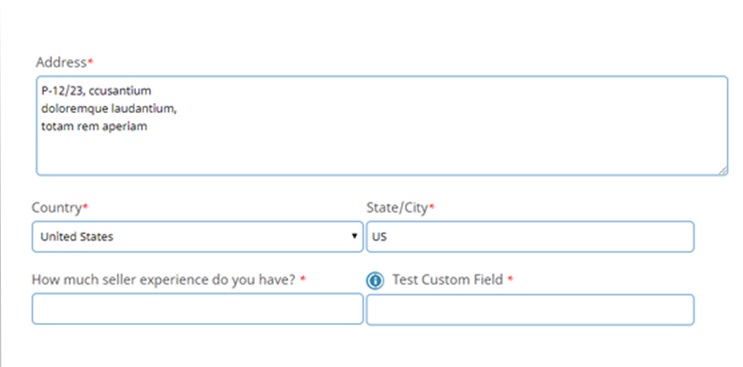
With the help of the PrestaShop Multivendor Marketplace, the admin can show the custom fields on the seller’s profile page. Further, the admin can allow this functionality under the “Profile Form Custom Fields” tab.
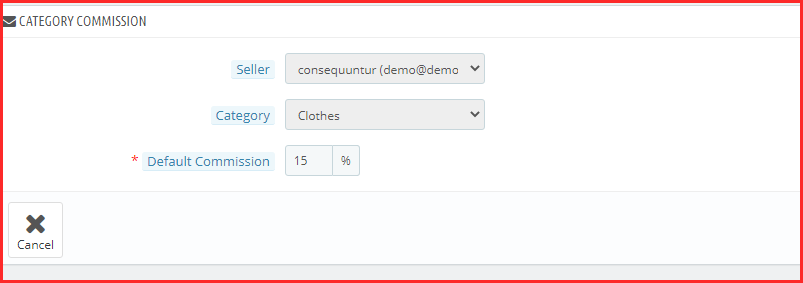
6.4 Category Wise Commission
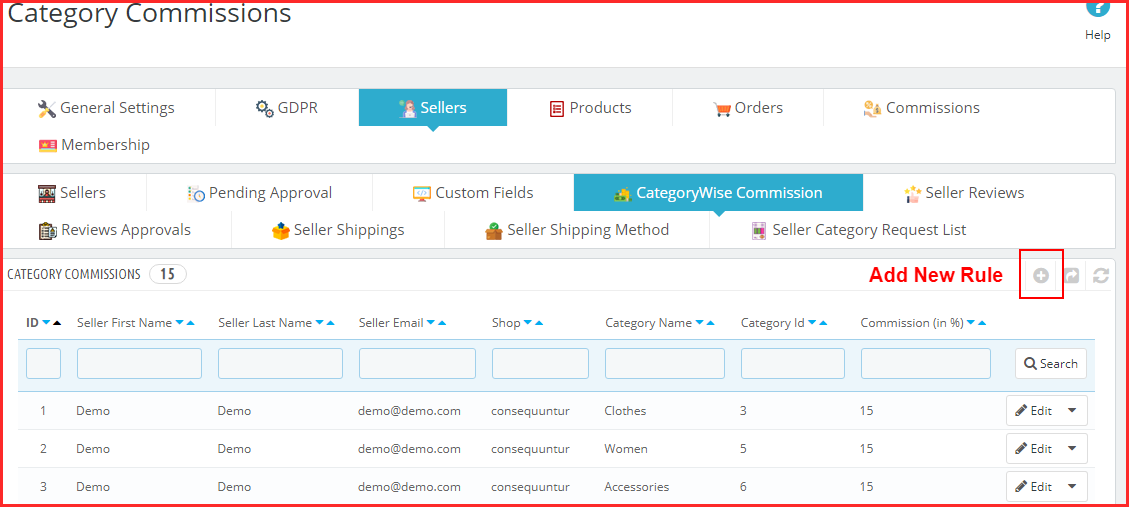
Now, the admin can easily divide the commission according to the product category. Thus, the admin can make new categories too accordingly.
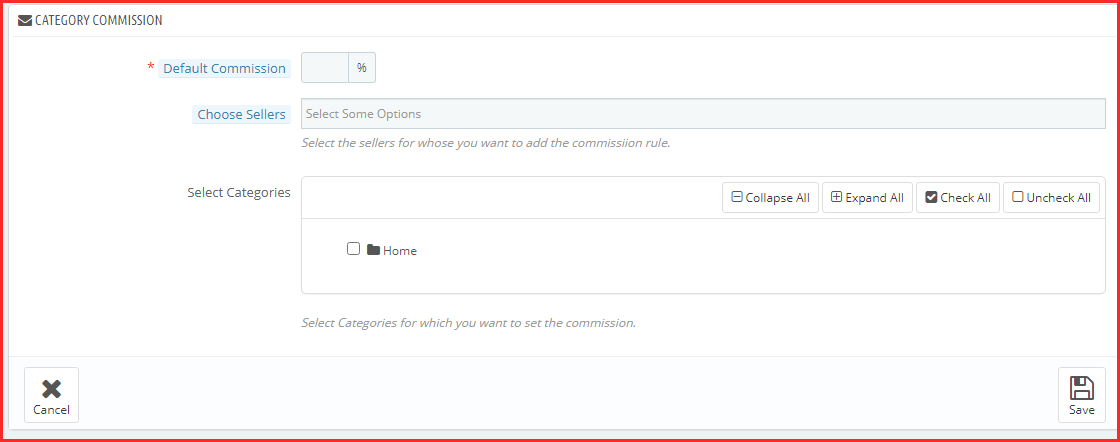
In the above screenshot, the admin can set a new category by entering a default commission. In fact, this enables the admin to charge different commission rates for different product categories.
Admin can edit the commission rule by clicking the edit option at any point in time.
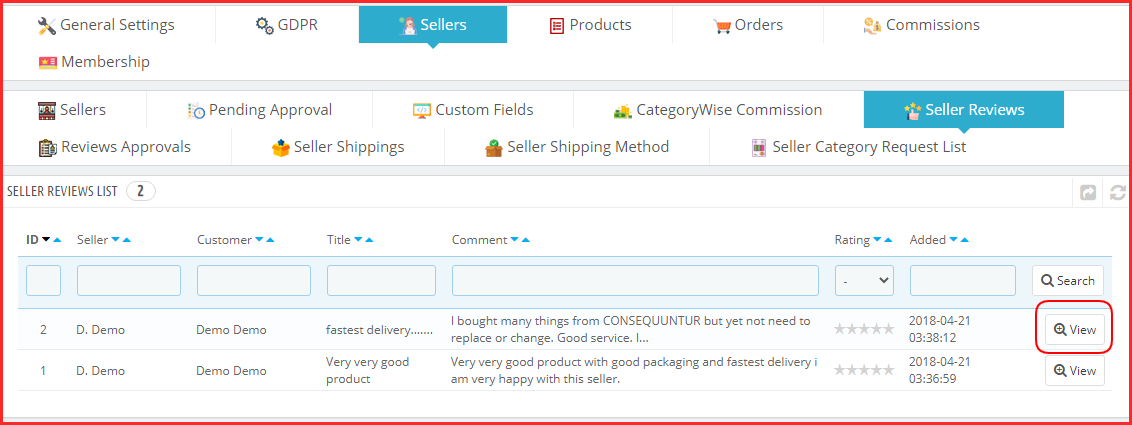
6.5 Seller Review
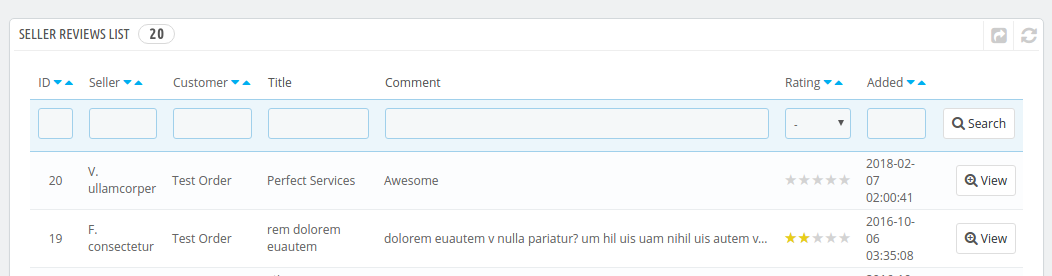
This seller Reviews tab of the Prestashop Multi-seller Marketplace extension contains a list of all the Sellers Reviews done by customers in the store.
If the admin disables the setting (i.e. Seller Review Approval Required), then a seller review approves directly. Further, when the customer adds. In addition, appears on this list. Otherwise, the review first appears in the Seller Review Approval list.
Note:- The Seller Reviews that the store owner disapproves of also appear in this list.
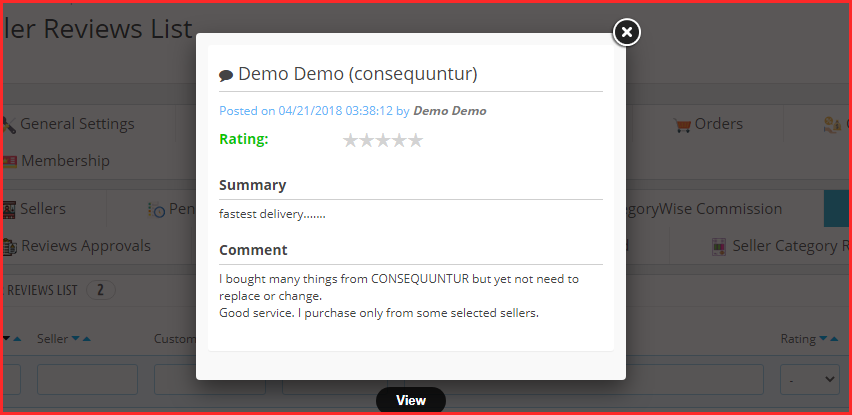
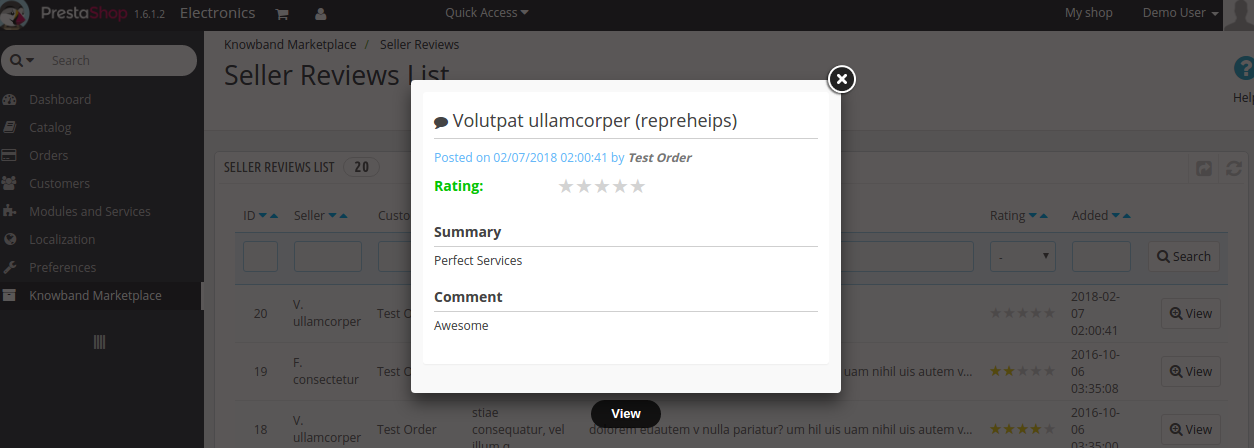
View Seller Review: To view all the details of a seller review you have to click on the View button in front of that review in the list.
On clicking the View button, a Pop-up will appear having all the details of the corresponding seller review.
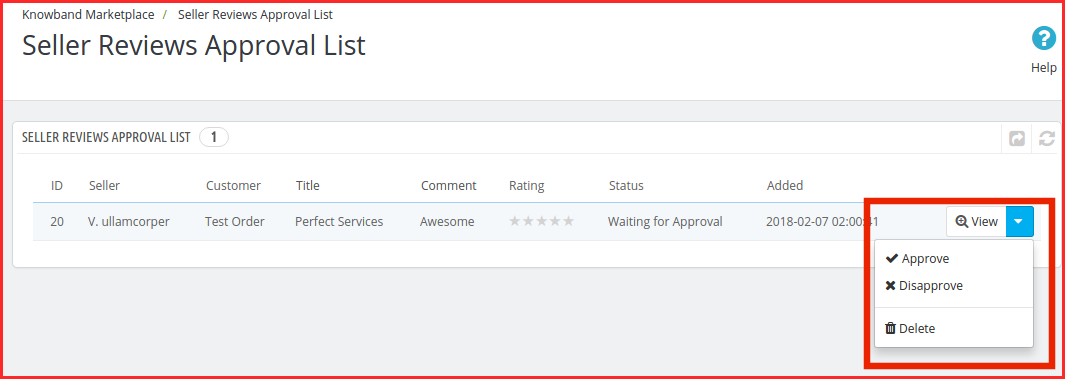
6.6 Seller Reviews Approval
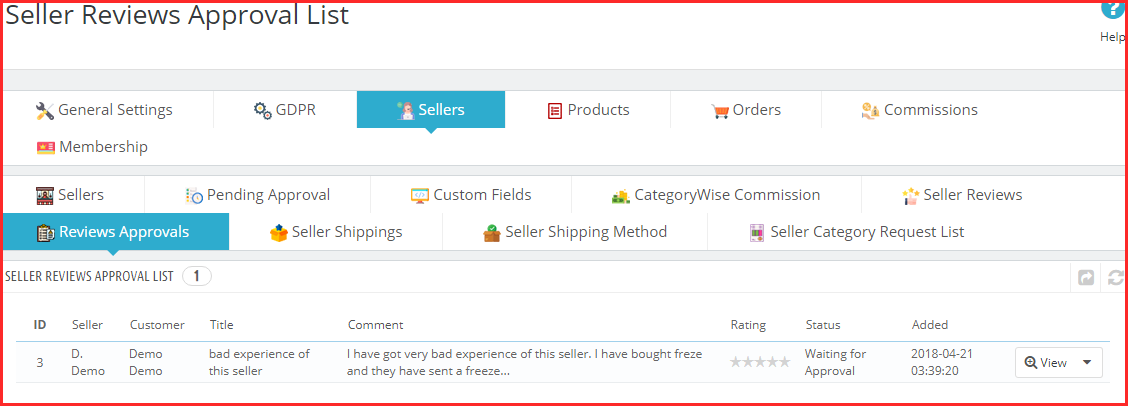
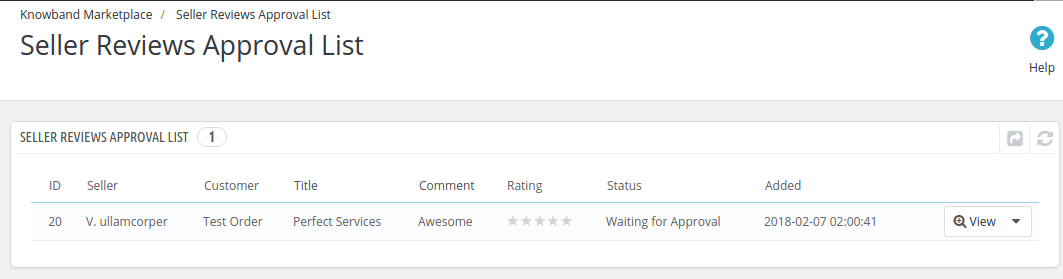
This tab of the Prestashop Multi-vendor Marketplace extension contains all the Seller Reviews. Furthermore, the ones that the customers post. In addition, no action is happening about them.
If the admin enables these settings (i.e. Seller Review Approval Required), then, only any seller review posted by any customer appears in this list otherwise, it directly appears in the Seller Reviews list.
The reviews that are pending approval are showcased as in the image below:
View Seller Review: To view all the details of a seller review you have to click on the View button in front of that review in the list.
On clicking the View button, a Pop-up will appear having all the details of the corresponding seller review.
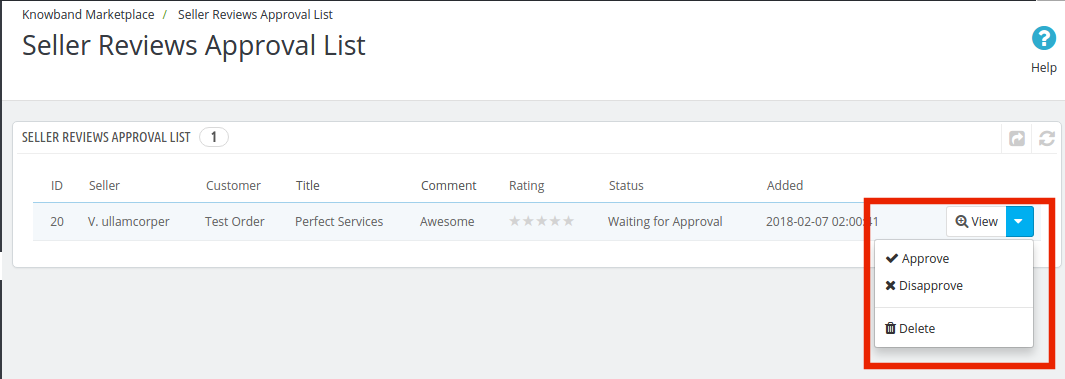
Approve Seller Review: To approve a seller review, you have to click on the Approve button in front of that review on the list.
Once a seller review approves from the backend, it becomes visible on the front end. In addition, is transferrable to the seller review list.
Note:- This action cannot be undone. Please use it carefully.
Disapprove Seller Review: To disapprove a seller review, you have to click on the Disapprove button in front of that review on the list.
A pop-up will appear asking for the reason for disapproval of the seller’s review. Fill in the reason and then submit the form to complete the action.
Once a seller review disapproves, it is transferable to the seller reviews list and cannot be found anywhere else.
Note:- This action cannot be undone. Please use it carefully.
Delete Seller Review: To delete a seller review, you have to click on the Delete button in front of that review on the list.
A pop-up will appear asking for the reason for the deletion of the seller review. Fill the reason and then submit the form to complete the action.
Once a seller review deletes, it is completely removed from everywhere.
Note:- This action cannot be undone. Please use it carefully.
All this can happen with a button click with the help of the Prestashop Marketplace extension.
6.7 Seller Shipping
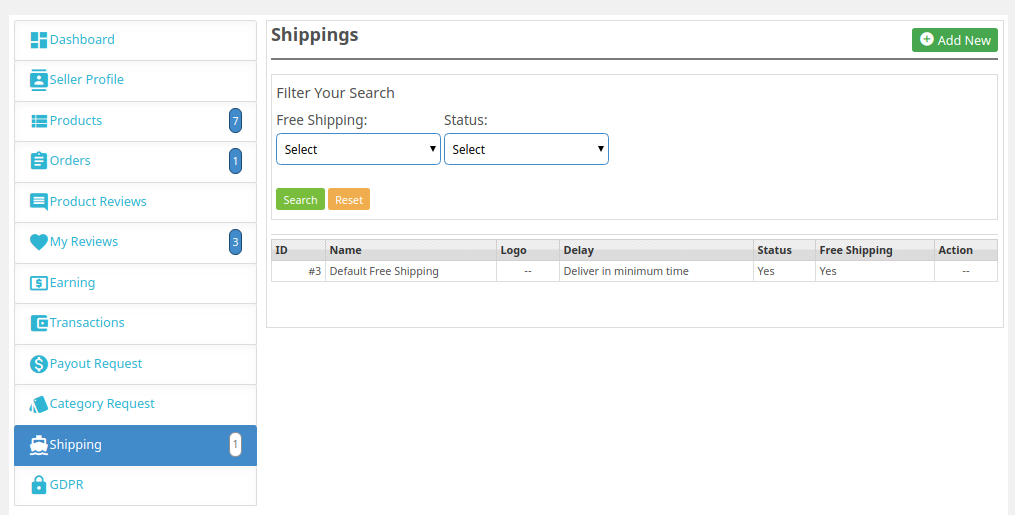
Whenever a new seller adds to the system, a default shipping method is also available that applies to all the products by default. Moreover, it is free as well.
The seller can add a new shipping policy and can map products to it as well, but until then, all the products are mappable to the default shipping policy only.
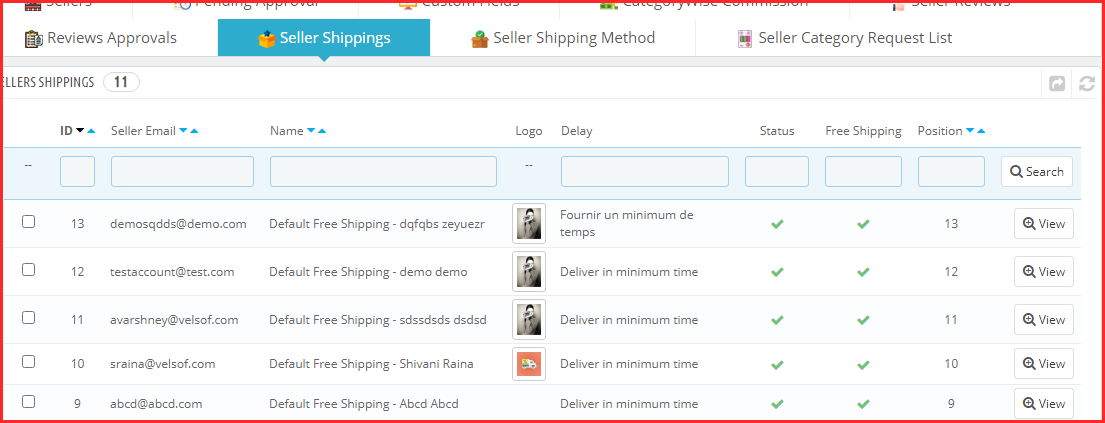
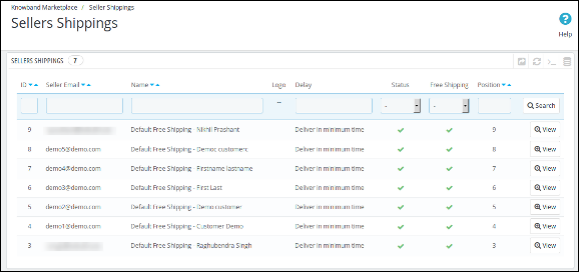
The Seller Shipping tab of the Prestashop Multi-vendor Marketplace addon page contains a list of all the shipping methods. Furthermore, the ones that the admin creates for the sellers are present in the system.
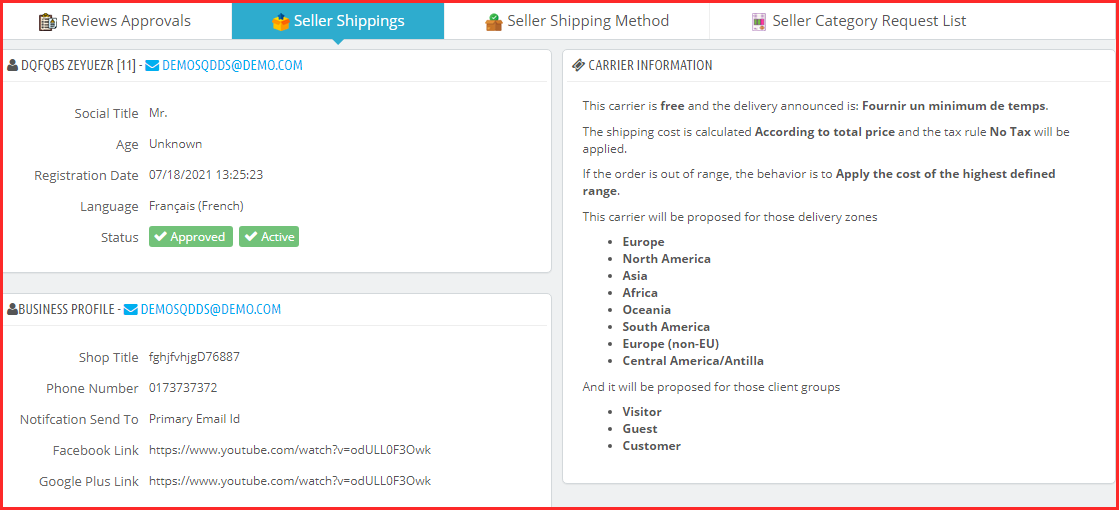
View Shipping: To view the details of a seller shipping, you have to click on the View button in front of that entry.
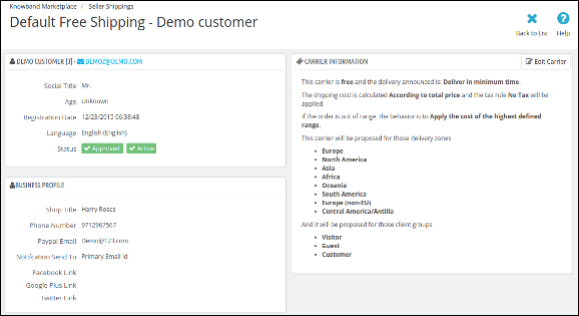
On clicking the button, a new page opens up having details of the respective shipping method.
The page will display Profile Status, Business Profile, Carrier Information and payment information (bank wire details)
Note:-
The admin will not be able to delete or edit any shipping method for any seller. In fact, if tries he/she will redirect to the Carrier Listing page with the corresponding error.
By default, all the products for a seller will be mappable to the Default shipping method for the respective seller. Thus, the default shipping methods are identifiable with the name Default Free Shipping – Seller Name.
6.8 Seller Shipping Method
Prestashop multivendor marketplace extension allows the sellers to define their shipping methods. For this, the ‘Allow Seller to define own Custom Shipping Method’ feature enables from the Setting tab of the Prestashop marketplace module.
6.8.1 How can the admin add Shipping Methods?
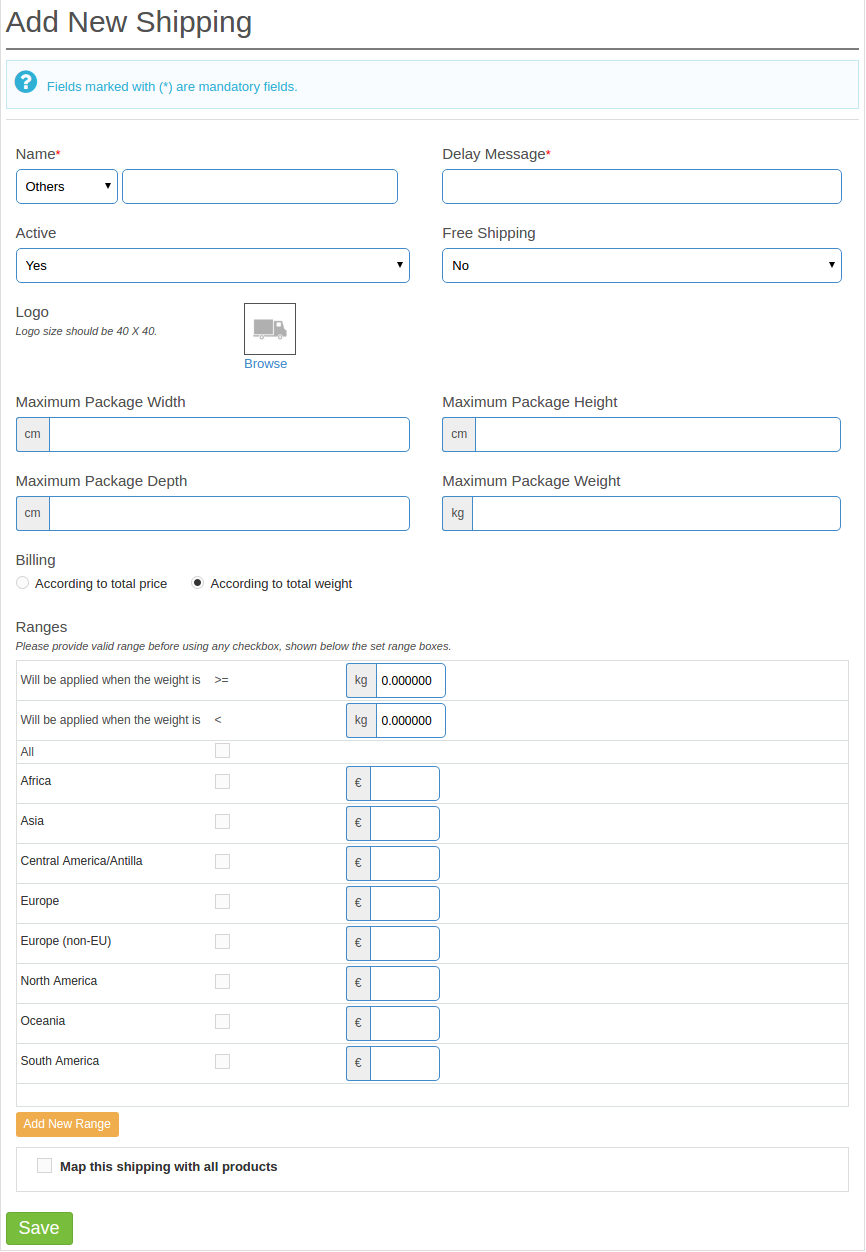
The admin can add custom shipping methods in this tab. To add custom shipping methods, click on the ‘Add New Shipping Methods’ link or the ‘+’ sign in the top-right position.
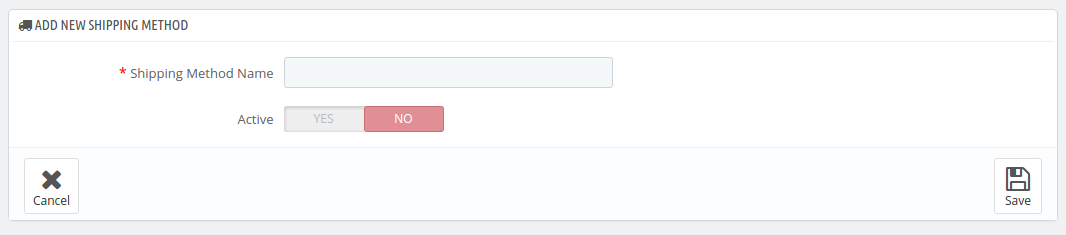
This will redirect you to the shipping methods creation page of the Prestashop marketplace addon.
Shipping Method Name: Enter the name of the shipping methods.
Active: Toggle the button to activate or deactivate the shipping method.
The shipping methods will be available as shown below. The admin can edit or remove them by clicking on the Edit or Delete button corresponding to each shipping method.
6.8.2 How can the Seller add custom Shipping Methods that they want to allow the customers to select?
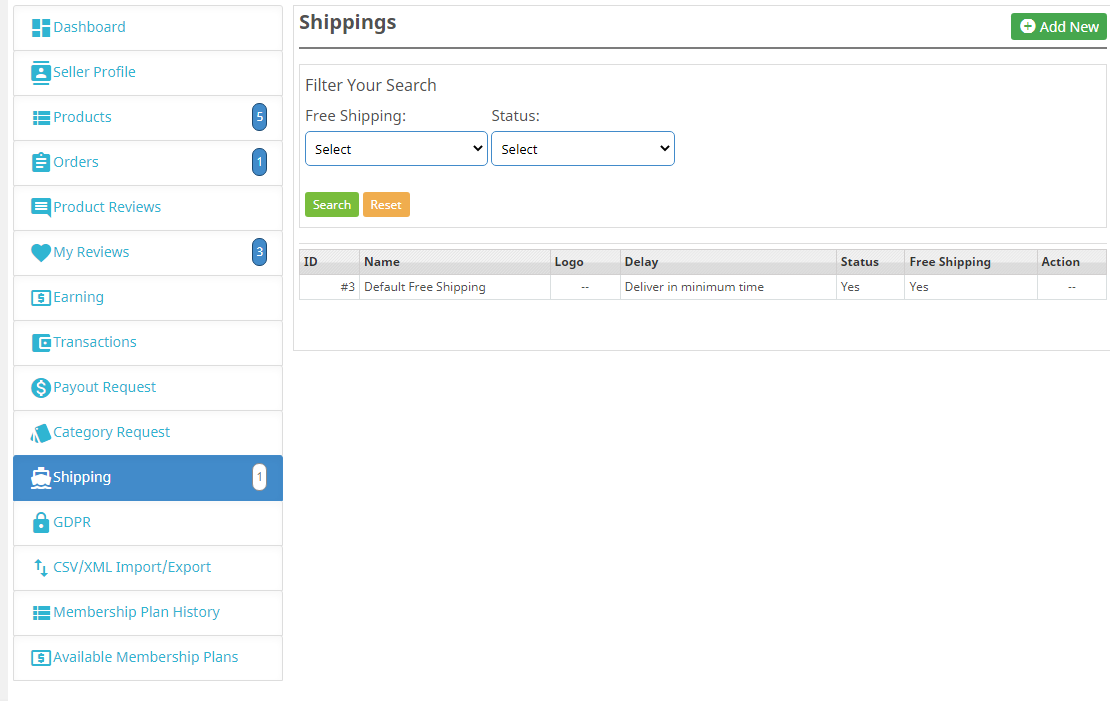
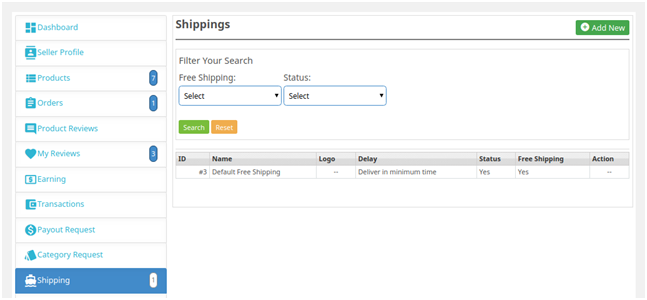
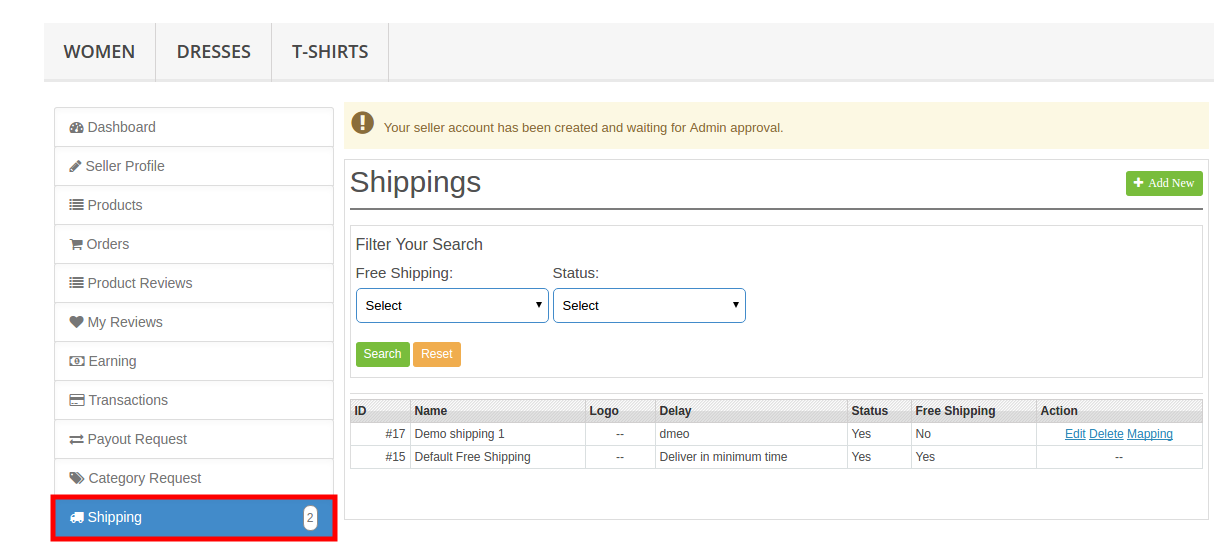
The seller can create their shipping methods from their dashboard. Go to the Dashboard -> Shipping tab.
The various shipping methods that the seller creates are available in this tab.
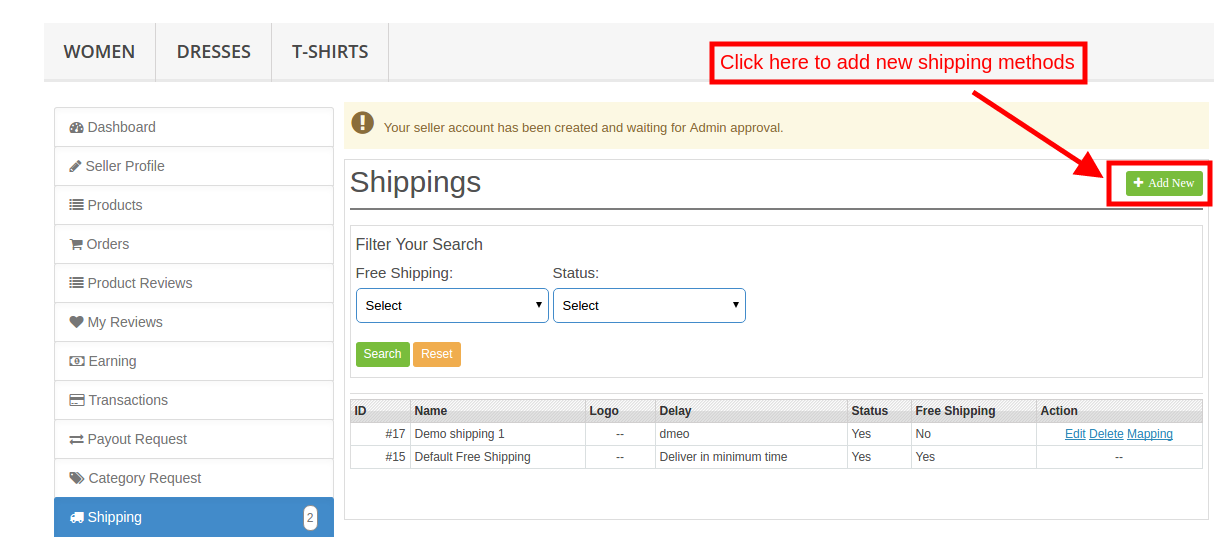
To add new methods, click on the ‘Add New’ link as shown in the image below:
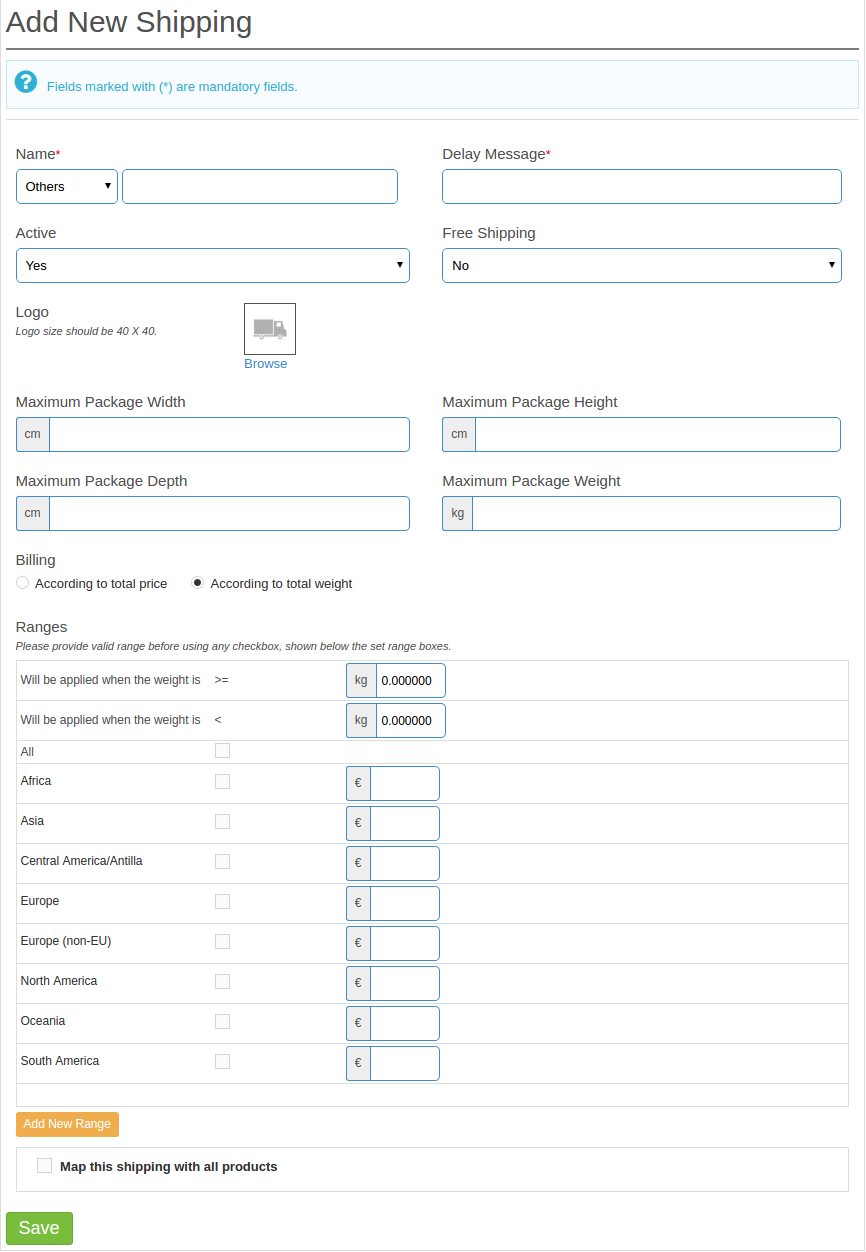
You’ll redirect to the shipping methods creation page. Further, the various field required to be filled are shown below:
The various shipping methods will list in the drop-down menu. To create a new one, select ‘Others‘. Enter the name of the shipping method.
The sellers can create the shipping methods by entering the required fields as shown in the image below.
6.9 Seller category Request list
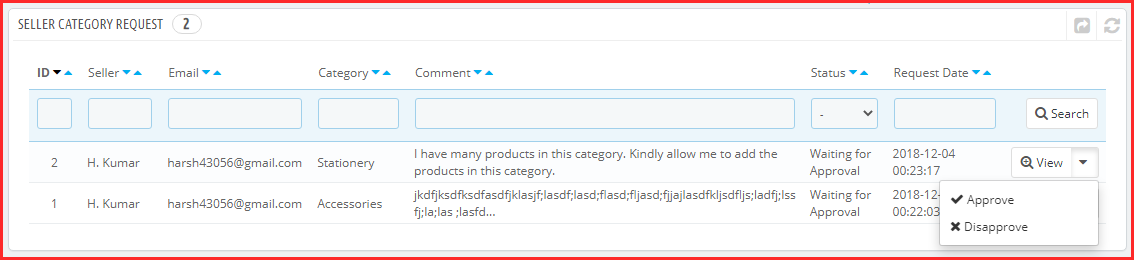
A seller can add products only to those categories that the admin allows to him/her. However, if the seller needs to add a product to a category that is not he does not allow, then the seller can request for the category. All those category requests appear on this list. A mail is also sent to the store owner to notify them about the Request for Category. Then, it is up to the store owner to approve or disapprove the request.
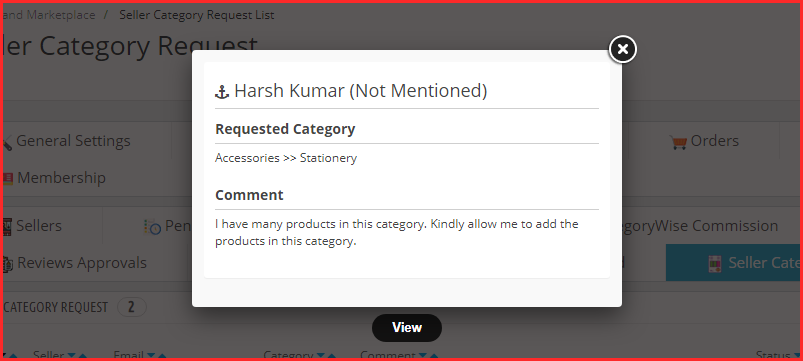
View Category Request: To view the details of a category request, you have to click on the View button in front of that category request on the list.
On clicking the View button a Pop-up will appear having all the details of the corresponding category request.
Approve Category Request: To approve a category request, you have to click on the Approve button in front of that category request on the list.
Note:- This action cannot be undone. Please use it carefully.
Disapprove Category Request: To disapprove of a category request, you have to click on the Disapprove button in front of that category request on the list.
A pop-up will appear asking for the reason for disapproving the category request. Fill out the reason and then submit the form to complete the action.
Note:- This action cannot be undone. Please use it carefully.
7.0 Products
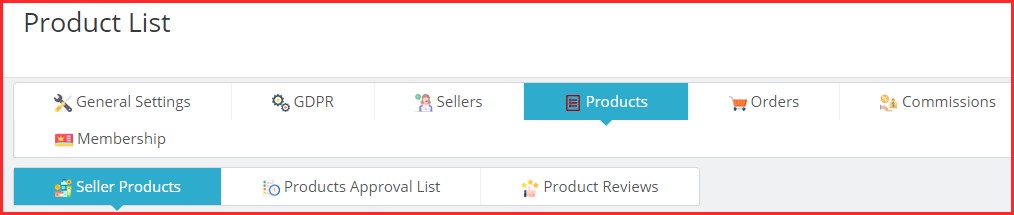
Product setting includes the seller product configuration, product approval list, and product review.
7.1 Seller Products
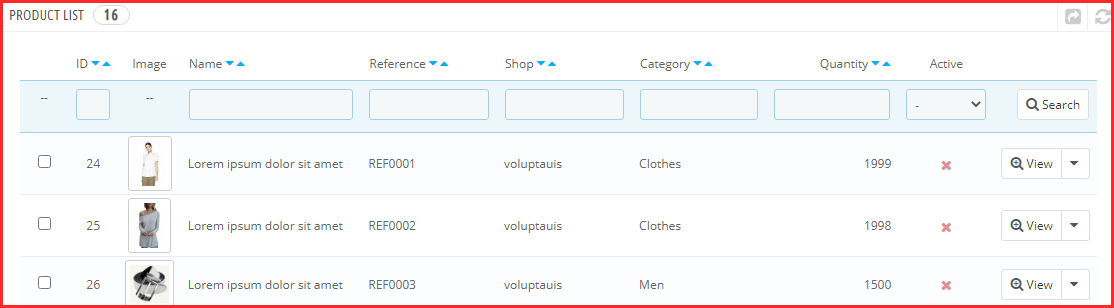
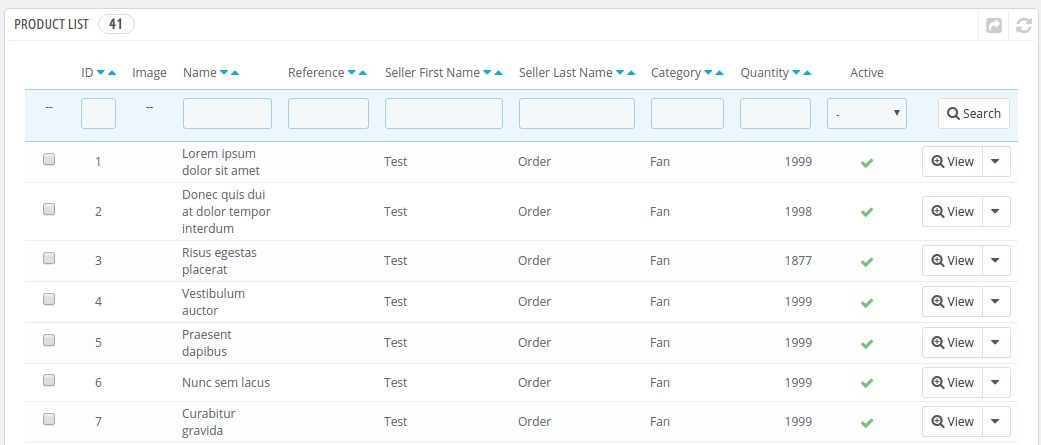
The Seller Products page of the Prestashop Multi-vendor Marketplace add-on consists of all the approved products added by the seller(s) on the store.
If the admin disables the settings (i.e. New Product Approval Required) in the Setting tab of the Prestashop Marketplace module, then a product approves directly when it is added by the seller and appears in this list. Otherwise, the product first appears in the Product Approval list.
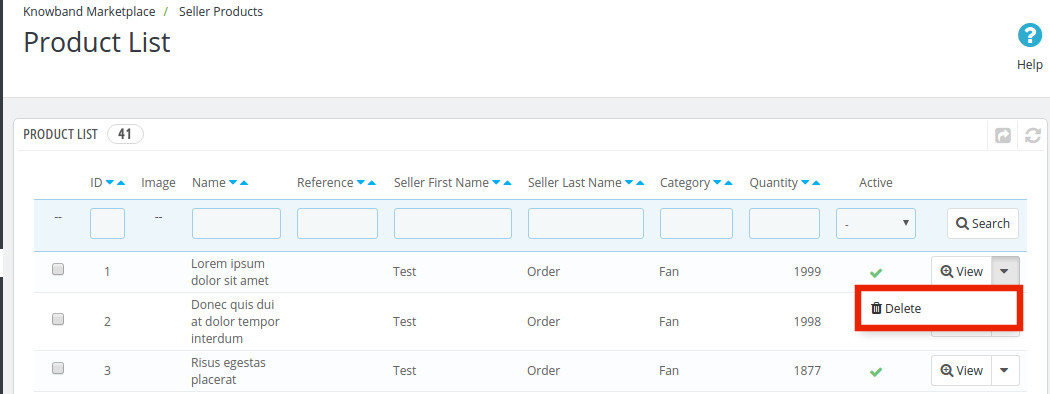
Delete Product: To delete a product, you have to click on the Delete button corresponding to each product as shown in the image below.
A pop-up will appear asking for the reason for the deletion of the product. To complete the action, fill in the reason. Further, click on the submit button.
A mail will be sent to the seller to notify the deletion of the product. The mail also contains the reason you have provided for the deletion of the product.
Note: The product delete action cannot be undone. Please use this feature carefully.
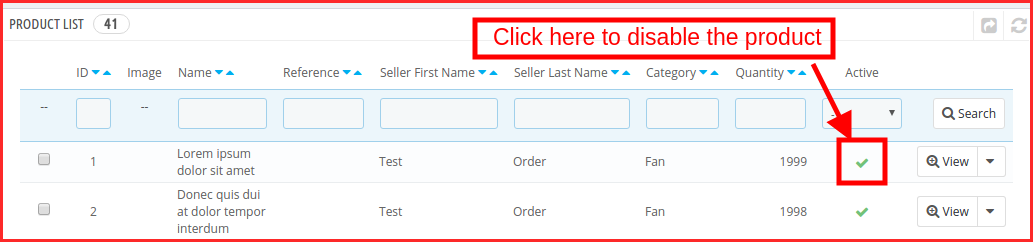
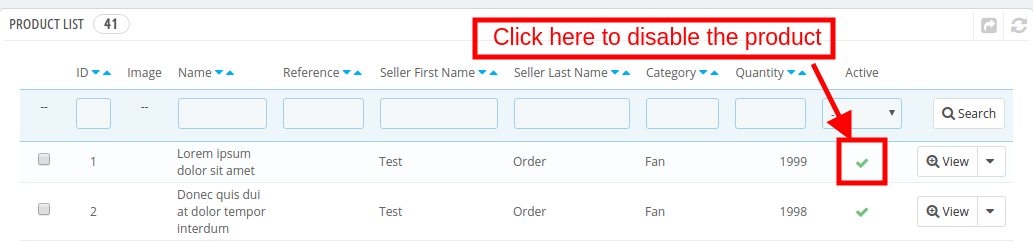
Enable/Disable Product: To change the status of any product, you have to use the Bulk Action feature of the Grid. To enable/disable any product, select the product(s) and choose the action (i.e. Enable or Disable) to complete the action.
Note: Once a product is disabled, it will not be visible at the front. To avoid disabling products and only disable a product if it is very necessary.
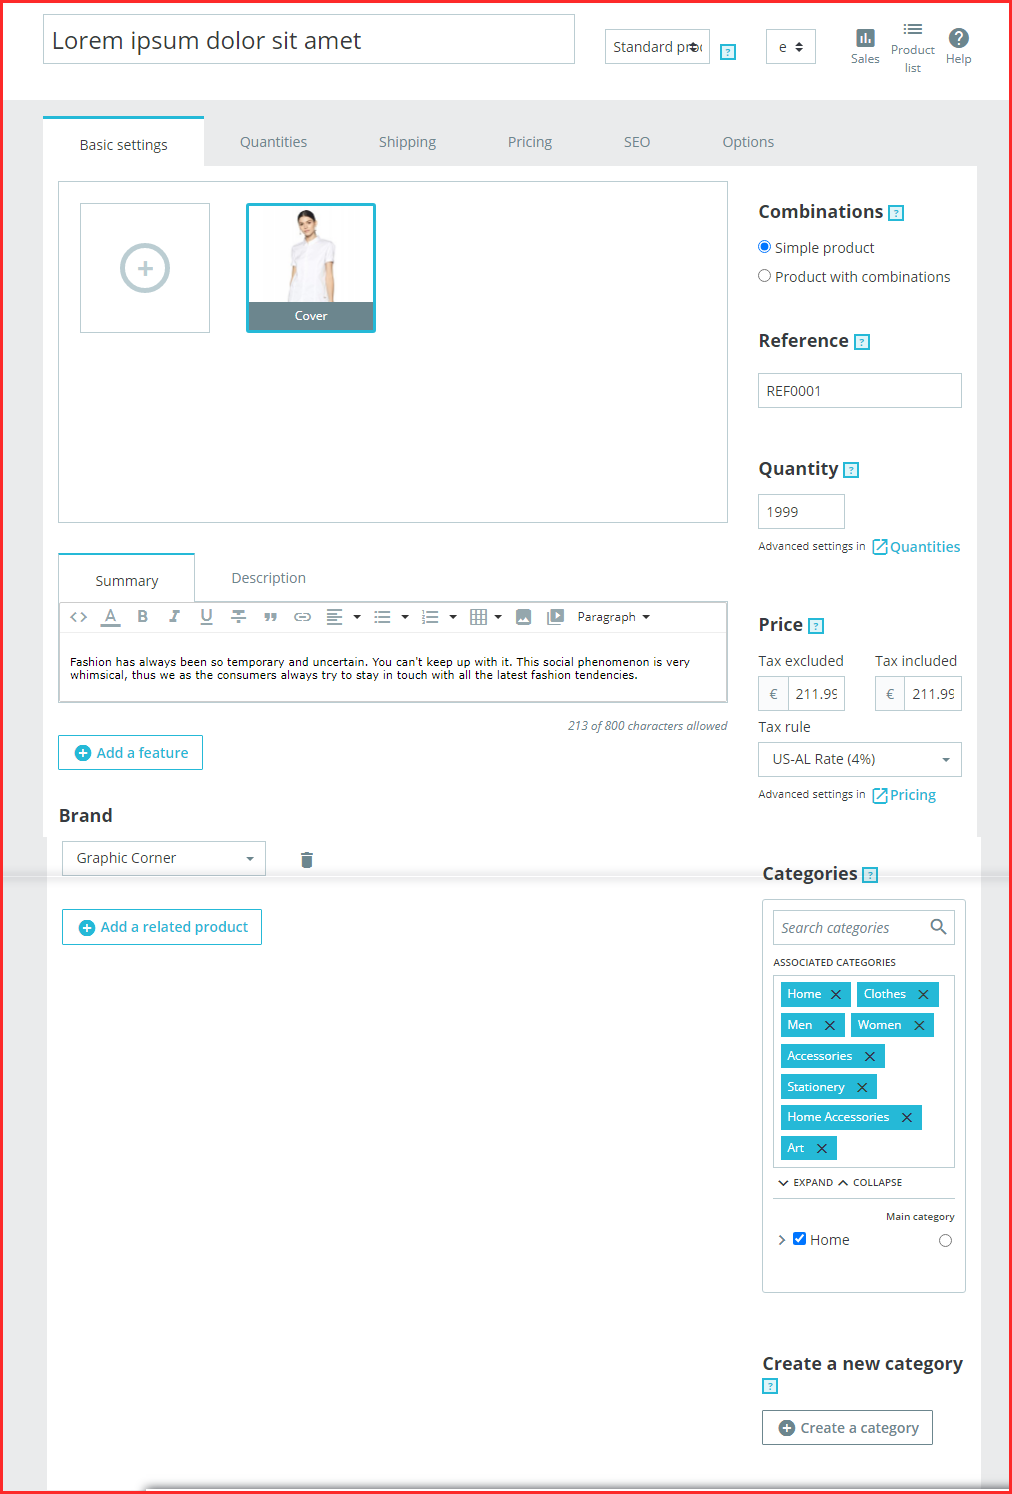
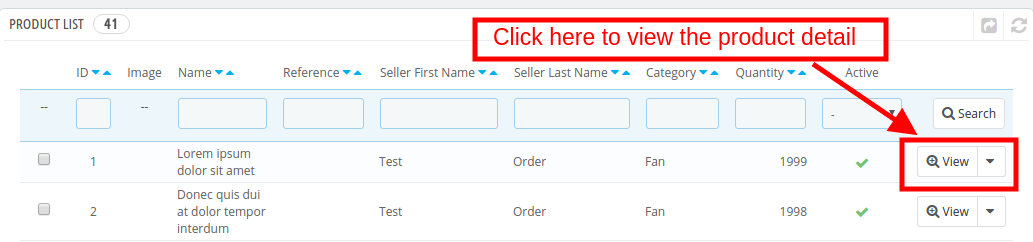
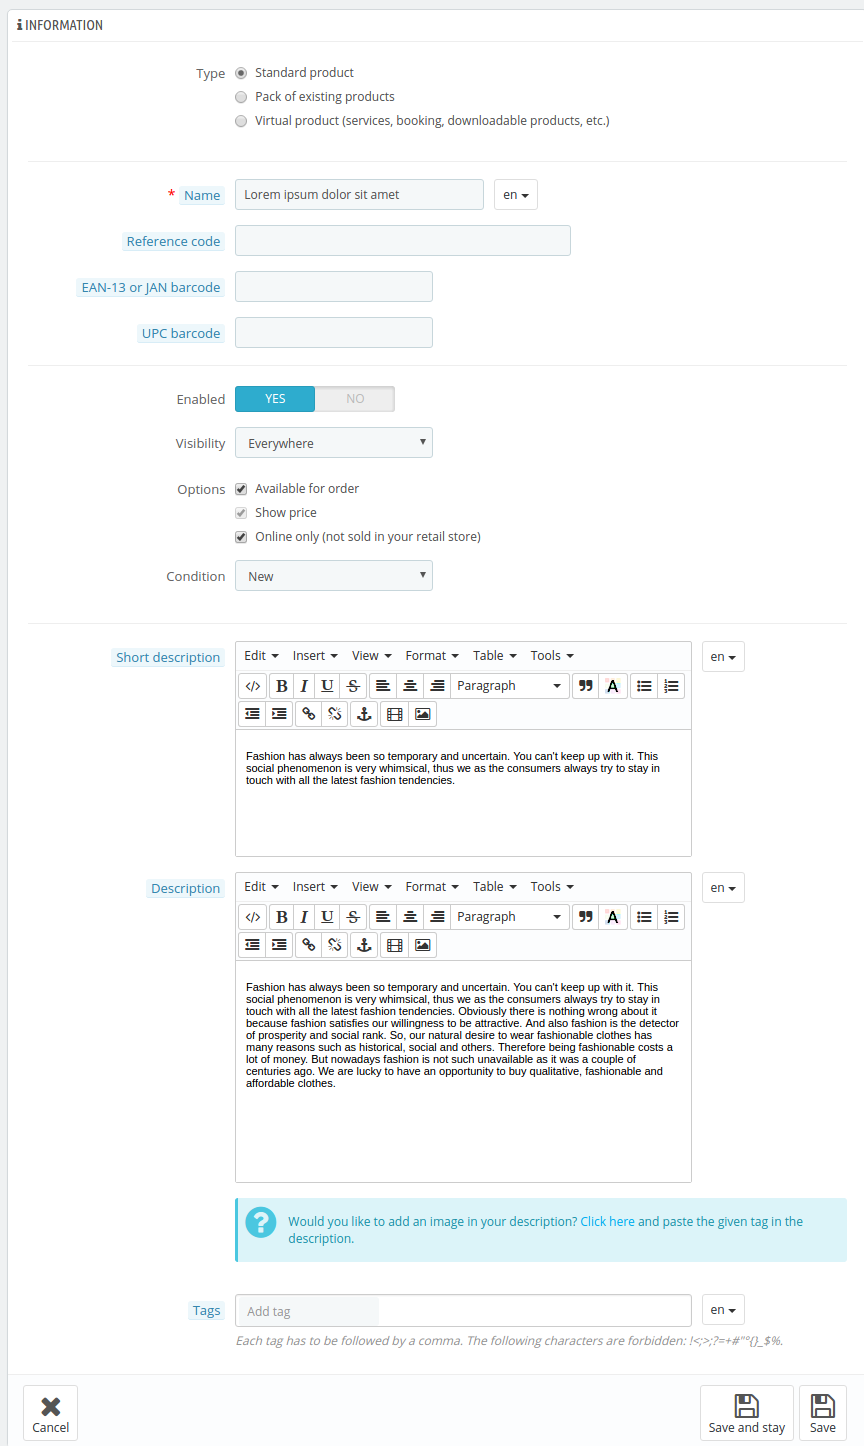
View or Edit Product: There is also an option to view the details of any product on the list. To do that you have to click on the View button in front of that product and it will take you to the edit page of the respective product. Further, on clicking the view button, you’ll redirect to the products detail page as shown below:
Admin can update the product settings. Knowband’s PrestaShop Marketplace Module provides options for updating the quantity, and shipping options like delivery time, date, shipping fees, etc. Moreover, the admin can update the pricing of the product.
For Google rankings, the product SEO can be updated.
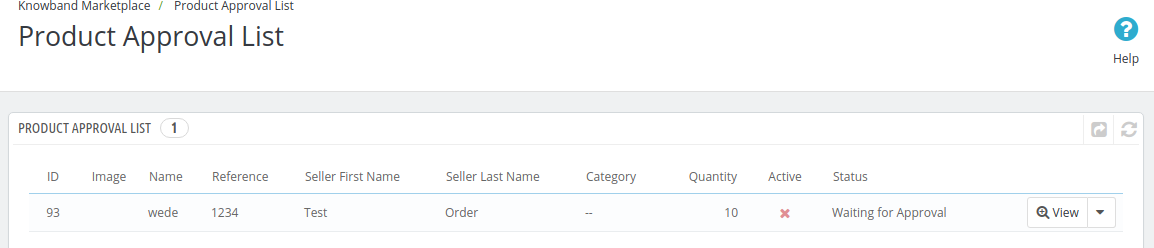
7.2 Products Approval List
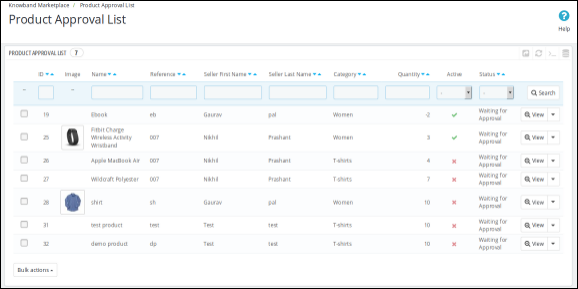
When a seller adds a product, then, first of all, it appears in this tab of the Prestashop Multi-vendor Marketplace extension. The store owner is also notified of the same through the mail. Then, it is up to the store owner to approve or disapprove of the product.
If the setting (i.e. New Product Approval Required) enables only then, a new product appears on this list. Otherwise, it directly appears in the Product List and approves automatically and is visible.
Disapprove Seller Product: To disapprove of a product, you have to click on the Disapprove button corresponding to that product on the list.
A pop-up will appear asking for the reason for the disapproval of the product. Fill out the reason and then submit the form to complete the action.
Once a product disapproves, a mail will be sent to the seller notifying disapproval of the product with the reason provided in the above form. The products that don’t get approval also appear on the same list. The Store admin can approve them at any point in time.
Approve Seller Product: To approve a product, you have to click on the Approve button in front of that product in the Product Approval list.
After approval, the product is moved from the Product Approval list to the Sellers Products list.
Note:- This action cannot be undone. Please use it carefully.
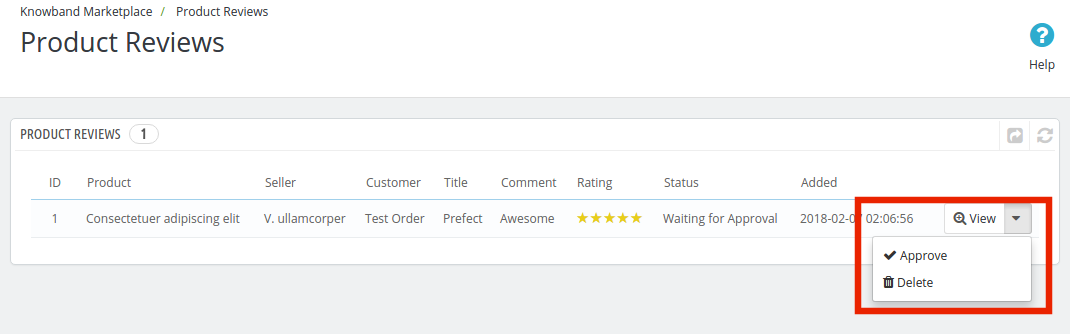
7.3 Product Reviews
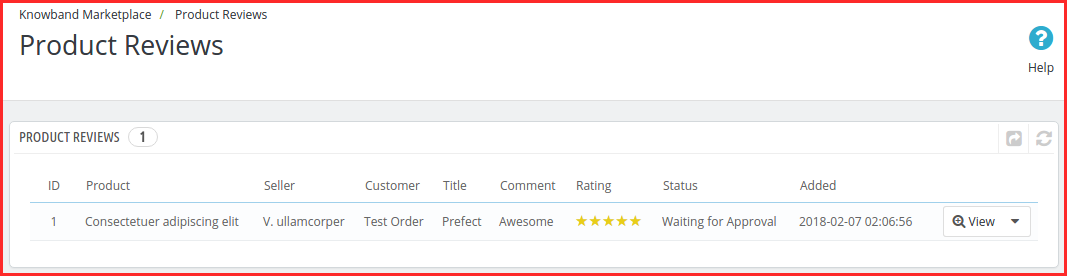
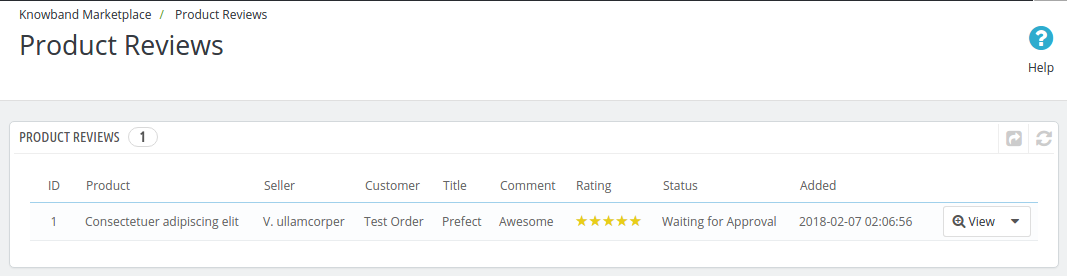
The Product Reviews page of the Prestashop Marketplace plugin consists of a list of all the product reviews sent by customers on the seller’s products.
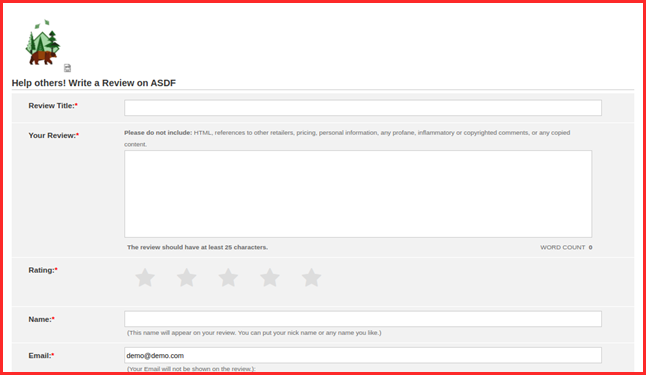
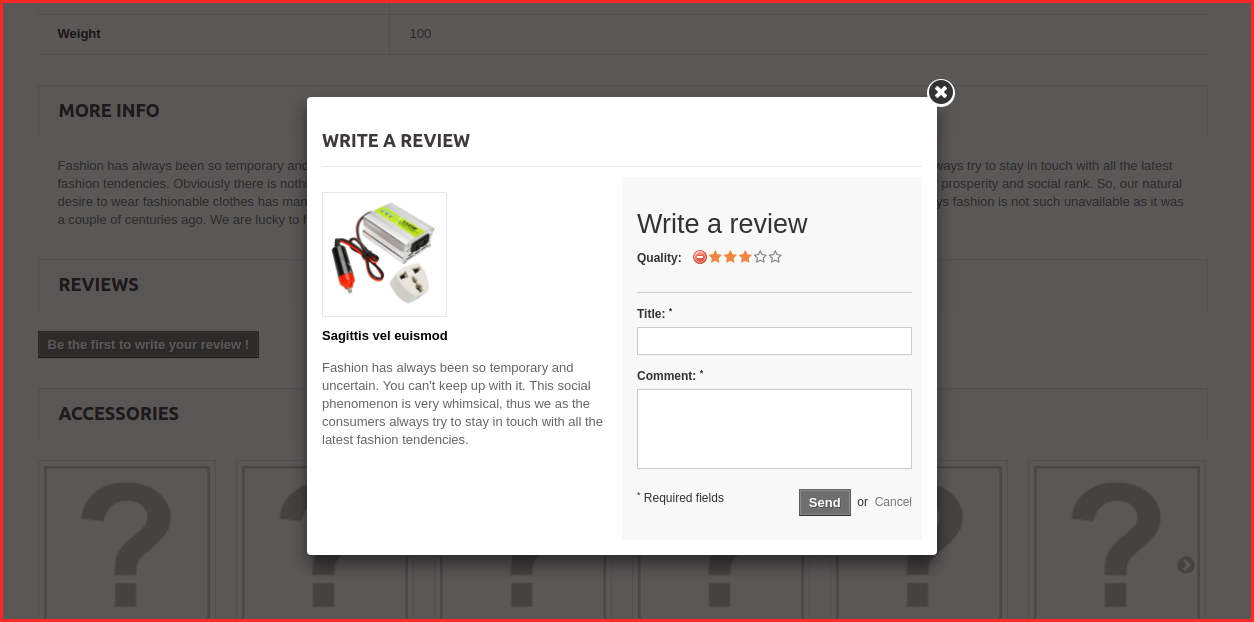
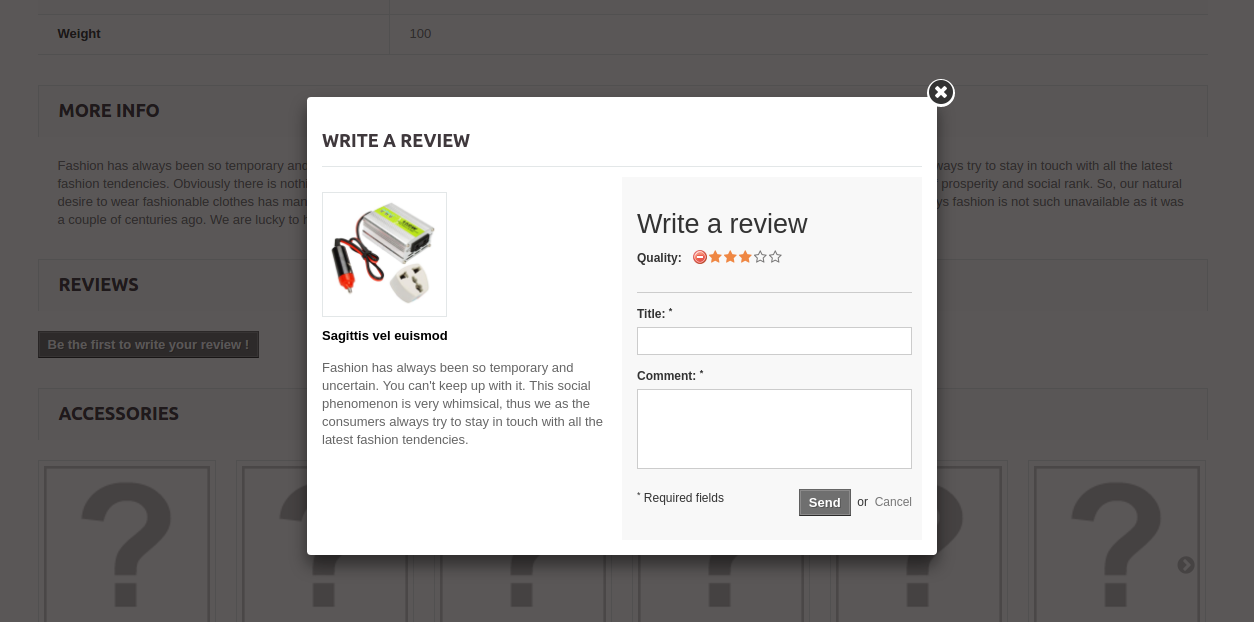
The online buyers can add a review on any of the seller’s products as shown below:
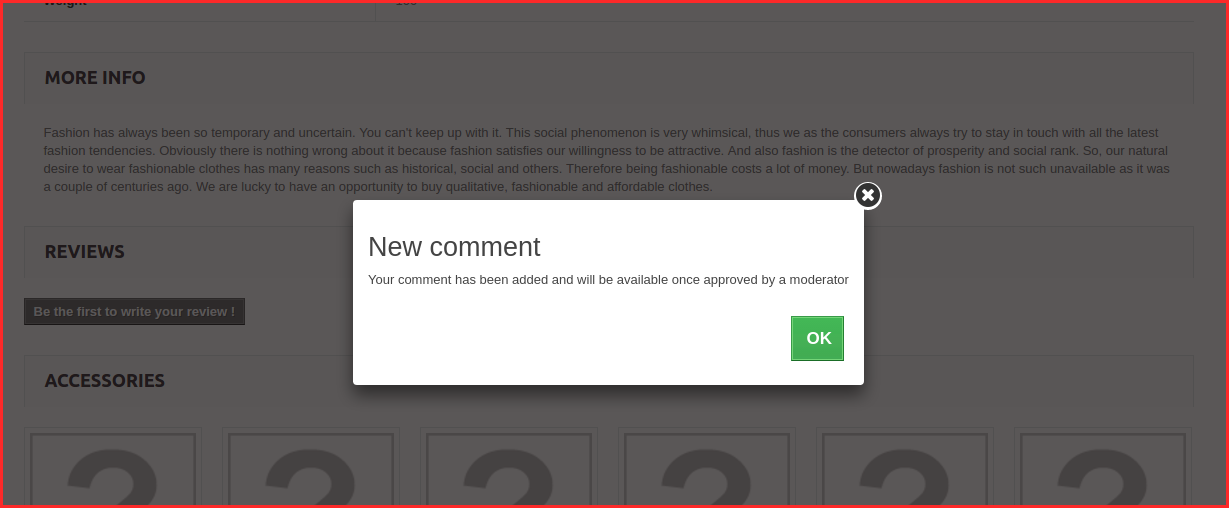
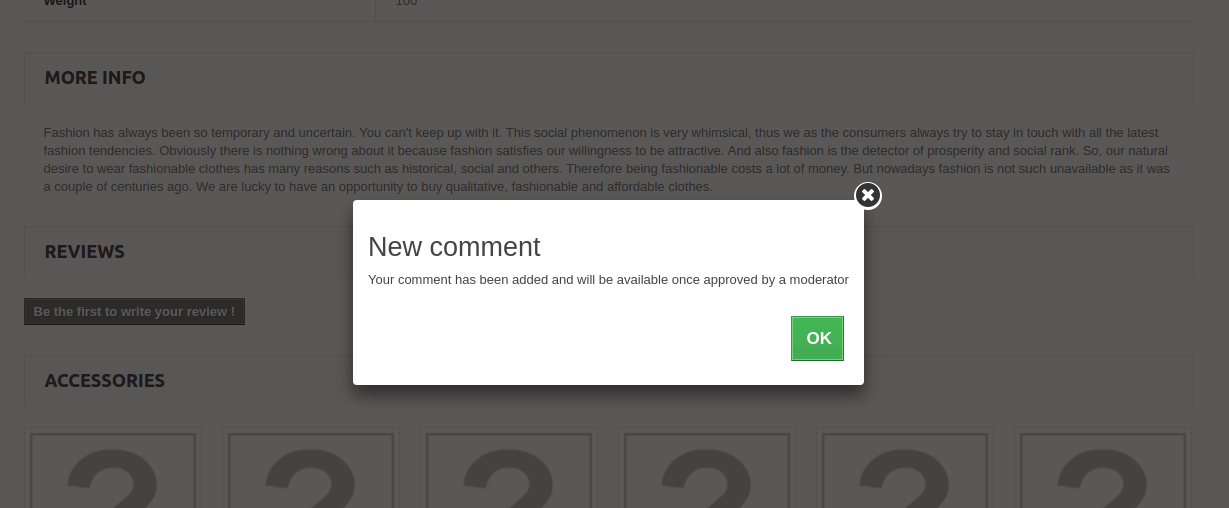
Once the review is posted by the customer, he’ll get a message saying that “Your comment has been added and will be available once the moderator approves them.”
These reviews are then listed in the Product Review tab of the Prestashop Multi seller Marketplace plugin.
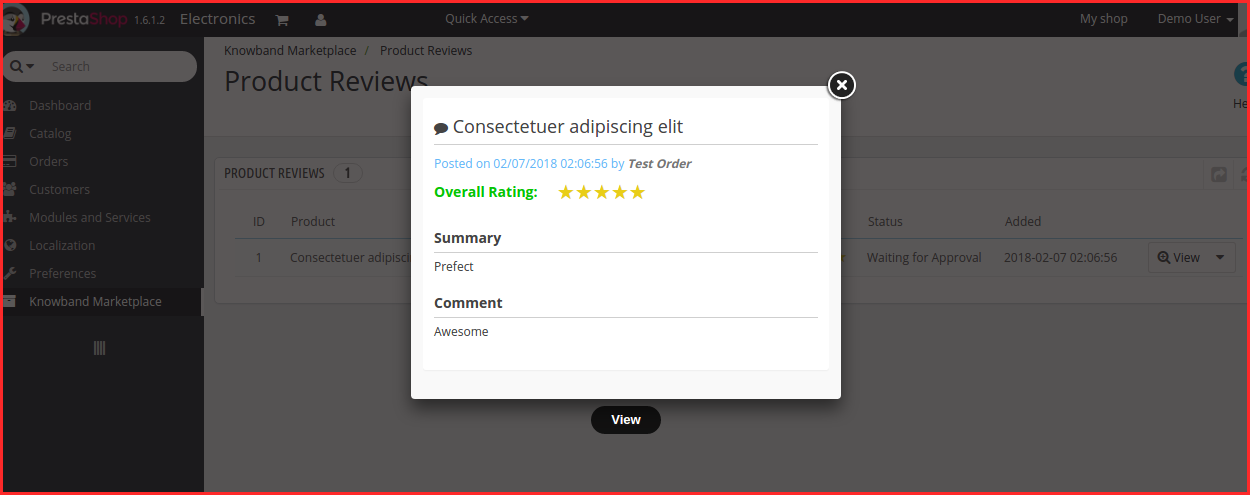
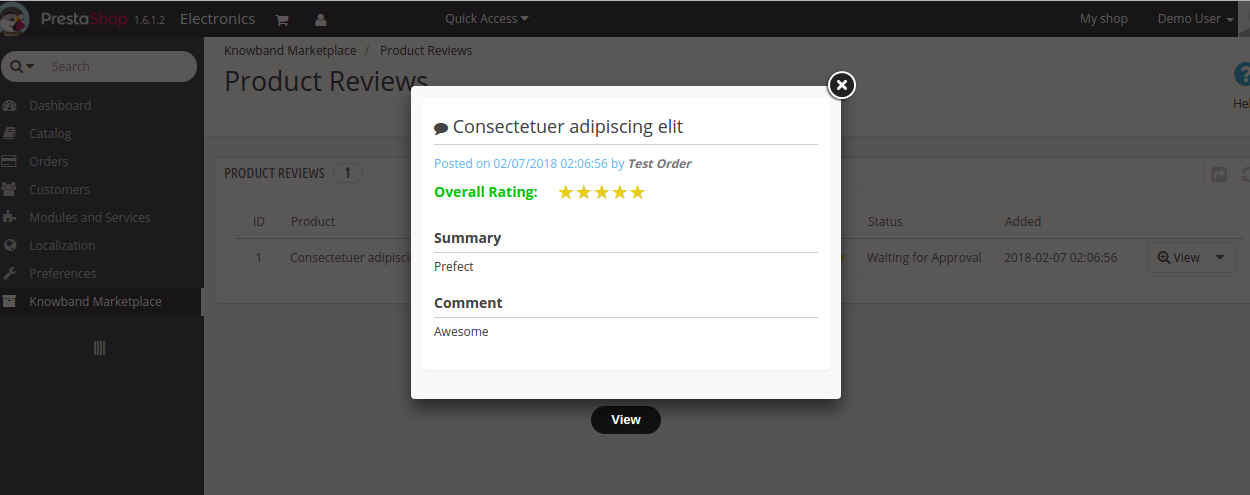
View Product Review: Most of the details of the product reviews are already mentioned in the grid but some of them are not. To view all the details of any Product Review, click on View Button in front of that review. A pop-up will appear having all the details of the product review.
As you click, you can see the complete review as shown in the image below:
Delete Product Review: To delete a product review, you have to click on the delete button in front of that product review on the list.
Note:- The product review deletes action cannot be undone. Please use this feature carefully.
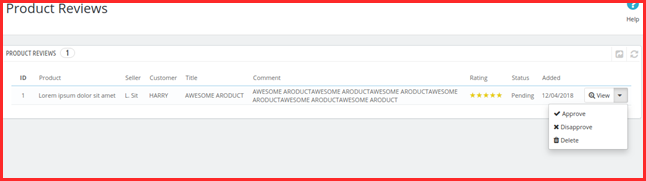
Approve Product Review: The product reviews that are added by the customers for the seller’s products will appear in the list here with the status Waiting for Approval and it will not be shown on the storefront to other customers until the approval. To approve it, you have to click on the Approve button in front of the product review.
8.0 Orders
Admin can view, edit and update the order status for both seller and admin orders.
8.1 Sellers Orders
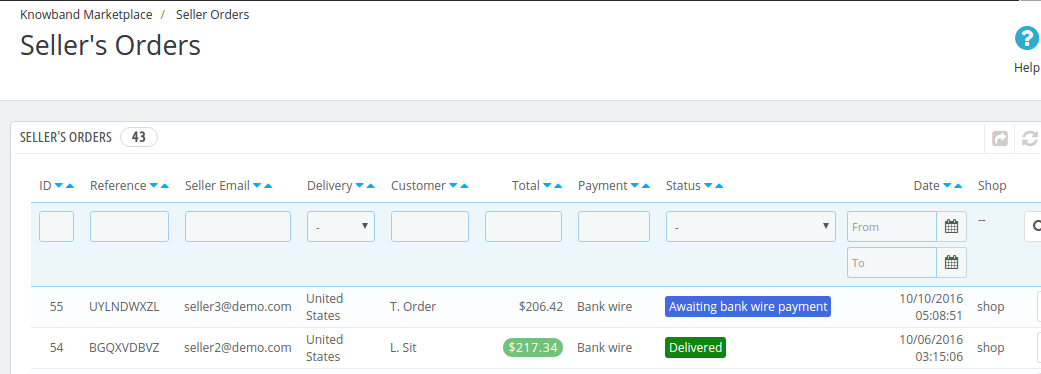
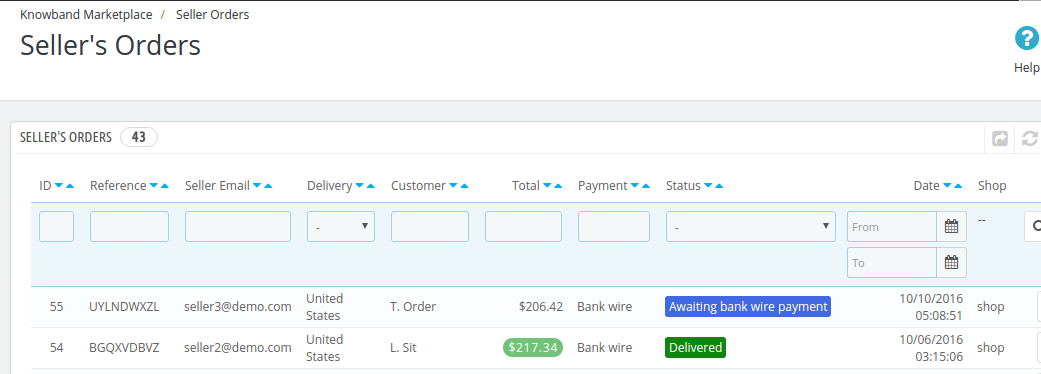
The Seller Order Tab of the Prestashop Multi-vendor Marketplace Addon consists of all the orders that are placed by customers for products added by sellers in the store. The orders shown in this list are split based on sellers which means, if there are products by different sellers in the same order then they will appear separately in this list.
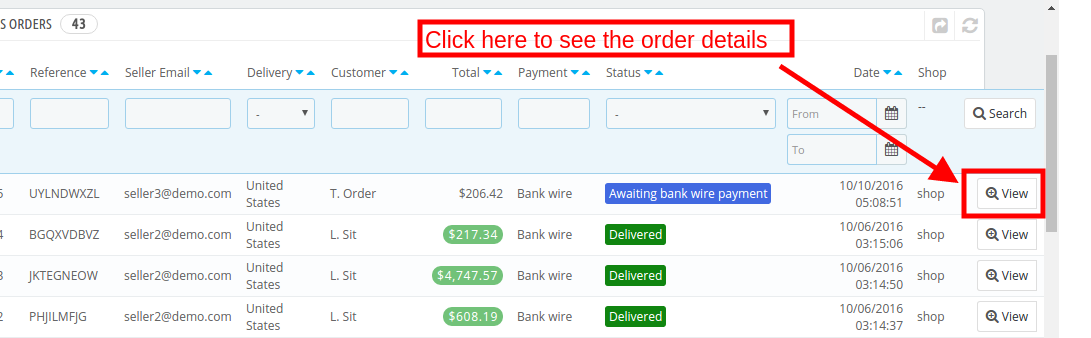
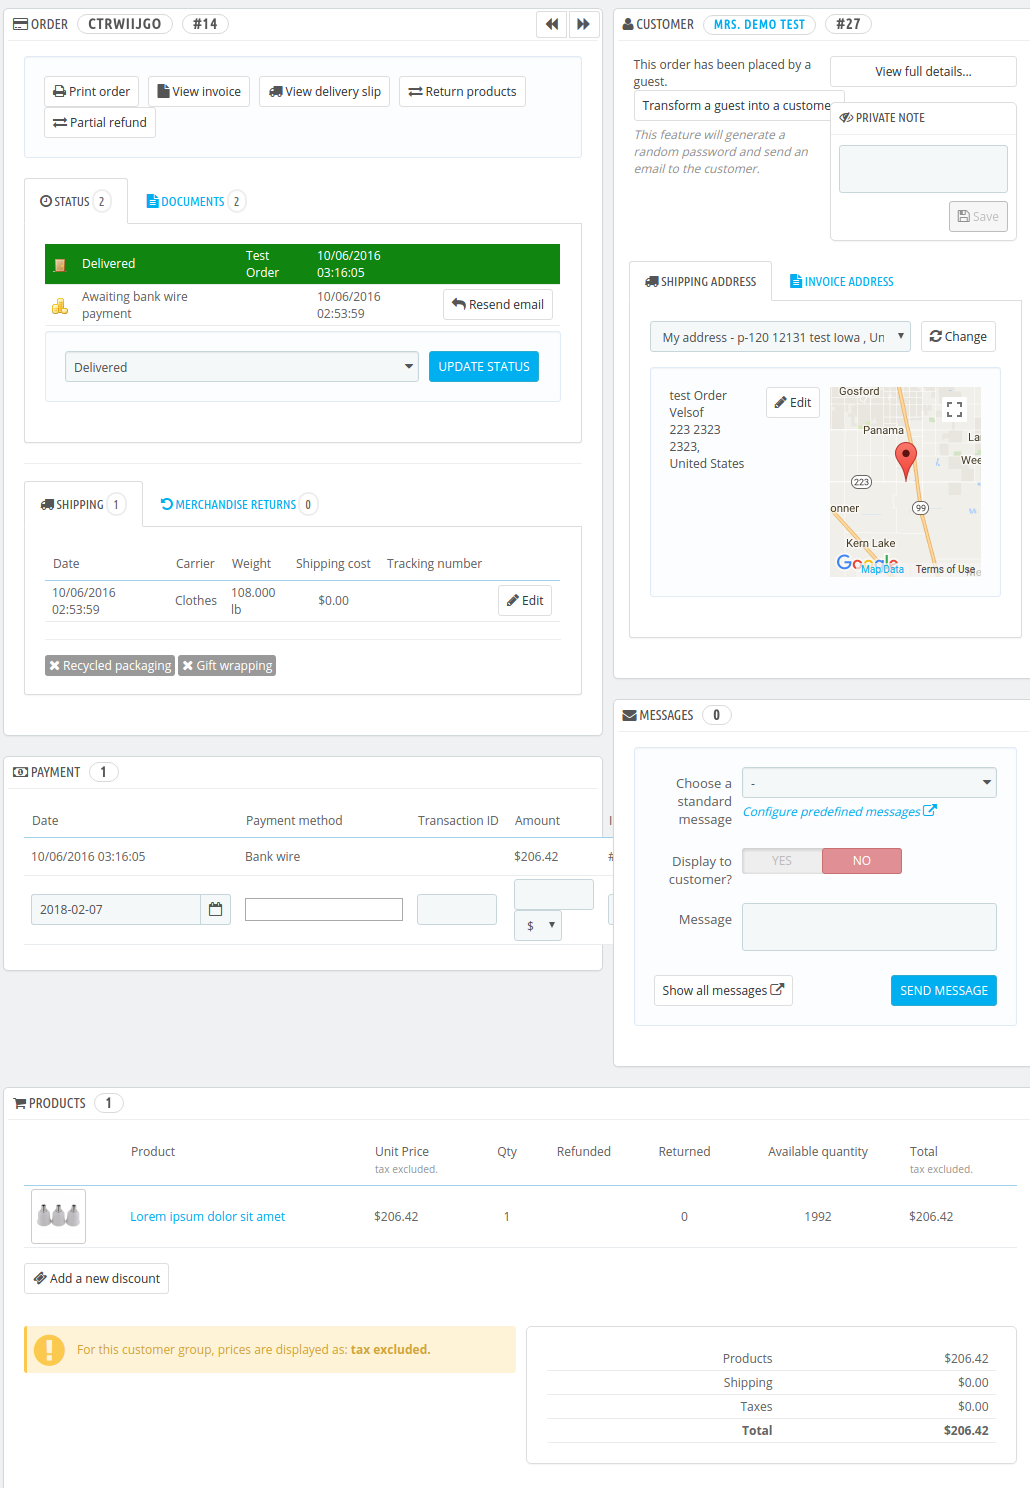
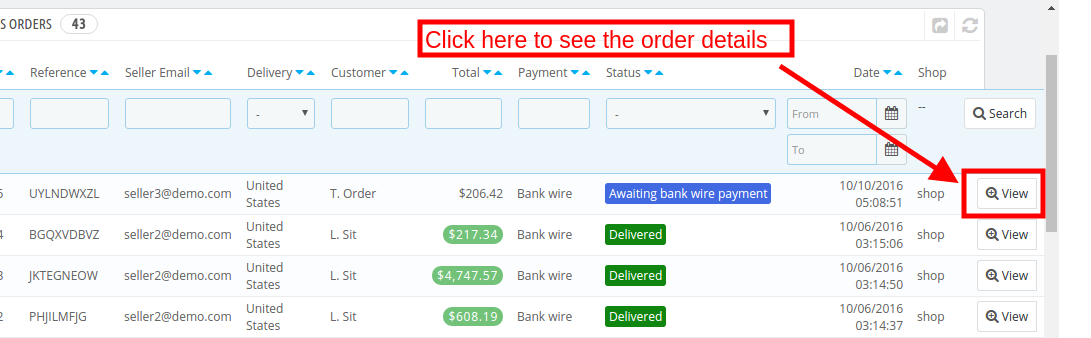
View Order: There is also an option to view the details of any order on the list. To do that, you have to click on the View button in front of that order, it will take you to the order details page of the respective order. This view page is the same as when you edit any order.
As you click on the View button, you’ll redirect to the order page as shown below:
8.2 Admin Order
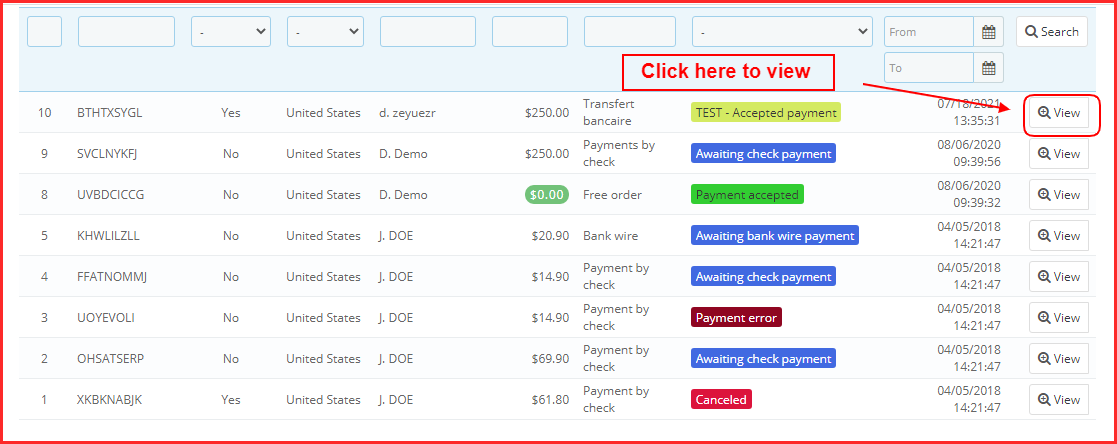
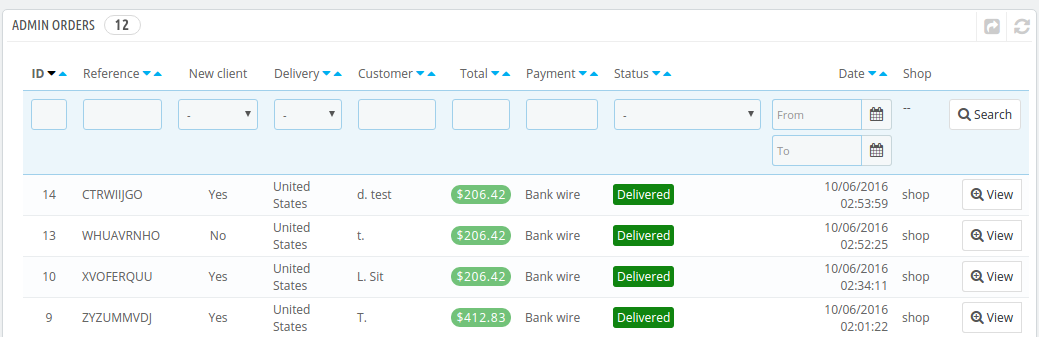
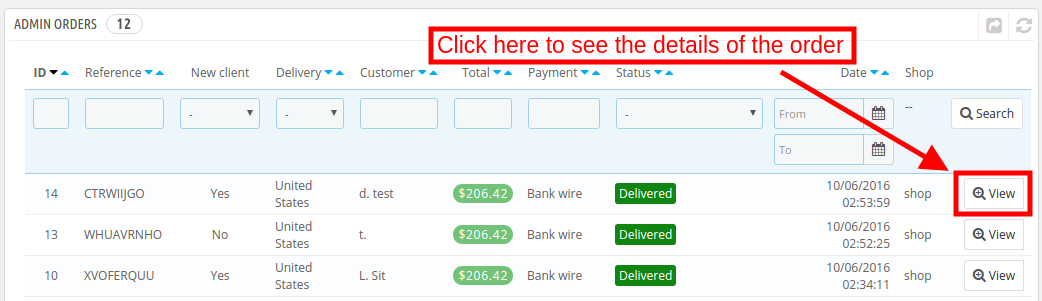
The Prestashop Marketplace module allows the store admin to sell more and more products without maintaining their inventory. However, the admin can even sell their products in the marketplace. The orders received for the products of the admin can be viewed in the Admin Order tab of the Prestashop Multi-seller Marketplace addon. The orders will be displayed as shown below. To see the details of the order, click on the View button corresponding to each order.
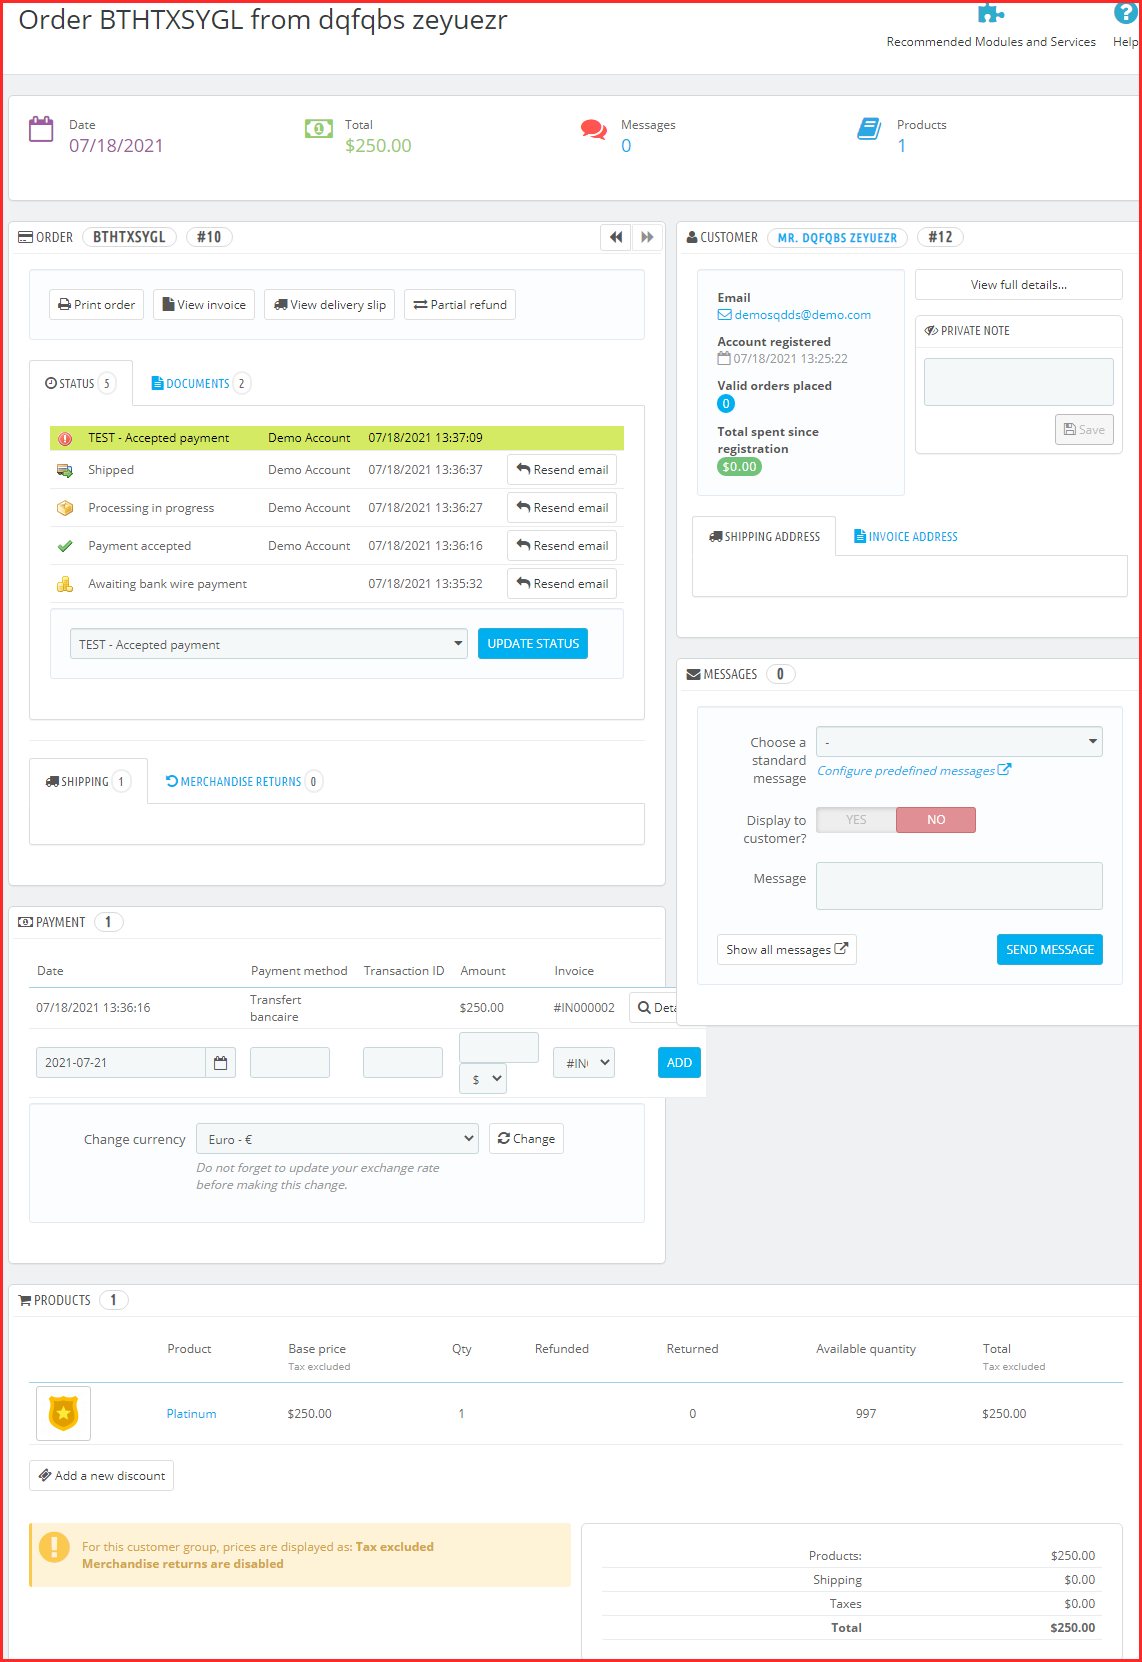
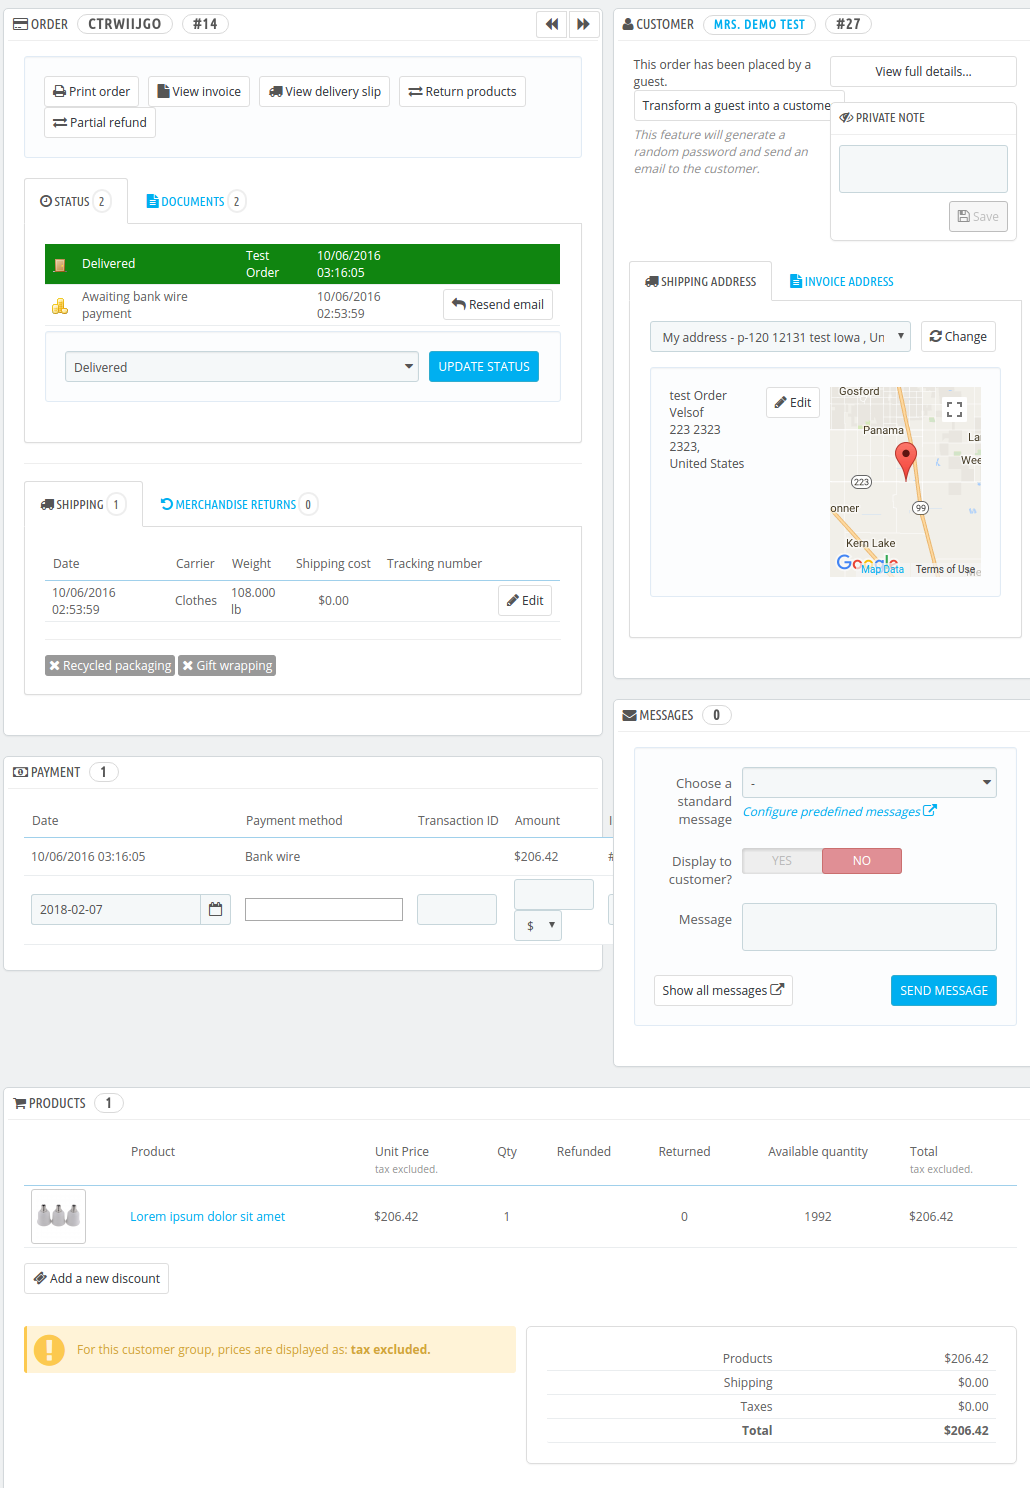
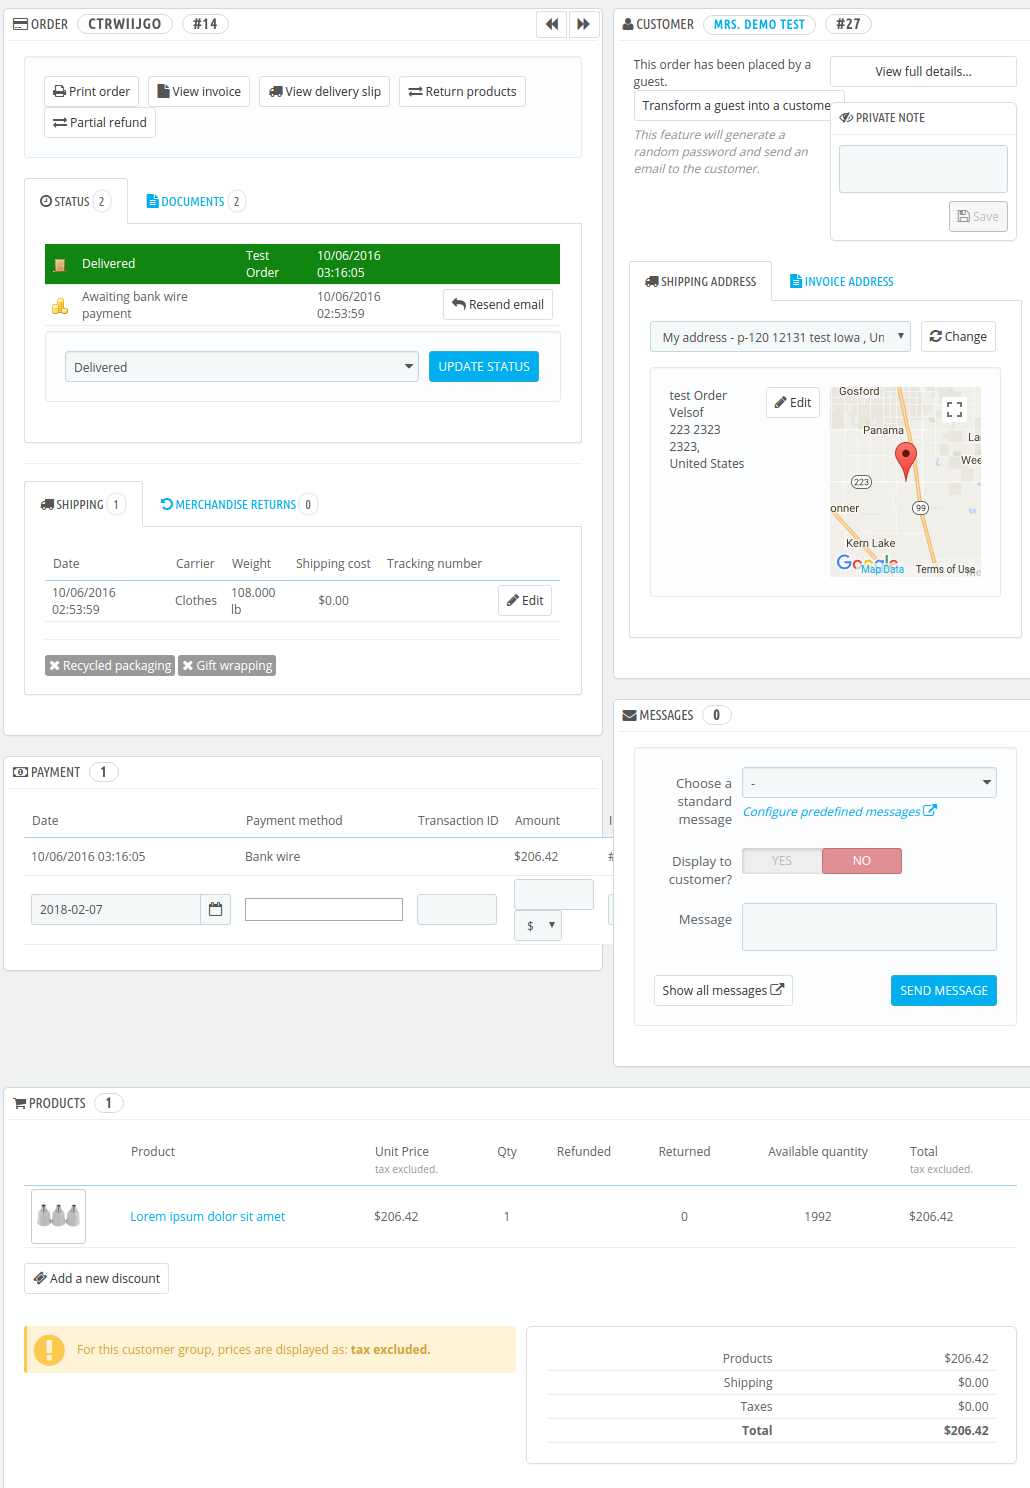
The order details page is shown in the image below:
9.0 Commissions
The PrestaShop Multi-seller Marketplace module makes it easier for the store admin to manage the commission structure of the marketplace.
9.1 Admin Commission
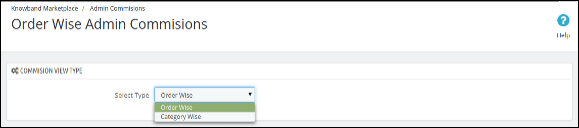
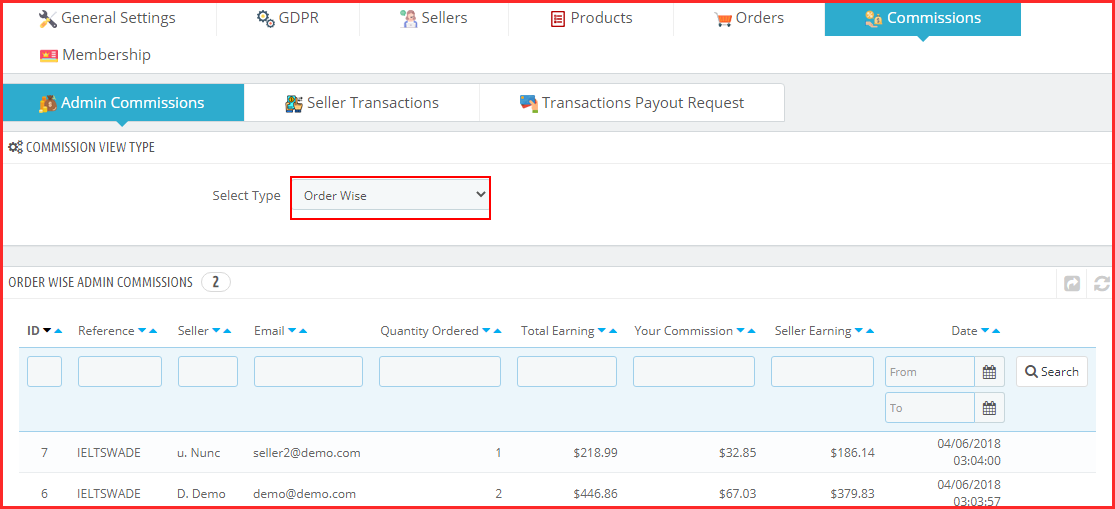
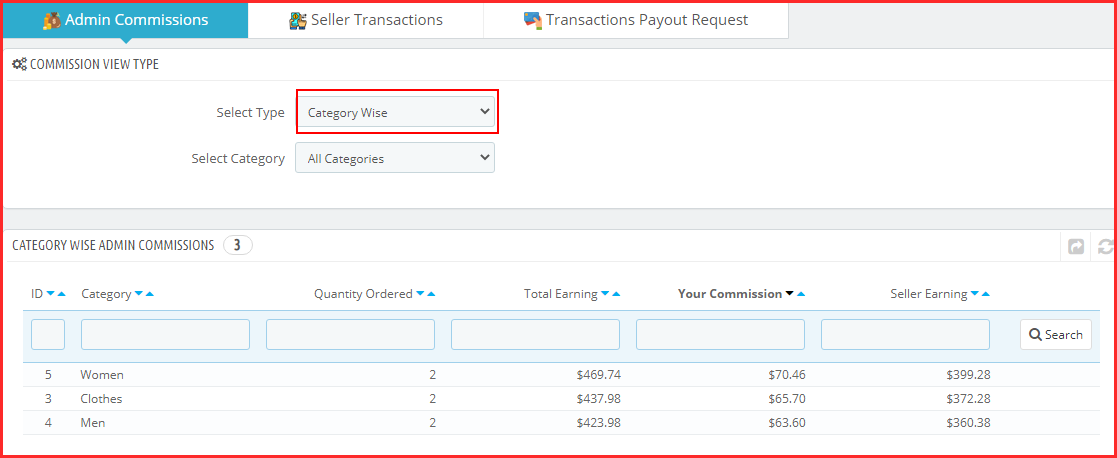
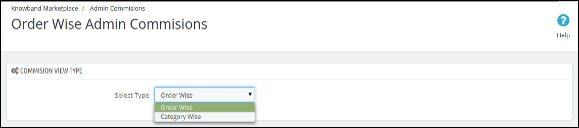
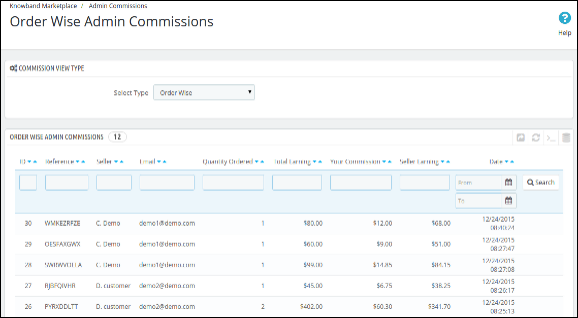
The Admin Commissions tab of the PrestaShop Multi seller Marketplace extension contains a filter through which the admin can filter the commissions earned in the form of Order Wise or Category Wise selection. By default, the page shows Order Wise Admin Commissions.
9.1.1 Order Wise Admin Commissions
This list contains all the commissions earned by the store owner on every order placed for any seller’s product. This list is split based on orders placed for selling products.
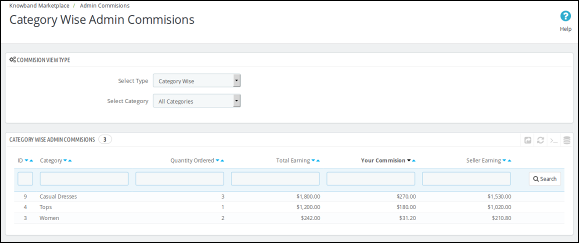
9.1.2 Category wise commissions
This list shows the total commission earned by the store owner from a seller. The store owner can also use filters to filter the commission reports category-wise.
It helps the store owner to identify commissions from different categories and which category has produced how much commission.
9.2 Seller Transaction
The system does not automatically transfer the amount in the seller’s account, hence the store owner has to keep records of the balance for all the sellers and manually transfer money to the seller and later on, enter the details of the transaction to keep a record of the same.
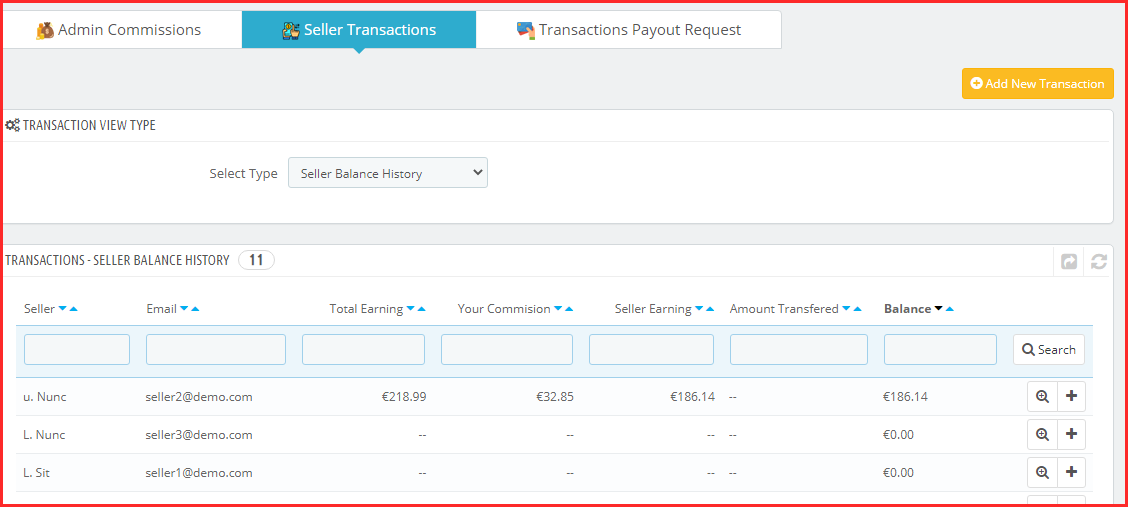
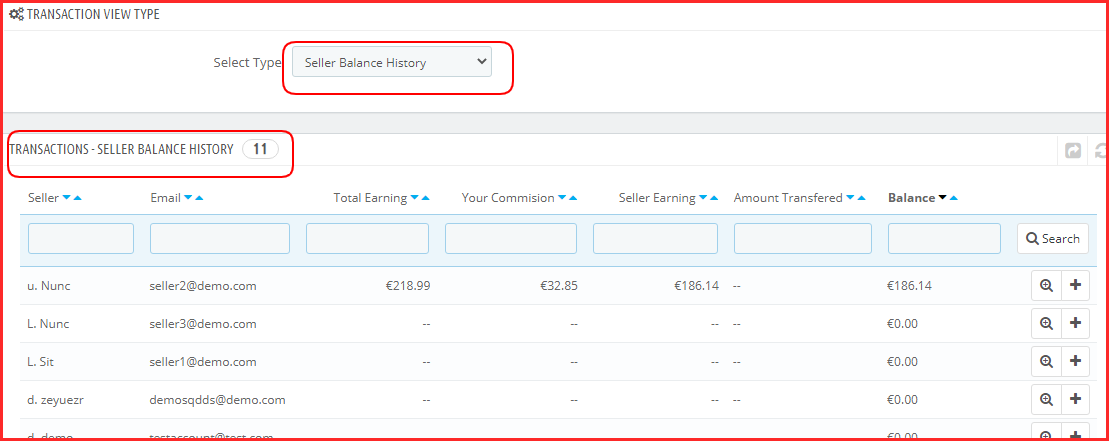
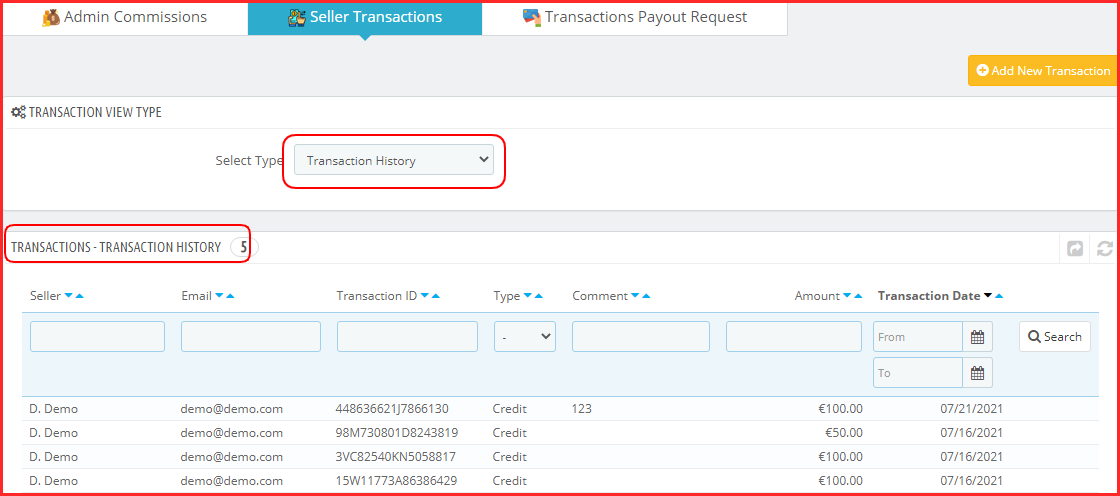
The Prestashop Marketplace module allows the admin to view two types of transactions of the sellers, that is, Seller Balance History and Transaction History.
The Seller Transactions page of the Prestashop Multi-vendor Marketplace plugin keeps the track of the seller transactions and the remaining balance of sellers.
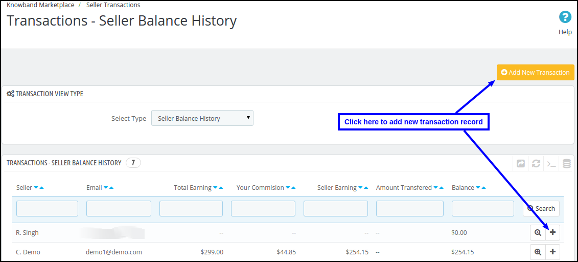
9.2.1 Seller Balance History
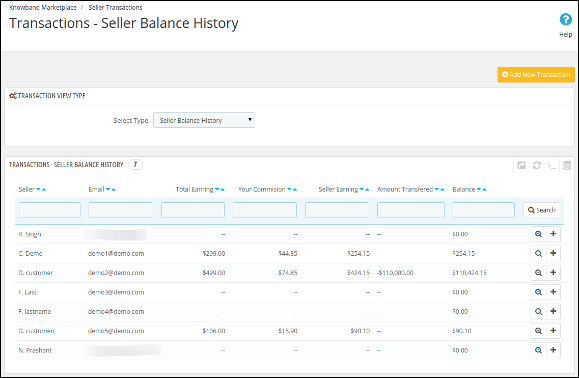
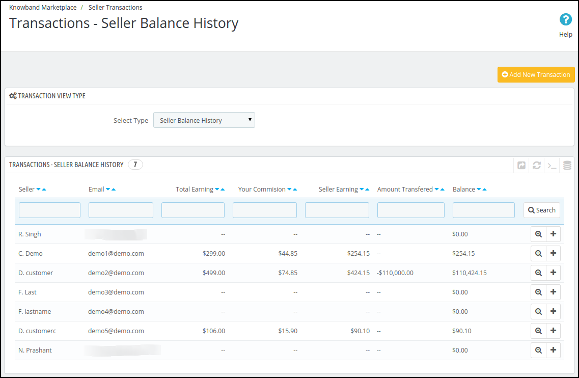
This list of the Prestashop Multi-seller Marketplace plugin contains all the balance variations for all the sellers in the system. The list shows the total sales of the seller, seller’s earnings, and your commission. This list helps the store owner to identify the earnings and categorize them seller-wise.
View Transactions Details
To view the details of the transactions done for a particular seller, you have to click on the View button in front of that seller.
On clicking on the View button in front of any seller, a new page will open up having a list of all the transactions done for the corresponding seller.
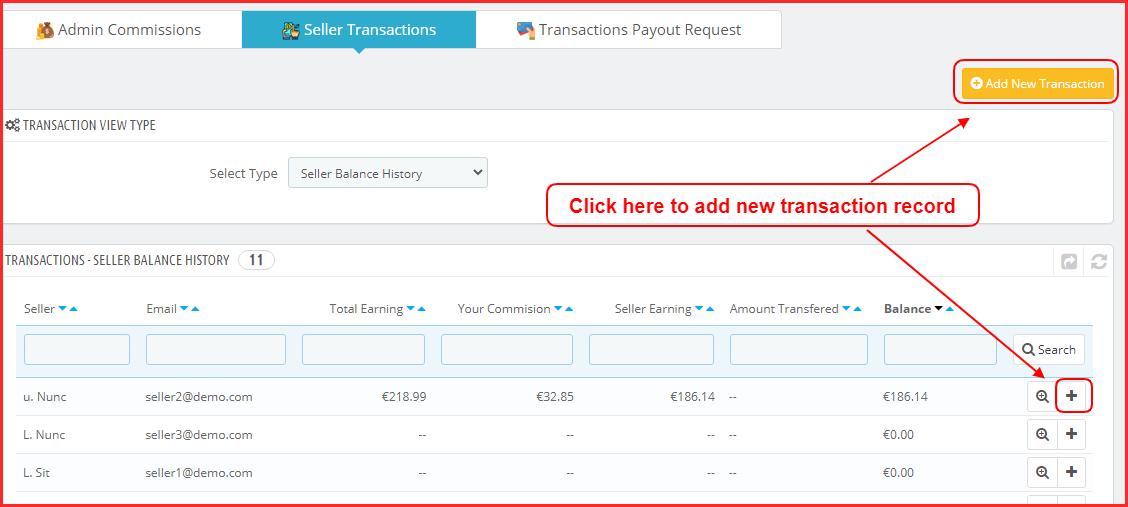
You can also add a new transaction for the current seller by clicking on the Add New Transaction button on the top right-hand side of the below page.
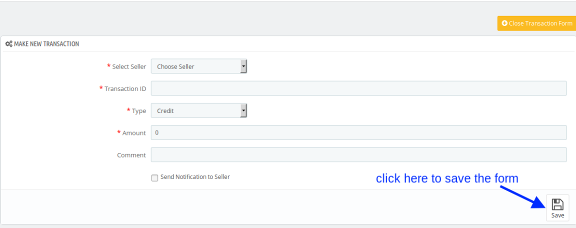
9.2.2 Create New Transaction from the back-end of the Prestashop Multi-vendor Marketplace Module
To add a new transaction detail for any seller, you have to either click on the Make New button in front of the seller or you can also click on the Make New Transaction button on the top right-hand side of the page.
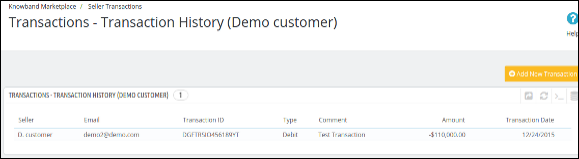
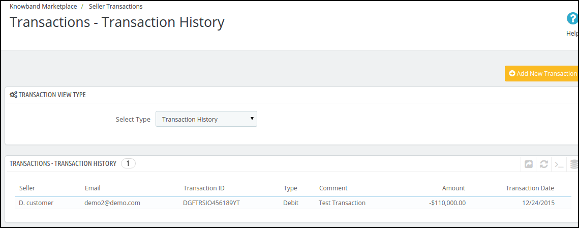
9.2.3 Transactions History
This page contains a list of all the transactions done to date to all the sellers available in the system.
You can also add a new transaction for any seller by clicking on the Add New Transaction button on the top right-hand side of the above page.
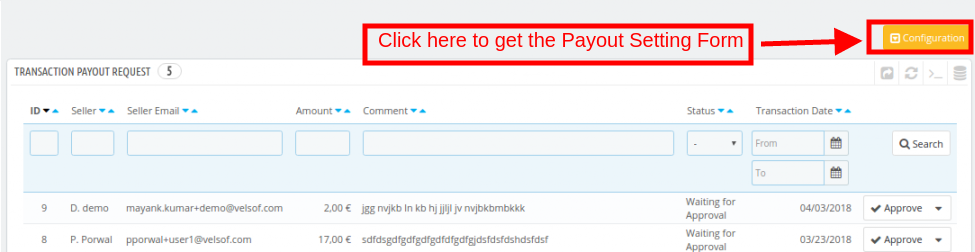
9.3 Transaction Payout Request
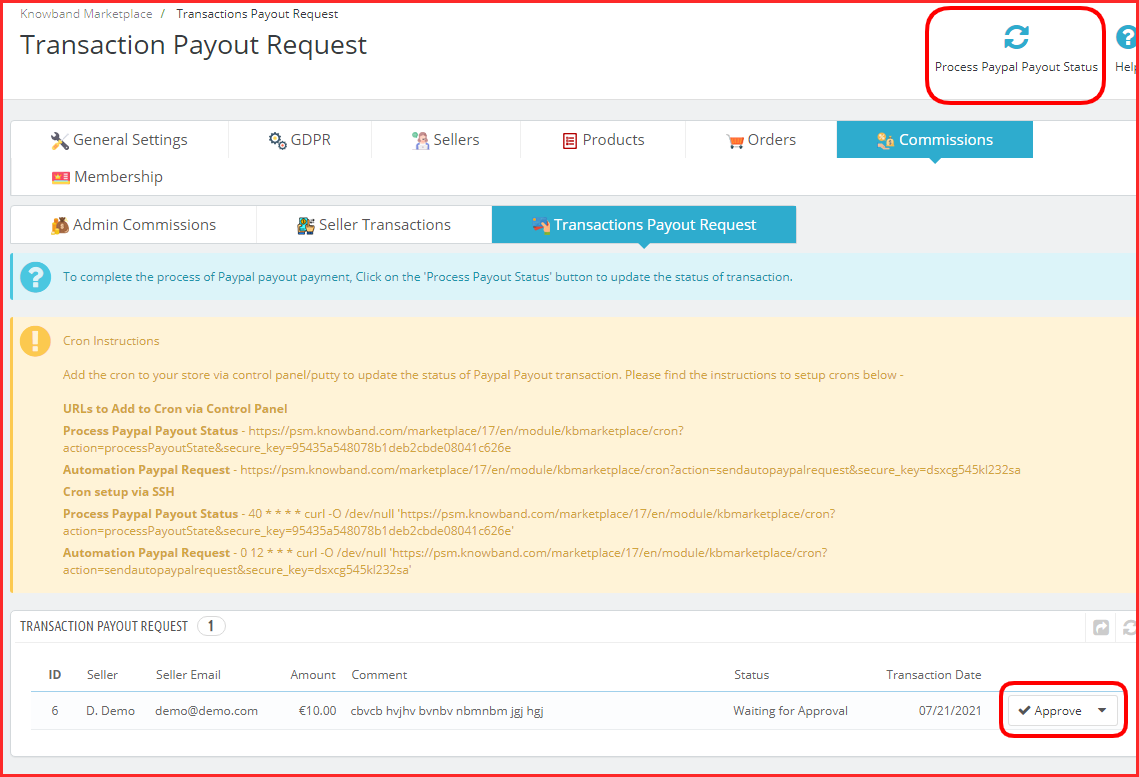
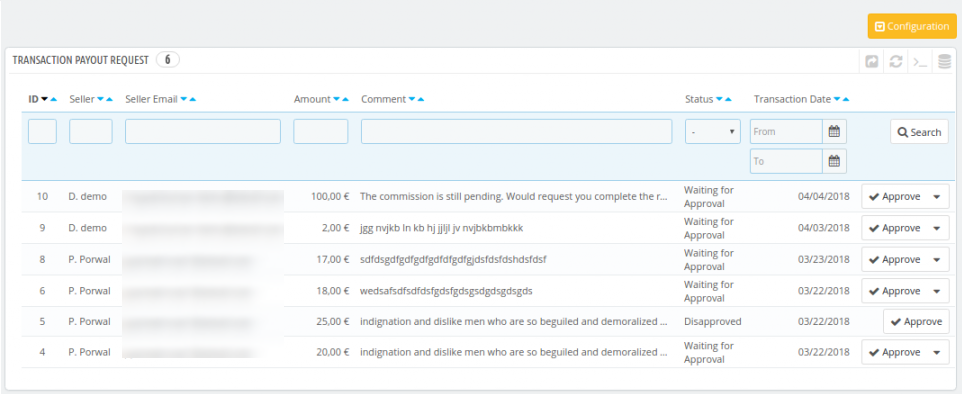
With this additional feature, the sellers can request the store admin for any payout. Earlier, the admin was in charge of any of the payment that was to be made to the sellers. However, the sellers can now initiate a payout request from their dashboard. The admin can approve or deny the payout request of the sellers from this tab of the PrestaShop multi-vendor marketplace addon.
Three payment methods are provided, that is, Bank Wire, Pay by Check, and PayPal.
The admin can use PayPal if this payment method is opted by the sellers.
Admin can enable automatic seller payout which helps the admin to automate the payout request process. Further, the admin can either use cron URL’s for this setup or use the “Process Paypal Payout Status” cron directly.
Admin can also add a particular amount which will always be kept on hold for sellers.
Note: Refer General Settings section for PayPal Payout Settings
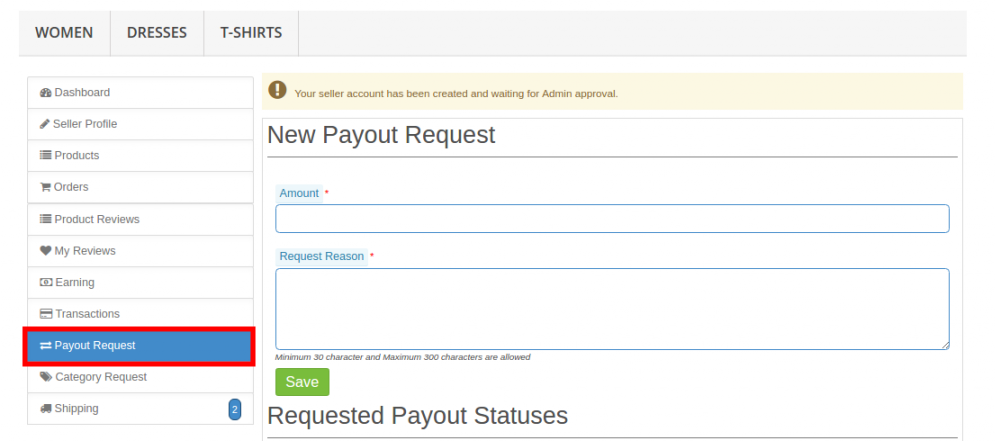
How can the seller create a Transaction Payout Request?
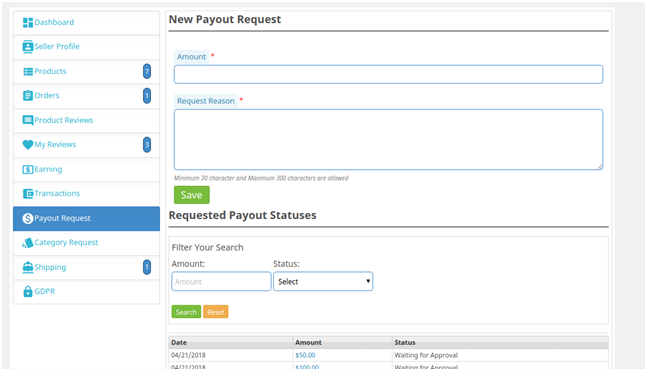
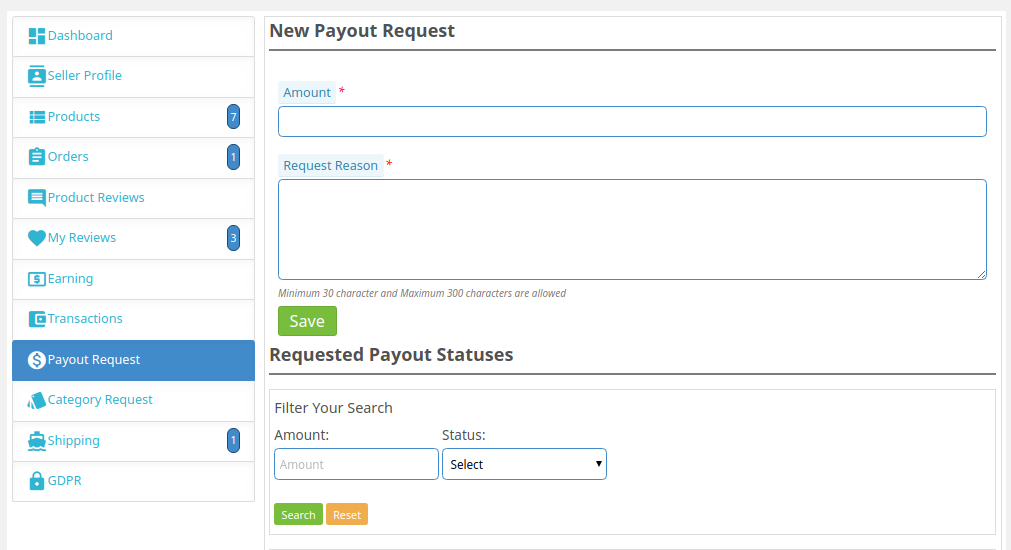
To create the payout request, the seller is required to click on the Payout Request tab of the dashboard of their account.
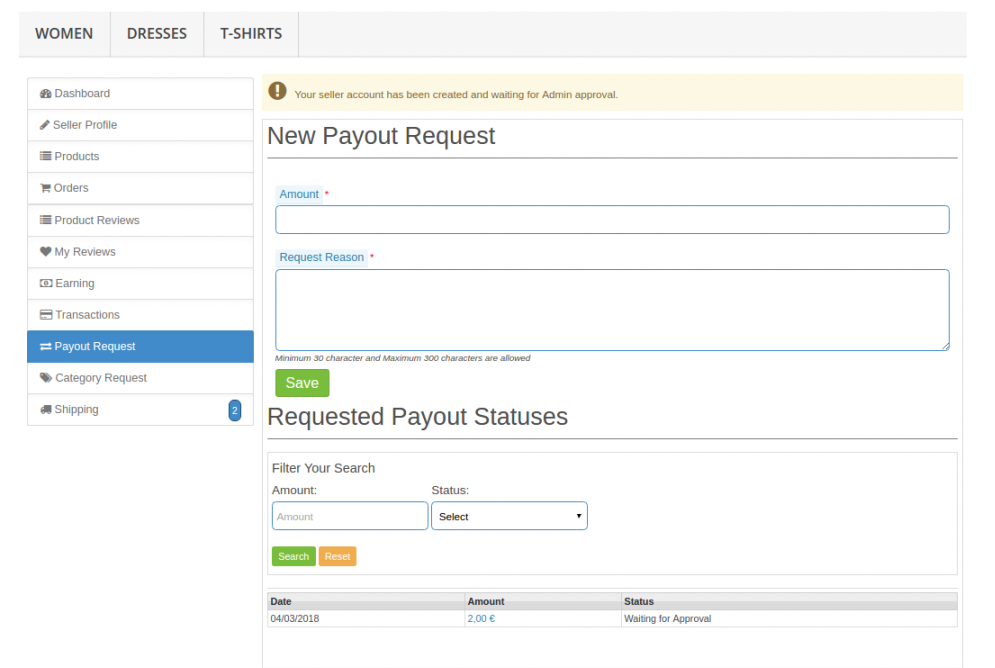
The various fields required to be filled by the seller are discussed below:
Amount: Enter the amount that you are requesting for the payout.
Request Reason: Specify the reason for which the payout request has been initiated.
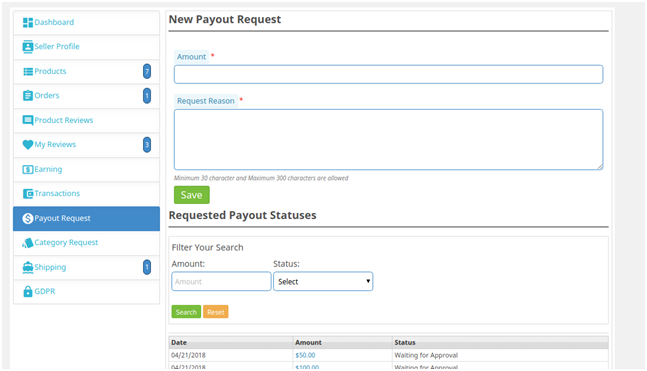
As the Save button is clicked, the payout request will list as shown in the image below:
The same payout request will list in the admin interface of the Prestashop multi-seller marketplace extension.
9.3.1 How can the admin approve/disapprove the Transaction Payout Request?
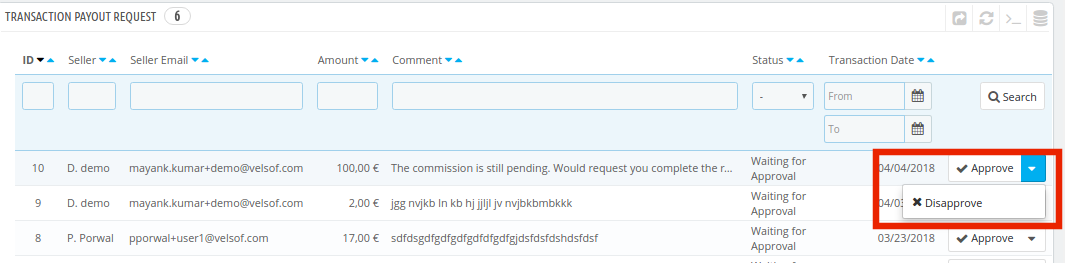
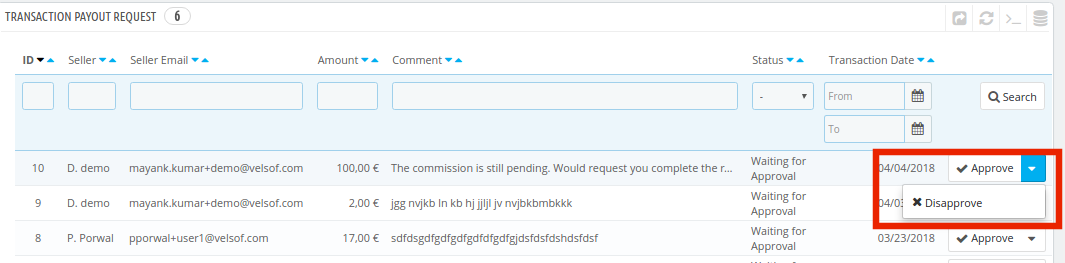
The admin can approve or reject the payout request by clicking on the Approve or Disapprove button corresponding to each request.
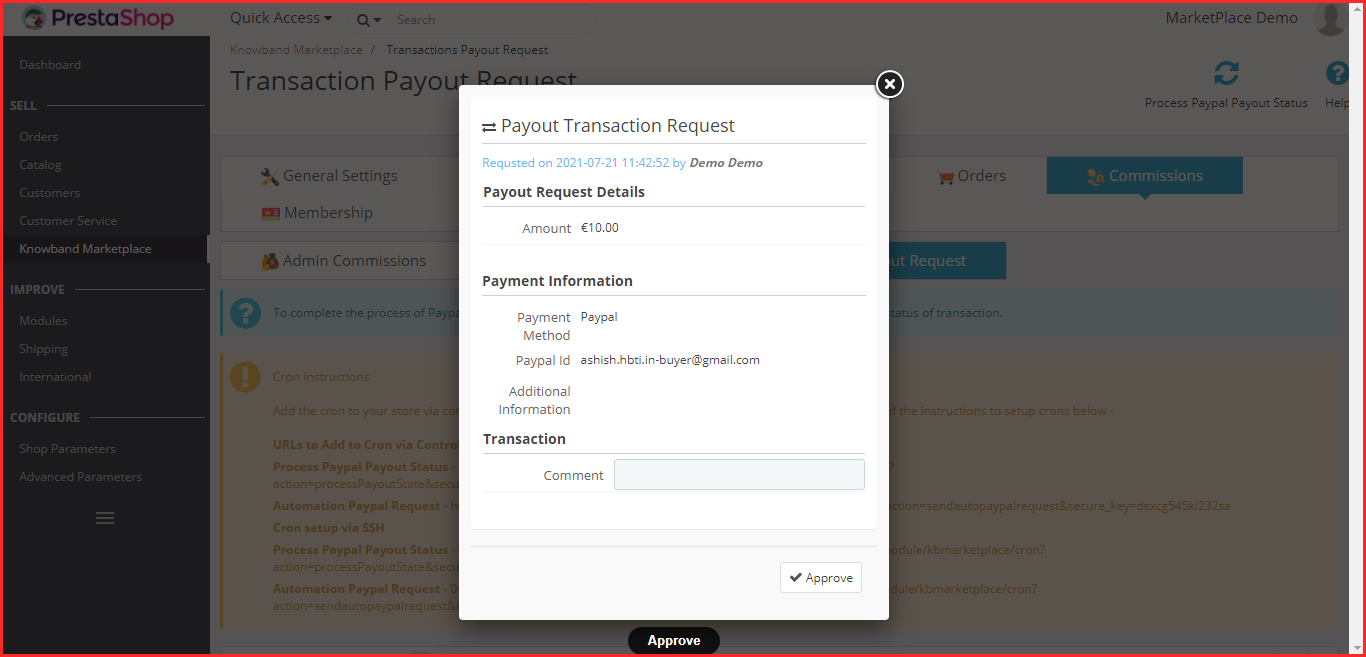
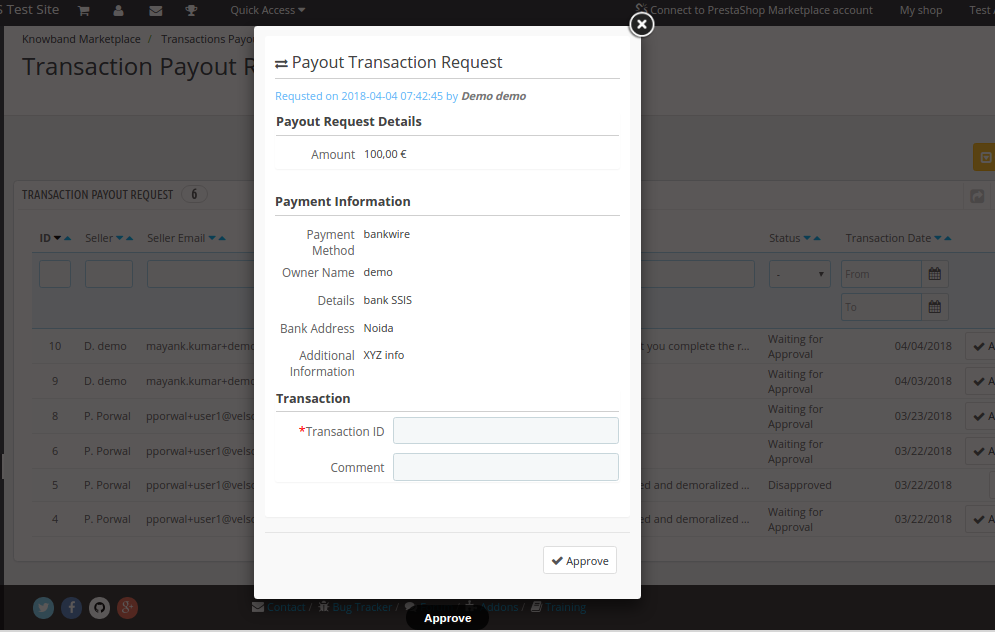
In case, the admin approves the payout, then, a popup will be displayed as shown in the image below:
If the payment methods are Bank wire or Pay by Check, then, the admin will have to enter the Transaction ID.
Once the request is successfully approved, the transaction will be saved in the Transaction Table.
In the case of the PayPal payment method, a request will be sent to PayPal and based on the response, success or error message will be displayed. If the request is successfully approved, it is added to the Transaction table.
10.0 Membership
Prestashop multi-vendor marketplace admin can create and update multiple membership plans for the sellers.
10.1 Settings
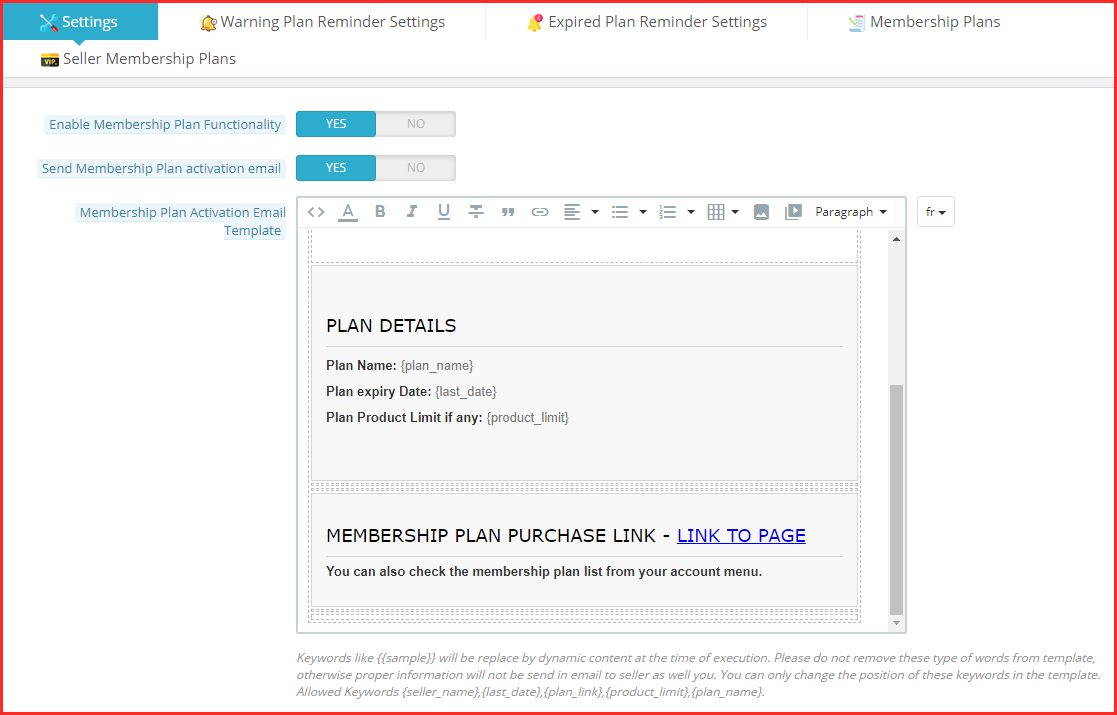
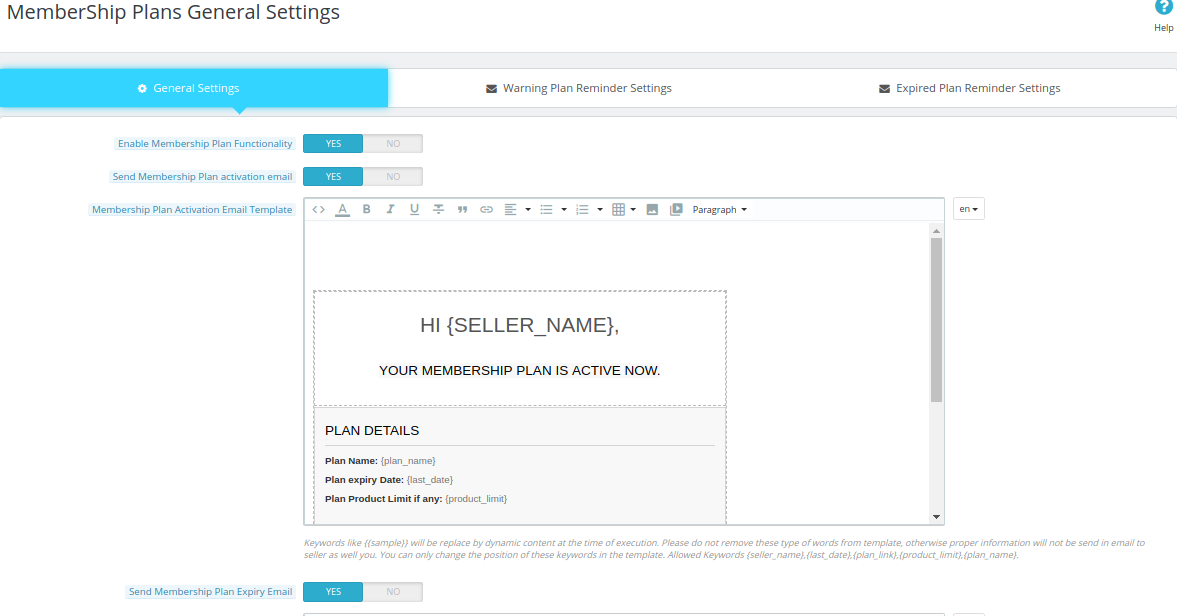
This page contains all the settings which the Store admin needs to control the membership plans. Enable membership plan functionality: By enabling this button store admin allows all the new and existing sellers to purchase a membership plan.
Send membership plan activation email: If the admin enables this feature, an email is sent to those sellers whose membership plan is activated.
Membership plan activation email template: Update the email template as required.
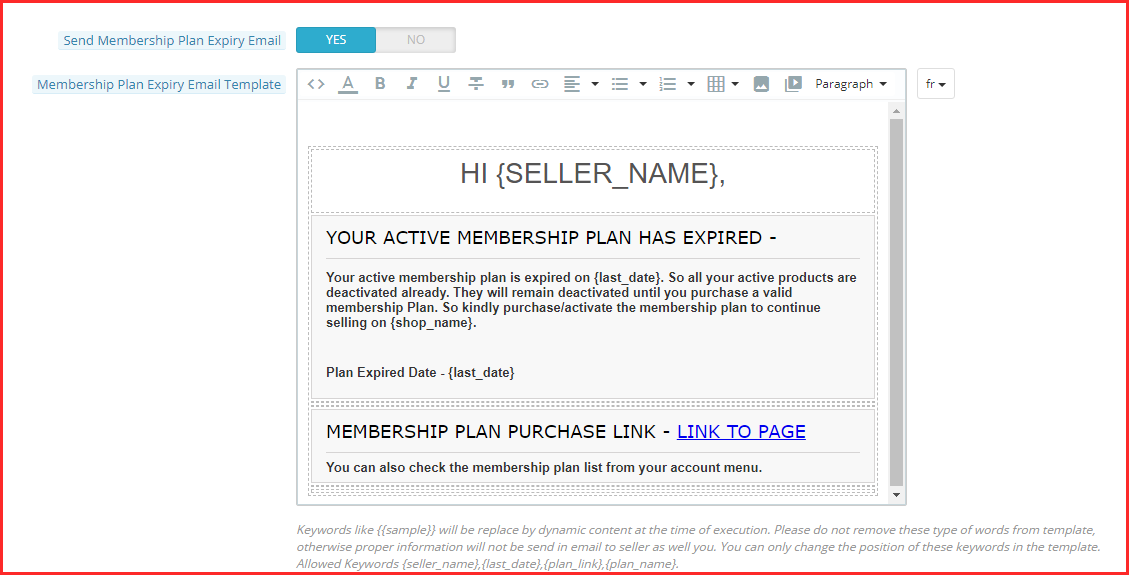
Send membership plan expiry email: If the admin enables this feature, an email is sent to those sellers whose membership plan is expired.
Membership Plan Expiry Email Template: Update the email template as required.
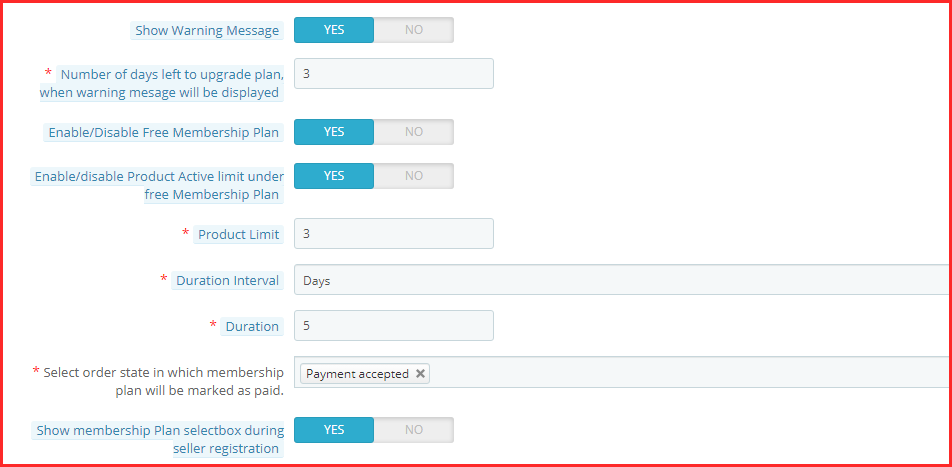
Show warning message: Store admin can use this feature to show a warning message to those sellers whose membership plan is about to expire.
Number of days left to upgrade plan: Store admin can also adjust the number of days to upgrade the membership plan. A warning message will be shown to the sellers during this time period for upgrading their plans.
Enable disable free membership plan: If the admin enables this feature, a free membership plan will be added to the seller’s membership plans.
Enable disable product active limit under the free membership plan: Store admin can enable and disable the product listing limit under the free membership plan
Product limit: Store admin can adjust the product listing limit using this tab.
Duration interval: The admin can adjust the duration interval of the free membership plan. For example: days, months, and years.
Duration: The admin can set the duration of the free membership plan after which this plan is deactivated.
Select the order state in which the membership plan will be marked as paid: Admin can select the order state on which free membership plan orders will be marked as paid.
Show membership plans select box during seller registration: If the admin enables this feature then sellers can select the membership plan at the time of registration.
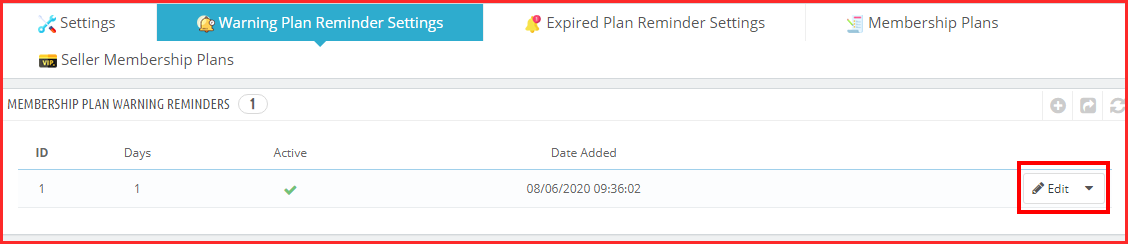
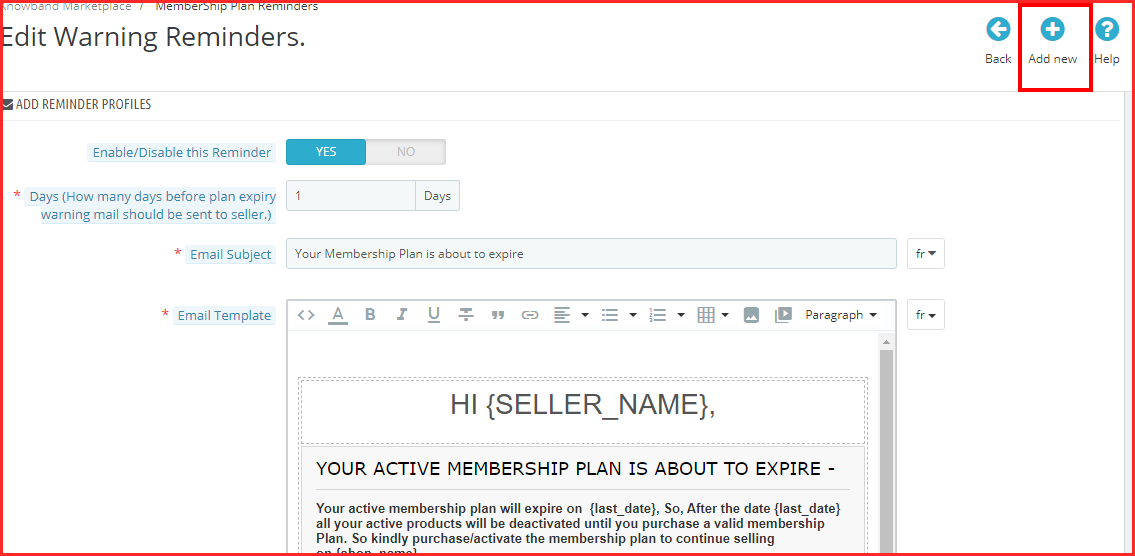
10.2 Warning Plan Reminder settings
Admin can enable this functionality to send a warning email to the sellers whose plan is about to expire. Admin can set the number of days before plan expiry warning mail should be sent to the seller.
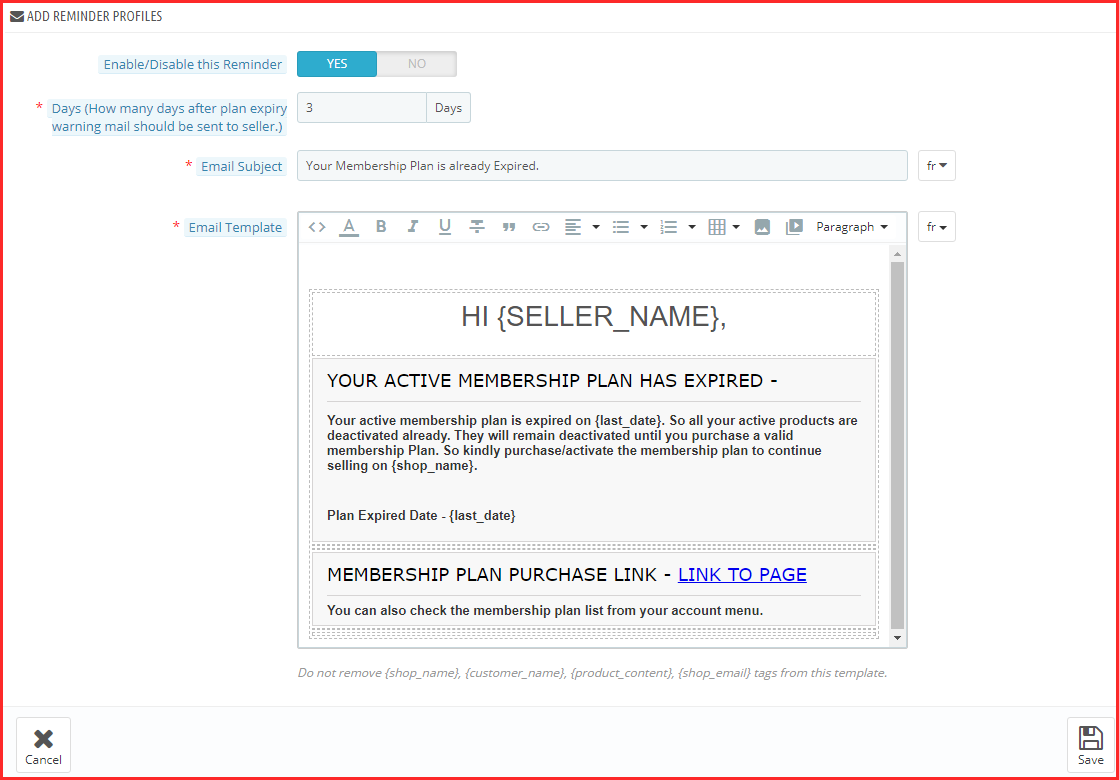
10.3 Expired Plan Reminder Settings
Admin can enable this functionality to send an email to those sellers whose membership plan
Admin can also set the number of days after the plan expiry warning email should be sent to the seller.
Moreover, the admin can customize the reminder email template.
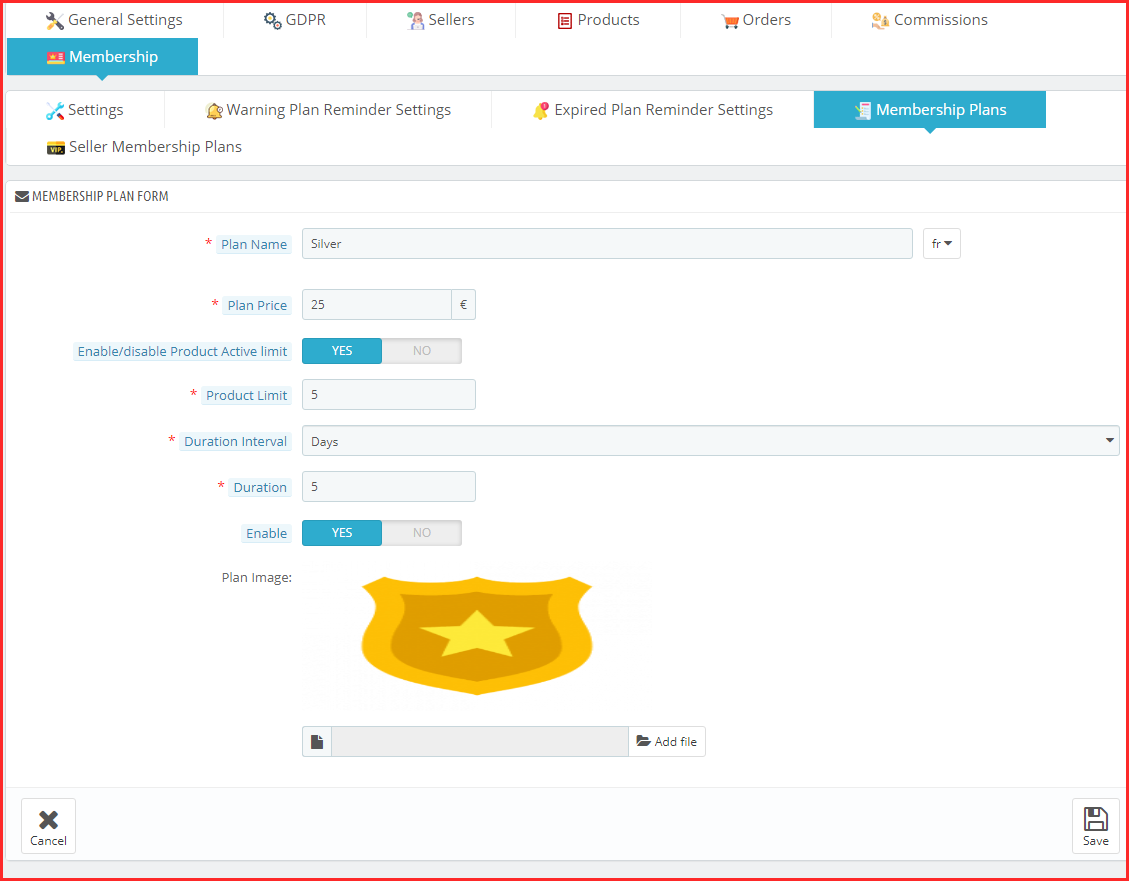
10.4 Membership Plans
Store admin can create a new membership plan under the membership plans tab. After clicking on the add new button, a new membership plan form will be open with the following fields:
Plan name: Admin can set the Plan name which is displayed to the sellers.
Plan price: Admin can set the plan price using this tab.
Enable/disable product active limit: Using this feature admin can enable the product listing limit for that particular membership plan.
Plan duration interval: Store admin can set the plan duration interval using this tab.
Duration: The admin can set the duration for which the plan remained active.
Enable: Using this tab admin can enable or disable the membership plan.
Plan image: Admin can choose the plan image that he wants to show to the sellers.
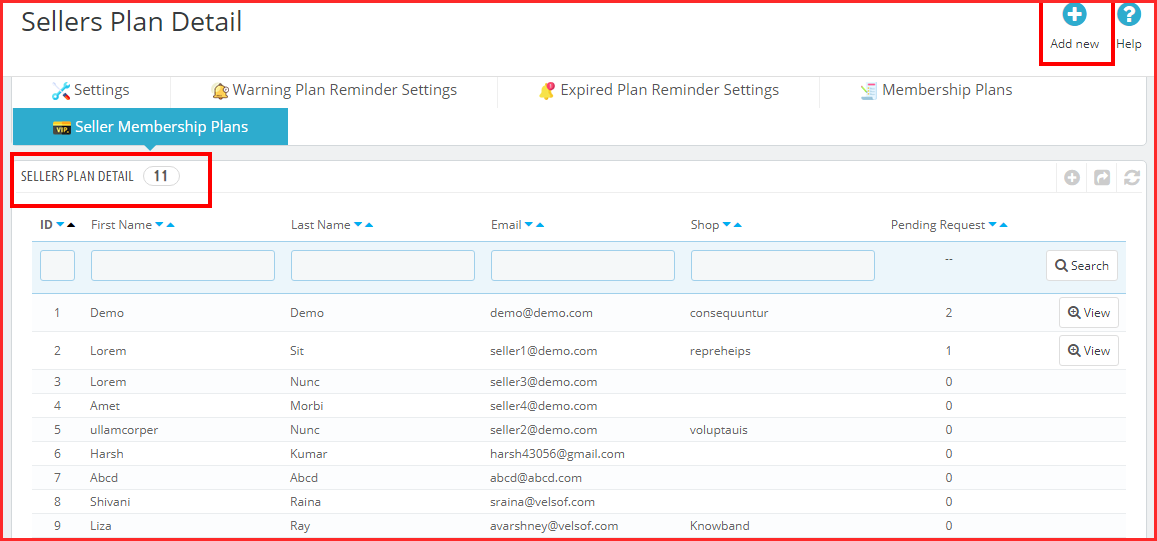
10.5 Seller Membership Plans
From this tab, the admin can check the seller’s plan details like their first name, last name, email, shop name etc.
From the add new option, the store admin can add new seller plan details by filling in the following details:
Choose sellers: Admin can choose the seller for which the admin wants to add plan details.
Add customized plan: Admin can also customize the plan details by filing the plan name, product active limit, duration interval, and duration details.
Mark plan as approved: If the admin enables this feature then the seller plan will approve.
Activate plan: The store admin can activate the seller’s plan by enabling this button.
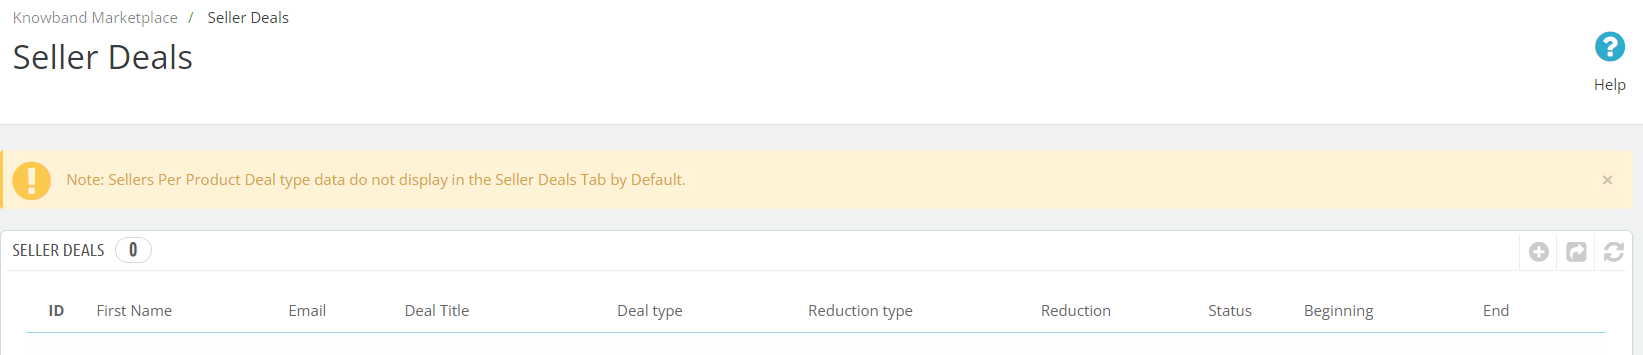
Seller Deals: In the following tab, the PrestaShop store admins can keep the track of the seller’s deals. Moreover, here we have provided various details such as deal type, reduction type, reduction, starting date, and deal ending date.
11.0 Seller Interface of PrestaShop Marketplace Module
Any seller has access to several pages that are designed for handling the functionality of a seller account. The link for all these pages is there on the My Account page of a customer who is also a seller.
Another way sellers can access the dashboard is displayed in the image below:
11.1 Seller Dashboard
The seller dashboard displays the analytics data of the sales, earnings, and total orders along with the number of products sold.
The seller can see the sales statistics, compare the sales data and check out the last order details as well.
Register As Seller Field (Register Page)
If a new customer is registering on the Store then simply enter your mail id according to the screenshot given below.
After clicking on “Create an Account”, you have to enter your information as given in the screenshot below.
Once the merchant becomes a seller of the marketplace, he can avail of all the functionality of the module and boost his sales effortlessly.
The Dashboard of the sellers includes a GDPR section. The customers can download their data and can even delete their accounts with ease.
11.2 Seller Profile
The sellers can edit their profile and personalize their shop from this tab of the dashboard.
From the seller profile section, a seller can update the general setting for their seller page view, add meta descriptions, create policies, and request payouts to the store admin.
11.2.1 How does Seller Profile Appears to customers?
Customers can visit the seller profile and shop from a particular seller too.
11.2.2 Customer can buy products from an individual seller
For visiting the seller page, the customer has to click on the seller’s profile then they will redirect to the seller’s shop.
11.3 Seller’s Product
The sellers can follow the path mentioned below in order to add a new product.
Go to My Account -> Dashboard -> Products
The already listed products are displayed in this tab of the seller’s Dashboard.
In order to add a new product click on the ‘+’ sign at the top right portion.
This will redirect you to the ‘Add New Product’ page. Fill up the required detail in order to add the product.
11.4 Order
The sellers can view their orders and related details in this tab of the Dashboard.
11.5 Product Reviews
The sellers can view the review received on their product in the Product Review Tab of their Dashboard. All the reviews received will be listed as shown in the image below:
11.6 My Reviews
The tab of the seller’s dashboard lists the reviews received on their profile.
11.7 Earnings
The total earnings of the seller are visible in this tab. The vendors can filter the results as per requirement.
The total earning history is visible as shown below:
11.8 Transactions
The seller can view their entire transaction history in this tab. The amount debits or credits in their account are visible here.
11.9 Payout Request
Sellers can view the list of payout requests sent to the admin from the Payout Request tab. For a new payout request, sellers need to fill in the payout amount and reason and send it to the admin for approval.
11.10 Category Request
The sellers can view the categories assigned to them. Additionally, they can even send a category request to the store admin. In order to send a category request, go to the Dashboard -> Category Request
11.11 Shipping
The sellers can view the shipping process as in the screenshot below:
11.12 CSV and XML
Also, the admin can import/export the products and combinations in CSV and XML formats.
11.13Membership plan history
Sellers can check their membership plan history by applying filters. Under the filters, sellers have to fill in the plan name and the status of the membership plan for checking the history of the membership plans.
11.14Available membership plans
Using this tab sellers can buy membership plans by checking the plan details.
Seller Customer Ticket System:
Knowband PrestaShop multi-seller marketplace provides a separate tab for managing tickets between customers and sellers. In the following tab, the sellers can find all the ticket details such as customer email address, last updated date, ticket number, etc. Moreover, we have also provided an option to search the tickets based on the filter options (customer name, customer email, status, from date, end date).
Seller-Customer-Ticket System: Front End Preview:
The customers will get an option on the seller’s products pages for “contact the seller”. After clicking on the same, they will be redirected to the above-mentioned page.
Here, the customers can fill out the details such as email, name, phone number, ticket subject, and issues regarding the tickets.
After submitting the details, the sellers can check the tickets on their personalized dashboard.
Discounts and Offers:
In the discount and offers tab, the sellers can create their own coupons and offers (applicable only to the seller’s products).
Here, we have provided the options for choosing a start date, offer end date, running status, deal type, and discount type (percentage/fix).
For more information on the Prestashop Multi seller Marketplace extension, refer to the following links:
The Prestashop Helpdesk Module by Knowband acts as a Ticket Management System for a particular store that makes easier for the merchant to manage the ticket which will be raised for his store by the customer.
The Prestashop customer helpdesk module is very useful for both the ends i.e for the merchant and the customer because it lets the customer raise the ticket in a very convenient way and at the other end lets the merchant manage the ticket in a very efficient way. This extension also shows the merchant the details of the customer those who have raised the ticket on his/her store.
To install this Prestashop addon, please follow the following steps:
1. Add addon folder under modules folder of your system.
2. After adding this addon folder, system will list the addon on module page under front office feature category as given below:
3. Click install to install Prestashop desktop helpdesk plugin.
Administration Module
After the Prestashop module is installed a new entry in the menu bar of the shop starts appearing in the back end with the name DESKOID. This menu will be containing a sub menu which further will be containing following options.
Each section of the Prestashop customer helpdesk is described in details below.
Tickets
After the admin will click on this option of the sub menu of the Prestashop customer contact addon, a new page will appear which will be containing all the tickets raised by the customers
1. Ticket Number: This field of the Prestashop ticket system will be having a number value which will represent each of the ticket uniquely i.e each ticket will be having a unique ticket number.
2. Topic/Subject: This field of the Prestashop contact us addon will be having the topic to which a ticket has been raised. These fields will be already described in the back end and will be discussed later in the manual.
3. Summary: Here the summary of the ticket will be present which will be entered by the customer when he/she will be raising the ticket in the front end of the Prestashop desktop helpdesk.
4. State: This field of the Prestashop customer helpdesk will show the current state of the ticket. It may be open,closed,on hold,Progress, Waiting for reply, unknown.
5. Priority: The priority of the ticket will be represented in this field of Prestashop customer contact. It will be having the options like: Low, normal, urgent , high, unknown.
6. Actions: Their will be many action for each ticket-
a) Change State: This action of the Prestashop ticket system will let the admin to change the state of the ticket to what he wants.
b) Change Priority: On clicking on this action the admin can change the priority level of a particular ticket.
c) View State Changes: This option of the Prestashop contact us addon will show the admin that how the state of a particular ticket has changed from the item it has been raised.
d) View Priority Changes: This field of the Prestashop desktop helpdesk will do the same as the view state changes action but will show the changes done in the priority of the ticket.
7. View Ticket: When the admin will click on the view ticket action then it will link the admin to an another page in which all the details with the conversation thread of the ticket will be mentioned. Admin can view all the details of the ticket here and can change the state and priority of the ticket. Admin can also reply to the customer from this page and all the details will be mentioned in the conversation thread given below the page.
Customers
In this menu of the Prestashop customer helpdesk the admin can view all the customer those who have raised the tickets on the store. The admin can also view their email id, phone number , customer name and which type of customer has raised the ticked i.i it is a registered customer or a guest customer.
Ticket Topics
This sub menu of Prestashop customer contact plugin will be having all the topics which will show up in the front while the customer will raise the tickets. The customers can raise the tickets below these topics only.
The status of each topics can also be changed by just clicking in the active link in the row of each topics respectively. If the topic is not active then it will not appear in the front end of the customer drop down menu when they will raise the ticket.
Each topic can also be edited and can be stored in different languages in the back end. So the topic name of this Prestashop plugin which will be appearing in the front will be according to the language of the store and the settings done for each topic name.
Configuration
In this sub menu of the Prestashop plugin by Knowband a button will be present which will be used to enable or disable the module in the front. If this setting of the Prestashop module is disabled than the Prestashop ticket system module will not work in the front end.
Front End Module
After enabling the Prestashop module from the back end a button starts appearing in the left hand side of the screen.
After clicking on this button of the Prestashop plugin, the user is redirected to the ticket system page where he can search a ticket and view it or he can create a new ticket.
The customer can create the ticket by using the topics which are given by admin in the back end of the Prestashop contact us addon by Knowband.
The customer can also view the conversation between him/her and admin when he views his ticket.
Prestashop Multi-Anbieter-Marktplatz-Addon by Knowband ist eine effektive Möglichkeit, Ihren Prestashop eCommerce-Shop in einen voll funktionsfähigen Online-Marktplatz zu verwandeln. Das Prestashop Marketplace-Modul kann Ihre E-Commerce-Site in einen vollständigen Marktplatz verwandeln. Der Prestashop-Marktplatz-Inhaber kann den Verkäufern / Verkäufern für die von ihnen verkauften Produkte eine Provision berechnen.
Prestashop
1.1 Admin Vorteile des Prestashop Multi-Vendor Marketplace Moduls:
Der Store-Administrator kann seinen E-Commerce-Shop mit wenigen Klicks in einen Marktplatz umwandeln.
Prestashop Multi-Vendor Marketplace-Modul bietet eine Reihe von Marktplatztypen zur Auswahl. Der Administrator kann das Layout für sein Geschäft auswählen und seine E-Commerce-Site in einen Marktplatz umwandeln.
Der Shop-Administrator kann nun seinen Marktplatz mit den EU-Gesetzen der DSGVO konform machen. Die Kompatibilität wird durch das Umschalten einer Schaltfläche in der Admin-Oberfläche von Etsy-Klon für Prestashop aktiviert.
Der Administrator kann dem Verkäufer sogar verbieten, die E-Mail-ID der Kunden anzuzeigen.
Der Administrator kann die Provision, die er den Verkäufern berechnen möchte, über das Back-End der Prestashop Multi-Vendor Marketplace-Erweiterung festlegen.
Der Administrator erhält vollständigen Zugriff, um die Produkte, die auf dem Marktplatz verkauft werden, zu genehmigen / abzulehnen und kann sogar die Menge der neuen Produkte, die ein Verkäufer mit Hilfe dieses Prestashop Multi-Vendor Marketplace-Plugins auf dem Marktplatz hinzufügen kann, festlegen.
Der Administrator kann die Funktionalität sogar automatisch per Knopfdruck vom Back-End der Prestashop Marketplace-Erweiterung aus genehmigen.
Der Store-Administrator erhält eine Option, um das Profil des Verkäufers per Knopfdruck zu bestätigen / abzulehnen.
Das Prestashop Multi-Vendor Marketplace-Addon ermöglicht es dem Store-Administrator, die auf dem Marktplatz agierenden Verkäufer einfach zu verfolgen und zu verwalten.
Der Prestashop-Administrator kann das Produkt oder die Kategorie entsprechend der Anforderung von der Verwaltungsoberfläche der Prestashop Multi-Vendor Marketplace-Erweiterung hinzufügen / entfernen.
Die Verkäufer können anfordern, eine neue Kategorie im Front-End des Marktplatzes hinzuzufügen. Diese Anfragen können im Modul Prestashop Multi-Vendor Marketplace eingesehen werden und der Administrator kann sie entsprechend akzeptieren / ablehnen.
Die Verkäufertransaktion kann von einem einzigen Tab des Prestashop Multi-Vendor Marketplace-Addons aus gesehen werden. So kann die Leistung der Verkäufer verfolgt werden.
Der Geschäftsadministrator kann den Bericht über die Provision anzeigen, die er vom Prestashop-Marktplatz erhalten hat.
Der Administrator kann
Die zusätzlichen Funktionen des Prestashop Marketplace-Moduls bieten sogar die Möglichkeit, benutzerdefinierte Versandmethoden zu erstellen.
Der Verkäufer kann entweder die Standardversandmethode auswählen oder benutzerdefinierte Methoden über sein Dashboard erstellen.
Das Prestashop Multi Seller Marketplace Addon ermöglicht es den Verkäufern, Auszahlungsanfragen von ihrem Dashboard aus zu initiieren. Der Administrator kann die Auszahlungsanforderung vom Back-End des Prestashop-Addons genehmigen oder ablehnen.
Die von den Verkäufern erhobenen DSGVO-Anfragen können vom Backend des Prestashop Marketplace Addons eingesehen werden.
Die Shop-Closure-Anfrage der Verkäufer wird von der Admin-Oberfläche der Prestashop Marketplace-Erweiterung genehmigt / abgelehnt.
1.2-Verkäufer Vorteile des Prestashop Multi-Vendor Marketplace-Moduls:
Die Anbieter können jede Art von Produkt auf dem Markt hinzufügen. Prestashop Multi-Vendor Marketplace Erweiterung unterstützt alle Arten von Produkten, von den einfachen, konfigurierbaren zu den virtuellen und gebündelten Produkten.
Die Verkäufer können den Administrator sogar auffordern, neue Kategorien hinzuzufügen.
Die Kommissionsgebühren sind fest, also ist die gesamte Transaktion transparent.
Das Prestashop Marketplace-Modul erleichtert es den Verkäufern, ihre Produkte an einen größeren Kundenstamm zu verkaufen.
Über das Dashboard können die Anbieter ihr Profil, ihre Produkte und Bestellungen einsehen.
Eine separate Verkäuferseite erleichtert es den Anbietern, ihr Geschäft zu bewerben.
Im Rahmen der DSGVO erhalten die Verkäufer die Möglichkeit, ihre persönlichen Daten im CSV-Format durch Anklicken einer Schaltfläche herunterzuladen.
Die Verkäufer können den Administrator sogar auffordern, sein Geschäft vom Marktplatz zu entfernen. Diese Anfrage wird vom Backend des Prestashop Marketplace Addon verarbeitet.
1.3 Käufervorteile
Die Online-Kunden können die von verschiedenen Anbietern angebotenen Produkte und deren Preise vergleichen und sich für die beste entscheiden.
Die Kunden erhalten die Möglichkeit, sowohl die Produkte als auch die Verkäufer zu überprüfen.
Die Verkäuferbewertungen helfen ihnen bei ihrer Kaufentscheidung.
Die Online-Käufer können das Produkt auf der Verkäuferseite auswählen.
2.0?InstalÜbersetzung
Befolgen Sie die folgenden Schritte für die Installation von Prestashop Marketplace Addon: 1. Laden Sie das Addon-Paket Prestashop Multi vendor Marketplace herunter. 2. Entpacken Sie das Paket im / modules-Verzeichnis Ihres Prestashop-Stores per FTP-Manager (wie Filezilla oder WinSCP – hier herunterladen: https://filezilla-project.org/). Folder Struktur für Prestashop Marketplace Addon ist in der folgenden Abbildung gezeigt:
3. Du wirst es können
4.Klicken Sie auf den Link Installieren, um zu installieren. Sobald das Prestashop Multi-Vendor Marketplace-Modul ordnungsgemäß installiert wurde, wird die Schaltfläche Install in Configure konvertiert.
3.1 Wie kann ich den Verkäufer vom Backend des Prestashop Marketplace hinzufügen?
Der Prestashop-Store-Administrator kann sogar neue Verkäufer aus dem Backend hinzufügen, indem er die folgenden einfachen Schritte ausführt: Im Hauptmenü des Prestashop-Shops Gehen Sie zu Kunden -> Gehen Sie zu Neuer Kunde auf der rechten Seite oder klicken Sie auf "+"Melden Sie sich oben rechts auf der Seite an, wie unten gezeigt. Sie werden zur Kundenerstellungsseite weitergeleitet. Unten wird ein neuer Block angezeigt, in dem Sie nach der Konfiguration des Verkäuferkontos gefragt werden. Der Administrator kann einen neuen Verkäufer hinzufügen, indem er das Formular und einen neuen Informationsblock, der direkt darunter angezeigt wird, ausfüllt. Von hier aus kann ein neuer Kunde als registriert werden
3.1.1 Wie kann der Administrator das Profil des Verkäufers vom Backend aus bearbeiten?
Um das Profil des Verkäufers zu bearbeiten, folgen Sie dem untenstehenden Profil: Gehen Sie zu Kunden -> Wählen Sie einen Kunden, der auch Verkäufer ist -> Klicken Sie auf Bearbeiten auf der Kundeninformationsseite. Der Ladenadministrator kann das Profil eines Verkäufers bearbeiten Klicken Sie einfach auf die Schaltfläche Bearbeiten, die dem Profil entspricht. Der Administrator kann das Profil bearbeiten, während sie das Profil des Kunden bearbeiten. Wenn diese Seite zum ersten Mal geladen wird, werden die Felder mit den Standardeinstellungen gefüllt, die für das Addon vordefiniert sind.
Prestashop Marktplatz Menü
Das Prestashop Multi-Vendor-Marketplace-Menü besteht aus einer Reihe von Untermenüoptionen, über die das Menü aufgerufen werden kann
Alle Konfigurationsoptionen werden nachfolgend im Detail beschrieben:
3.2-Einstellungen
Die Registerkarte "Einstellungen" des Prestashop Multi-Vendor Marketplace-Moduls ist in 2-Ebenen unterteilt, dh Verkäufer-Level-Einstellungen und Globale Level-Einstellungen. Diese Seite unten steuert nur die globalen Einstellungen für das Prestashop Marketplace-Modul.
3.2.1?GenralEinstellungen
Diese Seite enthält alle Einstellungen, die die Prestashop Multi-Vendor Marketplace-Erweiterung und einige andere Funktionen steuern.
Die Seite Allgemeine Einstellungen besteht aus folgenden Feldern:
Standardauftrag: Die Prestashop Multi-Vendor Marketplace Extension ermöglicht es den Verkäufern, die Provision, die den Verkäufern in Rechnung gestellt wird, zu ändern. In diesem Abschnitt wird der Standardprovisionsprozentsatz festgelegt, der von den Verkäufern von den von ihnen insgesamt getätigten Verkäufen berechnet wird.
Limit für Genehmigungsanfrage: Dies ist die maximale Anzahl an Anfragen, die ein Verkäufer stellen kann, um ein neues Verkäuferkonto zu erhalten. Dieses Limit wird für jeden Verkäufer nach der Registrierung auf seinem Konto festgelegt und kann später nicht mehr geändert werden.
Neues Produktlimit: Hier kann der Administrator die maximale Anzahl neuer Produkte eingeben, die ein Verkäufer hinzufügen kann. Nach diesem Limit kann der Verkäufer ohne Zustimmung des Administrators kein neues Produkt hinzufügen.
Aktivieren Sie die Verkäuferregistrierung:?By enabling this button, the admin can allow the new or existing customer who is not a seller to register as a seller. The same ‘Register as Seller’ option is available in the Customer Tab of the Prestashop store as well as in the front-end of the marketplace. Both the images are shown below.
Neue Produktzulassung erforderlich: Aktivieren Sie dieses Feld, wenn Sie ein neues Produkt, das von einem Verkäufer hinzugefügt wurde, genehmigen möchten, bevor es auf Ihrem Prestashop-Marktplatz angezeigt wird.
Senden Sie eine E-Mail an den Verkäufer auf Bestellplatz: Aktivieren Sie dieses Feld, um eine E-Mail an den Verkäufer zu senden, falls eine Bestellung für das / die Produkt (e) des Verkäufers erfolgt.
Verkäuferbewertung aktivieren: Aktivieren Sie dieses Feld, wenn die Kunden den Verkäufer überprüfen sollen.
Verkäufer Überprüfung Genehmigung erforderlich: Aktivieren Sie dieses Feld, wenn Sie möchten, dass die Verkäuferbewertung genehmigt wird, bevor sie im Ladengeschäft sichtbar wird.
Verkäufer auf der Vorderseite anzeigen: Aktivieren Sie dieses Feld, wenn Sie einen Link in der Kopfzeile des Prestashop Marketplace-Frontends über die Listing-Seite des Verkäufers anzeigen möchten. Wenn diese Einstellung deaktiviert ist, wird die Verkäuferliste angezeigt. Die Optionen für die Verkäuferliste werden wie unten gezeigt im Frontend angezeigt:
Auftragsabwicklung zulassen: Diese Einstellung aktiviert / deaktiviert die Verkäufer, um den Bestellstatus zu verwalten und zu ändern, den Versand der Bestellungen zu verwalten und die Rechnung ihrer Produkte zu generieren.
Produkt Wise Seller Details zum Erfolg anzeigen: Wenn aktiviert, werden die Verkäuferdetails auf der Bestellbestätigungsseite angezeigt.
Details zum Verkäufer auf der Produktseite anzeigen: Die Verkäuferdetails werden auf der Produktseite angezeigt, wenn diese Option aktiviert ist.
Dem Verkäufer erlauben, eine eigene Versandmethode zu definieren: Aktivieren Sie diese Funktionalität, damit die Verkäufer ihre eigenen Versandmethoden definieren können. Falls diese Funktion deaktiviert ist, werden nur die Standard-Versandmethoden, die vom Administrator definiert wurden, auf der Registerkarte Versand des Verkäufers angezeigt. Wenn diese Funktion aktiviert ist, erhält der Verkäufer eine 'Andere'Option im Frontend wie im Bild unten gezeigt: Der Verkäufer kann wählen'Andere', um seine benutzerdefinierten Versandmethoden hinzuzufügen.
Meta-Schlüsselwörter auflisten: Fügen Sie alle Meta-Tags (getrennt durch Komma) hinzu, mit denen Ihre Kunden die Verkäuferliste über Suchmaschinen durchsuchen können.
Listing Meta Beschreibung: Fügen Sie die Beschreibung den im obigen Feld hinzugefügten Meta-Tags hinzu.
Verkäufer Vereinbarung: Die Verkäufervereinbarung kann in diesem Abschnitt des Prestashop Multi-Vendor Marketplace-Plugins angepasst werden. Die gleiche Vereinbarung wird den Verkäufern angezeigt, sobald sie sich im Prestashop Marketplace registriert haben.
E-Mail-Vorlage bestellen: Die E-Mail, die an die Verkäufer gesendet werden soll, wenn eine Bestellung für ihr Produkt aufgegeben wird, kann von hier aus angepasst werden.
Kategorien erlaubt: Diese Option zeigt die Kategorien an, die den Verkäufern erlaubt sind, Produkte hinzuzufügen. Wenn keine Kategorie ausgewählt ist, sind alle Kategorien zulässig. Wenn einige der Kategorien ausgewählt sind, bedeutet dies, dass nur die ausgewählten Kategorien zulässig sind.
3.2.2 GDPR-Einstellungen
Der Store-Administrator kann die DSGD-Einstellungen aktivieren, indem er in diesem Abschnitt des Prestashop Multi-Vendor-Marktplatz-Addons auf einige Schaltflächen klickt. Die verschiedenen Felder werden im Folgenden diskutiert:
DSPR aktivieren: Klicken Sie auf diese Schaltfläche, um die Einhaltung der DSGVO zu ermöglichen.
Anzeige der Kundennummer für den Verkäufer aktivieren: Aktivieren Sie diese Funktion, wenn Sie die Kunden-ID den Drittverkäufern anzeigen möchten.
Option zum Schließen des Shops: Wenn diese Funktion aktiviert ist, erhalten die Verkäufer eine Option, um die Schließung des Shops zu beantragen. Es zeigt einen Abschnitt auf der Registerkarte im Dashboard der Verkäufer an, von dem aus die Anfrage ausgelöst werden kann.
2. Verkäuferliste
Diese Seite der Prestashop Multi-Anbieter-Marktplatz-Erweiterung
Es gibt mehrere Filter, um die Liste der Verkäufer zu filtern, wie im obigen Screenshot gezeigt. Die obige Abbildung besteht aus einer Liste aller genehmigten Verkäufer. Der Administrator kann auch einen Verkäufer in dieser Liste mithilfe der Bulk-Aktionen des Rasters aktivieren oder deaktivieren. Wenn ein Verkäufer deaktiviert ist, werden alle Produkte dieses Verkäufers ebenfalls deaktiviert und sind nicht auf der Storefront sichtbar. Wenn Sie auf die Schaltfläche Anzeigen klicken, wird eine neue Seite mit den Informationen zum Verkäufer geöffnet.
3.4. Verkäuferkonto-Genehmigungsanfrage
Wenn sich ein Verkäufer anmeldet oder ein Kunde sich als Verkäufer auf dem Prestashop-Marktplatz anmeldet, erscheint er zuerst auf dieser Registerkarte des Prestashop Multi seller Marketplace-Moduls. Der Geschäftsadministrator kann die Verkäuferkontoanfrage genehmigen oder ablehnen.
Verkäuferkonto genehmigen: Um das Konto eines Verkäufers zu bestätigen, müssen Sie auf die Schaltfläche Genehmigen klicken, die diesem Verkäufer in der Liste entspricht. Sobald das Verkäuferkonto genehmigt wurde, wird es direkt in die Verkäuferliste verschoben und alle Beschränkungen für das Verkäuferkonto werden freigegeben. Eine E-Mail wird an den Verkäufer gesendet, um über die Zustimmung des Verkäufers zu informieren.
Hinweis: – Die Verkäufer-Accounts, die vom Store-Eigentümer genehmigt wurden, können nicht rückgängig gemacht werden. Bitte verwenden Sie diese Funktion sorgfältig.
Verkäuferkonto ablehnen: Um ein Verkäuferkonto abzulehnen, müssen Sie in der Liste auf die Schaltfläche Ablehnen vor diesem Verkäufer klicken. Es erscheint ein Pop-up-Fenster, in dem Sie nach dem Grund für die Ablehnung des Verkäuferkontos gefragt werden. Füllen Sie den Grund aus und reichen Sie das Formular ein, um die Aktion abzuschließen. Eine E-Mail wird an den Verkäufer gesendet, um die Ablehnung des Verkäufers zu melden. Der Grund, der im Pop-up angezeigt wird, wird ebenfalls in dieser Mail gesendet.
Hinweis: – Sobald ein Verkäufer abgelehnt wurde, kann er erneut das Verkäuferkonto beantragen. Wenn ein Verkäufer dies tut, wird der Ladenbesitzer durch eine Benachrichtigungs-E-Mail benachrichtigt.
3.5 Produktzulassungsliste
Wenn ein Verkäufer ein Produkt hinzufügt, erscheint er zuerst auf dieser Registerkarte der Prestashop Multi-Anbieter-Marktplatz-Erweiterung. Der Geschäftsinhaber wird ebenfalls per Mail darüber informiert. Dann ist es Sache des Geschäftsinhabers, das Produkt zu genehmigen oder abzulehnen.
Wenn die Einstellung (dh Genehmigung für neues Produkt erforderlich) nur dann aktiviert ist, wird ein neues Produkt in dieser Liste angezeigt. Andernfalls erscheint es direkt in der Produktliste und wird automatisch genehmigt und angezeigt.
Produkt des Verkäufers ablehnen: Um ein Produkt abzulehnen, müssen Sie auf die Schaltfläche Ablehnen für dieses Produkt in der Liste klicken. Es erscheint ein Popup-Fenster, in dem Sie nach dem Grund für die Ablehnung des Produkts gefragt werden. Füllen Sie den Grund aus und reichen Sie das Formular ein, um die Aktion abzuschließen. Sobald ein Produkt abgelehnt wird, wird eine E-Mail an den Verkäufer gesendet, die die Ablehnung des Produkts mit dem oben genannten Grund meldet. Die abgelehnten Produkte werden ebenfalls in derselben Liste angezeigt. Der Store-Administrator kann sie jederzeit genehmigen.
Produkt des Verkäufers genehmigen: Um ein Produkt zu genehmigen, müssen Sie in der Produktzulassungsliste auf die Schaltfläche Genehmigen vor diesem Produkt klicken. Nach der Genehmigung wird das Produkt von der Produktzulassungsliste in die Liste der Verkäuferprodukte verschoben.
Hinweis: – Diese Aktion kann nicht rückgängig gemacht werden. Bitte benutze es sorgfältig.
3.6. Verkäufer Produkte
Die Verkäufer-Produktseite des Prestashop Multi-Anbieter-Marketplace-Addons
Wenn die Einstellungen (z. B. Neue Produktzulassung erforderlich) auf der Registerkarte Einstellungen des Prestashop Multi-Vendor Marketplace-Moduls erforderlich sind
Produkt löschen: Um ein Produkt zu löschen, müssen Sie auf klicken Löschen Schaltfläche für jedes Produkt, wie in der Abbildung unten gezeigt.
Es erscheint ein Popup-Fenster, in dem Sie nach dem Grund für die Löschung des Produkts gefragt werden. Um die Aktion abzuschließen, füllen Sie den Grund und klicken Sie dann auf Senden. Eine E-Mail wird an den Verkäufer gesendet, um die Löschung des Produkts zu melden. Die E-Mail enthält auch den Grund, den Sie für die Löschung des Produkts angegeben haben.
Hinweis :- Die Löschaktion für das Produkt kann nicht rückgängig gemacht werden. Bitte verwenden Sie diese Funktion sorgfältig.
Produkt aktivieren / deaktivieren: Um den Status eines Produkts zu ändern, müssen Sie die Funktion "Massenaktion" des Rasters verwenden. Um ein Produkt zu aktivieren / deaktivieren, wählen Sie die Produkte aus und wählen Sie die Aktion (z. B. Aktivieren oder Deaktivieren), um die Aktion abzuschließen.
Hinweis :- Sobald ein Produkt deaktiviert ist, ist es an der Vorderseite nicht sichtbar. Um zu vermeiden, Produkte zu deaktivieren und nur ein Produkt zu deaktivieren, wenn es sehr notwendig ist.
Produkt anzeigen oder bearbeiten: Es gibt auch eine Option, um die Details eines Produkts in der Liste anzuzeigen. Dazu müssen Sie auf den View-Button vor dem Produkt klicken und gelangen auf die Bearbeitungsseite des jeweiligen Produkts.
Wenn Sie auf die Schaltfläche "Ansicht" klicken, werden Sie zur Produktdetailseite wie unten gezeigt weitergeleitet:
Der Administrator kann die Änderungen nach Bedarf vornehmen, und die Änderungen werden im Front-End der Site angezeigt.
3.7. Verkäufer Bestellungen
Der Tab "Verkäuferbestellung" des Prestashop Marketplace-Add-Ons für mehrere Anbieter umfasst alle Bestellungen, die von Kunden für Produkte aufgegeben werden, die von Verkäufern im Geschäft hinzugefügt wurden. Die in dieser Liste aufgeführten Aufträge werden auf der Basis von Verkäufern aufgeteilt, dh wenn Produkte von verschiedenen Verkäufern in derselben Reihenfolge vorhanden sind, werden sie in dieser Liste getrennt aufgeführt.
Bestellung anzeigen: Es gibt auch eine Option, um die Details einer Bestellung in der Liste anzuzeigen. Dazu müssen Sie vor dieser Bestellung auf die Schaltfläche Anzeigen klicken, um zur Seite mit den Bestelldetails der jeweiligen Bestellung zu gelangen. Diese Ansichtsseite ist dieselbe wie beim Bearbeiten einer Bestellung.
Wenn Sie auf die Schaltfläche "Ansicht" klicken, werden Sie wie unten gezeigt zur Bestellseite weitergeleitet:
3.8-Administratorauftrag
Das Prestashop Marketplace-Modul ermöglicht es dem Store-Administrator, immer mehr Produkte zu verkaufen, ohne sein eigenes Inventar zu verwalten. Der Administrator kann jedoch auch eigene Produkte auf dem Marktplatz verkaufen. Die für die Produkte des Administrators erhaltenen Bestellungen können im Tab "Admin-Bestellung" des Add-ons "Prestashop Multi-vendor Marketplace Marketplace" eingesehen werden. Die Bestellungen werden wie folgt angezeigt:
Um die Details der Bestellung anzuzeigen, klicken Sie auf die Schaltfläche Ansicht für jede Bestellung.
Die Bestelldetails-Seite wird in der folgenden Abbildung angezeigt:
3.9. Produktrezensionen
Die Seite "Produktbewertungen" des Prestashop Multi-Vendor Marketplace-Plugins besteht aus einer Liste aller Produktbewertungen, die von Kunden auf die Produkte des Verkäufers gesendet wurden. Die Online-Käufer können eine Bewertung für jedes Produkt des Verkäufers hinzufügen, wie unten gezeigt:
Sobald die Bewertung vom Kunden veröffentlicht wurde, erhält er die Nachricht "Ihr Kommentar wurde hinzugefügt und ist nach der Genehmigung durch den Moderator verfügbar."
Diese Rezensionen werden dann im Tab "Produktbewertung" des Prestashop Multi seller Marketplace-Plugins aufgeführt.
Bewertungen ansehen: Die meisten Details der Produktbewertungen sind bereits im Raster aufgeführt, einige jedoch nicht. Um alle Details einer Produktbewertung anzuzeigen, klicken Sie auf die Schaltfläche Ansicht vor dieser Überprüfung. Ein Popup-Fenster mit allen Details zur Produktbewertung wird angezeigt. Wie
Produktbewertung löschen: Um eine Produktbewertung zu löschen, müssen Sie auf die Löschen-Schaltfläche vor der Produktbewertung in der Liste klicken.
Hinweis: – Die Aktion zum Löschen der Produktprüfung kann nicht rückgängig gemacht werden. Bitte verwenden Sie diese Funktion sorgfältig.
Produktbewertung genehmigen: Die Produktrezensionen, die von den Kunden für die Produkte des Verkäufers hinzugefügt werden, werden in der Liste mit dem Status Auf Genehmigung warten angezeigt. Anderen Kunden werden sie erst dann angezeigt, wenn sie genehmigt wurden. Um es zu genehmigen, müssen Sie auf die Schaltfläche "Genehmigen" vor der Produktbewertung klicken.
3.10. Verkäufer-Überprüfungs-Genehmigungsliste
Diese Registerkarte der Prestashop Multi-Vendor Marketplace-Erweiterung enthält alle Verkäuferbewertungen, die von den Kunden gepostet wurden, und es werden keine Maßnahmen ergriffen. Wenn die Einstellungen aktiviert sind (z. B. Genehmigung für die Genehmigung des Verkäufers), wird in dieser Liste nur eine von einem Kunden veröffentlichte Verkäuferbewertung angezeigt. Andernfalls wird sie direkt in der Liste der Verkäuferrezensionen angezeigt. Die Bewertungen, die zur Genehmigung ausstehen, werden wie in der folgenden Abbildung angezeigt:
Verkäuferbewertung anzeigen: Um alle Details einer Verkäuferbewertung einzusehen, müssen Sie auf die Ansicht-Schaltfläche vor dieser Überprüfung in der Liste klicken. Wenn Sie auf die Schaltfläche Anzeigen klicken, wird ein Popup mit allen Details der entsprechenden Verkäuferbewertung angezeigt.
Verkäuferbewertung genehmigen: Um eine Verkäuferbewertung zu genehmigen, müssen Sie vor dieser Überprüfung in der Liste auf die Schaltfläche Genehmigen klicken. Sobald eine Verkäuferbewertung genehmigt wurde, wird sie am Frontend sichtbar und an die Verkäuferüberprüfungsliste übertragen.
Hinweis: – Diese Aktion kann nicht rückgängig gemacht werden. Bitte benutze es sorgfältig.
Verkäuferbewertung ablehnen: Um eine Verkäuferbewertung abzulehnen, müssen Sie auf die Schaltfläche Ablehnen vor dieser Überprüfung in der Liste klicken. Es erscheint ein Pop-up-Fenster, in dem Sie nach dem Grund für die Ablehnung der Verkäuferbewertung gefragt werden. Füllen Sie den Grund aus und reichen Sie das Formular ein, um die Aktion abzuschließen. Sobald eine Verkäuferbewertung abgelehnt wurde, wird sie auf die Verkäuferbewertungsliste übertragen und kann nirgendwo anders gefunden werden.
Hinweis: – Diese Aktion kann nicht rückgängig gemacht werden. Bitte benutze es sorgfältig.
Verkäuferbewertung löschen: Um eine Verkäuferbewertung zu löschen, müssen Sie auf die Schaltfläche Löschen vor dieser Überprüfung in der Liste klicken. Es erscheint ein Popup-Fenster, in dem Sie nach dem Grund für die Löschung der Verkäuferbewertung gefragt werden. Füllen Sie den Grund aus und reichen Sie das Formular ein, um die Aktion abzuschließen. Sobald eine Verkäuferbewertung gelöscht wurde, wird sie von überall entfernt.
Hinweis: – Diese Aktion kann nicht rückgängig gemacht werden. Bitte benutze es sorgfältig. All dies kann auf Knopfdruck mit Hilfe der Prestashop Multi-Vendor Marketplace-Erweiterung erfolgen.
3.11. Verkäufer Bewertungen
Der Tab "Verkäuferbewertungen" der Erweiterung "Prestashop Multi-vendor Marketplace" enthält eine Liste aller Verkäuferbewertungen, die von Kunden im Laden durchgeführt wurden.
Wenn die Einstellung deaktiviert ist (z. B. Überprüfung der Lieferantenprüfung erforderlich), wird eine Verkäuferbewertung direkt genehmigt, wenn sie vom Kunden hinzugefügt und in dieser Liste angezeigt wird. Andernfalls wird die Überprüfung zuerst in der Genehmigungsliste für die Verkäuferüberprüfung angezeigt.
Hinweis: – Die Verkäuferbewertungen, die vom Geschäftsinhaber abgelehnt wurden, werden ebenfalls in dieser Liste angezeigt.
Verkäuferbewertung anzeigen: Um alle Details einer Verkäuferbewertung einzusehen, müssen Sie auf die Ansicht-Schaltfläche vor dieser Überprüfung in der Liste klicken. Wenn Sie auf die Schaltfläche Anzeigen klicken, wird ein Popup mit allen Details der entsprechenden Verkäuferbewertung angezeigt.
3.12. Verkäufer-Kategorie-Anfrageliste
Ein Verkäufer kann Produkte nur zu den Kategorien hinzufügen, die ihm erlaubt sind. Falls der Verkäufer ein Produkt zu einer Kategorie hinzufügen muss, die nicht erlaubt ist, kann der Verkäufer die Kategorie anfordern. Alle diese Kategorieanforderung erscheint in dieser Liste. Eine E-Mail wird auch an den Eigentümer des Geschäfts gesendet, um über die Anforderung nach Kategorie zu informieren. Dann ist es Sache des Geschäftsinhabers, die Anfrage zu genehmigen oder abzulehnen.
Kategorieanfrage ansehen: Um die Details einer Kategorieanforderung anzuzeigen, müssen Sie in der Liste auf die Schaltfläche Anzeigen vor dieser Kategorie klicken. Wenn Sie auf die Schaltfläche Anzeigen klicken, wird ein Popup mit allen Details der entsprechenden Kategorieanforderung angezeigt.
Kategorieanfrage genehmigen: Um eine Kategorieanfrage zu genehmigen, müssen Sie vor dieser Kategorieanfrage in der Liste auf die Schaltfläche Genehmigen klicken.
Hinweis: – Diese Aktion kann nicht rückgängig gemacht werden. Bitte benutze es sorgfältig.
Kategorieanfrage ablehnen: Um eine Kategorieanforderung abzulehnen, müssen Sie auf die Schaltfläche Ablehnen vor dieser Kategorieanforderung in der Liste klicken. Es wird ein Popup-Fenster angezeigt, in dem Sie nach dem Grund für die Ablehnung der Kategorieanforderung gefragt werden. Füllen Sie den Grund aus und reichen Sie das Formular ein, um die Aktion abzuschließen.
Hinweis: – Diese Aktion kann nicht rückgängig gemacht werden. Bitte benutze es sorgfältig.
3.13. Verkäufer Versand
Wenn dem System ein neuer Verkäufer hinzugefügt wird, wird eine Standardversandmethode hinzugefügt, die standardmäßig für alle Produkte gilt und auch kostenlos ist. Der Verkäufer kann neue Versandrichtlinien hinzufügen und ihm Produkte zuordnen, aber bis dahin werden alle Produkte nur der Standardversandrichtlinie zugeordnet. Der Tab "Seller Shippings" der Addon-Seite "Prestashop Multi seller Marketplace" enthält eine Liste aller Versandmethoden, die für die Verkäufer im System erstellt wurden.
Versand anzeigen: Um die Details eines Verkäuferversands anzuzeigen, müssen Sie auf die Schaltfläche Anzeigen vor diesem Eintrag klicken. Beim Klicken auf den Button öffnet sich eine neue Seite mit Details zur jeweiligen Versandart.
Hinweis: –
1. Der Administrator kann keine Versandart für einen Verkäufer löschen oder bearbeiten. Wenn es versucht wird, wird er / sie auf die Carrier Listing Seite mit dem entsprechenden Fehler weitergeleitet.
2. Standardmäßig werden alle Produkte für einen Verkäufer der Standardversandmethode für den jeweiligen Verkäufer zugeordnet. Die Standardversandmethoden können mit dem Namen "Standard Free Shipping – Seller Name" identifiziert werden.
3.14. Verkäufer Versandarten
Prestashop Multivendor Marketplace Extension ermöglicht es den Verkäufern, ihre eigenen Versandmethoden zu definieren. Dafür "Dem Verkäufer erlauben, eine eigene benutzerdefinierte Versandmethode zu definieren'Funktion aktiviert auf der Registerkarte Einstellung des Prestashop Marketplace-Moduls.
3.14.1 Wie kann der Administrator Versandmethoden hinzufügen?
Der Administrator kann auf dieser Registerkarte benutzerdefinierte Versandmethoden hinzufügen. Um benutzerdefinierte Versandmethoden hinzuzufügen, klicken Sie auf '.Fügen Sie neue Versandmethoden hinzu"Link oder"+"Melden Sie sich oben rechts an.
Dadurch werden Sie auf die Seite zur Erstellung der Versandmethoden des Prestashop Marktplatz-Addons weitergeleitet.
Name der Versandmethode: Geben Sie den Namen der Versandarten ein.
Aktiv: Klicken Sie auf die Schaltfläche, um die Versandart zu aktivieren oder zu deaktivieren. Die Versandarten werden wie folgt aufgelistet. Der Administrator kann sie bearbeiten oder entfernen, indem er auf die Schaltfläche klickt Bearbeiten or Löschen Taste entsprechend den Versandarten.
3.14.2 Wie kann der Administrator benutzerdefinierte Versandmethoden hinzufügen, die die Verkäufer auswählen sollen?
Der Verkäufer kann über sein Dashboard eigene Versandmethoden erstellen. Gehen Sie zur Registerkarte Dashboard -> Versand.
Die verschiedenen Versandarten, die von den Verkäufern erstellt wurden, werden auf dieser Registerkarte aufgelistet. Um neue Methoden hinzuzufügen, klicken Sie auf 'Neues hinzufügen'Link wie im Bild unten gezeigt:
Sie werden zur Seite zur Erstellung der Versandmethoden weitergeleitet. Die verschiedenen Felder, die ausgefüllt werden müssen, sind unten aufgeführt: Die verschiedenen Versandarten werden im Dropdown-Menü aufgelistet. Um ein neues zu erstellen, wählen Sie 'Andere". Geben Sie den Namen der Versandart ein.
Die Verkäufer können die Versandmethoden erstellen, indem sie die erforderlichen Felder wie in der Abbildung unten eingeben.
3.15. Admin-Provisionen
Die Administrator-Provisionen der Prestashop Multi seller Marketplace-Erweiterung enthalten einen Filter, mit dem der Administrator die Provisionen filtern kann, die in Form von Order Wise oder Category Wise gesammelt wurden. Standardmäßig wird auf der Seite die Order Wise Admin Commissions angezeigt. Das Prestashop Multi Vendor Marketplace-Modul erleichtert es dem Store-Administrator, die Provisionsstruktur des Marktplatzes zu verwalten.
3.15.1
Diese Liste enthält alle Provisionen, die der Ladenbesitzer bei jeder Bestellung für ein Verkäuferprodukt erzielt hat. Diese Liste wird auf der Grundlage von Bestellungen für Verkäuferprodukte aufgeteilt.
3.15.2Kategorieweise Provisionen
Diese Liste zeigt die Gesamtprovision, die der Ladenbesitzer von einem Verkäufer erzielt hat. Der Geschäftsinhaber kann auch Filter verwenden, um die Provisionsberichte kategorieweise zu filtern. Es hilft dem Ladenbesitzer Kommissionen aus verschiedenen Kategorien zu identifizieren und welche Kategorie hat wie viel Provision produziert.
3.16.
Mit dieser zusätzlichen Funktion können die Verkäufer den Geschäftsadministrator für jede Auszahlung anfordern. Zuvor hatte der Administrator eine Zahlung, die an die Verkäufer zu leisten war. Die Verkäufer können jedoch jetzt eine Auszahlungsanforderung von ihrem Dashboard aus starten. Der Administrator kann die Auszahlungsanfrage der Verkäufer über diesen Tab des Prestashop Multivendor Marketplace Addon genehmigen oder ablehnen. Drei Zahlungsmethoden stehen zur Verfügung: Banküberweisung, Zahlung per Scheck und PayPal. Der Administrator kann PayPal verwenden, wenn diese Zahlungsmethode von den Verkäufern aktiviert wurde. Klicken Sie auf den Link Konfiguration des Tabs "Transaktionsauszahlungsanforderung" des Prestashop Multi-Seller-Marktplatzmoduls.
Eingeben
Aktiv: Klicken Sie auf die Schaltfläche, um die PayPal-Auszahlungseinstellungen zu aktivieren.
Kunden ID: Geben Sie hier die Kundennummer Ihres PayPal-Kontos ein.
Kundengeheimnis: Geben Sie hier den geheimen Schlüssel ein.
PayPal-Modus: Wählen Sie im Dropdown-Menü Optionen den Modus Sandbox oder Live aus.
PayPal E-Mail Betreff: Geben Sie hier den Betreff für PayPal ein.
PayPal Währung: Wählen Sie die in Ihrem PayPal-Konto festgelegte Standardwährung aus.
3.16.1 Wie kann der Verkäufer eine Transaktionsauszahlungsanforderung erstellen?
Um die Auszahlungsanforderung zu erstellen, muss der Verkäufer im Dashboard seines Kontos auf die Registerkarte Auszahlungsanforderung klicken.
Die verschiedenen Felder, die vom Verkäufer ausgefüllt werden müssen, werden im Folgenden erläutert:
Menge: Geben Sie den Betrag ein, den Sie für die Auszahlung anfordern.
Anfrage Grund: Geben Sie den Grund für die Auszahlungsanforderung an. Wenn Sie auf die Schaltfläche Speichern klicken, wird die Auszahlungsanforderung wie in der folgenden Abbildung aufgeführt angezeigt:
Die gleiche Auszahlungsanforderung wird in der Admin-Oberfläche der Prestashop-Multi-Seller-Marktplatz-Erweiterung aufgeführt.
3.16.2 Wie kann der Administrator die Transaktionsauszahlungsanforderung genehmigen / ablehnen?
Der Administrator kann die Auszahlungsanforderung genehmigen oder ablehnen, indem er auf die Schaltfläche Genehmigen oder Ablehnen für jede Anfrage klickt.
Falls der Administrator die Auszahlung genehmigt, wird ein Popup wie im Bild unten angezeigt:
Wenn die Zahlungsmethoden Banküberweisung oder Zahlung per Scheck sind, muss der Administrator die Transaktions-ID eingeben. Sobald die Anfrage erfolgreich genehmigt wurde, wird die Transaktion in der Transaktionstabelle gespeichert. Im Falle einer PayPal-Zahlungsmethode wird eine Anfrage an PayPal gesendet und basierend auf der Antwort wird eine Erfolgs- oder Fehlermeldung angezeigt. Wenn die Anforderung erfolgreich genehmigt wurde, wird sie der Transaktionstabelle hinzugefügt.
3.17 Verkäufertransaktionen
Das System überweist den Betrag nicht automatisch auf das Konto des Verkäufers, daher muss der Geschäftsinhaber den Saldo für alle Verkäufer aufzeichnen und manuell Geld an den Verkäufer überweisen, und später die Details der Transaktion eingeben, um eine Aufzeichnung über den Verkäufer zu führen gleich. Das Modul Prestashop Multi Vendor Marketplace ermöglicht es dem Administrator, zwei Arten von Transaktionen der Verkäufer anzuzeigen, nämlich Verkäuferbilanz und Transaktionshistorie.
Die Seite "Verkäufertransaktionen" des Prestashop Multi Vendor Marketplace-Plug-Ins verfolgt die Verkäufertransaktionen und das verbleibende Saldo der Verkäufer.
3.17.1 Saldo der Verkäuferbilanz
Diese Liste des Prestashop Multi Vendor Marketplace-Plugins enthält alle Balance-Variationen für alle Verkäufer im System. Die Liste zeigt den Gesamtumsatz des Verkäufers, Verkäufer Einnahmen und Ihre Provision. Diese Liste hilft dem Ladenbesitzer, die Einnahmen zu identifizieren und sie Verkäufer weise zu kategorisieren.
3.17.2 Transaktionsdetails anzeigen
Um die Details der getätigten Transaktionen für einen bestimmten Verkäufer anzuzeigen, müssen Sie auf die Schaltfläche Anzeigen vor diesem Verkäufer klicken. Wenn Sie auf die Schaltfläche "Ansicht" vor einem Verkäufer klicken, öffnet sich eine neue Seite mit einer Liste aller Transaktionen, die für den entsprechenden Verkäufer getätigt wurden.
Sie können auch eine neue Transaktion für den aktuellen Verkäufer hinzufügen, indem Sie auf die Schaltfläche Neue Transaktion hinzufügen oben rechts auf der obigen Seite klicken.
3.17.3 Erstellen Sie eine neue Transaktion über das Backend des Prestashop Multi-Vendor Marketplace-Moduls
Um ein neues Transaktionsdetail für einen Verkäufer hinzuzufügen, müssen Sie entweder auf die Schaltfläche Neu erstellen vor dem Verkäufer klicken oder Sie können auch oben rechts auf der Seite auf die Schaltfläche Neue Transaktion erstellen klicken.
Beim Klicken auf die Schaltfläche erscheint ein neuer Block (Formular zum Hinzufügen einer neuen Transaktion) oben, der nach den Details der Transaktion fragt. Füllen Sie das Formular aus und senden Sie es ab, um die Aktion abzuschließen.
Hinweis :- Diese Aktion kann nicht rückgängig gemacht werden. Bitte benutze es sorgfältig.
3.17.4 Transaktionsverlauf
Diese Seite enthält eine Liste aller Transaktionen, die bisher für alle im System verfügbaren Verkäufer durchgeführt wurden.
Sie können auch eine neue Transaktion für jeden Verkäufer hinzufügen, indem Sie auf die Schaltfläche Neue Transaktion hinzufügen oben rechts auf der obigen Seite klicken.
3.18. Verkäufer Shop Anfrage schließen
Wenn sie vom Backend des Prestashop Multi Vendor Marketplace Plugins aus aktiviert werden, können die Verkäufer den Administrator bitten, den Shop zu schließen. Die Anfrage, das Konto des Verkäufers zu löschen, kann durch Klicken auf ein paar Schaltflächen aus dem Dashboard ausgelöst werden. Das Bild der Front-End-Schnittstelle ist unten abgebildet:
Sobald die Anfrage gesendet wurde, kann der Administrator sie von der Verkäuferladen Schließen?Ihre Anfrage Registerkarte der Prestashop Multi-Seller-Marktplatz-Erweiterung. Die Bestätigungsmail wird an den Verkäufer gesendet. Sobald der Verkäufer die Bestätigung liefert,genehmigenDie Schaltfläche wird entsprechend der Anfrage angezeigt. Der Administrator kann auf dasselbe klicken und die Anfrage vervollständigen.
Die gesamte Liste der Shop-Schließungsanfrage und deren Status wird in diesem Abschnitt des Prestashop-Multi-Seller-Marktplatz-Plugins angezeigt, wie in der folgenden Abbildung dargestellt:
3.19. DSGVO-Antrag
Die Verkäufer können ihre persönlichen Daten im CSV-Format herunterladen, indem sie einfach auf die Links klicken, die im Abschnitt "GDPR" des Dashboards zur Verfügung stehen, wie im Bild unten gezeigt:
Der Administrator kann die von diesem Abschnitt initiierten DSGVO-Anforderungen im Backend des Prestashop-Marktplatzmoduls für mehrere Anbieter anzeigen, wie in der folgenden Abbildung dargestellt:
3.20. E-Mail-Vorlagen
Das Prestashop Multi-vendor Marketplace-Addon bietet dem Store-Admin eine Reihe von Standard-E-Mail-Vorlagen. Diese Seite des Prestashop Marketplace enthält eine Liste aller E-Mail-Vorlagen, die im System mit allen Details der E-Mail-Vorlagen verwendet werden.
E-Mail-Vorlage bearbeiten: Um eine E-Mail-Vorlage zu bearbeiten, klicken Sie auf die Schaltfläche Bearbeiten vor einer E-Mail-Vorlage. Wenn Sie auf die Schaltfläche Bearbeiten klicken, öffnet sich eine neue Seite mit einem Formular für die E-Mail-Vorlage. Sie können die E-Mail-Vorlage hier auf diesem Bildschirm wie gewünscht ändern.
Um die in der E-Mail-Vorlage vorgenommenen Änderungen zu speichern, klicken Sie auf die Schaltfläche Speichern oder Speichern und Bleiben rechts unten auf der obigen Seite.
Hinweis: – Beachten Sie beim Bearbeiten der E-Mail-Vorlage, dass Sie keinen Text innerhalb der geschweiften Klammern einschließlich geschweifter Klammern bearbeiten, da das System sonst kein entsprechendes Schlüsselwort anzeigen kann (zB {{var any_var}}).
14.0-Verkäuferkonto
Jeder Verkäufer hat Zugriff auf mehrere Seiten, die für die Funktionalität eines Verkäuferkontos ausgelegt sind. Der Link für alle diese Seiten befindet sich auf der Seite Mein Konto eines Kunden, der auch ein Verkäufer ist.
Jede dieser Seiten wird nachstehend ausführlich beschrieben.
Frontmodul speichern
Im Front Store von Prestashop Marketplace fügt Addon mehrere neue Seiten und Blöcke hinzu, um auf die Funktionalität des Prestashop Multi Seller Marketplace Addons zuzugreifen.
Als Verkäuferfeld registrieren (Seite registrieren)
Wenn sich ein neuer Kunde im Store registriert, gibt es ein zusätzliches Feld auf der Registrierungsseite. Wenn der Kunde sich als Verkäufer registrieren möchte, muss der Kunde dieses bestimmte Feld markieren.
Als Verkäufer registrieren (Meine Kontoseite)
Falls der eingeloggte Kunde kein Verkäufer ist, gibt es einen Link auf Meine Kundenseite, um sich als Verkäufer zu registrieren. Der Kunde kann diesen Link verwenden, um ein Verkäufer zu werden.
Sobald der Händler zum Verkäufer des Marktplatzes geworden ist, kann er alle Funktionen des Moduls in Anspruch nehmen und seine Verkäufe mühelos steigern. Das Dashboard der Verkäufer enthält eine DSGVO-Sektion. Die Kunden können ihre persönlichen Daten herunterladen und sogar ihr Konto löschen.
Addon del fornitore di multi vendor di Prestashop by Knowband è un modo efficace per convertire il tuo negozio eCommerce Prestashop in un mercato online completamente funzionante. Il modulo Prestashop Marketplace può trasformare il tuo sito eCommerce in un mercato completo. Il proprietario del marketplace Prestashop può addebitare una commissione ai venditori / venditori sui prodotti che vendono.
Prestashop
1.1 Admin Benefit di Prestashop Multi Marketplace Marketplace Module:
L'amministratore del negozio può convertire il proprio negozio eCommerce in un mercato con pochi clic del pulsante.
Il modulo Multi vendor di Prestashop Marketplace offre una serie di tipi di marketplace tra cui scegliere. L'amministratore può scegliere il layout secondo la propria attività e convertire il proprio sito eCommerce in un marketplace.
L'amministratore del negozio può ora rendere il proprio marketplace conforme alle leggi GDPR dell'UE. La conformità è abilitata commutando un pulsante nell'interfaccia di amministrazione di Etsy clone per Prestashop.
L'amministratore può anche non consentire al venditore di visualizzare l'ID e-mail dei clienti.
L'amministratore può fissare la commissione che desidera addebitare ai venditori dal back-end dell'estensione di Prestashop Multi vendor Marketplace.
L'amministratore ottiene l'accesso completo per approvare / disapprovare i prodotti venduti sul mercato e può anche fissare la quantità dei nuovi prodotti che un venditore può aggiungere sul mercato con l'aiuto di questo plug-in di Marketplace di Prestashop Multi vendor.
L'amministratore può anche autorizzare automaticamente la funzionalità solo quando un pulsante si sposta dal back-end dell'estensione di Prestashop Marketplace.
L'amministratore del negozio ha un'opzione per approvare / disapprovare il profilo del venditore con un clic del pulsante.
L'addon di Prestashop Multi vendor Marketplace consente all'amministratore del negozio di monitorare e gestire facilmente i venditori che operano nel mercato.
L'amministratore di Prestashop può aggiungere / rimuovere il prodotto o la categoria secondo i requisiti dall'interfaccia di amministrazione dell'estensione del fornitore di Prestashop Multi.
I venditori possono richiedere di aggiungere una nuova categoria nel front-end del marketplace. Queste richieste possono essere visualizzate nel modulo del fornitore di Prestashop Multi Marketplace e l'amministratore può accettarle / rifiutarle di conseguenza.
La transazione del venditore può essere visualizzata da una singola scheda del componente aggiuntivo del fornitore di Prestashop Multi Marketplace. Pertanto, è possibile tenere traccia delle prestazioni dei venditori.
L'amministratore del negozio può visualizzare il rapporto della commissione guadagnata dal mercato Prestashop.
L'amministratore può
Le funzionalità aggiuntive del modulo di mercato Prestashop offrono anche un'opzione per creare metodi di spedizione personalizzati.
Il venditore può selezionare il metodo di spedizione predefinito o creare metodi personalizzati dalla loro dashboard.
L'addon del marketer multi-venditore Prestashop consente ai venditori di avviare richieste di pagamento dalla loro dashboard. L'amministratore può approvare o disapprovare la richiesta di pagamento dal back-end del componente aggiuntivo Prestashop.
Le richieste del GDPR raccolte dai venditori possono essere visualizzate dal back-end del componente aggiuntivo del marketplace di Prestashop.
La richiesta di chiusura del negozio dei venditori è approvata / non approvata dall'interfaccia di amministrazione dell'estensione del marketplace Prestashop.
Vantaggi del venditore 1.2 del modulo del multi vendor di Prestashop Marketplace:
I venditori possono aggiungere qualsiasi tipo di prodotto sul mercato. L'estensione di Multi Market Marketplace di Prestashop supporta tutti i tipi di prodotti, dal semplice, configurabile ai prodotti virtuali e in bundle.
I venditori possono persino richiedere all'amministratore di aggiungere nuove categorie.
Le commissioni sono fisse, quindi l'intera transazione è trasparente.
Il modulo Prestashop Marketplace rende più facile per i venditori vendere i loro prodotti a una clientela più ampia.
La dashboard consente ai venditori di visualizzare il proprio profilo, i prodotti e gli ordini.
Una pagina del venditore separata rende più facile per i venditori promuovere la propria attività.
Ai sensi della conformità GDPR, i venditori hanno la possibilità di scaricare i propri dati personali in formato CSV facendo clic su un pulsante.
I venditori possono persino richiedere all'amministratore di rimuovere il loro negozio dal marketplace. Questa richiesta viene elaborata dal back-end del componente aggiuntivo del marketplace di Prestashop.
Vantaggi dell'acquirente 1.3
I clienti online possono confrontare i prodotti e i loro prezzi offerti da diversi venditori e optare per il migliore.
I clienti hanno la possibilità di rivedere i prodotti e i venditori.
Le recensioni del venditore li aiutano nella loro decisione di acquisto.
Gli acquirenti online possono selezionare il prodotto visitando la pagina del venditore.
2.0?Instalregolamento
Seguire i seguenti passi per installare l'addon del Marketplace Prestashop: 1. Scarica il pacchetto di add-on Marketplace di Prestashop Multi vendor. 2. Decomprimi il pacchetto nella directory / modules del tuo negozio Prestashop via FTP manager (come Filezilla o WinSCP – scarica qui: https://filezilla-project.org/). La struttura delle cartelle per l'addon di Prestashop Marketplace è mostrata nell'immagine qui sotto:
3. Sarai capace di
4.Cliccare sul collegamento Installa per installare. Una volta installato correttamente il modulo del fornitore di Prestashop Multi Marketplace, il pulsante Installa verrà convertito in Configura.
3.1 Come aggiungere un venditore dal back-end del mercato Prestashop?
L'amministratore del negozio Prestashop può persino aggiungere nuovi venditori dal back-end semplicemente seguendo questi semplici passaggi: Nel menu principale del negozio Prestashop Vai a Clienti -> Vai a Aggiungi nuovo cliente sul lato destro della pagina o fai clic sul '+'accedi nella parte in alto a destra della pagina come mostrato sotto. Verrai reindirizzato alla pagina di creazione del cliente. Un nuovo blocco apparirà in fondo chiedendo la configurazione dell'account venditore. L'amministratore può aggiungere un nuovo venditore compilando il modulo e un nuovo blocco di informazioni che viene visualizzato subito sotto. Da qui un nuovo cliente può essere registrato come
3.1.1 Come può l'amministratore modificare il profilo del venditore dal back-end?
Per modificare il profilo del venditore, segui il profilo riportato di seguito: Vai a Clienti -> Seleziona un cliente che è anche un venditore -> Fai clic sul link Modifica nella pagina delle informazioni del cliente Nel caso, l'amministratore del negozio può modificare il profilo di un venditore semplicemente facendo clic sul pulsante Modifica corrispondente al profilo. L'amministratore può modificare il profilo così come modificano il profilo del cliente. Quando questa pagina viene caricata per la prima volta, i campi vengono riempiti con le impostazioni predefinite che sono predefinite per l'addon.
Menu di mercato Prestashop
Il menu del Marketplace di Prestashop Multi vendor comprende diverse opzioni di sottomenu che indirizzano il
Tutte le opzioni di configurazione sono descritte di seguito in dettaglio:
Impostazioni 3.2
La scheda Impostazioni del modulo Marketplace di Prestashop Multi vendor è suddivisa in livelli 2, ad esempio Impostazioni livello venditore e Impostazioni livello globale. Questa pagina sotto controlla solo le impostazioni del livello globale per il modulo di mercato Prestashop.
3.2.1?GeneralImpostazioni
Questa pagina ha tutte le impostazioni che controllano l'estensione del Marketplace di Prestashop Multi vendor e le sue numerose altre funzionalità.
La pagina delle impostazioni generali comprende i seguenti campi:
Commissione predefinita: L'estensione per il mercato dei vendor di Multi Prestashop consente ai venditori di correggere e modificare la commissione addebitata ai venditori. Questa sezione imposta la percentuale di commissione predefinita che verrà addebitata ai venditori dalle vendite totali effettuate da loro.
Limite della richiesta di approvazione: È il numero massimo di richieste che un venditore può fare per ottenere un nuovo account venditore. Questo limite verrà impostato per ogni venditore dopo la registrazione con il suo account e non può essere modificato in seguito.
Nuovo limite di prodotto: Qui l'amministratore può inserire il numero massimo di nuovi prodotti che un venditore può aggiungere. Dopo questo limite, il venditore non può aggiungere nuovi prodotti senza l'approvazione dell'amministratore.
Abilita la registrazione del venditore:?By enabling this button, the admin can allow the new or existing customer who is not a seller to register as a seller. The same ‘Register as Seller’ option is available in the Customer Tab of the Prestashop store as well as in the front-end of the marketplace. Both the images are shown below.
Approvazione del nuovo prodotto richiesta: Abilita questo campo nel caso in cui desideri approvare un nuovo prodotto aggiunto da qualsiasi venditore prima che venga visualizzato sul tuo Prestashop Marketplace.
Invia email al venditore al posto dell'ordine: Abilita questo campo per inviare una email al venditore nel caso in cui venga effettuato un ordine per i prodotti del venditore.
Abilita recensione venditore: Abilita questo campo, nel caso in cui desideri che i clienti rivedano il venditore.
Approvazione recensione del venditore richiesta: Abilita questo campo nel caso in cui desideri che la recensione del venditore sia approvata prima che diventi visibile sul fronte negozio.
Mostra venditori in primo piano: Abilita questo campo nel caso in cui desideri mostrare un link nell'intestazione del front-end del marketplace Prestashop sulla pagina di elenco del venditore. Se questa impostazione è disattivata, la pagina di elenco del venditore. Le opzioni di elenco dei venditori verranno visualizzate nel front-end come mostrato di seguito:
Consenti gestione ordini: Questa impostazione abilita / disabilita i venditori a gestire e modificare lo stato dell'ordine, gestire la spedizione degli ordini e generare la fattura dei loro prodotti.
Visualizza i dettagli del prodotto saggio del venditore in caso di successo: Se abilitato, i dettagli del venditore verranno visualizzati nella pagina di conferma dell'ordine.
Visualizza i dettagli del venditore sulla pagina del prodotto: I dettagli del venditore verranno visualizzati sulla pagina del prodotto se questa opzione è abilitata.
Consenti al venditore di definire il proprio metodo di spedizione personalizzato: Abilita questa funzionalità per consentire ai venditori di definire i propri metodi di spedizione. Nel caso in cui questa funzione sia disabilitata, solo i metodi di spedizione predefiniti definiti dall'amministratore vengono visualizzati nella scheda Spedizione del dashboard del venditore. Nel caso in cui questa funzione sia abilitata, il venditore otterrà un 'Altri 'opzione nel front-end come mostrato nell'immagine qui sotto: Il venditore può selezionare'Altri 'per aggiungere i suoi metodi di spedizione personalizzati.
Elenco delle parole chiave Meta: Aggiungi tutti i meta tag (separati da virgola) con cui i tuoi clienti possono cercare la pagina di elenco del venditore tramite motori di ricerca.
Elenco Meta Descrizione: Aggiungi la descrizione ai meta tag aggiunti nel campo sopra.
Accordo del venditore: L'accordo del venditore può essere personalizzato da questa sezione del plug-in del Marketplace di Prestashop Multi vendor. Lo stesso accordo verrà mostrato ai venditori una volta che si registreranno nel Marketplace Prestashop.
Ordina modello email: L'email da inviare ai venditori quando viene effettuato un ordine per il loro prodotto può essere personalizzata da qui.
Categorie consentite: Questa opzione mostra le categorie consentite per i venditori di aggiungere prodotti. Se nessuna categoria è selezionata, tutte le categorie sono consentite e se alcune delle categorie sono selezionate, significa che sono consentite solo le categorie selezionate.
Impostazioni 3.2.2 GDPR
L'amministratore del negozio può abilitare le impostazioni GDPR facendo clic su alcuni pulsanti in questa sezione del componente aggiuntivo del marketer multi vendor di Prestashop. I vari campi sono discussi di seguito:
Abilita GDPR: Attiva / disattiva questo pulsante per abilitare la conformità GDPR.
Abilita Visualizza ID cliente al venditore: Abilitare questa funzione se si desidera visualizzare l'ID dei clienti ai venditori di terze parti.
Opzione per chiudere Shop: Se questa funzione è abilitata, i venditori riceveranno un'opzione per richiedere la chiusura del negozio. Visualizza una sezione nella scheda nella dashboard dei venditori da cui è possibile sollevare la richiesta.
2. Elenco dei venditori
Questa pagina dell'estensione del Marketplace di Prestashop Multi vendor
Ci sono anche diversi filtri per filtrare l'elenco dei venditori, come mostrato nello screenshot qui sopra. La figura sopra è costituita da un elenco di tutti i venditori che sono approvati. L'amministratore può anche abilitare o disabilitare un venditore in questo elenco utilizzando le azioni collettive della griglia. Se un venditore è disabilitato, quindi, tutti i prodotti di quel venditore sono disabilitati e non saranno visibili sullo storefront. Quando fai clic sul pulsante Visualizza, si apre una nuova pagina composta dalle informazioni sul venditore.
3.4. Richiesta di approvazione dell'account del venditore
Quando un venditore si registra o qualsiasi cliente si registra come venditore sul mercato Prestashop, quindi, appare in questa scheda del modulo Mercato multiproprietà di Prestashop. L'amministratore del negozio può approvare o disapprovare la richiesta dell'account venditore.
Approva l'account del venditore: Per approvare l'account di un venditore, devi fare clic sul pulsante Approva corrispondente a quel venditore nell'elenco. Una volta che l'account del venditore è stato approvato, passa direttamente all'elenco dei venditori e vengono rilasciati tutti i limiti all'account venditore. Una mail verrà inviata al venditore per notificare l'approvazione dell'account venditore.
Nota: – Gli account venditore approvati dal proprietario del negozio non possono essere annullati. Si prega di utilizzare questa funzione con attenzione.
Disapprova l'account del venditore: Per disapprovare un account venditore, devi fare clic sul pulsante Disapprova davanti a quel venditore nell'elenco. Apparirà un pop-up che chiede il motivo di disapprovazione dell'account del venditore. Compila il motivo e quindi invia il modulo per completare l'azione. Una mail sarà inviata al venditore notificando la disapprovazione dell'account venditore. La ragione fornita nel pop-up verrà inviata anche in questa mail.
Nota: – Una volta che un venditore non è stato approvato, può nuovamente richiedere l'account del venditore e ogni volta che un venditore lo fa, il proprietario del negozio viene avvisato tramite un'e-mail di notifica.
Elenco di approvazione del prodotto 3.5
Quando un venditore aggiunge un prodotto, quindi, prima di tutto, appare in questa scheda dell'estensione del Marketplace di Prestashop Multi vendor. Al proprietario del negozio viene inoltre notificata la stessa tramite posta. Quindi, spetta al proprietario del negozio approvare o disapprovare il prodotto.
Se l'impostazione (ad es. New Product Approval Required) è abilitata solo allora, un nuovo prodotto appare in questo elenco. In caso contrario, appare direttamente nell'elenco dei prodotti e viene automaticamente approvato e visualizzato.
Disapprova il prodotto del venditore: Per disapprovare un prodotto, devi fare clic sul pulsante Disapprova corrispondente a quel prodotto nell'elenco. Apparirà un pop-up che chiederà il motivo della mancata approvazione del prodotto. Compila il motivo e quindi invia il modulo per completare l'azione. Una volta che un prodotto non è approvato, verrà inviata una mail al venditore che notifica la disapprovazione del prodotto con il motivo fornito nel modulo sopra. I prodotti non approvati appaiono anche nella stessa lista. L'amministratore del negozio può approvarli in qualsiasi momento.
Approva il prodotto del venditore: Per approvare un prodotto, devi fare clic sul pulsante Approva davanti a quel prodotto nell'elenco Approvazione prodotti. Dopo l'approvazione, il prodotto viene spostato dall'elenco Approvazione prodotti all'elenco Prodotti del venditore.
Nota: – Questa azione non può essere annullata. Si prega di usare con attenzione.
3.6. Venditori prodotti
La pagina dei prodotti del venditore del componente aggiuntivo Prestashop Marketplace multiplo
Se le impostazioni (ad es. Approvazione nuovo prodotto richiesta) nella scheda Impostazioni del modulo Prestashop Multi vendor Marketplace
Elimina prodotto: Per eliminare un prodotto, è necessario fare clic sul cancellare pulsante corrispondente a ciascun prodotto come mostrato nell'immagine sottostante.
Apparirà un pop-up che chiede il motivo della cancellazione del prodotto. Per completare l'azione, inserire il motivo e quindi fare clic sul pulsante di invio. Una mail sarà inviata al venditore per notificare la cancellazione del prodotto. La mail contiene anche il motivo per cui hai fornito la cancellazione del prodotto.
Nota :- L'azione di eliminazione del prodotto non può essere annullata. Si prega di utilizzare questa funzione con attenzione.
Abilita / Disabilita prodotto: Per modificare lo stato di qualsiasi prodotto, è necessario utilizzare la funzione Azione collettiva della griglia. Per abilitare / disabilitare qualsiasi prodotto, selezionare il (i) prodotto (i) e scegliere l'azione (es. Abilita o Disabilita) per completare l'azione.
Nota :- Una volta che un prodotto è disabilitato, non sarà visibile nella parte anteriore. Per evitare di disabilitare i prodotti e disabilitare solo un prodotto se è molto necessario.
Visualizza o modifica prodotto: C'è anche un'opzione per visualizzare i dettagli di qualsiasi prodotto sulla lista. Per farlo devi cliccare sul pulsante Visualizza di fronte a quel prodotto e ti porterà alla pagina di modifica del rispettivo prodotto.
Facendo clic sul pulsante Visualizza, verrai reindirizzato alla pagina dei dettagli dei prodotti come mostrato di seguito:
L'amministratore può apportare le modifiche richieste e le modifiche si rifletteranno nel front-end del sito.
3.7. Ordini del venditore
La scheda Ordine venditore dell'Addon del Marketplace di Multi vendor di Prestashop è composta da tutti gli ordini effettuati dai clienti per i prodotti aggiunti dai venditori sul negozio. Gli ordini mostrati in questo elenco sono suddivisi in base ai venditori, il che significa che se ci sono prodotti di venditori diversi nello stesso ordine, appariranno separatamente in questo elenco.
Visualizza ordine: C'è anche un'opzione per visualizzare i dettagli di qualsiasi ordine nell'elenco. Per fare ciò, devi cliccare sul pulsante Visualizza di fronte a quell'ordine, ti porterà alla pagina dei dettagli dell'ordine del rispettivo ordine. Questa pagina di visualizzazione è la stessa di quando si modifica qualsiasi ordine.
Quando fai clic sul pulsante Visualizza, verrai reindirizzato alla pagina dell'ordine come mostrato di seguito:
Ordine amministratore 3.8
Il modulo Prestashop Marketplace consente all'amministratore del negozio di vendere sempre più prodotti senza mantenere il proprio inventario. Tuttavia, l'amministratore può persino vendere i propri prodotti sul mercato. Gli ordini ricevuti per i prodotti dell'amministratore possono essere visualizzati nella scheda Ordine amministratore dell'aggiunta del Marketplace Marketplace di Multi-vendor di Prestashop. Gli ordini verranno visualizzati come mostrato di seguito:
Per visualizzare i dettagli dell'ordine, fare clic sul pulsante Visualizza corrispondente a ciascun ordine.
La pagina dei dettagli dell'ordine è mostrata nell'immagine qui sotto:
3.9. Recensioni dei prodotti
La pagina delle recensioni dei prodotti del plug-in per il marketplace di Prestashop Multi è costituita da un elenco di tutte le recensioni dei prodotti inviate dai clienti sui prodotti del venditore. Gli acquirenti online possono aggiungere una recensione su qualsiasi prodotto del venditore, come mostrato di seguito:
Una volta che la recensione è stata postata dal cliente, riceverà un messaggio che dice "Il tuo commento è stato aggiunto e sarà disponibile una volta approvato dal moderatore".
Queste recensioni sono quindi elencate nella scheda Product Review del plug-in Marketplace Prestashop Multi Seller.
Visualizza la recensione del prodotto: La maggior parte dei dettagli delle recensioni dei prodotti sono già menzionati nella griglia ma alcuni non lo sono. Per visualizzare tutti i dettagli di qualsiasi recensione del prodotto, fare clic sul pulsante Visualizza di fronte a tale revisione. Apparirà un pop-up con tutti i dettagli della recensione del prodotto. Come
Elimina recensione prodotto: Per eliminare una recensione del prodotto, è necessario fare clic sul pulsante Elimina di fronte alla revisione del prodotto nell'elenco.
Nota: – L'azione di eliminazione della recensione del prodotto non può essere annullata. Si prega di utilizzare questa funzione con attenzione.
Approva la recensione del prodotto: Le recensioni dei prodotti che vengono aggiunte dai clienti per i prodotti del venditore appariranno nell'elenco qui con lo stato In attesa di approvazione e non verranno mostrate in negozio agli altri clienti finché non saranno approvate. Per approvarlo, devi fare clic sul pulsante Approva davanti alla recensione del prodotto.
3.10. Elenco di approvazione della recensione del venditore
Questa scheda dell'estensione del Marketplace di Prestashop Multi vendor contiene tutte le recensioni dei venditori pubblicate dai clienti e non viene intrapresa alcuna azione. Se sono abilitate le impostazioni (ad esempio l'approvazione di revisione del venditore richiesta), solo la recensione di qualsiasi venditore pubblicata da qualsiasi cliente viene visualizzata in questo elenco, altrimenti viene visualizzata direttamente nell'elenco Recensioni venditore. Le recensioni in sospeso per l'approvazione verranno visualizzate come mostrato nell'immagine seguente:
Visualizza la recensione del venditore: Per visualizzare tutti i dettagli di una recensione del venditore devi fare clic sul pulsante Visualizza di fronte a quella recensione nell'elenco. Facendo clic sul pulsante Visualizza, apparirà un popup con tutti i dettagli della recensione del venditore corrispondente.
Approva la recensione del venditore: Per approvare una recensione del venditore, devi fare clic sul pulsante Approva davanti a quella recensione nell'elenco. Una volta che una recensione del venditore viene approvata, diventa visibile sul front-end e viene trasferita all'elenco di recensioni del venditore.
Nota: – Questa azione non può essere annullata. Si prega di usare con attenzione.
Disapprova la recensione del venditore: Per disapprovare una recensione del venditore, devi fare clic sul pulsante Disapprova davanti a quella recensione nell'elenco. Apparirà un pop-up che chiederà il motivo della mancata approvazione della recensione del venditore. Compila il motivo e quindi invia il modulo per completare l'azione. Una volta che la recensione di un venditore non è stata approvata, viene trasferita nell'elenco di recensioni dei venditori e non può essere trovata da nessun'altra parte.
Nota: – Questa azione non può essere annullata. Si prega di usare con attenzione.
Elimina recensione del venditore: Per eliminare una recensione del venditore, devi fare clic sul pulsante Elimina di fronte a quella recensione nell'elenco. Apparirà un pop-up che chiederà il motivo della cancellazione della recensione del venditore. Compila il motivo e quindi invia il modulo per completare l'azione. Una volta che la recensione del venditore viene cancellata, viene completamente rimossa da ogni luogo.
Nota: – Questa azione non può essere annullata. Si prega di usare con attenzione. Tutto questo può essere fatto con un clic del mouse con l'aiuto dell'estensione del Marketplace di Prestashop Multi vendor.
3.11. Recensioni dei venditori
Questa scheda Recensioni del venditore dell'estensione Multi-vendor di Prestashop Marketplace contiene un elenco di tutte le recensioni dei venditori fatte dai clienti sul negozio.
Se l'impostazione (vale a dire l'approvazione del riesame del venditore richiesta) è disabilitata, una recensione del venditore viene approvata direttamente quando viene aggiunta dal cliente e appare in questo elenco. In caso contrario, la recensione viene prima visualizzata nell'elenco Approvazione recensione venditore.
Nota: – Anche le recensioni dei venditori che non sono state approvate dal proprietario del negozio vengono visualizzate in questo elenco.
Visualizza la recensione del venditore: Per visualizzare tutti i dettagli di una recensione del venditore devi fare clic sul pulsante Visualizza di fronte a quella recensione nell'elenco. Facendo clic sul pulsante Visualizza, apparirà un popup con tutti i dettagli della recensione del venditore corrispondente.
3.12. Lista richiesta categoria venditore
Un venditore può aggiungere prodotti solo a quelle categorie che gli sono consentite. Nel caso in cui il venditore debba aggiungere un prodotto a una categoria non consentita, il venditore può richiedere la categoria. Tutte queste richieste di categoria vengono visualizzate in questo elenco. Viene inviata anche una mail al proprietario del negozio per comunicare la Richiesta di Categoria. Quindi, spetta al proprietario del negozio approvare o disapprovare la richiesta.
Visualizza la richiesta di categoria: Per visualizzare i dettagli di una richiesta di categoria, è necessario fare clic sul pulsante Visualizza di fronte a quella richiesta di categoria nell'elenco. Facendo clic sul pulsante Visualizza apparirà una finestra popup con tutti i dettagli della richiesta di categoria corrispondente.
Approva richiesta di categoria: Per approvare una richiesta di categoria, devi fare clic sul pulsante Approva davanti a quella richiesta di categoria nell'elenco.
Nota: – Questa azione non può essere annullata. Si prega di usare con attenzione.
Disapprova la richiesta di categoria: Per disapprovare una richiesta di categoria, devi fare clic sul pulsante Disapprova davanti a quella richiesta di categoria nell'elenco. Apparirà un pop-up che chiederà il motivo per cui disapprova la richiesta di categoria. Compila il motivo e quindi invia il modulo per completare l'azione.
Nota: – Questa azione non può essere annullata. Si prega di usare con attenzione.
3.13. Spedizione del venditore
Ogni volta che un nuovo venditore viene aggiunto al sistema, viene aggiunto un metodo di spedizione predefinito applicabile a tutti i prodotti per impostazione predefinita ed è anch'esso gratuito. Il venditore può aggiungere una nuova politica di spedizione e può mappare anche i prodotti, ma fino a quel momento tutti i prodotti sono mappati solo sulla politica di spedizione predefinita. La scheda Spedizioni del venditore della pagina degli addon del Marketplace di Prestashop Multi vendor contiene un elenco di tutti i metodi di spedizione creati per i venditori presenti nel sistema.
Vedi la spedizione: Per visualizzare i dettagli di una spedizione del venditore, devi fare clic sul pulsante Visualizza di fronte a quella voce. Facendo clic sul pulsante, si apre una nuova pagina con i dettagli del rispettivo metodo di spedizione.
Nota: –
1. L'amministratore non sarà in grado di eliminare o modificare alcun metodo di spedizione per qualsiasi venditore. In caso di tentativi, verrà reindirizzato alla pagina Elenco vettore con l'errore corrispondente.
2. Per impostazione predefinita, tutti i prodotti per un venditore verranno associati al metodo di spedizione predefinito per il rispettivo venditore. I metodi di spedizione predefiniti possono essere identificati con il nome Default Spedizione gratuita – Nome venditore.
3.14. Metodi di spedizione del venditore
L'estensione del mercato multivendor di Prestashop consente ai venditori di definire i propri metodi di spedizione. Per questo, l 'Consenti al venditore di definire il proprio metodo di spedizione personalizzato'funzione abilitata dalla scheda Setting del modulo del marketplace Prestashop.
3.14.1 Come può l'amministratore aggiungere metodi di spedizione?
L'amministratore può aggiungere metodi di spedizione personalizzati in questa scheda. Per aggiungere metodi di spedizione personalizzati, fare clic su 'Aggiungi nuovi metodi di spedizione'link o'+'accedi nella posizione in alto a destra.
Questo ti reindirizzerà alla pagina di creazione dei metodi di spedizione del componente aggiuntivo del marketplace di Prestashop.
Nome metodo di spedizione: Inserisci il nome dei metodi di spedizione.
Attivo: Attiva o disattiva il pulsante per attivare il metodo di spedizione. I metodi di spedizione saranno elencati come mostrato di seguito. L'amministratore può modificarli o rimuoverli facendo clic su Modifica or cancellare pulsante corrispondente a ciascun metodo di spedizione.
3.14.2 Come può l'amministratore aggiungere metodi di spedizione personalizzati che desiderano consentire ai venditori di selezionare?
Il venditore può creare i propri metodi di spedizione dalla loro dashboard. Vai alla Dashboard -> scheda Spedizione.
I vari metodi di spedizione creati dai venditori saranno elencati in questa scheda. Per aggiungere nuovi metodi, fare clic su 'aggiungi Nuovo'link come mostrato nell'immagine qui sotto:
Verrai reindirizzato alla pagina di creazione dei metodi di spedizione. I vari campi richiesti per essere compilati sono indicati di seguito: I vari metodi di spedizione saranno elencati nel menu a discesa. Per crearne uno nuovo, selezionare 'Altri '. Inserisci il nome del metodo di spedizione.
I venditori possono creare i metodi di spedizione inserendo i campi richiesti come mostrato nell'immagine sottostante.
3.15. Commissioni amministrative
L'Amministrazione Commissioni Amministrative dell'estensione del Mercato multiproprietà di Prestashop contiene un filtro attraverso il quale l'amministratore può filtrare le commissioni guadagnate sotto forma di Order Wise o Category Wise selection. Per impostazione predefinita, la pagina mostra Order Wise Admin Commissions.Il modulo Prestashop Multi vendor Marketplace facilita la gestione della struttura delle commissioni del marketplace da parte dell'amministratore del negozio.
3.15.1? Order Wise Admin Commissions
Questo elenco contiene tutte le commissioni guadagnate dal proprietario del negozio su ogni ordine effettuato per qualsiasi prodotto venditore. Questo elenco è suddiviso sulla base degli ordini effettuati per i prodotti dei venditori.
3.15.2Commissioni saggia di categoria
Questo elenco mostra la commissione totale guadagnata dal proprietario del negozio da un venditore. Il proprietario del negozio può anche utilizzare i filtri per filtrare la categoria di report delle commissioni. Aiuta il proprietario del negozio a identificare le commissioni di diverse categorie e quale categoria ha prodotto la commissione.
3.16.?Transaction Payout Request
Con questa funzione aggiuntiva, i venditori possono richiedere l'amministratore del negozio per qualsiasi pagamento. In precedenza, l'amministratore era incassato da qualsiasi pagamento che doveva essere effettuato ai venditori. Tuttavia, i venditori possono ora avviare una richiesta di pagamento dalla loro bacheca. L'amministratore può approvare o rifiutare la richiesta di pagamento dei venditori da questa scheda del addon del marketer multivendor Prestashop. Sono previsti tre metodi di pagamento, ovvero Bonifico bancario, Pay-per-Check e PayPal. L'amministratore può utilizzare PayPal se questo metodo di pagamento è scelto dai venditori. Fare clic sul collegamento Configurazione della scheda Richiesta pagamento transazione del modulo Mercato multiproprietario di Prestashop.
accedere
Attivo: Attiva o disattiva il pulsante per attivare le impostazioni di pagamento PayPal.
Identificativo cliente: Inserisci qui l'ID cliente del tuo account PayPal.
Client Secret: Inserisci la chiave segreta qui.
Modalità PayPal: Seleziona la modalità, cioè Sandbox o Live dal menu a discesa delle opzioni.
Oggetto Email PayPal: Inserisci l'oggetto dell'email per PayPal qui.
Valuta PayPal: Seleziona la valuta predefinita impostata nel tuo account PayPal.
3.16.1 Come può il venditore creare una richiesta di pagamento transazione?
Per creare la richiesta di pagamento, il venditore deve fare clic sulla scheda Richiesta di pagamento della dashboard del proprio account.
I vari campi che devono essere compilati dal venditore sono discussi di seguito:
Quantità: Inserisci l'importo che stai richiedendo per il pagamento.
Motivo della richiesta: Specify the reason for which the payout request has been initiated.
As the Save button is clicked, the payout request will be listed as shown in the image below:
La stessa richiesta di pagamento verrà elencata nell'interfaccia di amministrazione dell'estensione del marketplace multiproprietario di Prestashop.
3.16.2 Come può l'amministratore approvare / disapprovare la richiesta di pagamento della transazione?
L'amministratore può approvare o rifiutare la richiesta di pagamento facendo clic sul pulsante Approva o Disapprova corrispondente a ciascuna richiesta.
Nel caso in cui l'amministratore approvi il pagamento, verrà visualizzato un popup come mostrato nell'immagine seguente:
If the payment methods is Bank wire or Pay by Check, then, the admin will have to enter the Transaction ID.
Once the request is successfully approved, the transaction will saved in the Transaction Table.
In case of PayPal payment method, a request will be sent to PayPal and based on the response, success or error message will be displayed. If the request is successfully approved, it is added to the Transaction table.
Transazioni del venditore 3.17
The system does not automatically transfer amount in the seller’s account, hence the store owner has to keep records of the balance for all the sellers and manually transfer money to the seller and later on, enter the details of the transaction to keep a record of the same.
The Prestashop Multi vendor Marketplace module allows the admin to view two types of transaction of the sellers, that is, Seller Balance History and Transaction History.
La pagina Transazioni venditore del plug-in Multi marketplace del fornitore Prestashop tiene traccia delle transazioni del venditore e del saldo rimanente dei venditori.
Cronologia del saldo del venditore 3.17.1
Questo elenco del plug-in per il marketplace di Prestashop Multi vendor contiene tutte le variazioni di saldo per tutti i venditori nel sistema. L'elenco mostra le vendite totali del venditore, i guadagni del venditore e le commissioni. Questo elenco aiuta il proprietario del negozio a identificare i guadagni e a categorizzarli come venditori.
3.17.2 Visualizza i dettagli delle transazioni
In order to view the details of the transactions done for a particular seller, you have to click on the View button in front of that seller.
On clicking on the View button in front of any seller, a new page will open up having list of all the transactions done for the corresponding seller.
Puoi anche aggiungere una nuova transazione per il venditore corrente facendo clic sul pulsante Aggiungi nuova transazione in alto a destra nella pagina sopra.
3.17.3 Crea una nuova transazione dal back-end del modulo Marketplace di Prestashop Multi vendor
Per aggiungere un nuovo dettaglio della transazione per qualsiasi venditore, devi fare clic sul pulsante Crea nuovo di fronte al venditore oppure puoi anche fare clic sul pulsante Crea nuova transazione nella parte in alto a destra della pagina.
Facendo clic sul pulsante viene visualizzato un nuovo blocco (modulo per l'aggiunta di una nuova transazione) nella parte superiore che richiede i dettagli della transazione. Compila il modulo e quindi inviarlo per completare l'azione.
Nota :- Questa azione non può essere annullata. Si prega di usare con attenzione.
Cronologia transazioni 3.17.4
Questa pagina contiene un elenco di tutte le transazioni effettuate fino alla data a tutti i venditori disponibili nel sistema.
Puoi anche aggiungere una nuova transazione per qualsiasi venditore facendo clic sul pulsante Aggiungi nuova transazione in alto a destra nella pagina sopra.
3.18. Richiesta di chiusura del venditore
If enabled from the back-end of the Prestashop multi vendor marketplace plugin, the sellers can request the admin to close their shop.
The request to delete the sellers’ account can be initiated by just clicking a couple of buttons from the dashboard. The image of the front-end interface is shown below:
Una volta inviata la richiesta, l'amministratore può visualizzare lo stesso dal file Negozio Chiudi venditore?Richiesta tab of Prestashop multi seller marketplace extension.
The confirmation mail is send to the seller. Once the sellers provides the confirmation, an ‘approvare‘ button is displayed corresponding to the request. The admin can click the same and complete the request.
L'intera lista della richiesta di chiusura del negozio e il loro stato sono visualizzati in questa sezione del plug-in del marketplace multiproprietario di Prestashop come mostrato nell'immagine qui sotto:
3.19. Richiesta GDPR
I venditori possono scaricare i propri dati personali in formato CSV semplicemente facendo clic sui collegamenti forniti nella sezione GDPR della dashboard, come mostrato nell'immagine seguente:
L'amministratore può visualizzare le richieste GDPR avviate da questa sezione nel back-end del modulo multi-market di Prestashop come mostrato nell'immagine seguente:
3.20. Modelli di email
The Prestashop Multi-vendor Marketplace addon offers a number of default email templates to the store admin.
This page of the Prestashop Marketplace contains a list of all the emails templates that are used in the system with all the details of the email templates.
Modifica modello email: In order to edit an email template, click on the Edit button in front of any email template.
On clicking on the Edit button, a new page opens up having a form for the email template. You can change the email template as desired here on this screen.
Per salvare le modifiche apportate nel modello di posta elettronica, fai clic sul pulsante Salva o Salva e resta in basso a destra nella pagina sopra.
Nota: – While editing the email template please keep in mind that you don’t edit any text inside the curly brackets including curly brackets otherwise, the system will not be able to display corresponding keyword (i.e. {{var any_var}}).
Account venditore 14.0
Ogni venditore ha accesso a diverse pagine progettate per gestire la funzionalità di un account venditore. Il link per tutte queste pagine è presente nella pagina Il mio account di un cliente che è anche un venditore.
Ciascuna di queste pagine è descritta nei dettagli di seguito.
Store Front Module
Nel Front Store di Prestashop Marketplace Addon aggiunge diverse nuove pagine e blocchi anche per accedere alle funzionalità del componente aggiuntivo del marketer multiproprietario di Prestashop.
Registra come venditore (pagina di registro)
Se un nuovo cliente si registra nello Store, c'è un campo aggiuntivo nella pagina di registrazione. Se il cliente desidera registrarsi come venditore, il cliente deve contrassegnare questo particolare campo.
Registra come opzione venditore (pagina Il mio account)
Nel caso in cui il cliente registrato non sia un venditore, c'è un collegamento nella pagina Il mio account per registrarsi come venditore. Il cliente può utilizzare questo link per diventare un venditore.
Once the merchant becomes a seller of the marketplace, he can avail all the functionality of the module and boost his sales effortlessly.
The Dashboard of the sellers includes a GDPR section. The customers can download their personal data and can even delete their account with ease.