The most awaited PrestaShop version 1.7.6.0 is now released. Yes, you have heard it right. PrestaShop has now announced PrestaShop 1.7.6.0 on its official website. It took a long journey to deliver this biggest release since 1.7.1.0. After a development period of six months, PrestaShop is happy to announce its latest release. How worth is it? Well, we wish that it perfectly suits your eCommerce business needs in the long run. Moreover, we hope that you enjoy its latest updates and improvements.
What all PrestaShop features are added or improved?
This new version, PrestaShop 1.7.6.0 focuses on improving the existing features of PrestaShop and bringing them back to the merchants. During the whole improvement process, the code quality standards were maintained. Quickly, download the latest PrestaShop version 1.7.6for your store and enjoy the latest features and benefits.
New Features
Front office
New template design for emails sent to customers. The design is specially optimized for mobile displays so as to improve the shopping experience and customer relationship with the merchants.
Improved display of price details (product price, shipping, taxes, etc.) at different levels of the purchase process to gain customer trust and boost conversions.
Improved profile menu with allowed access to resources (documentation, training, agencies, help center, etc).
An updated version of the Product Comments module featuring rich snippets.
The various sorts and filters on product listing pages are fully refactored. A new price slider is also added.
Apart from new updates, there are various improvements which include:
Improved Catalog mode: Choose how to showcase your websites and display/hide product prices.
Improved currency management subsystem. You can add custom currencies for example.
Improved SEO for products with combinations.
Back office
Simple management of transactional emails directly from a new back-office page: Email Theme.
Show gathered prices for a product. Eg.“Price (tax incl.)” column has been added to the product listing. It is now possible to check both taxes included and excluded prices for each product.
New helper cards have been integrated on important pages to improve the software onboarding: Categories, Customers, Pages, Employees.
Dynamic preview of search engine results is enabled for other pages: Product page, Categories, CMS.
New watermark module has been updated to 1.7 (available in the Module Catalog).
Improved translation system for modules supporting multiple languages.
The Design section of the back office has been reconfigured. Gives an overview of all design features (RTL, logos, favicon and theme) so you can easily manage them the way you want.
The back-office administration is optimized for mobile devices.
PrestaShop addons Compatible with Prestashop Version 1.7.6.0
As new versions are released, you have to update your PrestaShop website to the latest store version. The very first step is to migrate all the data to keep their shop updated and fully-functional. Once the website is migrated to the updated version, the next step is to find themes and Prestashop addons compatible with the PrestaShop latest version 1.7.6. With Knowband, you can find all the compatible modules, templates, support, training to customize your online store.
Here is a list of the PrestaShop addons that will flawlessly work with the latest PrestaShop release 1.7.6.0.
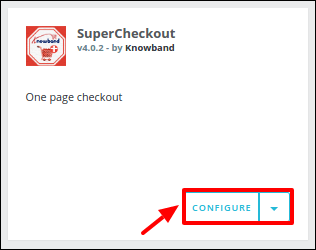
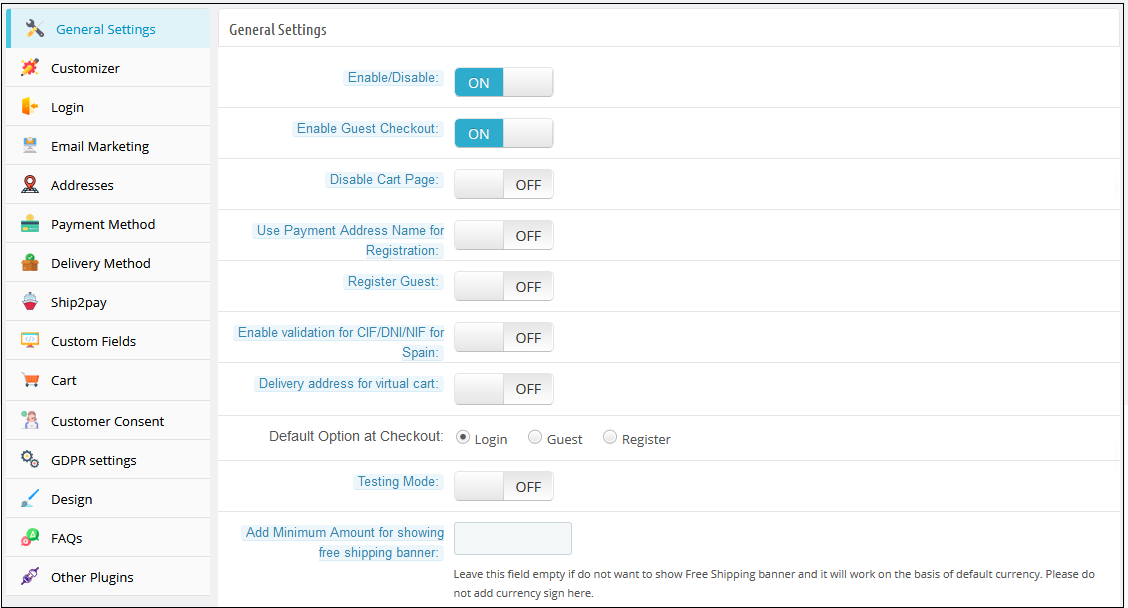
One Page Checkout: Convert the multi-page checkout design of your site into a single page checkout design with PrestaShop One Page Checkout. With multiple social login options, MailChimp Integrator, Guest Checkout, and many other rich features, PrestaShop One page Super checkout is a high ranked PrestaShop addon with 5000+ downloads and five-star ratings. Buy PrestaShop One Page Checkout from PrestaShop Addon Store and get high conversion rates for your store. PrestaShop one page checkout addon is now compatible with the latest PrestaShop version 1.7.6.0
Abandoned cart: Another five-star rated module, PrestaShop Abandoned Cart addon helps you to reduce the cart abandonment rate in your store. This Prestashop addon tracks the abandoned carts & sends a reminder to the abandoned cart users via email and pushes them to come back to the store and complete their purchase. With the help of PrestaShop Abandoned cart addon, you can improve the conversion rates by recovering the pending carts. With 1000+ downloads, you can buy this Prestashop addon from Addon Store. PrestaShop Abandoned Cart module is compatible with the latest PrestaShop version 1.7.6.0
Social Login: Add numerous social login options to your PrestaShop store using PrestaShop Social Loginizer and improve the shopping experience of your customers. This five-star rated Prestashop addon encourages your customers for quick signup.PrestaShop Social loginizer addon has over 1000 downloads, you can also buy Social Loginizer module from PrestaShop Store. PrestaShop Social loginizer addon is compatible with the latest PrestaShop version 1.7.6.0
Marketplace: Target your new audience and serve your customers with products from multiple retailers using PrestaShop Marketplace addon. Turn your store into a marketplace and provide a choice of selecting products and services to your customers. This five-star rated Prestashop module has completed 500+ downloads. Buy PrestaShop Marketplace addon for your store. PrestaShop Marketplace addon is compatible with the latest PrestaShop version 1.7.6.0
Advance Wishlist:PrestaShop Advanced Wishlist allows online shoppers to save the shortlisted product to their wishlist. The five star rated PrestaShop addon boosts the shopping experience of the shopper and so reduces the cart abandonment rate as well. This Prestashop module has reached 100+ downloads. Purchase the module from PrestaShop Addon Store. PrestaShop Advance Wishlist addon is compatible with the latest PrestaShop version 1.7.6.0
Return Manager: Manage the product return requests of your customers and allow easy return & replacement with the help of PrestaShop Return Manager. The module has already 500+ downloads. This is one of the popular five-star rated PrestaShop addons that provide a flexible RMA system for your store. Buy PrestaShop RMA from Addon Store and easily manage returns at your store. PrestaShop Return Manager addon is compatible with the latest PrestaShop version 1.7.6.0
Spin and Win: Are your visitors getting bored at your store? Add an interactive gamified interface using PrestaShop Spin and Win pop up addon and compel visitors to shop your site products. With over 100 downloads, Spin & Win is ranked among top-rated modules as it is highly used as an email subscription popup. This 3 in 1 popup shows fun-filled wheel interface asking email of the visitors in order to exchange discount coupons with them. Buy Spin and Win Email Subscription Popup from Addon Store. PrestaShop Spin and win popup addon is compatible with the latest PrestaShop version 1.7.6.0
Etsy Integrator: With PrestaShop Etsy Integration addon, add an effective interface to manage the product listing, inventory and orders for the Etsy marketplace from the PrestaShop Back Office. PrestaShop Etsy Integration has reached 100+ downloads and is ranked among the four star rated modules. Go and buy this PrestaShop addon now. PrestaShop Etsy Integration addon is compatible with the latest PrestaShop version 1.7.6.0
Mobile App Builder: Transform your eCommerce site into a fully-functional mobile app with PrestaShop Mobile App Builder (for Android and iOS). The customizable designs and layouts offered by this addon have contributed to four star rating performance on PrestaShop Addon Store. Over 100 downloads are completed, you too can get it for your store. Convert your site into a fully-featured app with Knowband Mobile App Builder. PrestaShop Mobile App Builder is compatible with the latest PrestaShop version 1.7.6.0
Some other recommended modules: Apart from the above listed, Knowband offers you some other PrestaShop modules to increase the revenues and conversion rates of your store. Go and get them from the Knowband store at the provided links:
Knowband, one of the leading eCommerce development company has shown its major contribution to the design and development of PrestaShop modules. The team of highly skilled and experienced developers has covered over 50 plugins for PrestaShop. These PrestaShop modules are compatible with the latest version 1.7.6.0.
With such high rated addon projects on PrestaShop Addon Store, Knowband is ranked among Superhero developers and badged as Modules Partner Creator as well.
What does the Superhero Developer Ranking say?
To help the user in picking up the right product, PrestaShop has set up an expertise ranking system. Each developer who contributes his/her product at addon store is marked with some kind of expertise level. Knowband ranks as a Superhero among the community of developers. They respond to customer queries in less than two hours of time. Customers who seek their support have rated their service quality to 99%. How amazing is that? You too can create your own custom store with Knowband modules for PrestaShop.
The digital gift card is a pleasant commodity to buy, sell, and receive! Whoever bought the digital gift card, saves time, fuel, and efforts to find the right thing to gift. Whoever receives it, find lucky enough to save from getting the wrong thing. Finally, whoever sells it, find cash upfront for an unsold thing! If you are looking for a perfect e-gift card addon, then, KnowBand PrestaShop gift card manager module helps you send the gift card to anyone without any hassle. With easy customer acquisition, the e-merchants can now double their revenue
The PrestaShop gift card manager Addon by Knowband allows the PrestaShop store owners to manage the gift cards according to the need. This PrestaShop gift card voucher addon is an effortless way to engage more customers with the website. The pre-paid vouchers can help the e-merchants aid the purchase intention of the store visitors and easily convert them into paying leads.
This PrestaShop gift card addon gives the flexibility to a customer to buy the gift card online and send Gift vouchers to friends via email on a specific date and time. The sender can print a gift card for giving it in person. It provides the functionality to create a personalized image gift card. Online shoppers can order gift cards for special occasions for their near and dear ones.
How Gift Card can help you to boost sales in your store?
81% of online buyers prefer to buy a gift card for a birthday, anniversary, holiday season, or festival.
38% of adults buy a gift voucher for a friend’s birthday.
One of the biggest selling days of the gift card is Father’s Day. In contrast, only 24,7% of moms wish to get a gift card for Mother’s Day, putting above homemade stuff, greeting cards, and dinner.
12% of buyers will buy gift cards for Wedding wishes and presents.
These are major facts that can prove the importance of the Gift card.
Prestashop gift card addon by Knowband has rich functionality that can help the admin to increase the revenue by selling gift cards.
1.1 Benefits for merchant
The store owner can increase customer engagement and the number of potential buyers on his/her PrestaShop store as well as boost their revenue. The following are the benefits for the merchant:
The store admin can add multiple gift cards in a matter of moments from the backend of the PrestaShop gift card addon.
PrestaShop gift manager addon by Knowband allows the store admin to set the card amount, validity period and other conditions that can be set from the backend of the PrestaShop send gift card module.
The PrestaShop store admin even gets easy options to change and edit the look and feel of the cards that will be shown in the front-end.
With the help of the PrestaShop gift voucher addon, the store admin can easily add the gift card templates according to the need.
The orders for the gift cards is trackable at a button click from the admin interface of the PrestaShop gift card manager module.
Knowband PrestaShop gift card addon enables the store merchant to show the gift card buttons on which page they want to show.
Even the email template for sending the gift cards and its PDF format to the recipient is customizable in a few easy steps from the backend of the PrestaShop gift card addon.
This PrestaShop send gift card module increases conversions especially for occasions like holidays.
PrestaShop Gift Card Manager addon by Knowband allows you to earn more revenue, get new customers by sending online gift cards, and offer discounts on the vouchers.
1.2 Benefits of customer
Customers can easily buy a gift card for their loved ones.
This PrestaShop gift card module by Knowband is best for those customers who are helpless for selecting a gift.
Customers can send a gift card with a custom image that the sender can upload while making the gift card purchase.
PrestaShop gift card add-ons allow online buyers to send the gift cards to their loved ones on the desired date and time.
The receiver of the Gift Card can redeem the amount partially while purchasing in the store.
2.0 Installation
After purchasing the PrestaShop gift card module from the store and you’ll get the following files.
1. The zipped file that consists of the source code of the module
2. User Manual
Follow the following steps to install the PrestaShop gift card manager extension:
Extract the “kbgiftcard.zip” zip file.
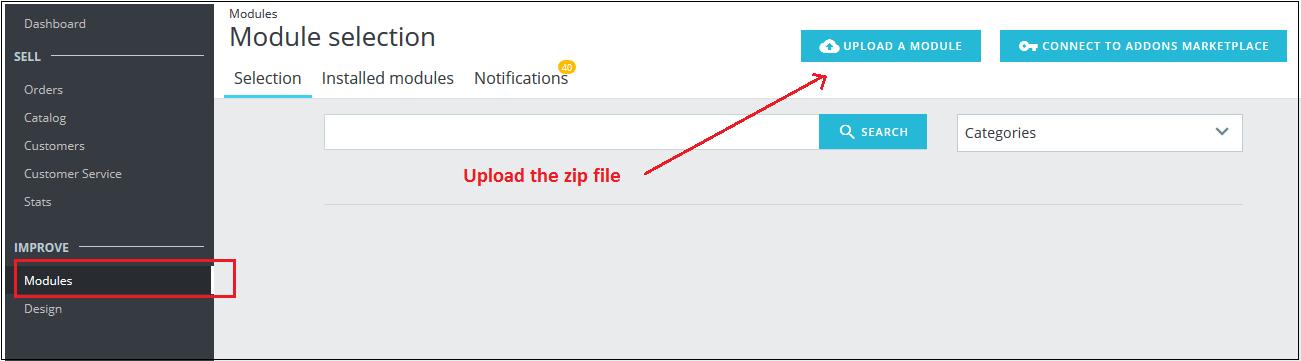
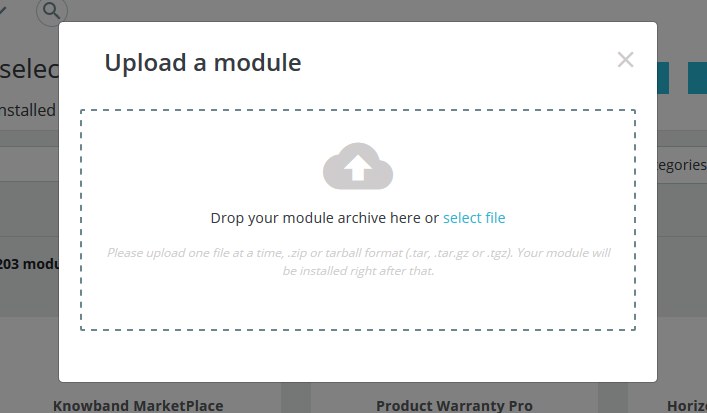
Go to the “Modules” section and click on the “Upload a Module” button. Select the “kbgiftcard.zip” file.
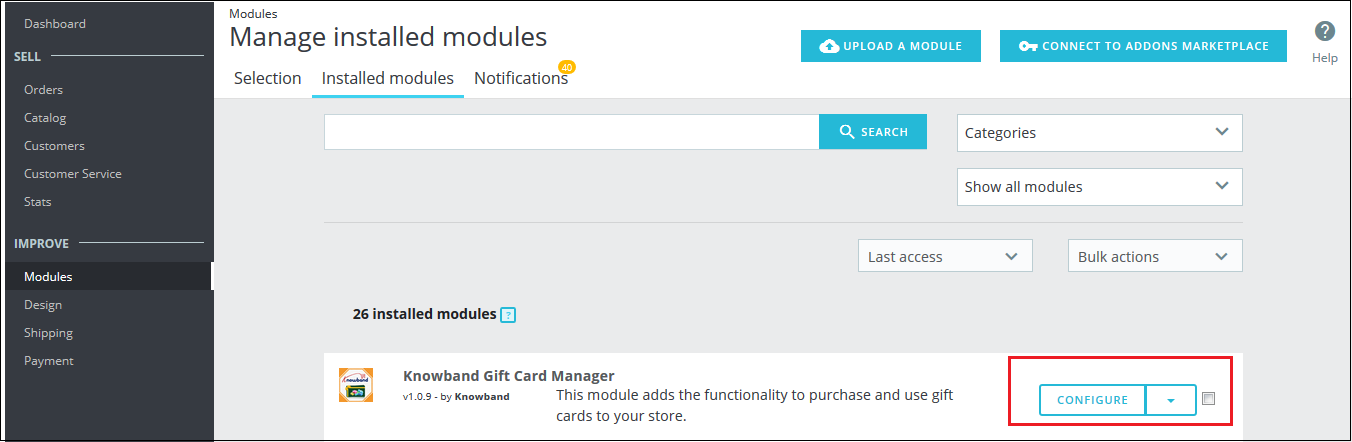
The PrestaShop gift card module is now ready for configuration. You can find that in Store Admin -> Modules. It would be shown as below –
You may even search for the module in the admin modules list by using the following details –
Keyword – Gift Card Manager
Category – Pricing and Promotion
Filter By – Installed & Not Installed / Enabled & Disabled
3.0 Admin Interface
The admin can enable and configure the PrestaShop Gift Card module by Knowband easily in a few simple steps. The admin interface of the addon has four customization options. They are below:
Module Configuration
Gift Card Templates
The Gift Card Products
Gift Card Orders
The various options are below in detail:
3.1 Module Configuration
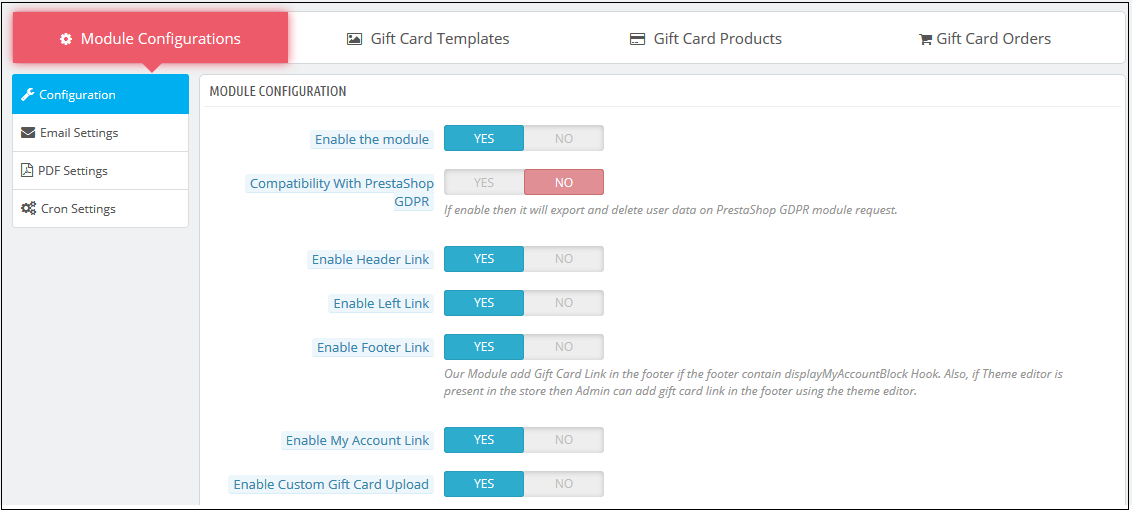
The ‘Module configuration’ tab of the PrestaShop gift voucher addon offers the four features to admin that are below:
Configuration
Email Settings
PDF Settings
Cron Settings
The following features are available in detail below:
3.1.1 Configuration Tab
When the admin comes to the configuration tab of the PrestaShop gift card extension. The configuration tab shows the multiple features that are shown below:
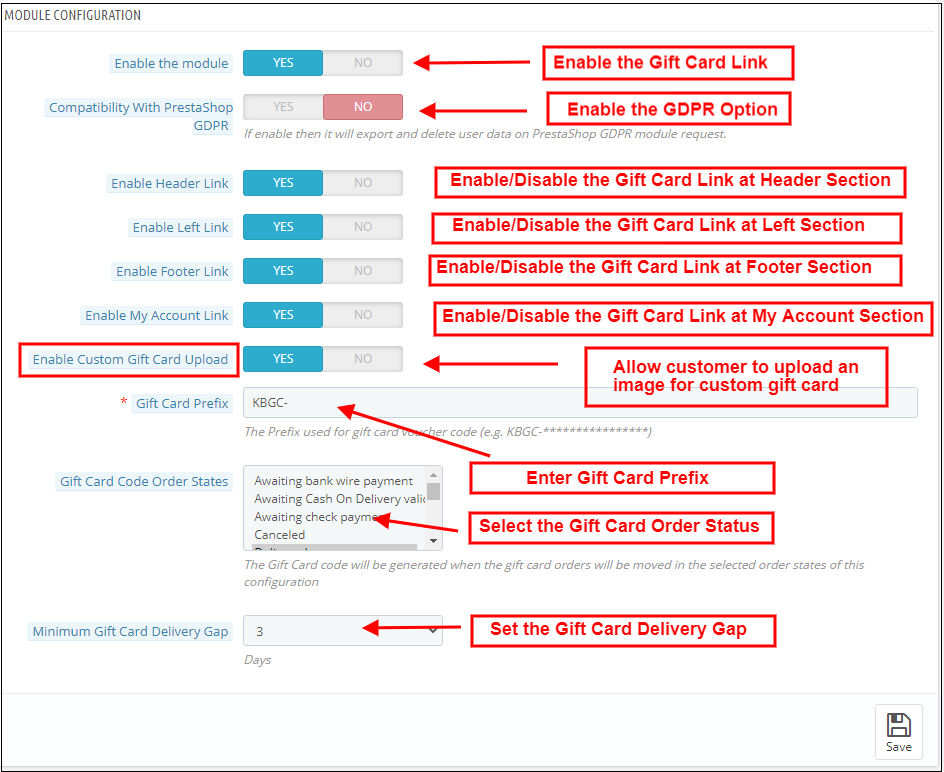
1. Enable the module: When the admin comes to the configuration tab of the PrestaShop gift voucher addon, he/she needs to enable the same from the backend. This happens with a button toggle as shown below.
2. Compatibility with PrestaShop GDPR: If the admin enables the settings, then the customers can access their GDPR rights to delete or export the customer data from their store
Note: If you are using the official GDPR module then you must need to enable this setting. The main purpose of this feature is to export and delete user data on the PrestaShop GDPR module request. It is also compatible with PrestaShop GDPR Module developed by Knowband.
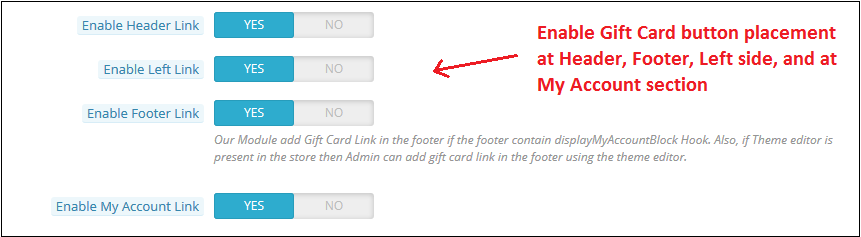
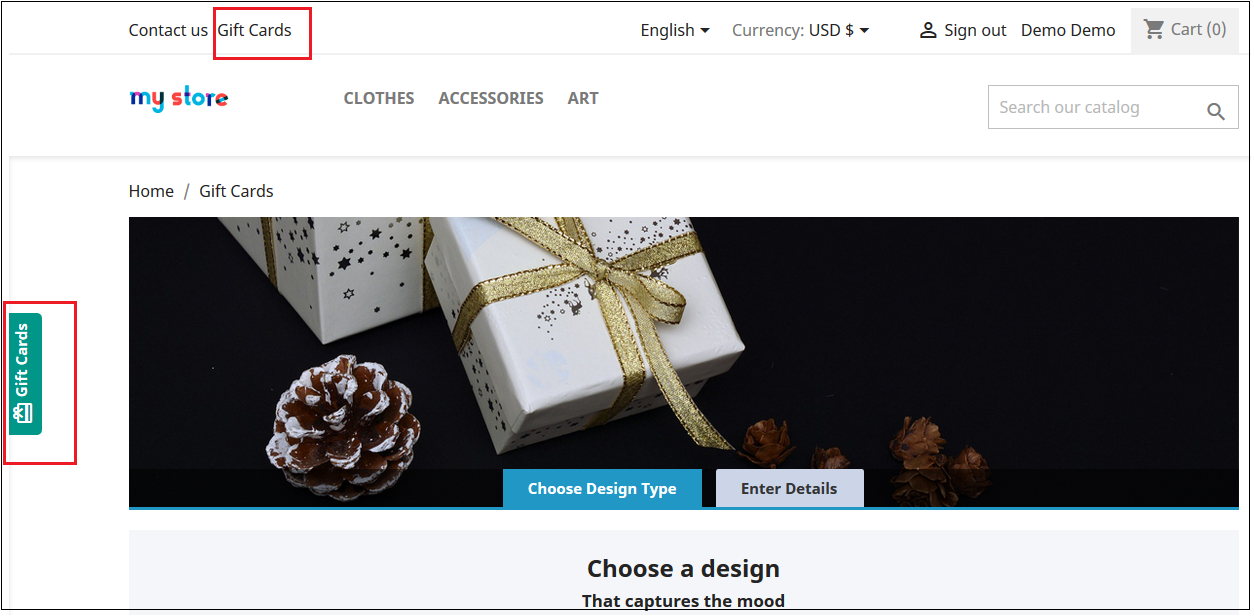
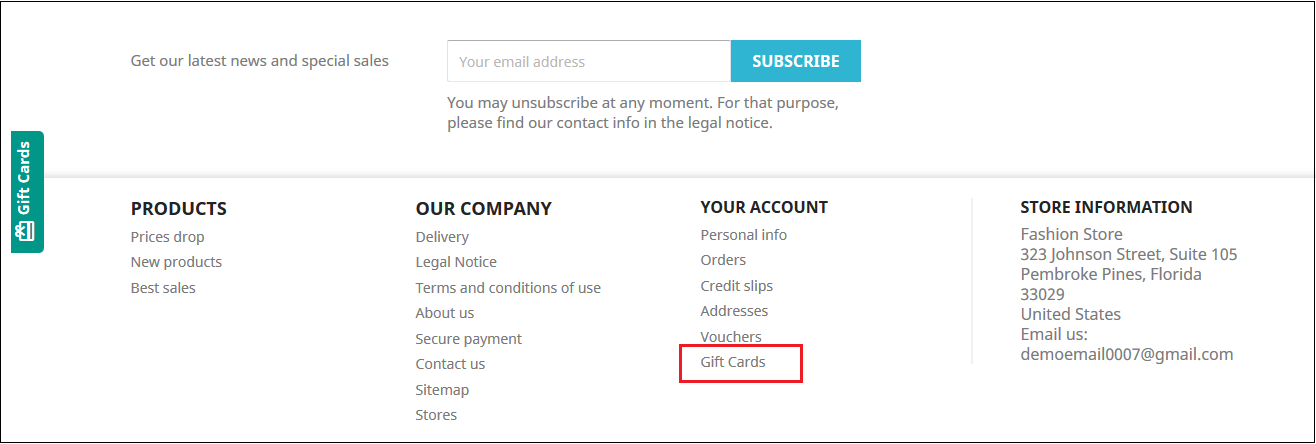
The link to the eCommerce gift cards can place on the web pages as per the requirement. The admin can enable or disable the link at the header or footer. It is placeable at the left side of the website where the visitors pay maximum attention. In addition, the option to redirect the customers to the ‘Gift card page’ can be provided in the ‘My Account’ page of the registered customers.
The links will be shown in the front-end of the website as shown below:
In the header & At the left side of the web page
In the footer
My Account Page
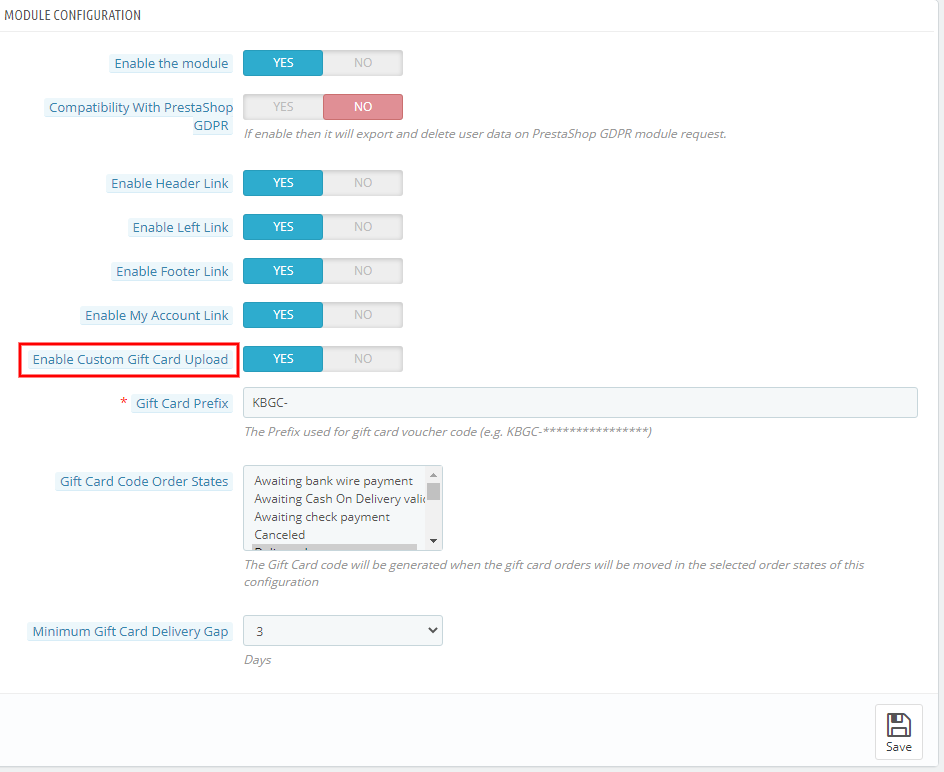
3. Enable Custom Gift Card Upload: If the admin enables this, the Gift Card Module allows users to upload an image to personalize a custom Gift cards.
4. Gift Card Prefix: In this option PrestaShop gift card addon the admin can set the prefix for the voucher code of the pre-paid gift card from here. The code enters in the format KBGC – ******
5. Gift Card order Status: The admin gets an option to select the status of the orders. The gift card code will be generated when the order is moved in any of the selected order states.
6. Minimum Gift Card Delivery Gap: The PrestaShop gift voucher allows the store admin to specify the minimum duration of the day. Further, when the order places and the day of the gift card delivery.
3.1.2 Email Setting
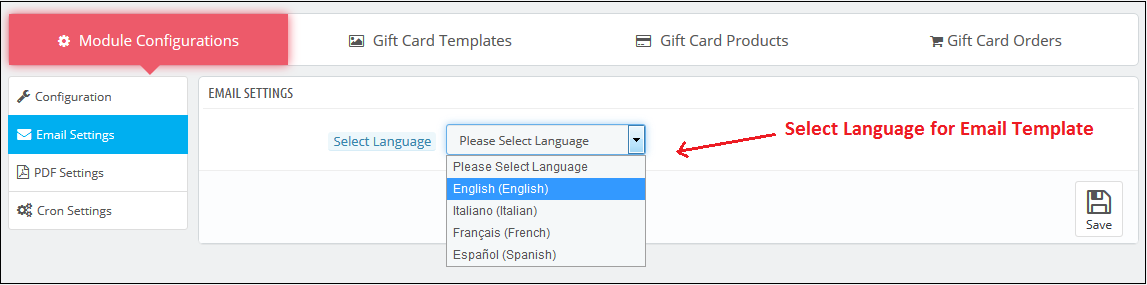
The customer gets an option to print the gift cards or else they can be sent to the receiver via email. The PrestaShop gift card module by Knowband offers default email templates that can be personalized as per the requirement of the store admin.
In addition, the PrestaShop gift voucher module offers multi-lingual support. The emails can be sent in various languages. The admin can select the desired language from the drop-down list.
Once the language is selected, the entire email right from the subject line to the content can be edited and personalized as per the requirement.
3.1.3 PDF Setting
The buyer can print the PrestaShop gift voucher module in PDF format. The PDF file of the Gift voucher can be printed in different languages. The admin can edit the content of the file. The changes made in the backend will be reflected in the PDF.
The admin needs to select the language as done in the email settings.
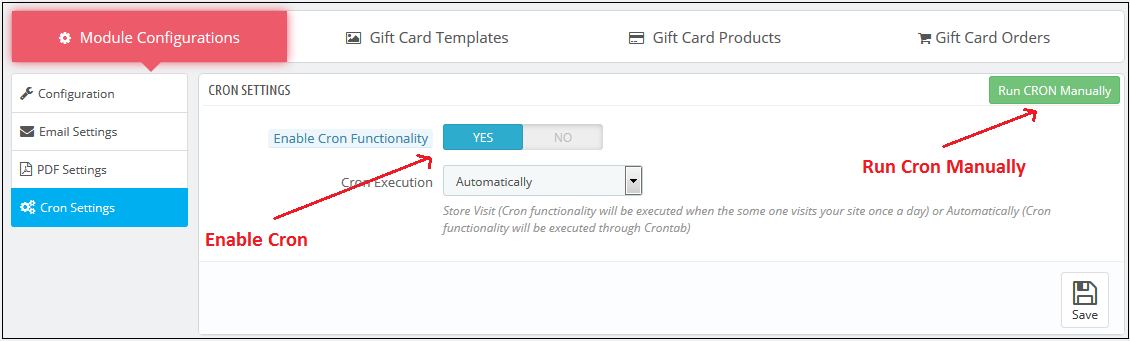
3.1.4 Cron Setting
You can add the Cron to your store via the control panel to send gift card vouchers automatically.
3.2 How to customize the template of the gift card?
3.2.1 Add New Gift Card Template
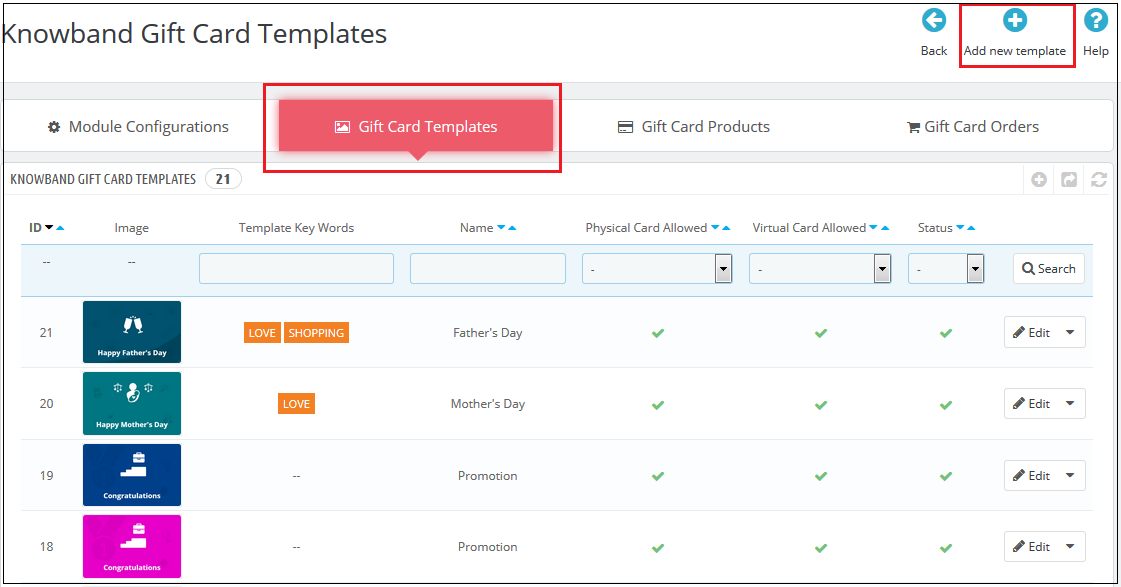
To create the new templates for the PrestaShop gift card manager addon, go to the Gift Card template tab and then click the ‘Add New Template’ option or ‘+’ sign at the top right side of the module.
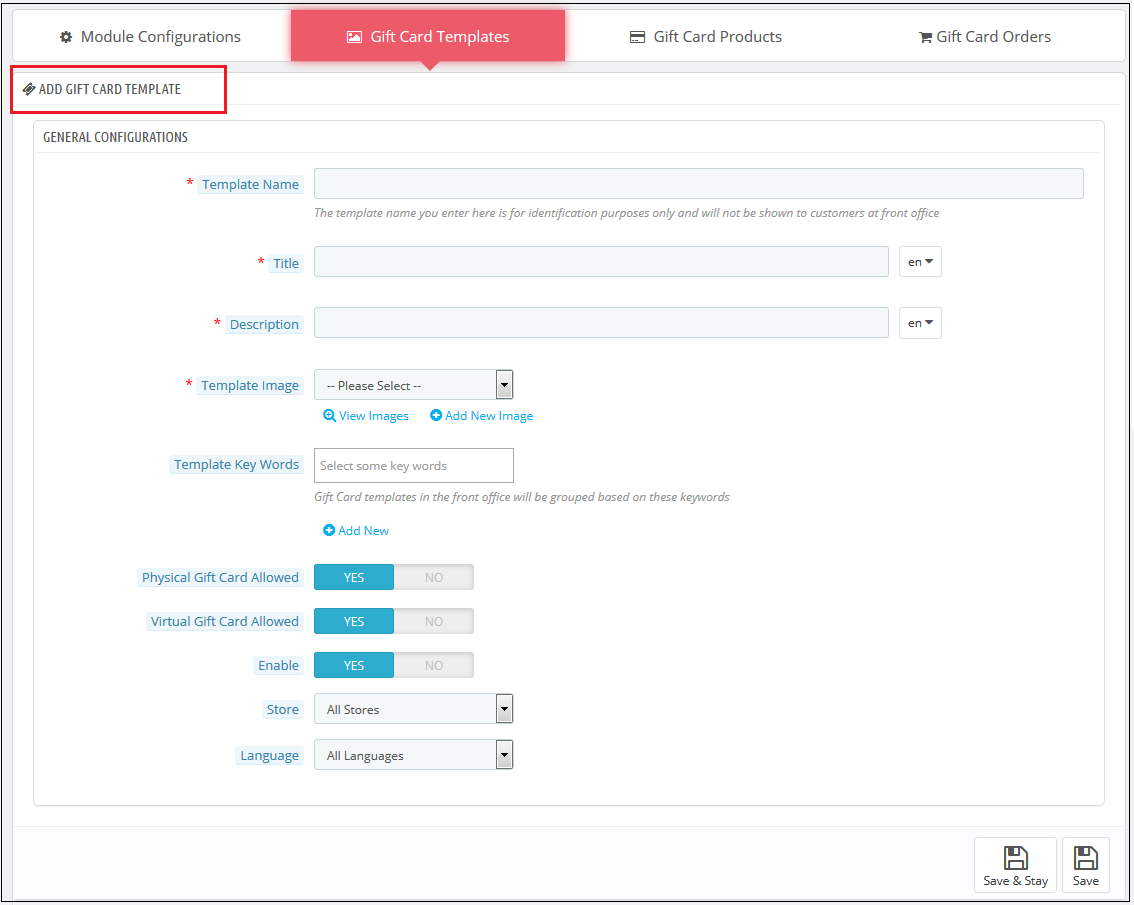
Fill up the information to create the template as shown in the image:
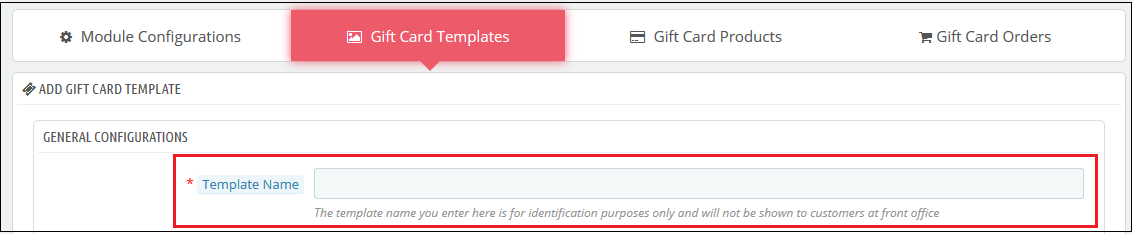
1. Template Name: The PrestaShop send gift card addon allows the store admin to name the template in this section.
2. Title and Description: With PrestaShop Gift Card Module, the admin can add a title and description for the Gift Card template.
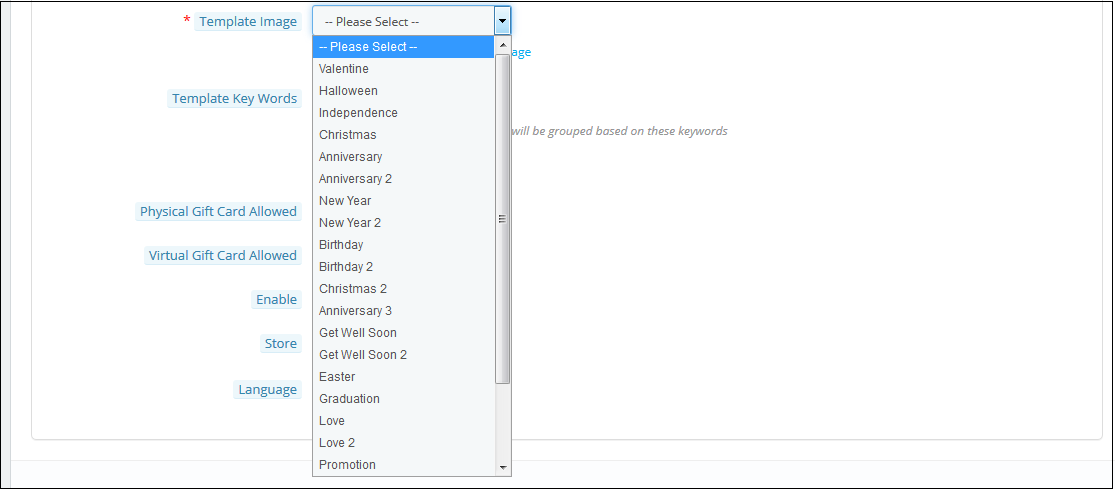
3. Template Image: The admin can select the image or the layout of the gift cards that will be shown in the front-end of the eCommerce site.
The images for the various occasions can be saved in the back-end of the PrestaShop gift card addon. The admin selects the occasion to find the image as shown below:
The store admin can even view the images for the various events that have been saved or can create a new image for the same.
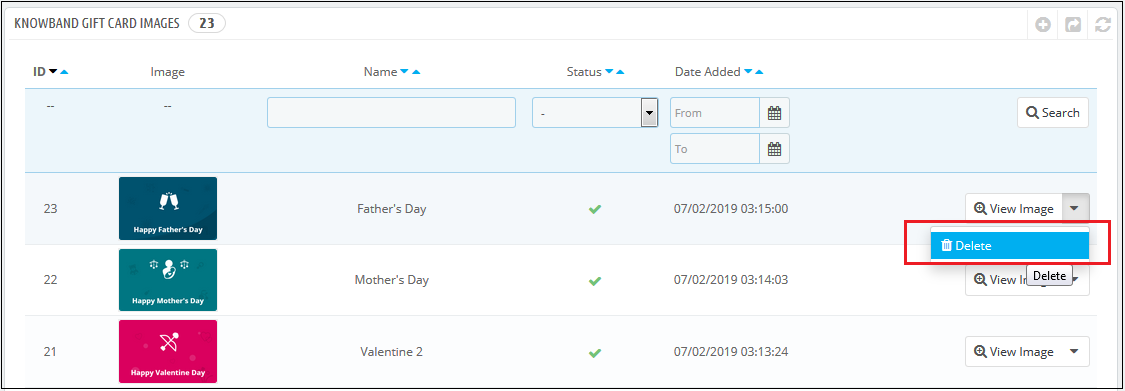
As you click on the ‘View Image’, you’ll head to the page below.
The list showcases the entire images that were created and saved. You can view the complete image or even delete it if is necessary.
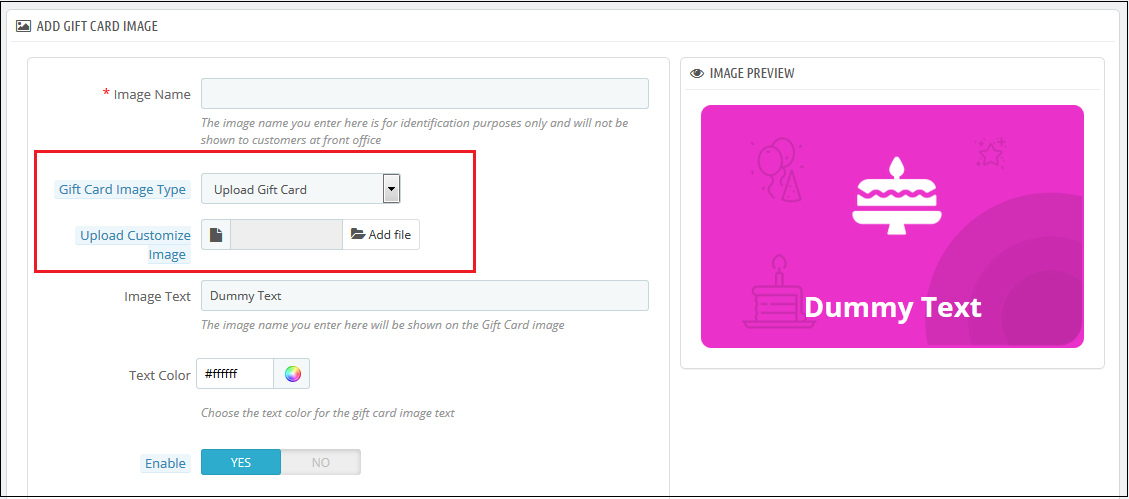
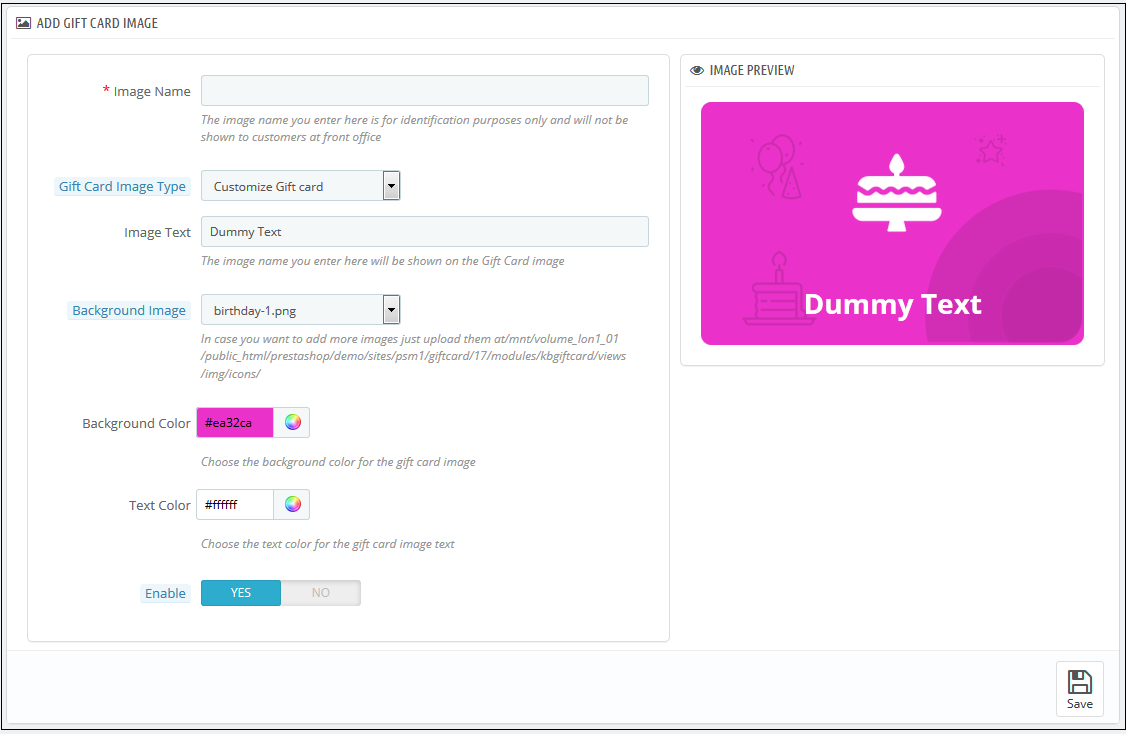
To create new images, click ‘Add New Image’ as shown below. The admin can choose a Gift Card Image Type. The store admin can customize the gift card or upload custom images also.
You can enter the image name and the text of the image to be shown on the gift card. Even the background image and color, as well as font color, can be changed at a button click. Preview the final image before making it live on the website.
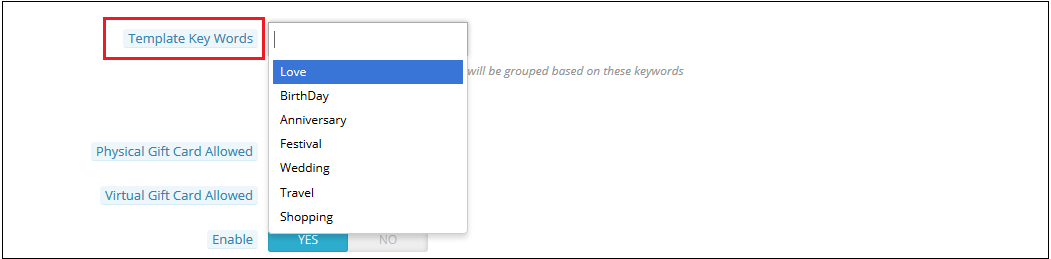
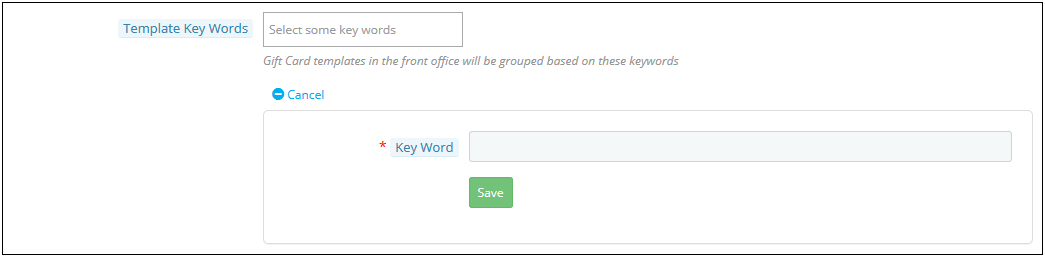
4. Template Keywords: The keywords of the gift cards can be selected from the list as shown below.
To create new keywords, click on ‘Add New’.
The admin can enter the keywords and save them here.
5. Physical Gift Card Allowed: The PrestaShop gift card manager addon by Knowband allows the store admin to enable the physical gift card for this template.
6. Virtual Gift Card Allowed: The functionality will allow the e-cards.
7. Enable: The functionality can enable or disable the template.
8. Stores: The PrestaShop gift voucher module is multi-store compatible. The admin can either enable the functionality in all the stores or can select anyone from the drop-down list.
9. Languages: The admin can select the desired language for the template from the drop-down list.
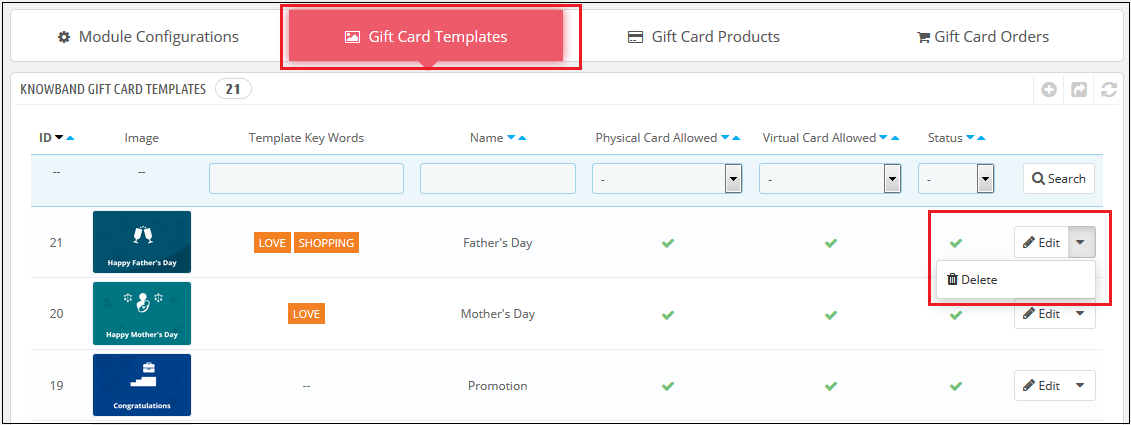
3.2.2 Edit Gift Card Template
The admin even gets an option to edit the template or delete from the section shown below:
3.3 How to customize the gift cards product?
3.3.1 Create New Conditions for the gift vouchers
The e-merchants can customize the pre-paid gift card products in a few simple steps.
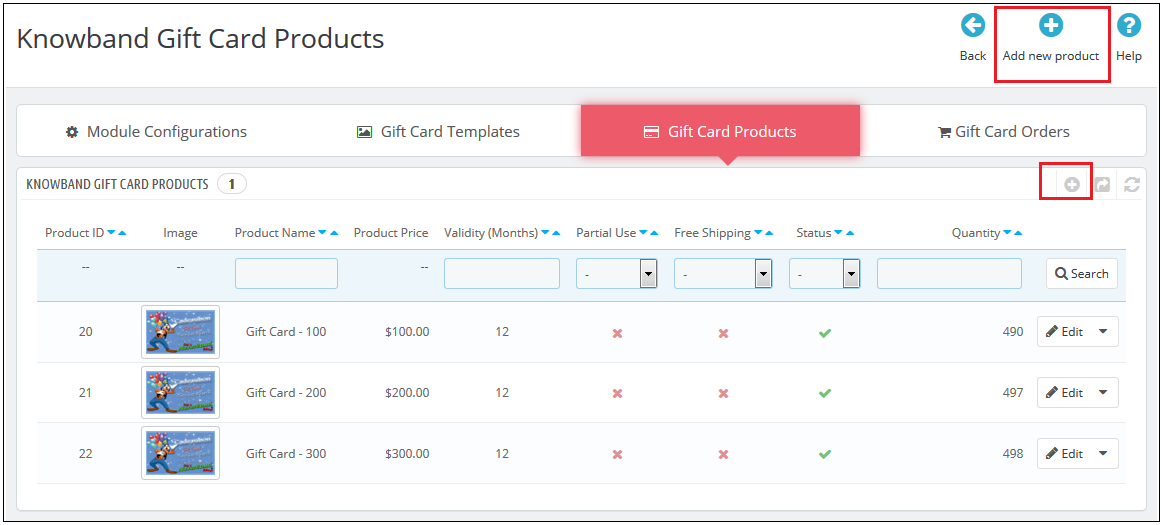
In the ‘Gift Card Product’ tab go to the ‘Add New Product’ or click on the ‘+’ sign in the top right section.
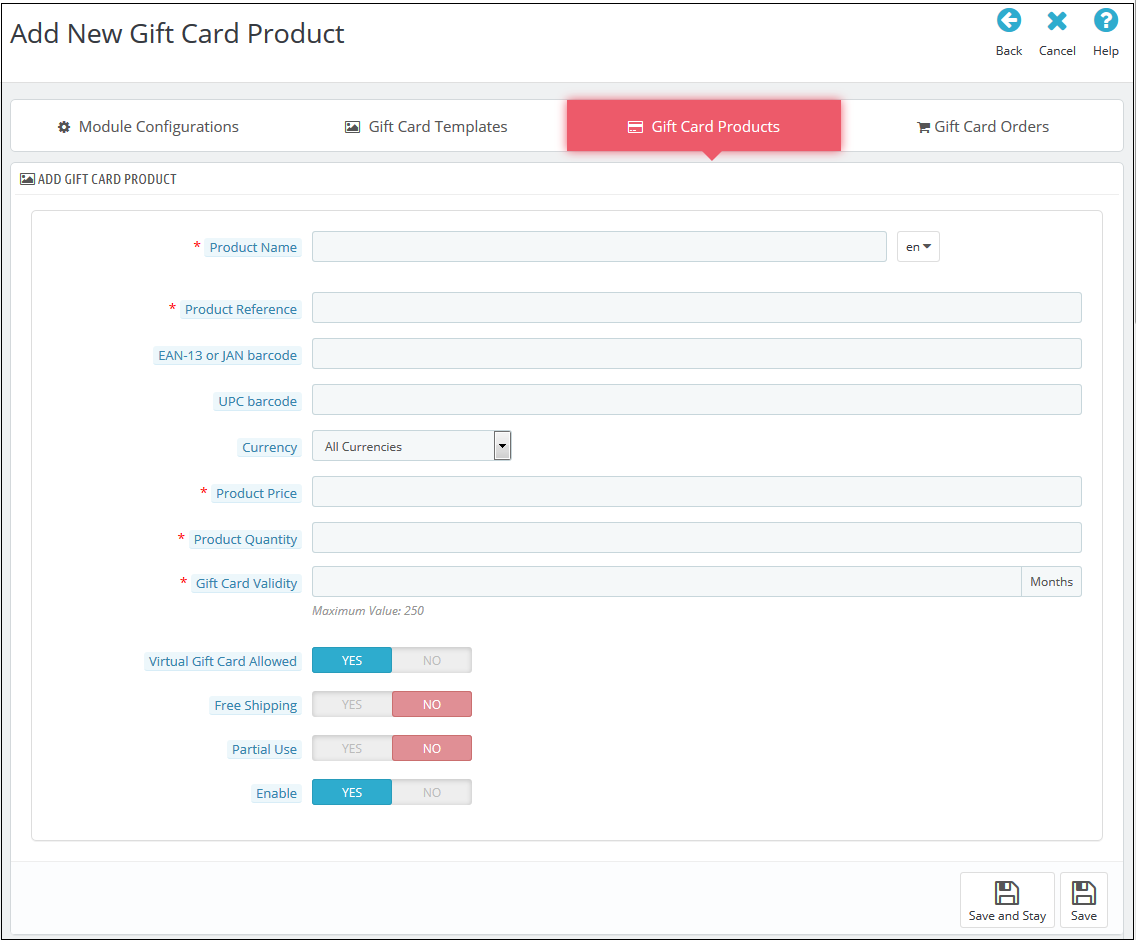
Below is the information that you need to provide for creating the product.
Product Name: Enter the name of the product here. It can be Happy Anniversary, Happy Birthday, Merry Christmas, or any other.
Product Reference: This includes the unique reference id. The admin can enter the internal reference code as per the requirement.
EAN-13 or JAN barcode: This product code is widely used internationally, but is specifically included for Europe and Japan. It is a super-set of UPC code and will be acceptable in North America.
UPC barcode: This product code is acceptable in almost all countries.
Currency: The admin can select the currency for the card from the drop-down list.
Product Price: The gift card amount enters here.
Gift Card Validity: The validity period in months of the gift card enters here.
Virtual Gift Card Allowed: Enable e-card by switching on the button.
Partial Use: The eCommerce seller can even allow partial use of the voucher amount.
Enable: The admin can enable or disable the PrestaShop gift voucher module from here.
3.3 Track the order for the gift cards of the site
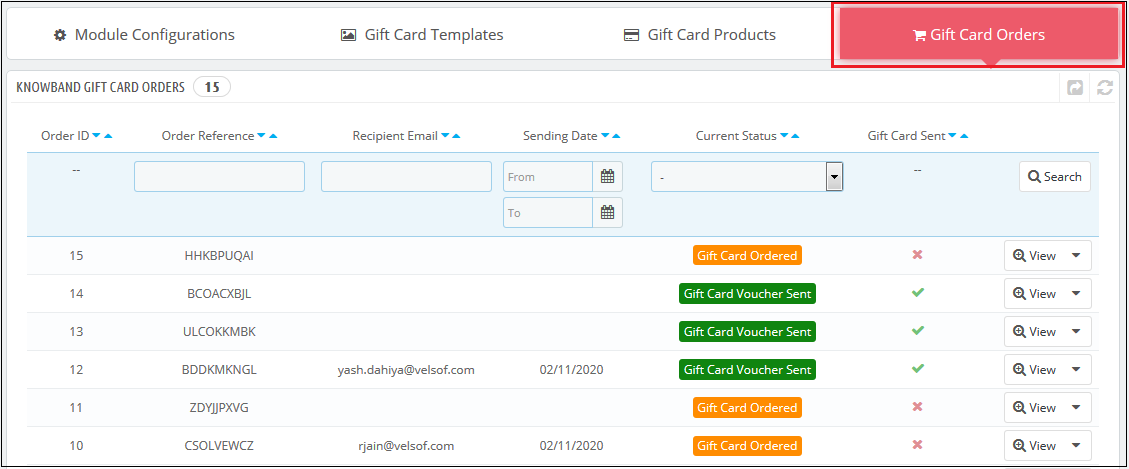
The Gift Card Order tab provides the entire list of the orders received for the gift cards. It involves the recipient email, date of sending as well as the status of the gift cards.
In the ‘Gift Card Order’ tab go to the ‘View’ button in the right section. This section shows the entire information about the order.
4.0 Website UI
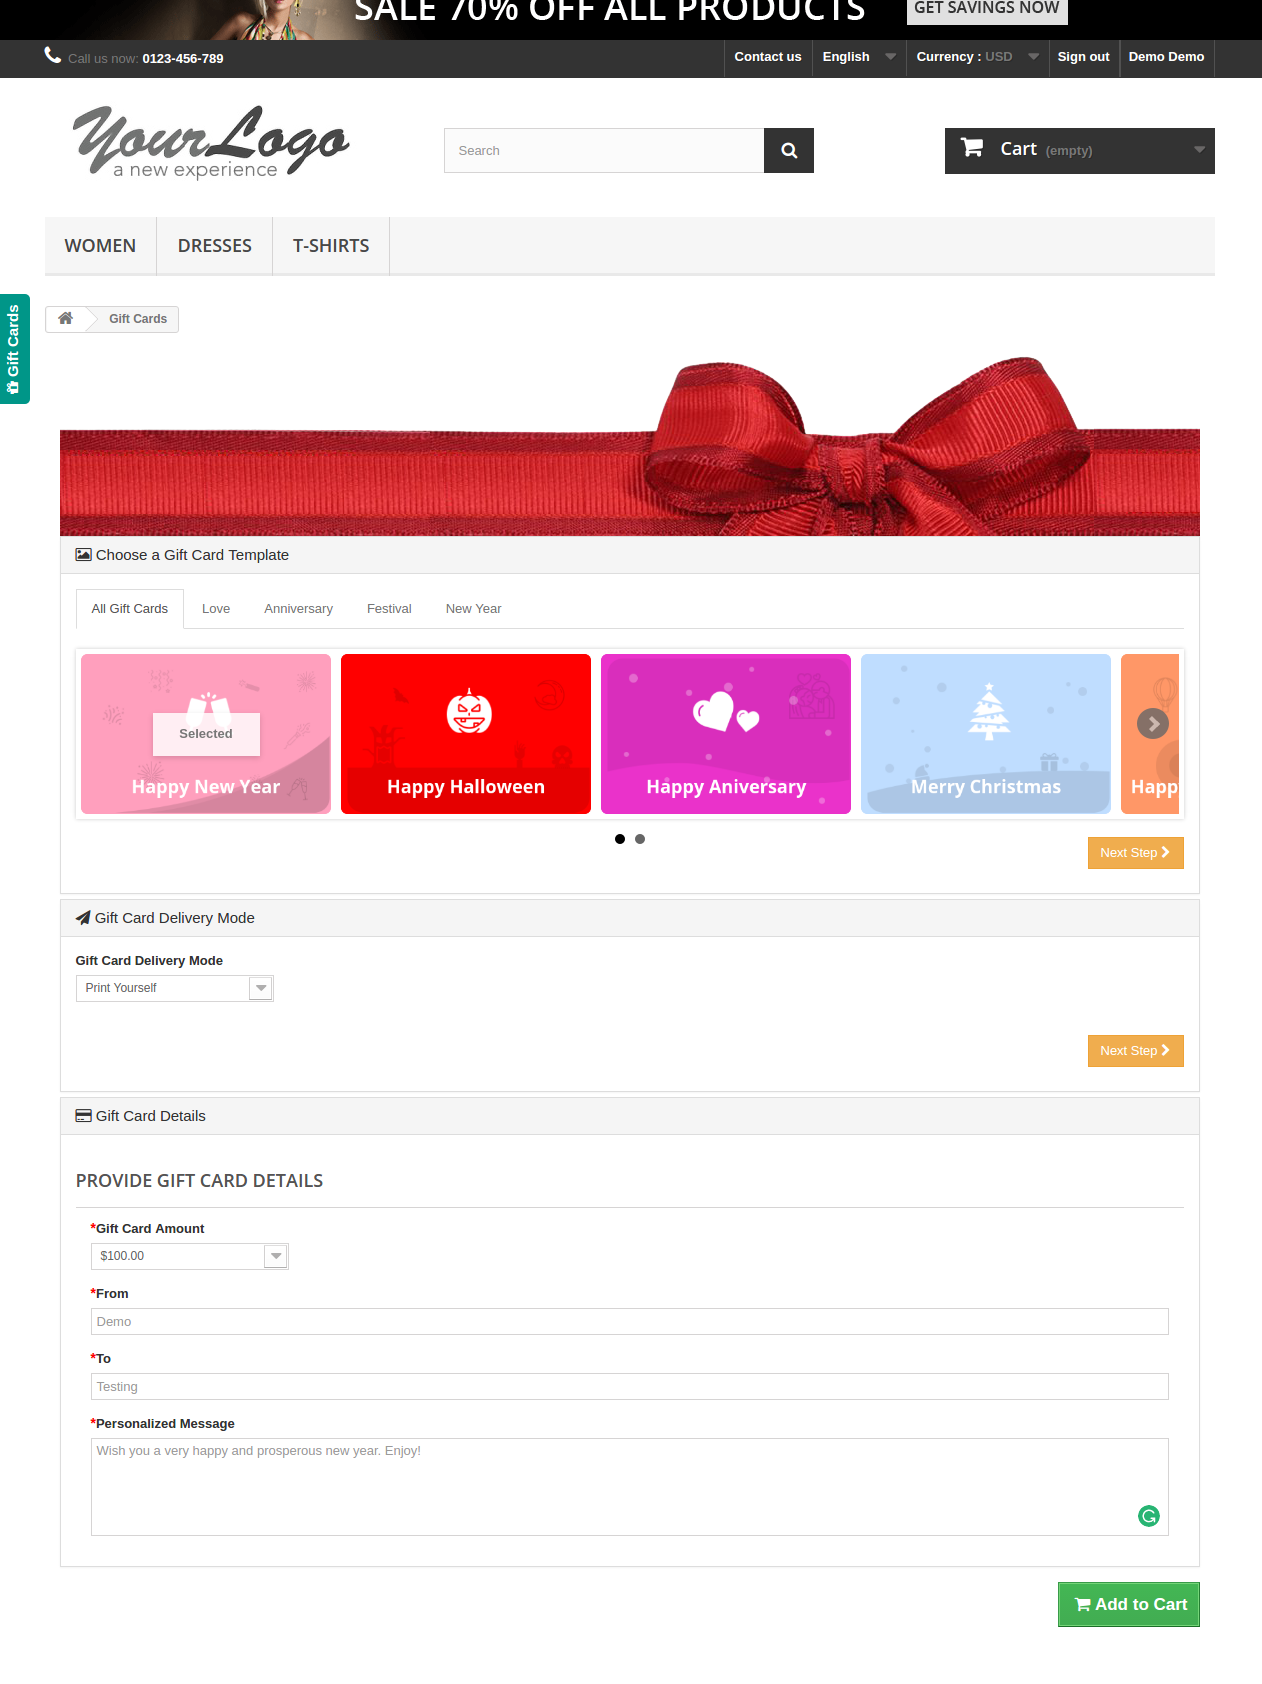
The links to the gift cards page can be viewed in the front end as opted by the store admin. Once the store visitors click on the link, they will head to the gift card page of the site.
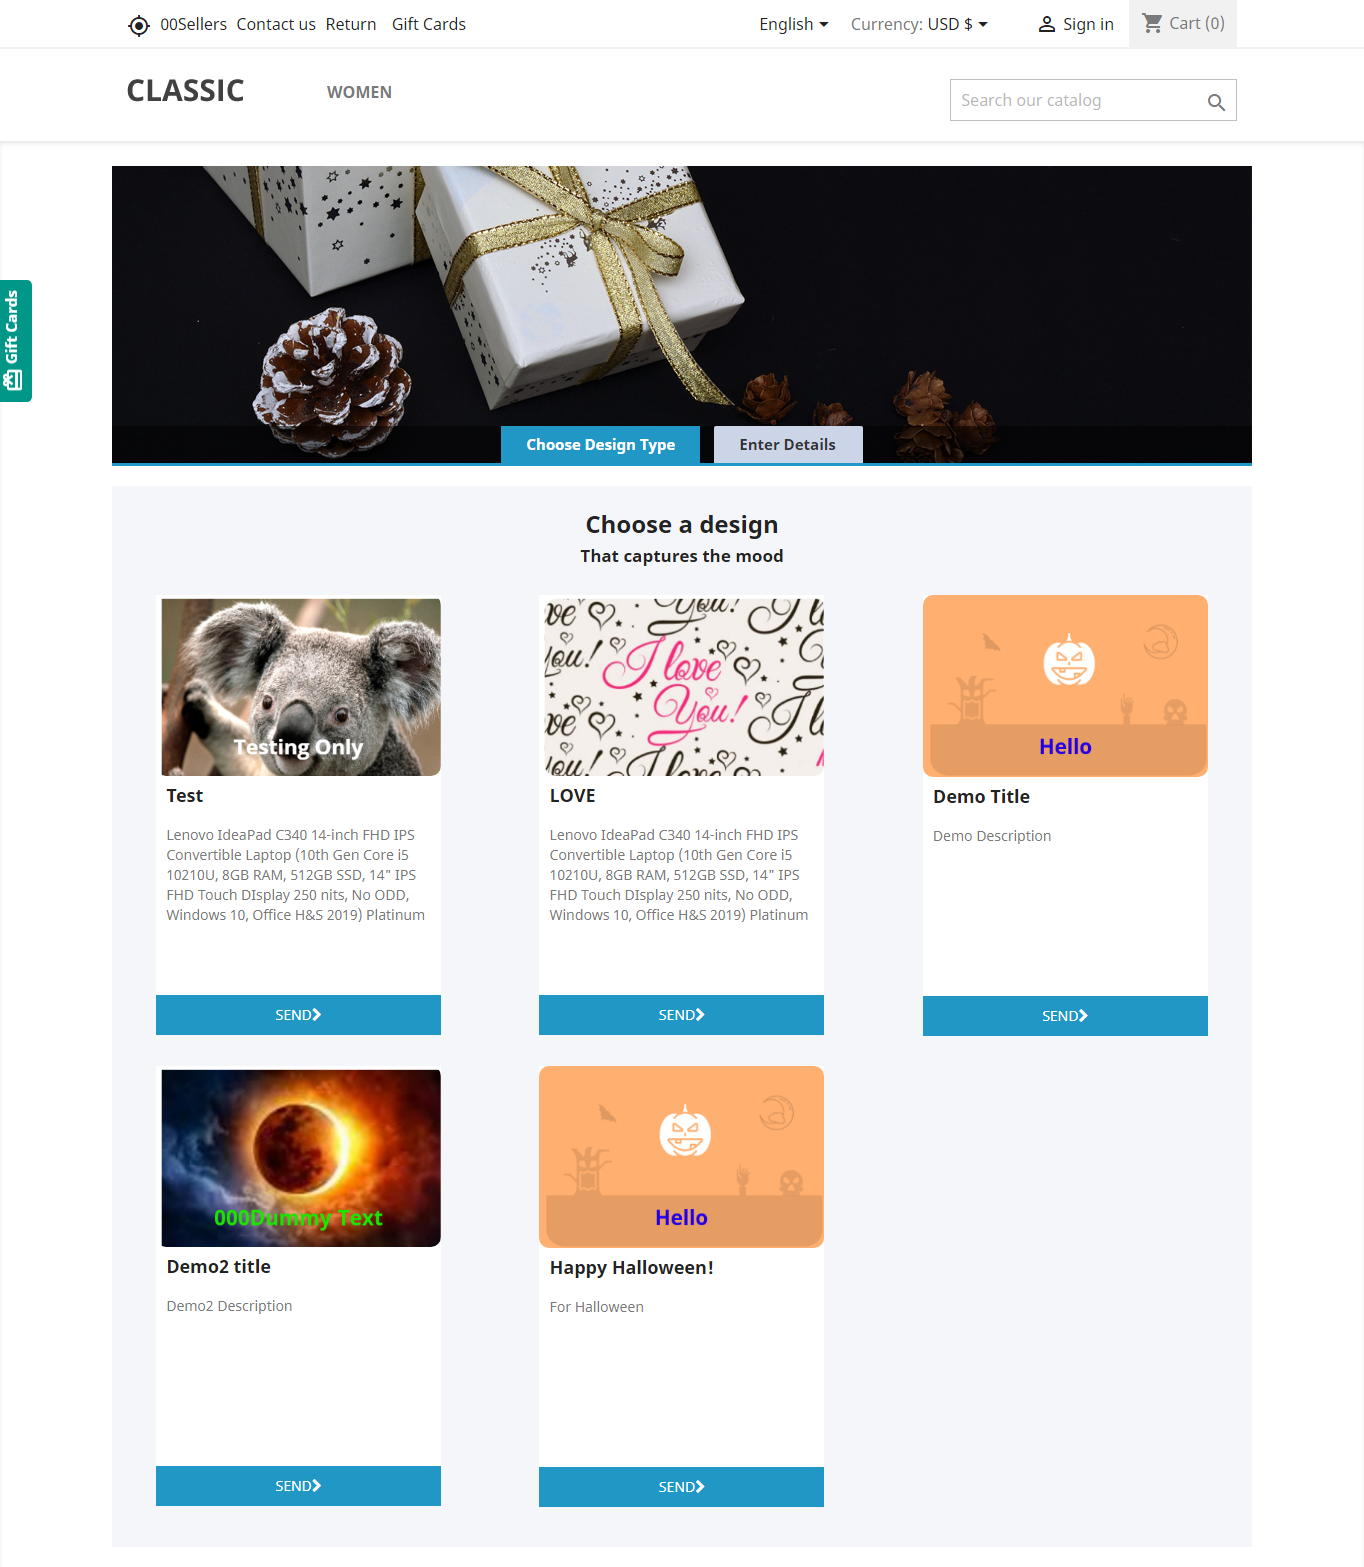
The PrestaShop gift card manager addon by Knowband is the front-end of the website will be shown very similarly to the image below:
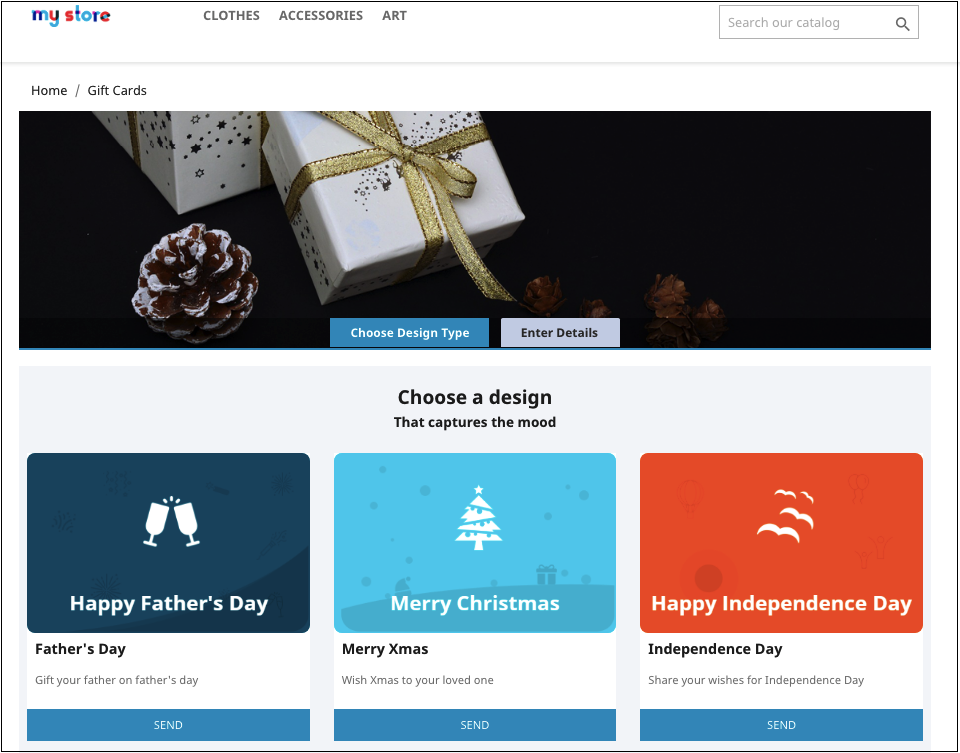
Shopping for the same is easy. The customers can select the card for different occasions. For instance, he chooses the Happy Halloween card. All he needs to do is to click on the Send button of the card.
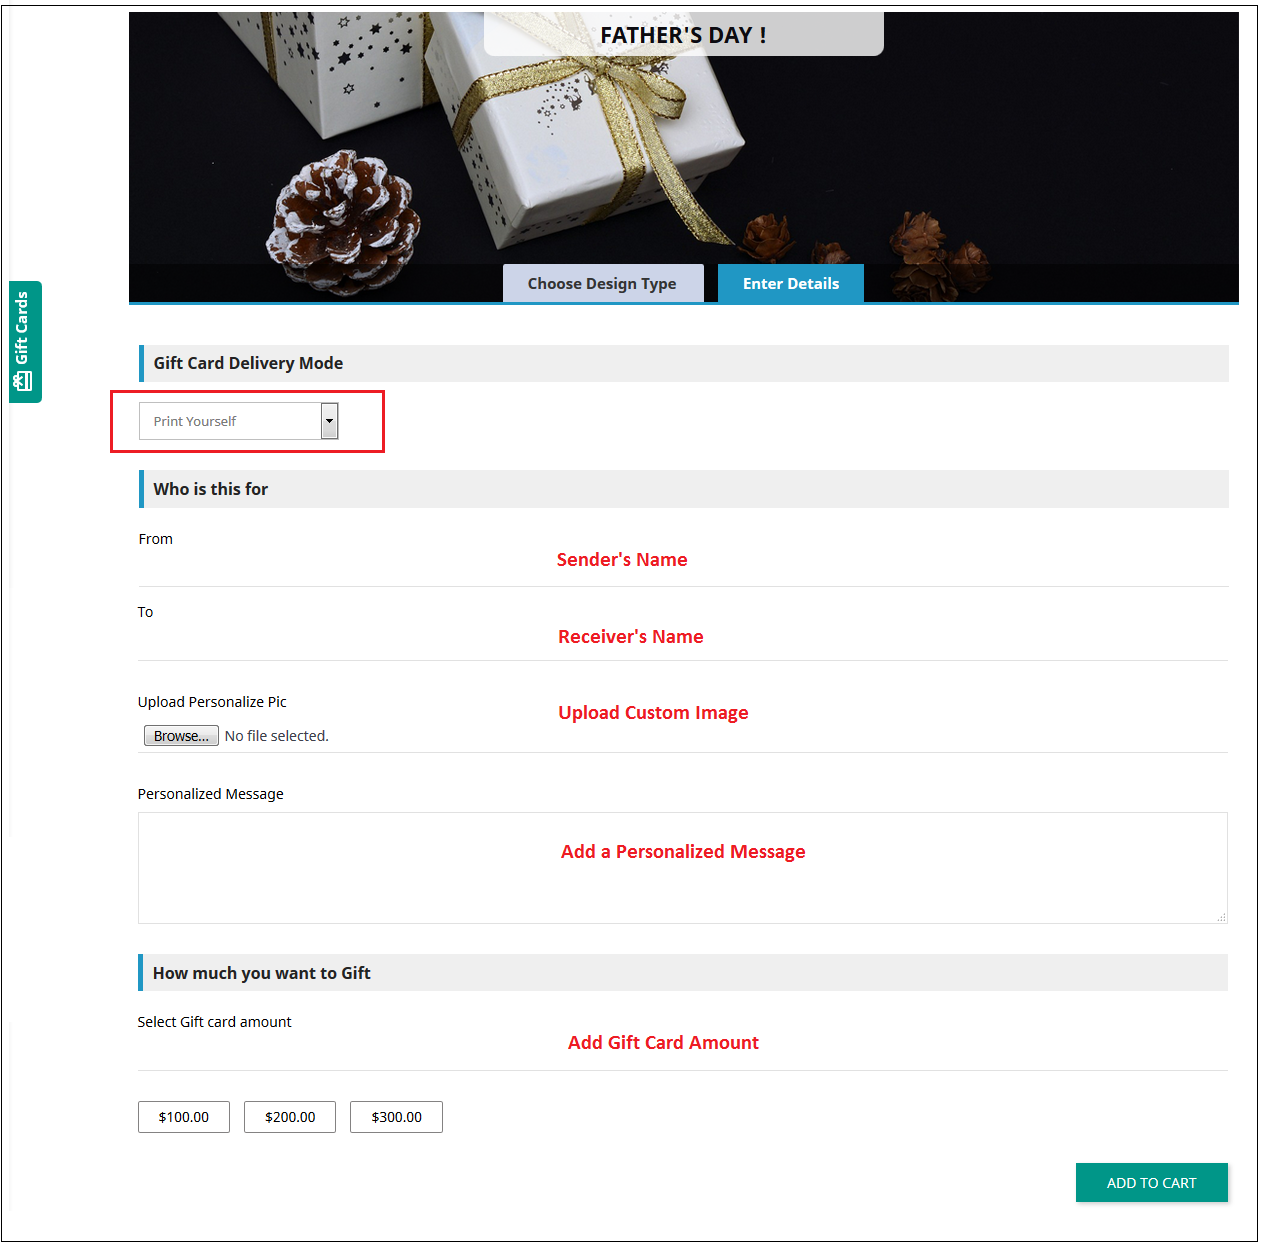
The customer will head to the ‘Enter Details’ page where he can add all the needful details.
He can print the card or send it via email. The sender and receiver names along with the message can be mentioned in the section as shown below.
Upload Image: The sender can upload a custom image for a Personalised Gift Card.
Print By Yourself: Insert the details to print the gift card.
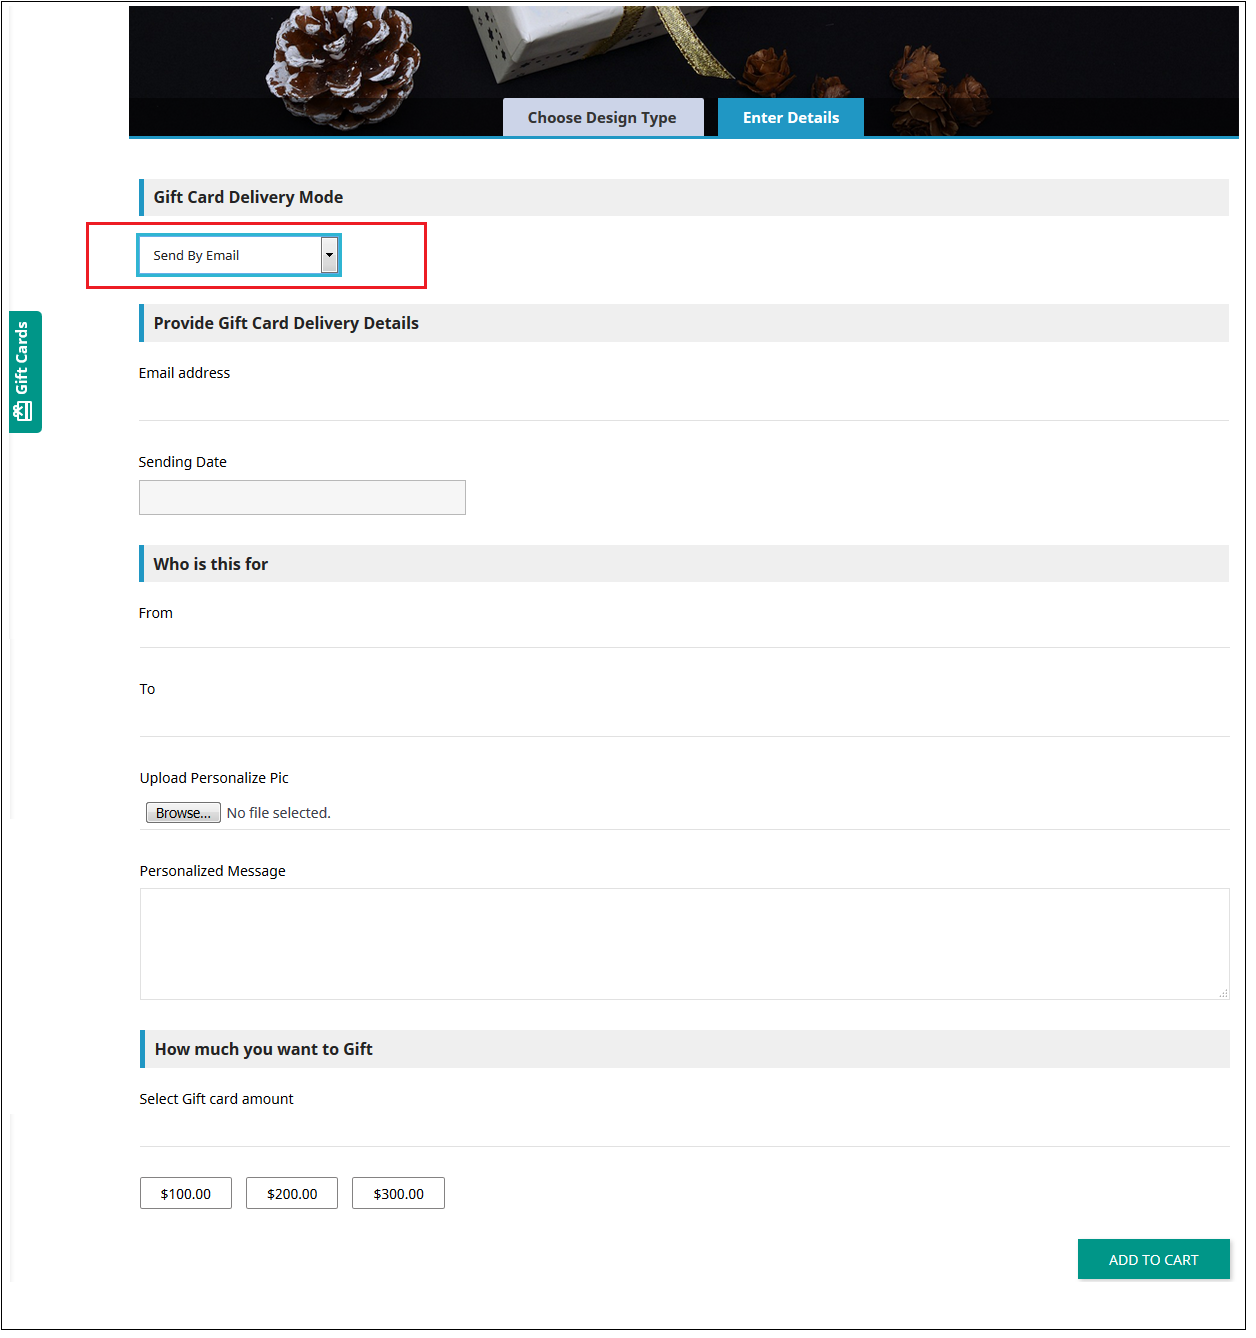
Send via email: Add the email address of the receiver, upload a custom image, and a note for your loved one.
Add the product to the shopping cart and proceed to the checkout page. The gift card will then be sent to the receiver.
Now you want to buy gift cards for your near and dear ones this PrestaShop addon is a way to connect with you with just one click. KnowBand PrestaShop Gift Card Module helps you engage more customers to your store.
Tutorial: Watch the Video Guide
To help you set up and use the PrestaShop Gift Card Manager Module, we have created a detailed YouTube tutorial. The video explains the installation process, configuration options, and how to manage gift cards step by step.
With the help of Prestashop SEO Wizard Addon the Prestashop store admin can enhance the visibility of the eCommerce site in a hassle free way. The Knowband Prestashop SEO Wizard module simplifies the most time-consuming works of SEO by automating the entire process. The Prestashop Merchant can now create the sitemaps or the XML files for the web pages as well as interlink URL of targeted pages with the anchor text at a button click. The site mapping can be done in multiple languages.
Searching the keywords in the contents of the site and then manually adding the links was quite a task earlier, but not anymore. The Prestashop SEO Wizard Module makes the entire process automated. It searches for the keyword in the long or short description in the front-end and adds the links automatically. Even the meta tags for the web pages can be added from the admin interface. You can optimize the product, category, manufacturer or even the CMS pages in a few simple steps. Become an SEO expert and let your web store rank higher in the SERP of the various search engines.
1.1 Project Objectives
Prestashop SEO expert addon offers a number of optimization options. Some of them are listed below:
1. The Prestashop SEO module allows the admin to create the XML file of the various web pages at a button click. Easing out the task of sitemap creation, the website can now rank be fetched by Google in minimal time.
2. The Prestashop SEO Wizard Addon searches for the specified keywords from the content of the website and attaches relevant links to it in minimal time.
3. The priority of the web pages, as well as the frequency of web crawling, can be set as well.
4. The store admin can include the nofollow or dofollow as per their wish. At the same time, the option to open the links in new tab can be incorporated without making any code changes.
1.2 Benefits of the Merchant
With the help of this Prestashop SEO Wizard Extension, the Prestashop store admin can create the XML sitemap of the PrestaShop as per desires.
The Store admin has access to set the priority if the web pages as per need.
This Prestashop SEO Expert addon allows the admin to set the frequency of the crawling as his/her requirement.
The Merchant can enable/disable the image option in the sitemap.xml file of the product pages.
The Prestashop SEO Expert Addon allows the e-merchant to enable/disable the sitemap at any time.
The Prestashop SEO addon gives the option to the store admin to add the link on the targeted keywords of the entire site as their need. It saves a lot of time to the admin.
The Admin can already add interlink on the targeted keywords edit or delete as per desires.
This Prestashop SEO Wizard addon enables the admin to keyword for the interlinking is searched in the short or long description of the products.
With the help of this Prestashop SEO Wizard module, the store admin to add the follow or no follow a link and it also allows the admin to open the link in new tab.
This Prestashop SEO expert module allows the store merchant to optimize the meta tags, meta title, meta description of the products, manufacturer, and categories page.
The Admin can optimize the products, categories, CMS, Manufacturers, product meta tag, update category meta tag and update manufacturers meta tags of the website incorporated in the front-end of the website from the Optimization Setting tab.
The entire interlinking is done from the back-end of the Prestashop XML file creation module.
The Prestashop SEO Expert extension allows the admin to restore the initial data via the group.
This Prestashop automated site interlinking Module in multilingual support.
This Prestashop SEO Wizard extension compatible with multiple stores.
Prestashop Sitemap generator Module for SEO helps the merchant to improve the visibility of the website.
2.0 Installation
After purchasing the Prestashop SEO Wizard Module, you’ll get following files as listed below:
1. kbseowizard.zip (contains source code of the module)
2. User Manual
Follow the steps mentioned below to install the extension:
Unzip the kbseowizard.zip file. It would contain files and folders as shown in the image below –
Copy all the files and folders from the extracted folder and paste them into “Modules” directory of your store. Follow the path – Root Directory/modules/.
3. The Prestashop SEO addon can be installed on your store now. You can find that in Store Admin -> Modules and Services. It would be shown as below –
You may even search for the module in the admin modules listwith the following details –
Keyword – SEO Wizards
Category – Front office
Filter By – Installed & Not Installed / Enabled & Disabled
4. Click on “Install” button to install the Prestashop SEO Wizard extesnion. It would show a pop-up for your confirmation. Click on “Proceed with the installation” option. This step will install the Prestashop module and show notification – “Module(s) installed successfully”.
3.0 Admin Interface
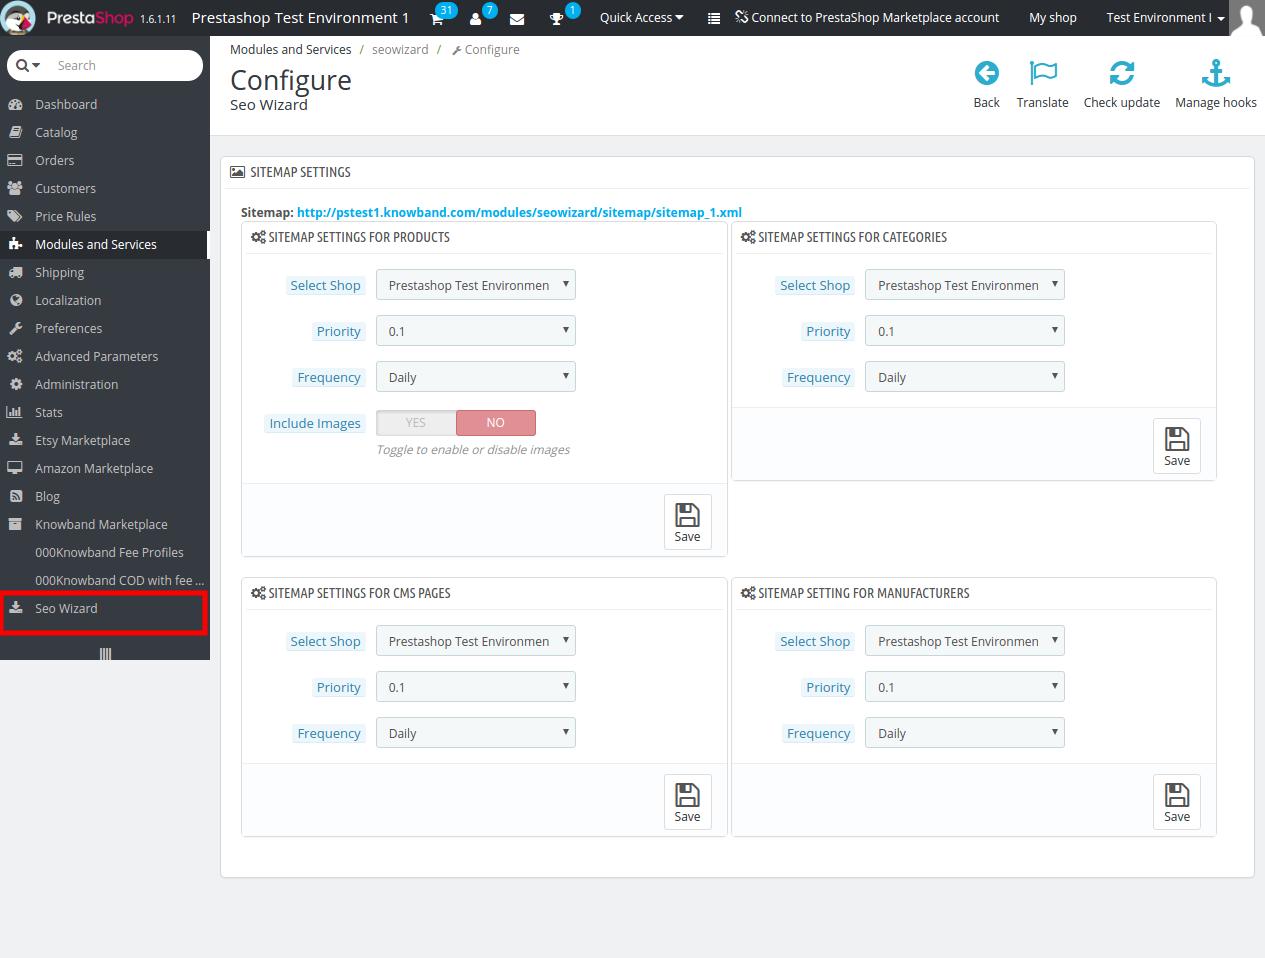
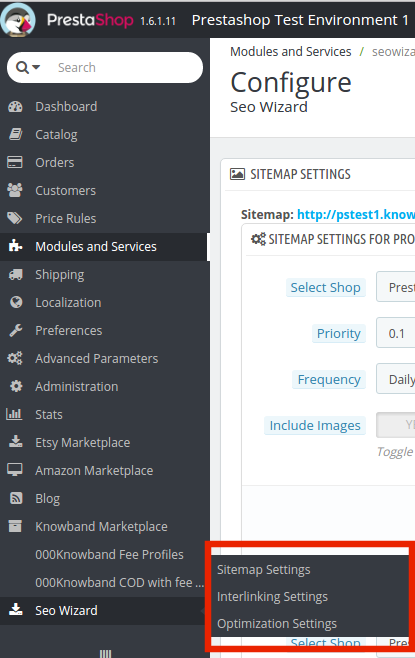
This Prestashop module allows the e-merchants to enhance the various SEO aspects of the site. Right from the sitemaps to the interlinking everything can be done in one link. This is the most time consuming and tedious task for the e-marketers. The Prestashop SEO wizard addon makes it simple and a matter of moments. You can find the Prestashop SEO expert extension in the main menu of the admin interface.
It basically offers four optimization options. They are listed below:
SiteMap Setting
Interlinking Setting
Optimization Setting
Meta Tag Settings
3.1 How is the Site Map created?
The site map of the web pages makes it easier for Google to find your sites. The creation of .XML file involved a lot of steps, but it can now be done at a button click.
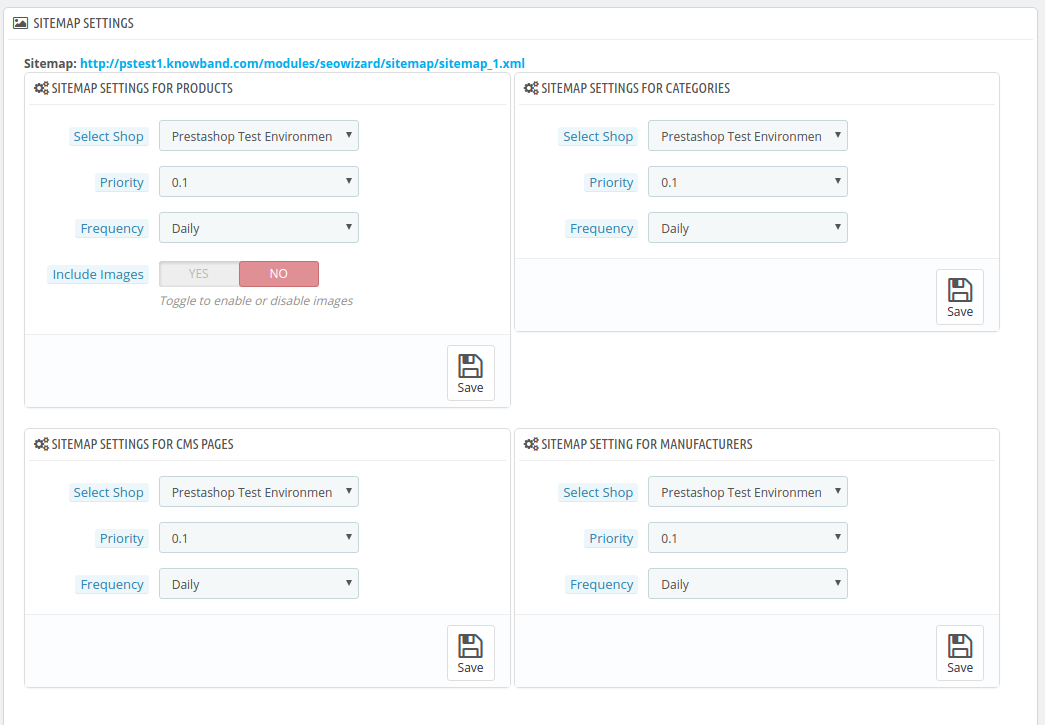
The Prestashop SEO addon allows the admin to create the sitemap or the .xml file for four different web page types. They are:
For Products
For Categories
For CMS Pages
For Manufacturers
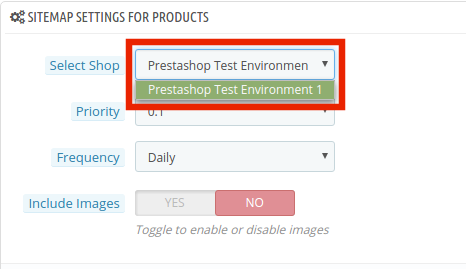
The Prestashop SEO Expert Extesnion is multi-store compatible. The admin can Select Shop from the dropdown menu in which they are looking to include the optimization option.
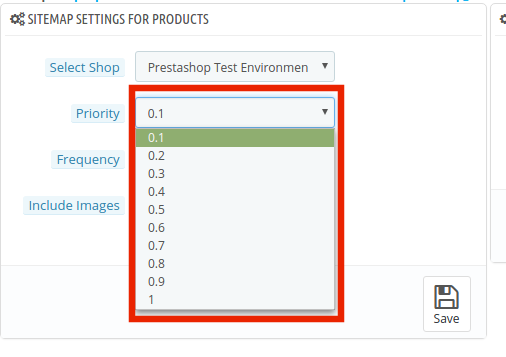
In addition, the admin can set the priority of each web page type as per the need. All he needs to do is to select the priority rank.
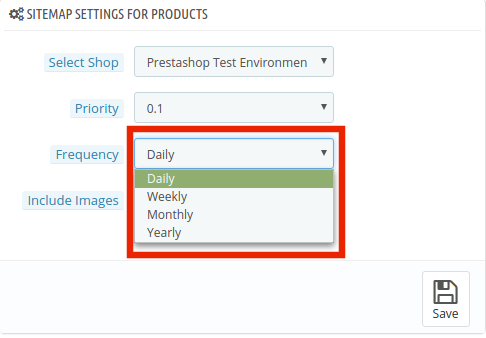
The frequency in which you want Google to crawl the web page can be selected. The crawling frequency can be set on Daily, Weekly, Monthly and Yearly basis.
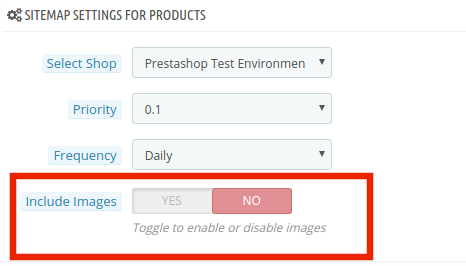
In addition, the admin can include the sitemapping of the product images just by a button click.
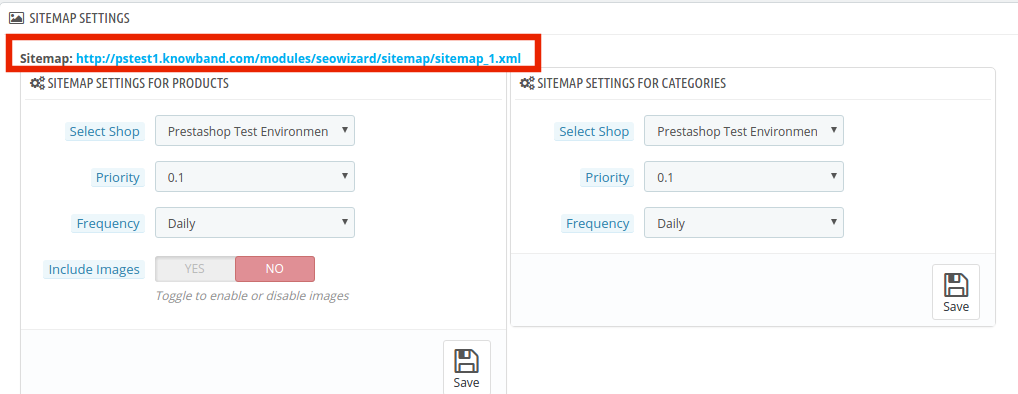
Make the changes and click on ‘save’. The .xml file will be created automatically. The link of thesame can be viewed at the top as shown in the image.
This Pretashop SEO wizard addon shown the xml file is obtained in the usual format.
The same process is followed in all the four web page types.
3.2 How is the Interlinking done on the site?
3.2.1 How is the new links created?
The Prestashop SEO Wizard extesnion allows the admin to add links to the keywords mentioned in the website in one go. Once the keyword and the link are mentioned in the back-end, the Pretsahop addon fetches for the word in the short description of the product pages and other web pages. The keywords are then converted to the anchor tag and specified links are attached to it.
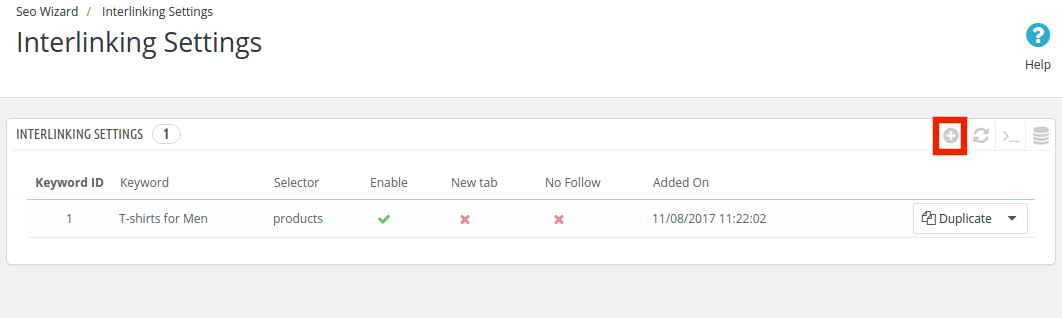
In order to do the interlinking, go the ‘Interlinking Setting’ of the Prestashop SEO expert module. It shows the list of the already created links and keywords. In order to create new once, click on the ‘+’ in the top right section.
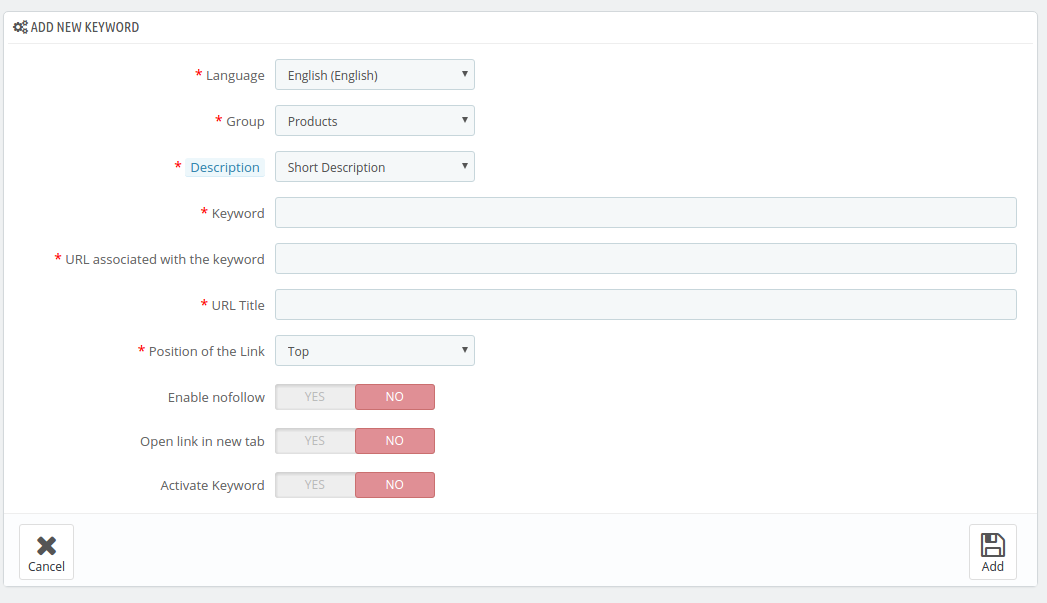
Enter the information required in the admin interface.
Language: The Prestashop SEO Wizard module offers multi-lingual support and the changes can be done in various languages.
Group: The group or type of web page, that is, Product, Manufacturer, CMS pages or Categories, can be selected from here. The interlinking will then be done in those pages only.
Description: This field is only for the product pages. The merchant can either select the ‘Short’, ‘Long’ or ‘Short and Long’ description. The keyword entered will then be searched in the selected descriptions and interlinking will be done in the same.
Keyword: Enter the keyword that you want to use as an anchor text.
URL: The URL that is to be linked with the keyword is mentioned in this section.
The position of the Link: The position of the link, that is, Top or Bottom can be selected here.
Enable Nofollow: The link can be used as a nofollow or a dofollow link as per the requirement of the user. In case you want to keep it as a nofollow link, switch the button on.
Open in New Tab: By enabling this feature, you can make sure that the links will open in the new tab instead of the same tab.
Activate Keyword: The keywords can be activated by toggling the button here.
3.2.2 How are the links keywords edited or deleted?
The keywords and the related information can be edited by clicking on ‘Edit’ button as shown below. The admin interface even offers the options to delete the existing ones.
3.3 How are the changes incorporated in the website?
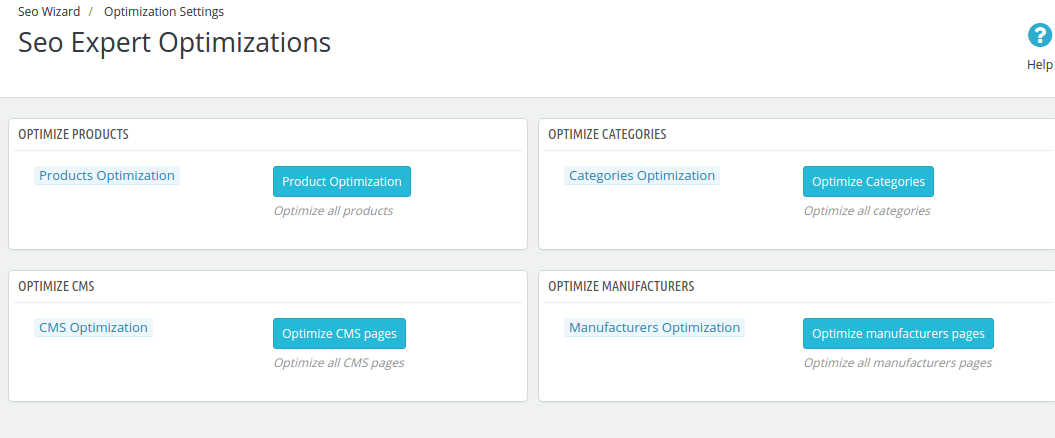
The entire interlinking done in the backend can be incorporated in the front-end of the website from the Optimization Setting tab.
The changes can be implemented on the front-end of the website by clicking on the ‘Optimize’ button. This option is available for all the different page type of group. Each page type can be optimized separately.
3.4 How to add Meta Tags in the Web Pages?
This Prestashop SEO Wizard addon simplifies the most time-consuming task of the e-marketers. The meta tags, that is, the meta titles, descriptions and keywords can be added for the product pages, category pages as well as for the manufactures.
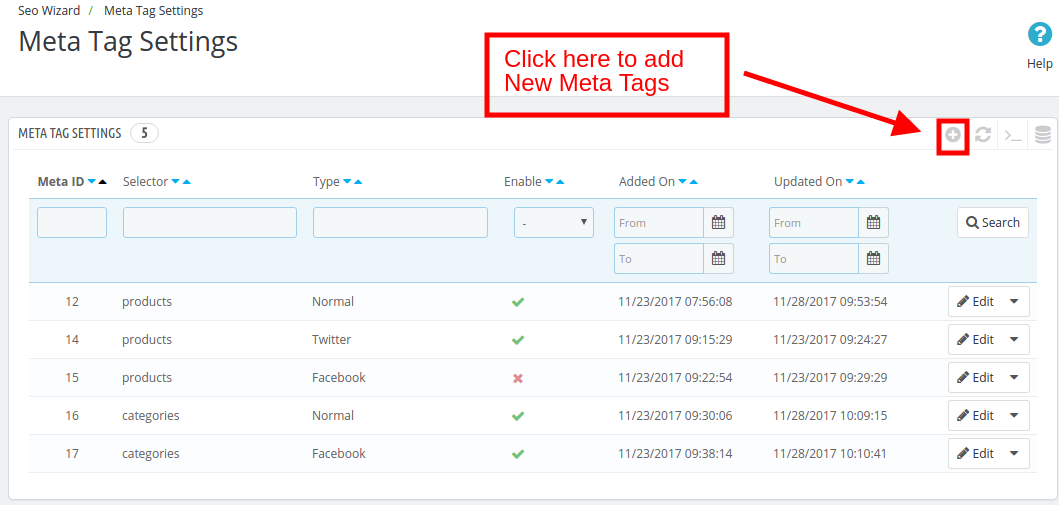
The list of the tags already created can be viewed in the ‘Meta Tag Setting’ tab. In order to create the new one, click on the ‘+’ sign in the top right corner of the admin interface.
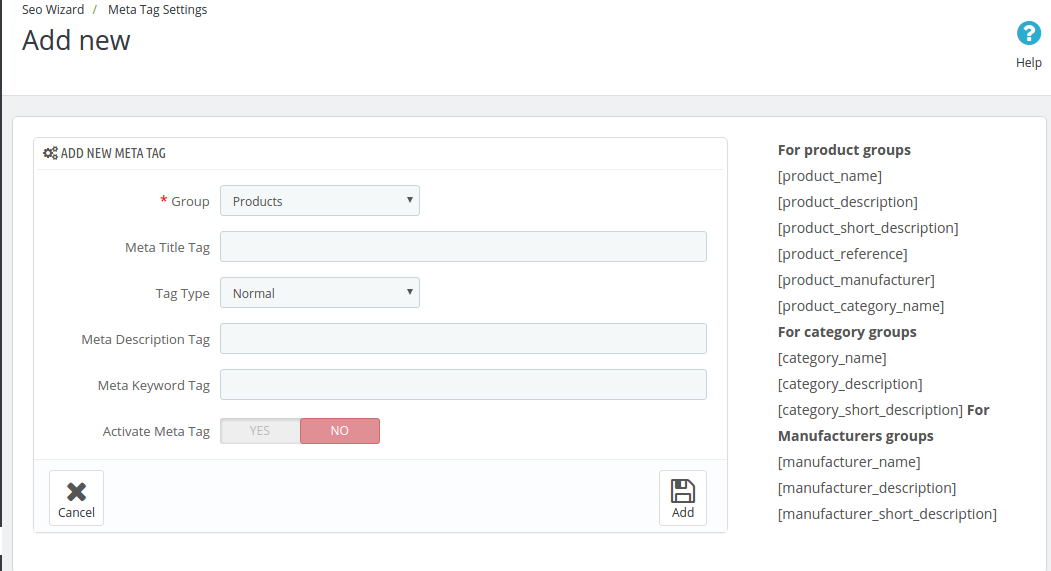
The meta tags can be, then, entered by filling up the required information fields.
Group: Select the group type in which you want to add the tags. You can choose from the Products, Categories or Manufacturer. Meta Title Tag: Enter the meta title for the web page here. Tag Type: The tag type can be Normal, Facebook or Twitter. The admin can select any from the drop-down menu. Meta Description Tag: The short meta descriptions of the web page can be entered here. Meta Keywords Tag: The keyword relevant to the web pages can be entered here. You can enter the main keywords, it’s variants as well as the long-tail keywords here. Activate Meta Tag: The meta tags can be enabled/disabled by toggling the button.
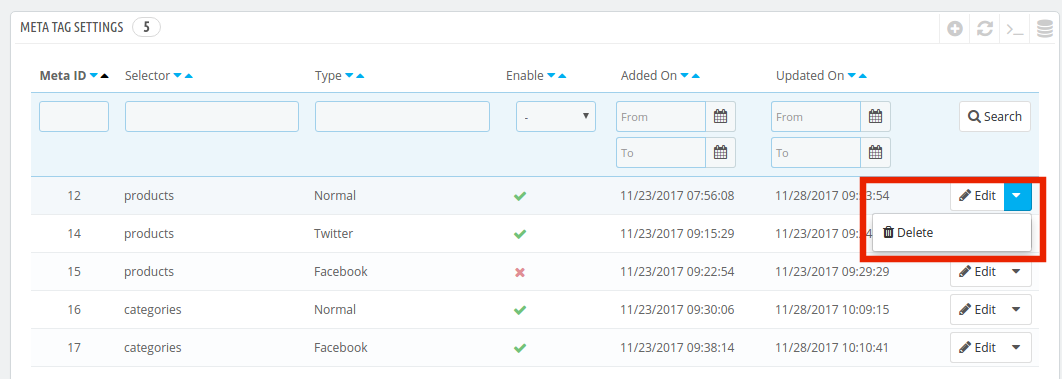
The created tags can be edited or deleted as shown below:
Now you can try Prestashop SEO Wizard module for on your Prestashop website. KnowBand Prestashop SEO Addon helps you engage more customer to your store & increase the customer base. The Prestashop XML file creation Extension allows the admin to manage SEO of the website easily without any hassle. The online seller can easily manage the interlinking, XML file creation and meta tags generation without any lengthy and time taking process.
The Prestashop Merchant can now create the sitemaps or the XML files for the web pages as well as interlink URL of targeted pages with the anchor text (read more about it here – Linkio.com) at a button click. The site mapping can be done in multiple languages.
Managing the shipping costs for different countries and regions is the biggest issue while catering to online customers globally. Knowband offers Prestashop Shipping Cost by Zipcode module allows the Prestashop eCommerce store admin to fix different shipping charges for different regions. This Prestashop Shipping Cost by Zipcode addon is one of the best Prestashop extensions. The Prestashop Shipping Cost by Post Code module helps you segregate the countries into the zone. The Prestashop store admin can enter multiple postal codes for the different regions. At the same time, he/she can even set the minimum and maximum range of the postal codes for a particular region from the admin interface of this Prestashop Shipping Cost by the country addon. The shipping cost for each zone can be set easily without any hassle. The charges will be calculated automatically at the checkout page in accordance to the zip code entered by the customer.
This Prestashop Shipping Cost by Zipcode addon is highly customizable and the store admin just needs to configure it as per the requirements. The admin needs to apply shipping cost settings a single time. There is no need to change any setting again and again. The online customers can view the shipping charges at the same time when they enter their area pin code. The transparency of the shipping cost calculation process increases customers trust on the website. The Prestashop zipcode wise shipping cost module makes shipping cost calculation very easy for the online store admin.
1.1. Project Objectives
Listed below are some of the objectives that the store owner can achieve with Prestashop Shipping cost by postal address.
The Prestashop eCommerce store admin can fix different shipping charges for the different regions in which the eCommerce site is operating.
The shipping charges of the customers are calculated automatically based on the zip code entered by them.
The amount charged will including or excluding the tax and handling charges as set by the store admin.
Store admin can fix the carrier charges according to the total price or total weight.
CSV File upload tab will allow the admin to add the shipping conditions for multiple locations in bulk.
1.2. Features
It is very easy to install and configure this Prestashop Shipping Cost by Zipcode addon.
The Prestashop Shipping Cost by Post Code module offers a simple and hassle-free implementation.
The e-merchant can enable or disable the shipping cost by postal code module just by toggling the button.
The admin can select zones from the dropdown list and also can add new zones whenever required.
The Prestashop Shipping Cost by Postal Code module admin interface offers a list of the countries to select from.
Admin can set shipping cost according to zip codes of the particular region.
The Prestashop shipping cost by location module allows admin to set the shipping cost according to the range of the postal codes that exist in that particular region.
The Prestashop shipping cost by country allows editing various shipping cost provided by the admin.
The shipping cost by zone module allows admin to fix the shipping charge based on zone, country, state/region, city, postcode range.
The Prestashop Shipping Cost by location plugin allows the store admin to disable the product delivery for a particular zone or region.
The Prestashop Shipping Cost by Postal Code addon is multi-lingual compatible.
The Prestashop delivery cost by postcode plugin is compatible with the latest versions of Prestashop.
The Prestashop eCommerce store admin can create the term and conditions of the carrier options.
ImportCSV file feature in the backend allows the admin to add shipping conditions for various countries, zones, zipcodes in bulk
2.0 Installation
Purchase the Prestashop shipping cost by postcode module from the store. On completing the transaction, follow the below steps:
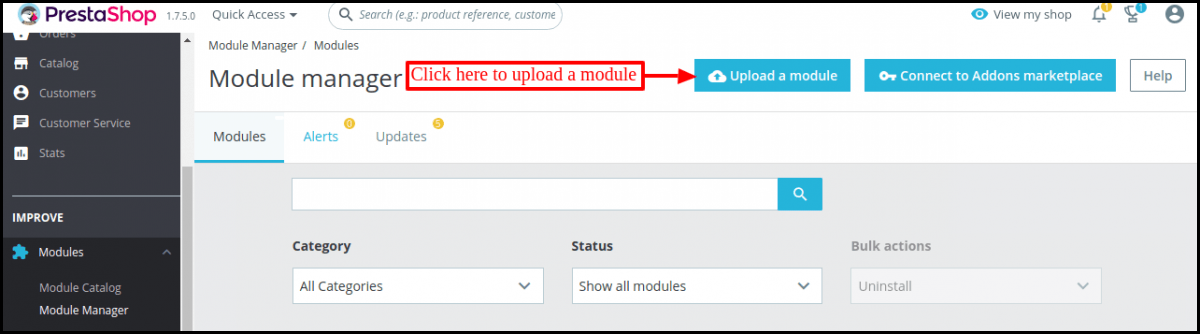
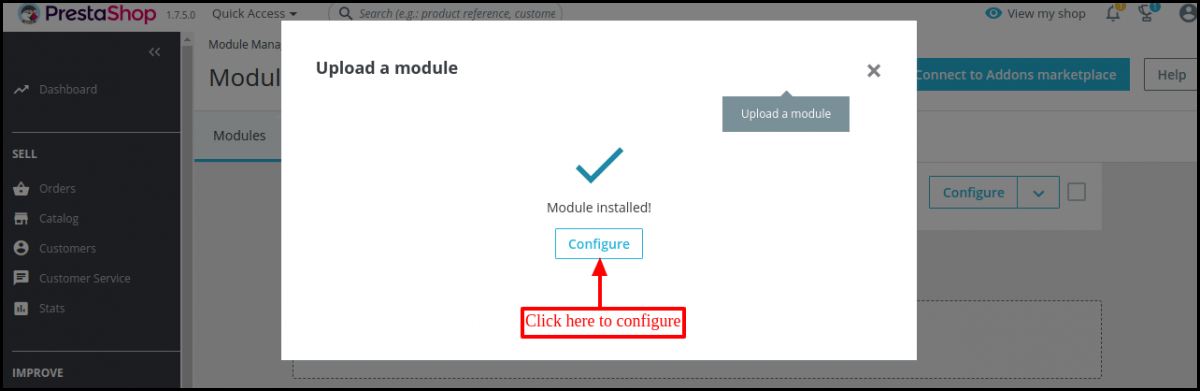
From the backend of the store, go to the Module Manager and click on “Upload a module”.
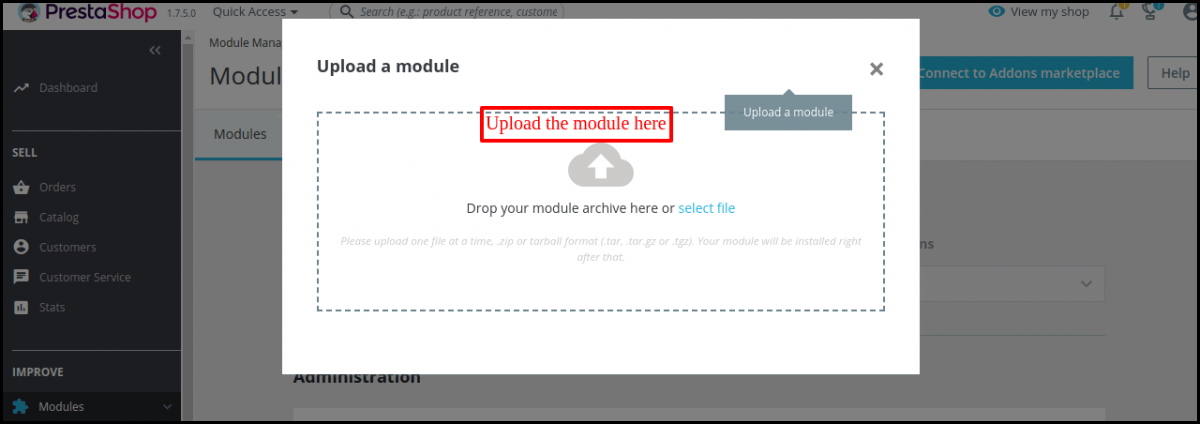
Upload the file from the system or drag and drop your module file here in the next tab. This step will install the module and show notification – “Module(s) installed successfully”.
Once the installation process is completed, “Module installed” notifications will get displayed.
Click on the configure button and your module is ready to use.
In case, you are not able to find the module in the admin modules list, please try searching module by entering the Keyword, Shipping Cost by Zipcode.
3.0 Admin Interface
This Prestashop Shipping Cost by Zipcode module is completely configurable. The settings can be updated via the admin interface.
3.1 How to start using the module?
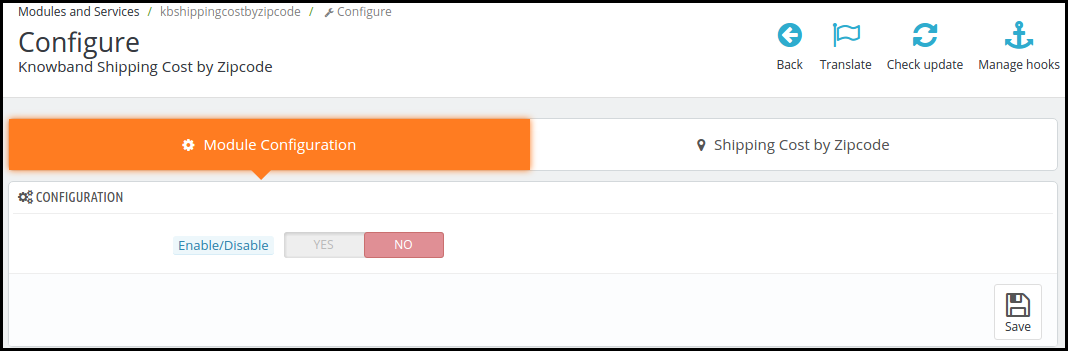
Once the installation is complete, all you need to do is to enable the Prestashop shipment charge by zipcode module on your Prestashop store by toggling the button as shown in the image below.
3.2 How to add new shipping conditions?
The very first step for adding new shipping cost by zipcode is to divide the location where you cater your products into different zones. The Prestashop Shipping Cost by Post Code module allows easy creation of zone and separation of the various regions. Follow the below-mentioned steps in order to create new conditions.
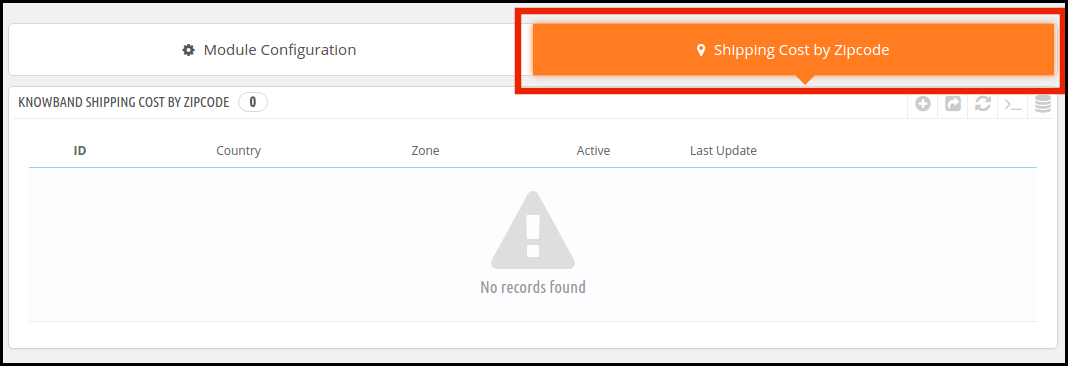
1. Go to the ‘Shipping Cost by Zipcode’ tab.
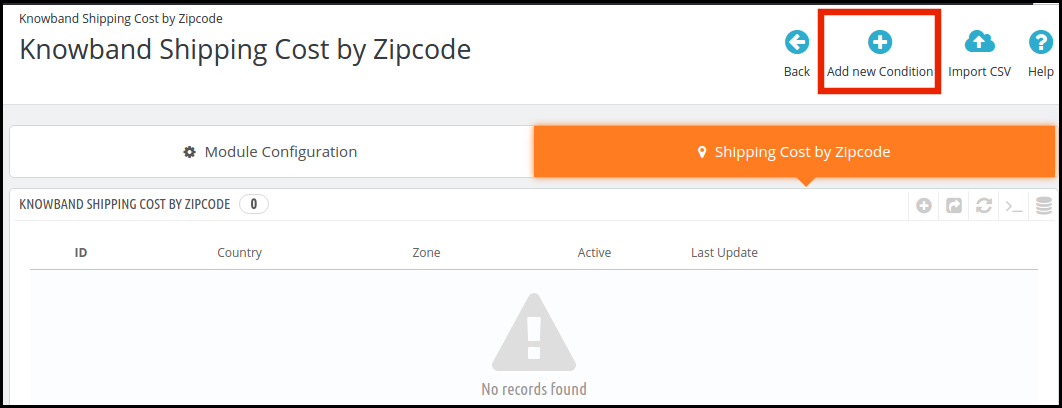
2. In order to create new zones, you need to click on the ‘Add New Condition’ on the top of the admin interface.
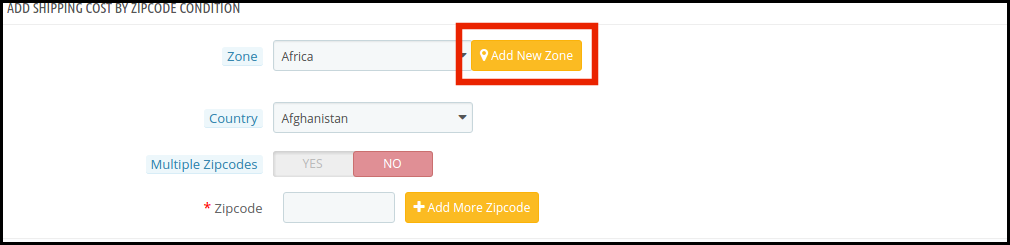
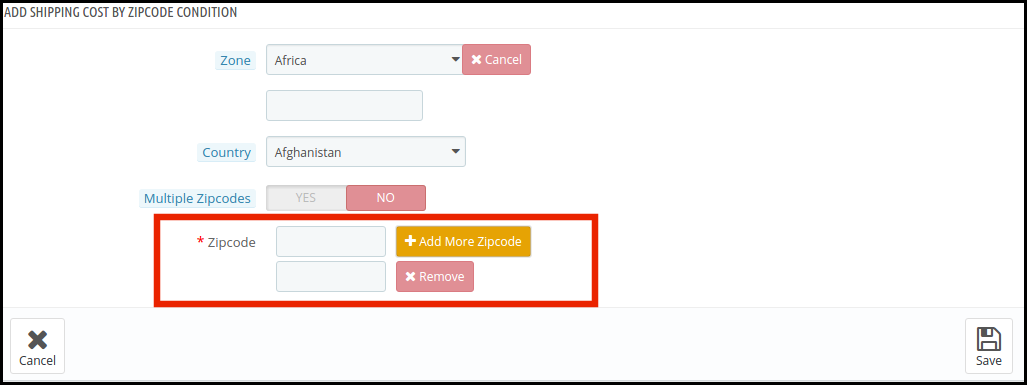
3. Once this is done, you’ll be redirected to the customization page. The Prestashop store admin is required to enter the following information as shown in the image below.
Let us discuss the options one-by-one.
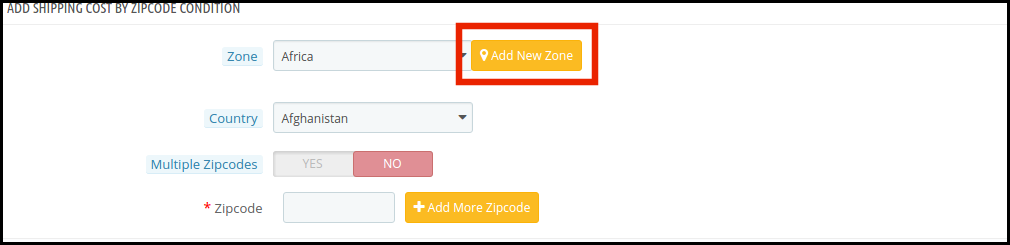
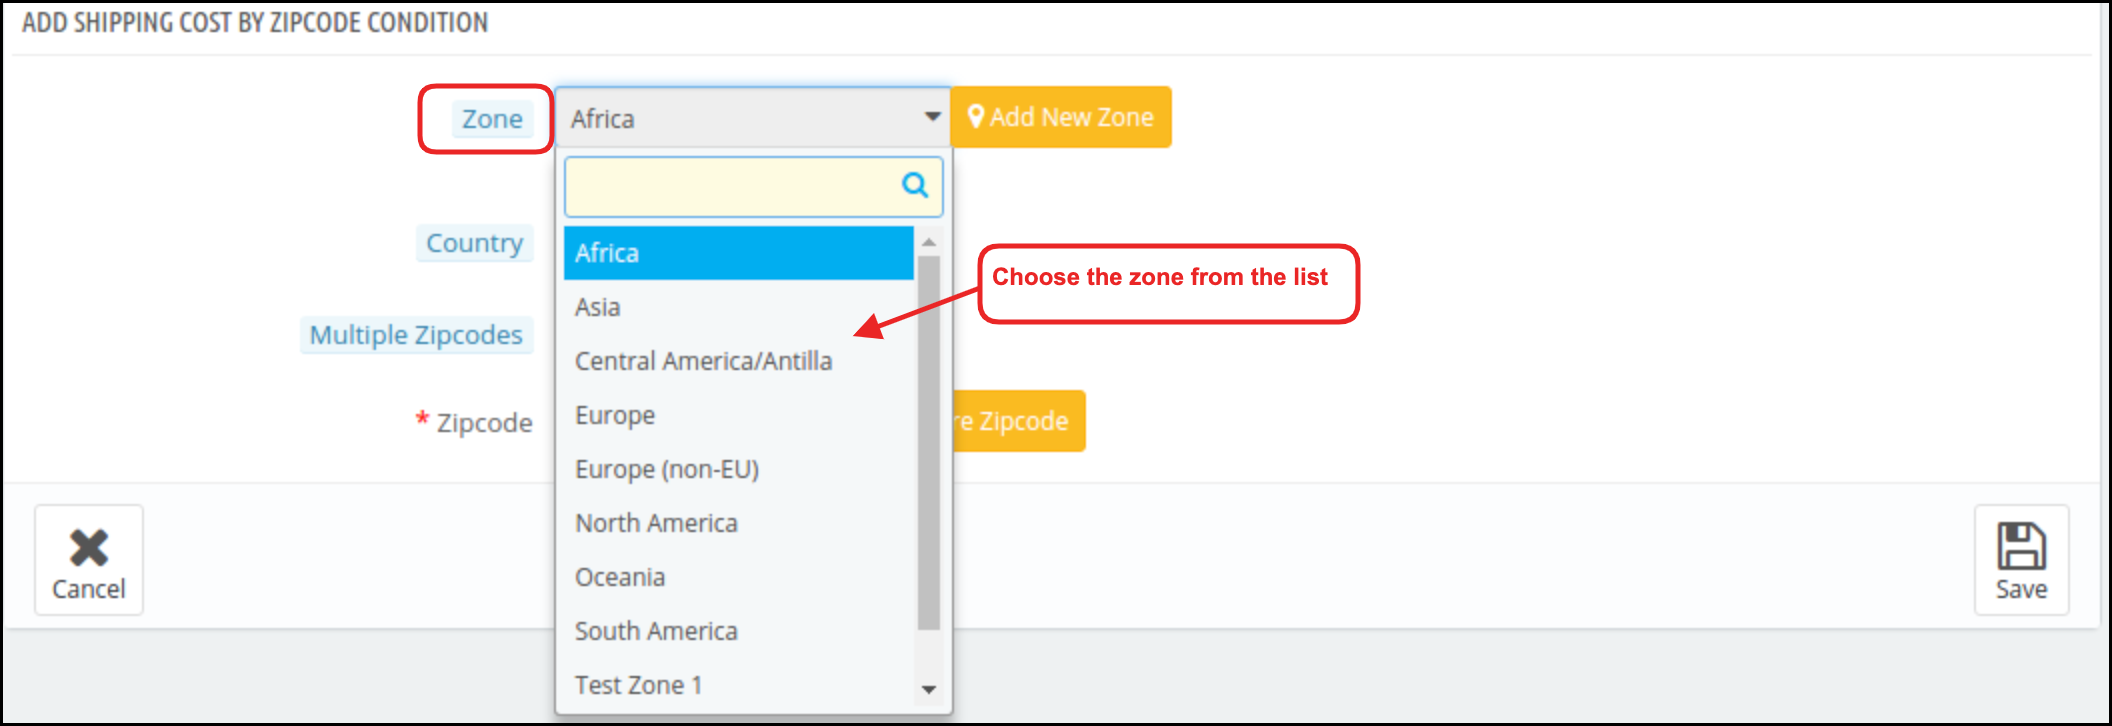
Zone: The various zones already created on the store will be shown in the drop-down list. The Prestashop store admin can select anyone and make the necessary changes.
In case, the admin wants to create a new zone, he can do so by clicking on the ‘Add New Zone’ option.
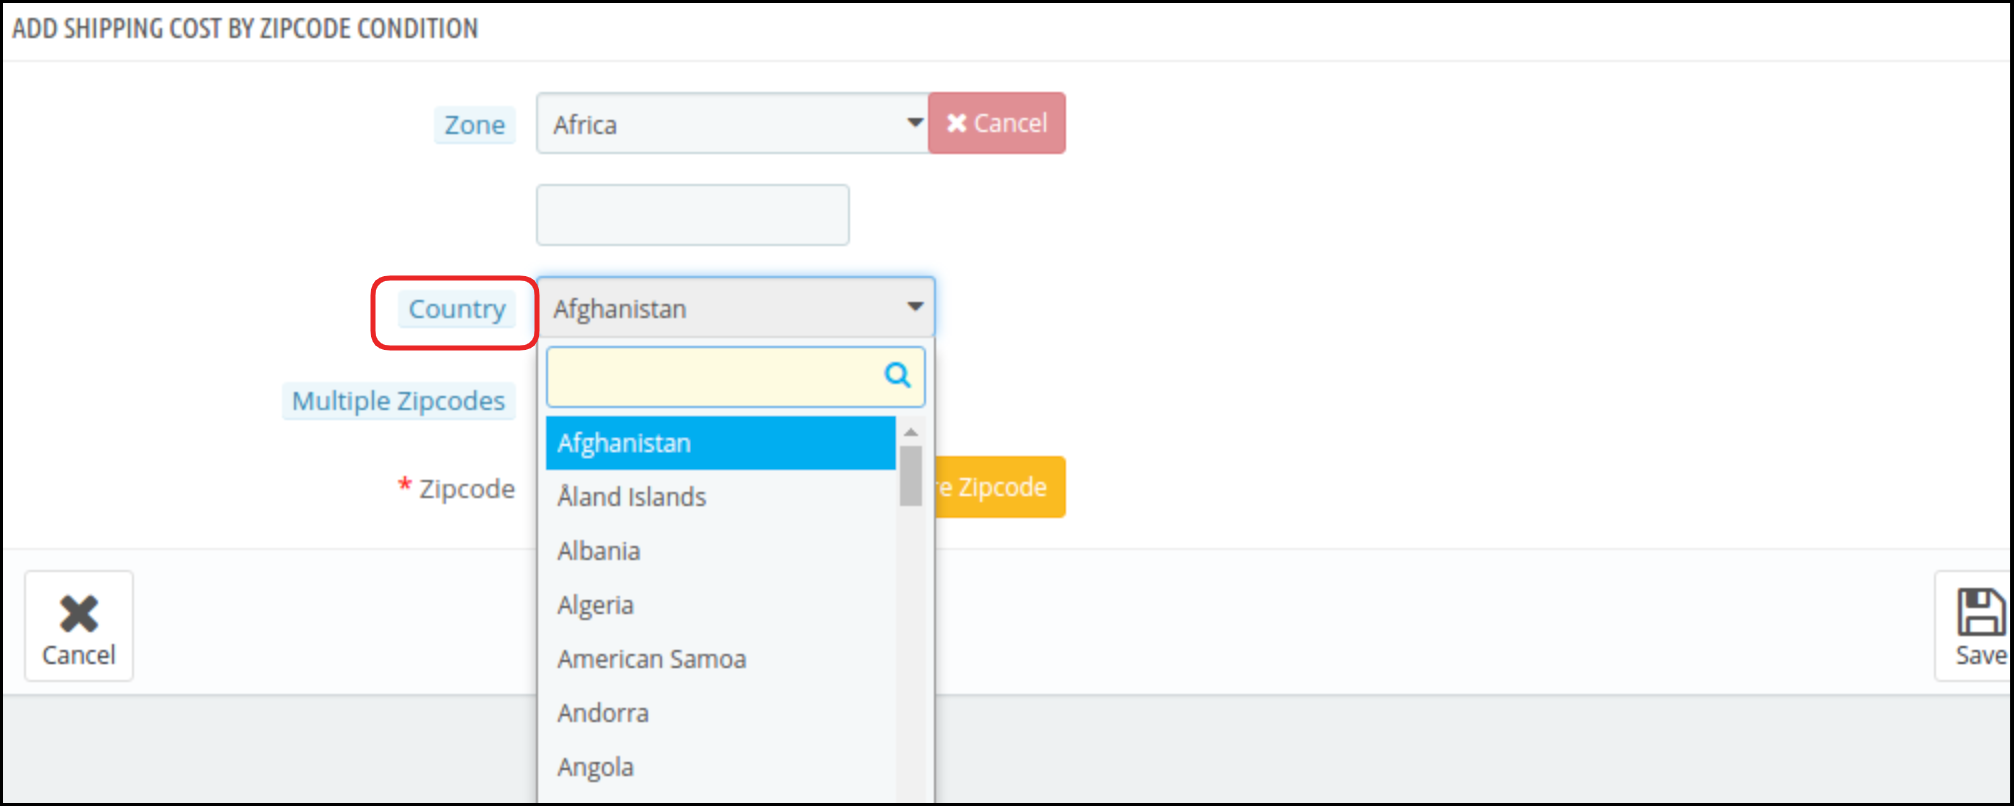
Country: The country for that particular zone can be selected from the list available.
Zipcodes: A particular zone can have either have multiple zip codes. The Prestashop store admin can add the postal codes by clicking on the ‘Add More Zipcodes’.
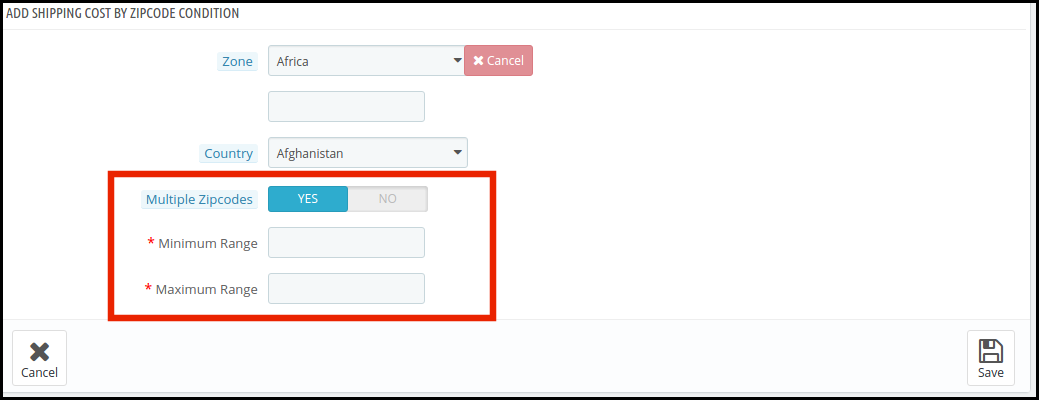
Multiple Zipcode: In case the eCommerce store admin is looking to add the range of the postal codes, he can do so switching this button on.
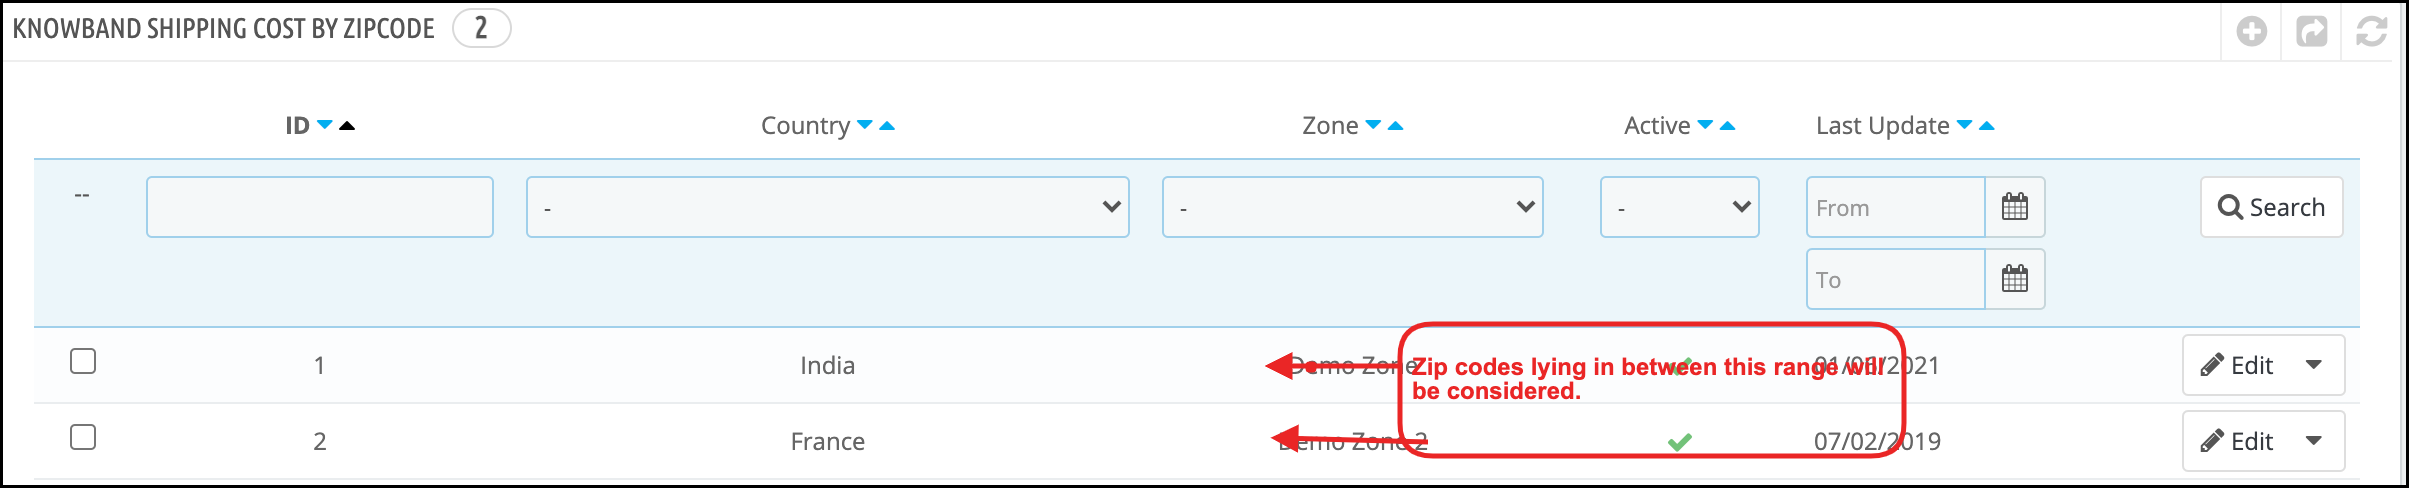
The Prestashop eCommerce store admin can then enter the minimum and maximum range of the postcodes. Any zip codes lying in between this range will be considered in that particular zone and the shipping charges will be calculated accordingly.
The list of the zones created can be viewed in the ‘Shipping Cost by Zipcode’ tab.
The exiting zones can be edited or deleted by clicking on the respective buttons.
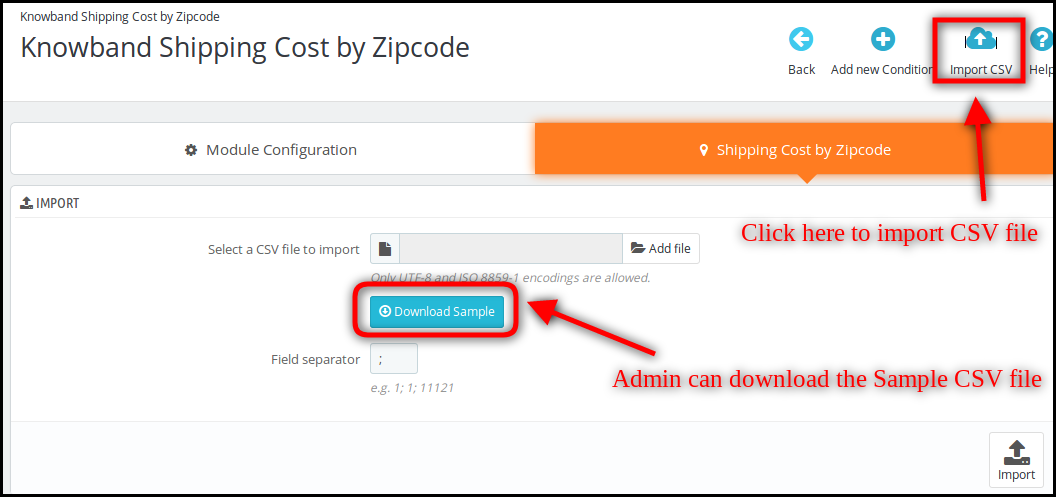
Import CSV:
The store admin can download a sample CSV file for adding multiple zip-codes. The admin just needs to click on the “Import CSV” option. The admin can download the sample CSV file.
Sample CSV File: There are three fields in sample CSV file ie.Country id, Zone and Zip Code.
The admin can enable or disable the zone from the admin panel.
After activating a particular zone the admin can insert the particular country ID and zip code easily. Thus the admin can easily enter multiple zipcodes at a time without any hassle.
3.3 How to enter shipping costs?
The shipping conditions can be fixed in the Shipping option of the main menu of the admin interface. Follow the below-mentioned root for the same.
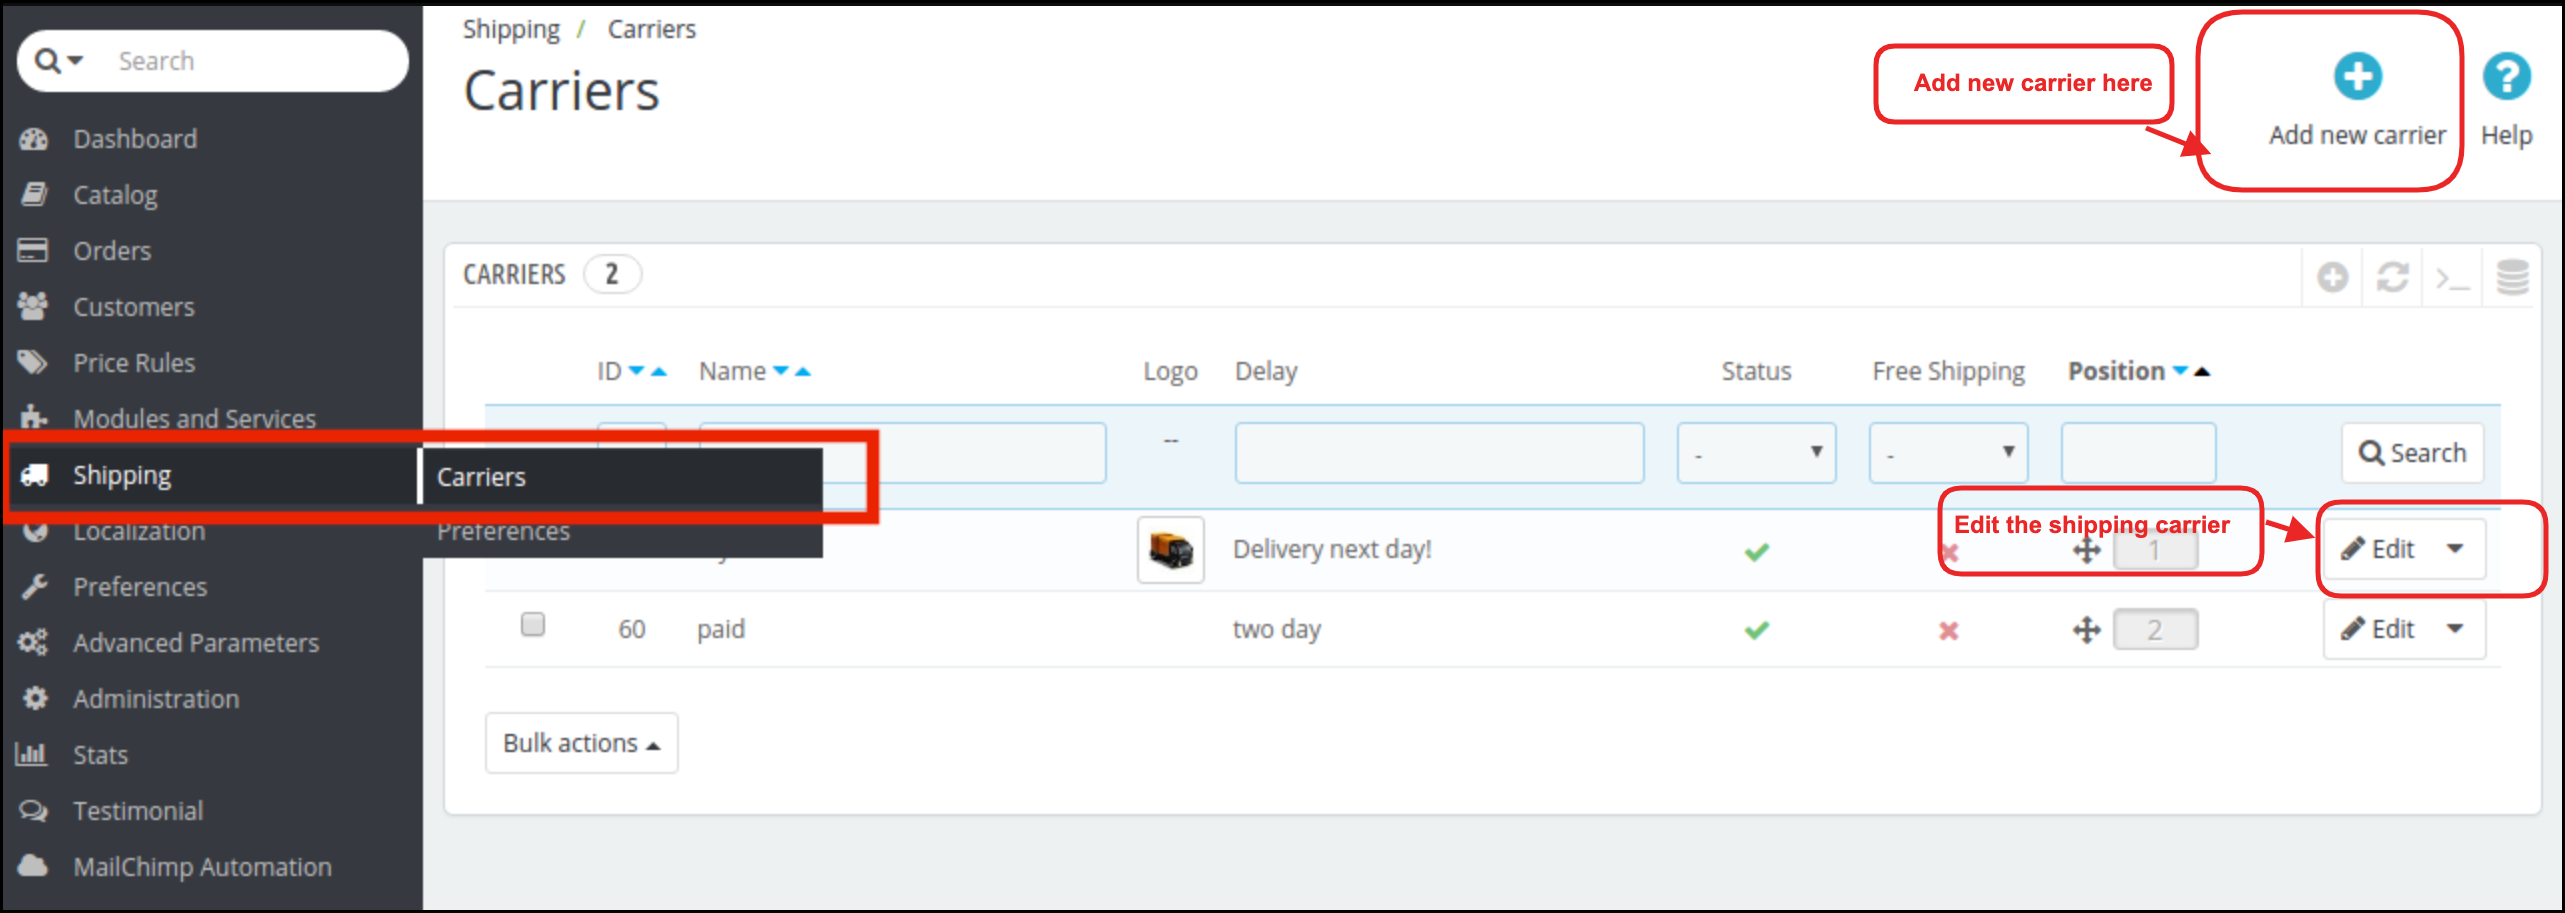
Go to the Main Menu -> Shipping -> Carrier -> Select the carrier option that you want to edit.
The admin can browse the ‘Edit’ option in order to make the necessary changes.
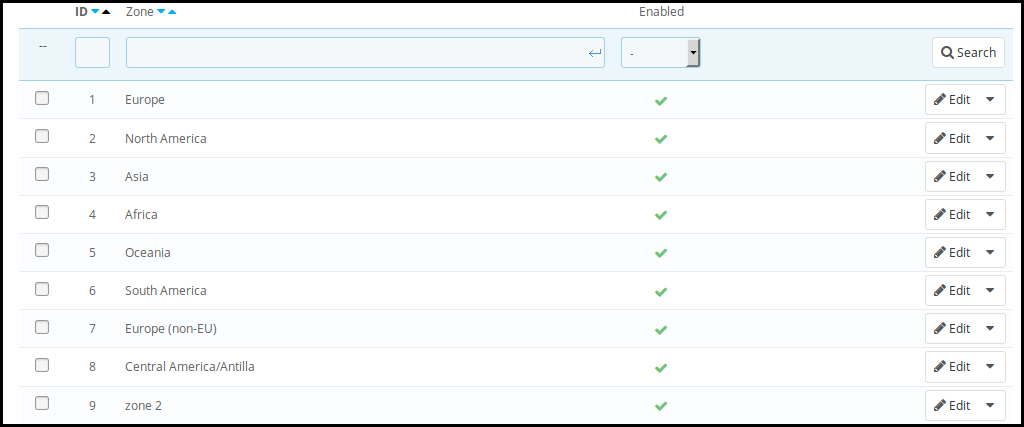
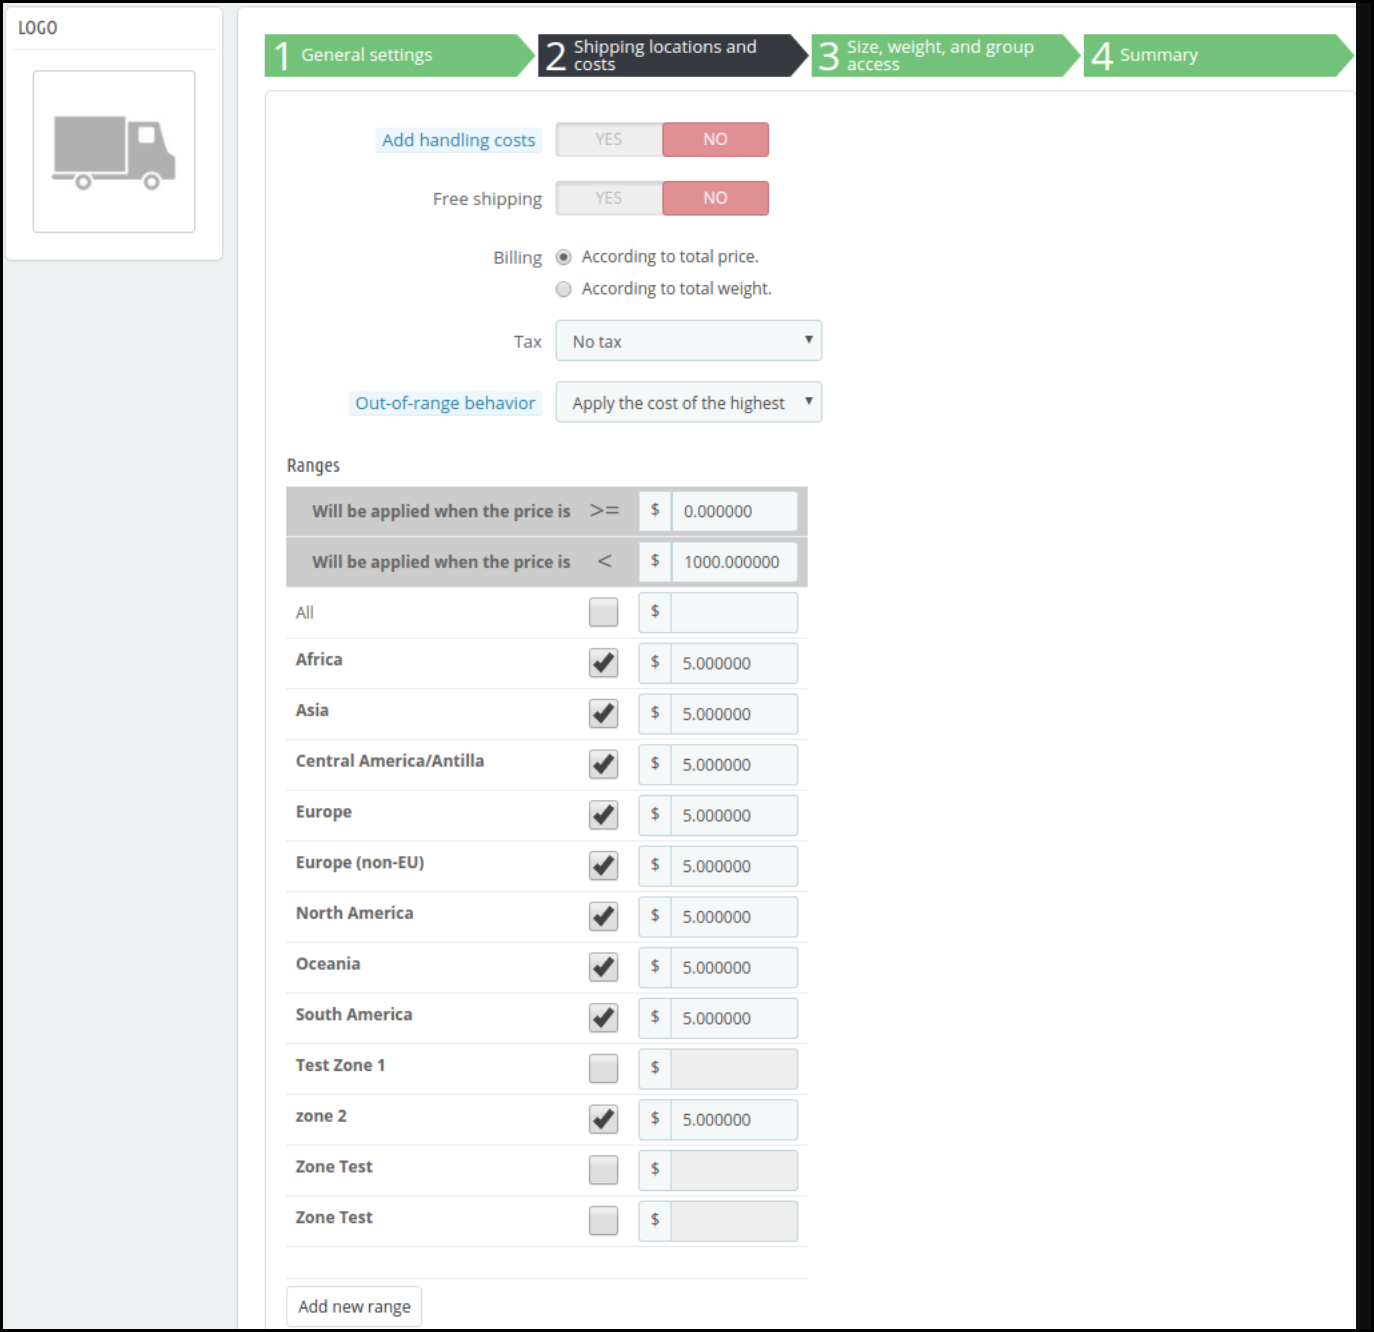
While the ‘General Setting’ and other options remain the same as per the store admin’s requirement, he can change the shipping cost based on the zipcodes. For this, he needs to go to the ‘Shipping Locations and Costs.
The Prestashop eCommerce store admin gets to optimize the shipping management by adding delivery cost for different regions. The shipping cost for the customers will then be calculated by taking all the aspects into account.
4.0 Website UI
In the front-end of the eCommerce website, the customer can enter their postal code and the carrier option available in that location and the total shipping cost will be calculated and shown in the checkout page as shown in the image below:
This way, the online store merchant can implement Prestashop Shipping Cost by Zipcode addon for automatic cost calculation. The eCommerce store admin can manage the delivery cost as per the customer’s area Pincode. The Prestashop Shipping Cost by Zipcode module allows the online store admin to segregate customers location into regions, countries, zones and area pin codes. The online store merchant can also include tax and handling fee in the shipping charges if he wishes to add it. The Prestashop Shipping Cost by Postal Code module allows the store admin to offer services and products all over the world by simplifying the shipping cost calculation process. After a successful setup, the Prestashop delivery cost by postcode addon automatically calculates the shipping cost on the checkout page.
For additional guidance, please refer to the tutorial video available below, which provides a step-by-step walkthrough of this module.
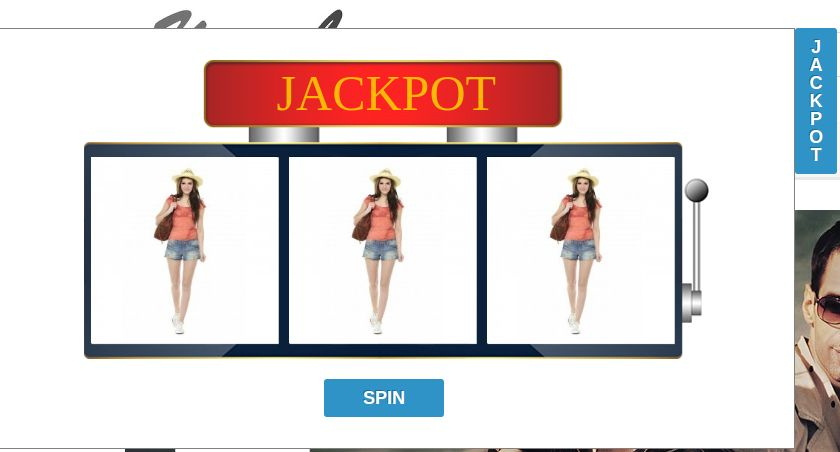
Do you want to improve user retention rate of your website? Here is a perfect opportunity for you to grab! Prestashop Product Jackpot addon, a loyalty reward program by Knowband lets the eCommerce store owners engage their audience by offering different free jackpot products. Jackpot modules are highly profitable for strengthening the customer base for your website. Most of the users actually don’t care what all exciting deals and products you bring for them. But finding a jackpot fun, they are encouraged to play and win from your store.
This Prestashop Jackpot Addon by Knowband will help the merchants to attract the customers to their stores by giving them opportunities to get the certain jackpot on whatever page they open first on the shop.
Whenever the customer will win any of the jackpot, a coupon code will be generated as the user enters his name and email id. The generated coupon code with all related information will then be sent to the entered email id. The customer will have to enter the coupon code on the checkout page to get the free gift product which he has won in the jackpot game earlier.
Installation of Prestashop Product Jackpot Addon
To install this Prestashop addon, please follow the following steps:
1. Add addon folder under modules folder of your system.
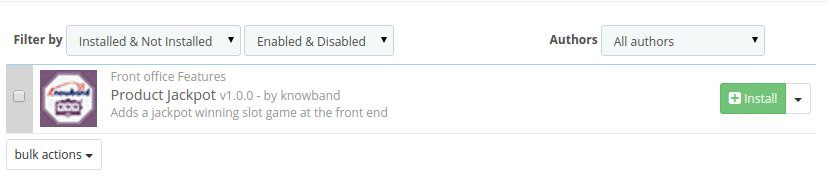
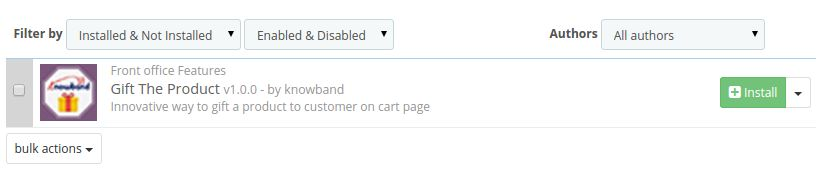
2. After adding this addon folder, the system will list the Prestashop addon on module page under front office feature category as given below:
3. Click ‘install’ to install this Prestashop plugin.
Administration Module
In admin module, there will be following options to configure this Prestashop free gift module. The freebie addon includes 2 tabs and they are as follows.
1. General Settings.
2. Email Settings.
Each section is described in details below.
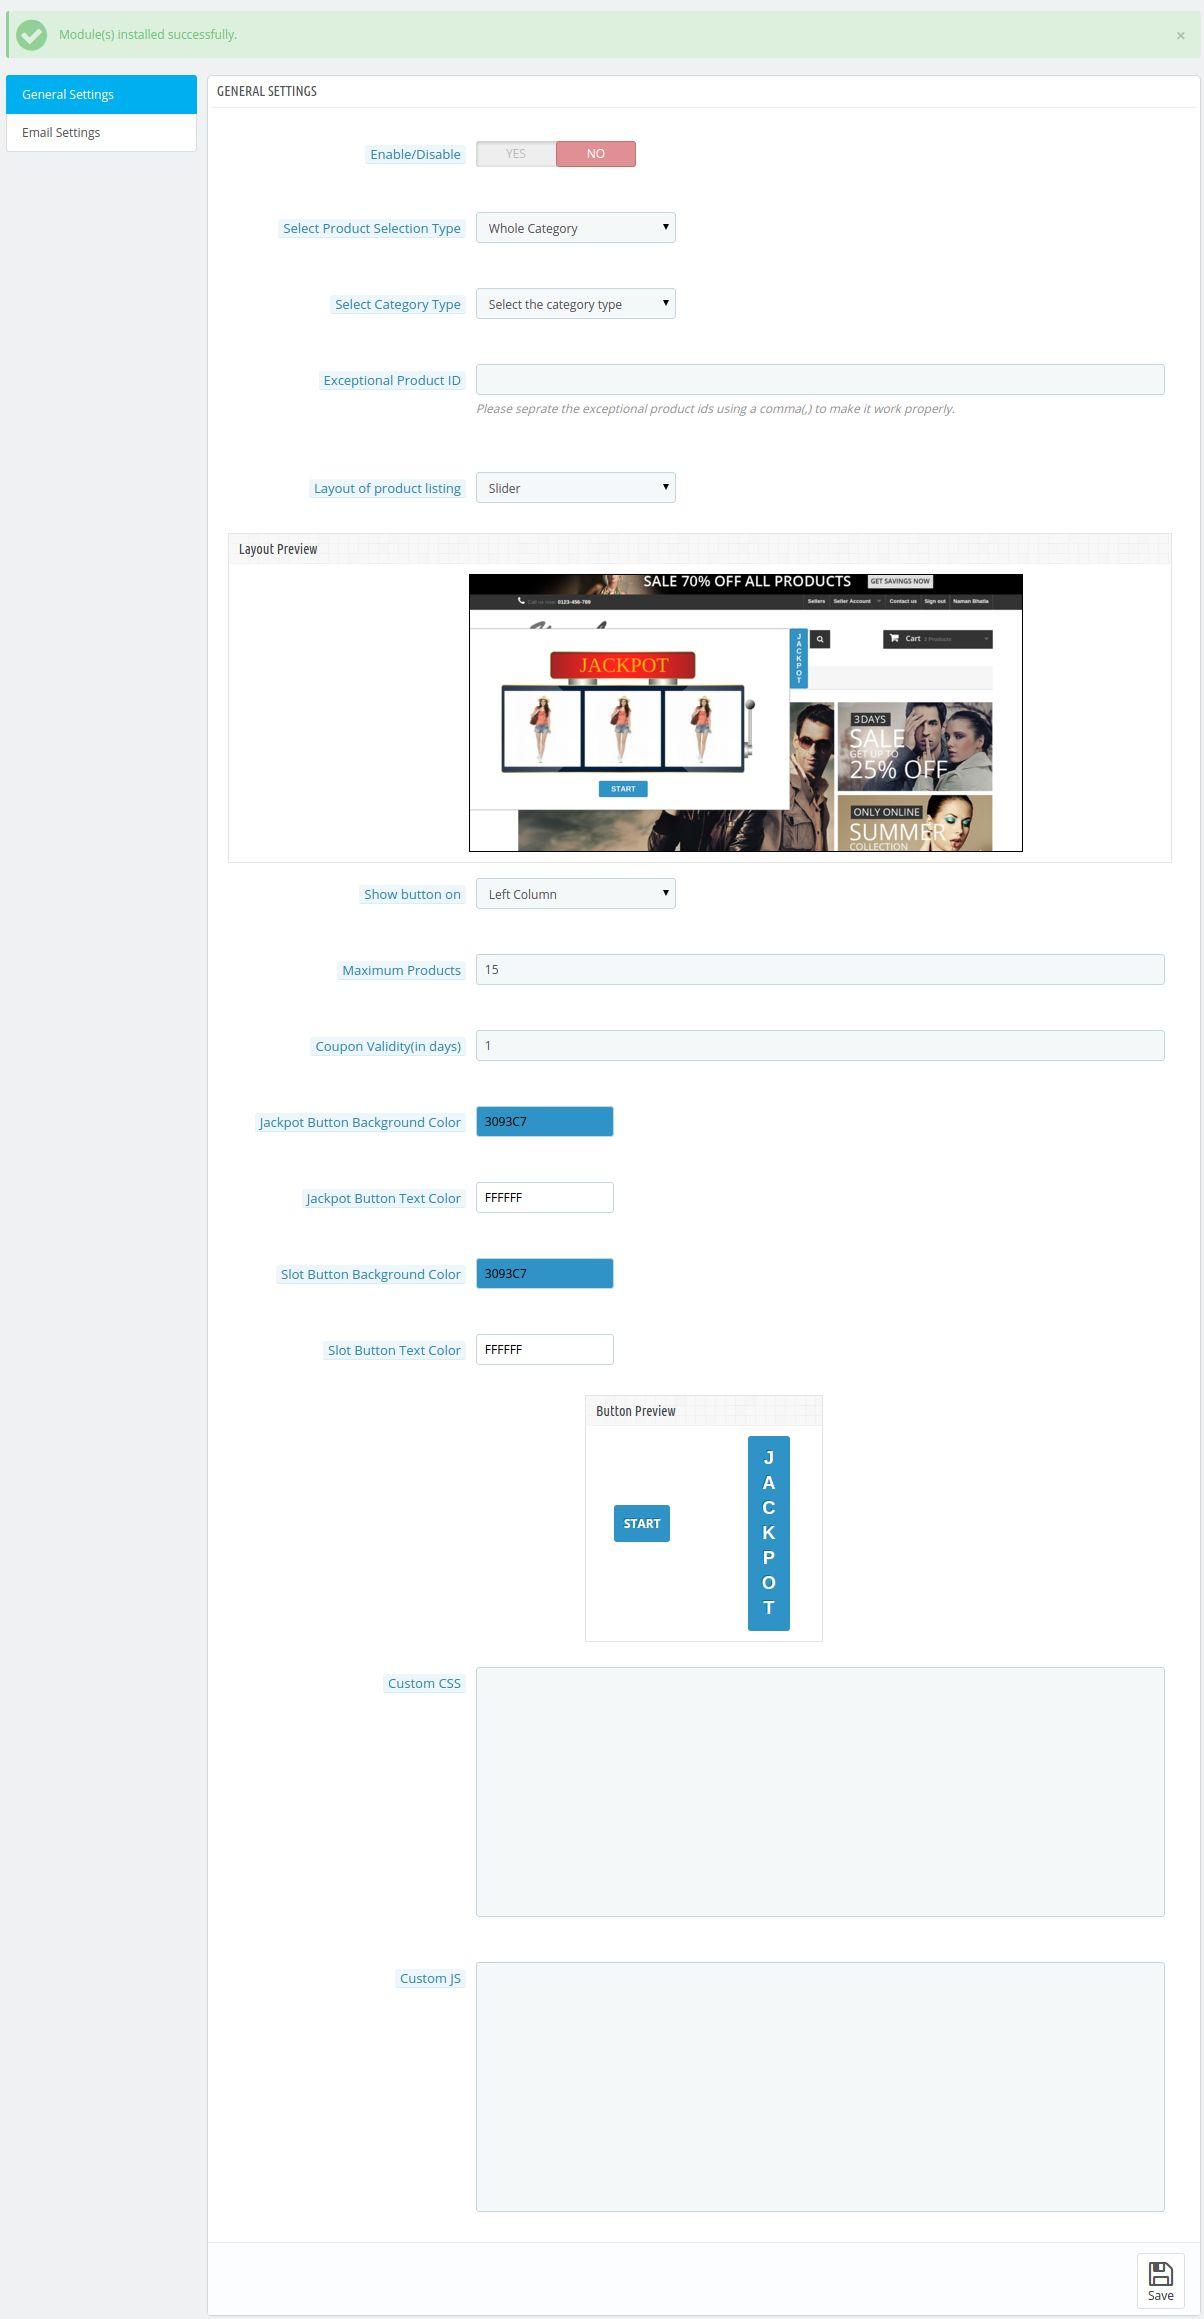
General Settings of Prestashop Customer Jackpot Addon:
This section will be having the following options to configure the Prestashop jackpot addon:
Enable/Disable: This option of the free product module will be having a toggle button with two specific values ON and OFF. This Prestashop module will only work if this is set to ON. If this is set to OFF then none of the features will be working and not even impact any other section of the website. By default, this option will be OFF.
Product Selection Type: In this field of the Prestashop gift module, the admin will select that how he is going to define the products which will be appearing in the jackpot game in the front. It will be of two types category and product.
IF ‘CATEGORY’ IS SELECTED-
Select Multiple Category: This field of Prestashop freebie addon only appears when the admin selects category as the product selection type. Here, the admin can select any type of categories whose product will be appearing in the front. This field will be multiple selection types.
Exceptional product Id: This field of Prestashop free gift addon also appears when the category is selected as product selection type. Here, the admin can enter those products id’s separated by the commas which he does not wants to appear in the front.
IF ‘SPECIFIC PRODUCT’ IS SELECTED-
Jackpot Product ID: In this field of the Prestashop customer jackpot addon, the admin has to enter all the products ids which he wants to display on the front. This field will only appear if the admin will select ‘Specific Product’ as product selection type.
Select Layout Type: There will be two layout types which will be available in this Prestashop jackpot addon. One layout will be a popup type layout in front and another layout will be a slider layout.
Custom CSS and JS: These fields of Prestashop gift module have been provided to let the admin change the look and feel of the front end of this Prestashop module.
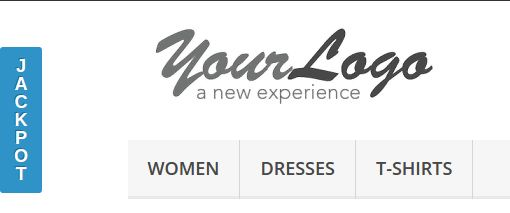
Show Button On: This field has two option left or right. Here, the admin can select that on which side the admin wants to put the jackpot button.
Coupon Validity: Here, the admin can enter the time up to which the coupon code generated by this Prestashop jackpot addon given to the customer will be considered as active.
Button Customization Options: The Prestashop freebie addon also has button customization option to change the background color and text color of the buttons which are used in the module in front. These buttons are the jackpot button (Only for slider layout) and Slot game button. The admin can change the background as well as text color above mentioned both buttons just by selecting the desired color from the color picker.
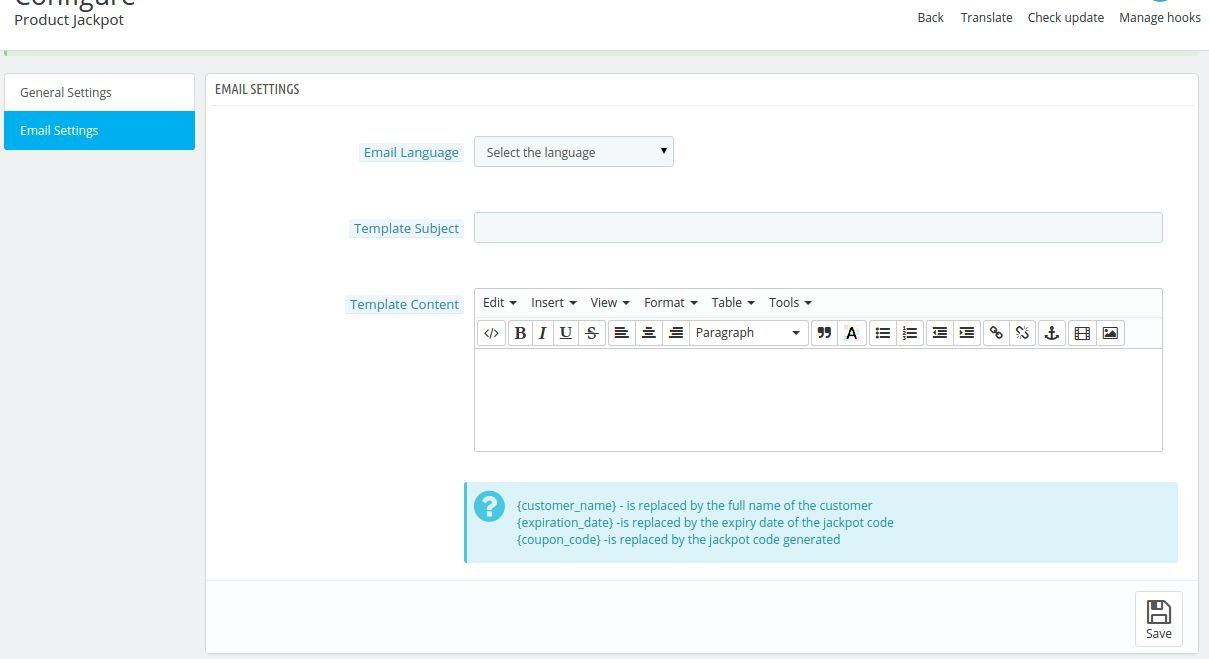
Email Settings of the Prestashop Jackpot Addon:
In this field of Prestashop gift module, the admin will have the following options:
Select Email Language: Here, the admin will select the email language using which he will send the email to the customers who have won the jackpot.
Template Subject: This field of Prestashop freebie addon allows the admin to enter the email subject. Whatever subject the admin will enter in this email field, it will be used as the subject of the email sent to the customer whenever they will win any jackpot in the front.
Template Content: Here, the admin can enter the email content which will be sent to the customers who will win the jackpot in the front.
There are certain constants which have to be used by the admin to let the customers know the discount code and discount validity of the respective code, that will be {{discount_validity}} and {{discount_code}}.
Front End Module of the Prestashop Freebie Addon:
When the Prestashop jackpot addon is enabled from the admin panel then it will appear in the front on the first page where the customer will visit the store. As the settings are given in back end, the module will be having two layouts and when the module will appear in front then it will be according to the layout selected by the admin in the back end.
The Prestashop Gift The Product addon by Knowband gives the benefits to both, the customer and the consumer. This module will absolutely help the merchant to increase the sales of the store and on the other hand, it will surely get the customers benefited by offering them products for free. This Prestashop extension will be the best option for a merchant to get the customers to his stores.
Objectives:
With the help of this Prestashop free gift addon by Knowband, the website owners can get the following things:
Increase in the customer’s engagement.
Reduction of the risk of cart abandonment.
Increase in the sale of the store.
Customer will be rewarded with freebies.
Prestashop gift product encourages the customer to buy things more often.
This Prestashop freebie addon will be one of the best options for the merchant to get the customers to his store.
Installation:
To install this Prestashop freebie addon, please follow the following steps:
1. Add addon folder under modules folder of your system.
2. After adding this addon folder, system will list the addon on module page under front office feature category as given below:
In admin module, you’ll see following options to configure this Prestashop promotion gift module:
1. General Settings
2. Price Rules
Each section is described in details below:
General Settings:
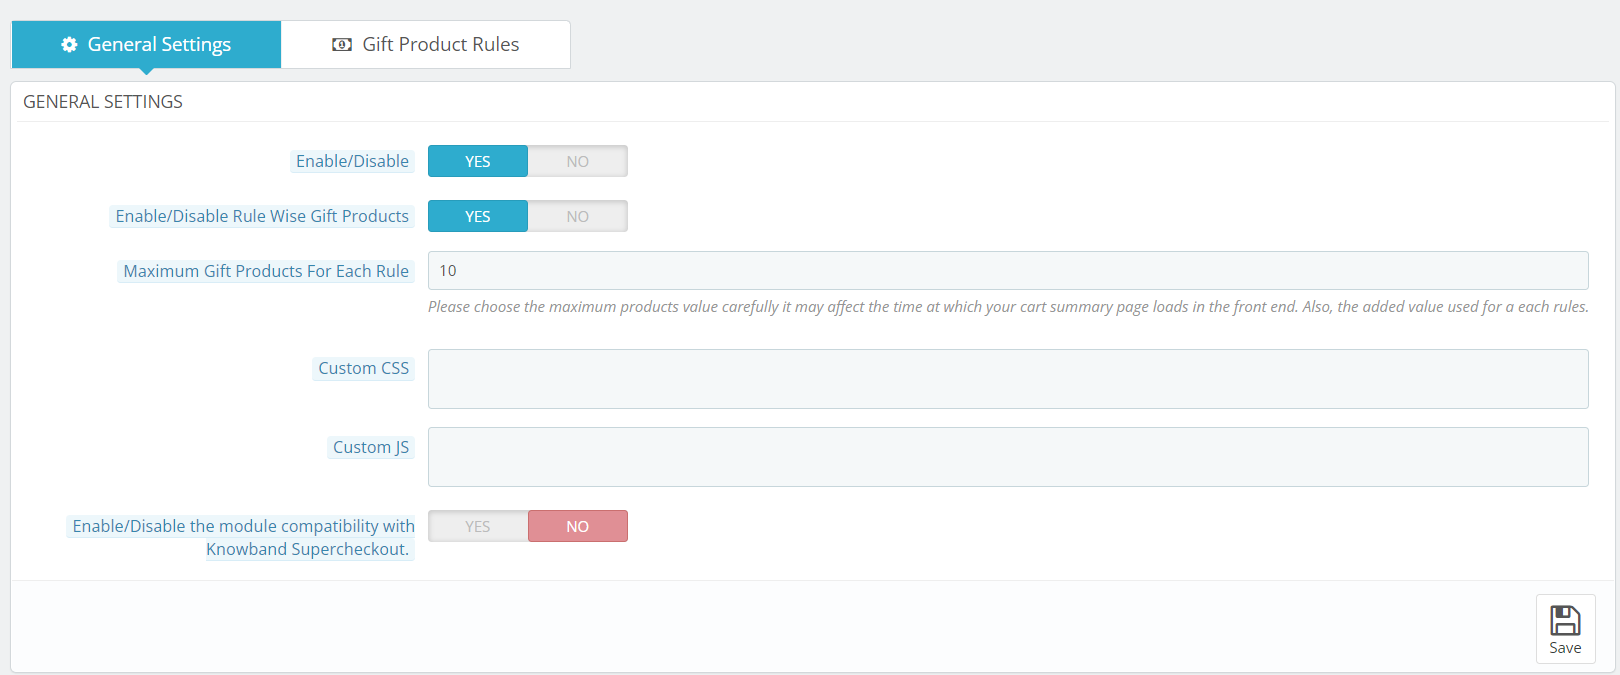
This section of Prestashop gift the product addon will have the following options to configure this Prestashop gift module:
1. Enable/Disable: This option has a toggle button with two specific values, i.e. YES and NO. This Prestashop reward gift addon will only work if this is set to YES. If you select NO, then none of the features will work. By default, this option is set to NO. You’ll need to select YES.
2. Enable/Disable Rule Wise Gift Products: This field is provided so that admin can set the restriction on the number of gift products displayed on the front for selection.
3. Maximum Gift Products For Each Rule: If this field is enabled then customer can chose more than 1 gift product according to the specified rules.
4. Custom CSS and JS: These fields have been given to the admin so that he can change the look and feel of the front end of the Prestashop free gift addon.
5. Enable/Disable the module compatibility with Knowband Supercheckout: This option has a toggle button with two specific values, i.e. YES and NO. This Prestashop reward gift addon will work with Knowband One Page checkout if this is set to YES. If you select NO, then it will not work with One page checkout module.
Price Rules:
In this section of Prestashop gift module, the admin will have to make the following price rules that will decide the gift product.
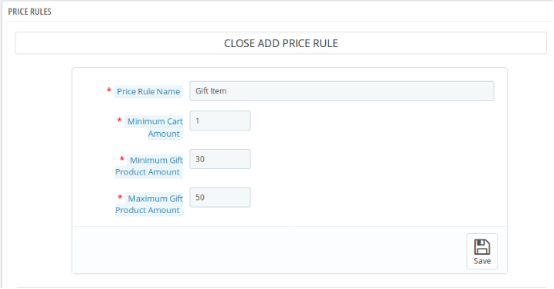
1. Price Rule Name: Here, you need to enter the name of the price rule that you want to be saved.
2. Minimum Cart Amount: Now, the admin will have to set the minimum cart amount to decide the Prestashop gift product.
3. Minimum Gift Product Amount: In this field of Prestashop freebie addon by Knowband, the admin will have to enter the minimum product amount of the gift products.
4. Maximum Gift Product Amount: Lastly, the admin will have to enter the maximum product amount of the gift products.
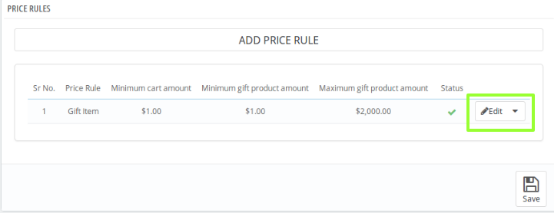
The Gift products which will be in between the entered price range will be shown to the customer in the front end.
This is how the Price Rule section looks like:
On clicking the edit button, a form will appear Where you’ll have to make the desired changes. This is how the Price Rule form looks like:
Front End Module
Once the Knowband Prestashop product purchase reward addon is enabled, a block will appear just below the cart summary on the front end saying “CONGRATULATIONS!! YOU ARE ELIGIBLE TO GET ONE OF THESE GIFTS”. This block will include the gift products according to the price rules which have been decided by the admin in the back-end of Prestashop gift the product addon.
We hope that we have covered all the concerns regarding the installation and product guide of this Prestashop Discount and Promotion Addon.
Watch Video Tutorial of Prestashop free gift addon:
Tutorial: Watch the YouTube Video Guide
To help you set up and use the Knowband PrestaShop Gift The Product Module, we have prepared a comprehensive YouTube tutorial video. This video demonstrates step-by-step how to install, configure, and manage gift rules to enhance your store’s promotional campaigns.
In This Tutorial Video, You Will Learn:
How to install and activate the Gift The Product module in your PrestaShop store
How to create gift rules based on cart value, product purchase, categories, or customer groups
How to display gifts on product pages and cart pages
How to manage multiple gift offers and set priority levels
Watch the tutorial here:
If you are a store owner and looking for an appealing option that can attract the customers to the store, then Prestashop freebie addon is the best solution for offering free gift products to your customers on completing the final checkout of the product.
Gifting can make anybody happy and if you don’t believe then you can simply buy Prestashop gift the product addon and experience better results for your Prestashop store.
For any questions, assistance, or custom modifications related to the Gift The Product module, contact our support team: support@knowband.com
Prestashop Social login module by Knowband allows your customers to register and login to your Prestashop store by using their social accounts from 13 social networks such as Facebook, Google Plus, Twitter, Foursquare, Live, WordPress, etc. This social login Prestashop module not only enhances your user’s experience but also increases sales and conversions.
Why use this Prestashop social media login plugin?
Prestashop Facebook login addon reduces the login/registration time of the customer.
This twitter login addon offers 14 social login/registration options.
Prestashop Google+ login addon offers a user-friendly interface.
Social login addon enhances user experience.
Prestashop social media login addon is fully customizable.
Installation steps of Prestashop Social Media Login Plugin:
The folder structure of the Prestashop Social Login plugin folder.
Copy the whole folder named as social loginizer into your modules folder of the root directory of your PrestaShop store through FTP.
You can also upload the zip folder of the module by clicking on Add New Module button, which should appear just in the top right corner of the module listing page.
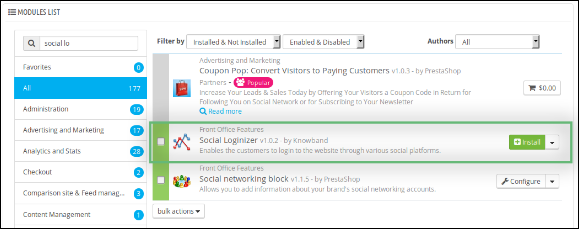
After that, you will be able to find the Prestashop social login plugin ready to be installed in the Modules in your PrestaShop store as shown below.
Click on the Install link to install this Prestashop social media login addon.
Admin Module of Social login Prestashop module
Here, the store owner can change the various settings of this Prestashop twitter login module by Knowband according to the requirements, which will be reflected at the front end as well as in the admin panel of the Prestashop Facebook login plugin.
After installing the social login Prestashop module into the store, this Prestashop plugin will provide the following tabs in the interface:General Settings
Facebook Settings
Google Plus Settings
Live Settings
LinkedIn Settings
Yahoo Settings
Amazon Settings
Paypal Settings
Foursquare Settings
Github Settings
Disqus Settings
Vkontakte Settings
WordPress Settings
Dropbox Settings
FAQs
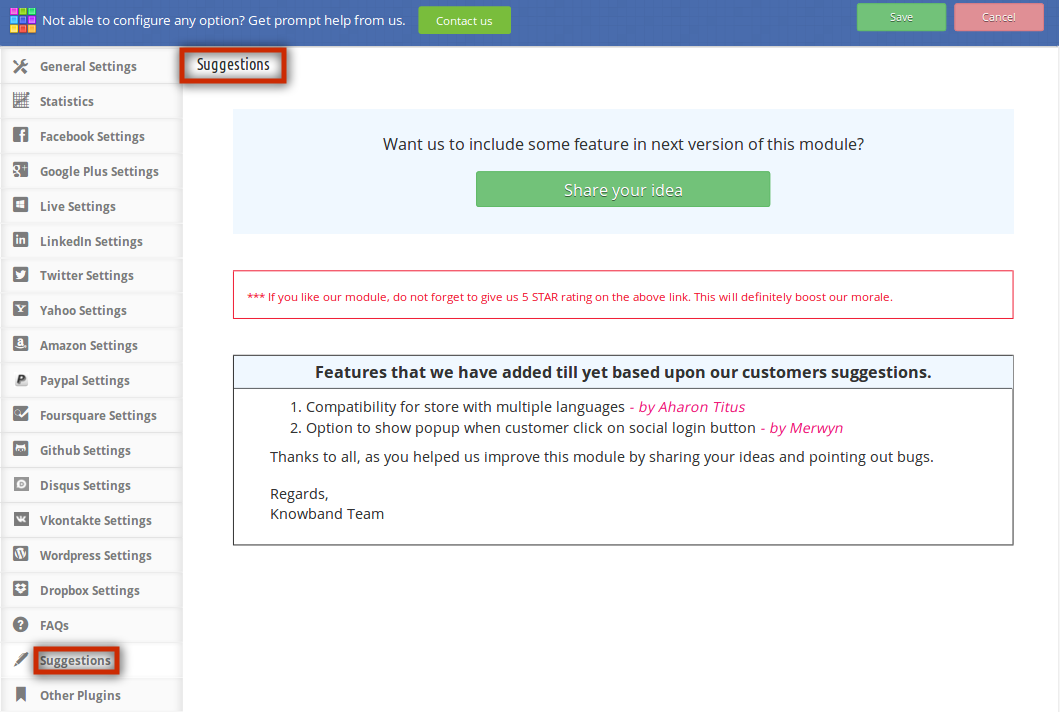
Suggestions
Other Plugins
Each tab is explained below.
General setting of Prestashop social login plugin:
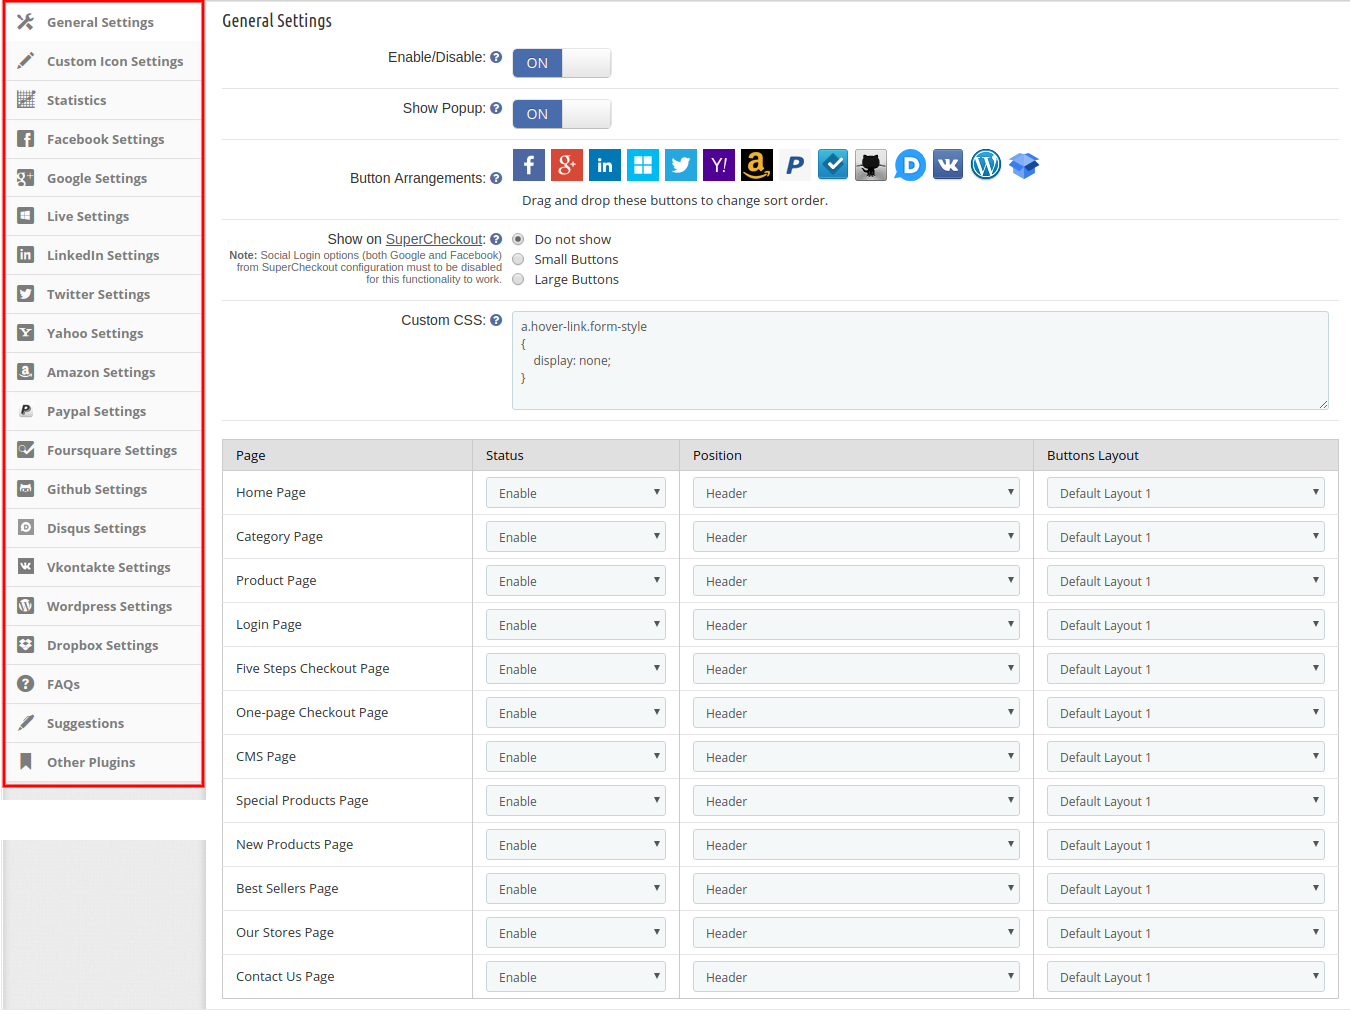
On clicking on the configure link on the module listing page (configure link will automatically appear once you install the plugin), the system will open the general settings tab of the Prestashop google+ login plugin by default as shown in the screenshot below:
Initially, fields in the above form will be already filled with their default values.
Enable/Disable: Initially, this field of the Prestashop social login plugin will be OFF. Admin can enable/disable the Prestashop social media login module by turning ON/OFF in this setting.
show Popup: After enabling this field of the Prestashop social media login plugin by Knowband, it will show the login popup when the customer will click on any of the social login options.
Button Arrangement: Here, in this field of the social login Prestashop module, the admin can change the sequence of the buttons as they appear at the front-end just by dragging and dropping the icon.
show on SuperCheckout: This field of the Prestashop google+ login plugin module allows the admin to show this Prestashop social media login plugin on the SuperCheckout page. The admin can also select the button sizes either small or large. If he doesn’t want to show this social login option, then he can disable this by selecting the “Do Not Show” option.
Custom CSS & JS: The Knowband Prestashop social media login plugin allows the admin to change the look and feel of the social login Prestashop plugin as per his choices.
The admin can also manage the status, position, and button size of the Prestashop social login plugin. Such as, at which page he wants to show the extension (Home Page/Category Page/Product Page/Login Page etc.), what would be the position of this Prestashop extension (Header/Footer/Left Column/Right Column), and what would be the size (Small/Large).
Custom Icon Settings of this Social login options module:
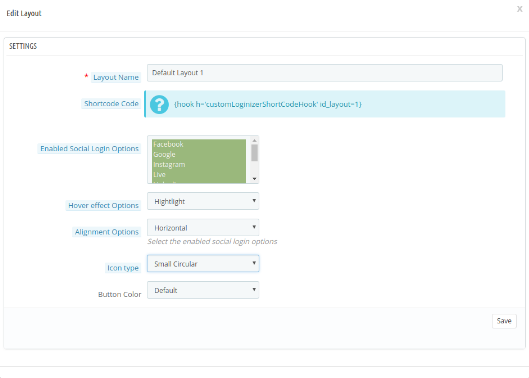
In Custom icon settings, the online store merchant can manage the look and feel of social login icons. There will be a list of layouts that can be added, updated, and deleted at any time as per the requirements. The list is shown below:
There are multiple customization options as shown below:
Layout name: Enter the name of the layout. Admin can also update the name of previously added layouts.
Shortcut code: Admin can copy and paste the shortcode in tpl to show the social login option as per your chosen position.
Enable social login options: Admin can select from various social login options for showing on the website front-end.
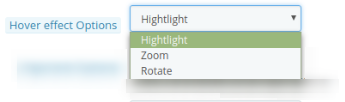
Hover effect option: Admin can select from several hover effects like he can highlight, rotate or zoom the social login icons.
Alignment options: Admin can align the social login options horizontally or vertically.
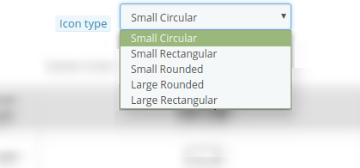
Icon type: Admin can set the icon type as small circular, small rectangular, small rounded, large rounded, and large rectangular.
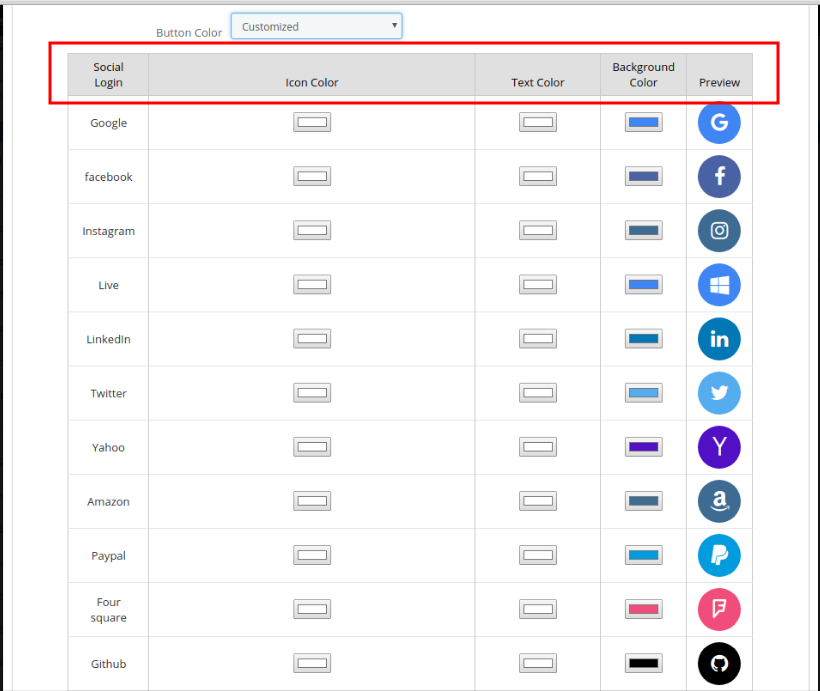
Button color: There are two options for button color. Admin can select the default button color or customize the button colors accordingly. Admin can select different colors from the color picker tool in the advance color selection option.
Statistics of Prestashop social login module
This field of the Prestashop twitter login module allows the store owner to view the report of Login and Registered users in graphical and tabular format. (Whether it is the social login or login with email id and password)
Facebook Settings:
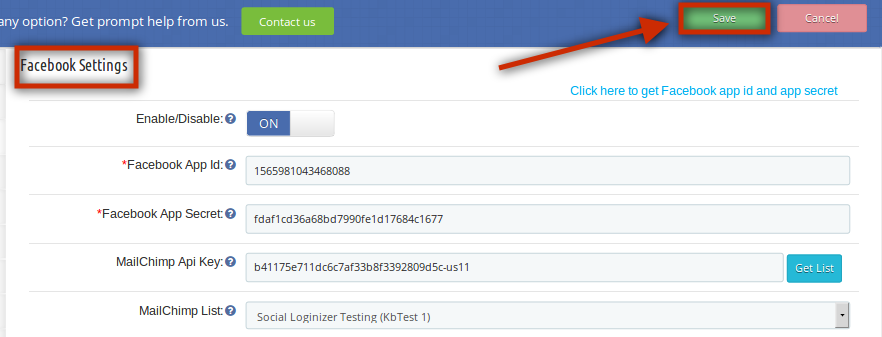
In this tab of the Prestashop Facebook login module, the admin can enable/disable Facebook login at the front end. Fill in the details and click on the ‘Save’ option. The following fields are mandatory:
Facebook App Id
Facebook App secret
The above field values will be available once you create a Facebook App in the respective developer’s console.
Google Plus Settings:
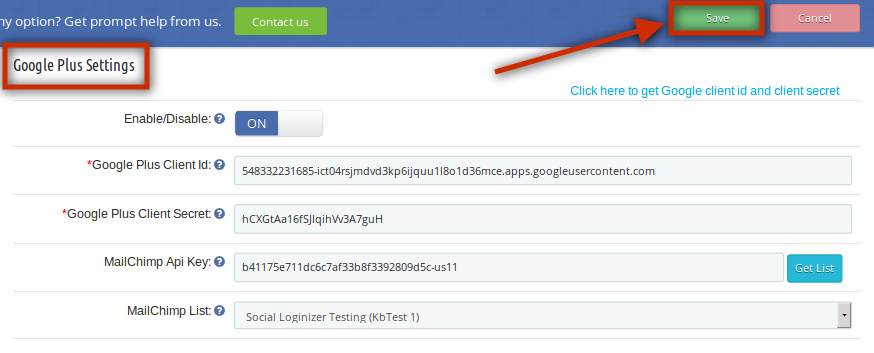
This tab of the Prestashop google+ login plugin allows the admin to enable/disable Google Plus login at the front end. Fill in the details and click on the ‘Save’ option. The following fields are mandatory:
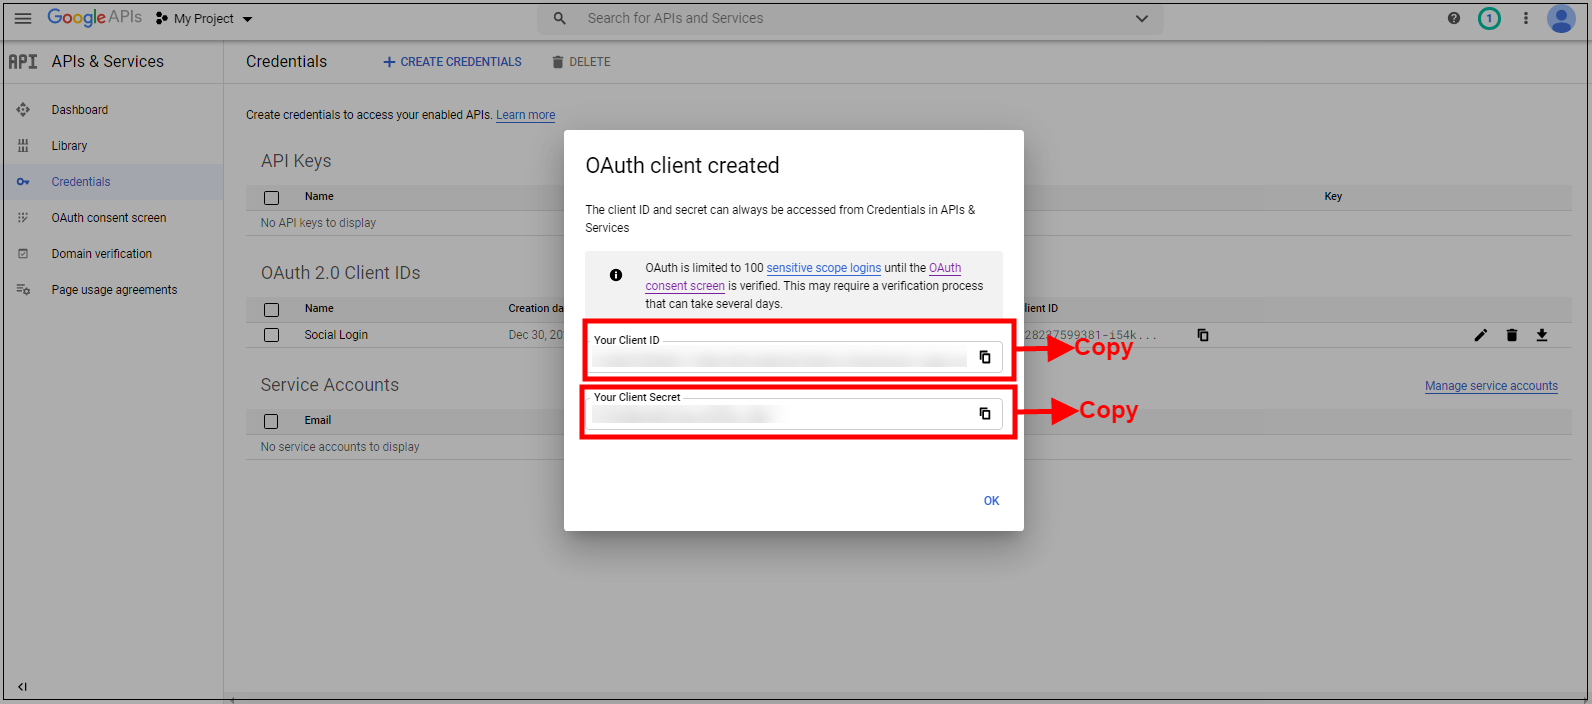
Google Plus Client Id
Google Plus Client Secret:
The above field values will be available once you create a Google Plus App in the respective developer’s console
Live Settings:
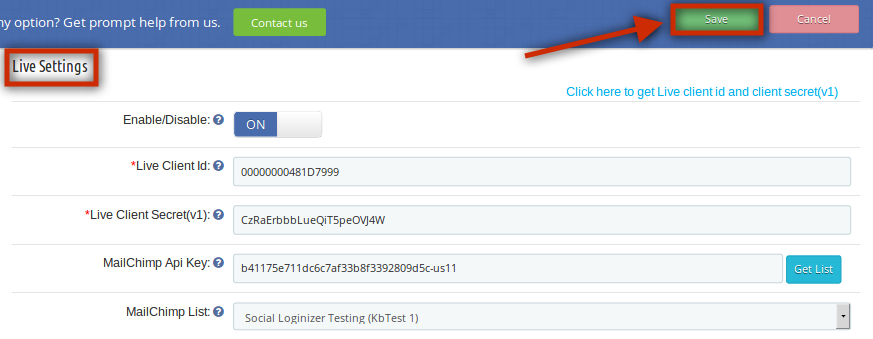
In this tab of the Prestashop social media login plugin, the admin can enable/disable live login at the front end. Fill in the details and click on the ‘Save’ option. The following fields are mandatory:
Live Client Id
Live Client secret(v1)
The above field values will be available once you create a Windows Live App in the respective developer’s console
LinkedIn Settings:
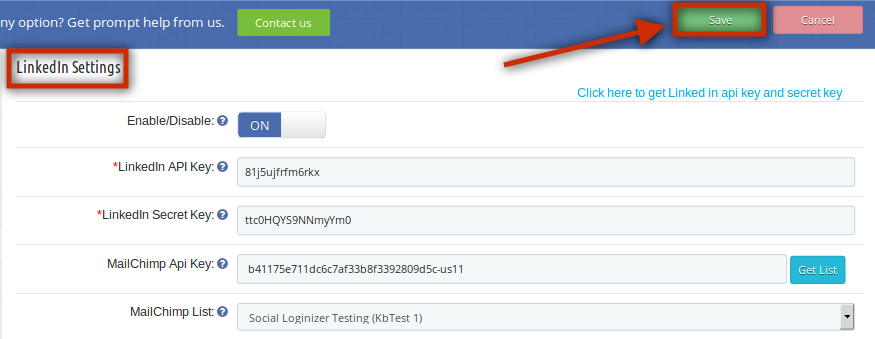
In this tab of Prestashop social login extension by Knowband, the admin can enable/disable Linkedin login at the front end. Fill in the details and click on the ‘Save’ option. The following fields are mandatory:
LinkedIn API Key
LinkedIn Secret Key
The above field values will be available once you create a LinkedIn App in the respective developer’s console.
For setup, the admin needs to follow these steps:
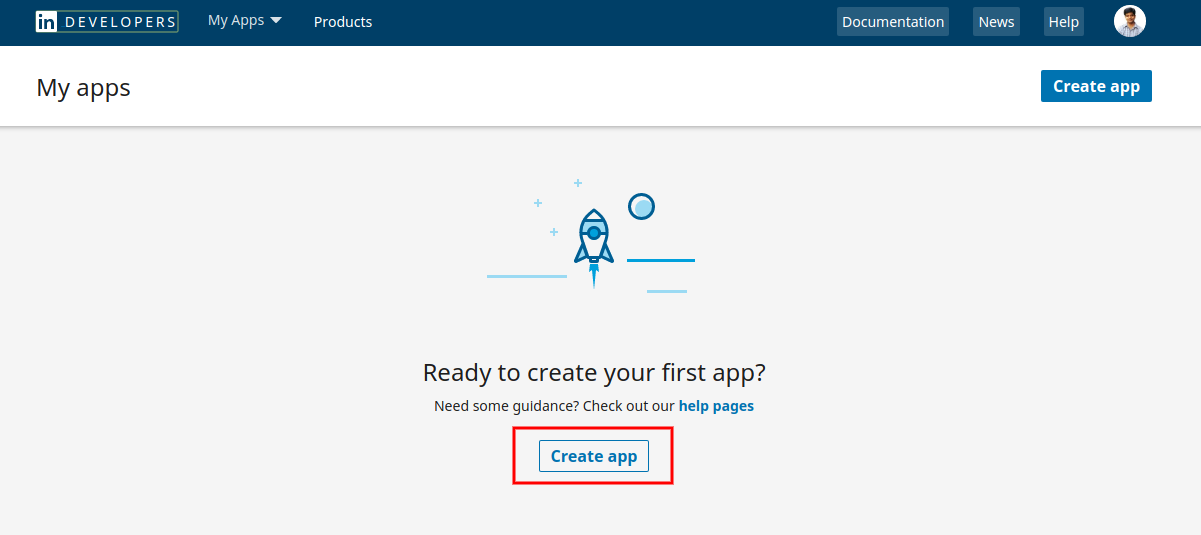
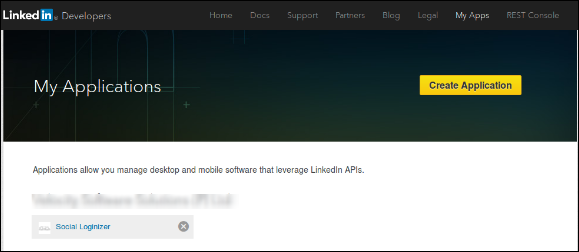
First of all, go to https://www.linkedin.com/developers/apps
Click on Create App option.
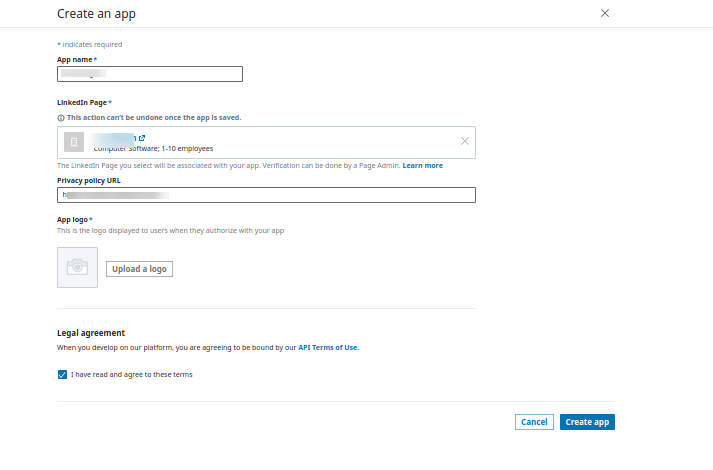
Now, Enter the details on the available form to register a new application. The website URL must be your Store URL like https://www.example.com.
After that, click on the create app button.
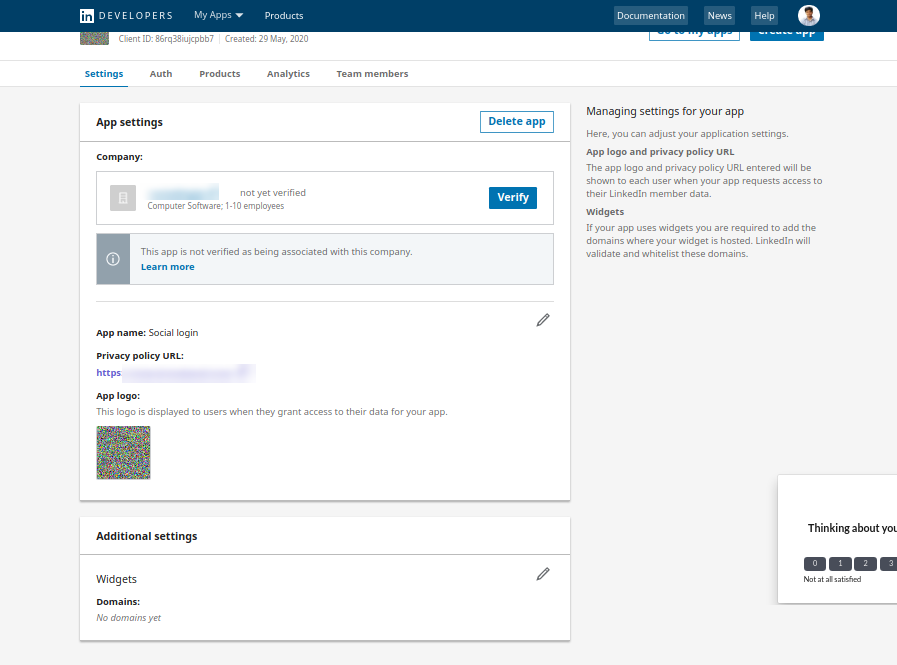
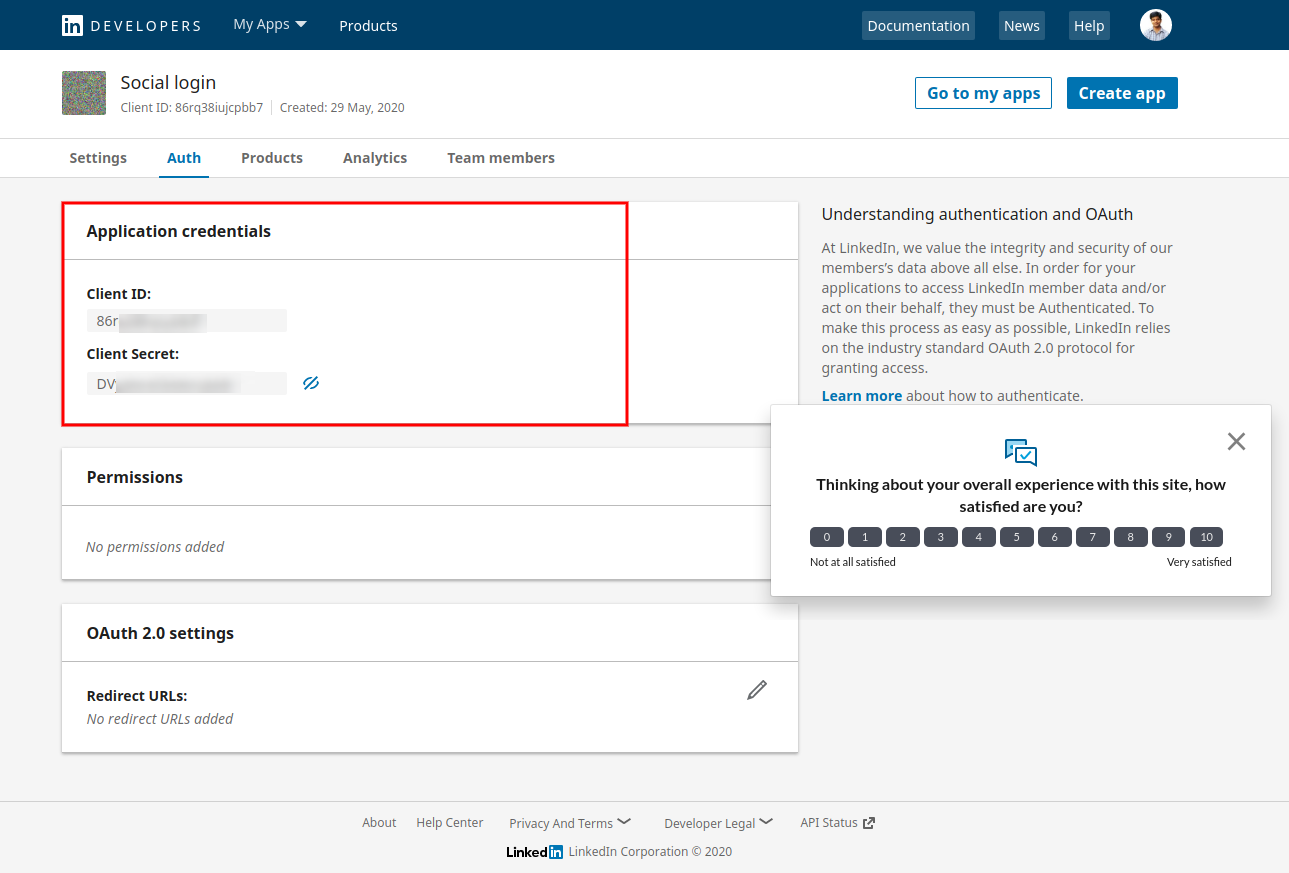
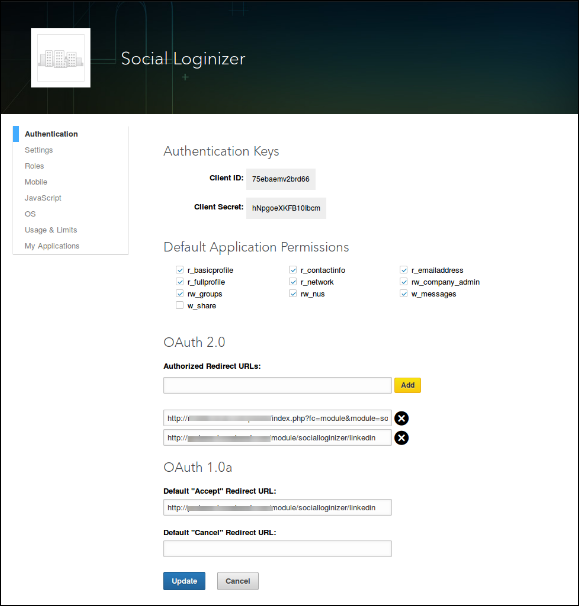
In the second option which is the auth section, the e-merchant can view the app Id and secret as shown below:
Twitter Settings:
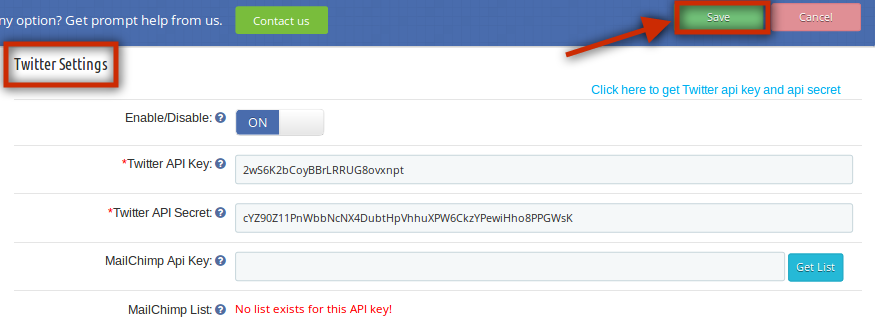
This tab of the Prestashop social media login plugin allows the admin to enable/disable Twitter login at the front end. Fill in the details and click on the ‘Save’ option. The following fields are mandatory:
Twitter API Key
Twitter API Secret
The above field values will be available once you create a Twitter App in the respective developer’s console.
Yahoo Settings:
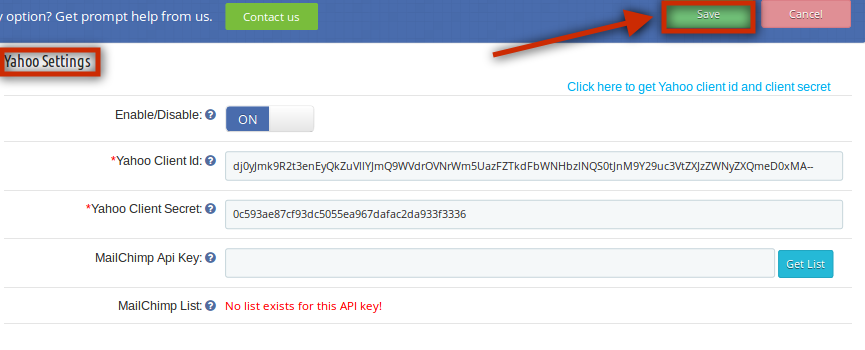
In this tab of the social media login Prestashop plugin, the admin can enable/disable Yahoo login at the front end. Fill in the details and click on the ‘Save’ option. The following fields are mandatory:
Yahoo Client ID
Yahoo Client Secret
The above field values will be available once you create a Yahoo App in the respective developers console.
Amazon Settings:
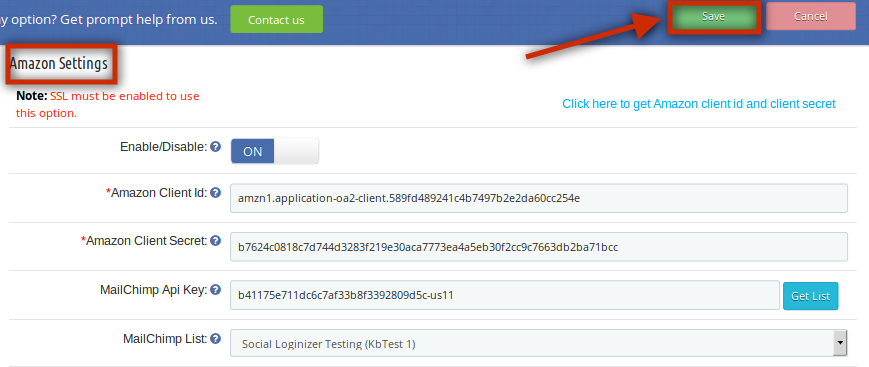
In this tab of the Prestashop social login plugin, the admin can enable/disable Amazon login at the front end. Fill in the details and click on the ‘Save’ option. The following fields are mandatory:
Amazon Client Id
Amazon Client Secret
The above field values will be available once you create an Amazon App in the respective developer’s console.
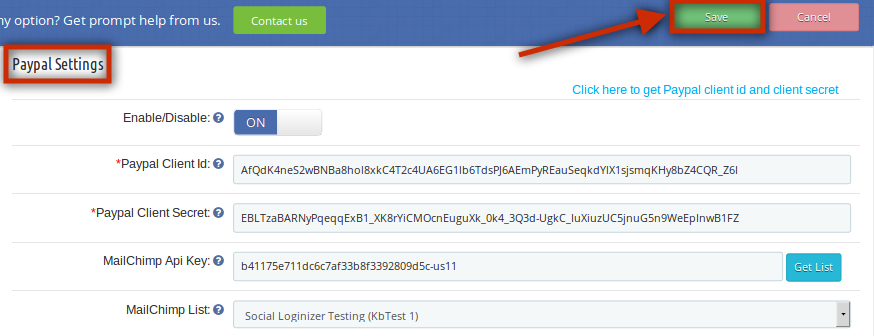
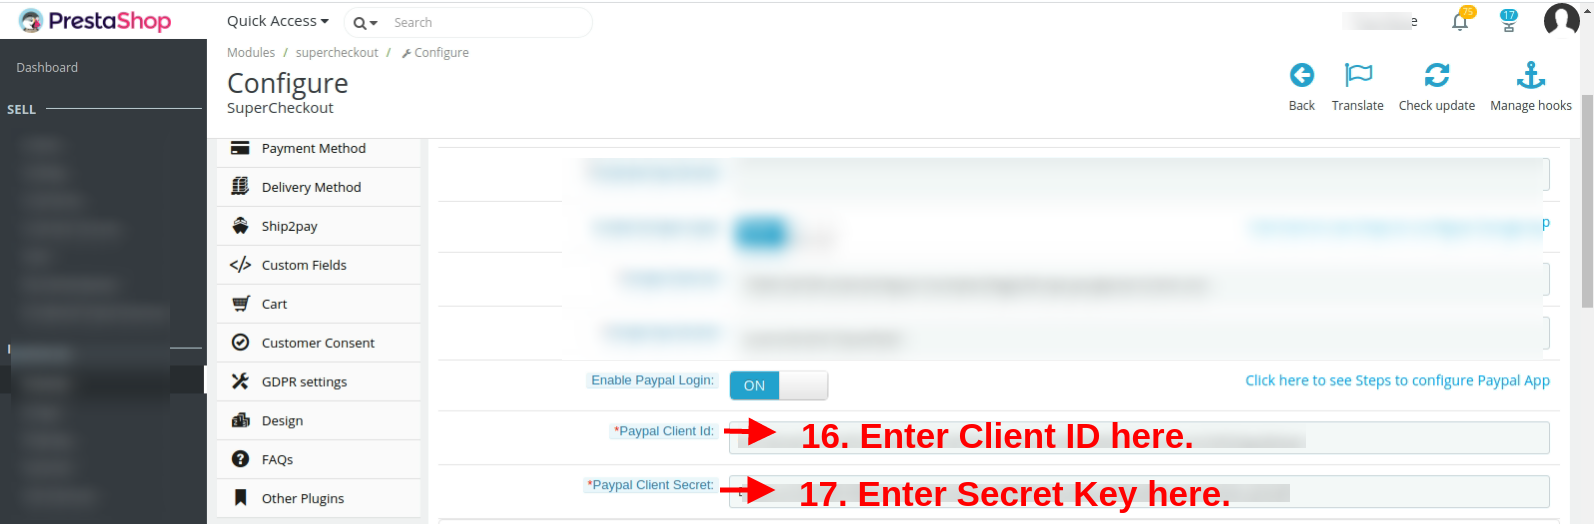
Paypal Settings:
In this tab of Prestashop google+ login addon, the admin can enable/disable Paypal login at the front end. Fill the details and click on the ‘Save’ option. The following fields are mandatory:
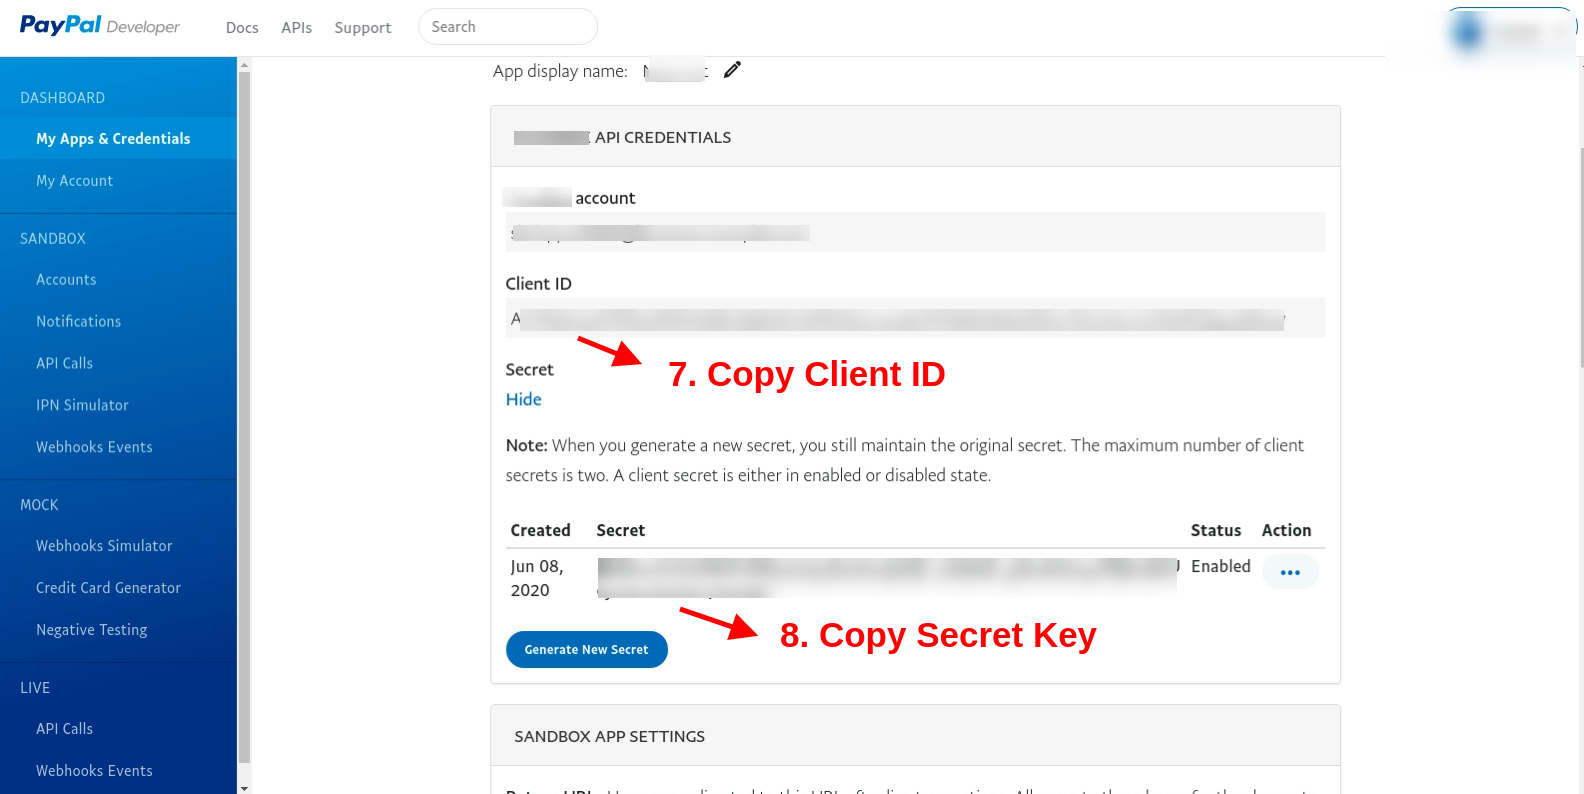
Paypal Client ID
Paypal Client Secret
The above field values will be available once you create a Paypal App in the respective developer’s console.
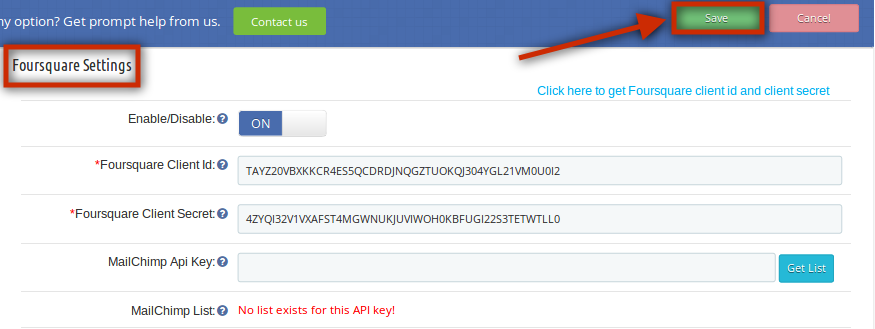
Foursquare Settings:
This tab of the Knowband Prestashop social login plugin allows the admin to enable/disable Foursquare login at the front end. Fill in the details and click on the ‘Save’ option. The following fields are mandatory:
Foursquare Client ID
Foursquare Client Secret
The above field values will be available once you create a Foursquare App in the respective developer’s console.
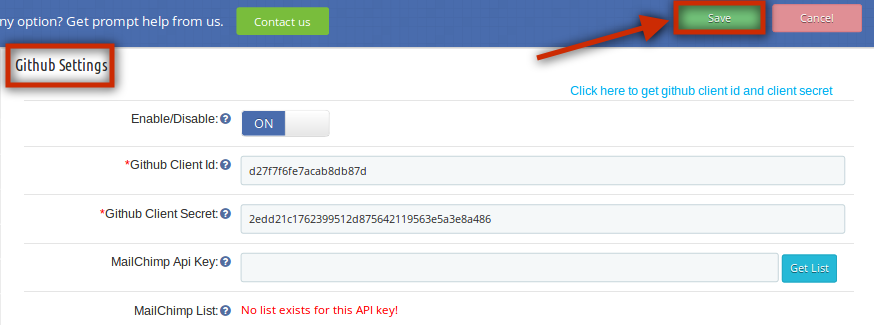
Github Settings:
In this tab of the Prestashop social media login module, the admin can enable/disable Github login at the front end. Fill in the details and click on the ‘Save’ option. The following fields are mandatory:
Github Client ID
Github Client Secret
The above field values will be available once you create a Github App in the respective developer’s console.
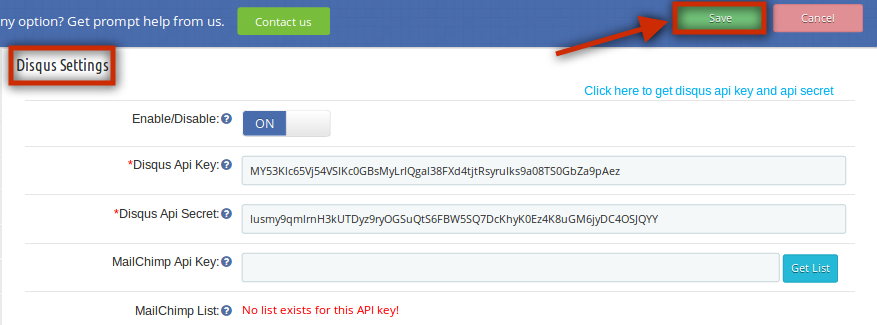
Disqus Settings:
In this tab of the Prestashop social media login plugin, the admin can enable/disable Disqus login at the front end. Fill the details and click on the ‘Save’ option. The following fields are mandatory:
Disqus API Key
Disqus API Secret
The above field values will be available once you create a Disqus App in the respective developer’s console.
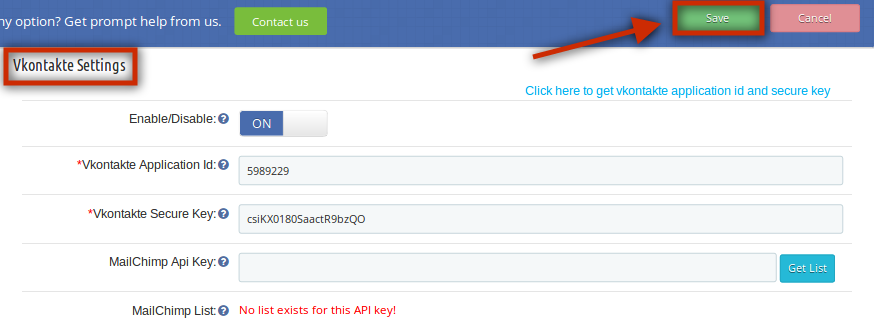
Vkontakte Settings:
In this tab of the Prestashop social login plugin by Knowband, the admin can enable/disable Vkontakte login at the front end. Fill in the details and click on the ‘Save’ option. The following fields are mandatory:
Vkontakte Application ID
Vkontakte Secure Key
The above field values will be available once you create a Vkontakte App in the respective developer’s console.
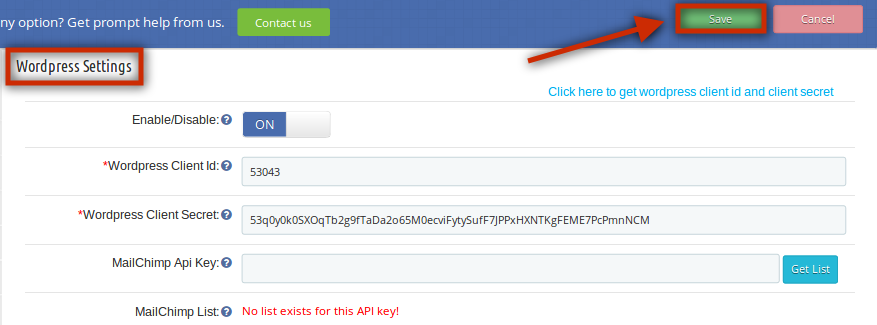
WordPress Settings:
This tab of the Prestashop social login module allows the admin to enable/disable WordPress login at the front end. Fill in the details and click on the ‘Save’ option. The following fields are mandatory:
WordPress Client ID
WordPress Client Secret
The above field values will be available once you create a WordPress App in the respective developer’s console.
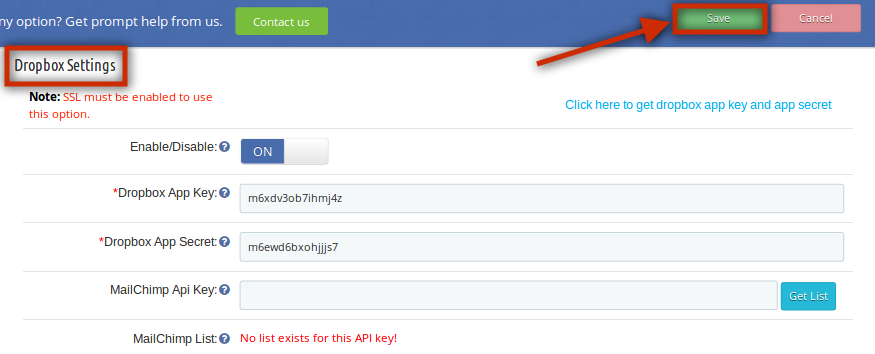
Dropbox Settings:
In this tab of the Prestashop Facebook login module, the admin can enable/disable Dropbox login at the front end. Fill the details and click on the ‘Save’ option. The following fields are mandatory:
Dropbox App Key
Dropbox App Secret
The above field values will be available once you create a Dropbox App in the respective developer’s console.
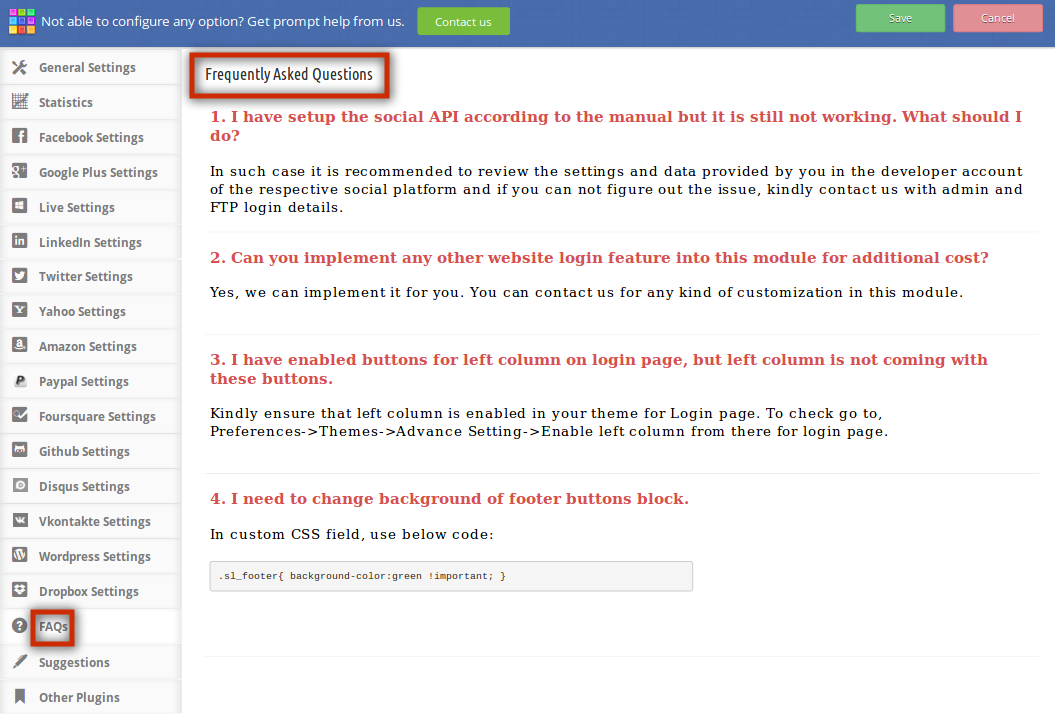
FAQs:
This tab of the social login Prestashop module contains several questions (with answers to them) that are asked by our customers. We recommend you go through the questions before raising any ticket for this Prestashop Facebook login plugin.
Suggestions:
In case you want to give any suggestions for some new features to be included in the new version of this Prestashop Google+ login plugin then you can use this tab.
Other Plugins:
This tab redirects to our developer page having the list of other plugins developed by us. If you like this Prestashop social media login plugin then you can try our other Prestashop plugins as well.
Front End Prestashop social login module:
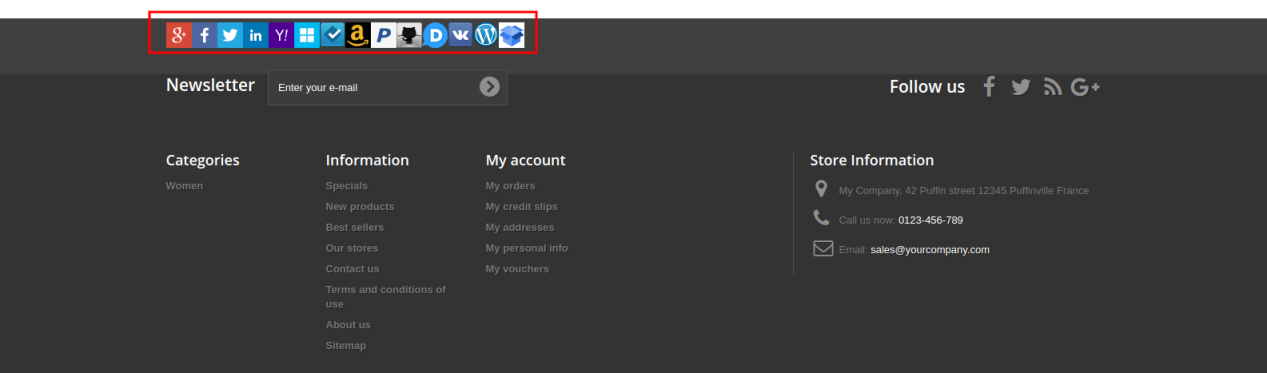
At the footer, the customers can view the social login options as shown below:
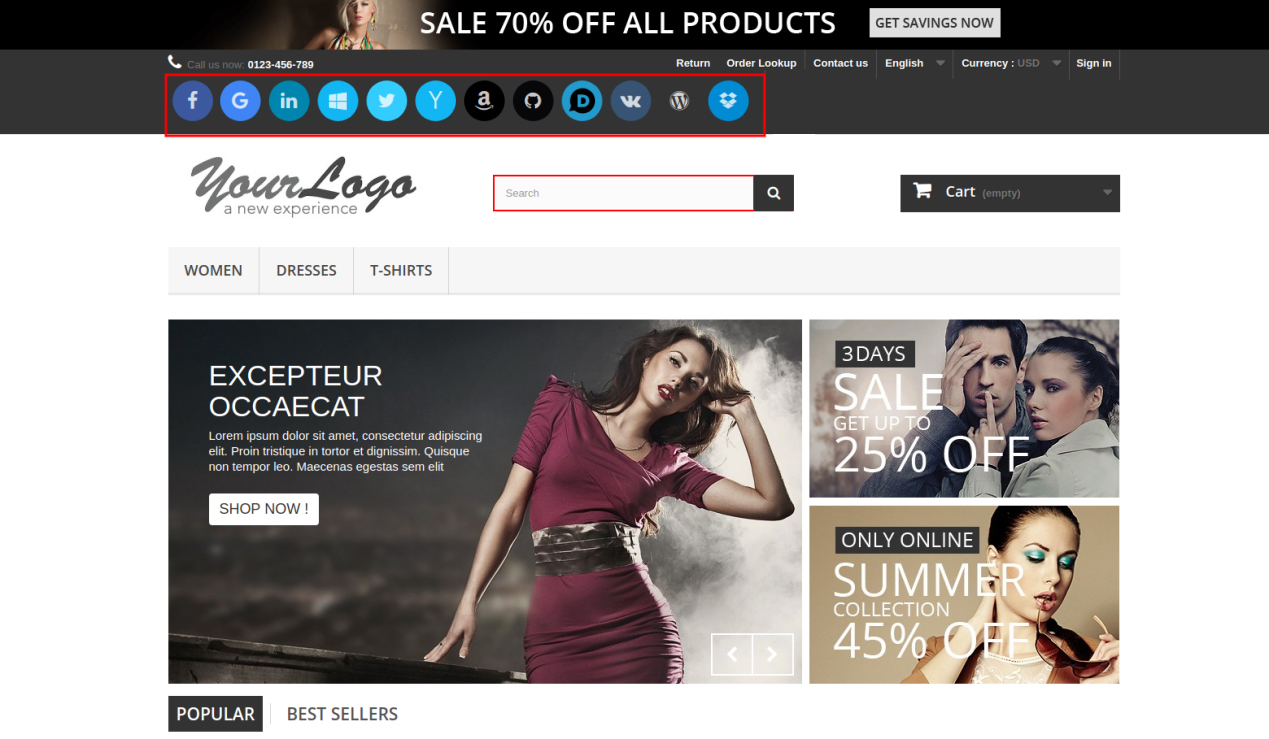
On the front end of this Prestashop social login plugin, customers can see the social login buttons near the ‘Sign in’ option as we have set the small button in the header of the website. Below is the screenshot of the same:
Short Code Functionality
In case you want to display social login buttons somewhere else where the module has no access. So, there is shortcode functionality providing you a way to display social login buttons anywhere throughout your site. To do this, you just have to put a line of code in your respective tpl file accordingly. The line of code is given below:
Code for display small icon: hook h=’customLoginizerShortCodeHook’ size=’small’
Code for display large icon: hook h=’customLoginizerShortCodeHook’ size=’large’
Recommendations:-
Refresh the home page of your store every time you enable/disable social media login Prestashop plugin. If Prestashop social login plugin is not working after installation then please check permissions on the modules folder. The folder should be writable. Please make the folder permission to 755.
How to get Facebook App details?
Facebook App can be created by following the below-mentioned steps:-
Step 1: Go to the given URL: https://developers.facebook.com/apps/
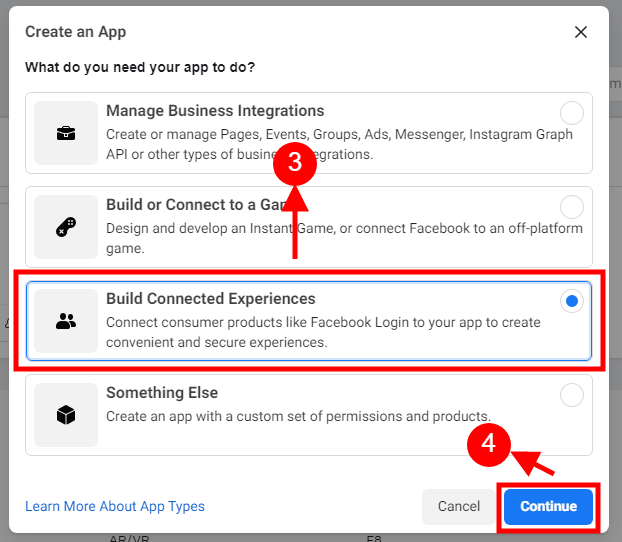
Step 2: Click on the “Add a New App” button.
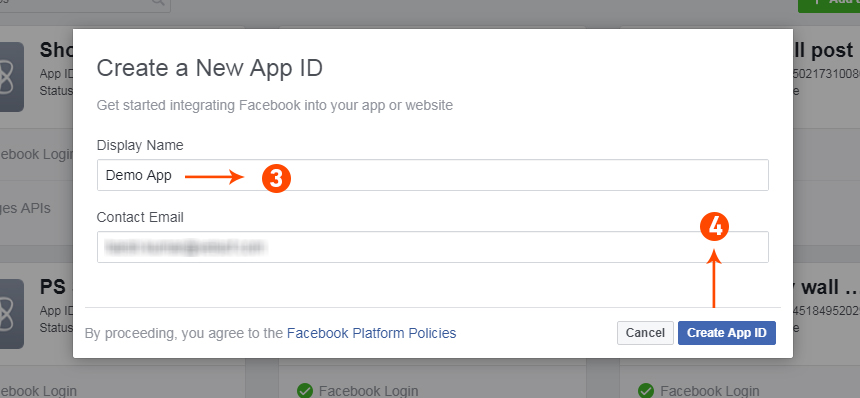
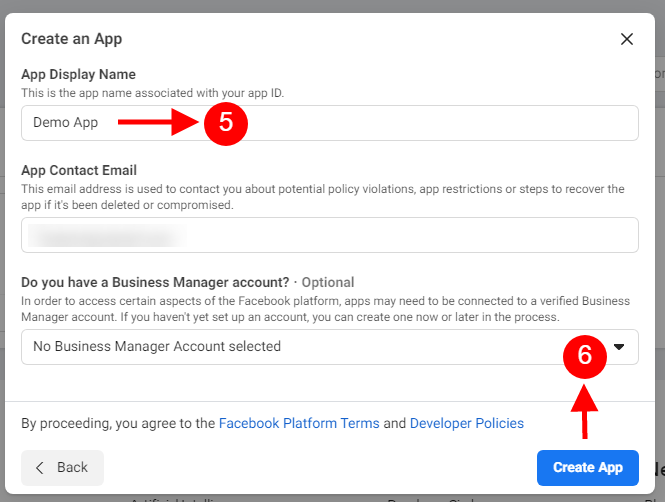
Step 3&4: Enter your App name and email id, then click on “Create App ID” button.
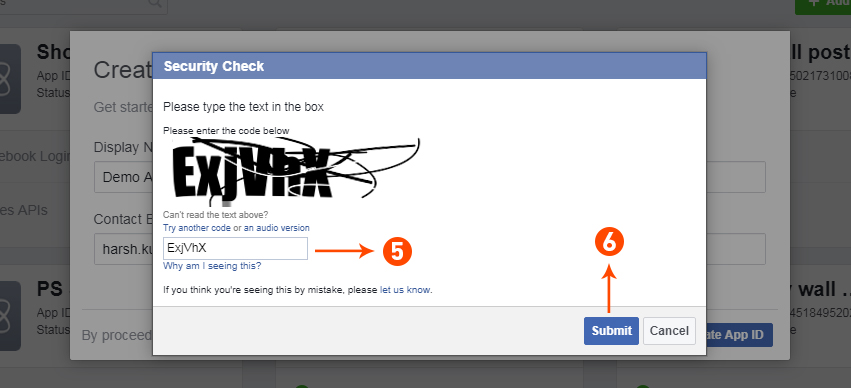
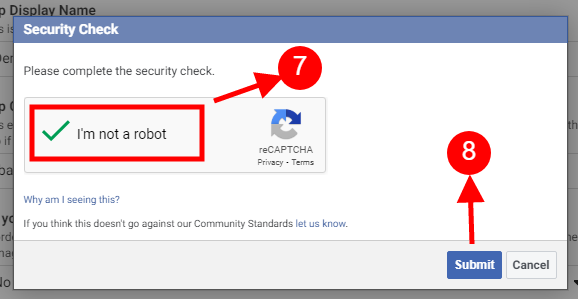
Step 5&6: After clicking on Create App ID you will have to go through a security check as shown:
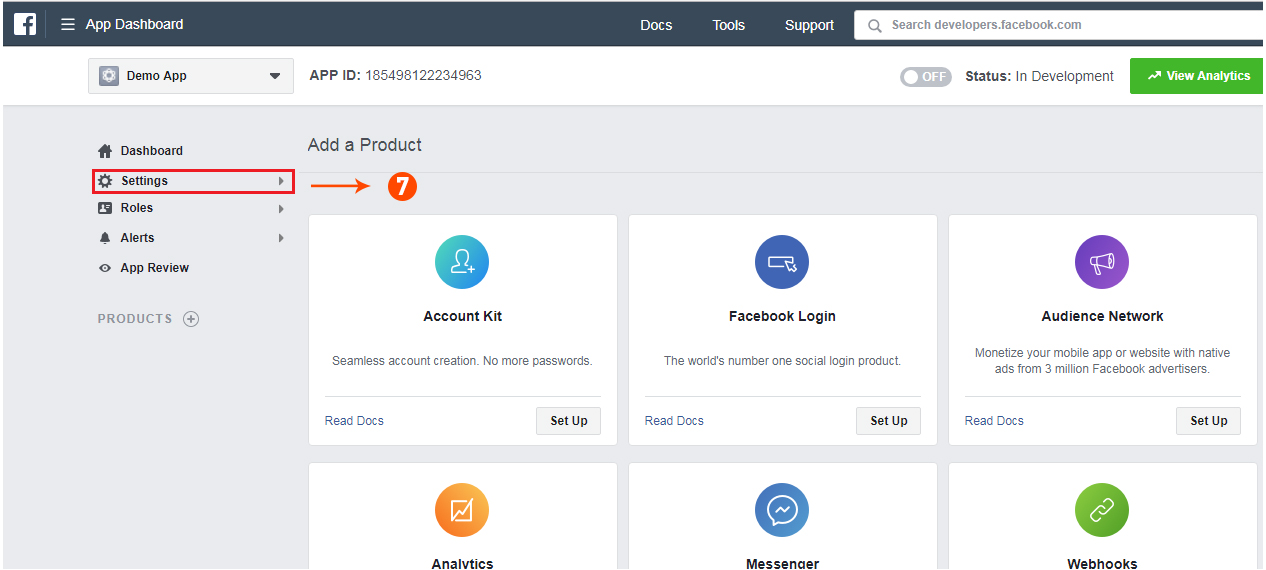
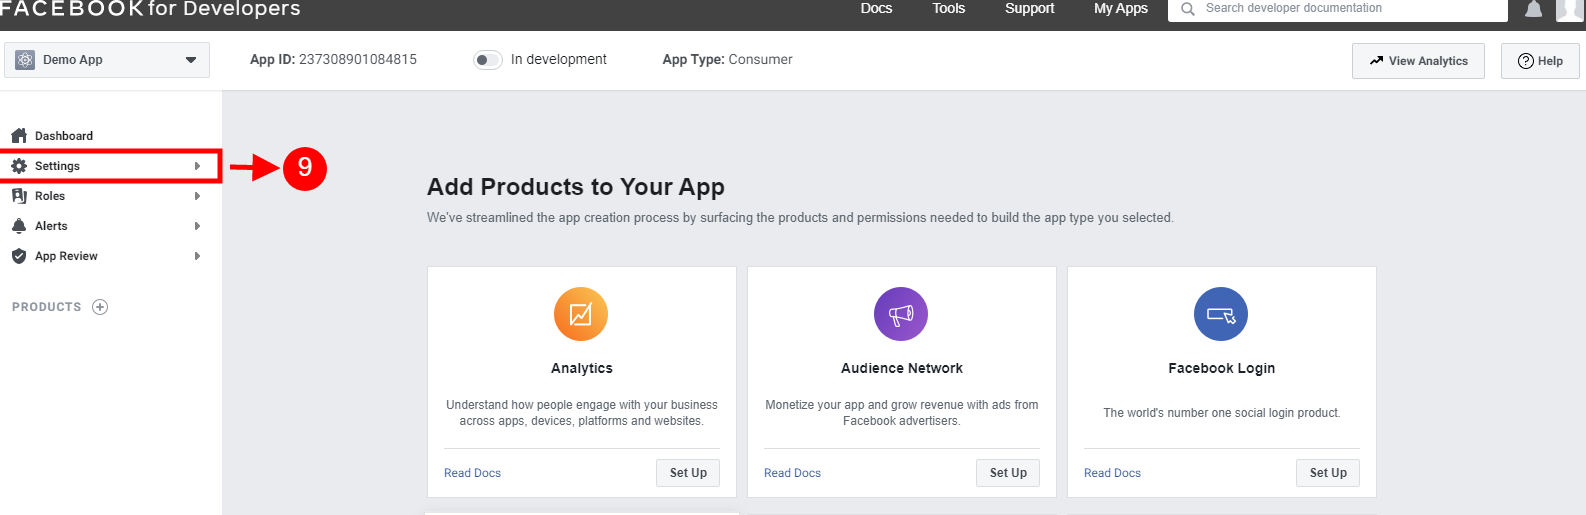
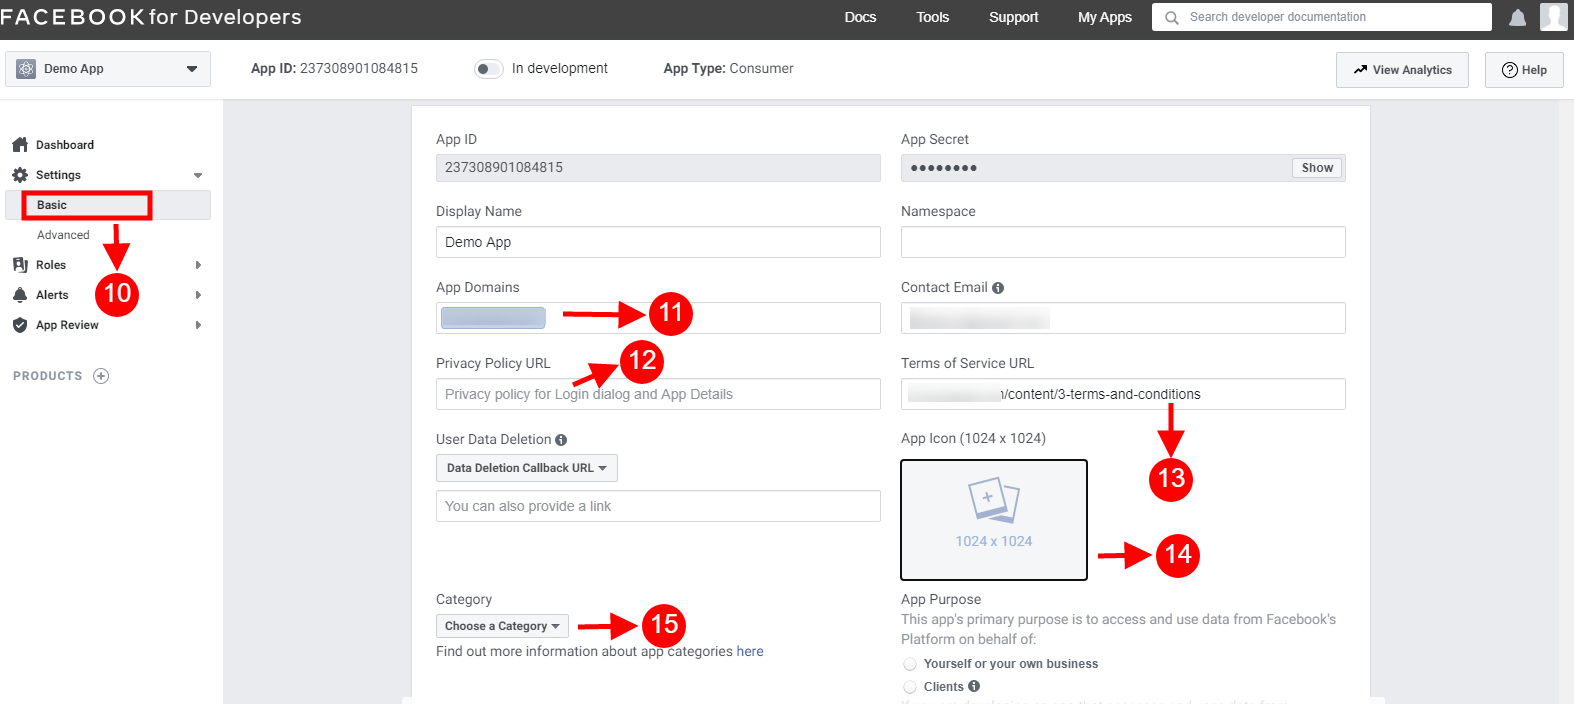
Step 7: Click on “Setting” tab.
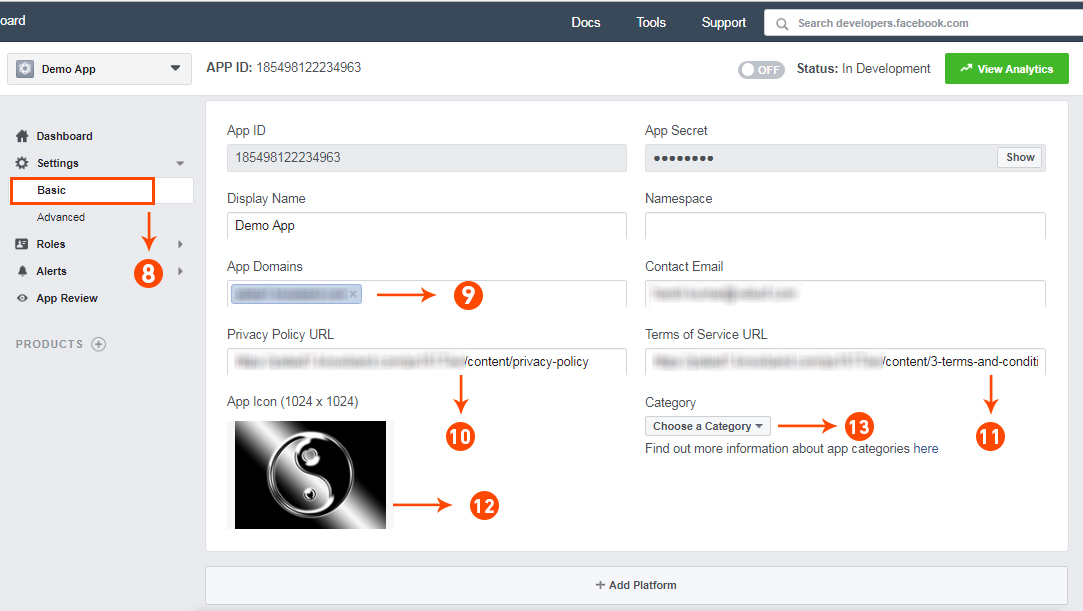
Step 8-13: Two options will be available in the dropdown, Basic and Advanced, click on “Basic”. And then enter your “App Domain”, “Contact Email”, ”Privacy URL”, ”Terms and Conditions URL”, ”Add Logo”, ”Select Category” and click on the “Save Changes” button.
App Domains:
yourdomain.com is correct
yourdomain.com/store is incorrect
www.domain.com is incorrect
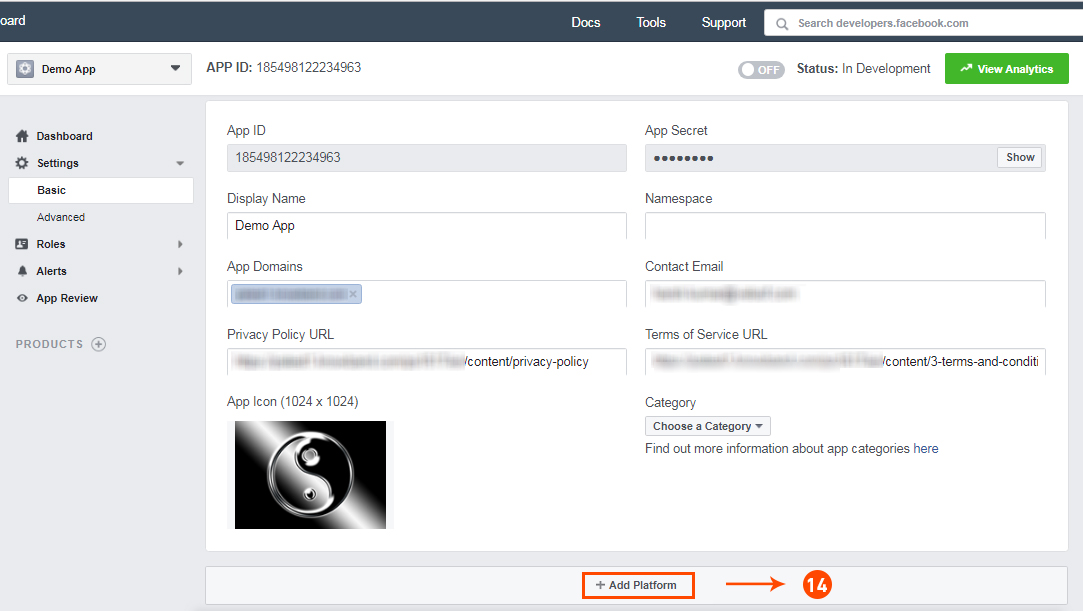
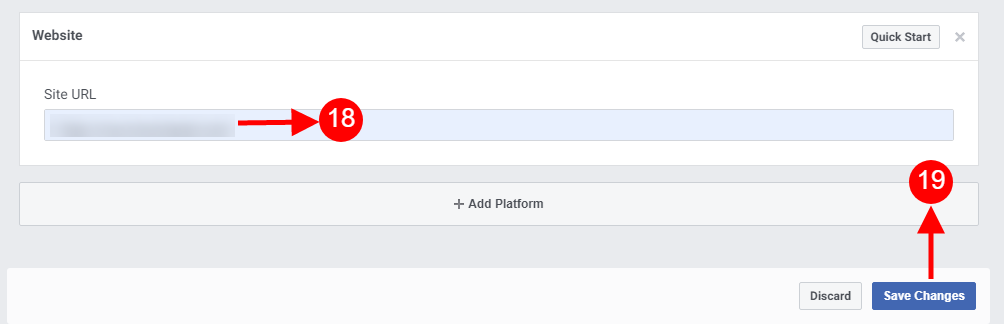
Step 14: Now click on “+Add Platform”.
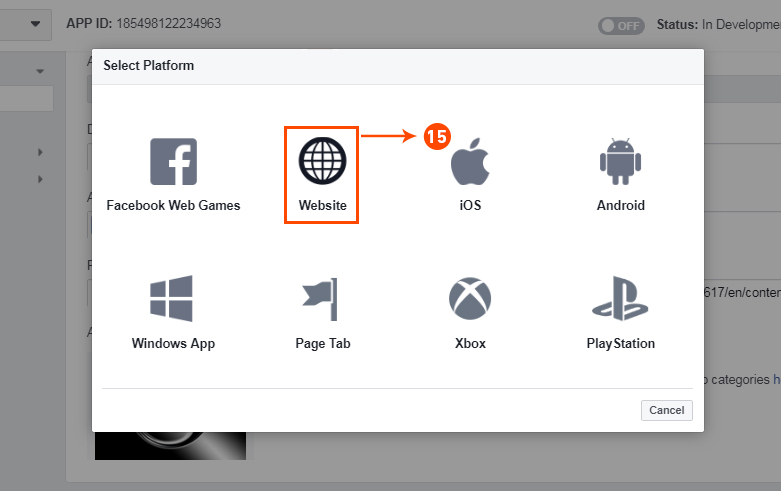
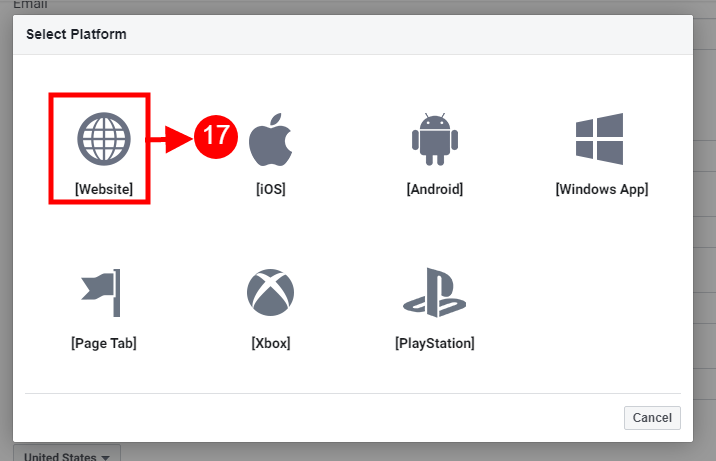
Step 15: And select Website as Platform
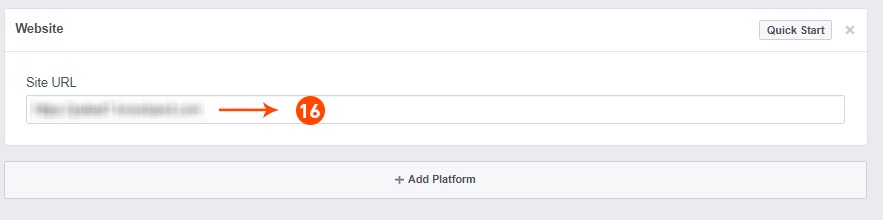
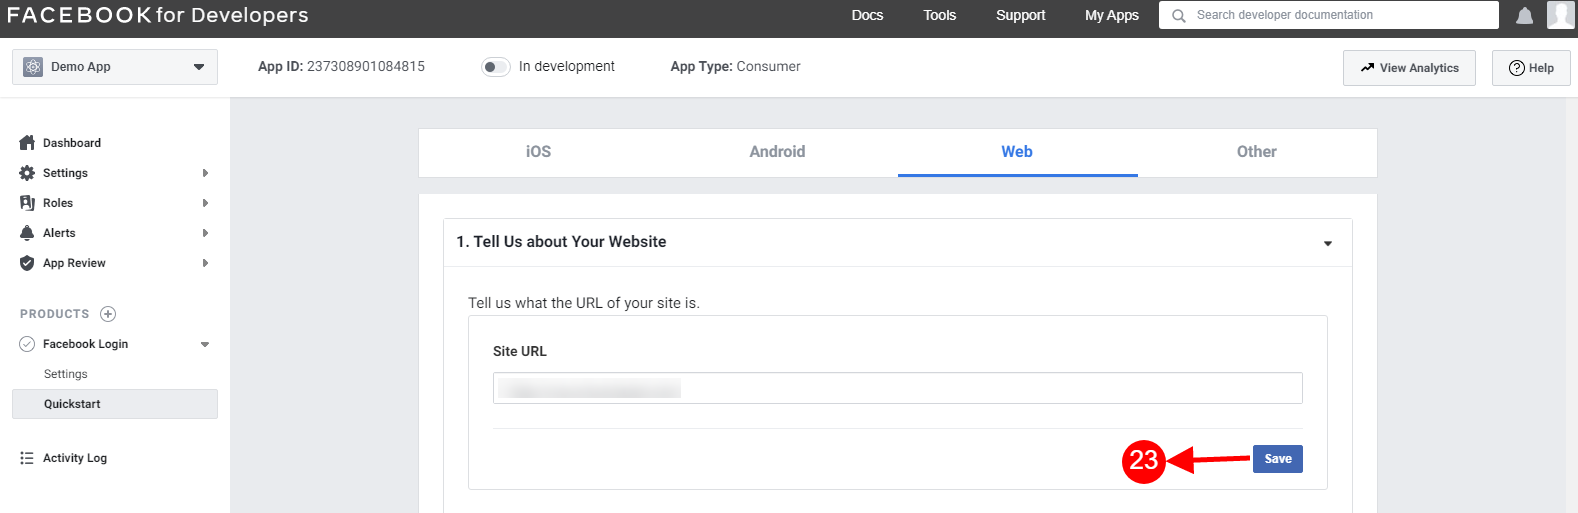
Step 16: Now Enter your site URL.
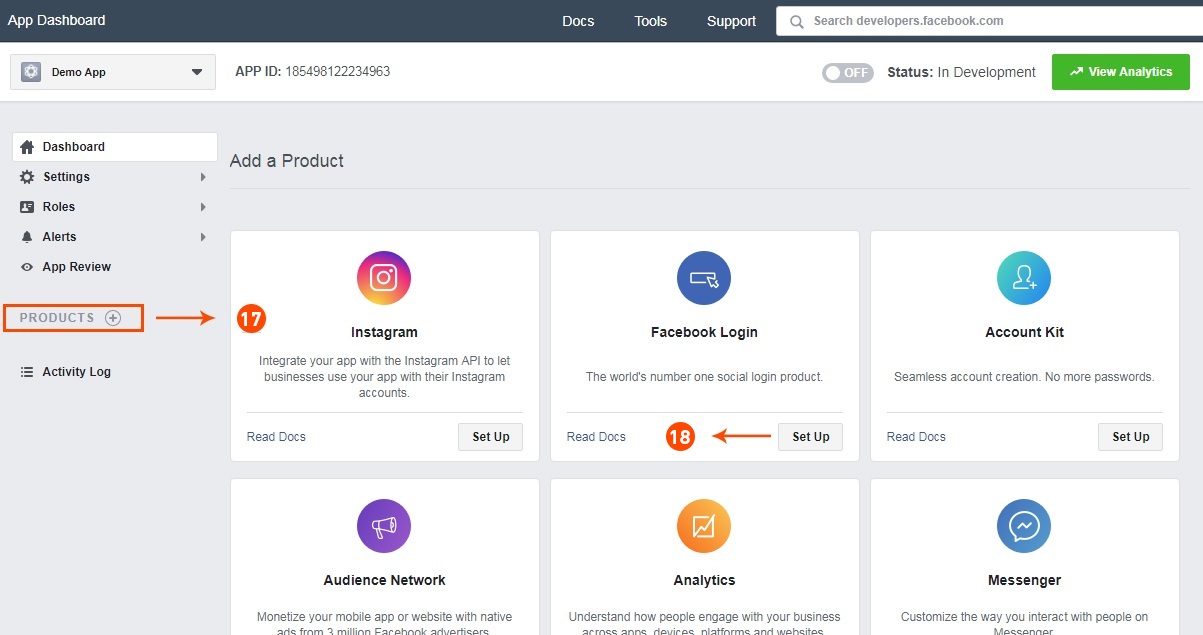
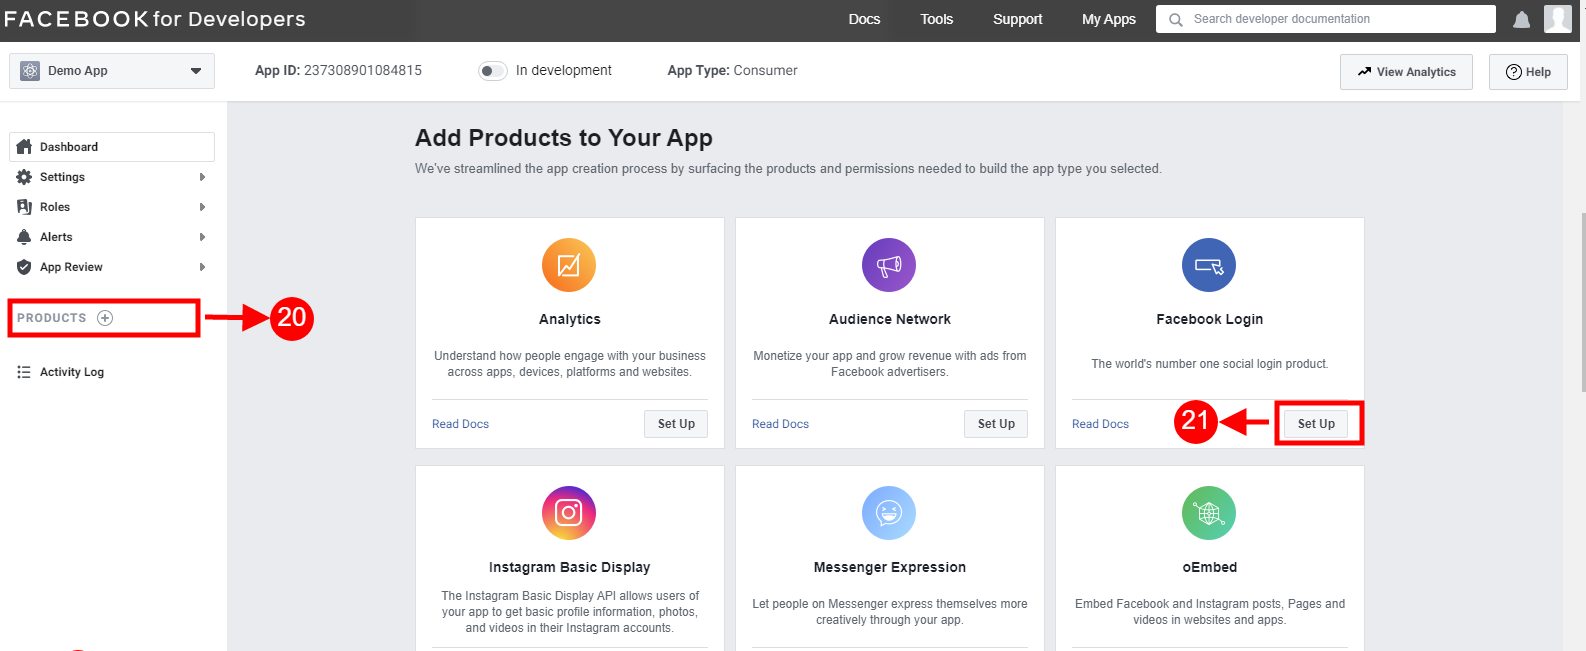
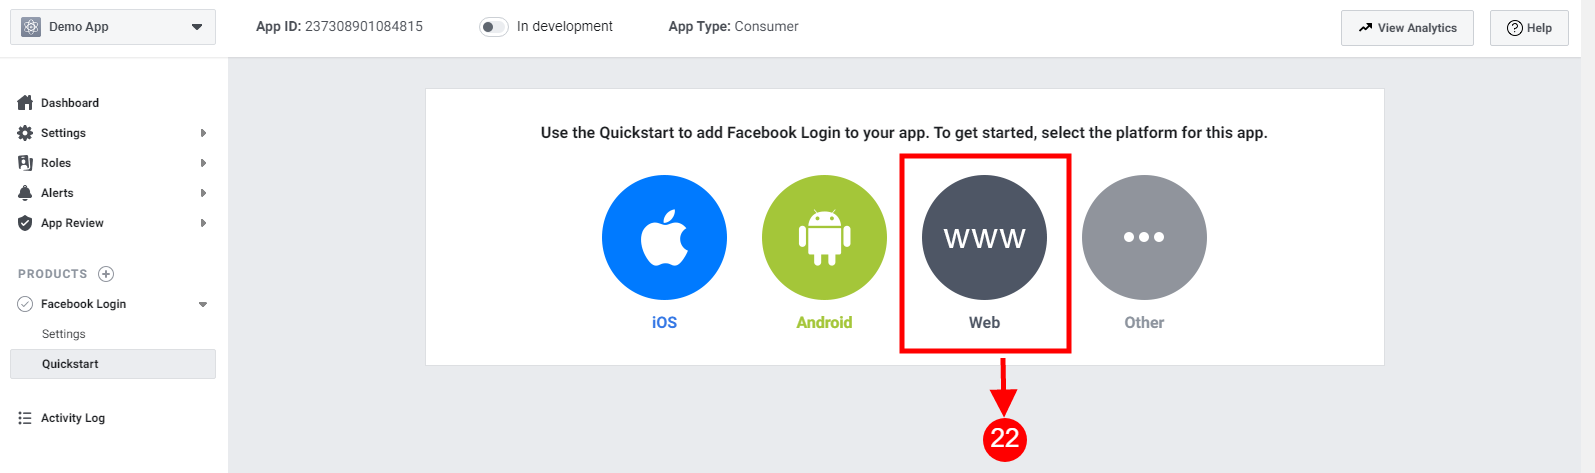
Step 17&18: Click on “Products+” and select Facebook login.
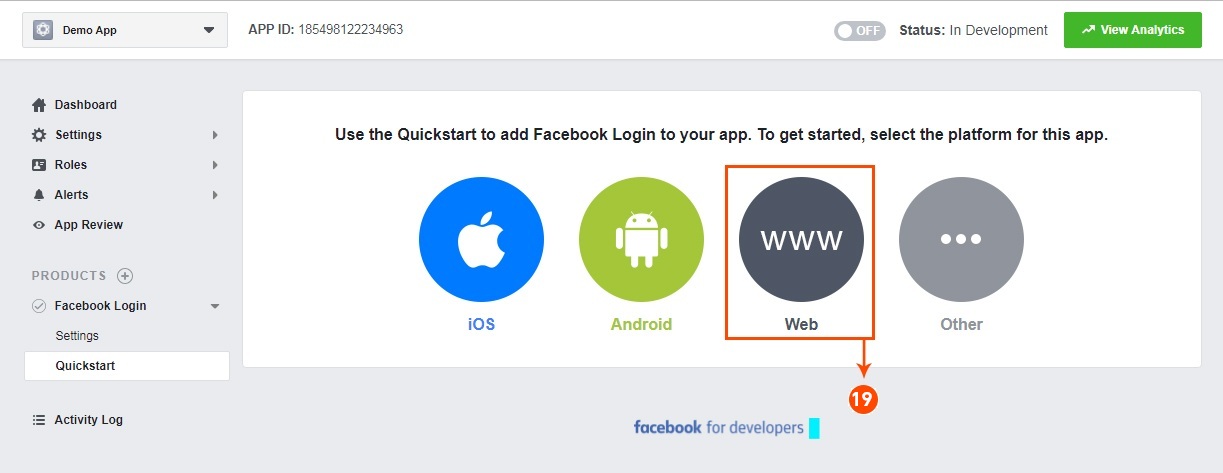
Step 19: Select web as the platform for the app.
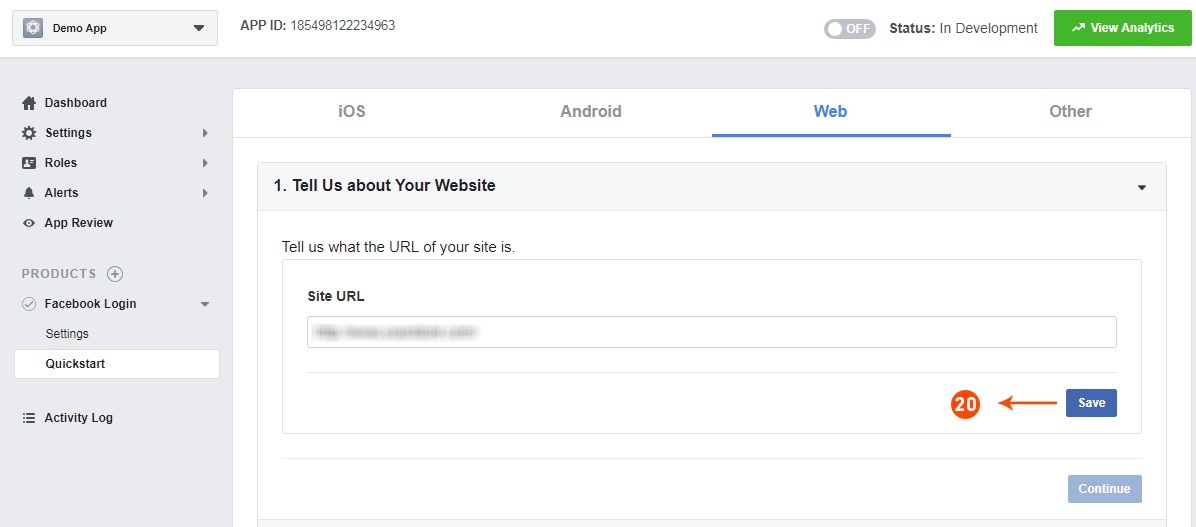
Step 20: Now click on save.
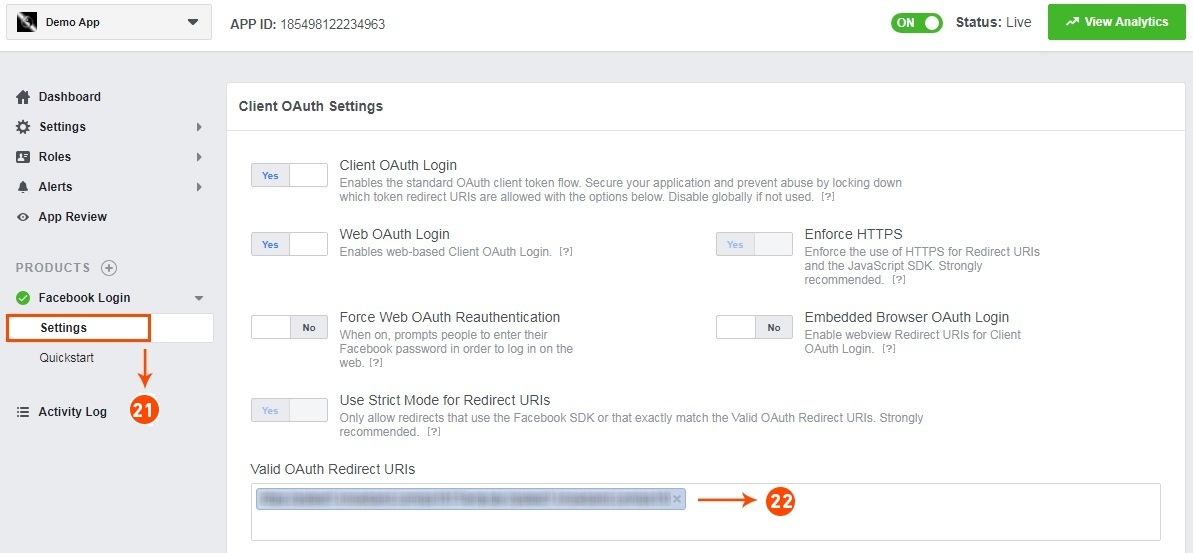
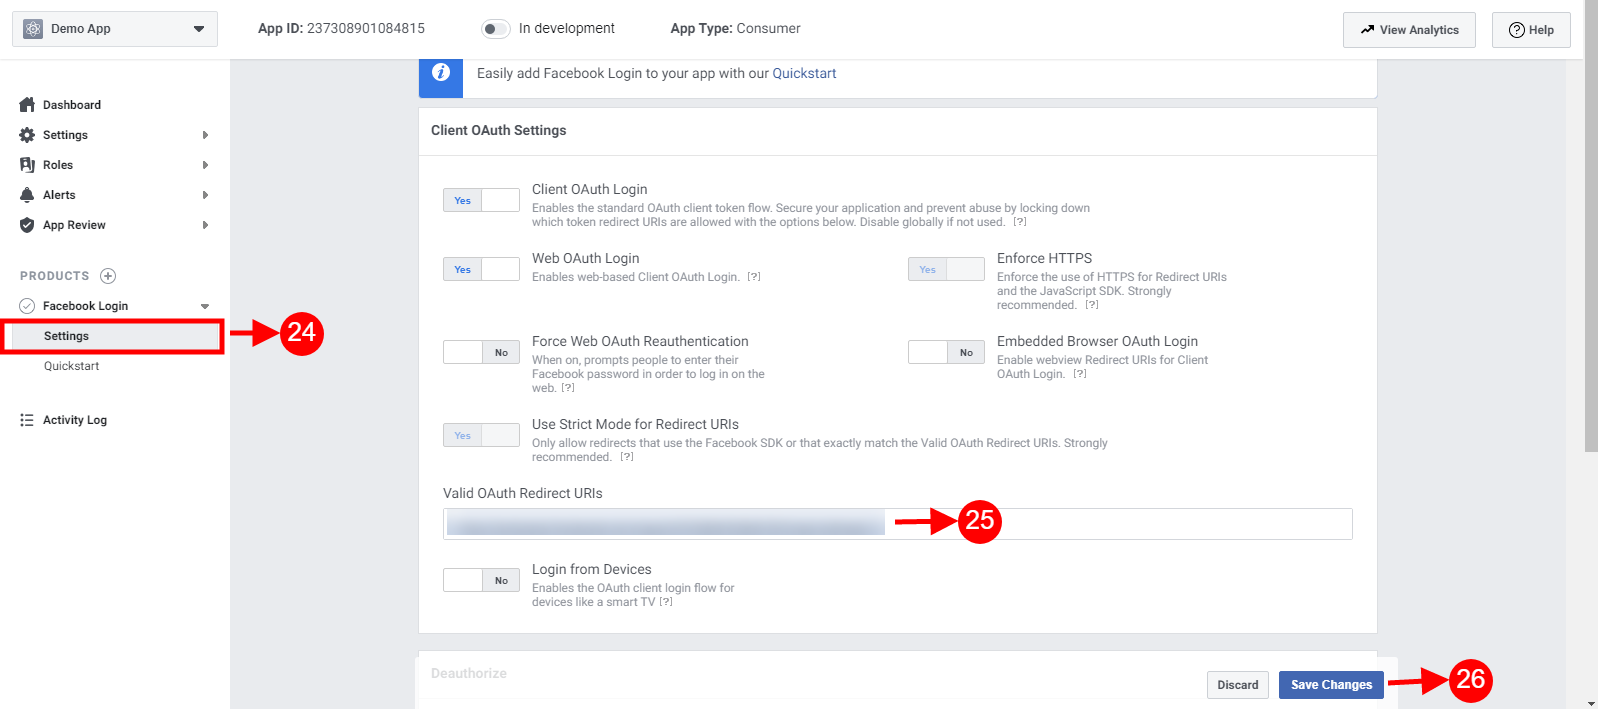
Step 21&22: Click on Settings and add a Valid OAuth Redirect URIs.
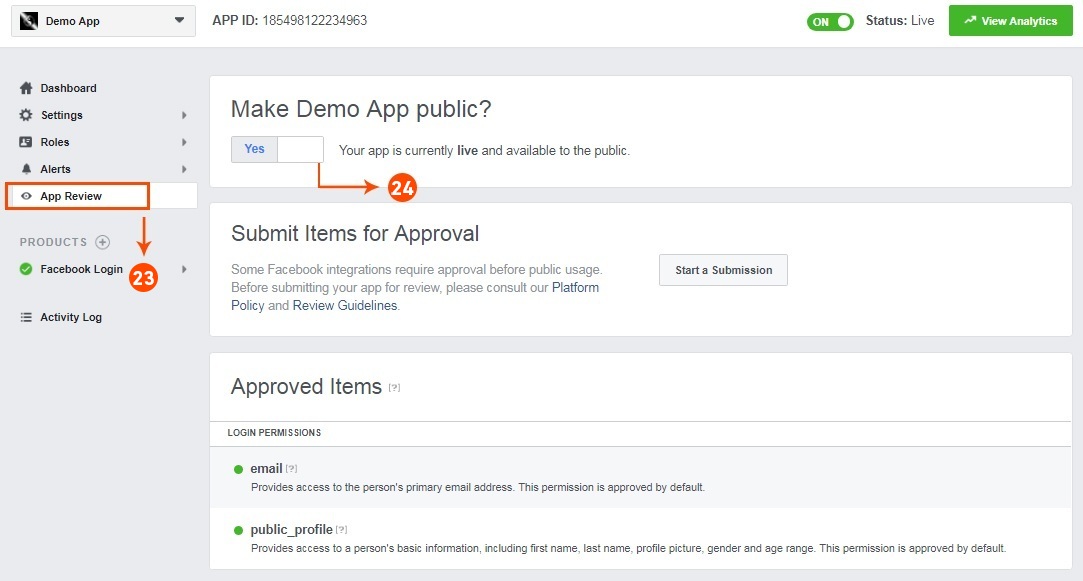
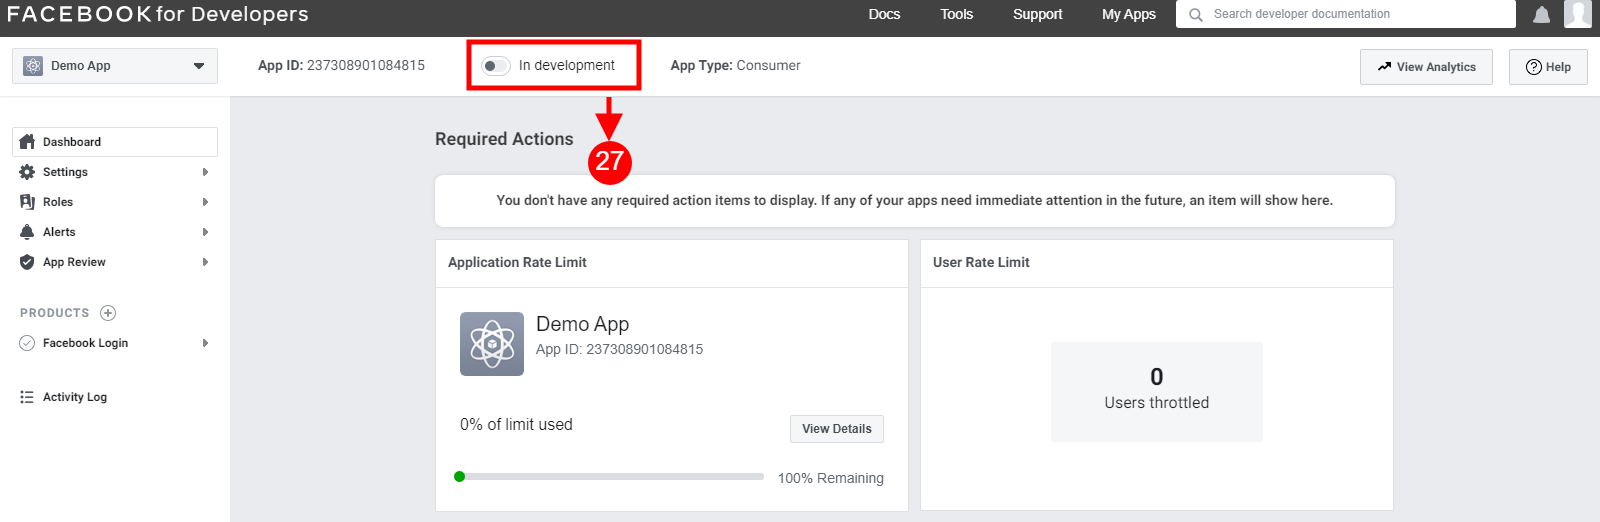
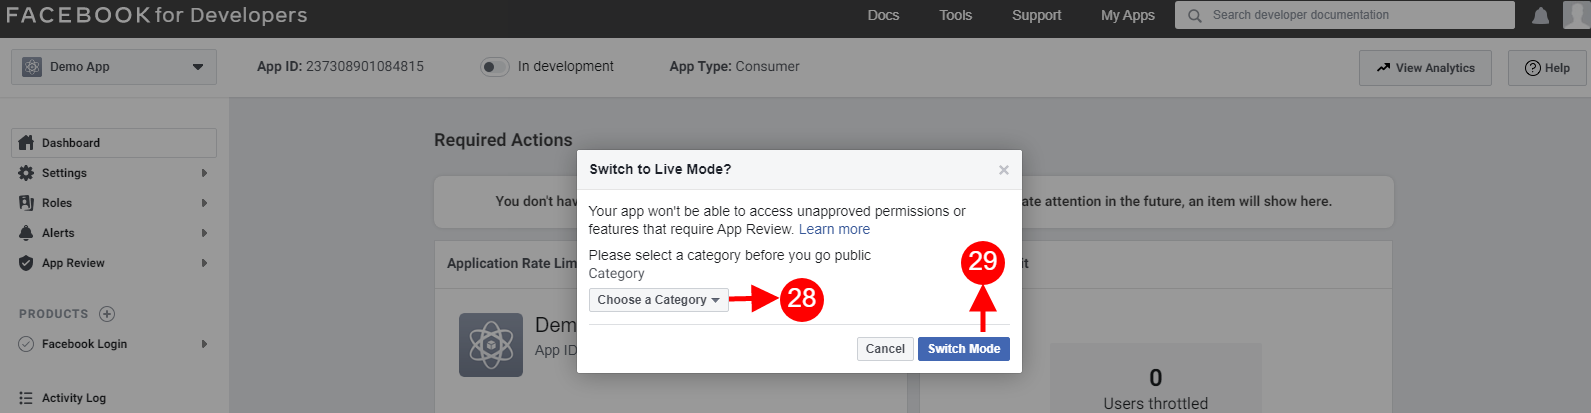
Step 23&24: Click on “App review”. And mark “Make ‘your app name’ Public” to Yes.
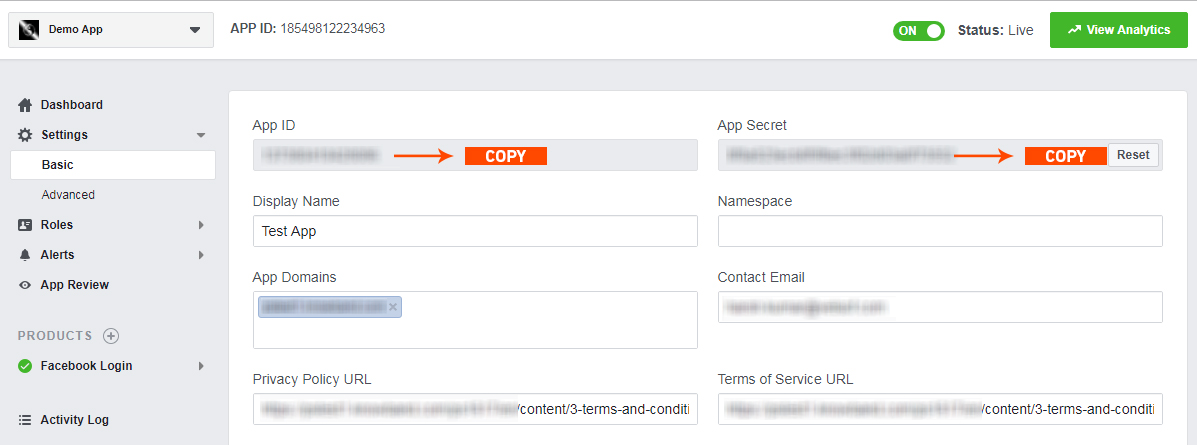
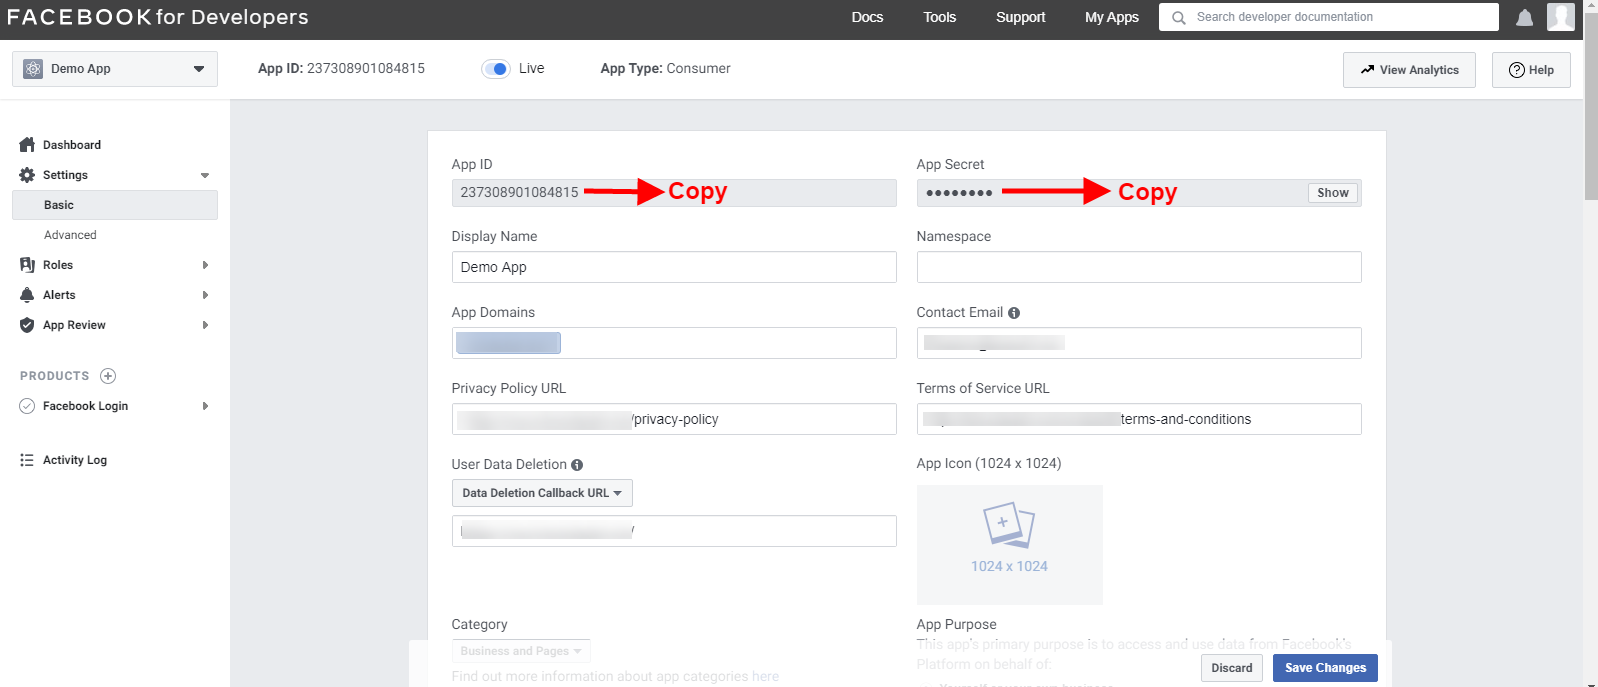
Final Step: Copy the App ID and App Secret and paste it into the fields provided in the module.
How to get Google App details?
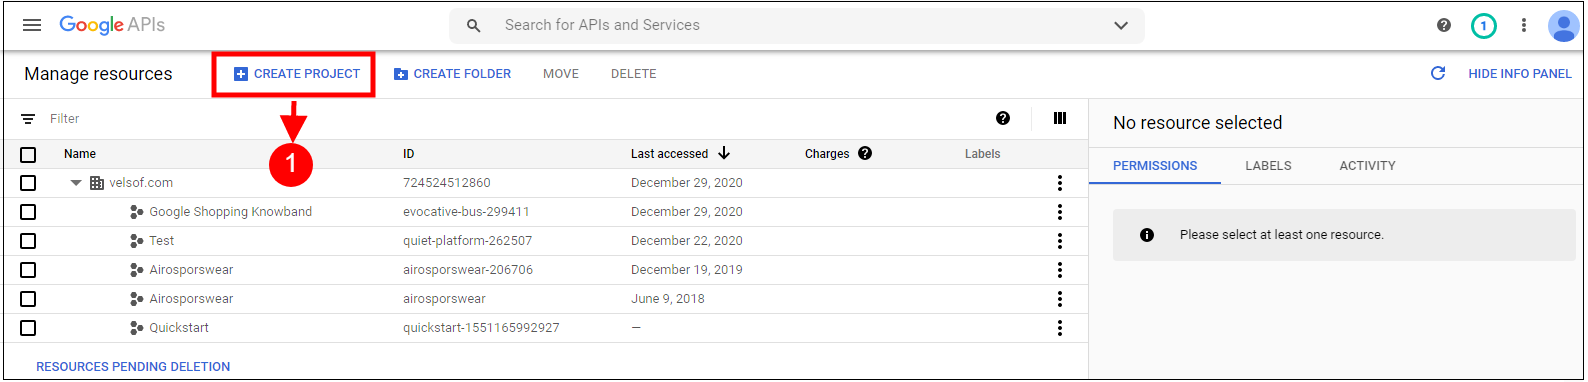
Go to Google Developers Console (https://console.developers.google.com/project) or click on the link given top right of the respective tab on the module configuration page.
Now click on Create Project on the left of the page.
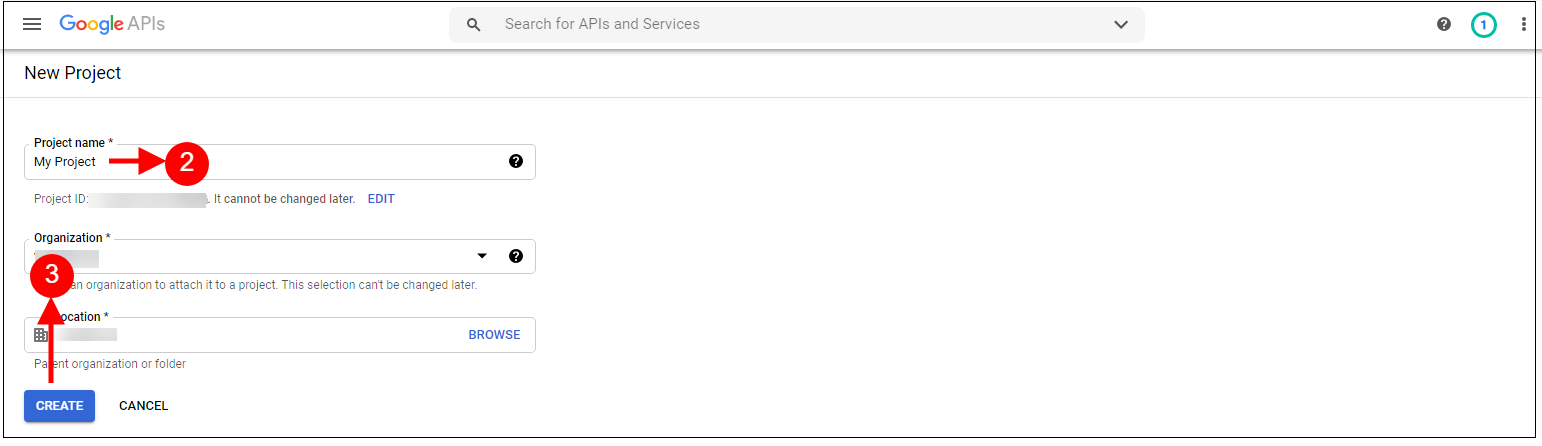
Enter a name for your project and proceed to the next step.
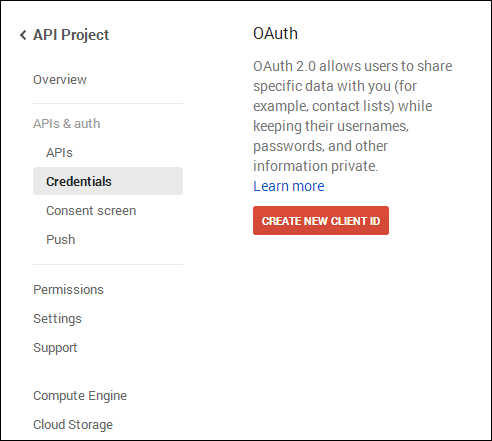
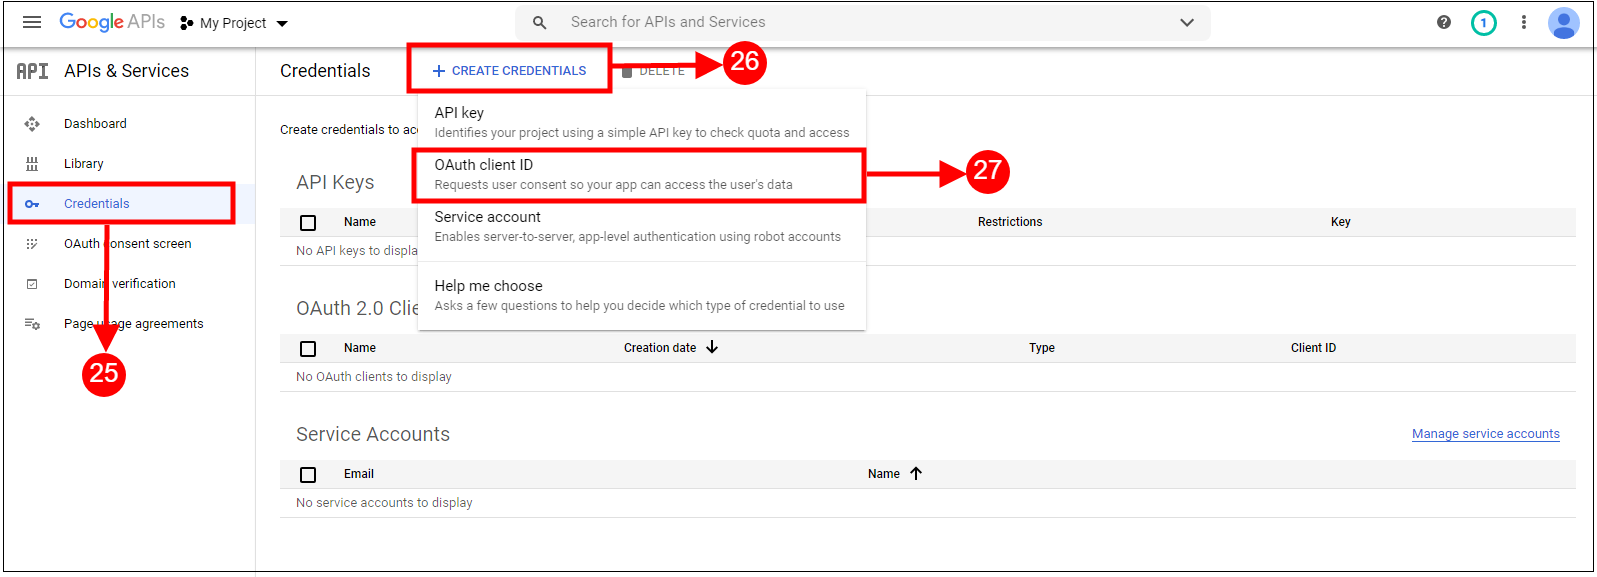
Now click on APIs and auth-> Credentials from the left menu as shown below.
Click Create New Client ID button from the right panel of the screen.
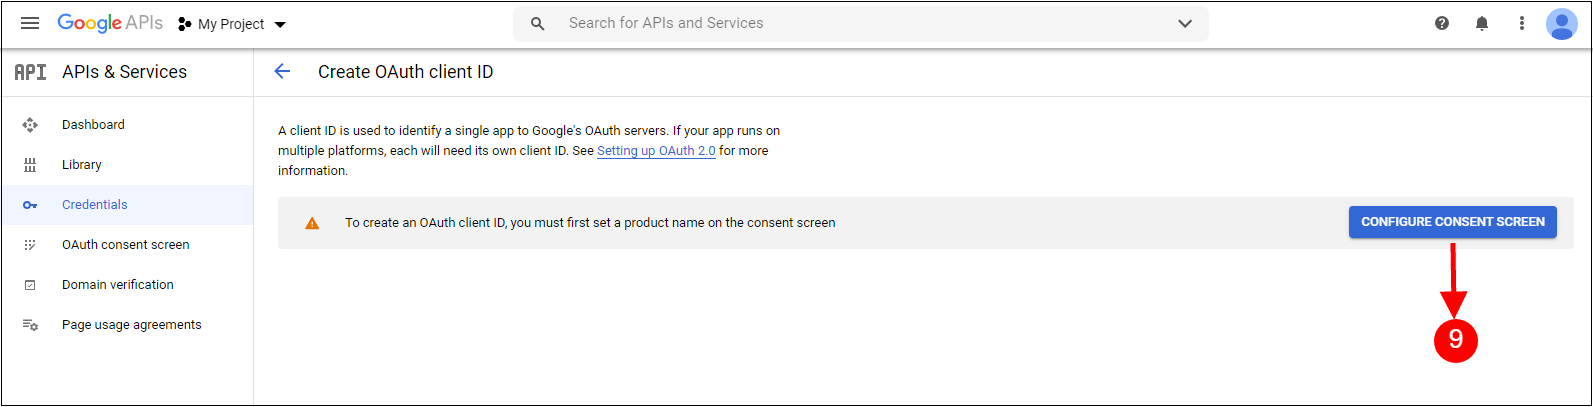
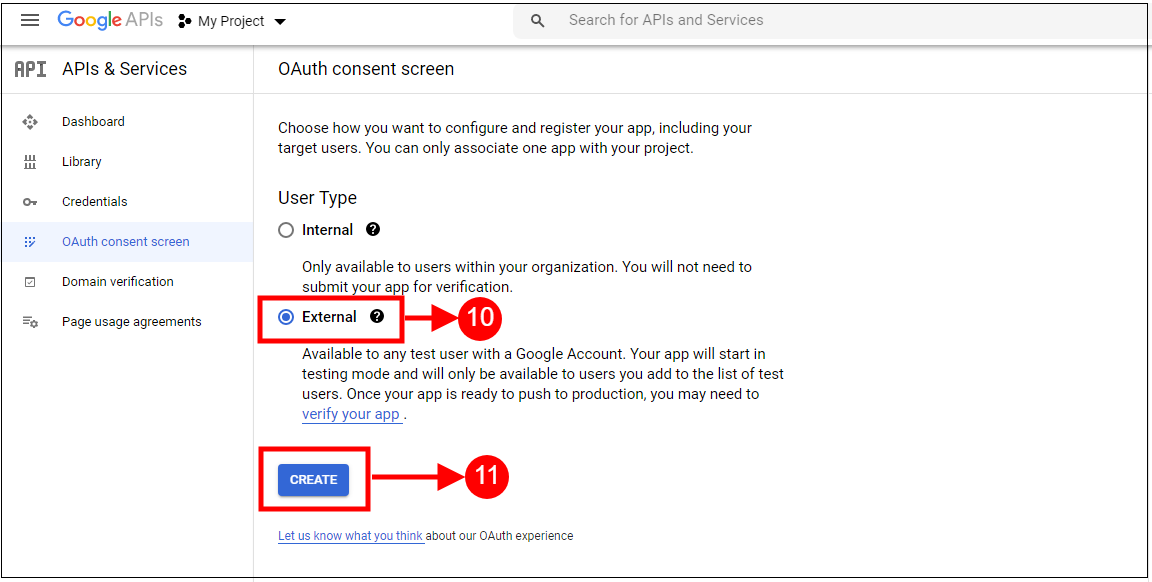
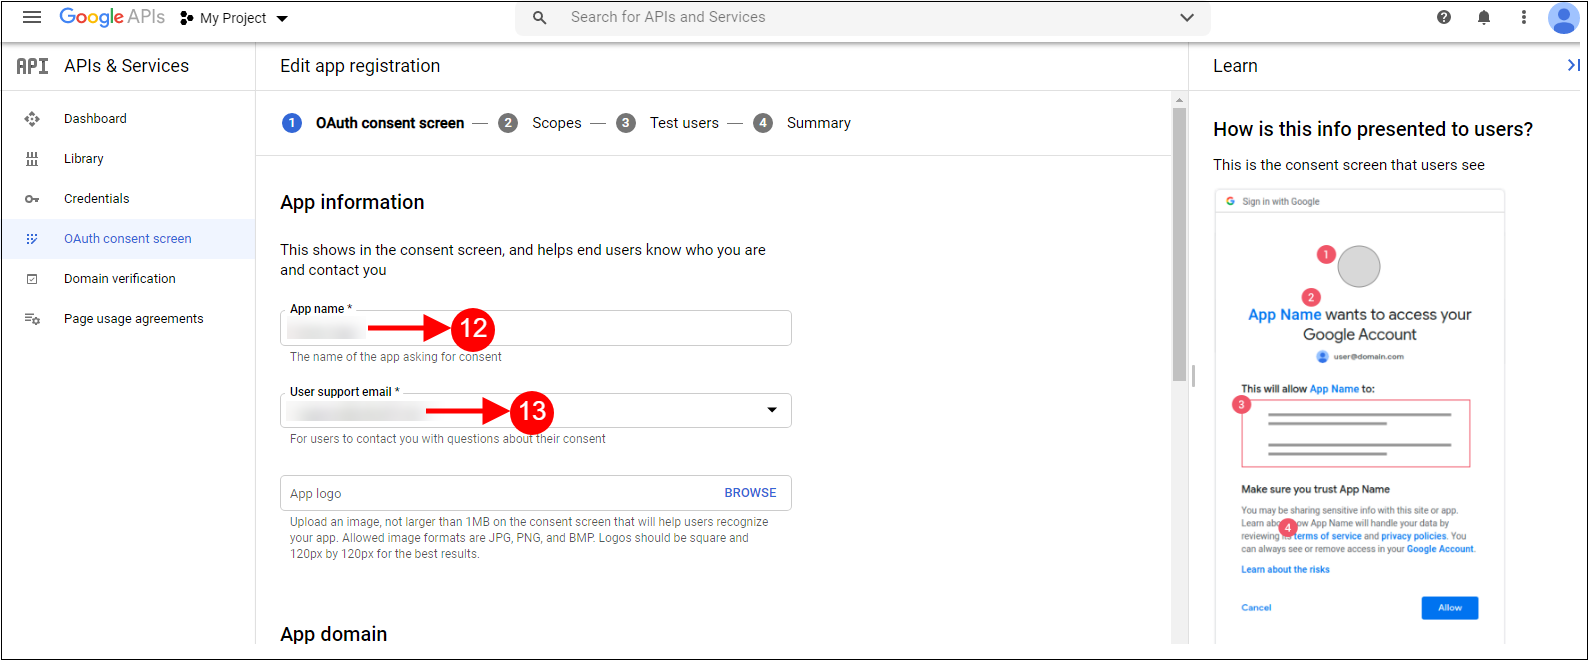
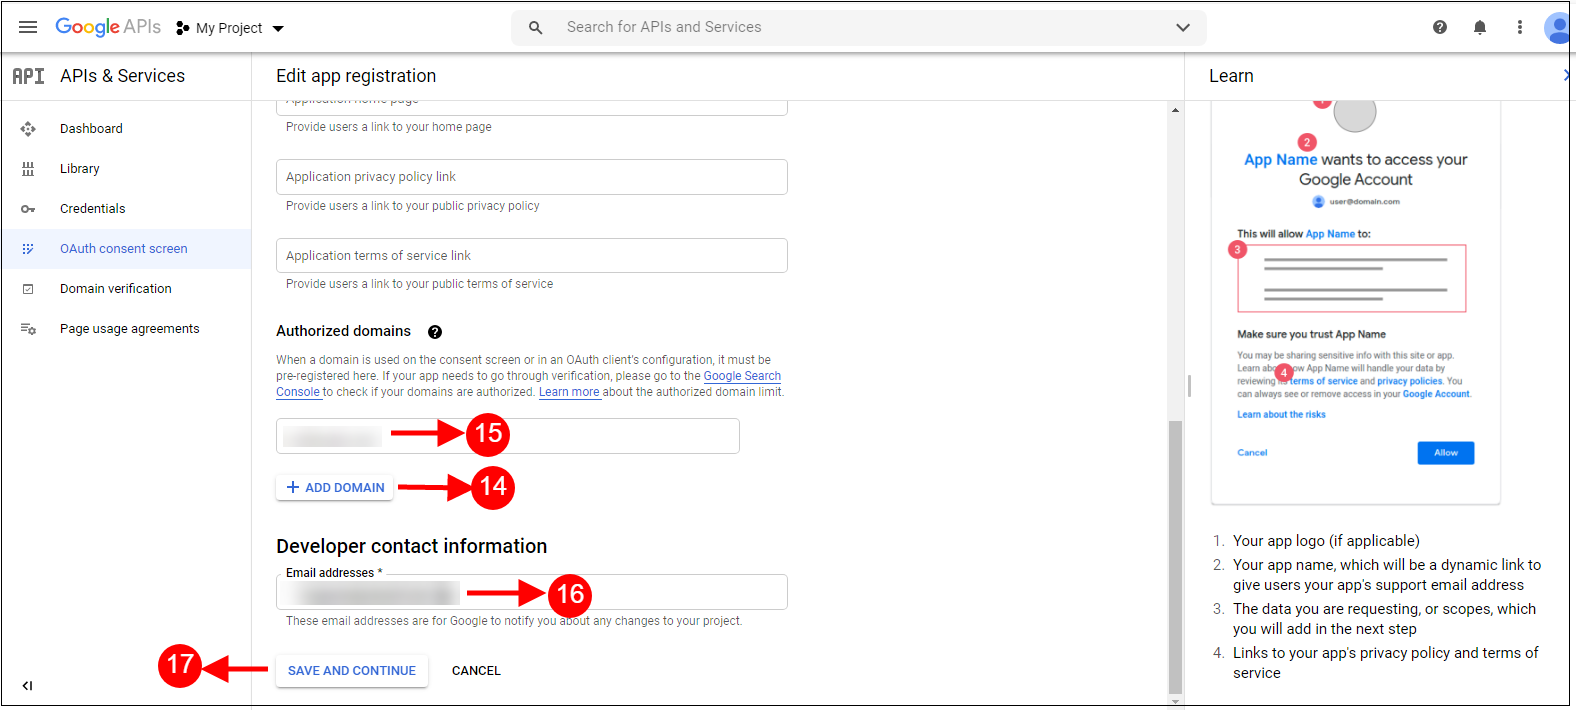
You may have to fill the form for Consent Screen before proceeding. To do so, that you have to click on Consent Screen in the left menu as shown in the image above.
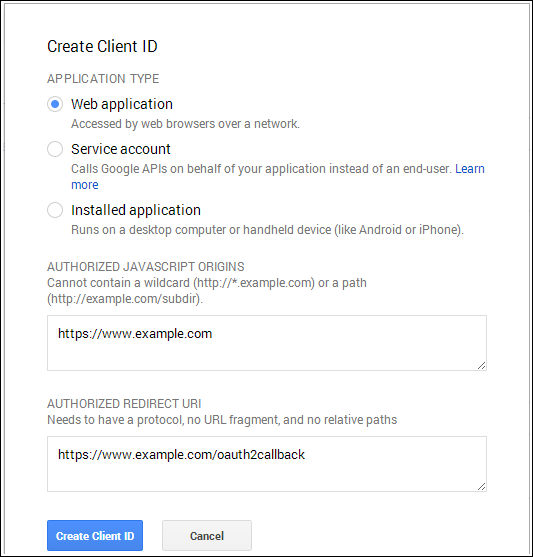
Fill the pop-up form with below details:
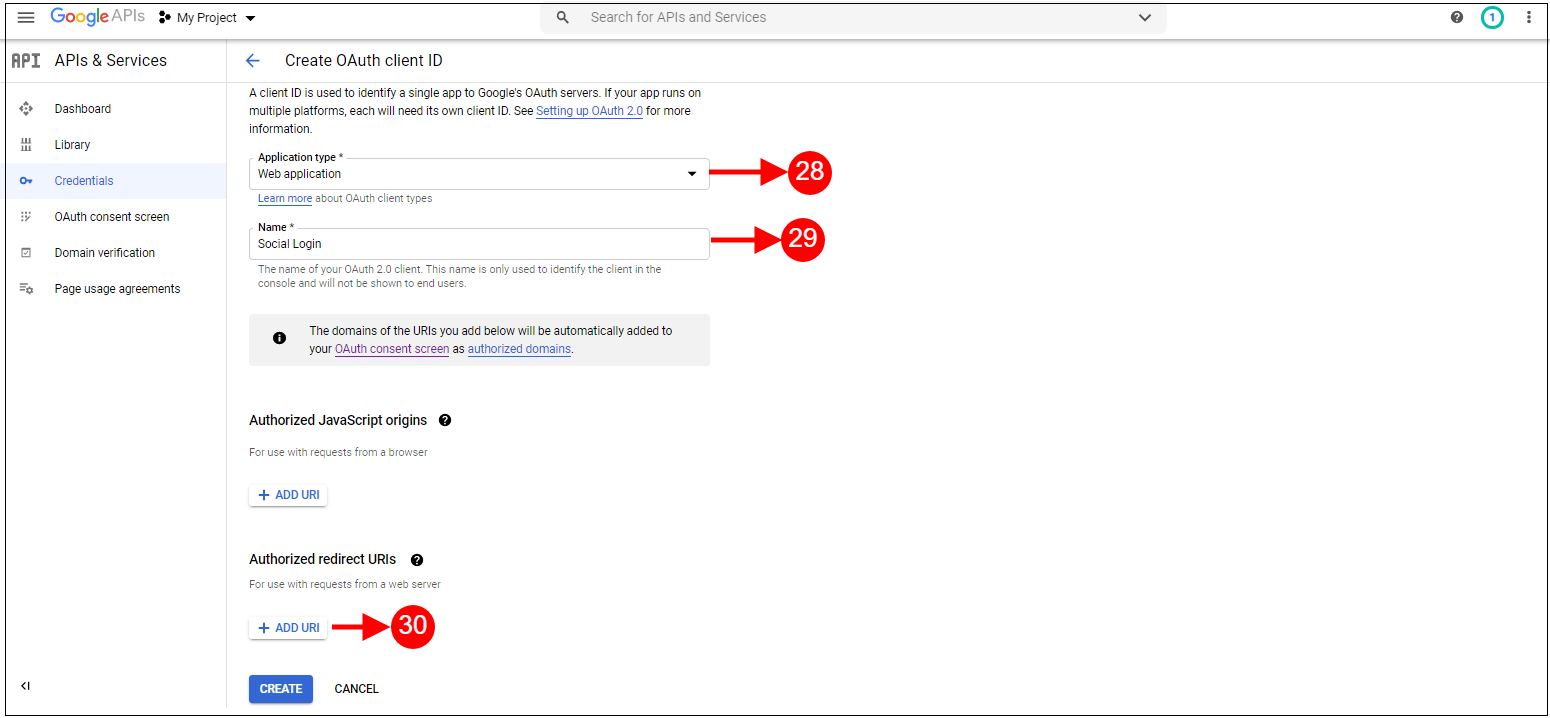
Application Type: Web Application.
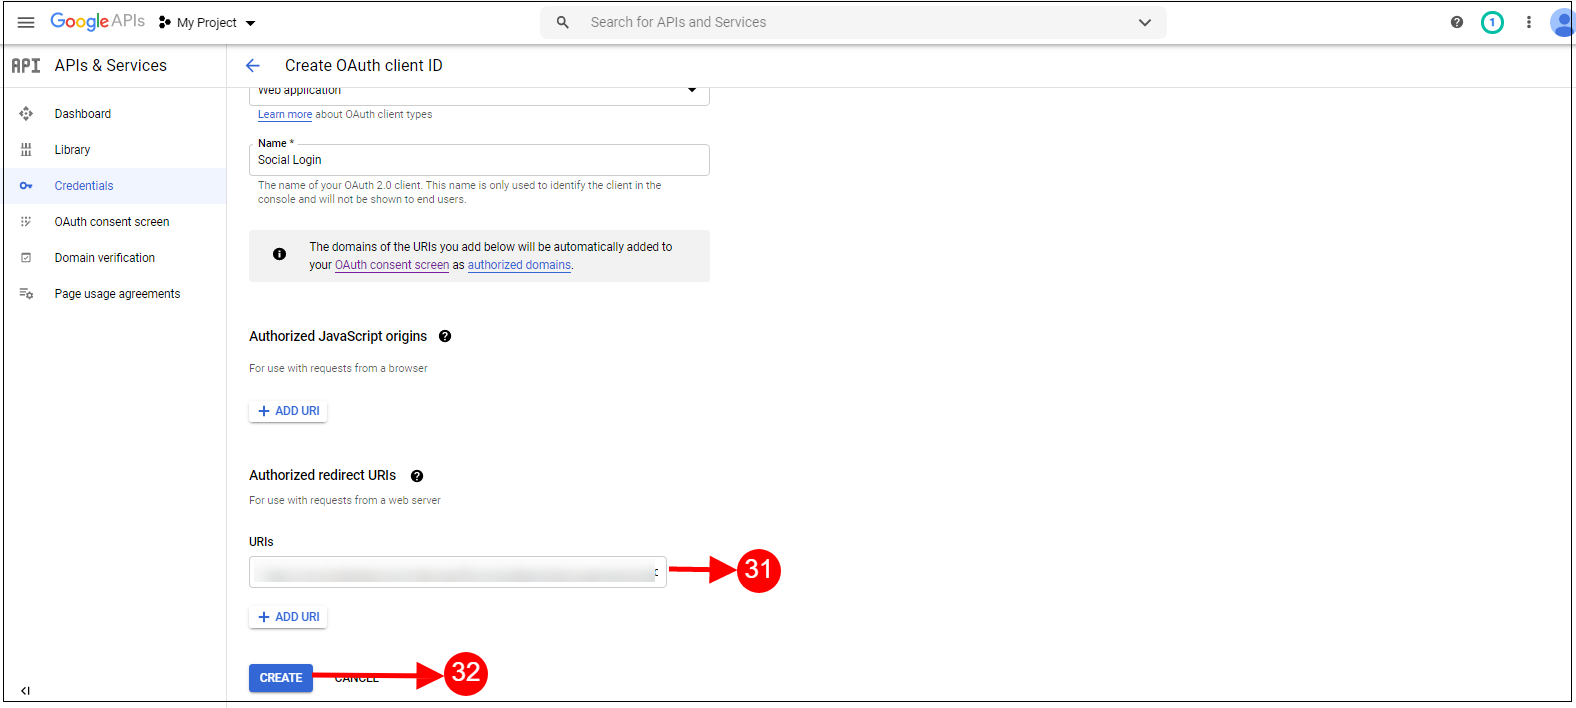
Authorized JavaScript Origins: Your store domain name (https://www.yourstore.com).
Authorized redirect URI or URI of Loginizer redirect page:
In case you are using SEO Friendly URL for your store then use this –
Please make sure that the Default Application Permissions are selected properly in order to use the app. As shown in the above image.
Now you can use the API details of the app to let your customers login to your store using their linkedIn account.
How to get Live App details?
Go to Microsoft Development Center (https://account.live.com/developers/applications/create) or click on the link given top right of the respective tab on the module configuration page.
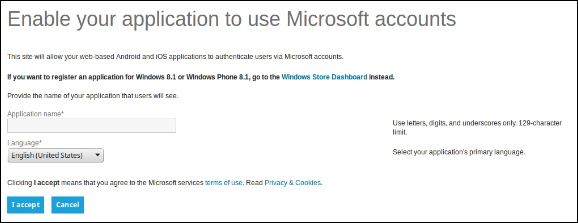
Enter the Application Name and click the I Accept button.
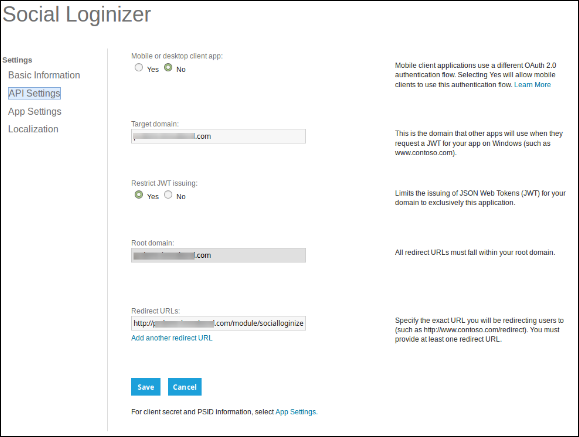
From the left menu select API Settings.
Now provide your store domain and Loginizer Redirect URL as
In Target Domain enter your domain name (example:- https://www.yourstore.com)
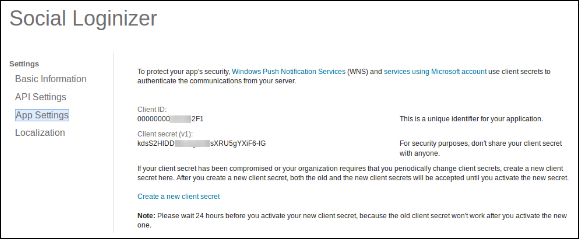
Now from the left menu click App Settings and copy your Client ID and Client Secret.
Now you can use the details of the application to let your customers login to your store using their Live or Microsoft Account.
How to get Twitter App details?
Go to Twitter App Management (https://dev.twitter.com/apps) or click on the link given top right of the respective tab on the module configuration page.
Click Create New App button.
Enter Application Details as follows:
Application Name: Name of your Application.
Description: 10 to 200 characters description of your application.
Website: Your store URL.
Callback URL: Loginizer redirects the page URL of your store.
In case you are using SEO Friendly URL for your store then use this for redirect URL –
Now, Click Yes, I agree, and then click Create your Twitter application.
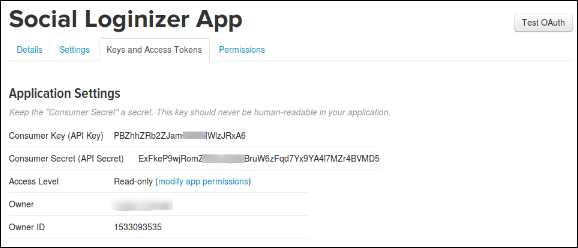
Next, select the Keys and Access Tokens from the menu below your Application Name and copy your API Key and API Secret.
Now you can use the details of the application to let your customers login to your store using their twitter account.
How to get Yahoo App details?
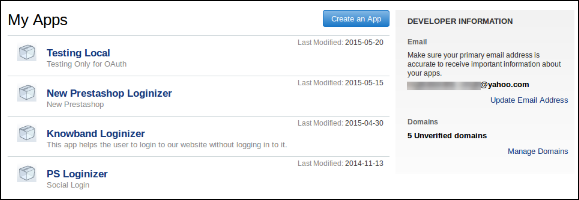
Go to Yahoo Developer Network (https://developer.apps.yahoo.com/projects) or click on the link given top right of the respective tab on module configuration page. Click on Create an App button to proceed.
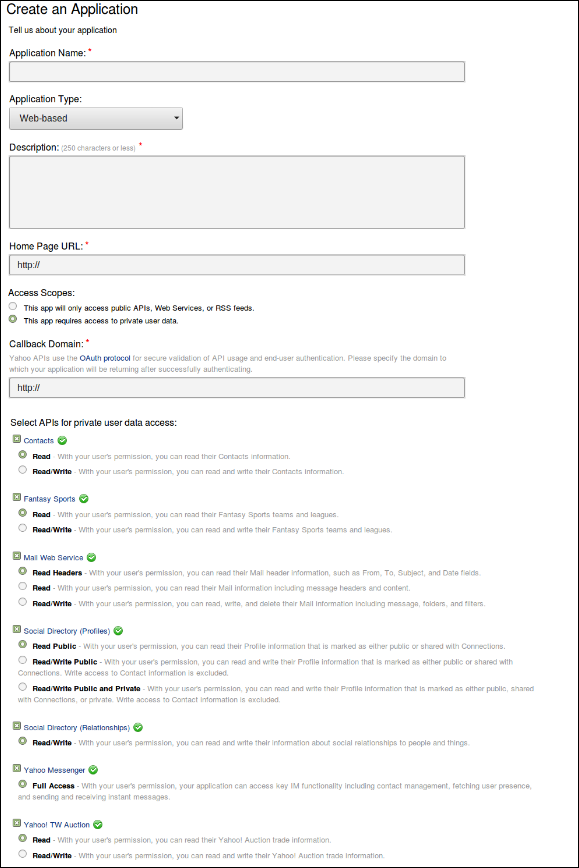
Fill in the required details as per instructions. Home URL will be your Store URL.
In case you are using SEO Friendly URL then use this for the callback domain:
Please make sure that the permissions for the app are properly selected while creating the App as shown in the image above.
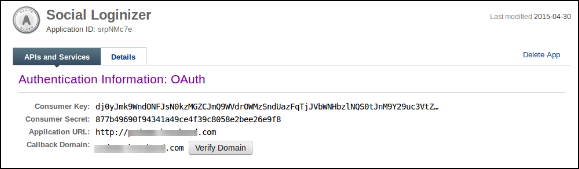
Once the application is created you can copy your Consumer Key and Consumer Secret.
Now you can use the details of the application to let your customers log in to your store using their yahoo account.
How to get Amazon App details?
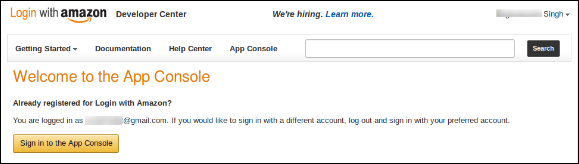
Go to Amazon Developer Network (https://login.amazon.com/manageApps) or click on the link given top right of the respective tab in the module configuration page.
Click on the Sign in to App Console button.
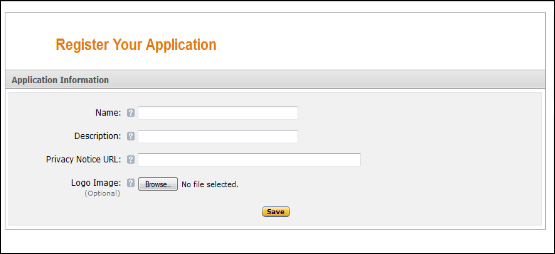
After successful login to App Console click on the Register New Application button in top right of the page and you will be redirected to the following page.
Enter Application Details as follows:
Name: Name of your Application.
Description: Description of your application.
Privacy Notice URL: Url of privacy policy page of your store.
Logo Image: Select the optional logo image of your store.
Click the Save button.
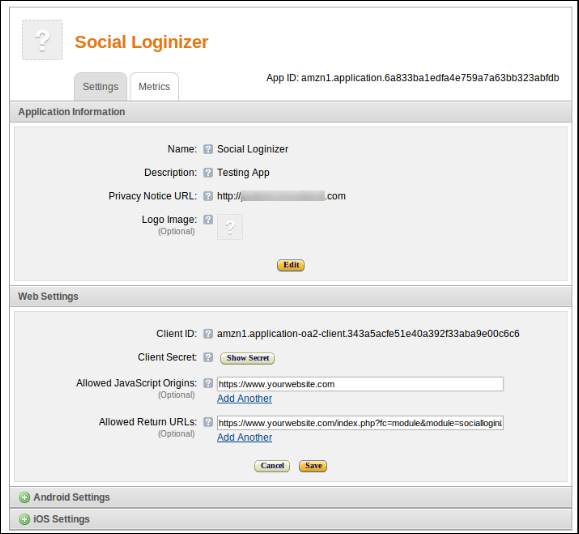
Now click on Web Settings to get your client id and secret.
Allowed Return URL: Loginizer redirects page URL of your store.
In case you are using SEO Friendly URL for your store then use this for redirect URL –
Note: To enable Amazon login into your website, your website must be secure with HTTPS otherwise Amazon login will not work.
Now you can use the client secret and client ID to let your customers login to your store using their amazon account.
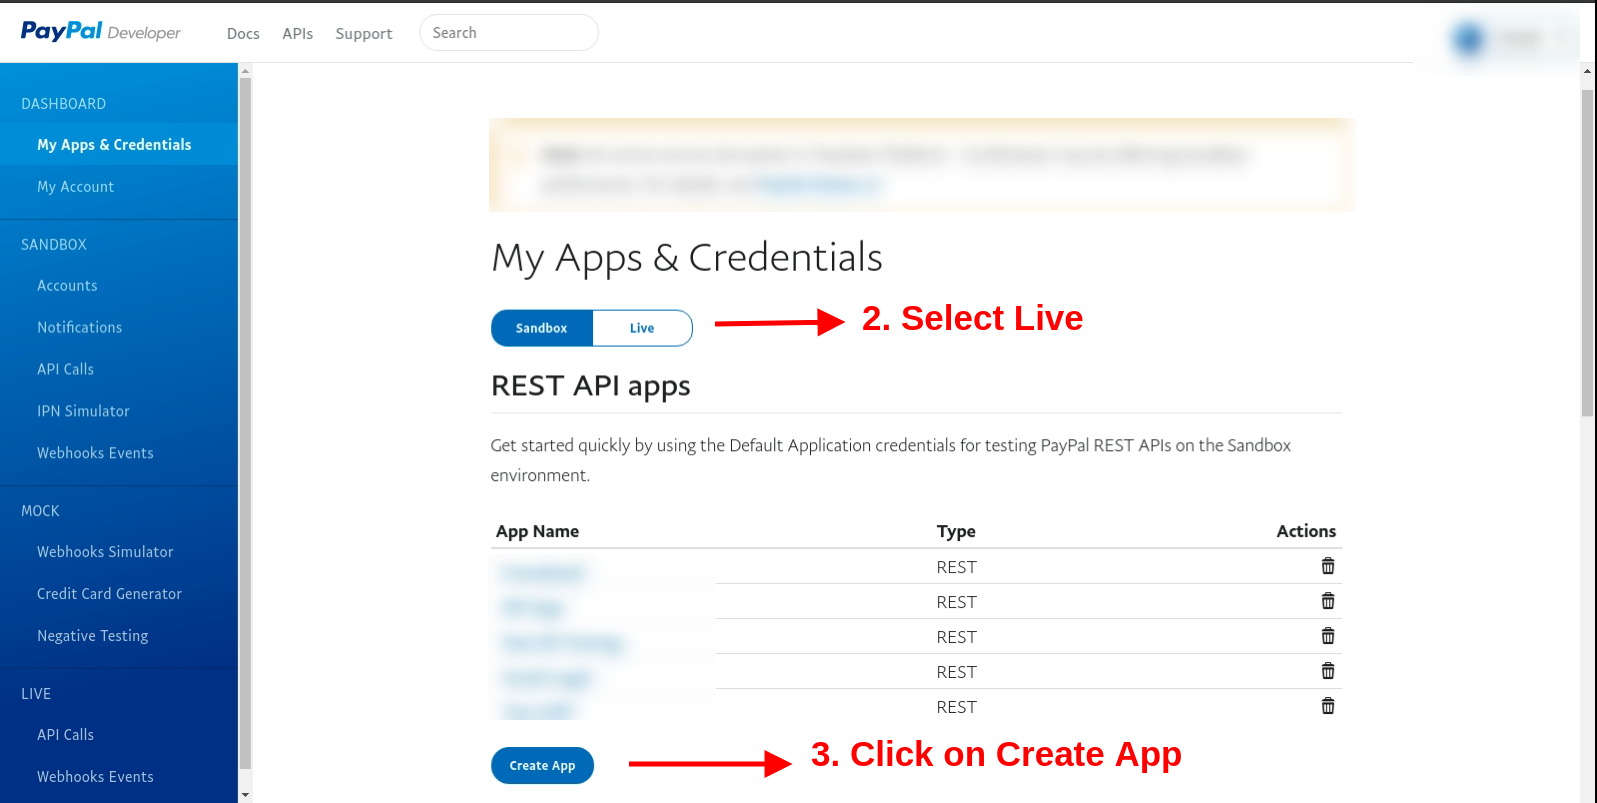
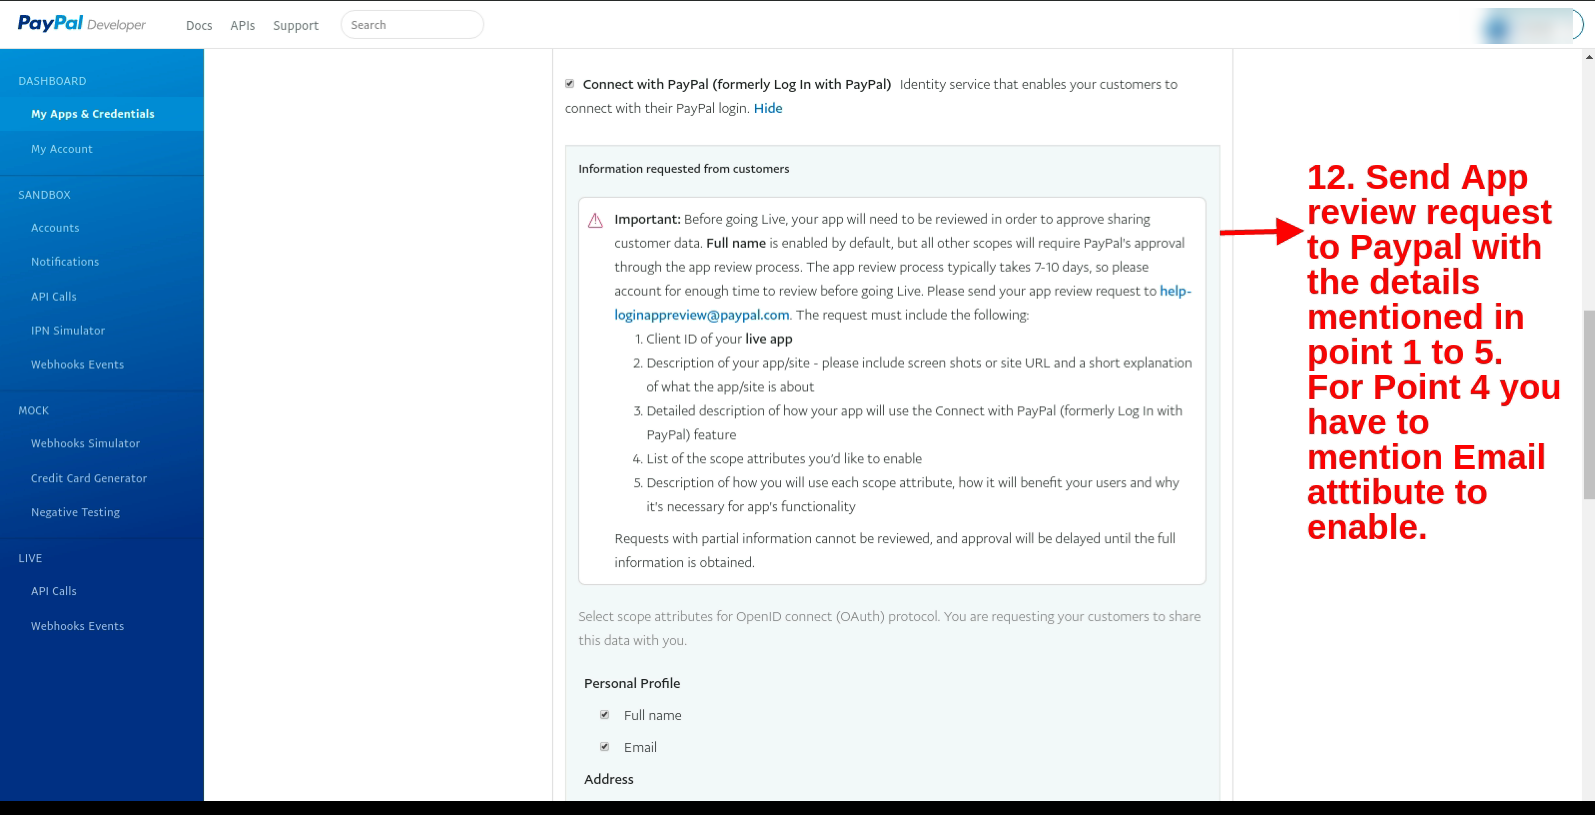
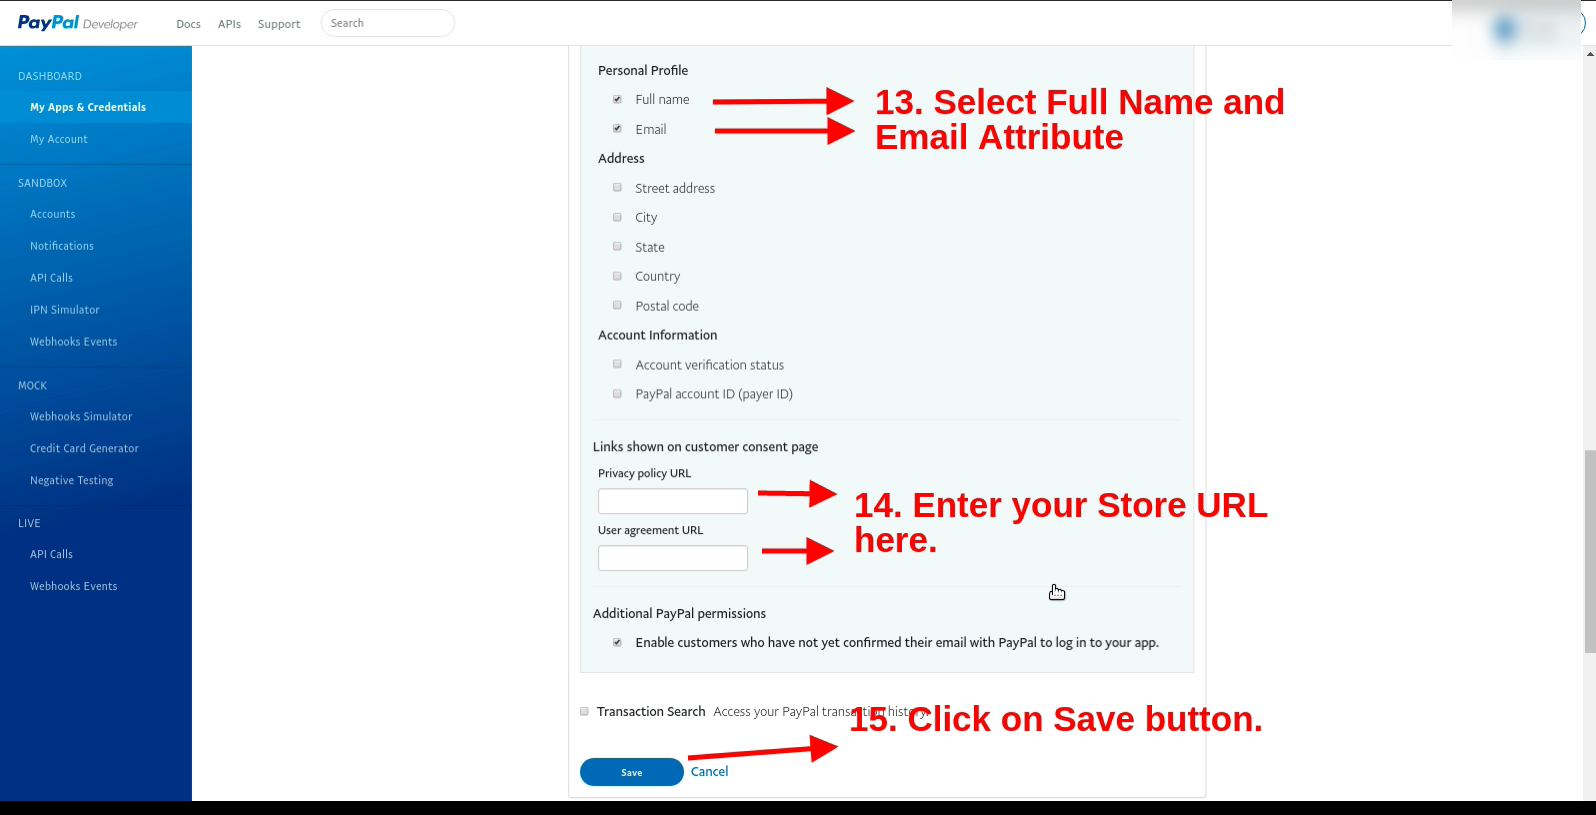
How to get Paypal App details?
Go to Paypal Developer Network (https://developer.paypal.com/webapps/developer/applications/myapps) or click on the link given top right of the respective tab on the module configuration page.
Click on Create App button.
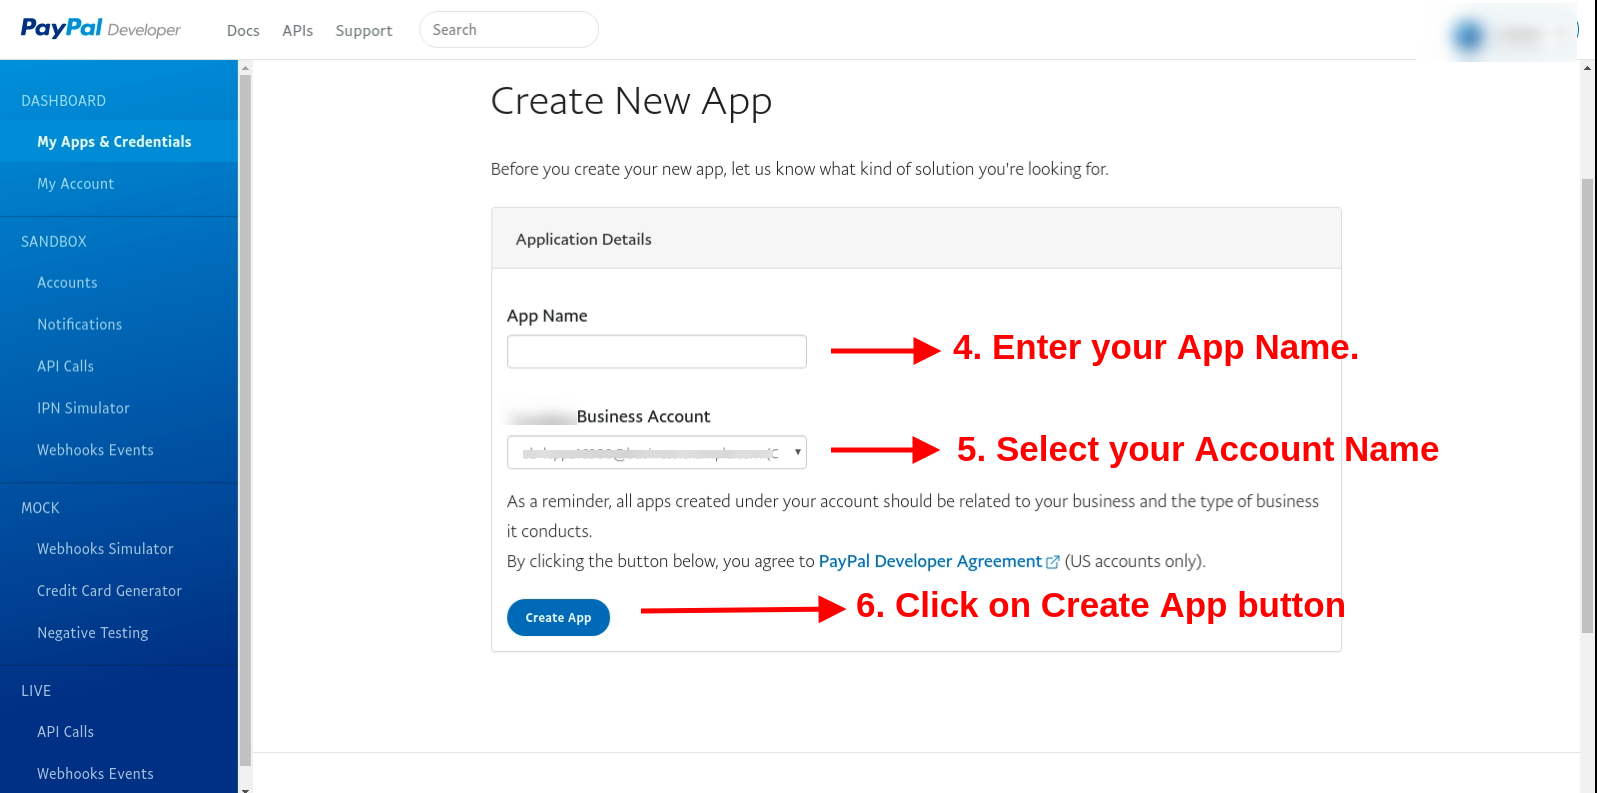
Now enter the name of your Application and click Create App Button.
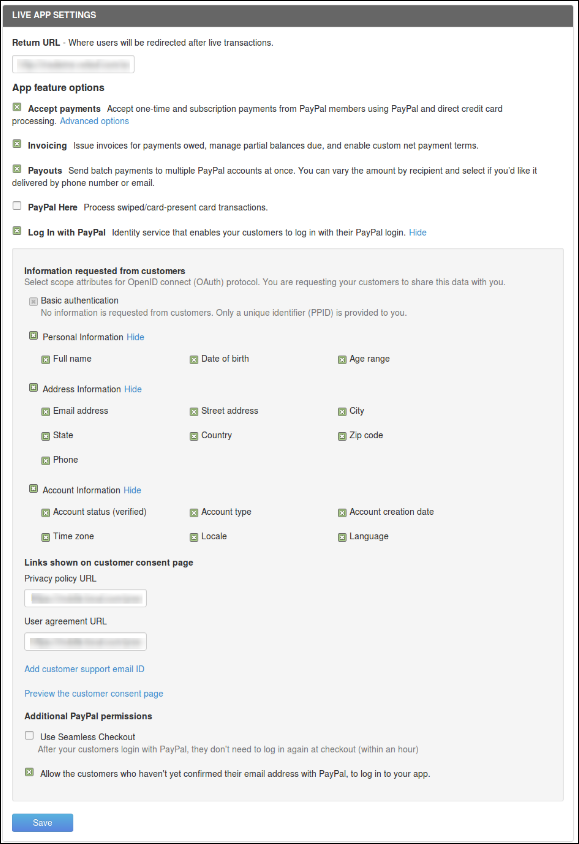
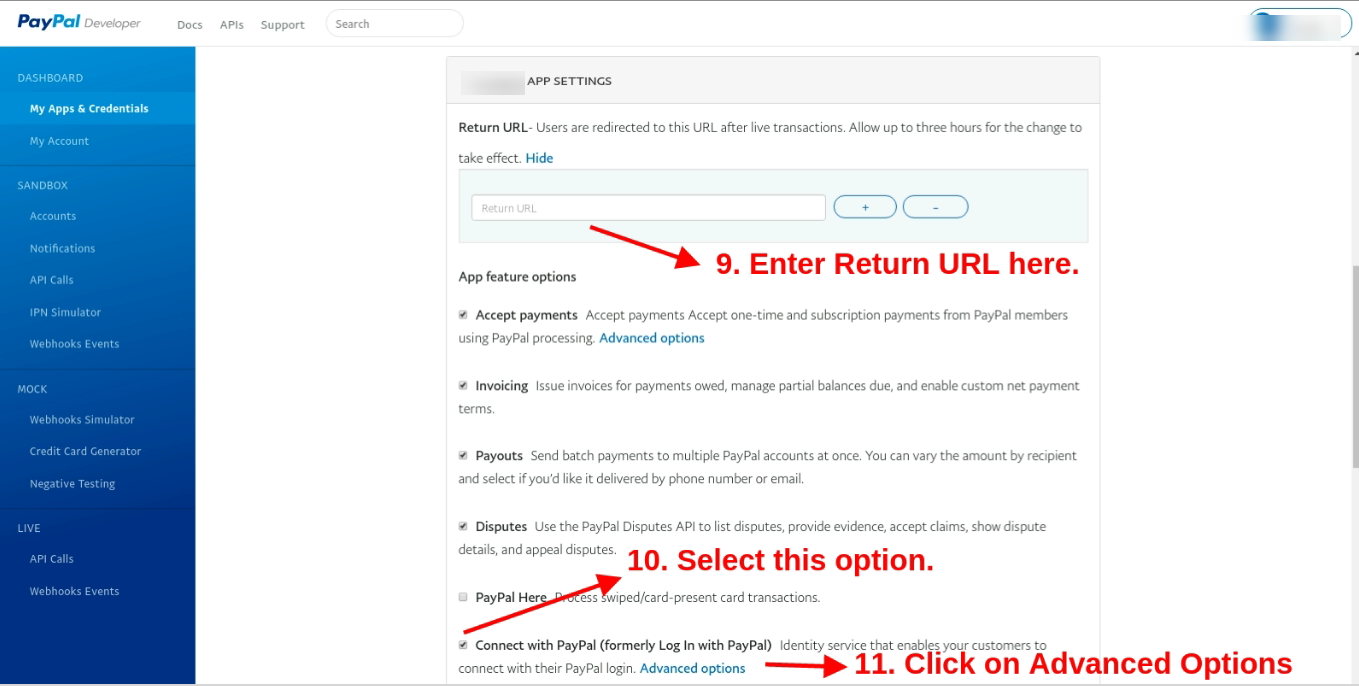
Set App return URL (live) as plugin redirect page URL of your store.
In case you are using SEO Friendly URL for your store then use this for redirect URL –
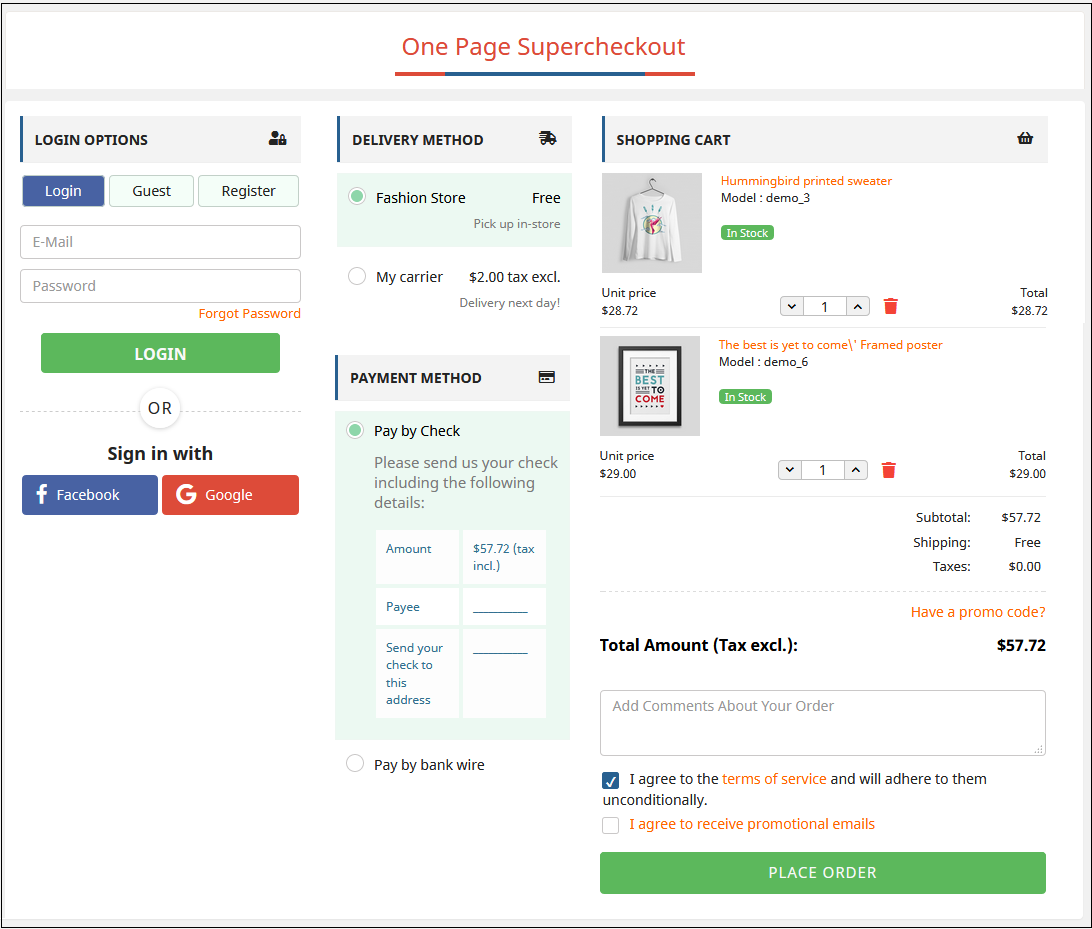
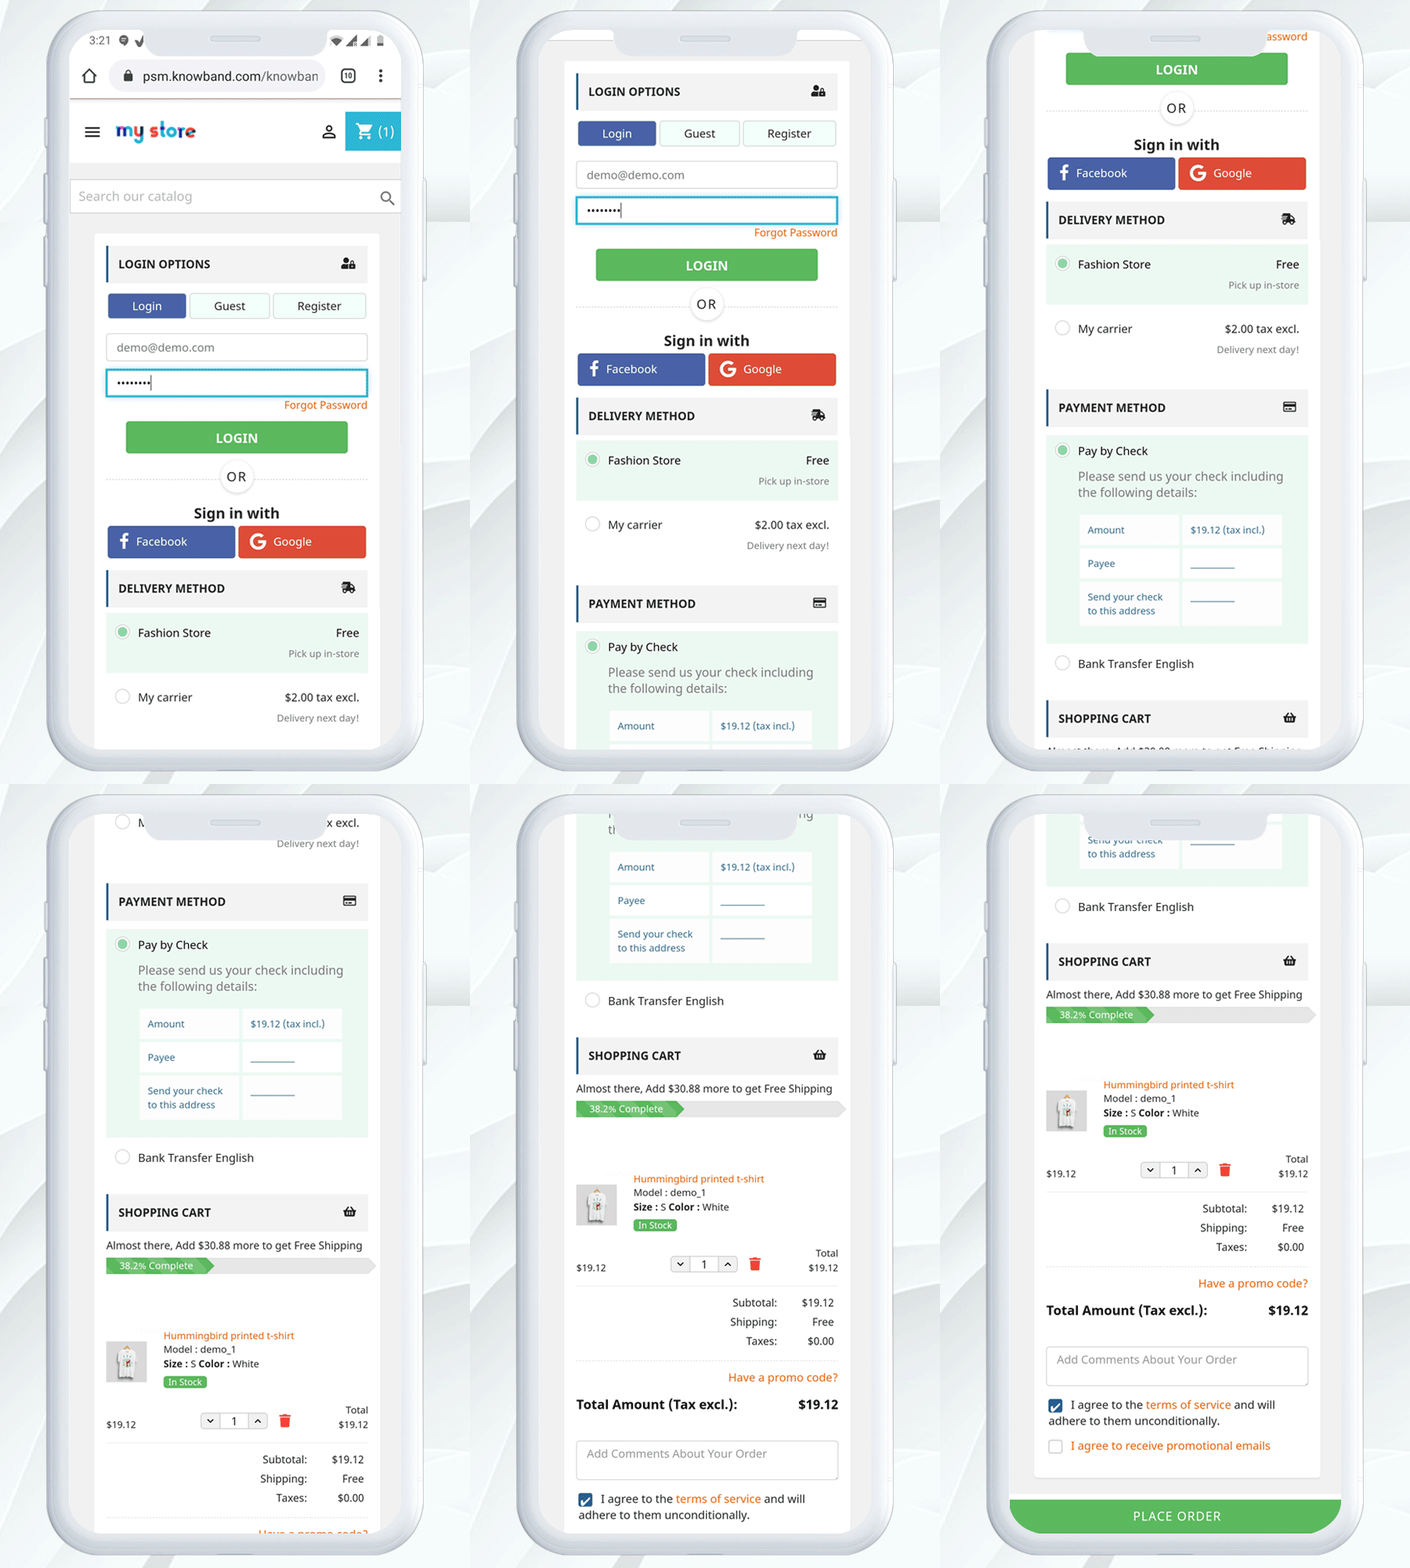
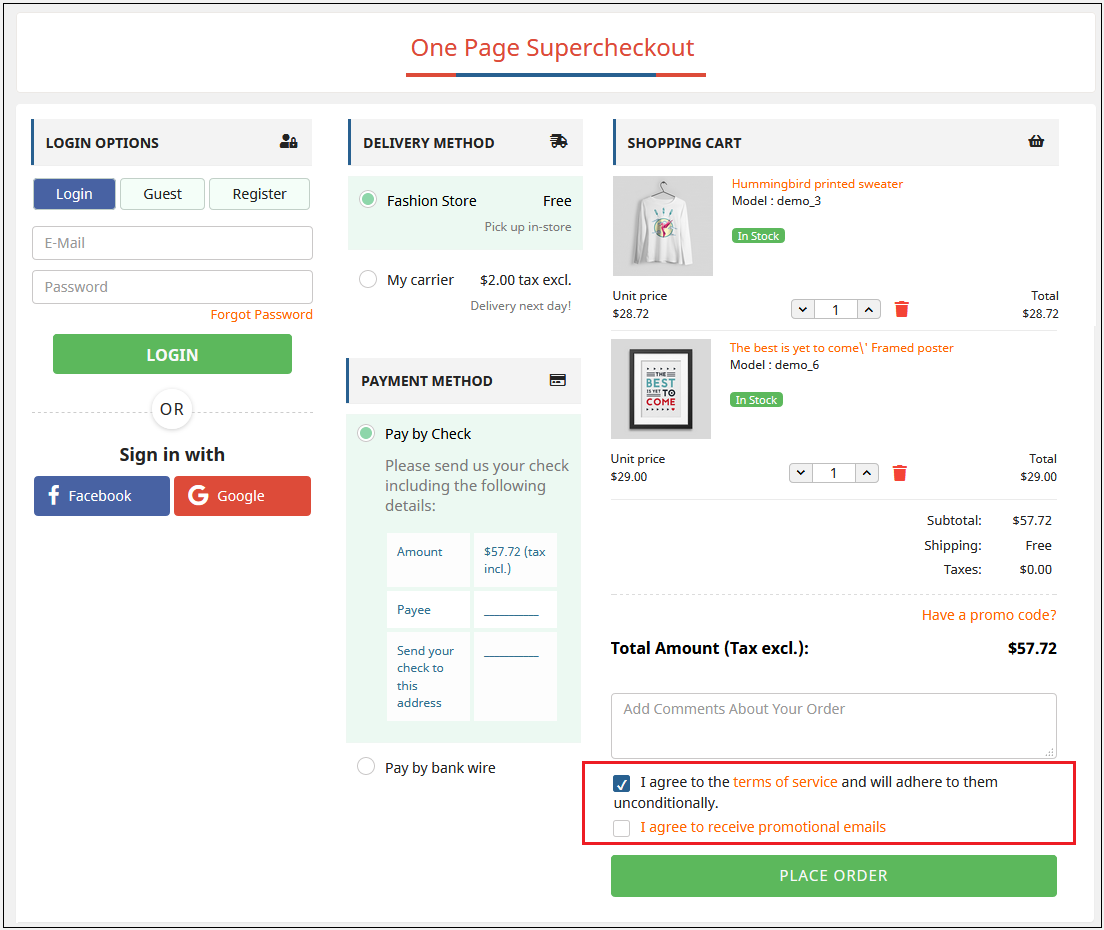
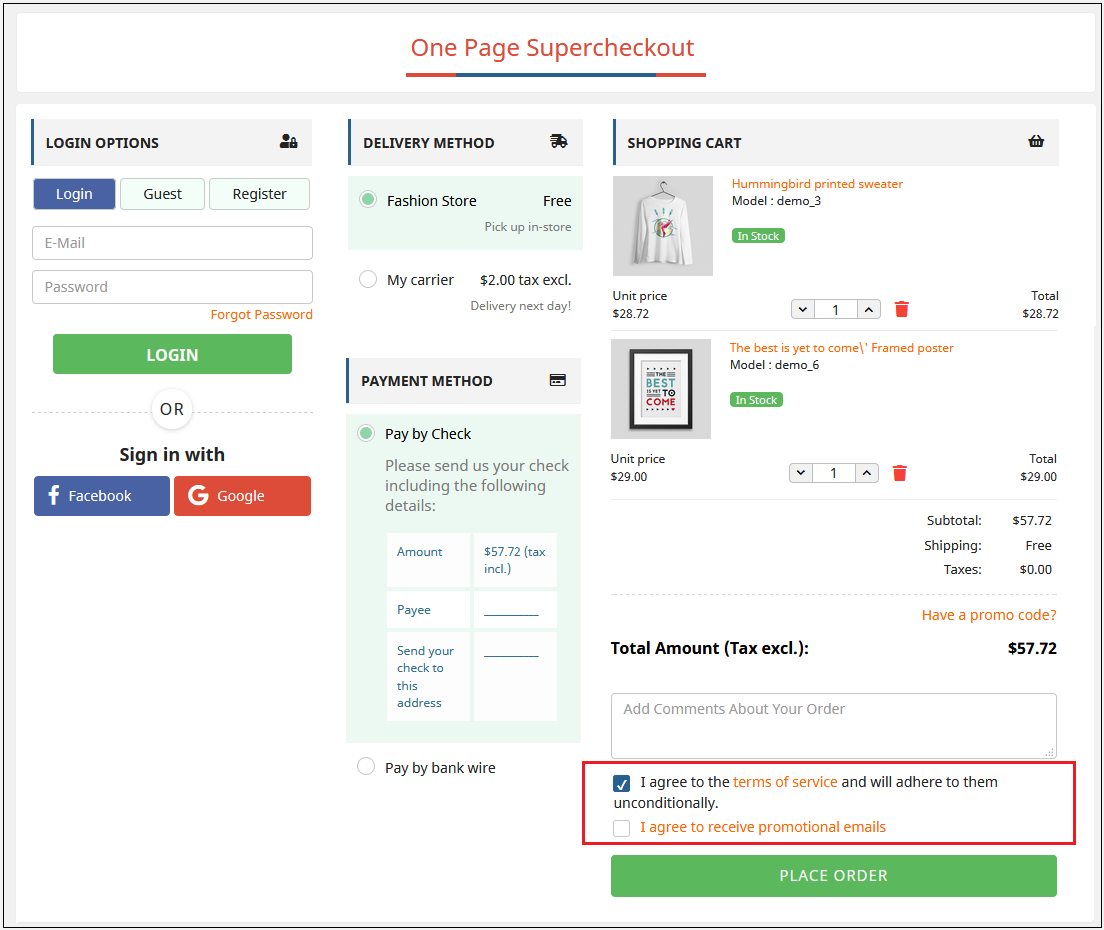
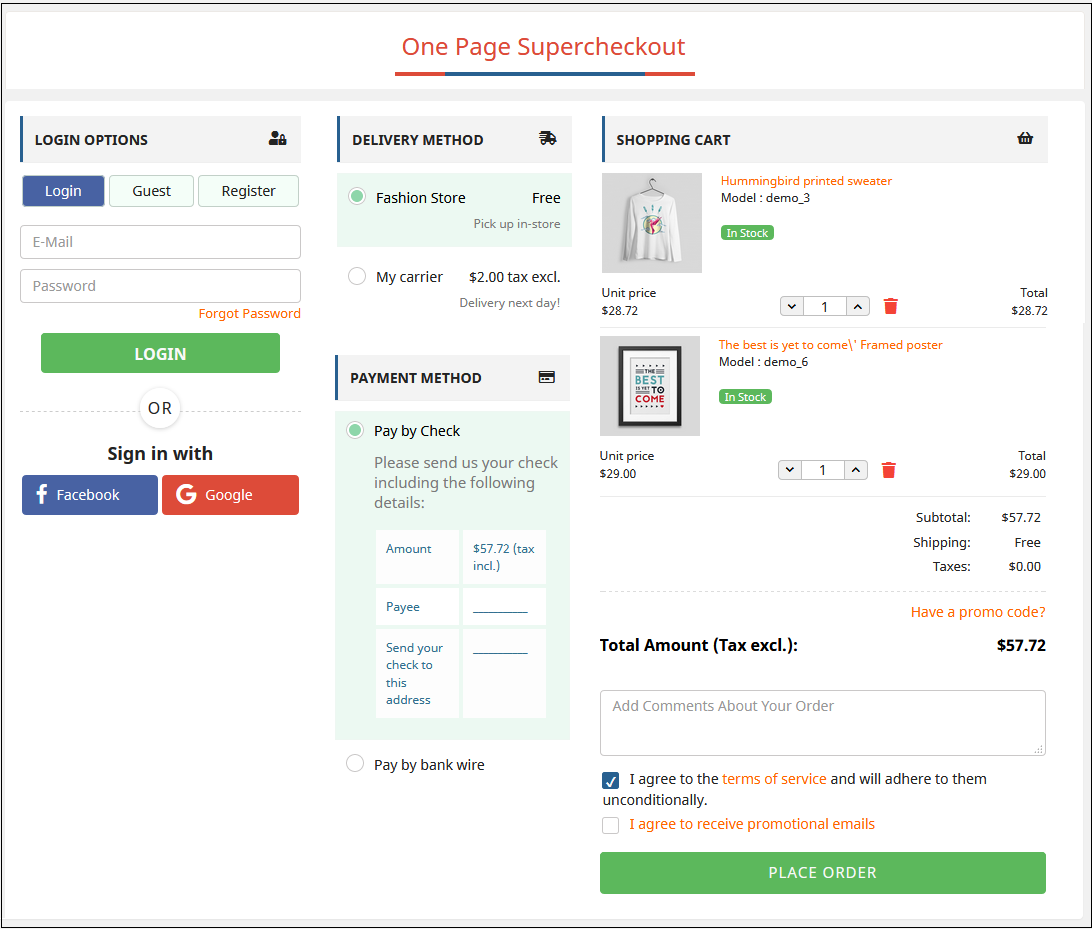
Prestashop is one of the widely used eCommerce platforms because of the awesome themes, features, and extensions available for the store owners. Every store owner wants to provide a smooth and fast shopping experience to their customers to make their business more successful. The checkout process became the key point of this process. Hence, Prestashop One Page Checkout Addon is a solution to this issue.
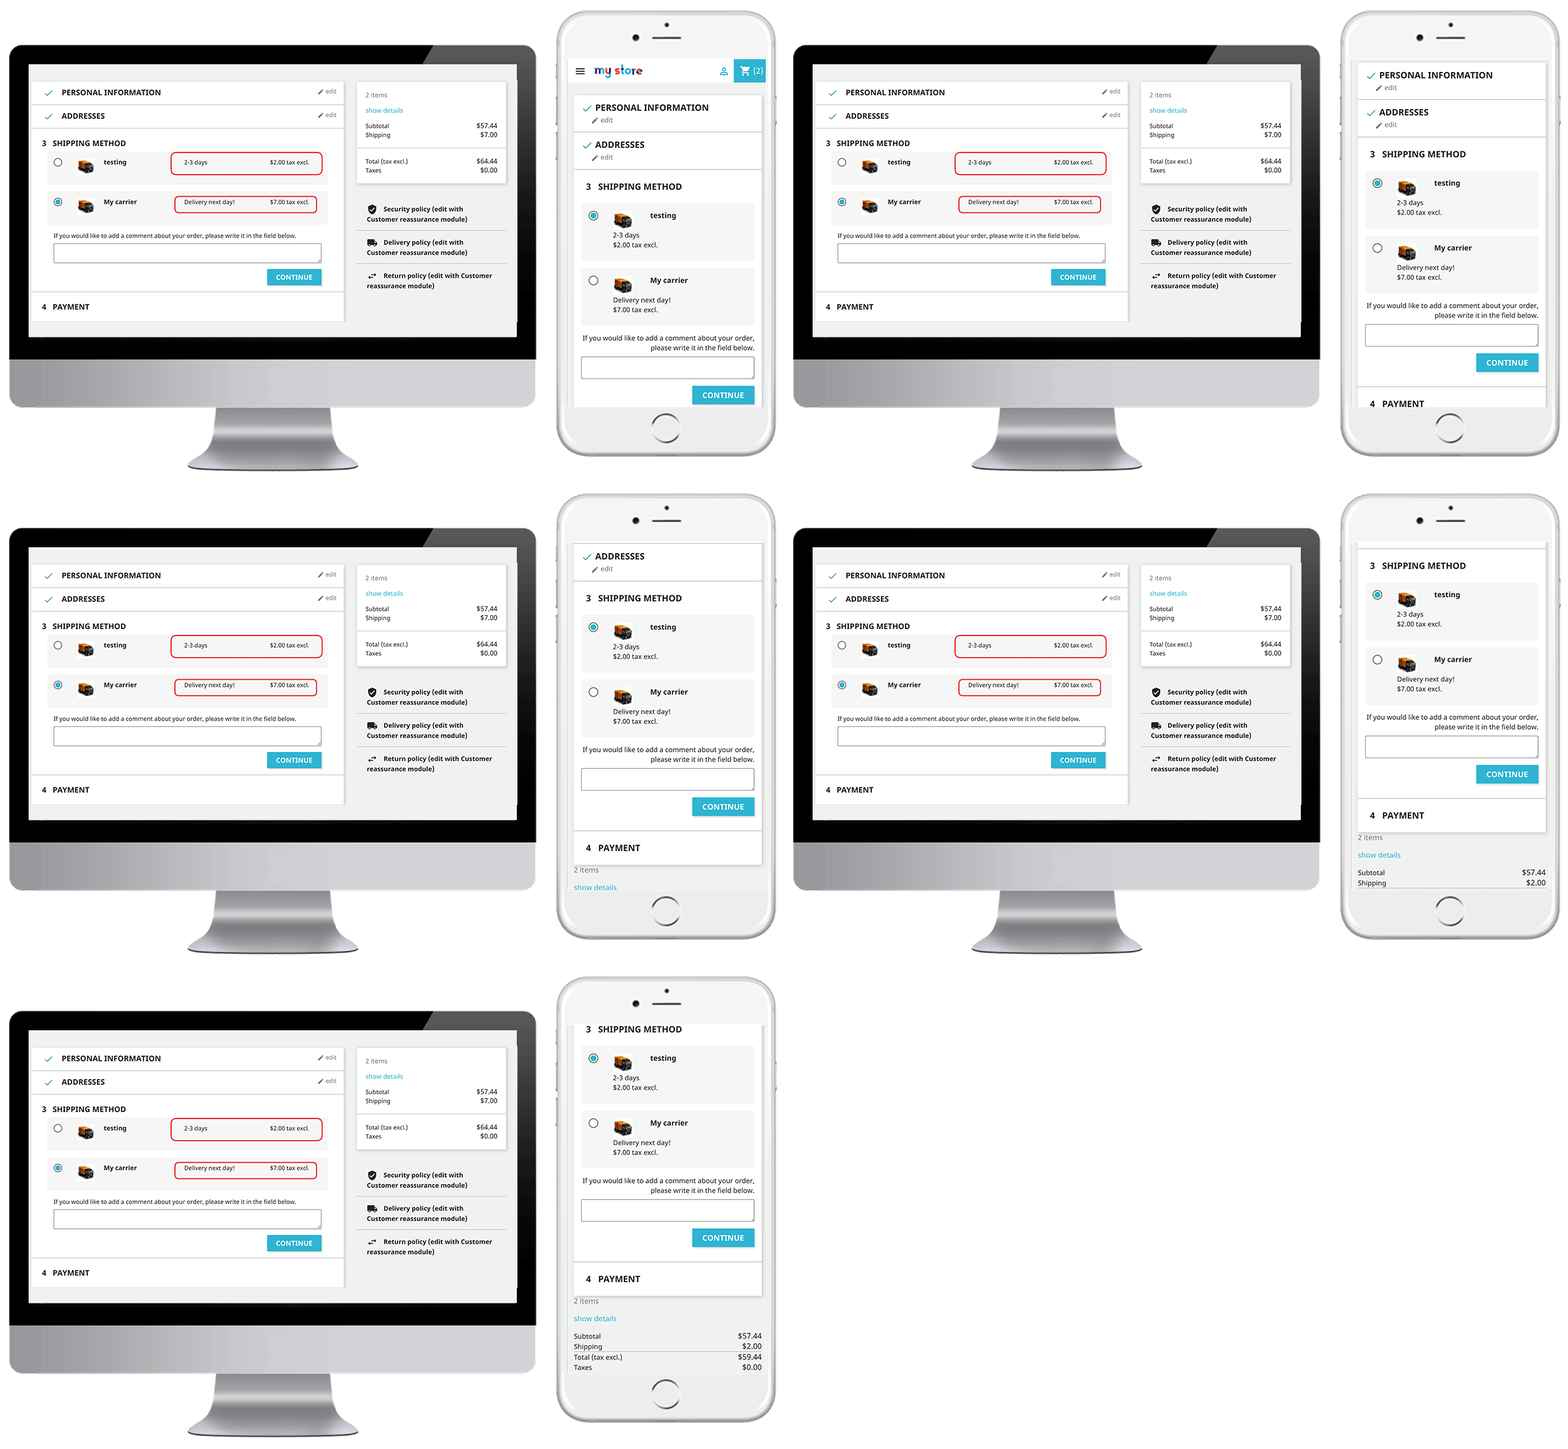
The One Page Checkout options reduce the additional efforts of the customers. It allows them to complete the checkout process on a single page hence reducing the abandoned cart. The best part that comes with Prestashop one checkout module is Social login. With this feature, users can log in with Google and Facebook login.
Mobile View:
Note: The Prestashop one step checkout Module by Knowband is GDPR compliant.
What’s New in PrestaShop One Page Checkout:
There are some newly added features in the PrestaShop One Page Supercheckout:
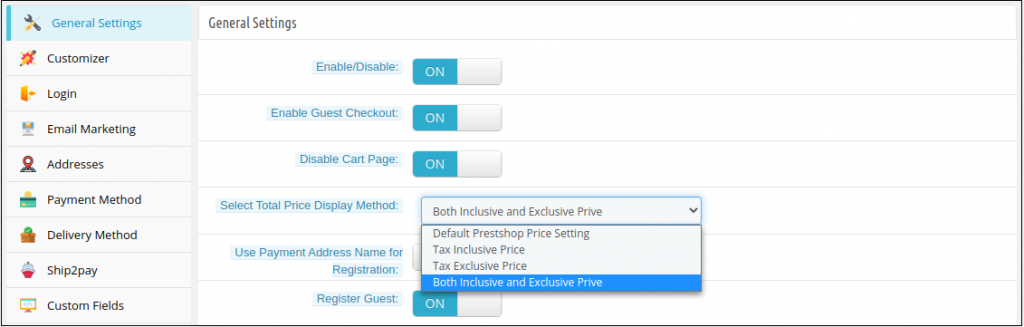
1) Choose Total Price Display Methods for the Checkout Page: Now the e-merchant can choose different methods to display the total price of the products on the checkout page. The store admin can choose default PrestaShop price, price inclusive tax, price exclusive tax, or both inclusive and exclusive price from the back office of the PrestaShop One Page SuperCheckout addon.
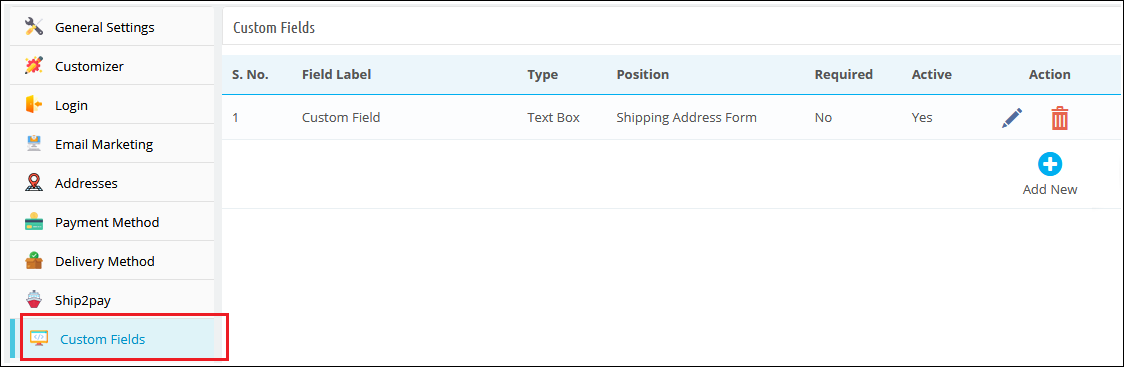
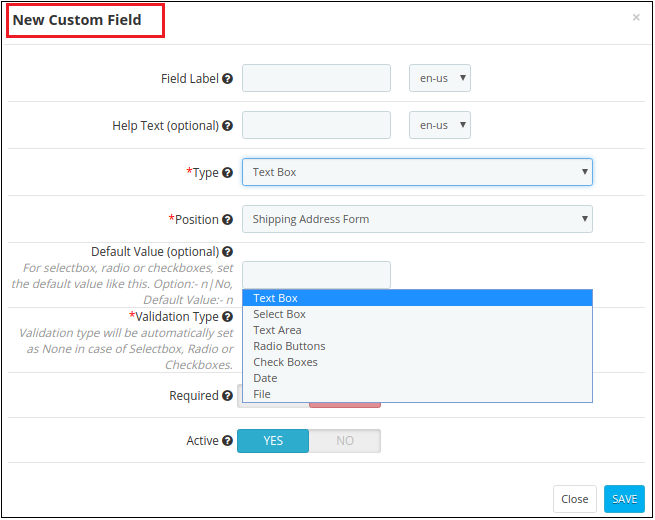
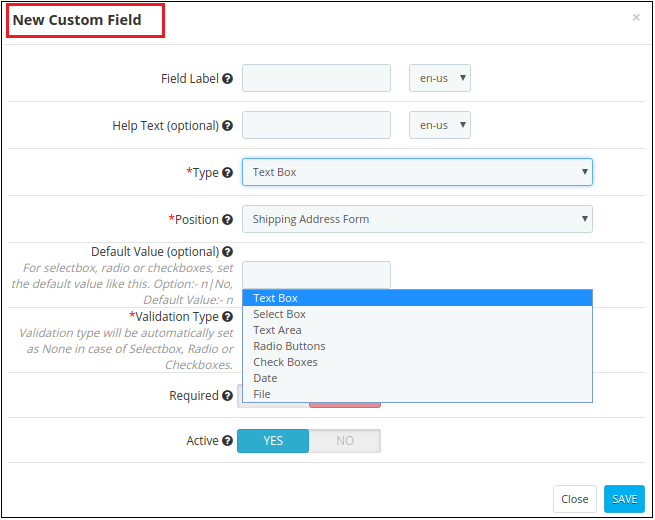
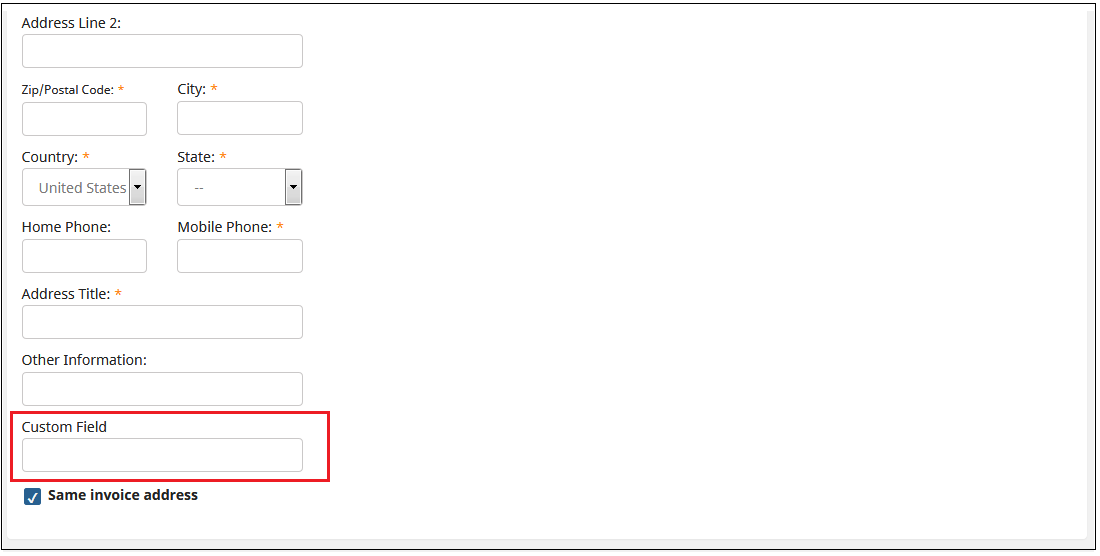
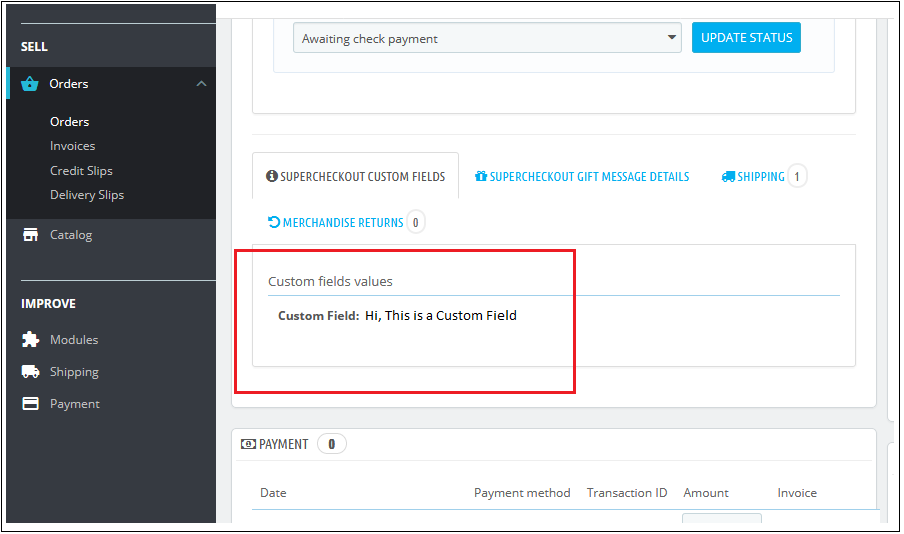
2) Option to Show the Custom Field in the Invoice: The store owner can now show the custom field’s data in the Invoice of the orders placed. The customers can check the custom field they added on the checkout page in their invoices.
3) Compatibility with Zasielkovna and gmparcellocker addons: Knowband’s PrestaShop One Page SuperCheckout addon is now fully compatible with the gmparcellocker and Zasielkovna addons.
4) Fixed Compatibility with Mollie Payment Method: In the latest update, the issues with the compatibility with the Mollie Payment Method have been fixed.
5) Compatible with PS v1.7.7.1: The PrestaShop One Page Checkout module is now compatible with the latest PrestaShop version v1.7.7.1.
6) The admin can make a detailed comparison between the order revenue earned and the revenue lost in abandoned carts in the form of a graphical data. They can filter analysis results in days, weeks, months and year to get a precise data.
7) There is a new added functionality to track the checkout behaviour. The admin can check the percentage of data filled or skipped by the online users who left their cart abandoned so that the admin can remove the unnecessary steps which are bothering the customers.
8) There is an option to verify whether the identification number CFI/DNI/NIF entered by the customers of Spain is correct or not.
1.1 Admin-Benefits of One Page Checkout Prestashop Addon
Let’s take a quick look at the benefits of having a Prestashop One step checkout module on your Prestashop store:
Prestashop Quick checkout addon allows the store owners can design their own one page checkout page as per the website theme.
Prestashop simplified checkout addon is compatible with multiple stores and devices.
This quick checkout extension Prestashop Targets multi-lingual customers.
The Prestashop fast checkout addon offers less and relevant checkout steps.
This quick checkout add-on Prestashop serves a better customer experience.
Prestashop One Page Checkout addon eliminates page reload time and keeps checkout information at a single page.
With the help of this Prestashop One Page Checkout Extension, custom fields can be added as desired.
Prestashop One Step Checkout Addon allows the admin to get a thorough statistical report about the rate of abandoned checkouts and the completed orders.
The new checkout behavior report helps the eCommerce merchant to analyze the behavior of the customers who abandoned their carts during the checkout process.
1.2 Features of Prestashop One Step Checkout Addon
One Page Checkout Prestashop offers easy customization.
With the addon, you can offer Guest checkout functionality to your customers.
Prestashop One Page Supercheckout provides simple & quick Login.
Social login options are offered in this one page checkout Prestashop addon.
Prestashop One Step Checkout Addon has an inline validation feature that shows an error to customers if any wrong value is entered.
One Step Checkout Prestashop Extension is compatible with multiple payment and shipping methods.
Responsive one page checkout Prestashop is mobile and tablet responsive.
This one page checkout module is GDPR compatible.
The responsive one page checkout Prestashop module allows the admin to create as many privacy policies as per the requirement.
The one step checkout Prestashop addon offers the admin to make any of the privacy policies mandatory or optional.
The admin can view the customer consent along with all the details including order id, email id, customer name, accepted consent, time, and date as well.
Prestashop responsive one step checkout addon is compatible with free and virtual/digital products.
Cart Customization on Prestashop One Page Checkout Page.
Prestashop one page checkout addon offers an option to add custom fields as well.
MailChimp Integration is provided in this Prestashop Quick checkout addon. Other integrators SendInBlue and Klaviyo are also supported.
Offers Ship2Pay feature which allows the store owner to map payment methods with the selected delivery methods.
Supercheckout provides an option to update or delete the saved address.
You also get an option to create ‘Date’ and ‘File’ type custom fields.
One Page Checkout displays shipping and payment methods only when the customer saves the address.
Admin can test the one page checkout on a specific URL that is provided at the backend.
Provides compatibility with various payment methods like Amazon Pay(only 1.7 version), a4paypalpro, and Play plug.
Prestashop simplified checkout addon allows the admin to add custom CSS and JS.
This quick checkout extension Prestashop SEO Friendly.
The Prestashop fast checkout addon offers multilingual Support.
Prestashop One Page Checkout module allows the admin to show/hide any fields.
Prestashop One Page Checkout Extension offers automatic customer registration.
More attractive feature
Country Autofill: The autofill feature of this Supercheckout module helps in auto-selecting the country for the customers based on their IP.
Google Address Autofill: The auto-fill feature automatically fills up the address fields at the Supercheckout page. The auto-fillup functionality uses Google Places Integration services for which Google API Key has to be configured from the backend.
Gift message: Allow your customers to add a gift message with the order. Admin can check this message on the order details page from the backend interface.
Show/Hide total tax field: Admin can show/hide the total tax field in the cart summary section of one page checkout.
Address Fields Layout Changes: Admin can change the address fields layout from 1-column to 2 columns. Example: User detail fields like First name & last name can be shown in a single row.
One Page Checkout is now compatible with Stripe Official and PayPal Plus payment methods.
Set Condition for Free Shipping: Prestashop Supercheckout gives an option to set a minimum amount for showing a free shipping banner at the checkout page.
Enable validation for CIF/DNI/NIF: Prestashop fast checkout addon offers validation for CIF/DNI/NIF for Spain.
Abandoned Checkout Statistics: Prestashop Quick checkout addon offers a graphical analysis of the abandoned cart details and completed order details.
Checkout Behaviour Report: The admin can track the checkout behavior in a precise graphical format.
With the addon, the store owner can now allow customers to log in with their Paypal ID.
The e-merchant can now redirect the customers directly to the checkout page after clicking on the Checkout button. If the admin disables this feature, then the users will be redirected to the cart page.
The store owner can now allow the customers to register themselves with their Payment address name. Earlier the users had the option to register with the delivery address but now they can use their Payment address as well.
2. One Page Checkout Prestashop Module Installation Guide
2.1 Copy the “SuperCheckout” module folder under your root_directory/modules/of your store via FTP or use the Prestashop interface to upload the plugin.
2.2 After copy, Prestashop one page checkout module will be listed on the module listing page in the admin panel as shown given below screen
2.3 If Prestashop one page checkout module is not displaying on your module listing page, search it by filtering the module with the following details.
Filter by: Installed & Not Installed/Enabled & Disabled
Note:
When you will click on the install button, a pop-up box will appear which will display warning messages. You can ignore these messages and move ahead. There will be no negative impact of this warning message on your store.
After installing Prestashop Supercheckout addon, a “configure” button will be in front of this one page checkout plugin on the module listing page as shown on the screen below:
3. User Manual
To access this Prestashop one page checkout addon, Click on the configure button of the Supercheckout module. On clicking, One Page Checkout Prestashop module interface will be open and the following screen will display as given below:
3.1 General Settings
3.1.1 General Settings of Prestashop Fast Checkout Addon
Enable/Disable: To enable the Prestashop one-page checkout plugin, switch the enable button from OFF to ON. The default value will be OFF.
Enable Guest Checkout: By enabling this option of the Prestashop quick checkout module, the store will allow the customer to checkout as a guest. The default value will be OFF
Register Guest: By enabling this option of the simplified checkout Prestashop module, the store will register guests automatically and send a registration email to the corresponding customer. The default value of this field of Prestashop One Step Checkout Addon will be OFF.
Enable validation for CIF/DNI/NIF for Spain: The admin can check and verify if the identification number CIF/DNI/NIF entered by the customers of Spain is valid or not.
Delivery Address for Virtual Cart: Admin can enable or disable this option to show/hide delivery addresses for the virtual or downloadable products.
Disable Cart page: With the module, the store admin can disable the cart page from the General Settings. If it is disabled, then the customer will be redirected directly to the Checkout page after clicking on the “Process to Checkout” button.
Select Total Price Display Method: With the addon, the store owner can select from various methods to display the product’s total price format on the checkout page. The admin can display the default PrestaShop price, price inclusive tax, exclusive tax, or both inclusive and exclusive tax.
Use Payment Address Name for Registration: The PrestaShop One Page Checkout module allows the customers to use the name mentioned in the Payment Address for registration.
Default Checkout Option: There are 3 options in this field of the One Step Checkout Prestashop Extension, which will display at the front end. With these options of the fast checkout Prestashop module, the admin can set which option will display to customers on the one page checkout. These options are:
1. Login: If this option of the Responsive one page checkout Prestashop addon is selected, the customer will see the login form in the login section.
2. Guest: If this option of the Prestashop responsive one step checkout addon is selected, the customer will see only the email field in the login section.
3. Register: If this option of the one page checkout Prestashop module is selected, the customer will see the registration form in the login section.
On the front, the customer can also change the checkout option. By default, the login option will be selected
Testing Mode: If you want to test the Prestashop one page checkout addon before making it live on your store then you can enable this option. While this option of the One Step Checkout Prestashop Extension is enabled your customers are redirected to the normal checkout page but you can open the SuperCheckout page directly through the URL. The URL for the same appears below this option once you enable it.
Add Minimum Amount for Showing Free Shipping Banner: Using this option, you can set a minimum amount for showing a free shipping banner at the checkout page.
3.1.2 Customizer settings of Prestashop fast checkout module
This tab in Prestashop one page checkout addon has the features using which the admin can modify the checkout front end by adding some CSS or JS in its fields. This tab of Prestashop fast checkout addon already has the feature to change the colors of buttons that appear in the checkout. Whatever CSS will be placed in the custom CSS field that CSS will appear in the front of the store and the same is the case with the custom JS field.
3.1.3 Login Tab
This tab of Prestashop fast checkout addon contains a setting to enable /disable Facebook and Google registration & login as shown below.
Enable Facebook Login: To enable Facebook Registration & Login, switch the button from OFF to ON. But before you do that do get Facebook APP ID and APP SECRET from https://developers.facebook.com without these keys, this functionality of the Prestashop single step checkout addon will not work. By default, this functionality of the one page checkout Prestashop addon will be disabled.
Enable Google Login: To enable Google Registration & Login, switch the button from OFF to ON. But before you do that do get Google APP ID, CLIENT ID, and APP SECRET from https://code.google.com/apis/console without these keys, this functionality of the quick checkout addon Prestashop will not work. By default, this field of the Prestashop One Step Checkout Addon will be disabled.
Enable Paypal Login: Activate or deactivate the login options from the admin interface. Enter PayPal client id and client secret from https://developer.paypal.com/developer/accounts/ and save the settings.
Please read Annexure A to set up Google, Facebook, and PayPal login.
3.1.4 Email Marketing Tab of the One Step Checkout Prestashop Extension
Mail Chimp is an email marketing service by which you can send bulk newsletters/offer emails to your customers. Mail Chimp also provides many attractive Templates and many more features. Our Prestashop one page checkout module allows you to add custom email directly to mail chimp list as soon as they register using our Prestashop one page checkout addon.
For using Mail Chimp you need to have an API Key.
A) How to configure Mail Chimp?
Login to your Mail Chimp account.
Click on the right corner tab > Choose Profile > Extras > API Keys.
Here Admin Can Create an API key by clicking on the “Create a Key” button.
Copy the API key.
Admin can also make a Different list for Each Social login customer by clicking on “List” in the Top Menu Bar.
Now Paste the API Key in the Provided Mail chimp API Key section and click on the “Get List” Button.
Select the list from the Dropdown menu.
B) Mail Chimp Settings:
Enable/Disable: To enable the Mail chimp, switch the enable button from OFF to ON. The default value will be “OFF”.
Subscribe Customer Checkbox: Check this option of the Responsive one page checkout Prestashop module, if you want to subscribe customers to mail chimp as soon as he comes out from the email field. Please note that this function will not subscribe them to the Prestashop list. Our mail chimp integration is responsible to subscribe only to the Mailchimp list.
Mail Chimp API Key: Enter Your Mail Chimp API Key and Click on the “Get List” button.
Mail Chimp List: Select your desired list and save settings.
Similarly, you can configure the other two email marketing integrators including Klaviyo and SendinBlue.
3.1.5 Addresses Tab
This tab in Prestashop one page checkout addon contains a setting for the fields which are to be shown in the customer registration, delivery address, and invoice address section on the front.
The Addresses Tab of the Prestashop Quick checkout addon consists of two sections. The one on the left is for Guest Customers and the right one for Registered Customers.
To make a field show/hide in the Prestashop one page checkout page, check the checkbox just to the left of the Show label.
To make a field of this fast checkout Prestashop checkout addon as mandatory (required field), check the checkbox just to the left of Require Label.
The fields of the Prestashop One Page Checkout Extension can also be rearranged according to the requirement. To rearrange just hold icon () and drag & drop the field vertically, wherever it is required.
On saving, the fields will be rearranged as per the changes.
This tab of the One Page Checkout Prestashop addon also has more features named inline validation and enables the save address feature. If inline validation is enabled then the fields like first name, last name, zip code are validated as soon as they are filled which lets the customer know that he/she is entering the wrong value. If the save address feature is enabled then a button with the text “SAVE” appears just below the address field of the Prestashop one page checkout addon and using that button the customer can save his/her address before placing the order.
Enable Auto Detect Country: If this option is enabled, then the country of the customer is automatically detected and filled into the provided country field on the Supercheckout page.
Enable Google Auto Address Fill: Using this option, the admin can enable auto-fillup of address with Google Places Integration.
Google API Key:For the above feature to work, the admin needs to set the Google API key through this configuration option.
3.1.6 Payment Method Tab of the Prestashop One Page Checkout Module
1. In Prestashop one page checkout addon, this tab contains settings for payment methods shown in one page checkout page like enabling/disabling, or selecting a default method.
2. Display Method: To Enable/Disable the payment methods on the checkout page, switch the button from ON to OFF or vice-versa. This will disable the payment method block from the checkout page. By default, this option of the Prestashop fast checkout addon will be enabled.
3. Display Style: There are 3 options in this field of the Prestashop One Step Checkout Addon to display how your payment methods will be displayed on the checkout page. By default, payment methods will be displayed with its name. If you select the style with the image, then please upload the image of size (95 X 20) for the corresponding payment method under the appropriate payment module directory.
4. Selected Default Method: This option of the One Step Checkout Prestashop module, will be a drop-down list of all installed payment modules. Here you can select the payment method, which will be displayed as selected at the time when a customer comes on the checkout page.
Ship2Pay: With the Ship2Pay feature, the store admin can map the payment methods with the selected delivery methods. If the admin has mapped some payment methods with a particular delivery method then other payment methods will be disabled for the customers on selecting this particular delivery method.
3.1.7 Delivery Method Tab of the Prestashop One Page Checkout Module
In one page checkout Prestashop, this tab contains settings for delivery methods shown on the checkout page like enabling/disabling, or selecting a default method
2. Display Method: To Enable/Disable the delivery methods on the checkout page switch the button from ON to OFF or vice-versa. This will disable the delivery method block from the checkout page. By default, this will enable.
3. Display Style: There are 3 options in this field of the Prestashop fast checkout addon to display how your delivery methods will display on the checkout page. By default, delivery methods will display with their name. If you select a style with an image, then please upload an image of size (95 X 20) for the corresponding delivery method.
4. Selected Default Method: This option of the Prestashop One Page Checkout addon will be a drop-down list of all active delivery methods. Here you can select the delivery method, which will be displayed as selected at the time when a customer comes on the checkout page. The selection will differ according to customer location. If your selected method maps with customer location, then the method will show as selected at the time of checkout page loading.
3.1.8 Custom Fields Tab of the Prestashop fast checkout module
In Prestashop one page checkout module, this tab is used to add custom fields on the front checkout page. This tab of the Prestashop simplified checkout addon contains a list of custom fields and options to Add, Edit, or Delete any field.
These custom fields of the Prestashop fast checkout addon can be used to get some additional data from the customer and display it in different positions i.e. Shipping Address Form, Payment Address Form, Cart Block, or Customer Registration Block.
A) How to add a custom field?
Following are the steps to add a custom field on the checkout page:
Click on the “Add New” button.
A pop-up will display, fill all the required fields and add your desired features.
Click on the “Save” button.
Example 1 – If the admin wants to add a drop-down with the label “Want to become Member ?”
Following are the steps to be followed –
1. Add a new custom field as shown below.
Configure its position as “Shipping Address Form”.
2. Go to Front End, add the product to the cart and proceed to “Checkout”. On the Checkout page, the custom field will be displayed as shown below.
3. Admin can check the data fetched from the customer by following steps –
(a) Go to the “Orders” tab. (b) Click on the “View” button for a particular order you want to check. (c) The Customer’s information will be displayed in the “SUPERCHECKOUT CUSTOM FIELDS” tab as shown below.
4. Customer can also check the Custom field by following steps-
(a) Go to the “My Account” page. (b) Click on “Order History and Details” (c) Click on the “Details” button (d) Image shown below will display.
Example 2 – If the admin wants to add a text area with the label “Gift Message”. Following are the steps to be followed –
1. Add a new custom field as shown below.
Configure its position as “Shipping Address Form”.
2. Go to Front End, add the product to the cart and proceed to “Checkout”. On the Checkout page, the custom field will be displayed as shown below.
3. Admin can check the data fetched from the customer by following steps –
(a) Go to the “Orders” tab. (b) Click on the “View” button for a particular order you want to check. (c) The Customer’s information will be displayed in the “SUPERCHECKOUT CUSTOM FIELDS” tab as shown below.
5. Customer can also check the Custom field by following steps-
(a) Go to the “My Account” page. (b) Click on “Order History and Details” (c) Click on the “Details” button (d) Image shown below will display.
B) How to edit a custom field?
To edit a custom field, click on the ‘Edit’ icon shown in front of any row of this Prestashop quick checkout module. It will open a form shown below. Values of the form in this Prestashop quick checkout module will be filled already.
Admin will have to click on the ‘Save’ button to save the edited details.
C) How to delete a custom field?
To delete a custom field of the Responsive one page checkout Prestashop module, the admin will have to click on the delete icon shown next to every table row. It asks for confirmation to delete a row.
3.1.9 Cart Tab of the Prestashop responsive one step checkout addon
This tab One Step Checkout Prestashop module contains setting for the cart, order total, and confirming the order as shown below :
Its divides into three sections :
Cart
Order Total
Confirm
A) Cart
1. Display Cart: By default, cart display will enable.
2. To Show/Hide cart summary options from the checkout page, check to uncheck the checkbox present in front of the Cart Summary Option label.
3. Product Image Size: This option of the one step checkout Prestashop module will show which size of the product image will be displayed on the One checkout page. By default, this field of the Prestashop quick checkout addon will be shown with their default values.
B) Order Total
To Show/Hide cart summary options from the checkout page check uncheck the checkbox present in front of the Cart Summary Option label.
C) Confirm
To Show/Hide cart summary options from the checkout page check uncheck the checkbox present in front of the Cart Summary Option label. Admin can provide an option to add a gift message along with their product order. Admin will have the option to check this message on the order details page from the backend.
3.1.10 GDPR Setting Tab of the One Page Checkout Prestashop Addon:
This field of the Prestashop one page checkout module allows the admin to add the opt-in boxes (checkbox) on the checkout page to meet the GDPR requirements. Admin can add the multiple opt-in boxes at the checkout page. As per the GDPR directives “The GDPR is clearer that an indication of consent must be unambiguous and involve a clear affirmative action (an opt-in). It specifically bans pre-ticked opt-in boxes. It also requires distinct (‘granular’) consent options for distinct processing operations. Consent should be separate from other terms and conditions and should not generally be a precondition of signing up to a service. You must keep clear records to demonstrate consent”.
Let’s take a look at the screenshot below:
Please refer to the attached screenshot of the front end:
3.1.10.1 Adding New Policy:
The one page checkout Prestashop addon allows the admin to add as many policies. To add a new policy, the admin will just need to click on the “Add New” option. After doing so, a popup will appear, where the admin will ask to fill in the details of the policy.
Privacy Policy Label: In this field, enter the privacy policy label. The text entered here will be visible to the user on the front end. Page URL to Link the Label: This field is not mandatory. But if you have any URL to link the label where you have defined your privacy policy, then enter the same here.
Required: This option is to make the policy field required or optional. If you make this field optional then the customers can continue to place his order without providing consent. Otherwise, only after providing consent, the user will be able to place the order.
Active: This field of the GDPR setting is to make the opt-in option enable or disable at the front end.
Let’s take a look at the screenshot below:
3.1.11 Customer Consent Tab of the one step checkout Prestashop module
This field of the Prestashop one step checkout displays the data of all the customers who have agreed to any privacy policy(s) defined by the admin. The data will also display the date, time, and order reference number as well. To view the list, the admin must have to enter the email id or order reference number and click on the Filter button. The accepted customer consent details will be displayed along with the order reference number, customer name, email id, accepted consent, date, and time as well. Let’s take a look at the screenshot below:
3.1.12 Design Tab of the Responsive one page checkout Prestashop module
This tab of the Prestashop one step checkout module contains the settings for the design of the checkout page in the catalog as shown below:
2. To change the width of any column adjust the slider present at the top as shown below :
3. Block of different steps of the simplified checkout Prestashop module can also be rearranged from one column to the other or in the same column as shown below:
4. On saving, the block will be rearranged in the checkout page as per the changes
3.1.13 Add Customer profile type as a custom field in PrestaShop Supercheckout
This tab of One Page Checkout allows the seller to add a custom field to select the customer type for the users. Admin can add various profile type options.
Enable/Disable Customer Profile: Admin can show or remove the customer type custom field by choosing the Yes and No option
Field type to customer type selection: Admin can decide if this field will be displayed as a dropdown menu or with radio buttons.
How to add a new customer type?
The administrator can build separate profiles for different categories of clients, such as business customers and personal orders, and display different fields for checkout for each type of profile, as well as decide whether or not the information is mandatory.
Click on the ‘Add New’ button on the customer profile page.
You will be redirected to a new page with the title ‘New Customer Profile’
Active: Enable or disable the profile from here.
Profile Name: Add or update the profile name
Delivery address: You will find various address field options like name, company, VAT number, address, city, country, contact number, etc. in this tab.
Make sure to select the ‘require’ checkbox if you want to make any field mandatory.
Display Address on Invoice: You will find various address field options like name, company, VAT number, address, city, country, contact number, etc. in this tab. The selected fields will be displayed on the invoice.
Make sure to select the ‘require’ checkbox if you want to make any field mandatory.
Enable/Disable Custom fields: You can show or hide the custom fields from this tab.
3.1.14 FAQ Tab of the Prestashop responsive one step checkout addon
This tab of the one page checkout Prestashop module contains several questions (with answers to them) that are asked by our customers. We recommend you go through the questions before raising any ticket for this Prestashop fast checkout addon.
3.1.15 Other Plug-ins Tab
This tab of the Prestashop fast checkout addon redirects to our developer page having a list of other plug-ins developed by us. If you like this Prestashop Quick checkout addon then you can try our other plug-ins also.
3.2 Abandoned Checkout Statistics
Here, the admin can look for the number of orders they have received, checkout conversion rate, abandoned checkouts, order revenue generated and revenues lost in abandoned carts.
Prestashop simplified checkout addon offers a comparison report between the completed orders and abandoned cart orders. The admin can analyze reports for a specified day, week, month, and year. This PrestaShop\ module offers a total of 3 graphical reports. Those are:
Prestashop simplified checkout addon offers a comparison report between the completed orders and abandoned cart orders. The admin can analyze reports for the specified day, week, month, and year. This PrestaShop module offers a total of 3 graphical reports. Those are:
Abandoned Revenues v/s Order Revenues
Number of Abandoned Checkouts v/s Number of orders
Checkout conversion
The data will appear in tabular format. The table includes the number of orders received, number of abandoned checkouts, revenue earned from orders, revenue lost due to abandoned carts, and checkout conversion rate.
The admin can check the data for a specified day, week, month, and year.
3.3 Checkout Behaviour Report
This feature offers a detailed report of the customers who abandoned their carts. It gives the data if they left the checkout process. The online store merchant can check the filled information percentage provided by the users who left the cart abandoned. They can check reports for any specific day, just by filtering out these dates.
4. Annexure A
4.1 How to Set up Facebook Login?
Follow the steps below to create Facebook App:-
1: Go to the given URL: https://developers.facebook.com/apps/
2: Click on the “Create App” button.
Step 3&4: Select the “Build Connected Experiences” option and click on the ‘Continue’ button.
5&6: Add “App Display Name”, “App Contact Email”, and choose from the “Do you have a Business Manager Account?” and then click on the “Create App” button.
7&8: After clicking on Create App ID you will have to go through a security check as shown:
10-15: Two options will be available in the dropdown, Basic and Advanced, click on “Basic”. And then enter your “App Domain”, ”Privacy URL”, ”Terms of Service URL”, ”Add Icon”, ”Select Category” and click on the “Save Changes” button.
App Domains:
yourdomain.com is correct
yourdomain.com/store is incorrect
www.domain.com is incorrect
16: Now click on “+Add Platform”.
17: And select Website as Platform.
18&19: Now Enter your site URL.
20&21: Click on “Products+” and click on the Setup button from the Facebook login tab.
22: Select the web as the platform for the app.
23: Add Site URL and click on save.
24-26: Click on Settings and add a Valid OAuth Redirect URIs.
Select Live from the “My apps and credentials” section. After that click on Create App button.
Now enter the app name, select the account name and click on create app button.
Copy client Id and secret key from here:
Here, enter the return URL ie. https://psm.knowband.com/supercheckout_demo/17/index.php?fc=module&module=supercheckout&controller=supercheckout&login_type=paypal after that select the “Connect with PayPal” option and click on “Advance options”
Send an App review request to Paypal with the details mentioned in points 1 to 5 (present in the screenshot). For Point 4 you have to mention the Email attribute to enable.
In the personal profile, section select the full name and email option. After that enter the store URL (https://psm.knowband.com/supercheckout_demo/17/) and click on the Save button.
Now enter the client ID and secret key after enabling the PayPal login page option.
5.0 Front-end Interface
After successful installation, the Checkout page will look like this. The admin can add or remove fields from the checkout page and thus can display all the checkout steps in one place.
In the updated version, there is a Paypal login option for the users.
Watch how this Prestashop One Page Checkout Plugin works:
Find more details about this Prestashop Simplified Checkout Addon below:
Prestashop One Page Checkout Module Product Link:Click Here One Page Checkout Prestashop Addon Admin Demo: Click Here Responsive one page checkout Prestashop Addon Front Demo: Click Here
Find this Prestashop One Page Checkout Module on Addon Store as well.Visit: Click Here
To install this better thank you Prestashop addon, please follow the following steps:
1. Add addon folder under modules folder of your system.
2. After adding this addon folder, system will list the Prestashop addon on module page under front office feature category as given below:
3. Click on install to install the Prestashop custom thank you page plugin.
Admin Interface
The better thank you page plugin by Knowband provide following features to the admin:
1. General Settings
2. Products Settings
3. Discount Settings
4. Advertisement Settings
General Settings:
After clicking on configure link of Better thank you page module General settings tab will open.
Fields listed will be filled with some default values
GENERAL SETTINGS TAB DETAILS:
1. Enable/Disable: Initially, this field of better thank you Prestashop addon will be OFF. User can enable/disable Prestashop addon functionality by turning this ON/OFF. 2. Show order reference number: This field of Prestashop Better Thank you page will be used to enable or disable the order reference number in the front end of the order confirmation page. 3. Product list position: Here, the admin can select the position of the product block which may be 1,2 or 3. 4. Discount block position: Here, the admin can select the position of the discount block which may be 1,2 or 3. 5. Banner position: Here, the admin can select the position of the banner block which may be 1,2 or 3.
Product Settings
After clicking on the product settings tab of the Prestashop custom thank you page the below screen appears.
PRODUCT SETTINGS TAB DETAILS:
1. Enable: Admin can enable and disable this feature of the better thank you page module by this button. 2. Text Message: This field of the better thank you prestashop addon allows the admin to add whatever text or media he feels like which will be displayed below the product list on the order confirmation page.
Advertisement Settings
After clicking on the product settings tab of the Prestashop Better Thank you page, the below screen appears.
ADVERTISEMENT SETTINGS TAB DETAILS:
1. Enable: Admin can enable and disable this feature of the module by his button.
2. Upload Image: Here the admin can upload the banner which the admin wants to show on the front end of the order confirmation page.
Front End Module
After enabling this Prestashop plugin by Knowband, the order confirmation box of the front end will be changed and a new order confirmation page will appear with the features of the backend settings done in the better thank you page.
The Prestashop custom thank you page module at the front-end appears as follows:
Better thank you page module enhances your order success page and gives you chance to customize the same in order to increase customer’s engagement and gain more sales as well. This Prestashop module is an effortless way to convert your order success page into a powerful marketing tool. This could be really one sure fire ways to boost the sale on your Prestashop store.
Recommendations
Refresh home page of your store every time you enable/disable plugin. If plugin is not working after installation then please check permissions on modules folder. The folder should be writable. Please make the folder permission to 755.
For a quick and easy walkthrough of the Prestashop Better Thank You Page Module, you can watch our step-by-step video guide. This tutorial demonstrates how to install, configure, and fully utilize all features of the module to enhance your order success page.
Tutorial Video of Prestashop Custom Order Success Page
In this video, you will learn how to:
Install the Better Thank You Page module in your Prestashop store.
Configure general settings, product display, and advertisement blocks.
Customize your order success page with banners, offers, and product recommendations.
Optimize the page layout for better customer engagement and increased sales.