7 Magento Extensions to capture Holiday Sales

Mark your calendar for the coming holiday season. It is time to start preparing your ideas and strategies to capture more holiday sales this season. Online businesses are grabbing huge sales every year during the holiday season, and you should not miss it too.

If you own a Magento 2 store and wondering which Magento extensions you should focus on in this holiday season, here are the 7 Magento extensions that I highly recommend implementing on your Magento and Magento 2 store to capture holiday sales.

1. Magento Spin and Win

Magento Spin and Win makes it to the top in our list of Magento holiday extensions.

Though the Spin and Win popup majorly focuses on creating more user engagement and growing your email list by providing a gamified experience to customers, you can capture huge sales with it by making it more appealing in the coming holiday season.

Magento Spin and Win extension provides you with the option to design your popup for various occasions. It comes with pre-existing themes for Halloween, Christmas, New Year, etc. You can adjust the look and feel of your popup in accordance with the occasion.

A popup having a holiday theme will draw more user attention during the holiday season. People would be excited to spin the wheel and earn some offers and discounts.

With this approach, you would be able to catch the holiday spirit and grab more holiday sales. Not to forget your email list would witness a lot of new entries.

Check out this extension for Magento 2 as well- Magento 2 Spin and Win

2. Magento Mobile App Builder

Enhance the online shopping experience of your customers by launching a mobile app for your Magento website.

Magento Mobile App Builder converts your website into a user-friendly mobile app (Android and iOS). Talking about its key features, it offers Real-time synchronization of the website into app, Home Page Layout Optimization, Fingerprint Login, Zopim and WhatsApp Chat support, Unlimited Push Notifications, All Product type support and much more.

If you are aiming for a high sales count in the coming holiday season, you should definitely go with this Magento extension.

Check out this extension for Magento 2 as well- Magento 2 Mobile App Builder

3. Magento Gift Card Manager

Moving forward in the list of Magento holiday extensions is Magento Gift Card Manager.

The schedule is hectic during the holiday season and people do not get enough time to purchase a gift for their every close one. This is when Gift Cards make things easier. Gift cards are the best option for last-minute shoppers.

A digital gift card is a one-stop solution for those who do not want to feel the burden of choosing gifts and spending hours in the search for a perfect gift.

Magento Gift Card Manager comes up with multiple gift card templates like for Halloween, Christmas, New Year, etc. You can create your own gift card template to give it a festive touch. Occasion based Gift Cards capture huge eCommerce sales.

If you do not have the gift card functionality, set it up today to grab holiday sales in the coming season.

Check out this extension for Magento 2 as well- Magento 2 Gift Card Manager

Read:

Get more Holiday sales by setting up a Gift Card section on your store

Why Digital Gift Cards are important to your business?

4. Magento Facebook Share and Win Discount

Social media has around 3.6 billion people user base and 1.69 out of which are registered users on Facebook. Share and win Magento extension for Facebook is the one that can help the e-merchant to offer a fixed or percentage-based discount if the customer shares the store product on their social media account. The customers will be receiving a coupon code if they share the store product on their Facebook wall or with a friend over Facebook messenger.

Thus, the offer encourages customers to promote store products without any extra efforts. This increases customer retention and brings new customers to the store. Facebook share and win for Magento and Magento 2 is one of the easiest ways to increase brand awareness.

Checkout this plug-in for Magento 2 as well- Facebook share and win a discount.

5. Magento Automatic Related Products

If you are looking for a Magento extension which can help you doing cross-sell then the best strategy which can work will be showing related products to the customers. Magento’s Automatic Related Product extension helps to cross-sell the store’s other products. Depending upon the product view or purchase statistics, this extension displays relevant products.

With Automatic Related Product Plugin, Magento 2 store owner can highlight the best-selling or new arrival pieces. This plug-in improves the up-selling and cross-selling of items from the shop.

To know more about the features and benefits you can refer to the product page of Magento Automatic Related Products extension.

6. Magento Affiliate and Referral Program

The “Refer and Earn” scheme works the best during the holiday season. It is the time when people shop the most and look for the sites offering heavy discounts. Therefore, the referral program, in this case, brings more sales, if you ask your users to refer your Brand to other people.

Magento Affiliate and Referral Program extension allows users to register as an affiliate on your store. After successful registration, the affiliate partner can share your website link to his/her audience through a referral code, a referral link, or share it on social media or via email.

You can also assign vouchers to the affiliate partner. The affiliate can share that voucher code with his known people and ask them to use that code while they shop. After a successful order, the affiliate will receive the incentives as set by the store merchant.

Check out this extension for Magento 2 as well- Magento 2 Affiliate and Referral Program

7. Magento Store Locator

The holiday season grabs countless orders, due to which customers face delays in the delivery. When the delay extends more than usual, it creates a sense of frustration among customers. This is where Magento store locator can prove beneficial for you as well as your customers.

Magento Store Locator extension allows you to display your store locations on the front end of your website. While purchasing a product, a customer can choose his nearest store and pick up the order when it reaches the location, to avoid late delivery.

People expect to receive the product as fast as possible during the holiday season. You can save their important time by implementing the store locator extension on your Magento store. The pickup facility will surely mark a change in your holiday sales graph.

Check out this extension for Magento 2 as well- Magento 2 Store Locator

Have any doubt in any of the Magento extensions? Feel free to ask by dropping a comment below or you can mail us your query at support@knowband.com

I hope these Magento extensions for the holiday season provide a big boost to your online business. You can look out for some more Magento extensions in our store.

Best wishes for your year-end sales.

This might also interest you:

10 Halloween Marketing Ideas to Uplift your Sales this October

Knowband’s list of modules to look out for this Holiday season

13 Marketing Ideas to boost your Holiday sales

3 Magento Extensions to acquire customer data

Magento Checkout Extensions that can tackle abandoned carts on your Magento site

Magento Instagram Shop Gallery extension

Magento Instagram Shop Gallery extension is a simple yet effective Magento extension that integrates your Instagram account on your Magento store. It fetches your Instagram account images or images put under a particular hashtag, on your Magento store. It helps you display the user-generated content and allows you to tag similar products available on your store to that content. User-generated content helps people make a better purchase decision.

Instagram Shop Gallery extension for Magento 2 adds an attractive Instagram look to your e-commerce store.

Features of Magento Instagram Shop Gallery extension

  1. Display Instagram Shop Gallery anywhere on your website, be it on Home Page, Product Page, Category Page, Contact Us Page, etc.
  2. You can place the Instagram Shop Gallery link at the footer of your website.
  3. Display the likes and comments of the images on the Instagram Shop Gallery.
  4. Though you can fetch as many images as you want, set a limit for the number of images to be shown in the Instagram Shop Gallery section.
  5. Select the kind of images that you want to display in the Gallery. For example, all the images, approved images or images mapped with related products.
  6. Define the hashtags for which you want to fetch the images. This becomes so helpful if you are running a marketing campaign.
  7. Magento Instagram Shop Gallery extension allows you to create a URL for your Instagram Shop Gallery page.
  8. Carousel mode provides an appealing interface to the Instagram gallery.
  9. Magento Instagram Shop Gallery extension is easy to install and set up with no requirement of technical knowledge.
  10. It is a multi-lingual and multi-store compatible extension.
  11. It is a fully responsive extension that fits perfectly with mobiles, tablets, and desktops.

Final word

Today, Instagram is one of the leading social media networks having a massive user engagement rate. Hence, having an Instagram Gallery section on your Magento store can be a great idea to enhance the user experience. Moreover, products attached to Instagram images can increase the conversion possibility. Do try out the Magento Instagram Shopping Gallery extension.

Magento Product Availability Check by Zipcode Extension – User Manual

1.0 Introduction:

Magento Product Availability Check by Zipcode Extension by Knowband allows the user to check the availability of the product in a particular area just by entering the zipcode. The Magento Product Availability extension also offers the admin to restrict the availability in the particular area(s). With the help of this Magento Zipcode extension, the admin can change the availability status whenever he wants to.

1.1 Features offered by Magento Product Availability by Postal Code Extension:

  1. By installing the Magento product availability by zipcode, the store admin can allow the store visitors to check the availability of the product in a particular region based on the zipcode.
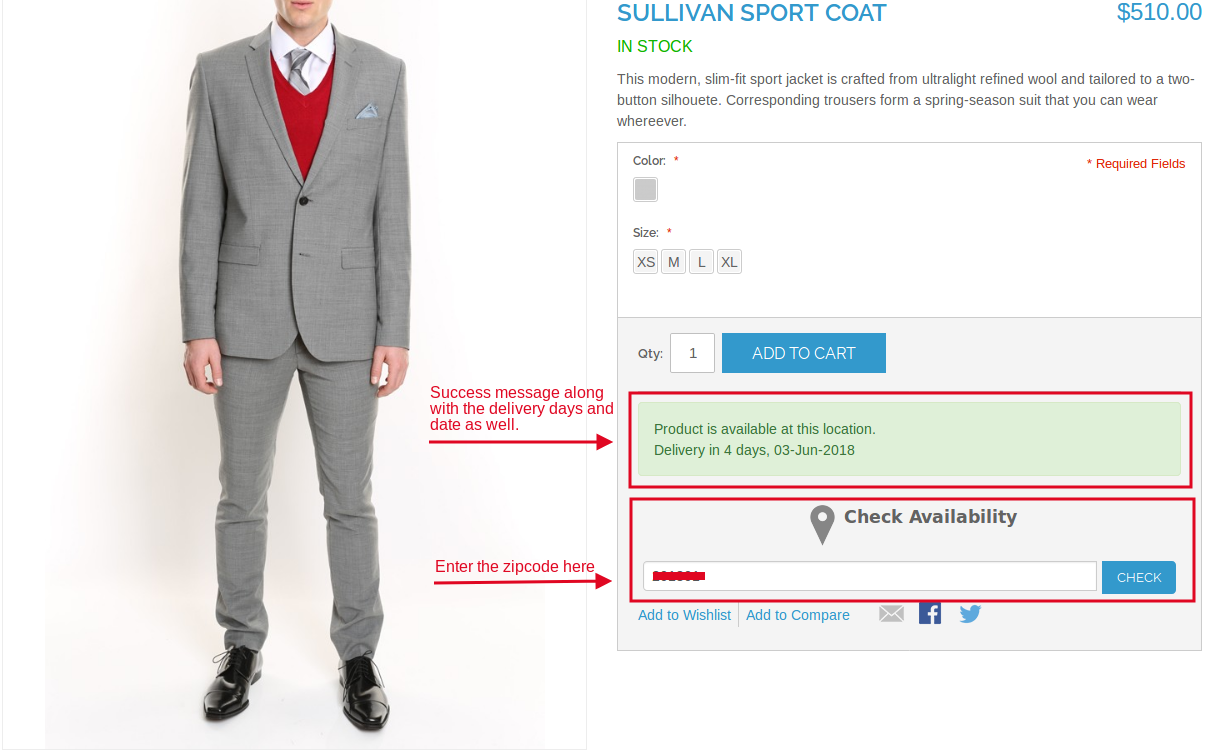
  2. The Magento Product Availability Check by Zipcode Extension allows the admin to show number of days with estimated delivery date if the product is available to the entered zipcode.
  3. The Magento Product zipcode validator module offers the admin to disable the checkout option if the product is not available to the entered zipcode.
  4. The admin can create various global zones.
  5. The Magento product zipcode validator extension allows the admin to view all the list of created zones as well under the “Global Zone” configuration interface.
  6. The module allows the admin to map the zones with product in order to specify their availability.
  7. The global zone can be edited/deleted as well.
  8. The admin can edit or delete the zipcodes from the created zones.
  9. The admin can add/delete the any product(s) from the selected zone also.
  10. The Product-Zone Mapping can be done manually or by uploading the CSV file as well.
  11. The admin can restrict the availability in the particular area.
  12. The admin can create the separate zones for the available and unavailable products.

2.0 Installation Steps of Magento Product Availability Check by Zipcode Extension:

Follow the simple steps in order to install the Magento Product Zipcode Validator Module:

1. Download the extension package from the Knowband store.
2. You’ll get a zipped file. Unzip the package on the root folder of your Magento setup via FTP manager (like Filezilla or WinSCP – download here: https://filezilla-project.org/). You’ll find the files and folders as shown in the image below:

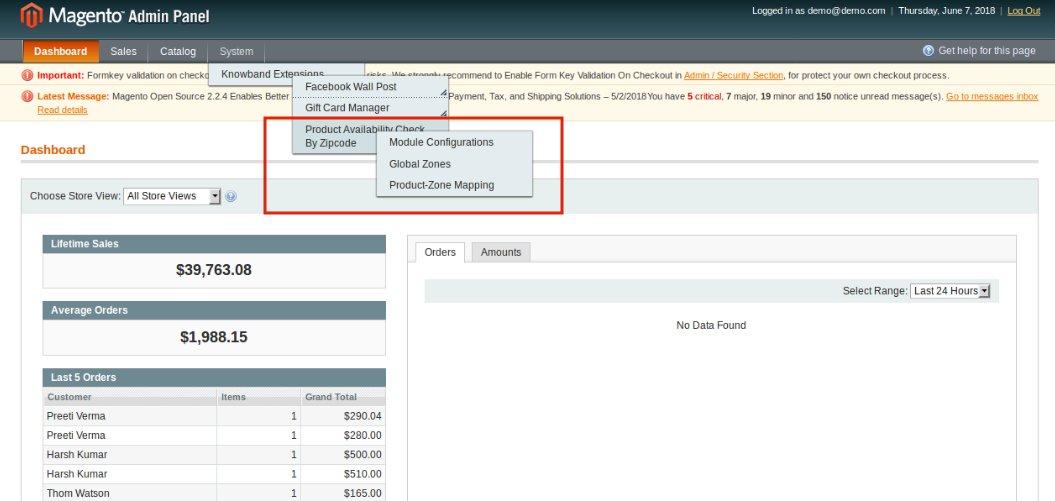
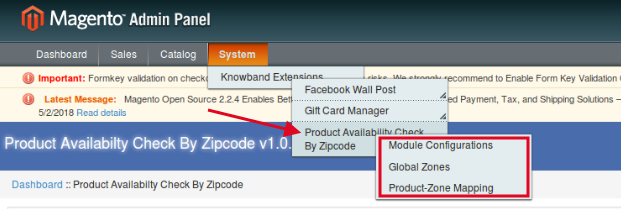
3. The extension is now installed and ready for use. In Admin Panel, go to “System > Knowband Extensions > Product Availability Check by Zipcode”.

You can now configure and use the Magento Product Availability extension.

3.0 Admin Interface of the Magento product zipcode validator extension:

The product zipcode validator Magento Extension offers following interfaces to be configured:

  1.  Module Configuration
  2. Global Zones
  3. Product-Zone Mapping

3.1 Module Configuration of Magento Product Availability by Zipcode extension:

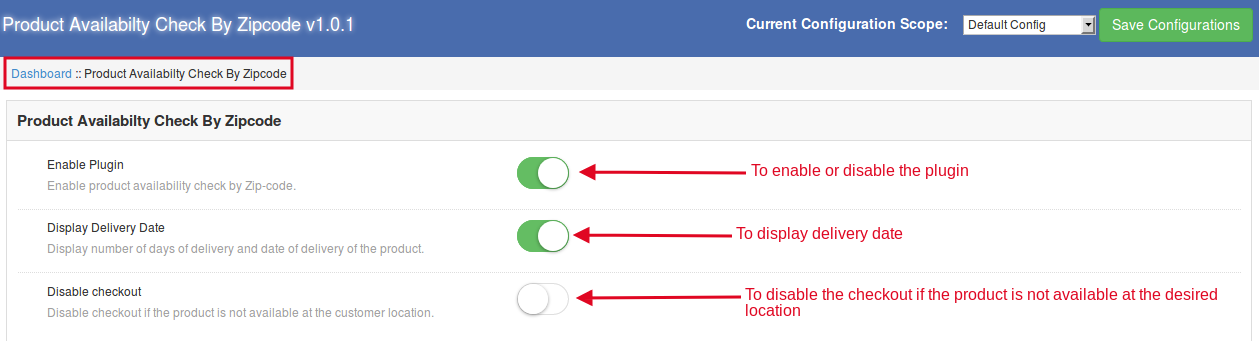
  • Enable Plugin: Enable the Magento Product Zipcode validator module by toggling this button. After enabling this, it will display a block on the product page to check the availability.
  • Display Delivery Date: Enable this toggle button to display the estimated delivery date of the product.
  • Disable Checkout: If this button is enabled, then, the customer can not place the order.

3.2 Global Zone Configuration of the Magento product zipcode validator extension:

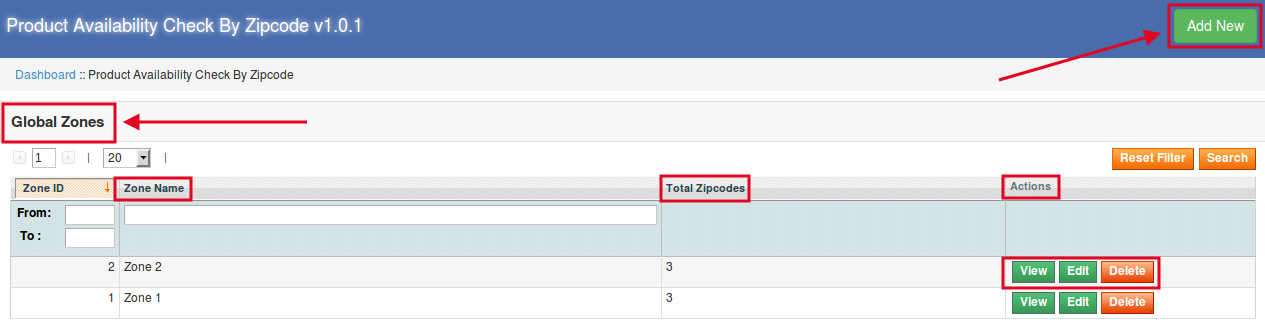
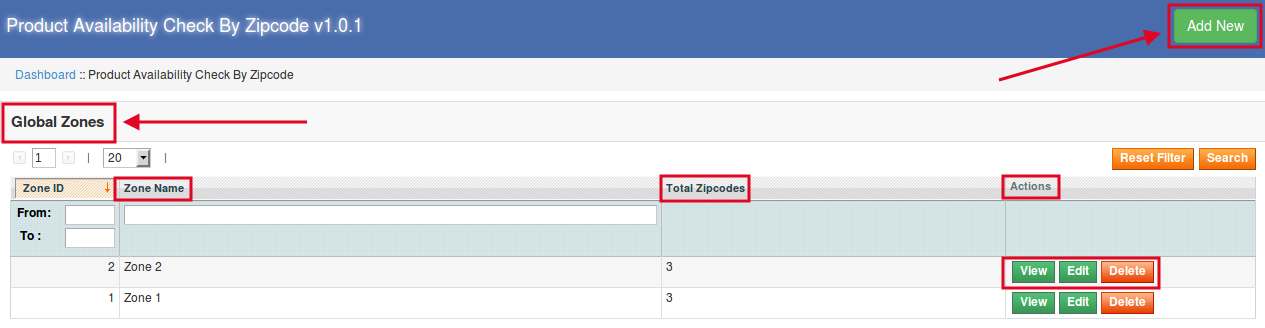
This interface contains the list of all the zones created by the store admin. The admin can add any number of global zones to make the product available or not available to the desired zipcode(s).

3.2.1 How to add New Zone?

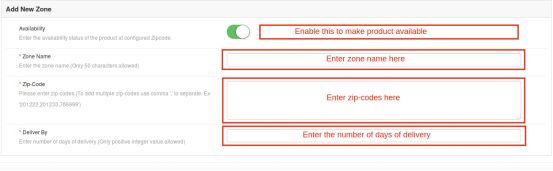
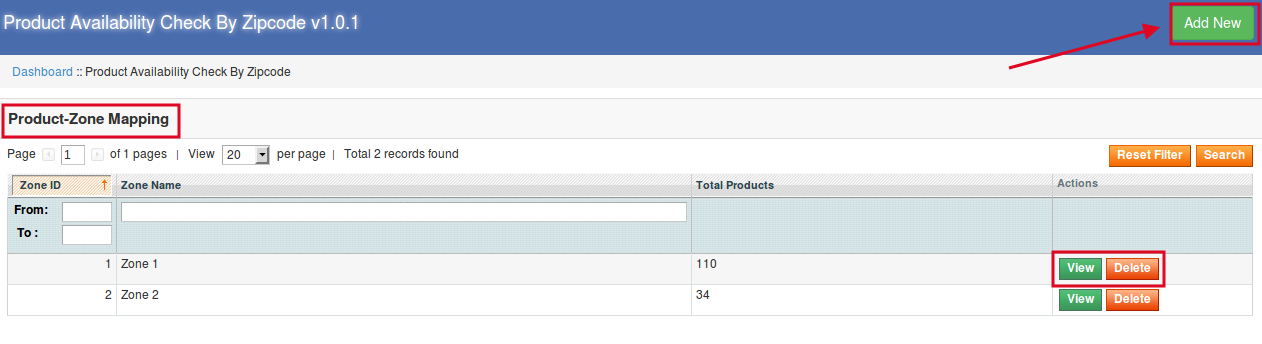
In order to create new zones click on the ‘Add New’ link at the top right section of the admin interface.

After clicking on the “Add New” button, you will see the following fields to configure:

  • Availability: Enable this button to make the product available for that particular zone.
  • Zone Name: Enter the name of the zone here.
  • Zipcode: Enter the zipcodes that are to be included in that particular zone. In case there are multiple zipcodes, enter the same separated by the comma.
  • Deliver By: Enter the number of days within which the products will be delivered to the customer. Only the positive integer value can be entered.

3.2.2 How to View/Edit/Delete the Global Zone(s)?

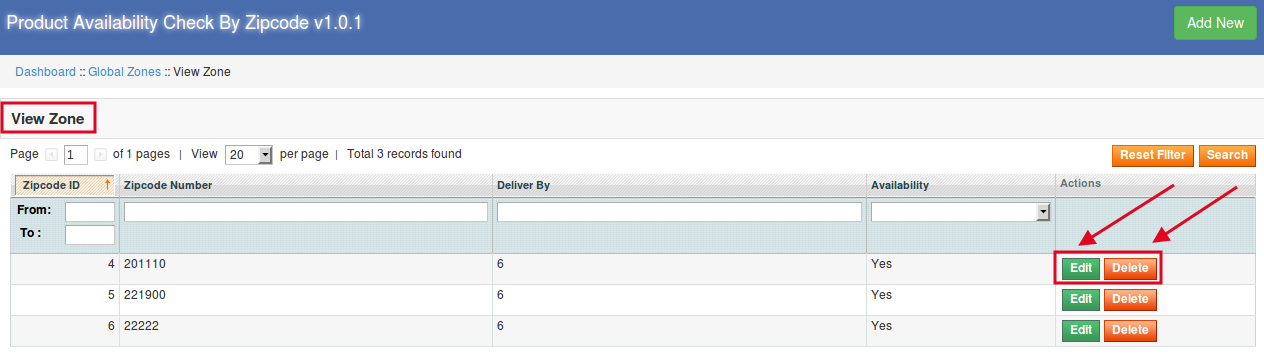
After clicking on the Global Zone configuration option, an interface will open containing all the list of created Global Zones. You can View/Edit/Delete the any of the Global Zones here.

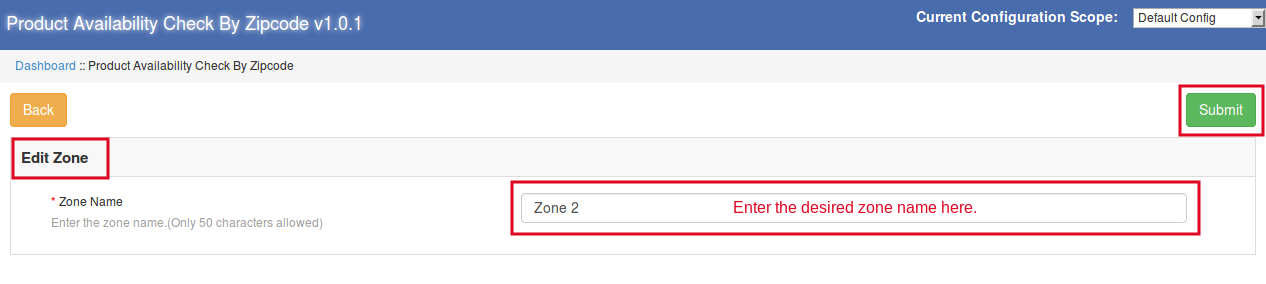
In order to edit the zones, click on the “Edit” button. On clicking here, you will be redirected to the new web page. Here you can change the zone name and click on “Submit “ button to make changes visible.

Editing the zone

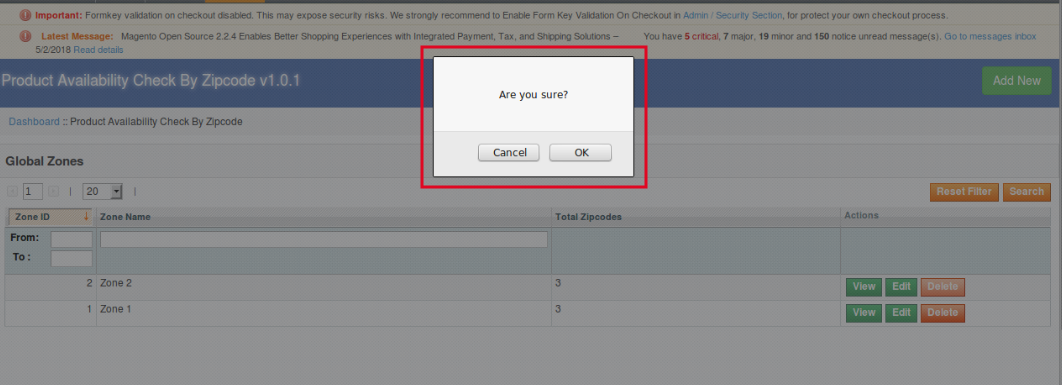
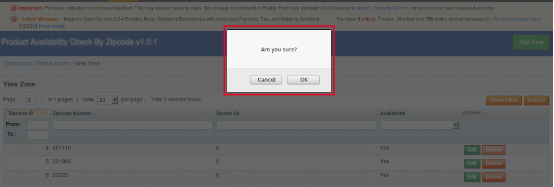
When the admin clicks on the “Delete” button under the “Global Zones” option, a popup will be shown quickly asking for the confirmation to delete the selected zone. Let’s take a look at the screen shot below:

Deleting the zone

3.2.2.1 How to edit/delete the Zipcodes?

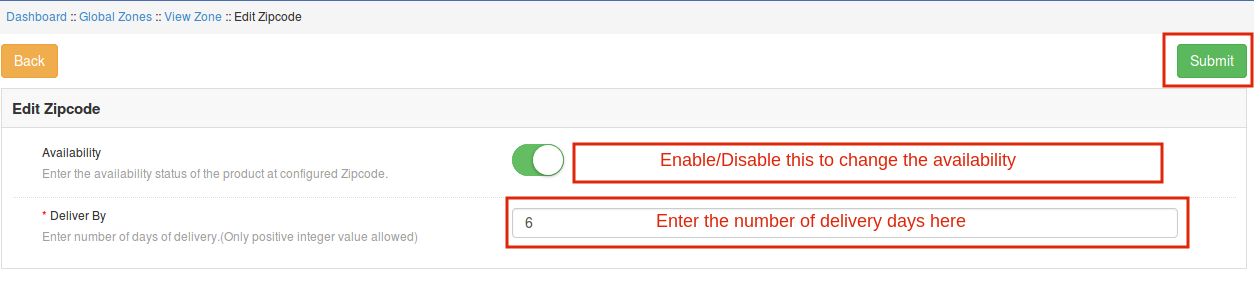
When you click on the edit option under the “View Zone”, you will get to see the following interface, where you can change the product availability for the particular zipcode and days of delivery as well.

Editing the zipcode

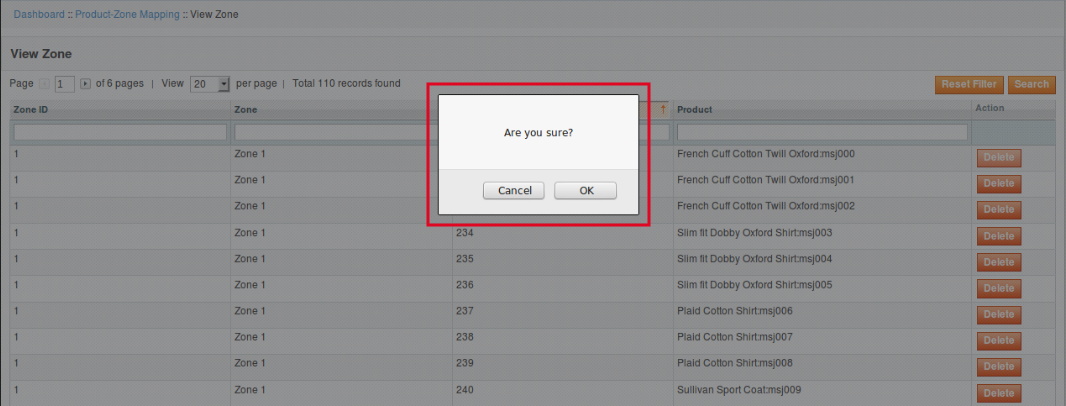
When you click on the “Delete” button under “View Zone” option, then a popup will appear asking for your confirmation whether to delete the zipcode or not. Take a look at the screenshot below:

Deleting the zipcode

3.3 Product-Zone Mapping Configuration:

When you click on Product-Zone Mapping configuration, you will see the following interfaces to be configured.

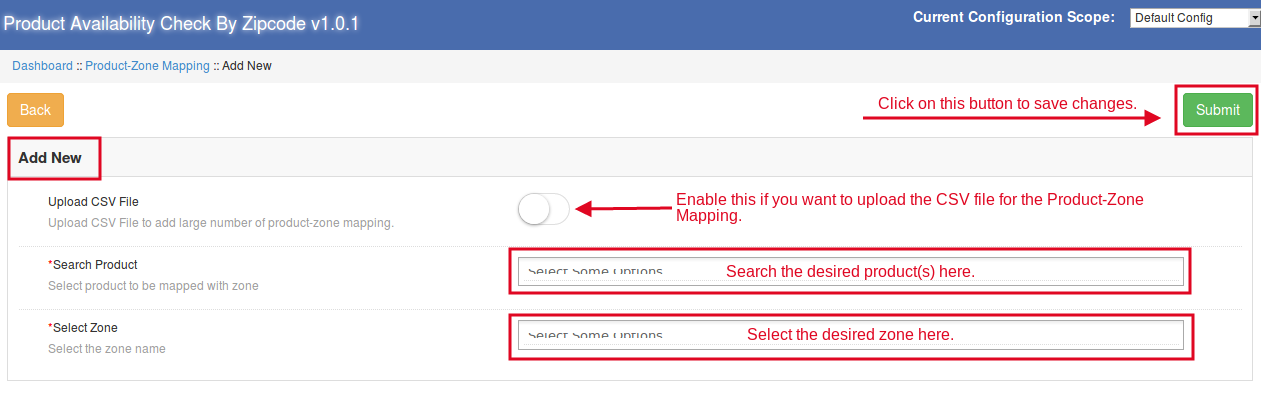
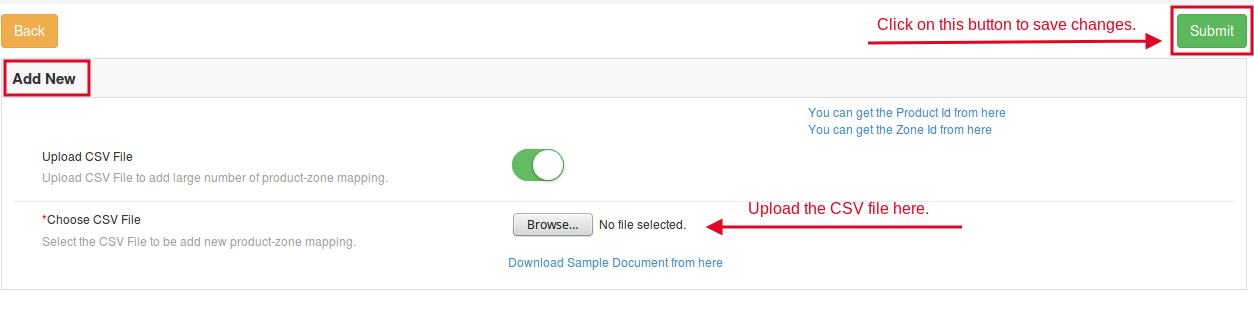
In this interface, the admin can add new product-zone mapping. He can do the same manually or by uploading the CSV file.

3.3.1 How to View/Delete the Zone:

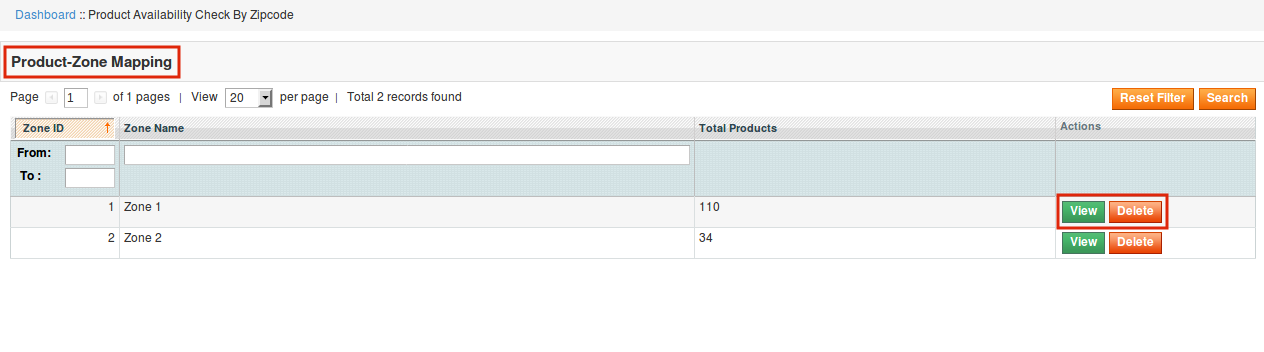
When the admin will click on “View” option, a new interface will be shown containing zone id, zone name, product id and product name along with the action of deletion of the product. Let’s take a look at the screen shot below:

View the zone

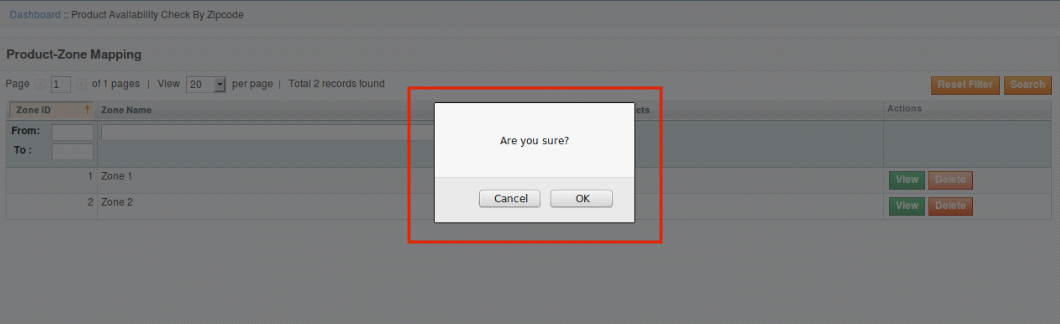
To delete the zone, the admin will just need to click on the “Delete” button. Once you click on the “Delete” button, a popup window will appear asking for the confirmation for the deletion. Take a look at the screen shot below:

Delete the zone

3.3.3.1 How to delete the product(s) from the zone:

Deletion of the product

If the admin wants to delete any particular product(s) from any zone, then he can do the same just by clicking on the “Delete” button under the Action category of the View Zone.

3.3.2 How to map the Product-Zone:

There are two ways of Product-Zone mapping. The admin can map the product-zone manually or he can do the same by uploading the CSV file as well.

3.3.2.1 How to Map the Product-Zone Manually:

  • Upload CSV File: This will be disabled if the admin is mapping the product-zone manually.
  • Search Product: Search and select the desired products from here.
  • Select Zone: Select the desired zone from here to which the admin wants to map the above-selected products.
3.3.2.2 How to Map Product Zone by Uploading the CSV File:

If you enable the “Upload CSV File” option, then you will see the option to upload the CSV file. By clicking on “Browse” option, you will be able to upload the CSV file. After doing this, click on “Submit” button to save the changes.

4.0 Front End of the Magento product zipcode validator extension:

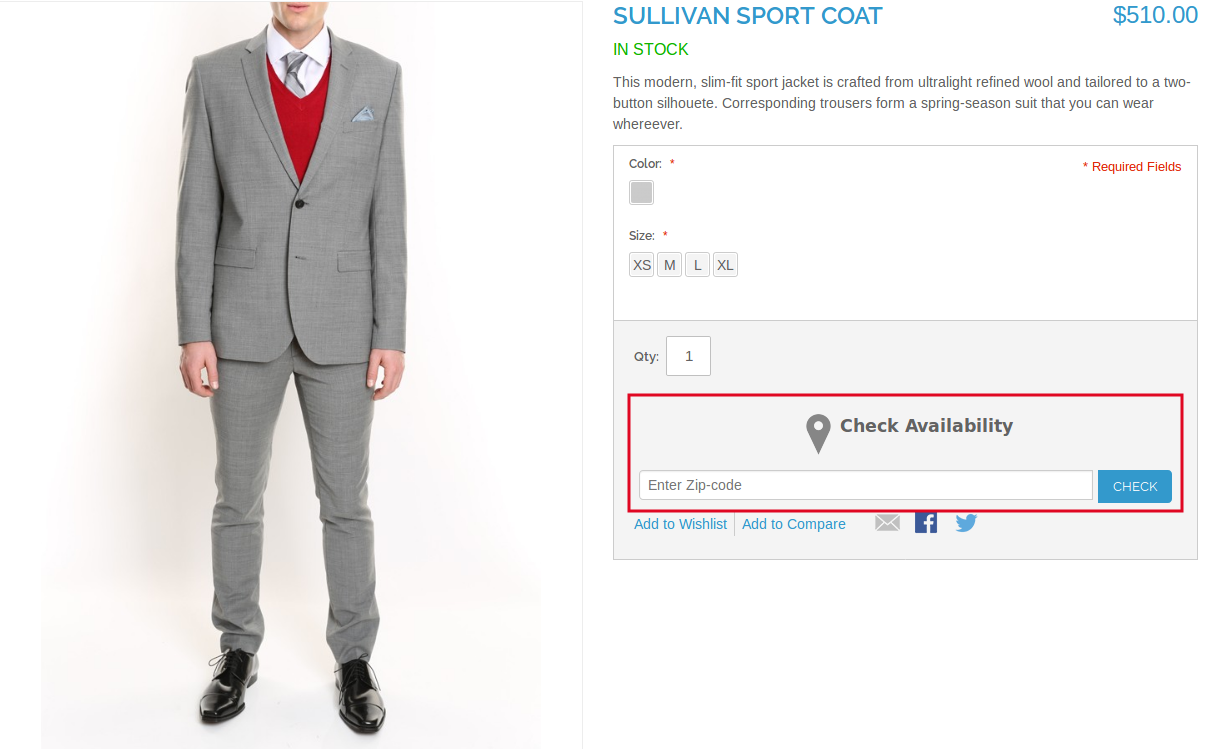
Once you configure all the interfaces of this Magento product zipcode validator extension, you will see a block on the product page where the users can enter the zipcode and check the availability of the product.


When the product is available:

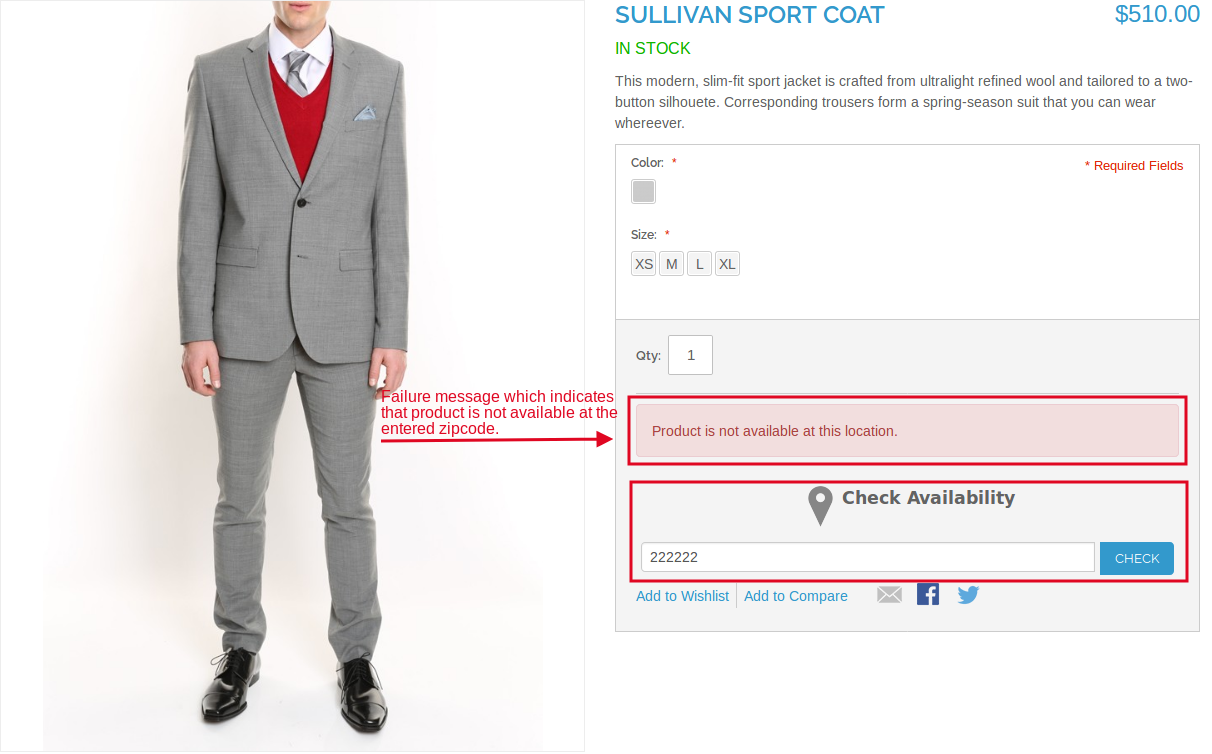
When the product is not available:

Find more details about this Magento extension below:

Magento Product Zipcode Validator Extension Link

Magento Product Availability Check by Zipcode Admin Demo

Magento Product Availability Check by Zipcode Front Demo

“Also, explore more Magento Extensions for your website.”

Magento Facebook Wall Post Extension – User Manual

1.0 Introduction

Post your products on your Facebook page automatically with the help of Magento Facebook Wall Post Extension by Knowband. This Facebook Wall Post Extension Magento lets the admin boost their brand visibility on one of the most engaged social media platforms, Facebook, where billions of users come daily. The advanced and easy to configure Facebook Wall Post Magento Extension boosts the users’ engagement and helps in increasing the traffic of the website as well.

1.1 Merchant benefits of Magento Facebook Wall Post Extension

  • Facebook Wall Post Extension Magento helps in increasing the visibility of your products/brand on social media platform.
  • Facebook Wall Post Magento Extension helps in increasing the overall traffic of the website by redirecting the users from Facebook to the site.
  • Magento Facebook Post Extension increases customer’s engagement even while they are surfing their Facebook account.
  • Magento Facebook Wall Post Extension provides an easier way to showcase your products, new arrivals and coupon codes to the target audience.

1.2 Features of Magento Facebook Wall Post Extension

  • The Facebook post extension for Magento offers the admin to post their category(s) and products automatically..
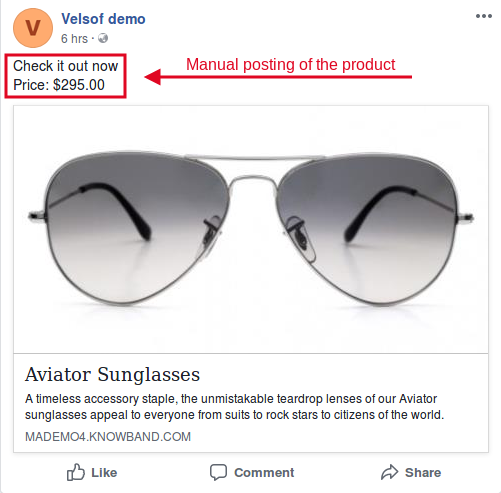
  • The Magento Facebook Post extension offers the admin to post the products manually as well.
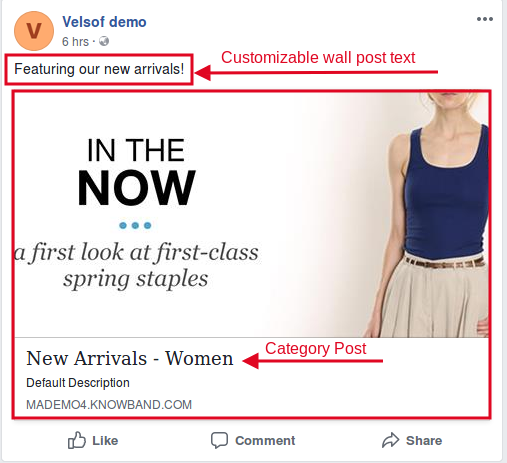
  • The admin can post the choice of the category(s) on the Facebook wall.
  • The Magento Facebook wall post extension allows the admin to select which type of description he wants to display on the Facebook wall, i.e long description, short or meta description.
  • The Magento Facebook wall post extension allows the admin to display the product price along with the wall post.
  • The Facebook post description is fully customizable. The admin can post his choice of description just in one click.
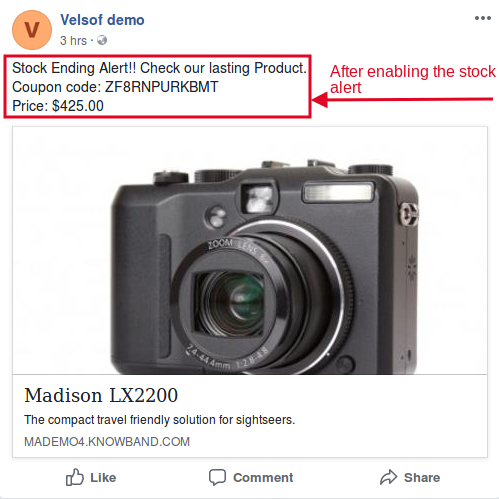
  • The Magento FB post module offers the admin to display the stock alert on Facebook post.
  • The Magento FB Post extension provides the admin to enter the desired quantity, below which the stock alert will be shown on the Facebook post.
  • The Facebook post extension for Magento also generates coupon for the stock alert.
  • The Magento Facebook wall post extension allows the admin to customize the coupon/voucher code as per his preferences.
  • The Facebook wall post extension Magento offers the feature to customize the voucher name, type, validity, and value as well.
  • The Magento FB post module offers two types of voucher to be given to the customers, i.e. Absolute or Percentage based.
  • The FB wall post extension Magento is easy to install, configure, and understand as well.

2.0 Installation Steps of Magento Facebook Post Extension

The steps to install the Magento Facebook Wall Post Extension are mentioned below:

  • Buy the Facebook Wall Post Extension Magento from Knowband. You can download the extension package.
  • The package has a zipped file that contains the user manual and the source code of Magento Facebook Wall Post Extension. Unzip the package.
  • Create a folder {Magento root}/app/code/Knowband/fbwallpost
  • Upload the extracted content in the above folder via FTP manager (like Filezilla or WinSCP – download here: https://filezilla-project.org/).
  • Now run below commands to install the Magento Facebook Wall Post Extension :
    php -f bin/magento module:enable –clear-static-content Knowband_ fbwallpost
    php -f bin/magento setup:upgrade
    php -f bin/magento setup:di:compile
    php bin/magento setup:static-content:deploy
  • The extension is now installed and ready for use. In Admin Panel go to “Knowband Extensions > FB Wall Post”.

You can now configure and use the Facebook Wall Post Extension Magento.

3.0 Admin Interface of the Facebook Wall Post Magento Extension

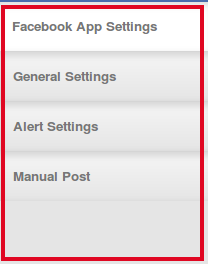
Magento Facebook Wall Post Extension offers following interfaces to be configured:

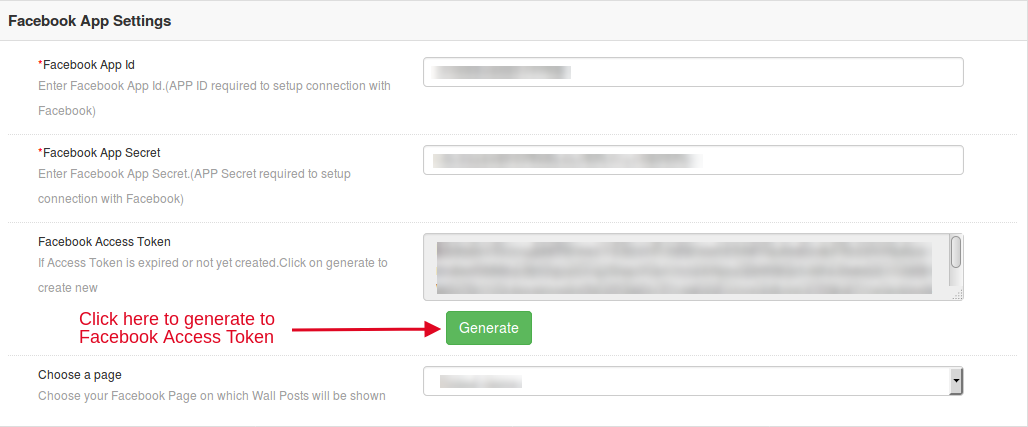
  • Facebook App Settings
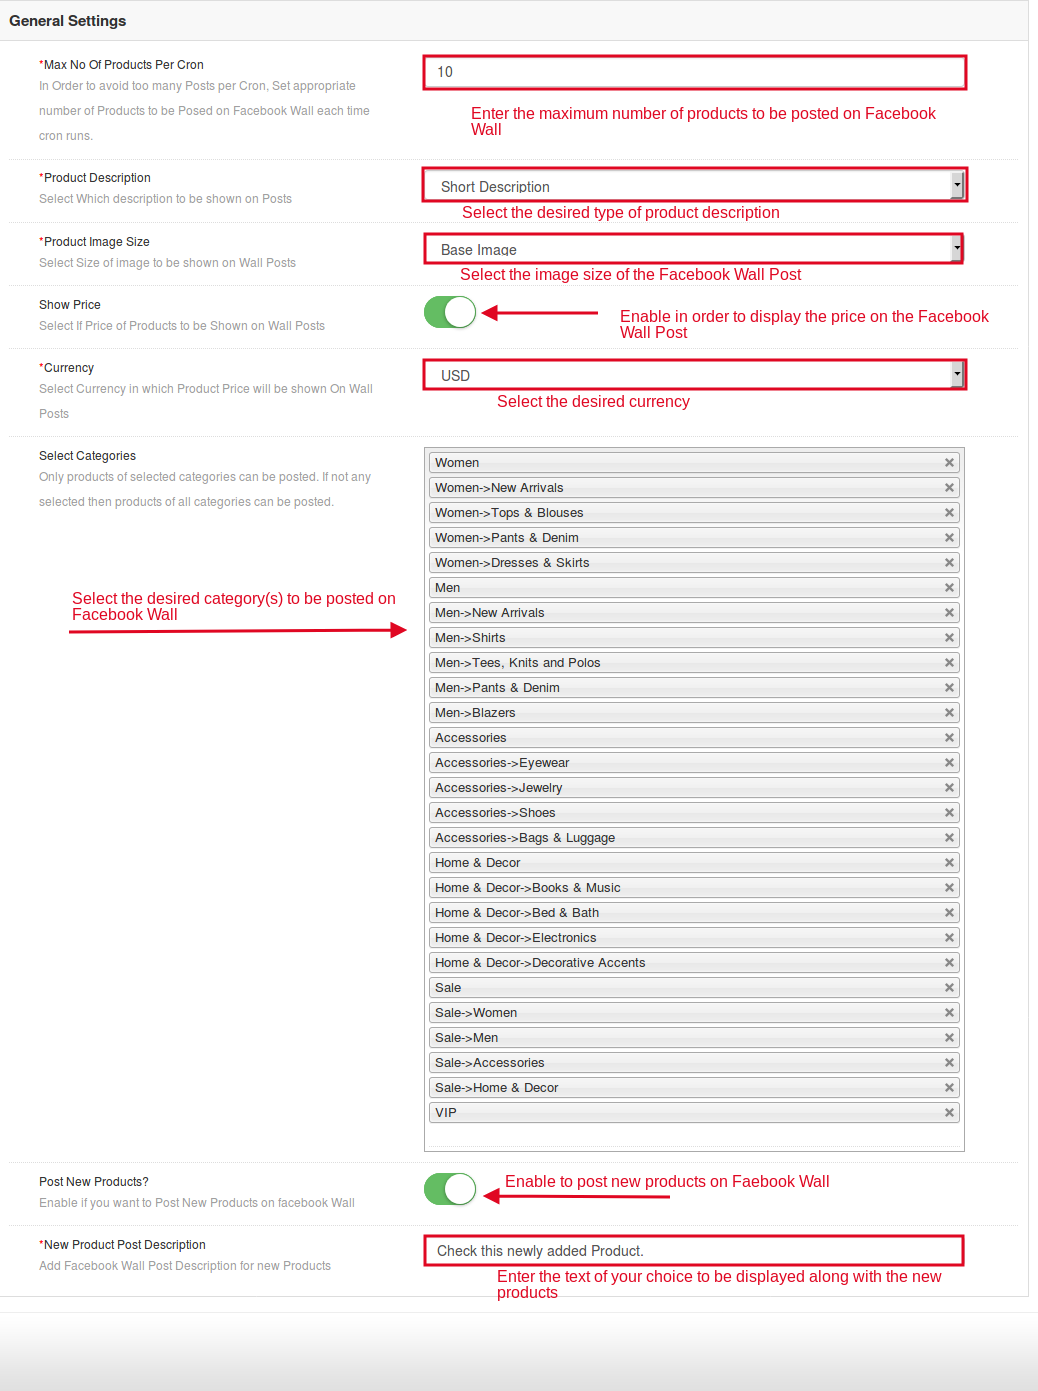
  • General Settings
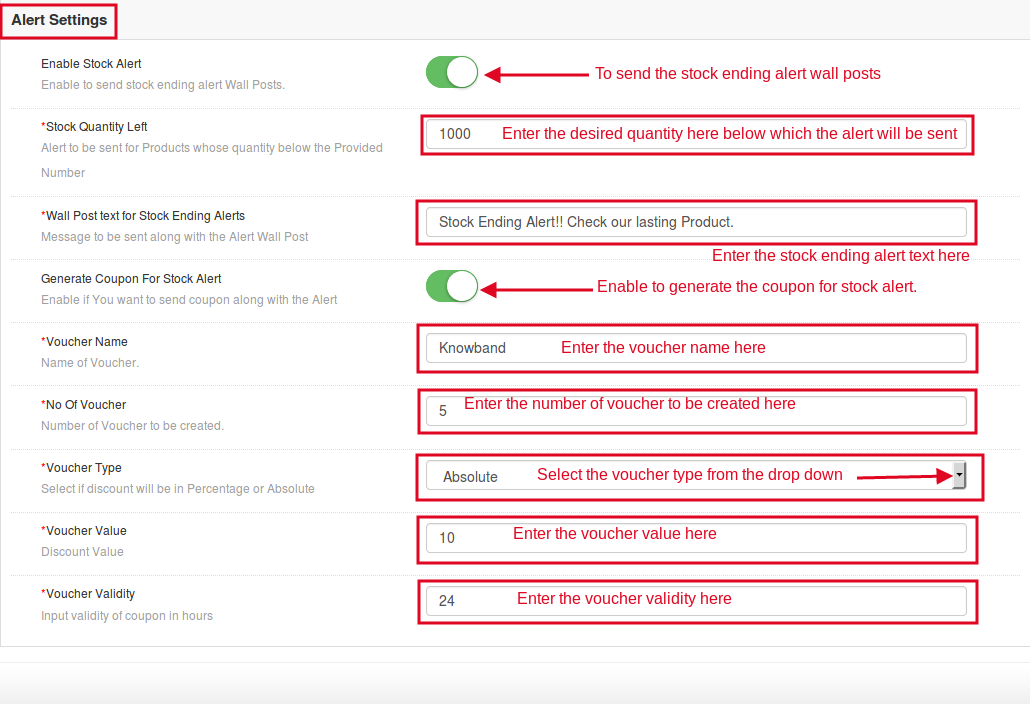
  • Alert Settings
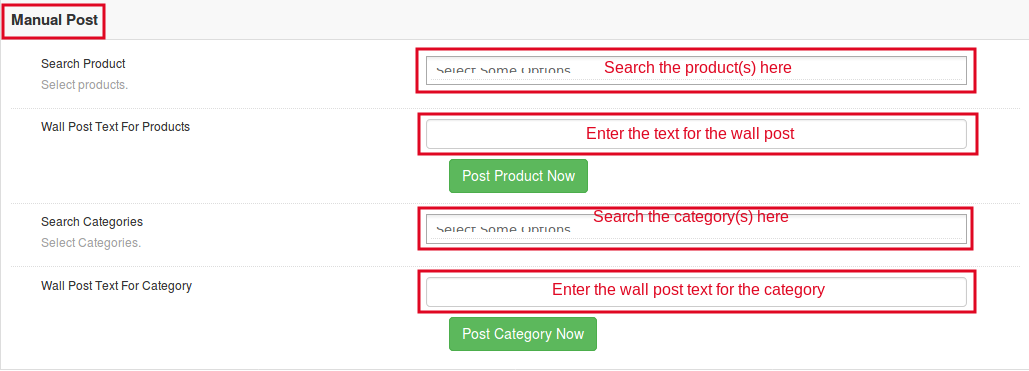
  • Manual Post

Below is the detailed description of all the tabs of this Facebook Wall Post Extension Magento.

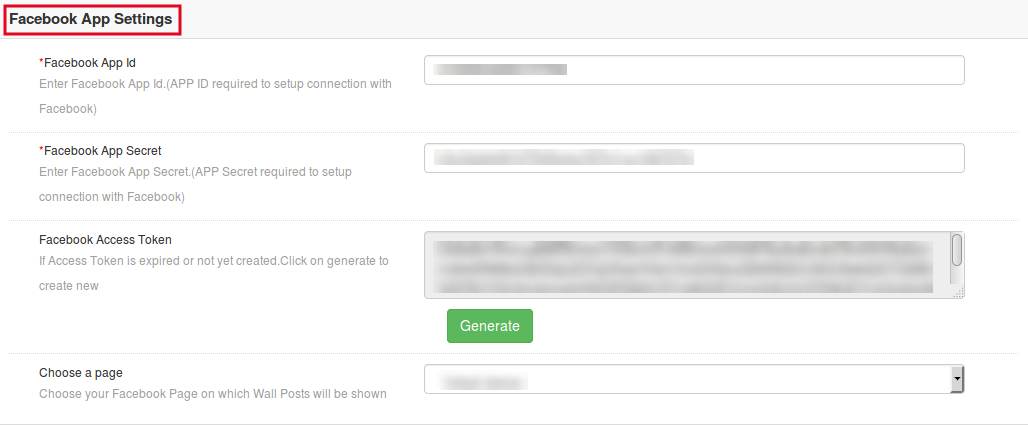
3.1 Facebook App Settings:

This interface of the Facebook Wall Post Magento Extension contains following fields to be configured:

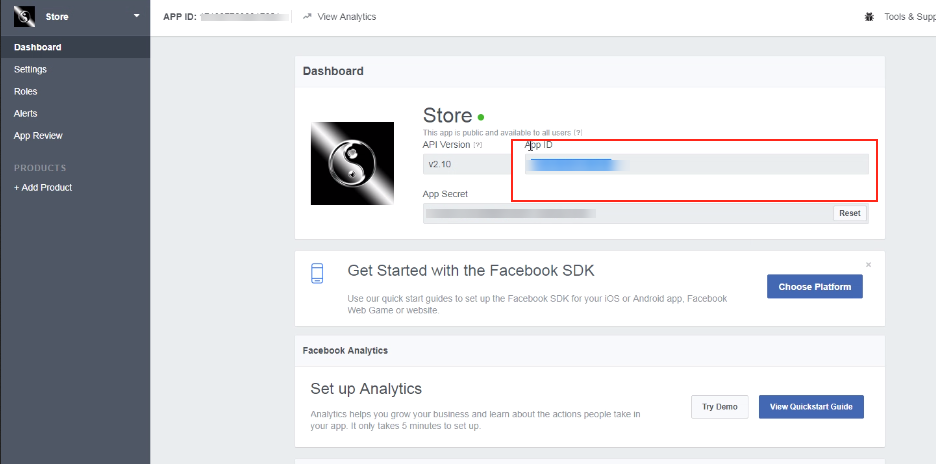
Facebook App ID: In this field of the Facebook Wall Post for Magento, enter your Facebook App ID that is required to set up the connection with Facebook. In order to find the App id, go to the dashboard of your Facebook App. Copy the app id from the column shown in the image below and paste it in the setup page of the module.

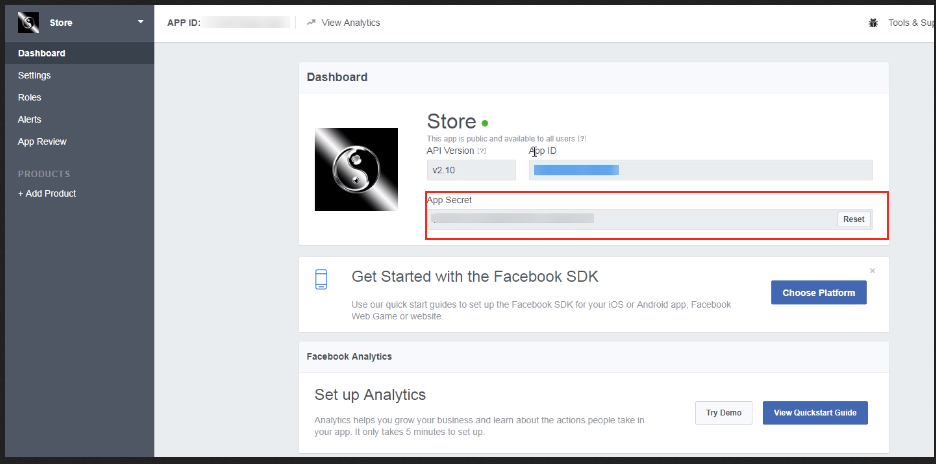
Facebook App Secret: In this field of Magento Facebook Post Extension, the admin needs to enter the Facebook App Secret. Copy the App Secret from the next column as shown in the image below.

Facebook Access Token: After entering the Facebook App ID and App Secret, the admin will need to generate the Facebook Access token. The Facebook Wall Post for Magento allows the admin to generate the Facebook Access Token just by clicking on “Generate” option of the Magento Facebook Post Extension.

Choose A Page: This field of Magento Facebook Wall Post Extension allows the admin to select the desired Facebook page on which he wants to display the wall posts.

3.2 General Settings of the Facebook Wall Post Extension Magento

This interface of the Facebook Wall Post Magento Extension contains following fields to be configured:

  • Max No Of Products Per Cron:  The admin can set the maximum number of products that has to be posted after the cron is executed. This field of the Facebook Wall Post for Magento offered the admin to avoid too many posts per cron. Magento Facebook Post Extension allows the admin to set the appropriate number of the products to be posted on the Facebook wall each time cron runs.
  • Product Description: This field of the Magento Facebook Wall Post Extension allows the admin to select the type of product description that they want to display in the Facebook wall post. It can be Short, Long or Meta Description.
  • Product Image Size: The Magento Facebook Wall Post Extension offers the admin to select the size of the image to be shown on the Facebook wall post.
  • Show Price: If the admin wants he can display the price of the products at the Facebook wall post.
  • Select Currency: The Facebook Wall Post Extension Magento provides the e-merchants to select the desired currency to be displayed on the Facebook wall post.
  • Select Categories: This Facebook Wall Post Magento Extension lets the admin to select the categories. The products of the selected category will be posted on the Facebook wall. If the admin will not select any of the category then products of all categories can be posted.
  • Post New Products: This field of Facebook Wall Post for Magento allows the admin to post the new products. In order to do so, he just need to toggle a button.
  • New Product Post Description: The admin can even change the description that will be displayed along with the wall post of new products. With the help of this field of the Magento Facebook Post Extension, the admin can do the same quickly.

3.3 Alert Settings of the Facebook Wall Post for Magento

In the alert settings of the Magento Facebook Post Extension, there are following fields to be configured:

  • Enable Stock Alert: Enable this button of the Magento Facebook Wall Post Extension in order to display stock ending alert at the Facebook wall posts.
  • Stock Quantity Left: In this field of Facebook Wall Post Extension Magento, enter the quantity, below which the stock alert will be displayed at the Facebook wall post.
  • Wall Post text for Stock Ending Alerts: In this field of the Facebook Wall Post Magento Extension, the admin can enter the text of his choice that would be displayed along with the stock alert. The stock alert message can trigger instant purchase intention of the prospective customers.
  • Generate Coupon For Stock Alert: This field of the Facebook Wall Post for Magento allows the admin to display the coupon code along with the stock alert.
  • Voucher Name: In this field of Magento Facebook Wall Post Extension offers the admin to enter the voucher name as per his preferences.
  • No Of Voucher: This field of Facebook Wall Post Extension Magento allows the admin to enter the number of voucher to be created.
  • Voucher Type: The Facebook Wall Post Extension Magento offers the e-merchants to select which type of voucher he wants to display at the Facebook wall. The admin can display whether vouchers with Absolute or percentage based discounts.
  • Voucher Value: This field of the Facebook Wall Post for Magento lets the admin enter the voucher value as per requirement.
  • Voucher Validity: This field of the Magento Facebook Post Extension allows the admin to enter the validity of the voucher as per his preferences.

3.4 Manual Post Settings of the Facebook Wall Post Extension Magento

This interface of the Magento Facebook Wall Post Extension has following fields for the manual posting of products:

  • Search Products: This field of the Magento Facebook Post Extension allows the admin to search for the desired product(s) to be posted on Facebook wall. The Facebook Wall Post for Magento offers the admin to post multiple products at a time.
  • Wall Post Text for Products: The Facebook Wall Post Magento Extension allows the admin to enter the text of his choice that would be displayed along with the product(s) on Facebook wall.
  • Search Categories: This field of the Facebook Wall Post Extension Magento allows the admin to search for the categories. The products of the selected category will be posted on Facebook wall. The admin can post multiple categories at a time.
  • Wall Post Text For Category: The Magento Facebook Wall Post Extension offers the admin to enter the text of his choice to be displayed along with the selected category post.

4.0 Front End of the Magento Facebook Wall Post Extension

Below is the screen shot of how the Facebook Wall Post will look like after configuring all the settings of the Magento Facebook Wall Post Extension.

When the product is posted manually:

When the products of desired category is posted:

When the stock alert is enabled:

Find more details about this Magento Facebook Wall Post Extension by Knowband below:

Magento Facebook Wall Post Extension Link: https://www.knowband.com/magento-fb-wall-post
Magento Facebook Wall Post Extension Admin Demo: https://mademo4.knowband.com/index.php/fbwallpost/adminhtml_index/index/key/f10f62778e25ddecb095bbbe2627bcee/
Magento Facebook Wall Post Extension Front Demo: https://www.facebook.com/Velsof-demo-506088173059178/

“Also, explore more Magento Extensions for your Magento store as well.“

Magento 2 Infinite Scroll Extension – User Manual

1.0 Introduction

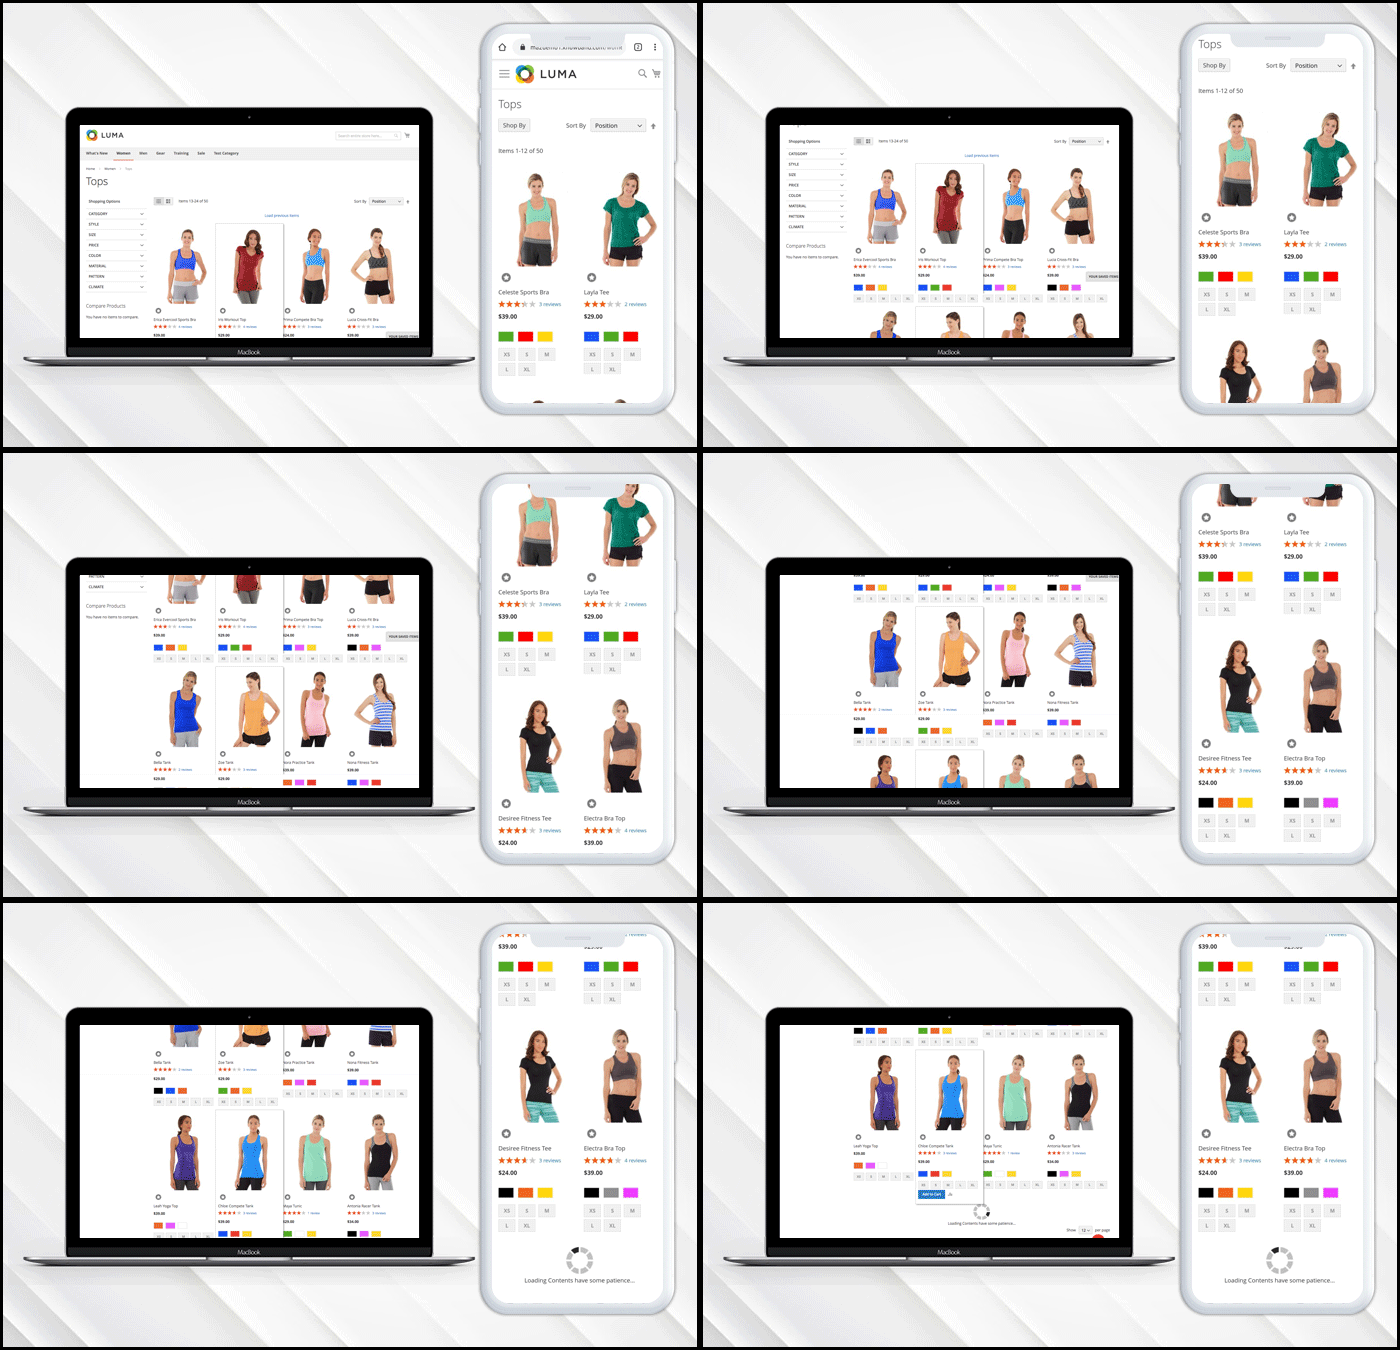
Infinite scrolling loads web page content continuously as the user scrolls down the web page. Basically, infinite scrolling is the technique of web design to eliminates pagination from the website. Magento 2 Infinite Scroll Extension by Knowband does the same. It removes the pagination and page reload functionality from the website and make navigation easier for your Magento store visitors to view the next set of products without reloading the web page.

1.1 Features of Magento 2 quick scroll extension:

  1. Magento 2 Infinite Scroll extension replaces the pagination system from the website.
  2. Magento 2 fast scroll extension reduces the load time of the website.
  3. Store admin can enable or disable the Magento 2 infinite scroll module in a single button click.
  4. Magento 2 quick scroll extension offers sandbox testing option to the admin. After enabling this store admin needs to enter the specific IP address to test the module.
  5. Infinite scroll for Magento 2 extension serves better user experience.
  6. Magento 2 fast scroll module optimizes the navigation of the site.
  7. The admin can specify the number of pages after which, “Load More” will be shown. Store admin can also adjust the loader speed.
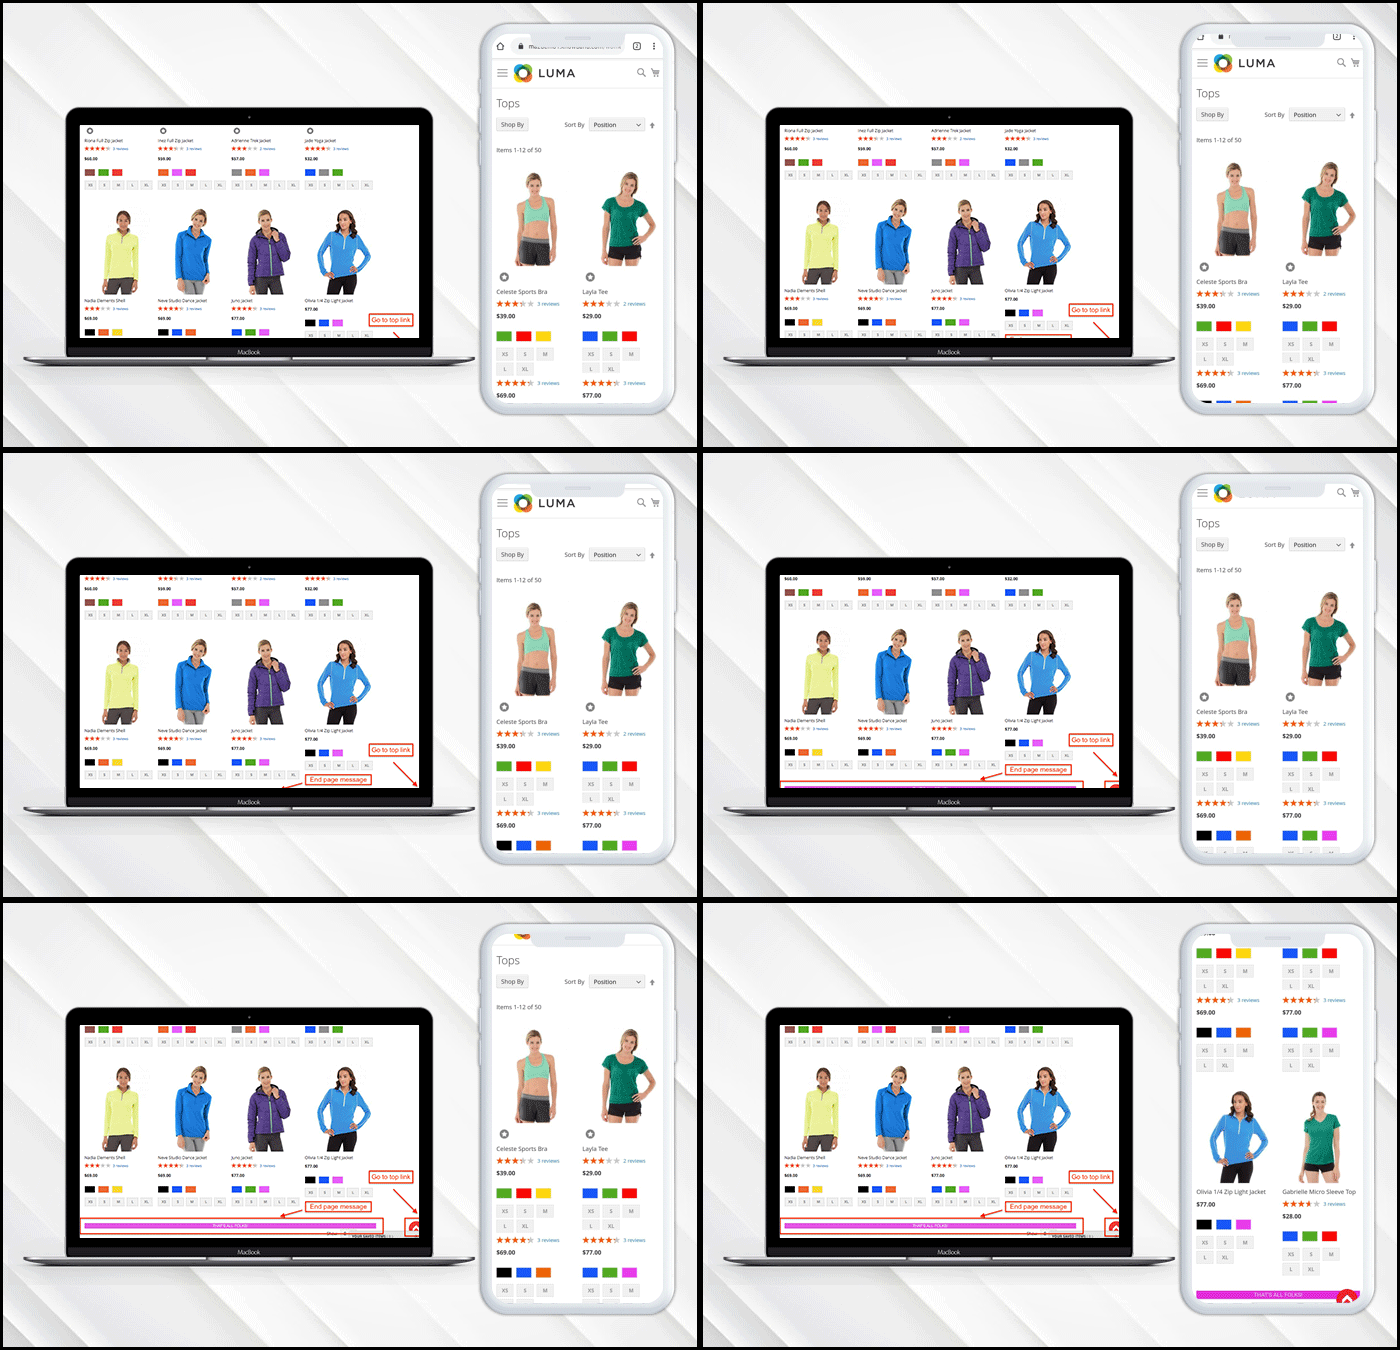
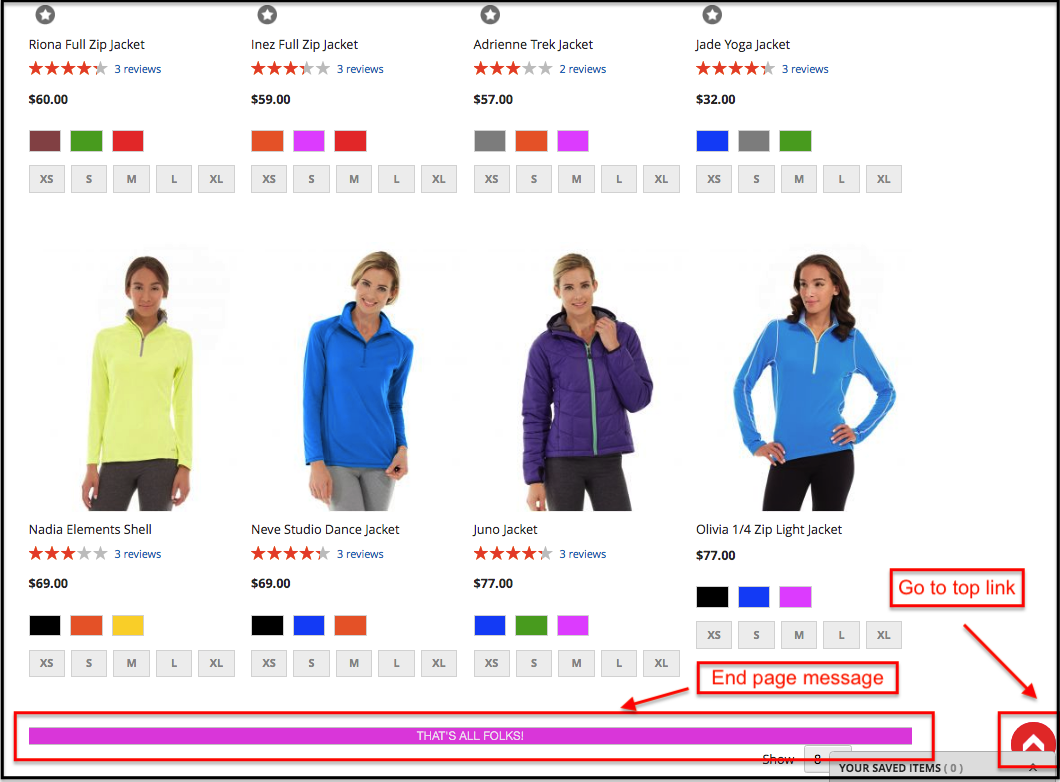
  8. Store admin can display end page message after the completion of the product listing.
  9. Magento 2 endless scroll extension works smoothly with list views as well as the grid view.
  10. Store admin can set the background color and text color of the end page message and go to the top link.
  11. Magento2 infinite scroll module offers the store admin to add the selector setting.
  12. Magento 2 infinite scroll module is mobile responsive.

2.0 Installation Steps of Infinite scroll for Magento 2 Extension:

The steps to install the Magento 2 quick scroll extension are mentioned below:

1. Buy the Infinite scroll for Magento 2 extension from Knowband. You can download the extension package.

2. The package has a zipped file that contains the user manual and the source code of Magento 2 Infinite Scroll Extension. Unzip the package.

3. Create a folder {Magento root}/app/code/Knowband/Infinitescroll

4. Upload the extracted content in the above folder via FTP manager (like Filezilla or WinSCP – download here: https://filezilla-project.org/).

5. Now run below commands to install the Magento 2 Infinite Scroll Extension:

php -f bin/magento module:enable –clear-static-content Knowband_ Infinitescroll
php -f bin/magento setup:upgrade
php -f bin/magento setup:di:compile
php bin/magento setup:static-content:deploy

php bin/magento cache:clean

6. The extension is now installed and ready for use. In Admin Panel go to “Knowband Extensions > Infinite Scroll”.

You can now configure and use the Magento 2 Infinite Scroll extension.

3.0 Admin Interface

Magento 2 fast scroll extension offers following interfaces to be configured:

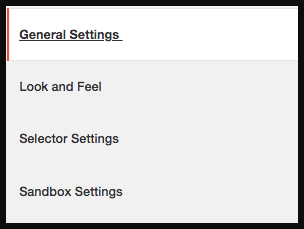
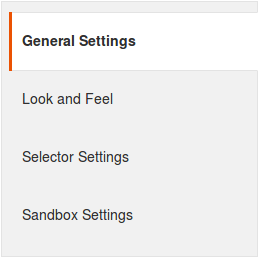
  1. General Settings
  2. Look and Feel Settings
  3. Selector Settings
  4. Sandbox Settings

Below is the detailed description of every setting:

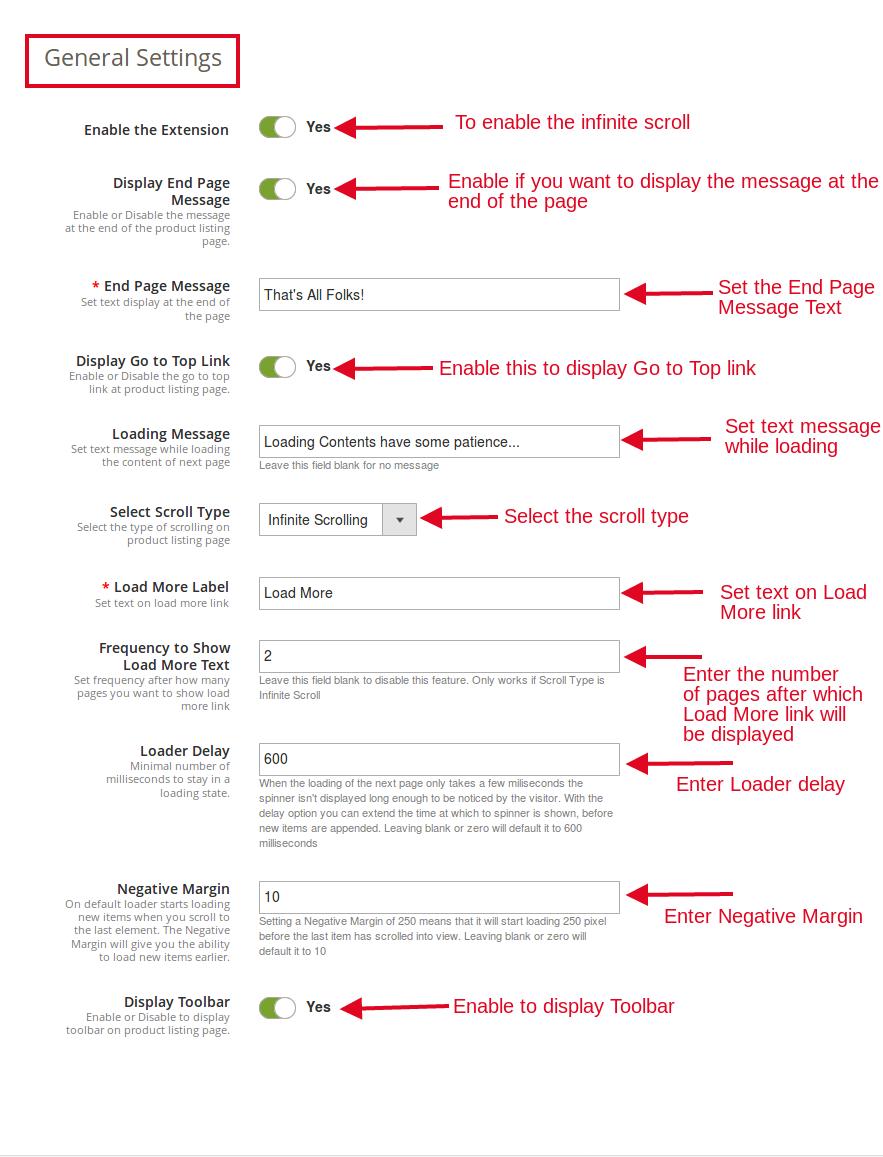
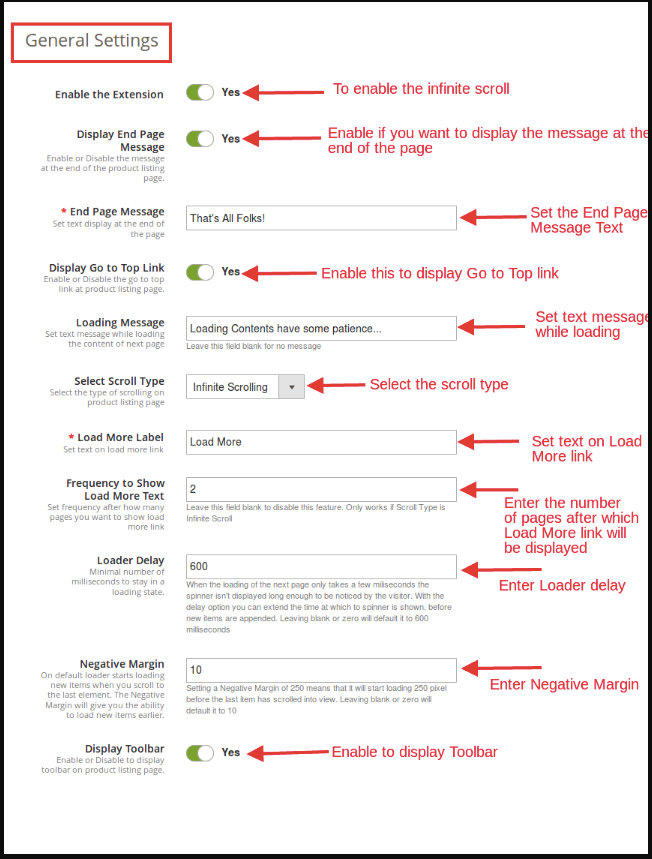
3.1 General Settings

From this tab, store admin can adjust the general settings of the Magento 2 infinite scroll module.

  • Enable the extension: This tab of Magento 2 fast scroll will enable the infinite scroll option. The admin can enable/disable this Magento extension whenever needed.
  • Display End Page Message: This field of Magento 2 quick scroll extension allows the admin to enable/disable the message that would be displayed at the end of the product listing page.
  • End Page Message: This field of Magento 2 endless scroll extension allows the admin to set the text of the end page message that would be displayed at the end of the product listing page.
  • Display Go To Top Link: The Magento 2 infinite scroll module allows the admin to display the “Go To Top Link” option that helps the users to jump to the top of the product listing page.
  • Loading Message: This section of Magento 2 fast scroll extension offers the admin to set the text while loading the content of the web page.
  • Select Scroll Type: The Magento 2 quick scroll extension provides the admin to select the type of scrolling on product listing page. Following options are given in scroll type:

a. Infinite Scrolling

b. Load More Link

  • Load More Label: When “Load More Link” option is selected, this field will be shown. This field of Magento 2 infinite scroll extension let the admin to set the text on Load More link.
  • Frequency to show Load More text: This field of Magento 2 fast scroll extension will work only when “Scroll Type” is “Infinite Scroll”. This field allows the admin to set the frequency of load more link to be shown in the front-end.
  • Loader Delay: This field of Magento 2 infinite scroll module allows the admin to set the minimal number of milliseconds to stay in a loading state.
  • Negative Margin: This field of Magento 2 quick scroll extension will give you the ability to load the new items earlier before you reach to last item of the page. By default, the loader starts loading new items when the user scrolls to the last element of the page. The admin can set the number of products here. For instance, if the number ‘X’ is entered here, then, the loader will start loading before there are X number of products left in the web page.
  • Display Toolbar: This field of Magento 2 endless scroll extension will allow the admin whether to display the Toolbar on product listing page or not.


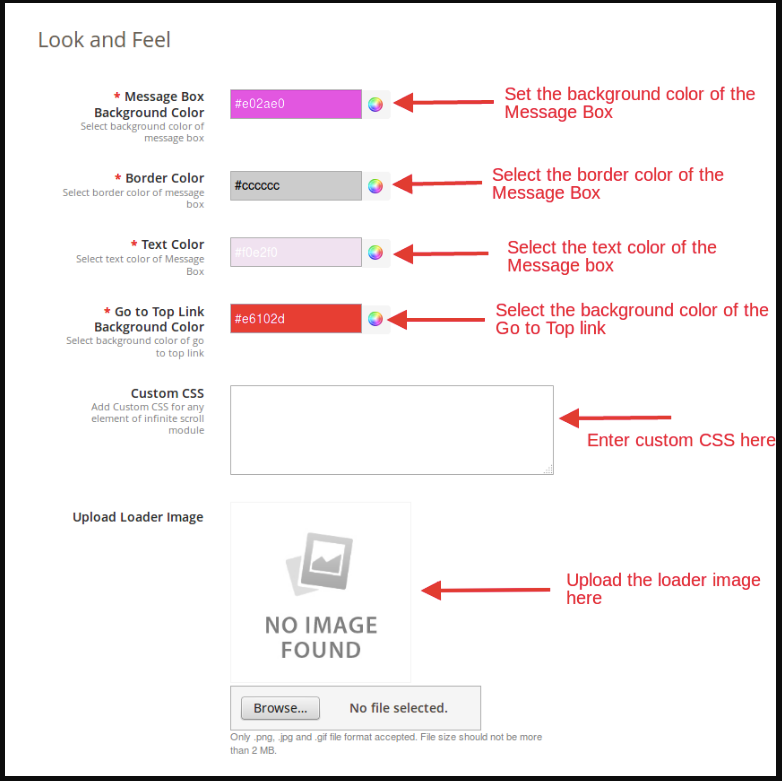
3.2 Look and Feel Settings

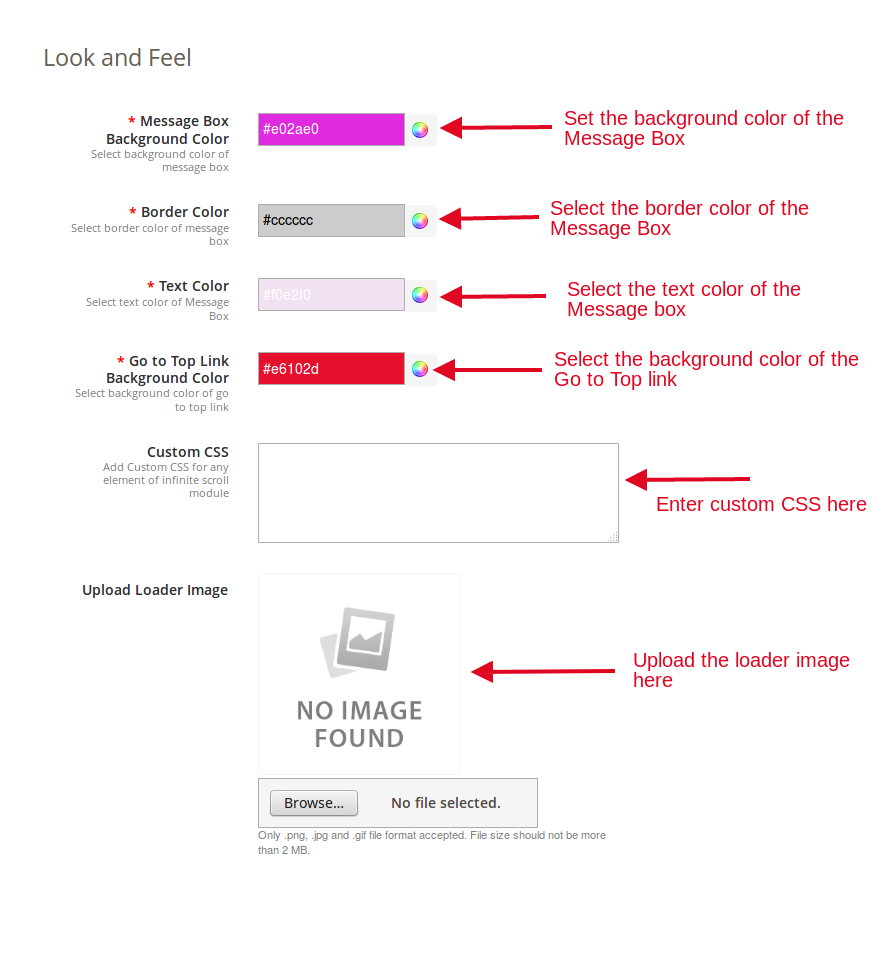
From this tab, the store admin can adjust the background and text color of the message box and go to top link.

  • Message Box Background Color: This tab of Magento 2 endless scroll extension offers the admin to set the background color of the message box.
  • Border Color: The Magento 2 Infinite Scroll extension allows the admin to customize the border color of the message box as per his preferences.
  • Text Color: The admin can customize the text color of the message box as per his choice. He can do the same just by selecting the color from the color picker.
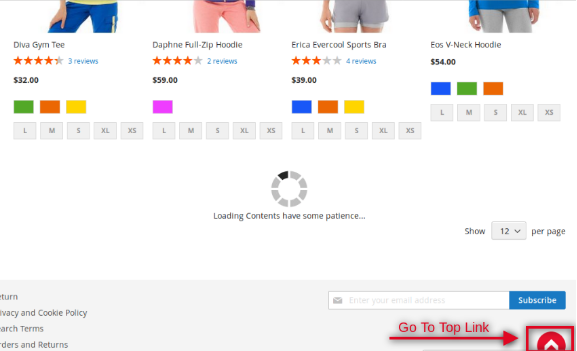
  • Go To Top Link Background Color: This field of Magento 2 fast scroll extension allows the admin to set the background color of the “Go To Top Link”. Below is the screenshot of the Go To Top Link:


  • Custom CSS: If the admin wants to add the custom CSS for any element of Infinite scroll for Magento 2 extension, then, he can do the same by adding CSS in this field.
  • Upload Loader Image: This tab of Magento 2 endless scroll extension allows the admin to upload the loader image of his choice. The admin can upload .jpg, .png and .gif format images only. Image size should not be more than 2 MB.

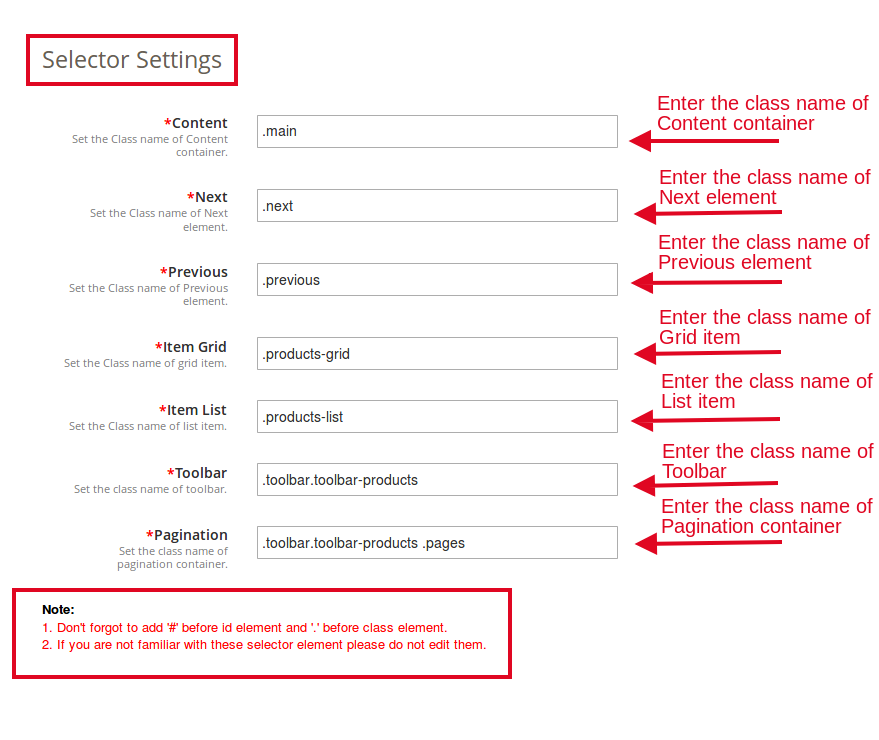
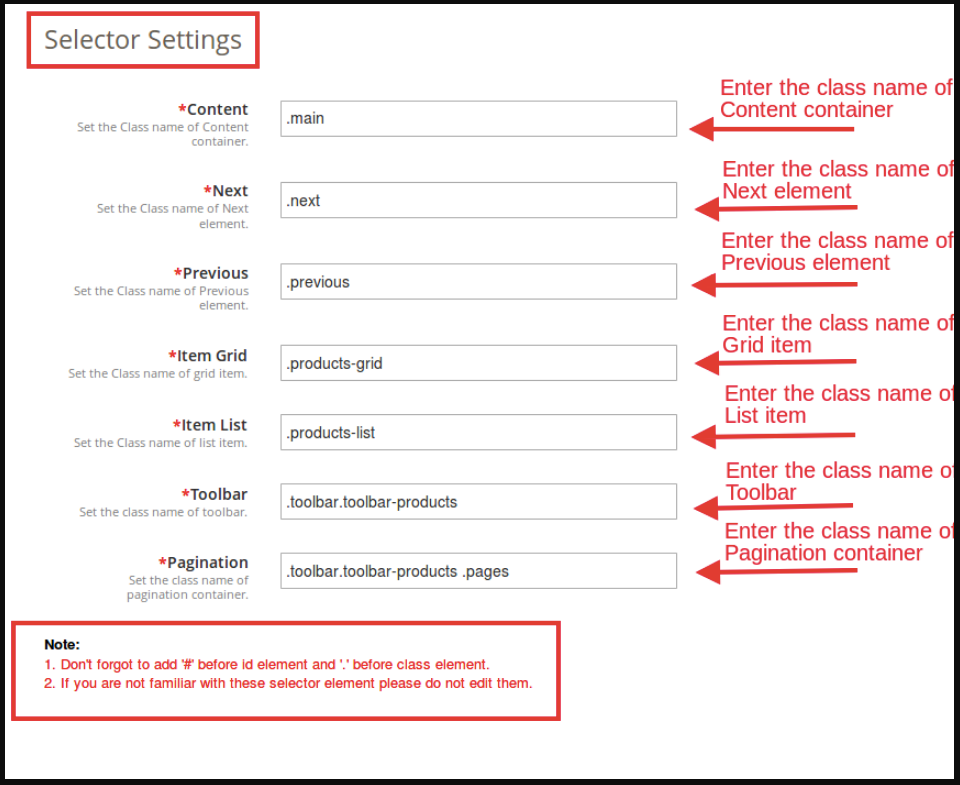
3.3 Selector Settings:

  • Content: This tab of Magento 2 Infinite Scroll extension allows the admin to set the Class name of the Content container.
  • Next: This tab of Magento 2 fast scroll extension offers the admin to set the Class name of Next element.
  • Previous: This tab of Magento 2 quick scroll extension allows the admin to set the Class name of the Previous element.
  • Item Grid: This field of Magento 2 endless scroll extension allows the admin to set the Class name of Grid item.
  • Item List: This field of Magento 2 endless scroll extension allows the admin to set the class name of the list item.
  • Toolbar: In this field of Magento 2 infinite scroll module, the admin will have to set the Class name of the Toolbar.
  • Pagination: This tab of Magento 2 quick scroll extension allows the admin to set the Class name of the pagination container.

NOTE:

1. Don’t forget to add ‘#’ before id element and ‘.’ before the class element.
2. If you are not familiar with these selector elements please do not edit them.

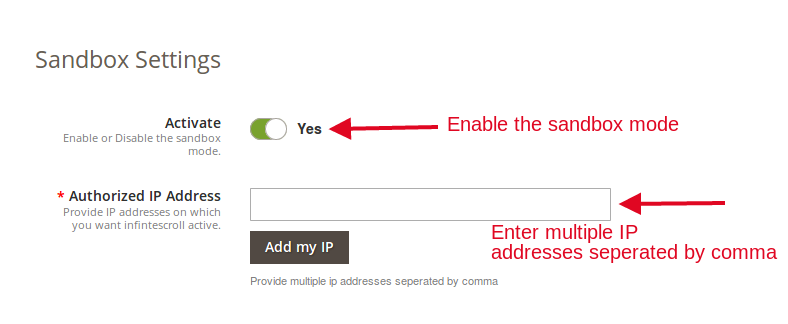
3.4 Sandbox Settings:

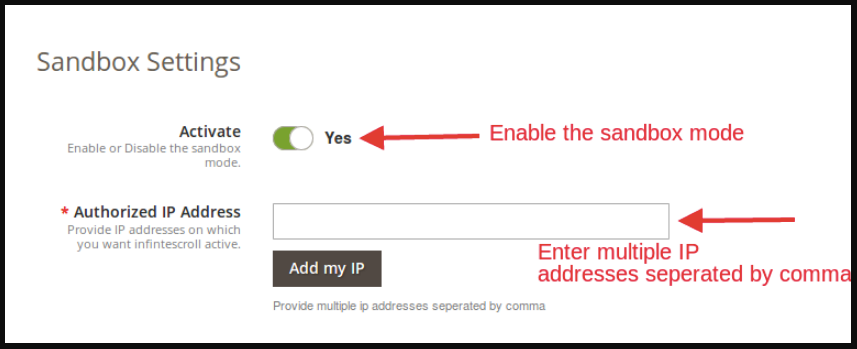
The Sandbox Settings tab of the Magento 2 infinite scroll extension offers the admin to test the extension before implementing it on the site.

  • Activate: Enable this field of Magento 2 fast scroll extension to test the extension.
  • Authorized IP Address: In this field of Magento 2 quick scroll extension, enter the IP addresses on which you want infinite scroll active. Make sure that the entered IP addresses are separated by a comma. You can add the IP by clicking on “Add my IP” option.

4.0 Store Front-end

The Magento 2 endless scroll extension will be enabled on the whole website where pagination occurs. The  Infinite scroll for Magento 2 extension would appear at the front as follows:

End page message and top link:

Find more details about this Infinite scroll for Magento 2 below:

Magento 2 endless scroll extension Admin Demo

Magento 2 fast scroll extension Extension Front Demo

“Also, explore more Magento 2 Extensions for your store.”

Things to Consider While Adding Subscriber pop-up in your Site

The addition of subscriber pop up in any website comes with a lot of added advantages. Most of the time, the website owners wishes to connect with a very large number of people, so that, if they want to update or inform them about any new activity, it can be done via the subscription Email id. It is one of the oldest and the most reliable form of communication between the sellers and the customers.

In this regard, today most of the website has come up with numerous form of email subscription pop up in order to get a better customer base. They try to lure the customers to subscribe to the website through various means. This has become a common practice as the conversion rate using the email subscription method are quite appreciable. The more number of email subscription improves the chances of the web store to gather a large number of traffic to the web store. It is noticed that at least 57% of the customers respond to the Email subscribed messages from the websites.

Most of the time, it is fruitful to use these email subscription pop up but the website must make sure that the inclusion of these pop ups is done in a very exciting manner The increasing number of these email subscription pop up have started to annoy the customers and most of the time they tend to ignore to fill out any details required by these forms. Therefore, the websites face a challenge on how to successfully incorporate these subscription pop ups in the website, so that the customers are not annoyed and at the same time the websites can make successful email subscription.

The points that must be kept in mind by the web stores owners before incorporating email subscription pop up in the websites can be listed as-:

Why to use?

The first thing that occupies the owners mind regarding the web store is Conversions. Every web store owner wants to make a healthy number of conversions on from their web store. In order to do so, it becomes quite important to have an approach. Thus, using the email subscription pop up allows the web store to connect to maximum number of the customers on the web store. The web store owner can inform them about the new arrivals, product updates and any ongoing sales on the web store. Therefore, a better subscriber base helps the web store owner to maximize the reach of the webs store and gather a better traffic to the web store.

What to use?

The owners can use the various forms in order to get the subscription from the customers. The first and the foremost requirement of a better email subscription pop up is that it must be attractive and the customers must not at any time feel like the web store is demanding way too much from them. Therefore, the various forms of pop up such as Spin and win pop up, Magento Scratch coupon pop up or some attractive email subscription pop up can be used, which can provide the customers with better offers on their purchase and at the same time can fetch the web store with a better number of subscribers to promote the web store.

Where to use?

One of the most important thing about the email subscription pop up is the position. The constantly appearing email subscription pop up annoys the customers very much and at one point or other the customers feel like giving up the web store and quitting. Therefore, the position and the timing of the email subscription popup is one of the important thing to be kept in mind. The better way to use the pop up would be as the exit pop up or during the checkout page because the customer is leaving the website either on a high note or on a lower note. Therefore, in this case if the web store provides the customers with some opportunities in the form of scratch card or freebies, it may motivate them to provide email ids. This is what makes the exit pop-ups a must-have for the eCommerce websites in particular. It compels the visitors to reconsider their exit.

When to use?

The web store can make sure the frequency of using the email subscription pop up may not be exceeding the customers tendency to go with them. If at any point the customer feels like the web store is being way too demanding than that may lead to negative results for the customers and they may leave or wouldn’t consider making a purchase. Thus, it becomes quite important to make sure that the timings of the email subscription pop up are evenly distributed and would fit in with the concern of the customers.

How to use?

The idea of using email subscription pop up is quite dependable. Every web store owner will have a different idea on how to make use of these pop ups. Thus, if the web store want they can opt various options such as use them as a gaming pop up like Spun and win pop up, which is a email subscription pop up but offers the customers a lot of offers based on owner’s preferences by taking their Email Id as a token of entrance to the contest. Same if the case with Magento scratch card, which offers the customers with the handsome discount based on their luck by taking their Email Id. Therefore there are a lot of ways to use these email subscription pop up. It basically depends upon the web store owner, in which way he wants to make use of these pop ups.

Over to You

The idea of using email subscription pop up is quite innovative. The web stores can gain a good number of subscribers if they make better use of these email subscription pop up. As, the email subscription pop ups are not limited to the classic way off asking for Email id, therefore they are one of the important assets for the web store owners in order to make a good number of conversions on the web store. Redefine your subscription based request and reap the desired result for your site.

How to Optimize the Product Page Content for Better User Engagement?

The distribution of contents in a web store is directly responsible for visitor engagement on the website. This is one way of providing the customer a better understanding about the products and services that is being offered by the eCommerce store. This won’t be wrong to say that a poorly optimize product page may result in loss of interest of the customer to inquire more about the product and go for its purchase. Thus, it is highly recommended to have a properly structured web page as per the need and requirement of the customer.

The optimization of a product may include various features from the selection of color theme to presentation of the products. Therefore, special attention needs to be taken in this regards. Most of the time, there are certain aspects in the product page that skips the attention of the designers which may ultimately cost some revenue. Moreover, it may even create several communication gap between the seller and the customers. The gap can result in the loss of the customer of the web store. However, if the contents of the landing pages are structured wisely, then, it can surely lure the customers to the checkout page.

Listed below are some of the features that should be included in the product page to optimize it to a very large extent.

1.  Inclusion of review and ratings

The customers wouldn’t want to bind themselves to make purchase if they are sure about the quality. Mostly the online shoppers rely on the reviews and ratings of the product before making their purchase decision. Therefore, the product page must provide the customer’s testimonial and feedback.

2.  Easy navigation

The navigation along the product page must be made smooth and easy. The customer would like to browse the web store more, if they are given the liability of checking out the web store in a proper manner. The usage of Infinite scroll can help the customer to browse all the products in a single page. The customer don’t have to put efforts in surfing through new page for every time they want to look for more options. The infinite scroll saves both time and efforts for the customers. In the same manner the customers must also be provided with the option to return to the homepage or their cart with a single click. The infinite scroll proves to be an easy approach if the customer has already purchases sufficient products and want to leave the web store. The web store must try the infinite scroll module to prove assistance to the customers at every possible way.

4.  Products video

One of the missing feature that most of the product page face are the Product videos. Most of the time, the product page is provided with only the page of the product. It surely helps the customers in relating them with the product but doesn’t completely satisfy their minds. Therefore, a better approach would include incorporating the product video to the product page. It gives a better insight of the product to the customer’s and they can have clear thoughts about buying the product. The addition of the product Video on the product age can be done easily by using the Magento Product video module. The module automatically attaches the video of the products to their respective pages in easy steps. It helps in making better sales by providing better glimpse of the product to the customers. Hence, the growth in the number of effective conversions are increased significantly.

5.  Alluring CTAs

The process of intriguing the purchase decision of a the web store visitor is quite troublesome. Now, the seller must come to their aid by providing to help them make up their mind. One of the best approach to make it possible is by providing the customers with the proper call-to-action. Adding coupon codes on the websites can motivate them to complete the transaction. At the same time, the buttons such as ‘Buy Now’, ‘Add to Cart’, and other such trigger should be placed properly in such a way that should instantly grab the attention of the customer.

Over to You

The optimization of the product page is the immediate need of every web store. Most of the web store keep a timely update of their product page in order to meet the requirements of the customers. It has become a basic necessity of the customers to be provided with various features in order to have a better shopping experience. Thus, the web store must optimize their product page to boost their conversions.

For more Information About Magento Product Video Module visit here:-

Module Link: https://www.knowband.com/magento-product-video

User Manual Link: https://www.knowband.com/blog/user-manual/magento-user-manual/magento-product-video-extension/

3 Magento Extensions to acquire customer data

Acquiring customer data is important for any online business. It helps the brand to get better insights into their customers. The availability of more customer data helps online businesses optimize their email marketing campaigns and make a personal connect with their users. If you are a Magento store owner, read this article to know about the 3 Magento extensions that would help you acquire customer data.

1. Magento Social Loginizer

One of the best ways to collect user data is by providing the social login option. Magento Social loginizer extension focuses on simplifying the registration process of the user by offering 15 social login options. With the ease of registration, the possibility of acquiring customer details becomes very certain. The social login option proves to be effective for both the customer as well as the merchant. If, on one hand, it makes the sign-up process convenient for the customer, on the other hand, it helps e-retailers acquire more customer data and perform personalized email marketing.

2. Magento Spin and Win Pop up

Gathering customer data is not easy anymore. You need to play smart to persuade your visitors to enter their details. A popup like Spin and Win proves to be beneficial in such cases.

Magento Spin and Win popup extension provides a gamifying experience to your visitors by displaying a spin and win wheel. It asks the customer to spin the wheel and earn some amazing discounts and offers on your store. Upon spinning the wheel, users are asked to provide their details in order to claim the discount.

Customer engagement on an eCommerce store largely depends on the kind of experience users find on your store, and Magento Spin and Win popup extension makes sure that it keeps the customers engaged in your store.

 3. Magento Auto Subscribe

Magento Auto Subscribe extension adds a subscription form to your Magento store and helps the web store acquire the customer data. You can place the subscription form on various web pages. Moreover, it auto-subscribes a customer for your store’s newsletters when he or she registers on your store or check out. You can customize the subscription form as per your preference and design its look and feel.

Over to You

Acquiring customer data is not difficult if you follow the right tactics. Try out the above-suggested Magento extensions and start capturing more user data. Have some more extensions to add? Drop down in the comments below.

Magento Custom Maintenance Page Extension – User Manual

Introduction of Magento Custom Maintenance Page Extension

1. Introduction

The Magento custom maintenance page module adds a feature into the website which is useful when the store owner puts the website under maintenance. By default, Magento shows a normal page to the site users/customers that “Service Temporary Unavailable” which doesn’t put any impact on the front-end users. To overcome this Knowband Magento website maintenance extension, this Magento extension allows the store admin to design a custom page to show during “site maintenance”. This is not the limit of this Magento maintenance page extension, the online retailers have also added some more features which certainly reduce overhead from the admin and allow him/her to do some more with the website.
This Magento custom maintenance page module is fully customizable where the store admin can easily customize the maintenance page as per desires.

1.1 The Benefit of the Magento Store Merchant:

  • Magento custom maintenance page allows the e-merchant to enable/disable maintenance mode on the website.
  • The online retailers can set the fix time period of the website maintenance mode.
  • The Magento maintenance mode extension gives an opportunity to the online store owner to change the look and feel of the maintenance page by changing colors easily with color picker tool, no technical knowledge is required.
  • The Magento maintenance page extension enables the store admin to add the content of the maintenance page as per desires.
  • This Magento maintenance page extension allows the admin to enable/disable the notification option. When admin enables the module, the customer to get mail alert when the website is active again.
  • The Admin can customize the email template as per desires.
  • With the help of this Magento website maintenance extension, the store admin can completely customize maintenance page by changing the background image, text color, text size and margin from the top or left.
  • The Magento maintenance page module enables the e-merchant to easily customize the cut down settings of the maintenance page.
  • The Store admin can easily upload the logo of the website with only a button click.

1.2 Features of the Magento Custom Maintenance Page Extension:

  • The Visitors have no access to website
  • Countdown timer.
  • This Magento extension provided by Knowband works for multiple stores.
  • It shows the custom message.
  • Customized page title
  • Notification Box for Users
  • Notify customers when the website is back from maintenance mode.

1.3 The Customer Benefits:

  • The customers can timely and easy access to the website.
  • The customer gets the notification when the website is live.

2. Installation

After purchasing the Magento extension, you will get the following files as listed below:

1. magentocustommaintenancepage.zip (contains source code of the extension)
2. User Manual

Follow the below steps to install the Magento website maintenance page extension:

1.Unzip the magentocustommaintenancepage.zip file.

2. Copy all the files and folders of unzipped folder into your store root directory.

3. After copying all the files and folders, clear the cache.

4. Open any page of your store. Magento will install the module at the time of loading any page.

5. After installing, please login into your admin panel and go to the below menu:

  • System > Configuration > Advanced
  • Here you will see that ” Vss_Storemaintenance” module is listed.

3. Extension Interfaces

There are two interfaces in this extension. Each interface has a different functionality according to its use. These interfaces are:

  1. Admin Panel Interface (Only be accessible by admin/store owner)
  2. Front End Interface (accessible to front end user)

Each interface has been described in separate section.

4. Admin Panel Interface

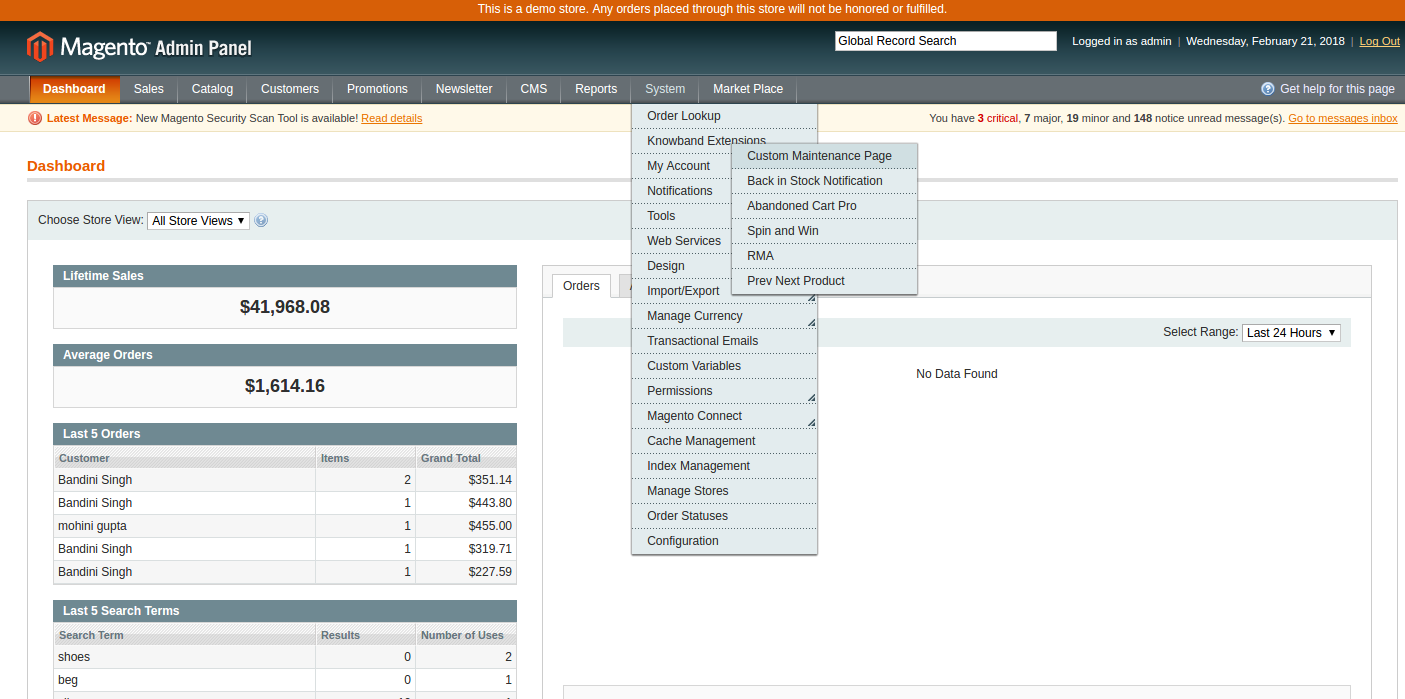
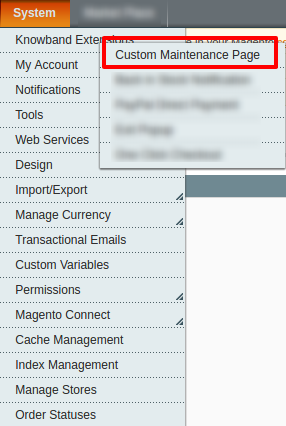
This part of the Magento custom maintenance page extension is for admin user, through which the admin can configure the settings. After installing the extension, Custom Maintenance Page menu option will be visible under System > Knowband Extensions menu in the menu bar as shown in the below screen:

On clicking the above menu, admin panel interface of the Magento maintenance page extension will open.

There are three tabs in the admin panel through which the store admin will be able to manage the functionality of the Magento custom maintenance page extension. These are listed below:

  1. General Settings
  2. Look and Feel
  3. Countdown Settings

4.1 General Settings

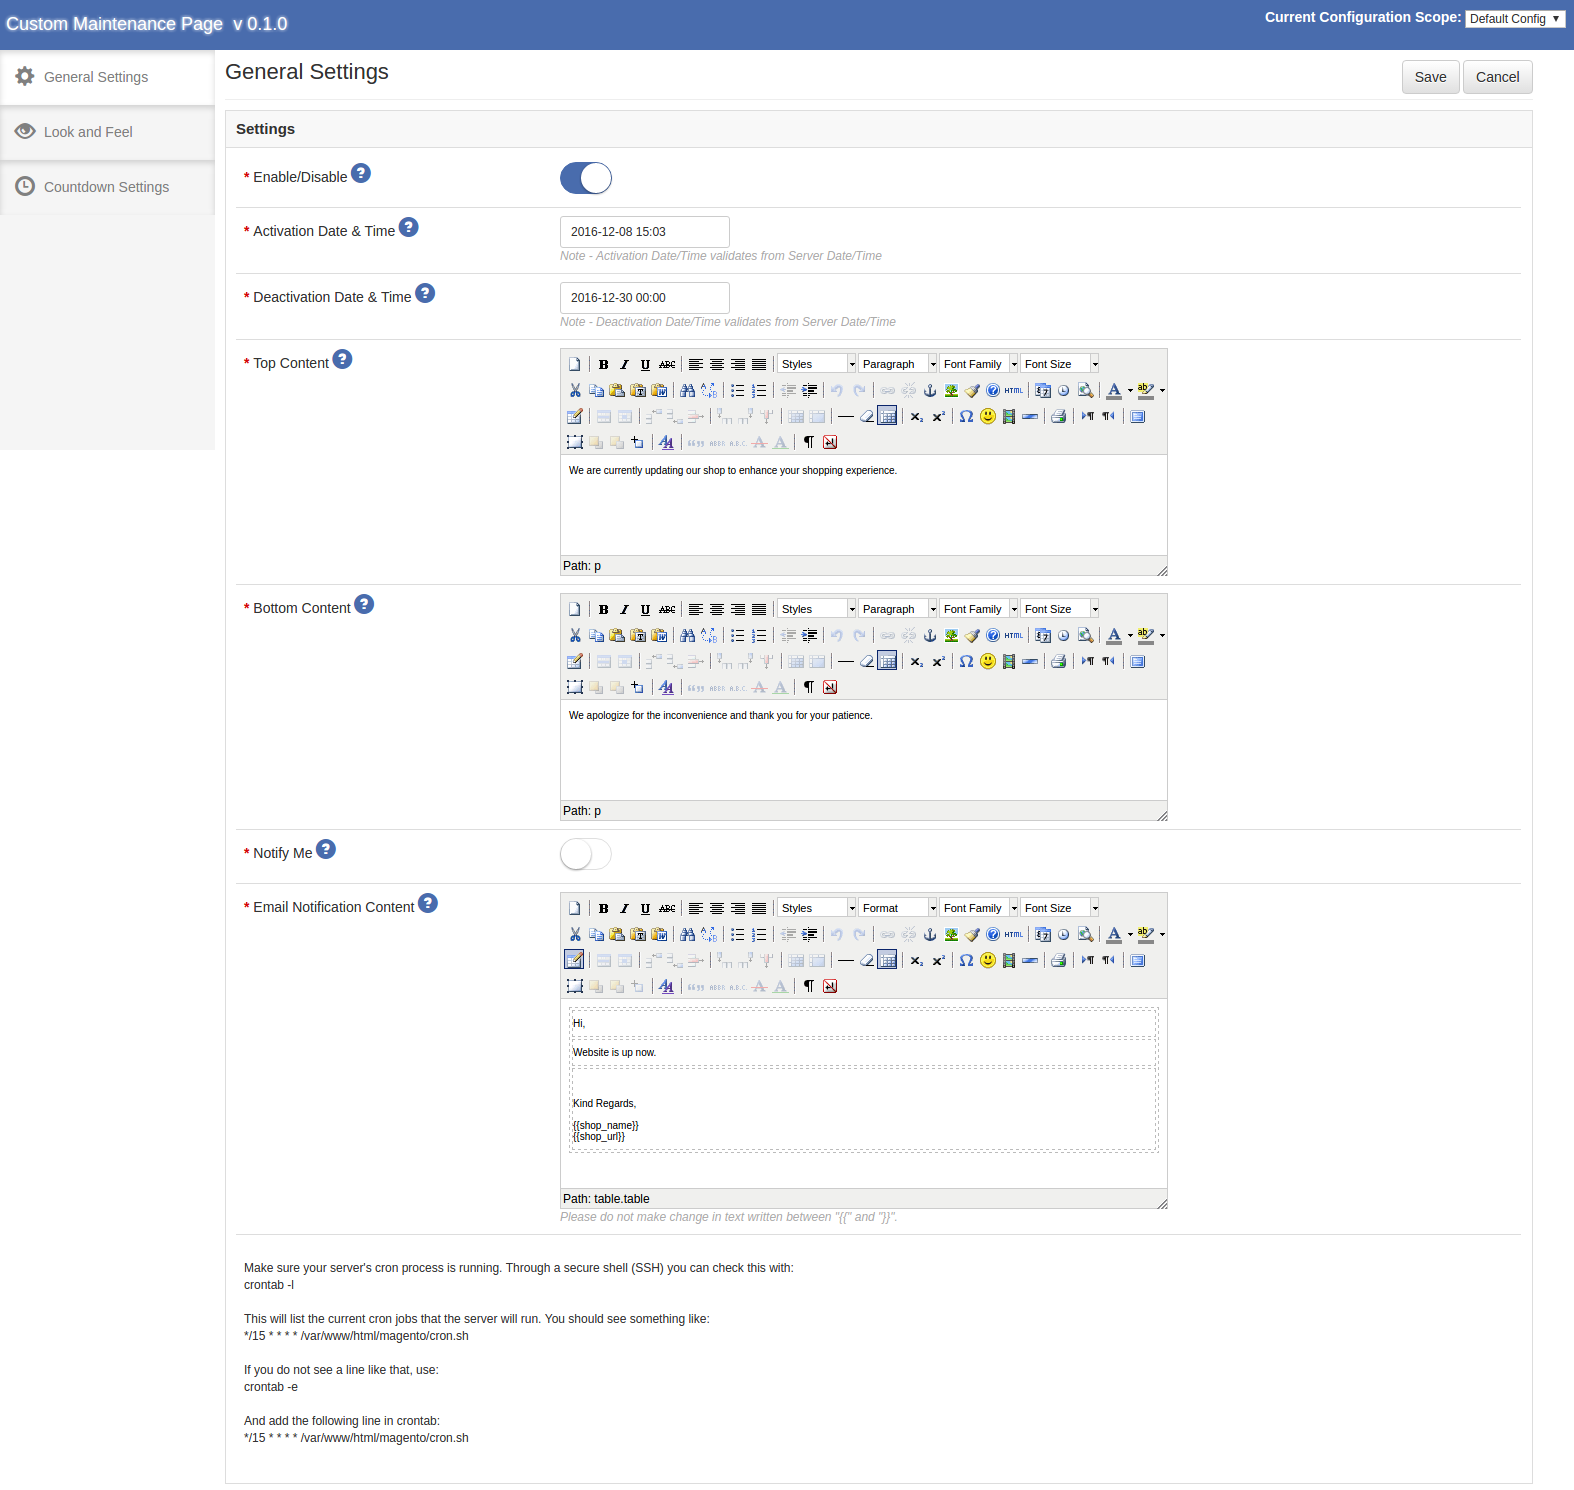
This tab will be opened by default when you click on the menu. General Settings tab has following options:

1. Enable/Disable

This is an on/off switch. The Store admin will have the option to Enable/Disable the extension. If enabled, then the website will go under maintenance and show custom maintenance page to the end users. (Certainly this action depends on some other factors/parameters of this extension like Activation/Deactivation date, etc.)

2. Activation Date & Time

This is a date picker which allows admin to select any future date to schedule site maintenance activation.

3. Deactivation Date & Time

This is a date picker which allows admin to select date greater than Activate Date & Time value to schedule site maintenance deactivation.

4. Top Content

This is a text editor which allows the store admin to provide some text to show on custom maintenance page at the top section.

5. Bottom Content

This is a text editor which allows the e-merchant to provide some text to show on custom maintenance page at the bottom section.

6. Notify Me

This is an On/Off switch. The admin will be able to enable/disable this feature. If enabled, customers will be able to subscribe their email ids on custom maintenance page to get mail notification when site will come out of maintenance.

7. Email Notification Content

This is a text editor which allows admin to provide email notification content to send to subscribers.

*Note: There is tool-tip for each label and default values for settings.

*Note: You have to make sure that Magento CRON process is running on your server to send notification to your customers when site comes out of maintenance. Through a secure shell (SSH), you can check this with:

crontab -l

This will list the current CRON jobs that the server will run. You should see something like:

*/15 * * * * /home/user/public_html/magento/cron.sh

If you do not see a line that, use:

crontab -e

And add the following line in crontab:

*/15 * * * * /home/user/public_html/magento/cron.sh

Below is the screen shot of the this tab :

4.2 Look and Feel

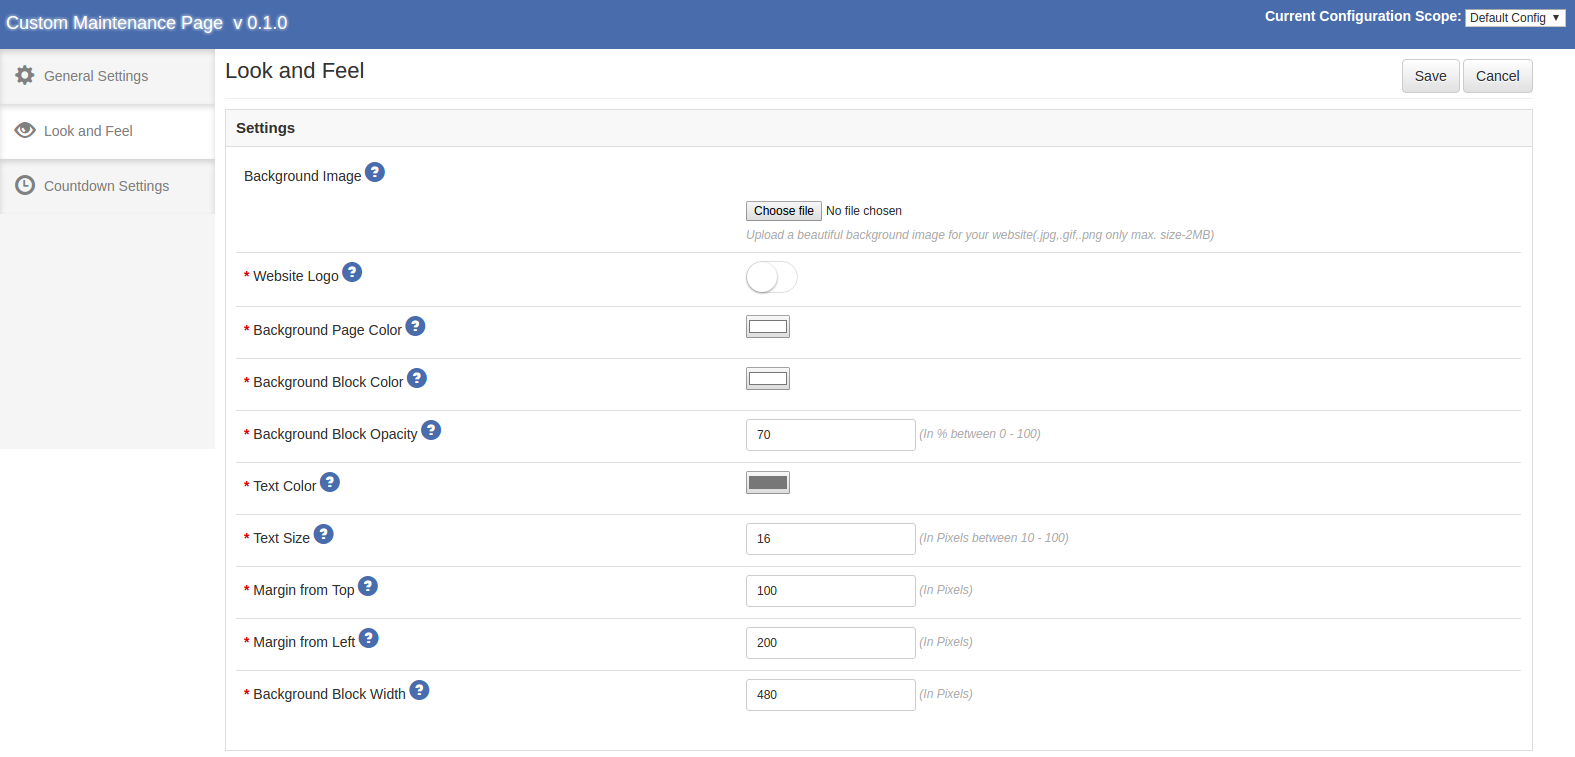
This tab contains the setting options to manage look and feel of the custom maintenance page of the store. You can find them below:

1.Background Image

This is the option through which the Magento store admin can upload an image which will be shown on the custom maintenance page to let the front-end users know that site is under maintenance.

2.Website Logo

This is the option through which the e-merchant can decide to show or hide the logo on the custom maintenance page.

3.Background Page Color

This is the option through which the admin can decide the background color of the custom maintenance page.

4.Background Block Color

This is the option through which the online retailers can decide the background color of the block shown on the custom maintenance page with the top and bottom content as provided in General Settings section.

5.Background Block Opacity

This is the option through which the eCommerce admin can decide the transparency of the block shown on the custom maintenance page with the Top and Bottom content as provided in General Settings section.

6.Text Color

This is the option through which the admin can decide the text color of the custom maintenance page.

7.Text Size

This is the option through which the online retailers can decide the text size of the custom maintenance page.

8.Margin from Top

This is the option through which the merchant can decide the margin from the top to display block on the custom maintenance page.

9.Margin from Left

This is the option through which the store owner can decide the margin from the left to display block on the custom maintenance page.

10.Background Block Width

This is the option through which the admin can decide the width of the block shown on the custom maintenance page. *Note: There is tool-tip for each label and default values for settings.

Below is the screen shot of the this tab :

4.3 Countdown Settings

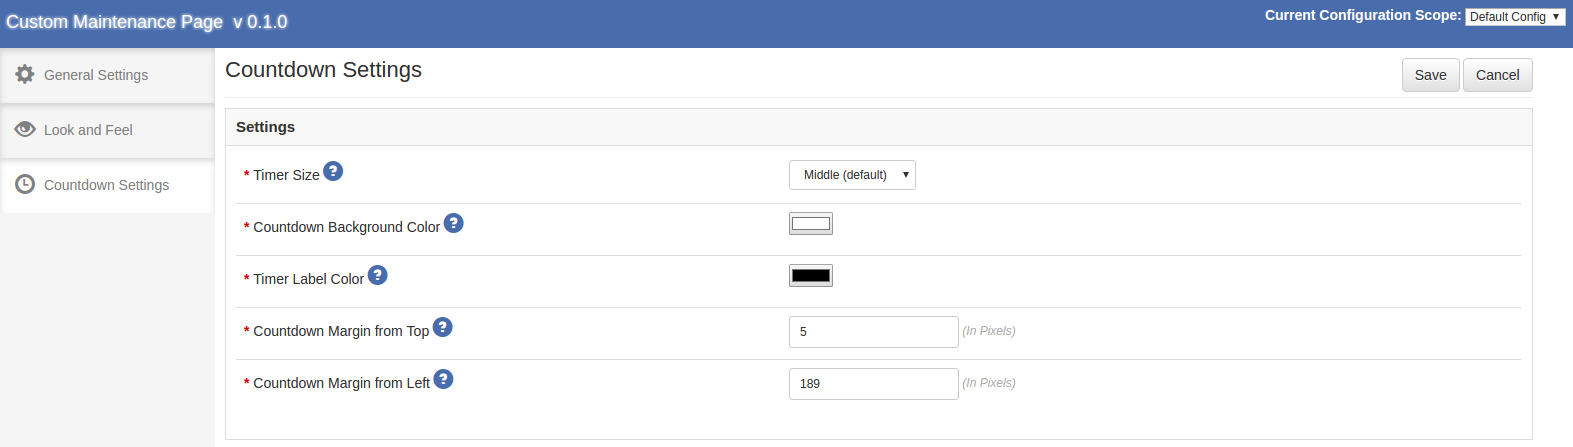
1.Countdown Timer Size

This is the option through which the store admin can decide the size of timer to be shown on the custom maintenance page. This option will be having following values – Default (Middle), Small, Extra Small, Large.

2.Countdown Timer Background Color

This is the option through which the online merchant can decide the background color of the countdown timer to be shown on the custom maintenance page.

3.Countdown Timer Label Color

This is the option through which the admin can decide the label color of the countdown timer to be shown on the custom maintenance page.

4.Countdown Timer Margin from Top

This is the option through which the store admin can decide the top margin of the countdown timer to be shown on the custom maintenance page.

5.Countdown Timer Margin from Left

This is the option through which the merchant can decide the left margin of the countdown timer to be shown on the custom maintenance page.

Note – There is tool-tip for each label and default values for settings.

Below is the screen shot of the this tab :

5. Front End Interface

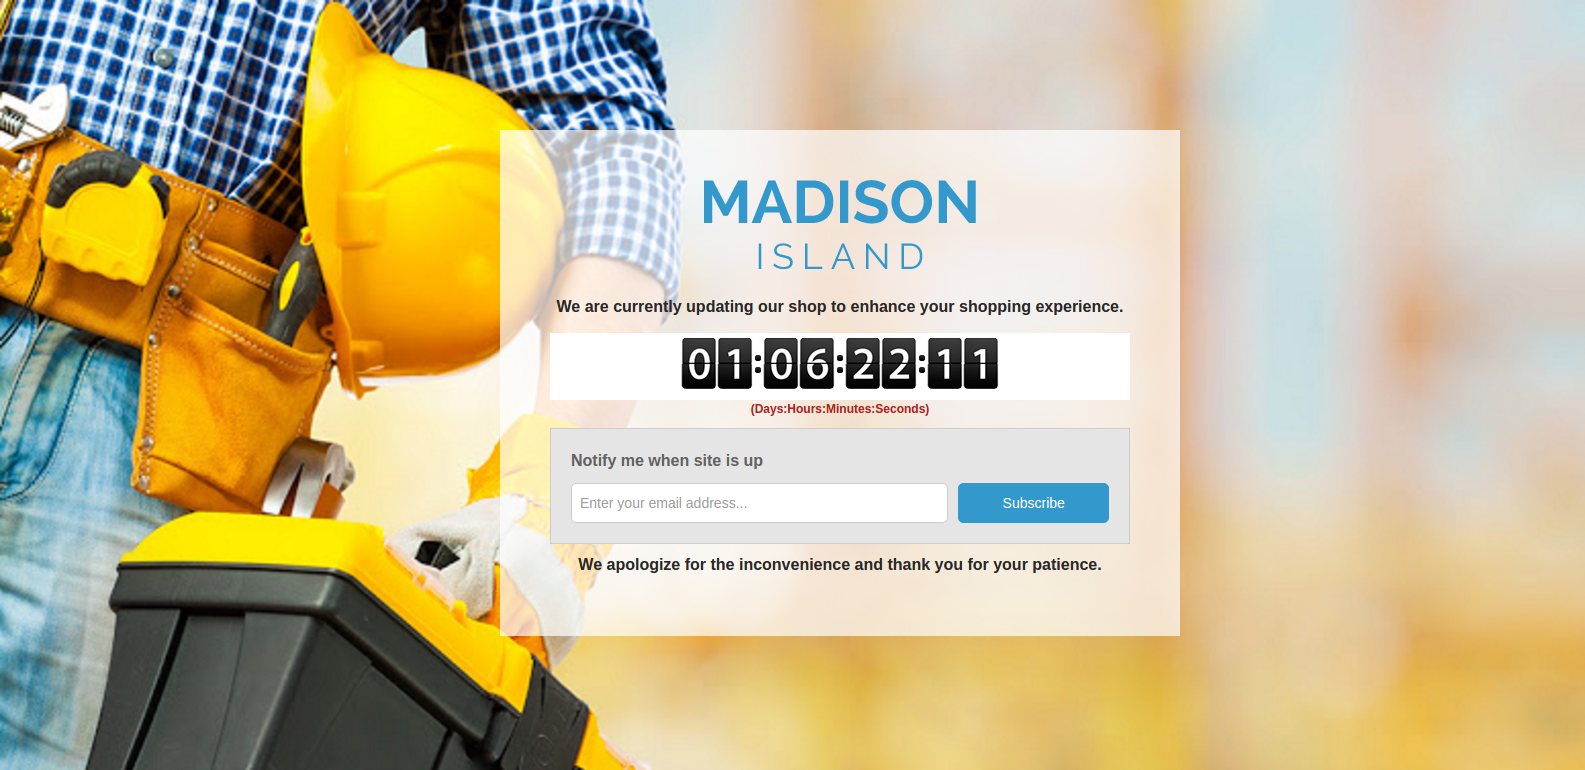
Front End Interface will show the custom maintenance page with configured settings set through the admin panel of this Magento custom maintenance page extension. You can find screenshot below –

You can see that a “Notify Me” block with an input box and “Subscribe” button is displayed in the above screenshot. This box appears only if admin has enabled the “Notify Me” option through the admin panel of this Magento maintenance mode extension (In General Settings tab). Front end users are able to subscribe themselves through this block by providing their email addresses.

*Note: You have to make sure that Magento CRON process is running on your server to send notification to your customers when site comes out of maintenance. Through a secure shell (SSH), you can check this with:

crontab -l

This will list the current CRON jobs that the server will run. You should see something like:

*/15 * * * * /home/user/public_html/magento/cron.sh

If you do not see a line that, use:

crontab -e

And add the following line in crontab:

*/15 * * * * /home/user/public_html/magento/cron.sh

You can try Knowband’s Magento custom maintenance page extension for on your Magento store. KnowBand’s Magento maintenance mode module helps give the better user experience to your eCommerce customer.

Module Link: https://www.knowband.com/magento-custom-maintenance-page

Please contact us at support@knowband.com for any query or custom change request as per your business requirement

Related Stories: