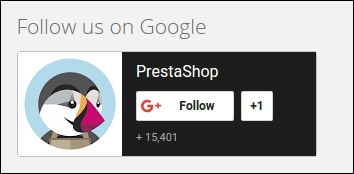
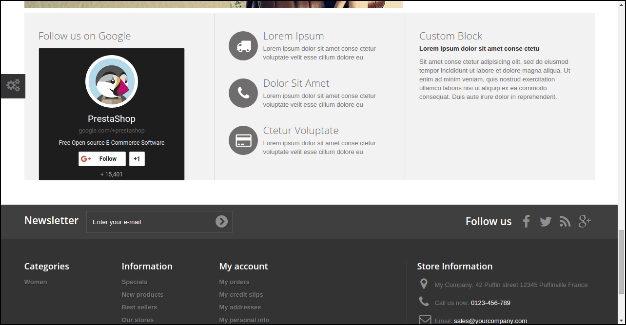
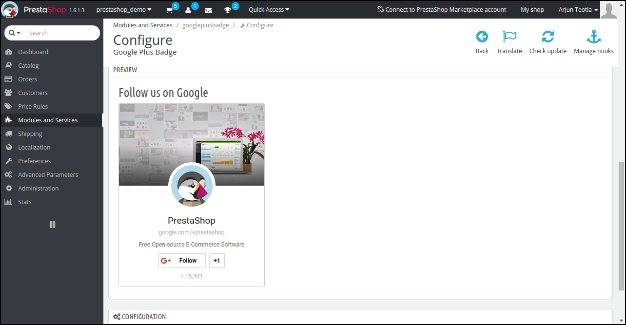
Knowband offerte Prestashop modulo google + badge che consente all'amministratore del negozio eCommerce di mostrare il collegamento goggle + profile in un blocco personalizzato. Questa estensione Prestashop consente all'amministratore di collegare la pagina della comunità, la pagina dell'azienda o il profilo personale. Questo è uno dei componenti aggiuntivi utili di Prestashop che è altamente personalizzabile. Ecco l'opzione di anteprima per la revisione delle modifiche dal pannello di amministrazione. Questo plug-in per social badge Prestashop è compatibile anche con più lingue e compatibile con più negozi.
Funzioni 1.1 del modulo badge Google Plus di Prestashop
Un'opzione di anteprima è disponibile per le modifiche di revisione.
Non entrare in conflitto con nessun altro modulo di terze parti.
Il badge Google + per il sito Web è un modulo completamente personalizzabile.
Personalizza il plug-in del badge Google + è compatibile con più negozi.
L'amministratore del negozio può mostrare o nascondere la tagline secondo le necessità.
Il badge Google + per l'addon del sito Web è compatibile con più lingue.
L'estensione del generatore di pulsanti di Google Plus è completamente mobile.
Questo badge Personalizza Google + è compatibile con tutti i temi Prestashop.
Puoi personalizzare l'aspetto del blocco secondo il tema del tuo sito web.
Il badge sociale di Prestashop consente di mostrare o nascondere l'immagine di copertina nel blocco.
L'amministratore del negozio può facilmente abilitare / disabilitare questo modulo semplicemente attivando o disattivando un pulsante.
Il pulsante Google + badge consente all'amministratore di scegliere tra due temi di colore: scuro o chiaro.
Il generatore di pulsanti di Google plus consente all'amministratore di scegliere tra il layout "Ritratto" o "Paesaggio".
Personalizza l'addon del badge Google + consente all'amministratore di collegare il profilo dell'azienda, la pagina dell'azienda o la pagina della community.
Guida all'installazione di 2.0
1. Copia la cartella del modulo "googleplusbadgeage" sotto "root_directory / modules /" del tuo negozio via FTP o usa l'interfaccia Prestashop per caricare il plugin.
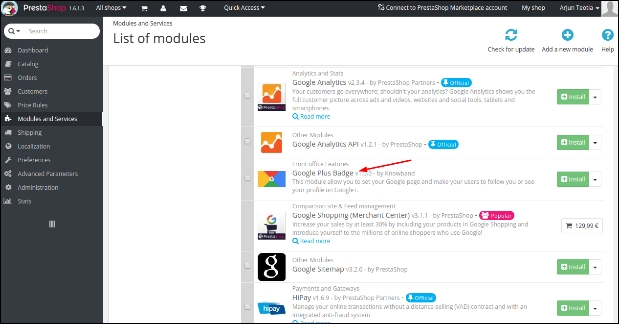
2. Dopo la copia, il modulo verrà elencato nella pagina di elenco dei moduli nel pannello di amministrazione come mostrato sotto la schermata.
3. Se il modulo non viene visualizzato nella pagina di elenco del modulo, cercarlo filtrando il modulo con i seguenti dettagli:
Parola chiave: googleplusbadge Autore: Knowband Categoria: funzione di front-office Filtra per: Installato e Non installato / Abilitato e Disabilitato
Nota:
1. Quando fai clic sul pulsante Installa, verrà visualizzata una finestra popup che visualizzerà i messaggi di avviso. Puoi ignorare questi messaggi e andare avanti. Non ci sarà alcun impatto negativo di questo messaggio di avviso sul tuo negozio.
2. Dopo aver installato il modulo, un pulsante "Configura" si troverà davanti a questo plugin nella pagina di elenco dei moduli come mostrato nella schermata seguente:
Manuale d'uso 3.0
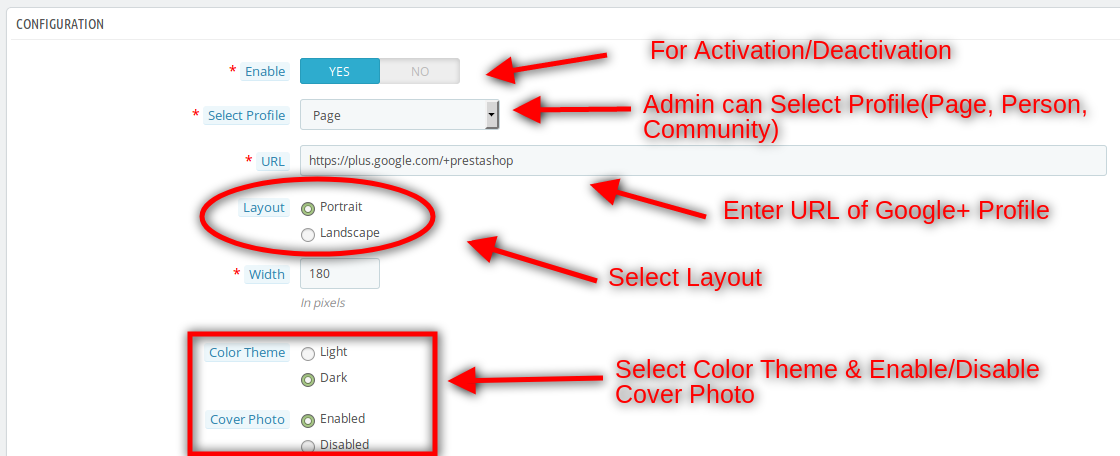
1. Per accedere a questo Prestashop Modulo Google Plus per badge, Fare clic sul pulsante "Configura" del modulo googleplusbadgeage. Facendo clic, l'interfaccia del modulo sarà aperta e verrà visualizzata la seguente schermata come indicato di seguito:
Impostazioni di configurazione 3.1
1. Attiva / Disattiva: Per abilitare il plug-in del badge google + di Prestashop, attiva il pulsante di attivazione da OFF a ON. Il valore predefinito sarà "OFF".
2. Seleziona profilo: L'amministratore del negozio eCommerce può selezionare qui il tipo di profilo. È possibile selezionare la persona, la pagina o il profilo della comunità.
3. URL: Inserisci l'URL del tuo profilo Google + che verrà mostrato in prima pagina.
4. Disposizione: L'amministratore del negozio può selezionare il layout del badge Google +. Il valore predefinito sarà "Ritratto".
. Larghezza 5: Questa è la larghezza del tuo badge Google +. I dati predefiniti saranno pixel "15". L'amministratore del negozio può impostarlo secondo il requisito.
6. Tema di colore: Questo è il tema del colore del badge. Puoi scegliere il tema scuro o il tema della luce. Il valore predefinito sarà "Scuro".
7. Foto di copertina: Questa è l'opzione per aggiungere una foto di copertina del tuo profilo sul badge. I dati predefiniti saranno "Abilitati".
8. Messaggio personale: Questa è la tagline del tuo badge. Il valore predefinito sarà "Abilitato".
9. Linguaggio: Puoi scegliere qualsiasi lingua in cui il tuo profilo è stato creato o meno. Un distintivo di lingua diverso sarà come sotto-
4.0 Front Office Interface
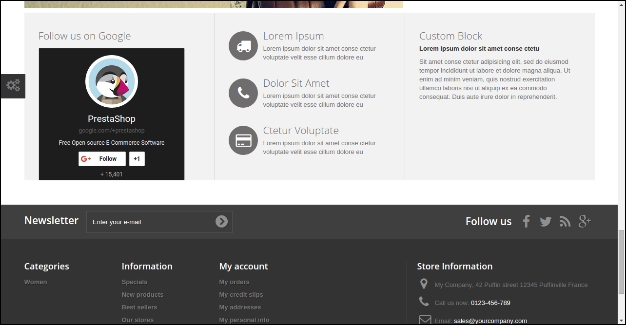
1. Interfaccia impostazioni predefinite
2. Passi Per migliorare l'interfaccia frontale:
Puoi facilmente migliorare l'interfaccia sganciare il blocco di Facebook dal gancio displayHome. E aggiungi questo modulo alla posizione 2nd seguendo questi semplici passaggi:
a. Apri il pannello di amministrazione del tuo negozio.
b. Clicca sulle posizioni sotto Moduli e Servizi nella colonna di sinistra. Ora vedrai una schermata come sotto-
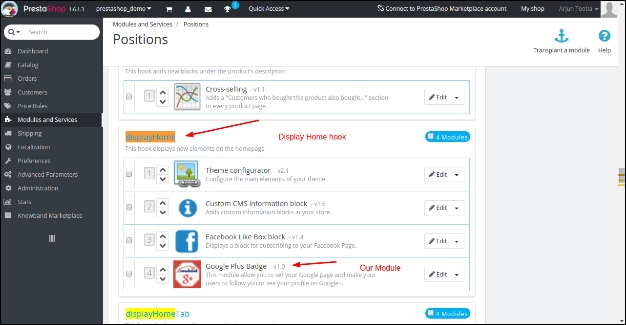
c. Ora premi "ctrl + F" sulla tastiera e cerca "displayHome". Nell'elenco apparirà il modulo di Google Plus.
d. Ora trascina e rilascia il modulo badge Google Plus sulle posizioni 2nd dalla posizione 4th.
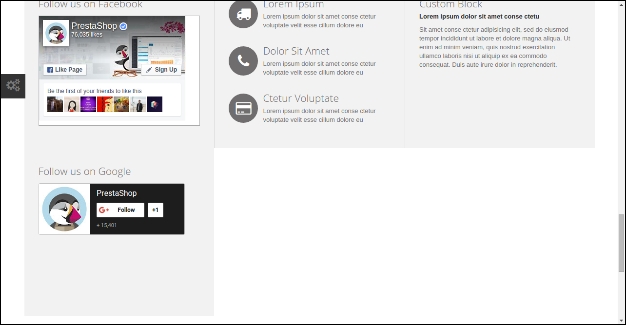
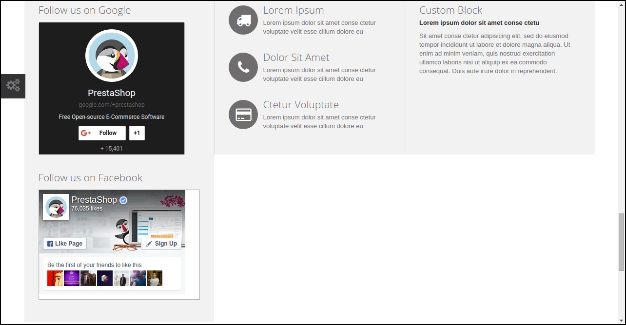
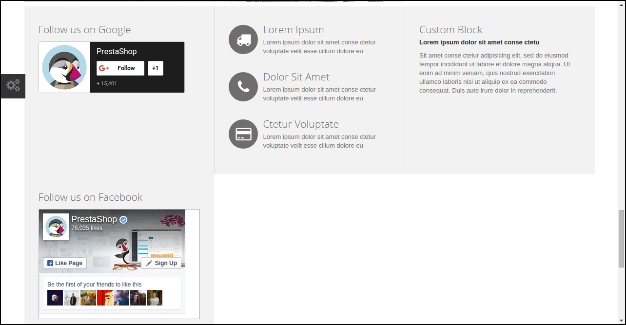
e. Ora la prima pagina sarà così-
f. Puoi anche rimuovere il blocco di Facebook da lì. Per rimuovere il blocco di Facebook segui i passaggi, altrimenti, ignorali.
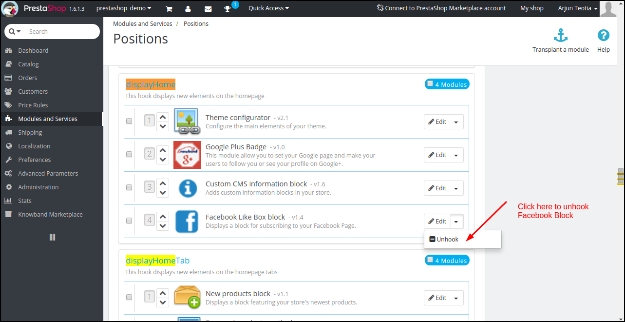
g. Torna di nuovo alle posizioni del passaggio 'd'. Ora fai clic sulle opzioni del blocco di Facebook. Fai clic sull'opzione sgancia lì.
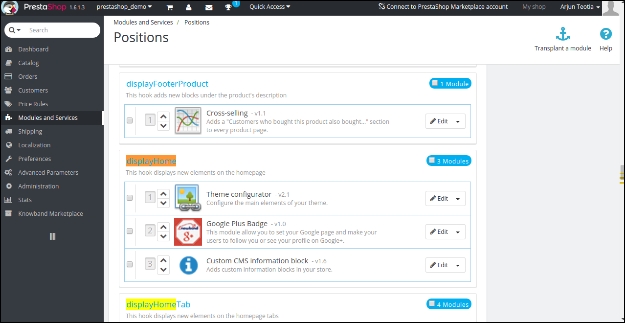
h. Ora dopo aver rimosso il blocco del blocco di Facebook, la tua home page apparirà più bella come sotto-
Introduction to Prestashop Exit pop up(email subscription) addon
Prestashop Exit pop up is a highly responsive Prestashop addon which shows an email subscription pop-up whenever any user visits or intend to leave your store. The feature-rich email subscription pop up encourages the visitors to complete their purchases by giving them discounts or coupon code when they are about to exit the site. With the help of the Prestashop addon, you can even subscribe them to the newsletter or register them for a new user. Prestashop exit popup also serves as an entry popup for the visitors hence gains customer attention as they enter to the website. By offering attractive discounts, the admin is able to attain customer loyalty as they enter to the store or when they wish to close the website window.
Prestashop Exit intent (email subscription)popup offers a lead generation strategy to engage the customer on the website for a longer duration by showing an engaging email subscription pop up.It is a great tool to get your customers registered for email subscriptions. The Prestashop addon curbs the exit of the store visitors when they are just about to leave the website. The hold back visitor feature of this Prestashop subscription pop up addon is beneficial to the store owners especially when the visitor decides never to return back to the store. This addon ensures that the customer will either stay back or return to the site in future for grabbing special discounts.
Features of Exit intent (email subscription) pop up addon:
The Prestashop exit pop-up addon provides discount and enticing offers to the customers just when they are about to leave the site.
This reduces the exit rate of the site and increases the average session time of each visitor.
The fully customizable Prestashop Email subscription Pop up addon can be matched with the theme of your Prestashop store.
The admin can set two different themes for entry popup and exit popup.
The store admin gets an option to change the look and feel of the email subscription pop up that is displayed on the front-end of the website.
The admin can view the performance of Exit pop up by comparing the total generated vs used coupons.
The Prestashop extension even allows you to test the subscription block before it is incorporated into the store.
The admin gets Custom CSS and JS option to customize the email subscription pop up.
Mail Chimp Integration syncs the email generated by the Prestashop subscription pop-up with the Mail Chimp account of the seller. The other email marketing services include Klaviyo and SendinBlue.
The e-marketers can send Automated emails with discount coupon codes.
The Prestashop store owners can subscribe your store visitors to the newsletter or register them for a new user.
Multi-lingual support.
Compatible with all Prestashop themes.
The Prestashop plugin has a responsive design and is compatible with multiple devices.
Benefits to the Merchant
The email subscription pop up encourages the store visitors to stay on the site for a longer duration.
The coupon codes motivates them to complete their purchases
This is one of the ways to reduces the Abandoned Carts.
With an increase in the user engagement, the store conversions increase drastically.
The store admin can convert your store visitors into your subscribers for the newsletter
Collects emails which can be later used for Mail marketing or Personalized promotions.
Admin can set differernt themes for welcome and exit intent popup.
With this entry-exit popup module, admin can control whether popup needs to be displayed on user entry, user exit or both.
Installation of Exit pop up-email subscription addon
After purchasing this responsive Exit pop up addon, you will get following files as listed below:
1. Compressed File in ZIP format (contains source code of the module)
2. User Manual
Follow the steps to install the extension:
Unzip the compressed file. It would contain files and folders as shown below –
Copy all the files and folders of an unzipped folder into your PrestaShop store “modules” directory on the path – Root Directory/modules/.
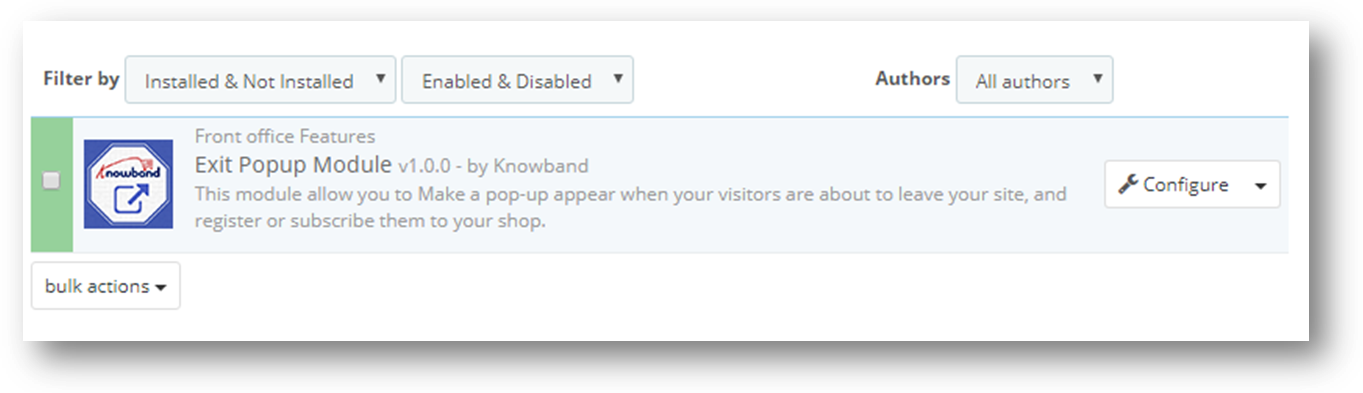
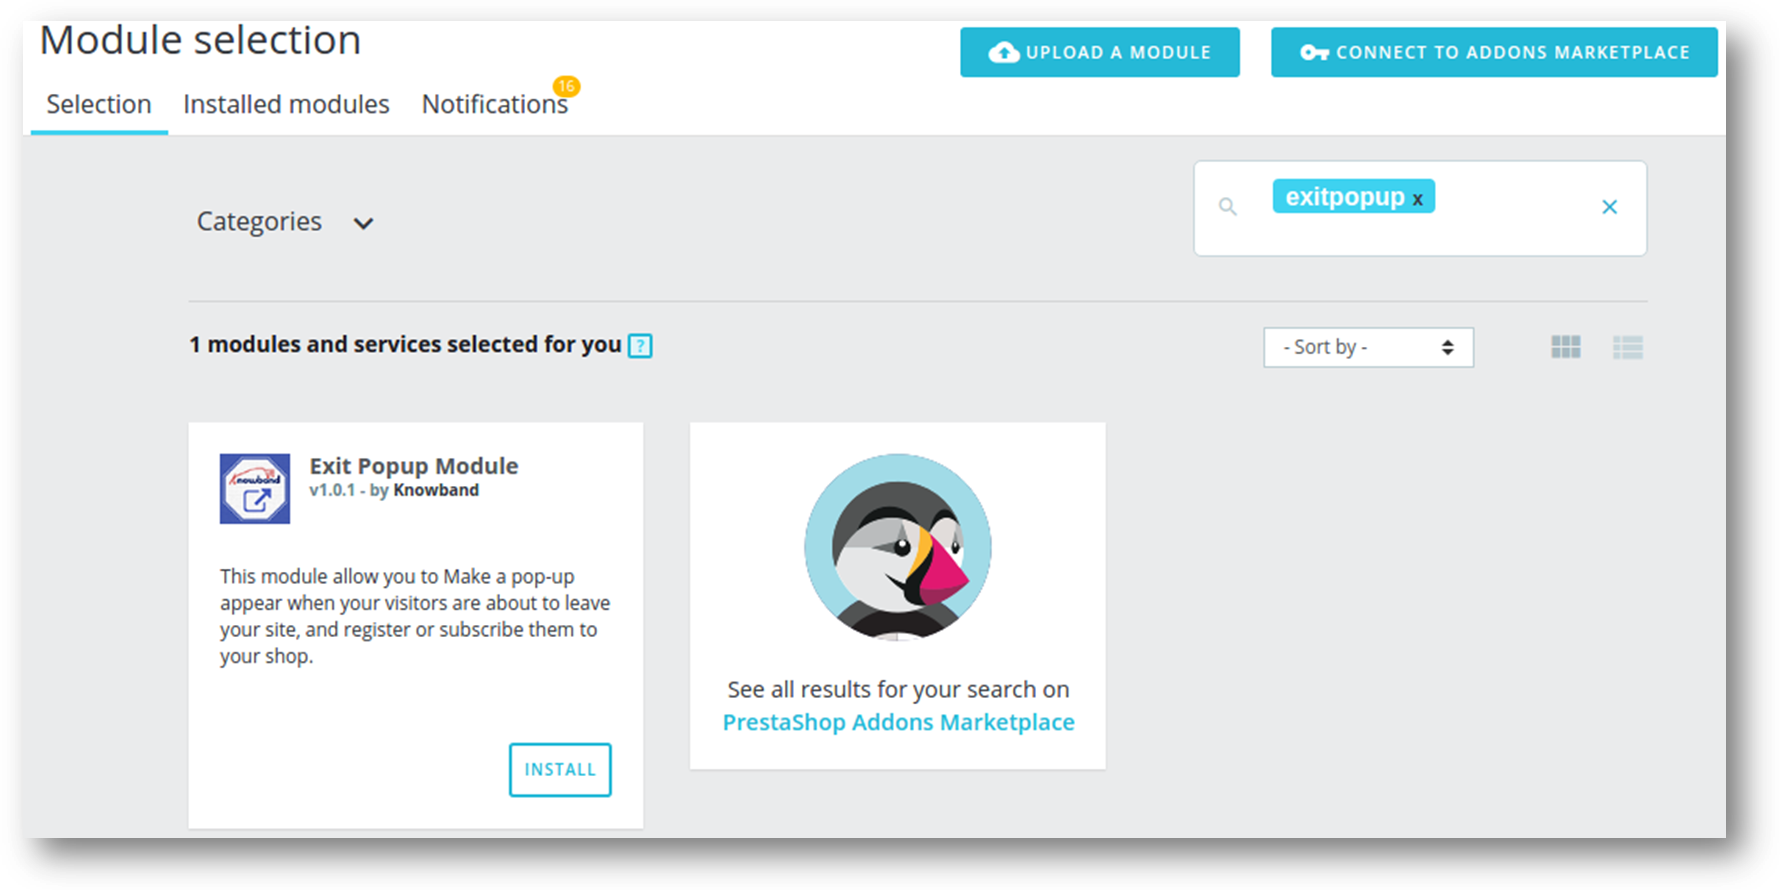
Now the exit pop up(email subscription)is ready to be installed on your store and you can find that in Store Admin -> Modules and Services. It would be shown as below –
For Prestashop 1.6.x.x-
For Prestashop 1.7.x.x-
4. Click on “Install” button to install the addon. It would show a pop-up for your confirmation. Click on “Proceed with the installation” option. This step will install the addon and show notification – “Module(s) installed successfully”.
How to configure Exit pop up-email subscription addon?
This addon is configurable and Prestashop Store Owner or Prestashop Store Admin can setup or configure this email subscription pop up through Admin Panel of store by following steps –
Go to Store Admin -> Modules and Services.
Find “Exit popup” and click “configure” button given corresponding to the addon.
It would open a new page as shown below.
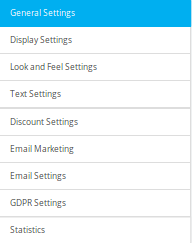
The configuration settings of this Prestashop welcome popup are divided into seven sections namely:
General Settings
Display Settings
Look and Feel Settings
Text Settings
Discount Settings
Email Marketing Settings
Email Settings
GDPR Settings
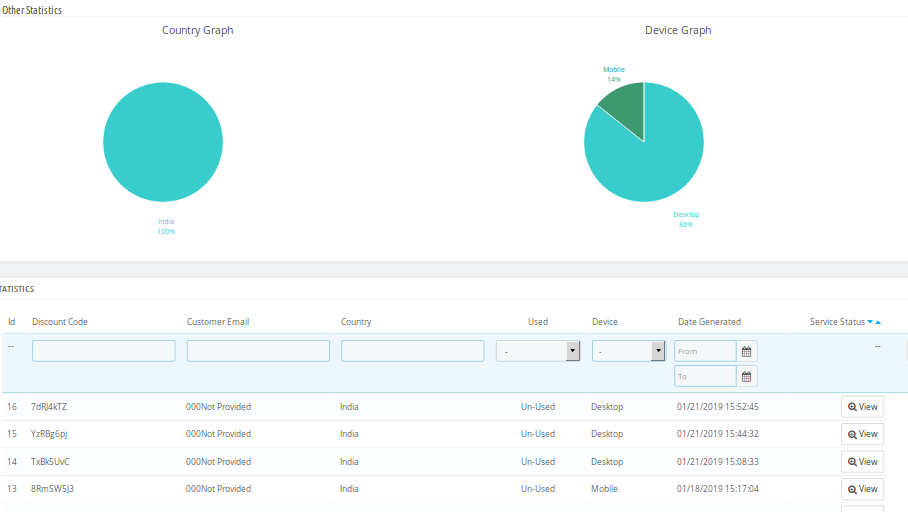
Statistics
Each section is described below.
Dashboard
You will see four statistics data in the dashboard.
Total Visitors- This is the count of total visitors who have seen the Email subscription pop up on exit.
Total Stayed User-This is the count of total users who stayed on your site after the Exit pop up appears on Prestashop storefront.On hover, you will also see the percentage of stayed users.
Total Newsletter Email subscription-This is the count of total newsletter subscription by the exit pop up addon.On hover, you will also see the percentage of total newsletter email subscriptions.
Total Coupons Generated- This is the count of total coupons generated by the email subscription pop up.On hover, you will see the percentage of total used coupons by Prestashop store visitors.
General Settings
You have to follow steps given below to configure General Settings –
Goto the Module and Services -> Module and Services
It would list all the modules of the Prestashop store. Find ‘Exit popup’ in modules list.
Now click on ‘Configure’ button given corresponding to the ‘Exit popup’ addon.
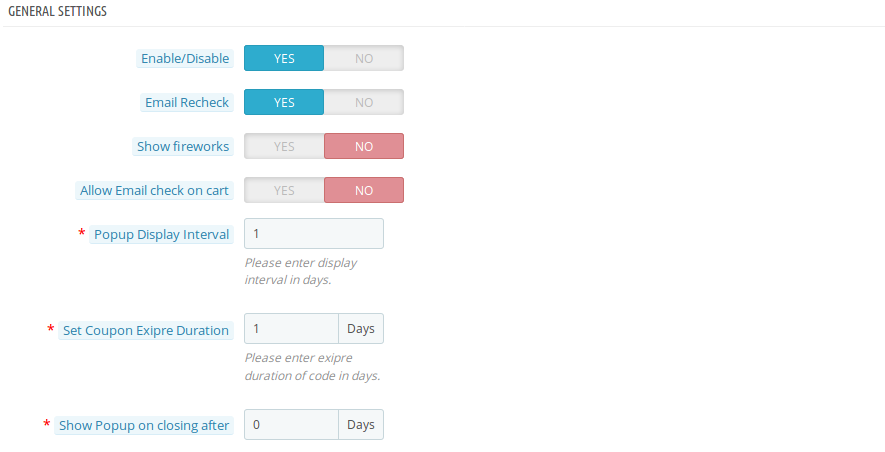
It would redirect Prestashop Store Owner or Admin to the general settings page as shown below
Update the values of given fields corresponding to ‘General Settings’ as per need.
Now click on ‘Save’ and it would validate and save the provided values.
That’s it.
This section has following input field which Prestashop store admin can update –
Enable/Disable: To enable the plugin, switch the enable button from OFF to ON. The default value will be set to “OFF”.
Email Recheck: This option lets admin to ensure that no user is provided coupon more than one time.
Show Fireworks: Admin can show fireworks in the background as the customer wins the coupon code.
Allow email check on cart: This option allows the admin to check whether the actual owner of this coupon and the one who is applying the coupon code are same or not. If this option is enabled, then no duplicate email ids will be accepted.
Popup Display Interval: Enter display interval(in days) after which the popup will be shown once the coupon is generated.
Set Coupon Expire Duration: This option lets you set the expire duration of the coupon(in days).
Show Popup on closing after: This allows the admin to set the number of days after which the entry popup or exit popup will be shown once closed by the user.
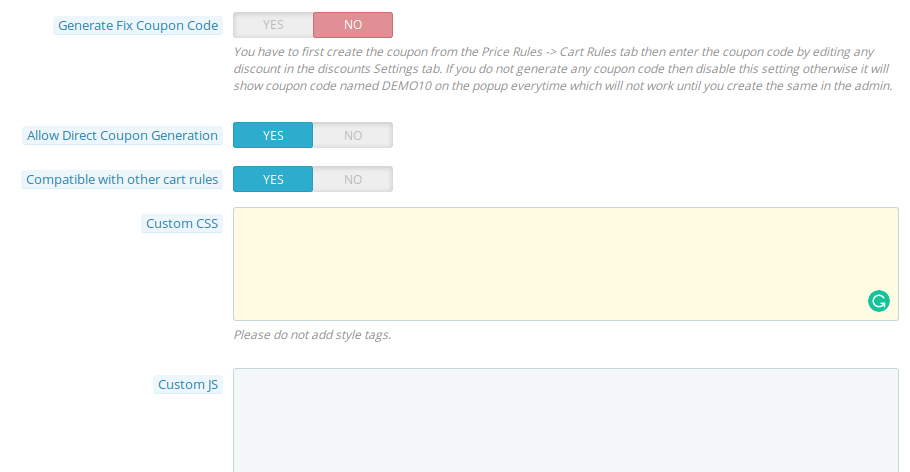
Generate Fix Coupon Code: Using this option, you can generate and set a fix coupon code for entry popup and exit poup.
Allow Direct Coupon Generation: If this setting is enabled, then the customer can generate the coupon code just by clicking the Get Coupon Code button.
Compatible with other Cart Rules: If you want that coupon generated from exit popup should not be used with the coupons generated from other sources, then set its compatibilty OFF.
Custom CSS and Custom JS: Admin can update the CSS and JS to customize the email subscription pop up without touching the base code of the addon. This field can help you in customizing the email subscription pop up according to your Prestashop store theme.
Display Settings
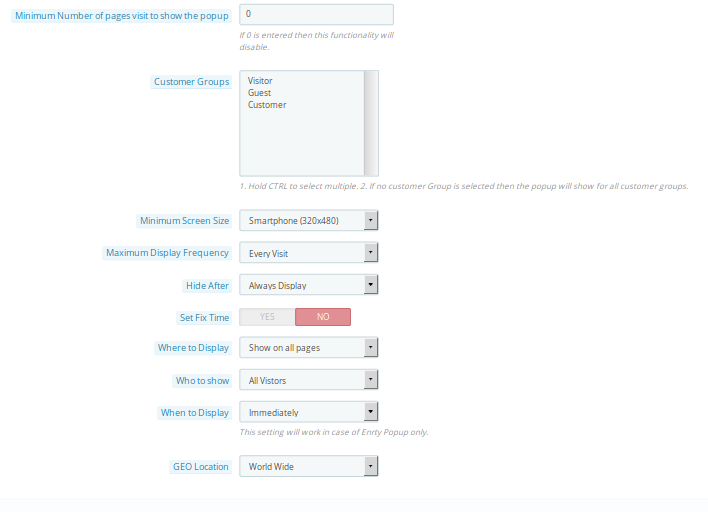
Maximum number of page visits to show popup: This option sets the page visit count after which the exit popup will be shown to the user.
Customer Groups: Admin can select the customer group from choices: Visitor, Guest or Customer.
Minimum Screen Size: Admin can select minimum screen size configuration to show entry-exit popup.
Maximum Display Frequency: Admin can also set maximum display frequency to display entry-exit popup.
Hide After: Select the time after which the popup hides automatically.
Set Fix Time: Admin can set fix time under which the customers can win discount coupons. This includes active popup date and expire popup date.
Where to Display: Admin can select the site pages where they want to display the entry-exit popup.
Who to Show: Admin can set the category of customers to which the entry-exit popup will be shown. This includes new visitors, returning visitors or all visitors.
When to Display: Admin can set when to display the popup to the users, after some specified time, scroll down percentage or immediately as the user enters the site. This setting will only work for entry popup.
Geolocation: Admin can set the geolocation where they want to show this entry-exit popup to the site users.
Look and Feel Settings
You have to follow steps given below to configure Look and Feel Settings –
Goto the Module and Services -> Module and Services
It would list all the modules of the store. Find ‘Exit popup’ in modules list.
Now click on ‘Configure’ button given corresponding to the ‘Exit popup’ addon.
It would redirect Prestashop store admin to a new page. Click on “Look and Feel Settings” tab and it would open a new section as shown below.
Update the values of given fields corresponding to ‘Look and Feel Settings’ as per need.
Now click on ‘Save’ and it would validate and save the provided values.
That’s it.
This section has following input field which Prestashop store admin can update –
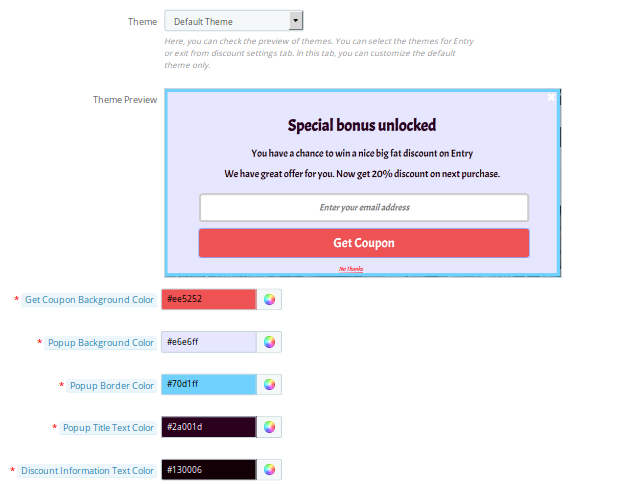
This Prestashop addon offers multiple themes to choose from. Other than five ready made popup templates, there is one default theme which is fully configurable from the backend interface. If the admin chooses any pre-defined template then he only requires to choose the background image for the entry-exit popup. But choosing default theme gives the following listed features to the admin.
Theme Preview: This option allows admin to preview various theme selection done in the above option.
Get Coupon background color: This option sets the background color of get coupon button shown over entry-exit popup.
Popup background color: Admin can set the background color of this exit popup using this option.
Pop up border color: Configures the border color of the Email subscription exit pop up.
Pop up title text Color: Configures the Title color of the Email subscription Exit Popup.You can set any color which matches your theme.
Discount information text color: Admin can configure the color of discount information text.
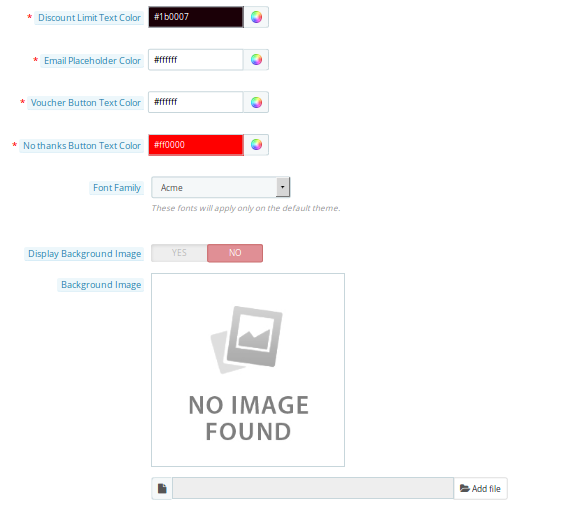
Discount limit text color: Admin can set the color of discount limit text.
Email Placeholder color: This option changes the background color of email placeholder.
Voucher button text color: Change font color of get coupon text using this option.
No thanks button text color: Change font color on No Thanks button.
Font family: Change font family of text shown over popup.
Display background image: Show or hide background image on popup.
Background image: If the above option is enabled, then you can browse and select desired image as background image.
Text Settings
The text settings for Prestashop Exit Popup can be configured using the following options. The admin can set the various texts in different languages.
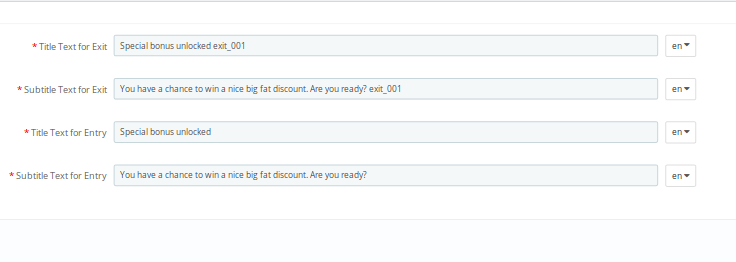
Title Text for Exit: This option sets the title text for the exit popup.
Subtitle text for Exit: This option sets the subtitle text for exit popup.
Title text for Entry: This option sets the title text for entry popup.
Subtitle text for Entry: This option sets the subtitle text for entry popup.
Discount Settings
You have to follow steps given below to configure Discount Settings –
Goto the Module and Services -> Module and Services
It would list all the modules of the store. Find ‘Exit popup’ in modules list.
Now click on ‘Configure’ button given corresponding to the ‘Exit popup’ module.
It would redirect Store Owner or Prestashop store admin to a new page. Click on “Discount Settings” tab and it would open a new section.
Update the values of given fields corresponding to ‘Discount Settings’ as per need.
Now click on ‘Save’ and it would validate and save the provided values.
That’s it.
This section has following input field which Prestashop store admin can update –
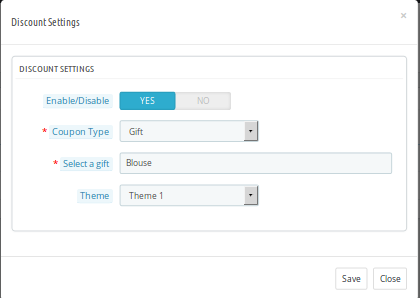
Admin can see the details of various discounts set for entry and exit popup. By clicking on the edit option admin can configure each of the set discounts separately. The discount settings popup contains the following options:
Enable/Disable: Admin can enable or disable the discount offered corresponding to welcome or exit popup.
Coupon Type: This option allows the admin to set the type of offer they want to provide on the entry-exit popup. It can be in the form of a fixed or percencentage discount, free shipping or a gift.
Select a Gift/Value: If its value then set the fixed or percentage value you want to offer as discount. If its a gift then select the product that you want to offer as gift to your customers.
Theme: This option allows the admin to set a separate theme for entry and exit popup.
Email Marketing
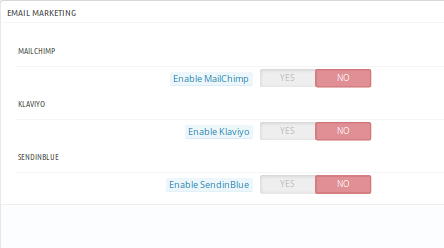
This section of Prestashop email subscription exit popup provides you three inbuilt choices for email marketing as given below:
This Prestashop module offers you three email marketing options as
MailChimp
Klaviyo
Sendin Blue
Each of them can be separately enabled/disabled and can be configured by setting up the required API keys from this backend panel.
Email Settings
The email settings of Prestashop entry-exit(email subscription) popup offers you following configuration settings as given below:
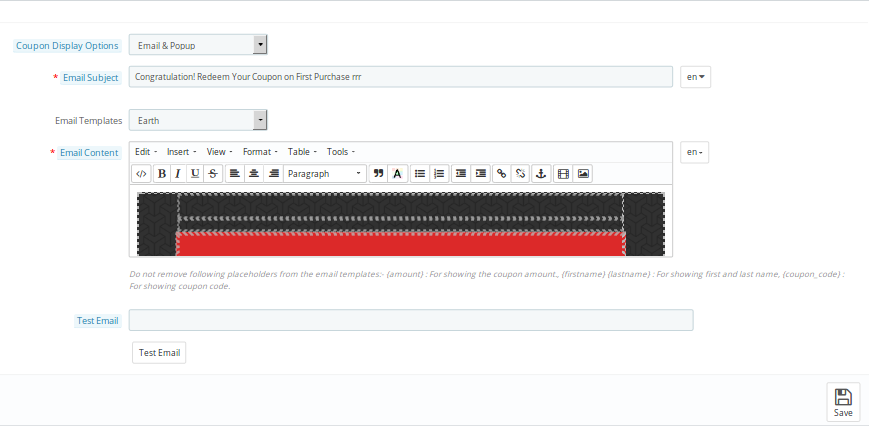
Coupon Display Options: Admin can choose whether they want to display the coupon code on popup only, email only or both.
Email Subject: Admin can set the subject for the email sent to the customers as they win the discount coupon.
Email Template: This options lets admin choose the template for the discount winning email. This email template is same for entry and exit popup.
Email Content: Admin can set the content of the discount email sent to the customers. They can specify the coupon code and coupon validity in the discount email.
Test Email: Admin can use this option to test the discount emails on a specific email before sending them to the actual user.
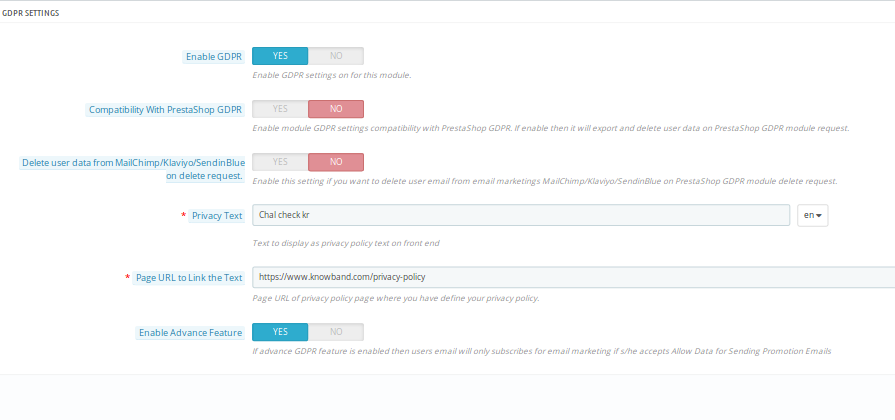
GDPR Settings
Prestashop email subscription exit popup addon is GDPR compatible and so the various GDPR settings can be configured using the given options listed below:
Enable GDPR: Enable or disable GDPR settings for this Prestashop exit popup module.
Compatibilty with Prestashop GDPR: Enable/disable module GDPR settings compatibility with PrestaShop GDPR. If enable then it will export and delete user data on PrestaShop GDPR module request.
Delete user data based on email marketing service request: Enable this setting if you want to delete user email from email marketings MailChimp/Klaviyo/SendinBlue based on PrestaShop GDPR module delete request.
Privacy Text: Admin can set a privacy text shown over the entry, exit popup.
Page URL to link the text: Admin can set a specific page URL of privacy policy page where you have defined your privacy policy for your website.
Enable Advance Feature: If advance GDPR feature is enabled then users email will only subscribes for email marketing if s/he accepts Allow Data for Sending Promotion Emails.
Statistics
You have to follow steps given below to configure Statistics-
Goto the Module and Services -> Module and Services
It would list all the modules of the store. Find ‘Exit popup’ in modules list.
Now click on ‘Configure’ button given corresponding to the ‘Exit popup’ addon.
It would redirect Prestashop store admin to a new page. Click on “Statistics” tab and it would open a new section as shown below –
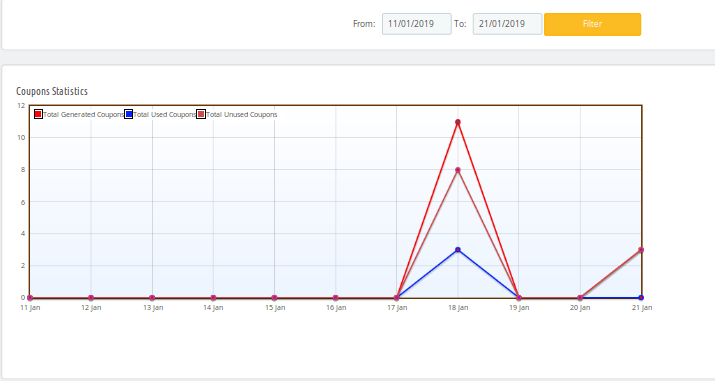
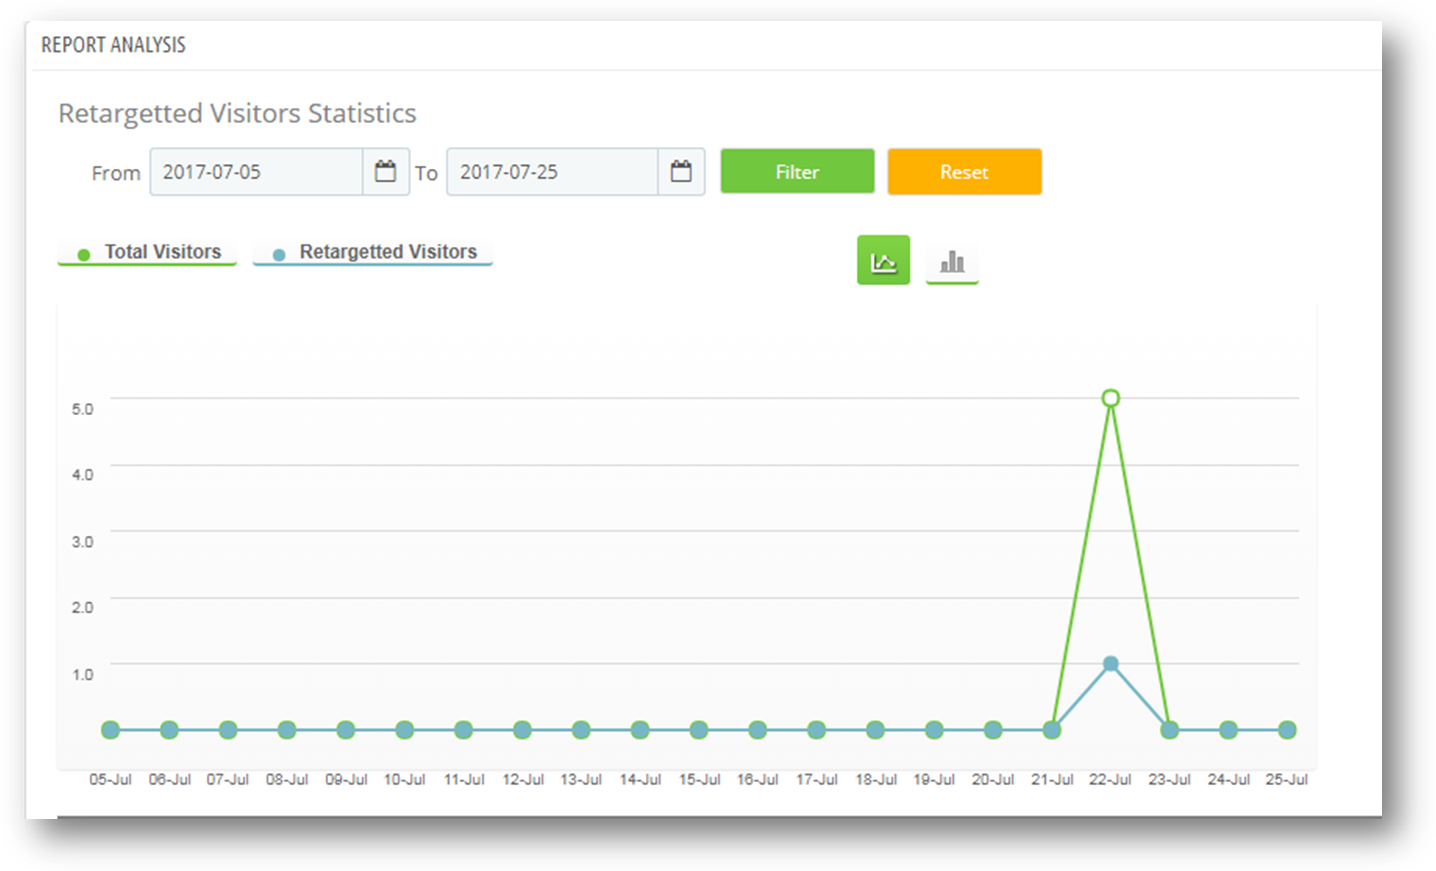
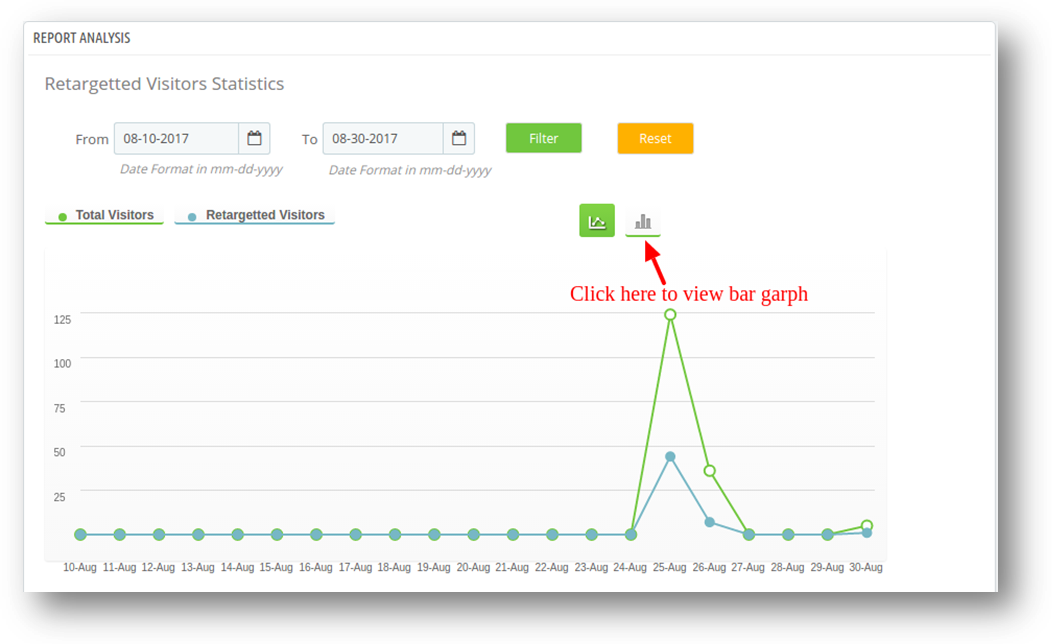
This tab shows the report analysis in graphs.You can filter the graph by selecting the date range in the ‘from’ and ‘to’ date fields.
There are two graphs in this tab-
Visitor graph: This is the graph between total visitors and retargeting visitors.
X-axis- Date and time
Y-axis- Total visitors and total staying users
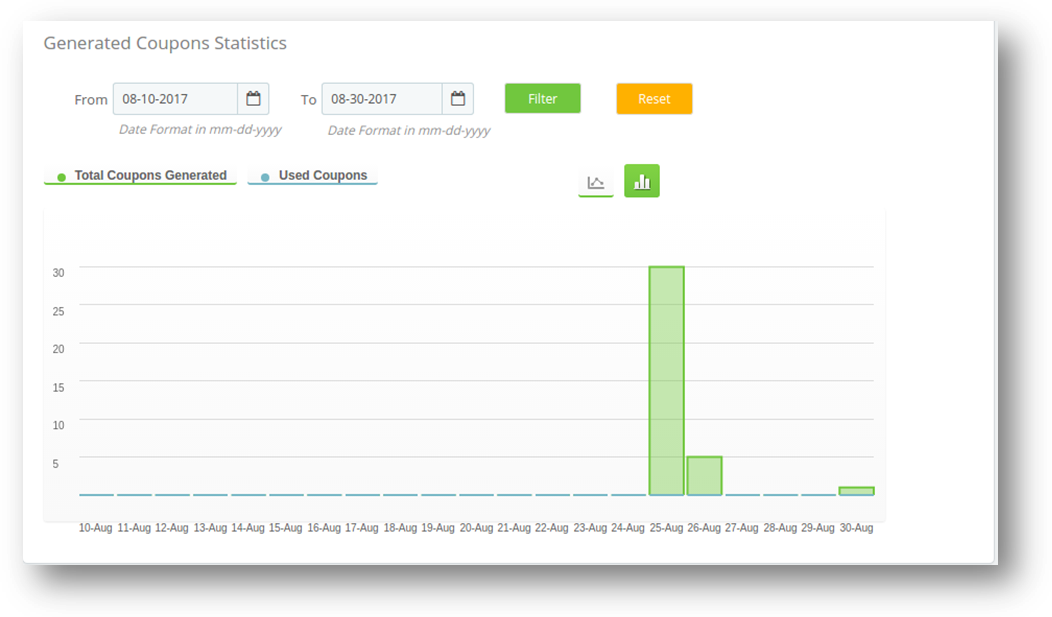
Coupon Graph: This is the graph between the total generated coupon and total used coupons.
X-axis- Date and time
Y-axis- Total generated coupons and total used coupons
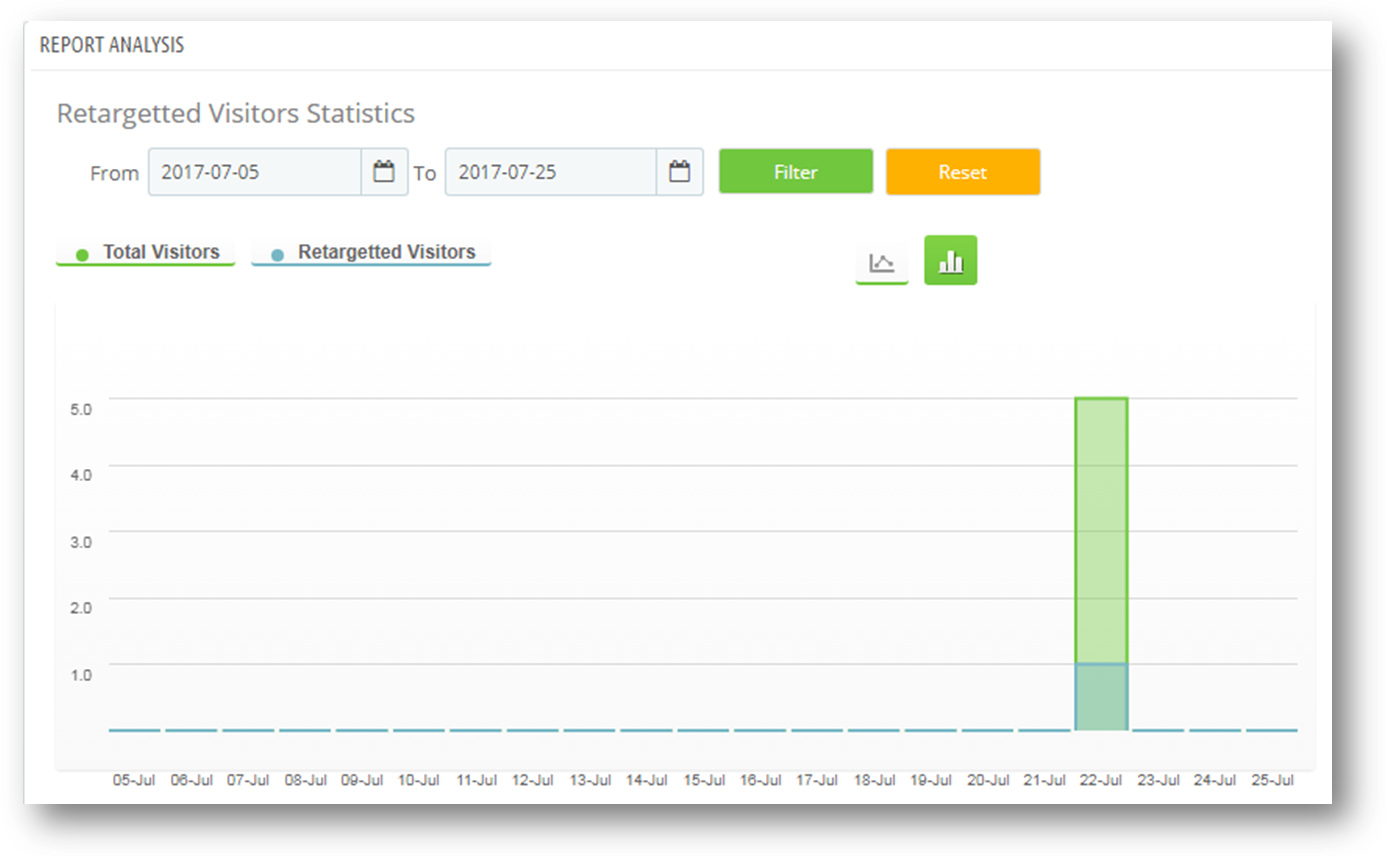
You can also view the graph in two form 1. Lines 2. Bars
1. Line graphs
Bar graph: To view bar graph.You need to click on its icon as shown in the following figure.
Bar graph will look like this.
MailChimp Settings
You have to follow steps given below to configure Statistics-
Goto the Module and Services -> Module and Services
It would list all the modules of the store. Find ‘Exit popup’ in modules list.
Now click on ‘Configure’ button given corresponding to the ‘Exit popup’ addon.
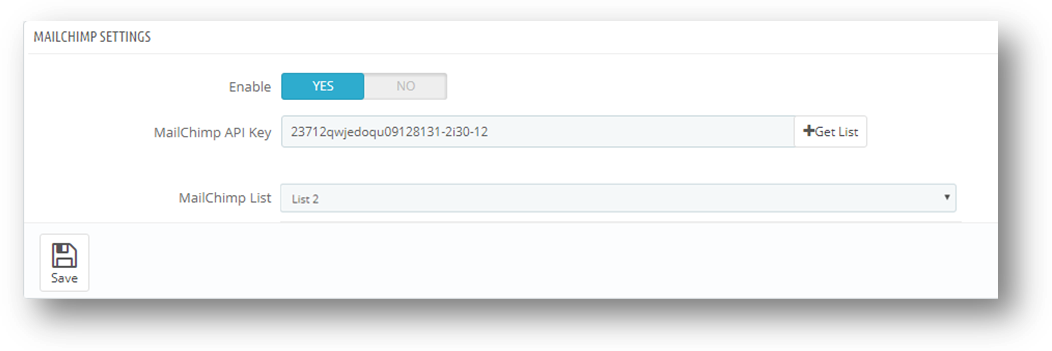
It would redirect Prestashop store admin to a new page. Click on “MailChimp settings” tab and it would open a new section as shown below –
Enable/Disable: The admin can enable/disable the Mailchimp settings. It will be initially set to “OFF”.
MailChimp API Key: MailChimp API key is the key that the user created on his/her MailChimp account at https://www.mailchimp.com. This API key will be used to connect to the MailChimp API. When user fills the “MailChimp API Key” field with a valid API key and click Get List button then the lists related to that MailChimp API key will display.
MailChimp Lists: MailChimp Lists will be available when the MailChimp API key is provided.
Frontend
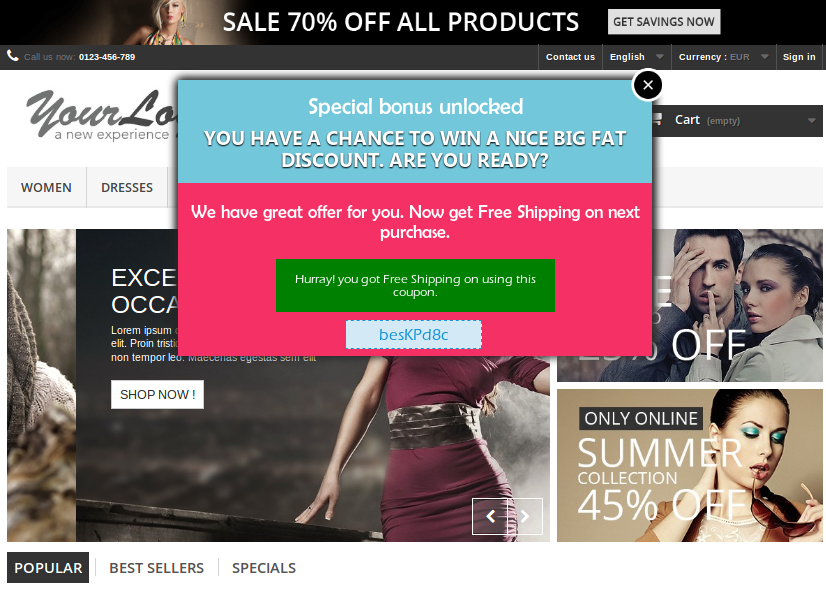
Prestashop Welcome or Entry popup shown as the customers enters on the site.
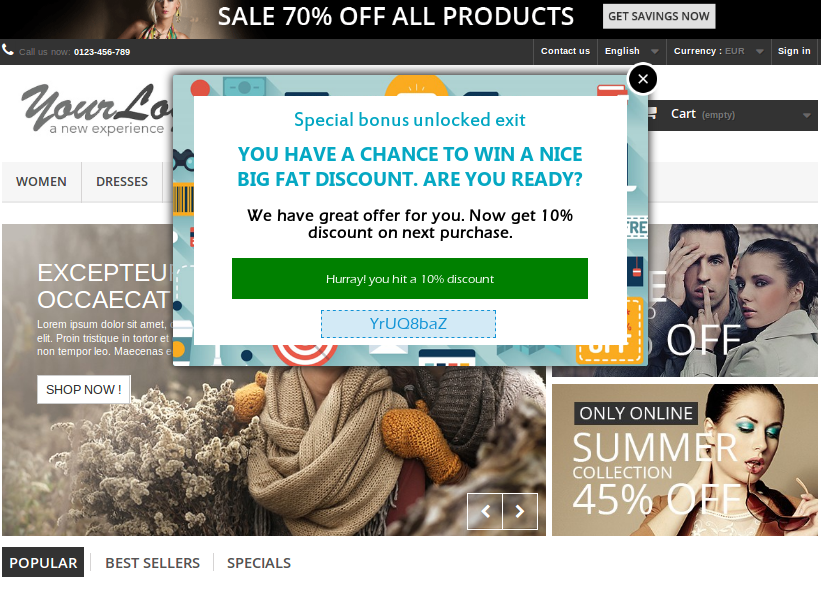
Prestashop Exit popup as the customer intends to leave the site or intends to close the window.
Recommendations
– If the plugin is not working after installation then please check permissions on modules folder. The folder should have write access. Please make the folder permission to 755.
Disclaimer: In case the “Exit” popup does not display at the front, kindly clear the cache or delete the cookies. Sometimes cookies prevent the popup from displaying at front.
Buy Prestashop Exit Pop up module on the Addon store
Retaining customers is the biggest challenge for any business and it is not a child’s play anymore to grab higher conversions. Online shoppers have multiple options to choose from, which makes the customer retention process more complicated. They are in no mood to wait for few more extra seconds on a site and often leave a site in the middle leading to shopping cart abandonment. One of the most effective strategies that can yield more conversions and sales to any store is email marketing. Tailored abandoned cart reminder emails are sent with the purpose of achieving more sales and grabbing customers on an eCommerce site. It is important to make your abandoned cart recovery email more personalized, engaging, and powerful for achieving maximum site conversions. If you are unable to grab the customer’s attention through your targeted abandoned cart recovery emails, it is time to try out these helpful tips.
1. Personalization is a key element-
It definitely makes sense to call your targeted customers by their first name or informing them about a specific event or occasion. Making your customer realize their self-importance is the best way to encourage them for completing any email action. This personalization can even work wonders in case of reminder emails that are sent with the purpose of recovering lost sales. There are certain plugins to recover abandoned cart that allows site owners to give a personal touch to their reminder emails for grabbing maximum conversions and sales. So don’t forget to make your reminder emails more personalized and relevant.
2. Dynamic content can make your emails more important
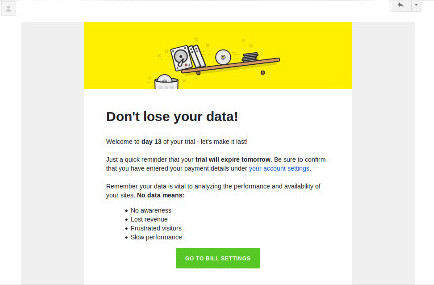
Simple texts are boring and not helpful in any manner. To increase the USP of your emails, you need to include dynamic content like images, links, videos, or other such content that also grabs the instant attention of your targeted customers towards your abandoned cart recovery emails. It increases customer engagement as well. Check out the screenshot of the email given below that makes use of dynamic content to persuade customers for purchasing the paid version of this Pingdom, a website speed optimization tool. Including a direct CTA is necessary to achieve your goal. The addition of an effective cart recovery link can be a great step in optimizing the sales of your eCommerce store.
3. Send reminder emails at a regular interval of time-
Reminder emails are not a one-time process and need to be done at a regular instance of time for maximum business results. You need to employ effective email marketing software such as Constant Contact, Aweber, MailChimp, and others that can help in sending reminder emails at a regular interval of time.
There is no sure-shot guarantee that your reminder emails will be opened and read for the first time only. It is important to send these abandoned cart recovery emails at a regular instance of time for reducing the chances of “being missed out” if the user is too busy at that moment.
You can plan your reminder emails or reminder alerts like send your first notification immediately when the customer leaves your website leaving a cart full of items.
The second to recover abandoned cart can be sent within 24 hours and must include the items they have left in their cart.
That didn’t work! It’s time to lead them with a sense of urgency and FOMO. What’s that? We will come to this later and for that keep reading.
In your next abandoned cart recovery email, you can include discount coupons and offers to entice them and this works wonders.
4. Include exciting offers in your emails
An important question arises in the mind that even if a reminder email is read, what are the chances of converting readers through it. The answer to this critical question is that you need to include exciting offers and deals in your reminder emails.
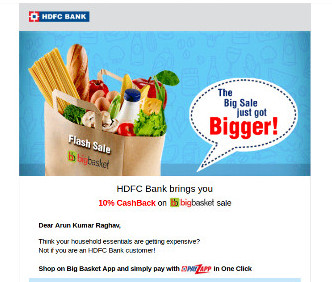
This will help in tempting your readers to complete their pending shopping orders. This ability to grab the customer’s attention through exciting deals is best utilized in the reminder emails sent by HDFC bank to its customers as shown below. The email urges the customers to avail the displayed offer, which is both engaging and unique.
5. Convey the urgency to your customers
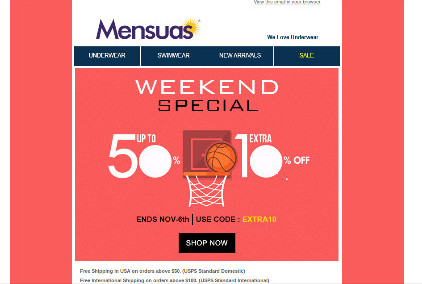
Take the case of this Mensuas site email that informs customers about exciting shopping offers and also conveys the deadline to avail this amazing offer simultaneously.
You need to remember the fact that the recipient of your email is a busy person and is involved in a range of other activities. It will not be worth surprising if your reminder email is left out by your targeted customers due to their busy schedules. There are online stores that use terms like “last chance to grab”, “sales offers ending midnight”, “one last opportunity to get the desired products”, and other such phrases in their reminder emails to grab the immediate attention of the recipients.
In the last
You are very well aware of the situation that the mailbox of a user is flooded with numerous emails, which may or may not be useful for the recipient. It is just a matter of few seconds that can determine whether your email will be read by your targeted customer or will be sent in the spam or trash. If you are able to make the most out of your emails, you can surely help in recovering abandoned carts for your store. So, learn to keep visitors engaged with your emails for getting maximum conversions and sales.
Implement the one page checkout functionality on your Magento store for higher conversions.
If you are looking to improve the sales of your eCommerce store, it is important to analyze the checkout process of your site. It is one of the important element that can lead you to conversion or shopping cart abandonments. The checkout process is observed as an important part of any eCommerce store that needs to be improved for achieving higher conversions.
If you are unable to make improvements on the checkout functionality, it is sure to make a significant impact on your conversion rates and sales. To reduce the increasing abandoned carts, numerous Magento site owners are putting their money behind the Magento One Page Checkout extension. Here are the various reasons that support the claim that a checkout extension can help in optimizing the sales and conversions for your online store.
Don’t miss out on giving error reporting information
Error reporting in a checkout process helps in quick completion of the placed order.
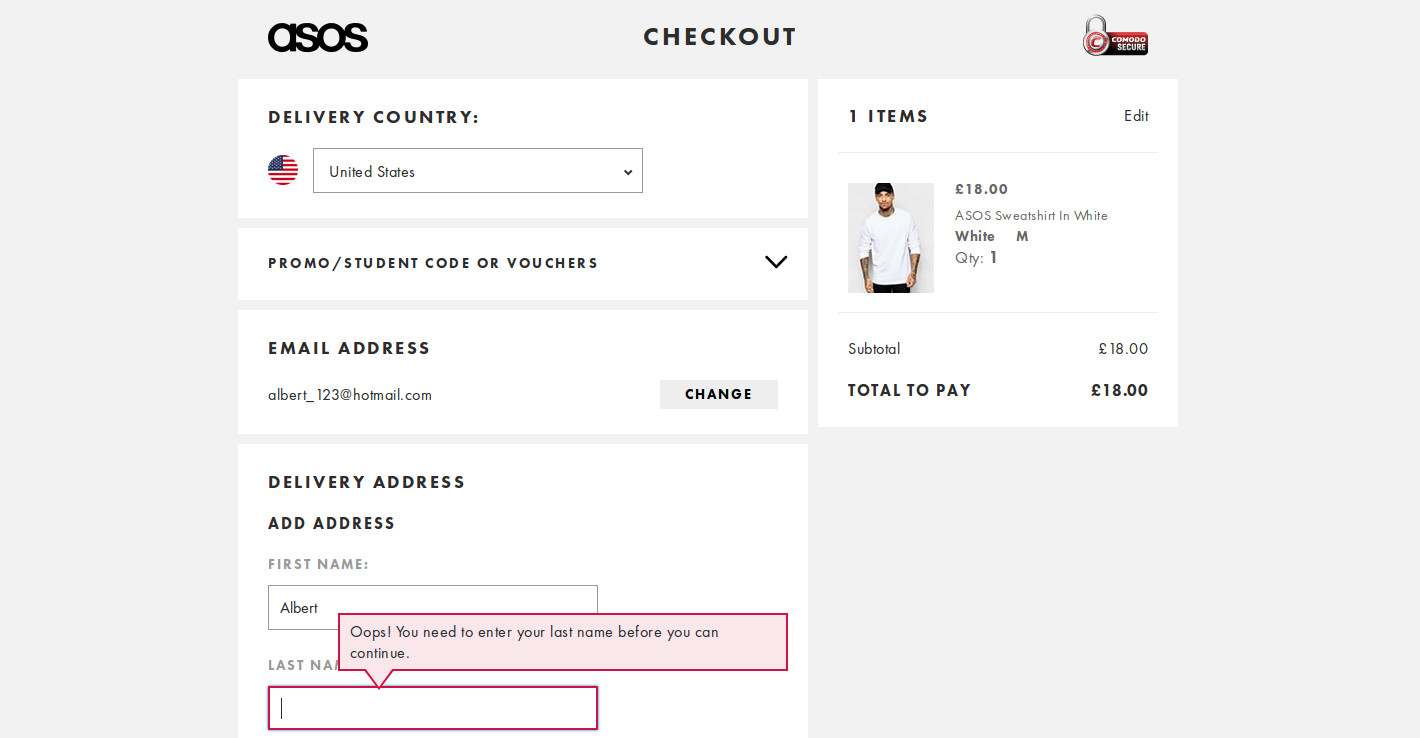
It would be a great idea to inform customers about the errors encountered by them on the checkout page itself. This error reporting will help in completing your checkout process in a timely manner, thereby reducing the chances of shopping cart abandonments. An ideal checkout extension should be capable of informing customers about their checkout related errors, so install the same on your store. For better understanding, look at the checkout page of this Asos site that provides timely error reporting information to its customers regarding the placed order. In this scenario, customers can eliminate the errors shown on the Asos site checkout page for improving product sales.
Check out the validity of your coupon codes
Provide the option of promo or coupon codes in your checkout process for higher conversions.
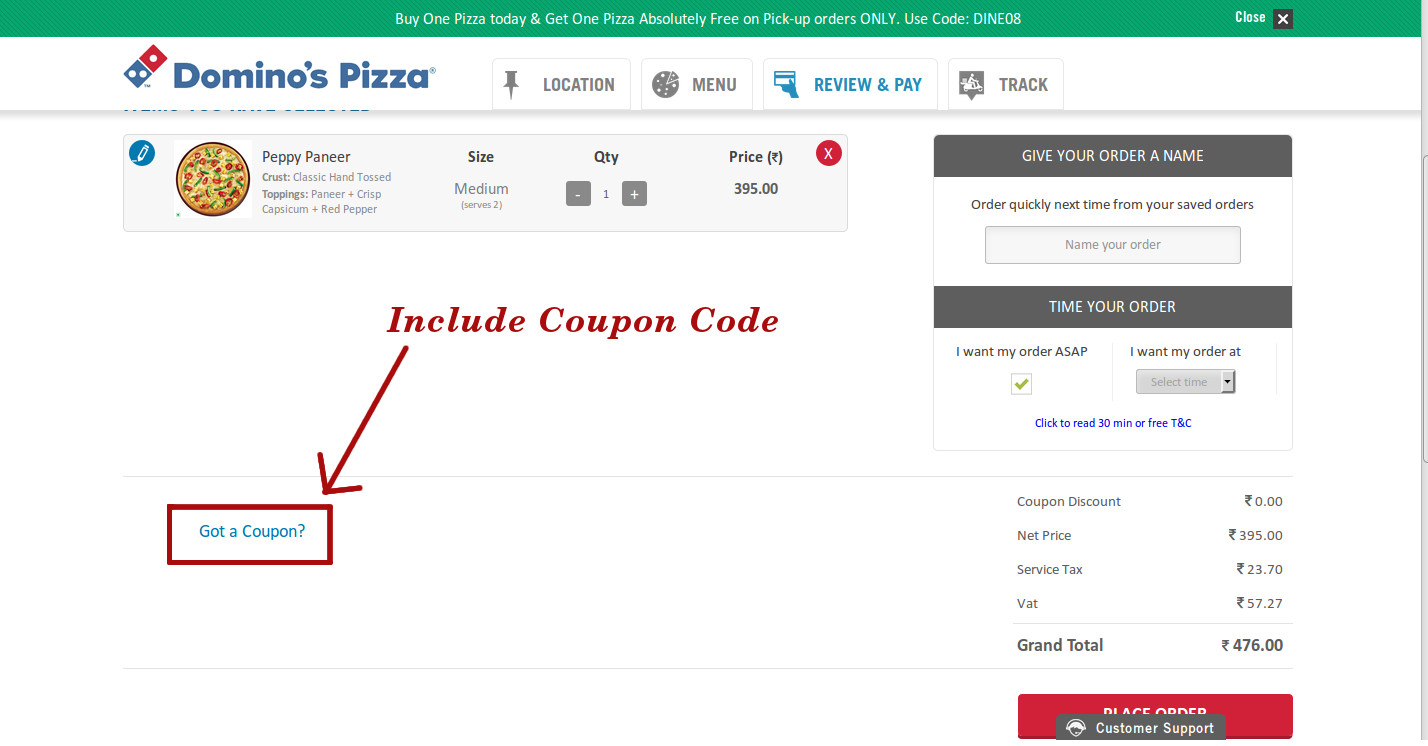
Tempting your customers with impressive coupon codes or promo codes are a great way to boost the sales of your online store. It is a common human behavior to look out for discount coupons while purchasing a product from an online store. The presence of exciting coupons or promo codes encourages the customer to complete an existing order. This strategy is best utilized by Domino’s, a global pizza chain that prompts its customer to use their coupon code to avail the pricing discounts on their placed pizza order as shown in the image below.
So, don’t forget to opt a checkout page extension that allows you to provide coupon codes to your visiting customers on the site.
Offers alternative payment and shopping options
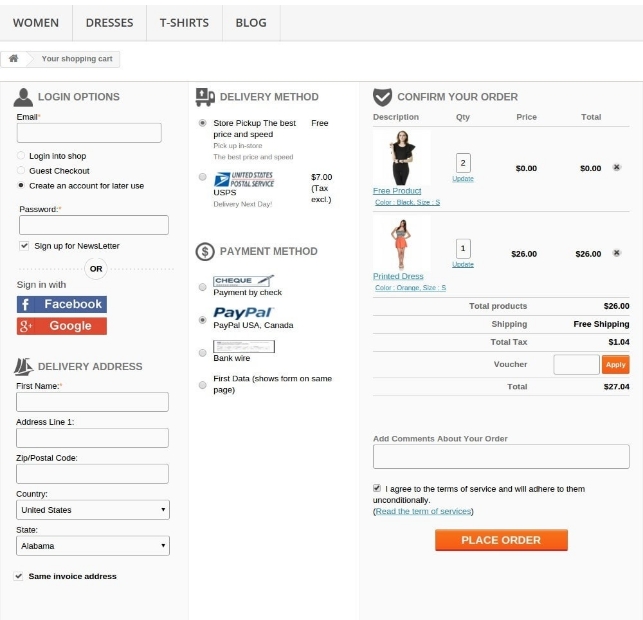
It is observed that presence of multiple payment and shipping options helps in improving the customer engagement on an online store. Don’t force your targeted customers to make an online purchase through your existing payment and shipping options only. This concern is best addressed by this feature packed Magento One Page Checkout from Knowband store that simplifies the online shopping experience for Magento sites. It offers freedom to customers to choose any of the available payment and shipping options for a smooth checkout experience. Multiple payment options not only optimizes the product sales and conversions but also helps in building the customer trust towards an online store.
Helps in minimizing the checkout formalities
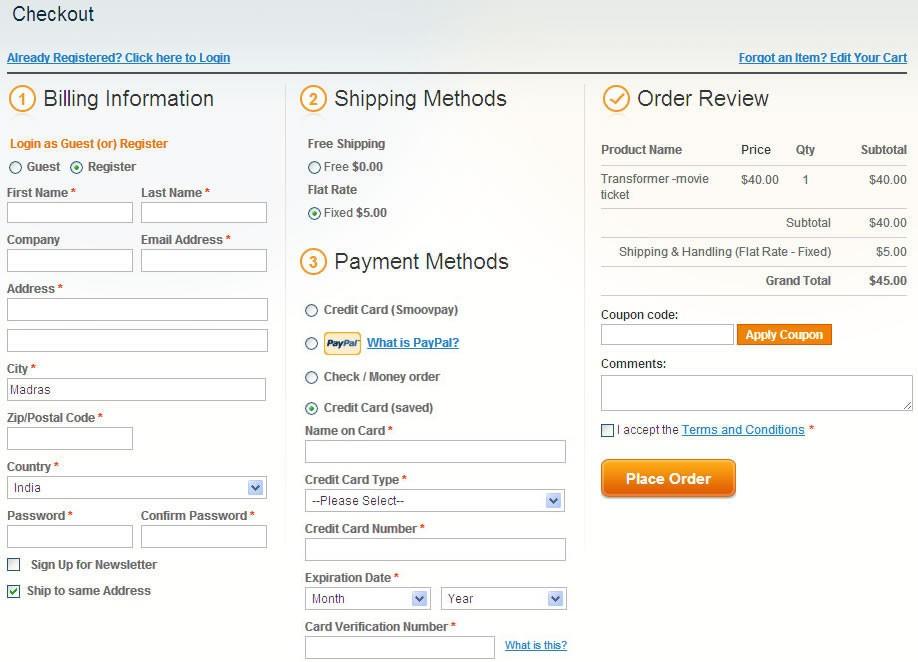
Customers making an online purchase are too busy which makes them opt for this online shopping mode instead of making door-to-door shopping. It is obvious that they would not want to waste their time on unnecessary checkout formalities but this is not the case in the real time scenario. Due to the complicated checkout formalities, the opportunity of making better sales through a simplified checkout process is lost eventually. According to a report of Baymard on the checkout usability, “An average site can increase its conversion rates by 35.26% through the help of a simple checkout process”. It is important to restrict your checkout formalities to a single page only for grabbing maximum customer attention and sales. If you want to experience how a one page checkout formality can help your online store, you need to take a quick look at this image shown below:
A single page checkout process can help in optimizing the sales and conversions of an online store.
Closing tips
There is not a single online store that can boast of having improved sales and conversions without the presence of a simple checkout process. It is an important constituent of any eCommerce store that can easily win sales and customers at the first time only. Don’t hesitate to implement quick changes in your checkout process if it can help you earn some more customers and conversions. The success of your eCommerce store lies in keeping your checkout process flexible and customer friendly. You Might Also Like:
Yesterday, 2nd November, 2016 was a big day for eCommerce site owners as Magento Commerce and Acquia has announced their partnership to offer a rich digital experience to customers. This integration is a big news for Magento site owners as it enables them to control the customer journey by providing personalized content-rich experiences.This collaboration will help eCommerce store owners to avail the best-in-class content management and personalization services along with the diverse Magento eCommerce functionalities. The importance of personalization in eCommerce can be understood from the statement of Tom Erickson, CEO of Acquia as
“Commerce as we know it has changed, and the imperative has emerged for brands and merchants to deliver powerful, personalized experiences”. He further stated that “Acquia and Magento combine the best attributes of open source development — agility, speed, innovation and security. Together, we’re putting the power back in the hands of merchants and brands to allow them to control every pixel of the experience throughout the customer journey.”
Impact of this business collaboration on B2B and B2C merchants
The coming together of Magento and Acquia is one of the good things that has happened in the eCommerce industry in the recent times. Take a quick look below to understand how it can be of great help in the present eCommerce scenario.
Offers wide scale personalization-
This partnership has helped in providing context based real time experiences to customers irrespective of the device or channel used by them.
Improves decision making process-
With this collaboration, it is now easy to implement and manage the content-rich eCommerce experiences for any store.
Enhanced authority to marketers-
Now, the marketing team can work more closely with the merchants to offer a detailed content-rich digital experiences and help in merchandising activities.
Great flexibility-
This business collaboration has offered a wide range of flexibility to numerous eCommerce sites to fulfill any market conditions and expectations.
To get a better insight about this partnership in terms of eCommerce, check out this statement of Mark Lavelle, CEO of Magento Commerce
“At the heart of this partnership is a shared open-source heritage and vision for delivering on next-generation commerce and customer experiences that are unprecedented for the industry.” He further elaborated that “The combined power of our respective technologies and our thriving global ecosystems will allow our customers to drive unbridled innovation, engage consumers like never before, and pave the way for the commerce experiences of tomorrow.”
For ensuring a better Magento eCommerce experience, Acquia and Magento have integrated the Drupal CMS with Acquia Lift solutions to deliver personalized eCommerce solutions to customers. It can help in bringing content, commerce, and context at one place for simplifying the customer journey. Some of the companies that are working to utilize this new business collaboration are MRM//McCann and Optaros, Third & Grove, Born Group, Inviqa, and HS2.
This collaboration was announced by Acquia Chief Product Officer, Chris Stone and CEO of Magento, Mark Lavelle at the Acquia Engage, which is an annual customer conference. For more details about this business collaboration, check out this link.
With the introduction of the friendly URL and customized URL, PrestaShop revolutionized the control of URLs in its update PrestaShop v1.5. Later in the PrestaShop v1.7, it added the feature of URL dispatcher to enhance the URL rewriting in PrestaShop. With this update, PrestaShop made the URL rewriting or URL customization for modules very easy.
An SEO URL structure is a special customized URL which simplifies the complex structure of the URL to a very simple and easy to understand structure.
For example :
Say you have new module called “yourmodule”. Let say it has two main functions.
1. Page list of commands for any user
2. Using “yourmodule” to see the order details.
Now if the friendly URL is Disabled, you will see your page list URL something like this:
As we can see that the second case presents the more simplified and understandable URL structure and this is because of the Friendly URL being active on your site.
Friendly URLs are nice to have on your site. A clean, SEO friendly URL is more understandable and easily readable by the search engines. Adopting a friendly URL is one of the pre-development SEO approaches.
How to get the Friendly URL for your front controller pages?
Follow these simple steps to get an SEO Friendly URL for your module controller:
Step 1: Login to your Back office.
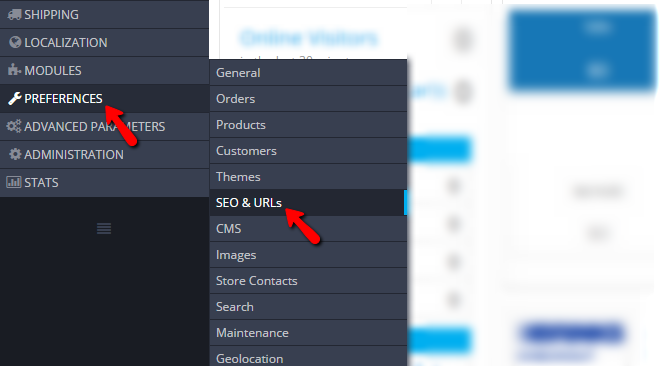
Step 2: Navigate to Preferences>>SEO & URLs
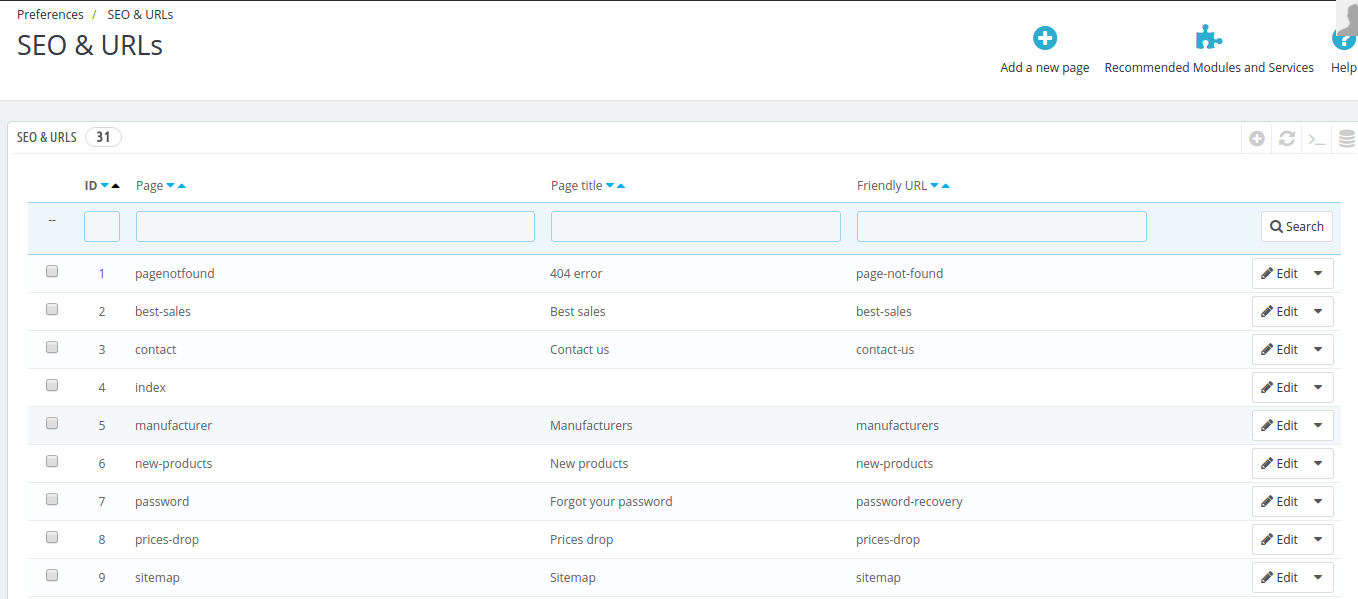
Step 3: You will see the configuration page “SEO & URLs”.You will see the list of front pages, Page Title, and their URL.
Something like the below screenshot:
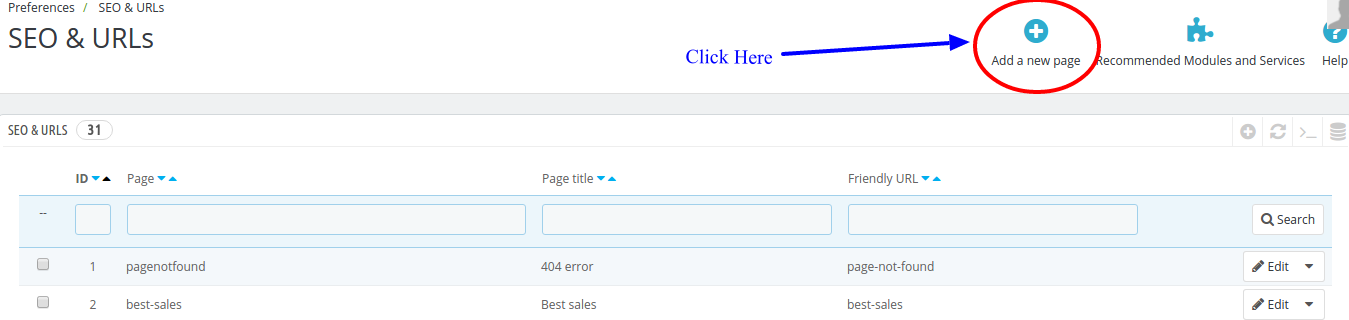
Step 4: Now, click on “Add new Page” as shown in the screenshot below:
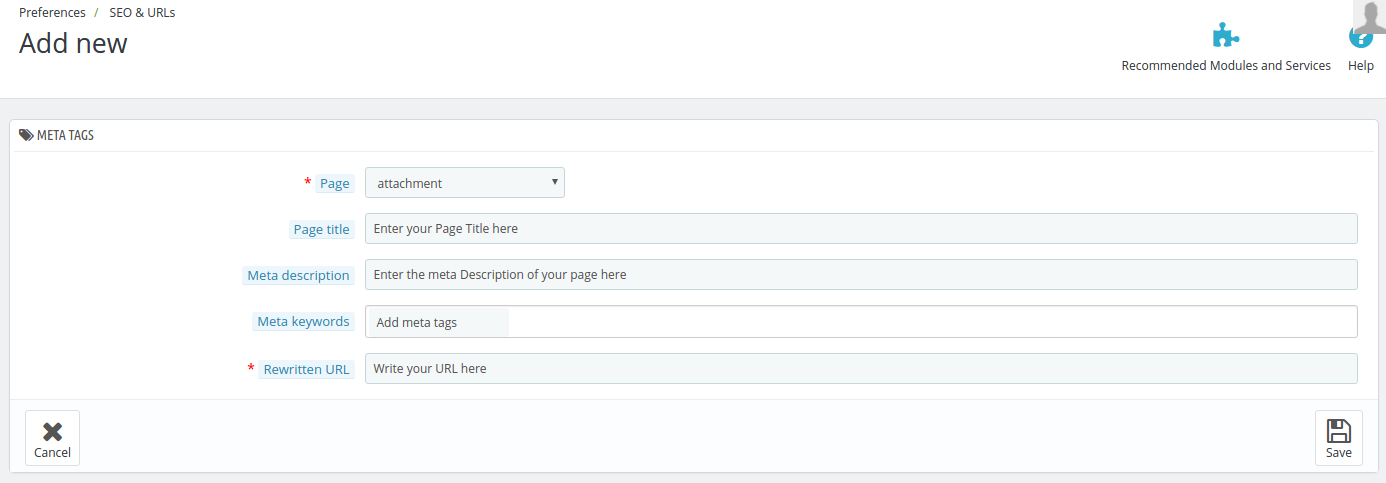
You will be redirected to a page which looks something like below:
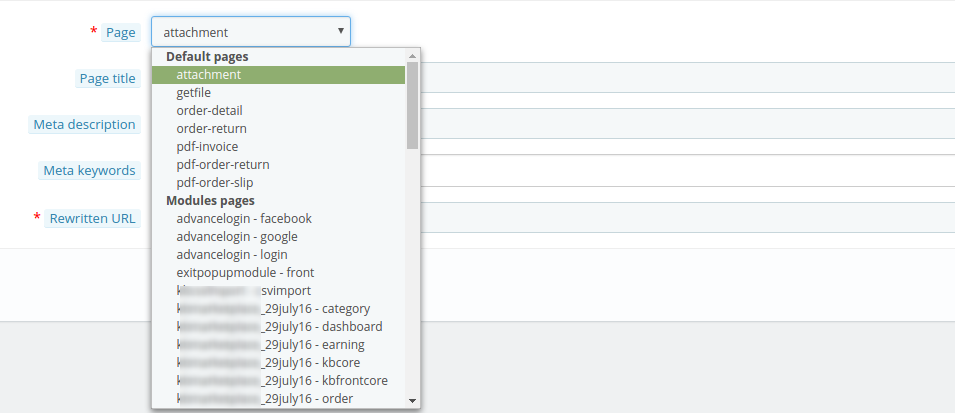
Step 5: When you click on the tab “Page”, it will open a drop down list of all the pages that are created on your website. Select the page from the list for which you want to rewrite the URL.
Step 6: Enter the details asked in the form above and also mention your custom URL in the “Rewritten URL” tab. Click “Save” to store your settings.
You have done the the task of rewriting the URL after you saved the form. But in some cases you will need to perform the following additional operations.
1. Clear the cache: Sometimes cache won’t let the new URL show on the front end. To avoid this you need to go to Advance Parameter>>Performance and clear the cache from there.
2. Make sure in Preferences >> SEO & URLs >> SET UP URLS, the “Friendly URL is turned on”. You can also disable the “Accented URL”; it’s optional.
An alternate way of implementing SEO-friendly URL
Knowband offers an alternative and easier method of making the URLs of your store user-friendly. PrestaShop SEO Optimizer – Clean URLs & 301/302/303 redirection Module offered by Knowband IDs from all the URLs of the stores in one go. By removing the product and category ID, the links of the landing pages becomes SEO optimized. Additionally, you can even remove the default ISO and .html from the links without making any manual changes. Not just this, you can retrieve the list of the URLs redirected to a new link or the links that are redirecting to 404 error by using PrestaShop 301/302/303 Redirect.
What are the features offered by Knowband’s Prestashop URL cleaner addon?
Some of the admin features offered by this Prestashop SEO optimizer extension are mentioned below:
With PrestaShop SEO URL Addon, you can optimize the URLs of your site from SEO point-of-view and improve the website ranking in the Google SERP results.
No manual changes are required to be done with PrestaShop SEO Friendly URL module.
The Prestashop addon lists out the URLs that have 301/302/303 redirection as well as the links that redirects to 404 error.
You can remove .html and default ISO from the URLs if required with Prestashop SEO Friendly URL extension.
Why you should have SEO-friendly URLs?
Having discussed the various ways of implementing SEO-optimized URL, the question of why you need to have one in the first place might come to your mind. So, listed below are some of the reasons for the same.
URLs with a structured hierarchy are preferred by GoogleBot. Such URLs make it easier for the crawler to crawl pages throughout the site.
If you links with structured hierarchy, then, the webpages will get indexed easily. Not just this, such pages are displayed in search results faster.
Even in case of indexed links, the recrawling becomes easier.
With a SEO friendly URL structure, it becomes easier to promote your site.
Moreover, it is a preferred option from the end-users’ point-of-view. It is easier for the user to remember the links of the landing pages.
So, here we learned that how we can rewrite the URL of any front page on our PrestaShop site. The support for Friendly URLs is really a nice feature in PrestaShop which also acts used as a competitive advantage against other CMS systems.
There are times when the store visitors land up on the website looking for a product, but leaves the website because the product are not in stock .They find the same on some other stores and you lose a conversion. You’ll never know why the visitors left your site without purchasing anything. In order to find the problem and rectify the issue, you must enhance customer’s engagement with your site, so that, you can get them back if they are leaving your store for this reason.
Here store owner can change the various settings of this Prestashop plugin according to requirements, which will be reflected on front end as well as in admin panel.
To install this plug-in, please follow the following steps:
1. Add all whole plugin folder to the modules folder into the root directory of the PrestaShop Store.
2. After adding plug-in files, the system will list the plug-in on module page.
3. Click on install/uninstall according to need.
4. Another way is, you can zip the whole folder and then click on Add New Module link displaying on top right corner of module listing page as shown in below screen:
5. After installing this Prestashop module, Configure link will be displayed instead of Install link as shown in below screen:
6. Now, your Prestashop out of stock subscription module is ready to use and click on Configure link to configure module.
Admin Interface
After installing this Prestashop notification addon, the admin will get following interfaces:
General Settings
Request for Notification Email Settings
Notification Email Setting
Analysis
General Settings
When you click on configure button, system will open general setting field by default. This field has following options:
Initially fields in above form will be already filled with their default values.
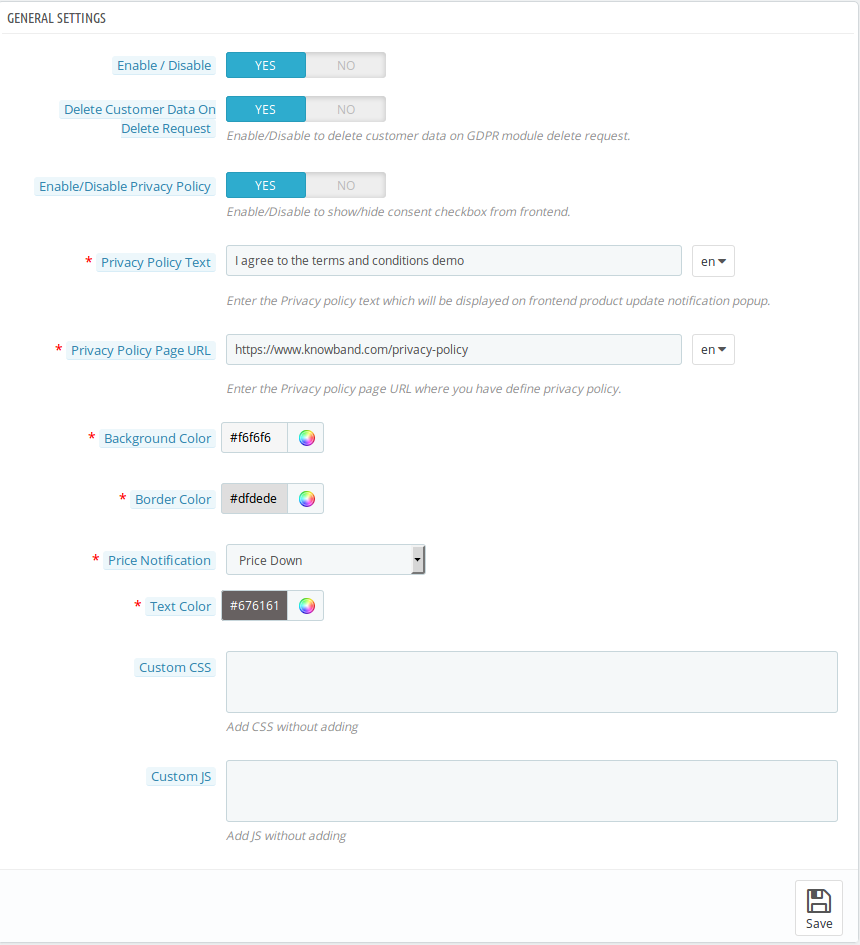
Enable/Disable: Initially, this Prestashop out of stock notification addon by Knowband is set to NO option. You must need to set this to YES in order to get the benefits of the addon.
Delete Customer Data on Delete Request: Enabling this functionality will enable the option for the customers to request for personal data deletion.
Enable/Disable Privacy Policy: The Prestashop product update notification module allows the admin to display or hide the privacy policy at front end.
Privacy Policy Text: This field of the Prestashop product update module allows the admin to set the desired privacy policy text. The privacy policy text can be edited whenever needed.
Privacy Policy URL: The admin can link the privacy policy to the desired choice of URL. The URL can also changed whenever required.
Background Color: This field of Prestashop product update notification addon is filled with some default value at initial level. Admin can change the background color of the subscription box by selecting a color from the color picker which will be reflected at the front end.
Border Color: In this field, the admin can change the border color of the subscription box according to his preference.
Price Notification: This field of the product update notifcation Prestashop provides the admin to select the type of price level to notify subscribers. The admin can either select Price Down, Price Up or Both type of price level.
Text Color: The respective Prestashop plugin even allows the admin to customize the text-color of the subscription box as per his choice.
Custom CSS & JS: Both of these option allows to the admin to change the look and feel of this Prestashop in stock notification addon by Knowband.
Request for Notification Email Settings:
Once you select the language, following fields will be shown:
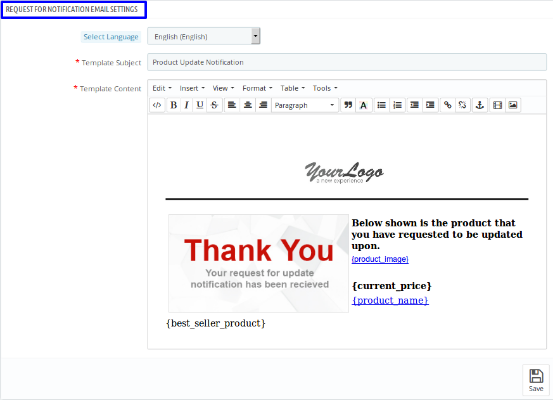
Select Language: In this field of Prestashop product update addon, the admin can select from four of the languages, i.e. English, French, Spanish & Italian.
Template Subject: Here, the admin can enter the text of his choice as subject. By default, the subject of the email is Product Update Notification.
Template Content: This is the body of the email that user receives after subscription. The admin can modify the text as per his preferences.
Notification Email Settings
The admin can manage the following two things under this category of Prestashop out of stock subscription module by Knowband:
Product Quantity Update Notification
Product Price Update Notification
Once you select the language of your choice, you’ll be able to see following settings:a.
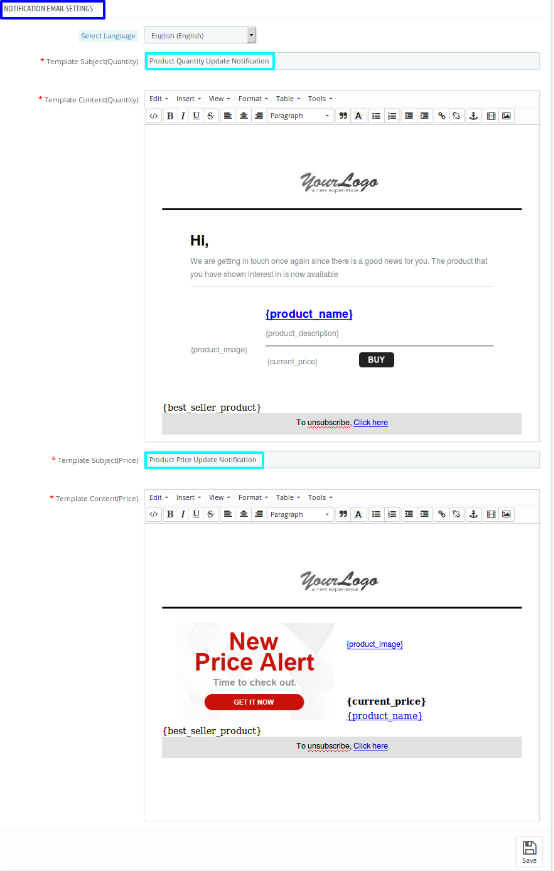
Product Quantity Update Notification: Product Quantity Update Notification is the template subject of the email. This is for the Out of Stock products. When the product, for which, customer has subscribed will be in stock then this email will be sent to the subscribers automatically. The admin can change the template subject and template content as per his choice.
Product Price Update Notification: This is the second part of the Notification Email Setting have Product Price Update Notification as template subject. This is for when there is change in the product price according to your setting that you have saved in General Setting under “Price Notification” field. Here, also, the admin can change the template subject and template content as per his choice.
Analysis:
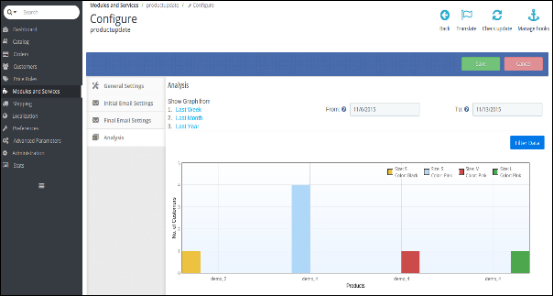
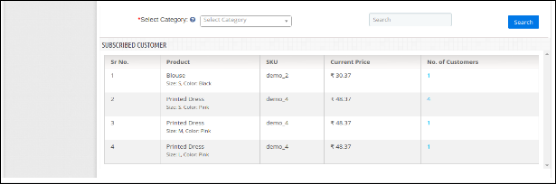
In analysis section of this Prestashop product update notification addon, the admin can see the overall report of subscribed product and customers in the form of graph and in the form of detailed list as well. When you select a date range, the graph will be displayed the top 10 products.
With the help of selected category and search element, the admin can see all the details about subscribed products along with the number of customer subscribed. For more details of the subscribed customer, admin will just need to click on the “number of customer”. By doing so, he can see the details about the subscribed customer in the pop-up menu.
Front End Module:
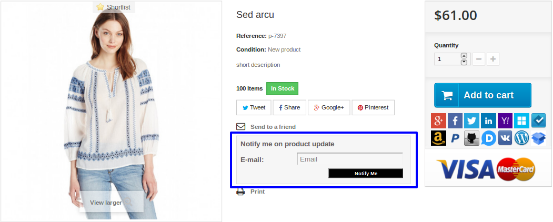
Once you enable this Knowband Prestashop notification addon at the back end, user will see the subscription box at the product page. The box contains a input field to enter the email id and a Notify Me button, through which, the customer will be subscribed to the respective product.
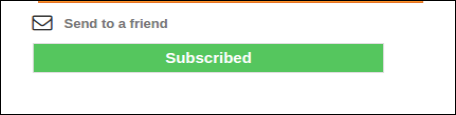
When a customer enters the email id and clicks to the button notify me the initial email will be sent to the entered email address and the message showing subscribed.
There will be a case when the entered email for subscription and the respective already exist, in that case the subscriber will be updated and the updated email will be sent again to the email.
Es gibt Zeiten, wenn die Ladenbesucher auf der Web site nach einem Produkt landen, aber die Web site verlassen, weil das Produkt nicht auf Lager ist. Sie finden das selbe auf einigen anderen Speichern und Sie verlieren eine Umwandlung. Sie werden nie wissen, warum die Besucher Ihre Website verlassen haben, ohne etwas gekauft zu haben. Um das Problem zu finden und das Problem zu beheben, müssen Sie die Interaktion des Kunden mit Ihrer Website verbessern, sodass Sie sie zurückerhalten können, wenn sie Ihr Geschäft aus diesem Grund verlassen.
Das Prestashop Produkt Updated Notification Modul des Knowbands ist DSGVO konform.
Schritte für die Installation von Prestashop Product Update Notification Addon
1. Ordnerstruktur des Plug-Ins für Produktaktualisierungen
2. Kopieren Sie den gesamten Ordner, der als Produktupdate bezeichnet wird, in Ihren Modulordner des Stammverzeichnisses Ihres PrestaShop-Speichers über FTP.
3. Sie können das Produktupdate-Plug-In für die Installation in den Modulen in Ihrem PrestaShop-Shop wie unten gezeigt finden.
4. Klicken Sie auf den Link Installieren, um das Programm zu installieren Prestashop-Plugin.
Admin-Modul
Hier kann der Shop-Inhaber die verschiedenen Einstellungen dieses Prestashop-Plugins entsprechend den Anforderungen ändern, die sowohl im Frontend als auch im Admin-Panel berücksichtigt werden.
Befolgen Sie die folgenden Schritte, um dieses Plug-in zu installieren:
1. Fügen Sie den gesamten Plugin-Ordner zum Modul-Ordner in das Stammverzeichnis des PrestaShop Stores hinzu.
2. Nach dem Hinzufügen von Plug-in-Dateien listet das System das Plug-in auf der Modulseite auf.
3. Klicken Sie je nach Bedarf auf Installieren / Deinstallieren.
4. Eine andere Möglichkeit besteht darin, den gesamten Ordner zu komprimieren und dann auf den Link Add New Module (Neuer Modul hinzufügen) zu klicken, der oben rechts auf der Modullistenseite angezeigt wird, wie in der folgenden Abbildung gezeigt:
5. Nach der Installation dieses Prestashop-Moduls wird der Link Konfigurieren anstelle des Links Installieren angezeigt, wie in der folgenden Abbildung dargestellt:
6. Jetzt ist Ihr Prestashop Out-of-Stock-Abonnementmodul einsatzbereit und Sie klicken auf Konfigurieren, um das Modul zu konfigurieren.
Admin-Schnittstelle
Nach der Installation dieses Prestashop-Benachrichtigungs-Addons erhält der Administrator folgende Schnittstellen:
Allgemeine Einstellungen
Anfrage für Benachrichtigungs-E-Mail-Einstellungen
Benachrichtigungs-E-Mail-Einstellung
Analyse
Allgemeine Einstellungen
Wenn Sie auf die Schaltfläche Konfigurieren klicken, öffnet das System standardmäßig das Feld für allgemeine Einstellungen. Dieses Feld hat folgende Optionen:
Anfänglich sind Felder in der obigen Form bereits mit ihren Standardwerten gefüllt.
Aktivieren deaktivieren: Anfangs ist dieses Prestashop Out of Notification Addon von Knowband auf NO gesetzt. Sie müssen dies auf YES setzen, um die Vorteile des Addons zu nutzen.
Löschen Sie Kundendaten in der Löschanforderung: Wenn diese Funktionalität aktiviert wird, können die Kunden die Löschung persönlicher Daten beantragen.
Aktivieren / Deaktivieren der Datenschutzrichtlinie: Das Prestashop-Produktupdatbenachrichtigungsmodul ermöglicht es dem Administrator, die Datenschutzrichtlinie am Frontend anzuzeigen oder auszublenden.
Datenschutzrichtlinie Text: In diesem Feld des Prestashop-Produktaktualisierungsmoduls kann der Administrator den gewünschten Datenschutzrichtlinientext festlegen. Der Text der Datenschutzrichtlinie kann bei Bedarf geändert werden.
Datenschutz URL: Der Administrator kann die Datenschutzrichtlinie mit der gewünschten URL-Auswahl verknüpfen. Die URL kann auch bei Bedarf geändert werden.
Hintergrundfarbe: Dieses Feld des Prestashop-Produktupdate-Benachrichtigungs-Addons ist auf der Ausgangsebene mit einigen Standardwerten gefüllt. Der Administrator kann die Hintergrundfarbe der Subskriptionsbox ändern, indem er eine Farbe aus der Farbauswahl auswählt, die am Frontend reflektiert wird.
Randfarbe: In diesem Feld kann der Administrator die Rahmenfarbe der Abo-Box nach seinen Wünschen ändern.
Preisbenachrichtigung: Dieses Feld der Produktaktualisierungsbenachrichtigung Prestashop bietet dem Administrator die Möglichkeit, den Preistyp für die Benachrichtigung der Abonnenten auszuwählen. Der Administrator kann entweder "Preis runter", "Preis aufwärts" oder "Beide" auswählen.
Textfarbe: Mit dem entsprechenden Prestashop-Plugin kann der Administrator sogar die Textfarbe der Abo-Box nach Belieben anpassen.
Benutzerdefiniertes CSS und JS: Beide Optionen ermöglichen es dem Administrator, das Aussehen und Verhalten dieses Prestashop im Add-on-Addon von Knowband zu ändern.
Anfordern
Einmal
Sprache wählen: In diesem Bereich des Prestashop-Produktupdate-Addons kann der Administrator aus vier Sprachen auswählen, dh Englisch, Französisch, Spanisch und Italienisch.
Vorlage Betreff: Hier kann der Administrator den Text seiner Wahl als Betreff eingeben. Der Betreff der E-Mail ist standardmäßig die Produktaktualisierungsbenachrichtigung.
Vorlageninhalt: Dies ist der Hauptteil der E-Mail, die der Nutzer nach dem Abonnement erhält. Der Administrator kann den Text gemäß seinen Einstellungen ändern.
Benachrichtigung
Das
Produkt
Produkt
Einmal
Benachrichtigung über Produktmengenaktualisierung: Produktmengenaktualisierungsbenachrichtigung ist der Vorlagen-Betreff der E-Mail. Dies ist für die Out of Stock Produkte. Wenn das Produkt, für das sich der Kunde angemeldet hat, vorrätig ist, wird diese E-Mail automatisch an die Abonnenten gesendet. Der Administrator kann den Vorlageninhalt und den Vorlageninhalt nach seiner Wahl ändern.
Produktpreisaktualisierungsbenachrichtigung: Dies ist der zweite Teil der Benachrichtigungs-E-Mail-Einstellung, der die Produktpreisaktualisierungsbenachrichtigung als Vorlage unterliegt. Dies ist der Fall, wenn sich der Produktpreis gemäß Ihrer Einstellung ändert, die Sie in der Allgemeinen Einstellung unter "Preisbenachrichtigung" gespeichert haben. Auch hier kann der Administrator den Vorlagen- und Vorlageninhalt nach seiner Wahl ändern.
Analyse:
Im Abschnitt "Analyse" dieses Prestashop-Produktsupdate-Benachrichtigungs-Addons kann der Administrator den Gesamtbericht des abonnierten Produkts und der Kunden in Form eines Diagramms und in Form einer detaillierten Liste anzeigen. Wenn Sie einen Datumsbereich auswählen, werden in der Grafik die besten 10-Produkte angezeigt.
Mithilfe der ausgewählten Kategorie und des Suchelements kann der Administrator alle Details zu abonnierten Produkten zusammen mit der Anzahl der abonnierten Kunden anzeigen. Für weitere Details des abonnierten Kunden muss der Administrator nur auf die "Nummer des Kunden" klicken. Auf diese Weise kann er im Popup-Menü die Details zum abonnierten Kunden sehen.
Vorderseite
Sobald Sie dieses Knowband Prestashop-Benachrichtigungs-Add-On am Backend aktiviert haben, wird der Benutzer die Abonnement-Box auf der Produktseite sehen. Die Box enthält ein Eingabefeld zur Eingabe der E-Mail-ID und eine Schaltfläche Benachrichtigen, über die der Kunde das jeweilige Produkt abonniert.
Wenn ein Kunde die E-Mail-ID eingibt und auf die Schaltfläche klickt, wird mir mitgeteilt, dass die ursprüngliche E-Mail an die eingegebene E-Mail-Adresse und die Nachricht mit dem Abonnement gesendet wird.
Es wird einen Fall geben, wenn die eingegebene E-Mail für das Abonnement und die entsprechenden bereits existieren, in diesem Fall wird der Abonnent aktualisiert und die aktualisierte E-Mail wird erneut an die E-Mail gesendet.
Fühlen Sie sich frei, uns unter support@knowband.com für jede Anfrage oder benutzerdefinierte Änderung Anfrage gemäß Ihrer Geschäftsanforderung zu kontaktieren.
Ci sono momenti in cui i visitatori del negozio arrivano sul sito Web alla ricerca di un prodotto, ma lascia il sito Web perché il prodotto non è in magazzino. Trovano lo stesso su altri negozi e perdi una conversione. Non saprai mai perché i visitatori hanno abbandonato il tuo sito senza acquistare nulla. Per trovare il problema e correggere il problema, devi aumentare il coinvolgimento del cliente con il tuo sito, in modo che, se lo desideri, puoi riprenderli se lasciano il tuo negozio per questo motivo.
Il modulo di notifica aggiornato del prodotto Prestashop di Knowband è conforme a GDPR.
Passaggi per l'installazione del componente aggiuntivo di notifica dell'aggiornamento del prodotto Prestashop
1. Struttura delle cartelle della cartella del plugin di aggiornamento del prodotto.
2. Copia l'intera cartella denominata come aggiornamento del prodotto nella cartella dei moduli della directory principale del tuo negozio PrestaShop tramite FTP.
3. Potrai trovare il plug-in di aggiornamento del prodotto pronto per essere installato nei moduli nel tuo negozio PrestaShop come mostrato di seguito.
4. Fare clic sul collegamento Installa per installare il Plug-in Prestashop.
Modulo di amministrazione
Qui il proprietario del negozio può modificare le varie impostazioni di questo plug-in Prestashop in base alle esigenze, che si rifletteranno sul front-end e nel pannello di amministrazione.
Per installare questo plug-in, si prega di seguire i seguenti passi:
1. Aggiungi tutta la cartella di plug-in completa alla cartella dei moduli nella directory principale di PrestaShop Store.
2. Dopo aver aggiunto i file plug-in, il sistema elencherà il plug-in sulla pagina del modulo.
3. Clicca su Installa / Disinstalla secondo necessità.
4. Un altro modo è che puoi comprimere l'intera cartella e fare clic sul link Aggiungi nuovo modulo visualizzato nell'angolo in alto a destra della pagina di elenco dei moduli, come mostrato nella schermata di seguito:
5. Dopo aver installato questo modulo Prestashop, verrà visualizzato il collegamento Configura invece del collegamento Installa come mostrato nella schermata di seguito:
6. Ora, il modulo di abbonamento Prestashop esaurito è pronto per l'uso e fai clic su Configura link per configurare il modulo.
Interfaccia di amministrazione
Dopo aver installato questo addon di notifica Prestashop, l'amministratore otterrà le seguenti interfacce:
Impostazioni generali
Richiesta di impostazioni e-mail di notifica
Impostazioni e-mail di notifica
Analisi
Impostazioni generali
Quando fai clic sul pulsante Configura, il sistema aprirà il campo delle impostazioni generali per impostazione predefinita. Questo campo ha le seguenti opzioni:
Inizialmente i campi nel modulo sopra saranno già riempiti con i loro valori predefiniti.
Attiva / Disattiva: Inizialmente, questo addon di notifica Prestashop esaurito da Knowband è impostato su NO opzione. È necessario impostare questo su SÌ per ottenere i vantaggi dell'add-on.
Elimina i dati cliente sulla richiesta di cancellazione: Abilitando questa funzionalità si abiliterà l'opzione per i clienti di richiedere l'eliminazione dei dati personali.
Abilita / Disabilita l'informativa sulla privacy: Il modulo di notifica di aggiornamento del prodotto Prestashop consente all'amministratore di visualizzare o nascondere la politica sulla privacy al front-end.
Testo della politica sulla privacy: Questo campo del modulo di aggiornamento del prodotto Prestashop consente all'amministratore di impostare il testo della privacy policy desiderato. Il testo della politica sulla privacy può essere modificato ogni volta che è necessario.
URL della privacy: L'amministratore può collegare la politica sulla privacy alla scelta dell'URL desiderata. L'URL può anche essere modificato quando richiesto.
Colore di sfondo: Questo campo di addon di notifica di aggiornamento del prodotto Prestashop viene riempito con un valore predefinito al livello iniziale. L'amministratore può modificare il colore di sfondo della casella di sottoscrizione selezionando un colore dal selettore di colori che verrà riflesso nella parte anteriore.
Colore del bordo: In questo campo, l'amministratore può cambiare il colore del bordo della casella di abbonamento in base alle sue preferenze.
Notifica del prezzo: Questo campo della notifica di aggiornamento del prodotto Prestashop consente all'amministratore di selezionare il tipo di livello di prezzo per informare gli abbonati. L'amministratore può selezionare Prezzo basso, Prezzo alto o Entrambi i tipi di livello di prezzo.
Colore del testo: Il rispettivo plug-in di Prestashop consente anche all'amministratore di personalizzare il colore del testo della scatola di abbonamento come da sua scelta.
CSS e JS personalizzati: Entrambe queste opzioni consentono all'amministratore di modificare l'aspetto grafico di questo Prestashop nell'aggiornamento delle notifiche di Knowband.
Richiesta
Una volta
Scegli la lingua: In questo campo di add-on di aggiornamento del prodotto Prestashop, l'amministratore può selezionare da quattro delle lingue, cioè inglese, francese, spagnolo e italiano.
Oggetto del modello: Qui, l'amministratore può inserire il testo di sua scelta come soggetto. Per impostazione predefinita, l'oggetto dell'e-mail è Notifica di aggiornamento del prodotto.
Contenuto del modello: Questo è il corpo dell'email che l'utente riceve dopo l'iscrizione. L'amministratore può modificare il testo secondo le sue preferenze.
Notifica
Il
Prodotto
Prodotto
Una volta
Notifica aggiornamento quantità prodotto: La notifica di aggiornamento della quantità di prodotto è il modello oggetto dell'e-mail. Questo è per i prodotti Out of Stock. Quando il prodotto, per il quale il cliente è iscritto, sarà disponibile, questa email verrà inviata automaticamente agli abbonati. L'amministratore può modificare l'oggetto del modello e il contenuto del modello secondo la sua scelta.
Notifica aggiornamento prezzo prodotto: Questa è la seconda parte delle impostazioni e-mail di notifica con la notifica di aggiornamento del prezzo del prodotto come oggetto del modello. Questo è per quando c'è un cambiamento nel prezzo del prodotto in base alle impostazioni che hai salvato in Impostazioni generali nel campo "Notifica prezzi". Qui, inoltre, l'amministratore può cambiare l'oggetto del modello e il contenuto del modello secondo la sua scelta.
Analisi:
Nella sezione di analisi di questo addon di notifica di aggiornamento del prodotto Prestashop, l'amministratore può vedere il report complessivo del prodotto sottoscritto e dei clienti sotto forma di grafico e sotto forma di elenco dettagliato. Quando selezioni un intervallo di date, sul grafico verranno visualizzati i prodotti 10 migliori.
Con l'aiuto della categoria selezionata e dell'elemento di ricerca, l'amministratore può vedere tutti i dettagli sui prodotti sottoscritti insieme al numero di clienti iscritti. Per maggiori dettagli sul cliente iscritto, l'amministratore dovrà solo fare clic sul "numero di clienti". In questo modo, può visualizzare i dettagli sul cliente iscritto nel menu a comparsa.
Davanti
Una volta abilitato questo addon di notifica di Knowband Prestashop nel back-end, l'utente vedrà la casella di sottoscrizione nella pagina del prodotto. La casella contiene un campo di immissione per inserire l'ID e un pulsante di notifica, tramite il quale il cliente verrà abbonato al rispettivo prodotto.
Quando un cliente immette l'id dell'email e fa clic sul pulsante, l'email iniziale verrà inviata all'indirizzo e-mail inserito e al messaggio che viene visualizzato.
Ci sarà un caso in cui l'e-mail inserita per la sottoscrizione e la rispettiva già esistente, in tal caso l'abbonato verrà aggiornato e l'e-mail aggiornata verrà inviata nuovamente all'e-mail.
Non esitate a contattarci all'indirizzo support@knowband.com per qualsiasi richiesta o richiesta di modifica personalizzata in base alle vostre esigenze aziendali.
Zdarzają się sytuacje, gdy użytkownicy sklepu trafiają na stronę szukając produktu, ale opuszczają witrynę, ponieważ produkt nie jest dostępny w magazynie. Są takie same w niektórych innych sklepach i tracisz konwersję. Nigdy nie dowiesz się, dlaczego użytkownicy opuścili Twoją witrynę, nie kupując niczego. Aby znaleźć problem i rozwiązać problem, musisz zwiększyć zaangażowanie klientów w witrynie, aby móc je odzyskać, jeśli opuszczą Twój sklep z tego powodu.
Właściciel sklepu może zmienić różne ustawienia tej wtyczki Prestashop zgodnie z wymaganiami, które zostaną odzwierciedlone na interfejsie użytkownika, a także w panelu administracyjnym.
Aby zainstalować tę wtyczkę, wykonaj następujące kroki:
1. Dodaj cały folder wtyczek do folderu modułów do katalogu głównego Sklepu PrestaShop.
2. Po dodaniu plików wtyczek system wyświetli listę wtyczek na stronie modułu.
3. Kliknij na instalację / odinstalowanie zgodnie z potrzebą.
4. Innym sposobem jest skompresowanie całego folderu, a następnie kliknięcie linku Dodaj nowy moduł w prawym górnym rogu strony z listą modułów, jak pokazano na poniższym ekranie:
5. Po zainstalowaniu tego modułu Prestashop, link Konfiguruj zostanie wyświetlony zamiast łącza instalacji, jak pokazano na poniższym ekranie:
6. Teraz Twój Prestashop z modułu subskrypcji magazynowej jest gotowy do użycia i kliknij Konfiguruj łącze, aby skonfigurować moduł.
Interfejs administracyjny
Po zainstalowaniu tego dodatku do powiadomienia Prestashop, administrator otrzyma następujące interfejsy:
Ustawienia ogólne
Żądanie ustawień powiadomień e-mail
Ustawienie wiadomości e-mail z powiadomieniem
Analiza
Ustawienia ogólne
Po kliknięciu przycisku konfiguracji system otworzy domyślnie ogólne pole ustawień. To pole ma następujące opcje:
Początkowo pola w powyższym formularzu będą już wypełnione wartościami domyślnymi.
Włącz / wyłącz: Początkowo ten Prestashop z giełdy powiadomień o stanie zapasów przez Knowband jest ustawiony na opcję NIE. Musisz ustawić to na TAK, aby uzyskać korzyści z dodatku.
Usuń dane klienta na żądanie usunięcia: Włączenie tej funkcji umożliwi opcję żądania usunięcia danych osobowych przez klientów.
Włącz / wyłącz politykę prywatności: Moduł powiadomień o aktualizacji produktu Prestashop umożliwia administratorowi wyświetlenie lub ukrycie polityki prywatności na pierwszym planie.
Tekst polityki prywatności: To pole modułu aktualizacji produktu Prestashop umożliwia administratorowi ustawienie pożądanego tekstu polityki prywatności. Tekst polityki prywatności można edytować w razie potrzeby.
URL polityki prywatności: Administrator może powiązać politykę prywatności z żądanym wyborem adresu URL. Adres URL może również ulec zmianie w razie potrzeby.
Kolor tła: To pole dodatku do powiadomienia o aktualizacji produktu Prestashop jest wypełnione pewną wartością domyślną na poziomie początkowym. Administrator może zmienić kolor tła pola subskrypcji, wybierając kolor z próbnika kolorów, który zostanie odzwierciedlony na interfejsie użytkownika.
Kolor ramki: W tym polu administrator może zmienić kolor ramki subskrypcji zgodnie z własnymi preferencjami.
Powiadomienie o cenie: To pole powiadomienia o aktualizacji produktu Prestashop zapewnia administratorowi wybór typu poziomu cen, aby powiadomić subskrybentów. Administrator może wybrać obniżenie ceny, podwyższenie ceny lub oba rodzaje poziomu cen.
Kolor tekstu: Odpowiednia wtyczka Prestashop pozwala nawet administratorowi dostosować kolor tekstu pola subskrypcji zgodnie z własnym wyborem.
Niestandardowe CSS i JS: Obie te opcje umożliwiają administratorowi zmianę wyglądu i sposobu działania tego Prestashopa w dodatku do powiadomień giełdowych przez Knowband.
Żądanie
Pewnego razu
Wybierz język: W tym polu dodatku do aktualizacji produktu Prestashop administrator może wybrać jeden z czterech języków, tj. Angielskiego, francuskiego, hiszpańskiego i włoskiego.
Temat szablonu: W tym miejscu administrator może wprowadzić wybrany przez siebie tekst jako temat. Domyślnie tematem wiadomości e-mail jest powiadomienie o aktualizacji produktu.
Zawartość szablonu: Jest to treść wiadomości e-mail, którą użytkownik otrzymuje po subskrypcji. Administrator może zmodyfikować tekst zgodnie ze swoimi preferencjami.
Powiadomienie
The
Produkt
Produkt
Pewnego razu
Powiadomienie o aktualizacji ilości produktu: Powiadomienie o aktualizacji ilości produktów jest szablonem wiadomości e-mail. Dotyczy produktów z magazynu. Kiedy produkt, na który klient dokonał subskrypcji, będzie dostępny w magazynie, ten e-mail zostanie automatycznie wysłany do subskrybentów. Administrator może zmienić temat szablonu i zawartość szablonu zgodnie z własnym wyborem.
Powiadomienie o aktualizacji cen produktu: Jest to druga część ustawienia Powiadomienie o e-mailu, które jako temat szablonu ma powiadomienie o aktualizacji cen produktu. Jest tak w przypadku zmiany ceny produktu zgodnie z ustawieniem zapisanym w Ustawieniach ogólnych w polu "Powiadomienie o cenie". Tutaj również administrator może zmienić temat szablonu i zawartość szablonu według własnego wyboru.
Analiza:
W dziale analizy tego dodatku do aktualizacji produktu Prestashop administrator może zobaczyć ogólny raport subskrybowanego produktu i klientów w formie wykresu oraz w postaci szczegółowej listy. Po wybraniu zakresu dat na wykresie zostaną wyświetlone najlepsze produkty 10.
Za pomocą wybranej kategorii i elementu wyszukiwania administrator może zobaczyć wszystkie szczegóły dotyczące subskrybowanych produktów wraz z liczbą subskrybowanych klientów. Aby uzyskać więcej informacji o subskrybowanym kliencie, administrator będzie musiał kliknąć "numer klienta". Dzięki temu może wyświetlić szczegóły dotyczące zasubskrybowanego klienta w wyskakującym menu.
Z przodu
Po włączeniu tego powiadomienia Addband Prestashop na zapleczu użytkownik zobaczy pole subskrypcji na stronie produktu. W polu tym znajduje się pole wprowadzania, w którym można wprowadzić identyfikator e-mail oraz przycisk Powiadom mnie, za pomocą którego klient będzie subskrybować dany produkt.
Gdy klient wprowadzi identyfikator e-mail i kliknie przycisk, powiadom mnie, że pierwsza wiadomość e-mail zostanie wysłana na podany adres e-mail, a wiadomość zostanie wyświetlona zasubskrybowana.
Pojawi się przypadek, w którym wprowadzony adres e-mail dla subskrypcji i odpowiedni już istnieje, w takim przypadku subskrybent zostanie zaktualizowany, a zaktualizowana wiadomość e-mail zostanie wysłana ponownie na adres e-mail.