The government’s announcement in march regarding the allowance of 100% FDI in marketplace model set the bell ringing in e-commerce market. As most of the big e-commerce websites are adopting the marketplace model, we need to understand that what exactly is all about and how it can be the new shift in the market.
What it is ?
A marketplace model refers to an arrangement in which the e-commerce websites allow the small vendors and entrepreneur to use their digital platform so as to connect with large base of buyers. In lieu of their usage of the platform, the vendors pay a certain percentage of profit they gained through each transaction made online. It marks a shift from the traditional inventory based model where the e-commerce websites used to keep the stock in their warehouses. They had to update it regularly in accordance with the market’s demand.
How it can mark a shift ?
With most of the e-commerce business in developed countries going the marketplace way, the developing countries are also adopting the same. The reason for this can be sited from the fact that, the nature and structure of the marketplace model is such that it caters the demand of all the stakeholders involved. The customers get a wide range of product to choose form, while the sellers get an access to larger consumer base. The e-commerce website on the other hand enjoys certain benefits in terms of cost cuts, customer satisfaction, conversion rate, and commission from the sellers.
Another reason why the marketplace model holds a key is its inclusive nature. The offline shop owners who were left ignored after the advent of e-commerce era now get a chance to evolve themselves and reap the benefits of the digital market.
While providing such benefits, the one thing which marketplace model does silently is its contribution to the economy. By bringing in the small and medium vendors and start up in the picture, it widens the base of economy. Especially in developing countries where a large portion of market is captured by SMEs and start ups.
Transparency and seamless delivery are other such aspects which favors the marketplace model. With similar guidelines for all the sellers it promotes healthy competition. At the same time, it promotes transparency as the customers clearly know with whom they are transacting.
How you can adopt it ?
In order to shift your e-commerce website to the marketplace model you need to install the marketplace module of the CMS platform you are using for your website. For example, various marketplace module like Knowband’s Magneto’s marketplace extension, PrestaShop’s marketplace module etc. are available online. These modules are user friendly and easy to adopt, and allow you to get an overview through the free trial facility provided.
Conclusion
With the wind sailing in direction of the marketplace model, we need to wait and watch as how long it will take for the marketplace model to capture the market. Nevertheless with its add advantages, it presents a strong case against the traditional inventory based model.
Marketing strategy plays a crucial role in deciding the fate of your business enterprise. A marketing strategy has the potential to either make or break the situation for your enterprise. Content marketing is one aspect of your marketing strategy that can do wonders to your business if properly utilized. Content marketing generally refers to the act of delivering the content that is relevant and interesting to your target audience. Even though it sounds general, it has been the area which is less pondered during your business discussions. We will here take a look at the reasons which make content marketing an effective part of your marketplace enterprise.
What does content marketing brings to your marketplace?
Content marketing involves a detailed structurization of your marketing strategy.
Marketplace model provides a good scope for content marketing, as there is always a chance of mixing up of irrelevant content due to the presence of a large number of sellers and a huge range of products. Now we will look at the aspects which make content marketing a necessity for your marketplace.
1. Ads doesn’t create value: The content that you put on your ads doesn’t arouse much of desire from the visitors. Though the branding aspects of these ads is high in a marketplace set up, but they often act as a disturbance to the actual content reading. You can structure your ads to provide a little more sneak into the product like price, brand, discount etc. This will act as the crux for the entire content and will make it a bit interesting for the visitors.
2. Makes customer realize the utility of the product: An ordinary display of content highlights only the seller’s aspect in its description. While a content marketing approach molds it into a description that describes its utility from the customer’s perspective. For instance, a normal safety shoe Ad will describe the product in length, but in content marketing approach can provide a detailed information of the same to the target audience.
3. Helps you in realizing the power of visuals: A content marketing guides you to make your marketplace more visitor friendly and customer-centric. It is always difficult to cramp through a detailed content for a range of products in marketplace set up. The content marketing approach helps you realize that its not the usual textual description that works all the time. Videos are an important part of your content set up. They not only help in making the website more engaging, but also provides a better insight and remembrance for the visitors. So, videos can also act as an important content on your product pages that works for both – product description and content marketing.
4. Helps in website SEO : Visitor’s land on your website either when they are looking for the product and services delivered by you or when they are searching generally for product and services that fall under your functional area. In this case, a market-oriented content will attract the maximum traffic through higher SERPs as it will be showcasing those keywords that the customer usually targets. Thus, marketing of content becomes essential, especially when you are dealing with a range of products.
Final say
The importance of adopting a customer-centric and user-friendly approach for your website is the need of the hour for all the websites. However, o run through text charges and they worked, orders were created.
The multi-vendor marketplace model has created a sensation since it arrived in the e-commerce arena. The growth and expansion opportunity that it brings along are seen as the driving factors behind its success. The adoption of the model has bought some effective results for those who have adopted it thus, substantiating its success.
Initially, the developed countries were latching on to the model but now after the effect, it has created, developing countries are not far behind. You might be wondering how a shift in a model can bring such a difference to your business growth. To make your job easy we will here discuss on how a multi-vendor marketplace model helps in expanding your business growth.
Multi-vendor marketplace vs business growth
After taking a look at the general trends of the marketplace model, we will now shift our focus towards its positive effects on your business.
Base expansion: By allowing the integration of various vendors on to your platform, a marketplace module expands the base of the products and services offered by you. More the number of choices you offer, more are the chances that the visitor will turn into a customer. Thus, a direct boost to your conversion rate.
Deeper market penetration: As the multi-vendor model involves the integration of sellers from various regions, it becomes easier to cater to the early shipment needs of the customers. This allows you to reach the customers even at the remotest corner, thus increasing your market penetration.
Cost-cutting: The shift to multi-vendor model takes away the responsibility of product update, inventory management, and SKU up-gradation. This, in turn, cuts the cost involved in managing these expenses without even disturbing the flow of your business. You can utilize these resources in some other aspects of your business like the enhancement of your product shipment through integration with different shipping solutions.
Efficiency: With multiple vendors involved, the process of procurement, packaging, and shipment take place in a more speedy and efficient way. Unlike the traditional model, where all these responsibilities rest with a single unit that too for the entire range of customers, this division of labor makes the task smooth and simple.
Customer satisfaction: By enriching your business with the above-mentioned features, the last thing which you can expect from the model is ensuring customer satisfaction. The aim of any business is to satisfy the customer with their product and services and to cater to this need you need to devise methods that cater to this effect.
Final say
Expansion and growth are what any business love to witness. To achieve these aims for your business, you need to ensure that your business is leaving up to the extent of its full potential. Multi-vendor marketplace model is one such tool you can rely on expand your business reach.
Prestashop Mailigen & MailChimp Integrator Addon by Knowband is a Prestashop module that allows the system to automatically sync customers email addresses of your store on Mailigen Account or MailChimp Account or both accounts. Mailigen and Mailchimp both are email service providers through which you can send newsletters or emails related to your services and offers to your customers. Also, Both provides number of email templates which you can select as per your need.
1.1 Benefits of the Admin:
1. This Prestashop Mailigen and MailChimp Integrator addon allows the store admin to enable/disable the module as per need.
2. Smart sync feature allows admin to subscribe users to his/her Mailigen and MailChimp account.
3. The Prestashop Mailigen and MailChimp Integrator extension offers the smart sync feature. However, the module synchronizes of email as soon as focus is blurred from email field.
4. The Prestashop Mailigen extension allows the store admin to sync the Mailigen account by entering the Mailigen API Key.
5. The Prestashop MailChimp integrator module allows the store admin to sync the MailChimp account by entering the MailChimp API Key.
6. The Store admin can easily synchronize the Mailigen & MailChimp account with your store without any hassle.
7. With the help of this Magento Addon, The Online retailers can send email campaigns to all the customers either they have registered to the site or not.
8. The advanced feature of this Prestashop extension, the admin can also include Field Id and Class Id to sync emails from the non-default email fields.
9. The Prestashop addon helps the Prestashop merchant in email marketing.
10. The Admin can boost the website revenue.
2.0 Installation
After purchasing the Prestashop Mailigen and MailChimp Integrator extension, you will get following files as listed below:
1. Compressed File in ZIP format (contains source code of the module)
2. User Manual
Follow the following steps to install the extension:
1. Unzip the compressed file. It would contain files and folders as shown below –
2. Copy all the files and folders of unzipped folder into your store “modules” directory on the path – Root Directory/modules/.
3. Now Prestahsop extension is ready to be installed on your store and you can find that in Store Admin -> Modules and Services. It would shown as below –
For Prestashop 1.6.x.x
For Prestashop 1.7.x.x
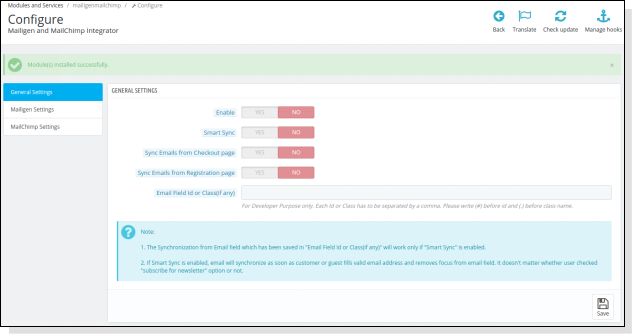
4. Click on “Install” button to install the Prestahsop MailChimp integartor addon. It would show a pop-up for your confirmation. Click on “Proceed with the installation” option. This step will install the Prestashop addon and show notification – “Module(s) installed successfully”.
3.0 How to configure module ?
This Prestashop Mailigen and MailChimp integrator extension is configurable and the Store Owner can setup or configure this Prestashop module through Admin Panel of store by following steps given below –
1. Go to Store Admin -> Modules and Services
2. Find “Mailigen and MailChimp” and click “configure” button given corresponding to the module.
3. It would open a new page as shown below –
4.0 Admin Panel
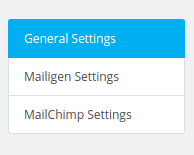
The admin panel will have 3 tabs for configuring this plugin, as listed below:
General Settings
Mailigen Settings
MailChimp Settings
4.1 General Settings
This section the Prestashop Mailigen and MailChimp integrator extension allows the online retailers to enable/disable the Prestashop addon with some more configurations.
You have to follow steps given below to configure General Settings –
1.Goto the Prestashop Module and Services -> Module and Services
2.It would list all the modules of store. Find ‘Mailigen and MailChimp’ in modules list.
3.Now click on ‘Configure’ button given corresponding to the ‘Mailigen and MailChimp’ module.
4.It would redirect eCommerce merchant to a new page as shown below –
5.Update the values of given fields corresponding to ‘General Settings’ as per need.
6. Now click on ‘Save’ and it would validate and save the provided values.
That’s it.
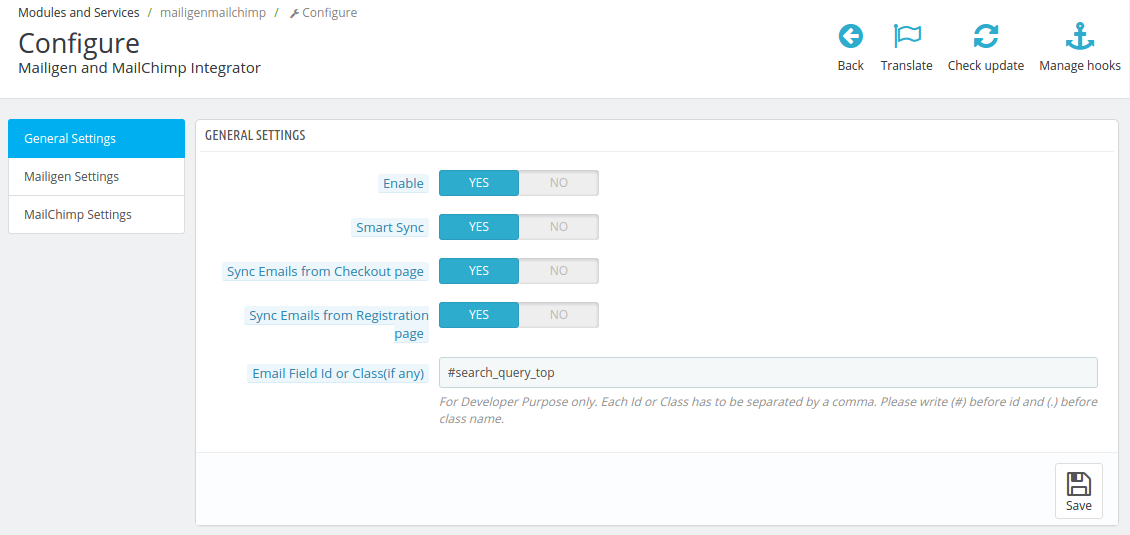
From here admin can enable/disable Prestahsop extension Also he/she can set the page ( registration and checkout ) from where to sync e-mail id.
General Settings tab will have following options:
1. Enable: From this button admin can enable/ disable the Knowband’s Prestahsop Mailigen and MailChimp module. By default, it will be off.
2. Smart Sync: This option when enabled, email id after validation will be synchronized if visitor/guest/customer remove focus after filling email field irrespective of the fact if the user have submitted the form or not or user have opted for newsletter subscription or not. If it is disabled the email will be synced only when form is submitted and if customer has opted for newsletter subscription.
3. Sync Email from Checkout page: From this button admin can set whether to sync email from checkout page or not. If enabled, email will be synced from the checkout page to accounts configured in admin panel. If customer chooses guest checkout then only email address filled at the time of checkout will sync.
4. Sync Email from Registration page: From this option the Prestashop store Admin can set whether to sync email from registration page or not. If enabled, email will be synced from the registration page to accounts configured in admin panel. If guest chooses to create account on checkout page or guest sign up in both cases, email will be synced if he/she chooses “subscribe for newsletter”.
5. Email Field Id or class (if any): This text field is for developer purpose only. From this option the Online retailers or his/her developer can set the fields of email or newsletter from which he/she wants email to sync. The field id name or class name should be followed by (#) or (.) respectively. The purpose of this field is to make module compatible with other newsletter forms which comes with theme or some third party module.
4.2 Mailigen Settings
This section allows the store admin to enable/disable Mailigen functionality which allow system to sync emails on Mailigen system.
You have to follow steps given below to configure Mailigen Settings –
1. Goto the Module and Services -> Module and Services
2. It would list all the modules of store. Find ‘Mailigen and MailChimp’ in modules list.
3. Now click on ‘Configure’ button given corresponding to the ‘Mailigen and MailChimp’ module.
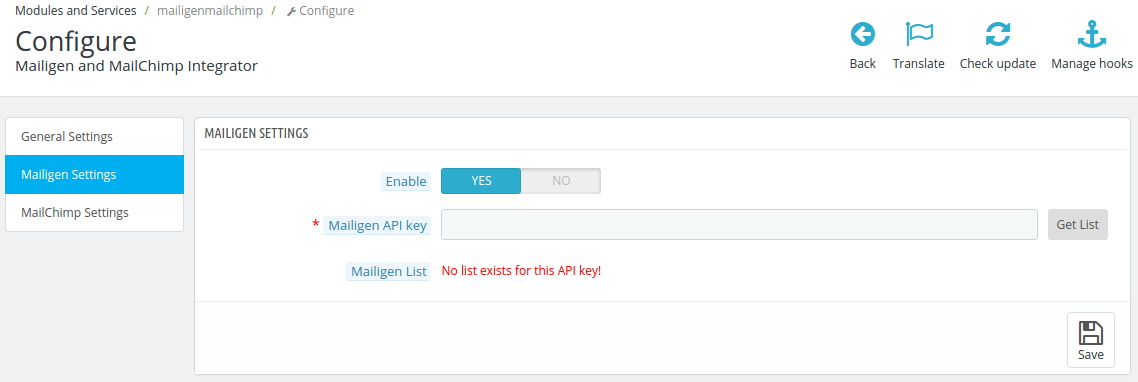
4. It would redirect Store Owner to a new page. Click on “Mailigen Settings” tab and it would open a new section as shown below -\
5. Update the values of given fields as per need.
6. Now click on ‘Save’ and it would validate and save the provided values.
7. That’s it.
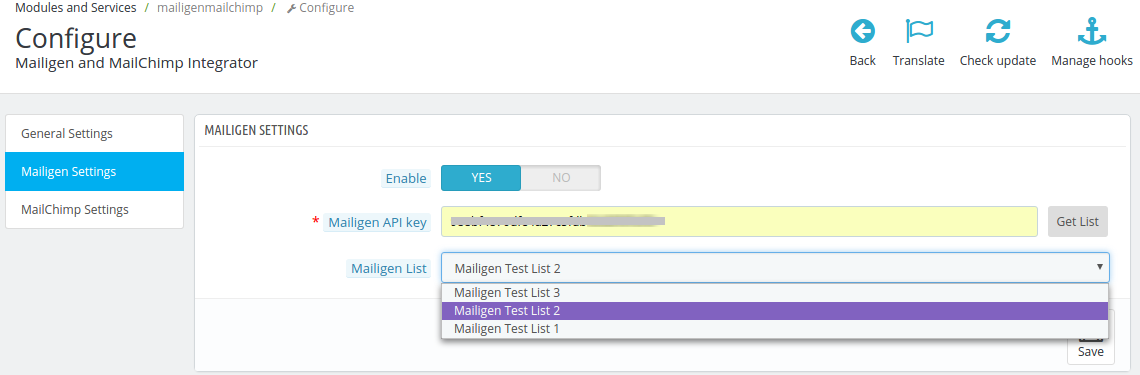
Mailigen Settings tab will have following options.
Enable: From this option admin can enable/disable the Mailigen settings. Initially it will be off.
Mailigen API Key: Mailigen API key is the key that the user created on his/her Mailigen account at www.mailigen.com. This API key will be used to connect to the Mailigen API. Fill API field with correct API and click Get List button. Lists drop down will be visible containing all the lists related to that Mailigen API key.
Mailigen Lists: Mailigen Lists will be available when the Mailigen API key is provided.
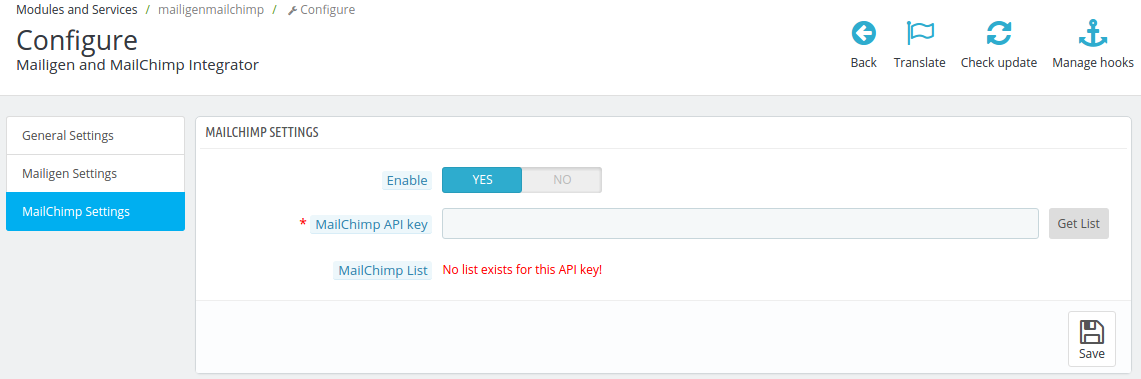
NOTE : If the Mailigen Settings > Mailigen API key field is empty then no lists will be shown , but an error message will be shown instead saying ‘No lists exist for this API key !’ as shown in screen above.
To Set up Mailigen Account
Visit mailigen and create account. After account creation, login to your account.
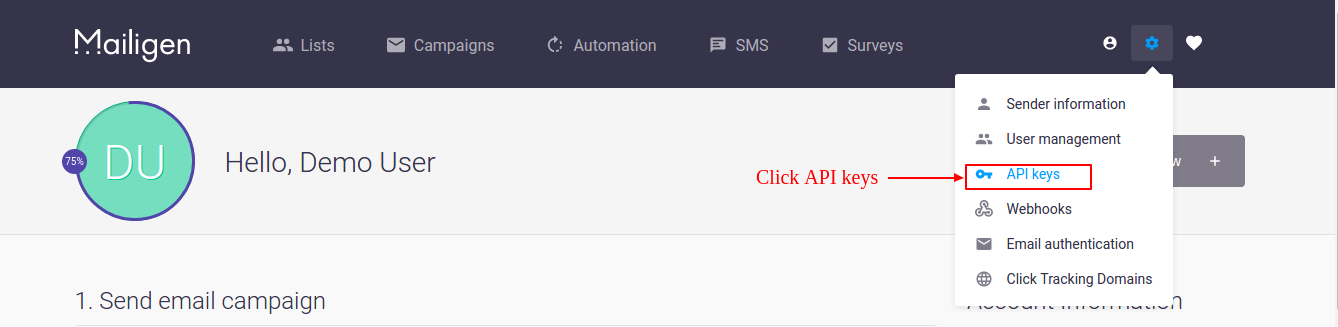
On Dashboard, click settings icon on upper right corner of dashboard as seen in screen below.
After clicking settings icon drop down will open, click API keys in that menu. Screen is given below:
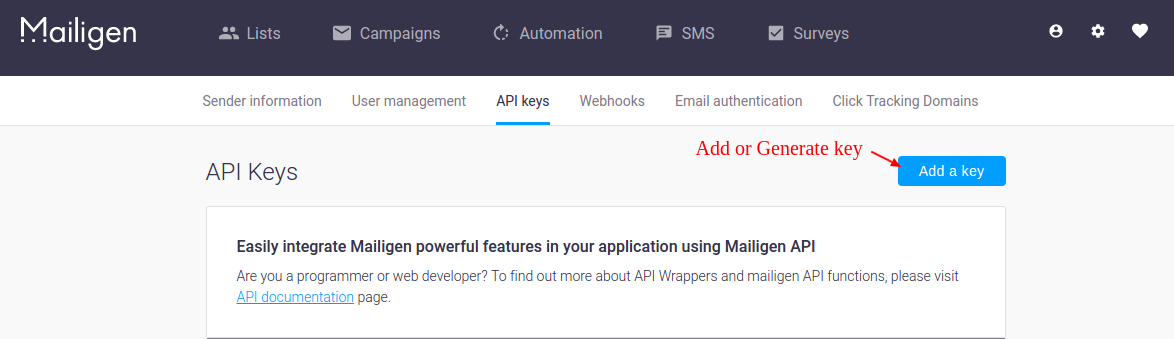
After clicking “API keys” link, admin will be redirected to new page where he/she can add API key. Click Add a key link to create API.
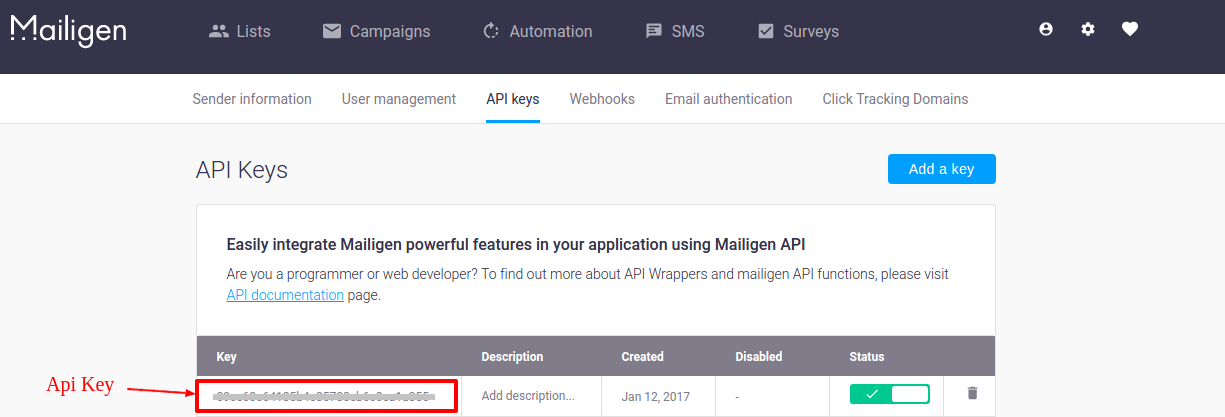
After generation of key, your API key will be visible in list as shown below. Use this key load your lists in plugin.
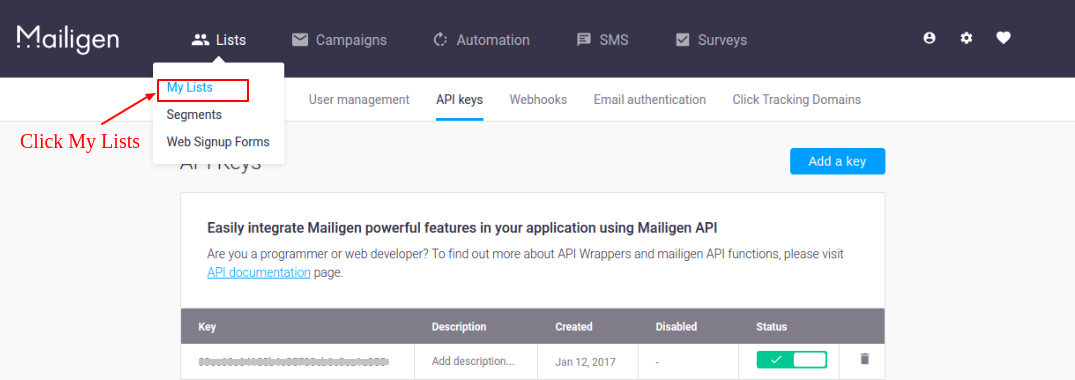
Now to create list, Go to Lists tab in upper menu. Drop down will open. Click “My Lists”link to view you lists or to create lists.
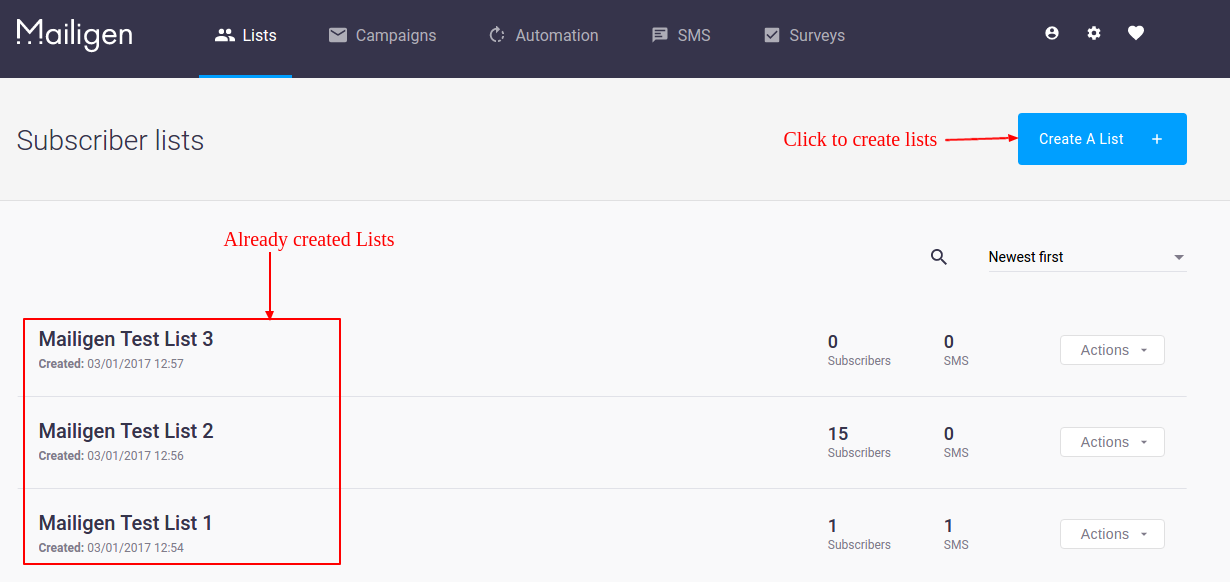
On My Lists page, Click “Create a list” to create new list. After creation lists will be visible on My Lists page as shown in screen below.
4.3 MailChimp Settings
This section allows admin to enable/disable MailChimp functionality which allow system to sync emails on MailChimp system.
You have to follow steps given below to configure MailChimp Settings –
1. Goto the Module and Services -> Module and Services
2. It would list all the modules of store. Find ‘Mailigen and MailChimp’ in modules list.
3. Now click on ‘Configure’ button given corresponding to the ‘Mailigen and MailChimp’ module.
4. It would redirect Store Owner or Admin to a new page. Click on “MailChimp Settings” tab and it would open a new section as shown below –
5.Update the values of given fields as per need.
6.Now click on ‘Save’ and it would validate and save the provided values.
7.That’s it.
MailChimp Settings tab will have following options.
Enable/Disable: From this option admin can enable/disable the MailChimp settings. Initially it will be off.
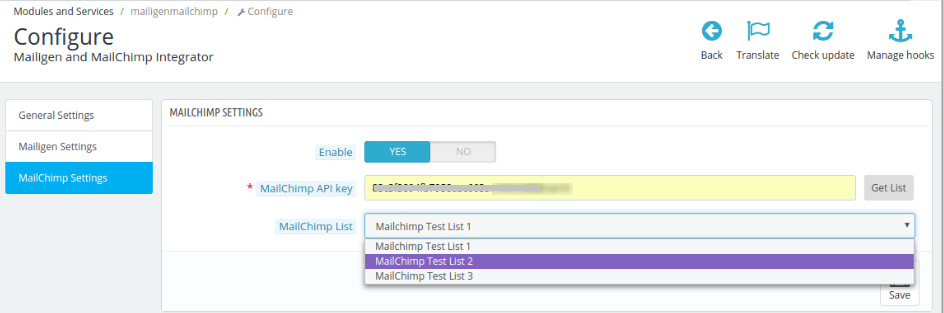
MailChimp API Key: MailChimp API key is the key that the user created on his/her MailChimp account at www.mailchimp.com. This API key will be used to connect to the MailChimp API. Fill API field with correct API and click Get List button. Lists drop down will be visible containing all the lists related to that MailChimp API key.
MailChimp Lists: MailChimp Lists will be available when the MailChimp API key is provided.
NOTE : If the MailChimp Settings >MailChimp API key field is empty then no lists will be shown , but an error message will be shown instead saying ‘No lists exist for this API key !’ as shown in screen above.
To Set up MailChimp Account
Visit mailchimp and create account. After account creation, login to your account.
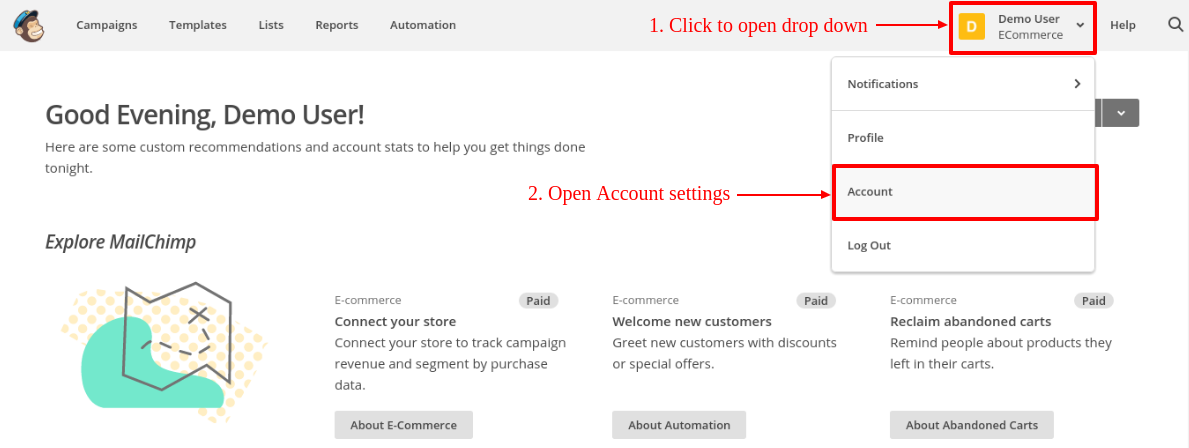
On Dashboard, click button on upper right corner of dashboard. Drop down menu will open, click Account link in that menu as seen in screen below.
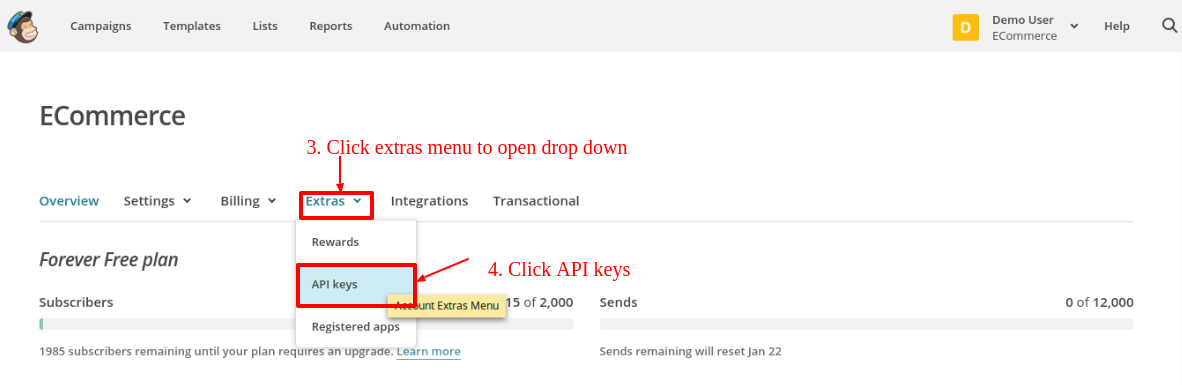
On Account settings page, some sub menus will be visible. Click “Extras” sub-menu to open drop down menu. Click “API keys”as shown in screen below:
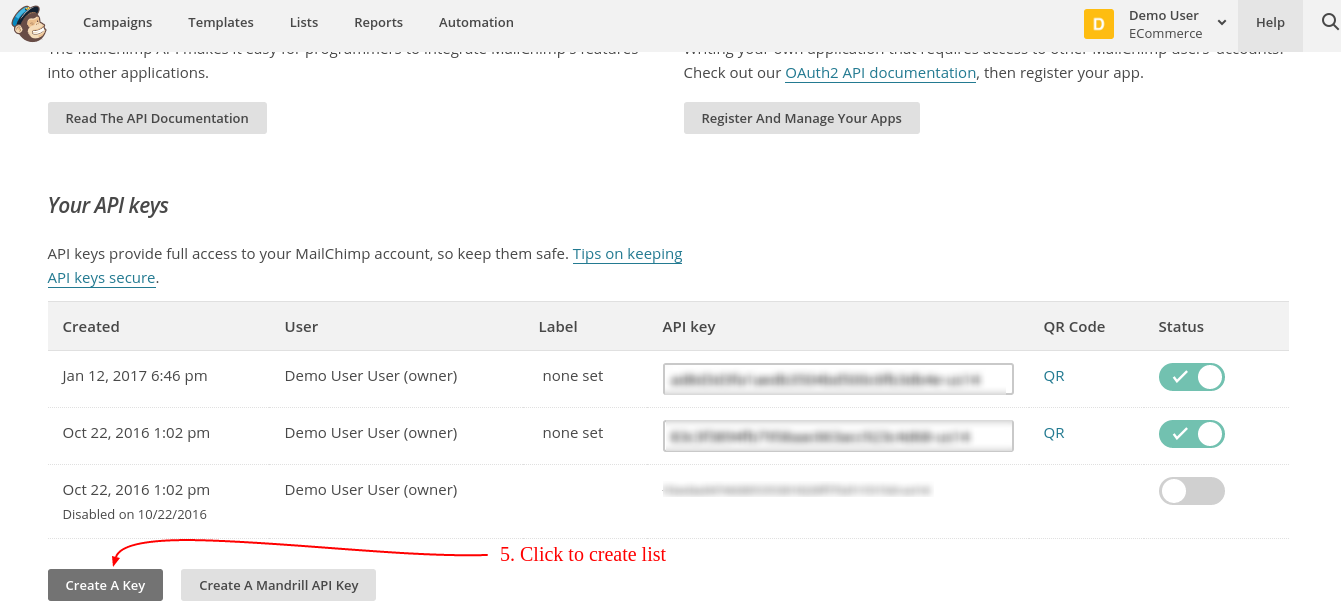
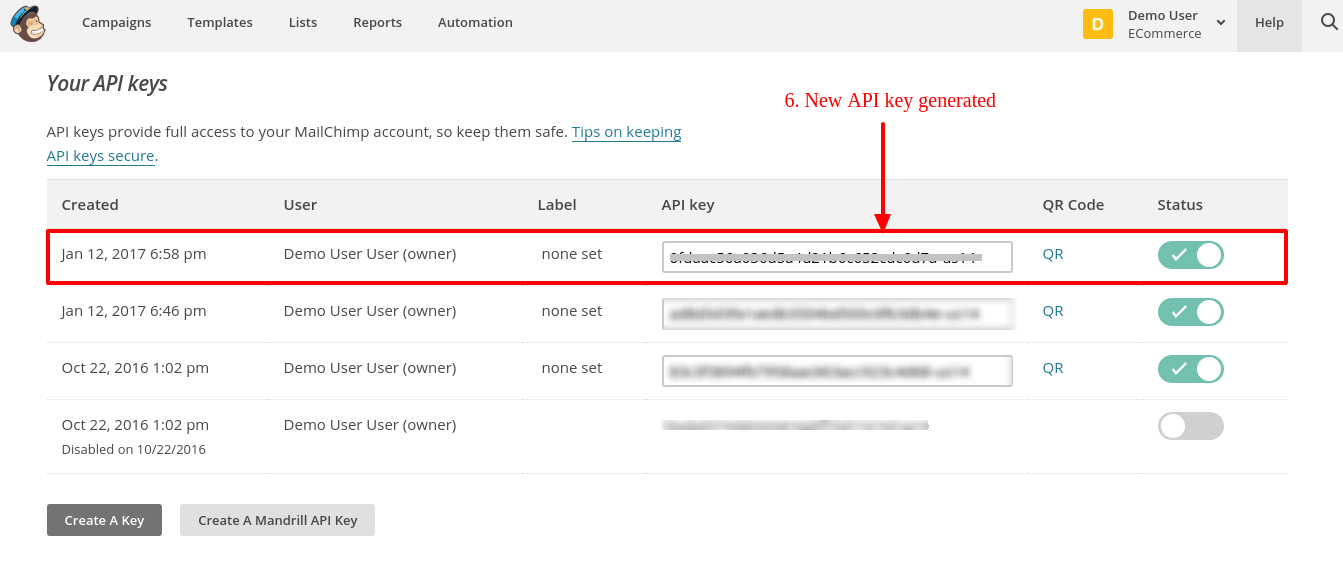
On API keys page, click “Create a key”to generate API key. After creation, a new API key will be added to your API keys list. Screen is given below:
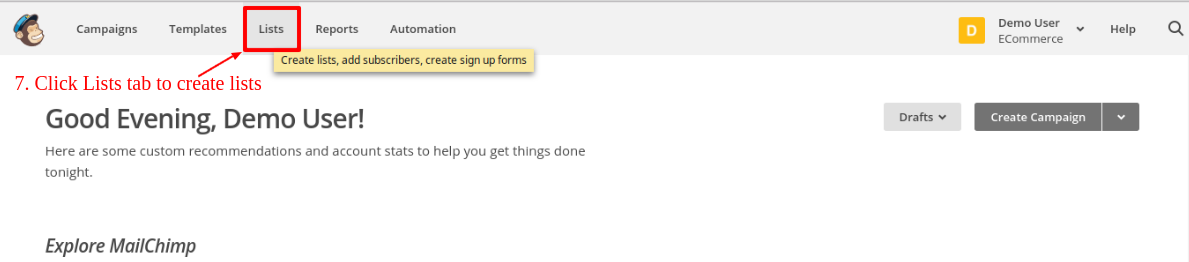
Now to create list, click Lists tab in upper menu. Admin will be redirected to new page where he/she can view lists and create lists also. Screen is given below:
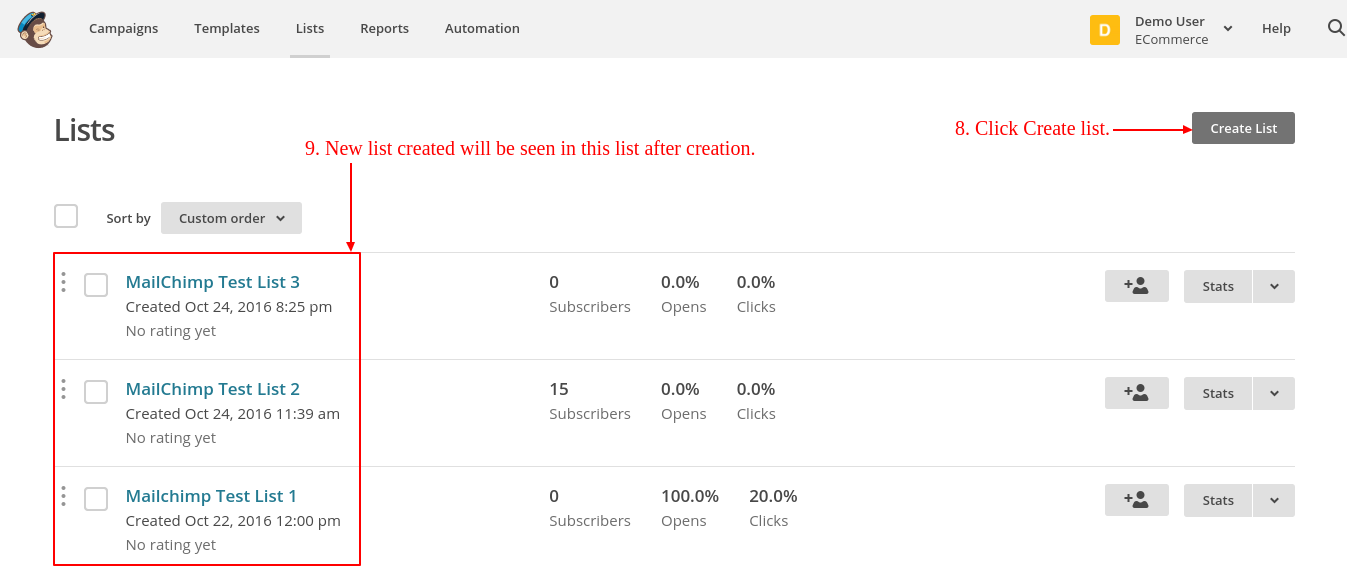
On Lists page, Click “Create list” to create new list. After creation lists will be visible on Lists page as shown in screen below.
5.0 Front End
Newsletter Subscription
If Smart sync is disabled and customer or guest enters email in newsletter field and click submit, email will be added to the lists configured in admin panel. If smart sync is enabled, email( if valid) will be added to lists on removing focus from email field. It doesn’t matter whether user clicked submit button or not.
Registration Page
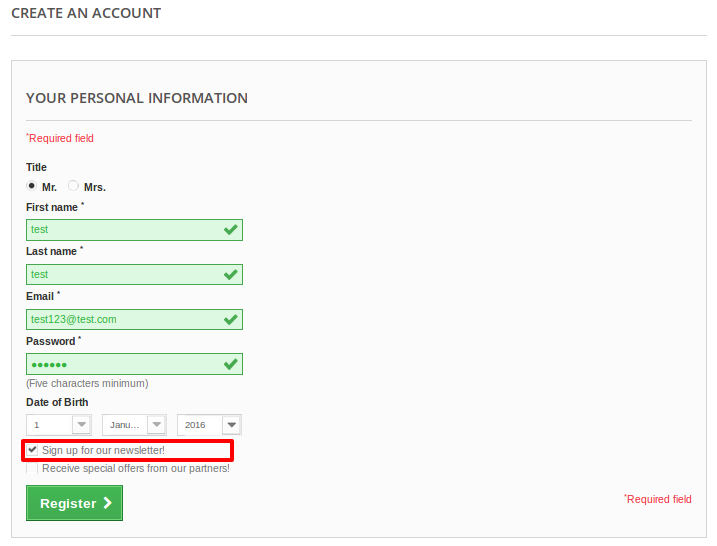
If the ‘Sync Email from Registration Page’ setting is enabled in Admin panel, then after registration customer’s email address will be synchronized to the configuration lists if he/she chooses the option to subscribe to newsletter. If “Smart Sync” is also enabled then email will be synchronized with lists on removing focus from email field. It doesn’t matter whether user registered or not.
Checkout Page
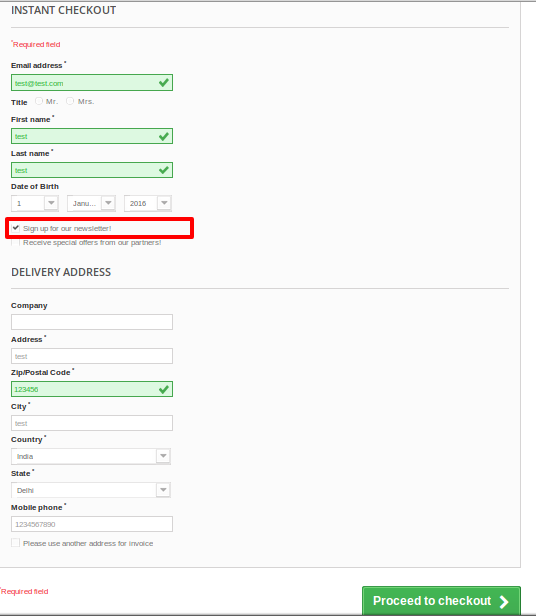
If the ‘Sync Email from checkout page’ is enabled in admin panel, then on the guest checkout page after checkout, guest’s email address will be synchronized to the configuration lists if he/she chooses the option to subscribe to newsletter. If “Smart Sync” is also enabled then email will be synchronized with lists on removing focus from email field. It doesn’t matter whether user checkout successfully or not.
Note: If “Smart Sync” is enabled then it doesn’t matter whether customer or guest checked “Sign up for newsletter” or not, synchronization will take place on blur event from email input field.
You can try Prestashop Mailigen and MailChimp Integrator addon for on your Prestashop website. KnowBand’s Prestashop Mailigen and MailChimp Integrator extension helps you in email marketing to your eCommerce store & boost th website traffic.
The e-commerce world has started shifting its base towards the multi-vendor model in the past few years. The traditional inventory model which used to be the king some while ago is now becoming a choice of lesser importance. The reason for which it is cited in the nature and scope of the multi-vendor model which fits in with the aspirations of the e-commerce world. Being mutually beneficial and inclusive in nature, it not only caters to the demand of sellers, but also brings delight to the customers by providing a wide range to choose from. The importance of having a multi-vendor platform for an e-commerce website is what that cannot be bogged down. But, what are those platforms that offer you a chance to build such a platform for your website? To ease your task a bit, we will discuss some of the trending multi-vendor that you can choose from.
WordPress
WordPress is a reliable name in the market.
With a market share of over 23%, the reliable support for the website, WordPress, needs no introduction when it comes to discussing the e-commerce platforms. Being a reputed name in the market, WordPress offers a smooth transformation for your business into a multi-vendor setup. The various customization and management features offered allows you to cut the hassle which comes in with the management of a multi-vendor marketplace.
Magento
Magento is another open source platform for your website.
Magento is another such name in the market which entirely focuses upon enriching your e-commerce experience. With a dedicated support for your e-commerce website, Magento is a name you can rely upon. Through Magento marketplace extension, it allows you to adopt the multi-vendor mode for your website. By providing an option for separate seller profile with specific login, it provides freedom of managing and updating the products to the vendors. Thus, providing them with the experience of a personal e-commerce set-up for their business.
Always being the first choice of any large scale online business setups, a Magento store can always be converted into a marketplace site using any of the better Magento multi vendor marketplace extensions.
PrestaShop
PrestaShop has been there for a while.
Being there in the market for a decade or so PrestaShop has tightened its grip with its service quality and features. With over 1,00,000 sites availing its services, PrestaShop stands as a strong contender to be chosen for your marketplace website. The features offered include easy integration of multi-payment options, simple registration, and profiling of vendors, easy customization and effective product and service management. All these contributes in the transformation of your business into a multi-vendor mode for a smooth ride.
PrestaShop has always been a first choice of most of the business startups. With the availability of effective marketplace modules like Knowband-PrestaShop marketplace module, it has become so easy to convert your PrestaShop store in to PrestaShop marketplace site.
OpenCart
OpenCart provides you a seamless experience.
OpenCart is one such platform which stands among the top in the business. With e-commerce specific features and valuable modules, OpenCart has always ensured a seamless business transaction for its users. Features like e-mail payment notification for vendor and personalized store management makes OpenCart a good choice to opt. Moreover, OpenCart is one of the easiest eCommerce platforms to learn to work upon. With high affinity to extendable feature using OpenCart Modules, it possess a major flexibility to get converted in to a marketplace site using any of the efficient OpenCart marketplace addons.
Final say
The above-mentioned e-commerce platforms are some of the tops in their section. Their user base and market credibility are ever increasing. In order to, make a smooth transaction for your multi-vendor set-up, you can rely on any one of them.
Prestashop Google ReCaptcha Addon is an effective security solution that protects your website from spam entries while letting real people pass through with ease. The Prestashop addon can be used for login, registration, password recovery, popular contact forms, and other. Google ReCaptcha addon displays images to identify humans as part of their normal validation procedures. This Prestashop Google reCaptcha addon is highly customizable and offers flawless functioning. The e-merchant can easily customize this Prestashop Google reCaptcha addon from the back-end.
2.0 Introduction
The Prestashop Google reCaptcha addon has a functionality through which Prestashop website will be able to confirm that the user is not a robot. It’s easy for people and hard for bots.
The Prestashop addon provides a lot of features which are as follows:
Admin can Enable/Disable the Prestashop Google reCaptcha addon without any hassle.
Admin can display Prestashop human verification on the Customer Login Page.
Prestashop Google reCaptcha addon allows the admin to display Google ReCaptcha on the Customer Registration Page.
Admin can display Google ReCaptcha on the Customer Forget Password Page.
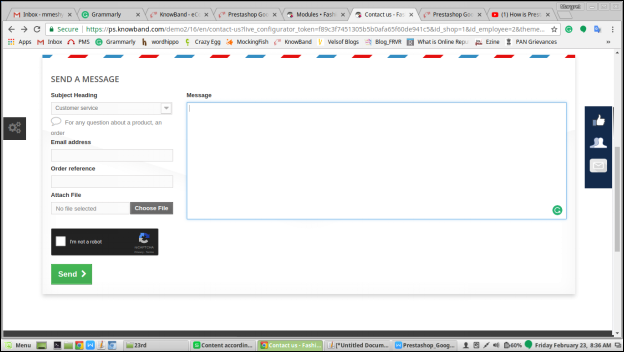
Admin can display Google ReCaptcha on the Customer Contact Page.
Admin can configure the number of attempts after which Google ReCaptcha will display.
Admin can display Google ReCapcha on the Super Checkout Page.
If a visitor opts for newsletter then admin can allow Google ReCaptcha verification for the confirmation of newsletter subscription.
Prestashop Human Verification addon works for both v2 and v3 recaptcha systems.
Admin gets an option to select the type of recaptcha for the different pages from the backend of Prestashop Google reCaptcha
Advanced users can add Custom CSS (Cascading Style Sheet) and Custom JS (JavaScript) in the block for customization.
Admin can configure the different Site Key and Secret Key for his/her different Prestashop domains.
Admin can easily set the Site Key and the Secret Key on the official site of Google ReCaptcha for his domain by following the Steps to Configure.
This Prestashop Google reCaptcha addon is compatible with SSL enabled stores.
3.0 Installation Manual
Follow the below-mentioned steps to install the Prestashop Google ReCaptcha addon by Knowband:
Download the Prestashop addon package.
Unzip the package in /modules directory of your Prestashop store via FTP manager (like Filezilla or WinSCP – download here: https://filezilla-project.org/). Folder structure for Google ReCaptcha addon inside /modules/googlerecaptcha directory is shown in the image below:
You will be able to find the Prestashop Google ReCaptcha addon that is ready to be installed in the “Modules List” in your Prestashop store as shown below.
Click on the “Install” link to install. Once the module is installed properly, the “Install” link will be converted to “Configure”.
4.0Admin Interface of Prestashop Google reCaptcha addon
This User Manual will guide you through the Admin Module/Store Front settings and various features of this Prestashop Google ReCaptcha Addon.
The admin interface of Prestashop Google reCaptcha system consists of 4 tabs listed below:
General Settings
v2 ReCaptcha Settings
v3 ReCaptcha Settings
Look and Feel Settings
4.1 General Settings Tab
Following are the steps to configure the General Setting tab –
Go to modules and services.
Search Module ‘Google ReCaptcha.
Click on the Configure button.
Select ReCaptcha Setting Tab.
Enable Plugin: By default, it will be OFF. This Prestashop human verification module will only work if this setting is ON.
Enable GoogleReCaptcha for: By default, all the checkboxes would be selected. It is used to set the position of the Google ReCaptcha on a particular
Recaptcha for Customer Login Page: When enabled, this setting will either show v2 or v3 ReCaptcha on customer login pages set by the admin.
Recaptcha for Customer Registration Page: When enabled, this setting will either show v2 or v3 ReCaptcha on the customer registration page as set by the admin.
Recaptcha for Supercheckout Page: When enabled, this setting will either show v2 or v3 ReCaptcha on the checkout page as set by the admin.
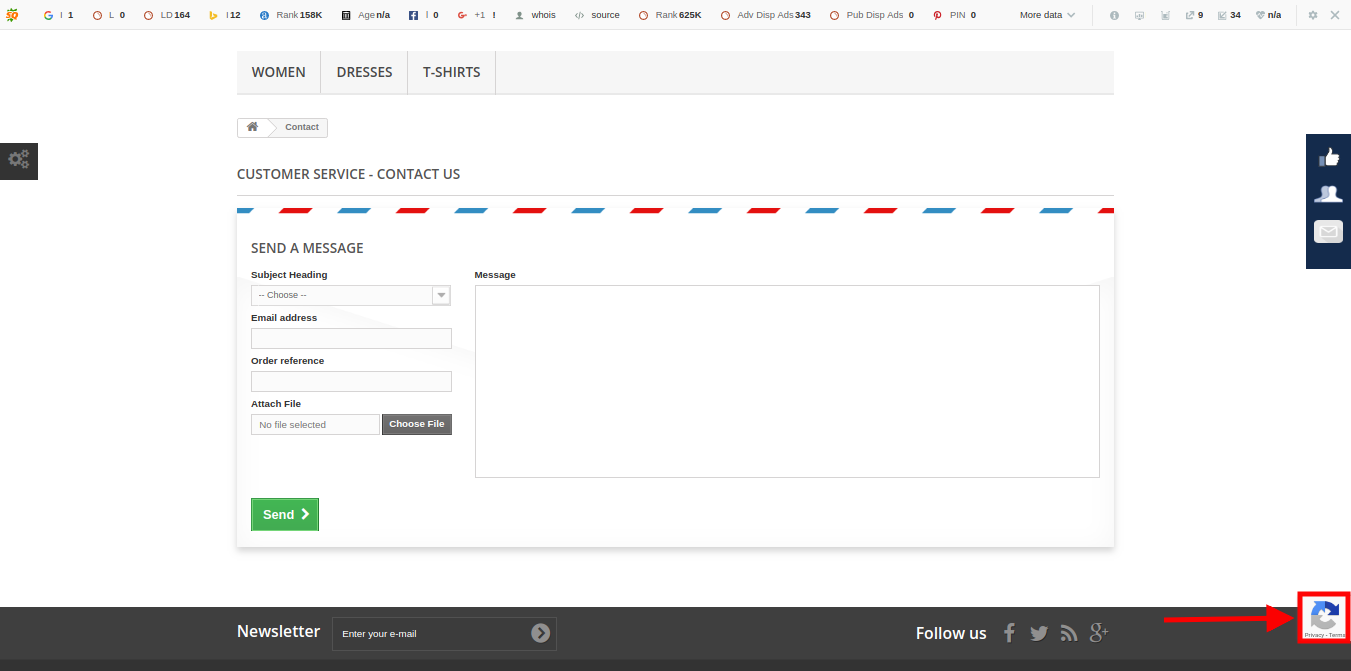
Recaptcha for Contact us Page: When enabled, this setting will either show v2 or v3 ReCaptcha on the contact us page as set by the admin.
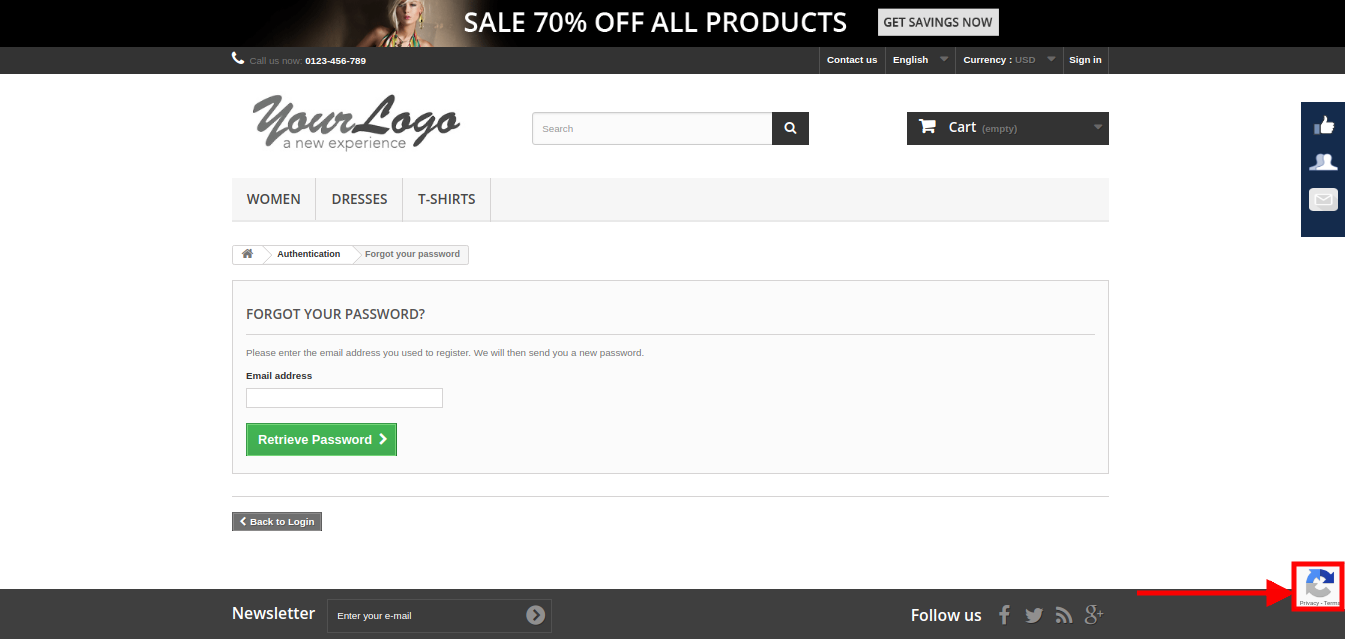
Recaptcha for forgot password Page: When enabled, this setting will either show v2 or v3 ReCaptcha on the forgot password page as set by the admin.
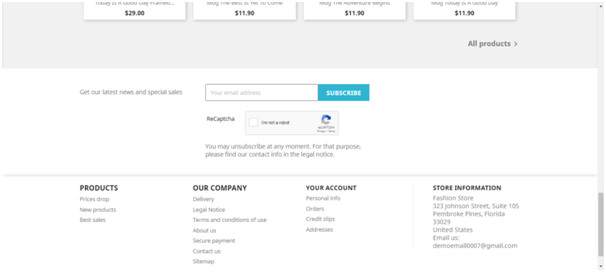
ReCaptcha for Newsletter: If enabled, this functionality will display the v2 or v3 ReCaptcha for newsletter subscription.
After you have set all the configuration options, click on Save button. By clicking this button, the Prestashop module will save setting into the database and return back with a success message.
4.1.1 How to activate module?
Follow these steps to activate the module –
After installation of the module, go to the “Module and Services”.
It would list all the modules of the store. Find “Google ReCaptcha” in modules list.
Now, click on the “Configure” button given corresponding to the “Google ReCaptcha” module.
It would redirect the admin to a “General Settings” tab.
Go to “ReCaptcha Settings” tab and configure the “Site Key” and the “Secret Key” which you will get by following “Steps to Configure” below the text fields.
After configuration “Site Key” and “Secret Key”, go to the General Settings tab and switch the “Enable/Disable” button to “Yes” and configure all other details as per your desire.
Click the “Save” button.
4.2v2 ReCaptcha Settings
This tab will contain all the necessary steps to setup Google ReCaptcha in the module.
Following are the steps to configure v2 ReCaptcha Setting tab –
Go to modules and services.
Search Module ‘Google ReCaptcha.
Click on Configure button.
Selectv2 ReCaptcha Setting Tab.
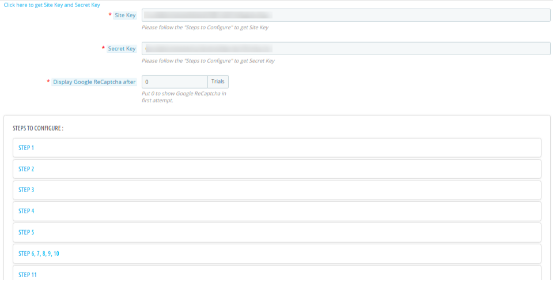
This Tab contains 3 fields, the first has link to set Google ReCaptcha and the next are steps to configure Site Key and Secret Key.
Site Key: Admin will enter the Site Key to display the widget on the site. This field is mandatory to enable plugin.
Secret Key: Admin will enter the Secret Key to authorize communication between the application and the reCAPTCHA server to verify the user’s response. This field is mandatory to enable the Prestashop Google reCaptcha plugin.
DisplayGoogle ReCaptcha After: By default, it would contain 0. It would be used to display Google ReCaptcha after a certain number of attempts.
Steps To Configure: This will contain all the steps to get Site Key and Secret Key for a particular domain name.
Click here to get Site Key and Secret Key: This link will redirect admin to the official website of Google ReCaptcha to get Site Key and Secret Key.
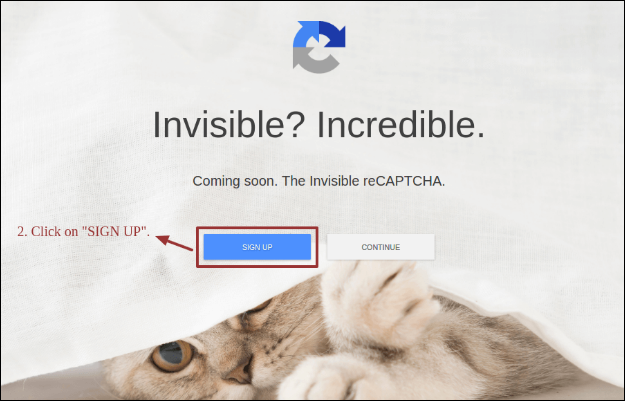
Following are the steps to visit Google ReCaptcha official site –
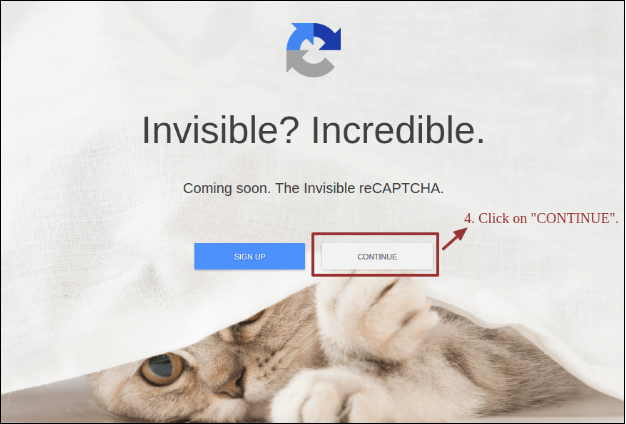
Click on “SIGN UP” if you do not have a Gmail account.
Create/Login to your Gmail account.
Click on “CONTINUE”.
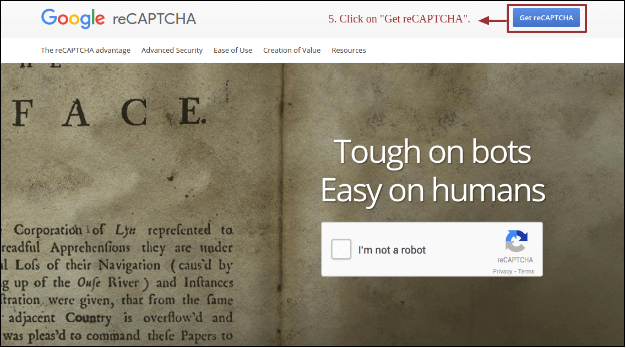
Click on “Get ReCaptcha”.
Enter “Label” of your Domain.
Enter “Domains” of your store.
Click on “Register”.
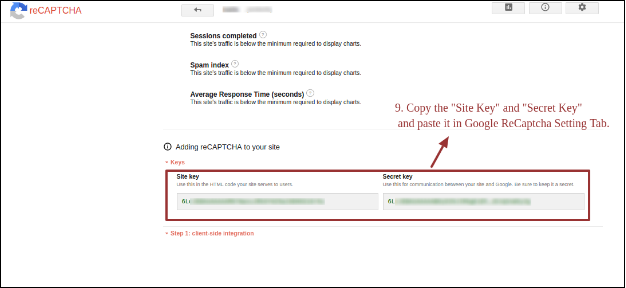
Copy the “Site Key” and “Secret Key” and paste it into Google ReCaptcha Setting Tab.
4.3 v3 ReCaptcha Settings
This tab will contain all the necessary steps to setup Google ReCaptcha in the module.
Following are the steps to configure v3 ReCaptcha Setting tab –
Go to modules and services.
Search Module ‘Google ReCaptcha.
Click on Configure button.
Select v3ReCaptcha Setting Tab.
This tab contains 2 fields, the first has link to set Google ReCaptcha and the next are steps to configure Site Key and Secret Key.
Site Key: Admin will enter the Site Key to display the widget on the site. This field is mandatory to enable plugin.
Secret Key: Admin will enter the Secret Key to authorize communication between the application and the reCAPTCHA server to verify the user’s response. This field is mandatory to enable the Prestashop Google reCaptcha plugin.
Steps To Configure: This will contain all the steps to get Site Key and Secret Key for a particular domain name. Follow the same procedure as for v2 Google reCaptcha.
4.4 Look & Feel Setting Tab
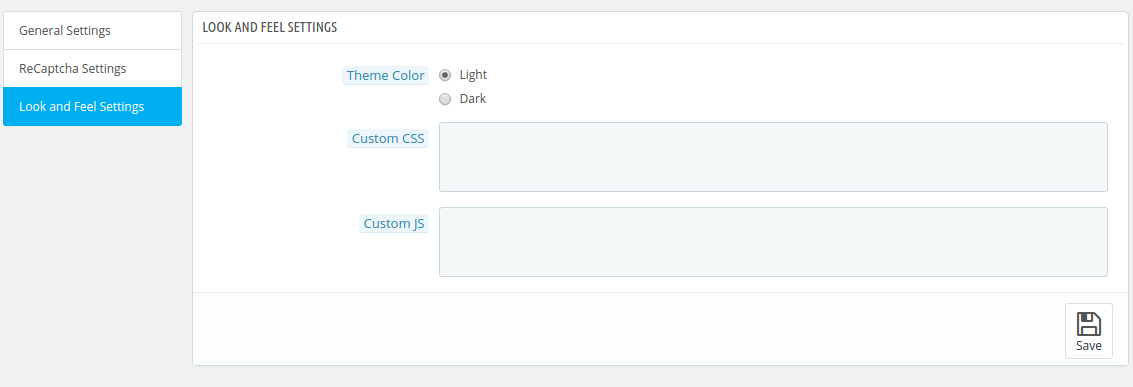
This tab will contain all the look and feel features of the Prestashop module.
Following are the steps to configure Look and Feel Setting tab-
Go to modules and services.
Search Module ‘Google ReCaptcha.
Click on Configure button.
Select Look and Feel Setting Tab.
Fields
Theme: Admin will select the theme – Light or Dark for the Google ReCaptcha.
Following are the steps to configure Google ReCaptcha theme –
Go to modules and Services.
Search Module ‘Google ReCaptcha.
Click on Configure button.
Select Look and Feel Setting Tab.
Select Theme.
Custom CSS: Admin can use this option to add custom CSS if required.
Following are the steps to configure Custom CSS –
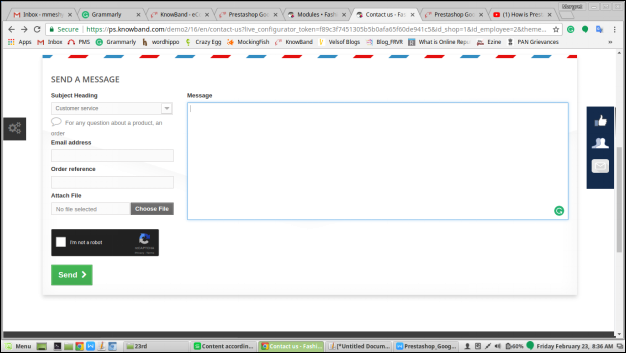
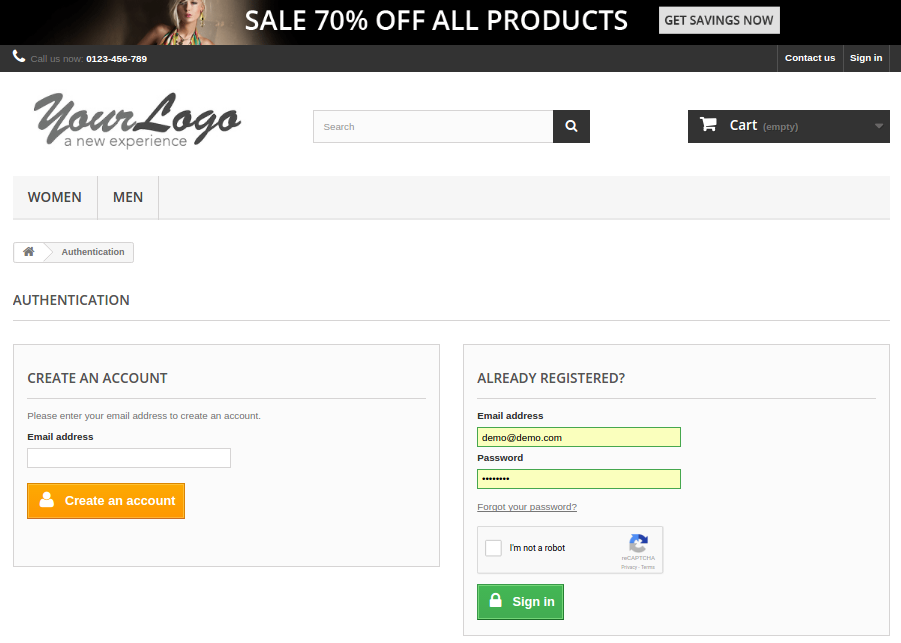
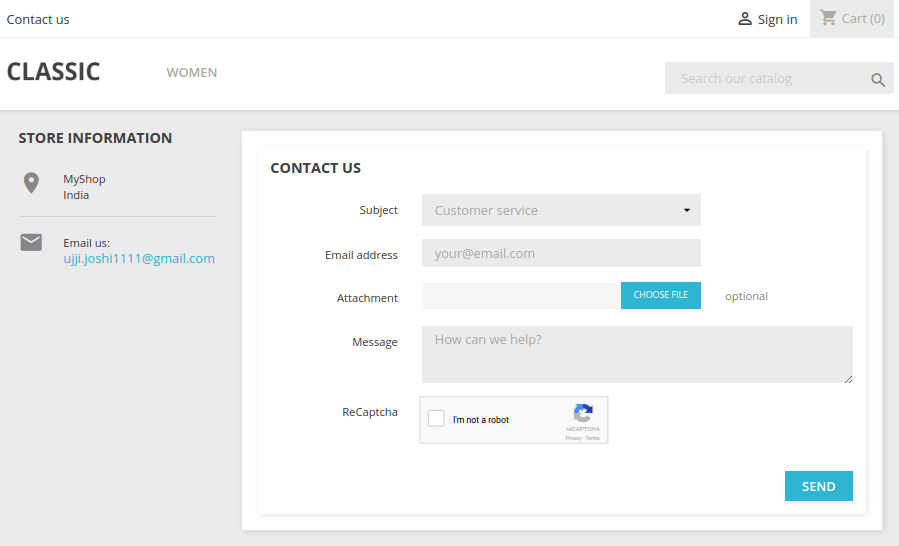
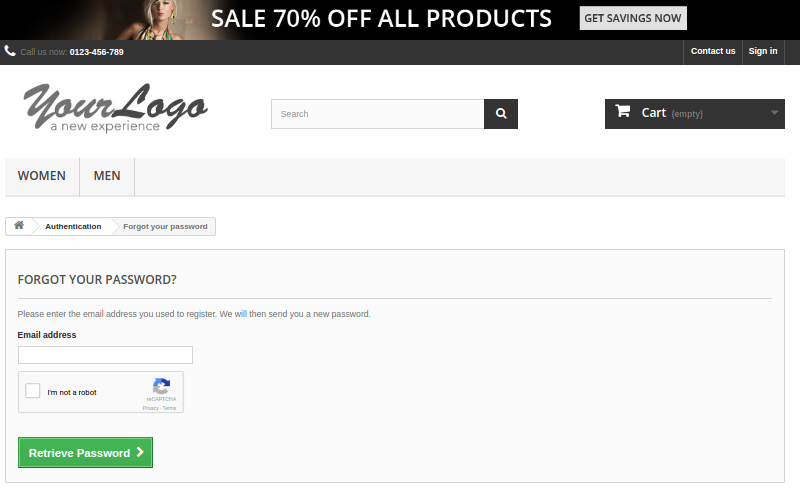
If admin enables the plugin then Google ReCaptcha will be displayed for selected forms in the Front End as shown below.
5.1 Customer Login Page
Following are the steps to visit Customer Login Page –
Go to Front End Home Page.
Click on the “Sign In” option.
5.2 Customer Registration Page
Version 1.6.x.x –
Following are the steps to visit Customer Registration Page in version 1.6.x.x –
Go to Front End Home Page.
Sign In.
Click on the button “Create an Account”.
Version 1.7.0.x –
Following are the steps to visit Customer Registration Page in version 1.7.0.x –
Go to Front End Home Page.
Sign In Option.
Click on the link “No Account? Create one here“.
5.3 Customer Contact Page
Version 1.6.x.x –
Following are the steps to visit Customer Contact Page in version 1.6.x.x –
Go to Front End Home Page.
Click on “Contact Us” option.
Version 1.7.0.x –
Following are the steps to visit Customer Contact Page in version 1.7.0.x-
Go to Front End Home Page.
Click on “Contact Us” option.
5.4 Customer Password Forgotten Page
Version 1.6.x.x –
Following are the steps to visit Customer Password Forgotten Page in version 1.6.x.x-
Go to Front End Home Page.
Sign In option.
Click on “Forget Password?”.
Version 1.7.0.x –
The following are the steps to visit Customer Password Forgotten Page in version 1.7.0.x-
Go to Front End Home Page.
Sign In option.
Click on “Forget Password?”.
5.5 Newsletter
Version 1.6.x.x –
Following are the steps to visit Customer Password Forgotten Page in version 1.6.x.x-
Go to Front End Home Page.
Go to the newsletter subscription tab on the footer section
Enter the email address and click on subscribe.
Version 1.7.0.x – The following are the steps to visit Customer Password Forgotten Page in version 1.7.0.x-
Go to Front End Home Page.
Go to the newsletter subscription tab on the footer section
Enter the email ID and click on the subscribe button.
Note: This Prestashop Google reCaptcha module by Knowband will work on the default form of the Prestashop store for the above-mentioned pages i.e. Customer Login Page, Customer Registration Page, Customer Contact Page, super checkout page, and Customer Password Forgotten Page and for Newsletter subscription. This module will not be applicable for the Guest Checkout Page.
5.6 v3 Google ReCaptcha
On Contact Us Page
2. On Forgot Password Page
Check out the Prestashop Google reCAPTCHA Tutorial
Multi-vendor marketplace model has been making the buzz ever since it was introduced in the e-commerce industry. The mutual benefit sharing and inclusive nature of the model brings a win-win situation for all the stakeholders involved. However, The key component that culminate to make a successful model is a topic of discussion for many. Here we will discuss those essential components that a marketplace model of e-commerce is composed of.
Component of Multi-vendor marketplace model
Blind adoption of anything can be dangerous. Hence, go true with the Multi-vendor marketplace model.
Now we will take a look at those components of marketplace model which make it a success.
Easy inclusion of vendors: An effective Multi-vendor model allows easy registration and listing of products by a vendor. Vendors require an easy procedure for listing their products. Also, many vendors ask for an own profile page to effectively extend the reach of their product. This profile provides the vendors with an interface like their own website. The vendors can upload and manage their products using this interface.
Feedback and reviews: As a large number of sellers are involved in a Multi-vendor model, customers generally do not prefer to contact the sellers directly. In this case, they look for an alternative such as an online review or feedback from the established customer about a particular vendor. A good Multi-vendor caters to this need by providing the customers an option to give a review or decimate feedback using their account or email id.
Smooth search feature: An effective marketplace model allows you to easily search for a desired product or vendor in a sea of vendors and from around a range of products. With the ease the customer is able to locate the product on your website, the higher are the chances that he will convert it into a purchaser. Thus, your conversion optimization is at stake when we talk about this component. Any effective marketplace module that follow the standards, will provide this functionality for sure.
Price management: Due to the involvement of a large number of sellers, there is always a chance of price variability for a particular product. Thus, an effective Multi-vendor platform must cater to this need and shall assist you in maintaining the price of the products in accordance with its features. Moreover, as you are involved in the process, you will be generating an effective amount of money in the form of commission. So, management of your profit margin shall also be assisted here.
Final Words
Catering to its popularity in the market and the role it plays in your conversion optimization, a Multi-vendor model becomes an indispensable addition for your e-commerce website. You can easily adapt to this model by installing a Multi-vendor module in accordance with your eCommerce platform. Magento multi-vendor extension is one such software for Magento based e-commerce website.
The Magento product update notification extension by Knwoband adds an attractive functionality to your Magento website, which is beneficial for both the store owner and the customers. This Magento extension helps the customers to subscribe for product updates i.e. if product price or stock availability changes customer will be notified by an email. Magento back in stock module adds a simple block to the product page of Magento store through which the user can subscribe by entering the email id for the respective product.
The subscribed customers for product will be visible to store owner and helps in updating the product according to requirement so that customer can buy those products.
The Magento stock alert provides simple input field to enter email Id and a notify button that will be displayed on the product page itself. Customers can easily get subscribed to the product by entering email id and start getting email corresponding to that.
Installation
After purchasing this Magento extension, you will get following files as shown below:
magentoproductupdatenotification.zip(contains source code of the extension)
User Manual
Follow the following steps to install the Magento extension by Knowband:
Unzip the magentoproductupdatenotification.zip file.
Copy all the files and folders of unzipped folder into your store root directory.
After copying all the files and folders, clear the cache.
Open any page of your store. Magento will install the Magento module at the time of loading any page.
After installing, please login into your admin panel and go to the below menu:
System > Configuration > Advanced
Here you will see that “Vss_Productupdate” module is listed.
Extension Interfaces
There are two interfaces in this Magento price alert notification extension. Each interface have different functionality according to its use. These interfaces are:
Admin Panel Interface(Only be accessible by admin/store owner)
Front End Interface(accessible to front end user)
Each interface of this Magento product update extension has been described in separate section.
Admin Panel Interface
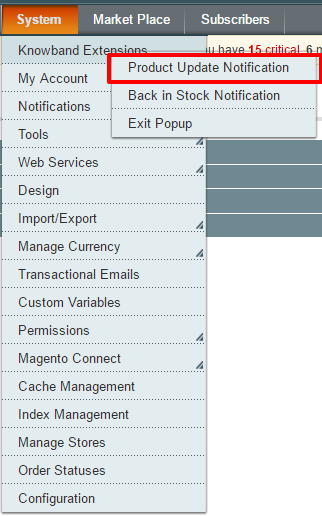
This part of the plug in will be for admin user, through which the admin can configure the settings. After installing Magento extension, Product Update Notification menu will be visible under System > Knowband Extensions menu in the menu bar as shown in below screen:
On clicking above mentioned menu, admin panel interface of the Magento stock alert extension will open.
There are four tabs in the admin panel of this Magento price alert through which the admin will be able to manage the functionality of the Magento plugin. These are listed below:
General Settings
Request for Notification Email Settings
Notification Email Settings
Analysis
General Settings
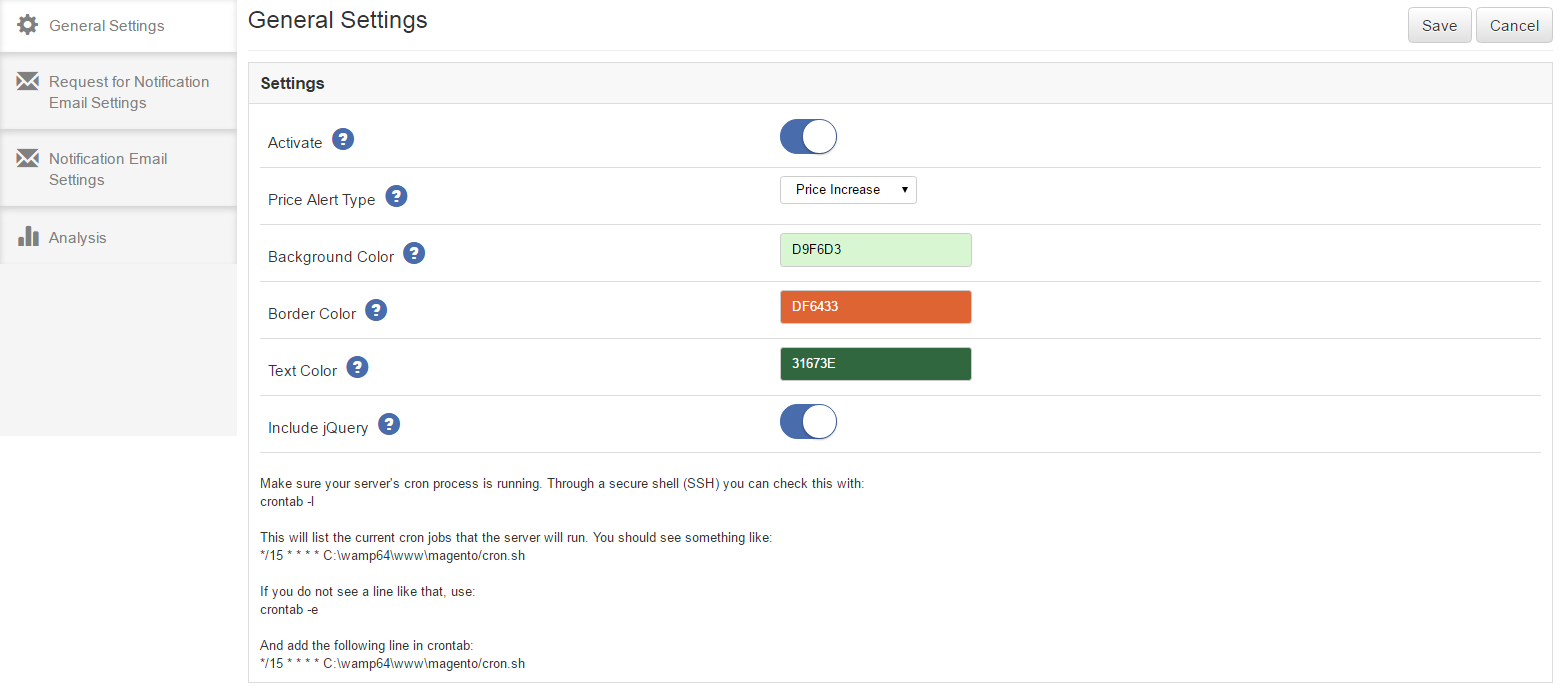
This tab will be opened by default when you click on the menu. General Settings tab will have following options:
Activate – This will be an on/off switch. Admin will have the option to Enable/ Disable the Magento back in stock extension. If enabled Magento stock alert will be enabled on front end product page otherwise not.
Price Alert Type – This will be a drop down list having options “Price Decrease”, “Price Increase” and “both”. It means if “Price Decrease” is set then mail will be triggered to customer only when price of subscribed product decreases. If “Price Increase” is set then mail will be triggered when price of subscribed product increases. And if “both” is set then mail will be triggered in both cases. Default value of this Magento price alert notification extension will be set to “Price Decrease”.
Background Color – This will be a color picker palette. It will set the background color of Magento product update extension block on the product page.
Border Color – It will also be a color picker palette. It will set the border color of Product update extension block on the product page.
Text Color – This will also be a color picker palette. It will set the text color in the Magento stock alert extension block on the product page.
Include j-Query – This field of Magento price alert will also be an on/off switch. By default it will set to off but if you are using Magento version lower than 1.9 then turn it on. It will include required j-Query files.
*Note 1: Stock notification mail will be sent to the customers at every time when product goes in stock from out of stock.
*Note 2: You have to make sure that Magento CRON process is running on your server to get notified your customers when any subscribed product comes in stock. Through a secure shell(SSH), you can check this with:
crontab -l
This will list the current CRON jobs that the server will run. You should see something like:
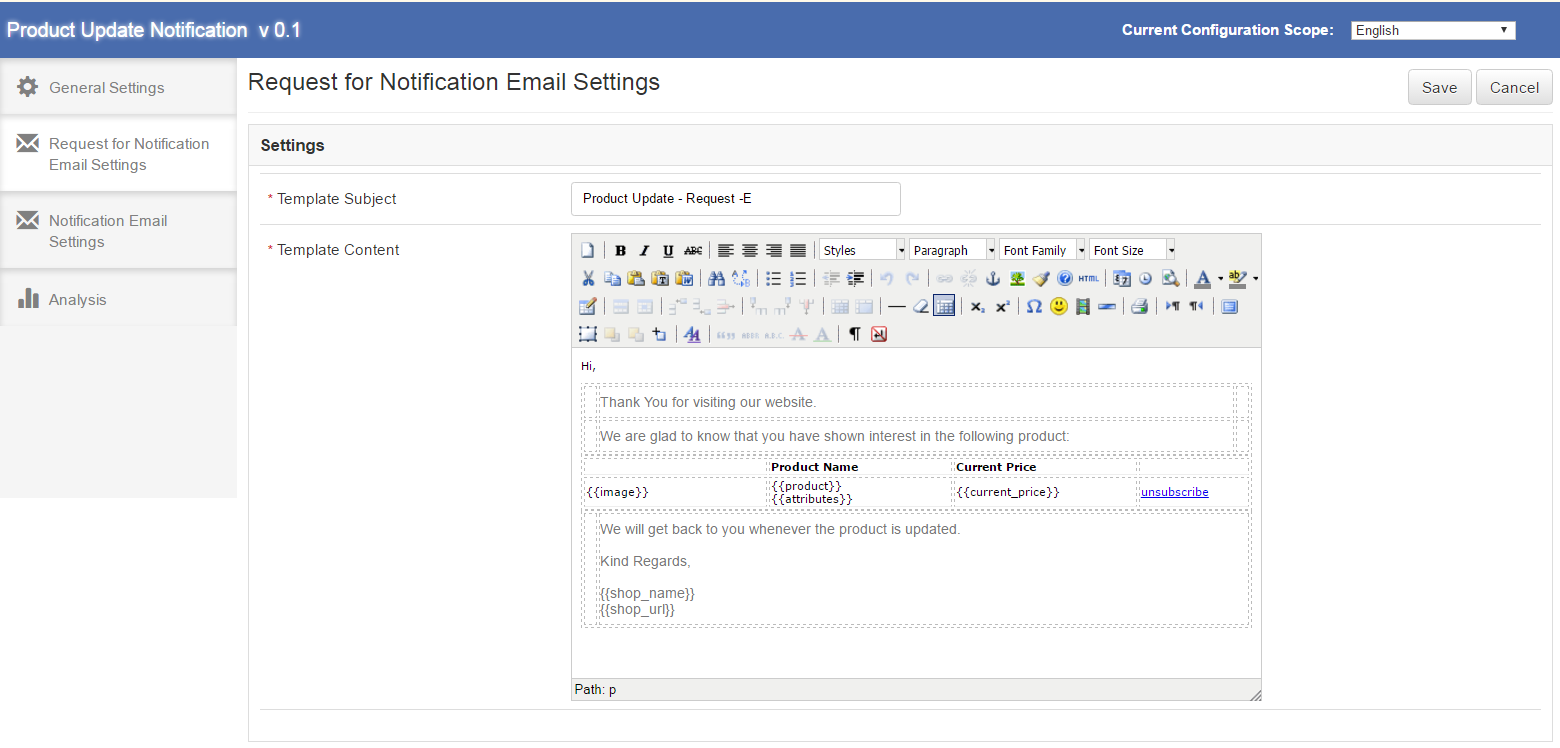
This tab of product update notification Magento will have the Email settings which will be sent when customer subscribes himself for notifications for a particular product. This tab will have the following options:
Template Subject – It will be the subject of the mail which will be sent. This field of the Magento product update will be mandatory and default value will be ‘Product Update – Request’.
Template Content – This will be the content of the mail which will be sent initially to the customer. This field will also be mandatory. The default content of the Magento back in stock plugin will be as shown in the proposed screen below. The content enclosed in {{}}, will be the variables which will be used when sending actual mail. Other than these all content would be static. There will also be “Unsubscribe” link against the product clicking on which customer will be redirected to a page on store showing “You have been unsubscribed successfully”.
Below is the screen shot of the this tab :
Notification Email Settings
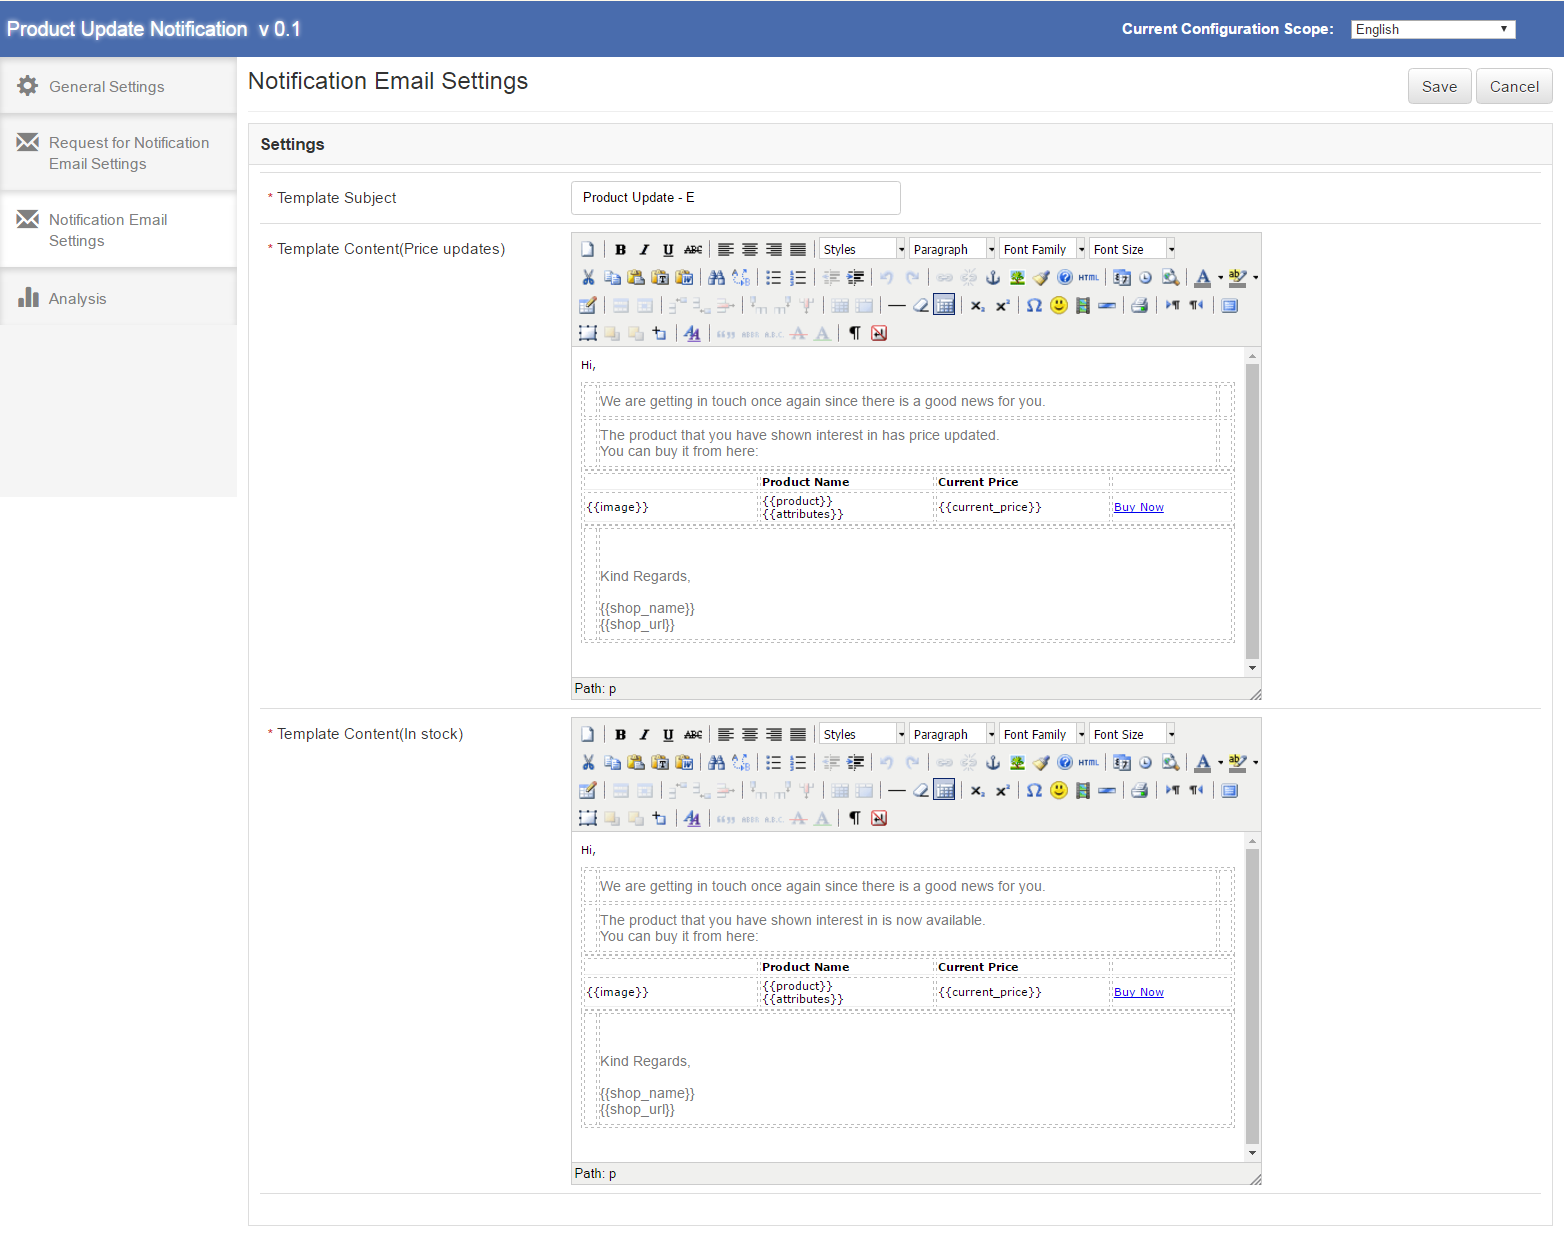
This tab of Magento stock alert extension will have the Email settings which will be sent to the subscribed customers for a particular product and that product gets updated i.e. either price updated or comes in stock from out of stock. This tab of Magento price alert extension will have the following options:
Template Subject – It will be the subject of the mail of the Magento product update extension which will be sent to the customer when product gets updated. This field will be mandatory and default value will be ‘Product Update’.
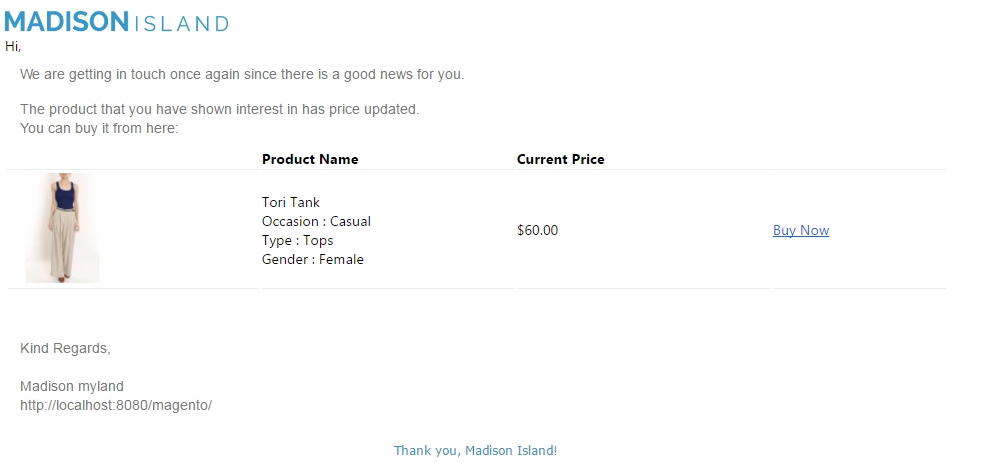
Template Content(Price Updates) – This will be the content of the mail of product update notification extension which will be sent finally to the customer when a particular subscribed product gets price update. This field of Magento price alert notification extension will also be mandatory. The default content will be as shown in the proposed screen below. The content enclosed in {{}} will be the variables which will be used when sending actual mail. Other than these all content would be static.
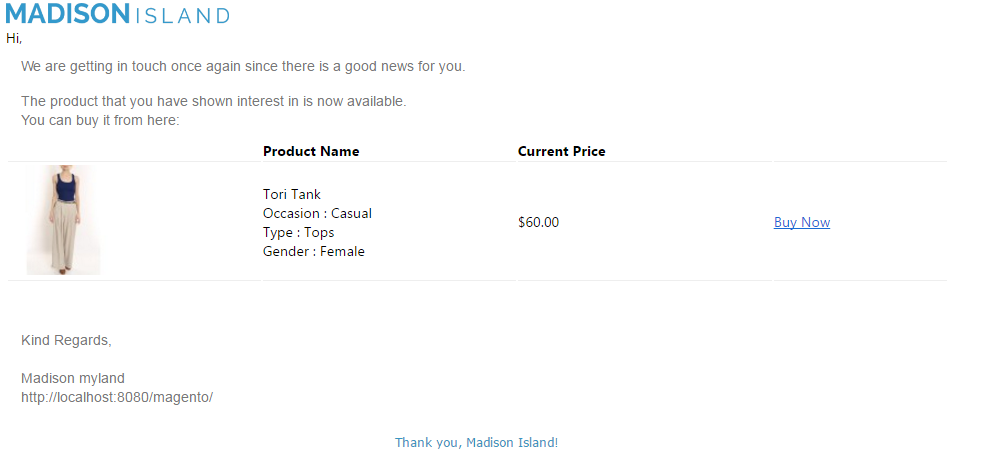
Template Content(In Stock) – This will be the content of the mail which will be sent finally to the customer when a particular subscribed product comes in stock. This field will also be mandatory. The default content of the Magento stock alert will be as shown in the proposed screen below. The content enclosed in {{}} will be the variables which will be used when sending actual mail. Other than these all content would be static.
Below is the screen shot of the this tab :
Analysis
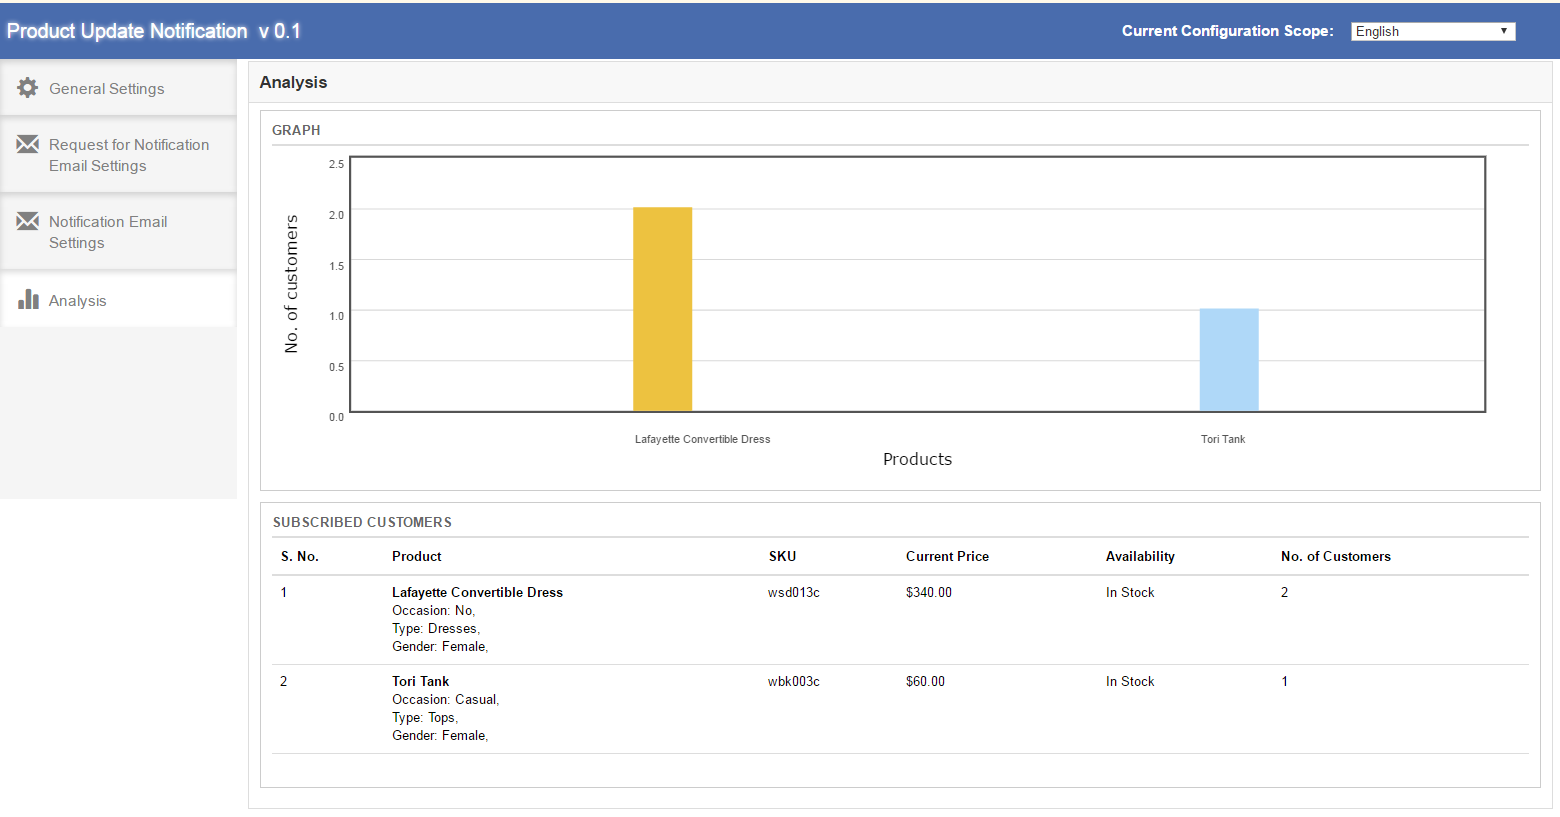
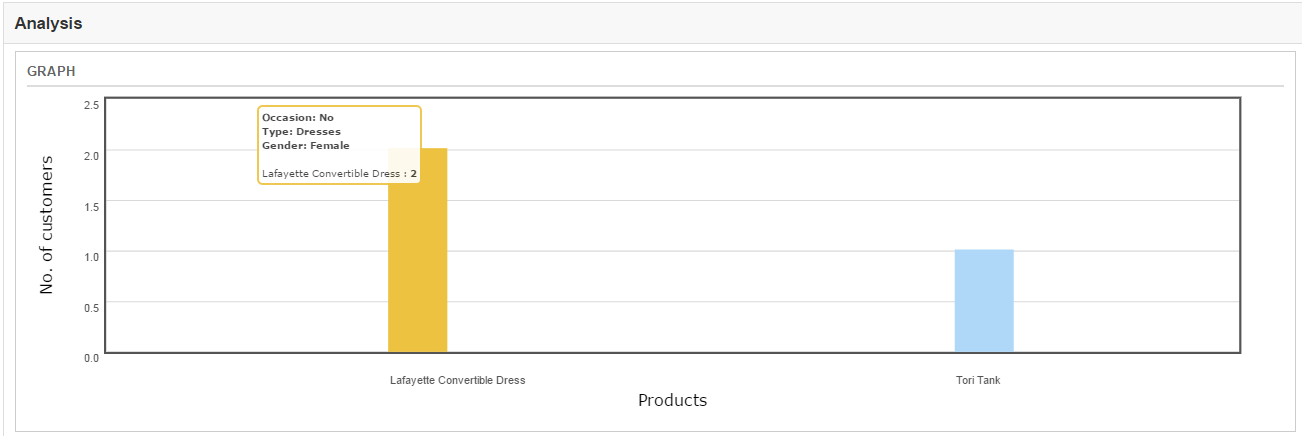
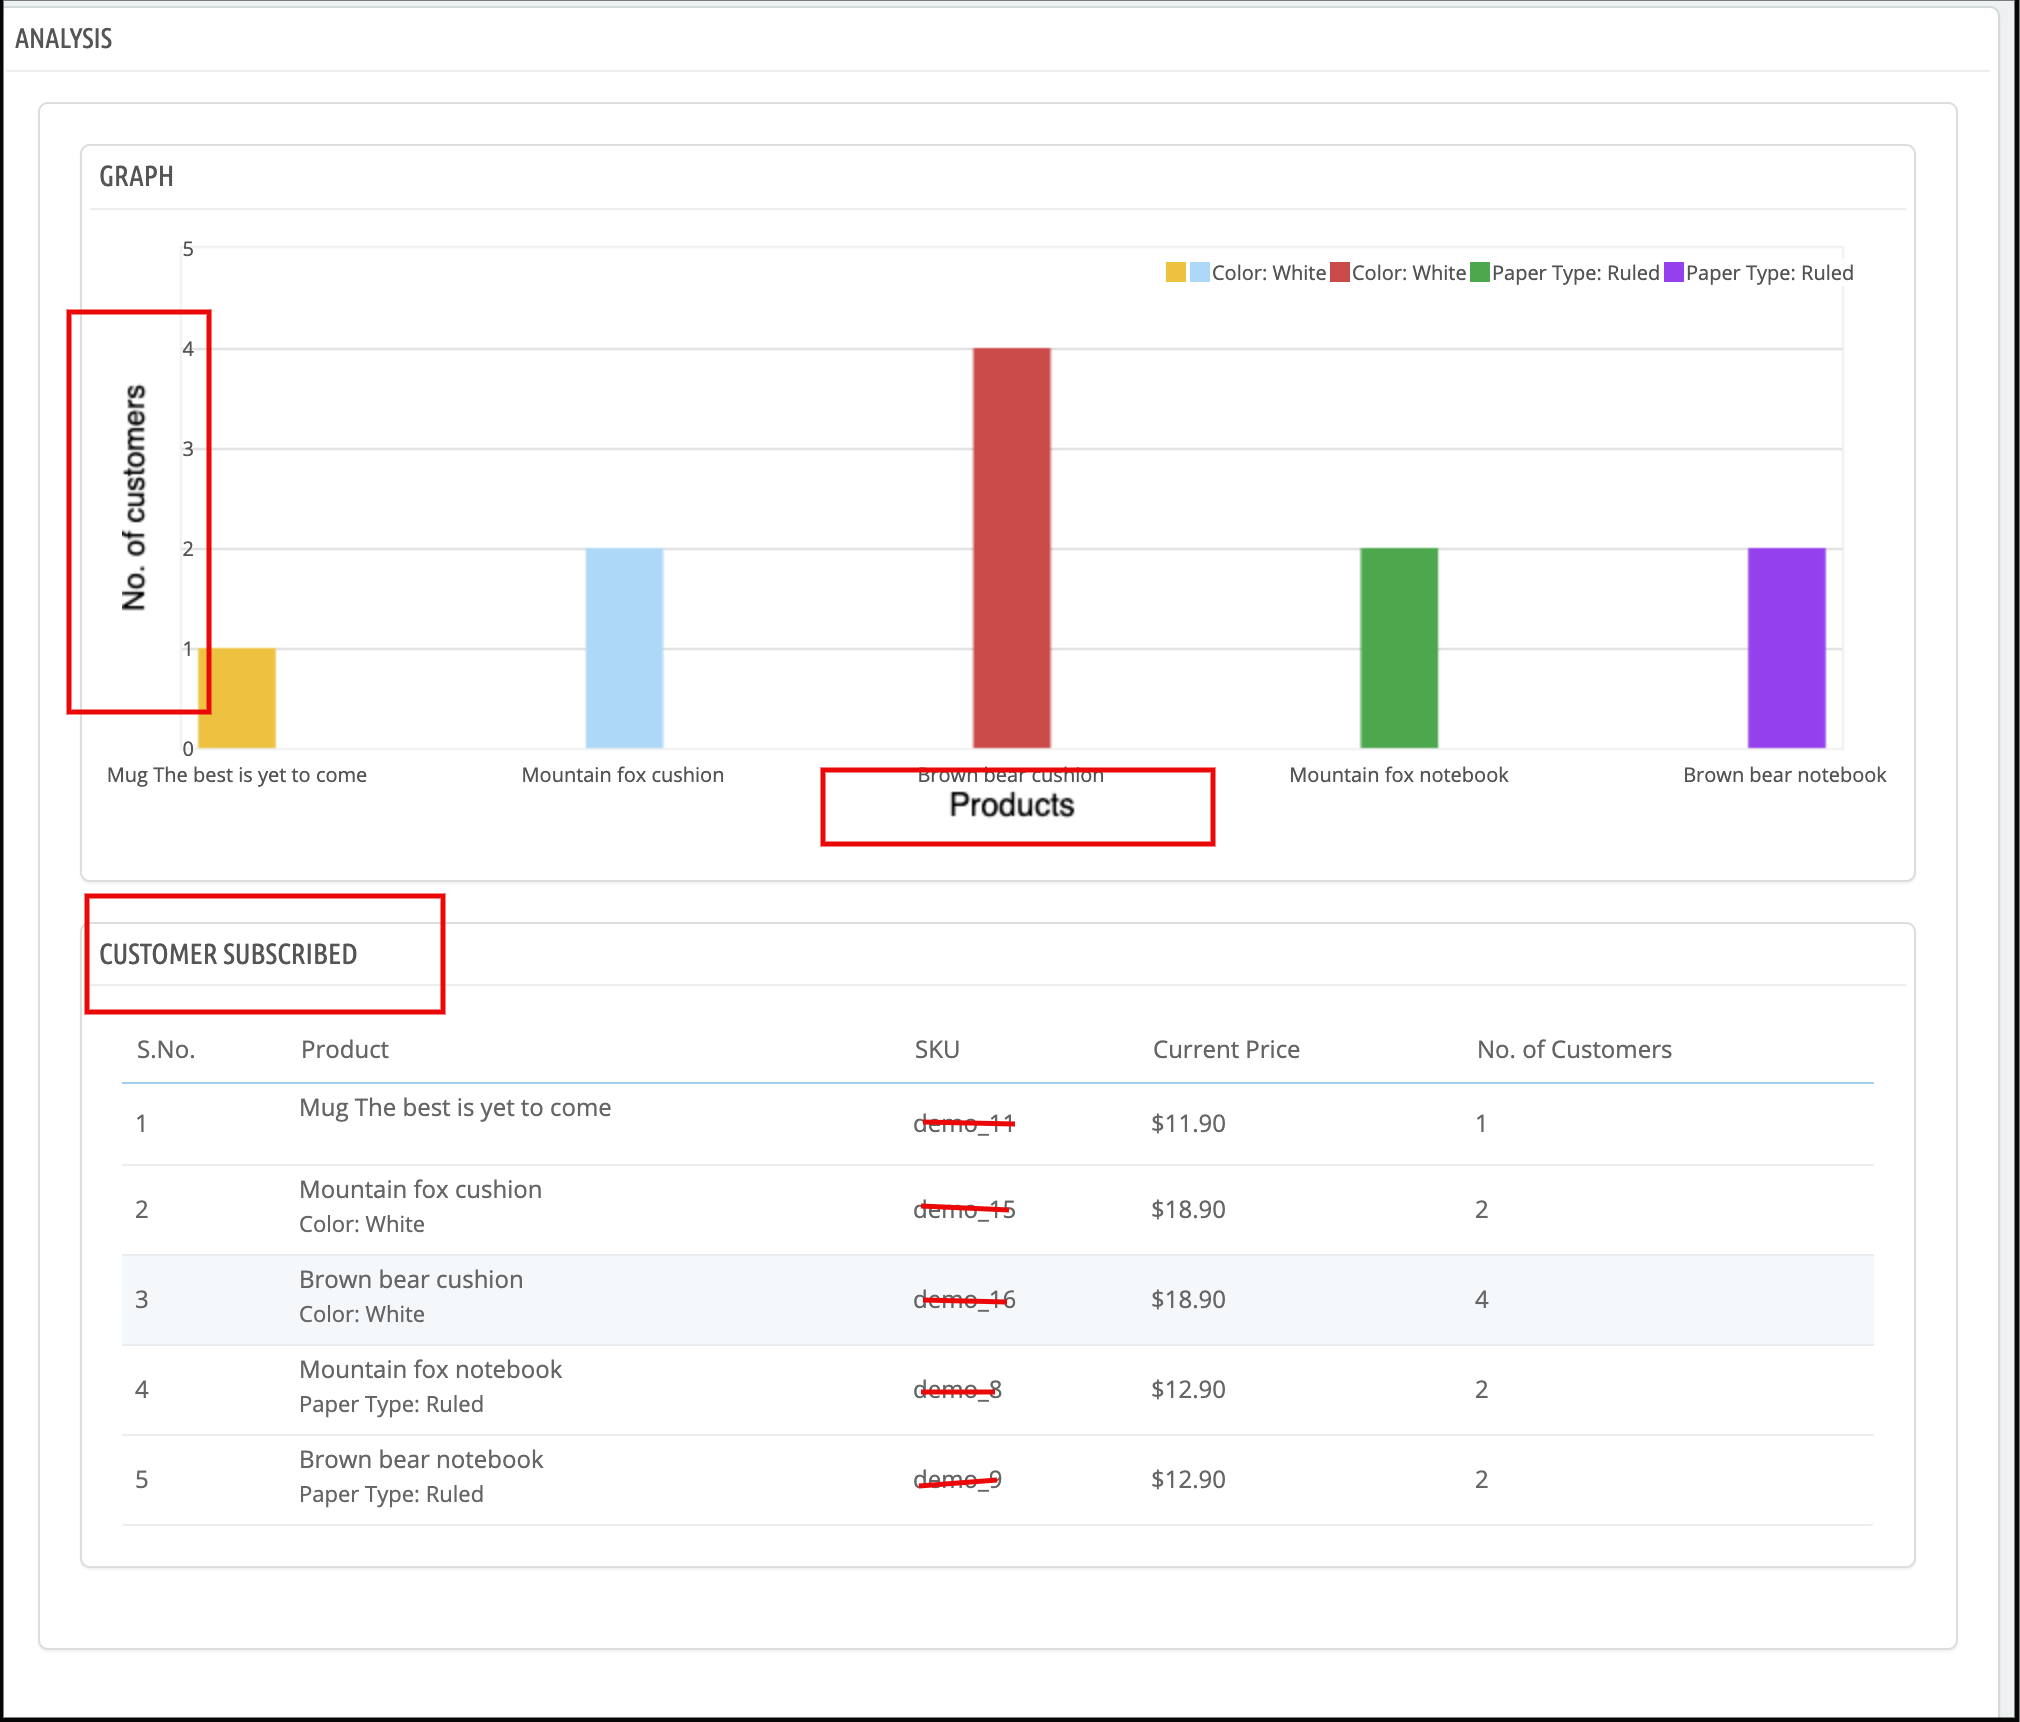
In this tab of product update notification extension, complete analysis of the subscribed customers can be found. This analysis would be in form of graph and in form of detailed list. It will be the analysis of top 10 products. Also, this list would only include the customers who are waiting for the notification email(either price update mail or stock availability mail). This tab of Magento product update extension will have two sections, which are described below:
GRAPH – The graph of the Magento stock alert will show the analysis of top 10 products. Horizontally products would be shown and vertically number of customers would be shown. On hovering a bar in the graph name of the product, product attributes and number of customers which have subscribed for this product will be shown in a pop up.
SUBSCRIBED CUSTOMER – Subscribed customer would be a product wise detailed list. In first column of the list S. No., in second column product name and product attributes, in third column SKU of the product, in fourth column current price and in fifth column availability of the product(In stock or out of stock) and in sixth column number of customers that have subscribed for this product would be shown. This list of Magento price alert notification extension would also show top 10 products.
Below is the screen shot of the this tab :
On hovering a bar in the graph a small pop up will come as below:
Front End Interface
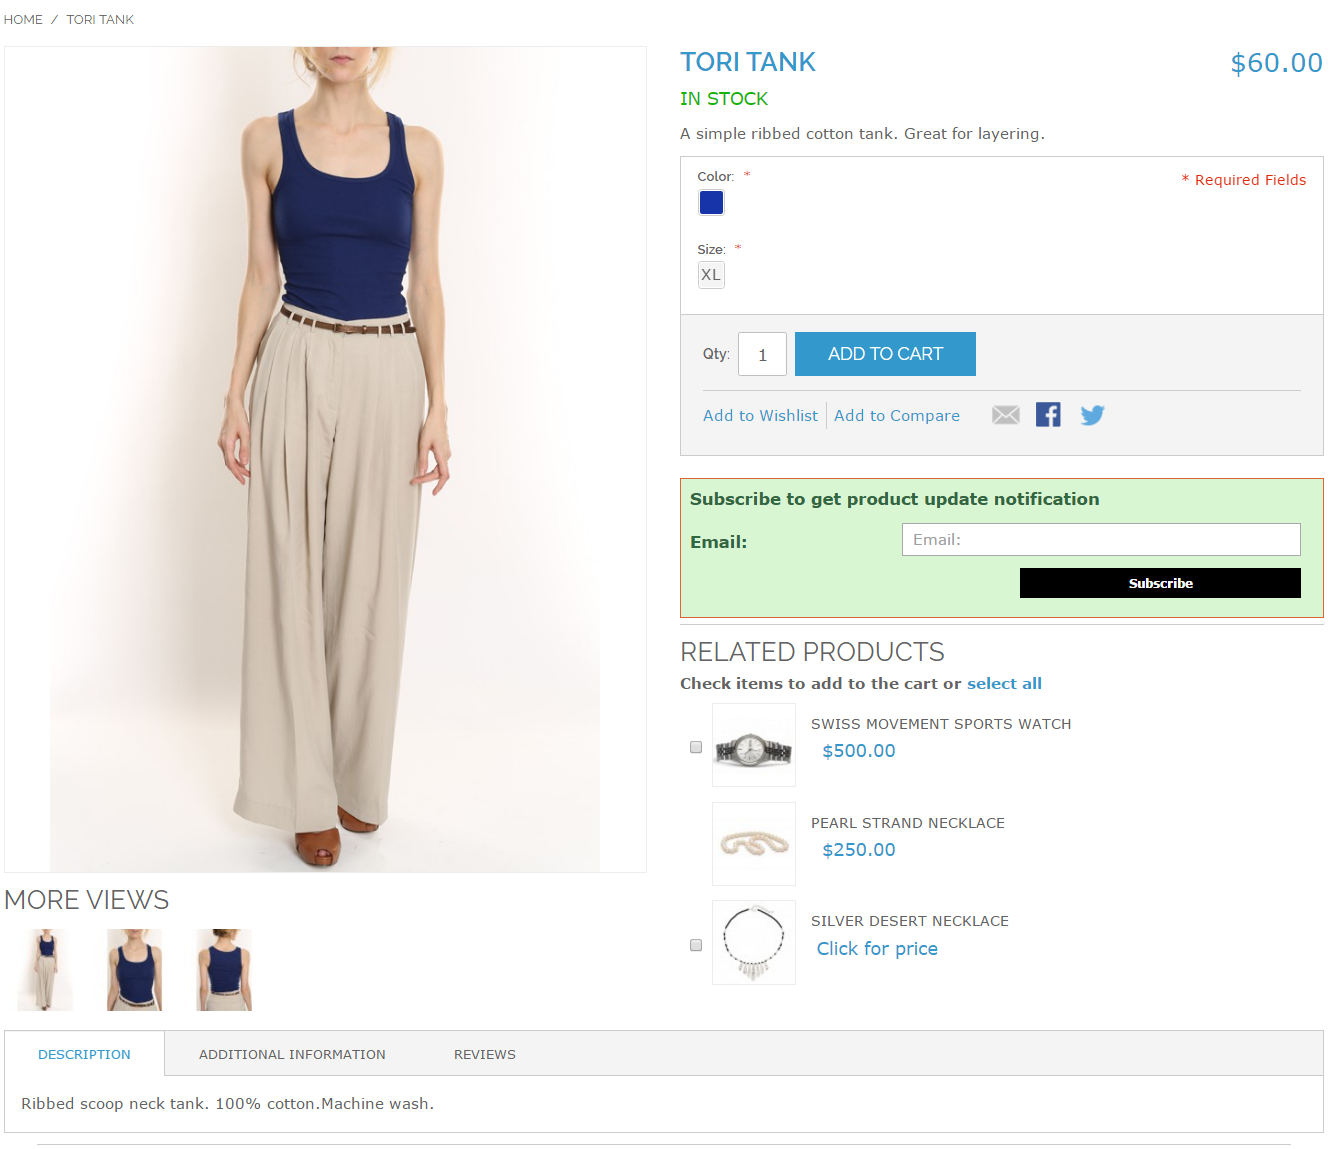
After enabling the Magento product update extension, the front end user will see a subscribe box at the product page. This block will contain an input field as to enter email id and a notify button through which the user will get subscribed for the respective product.
The front end of product update extension would appear as follows:
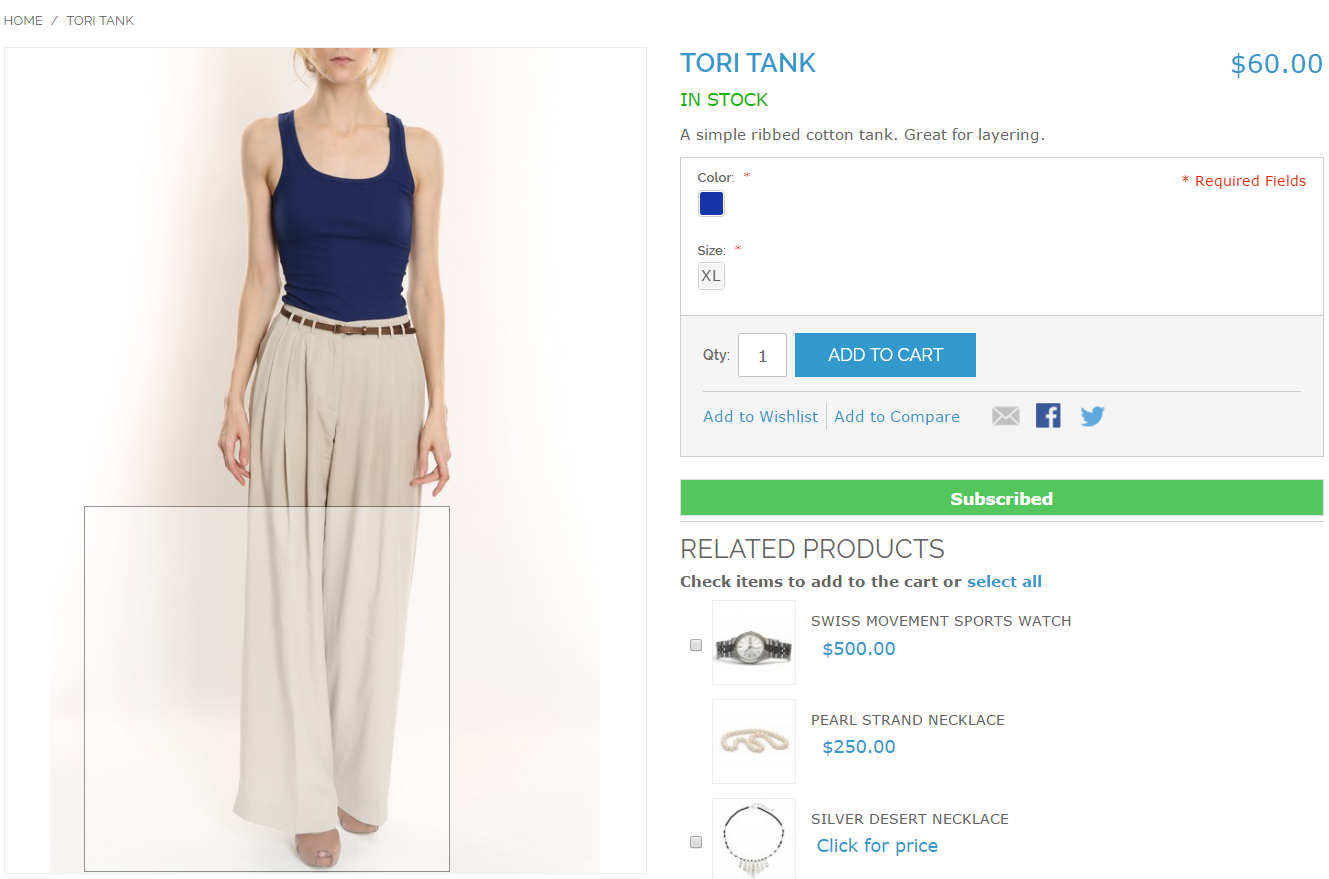
When customer enters the email id and click to the button “Subscribe” the initial mail will be sent to the entered email address and the message showing subscribed as below.
Note*
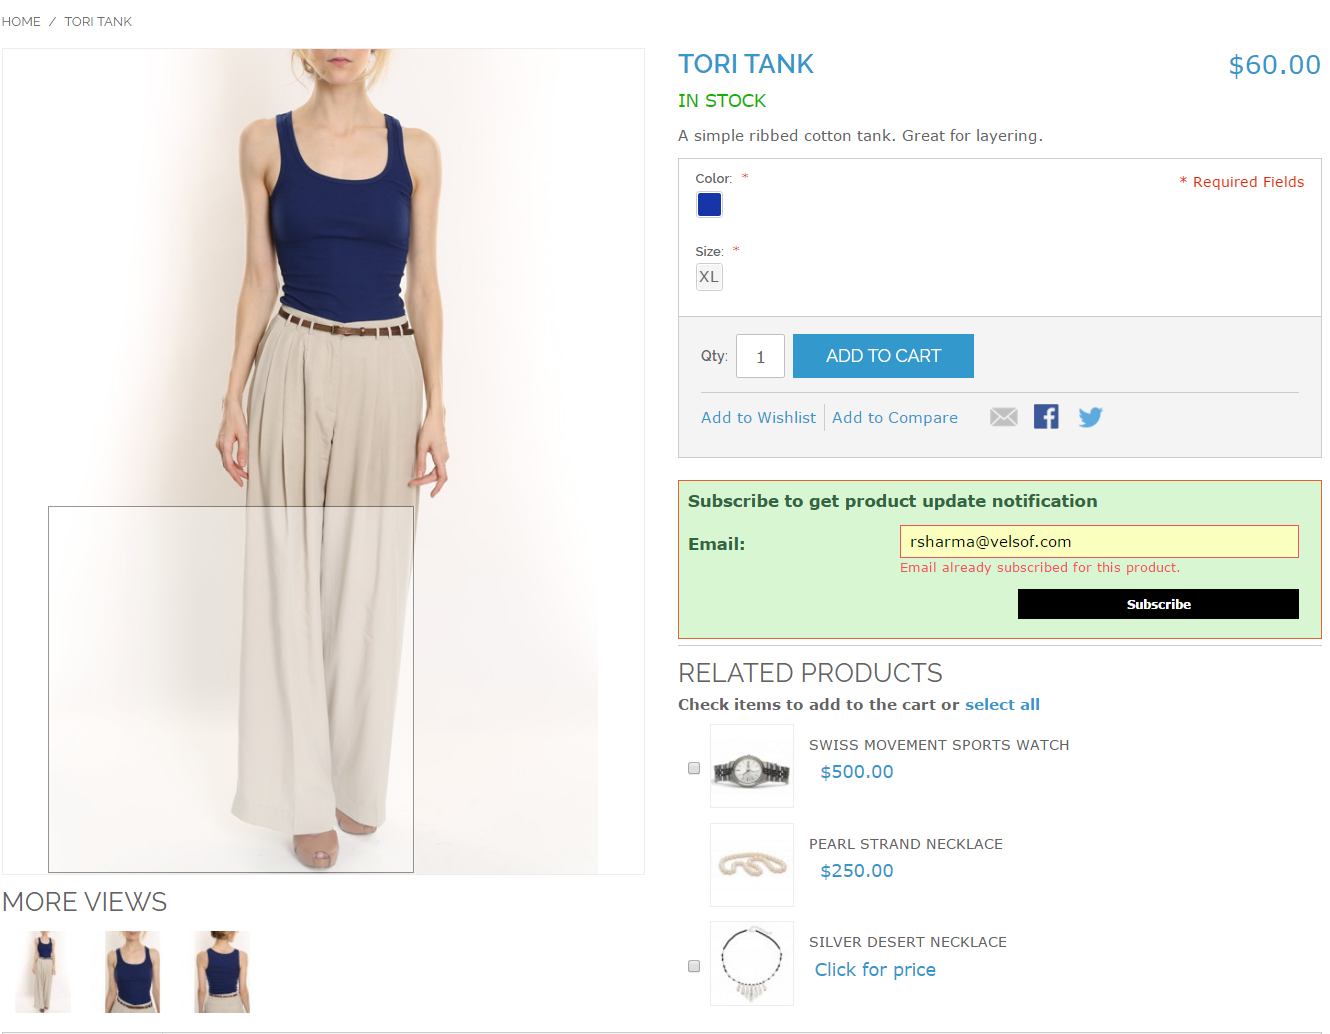
If a customer who has already subscribed for a particular product for Product Update tries to subscribe again with same email id for the same product then a message will appear showing “You have already subscribed for this product.”.
The screen shot is as following:
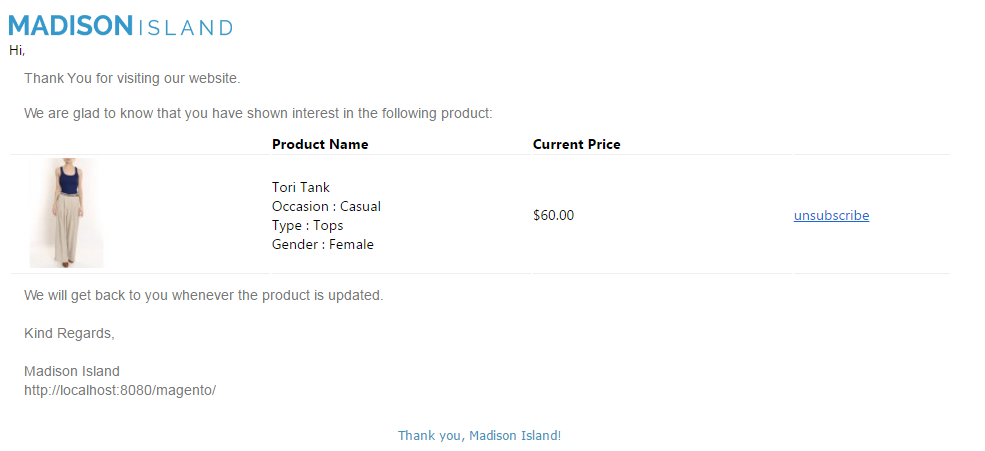
The initial email of the Magento stock alert extension by Knowband that will be triggered to the entered email id is as following:
* Whenever the price of the product changes from admin panel and CRON for the module runs, the product update mail that will be triggered will be as following –
* Whenever product goes In stock from Out of stock and CRON for the module runs, the product update mail that will be triggered will be as following –
Magento has proven itself as an effective platform in the eCommerce arena. It has been the driving force behind various eCommerce websites that are standing firm and delivering. Keeping up with the various technological advancement in the market, it keeps on updating its platform by introducing various conversion effective extensions timely. The latest in this series is the ajax cart extension. The new Magento extension has already started creating a buzz about its efficiency and conversion driving abilities. Before you go on to install this update, let us discuss the various benefits that you can expect after installation.
The cart extension module is another effective tool from the house of Magento.
Have a look at the various benefits that cart extension module carries for your website.
Cuts loading time: The Ajax based cart extension allow you to cut the time which is wasted in reloading of the pages. The customer can easily add the product to his/her cart and make a purchase without waiting for the product page to load every time. He/she can easily make the choice either to continue shopping or head away directly from the ‘Add to cart’ page. It takes away the frustration that occur while reloading of the pages even for a minor change in the cart.
Hassle free editing: Customers can make any addition or subtraction in the cart without any hassle, that too by directly clicking on the product. They need not wait to land on the product page each time to make such changes. This will make the visiting experience of your website more prolific and connective. The more seamless you make your customer experience the more is the chance to optimize your conversion.
Allows comparison among products: The new extension allows the customers to compare between the products. The visitors on your website can easily compare the products by just adding them to the compare list rather than visiting the product pages individually for each product. This saves a lot of time while providing a holistic overview of products to the customer.
Freedom of customization: The extension allows you to make various customization on the front end of your web page. For instance, you can introduce various animation effect to show the movement of the product in and out of the cart. This customization option allows you to make the changes that have the potential to grab the eye of the visitors.
Final say
By enhancing your eCommerce website with the above mentioned features the Magento’s ajax cart extension directly pings at the chances of optimizing your conversions. Being a reliable and consistent platform, Magento has always provided its user an opportunity to explore their business potential and this extension is on the same lines.
The online merchant can now use Knowband’s Prestashop back in stock notification module which allows the online users to subscribe for the favourite out of stock products. This Prestashop Out of Stock Subscription addon sends a notification to the subscribed customers when the products come in stock again. The Prestashop store merchant can show a notify block on the out of stock product pages. Store owners can also customize the looks and feel of the notification box. The online users can share the email id where they want to receive the Instock email alerts and click on the “Notify me” button.
The online users can view the list of subscribed products and also remove any product from the subscribed product’s list. This Prestashop product stock notification extension also provides an option to send low stock alert notification to the subscribers. The online merchant can send the low stock alert email notification after the specific quantity which can be set from the admin interface.
The Knowband’s Prestashop Back in Stock Module is GDPR compliant. The Prestashop product stock notification addon is integrated with Mailchimp, Klaviyo, SendInBlue email integrator. The store merchant can also view the list of subscribed customers along with the product name. The subscribers can be removed from the subscriber list. Admin can also download the subscriber’s list in CSV format.
1.1 Salient Features offered by Prestashop back in stock notification Addon
The online merchant can use this Prestashop product stock notification addon for sending email notifications of product back in stock to those users who subscribed for the same.
The Prestashop product stock notification addon offers GDPR compliance.
Admin can enable privacy policy settings and apply the related configurations from the admin interface of this Prestashop back in the stock addon.
In the updated version of this Prestashop back in stock notification Module, the online users have an option to view the subscribed products list. They can also remove any product from this list if they wish to do so.
The online merchant can also send low stock alert notifications to the subscribers for the subscribed products.
Prestashop product stock notification addon allows adjusting the color of the notification box using the color picker tool.
Admin can also enter the custom CSS and JS code for the advanced look and feel management.
The online merchant can integrate Mailchimp, Klaviyo, SendInBlue email integrator for creating a list of customers for email marketing activities in the future.
The store admin can view a list of highly demanded products from the analysis section.
The Prestashop back in stock notification Addon shows a list of all the subscribers and the e-merchant can also remove any subscriber from the list
Provides an option to add custom fields on the back in the stock window/notification box.
Collect information like name, region, address, etc from the subscribers. It has a text field, radio button, select option, etc for adding the custom fields.
You can also set priority for the fields to organize them in proper order.
Admin can set the order for the added custom fields.
PrestaShop Back in stock is provided with V3 ReCaptcha settings for bot and spam protection
The prestaShop owner can download the subscriber list in CSV format from the backend of Back In Stock Alerts Module.
The Prestashop back in the stock plugin is mobile responsive, compatible with all the Prestashop themes and is also SSL compatible.
The Prestashop back in stock notification Module offers multi-store and multi-lingual support.
Prestashop Instock Notifierallows store owners to share subscribed products, in stock, and low stock updates via em Store owners can easily customize the subject and body of the emails.
1.2 Technology for Development
Language: PHP
FrameWork: PrestaShop
2.0 Installation Guide
First of all, purchase the Prestashop back in stock notification
Addon and follow the below steps:
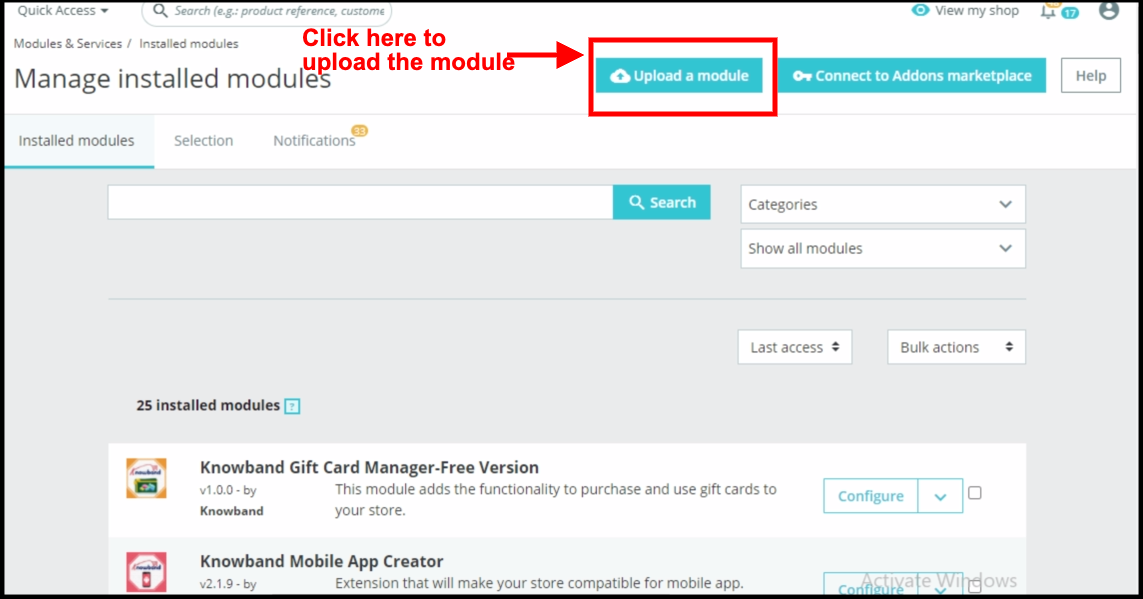
From the backend of the store, go to the Module Manager and click on “Upload a module”.
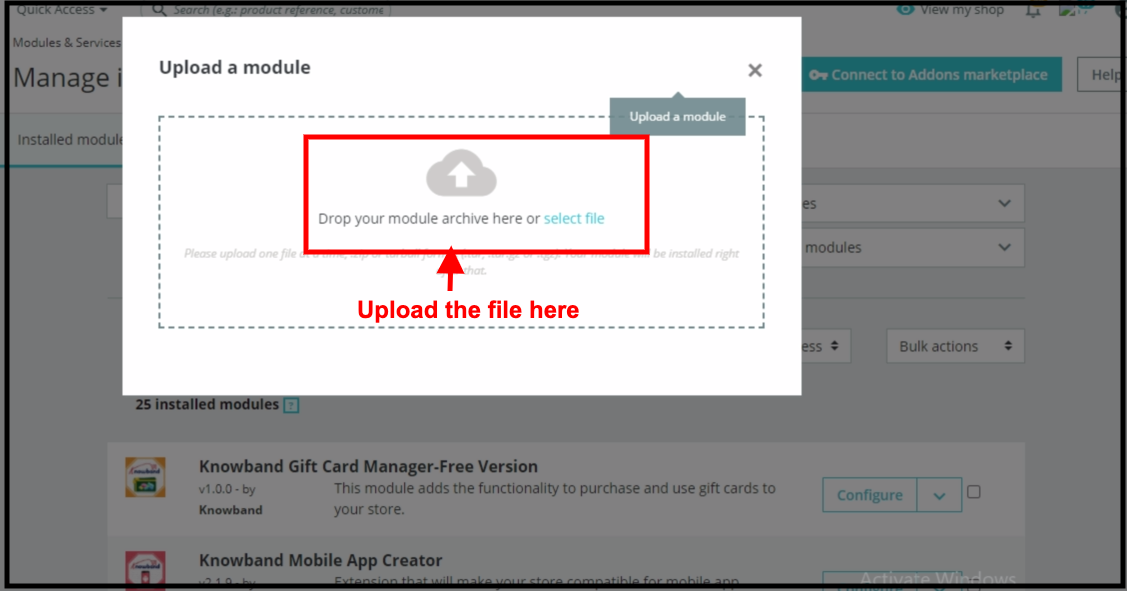
Upload the file from the system or drag and drop your module file here in the next tab.
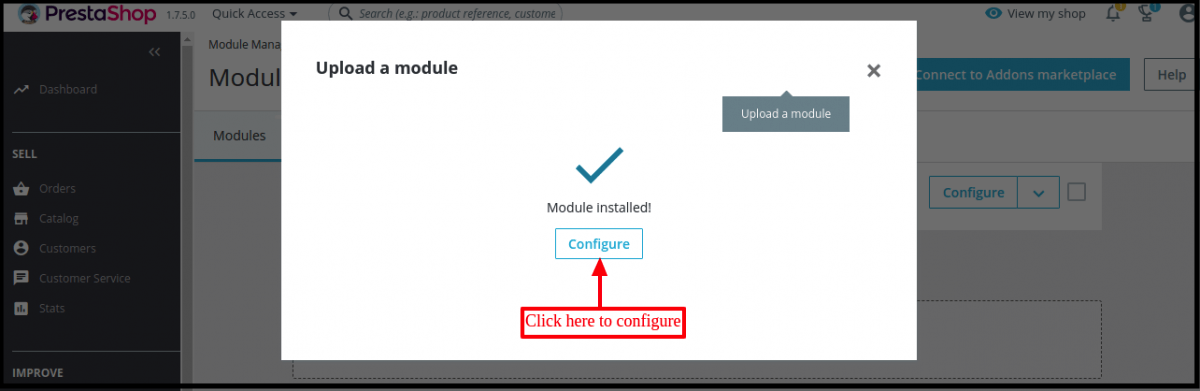
Once the installation process is completed, “Module installed” notifications will get displayed.
After the installation process, you will get access to the admin interface of the module by clicking on the “Configure” button. Click on the configure button and your module is ready to use.
3.0 Admin Interface
After installing Prestashop back in stock notification plugin into the store, the Prestashop plugin will provide Module Configuration and Subscribers list.
Admin will get these configuration options:
General Settings
Initial Email Settings
Final Email Settings
Low Stock Email Settings
Email Marketing Settings
Analysis
V3 Recaptcha Settings
Add Custom Fields
Subscription List
Each interface of this Prestashop back in stock is explained below.
3.1 General Settings
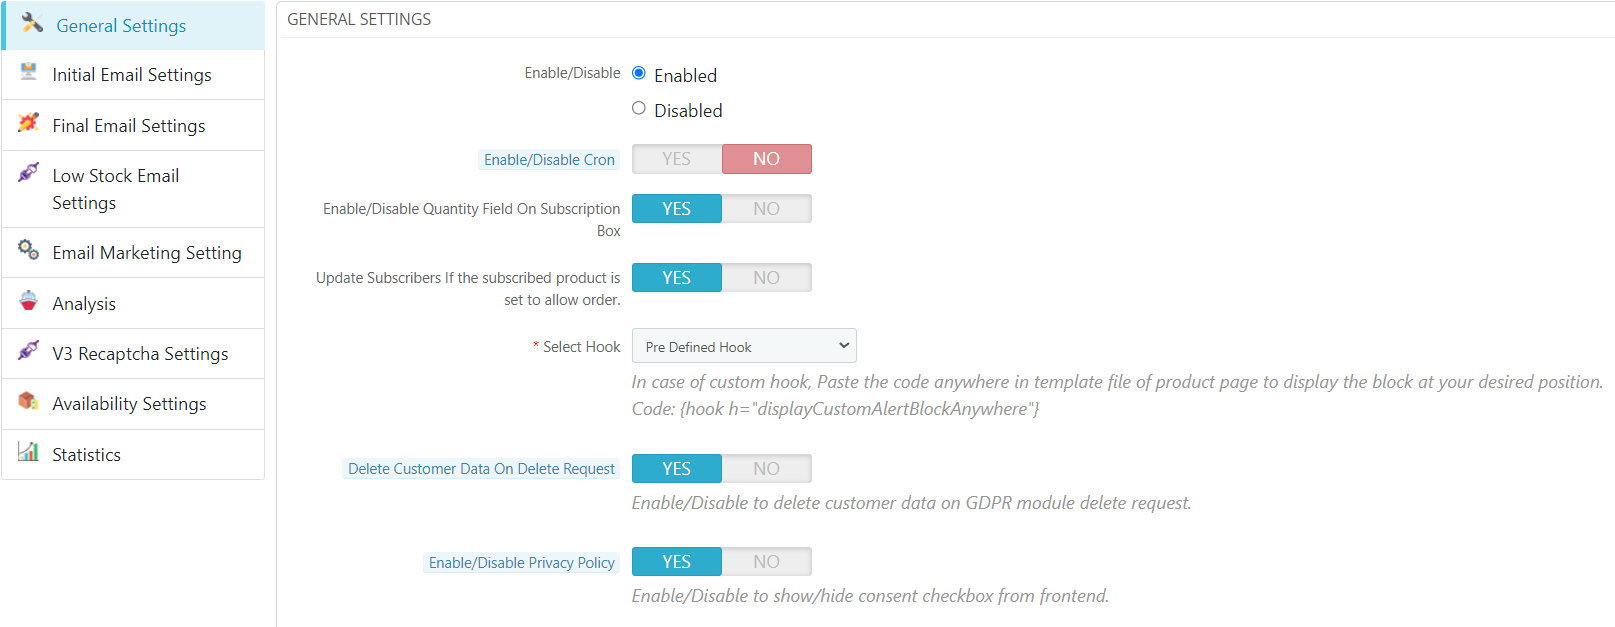
On clicking on configure link on Prestashop stock alert module listing page, the system will open general settings tabs of this Prestashop plugin by default. Initially, fields of this Prestashop product stock notification addon in the above form will be already filled with their default values.
Enable/Disable: Initially, this field of Prestashop back in the stock module by Knowband will be “OFF”. Admin can enable/disable the PrestaShop plugin by turning ON/OFF in this setting.
Enable/Disable Cron: When this field is enabled the admin needs to hit the settled cron and the mail will be sent to respective subscribers.
Enable/Disable Quantity Field On Subscription Box: When this field is enabled the users are allowed to enter the quantity of their respective product from the field that will be displayed in the subscriber form.
Update Subscribers If the subscribed product is set to allow order: When this functionality is enabled then the customers who have subscribed to the product will receive the back-in-stock mail when the product is set to allow order.
Delete Customer Data on Delete Request: Enabling this functionality will delete the customer data on GDPR module delete request.
Privacy Policy: Enable this toggle button to display the privacy policy option at the front end. The Privacy Policy will be shown at Notify Me block.
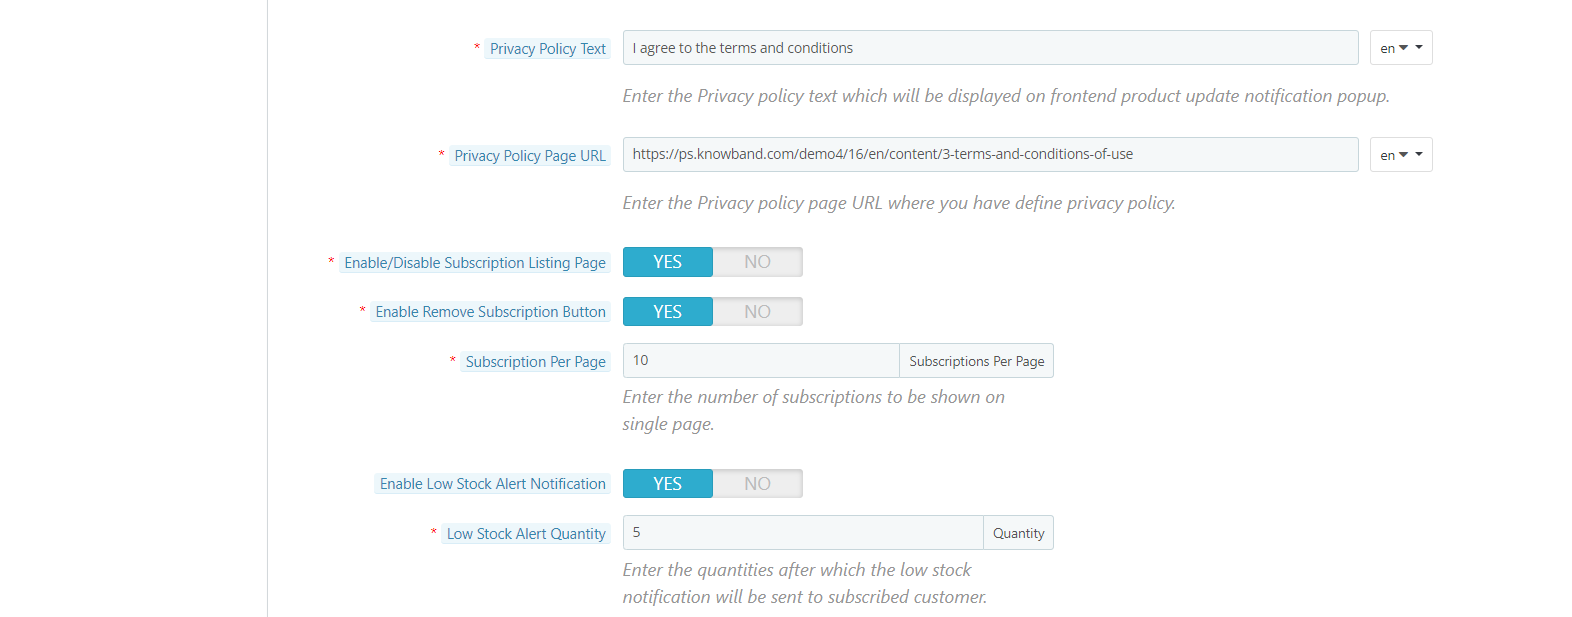
Privacy Policy Text: The admin can enter the desired text for a privacy policy. The text can be changed whenever needed.
Privacy Policy Page URL: The admin can easily set his choice of URL to the privacy policy.
Enable/disable Subscription listing page: The online merchant can enable this option for showing a list of subscribed products on the website front-end interface.
Enable Remove Subscription button: By enabling this option, the online merchant can show a remove button that can be used for removing any product from the subscription list.
Subscription per page: Select the number of products that you want to show per page.
Enable Low Stock Alert Notification: Enable this option for sending a low stock alert notification for the users.
Low Stock Alert Quantity: Enter the quantity after which you want to alert the subscribers.
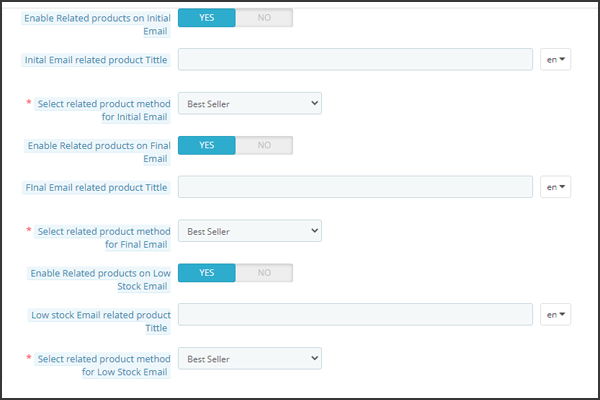
Show Related Products in initial, final and low stock email
Enable Related Products in Initial email: It allows admin to add related products in the initial email. You can add a title to the related products and choose what kind of products you want to show.
Enable Related Products in Final email: It allows admin to add related products in the final email alert of Back in Stock. You can add a title to the related products in the final email and choose what kind of products you want to show.
Enable Related products in Low stock email: Users can add related products in the low stock email alert. You can add a title to the related products in the final email and choose what kind of products you want to show.
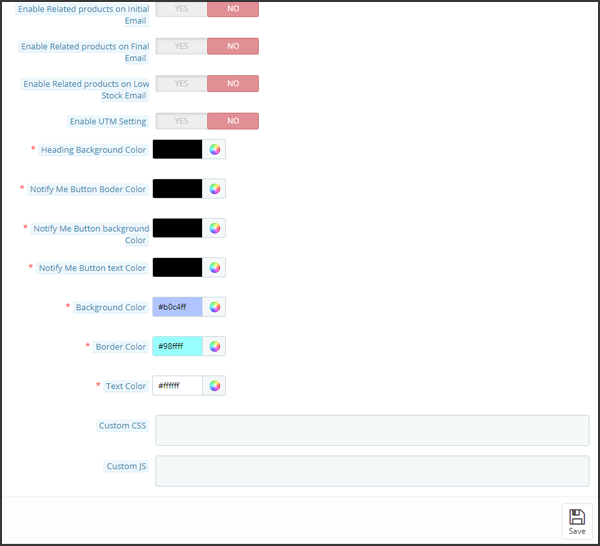
Enable UTM Setting: By enabling UTM settings, you can add UTM source, UTM medium, and UTM campaign links
Heading Background color: Change the background color of the heading for the notification box
Notify me button border-color: Edit the button border color here
Notify me button background color: The button background color can be selected here
Notify me button text color: Change the text color of the button from here.
Background Color: Initially, this field of Prestashop stock alert module will be filled with some default value. Admin can change the background color of the subscription box by picking the color from the color picker that will be reflected on the front end of the Prestashop product stock notification addon.
Border Color: Using this option of the Prestashop back in stock notification plugin, the admin can set the border color of the subscribed box using the color picker.
Text Color: This field of Prestashop back in stock module allows the admin to change the text color of the notify box.
Custom CSS: This option of the Prestashop stock alert module allows the admin to write there own CSS as per requirement and will be reflected in the front end of this Prestashop plugin.
Custom JS: This field of Prestashop product stock notification addon allows the admin to write there own JavaScript as required.
3.2 Initial Email Settings
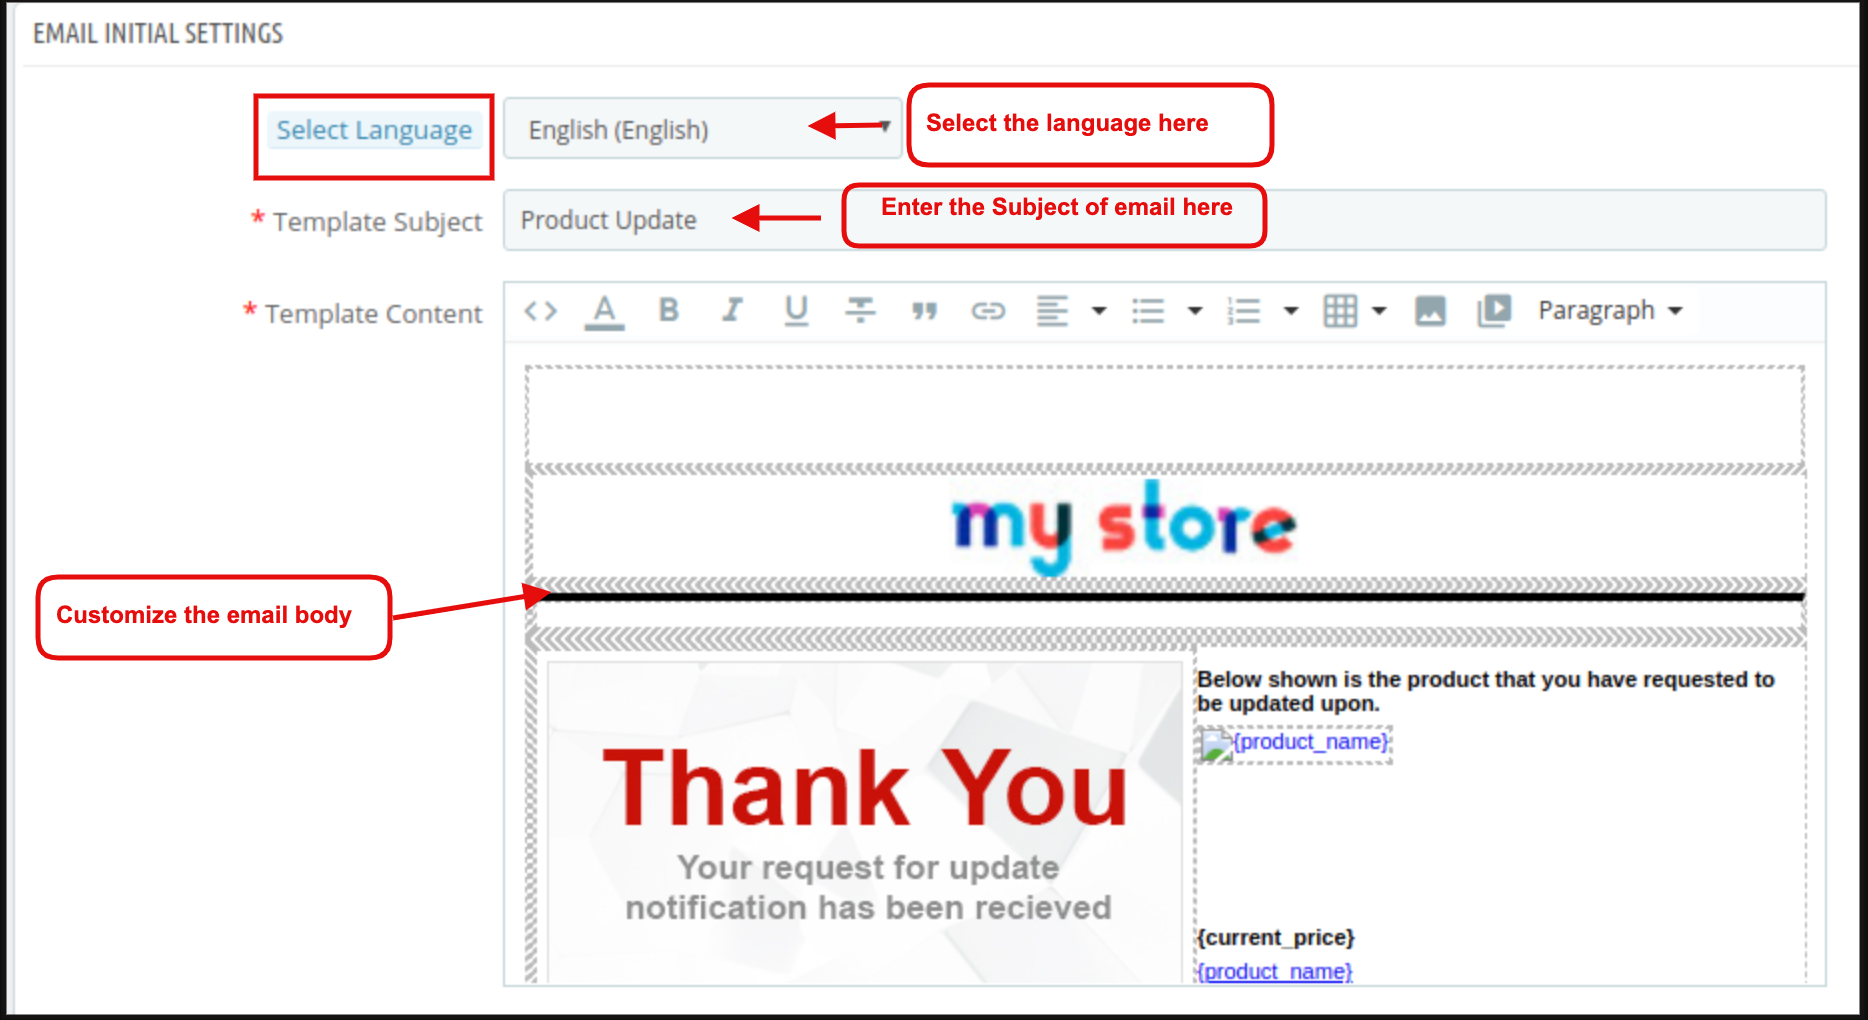
In this tab of the Prestashop product stock notification addon by Knowband, the admin can edit the email template of this Prestashop Out of Stock Subscription module. Admin can change the subject and main body of the mail corresponding to the particular language enabled or selected. The initial mail will be sent to the customer when the customer subscribes to a particular product.
3.3 Final Email Settings
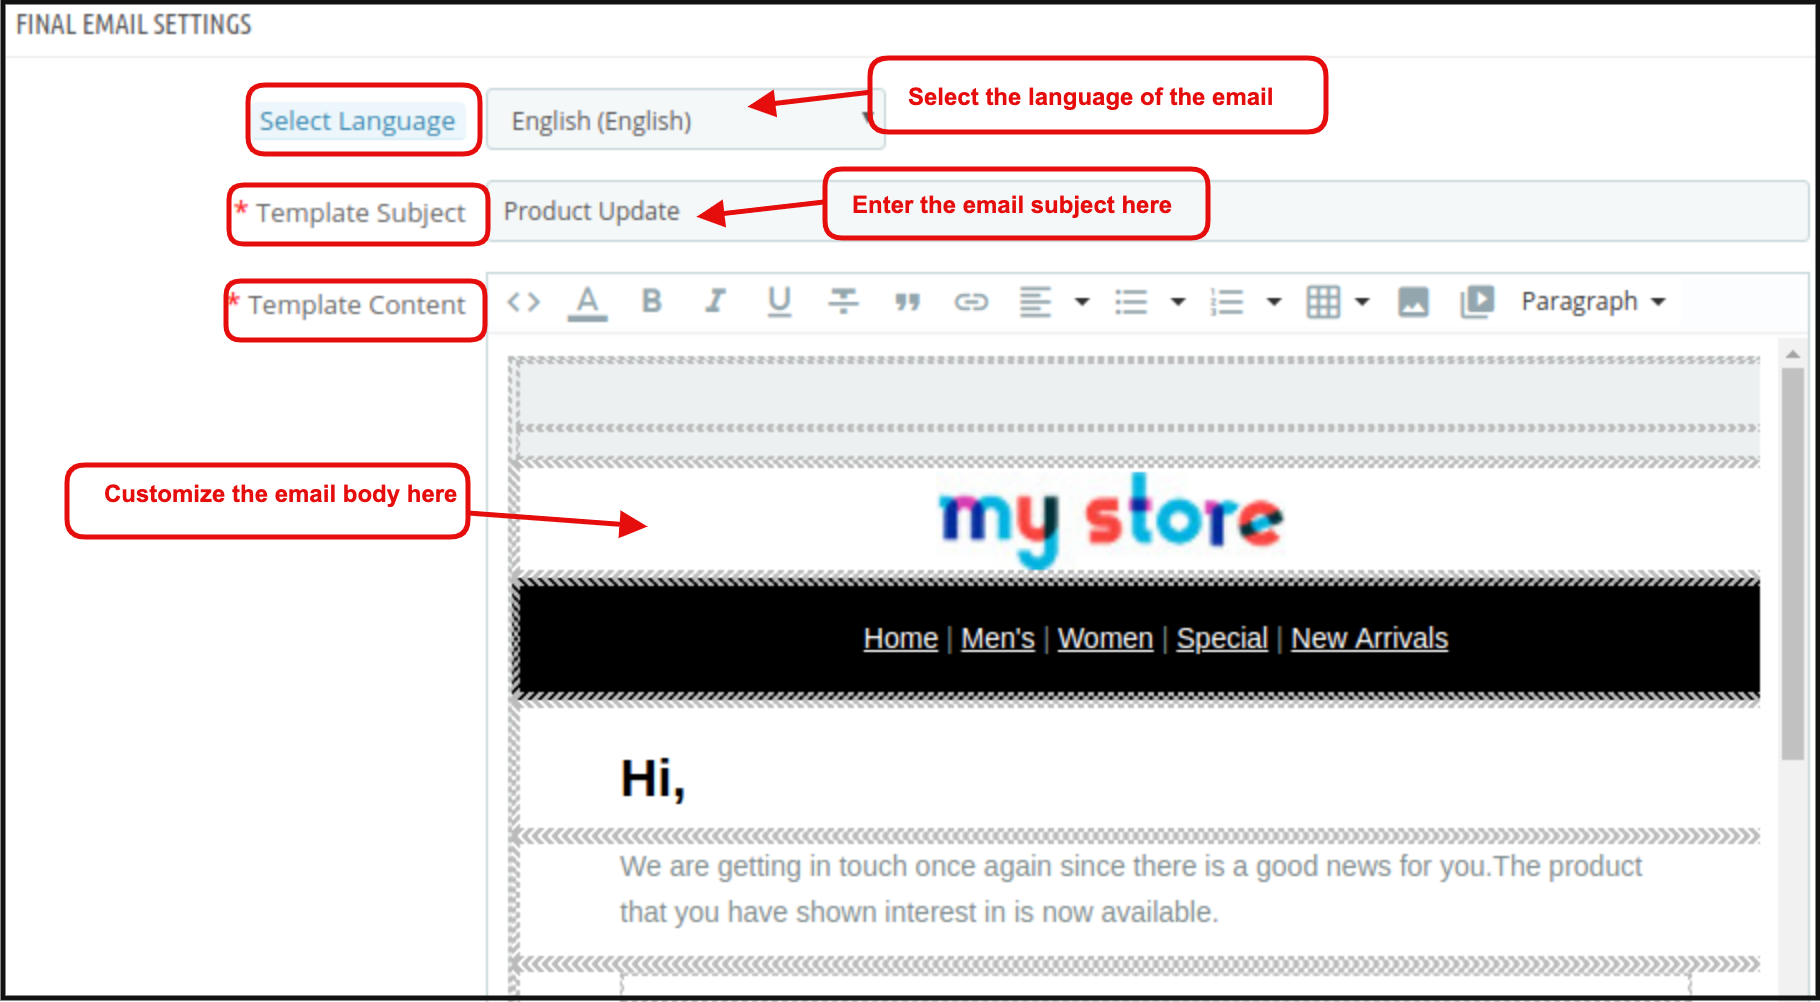
In this tab of the Prestashop reminder email module, the admin can edit the final email template to send to the customer when the product quantity of the product will be updated/ Instock. Admin can start customizing the email template after selecting the language corresponding to which admin wants to edit the template.
3.4 Low Stock Email Settings
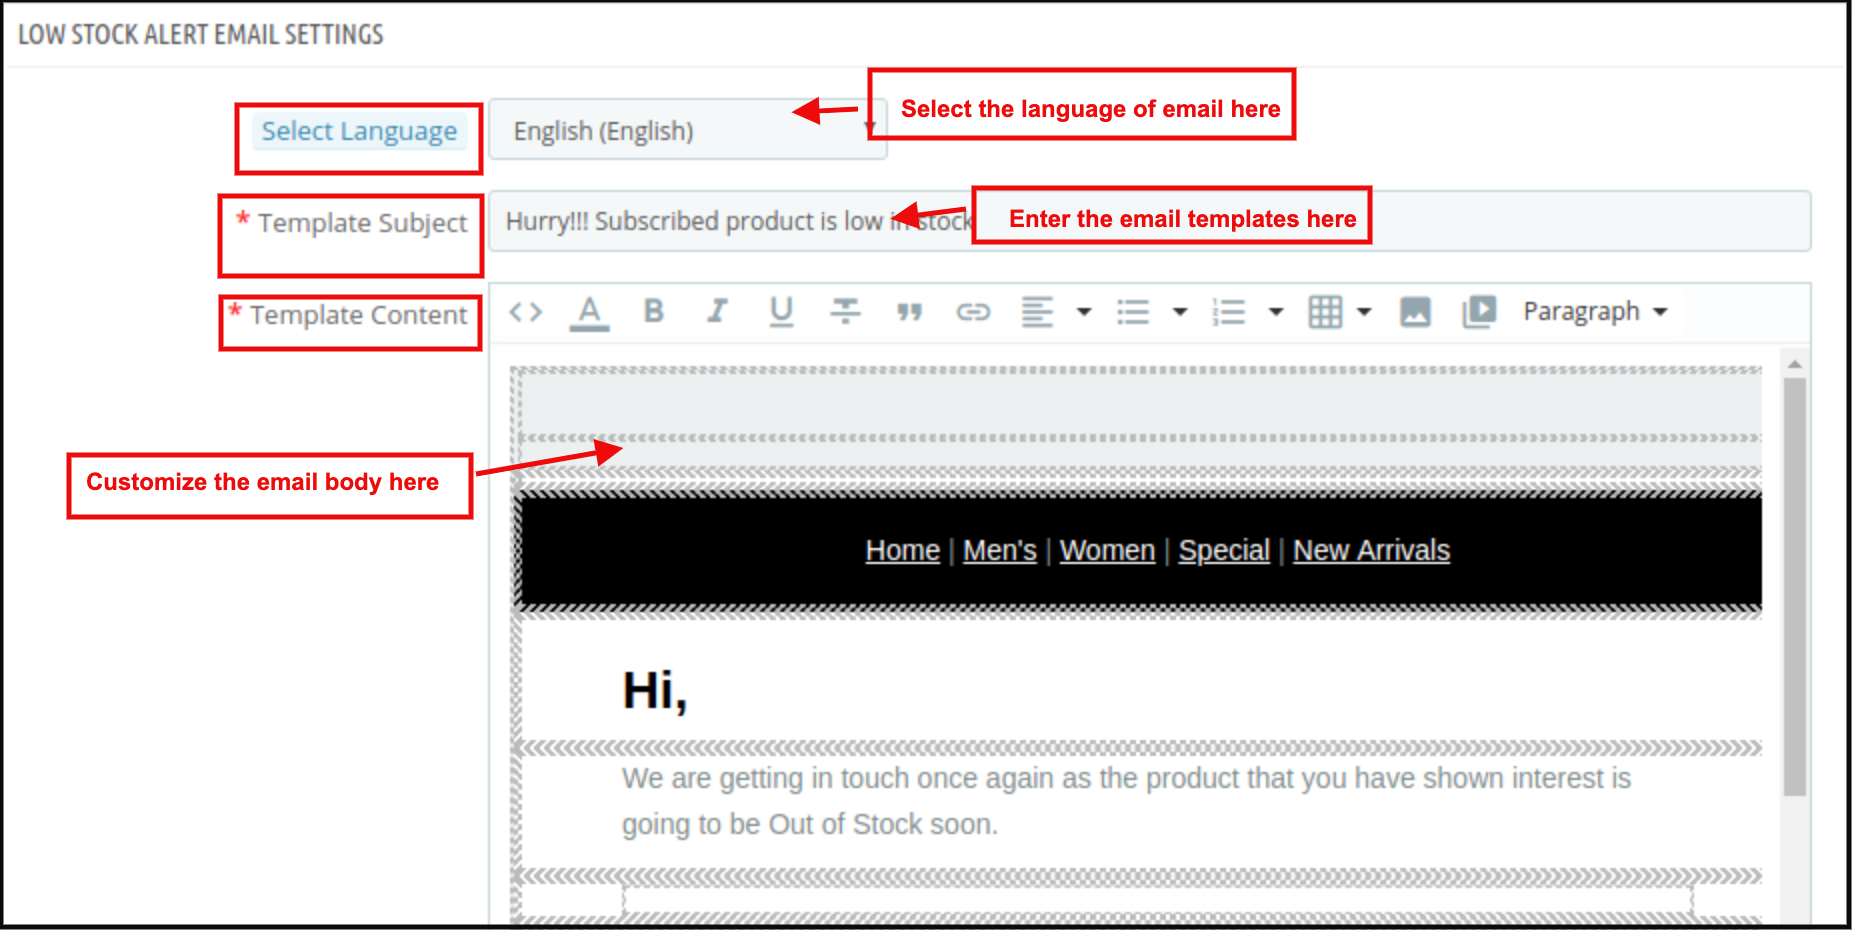
In this tab, an email template is available which can be further edited for sending a low stock email notification to the subscribers. The online merchant can select the language, enter the email subject line and edit the main content. Store admin can make changes in the subject and body of the mail anytime from the backend.
3.5 Email Marketing Settings
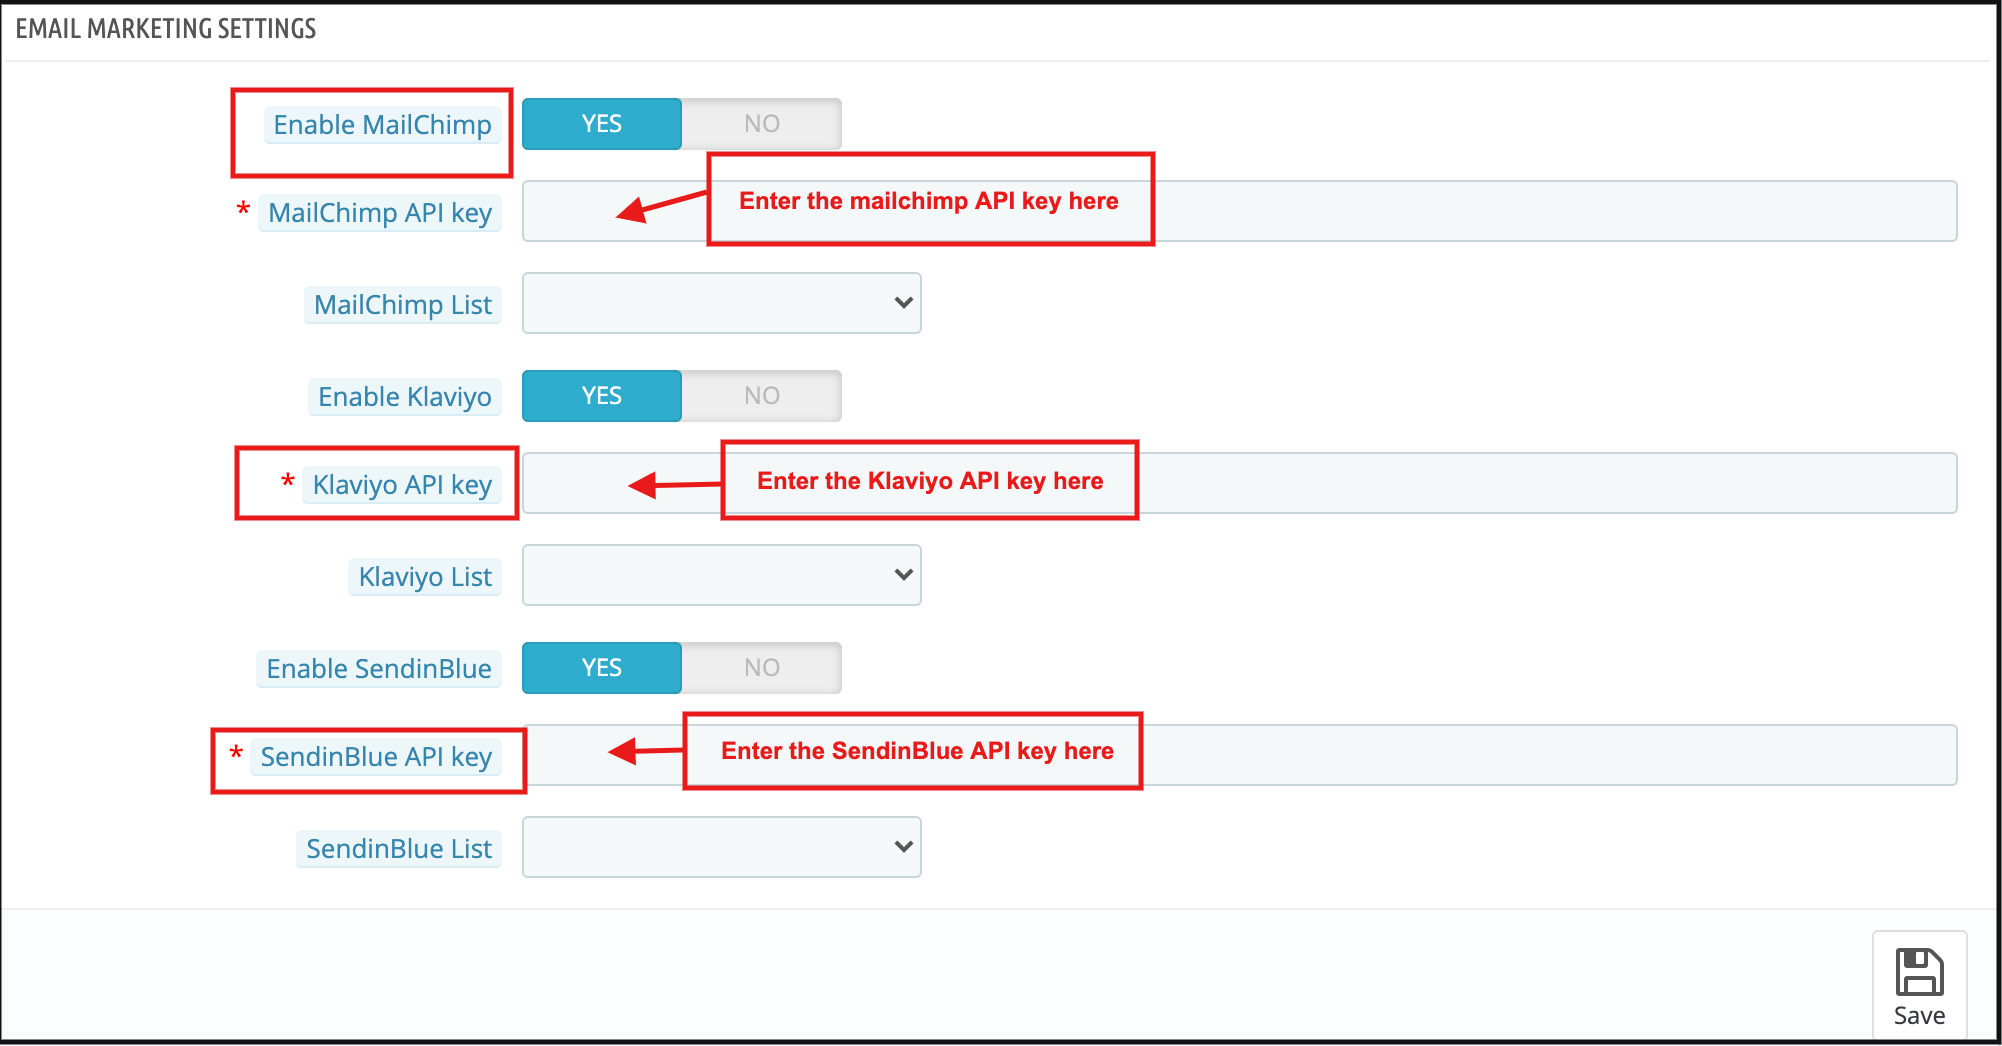
Admin can integrate various email integrators like MailChimp, Klaviyo and SendinBlue. Admin just needs to enter the API key for these email integrator sites and select the list in which they want to save the email id details.
3.6 Analysis
The complete analysis of the subscribed customers can be done in the form of a graph and the form of the detailed list. The graph will be displayed for the top 10 products at the back end of the Prestashop reminder email module.
According to the search elements and categories selected the list of the subscribed product will be displayed with some customers subscribed.
3.7 Subscriber List
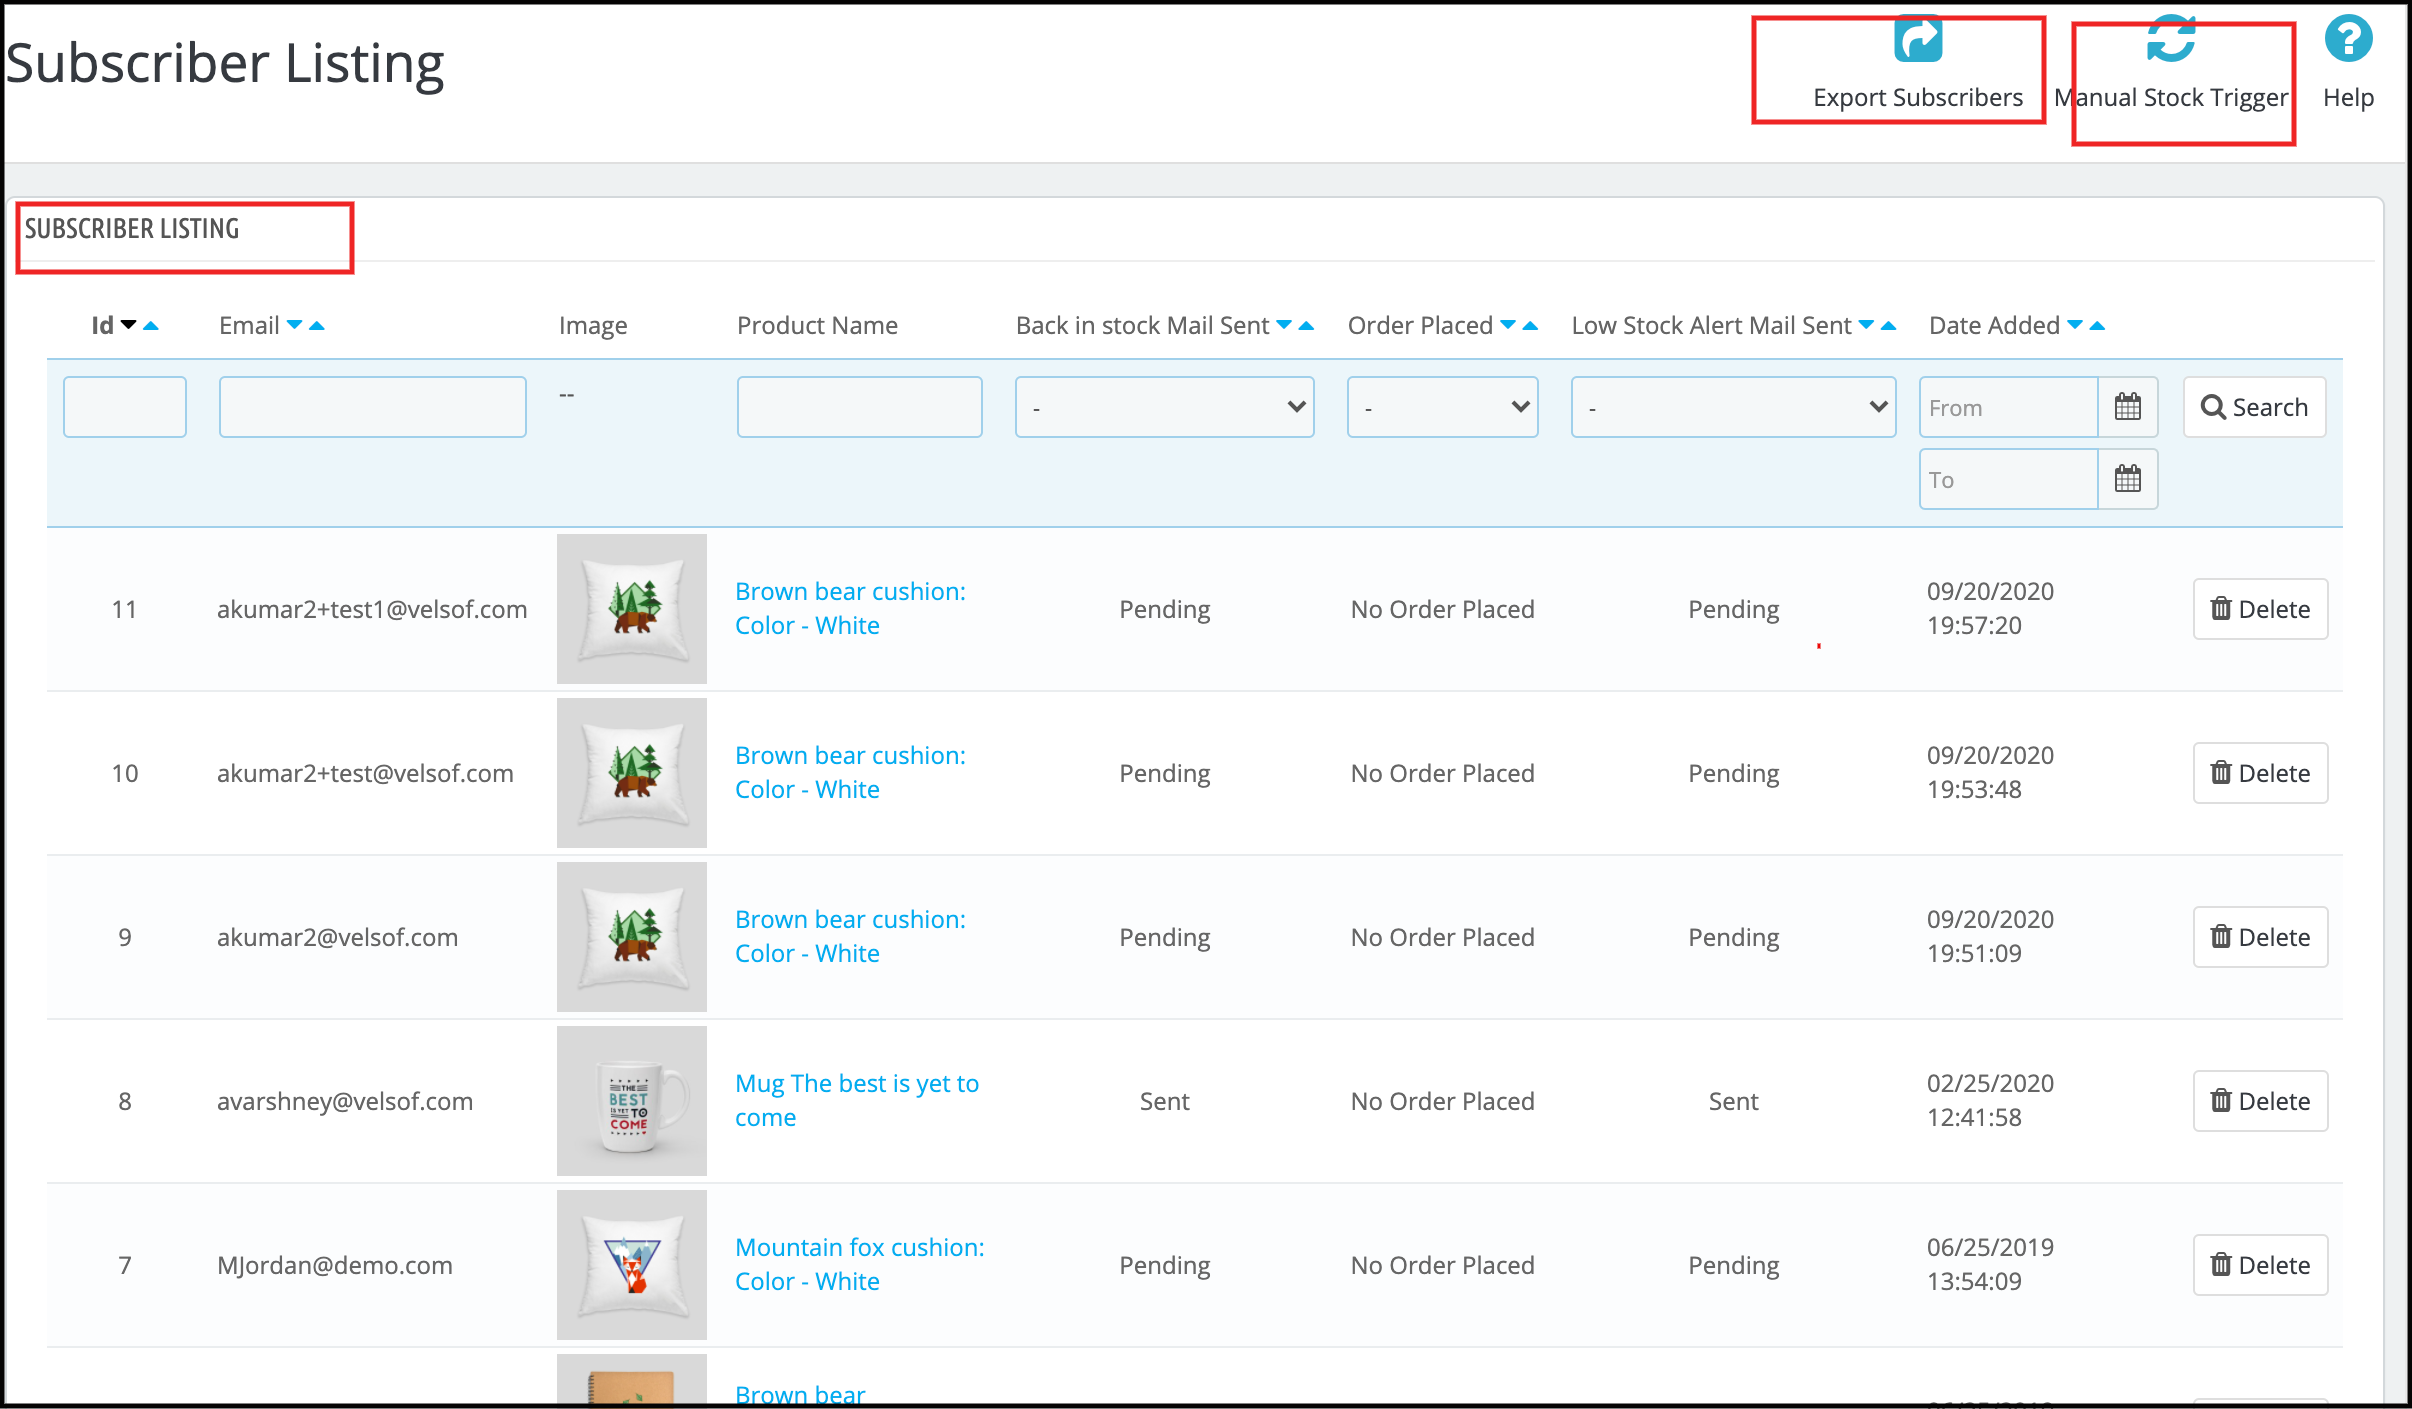
The online merchant can view a list of all the subscribers. The online merchant can view the email id of the subscribers, product details, and email status. Admin can also view if the customer placed an order for that product or not. An online merchant can also download the overall list of subscribers in CSV file format.
You can also check the subscriber list from the left menu of the dashboard.
3.7 V3 Recaptcha Settings
Admin can add the V3 Google reCaptcha from this setting.
Enable: Toggle to enable or disable the Google reCaptcha on your PrestaShop store with Back in stock notification box
V3 Site Key: Admin can enter V3 site key
V3 Secret Key: Enter V3 secret key
3.8 Add Custom Field
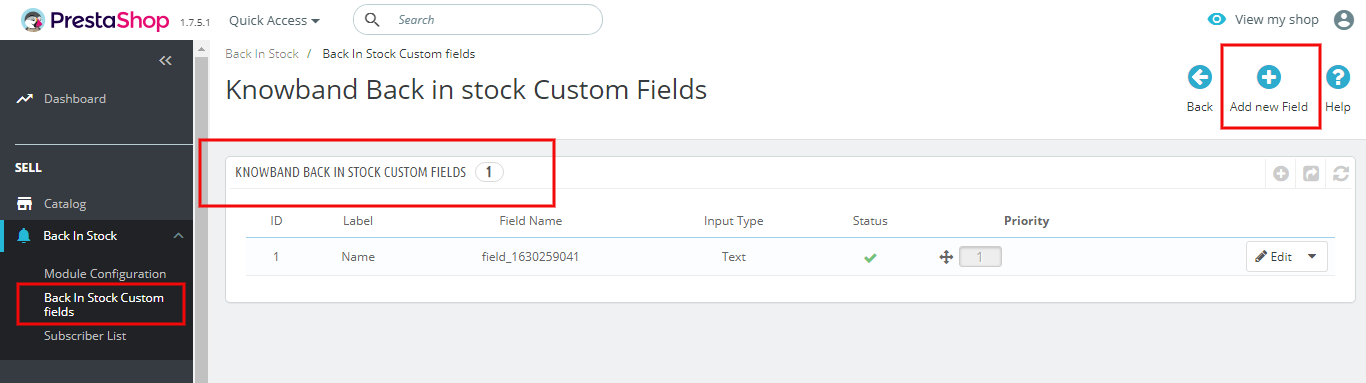
You can add new custom fields and set their priorities from this setting. It allows you to add fields like text, radio, select, etc. Every type of field requires some additional configuration and after making the changes, save the settings and enable it if you want to activate it on your Back-in-Stock subscription box.
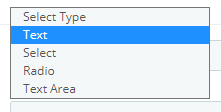
You can click on the Add New button to create new custom fields. Once you click on the Add New button, you will be redirected to a new window where you have to select the field type.
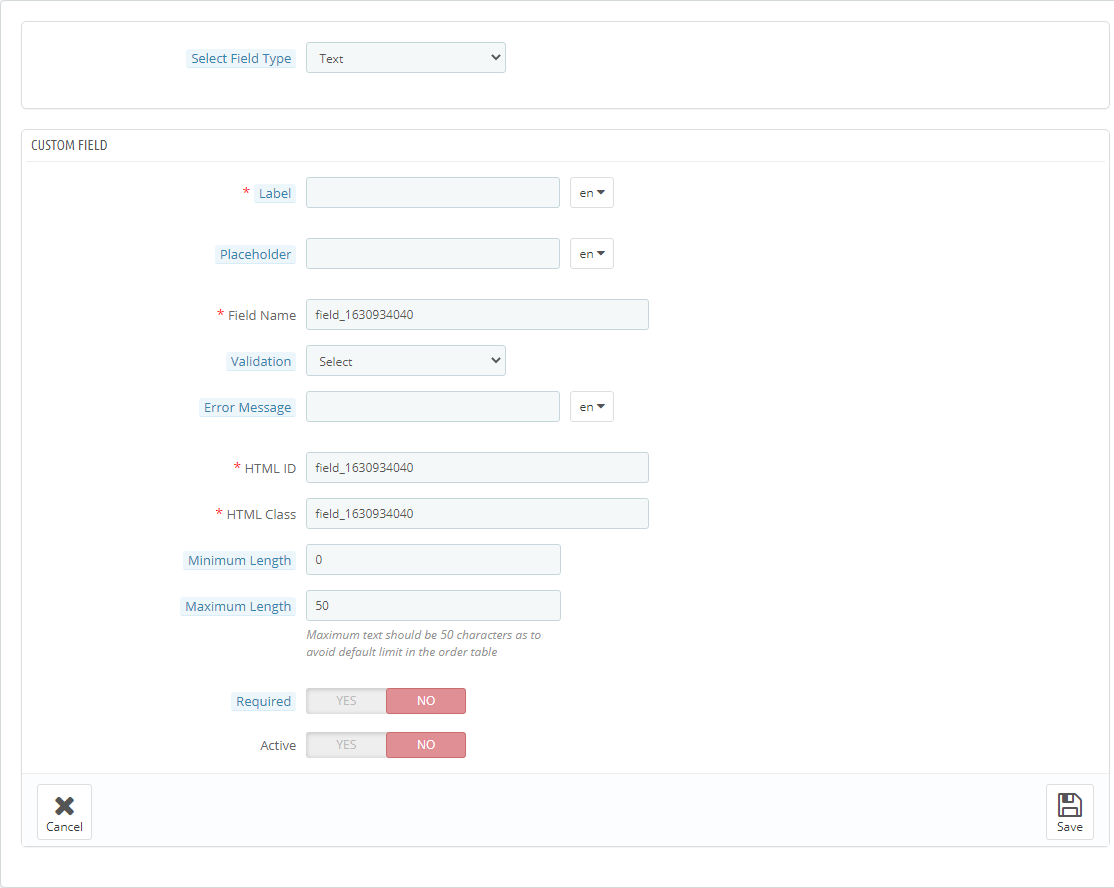
For text:
Add text, message, or other custom fields from this menu.
4.0 Front-end Interface
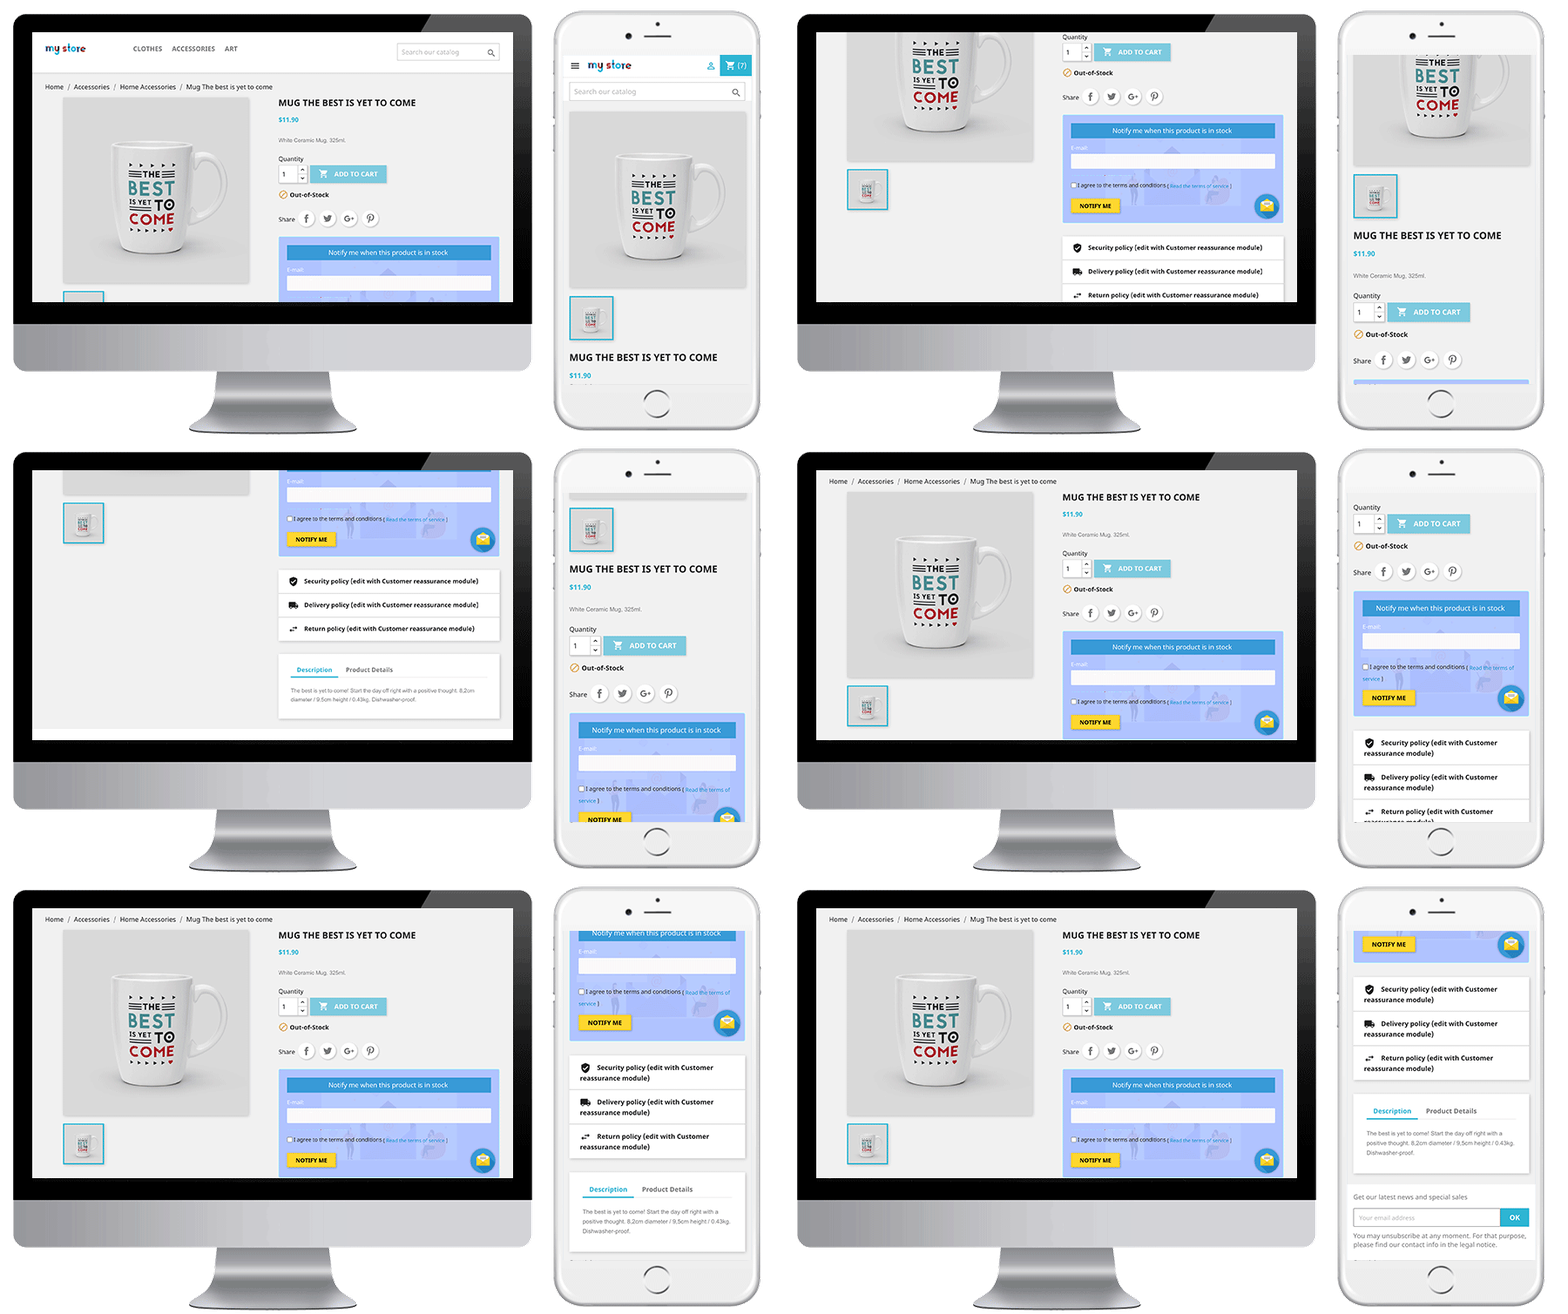
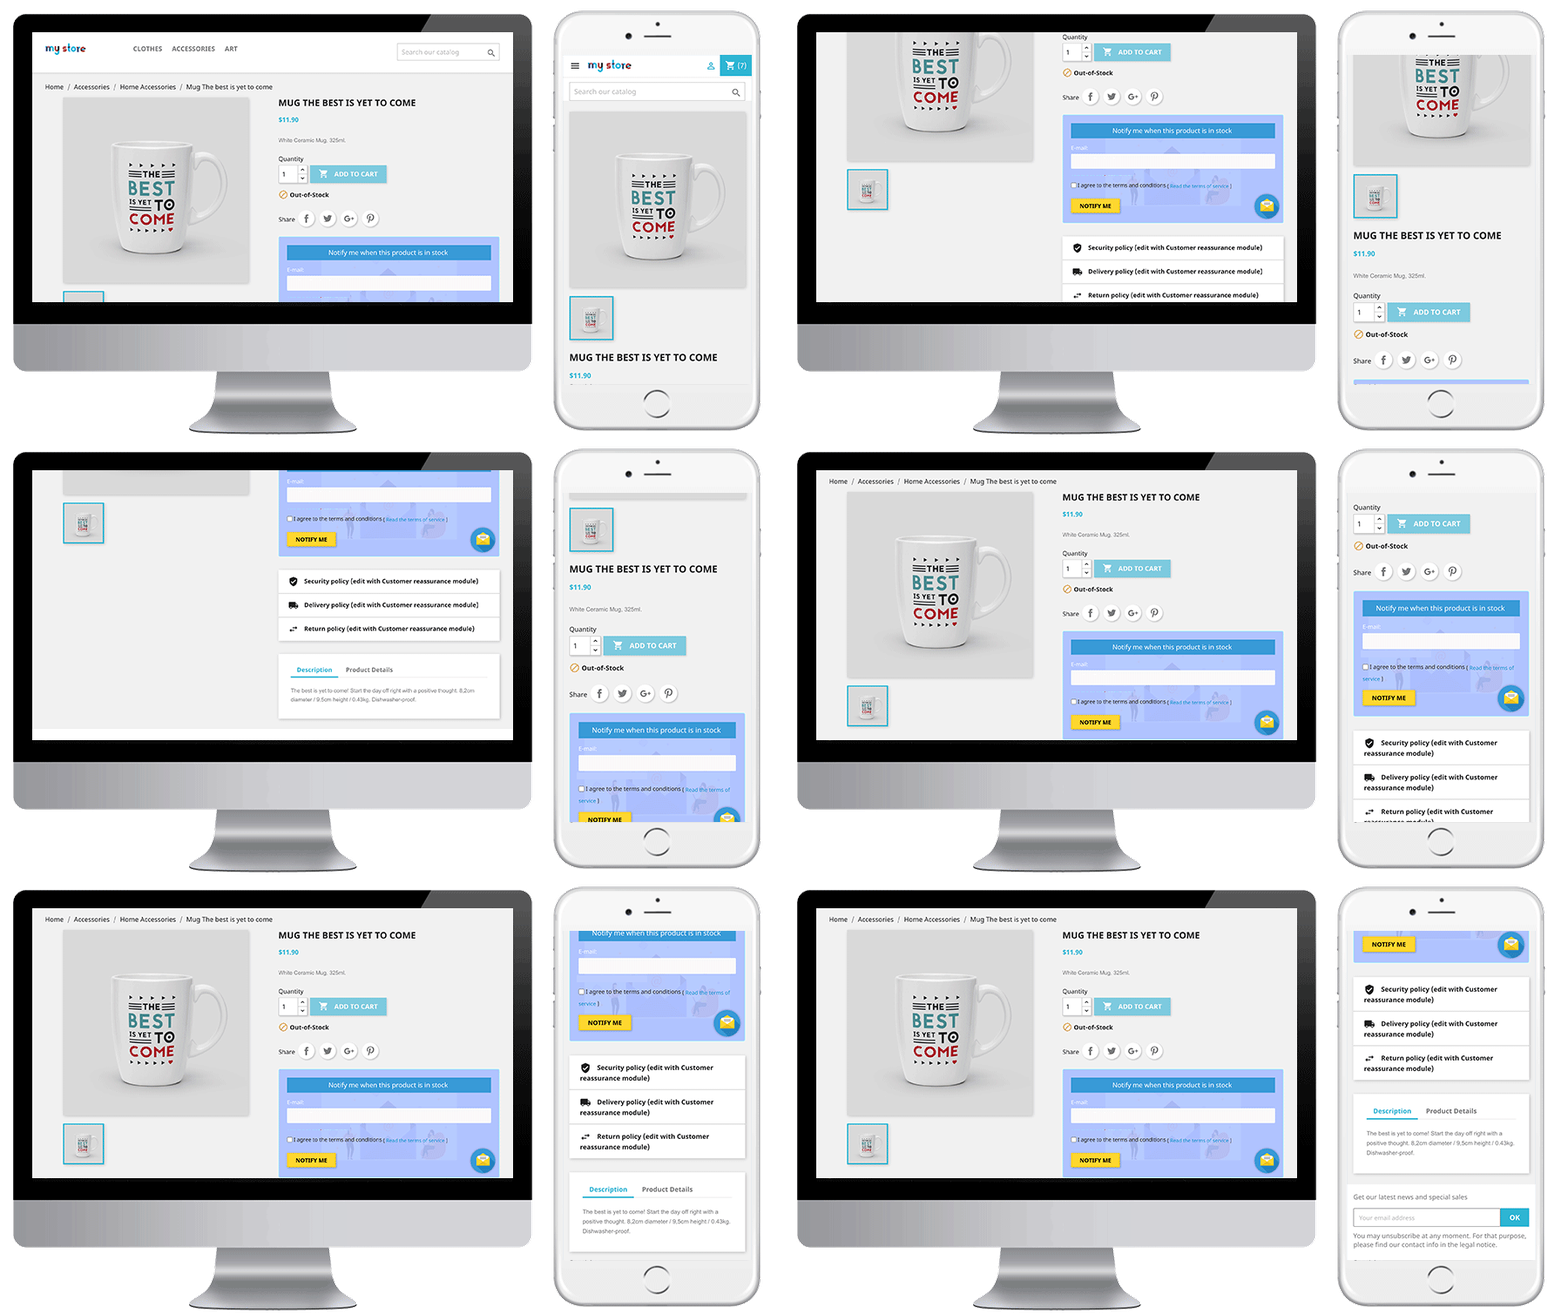
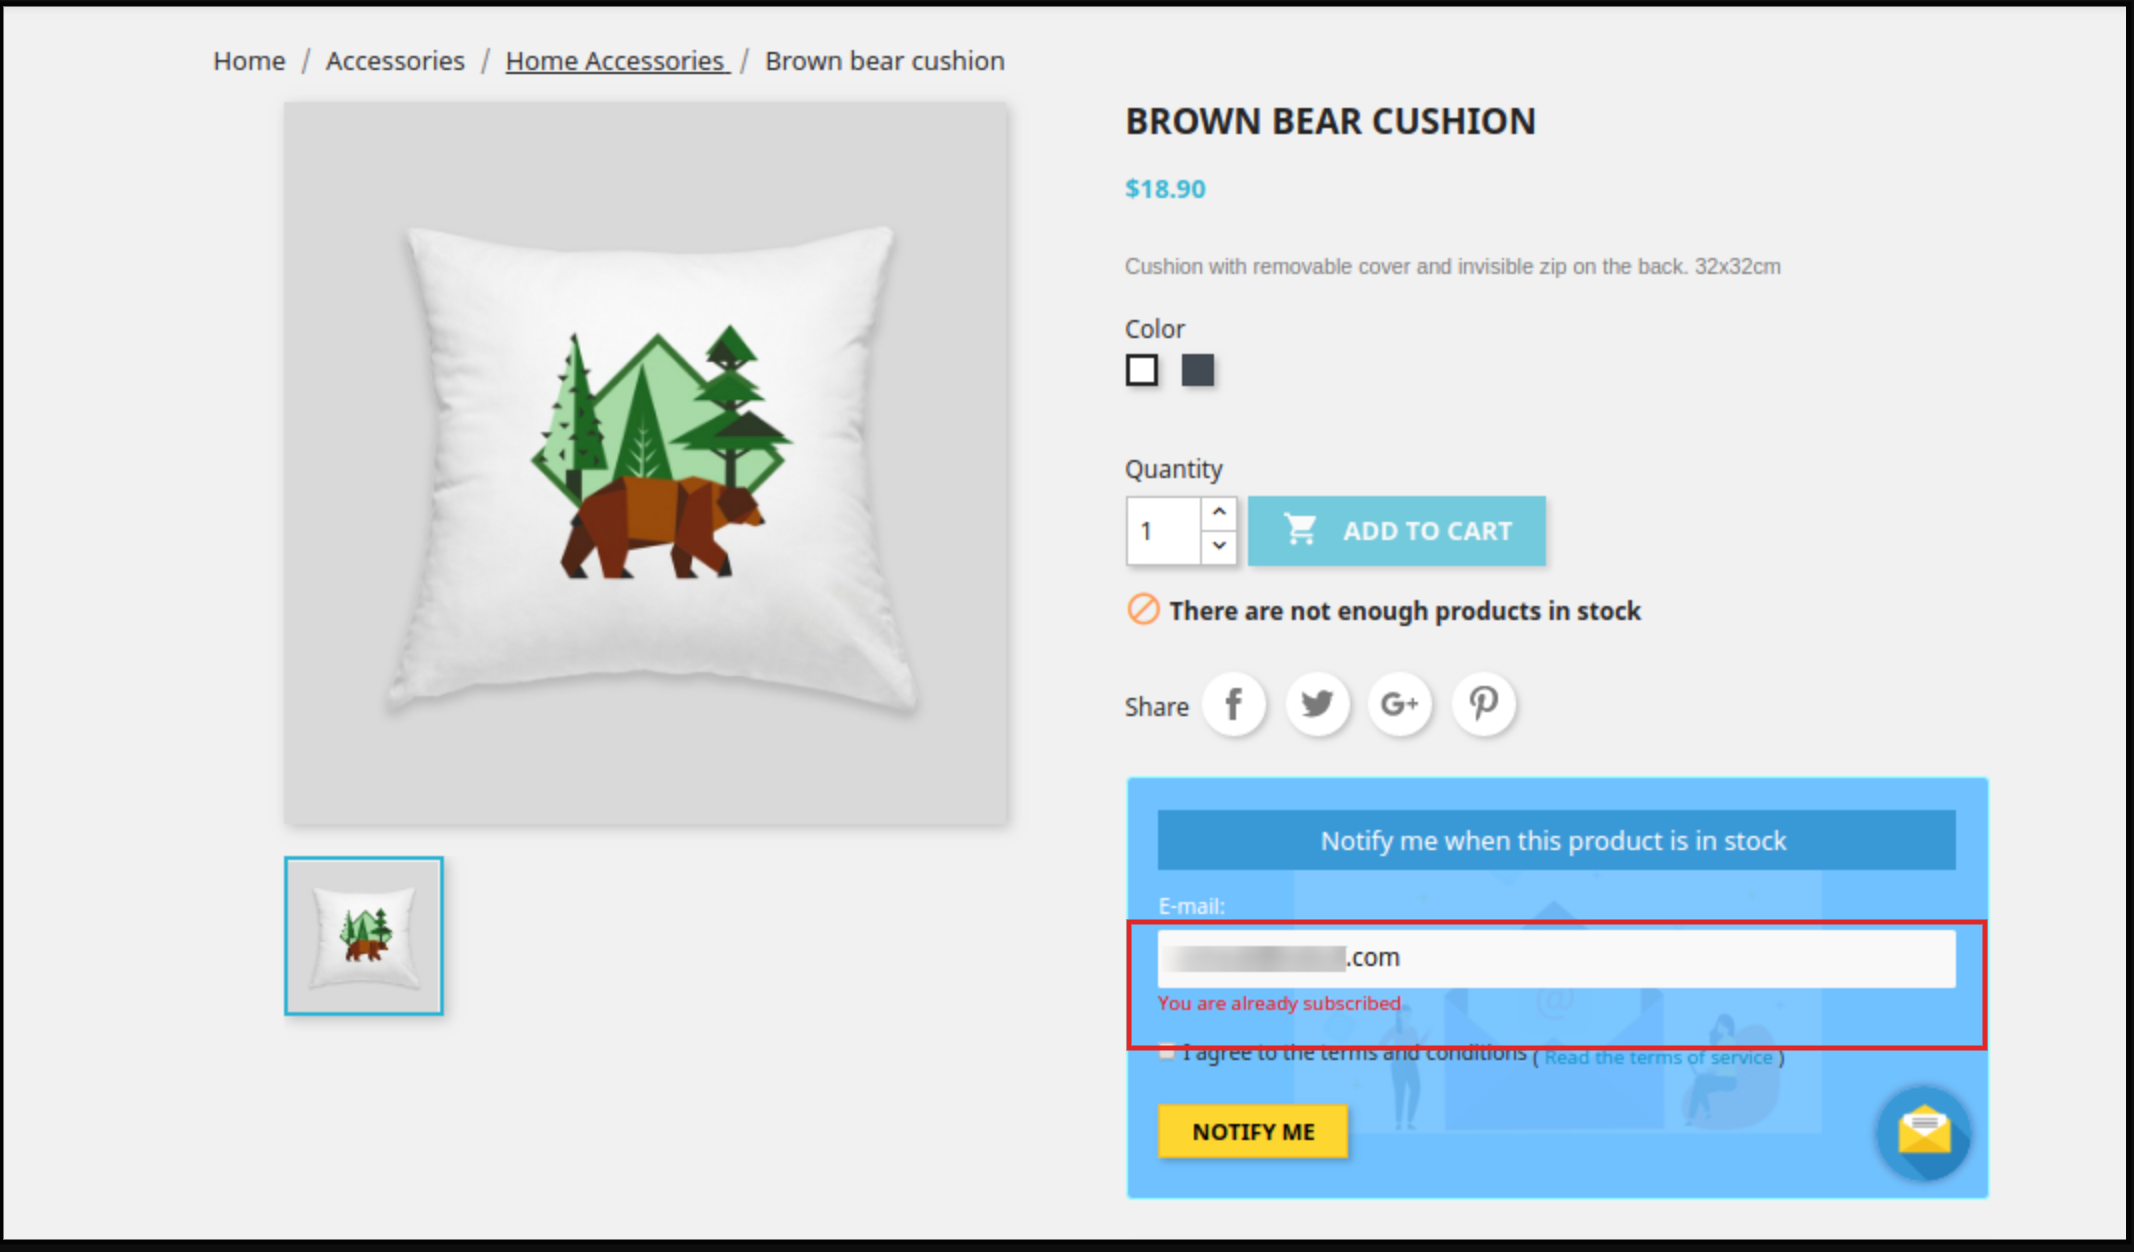
The online users can view an out-of-stock product notification box on the product pages and they can share email id for notification. The subscription block of the Prestashop reminder email module would appear as follows:
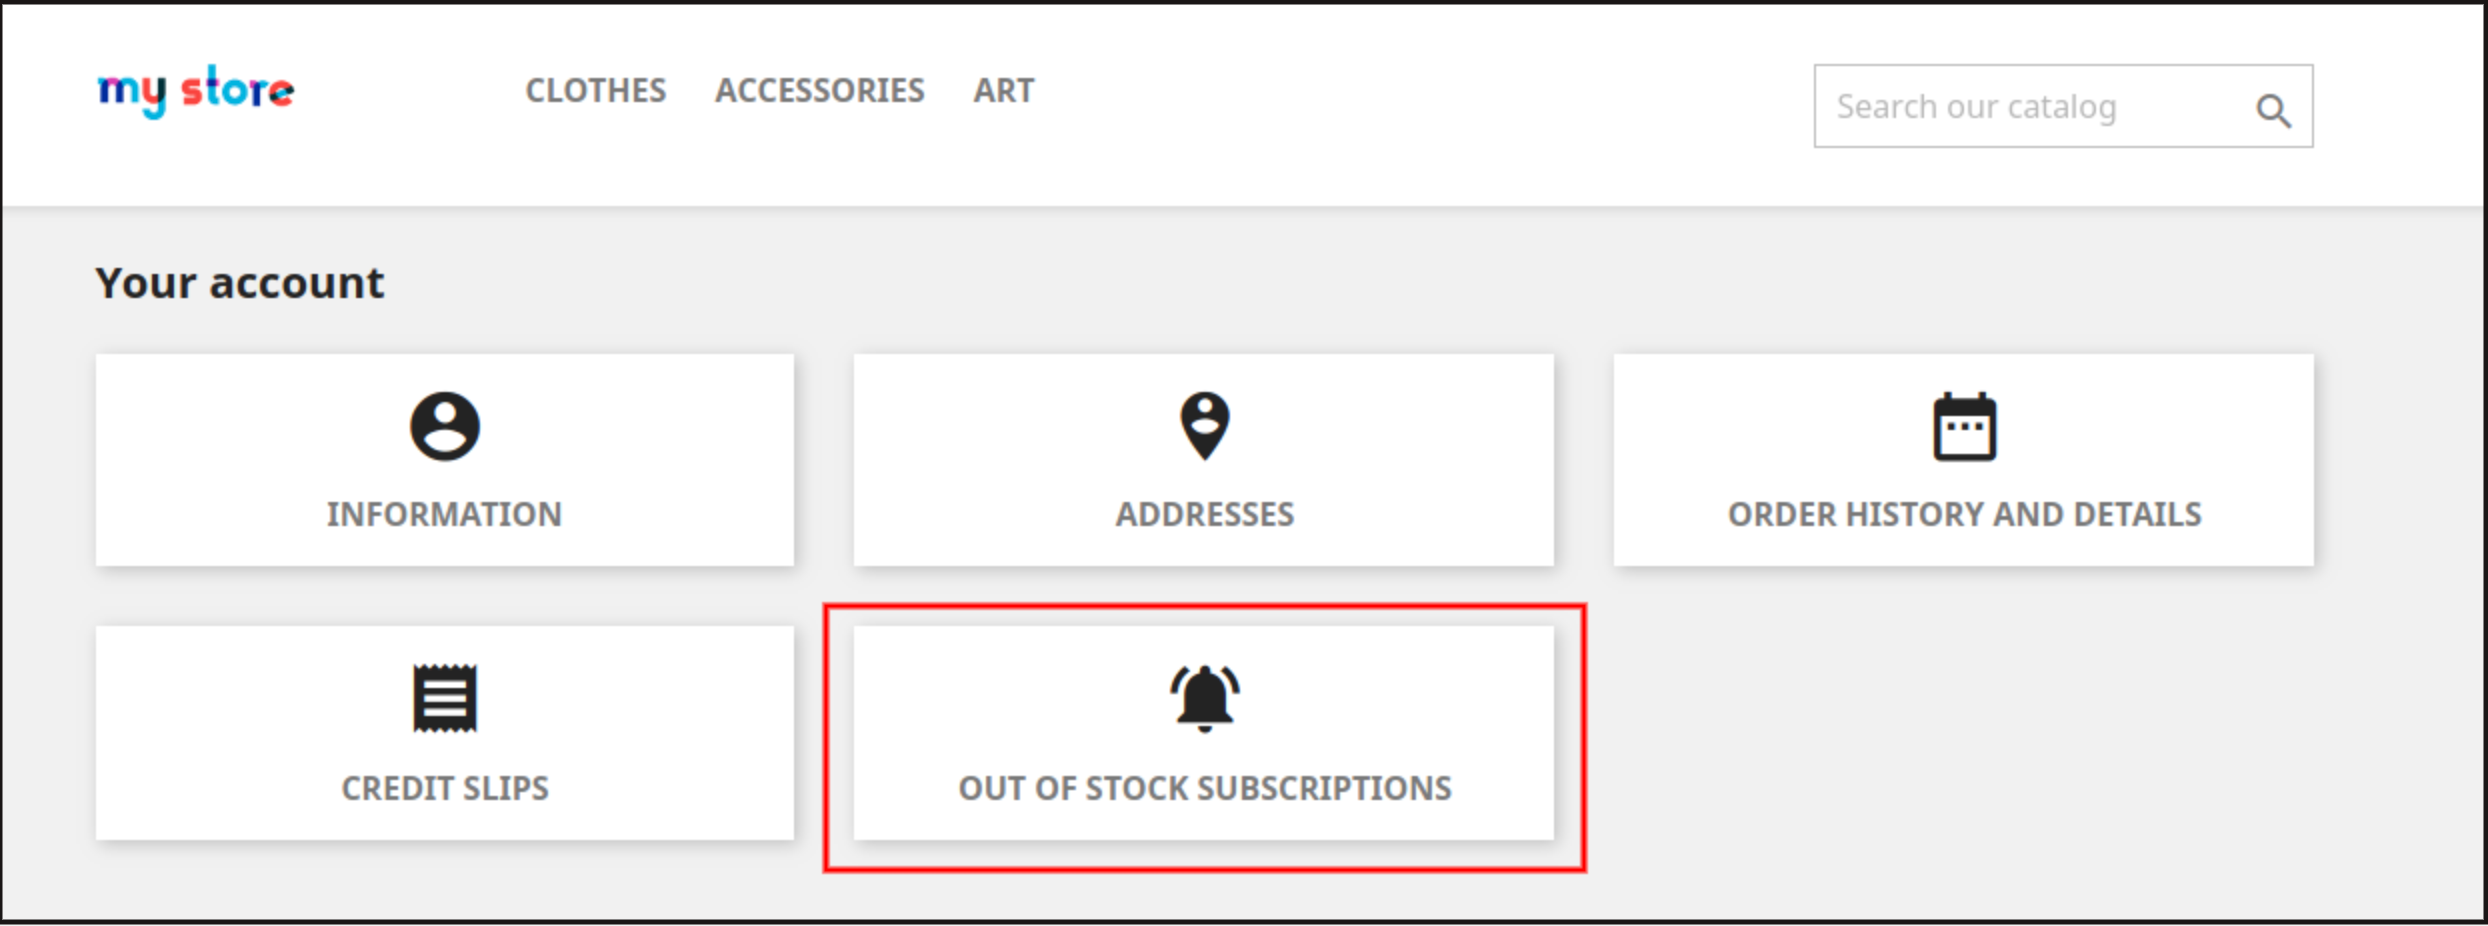
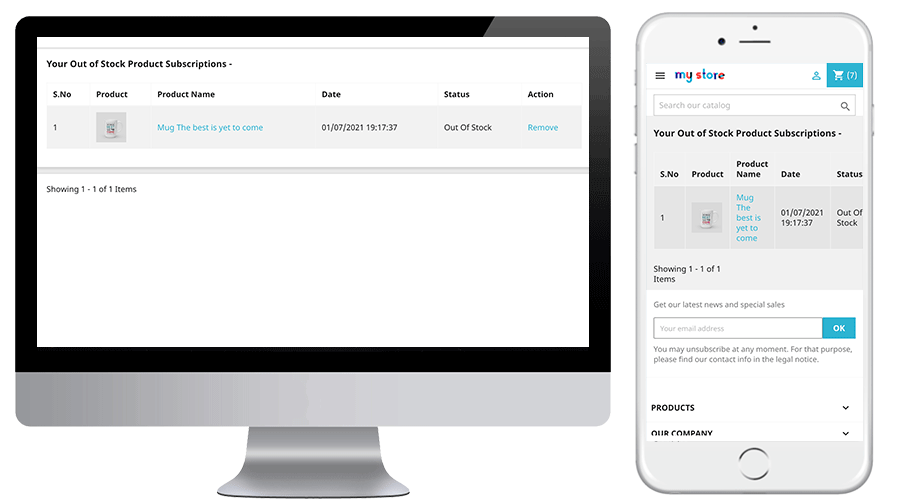
The online users can also view the subscription list from the account menu. They need to click on “Out of stock Subscription” as shown below:
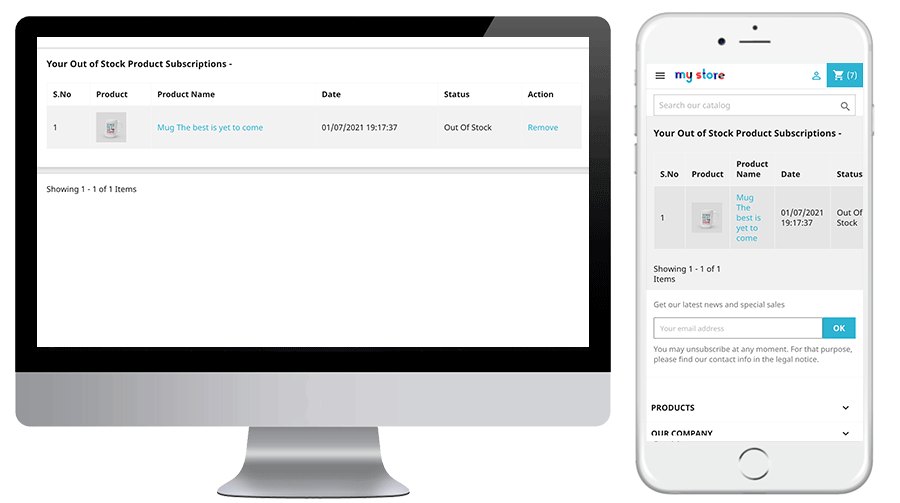
After clicking on the “Out of stock Subscription” option, they can view the list of all subscribed products and they can also remove any product from the list by clicking on the “Remove” button.
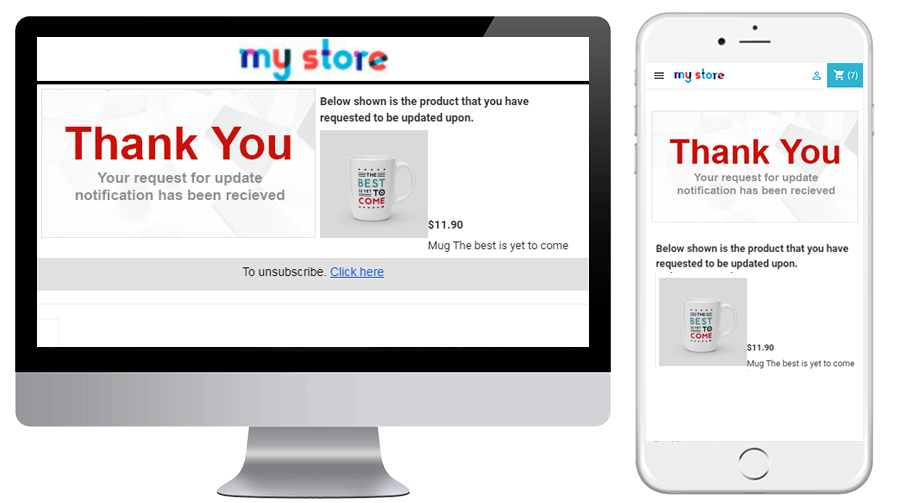
When the customer enters the email id and clicks to the button notify me the initial mail is sent to the entered email address and the message showing subscribed.
Prestashop Back in stock module will prevent the customer from subscribing the same product twice. It will display “already subscribed” message on the front end of the store.
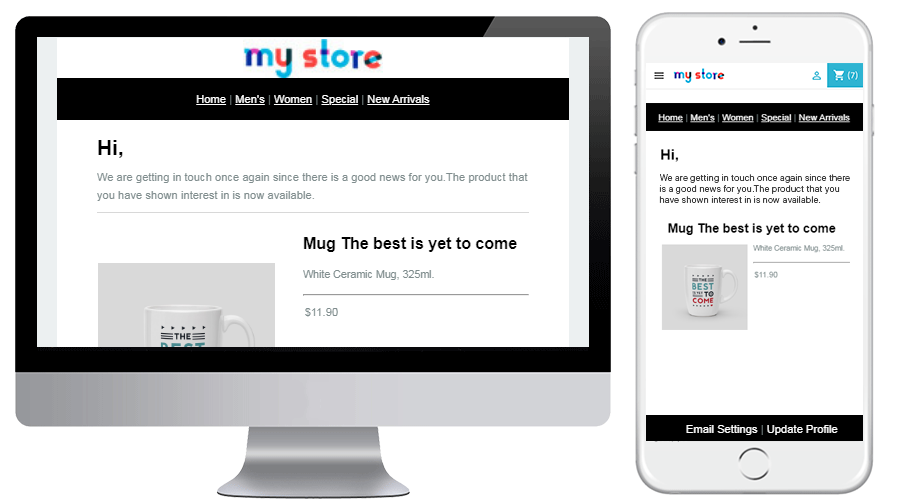
The online users can get an email notification when the product is available in stock.
They can also view a low stock alert email for the subscribed product in case of running stocks. The subscribed product status can also be checked from the Out of stock notification tab.
Engage your customers even when their product is out of stock. Quickly allow your customers to subscribe for back in stock alerts right from the product page. Don’t let them miss their favourite product deals on your store. This automatic notification is easy to install and configure on your Prestashop store. Purchase this module from addon store