The Prestashop Birthday coupon addon allows the store merchant to send the discount vouchers and free gifts to the customer on their birthdays. Prestashop Birthday Gift Addon is an effortless way to please your customers and boost your sales at the same time. The module makes sure that the eCommerce store owner never misses a chance of create a special connection with their customers. You can propose your promotions in many forms such as Discount percentage, amount or even free gifts.
Easy to use, this Prestashop addon allows you to send automatic wishes coupled with the incentives to the customers. The admin can even apply country-wise and category-wise restriction to the offers.
1.1. Benefits of Merchant
Prestashop Birthday Present module allows the admin to configuration the module easily.
Prestashop Birthday Coupon addon enables the Prestashop store admin to set the terms and conditions for the discount/presents offered to the customers on their birthdays.
Prestashop Birthday gift module allows the admin to change the Coupon prefix or coupon code name in different languages as per the requirement.
This prestashop addons generate the automatic coupon each time and send the email to their customer.
This PrestaShop Birthday voucher extension enable Prestashop owners to set the minimum cart value required to avail the discount offered.
This PrestaShop Birthday coupon addon allows the store owners to enable the partial use discount amount.
This Prestashop Birthday Coupon module faciliates the online merchant to choose the occasion for sending the present, i.e., Customer birthday or on completing a year of account creation.
It Allows the personalisation of the emails being sent to the customers.
Admin can enable/disable the tax option for minimum cart value.
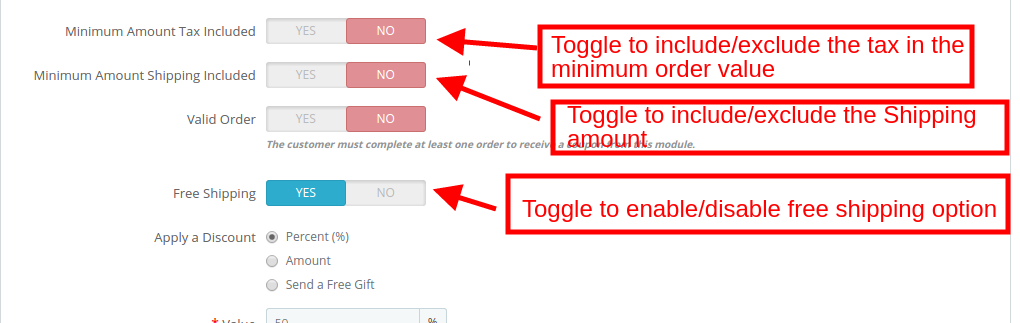
This Prestashop Birthday Discount addon allows admin to enable/disable the free shipping option.
This Prestashop Birthday Coupon extension faciliates the admin to select an offer type i.e. Percent, Amount & send a free gift.
This Prestashop extension allows admin to set the no of days before the Birthday when you want to send the email.
This Prestashop Birthday coupon extension allows admin to customize the email template and coupon code email.
This Prestashop Birthday gift addon enable admin to add country restriction.
Admin can select category restriction.
This Prestashop Birthday gift module gives access to admin to view the graphical representation to check the list of the coupon generated as well as the status of the coupons.
1.2 Benefits of Customer
Customer feels special when they receive the coupon on their birthday and change the mindset to the next shopping.
This Prestashop Birthday gift addon can send free gift or discount coupons to the customer on their birhday,
Customer can use the coupon easily to the next purcharse.
2.0 Installation
After the purchase the Prestashop Birthday Coupon Addon from the store and you will get following files as listed below
1. Zipped file containing the source code of the module
2. User Manual
Follow the following steps to install the addon in the Prestashop store:
Unzip the zipped file. It would contain files and folders as shown below –
Copy all the files and folders of the unzipped folder into your store “Modules” directory on the path – Root Directory/modules/.
Now module is ready to be installed in your store and you can find it in Store Admin -> Modules and Services.
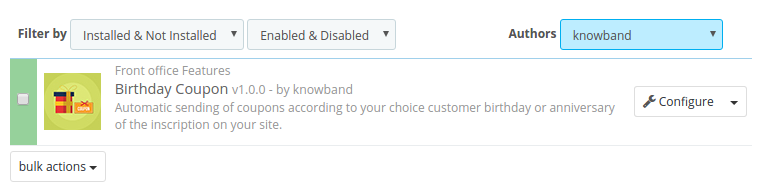
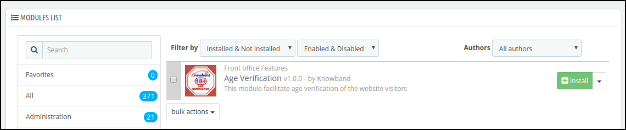
In case, you are not able to find module in admin modules list, please try searching module with following details –
Keyword – Birthday Coupon
Authhor – knowband
Category – Front office
Filter By – Installed & Not Installed / Enabled & Disabled
Click on “Install” button to install the module. It would show a pop-up for your confirmation. Click on “Proceed with the installation” option. This step will install the module and show notification – “Module(s) installed successfully”. Once the installation is complete, the admin can configure the module.
3.0 How to configure module ?
Once the prestashop addon is configurable, the Store Owner can setup or configure this module through the admin Panel of the store. There are following sections available to configure this module –
Go to Store the admin -> Modules and Services
Find “Birthday Coupon” and click “configure” button given corresponding to the module i.e. shown below-
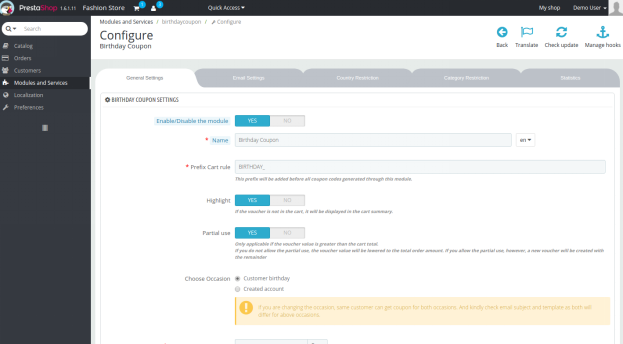
After clicking on the “configure” button, you will see a window like the one mentioned below-
4.0 Admin Interface
After installing the Prestashop birthday copon addon into the Prestashop store, the online merchant can easily manage and control the birthday wishes and coupons being offered to the customers. The store owner can make the basic changes in the coupons, email triggers and can even set restrictions on the offers. The various configuration options are mentioned below:
General Settings
Email Settings
Country Restrictions
Category Restrictions
Statistics
Each section of Prestashop Birthday Gift Addon is discuss them in details:
4.1 General Settings
In this section admin can manage the set the coupn code prefix, coupn code validity and musch more. The various configuration options in this section are discussed below:
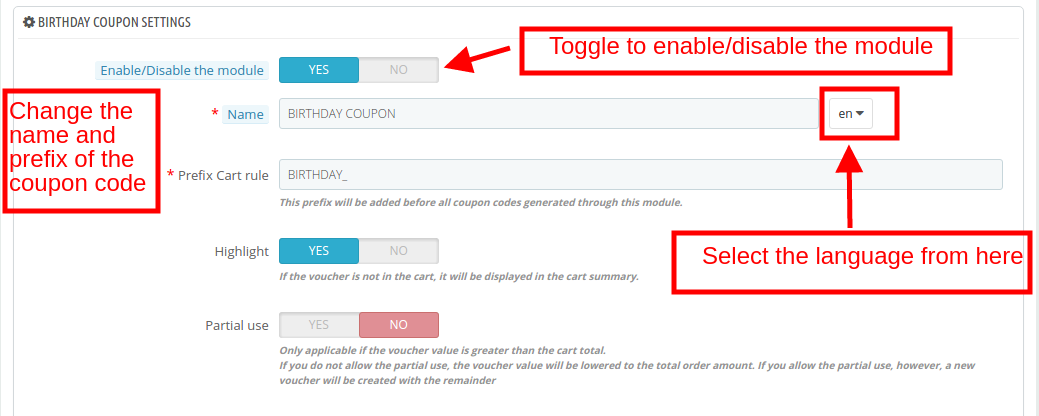
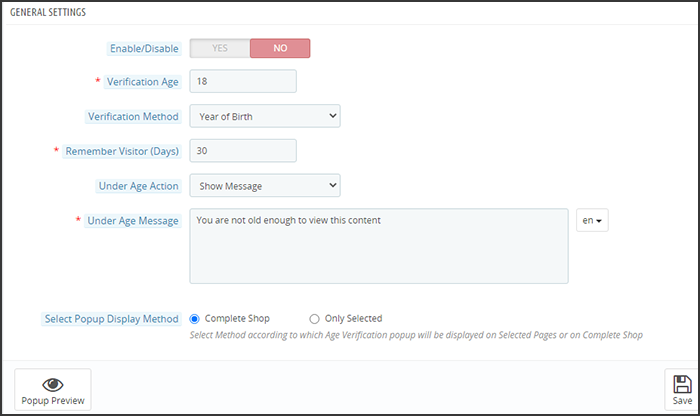
Enable/Disable: The Prestashop Birthday Vouchers Addon can be enabled/disabled from this section.
Name: Admin can enter the name of the coupon code in the desired language. The module supports multiple languages.
Prefix Cart Rule: This is the prefix that will be added before every coupon code generated by the module. Store owner can change this prefix according to the need.
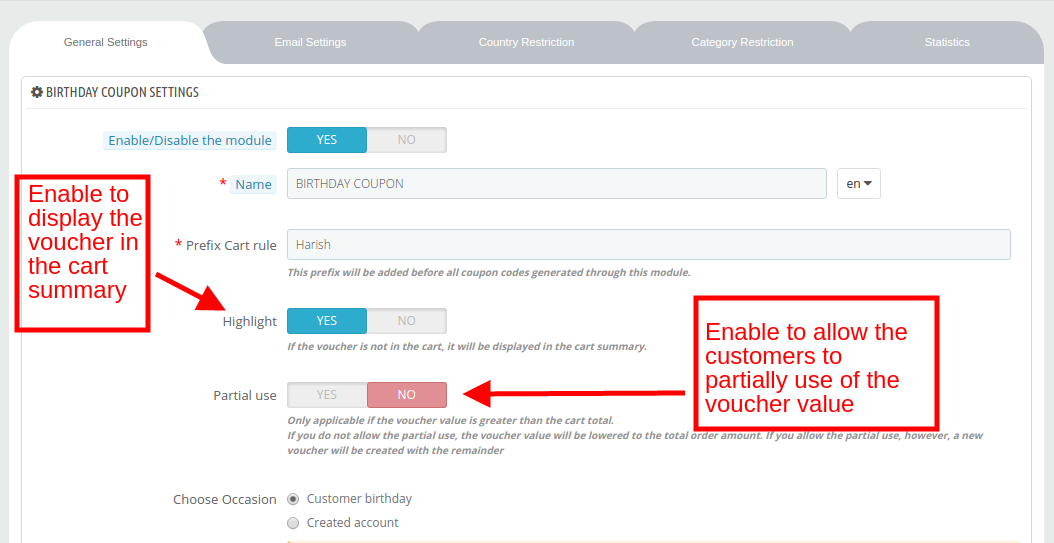
Highlight: The Prestashop Birthday Coupon Addon enable this functionality to display the voucher amount in the cart summary. It will be displayed if the voucher is shown in the cart.
Partial Use: If this feature is enabled, then, the customer gets an option to use the voucher amount partially. In case of partial use, a new voucher will be created with the remaining amount.
Choose Occasion: The Prestashop Birthday Vouchers Extension allows admin towishes along with the voucher are sent on two different occasions, that is, the Birthday of the customer or on completion of a year of account creation. The admin can select any one occasion from this selection.
Coupon Validity: In this section admin can set the expiry duration (in days) of the coupon code.
Minimum Amount: Set the minimum order amount. The coupon will be applicable only if the order value is above this fixed amount.
Select Minimum Amount Currency: Select the currency from the drop-down list of the minimum amount value.
Minimum Amount Tax Included: If the button is enabled, the minimum order amount will consider the tax. Otherwise the tax will be excluded while considering the minimum order amount.
Minimum Amount Shipping Included: If the button is enabled, the minimum order amount will include the shipping amount. Otherwise, the shipping amount will not be considered in the minimum order limit.
Valid Order: This validates the eligibility of the customers for availing the offers. If it is enabled, then, the customer must have completed at least one order in order to get the incentive.
Apply a Discount: This Prestashop Birthday Coupon Addon allows admin can offer an incentive to the customers in three form.
Percent Discount: In this section admin can set the percentage value.
Amount: In case of a fixed amount, enter the value and then select the currency in which you want to offer the discount. You can even include/exclude tax from the discount value by toggling the button shown below.
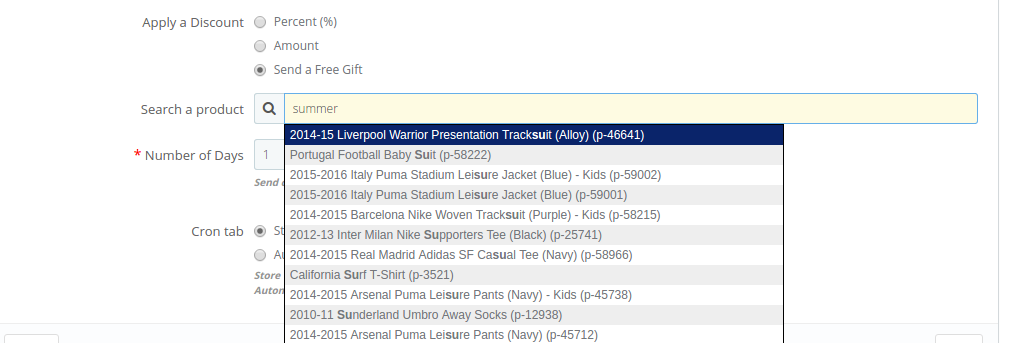
Send a Free Gift: The admin can even gift a product for free to the customer. You can search the product as shown in the image below:
Number of Days: In this section the Prestashop Birthday Coupon Addon set the number of days before the Birthday when you want to send the email trigger.
Cron Tab: There are two cron settings offered to the store owners.
Store Visit: Cron will be executed every time someone visits your site.
Automatically: The cron functionality will be executed through the cron tab.
4.2 Email Settings
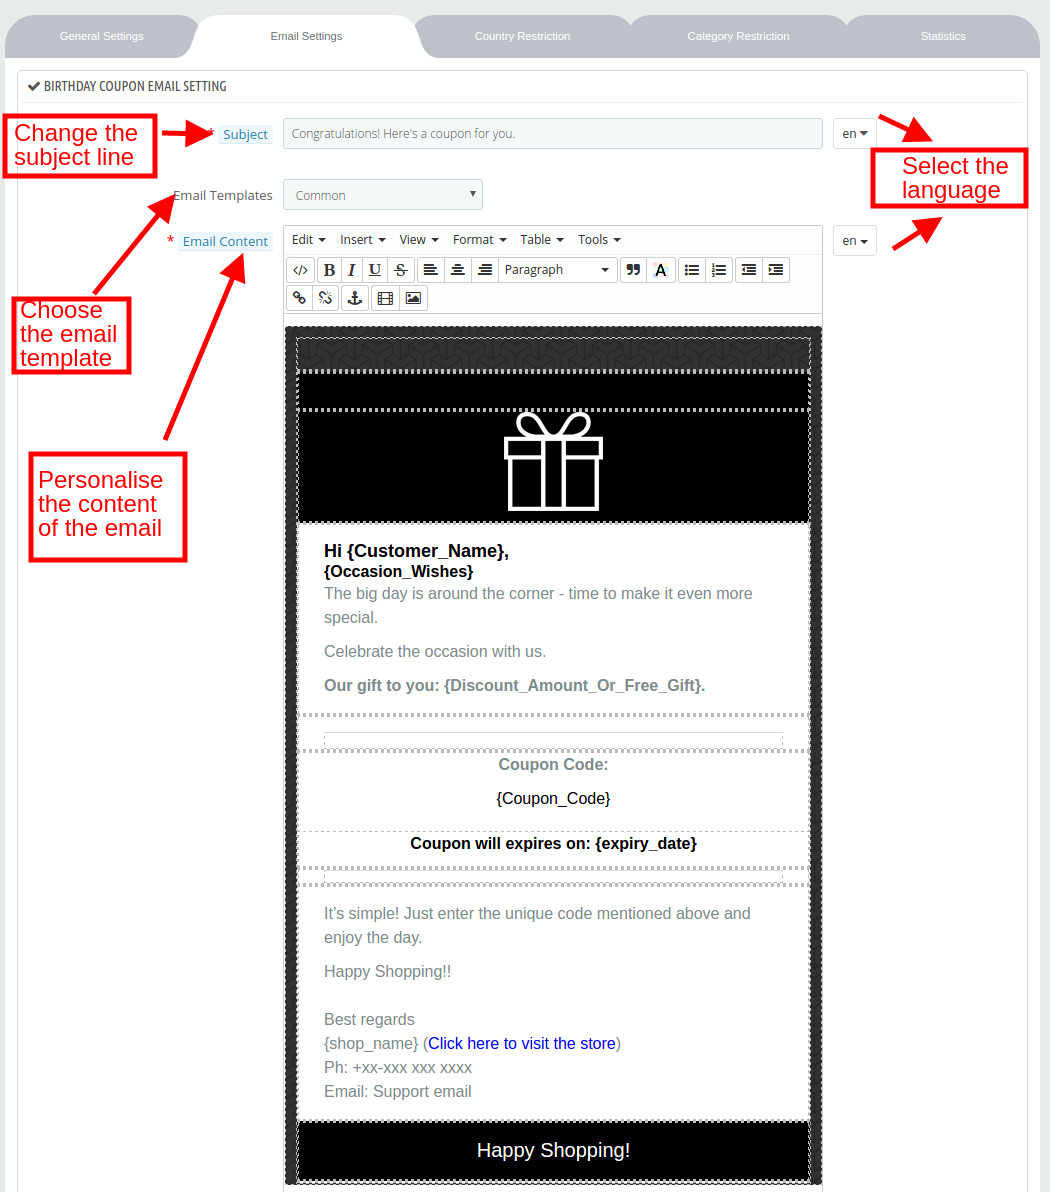
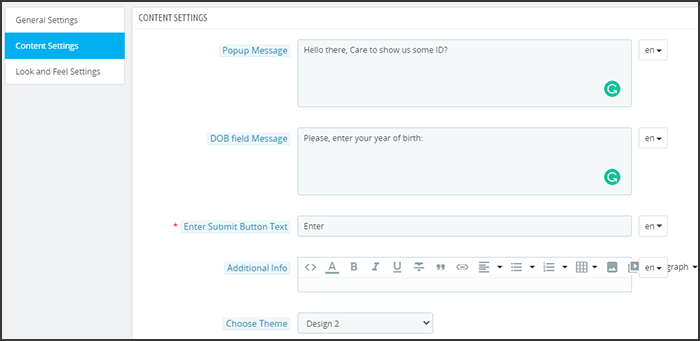
In the email setting tab the Prestashop Birthday gift Addon enable the store admin to change the subject line and content of wishes to be sent via email. It offers the multiple email template that admin can choose according to the need. Below shown the image-
4.3 Country Restriction
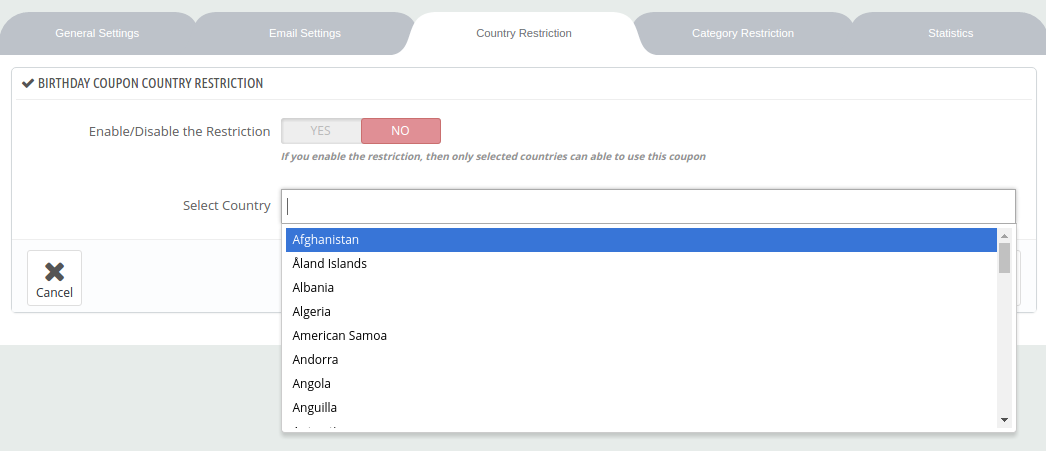
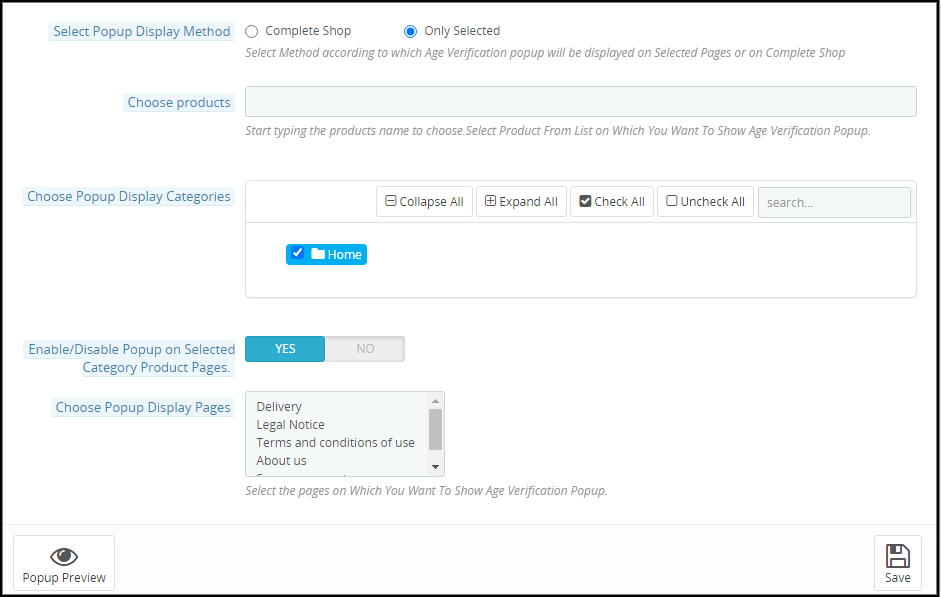
In this section the Prestashop Birthday Coupon Addon allows admin to admin can add country-wise restrictions in the offers. Enable the buttonas shown below and select the country from the list. The offer will now be applicable for the selected countries only.
4.4 Category Restriction
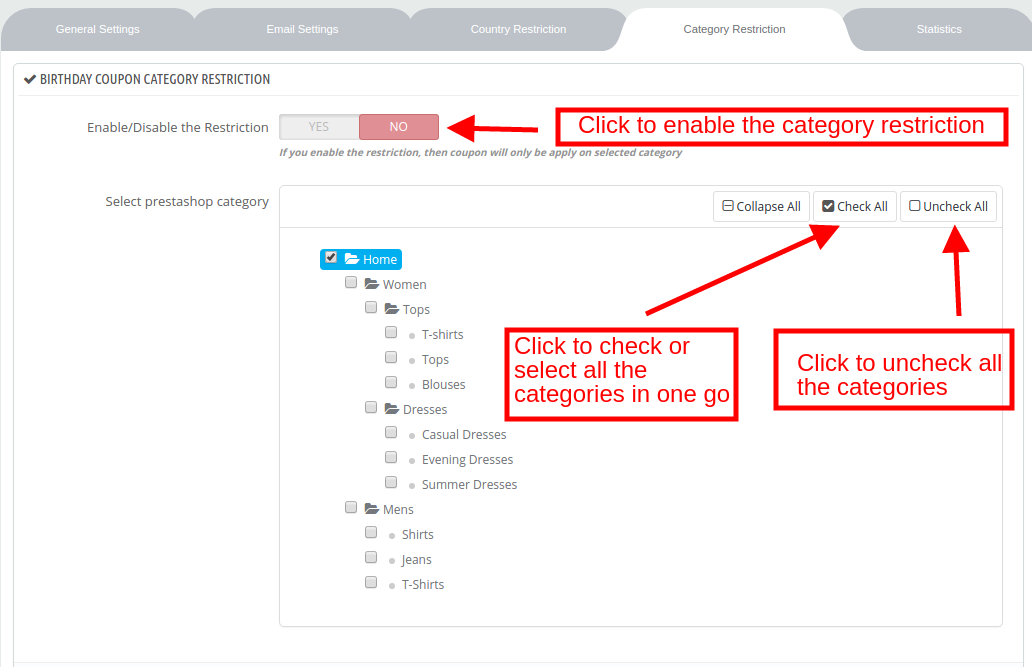
The coupon code offered to the customer will be applicable to all the categories available in the site if no category restriction is applied. In order to apply the restriction, enable the button shown below. Expand the category and check the desired categories. The coupon will apply only to the selected categories.
4.5 Statistics
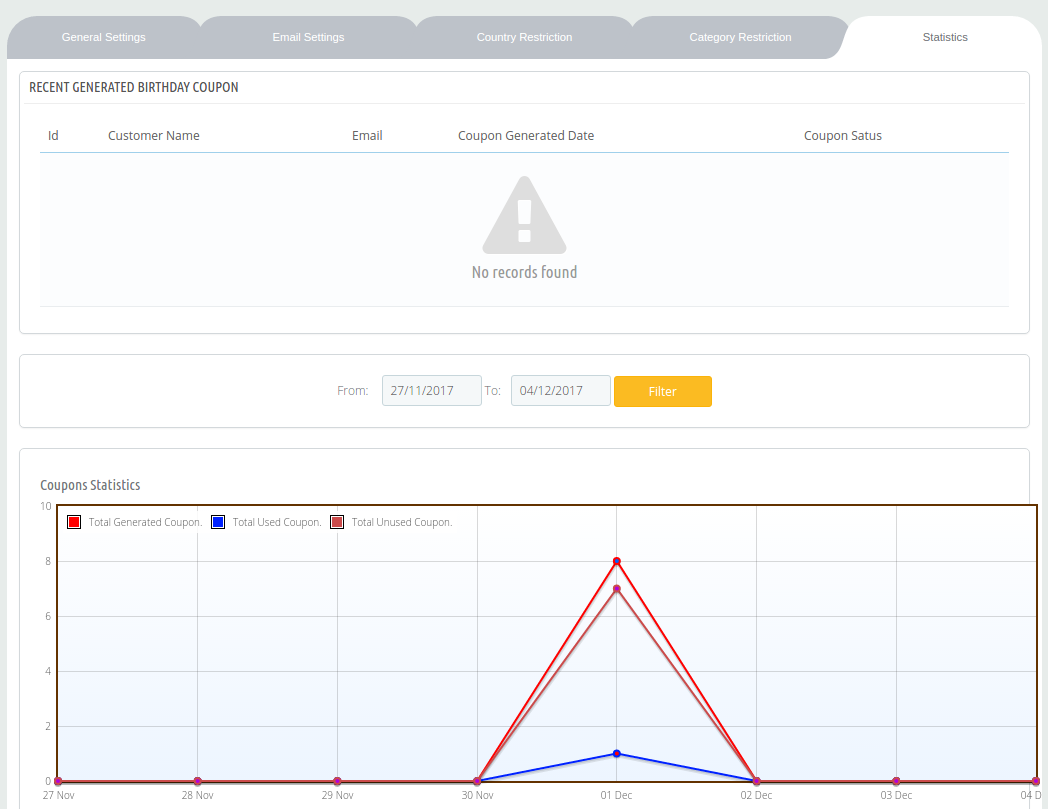
The store admin can find the entire list of the coupon generated as well as the status of the coupons in the Statistic tab of the module. The report is generated in both tabular and graphical format.
Now you can try Prestashop Birthday Coupon Addon for on your Prestashop website.
With the help of Prestashop SEO Wizard Addon the Prestashop store admin can enhance the visibility of the eCommerce site in a hassle free way. The Knowband Prestashop SEO Wizard module simplifies the most time-consuming works of SEO by automating the entire process. The Prestashop Merchant can now create the sitemaps or the XML files for the web pages as well as interlink URL of targeted pages with the anchor text at a button click. The site mapping can be done in multiple languages.
Searching the keywords in the contents of the site and then manually adding the links was quite a task earlier, but not anymore. The Prestashop SEO Wizard Module makes the entire process automated. It searches for the keyword in the long or short description in the front-end and adds the links automatically. Even the meta tags for the web pages can be added from the admin interface. You can optimize the product, category, manufacturer or even the CMS pages in a few simple steps. Become an SEO expert and let your web store rank higher in the SERP of the various search engines.
1.1 Project Objectives
Prestashop SEO expert addon offers a number of optimization options. Some of them are listed below:
1. The Prestashop SEO module allows the admin to create the XML file of the various web pages at a button click. Easing out the task of sitemap creation, the website can now rank be fetched by Google in minimal time.
2. The Prestashop SEO Wizard Addon searches for the specified keywords from the content of the website and attaches relevant links to it in minimal time.
3. The priority of the web pages, as well as the frequency of web crawling, can be set as well.
4. The store admin can include the nofollow or dofollow as per their wish. At the same time, the option to open the links in new tab can be incorporated without making any code changes.
1.2 Benefits of the Merchant
With the help of this Prestashop SEO Wizard Extension, the Prestashop store admin can create the XML sitemap of the PrestaShop as per desires.
The Store admin has access to set the priority if the web pages as per need.
This Prestashop SEO Expert addon allows the admin to set the frequency of the crawling as his/her requirement.
The Merchant can enable/disable the image option in the sitemap.xml file of the product pages.
The Prestashop SEO Expert Addon allows the e-merchant to enable/disable the sitemap at any time.
The Prestashop SEO addon gives the option to the store admin to add the link on the targeted keywords of the entire site as their need. It saves a lot of time to the admin.
The Admin can already add interlink on the targeted keywords edit or delete as per desires.
This Prestashop SEO Wizard addon enables the admin to keyword for the interlinking is searched in the short or long description of the products.
With the help of this Prestashop SEO Wizard module, the store admin to add the follow or no follow a link and it also allows the admin to open the link in new tab.
This Prestashop SEO expert module allows the store merchant to optimize the meta tags, meta title, meta description of the products, manufacturer, and categories page.
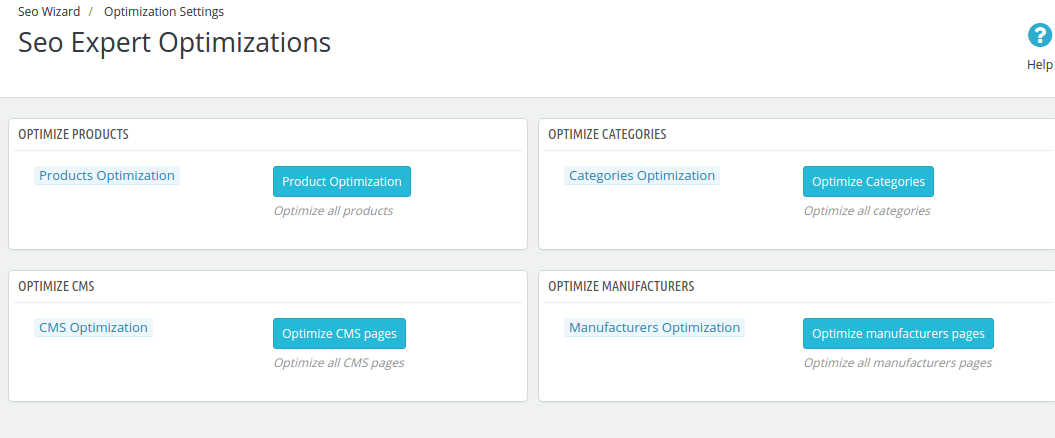
The Admin can optimize the products, categories, CMS, Manufacturers, product meta tag, update category meta tag and update manufacturers meta tags of the website incorporated in the front-end of the website from the Optimization Setting tab.
The entire interlinking is done from the back-end of the Prestashop XML file creation module.
The Prestashop SEO Expert extension allows the admin to restore the initial data via the group.
This Prestashop automated site interlinking Module in multilingual support.
This Prestashop SEO Wizard extension compatible with multiple stores.
Prestashop Sitemap generator Module for SEO helps the merchant to improve the visibility of the website.
2.0 Installation
After purchasing the Prestashop SEO Wizard Module, you’ll get following files as listed below:
1. kbseowizard.zip (contains source code of the module)
2. User Manual
Follow the steps mentioned below to install the extension:
Unzip the kbseowizard.zip file. It would contain files and folders as shown in the image below –
Copy all the files and folders from the extracted folder and paste them into “Modules” directory of your store. Follow the path – Root Directory/modules/.
3. The Prestashop SEO addon can be installed on your store now. You can find that in Store Admin -> Modules and Services. It would be shown as below –
You may even search for the module in the admin modules listwith the following details –
Keyword – SEO Wizards
Category – Front office
Filter By – Installed & Not Installed / Enabled & Disabled
4. Click on “Install” button to install the Prestashop SEO Wizard extesnion. It would show a pop-up for your confirmation. Click on “Proceed with the installation” option. This step will install the Prestashop module and show notification – “Module(s) installed successfully”.
3.0 Admin Interface
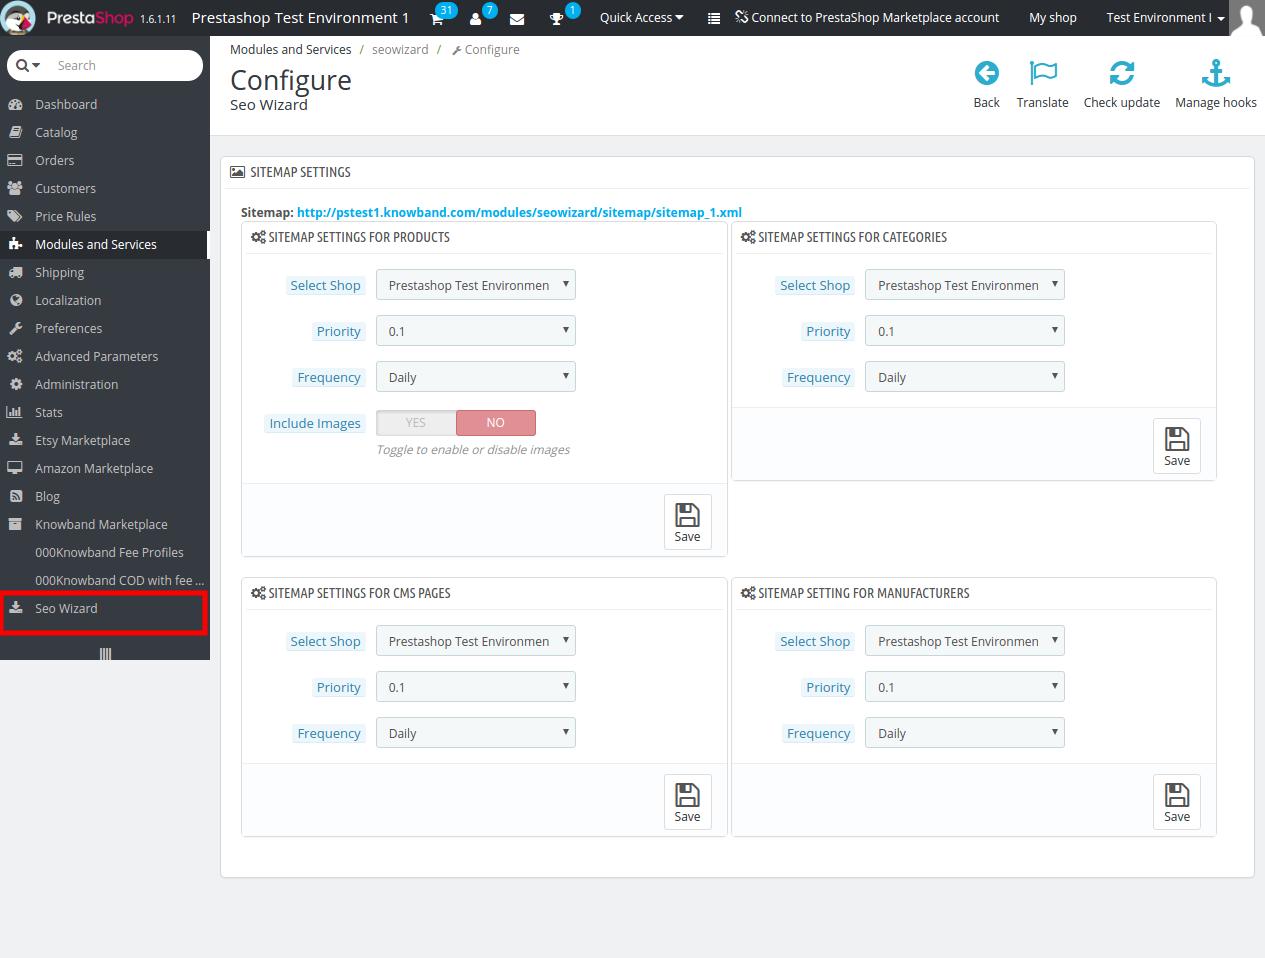
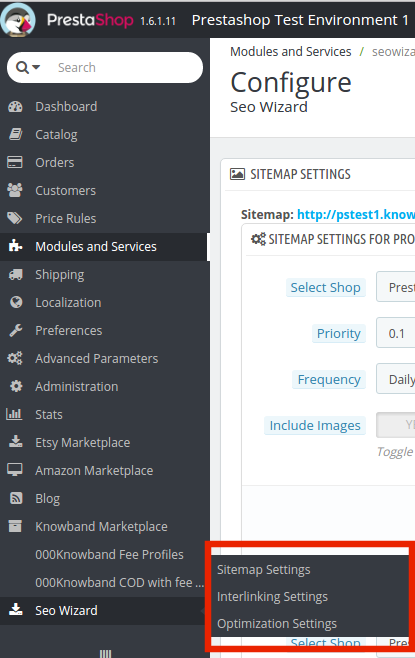
This Prestashop module allows the e-merchants to enhance the various SEO aspects of the site. Right from the sitemaps to the interlinking everything can be done in one link. This is the most time consuming and tedious task for the e-marketers. The Prestashop SEO wizard addon makes it simple and a matter of moments. You can find the Prestashop SEO expert extension in the main menu of the admin interface.
It basically offers four optimization options. They are listed below:
SiteMap Setting
Interlinking Setting
Optimization Setting
Meta Tag Settings
3.1 How is the Site Map created?
The site map of the web pages makes it easier for Google to find your sites. The creation of .XML file involved a lot of steps, but it can now be done at a button click.
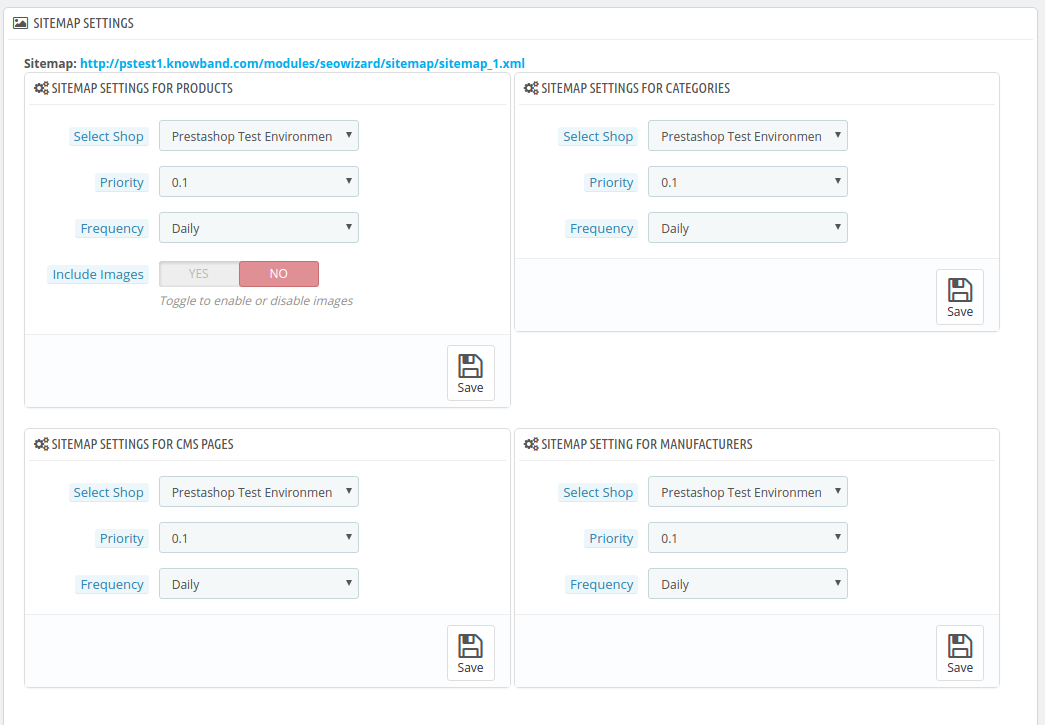
The Prestashop SEO addon allows the admin to create the sitemap or the .xml file for four different web page types. They are:
For Products
For Categories
For CMS Pages
For Manufacturers
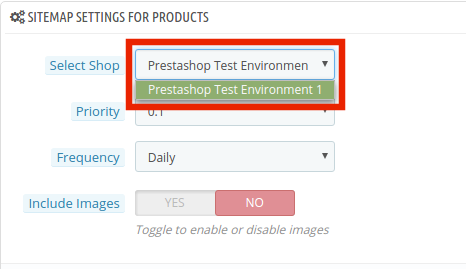
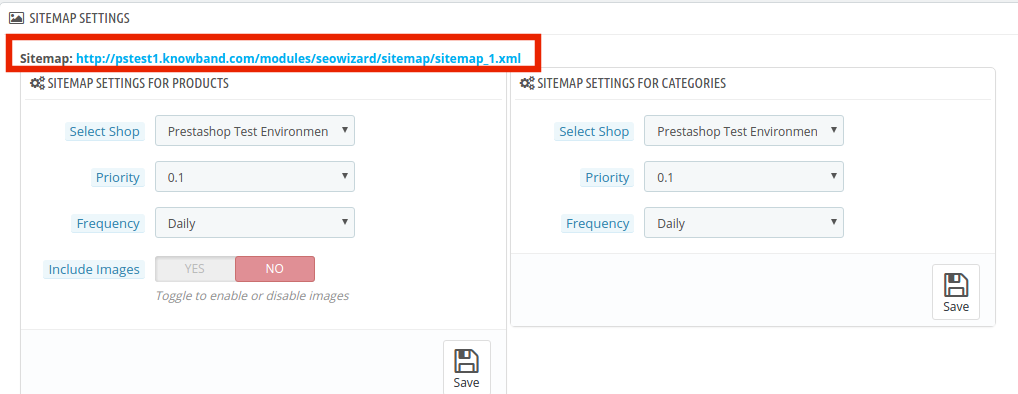
The Prestashop SEO Expert Extesnion is multi-store compatible. The admin can Select Shop from the dropdown menu in which they are looking to include the optimization option.
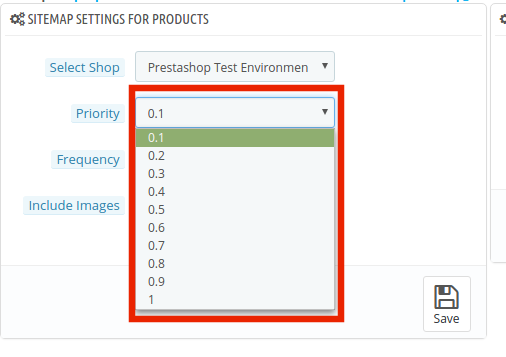
In addition, the admin can set the priority of each web page type as per the need. All he needs to do is to select the priority rank.
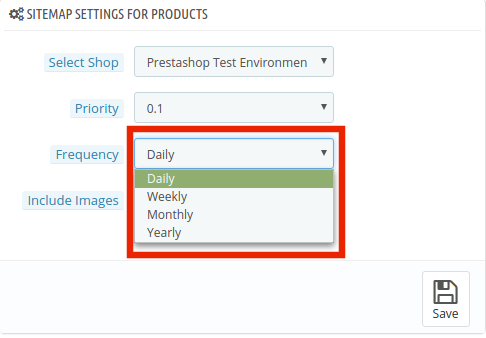
The frequency in which you want Google to crawl the web page can be selected. The crawling frequency can be set on Daily, Weekly, Monthly and Yearly basis.
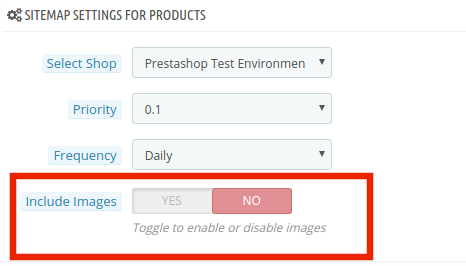
In addition, the admin can include the sitemapping of the product images just by a button click.
Make the changes and click on ‘save’. The .xml file will be created automatically. The link of thesame can be viewed at the top as shown in the image.
This Pretashop SEO wizard addon shown the xml file is obtained in the usual format.
The same process is followed in all the four web page types.
3.2 How is the Interlinking done on the site?
3.2.1 How is the new links created?
The Prestashop SEO Wizard extesnion allows the admin to add links to the keywords mentioned in the website in one go. Once the keyword and the link are mentioned in the back-end, the Pretsahop addon fetches for the word in the short description of the product pages and other web pages. The keywords are then converted to the anchor tag and specified links are attached to it.
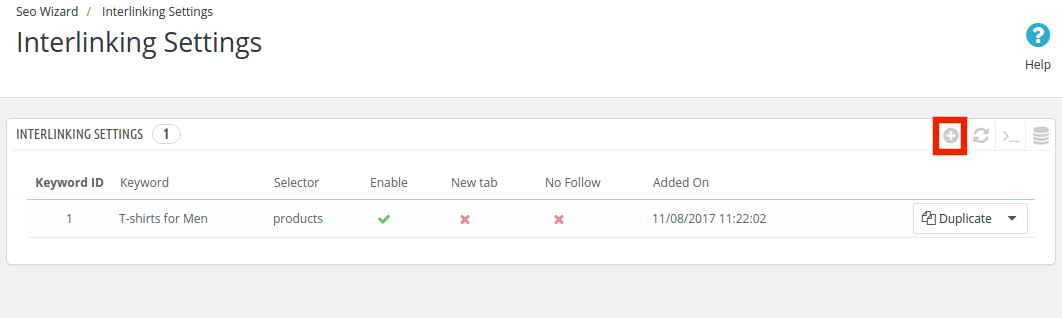
In order to do the interlinking, go the ‘Interlinking Setting’ of the Prestashop SEO expert module. It shows the list of the already created links and keywords. In order to create new once, click on the ‘+’ in the top right section.
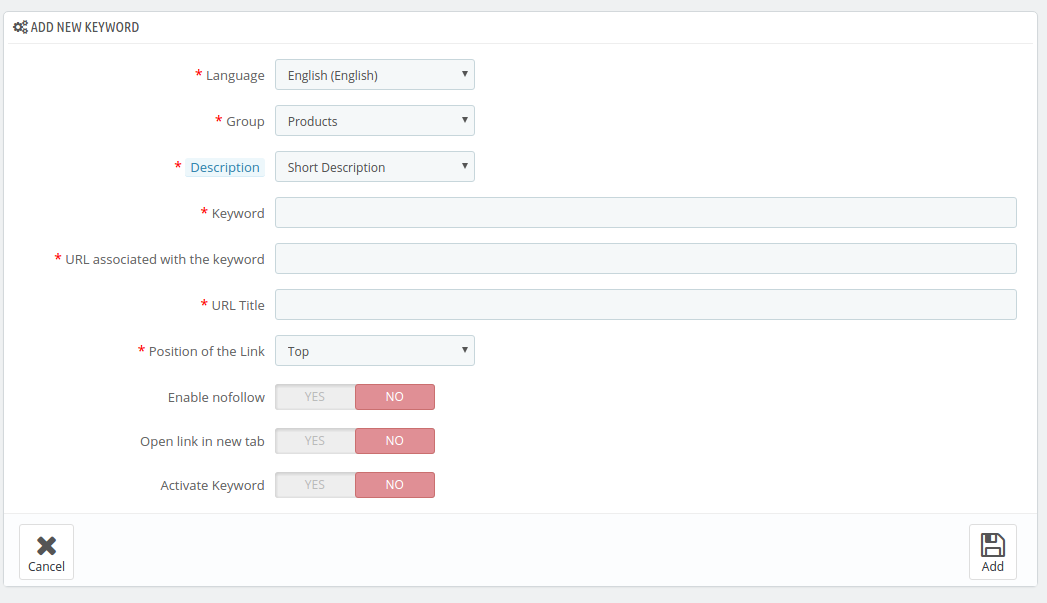
Enter the information required in the admin interface.
Language: The Prestashop SEO Wizard module offers multi-lingual support and the changes can be done in various languages.
Group: The group or type of web page, that is, Product, Manufacturer, CMS pages or Categories, can be selected from here. The interlinking will then be done in those pages only.
Description: This field is only for the product pages. The merchant can either select the ‘Short’, ‘Long’ or ‘Short and Long’ description. The keyword entered will then be searched in the selected descriptions and interlinking will be done in the same.
Keyword: Enter the keyword that you want to use as an anchor text.
URL: The URL that is to be linked with the keyword is mentioned in this section.
The position of the Link: The position of the link, that is, Top or Bottom can be selected here.
Enable Nofollow: The link can be used as a nofollow or a dofollow link as per the requirement of the user. In case you want to keep it as a nofollow link, switch the button on.
Open in New Tab: By enabling this feature, you can make sure that the links will open in the new tab instead of the same tab.
Activate Keyword: The keywords can be activated by toggling the button here.
3.2.2 How are the links keywords edited or deleted?
The keywords and the related information can be edited by clicking on ‘Edit’ button as shown below. The admin interface even offers the options to delete the existing ones.
3.3 How are the changes incorporated in the website?
The entire interlinking done in the backend can be incorporated in the front-end of the website from the Optimization Setting tab.
The changes can be implemented on the front-end of the website by clicking on the ‘Optimize’ button. This option is available for all the different page type of group. Each page type can be optimized separately.
3.4 How to add Meta Tags in the Web Pages?
This Prestashop SEO Wizard addon simplifies the most time-consuming task of the e-marketers. The meta tags, that is, the meta titles, descriptions and keywords can be added for the product pages, category pages as well as for the manufactures.
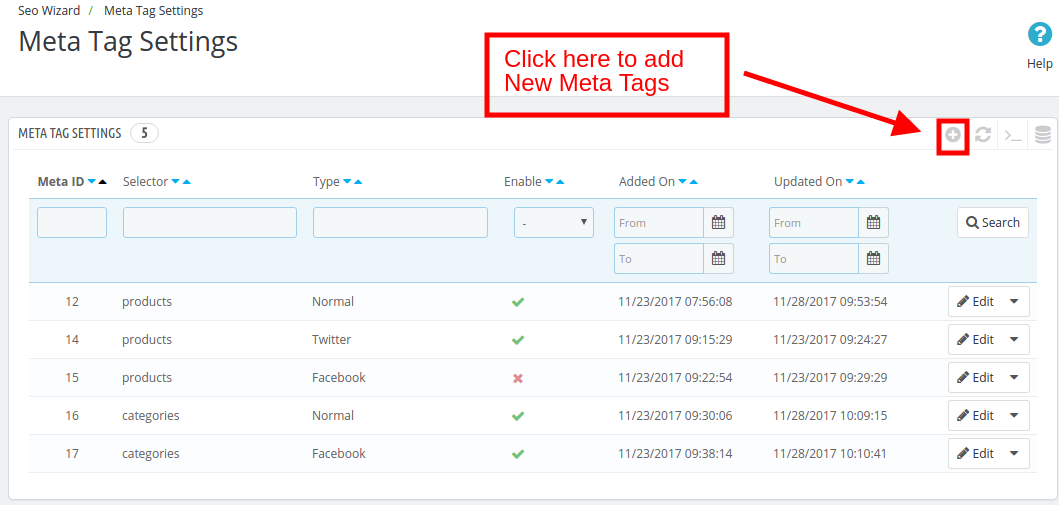
The list of the tags already created can be viewed in the ‘Meta Tag Setting’ tab. In order to create the new one, click on the ‘+’ sign in the top right corner of the admin interface.
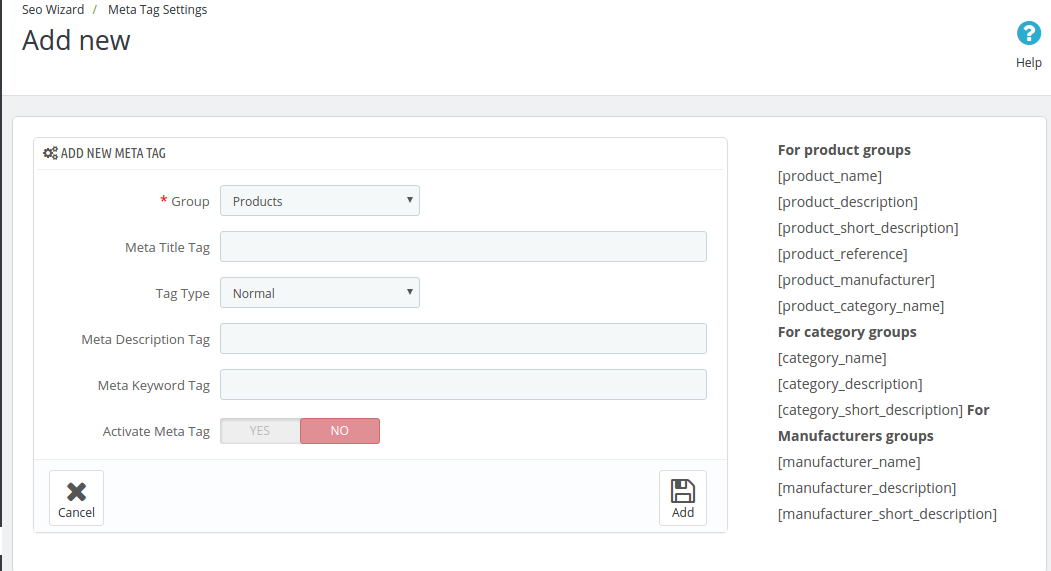
The meta tags can be, then, entered by filling up the required information fields.
Group: Select the group type in which you want to add the tags. You can choose from the Products, Categories or Manufacturer. Meta Title Tag: Enter the meta title for the web page here. Tag Type: The tag type can be Normal, Facebook or Twitter. The admin can select any from the drop-down menu. Meta Description Tag: The short meta descriptions of the web page can be entered here. Meta Keywords Tag: The keyword relevant to the web pages can be entered here. You can enter the main keywords, it’s variants as well as the long-tail keywords here. Activate Meta Tag: The meta tags can be enabled/disabled by toggling the button.
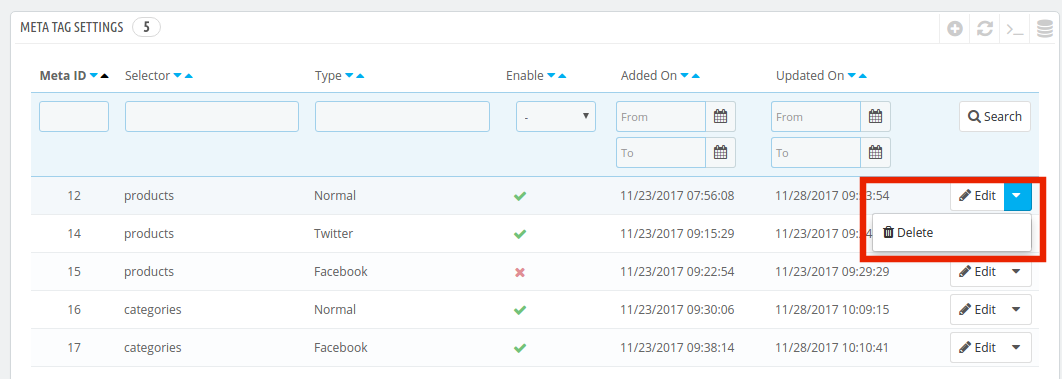
The created tags can be edited or deleted as shown below:
Now you can try Prestashop SEO Wizard module for on your Prestashop website. KnowBand Prestashop SEO Addon helps you engage more customer to your store & increase the customer base. The Prestashop XML file creation Extension allows the admin to manage SEO of the website easily without any hassle. The online seller can easily manage the interlinking, XML file creation and meta tags generation without any lengthy and time taking process.
The Prestashop Merchant can now create the sitemaps or the XML files for the web pages as well as interlink URL of targeted pages with the anchor text (read more about it here – Linkio.com) at a button click. The site mapping can be done in multiple languages.
Prestashop Shipping Timer module increases the conversion rate by displaying the timer for the one-day delivery offer. If the product is ordered within the time span specified by the timer, then, the package is delivered to the customer on the same day. The countdown timer specifying the time limit for availing this offer creates an urgency in the minds of the store visitors. Aiding the purchase decision of the customers, the Prestashop addon is an effortless way to boost the chances of conversions.
1.1. Basic Features of this Prestashop Shipping Timer addon
The Prestashop Shipping Timer module is easy to install and configure.
The admin can easily enable or disable this Prestashop shipping timer addon.
This Prestashop addon offers hassle-free implementation.
The Prestashop shipping module is highly customizable.
The Prestashop shipping module is multi-lingual compatible.
No code changes are required for implementation.
There is no technical help is needed for showing shipping timer in the front-end.
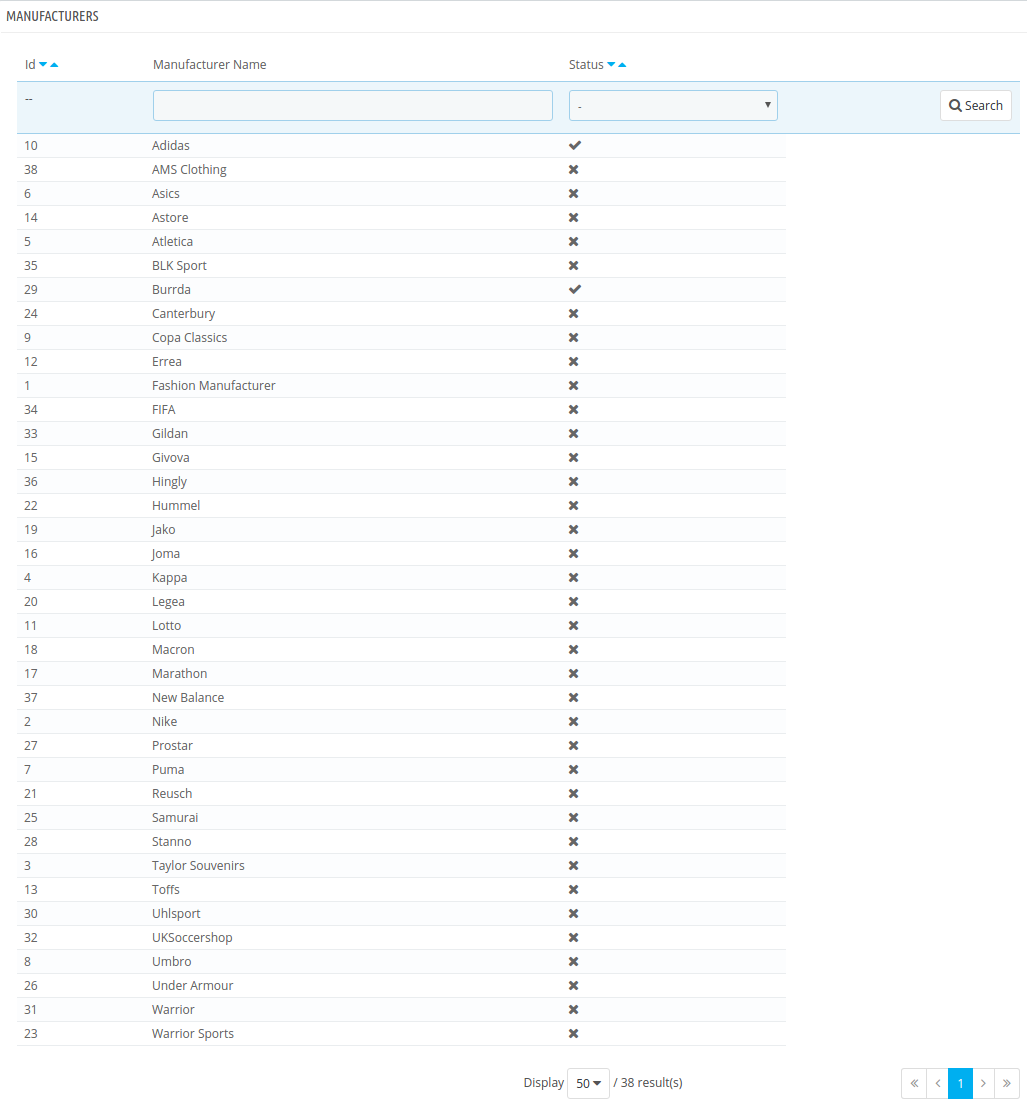
Multiple choices for selection that is categories, countries, suppliers, manufacturer etc.
The Prestashop store admin can set the start & end time.
Admin can select the days for showing the countdown timer.
Admin can set the vacation dates to restrict the functionality.
Admin can show warning on the cart page
The plugin allows the admin to set the look and feel of the timer.
The Prestashop store admin can view order details.
The Prestashop Countdown timer helps to increases conversion rate.
The countdown timer ensures fast decision making by customers.
Customers don’t need to compare delivery timing for the same products on other websites.
1.2. Project Objectives
The Prestashop Extension offers a win-win situation for both the customers as well as the store admin. While the store visitors get the much needed quick delivery option, the e-merchants clear off their inventory with minimal effort. Here are some of the objective that Prestashop one-day delivery timer module offers to the eCommerce store owners.
The admin can fix the time duration for the one-day shipment offer. A timer will be shown on the product page reminding the customers about the time limit.
The admin can select the product, category in which he is looking to add the feature. The e-merchant can even select the name of the supplier and manufacturer in which he wants to offer one-day delivery offer. The module even provides an option to select the region and countries in he wants this offer to be applicable.
The highly customizable module allows the admin to change the look and feel of the timer in a matter of moment.
The orders received can be viewed in the admin interface.
2.0 Installation
The Prestashop store admin is required to purchase the module. Once the purchase is done, following files and folders will be delivered.
shippingtimer.zip that contains source code of the module
User Manual
Follow the following steps to install the extension:
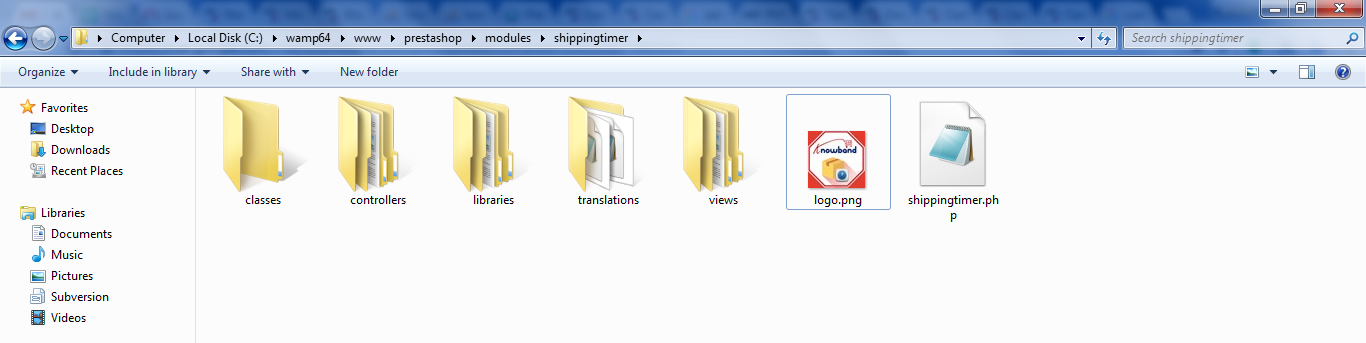
Unzip the shippingtimer.zip folder. The folder would consist of the files and folders as shown below –
Copy all the files and folders from the unzipped folder and paste them into your store “Modules” directory on the path – Root Directory/modules/.
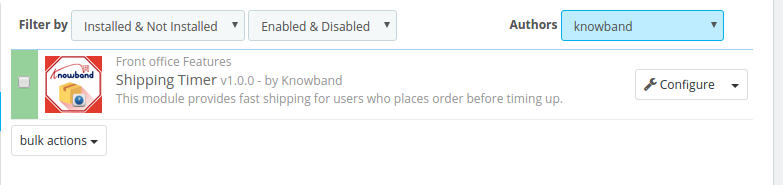
The Prestashop Shipping Timer can now be installed on your Prestashop store.You can find it in Store Admin -> Modules and Services. It would be shown as below –
In case, you are not able to find module in admin modules list, you can search for it in the search tab-
Keyword – Shipping Timer Category – Front office Filter By – Installed & Not Installed / Enabled & Disabled
Click on “Install”.it would show a pop-up for your confirmation. Click on “Proceed with the installation” option. This step will install the module and show notification – “Module(s) installed successfully”.
3.0 Admin Interface
On entering the admin interface of the Prestashop module, the store owner gets a number of easy configuration options. The changes in the features and functionalities of the module can be customized with a few button clicks. Let us discuss the various configuration option one-by-one.
3.1 How to start the configuration process?
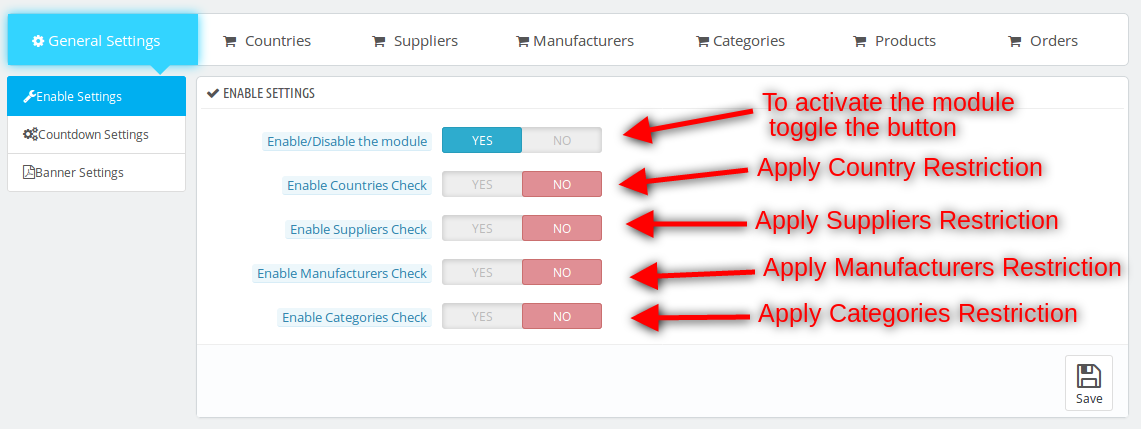
The configuration process of Prestashop shipping timer module starts with the General Setting tab of the addon. Listed below are some of the options offered in this tab.
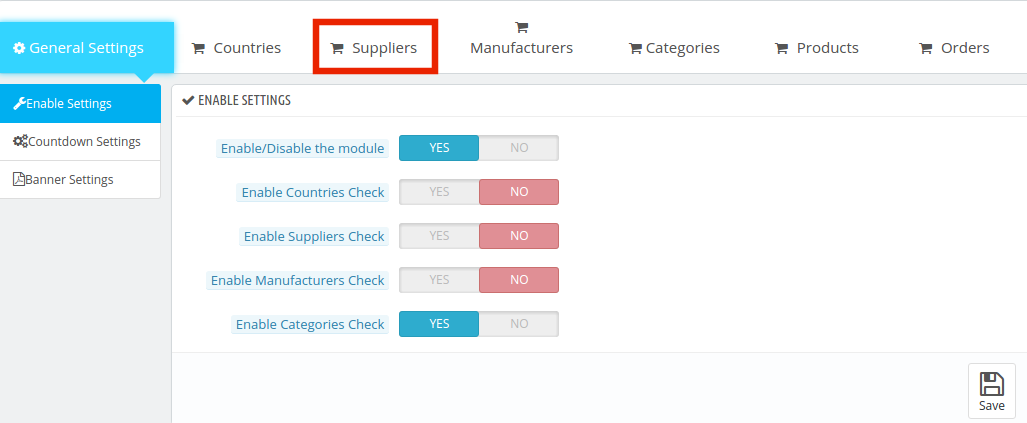
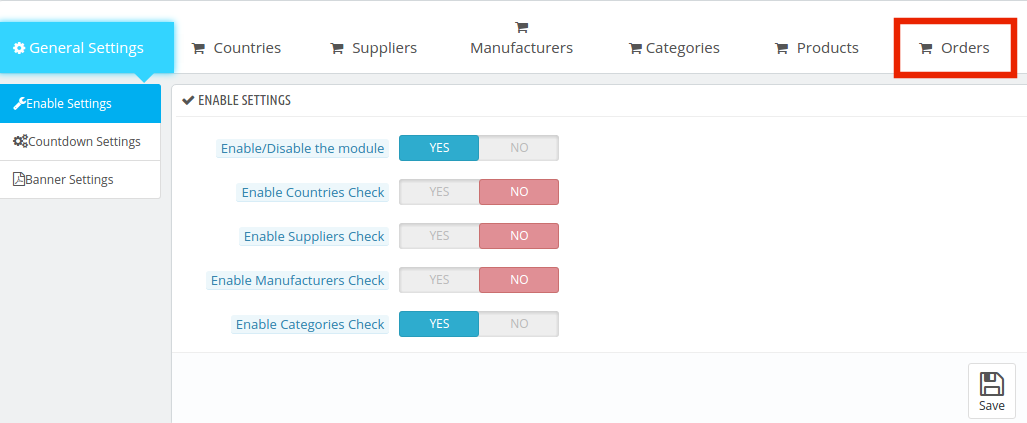
Enable/Disable the Module
Enable Country Check
Enable Supplier Check
Enable Manufacturer Check
Enable Categories Check
3.1.1 Enable and Disable the Module
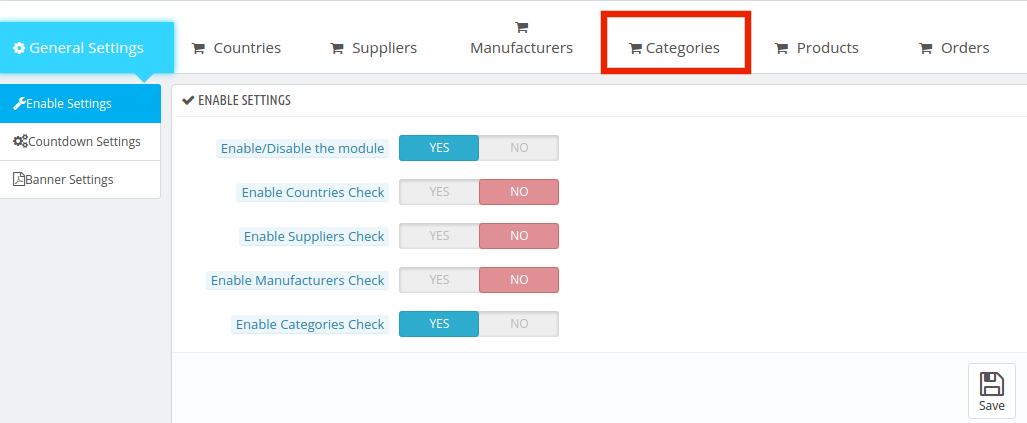
Along with all the customization option, the store admin gets the option to enable or disable the module from the Prestashop store. This can be done just by toggling the button shown below.
3.1.2 Enable Country Check
The free shipping timer can be set for all the countries in which the eCommerce company is operating. The countdown for one-day delivery is set by default for all the countries if the button is switched off.
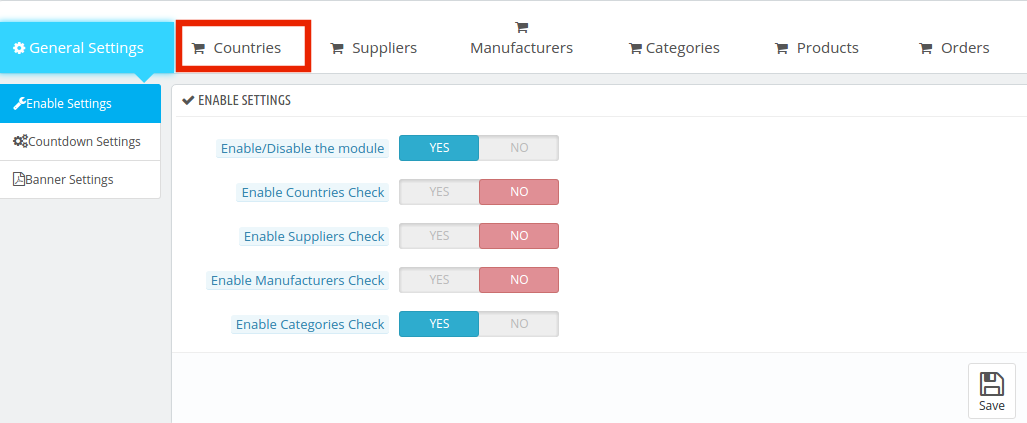
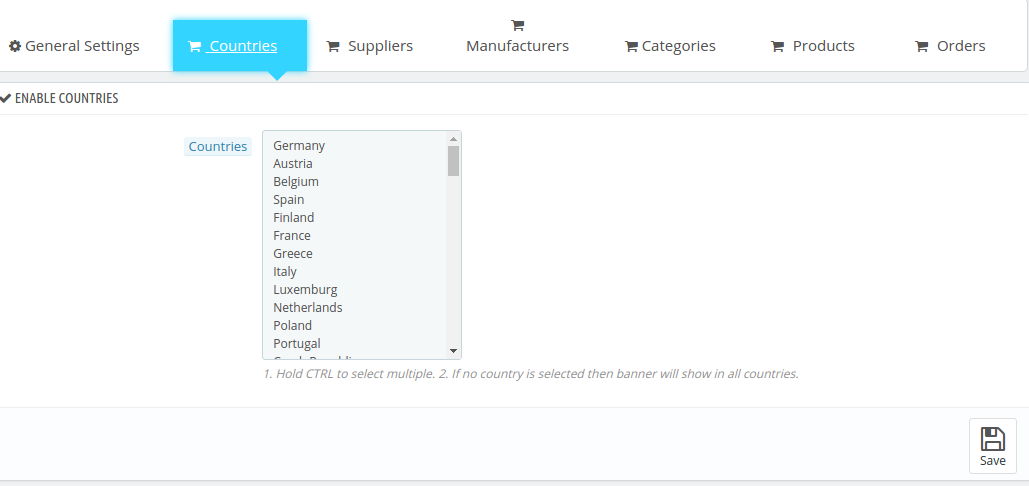
In case, the admin wants to disable this option for any particular country, then, he can do so by switching it on. Once this is done, the admin can select the countries where he wants to give this offer from the ‘Countries’ tab.
The admin is provided with the list of various countries to choose from. The locations can be selected from the list. In case, no country is selected, then, the offer will be applicable in all the countries.
3.1.3 Enable Supplier Check
The offer can be made valid for the selected supplier as per the need of the store admin. For selecting or deselecting any particular supplier, the ‘Enable Supplier Check’ button should be switched on.
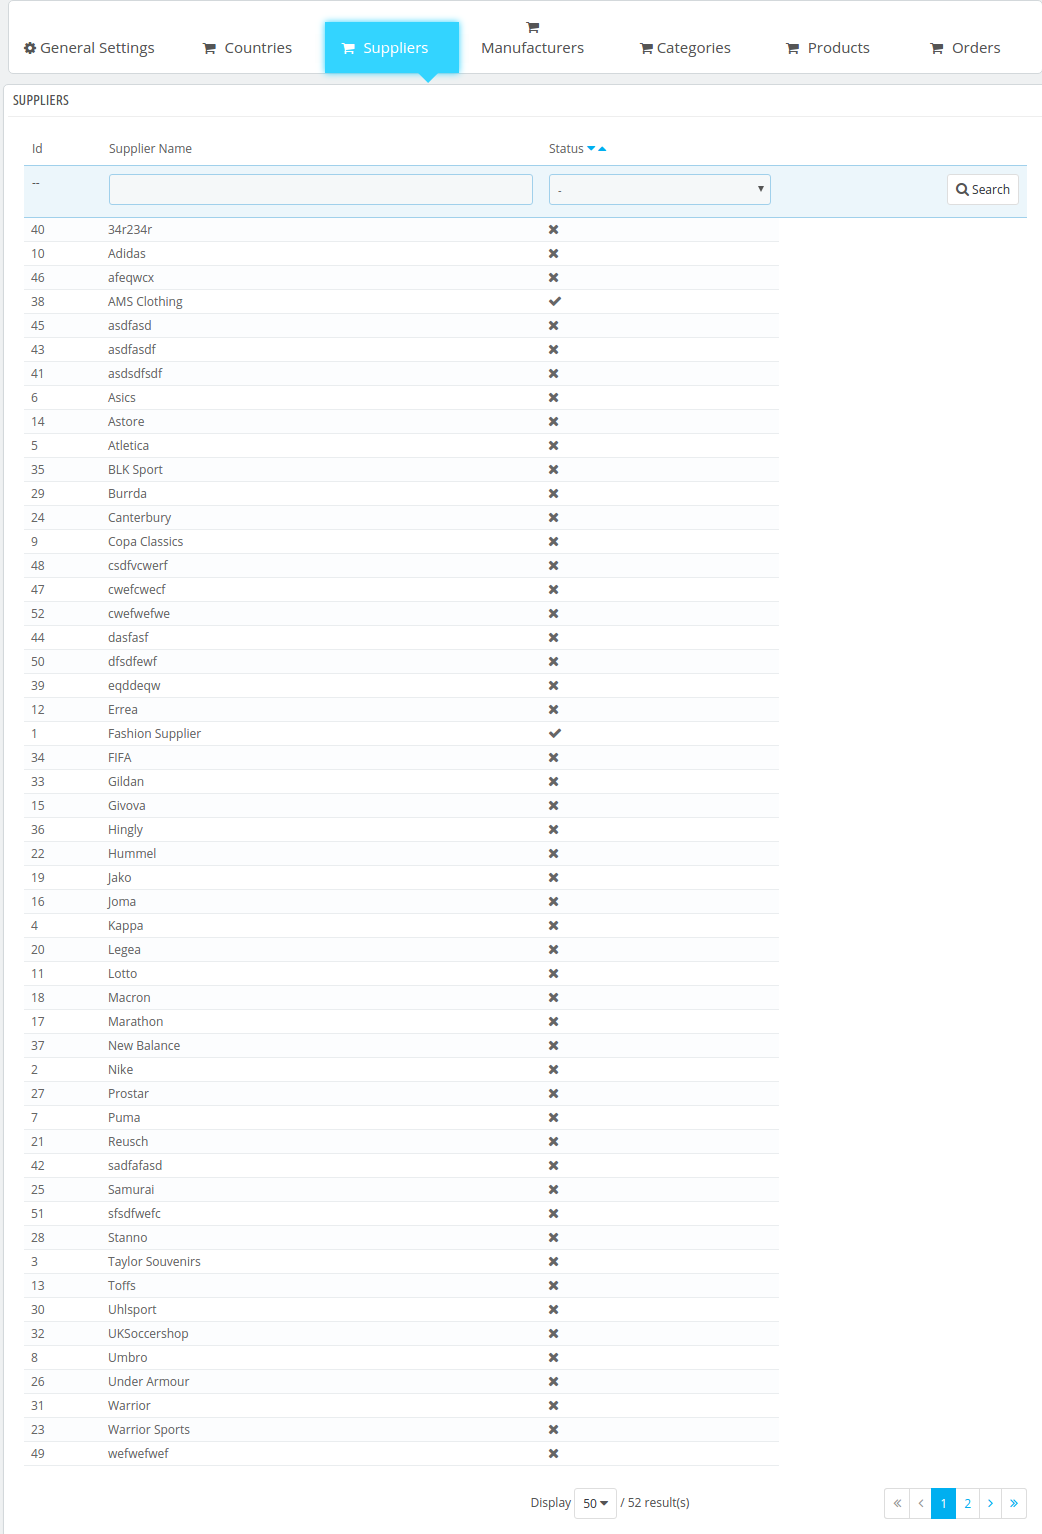
Once this is done, the admin can select the name of the supplier from the tab as shown in the image below.
The Supplier Tab includes the names of the different suppliers operating on the eCommerce store. The admin needs to check the names manually in order to add this feature. The search bar enables the store owner to find the name of a particular supplier instantly.
3.1.4 Enable Manufacturer Check
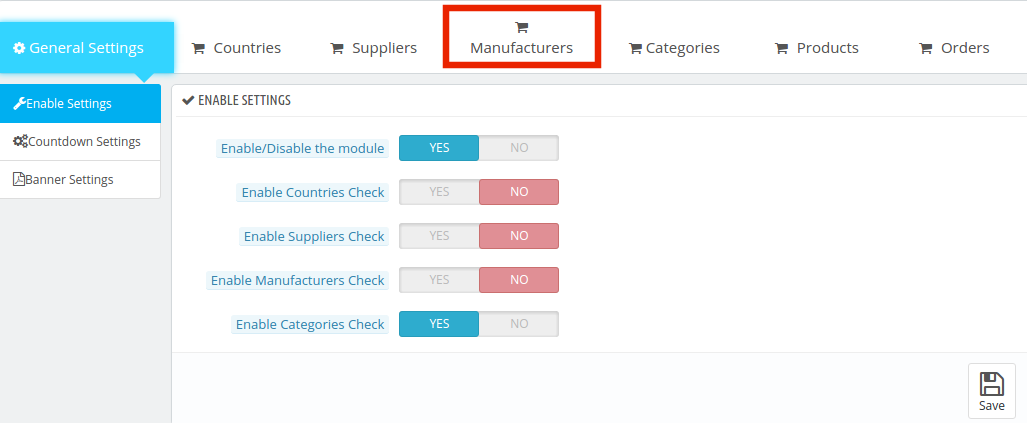
The same process can be adopted in selecting or deselecting the manufacturer. Enable the features from the ‘General Setting’ tab.
Once this is enabled, the admin can go to the Manufacturer tab.
This includes the list of the brands and manufacturer of the Prestashop eCommerce store. Select the names in which want you to offer one-day delivery and save the changes made in the configuration.
3.1.5 Enable Categories Check
The Prestashop eCommerce admin can enable or disable the Category check by toggling the button as shown below.
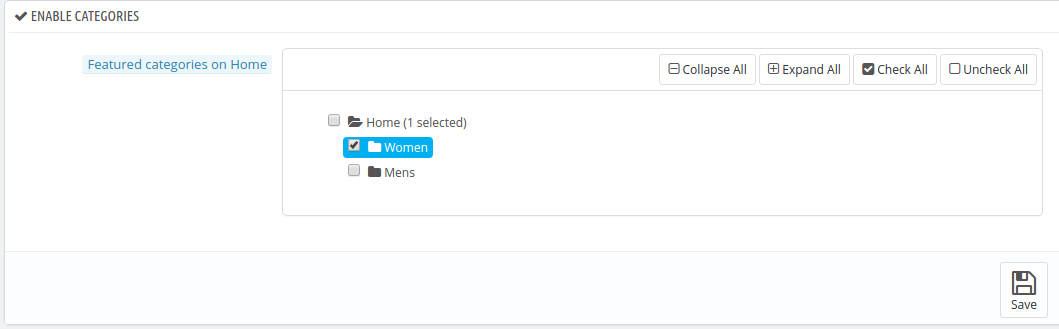
The category tab includes the list of the categories that you have on the website.
The Prestashop store admin can expand the categories and select the ones in which he wants to add this feature of shipping timer. The categories can be checked or unchecked with a button click.
3.1.6 How can the products for adding the shipping timer be selected?
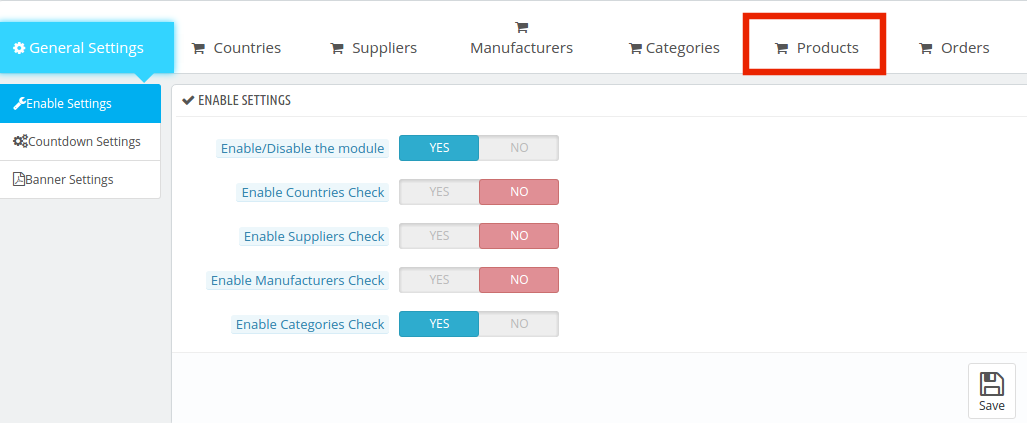
In order to select the products that are to include the shipping timer, the admin can go to the ‘Product’ tab.
The tab includes the entire list of the products being offered at the eCommerce site. The admin can check each product in which he wants to offer instant shipping option.
3.1.7 How to check the orders placed?
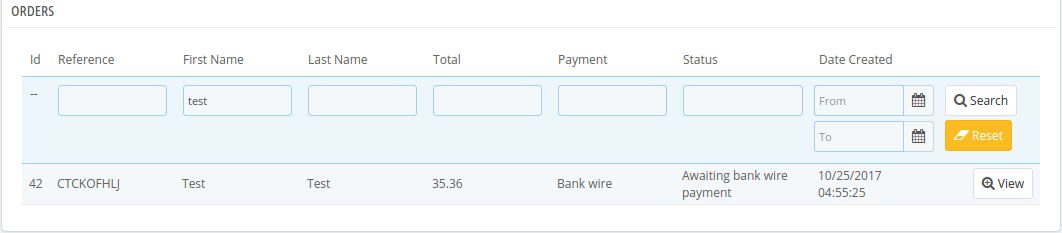
Prestashop one-day delivery timer module even allows the admin to track the orders received. The purchase orders of the products with the one-day shipping features can be viewed in the ‘Order’ tab of the admin interface.
The entire list of the orders received can be retrieved in this tab. The admin can apply the filters to see the details of any particular customer as per the need.
3.2 How to apply the countdown settings?
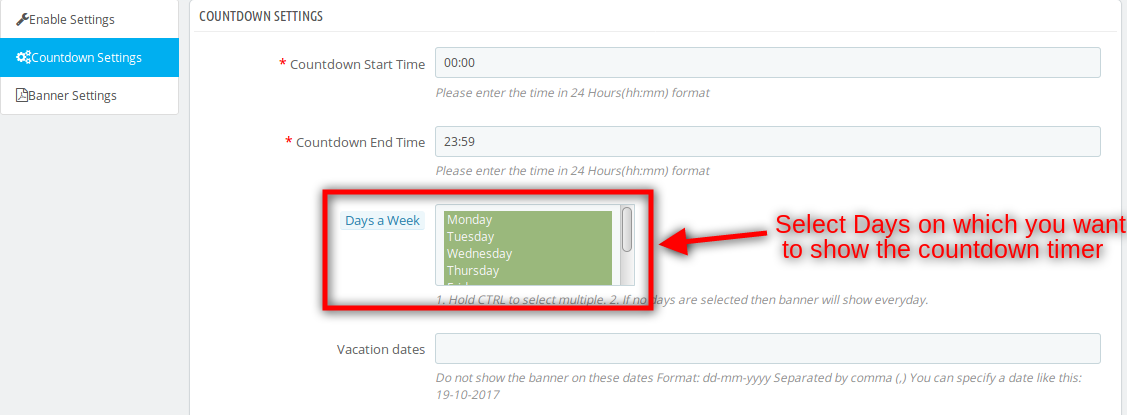
The shipping timer and the countdown setting can be changed from the back-end of the module. The admin can fix the time when the timer is to start and end. They are even given a choice to select the days of the week when they want to show the timer.
Countdown Start Time: This refers to the time when the timer of the shipping offer is to start on the website.
Countdown End Time: This determines the time after which the customers will not be able to avail the features of one-day shipping. Both the time should be entered in 24 Hours format.
Days of the Week: The admin can select the days when he wants to offer this features. In case no day is selected, the timer will be shown everyday.
Vacation Dates: If case the admin doesn’t want to show the timer on a particular day, he can enter the dates in this section. Multiple dates can be entered separated by commas. This can prove a helpful feature during holidays.
3.3 How to change the look and feel of the timer?
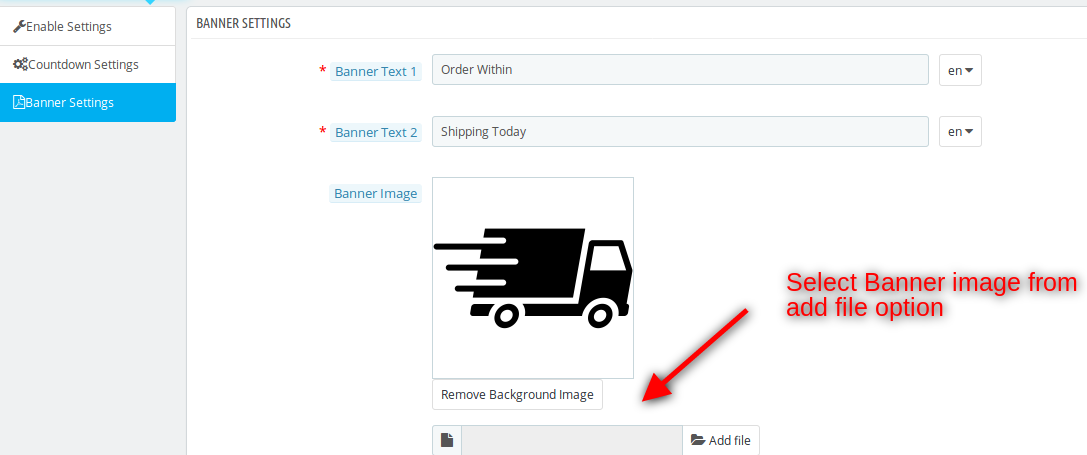
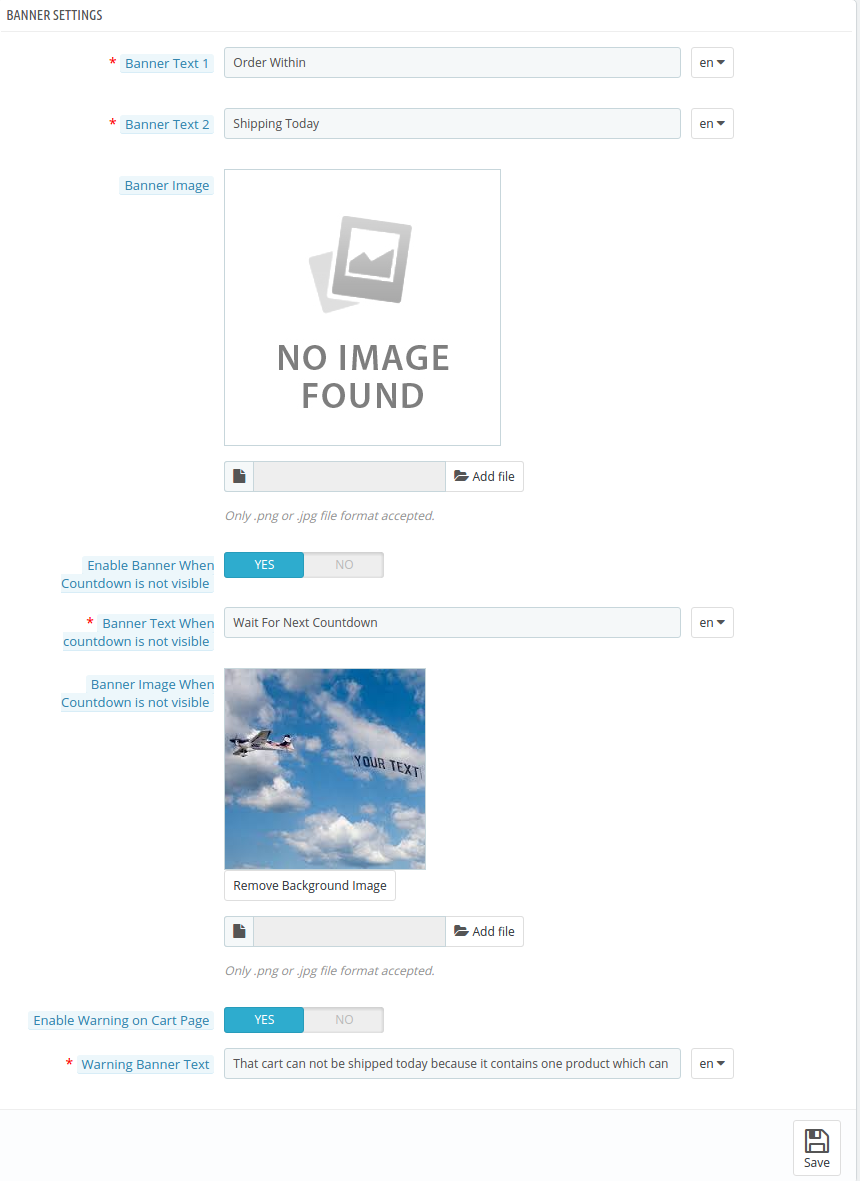
The banner setting and the look and feel of the changed from the ‘Banner Settings’ tab. Here are the customization options offered.
1. Banner Text 1 and Text 2: The text that you want to show on the banner countdown clock can be written here. The module offers multi-lingual support, so, the text can be entered in multiple languages depending upon the website.
2. Banner Image: The image of the countdown meter can be selected from the local drive and uploaded on the front-end of the website.
3. Enable Banner When Countdown is not Visible: When the countdown to the shipping offer is not working, the admin gets an option to show some other banner in the front-end. This feature can be enabled or disabled as per the need.
4. Banner Text When Countdown is not Visible: Once this feature is enabled, the store owner is required to enter a text that will be shown along with the banner. The admin can flash the message reminder the customer about the future offers.
5. Banner Image When Countdown is not Visible: This banner image can be selected from the local drive of the computer.
6. Enable Warning on Cart Page: If the products with this feature are added to the cart, the admin can show the necessary message to the customer by enabling this button. The message may remind the customer about the insufficient cart value for availing the offer or any other message as per the need.
7. Warning Banner Text: The text that the admin wants to be shown in the cart can be entered here.
4.0 Website UI
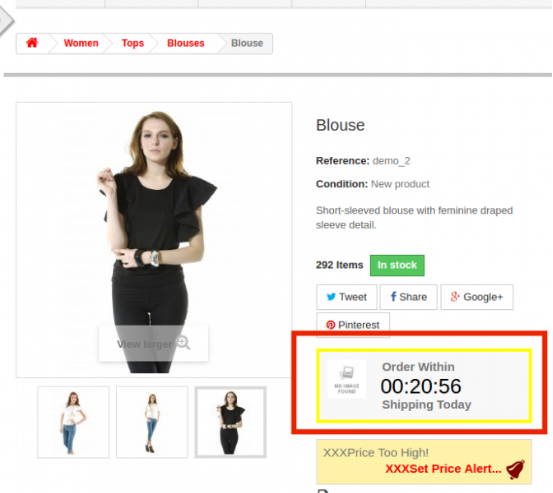
The shipping timer will be shown in the front-end of the website as customized by the admin. The countdown timer on the product page of the website is shown in the image below.
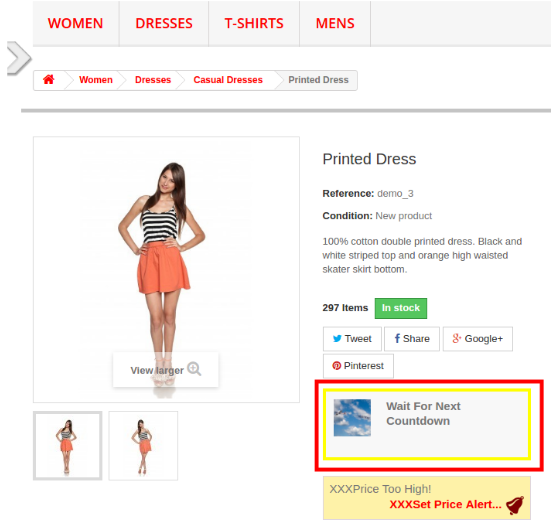
In case, the countdown or the timer is not shown, then, the alternate banner will be shown in the front-end.
This way the customers can get the ordered product on the same day. This Prestashop shipping timer addon shows a shipping timer on the product page which makes a sense of urgency in the customer’s mind. Thus the customer can make their purchase decision fastly without wasting any time. Same day delivery is a very demanding feature from customer’s end. Thus with the help of this Prestashop shipping timer plugin, the store admin can offer same day delivery to the customers and at the same time, the admin can also boost the conversion rate of the website. The Prestashop countdown timer addon is fully customizable and the customers can easily view the countdown timer on the front-end. The Prestashop countdown timer module allows the admin to show shipping timer without any code changes and technical help. This Prestashop shipping module offers a user-friendly and mobile responsive also.
In the competitive eCommerce ecosystem, staying ahead of trends and in sync with the hot and happenings of the industry. Tapping the psychology of the site visitors and selling them the idea instead of the products is the best way to have an edge. The spin and win contest is one of the trends that has reaped results for a lot of players in the industry. Prestashop Spin and Win Module is one such addon that can help boost conversions.
Features of PrestaShop Spin and Win Popup Module
The Spin and Win Module is a 3-in-one PrestaShop addon that you can use as an Entry popup, Exit popup, and email subscription module.
This amazing gamified tool is very helpful in increasing customer engagement in your store. You can offer various discounts to your customers when they spin the wheel to win a reward. This Wheelio like module is made for every eCommerce store that is having customer engagement issues and a higher bounce rate.
Use it as an Entry popup, Exit popup, and email subscription module
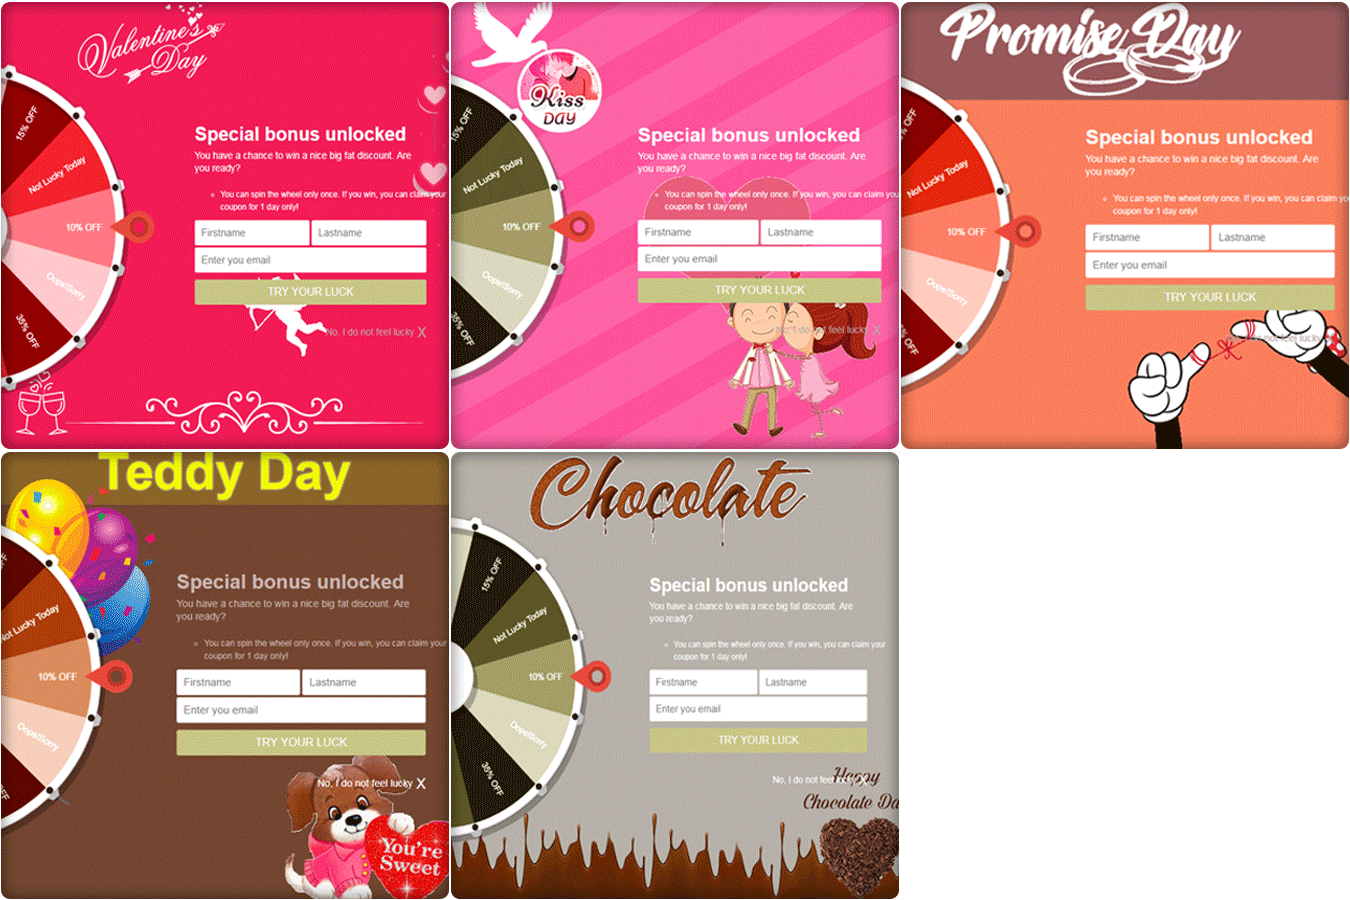
Several themes for every occasion like events, festivals, holiday season, such as for Halloween, Easter, Black Friday, Christmas, New Year, and others, etc.
Gamified Popup tricks the customer’s psychology and keeps them engaged in your store.
You can edit the offers displayed on the slices of the wheel.
The wheel can have different numbers of slices as you want and change the cart rules.
Control the display frequency, gravity, and position, of the Prestashop Popup module.
You can schedule the module and themes prior to the occasion in case you have a busy schedule.
It effortlessly synchronizes the email IDs with Mailchimp, Klavio, and Sendinblue integrators.
The Spin and Win Popup supports multiple languages and is compatible will all PrestaShop themes.
Wonder how can this spin and win module help increase the conversions. Check out the points about this Spin and Win Popup module mentioned below to know the reasons that make it a revenue booster.
5 Ways Prestashop Spin and Win Popup Module can boost your Conversions
Increases the website traffic
It is a proven fact that a better and attractive UI of the site can lure more customers. Even though there are many other factors that affect the purchase decision of the customers, the look and feel of the site is one aspect that can entice them to stay in the store. Any tedious or monotonous-looking site can put down the browse intention of your target audience. The playful way to give away the offers is something that intrigues the customers to visit your site again and again. Not just this, as per a psychological study, any free coupon is as good as no coupon for online shoppers. Hence, the entire scenario should be structured in such a way that the customer feels as if he/she has stricken a deal or bargain. And what can be better than making them spin the wheel to get the offers?
Better customer engagement
As mentioned above, a better UI is an effortless way to keep the visitors engaged for a longer period of time. While a coupon 10% discount is considered worthless by the shoppers in general, the fun-filled way to get the same offer will make it worthwhile. Another striking factor of the spin and win popup module is that is a better option than the exit pop-ups. Add a spin and win module to your online store and this can effortlessly cripple the exit intent of the visitors. Greater customer engagement is the key to greater conversions. So, the playful spin and win popup wheel option will ultimately aid your conversions.
Aids Email marketing and remarketing
The customers can spin the wheel of the spin and win module only after entering the email ids. Hence, the exit pop-up can even increase the database of the customer is you have. Along with this, the store owners get an additional feature in this spin and win module. The visitor can spin the wheel only with a single id. Hence, one person can’t claim multiple coupons. Moreover, the playful spin and win popup module can get the customers hooked and they even tend to enter multiple email ids. Hence, this facilitates the email marketing campaign of the store owner. The promotional emails can be sent to a greater audience and hence the chances of conversions increases ultimately.
Reduces the bounce rate due to annoying pop-ups
The pop-ups have been used for a very long time to curb the exit intention of the visitors. However, it was even accused of annoying the customers. Prestashop Exit Spin Wheel module is one to stop the visitors from exiting the site without even annoying them. The best thing about this spin and win popup module is that the store owners can even regulate the frequency of the wheel display. Thus, the alluring spin and win module reduce the bounce and exit rates. It is obvious that the more time the customers spend on the site, the more will be the chances of conversions.
Facilitates the purchase decision of the customers
The prizes won by spinning the wheel can be easily used while shopping. The coupon code is generated automatically in this spin and win popup module. The customers can copy the code and paste it in the Voucher Code area of the PrestaShop checkout page. Not just this, the customers are even notified about the coupon code through email. This can facilitate the purchase decision of the visitors and compel them to go to the checkout page.
Final say
The best way to enhance the conversions and revenue is to keep the customers engaged for a longer duration. While the classic exit pop-ups are considered annoying, Prestashop Spin and Win Module by Knowband are some of the most attractive ways to reduce the exit rate and lure visitors to the checkout page. You can use different themes for various occasions. Voila, This module can keep you ahead of your competitors.
Avec ce module install sur votre serveur web, vous pourrez faire l’ex rience de baisse vers le bas dans le panier taux d’abandon. En voyant des courriels de rappel, vous serez en mesure de suivi avec les perspectives qui n’a pas russi compl ter l’achat et ont quitt leur panier abandonn . Prestashop Abandonn panier vous permet d’envoyer des mails suivre sur mesure jusqu’à la fin de retour. Pour attirer les clients, propri taire du magasin peut m me envoyer des offres ou des remises promotionnelles ajout s dans les e – mails de rappel.
En voyant ces courriels de rappel, vous serez en mesure de montrer aux clients comment vous êtes profondément préoccupé et cela vous permettra de tirer la confiance forte et la fidélité des clients pour votre entreprise. Les clients se sentent appréciés avec le fait que vous leur valeur et essayez de régler les choses. Avec ce sentiment, ils pourraient prendre une décision d’achat de votre magasin.
Caractéristiques de Prestashop Abandonné Panier e-mails de récupération
Envoyer des e-mails de récupération pour amener les clients revenir
Permettre aux clients de récupérer automatiquement leurs chariots
Inclure les détails commerciaux du panier dans les e-mails de rappel
Caractéristiques pour admin magasin
Créez votre propre modèle de courrier électronique en utilisant du texte, des images, du HTML, etc.
Admin peut facilement acc der des informations sur les commandes abandonn es et num ro de commande
Admin a le contr le total de rappels envoy s, c.- -administrateur peut d cider apr s combien de temps panier sera pris comme abandonn et peut galement d finir le temps de retard pour envoyer des mails
Possibilité de personnaliser le modèle de courrier électronique en ajoutant des variables personnelles comme le nom du client, des informations produit, des réductions et des offres dans le modèle de courrier électronique.
Gérez facilement et voir toutes les entrées de panier abandonnées, c.- -administrateur peut surveiller les performances en fonction du nombre total de chariots qui ont été convertis en ventes et commander.
Abandonner panier Prestashop module permet d’attirer les visiteurs dans votre magasin pour compléter le processus de commande. Un courrier d’alerte est envoyé au compte du client qui lui donne / elle des informations détaillées sur les commandes en cours. La fonctionnalit de ce module vous permet de r cup rer les ventes de commandes qui se loigna avant de partir.
Avantages
Augmenter les conversions en récupérant les ventes perdues
Augmenter la fid lit des clients
Augmenter le retour sur investissement pour votre entreprise
Installez ce module pour faire baisser les taux d’abandon de panier sur votre magasin en mettant en place un solide panier stratégie de rétablissement.
Avec ce module install sur votre server web, vous pourrez faire l’exp rience de baisse vers le bas dans le panier taux d’abandon. En envoyant des courriels de rappel, vous serez en mesure de suivi avec les Perspektiven qui n’a pas r ussi compl ter l’achat et ont quitt leur panier Avoidn . Prestashop Abandonn panier vous permet d’envoyer des mails suivre sur mesure jusqu’ la fin de retour. Pour attirer les client, propri taire du magasin peut m me envoyer des offres ou des Remises Promotionnelles ajouts dans les e-mails de rappel.
En envoyant ces courriels de rappel, vous serez en mesure de montrer aux client comment vous tes profond ment pr occup et cela vous permettra de b tir la trust forte et la fid lit des Clients pour votre entreprise Les Clients se sentent appr ci s avec le fait que vous leur valeur et essayez de r gler les chooses. Avec ce sentiment, ils pourraient prendre une d cision d’achat de votre magasin.
Caract ristiques de Prestashop Abandonn Panier e-mails de r cup ration
Envoyer des e-mails de r cup ration pour amener les clients revenir
Permettre aux client de r cup rer automatiquement leurs chariots
Integrieren Sie les d tails commerciaux panier dans les e-mails de rappel
Caract ristiques pour admin magasin
Cr ez votre propre mod le e-mail en utilisant du texte, des images, HTML, etc.
Admin peut facilement acc der des informations sur les commandes Avoidn es et num ro de commande
Admin a le contr le total de rappels envoy s, c.- -administrateur peut d cider apr s combien de temps panier sera pris comme Cancellationn et peut galement d finir le temps de retard pour envoyer des mails
Möglichkeit des Personalisator-Mod le de courrier lectronique en ajoutant des variables personnalis es comme le nom du client, des informations produit, r ductions and offres dans le mod le de courrier lectronique.
G rez facilement et voir toutes les entr es de panier Avoidn s, c.- -administrateur peut surveiller les performances en fonction du nombre total de chariots qui ont t converties en ventes et commander.
Pourquoi est-il n cessaire d’installer Prestashop Abandonn panier Addon sur votre magasin
Prestashop Abandonn panier Modul permet d’attirer les visiteurs votre magasin pour compl ter le processus de commande. Un courrier d’ alerte est envoy au compte du client qui lui donne / elle des informations d taill es sur les commandes en cours. La fonctionnalit de ce module vous permet de r cup rer les ventes de commandes qui se loigna avant de partir.
Avantages
Augmenter les Conversions en r cup rant les ventes perdues
Augmenter la fid lit des Clients
Augmenter le retour sur investissement pour votre entreprise
Installez ce module pour faire baisser les taux d’abandon de panier sur votre magasin en mettant en place un solide panier strat gie de r tablissement.
Avec ce module install sur votre server web, vous pourrez faire l’exp rience de baisse vers le bas dans le panier taux d’abandon. Envoyant des courriels de rappel, vous serez en mesure de suivi avec les perspectives qui n’a pas r ussi compl ter l’achat et ont quitt leur panier leaven . Prestashop Abandonn panier vous permet d’envoyer des mails suivre sur mesure jusqu’ la fin de retour. Pour attirer les customers, propri taire du magasin peut m me envoyer des offres ou des remizy Promotionnelles ajout´s dans les e-mails de rappel.
Envoyant ces courriels de rappel, vous serez en mesure de montrer aux klienci komentarz vous tes profond ment pr occup et cela vous permettra de b tir la confiance forte et la fid lit des customers pour votre entreprise. Les customers se sentent appr ci’s avec le fait que vous leur valeur et essayez de r gler les chooses. Avec ce sentyment, ils pourraient prendre une d cision d’achat de votre magasin.
Caract ristiques de Prestashop Abandonn Panier e-maile de r cup ration
Envoyer des e-mails de r cup ration pour amener les customers revenir
Permettre aux customers de r cup rer automatiquement leurs chariots
Dołącz les d tails commerciaux panier dans les e-mails de rappel
Caract ristiques pour admin magasin
Cr ez votre propre mod le e-mail en utilisant du texte, des images, HTML, etc.
Admin peut facilement acc der des informations sur les commandes leaven es et num ro de commande
Admin a le contr le total de rappels envoy s, c.- -administrateur peut d cider apr s combien de temps panier sera pris comme canceln et peut galement d finir le temps de retard pour envoyer des mails
Possibilit de personnaliser mod le de courrier lectronique en ajoutant des variable personnalis es comme le nom du client, des informations produit, r ductions et offres dans le mod le de courrier lectronique.
Gérez facilement et voir toutes les entrées de panier leaven’s, c.-é-administrateur peut surveiller les performances en fonction du nombre total de chariots qui ont ‘t’ converties en ventes et commander.
Pourquoi est-il n cessaire d’installer Prestashop Abandonn panier Addon sur votre magasin
Prestashop Abandonn panier module permet d’attirer les visiteurs votre magasin pour compl ter le processus de commande. Un courrier d’alerte est envoy au compte du client qui lui donne / elle des informations d taill es sur les commandes en cours. La fonctionnalit de ce module vous permet de r cup rer les ventes de commandes qui se loigna avant de partir.
korzyści
Augmenter les conversions en r cup rant les ventes perdues
Augmenter la fid lit des customers
Augmenter le retour sur investissement pour votre entreprise
Installez ce module pour faire baisser les taux d’abandon de panier sur votre magasin en mettant en place un solide panier strat gie de r tablissement.
Avec ce module install sur votre serveur web, vous pourrez faire l ‘exp rience de baisse vers le bas dans le panier taux d’abandon. Envoyant des courriels de rappel, vous serez en mesure de suivi avec les perspectives qui n’a pas r ussi compl ter l’achat et ont quitt leur panier abandonn . Prestashop Abandonn panier vous permet d’envoyer des mails suivre sur mesure jusqu’ la fin de retour. Pour attirer les clients, propri taire du magasin peut m me envoyer des offres ou des promoción de remises ajout s dans les e – mails de rappel.
Envoyant ces courriels de rappel, vous serez en mesure de montrer aux clients comment vous tes profond ment pr occup et cela vous permettra de b tir la confiance forte et la fid lit des clients pour votre entreprise. Les clients se sentent appr ci s avec le fait que vous leur valeur et essayez de r gler les choses. Avec ce sentiment, ils pourraient prendre une d cision d’achat de votre magasin.
Caract ristiques de Prestashop Abandonn Panier e-mails de r cup ration
Envoyer des e-mails de r cup ration pour amener les clients revenir
Permettre aux clients de r cup rer automatiquement leurs chariots
Inclure les d tails commerciaux panier dans les e-mails de rappel
Caract ristiques pour admin magasin
Cree un modelo de correo electrónico propio en el que se utilice el texto, des imágenes, HTML, etc.
Admin peut facilement acc der des informations sur les commandes abandonn es et num ro de commande
Admin a le contr le total de rappels envoy s, c.- -administrateur peut d cider apr s combien de temps panier sera pris comme abandonn et peut galement d finir le temps de retard pour envoyer des mails
Possibilit de personnaliser mod le de courrier lectronique en ajoutant des variables personnalis es comme le nom du client, des informations produit, r ductions et offres dans le mod le de courrier lectronique.
G rez facilement et voir toutes les entr es de panier abandonn s, c.- -administrateur peut surveyiller les performances en fonction du nombre total de chariots qui ont t converties en ventes et commander.
Pourquoi est-il n cessaire d’installer Prestashop Abandonn panier Addon sur votre magasin
Panier Abandonn de Prestashop módulo permet d’attirer les visiteurs votre magasin pour compl ter le processus de commande. Un courrier d ‘alerte est envoy au compte du client qui lui donne / elle des informations d taill es sur les commandes en cours. La fonctionnalit de ce module vous permet de r cup rer les ventes de commandes qui se loigna avant de partir.
Ventajas
Augmenter les converssions en r cup rant les ventes perdues
Augmenter la fid lit des clients
Augmenter le retour sur investissement pour votre entreprise
Instale módulo ce pour faire baisser les taux d’abandon de panier sur votre magasin en mettant en place un solide panier strat gie de r tablissement.
Knowband has developed an interface for the Prestashop store owners that can help them start selling on the Etsy marketplace. Further, the Prestashop Etsy integration addon saves the time of the sellers. How? By reducing the time involved in the manual listing process. In fact, the Prestashop Etsy marketplace integration module offers them a feature to handle the inventory. In addition, handle orders for the Etsy shop from the Prestashop back office.
Etsy is a marketplace that works as an intermediary between customers and artists. In addition, craftsmen of handmade items, or collectors of vintage products. Furthermore, the Etsy marketplace connector provides a unique platform to sellers to showcase their products. Thus, they can spread awareness regarding their products and services through this platform. It is also important for the marketplace to offer the best services to consumers. In fact, consumers like to have options and alternatives to choose from. Hence, the marketplaces are competing to win the sellers and offer great services to them to connect with their stores. Further, Etsy has more than 25 million visitors each month. Further, which gives sellers a wonderful opportunity to reach a larger audience network.
1.1 Key features of the Prestashop Etsy Integration module:
Simple installation and quick starting: The Etsy Prestashop integration module can install quickly. Further, the user-friendly interface of the Prestashop Etsy integration allows an easy process to list the products on the Etsy marketplace.
Bulk uploading of the products: By using this Prestashop Etsy integration addon, the admin can upload products in bulk.
Mapping of the store category with Etsy category: Sellers can easily map the product attributes and category with the Etsy category. Further, with the profile-based listing of the Prestashop Etsy API integrator.
Shipping template synchronization: Create shipping templates from the back-end of the Prestashop Etsy integration extension. Moreover, sync these templates with Etsy with the help of the cron jobs.
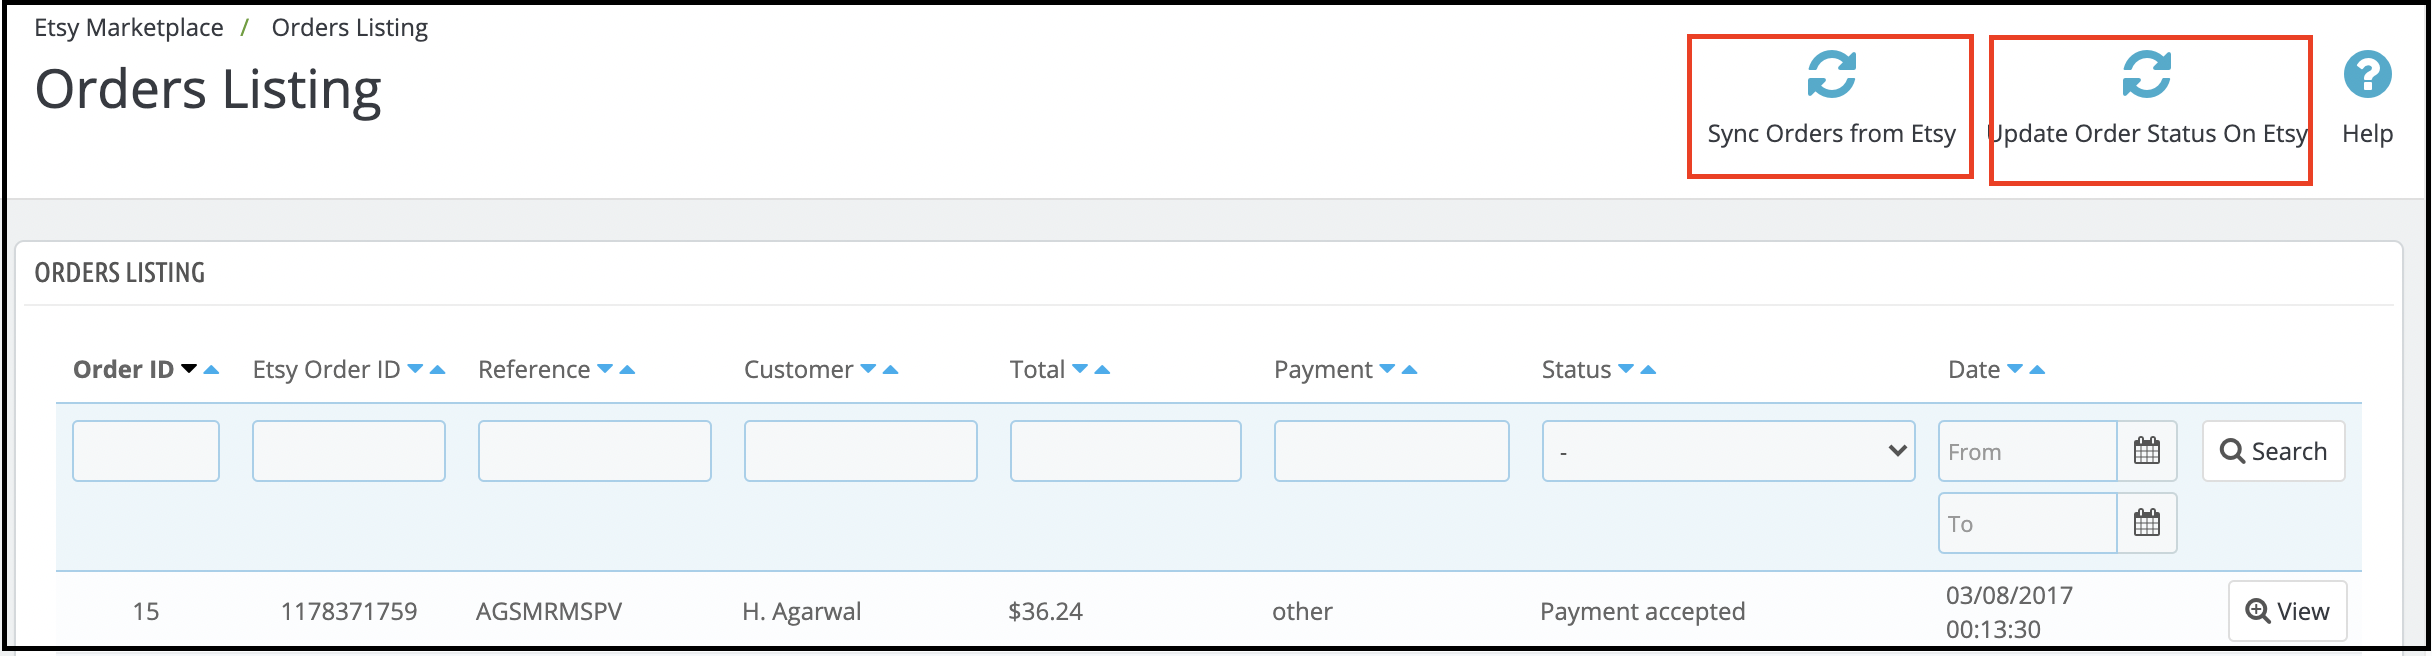
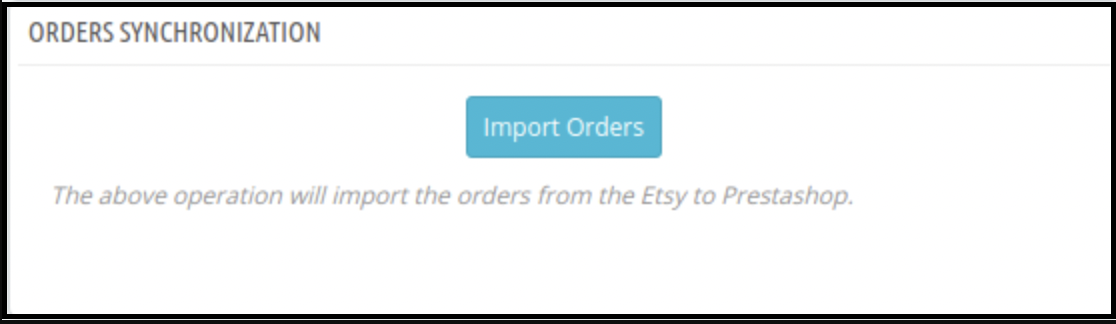
Order Synchronization: Manage and keep track of Etsy orders from the admin interface of the Etsy Prestashop API integration addon.
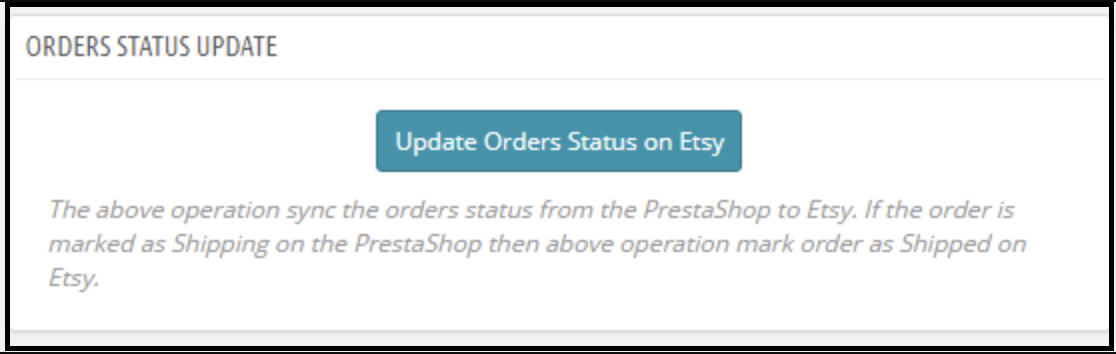
Order Status update: The Admin can update the order status of the Etsy marketplace orders with the help of the cron jobs. Furthermore, offered by the Prestashop Etsy integration module.
Inventory management: The admin can manage inventory for the Etsy store products from the Prestashop Back Office. The current status of the products can sync with the help of the cron jobs. Further, offered by the Prestashop Etsy synchronization extension. Suppose, they make any changes in the product inventory or attributes in the Prestashop store. Further, they can synchronize with Etsy with a button click with the Etsy Prestashop synchronization module.
Language translations: Prestashop Etsy integrator offers multi-lingual support. The admin can select the second language for the store. Moreover, easily synchronizes it with the Etsy marketplace shop. Further, through the cron job offered by the Etsy Prestashop integrator.
New Features offered by Knowband’s Prestashop Etsy Integrator Version 4.0.1:
OpenAPI Authentication for Etsy APIs: We have updated the module to work with Etsy’s new OpenAPI authentication. Now, all Etsy API requests include the required authentication headers, following Etsy’s latest standards, so your integration continues to work smoothly.
Return Policy Configuration & Mapping: A new return policy feature has been added to the module. Now admins can now create and manage multiple return policies and map them to specific profiles. Any products linked to a profile will automatically update on Etsy with the assigned return policy.
Key Features offered by Knowband’s Prestashop Etsy Integrator Version 2.0.0:
UX-related changes: To improve the user experience the interface of the shipping template has been changed. In addition, all the options for shipping template creation have been merged onto the same page. Furthermore, just like the Prestashop Etsy Marketplace interface.
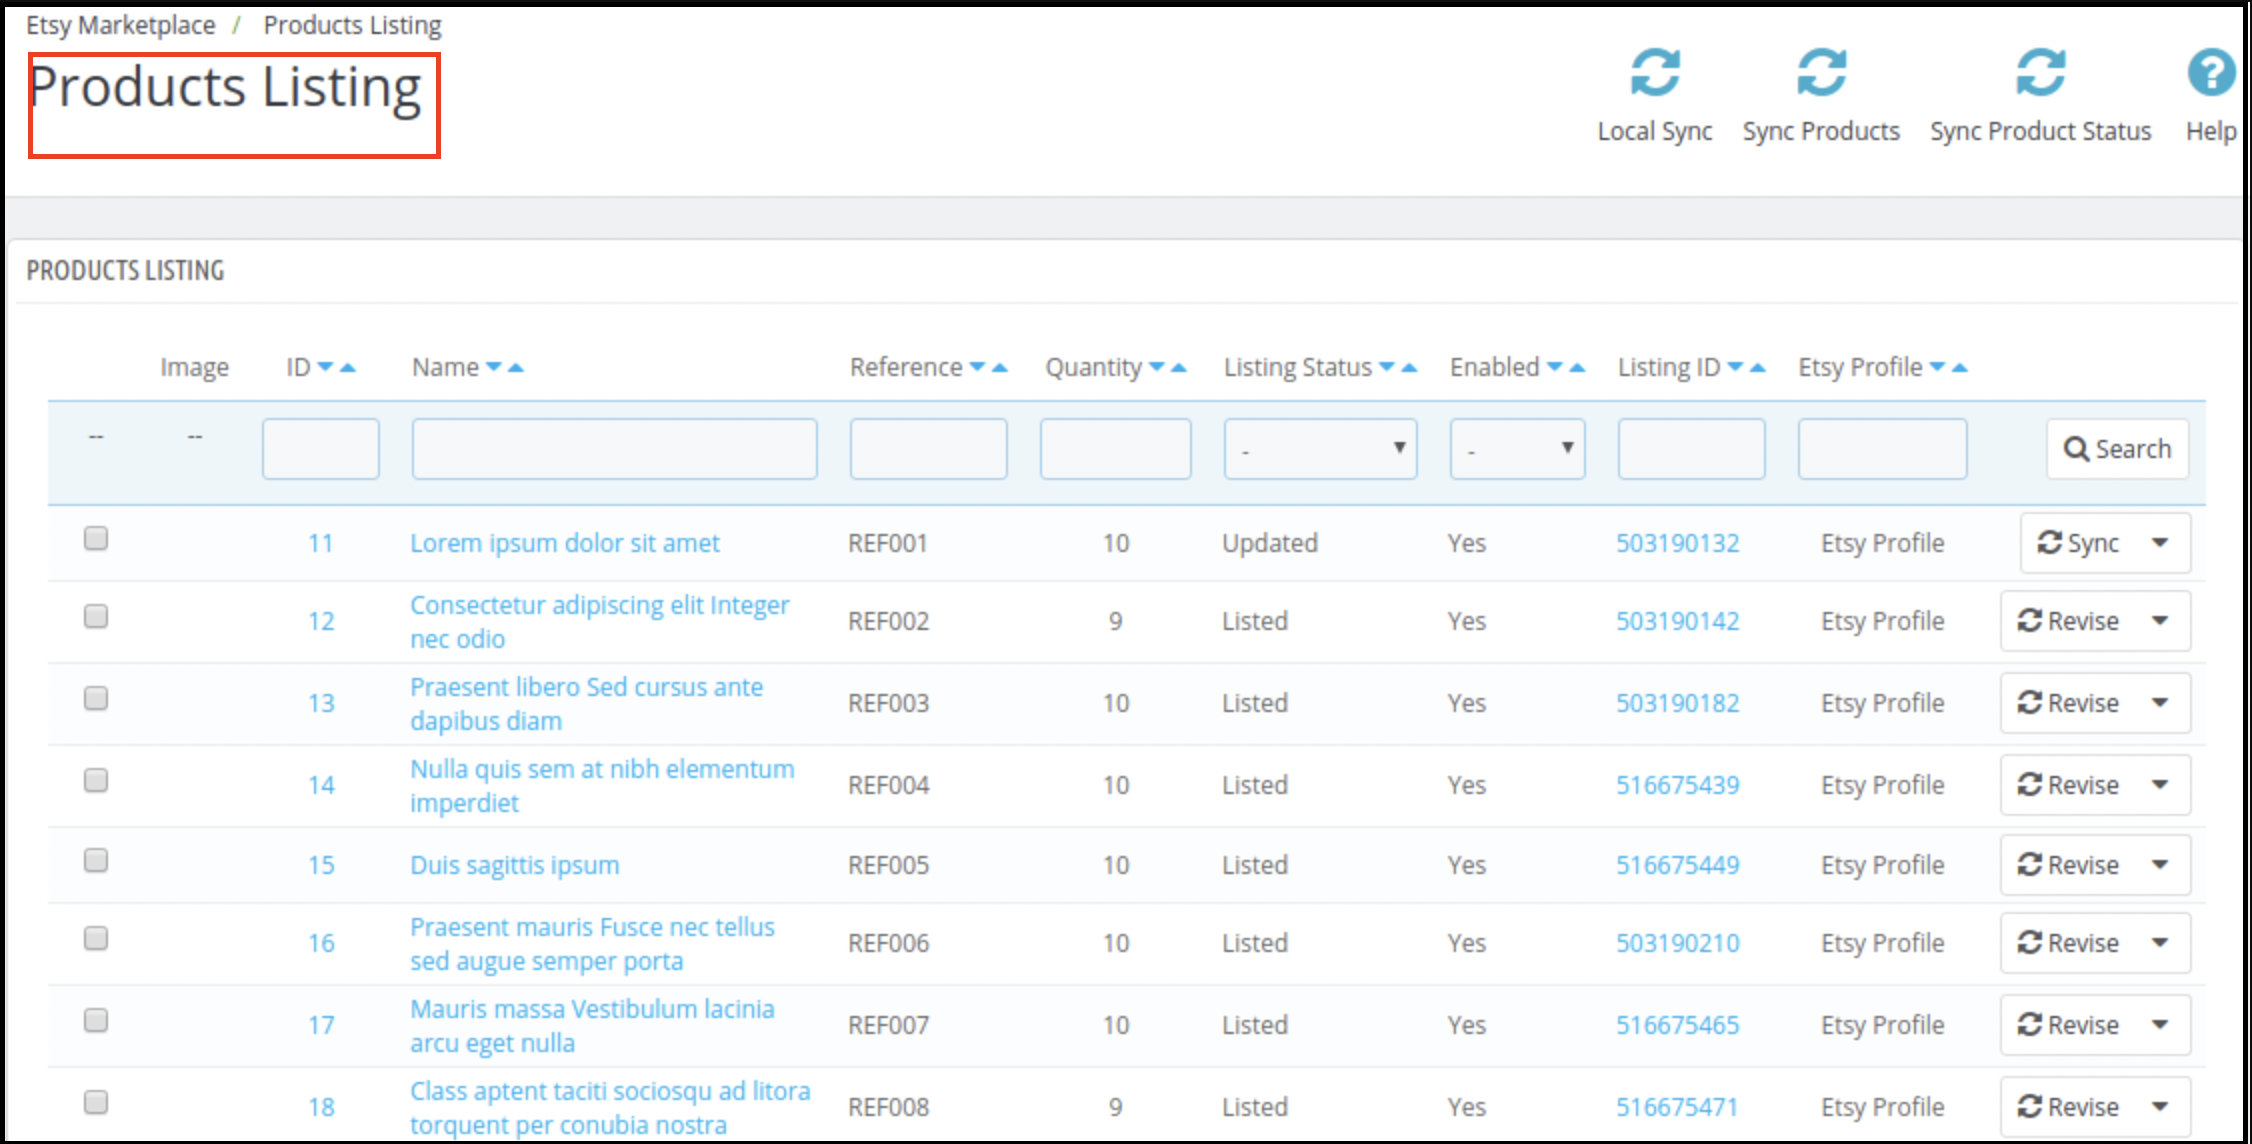
Code Optimization: Now the admin can sync the products from the Products Listings page. There are 3 options for product sync:
Local Sync: Local Sync option allows the admin to sync the PrestaShop store products to the Etsy PrestaShop Integration module. All the products which are mappable to a Profile will list in the Product Listings. Moreover, the admin can list the individual products on the Etsy Marketplace.
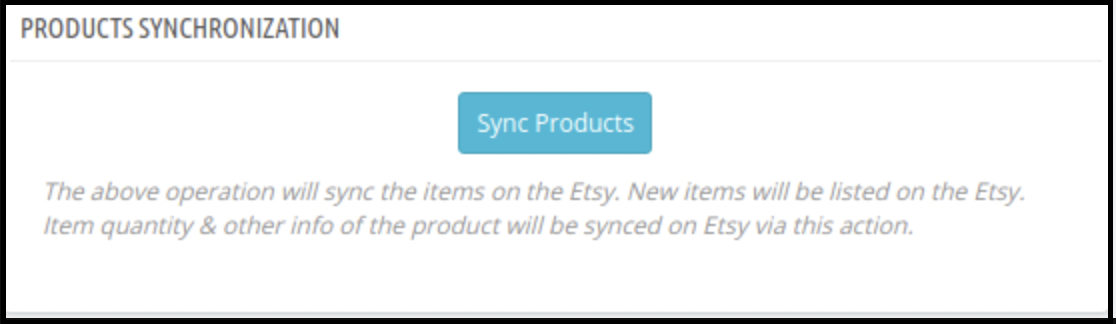
Sync Products: Sync Products option will sync the products to the Etsy Marketplace. All the enabled products will sync to the Etsy Marketplace. To avoid the syncing error, the admin can select the number of products. Further, to sync in one go under the General Settings. Cron setup is available to automate the process to list the products.
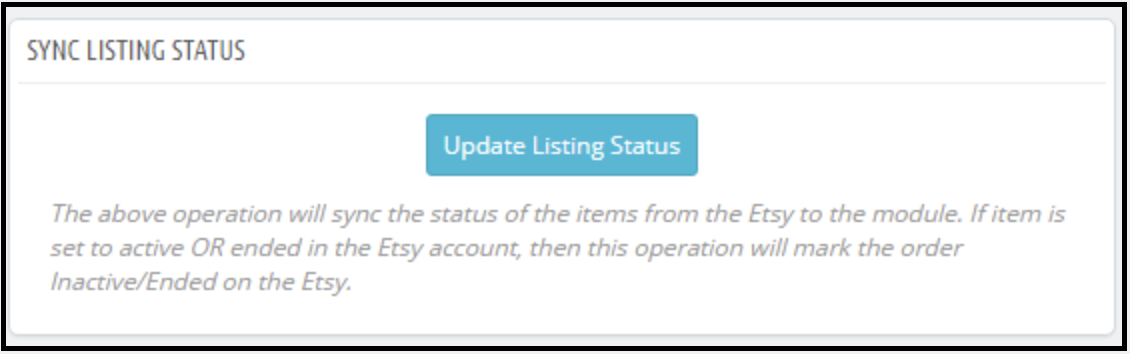
Sync Product Status: The admin can get the listing status of the syncing products by using the Sync Product Status.
Products Listings: In case you want to set the products as Inactive, Delete those products from this page only (Instead from the Etsy account). In fact, setting the product as Inactive on the Etsy account directly will relist the item on Etsy. Further, on the next CRON run.
The admin can view the Etsy store products from the Products Listings tab. Further, click on the Listing Id. In addition, it will open the Etsy store listing.
The admin can view the PrestaShop store listing by clicking the Product Name.
The admin can view the product listing page in the back office by clicking the ID.
Store admin can add Etsy store orders with store carriers.
Store admin can add the tracking numbers on Etsy orders.
Stora admin can add a size chart image for each profile and this additional image will be uploaded to Etsy.
Now instead of listing the variations separately on the Products Listings page, all the variations list under the product name.
The admin can sync the individual products to the Etsy Marketplace instead of listing the entire profile.
The admin can Disable/Enable Items before syncing and only enabled items will list to the Etsy store.
Custom Product Information: Now, the Prestashop Etsy Connector addon allows the admin to list the same product with different product details (product title and description) on Etsy Marketplace.
Profile Level Synchronization: We have recently introduced the profile level synchronization feature that allows the store admin to list/update the products from a particular category only instead of all.
Prestashop Etsy Marketplace Integration module
Knowband’s Prestashop Etsy Marketplace Integration module helps Prestashop store owners seamlessly connect their stores with Etsy to expand their reach and increase sales.
Additional features of the Etsy Prestashop Integration module
Attribute Mapping: All the PrestaShop store attributes will sync to the Etsy Marketplace Integration module automatically. In addition, the admin just needs to map these attributes to the Etsy Marketplace.
Etsy Category Attribute: The Etsy Category Attributes are now available in the Etsy Marketplace Integration module. Further, the admin can set the various attributes. For instance, Primary Color, Secondary Color, Holiday, and Accessory Style.
Product or Category Mapping: The PrestaShop Etsy marketplace Integration module enables syncing. Further, the selected products or entire category to the Etsy Marketplace. Furthermore, under the Profile Management tab of the Etsy Marketplace connector module, the admin can select the Product/Category option to sync the store products.
Custom Pricing: Etsy Prestashop integration module allows the admin to list the products on the marketplace at a different price. In fact, the admin can change the price of the products. Further, that displays on the marketplace by a fixed amount or a percentage amount. As per the requirement, the admin can increase or decrease the price of the products. In fact, he can do it from the back-end of the Prestashop Etsy integration addon.
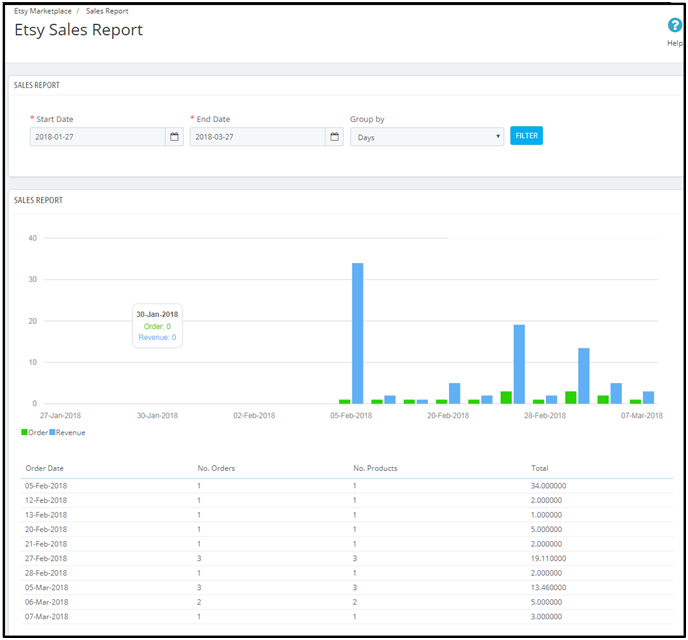
Sales Report: The sales report tab of the Etsy Prestashop integration plugin allows the sellers to check the order and revenue report.
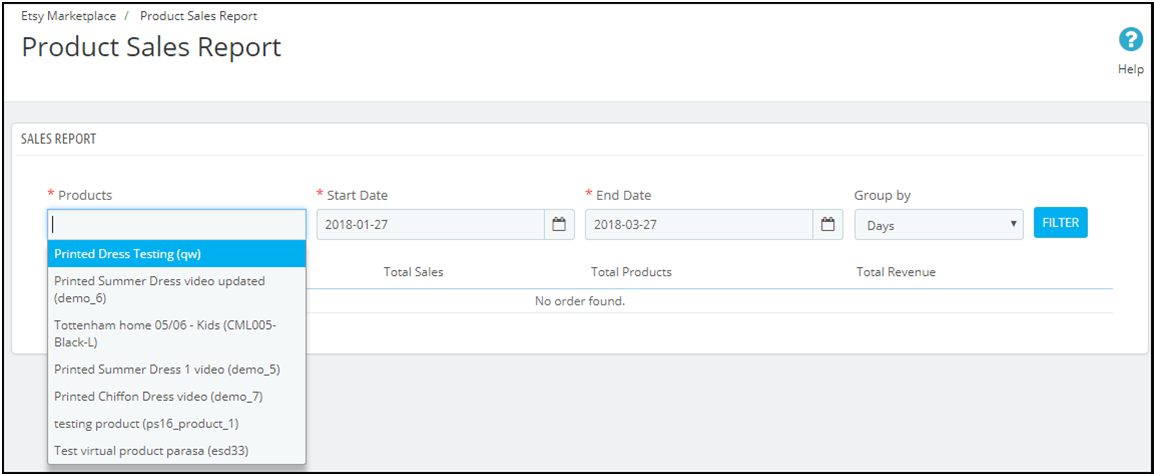
Product Sales Report: The admin can even view the sales report of particular products. In fact, he can do it from the back-end of the Prestashop Etsy integration plugin.
Shop Section: The Prestashop addon offers an option of adding a shop section in the front-end of the Etsy marketplace to the e-sellers. Further, the shop section allows the admin to categorize the products in a particular category. In fact, the created shop section will display at your Etsy shop.
Product Description Template: The e-sellers can use different placeholders for their product description to make them more impactful.
You can also watch the video on “Upgrade Guide – Knowband’s Prestashop Etsy Connector v3.0.4” here:
2.0 Installation
After purchasing the Prestashop Etsy integration extension, you will get the following files as available below:
1. kbetsy.zip (contains source code of the module)
2. User Manual
Follow the following steps to install the Etsy Prestashop integration extension:
Unzip the kbetsy.zip file. It would contain files and folders as shown below –
Copy all the files and folders of the unzipped folder into your store “modules” directory on the path – Root Directory/modules/.
Now module is ready to install on your store. Moreover, you can find that in Store Admin -> Modules and Services. Further, it would be shown as below –
In case, you are not able to find the module in the admin modules list. Further, please try searching the module with the following details –
Keyword – Etsy
Category – Other
Filter By – Installed & Not Installed / Enabled & Disabled
Click on the “Install” button to install the module. It would show a pop-up for your confirmation. Further, click on the “Proceed with the installation” option. In fact, this step will install the module and show a notification – “Module(s) installed successfully”.
3.0 System Setup
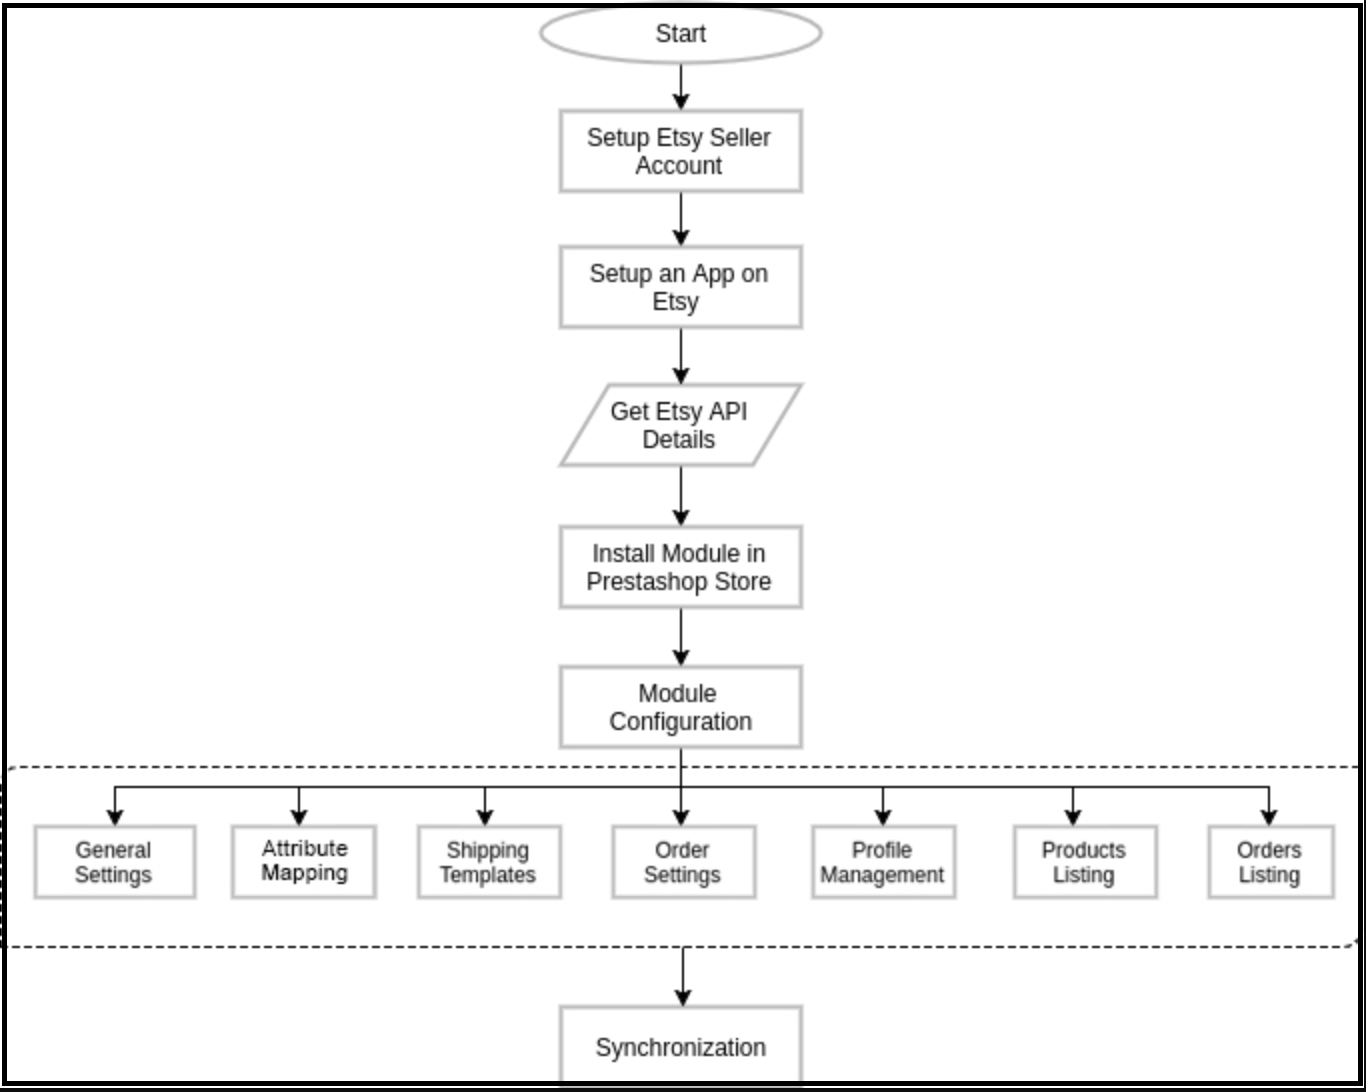
Before proceeding ahead, it is important to know what is the correct flow of actions. Further, to set up this system as several things are dependent on other things. In addition, if we do not take care, then it will become difficult to process smoothly or may be error-prone.
You need a seller account on Etsy to start selling on Etsy Marketplace. Moreover, to configure the Etsy Prestashop integration addon. In this section, we are listing all the steps to create a seller account on Etsy. Please find them below –
Click on the “Sell on Etsy” button present at the top right corner.
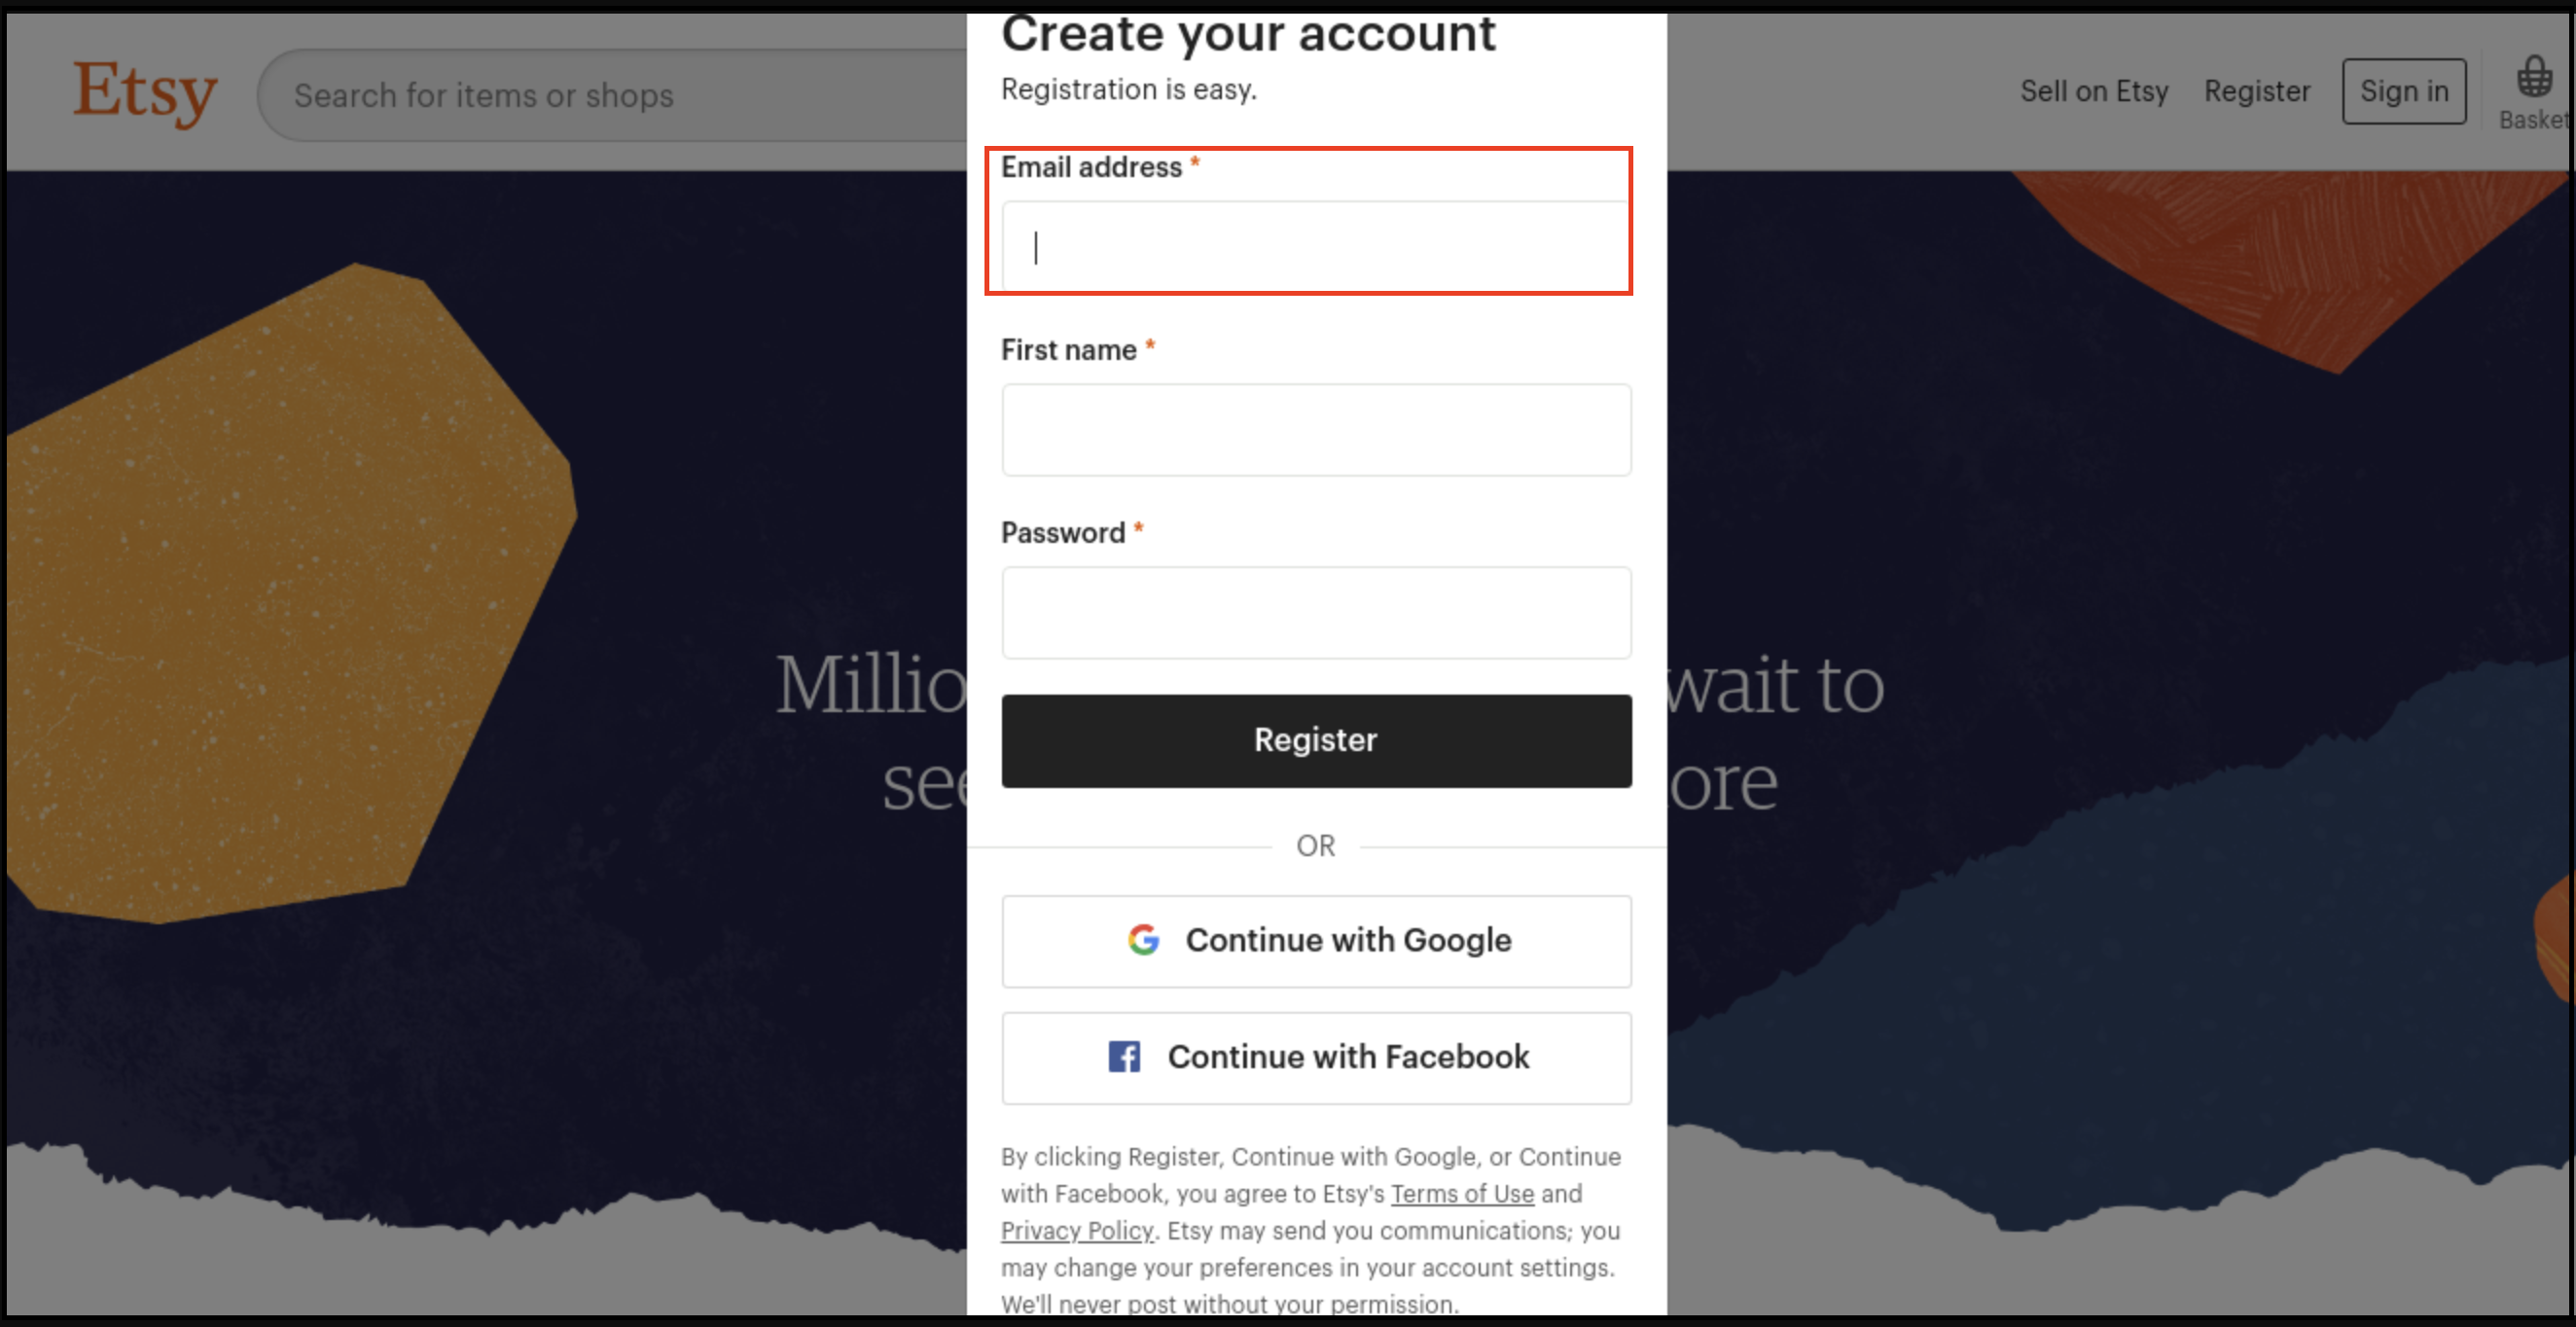
Click on the “Register” button on the page you are visiting now. Further, refer to the screenshot given below.
Fill up the registration form and click on the “Register” button. In fact, it would create your seller account and send a verification email to the provided email address.
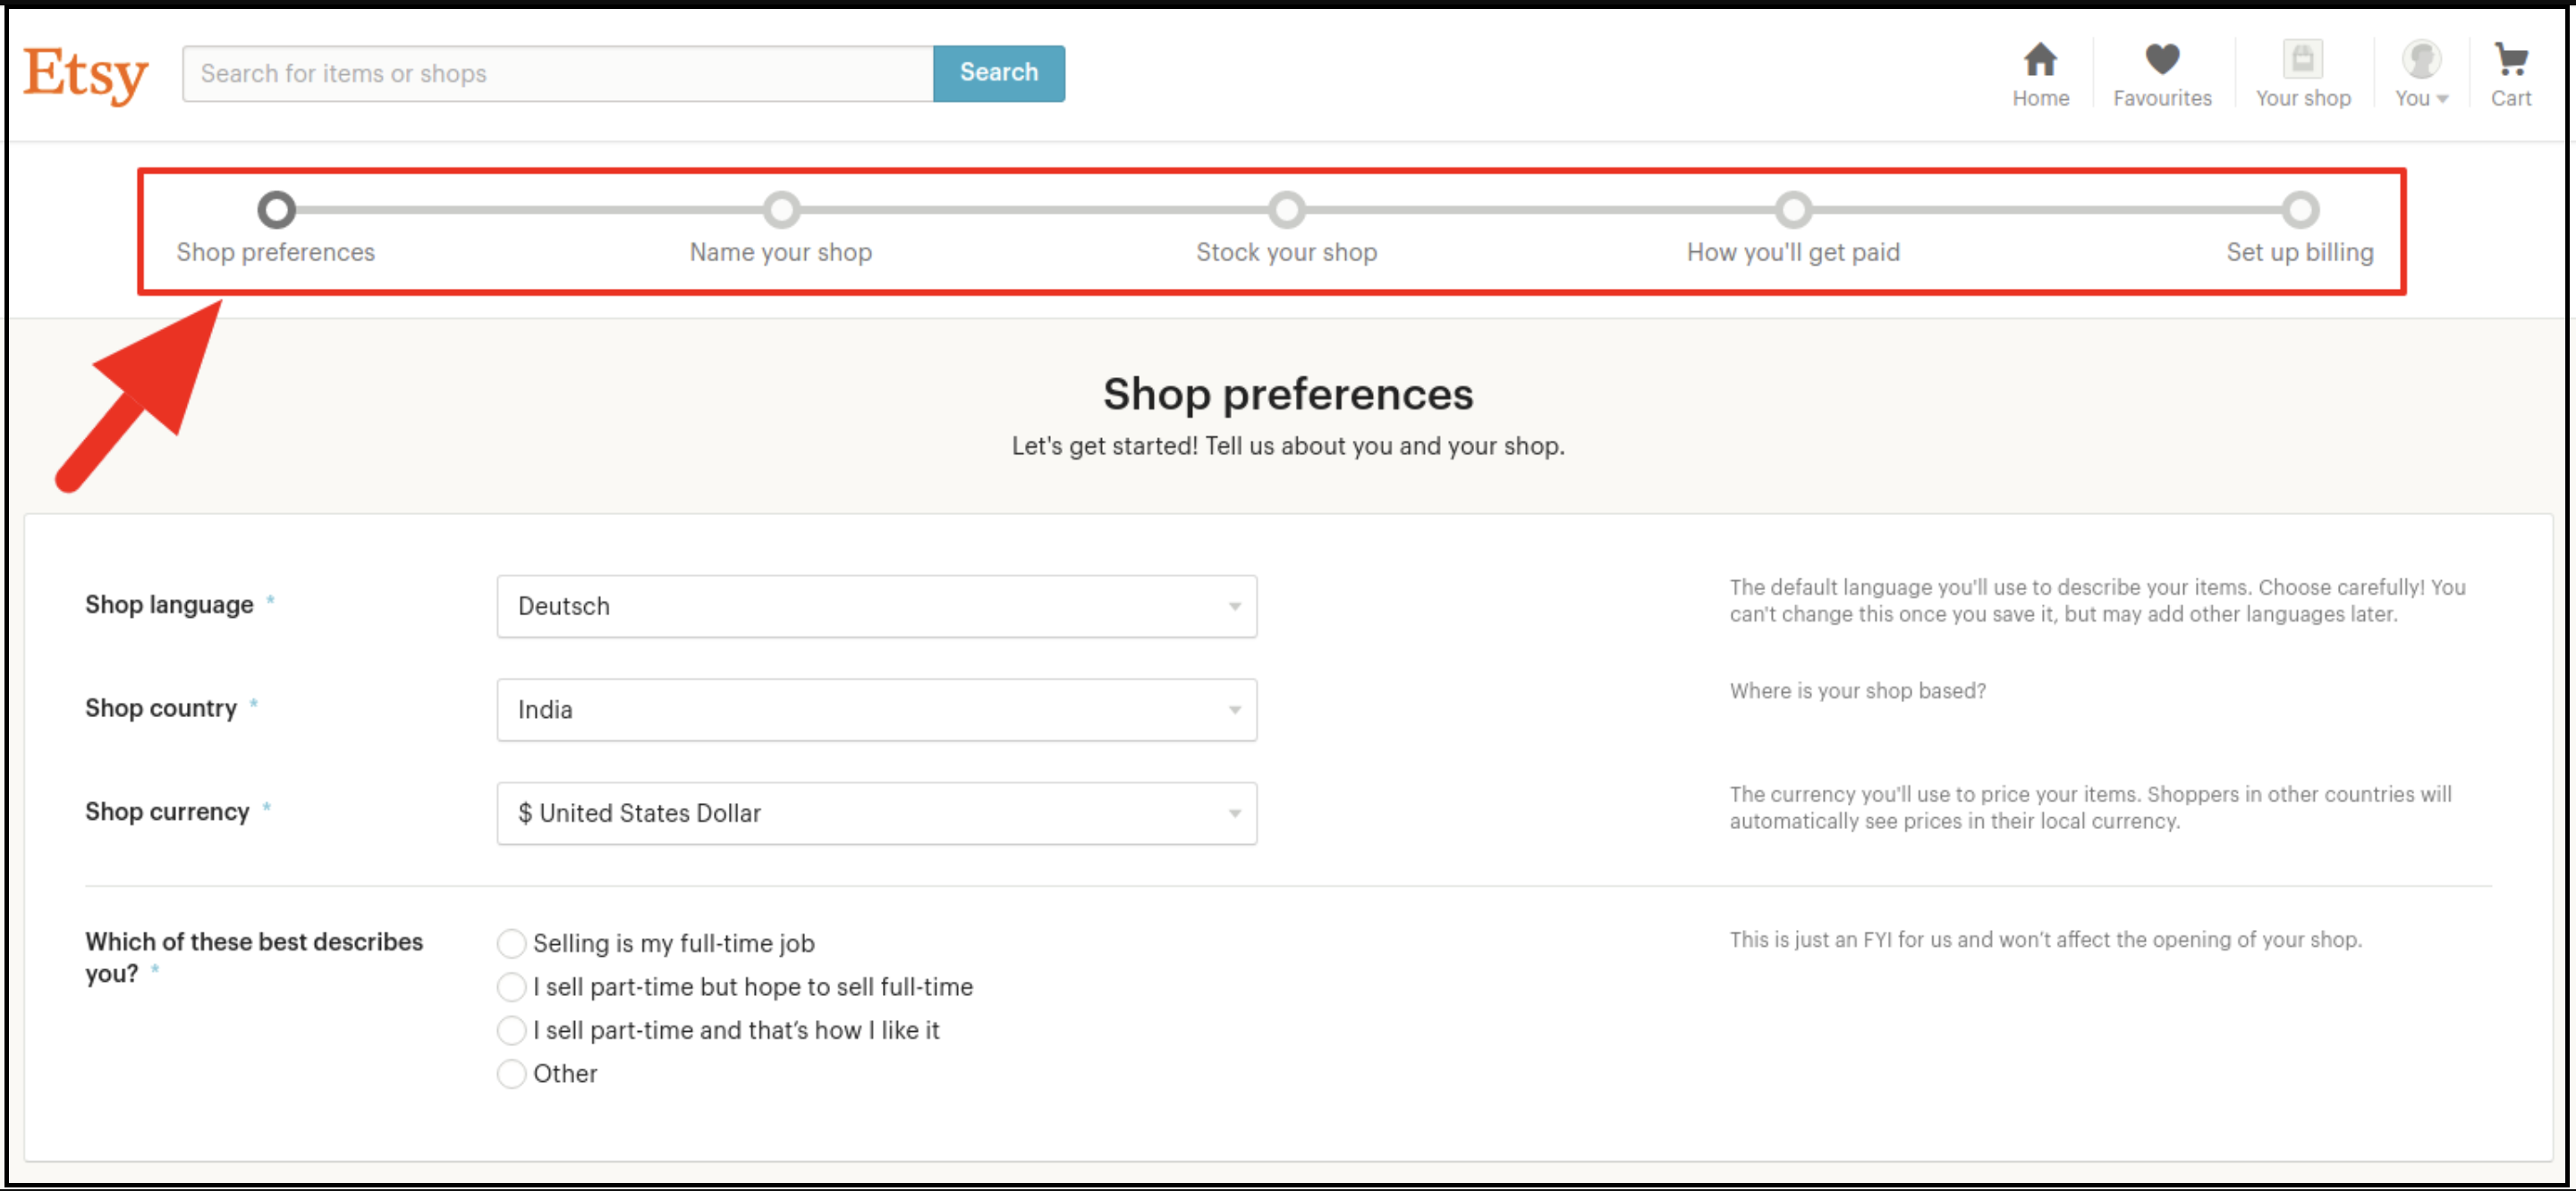
Now, it would also redirect you to another page as shown below.
Now, it is asking to set up your shop preferences. Further, complete all the highlighted sections. For instance, Shop Preferences and Name your shop, Stock your shop, How you will get paid, and Set up Billing.
5.0 Etsy Marketplace Integration- Setup an App
To start communication between Prestashop Store and Etsy Seller Account, you need to create an App on Etsy Marketplace. Further, the following are the steps to create an App on Etsy –
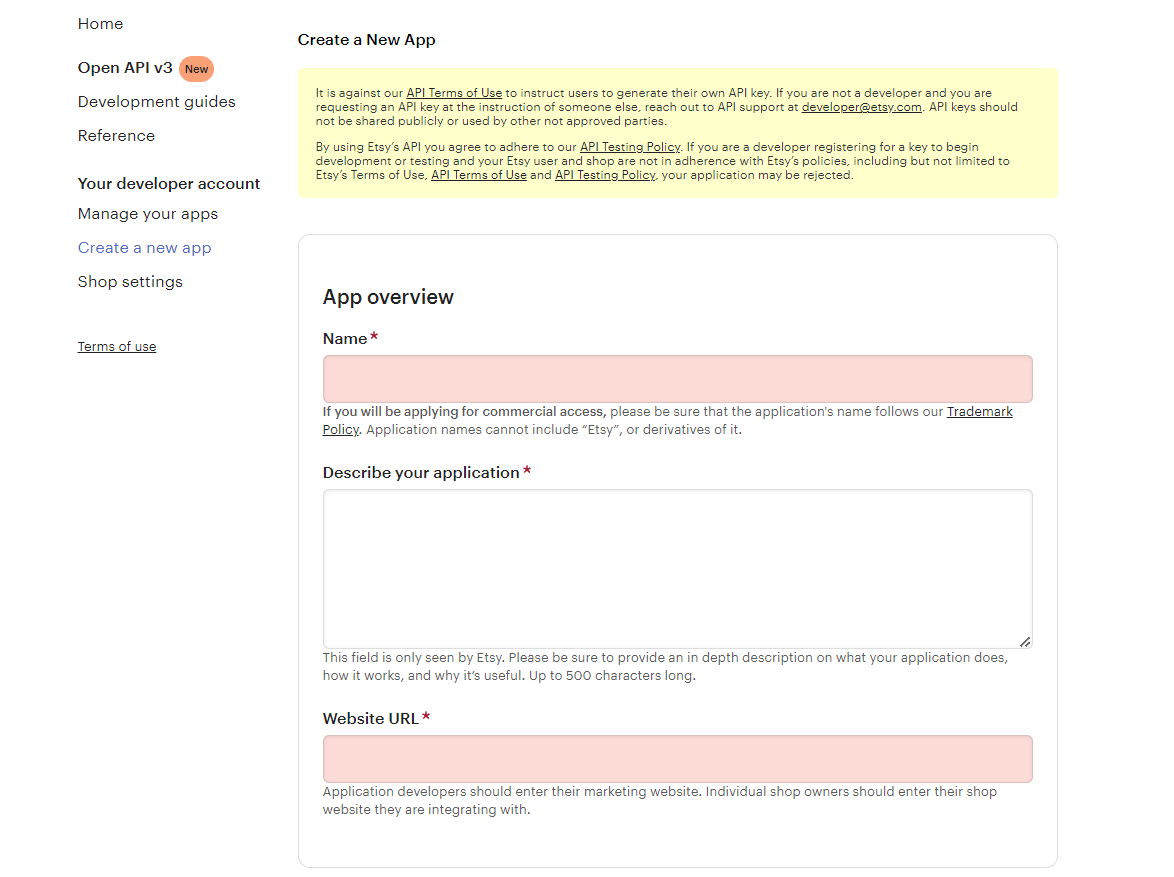
It would open a page where a form will be shown with a few input fields as shown below.
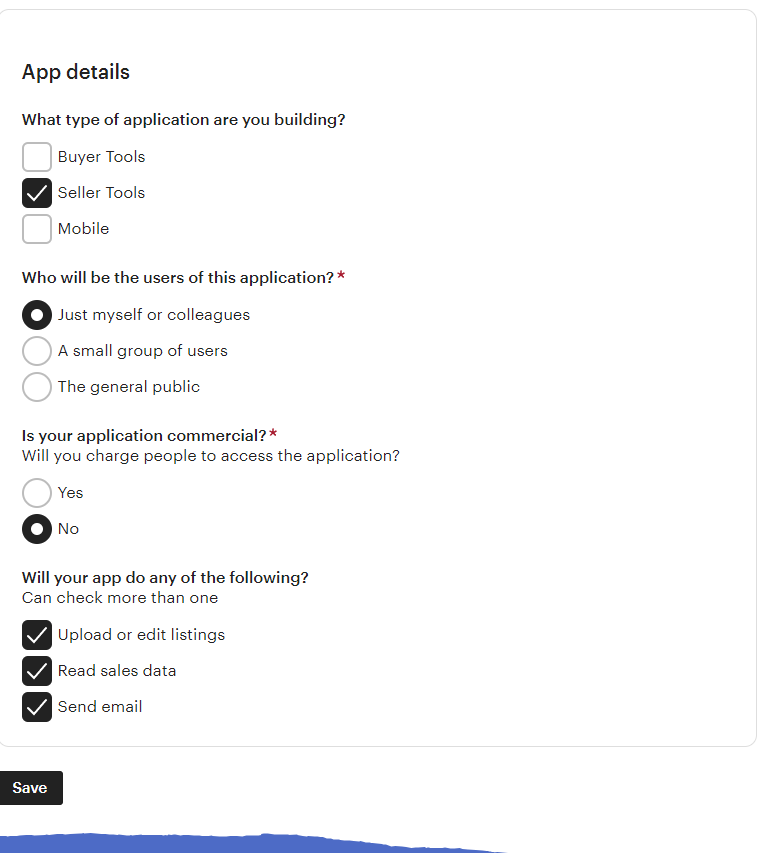
Fill up the form and click on “Read Terms and Create App”. Further, please make sure that you left the “Inventory Management Compatibility” checkbox is checked.
It would ask to accept “terms and conditions”. In fact, accept and click on the “Create App” button.
It would register your App on Etsy Marketplace and provide API details.
Once you successfully created the API, add the callback URL.
Click on the name of your App
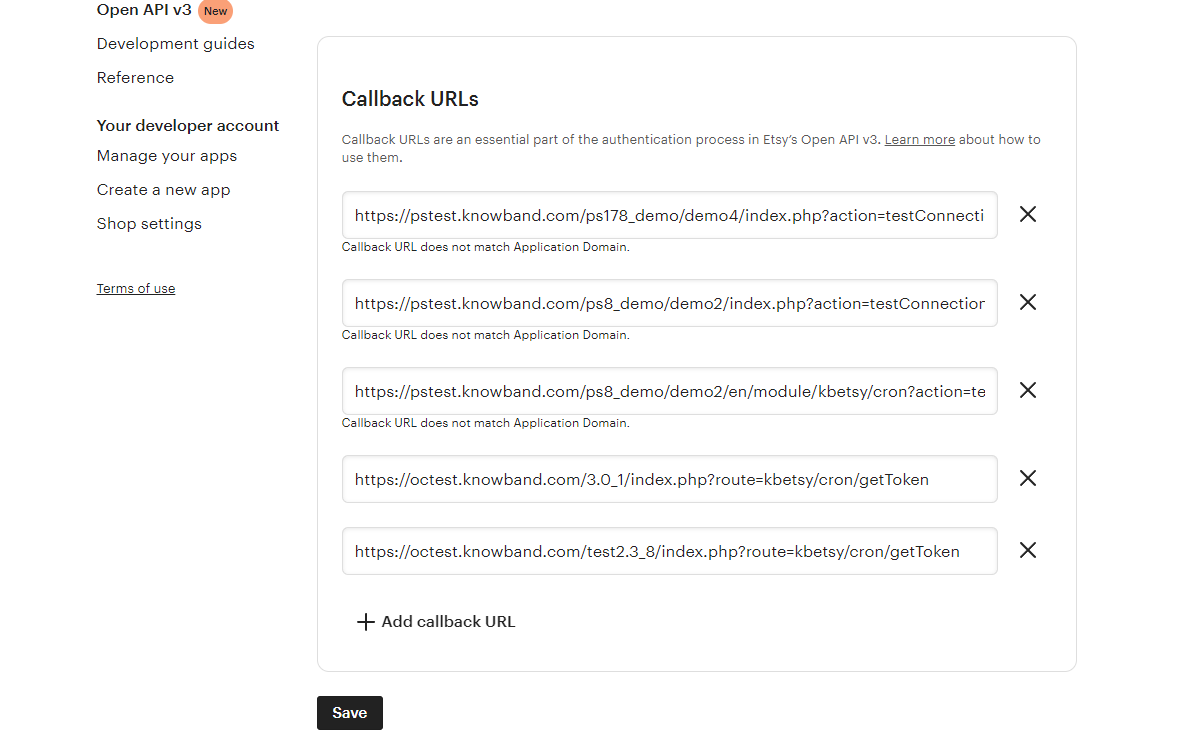
Click on edit your callback URLs. After clicking on the following button, the page shown in the image will appear.
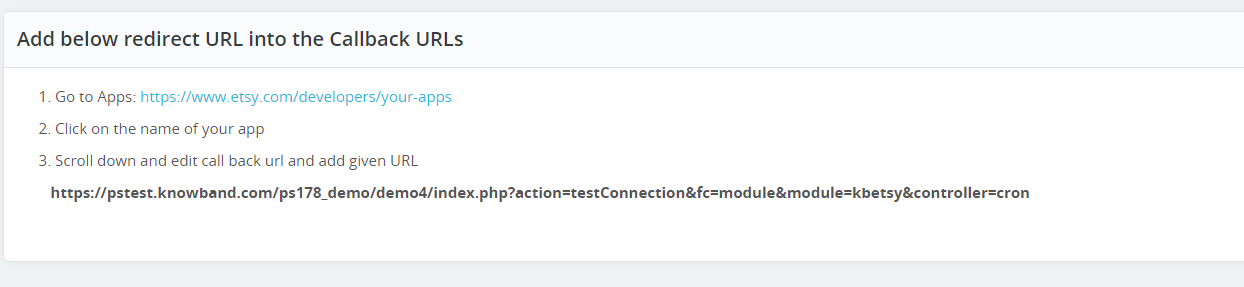
For finding the callback URL, please refer to the general setting section of our Prestashop Etsy Marketplace module. Copy the shown URL in the below image and paste the same on Etsy.
Click on the save button.
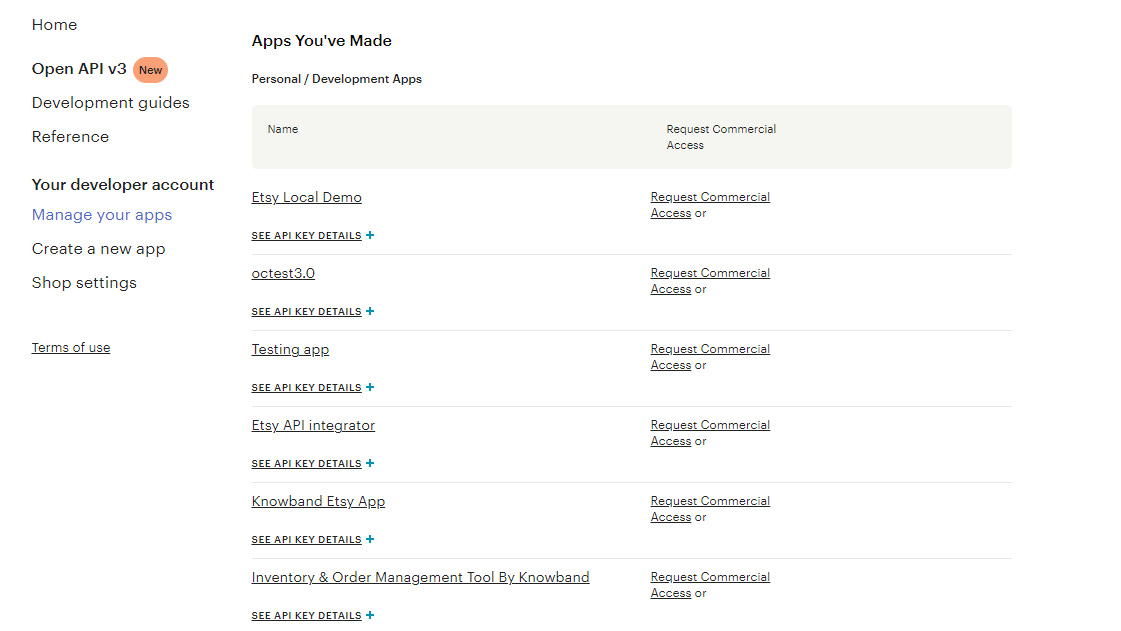
After saving the data, you will find the API page, where you can manage all of your Etsy Apps.
6.0 Admin Interface
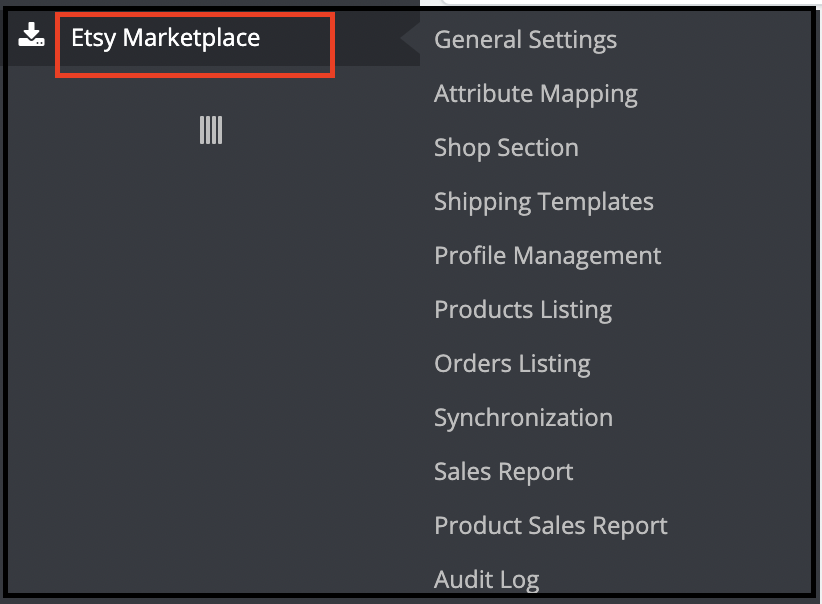
This Prestashop Etsy Integration addon is configurable. Moreover, the configuration settings can be updated via the admin interface. Further, after installation, store admin can find a menu named “Etsy Marketplace” in the left panel of Admin as shown below –
“Etsy Marketplace integration addon” menu contains the following options –
General Settings
Attribute Mapping
Shop Section
Shipping Templates
Profile Management
Products Listing
[New]Return Policy
Orders Listing
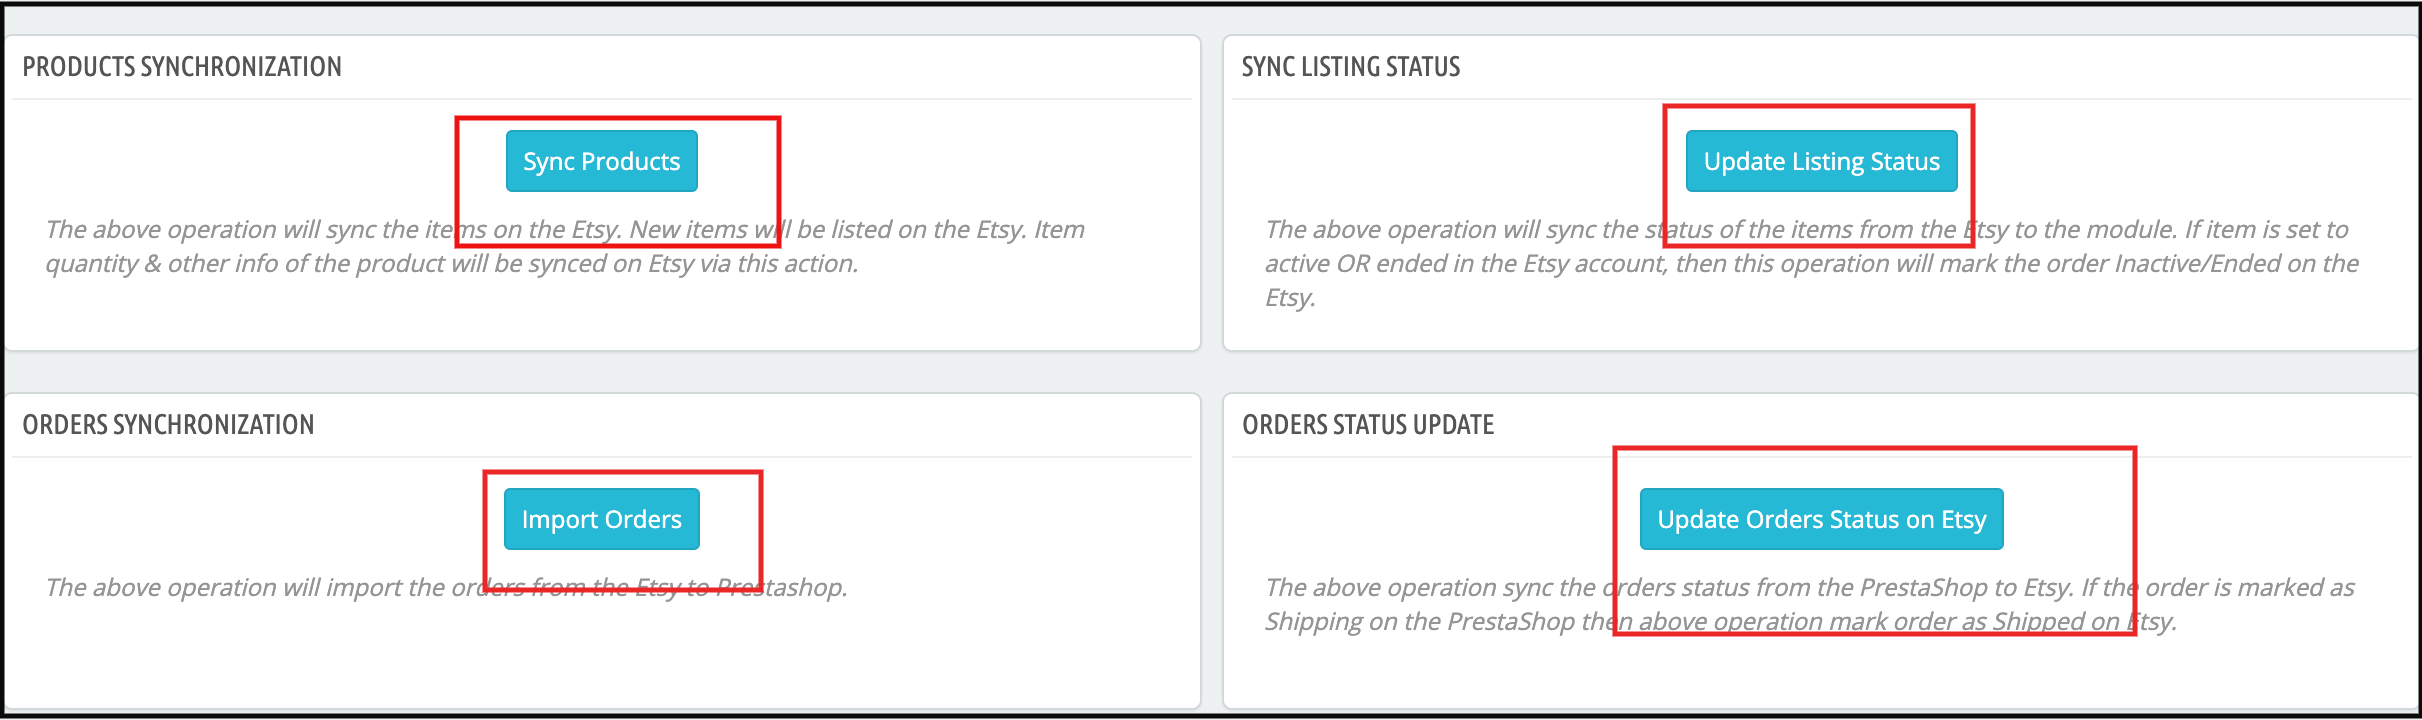
Synchronization
Sales Report
Product Sales Report
Audit Log
Each tab is explained below.
6.1 General Settings
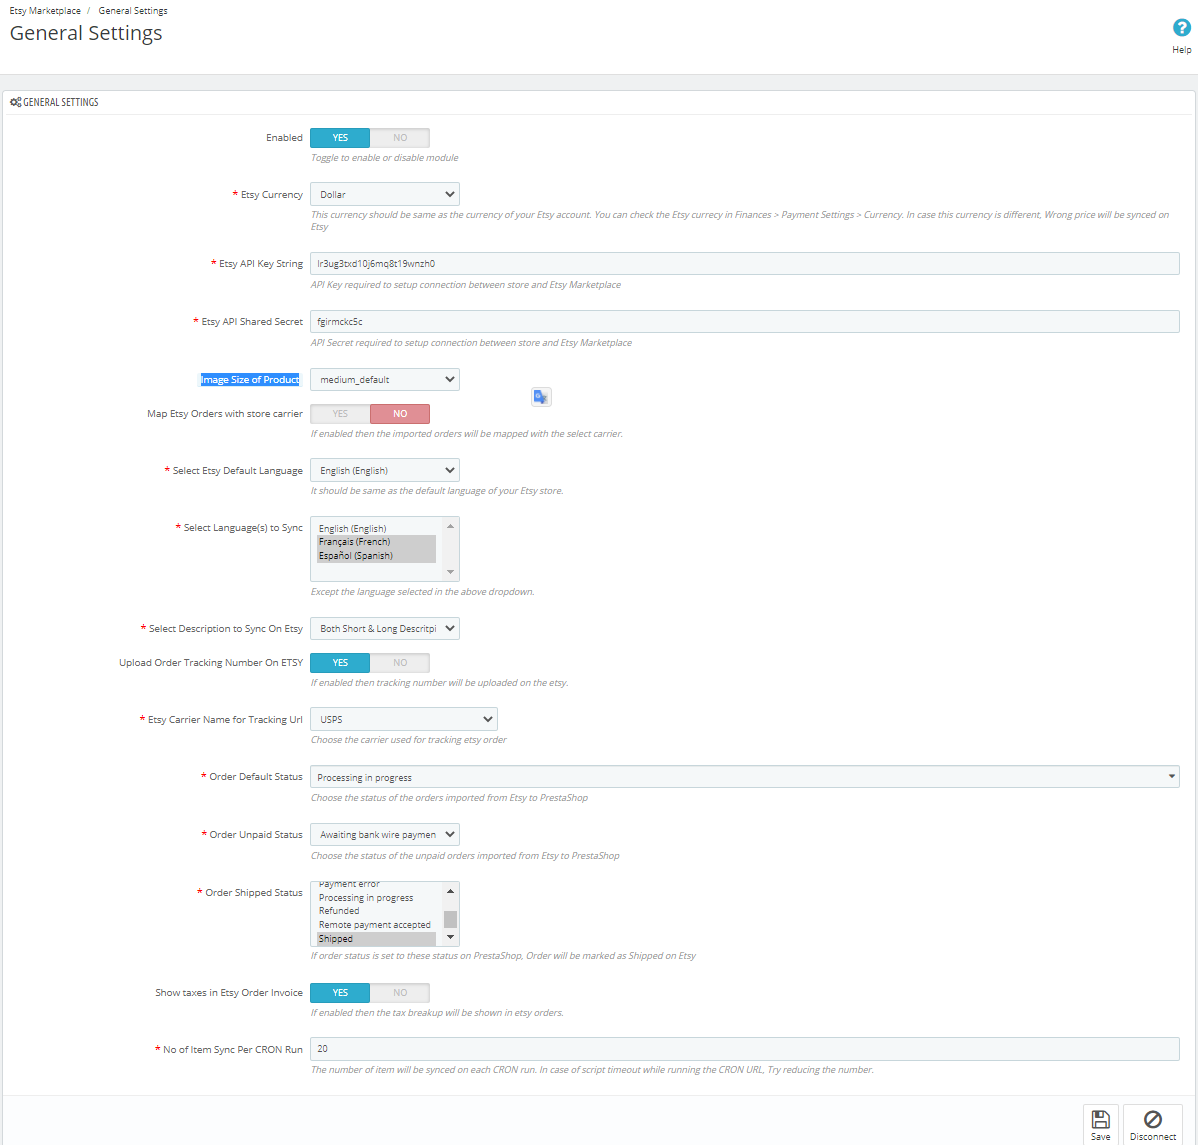
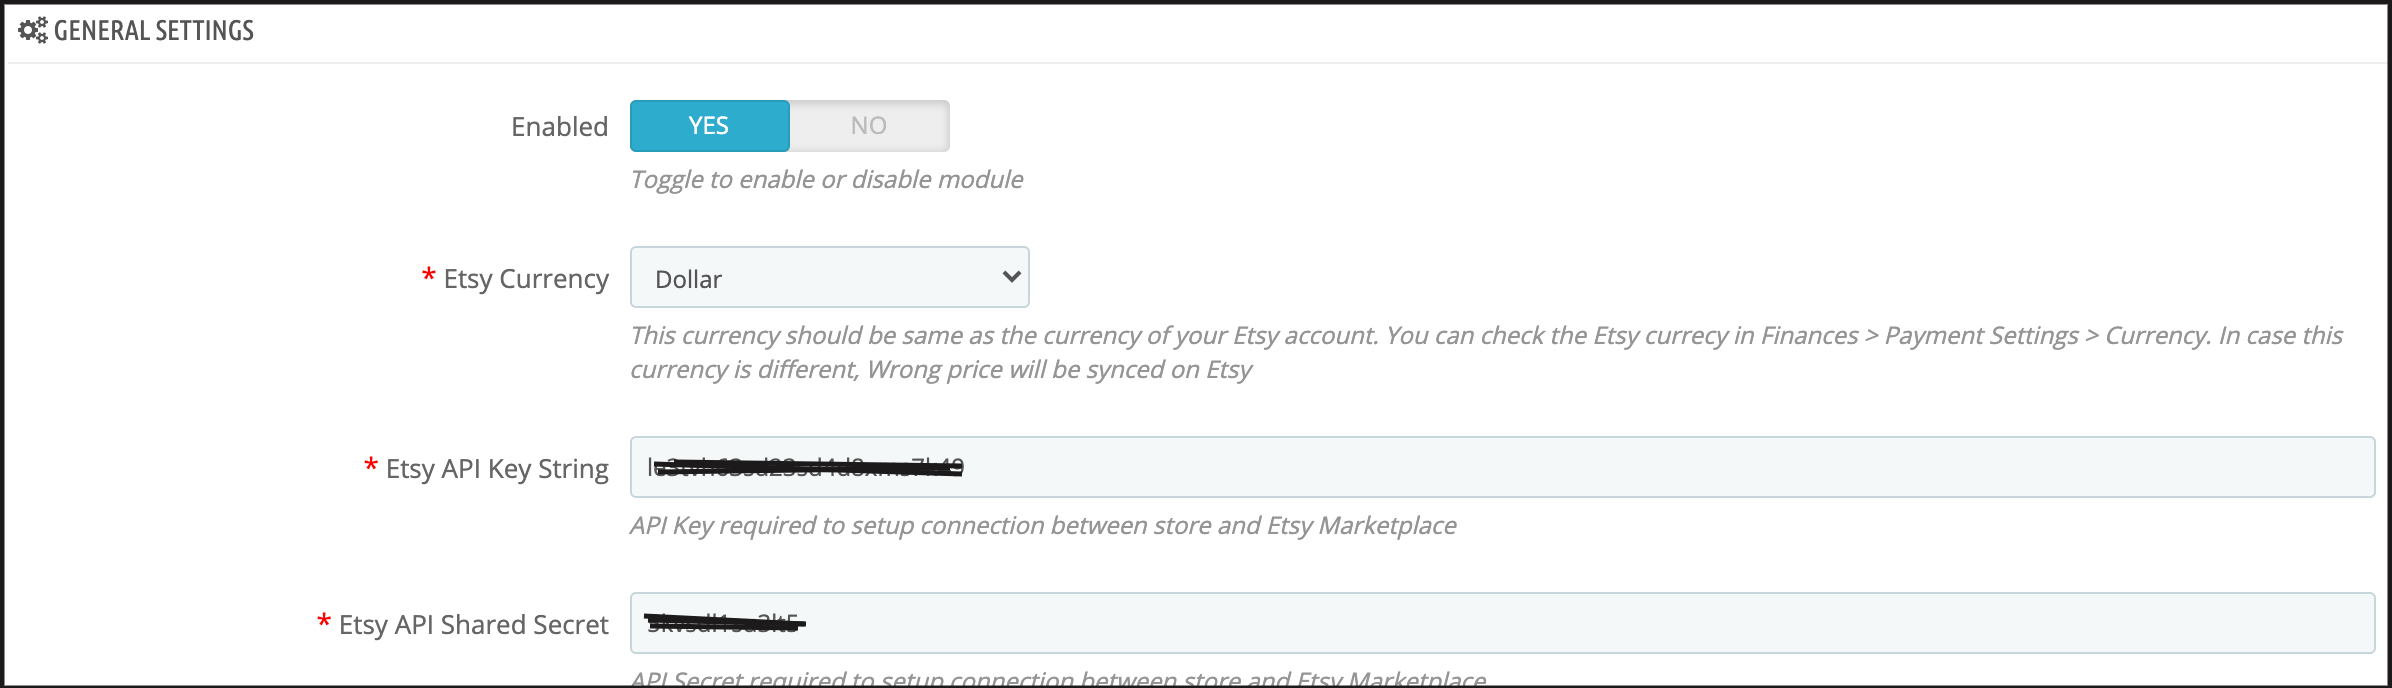
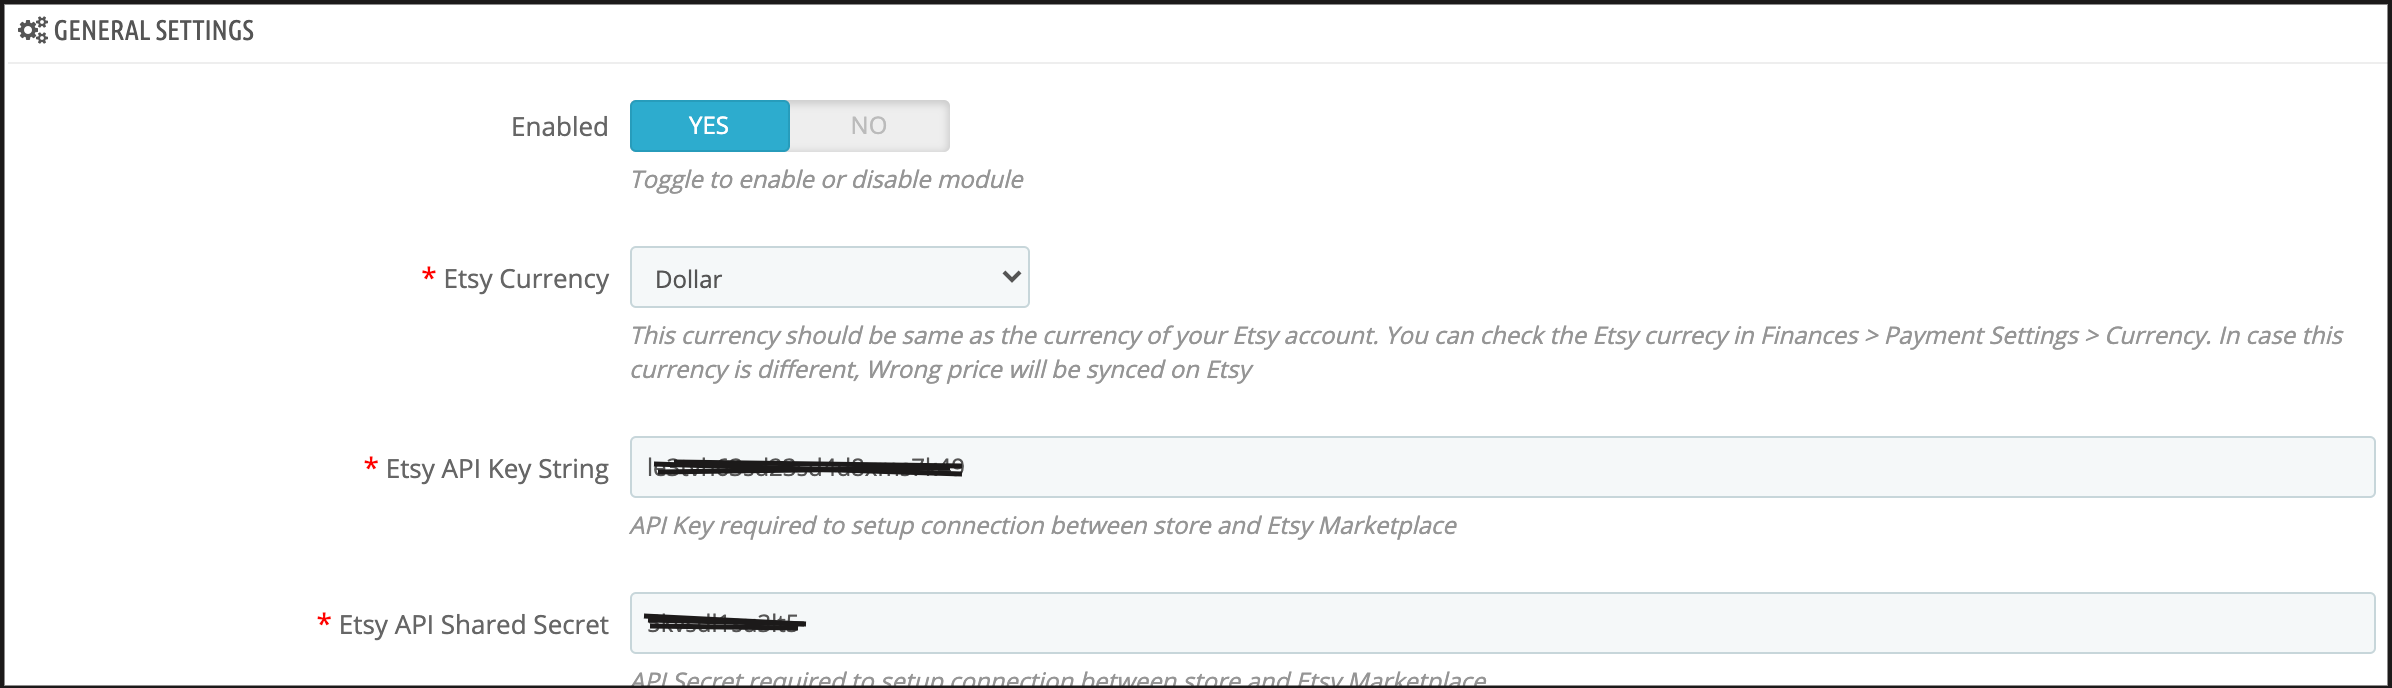
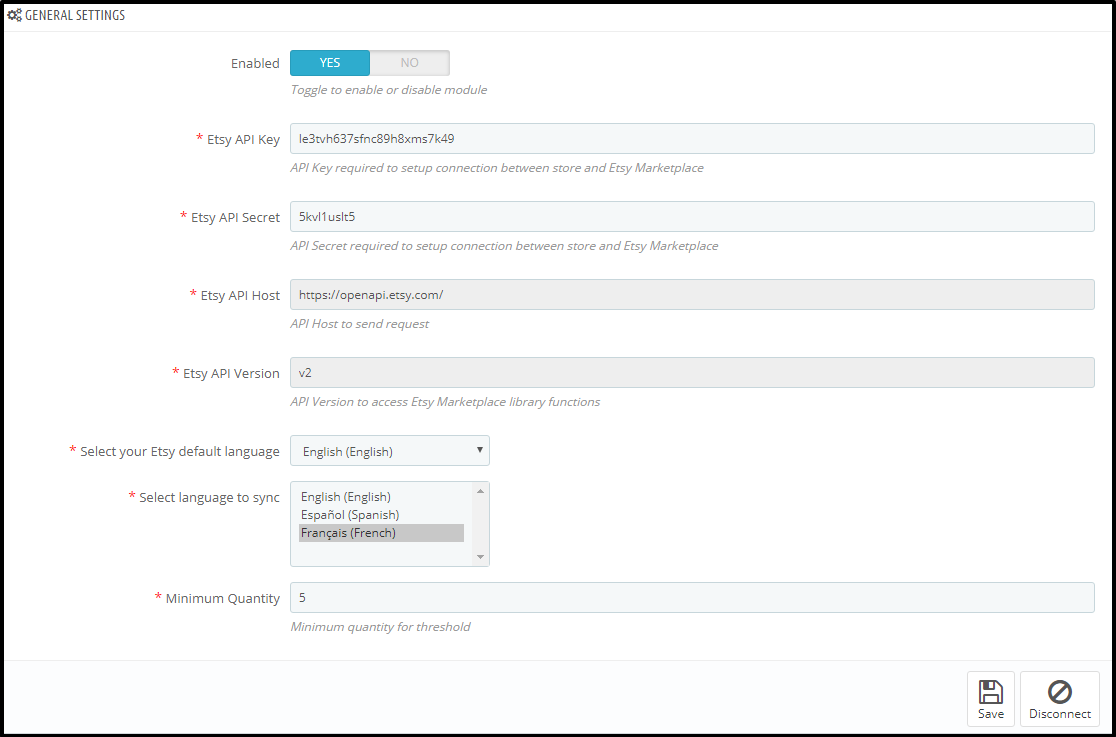
The General Settings tab of the Prestashop Etsy API integrator is there for capturing details. Further, of Etsy Prestashop Marketplace API like API Key, Host, etc. Please find the description of each input field below –
1. Enabled
Admin can Enable/Disable this Etsy Prestashop API integration module by the toggling button. If enabled, the Prestashop Etsy connector and all its settings will be working. Further, otherwise, there will be no impact of this module on the store.
2. Etsy Currency
This is a drop-down where the admin has to choose the appropriate currency. Further, for their which is similar to their Etsy Account.
3. Etsy API Key
This is a text box in which the admin has to enter Etsy API Key. Furthermore, which will authenticate the connection being established between the store and Etsy.
4. Image Size of Product
This feature allows the admin to select the size of the product image. Further, that will sync to Etsy Marketplace from PrestaShop.
5. Etsy API Secret
This is a text box in which the admin has to enter Etsy API Secret Key mandatory for authentication. Furthermore, between the Prestashop store and Etsy Marketplace.
6. Map Etsy Orders with Store Carrier
If enabled then the imported orders will be mappable with the select carrier.
7. Select Shipping Methods for Etsy orders
Store admin can select the shipping methods for Etsy Orders from the given list.
8. Etsy Default Language
The Etsy Prestashop Integration module allows the store admin to select the default language of the store.
9. Select Language to Sync
Admin can select the secondary languages to sync with Etsy Marketplace.
10. Select the Description type to sync on Etsy
This option enables Etsy sellers to the long description and short descriptions. In fact, or both they want to sync with the marketplace. Furthermore, they can select any one option from the descriptions that will sync according to the selection.
11. Upload the Order Tracking Number On Etsy
If enabled then the store admin can add the tracking number on orders and it will be uploaded on Etsy.
12. Etsy Carrier Name for Tracking Url
Store admin can choose the carrier used for tracking Etsy orders.
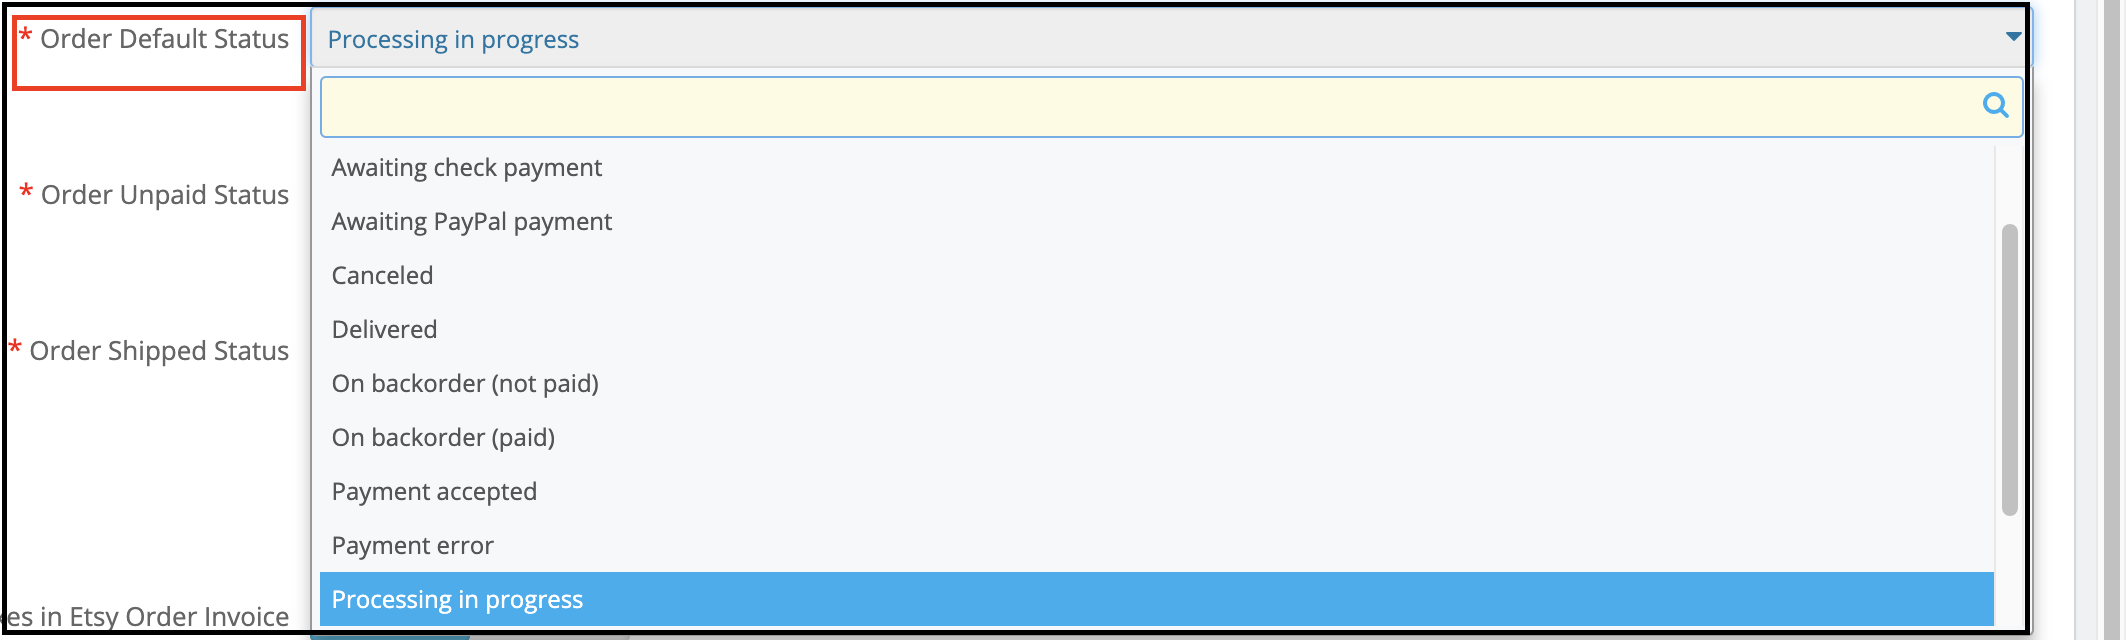
13. Order Default Status
This is a drop-down menu. Moreover, the admin has to choose order default status for orders imported from Etsy to PrestaShop.
14. Order Unpaid Status
This is a drop-down menu. Moreover, the admin has to choose order unpaid status imported for orders imported from Etsy to PrestaShop.
15. Order Shipped Status
This is a drop-down menu and the admin has to choose order shipped status for orders imported. In addition, if the order status is set to this status the orders will be marked as shipped on Etsy.
16. Show taxes in Etsy Order Invoice
If enabled then the tax breakup will be shown in Etsy orders.
17. No. of Items sync per cron
This is a text box and the admin has to define several items that he wants to sync per cron.
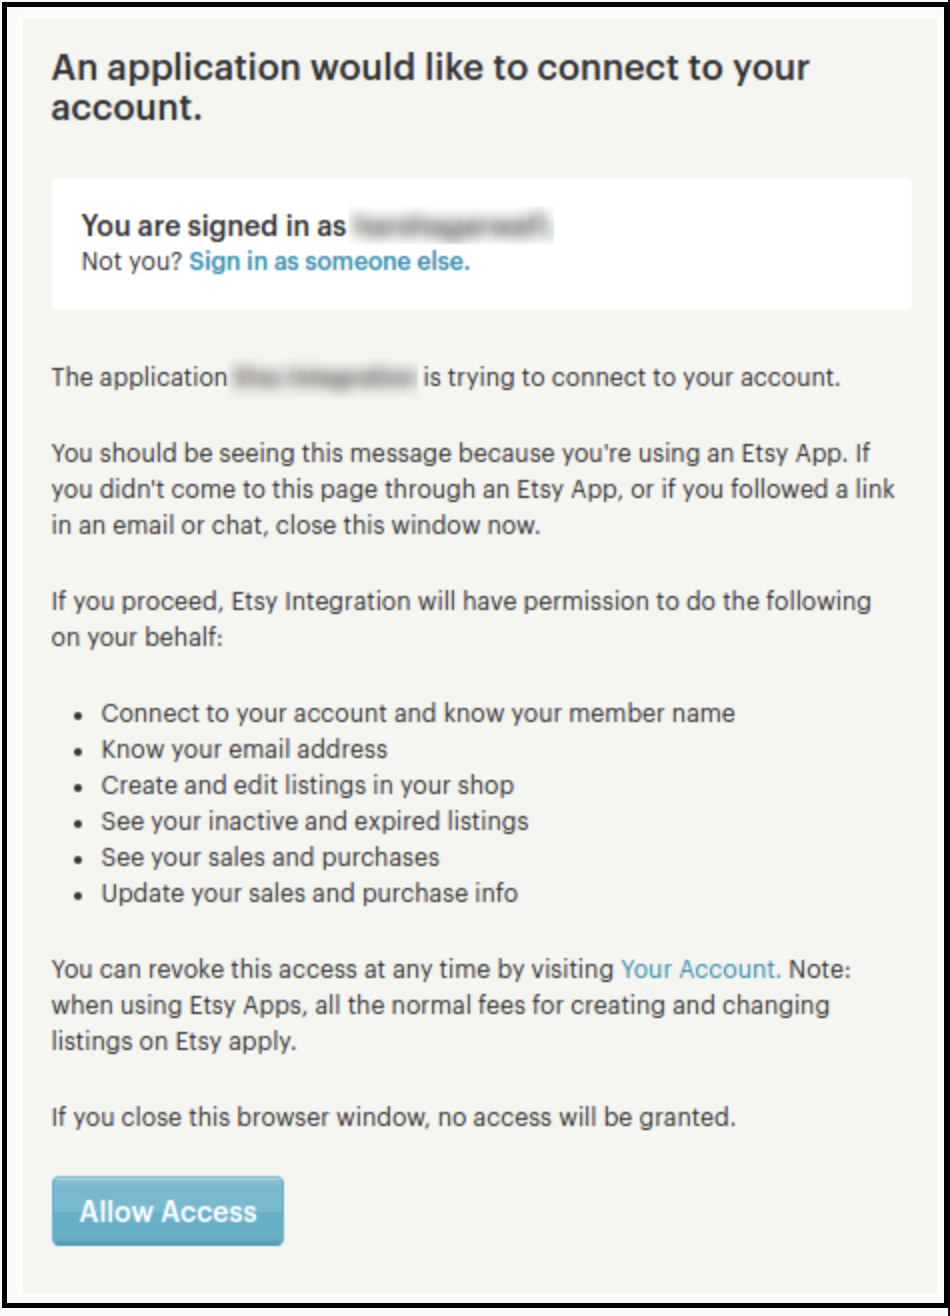
After providing these details or filling up the form, click on the “Connect” button. In fact, it would redirect admin to Etsy Marketplace to allow the App Access to the store. Furthermore, click on the “Allow Access” button as shown below. Moreover, it would establish a connection between the store and Etsy Marketplace.
It would also redirect admin back to the same page of “General Settings”. In addition, show the “Disconnect” button instead of “Connect” as the connection has now been set up with Etsy Marketplace. In fact, you can find the screenshot below –
6.2 Attribute Mapping
All the PrestaShop store attributes will sync to the Etsy Marketplace Integration module automatically. Moreover, the admin just needs to map these attributes to the Etsy Marketplace attributes.
6.3 Shop Section
The shop section option offered by the Prestashop Etsy API integrator enables the e-merchants to create separate sections. Further, for the products of the same type. For instance, they can create sections like fashion, sports, and others. In fact, the customers can hit the section of their choice. Moreover, directly land on the products of their choice without browsing the entire assortment.
6.3.1 How to create new shop sections?
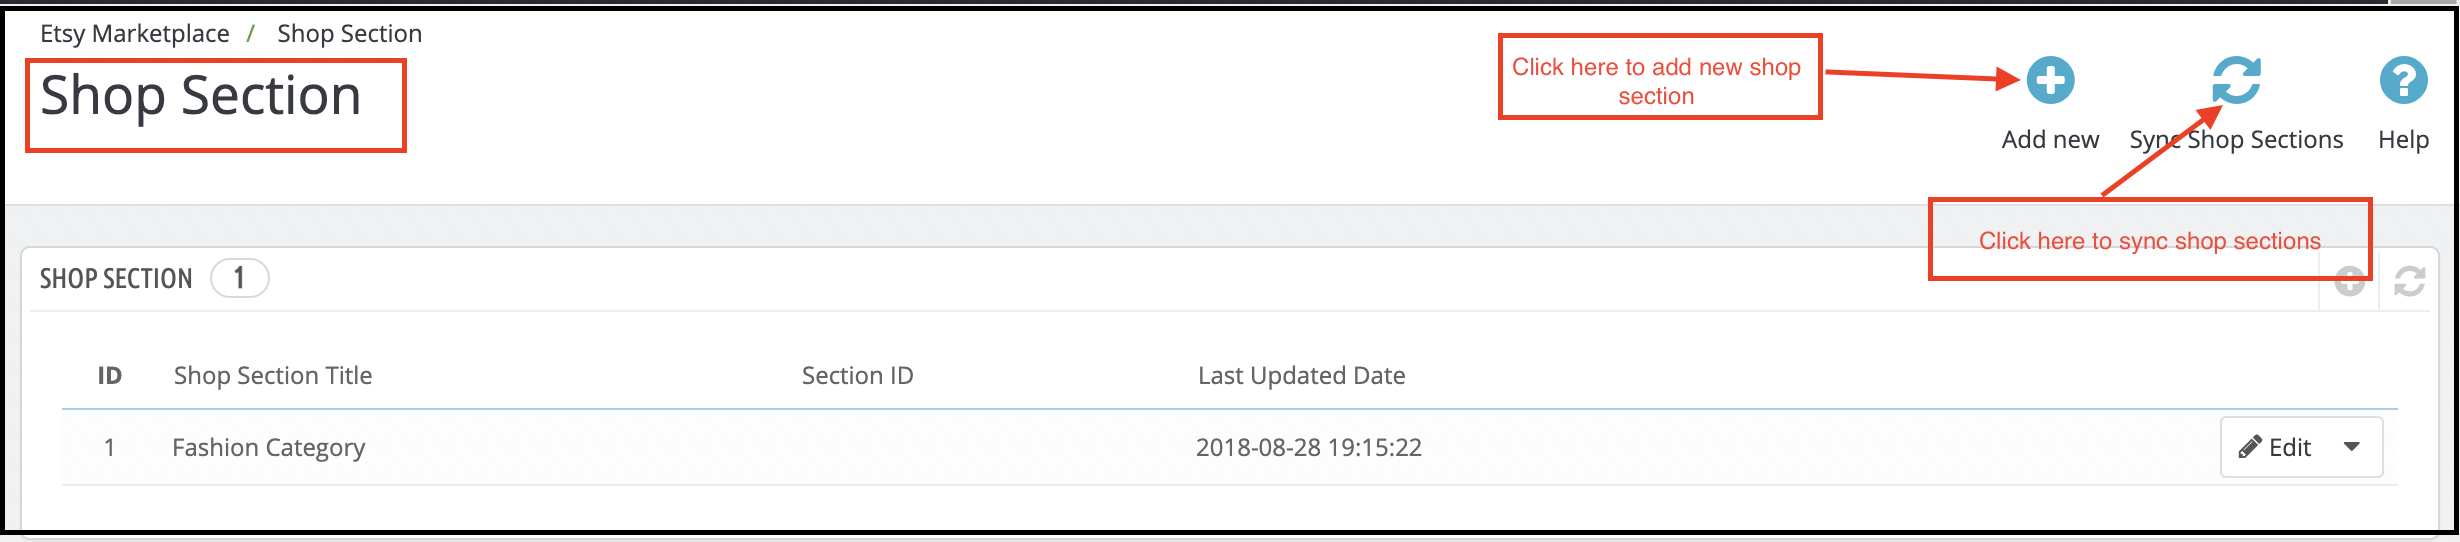
To add new shop sections, click on the Add New option at the top right position of the admin interface.
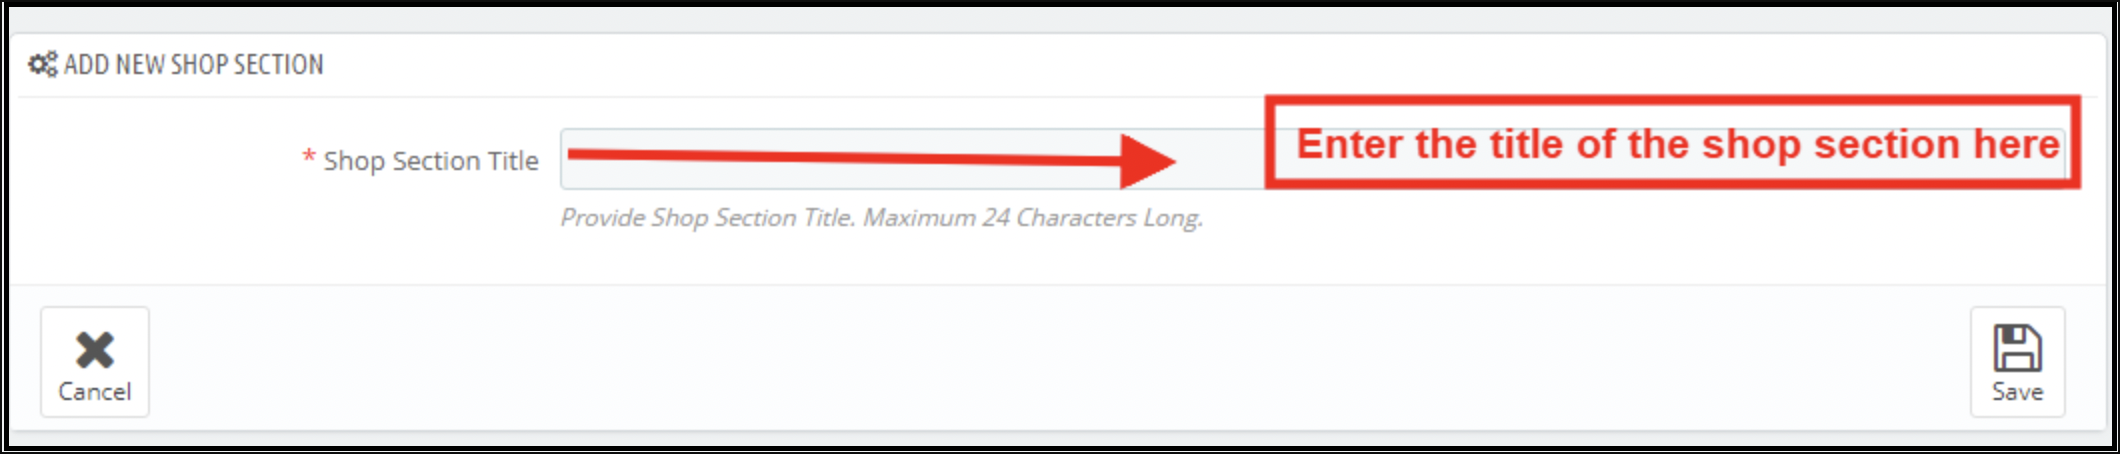
This will redirect you to the shop section creation interface.
Enter the name of the shop section in ‘Shop Section Title’ and save the changes.
To sync the section with the marketplace click on the Sync Shop Sections button at the top right corner of the interface. Further, the cron option will sync all the sections in one go.
The synced sections will display in the ‘Profile Management’ tab. Further, the Prestashop Etsy Integrator is shown in the image below.
The admin can select the shop section and the products of that particular profile will list under the selected section.
6.3.2 How to edit or delete the shop sections?
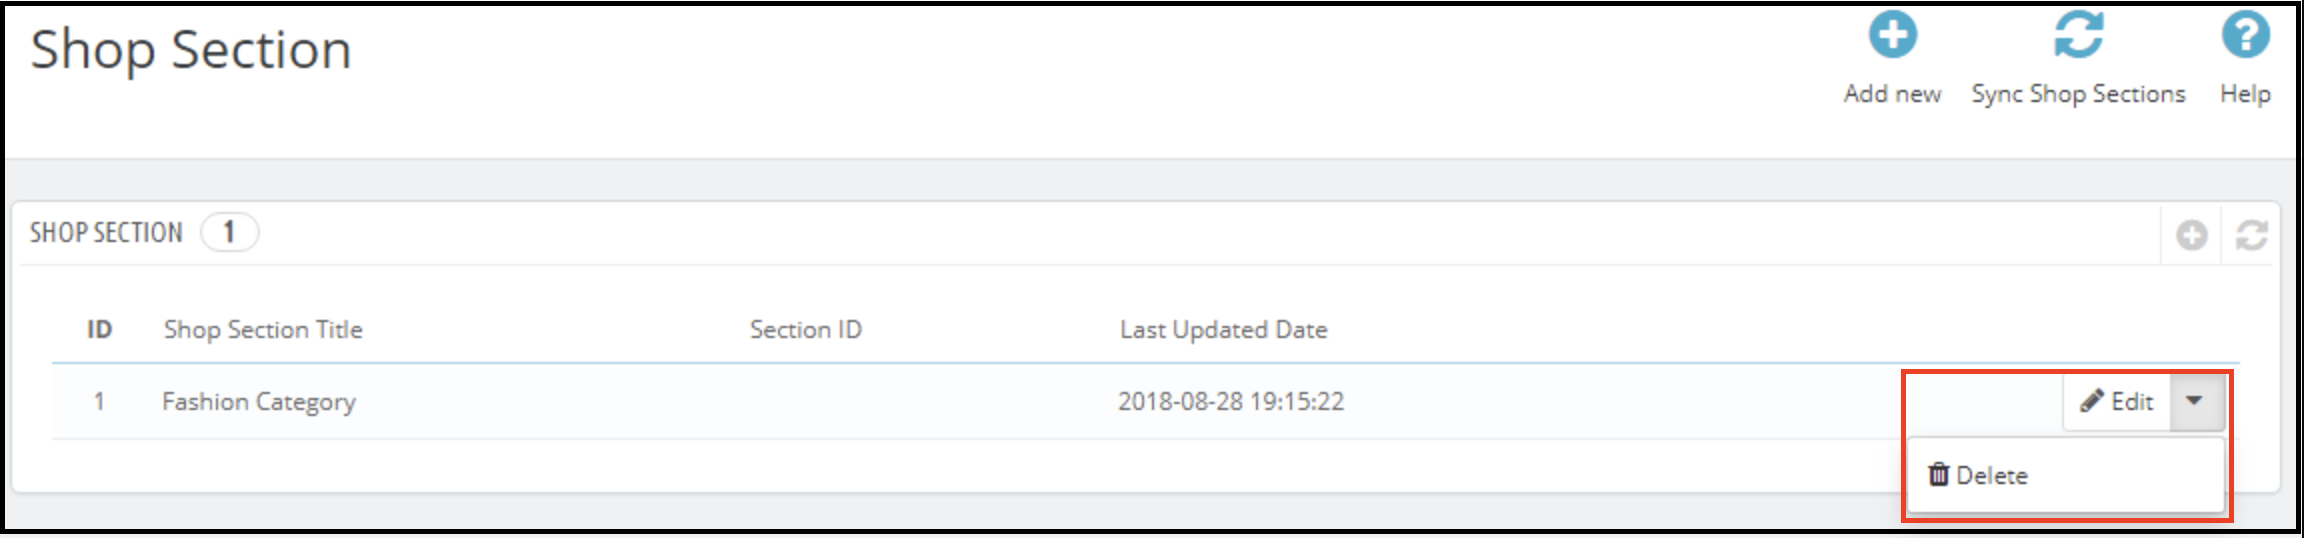
To edit a particular shop section, click on the ‘Edit’ button corresponding to it. Likewise, to remove the same, click on the corresponding ‘Delete’ button.
The created sections will display at the front-end as shown in the image below:
6.4 Shipping Templates
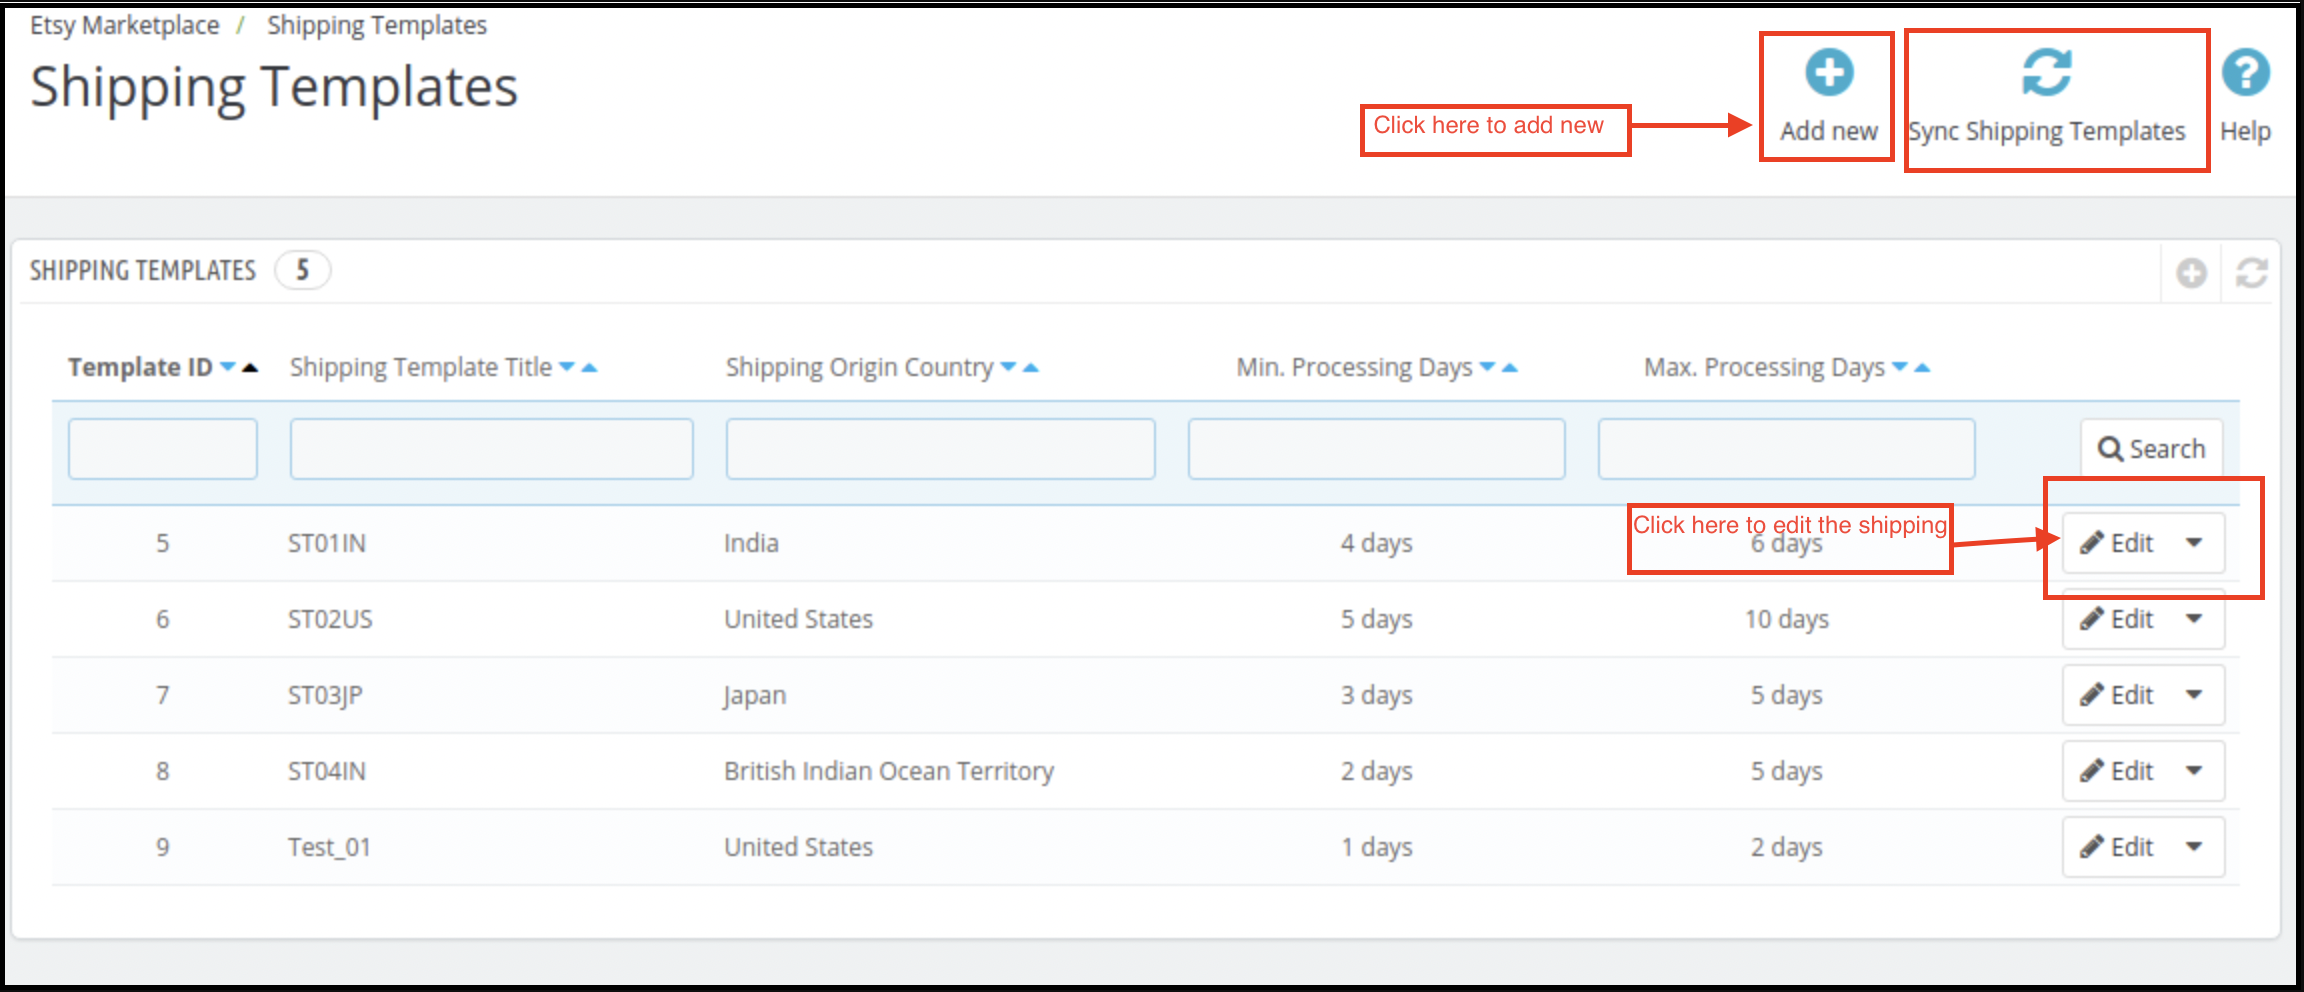
Etsy Prestashop connector allows the store admin to create the Shipping Templates to manage shipping options on the Etsy marketplace. Further, in this tab of the Prestashop Etsy integrator, the admin can create Shipping Templates. Furthermore, that contains shipping details. For instance, Shipping Origin Country, Minimum and maximum processing time for the orders, etc. In fact, the admin can create multiple Shipping Templates as per the need of the system. Further, the admin will have to map Shipping Templates to the Profiles (In Profile Management Tab) to make it work on Etsy Marketplace. This is explained later in this document. Thus, each Shipping Template can have multiple shipping entries. Further, to define shipping destinations and their cost according to the destinations.
Note – One Shipping Template can have one origin. However, multiple destinations with their costs. Further, the admin can add different standard entries and delivery upgrades for the shipping templates.
6.4.1 Steps to Add Shipping Templates
Following are the steps to add a Shipping Template to the system –
Go to the Etsy Marketplace connector addon-> Shipping Templates (Menu Option)
It would display the page where already added Shipping Templates will list (If any). Click on the “+” (Plus Icon – as shown in the above screenshot).
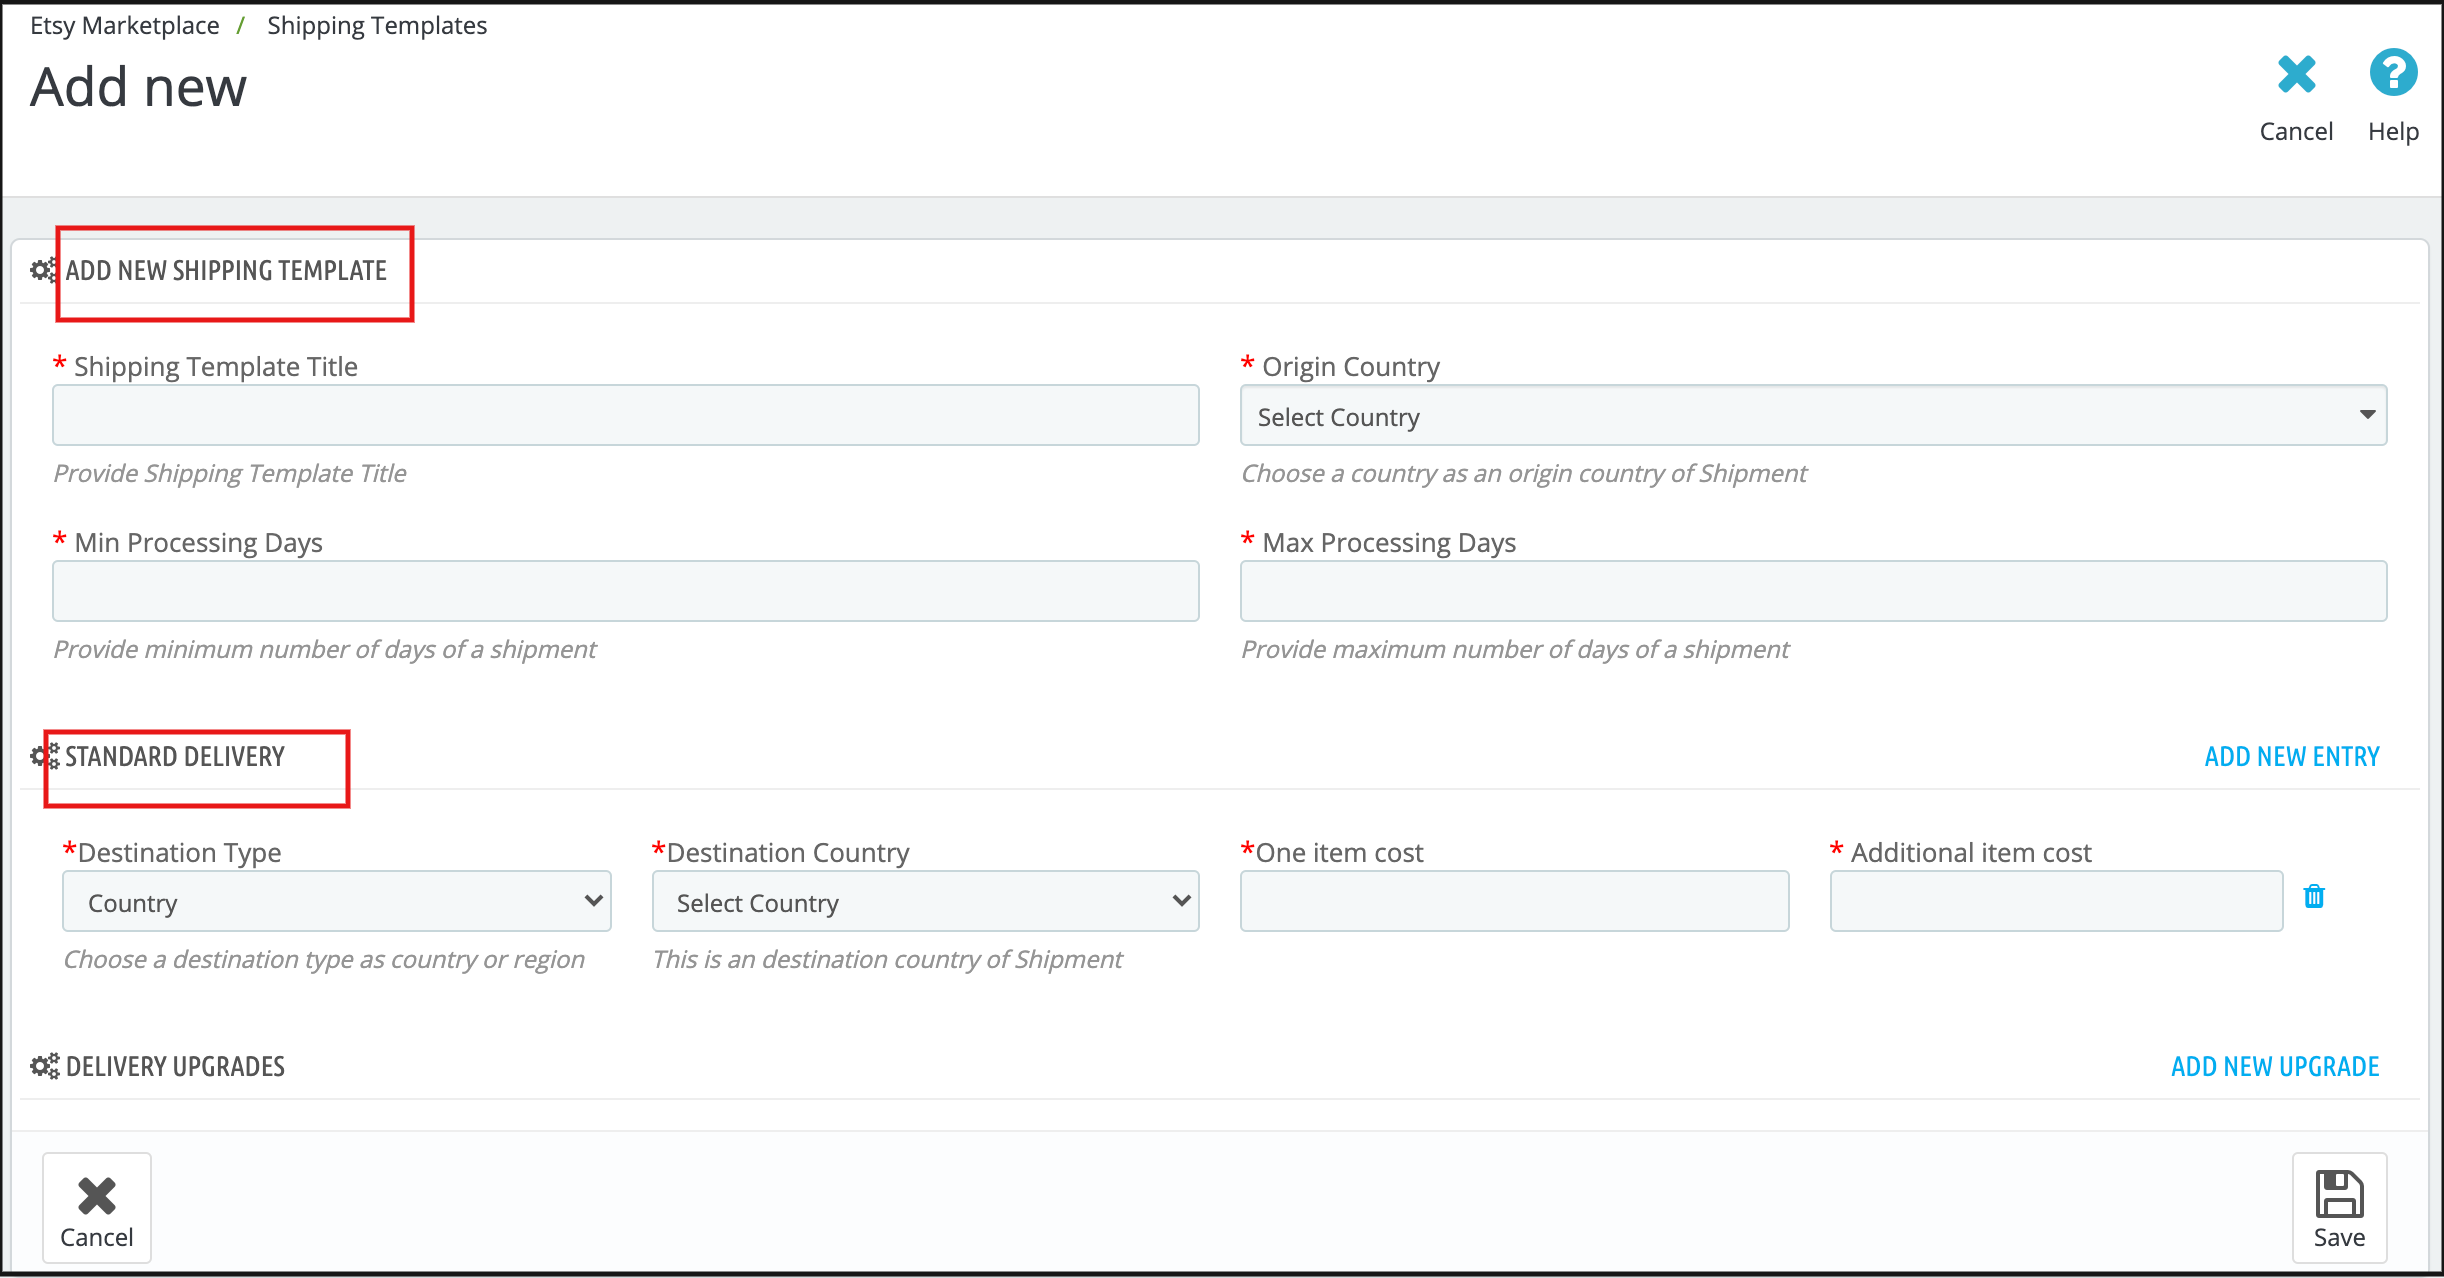
It would redirect the admin to the new page where a form with some input field will be shown (Screenshot is shown below).
Fill up the following input fields of the form –
Shipping Template Title
Origin Country
Origin Post Code
Processing Days (Min and Max)
Destination Type
Destination Country
One Item Cost
Additional Item Cost
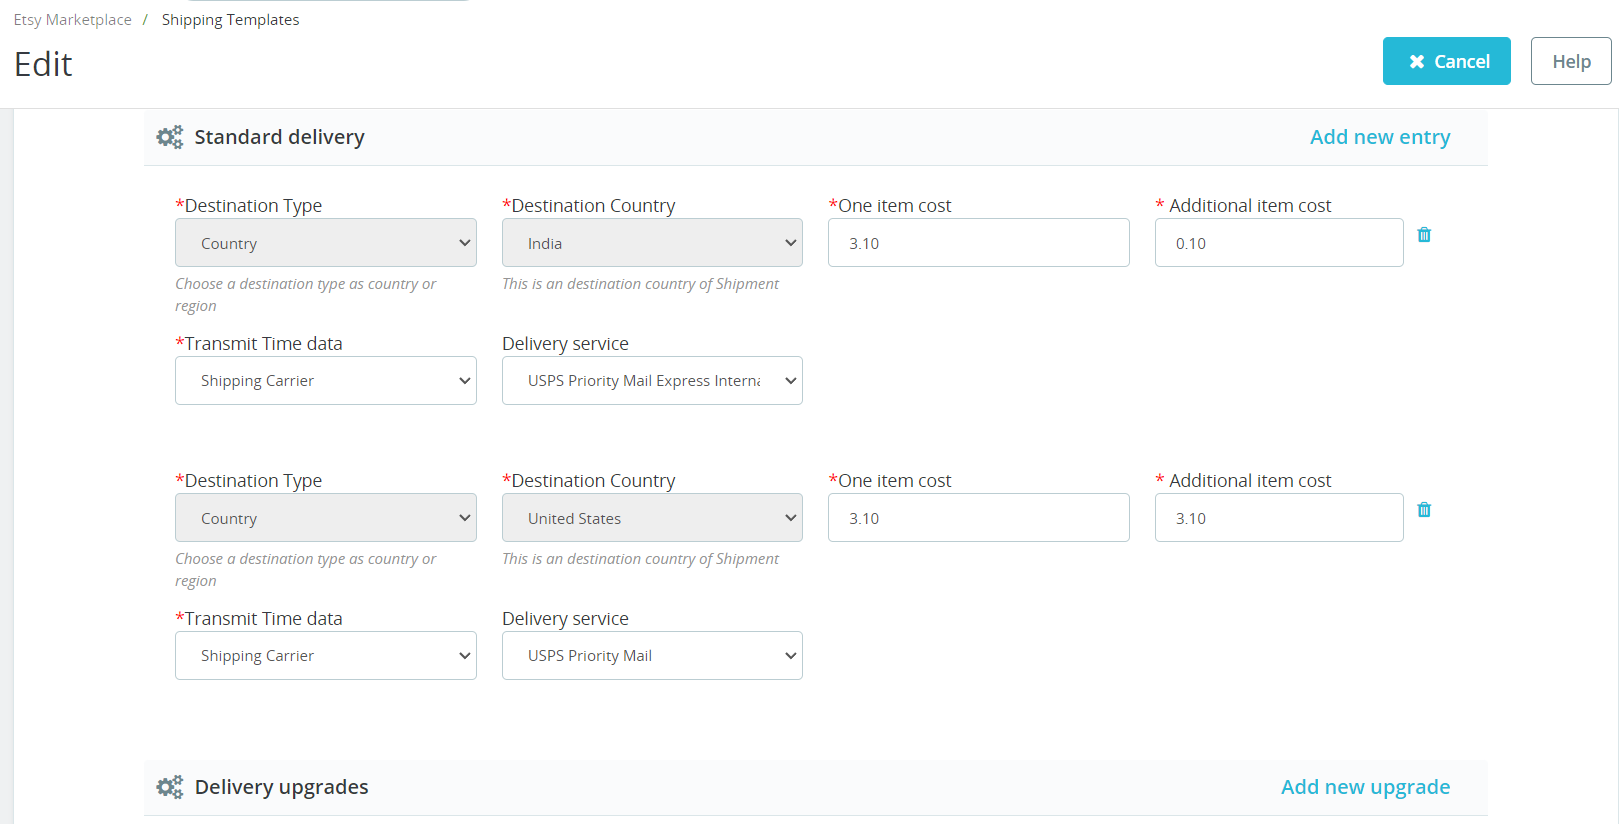
Transmit Time Data (Choose Shipping career or add custom Delivery time.)
Choose Delivery Service (If the previous option is selected as a shipping career).
Or Choose Min and Max Processing days (if the previous option is selected as Delivery time).
Click on the “Save” button.
It would validate the provided data and save the details into the system if valid.
6.4.2 Steps to Edit/Delete Shipping Template
Following are the steps to edit/delete Shipping Template from the system –
Go to the Prestashop Etsy Marketplace Integration addon-> Shipping Templates (Menu Option)
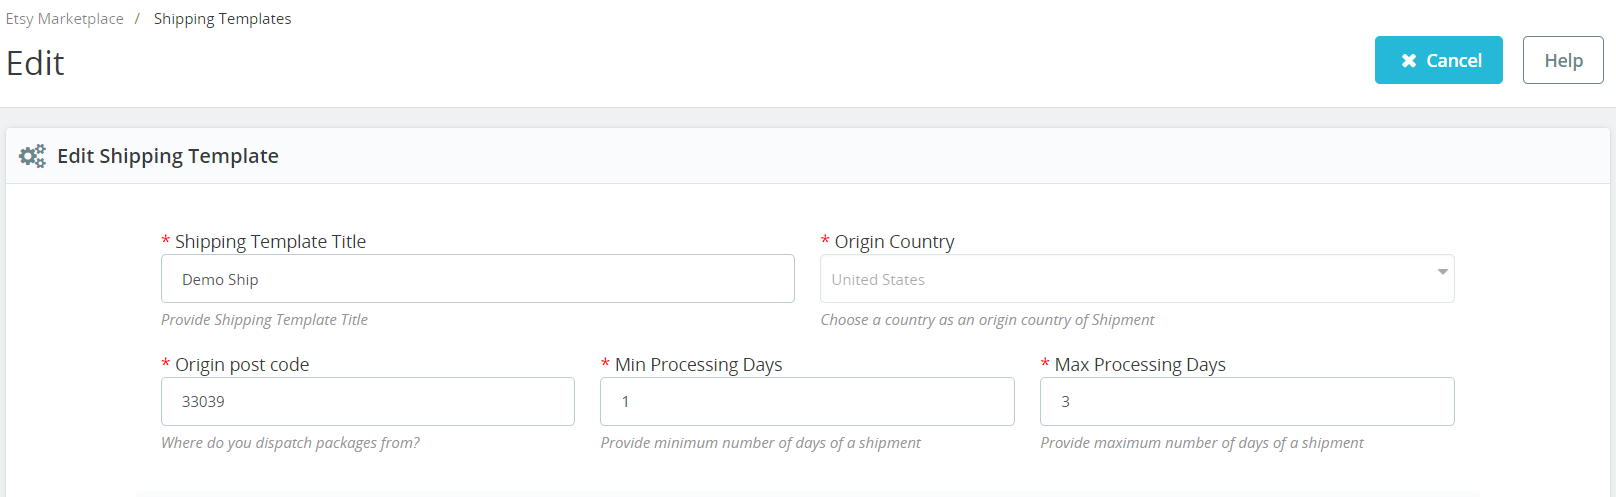
It would display the page where already added Shipping Templates will list (If any). In fact, click on the “Edit/Delete” link given under the drop-down being shown corresponding to each Shipping Template.
If the admin has chosen the “Edit” option then it would redirect the admin to a new page. Further, where a form with an already filled input field will be shown. Admin can simply update values. Moreover, save the details by clicking on the “Save” button.
If the admin has chosen the “Delete” option then it would delete the Shipping Template. In addition, all its Shipping Template Entries are from the system.
After creating shipping templates it is required to synchronize the Shipping Templates. Further, the admin needs to click the “Sync Shipping Templates” button under the “Shipping Templates” tab of the Etsy marketplace integration module. In fact, only after successful synchronization, these shipping templates will appear on the listing page.
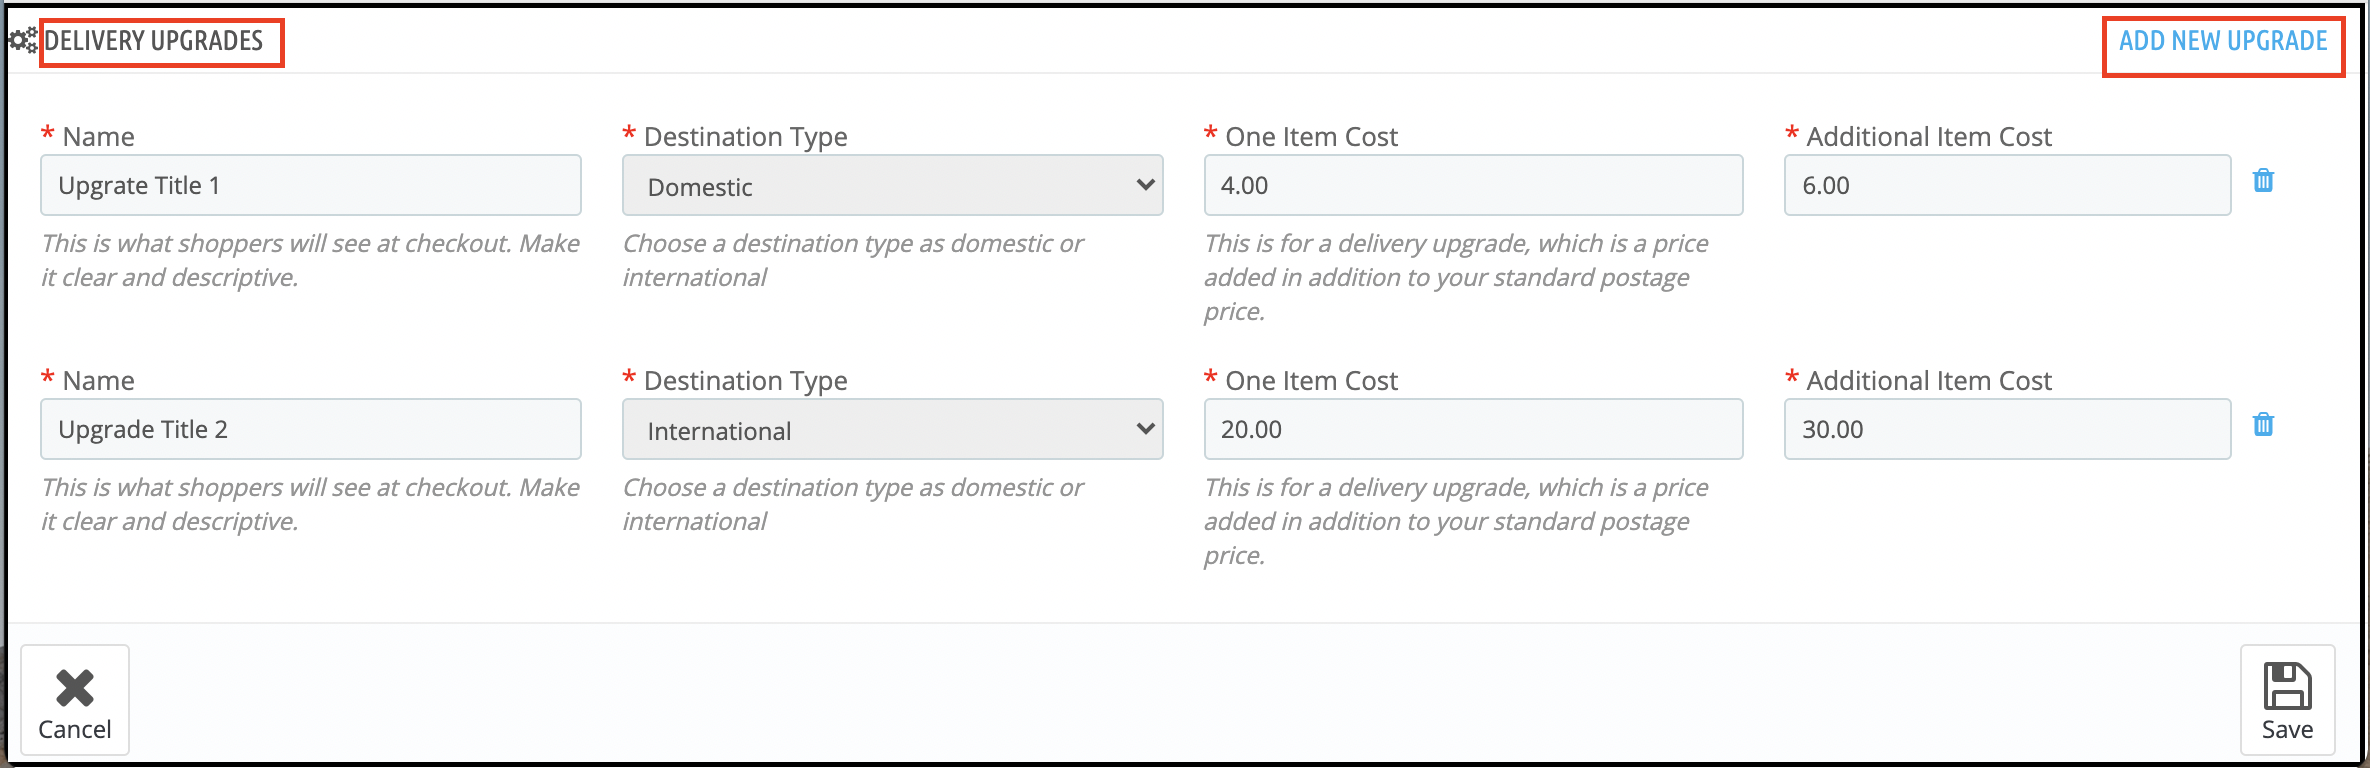
6.4.3 Delivery Upgrades
Admin can add the delivery upgrades to the Shipping Templates from this tab of the Etsy Prestashop integrator. In fact, the Delivery Upgrades tab of the Etsy Prestashop integration module displays the list of the Delivery upgrades added to the shipping templates.
6.4.4 Add Delivery Upgrades for a Shipping Template
Following are the steps to add Delivery Upgrades to the Shipping Templates-
Go to the Prestashop Etsy Integrator -> Shipping Templates (Menu Option)
It would display the page where already added Shipping Templates will list (If any). Click on any of the Shipping Templates in which you want to add Delivery Upgrades.
It would redirect to that particular Shipping Template Page.
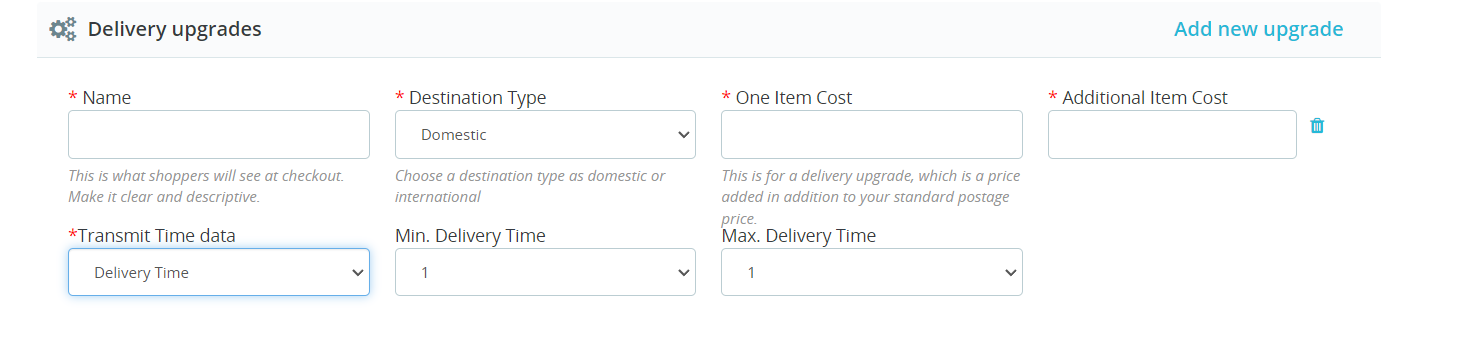
Click on the “Add New Upgrade” at the bottom right side of the Etsy Prestashop Integrator and it would open a drop-down form with, the input field will be shown.
Fill up the following form fields –
Delivery Upgrade Name
Destination Type
One Item Cost
Additional Item Cost
Transmit Time Data (Choose Shipping career or add custom Delivery time.)
Choose Delivery Service (If the previous option is selected as a shipping career).
Or Choose Min and Max Processing days (if the previous option is selected as Delivery time).
Click on the “Save” button.
It would validate and save the details to the system if valid.
6.5 Profile Management
The Profile Management tab provides options to create a profile for product listing. Further, profile-based listing allows the seller to list the attribute and categories of the Prestashop products. Furthermore, with the Etsy marketplace attributes and categories. In fact, the seller can select multiple Prestashop store categories at a time if there is only one category on Etsy for these products.
Under Profile Management admin can select the Shop Section in which he wants to show products for that profile.
In the recent enhancements, we have also provided the option to synchronize products on the profile level. Thus, if you want to update/list products on Etsy for particular profiles only, you can find the crons in the profile management tab itself.
Note: Please make sure to synchronize the Shipping Templates otherwise these details will not reflect in the Profile Management. Go to the Shipping Template tab of Prestashop Etsy Integration Addon and run the “Sync Shipping Templates” cron.
6.5.1 Add Profile to the System
Following are the steps to add Profile into the system –
Go to the Prestashop Etsy Integration Module -> Profile Management (Menu Option)
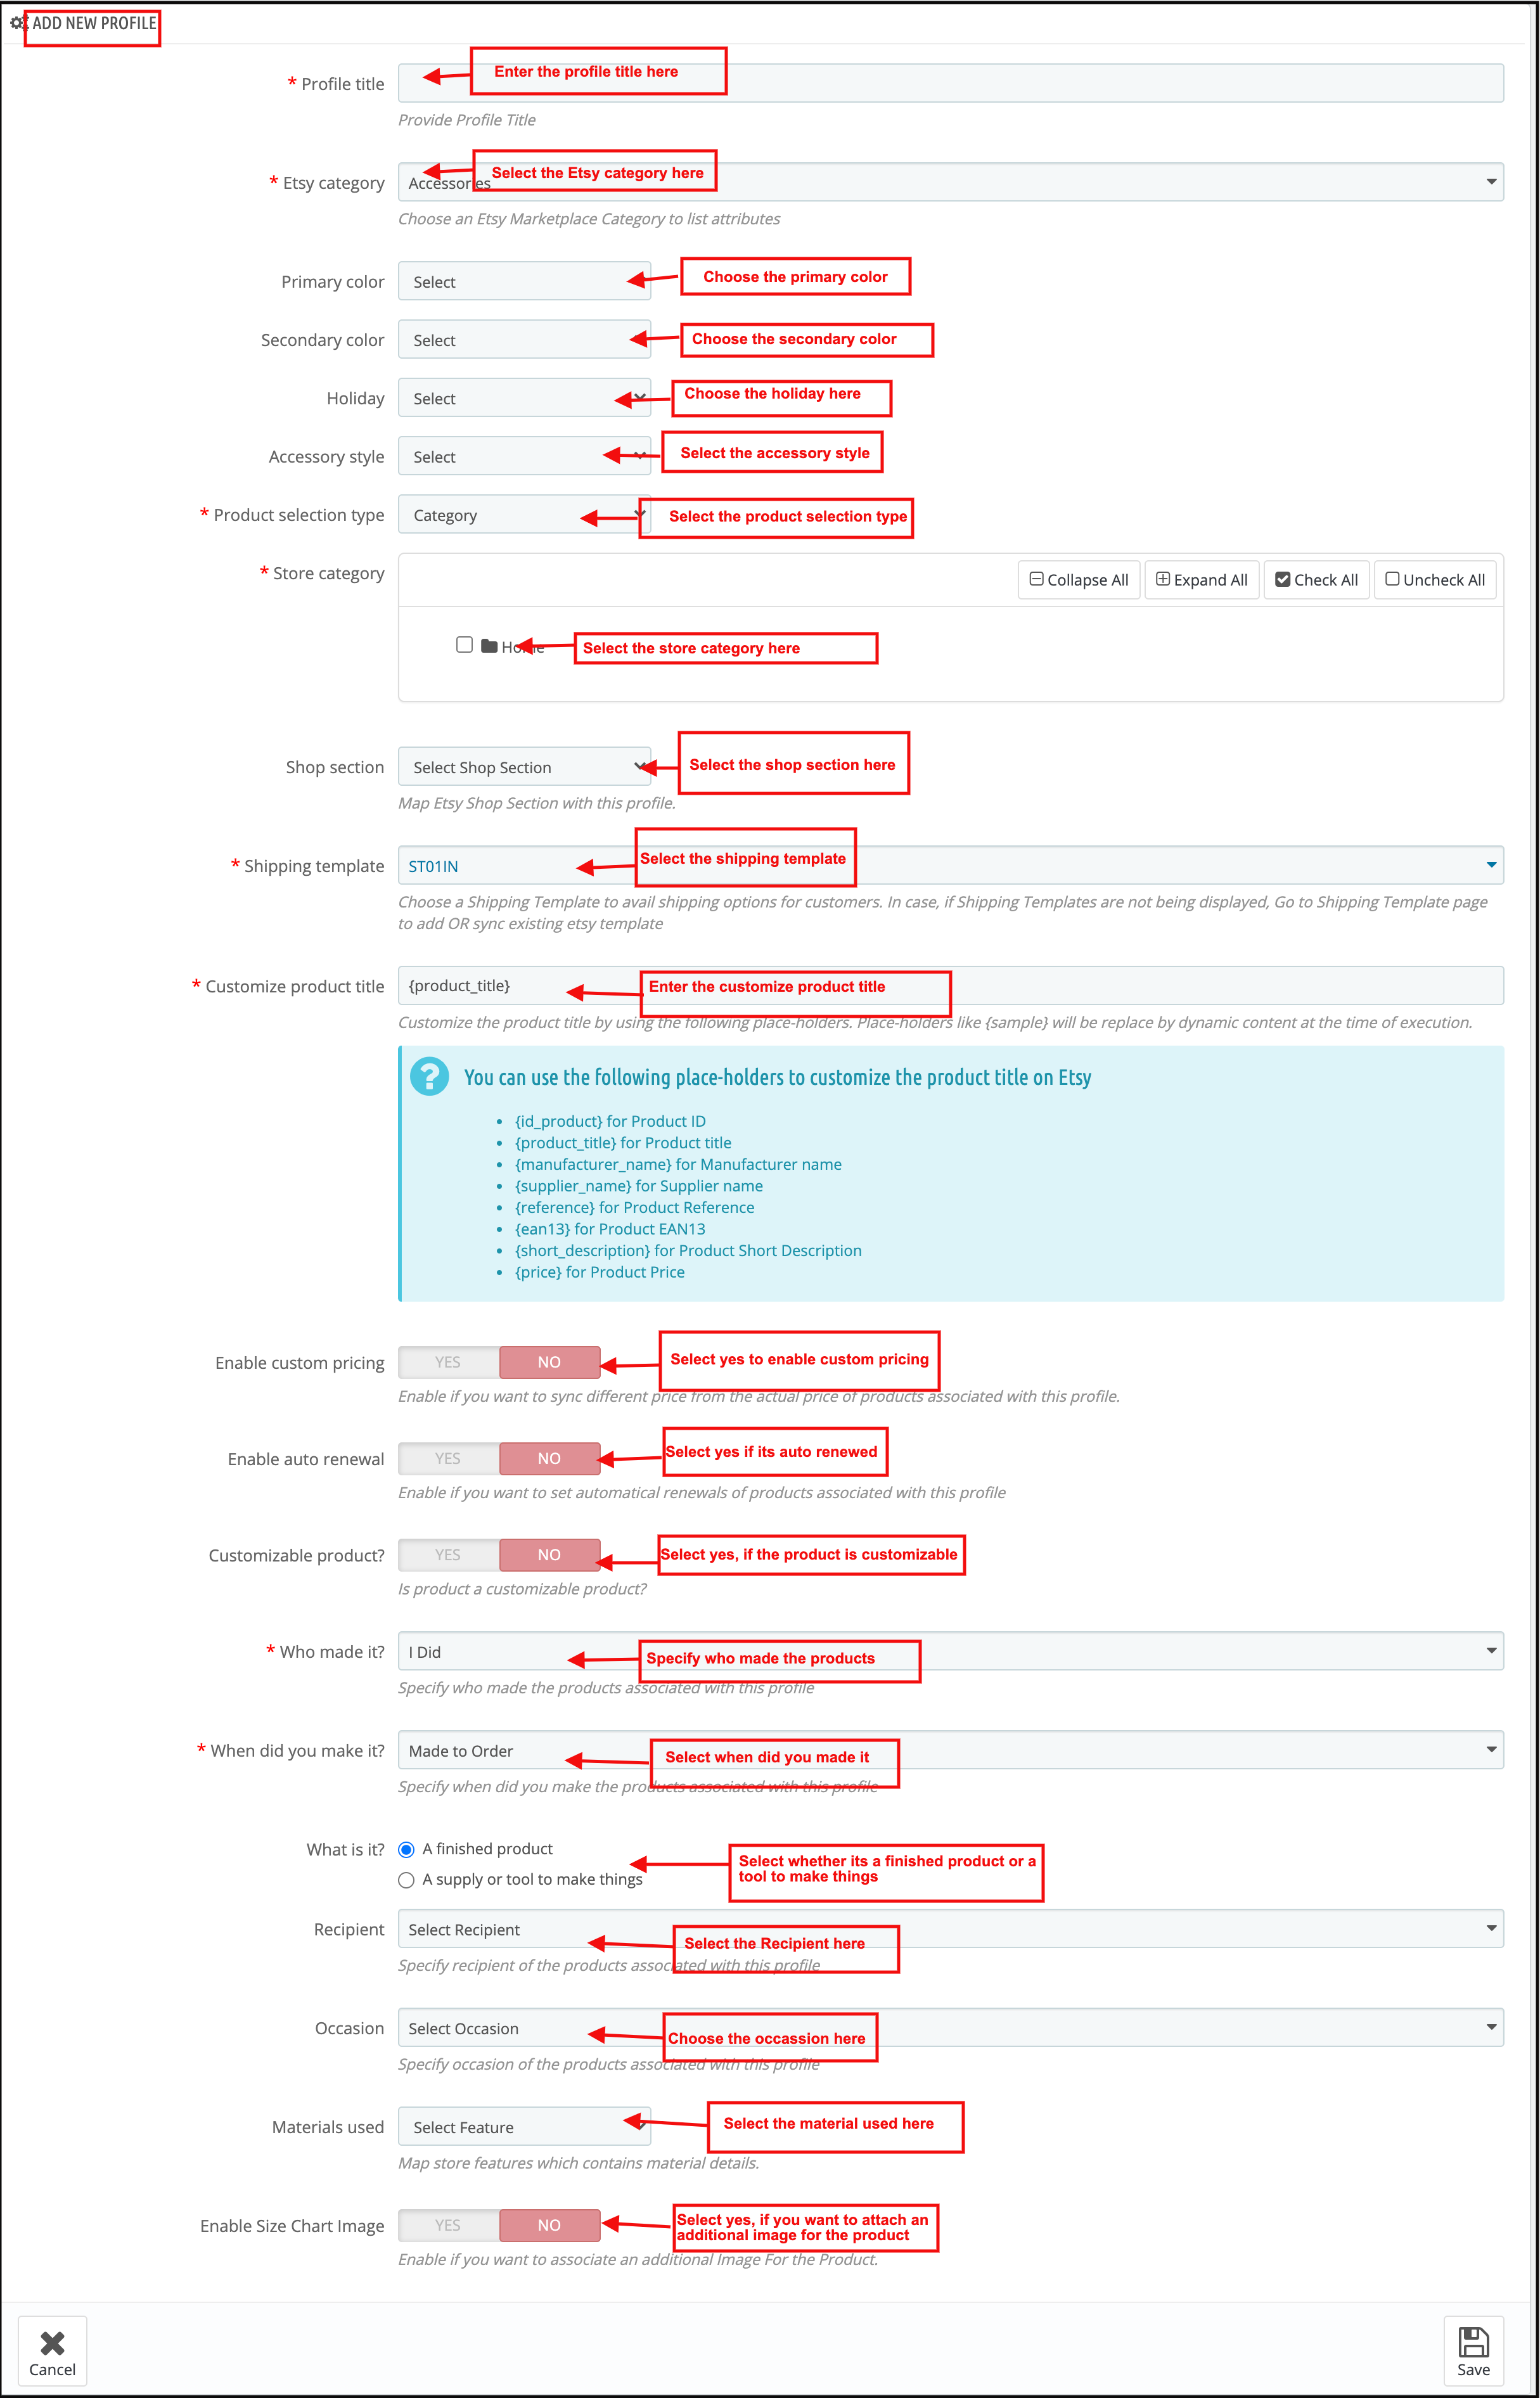
It would redirect the admin to a page where already added profiles will list (If any). Click on the “+” on the top right side of Etsy Prestashop Integrator (Plus icon as shown in the screenshot below) and it would redirect the admin to a new page where a form with some input fields will be shown.
Fill up the following input fields –
Profile Title
Etsy Category (List of Etsy Marketplace categories)
Store Category (List of Store Categories)
Shipping Template (List of Shipping Templates)
Primary Color
Secondary Color
Holiday
Accessory Style
Product Selection Type
Customize Product Title
Enable Custom Pricing
Customizable Product
Alter Quantity
Enable AutoRenewals
Who made it
When did you make it
Recipient
Occasion
Materials Used
Shop Section
Enable Size Chart Image
Size Chart Image
and click on the “Save” button.
It would validate and save the details into the system if valid.
6.5.2 Edit/Delete Profile
Following are the steps to edit/delete a profile from the system created in the Prestashop Etsy Integration plugin-
Go to the Prestashop Etsy Integration plugin -> Profile Management (Menu Option)
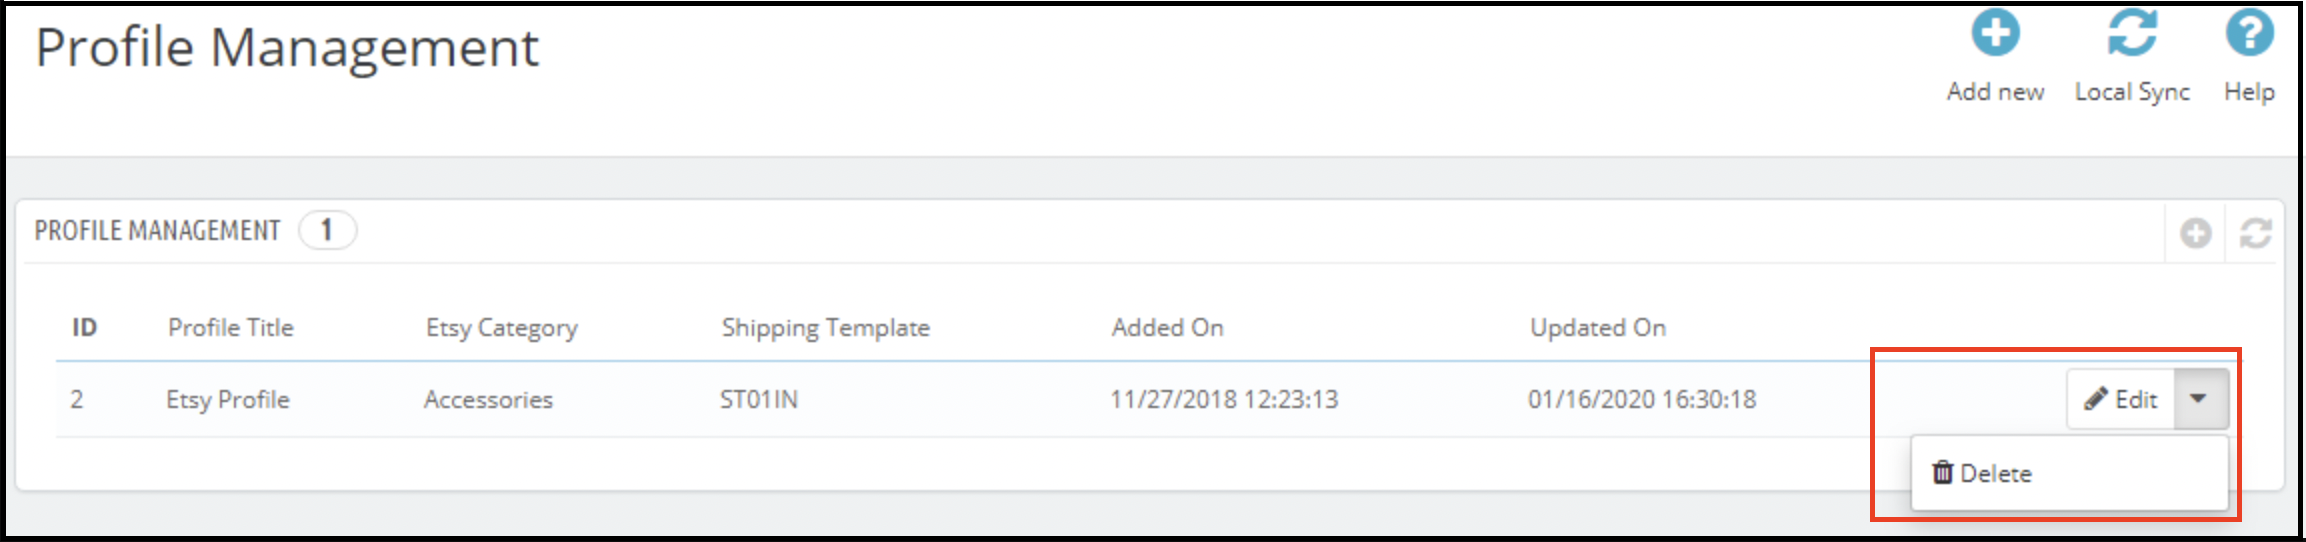
It would redirect the admin to a page of the Prestashop Etsy Integration module where already added profiles will list (If any, shown in the screenshot below).
Click on the “Edit/Delete” link given corresponding to each profile as shown in the above screenshot.
If the admin has chosen the “Edit” option then it would redirect the admin to a new page where a form with some already filled input fields will be shown. Admin can simply update values and save the details by clicking on the “Save” button.
If the admin has chosen the “Delete” option then it would delete the selected Profile from the system.
6.5.3 Product Selection Type
This is a drop-down and from this admin can select whether he wants to select the whole category to list or select particular products to add.
6.5.4 Etsy Category Attribute
Etsy Category Attributes are now available in the Etsy Marketplace Connector module. The admin can now choose the Primary Color, Secondary Color, Holiday, and Accessory Style.
6.5.5 Size Chart Image
By using this feature admin can also add an image for the product.
6.6 Products Listing
This section of Etsy Prestashop Integrator shows the list of all the products selected to list or listed on the Etsy Marketplace with their listing status and other details as shown in the screenshot below:
There are the following options cron options offered in the product listing tab of the Prestashop Etsy Integration module –
6.6.1 Sync Products
This option syncs the products of the category that was mappable in the profile. As the ‘Sync Products’ is executed, all the products of the profile will be listed at etsy.com.
6.6.2 Sync Product Status
The listing status of the products can sync back from the marketplace to the store by executing this cron of the Prestashop Etsy integrator.
6.6.3 Delete Products
This option allows the admin to delete product listings from Etsy Marketplace in bulk. To delete a product listing, the admin has to select the products that they want to remove and click on “Delete Product”. This will remove all the selected products from the listing.
6.6.4 Renew Products
This option allows the admin to renew the product in case the listing has expired on Etsy Marketplace in bulk. Furthermore, to renew the product, the admin has to select the products that they want to renew and click on the “Renew Product” action.
Along with this, the admin even gets the option to renew or relist one particular product. In fact, there is a Renew option corresponding to each product that has expired.
After setting up a product for renewal or relisting, these actions will be replaced with the “Delete” action.
Note – Product Renewal is chargeable on Etsy Marketplace.
6.6.5 Local Sync
Admin can sync all the products of their profiles using Local Sync and then every profile’s products list on the Product Listing Page. From there, the admin has an option to list individual products or lists in bulk.
6.6.6 Custom Product Details
In this section, the store admin can create different product titles and descriptions for Etsy product listings. Here, we provide an option for using the existing product details or create different ones for Etsy.
6.7 [New Feature] Return Policy Synchronisation
This tab allows the admin to manage and synchronize return policies between the module and Etsy. You can create, edit, and delete multiple return policies and assign them to specific profiles. Once mapped, any category associated with a profile will automatically update on Etsy with the corresponding return policy.
Add New: Create new return policies or modify existing ones directly from the module.
Sync Return Policies: Use the Sync Return Policy cron to fetch all available return policies from Etsy to your PrestaShop store. The synchronization includes details such as accept return/exchange options, the number of allowed returns/exchanges, and return deadline dates.
Profile Mapping: Within profile mapping, you can select a return policy to be assigned to the products in the chosen category.
Automatic Updates: When a product is added or updated in a mapped profile, the assigned return policy is automatically applied on Etsy.
This feature ensures your return policies remain consistent across your store and Etsy listings, saving time and reducing manual effort.
6.8 Order Listing
This tab of Etsy Prestashop Integrator shows the list of orders placed on Etsy Marketplace for your store products on Etsy as shown in the screenshot below –
Note: Please make sure to click on the “Sync Orders Listing” option under the Synchronization tab of the Etsy Prestashop integration module. Furthermore, only after successful sync orders will synchronize to the Prestashop back office.
6.9 Synchronization
All tabs offered by the Etsy Prestashop integration addon defined above are basically for saving the settings. Further, also the options in the system are used during synchronization between the Prestashop Store and Etsy Marketplace. In fact, there are the following cron jobs to synchronize content between the Prestashop Store and Etsy Marketplace which you can find below –
6.9.9 Products Listing on Etsy Marketplace
Following are the steps to synchronize Products Listing on Etsy Marketplace –
Go to the Etsy Prestashop Integration addon -> Synchronization (Menu Option)
It would redirect the admin to a new page where all synchronization actions are listed as shown in the above screenshot.
Click on the “Sync Products ” button shown below.
It would perform the following actions –
Update the Product list based on the profiles created in the system.
Add Products to Etsy Marketplace with product details (e.g. Price, Quantity, Image, etc.)
Update Products on Etsy marketplace which are already listed on Etsy Marketplace
Renew Products on Etsy Marketplace for that renewal are enabled.
Delete Products on Etsy Marketplace which are marked deleted on the Store.
Update the Listing Status of each product listed on Etsy Marketplace.
If synchronization completes successfully then it will display a message – “Synchronization completed” else “Synchronization failed”.
6.9.2 Orders Listing from Etsy Marketplace
Following are the steps to synchronize Products Variations Listing on Etsy Marketplace –
Go to the Prestashop Etsy Connector -> Synchronization (Menu Option)
It would redirect the admin to a new page where all synchronization actions are listed as shown in the above screenshot.
Click on the “Import Orders” button shown below.
It would perform the following actions –
Get Orders and Transaction details from Etsy Marketplace
Create Customers and Shipping Carriers into the Store as per the details that come from Etsy Marketplace
Create Orders into the Store as per the details that come from Etsy Marketplace and set the order status as per the configuration settings updated in the “Order Settings” tab of this module in admin.
If synchronization completes successfully then it would display the message – “Synchronization completed” else “Synchronization failed”.
6.9.3 Orders Status on Etsy Marketplace
Following are the steps to update the status of orders on Etsy Marketplace –
Go to the Prestashop Etsy connector -> Synchronization (Menu Option)
It would redirect the admin to a new page where all synchronization actions are listed as shown in the above screenshot.
Click on the “Update Orders Status on Etsy” button shown below.
It would perform the following actions –
Check if there is any status update recorded by the module for any Etsy Order.
Update the Status of Orders as per the configuration settings updated in the “Order Settings” tab of this module in the admin
If synchronization completes successfully then it would display the message – “Synchronization completed” else “Synchronization failed”.
6.9.4 Update Product Listing Status from Etsy Marketplace
Sync the product status from Etsy to the Prestashop store by clicking this cron under the Synchronization tab.
1. Go to the Etsy Integration module -> Synchronization.
2. Click on the Update Listing Status from Etsy Marketplace.
6.10 Sales Report
The Etsy Prestashop integration module allows the store admin to check the sales report for the Etsy shop orders. Admin can use the date filter to check the sales report.
6.11 Product Sales Report
Etsy Prestashop Integration extension allows the store admin to generate the reports product-wise.
6.12 Audit Log
The audit log section of the Etsy PrestaShop connector helps to keep track of all the takes performed by the administrator.
With the rise of the internet, more and more businesses and brands are moving their operations online but yet are not introducing robust enough age-verification mechanisms. This has made it easier for young people to access products, services, and content that are age-restricted.
As age-restricted commerce continues to grow, it becomes more important than ever to protect our youth and keep the products and services intended for adults out of the reach of children. Robust online age verification is imperative in order to sift out those who are underage and prevent any law-breaking.
Introduction
This Prestashop age verification module by Knowband helps the store owner to add a new popup to validate the age of the visitor.
Whatever your reasons, you may need your site’s visitors to confirm their age before viewing the content of your site. Age Verification does just that. It’s a simple Prestashop plugin by Knowband that lets you specify a minimum age and add an age-gate between a potential visitor and your content, just to be safe. This Prestashop age verification popup module helps the store owner to add a filter in the website visitors on the basis of their age. The popup 18+ Prestashop module is very easy to install and configure. No technical knowledge is required.
The age verifies Prestashop module provides a lot of features which are as follows:
Admin can validate the age of the visitor with the help of age verification Prestashop addon.
The Prestashop age verification module allows the admin can display the date of birth drop down, year of birth, or a Yes/No option to validate the user.
The Prestashop 18+ verification addon offers the admin to display a small note at the front end for visitors.
Admin can also redirect the customers whose age is less than the set minimum age limit.
Admin can display the configured image on the front end of the Prestashop module by Knowband.
The Prestashop verification popup allows the admin to display the terms and conditions link and checkbox to validate the age.
Visitors can check the terms and conditions of use.
Admin can select the text and background color of the popup 18+ Prestashop addon.
The custom templates are available for pop up.
The Prestashop age verification module offers the admin to add Custom CSS and Custom Js for the block.
Admin can choose the text and background color of the “Enter” and “Exit” buttons of the Prestashop age verification popup by Knowband.
Installation Manual
Follow the following steps for installing age verify Prestashop module:
Download the Prestashop add-on package.
Unzip the package in /modules directory of your Prestashop store via FTP manager (like Filezilla or WinSCP – download here: https://filezilla-project.org/). The folder structure for the Age Verification addon is shown in the image below:
You will be able to find the Age Verification addon that is ready to be installed in the “Modules List” in your PrestaShop store as shown below.
Click on the “Install” link to install the age verification Prestashop addon. Once the Prestashop module by Knowband is installed properly the “Install” link will be converted to ‘Configure’.
User Manual
This User Manual will guide you through the Admin Module/Store Front settings and various features of this Prestashop age verification.
Admin Interface
This interface of the Prestashop 18+ verification module will contain 2 tabs ‘General Setting Tab’ and ‘Look and Feel Setting Tab’ after successful installation.
General Setting Tab
This tab of the Prestashop verification popup will contain these fields . Steps –
1 . Go to Modules and Services > Search module ‘Age Verification’ > Click on “ Configure” Button > Select General Setting Tab.
Fields
Enable: By default, the value of this field of popup 18+ Prestashop module will be OFF. The whole functionality of this Prestashop plugin will depend on the value of this setting.
Steps – Go to modules and Setting >Search Module ‘Age Verification’> Click on Configure button > Select General Setting > Enable the plugin Option > Click on Save.
Verification Age: By default, it would be 18. Admin can configure the minimum age (1-100 years) to validate the visitor.
Verification Method: There are three ways you display the verification option: Yes/no buttons- They can add Yes or No buttons for age verificationYear of Birth: Ask them to input the year of birthDate of Birth: Ask the visitors to enter the complete DOB.
When the admin enables it, he would be able to display the date of birth drop-down buttons to validate visitors. By enabling this field of the Prestashop age verification popup, 3 dropdowns would be displayed in the front end – date, month, year.
Display Date of Birth: By default, this field of the Prestashop age verification module would be ON.
Note: To display a Date of Birth drop-down, make sure that ‘Display Date of Birth’ is Enabled.
Remember Visitor Days: Enter the minimum number of days for which the cookie will be store. The Popup will be shown again for age verification after this amount of time.
Under Age Action: The admin can redirect the user to any other page or display a message to the user when the customer’s age is less than the lowest permitted age.
Redirect URL: If you have selected to redirect the underage customers to any other page, you have to input the URL in this section.
Under Age Message: Set a message to be displayed to underage customers if you have chosen to show a message in an underage action setting.
Choose Popup Display method: It involves twooptions. Select Method according to which Age Verification popup will be displayed on Selected Pages or on Complete Shop. The age verification popup can be shown for the entire shop or you can choose some specific products and categories.
Only Selected: This involves various different settings
Choose Popup Display Products: Add products for which you want to display the age verification pop-up.
Choose Popup Display Categories: Selecting categories for the age verification. You have to enable the Popup on Selected Category Product Pages to display it.
Choose Pop-up Display Pages: Select pages for which it is required to display the age verification pop-up. It includes delivery page, T&C Page, About us, Payment, etc.
Preview: You can preview the pop-up before saving the new settings.
Note: Save the settings before moving to the next menu.
Content Setting Tab
Update the text, font, theme, etc. in the content setting menu.
Popup Message: By default, it would be ON. When the admin enables this option of the age to verify the Prestashop module, he would be able to display a small note in the front end and a field “Enter Small Note” would be displayed below the “Display Small Note” button.
Note: To display a note, make sure that ‘Display Small Note’ is Enabled.
DOB Field Message: Admin can enter a small message at this text field and can display it at the front end of the age verification Prestashop addon for entering the DOB.
Enter Submit button Text: Here, the admin can add the text that he/she wants to show on the button.
Enter Additional message: Admin can add custom messages like terms and conditions, terms of entry, policy, etc.
Choose Design: Admin can choose a theme for the popup window. The PrestaShop Age verification module provides 9 default designs.
Front End View:
Use Selected theme image: If enabled then the selected design default images will be shown on the Popup otherwise you can upload your Custom Images. The designs have logo images, Verification window images, and Background Images.
Custom Image setting
Logo Image: Custom logo images can be uploaded only when the Selected Theme Images setting is disabled. Prestashop store admin can upload logo in .png, .jpg, .jpeg, .gif file format in Age verification
Verification Window Image: Upload verification window image only works when Selected Theme Images setting is disabled.It allows the store manager to upload images in .png, .jpg, .jpeg, .gif file format.
Background Image: Upload background image also works only when Selected Theme Images setting is disabled. Only .png, .jpg, .jpeg, .gif file format accepted for the background image.
Look and Feel Setting Tab:
This tab of the Prestashop age verification module will contain all the look and feel features of this Prestashop module.
Fields
Text Align: You can select the text alignment as the center, left, or right for the popup text message.
Popup Shape: The Popup shape could be Rectangle or Rounded. Admin of PrestaShop Age Verification Addon is free to decide the popup shape.
Popup Background Color: This field of the age verification Prestashop addon will set the color of the Popup background.
Popup Opacity: This will set the background opacity (darkness) outside the popup in the front end of the Prestashop 18+ verification module.
Popup Text Color: The module allows the admin to set the popup text color and chose a color that matches the website theme or the image uploaded.
Submit Button Color: Select the submit button color here for the age verification ‘submit’ button.
Submit Button Text Color: This will set the color of the text inside the “Submit” button of the Prestashop age verification popup module.
Popup Message Font Size: You can enter the font size for Popup Message which will range between 10-40px.
Text Font Size: Admin can enter the font size for the popup text that ranges between 10-20px.
Additional Info Font Size: You can enter the font size for Additional Info that ranges between 10-20px.
Enter Button Text Color: This will set the color of the text inside the “Enter” button of the Prestashop age verification popup module.
Enter Button Background Color: This field of the age verification Prestashop addon will set the color of the background inside the “Enter” button.
Exit Button Background Color: This option of the Prestashop age verification will set the color of the background inside the “Exit” button.
Background Opacity: This will set the background opacity (darkness) outside the popup in the front end of the Prestashop 18+ verification module.
Custom CSS: This will set the CSS of the block of the Prestashop verification popup by Knowband.
If the admin enables the Prestashop age verification module plugin then the below-like image will be displayed in the Front End of the popup 18+ Prestashop addon and the age verification process will proceed.
If the age is equal to or greater than the admin configures verification Age ’, then the visitor will be allowed to enter the website otherwise the customer will be redirected to the configured URL. If Exit is pressed then visitors will be redirected according to the configured URL.
Age Verification Default PopUp
Users can enter Year of Birth
2. User can Enter DOB
The opacity is set as 0.5 for the below popup image
3. User can choose the Yes/No button
Rectangle Popup Format
Rounded Pop-up Format
Watch the video tutorial here:
To help you set up the configuration and perfect use of the Prestashop Age Verification 18+ Pop-Up Addon, we have prepared a detailed tutorial video. This video walks you through the installation, configuration, and usage of the module step by step.
Recommendation
The Module folder ageverification > views >img > admin > “ uploads” must have writable permission 0775 .
Steps –
Go to the module folder ageverification > views > img > admin > uploads.
Give the 0775 writable permission to the folder uploads.
Find more details about this Prestashop Addon by Knowband below: