Magento 2 Loyalty Points Extension- User Manual

1.0 Introduction

Now the online merchant can implement a reward system on the website and increase website profit easily. Knowband offers Magento 2 Loyalty Points Extension which allows the store admin to offer loyalty points to the online buyers on specific events. The online users can get loyalty points on their birthday, first order, new signup, ordering any specific product or product of a specific price. This way, online buyers can collect loyalty points and convert them into vouchers while placing the next order.

By offering loyalty points to the customers, the online merchant can assure repeated orders from the same customers. The Magento 2 Loyalty reward points module allows the online merchant to set the behavior rules and product cart rules. Only those customers who’ll meet these conditions will get loyalty points.

1.1 Basic Features of this Magento 2 Loyalty Points Extension

  • The online merchant can offer loyalty points to online buyers and get more orders.
  • The online merchant can assure customer retention and customer acquisition by offering loyalty points to the buyers.
  • The online merchant can apply Cart rule and Behavior rule from the Magento 2 Loyalty Points Extension admin interface. This way, he can control the overall process of offering loyalty points.
  • The online merchant can set the amount per loyalty point, validity days and expiry information. Admin can also send an email notification for informing the online users regarding loyalty points expiry.
  • Admin is allowed to offer loyalty points on the customer’s birthday by setting the amount and selecting the customer group for this.
  • The store merchant can offer loyalty points to any customer by setting the loyalty points, validity days, loyalty point status and selecting the email id for sending loyalty points. The Magento 2 Loyalty Points module also has an option to upload the CSV file for adding loyalty points.
  • Admin can view the customer’s loyalty point balance and also modify the status or any other detail.
  • Customizable email templates are available for sending an email notification to the customers. Admin can also customize the email templates from the admin interface of Magento 2 Loyalty points and discount module.
  • Cron settings are available for sending birthday points, expired points notifications on a single click. Admin can also change the loyalty points state to expire using these cron settings.

2.0 Installation

After purchasing Magento 2 Loyalty Points Extension, the store admin will get the following files:

  1. Knowband_Loyaltypoints.zip which has the source code of this Magento 2 Loyalty Points module.
  2. User Manual, with all the basic details and information.

The steps to install the Magento 2 Loyalty Points Extension are mentioned below:

  • Buy the Magento 2 Loyalty Points Extension from Knowband. You can download the extension package.
  • The package has a zipped file that contains the user manual and the source code of Magento 2 Loyalty Points module. Now, Unzip this package.
  • Create a folder {Magentoroot}/app/code/Knowband/Loyaltypoints
  • Upload the extracted content in the above folder via FTP manager (like Filezilla or WinSCP – download here: https://filezilla-project.org/).

Now run below commands to install the plugin:

1. php bin/magento module:enable Knowband_Loyaltypoints
2. php bin/magento setup:upgrade
3. php bin/magento setup:di:compile

The extension is now installed and ready for use. In Admin Panel go to “Knowband Extensions > loyalty points”.
You can now configure and use the Knowband’s Magento 2 Loyalty reward points module.

3.0 Admin Interface

After installing the Magento 2 Loyalty Points Extension, the e-merchant can configure is as per the requirements. There are multiple configuration options as shown below:
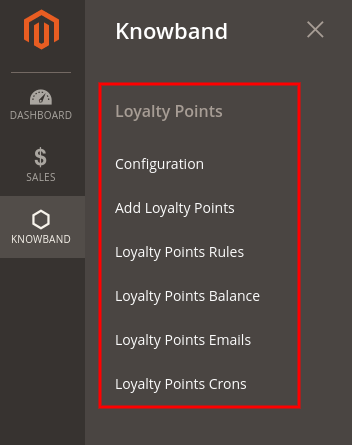
Magento 2 Loyalty Points Extension Configuration options

  • Configuration
  • Add Loyalty Points
  • Loyalty Points Rules
  • Loyalty points balance  
  • Loyalty points Emails
  • Loyalty Points Crons

3.1 Configuration

In Configuration settings, the online merchant will get these options:

  • General Settings
  • Label Settings
  • Birthday Settings

3.1.1 General Settings

In General Settings, there are options to apply basic settings related to loyalty points. The online merchant will get these options here:
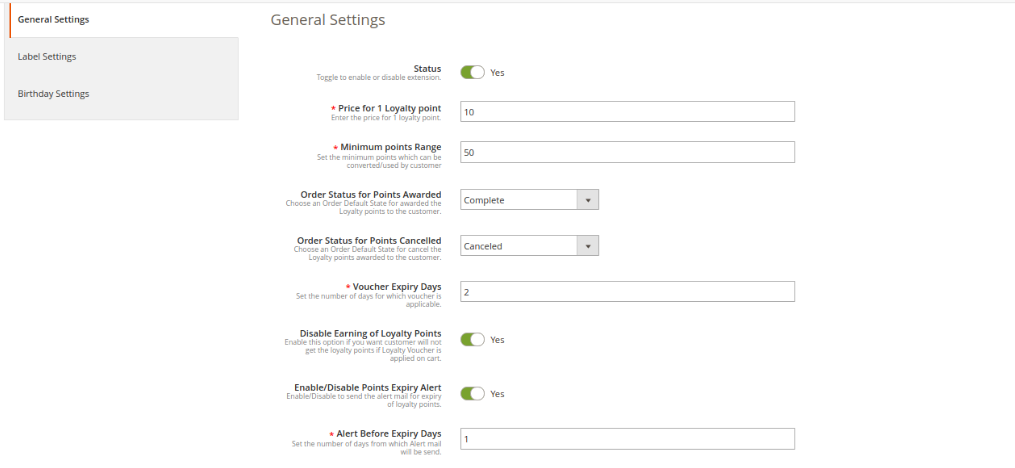
  • Status: Toggle the button for activating or deactivating loyalty points functionality in your store.
  • Price for 1 loyalty point: Set the price per loyalty point from here.
  • Minimum Points Range: Set the minimum points which need to be used by the customers while converting it to the voucher.
  • Order Status for Points Awarded: Set the default order status on which customers will get loyalty points.
  • Order Status for Points canceled: You can also set the order status on which loyalty points will be canceled from the customer’s account.
  • Voucher Expiry days: Set the number of days after which voucher will be expired.
  • Disable Earning Of Loyalty Points: Enable this field if you don’t want to offer loyalty points to the customers when they apply loyalty vouchers in the cart.
  • Enable/Disable Points Expiry Alert: Activate this option if you want to send an email to alert the customers about the expiry of loyalty points.
  • Alert Before Expiry Days: Set the number of days before which you want to send an alert.

3.1.2 Label Settings

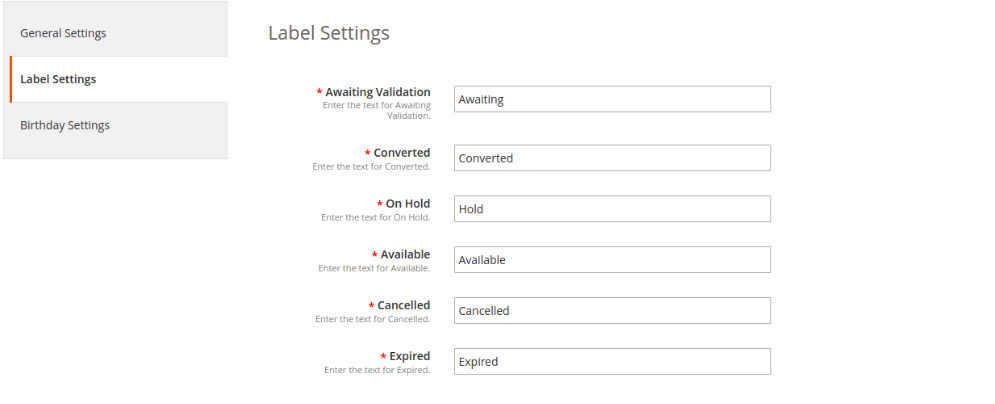
In this section, the online merchant can set the label for loyalty points. The Magento 2 Loyalty reward points module allows the store admin to set the label for Awaiting Validation, Converted, On Hold, Available, Canceled and Expired loyalty points.
3.1.3 Birthday Settings

The Magento 2 Loyalty points and discount module allows offering birthday loyalty points to the customers. These are the customization options as shown below:
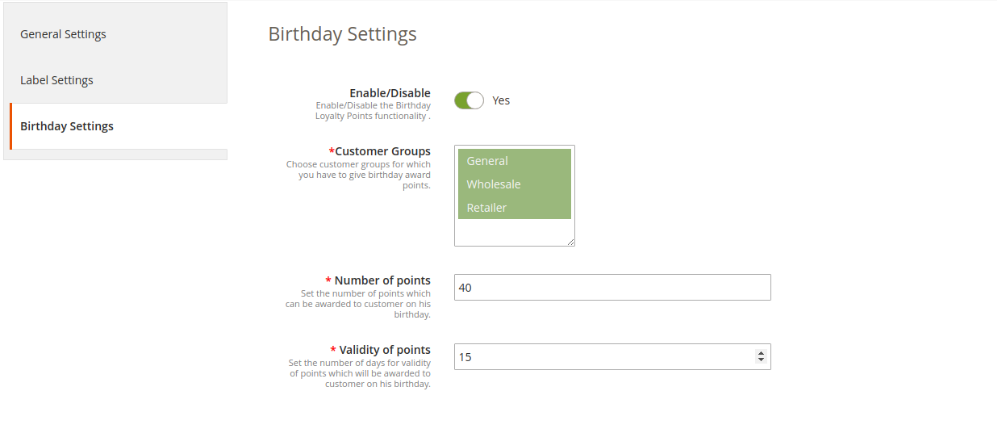
  • Enable/Disable: Toggle the button for activating or deactivating the settings to offer loyalty points on birthdays.
  • Customer Groups: Choose the customer group to which you want to offer birthday loyalty points.
  • Number of points: Enter the loyalty points which you want to offer on the birthday.
  • Validity of Points: Set the number of days for which loyalty points will be valid.

3.2 Add Loyalty Points

In this section, the online merchant can apply the settings for offering loyalty points to the customers. Admin can offer loyalty points to any specific customer or offer to multiple customers by uploading the CSV file. These are the configuration options available in this section:

  • Add Points
  • Add points using CSV

3.2.1 Add Points

The online merchant can offer loyalty points for the customers by selecting their email id. Check the customization options below:
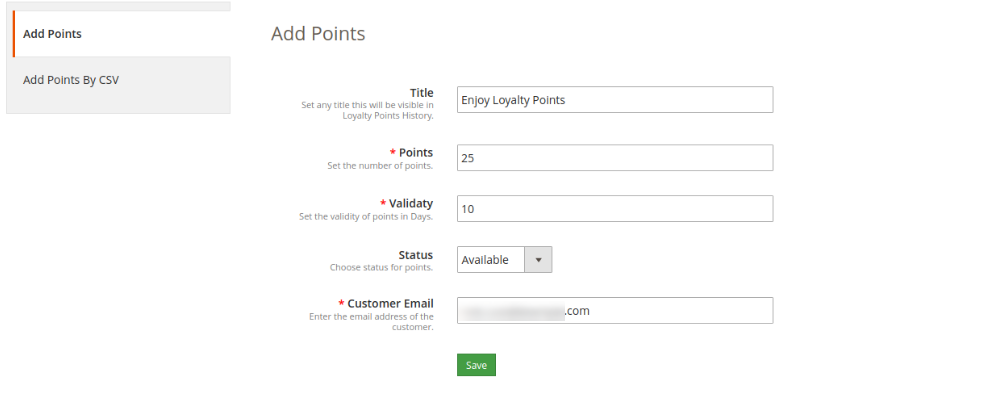
  • Title: Set the loyalty points title from here.
  • Points: Enter the number of loyalty points which you want to offer.
  • Validity: Set the points validity days from here.
  • Status: Select the initial status for loyalty points.
  • Customer Email: Enter the customer’s email id here.

3.2.2 Add Points Using CSV

The online merchant can download the sample CSV file and then add loyalty points with other details. After that, he can upload the updated CSV files for offering loyalty points.
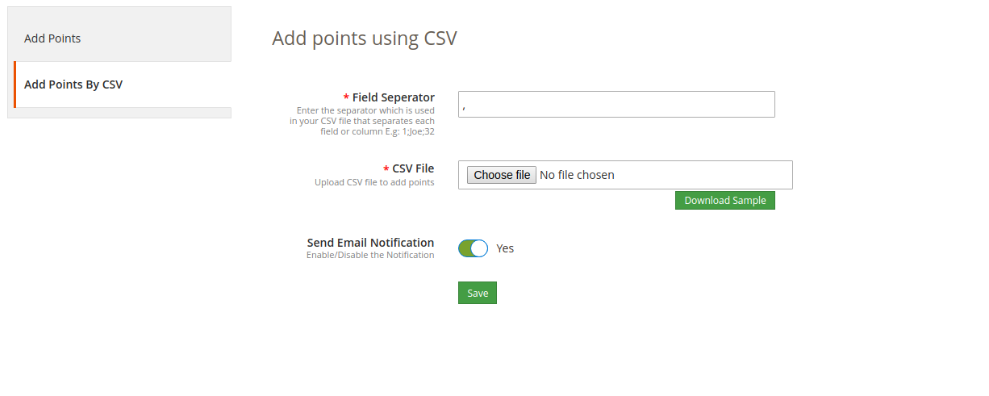
 

  • Field Separator: Set the field separator for columns.
  • CSV File: Upload CSV File to add loyalty points. (From the download button, admin can first download the sample CSV file)
  • Send Email Notification: Enable email notification for notifying the customers regarding offered loyalty points.

3.3 Loyalty Points Rules

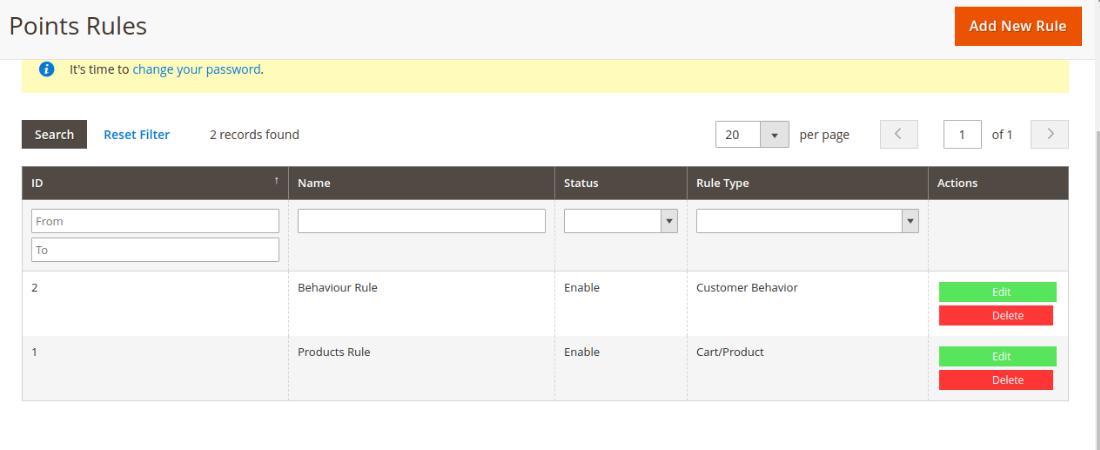
Admin can add various customer behavior and cart/product rules for offering loyalty points. The Magento 2 Loyalty points and discount module allows adding various rules without any limitations. The online merchant can edit or delete any rule anytime from the Magento 2 Customer reward points module back-end.
3.3.1 Add new Loyalty Rule

Admin can apply these settings for adding new rules from the admin interface:
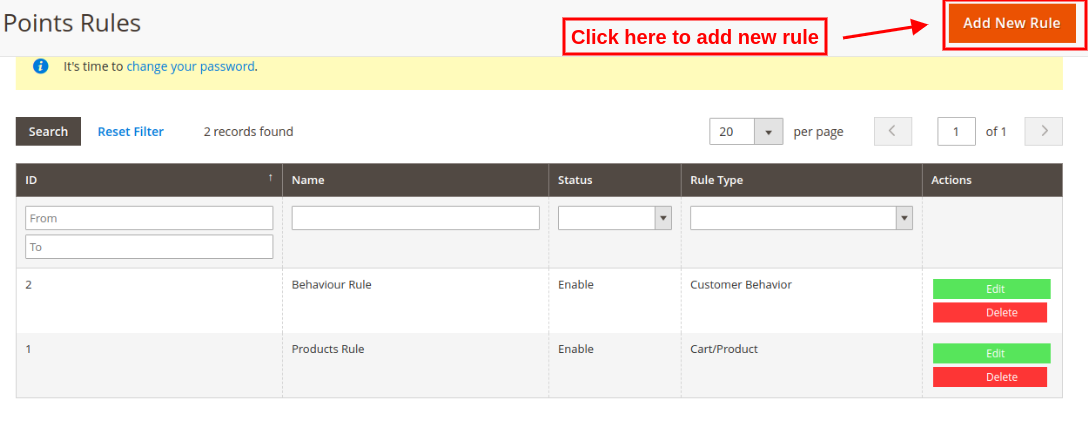
Admin needs to click on “Add New Rules” option and apply these settings:
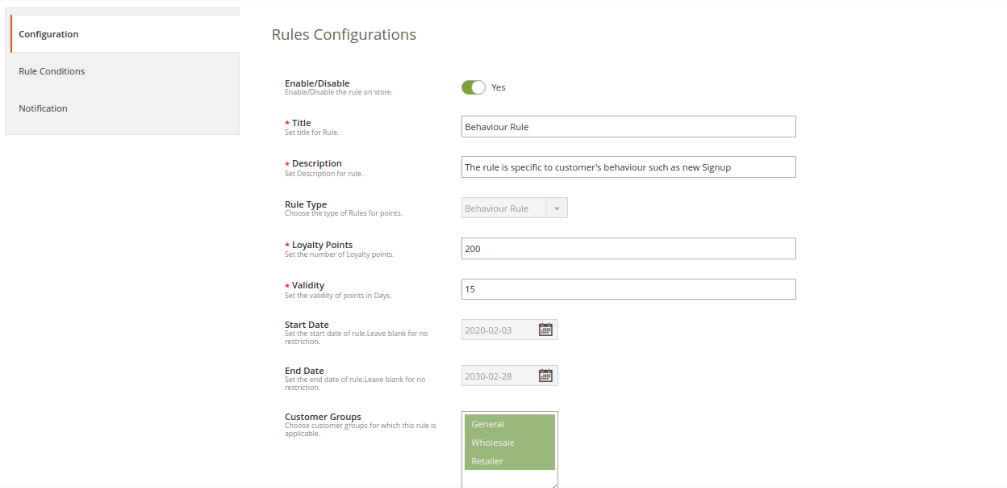
  • Enable/Disable: Activate or deactivate the rule.
  • Title: Enter the rule title.
  • Description: Enter the rule description.
  • Rule Type: Select the rule type ie. Product cart rule and behavior rule.
  • Loyalty Points: Enter the number of loyalty points.
  • Validity: Set the validity of loyalty points in days
  • Start Date: Set the start date of the rule. You can leave it blank if you don’t want to apply any restrictions.
  • End Date: Here, set the end date for the rule. You can leave it blank for no restriction.
  • Customer Groups: Select the customer’s group for which this loyalty rule is applicable.

There are several rule types that are based on product cart and behavioral rule.

A. Product Cart Rule

1. Offer loyalty points based on the cart subtotal

There is an option to apply conditions on cart subtotal amount. The store merchant can apply the condition to offer loyalty points to the customers when the cart subtotal is any specific amount, is not a specific amount when cart total amount is equal to or greater than selected amount when cart amount is equal or less than the selected amount, greater than the selected amount, less than the amount.

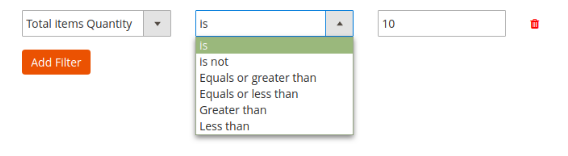
2. Offer loyalty points based on the item quantity

The online merchant can provide loyalty points to the customers when they shop for specific product quantity. Similar conditions as “cart subtotal” will be applied for item quantity also.
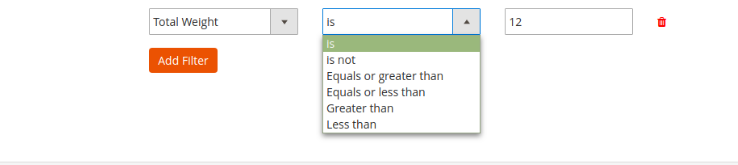
3.Offer loyalty points based on the total weight

Admin can also set the condition related to the weight of the products. Admin needs to define what should be the total weight of the cart to earn loyalty points.
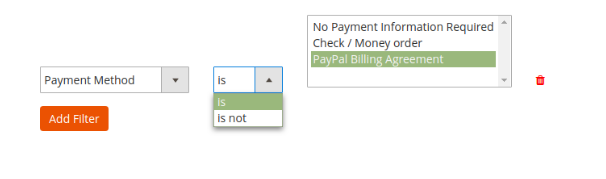
4. Offer loyalty points based on the Payment method

The store merchant can offer loyalty points to those customers who select or do not select any specific payment method.
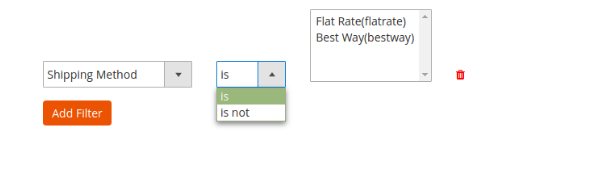
5. Offer loyalty points based on the shipping method

The store admin can provide loyalty points when a customer opts for the defined shipping service.
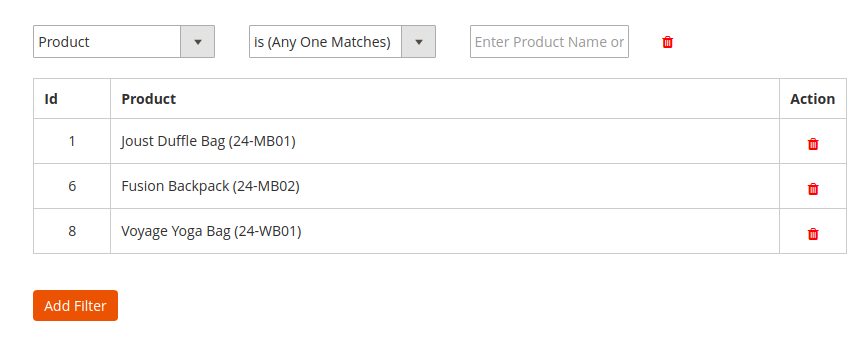
6.Offer loyalty points based on the product

Admin can offer loyalty points when cart products match with all/any selected product or no product matches at all as shown below:
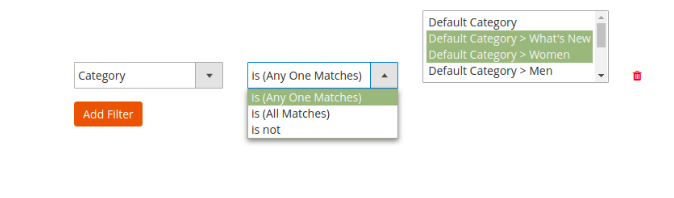
7.Offer loyalty points based on the category

The online merchant can offer loyalty points when customers purchase from a certain category(all or any matches)/do not purchase from the specific category.
8.Offer loyalty points based on the price

The Loyalty points extension for Magento allows the store admin to offer loyalty points when the cart price meets conditions as per the module settings. Similar conditions as “cart subtotal” can be included in Price Settings.


 
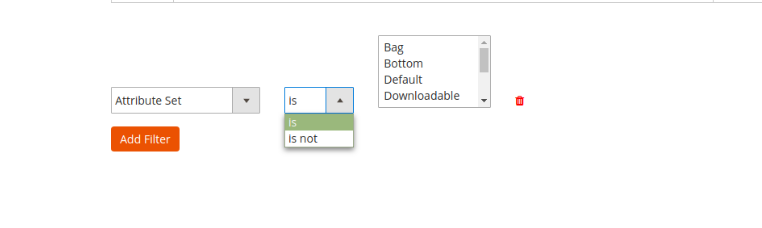
9.Offer loyalty points based on the attribute set

The online store admin can set the conditions related to attribute sets. The customers can get reward points if added products from/not from a specific attribute set.
Note: The online merchant can select “AND” or “OR” condition conjunction from the condition section. Admin can select “AND” if he wants customers to meet all the conditions. If he wants to offer loyalty points to the customers in meeting any of the condition then he’ll select “OR” conjunction.

B. Behavior rule
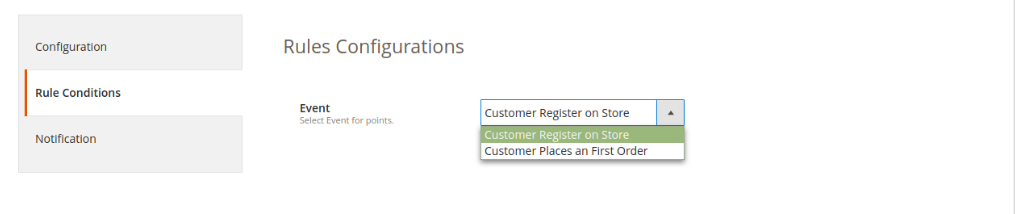

 
1. Offer loyalty points on registration

The online users can earn loyalty points when they signup in the store.

2. Offer loyalty points on first order

The store merchant can also offer loyalty points on customer’s first order.

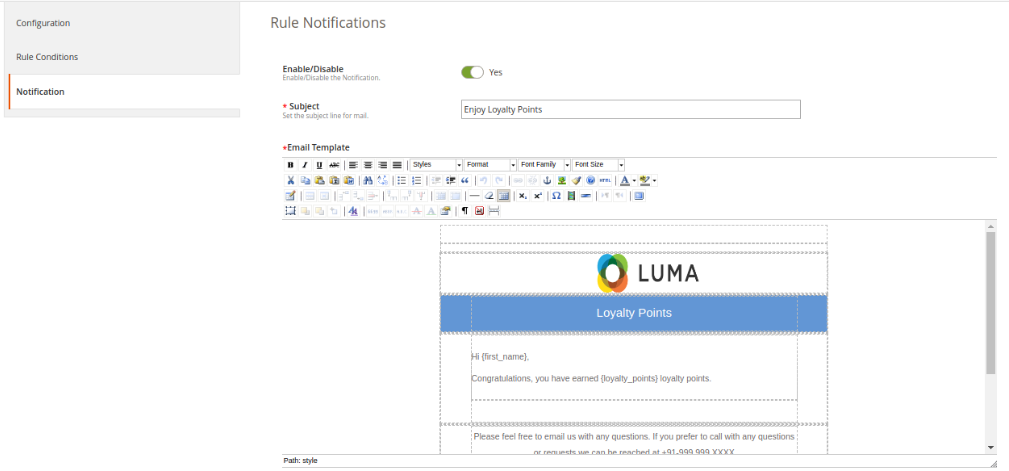
Email Notification: The online merchant can send an email with the loyalty point details will be sent to the customers if they get any loyalty point. The online merchant can enable or disable the settings for sending an email notification. The online merchant can also customize the email template easily.
3.3.2 Edit Loyalty Rule

The online store admin can also modify the rule settings from Magento 2 Loyalty reward points plugin admin interface.
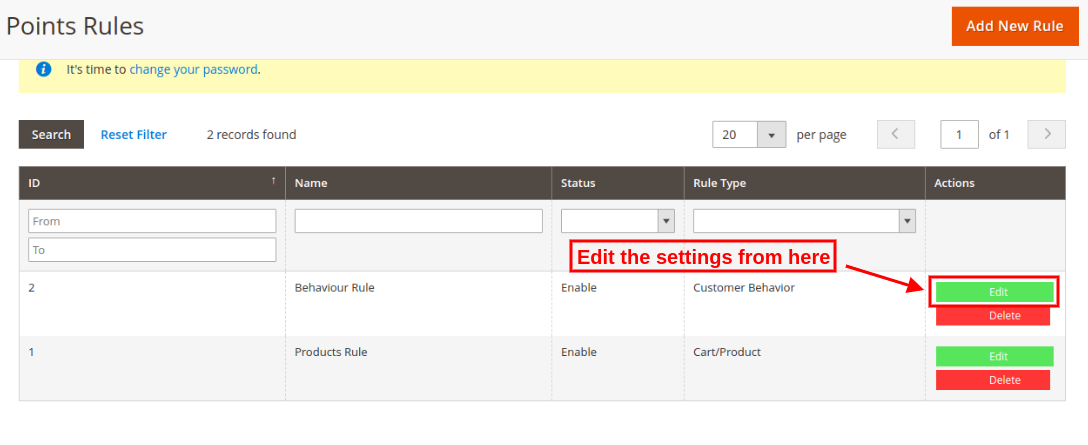
Admin can apply changes and also add new conditions in any rule.

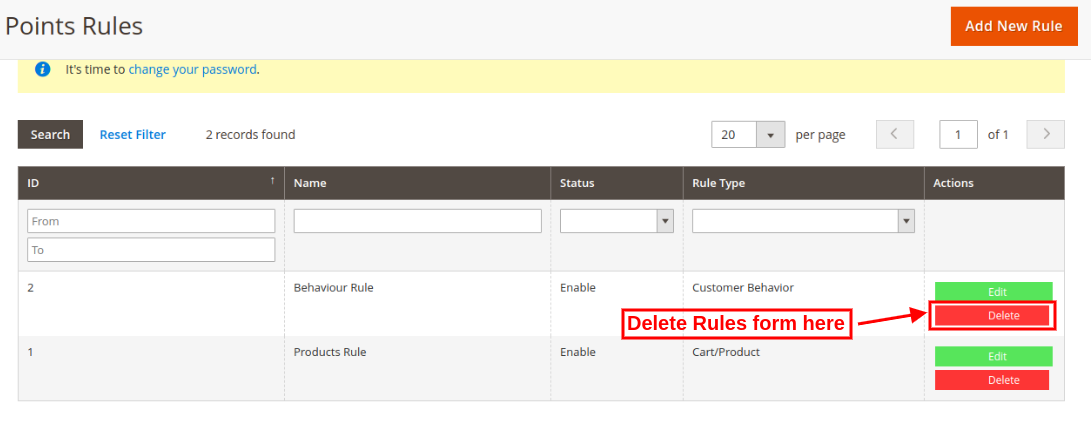
3.3.3 Delete Loyalty Rule

The Magento 2 Loyalty reward points module allows deleting the loyalty rules easily by clicking on the “Delete” button.
3.4 Loyalty points balance

Magento 2 Loyalty points system plugin allows the online merchant to view the list in which the store merchant can view the loyalty points balance of any customer. There is a filter option available for ease of store admin.
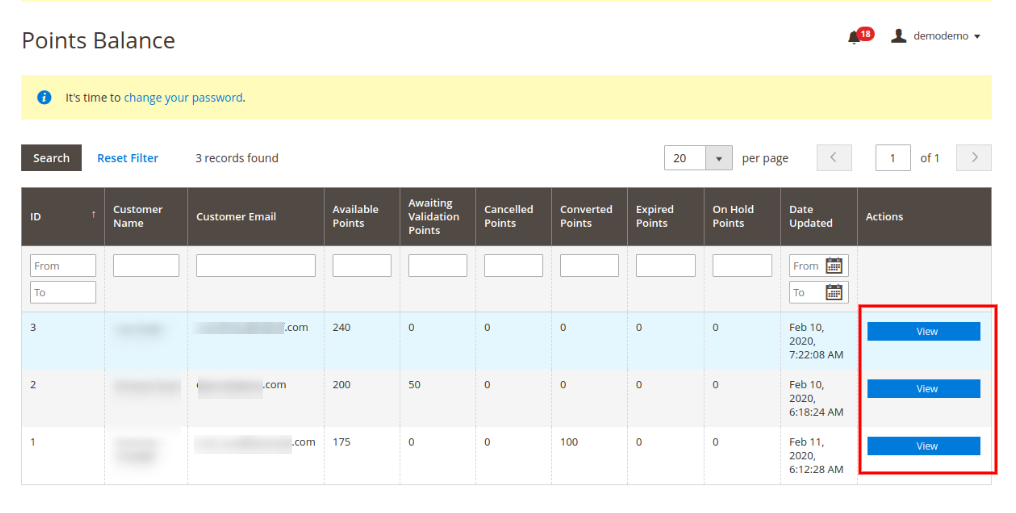
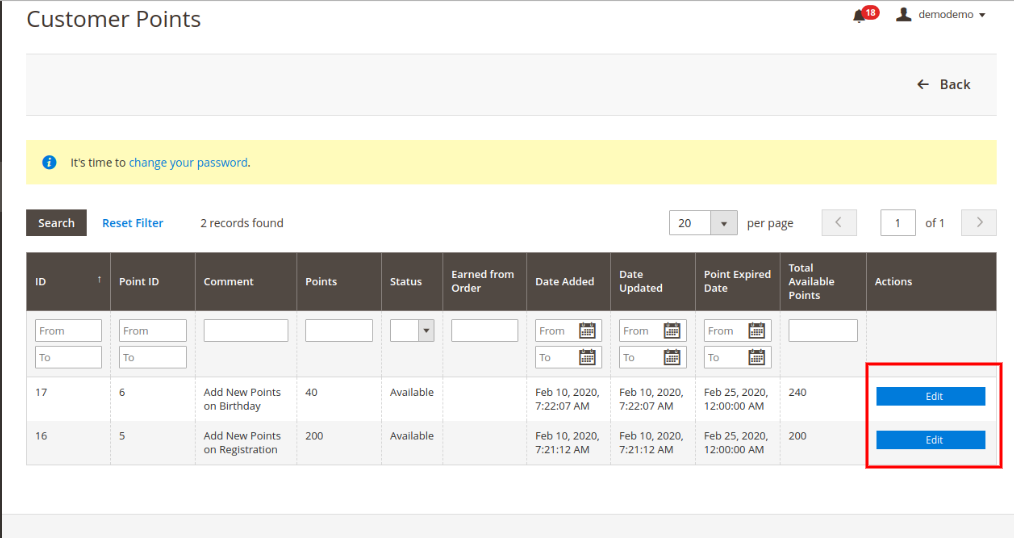
After clicking on the view button, the online merchant can get a list of all the reward points earned by that particular customer. The store merchant can also modify the loyalty points from here:

These are the options which can be modified:
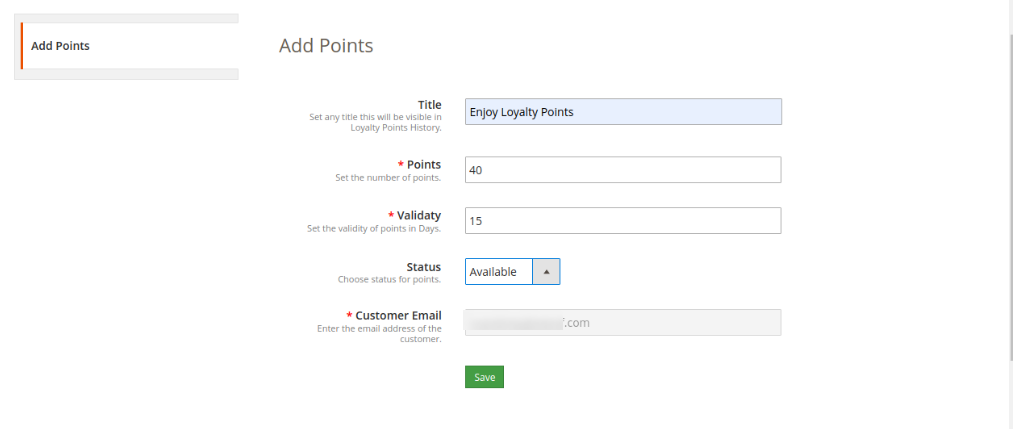
  • Title: Enter the new title for showing on loyalty points history.
  • Points: Set the number of loyalty points.
  • Validity: Set the validity of loyalty points in days.
  • Status: Change the status of loyalty points.
  • Customer Email: view the email id details.

3.5 Loyalty Points Emails

In this section of Loyalty points extension for Magento 2, the online merchant can view the list of email templates for various status:
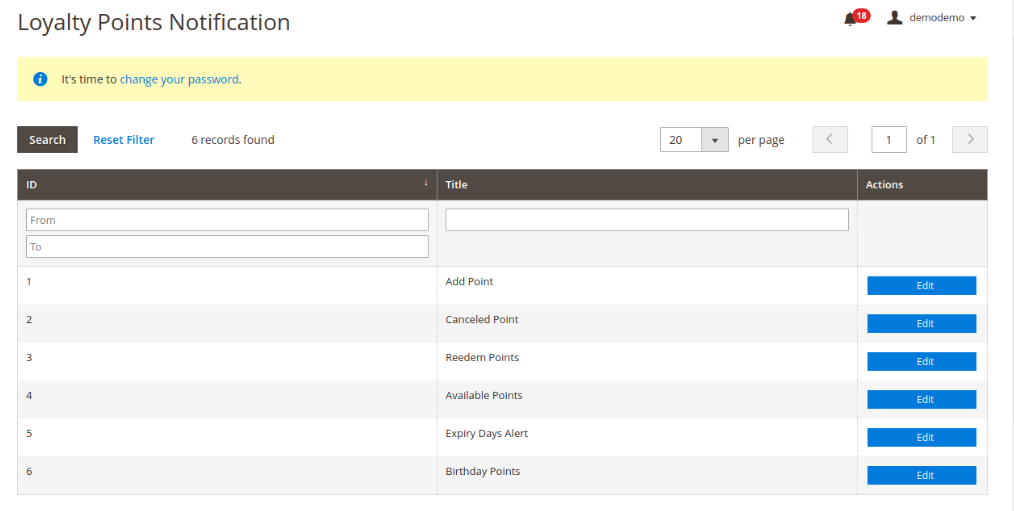
Admin can click on the “Edit” button and customize the email templates for sending to the customers:
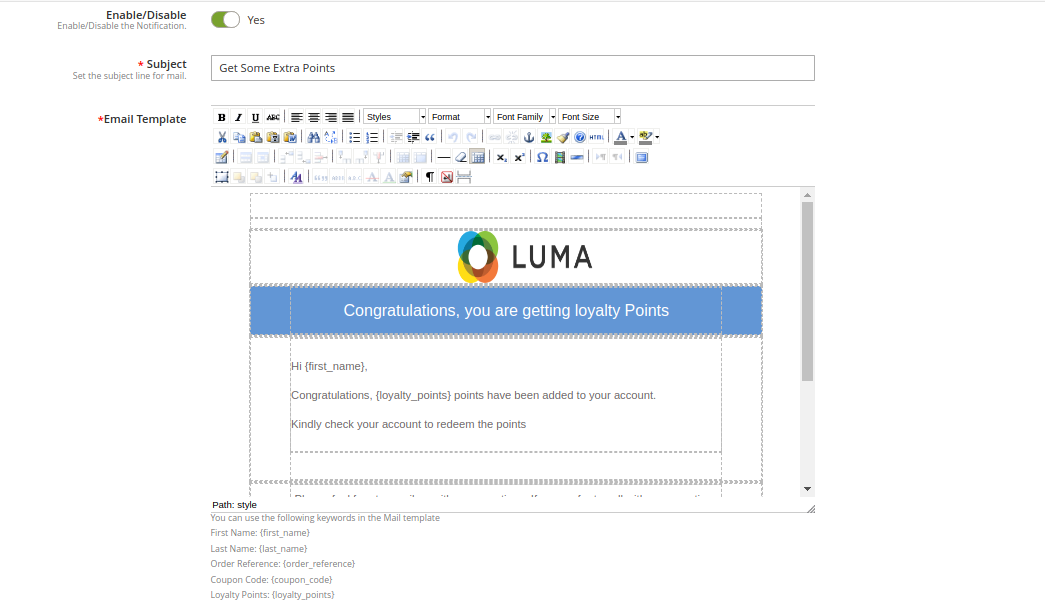
  • Enable/Disable: Admin can enable or disable this option.
  • Subject: Enter the subject line for the email.
  • Email Template: The online merchant can configure the email by adding images, HTML text and description.

3.6 Cron Instructions

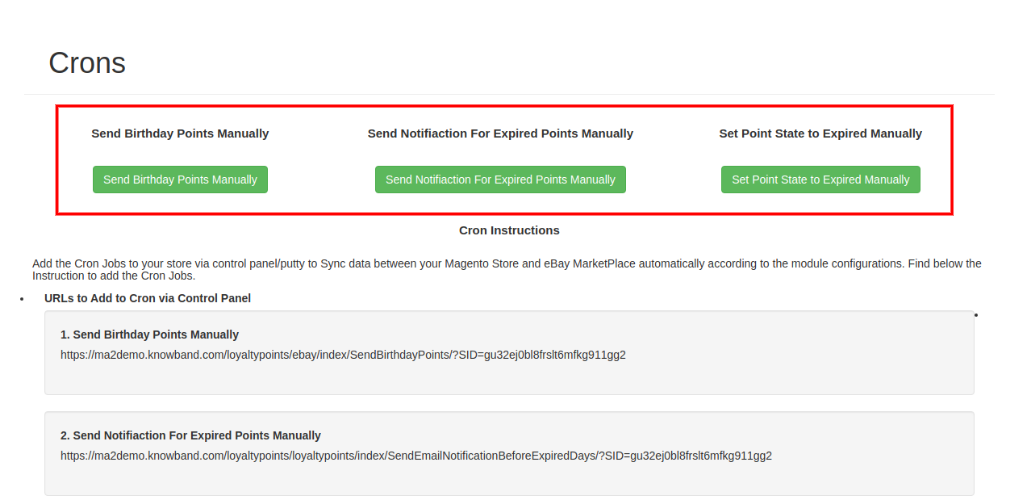
Admin can also configure cron and manage the overall process of offering loyalty points easily with the help of crons. This way, admin can send birthday points manually, send a notification for expired points and set the loyalty point state to expired manually.
4.0 Front-end Interface

The online buyers have an option to get loyalty points on signup, first-order events and they can also get loyalty points on any specific order and cart state.

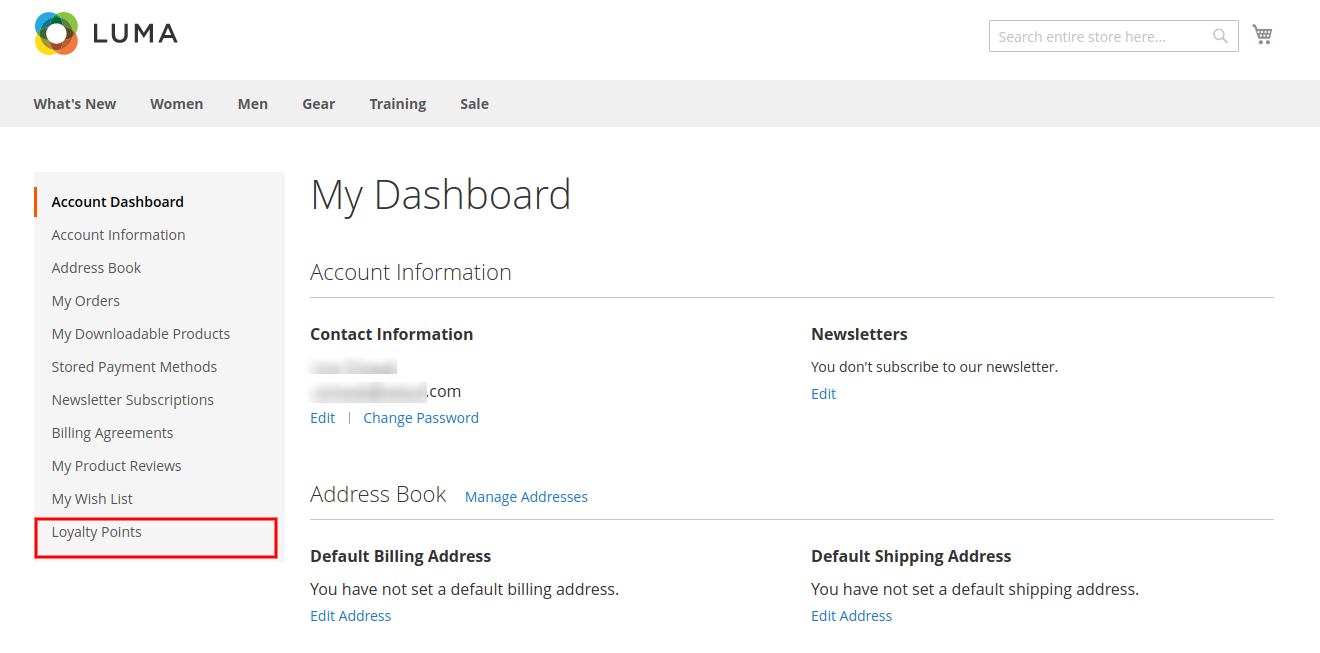
They can check an additional field in the “My Account” section. This field is “Loyalty Points” in which, the online users can view the loyalty point details as shown below:
The online users can view the loyalty points details on the “loyalty points history” and they can convert the loyalty points into the discount coupon.
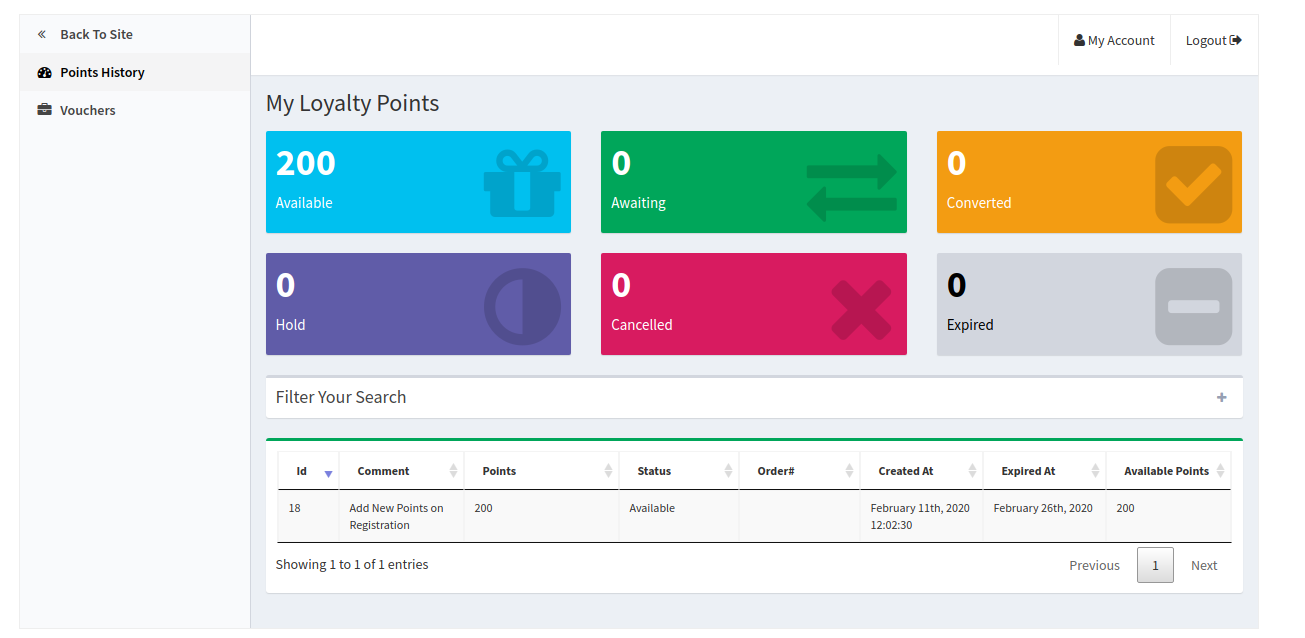
 

The online users can view the total available loyalty points.
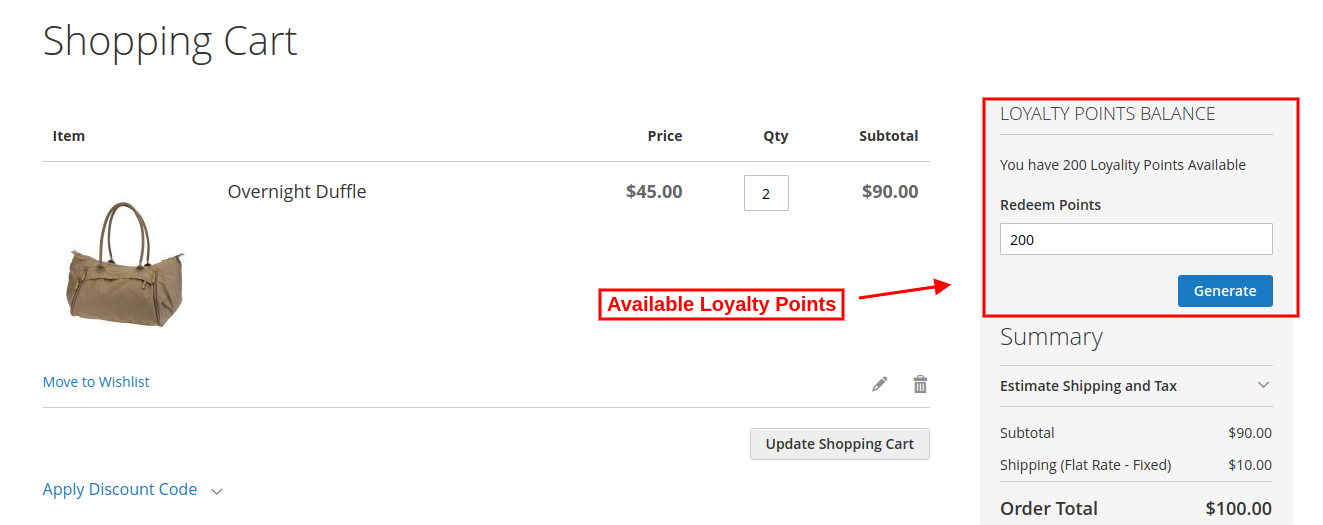
The online users can enter the amount which they want to use for the ordered product as shown below:
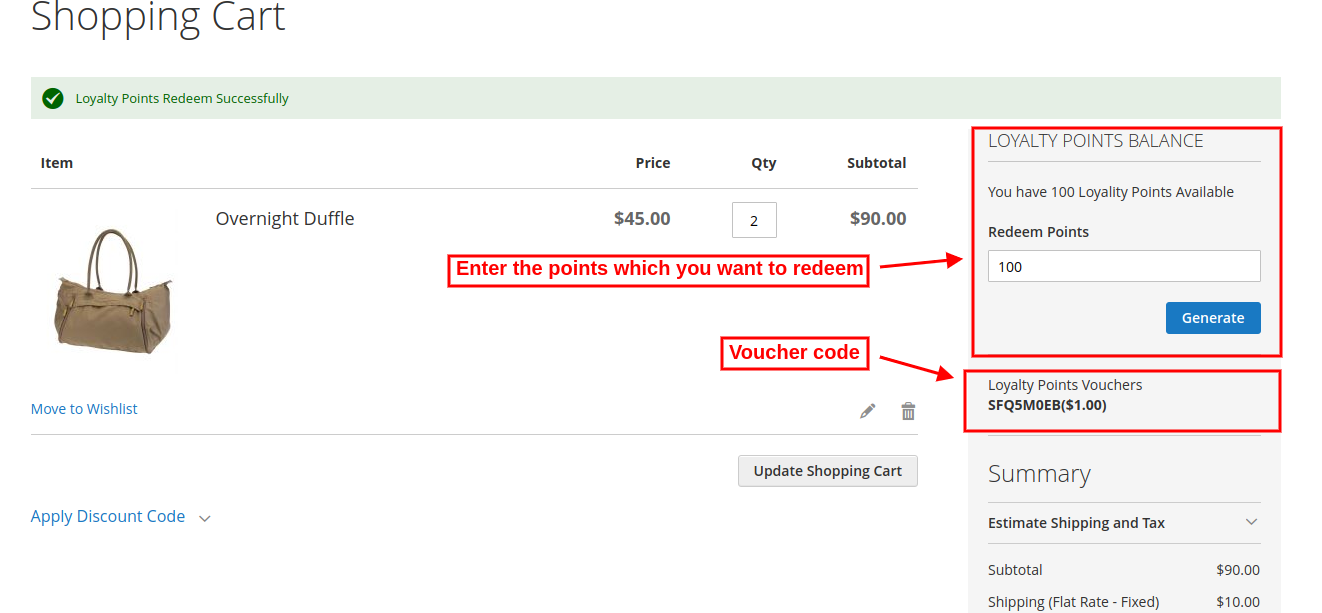
After generating the coupon code, online users can apply it as shown below:
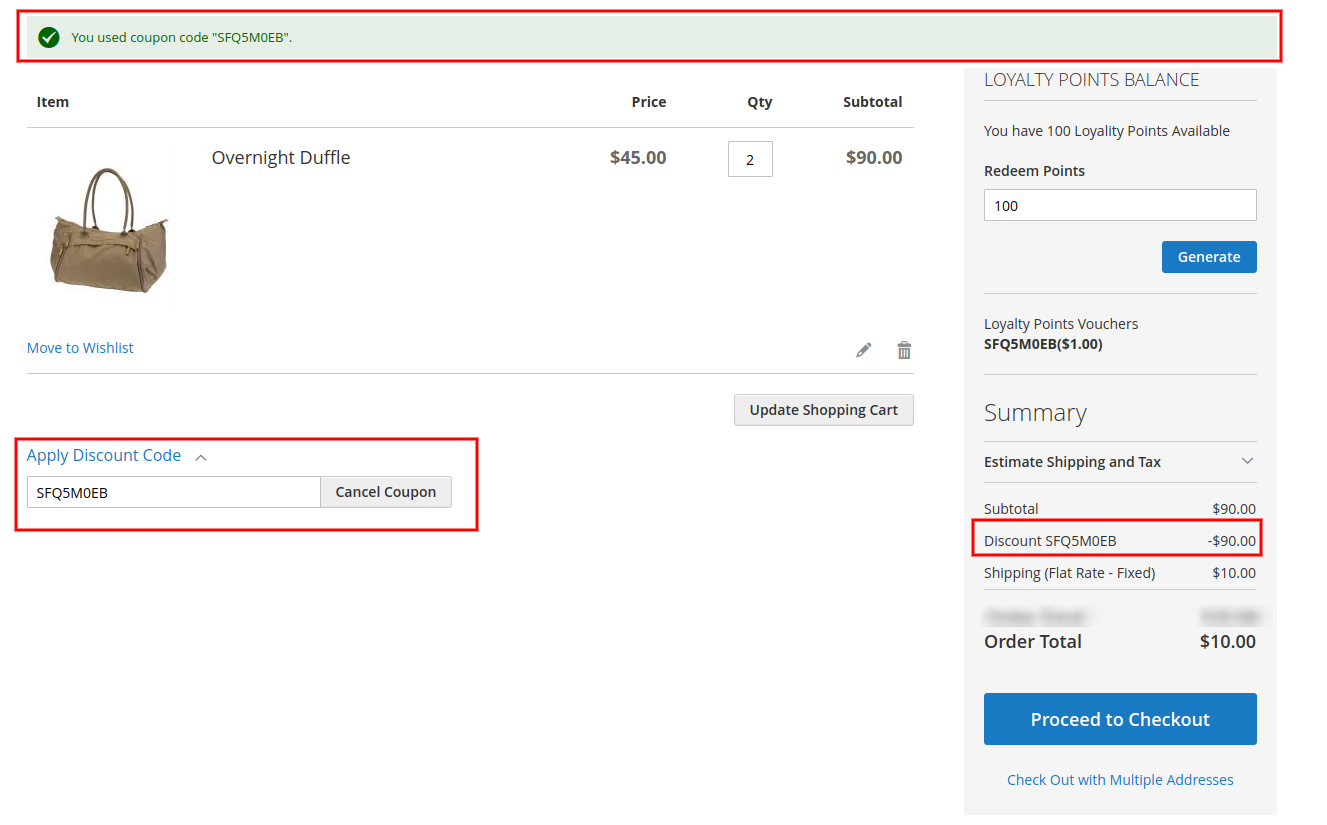
 

This discount coupon will be applicable to the subtotal amount. The customers can apply the coupon and get a discount on the ordered product. They need to pay delivery charges(if any).

The online users can also view the created voucher details in “vouchers” section as shown below:
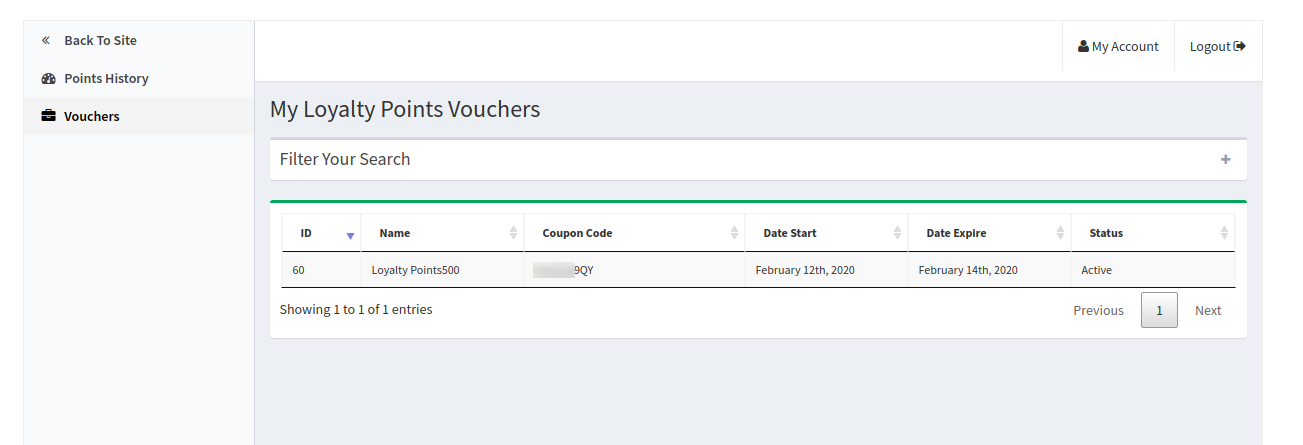
The online users can view the coupon code and validity days also.

After placing the order, the online users will also get an email notification. The Magento 2 Loyalty reward points module sends a separate notification whenever the customers get any loyalty points related information.
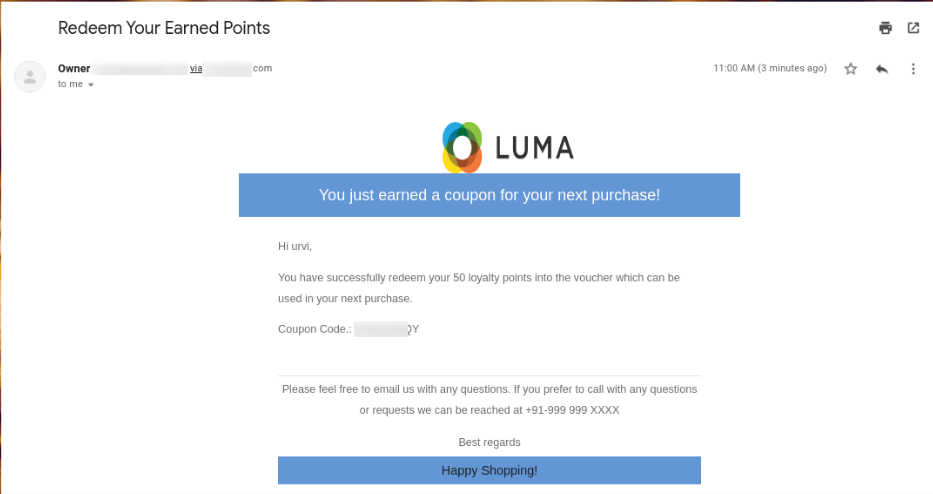
This way, the online users can get loyalty points and enjoy shopping.

Top 4 Magento 2 Extensions to Improve Performance of your Product Pages

A product page is one of the important elements for any eCommerce website. It is the page which, if optimized well, can make the purchase journey of your potential customers flexible and make their buying decision even stronger.

What elements should be added to the product page? How can its performance be improved? Which extensions will be beneficial?

If you have these questions running through your mind, this blog post will provide you with the answers.

In this write-up, I have specified 4 Magento 2 Extensions that can help you improve your product pages’ performance.

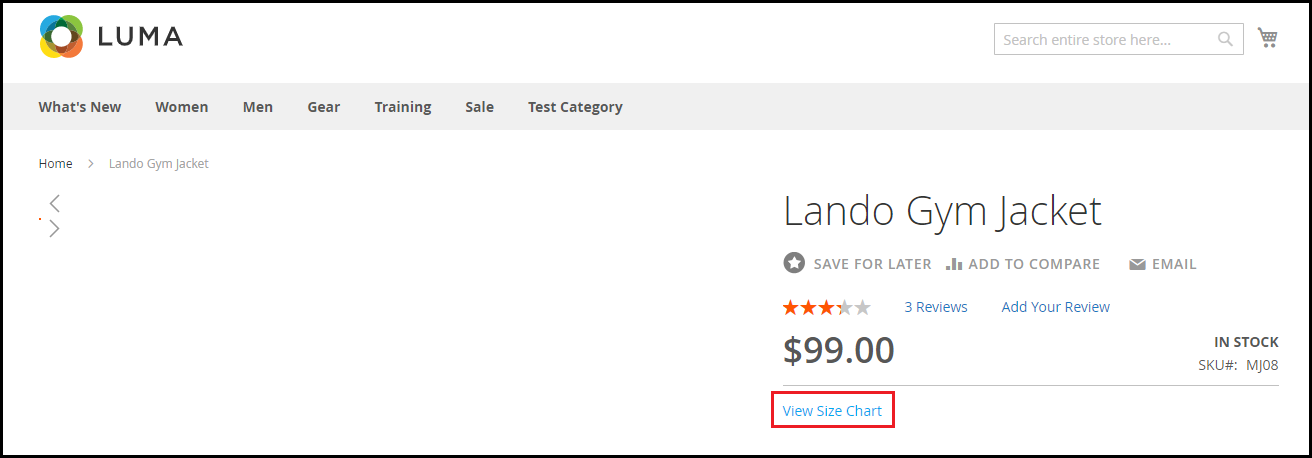
1. Magento 2 Product Size Chart

If you have a Fashion website, this Magento 2 extension is a must.

For any website that deals with clothing items, providing shoppers with a size guide is necessary. Many eCommerce returns take place due to customers not receiving the correct sized product.

Though websites allow choosing the desired size, not many of them display the size guide in detail. For example, simply displaying S, M, L and XL would not help with the exact measurements. Different websites have different measurements, and even a slight difference in measurement can lead to the size issue. It would be wise if you could display the measurements as well along with the size type so that shoppers have a clear idea of what would be a perfect fit for them.

With Magento 2 Product Size Chart extension, you can add a size chart option on your product pages that reflects the dimensions of the product, hence enhancing the shopping experience and reducing the possibility of return.

2. Magento 2 Web Push Notification

Brands leverage the power of web push notifications to deliver important updates to their subscribers even when they are not present on the website. From boosting website traffic to increasing sales, web push notifications deliver effective results.

Talking about the Magento 2 Web Push Notification extension, though it has too many features, there are some extremely useful features that would help you set up a perfect product page.

In this module, particularly for the product pages, you can ask users to subscribe to product price alert or product back-in-stock alert so that if a user feels that the product price is too high or finds that the product is currently not in stock, they can subscribe to receive alerts whenever there is a price drop or product is available.

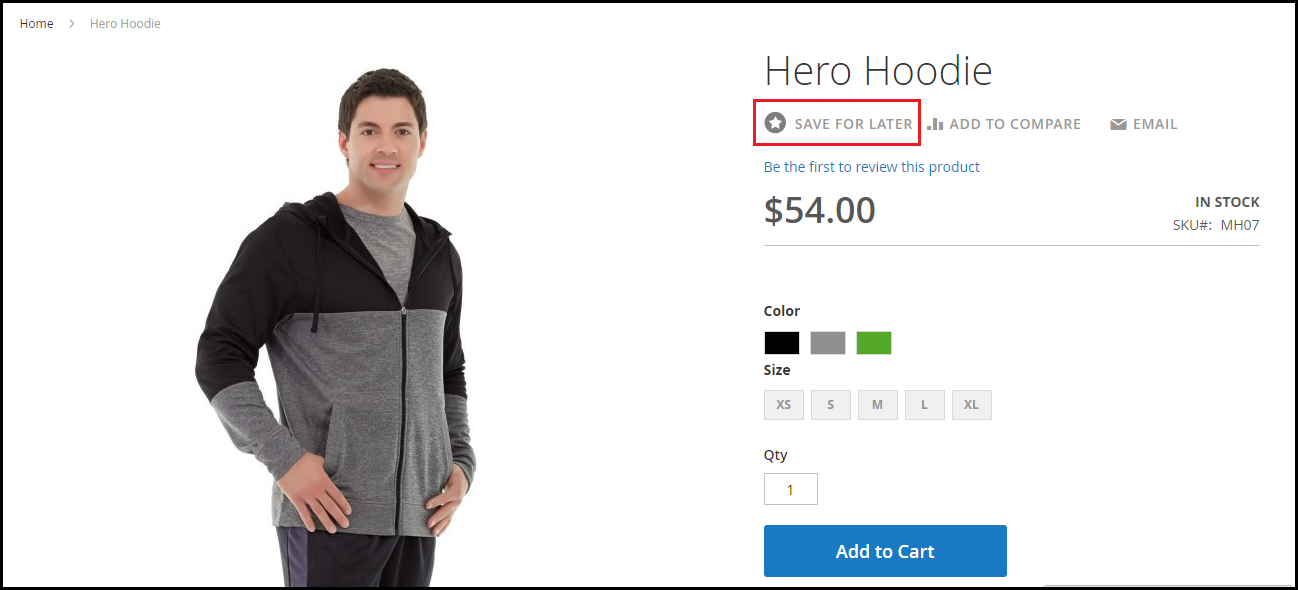
3. Magento 2 Advance Wish List/ Save For Later

The Magento 2 Advance Wish List/Save for Later extension allows your potential customers to save the items they wish to purchase in the future. Generally, when people make a purchase decision, they add the items in their wish list so that they do not have to search it again and they can directly view that product in their save items. It also happens when visitors are usually not much impressed with the product price.

By having the option to save for later, they can put that product in that section and access it anytime without having to search again.

4. Magento 2 Infinite Scroll

This Magento 2 extension might not seem much relevant from the product page optimization perspective, but it can help you with product listing system.

If you usually follow the pagination process on your website for product listing, the Magento 2 Infinite Scroll extension lets you turn that into Infinite Scrolling. As a result, all the products that have been segmented into multiple pages will be brought together on a single page and would load automatically as the user scrolls down.

This tends to make product browsing simple and exciting, and increases user engagement at the same time.

If you have anything to ask regarding these Magento 2 extensions, do let me know in the comments below or if you need any kind of assistance, you can contact us at support@knowband.com

A Definitive Guide to Effective Email Marketing in 2020

The most common form of online marketing over the years has been Email Marketing. Even though it has become conventional, it is still one of the most preferred communication channels for marketers.

There has been a huge shift in the way marketing is done, especially with the introduction of social media. But does that mean email marketing is no longer effective?

No! Even today, email marketing is quite effective but just like every other thing that requires improvisation or a change over time, email marketing, too, requires a change in its approach.

In this write-up, I am going to share how to do email marketing the right way in 2020. Let’s begin.

What is Email Marketing?

In the simplest words, making use of emails to promote your products or services is what we call as Email marketing. But it doesn’t just involve promotion.
Email marketing is the beginning of your relationship with your potential customers, and to make that relationship successful, it needs to be given time and effort plus you need to provide some value to your prospects.

It requires regular communication to understand your clients so that you could pitch them your products as per their response.

Email Marketing Best Practices 2020

Follow the below mentioned best practices for email marketing.

1. Let your subject line arouse Curiosity

If you want your email subscribers to pay attention to your emails, the subject line has a major role to play. The email content inside would not even matter if your subject line does not stand out. And that way your email would either remain unopened or land in the spam folder after some time.

To have a high email open rate, make sure the subject line is catchy and arousing curiosity to open it, but at the same time, it should not be vague or misleading like a click-bait.

2. Show a bit of Creativity in the Email Content

The job does not end if you have successfully made your prospects open your emails with a tempting subject line. The email content is equally important. Both of them complement each other. If the content is not interesting, the email subjects can lose their importance over time.

Imagine for a second. Impressed by the subject line, your subscribers opened your email expecting the content to be as amazing as the subject but after a while, they find it too boring.

What would happen? First, you will have low click rates. Second, they might even unsubscribe. Third, they would not fall for the subject line in the future.

But if your content is amazing that keeps them engaged, they will be waiting to receive your email updates. This way, you will have a higher open rate as well as higher click rate.

To write awesome content, keep it as crisp as you can. Write in plain and easy to understand English. Keep a flow and add a bit of humour element in it as well. Yes, you should be professional but too much of it can kill the interest. There should be friendliness.

3. Segment your Audience

It is important that your emails are delivered to the right audience instead of any random subscriber. While it can be useful to some, it can be totally irrelevant to others. This does not leave a good impression and can often lead to your subscribers unsubscribing from your emails.

So what should you do? Segmentation is the answer. Segment your email database into relevant categories and target them accordingly. There is no point sending emails to those prospects for whom the email is not relevant.

4. Do not Spam

A normal user receives a heck of emails every day. And no one has this much time to open every single email. Thus, you should restrict yourself from sending emails too often. Continuous messaging can land your messages in the spam folder.

Understand that people have subscribed to you because they feel it is something valuable. If you bombard them with emails, the value declines. And remember quality always matters over quantity.

Limit your email frequency and maintain the quality.

5. Remove Inactive Subscribers

There will be many in your email subscribers’ list who never respond to your emails. They do not even open your emails, let alone paying attention to the inside content.

So, it would be better if you clean them off your list. I am sure you would have tried many attempts to engage them but got no sign. In such cases where your subscribers have not shown any kind of indication in the past six months or a year maximum, removing them would make more sense.

Email Marketing Trends and Strategy 2020

Let’s check out the email marketing strategies and trends that would help you in your email marketing campaigns in 2020.

1. Go Mobile

The count of mobile phone internet users is exceeding rapidly. Majority of the people today are using hand-held devices to browse the Internet, be it for surfing social media or checking their emails.

So if you have not made your emails mobile-friendly, you can face a downfall in mobile traffic. When you are sending emails, make sure that the text, as well as the visuals, fit well both in desktop and mobile. Sometimes, visuals do not look as appealing on mobile as they look on desktop. They take time to load and do not fit properly with the screen. It often leads to users bouncing off within a fraction of seconds.

Optimize your emails for mobile. It has a higher potential to increase your email open rate.

2. Add testimonials in your Email content

It’s a good move to showcase what your customers think about your products or services in your emails. Whatever you are trying to pitch to your potential customers, try adding some testimonials related to it inside the email. Testimonials are influential and can bring positive results.

You have very limited time to impress your prospects. And within that time, you need to hit your point right. By displaying testimonials, you can develop interest inside them and make them keen to check it out.

3. Personalize your Emails

Adding a personal touch to your emails can deliver much better results than without it. You need to make your subscribers feel that it is them whom you are talking to in personal else it sounds like an automated message that has been set same for all.

For example, if I am receiving an email that says Hey or Dear Customer and there is another email that starts with Hey Manish or Dear Manish, the latter would catch my attention immediately. This is what you need to do as well.

And it does not mean that you need to reach out to every prospect individually. You can make use of your customer data and put a first name tag on your emails. Almost every email marketing tool provides email personalization.

Personalized email marketing has been in the trend for quite some time now and it is here to remain in 2020 as well.

4. A/B Testing

A/B testing always helps when you are running an email marketing campaign. It helps you find out which kind of emails users are finding more helpful. You can know which email at what time is having more open and click rates as compared to the other. It provides you with an opportunity to improvise your approach and make changes accordingly.

5. Set your timing right

Ok, let’s say you have subscribers from all around the world. Will sending emails to all at one time make sense? Definitely No! There would be no point of sending an email to a subscriber who is receiving it at 4 am or 11 pm.

This is why I previously mentioned that it is important to segment your subscribers so that emails are delivered to the right audience at the right time.

The Bottom Line

Email Marketing is not going anywhere. It is here to stay not just even in 2020 but for many upcoming years. Just go with the trend, notice the changes in the approach and try to come up with some creative thoughts every now and then instead of following a mainstream approach every time.

What’s your take on email marketing for the year 2020? Do let me know in the comments below.

You might also like:

8 Email Popup Best Practices to Grow Email List and Boost Conversions

6 Effective Ways to Build and Grow your Email List

5 Conventional Mistakes that are Killing your Email Subscriptions

How to drive eCommerce Conversions through email marketing?

7 email marketing software for small businesses

7 Must-Have OpenCart Extensions to prepare your store for Valentine’s Day

The week of love is just around the corner. On one hand where the love birds would be searching a perfect gift for their partner, Brands, on the other hand, would love to make their shopping experience better and smoother.

Have you done your preparations for Valentine’s Day? Is your marketing strategy ready to be implemented? Well, even if you haven’t, it is still not too late.

OpenCart Extensions for Valentine’s Day

If you have a website on the OpenCart platform, here are the 7 must-have OpenCart extensions that you can consider implementing on your website to catch the spirit of Valentine’s Day. Check them out.

1. OpenCart Gift Card Extension

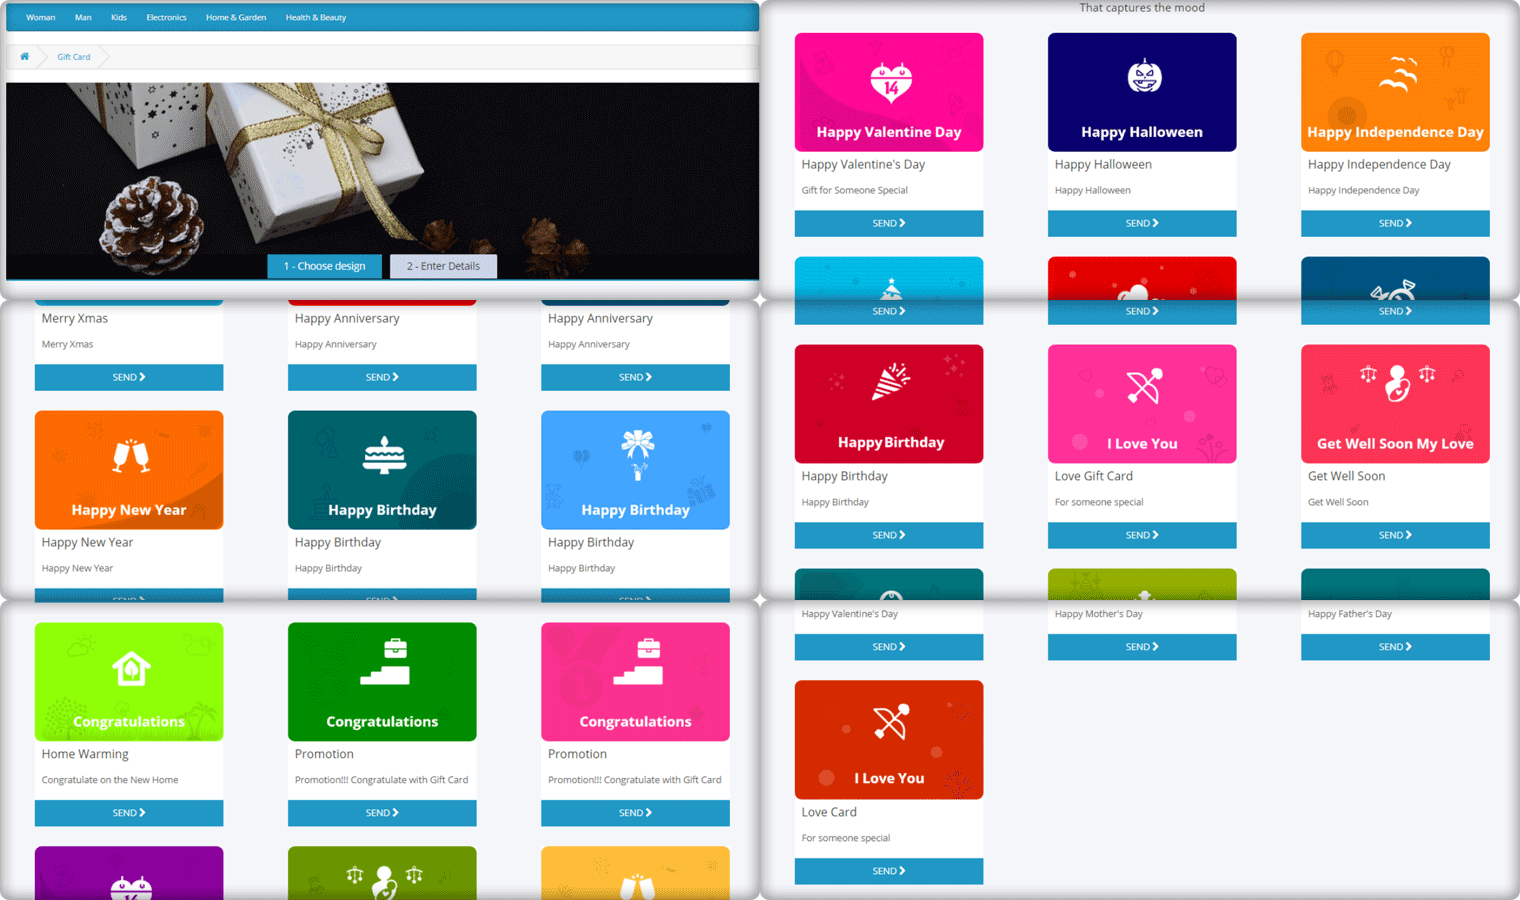
Gift Cards purchases are seen in high numbers during Valentine’s week and there is no doubt shoppers would be looking for some Valentine’s theme-based Gift Cards on your website too. Reduce this hassle with OpenCart Gift Card Extension.

The Gift Card module adds a gift card section on your OpenCart website and provides you with pre-existing gift card templates for multiple occasions including Valentine’s Day. It allows the users to print personalized gift card by uploading a custom image. You can customize these templates, add new ones, and do many more customization with the help of this OpenCart Gift Card Extension.

2. OpenCart Spin and Win Extension

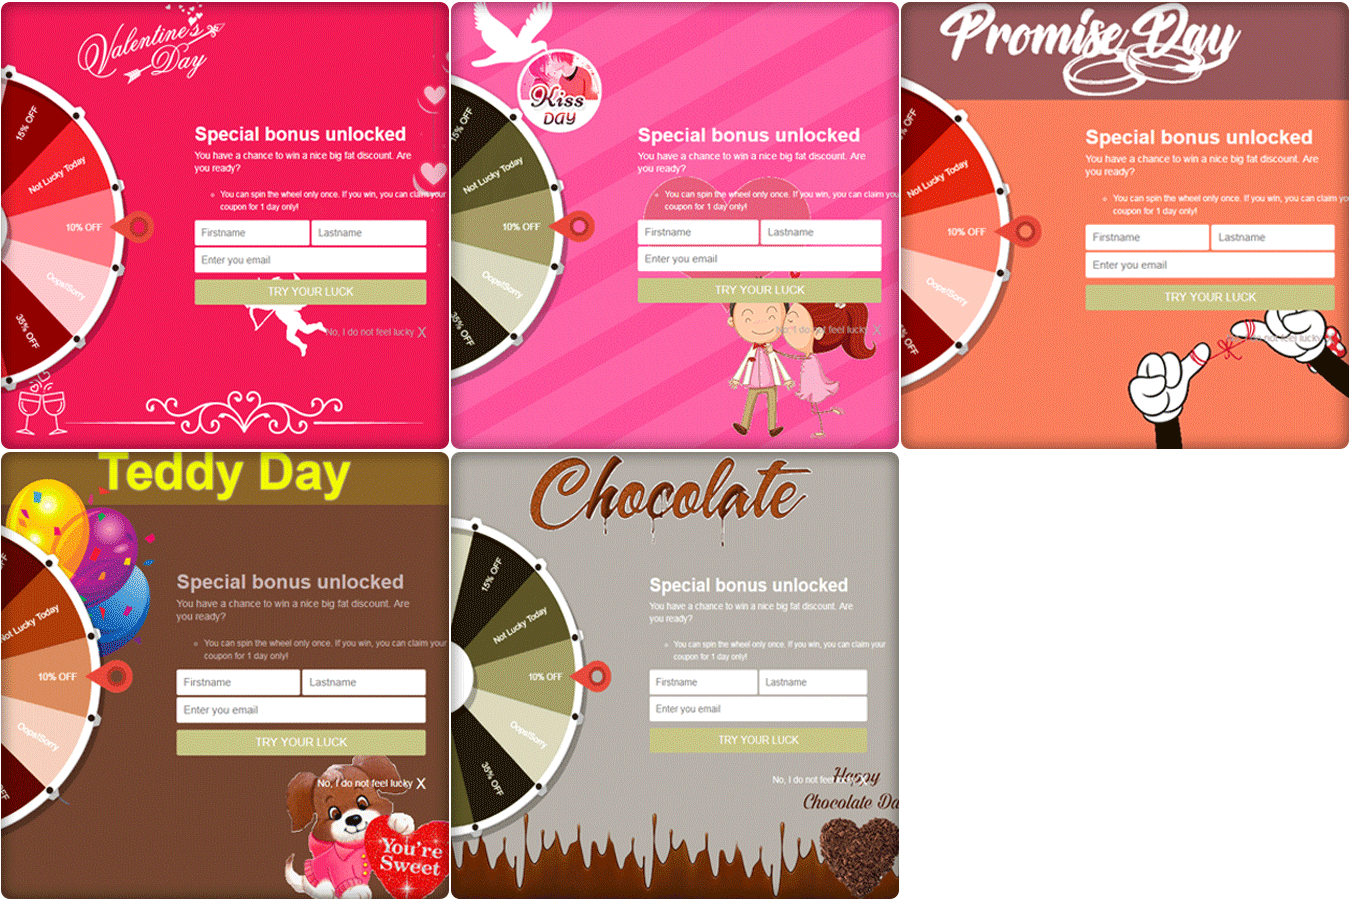
How about giving your visitors Valentine’s feel as soon as they enter your website? The OpenCart Spin and Win extension has multiple themes designed for Chocolate Day, Hug Day, Rose Day, Kiss Day, Promise Day, Propose Day, Teddy Day, and Valentine’s Day, to give your popup an amazing look.

The Spin and Win Popup extension adds a gamified Spin 2 win wheel on your website. Besides keeping Valentine’s feel, it tends to generate higher user engagement, helps you grow your email list, and boosts your conversions.

It lets you encourage your visitors to spin the wheel and earn some enticing discounts.

3. OpenCart Countdown Sales Timer Extension

Announce your Valentine’s sale to your store visitors through OpenCart Countdown Sales Timer extension.

This OpenCart module helps you set a countdown timer on the front end of your website for your upcoming sales so that your store visitors are very well aware of the commencement of your sales day and do not miss out on it later.

It is a perfect module to highlight your future sale offers without disturbing the user experience. By implementing this module on your OpenCart website, you can expect an increase in your sales when the actual sale season starts.

4. OpenCart One Page Checkout

Though this might make you think as to how one page checkout can be helpful during Valentine’s, it is something that you should definitely consider using.

Many cart abandonments take place due to a long and complicated checkout process. And you can lose out on huge conversions when the visitors count on your store is high but they are not making past the checkout page.

Remove the multi-step checkout barrier with the simple OpenCart One Page Checkout. The extension puts all the checkout fields on a single page and helps your prospects take a quick exit. A user can fill the entire checkout related information in any particular order and check out quickly.

Guest checkout, Social login, checkout field customization, multiple shipping and payment modes support are some of the amazing features of OpenCart One Page Checkout.

5. Print-on-demand Products

Print-on-demand services provide an alternative way to bypass inventory management time, investment, and risk, letting you go from creating to selling custom items at a fraction of the cost.

You can put your original spin on everyday items and sell them online, from t-shirts to posters, backpacks to books.
You can always graduate from using a print on demand platform to keeping your inventory if one of your online business ideas pans out and you start making a large number of sales or continue to use these services while exploring new ways to expand your audience.

This Valentine’s Day, to achieve this you can add a Product Customization Module to your eCommerce store. The users surprise their loved ones with custom, personalized gift items. The choice is yours!

6. OpenCart Preferred Delivery Time Extension

There will be many last-minute shoppers on your store this Valentine who would want to order an item and get it as soon as possible or at a specific date and time. Make this possible for those shoppers with OpenCart Preferred Delivery Time extension.

Through this module, shoppers can specify the date and time on which they want to get their order delivered. They can choose their preferred delivery time on the checkout page. This would prove very beneficial to those users who want to receive a product at a certain occasion and at a certain time.

From the backend configurations, you can make certain changes in the module functionality.

7. OpenCart Cash on Delivery with Fee Extension

With OpenCart Cash on Delivery with Fee extension, you can ask your customers to pay an additional fee when they choose COD option on the payment page. The cash on delivery method is the widely adopted payment method as the majority of the shoppers do not like paying the product price until it reaches them.

The extension helps customers feel more secure and relaxed as they do not need to worry about sharing their card details online.

Over to You

Make the best of this Valentine’s week with these 7 OpenCart Extensions. You will surely witness a boost in your conversions.

If you face any issue with any of these modules or need any kind of assistance, reach out to us at support@knowband.com

6 Amazing OpenCart Extensions for Product Page Optimization

When a user lands on your website in search of a product, it is primarily the product page that gives them a push to go for the purchase. Although for a conversion to take place, every element from the beginning till the end is vital. But the product page is the primary focus, and this is why product page optimization is highly important.

If the product page does not look appealing, informative and standardized, the prospect might give up the purchase idea and look for that product on your competitor’s store.

Understanding the importance of optimized product pages, here are the 6 OpenCart Extensions that will help you with product page optimization. Check them out.

1. OpenCart Product Video Extension

What could be a better way to help a prospect in his/her purchase than showing them an informative video of that product? Shoppers have plenty of doubts roaming around their head when purchasing a product online.

Besides product images, a product video eliminates those doubts to a great extent and helps you gain more trust of consumers.

OpenCart Product Video extension adds a “Product Video” tab on your product pages, hence allowing customers to have a look at the product video before purchasing the desired product. You can integrate videos to your OpenCart website effortlessly from multiple platforms likes YouTube, Dailymotion, and Vimeo.

Related: 4 Benefits that Highlight the Importance of Product Videos in eCommerce

2. OpenCart Product Size Chart Extension

One of the major reasons why customers return clothing items is the incorrect product size. Not having an idea of the accurate product size often leads to customers ordering an incorrect sized product. In fact, different eCommerce websites have different length measures for particular size type. An L-sized t-shirt would not necessarily be of the same size everywhere.

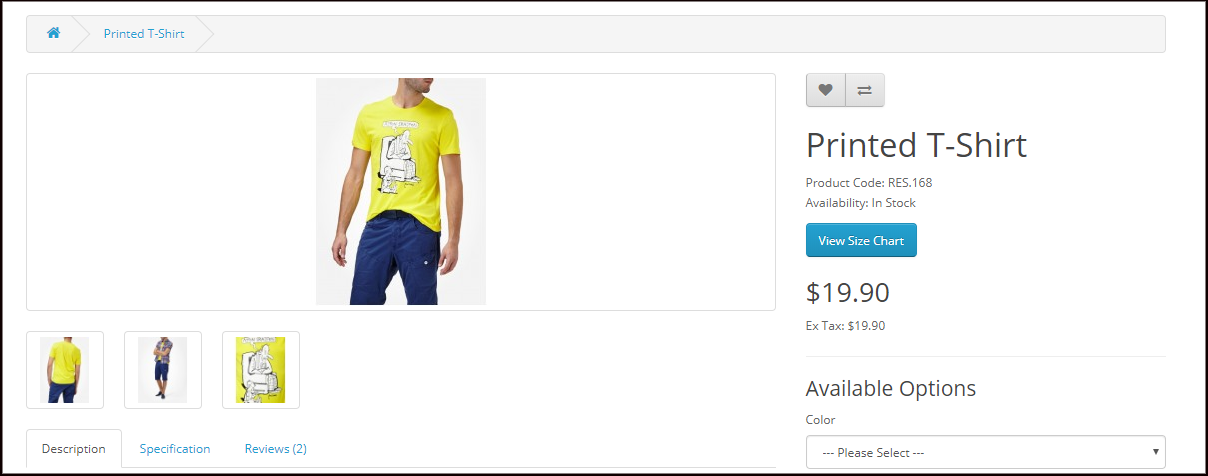
OpenCart Product Size Chart extension adds a “View Size Chart” tab on your product pages through which users can confirm which size product would fit them the best. From the back-end, you can specify the measurements of a particular size type.

3. OpenCart Product Designer/Customizer Extension

Product customization has been in the trend for quite a few years now. Many online shoppers look to purchase customized products. In fact, today, there are entire businesses set up on product customization.

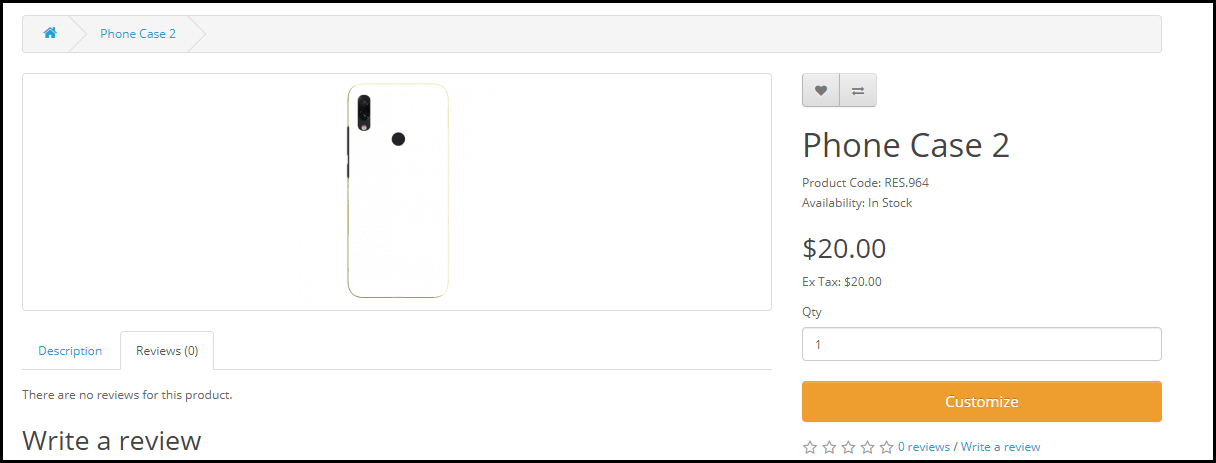
OpenCart Product Designer/Customizer extension adds a “Customize” tab on your product pages with the help of which a user can personalize a product as per their needs and desire. The configurations for this module can be modified from the back-end including setting up the customization price as well.

Related: 5 Benefits of Product Customization

4. OpenCart Product Availability Check by Zip Code Extension

Let customers check whether a particular product is eligible for delivery or not, at their desired location, right on the product page.

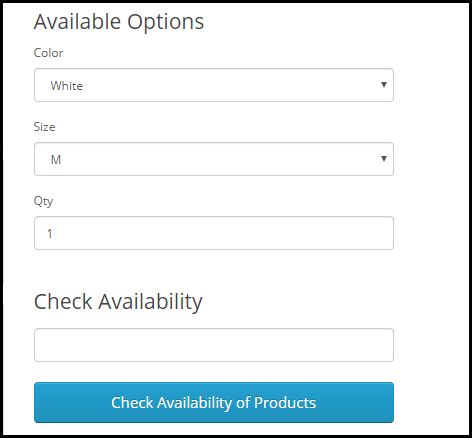
With the help of OpenCart Product Availability Check by Zip Code extension, also called as OpenCart Zip Code Validator, the buyer can check whether the product is available for delivery at their location or not by simply specifying the area zip code. The module adds a “Check Availability of Products” tab on your product pages.

If unavailable, it will display that the product is not available at the specified zip code.

5. OpenCart Advance Wish List/ Save for Later Extension

Let shoppers save a product for later if they do not want to purchase it at that particular moment. With OpenCart Advance Wish List/ Save for Later extension, you can allow your prospects to add the products in their saved items list.

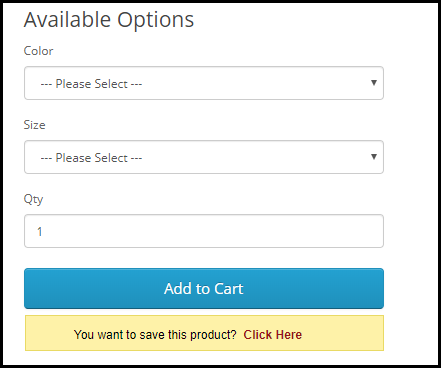
The module adds an option right below the “Add to Cart” button to make customers save that product. As a result, whenever the prospect returns and decides to make the purchase, they can simply view that product from their saved items.

This gives you an idea of the customer’s requirements and you can approach them later and help them purchase that product.

6. OpenCart Review Incentive Extension

Product Reviews highly matter for any online business. They not only influence the buying decision of the future customers but also help businesses get feedback about the product quality as well as the issues customers are facing with it. Brands do reach out to customers and ask them to review the product they recently purchased, but not many customers take it seriously.

With OpenCart Review Incentive Extension, you can encourage customers to leave a review on the products and reward them with exciting incentives for every successful (approved) review. You can set the incentive value, review reminder date and do much more through OpenCart Review Incentive Extension.

Related: Why Product Reviews are Important in eCommerce?

Final Word

Do whatever it takes to make your product pages user-friendly. Take the help of these 6 OpenCart Extensions for product page optimization and make the purchase experience of your visitors better than ever.

If you need any assistance in any of the above-mentioned OpenCart Extensions, reach out to us at support@knowband.com

OpenCart SEO Redirect Extension

“OpenCart SEO Redirect extension is a simple yet effective module that helps you perform different kinds of redirects on your website and maintains your website’s performance on the search engine.”

Changed the URL of a web page and want to redirect it to the new page instead of displaying a 404 error to your website visitors? Or want to have plain, simple SEO-friendly URLs for complexed URLs? We have got you covered. If you have an OpenCart website and want to make these changes, OpenCart SEO Redirect Extension is all you need.

Features of OpenCart SEO Redirect Extension

Let’s take a look at what features does the OpenCart SEO Redirect Extension offers.

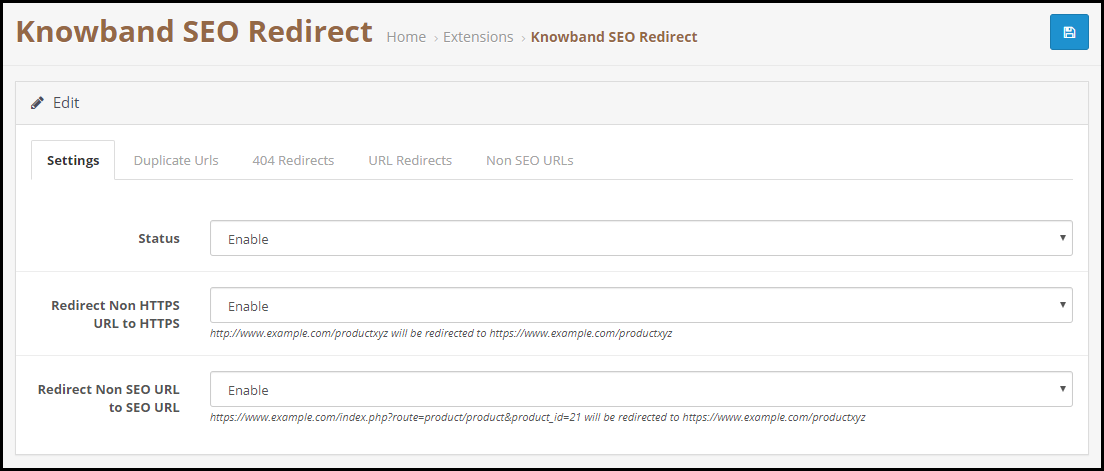
1. Redirect HTTP URL into HTTPs URL

OpenCart URL Redirect module allows you to convert Non-SSL certified web pages into SSL-Certified web pages. Hence, if you have added an SSL certificate to your OpenCart website and want to update the HTTP version into HTTPs, OpenCart SEO Redirect extension will let you do that comfortably.

2. Track and Rewrite Duplicate URLs

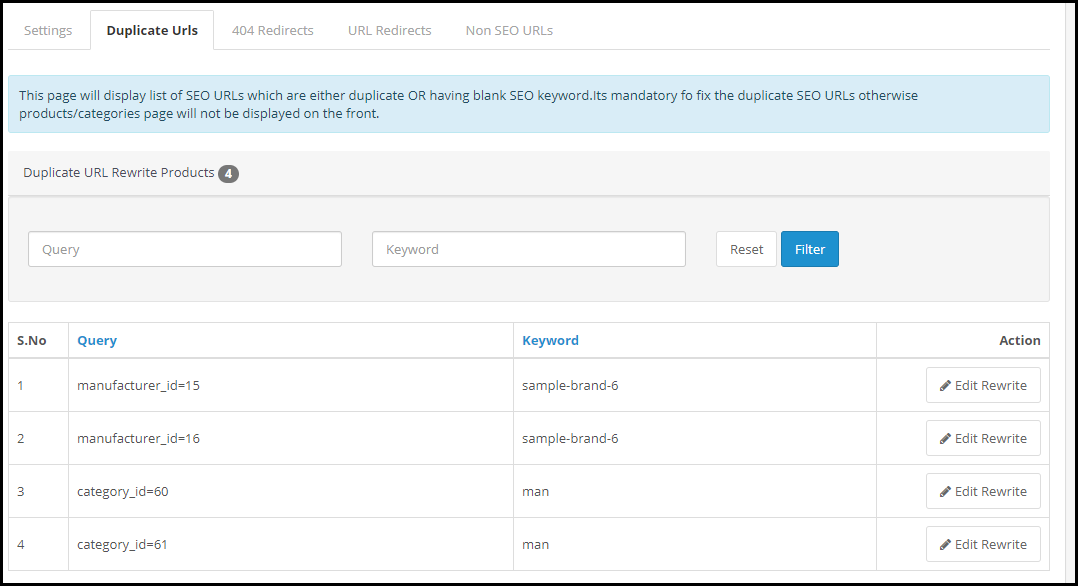
The OpenCart URL cleaner extension displays a list of possible duplicate URLs under the “Duplicate URLs” tab.

It displays the different URL queries associated with the same keyword. You can rewrite a particular URL, modify its keyword and set an SEO-friendly URL and redirect the visitors on the updated URL for that specific query.

3. Perform 404 Redirects

OpenCart SEO Redirect extension helps you perform 404 redirects. Under the 404 Redirects tab are the fetched URLs that are showing a 404 error. It also displays the fetched count of that particular URL.

To redirect a web visitor from those URLs to new URLs, simplify specify the new URL and the URL type. There are three types of redirects that you can perform-

301 Redirect- Moving a URL to a new URL permanently

302 Redirect- Moving a URL to a new URL temporarily

303 Redirect- GET method used to retrieve information

4. Track Non-SEO URLs

OpenCart SEO Redirect module displays a list of the Non-SEO URLs added by the admin, under the “Non-SEO URLs” tab and helps you convert them into SEO-friendly URLs. You can specify the path where you want to redirect a visitor if he or she clicks on its Non-SEO friendly path.

Benefits of OpenCart SEO Redirect Extension-

1. Keep Visitors Engaged

Leading visitors to broken or 404 pages can severely affect your website’s SEO and you may face a higher bounce rate and a decrease in website traffic. These problems get eliminated with OpenCart SEO Redirect Extension.

2. Remove Old URLs

By performing an SEO Redirect, you notify the search engine bot that the old URL has moved to a new path. Hence, it removes the previous existing URL and replaces it with the new one. Web visitors will then see a new URL indexed on the search engine.

If you need assistance with this OpenCart extension, contact us at support@knowband.com

How to add setting for custom plugin in the WordPress setting menu?

Objective of the blog:

The objective of this blog is to help you know how the setting of any custom plugin is created. Nowadays, most of the plugins contain settings to allow users to alter the functionality of the plugin according to their choice.


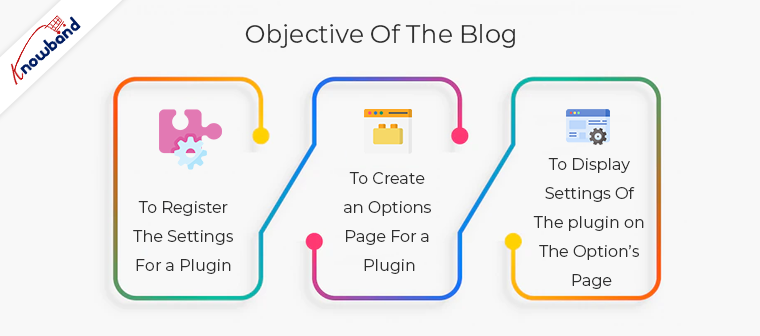
In this blog, we are creating the custom plugin for your reference. The basic requirements to add the setting of the plugin are:

  • To register the settings for a Plugin
  • To create an Options Page for a plugin
  • To display Settings of the plugin on the Option’s Page

Steps to add the plugin setting:

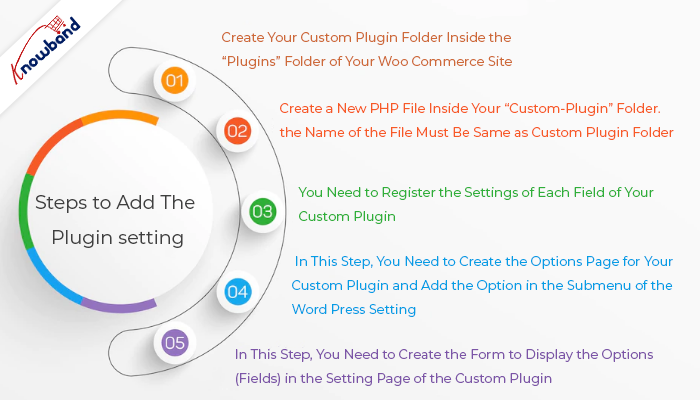
1. Create your custom plugin folder inside the “plugins” folder of your Woo Commerce site.
In the sample code, we have created a folder “custom-plugin”.

2. Create a new PHP file inside your “custom-plugin” folder. The name of the file must be same as custom plugin folder. In the sample code, we have created a file “custom-plugin.php”.

3. You need to register the settings of each field of your custom plugin. This step whitelist your plugin setting options (fields) that are used to save the plugin setting data in the wp_options table. Here, I have registered the setting for my custom-plugin as shown below and added that code to the “custom-plugin.php” file.

/*
* Plugin Name: Custom Plugin
* Description: This plugin is the custom plugin and created by velsof
* Version : 1.0.0
* Author: Velsof
*/
function custom_plugin_register_settings() {

register_setting(‘custom_plugin_options_group’, ‘first_field_name’);

register_setting(‘custom_plugin_options_group’, ‘second_field_name’);

register_setting(‘custom_plugin_options_group’, ‘third_field_name’);

}
add_action(‘admin_init’, ‘custom_plugin_register_settings’);

To learn more about “register_setting” you can check the document

“https://developer.wordpress.org/reference/functions/register_setting/”

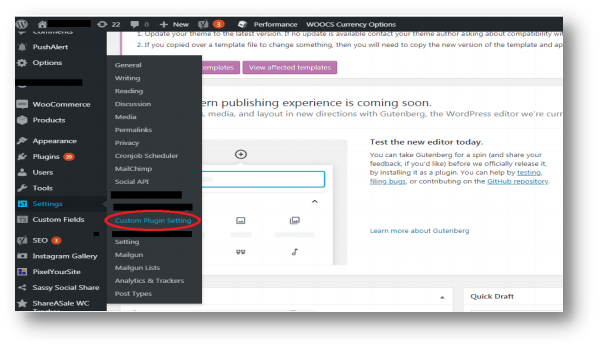
4. In this step, you need to create the options page for your custom plugin and add the option in the submenu of the Word Press setting. In the sample code, we have written the code of options page below and added the same to the “custom-plugin.php” file.

function custom_plugin_setting_page() {

// add_options_page( string $page_title, string $menu_title, string $capability, string $menu_slug, callable $function = '' )

add_options_page('Custom Plugin', 'Custom Plugin Setting', 'manage_options', 'custom-plugin-setting-url', 'custom_page_html_form');

// custom_page_html_form is the function in which I have written the HTML for my custom plugin form.
}
add_action('admin_menu', 'custom_plugin_setting_page');

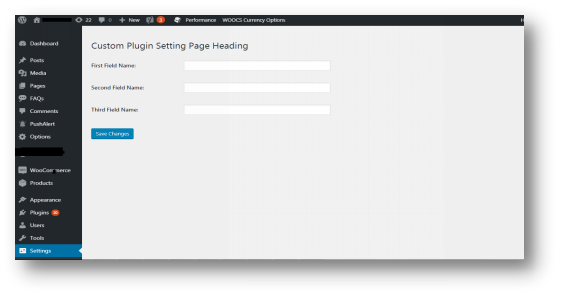
After completing this step you will be able to see the option of your custom plugin in the Word press setting as shown in the image below:

5. In this step, you need to create the form to display the options (fields) in the setting page of the custom plugin. Here, I have created a function “custom_page_html_form” as shown below and added the same to the “custom-plugin.php” file.

function custom_page_html_form() { ?>
    <div class="wrap">
        <h2>Custom Plugin Setting Page Heading</h2>
        <form method="post" action="options.php">
            <?php settings_fields('custom_plugin_options_group'); ?>

        <table class="form-table">

            <tr>
                <th><label for="first_field_id">First Field Name:</label></th>

                <td>
<input type = 'text' class="regular-text" id="first_field_id" name="first_field_name" value="<?php echo get_option('first_field_name'); ?>">
                </td>
            </tr>

            <tr>
                <th><label for="second_field_id">Second Field Name:</label></th>
                <td>
<input type = 'text' class="regular-text" id="second_field_id" name="second_field_name" value="<?php echo get_option('second_field_name'); ?>">
                </td>
            </tr>

            <tr>
                <th><label for="third_field_id">Third Field Name:</label></th>
   <td>
<input type = 'text' class="regular-text" id="third_field_id" name="third_field_name" value="<?php echo get_option('third_field_name'); ?>">
                </td>
            </tr>
        </table>

        <?php submit_button(); ?>

    </div>
<?php } ?>

After completing this step the form of your custom plugin will be created and the data will be saved in the database on clicking the button “Save Changes” as shown below:

Note: If you get the error “options page not found” on saving the setting of the custom plugin. Then you need to follow the below steps:

1.Open “options.php” file (File Location: wp\wp-admin\options.php).

2.Add the custom plugin option group in the $whitelist_options array.

Example:

$whitelist_options['custom_plugin_options_group’] = array('first_field_name’, ‘second_field_name’, ‘third_field_name’);

You can download the sample code here.

Summary

After reading this document you will be able to add the setting of your custom plugin in the WordPress setting menu.

Knowband also provides the best in class modules for Prestashop, Opencart, Magento, Magento 2, and Woocommerce.

We are providing a No Code Mobile App Solution for Woocommerce that every store needs to have. Know more here.


A complete guide to Cross-selling and Upselling in eCommerce

You go to McDonald’s or Burger King. You ask for a Burger but they ask you back in a very polite way “Sir/Mam, would you like to have some fries or coke with it?” This is Cross-selling.

Let’s say you agree to this combo meal which has one burger, regular fries and a small coke. But they ask you whether you would like to have medium or large fries or a large coke. This is Upselling.

A simple definition for these two terms would be-

Cross-selling: It is a practice where you encourage a customer to purchase products related to the one they are already purchasing. These related products are those that add value to the current purchase.

Another example of cross-selling would be buying a screen protector and mobile case along with the smartphone.

Upselling: It is a practice that involves encouraging a customer to purchase a better version of the product they have decided to purchase.

You would have often received suggestions to upgrade your existing plan when buying a subscription for a service. This is another example of Upselling.

Difference between Cross-selling and Upselling

Put simply, the difference between Cross-selling and Upselling is that Cross-selling is making customers purchase products that would seem complementary with the existing product while Upselling is making customers purchase a higher-end product, a product that is slightly expensive than the original one.

Talking about their similarity, both Cross-selling and Upselling intend to bring in more sales and hence more revenue, and at the same time, leaving customers satisfied.

In eCommerce, these strategies are implemented by brands or businesses on the product page so that the prospect can have a look around on the products that could match their purchase before they head towards the checkout page.

E-commerce giants like Amazon and Flipkart encourage Upselling and Cross-selling on their website by using the terms like “Frequently bought together”, “Similar Products”, or “Customers who viewed this item also viewed”.

Cross-selling and Upselling: Best Practices and Strategies

Let’s try to understand how to make the best use of the Cross-selling and Upselling strategy.

1. Make Sure Products are Highly Relevant

For your Upselling and Cross-selling tactics to deliver positive results, the recommended products must sync well with the product the user is purchasing. If they are not relevant, there would not be any added or expensive purchase. Instead, you will be more likely to turn off the customer.

Knowing what would fit with what product is the foundation of a successful Upselling and Cross-selling strategy.

2. Make it Easy to Add Related Items

Simply displaying similar products would not make an effective cross-selling strategy. Let’s say the consumer wants to purchase related products. Now he or she will need to add each item separately to the cart. This, being a time-consuming process, can often be avoided by the user, thinking they would buy it any other day.

How about making the user purchase related products comfortably, right when they click on the “Buy Now” button?

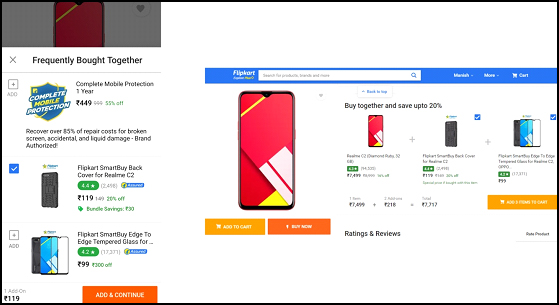
I like the way Flipkart uses its cross-selling strategy. They simply display a “Buy together and save upto” right next to the product and “Frequently Related Products” popup (on mobile devices) that slides up from the bottom and allows shoppers to add the related items right from that place, hence eliminating the extra efforts required to put otherwise.

3. Offer a Bundle Package

Following the second point, the more convenient approach would be to offer a bundle package of the product and its associated products. And the bundle should be comparatively at a lesser price than the total price of the individual products combined. It creates higher chances of a sale.

Benefits of Cross-selling and Upselling

Let’s take a look at what benefits do Cross-selling and Upselling provide.

1. Increased Sales and Revenue

Since cross-selling encourages customers to purchase similar items, it leads to an increase in the sales count and hence boosts your revenue.

This strategy often helps businesses sell those products which otherwise are gone unnoticed or purchased very rarely.

2. Increased Average Order Value

With both Cross-selling and Upselling pushing customers to spend more than the actual amount, this ultimately leads to an increase in the average order value.

3. Increased Customer Engagement

Customers tend to spend more time interacting with the products on your website when you display the related or better version of the products. They engage more, thus generating higher user engagement.

4. Customer Satisfaction

Upselling and Cross-selling help potential customers in their purchase decision by recommending them products which could go well with their purchase or get even better. This leaves customers highly satisfied after the purchase, hence enhancing the customer experience.

Want to enable Cross-selling and Upselling on your eCommerce website? Try out our Automatic Related Products module.

Automatic Related Products Module by KnowBand

The Related Products module by Knowband helps you perform Cross-selling and Upselling on your eCommerce website. This lets you display best sellers, new arrivals, top visited products and products based on a user’s history, on the Home Page, Product Page, Category Page, Cart Page, etc.

You can specify a limit to the number of products to be displayed and also select the display position. The module is available for PrestaShop and OpenCart. Check out

PrestaShop Automatic Related Products addon

Magento Automatic Related Products extension

If you liked this information on Cross-selling and Upselling, do leave a comment below. And if you need any kind of assistance with the Related Products module, you can reach out to us at support@knowband.com

Read our Popular Posts:

One Page Checkout vs Multi-Page Checkout

5  Benefits of Product Customization

10 Benefits of Social Login in eCommerce

6 Simple Tips to Reduce eCommerce Returns

Pagination vs Infinite Scroll

How to Integrate Google reCAPTCHA with PHP?

Nowadays everyone wants to get rid of spam on their website whether it is spam comments or spam messages or spam traffic on your site. To protect your website from spam, one of the best and easiest ways is to use Google reCAPTCHA.

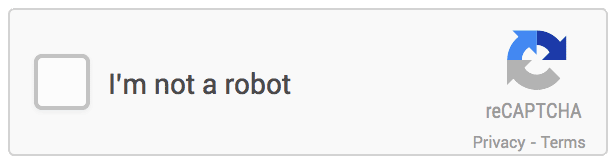
In earlier days, people used to put some random number or string on the screen and verify it on the server-side. But this method is the old-day method and it is also time taking for many users whereas Google’s reCAPTCHA method is easy to use and takes less time resulting in a better user experience. They just need a single click to prove that they are humans and not a robot. Google reCAPTCHA is very easy to implement in a PHP script.

Recommended Read: How to integrate Google ReCaptcha protection on your PrestaShop store?

In this blog, you will learn how to Integrate Google reCaptcha with PHP in our step by step guide.

Step 1: To fetch the Google reCAPTCHA API key

To get an API key to use reCAPTCHA with PHP, you need to register your website at – https://www.google.com/recaptcha/admin. The screenshots are given below for your help:


Label: Use a label of your own choice, so that it is easy to recognize the site in the future. You can add your brand name of website URL in this field to enhance the readability of the project name.

reCAPTCHA type: Choose any one type of reCAPTCHA you prefer for your site. There are two types available currently i.e., reCAPTCHA v3 and reCAPTCHA v2. We have used reCAPTCHA v2 in the sample project.

Domains: Here you need to enter your website name for which you will be implementing the reCAPTCHA functionality. It applies to the domains you enter here, and also to its subdomains. For example, a registration for abc.com also registers xyz.abc.com.

Now just check the checkbox of Accept the reCAPTCHA Terms of Service and click on Submit button.

Now you have the site key and secret key for your website.

Step 2: To Implement the Google reCaptcha with PHP the second step comes as Implementing reCAPTHA functionality to your site:

  • To add reCAPTCHA in PHP first you need to include the reCAPTCHA JavaScript library in your HTML.
    <script src='https://www.google.com/recaptcha/api.js' async defer >
  • Now add this HTML code where you want to show the reCAPTCHA widget.
    <div class="g-recaptcha" data-sitekey="site_key">
  • Replace site_key with the site key provided by google for your website.
  • It is done now, just refresh your page and you will see the reCAPTCHA widget on your site.

Step 3: To Validate the user’s response

Now, you need to validate the response when a user clicks on the reCAPTCHA widget. The PHP code to verify the user’s response is given below:

<?php
 
  if(isset($_POST['g-recaptcha-response']) && !empty($_POST['g-recaptcha-response']))
  {
        $secret = 'your_actual_secret_key';
        $verifyResponse = file_get_contents('https://www.google.com/recaptcha/api/siteverify?secret='.$secret.'&response='.$_POST['g-recaptcha-response']);
        $responseData = json_decode($verifyResponse);
        if($responseData->success)
        {
            $succMsg = 'Your contact request have submitted successfully.';
        }
        else
        {
            $errMsg = 'Robot verification failed, please try again.';
        }
   }
?>

Add your actual secret key in the above code and you are Done.

Get the Sample code here.

Recommended Read:  Two Effective Modules to Keep Away Spammers and Bots from PrestaShop store

Knowband offers Google ReCaptcha Addon for various platforms including PrestaShop, and OpenCart. The Google ReCaptcha module is a powerful security tool that guards your website against spam entries while facilitating easy access for actual users.

The Google ReCaptcha plugin can be used for sign-in, registration, password reset, well-known contact forms, and other things. Images are shown in the Google ReCaptcha addon as part of their standard validation processes to help identify humans.

This Google reCaptcha module offers excellent performance and is extremely customizable. From the back end of Knowband modules, the e-merchant may quickly adjust the Google reCaptcha addon.

Prestashop Google ReCaptcha Addon

PrestaShop Google reCaptcha by Knowband enhances your store’s security by integrating Google reCaptcha, preventing spam and automated bots.

SHOP NOW

Final Words:

Implementing Google reCAPTCHA on websites is essential for security. It helps tell real users from bots, preventing spam and automated attacks. This keeps user data safe and ensures the website runs smoothly. By blocking harmful traffic, reCAPTCHA improves the user experience, making online interactions safer and more reliable.

Recommended read – Empower Your PrestaShop Store Security with Knowband’s Top PrestaShop Modules
Along with this, the Google reCaptcha is also compatible with Knowband’s One Page Checkout, protecting you against transaction fraud. It is the best way to guard your store against transaction fraud. To view the admin demo and front-end demo of the Google reCaptcha Module, visit our store.

Avoid letting spammers harm your business!

Jak zintegrowa? google reCAPTCHA z PHP

W dzisiejszych czasach ka?dy chce pozby? ¿si? spamu na swojej stronie, niezale?nie od tego, czy jest to spam w komentarzach, wiadomo?ci spamowe, czy ruch spamowy w Twojej witrynie. Aby chroni? swoj? Witryn? przed spamowaniem, jednym z najlepszych i naj?atwiejszych sposob�w jest u?ycie Google reCAPTCHA.

Dawniej ludzie umieszczali na ekranie losow? liczb? lub ci?g znak�wi weryfikowali je po stronie serwera.

Ale ta metoda broma estrella? método? i bromea czasoch?onna dla wielu u?ytkownik�w, podczas gdy metoda Google reCAPTCHA bromea ?atwa wu?yciu i zajmuje mniej czasu, co zapewnia lepsze wra?enia u?ytkownika. Wystarczy jedno klikni?cie, aby udowodni?, ?es? lud?mi, a nie robotami. Google reCAPTCHA bromea bardzo ?atwy do zaimplementowania w skrypcie PHP.

Na tym blogu dowiesz si?, jak krok po kroku zintegrowa? google reCAPTCHA en swojej stronie z PHP.

Krok 1: Aby Pobra? klucz API reCAPTCHA

Aby uzyska? klucz API do korzystania z reCAPTCHA, musisz zarejestrowa? swoj? Witryn? vaina adresem – https://www.google.com/recaptcha/admin. Zrzuty ekranu znajduj? ¿si? poni?ej dla Twojej pomocy:


Nazwa U?yj w?asnej etykiety, aby ?atwo by?o rozpozna? Witryn? w przysz?o?ci.

escribe reCAPTCHA: Wybierz dowolny typ reCAPTCHA, kt�ry preferujesz dla swojej witryny. Obecnie dost?pne s? dwa tipy, tj. reCAPTCHA v3 y reCAPTCHA v2. W przyk?adowym projekcie zastosowali?my reCAPTCHA v2.

Domeny: Tutaj musisz poda? nazw? swojej strony internetowej, dla kt�rej b?dziesz wdra?a? funkcjonalno?? reCAPTCHA. Dotyczy to domen, kt�re tutaj wpisujesz, a tak?e ich subdomen. Na przyk?ad rejestracja dla abc.com rejestruje r�wnie? xyz.abc.com.

Teraz po prostu zaznacz polo wyboru Zaakceptuj Warunki korzystania z us?ugi reCAPTCHA i kliknij na przycisku Prze?lij.

Teraz masz klucz witryny i tajny klucz dla swojej witryny.

Krok 2:?Wdro?enie funkcji reCAPTHA?w swojej witrynie

  • Aby doda? reCAPTCHA najpierw musisz do??czy? biblioteca? JavaScript reCAPTCHA hace swojego kodu HTML.
    
    
  • Teraz dodaj ten kod HTML, w kt�rym chcesz pokaza? ancho y reCAPTCHA.
    
    
  • Zast?p?site_key? kluczem witryny dostarczonym przez Google dla Twojej witryny.
  • Zrobione teraz, po prostu od?wie? stron?, un zobaczysz wid?et reCAPTCHA na swojej stronie.

Krok 3: “Weryfikowanie odpowiedzi u?ytkownika”

Teraz musisz zweryfikowa? odpowied?, gdy u?ytkownik kliknie wid?et reCAPTCHA. Kod PHP do weryfikacji odpowiedzi u?ytkownika jest podany poni?ej:

sukces) { $succMsg = 'Twoja pro?ba o kontakt zosta?a pomy?lnie przes?ana.'; } else { $errMsg = 'Weryfikacja robota nie powiod?a si?, spr�buj ponownie.'; } } ?>

Dodaj sw�j rzeczywisty tajny klucz w powy?szym kodzie i gotowe.

Pobierz przyk?adowy kod tutaj.