Knowband’s Prestashop page visitor count display addon allows the store admin to showcase the number of store visitors viewing a particular page. Other customers and admin can also view the count of page viewers. A display box with “Currently X number of people are looking at this page” message shows on the front end. This functionality improves customers confidence and trust on the website as well as products also.This is one of the best Prestashop modules offered by Knowband.
The Prestashop module helps the PrestaShop eCommerce store admin to increase the popularity of the products and website. You can customize the module as per the requirements.
Features:
Prestashop visitor counter module is easy to install and configure.
Page viewer plugin offers simple and hassle-free implementation.
No technical knowledge is required.
Prestashop counter addon is highly customizable.
Admin can easily enable/disable the module just by a button toggle.
Admin can set look and feel by editing background color and border color for the display box.
Page view counter allows admin to auto-hide the message box.
Admin can set the hidden time after which the display box will be invisible.
Website hit counter extension allows to add custom CSS code for customization.
The PrestaShop Page Viewers Counter allows admin to set the time span for showing viewer’s count on pages.
Admin can select the position to show the message box.
Admin can set the number of visitors to a particular page.
Website visitor tracker addon is fully compatible with all Prestashop themes.
Visitor hit counter module is multi-store compatible.
To install this addon, please follow the following steps:
1. Add addon folder under modules folder of your system.
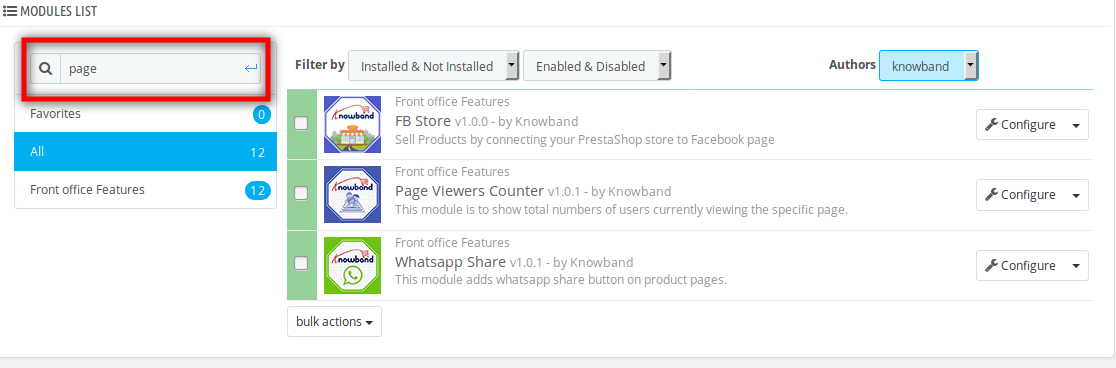
2. After adding this addon folder, system will list the addon on module page under front office featurecategory as given below:
3. Click on install to install the plugin
Admin Interface
Following features will be provided to the admin :
1. General Settings
2. Home Page Settings
3. Category Page Settings
4. Product Page Settings
General Settings
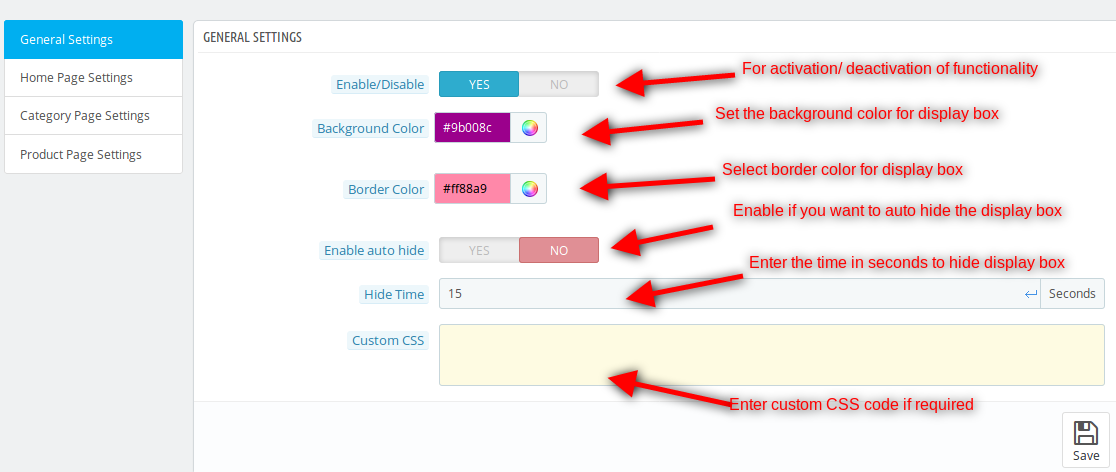
After clicking on configure link of Page Viewer addon on module listing page, the system will open general settings tabs by default as shown in the screen below:
Fields listed will be filled with some default values:
1.Enable/Disable: Initially, this will be OFF. The user can enable/disable addon functionality by turning this ON/OFF.
2.Background Color: Background color for the display box at the front end can be changed by picking a color from color picker.
3. Border Color: Border color to display on the border of display box can be selected here.
4. Enable Auto Hide: The display box will appear on the page as soon as the page loads after enabling the display area and will automatically hide after 10 seconds, admin can specify the auto-hide time period.
5. Custom CSS: Admin can change the CSS of the display box by adding custom CSS in the text area.
Home Page Settings
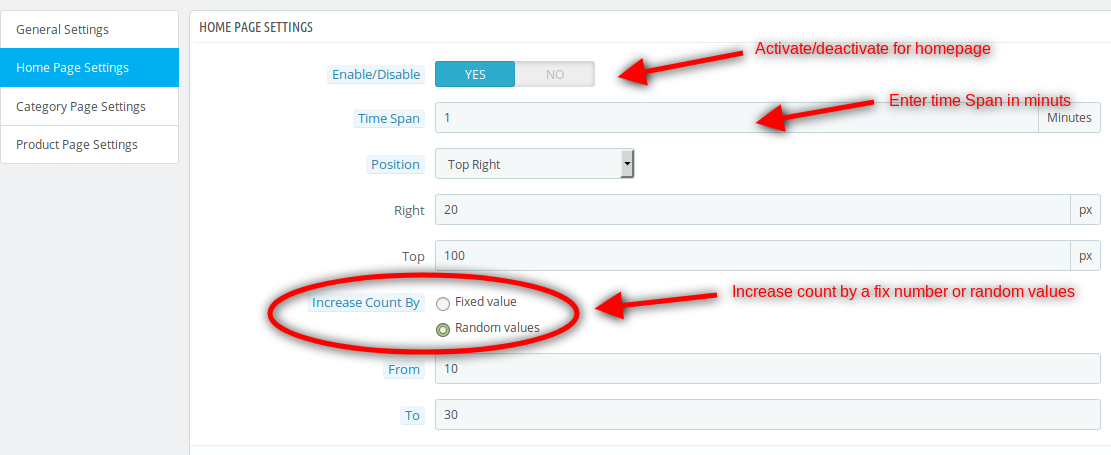
In this tab, change the settings for Homepage, the enable/disable option will be available there.
1. Enable/Disable: Can enable/disable according to the need whether to display on the homepage or not, by default it will be disabled.
2. Time Span: The time difference in minutes, the time corresponding to which viewers will be displayed on the homepage. The default value will be 1 minute.
3. Position: The position where users will see the display box in the page, admin will have the option to change the position by adding padding (right, left, top, and bottom) according to the selected position.
4. Increase Count By: The default value on which the total visitors will be added. Two options will be provided:
Fixed value: The fixed value on which viewer will be added. The default value will be 0.
Random Value: The range of random value will be set here, the default value will be 0.
5. Count Viewers on Homepage: The no. of viewers on the home page at the current time will be displayed. Admin can use the refresh button to view the current viewers.
Category Page Settings
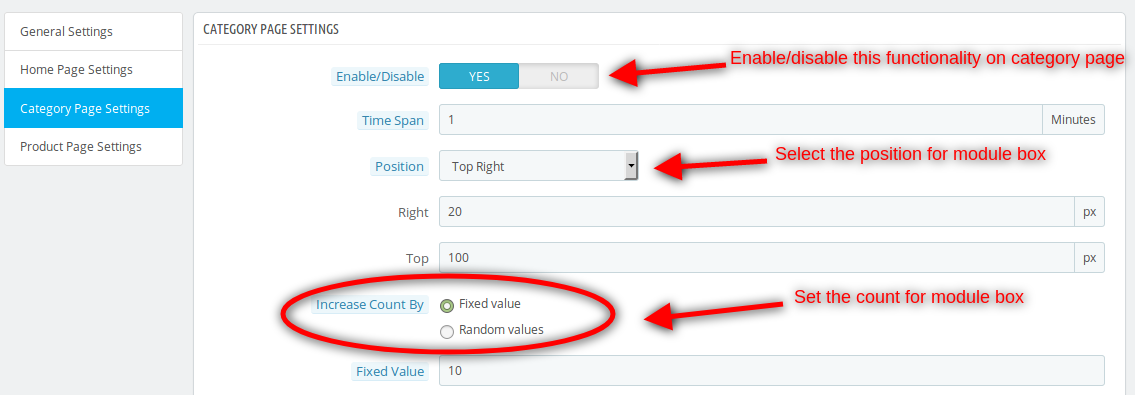
In this tab, change the settings for Category page, the enable/disable option will be available there:
1. Enable/Disable: Can enable/disable according to need whether to display on a Category page or not, by default it will be disabled.
2. Time Span: The time difference in minutes, the time corresponding to which viewers will be displayed on the category page. The default value will be 1 minute.
3. Position: The position where users will see the display box on the page, admin will have the option to change the position by adding padding (right, left, top, or bottom) according to the selected position.
4. Increase count By: The default value after which the total visitors will be counted, two options will be provided:
Fixed value: The fixed value on which viewer will be added. The default value will be 0.
Random Value: The range of random value will be set here, the default value will be 0.
5. Count Viewers on Category page: The number of viewers on the Category page at the current time will be displayed corresponding to the selected category from the select box.
Product Page Settings
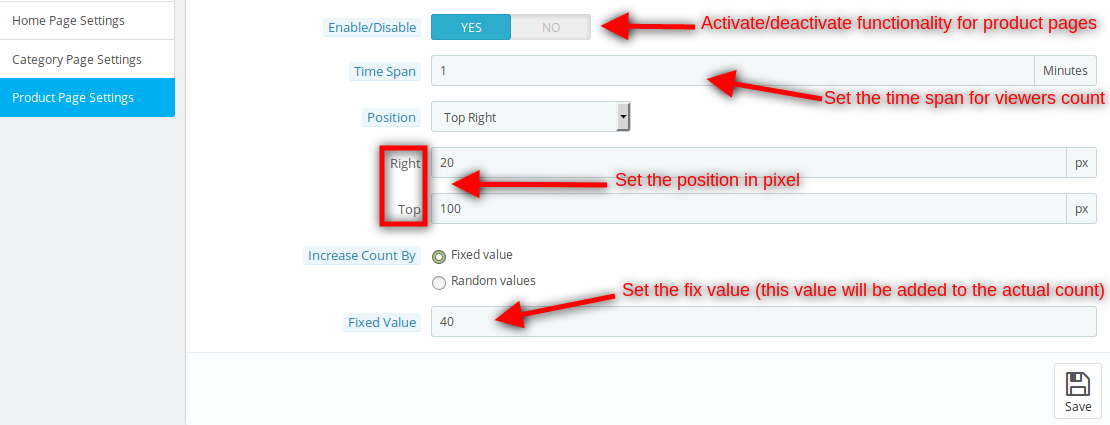
In this tab, change the settings for Product page, the enable/disable option will be available.
1. Enable/Disable: Can enable/disable according to need whether to display on the Product page or not, by default it will be disabled.
2. Time Span: The time difference in minutes, the time corresponding to which viewers will be displayed on the homepage. The default value will be 1 minute.
3. Position: The position where users will see the display box in the page, admin will have the option to change the position by adding padding (right, left, top, or bottom) according to the selected position.
4. Increase count By: The default value after which the total visitors will be counted, two options will be provided:
Fixed value: The fixed value on which viewer will be added. The default value will be 0.
Random Value: The range of random value will be set here, the default value will be 0.
5. Count Viewers on the Product page: The number of viewers on the Product page at the current time will be displayed corresponding to the selected product from the select box.
Front End Module
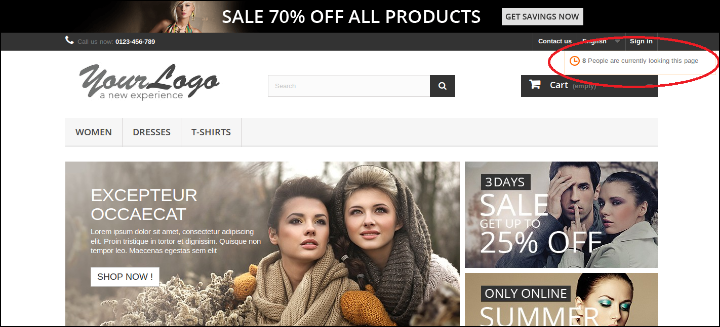
After enabling the PrestaShop page viewers counter plugin, the front-end user will see a display box at home page, product page, category page according to admin requirements.
The Display box at the front-end appears as follows:
Recommendations
Refresh home page of your store every time you enable/disable plugin. If the plugin is not working after installation, then please check permissions on modules folder. The folder should be writable. Please make the folder permission to 755.
Develop FlutterOpenCart Mobile App for your eCommerce store with KnowBand’s OpenCart Mobile App Builder & start observing a sudden growth in your store conversions & sales.
1.0 Introduction
If you are an OpenCart website owner & currently selling products on your website, try KnowBand’s automated mobile apps solution & take your business to the mobile world. The OpenCart Mobile App Builder is the pre-configured framework designed to develop FlutterAndroid & iOS apps for your online website. This ready-to-go mobile app solution is the most advanced & smartest solution to own a pair of fully functional Android & iOS stores without any coding or technical skills.
KnowBand has made a mark in the eCommerce industry as a leading mobile app provider for almost all the major eCommerce platforms. Its OpenCart Mobile App Builder is the easiest way to build feature-packed OpenCart Mobile Apps in just 3 simple steps:
2. Share the app-related specifications & requirements.
3. Get your own FlutterOpenCart Apps in 2-3 days.
We, at KnowBand, are an exceptionally skilled and proficient pool of programmers, designers, and other involved professionals. We can deliver an OpenCart mobile app that closely matches your personal expectations and business requirements. If you are not sure about the utility of this mobile app for your OpenCart store, let us throw some light on this amazing OpenCart Mobile App Builder.
Latest Enhancements in Opencart Mobile App Builder v4.8
The OpenCart Mobile App Builder Extension now introduces two powerful new integrations with the AI-Powered Chatbot Extension and the Opencart VideoMate Extension. These latest integrations significantly improve customer engagement, automate support, and enhance product presentation within your mobile application.
The Opencart AI Chatbot Extension leverages popular and advanced AI models of 2026, such as OpenAI ChatGPT, Google Gemini, Claude, and DeepSeek, enabling intelligent, real-time customer interaction directly inside the mobile app.
The Opencart Video Manager Extension transforms the shopping experience with immersive video carousels and a floating video player, helping merchants showcase products in a more engaging and conversion-driven format.
Together, these features make the OpenCart Mobile App Builder a complete AI-powered mobile commerce solution for modern eCommerce stores.
1.1 Prominent Features of OpenCart Mobile App Builder:
The following are some of the major features you’ll get in your OpenCart Mobile Apps:
–> Customizable Home Screen Layout (Complete Flexibility)
1.2 Recent Enhancements in Opencart Mobile App Builder!
1. Dynamic Position of the Signup-Login Popup in Home Page Layout: Admins can now customize the position of the signup-login popup on the home page, offering a more flexible user experience.
2. Enhanced Review Pages:
Write Review: Simplified process for customers to leave feedback.
Read Review: Improved interface for browsing reviews.
Review on Product Page: Reviews are now more accessible directly on product pages.
3. Video in Banner Elements: We have introduced video options in the banners available for the app’s home page layout. Now, the admin can add a YouTube video or can also upload a video below 2 MB for the square, horizontal, grid, and countdown banner components.
4. Push Notification Updates: Recently Firebase has officially deprecated the older cloud messaging API. Due to that the admin configurations now support uploading Firebase key JSON files for better management.
5. CMS and Layout Redirection in Banners and Category Elements: Banners and category elements available in the home page layout now support redirection to CMS and multi-layered layouts.
6. Automatic Banner Sliding in Horizontal Banner Slider: Horizontal banner sliders now feature automatic sliding, improving user engagement. The admin can also add the time difference on which he wants to slide the banners automatically.
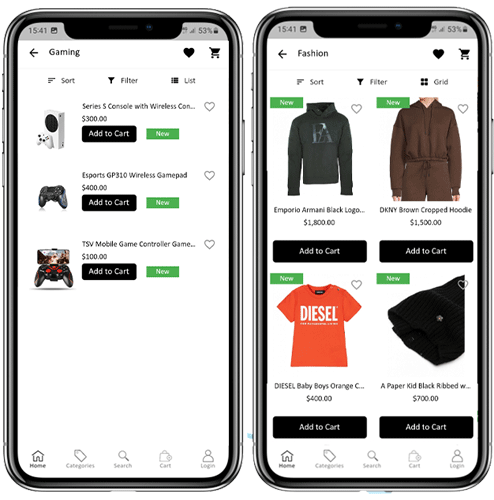
7. List and Grid View for Product Listing Screen: Users can toggle between list and grid views on the product listing screen for more convenient browsing. This new feature not only improves the UI but also provides more convenience to the customers while browsing the products.
8. Common Notification by Admin: Admins can now send common notifications to all users, ensuring important messages reach everyone. Furthermore, customers can check all the past notifications in the notification tab available in the app.
9. Custom Banner Element in Home Page Layout: Now, the Opencart admin can upload banners of any size, offering greater customization of the home page.
10. Redirection in Top Category Element: Top category elements now support redirection to specific layouts, improving user navigation.
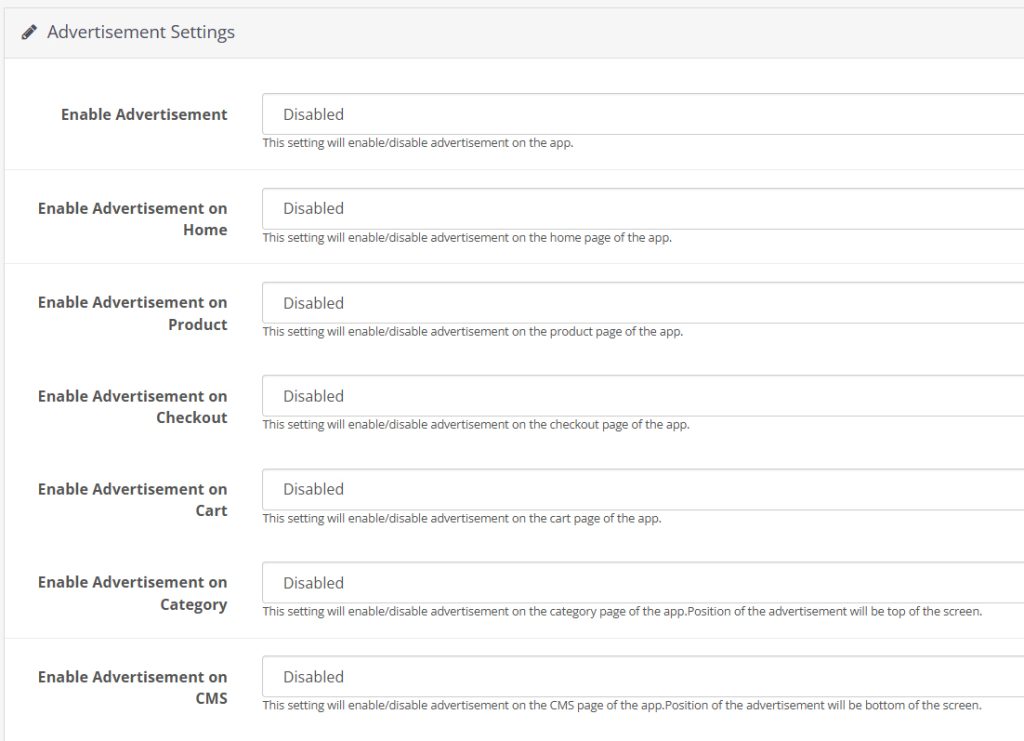
11. Advertisement Setting: The enhanced OpenCart Mobile App Builder allows store admins to turn their apps into revenue-generating channels by incorporating in-app advertisements. With Google AdMob integration, admins can now display banner ads on various app pages, creating a seamless way to generate additional income while keeping users engaged.
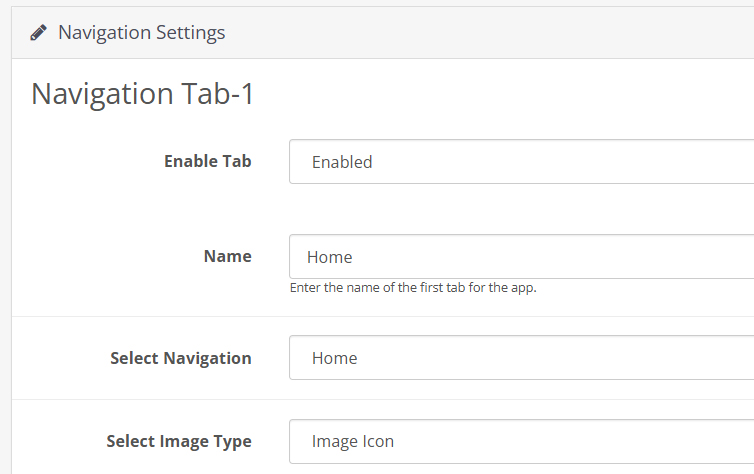
12. Navigation Setting: With flexible customization options, the store admin can adjust the look and feel of the tab bar layout. Now, the modules allow the admin to choose the names, set redirections, choose icons, and personalize color schemes, offering a unique and branded app experience that aligns with their store’s style.
Knowband’s OpenCart Mobile App Builder
The OpenCart Mobile App Builder by Knowband helps you create a mobile app for your store without coding. Easily turn your website into a user-friendly app!
KnowBand offers a demo of OpenCart Mobile Apps before actual mobile app development. We have brought free of cost demo for all the eCommerce store owners out there.
2.1 View Our Demo Store working on Apps
Take a look at our app functionalities with our demo OpenCart Mobile Apps. We have integrated our demo store with the app in order to let you explore the app working. All you need to do is to follow these simple instructions:
Step 1: Download and install the Nautica OpenCart Mobile App on your testing device. Here, are the links to OpenCart Demo Apps:–> Apple App Store–> Google Play Store
Step 2: Open the App and tap the “View Demo” button being displayed on the splash screen. Enter some relevant details like Name, E-mail & Store URL & experience our demo store running on the demo app.
Note: To access the Admin Panel of KnowBand’s OpenCart Mobile App Builder on our demo store, visit here.
2.2 View Your Store working on Demo Apps
Want to test your own store on the demo apps. Well, we made even that possible with 3 simple steps:
Step 2: Install the Demo Apps (links in the previous section) on your mobile testing device. Open the App & enter your website URL in “View Your Store”.
Step 3: Tap “View Your Store” and start experiencing your own store on OpenCart Demo apps.
Note: This Free version of Mobile App Builder is just for the demo purpose & no APK/IPA files will be provided with this module. In order to get your own APK/IPA files, you need to purchase the paid version of the OpenCart Mobile App Builder.
3.0 Build OpenCart Mobile App in 3 Simple Steps
Once you are satisfied with the demo apps working, it’s time to build your own mobile apps. The process to develop mobile apps with OpenCart Mobile App Builder is only a matter of these 3 simple steps:
Step 1: Purchase & Install Module on your website.
If there is any issue while publishing the app on respective stores, we would get it done for you.
4.0 Admin Panel Screens
Once the OpenCart Mobile App Builder is installed on the website, let’s take a look at its backend panel configuration. First of all, go to Extensions>>Modules>>KnowBand Mobile App Creator & click on configure option. It will bring the following interfaces to you:
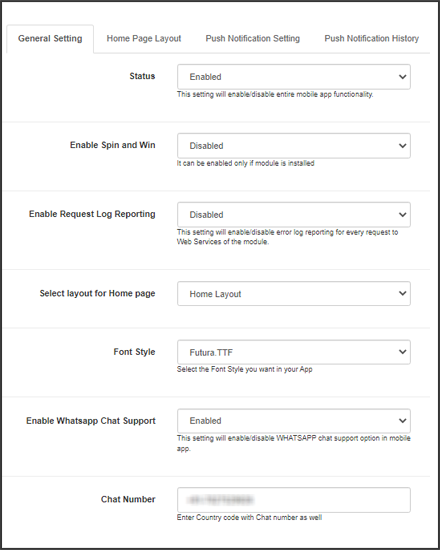
4.1 General Settings:
a) Status: Enable/disable the OpenCart Mobile App Builder module to make the apps work on mobile devices.
b) Enable Back in Stock: This option allows the admin to enable/disable Knowband’s back-in-stock module in the apps.
c) [New] Enable Spin & Win: This option allows the admin to enable or disable the Knowband’s Spin & Win Module in the mobile app.
d) [New] Enable AI Chatbot: You can now enable the AI Chatbot on your mobile app using the Opencart AI Chatbot Extension.
e)[New] Enable Videomate: Now, admins can easily add the instagram reels, shorts, videos in trending vidgets using the Opencart Videomate Extension
f) Font Style: This option provides multiple font styles to suit your app’s appearance.
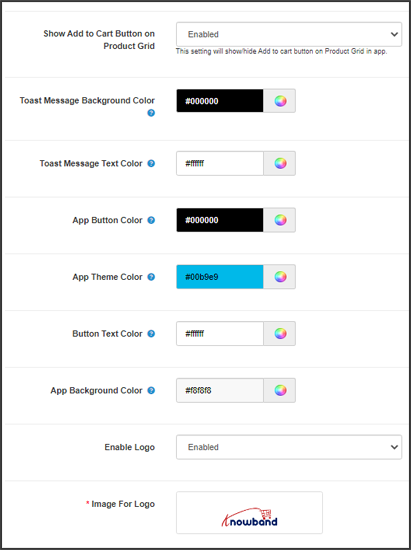
g) Show Add to Cart Button on Product Grid: If you want to show/hide the “add to cart” button from the product listing pages, you can manage the same from this button.
h) Mandatory Phone Number at Registration: Make the mobile number field optional/mandatory on the app’s sign-up page from here.
i) Redirect on Cart Page when Add to Cart: If you want users to directly redirect to the cart page upon clicking on the “add to cart” button, you can enable this option from here.
j) Enable Notification List Feature: This button allows the store admin to enable/disable the notification feature in the Android and iOS apps.
k) Enable Sing-up Pop-up: You can enable/disable the login pop-up for the non-logged-in customers in the app.
l) Enable Request Log Reporting: Enable the error log on mobile apps. This log file is used when the app shows any error or abnormal behaviour.
m) Select Layout for Home Page: Choose the desired layout for your app home screen. You can create multiple layouts under the Home Page Layout tab.
n) Enable WhatsApp Chat Support: Enable/disable the WhatsApp chat option on mobile apps.
o) App Button Color: Choose the button color for your apps.
p) App Theme Color: Choose the theme color for your apps.
q) App Button Text Color: Choose a button-text color for your apps.
r) App Background Color: Choose a background color for your apps.
p) Enable Logo: Enable the logo in your mobile apps. You can upload the logo image which will be displayed on the header of the mobile apps.
q) Fingerprint Login: Enable/disable fingerprint login in mobile apps.
r) Phone Number Login: Enable/disable phone no login in the mobile apps.
s) Disabled Shipping Methods: Disable the shipping methods that you do not want to display in the apps.
4.2 Payment Methods:
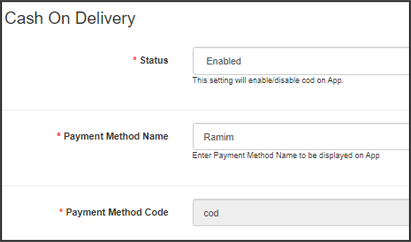
The OpenCart Mobile App Creator offers additional COD payment option to make the payments easier in the apps. The mobile apps with this extension already support web-view payment options in mobile apps.
4.3 Push Notifications:
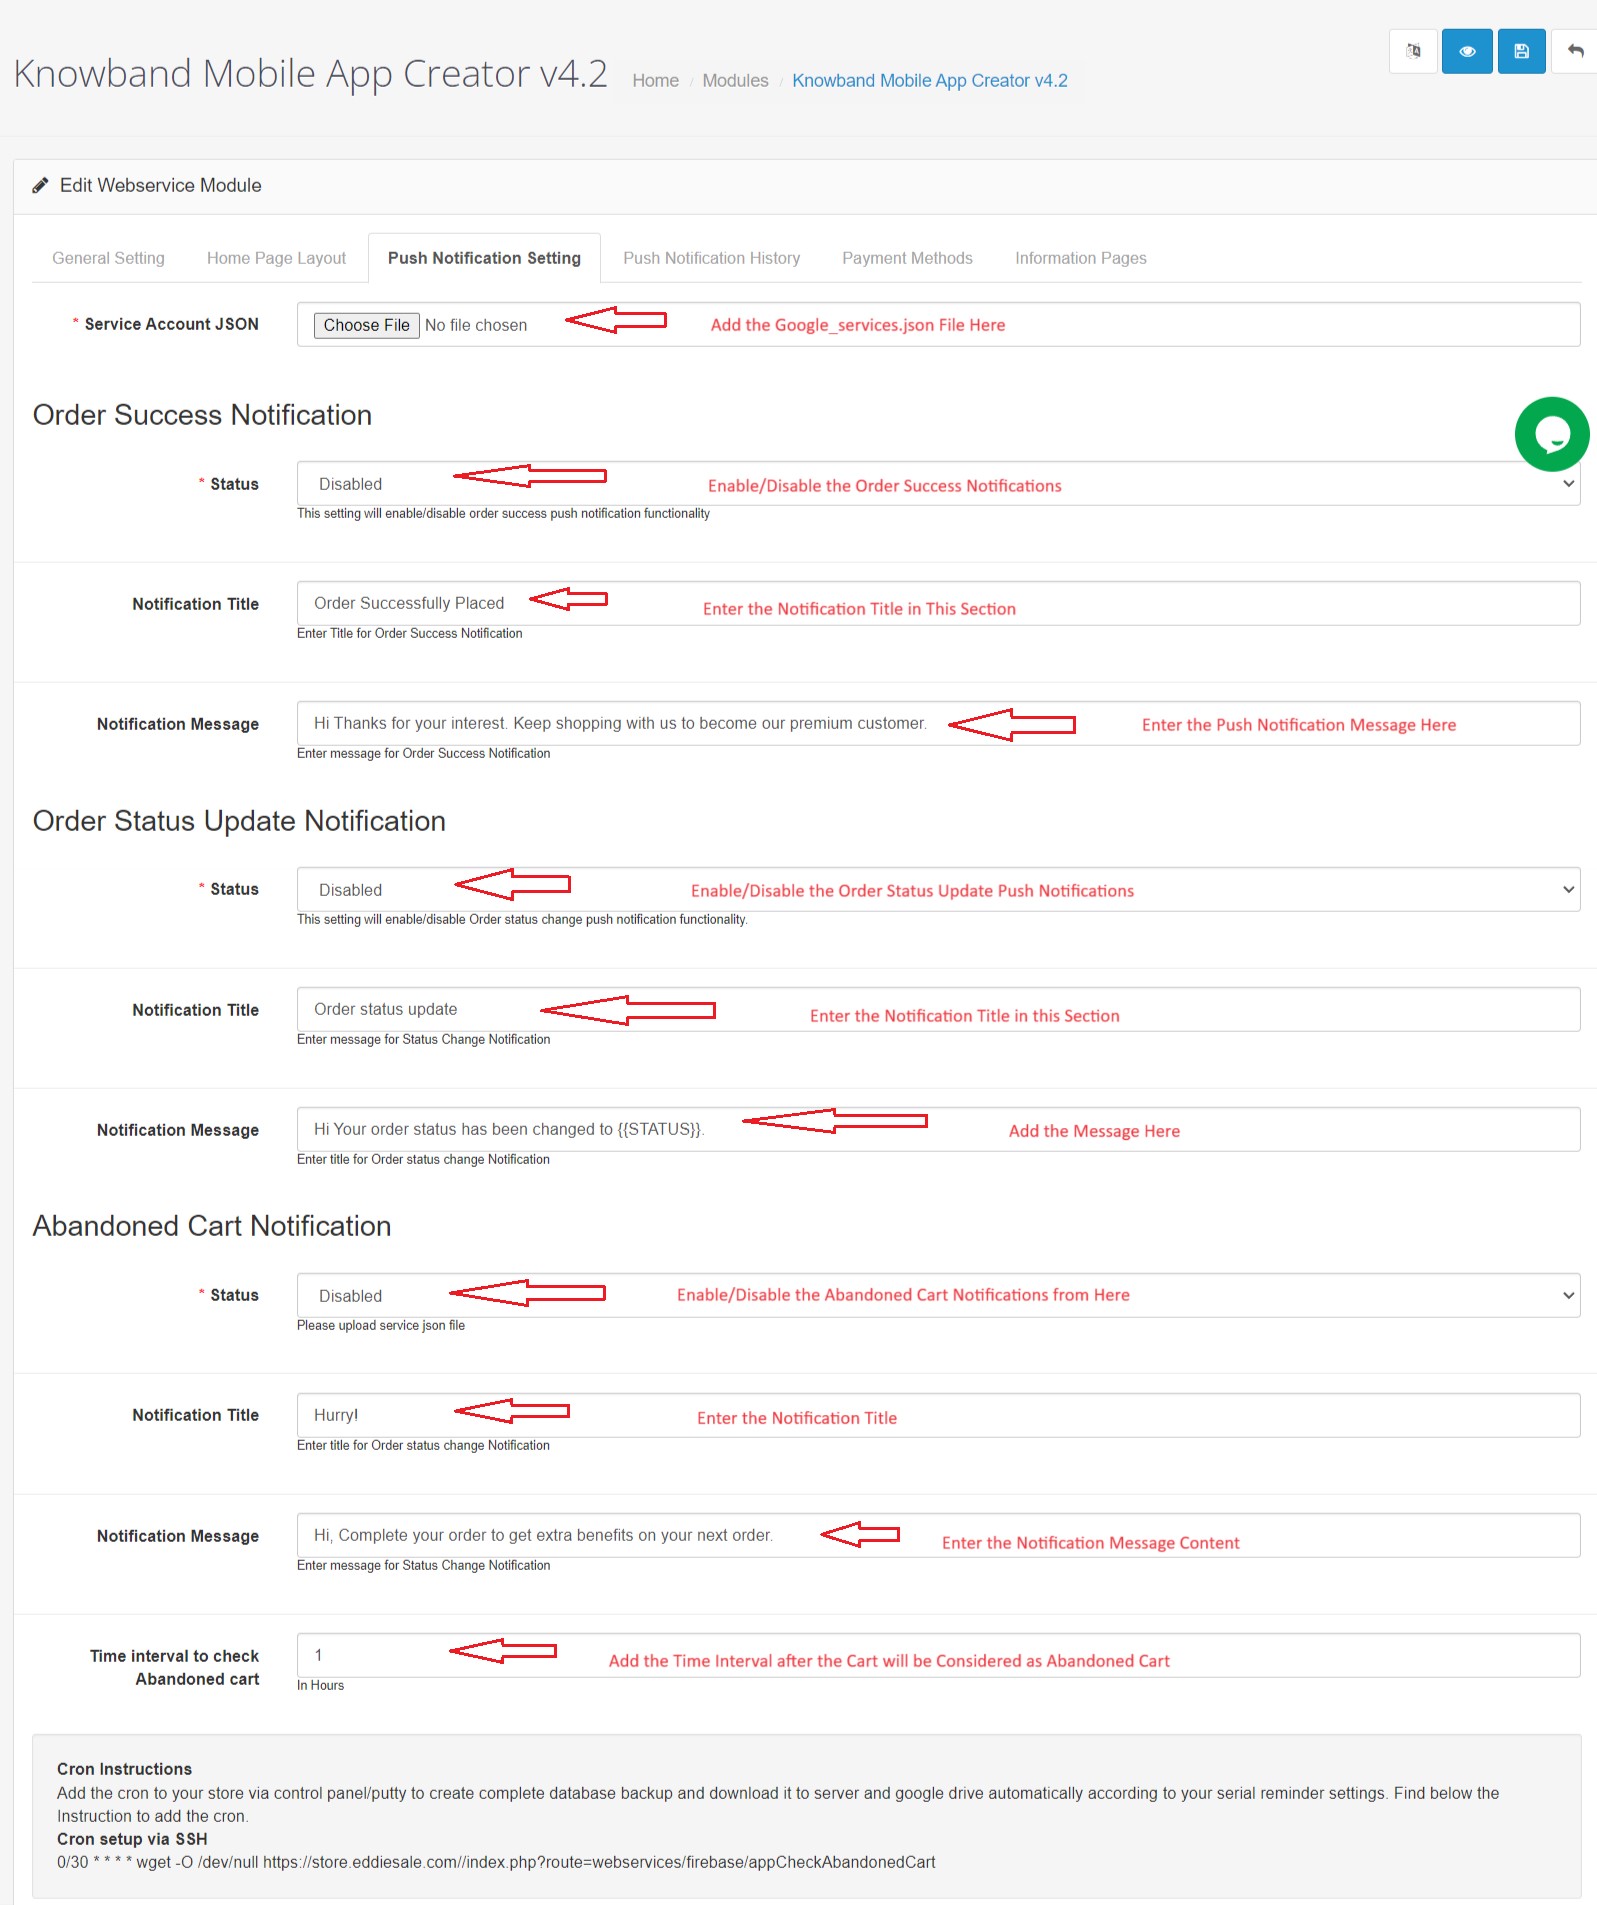
a) Service Account Json: In order to set-up the push notification in both the Android and iOS app, you will have to add the google_services.json file in this section. You can get the same in your Firebase account or can also ask the Knowband support team for the JSON file for your Firebase project.
b) Order Success Notification: Configure an automated order creation push notification which would be sent automatically on the user’s apps who successfully create an order.
c) Order Status Update Notification: Configure an order status update notification which would be sent automatically to the users whenever there is an update in order delivery status.
d) Abandoned Cart Notification: Configure automated abandoned cart notification which would be sent automatically to the users who left their products in the cart.
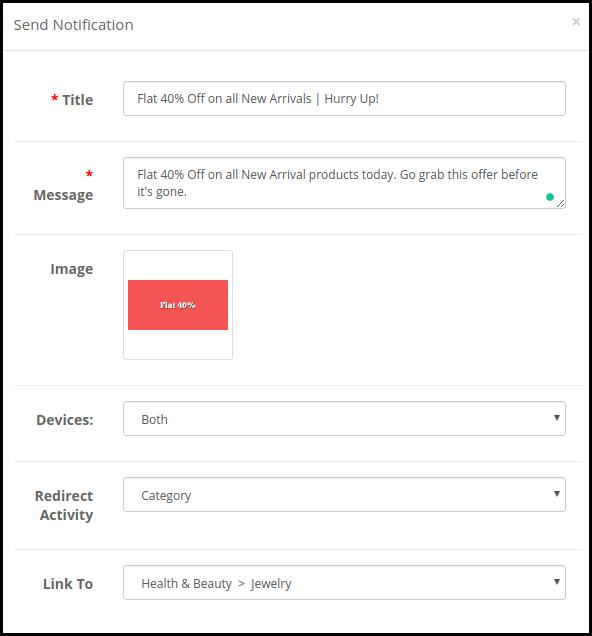
e) Send Notification: The store admin can even send manual notifications & highlight any deal or discount to the mobile app users.
4.4 Information Pages:
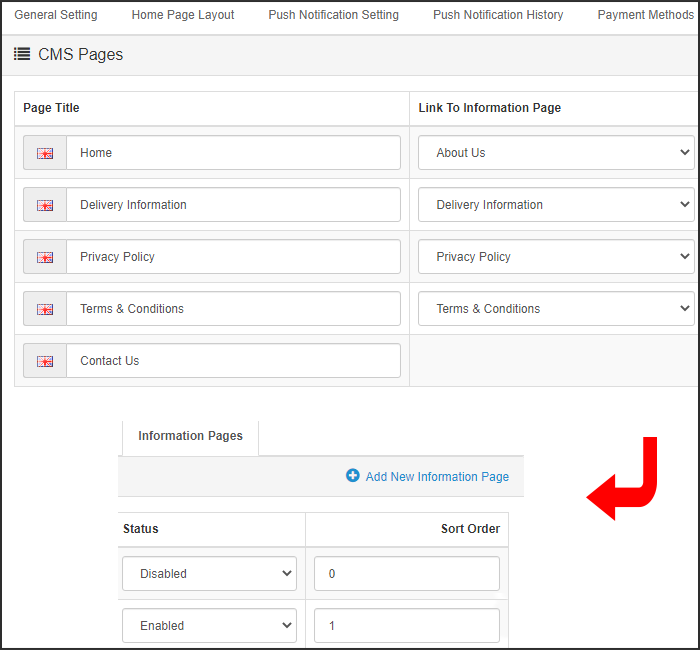
This tab of the OpenCart Mobile App Maker allows you to manage the CMS pages on the apps. You can customize the name and landing page of various CMS along with their sort order. New pages can also be added from here if there is a requirement.
4.5 Home Page Layout:
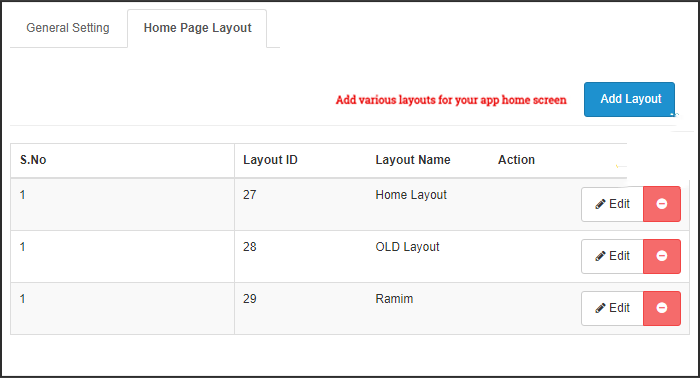
The OpenCart Mobile App Builder allows you to create & save various intuitive & appealing layouts for your mobile app home screen.
After adding the layout, click on Edit option & start adding & configuring various elements for your app home screen.
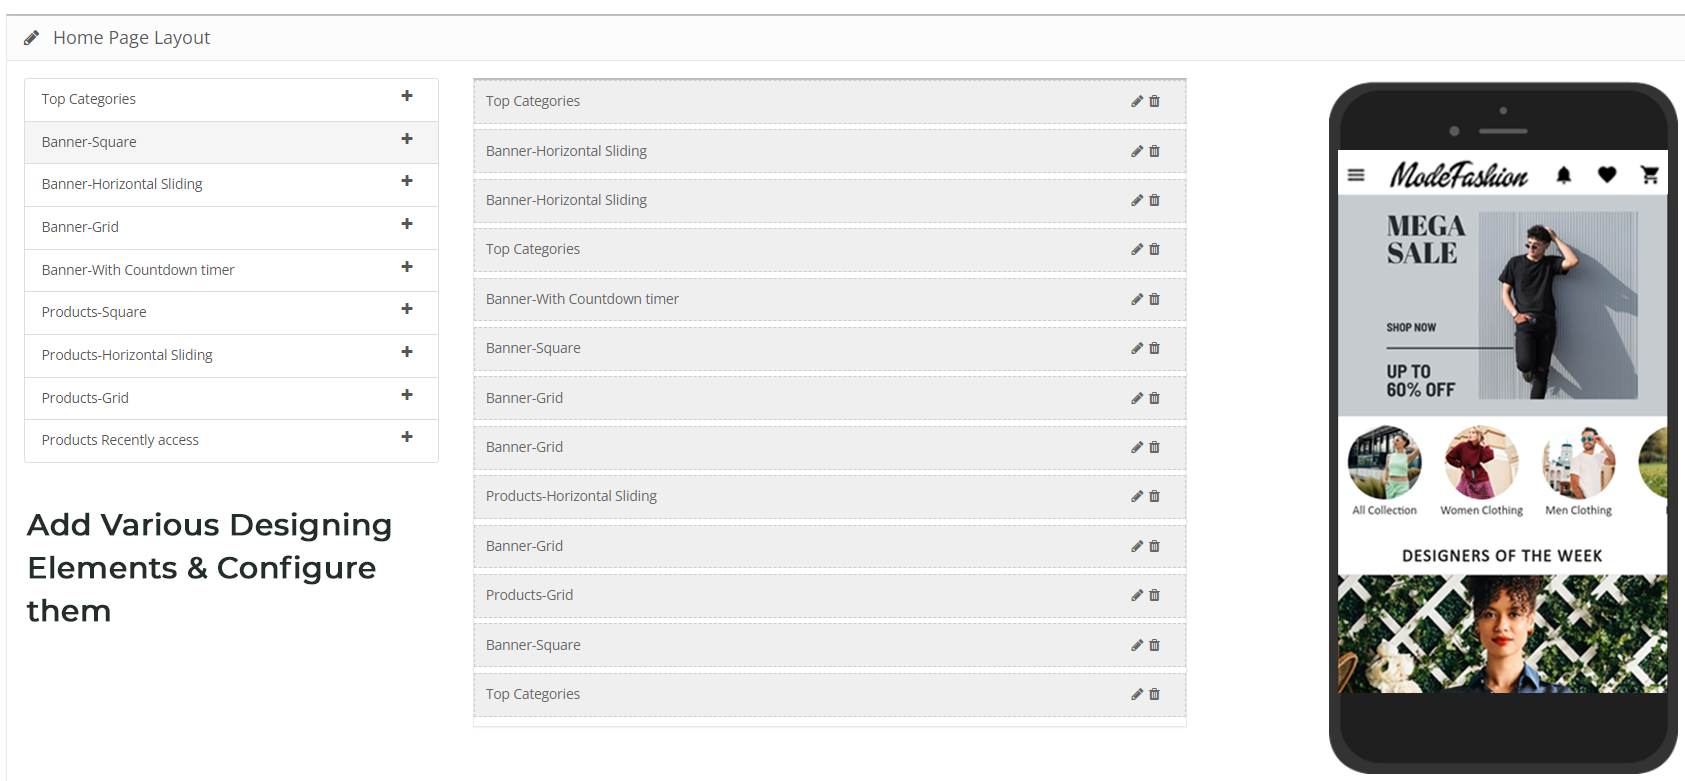
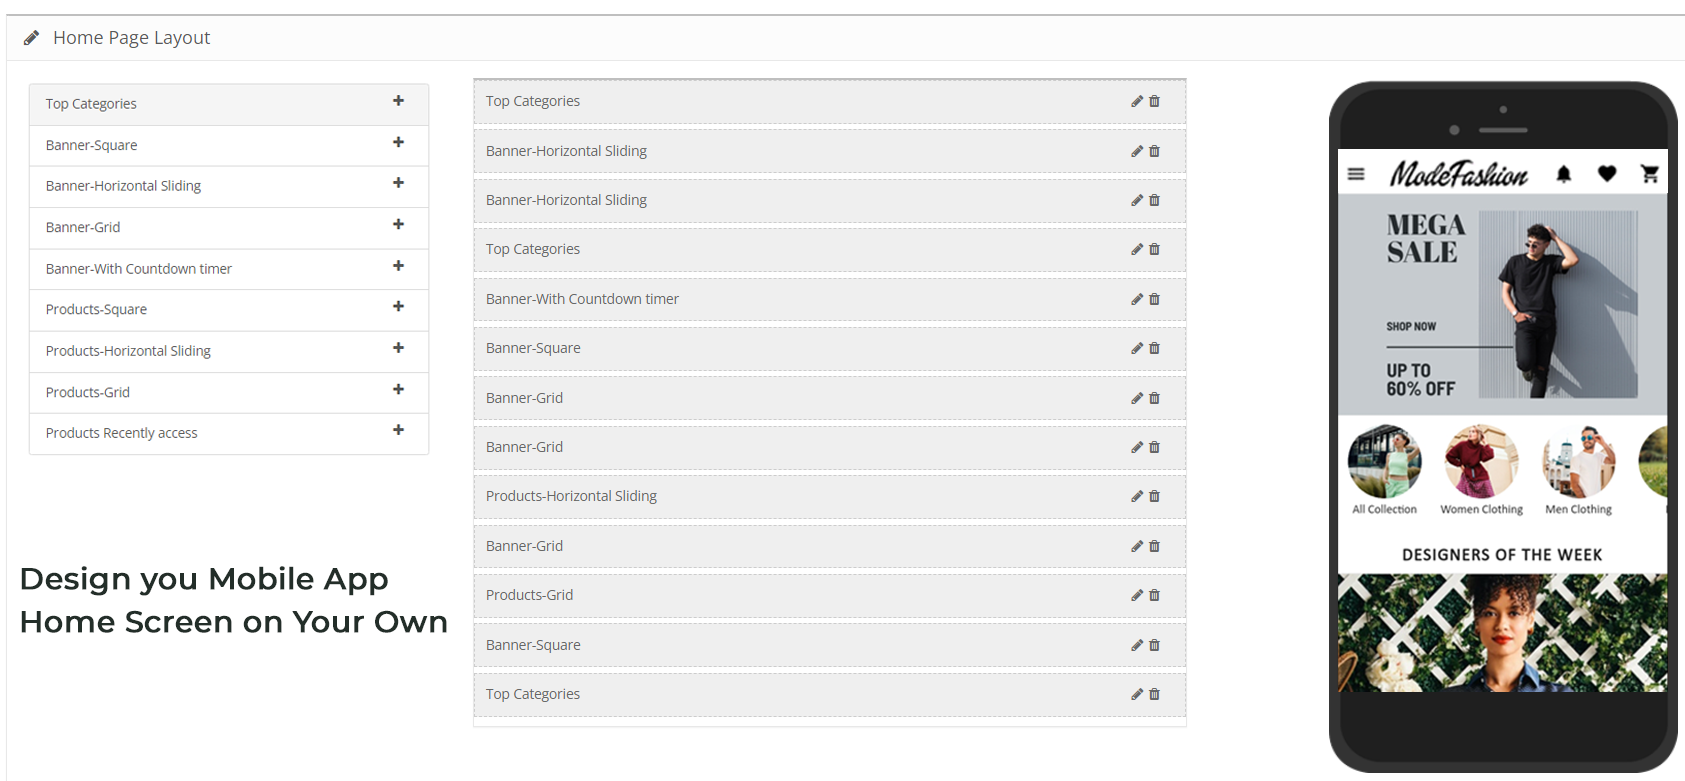
The store admin can configure the following design elements on the mobile app home screen:
Top Categories:
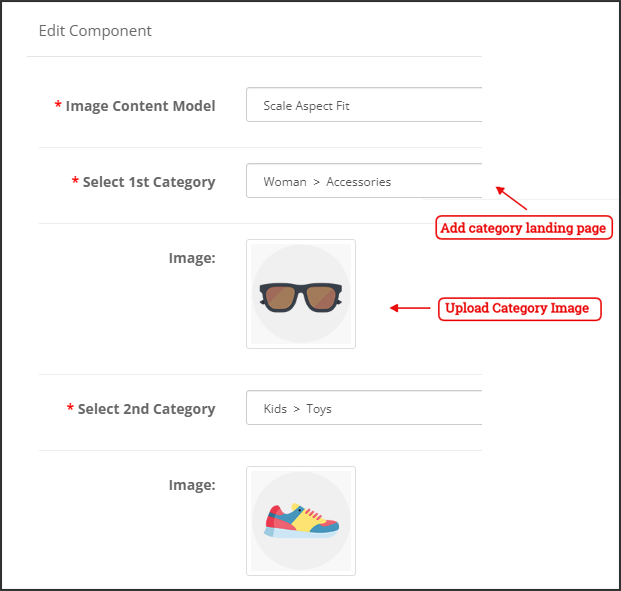
These are the categories displayed on the top of the home screen in the form of squares. You can configure their images & landing pages from the backend. Maximum 8 such categories are added of which 4 are mandatory.
Square Banner:
You can offer a square-shaped banner on the home screen of OpenCart Mobile App whose image & landing page link can set from the backend.
Sliding Banner:
These are the sliders for your home screen which can be configured from the module backend.
Grid Banner:
These are the banners for the app home screen displayed in the form of a grid listing & can be customized accordingly.
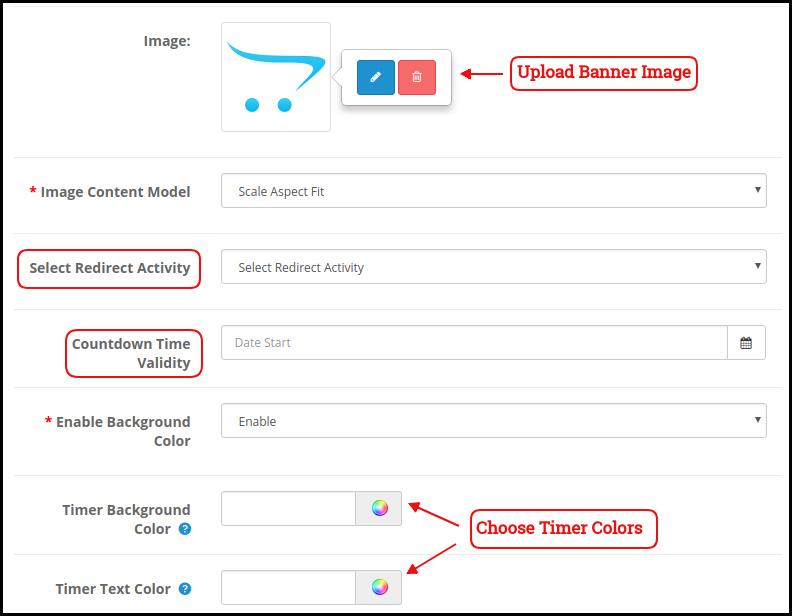
Countdown Banner
The OpenCart Mobile App Maker offers a count-down timer banner in your mobile apps. You can configure the banner image, landing page, and timer from the backend.
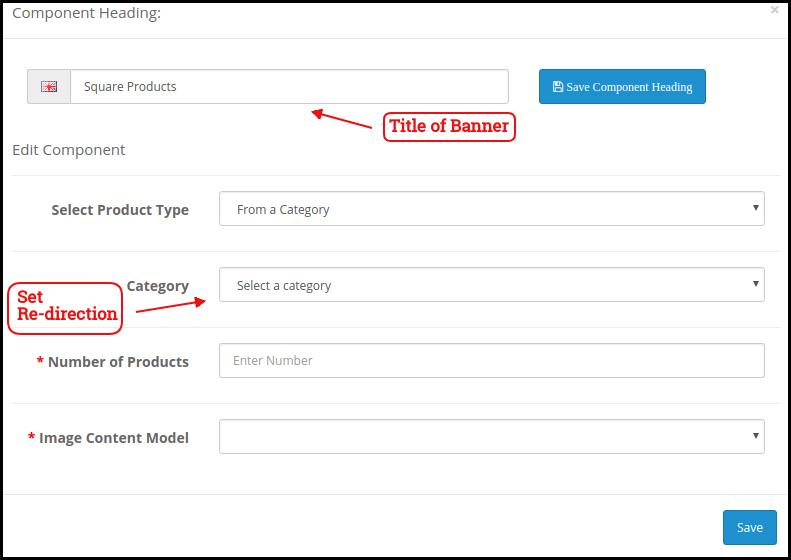
Square Products:
You can even list the products in square listing on the mobile app home screen.
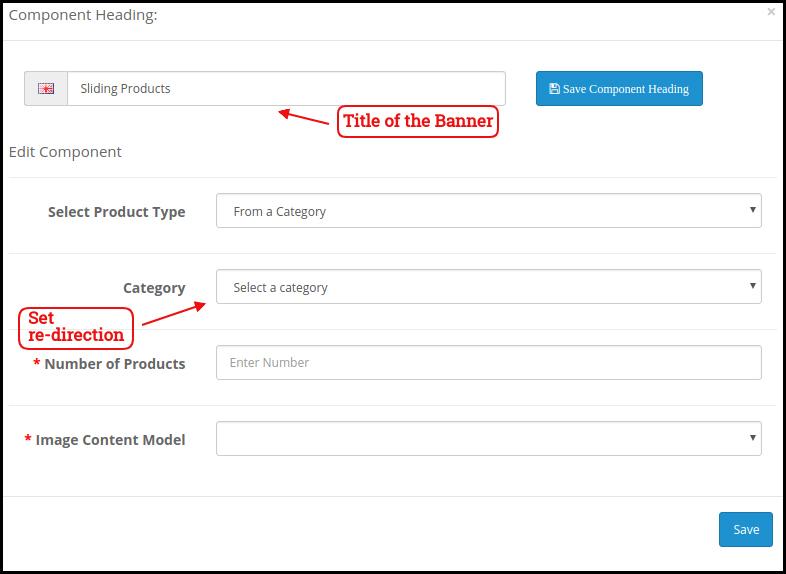
Sliding Products
The products can be displayed in the slider view on the mobile app Home Screen & can be configured from backend panel.
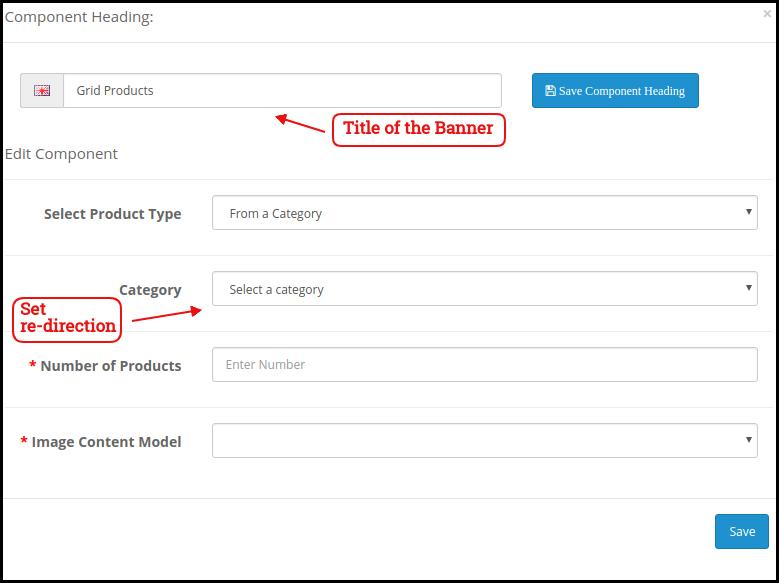
Grid Products:
The products can be displayed in the grid view on the home screen.
Products Recently Accessed:
The OpenCart Mobile App Creator offers the recent products tab on the mobile app home screen which displays recent products viewed by the user. You can just add the element in your layout to display the same on the home screen.
Login/Sign up Pop-up:
The Opencart admin can encourage the customers to keep their account logged in in the apps by showing a dynamic login/sign-up pop-up on the home page of the app.
Advertisement Banner:
The Opencart App admin can select the position of the advertisement banner on the home page with this layout component.
Note: The store admin can add up to 20 elements while designing the layout in the backend panel.
4.6 Advertisement Setting:
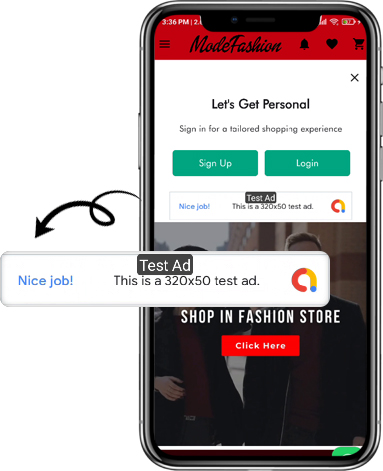
The updated Opencart App Maker allows the store admin to use their apps as an additional income channel by providing in-app advertising features in the apps. The new app comes with Google AdMob integration that allows the admin to show banner advertisements on the different pages of the app.
Enable Advertisement:
This setting will enable/disable the advertisements in the apps.
Enable Advertisement on Home:
If you want to enable/disable the advertisement feature on the home page of the app, you can use the following button.
Home Ad Unit ID:
The admin can find the Ad Unit ID on the Google AdMob console. Once done, you can enter the unit ID in the following section.
Enable Advertisement on Product:
This button will enable/disable the advertisement on the product page of the app.
Product Ad Unit ID:
Enter the Product Ad Unit ID in this section.
Select Product Position:
Using this option, the store admin can select the position of the Ad on the product page. This feature allows the admin to select from the below product image and description or above the add to cart button or related product section, providing more flexibility to the store admin.
Enable Advertisement on Checkout:
Using this button, the store admin can enable/disable the Advertisements on the checkout page.
Checkout Ad Unit ID:
Enter the Unit ID here.
Select Checkout Position:
Select the Advertisement position from here. The store admin can select from various options like top of the screen, bottom of the screen, above the products, and below the shipping methods.
Enable Advertisement on Cart:
Enable/Disable the advertisement on the cart page with this button.
Cart Ad Unit ID:
Enter the Unit ID for the banner on the cart page.
Select Cart Position:
The store admin can select the ad position from here. This option allows the admin to select from below the products or above the products option.
Enable Advertisement on Category:
This feature will enable/disable the Advertisement on the category page.
Category Ad Unit ID:
Enter the category Ad Unit ID.
Enable Advertisement on CMS:
Enable/Disable the advertisement on the CMS pages from here.
CMS Ad Unit ID:
Add the CMS Ad Unit ID.
4.7. Navigation Setting:
The Opencart Mobile App Builder provides the admin with the option to modify the look and feel on the bottom navigation bar of the app. Using the built-in features, the store admin can modify the name, redirection, icon, and color combinations of the tab bar layout.
Here is a detailed overview:
Enable Tab:
The store admin can enable/disable the bottom navigation icons from the following option.
Name:
Enter the navigation icon name here.
Select Navigation:
Select the redirect activity from home, cart, category, search, and profile from here.
Select Image Type:
The store admin can select if he wants to upload a custom image for the navigation bar components or the option to select built-in images is also there under the configurations.
In total, the app provides 5 different bottom navigation bar icons that can be configured with the help of the above-mentioned guide.
5.0 Mobile App Screens:
5.1 Home Screen:
The OpenCart Mobile App Builder offers a dynamic home screen in the mobile apps which can be easily designed from the backend panel. The store admin gets the complete flexibility to design & craft the home screen as per his/her choice. The OpenCart Mobile App Builder offers the following designing elements:
–> Top Categories
–> Square Banners
–> Sliding Banners
–> Grid Banners
–> Square Products
–> Sliding Products
–> Grid Products
–> Countdown Timer Banner
–> Recently Viewed Products
-> Login/sign up Pop-up.
The positioning of these attributes can also be changed as well just with simple drag & drop.
a) Dynamic Layouts: Craft alluring home screen layouts on your own which connect with the users & compel them to make the purchase.
b) Website Logo: Add your store logo in the module backend & display the same on the header of the app.
c) Search: The search option in the OpenCart Mobile App allows the users to search for products without any hassle. Keyword makes it easier for the buyers to get the right product in the least time.
d) Wishlist: Wishlist option in the OpenCart Mobile App lets you bookmark the products regarding future purchase.
e) Shopping Cart: The users can access the shopping cart from the top-right corner of the home screen.
f) WhatsAppYour OpenCart Mobile App users can directly contact you regarding any query or concern through WhatsApp chat option on the home screen.
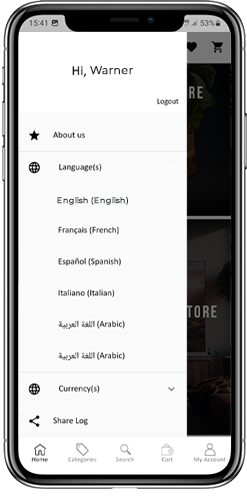
5.2 Accordion Menu (Navigation Bar)
The OpenCart Mobile Apps for Android & iOS come up with easy to use categorization of your store products. The online shoppers get to browse all the categories in the navigation bar along with all CMS pages.
The Accordion menu categories are the same as of your store & it provides the following options:
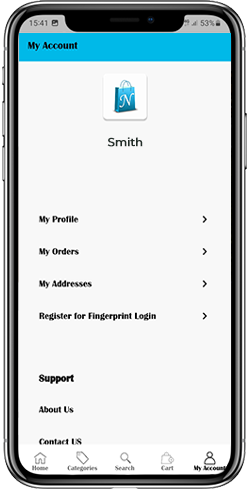
My Account: The My Account screen of OpenCart Mobile App contains all the user information like Personal Details, Shipping Address(s) & Order Details. There is even an option for the users to register their fingerprints. The online shoppers get to view complete personal details from here & update the password as well.
Categories: All your store categories are fetched on the mobile apps as well. Offer a multi-level categorization to your app users & let them browse products with ease.
CMS Pages: All of your website CMS pages like About Us, Contact Us, Terms & Conditions, etc will be displayed here.
5.3 Category Screen:
All sorts of categorizations available on your the OpenCart stores will be displayed in the mobile apps as well. The category screen has two views: Grid & List view. The product image, name, and price is displayed for all product listings. The mobile apps with OpenCart Mobile App Maker have multiple filter & sorting options which simplify product search for the users.
Sort: Sort option in OpenCart Mobile Apps allow the users to view products in Low to High or High to Low category.
Filter: Filter down the category products with various attributes like price, cost etc. & search desired products without any efforts.
5.4 Product Screen:
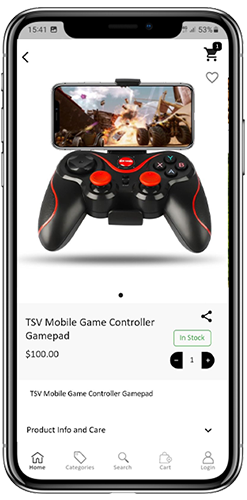
The product screen of the OpenCart Mobile App is as simple & easy-to-use as it could get. Every product has multiple images displayed along with its name & price. The product availability is also displayed as “In Stock” or “Out Of Stock”. The product screen has the following other options:
Product Options: Various options related to the product like size, color, etc. are displayed on the product screen. These options are the same as available on your website.
Short Description: Users get to read the short description of your product to quickly make up their minds. The OpenCart Mobile App displays both short & full descriptions of the products.
Product Info & Care: All the information related to the specific product is displayed under this section. This is the same information as of the website.
Add To Wishlist: The users can even add the products into the wishlist bag from here. The products added in wishlist are bookmarked for the future purchase.
Add To Cart: The Add To Cart button allows you to add product in the cart which can be processed further in successful order creation.
Product Social Sharing: The OpenCart Mobile App has the option to share the products on different social platforms, Bluetooth & e-mail. The users can share the products with their friends & relatives & bring potential users to your store.
5.5 Wishlist Screen:
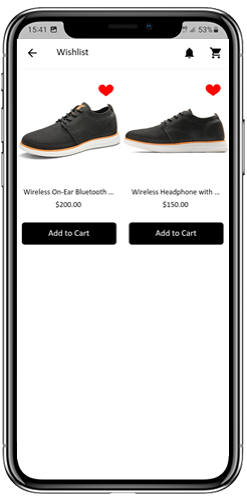
The OpenCart Mobile App Builder has a wishlist bag allowing the users to bookmark products for future purchases. The users can view the list of all wishlist products from this screen. It has the following options:
Add To Cart:
The app users can add the wishlist product directly into shopping cart with Add To Cart option.
5.6 Login Screen
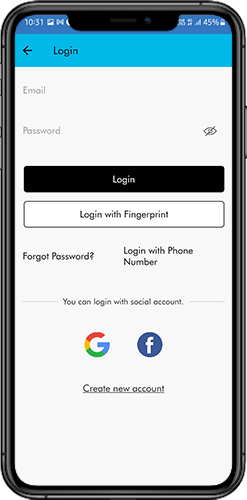
The OpenCart Mobile App Creator offers various one-tap login options & make sign-in/registration process more seamless:
Login: The app users can authenticate & access OpenCart Mobile Apps using e-mail sign-in credentials.
Sign Up: All the new users can sign-up & create their account on the store from the mobile App. The sign-up form of the OpenCart Mobile App is fully uncluttered.
Login with Phone Number: Your OpenCart Mobile App comes up with a phone number login option as well which allows users to verify OTP & log in without any hassle.
Login with Fingerprint: Your app users also get an option to log in with a fingerprint. This biometric authentication allows the users to login apps in seconds.
Login with Facebook: The users can log in into mobile apps using their Facebook Account Credentials.
Log in with Google: The users can log in into app using their Google Account Credentials.
5.7 Shopping Cart Screen:
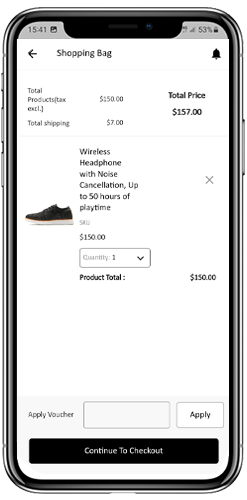
The Shopping Cart screen of your OpenCart Mobile App will display all products added into shopping cart.
The app user’s can view Product name, quantity, total price & shipping cost. This screen has the following options:
1. Apply Voucher:This option allows the users to get discounts & offers by entering valid coupons & voucher running on your website.
2. Total Product Price:The users can view the complete cost of their shopping bag which is automatically updated as per any addition in the cart.
3. Update Product Quantity:The users can even update the specific product quantity.
4. Remove Product:The app users can simply remove the product from the cart.
6. Continue To CheckoutThe app users can proceed further to the checkout & payment screens just by tapping the “Continue To Checkout” option. It will re-direct users on the checkout screen.
5.8 Checkout Process:
There is a simplified checkout process in the OpenCart mobile app builder. Details like shipping details, billing details, order numbers, order comments, and others are available for customers in the checkout process of the mobile app.
Orders can be placed by just following a few easy steps on the eCommerce mobile apps.
Users can choose a product and add it to their cart. After clicking on the shopping bag, the customer can select the appropriate amount of a product. In addition, mobile app users can view the total number of products and shipping prices.
At the bottom of the same page, the customer also gets the option to apply any vouchers and coupon codes.
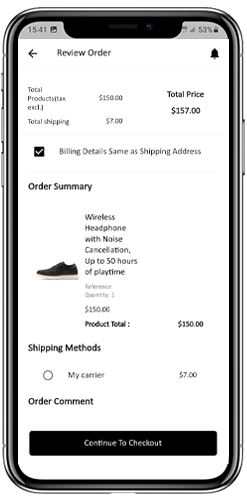
2. The user can review the order after selecting the Continue to Checkout option and can see various details. Such as product pricing, shipping cost, shipping address (editable on the same page), order summary (number of products), and total price.
Moreover, the customer can choose their preferred shipping method on the same page. In addition, the user can specify any particular requests or requirements in the order comment field at the bottom of the screen.
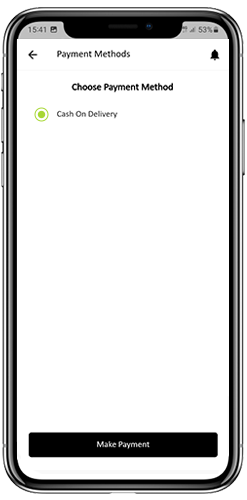
3. After clicking on the continue to checkout option, the front end mobile app user will be redirected to the payment method screen. On this screen, customers can choose from all the payment alternatives available on the e-commerce website. The Android and iOS apps consist of a cash-on-delivery payment option by default.
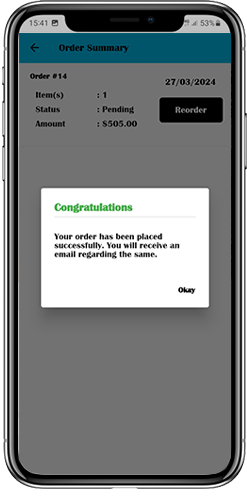
4. Once the user has completed the online payments, he or she will be forwarded to the order summary screen. In which, the customer can view the order status, order number, and amount, along with other information. The order confirmation popup message will also appear on the screens of mobile app users.
5.9 Payment Screen:
The payment screen on OpenCart Mobile App displays both web-view & Flutterapp payment methods. The OpenCart Mobile Apps supports all sorts of website payment options along with PayPal & COD payment methods. Moreover, various other native payment options like PayU, Apple Pay, Amazon Pay, Braintree, Stripe etc. can also be added in your mobile app over a fair price.
5.10 My Account Screen
My Account screen of the OpenCart Android/iOS App allows the users to view the complete account details including a list of all previous orders by just tapping on my orders option. My Account screen has the following other options:
Order History:The users get to know about complete order details created on the app. The order creation date, reference, price & delivery status is available on this screen.
Update Profile:Users can also update their pre-saved profile details like First or last name, phone number & password.
Shipping Address(s):The app users can see the complete list of saved Shipping Addresses. New Shipping address can also be added from here.
Order Details:The app users can view the complete list of the previously placed orders from the app.
Re-order feature:There is a direct re-order functionality allowing the users to repeat the order just by clicking the “Re-order” button
5.11 Order Detail Screen
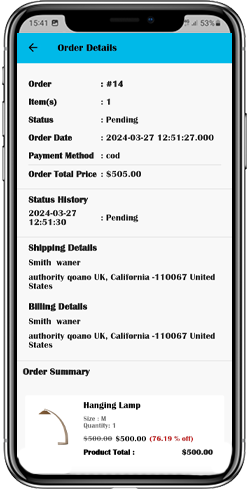
Order details screen of OpenCart Android & iOS App provides complete order detail such as shipping address, product summary, shipping and payment method, and total cost summary. This order detail is of the previous order placed by you. The users can even track the delivery of previously placed orders directly from this screen.
5.12. In-App Advertisement Samples:
The admin can set the advertisement banners on the different pages of the app. Here’s how it will look to your customers.
6.0 Advanced OpenCart Marketplace with Mobile App
KnowBand’s OpenCart Marketplace converts your online website into a fully-fledged marketplace. The OpenCart Mobile App Builder is fully compatible with OpenCart Marketplace extension. This means you can bring the entire marketplace listing on the same OpenCart Android & iOS Mobile Apps. Thus, launch a pair of Marketplace-compatible Mobile Apps with KnowBand & attract a large base of sellers & customers to your store.
–> As the user clicks on the Seller option, he/she is redirected to the Seller page of the mobile store. The user can view the list of the sellers of the marketplace along with their ratings.
–> The customers can click on the name of the seller in order to see his profile and the product being offered. The sellers can log in with their username and password. They are then redirected to the dashboard.
7.0 OpenCart Mobile App Builder for Android and iOS – Video Tutorial
This video tutorial walks you through the complete configuration of the OpenCart Mobile App Builder extension by KnowBand. Learn how to set up your app from backend to frontend with step-by-step guidance on:
General Settings
Push Notification Settings
Payment Methods
Home Page Layout
And many more essential configurations
By the end of this tutorial, you’ll be able to fully configure your OpenCart mobile app for both Android and iOS, ensuring a smooth and professional setup.
The eCommerce store admin can improve the traffic and engage the customers with the help of informative blogs. With the help of blog posts, the store owner can share information related to the available products and brands. The Prestashop eCommerce store admin can now display and manage the blogs on their website without any hassle using Knowband’s Prestashop blog manager module.
This Prestashop blog post addon is fully customizable and offers smooth functioning. The Prestashop blog module offers the e-merchant to set the position and priority of popular blogs, recent blogs, blog search box and blog category. The admin can also allow commenting on the blogs from the admin interface of this Prestashop blog post manager module. The admin can engage the customers on the website by setting the attractive banner image and showing related products on the blog post page.
1.1 Admin benefits
The eCommerce store owner can add blog posts without any limitations with the help of Prestashop Blog Post Extension.
Multiple blog categories and subcategories can be added from the admin interface.
The Prestashop blog post addon allows the admin to set the position for the blog categories, blog search box, popular blog posts and recent posts.
The Prestashop blog post addon allows the admin to set the priority of blog category, blog search box, popular posts and recent posts for setting their position on the front-end.
Admin gets an option to display related products on the blog post page on the blogging pages. The admin can select the related products from categoryPrestashop blog post addon page or manufacturer page.
The Prestashop blog solution module allows setting any post as a popular post.
This Prestashop blog post addon offers hassle-free and flawless implementation.
The store admin can set the meta title and meta description on the blog home page.
The admin can allow commenting on the blog posts. Admin can allow commenting only to the registered customers or guest customers too.
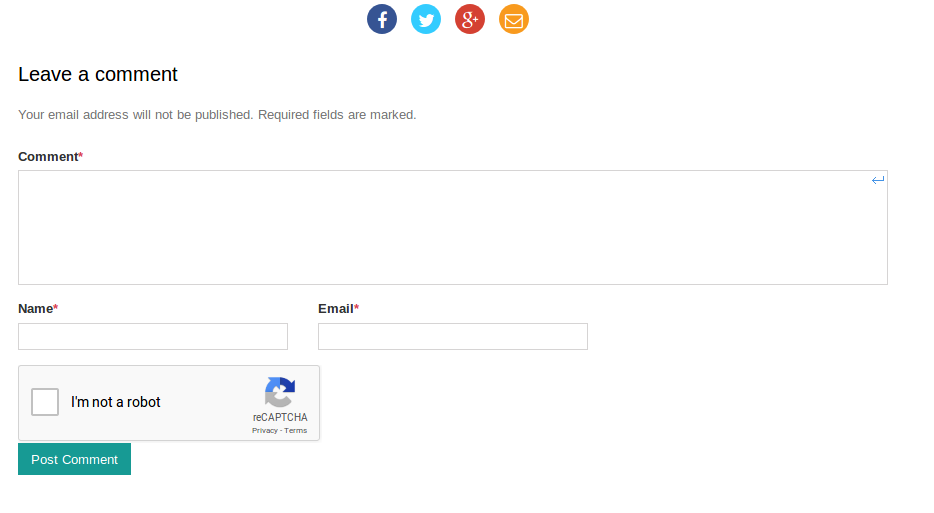
The Prestashop blog solution module allows configuring recaptcha settings to verifying if the blog readers are human or not. Only human can comment on the blog post if the admin set the recaptcha.
The Prestashop blog addon allows setting the meta title and meta description of the blog categories.
1.2 Admin features
The Prestashop blog post manager extension is easy to install and configure.
The eCommerce store owner can activate or deactivate this Prestashop blog post manager plugin just by clicking a button.
The admin can set the position and priority for the blog category, blog search box, recent posts and popular posts from the admin panel of the Prestashop blog addon.
The Prestashop blog integration allows the store owner to select the count of the blog post to display on the blog page.
The Prestashop blog review addon allows the admin to enable or disable commenting on the website store.
The eCommerce store admin can insert multiple blog categories and subcategories easily.
This PrestaShop blog module has a fully mobile responsive interface.
Blog comment extension is compatible with all PrestaShop themes.
This Prestashop blog post manager is SSL compatible.
This PrestaShop blog manager plugin is multi-store compatible.
The Prestashop blog solution module is multi-lingual compatible also.
No code changes are required for Prestashop blog post addon implementation.
This Prestashop blog integration offers smooth functioning.
2.0 Installation Steps
After purchasing the Prestashop blog addon from the store, the store admin will get the above files:
1. The zipped file that consists the source code of this Prestashop blog post manager addon.
2. User Manual
The admin needs to follow these steps to install the Prestashop blog plugin:
The admin needs to unzip the zipped file. This file includes some files and folders.
After that, admin can copy the overall content of the folder and paste them into the “Modules” folder of the store’s directory. The admin can follow the path – Root Directory/modules/.
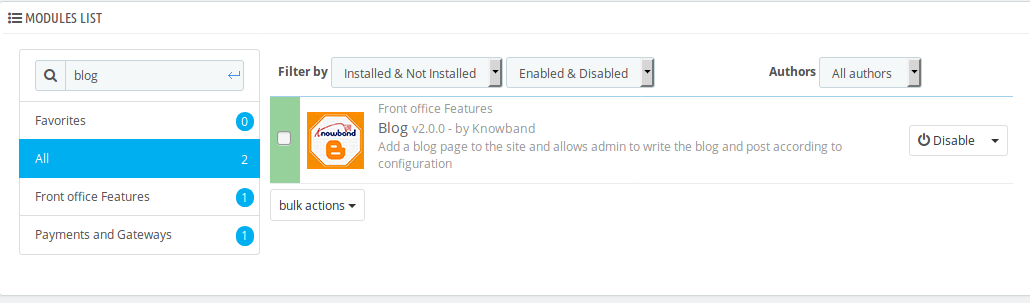
3. Now the store owner can install the Prestashop blog module. As an eCommerce store owner, you can find that in Store Admin -> Modules and Services. It would be shown as below –
Now you just need to click on “Install” button to install this Prestashop blog module easily. A confirmation pop-up will be shown. Click on “Proceed with the installation” option. This step will install the blog module and show notification – “Module(s) installed successfully”.
3.0 Admin Interface
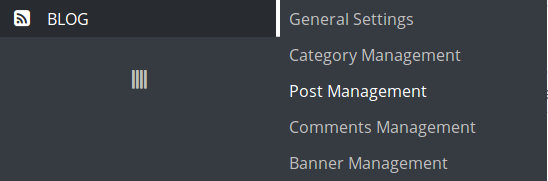
The eCommerce store admin can now configure this Prestashop blog addon. The admin will get these configuration options:
General Settings
Category Management
Post Management
Comments Management
Banner Management
3.1 General settings
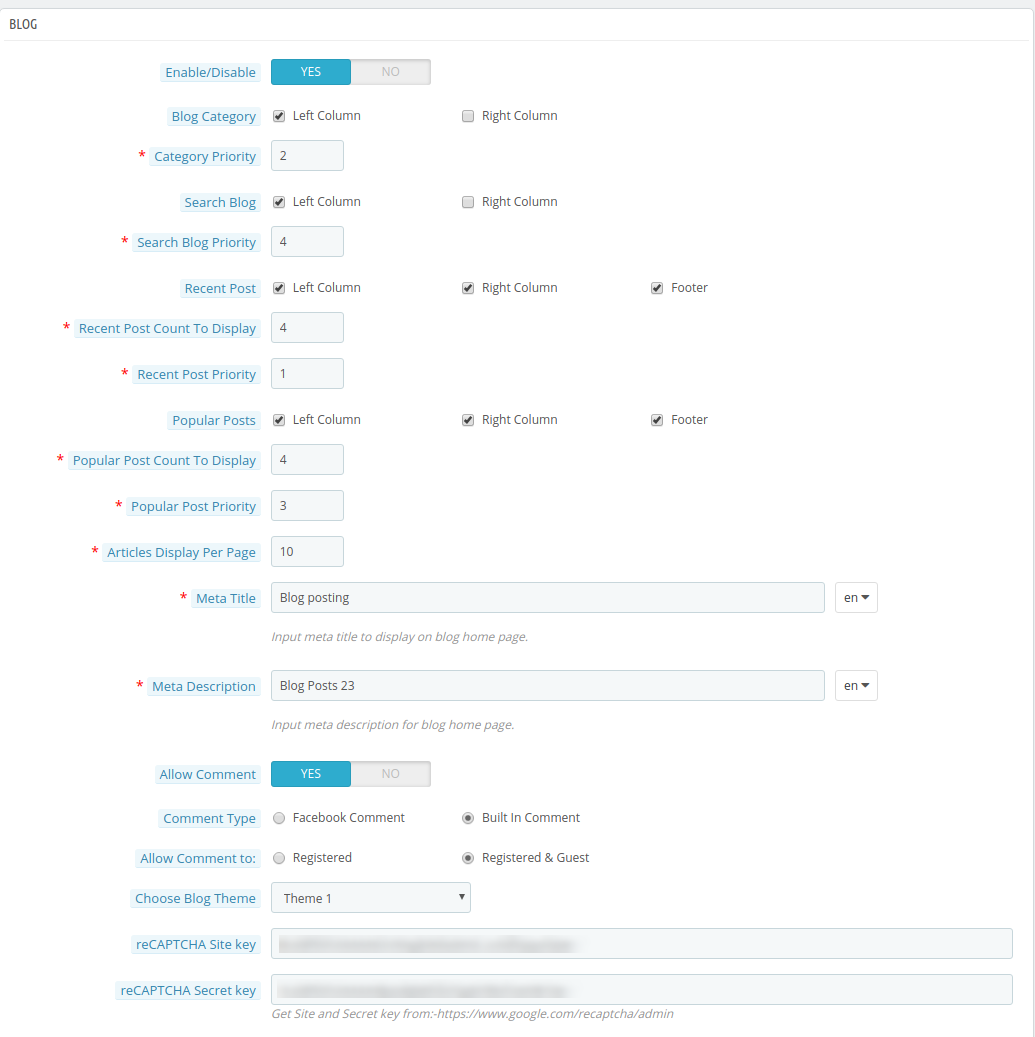
1. Enable/Disable: The store admin can toggle the button to activate or deactivate the Prestashop blog addon.
2. Blog category: The store admin can select the left or right column to show the blog category. As per the selection, the categories will be shown in the left or right corner of the blogging page.
3. Category priority: The store admin can also set the priority of the blog categories. The high priority categories will be shown at the top.
4. Search blog: The store admin can set the option to search the blogs in the left or right column as per the requirement.
5. Search blog priority: The store admin can set the search blog priority here.
6. Recent Post: The store admin can display recent posts in the left column, right column and footer as per the need. Admin can also select all the three positions as well.
7. Recent post count to display: The store admin can set the number of posts to display in recent posts block.
8. Recent post priority: The admin can also set the priority to display the recent posts.
9. Popular posts: The store admin can also set the position of the popular posts block. This position might be left column, right column and footer. Admin can also select all three positions.
10. Popular Post Count to display: The admin can set the number of popular posts to show in this block.
11. Popular post priority: The store admin can also set the priority to display the popular post.
12. Articles Display per page: Here the store merchant can set the number of articles to display on a single page.
13. Meta title: The store owner can set the meta title to display on the homepage.
14. Meta Description: The store merchant can also set the meta description for the blog homepage.
15. Allow commenting: The store admin can allow commenting if he wishes to.
16. Comment type: The store admin can select the type of comment ie Facebook comment or built-in comment.
17. Allow Comment to: The store admin can allow commenting only to the registered customers or guest users also.
18. Choose Blog theme: The store admin can select from different blog themes.
19. ReCAPTCHA site Key: The store admin can incorporate reCaptcha in the commenting option of the blogging page. Enter the ReCAPTCHA site Key in this section.
20. ReCAPTCHA Secret Key: Enter the ReCAPTCHA secret Key here.
3.1.1 How to get site key and secret key?
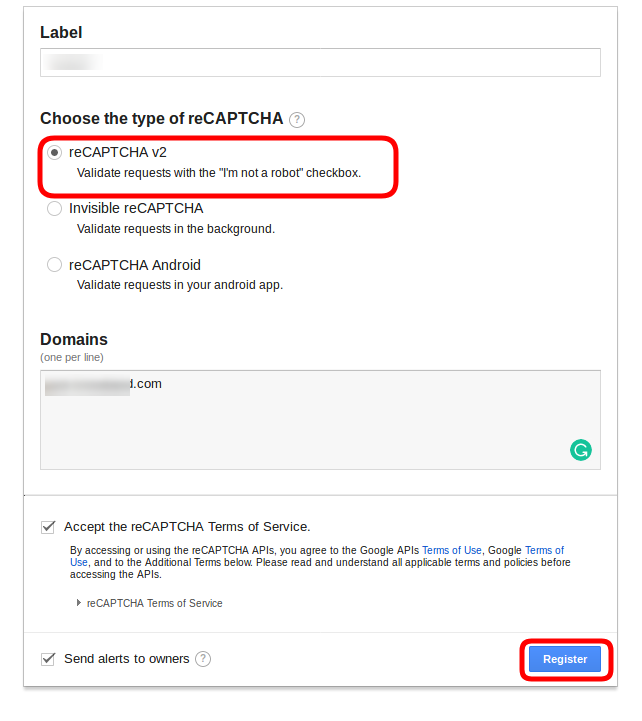
The store admin can get the site key and secret keys by following these steps:
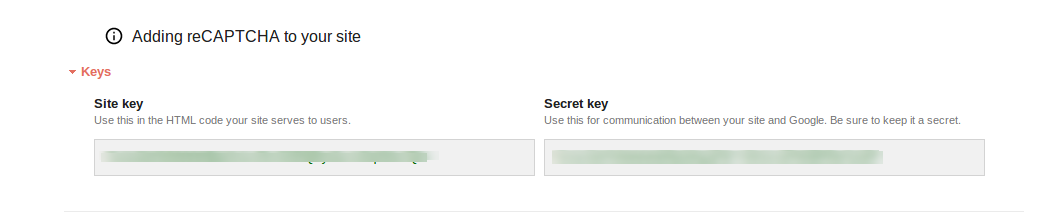
After that the admin can get the site key and secret key as shown below:
3.1.2 Front-end Interface after setting recaptcha
3.2 Category Management
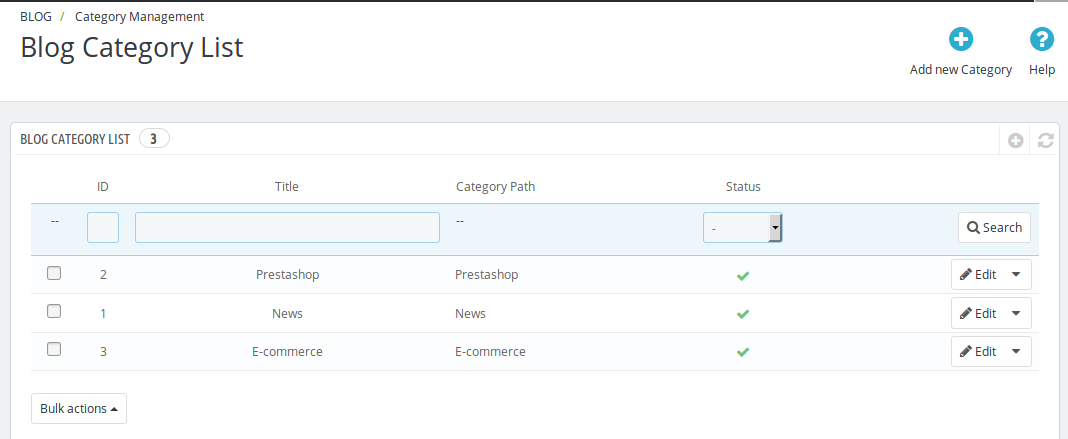
This Prestashop blog post module allows category management. There is a blog category list available in the admin panel. The store admin can add a new category, delete the category or modify the category as per their needs.
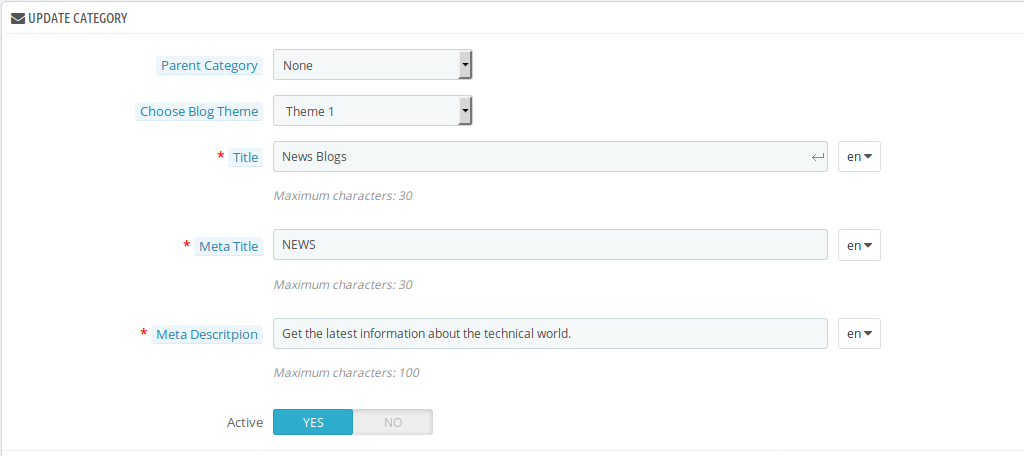
The various field in the category creation section are discussed below:
1. Parent category: The store admin can select any parent category for any category from here.
2. Choose blog theme: The store admin can select from various themes.
3. Title: The store owner can set the category title text for this blog category.
4. Meta Title: The store owner can set the meta title in various languages.
5. Meta description: The eCommerce store seller can also set the meta description of this category.
6. Active: The store owner can activate or deactivate the blog category just by a single click.
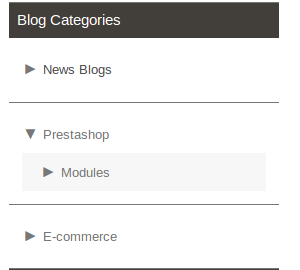
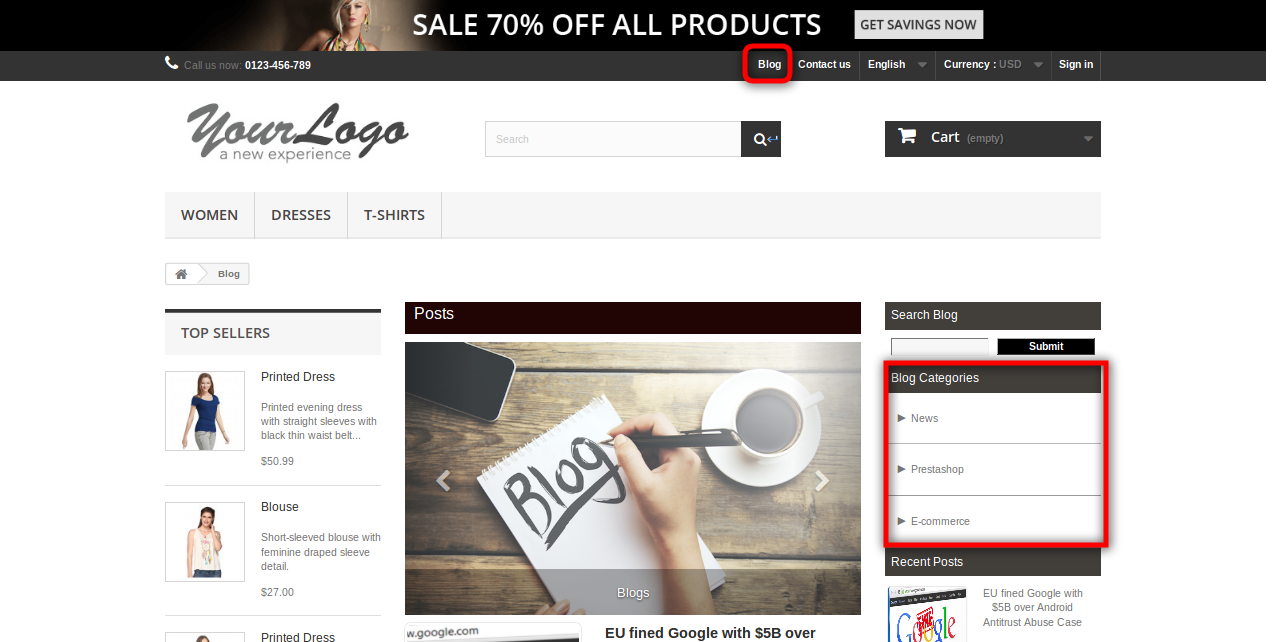
3.2.1 Front-end view
The blog category will be displayed on the front-end as shown below:
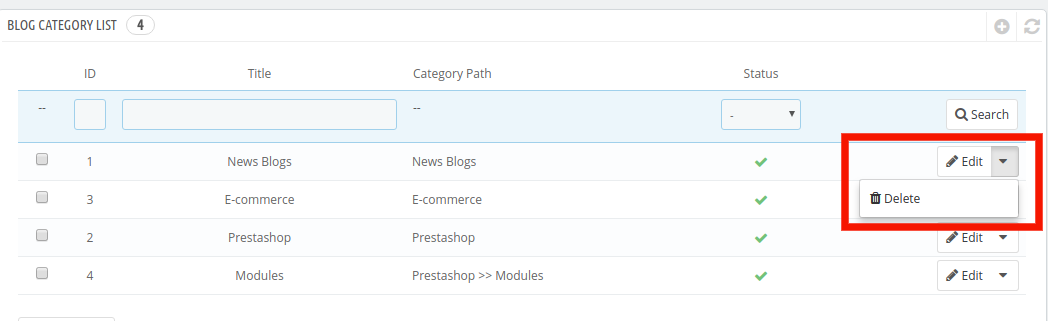
3.2.2 How to Edit or Delete the Categories?
Click on the Edit and Delete button corresponding each category in order to edit or delete the same as shown in the image below:
3.3 Post Management
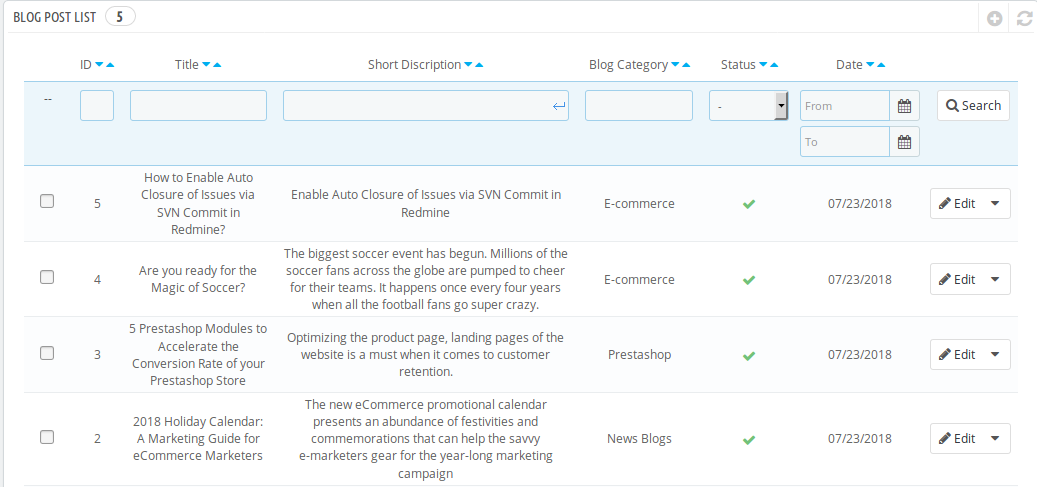
This Prestashop blog solution module offers post management. Here the admin can view the list of blog postings. The admin can add a new blog post, update the previous postings and delete the post.
3.3.1 How to Add New Blog Posts?
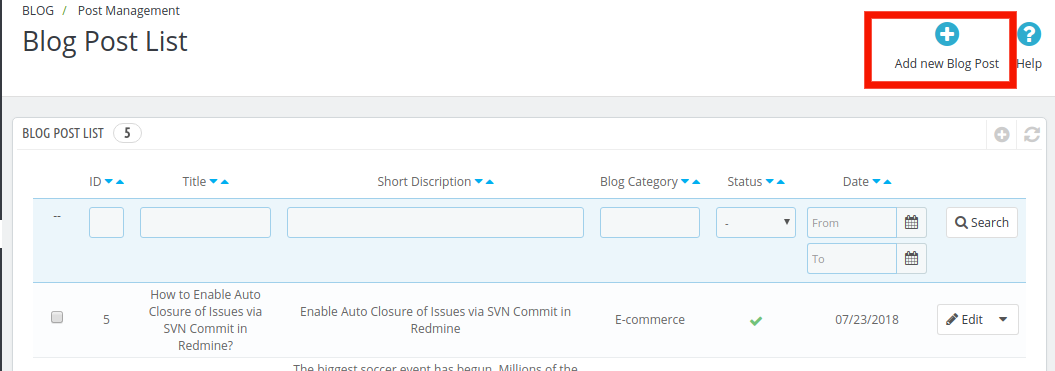
In order to create new blog posts, click on the Add New Blog Post as shown in the image below:
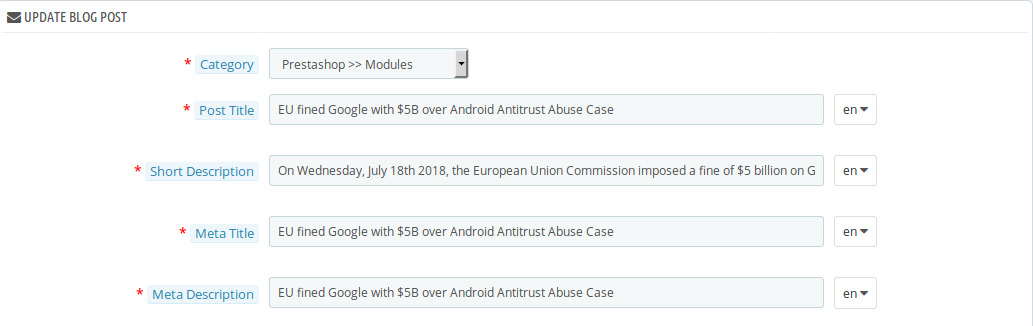
The various field of the blog post creation interface is discussed below:
1. Category: The store admin can select the category of the blog post.
2. Post title: The store owner can set the title of the blog post here.
3. Short Description: The store owner can insert the short description of the blog post here.
4. Meta title: The admin can insert the meta title of the blog post.
5. Meta description: The store owner can insert the meta description of the blog post.
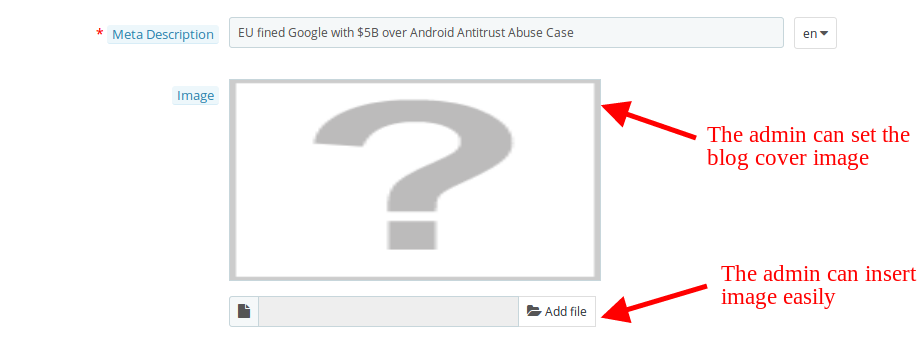
6. Image: The admin can set the cover image for this blog post. The maximum file size can be 5 MB.
After inserting image the admin can also update and delete it.
7. Content: The admin can write the blog content here. The admin can set the format and insert the links easily.
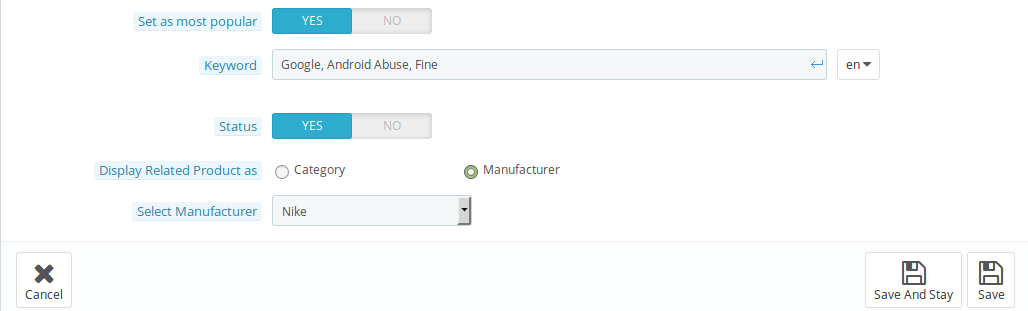
8. Set as most popular: The admin can also set the blog post as most popular by clicking the button.
9. Keyword: The admin can set the keyword for the blog post.
10. Status: The admin can enable or disable the blog post visibility. The admin can activate it for showing on the front-end.
11. Display Related Product as: The store admin can display related products on the article page. The admin can select the related product from category or manufacturer.
12. Select category: The admin can select the particular category from which he wants to show the related product.
13. select Manufacturer: The admin can select the manufacturer from which he wants to show the related product.
3.3.1.1 Front-end view of blog posts
Here the customers can view the blog with cover image.
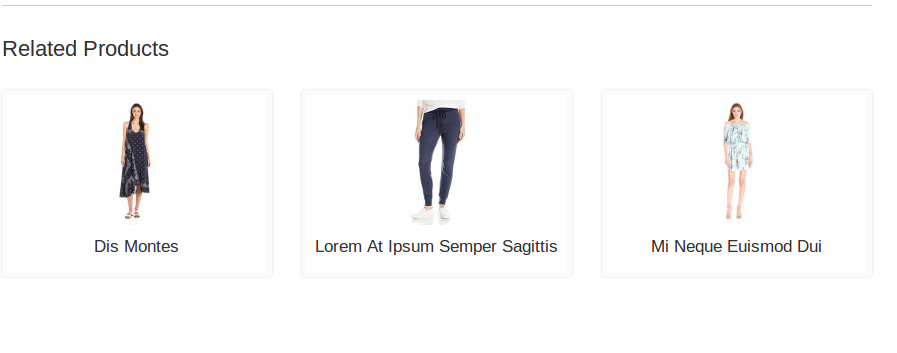
The related products will display just after the blog. The store-front will look like below image:
3.3.2 How to Edit or Delete Blog Posts?
Click on the Edit or Delete button corresponding to each blog posts in order to edit or delete the same.
3.4 Comments Management
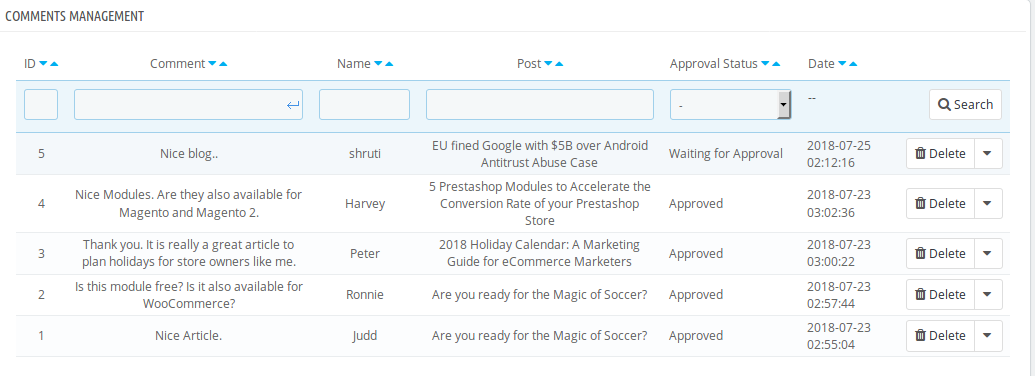
The admin can view the list of comments in the admin panel. The eCommerce store admin has rights to approve, disapprove and delete the comments.
3.5 Banner Management
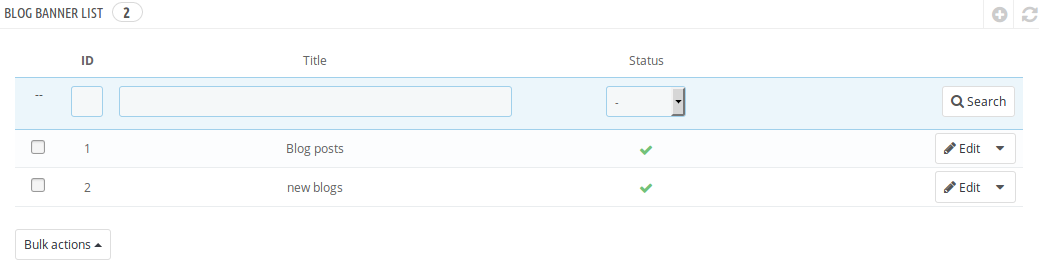
The admin can view the blog banner list in this section. The store owner can add a new banner, delete the banner and update the blog banner.
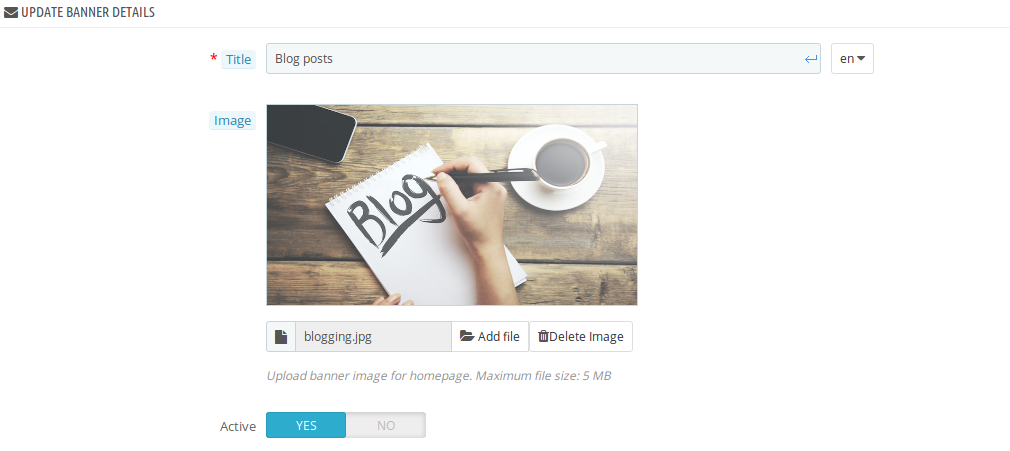
1. Title: The store owner can set the blog banner text. This text will be shown with the banner image.
2. Image: The admin can also set the banner image. The maximum file size can be 5 MB.
3. Active: The store admin can enable or disable the blog banner.
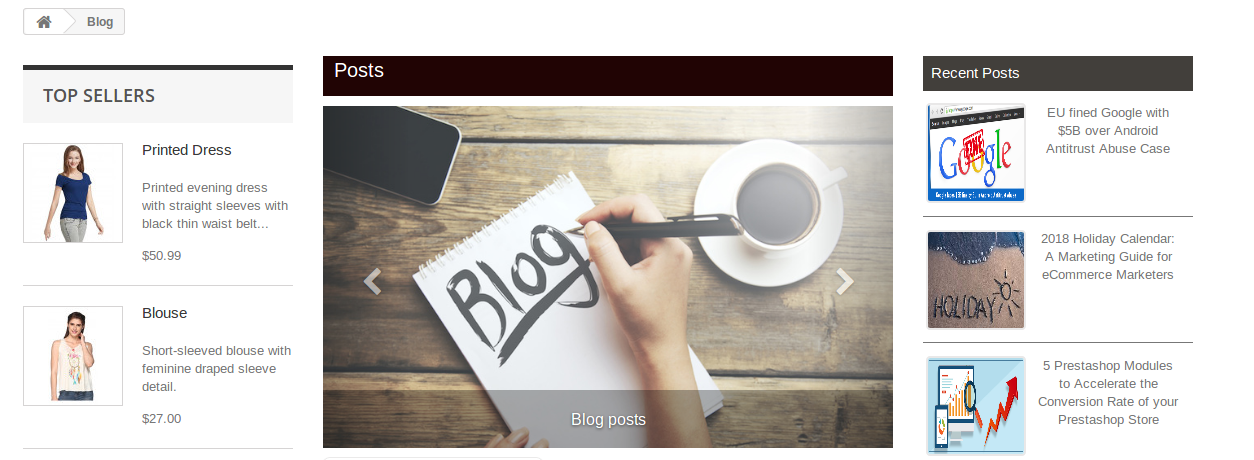
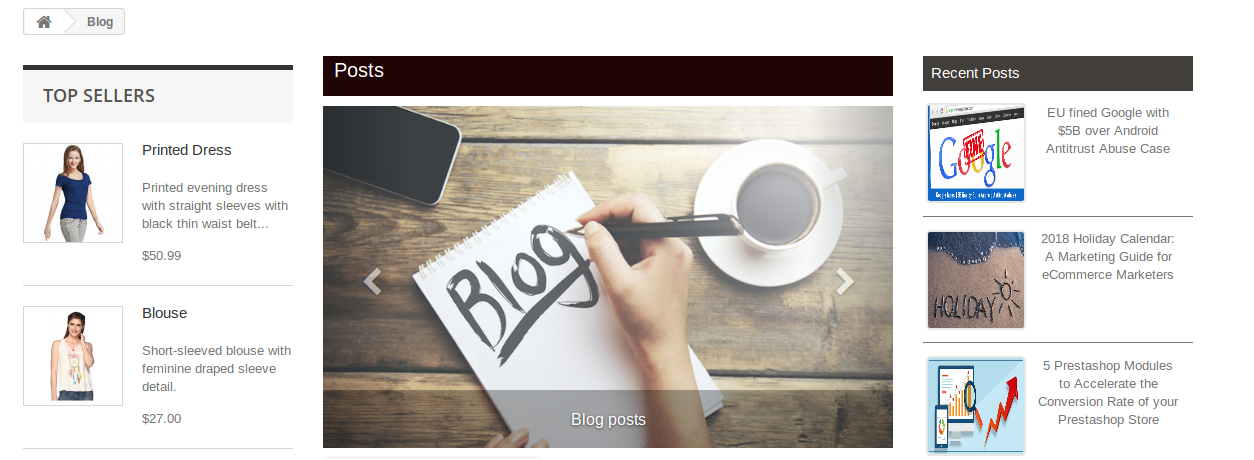
The customers can view the blogs on the front-end interface as shown below:
4.0 Front-end Interface
The customers can view the blogs on the front-end of the website.
Store visitors can view the recent products easily.
Popular posts will be displayed on the front-end interface like below:
The customers can easily read the blog.
Thus with the help of this Prestashop blog integration module, the online store admin can easily show and manage the blogs on the front-end of the website. It is very easy to apply the settings and show the blogs on the website. There are lots of additional settings for better customer experience.
For more details about this addon you can visit here:
The growing expectations and the cut throat competition in the online business environment has pushed the bar to a much greater level for various eCommerce businesses. In order to match up to these expectations, it is important to make transition towards a more effective eCommerce platform that can fulfill your all business aspirations. As, it is said “Look before you leap”, similarly before ensuring the movement towards any eCommerce platform, it is important to consider all the pros and cons for avoiding the major implications later on. Take a look at the various scenarios that can make a crucial impact in this direction.
In order to keep your customers hooked to your site, it is important to provide an unmatched user experience. To achieve the same, you need to improve website navigation, website loading time, search facilities, landing page and other such components for grabbing the instant customer attention and product sales. Analyze if the eCommerce platform which you are thinking for making the transition fulfills all the above mentioned criteria in the best possible manner.
2. Support for mobile devices-
Mobile devices are increasing day by day and so are their role in the eCommerce business. More number of people are now doing online shopping through various mobile devices like smart phones and tablets which explains their importance in the online business environment. There should not be any considerable difference in the user experience of your customers that are surfing the site on desktop or laptops and the one that are surfing the site on various mobile devices. For accomplishing this crucial task, the eCommerce platform selected by you should be capable to support all the mobile based devices effectively in order to boost your product sales, site traffic, conversion rates and customer engagement.
3. Scope for added functionality due to changing market conditions and business scenario-
Your eCommerce platform needs to be flexible enough for including new functionality and plugins for improving the productivity and usability of your online store. There are various important eCommerce plugins from Knowband and other plugin development company for making the various crucial website tasks much faster and in a seamless manner. Further, it may arise that store owners may need to add Magento extensions, PrestaShop modules, OpenCart extensions or any other platform based plugins for improving the overall functionality of their website which will be possible only if the eCommerce platform on which the site is built can accommodate new plugins and functionality without any hiccups.
4. Can contribute towards your eCommerce performance indicators-
Every online store is doing business with the aim of achieving any of these eCommerce key performance indicators like conversion rates, site traffic, increased clicks, more number of online registrations and other such metrics. Your chosen platform should have added functionality and features that can effortlessly contribute towards achieving these key performance indicators.
5. Cost of installing and maintaining that platform-
There are various business entities that are having a weak financial condition and can’t afford to spend a large amount of money in installing and maintaining an eCommerce platform for long term business growth and expansion. Before selecting a new platform, make sure that it is not burning a major hole into your pocket for installation, maintenance and configuration purposes in order to minimize the operating cost of your business.
6. Effective time of installation and functioning of the platform-
Always choose an eCommerce platform that require minimum amount of time for its installation for ensuring a faster and seamless functioning of your online store. If your selected eCommerce platform is taking several months for ramping up its infrastructure, your business is sure to suffer in a big way.
Once, you have have gone through all these checkpoints carefully, there are less chances of making any mistakes while selecting the appropriate eCommerce platform for your online business entity. It will further save your time, money and business opportunities from getting being wasted.
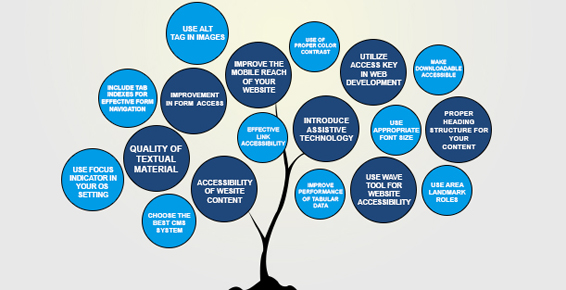
Having an eCommerce website with a pathetic accessibility to its targeted customers is like having a good looking car which does not have a performing engine. Nobody would like to visit a website that takes too much time to load properly and often frustrates a user. If you want to improve the fortunes of your business entity, you need to work towards enhancing your website accessibility for brilliant conversion rates and product sales. With the support of an effective eCommerce website design, seamless site navigation, faster checkout process, impressive website loading time and performance, you can easily achieve the remarkable success in terms of site traffic, conversion rates, customer engagement and product sales. Here is a detailed account of what all ingredients are required for a mind blowing website accessibility.
1. Improve the reach and quality of textual material-
Any website without an impressive and engaging content or text is simply useless. Moreover, the recent Google algorithms like Panda, Hummingbird and others have time and again proved the superiority of the content for generating the required site traffic and conversion rates. Remember to pay adequate attention towards the content as well as graphics or images for increasing the readership of your written content. Take a look at the various ways by which you can accomplish this crucial task seamlessly.
Use high quality optimized images for increasing the worth and appeal of your written content. Further, use effective image alt tag along with the caption and description for improving the SEO friendliness of your content.
Offer high quality short videos with your content (Product Video) for making content more appealing and worth while.
Make use of an effective alternative audio content that does not affect the overall performance and loading time of your website.
Utilize the services of a plain text transcript or RSS feed for making site content available to large number of visitors.
Include a closed caption for optimizing the video experience of your targeted customers.
2. Employ ways to read content for your targeted customers-
There are numerous people who may not be able to read your site content properly due to visual impairment, small font size or illegible font type of your written text. For ensuring a seamless site accessibility to these type of customers, it is mandatory to have an audio version of your page and site content. This recorded audio file can conveniently convey the written message of your website and its internal pages to your targeted customers. Apart from this, there are various screen reader softwares like Microsoft Narrator, JAWS from Freedom Scientific, VoiceOver for Mac systems, Orca (open source) for Unix based Systems, NVDA (open source), Dolphin Supernova by Dolphin and various such others.
3. Take required steps to improve your site navigation (especially forms)-
What good is of a website if it does not allow visitors to navigate through it in a seamless manner? It would be a sheer wastage of your time, money and efforts if navigating around your website is a challenging task. There can be numerous factors on your site that can act as a major stumbling block in the seamless navigation of your website. You need to give special attention to these particular site elements like registration forms, checkout page, images, videos, links and other such areas for ensuring the effortless navigation of your website.
Among them, forms are said to have a drastic effect on the website performance and navigation. You need to eliminate unnecessary fields, illogical labels and other such factors so that visitors can fill out your site forms without any hiccup. Moreover, you need to avoid time bound restrictions and use correct headings for your content on your website for facilitating a faster navigation. For increasing the accessibility of your site forms, you need to perform the following steps.
Use a well positioned and descriptive label with each field in your form.
For establishing an effective relationship between the label text and form field, you can either use a <label> tag or an <ARIA> property.
Ensure that the tab order of your form is at proper synchronization with the order of the form fields.
For similar or related fields in a form, you can group them together using the fieldsets. Take for example, fields like “Street Name/Localityâ€, “Village/City†and “State/Province†can be combined together under a single field of “Correspondence addressâ€.
Inform users about mandatory fields in your form through the help of asterisks symbol (*). Apart from this, you can make desired fields mandatory by using the ARIA property. Use ARIA required=â€true†for mandatory form fields and ARIA required=â€false†if the field is optional in nature.
Provide customer information regarding successful submission of their form or any submission related errors. Show errors on the relevant place and position on your form for increasing the chances of faster error resolution that can help in the quick form submission.
Avoid the use of CAPTCHA codes for form validation due to their inaccessibility and performance issues. There are other alternatives like Sweet Captcha, PlayThru, NuCaptcha, client side JavaScript checkboxes and such others that can be used for validating form data. For understanding more about making your forms spam free, you can check out this link.
4. Select the color that is in resonance with your site content, images, backgrounds and other such elements-
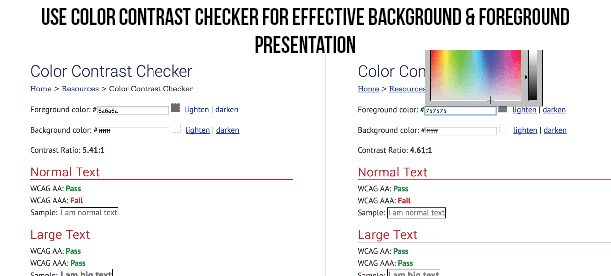
For ensuring the effective readability of your website, it is important to choose the appropriate color for your background and foreground elements. Remember, to use a contrasting color for your text and its background for better accessibility of your website. Beware of using similar colors for both the text and background of your website like using the black text color along with violet, brown or any other dark color will affect the usability of your website to a great extent. The normal contrast ratio while using the color for your background and foreground elements should be around 7:1 but even a contrast ratio of 4.5:1 will also do justice to the visibility of your content and will ensure effective accessibility of your concerned website. You can check the color combination with the help of a/b testing and heatmap tools. By these tools you will be able to know more effective areas and less effective areas and make the required changes on the website.
5. Ensure the proper font size of your content-
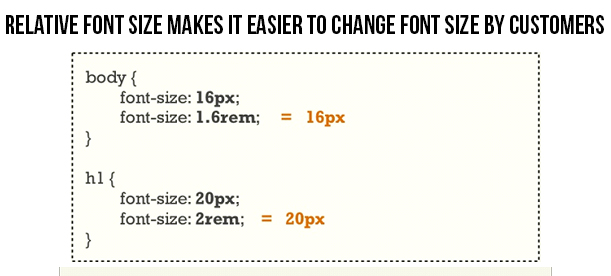
It would be practically immature and naive to expect your readers to have an exceptional eye sight of 6/6 so that they can effortlessly read the small font size content on your website. Don’t make your customers to struggle too much while reading your website content. For facilitating a seamless accessibility to your website content, you need to use relative font sizes that are expressed in terms of percentages or ems rather than using absolute font sizes which are expressed in terms of points or pixels. Due to this above practice, it is practically much easier for the users to make desired changes in the font sizes as per their requirements and eye sight. So, it is the need of the hour to focus on the font size also and not just on improving the visual appeal of your website.
6. Role of Assistive technology in the website accessibility-
Assistive technology also known as Adaptive technology (AT) is actually a blessing for the people with various types of disabilities linked to visual, speech, cognitive, motor or other such physical and mental disorders for accessing the various areas of a website effortlessly that use precise mouse movement, positioning or clicks. The technology stands for a group of assistive, adaptive and rehabilitative devices that are aimed for people with different disabilities along with the process that is involved in locating, selecting and utilizing these devices. This technology has provided a great sense of freedom to all disabled people through the help of various enhancements that have changed the way by which these people used to interact with various digital devices.
Various devices like screen readers, braille system, screen magnification software, speech recognition software, switch access and other such have done a tremendous job in providing a seamless website accessibility to people with various types of disabilities. For more information about different types of assistive technologies that are acting as guiding light for disabled people, all you need to do is just follow this simple link.
7. Improve the performance and nature of your links-
For directing more number of people on the desired location of your links, make sure that your links are having a proper label and color for indicating your targeted customers about them. Use a more contextual based text than those simple phrases like “click hereâ€, “read moreâ€, “know more†and other such statements that can prompt your targeted customers to click on a particular link. Further, choose the right color for your link for getting higher customer attention and link accessibility.
8. Use HTML for improving the accessibility of your tabular data-
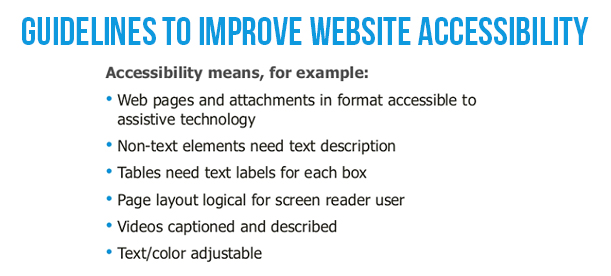
Make it a point to use only HTML for data tables instead of using the images. This approach will be extremely useful for the visitors that are using the assistive technologies for accessing the table content. Moreover, try to include proper column headers for improving the accessibility of your table content. It is also advised not to use tabular format for the page layout or structure as it causes problem in the effective accessing of the content.
For making your data tables more accessible to your users, you need to mark up your table header cells effectively. Apart from this, you need to use the scope attribute value for the associated column header or row header of your table. If you want to improve the accessibility of your “date†field in your table, you need to change <td>Date</td> to <th scope=”col”>Date</th> in your coding part. Further, in order to inform users about your data table, you need to include a relevant description or table caption through the use of <caption> tag. For example,
<table>
<caption>Class Schedule</caption>
<tr>….
9. Check the accessibility of your page through the use of WAVE-
Web Accessibility Evaluation Tool (WAVE) is a remarkable tool that can help web developers in improving the accessibility of their website. This website evaluation tool provides crucial insight and feedback about the accessibility of your page by entering the URL of your web page on the Wave tool home page. If you have any doubts, queries and concerns about this website evaluation tool, do check out this helpful link, https://wave.webaim.org/help. Moreover, first time users that are not familiar with this pioneering website accessibility and evaluation tool can take the help of this link for getting required knowledge about checking the accessibility of their website. Other tools besides WAVE that can be the guiding light for improving your site accessibility are CynthiaSays, Tenon and much more.
10. Work towards making your downloadable content accessible to your targeted customers-
It would be in the interest of your website if you can take the required steps in making your downloadable content on your site like terms and conditions documentation, product use manual, product category specification or any other such document accessible to your interested users. Don’t make them to roam here and there in search of required softwares for accessing a particular document but do ensure to make your downloadable content accessible through common available software. Always use a comma separated or tab delimited files, PDF files and other such formats that do not need any licensed proprietary softwares from the concerned vendor. For making your content accessible through the PDF format, you need to follow the various guidelines that are mentioned in this crucial link, https://webstandards.sonoma-county.org/content.aspx?sid=1014&id=1123.
11. Utilize the services of ARIA landmarks-
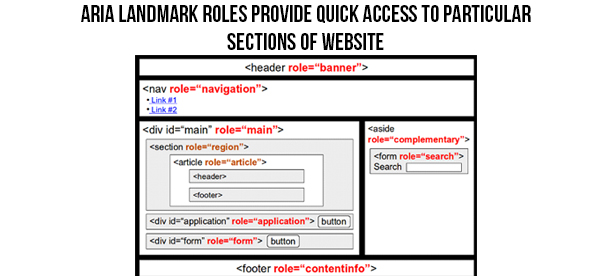
Thanks to the introduction of the new Accessible Rich Internet Applications (ARIA), a specification of the World Wide Web Consortium (W3C) which is a global web governing body, web applications can now be easily interacted and shared through keyboard. You can easily make your site more keyboard navigation friendly through the use of ARIA landmark roles. All, you need to do is just add an HTML attribute for any of the landmark roles, say for example role=â€navigationâ€, role=â€main†or role=â€search†for directing user to the particular section of the page through a single keystroke. Let us check this HTML code that can add the appropriate landmark role attribute on the “main†and “search†section of a website.
<div id=”maincontent” role=”main”>
<form action=”search.php” role=”search”>
12. Learn to use the services of Learning Management Systems (LMS) and Content Management Systems for enhancing accessibility of your website-
For improving the accessibility of your eCommerce website, you need to avail the services of an effective eCommerce platforms that consist of numerous features. Apart from this, you can take the services of various Content Management Systems like WordPress, Joomla, Drupal and others for providing easy access to numerous themes, templates, eCommerce plugins and other such options. Plugins are seen to provide an advanced level of accessibility, performance and usability to a website for improving the overall performance of a website.
However, make sure that you are availing the expertise of an exceptional plugin design and development services like Knowband that has years of experience in this area. Some of the superb plugins provided by it are as follows:
OpenCart– Here are some of the OpenCart Extensions that can help in enhancing the productivity of your OpenCart store to a great extent. They are OpenCart Ajax Cart+, OpenCart One Page Supercheckout Pro, OpenCart Social Loginizer, OpenCart Price Alert and such others.
PrestaShop– If you are having a PrestaShop store, these are some of the PrestaShop Addons that can be the game changer for your online store and can improve the accessibility and performance of your website. Take a look at these plugins which are PrestaShop Abandoned Cart, PrestaShop Return Manager, PrestaShop One Page Supercheckout and many others.
13. Improve the reach of your website on various mobile based devices-
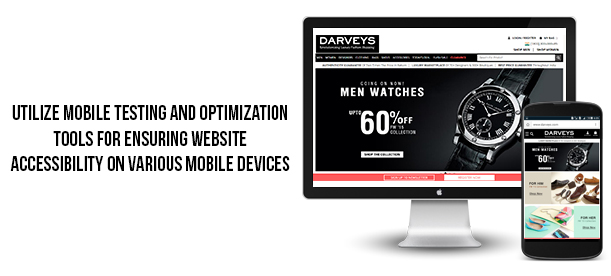
Due to the constant increase in the number of mobile customers, it is the sole responsibility of every online business entity to make its website accessible to various available mobile devices. Use various tools like Mobile Usability, mobile friendly test, PageSpeed Insights, Pingdom website speed test and other mobile SEO tools for improving the performance of your mobile website. If you want to know more about how to improve your mobile SEO results, do visit this informative link. Further, use of the content delivery network (CDN) services along with the webp image format for Google Chrome browser can make a significant effect on the accessibility of your website on various mobile based devices.
14. Make use of proper alt text for images-
Although, it is said that “An image can say a thousand words itself†but these images need the support of Alt text for helping user understand the proper intent or message behind these images. Moreover, these alt text becomes much more useful while using an informative images like infographics. It is to be noted that the message which is to be conveyed with a particular image needs to be used in the alt text of that image. Similarly, if the concerned image consists of some text, that particular text should also be included in the alt text. Make sure the images that are used as links are provided with appropriate alt text so that screen reader can read the associated message of your image rather than reading the file name of your image. Here is the sample code about how an alt attribute can be used in an image for improving its appeal and understanding among the targeted customers.
<img src=”webaimlogo.jpg” alt=”WebAIM – Web Accessibility In Mind”>
However, you can leave the alt text empty for your images if the image is purely used for fancy decoration purposes as it will take the focus of your customers away from the concerned image.
15. Initiate steps to make your website more accessible through keyboard-
There are numerous users that like to navigate a particular website through the use of keyboard shortcut keys or Access keys. These Access keys are HTML elements that are not effectively used during website development process for ensuring a seamless access to certain sections of the website through keyboard. In order to use the services of Access keys, you need to follow these steps.
– Press Function key (Alt in case of Windows and Ctrl if the system is a Mac) along with the specific letter or number key that is associated with a particular section of the website.
Further, programmers can effortlessly add the functionality of Access keys on their website by adding a simple HTML code into the navigation anchor tag of their concerned site. The sample code is as shown below.
<a href=”index.html” accesskey=”1″>Home</a>
However, what limits the usage of Access keys on a global level is that there is no universal set of assigned keys that can be used for implementing the functionality of Access keys on a website. Apart from this, there is no such mechanism by which users can be informed about the keyboard keys that are used as Access keys for navigating around a site. But, there are certain countries like UK where concerned authority has recommended a set of Access keys that can be assigned for a seamless website navigation through keyboard. Here is a list of those Access keys.
S – Skip navigation
1 – Home Page
2 – News/Updates
3 – Site Map
4 – Search
5 – Frequently Asked Questions (F.A.Q)
6 – Help
7 – Complaints Procedure
8 – Terms and Conditions
9 – Feedback Form
10 – Access Key Information
16. Include headings correctly for organizing your content structure-
For a seamless access to your site content, make use of the heading structure. Use HTML heading tags like <h1>, <h2>, <h3> and others at appropriate place in your content for the effective organization of your content and for better readability. Follow the correct order of your headings and keep presentation away from the heading structure through the use of CSS. Some of the guidelines that needs to be followed while creating a new CSS class for your content are as follows.
Always use <h1> tag for the main title of the page. Keep <h1> heading tag reserved for the title of the website and other individual pages.
Include headings for the proper indication and organization of your content structure.
Follow a proper order while using the headlines and never jump from <h1> to <h3> heading tag directly as it gives a sense of feeling to readers that some particular content is missing in the middle.
17. Make use of tab indexes for the seamless navigation around your website-
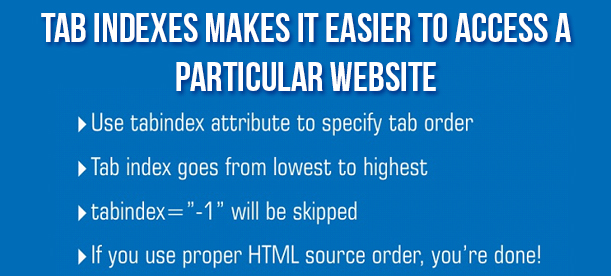
For determing the proper order of navigation around form fields through the use of tab key, it is important to utilize the tab indexes. This feature plays a key role while navigating around the forms on a site. However, if your page design is equipped with proper logical order and a strong hierarchy due to the presence of headings and sub headings, there is not much to worry about this tab index.
As, forms consist of numerous small elements like checkboxes and radio buttons which needs precise mouse positioning and click by humans, performing the same would be difficult for a person with motor disability. In situations like this, life of these people can be in much relief if a proper tab indexing is performed on the form which can enable user to interact with each and every form element through simple keyboard strokes.
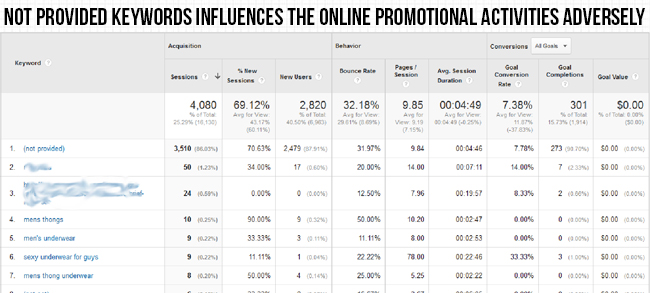
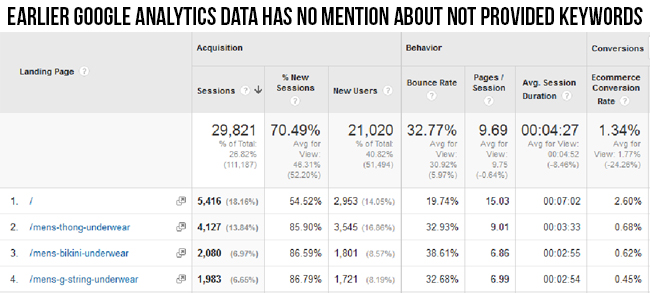
“Ignorance is a sin” and it will not be a hyperbole when it comes to the “not provided” keywords while analyzing the data of Google Analytics tool. This is a matter of serious concern for all the Web marketers and analysts as without a clear insight about your online traffic particularly about “not provided” keywords, you can’t expect to improve your conversion rates and product sales.
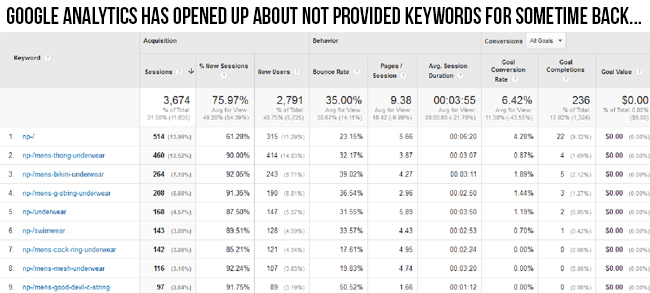
“Not provided” keywords are those organic keywords that are used by an online user on a search engine to arrive at your website. These keywords that drive customers towards your website are collectively grouped under the “not provided” keywords and are not passed onto your targeted website. This was done by the Google on the pretext of protecting the user privacy but in reality it was a smart strategy to push more people towards paid keyword targeting, PPC ads and other such paid advertising mediums. Around 85% of the keywords used on Google for accessing a particular website comes into the category of “not provided” keywords when seen through the report of Google Analytics tool.
Classification of the online traffic
To drive traffic towards your site, two types of keyword referral campaigns are utilized by online businesses. They can be classified as organic keywords and paid keywords. Let us brief you about the two.
Organic keywords- These are the keywords that are used by your targeted customers to land at your particular website by clicking on one of the organic search results of various search engines like Google, Yahoo, Bing and others.
Paid keywords- These consists of various PPC ads, social media ads and other such paid mediums that has brought customers on your particular website. Although, businesses have to pay a particular fixed amount for this type of customer acquisition strategy but this is a very reliable method in terms of getting high traffic for your site.
Google Analytics is a smarter way to get valuable insight about incoming traffic on your site. It provides complete detailed information about the nature of the incoming traffic, source of the incoming traffic whether organic or paid, device used by customers while surfing and other such crucial data. As per a recent change by Google on 8th January, 2015, there have been a slight change in the representation of the “organic keywords” on Google Analytics tool. For getting access to the organic keywords option in your Google Analytics tool, perform the following steps.
– Click on the ‘Acquisitions’ tab on the screen of your Google Analytics tool.
– Now, click on the ‘Campaigns’ tab located at the bottom of ‘Acquisitions’ tab.
– Under the ‘Campaigns’ tab, you will find the option ‘Organic Keywords’ there.
Hiding of “not provided” keywords by Google
On 18th October, 2011, a major announcement was made by the Google that from onwards, the search terms used for landing at a particular site would not be passed on to that destination website. Instead, all these visits would now be clubbed together in the form of “not provided” keywords which is represented as “np”. All this was done to protect the privacy of the online searcher as they would not like their search terms to be passed onto the destination site. Due to this change, all the “keywords” used by the online customers to land at a particular website is now grouped together under the “not provided” category. This change has caused much ambiguity among numerous SEO professionals as they are not getting any clear idea about the keywords that are being increasingly used by their targeted customers to arrive at their particular website. Further, it has made the task of content marketing a little harder and has affected the website rankings and online popularity of a business.
Effect of the hummingbird update on SEO
Hummingbird algorithm of Google was launched in August, 2013 and it changed the entire face of the SEO industry. It is a complete new algorithm that consists of more than 200 factors that can make a tremendous impact on the website rankings and search engine results. This algorithm was created with a focus towards the mobile devices and for making the SEO results more mobile friendly. Due to the addition of “conversational search”, the focus of SEO has changed from the use of individual keywords to more towards the meaning or semantic context of a particular search phrase. The algorithm works on the principle of “understanding meaning behind the search phrases rather than just the words in the phrases”. Hummingbird is a blessing for the SEO professionals who use the white hat SEO approaches by following all the Google guidelines and regulations and can invite severe penalties for the black hat SEO that use illegitimate stuffing of the keywords to cheat search engine crawlers.
As long as you are blessed with the services of good content publishers and writers, you don’t need a reason to panic as the SEO focus has changed from the keyword stuffing to semantic meaning of your written content. Moreover, it is working towards making the search results more effective for voice based searching. Some of the various features introduced by this Hummingbird algorithm are:
Use of the long tailed keywords for the search results.
Focus towards the semantic based content instead of plain keyword stuffed content.
Introduction of the knowledge graph feature for providing brief information about a topic without even clicking the search results.
Giving more emphasis on the attractive images, videos and visual elements in your content for increasing its semantic appeal.
Making use of natural language processing and artificial intelligence feature.
Changes occurred in the Google Analytics tool
In order to get the effective insight about the arriving site traffic on your website, you need to keep track on the analytical activity of your website by clicking on the landing page option of your Google Analytics tool. Let us understand this with the image given below.
According to the above image, SEO professionals were earlier clueless about the impact of “not provided” keywords on the different landing pages of their website. There was no mention of “not provided” keywords anywhere on the different pages of the website. The SEO team was earlier unable to decipher the complete analytical data regarding the incoming site traffic on their website. Due to this, it was difficult for them to target particular high ranking Google keywords as there was no information about “not provided” keywords on the landing page tab of the Google Analytics tool.
In the image shown above, it has been observed that since 20th November, 2015, Google has started providing information about “not provided” keywords in the form of “np”. Due to this relaxation, it is now easier for the content marketing and SEO team to target high converting keywords for their website in order to generate more traffic and conversion rates. One can easily see the traffic statistics that has generated out of the “not provided” keywords (np) on various pages of their website and it has opened new doors of keyword targeting and content marketing.
So, stay tuned with us and get constant updates regarding “not provided” keywords for improving the performance and website rankings of your online business.
Newsletter Integrator is an OpenCart Plugin that lets you increase your mailing list by adding customers in your configured lists of email marketing services as configured in admin panel. You can choose to configure any of the services or multiple at the same time from ‘Mailchimp’, ‘Constant Contact’ and ‘iContact’.
2. Front End
On the front end,when a customer chooses to subscribe to a newsletter in default OpenCart, the customer is automatically added top the lists configured in admin panel when clicked on continue.
A customer will also be added to configured lists on registration if he/she choose the option subscribe to newsletter.
3. Admin Panel
The admin panel has 4 tabs for configuring this plug-in, as listed below:
1.General Settings
2.Mailchimp
3.Constant Contact
4.iContact
3. Admin Panel
The admin panel has 4 tabs for configuring this plug-in, as listed below:
1.General Settings
2.Mailchimp
3.Constant Contact
4.iContact
4. General Settings
General Settings tab has following options:
Enable/Disable(On/Off Switch):
This is the main switch to enable/disable the entire Module.
In this tab, admin can choose from the lists in his/her MailChimp account where emails should be added. Initially a message will be displayed like No list exists for this API key!
MailChimp API key: Admin needs to enter API key to fetch lists from his/her account. As soon as admin enters the key and clicks outside the text box, request is sent and lists (ifany) are fetched and displayed in a dropdown box.
MailChimp List: Choose from the lists displayed here.
6. Constant Contact
In this tab, admin can choose from the lists in his/her Constant Contact account where emails should be added. Initially a message will be displayed like No list exists for the combination of Key and Token provided above!.
Constant Contact API key: Admin needs to enter API key. As soon as admin enters the key and clicks outside the text box, request is sent and lists (ifany) are fetched and displayed in a dropdown box.
Constant Contact Access Token: Admin needs to enter access token along with API Key. As soon as admin enters the token and clicks outside the textbox, request is sent and lists (ifany) are fetched and displayed in a dropdown box.
Constant Contact List: Choose from the lists displayed here.
7. iContact
In this tab, admin can choose from the lists in his/her iContact account where emails should be added. Initially a message will be displayed like No list exists for this account!.
iContact APP key: Admin needs to enter APP key. As soon as admin enters the key and clicks outside the text box, request is sent and lists (ifany) are fetched and displayed in a dropdown box.
iContact APP Password: Admin needs to enter APP Password along with APP Key. As soon as admin enters the password and clicks outside the text box, request is sent and lists (ifany) are fetched and displayed in a dropdown box.
iConstant Username: Admin needs to enter user name as well along with APP Password and APP Key. As soon as admin enters the username and clicks outside the text box, request is sent and lists (ifany) are fetched and displayed in a dropdown box.
iConstant List: Choose from the lists displayed here.
Turning site visitors into an engaging shopaholic is often perceived as a critical task due to the emergence of various e- commerce sites and the changing mindset of the targeted customers. If your e- commerce site can keep your visitors hooked, you can easily improve your chances of making product sales and conversion rates. But, if it is otherwise, you can take counteractive steps by installing an effective OpenCart extensions on your site so as to keep your visitors engaged to your business organization. Here are the few reasons that supports why our Knowband OpenCart Ajax Cart+ module is simply the best buy option for your online store.
Simple installation and configuration
Unlike other e- commerce plugins that needs technical knowledge for installation and configuration, this OpenCart module can be easily installed by any technical and non- technical individual effortlessly. It can be easily installed with a simple click and the user can also perform configuration without any hassles.
The fear of losing out your customers due to complicated checkout process is going to be a thing of past as this e- commerce module has simplified the checkout process to a great extent. It has provided brilliant features to customers that allow them to make quick changes in their shopping carts. Due to these features, customers can happily complete their checkout formalities which in turn will reduce your shopping cart abandonments.
Works perfectly with other themes and modules
This e- commerce plugin does not pose any hindrance in the working or functioning of any other modules and provides effective synchronization so that different modules can work independently on an e- commerce store. Moreover, it works superbly with different website themes and its features and functionality are not dependent on any theme.
Provides multiple popup features
OpenCart Ajax Cart+ extension has added new range of features and functionality in the popup option. With this plugin, site owners can show popup on their add to cart, add banners in their popup, provide related products in the popup feature, turn off popup on their mobile devices and other such functions. It also allow customers to apply coupon and voucher code on their cart besides providing a direct button to customers for landing on the checkout page. Everything can be so effortlessly managed and operated by the popup feature of this e- commerce module.
So, turn your e- commerce store into an ultimate shopping hub for shopaholic customers by purchasing this OpenCart extension from our e- commerce store, www.knowband.com. You will be proud of your purchase due to the wonderful services and features provided by this e- commerce plugin for your e- commerce organization. Further, our online store, Knowband do provide e- commerce plugins for other platforms for Magento and PrestaShop.
Various e- commerce organizations are giving added emphasis to the social login on their site so that visitors can engage with their business organization and can create the necessary awareness about their featured products and e- commerce company. But, the major stumbling block in this regard is the complex social login facility that makes it extremely difficult for your visitors to login into your e- commerce site. By analyzing this grave situation, our organization has developed a wonderful e- commerce social checkout extension for Magento site owners that can ensure customers a seamless social login facility. Here are the salient features of this Magento Social Login extension that has created huge ripples in the online business community.
Faster sign up facility through interactive login facility
Now, customers don’t have to create unnecessary accounts for logging into their social media accounts as they can now easily login through social login popup options. They can seamlessly login with their existing social media accounts due to this wonderful Magneto extension. The Magento social login extension also consists of a “Quick login” feature that help visitors to login successfully without filling out any login form.
Work uninterruptedly with multiple devices
By thinking about the diverse range of online customers that are using multiple devices like desktops, laptops, smartphones or tablets, this e- commerce modules can be used with any of these devices without any problem. The responsive design of Magento social login extension makes it superb to be used across multiple devices and offer same level of services to every customers irrespective of the device used by them.
Trouble free installation and configuration
This Magento social extensions is very easy to be installed by any individual irrespective of its technical and non- technical background. The user can effortlessly transfer files from the server to the Magneto site and can simultaneously install it also. The Magento social login extension has facilitated the quick installation and configuration with a simple click.
Effective management of the social accounts
For preventing the misuse of the social accounts by some miscreants, this Magento social login extension has provided freedom to site admin for easy enabling or disabling of the social media accounts through the back end of the web store. Further, it has helped in the easy checkout process as customers can seamlessly access their social media accounts if their account is showing disabled.
Allow effective sorting of the social media buttons
One of the best feature of this Magento social login extension is that it allows effective sorting of the social buttons on the horizontal and vertical basis. Moreover, site admin can easily drag and drop the social media buttons and can decide about placing these buttons horizontally or vertically. By using A/B testing tool he can check which button is more preferred by the customers.
Effortless customization and tracking facilities
Now, with the help of this Magento social module, site admin are capable of making swift changes in the social bar headings and the text of the social login link. Further, it provides authority to site admin to track any desired social media account of customer and analyze his/her complete login history through various social media accounts.
So, you don’t have to be impatient if you are unable to get the effective number of followers on social media, all you need to do is just surf our e- commerce site, www.knowband.com. By visiting our Knowband site, users can place an easy order for this Magento social login extension or any other e- commerce module for their Magento, OpenCart and PrestaShop customers.
OpenCart Social Login extension adds the social login block on your website and allows your customers to sign-up/log in on your website through various social media networks such as Facebook, Instagram, Twitter, etc.
Online shoppers always look for an easy sign-up option on an eCommerce website No one likes to get involved in a lengthy registration process.
And today with the availability of multiple e-commerce websites, users do not mind leaving a site if it follows a lengthy and mandatory account creation.
This has been made easier with the introduction of social login. Almost every eCommerce website provides the social login option today. If you own a store on the OpenCart platform, you can also add the social login facility on your website with the help of the OpenCart Social Loginizer extension.
OpenCart Social Loginizerstreamlines the registration process on your OpenCart website and enhances the user experience by providing visitors with the facility to sign-up on your store with 8 social login options that include Facebook login, Google login, Instagram login, Twitter login, LinkedIn login, Yahoo Login, Amazon login and PayPal login.
Here are some of the reasons why you should try this OpenCart Social Login extension. This includes its features as well as benefits.
1. Multiple Social Login options
The OpenCart Social Media Login extension covers nearly all the major social media networks so that your visitors have several options to choose from and can select their preferred login option. The more options you provide, the more comfortable users will feel.
2. Place Social Login block on multiple places
With OpenCart Social Login module, you can place the social login block on multiple places on your website such as the Checkout Page, Product Page, etc. This is to help visitors to login from the same page they are present on and not asking them to come back to the registration page. For example, if the social login option is not present on the checkout page, it can compel your potential customers to abandon their cart.
You can also select the display position, for example, it can be placed on the top, bottom, right, or left.
3. Customizable Social Icons
The OpenCart Social Login extension lets you customize the social login icons. It has various styling options. You can choose the icon shape (circular, rectangular, etc) and also select some pleasing hower effect. There is also an option to customize the icon colour.
4. Get Insights into registrations made through Social Login
The social login extension for OpenCart offers pie chart analysis of the use of the social login options. The statistics display how many times users have opted for the social login option and how many users have been registered through it. It also displays which login option the user preferred along with their registration details like name and email address.
5. Seamless single click installation
The OpenCart Social Loginizer extension can be easily installed with a single click. You do not need any technical knowledge or assistance for installing this social media module onto your e-commerce website.
6. OpenCart Social Login encourages Quick Signup
The module ensures that users do not have to spend too much time on the registration task and can sign-up within one or two clicks. Quick signup also reduces the cart abandonment rate on your website. (When social login is placed on the checkout page!)
7. Helps in increasing the user registrations
With the social login facility, customers who are reluctant to register because of the lengthy registration process find it easy to sign-up. And with options such as Facebook login, Google login, Instagram login, users are more likely to signup as they are the widely used networks, that ultimately grow your email list.
For any kind of query or assistance, reach out to us at support@knowband.com and feel free to drop down your query below in the comment section as well.