Now it has become an old news. We all know about eBay’s decision to remove all active contents from the site. This is one on the cons of selling on eBay where you have to stay ready to adopt biggest changes frequently. Never mind, even with these cons we know that selling on eBay is important.
How will it affect the eBay sellers?
Many eBay sellers use listing templates to make their product listing look nice and standing out. So, far almost all of these templates made use of active contents. eBay sellers who also have their own eCommerce site use eBay integration modules to manage the eBay listing from their a site itself. Many of these integration solutions also use active contents.
By active content, we mean that piece of code which runs a script on the page. According to eBay, active content that they would ban includes “JavaScript, Flash, Plug-ins, and form actions that can create features such as cross-platform promotion or video embedding”
With eBay banning these active contents, templates using such contents will no longer function. In the worst case, the seller using the active content after June 2017 would loose the listings after these listings being removed by the eBay.
So, you must make sure you are all ready and compliant with the new rules before June rolls up and kills your listing.
How can you know whether you comply or not?
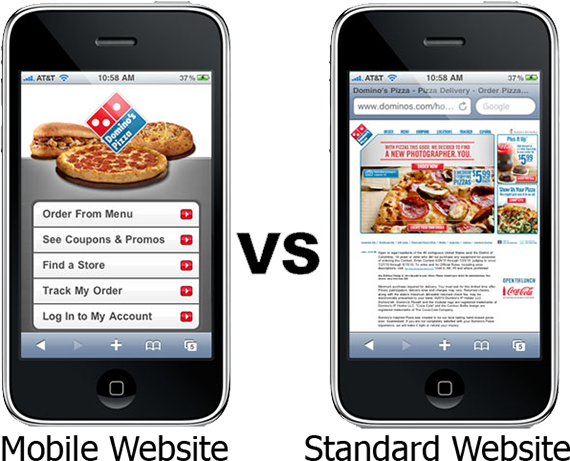
eBay refers to this testing tool for sellers to check the mobile friendliness of their listings.
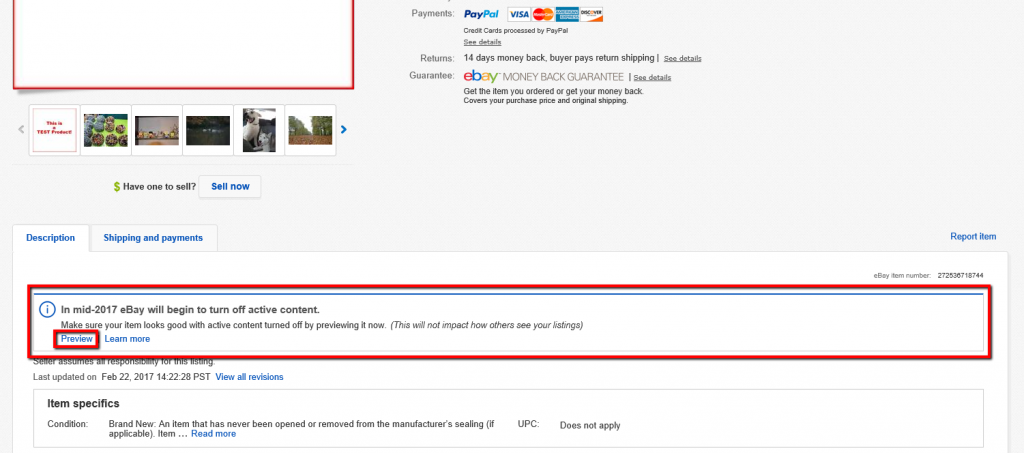
Moreover, eBay also provides a preview mode to see how your listing would look without active content.
“To use the tool, view your item page and click the preview option in the item description tab. This preview link is only visible to you, the seller. Buyers cannot see this option and previewing the item does not alter the description in any way.”
Why is eBay making this huge change?
According to eBay “The use of active content in listings, including JavaScript, Flash, plug-ins and form actions, can negatively impact the user experience by inhibiting mobile purchasing, increasing page load times, and increasing security vulnerabilities”
eBay understands the importance of being mobile friendly and knows that hassle-free mobile experience is the biggest requirement here. As many of eBay sales involve at least one visit from the mobile device, ignoring the mobile experience is what eBay is looking for.
While active contents like Flash fails to load properly or even at all on the mobile devices, they degrade the customer experience ultimately degrading the site’s name, and eBay does not seem to be in a mood to tolerate this.
Do not forget the impact on the page load speed it will have after removing the active contents. The page load speed can be exponentially improved by removing such contents.
The most important concern behind active contents that eBay revealed was the security threats. Active content can lead to security issues, like injection of malware to the pages which would also infect the eBay users’ devices.
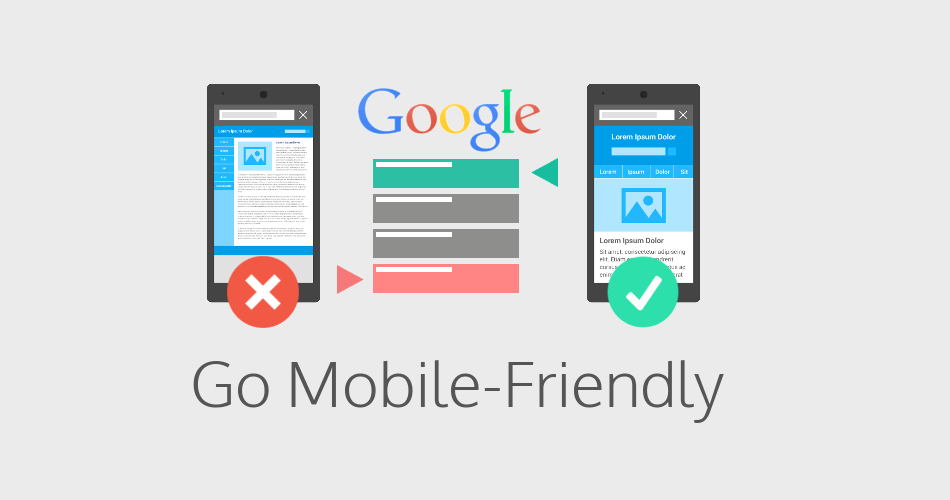
Most interesting thing that eBay came up is telling sellers that they can enjoy improved exposure to search engines if they remove the active contents. How? eBay didn’t explain that, but I guess, without active contents the listing would go mobile-friendly and since Google uses mobile friendliness as one of ranking signals, it would improve the visibility and ranking on the Google search engine.
How to adopt eBay’s new guidelines?
With the notification regarding active content, eBay has also released a guidance for what you need to do to adopt the new changes. They have clearly notified that users need to remove all their active contents and use alternatives wherever applicable. If you use template, integration tool, and other such tools from third parties, you need to speak to them and get an information on what they are doing to make their solution comply with active content guidelines.
One thing that is worth to note here is that eBay statement:
“If you are a new Store subscriber, we highly recommend that you do not invest in any custom html stores experience, as this will not be supported long term”
eBay suggests an alternative way- stick with the native eBay stores experience. It clearly implies that eBay is planning to completely deactivate the custom template use in coming future. For the time being, it’s not a problem as it will take some time. However, it’s important to comply with the guidelines if you are using templates now.
It is not a shop template module, it is an eBay listing management solution that enables a PrestaShop store owner to manage his/her eBay listings from PrestaShop store itself. So, it does not target the product front pages, instead, it targets the product listing.
It uses the simple Native eBay product listing steps to map the PrestaShop listing with eBay listing following eBay product listing guidelines. So, there is no chance that it uses the active content.
2017 is on full fledge, so is the eCommerce market. It’s almost half past and we are all set to step inside the rest half of the adventure.
Adventure? Yes, if you are an eCommerce entrepreneur and your business is still kicking, you know what I mean.
This year, till now, has witnessed so many start-up successes, while some were not so lucky. Are you one of those lucky ones?
If ‘Yes’, congrats! You did the job right till now. If ‘No’, there is no problem. In this post, I have compiled a list of some really useful eCommerce ideas that you can still adopt to keep on kicking. Hopefully, if you do it right, you might get something to reestablish your business, if you were not so lucky earlier.
So, here it goes.
1. Take Mobile Optimization as priority now
Jordan Linberg, Founder, and Owner of Stardust Memorials says “If your web-store isn’t mobile-friendly, do something about it right now. Mobile shopping (phones and tablets) is the future of eCommerce, and websites that are not mobile responsive are going to be a bigger and bigger barrier to success for their owners” – Information courtesy: Practical Ecommerce
He got it right. Optimizing for mobile is a topic that is being discussed from the time unknown now. Ask any successful web-shop owner, you will get the same answer- they took mobile optimization as a priority.
“According to Google 61% of users are unlikely to return to a mobile site they had trouble accessing and 40% would visit a competitor’s site instead”- Source
Are you ignoring the mobile experience of your store? you are not just pushing your potential customers away but also sending them straight to your rival’s site that has better mobile experience than yours.
“57% of users say they won’t recommend a business with a poorly designed mobile site” – Source
E-Commerce website design is not just about looks today- it’s all about the user experience. While content optimization is a crucial factor on every website, eCommerce sites still have to do a lot more than just optimizing contents.
The ultimate goal with a user on your web-shop is to complete the checkout and receive a successful order. That can only be achieved if your site is responsive enough for the customer to easily perform everything from browsing a product page to completing the checkout, right from a mobile device.
“Google officially consider mobile friendliness as one of its ranking signals”- Source
Till now we have been looking at the stats that revealed how you are killing your sales and conversion by not optimizing for mobile. The above fact just pushed us to look at a more dangerous side – Mobile SEO.
When you have a site that is well optimized for mobile users, you are a hero in Google’s eyes. However, by not optimizing for mobile yet, you are surely fixing a bad spot in the same eyes. You will find yourself nowhere in the mobile SERPs and even if somehow you are visible somewhere, bounce rates would make you itch your head like anything.
So, it’s almost mid 2017, and mobile commerce is on full fledge. Tougher days are yet to come, optimize for mobile today to secure your business. In fact, why just secure? You can actually touch the sky of revenue generation by making the best possible optimizations.
2. Focus on your new customers and retain them
As eCommerce sellers, we presume that a customer would order only once. As a result, we take a very less interest in generating repeat sales from the new customers. Well! That’s a mistake, a big one I would say. Undervaluing the new customers not only affects the new customer acquisition but also make the growth stagnant. If you check the sample of your past customers, every repeat customer on your store was once a new customer. Perhaps, it’s your product quality, quicker product delivery, better mobile experience, or the well-optimized checkout process that has encouraged a new customer to shop once again on your store.
It’s time that you understand that the same channel that has pulled a new customer can also generate repeat sales. Acquiring a new customer is tough, and tougher is to retain them. However, with some serious optimization and marketing, it is possible to generate repeat sales more easily than acquiring a new one.
Today, if you are something of a popular image on the social channels, you start producing gold with your business. Social media, the fastest and easiest medium to carry your words to the millions can also break your brand image if gone wrong.
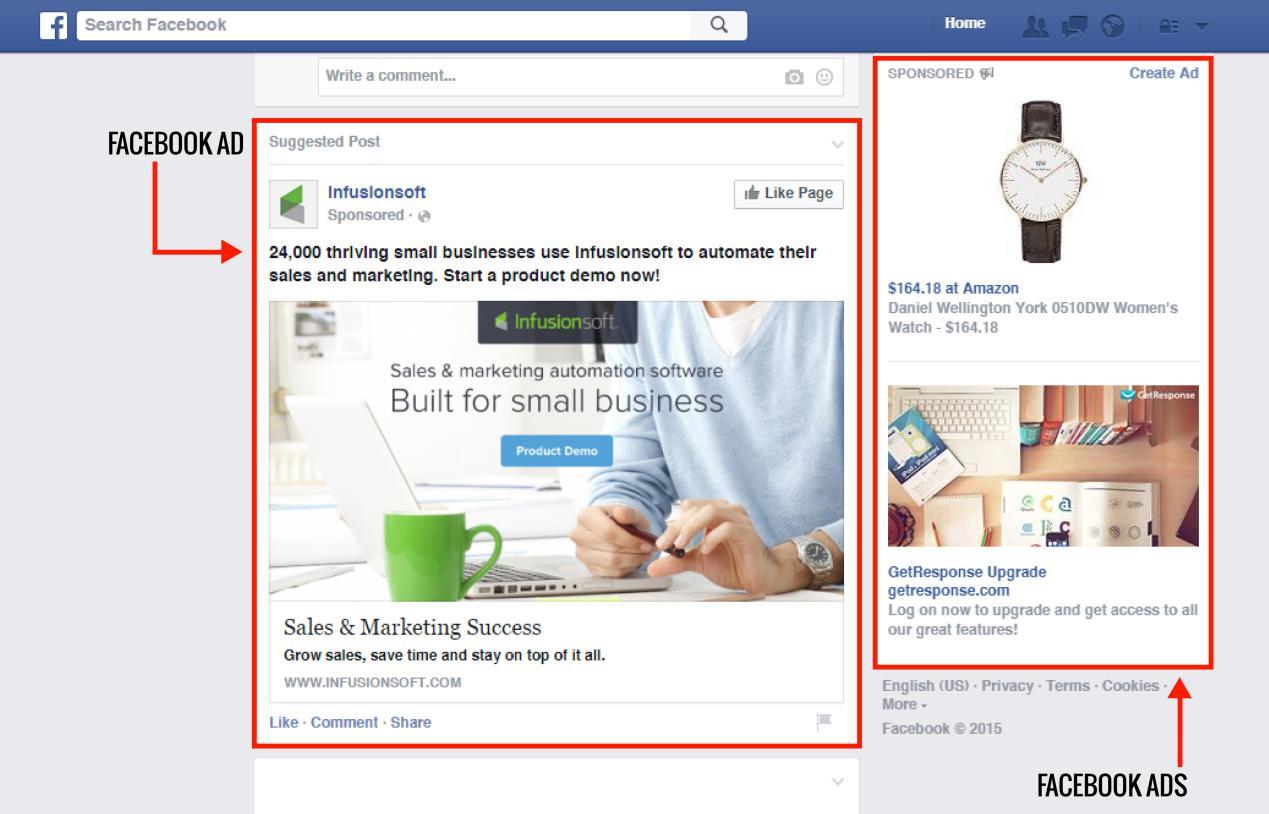
Facebook Ads for example. You may have launched a successful Facebook Ad campaign which is doing quite well. But if you are showing the same Ad again and again to the same not-interested customer, you are irritating him/her and killing your brand image at the same time.
What that worked on one customer may not work on another. Michael Stancil, Director of Commerce, Wedding Wire, says that you should keeping changing the images, and Ad text of your Ads every week. In this way, your same Ad will always look fresh and will have something new for each time. Perhaps, some random change might hit even the not-interested customer and get you a successful conversion.
Leverage every possible Ad type that you can get on the social platforms. Especially for a platform Like Facebook where ROI is always impressive, you can’t say no to it. Not just Facebook, even Snapchat is not far behind, and who can ignore YouTube which has become a major target for the businesses around the globe.
On the whole, get on these social channels with your Ads and follow the best practices to keep them fresh and updated.
4. Don’t be an orthodox, make wise decisions
It’s a human tendency to easily believe in the things that we hear from the surroundings. Gradually these believe develop into conventions and we start confronting anyone countering those conventions.
You would not purchase a cell phone without researching the complete specs, reviews, ratings, performance, battery capacity, RAM, ROM, and customer support. This information helps you to make an informed decision that is backed by a data-driven research. So, why would you make your Add to cart button Yellow, Send reminder emails, and remove guest checkout option without understanding the data behind making such a decision?
Just because, the yellow color works so well for Amazon, it doesn’t mean it will also work for you. Just because, ASOS increased the checkout rate without having guest checkout option, it doesn’t mean it would work for you too.
If you are an eCommerce entrepreneur, stay away from these orthodoxies. Businesses run on facts, data, and analytics. For everything you believe about your business, make sure you have enough data to prove it right.
Use the business analytic tools like Google Analytics, A/B testing, and heatmapping to collect the data that drives your business. These tools will not only help you to know about the actual scenario correctly but will also present a deeper insight about your target customers.
For example, A/B testing your decision to make your Add to cart button ‘Orange’, would give you a statistically proven data that would either support or oppose your decision.
Yes, you should go like this!
In this way, you can avoid the Orthodox beliefs and make an informed decision with higher success chances. In 2017 and onwards, a decision backed by the analytic and research is always more efficient and correct as compared to baseless beliefs.
5. Get ready for a new Analytic tool-
Google Optimize Who doesn’t know about Google Analytics? The well-known business tool that acts as a base for every decision we make. It’s popular not just because it’s free, but for its efficiency to present even the minor datum in so much detail. Furthermore, who can forget the Content Experiments?
Well, 2017 has brought something equally special as Google Analytics – the Google Optimize and Optimized 360. After keeping in Beta stage for a prolonged period, Google finally made these two tools available to the general public in March 2017.
These two tools have already created a buzz in the market. It would be interesting to see how Google Optimize (the free version) would hold the market. Rest, the Optimize 360 might be a luxury for most of us with a cost around $150,000/year.
For online store owners, the new free A/B testing tool from Google might be a perfect and better replacement for Google Analytic Content Experiments. If you are not an orthodox believer, and you believe in leveraging data for making the decisions, perhaps it’s a time you should give it a shot.
6. Track your Cart abandonments
The whole eCommerce market is moaning from the pain of Abandonment curse. Believe it or not, probably all the perceptions that you have about Shopping cart abandonment till now is incorrect.
A quite popular perception is “If your shopping cart abandonment rate is 67.89%, you are losing 67.89 % of your sales”.
But that’s not true!
The biggest idea for eCommerce in 2017 would be to change this perception once and for good. In fact, this perception completely follows the orthodox believe that we discussed in the fifth point.
It’s completely wrong to assume that every visitor adding a product to the cart has a definite intention to buy only. You would be surprised to know that hardly 30-40% of these visitors actually have an intention to buy when they add a product to the cart. However, even then it does not indicate a definite commitment to purchase.
So, before setting your Abandoned cart recovery tool to bombard the reminder emails, hold your horses for a moment and rethink whom should you target actually?
We discussed in the first point how Google wants you to go mobile friendly. However, the mobile-first-index is something that goes beyond “wants” and takes you to “You have to”.
In all the mobile based announcements and updates before mobile-first-index, the impact was totally on your mobile SEO. When this update would be live, Google will index your mobile version of the site first, and your whole ranking (both on mobile and desktop) would be based on how Google sees your mobile site.
That means if Google does not like your mobile site, it will drop your ranking not only on mobile search results but also on desktop SERP.
Image courtesy: search engine land
Worried? You should be, but there is still some time. The Mobile-First-Index update is still in testing phase and is not going to be live any sooner, at least for a couple of months yet.
Leverage the time you have. If you have not optimized for the mobile-first-indexing yet, start optimizing now. You have a lot of work to do. Before that do not forget to go through the words from Google’s official notification on webmasters. Google has already given there a list of “what you should do and what not”.
To Summarize
It’s clear that you are not going to step in 2018 with your business if you have ignored the mobile commerce. From mobile-optimization to mobile-first-index, 2017 and Google both want you to go mobile friendly as soon as possible.
Similarly, an interesting idea to thrive in 2017 would be to stop being orthodox and start accumulating data-driven ideas through analytics. It also involves changing our perceptions over various myths and conventions- shopping cart abandonment as an example.
It’s also the time when we develop a profound focus on- customer acquisition, customer retention, and customer remarketing to leverage every chance for conversion and revenue generation.
On the whole, 2017 can be a year for you if you are well packed with these three aspects:
Decisions backed by data to support it; not baseless beliefs.
Email is cheap, email is fast, email is still kicking and will keep thriving in the future. The bottom line is it is an important marketing tool that is accessible by any marketer for promoting, pushing, and broadcasting the company’s words to the millions.
But before that, you need the email addresses of your target customers to contact them. How would you get their email addresses?
The wrong way
Purchase email data from an agency !?! That I wouldn’t recommend. The email data collected by these agencies consist of a huge pool of email addresses that might not even be relevant to your business. If you use these data, you have a 99% chance of ending up in the spam folders of those users.
The best way
The best way would be to use your own online store to collect the data. The data collected from your own store would be more relevant as these users are interested in your business, that’s why they are there on your site.
There are several ways to collect the email address on your online store. I have chosen the 5 surefire ways that never fail and when combined, provides enough pool of relevant data for your email marketing campaign.
1. Use an efficient email marketing tool
You are going to collect, keep, and use thousands of email addresses, you need a tool that can organize your collected email data and keep them all safe at a single place.
Obviously, you need an email marketing tool to send thousands of emails and run your email marketing campaign. Some email marketing tools that are popular in this category are:
These email marketing tools have hundreds of servers that ensure your mail sent through them avoid the spam filters and is delivered to the right inbox on the right time.
The best thing is that the tools can be integrated right into your eCommerce platform by installing respective modules or extensions.
For example, the PrestaShop Mailigen and MailChimp Integrator module is used to connect your PrestaShop store with your Mailigen and MailChimp account’s email data repository. That is, all the email data that will be collected from your store would be synced and saved in your email marketing account.
So, you need a third-party email marketing tool for:
Saving the collected email data
Launching an email marketing campaign
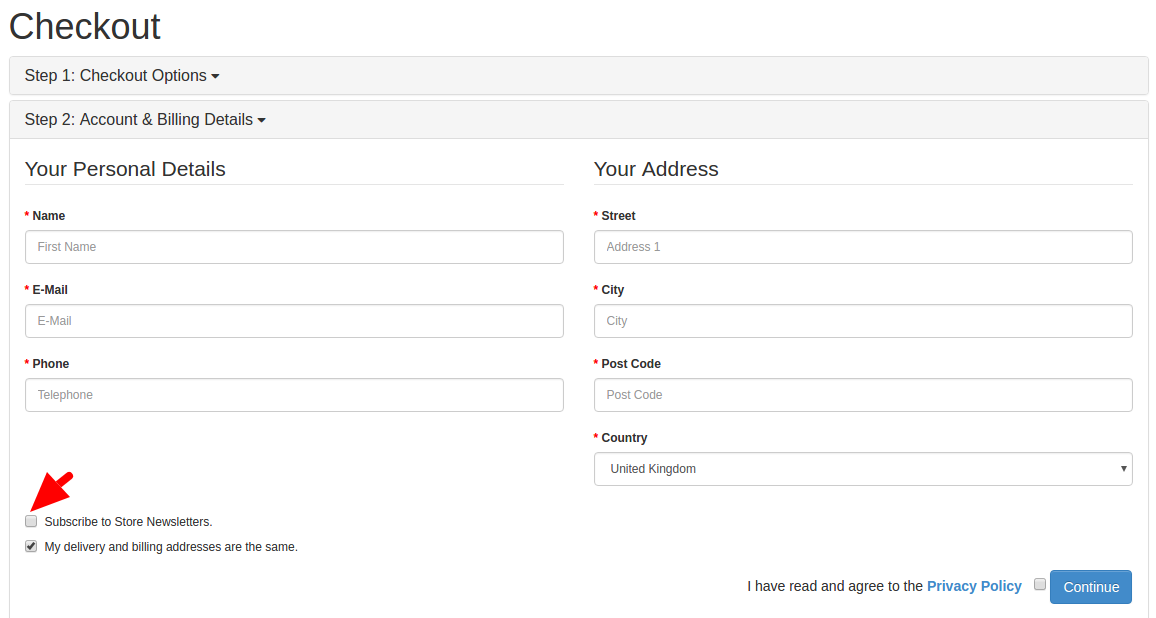
2. Collect Email addresses from the checkout
Checkout process would be the most obvious and straightforward place to collect the email addresses. Despite this many marketers make a huge mistake. They collect the email addresses of only those users who create an account. There are no means to collect the data from non-registered users.
A simple newsletter opt-in box could be really helpful to collect email data from even the non-registered users. In fact, there are newsletter extensions that are capable of creating opt-in boxes that directly sync the email data with your email marketing tool.
For example, Opencart Newsletter Integrator plugin can do the same job on your OpenCart based store. It syncs the email data with your MailChimp, Constant Contact and iContact account if configured.
3. Use motivations as a lead magnet
By default, people feel reluctant to sign up for the newsletter subscription or fill any registration form. You won’t be able to add new email addresses to your data unless people are motivated to sign up for your newsletters. These motivations can actually convert your boring subscription forms into an exciting opportunity to grab.
You can use several motivations. For example:
Search engine watch asks the users to subscribe to get free daily updates from the SEO experts.
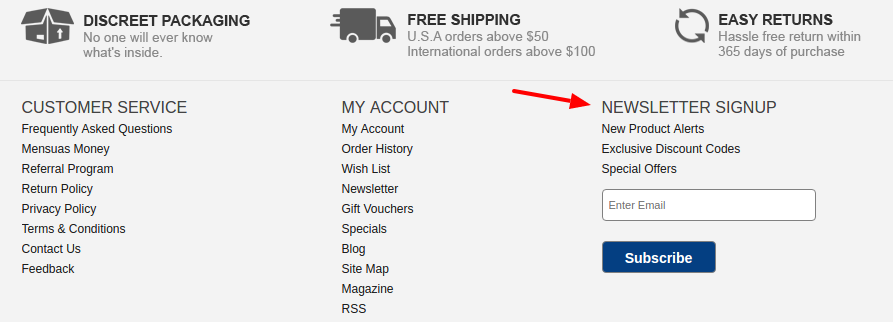
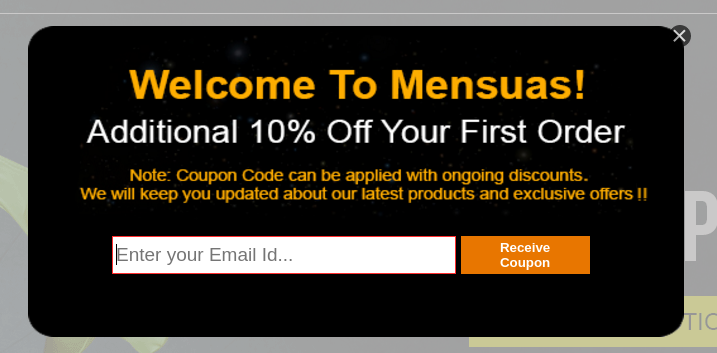
Mensuas uses exclusive coupons and offers as a motivation to push users towards newsletter subscription.
You can use various other lead magnets to attract the customers towards your email collection interface. That too without using a newsletter opt-in or subscription form. I am talking about other means of collecting the email data on your store:
A free giveaway contest can provide you thousands of entries in a comparatively lower time than the newsletter opt-ins. Deploy a giveaway contest on your store and provide the contest entry through a simple registration form.
Use a self-coupon generation form that would send the coupon codes to the user’s email address after the user provides it in the form.
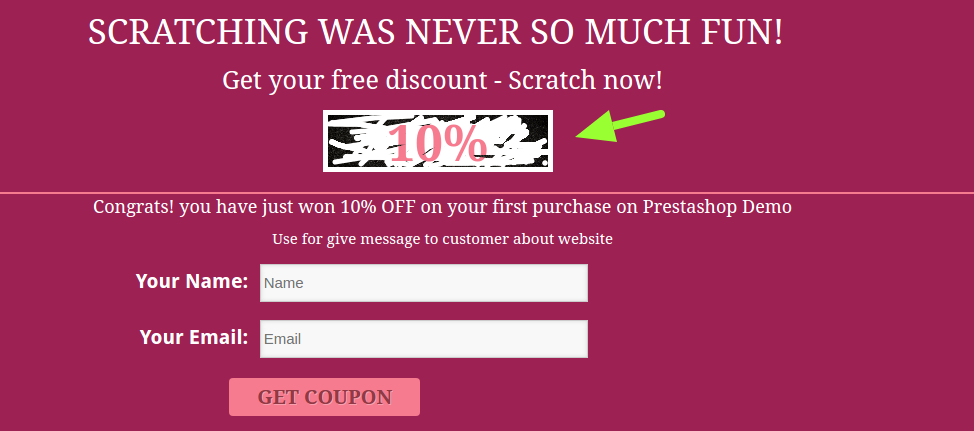
For example, PrestaShop Scratch coupon module shows a virtual scratch coupon which users can scratch using the cursor to see how much discount they have won. After that, they need to provide their email address to receive the coupon code.
4. Use exit intent tracking & entry pop-ups
Most of the marketers think that pop-ups annoy the customers and they highly oppose the use of pop-ups on their sites. But I have found that this thought is one of the orthodox beliefs, they have never tested it on their own stores.
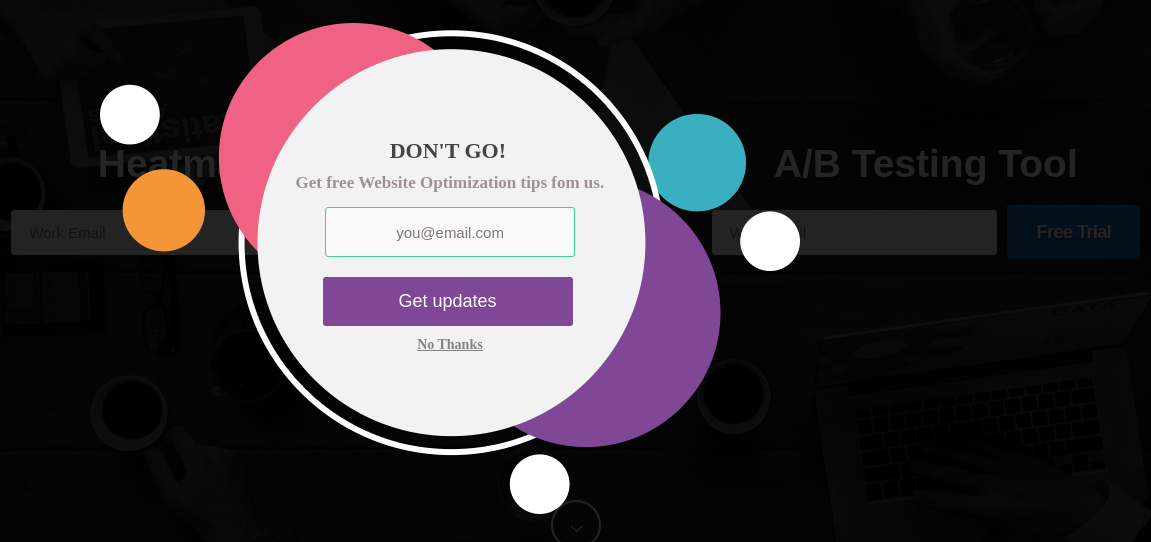
For example, we thought the same until we tested an exit pop-up on MockingFish. The results were surprising. We received the highest sign-up rate after implementing the exit intent pop-up which looks like this.
So, if you are still up against the idea of using pop-ups to collect the email data, you should once test a similar pop-up on your shop. You may start with something of less risky- like on the blog page for example. Just test it and see how it does.
Another type of pop-up that could be tried is the entry pop-up. Well, this idea is not supported by many. Showing a pop-up just after visitor lands on the site could be risky. Perhaps something of great value to the users might not irritate them. Something like this could be less risky:
Don’t be afraid of using the pop-ups and pop-up promotions. Use them wisely and provide some value to the users, they will certainly convert and provide quite relevant and more likely to convert users.
5. Use auto-subscriptions and email address capturing-
For all the ways that we have read till now in this post, you have to depend on the users to fill and submit a form for collecting the email address. Auto-subscriptions work a bit differently where email address entered by the user is automatically captured and synced with the repository without even submitting a form.
For example, Magento Auto-subscribe extension is capable capturing the email address of a user from the checkout page without even letting the customer know about it. As soon as the customer comes out of the email field the extension triggers the capture event that copies the email address to your MailChimp or Constant Contact repository even if the customer does not click the submit button.
The same process can also be followed in several website forms that you use- exit pop, newsletter pop-up, etc.
Conclusion
Once you have the email address, the main work begins- sending the emails. With a personally collected email data on your own store, you have the permissions of the users to send them the targeted emails. Moreover, as they already expect an email from the store, you have more chances of high open rates. Use the email marketing tools to plan the campaigns and schedule emails at different time lines.
Sending regular emails remind customers that we exist and have stories to tell and offers to give. A more engaging relationship can be created with email conversations. Just remember to send some different types of emails occasionally apart from the marketing emails. Perhaps a monthly news update, free e-book, or a loyalty coupon, could be a great occasional change.
The past decade has witnessed an immense growth in the social media popularity. The best thing happened when social media started helping businesses to establish a solid web presence, generate strong leads, and increase website traffic through an effective marketing strategy.
With social media today you can reach to your first-time visitors as well as the repeat customers in multiple ways and showcase the best your business has to offer. A well developed and organized social networking strategy is very crucial when you depend on social media for marketing, lead generation and much more.
Different forms of social media engagement provide multiple ways to improve the user experience and brand image of your business. Features like social login, Facebook login, click to tweet, share on Facebook, follow on Twitter are some examples of how social media can be integrated on your site itself.
Today we are going to discuss on such integration that you can do on your Magento store- how to add the Facebook’s “Like button” and Twitter’s “Follow button” on your Magento store? This addition will help you to improve the social media visibility of your Magento pages by allowing users to Like or Follow your brand.
Get Facebook Like button code
Let’s start with Facebook like button then we will add the Twitter “Follow” button. So, for adding the Facebook Like button first visit the Facebook’s developer site and navigate to the following URL.
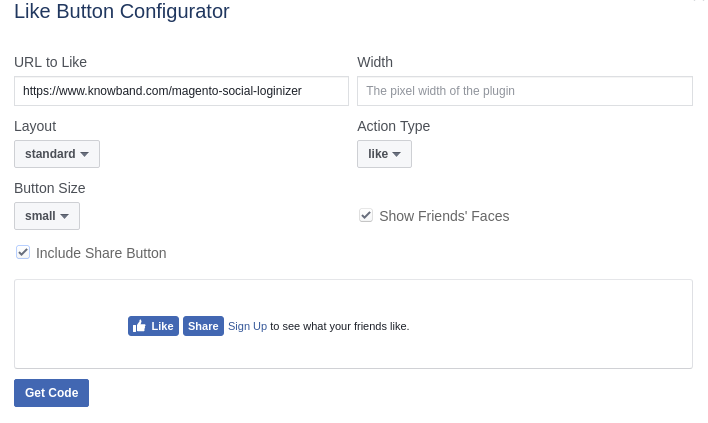
You will find the following form asking some details to be filled in.
Enter your website page URL or your Facebook social page’s URL in the “URL to Like Section”
Enter the width of the button that you wish.
Select the button layout and hit the Get Code button below.
If you also want to show the Facebook “Share” button by the side of Like button, you can check the check-box that says “include Share Button”. Keep the code screen as it is, and proceed to the next step.
Get the Twitter Follow button code
To get the Twitter’s Share button code you need to first visit the following Twitter URL.
Here, enter your Twitter page URL and follow the on-screen instructions to get the Share button code.
Scroll down to find the following interface and click as shown in the image below:
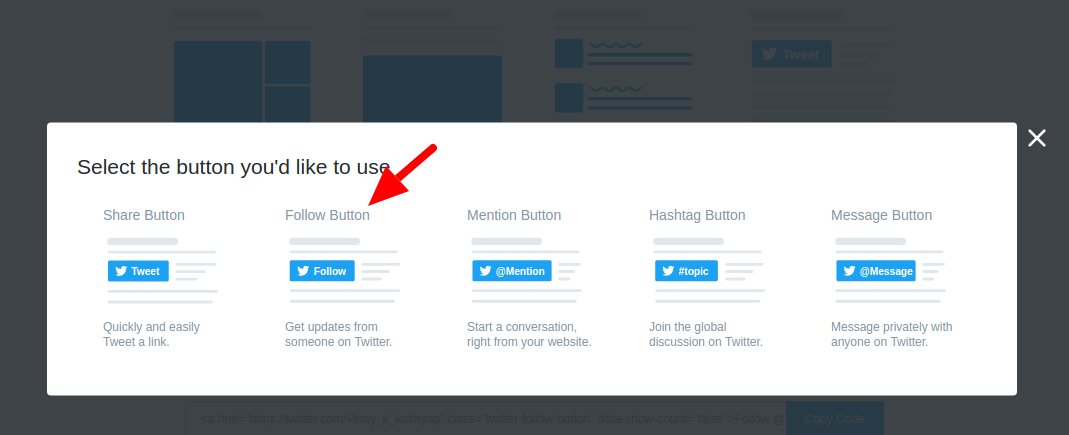
Next, you will see a pop-up. Here you need to click on the “Follow Button” option as shown in the image below:
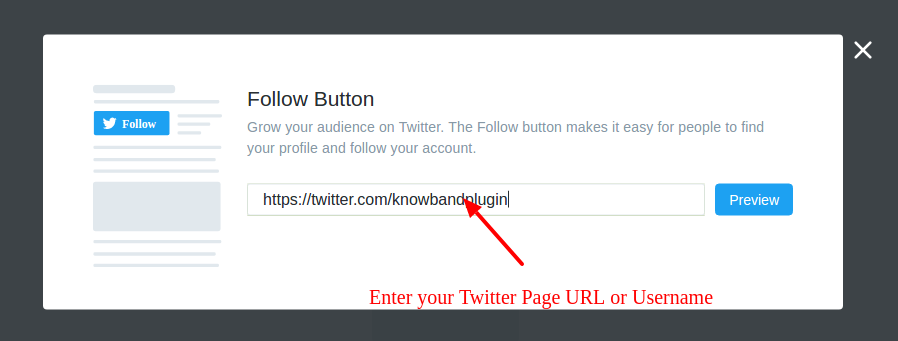
The next interface will ask you to enter either your Twitter Page URL or your Twitter Username. Enter anyone and click Preview. You will get the code.
Add social buttons to your Magento store
Now we have the Facebook Like button and Twitter Share button code. I am going to add these social buttons on my Magento Product Page. So I need to edit the following file from website’s FTP.
After this code, add a new <div> with class=”social-info”. Inside this new <div>, add the codes that you have got from Facebook and Twitter respectively. The code would look something like this:
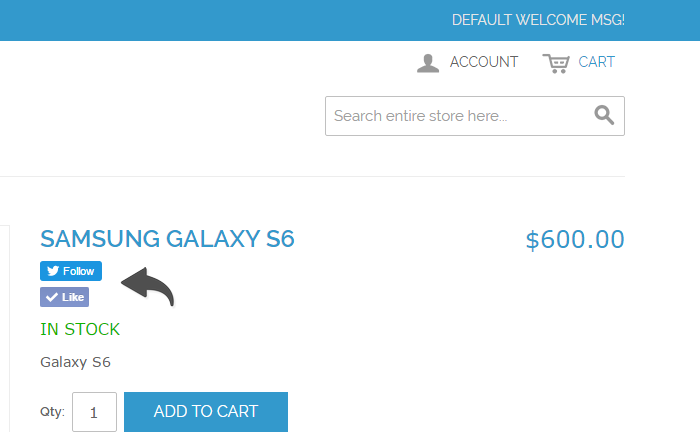
When done with the code addition, Save the file. Clear the Cache Magento cache and navigate to your product page to see if you are successful in adding the social buttons to your Magento store. It would look something like this if added correctly:
To conclude
Social media has become an inseparable organ of the businesses thriving because of it. Whether it is through social login plugins, Social advertisement, or social sharing, social media is helping businesses in uncountable ways. Which kind of social media options do you use in your business? Do let us know in the comments.
PrestaShop is purely an eCommerce platform and possesses a great CMS capability too. Though you don’t have the fully fledged controls like in the CMS platforms, you can still achieve all your basic requirements as a CMS with PrestaShop. In this post, taking PrestaShop 1.6.x and 1.7.x as the target version, I am going to explain how you can add a CMS page on PrestaShop store. Furthermore, we will also see how you can link that page to the header/footer menu.
Adding a CMS page on PrestaShop 1.6.x
Step 1: Log into your PrestaShop back-office as an admin user.
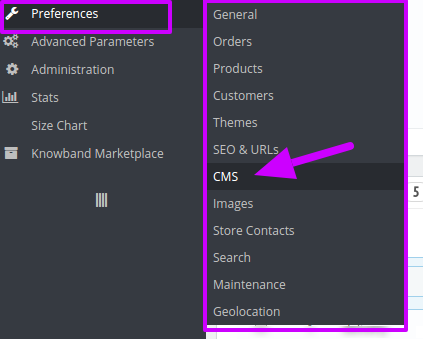
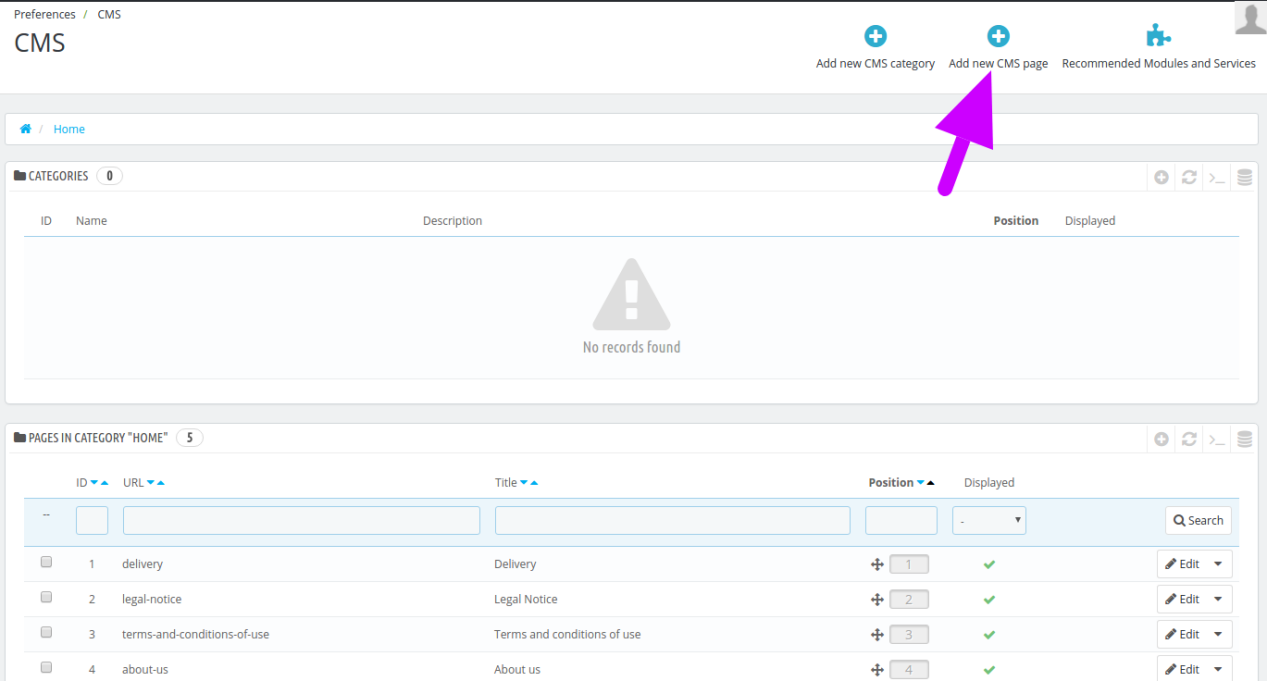
Step 2: Go to Preferences>>CMS. Here you will see all the CMS pages created on your PrestaShop store.
Step 3: Click on “Add New CMS Page” button at the top right corner of the page.
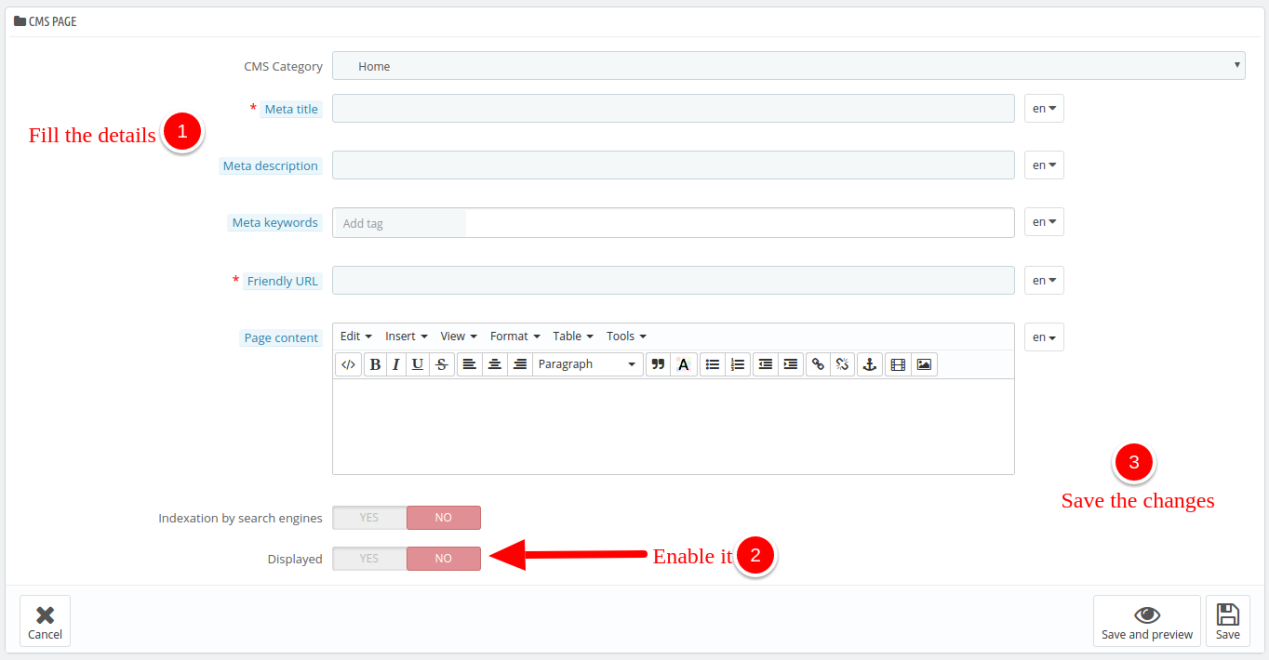
Step 4: Next, you need to fill out all the required fields. After filling the fields, just enable the page and “Save” the changes.
Step 5: Note down the CMS page ID displayed in the first column of the CMS pages list. You will need this ID later.
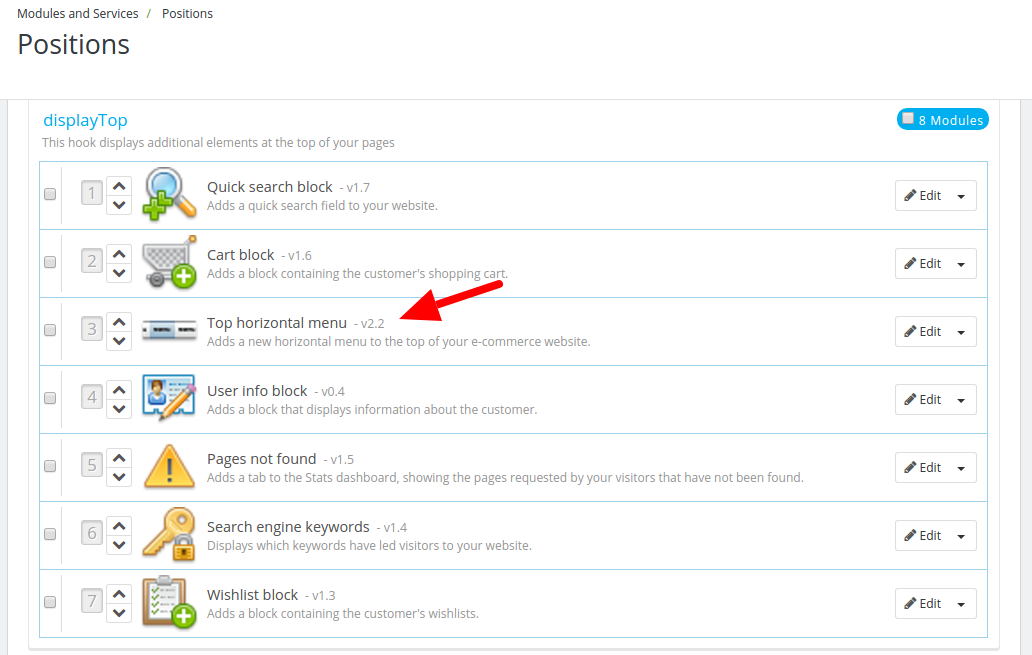
Step 6: Now, go to Module>>Positions, and check which module is showing the Top horizontal menu in your template. I found it in “displayTop” section of the position in my version.
Adding a CMS page on PrestaShop 1.7.x
Similarly for adding a CMS page in the Prestashop version 1.7.x, follow the steps mentioned-below:
Step 1: Log into your PrestaShop back-office as an admin user.
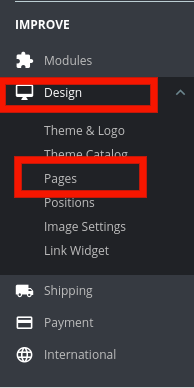
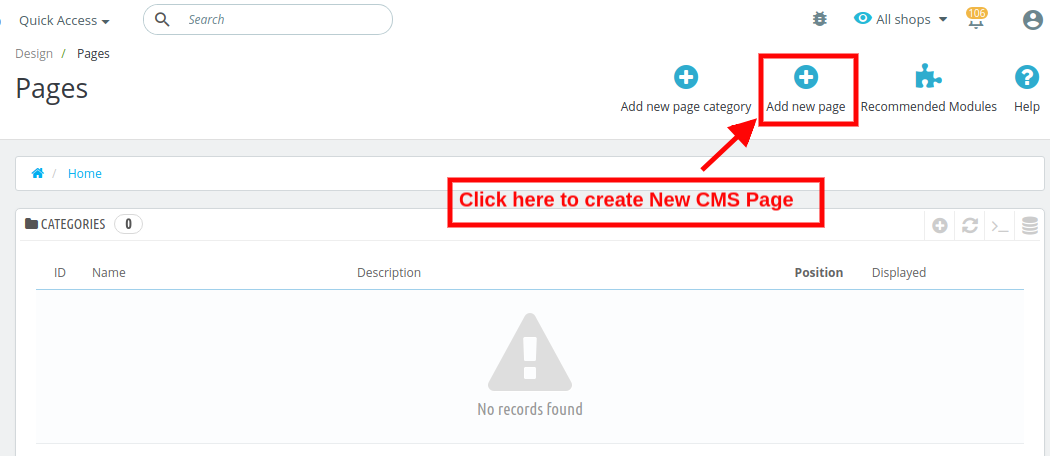
Step 2: Go to Dashboard>>Improve>>Design>>Pages as shown in the image below:
Step 3: Click on “Add New Page” button at the top right corner of the page.
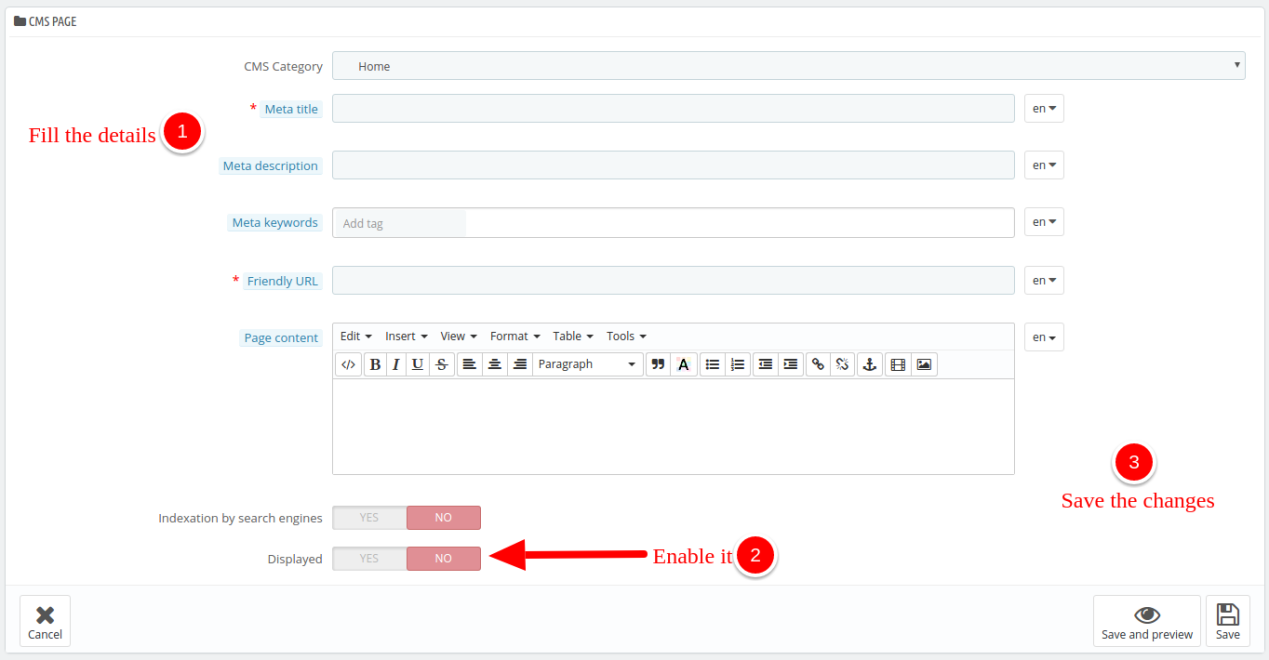
Step 4: Next, you need to fill out all the required fields. After filling the fields, just enable the page and “Save” the changes.
Step 5: Note down the CMS page ID displayed in the first column of the CMS pages list. You will need this ID later. Save the changes.
Adding a link of the CMS page to the header menu
Step 1: Connect to your site’s files by logging into your FTP account. You can use FileZilla to access the files or the cPanel access if you host has provided one.
Step 2: Now, navigate to the following file directory:
themes/themeXXX/modules/blockpermanentlinks
PS: “themeXXX” is the name of your theme.
Edit, blockpermanentlinks-header.tpl file. You can use any text or code editor. I am using Netbeans for editing.
Step 3: Each of the list element in the code here represent one menu element in the Header. For example this code represents a header menu element named sitemap:
Step 6: Save the file. You have now added a link to the CMS page named “new” which had the Page ID “8”.
Adding a link of the CMS page to the Footer menu
How to Add a link of the CMS page to the Footer menu of Prestashop 1.7.x?
We will now link the same page to the footer menu of Prestashop 1.7.x.
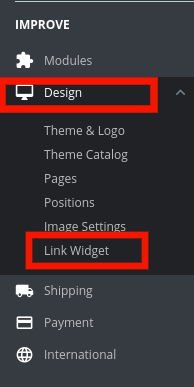
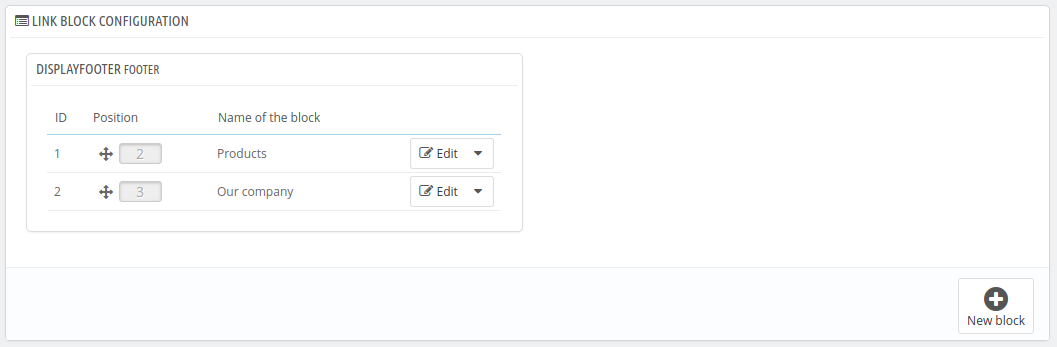
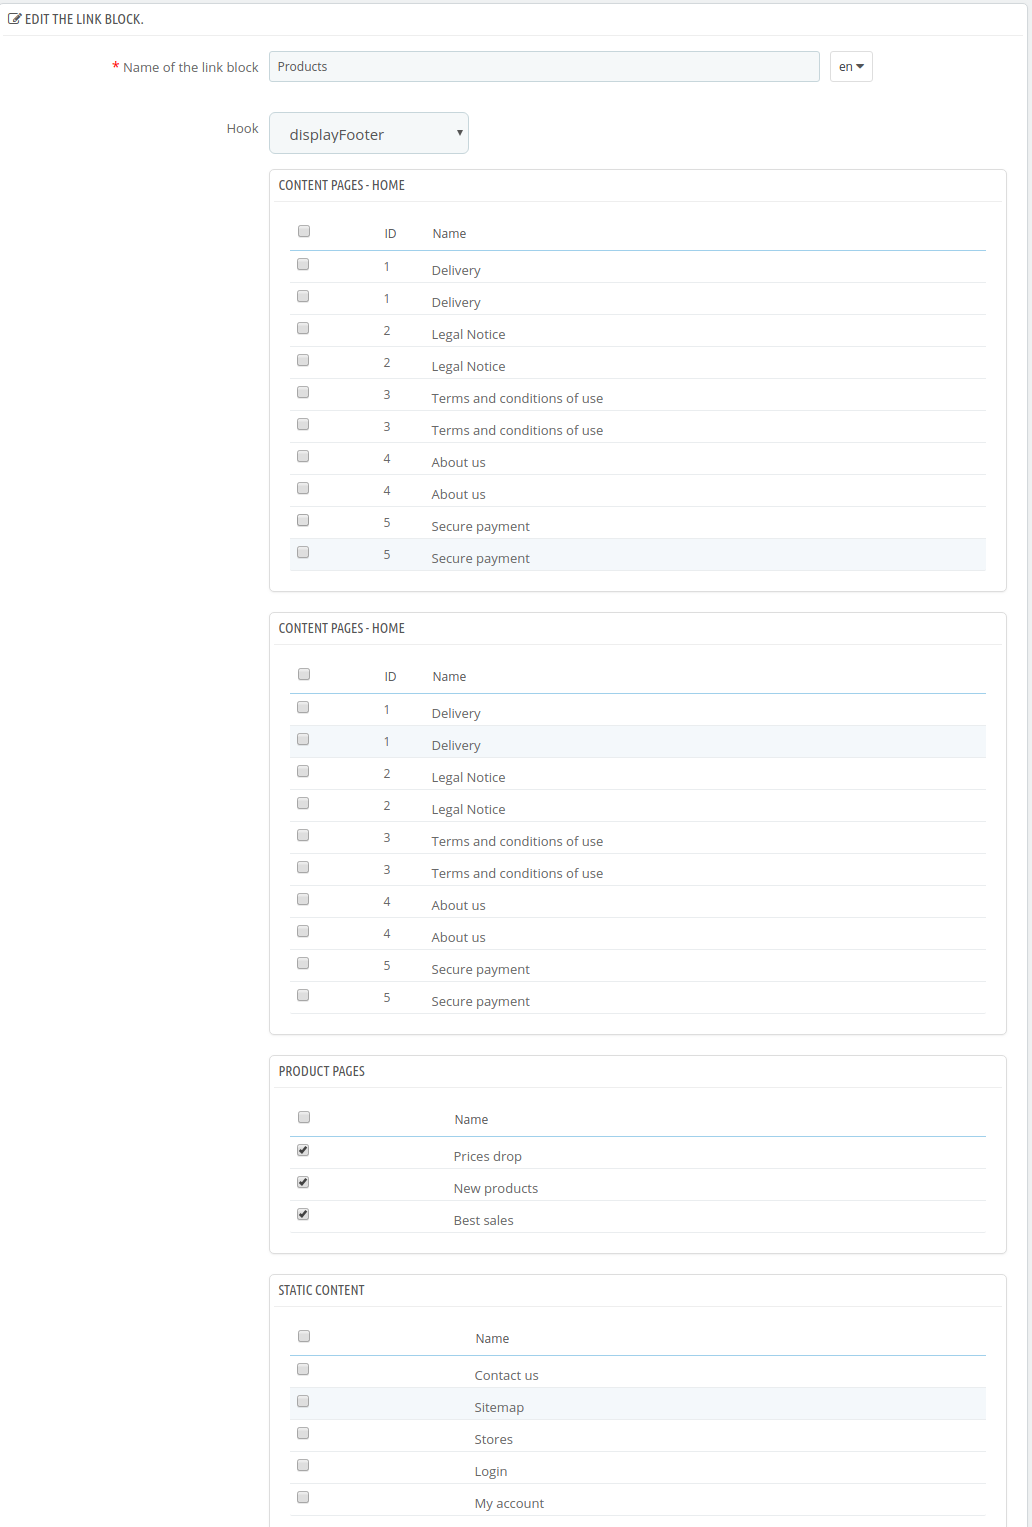
Step 1: Go to Design – > Link widget. This will display the blocks that are currently displayed on your site.
Step 2: In order to open a Block setting from the existing ones, click the Edit button corresponding to it.
In order to activate the newly created page and make it visible, select the checkbox corresponding to it’s title. You can find the link to your CMS page in the footer.
We will now link the same page to the footer menu.
How to Add a link of the CMS page to the Footer menu of Prestashop 1.6.x?
Follow the steps mentioned below to link the same page to the footer menu of Prestashop 1.6.x.
Step 1: Go to your Admin panel and navigate to “Modules & Services >> Modules & Services” and search “CMS Block” module.
Step 2: Click on the Configure button.
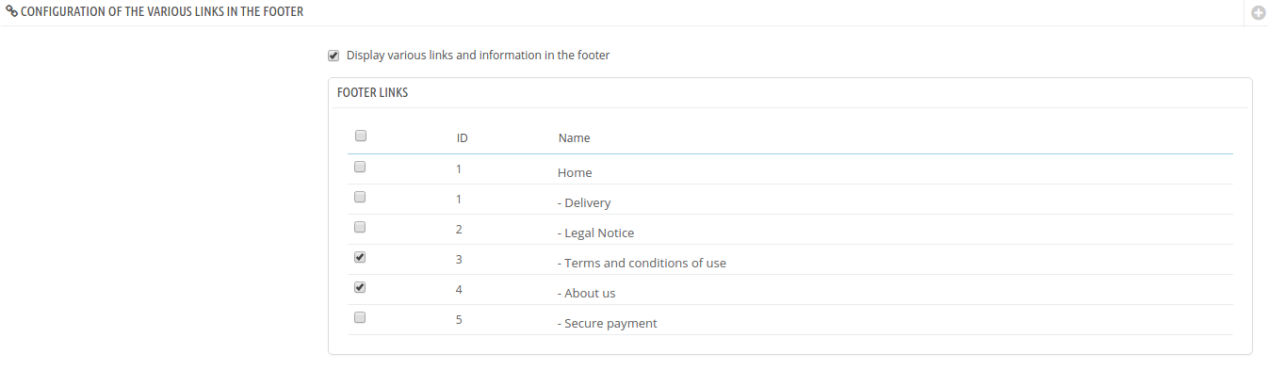
Step 3: Look for the “CONFIGURATION OF THE VARIOUS LINKS IN THE FOOTER” section. Here, if you find your newly added CMS page in the list.
Step 4: Enable your page by clicking on the check-box in the first column. Click the “Save” button to apply the changes. You have now added a link to your CMS page on the Footer menu.
An Easier way to Create CMS Pages on Prestashop
Well, that was quite a show. We created a page, edited the codes, navigated from pages to pages and finally linked it to the Header and Footer menu. But that was just a single page we created, what if you need to link more pages? Each time editing the codes is a quite tiring job.
Is there any easier way to do that without messing with the code?
Yes, Of Course! The PrestaShop page Maker module by Knowband has been designed to serve the exact purpose. Frankly, there is a lot more it can offer. For now, let’s see how can you use this module to create CMS pages and add them to the header link without editing the code.
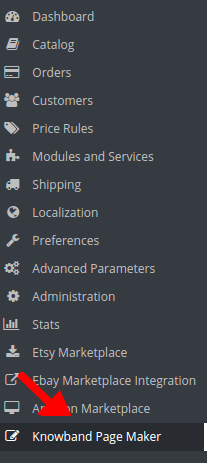
Step 1: Go to Knowband Page Maker menu in the left menu bar.
Step 2: In the next screen, Click on “Add new page” button.
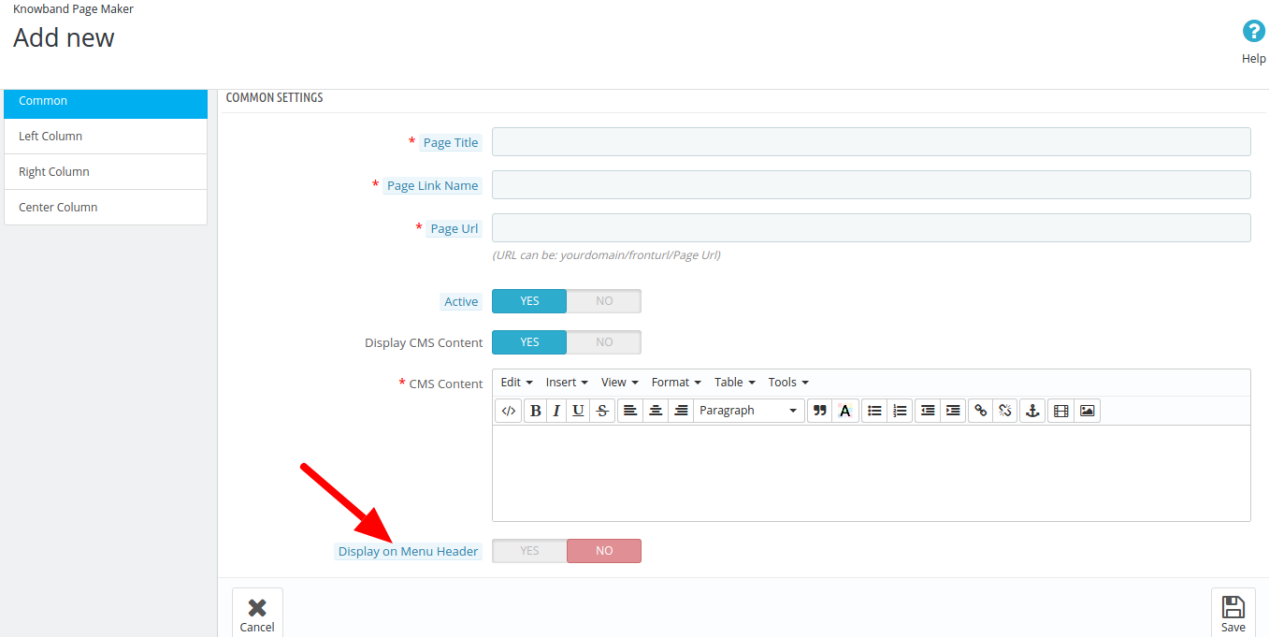
Step 3: The Add new page interface consists of the four tabs. In the Common Settings tab, fill out all the details. You can give a Page Title, Page Link Name, and custom page URL.
Step 4: After filling out the details, You will see an option at the end of the page “Display on Menu Header”. You need to just enable this option and your newly added page will be instantly linked on the Header Menu.
In addition, to the ease of creation of the CMS pages, the Prestashop CMS Page Maker addon offers a number of other features. Some of them are discussed below:
The best thing about this Prestashop page creator module is the multi-lingual functionality. Thus, the landing pages can be made in multiple any language as per the requirement of the store admin.
The URL of the created page can be linked to the header without getting into the technicalities as mentioned above.
Along with the generic contents, the admin even gets an option to display the Best Sellers, New Arrivals, Featured Products and Special Products as well.
The Prestashop landing page maker addon even allows the admin to align the contents left, right or center without making any changes in the CSS of the site. This is done just at a button click.
With the ease of creating the meta data, the page maker extension for Prestashop helps you keep it SEO-optimized.
Additionally, you can even custom CSS codes for customizing the look and feel of the webpages.
Along with creation, the Prestashop page maker enables you to edit or remove the CMS pages as well.
The Prestashop addon creates mobile-responsive pages. Thus, the site will stay optimized for the mobile user even after you create new webpages.
To conclude
That was very quick. With the Prestashop Page Maker module, we did the linking in a snap of time- 4 simple steps to be exact. Fortunately, we did not have to edit any code. You have multiple options for performing the same task here, both the options are quite open, now you can choose which one is best for you.
PrestaShop Puramente una piattaforma di eCommerce et possiede anche una grande capacit� CMS. Sebbene tu non disponga dei controlli completei come nelle piattaforme CMS, puoi comunque soddisfare tutti i tuoi requisiti di base come CMS con PrestaShop. page CMS sur le négoce de PrestaShop. Inoltre, vedremo anche come collegare quelle pagina al menu di intestazione/pi� di pagina.
Ajouter une page CMS sur PrestaShop 1.6.x
Étape 1: Accédez à votre back-office PrestaShop comme administrateur principal.
Étape 2: continuer Préférence>>CMS.? Qui vedrai tutte le pagine CMS créer sul tuo negozio PrestaShop.
Étape 3: Cliquez « Ajouter une nouvelle page CMS » pulsante nell’angolo in alto a destra della pagina.
Étape 4: Successivamente, � necessario compilare tutti i campi richiesti. Dopo aver compilato i campi, � suffite abilitare la pagina e “Salva” le modifiche.
Étape 5: Prendere nota dell’ID pagina CMS visualizzato nella prima colonna dell’elenco delle pagina CMS. Avrai bisogno di questo ID in seguito.
Étape 6: Maintenant tu vas Modulo >>Positionse controlla quale modulo mostra il menu orizzontale superiore nel tuo modello. L’ho trovato nella section “displayTop” della posizione nella mia versione.
Ajouter une page CMS sur PrestaShop 1.7.x
Allo steso modo per aggiungere una pagina CMS nella versione 1.7.x di Prestashop, segui i passaggi indicati di seguito:
Étape 1:? Accedi al tuo back-office PrestaShop come utente administrateur.
Étape 2:?Vai un?Tableau de bord>>Migliora>>Design>>Page come mostrato nell’immagine qui sotto:
Étape 3:?Fai clic sul pulsante?”Aggiungi nuova pagina”?nell’angolo in alto a destra della pagina.
Étape 4:? Successivamente, � necessario compilare tutti i campi richiesti. Dopo aver compilato i campi, � suffite abilitare la pagina e “Salva” le modifiche.
Étape 5: Prendere nota dell’ID pagina CMS visualizzato nella prima colonna dell’elenco delle pagina CMS. Avrai bisogno di questo ID in seguito. Salva le modifié.
Aggiunta di un collegamento della pagina CMS al menu di intestazione
Étape 1: Collegati ai file de votre site accédant à votre compte FTP. Puoi utiliser fichierZilla par accedere ai file o al cAccesso al panello se l’hôte ne ha fornito uno.
Étape 2: Ora, vai alla seguente directory di file:
temi/themeXXX/moduli/blockpermanentlinks ???
PS : “themeXXX” – il nomme votre thème.
Changement, blockpermanentlinks-header.tpl fichier. Puoi usare éditeur qualsiasi di testo o codice. Sto usando Netbeans par la modification.
Étape 3: Ciascun elemento dell’elenco nel codece qui rappresenta un elemento di menu nell’intestazione. Ad esempio queto code rappresenta un elemento del menu di intestazione denominato sitemap:
Per attivare e rendere visibile la pagina appena creata, seleziona la casella di spunta corrispondente al suo titolo. Puoi trovare il link alla tua pagina CMS nel footer.
Ora collegheremo la stessa pagina al menu a pi� di pagina.
Venez rejoindre un collegamento della pagina CMS al menu Footer di Prestashop 1.6.x?
Segui i passaggi indicati di seguito per collegare la stessa pagina al menu a pi� di pagina di Prestashop 1.6.x.
Étape 1: Vai al tuo pannello di amministrazione e vai a “Modules et services >> Modules et services” e di ricerca “Blocco CMS” modulo.
Étape 2: Cliquez la configuration pulsant.
Étape 3: Sélectionnez la section “CONFIGURAZIONE DEI VARI LINK NEL PIEDE”. Qui, se trovi la tua pagina CMS appena aggiunta nell’elenco.
Étape 4: Abilita la tua pagina cliccando sulla casella di controllo nella prima colonna. Fare clic sul pulsante “Salva” pour appliquer le modifiche. Ora hai aggiunto un collegamento alla tua pagina CMS nel menu Pi� di pagina.
Un modo pi� semplice per creare pagine CMS su Prestashop
Be’, � stato un vero spettacolo. Abbiamo creato una pagina, modificato i codici, navigato da una pagina all’altra e infine l’abbiamo collegata al menu Intestazione e Pi� di pagina. Ma quella era solo una singola pagina che abbiamo creato, e se avessi bisogno di collegare pi� pagine ? Ogni volta che si modificano i codici � un lavoro abbastanza faticoso.
C’� un modo pi� semplice per farlo senza pasticciare con il codice ?
S�, naturellement ! Il Module pour la création de la page de PrestaShop?by Knowband � stato progettato per servire lo scopo esatto. Francament, c’� molto di pi� pu� offrire. Par ora, vediamo come puoi utilizzare questo modulo per creare pagine CMS e aggiungerle al link dell’intestazione senza modificare il codice.
Étape 1: continuer Créateur de la page de Knowband menu nella barra dei menu a sinistra.
Étape 2: Sur l’écran suivant, cliquez sur “Aggiungi nouvelle page” pulsant.
Étape 3: L’interfaccia Aggiungi nuova pagina � composta da quattro schede. Nel Paramètres communs scheda, compila tutti i dettagli.? Puoi fornire un titolo pagina, un nome collegamento pagina e un URL pagina personalizzato.
Étape 4: Dopo aver compilato i dettagli, vedrai un’opzione alla fine della pagina “Visualizza nell’intestazione del menu”. Devi solo abilitare questa opzione e la tua pagina appena aggiunta sar� immediatamente collegata al menu di intestazione.
Oltre alla facilit� di creazione delle pagine CMS, il componente aggiuntivo Prestashop CMS Page Maker offre une série d’autres fonctionnalités. Alcuni di essi sono discuti di seguito :
La cosa migliore di questo modulo per la creation di pagine Prestashop � la funzionalit� multilingue. Pertanto, le pagine di destinazione possono essere realizzate in pi� lingue in base alle esigenze dell’amministratore del negozio.
L’URL della pagina creata pu� essere collegato all’intestazione senza entrare nei tecnicismi di cui sopra.
Insieme ai contenuti generici, l’amministratore ha anche un’opzione per visualizzare i pi� venduti, i nuovi arrivi, i prodotti in evidenza e anche i prodotti speciali.
L’add-on pour la création de la page d’accueil de Prestashop consent également à tous les administrateurs de tous les contenus dans le même cas, dans le centre ou dans le centre uniquement pour apporter des modifications au CSS du site. Questo viene fatto semplicemente con un clic del pulsante.
Avec la facilité de création et de métadonnées, l’extension de la création de la page par Prestashop ti aiuta a mantenerlo ottimizzato par le SEO.
Inoltre, puoi anche personalizzare i codici CSS per personalizzare l’aspetto delle pagine web.
Lors de la création, le créateur de la page Prestashop autorise la modification ou la suppression de la page CMS.
L’addon Prestashop crée une page mobile. Pertanto, il sito rimarr� ottimizzato per l’utente mobile anche dopo aver creato nuove pagine Web.
De conclure
� stato molto veloce. Avec le modulo Prestashop Page Maker, appliquez le collegamento in a attimo : 4 passaggi semplici per l’esattezza. Heureusement, non abbiamo dovuto modificare alcun codice. Hai pi� opzioni per eseguire la stessa attivit� qui, entrambe le opzioni sono abbastanza aperte, ora puoi scegliere quale � la migliore per te.
PrestaShop � Puramente una piattaforma di eCommerce e possiede anche una grande capacit� CMS. Sebbene tu non dissponga dei controlli completi come nelle piattaforme CMS, you come comunque soddisfare tutti i tuoi requisiti di base come CMS con PrestaShop CMS-Seite in Negozio PrestaShop. Inoltre, vedremo anche come collegare quella pagina al menu di intestazione/pi� di pagina.
Hinzufügen einer CMS-Seite zu PrestaShop 1.6.x
Schritt 1: Accedi al tuo back-office PrestaShop come utere amministratore.
Schritt 2: Los Präferenz >> CMS.? Qui vedrai tutte le page CMS create sul tuo negozio PrestaShop.
Schritt 3: Klicken “Neue Seite CMS hinzufügen” pulsante nell’angolo in alto a destra della pagina.
Schritt 4: Successivamente, � necessario compilare tutti i campi richiesti. Dopo aver compilato i campi, � enoughe abilitare la page e “Salva” le modifiche.
Schritt 5: Prenderne nota dell’ID page CMS visualizzato nella prima colna dell’elenco delle pagene CMS. Avrai bisogno di questo ID in seguito.
Schritt 6: Oder vai Modulo >>Posizionie controlla quale modulo mostra il menu orizzontale superiore nel tuo modello. L’ho trovato nella sezione “displayTop” della posizione nella mia versione.
Hinzufügen einer CMS-Seite zu PrestaShop 1.7.x
All diese Änderungen wurden vorgenommen, um eine CMS-Seite in der Version 1.7.x von Prestashop zu öffnen, dann folgen folgende Hinweise:
Schritt 1:?Accedi al tuo back-office PrestaShop come utete amministratore.
Schritt 2:?Vai a?Dashboard>>Migliora>>Design>>Seite come mostrato nell’immagine qui sotto:
Schritt 3:?Fai clic sul pulsante??Aggiungi nuova pagina?nell’angolo in alto a destra della pagina.
Schritt 4:? Successivamente, � necessario compilare tutti i campi richiesti. Dopo aver compilato i campi, � enoughe abilitare la page e “Salva” le modifiche.
Schritt 5: Prendere nota dell’ID page CMS visualizzato nella prima colna dell’elenco delle pagene CMS. Avrai bisogno di questo ID in seguito. Salva le modifiche.
Fügen Sie einer CMS-Collegamento-Seite das Menü der Website hinzu
Schritt 1: Collegati ai file del tuo sito accedendo al tuo account FTP. Puoi verwenden fileZilla per accedere ai file o al cAccesso al pannello se l’host ne ha fornito uno.
Schritt 2: Ora, vai alla seguente directory di file:
temi/themeXXX/moduli/blockpermanentlinks???
PS: “themeXXX” ist der Name des Themas.
Veränderung, blockpermanentlinks-header.tpl Datei. Puoi verwenden Qualsiasi Editor di testo o codice. Sto usando Netbeans per la modifica.
Schritt 3: Ciascun elemento dell’elenco nel codice qui rappresenta un elemento di menu nell’intestazione. Ad esempio questo codice rappresenta un elemento del menu di intestazione denominato sitemap:
Per attivare e rendere visibile la pagina appena creata, seleziona la casella di spunta corrispondente al suo titolo. Suchen Sie den Link zu Ihrer CMS-Seite in der Fußzeile.
Ora collegheremo la stessa pagina al menu a pi� di pagina.
Kommen Sie zu einer Sammlung von CMS-Seiten im Menü Footer von Prestashop 1.6.x?
Segui i passaggi indicati di seguito per collegare la stessa page al menu a pi� di page di Prestashop 1.6.x.
Schritt 1: Vai al tuo pannello di amministrazione e vai a “Module e servizi >> Module e servizi” e di ricerca “Blocco-CMS” modulo.
Schritt 2: Klicken il Configura pulsierend.
Schritt 3: Cerca la sezione “CONFIGURAZIONE DEI VARI LINK NEL PIEDE”. Qui, se trovi la tua page CMS appena aggiunta nell’elenco.
Schritt 4: Abilita la tua pagina cliccando sulla casella di controllo nella prima colonna. Fare click sul pulsante “Salva” per apply le modifiche. Ora hai aggiunto un collegamento alla tua pagina CMS nel menu Pi� di pagina.
Ein einfacher Modus für eine CMS-Seite auf Prestashop
Be’, � stato un vero spettacolo. Abbiamo creato una pagina, modificato i codici, navigato da una pagina all’altra e infine l’abbiamo collegata al menu Intestazione e Pi� di pagina. Ma quella era solo una singola pagina che abbiamo creato, e se avessi bisogno di collegare pi� pagine? Ogni volta che si modificano i codici � un lavoro abbastanza faticoso.
C’� un modo pi� semplice per farlo senza pasticciare con il codice?
S�, naturalmente! Il Modul für die Erstellung der Seite von PrestaShop?by Knowband � stato progettato per servire lo scopo esatto. Francamente, c’� molto di pi� pu� offrire. Per ora, vediamo come puoi utilizzare questo modulo per creare pagine CMS e aggiungerle al link dell’intestazione senza modificare il codice.
Schritt 1: Los Ersteller der Seite von Knowband menu nella barra dei menu a sinistra.
Schritt 2: Nella schermata successiva, Fahrpreis klicken Sie auf su “Aggiungi nuova pagina” pulsierend.
Schritt 3: L’interfaccia Aggiungi nuova pagina � composta da quattro schede. Nel Impostazioni comuni scheda, compila tutti i dettagli.? Puoi fornire un title page, un name collegamento page e un URL page personalizzato.
Schritt 4: Dopo aver compilato i dettagli, vedrai un’opzione alla fine della pagina “Visualizza nell’intestazione del menu”. Devi solo abilitare questa opzione e la tua pagina appena aggiunta sar� immediatamente collegata al menu di intestazione.
Mehr Möglichkeiten zur Erstellung von CMS-Seiten, die zusätzliche Komponente von Prestashop CMS Page Maker aus einer Reihe von anderen Funktionen. Alcuni di essi sono diskussioni di seguito:
La cosa migliore di questo modulo per la creazione di pageine Prestashop � la funzionalit� multilingue. Pertanto, le pagine di destinazione possono essere realizzate in pi� lingue in base alle esigenze dell’amministratore del negozio.
L’URL della pagina creata pu� essere collegato all’intestazione senza entrare nei tecnicismi di cui sopra.
Insieme ai contenuti generici, l’amministratore ha anche un’opzione per visualizzare i pi� venduti, i nuovi arrivi, i prodotti in evidenza e anche i prodotti speciali.
Das Addon für die Erstellung der Landing Page von Prestashop stimmt allen Administratoren der gesamten Website zu, die in einer einzigen Version enthalten sind, eine destra o al centro senza apportare modifiche al CSS del sito. Questo viene fatto semplicemente con un clic del pulsante.
Con la facilit� di creare i metadati, l’estensione per la creazione di pageine per Prestashop ti aiuta a mantenerlo ottimizzato per la SEO.
Inoltre, puoi anche personalizzare i codici CSS per personalizzare the aspetto delle page web.
Insieme alla creazione, der Ersteller der Seite Prestashop, willigen Sie ein, Änderungen vorzunehmen oder die CMS-Seite zu ändern.
L’addon Prestashop crea pagine mobili. Pertanto, il sito rimarr� ottimizzato per l’utente mobile anche dopo aver creato nuove pagine Web.
Schlussfolgern
� stato molto veloce. Mit dem Modul Prestashop Page Maker, abbiamo eseguito il collegamento in a attimo: 4 semplici passaggi per l’esattezza. Fortunatamente, non abbiamo dovuto modificare alcun codice. Hai pi� opzioni per eseguire la stessa attivit� qui, entrambe le opzioni sono abbastanza aperte, ora puoi scegliere quale � la migliore per te.
PrestaShop � esclusivamente una piattaforma di eCommerce e possiede anche una grande capacit� CMS. Puoi comunque soddisfare tutti i tuoi requisiti di base come CMS con PrestaShop.?In questo post, prendendo PrestaShop 1.6.xe 1.7.x?come versione di destinazione, Spiegher� aggiungere una pagina CMS sul negozio PrestaShop. Inoltre, vedremo anche come collegare quella pagina al menu di intestazione/pi� di pagina.
Aggiunta di una pagina CMS su PrestaShop 1.6.x
Passo 1: Accedi al tuo back-office PrestaShop come utente amministratore.
Passo 2: Vai su Preferenze>>CMS.? Qui vedrai tutte le pagine CMS create sul tuo negozio PrestaShop.
Passo 3: Fare clic su “Aggiungi nuova pagina CMS” pulsante nell’angolo in alto a destra della pagina.
Passo 4: Successivamente, � necessario compilare tutti i campi richiesti. Dopo aver compilato i campi, � sufficiente abilitare la pagina e “Salva” le modifiche.
Passo 5: Prendi nota dell’ID pagina CMS visualizzata nella prima colonna dell’elenco delle pagine CMS. Avrai bisogno di questo ID in seguito.
Passo 6: Ora vai Modulo >>Posizionie controlla quale modulo mostra il menu orizzontale superiore nel tuo modello. L’ho trovato nella sezione “displayTop” della posizione nella mia versione.
Aggiunta di una pagina CMS su PrestaShop 1.7.x
Allo stesso modo per aggiungere una pagina CMS nella versione 1.7.x di Prestashop, segui i passaggi indicati di seguito:
Passo 1:?Accedi al tuo back-office PrestaShop come utente amministratore.
Passo 2:?Vai a?Cruscotto>>Migliora>>Design>>Pagine come mostrato nell’immagine qui sotto:
Passo 3:?Fai clic sul pulsante?”Aggiungi nuova pagina”?nell’angolo in alto a destra della pagina.
Passo 4:? Successivamente, � necessario compilare tutti i campi richiesti. Dopo aver compilato i campi, � sufficiente abilitare la pagina e “Salva” le modifiche.
Passo 5: Prendi nota dell’ID pagina CMS visualizzata nella prima colonna dell’elenco delle pagine CMS. Avrai bisogno di questo ID in seguito. Salva le modifiche.
Aggiunta di un collegamento alla pagina CMS al menu di intestazione
Passo 1: Collegati ai file del tuo sito accedendo al tuo account FTP. Puoi usare fileZilla per accedere ai file o al cAccesso al pannello se l’ospite ne ha fornito uno.
Passo 2: Ora, vai alla seguente directory di file:
temi/themeXXX/moduli/blockpermanentlinks???
PS: “themeXXX” � il nome del tuo tema.
Modifica, blockpermanentlinks-header.tpl file. Puoi usare qualsiasi editor di testo o codice. Sto usando Netbeans per la modifica.
Passo 3: Ciascun elemento dell’elenco nel codice qui rappresenta un elemento di menu nell’intestazione. Ad esempio questo codice rappresenta un elemento del menu di intestazione denominato sitemap:
Per attivare e rendere visibile la pagina appena creata, seleziona la casella di spunta corrispondente al suo titolo. Puoi trovare il link alla tua pagina CMS nel footer.
Ora collegheremo la stessa pagina al menu a pi� di pagina.
Come aggiungere un collegamento della pagina CMS al menu Footer di Prestashop 1.6.x?
Segui i passaggi indicati di seguito per collegare la stessa pagina al menu a pi� di pagina di Prestashop 1.6.x.
Passo 1: Vai al tuo pannello di amministrazione e vai a “Moduli e servizi >> Moduli e servizi” e di ricerca “Bocco CMS” modulo.
Passo 2: Fare clic su il Configura pulsante.
Passo 3: Cerca la sezione “CONFIGURAZIONE DEI VARI LINK NEL PIEDE”. Qui, se trovi la tua pagina CMS appena aggiunta nell’elenco.
Passo 4: Abilita la tua pagina cliccando sulla casella di controllo nella prima colonna. Fare clic sul pulsante “Salva” per applicare le modifiche. Ora hai aggiunto un collegamento alla tua pagina CMS nel menu Pi� di pagina.
Un modo pi� semplice per creare pagine CMS su Prestashop
Be’, � stato un vero spettacolo. Abbiamo creato una pagina, modificato i codici, navigato da una pagina all’altra e infine l’abbiamo collegata al menu Intestazione e Pi� di pagina. Ma quella era solo una singola pagina che abbiamo creato, e se hai bisogno di collegare pi� pagine? Ogni volta che si modificano i codici � un lavoro abbastanza faticoso.
C’� un modo pi� semplice per farlo senza pasticciare con il codice?
Sì, naturalmente! I l Modulo per la creazione di pagine di PrestaShop?by Knowband � stato progettato per servire lo scopo esatto. Francamente, c’è molto di pi� pu� offrire. Per ora, come puoi utilizzare questo modulo per pagine CMS e aggiunge al link dell’intestazione senza modificare il codice.
Passo 1: Vai su Creatore di pagine di Knowband menu nella barra dei menu a sinistra.
Passo 2: Nella schermata successiva, fare clic su “Aggiungi nuova pagina” pulsante.
Passo 3: L’interfaccia Aggiungi nuova pagina � composta da quattro schede. Nel Impostazioni comuni scheda, compila tutti i dettagli.? Puoi fornire un titolo pagina, un nome collegamento pagina e un URL pagina personalizzata.
Passo 4: Dopo aver compilato i dettagli, vedrai un’opzione alla fine della pagina “Visualizza nell’intestazione del menu”. Devi solo abilitare questa opzione e la tua pagina appena aggiunta sar� immediatamente collegata al menu di intestazione.
Oltre alla facilità di creazione delle pagine CMS, il componente aggiuntivo Prestashop CMS Page Maker offre una serie di altre funzionalità. Alcuni di essi sono discussi di seguito:
La cosa migliore di questo modulo per la creazione di pagine Prestashop � la funzionalit� multilingue. Pertanto, le pagine di destinazione possono essere realizzate in pi� lingue in base alle esigenze dell’amministratore del negozio.
L’URL della pagina creata può essere collegato all’intestazione senza entrare nei tecnicismi di cui sopra.
Insieme ai contenuti generici, l’amministratore ha anche un’opzione per visualizzare i pi� venduti, i nuovi arrivi, i prodotti in evidenza e anche i prodotti speciali.
L’addon per la creazione di landing page di Prestashop consente anche all’amministratore di allineare i contenuti a sinistra, a destra o al centro senza modifiche al CSS del sito. Questo viene fatto semplicemente con un clic del pulsante.
Con la facilità di i metadati, l’estensione per la creazione di pagine per Prestashop ti aiuta a creare un mantenerlo ottimizzato per la SEO.
Inoltre, puoi anche personalizzare i codici CSS per personalizzare l’aspetto delle pagine web.
Insieme alla creazione, il creatore di pagine Prestashop ti consente di modificare o rimuovere anche le pagine CMS.
L’addon Prestashop crea pagine mobili. Pertanto, il sito rimarr� ottimizzato per l’utente mobile anche dopo aver creato nuove pagine Web.
concludere
� stato molto veloce. Con il modulo Prestashop Page Maker, abbiamo eseguito il collegamento in un attimo: 4 semplici passaggi per l’esattezza. Per fortuna, non abbiamo dovuto cambiare alcun codice. Hai pi� opzioni per eseguire la stessa attivit� qui, entrambe le opzioni sono abbastanza aperte, ora puoi scegliere quale � la migliore per te.
PrestaShop � puramente piattaforma di eCommerce i ma również wielką pojemność� CMS. Jeśli nie chcesz, aby kontrola była kompletna z CMS, jeśli chcesz poznać wszystkie wymagania związane z CMS z PrestaShop.? W tym poście, przedstaw PrestaShop 1.6.xe 1.7.x? strona CMS do negocjacji PrestaShop. Inoltre, vedremo anche come collegare quella pagina al menu di intestazione/pi� di pagina.
Dołącz do strony CMS w PrestaShop 1.6.x
Krok 1: Uzyskaj dostęp do swojego back-office PrestaShop jako administrator.
Krok 2: iść Preferencje>>CMS.? Zapoznaj się ze wszystkimi stronami CMS stworzonymi w ramach negocjacji PrestaShop.
Krok 3: Kliknij „Aggiungi nowa strona CMS” pulsante nell’angolo in alt a destra della pagina.
Krok 4: Successivamente, � necessario compilare tutti i campi richiesti. Dopo aver compilato i campi, � wystarczający abilitare la pagina e „Salva” le modifiche.
Krok 5: Prendere nota dell’ID pagina CMS visualizzato nella prima colonna dell’elenco delle pagine CMS. Avrai bisogno di tego identyfikatora w seguito.
Krok 6: Ora Vai Moduł >>Pozycjee controlla quale modulo mostra il menu orizzontale superiore nel tuo modello. L’ho trovato nella sezione „displayTop” della sizione nella mia versione.
Dołącz do strony CMS w PrestaShop 1.7.x
Wybierz właściwy tryb dodawania strony CMS w wersji 1.7.x w Prestashop, przejdź do kolejnych wskazań:
Krok 1:? Dostęp do back-office PrestaShop jako administrator.
Krok 2:?Wai?Deska rozdzielcza>>Migliora>>Projektowanie>>Pagine come mostrato nell’immagine qui sotto:
Krok 3:„Fai clic sul pulsante” „Aggiungi nuova pagina”? nell’angolo in alt a destra della pagina.
Krok 4:? Successivamente, � necessario compilare tutti i campi richiesti. Dopo aver compilato i campi, � wystarczający abilitare la pagina e „Salva” le modifiche.
Krok 5: Prendere nota dell’ID pagina CMS visualizzato nella prima colonna dell’elenco delle pagine CMS. Avrai bisogno di tego identyfikatora w seguito. Salva le modifiche.
Aggiunta di un colllegamento della pagina CMS al menu di intestazione
Krok 1: Połącz plik z Twoim miejscem dostępu do Twojego konta FTP. Puoi używaj fileZilla za accedere plik ai o al cDostęp do panelu se l’host ne ha fornito uno.
Krok 2: Ora, vai alla seguente directory di file:
temi/themeXXX/moduli/blockpermanentlinks???
PS: „themeXXX” – il nome del tuo temata.
Zmiana, blockpermanentlinks-header.tpl plik. Puoi używać qualsiasi redaktora testo o kodeksie. Stosuj Netbeans na modyfikacje.
Krok 3: Ciascun elemento dell’elenco w kodeksie qui rappresenta un elemento di menu nell’intestazione. Ad esempio questo codice rappresenta un elemento del menu di intestazione denominato sitemap:
Per attivare e rendere visibile la pagina appena creata, seleziona la casella di spunta corrispondente al suo titolo. Poszukaj linku we wszystkich stronach CMS w stopce.
Ora collegheremo la stessa pagina al menu a pi� di pagina.
Przyjdź dodać colllegamento z CMS strony w menu Footer di Prestashop 1.6.x?
Przejdź do wskazówek dotyczących przebiegu, aby połączyć tę stronę z menu na stronie Prestashop 1.6.x.
Krok 1: Vai al tuo pannello di amministrazione e vai a „Moduły i usługi >> Moduły i usługi” e di ricerca “Blokowy CMS” moduł.
Krok 2: Kliknij Konfiguracja pulsujący.
Krok 3: Cerca la sezione “KONFIGURACJA DEI VARI LINK NEL PIEDE”. Qui, se trovi la tua pagina CMS appena aggiunta nell’elenco.
Krok 4: Abilita la tua pagina cliccando sulla casella di controllo nella prima colonna. Fare clic sul pulsante “Salva” per applicare le modifiche. Teraz hai aggiunto un colllegamento alla tua pagina CMS nel menu Pi� di Pagina.
Un modo pi� semplice per creare pagine CMS su Prestashop
Be’, � stato un vero spettacolo. Abbiamo creato una pagina, modificato i codici, navigato da una pagina all’altra e infine l’abbiamo collegata al menu Intestazione e Pi� di pagina. Ma quella era solo una singola pagina che abbiamo creato, e se avessi bisogno di colllegare pi� pagine? Ogni volta che si modificano i codici � un lavoro abbastanza faticoso.
C’� un modo pi� semplice per farlo senza pasticciare con il codice?
S�, naturalmente! Il Moduł do tworzenia strony w PrestaShop?przez Knowband � status progettato per servire lo scopo esatto. Francamente, c’� molto di pi� pu� offrire. Za jakiś czas, możesz skorzystać z tego modułu, aby stworzyć stronę CMS i dodać link dell’intestazione senza modificare il codice.
Krok 1: iść Twórca strony Knowband menu nella barra dei menu a sinistra.
Krok 2: Nella schermata successiva, taryfa clic su „Aggiungi nowa strona” pulsujący.
Krok 3: L’interfaccia Aggiungi nuova pagina � composta da quattro schede. Nel Impostazioni comuni scheda, skompiluj wszystkie szczegóły.? Daj tytułową stronę, nazwę koleżeńskiej strony i spersonalizowaną stronę URL.
Krok 4: Dopo aver compilato i dettagli, vedrai un’opzione alla fine della pagina “Visualizza nell’intestazione del menu”. Devi solo abilitare questa opzione e la tua pagina appena aggiunta sar� immediatamente collegata al menu di intestazione.
Olbrzymia łatwość tworzenia strony CMS, dodana dodatkowa funkcja Prestashop CMS Page Maker oferuje nową serię innych funkcji. Alcuni di essi sono discussioni di seguito:
La cosa migliore di questo modulo per la creazione di pagine Prestashop � la funzionalit� multilingue. Pertanto, le pagine di destinazione possono essere realizzate in pi� lingue in base alle esigenze dell’amministratore del negozio.
L’URL della pagina creata pu essere colllegato all’intestazione senza entrare nei tecnicismi di cui sopra.
Insieme ai contenuti generici, l’amministratore ha anche un’opzione per visualizzare i pi� venduti, i nuovi arrivi, i prodotti in evidenza e anche i prodotti speciali.
Dodatek do tworzenia strony docelowej Prestashop pozwala również na zarządzanie wszystkimi treściami i treściami, a także o al centro bez zmian w CSS. Questo viene fatto semplicemente con un clic del pulsante.
Z ułatwieniem tworzenia metadanych, rozszerzeniem tworzenia strony dla Prestashop, która pomaga w optymalizacji obsługi SEO.
Inoltre, pooi anche personalizzare i codici CSS per personalizzare l’aspetto delle pagine web.
Dołącz do wszystkich kreacji, twórca strony Prestashop, aby wyrazić zgodę na modyfikację lub usunięcie również strony CMS.
L’addon Prestashop crea pagine mobili. Pertanto, il sito rimarr� ottimizzato per l’utente mobile anche dopo aver creato nuove pagine Web.
Podsumowując
� stato molto veloce. Z modułem Prestashop Page Maker, zrób to w następujący sposób: 4 pojedyncze przejścia na tablicę. Fortunatamente, non abbiamo dovuto modificare alcun codice. Hai pi� opzioni per eseguire la stessa attivit� qui, entrambe le opzioni sono abbastanza aperte, ora puoi scegliere quale � la migliore per te.