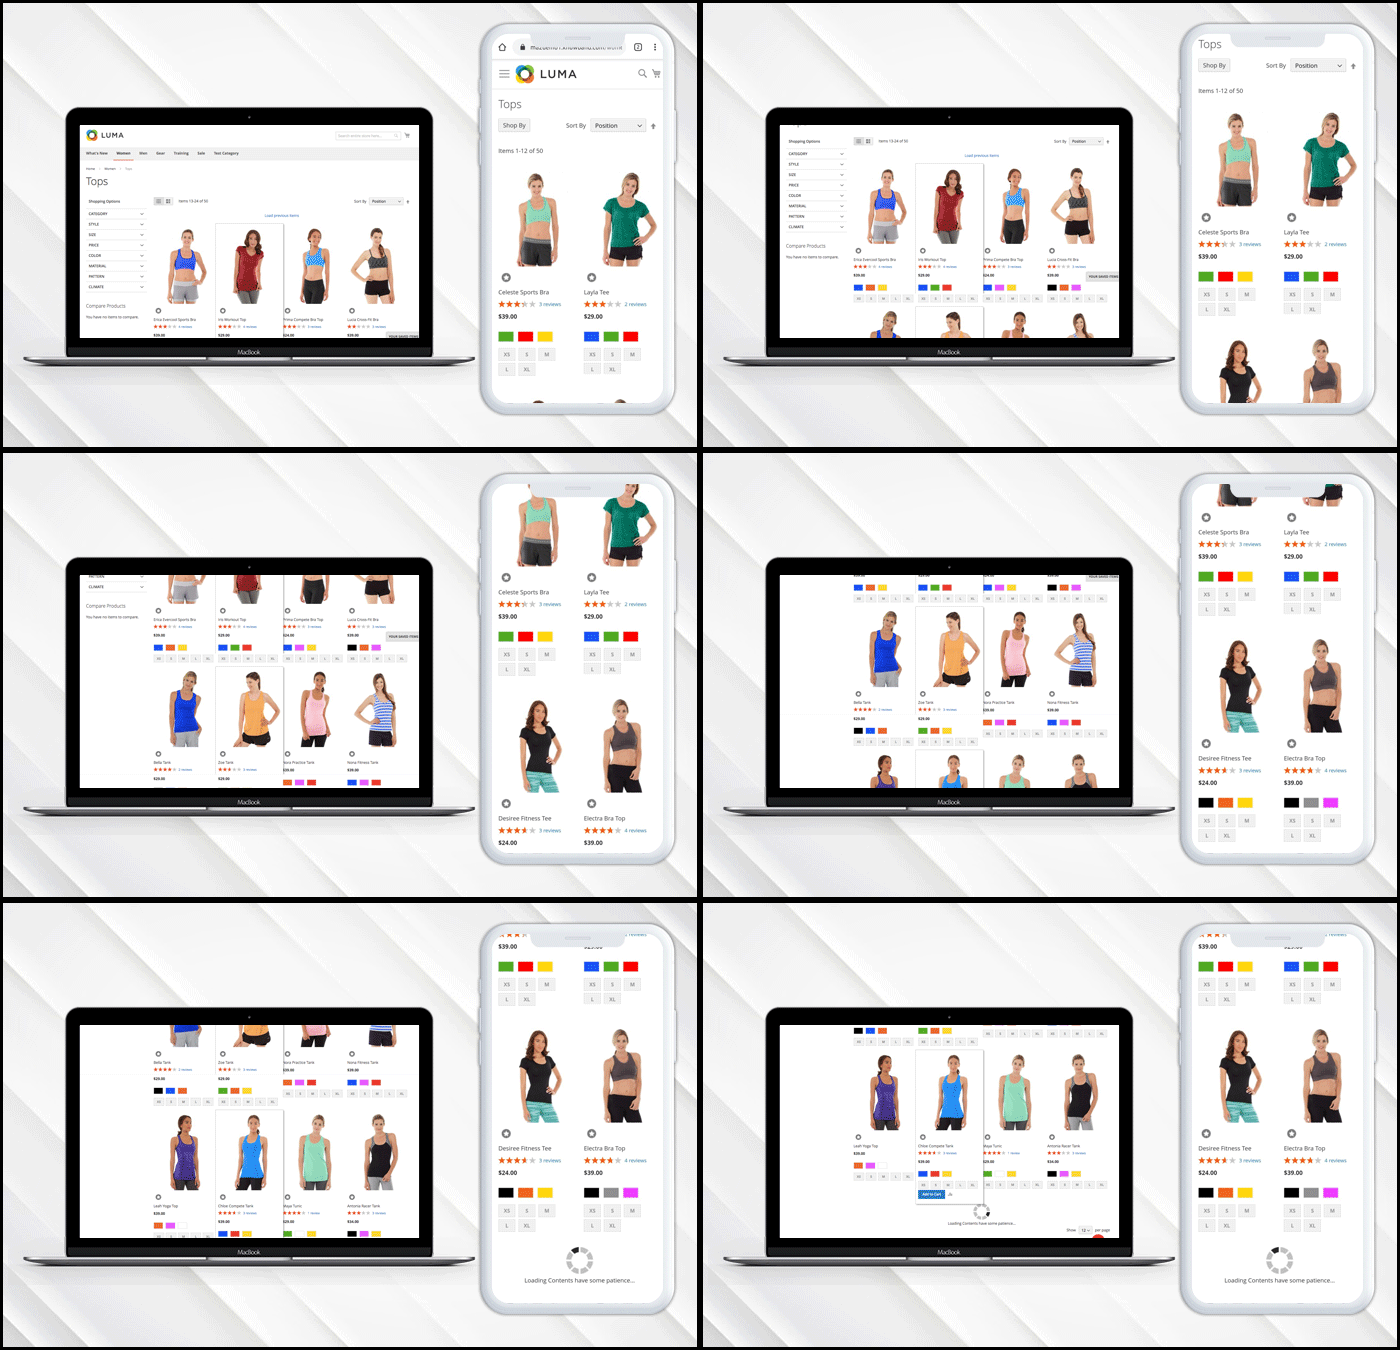
Magento Instagram Shop Gallery extension is a simple yet effective Magento extension that integrates your Instagram account on your Magento store. It fetches your Instagram account images or images put under a particular hashtag, on your Magento store. It helps you display the user-generated content and allows you to tag similar products available on your store to that content. User-generated content helps people make a better purchase decision.
Instagram Shop Gallery extension for Magento 2 adds an attractive Instagram look to your e-commerce store.
Features of Magento Instagram Shop Gallery extension
Display Instagram Shop Gallery anywhere on your website, be it on Home Page, Product Page, Category Page, Contact Us Page, etc.
You can place the Instagram Shop Gallery link at the footer of your website.
Display the likes and comments of the images on the Instagram Shop Gallery.
Though you can fetch as many images as you want, set a limit for the number of images to be shown in the Instagram Shop Gallery section.
Select the kind of images that you want to display in the Gallery. For example, all the images, approved images or images mapped with related products.
Define the hashtags for which you want to fetch the images. This becomes so helpful if you are running a marketing campaign.
Magento Instagram Shop Gallery extension allows you to create a URL for your Instagram Shop Gallery page.
Carousel mode provides an appealing interface to the Instagram gallery.
Magento Instagram Shop Gallery extension is easy to install and set up with no requirement of technical knowledge.
It is a multi-lingual and multi-store compatible extension.
It is a fully responsive extension that fits perfectly with mobiles, tablets, and desktops.
Final word
Today, Instagram is one of the leading social media networks having a massive user engagement rate. Hence, having an Instagram Gallery section on your Magento store can be a great idea to enhance the user experience. Moreover, products attached to Instagram images can increase the conversion possibility. Do try out the Magento Instagram Shopping Gallery extension.
Knowband offers Magento Affiliate and Referral program extension which allows the online store admin to get more customers and traffic also. The online store admin can allow the customers to register as an affiliate and create referrals for the store. The online affiliate users can earn money for every referral. The admin can apply the settings in order to provide a referral commission. The admin can provide commission on new customer registrations or on order placed by the referred customers. The referred customers can place their order using referral code, coupon code or referral link provided by the affiliate customer.
This way the online store admin can improve website sales and traffic easily just by offering a commission to the affiliate customers. The eCommerce store admin can easily promote the store without any extra efforts. The affiliate customers can also get benefits by referring new customers. They can get commission by new customer registrations and order placed by the customers. The Magento Referral Program plugin provides an easy way to promote the website.
1.1 Basic Features of this Magento extension
The online store admin can allow the customers to register their account as an affiliate and create referrals for the store for getting an exciting commission.
The Magento Affiliate and Referral program extension allows the admin to activate or deactivate new affiliate registrations anytime.
The Magento Affiliate and Referral program plugin provides various methods to share for the referral.
The affiliate customers can send referral code, share a link, share discount voucher, share a link on social media platforms and share a link by email.
The online store admin can show an option to share the link on Facebook, Google plus, Twitter and Pinterest.
Admin can set a global referral rate for the order placed. This value will be in percentage. Admin can also set referral rate for particular affiliate customer.
The admin can also set the global referral rate for user registration. This will be a fixed value. Admin can also set specific referral rate for affiliate customers.
The Magento Referral Program plugin provides an option to select the global voucher type and set it’s value accordingly.
The online store admin can also select the action on which the referral will be counted.
The online user can get the referral commission on new user registration or when the order is placed.
The online users can register as an affiliate and create referrals for the store in order to get a commission.
The Magento Referrals module provides a dashboard for showing referral and commission-related details easily.
The Magento Affiliate Program extension provides functionality for the affiliate customers to redeem their commission by sending a request for payout.
2.0 Installation
The online store merchant can install the Magento Affiliate and Referral program extension by following these steps:
Admin can download the extension package from the Knowband store.
After downloading the extension package, you will get a zipped file. Unzip the package on the root folder of Magento setup via FTP manager (like Filezilla or WinSCP – download here: https://filezilla-project.org/). The admin will find the files and folders as shown in the image below:
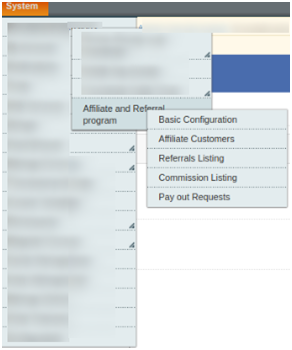
3. The extension is now installed and ready for use. In the Admin Panel, go to “System > Knowband Extensions >Magento Referral Program plugin”.
Now, the store admin can use and configure the Magento Affiliates extension.
3.0 User Manual
Admin will get various customization options after installing the Magento Affiliate and Referral program extension successfully. Admin can configure the Magento extension in order to implement the affiliate functionality on the eCommerce website.
Below-mentioned are the configuration options:
Basic Configuration
Affiliate Customers
Referrals Listing
Commission Listing
Pay Out Requests
3.1 Basic Configuration
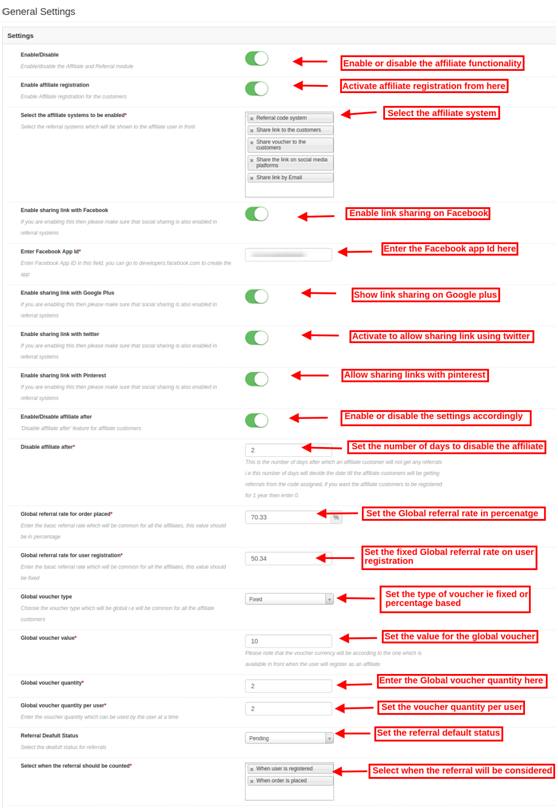
In the Basic settings field, you can apply the settings for showing affiliate system functionality on the website. The store owner can apply the settings as per the requirement.
These are the configuration options:
Enable/Disable: Activate or deactivate the Magento Affiliate and Referral program extension just by a single button toggle.
Enable Affiliate registration: Activate the settings in order to show affiliate registration options on the website front-end.
Select the Referral System to be enabled: Select the referral system from the provided options. The admin can choose from the referral code system, share the link to the customers, share voucher to the customers, share the link on social media platforms, and share the link by email.
Enable sharing link with Facebook: Activate this option in order to allow affiliate customers to share the link using their Facebook account. “Share the link on social media platform” option should be selected for this implementation.
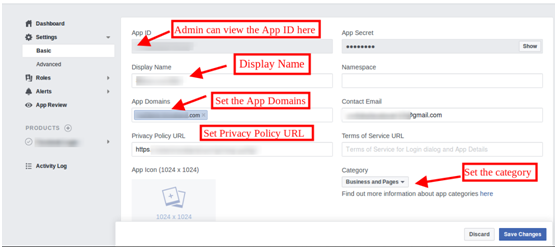
Enable Facebook App ID: You need to enter Facebook app id in this configuration option. Follow the steps described in 3.1.1 section in order to create a Facebook app ID.
Enable Sharing Link With Google Plus: Show/hide the option of link sharing with Google plus. The affiliate customers can share the link with their Google plus account.
Enable Sharing Link With Twitter: In order to provide an option to share a link with Twitter, the admin can enable the settings.
Enable Sharing Link With Pinterest: Enable/disable the settings for showing/hiding link sharing using Pinterest.
Enable disable affiliate after:Activate or deactivate the settings as per the requirement. After enabling this option, a new configuration option will be displayed.
Disable affiliate after: Set the number of days after which you don’t want to provide any referrals to the affiliate customers. Set the days after which the affiliates will not get any referrals from the assigned code.
Global referral rate for order placed: Set the Global referral rate i.e., a common referral amount for all the affiliates. This value will be in percentage.
Global referral rate for user registration: Here, you can set the referral rate for the user registration which will be common for all the affiliates. This value will be fixed.
Global voucher type: Select the type of voucher i.e., fixed or percentage based. This will be the type of voucher which will be common for all the affiliates.
Global voucher value: Enter the value for global voucher.
Global voucher quantity: Set the number of the vouchers for providing all the affiliate customers. The affiliate customers can share the vouchers with the referrals.
Global voucher quantity per user: Enter the number of times, a user can apply these vouchers.
Referral Default status: Here, you can set the default status for the referrals. It can be accepted, rejected and pending.
Select when the referral should be counted: Magento Affiliate and Referral program extension provides an option to consider referral on new user registration or while the order is placed.
3.1.1 Steps to generate the Facebook app ID
Follow these steps in order to generate Facebook app ID:
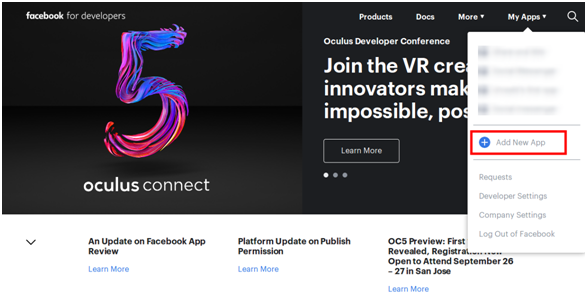
Go to the “MY APPS” and click on ”ADD NEW APP” option.
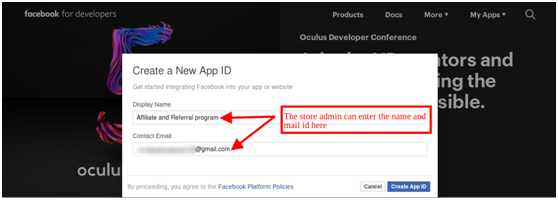
Enter the “Display Name” and “contact email ID” details. After that, click on the “Create App ID” button.
Now, go to the “Settings” and select the “Basic” option. Here, you can get the APP ID. Now, you need to insert app domains, category, privacy policy URL here.
Thus, you can get the Facebook app ID.
3.2 Affiliate Customers
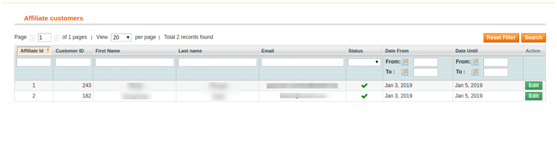
Here, in this configuration option, the online store admin can view the affiliate customer’s list. The Magento Affiliate and Referral program extension provides affiliate customers list in the admin interface.
3.2.1 How to Edit Affiliate Customer details?
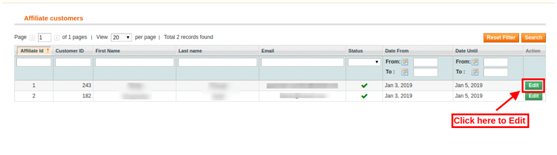
Admin can click on the “Edit” button, in order to change the details of any affiliate customer.
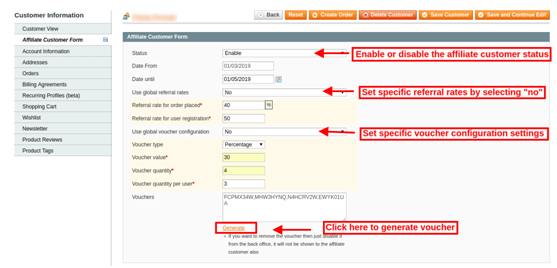
After clicking on the “Edit” option, the online store admin can modify the details related to the affiliate customers.
Magento Affiliate and Referral program module provides these configuration options as shown below:
Status: Activate or deactivate the affiliate customer’s status from the admin interface of this Magento Affiliate and Referral program plugin.
Affiliate From: Here, you can view the date from which the customer has registered as an affiliate.
Affiliate Until: You can set the date till the customer will be an affiliate.
Use global referral rates: The online store admin has an option to use Global referral rate or set specific referral rates for the particular affiliate customer.
Referral rate for order placed: Set specific referral rate which you want to offer on order placement.
Referral rate for user registration: Set the fixed amount of referral on new user registration.
Use global voucher configuration: As a store owner, you have an option to use a global voucher or configure a specific voucher for any customer.
Voucher type: Select the percentage or fixed voucher type.
Voucher value: Set the value of the voucher.
Voucher quantity: Set the number of vouchers.
Voucher quantity per user: The admin can set the number of vouchers per users.
Vouchers: Here, you can view the generated vouchers.
Generate: Admin can click on the Generate button in order to generate new coupons as per the applied settings.
3.3 Referrals Listing
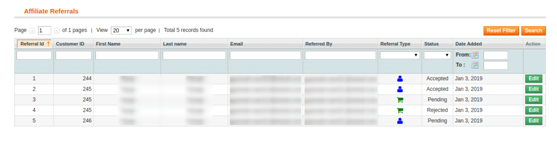
In referrals listing, the online store owner can view the referrals and their details also. The Magento Affiliate and Referral program extension provides a list of all the referral customers.
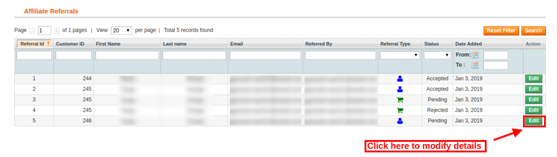
The store owner can also edit the affiliate’s status. The admin just needs to click on the “Edit” button.
After clicking on the “Edit” button, you will get these customization options:
Affiliate: Here, you can view the email id details of the affiliate customers.
Description: View the activity performed by the affiliate customer.
Commission value: Here, you can view the commission value as per the configuration.
Commission currency: Here you can view the currency type.
Order reference: Order reference will be displayed here if any referral places an order.
Referral status: Set the status of the referral as accepted, rejected and pending.
Referral date: You can also change the referral date from the admin interface.
3.4 Commission Listing
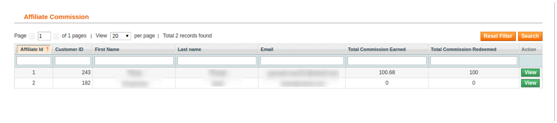
Here, in commission listing the online store admin can view the affiliate commission. The store admin can view the overall commission offered to the affiliate customers.
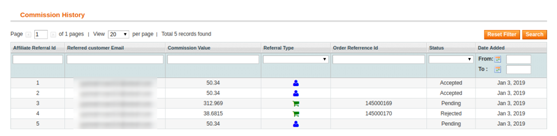
Admin can click on the view button in order to get the commission details. Here, the online store admin can view the email id details, commission value and it’s status.
3.5 Pay Out Requests
Magento Affiliate and Referral program extension provides an option to handle payout requests. The affiliate customers can send payout requests in order to redeem the commission. The affiliate customers can request to generate a voucher or directly ask for the payout.
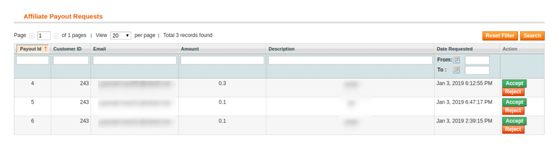
The online store admin can view all the “payout requests” in this section and accept or reject the payout requests.
The store admin can view the payout request in the “Payout requests” option and then accept or reject the request.
4.0 Front-end Interface
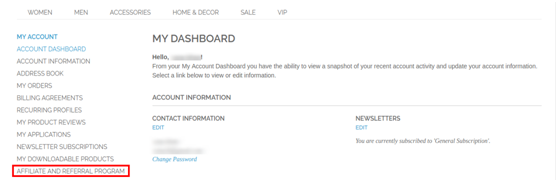
After creating an account the online users can click on the “Affiliate and Referral Program” in order to register as an affiliate customer.
After clicking on this “Affiliate and Referral Program” option, the online users can register as affiliate customer.
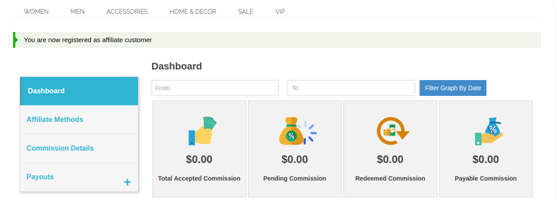
Now, the online users are registered as an affiliate and they can view the details as shown below:
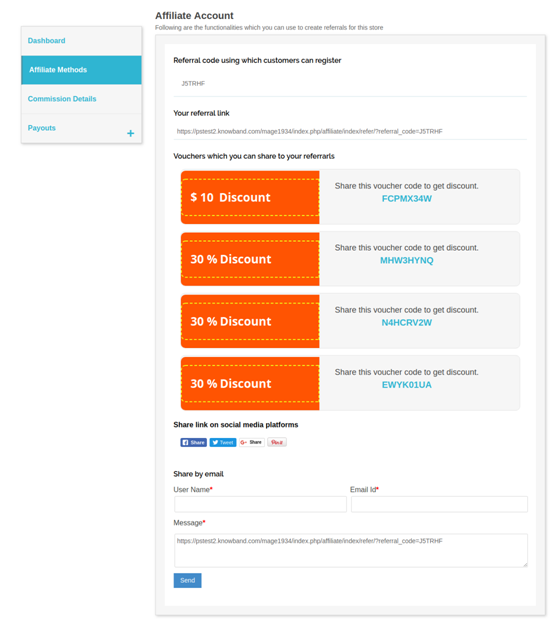
There are several methods to share the referral codes. The affiliate customers can share the referral codes in order to get the commission.
The affiliate customers can share referral code, share referral link, share vouchers, share the link on social media platforms and share the store link via email.
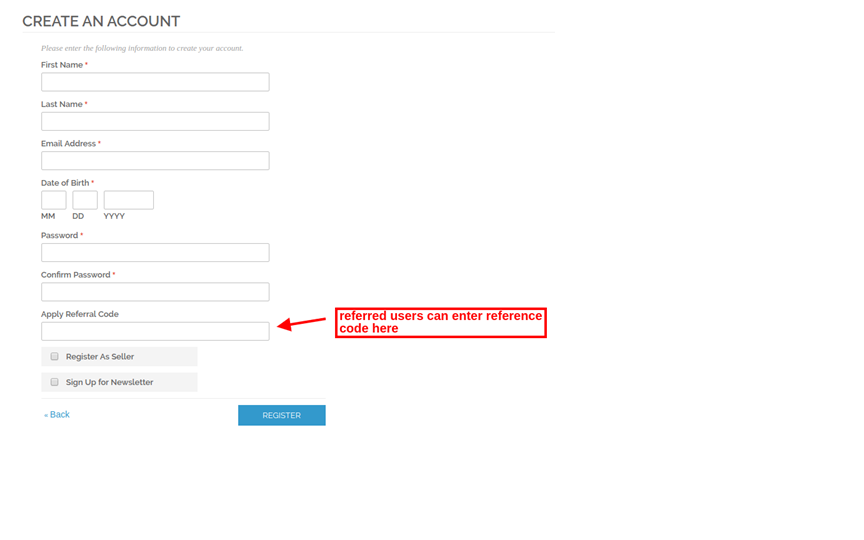
Referred users can register using referral code as shown below:
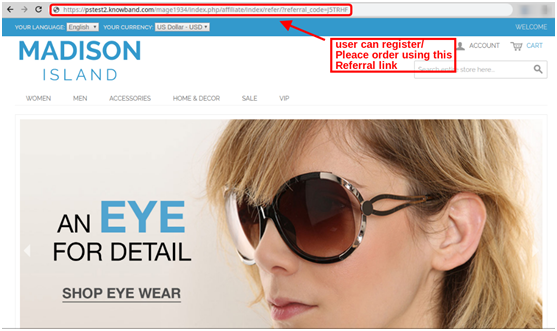
The online users can register using referral link shared by the affiliate customers or place an order with the referral link. The affiliate customer will get the referral amount as per the action performed by the referred online user.
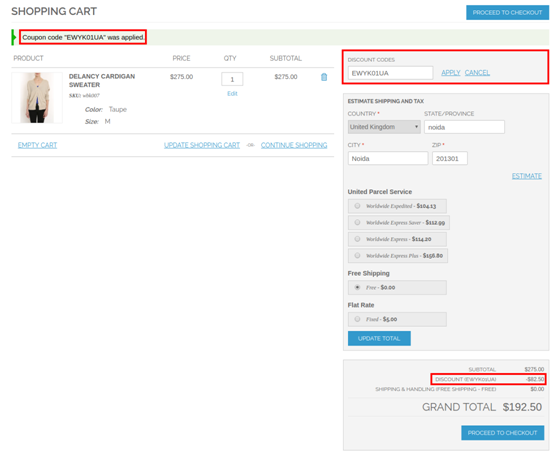
The online users can also use voucher codes shared by affiliate customers in order to get discount. The affiliate customers will get referral commission for such orders.
This way the affiliate customers can refer the online users and get the referral commission easily.
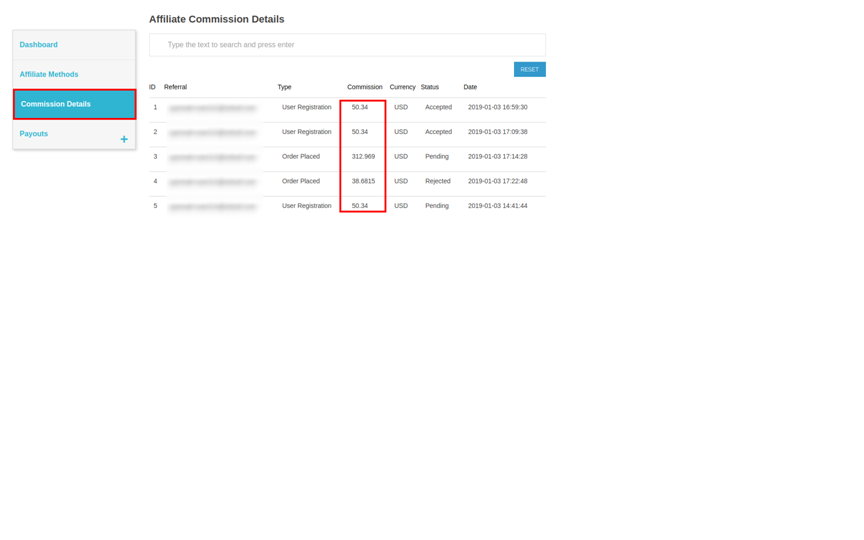
The affiliate customers can view the rewarded commission on every referral. They can also view the status of the commission on the website front-end interface. In “Commission Details”, the online users can view each and every detail easily.
The online users can request for payout by clicking on ”Payouts” option. The online users can click on the “vouchers” in order to request for generating a voucher. The online user can also request for payout.
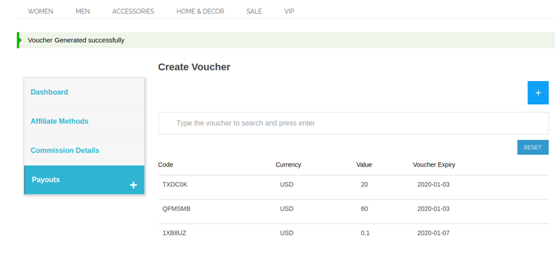
In order to generate vouchers, the online store admin can click on the “voucher” option. After that click on the “+” sign and enter the amount to generate voucher of that value. After that, click on the “request” button. A success message will be shown on the top of the eCommerce website.
In order to send payout request, the affiliate customers can click on the payout option. After that, they need to click on “+”. Here, the affiliate customers can enter the payout amount and enter the description. After clicking on the “Payout” button, the affiliate customers can send their request successfully.
Initially, the payout requests status will be ”pending”. The online store admin can accept or reject the “payout” request.
In the Dashboard, the affiliate customers can view the total accepted commission, pending commission, redeem commission and payable commission. A graphical representation is also available for viewing total commission, redeem commission and total referral easily.
This way, the online store merchant implements Magento Affiliate and Referral program extension module and allows the online users to refer the store to get a reward for it. The Magento Affiliate and Referral program module is highly customizable and offers smooth functioning. The e-merchant can provide multiple ways of referring to the website. The Magento Affiliate and Referral program plugin allow viewing all the affiliate customers list from the admin interface. The online merchant can also apply specific settings for each customer. The Magento Affiliate Program extension provides an option to set a referral amount from the admin interface. The online merchant can offer a specific amount on new registration and order confirmation. You can generate discount vouchers for affiliate customers for referring to the store. The online affiliate customers can refer store and get the exciting reward which can be converted in discount vouchers or the users can request for payout.
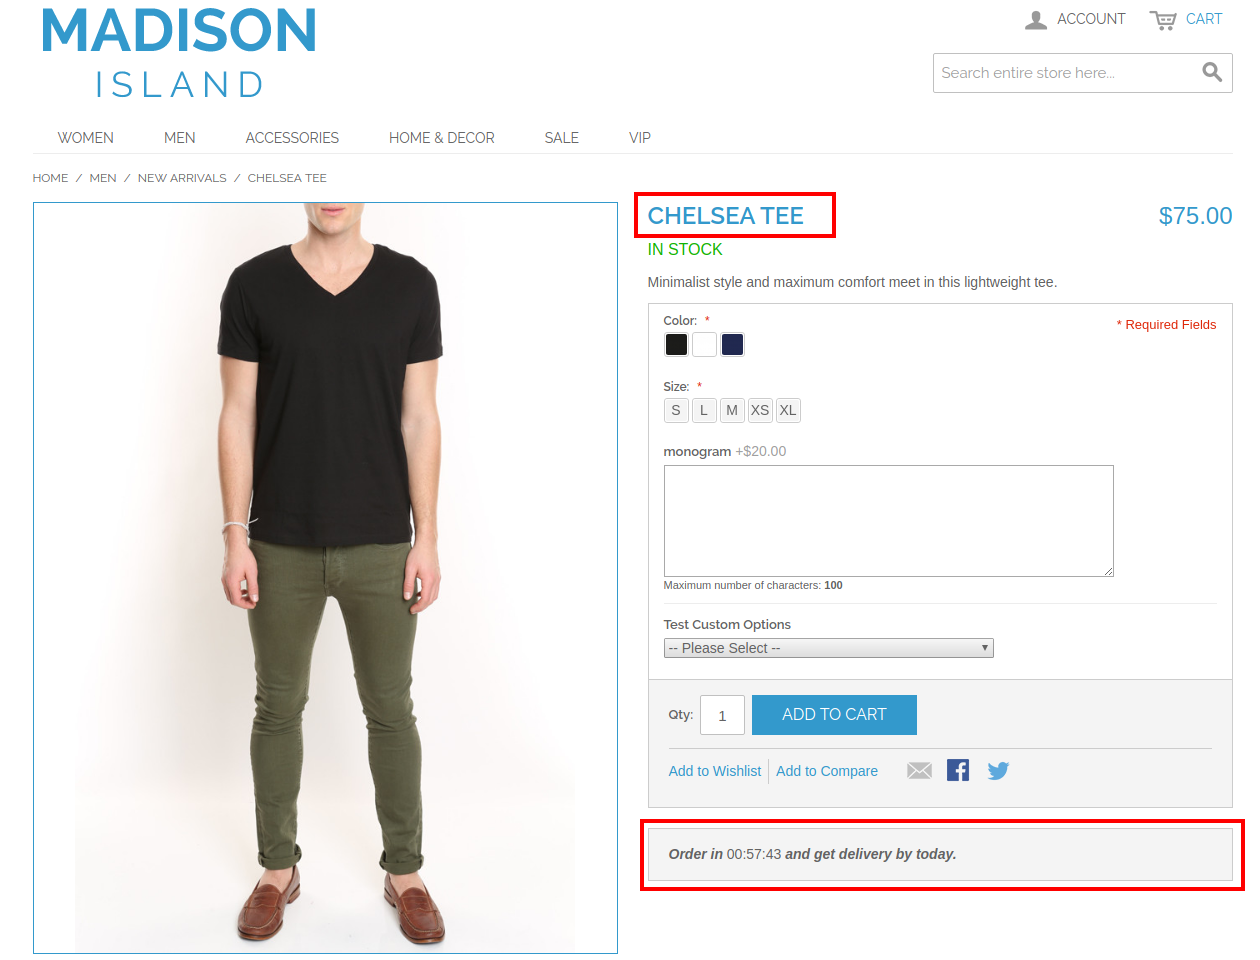
Knowband offers Magento Shipping Timer extension by which the online store admin can offer same day delivery to the online users. The Countdown timer extension for Magento implements the functionality to show a countdown timer on the website product pages. The online user has an option to get that product on the same day by confirming their order within the provided time. The online store owner can set the start time and end time for setting the duration of this countdown timer.
The Countdown timer module for Magento is highly customizable and helps the online merchant to get more conversions without any extra efforts. The Magento Countdown timer allows the admin to apply restriction on countries, categories and products for not showing the countdown timer. The admin can also select the vacation dates from the admin interface of this Magento Shipping module.
1.1 Basic Features of this Magento Shipping Timer extension
By using this Magento Shipping Timer plugin, the online store admin can insert a countdown timer on the website product pages.
Admin is allowed to set the time duration for this countdown timer. The e-merchant can set the start and finishing time from the admin interface of Countdown timer extension for Magento.
The Magento store owner can restrict the countries, categories and products from the admin interface if he doesn’t want to show a countdown timer on these products, categories and countries.
The Magento Shipping module allows setting vacation days for not offering same day delivery offer.
The e-merchant can also set the weekdays on which he wants to show countdown timer.
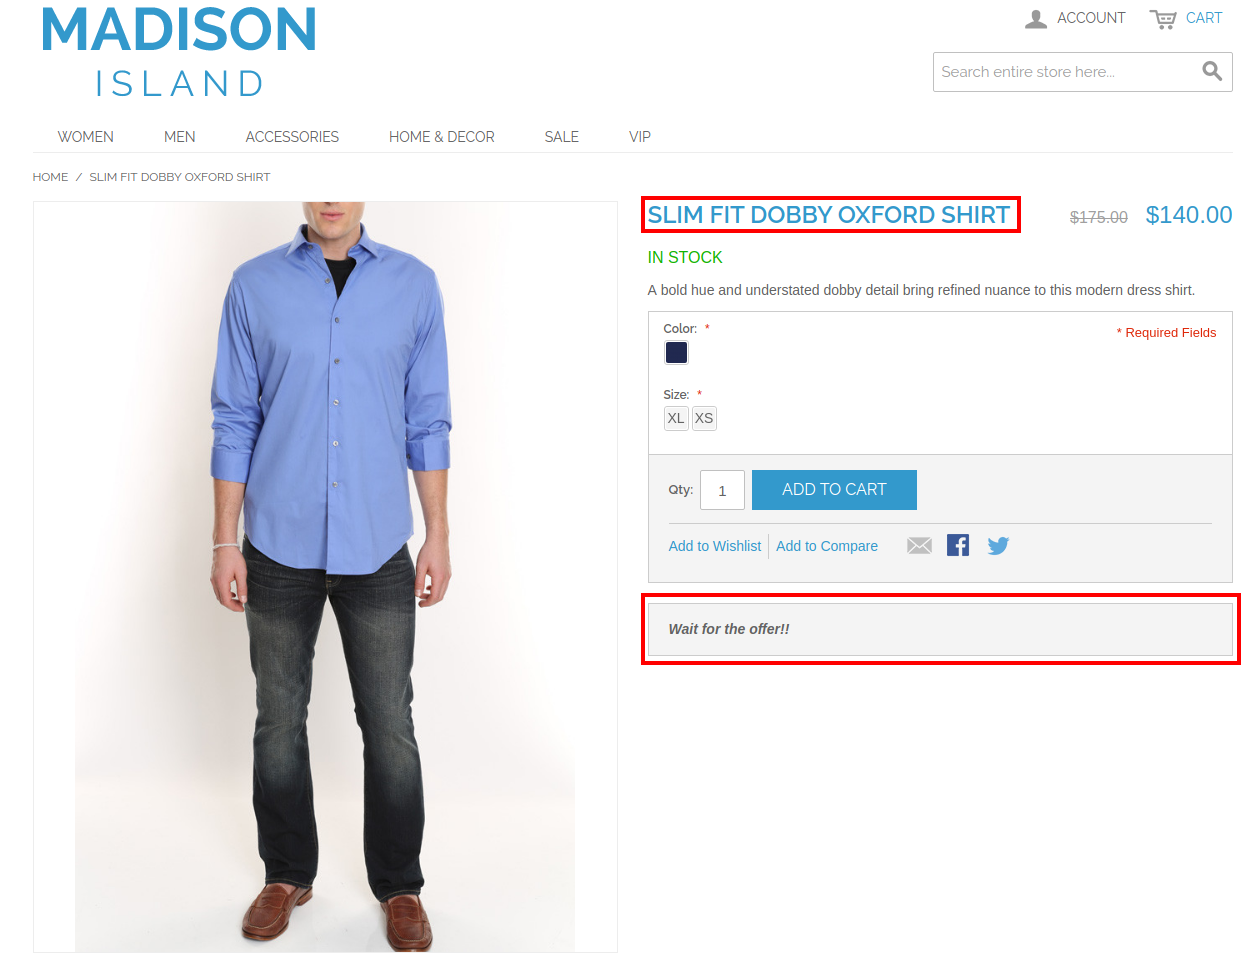
The admin can show a banner to the customers for providing information about the remaining time to grab the same day delivery offer.
The admin can increase conversions and profit without any complicated process.
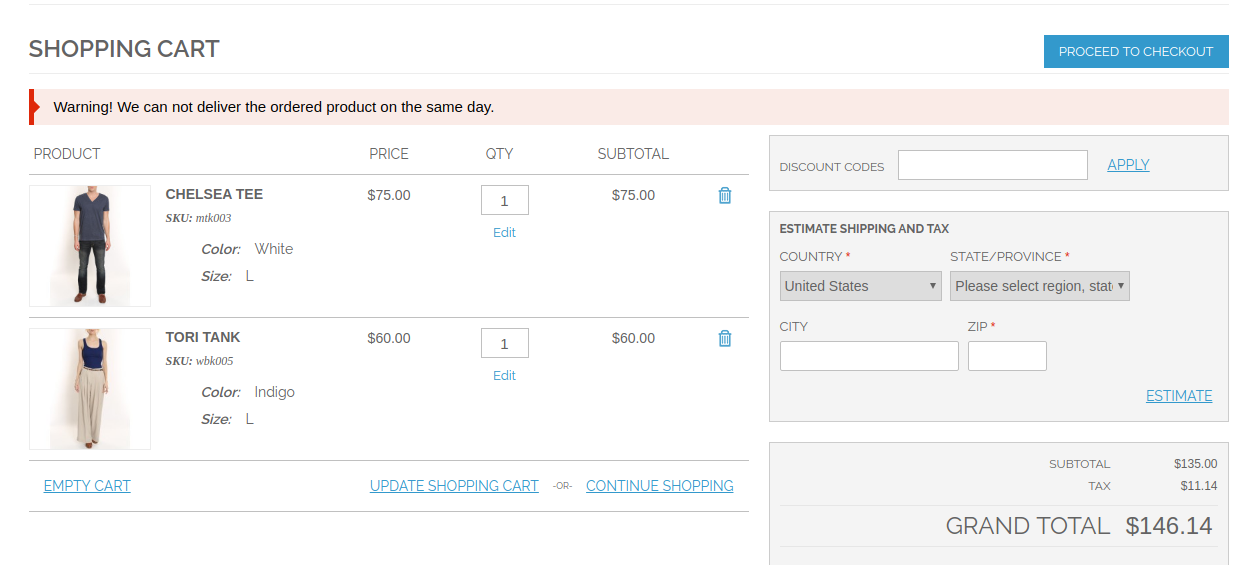
The Magento Shipping Timer module allows showing an error message on the cart page if the customer adds any product which cannot be delivered on the same day.
The Magento Shipping module is multi-lingual compatible.
The Countdown timer extension for Magento is mobile responsive also.
2.0 Installation
The online store merchant can install the Countdown timer extension for Magento easily by following these steps:
Download the extension package from the Knowband store.
After downloading the extension package, you will get a zipped file. Unzip the package on the root folder of Magento setup via FTP manager (like Filezilla or WinSCP – download here: https://filezilla-project.org/). The admin will find the files and folders as shown in the image below:
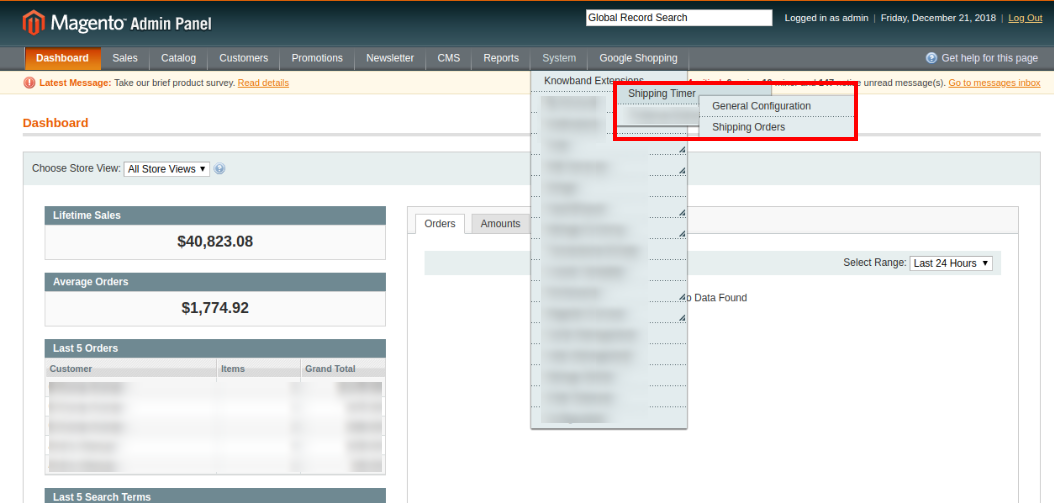
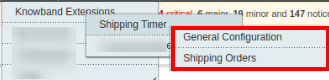
3. The extension is now installed and ready for use. In the Admin Panel, go to “System > Knowband Extensions >Magento Shipping Timer extension”.
Now, the store admin can now use and configure the Magento Shipping Timer extension.
3.0 User Manual
After installing the Countdown timer extension for Magento, the admin will get several customization options. By applying the settings, admin can showcase the countdown timer easily on the website front-end interface. These configuration options will be available for applying the settings:
General Configuration
Shipping Orders
3.1 General Configuration
In General Configuration, you will get these customization options:
3.1.1 General Settings
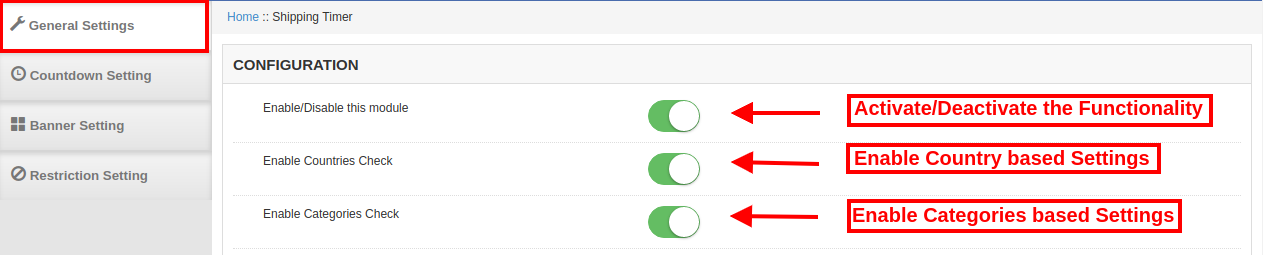
In General settings, the admin can apply settings to display a countdown timer on the website product pages.
Enable/Disable this Module: Enable or disable the Magento Shipping Timer extension from the admin interface without any hassle.
Enable Country Check: Enable Country check in order to apply country-based settings.
Enable Category Check: Enable or disable the Category check as per the requirements.
3.1.2 Countdown Settings
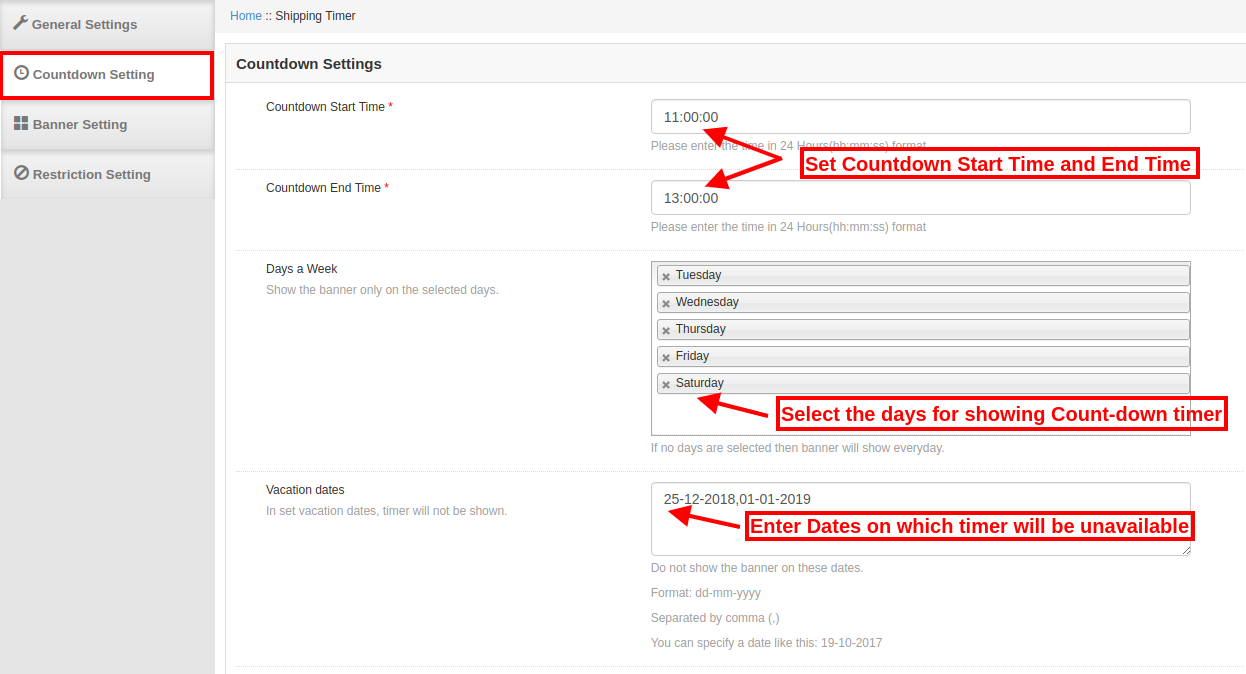
In Countdown Settings, the admin has an option to apply settings for showing a countdown timer on the website front-end interface. There are multiple customization options as shown below:
Countdown Start Time: Set the countdown start time in 24-hour format. The countdown timer will start as per the settings.
Countdown End Time: In this customization option, the online store admin can enter countdown end time. The online users can view the countdown timer in this time duration.
Days a Week: Select the days in which you want to show countdown timer banner on the website product pages. If you don’t select any day, the countdown timer will be displayed on every day.
Vacation Dates: Enter the vacation date on which you don’t want to display this countdown timer on the website front-end interface.
3.1.3 Banner Settings
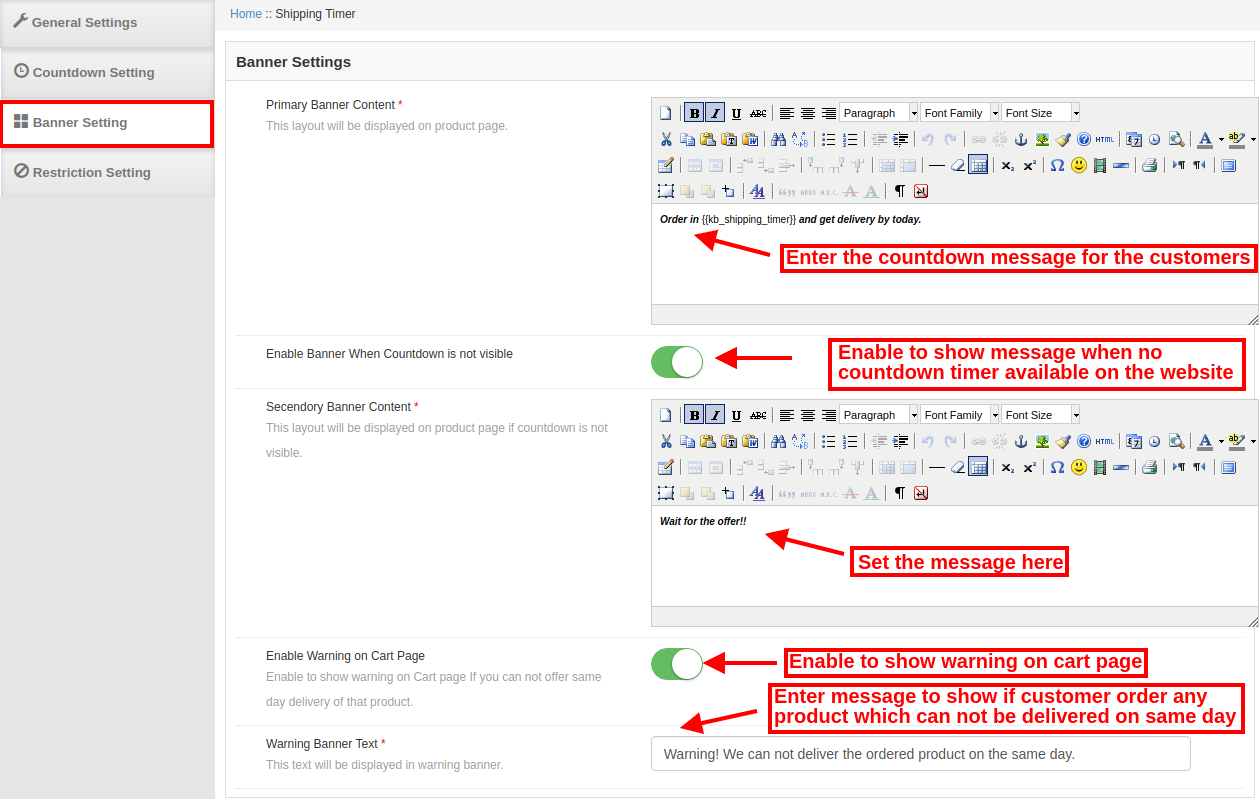
Here, the online store admin can apply the banner related settings. The online store merchant can set the banner text and provide countdown timer related details.
Primary Banner Content: Enter the message/content which you want to show on the countdown banner.
Enable Banner When Countdown is not visible: Enable or disable the settings from here. Admin can show a banner on the website front-end interface when countdown timer is not available on the product pages. This way, the customers can have an idea about same day delivery offer.
Secondary Banner Content: The online merchant can set the secondary banner content from this customization option.
Enable Warning on Cart Page: Activate or deactivate the settings in order to show a warning on cart page. If the customer will try to add any product which can not be delivered on the same date, then there will be a warning on the cart page.
Warning Banner Text: Enter the warning banner text here. The customers can view this warning message on the cart page if they add any product which can not be delivered on the same day.
3.1.4 Restriction Settings
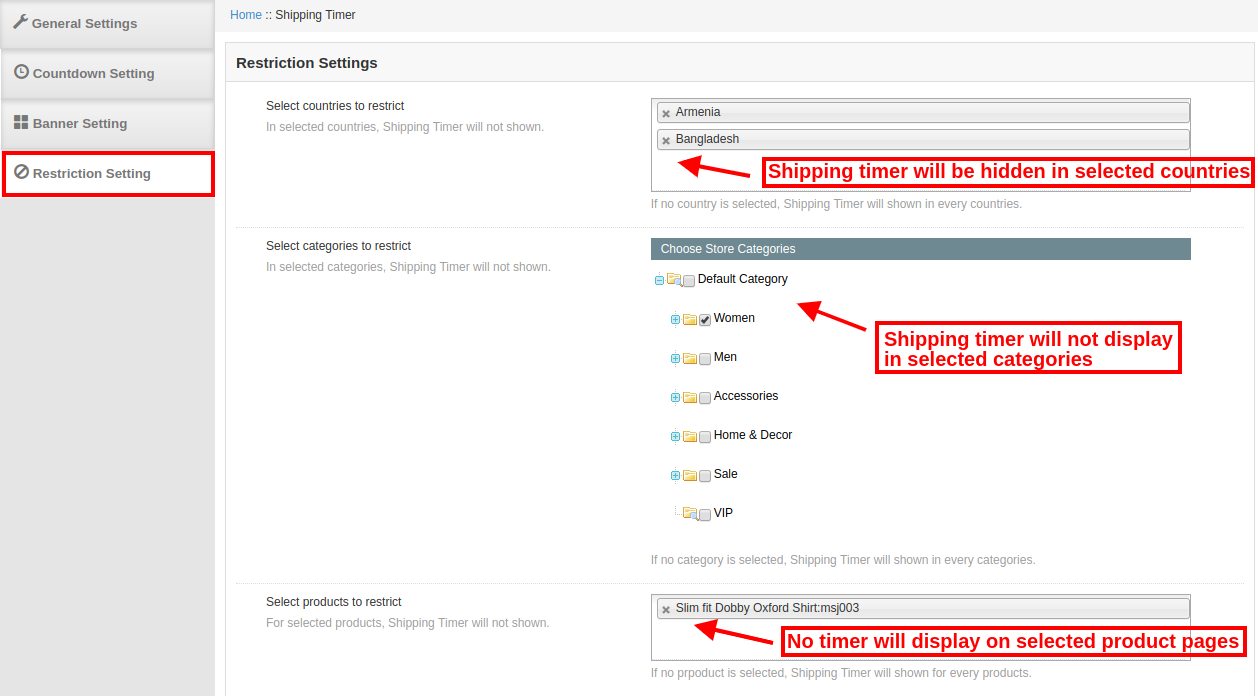
In this section, the admin can apply the country, category and product-based restrictions. Admin can select the countries, categories and products on which he doesn’t want to display the countdown timer.
Select Countries to restrict: Select the countries for which, you don’t want to display countdown timer. The admin can select multiple countries from the drop-down list.
Select Categories to restrict: Select the categories on which, you don’t want to show countdown timer.
Select Products to Restrict: You can also select a particular product for restricting it. No countdown timer will be displayed on the selected product pages.
3.2 Shipping Orders
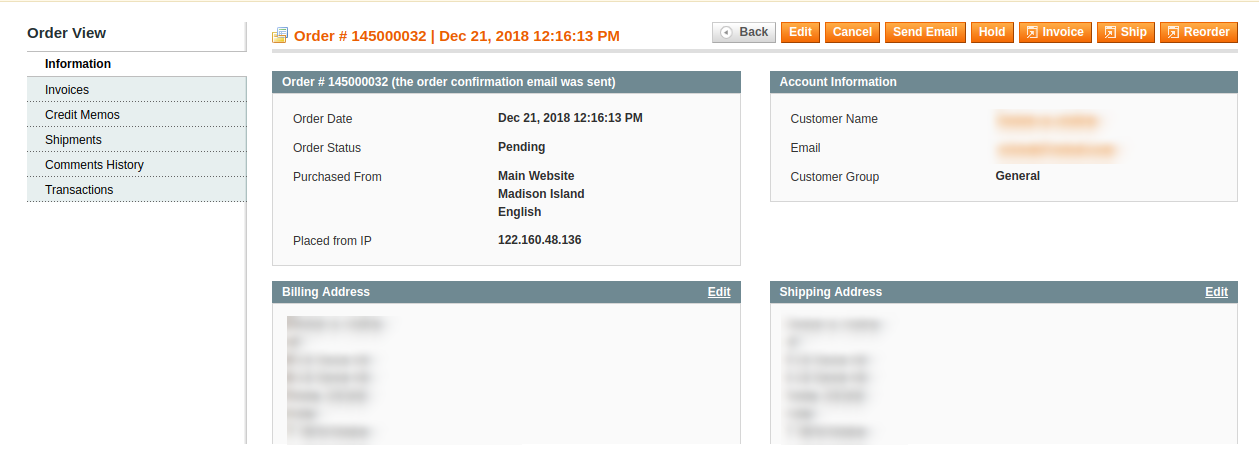
In shipping orders, you can view the shipping order details easily. You can view a list of orders with shipping timer and offer same-day shipping for the same.
The e-merchant can click on the “view” button in order to check order details.
4.0 Front-end Interface
The online users can view the shipping timer on the product pages. They can get same day shipping on ordering the product within the provided time.
The customers can view the banner even if count-down timer is not available. This way, they can get an idea about such same day delivery offers.
The online users will get a warning message if they add any product which cannot be shipped on the same day.
As the name suggests, Captcha (“Completely Automated Public Turing test to tell Computers and Humans Apart”), is a service provided by Google that prevents the sites from spam and bots. Incorporating Captcha is one of the ways of identifying whether the visitor trying to register in your site is a human or a bot.
Despite it’s extensive use in almost every industry that has their online presence, the exact difference between Captcha and reCaptcha is not known to some. Moreover, some of the site owners are still baffled regarding which one should they choose. If you are all bailed up with these questions, then, this article can help you out. The write-up even brings forth the way to incorporate Captcha and reCaptcha in Magento sites.
What is the difference between Captcha and reCaptcha?
Both Captcha and reCaptcha serves the purpose of protecting the site from robots.
Captcha shown in the registration of the site shows up an equation using numbers and ask the user to complete the math equation like addition, subtraction, or multiplication. Thus, bots and spammers have no chances.
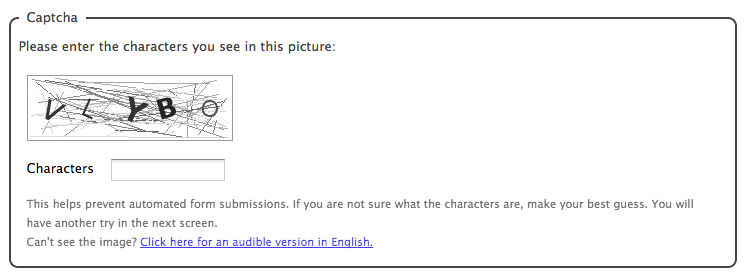
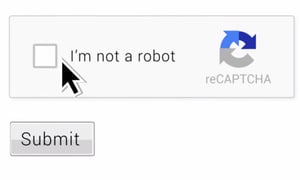
On the other hand, ReCaptcha is similar to captcha, but it supports two versions. The first offers you to enter some words or digits from the image, and the second offers you to mark the checkbox “I’m not a robot”.
Which one should you choose – Captcha or reCaptcha?
While both the system serves the same purpose for you, the latter is a more preferable option. From the customer point-of-view, reCaptcha is considered to be a more feasible option. The complicated Captcha and it’s fuzzy text are considered annoying by the users. In some of the cases, it has even cost some conversions to the sites. However, reCaptcha protects your site from spam without annoying your authentic users. Hence, the security constraints coupled with the ease of navigation of the site users provide a plus point to reCaptcha over Captcha.
How to incorporate Captcha and reCaptcha on your Magento store?
Magento 1.9 and 2 support CAPTCHA, but it is disabled by default.
In order to enable Captcha protection for the administration login page on Magento 1.9, follow these steps:
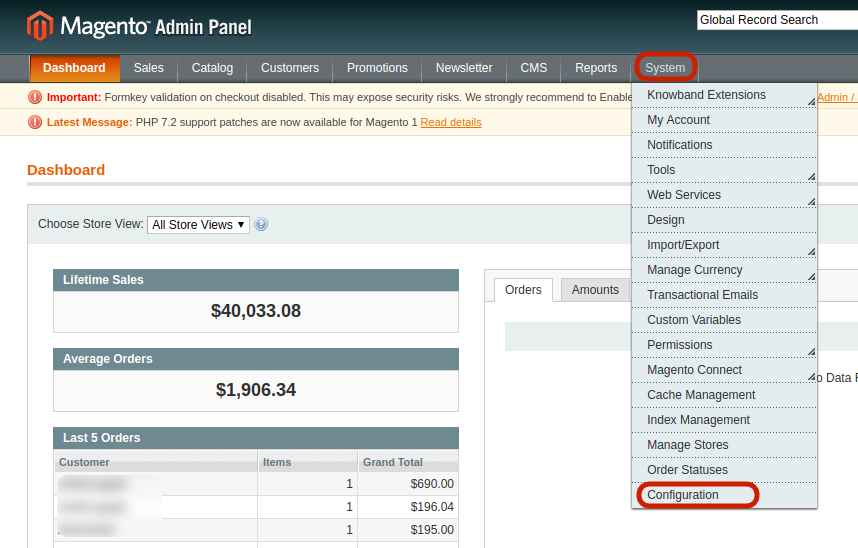
Log in to your Magento store and navigate to the top menu bar.
Click System -> Configuration.
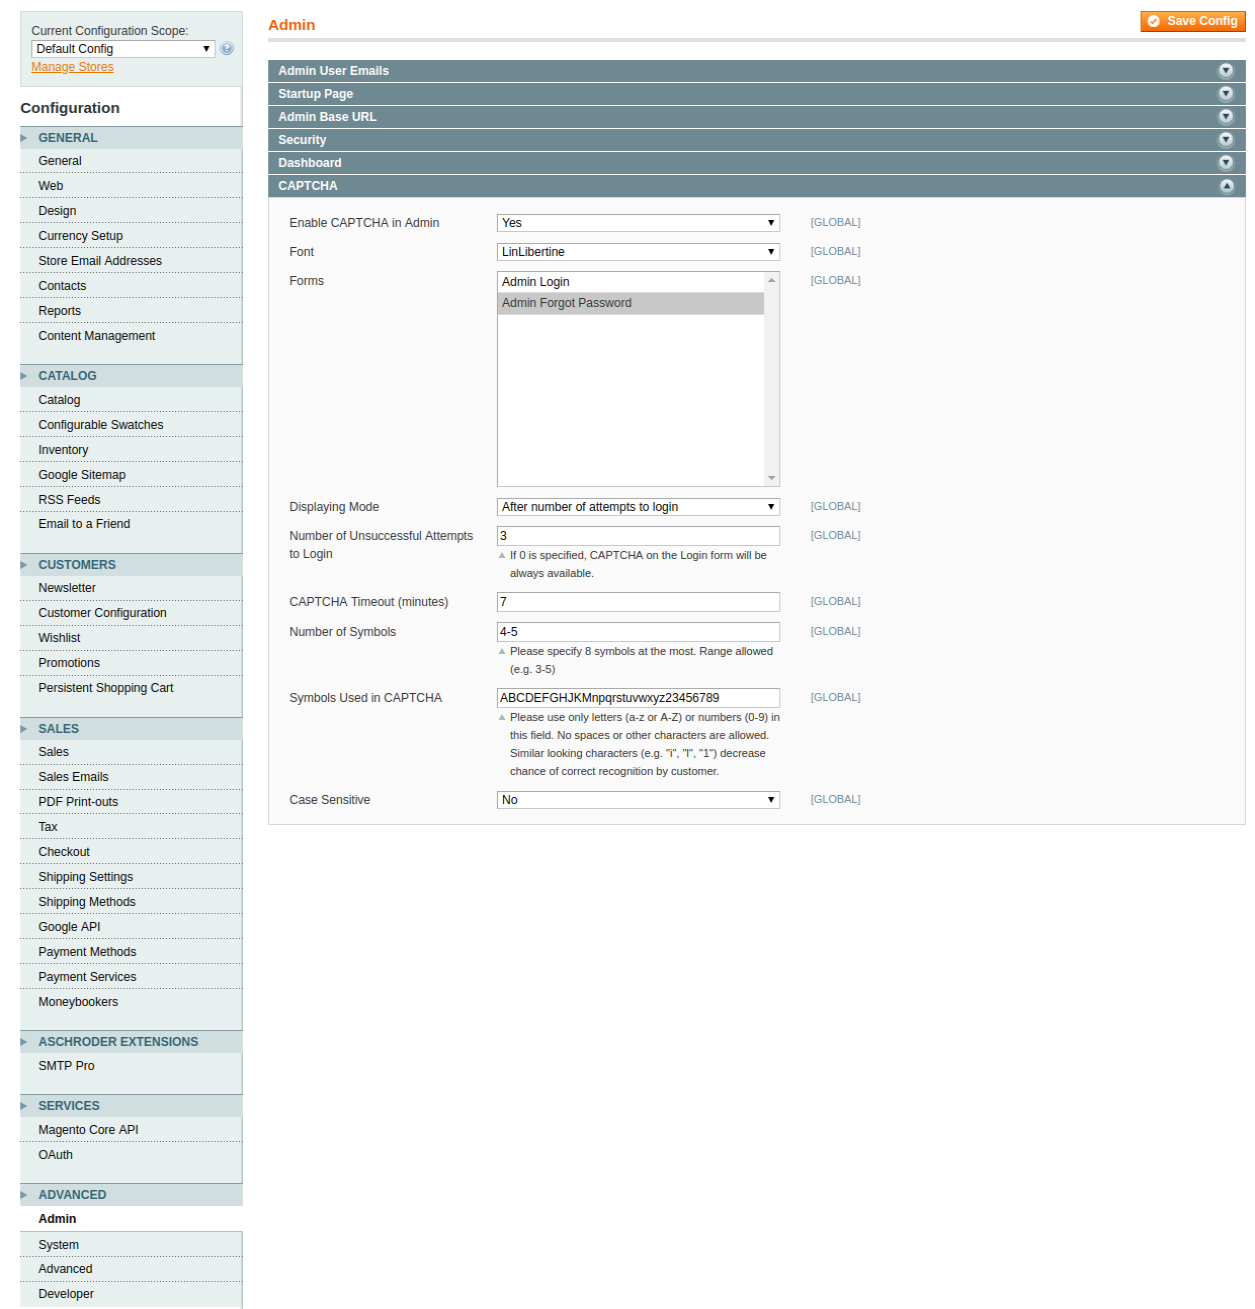
In the Configuration tab, you’ll find a number of options on the left side. Scroll down and click on Advanced -> Admin -> CAPTCHA.
By default this option is disabled, enable it by selecting ‘Yes’.
Fill the configuration options that comprises of the following:
Font: select the font that appears in the CAPTCHA. Forms box: select the forms where you want to display the Captcha protection. Displaying Mode: Select whether you want the CAPTCHA to appear always or after a certain number of failed login attempts. CAPTCHA timeout: Fix the timeout session for the Captcha. Number of Symbols: Specify the range of symbols that you want to allow. Symbols used in Captcha: Specify the symbols that you want to include in Captcha
Click Save. This will enable the Captcha on the login form of the site.
Making the job of site protection even easier, Knowband offer an easy-to-use, Magento Google reCaptcha extension that can help you incorporate reCaptcha not just on the login page, but on the checkout page and other such web forms of your site. For this, you are required to obtain Google Site Key and Secret Key.
Here’s how it works.
Get the Magento Google reCaptcha module from the Knowband and install it in your Magento store. Share the retrieved Site and Secret key, select the web pages where you want to display it and the reCaptcha will be incorporated in your store.
The new buzz in the ecommerce industry is the Adobe’s acquisition of ecommerce platform provider Magento. Magento is an open source platform with its presence worldwide. The revenue of the Magento in the year 2017 was around $150 Million and Adobe agreed to acquire Magento for $1.68 billion. Adobe is the leader in designing and have a world-class experience in delivering the digital services with the best ever tools like Adobe Experience Manager, Adobe Analytics and Adobe Campaign. There were rumors in the industry that Adobe is looking forward to making an entry in the commerce solution and the decision of acquiring Magento is quite surprising for the ecommerce world.
The transaction is expected to close during the third quarter of Adobe’s 2018 fiscal year. Until the transaction closes, each company will continue to operate independently. As per the press release by Adobe –
“Adobe is the only company with leadership in content creation, marketing, advertising, analytics and now commerce – enabling real-time experiences across the entire customer journey,” said Brad Rencher, executive vice president and general manager, Digital Experience, Adobe. “Embedding commerce into the Adobe Experience Cloud with Magento enables Adobe to make every moment personal and every experience shoppable.”
“Adobe and Magento share a vision for the future of digital experiences that brings together Adobe’s strength in content and data with Magento’s open commerce innovation,” said Mark Lavelle, CEO, Magento. “We’re excited to join Adobe and believe this will be a great opportunity for our customers, partners and developer community.”
Adobe stated they envision Magento as a good fit to their portfolio for the mid- and enterprise markets and again highlighted that both Adobe and Magento share some customers such as Coca-Cola, Warner Music Group, Nestlé and Cathay Pacific.
The company revealed that Magento’s 2017 revenues were in the neighborhood of $150 million and that Magento currently employs about 750 people.
Executives from Adobe kept highlighting the cloud business Magento developed over the last couple of years and that the platform’s development has been Cloud-First.
They also hinted that Adobe will be concentrating on extending capabilities of the cloud platforms between the two companies.
Another area they highlighted to investors was the 300,000 plus strong developer network Magento brings to Adobe.
It’s a bit unclear how Adobe counted these developers and in a fact sheet released about the acquisition, it also mentions 1,150+ Magento partners.
Most likely, they did an estimated “headcount” of developers that work at Magento partners who are involved in active development on products and services that integrate with the Magento platform.
As posted on the Magento blog “As Content + Commerce capabilities have become inextricably linked, commerce plays a more integral part of the consumer experience than ever before.
With Magento’s position as the world’s most popular commerce platform and Adobe’s leadership in designing and delivering great digital experiences, we will enable every business to create and deliver compelling real-time experiences, engage with customers across every touchpoint, and transact anywhere across the entire customer journey for both B2C and B2B.
We stand at the forefront of a tremendous opportunity:
To offer even greater value to customers, partners and developers across their commerce investment
To accelerate our product roadmap enabled by the breadth and depth of Adobe’s product capabilities and cloud technology
To tap Adobe’s global operational scale to accelerate our penetration into new verticals and geographies
To harness the creative passion of our Community towards our mission of using technology to connect and empower people”
Infinite scrolling loads web page content continuously as the user scrolls down the web page. Basically, infinite scrolling is the technique of web design to eliminates pagination from the website. Magento 2 Infinite Scroll Extension by Knowband does the same. It removes the pagination and page reload functionality from the website and make navigation easier for your Magento store visitors to view the next set of products without reloading the web page.
1.1 Features of Magento 2 quick scroll extension:
Magento 2 Infinite Scroll extension replaces the pagination system from the website.
Magento 2 fast scroll extension reduces the load time of the website.
Store admin can enable or disable the Magento 2 infinite scroll module in a single button click.
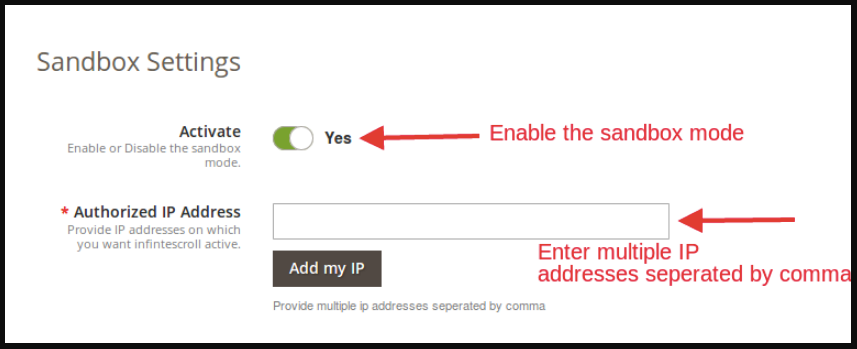
Magento 2 quick scroll extension offers sandbox testing option to the admin. After enabling this store admin needs to enter the specific IP address to test the module.
Infinite scroll for Magento 2 extension serves better user experience.
Magento 2 fast scroll module optimizes the navigation of the site.
The admin can specify the number of pages after which, “Load More” will be shown. Store admin can also adjust the loader speed.
Store admin can display end page message after the completion of the product listing.
Magento 2 endless scroll extension works smoothly with list views as well as the grid view.
Store admin can set the background color and text color of the end page message and go to the top link.
Magento2 infinite scroll module offers the store admin to add the selector setting.
Magento 2 infinite scroll module is mobile responsive.
2.0 Installation Steps of Infinite scroll for Magento 2 Extension:
The steps to install the Magento 2 quick scroll extension are mentioned below:
1. Buy the Infinite scroll for Magento 2 extension from Knowband. You can download the extension package.
2. The package has a zipped file that contains the user manual and the source code of Magento 2 Infinite Scroll Extension. Unzip the package.
3. Create a folder {Magento root}/app/code/Knowband/Infinitescroll
4. Upload the extracted content in the above folder via FTP manager (like Filezilla or WinSCP – download here: https://filezilla-project.org/).
5. Now run below commands to install the Magento 2 Infinite Scroll Extension:
6. The extension is now installed and ready for use. In Admin Panel go to “Knowband Extensions > Infinite Scroll”.
You can now configure and use the Magento 2 Infinite Scroll extension.
3.0 Admin Interface
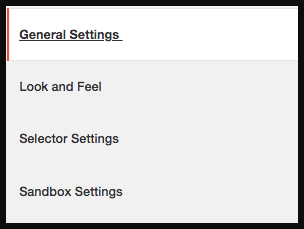
Magento 2 fast scroll extension offers following interfaces to be configured:
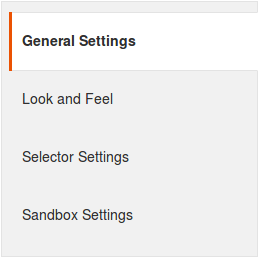
General Settings
Look and Feel Settings
Selector Settings
Sandbox Settings
Below is the detailed description of every setting:
3.1 General Settings
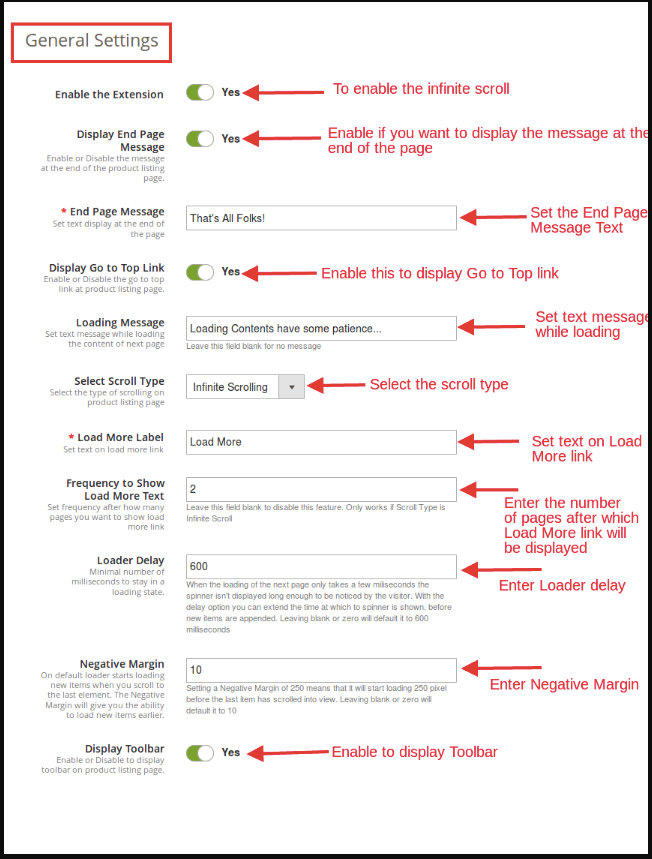
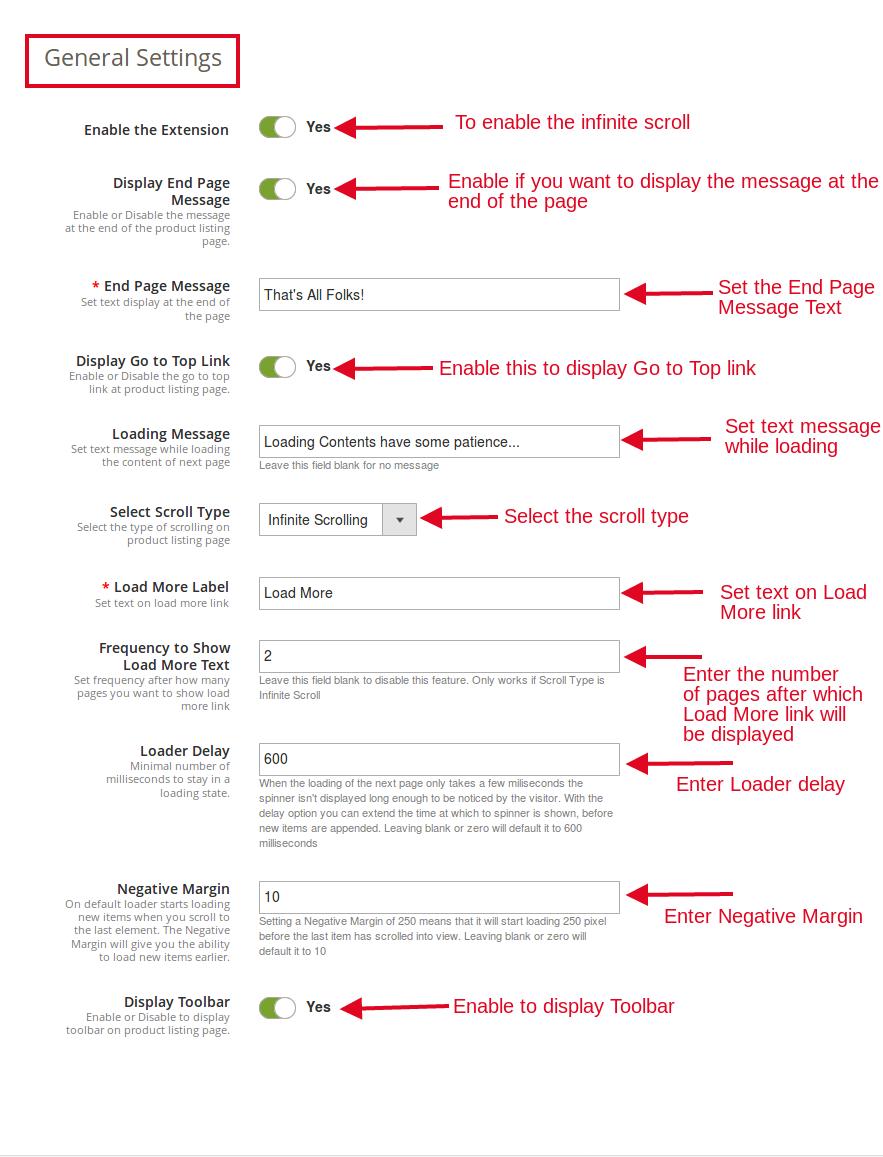
From this tab, store admin can adjust the general settings of the Magento 2 infinite scroll module.
Enable the extension: This tab of Magento 2 fast scroll will enable the infinite scroll option. The admin can enable/disable this Magento extension whenever needed.
Display End Page Message: This field of Magento 2 quick scroll extension allows the admin to enable/disable the message that would be displayed at the end of the product listing page.
End Page Message: This field of Magento 2 endless scroll extension allows the admin to set the text of the end page message that would be displayed at the end of the product listing page.
Display Go To Top Link: The Magento 2 infinite scroll module allows the admin to display the “Go To Top Link” option that helps the users to jump to the top of the product listing page.
Loading Message: This section of Magento 2 fast scroll extension offers the admin to set the text while loading the content of the web page.
Select Scroll Type: The Magento 2 quick scroll extension provides the admin to select the type of scrolling on product listing page. Following options are given in scroll type:
a. Infinite Scrolling
b. Load More Link
Load More Label: When “Load More Link” option is selected, this field will be shown. This field of Magento 2 infinite scroll extension let the admin to set the text on Load More link.
Frequency to show Load More text: This field of Magento 2 fast scroll extension will work only when “Scroll Type” is “Infinite Scroll”. This field allows the admin to set the frequency of load more link to be shown in the front-end.
Loader Delay: This field of Magento 2 infinite scroll module allows the admin to set the minimal number of milliseconds to stay in a loading state.
Negative Margin: This field of Magento 2 quick scroll extension will give you the ability to load the new items earlier before you reach to last item of the page. By default, the loader starts loading new items when the user scrolls to the last element of the page. The admin can set the number of products here. For instance, if the number ‘X’ is entered here, then, the loader will start loading before there are X number of products left in the web page.
Display Toolbar: This field of Magento 2 endless scroll extension will allow the admin whether to display the Toolbar on product listing page or not.
3.2 Look and Feel Settings
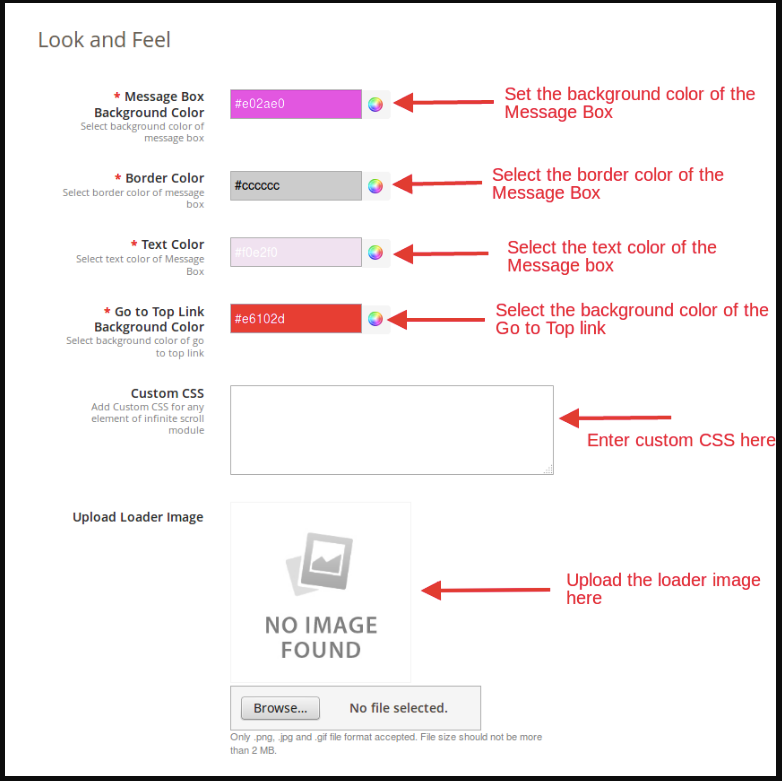
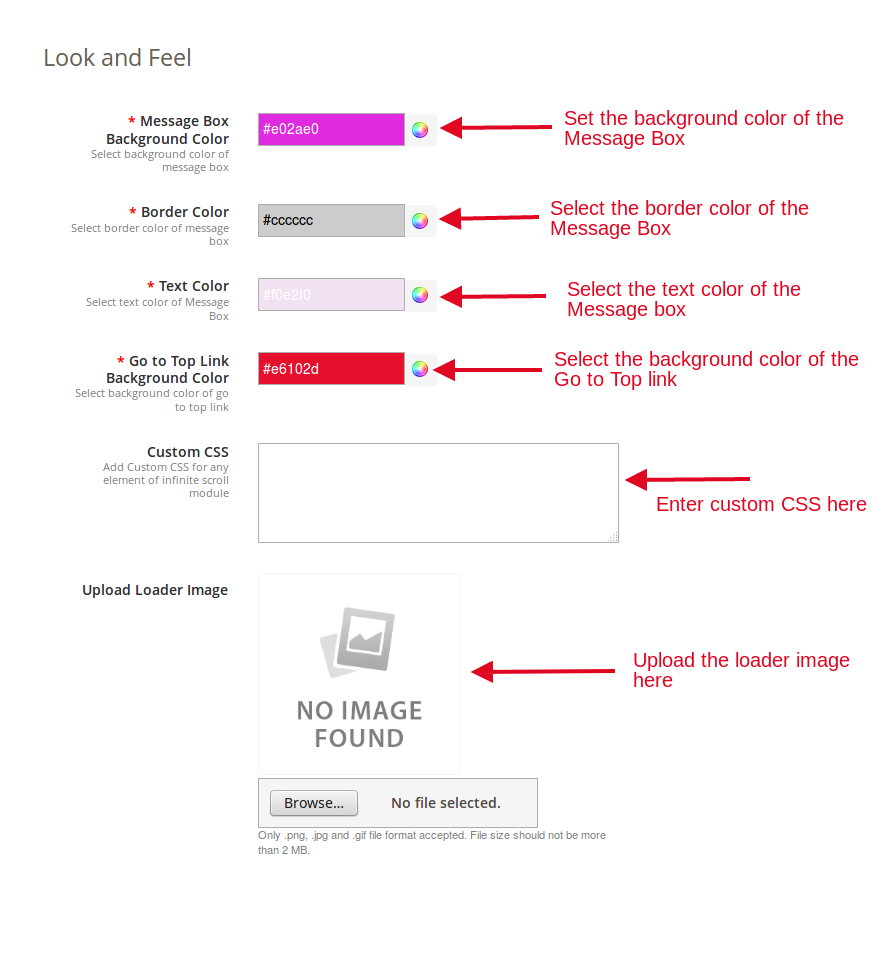
From this tab, the store admin can adjust the background and text color of the message box and go to top link.
Message Box Background Color: This tab of Magento 2 endless scroll extension offers the admin to set the background color of the message box.
Border Color: The Magento 2 Infinite Scroll extension allows the admin to customize the border color of the message box as per his preferences.
Text Color: The admin can customize the text color of the message box as per his choice. He can do the same just by selecting the color from the color picker.
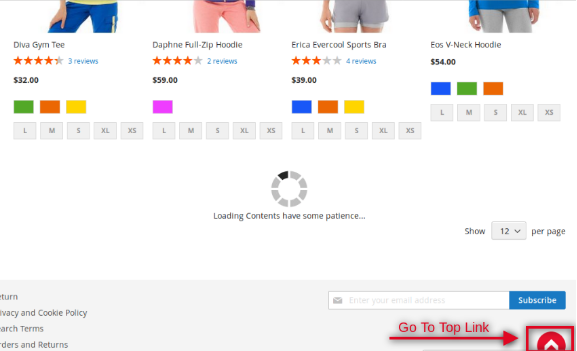
Go To Top Link Background Color: This field of Magento 2 fast scroll extension allows the admin to set the background color of the “Go To Top Link”. Below is the screenshot of the Go To Top Link:
Custom CSS: If the admin wants to add the custom CSS for any element of Infinite scroll for Magento 2 extension, then, he can do the same by adding CSS in this field.
Upload Loader Image: This tab of Magento 2 endless scroll extension allows the admin to upload the loader image of his choice. The admin can upload .jpg, .png and .gif format images only. Image size should not be more than 2 MB.
3.3 Selector Settings:
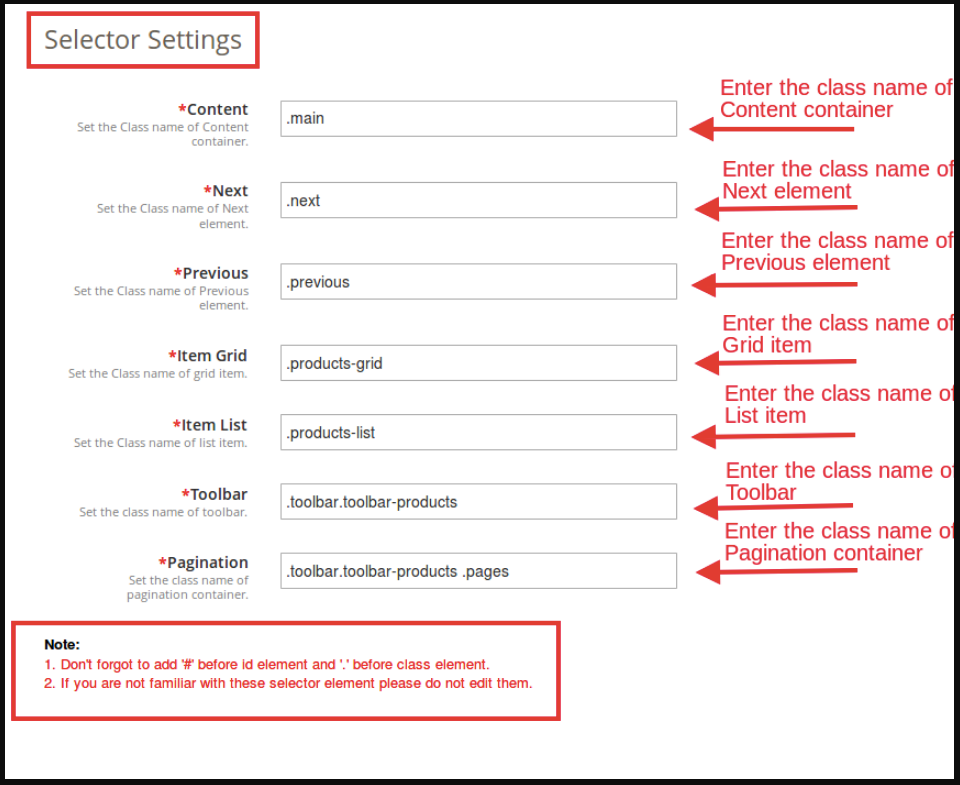
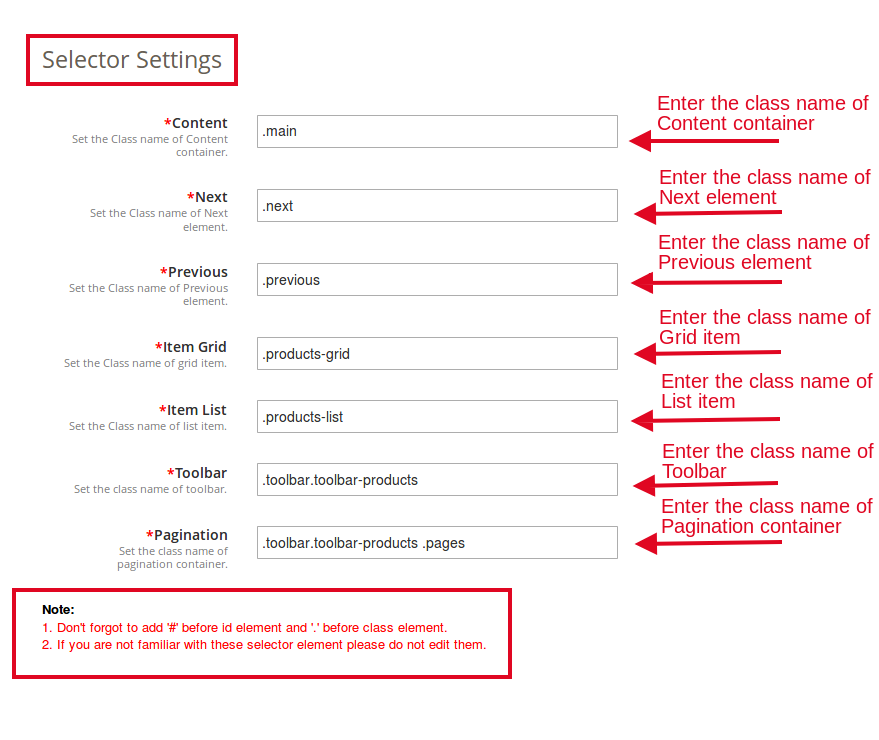
Content: This tab of Magento 2 Infinite Scroll extension allows the admin to set the Class name of the Content container.
Next: This tab of Magento 2 fast scroll extension offers the admin to set the Class name of Next element.
Previous: This tab of Magento 2 quick scroll extension allows the admin to set the Class name of the Previous element.
Item Grid: This field of Magento 2 endless scroll extension allows the admin to set the Class name of Grid item.
Item List: This field of Magento 2 endless scroll extension allows the admin to set the class name of the list item.
Toolbar: In this field of Magento 2 infinite scroll module, the admin will have to set the Class name of the Toolbar.
Pagination: This tab of Magento 2 quick scroll extension allows the admin to set the Class name of the pagination container.
NOTE:
1. Don’t forget to add ‘#’ before id element and ‘.’ before the class element. 2. If you are not familiar with these selector elements please do not edit them.
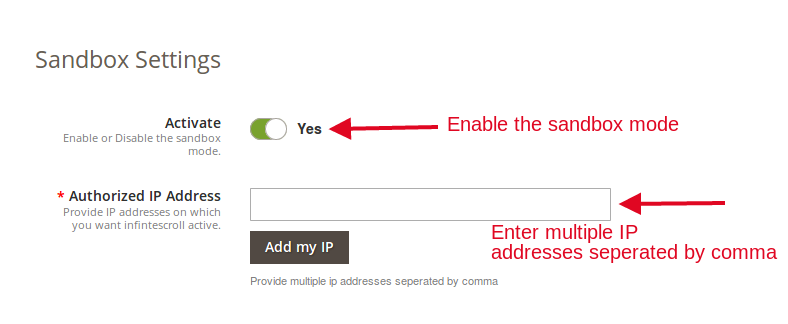
3.4 Sandbox Settings:
The Sandbox Settings tab of the Magento 2 infinite scroll extension offers the admin to test the extension before implementing it on the site.
Activate: Enable this field of Magento 2 fast scroll extension to test the extension.
Authorized IP Address: In this field of Magento 2 quick scroll extension, enter the IP addresses on which you want infinite scroll active. Make sure that the entered IP addresses are separated by a comma. You can add the IP by clicking on “Add my IP” option.
4.0 Store Front-end
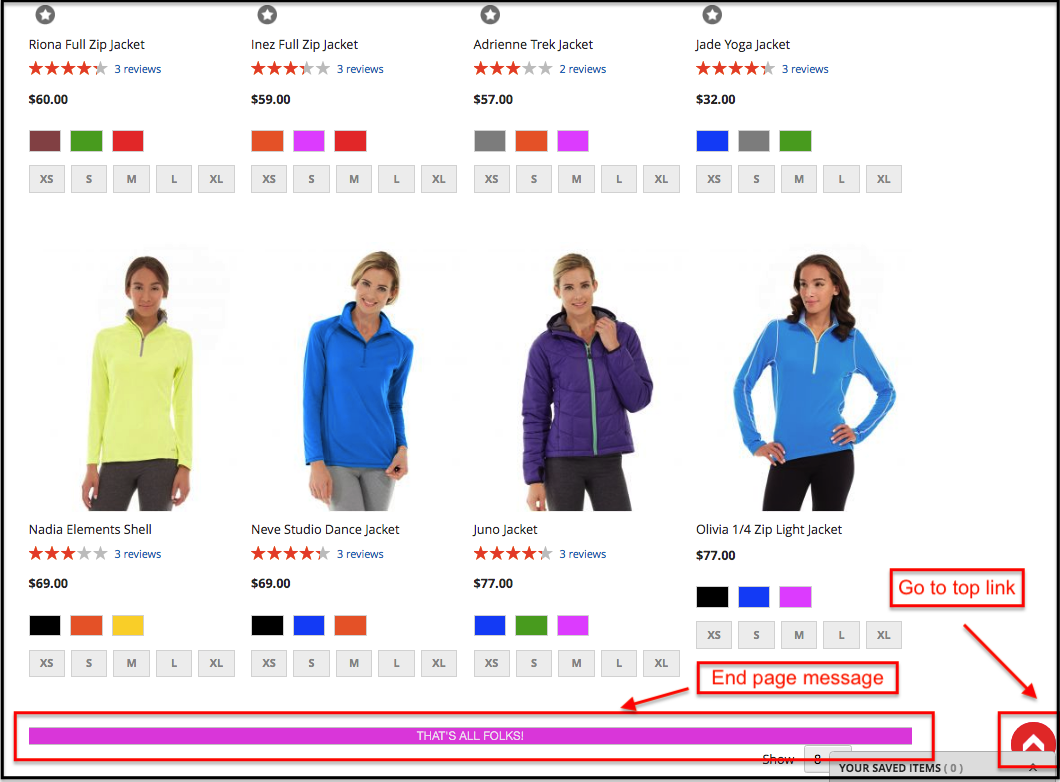
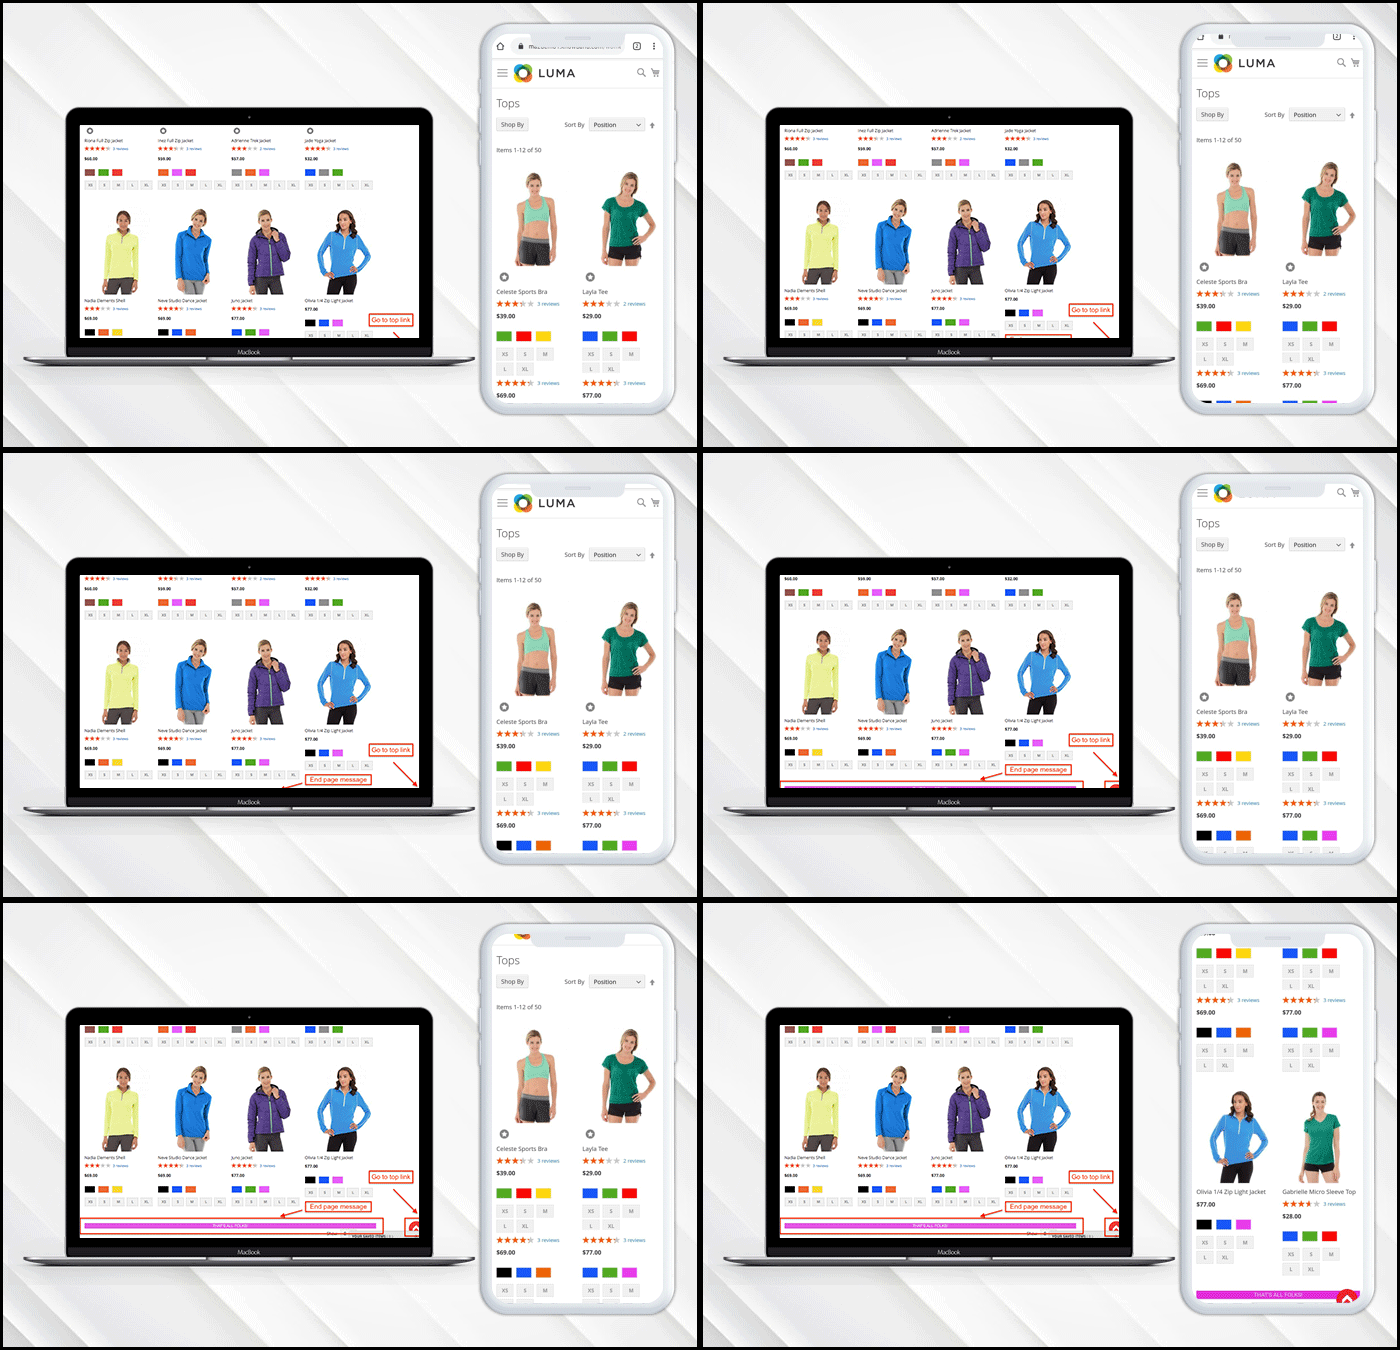
The Magento 2 endless scroll extension will be enabled on the whole website where pagination occurs. The Infinite scroll for Magento 2 extension would appear at the front as follows:
End page message and top link:
Find more details about this Infinite scroll for Magento 2 below:
Magento eBay connector offers the quickest means to the Magento store owners to integrate their store with the very popular eBay marketplace. The eBay integration allows the merchants to manage the inventory and orders from a single interface.
Headquartered in San Jose, California, eBay is a multinational eCommerce corporation that popular as an online auction and shopping site. It facilitates consumer-to-consumer and business-to-consumer sales and offers an easy and customizable interface for the sellers across the globe to list and sell their products effortlessly. eBay operates in over 30 nations. The product listing of eBay combines 800+ million product listings that are not just unique but are even coupled with great deals.
Magento eBay Marketplace Integration module by KnowBand offers a smart solution to the e-merchants to integrate their store with the eBay Marketplace. The store admin can list products to the marketplace and sync the orders from the marketplace to their Magento store.
1.1 Merchant benefits of Magento eBay Integrator by Knowband
The Magento eCommerce sites can easily expand their reach by integrating their store with the popular marketplace with the help of this Magento eBay integrator.
The Magento eBay API integrator allows the store admin to sell their products to a larger audience base.
The eBay Magento connector allows the sellers to sync their site with any of the eBay sites.
The eBay Magento connector module offers multi-currency and multi-lingual support that helps you offer the services according to the target customer.
The eBay Magento integration plugin is easy-to-understand and the admin can start selling in the marketplace in a few simple steps.
The user-friendly interface of the Magento eBay integration extension makes it easier for the store admin to manage their merchandise from a single platform.
The merchants can add/remove the product, manage the details and inventory from the admin panel of the Magento eBay integration plugin.
The admin can manage the shipping methods for the eBay store from the admin panel of the Magento eBay Marketplace connector extension.
Profile-based product listing of the Magento eBay API integration module makes it easier for the merchants to list the products in bulk.
Even the order processing becomes easier with the robust eBay Magento API integrator.
The seller can check the reason for error product rejection and rectify accordingly from the back-end of the Magento eBay integrator.
The Magento eBay API integration plugin comes with free support for 3 months.
The eBay Magento connector extension is easy-to-use and can be configured with the least effort.
2.0 Installation of Magento eBay Integrator
Follow the following steps for installing eBay Magento Marketplace integration extension:
1. Download the Magento eBay integration extension package.
2. Unzip the package in your root folder of Magento setup via FTP manager (like Filezilla or WinSCP – download here: https://filezilla-project.org/).
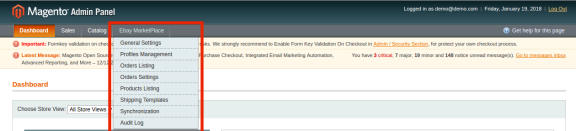
3. In the admin panel, go to eBay Marketplace in the main menu.
4. The Magento eBay Marketplace Integration module is now ready for use.
This User Manual will guide the users through the Magento eBay integration extension configuration and settings.
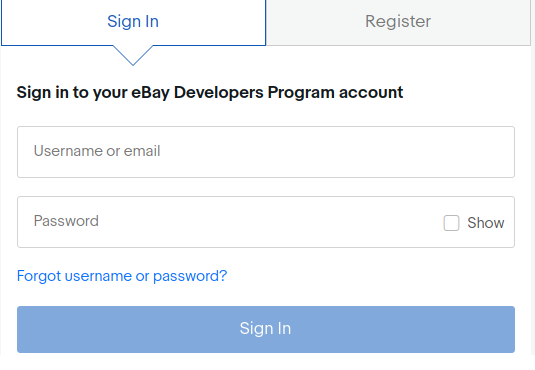
To start selling on eBay Marketplace you need to have a seller account on eBay. In this section, we are listing all the steps to create a seller account on eBay. Please find them below –
3. After filling valid data click on join and you will be redirected to the application creation page.
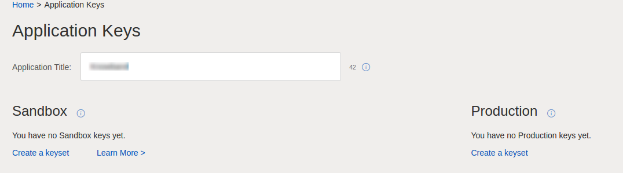
4. Enter the application name and click on ‘Create a keyset’ under the Production section, a new form will be opened.
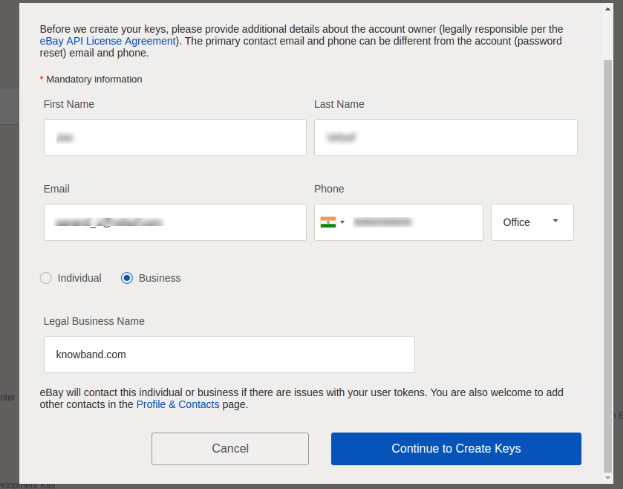
5. Enter the details and click on Continue to create Keys.
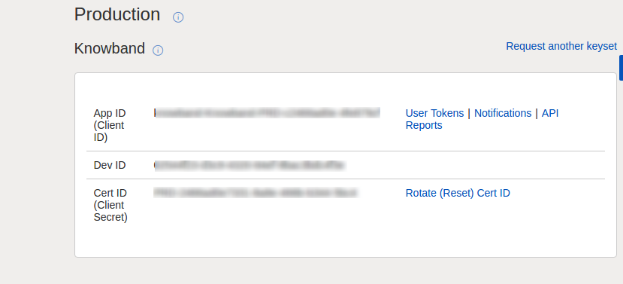
6. Application keys will be shown.
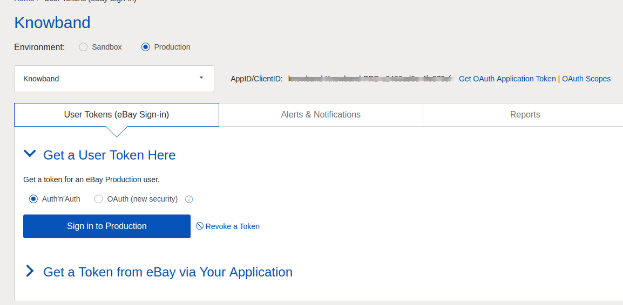
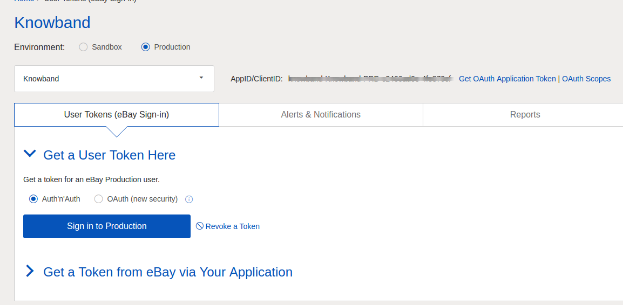
7. To create user token, click on User Tokens link in the above image.
8. Click on ‘Sign in to Production’ to get a token.
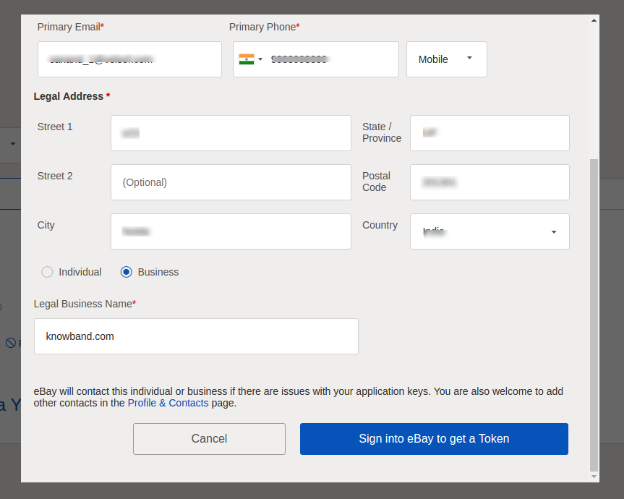
9. Fill the details and click on “Sign in to eBay to get a Token’”.
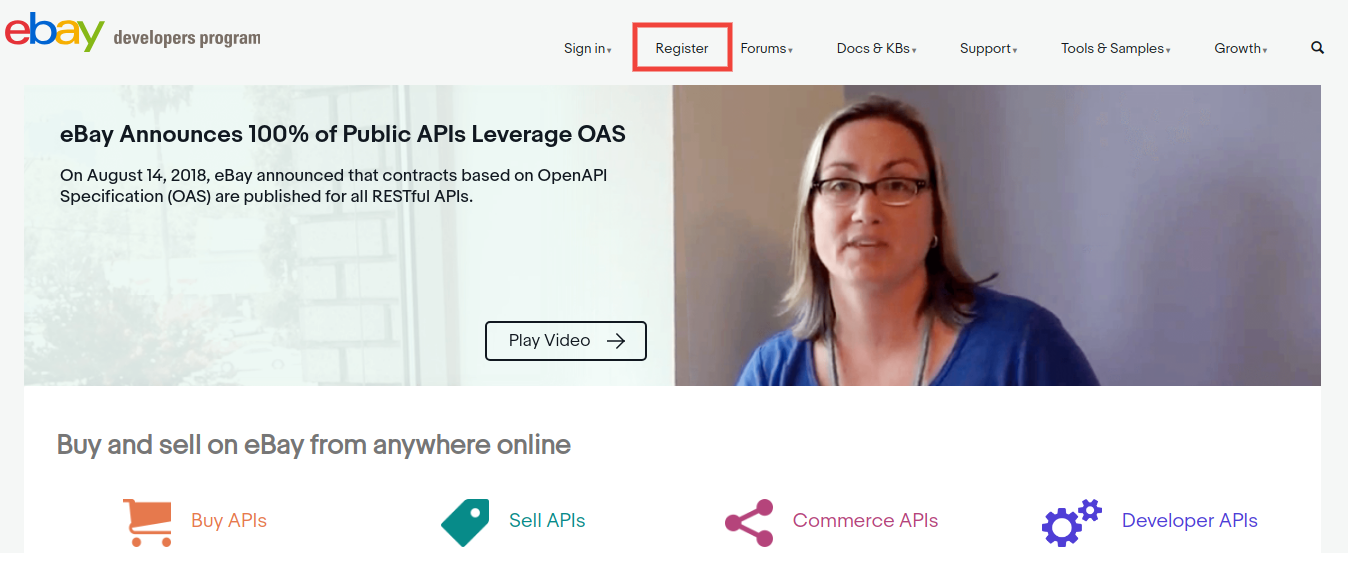
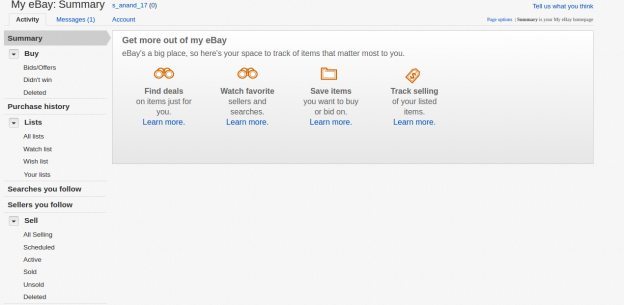
10. Sign into already created eBay Seller account or register as shown below:
1. On clicking register and filling details you will be redirected to your Seller eBay account.
2.2 To Get a token from eBay via your application
1. To create user token, click on User Tokens link in the below image.
Steps to reach this screen:-
A. Login into your developer’s eBay account.
B. On a successful login, you will see the below-added screen.
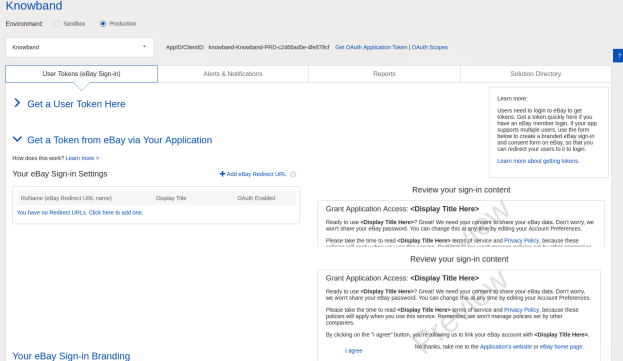
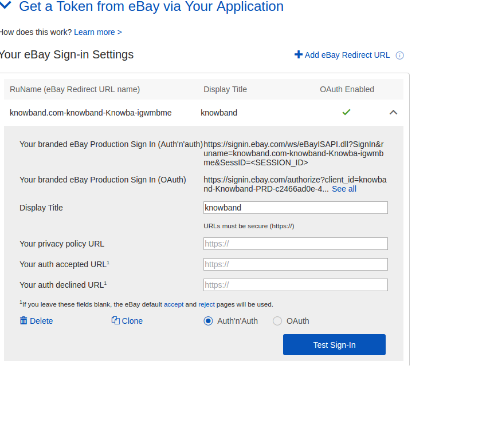
2. Click on “Get a Token from eBay Via Your Application.”
Steps to reach this screen:-
A. Click on “User Tokens” from the above screen.
3. Click on add eBay redirect URL and fill the form and save.
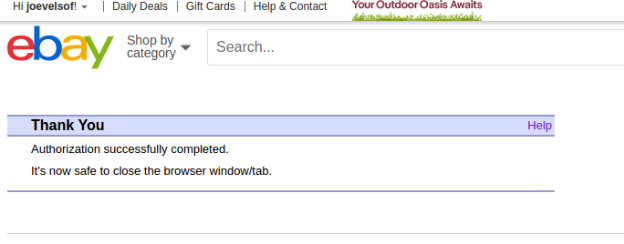
4. On clicking I agree from the right side form, you will be redirected to the authentication page.
3.0 Admin Interface of Magento eBay Integrator
Admin panel of the Magento eBay API Integration extension offers 8 configuration options.
1. General Settings
2. Profile Management
3. Order Listing
4. Order Settings
5. Product Listing
6. Shipping Template
7. Synchronization
8. Audit Log
3.1 General Settings
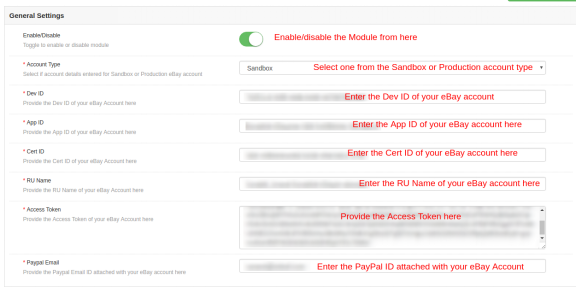
Once you have created a seller’s account, you need to fill-up the form to validate the synchronization of the store with the marketplace. Navigate to Admin Interface>eBay Marketplace>General Settings.
Fill the form shown in the General settings section. Each field for the configuration panel of Magento eBay Integration plugin is explained below:-
1. Enable/Disable
Enable/disable the Magento eBay API integrator by toggling this button.
2. Account Type
The admin can either choose the Sandbox account or the Production eBay account. The sandbox account is for testing purposes. While the Production account is for the final store integration.
3. Dev Id
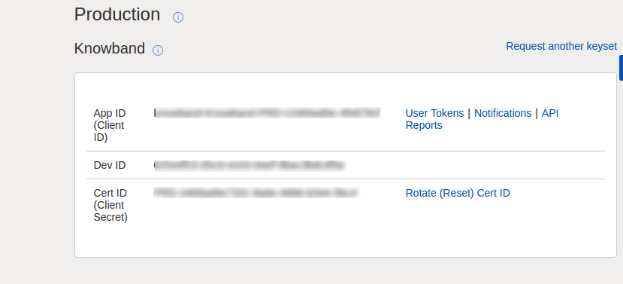
Enter the Dev ID of your eBay account in this section. To find your Dev ID, sign in the eBay developer account. In the application key section, you’ll find App ID, Dev ID, and Cert ID as shown in the image below.
4. App Id
Copy the App ID from your eBay account and copy the same in this field.
5. Cert Id
Enter the Cert Id of eBay account in this section. You can find the Cert Id as shown in the above image.
6. RU Name
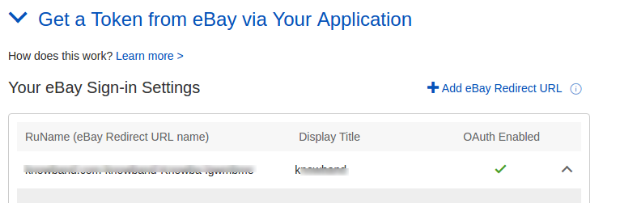
Enter the RU Name of the eBay account. To obtain your RU name, go to the ‘Get a Token from eBay via Your Application’ tab after adding a redirect URL.
7. Access Token
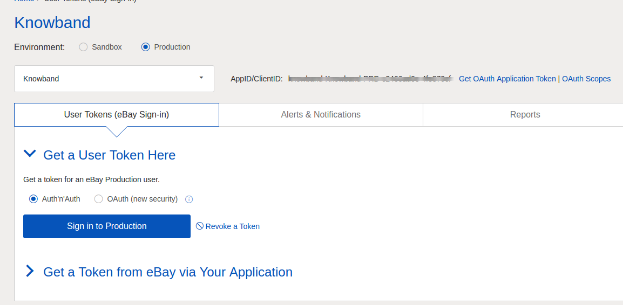
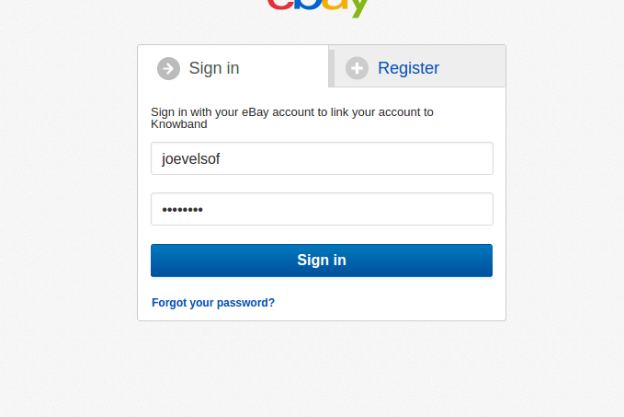
Copy the Auth Token of eBay account and paste in this section. To get the access token, you need to click on Sign in to Production as shown in the below image.
Sign in to the account from the form below:-
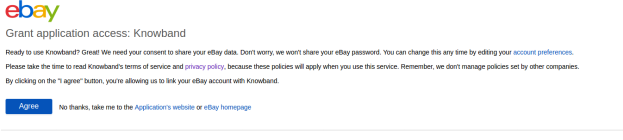
Click on I agree and get access tokens.
8. Paypal Email
Enter a valid PayPal ID connected to your eBay account. Follow the steps mentioned below:
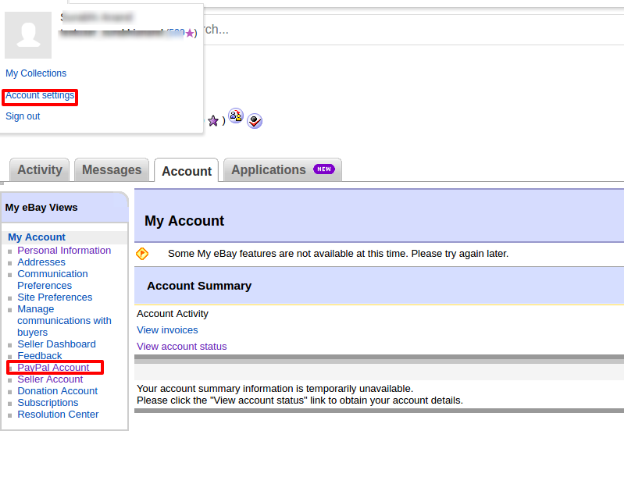
1. Log in to your eBay seller account.
2. Click on account settings from top left dropdown an click on Paypal account.
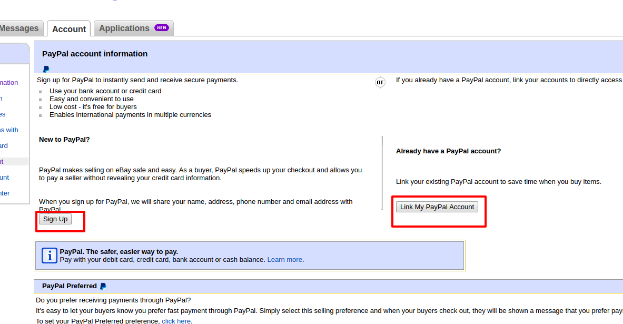
3. Now Sign up or link your already created PayPal account with the eBay seller account.
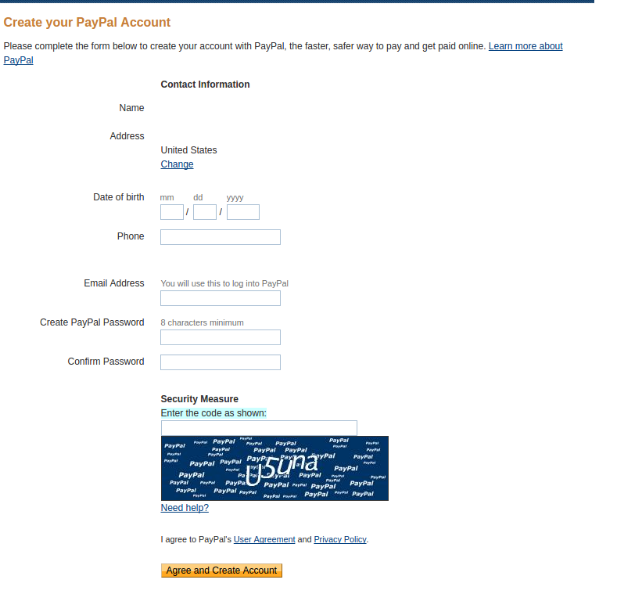
4. On clicking Sign Up, you will be redirected to the PayPal account creation page. Just create a profile by filling the details and link it to your seller’s account.
3.2 Profiles Management
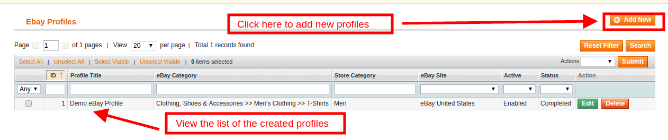
The Magento eBay Marketplace Integrator plugin offers an option of the profile-based product listing. The profiles created in the admin interface of the Magento to eBay integration plugin can be viewed in this tab. The admin can create a new profile and edit or delete the already created profiles.
3.2.1 How to Add New Profiles?
Follow the steps, to create new profiles, Go to the Admin Panel>eBay Marketplace>Profile Management.
Click on the ‘Add New’ button as shown below:
The profile creation tab of the Magento eBay Integration plugin is categorized into three tabs. They are:
General Setting
Profile Return
Profile Specifics
3.2.1.1 General Settings
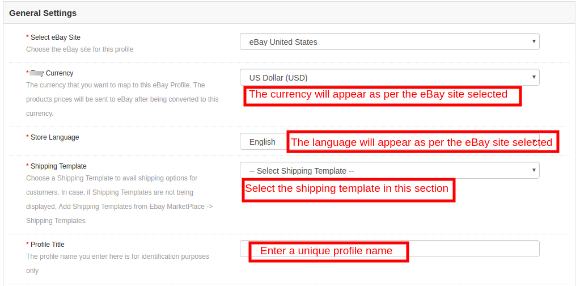
Once the eBay site is selected, the store admin is required to enter the following information.
eBay Currency: The currency will be automatically selected as per the eBay site selected by the admin. The store admin can even change the currency if required.
Store Language: The store admin needs to select the language as per the selected eBay site.
Shipping Template: The shipping options created in the Shipping Template Tab will be listed here (See Section 1.2.7). Select the shipping option that you want to display to the marketplace customer.
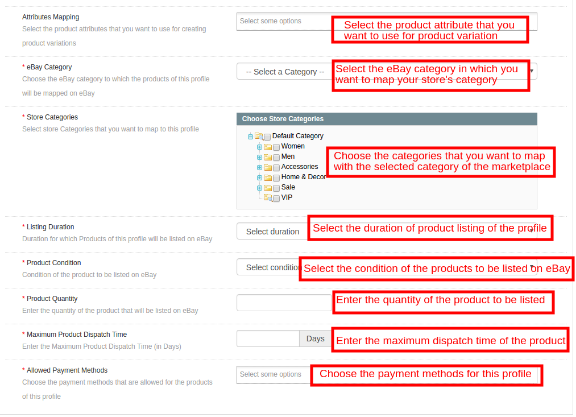
Attribute Mapping: Select the attributes based on which you want to create product variations.
eBay Category: Select the eBay category from the dropdown menu in which you want to map the categories of the store.
Store Categories: Check the categories that you want to map in the selected category of eBay. The Magento eBay integrator allows the admin to map multiple categories of the Magento store with a single category of eBay. To list multiple eBay categories, you are supposed to create multiple profiles.
Listing Duration: Select the duration for which the products of the profile is to be listed in the marketplace.
Product Condition: The default conditions are listed in the drop-down menu. Select the condition of your product.
Product Quantity: Enter the quantity of the product here.
Maximum Product Dispatch Time: Enter the maximum expected product dispatch time.
Allowed Payment Methods: Select the payment methods that you want to allow for this particular profile.
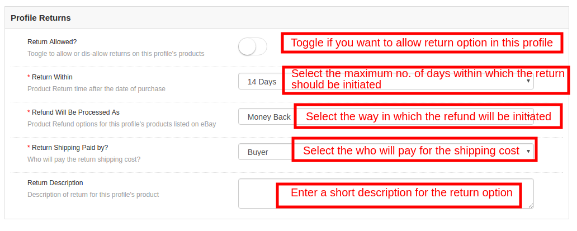
3.2.1.2 Profile Returns
The store admin can manage the return requests of the marketplace from the back-end of the eBay Magento API integrator. Here are some of the customization options offered in this tab.
Return Allowed: Enable the button if you want to allow return option in this profile.
Return Within: Enter the maximum number of days within which the return request should be initiated.
Refund will be Processed As Select how the refund will be offered to the customer.
Return Shipping Paid by?: Select who will pay for the shipping cost of the returned product.
Return Description: Enter a short description for the return option here.
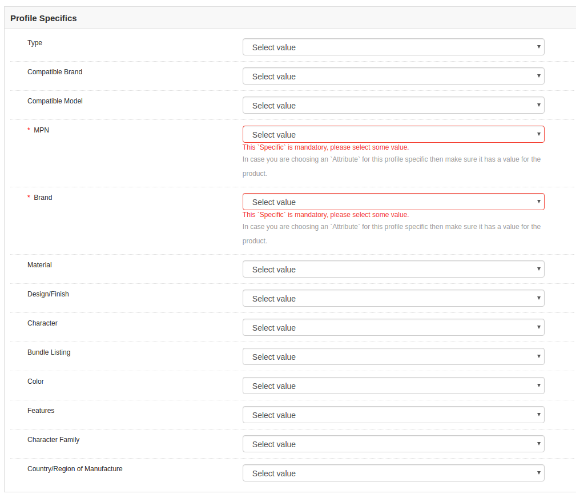
2.3.2.1.3 Profile Specifics
Profile specifics will appear as per the category of the eBay selected in the General Setting tab of the Profile Management. This tab includes fields like Type, Brand, Model, Color, Features, and others. Fill up the fields as per the category selected and the product mapping will be done accordingly. The specifics marked by * are mandatory. Other specifics can be left blank.
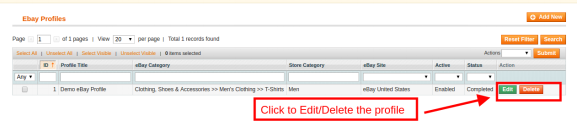
3.2.2 How to Edit/Delete the existing Profile?
Templates will be listed (If any) in the Profile Management tab of the Magento eBay integration extension. Click on the ‘Edit or Delete’ button to edit/delete the profile as shown in the image:
The Profiles can be enabled/disabled by selecting the option in the ‘Active’ tab.
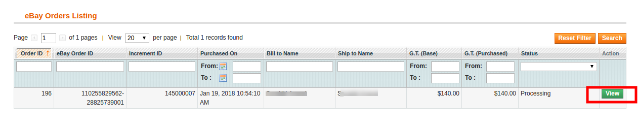
3.3 Orders Listing
The orders received from the marketplace will be synced to the Magento store once the cron is executed in the Synchronization tab. (See Section 1.2.7)
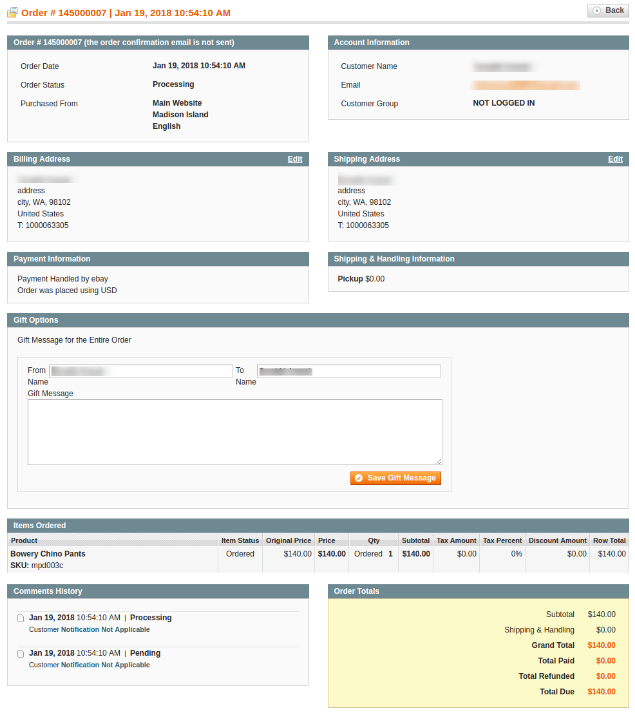
The orders listed as shown in the image below. To view the details and process the same click on the ‘View’ button corresponding to each order.
The store admin can now see the following details of each order.
It offers basic information like order date, status, billing and shipping address, payment information, gift options, item ordered, comments history.
The default order view page is shown below:
1. Invoice: The Magento merchants can generate the invoice of the order. Once the invoice is created, the processing of the order will be initiated.
2. Credit Memos: Change the status of the credit here.
3. Shipments: The admin can update the shipment details in this section.
3.4 Orders Settings
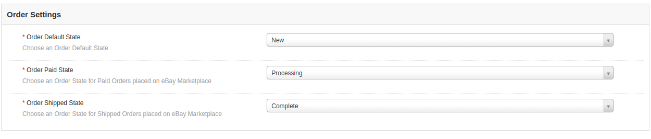
The Magento eBay connector offers two-way integration. The admin can mark which status will be displayed when an order is synced.
It includes three options:
Order Default State: Select the default status of the orders that will be displayed in the marketplace.
Order Paid State: Select the status of the paid orders.
Order Shipped State: Select the status for shipped orders.
Note –
The default status is the first status of the order when it is placed on the store.
Paid status means that payment for the order has been made and accepted.
Shipped status means that ordered items have been shipped.
To update the change in the order status by executing cron in the Synchronization tab of the Magento eBay Marketplace integration plugin. (See Section 1.2.7)
3.5 Product Listing
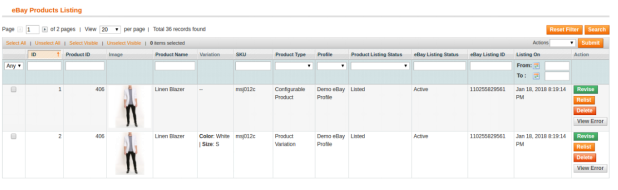
The store admin can view all the products listed in the marketplace from the Product Listing tab of the Magento eBay Integration extension.
Here are some of the listing options offered in this tab of the Magento eBay Integration plugin.
Revise
The store admin can click on the ‘Revise’ button to update any change in the product detail. Whether you make a change in the product description, pricing or quantity of the products, all the changes will be updated in the marketplace by this button.
Delete
This option allows the admin to delete the product from eBay Marketplace. Click on “Delete” action corresponding to each product listing if you want to remove it from the eBay.com.
Relist
The ‘Relist’ option allows the admin to relist the products that have expired or have been removed from the marketplace.
The admin is supposed to run the respective cron after clicking on these action buttons to sync the changes with the marketplace.
View Error
The admin can view the error that occurred in listing the product. For this, click on ‘View Error’ action.
Adding products from the product listings tab
If you want to add a product in the product listing tab, the admin has to create a profile of the product in the Profile section of the module. (read section 3.2.1) There you will get a step by step procedure of creating a profile and adding the product in the products listing tab.
Different statues in the filter of the product listing
Here are some different statues in the filter of the product listing.
New: After applying this filter, admin can view the new products listed on the Marketplace.
Listed: After applying this filter, admin can view the listed products listed on the Marketplace.
Updated: After applying this filter, admin can view the updated products listed on the Marketplace.
Deleted: After applying this filter, the admin can view the list of disabled products.
Relist: After applying this filter, admin can view the relist products listed on the Marketplace.
3.6 Shipping Templates
The Magento store admin gets to create N number of shipping template from the back-end of Magento eBay Integration extension.
3.6.1 How to create New Shipping Templates?
To create new shipping templates, click on the ‘Add New’ button.
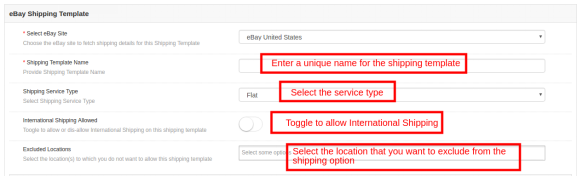
You’ll be redirected to the shipping template creation page.
Select eBay Site: First, select the eBay site for which you are creating the shipping template.
Shipping Template Name: Enter a name for the shipping template.
Shipping Service Type: Select the shipping service type.
International Shipping Allowed: Switch on the button if you want to allow international shipping.
Excluded Location: Select the locations (if any) that you want to exclude from this shipping method.
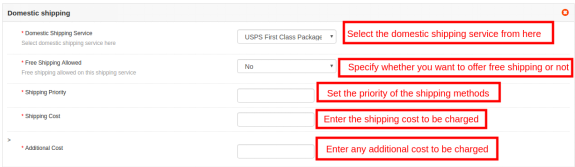
Fill the below-mentioned fields for domestic shipping:
Domestic Shipping Service: Select the domestic shipping service from here.
Free Shipping Allowed: Select ‘Yes’ if you want to allow free shipping services.
Shipping Priority: Set the priority for the shipping methods. The options will be displayed in the front-end as per the priority set.
Shipping Cost: Enter the Shipping Cost to be charged.
Additional Cost: Specify the additional cost to be charged.
3.6.2 How to Edit/Delete Shipping Templates?
The admin can edit/delete the shipping template by entering the Edit or Delete button as highlighted in the image below:
3.7 Synchronization
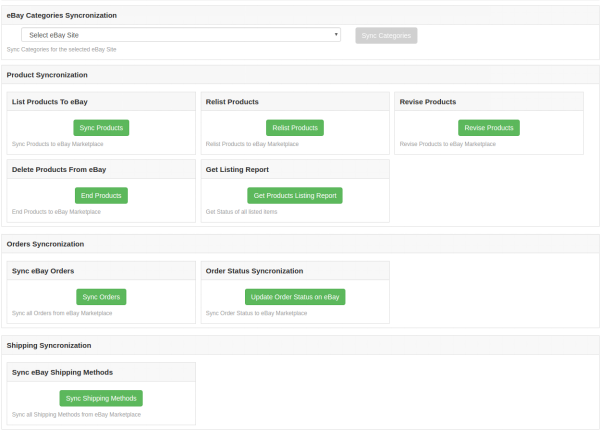
The Magento to eBay integration allows easy synchronization between both the stores. All the synchronization jobs can be performed from this tab.
The synchronization tab of the Magento eBay Integration module offers three synchronization options. That is Product, Order and Shipping synchronization.
3.7.1 How to sync the products on eBay Marketplace?
Click on the “Sync Product” button as shown below.
It will add products in the marketplace with the respective product details.
3.7.2 How to Relist the product on the eBay Marketplace?
Click on the “Relist Products” button as shown below.
This will relist the expired products in the marketplace. It will update the listing of the products whose relisting was initiated in the Product Listing tab.
3.7.3 How to Revise the product on the eBay Marketplace?
Click on the ‘Revise Product’ as shown below to revise the products on the marketplace. Any change in the product details, image, pricing, etc can be synced by executing this cron offered by Magento eBay Integrator.
3.7.4 How to Remove a product on the eBay Marketplace?
Click on the ‘End Product’ as shown below to remove products from the marketplace. The admin has to click on the ‘Delete’ button in the products listing tab before executing this cron eBay Magento Integrator.
3.7.5 How to Import the listing report from the eBay Marketplace?
By executing ‘Get Products Listing Report’, the admin can import the report of the product listing from the marketplace. The eBay status column will be filled when this action is executed Magento eBay Integrator.
3.7.6 How to sync Orders from the eBay Marketplace?
Click on the “Sync Orders” button as shown below.
It would perform the following actions:
It will sync the Orders and related details from eBay Marketplace to the Magento store.
It creates the orders in the Magento store as per the details of the order received from the Marketplace.
3.7.7 How to sync Order Status to the eBay Marketplace?
Click on the “Update Order Status on eBay” button as shown below.
It would perform the following actions
The cron checks if there is any status update recorded by the Magento eBay integrator for any order.
The updates are then synchronized accordingly.
It updates the Status of Orders as per the configuration settings modification in the “Order Settings” tab of the admin interface of the Magento eBay Integration module.
3.7.8 How to sync Shipping Methods to eBay Marketplace?
Click on the “Sync Shipping Methods” button shown below. It will sync all the shipping methods created in the Magento eBay Marketplace integration plugin to the eBay marketplace. This is a one time process.
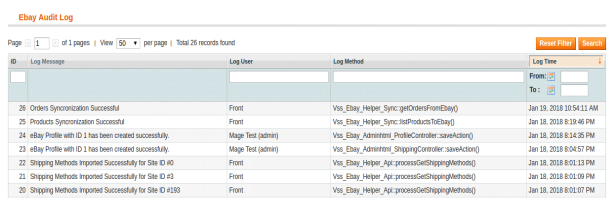
3.8 Audit Log
This tab offers an overview of all the tasks being performed in the back-end of the Magento eBay Integrator extension.
In this present era, being an eCommerce store owner is not a cake walk. They have to keep an eye on the competition growing everyday in this industry. So it’s really important to provide your business a platform in the form of marketplace which will help you to increase the sales of your eCommerce store.
Etsy is one of the most successful and renowned marketplaces which allow people to buy and sell products worldwide.
Knowband offers Etsy Magento Integration extension which provides an effective approach to integrate the Etsy marketplace with their Magento webstore. The Etsy Magento connector addon integrates your eCommerce store with the Etsy marketplace by using the Etsy API. After successful integration, you can update and list your products on the Etsy marketplace from the back-end of this integrator even without even visiting the marketplace.
Etsy Magento module allows sellers to upload products in bulk, thus reduce the chances of the errors which occur during manual listing. Sellers have the feature to manage the inventory and orders from the Magento admin panel.
Fill up all the required details in the registration form and click on “Register”. It would create your seller account and send a verification email to the provided email address.
The verification email will contain a link which will redirect to the setup your shop preferences. Enter all the required details like – Shop Preferences and Name your shop, Stock your shop, How you will get paid and Set up Billing to open your seller account.
Etsy Marketplace Integration- Setup an App
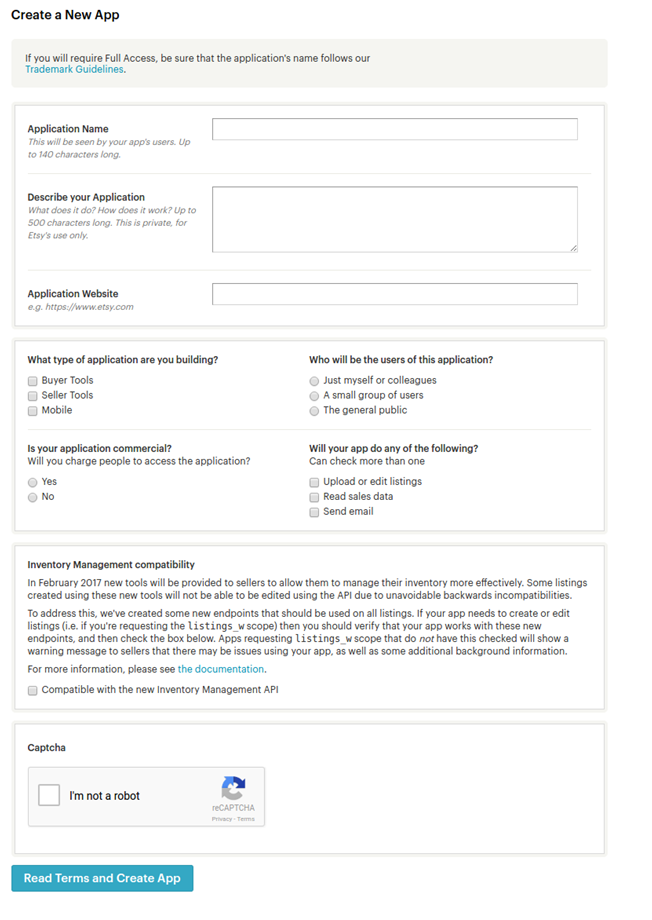
You need to create an App on Etsy Marketplace to establish a connection between Magento Store and Etsy Seller Account. Please follow steps to create an App on Etsy –
Go to the link (It would open a page where a form will be shown with few input fields as shown below)
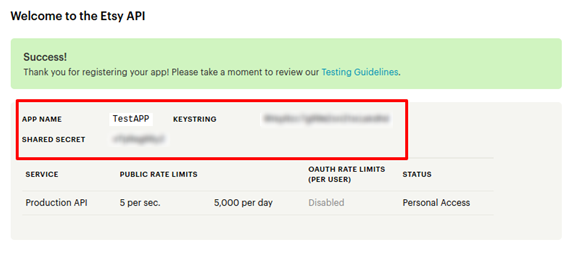
Enter all the mandatory details in the form to register your App on Etsy marketplace and you can see your API details as below:
Admin Interface
Admin Panel Settings contains the 8 tabs for settings.
General Settings
Shipping
Order Settings
Profile Management
Product Listing
Order Listing
Synchronization
Audit Log
Steps to configure module:
General Settings:
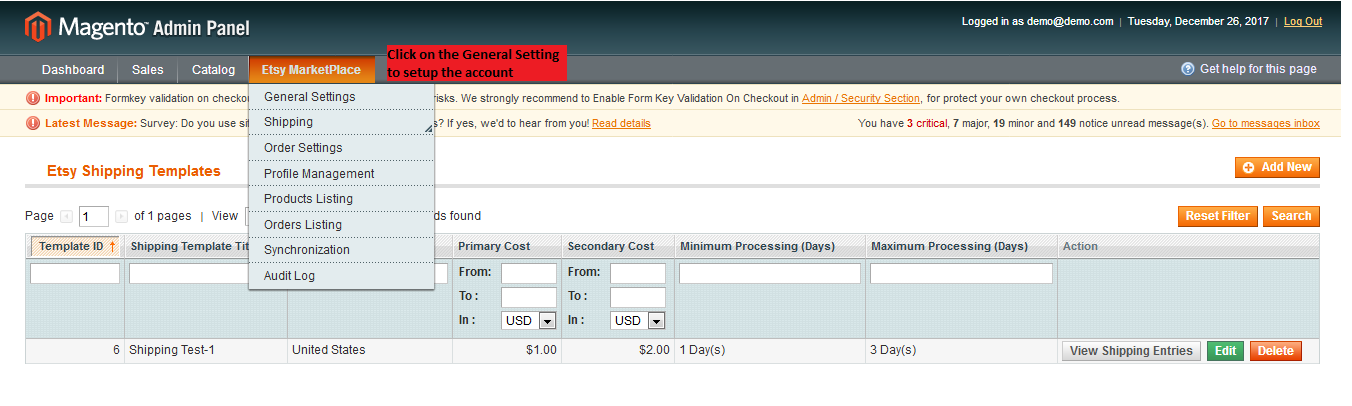
Install the module and click on the General Settings tab to connect your Magento store with Etsy Marketplace
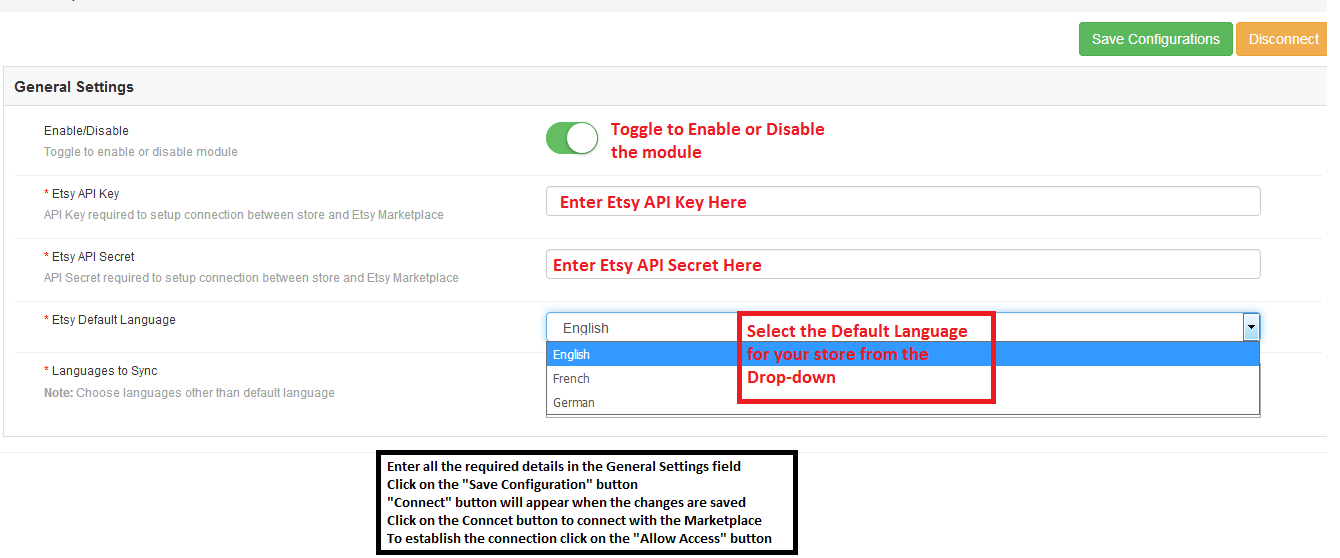
Enter all the required details in the General Settings field and follow the instructions.
Shipping Templates:
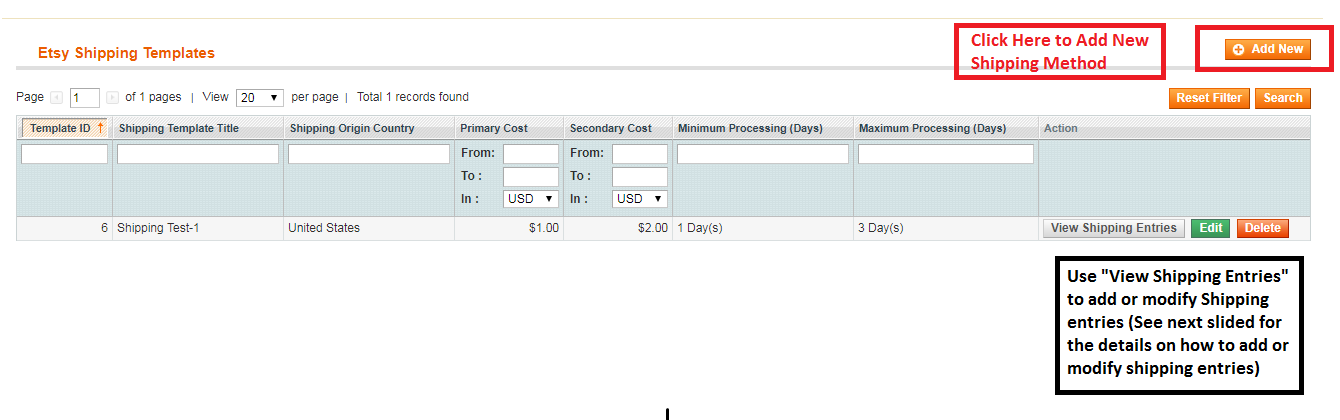
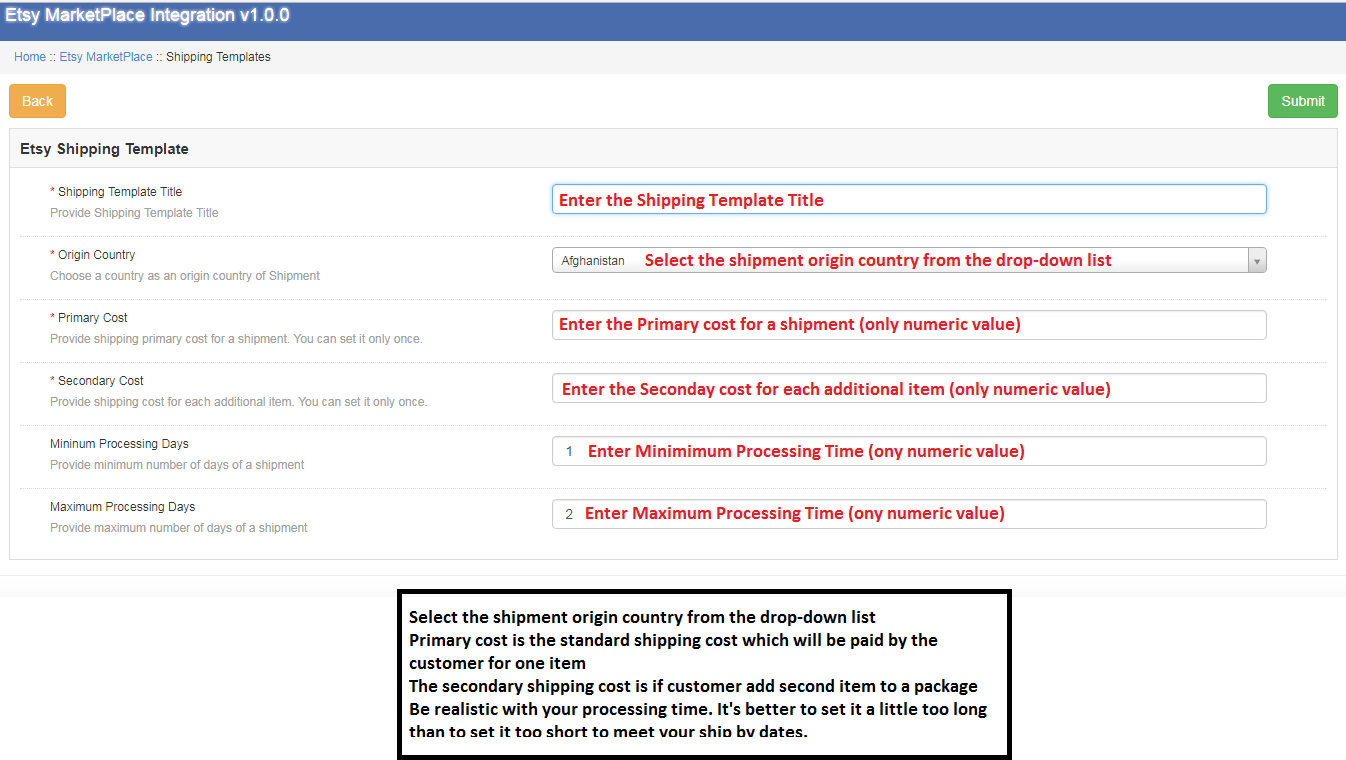
Now add shipping templates to enable shipping methods on Etsy Marketplace. Please refer to the next slide to see how to enter required details in Shipping Template fields.
Enter all the required details in the Etsy Shipping Templates.
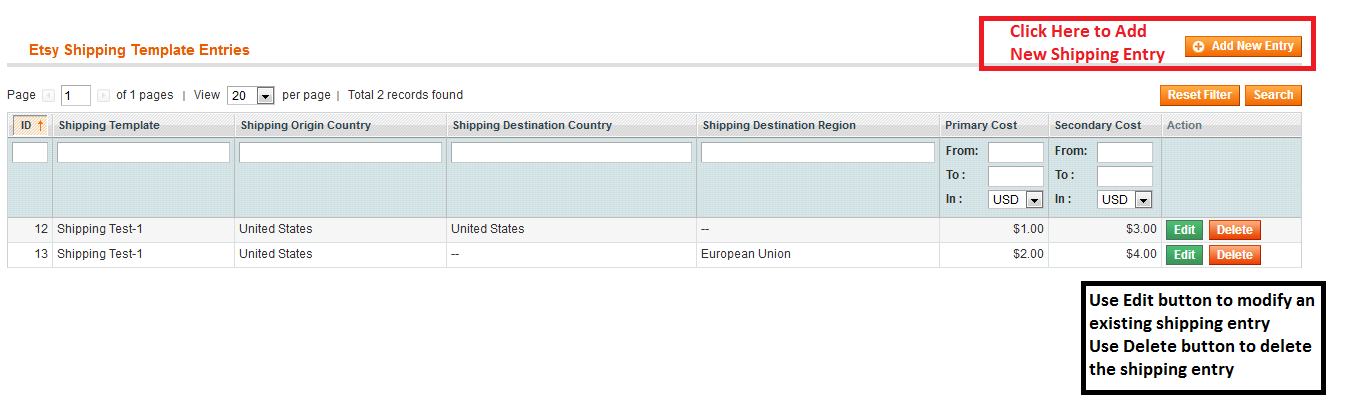
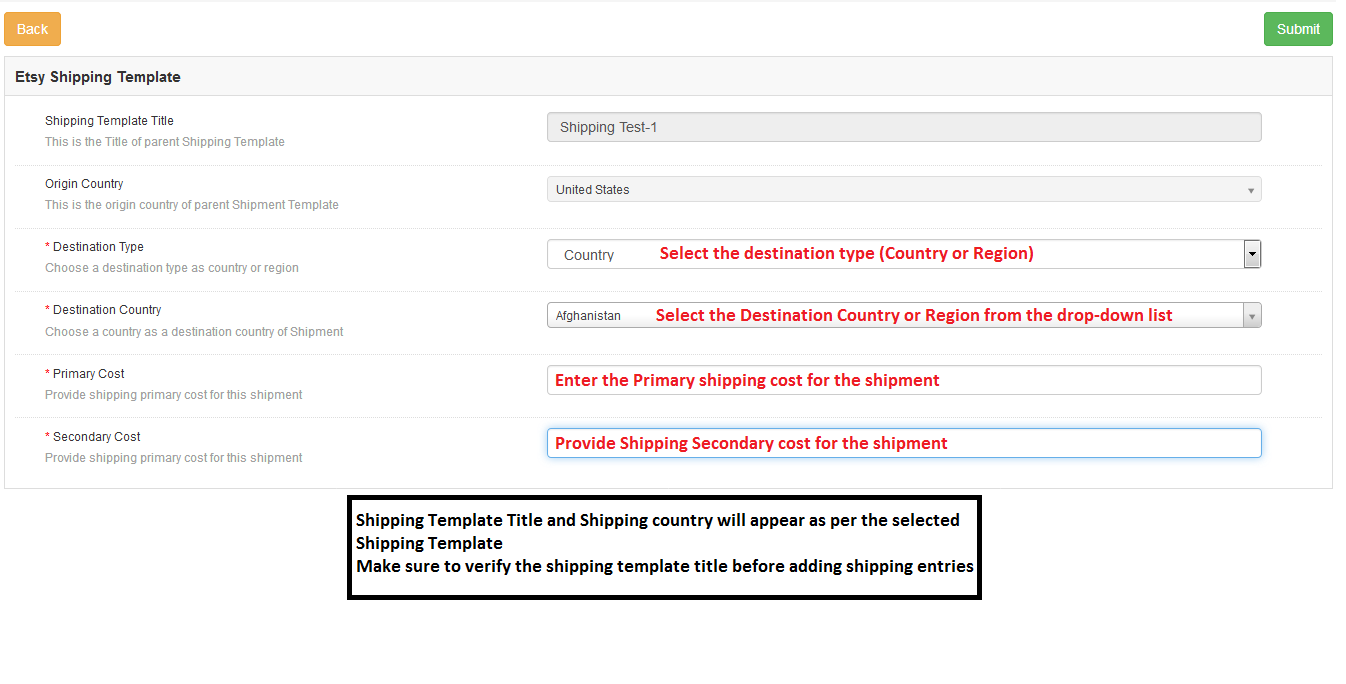
Now add the shipping entries for the selected shipping template.
Enter all the required details in the shipping entries fields.
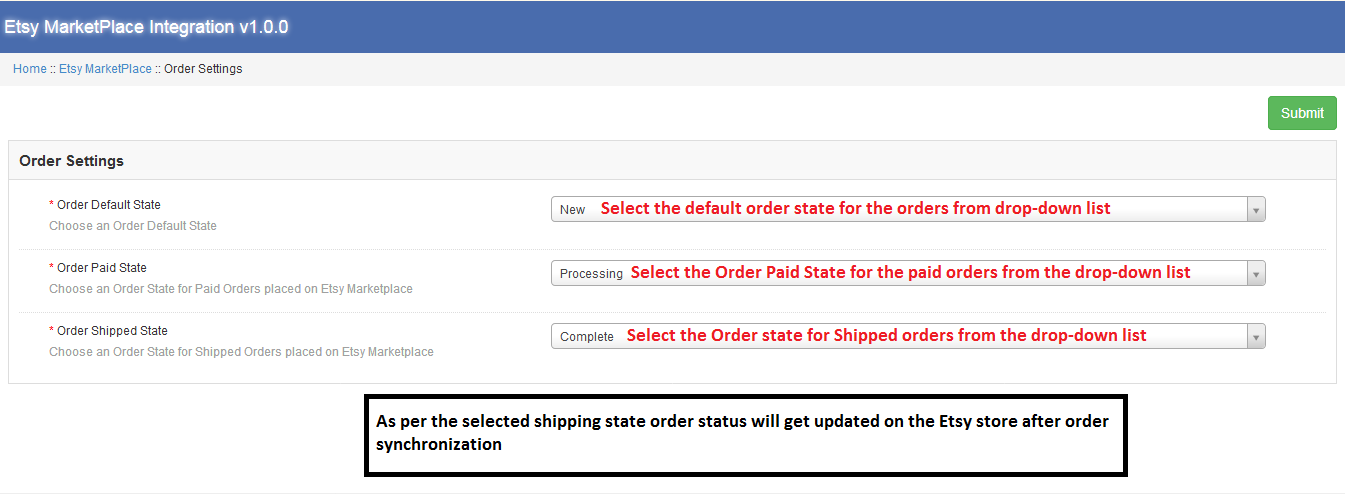
Order Setting:
Order Settings tab helps map store order statuses with Etsy Marketplace order statuses. This will be used for capturing orders details from Etsy Marketplace. For mapping the orders from the Etsy Marketplace to the Magento store, you need to execute the Order cron in the Synchronization tab.
Profile Management:
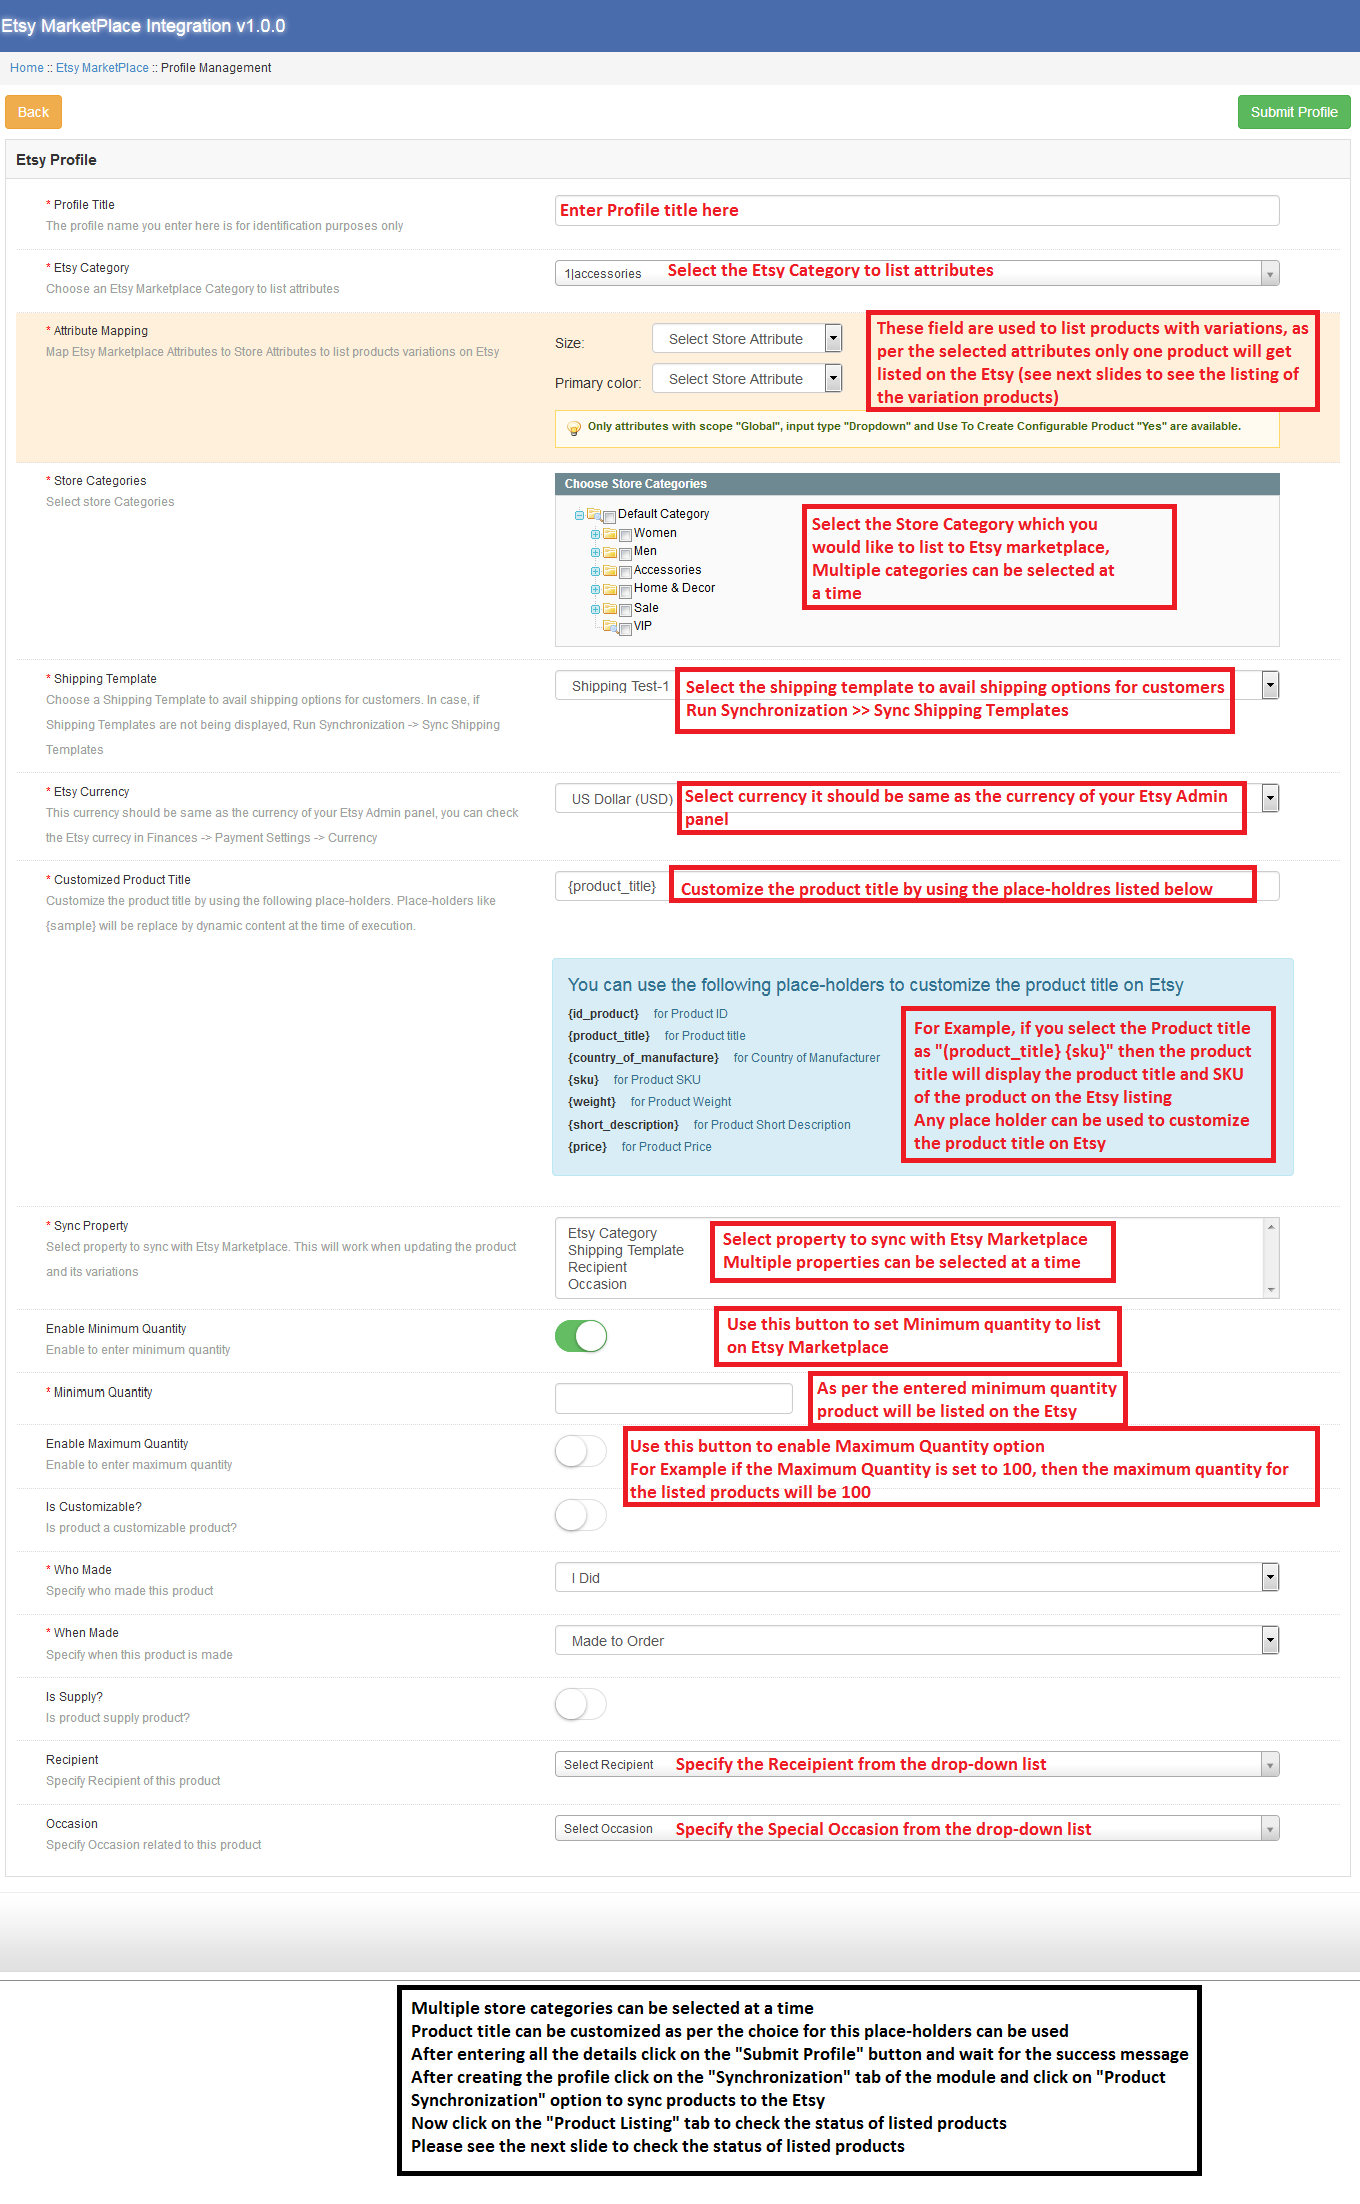
Now create a profile to list products to Etsy Marketplace. Sellers can create multiple profiles to sync the products in bulk with the option to select different shipping options.
Product Listing:
Admin can check the status of the listed products by clicking the “Product Listing” option.
Synchronization:
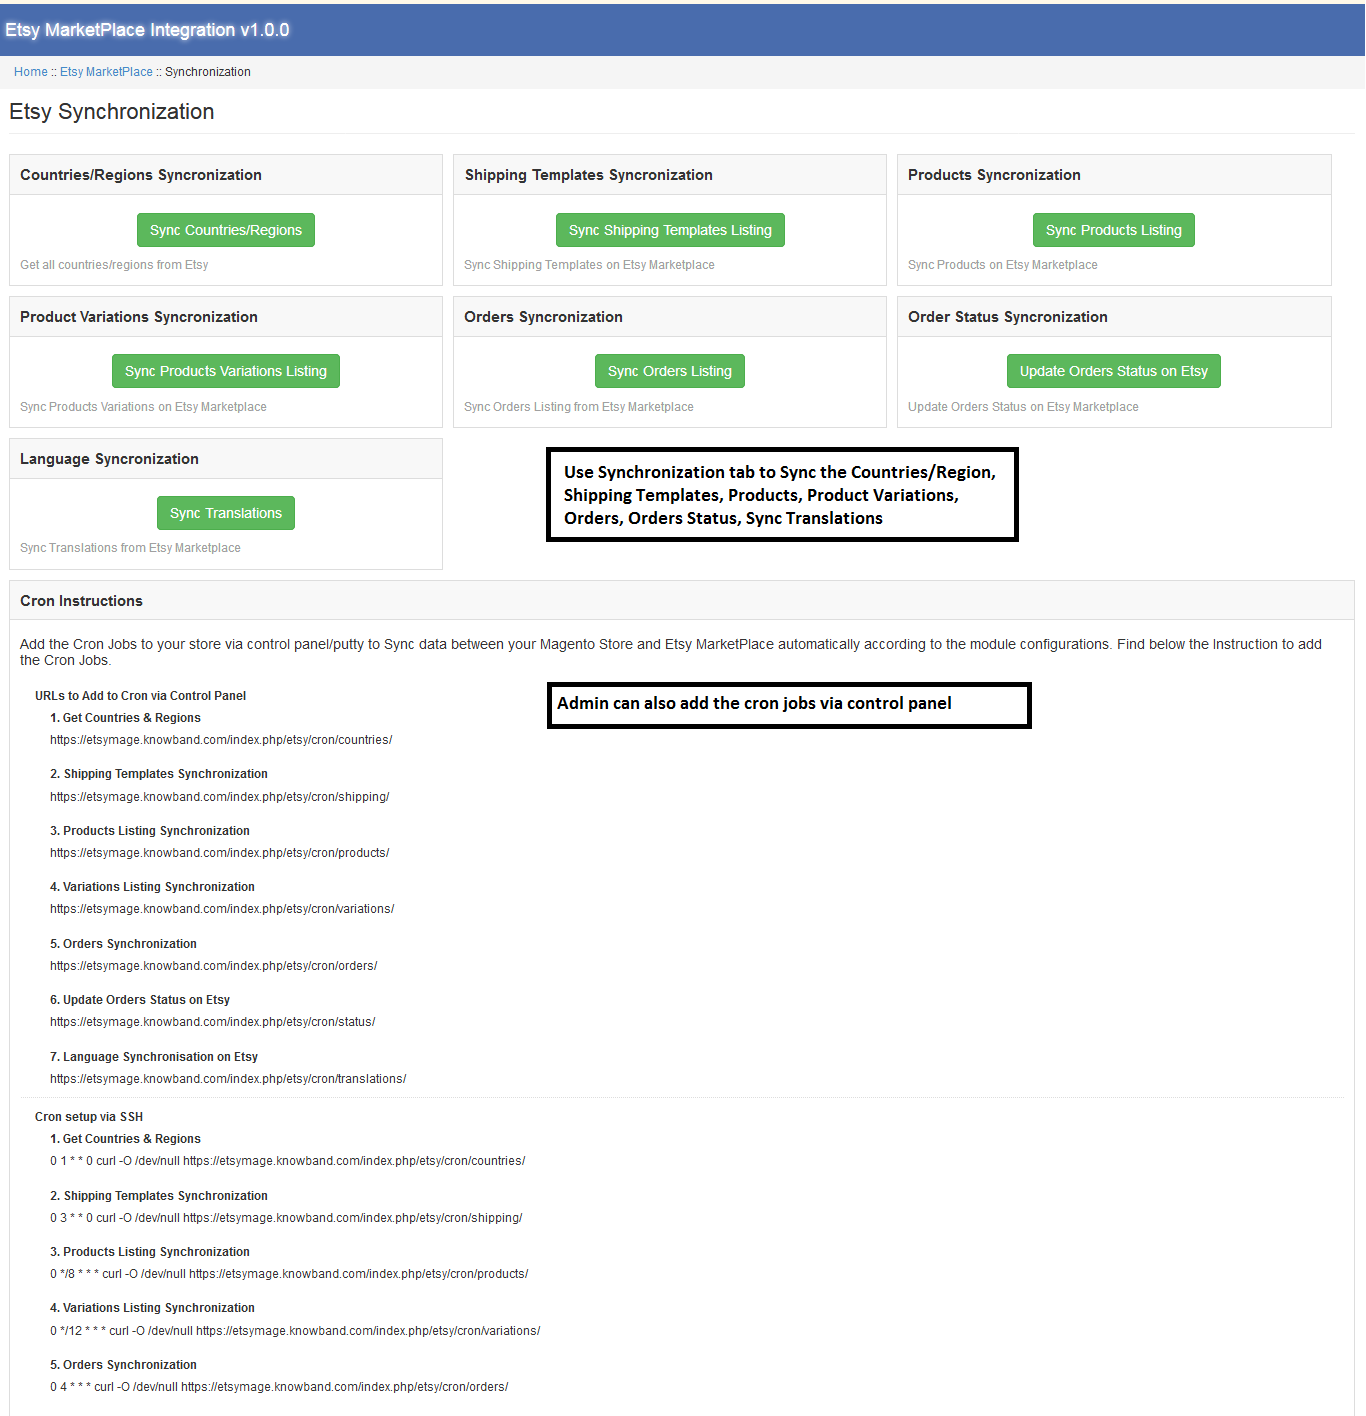
Country/Region Synchronization: Before creating the shipping templates please make sure to sync the country/region by clicking the “Sync Countries/Regions” only after that countries and regions will be added to the database.
Shipping Template Synchronization: Before creating the New Profil please make sure to sync the shipping templates by clicking the “Sync Shipping Templates Listing” only after that shipping template entries will be visible in the profile’s shipping template section.
Products Synchronization: Make sure to Sync the products after creating a profile only after that selected products under the newly created profile will get listed on the Etsy store. Admin can also check the status of the listed products under the section “Product Listing”. All the listed products will show the status as “Listed”.
Product Variations Synchronization: To list the variation products to Etsy marketplace please make sure to click the “Sync Products Variations Listing” only after that variation products will get listed in the Etsy marketplace. Otherwise, these variations product will show the status as “Pending”. After successful sync listing status for these products will be changed to the Listed.
Orders Synchronization: Use the Sync Order Listing button to sync Etsy store orders to the Magento Admin. After successful synchronization, you can see the Etsy store order under the Order Listing tab.
Order Status Synchronization: Admin can modify the status of Etsy orders which have already synchronized to the Admin panel. On clicking the “Update Order Status on Etsy” order status will get updated on the Etsy store also.
Language Synchronization: To add the product description in another language admin need to use the “Sync Translations“.
Order Listing:
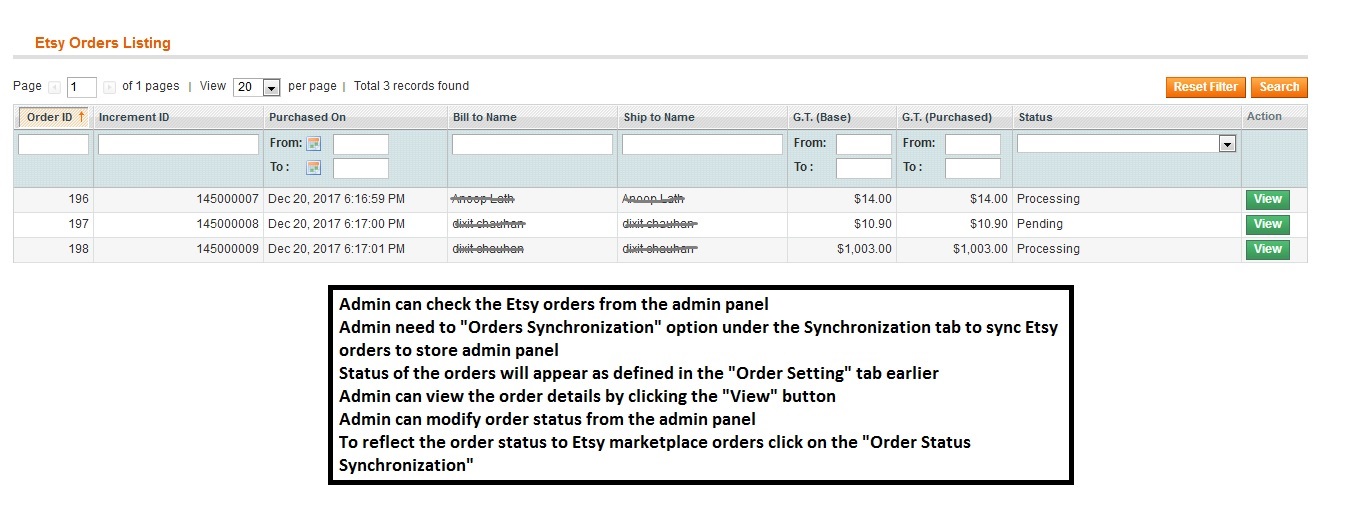
To synchronize the Etsy marketplace orders to the Magento store admin panel first admin needs to synchronize the order listing as explained in the order synchronization above. After that, all the Etsy store order can be modified from the Magento store admin.
After modifying the order status for the orders synchronized to Magento admin panel, admin can update the order status for these Etsy orders by clicking the “Order Status Synchronization” option in the Synchronization tab.
Audit Log:
Admin can use the Audit Log tab to keep the track of the tasks performed.
By following the procedure explained above sellers can easily sale their Magento store products to the Etsy marketplace in a hassle-free manner.
Please click on the link below to purchase this Magento Etsy Marketplace Integration.
The addition of subscriber pop up in any website comes with a lot of added advantages. Most of the time, the website owners wishes to connect with a very large number of people, so that, if they want to update or inform them about any new activity, it can be done via the subscription Email id. It is one of the oldest and the most reliable form of communication between the sellers and the customers.
In this regard, today most of the website has come up with numerous form of email subscription pop up in order to get a better customer base. They try to lure the customers to subscribe to the website through various means. This has become a common practice as the conversion rate using the email subscription method are quite appreciable. The more number of email subscription improves the chances of the web store to gather a large number of traffic to the web store. It is noticed that at least 57% of the customers respond to the Email subscribed messages from the websites.
Most of the time, it is fruitful to use these email subscription pop up but the website must make sure that the inclusion of these pop ups is done in a very exciting manner The increasing number of these email subscription pop up have started to annoy the customers and most of the time they tend to ignore to fill out any details required by these forms. Therefore, the websites face a challenge on how to successfully incorporate these subscription pop ups in the website, so that the customers are not annoyed and at the same time the websites can make successful email subscription.
The points that must be kept in mind by the web stores owners before incorporating email subscription pop up in the websites can be listed as-:
Why to use?
The first thing that occupies the owners mind regarding the web store is Conversions. Every web store owner wants to make a healthy number of conversions on from their web store. In order to do so, it becomes quite important to have an approach. Thus, using the email subscription pop up allows the web store to connect to maximum number of the customers on the web store. The web store owner can inform them about the new arrivals, product updates and any ongoing sales on the web store. Therefore, a better subscriber base helps the web store owner to maximize the reach of the webs store and gather a better traffic to the web store.
What to use?
The owners can use the various forms in order to get the subscription from the customers. The first and the foremost requirement of a better email subscription pop up is that it must be attractive and the customers must not at any time feel like the web store is demanding way too much from them. Therefore, the various forms of pop up such as Spin and win pop up, Magento Scratch coupon pop up or some attractive email subscription pop up can be used, which can provide the customers with better offers on their purchase and at the same time can fetch the web store with a better number of subscribers to promote the web store.
Where to use?
One of the most important thing about the email subscription pop up is the position. The constantly appearing email subscription pop up annoys the customers very much and at one point or other the customers feel like giving up the web store and quitting. Therefore, the position and the timing of the email subscription popup is one of the important thing to be kept in mind. The better way to use the pop up would be as the exit pop up or during the checkout page because the customer is leaving the website either on a high note or on a lower note. Therefore, in this case if the web store provides the customers with some opportunities in the form of scratch card or freebies, it may motivate them to provide email ids. This is what makes the exit pop-ups a must-have for the eCommerce websites in particular. It compels the visitors to reconsider their exit.
When to use?
The web store can make sure the frequency of using the email subscription pop up may not be exceeding the customers tendency to go with them. If at any point the customer feels like the web store is being way too demanding than that may lead to negative results for the customers and they may leave or wouldn’t consider making a purchase. Thus, it becomes quite important to make sure that the timings of the email subscription pop up are evenly distributed and would fit in with the concern of the customers.
How to use?
The idea of using email subscription pop up is quite dependable. Every web store owner will have a different idea on how to make use of these pop ups. Thus, if the web store want they can opt various options such as use them as a gaming pop up like Spun and win pop up, which is a email subscription pop up but offers the customers a lot of offers based on owner’s preferences by taking their Email Id as a token of entrance to the contest. Same if the case with Magento scratch card, which offers the customers with the handsome discount based on their luck by taking their Email Id. Therefore there are a lot of ways to use these email subscription pop up. It basically depends upon the web store owner, in which way he wants to make use of these pop ups.
Over to You
The idea of using email subscription pop up is quite innovative. The web stores can gain a good number of subscribers if they make better use of these email subscription pop up. As, the email subscription pop ups are not limited to the classic way off asking for Email id, therefore they are one of the important assets for the web store owners in order to make a good number of conversions on the web store. Redefine your subscription based request and reap the desired result for your site.
Whenever an eCommerce store comes across an abandoned cart, it highly demotivates the sellers. Most of the sellers want to make the better use of web store by making higher sales on their products. In this effort it might be possible that may some of the customers might not feel the same for the sellers and abandon the cart but if the rate of abandoned cart increases up to a certain amount then it is matter of concern for both the web store and the sellers. The situation demands immediate actions and proper measures to tackle the problem.
The web stores need to follow such customers in order to know the exact reasons and to make the services better for other customers. In this effort the web store can use the Magento Abandoned Cart module to track down the customers with abandoned cart. The problem of abandoned cart doesn’t only concerns the seller regarding a particular customer but also helps in determining the general pattern followed by the customer which leads them to abandon the cart. In a survey it was found that the rate of abandoned cart is about 70%. Therefore, precautionary measures are required to be taken.
The web stores can always use various methods in order to reduce the number of abandoned cart but the requirement of feasible options is an important criteria. The options must help in reducing the abandoned cart and at the same time providing the customers with better options so that they may shop with ease in the near future. It will help the web stores in understanding the customers more appropriately and tackle with the problem by getting on the same page as the customers are.
Let us discuss some of the surefire abandoned cart tips.
1. Segmented Email Marketing
Emails have been found to have a success rate of 12%. Though they may seem an obsolete form of marketing but still today they have the highest rate of response. The web stores can make the better use of the Email strategy to reduce abandoned cart. It will be a better idea to collect the Email id of the customers before the purchase as after they have abandoned the cart it becomes really difficult to track them back. The web stores can also use the abandoned cart Emails as soon as they abandon the cart It helps the web store to reach out to the customers and help them recover their abandoned cart.
2. Use the discounts timely
The eCommerce store owners must make the timely use of the discounts. Most of the customers will abandon a cart only after they find the product missing some kind of discount on the products. Thus the web store can always come with timely discounts on the products such that the customers may feel good about making a purchase. Even if the customer has abandon the cart then the web store can reach out to them with the updated price of the products. With a fall in the price of the product the customers are more likely to make a purchase on the product.
3. Prevent an out of stock crisis
The reason for the cart abandonment may be the shortage of the products with the seller. Therefore, the web store must make a serious note on the number of products that are available with the seller. As, the web store has sufficient number of products therefore the chance of cart abandonment due to the shortage of the products is reduced. With the sufficient number of the products available with the store the chances of customers receiving the product without having to wait is more convenient.
4. Shipping assistance
A recent study shows that the actual rate of abandonment of the cart due to No shipping assistance is about 20%. Therefore, the web store must make proper arrangements in order to provide the delivery of the products to the customers. The assurance of a safe and timely delivery assures the customers about the web store services and they are less likely to abandon their carts in that case. Moreover, if the web store can provide free delivery to the customers in certain cases then the customers are very less likely to abandon the carts due to shipping assistance.
5. Exit pop ups
Suppose a customer decides to abandon the cart then the web stress can come up with creative ideas to stop the customer from abandoning the cart. One of the better idea is to use the exit pop ups. Pop ups like Spin and win assure the customers with the special offers and prizes that are been given by the web store to the customers for the specific period of time. The creativity and the luring offers on the pop us are sure to make the customers complete their purchase and make a better purchase.
6. Make them shop
How about the web store doesn’t give a chance to the customers to abandon the cart? The web stores can make the products and the website too interacting that the customers feels like to shop from the web store. For starters the web store can provide timely gift vouchers to customers on making a purchase for particular amount. The abandoned cart mostly arises due to lack of the features provided by the web store. The inclusion of various features such as Social login, one page checkout and freebies will motivate the customers to keep shopping. Therefore, the web store must be open to all possibilities when it comes to reduce the number of abandoned carts.
Over to You
The abandoned cart is a serious issue for the sellers and the web store. In order to keep the number under check, various strategies needs to be performed as they lead the web stores to lose a healthy amount of revenue that could be collected. Thus, making sure the web store check outs are optimized to gain maximum conversions.