A Guide to Instagram Hashtags in 2021

“Instagram Hashtags are a key to boosting your brand presence on the world’s second-largest social media platform after Facebook (Excluding YouTube and WhatsApp). In this article, we will cover the role of Instagram Hashtags; why they are important, and how to use hashtags in your Instagram posts to achieve productive results.

Hashtags play a major role in your social media marketing strategy. Some of the popular social media platforms where hashtags are of supreme value are Instagram and Twitter. Though you will see people or brands using hashtags on other social platforms as well like Facebook and LinkedIn, they are not as effective as they are on the former two platforms.

What are Hashtags?

A hashtag, denoted by the number or symbol # (hash) is a tag that is used to highlight or add a label to a specific topic, content, or theme. It basically forms a category for all the content falling under a particular hashtag.

For example, in a Brazil vs Argentina Football match, you would find people using hashtags like  #BRAvARG or #ARGvBRA. These hashtags will become a thread for people to have a discussion on that match.

With the latest update of Instagram, you get a maximum limit of 30 hashtags for each post. Along with that, a user can also tag 20 people in their posts.

Why Instagram Hashtags are Important in 2021?

What role do Instagram hashtags play in your marketing? How can they be an invaluable asset for your business promotion on the Instagram platform? Let’s try to find out.

1. Instagram Hashtags help to Build Brand Awareness

The most effective use of Instagram hashtags is to build brand awareness. The primary reason for setting up an Instagram business account is to make the users of that platform aware of your Brand. And to make that happen, you need to make use of hashtags and create your own brand hashtags as well. This is important because if your hashtag contains your brand name, it will appear in the search results when users are searching for something related to your brand.

2. To Increase Product Visibility

Instagram hashtags help a lot in marketing. They provide you with a wide organic reach and can help you promote your brand products in front of a huge Instagram audience, thus increasing your product visibility.

While hashtags might seem interesting, they would not be of any use if they are not relevant. Searches on Instagram are based on Hashtags only. When posting about a product, use Hashtags that you think would display your post in the search results. Think from a user’s point of view, what would they be searching that could make your post appear on the search results.

3. Instagram Hashtags Generate High User Engagement

A study suggests that Instagram posts that contain hashtags achieve 13% higher engagement than posts without hashtags. And the reason is obvious. The more people who see your post, the more interaction you will get. And with higher user engagement, you will get more followers for your Brand.

4. Instagram Hashtags can be helpful for your Marketing Campaigns

Marketing campaigns that focus on user-generated content are completely based on hashtags.

Many popular brands have utilized the power of hashtags for branding. Coca Cola launched a “Share a Coke” campaign in 2011 where they asked people to share their coke moments by using the hashtag #ShareaCoke. The campaign was a huge hit.

You can create similar campaigns for your brand and go viral overnight on the Instagram platform. No paid advertising can beat this kind of promotion.

But it isn’t as easy as it said, especially for a new brand. Prepare a roadmap on how can you make your campaign successful. Most importantly, provide some freebies or gift vouchers in return. If people are not going to get benefited, it would hardly arise their interest.

5. To be Ahead of your Competitors

Know who your competitors are, track what they are doing, what they advertise, what kind of hashtags do they use. This will give you an insight into your competitors and you can analyze their strong points and weak points to make your brand look better than them. Learn what works best for you and what doesn’t. Moreover, hashtags keep changing, so keep a check on the latest trending Instagram hashtags.

Few things that you don’t know about the hashtags

At some point, you may observe that your hashtags aren’t working. Here are some reasons why this happens:

  1. You are using hashtags that are irrelevant to your posts
  2. You’re using banned hashtags
  3. Maybe you are using the same hashtags every time
  4. You’re choosing hashtags that are too broad
  5. You’re using hashtags that are too competitive

Avoid making these mistakes when planning on your hashtags before making any of your next Instagram posts live.

Final Word

If you want to get noticed by the Instagram community, start using hashtags, and use them in the right way so that your content is presented in front of the right audience.

Do you know, you can fetch Instagram content on your e-commerce website as well? Yes, you heard it right. If you own an eCommerce store on the OpenCart, Magento, or Magento 2 platform, you can get this feature by using Instagram Shop Gallery.

Instagram Shop Gallery extension will add an attractive Instagram Gallery section to your website. With the help of this extension, you can display your own Instagram account images and images based on hashtags, and then you can tag or mention your store products on the fetched images, similar to Instagram Shoppable Posts. Do give this a try.

Instagram Shop Gallery extension for OpenCart

Magento Instagram Shop Gallery

Instagram Shop Gallery for Magento 2

If you have any more points to add to this article, do let me know by dropping a comment below. I would like to know your take as well on the Instagram hashtags.

For any query or assistance, reach out to us at support@knowband.com

A complete guide to Instagram Shopping

According to the stats collected by Hootsuite, 1 billion people use Instagram every month, and around 130 million Instagram users tap on a shopping post. Brands use Instagram shopping posts to showcase their products and drive more sales. An Instagram Shop allows Instagram users to look for the desired product by visiting the brand page. The products are tagged on the images and users are redirected to the website to complete the checkout. In fact, with Instagram’s latest checkout feature, people can now purchase products directly from Instagram without having to close the app or getting redirected to the original store.

With Instagram shopping posts, you can make your followers aware of your products and guide them towards an easy purchase. Ensure you are using the Instagram shopping costs effectively, which means using high-quality product images, attractive captions, proper hashtags, and a perfectly timed sales pitch.

In this article, I will provide you a guide to set up your Instagram shop, brief you on how to add product tags to your Instagram posts and how you can drive more sales with Instagram shopping posts.

What are Instagram Shopping posts?

An Instagram shopping post contains product tags that make it easier for Instagram users to browse those products and make a purchase. They make the shopping path easy for the followers.

Many e-commerce retailers have even integrated their Instagram business account on their website and created a similar kind of Instagram Shop. KnowBand offers an Instagram Shop Gallery extension that fetches your Instagram account images or Instagram hashtags on your eCommerce store and helps you link your store products to the fetched Instagram content. The extension is currently available for OpenCart, Magento and Magento 2. Check them out.

OpenCart Instagram Shop Gallery extension

Magento Instagram Shop Gallery extension

Magento 2 Instagram Shop Gallery extension

How to set up an Instagram shop?

You need to go through a few steps before you can share a shoppable post.

1. Instagram has approved 46 countries to avail the features of Instagram shopping. Hence, your location should be in those 46.

2. You must have a business profile on Instagram that sells physical products.

3. Your Instagram business profile must be associated with a Facebook catalog for your products.

To create a catalog for your products, you need to add a Shop section to your Facebook page. Then go to your business manager account, create a new or add an existing catalog that you would like to use for Instagram shopping.

If you are a PrestaShop or Magento store owner, you can take the help of the PrestaShop FB store addon and Magento FB store extension respectively to open a Facebook shop.

4. Once you have followed all the steps, Instagram will review your account. This can take a couple of days.

5. After your account gets approved, you can start adding product tags to your Instagram posts.

How to add product tags to your Instagram posts?

The process to add product tags to your Instagram posts is pretty simple. You just need to select the picture, write your caption, use suitable hashtags. Just when you are about to finish, you will see the option of “Tag Products”.

Now, search for the product name that you want to tag in your post and add it. You can add up to 5 tags on your post.

Once it is done, you are ready to share your first Instagram shopping post.

How to drive sales with Instagram shopping posts?

1. Use High-quality pictures

The quality of your images decides the interest of the user in the products. No matter how amazing your product is, a bad quality image will not encourage a user to go for the purchase. Get your products photoshoot from a professional photographer for an amazing response from the followers.

2. Use Proper Hashtags

Optimize your Instagram shopping posts by using proper hashtags, which clearly define your products so that when people start searching for that term, your product appears on the search results. This gives a wide organic reach to your Instagram shopping posts. In addition to this, when a user follows a hashtag, your product visibility increases. More visibility creates more chances for sales.

3. Make sure the tags are attached to the right products

Attaching irrelevant tags to the products can mislead your followers and leave a bad impression. It can break the credibility.

4. Use Instagram stories to increase user engagement

Instagram stories are the latest trend. Brands use stories to attract the attention of followers. An Instagram story ensures that your followers do not miss any important announcement if in case they have skipped the post.

Conclusion

Instagram is currently one of the most engaging social media networks for users. Brands should not ignore its popularity. Instagram shopping posts look promising to reach out to potential customers. Such features provide businesses an excellent opportunity to attract Instagram users and convert them into potential buyers.

Create an Instagram Shop section on your e-commerce store as well. This works well to fetch user-generated content by using Hashtags and increases your brand awareness if you are running a marketing campaign.

How to Sell on Etsy Marketplace?

Whenever we think of buying handcrafted products online, the first word that comes in our mind is Etsy. Etsy Marketplace is a professional seller community that mainly focuses on handmade products or vintage items and craft-oriented products like jewelry, clothing, health and beauty and many more. It can also be considered as the C2C platform because the merchants listed on Etsy are majorly small business owners. The amazing shopping experience on Etsy makes it one of the most popular Marketplaces all over the world.

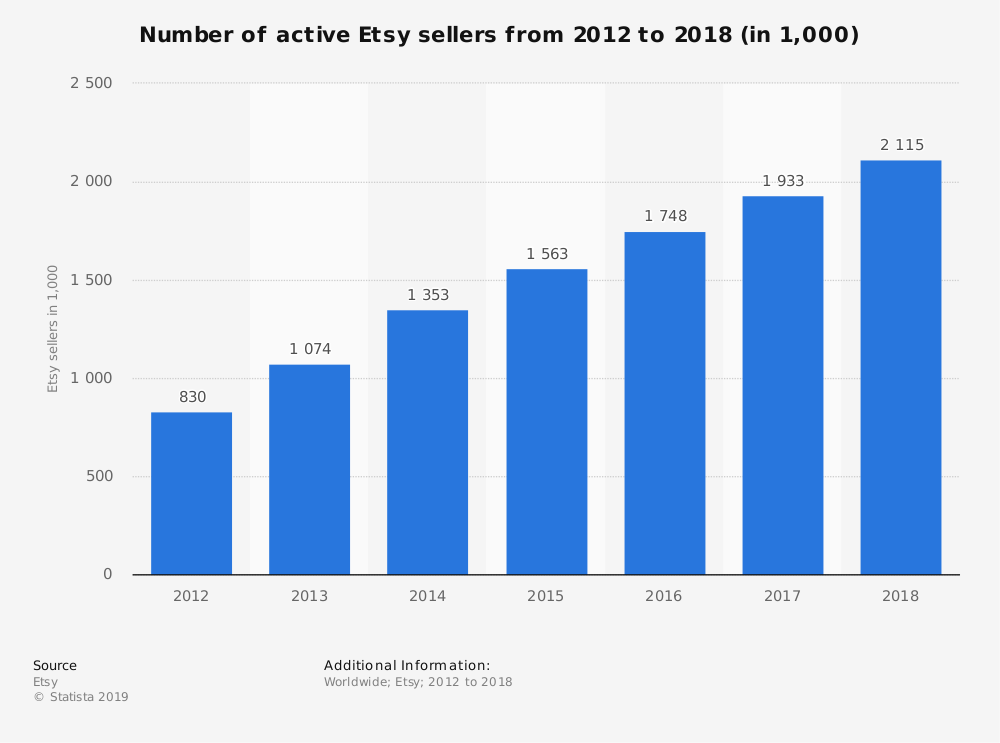
                                                        Source: Statista

This seller’s guide is a doorway for all the aspiring sellers who are looking forward to selling on Etsy Marketplace.

Top-selling items on Etsy

Etsy is a unique e-commerce website mainly focused on handmade or vintage items and supplies, as well as unique factory-manufactured items. To sell an item on Etsy, it’s important yo keep a check on the ranking of your products too in the search results.

Before we start we should have a look at the top-selling items on Etsy Marketplace:

  • Jewelry.
  • Clothing
  • Craft Supplies and Tools.
  • Kids and Baby.
  • Vintage Items
  • Homemade or Specialized Candies.
  • Party decorations.
  • Vinyl and heat transfer supplies.

While the best sellers on Etsy Marketplace includes a wide range of categories, like jewelry, bags, clothing, home decor and furniture, toys, art, as well as craft supplies and tools.

Cost to Sell On Etsy

There are 4 various types of fees applied when you list your products for sale on Etsy Marketplace. These are as follows:

a) Listing Fee:

Listing your products online on Etsy Marketplace costs sellers an amount of 0.20 $ (excluding variations) for 4 months. For example, if you sell vintage items of which belong to 4 different categories or variations, it will cost you 0.80 dollars(4 x $0.20).

After 4 months, sellers have to renew the listings either manually or they can set an auto-renew option, and again the cost applied would be 20 cents per listing

The additional quantity is also charged by $0.20 that sells for only one transaction. It means if there are more than 1 listing in 1 order then, $0.20 will be charged on each item. For more information, you can go through the following link: Multi-Quantity Fees

b) Shipping Process Fee:

The shipping charges are set as it is used to deliver the product on a given address. Shipping charges are variable depending upon the weight of the product, location distance and shipment carrier company.

c) Transaction fee:

Under this, 2 types of fees are included. First is the shipping transaction fee and constitutes 5% of the shipping process fees.

Then the second fee comes is the transaction fee which constitutes 5% of the total value of the product. An additional 3% fee is imposed for choosing Etsy’s “Immediate Checkout”.
Apart from being reasonable, Etsy Marketplace provides you the flexibility to sell products from your online store. Thus, if you have a Magento store, you can easily sell Magento products on Etsy.

d) VAT:

Firstly we should know that there are 2 types of VAT fees: Processing fee VAT and seller services VAT.

After charging all kinds of fees, VAT is imposed if sellers use them They will only be imposed if you use fees like Etsy payment processing fee, deposit currency conversion, promoted listings, Google Shopping ads, and Targeted offers.

Now all the Manufacture related information is been given. So, let’s move further to discuss the process of selling on Etsy Marketplace:

Step 1: Get Started

Firstly, create your seller account on Etsy and go through the Etsy policies and ensure whether Etsy Marketplace is ideal for your business or not.

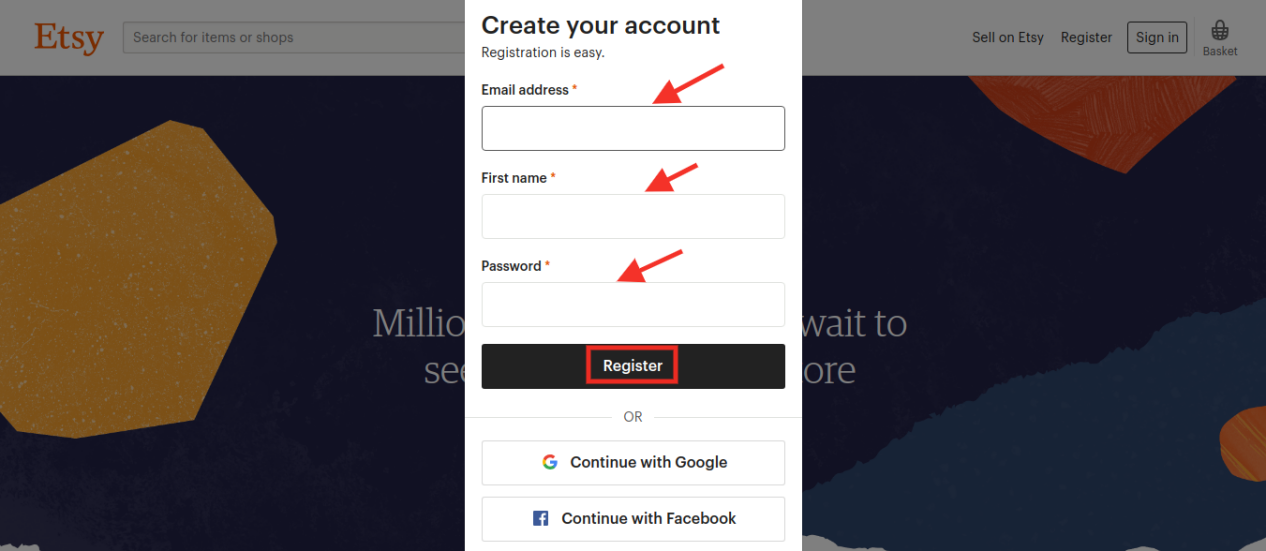
After creating your Etsy account, register your profile by entering the email address, username and password or you can directly signup through your social media account.

Step 2: After Creating Profile Create Your Own Shop

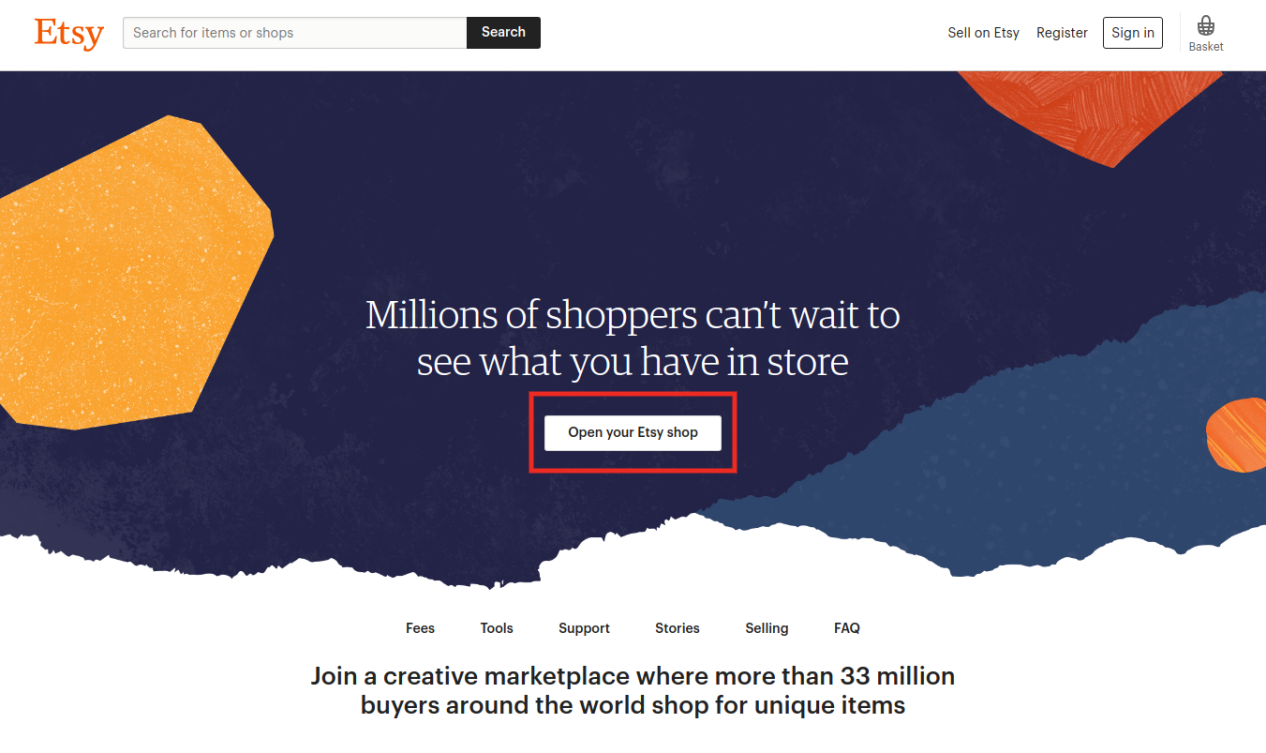
Click on the “Sell on Etsy” option, After clicking on this option, you will be redirected towards your shop page and now you have to enter some information as follows:

a) Shop Preferences
b) Name your Shop
c) Stock your shop
d) How you’ll get paid
e) Set up billing

Step 3: Section utilization of Etsy shop

This section is been included with various steps in which sellers have to upload a shop logo and cover photograph, etc. Sellers have to also update the shop’s “About” section. Leverage the facility of your shop segments to make your customers discover your shop products and go for the instant purchase.

Step 4: Branding and advertisement for the advancement of the Etsy shop

Creating an Etsy shop is not a complete process, it’s really important to make your brand shop popular on Etsy. Sellers should ascertain their shop details optimization for Etsy Search. Sellers can take a step forward and include a shop location so that your shop could be located by nearby customers. Sellers should focus on promoting their shop either through free or paid ads. They can offer great offers and discounts to their customers so that customers can go for instant purchase.

Step 5: Managing the shop by maintaining good SEO

Sellers should ensure to meet all the requirements after you cover all the above procedures for Etsy’s Dealer Insurance Approach. Sellers should be in contact with Etsy’s Survey framework and should have an idea to make their first deal.

For a good online business on Etsy, maintaining good SEO is very important which can help to increase customer engagement and optimization of the website.
Sellers should keep an eye on the following points:

  • The rate of customer engagement in your Etsy shop.
  • The reviews (either positive or negative) by your customers.
  • Product Listing Quality factor
  • Inbound links

For more information in one picture, you can have a look at the tips to rank your products up on the search results on the Etsy Marketplace.

Who pays for Shipping on Etsy buyer or seller?

Shipping charges vary from product to product. Some products are delivered without delivery charges where sellers bear the shipping cost while some products have added delivery charges and customers have to pay for it It varies from product to products. Some of the products are offered free shipping where sellers bear the cost of shipping whereas, some require buyers to pay for shipping. It depends upon the order value, shipping destination, and the shipment method chosen by the buyers.

Finally

Etsy is a global marketplace. Selling here is an opportunity for sellers who want to make money out of their talent and creativity. Etsy Marketplace is the one-stop solution for these artists and they can sell their products to earn a huge chunk of profits. They also get a chance to access a huge no. of the audience all over the world which increases your cross border sales too.

How KnowBand can help you to sell on Etsy Marketplace?

Knowband offers Etsy Integration Extension which is a smart solution for an eCommerce store owner to clear out the complexities of selling products on Walmart. It works by providing an API Integrator between an eCommerce store and the Walmart marketplace. It bridges the gap between your eCommerce store and Etsy with the help of which sellers can easily map their product listings on the Marketplace website. Once the integration is successful, the admin can update all the product listings on Walmart Marketplace from the back-end without even visiting the Marketplace site. Available for different CMS platforms like PrestaShop, Magento, Shopify, and OpenCart, sellers can easily download and install it on their website without any inconvenience.

For more information, contact us via support@knowband.com.

Find out some more related articles here

  1. How to Launch a Marketplace like Etsy and Ebay?
  2. How to add or update the shipping profile in Etsy Marketplace?
  3. How to sell on Walmart Canada?
  4. How to sell on Walmart Marketplace?
  5. How to create Seller Account in eBay Marketplace?

Social Media Marketing for eCommerce: Strategies and Best Practices

If you run an eCommerce business, you would probably know how much importance social media holds these days for brand promotion. From boosting brand awareness to grabbing more conversions, social media has shown huge potential and played a crucial part in the eCommerce growth in recent years.

The reality is, businesses do understand its value but not everyone is able to capitalize on social media platforms. Social media is not just about random posting and advertising on Ad-hoc basis.

Some brands mark their presence on social media just because they feel it is a necessity or a trend that should be followed. Or maybe because their competitors have also set foot on some platforms.

Let me be very clear. If you are following the same approach, you are not going to get any benefit through it. Moreover, there is no point continuing with your social media pages if you do not have a plan and time to implement your social media marketing strategies.

Except that you use social media just to post random stuff about your brand or company’s inside stories, it would be better if you utilize that time at somewhere important. Do not start just for the sake of your brand presence.

In this article, I will be discussing some social media marketing strategies along with some useful social media practices to enhance your eCommerce business and take it to the next level.

Social Media Marketing Strategies

1. Set Your Goals

The primary social media marketing strategy would be deciding beforehand what you would like to achieve through social media. Whether your motive is to drive more inbound traffic to your website, increase followers count, generate leads or get sales, the plan to achieve the ultimate result should be clear from the very beginning.

Prepare a roadmap. Get a blueprint and start working accordingly. Moreover, focus only on those platforms which you feel are relevant to your business. There is no point in wasting time on Twitter if your target audience is on Facebook.

So put your time and effort on channels from where you can get desirable results. Do not focus on succeeding on every social platform.

2. Analyze Your Audience

Adding to the social media marketing strategies is analyzing your audience. Social media is spread across countries, and people of every age group spend time on social media. But is every age group relevant to your business?

As of now, Facebook has nearly 2.4 billion monthly users followed by Instagram with more than 1 billion monthly users. With such a vast user base, it becomes important to narrow down the demographics to reach the relevant target audience. If the majority of your business comes from people aged 20-35, targeting people over 50 would not make any sense.

For the informative purpose, Linkedin and Twitter can be beneficial, and if you are expecting higher engagement from the young community, there is no better option than Facebook and Instagram. It all depends on your niche and your audience base.

3. Create Quality Content

One of the common mistakes that businesses generally make is they focus only on promotion. Excessive promotion is a downside. It may take away the interest of your followers and you may lose out on potential customers.

Remember, social networks were not meant for selling but to connect with people. So, ensure you are providing quality content with a mixture of information and entertainment. Yes, promotion is necessary but do not sound like a salesman every time.

Brands who know how to keep the interest of their followers succeed in the social media platforms. Be witty, make attractive but useful posts, post videos. People react to what they like and what they find attractive which tends to bring more user engagement.

4. Have a Facebook Store and Instagram Shop

The Facebook business page consists of a “Shop Now” tab where brands can add their store products and promote them. Users can check out the products right from your brand page and are redirected to the website for buying purpose. The Facebook shop helps you drive more traffic to your website and generate more sales.

Similarly, you can consider the idea of Instagram shoppable posts that allow you to tag your products on the images, boosting product visibility. Consumers can now checkout directly from Instagram without getting redirected to the original website. But to have an Instagram Shop, you need to match the eligibility criteria defined by the Instagram community.

Facebook and Instagram Shop play crucial roles in your social media marketing strategy.

Read: The Pros and Cons of a Facebook store

Having a website on the PrestaShop or Magento platform and want to open a Facebook shop for your business, try out our PrestaShop Facebook store addon and Magento Facebook store extension.

Social Media Best Practices

1. Post at Regular Intervals

One of the basic social media best practices is to remain active. Post content at regular intervals, at least 1 piece of content daily or on alternate days.

Do not keep too much gap between your posts. It results in losing out followers and affects your brand image. When there is a long gap between posts, followers feel that you are not active and that there’s no point following you.

And it can cost you new followers too. If someone visits your brand page and finds out that you have been highly inactive, they would hardly be interested in following you.

You may or may not find it true but people stop engaging in posts when the posting frequency is too less.

 2. Use Appealing Visuals for your Posts

I would not even bother to pay a look at a post that contains untidy visuals, let alone engaging with it. But if I find a post having great visuals, I would surely stop for a moment while scrolling through my feed. This is why visuals make one of the most important social media best practices. They tend to grab user attention.

Use high-quality pictures and colours that are pleasing to the eyes. Avoid writing too much text on pictures and make sure you are using the appropriate image size. Different social media platforms have different image sizes set for proper display.

3. Use Hashtags

The game of hashtags is very interesting and popular on social media. Hashtags are generally user-generated tagging which makes it possible for users to find posts or messages regarding a specific theme, content or news. It gives you a wide organic reach and increases viewership.

Hashtags play a crucial role in social media sites like Twitter and Instagram. When people use a particular hashtag for search, all the relevant content associated with that hashtag appears in front of the user. This makes it easy for people to filter out what exactly they want to look for.

Hashtags are an ACE for user-generated content campaigns.

4. Engage with your Audience

Social media is all about interacting with each other. People don’t use social media to just read or watch. Interaction is important. Successful businesses care a lot about their audience and they like interacting with their followers.

Ask questions, organize quizzes, participate in discussions, reply to users’ queries in comments. Join people in their conversations and show them your human side instead of sending automated answers.

Try to come up live on Facebook and Instagram, look for their questions and answer them at that very moment.

5. Find the Right Time to Post

Post at the right time is crucial to get a higher reach. The right time, here, means the time when a majority of your followers are active on social media. The reach of your posts would be very less if they aren’t posted at an appropriate time.

So, what’s the ideal time to post? You can find the best time to post on different social media platforms on CoSchedule Blog. You should also use social media tools like Buffer and Hootsuite for post scheduling.

6. Boost Posts That Are Performing Well

You want more and more people to see your content, right? Social media ads would help you do so. You may argue that spending money on boosting posts would be a waste of money until you are expecting an ROI from it but sometimes, reach is more important than the results.

I am not suggesting spending huge bucks, a little amount that too on well-performing posts would do great.

Final word

Utilizing social media platforms can be a big boost for your online business. All you need to do is follow the right approach and implement the right tactics. This will help you drive more traffic and conversions and increased brand awareness.

Hope you enjoyed reading the social media marketing strategies and best practices. If you found this information useful and have any point to add, let me know in the comments below.

Also Read:

6 Must-Have Social Media Addons for your PrestaShop store

7 ways to boost up your Sales using Social Media

How to Change Fulfillment Latency & Inventory for Products on Amazon Using API?

Objective:

After reading this blog, you will be able to understand how the seller can change inventory and fulfillment latency for products on Amazon using API.

Let’s know about the Fulfillment Latency

Fulfillment latency is the number of days in which the seller needs to dispatch the order after getting the order from Amazon. It can also be defined as the maximum time available to the seller to dispatch the parcel. The fulfillment time is set by the seller corresponding to each product. Fulfillment latency is also known as handling time.

Amazon fulfillment API helps the seller to set the product’s inventory and fulfillment latency time on Amazon.

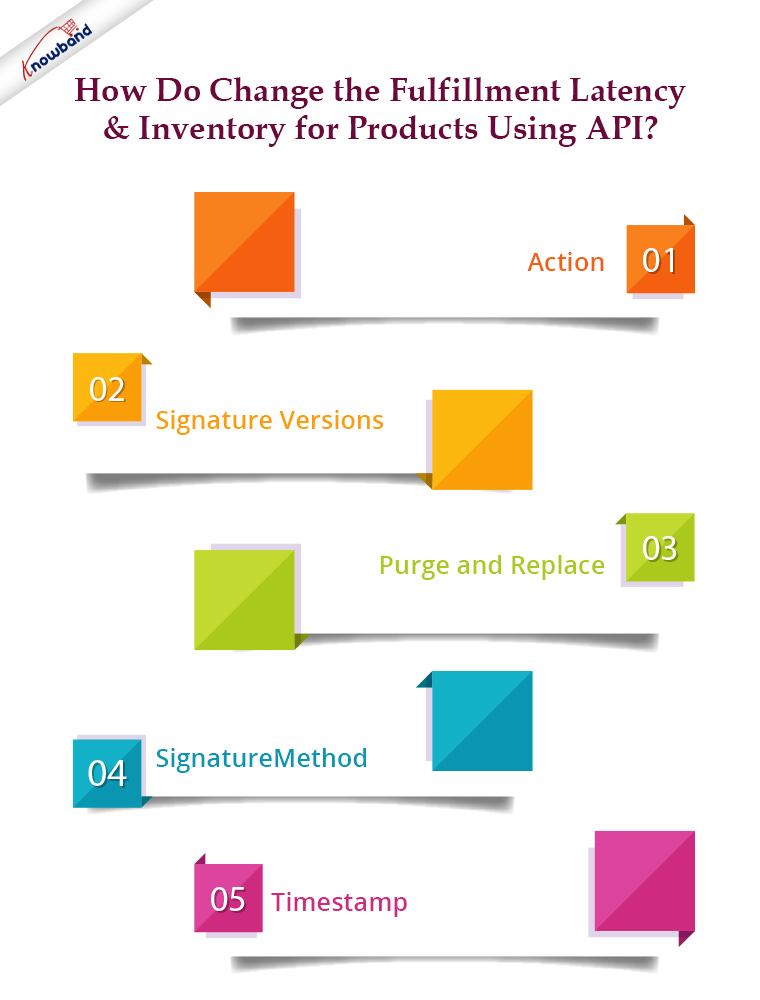
How do change the Fulfillment Latency & Inventory for products using API?

Let us know about the fields that you will need to send in the request to Amazon:

Action

This field specifies the action which needs to be performed on the request and this helps to determine what parameter should be in the request.

Signature: Whenever you send the HTTP request to Amazon, you need to add the signature with the URL. By checking the signature, Amazon can identify the merchant from whom the request has been received. We use a hash value (HmacSHA256), some data of the request, and a secret access key to create a signature.

Signature Versions

2 signature versions are supported and these versions are:

(1)Version 4:
(2)Version 2:

Both versions can be used to sign the request but we recommend you to sign your request with Signature Version 4 in this blog, signature version 2 is used.

Purge and replace

The purge and replace field replaces the existing listing of products from Amazon if its value is true. So you always need to set its value to false in the request if don’t want to remove listingsting from AmazFreeTypeType

Feed type specifies how the data should be processed. To change fulfillment latency and inventory, you need to specify the feed type “_POST_INVENTORY_AVAILABILITY_DATA_”.

Signature Method

Signature methods hash-based based protocols and you need to apply these methods to calculate signatures. E.g. HmacSHA256

Timestamp

In this field, you need to add the time at which you are making the request.

To change the fulfillment latency and inventory of the product, you need to send the following data in the request to Amazon:
$url =

https://mws.amazonservices.co.uk                               // Here you need to write the End point
/?AWSAccessKeyId=XXXXXXXXXXXXXXXXXXXX              // Here write your AWS Access Key
&Action=SubmitFeed                                        // Action should be SubmitFeed   &FeedType=_POST_INVENTORY_AVAILABILITY_DATA_  // Feed Type    
&MarketplaceIdList.Id.1= XXXXXXXXXXXXXX                 // Here write your marketplace list id
&Merchant=XXXXXXXXXXXXXX                                     // Here write your seller id or merchant id
&Signature=1234Knowband1234example1234         // Here you need to write the signature
&SignatureMethod=HmacSHA256                                  // Hash method which used to create signature
&SignatureVersion=2
&Timestamp=gmdate("Y-m-d\TH:i:s\Z",time()))
&Version=2009-01-01
&PurgeAndReplace=false                                            // Always set purgeAndReplace Value as false   
                                                                                   // else it will replace all the existing product data

You will also need to create the XML file which will contain inventory and fulfillment latency details of those SKUs for which you want to change the fulfillment latency and inventory. The sample feed is given below:

$xml_file = Full path of the XML file on the server

$xml_data is given below

<AmazonEnvelope xmlns:xsi="https://www.w3.org/2001/XMLSchema-instance" xsi:noNamespaceSchemaLocation="amzn-envelope.xsd">
<Header>
<DocumentVersion>1.01</DocumentVersion>
<MerchantIdentifier>XXXX-XXXX-XXXX</MerchantIdentifier>
</Header>
<MessageType>Inventory</MessageType>
<Message>
<MessageID>1</MessageID>
<OperationType>Update</OperationType>
<Inventory>
<SKU>p-25976-MB</SKU>
<Quantity>0</Quantity>
<FulfillmentLatency>2</FulfillmentLatency>
</Inventory>
</Message>
<Message>
<MessageID>2</MessageID>
<OperationType>Update</OperationType>
<Inventory>
<SKU>p-25976-XSB</SKU>
<Quantity>0</Quantity>
<FulfillmentLatency>2</FulfillmentLatency>
</Inventory>
</Message>
<Message>
<MessageID>3</MessageID>
<OperationType>Update</OperationType>
<Inventory>
<SKU>p-25976-X-L</SKU>
<Quantity>0</Quantity>
<FulfillmentLatency>2</FulfillmentLatency>
</Inventory>
</Message>
<Message>
<MessageID>4</MessageID>
<OperationType>Update</OperationType>
<Inventory>
<SKU>p-25976-SB</SKU>
<Quantity>0</Quantity>
<FulfillmentLatency>2</FulfillmentLatency>
</Inventory>
</Message>
<Message>
<MessageID>5</MessageID>
<OperationType>Update</OperationType>
<Inventory>
<SKU>p-25976-LB</SKU>
<Quantity>0</Quantity>
<FulfillmentLatency>2</FulfillmentLatency>
</Inventory>
</Message>
</AmazonEnvelope>

You need to send the request UXML XML data and header together in a request. The header values are used by the server for an end-to-end check on the data and for detecting unintentional modifications to the data further in the transition.

$headers = array (
          'Expect: ',
          'Accept: ',
         'Transfer-Encoding: chunked',
         'Content-Type: application/x-www-form-urlencoded; charset=utf-8',
         'Content-MD5: ' . base64_encode(md5_file($xml_file, true))        //encode the xml file
 );


$options = array(
         CURLOPT_URL                  => $url,
        CURLOPT_POST                    => 1,
                       CURLOPT_FOLLOWLOCATION => true, // follow redirects
           CURLOPT_RETURNTRANSFER => true, // return web page             
         CURLOPT_POSTFIELDS          => $xml_data,
         CURLOPT_HTTPHEADER         => $headers,
         CURLOPT_ENCODING             => "UTF-8",       // handle all encodings
           CURLOPT_AUTOREFERER        => true, // set referer on redirect
           CURLOPT_CONNECTTIMEOUT  => 120, // timeout on connect
                CURLOPT_TIMEOUT                => 120, // timeout on response
           CURLOPT_SSL_VERIFYHOST    => 2,
           CURLOPT_SSL_VERIFYPEER     => false, // disable certificate checking
           CURLOPT_FILE                   => "$fp"
           );
$ch = curl_init( $url );
@curl_setopt_array( $ch, $options );
$content = curl_exec( $ch );

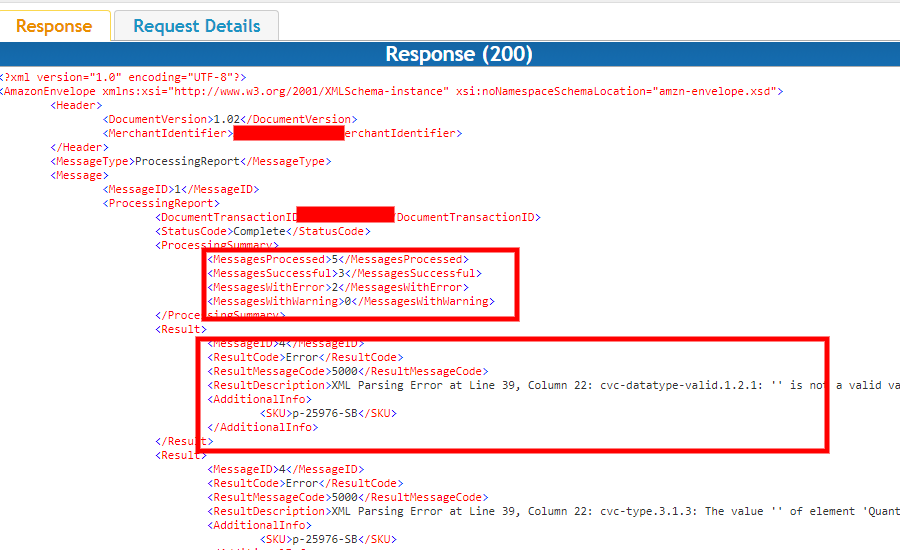
In the response, you will get the number of the SKU which are successfully processed (means fulfillment latency and inventory have been changed) and the number of SKU tis is not processed due to error, as given in the screenshot of the response feed below:


Summary

After reading this document, you (seller) can easily change the fulfillment latency and inventory of products on Amazon using Amazon MWS API.

Knowband offers eCommerce development services and can assist you in creating a brand-new eCommerce website. To provide our customers with the greatest and most efficient post-sale service, we have a dedicated support team that is constantly on hand to help them. We continue to fulfill our duties to clients that want help with urgent website issues even on the weekends.

The best Magento, Opencart, Prestashop, and Magento 2 modules are also available. One Page SuperCheckout, Multi-Vendor Marketplace, Mobile App Builder, Spin and Win Module, Abandoned Cart, and more popular modules are just a few of what Knowband has to offer. You can reach us at support@knowband.com if you have any questions.

Handle Large Data in Select2 Dropdown

Objectives of the blog

After the reading of this blog, you will able to know how you can handle the large set of data in the Select2 dropdown menu.

Description  

For a dropdown, if use the select2 library, it works really well for the small number of data but when the data become too large then you can face the issue of slowness. For example, suppose a dropdown of 20,000 options then the select2 library can take up to some seconds to minutes to open the dropdown. For such a large dropdown menu and to avoid this slowness issue, select2 provides an alternate solution.

In the normal select2 dropdown, we use <select> element. In the <select> element, select2 library binds all options in one go and this is causing the slowness for the large data. So instead of using the <select> element, you can use the textbox dropdown and select2 library helps to bind the textbox as the dropdown menu so it will give the fill of the dropdown menu to the users. The select2 library can smartly bind user-defined 20 or 30 options at a time and remaining data will binds either on search or on the scroll.

Running code is given below.

<!DOCTYPE html>
<html>
    <head>
        <link rel="stylesheet" href="//cdnjs.cloudflare.com/ajax/libs/twitter-bootstrap/3.3.7/css/bootstrap.min.css" />
        <link rel="stylesheet" href="//cdnjs.cloudflare.com/ajax/libs/select2/3.5.4/select2.min.css" />
        <link rel="stylesheet" href="//cdnjs.cloudflare.com/ajax/libs/select2-bootstrap-css/1.4.6/select2-bootstrap.min.css" />
        <style>
            .select2-container-multi .select2-choices .select2-search-choice {padding: 5px 5px 5px 18px;}
        </style>
    </head>
    <body>
        <div class="container">
            <div class="page-header">
                <h1>Select2 Dropdown menu with pagination</h1>
                <p>To improved performance of the dropdown with large data sets (20 000 items)</p>
            </div>
            <form method="post">  
                <input id="test" style="width:100%;" placeholder="type a number, scroll for more results" name="data" />
                <input type="submit" value="Submit" name="Submit" class="btn btn-info"/>
            </form>
        </div>
        <script type="text/javascript" src='//ajax.googleapis.com/ajax/libs/jquery/3.1.0/jquery.min.js'></script>
        <script src="//cdnjs.cloudflare.com/ajax/libs/lodash.js/4.15.0/lodash.min.js"></script>
        <script src="//cdnjs.cloudflare.com/ajax/libs/select2/3.5.4/select2.min.js"></script>
        <script>
            (function () {
                // initialize select2 dropdown
                $('#test').select2({
                    data: dropdownData(),
                    placeholder: 'search',
                    multiple: true,
                    // creating query with pagination functionality.
                    query: function (data) {
                        var pageSize,
                                dataset,
                                that = this;
                        pageSize = 20; // Number of the option loads at a time
                        results = [];
                        if (data.term && data.term !== '') {
                            // HEADS UP; for the _.filter function I use underscore (actually lo-dash) here
                            results = _.filter(that.data, function (e) {
                                return e.text.toUpperCase().indexOf(data.term.toUpperCase()) >= 0;
                            });
                        } else if (data.term === '') {
                            results = that.data;
                        }
                        data.callback({
                            results: results.slice((data.page - 1) * pageSize, data.page * pageSize),
                            more: results.length >= data.page * pageSize,
                        });
                    },
                });
            })();
            // Function to fetch the demo data for the dropdown menu
            function get_random_word(str) {
                return str
                        .split('').sort(function () {
                    return 0.5 - Math.random();
                }).join('');
            }
            // For the testing purpose we are making a huge array of demo data (20 000 items)
            function dropdownData() {
                return _.map(_.range(1, 20000), function (i) {
                    return {
                        id: i,
                        text: get_random_word('The quick brown fox jumps over a lazy dog') + ' ' + i,
                    };
                });
            }
        </script>
    </body>
</html>


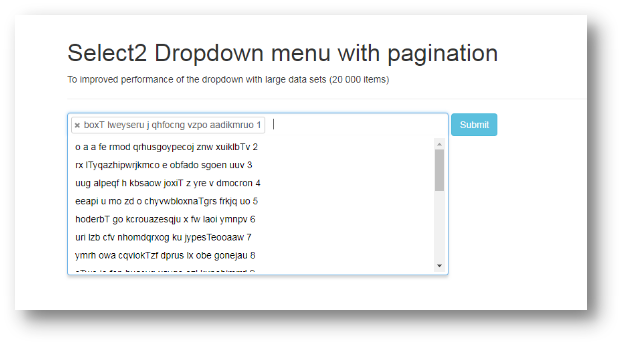
Output Screen


Summary

When user will submit this form, system will get the selected data in an array.

For any issues, please feel free to reach us at support@knowband.com. We also provide the top modules for Prestashop, Opencart, Magento and Magento 2. For more information, click here.

You can also take a look at our bestselling module One Page Supercheckout here:


How to delete products from the Newegg marketplace

Objective of the blog

This blog helps us to learn how a seller can delete its products from the Newegg marketplace.

Methods to delete Products from the Newegg marketplace

You can delete products from the Newegg marketplace by using seller account

Delete manually from seller account

1. Open the Newegg seller portal (URL- https://sellerportal.newegg.com).

2. Fill the credentials (User Name and Password) and click on the Login button.

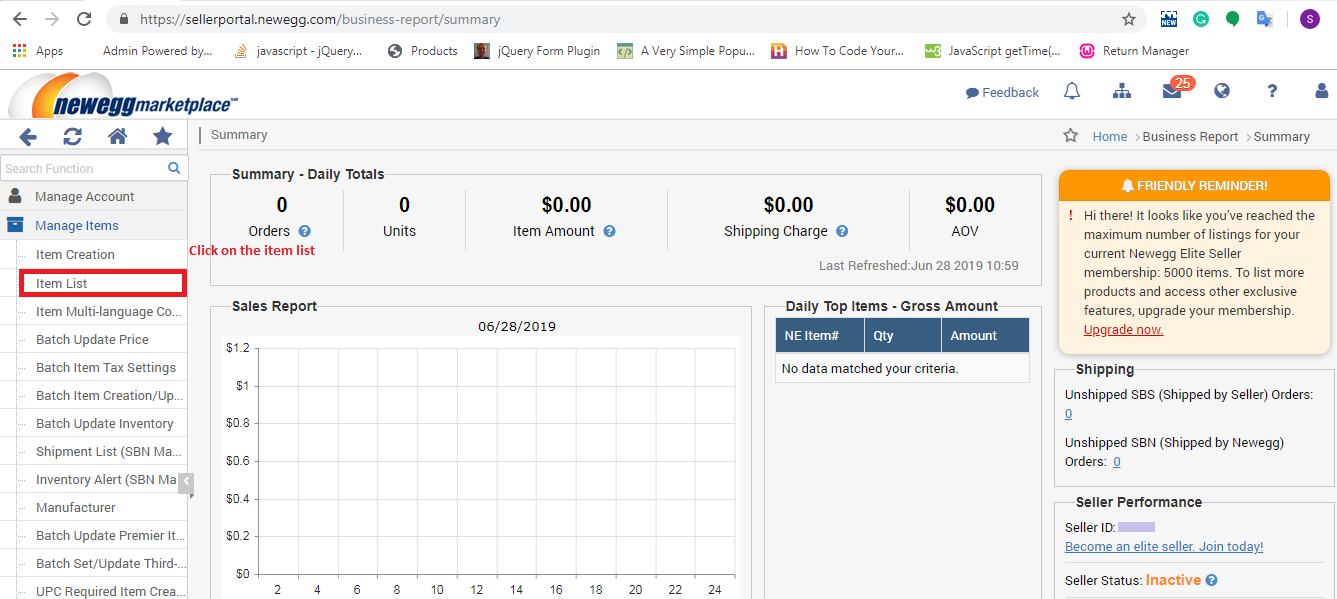
3. After logging in you have to select the “Item List” from the “Manage Items” section as shown in the image below:

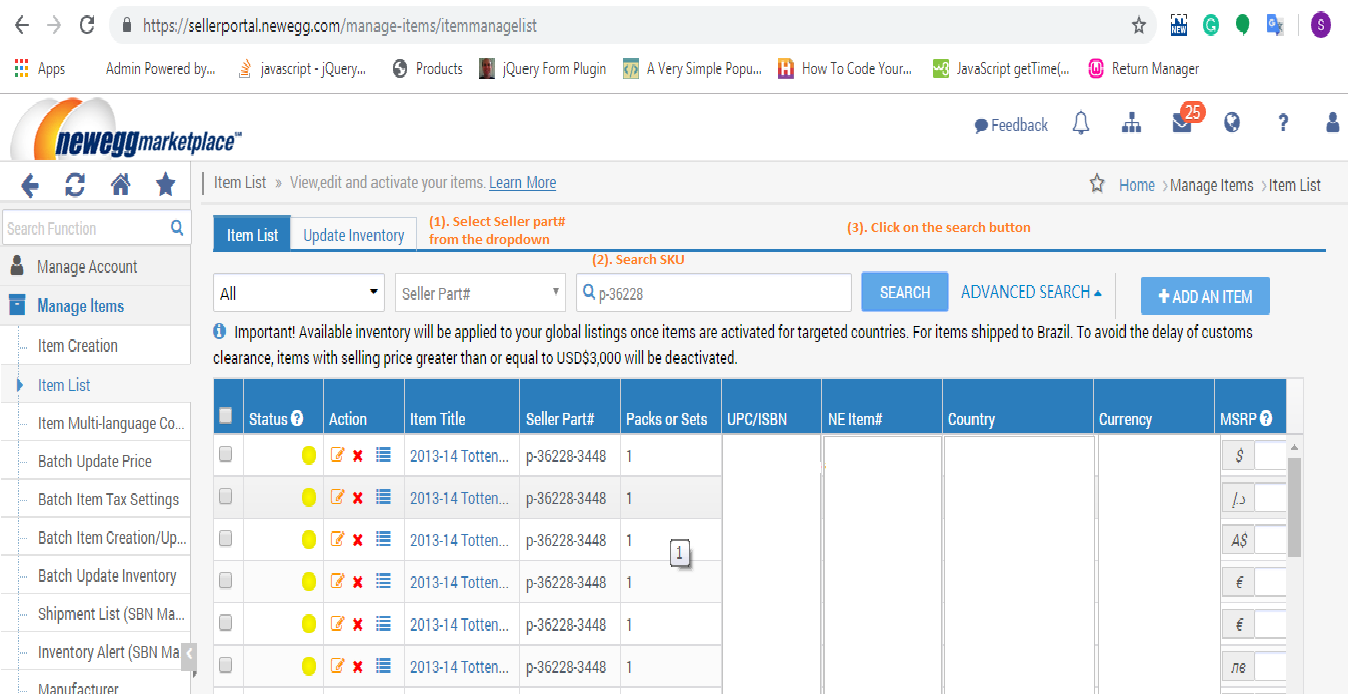
4. In the Item list page, you will need to click on the Search button after entering the SKU in the search box as shown in the image below.


5. On clicking the search button, the searched SKU list will be appeared where you need to follow the following steps to delete the products.

I.Check the checkbox of the products.

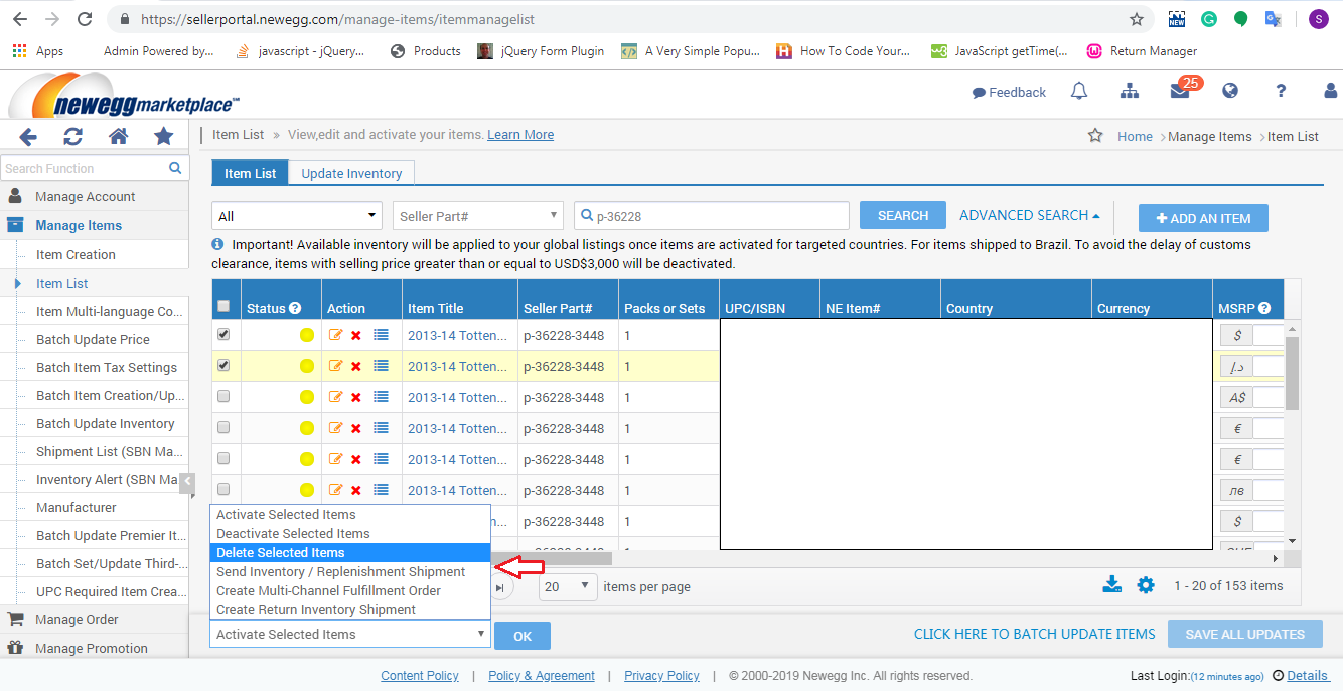
II.Select the “Delete Selected Item” option from the drop-down (located at the lower of the page) and click on the OK button to delete the selected product as shown in the below image:

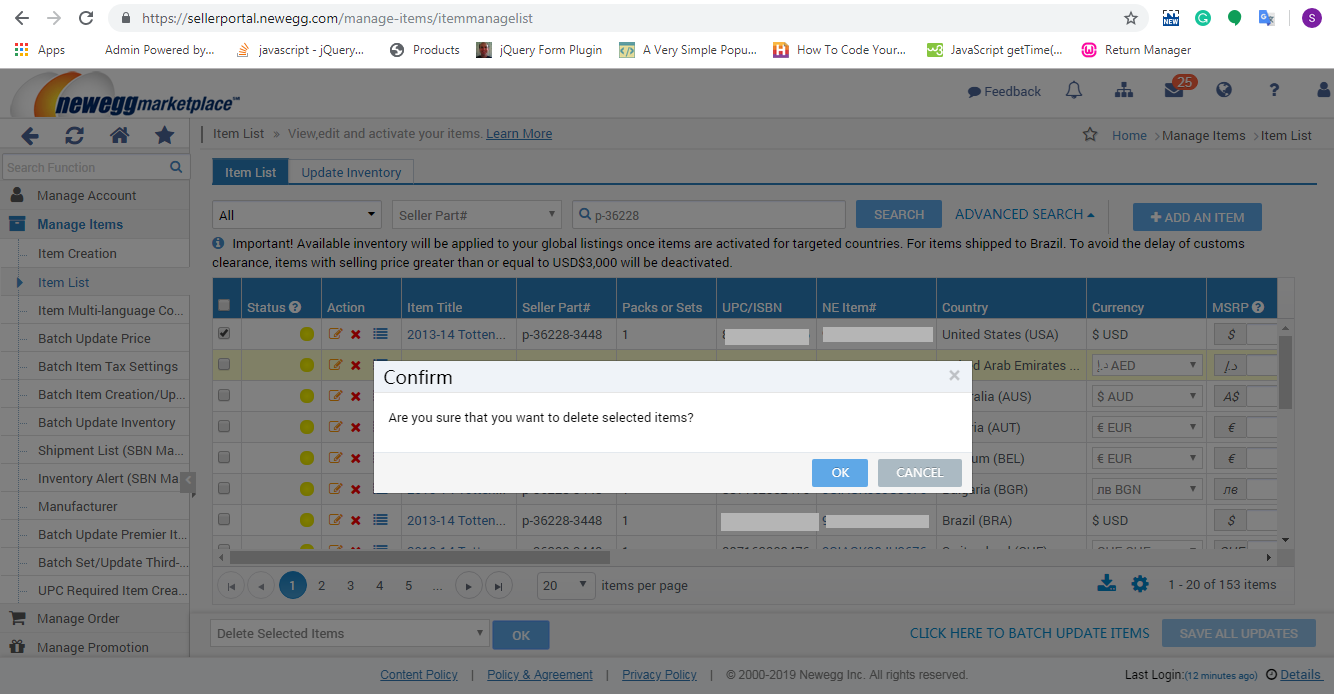
6. On clicking the OK button, a popup will be displayed on the screen for the confirmation and you will need to click on the OK button of the popup to delete the selected products as shown in the image below:


Summary

This blog helps you (seller) to delete your products from the Newegg marketplace.

Namespace in PHP

Objective: To learn how we can use same name of the class in PHP using namespace.

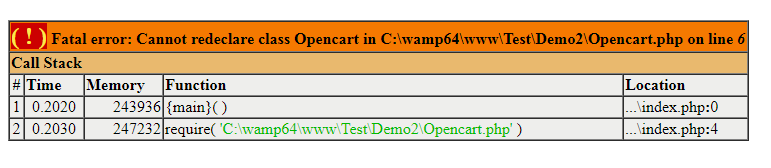
Generally we cannot use two or more class with the same name. It will give an error: “Cannot redeclare class” as shown below-

To handle this, we can use the namespace as shown in the example given below:

1. Defining the namespace Demo1 with Student class in the Demo1/Student.php

<?php
namespace Demo1;
class Student {
//All code will be here for this class
var $a = 10;
}
?>

2. Defining the namespace Demo2 with Student class (class with same name) in the Demo2/Student.php

<?php
namespace Demo2;
class Student {
//All code will be here for this class
var $a = 20;
}
?>

3. Now in the sample file index.php, we are able to use the both class without any error:

<?php
// including both of Student classes
require "Demo1/Student.php";
require "Demo2/Student.php";

//making an instance of Demo1\Student()
$ Student1 = new Demo1\Student();
//using the first class functionality
echo $Student1->a.'<br>';

//making another instance of Demo2\Student()
$Student2 = new Demo2\Student();
//using the second class functionality
echo $Student2->a;

Output Screen:

10
20

Both classes will have different functionality and we will be able to use both classes in a single file easily.

Note: We can make the code more easy by using the PHP use() function:

use Demo1\Student as Student1;
$Student1= new Student1();
echo $Student1->a.'<br>';

use Demo2\Student as Student2;
$Student2 = new Student2();
echo $Student2->a;

File Structure:

index.php
Demo1/Student.php
Demo2/Student.php

Related Article: Auto Loading in PHP

How to Simplify the Online Shopping Experience of Customers?

The success of an eCommerce store majorly depends on the kind of experience that it provides to its users. User experience is of vital importance for customer acquisition as well as customer retention. With fierce competition among brands in the e-commerce market, the one which provides a simplified shopping experience to its users wins the race.

Why is UX so important?

Consumers do not easily forget a brand that offers a great user experience. UX is important for your online business to provide comfort to your visitors and make them loyal to your brand. It is the user experience that will keep your customers stick to your store in the long run.

Now, the important part, how to simplify the online shopping experience for customers? Think from a customer’s point of view. Treat yourself as your own store visitor, browse your website and ask yourself whether you are finding a comfortable experience or not.

There are always areas for improvement. In this article, I will provide you with 7 useful tips to simplify the online shopping experience and enhance the customer experience. Check them out.

1. Design your Home Page well

Your home page is the interaction point for your visitors. It decides whether the user is going to spend some time on your store or take an early exit. No matter how amazing your offerings are, if the home page of your eCommerce store doesn’t please the visitors, you are going to see a significant increase in the bounce rate and eventually lose out on potential customers.

Do not miss out on the prospects. Make your home page attractive, something that keeps the excitement in the visitor to browse your store. Give it a good design. Make your first impression count.

2. Provide easy Search Functionality

Enable easy search functionality for your customers to search for their desired product effortlessly. Well, even before this, place your search bar in the right places and make it easy to spot.

Your site search functionality should understand your users’ queries and provide relevant results. An effective site search should be responsive enough to display appropriate results on abbreviations, misspellings, related product searches, etc.

Try out Knowband’s Search Auto-suggest addon for Prestashop that allows you to customize your search bar as per your choice and helps you enhance your site search functionality.

3. Simplify your checkout process

Do not make your users wait for too long to place the order. The longer it takes for them to check out, the higher the chances of cart abandonment.

Make sure your checkout page offers easy login facility like Social login, a Guest checkout for those who do not want to get themselves registered on your e-commerce store, an easy option to update the product quantity without going back to the product page, multiple payment options, etc.

Try out our One Page Checkout for PrestaShop, OpenCart, Magento and Magento 2.

PrestaShop One Page Checkout

OpenCart One Page Checkout

Magento One Page Checkout

Magento 2 One Page Checkout

Read: One Page Checkout vs Multi-Page Checkout: Which is better and Why?

4. Make your site mobile responsive

A majority of online shoppers prefer to shop from their mobile devices. Not everyone carries a laptop with him/her every time and not everyone is available at the desktop, but almost everyone owns a mobile phone today. This is why a mobile-optimized e-commerce site is a must for e-retailers in order to gain more mobile traffic and improve the online shopping experience of their mobile users.

5. Have a mobile app

Today, almost every business has their mobile app. Having a mobile app makes the shopping journey of consumers more convenient. In addition to this, the benefit of having a mobile app is that consumers are generally logged in into the app even when they are inactive. It avoids the re-login headache, and on top of that, offers faster loading and quick entry into the store. A mobile app is a necessity today for consumers as well as for merchants to simplify the customer experience.

6. Encourage reviews and ratings

Reviews heavily influence a customer’s decision to purchase a product. When shoppers search for a particular item, they look for its reviews to ensure its quality, to know whether it’s worth spending money or not.

Similarly, ratings define product quality. A well-rated product automatically builds up the trust in the user about that product and encourages them to make a purchase. This enhances user experience and reduces product return.

7. Enhance customer support

Consumers are filled with queries. It can be about some offerings, product availability, product return, etc. Anyone would love getting their queries resolved as soon as possible. Online shoppers are no different. Providing customers with an easy way to reach out to your support team makes them feel more relaxed and satisfied. Allow customers to contact you by dropping an instant message, email or a phone number.

Conclusion

Online businesses have realized the importance of providing a simplified shopping experience to users. If you want to grow as an eCommerce brand, focus on your customers’ needs and try to fulfil them. Take care of your customers and you will need not worry about your conversions much.

If you find the above-mentioned tips on “How to simplify the shopping experience of your customers?” helpful, do leave a comment below.