We boast of the best in the industry plugins for eCommerce systems and has years of experience working with eCommerce websites.
We provide best plugins for platforms like - Magento, Prestashop, OpenCart and Shopify. We also provide custom module development and customization services for the website and modules.
In this present era, being an eCommerce store owner is not a cake walk. They have to keep an eye on the competition growing everyday in this industry. So it’s really important to provide your business a platform in the form of marketplace which will help you to increase the sales of your eCommerce store.
Etsy is one of the most successful and renowned marketplaces which allow people to buy and sell products worldwide.
Knowband offers Etsy Magento Integration extension which provides an effective approach to integrate the Etsy marketplace with their Magento webstore. The Etsy Magento connector addon integrates your eCommerce store with the Etsy marketplace by using the Etsy API. After successful integration, you can update and list your products on the Etsy marketplace from the back-end of this integrator even without even visiting the marketplace.
Etsy Magento module allows sellers to upload products in bulk, thus reduce the chances of the errors which occur during manual listing. Sellers have the feature to manage the inventory and orders from the Magento admin panel.
Fill up all the required details in the registration form and click on “Register”. It would create your seller account and send a verification email to the provided email address.
The verification email will contain a link which will redirect to the setup your shop preferences. Enter all the required details like – Shop Preferences and Name your shop, Stock your shop, How you will get paid and Set up Billing to open your seller account.
Etsy Marketplace Integration- Setup an App
You need to create an App on Etsy Marketplace to establish a connection between Magento Store and Etsy Seller Account. Please follow steps to create an App on Etsy –
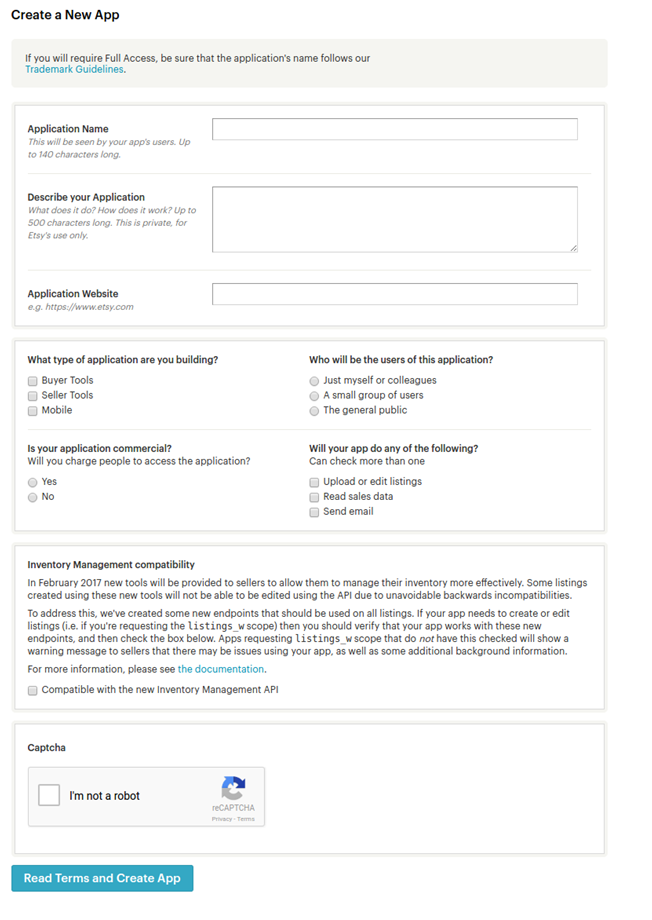
Go to the link (It would open a page where a form will be shown with few input fields as shown below)
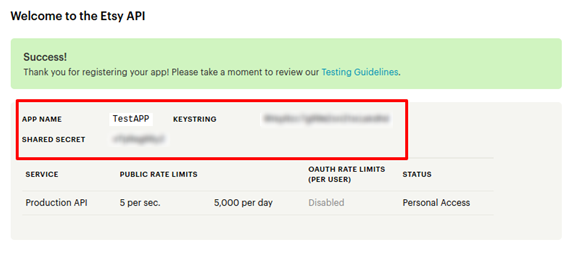
Enter all the mandatory details in the form to register your App on Etsy marketplace and you can see your API details as below:
Admin Interface
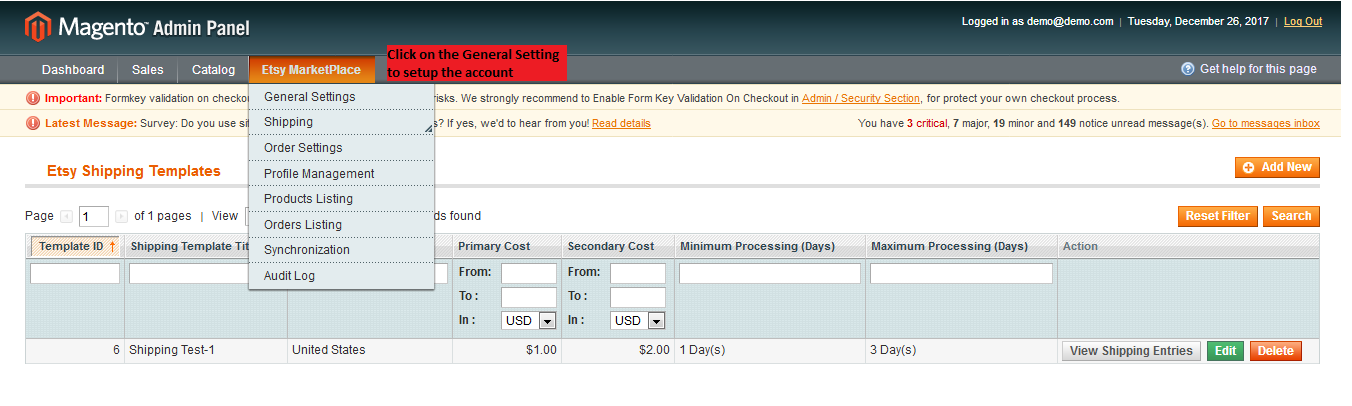
Admin Panel Settings contains the 8 tabs for settings.
General Settings
Shipping
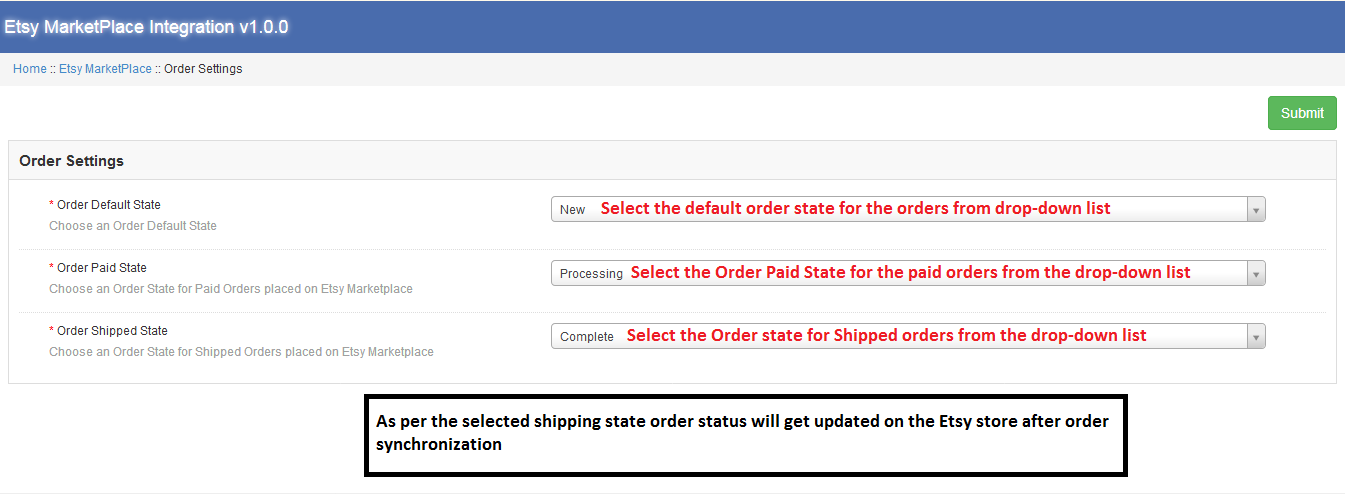
Order Settings
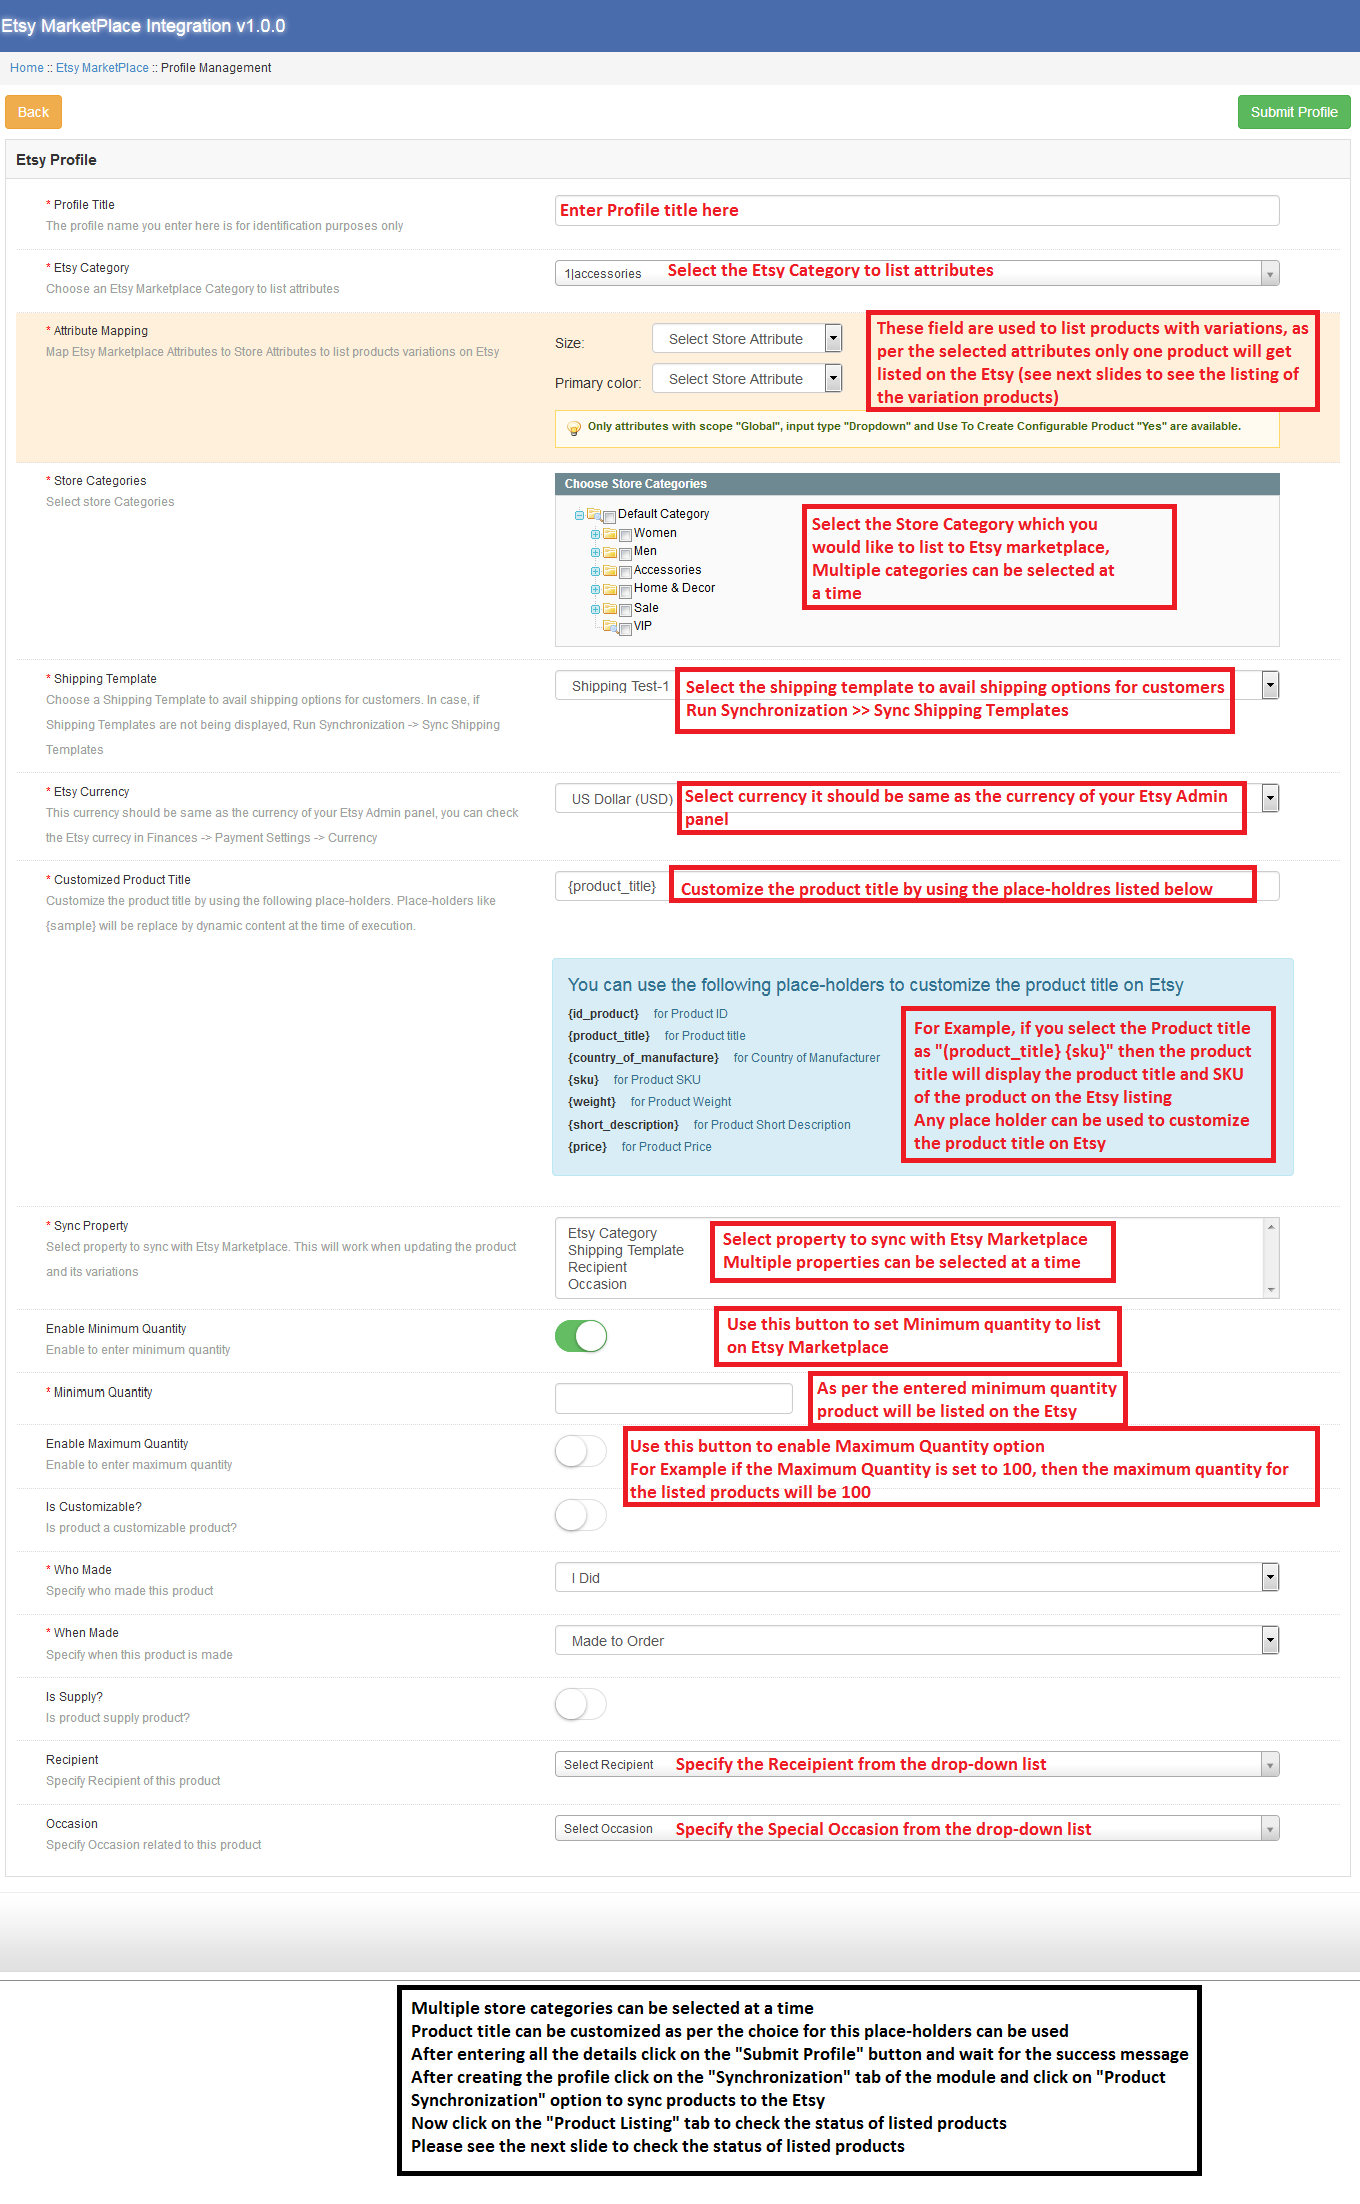
Profile Management
Product Listing
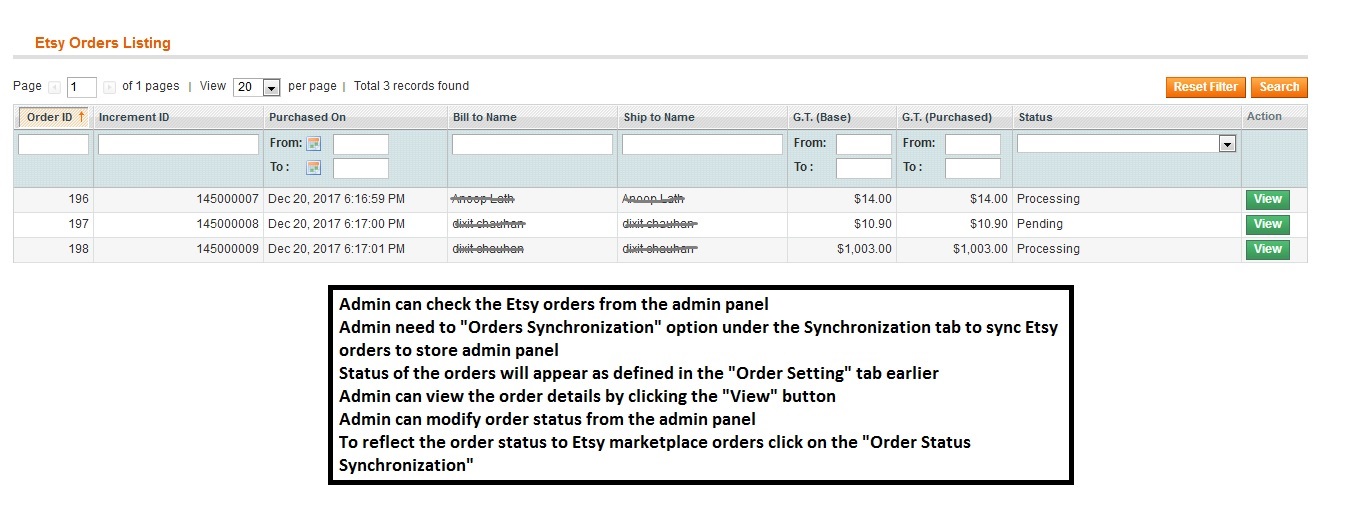
Order Listing
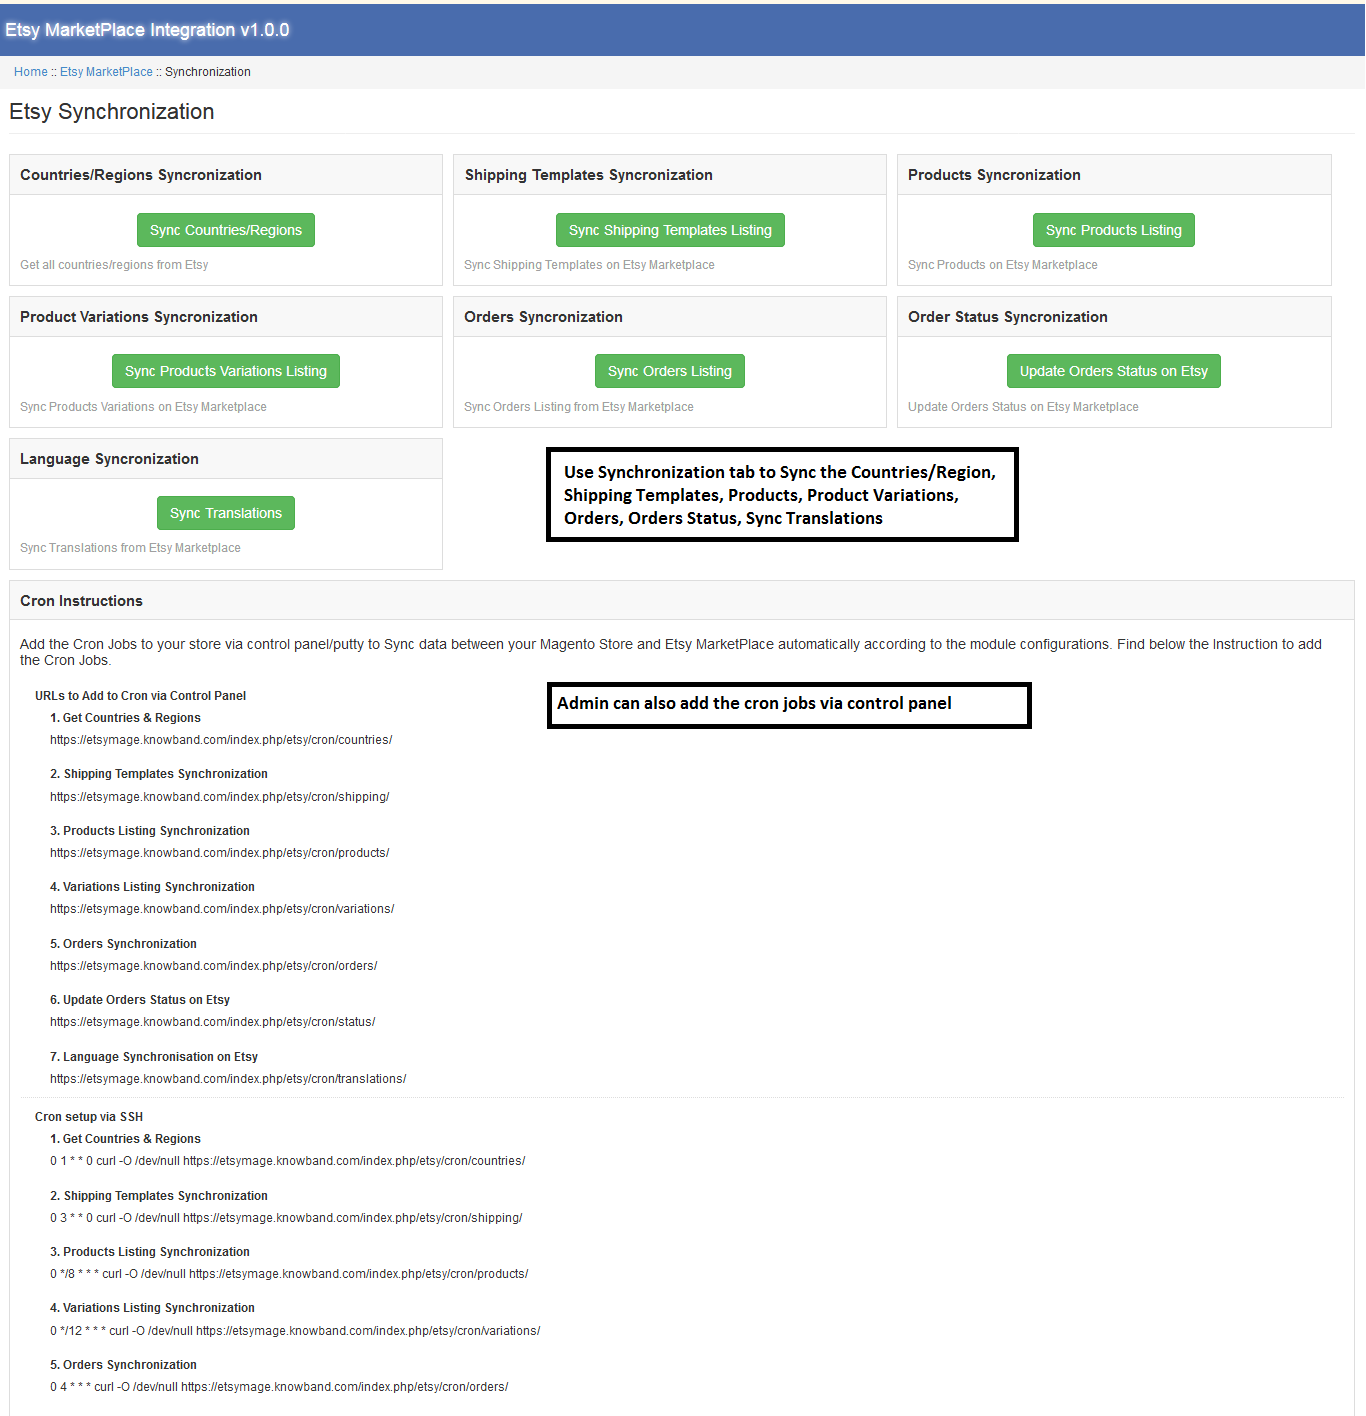
Synchronization
Audit Log
Steps to configure module:
General Settings:
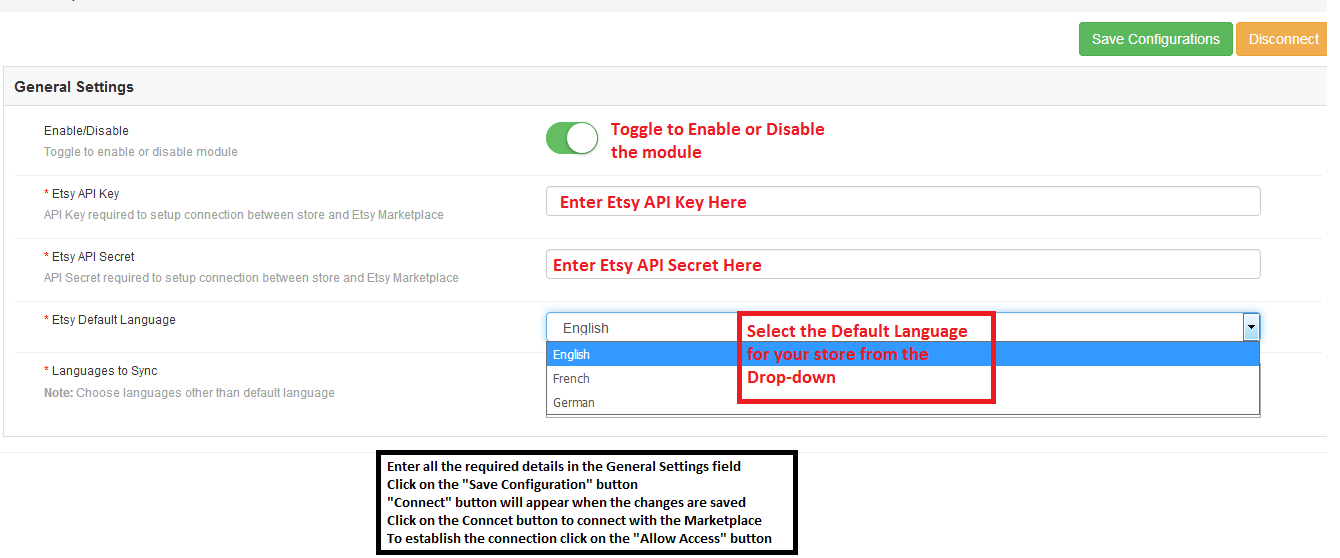
Install the module and click on the General Settings tab to connect your Magento store with Etsy Marketplace
Enter all the required details in the General Settings field and follow the instructions.
Shipping Templates:
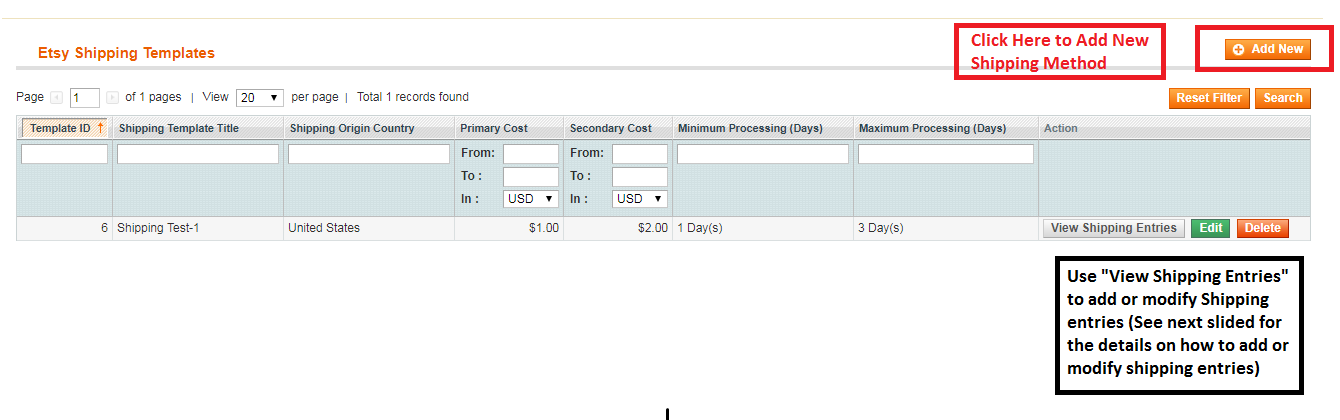
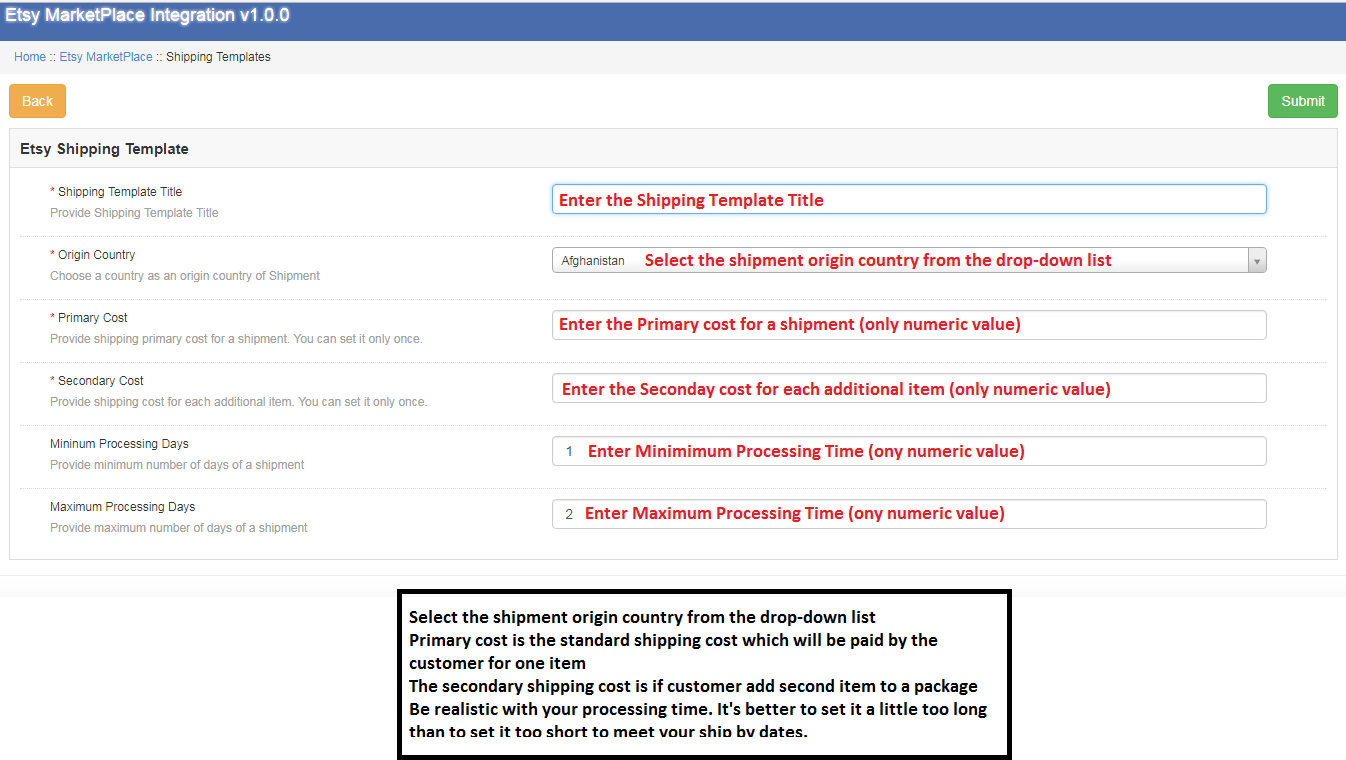
Now add shipping templates to enable shipping methods on Etsy Marketplace. Please refer to the next slide to see how to enter required details in Shipping Template fields.
Enter all the required details in the Etsy Shipping Templates.
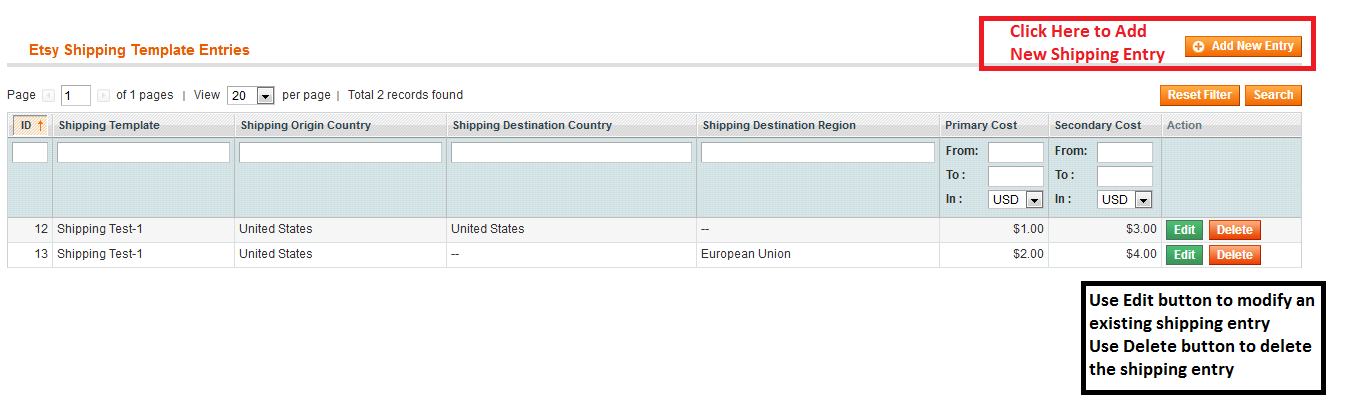
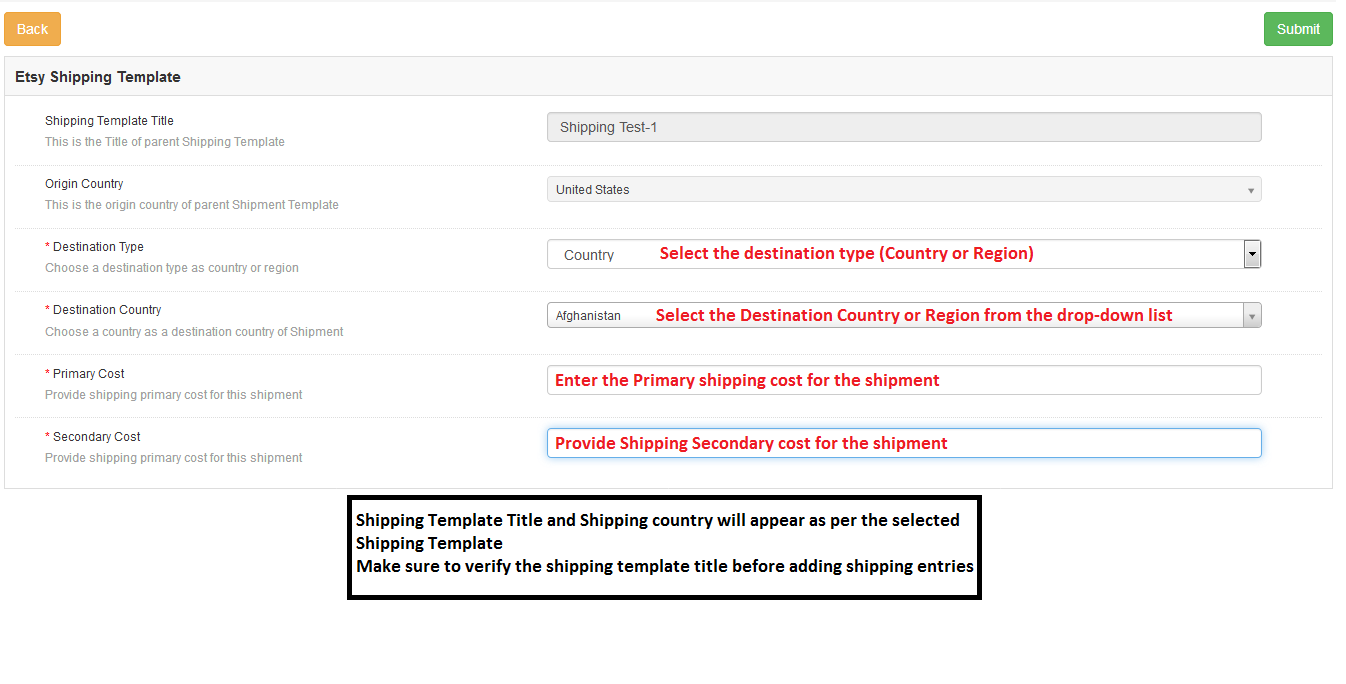
Now add the shipping entries for the selected shipping template.
Enter all the required details in the shipping entries fields.
Order Setting:
Order Settings tab helps map store order statuses with Etsy Marketplace order statuses. This will be used for capturing orders details from Etsy Marketplace. For mapping the orders from the Etsy Marketplace to the Magento store, you need to execute the Order cron in the Synchronization tab.
Profile Management:
Now create a profile to list products to Etsy Marketplace. Sellers can create multiple profiles to sync the products in bulk with the option to select different shipping options.
Product Listing:
Admin can check the status of the listed products by clicking the “Product Listing” option.
Synchronization:
Country/Region Synchronization: Before creating the shipping templates please make sure to sync the country/region by clicking the “Sync Countries/Regions” only after that countries and regions will be added to the database.
Shipping Template Synchronization: Before creating the New Profil please make sure to sync the shipping templates by clicking the “Sync Shipping Templates Listing” only after that shipping template entries will be visible in the profile’s shipping template section.
Products Synchronization: Make sure to Sync the products after creating a profile only after that selected products under the newly created profile will get listed on the Etsy store. Admin can also check the status of the listed products under the section “Product Listing”. All the listed products will show the status as “Listed”.
Product Variations Synchronization: To list the variation products to Etsy marketplace please make sure to click the “Sync Products Variations Listing” only after that variation products will get listed in the Etsy marketplace. Otherwise, these variations product will show the status as “Pending”. After successful sync listing status for these products will be changed to the Listed.
Orders Synchronization: Use the Sync Order Listing button to sync Etsy store orders to the Magento Admin. After successful synchronization, you can see the Etsy store order under the Order Listing tab.
Order Status Synchronization: Admin can modify the status of Etsy orders which have already synchronized to the Admin panel. On clicking the “Update Order Status on Etsy” order status will get updated on the Etsy store also.
Language Synchronization: To add the product description in another language admin need to use the “Sync Translations“.
Order Listing:
To synchronize the Etsy marketplace orders to the Magento store admin panel first admin needs to synchronize the order listing as explained in the order synchronization above. After that, all the Etsy store order can be modified from the Magento store admin.
After modifying the order status for the orders synchronized to Magento admin panel, admin can update the order status for these Etsy orders by clicking the “Order Status Synchronization” option in the Synchronization tab.
Audit Log:
Admin can use the Audit Log tab to keep the track of the tasks performed.
By following the procedure explained above sellers can easily sale their Magento store products to the Etsy marketplace in a hassle-free manner.
Please click on the link below to purchase this Magento Etsy Marketplace Integration.
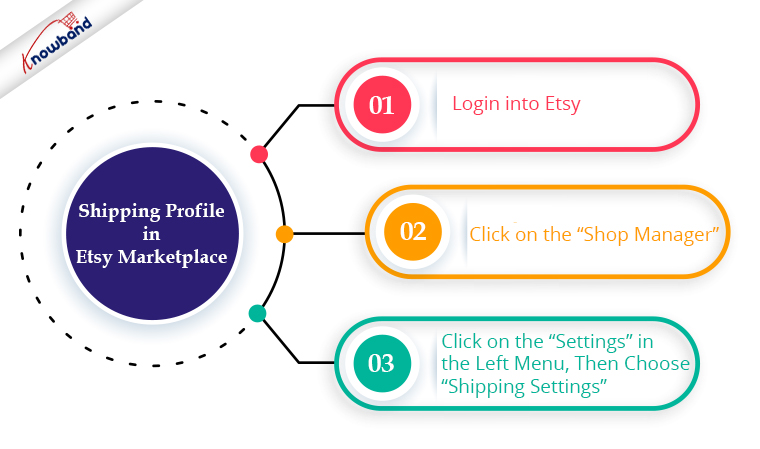
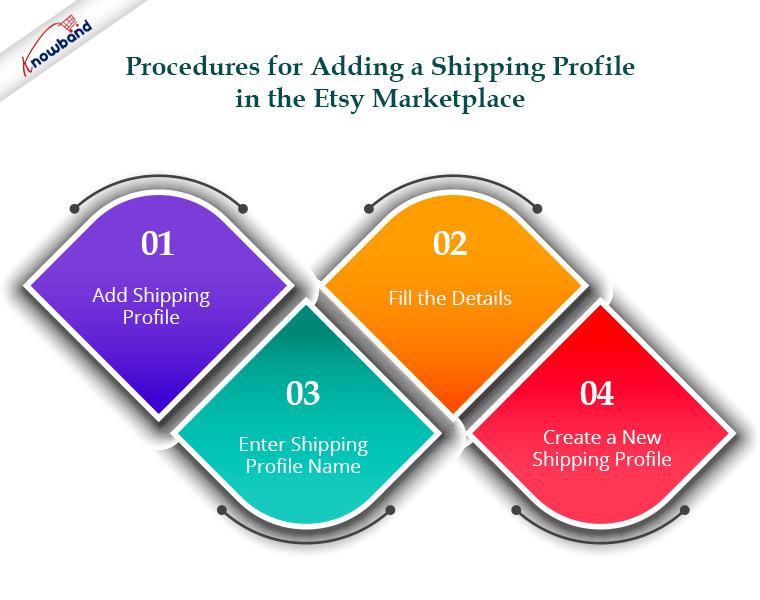
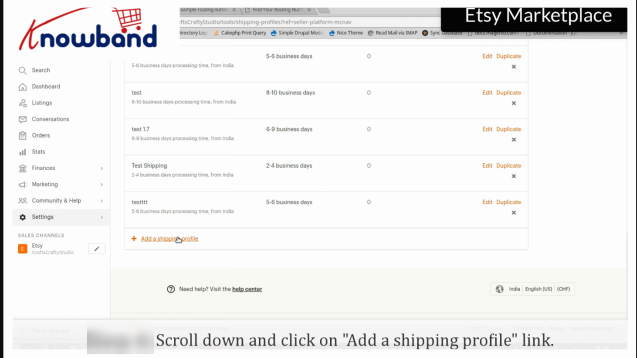
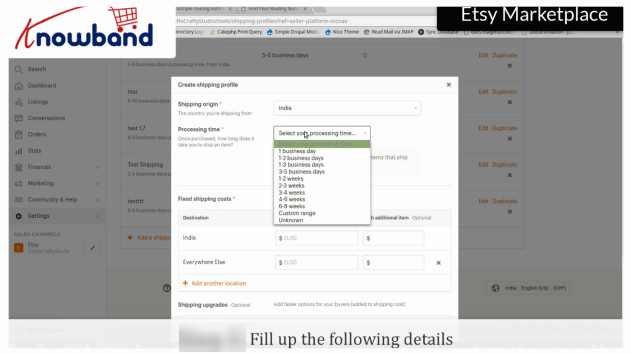
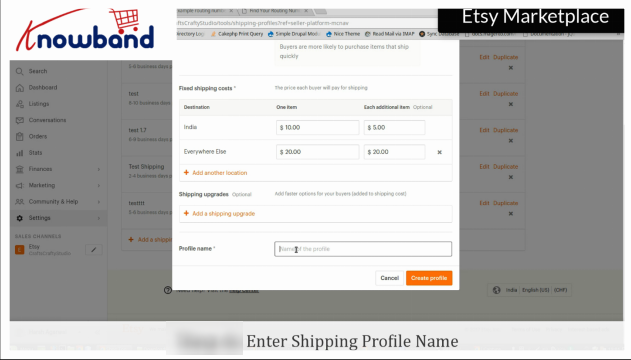
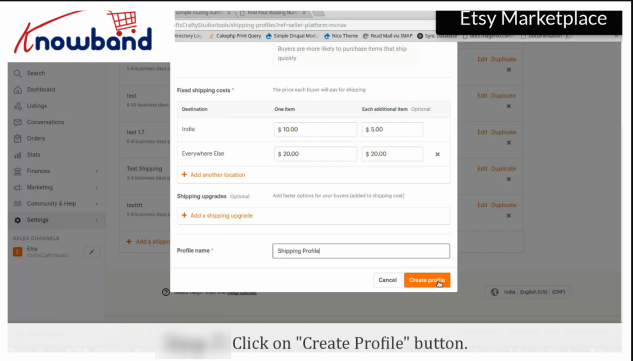
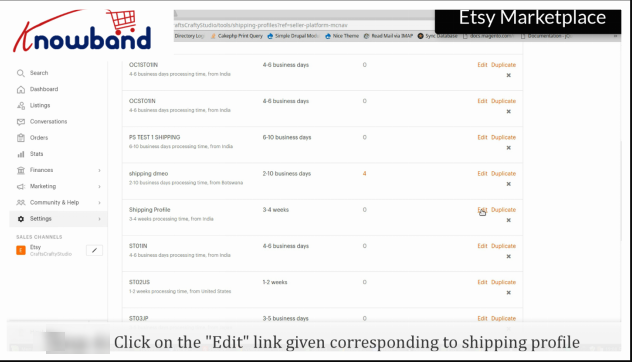
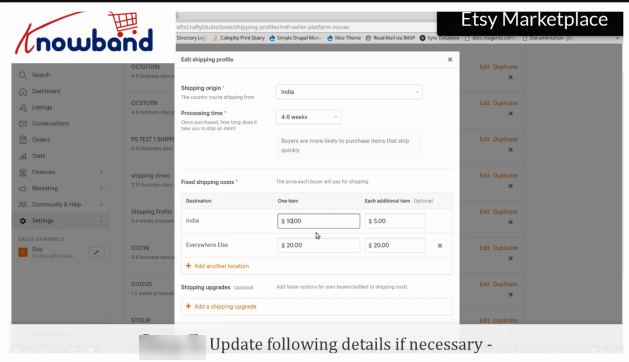
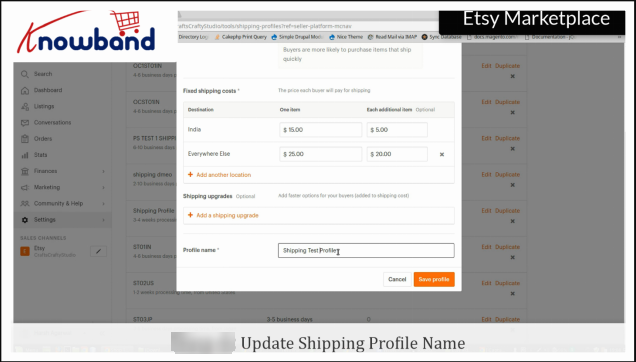
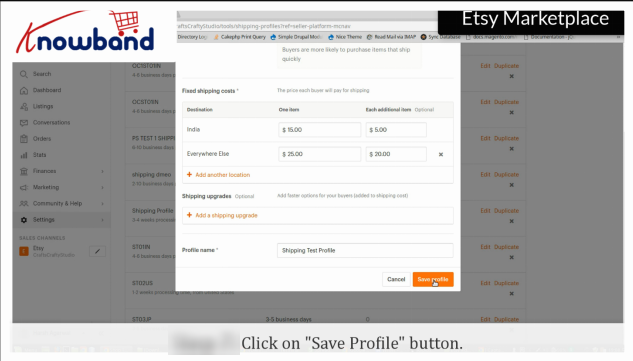
The shipping method varies from time to time, let it be cost or time duration, which is why Etsy Marketplace provides you with an option to add a new shipping profile or update the existing one free of cost. This will help your customers to have their products shipped with the most desirable and convenient method.
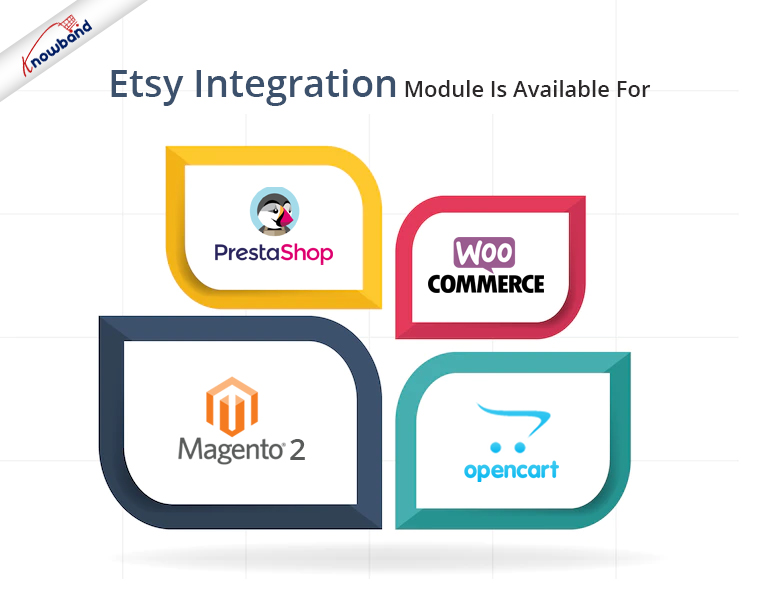
Are you looking to integrate your store with the Etsy marketplace? Knowband offers Etsy Marketplace Integrators for various CMS platforms like Prestashop, OpenCart, Magento 2 and WooCommerce. This helps in showcasing your products among the larger audiences and enhances brand awareness as well.
From the backend, the admin can establish shipping profiles, which can then be mapped to the various profiles generated under the Profiles Management. All of the cron settings can be automated using the synchronisation tab’s cron settings. Therefore, an online owner may quickly sync product status, order status, language sync, order status update, etc. utilising the Synchronization tab.
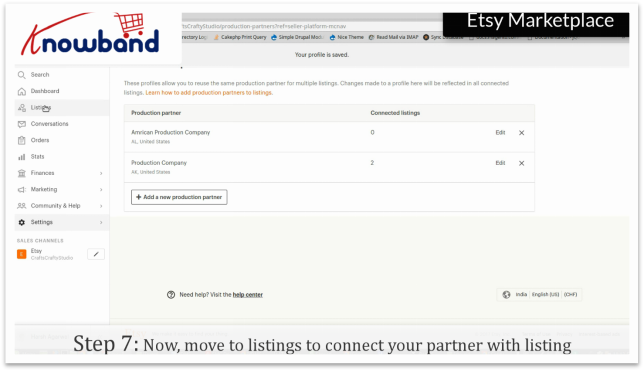
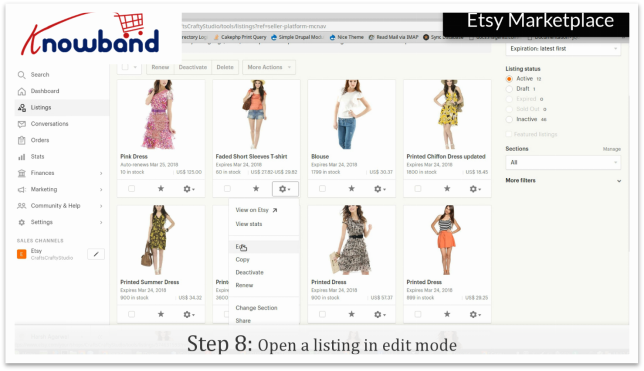
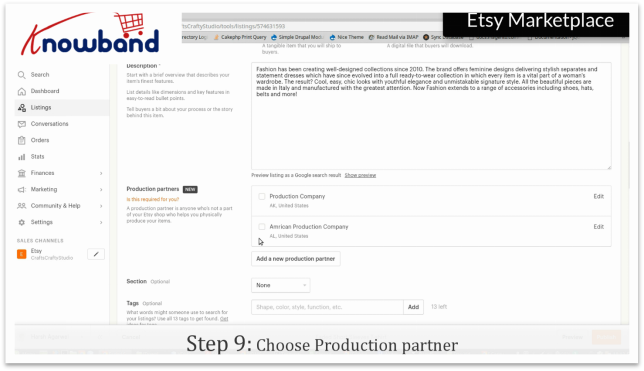
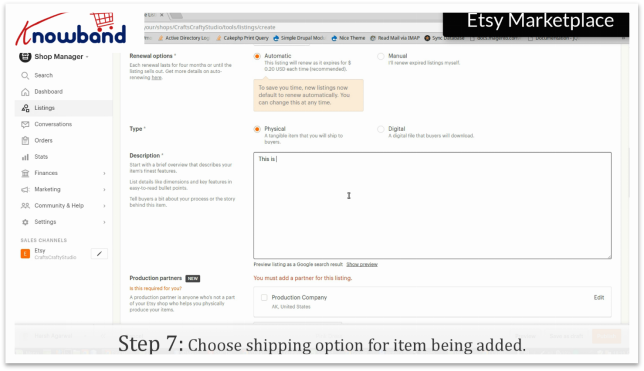
A production partner or manufacturer is someone who will assist you in producing items to be sold at the Etsy Marketplace. To maintain transparency, Etsy Marketplace has its handmade policy and the seller needs to follow those policies if he wants to sell the goods along with a production partner. Are you willing to show the same listing to multiple production partners? Etsy provides a very easy and convenient way to connect these both which eases your work.
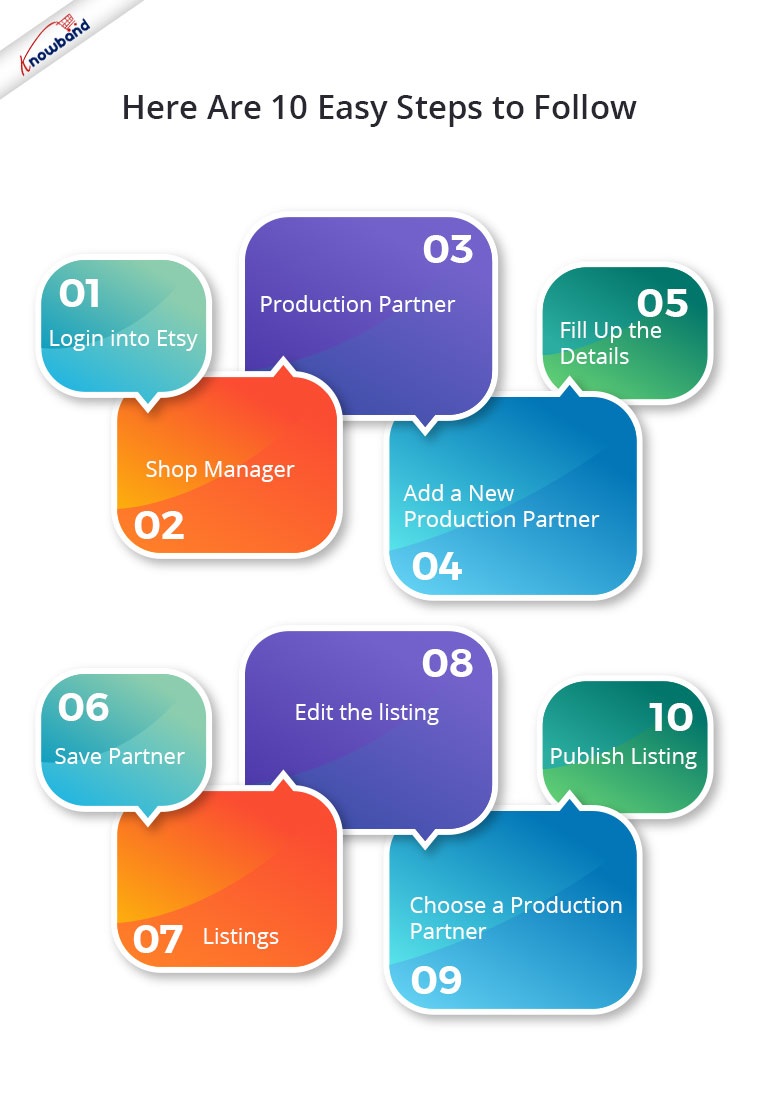
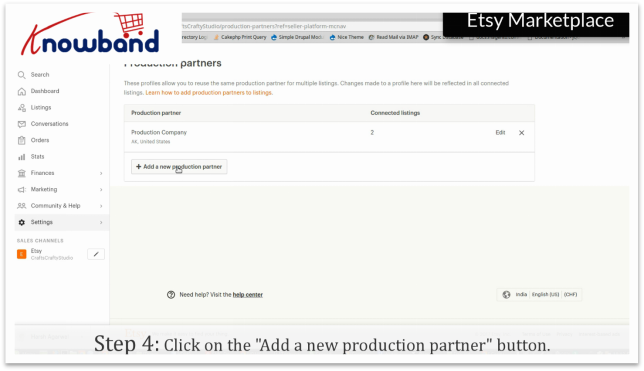
Click on the “Add a new production partner” option provided.
Step 5:Fill up the details
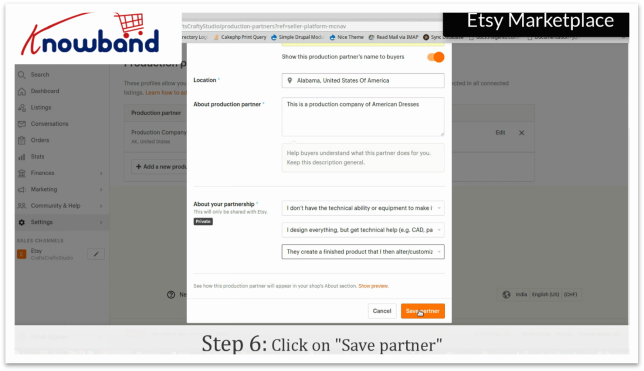
Fill up the details in the “Add a new production partner” pop-up open such as production partner, location, about production partner, about your partnership and other relevant options.
Click on the “Publish” option to save the changes you have just made.
In the End:
Are you looking to integrate your store with the Etsy marketplace? Knowband’s Etsy Marketplace Integration offers an easy interface to integrate your store into Etsy.
Etsy integrators are available for Prestashop, Magento 2 and OpenCart-based stores. Etsy offers APIs so that sellers may display their goods, easily keep track of inventory, and handle orders. Knowband provides the Etsy Integration module using these APIs, saving the online store owner from having to list each of their products on the Etsy Marketplace and PrestaShop separately.
Simply adding their products to the online store will automatically list them on the Etsy store. For any queries, please contact us at support@knowband.com.
Watch how to add Production Partner and connect with listing in Etsy Marketplace
Etsy is a professional online marketplace specifically engaged in online trading of vintage and handcrafted products. The site also regulates the buying and selling of art products such as jewelry-making tools, wire, and beads.
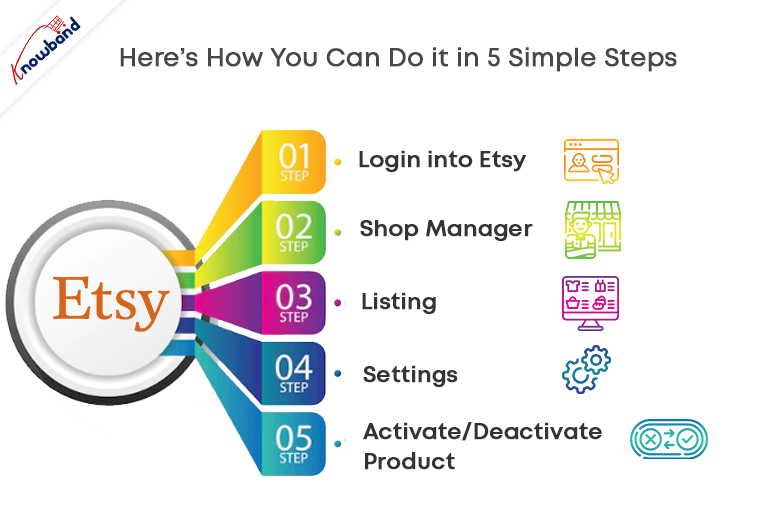
Etsy provides a very easy and quick way to add products in your shop. Adding products in your shop is a cakewalk, through which you can showcase your products to your customers. This article will walk you through the process of adding a product or activating/deactivating the product listing in your Etsy shop.
A) STEPS TO ADD A PRODUCT ON ETSY MARKETPLACE:
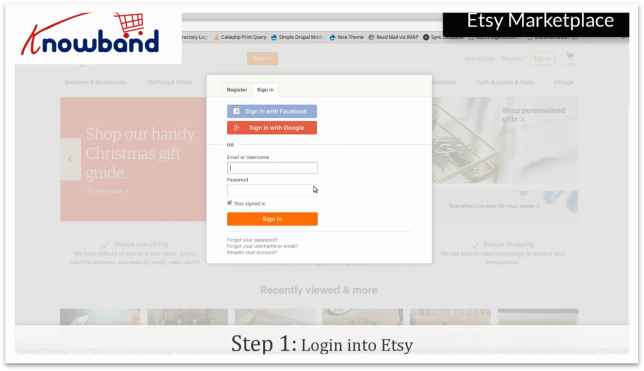
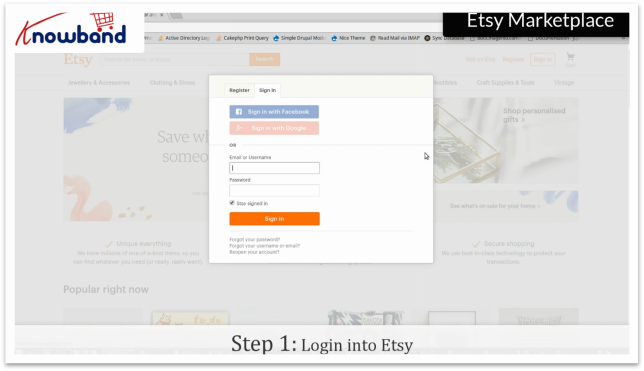
Step 1: Login into Etsy
Got to https://www.etsy.com/. Login to your Etsy account by clicking the “Sign in” option provided in the top right corner.
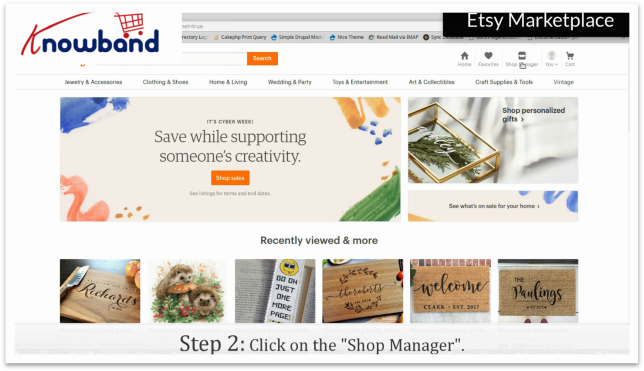
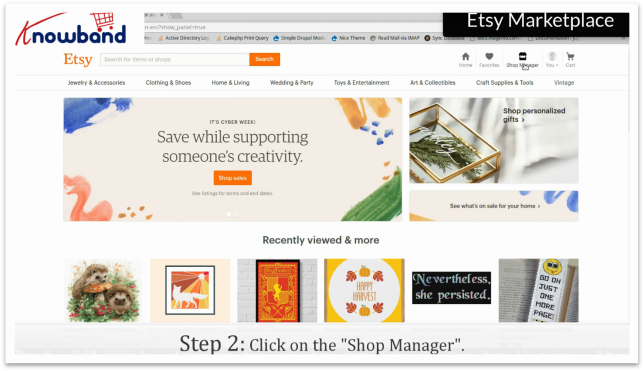
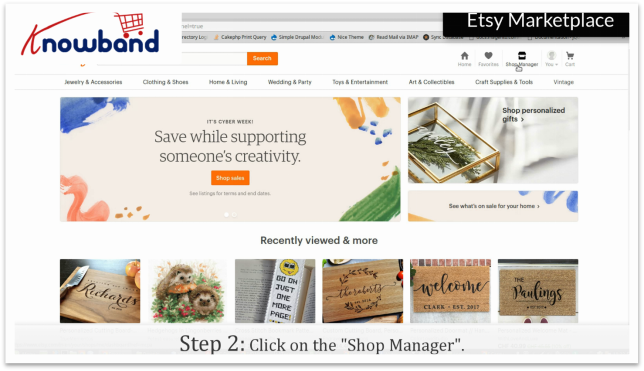
Step 2: Shop Manager
After you have successfully logged in, click on the “Shop Manager” in the top right corner.
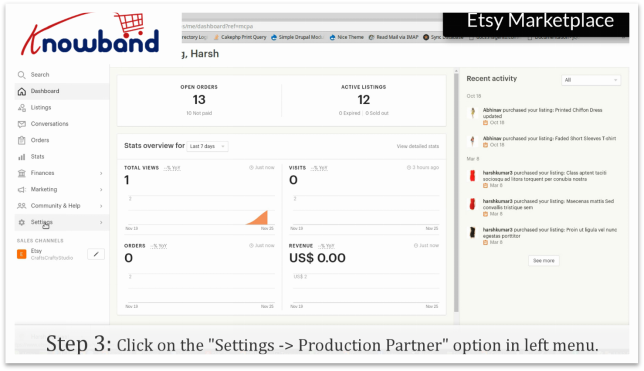
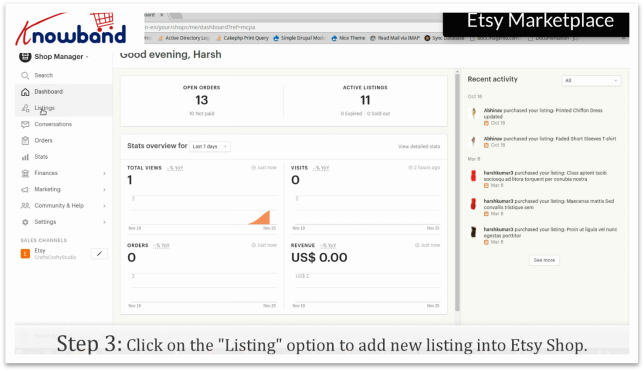
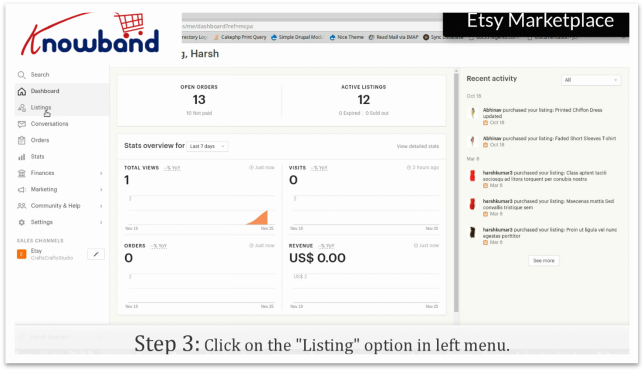
Step 3: Listing
In the “Shop Manager”, you will find an option “Listings” on the left menu. The option displays all the products you have added to your marketplace.
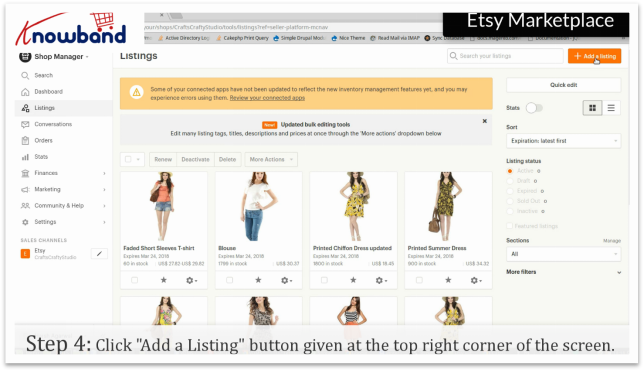
Step 4: Add a listing
Click on the “Add a listing” button in the top right corner, the option lets you add the product’s photo and other details of the product.
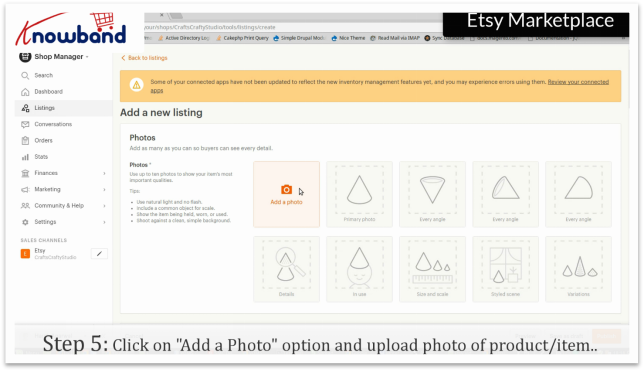
Step 5: Adding Photo
Click on the “Add Photo” option and upload a photo of the product/item. After this, you will be able to see the image of your products listed by you.
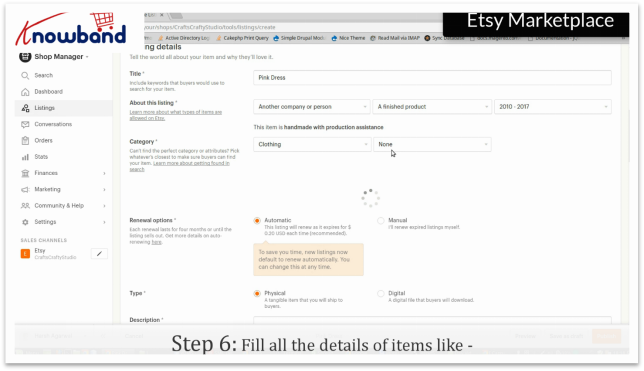
Step 6: Add details
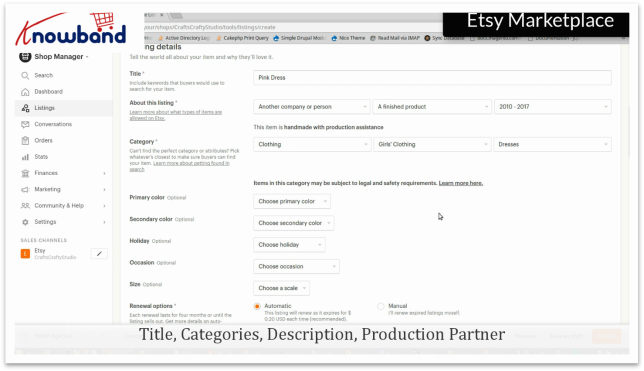
Fill all the details of the product/item like title, categories, description, production partner, a primary and secondary color, size, price & quantity of the product and other relevant details. The description of the product should be accurate and meaningful so that customers can understand the product in detail and can go for instant purchases without any inconvenience.
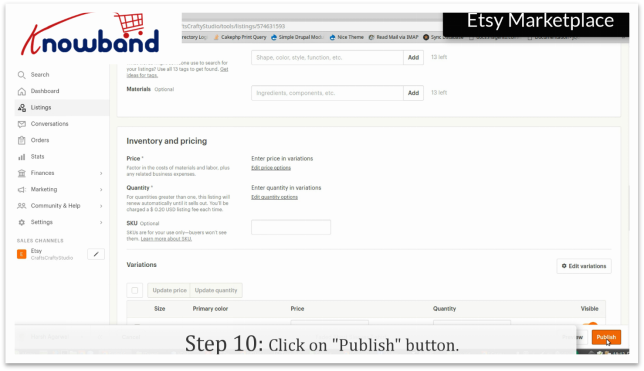
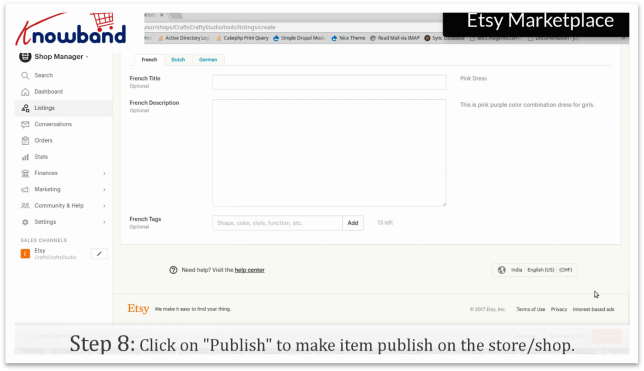
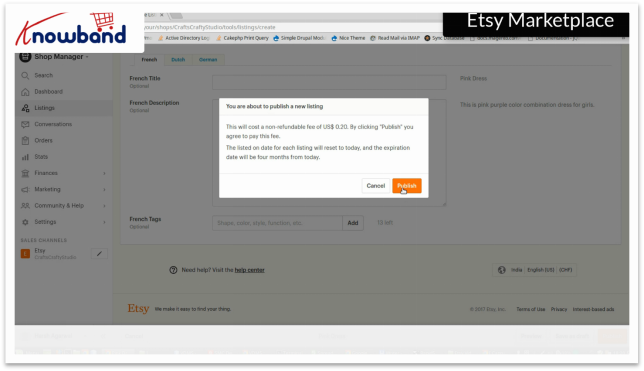
Click on the “Publish” button to make items publish in your store. Now your products are visible on the front end of Etsy Marketplace.
Once the above steps are completed, the item will be public on your store.
Video for adding a product on Etsy
B) STEPS TO ACTIVATE/DEACTIVATE THE PRODUCT LISTING ON ETSY MARKETPLACE:
Etsy also offers sellers access to renew/hide and activate/deactivate items from the Etsy Marketplace. There are times when you add product to your store and you can’t have enough supply to deliver. That is when, Etsy lets you deactivate your listings for items you can’t provide to your customers and then reactivate them later.
After logging in to Etsy. Complete the first 3 steps listed above. After that you can follow the steps as follows:
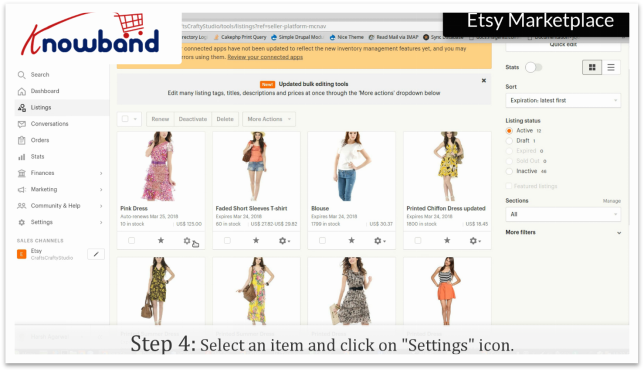
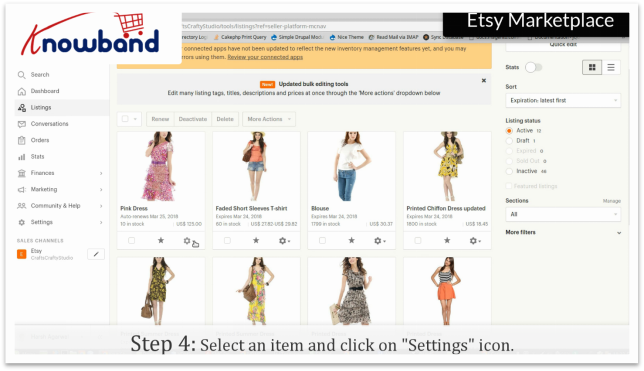
Step 4: Settings
In the listing tab, there is a “Settings” option, which will give you options to manage the product.
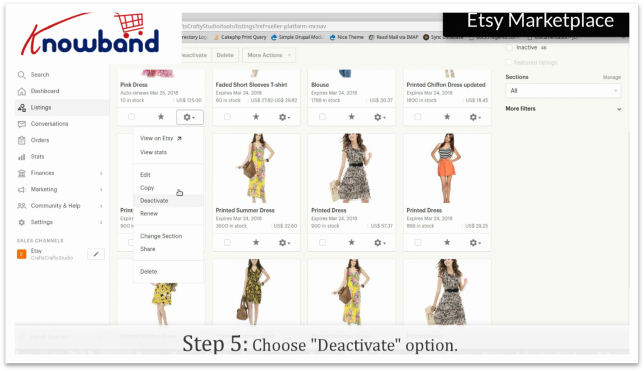
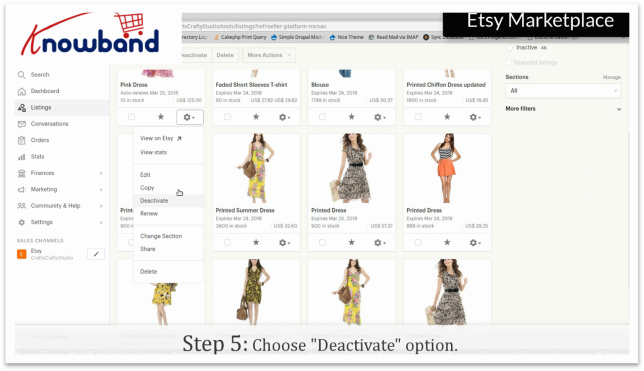
Step 5: Activate/Deactivate Product
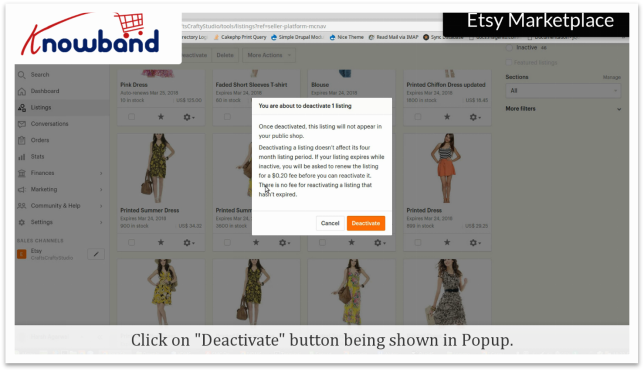
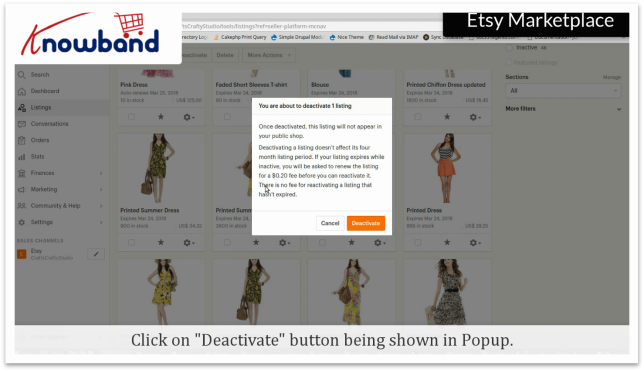
Click on the “Activate/Deactivate”. The store will ask for confirmation, on confirming the same, the store will activate/deactivate the product. Once deactivated, the listing will not appear in your public shop.
For reactivating the items, the seller needs to check the whether the listed item is expired or not. For expired items, the seller needs to pay 0.20 USD to renew the item. For inactive items who haven’t expired, reactivating is free of cost.
Video for activating/deactivating product listing on Etsy Marketplace:
Over to you:
Selling on Marketplace like Etsy could be the best decision as it provides huge audience access all over the world. This could let sellers earn a huge chunk of profits. Now the decision of selling on a Marketplace is totally up to you! The Etsy marketplace is doing everything to be the best in the industry and certainly, a good opportunity for you get on the bandwagon. Are you looking to integrate your store with the Etsy marketplace? Knowband’s offers Etsy Marketplace Integration for various CMS platforms like PrestaShop, Magento, Shopify, and OpenCart. It offers an easy interface to integrate your store into an Etsy marketplace.
Etsy offers sellers the access to renew/hide and activate/deactivate items from the Etsy Marketplace.There are times when you add product to your store and you can’t have enough supply to deliver. That is when, Etsy lets you deactivate your listings for items you can’t provide to your customers and then reactivate them later.
Login to your Etsy account by clicking the “Sign in” option provided in the top right corner.
Step 2: Shop Manager
After you have successfully logged in, click on the “Shop Manager” in the top right corner.
Step 3: Listing
In the “Shop Manager”, you will find an option “Listings” in the left menu. The option displays all the products you have added in your marketplace.
Step 4: Settings
In the listing, there is a “Settings” option, which will give you options to manage the product.
Step 5:Activate/Deactivate Product
Click on the “Activate/Deactivate”. The store will ask for confirmation, on confirming the same, the store will activate/deactivate the product. Once deactivated, the listing will not appear in your public shop.
For reactivating the items, seller needs to check the whether the listed item is expired or not.For expired items,seller needs to pay 0.20 USD to renew the item.For inactive items who has n’t expired, reactivating is free of cost.
Watch how to Activate/Deactivate listing at Etsy Marketplace?
There are many aspects to manage the online business like: marketing strategy, social media optimization, email marketing- the list goes on and on. Present time most of the online merchants offering free shipping to their customer & they see the result free shipping generates more sale. Knowband offers you a Prestashop Free Shipping Manager Addon.
The Knowband Prestashop Free Shipping manager addon allows the admin to offer free shipping to the customers. Not just this, the admin can even apply shipping charges when the cart value is below a certain limit. All this can be done following few simple customization option at the back end of the admin interface of the module.
The shipping charges are determined by two factors. They are listed below:
The cart value or the total price of the order: The store admin can determine the shipping charges as needed when the cart value of the shopper is below a certain limit. This limit can be set by the store owner himself.
The total weight of the order: The store admin can even charge shipping amount when the weight of the parcel exceeds beyond a certain permissible limit.
1.1 Benefits of Merchant
The Prestashop free shipping manager addon is aimed at making it easier for the store owner to manage the shipping cost of their website. Listed below are some of the objectives that can be achieved by the Prestashop extension:
Terms & Conditions: It allows the store owner to set the terms and conditions for the shipping of the eCommerce store. The admin can offer free shipping or charge an amount as per his wish.
Free Shipping by Price: It allows the store owner to set the price of cart value below this price admin won’t be allowed the Free shipping by price.
Free Shipping by Weight: It allows the store merchant to set the minimum and maximum limit of the weight of the package below this weight they can charge the shipping cost.
Free Shipping by Zone: It allows the PrestaShop admin to select the country where they want to offer free shipping by zone.
Free Shipping by Carrier: It allows the owners to select the carrier option which his/her want to provide the free shipping option.
Look and Feel Settings: In this option admin can change the background color, button color and border color of the free shipping block.
Customer Selection: In this option, Prestashop store merchant can select the customer according to the need.
The Free shipping comples customer to add more product to the shopping cart.
These Prestashop addons motivate customers to spend more time on your website and your customers will feel in control of what they’re spending on.
1.2 Benefits of Customer
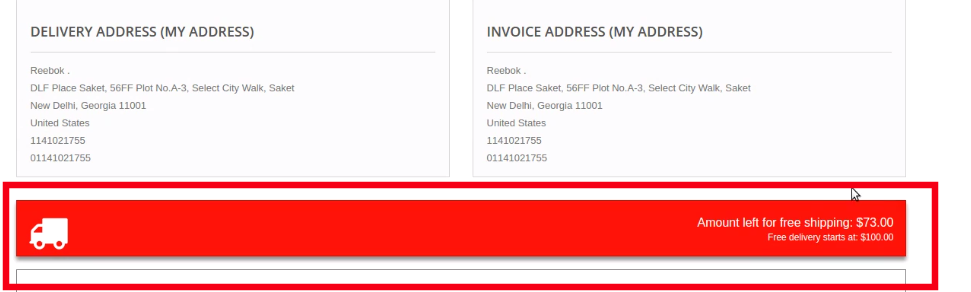
This Prestashop Free Shipping manager module shows a block on cart summary which gives the exact information about the condition.
This Prestashop Free Shipping manager extension gives them access to a customer to buy the product with free shipping.
2.0 Installation
After purchasing the Prestashop Free Shipping manager addon, you will get following files as listed below in the apk folder:
freeshipping.zip (contains source code of the module)
User Manual
In order to install the extension in your Prestashop store follow the below mentioned steps:
Unzip the freeshipping.zip file. It would contain a number of files and folders as shown below
Copy the entire content, that is, the files and folders of the unzipped folder. Paste the same into the “Modules” folder of your store’s directory. Follow the below-mentioned address path – Root Directory/modules/.
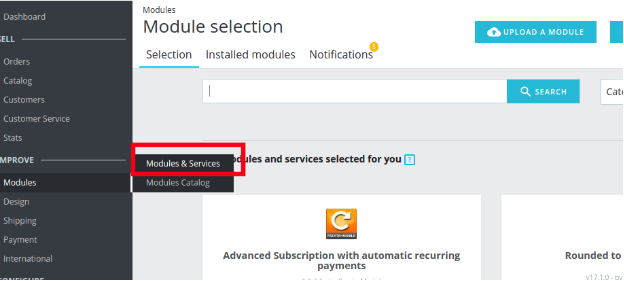
The plugin is all set to be installed in the store. Go to the Store Admin and then to‘Modules and Services’. Your module will be shown as below –
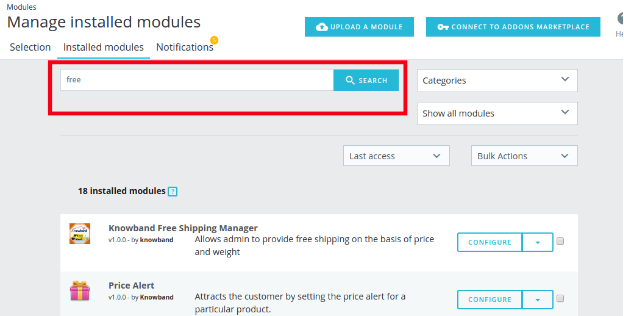
In case, you are not able to find module in admin modules list, you can do so by searching for it with the details mentioned below-
Keyword – Free Shipping
Category – Front office
Filter By – Installed & Not Installed / Enabled & Disabled
Click on the “Install” button just next to your module. It would show a pop-up for your confirmation. Click on “Proceed with the installation” option. This step will install the module and show notification – “Module(s) installed successfully”.
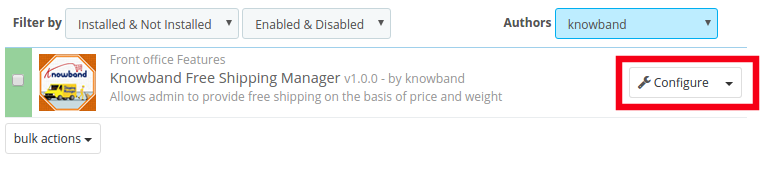
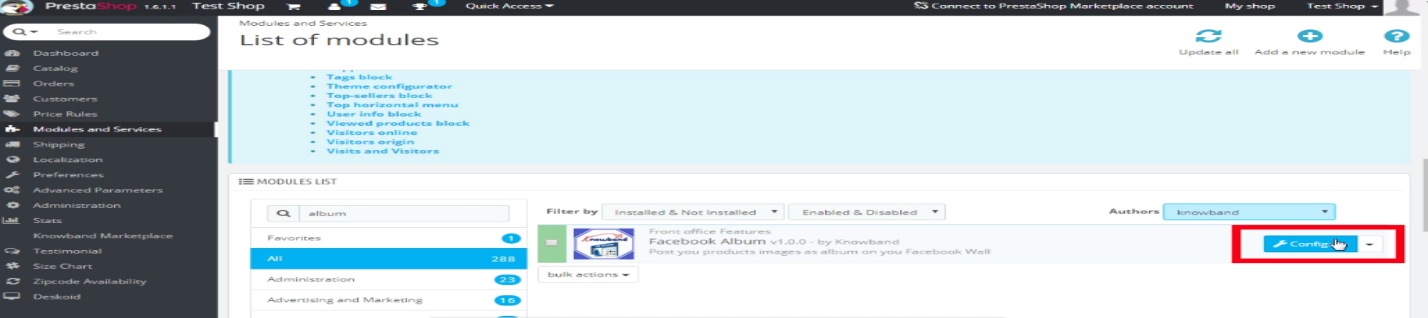
Once the installation is complete, you can get an access to the admin interface of the module by clicking on the “Configure” button.
3.0 Admin Interface
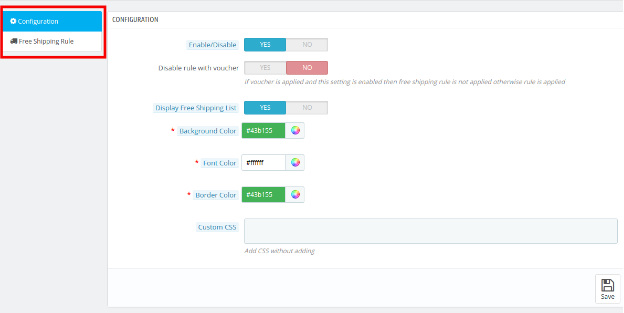
The Prestashop Free Shipping Manager addon is fully configurable. The best thing is the configuration settings can be updated via the admin interface by just clicking the buttons. No code changes are required for the same. The admin interface of the extension has two customization options. They are listed below:
1- Configuration
2- Free Shipping Rule
These options are discussed in detail below:
3.1 Configuration Settings
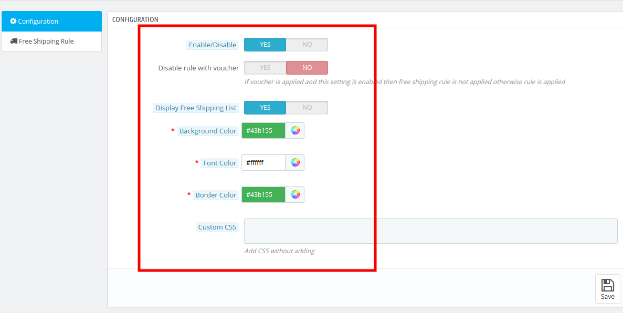
The ‘configuration’ tab of the Prestashop Free Shipping Manager extension offers the seven options to admin that are shown on image below:
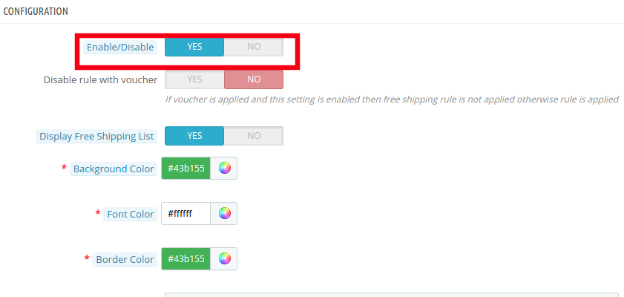
3.1.1 Enable the module: In this section admin can enable/disable the module. This can be done with a button toggle as shown below.
Listed below are some of the options that are offered to the store owner by Prestashop Free Shipping Manager Module.
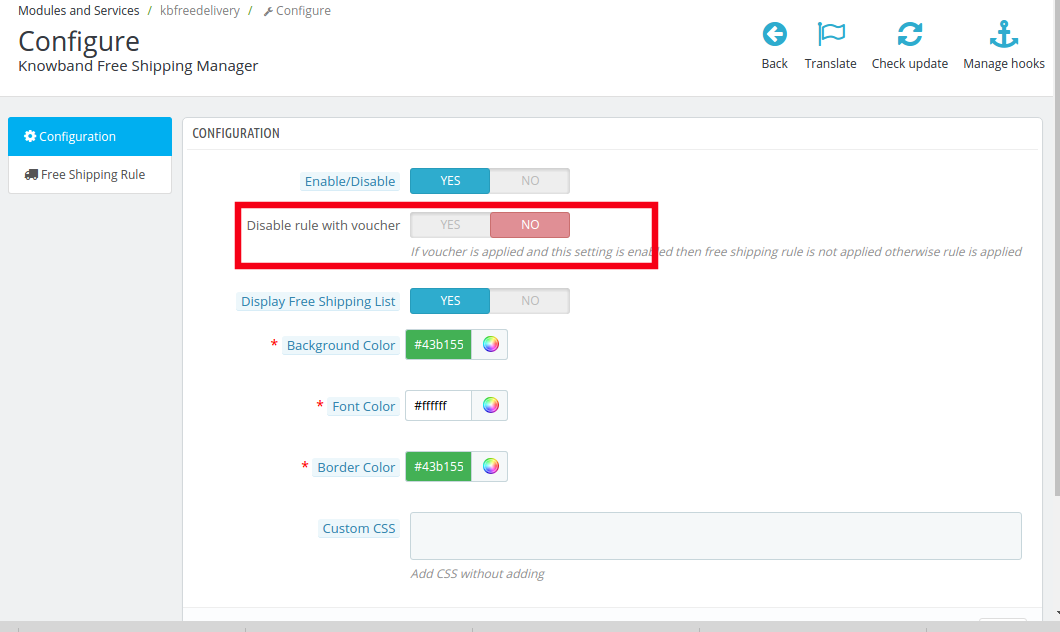
3.1.2 Disable Rule With Voucher
Once this setting is disabled, the free shipping offer will not be applicable even when the voucher is applied.
As it is disabled, the free shipping rule will not be applicable if the voucher is applied on any purchase.
In case, you want to offer free shipping even if any voucher code is applied, then, you can do so by enabling the button.
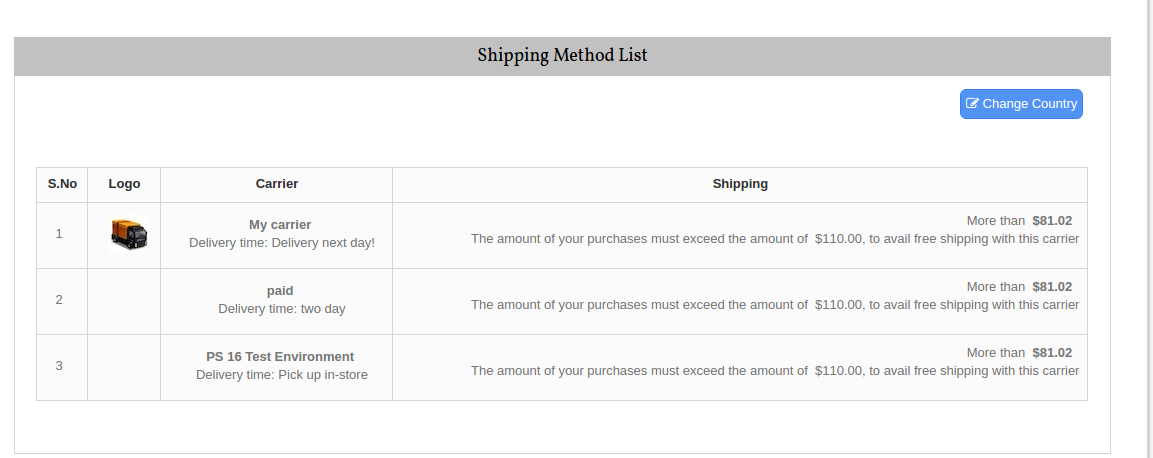
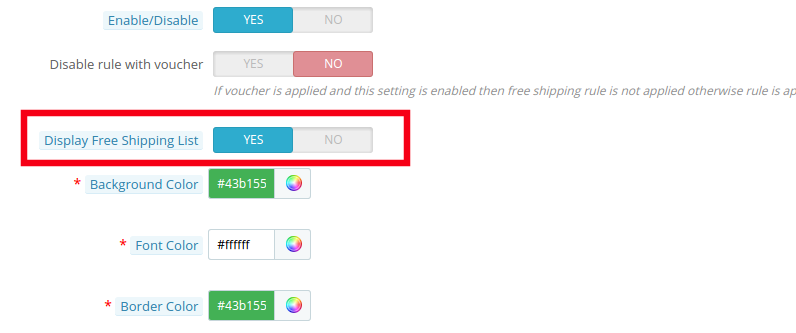
3.1.3 Display Free Shipping List
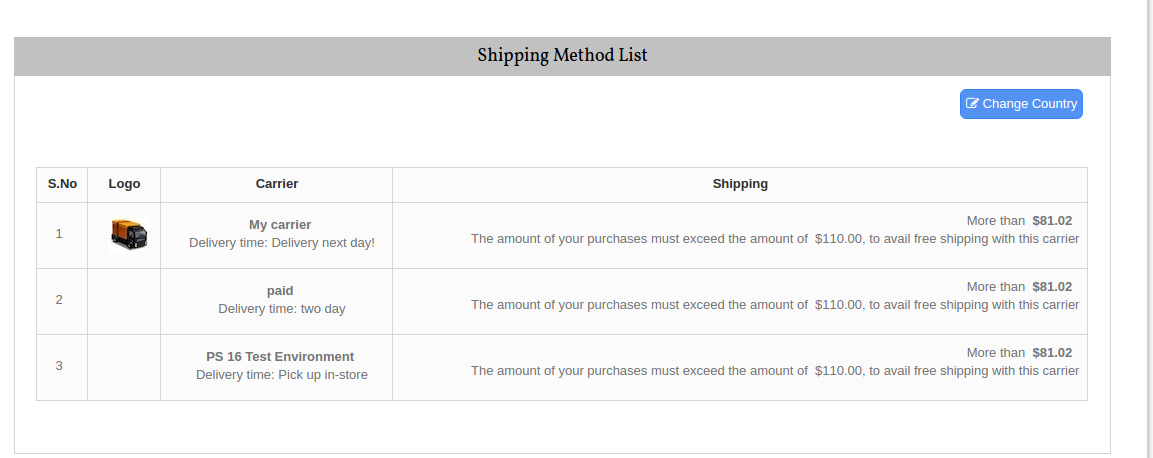
The various free shipping methods can be displayed to the visitors on the website. The list will be shown as mentioned in the image below.
However, if the Prestashop store admin wants to remove the feature, he can do so by disabling the button mentioned below.
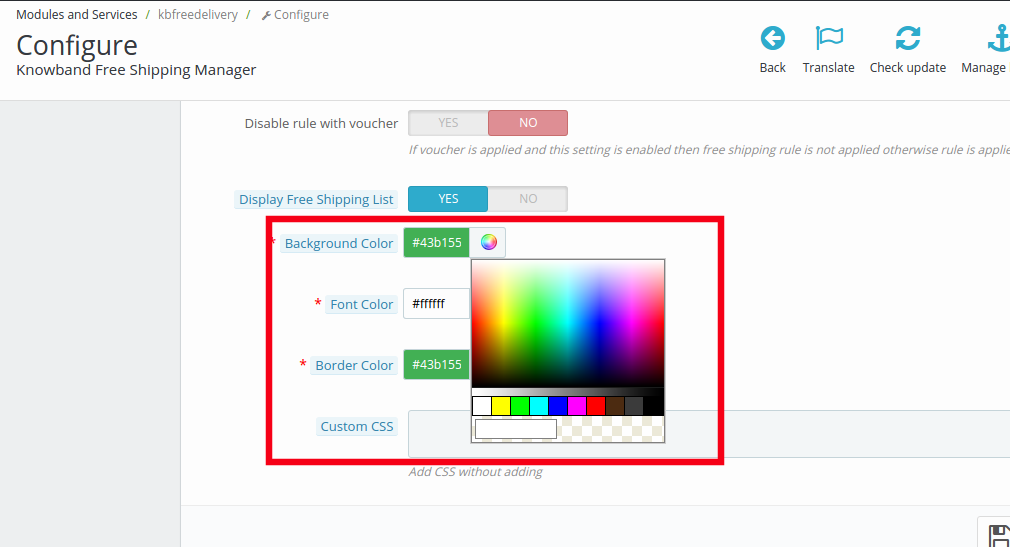
3.1.4 Background Color
The color picker can help you change the background color of the free shipping display.
You may the color that suits the theme of your Prestashop store.
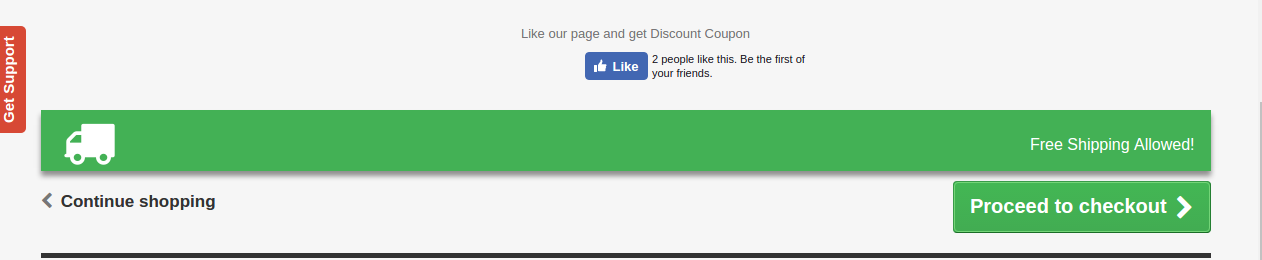
The message will be displayed in the front end of the website as shown in the image below.
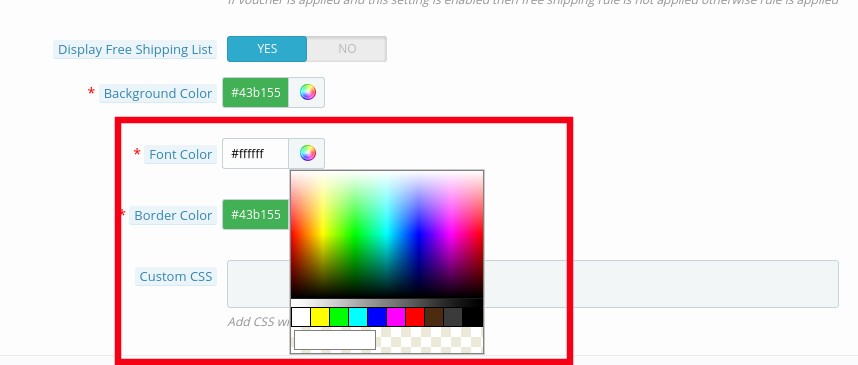
3.1.5 Font Color
The font color of the message that is to be flashed on the website can be picked and set from here.
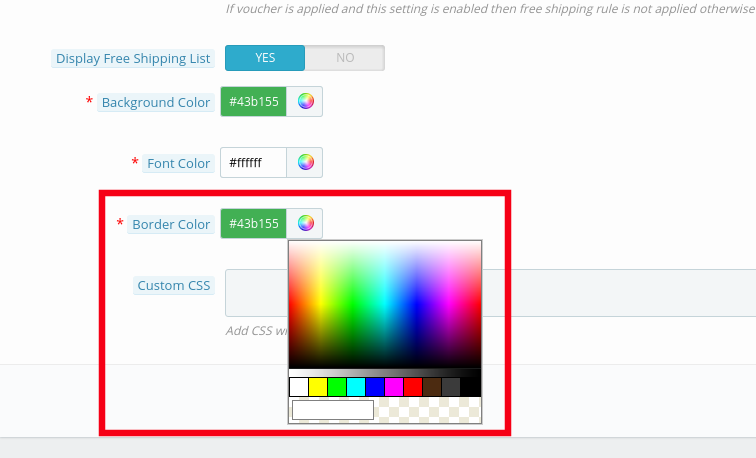
3.1.5 Border Color
The entire block can be customized as per the requirement of the website. The border color of the box can be selected and changed from color picker as shown in the image below.
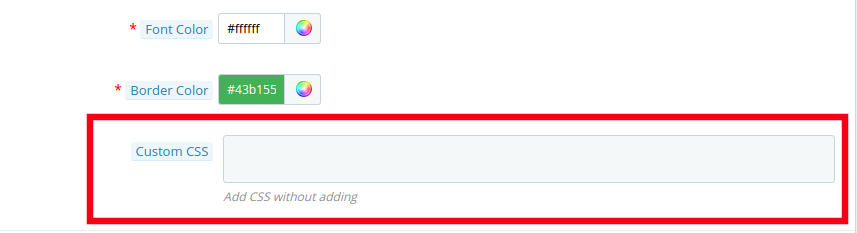
3.1.6 Custom CSS
Any custom change in the look and feel of the module can be done from here. The store admin can customize it by entering custom CSS code in the block shown below.
3.2 Free Shipping Rule
The online merchants get full access to change and modify the terms and conditions of shipping method on their website. All this can be done by just filling up few information.
Follow the steps mentioned below in order to make the changes:
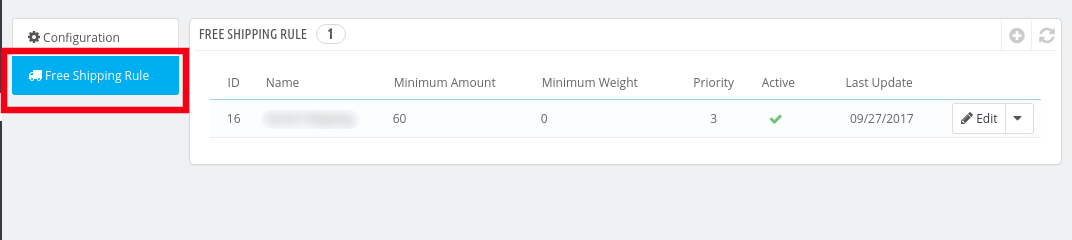
Go to “Free Shipping Rule”. You’ll be redirected to the interface where you will get the list of the rules already fixed by you.
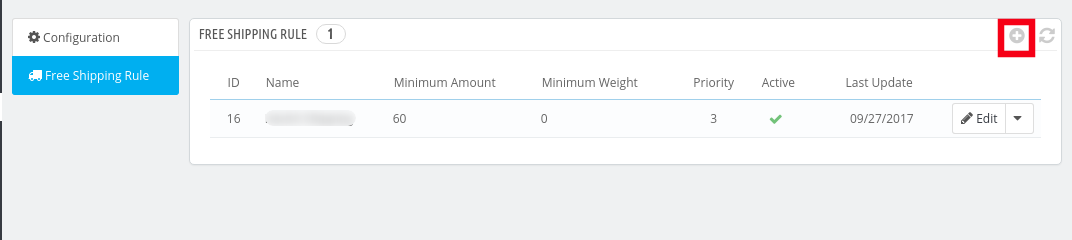
In order to add new rules click on the ‘+’ sign on the right end of the page as shown in the image below:
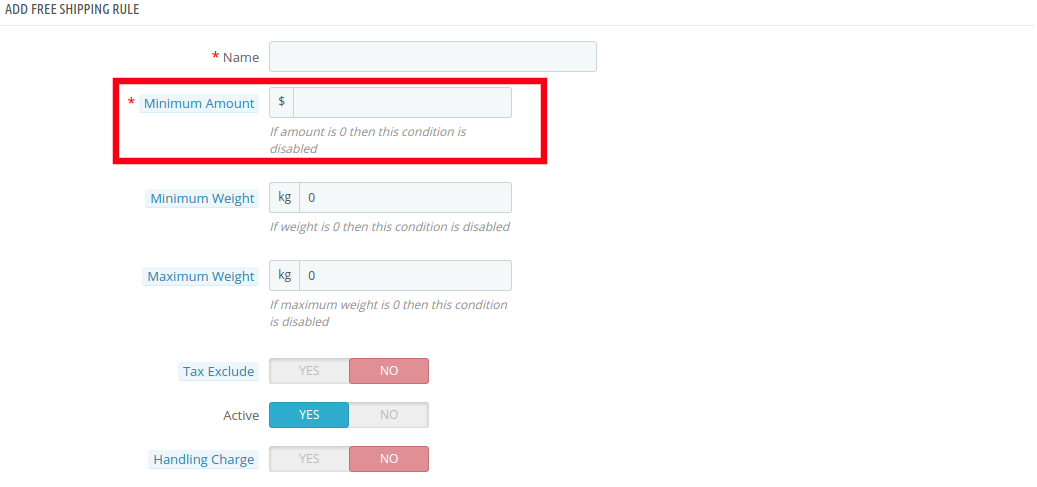
You’ll be redirected to “Add Free Shipping Rule” page.
Listed below are some of the information that you need to enter in order to set the free shipping rules.
Enter the Name: Enter the name of the shipping rule. It can be anything as per your convenience.
Minimum Amount: Enter the minimum cart value at which you want to offer the free shipping by price options. This facility will be disabled at the store if the minimum amount is ‘0’.
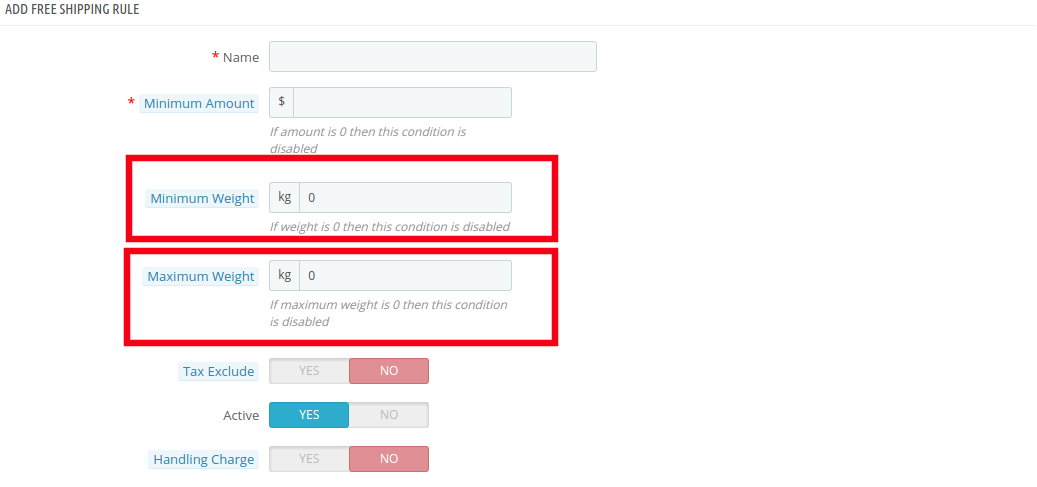
Minimum Weight and Maximum Weight: Set the minimum and maximum weight of the parcel beyond which you are looking to charge the shipping cost. Below this limit, the site will by default offer free shipping facility. The weight is to be entered in Kilogram.
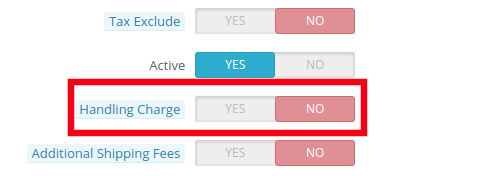
Tax Exclude: You can include the tax or exclude it from the shipping charges by enabling or disabling the button mentioned below.
Handling Charge: The merchant can even include the handling charge in the shipping cost by enabling this button. Otherwise, he can leave it disabled.
Additional Shipping Charge: In case of any additional shipping charge, the store owner can enable the button shown in the image below.
Zone: The Prestashop Free Shipping Manager Addon even allows the store admin to set free shipping facility as per the geographical location of the customer. The admin can choose the zones where he wants to offer this facility and give the facility to customer to buy the products free shipping by zone.
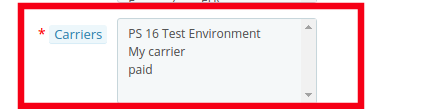
Carrier: In this section prestashop store admin can selectall the carrier options in which you would like to include this facility.
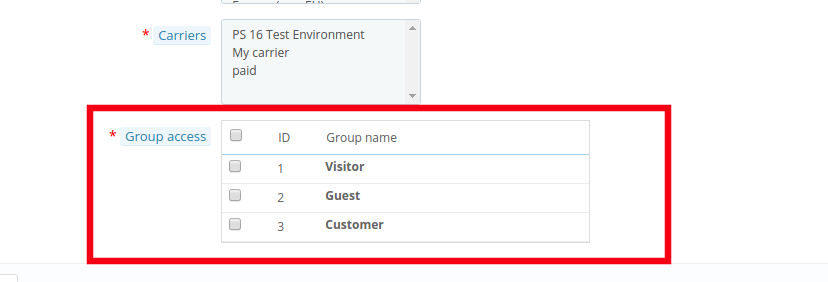
Group Access: The store admin can offer the free shipping facility to the Registered Customer, the Visitors or the New Customers as per his wish. Just check the options that you want to include in the feature.
4.0 Website UI
The changes done in the prestashop store back-end will be reflected in the front-end of the website.
4.1 Free Shipping Block
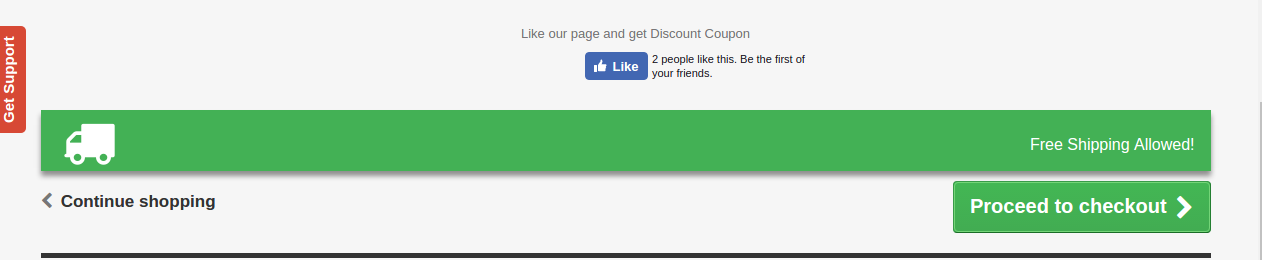
The free shipping block will be shown as mentioned below.
4.2 Free Shipping Limit
In case you have fixed any limit for the offering free shipping than the same will be shown on the cart of the shopper. If the customer select the product below the cart limit this block shows a block on cart summary which gives them the exact information on the condition to fulfill.
4.2 Free Shipping List Display
The entire list of the free shipping methods will be displayed on the website if the functionality is enabled by the store admin. This can provide a better user experience and ensure more transparency during the transaction.
Now you can try Prestashop free shipping manager module for on your Prestashop website. KnowBand Prestashop Free Shipping Manager Addon helps you enagege more customer to your store & increase the customer base.
Creating a product-based photo album on Facebook has always been a time-consuming and painful process for the eCommerce store owners. While the social media marketing is the key to success in the eCommerce ecosystem, getting rid of the hurdles have always been a tough task.
Prestashop Fb Album module is one such addon that makes the job easier for the Prestashop store owners. This powerful tool can increase the customer engagement along with the number of Facebook followers of your online store.
1.1 Project Objectives
The module can be used by the store owner to achieve following objectives:
The Prestashop plugin allows the store owner to create a new album on Facebook directly via the admin panel of the module.
The admin can even customize the existing albums.
The visitors can perform a product search via a simple product name or brand
Select the desired photos of a particular product and post the complete album on the Facebook page with just a click of a button
Enhances the look and feel of the Facebook page with alluring visual communication
2.0 Installation
Once the purchase and download is complete, you’ll find following files in the module folder:
1. facebookalbum.zip (It contains source code of the module)
2. User Manual
Follow the following steps to install the extension:
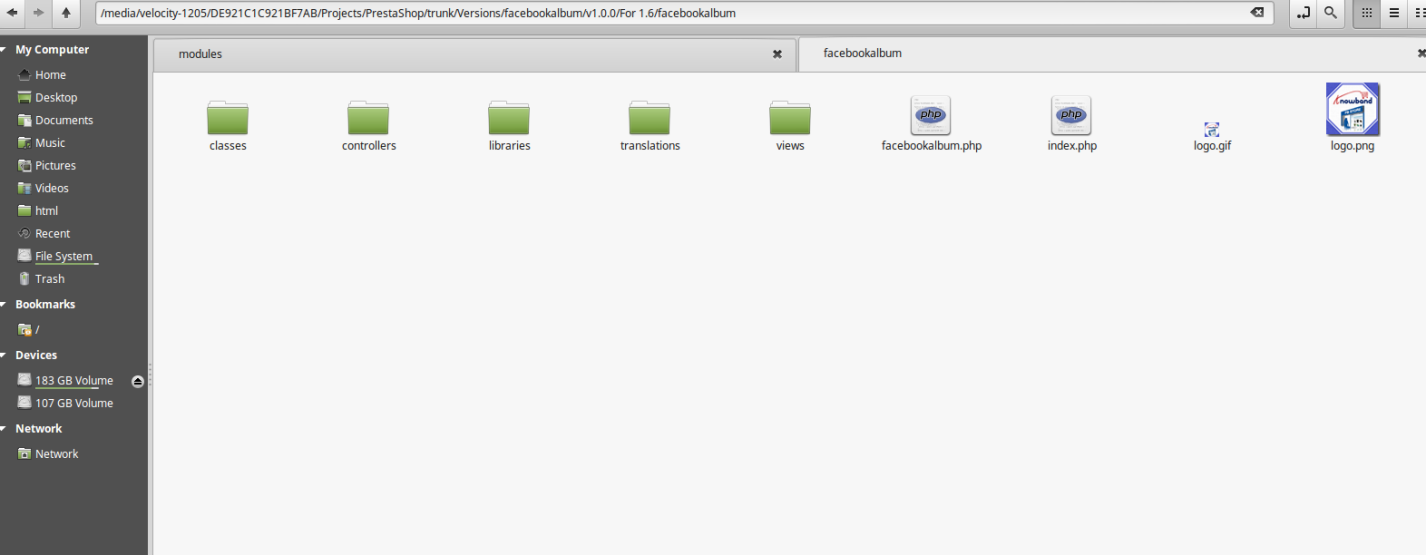
Unzip the facebookalbum.zipfile. It would contain files and folders as shown in the image below.
Copy all the files and folders of unzipped folder into your store “modules” directory on the path – Root Directory/modules/.
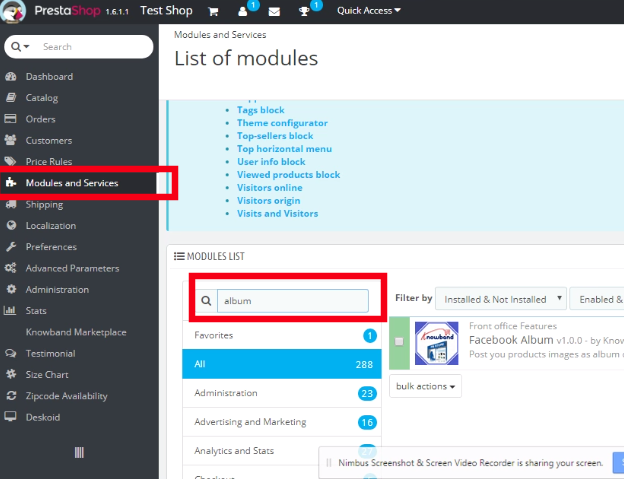
The module is now ready to be installed in your store. Go to the Store Admin and then to Modules and Services. Seach the name of your plugin in the Search tab, as shown in the image below.
Click on “Install” button to install the module. It would show a pop-up for your confirmation. Click on “Proceed with the installation” option. This step will install the module and show notification – “Module(s) installed successfully”.
The module is now successfully installed and ready for use. You can configure it as per your store requirement from the admin panel.
3.0 Facebook App Creation
Facebook App can be created by following steps mentioned below:-
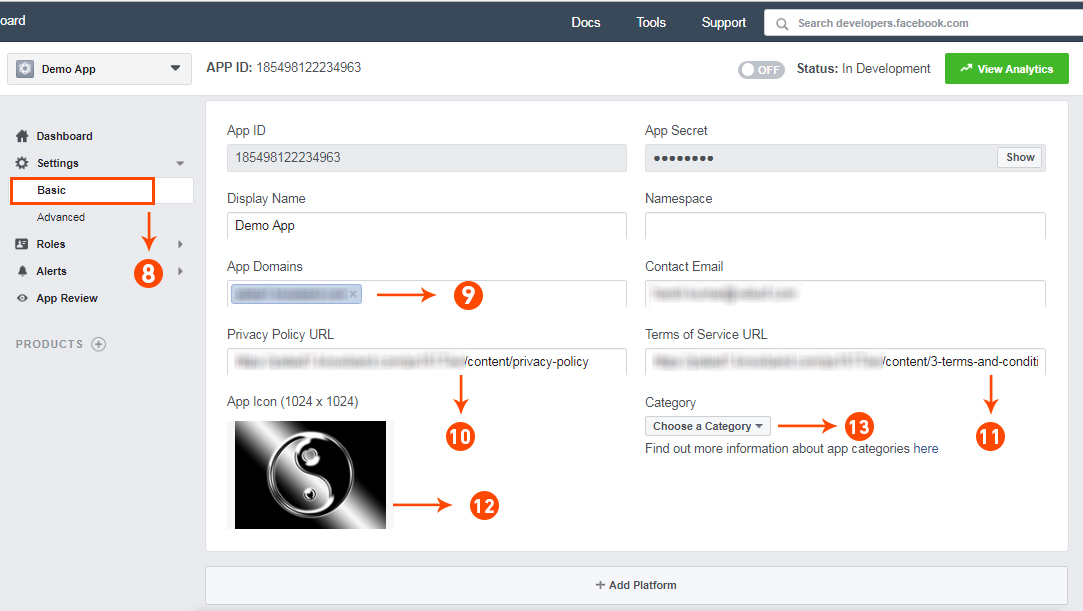
1. Go to given url mentioned below:
https://developers.facebook.com/apps/
2. Click on the “Add a New App”button.
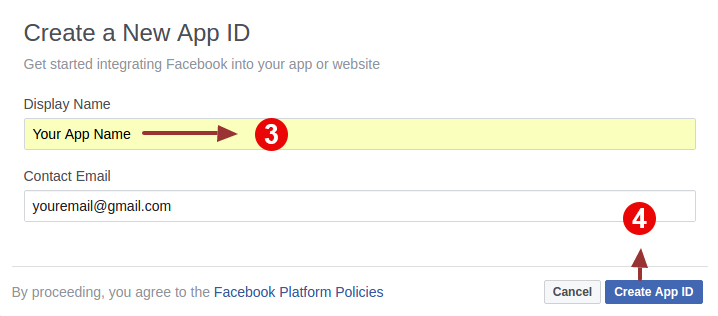
4. Enter your App name and email id, then click on “Create App ID” button.
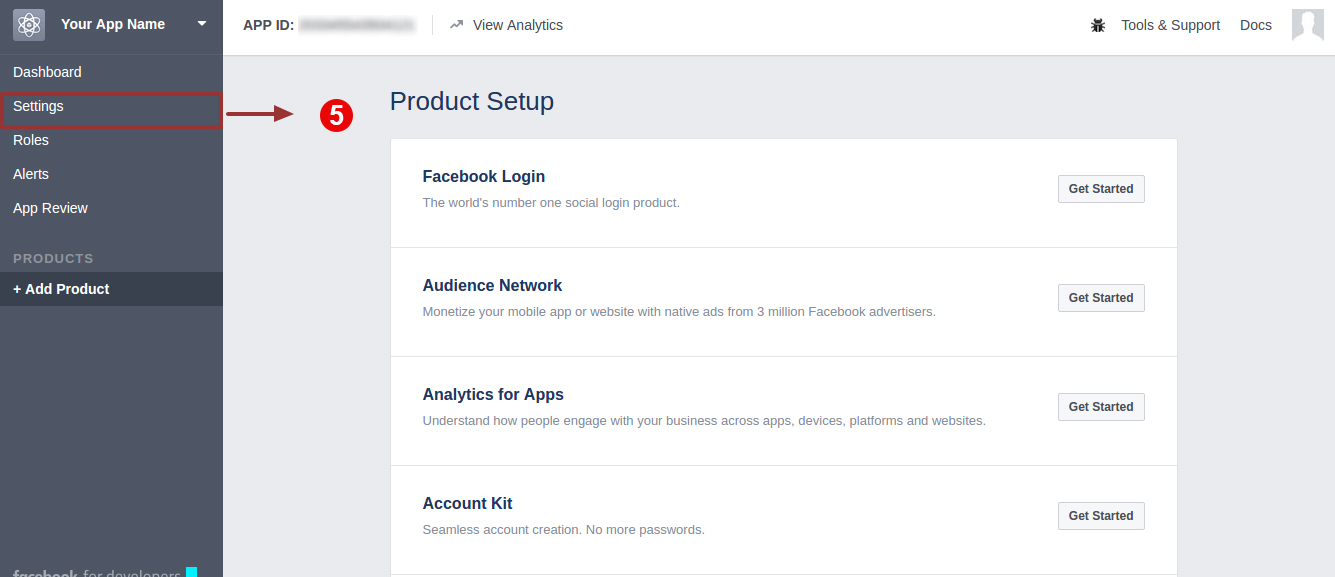
4. Click on “Setting” tab.
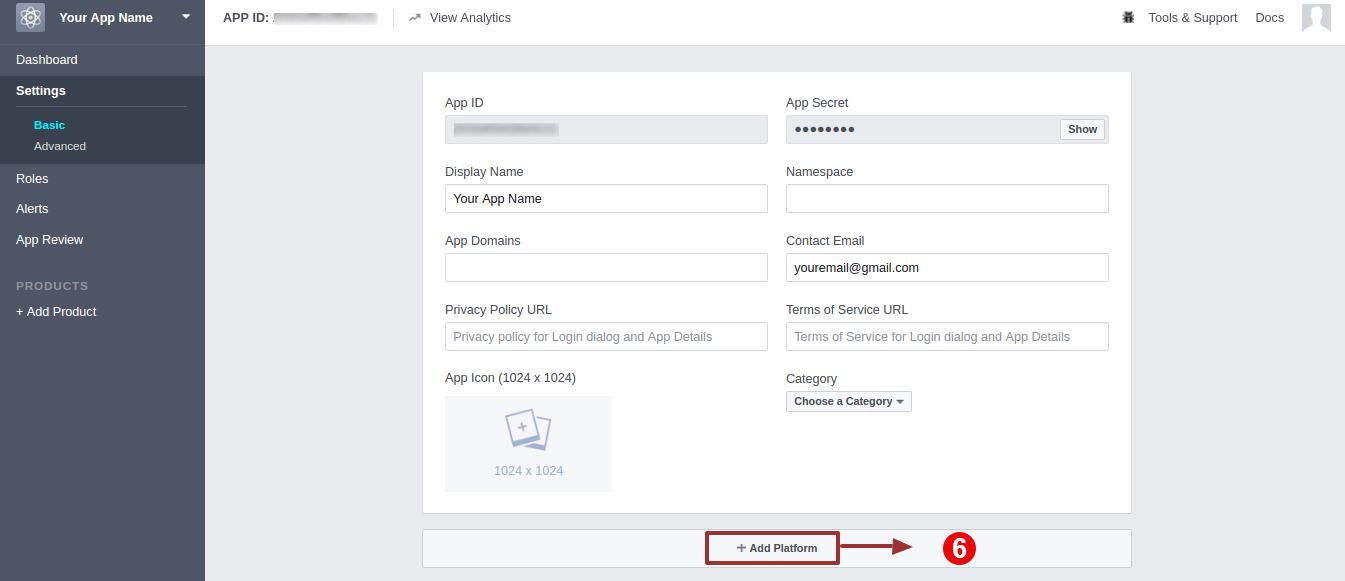
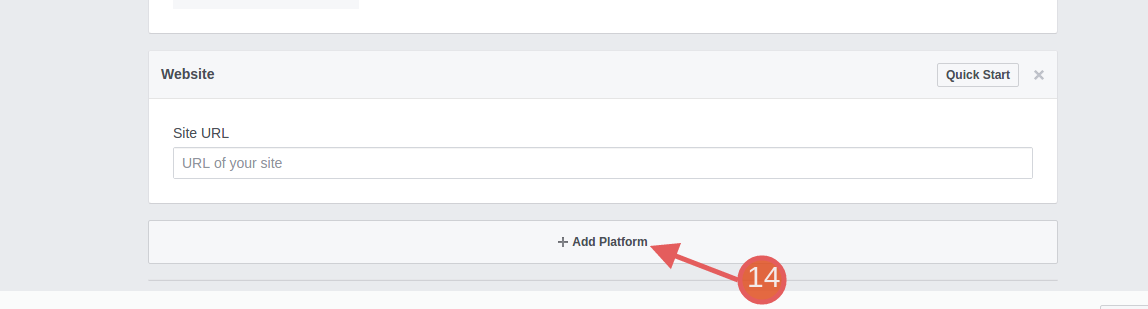
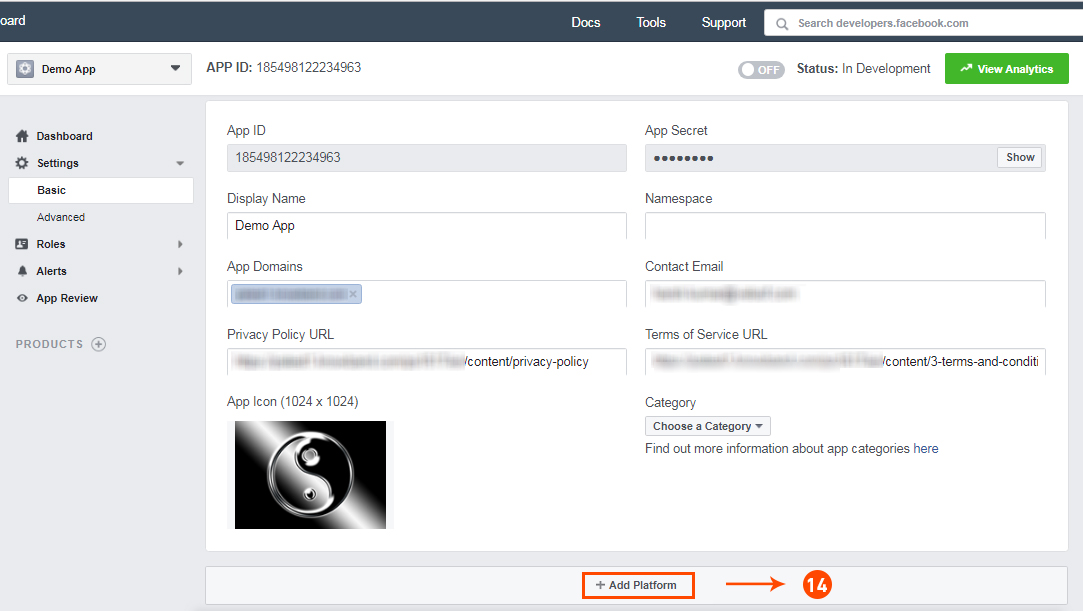
5. Click on “Add Platform”.
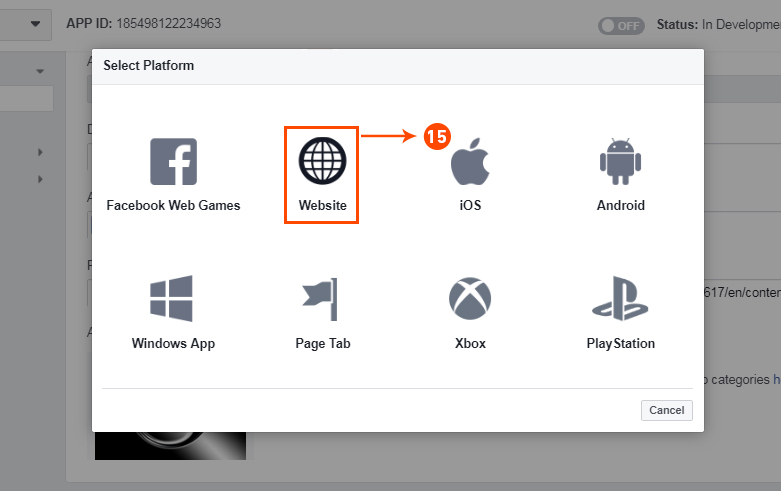
6. Choose “Website” as platform.
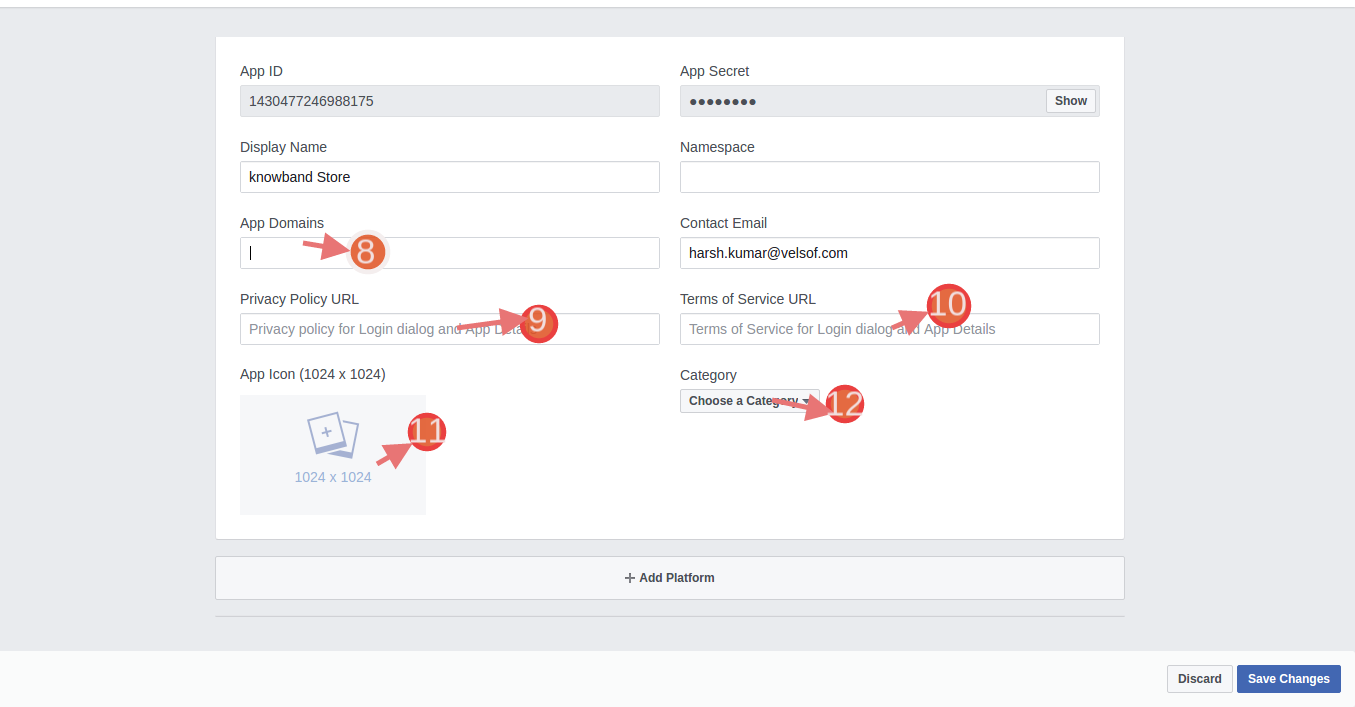
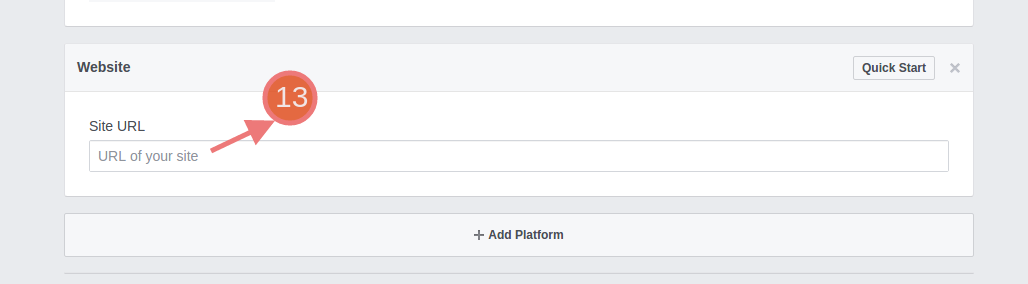
7. Enter your “App Domain” , “Contact Email”,”Privacy url”,”Terms and Conditions url”,”AddLogo”,”Select Category”,“Site URL” and click on “Save Changes” button.
App Domains:
yourdomain.com is correct
yourdomain.com/store is incorrect
www.domain.com is incorrect
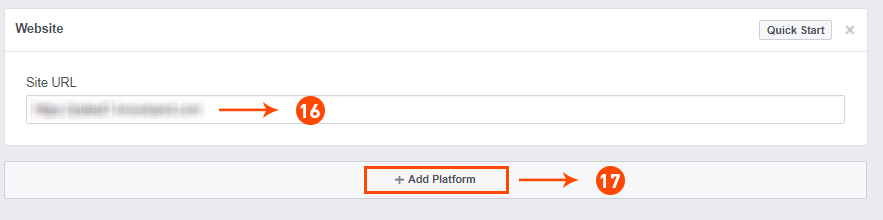
Enter your Site URL.
Once again click on “Add Platform to add Page”
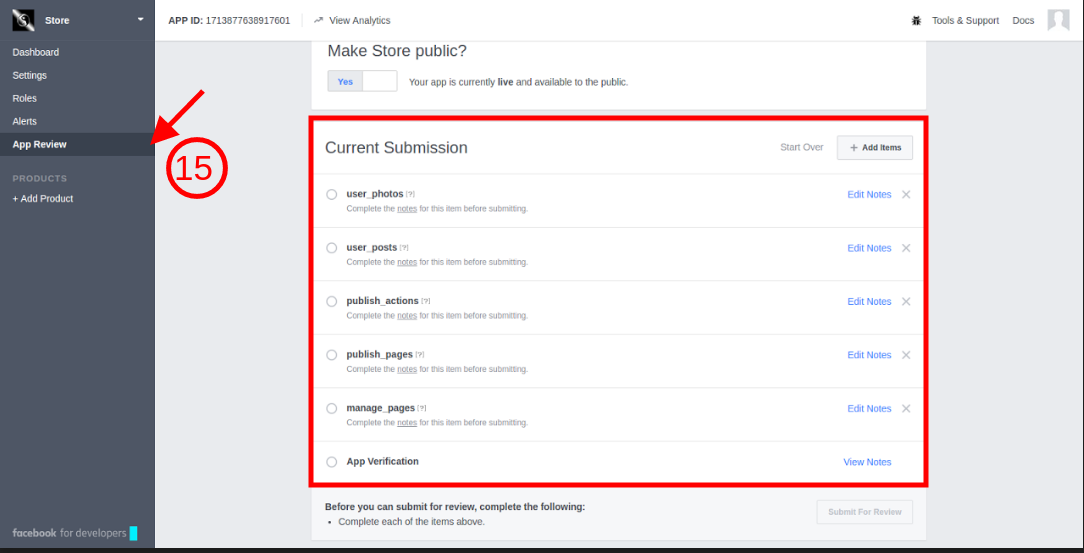
8. Under “App Review” tab:-
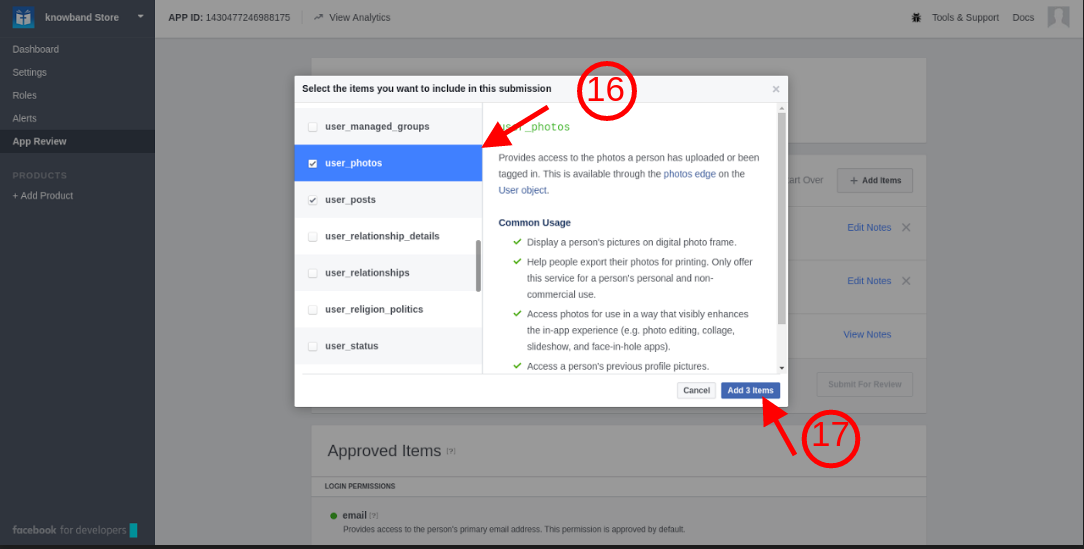
Check all the permissions shown in the tab.
Select ‘User Photo’ tab and then click on ‘Add 4iteks’
After following the steps mentioned above, the screen will be displayed as shown below.
4.0 Admin Interface
The store owner gets complete access to the change the various functionality offered by the plugin. In order to go to the admin panel, click on the ‘Configure’button.
4.1 How to sync Prestashop FB Album Module with the eCommerce store?
On clicking the “Configure” button, the admin will be redirected to the admin interface of the module.
The configuration page includes following setting options:
Facebook App Setting
General Setting
Album Setting
Cron Setting
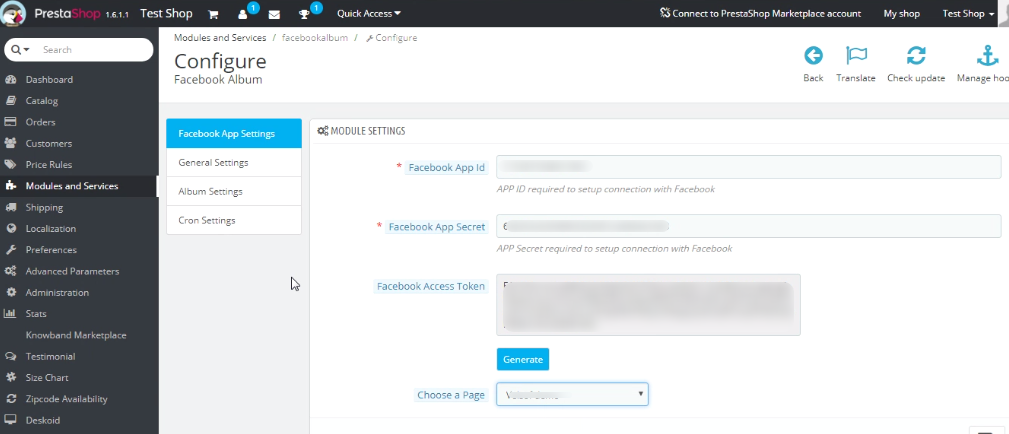
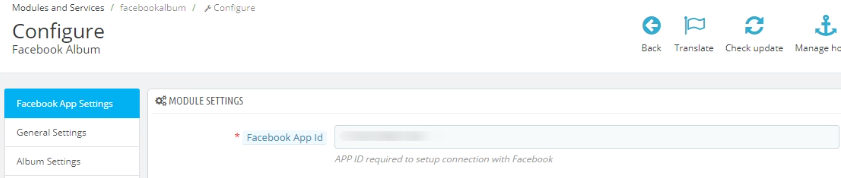
The first step includes the process of ‘Facebook App setting’. That is, the store admin will be asked to save the “Facebook App Id” and “Facebook App Secret” and connect to Facebook as shown below:-
4.1.1 Where can you find the Facebook App Id and App Secret?
The Facebook App Setting includes the process to the sync the Facebook profile of the store owner. Follow the below-mentioned steps:-
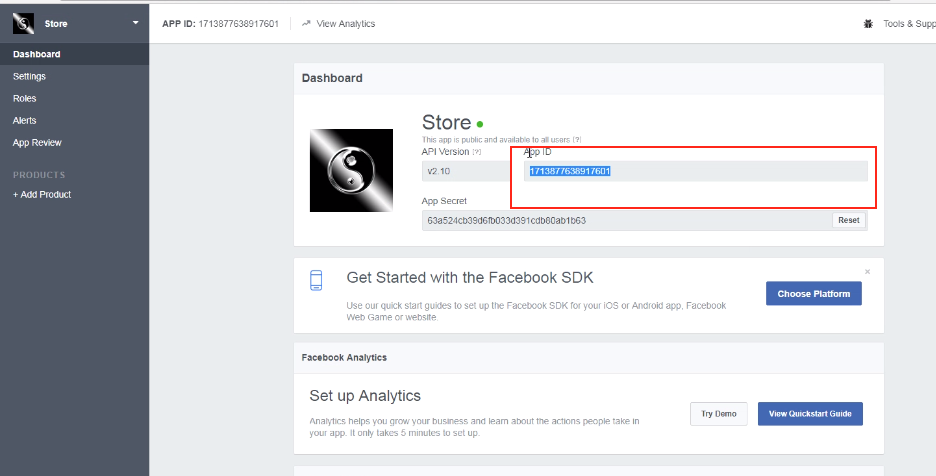
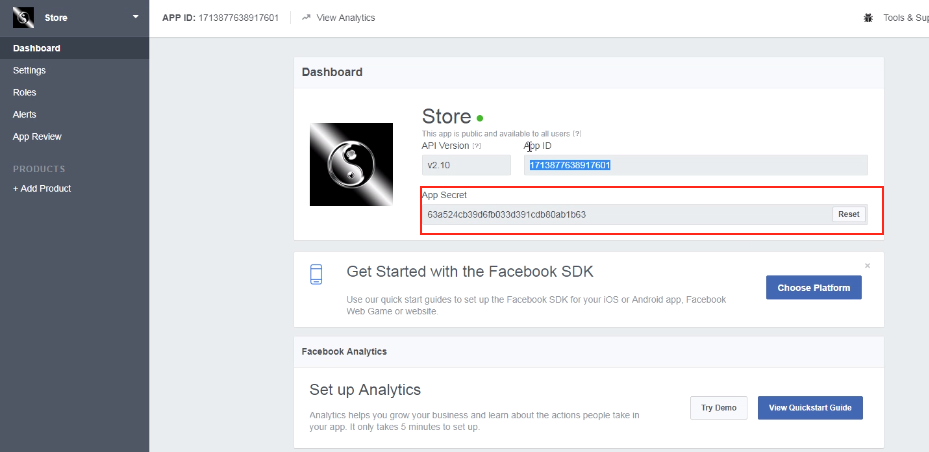
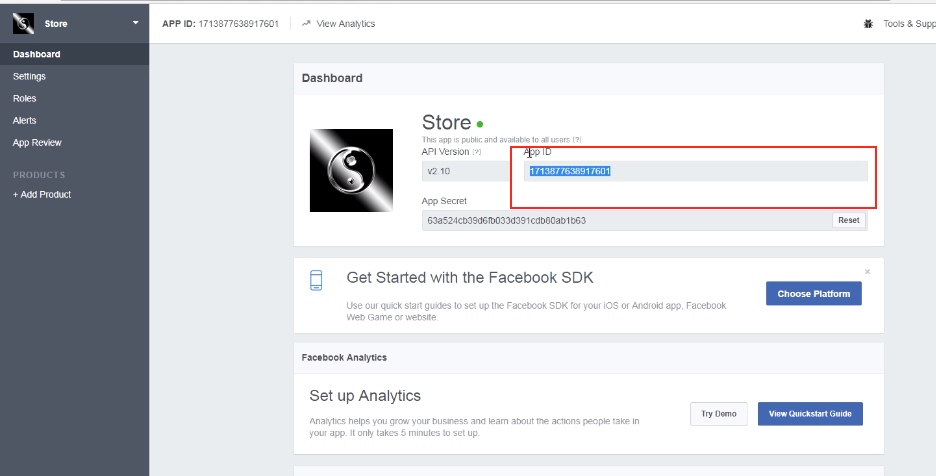
Facebook App Id:- In order to find the App id, go to the dashboard of your Facebook App. Copy the app id from the column shown in the image below and paste it in the setup page of the module.
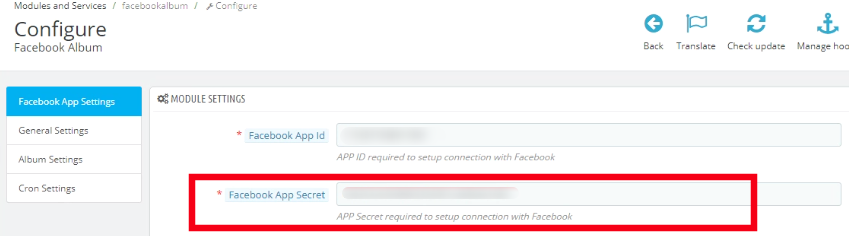
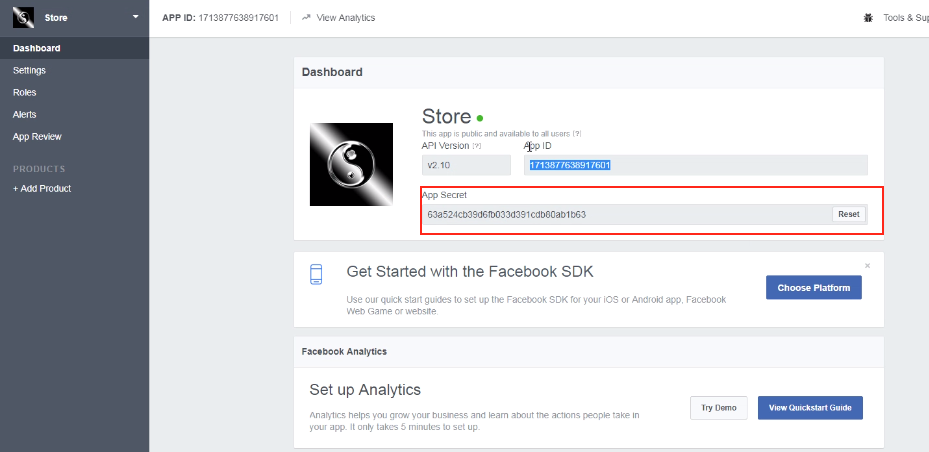
Facebook App Secret:- The next thing you need to do is to copy the Facebook App Secret from the dashboard. Copy the App Secret from the next column as shown in the image below and paste it in the admin interface of the module.
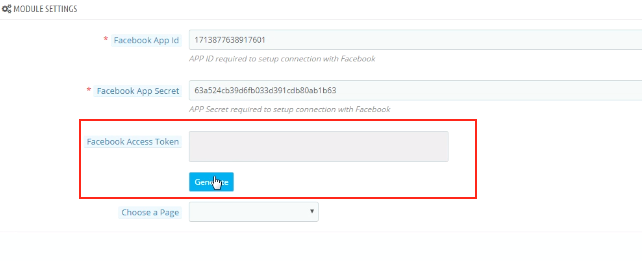
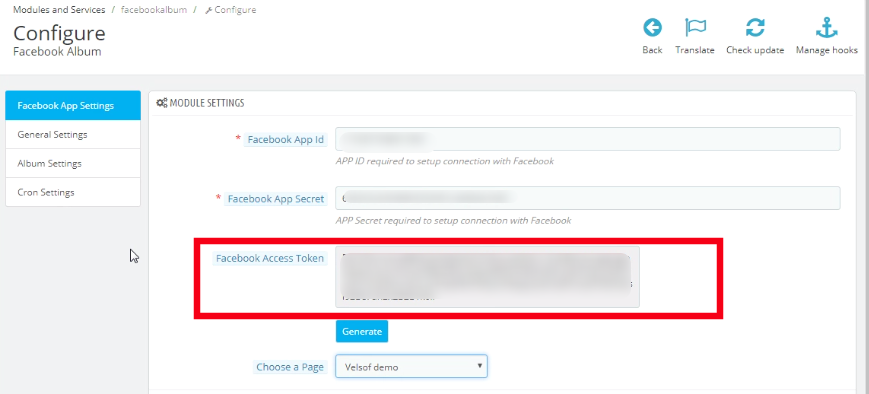
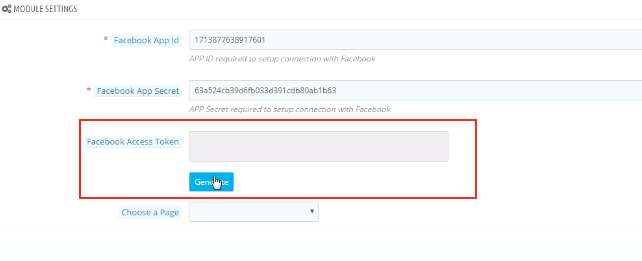
Facebook Access Token: Once the App id and App secret are saved, the Facebook Access Token will be generated automatically. Click on the ‘Generate’ button. This button will be disabled by default and will be enabled only when the App Id and App Secret is entered.
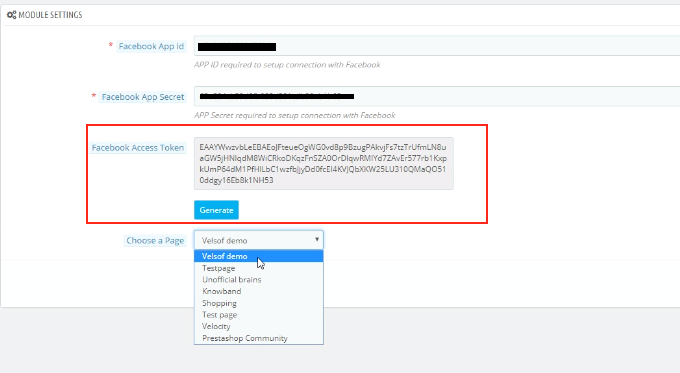
As you click on the button, you will get a pop-up for Facebook Login. Log in your Facebook store and the access token will be generated.
The module is now synced with your Facebook store and is ready for use.
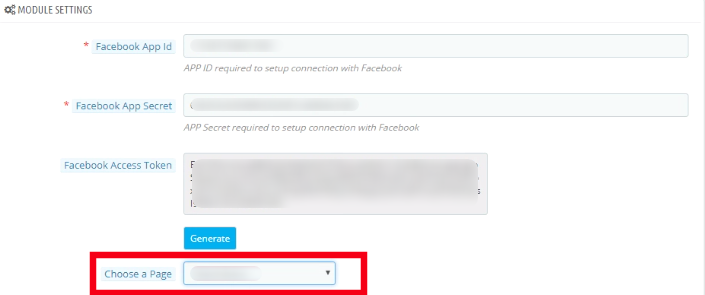
‘Choose the Page’ from the options given in the dropdown list and save the changes. The posts will be displayed on the page selected by you. For instance, we take the page as shown in the image below.
4.2 How to customize the front end of the Facebook Album?
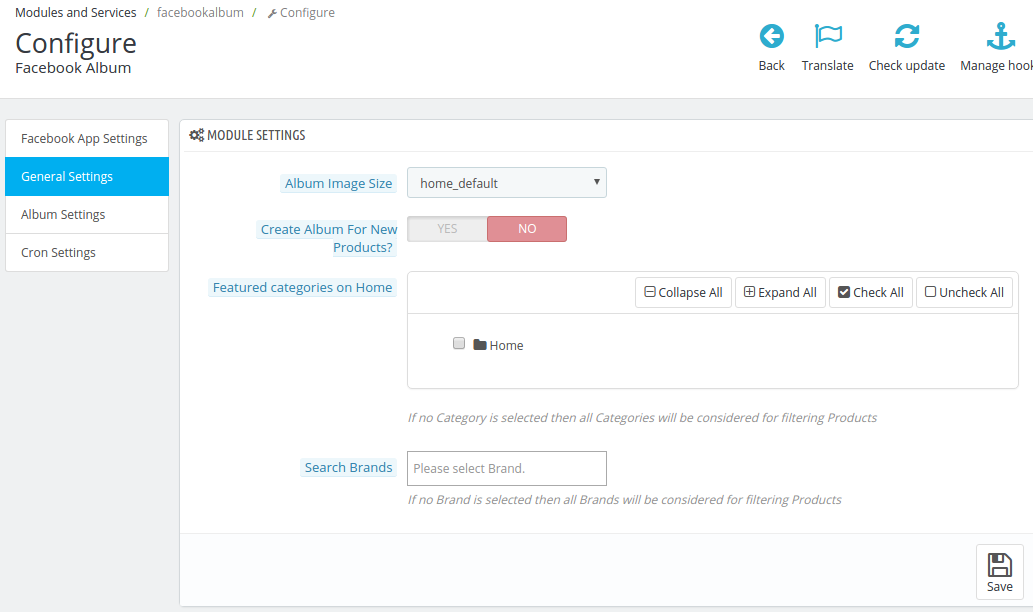
On adding/editing any profile, the admin will be asked to connect to Facebook App. Once the module is successfully synced with the Facebook Page of the admin, the store owner can customize the look and feel of the album to be displayed on the Facebook page. The ‘General Setting’ offers various customization options. Let us discuss the customization options one-by-one.
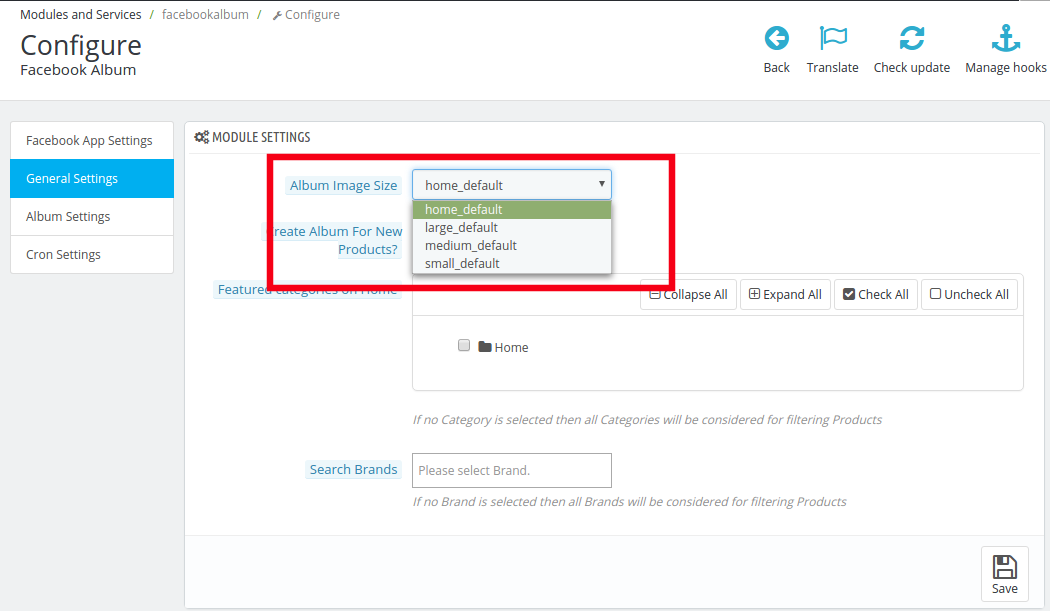
4.2.1 Album Image Size
The size in which you want to display the image of your album can be selected from here. There are various options available in the drop box, you may choose the one that suits your requirement.
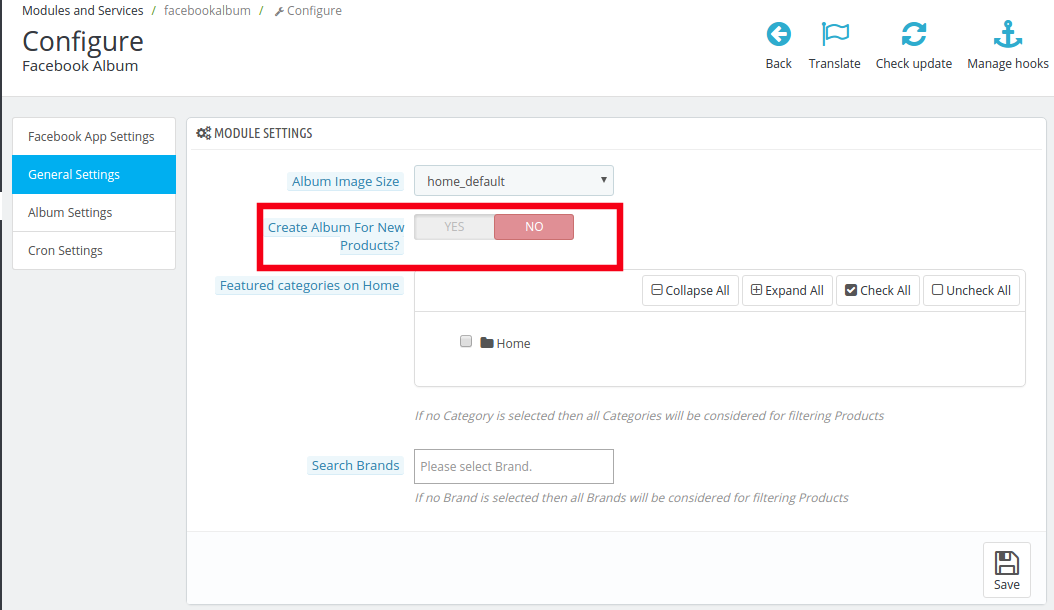
4.2.2 Create Album for new product
This option provides you a choice to select Whether you want to create a look book for the new arrivals or not. You may enable or disable it as per your requirement.
As this feature is enabled, a series of questions are asked to the user.
4.2.2.1 Choose an album from the existing ones for the album of new products
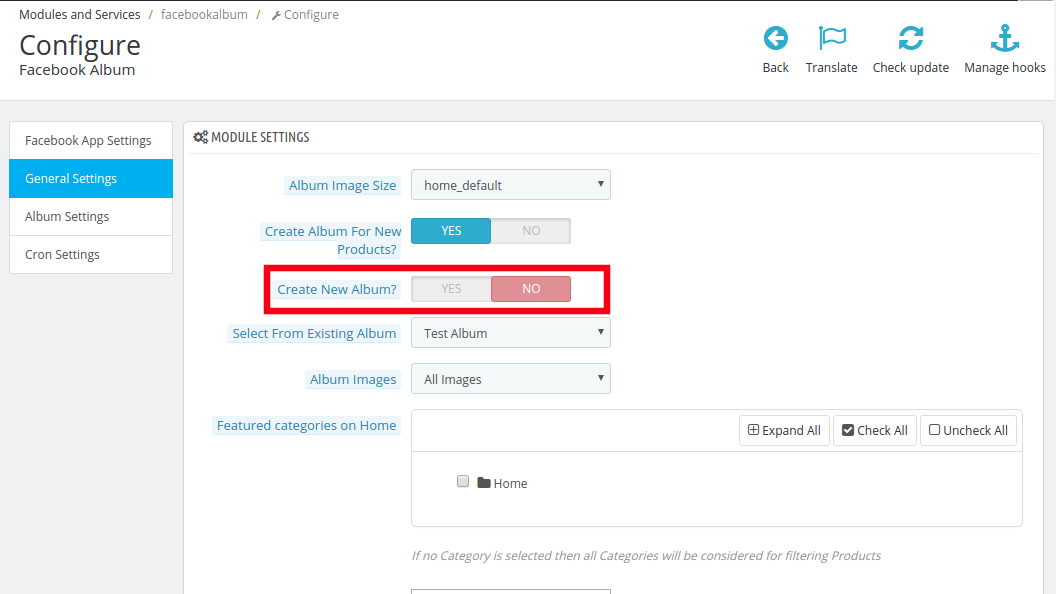
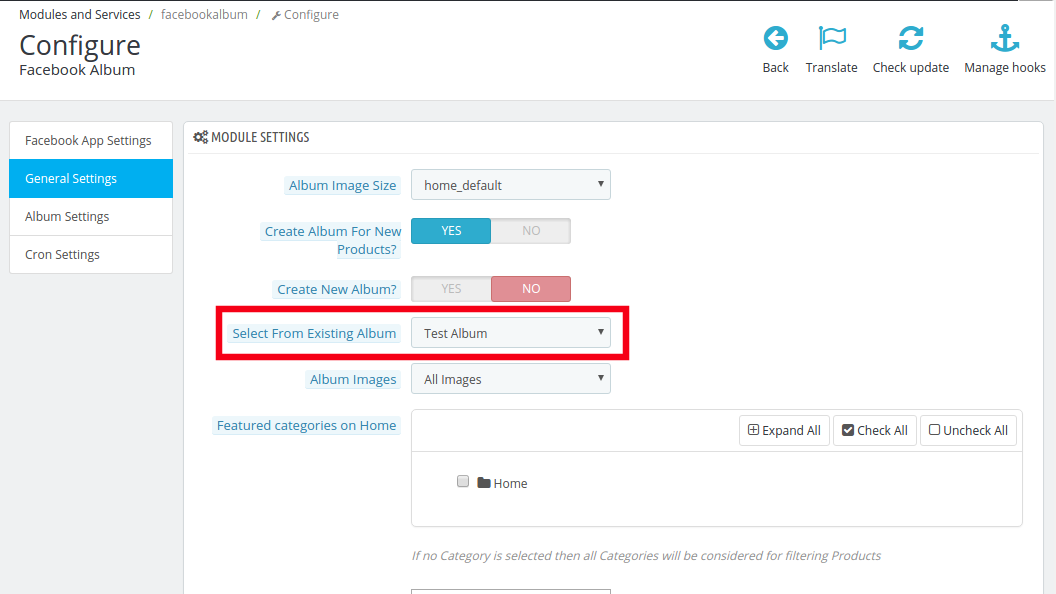
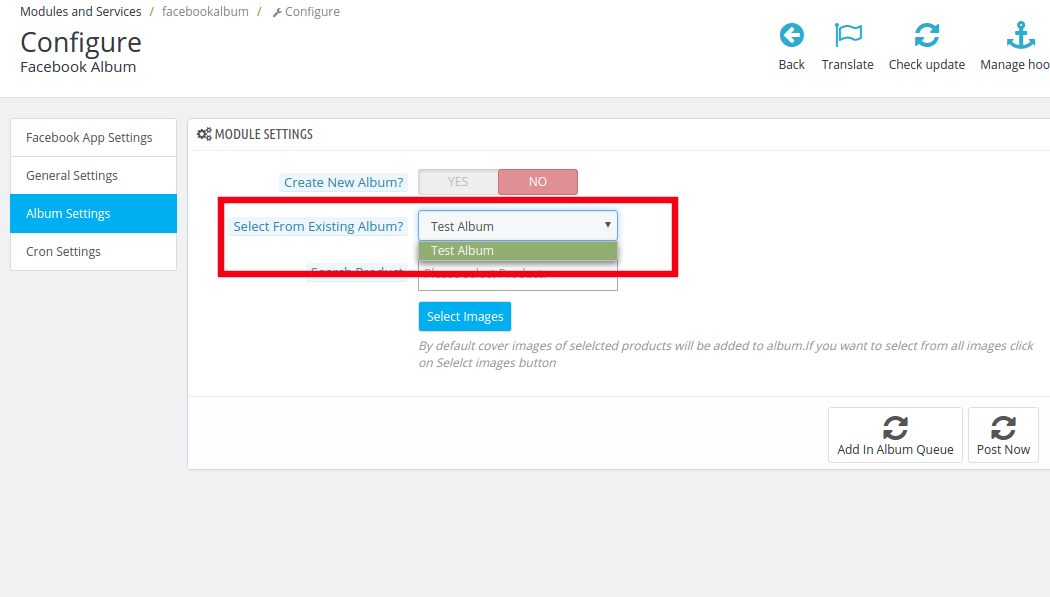
The store admin can either create an entirely new album for the new arrivals or else he choose one from the existing albums. In order to choose one from the existing albums, disable Create New Album.
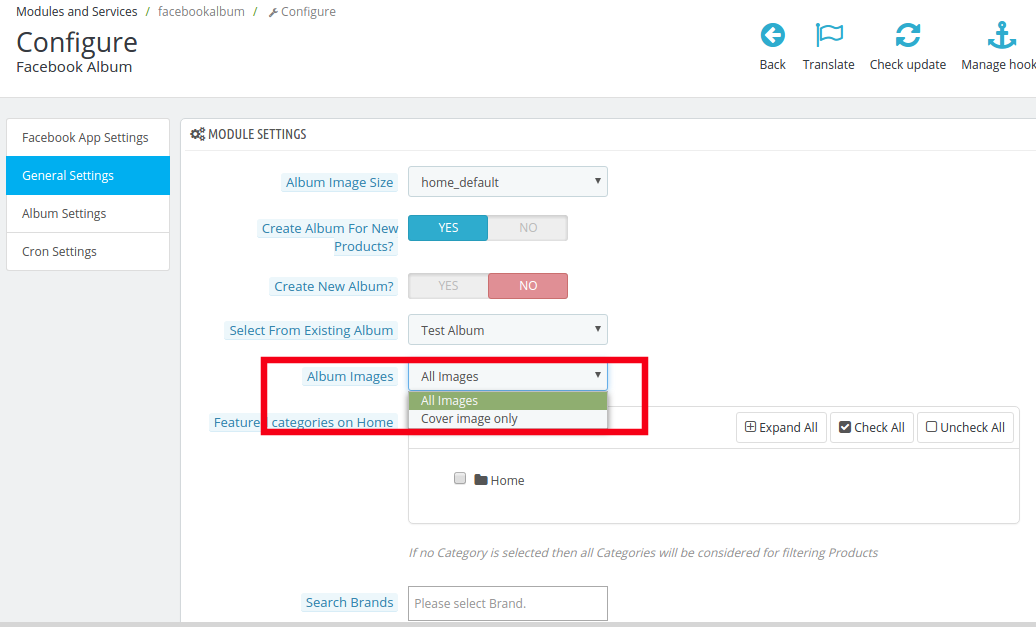
The albums already existing on your Facebook Page will be displayed in the drop box of the next column, that is, Select from Existing Album. Make your selection and then choose the images you want to display.
You can either select All Images or just the Cover Image from the Album Image section as shown in the image below.
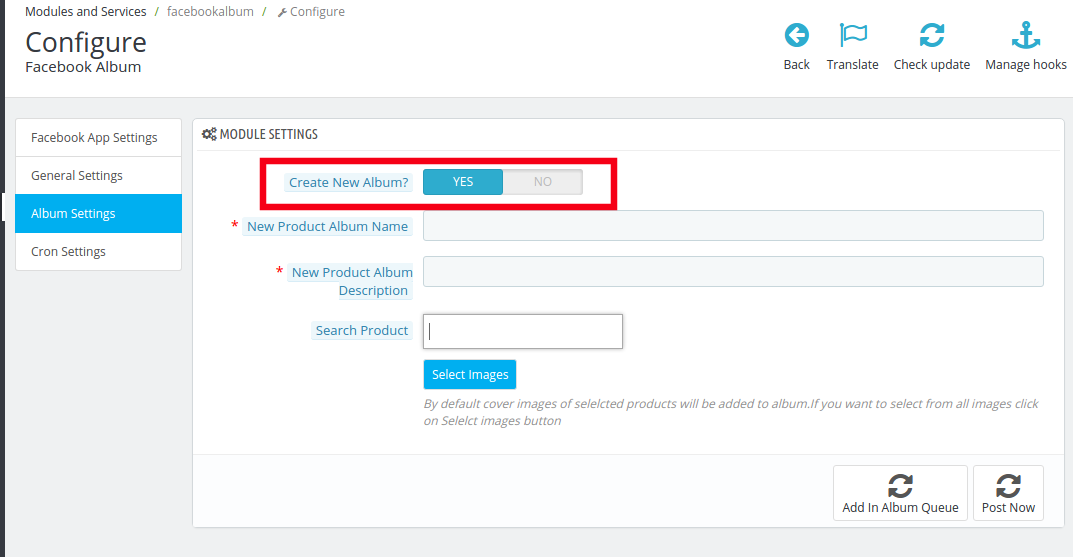
4.2.2.2 Create a new album for the new products
Prestashop FB Album plugin even offers you an option to create a new album for the new products. In order to do so, enable Create New Album.
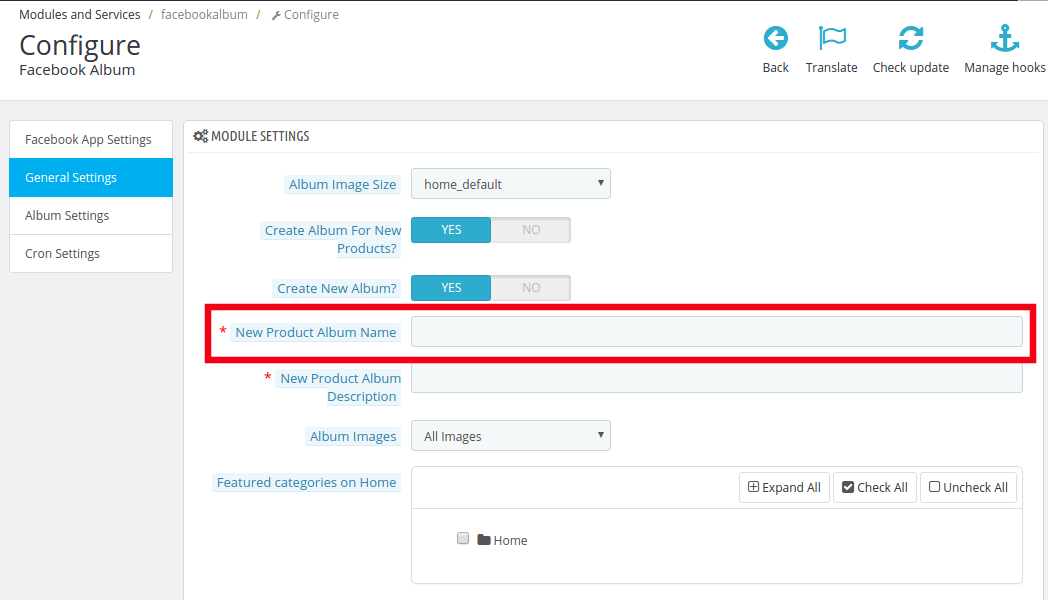
Enter the name of the album in the section New Product Album Name.
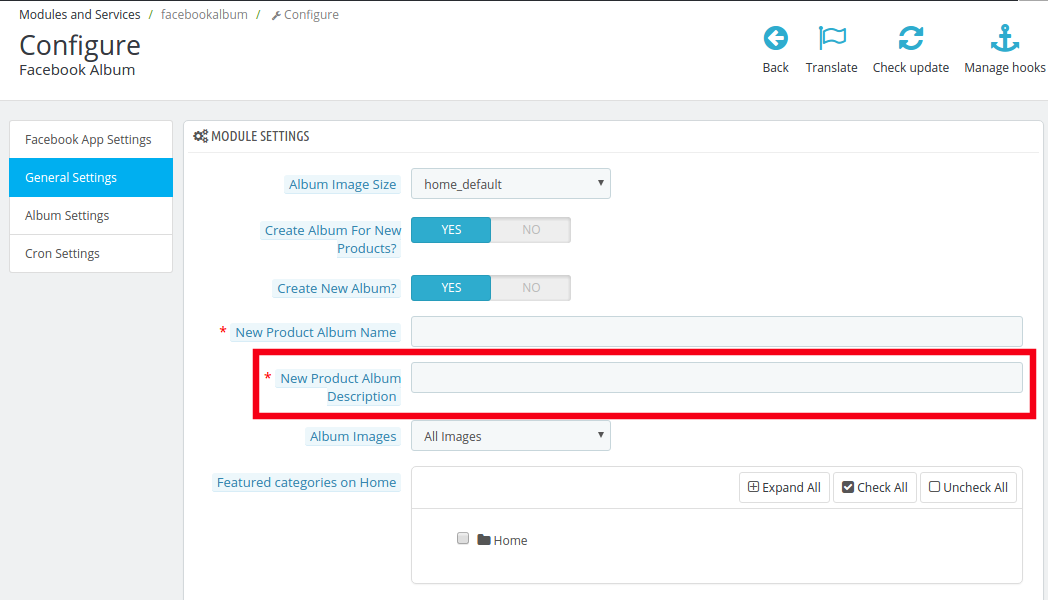
Write a short New Product Album Description in the next column.
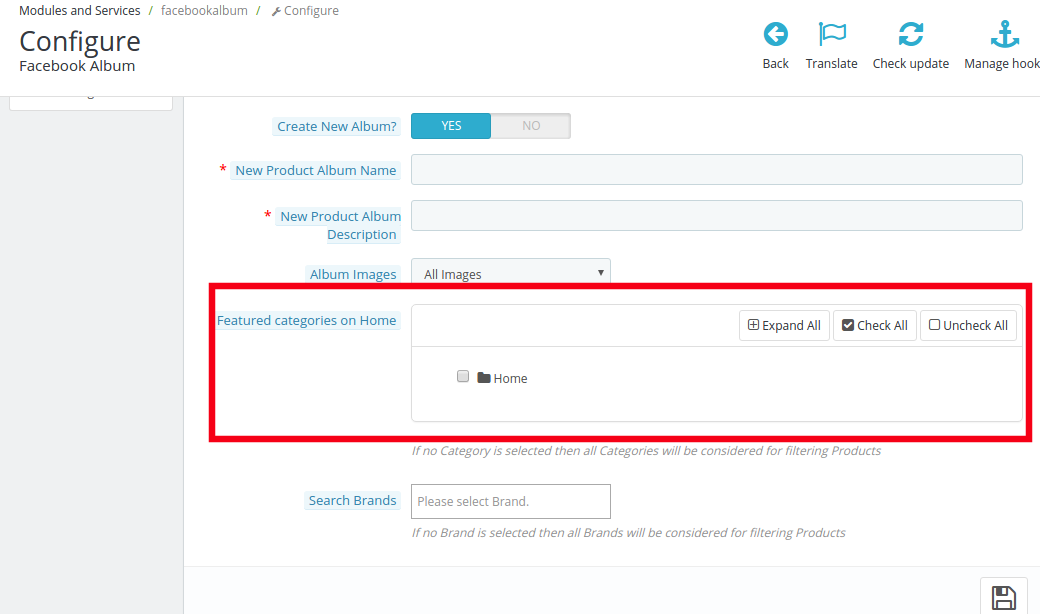
4.2.4 Featured categories on Home
Select the featured categories of your eCommerce store that you want to display in the photo album.
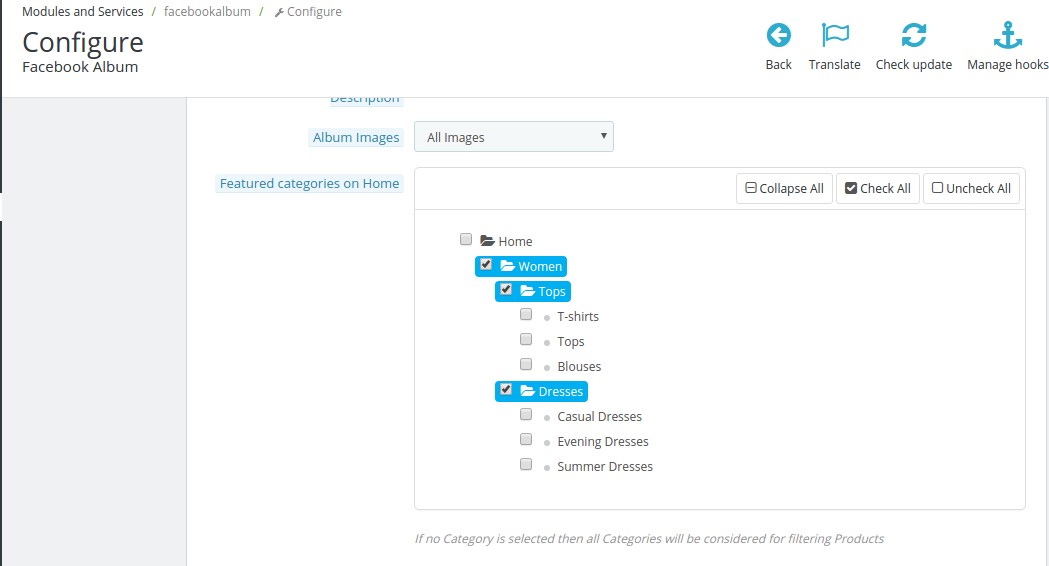
The entire category can be view by clicking on the Expand All button. Check the categories that you want to include and the changes will be synced in your Facebook Album.
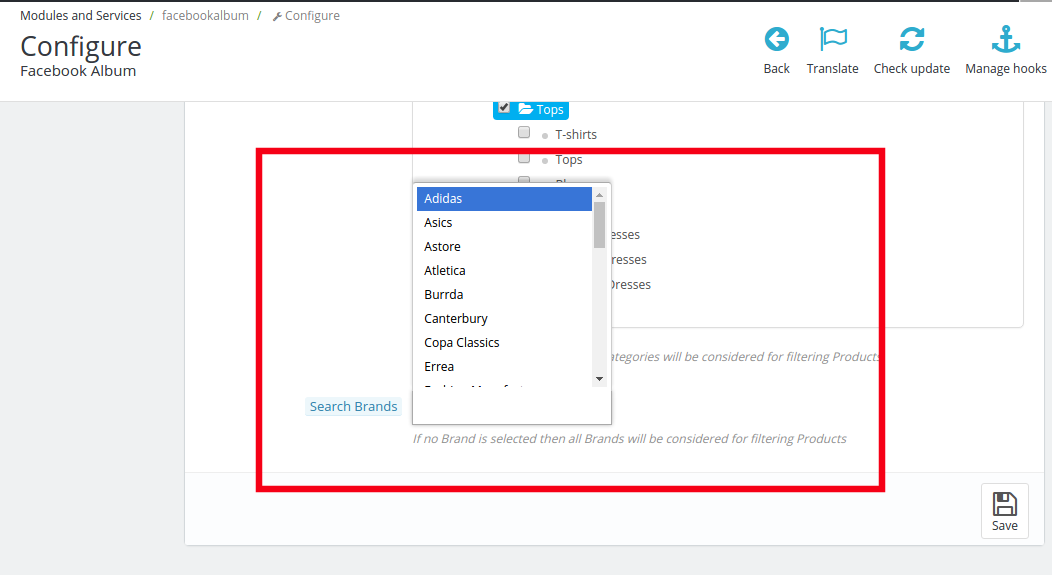
4.2.4 Search Brand
Select the brands from the choice offered that you specifically want to include in the search filters. In case, none of the brand is selected than the module will consider all the brand for filtering products.
4.4 How to customize the photo album?
There are two functionalities offered by this customization option. They are listed below.
Customization the existing albums
Creation of new album
Let us discuss them one-by-one in details.
Customization of exiting album
In order to customize the existing album, select the one from the dropdown list of Select from Existing Album.
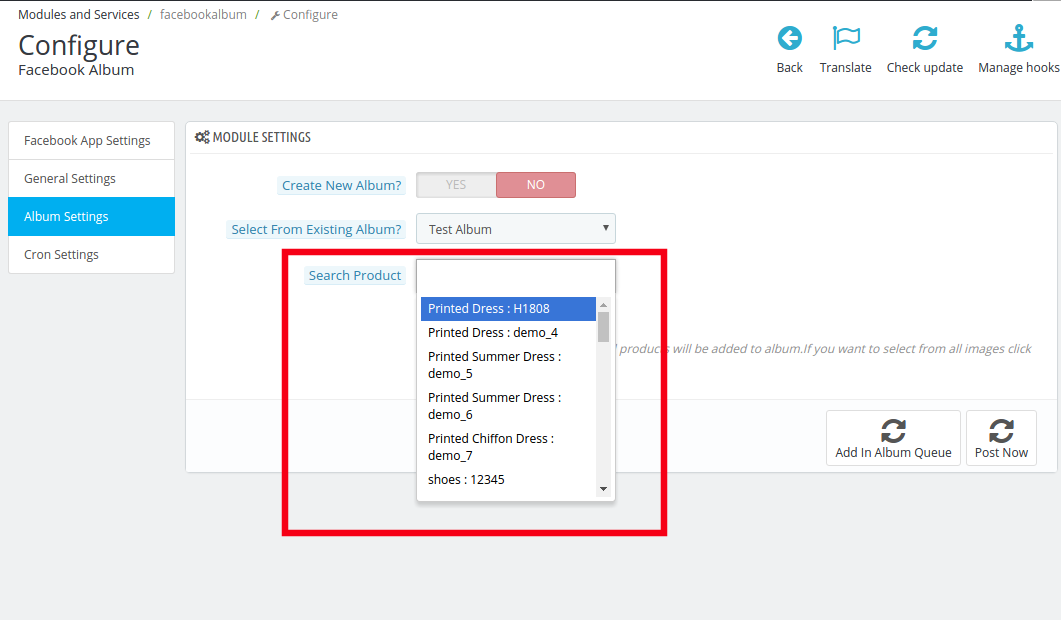
Once the album is selected, choose the image of the product that you want to include in the album from Search Product option.
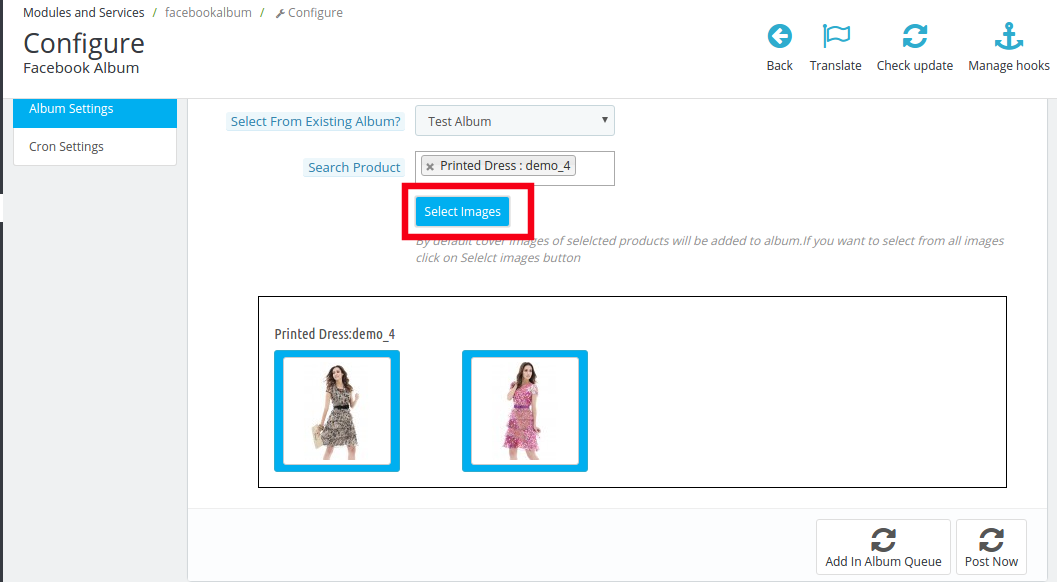
As you hit the Search button, the images of that product will be displayed you can choose the image that you need to include in the photo album.
You can either Add the image in the album queue or you can choose the option of Post Now.
Creation of New Album
In order to create a new album enable the Create New Album option.
Enter name of the product album and the description in the following sections.
Select the images of the product in the same way as it was done earlier.
The album is ready to be displayed on the Facebook Page of your store.
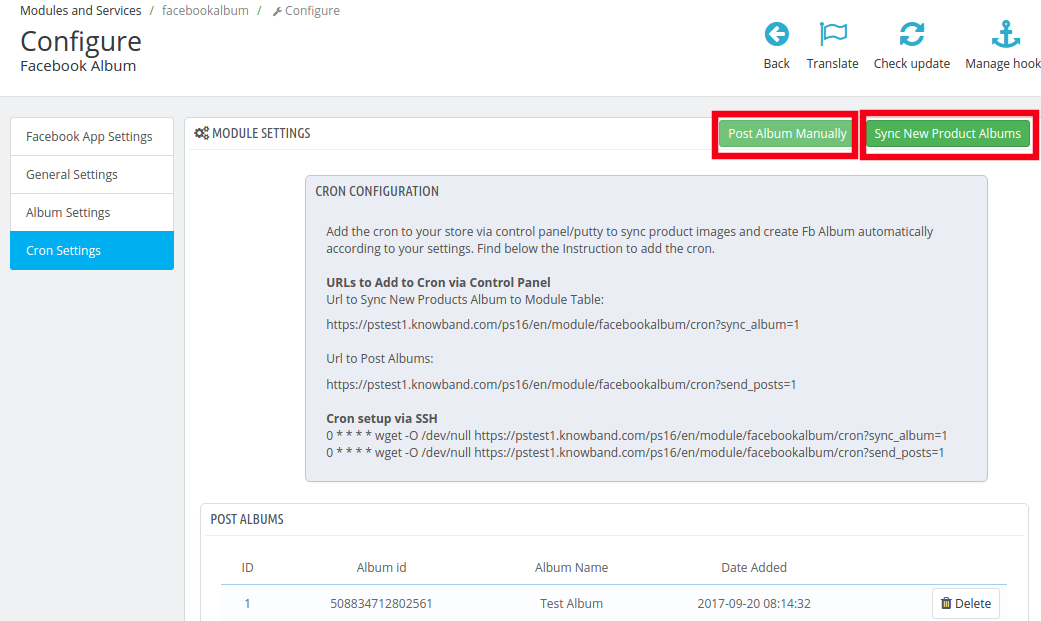
4.4 How can Cron Setting help?
The Cron setting allows you to sync your photo albums and post it on the Facebook page.
‘Sync New Product Album’ will allow you to sync the products album on your Facebook page. The albums will, then, get listed below.
On clicking the ‘Send Album Manually’, the album will get posted on the Facebook Wall of the admin.
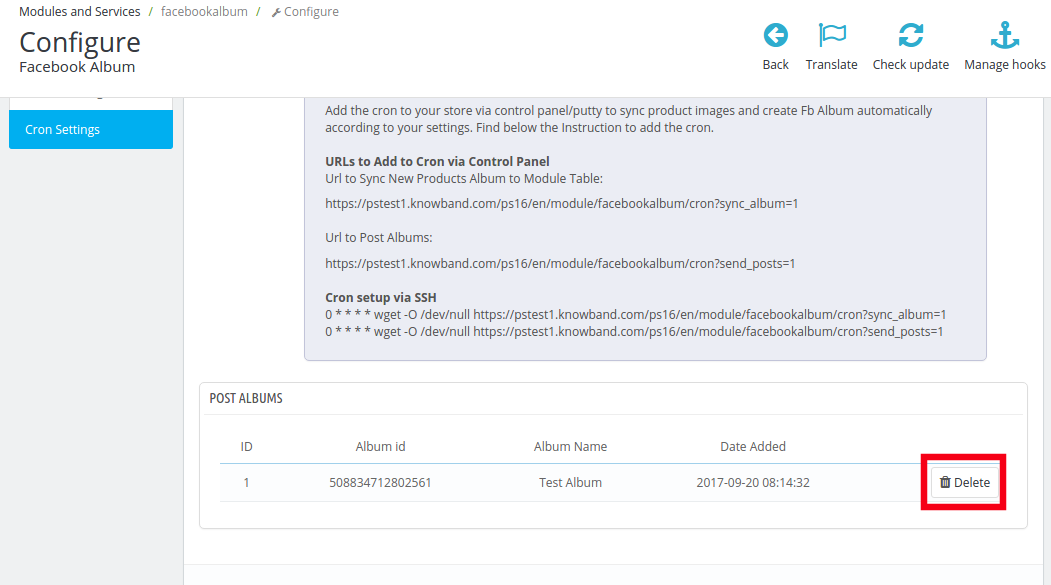
The admin can even delete the listed albums from the queue by clicking on the ‘Delete’ icon.
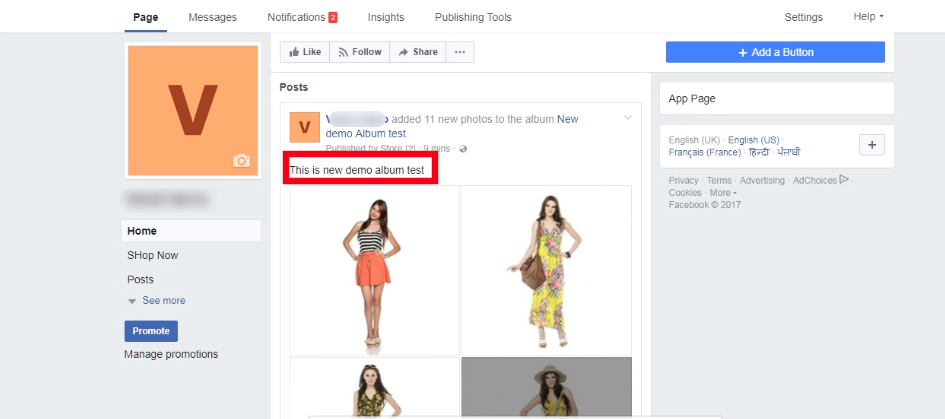
5.0 Facebook Photo Album UI
Once you have configured Prestashop Facebook Album module and synced with the Facebook profile, the photo albums will be shown on your Facebook page.
5.1 Facebook Photo Album
The album will be shown on the Facebook as shown in the image below.
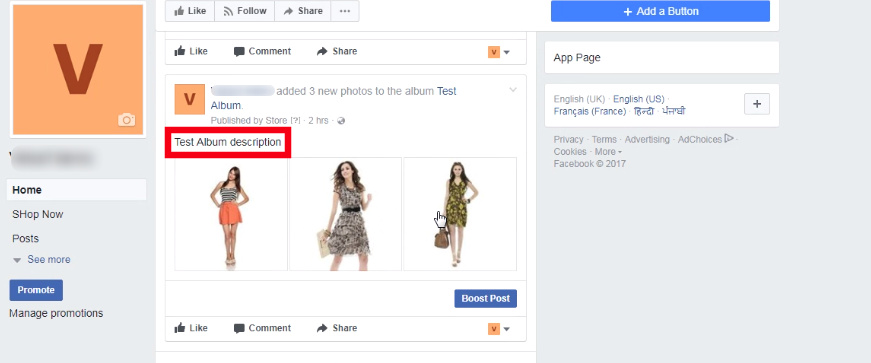
5.2. Photo Album with description
Right from the products images to the descriptions, everything will be shown on the wall post of your Facebook page.
1.0 Introduction to Prestashop Email subscription popup – Spin and Win
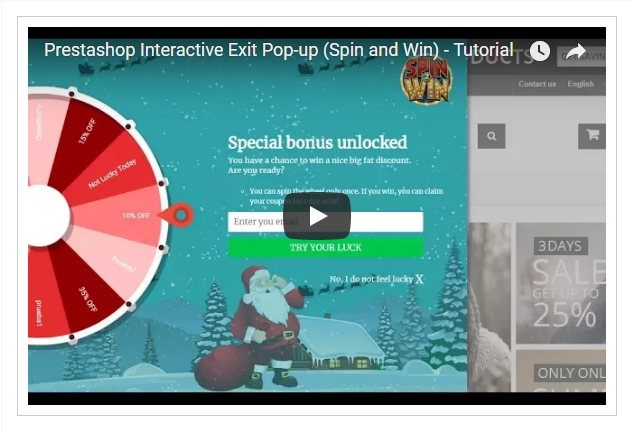
PrestaShop is a free, open-source eCommerce solution. Anyone can create his/her store using Prestashop with minimal effort. The admin needs no technical knowledge to set up the Prestashop store. Prestashop Email subscription popup by Knowband has replaced the old way of email subscriptions as the old-fashioned way of offering a 10% discount in exchange for email ids does not excite the visitors. We at Knowband have come up with a new way of engaging the customers with the website. Prestashop Spin and Win (Prestashop Email Subscription popup) addon display an interactive and responsive gamified interface in the front-end of the website.
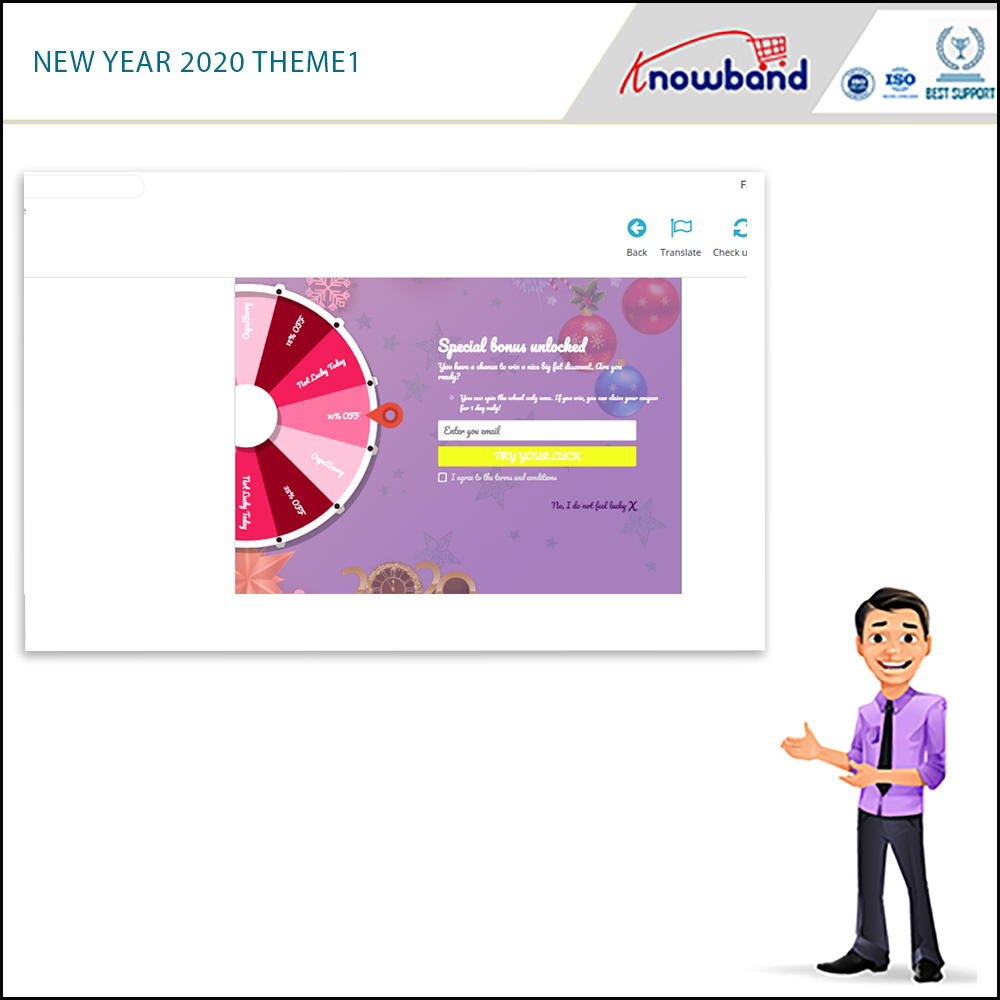
New themes available: In 2020, there are 4 New Year themes available for the store admin.
Spin and Win addon is now compliant with the GDPR. GDPR settings are available in the module using which the Prestashop admin can comply with the rules of the GDPR. Please refer to the GDPR Settings to know more about the GDPR.
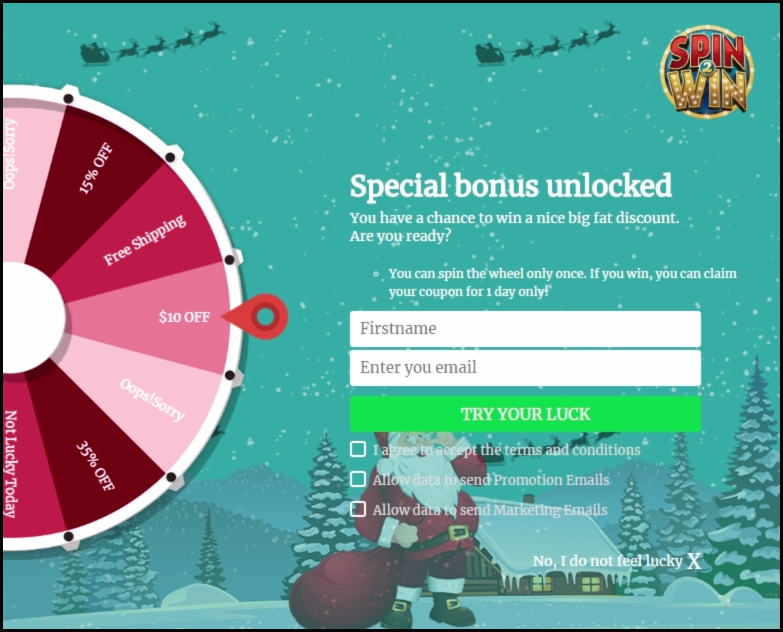
The overall functionality of Spin and win(a responsive email subscription pop up):
1. The customer visits the website.
2. Newsletter subscription pop up appears on the Prestashop storefront. (is usable as an entry or exit pop up)
3. The user enters the email Id.
4. Spin the spin and win pop up and get discounts
5. Email Ids entered are captured by the addon.
The responsive and interactive email subscription pop interface enhances the customer experience and compels them to visit your site again. The addonis usable as an exit-intent pop-up as well as email subscription pop-ups in the eCommerce sites.
What’s New?
Theme Scheduling: The eCommerce store owner can schedule a theme for any occasion by adding the start and end date.
Update Number of Slices: This new feature allows the admin to select the number of slices for when. Now admin can select 6, 8, or 12 slices for the wheel.
Export Email Functionality: Updated version has Export Email functionality to export emails of customers into a CSV file from the admin panel.
Show Progress meter: Under the general setting of Spin and Win, the store admin can set the Progress meter percentage which will display on the front end of the Popup.
Provide an option to customers to choose to generate a coupon with or without email ID: If the admin enables, it has the functionality to provide an option for customers to choose whether they want to provide their email id or not.
Testing based on IP Address: The eCommerce store owners can now test the Spin and Win addon before actually implementing it on the store by entering their IP Address.
Set Coupon Expiry day: This new feature allows the admin to set the coupon expiry date even after the coupon is generated.
Minimum Amount filled: Under the slice settings tab, the admin can now set the minimum value the cart should have for the coupon. Further, that the customer uses.
1.1 Merchant Benefits of this Newsletter subscription popup addon:
By using this Exit popup cum Entry popup addon, the store owners can achieve the following things.
Boosts Lead generation.
The customer can claim the discount by entering their email id. Hence, it increases the customer base of the store user.
The responsive and interactive user-friendly interface ensures a high impact on direct sales. It improves the overall conversion rate, using coupons and discounts.
Turn Visitors into potential buyers and improve conversion rates by offering users a completely different way to win discounts.
Fully Customizable subscription pop up
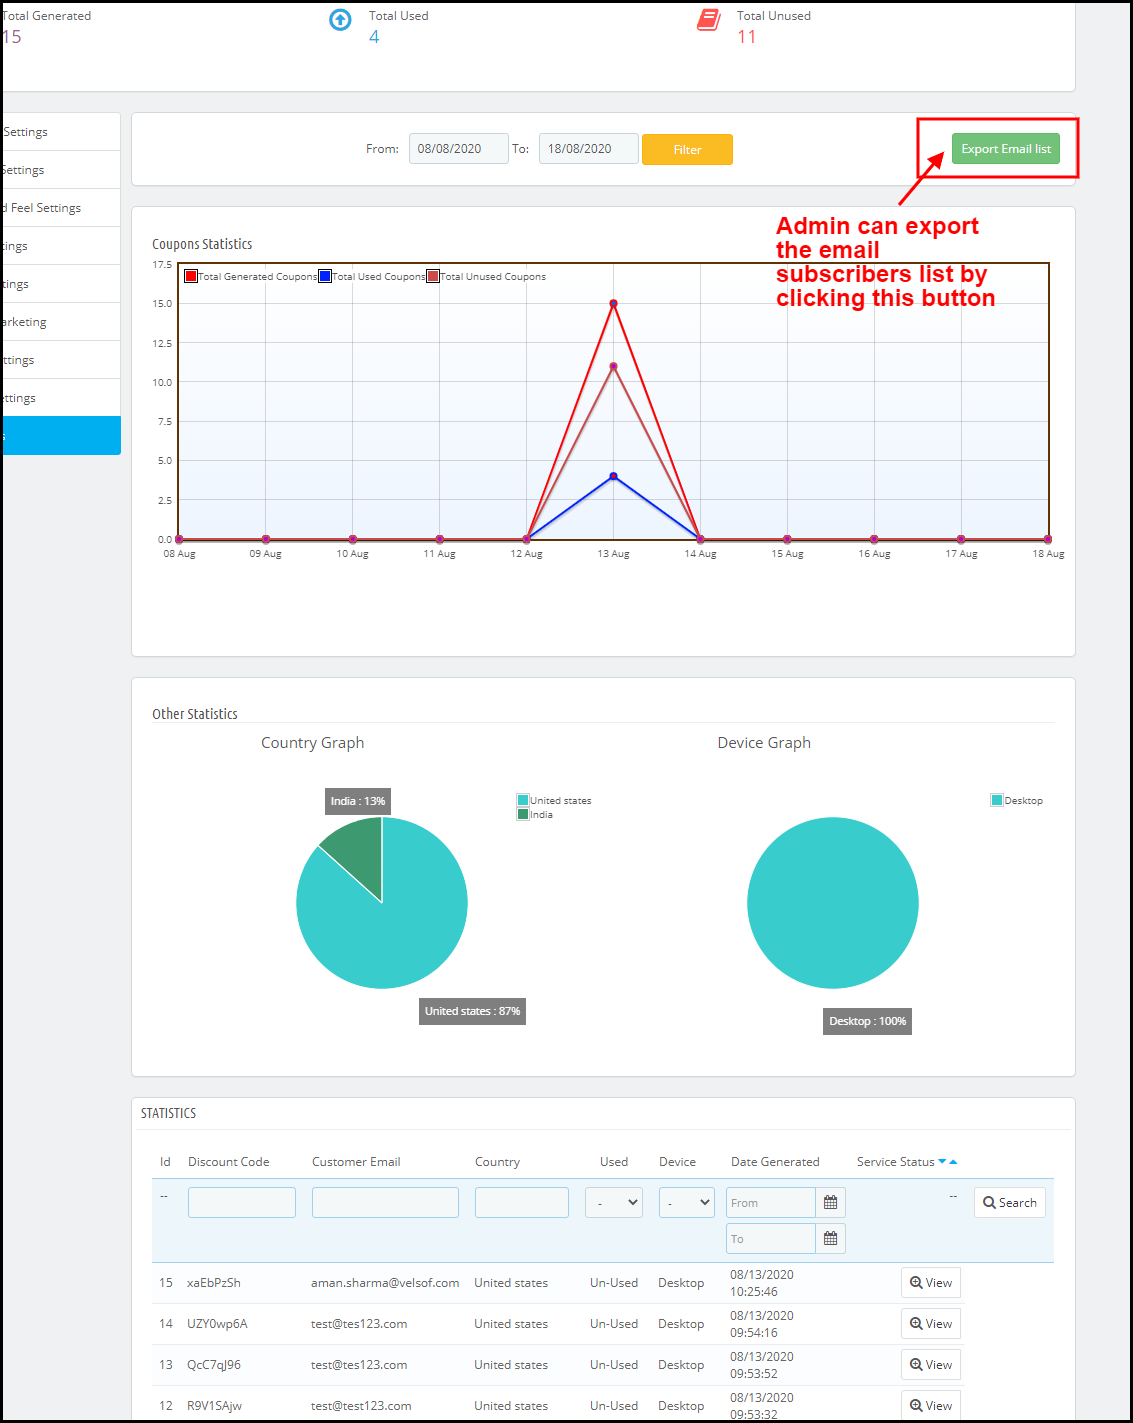
Detailed Reporting.
Export Email subscriber list in.CSV format
Theme scheduling for occasions without taking extra effort.
The look and feel of the spin and win pop up as well as the email notification is customizable from the back end.
GDPR Settings are available in the module using which the Prestashop admin can comply with the rules of GDPR.
New classic themes for Spin and Win popup help e-merchants in drawing user attention on different occasions. New Holiday themes for Christmas and New Year are available to attract more and more visitors to the store.
Effortlessly generate a fixed coupon code for each Spin Win slice.
Restrict the compatibility of Spin and Win coupons with other active coupons of the store.
The store owner can now display the latest New Year 2020 themes on his website.
1. Responsive 3 in 1 pop-up: Is usable as an Entry pop up, Exit pop up, or Email Subscription pop up.
2. The admin can select from the multiple available wheel designs as well as spin and win themes to choose from.
3. The new version allows the admin to schedule a valid active and expiry date for a theme. After the expiry date, it will be set to the default one.
4. The interactive Spin and Win game lures customers and helps admin to engage more customers thereby increasing the customer base of the site.
5. The interactive Spin and Win game lures customers and helps admin to engage more customers thereby increasing the customer base of the site.
6. The back-end offers Readymade Email Templates which is further customizable.
7. The store admin can change the look and feel of the Prestashop exit pop-up as per the requirement. The admin can now apply the latest New Year 2020 themes as well on his website.
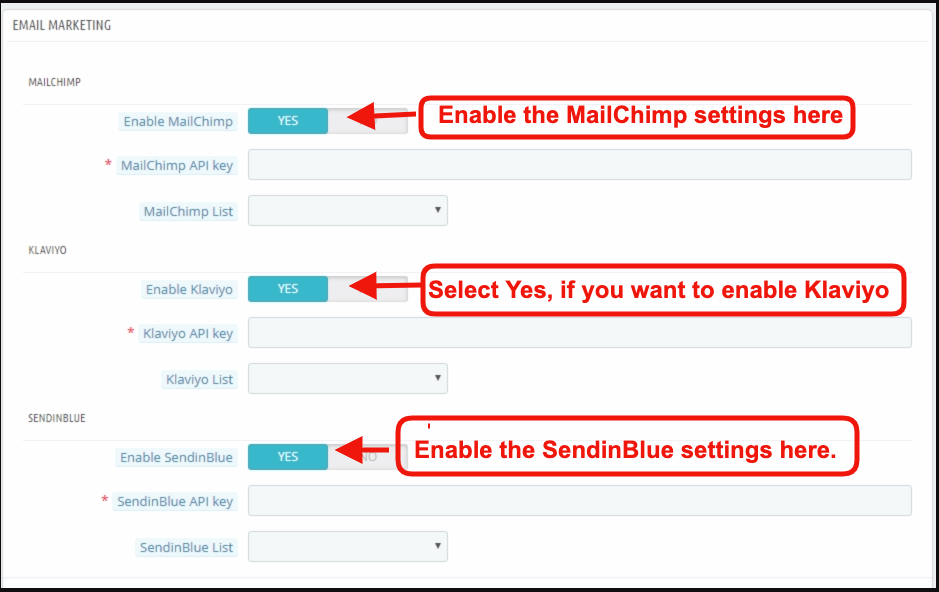
8. Prestashop Spin and Win (email subscription) pop up offers Mail Chimp, Klaviyo and, SendinBlue Integration.
9. Spin and win popup allows the admin to choose the number of slices in a wheel. There are 6, 8, and 12 sliced wheel options available.
10. Show the progress meter on the front end with a progress percentage. This will display with a label that the admin adds.
11. Prestashop Exit pop up allows admin to provide an option for customers to choose whether they want to provide their email id or not.
12. Set the discounts and offers on each slice and also set the gravity of each slice, the slice with maximum gravity will have larger occurrences.
13. Prestashop Newsletter subscription popup addon allows admin to customize the email subscription pop up using Custom CSS and JS without making any changes in the base code
14. Prestashop Entry popup addon allows admin to choose whom to display, where and when to display, maximum display frequency of the Spin and win (email subscription) pop up.
15. Prestashop Newsletter subscription popup offers wheel sound options which adds a sound when the Spin wheel rotates, it gives a more lively feeling of the Spin and Wins game.
16. Prestashop Exit intent popup addon offers an option to show fireworks on the Spin and Win popup when a customer wins a discount to make the win of the customer more exciting and fun.
17. Prestashop Newsletter popup offers an Email Recheck option on the cart as well. Just to make sure if the customer who is applying the coupon is the same who played the Spin and Win game.
18. Prestashop Exit popup addon allows admin to choose the pages to display the pop up i.e, Category page, Home page, Product page, etc.
19. Email Recheck option to Restrict the same Email Id from availing the discount coupon more than once.
20. Prestashop Newsletter subscription popup addon offers to Pull Out Tab facility for customers as spinning the wheel is not compulsory for visitors.
21. Prestashop Newsletter popup addon allows Prestashop admin to preview the Email subscription popup and the Spin wheel at the admin panel itself.
22. Prestashop Email Subscription popup addon offers a Responsive and Interactive user-friendly interface that ensures a high impact on direct sales. Turn Visitors into potential buyers and improve conversion rates by offering users a completely different way to win discounts.
23. Prestashop Spin and win is compliant with the GDPR, GDPR settings are available in the Spin and Win admin panel. Using these settings admin can comply with the rules of GDPR.
24. Prestashop Spin and Win module offers Detailed Reporting
Check the performance of the interactive spin and win pop up by comparing the total generated vs used coupons using interactive graphical reports
Tabular reports displaying coupon codes, details of coupon holders (customers), the country where the addon is usable, and the device on which the customer uses it.
The report which incorporates email addresses of the customers can be exported in the form of.CSV file
27. Prestashop Spin and Win are Compatible with all themes.
28. Desktop, Mobile, and Tablet responsive design
29. Prestashop Spin and Win popup module allow the admin to control the compatibility of Spin and Win coupon with other site coupons. If this feature disables, then the coupon generated from Spin and Win will not work with the other active coupons. They can also set a coupon expiry date as well.
30. Admin can generate a fixed coupon code for each slice of the Spin Wheel. They can also fix the minimum cart value customers should have to generate the discount coupon.
31. This interactive spin and win popup offer a direct coupon generation functionality that allows the customers to generate a spin win coupon without filling any user name fields.
32. Prestashop email subscription popup allows admin to select one or more customer groups which include: visitor, guest, the customer.
33. Admin can set the visibility of Spin and Win popup on the specified number of page visits. If 0 is entered then this functionality will disable and the user will see the spin wheel popup as they enter the site.
34. Prestashop Interactive popup addon allows the store owners to test the module before implementing it on the store.
2.0 Installation of Spin and Win – Responsive Email Subscription pop up
Once you purchase the addon, follow the below steps:
Go to the Store Admin -> Modules and Services.
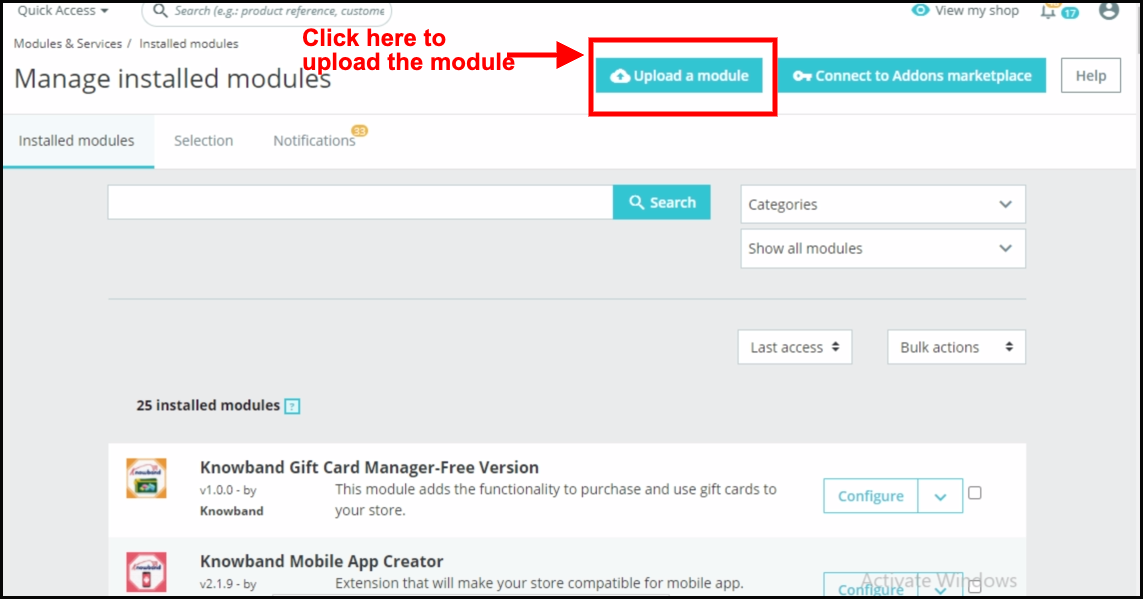
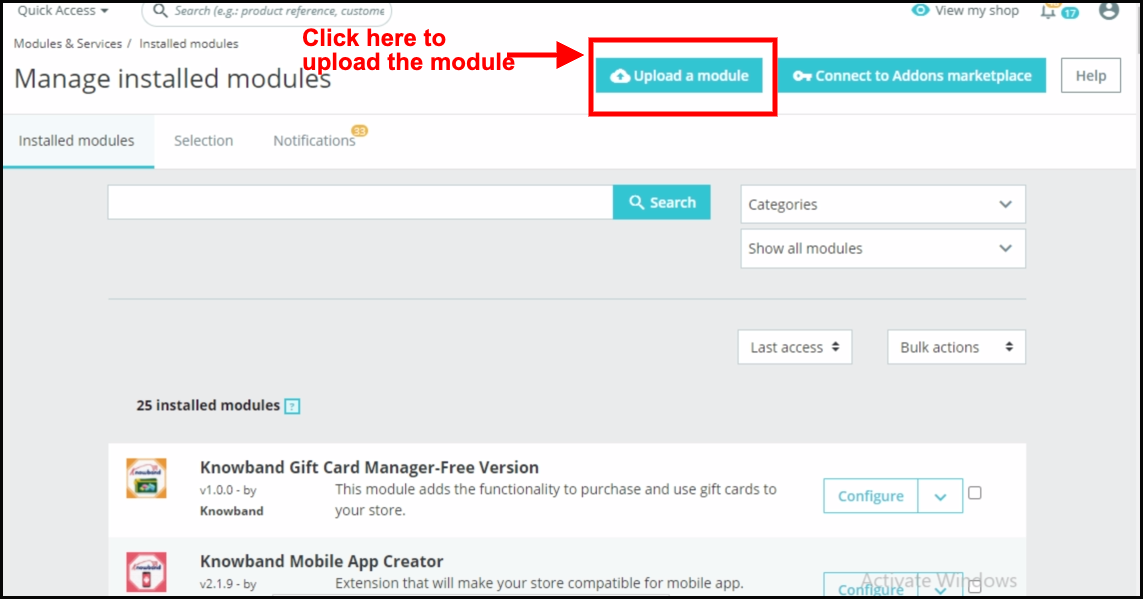
2. Click on “ Upload a module”. You can drag or drop the file or can simply select the file from the system.
Once the file is completely uploaded, a notification of “Module(s) installed successfully” will display.
3.0 Admin Interface – Spin and Win – Entry, Exit, and Email subscription pop up
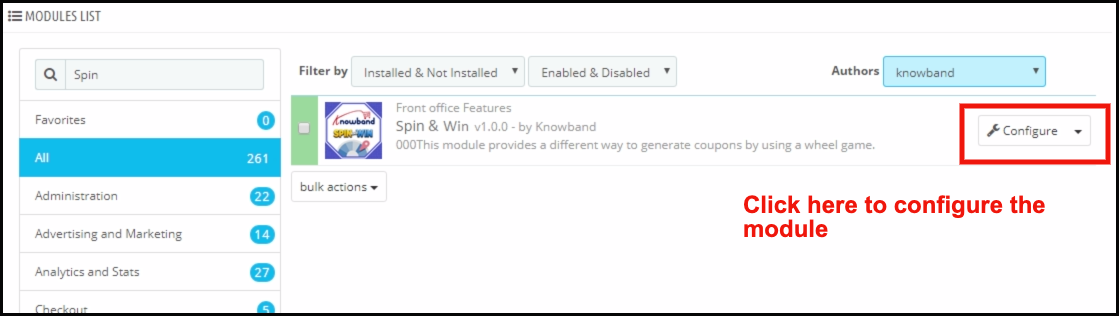
Once the installation is complete, the next steps include configuring the addon. Click on the ‘Configure’ button just next to Prestashop Spin and Win Addon.
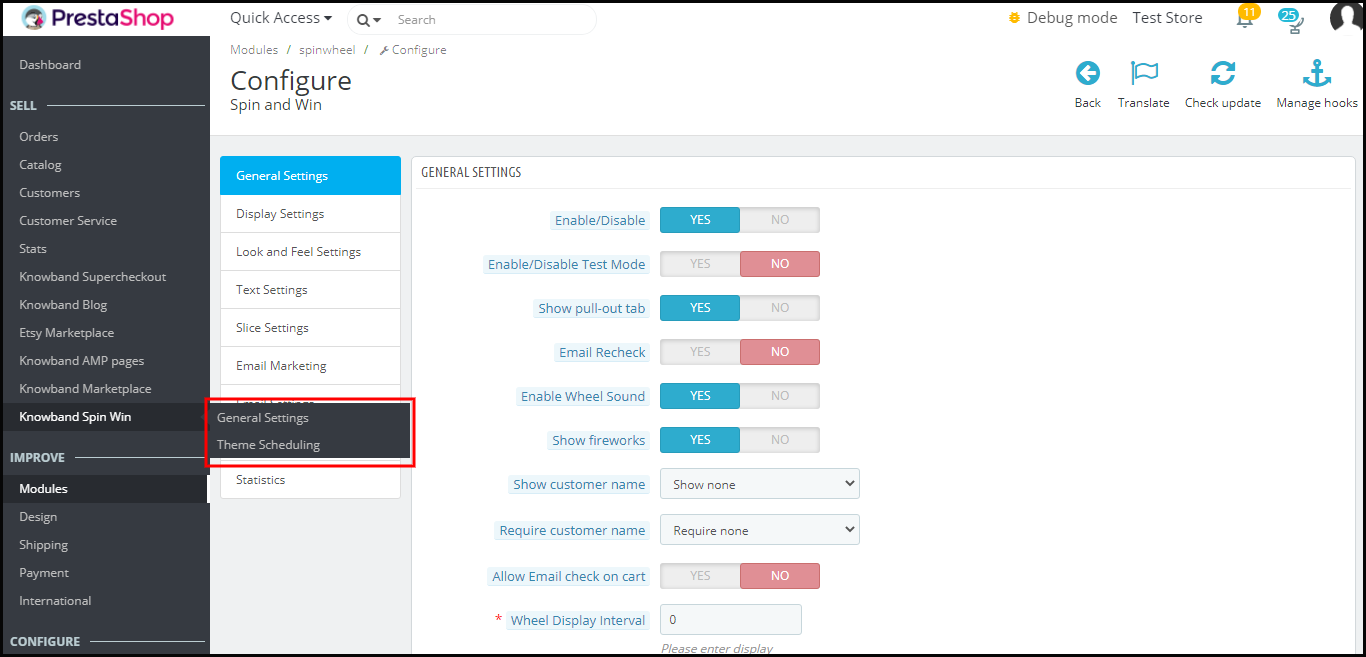
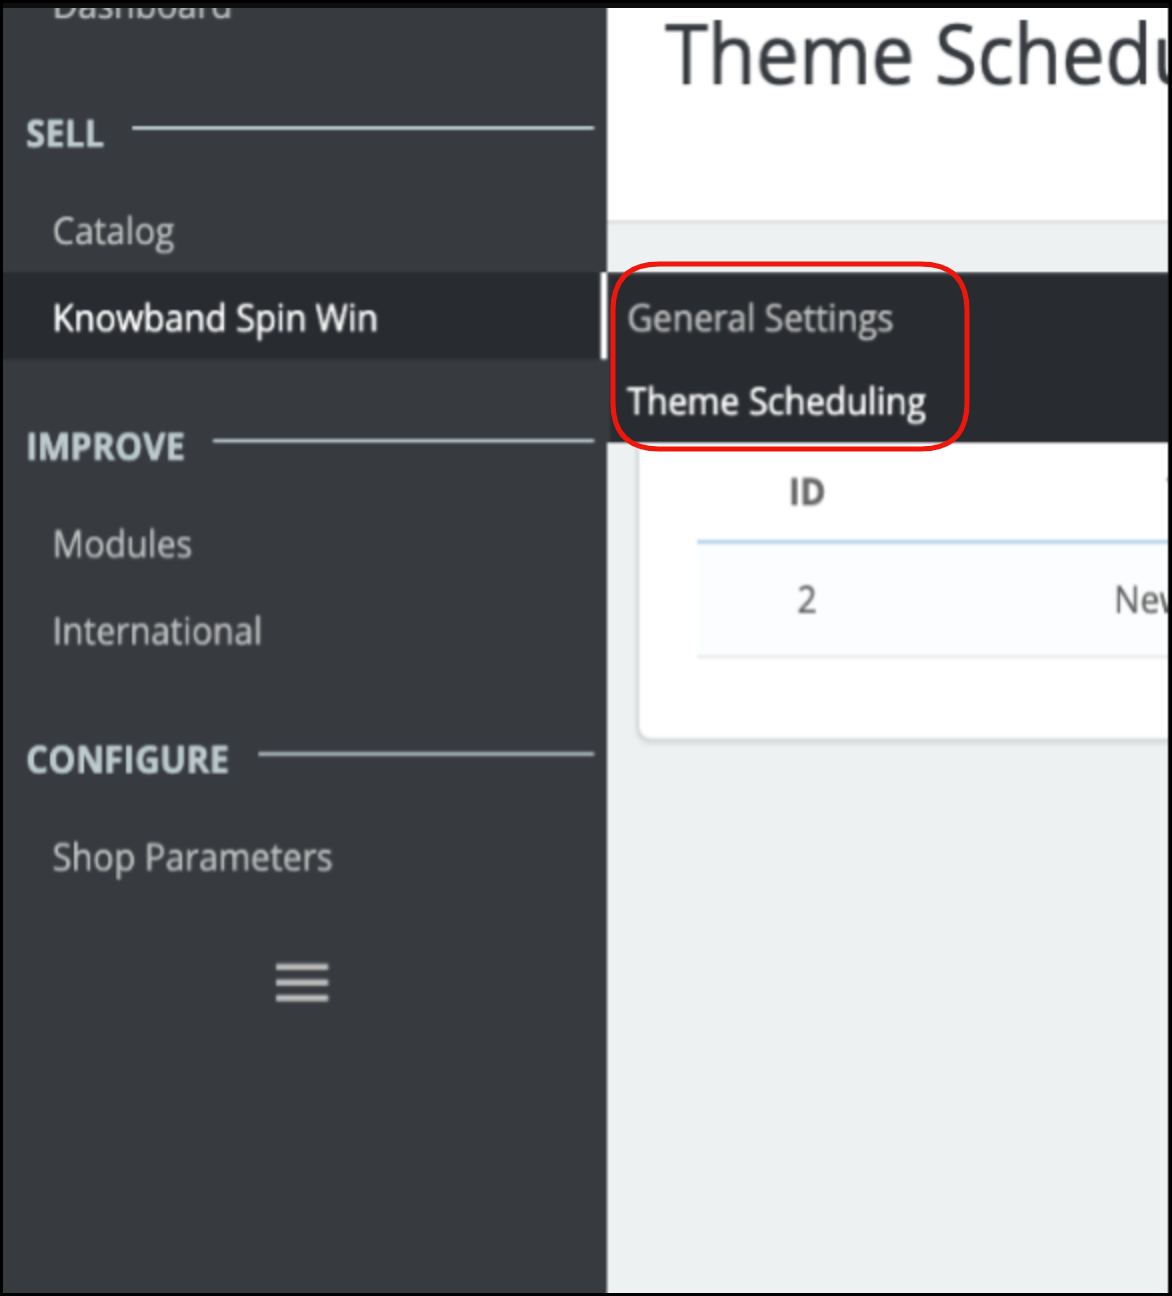
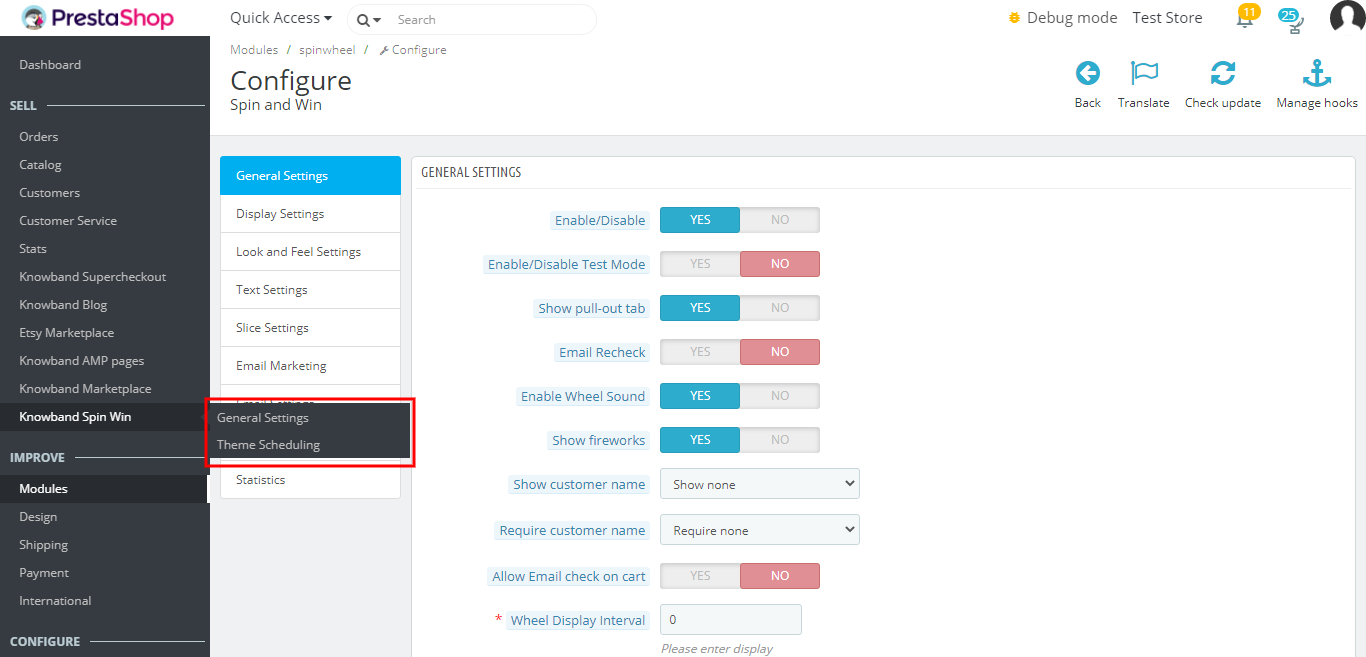
The Prestashop admin panel of the addon offers various customization options to the Prestashop store owners. The new version has two default setting options separately for General settings and Theme scheduling.
3.1 How to start the configuration process?
On clicking configure from the module listing page, Prestashop Admin will be redirected to the configuration page. The very first tab in the main menu includes “General Setting” as shown below:-
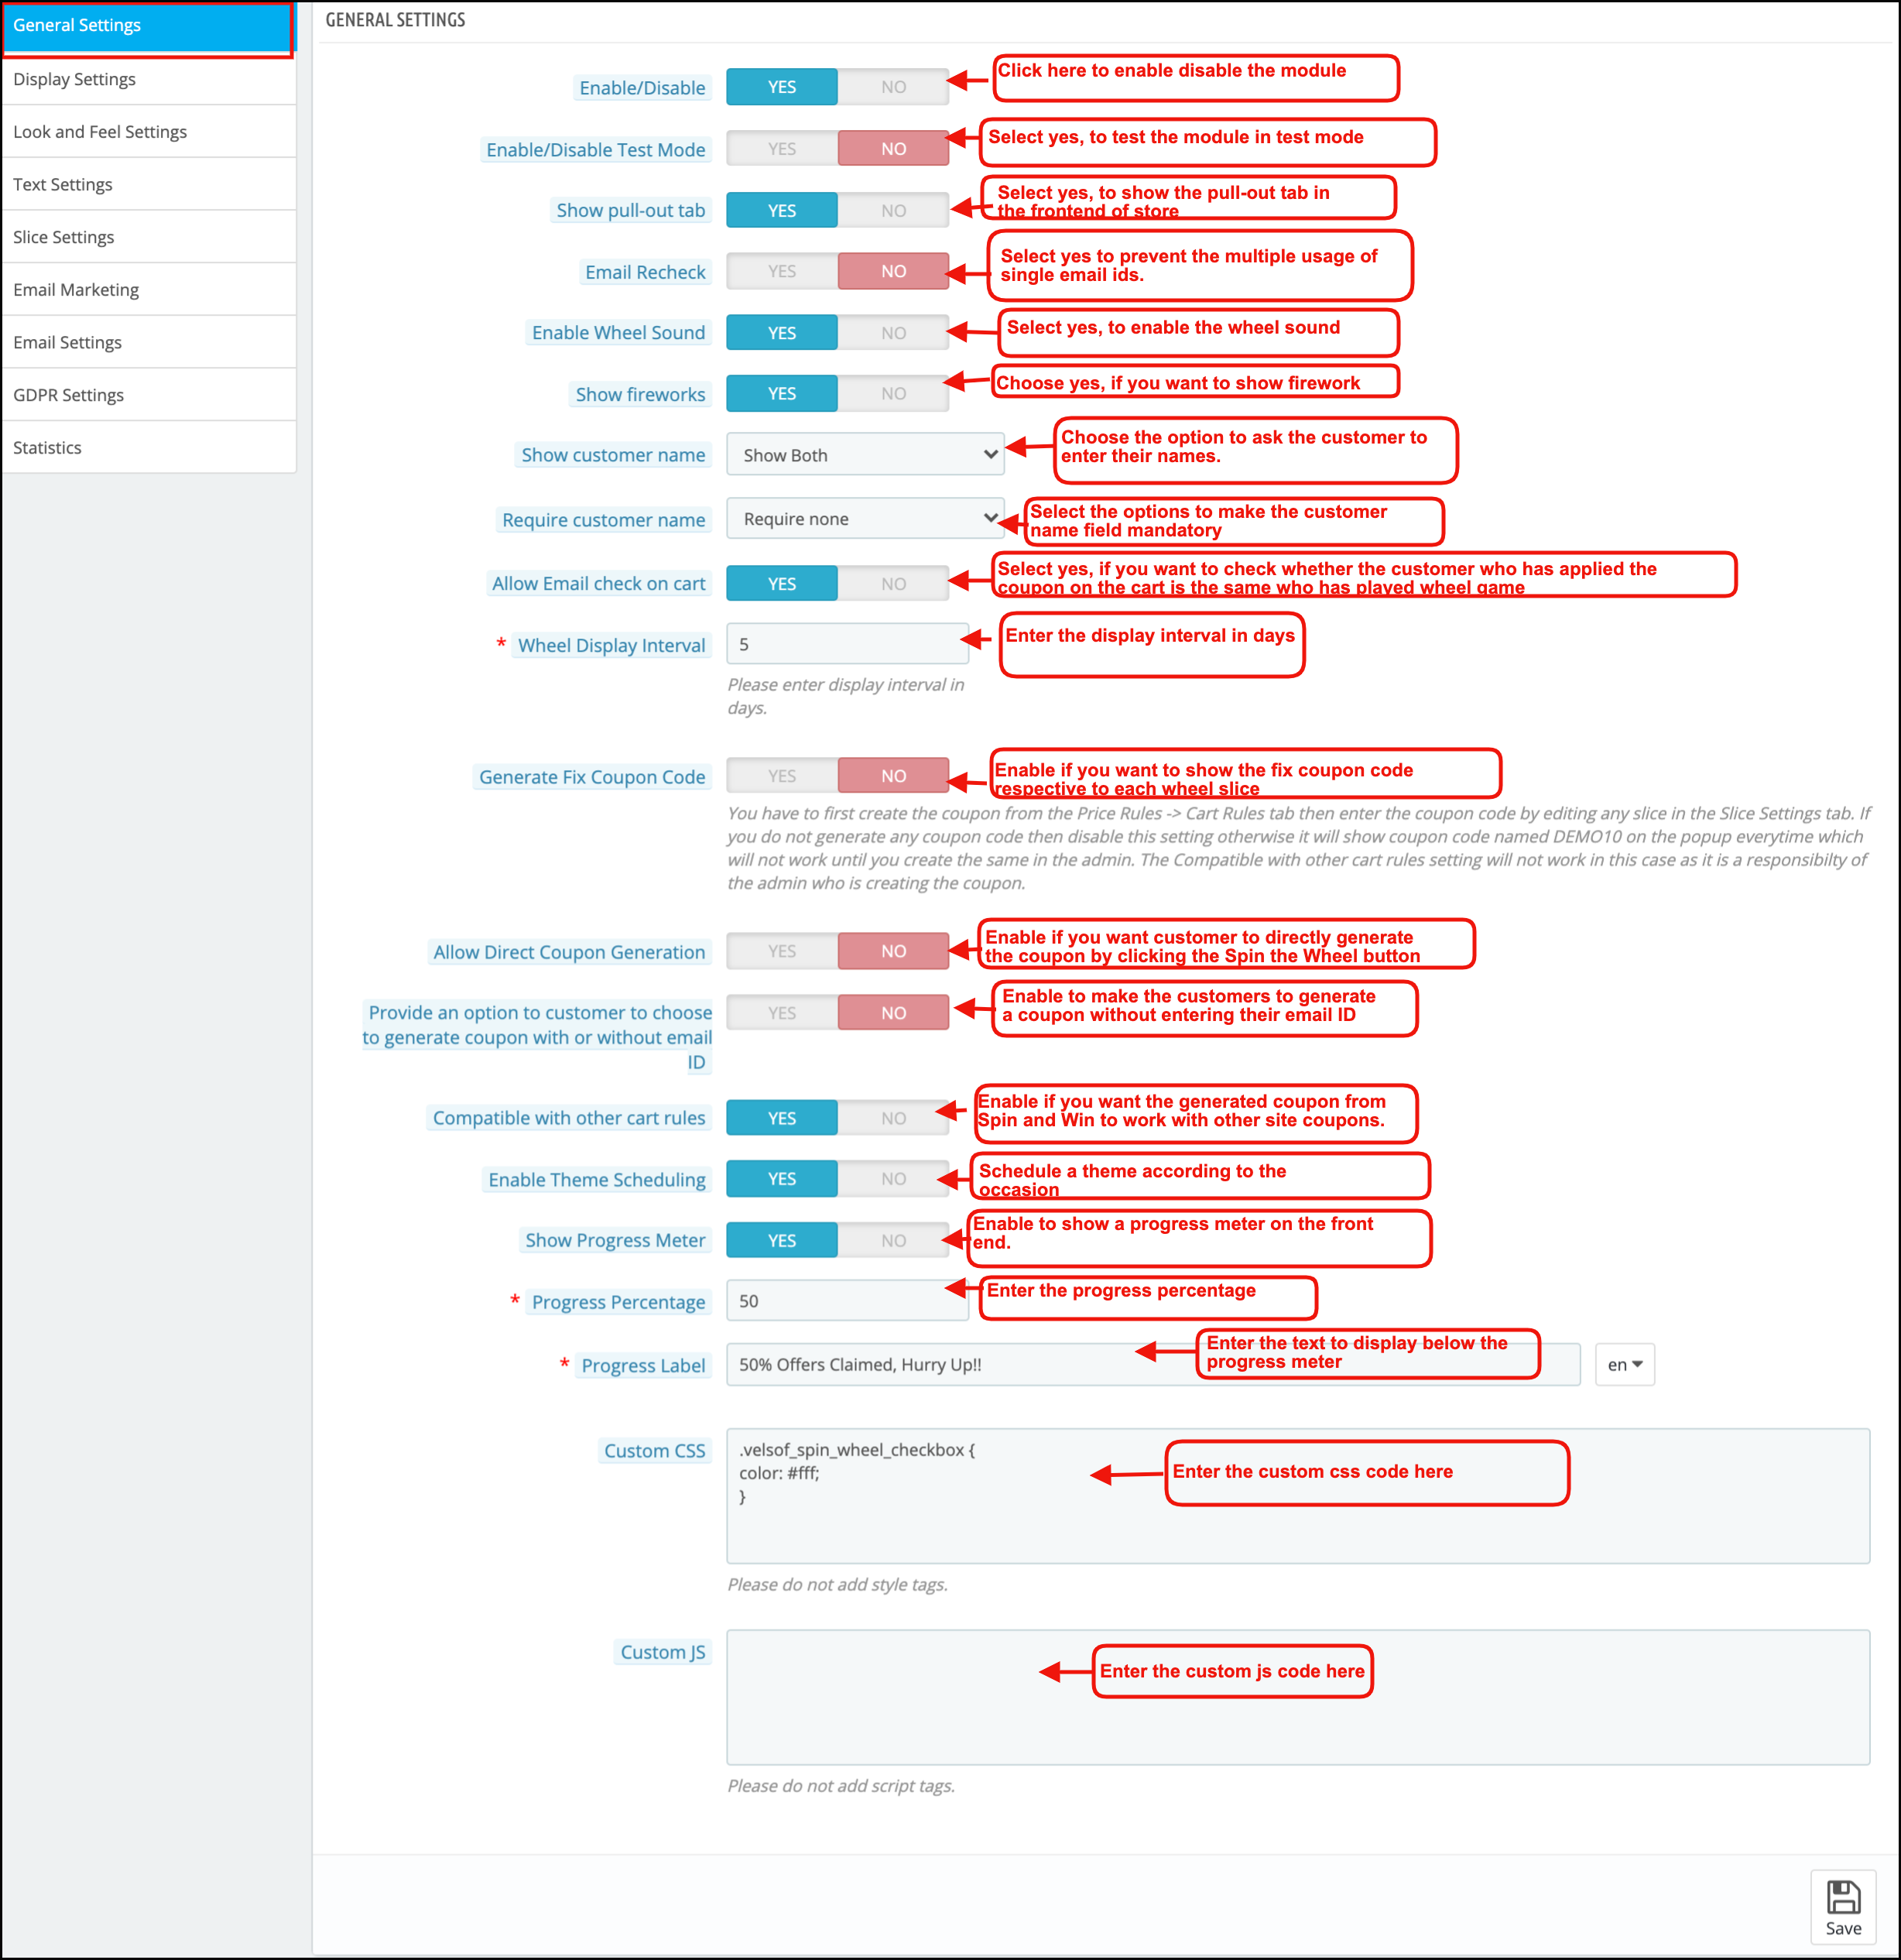
Listed below are some of the customization options that can help the admin make the initial changes in their Spin and Win (email subscription) Addon.
1. Enable/Disable:-The admin can enable or disable the addon using this setting.
2. Enable/Disable Test Mode:- The store admin can enable the test mode and enter their IP Address to test the module before implementing it in the store
3. Show Pull-out Tab:- The visitors of the website can remove the spin and win pop up by clicking on the ‘I’m not feeling lucky link as shown in the image below.
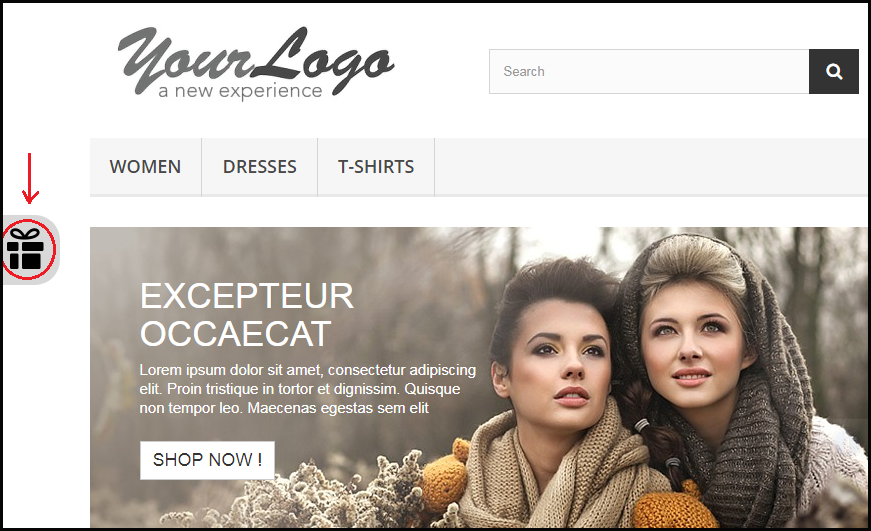
By enabling this setting, the store owner can provide the option to pull the spin and win spin and win pop up back on the screen by the user.
The customer can click on the gift icon on the left side as highlighted in the image above to pull out the email subscription pop up spin and win pop back.
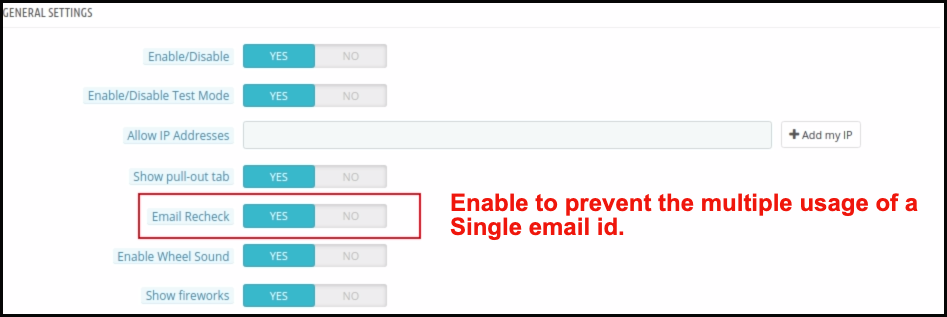
4. Email Redundancy Check:- This provides an option on the Prestashop store to verify the email id of the customer to ensure that there is no repetition of email ids. In case, the customers are only allowed to use coupon code ones. The customers cannot use the single email id twice. This can be done by enabling the Email Recheck option as shown in the image below.
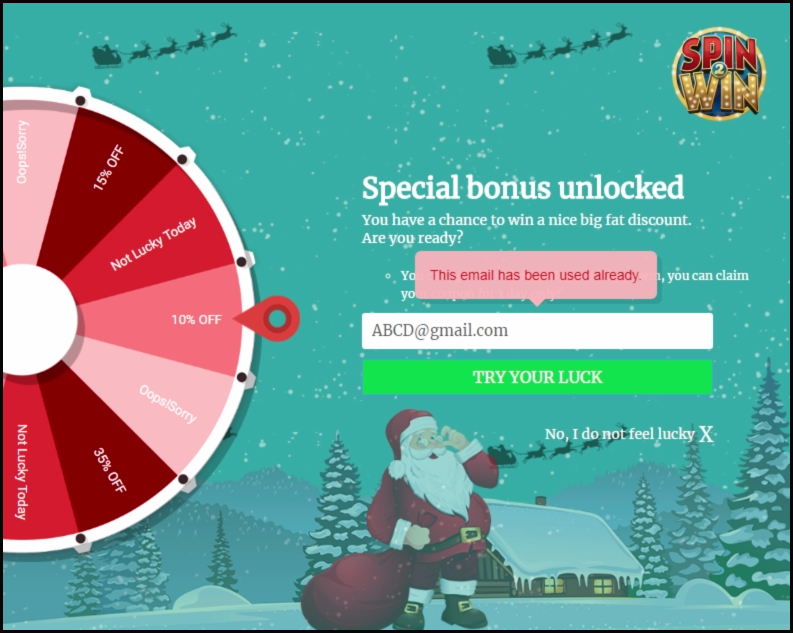
In case the same email id is entered again, a message will be shown as below.
5. Enable Wheel Sound: Prestashop store admin can enable wheel sound. Further, the wheel will generate a tapping sound when he enables this option.
6. Show Fireworks: Prestashop Newsletter subscription popup addon offers an option for admin to show fireworks on the email subscription popup when a customer wins a discount. Admin can enable this setting to make the win of the customer more special and exciting.
7. Show Customer Name: Prestashop admin can now ask for the Customer name before a customer plays the Spin and Win game.
8. Require Customer Name: Prestashop admin has an option to make the Customer name field mandatory or optional.
9. Allow Email Recheck on Cart: This option will check whether the customer who has applied the coupon on the cart is the same who has played the Spin and Win the game.
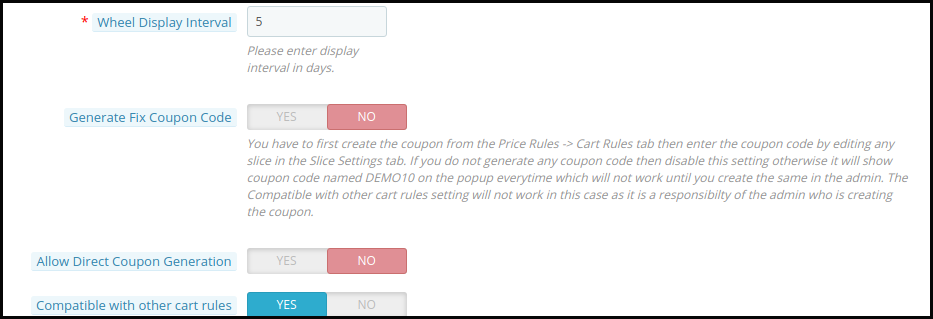
10. Spin and win pop up Display Interval:- Prestashop store admin can enter the number of days after which the Spin and win pop up(email subscription pop up) will display to the customer.
11. Generate Fix Coupon Code: Admin can enable/disable this option to add fix coupon code respective to each wheel slice under the Slice Settings tab of the module. For this, the admin has to first create the coupon code from the Price Rules -> Cart Rules tab then enter the coupon code by editing a particular slice.
12. Allow Direct Coupon Generation: If the admin enables this setting, then the customer can directly generate the coupon by clicking the Spin the Wheel button. If he disables it, then the customer has to fill in the required information to play the game.
13. Provide an option to customers to choose to generate a coupon with or without email ID: With Prestashop Spin and win, the admin can allow users to generate a coupon without entering their email ID.
14. Compatible with other cart rules: Admin can control the compatibility of spin and win coupon code with other active coupons on site. If the admin disables this setting, then the coupon generated from Spin and Win will not work with other site coupons.
15. Enable Theme Scheduling: If the admin enables this, he can now schedule a theme according to the occasion, and once the validity of the theme gets over, it will be set to the default theme.
16. Show Progress Meter: With this new feature of Exit pop up, the admin can show a progress meter on the front end.
17. Progress Percentage: Prestashop spin and win module allow admin to insert a value for displaying the progress percentage i.e. the value for offers claimed.
18. Progress label: In this tab, the admin can add a text which will display below the progress meter like ‘75% Offers Claimed, Hurry Up!!’.
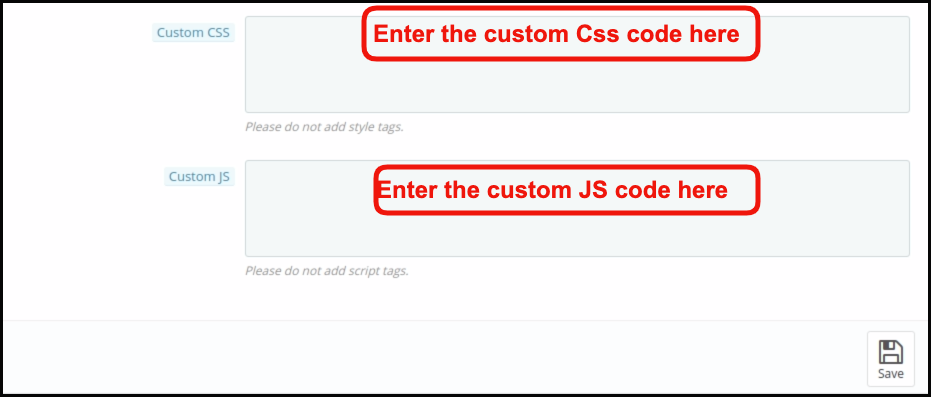
19. Custom CSS and Custom JS:- The admin can even change the look and feel of the addon as per their need by entering the custom CSS and custom JS code in this section.
Save the changes that you have made in the configuration setting.
3.2 How to change the Display Settings?
This option enables you to change the setting of the display of this email subscription Spin and win pop up. It includes the following setting options.
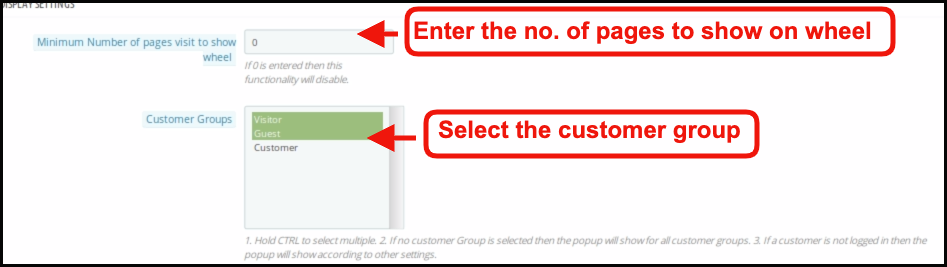
1. Minimum Number of pages visit to show wheel: Admin can set the minimum count of site pages while should be visited to show the spin wheel to customers. If the admin enters 0, then the functionality disables.
2. Customer Groups: Admin can select one or more groups to which the spin and win popup will display. Use the CTRL key to select multiple options.
3. Minimum Screen Size: The drop-down list offers a few screen sizes for the admin to choose from.
4. Maximum Display frequency: The admin can select the frequency of the spin and win pop up email subscription pop up display here. Select one option from the multiple choices offered in the drop-down list.
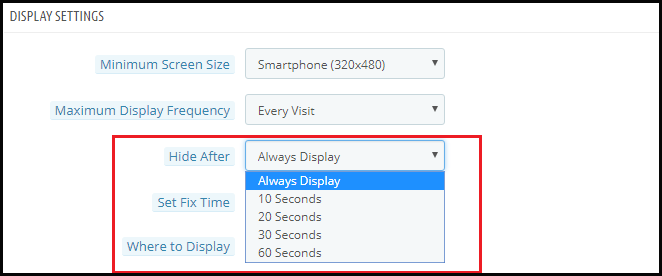
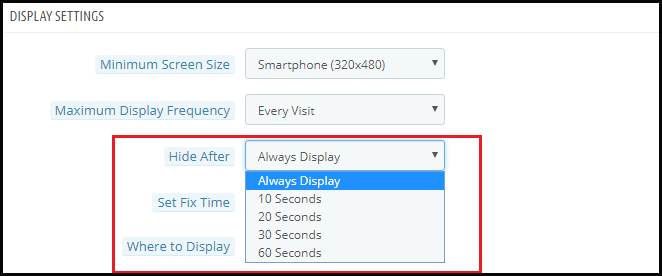
5. Hide After: The admin can select the time interval in seconds after which he wants to hide the spin and win pop up and win pop up.
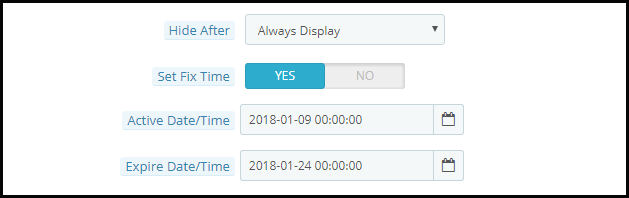
6. Set Fix Time: You can enable or disable the fixed time from here.
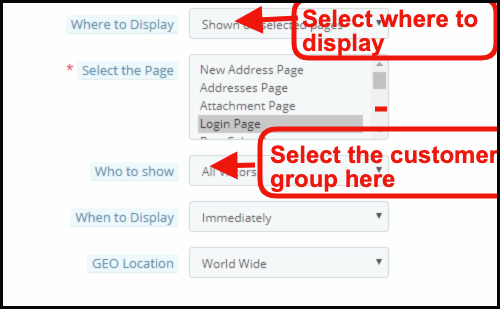
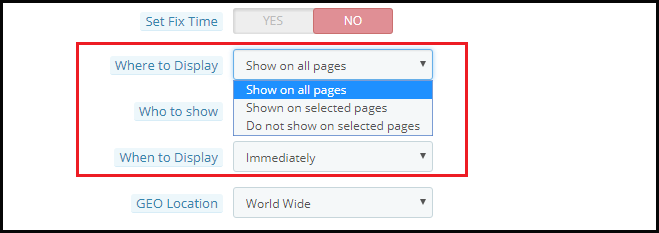
7. Where to Display: You can select the pages where you want to display the spin and win pop up. Admin can select Product page, category, Home page to display this interactive and responsive email subscription pop up.
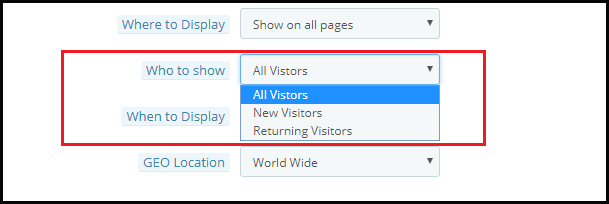
8. Who to Show: You can select the visitors to whom you want to show the spin and win pop up. You may select ‘All Visitors’, ‘Registered Visitors’, or ‘Guest Visitors’.
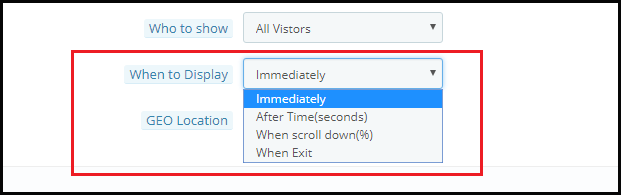
9. When to Display: You may choose exactly when you want the spin and win pop up to display. You can either display it immediately when the customer lands on your site or after some time or when the visitor scrolls down or you can use it as an exit intent pop up.
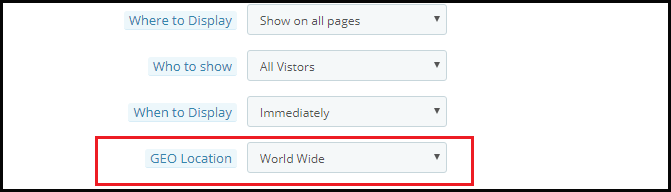
10. Geo Location: You can even select the display option as per the Geolocation of the visitor.
3.3 How can the look and feel of the addon be changed?
The Look and Feel Setting in the Prestashop admin panel allows you to change the look of the spin and win pop up as it appears on the website.
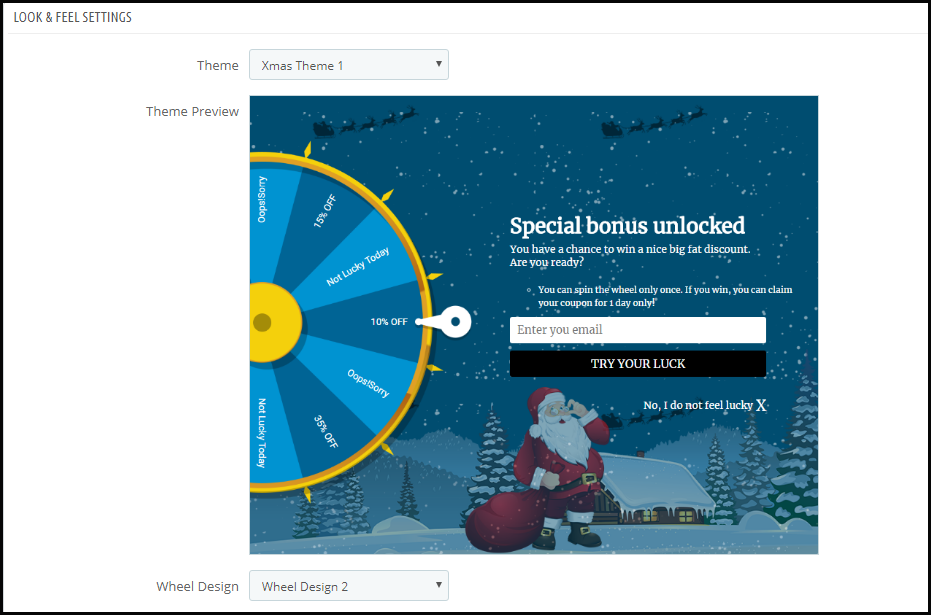
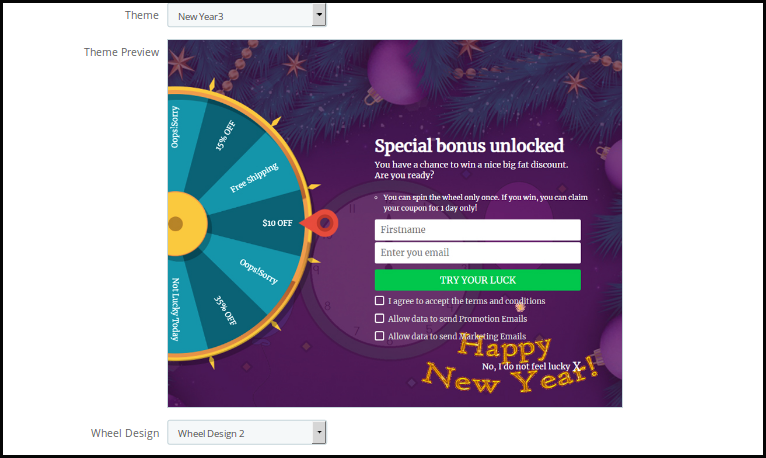
1. Theme: Prestashop admin can see the preview of the Prestashop Newsletter popup in the admin panel itself before making it live. There are multiple themes to choose from. Admin can choose as per the occasions like New Year and Christmas. The PrestaShop admin can now apply the latest New Year 2020 themes on his website. There are 4 eye-catching New Year 2020 themes to choose from.
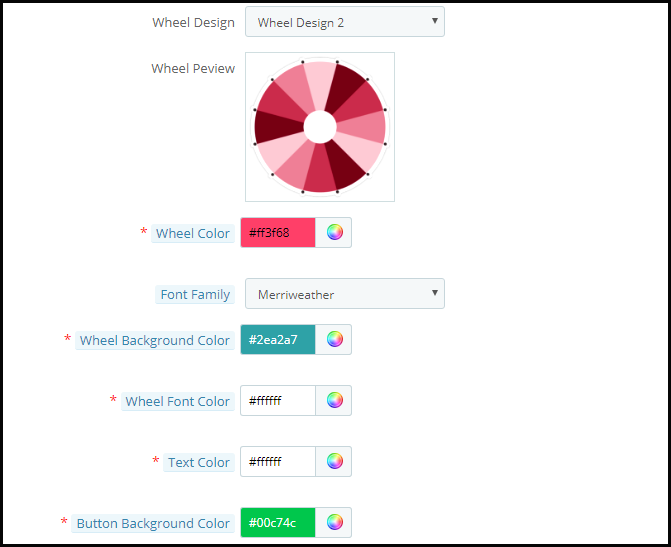
2. Wheel Design: Prestashop store admin can change the Design of the spin wheel. Prestashop admin can also see the preview of the Spin wheel in the admin panel itself.
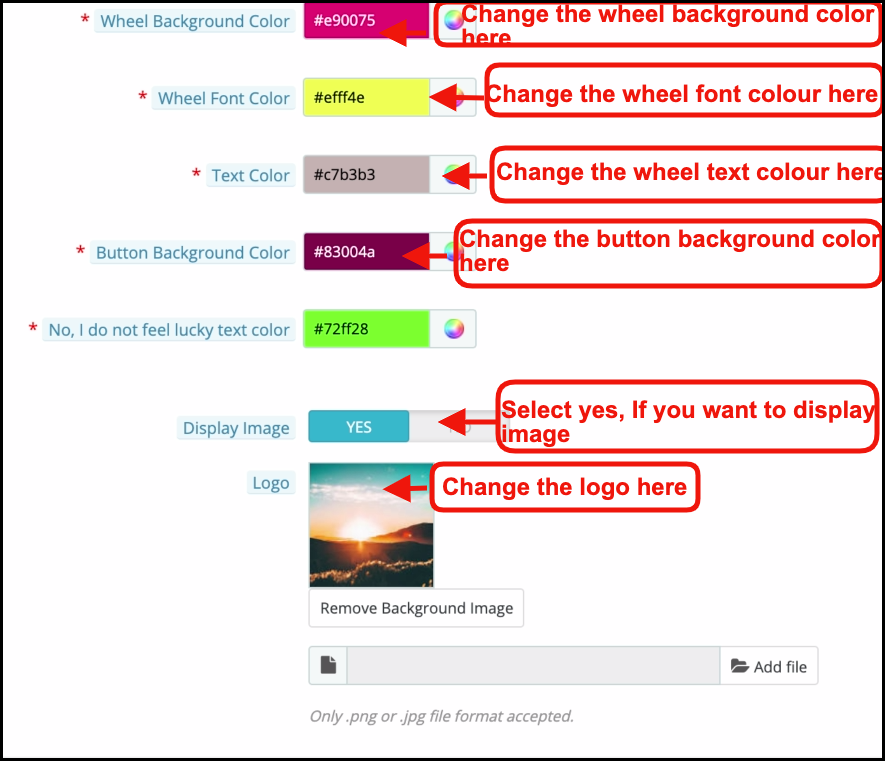
3. Wheel Color: Prestashop admin can select the color of the Wheel using this option. The spin wheel is customizable in endless ways and the admin can even match it with the Prestashop store theme.
4. Font Family: Prestashop email subscription popup allows Prestashop admin to choose the Font suitable on the Newsletter subscription popup.
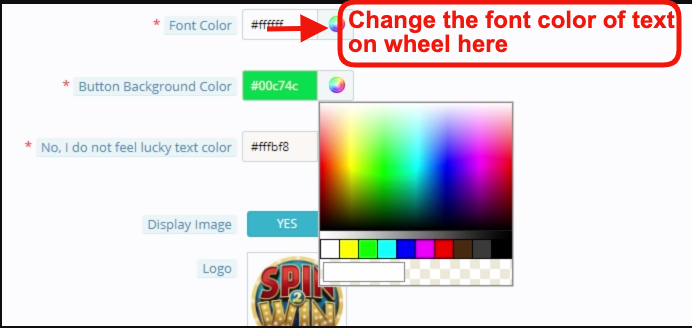
5. Wheel Background and Font color: Background color and Fonts on the Spin Wheel are customizable using these options.
6. Text Color and Button Background color: The Text color and the Button background color on the Email subscription popup is customizable using these options.
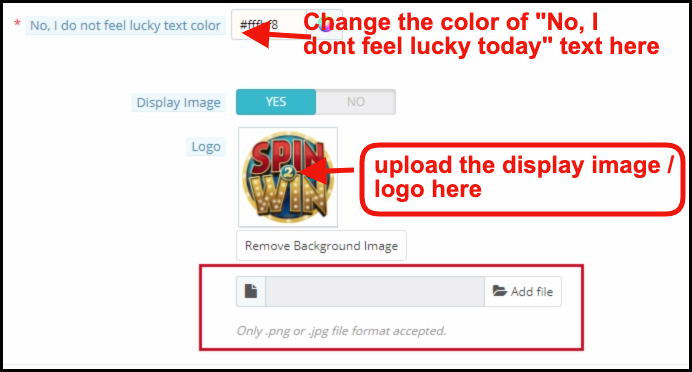
7. Display Image: You can enable or disable the Display Image by selecting the Yes or No button.
You can change the logo that displays with the spin and win pop up. The image of the logo to display can be selected from the device by clicking on the Add File button as shown in the image below.
The changes made here will be reflected on your website.
The spin and win pop up shown on the website includes the ‘Try Your Luck’ button. You can change the color of the button by changing the setting of ‘Button Background Color’.
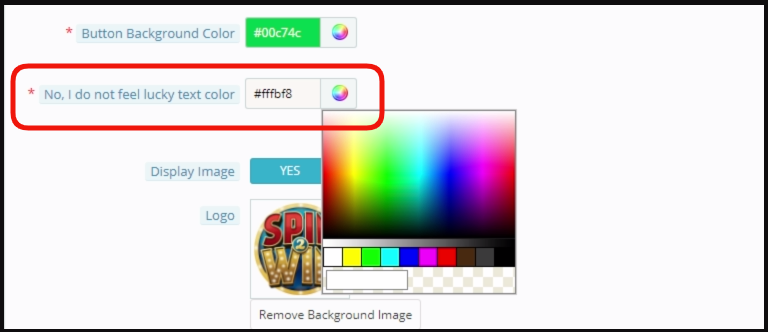
Even the font of ‘I’m not feeling lucky’ can be changed as shown in the image below.
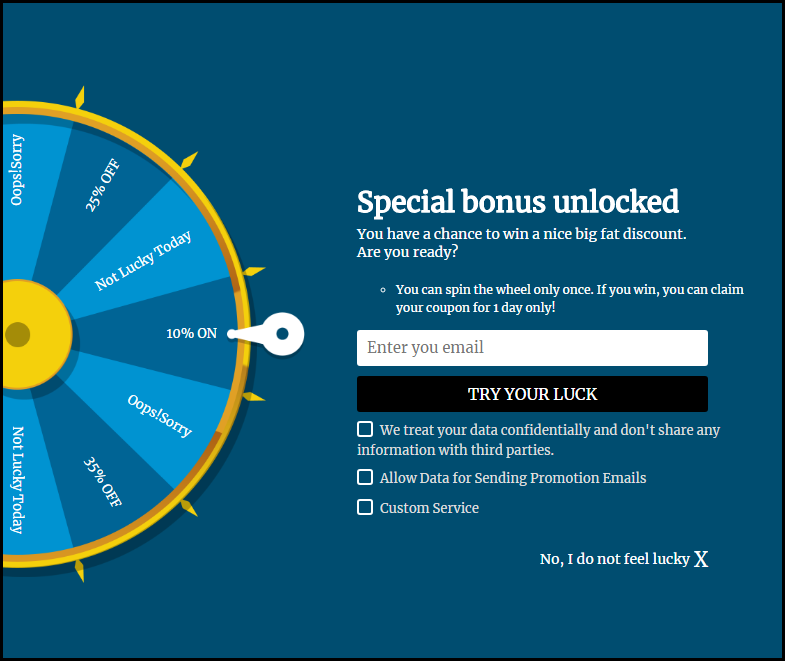
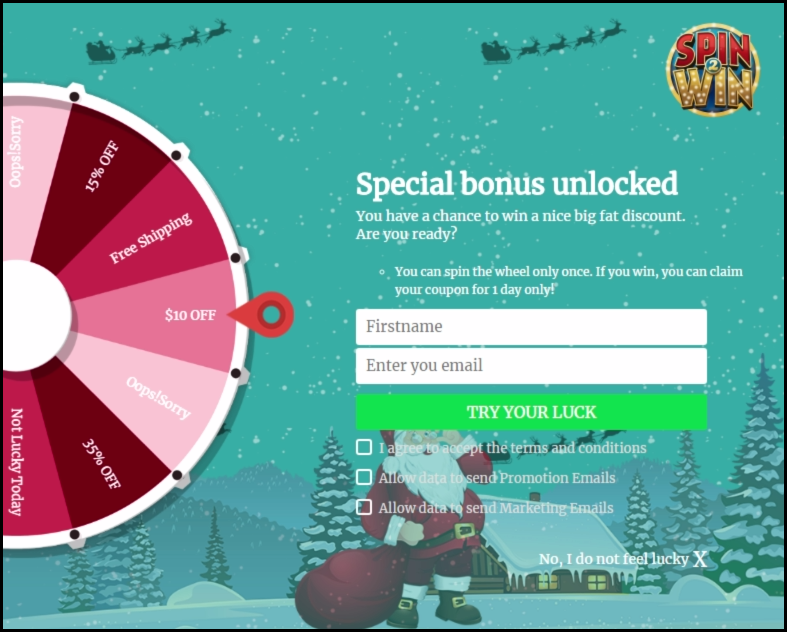
The entire changes made by you will be reflected on the front end as shown in the image below.
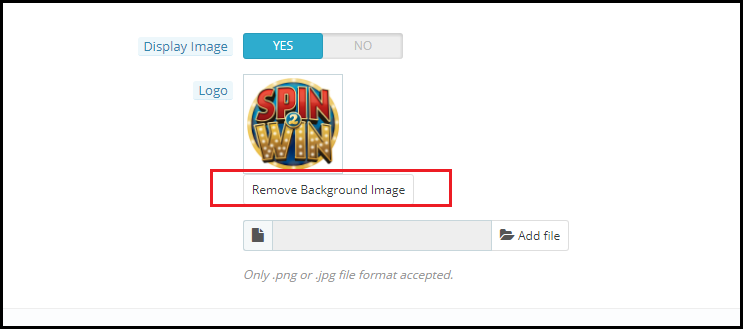
At last, the admin panel even provides an option to remove the background image if he wants to by clicking on the Remove Background Image Button.
3.4 How can the look and feel of the Spin and win pop up be changed?
The admin can change the look and feel of the spin and win pop up by changing the Look and Feel Settings configuration in the ‘Wheel Setting’ option.
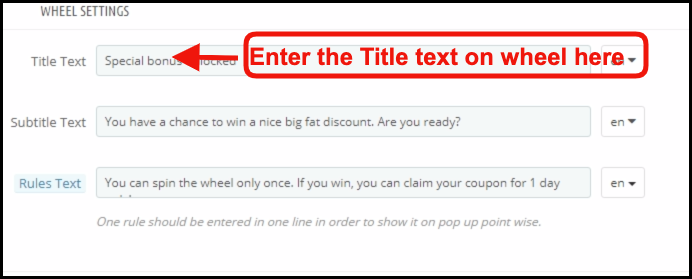
3.5 How can Prestashop admin change the Text on the Email Subscription pop up?
Prestashop admin can change the text on the Email Subscription pop up using the Text settings. Admin can customize the text in any language.
3.6 Can admin change the setting of the different slices of the Spin and win pop up?
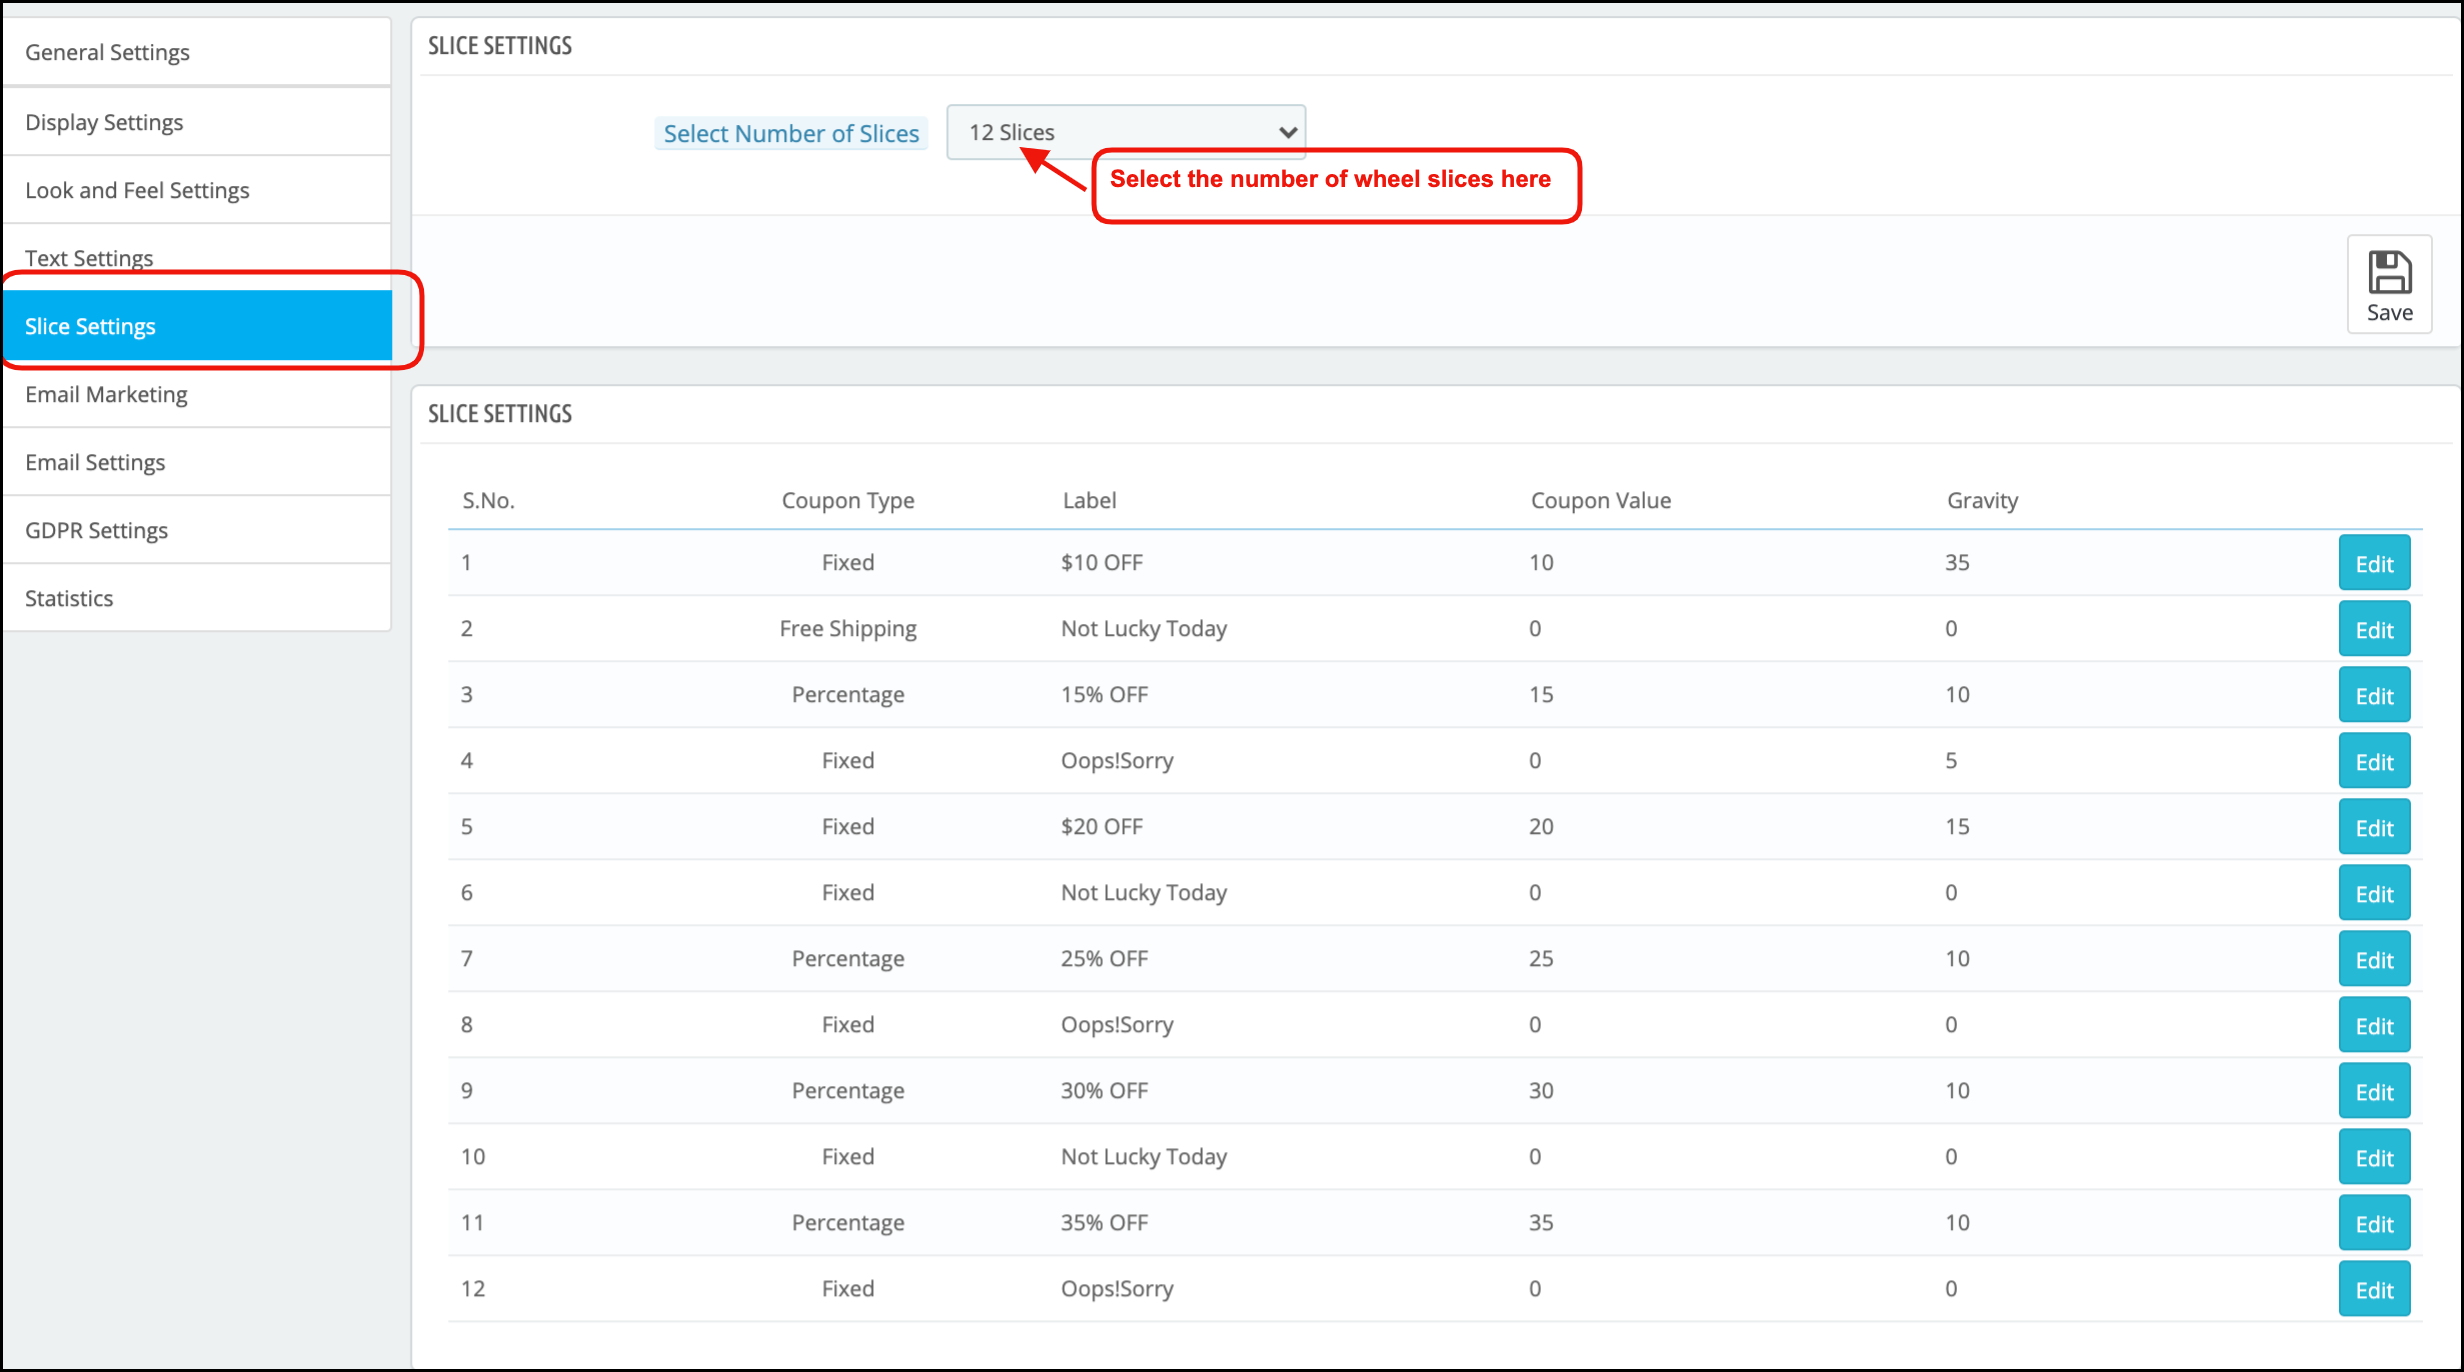
Yes, even the settings and the text or offers available in the different slices of the spin and win pop up can be changed from the ‘Slice Setting’ option.
As you click on the setting, you will get an option to select the number of slices to show on the front end and the list of the various slices will be shown.
Select Number of Slices: With the Updated version of the spin and win module now admin can select out of six, eight, or twelve slices for the front end.
Each slice can be configured by clicking on the Edit button.
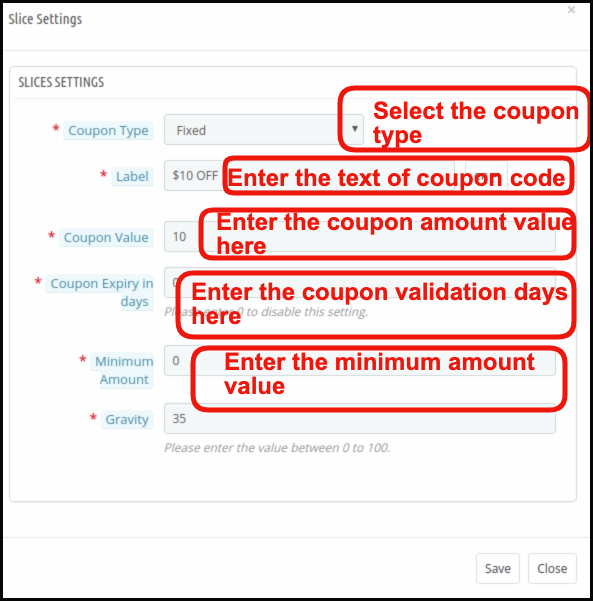
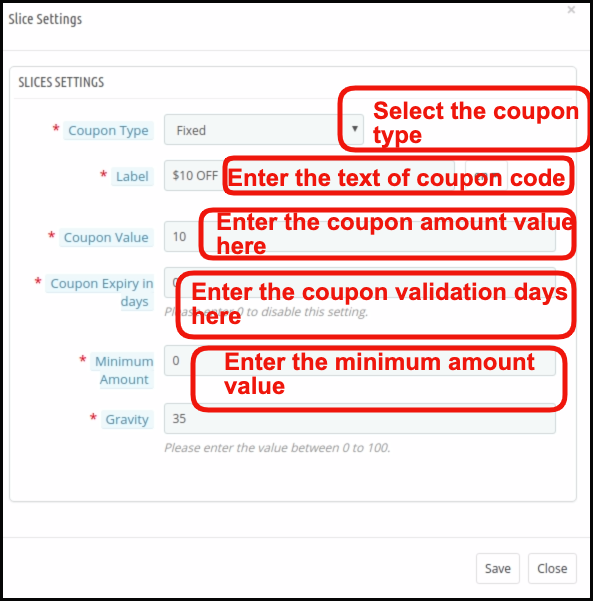
As you click on the Edit button, a pop up will appear where Prestashop store admin can set the Coupon Type (Which can be Fixed or in Percentage or gift or free shipping ), Label, Coupon Value, Coupon expiry in days, minimum amount, Gravity and fix coupon code. Save the changes and the same will be reflected in the spin and win pop up shown on your website.
3.7 How is the email customized?
Prestashop spin and win addon offer Mail Chimp, Klaviyo and, SendinBlue integration. The email Id entered in the email subscription popup is automatic with the store owner’s Mail Chimp, Klaviyo and, SendinBlue account. The emails captured are usable for personalized promotions.
3.8 How can I change the email settings?
The ‘Email Setting’ option allows the admin to customize the email templates that are sent to the customers.
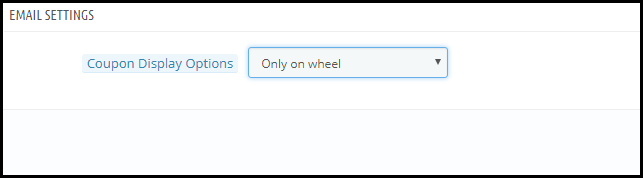
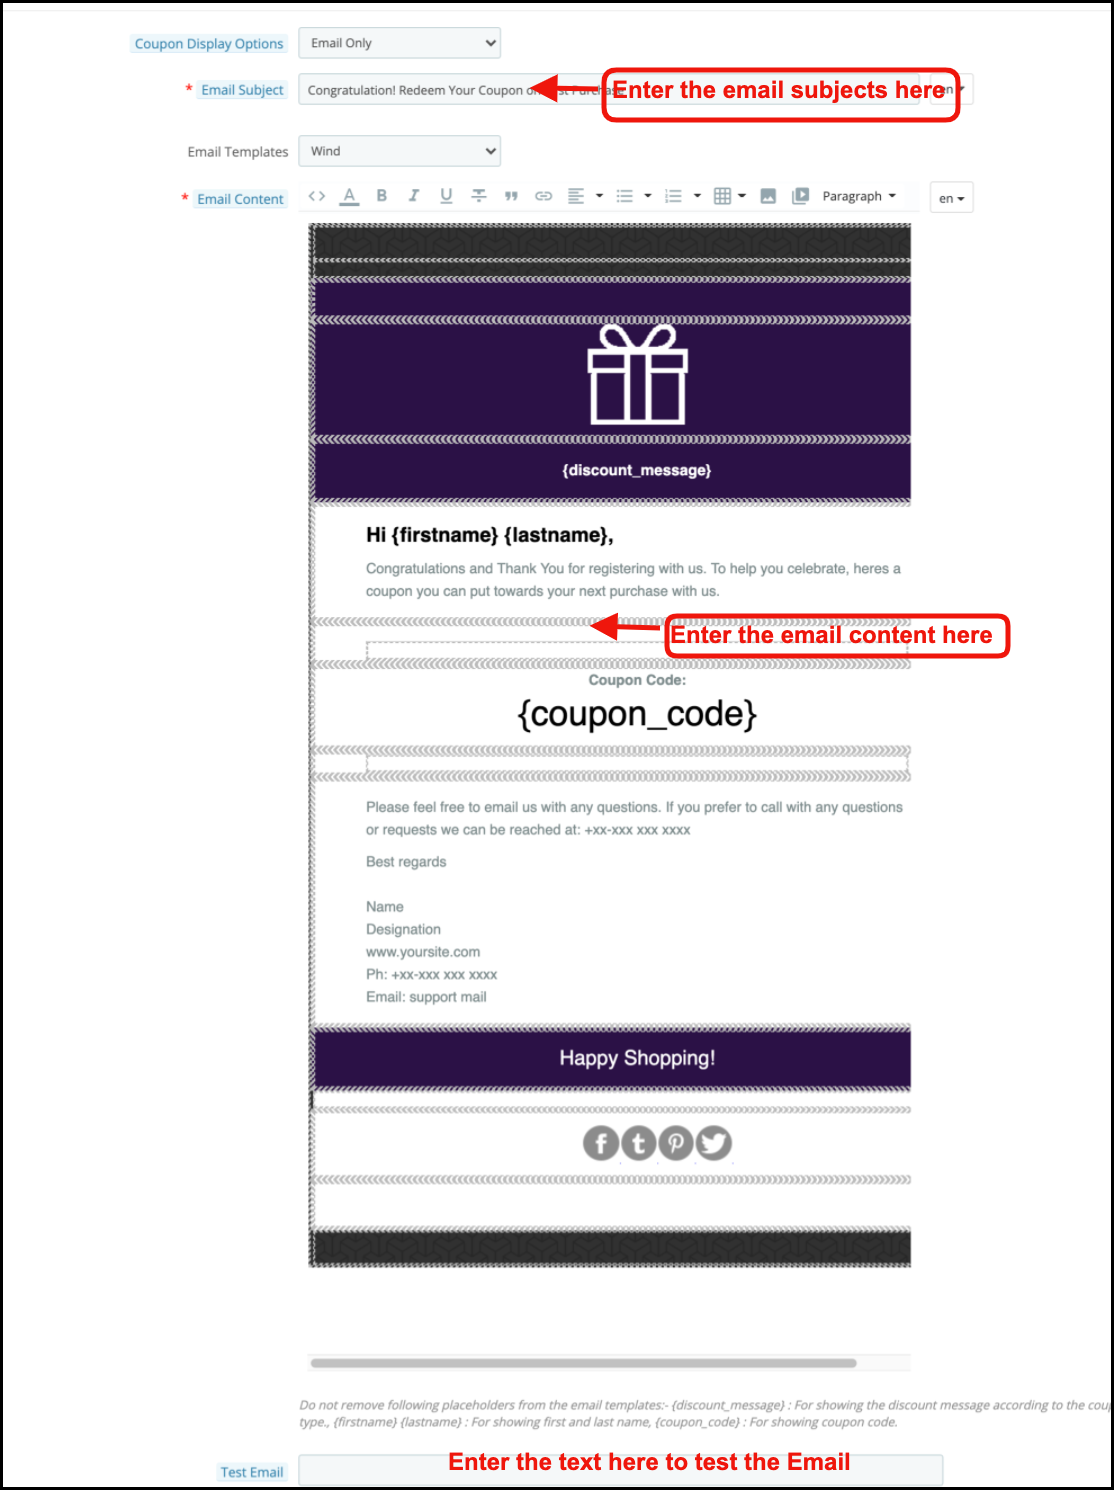
Coupon Display Options: It allows the admin to choose the places where he wants to display the coupon. Namely ‘Only on Wheel’, ‘Email Only’, ‘Email & Wheel’.
Email subject: Set the subject of the email in this tab.
The Email Templates: In the next tab sellers can choose the templates from the available templates.
Email content: In this tab, the store owner can customize the email body at his convenience.
3.9 GDPR Settings
GDPR or General Data Protection Regulation is a new act that will be enforced from 25 May 2018. It is mandatory for all the companies which are handling the personal data of EU citizens. GDPR offers various rights to the customers (mentioned below) which helps them to keep their data safe and secure.
1. The right to be informed
2. The right of access
3. The right to rectification
4. The right to erasure
5. The right to restrict processing
6. The right to data portability
7. The right to object
8. Rights concerning automated decision making and profiling
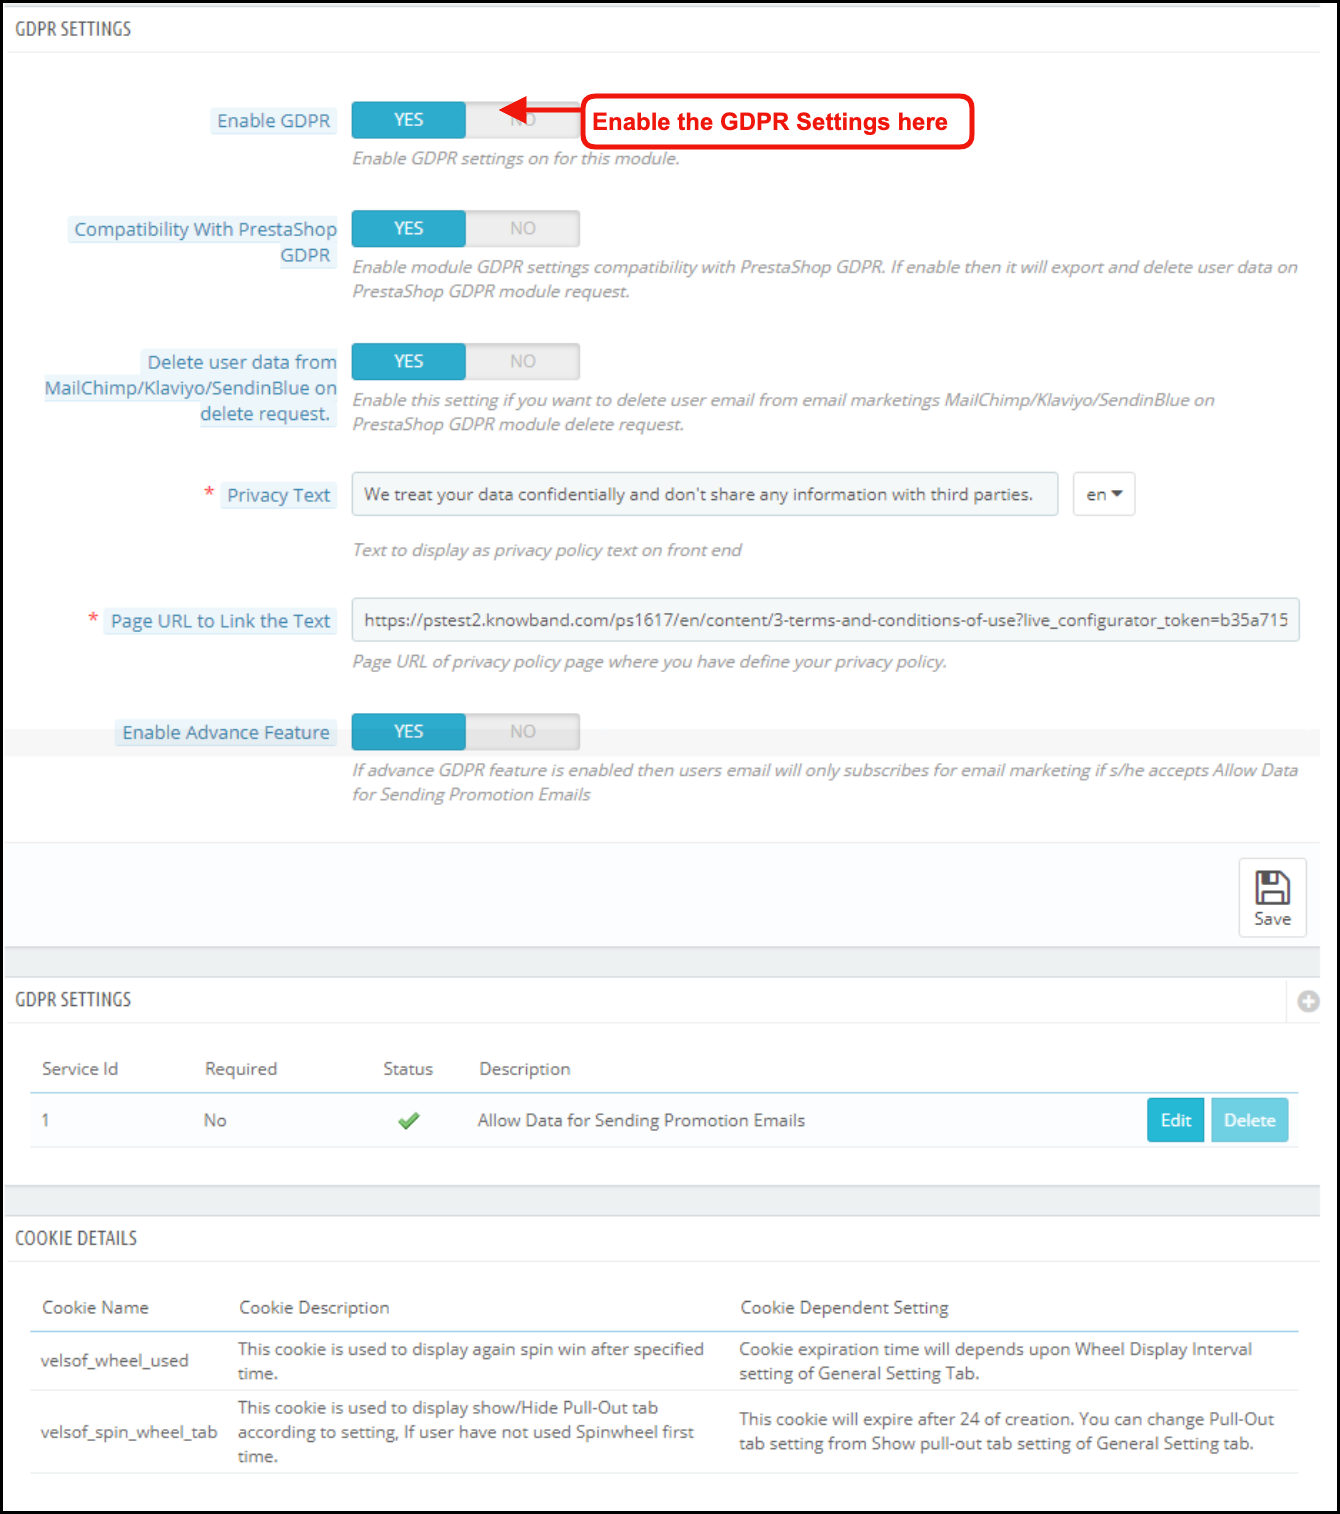
GDPR settings will help the Prestashop store admin to comply with these rules. Please refer to the attached screenshot in which we have highlighted the GDPR Settings tab.
a) Enable GDPR: Enable or disable the GDPR options using this option. There are the following options in the GDPR settings tab for the merchants to make the popup module compliant with the GDPR. The GDPR settings will remain unavailable by default and as per the business need, the store admin needs to enable it.
b) Compatibility with Prestashop GDPR: Admin has the option to enable/disable this feature. If you are using the official GDPR module then you must need to enable this setting. The main purpose of this feature is to export and delete user data on the PrestaShop GDPR module request. It is also compatible with Prestashop GDPR Module developed by Knowband.
c) Delete user data from MailChimp/Klaviyo/SendinBlue on delete request: As the Spin and Win pop-up addon syncs the captured email ids to the MailChimp/Klaviyo/SendinBlue email service providers (third-party service providers, so if this setting is on and you use the services of any one of these email service provider then on the data deletion request the subscriber details will get deleted automatically).
d) Privacy Text: The module will add a checkbox to the pop-up design with the privacy text; this text will be visible to the front-end user at the time of entering the email id in the email box.
e) Page URL to Link the Text: Admin can add the link to “Privacy Policy” or any other page with this message.
f) Enable Advanced Feature: This option allows the store admin to add more checkboxes to the pop-up design for marketing permission or any other permission like age verification (age should be 16+).
If the admin enables the Advance Feature setting, then he will be able to access the additional checkbox setting option. As per requirement, the admin can add multiple checkboxes.
g) Service Settings: All the additional checkboxes that the admin adds will be listed under the Service Settings. Admin can add multiple checkboxes with ease.
How to add a new checkbox:
1. Click on the (+) sign to add a new checkbox.
Note: By default one service will be listed on the service list and the admin can update the text for the service.
2. On clicking the + sign will open a pop-up and admin need to enter the details like – Service Label, Make service mandatory and Enable Service.
Service Label: This is a text input field. The text entered here will be visible to the front-end user.
Make Service Mandatory: This is a toggle button. If this is set to Yes, then this field will be marked as Mandatory, and without confirming the checkbox visitors will not be able to get the offer.
Enable Service: Admin has the choice of Enable/Disable a service at any time.
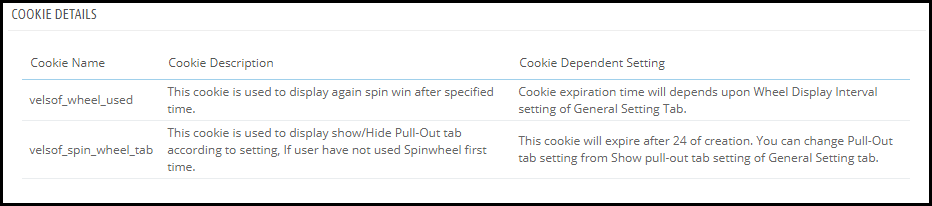
Cookie Details:
As the Spin and Win module uses the Cookies so the description and the use of these cookies have been listed in the section so that the admin can put these details on the Cookie Policy or Privacy Policy page.
Record of consent:
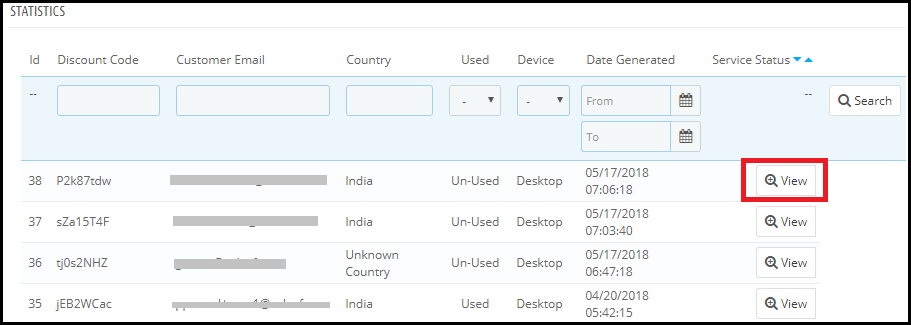
As soon as the user opt-in for the promotion and spin and the wheel to get the discount coupon code. The Spin and Win Pop-up module keeps the proof of the opt-in, as it is needful for the lawful processing of the captured data. As the unique coupon code is generated each time so the Statistics tab of the Spin and Win GDPR Compliant Module also records the permissions of the users. Please refer to the attached screenshot.
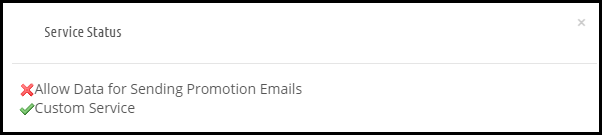
On clicking the view button admin can check the permission of the user.
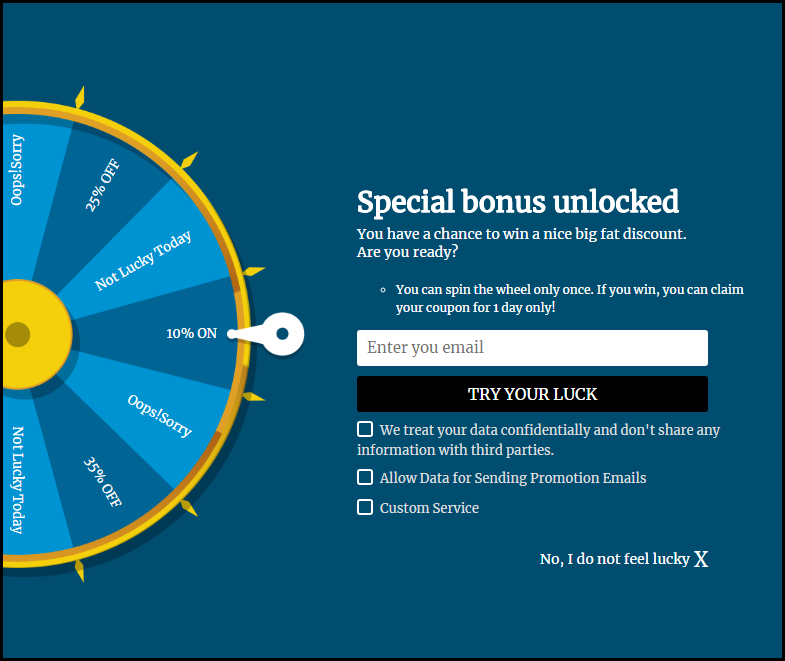
After enabling the GDPR Settings the Spin and Win pop-up design will look like this –
3.10 How is the statistical report of the Spin and win pop up generated?
Yes, the Prestashop admin has complete access to the statistical report of the visitors who spin the wheel and claim the coupon generated by the same. The report is generated in both graphical and tabular format.
(New Feature) Export Email List: Now Prestashop Exit Pop Up allows the store admin to export the list of email subscribers by clicking the Export Email Button on the Statistics Setting Page.
4.0 Theme Scheduling
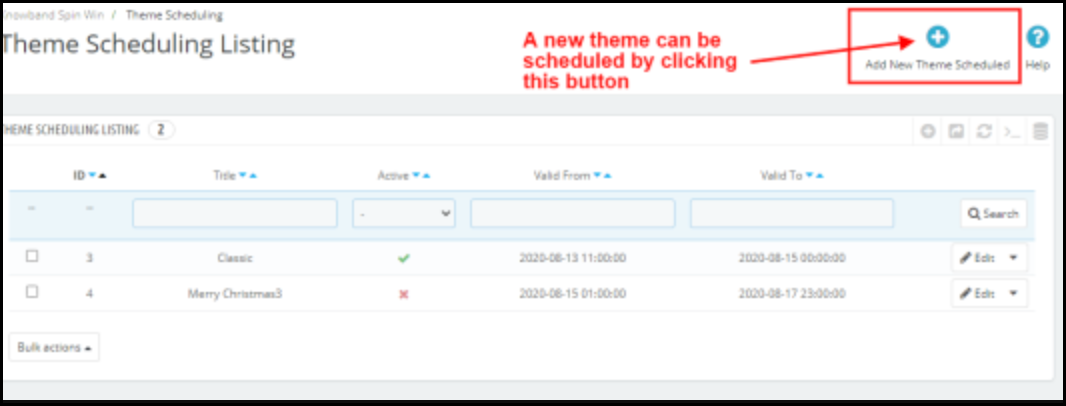
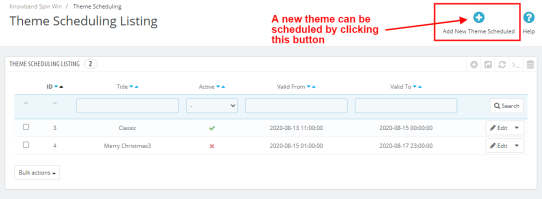
Theme Scheduling is the new feature in Prestashop Spin and Win email subscription module. This feature allows the admin to select the validity date and expiry date for a particular theme. Prestashop Store owner can now set a schedule for displaying a specific theme on a particular occasion and this will automatically change to the default theme on the theme deactivation date.
Add New Theme Schedule: Prestashop store admin can add a new theme schedule by clicking the ‘Add New Theme Schedule’ button.
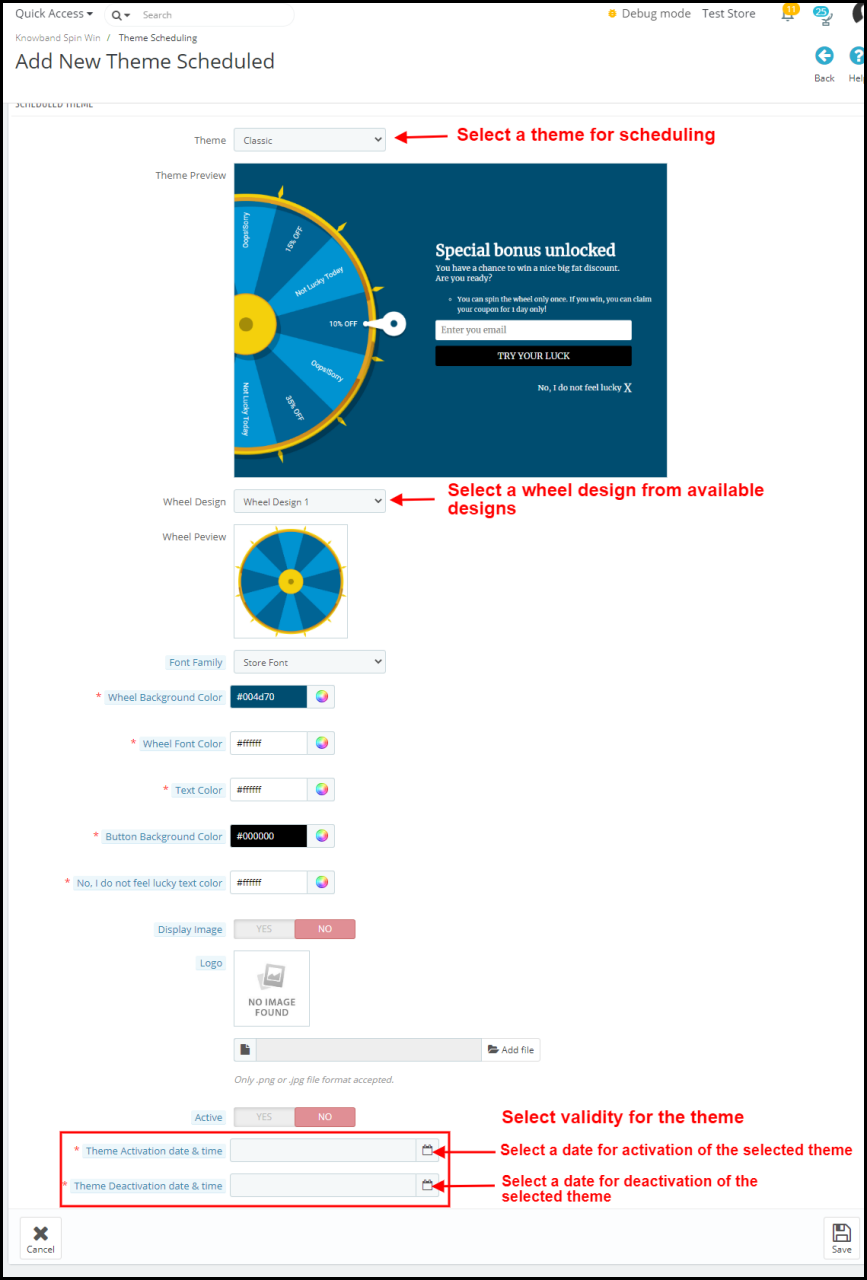
For this, you can select the theme type and change the look and feel of the wheel. (refer 3.3 Look and Feel Setting)
The new feature in Theme Scheduling
Active: With Prestashop spin and win module admin can activate or deactivate a new theme schedule by a toggle button.
Theme Activation date and time: If the new theme is activated, the store admin will have to enter the date and time for the activation of a particular theme.
Theme Deactivation date and time: The activated theme will be deactivated on the date and time entered in this tab. This allows the admin to apply a theme for the Spin and Win module for a fixed time and the store admin can plan this way before the special day.
Disclaimer: In case the “Spin and Win” wheel popup does not display at the front, kindly clear the cache or delete the cookies. Sometimes cookies prevent the popup from displaying at the front.
PrestaShop Fb Wall Post User Manual provides an easy to use and configure feature to the Prestashop store owners to automatically post your products, categories and brands on your official Facebook page. The innovative and easy to understand and configure module helps in boosting the customer engagement on the social media platform in just a few button click.
1.1. Project Objectives
The module can be used by the store owner to achieve following things:
It allows the admin to post product, category and brand automatically on your Facebook store.
The Module even allows the admin to post the new products on the Facebook page of the store
The admin can hide or display the price of the product.
You can even get the Low Stock post with the help of this module.
The admin can even post the discount coupons.
2.0 Installation
Follow the following steps to install the extension:
Unzip the Facebookwallpost.zip file. It would contain files and folders.
Copy all the files and folders of unzipped folder into your store “modules” directory on the path – Root Directory/modules/.
The module is now ready to be installed in your store. You can find it in Store Admin -> Modules and Services.
Click on “Install” button to install the module. It would show a pop-up for your confirmation. Click on “Proceed with the installation” option. This step will install the module and show notification – “Module(s) installed successfully”.
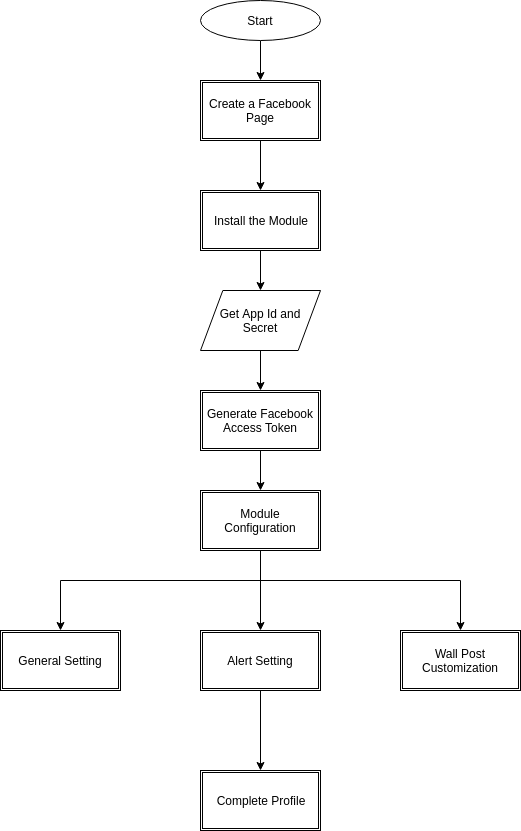
3.0 System Setup
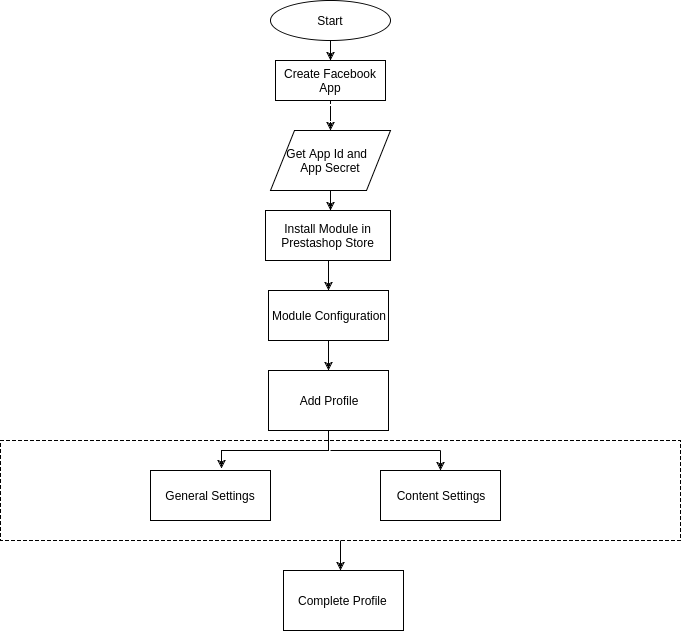
Before proceeding ahead, it is important to know that what is the correct flow of actions to setup this system as there are several things which are dependent on other things and if we do not take care of them then it would become difficult to process smoothly or may be error prone.
4.0 Admin Interface
The admin interface of the module is completely configurable. Click on the ‘Configure’ next to the module in the admin panel.
4.1 How To Start configuration process?
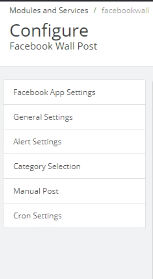
After clicking the “Configure” button, the admin will be redirected to the Configuration page of the module. It offers the below-listed configuration options:
Facebook App Setting
General Setting
Alert Setting
Category Setting
Manual Post
Cron Setting
Let us discuss each options one-by-one.
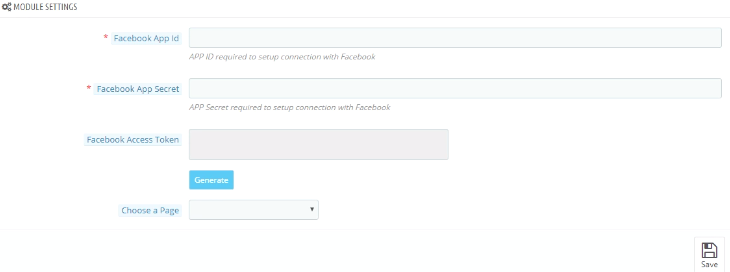
Facebook App Setting:- The Facebook App Setting includes the process to the sync the Facebook profile of the store owner. Follow the below-mentioned steps:-
Facebook App Id:- This field is for Facebook App Id created for this module. Enter the Facebook App Id in the first column. In order to find the App id, go to the dashboard of your Facebook App. Copy the app id from the column shown in the image below and paste it in the setup page of the module.
Facebook App Secret:- This field is for Facebook App Secret created for this module. Copy the App Secret from the next column as shown in the image below.
‘Save’ the changes made in the configuration setting.
Facebook Access Token: The next thing you need to do is generate the ‘Facebook Access Token’. Once the changes are saved, click on the ‘Generate’ button. This button will be disabled by default. It will be enabled only when the App Id and App Secret is entered and the changes have been saved.
As you click on the button, you will get a pop-up for Facebook Login. Log in your Facebook store and the access token will be generated.
The module is now synced with your Facebook store and is ready for use.
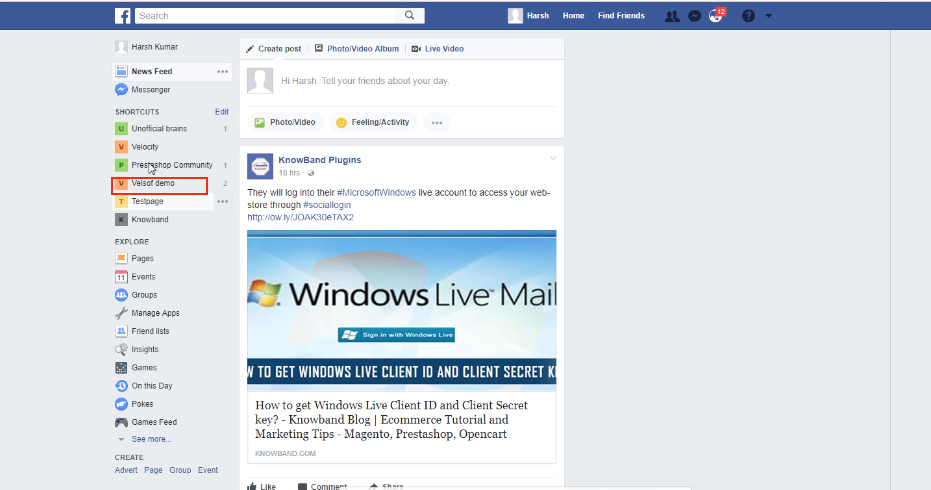
‘Choose the Page’ from the options given in the dropdown list and save the changes. The posts will be displayed on the page selected by you.
4.2 General Settings
The module is now successfully synced with the Facebook Page of the admin.
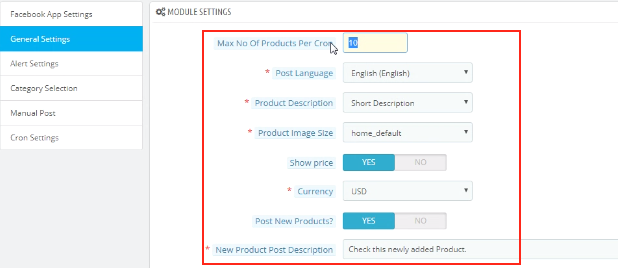
The General Setting allows to make the necessary changes in the look and feel of the FB Wall Post module. Here are some of the options offered.
You can change the ‘Maximum number of Products Per Cron’.
You can select the ‘Post Language’.
The admin can set the ‘Product Description’.
Select the ‘Product Image Size’ from the options offered in the dropdown list.
The ‘Show Price’ option enables you to either display or hide the price of the products.
The admin can select the desired ‘Currency’ from the option available.
‘Post New Products?’ option asks you if you want to Post New products on the Facebook Wall or not.
In case you are posting the new product, then, you can even set the description for the same in the ‘New Product Post Description’.
Click on the ‘Save’ button in order to save the changes made by you.
4.3 Alert Setting
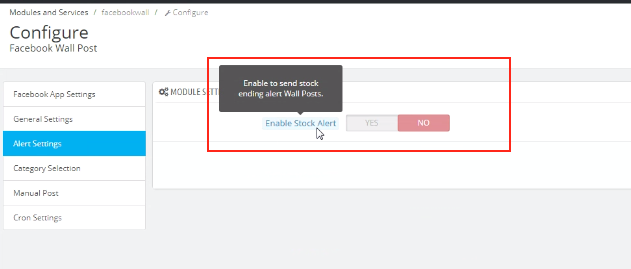
Here, you can enable/disable the option to send Stock Ending Alert Wall Posts.
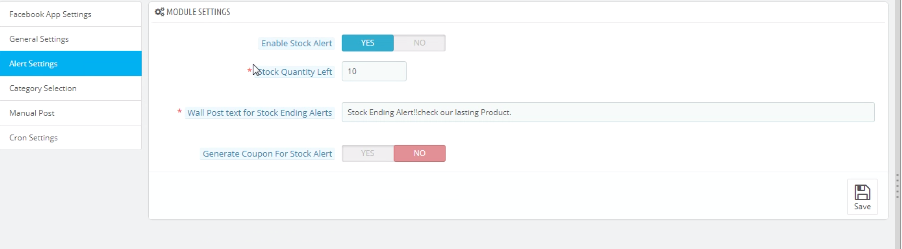
In case, you enable this option, then, you’ll be asked a series of question which includes the following.
Stock Quantity Left: You can enter the quantity of the stock below which the alert will be send on the wall post.
Wall Post Text for Stock Ending Alert: You can enter the text that you want to be displayed when the inventory falls below a certain limit.
Generate Coupon For Stock Alert: You can enable it if you want to send coupon along with the Alert. In case you enable the coupon code option, the module provides an option to customize the vouchers as well.
Voucher Name: The name of the voucher can be entered in the first column. You can even choose from the different language options available and select the one as per your requirement.
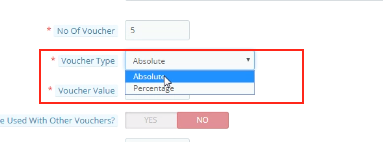
No. Of Vouchers: Allow you to select the number of vouchers you want to send.
Voucher Type: You can select the type of voucher you want to send. It can ‘Absolute’ or ‘Percentage’.
Can be used with Other Vouchers: You can enable this option if the voucher can be send with other vouchers as well.
Voucher Validity: Set the duration for which the voucher is valid is here.
4.4 Category Selection
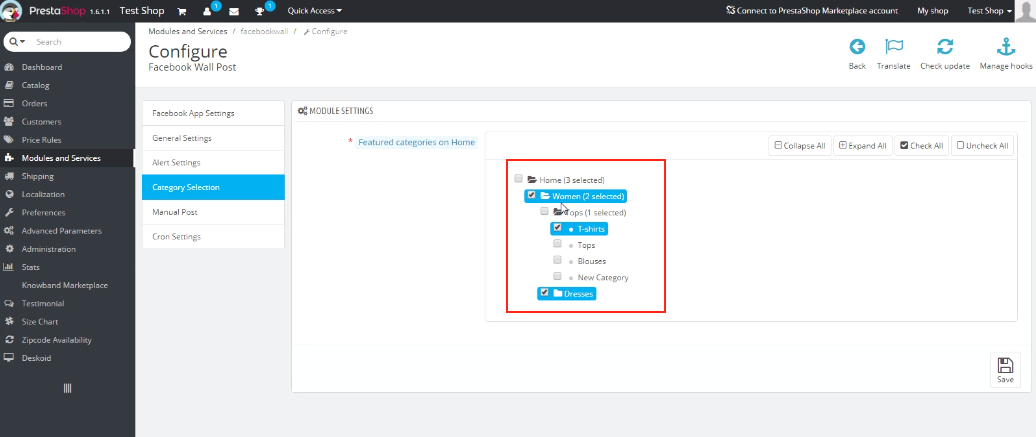
You can select the categories you want to display on the Facebook wall post here. Check the options that you want to display. Only those products whose default category is selected in this section will be posted on the Facebook Wall.
4.5 Manual Post
This option allows you to customize the wall post manually.
Search Product: It will show the dropdown of various product options. You can select the one as per your wish.
Wall Post Text For Products: Set the text that you want to display on the wall post. Click on ‘Post Product Now’ button and the products will be posted.
Search Category: It will show the dropdown of various category options. You can select the one as per your wish.
Wall Post Text For Categories: Set the text that you want to display on the wall post. Click on ‘Post Category Now’ button and the products will be posted.
Search Brand: It will show the dropdown of various brands options. You can select the one as per your wish.
Wall Post Text For Brands: Set the text that you want to display on the wall post. Click on ‘Post Brand Now’ button and the products will be posted.
4.6 Cron Selection
Add the cron configuration to your store in order to sync the products and send Facebook wall posts to your customers automatically according to your setting.
‘Sync Product Manually’ will allow you to sync the products. The products will then get listed below. The admin can even delete the listed products from the table by clicking on the ‘Delete’ icon.
On clicking the ‘Send Post Manually’, the products will get posted on the Facebook Wall of the admin.
5.0 Facebook Tab UI
Once you have already configured Prestashop Facebook Wall Post module and synced with the Facebook profile, the changes will be shown in the front end.
5.1 Home Page
Home page will have the UI similar to mentioned below.
5.2. Selected Page
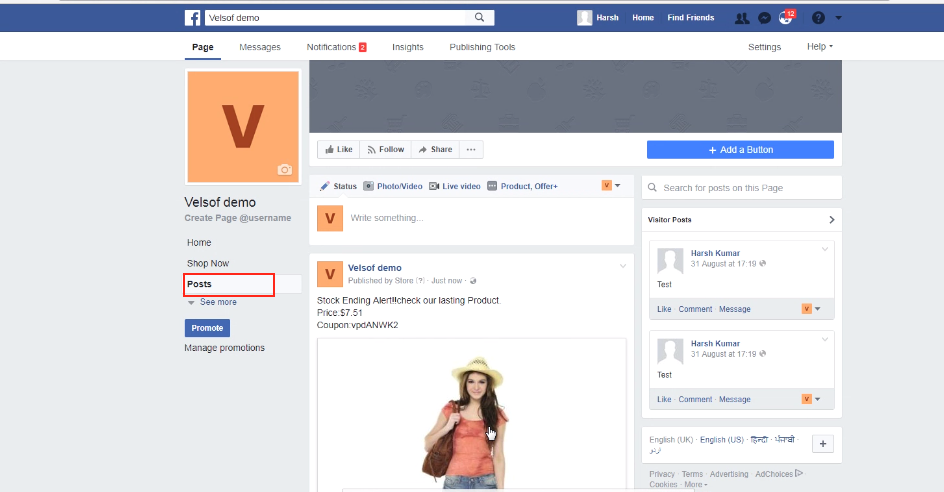
Go to the page which you selected earlier in the admin interface. The products posted will be shown on the wall post of the page.
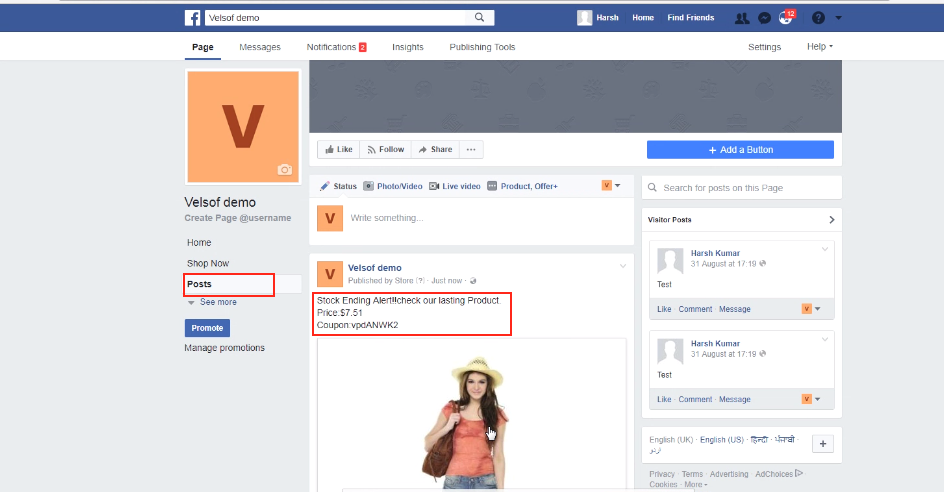
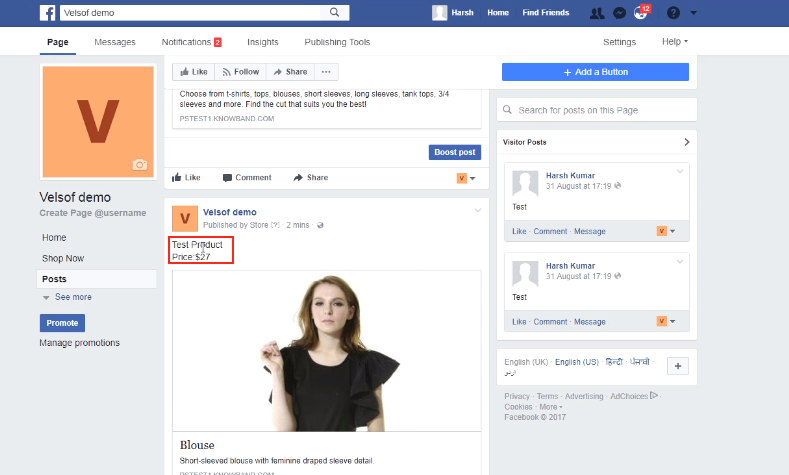
As you can see in the image below, the Stock ending alter has been posted on the wall along with the Product Price and the Coupon Code.
The Product along with the price can be seen on the wall of the Facebook.
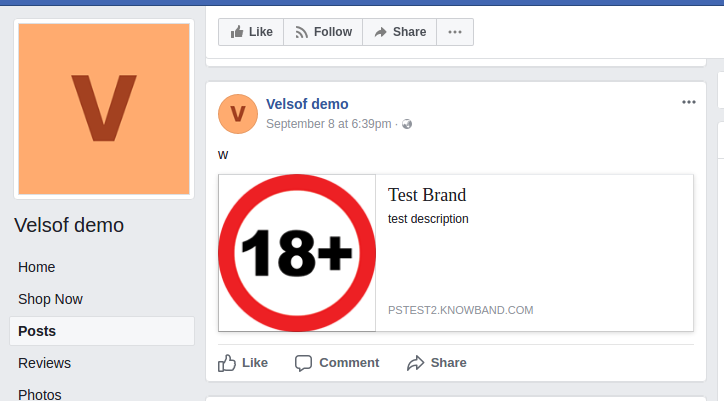
This is how the brand posted on the wall will look like.
The category to be displayed on the Facebook will be seen like this in the front end.
Having a Facebook store is one of the intelligent ways to hike your business growth. One of the best steps to recognize your business globally is to step into a social community, one amongst them is Facebook. It allows you to seek attention of your new audiences and thereby generate more customers for the store. The best part is that you can easily share your content with ease, market your store product and services. Opening a Prestashop Facebook Store is a no-brainer that improves your site sales from the bottom line.
PrestaShop is a free e-commerce platform where anyone can create his/her shop with just few steps. After having a shop, the main concern comes up to every shop owner is the marketing and making his products/brand more and more exposed to the world. As the Facebook claims, there are over 2 billion active users on Facebook by the year 2017. Here, we have made your work easier with Prestashop Facebook Store Addon.
Now you can have your Facebook Shop, change layout, template, and module with no design or coding skills required.
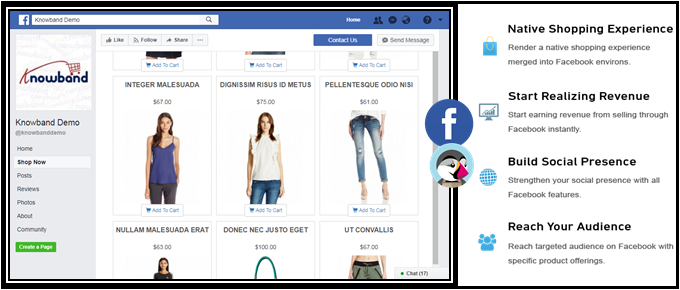
KnowBand Prestashop Facebook Store module helps you connect your PrestaShop store with Facebook and help you showcase your products to a very wide range of people.
1.1. Benefits of Prestashop Facebook Store Module for merchant
The store owner can increase the number of visitors and potential buyers on his/her PrestaShop store and boost their Facebook community with the help of this Facebook store integration Prestashop module.
The Prestashop Facebook integration module integrates your fan page on Facebook with your PrestaShop store.
The Facebook store integration with Prestashop offers auto listing of products on your Facebook store.
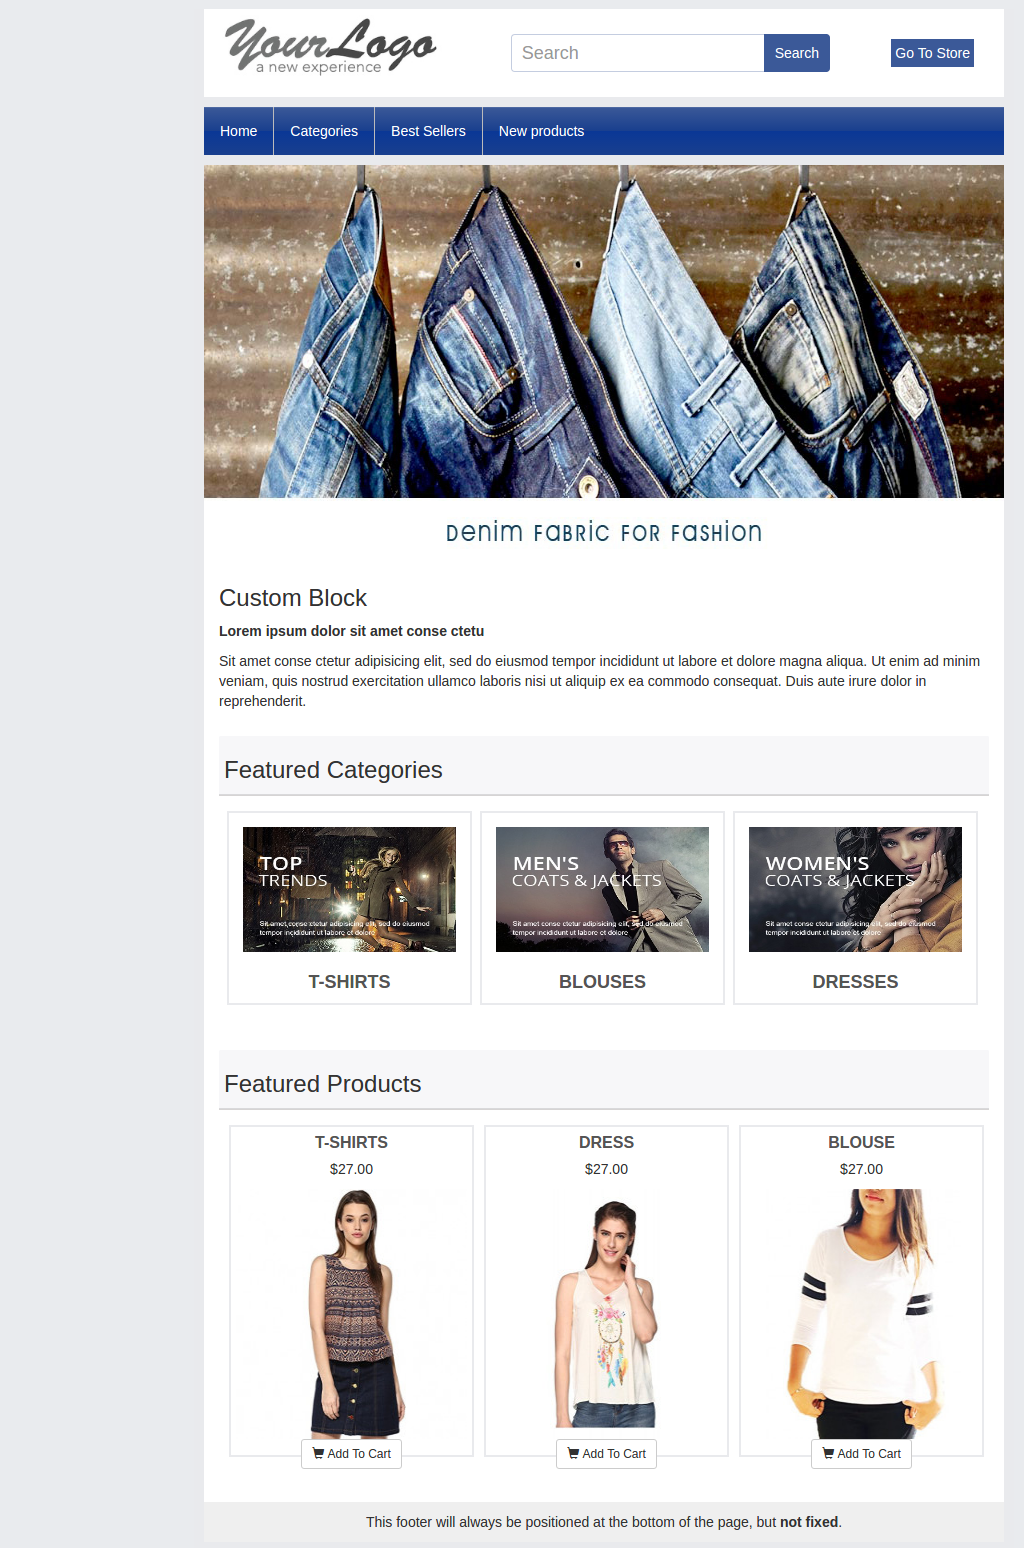
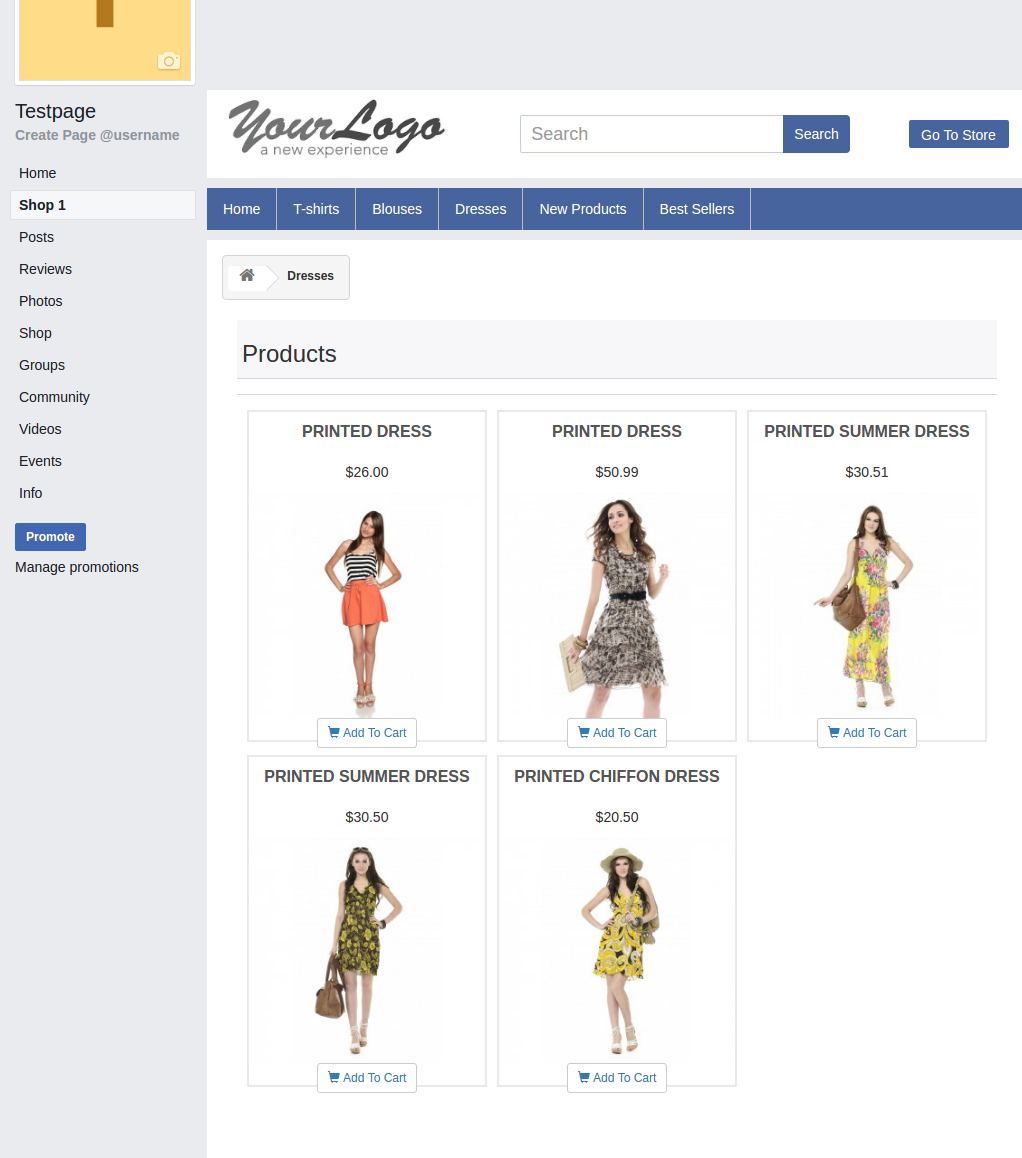
The Prestashop Facebook shop integration module has the option to display categories and featured products, etc.
The Prestashop Facebook Store Integration module increases your revenue and increase customer following/loyalty to your brand.
The Prestashop Facebook store module increase the genuine likes and followers on your Facebook Page.
The Prestashop Facebook Store Setup module creates a Shop tab inside your Facebook fan page to allow users to see products.
The Prestashop Facebook Integration module analyzes the change in sale with Google Analytics.
Change look and feel of the Prestashop Facebook shop anytime.
The Prestashop Facebook Shop Addon displays the desired products and categories.
1.2. Benefits of the Prestashop Facebook Store Integration for customers
With this Prestashop Facebook integration module by Knowband, the customer can have a look at your shop/products without actually visiting your PrestaShop store.
The Prestashop Facebook store module can be translated into desired language.
The prices of the Prestashop Facebook shop module can be changed to the local currency.
After clicking the “Add to cart” button corresponding to a product on FB Store, the customer is taken to the store to have an authenticated shopping experience.
2.0 Installation of Prestashop Facebook Shop Module
After purchasing the Prestashop Facebook shop module, you will get following files as listed below:
facebookstore.zip (contains source code of the module)
User Manual
Follow the following steps to install the Prestashop Facebook shop module:
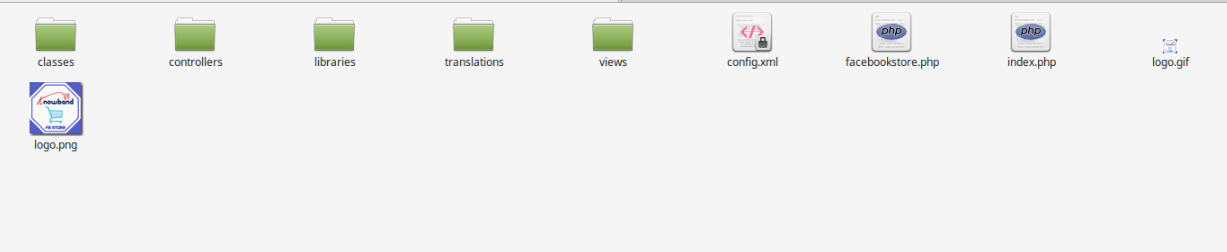
Step 1: Unzip the facebookstore.zip file. It would contain files and folders as shown below –
Step 2: Copy all the files and folders of unzipped folder into your store “modules” directory on the path – Root Directory/modules/.
Step 3: Now the Prestashop Facebook Store module is ready to be installed on your store and you can find that in Store Admin -> Modules and Services. It would shown as below –
In case, you are not able to find this Prestashop Facebook shop module in admin modules list, please try searching module with following details –
Keyword – Fb Store
Category – Front office
Filter By – Installed & Not Installed / Enabled & Disabled
Step 4: Click on “Install” button to install the Prestashop Facebook shop module. It would show a pop-up for your confirmation. Click on “Proceed with the installation” option. This step will install the Prestashop Facebook store module and show notification – “Module(s) installed successfully”.
3.0 System Setup of Prestashop Facebook Store Addon
Before proceeding ahead, it is important to know that what is the correct flow of actions to setup this system as there are several things which are dependent of other things and if we do not take care of them then it would become difficult to process smoothly or may be error prone.
4.0 Facebook App Creation
Facebook App can be created by following below mentioned steps:-
Step 1: Go to given url :https://developers.facebook.com/apps/
Step 2: Click on the “Add a New App”button.
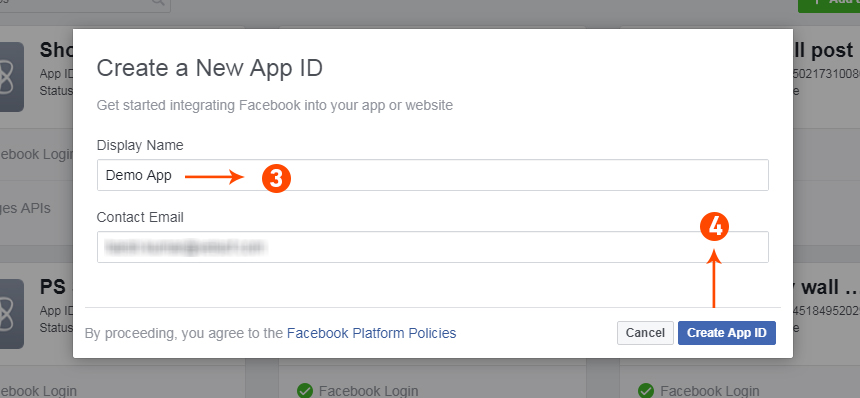
Step 3&4: Enter your App name and email id, then click on “Create App ID” button.
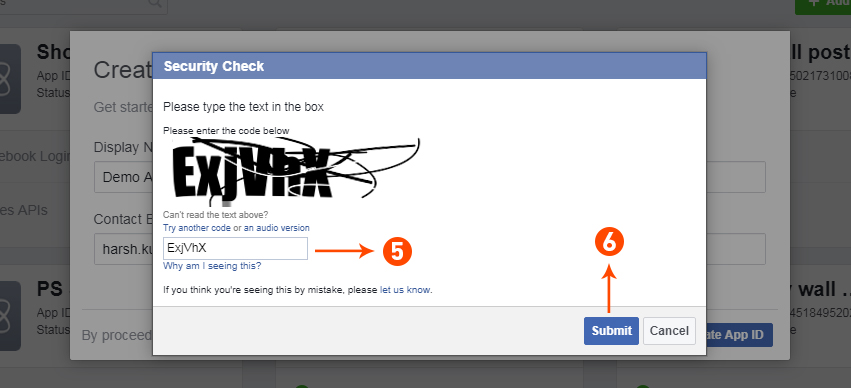
Step 5&6: After clicking on Create App ID you will have to go through a security check as shown:
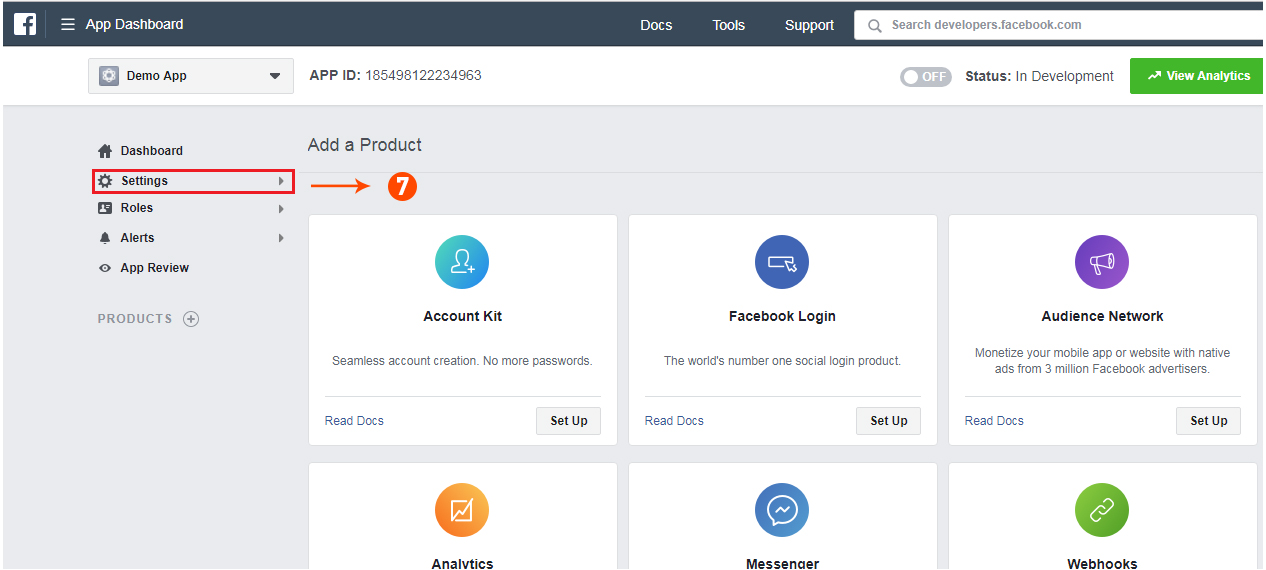
Step 7: Click on “Setting” tab of Prestashop Facebook Store Addon.
Step 8-13: Two option will be available in the dropdown, Basic and Advanced, click on “Basic”. And then enter your “App Domain”, “Contact Email”, ”Privacy URL”, ”Terms and Conditions URL”, ”Add Logo”, ”Select Category” and click on “Save Changes” button.
App Domains:
yourdomain.com is correct
yourdomain.com/store is incorrect
www.domain.com is incorrect
Step 14: Now click on “+Add Platform”.
Step 15: And select Website as Platform
Step 16&17: Now Enter your site URL and Click on “+Add Platform”.
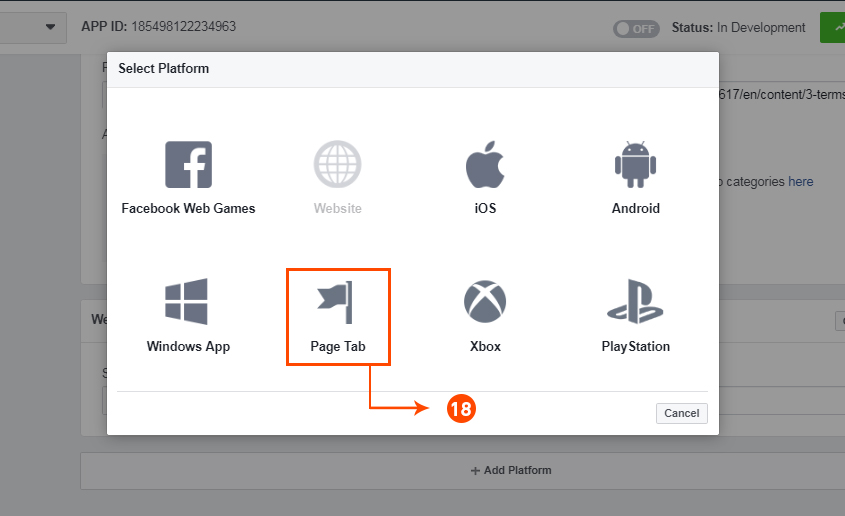
Step 18: This time select “Page Tab” as your platform.
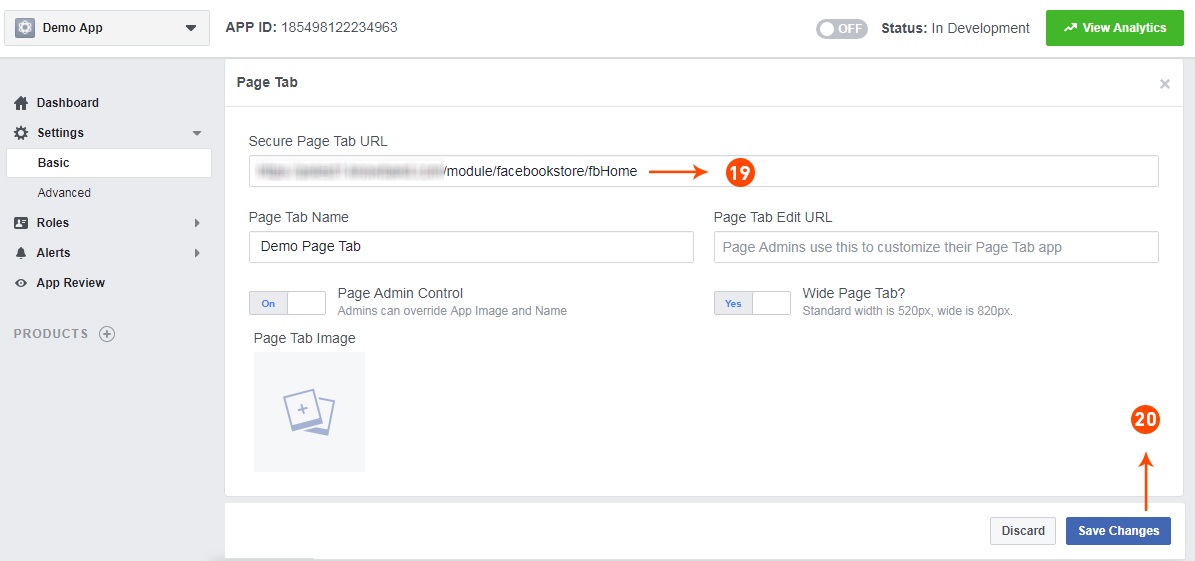
Step 19&20: Add Page tab URL and Save changes. If the changes are not saved, it means you have not configured the app properly. Check again the app domain, privacy policy, terms and condition URLs and website URL and try again.
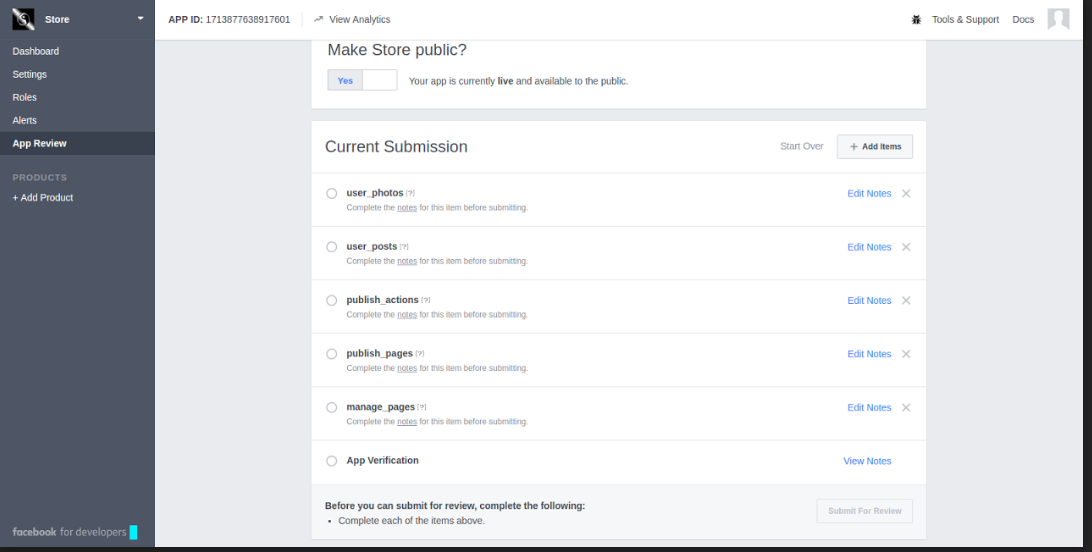
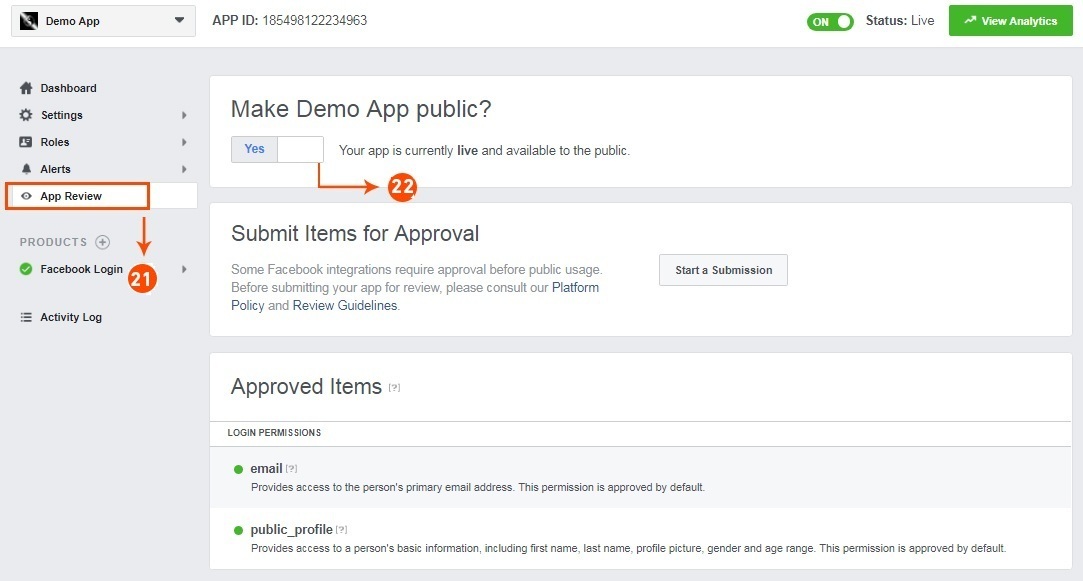
Step 21&22: Click on “App review”. And mark “Make ‘your app name’ Public” to Yes.
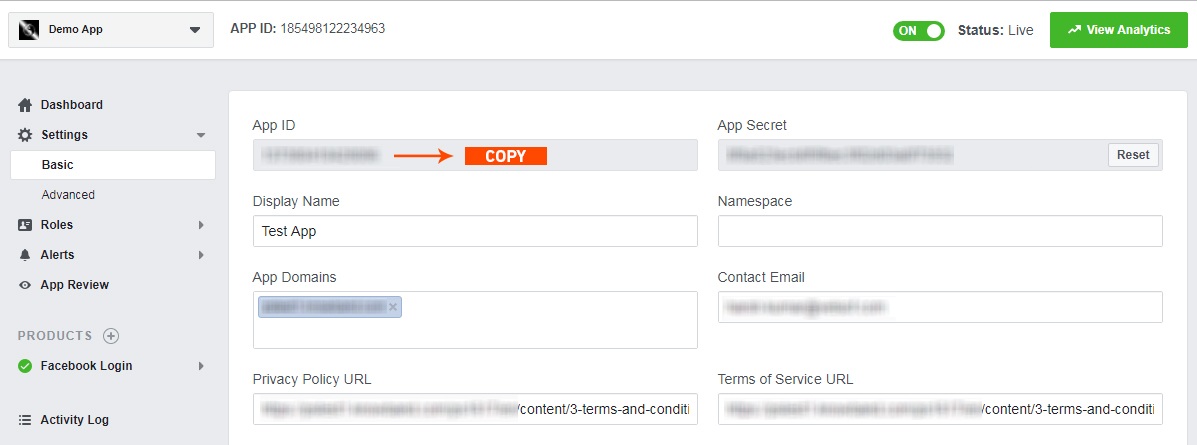
Step 23: Copy the App ID and paste it into the fields provided in the module.
5.0 Admin Interface of Prestashop Facebook Store Module
The admin interface of the facebook store integration with Prestashop is designed in such a way that a PrestaShop store owner can make the changes to his/her Facebook Store have the changes without wasting the time. Once the Prestashop module is setup completely, then the store owner can change the logo, banners and the layout of the shop.
Following are the steps which will help you setup your admin interface of the Facebook store plugin by Knowband:
5.1 How To Start configuration process of Prestashop Facebook Store Addon?
On clicking configure from Prestashop Facebook shop integration module listing page, the admin will be redirected to configuration page to save the “Facebook App Id” as shown below:-
Facebook App Id:- This field of the Prestashop Facebook Store Integration module is for Facebook App Id created for this Facebook shop module.
2. Next:- On Clicking this button, Facebook App ID will be saved in Db
5.2 How To Add Profile?
After successfully saving the App Id you will be redirected to the General settings page.
Add Profile Form has mainly two sections:-
General Settings
Content Settings
5.2.1 General Settings
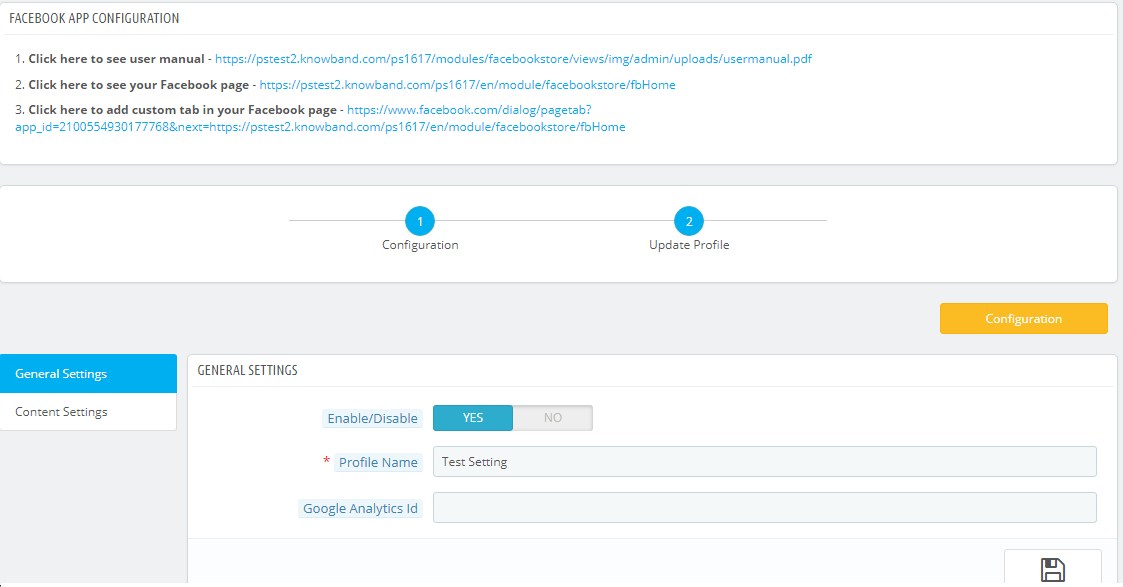
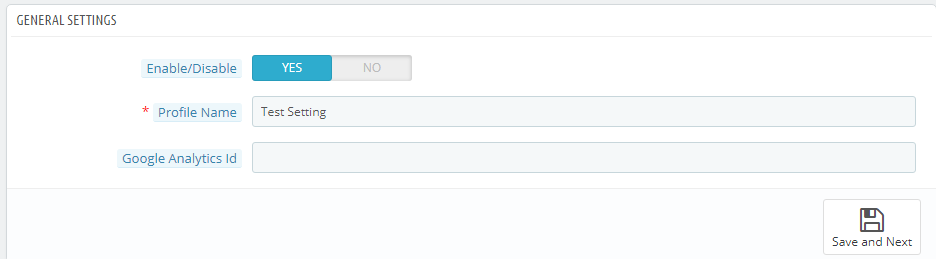
In general settings tab of Prestashop Facebook Store Addon, the Prestashop Admin has an option to add the profile name, option to enable and diable the Profile and Integration with the Google analytics using Google analytics ID.
Save and Next: Clicking on this button will save the settings and will create a profile.
Enable:- Facebook Tab content will be enabled or disables using this setting of the Prestashop Facebook Integration module.
Profile Name:- This field of the Prestashop Facebook Shop Addon is for the profile name for differentiating Profiles.
Google Analytics Id:- This field of Prestashop facebook shop integration module, the admin can enter Google analytics id to track the performance of the pages of Prestashop Facebook store.
5.2.2 Content Settings:–
All home page content settings of the Prestashop Facebook integration module will be saved from here:-
Logo: System will pick the default logo from the PrestaShop. If user wants, he/she can upload new logo which will be displayed on Prestashop Facebook Shop Page.
Home Page Banner: In this field of Facebook store integration with Prestashop plugin, the admin can upload a banner image which will be displayed on the home page.
Home Page Content: In this field of Prestashop Facebook Store Setup module, added text will be displayed on Home Page of Prestashop Facebook shop tab.
Menu Items: Admin can select the menu items from Predefined list of the Prestashop Facebook shop integration module, which will be displayed on Facebook Shop tab. As of now keep the menu as single level which will be displayed on the Facebook Store tab.
Possible Menu Items which user can select.
Home Page
Categories
Best Sellers
New Products
Facebook Page Color: This option of Prestashop Facebook shop integration addon will be the color of all buttons and menu of Facebook Store Page.there will be option to reset to FB original color any time on clicking reset button. Default color will be :”#48649f”
Max No of featured Categories: Admin can select max number of featured categories to be shown on Home page under this field of Prestashop Facebook Store Integration module.
Featured Categories: In this field of Prestashop Facebook store module, the admin user can select the categories which will be displayed on the Home Page.
Product To be shown: In this field of Prestashop Facebook Store Integration module, system will ask the type of product to be shown on home page, i.e. From selected from below options or as shown on main website home page. It will be a dropdown.
Max No of featured Products: This field of Prestashop Facebook Store Setup module by Knowband allows the admin to select max number of featured products to be shown on Home page.
Featured Products On Home: In this field of Prestashop Facebook integration module, the admin user can select the products which will be displayed on the Home Page of the Facebook store.
Product Image Size: In this field of Prestashop Facebook Integration module by Knowband, the system will ask the size of image, i.e. small or big.
Footer Content: In this field of Facebook store integration with Prestashop module, the admin can add the content in the footer. Added text will be displayed on Home Page of Prestashop Facebook shop tab.
5.2.2 How to add a Custom tab in the FB page?
After saving the General settings and Content settings, you will have to add the Custom tab in the FB page. And to do this, click on the link to add the Custom tab as shown in the Screenshot below:
After clicking on this link you will be directed to page shown below:
You can select the page where you want to add the Custom tab. After selecting the page click on Add Page tab. After clicking on this button you will be directed to the page shown below:
This page will display how the Custom tab will look.
After this, you can go to the FB page where you have added the Custom Tab. You can see it will be added to the FB page as shown below:
The Custom Tab will look as shown as below:
6.0 Facebook Tab UI
Clicking on the Added Tab from the Facebook page, Facebook Shop home page will be displayed.
6.1 Home Page
Home page will have the UI similar as mentioned below displaying the following:
Top bar
Header section
Menu bar
Text
Featured categories
Featured products, etc.
Top Bar: Top bar of the Prestashop facebook integration plugin will have Home link, Language Selection Dropdown & Currency Selection Dropdown if store is having multiple language or currency. Option to Go to Online will also be there (Go to Shop)
Header Section: Header section of the Prestashop Facebook store will have the logo, Search bar and Go to Store link.
Menu Bar: In thi field of Prestashop Facebook store module, based on the selection of Menu Items, Menu will be displayed. All the links needs to be opened in facebook iframe itself instead of redirecting user to Website.
Banner Image: In this field of Prestashop Facebook Store Setup addon, the admin can upload the banner image as well. If uploaded from Admin Panel, Home page of the Prestashop Facebook store will display the banner on Home page.
Text: If any text added in admin, Home page of the Prestashop Facebook store will display the text block otherwise it will be not be displayed.
Featured Categories: Featured categories section of the Prestashop Facebook Store Setup module will be displayed after “Text” section. Feature categories section will have category image, name of the category. Clicking on the same will redirect user to respective category page.
Featured Products: Featured Products will be shown as per profile settings.
6.2 Other Pages
New Products page, Best sellers, category pages layout will be similar to below screen.
Now you are ready to have your Prestashop Facebook Shop giving your customers a way to connect with you with just one click. Clicking on the “Add to cart” option, the customer is redirected to your store to have a secure shopping experience.
Find below more details about this Prestashop Facebook Store Addon by Knowband: