Analysis of how India can beat the U.S as the world’s largest eCommerce market

With the changing business landscape and busy lifestyles, more and more people are now moving towards online shopping due to the ease of product availability, product delivery at the doorstep, online payment facility and other such benefits. With this trend, eCommerce is fast growing and is expanding into unknown global territories for offering quick shopping experience. Countries like China, US and India are some of the world’s biggest economies that have embraced the eCommerce market in a big way.

Among all these countries, the Indian economy has emerged as the lucrative and most promising market for eCommerce companies in the years to come. The above situation has arisen due to the number of reasons like young demographic population, increased use of broadband internet services, the rise of mobile-based devices and a number of other such factors. All these reasons have made India emerge ahead among countries like the USA when it comes to eCommerce market and conversion rate optimization results. According to a joint report of ASSOCHAM-Forrester study paper, the Indian eCommerce revenue is expected to grow from $30 billion in the year 2016 to $120 billion in the year 2020, which is supposed to be an annual rate of 51%, the highest in the world.

Where does India stands in terms of eCommerce growth and internet users?

The Indian market may be lower in the base when compared to China and other countries such as Japan but the growth rate is much ahead of others. The rate of eCommerce growth in various countries of the world is as follows. China is growing at the rate of 18%, Japan is currently growing at 11%, South Korea is moving ahead with a 10% growth but all these economies does not stand anywhere when compared to the annual expansion rate of India at 51%.

Additionally, India is ahead of countries like Brazil and Russia under BRICS organization in terms of internet users with 25 million of Internet users being added every year. India has an internet user base of 400 million when compared with the 210 million internet users in Brazil and 130 million internet users in Russia for the year 2016. Apart from this, around 75% of online users in India fall into the age group of 15-34 years due to the young Indian population.

As per the statement of D S Rawat, ASSOCHAM Secretary General, “This is expected to be a continuing trend in coming years, given the age distribution in India”. In this way, the eCommerce stores have also registered growth in the various categories that are dedicated to the young population in the last one year. Further, these young online shoppers come under the age group of 15-24 years representing both males and females.

What are the areas in eCommerce business that are going to be affected?

With the higher reach of the internet and mobile services, people are doing more and more browsing related activities on their mobiles and smartphones instead of desktop/laptop devices. This has led to a significant growth in the online travel category consisting of the various services like car rentals, airlines, hotels, travel review and other information sites. Moreover, the top 10 traveling sites in the travel category consist of a combination of travel options as well as information. There are multiple online users that are trying to gather information on travel options on a regular basis and end up coming to the Indian Railways site.

Further, the retail category has seen an increase of 65 million unique visitors per month that annually contributes to a growth of 55%. This can be seen in all the retail categories that show promising transactions and conversion rates along with the increase in site visitors. Besides this, apparel business has emerged as the fastest growing subcategory in the retail business and has witnessed 24% online users. With this growth, it is time to take the help of eCommerce mobile app extensions that can help in transforming your PrestaShop and OpenCart sites into respective mobile apps for grabbing maximum revenue sales.

What are the things that are working in the favor of India?

            Analyze the eCommerce scenario in India for grabbing optimum business results.

With the increase in the internet users around the world, use of mobile devices, favorable demographics, increased use of online payments and a range of other factors, eCommerce business in India is expected to grow effectively. There are various segments like branded apparel, accessories, jewelry, gifts, footwear and other segments that are the key items in the eCommerce shopping which are quickly moving on the mobile phone applications.

Mobile phones are actively used for making eCommerce sales that form around 60-65 percent of the total sales generated by various eCommerce companies in India. It is believed that m-commerce can help in contributing up to 70 percent as eCommerce revenues in this ever-growing eCommerce market. According to the statement of Ron Kalifa, Vice Chairman at Worldpay, a global payment firm,

“The market is predicted to reach $63.7 billion by 2020 and overtake the US by 2034. This enormous development, will in turn open up enormous opportunities for companies who sell online.”

He further stated that

“Leading companies such as Amazon and Alibaba are already making their move, indicating a clear incentive for merchants to gain their foothold within India’s budding eCommerce market as soon as possible.”

The eCommerce market report of Worldpay also highlighted some of the critical points that are discussed below:

  • The eCommerce growth in India will be driven by the increasing internet users which are roughly around 350 million in number. The strength is expected to be nearly doubled as 600 million by the year 2020.
  • The number of mobile phone shipments in India has risen to a great extent in the past few years. Currently, India is the biggest consumer of mobile phones around the world having data plans two times cheaper as compared to China and three times cheaper than the United States.
  • With the maximum number of people that are switching from the 3G to 4G networks due to affordable prices, the mobile shopping is expected to surge further among the young population.

Conclusion

With the current business scenario in the favor of India, eCommerce site owners need to take the help of an expert eCommerce plugin development services that can help them take up the charge. So, there can’t be any other opportune moment for your eCommerce business if you are still unable to capitalize the present circumstances. It is definitely your chance to emerge big in your particular eCommerce business segment.

Liked This? You’ll Like These Too

Magento One Click Checkout(Buy Now) Extension- User Manual

Introduction of Magento One Click Checkout (Buy Now) Extension

1.0 Introduction

The Knowband Magento one click checkout (Single Checkout) extension is a module which when enabled allows the online shoppers to buy product instantly without modifying their exiting cart. A new button “Buy Now” will be shown at product detail page. On clicking this button, the old cart will be hidden and the new product will be added to the cart for instant checkout.

On successful order confirmation, old cart will be resumed.

Old cart can also be resumed along with the new product, if after clicking on “Buy Now” button customer navigates to any other page.

This Magento Quick checkout extension will also provide an option to track the number of times the users clicked and bought from the “Buy Now” button.

Also, the Google analytic code can be inserted through this Magento single click checkout extension which will be helpful in Google tracking on click of “Buy Now” button.

1.1 How Merchant will benefit from Magento One Click (Single click) Checkout Extension?

  • The Magento quick checkout extension allows the store admin to adds a ‘Buy Now’ button on Product pages, clicking on which will directly take the user to the checkout page with only the current product in the cart.
  • The Magento one click checkout extension enables the store admin to customize the One click checkout (Buy Now) button if they require.
  • The Magento instant checkout extension allows the e-merchant to include the jQuery if required.
  • The Store admin can track the One click checkout (Buy Now) button clicks by adding the Google analytics script code.
  • With the help of the Statistics tab, the admin can view the visited product page and also the conversion mapping of those who clicked on “Buy Now” button and placed a successful order.
  • The Magento single button checkout extension boosts the direct sales.
  • The Online retailers have a chance to increase the conversion rate of the website.
  • With the use of this Magento one click checkout (Buy now) extension, the store admin can make the UI and UX of the site appealing and responsive.
  • This Magento instant checkout extension is easy to use.
  • This Magento single click checkout extension reduces the cart abandoned rate of the website.

1.2 How Customer will benefit from Magento One Click (Single click) Checkout Extension?

  • The Customer can easily make the checkout process without editing the old shopping cart.
  • The Online consumers will get a quick and hassle-free way to directly checkout.
  • The Online shoppers can checkout in a single click.
  • The Buyers always love the easy and fast checkout process.

2.0 Installation

After purchasing the Magento single click checkout extension, you will get the following files as listed below:

1. magentocustommaintenancepage.zip (contains source code of the extension)
2. User Manual

Follow the following steps for installing Magento One Click Checkout Module:

Download the Magento extension package.

1.Unzip the package on your root folder of Magento setup via FTP manager (like Filezilla or WinSCP – download here: https://filezilla-project.org/).

2. Copy all the files and folders of unzipped folder into your store root directory.

3. After copying all the files and folders, clear the cache.

4. Open any page of your store. Magento will install the module at the time of loading any page.

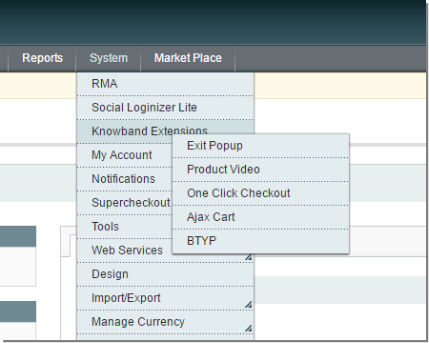
5. In the Admin Panel go to “System > Knowband Extensions > One Click Checkout”.

3.0 Extension Interface

There are two interfaces in this extension. Each interface has a different functionality according to its use. These interfaces are:

A.Admin Panel Interface (Only be accessible by admin/store owner)
B.Front End Interface (accessible to front end user)

Each interface has been described in separate section.

4.0 Admin Panel Settings

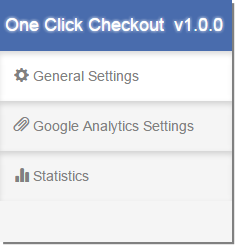
Admin Panel Settings contains the 3 tabs for settings.

4.1 General Settings

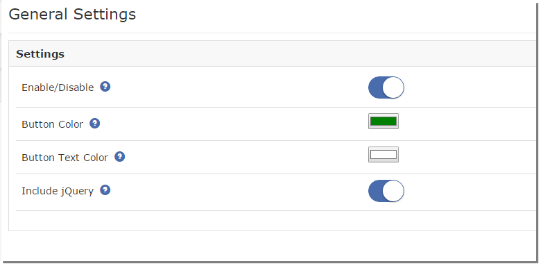
From here, Admin can enable/disable this plugin. Also look and feel of Button can be controlled here. Initially the fields in form will be already be filled with their default values.

Setting will have options as:-

  1. Enable/Disable: This option allows user to enable or disable the Magento one click checkout extension. By default this option will be disabled.
  2. Button Color: “Buy Now” Button color at product detail page of front end will be changed by this option.
  3. Button Text Color: “Buy Now” Button text color will be changed by this option.
  4. Include jQuery: This option allows us to include jQuery in our Magento single click checkout extension so that the module can work for other versions of the Magento also.

4.2 Statistics

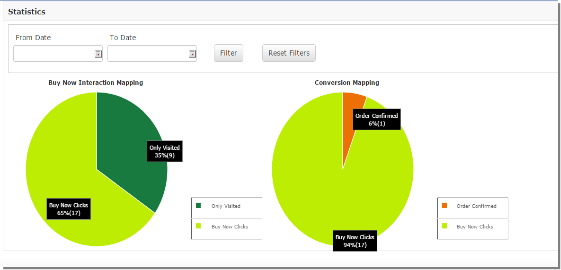
From here the store owner can see the no. of customers who visited product page and also the conversion mapping of those who clicked on “Buy Now” button and placed successful order.

  1. Statistics: Two pie charts will be shown here. There will be a filter to select the start date and the end date to create the pie chart.

a. Buy Now Interaction mapping: It will show mapping between the number of visitors to Product details page and number of visitors who clicked “Buy Now” Button.

b. Conversion Mapping: It will show mapping between No of clicks on “Buy Now” Button and no of order placed by this this options to show actual conversion rates.

5.0 Store Front

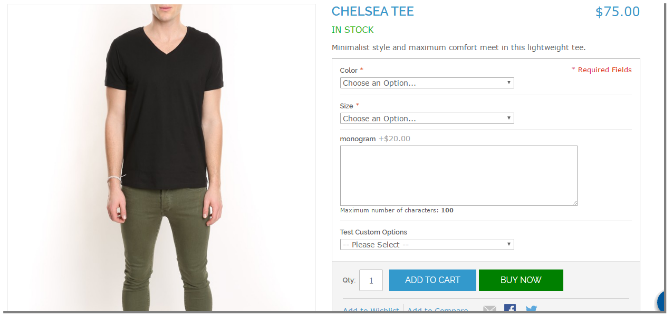
After enabling this Magento one click checkout extension, a new “Buy Now” button will be shown at product details page along with “Add To Cart” Button.

The Magento direct checkout extension at the front-end will appear as follows:

  • This “Buy Now” button allows user to order product instantly. On clicking “Buy Now” button, a new cart with this product will be created and it is redirected to checkout page.
  • On successful Order confirmation, old cart will be resumed.
  • After clicking “Buy Now” button, if customer will navigate to any other page then old cart will be resumed along with this new product.

You can try Knowband’s Magento One Click Checkout extension for on your Magento store. KnowBand’s Magento single click checkout module helps you increase customer engagement to your store and give the better user experience to your eCommerce customer. It also reduces the exit rate of the store by minimizing the checkout overhead involved in purchasing a single product. Moreover, the implementation of single button checkout feature doesn’t affect the product page design and layout. As the customer opts for a single buy, the existing cart items remain unaltered. Additionally, if the customer skips the single buy checkout, the product is automatically added to the cart.

Module Link: https://www.knowband.com/Magento-one-click-checkout

Admin Demo: https://mademo3.knowband.com/index.php/oneclickcheckout/adminhtml_index/index/key/3d77b3a591113336177dead9ce8e2016/

Front Demo: https://mademo3.knowband.com/

Please contact us at support@knowband.com for any query or custom change request as per your business requirement.

Magento 2 Autosubscribe – User Manual

Introduction

Knowband offers Magento 2 auto subscribe extension which allows the store admin to showcase an attractive subscription pop-up or subscription box on the eCommerce store. Now the e-merchant can get more email subscribers for sending the email newsletter. By showing an attractive subscription popup on the homepage the admin can improve the chances of more subscription. If you are an eCommerce store admin and want to get more email subscriptions then you can apply for this Magento 2 email newsletter extension. The advance feature of this Magento 2 Mail Chimp extension is that it can subscribe the store visitors while checkout or registration.

This module will let you add Email ID of the customers, automatically into your MailChimp and Constant Contact’s contact list as soon as they register themselves or checkout items at your online store. Visitors can also subscribe themselves through auto-subscribe box or through pop up that appears on the home page.

Features:

  • Easy to install and configure.
  • It is easy for the admin to activate this Magento 2 auto subscribe extension.
  • This Magento 2 email subscribe module is highly customizable.
  • There is no need to change codes for implementation.
  • You don’t need any technical help for applying this functionality.
  • The Magento 2 newsletter subscribe module allows the store owner to show subscription box on every page or selective pages.
  • There is an option in Magento 2 newsletter pop up to show subscription box in content or sidebar as per the requirement.
  • This Magento 2 module offers the admin to design form as per the requirement.
  • You can set the look and feel of this subscription box and subscription popup without any code changes.
  • The admin can set the subscription pop-up display interval from the admin panel.
  • The store admin can display a success message just after completion of subscription process.
  • This Magento 2 Mail Chimp extension supports MailChimp and constant contact API.
  • The Magneto 2 MailChimp extension automatically passes the email id information from the eCommerce store to the MailChimp/Constant Contact account.
  • The e-merchant can auto subscribe the store visitors while checkout, registration or guest checkout.
  • Fully customizable email templates are available for sending personalized emails.
  • The Magento 2 Mail Chimp extension offers a user friendly interface.
  • Magento 2 email subscription popup offers mobile responsive layout.
  • This email newsletter extension is theme compatible.

Installation Guide of Magento 2 Auto Subscribe

  1. Download the zip from our Magento Plugin Store & unzip it.
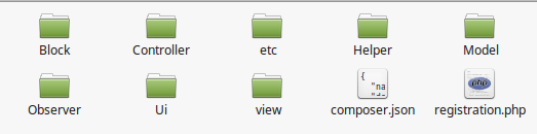
  2. Open the extracted directory & you will see following folder structure.

3. Create a folder {Magento root}/app/code/Knowband/Autosubscribe.

4. Copy the extracted content in the above folder.

5. Run the following command in Magento root

  • composer require constantcontact/constantcontact
  • composer require drewm/mailchimp-api

Enable Autosubscribe

Enable Autosubscribe Run the following commands in your terminal to enable autosubscribe plugin

  1. php -f bin/magento module:enable –clear-static-content Knowband_Autosubscribe
  2. php -f bin/magento setup:upgrade

Configure Autosubscribe

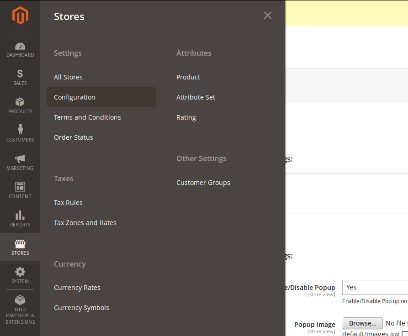
Log into your Magento Admin, then goto Stores -> Configuration -> Knowband -> Autosubscribe and configure the plugin as shown below:

User Manual

Prerequisites

Php version 5.6 or greater

To access the API of constant contact, one must use the php version equal or higher than 5.6 . Unless your server is running the required php version, you will not be able to successfully install this plugin.

MailChimp

Before you may use this module, you must have a valid account with MailChimp and one or more lists created into it. Note that, you must also have the access right to alter your email subscribers list. Below we have mentioned the data which plugin needs for successful installation –

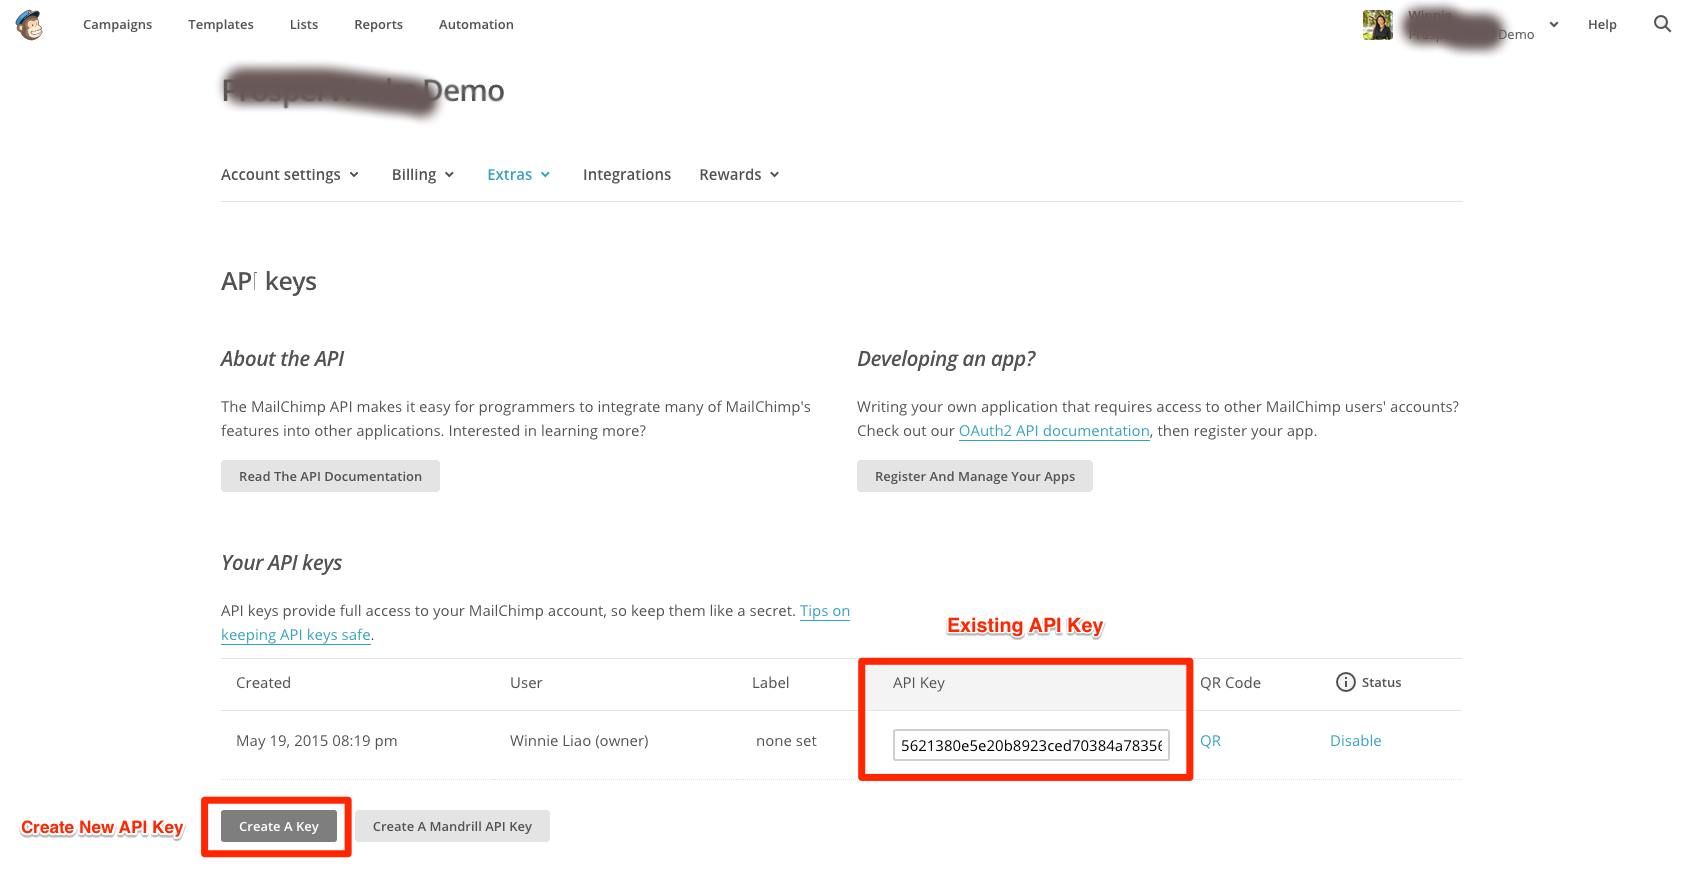
API Key: In MailChimp, users with Manager permissions can generate and view their own API keys.

  1. Click your profile name to expand the Account Panel, and choose Account.
  2. Click the Extras drop-down menu and choose API keys.
  3. Copy an existing API key or click the Create A Key button.
  4. Name your key descriptively, so you know what application uses that key.

Constant Contact

You need to have a valid account with constant contact and one or more lists created into it. Note that, you must also have the access right to alter your email subscribers list. You will need to provide these for this module to work.

API Key: You can get API Key as follows

  1. Open the Constant Contact API Key Management Portal (powered by Mashery) https://constantcontact.mashery.com/
  2. Log in using your Mashery ID or create one by clicking “Register” for a user account.
  3. Click the API Keys tab.
  4. Click Get API Keys.
  5. Fill out the Constant Contact Registration Application.
  6. Click Register Application.

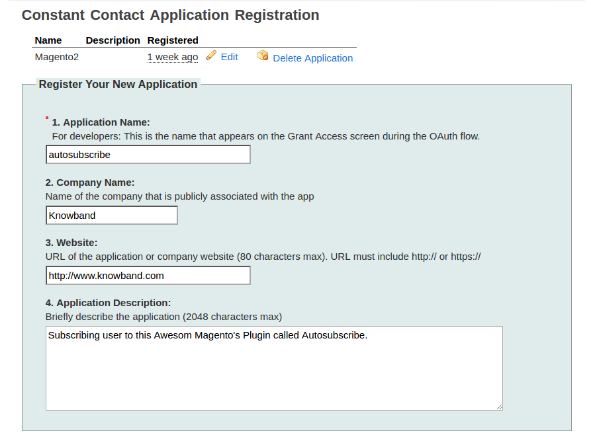
Enter the app details on registration form as shown below:

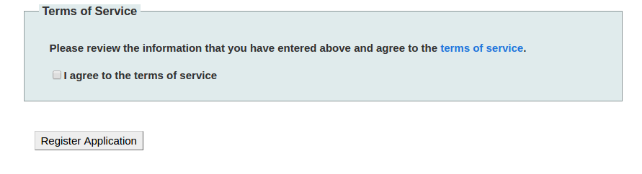
Check the I agree to terms of service and click Register Appliation as shown below:

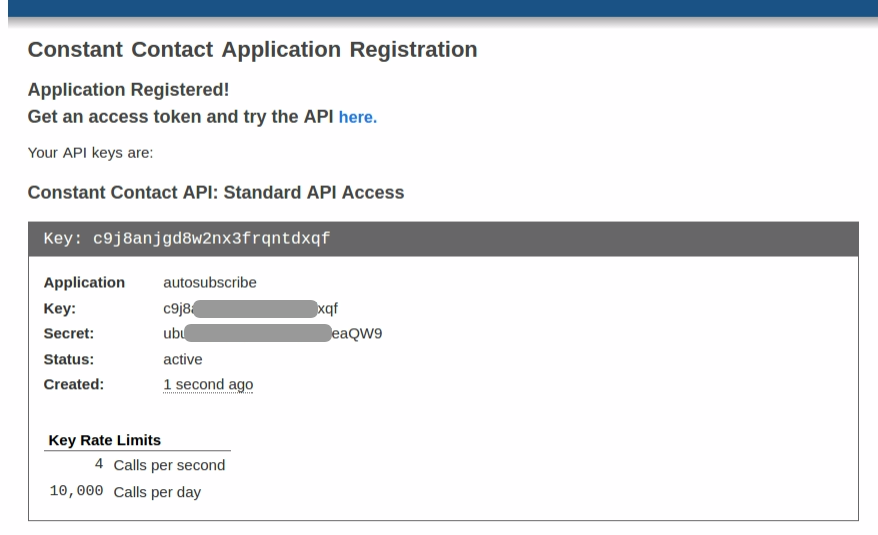
After successful registration, API-Key will be shown as follows:

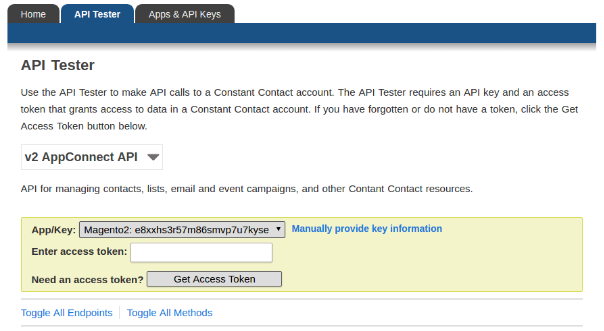
Access Token: To get access token. Click API Tester, enter you API Key and click Get Access Token as shown in the screenshot below:

In case you are still facing problem with getting your API Key and Access Token, please follow the instructions as mentioned in link https://developer.constantcontact.com/api-keys.html

Admin Settings

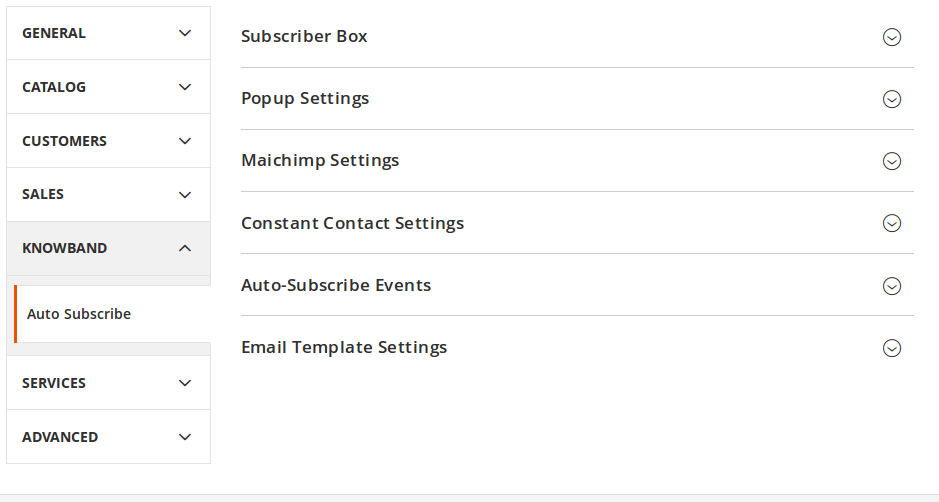
To access Autosubscribe plug-in, go to Stores -> Configuration -> Knowband -> Autosubscribe

Store admin will have various settings options categorized as follows:

Subscriber Box Settings

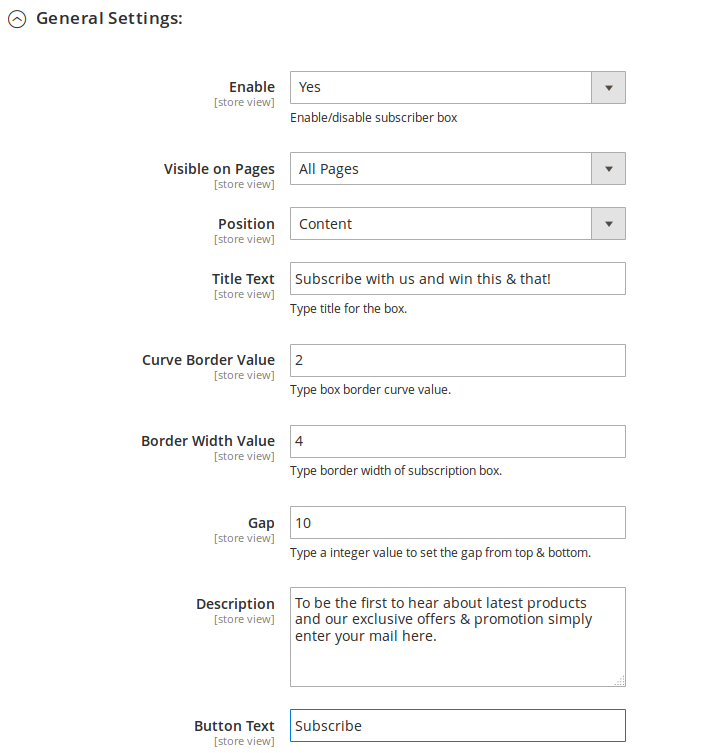
Admin can customize the subscription box to be displayed in store front by using the following settings option available.

Enable/Disable: Admin can choose to enable or disable the subscription box by turning this button on or off. One cannot view subscription box on front.

Visible on Pages: Admin can choose whether the subscription box should be visible on all pages or specific pages. On selecting specific page user will be shown a list of pages from which user can select.

Position: Admin can select the position of box. We can show the box either on main content box or in the sidebar.

Title Text: Admin can enter the text to be shown for the title of box. By default, it is set to “Subscribe”.

Curve Borders Value: You can enter the radius for curve borders. This value will be applied to the four corners of the subscription box on front.

Box Border Width: You can set the border width for box.

Description: You can enter the text for describing to visitors, the advantages of subscribing to your email list here.

Button text: You can change the text for button in this text box.

We have also added the code snippet of module in case admin wants to add the subscription box manually on CMS or any other page.

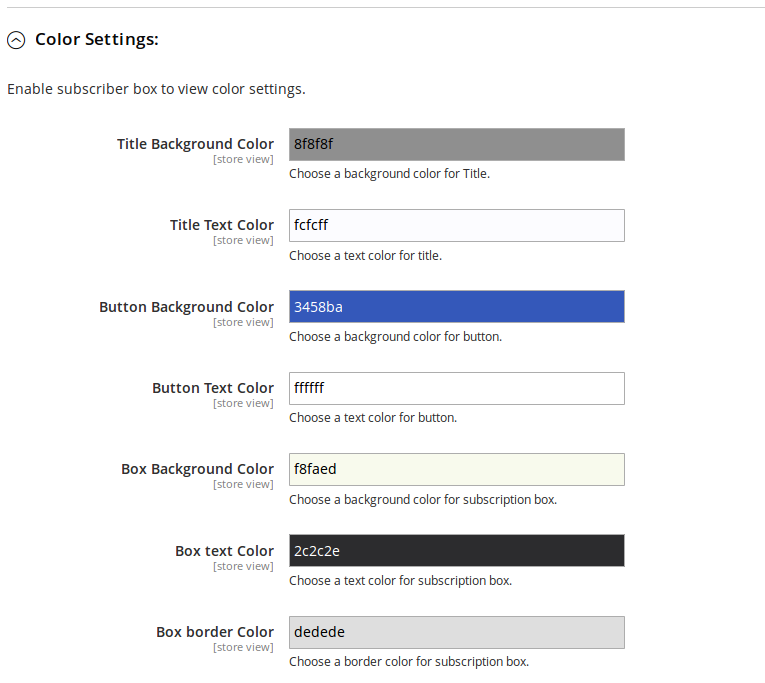
Color Scheme

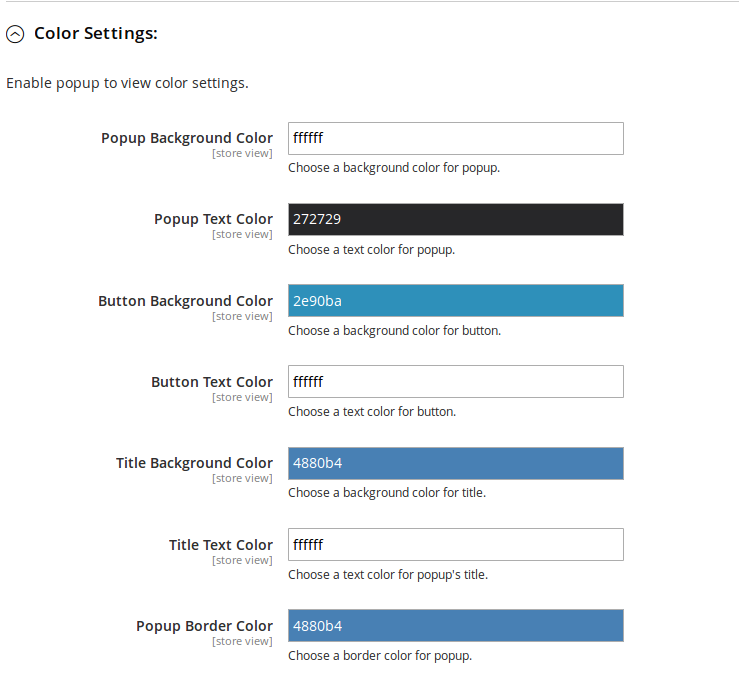
We have added the color picker option to set the background color and text color for different sections of subscription box.

Pop up Settings

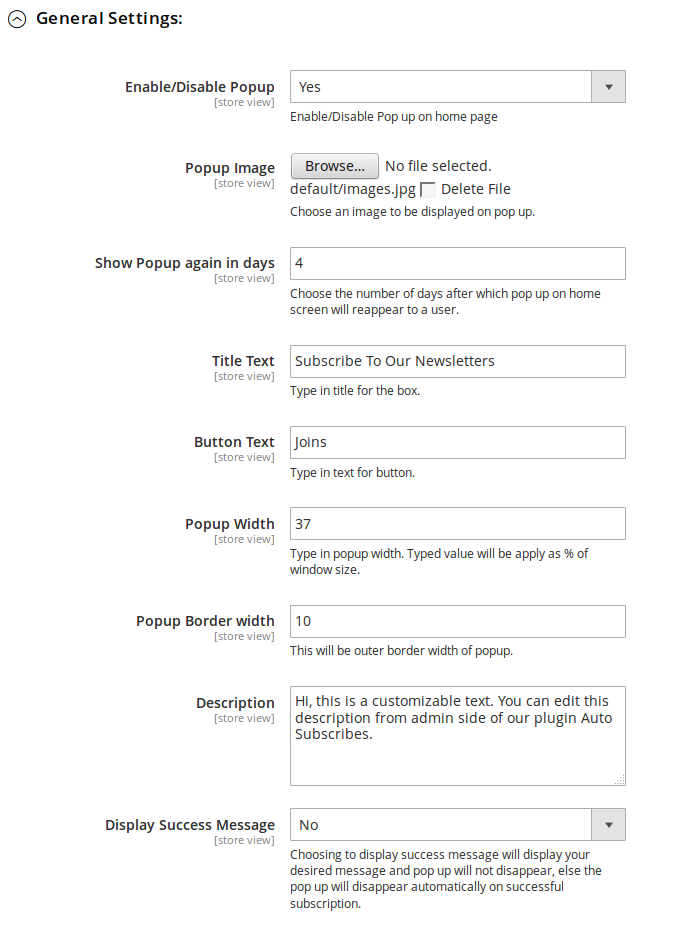
Admin can customize the pop up box too. If this box is enabled then it will show on home page only.

Enable/Disable Pop up:  Admin can choose to enable or disable the pop up display on home page.  One cannot view subscription pop up on front until this is enabled.

Pop up Image: Admin can choose to show any image on the pop up box, or choose to not show any image at all.

Show pop up again in (days): You can choose the duration (in days) for which the pop up will not reappear from the day the pop up appeared first time on a user’s system. If you want pop up to appear only once in a lifetime, type in a large number of days, for say 999. If you want it to appear every time a user lands home page, you should choose to type value as 0.

Title Text: You can change title of your pop-up from this option.

Description Text: Description appearing on the pop up can also be customized by adding desired text .

Button Text:  Button text and its font color can also be set from admin panel.

Button background color: You can also change the background color of your button to go with your theme.

Display Success Message: Turning it off means that the moment a successful subscription takes place through this pop up, it will get automatically closed without showing any success message to the user. Turning it on will display a customized success message on the pop up box after successful subscription.

Success Message:  Here you must enter the text to be displayed and choose the desired color for the text.

Color Scheme: We have added the color picker option to set the background color and text color for different sections of popup box.

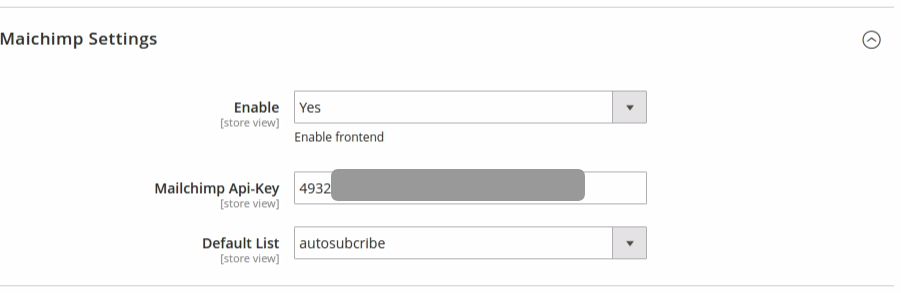
MailChimp

In this tab, admin can choose from the lists in his/her MailChimp account where emails should be added. Initially the Default List dropdown will contain “No options found”.

MailChimp API key: Admin needs to enter API key to fetch lists from his/her account. As soon as admin enters the key and clicks outside the text box or press enter button, request is sent and lists (if any) are fetched and displayed in a drop down box.

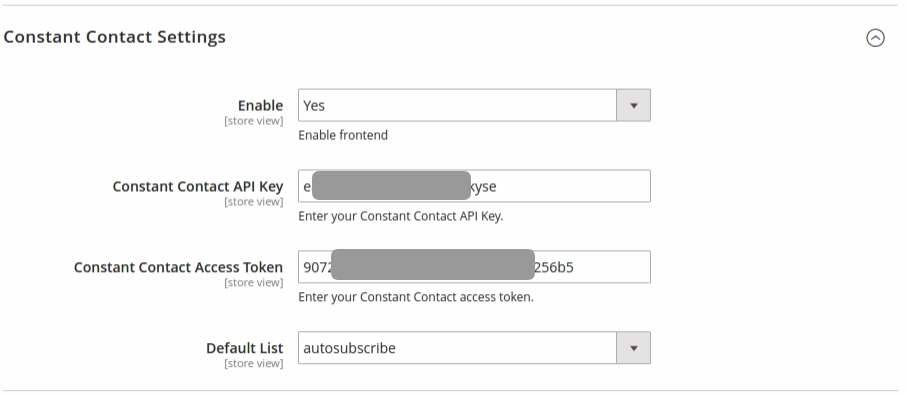
Constant Contact

In this tab, admin can choose from the lists in his/her Constant Contact account where emails should be added. IInitially the Default List dropdown will contain “No options found”.

Constant Contact API key: Admin needs to enter API key. As soon as admin enters the key and clicks outside the text box, request is sent and lists (if any) are fetched and displayed in a drop down box.

Constant Contact Access Token: Admin needs to enter access token along with API Key. As soon as admin enters the token and clicks outside the text box, request is sent and lists (if any) are fetched and displayed in a drop down box.

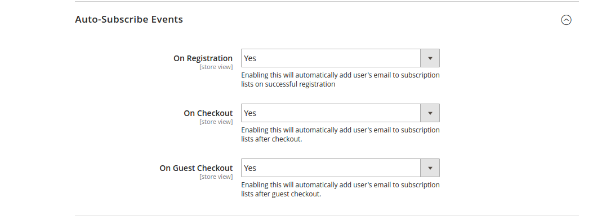
Auto Subscribe Events

Auto-subscribe events are the events on which the users can be subscribed to the configured lists in admin automatically. On such events, user will not be notified of being added to the subscription lists you have chosen in admin.

Register: Turn Register to ‘on’, if you want a user to be automatically added to your list on successful registration.

Checkout: Turn Checkout to ‘on’, if you want a user to be automatically added to your list on successful checkout.

Guest Checkout: Turn Guest Checkout to ‘on’, if you want a user to be automatically added to your list on successful guest checkout.

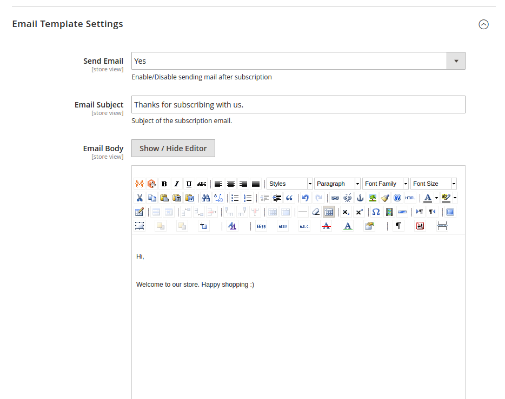
Email Settings

Email settings will be used to set the email template that will send to customer after successful subscription. Admin can disable/enabled the email if he don’t want to send the email to customer.

Store Front

Auto-subscribe Module

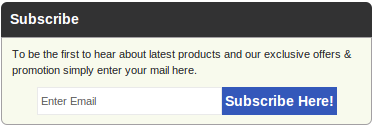
On the front end, users will have the option to subscribe themselves by clicking on subscribe button. The module will look like following screen with default settings.

In content section

In sidebar

Pop up

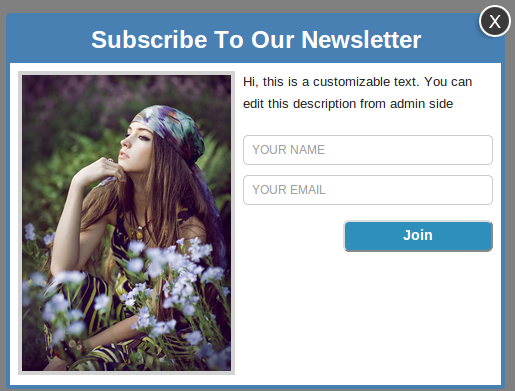
On the user’s end, pop up will appear something like this screen below, depending upon your chosen display settings.

To subscribe through this pop up, type in your email (required) and name (optional), and then click on the button below. On successful subscription, either the pop up will disappear automatically or a custom message provided by you in admin settings will start appearing on the pop up.

For more details about Magento 2 extensions visit Knowband store.

Knowband Magento 2 auto subscribe extension link.

Knowband Magento 2 email subscription popup admin demo link.

Knowband Magento 2 MailChimp extension front demo link.

Magento 2 email subscribe user manual link.

Please contact us at support@knowband.com for any query or custom change request as per your business requirement.

Decoding the SEO settings of Magento 2 platform

Magento 2 platform is the recent upgrade which is dedicated for Magento users around the world. This eCommerce platform is equipped with multiple features and functionalities that are aimed at simplifying the online shopping experience. For the growth and online popularity of your Magento 2 site, this platform consists of various SEO settings that can handle a wide range of functions.

In this blog, we are taking a quick tour around the various SEO settings that are a part of this featured loaded Magento 2 platform. If you want to optimize the performance of your Magento site, here are the various SEO features that need to be considered for better online search engine rankings.

Meta Data

Apart from the standard default titles and meta descriptions that can be set on the individual basis for a store through HTML Head fields, there is one more addition in this latest Magento 2 upgrade. It consists of Product Fields Auto-Generation feature that allows establishing a pattern for titles and meta descriptions for all the products on a Magento 2 site automatically. However, this new feature does not contain the facility to customize auto generation per products groups for any business requirements.

Canonicals

While applying canonical tags on category pages under SEO settings in Magento 2 platform, it needs to be understood that the canonical tags pointing to the main category URL are also present for sorting and filtering pages with parameters. This may not be a great way to handle partially duplicate content but it is still better than having numerous URLs with parameters that are indexed by Google.

XML sitemap

Magento 2 update consists of a feature that allows automatic inclusion of images to your sitemap for improved Google rankings of images. This feature is an extra addition besides the earlier SEO features of crawl delay and update frequency. Besides this, the eCommerce platform provides site owners an option that enables them to add XML sitemap URL into the robots.txt file.

Robots.txt

With this latest Magento upgrade, it is easy to edit your robots.txt file from the admin grid. Unlike the previous Magento platform, it does not require any FTP or other formalities for implementing changes in the robots.txt file. You need to further utilize the services of Google Console for having a clear insight into the performance of directives present in a file work.

Rich Snippets for products

This latest Magento 2 platform consists of microdata facility for product pages by default. It does not contain any option to perform editing through the admin panel which is actually not required. With this markup, you can achieve rich snippets on Google search results pages. However, in the case of adding any organization, breadcrumbs or another markup, the site owners need to install feature driven Magento 2 extensions on their site.

Easy integration of Google Analytics and Google Adwords tools

Integrating any site analytics, customer tracking and heatmap extension like Google Analytics along with keyword planner tools like Google Adwords is a cakewalk exercise for latest Magento 2 platform. It consists of special fields that allow site owners to insert the tracking codes without performing any changes in the templates.

This Magento 2 upgrade possesses many improved SEO functionalities for Magento site owners. For fulfilling any other specific SEO features, you can add any desired eCommerce extensions on your site.

Final words

Magento 2 platform is the latest Magento upgrade that is impressive and powerful due to its exceptional features and functionalities. It is packed with numerous SEO features that can help in optimizing the online visibility and search engine rankings on various search engines. In addition to these inbuilt SEO features, site owners can include any desired Magento 2 extensions through any eCommerce plugin development services company. For getting amazing eCommerce extensions at the most affordable price, site owners can also visit the Knowband store.

You Might Also Like:

How to Reset Opencart admin password?

Have you lost your OpenCart password? You might be surprised to learn that this is a problem with admin panels quite frequently.

You can update the password in the database if you’ve forgotten your OpenCart admin password. Your account’s password must be changed using phpMyAdmin in cPanel.

Most of the times, it happens when you forget or lost your admin login password and are not even able to recover it using forgot password link. In this case, the only way to regain access to the admin panel is to reset the password directly from the database. The steps to reset the password from the database are easy, but can cause a critical issue if not performed properly. The tutorial discusses the steps to reset OpenCart admin password.

Before proceeding further, we recommend you to take backup of your complete database, just in case.

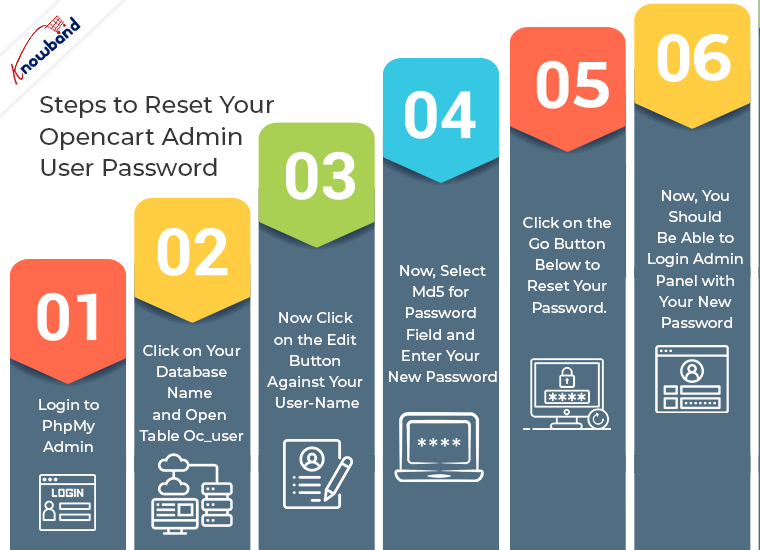
You need to perform following steps to reset your Opencart admin user password.

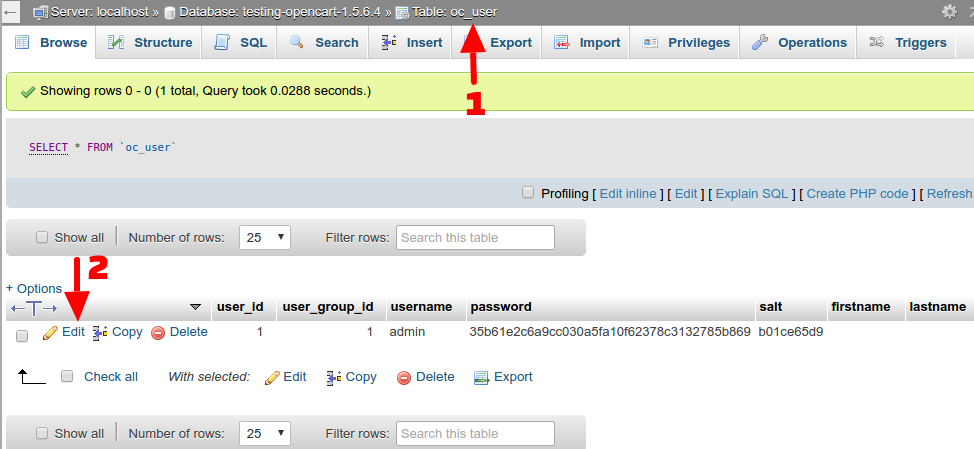
Step #1: Login to PhpMyAdmin. PhpMyAdmin is a tool which is used to access Mysql database.

Step #2: Click on your database name and open table oc_user (we are assuming here that your database prefix is oc_).

Step #3: Now click on the edit button against your user-name.

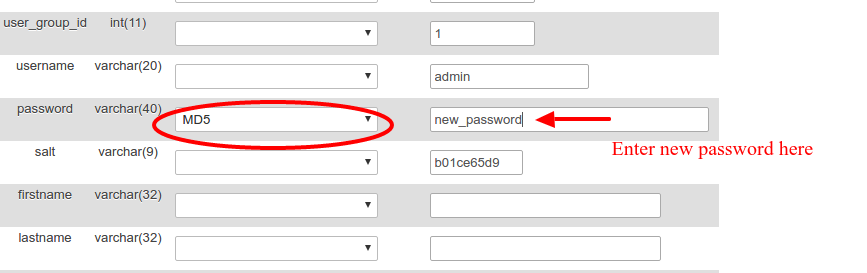
Step #4: Now, select md5 for Password field and enter your new password.

Step #5: Click on the Go button below to reset your password.

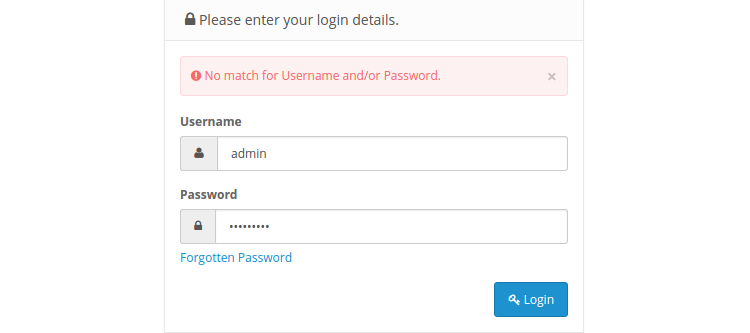
Step #6: Now, you should be able to login admin panel with your new password.

These are steps to reset OpenCart admin password.

Feel free to contact us, if you face any issues with the steps mentioned above. Moreover, visit Knowband and avail the solution to your eCommerce platform related issues for mainly these platforms- OpenCart, Magento, Magento 2, Woocommerce, and PrestaShop. We do offer customized plugin development services for these platforms.

Check out No Code Mobile App Builder Solution that every Opencart Admin must have:

How to reset Opencart admin password?

In den meisten Fällen passiert es, wenn Sie Ihr Administrator-Login-Passwort vergessen oder verloren haben und es nicht einmal mit dem Passwort-Passwort wiederherstellen können.

In diesem Fall besteht die einzige Möglichkeit, den Zugriff auf das Admin-Panel wiederherzustellen, darin, das Passwort direkt über das Administratorkennwort zurückzusetzen

Bevor Sie fortfahren, empfehlen wir Ihnen, eine Sicherungskopie Ihrer vollständigen Datenbank zu erstellen, nur für den Fall.

Sie müssen die folgenden Schritte ausführen, um Ihr OpenCart Admin-Benutzerkennwort zurückzusetzen.

Schritt # 1: Einloggen in

Schritt # 2: Klicken Sie auf Ihren Datenbanknamen und öffnen Sie die Tabelle oc_user (wir gehen hier davon aus, dass Ihr Datenbank-Präfix oc_ ist).

Schritt # 3: Klicken Sie nun auf den Bearbeiten-Button neben Ihrem Benutzernamen.

Schritt # 4: Wählen Sie nun md5 für das Passwortfeld und geben Sie Ihr neues Passwort ein.

Schritt # 5: Klicken Sie auf die Schaltfläche Los, um Ihr Passwort zurückzusetzen.

Schritt # 6: Jetzt sollten Sie in der Lage sein, sich mit Ihrem neuen Passwort in das Admin-Panel einzuloggen.

Fühlen sich frei kontaktieren Sie uns.wenn du auffällst

How to reset Opencart admin password?

Il più delle volte, succede quando dimentichi o perdi la password di accesso amministratore e non sei nemmeno in grado di recuperarla usando il link password dimenticata.

In questo caso, l'unico modo per riottenere l'accesso al pannello di amministrazione consiste nel reimpostare la password direttamente da

Prima di procedere ulteriormente, ti consigliamo di eseguire il backup del tuo database completo, per ogni evenienza.

È necessario eseguire le seguenti operazioni per ripristinare la password dell'utente amministratore di Opencart.

Passo # 1: Accedere

Passo # 2: Fare clic sul nome del database e aprire la tabella oc_user (assumiamo che il prefisso del database sia oc_).

Passo # 3: Ora fai clic sul pulsante di modifica con il tuo nome utente.

Passo # 4: Ora, seleziona md5 per il campo Password e inserisci la tua nuova password.

Passo # 5: Fare clic sul pulsante Vai sotto per reimpostare la password.

Passo # 6: Ora, dovresti essere in grado di accedere al pannello di amministrazione con la tua nuova password.

Sentiti libero di CONTATTI, se affronti

How to reset Opencart admin password?

Zazwyczaj dzieje się tak, gdy zapomniałeś lub zgubiłeś hasło logowania administratora, a nawet nie możesz go odzyskać za pomocą zapomnianego linku do hasła.

W takim przypadku jedynym sposobem na odzyskanie dostępu do panelu administracyjnego jest zresetowanie hasła bezpośrednio z

Zanim przejdziemy dalej, zalecamy na wszelki wypadek wykonanie kopii zapasowej całej bazy danych.

Musisz wykonać następujące kroki, aby zresetować hasło użytkownika admin OpenCart.

Krok # 1: Zaloguj się do

Krok # 2: Kliknij swoją nazwę bazy danych i otwórz tabelę oc_user (zakładamy tutaj, że twój prefiks bazy danych to oc_).

Krok # 3: Teraz kliknij przycisk edycji na swojej nazwie użytkownika.

Krok # 4: Teraz wybierz pole md5 dla hasła i wprowadź nowe hasło.

Krok # 5: Kliknij przycisk Go poniżej, aby zresetować hasło.

Krok # 6: Teraz powinieneś być w stanie zalogować się do panelu administracyjnego za pomocą nowego hasła.

Zapraszam do Skontaktuj się z nami, jeśli stawisz czoła

How to reset Opencart admin password?

Na maioria das vezes, isso acontece quando você esquece ou perde sua senha de login de administrador e nem consegue recuperá-la usando o link de senha esquecida.

Neste caso, a única maneira de recuperar o acesso ao painel de administração é redefinir a senha diretamente do

Antes de prosseguir, recomendamos que você faça backup de seu banco de dados completo, apenas no caso.

Você precisa executar as seguintes etapas para redefinir sua senha de usuário administrador do Opencart.

Etapa # 1: Logar em

Etapa # 2: Clique no nome do seu banco de dados e abra a tabela oc_user (estamos assumindo aqui que o prefixo do seu banco de dados é oc_).

Etapa # 3: Agora clique no botão de edição em seu nome de usuário.

Etapa # 4: Agora, selecione md5 para o campo Senha e insira sua nova senha.

Etapa # 5: Clique no botão Ir abaixo para redefinir sua senha.

Etapa # 6: Agora, você deve poder acessar o painel de administração com sua nova senha.

Sinta-se livre para contacte-nos, se você enfrentar

How to reset Opencart admin password?

In den meisten Fällen passiert es, wenn Sie Ihr Administrator-Login-Passwort vergessen oder verloren haben und es nicht einmal mit dem Passwort-Passwort wiederherstellen können.

In diesem Fall besteht die einzige Möglichkeit, den Zugriff auf das Admin-Panel wiederherzustellen, darin, das Passwort direkt über das Administratorkennwort zurückzusetzen

Bevor Sie fortfahren, empfehlen wir Ihnen, eine Sicherungskopie Ihrer vollständigen Datenbank zu erstellen, nur für den Fall.

Sie müssen die folgenden Schritte ausführen, um Ihr OpenCart Admin-Benutzerkennwort zurückzusetzen.

Schritt # 1: Einloggen in

Schritt # 2: Klicken Sie auf Ihren Datenbanknamen und öffnen Sie die Tabelle oc_user (wir gehen hier davon aus, dass Ihr Datenbank-Präfix oc_ ist).

Schritt # 3: Klicken Sie nun auf den Bearbeiten-Button neben Ihrem Benutzernamen.

Schritt # 4: Wählen Sie nun md5 für das Passwortfeld und geben Sie Ihr neues Passwort ein.

Schritt # 5: Klicken Sie auf die Schaltfläche Los, um Ihr Passwort zurückzusetzen.

Schritt # 6: Jetzt sollten Sie in der Lage sein, sich mit Ihrem neuen Passwort in das Admin-Panel einzuloggen.

Fühlen sich frei Kontaktwenn du auffällst

Your license is inactive or expired, please subscribe again!