We boast of the best in the industry plugins for eCommerce systems and has years of experience working with eCommerce websites.
We provide best plugins for platforms like - Magento, Prestashop, OpenCart and Shopify. We also provide custom module development and customization services for the website and modules.
Checkout process is a matter of primary concern for every eCommerce store owner as it makes a tremendous impact on the customer engagement, conversion rates and product sales of your store. According to the study of an independent web research company, Baymard Institute, average of 67.75% shopping carts are abandoned by customers due to one or more reasons. With this crucial figure, maximum number of abandoned carts are occurring due to the presence of time consuming checkout process which explains the urgency for a simple and engaging one page checkout process. No online shopper would like to spend time doing checkout on a site having multiple stages for purchasing a particular product and hence arises the necessity for one page checkout process for getting maximum customer engagement and product sales on your eCommerce store. Let us throw some more light on the requirement of one page checkout process for your PrestaShop store in order to get more conversions and product sales.
1. Less, simple and relevant checkout steps- Customers often become frustrated due to the time consuming, multiple pages and irrelevant steps that are involved in the checkout process. Keep the entire process limited to a single page and include only relevant checkout fields in order to keep customers engaged to your online store. You can place a guest checkout option, social login that allows Facebook login, Google login and PayPal login and you can customize the checkout as per your desire. If you are able to reduce the complexity of your checkout process, you can effortlessly achieve higher conversion rates and product sales for your online store. In case, you don’t know which way to go for, you can take the help of our PrestaShop checkout module from Knowband for a simple and engaging checkout experience.
2. It helps in clearing confusion and makes product purchasing much more engaging- When customers have to fill out the multiple pages during the checkout process for purchasing a particular product, they become confused and often leaves the checkout process in the middle thinking it to be much more time consuming. Due to this, rate of abandoned carts on your PrestaShop store are increased and the product sales are also lowered to a great extent. To tackle abandoned carts effectively by tracking your sales activity, you can take the help of modules like PrestaShop checkout page analytics for improving your customer engagement and user experience on your site.
3. Improves product sales and better customer experience- Less the number of checkout steps in a checkout process, more will be the rate of product sales and customer engagement. Focus your efforts on reducing the complexity of your checkout process for enhancing customer experience and product sales on your PrestaShop site. There are various PrestaShop checkout extensions that can help in making your checkout process a more delightful experience for your targeted customers.
4. Eliminates page reload time and keeps checkout information at a single page- Frequent page reloads during the checkout process distracts the customers from the shopping experience and thus reduces the customer engagement on an online store. By keeping all the checkout related formalities at one single place, you can keep your customers engaged and can boost your product sales to a great extent.
Thus, don’t spoil your chances of business growth and expansion with a time consuming and confusing checkout experience but grab the initial lead with a single page PrestaShop checkout process. It is definitely your chance of making the most with a single page checkout process for a brilliant eCommerce future ahead.
Checkouts are an important part for every eCommerce store and has been the driving factor for conversion rates and product sales. If you can ensure an easy and seamless online shopping experience through your checkout process, you can effortlessly achieve big in terms of sales and conversion rates. For ensuring a faster and time engaging checkout experience, you can take the assistance of various checkout plugins from Knowband that can be the game changer for your business. Take a look at these plugins which are explained below:
1. PrestaShop One Page checkout-
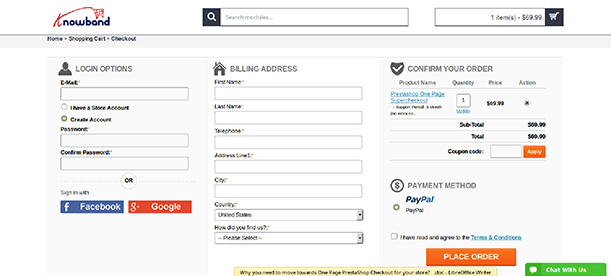
When you have to provide an amazing checkout experience to your site visitors for better product sales and eCommerce conversions, you need to bank upon this wonderful PrestaShop One Page checkout module. It has transformed the multi page checkout functionality of your store to a single page checkout process. Some of the wonderful features of this checkout extension are as follows:
Easy customization facility to hide/show desired fields from your checkout process.
Presence of language translation feature for translating the module text into desired language through feature packed admin panel.
Provide functionality to choose default shipping and payment method for your online store.
Seamless integration of newsletter and voucher field on checkout page for better conversions and customer engagement.
Purchasing products on an eCommerce store is a simple process now with the presence of a single click checkout button. The “Buy Now” button available on the product page makes it possible to purchase product directly without the need to go at shopping cart page. Here are the amazing features of one of the wonderful PrestaShop checkout extensions built by Knowband store that are explained below.
Support seamless customization for better customer engagement and sales.
Comes with fully mobile responsive design for accessibility on multiple mobile based devices.
Compatible with all themes and third party module.
Getting detailed information about the checkout experience of your site visitors is an important component that can help in improving your customer engagement, product sales and conversion rates. Moreover, with the detailed analytics report of your checkout process, it is now much easier to reduce shopping cart abandonments on your online store. Let us take a look at some of its brilliant functionalities for the growth and expansion of your eCommerce store.
Helps in tracking customer behavior in a seamless manner for reducing abandoned carts and for improving the checkout experience.
Maintains record of customer email addresses for effective customer retargeting.
Ensures quicker recovery of abandoned carts by providing detailed information about checkout process.
Provide complete cart details along with customer email id for seamless cart recovery.
4. PrestaShop One Page Supercheckout Free version-
This free Prestashop module is one of the most valued checkout extensions that can redefine the online shopping experience for your targeted customers. There are no more multiple pages checkout form and the whole process has been replaced with a simple single page checkout experience. Some of the mind blowing features and functionalities offered by this module are:
Provides seamless customization facility for product management.
Supports multiple payment and shipping method for your store.
Adaptable to multiple mobile based devices due to the presence of fully responsive design.
Helps in reducing shopping cart abandonments along with significant improvement in product sales and eCommerce conversions.
Don’t under- estimate the potential of checkout extensions for the overall growth and progress of your online store. It is time to evolve your online shopping experience according to the changing business requirements and customer expectations for getting maximum business output.
Introduction of Prestashop Quick Login Popup Addon:
Reduce the login time of your customers by integrating Prestashop Quick Login Popup Addon by Knowband on your Prestashop store. The addon offers the customers two ways to login, i.e.
Facebook Account
Google Plus Account
The customer will not need to go through the signup process of that particular website. They can now login with just one click.
Features:
It is very easy to install and configure this Prestashop login popup with facebook and google addon.
The store owner can activate or deactivate the Prestashop google login popup anytime.
This Prestashop facebook login popup allows the customers to log-in quickly via Facebook or Google.
The store owner can offer Facebook and Google Plus login feature on the eCommerce store.
The admin can display or hide Facebook and Google login button anytime.
The store owner can display the banner.
The Prestashop addon allows the store owner to change the popup background image.
The admin can set the size of social login buttons. It can be large or small.
The Prestashop advance login popup is SSL Compatible.
The Prestashop login popup multi-store compatible.
The Prestashop advance login popup is compatible with all the Prestashop themes.
Steps For Installation of Prestashop Quick Login Popup Addon:
To install this advance login popup addon, please follow the following steps:
1. Add zipped file with the source code of the Prestashop addon in the Modules folder of your system.
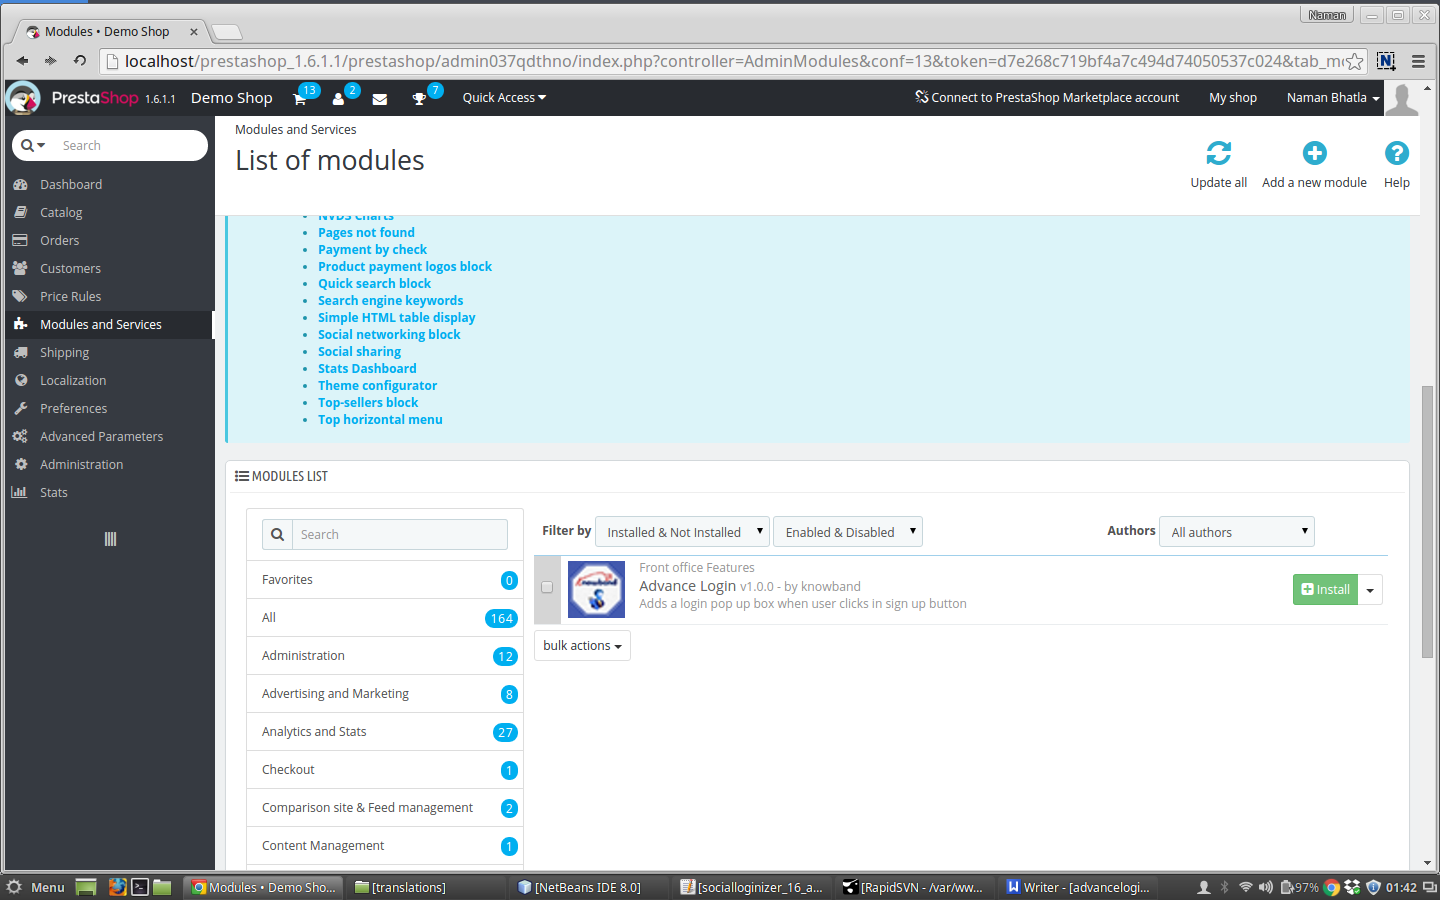
2. After adding this addon folder, the system will list the addon on module page under front office feature category as given below:
3. Click on install button in order to install the Prestashop login popup plugin.
Admin Interface:
When you click on ‘Configure’ option of this social login popup plugin, you’ll see following setting options:
1. General Settings
2. Facebook Settings
3. Google Plus Settings
General Settings:
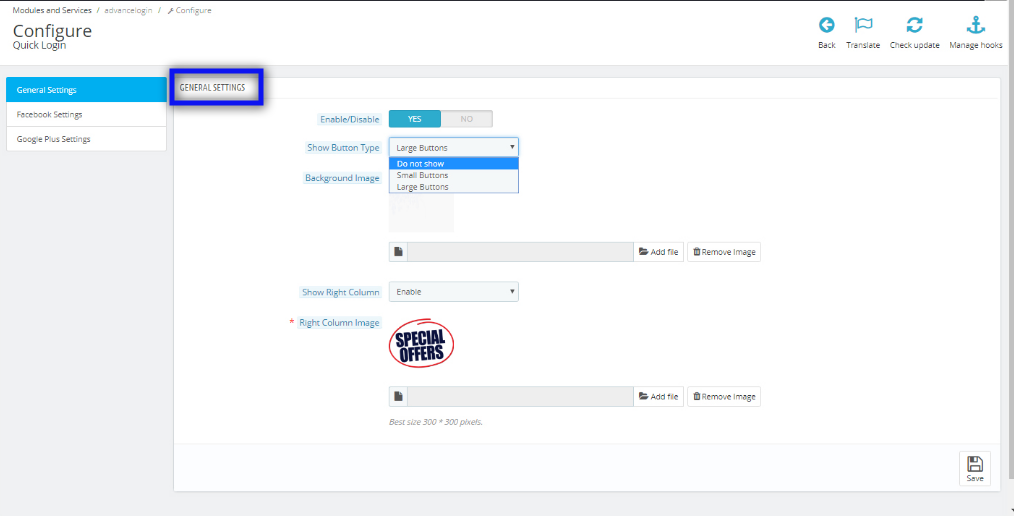
After clicking on configure link of Prestashop advance login popup addon, General settings tab will open.
Fields listed will be filled with some default values.
GENERAL SETTINGS TAB DETAILS:
Enable/Disable: This field of Prestashop quick login addon offers the admin to enable/disable the addon. The admin needs to set this option to ‘YES’ to work the module.
Show Button Type: This field has three options in which the admin has to select the type of buttons he wants to show on the pop up box (Facebook and Google buttons) it may be large or small buttons. If the admin does not want to show the buttons then also he has an option.
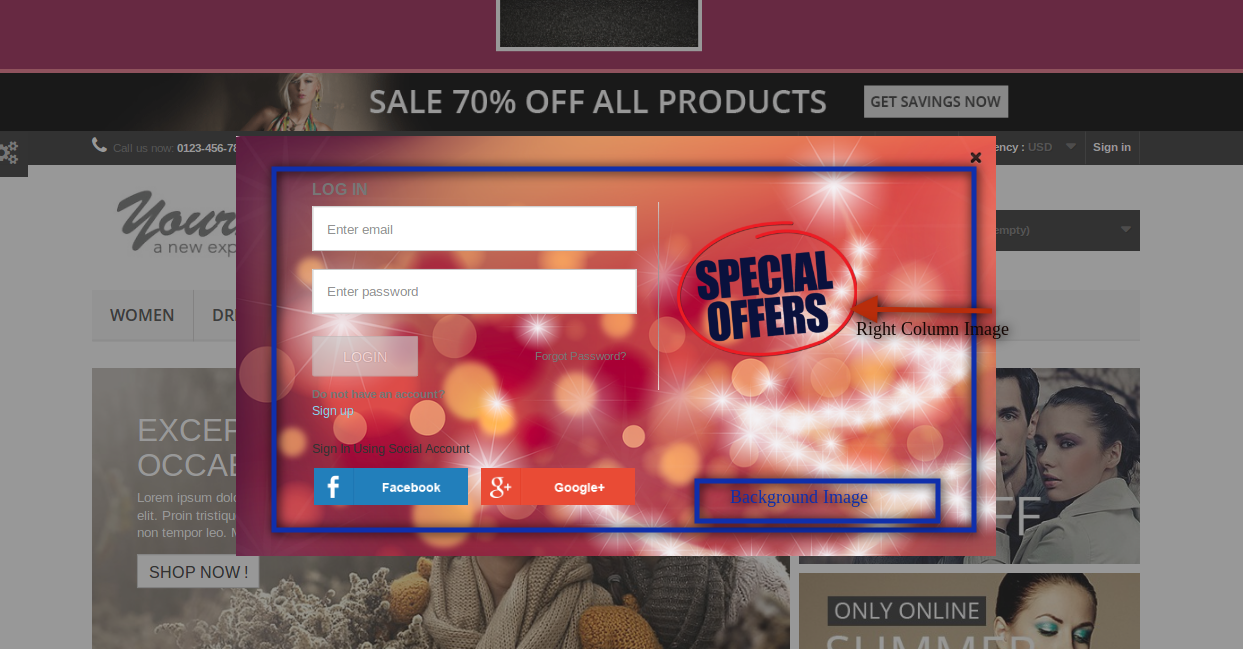
Background Image: In this field of Prestashop advance login popup, the user can decide and upload the background image on the pop up box. The image to be entered should be transparent.
Right Column: This is also an image upload option. The image uploaded in this option will be added on the right side of the pop up box.
Facebook Settings:
After clicking on the Facebook settings tab the below screen will appear.
FACEBOOK SETTINGS TAB DETAILS:
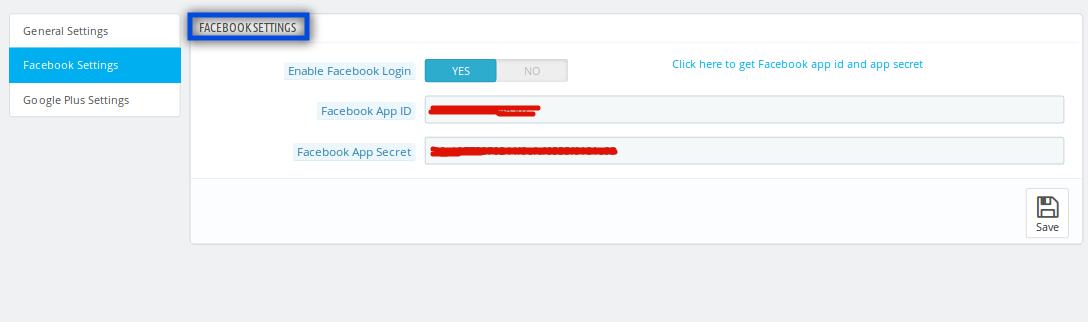
Enable Facebook Log in: This is an enable/disable button for the Facebook log in.
Facebook App ID: Here the admin has to enter the Facebook app ID of his.
Facebook App Secret: In this field of social login popup the admin has to add the Facebook App Secret.
Google Plus Settings:
After clicking on the Facebook settings tab the below screen appears.
GOOGLE PLUS SETTINGS TAB DETAILS:
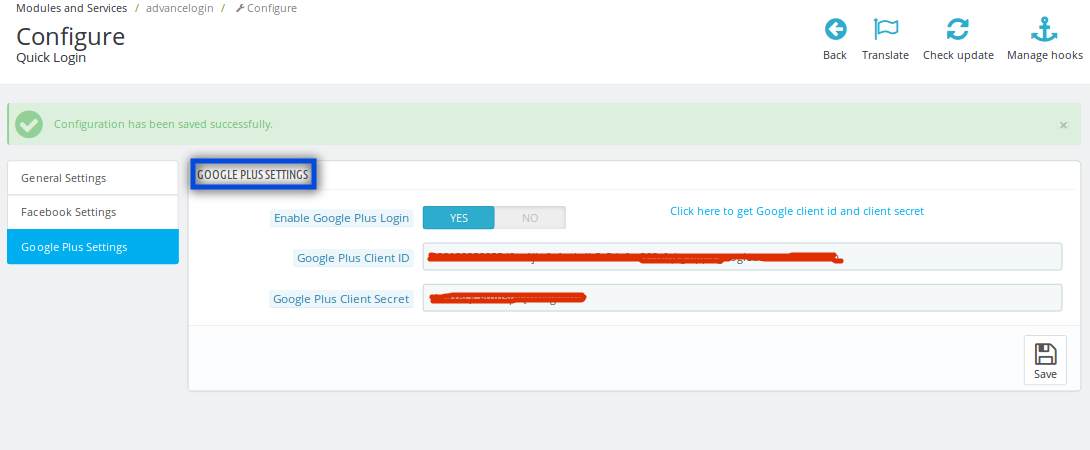
Enable Google Log in: This is an enable/disable button for the login through Google Plus.
Google Plus Client ID: In this field of Prestashop quick login addon, the admin has to enter his Google plus client ID.
Google Plus Client Secret: Here, the admin has to add the Google Plus client secret.
Front End Interface:
After enabling the social login popup addon, the pop up box starts appearing on the page as soon as the user clicks on the login/sign up button.
The Prestashop module at the front-end appears as follows:
Recommendations:
Refresh home page of your store every time you enable/disable plugin. If the plugin is not working after installation then please check permissions on modules folder. The folder should be writable. Please make the folder permission to 755.
Introduzione del componente aggiuntivo di accesso rapido Prestashop:
Riduci i tempi di accesso dei tuoi clienti integrando Add-on Popup di accesso rapido Prestashop di Knowband sul tuo negozio Prestashop. L'addon offre ai clienti due modi per accedere, es
Facebook Account
Account Google Plus
Il cliente non avrà bisogno di passare attraverso il processo di registrazione di quel particolare sito web. Ora possono effettuare il login con un solo clic.
Passaggi per l'installazione del componente aggiuntivo di accesso rapido Prestashop:
Per installare questo addon popup di accesso anticipato, si prega di seguire i seguenti passi:
1. Aggiungi file compresso con il codice sorgente di Addon Prestashop nella cartella Modules del tuo sistema.
2. Dopo aver aggiunto questa cartella di addon, il sistema elencherà l'addon sulla pagina del modulo sotto la categoria delle funzioni di front office come indicato di seguito:
3. Fai clic sul pulsante Installa per installare il plug-in di accesso PrestaShop.
Interfaccia di amministrazione:
Quando fai clic sull'opzione "Configura" di questo plugin popup di accesso social, vedrai le seguenti opzioni di impostazione:
1. impostazioni generali
2. Impostazioni di Facebook
3. Impostazioni di Google Plus
Impostazioni generali:
Dopo aver fatto clic sul collegamento di configurazione del popup di accesso anticipato di Prestashop, si aprirà la scheda Impostazioni generali.
I campi elencati saranno riempiti con alcuni valori predefiniti.
DETTAGLI DELLA SCHEDA IMPOSTAZIONI GENERALI:
Attiva / Disattiva: Questo campo di add-on rapido di Prestashop consente all'amministratore di abilitare / disabilitare l'addon. L'amministratore deve impostare questa opzione su "SÌ" per far funzionare il modulo.
Mostra il tipo di pulsante: Questo campo ha tre opzioni in cui l'amministratore deve selezionare il tipo di pulsanti che desidera mostrare nella casella di pop-up (pulsanti di Facebook e Google) può essere grandi o piccoli pulsanti. Se l'amministratore non vuole mostrare i pulsanti, ha anche un'opzione.
Immagine di sfondo: In questo campo di popup di accesso anticipato Prestashop, l'utente può decidere e caricare l'immagine di sfondo nella casella pop-up. L'immagine da inserire deve essere trasparente.
Colonna destra: Questa è anche un'opzione di caricamento dell'immagine. L'immagine caricata in questa opzione verrà aggiunta sul lato destro della finestra pop-up.
Impostazioni di Facebook:
Dopo aver fatto clic sulla scheda delle impostazioni di Facebook, apparirà la seguente schermata.
DETTAGLI DELLA SCHEDA IMPOSTAZIONI FACEBOOK:
Abilita accesso a Facebook: Questo è un pulsante di abilitazione / disabilitazione per il login di Facebook.
ID app Facebook: Qui l'amministratore deve inserire l'ID della sua app Facebook.
Facebook App Secret: In questo campo di popup di accesso social l'amministratore deve aggiungere l'App Secret di Facebook.
Impostazioni di Google Plus:
Dopo aver fatto clic sulla scheda delle impostazioni di Facebook, viene visualizzata la schermata seguente.
DETTAGLI DELLA SCHEDA DELLE IMPOSTAZIONI DI GOOGLE PLUS:
Abilita Google Accedi: Questo è un pulsante di abilitazione / disabilitazione per l'accesso tramite Google Plus.
ID cliente di Google Plus: In questo campo di accesso rapido a Prestashop, l'amministratore deve inserire il suo ID cliente Google Plus.
Segreto client di Google Plus: Qui, l'amministratore deve aggiungere il segreto del client Google Plus.
Interfaccia front-end:
Dopo aver abilitato l'addon popup di accesso social, la finestra pop-up inizia a comparire nella pagina non appena l'utente fa clic sul pulsante di accesso / registrazione. Il modulo Prestashop nel front-end appare come segue:
Raccomandazioni:
Aggiorna la pagina iniziale del tuo negozio ogni volta che attivi / disattiva il plug-in. Se il plug-in non funziona dopo l'installazione, controllare le autorizzazioni sulla cartella dei moduli. La cartella dovrebbe essere scrivibile. Si prega di rendere l'autorizzazione della cartella a 755.
Non esitate a contattarci all'indirizzo support@knowband.com per qualsiasi richiesta o richiesta di modifica personalizzata in base alle vostre esigenze aziendali.
Wprowadzenie do Prestashop Quick Login Popup Addon:
Zredukuj czas logowania swoich klientów poprzez integrację Prestashop Szybkie logowanie Popup Addon przez Knowband w swoim sklepie Prestashop. Addon oferuje klientom dwa sposoby logowania, tj
Konto Facebook
Konto Google Plus
Klient nie musi przechodzić procesu rejestracji tej konkretnej witryny. Mogą teraz logować się za pomocą jednego kliknięcia.
Aby zainstalować ten dodatkowy dodatek popup do logowania, wykonaj następujące czynności:
1. Dodaj spakowany plik z kodem źródłowym pliku Dodatek Prestashop w folderze Moduły w twoim systemie.
2. Po dodaniu tego katalogu addon, system wyświetli listę dodatków na stronie modułu w kategorii funkcji front office, jak podano poniżej:
3. Kliknij przycisk instalacji, aby zainstalować wyskakujące okienko logowania do Prestashop.
Interfejs administracyjny:
Po kliknięciu opcji "Konfiguruj" tej wtyczki społecznościowego wyskakującego okienka, zobaczysz następujące opcje ustawień:
1. Ustawienia główne
2. Ustawienia Facebooka
3. Ustawienia Google Plus
Ustawienia główne:
Po kliknięciu na link konfiguracyjny dodatku popup do logowania Prestashop, otworzy się zakładka Ustawienia ogólne.
Wymienione pola zostaną wypełnione pewnymi wartościami domyślnymi.
USTAWIENIA OGÓLNE DANE TABELI:
Włącz / wyłącz: To pole dodatku do szybkiego logowania Prestashop oferuje adminowi włączenie / wyłączenie dodatku. Administrator musi ustawić tę opcję na "TAK", aby moduł działał.
Pokaż typ przycisku: To pole ma trzy opcje, w których administrator musi wybrać rodzaj przycisków, które chce pokazać w wyskakującym okienku (przyciski Facebook i Google), może to być duży lub mały przycisk. Jeśli administrator nie chce pokazywać przycisków, to ma również opcję.
Zdjęcie w tle: W tym polu wyskakującego okna logowania Prestashop użytkownik może zdecydować i przesłać obraz tła w wyskakującym okienku. Obraz do wprowadzenia powinien być przezroczysty.
Prawa kolumna: Jest to również opcja przesyłania zdjęć. Obraz przesłany w tej opcji zostanie dodany po prawej stronie wyskakującego okienka.
Ustawienia Facebooka:
Po kliknięciu na zakładkę ustawień Facebook pojawi się poniższy ekran.
USTAWIENIA FACEBOOK TABELA:
Włącz logowanie na Facebooku: To jest przycisk włączania / wyłączania dla logowania na Facebooku.
Identyfikator aplikacji Facebook: Tutaj administrator musi wprowadzić identyfikator swojej aplikacji na Facebooku.
Sekret aplikacji Facebook: W tym polu wyskakującego okna logowania do społeczności administrator musi dodać Tajemnicę aplikacji na Facebooku.
Ustawienia Google Plus:
Po kliknięciu na zakładkę ustawień Facebook pojawi się poniższy ekran.
GOOGLE PLUS SETTINGS TAB SZCZEGÓŁY:
Włącz logowanie Google: To jest przycisk włączania / wyłączania logowania przez Google Plus.
Identyfikator klienta Google Plus: W tym polu dodatku szybkiego logowania Prestashop administrator musi wprowadzić swój identyfikator klienta Google Plus.
Sekret klienta Google Plus: W tym miejscu administrator musi dodać tajny klucz klienta Google Plus.
Interfejs czołowy:
Po włączeniu dodatku dodatku do społecznościowego wyskakującego okna pojawia się okno pop-up, gdy tylko użytkownik kliknie przycisk logowania / rejestracji. Moduł Prestashop na interfejsie wygląda następująco:
zalecenia:
Odśwież stronę główną swojego sklepu za każdym razem, gdy włączysz lub wyłączysz wtyczkę. Jeśli wtyczka nie działa po instalacji, sprawdź uprawnienia do folderu modułów. Folder powinien być zapisywalny. Proszę nadać folderowi uprawnienia do 755.
Reduza o tempo de login de seus clientes integrando Prestashop – Login Rápido Popup Addon por Knowband na sua loja Prestashop. O addon oferece aos clientes duas formas de login, ou seja,
Conta Facebook
Conta do Google Plus
O cliente não precisará passar pelo processo de inscrição desse site específico. Eles podem agora fazer o login com apenas um clique.
Etapas para instalação do Prestashop Quick Login Popup Addon:
Para instalar este addon de popup de login avançado, siga os seguintes passos:
1. Adicionar arquivo zipado com o código fonte do Addon Prestashop na pasta Módulos do seu sistema.
2. Depois de adicionar esta pasta addon, o sistema irá listar o addon na página do módulo na categoria de recursos front office, conforme abaixo:
3. Clique no botão de instalação para instalar o plugin popup de login do Prestashop.
Interface de administração:
Quando você clica na opção 'Configurar' deste plugin de popup de login social, você verá as seguintes opções de configuração:
1. Configurações Gerais
2. Configurações do Facebook
3. Configurações do Google Plus
Configurações Gerais:
Depois de clicar no link de configuração do addon popup de login avançado Prestashop, a guia Configurações gerais será aberta.
Os campos listados serão preenchidos com alguns valores padrão.
DETALHES DA ABA DAS CONFIGURAÇÕES GERAIS:
Habilitar desabilitar: Este campo de addon de login rápido Prestashop oferece ao administrador para ativar / desativar o addon. O administrador precisa definir essa opção como 'YES' para funcionar no módulo.
Mostrar tipo de botão: Este campo tem três opções em que o administrador tem que selecionar o tipo de botões que ele quer mostrar na caixa pop-up (botões do Facebook e Google), pode ser botões grandes ou pequenos. Se o administrador não quiser mostrar os botões, ele também terá uma opção.
Imagem de fundo: Neste campo de pop-up de login avançado Prestashop, o usuário pode decidir e fazer o upload da imagem de fundo na caixa pop-up. A imagem a ser inserida deve ser transparente.
Coluna Direita: Esta também é uma opção de upload de imagem. A imagem enviada nesta opção será adicionada no lado direito da caixa pop-up.
Configurações do Facebook:
Depois de clicar na guia Configurações do Facebook, a tela abaixo será exibida.
DETALHES DA ABA DE CONFIGURAÇÕES DO FACEBOOK:
Ativar o Login do Facebook: Este é um botão de ativação / desativação para o login do Facebook.
Facebook App ID: Aqui o administrador tem que digitar o ID do aplicativo do Facebook dele.
Segredo do aplicativo do Facebook: Neste campo de popup de login social, o administrador tem que adicionar o Segredo do Aplicativo do Facebook.
Configurações do Google Plus:
Depois de clicar na guia Configurações do Facebook, a tela abaixo será exibida.
DETALHES DA ABA DE CONFIGURAÇÕES DO GOOGLE PLUS:
Ativar o login do Google: Este é um botão ativar / desativar para o login através do Google Plus.
ID do cliente do Google Plus: Neste campo do addon de login rápido do Prestashop, o administrador precisa inserir seu ID de cliente do Google plus.
Segredo do cliente do Google Plus: Aqui, o administrador precisa adicionar o segredo do cliente do Google Plus.
Interface Front End:
Depois de ativar o addon de popup de login social, a caixa pop-up começa a aparecer na página assim que o usuário clica no botão de login / inscrição. O módulo Prestashop no front-end é exibido da seguinte maneira:
Recomendações:
Atualize a página inicial de sua loja toda vez que você ativar / desativar o plugin. Se o plug-in não estiver funcionando após a instalação, verifique as permissões na pasta modules. A pasta deve ser gravável. Por favor, faça a permissão da pasta para 755.
Sinta-se livre para nos contatar em support@knowband.com para qualquer consulta ou solicitação de mudança personalizada de acordo com sua exigência de negócios.
When you have to improve the performance and utility of your Magento store, you need to have mind blowing Magento themes. They can not only grab the instant attention of your targeted customers but can also be the game changer for numerous businesses around the world. If you want to achieve stupendous growth in terms of conversion rates, site traffic and product sales, here are some of the free Magento themes that can show you the guiding light.
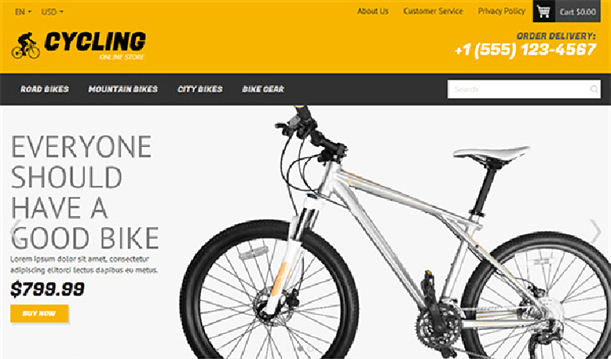
1. Cycling
Now, presenting your product in an appealing manner is a seamless task due to the availability of this free Magento theme. It has a clean and fully mobile responsive design that makes it accessible to multiple devices like desktops, laptops, smart phones and tablets. Due to other features, this Cycling theme is one of the most important free Magento theme from Template Monster, a Magento theme development company.
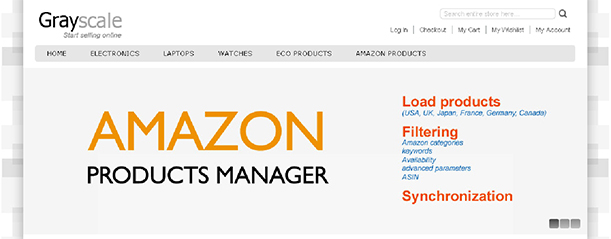
2. Grayscale
With this Magento theme, you get a clean design along with a boxed layout. One of the specialty of this eCommerce theme is that it doesn’t include any excessive elements for the store owners in order to keep their attention attracted towards the management of their products and store.
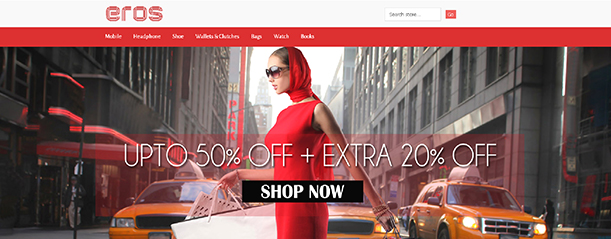
3. Eros
Magento development services have arrived with a clean code and a wide range of advanced features in the form of this Eros theme that can provide you seamless site performance and fast loading speed. Apart from this, the theme can be effortlessly customized and adjusted to any screen resolution within few seconds.
4. HandyStore
This eCommerce theme, HandyStore consists of a fully responsive design that can adapt to every other screen resolution. Due to this feature, the content of your site is automatically adjustable to any given screen size where it is intended to be displayed. Now, more people can access your website through multiple available devices and can boost your chances of business growth. It is mostly targeted for educational purpose sites and is not recommended for commercial sites. However, eCommerce store owners can take this theme as a reference material for designing their eCommerce site.
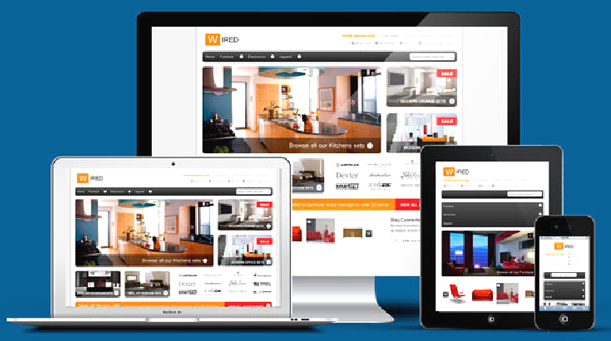
5. HelloWired
With the emergence of this free responsive Magento theme, store owners can effortlessly take their online business to great heights. It is exclusively designed for interior or furniture related business segment and has given a big boost to the Magento theme development services across the world. There are various features like outstanding support, high quality related assurance, enhanced safety and security, seamless customization facility, lightweight structure and optimized for search engine results.
6. Gala Eva
With more than 20+ transition effects in image slide show, this free Magento theme is a perfect example of exemplary Magento development services that can effortlessly grab maximum customer attention and conversion rates for your online store. It has other amazing features like easy color, background, seamless font customization, social media and payment method icons and other such functionalities that can provide an outstanding look and feel to your Magento store.
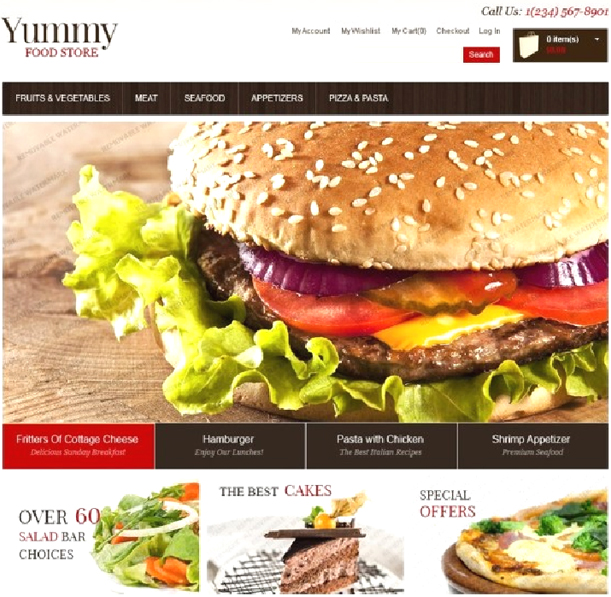
7. Yummy
Responsive themes have become the necessity of the hour as people are browsing site through numerous devices like desktops, laptops, smart phones or tablets. In these circumstances, only an impressive eCommerce theme can provide an effective business results in terms of conversion rates, product sales and site traffic. Within a few clicks, you can easily set up your business in the online environment and can take required actions to turn your venture into a profitable business entity.
For achieving sure shot business results by your Magento store, you need to adopt these amazing free responsive themes that can make your Magento stores accessible to various devices for better conversions and sales. Apart from these impressive themes, you also need to have wonderful eCommerce modules from an effective Magento development services such as Knowband that can improve the functionality, performance and site traffic for your online store be it on Magento, PrestaShop, OpenCart or any other such platform.
Today, Online Customers on eCommerce sites browse through multiple products but only make a purchase of a selected product at a particular instance of time because the goal of the shoppers is not to make an immediate purchase always. Sometimes, the customers just visit to have a look at the product and add it to their cart, so that later when they would need the product they can buy it. Moreover, they check the other store prices and checkout. The Prestashop Advanced Wishlist addon by Knowband provides a special feature to display the shortlisted, recently viewed and recommended products/banners into the website. This Prestashop wishlist module allows the customer to shortlist their favorite products so that they can be aware of the products they want to purchase or view later. This Prestashop save for later extension is like a basket in hand where you add whatever you like and can change the quantity at last when making the purchase.
Knowband Prestashop Advanced Wishlist addon is integrated with GDPR hooks. GDPR settings are added in the module using which the Prestashop admin can comply with the rules of the GDPR. Please refer to the General Settings to know more about the GDPR.
The Prestashop advanced wishlist module by Knowband is beneficial for both merchant and the customer. Let us discuss how Prestashop wishlist addon is working.
1.1 Benefits for the Merchant
This Prestashop advanced wishlist addon is a help to the store owners for tracking the Customer requirement.
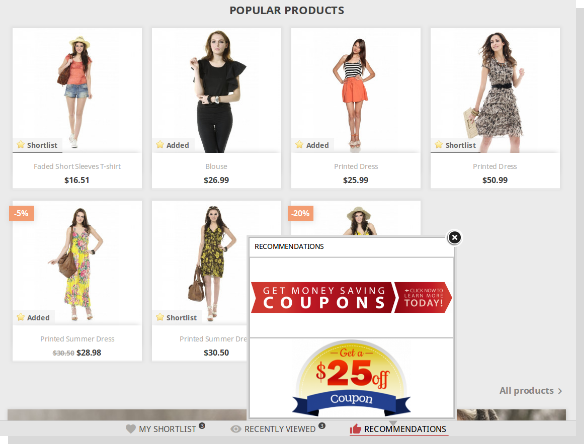
This Prestashop wishlist module shows the bar at the bottom of every page containing three different blocks as ‘My Shortlist’, ‘Recently Viewed’ and ‘Recommendations’. Each block has a pop-up containing respective data. This bar is managed by the admin according to the need.
This Knowband Prestashop advanced wishlist addon shows my wishlist block which is controlled by the online merchant. My Shortlist pop-up shows the products shortlisted by the customer.
This Prestashop advanced wishlist extension shows the recommendations block which is totally controlled by the Store Owner. Store the admin can choose products or banners as per choice.
This Prestashop save for later extension gives the access to the admin to enable/disable the recently viewed block that shows the products which are recently viewed by the customer.
This Prestashop wishlist addon helps the admin to view the product details which product is high on demand or which product is added in the wishlist the most. The Graph shows the whole information about the wishlist product.
This Prestashop advanced wishlist extension allows the admin to know what customers wish to purchase.
The Prestashop save for later extension helps for re-marketing.
This Prestashop wishlist addon reduces the abandoned cart of the website.
This module helps the admin in boosting sales and conversion rates for your online store.
The admin can easily customize the save for later addon.
The online store admin can set the number of products which he wants to show on the customer’s wishlist page.
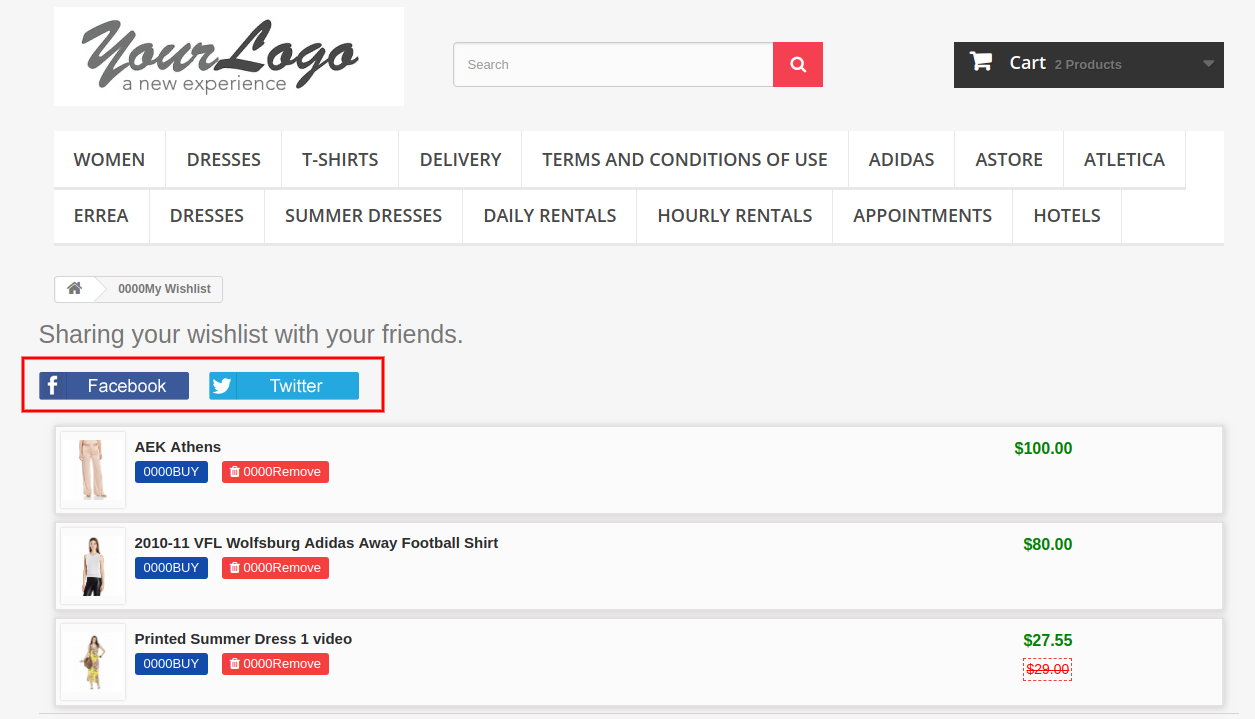
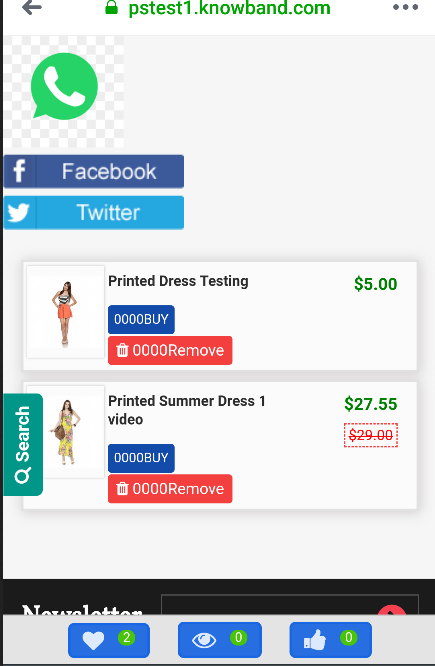
The online store merchant can also provide an option to share wish-listed products on Social media platforms like Facebook, Twitter and WhatsApp.
Customers can view wishlist products, recently viewed products and recommendations.
The Prestashop wishlist module offers a userfriendly and eye-catchy interface.
The Prestashop wishlist addon is mobile responsive, multi-lingual compatible and offers multi-store support.
Admin can show specific Wishlist tab on the website.
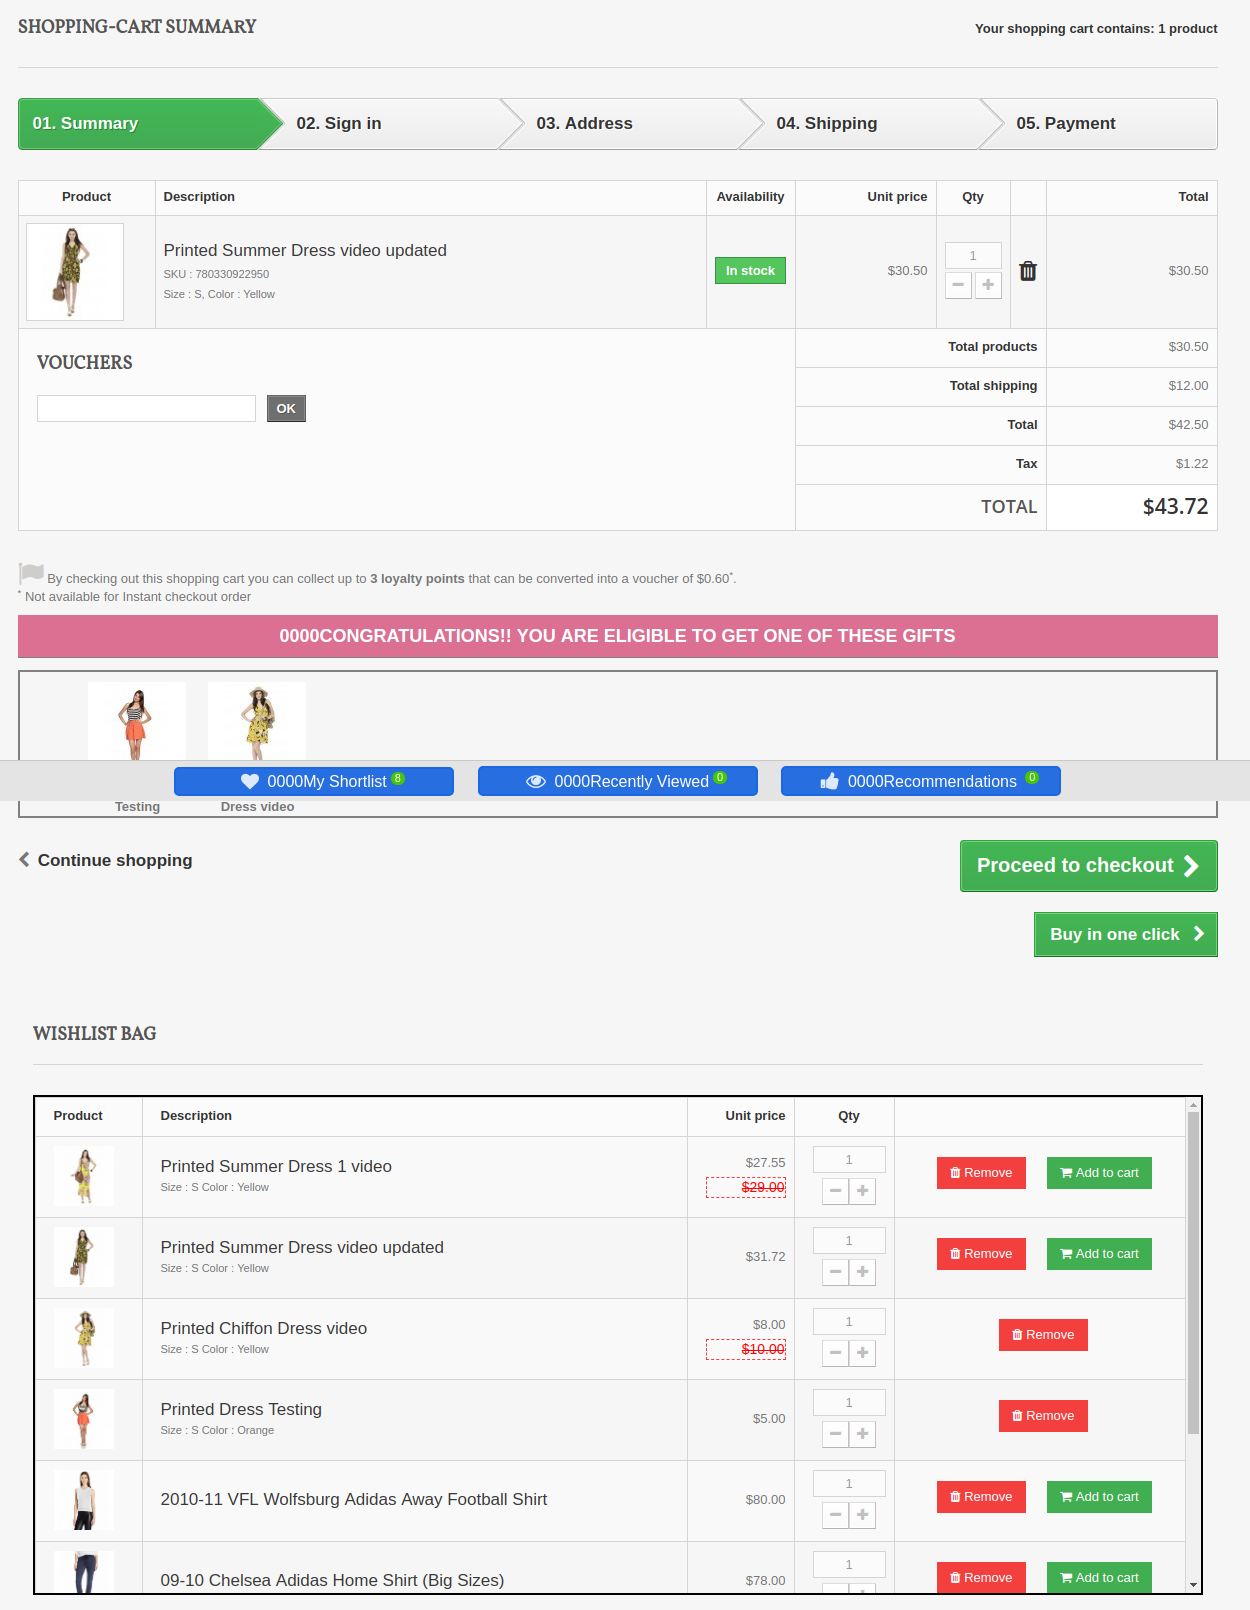
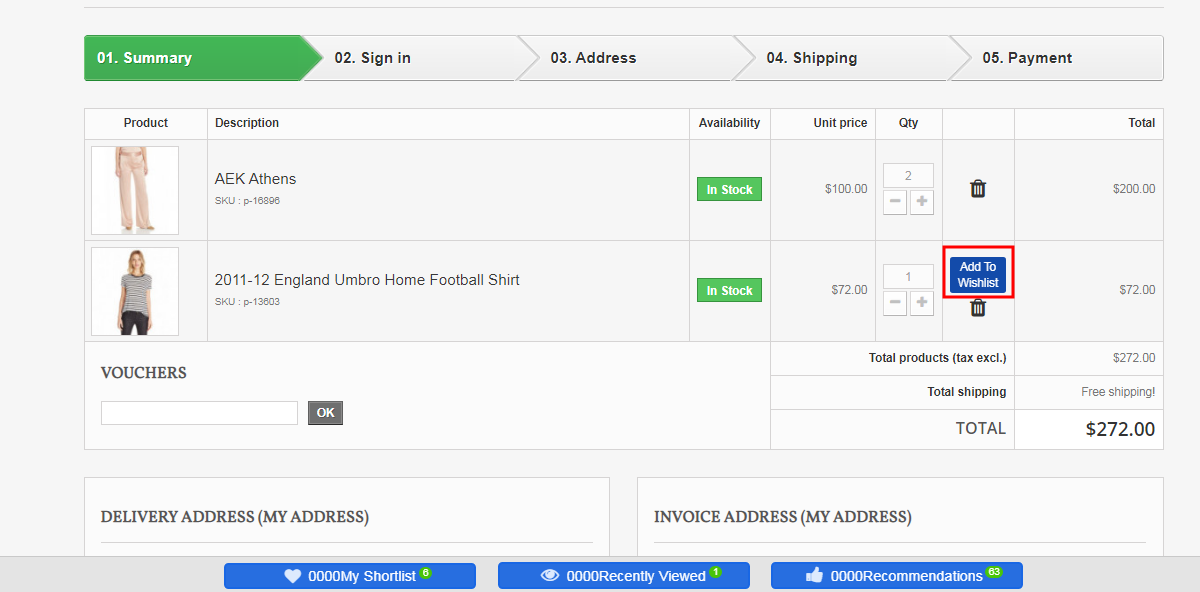
The Prestashop plugin shows wishlist on the checkout page.
The customers can add available products from wishlist and move any product from cart to wishlist.
1.2 Benefits for the Customer
This Prestashop favorite product list addon helps online shoppers to add products to their wishlist and feel free to buy it later.
This Prestashop save for later module by Knowband is mobile responsive and allows the customers to use the Wishlist feature both on their mobile phones and desktop.
Customers can add product from the wishlist while checkout.
The online users can move any product to wishlist by clicking on “Add to Wishlist” button.
The online users can also share their wishlist on Facebook, Twitter and Whatsapp.
2.0 Installation
After purchasing the Prestashop advanced wishlist addon, you will get the following files as listed below:
1. Compressed File in ZIP format (contains source code of the module)
2. User Manual
Follow the following steps to install the Prestashop save for later extension:
1. Unzip the compressed file. It would contain files and folders as shown below –
2.Copy all the files and folders of the unzipped folder into your store “modules” directory on the path – Root Directory/modules/.
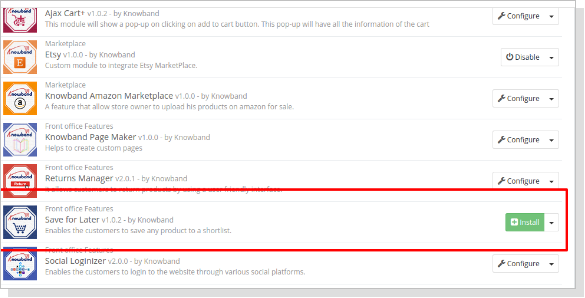
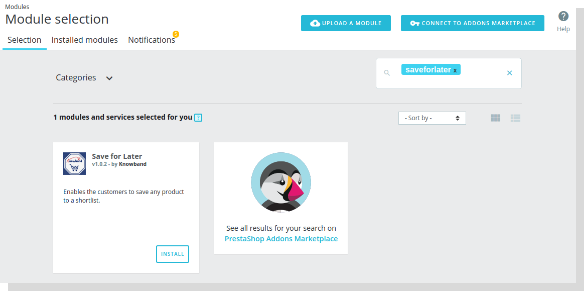
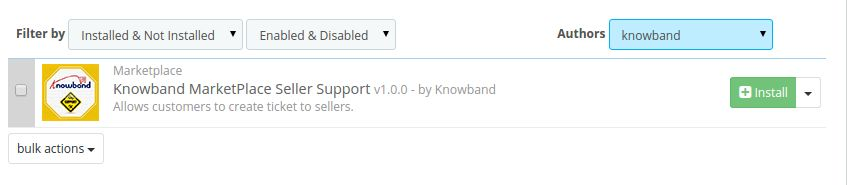
3. Now, the module is ready to be installed on your store and you can find that in Store the admin -> Modules and Services. It would shown as below –
PrestaShop 1.6
PrestaShop 1.7
4. Before installing the module, please make sure that ‘Customer.php’ does not exist in ‘Root Directory/override/classes/ folder. If it exists, then please remove it. Also, clear cache before installing the module.
5. Click on “Install” button to install the module. It would show a pop-up for your confirmation. Click on “Proceed with the installation” option. This step will install the module and show notification – “Module(s) installed successfully”.
3.0 How to configure module?
Once the Prestashop wishlist addon is configurable, the Store Owner can setup or configure this Prestashop save for later module through the Admin Panel of the store. There are following sections available to configure this module –
Go to Store the admin -> Modules and Services
Find “Advanced WishList Addon” and click “configure” button given corresponding to the module i.e. shown below-
After clicking on the “configure” button, you will see a window like the one mentioned below-
4.0 Admin Interface
After installing the Prestashop wishlist addon into the Prestashop store, the admin interface is designed in such a way that a Prestashop store owner can make the changes without any hassles. There are the following sections available on the admin interface: –
General Settings
Save for Later
Recently Viewed
Recommendations
Social Sharing
Recommendations
Product Analysis
Customer Analysis
Order Analysis
Above 5 points are actually one section which comes under “Settings” but as described here as a separate entity for more clarity.
Each section of this Prestashop save for later module is explained below.
4.1 Settings Tab
4.1.1 General Settings
In the General settings tab, we have five options which the admin can use to manage the store;
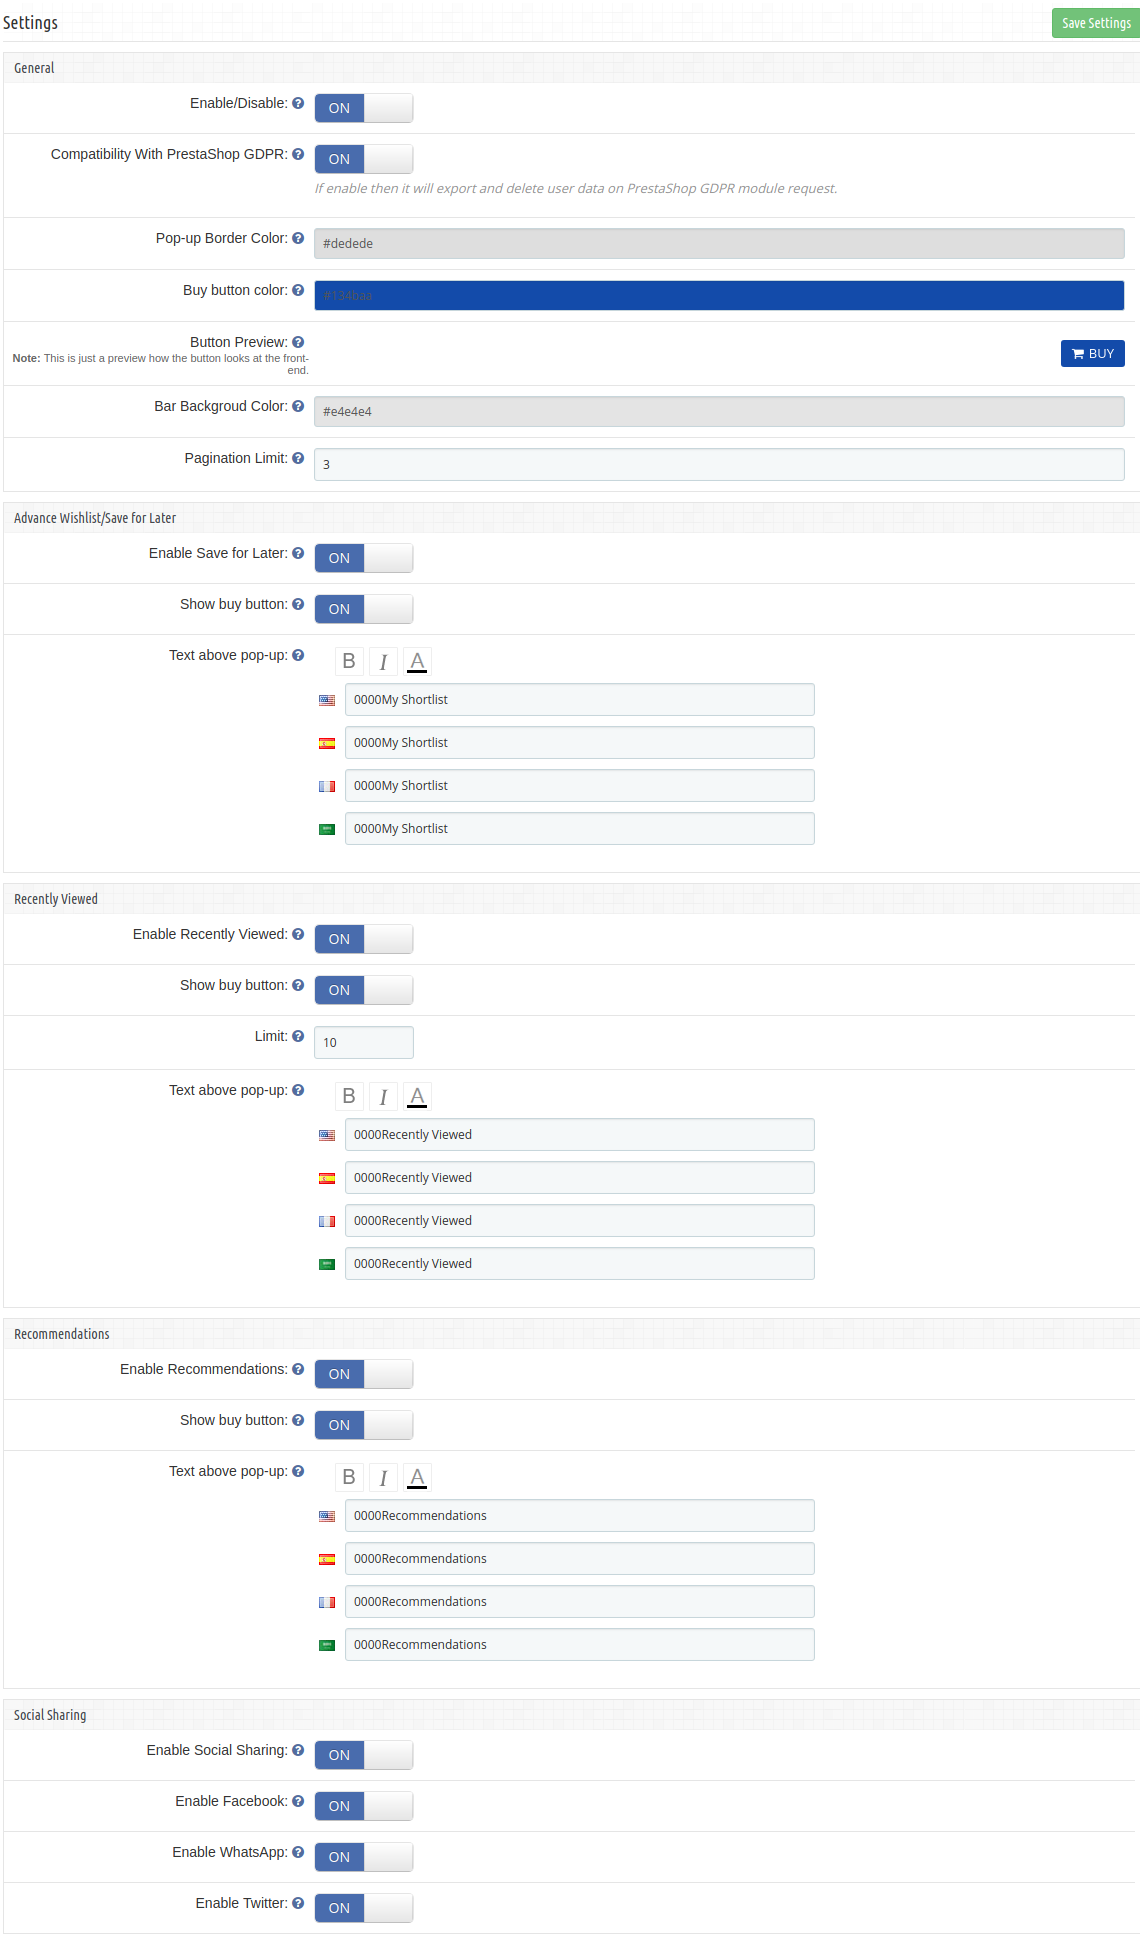
Below mentioned is the general setting tab image-
This tab contains the following input fields which the Store Owner or the admin can update –
Enable/Disable: Initially, this will be notified as “OFF” And the admin can enable/disable the module by turning ON/OFF this option.
Compatibility with Prestashop GDPR Module: The Admin can enable the GDPR option. The Customer has an access to request the admin to delete and export the personal data from the back-office. The Admin can also export the customer data from the back-end.
Note: If you are using the official GDPR module then you must need to enable this setting. The main purpose of this feature is export and deletes user data on PrestaShop GDPR module request. It is also compatible with Prestashop GDPR Module developed by Knowband.
Pop-up Border Color: This setting enables the admin to change the border color of the pop-ups appearing at the front-end. Initially, it has a default color that best suits the pop-ups.
Buy Button Color: This setting enables the admin to change the buy button color appearing at the front-end, in front of every product in the pop-ups. Initially, it has a default color that best suits the button.
Button Preview: This option is not a setting, it is just a preview window of the buy-button appearing on the front-end. When the color of the buy button is changed using the above setting, then the color of the button preview will change dynamically displaying the current appearance of the buy button.
Bar Background Color: This Prestashop Advanced Wishlist addon enables the admin to change the background color for the bottom bar that appears at every page on the front-end. Initially, it has a default color that best suits the background of the bar.
Pagination Limit: The online merchant can set the number of products which he wants to show in a single page.
4.1.2 Save For later
In this section, the Prestashop Save for later addon allows Store Owner or the admin to update the settings of “My Shortlist” section of the Front-end. Through this section, the Store Owner or the admin can do the following things –
1.Enable/Disable “My Shortlist” section in the Store Front.
2.Show/Hide the Buy button
3. Add some text to “My Shortlist” popup which will be shown at the top of popup.
This Prestashop Advanced Wishlist extension form contains the following input fields which the Store Owner can update:
Enable Save for Later: Initially, this will be displayed as “OFF”. the admin can enable/disable the shortlist option by toggling the button.
Show buy Button : This Prestashop save for later addon allows the admin to choose whether to display the buy button in front of the products in the Shortlist pop-up or not.
Text above pop up: This Prestashop advanced wishlist addon allows the admin to enter the text that should be displayed at the front-end as a heading for the shortlist pop-up. the admin can enter the different text for different languages available in the system and can also customize the appearance (i.e. bold, italic and color of text) of the text using the font-style options.
4.1.3 Recently Viewed
Through this section, the Store Owner or the admin can do following things –
1.Enable/Disable “Recently Viewed” section in Store Front.
2.Show/Hide the Buy button
3.Limit the number of products to display
Add some text to the “Recently Viewed” popup which will be shown at the top of pop-up.
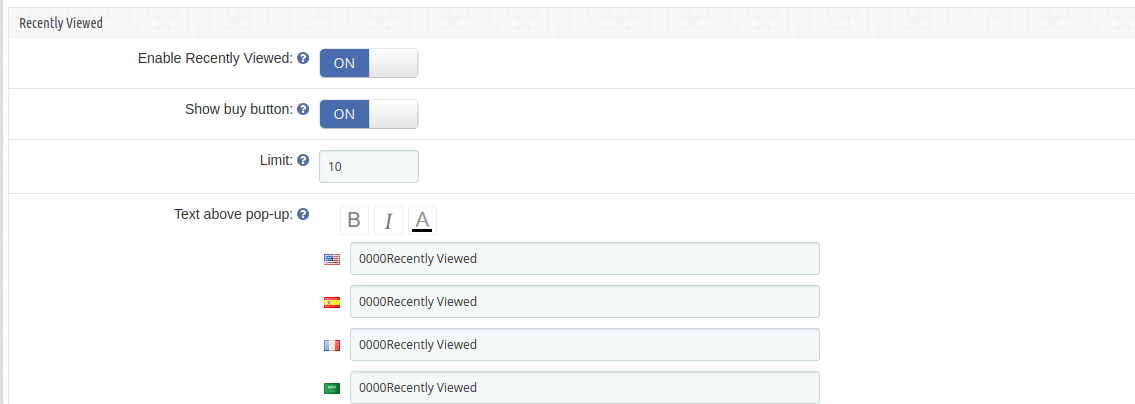
This Section contains the following input fields which the Store Owner or the admin can update –
1. Enable Recently Viewed: Initially, this will be OFF. Admin can enable/disable Recently viewed option by turning ON/OFF this setting.
2. Show buy Button : This setting enables the admin to choose whether to display the buy button in front of the products in the Recently viewed pop-up.
3. Limit: Admin can limit the products to display in recently viewed product section.
4. Text above pop up: This setting enables the admin to enter text that should be displayed at the front-end as a heading for the recently viewed pop-up. The admin can enter different text for different languages available in the system and can also customize the appearance (i.e. bold, italic and color of text) of the text using the font-style options.
4.1.4 Recommendations
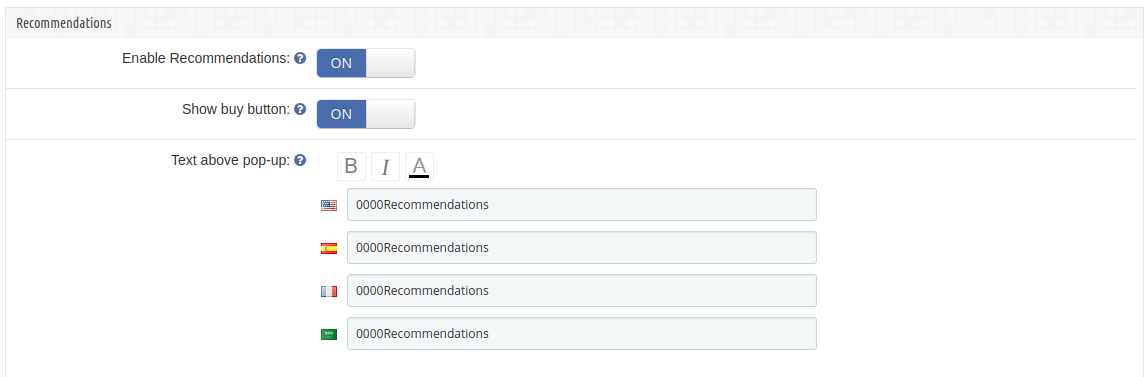
In this tab, change the settings for the Recommendations block of the plugin. Here, the admin can recommend various things to the customer as per the need. the admin can enable/disable it and can also customize the text above the recommendations popup.
1.Enable/Disable “Recommendations” section in the Store Front.
2.Show/Hide Buy Button
3.Add some text to the “Recommendations” popup which will be shown at the top of pop-up.
This form contains the following input fields which Store Owner or the admin can update –
1. Enable Recommendations : Initially, this will be OFF. Admin can enable/disable Recommendations option by turning ON/OFF this setting.
2. Show buy Button : This setting enables the admin to choose whether to display the buy button in front of the products(if admin wants to recommends products to customers) in the Recommendations pop-up.
3. Text above pop up : This setting enables the admin to enter text that should be displayed at the front-end as a heading for the Recommendations pop-up. The admin can enter different text for different languages available in the system and can also customize the appearance (i.e. bold, italic and color of text) of the text using the font-style options.
4.1.5 Social Sharing
The online store merchant can allow the online buyers to share wish list products in various Social Media Platform.
Enable Social Sharing: Enable or Disable social sharing option
Enable Facebook: Activate or deactivate to allow users to share wish-listed products on Facebook.
Enable Whatapp: Allow/disallow customers to share products on Whatsapp.
Enable Twitter: Enable the functionality to allow customers to share wish-listed products on Twitter.
5.0 Recommendations
This Prestashop advanced wishlist addon by Knowband allows the Store Owner or the admin to setup the content of Recommendation pop-up to display at Store Front.
There are 3 options available for Store Owner:
1.Banner
2.Related Products
3.Selected Products.
The admin can only choose one of them to display at Store Front as the content of Recommendations Pop-up.
5.1 Banners
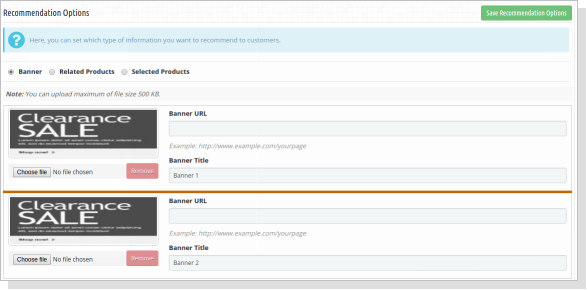
Using this option, the admin can upload a maximum of two banners for the recommendations popup, there is also an option to enter the URls for the banners uploaded.
You have to follow steps given below to show banners in Recommendations Pop-up –
Go to the Module and Services -> Module and Services
It would list out all the modules of store. Find ‘Save for Later’ in modules list.
Now click on the ‘Configure’ button given corresponding to the ‘Save for Later’ module.
It would redirect the Store Owner or the admin to a module settings page. Now click on “Recommendations” option listed at left side column.
It would open a new section. Choose “Banner” option. It would display the section where you can upload/change banners (Max. 2) with their Title and Link. You can find the screenshot below –
Click on “Save Recommendation Options” button. It would validate the data and submit the form.
5.2 Related Products
You have to follow the steps given below to show the related products in the Recommendations Pop-up –
Go to the Module and Services -> Module and Services
It would list all the modules of the store. Find ‘Save for Later’ in modules list.
Now click on ‘Configure’
button given corresponding to the ‘Save for Later’ module.It would redirect the Store Owner or the admin to a module settings page. Now click on “Recommendations” option listed at left side column.
It would open a new section. Choose “Related Products” option. You can find the screenshot below –
Click on “Save Recommendation Options” button. It would validate the data and submit the form.
That’s It.
5.3 Selected Products
You have to follow the steps given below to show selected products in Recommendations Pop-up –
Go to the Module and Services -> Module and Services
It would list all the modules of the store. Find ‘Save for Later’ in modules list.
Now click on ‘Configure’ button given corresponding to the ‘Save for Later’ module.
It would redirect the Store Owner or the admin to a module settings page. Now click on “Recommendations” option listed at left side column.
It would open a new section. Choose “Selected Products” option. You can find the screenshot below –
After choosing “Selected Products” option, the module will ask to choose Category and then the Products to display at Store Front. Choose Products and module will list them one by one in a list. The admin can remove selected one from this list if needed.
Click on “Save Recommendation Options” button. It would validate the data and submit the form.
That’s It.
6.0 Product Analysis
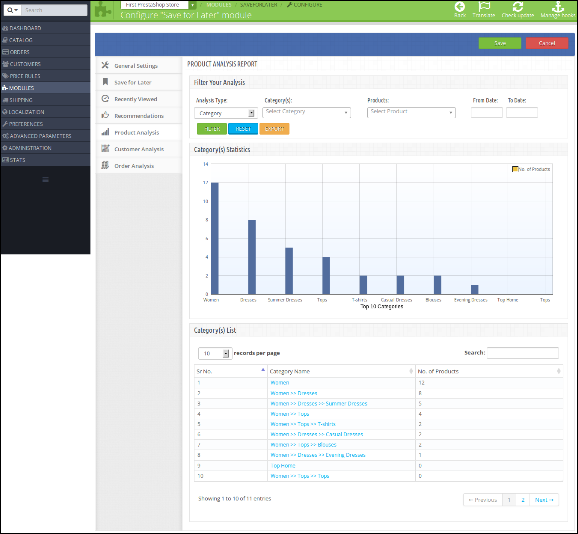
This Prestashop save for later addon tab will display the category/product reports in the form of graphs and list. The graph will display top ten categories/products shortlisted by customers in descending order. You can find the screenshot below –
Below is the screen of this Product wishlist module product analysis tab:
1. Filter your analysis: The filter will be used for filtering data. There are folowing parameters on the basis of you can filter report:
Analysis Type: This will be the dropdown list. With this filter, you can change the behavior of report such displaying report for top 10 categories or top 10 products.
Category(s): Here you can select multiple categories to filter the report. This option will be hidden if you select analysis type as Products.
Products: The products will be in this drop-down will be displayed on the basis of categories you have selected. If analysis typeset as Product, it will display all the products.
Start and Date: To Specify start and end date.
Filter: To display filtered data, the user must have to click on this button.
Reset: On clicking this button, the module will reset all parameter and display default report i.e displaying report according to categories.
Export: To export the current report in excel.
2. Category(s)/Product(s) Statistics: This Prestashop wishlist addon by Knowband shows a bar graph which will display top 10 categories or top 10 products on the basis of analysis type.
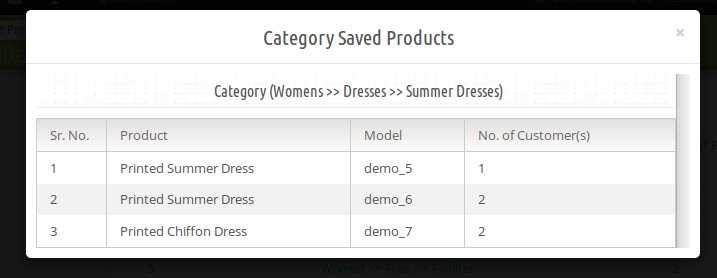
3. Category(s)/Product(s) List: In this, Prestashop advanced wishlist addon will list all the categories/products in descending order. If the analysis type is “Category” the module will display the category name in this list as clickable. On clicking the category, the module will display how many and which products of this category shortlisted by customers in the pop up box as shown in the below screen:
7.0 Customer Analysis
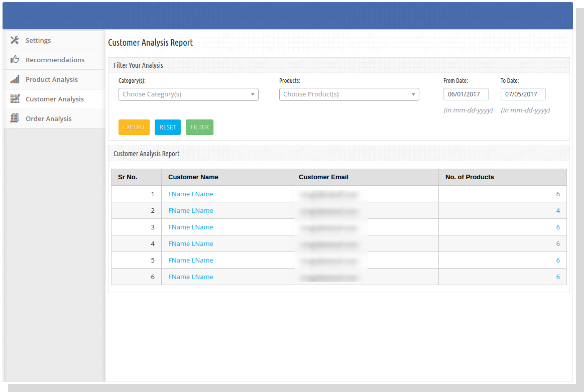
This Knowband Prestashop advanced wishlist addon shows the tab to display the list of customers with their number of shortlisted products. Here, the admin can also view the products list shortlisted by the particular customer.
1. Filter your analysis: The filter will be used for filtering data. There are folowing parameters on the basis of you can filter report:
Category(s): Here you can select multiple categories to filter the report.
Products: The products will be in this drop down will be displayed on the basis of categories you have selected.
Start and Date: To Specify start and end date.
Filter: To display filtered data, the user must have to click on this button.
Reset: On clicking this button, the Prestashop save for later module will reset all parameter and display default report i.e displaying report according to categories.
Export: To export the current report in excel.
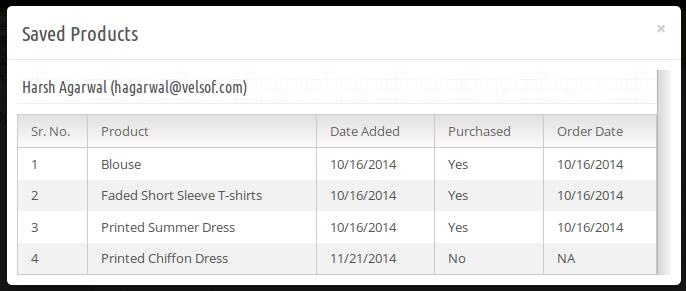
2. Customer Analysis Report: In this, the Prestashop wishlist module will list all the registered customers and guest customers (who have placed an order as the guest) with how many products he/she has shortlisted. The customer email in this link will be clickable. On clicking email, a popup will display to showcase which product he/she has shortlisted and among these, which products are bought by corresponding customers as shown below:
8.0 Order Analysis
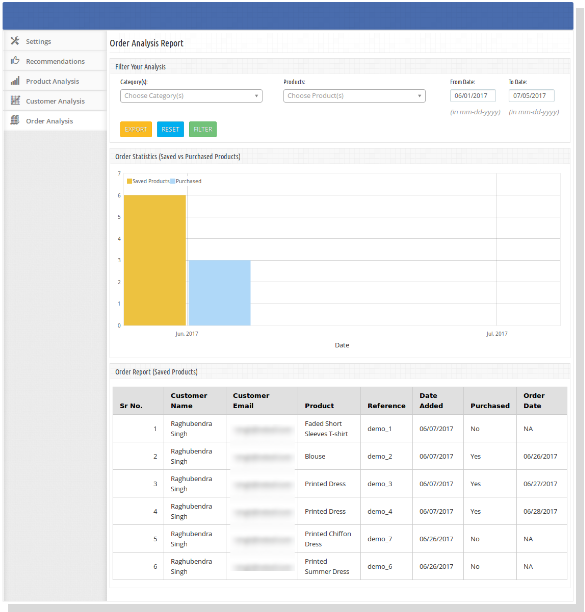
This tab is for doing analysis on the basis of how many products are ordered after shortlisted by the customer as shown in below screen:
1. Filter your analysis: The filter will be used for filtering data. There are folowing parameters on the basis of you can filter report:
Category(s): Here you can select multiple categories to filter the report.
Products: The products will be in this drop-down will be displayed on the basis of categories you have selected.
Start and Date: To Specify start and end date.
Filter: To display filtered data, the user must have to click on this button.
Reset: On clicking this button, Prestashop save for later addon will reset all parameter and display default report i.e displaying report according to categories.
Export: To export the current report in excel.
2. Order Report: In this, Prestashop advance wishlist addon by Knowband will list all the products which are shortlisted by customers with Purchased status. This Purchased status will tell you that this product is bought after shortlisted by the same customer.
9.0 Front End
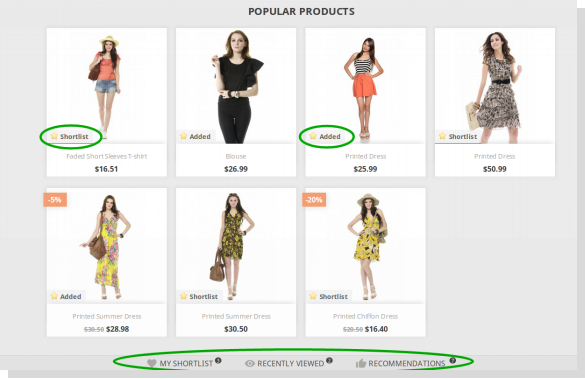
After enabling the Prestashop wishlist addon the front-end user will see a bottom bar at every page of the front-end containing the blocks as they are enabled using the admin panel of the plugin.
The bottom bar at the front-end appears as follows:
PrestaShop Advanced Wishlist Addon 1.6
PrestaShop Advanced Wishlist Addon 1.7
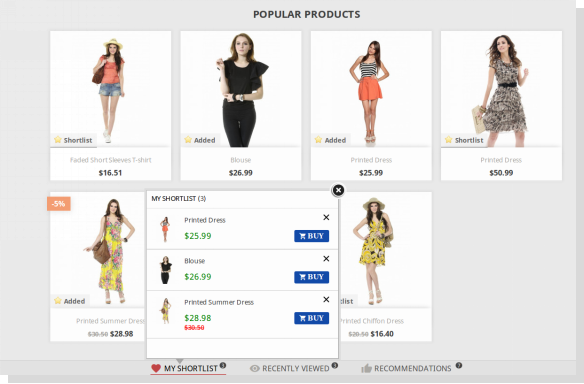
The highlighted Shortlist button will allow customers to shortlist corresponding products into the separate bucket. This bucket displays at the bottom of the page as highlighted in above screen.
When the customer clicks on Shortlist button, the product will be added into bucket and button text will be changed from Shortlist to Added.
My Shortlist Pop-up
This Prestashop advanced wishlist addon by Knowband shows pop-up contains the products that are shortlisted by the customer. The customer can also remove the products from the shortlist by using the cross sign in front of products from the pop-up.
PrestaShop Wishlist Addon 1.6
PrestaShop Wishlist Addon 1.7
Recently Viewed Pop-up
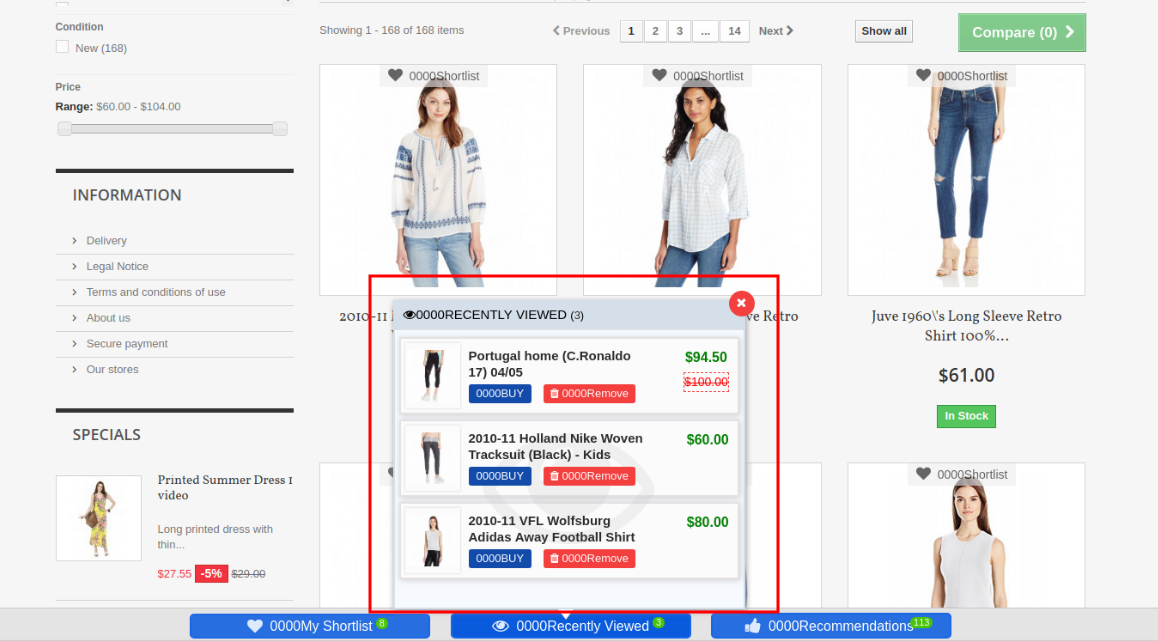
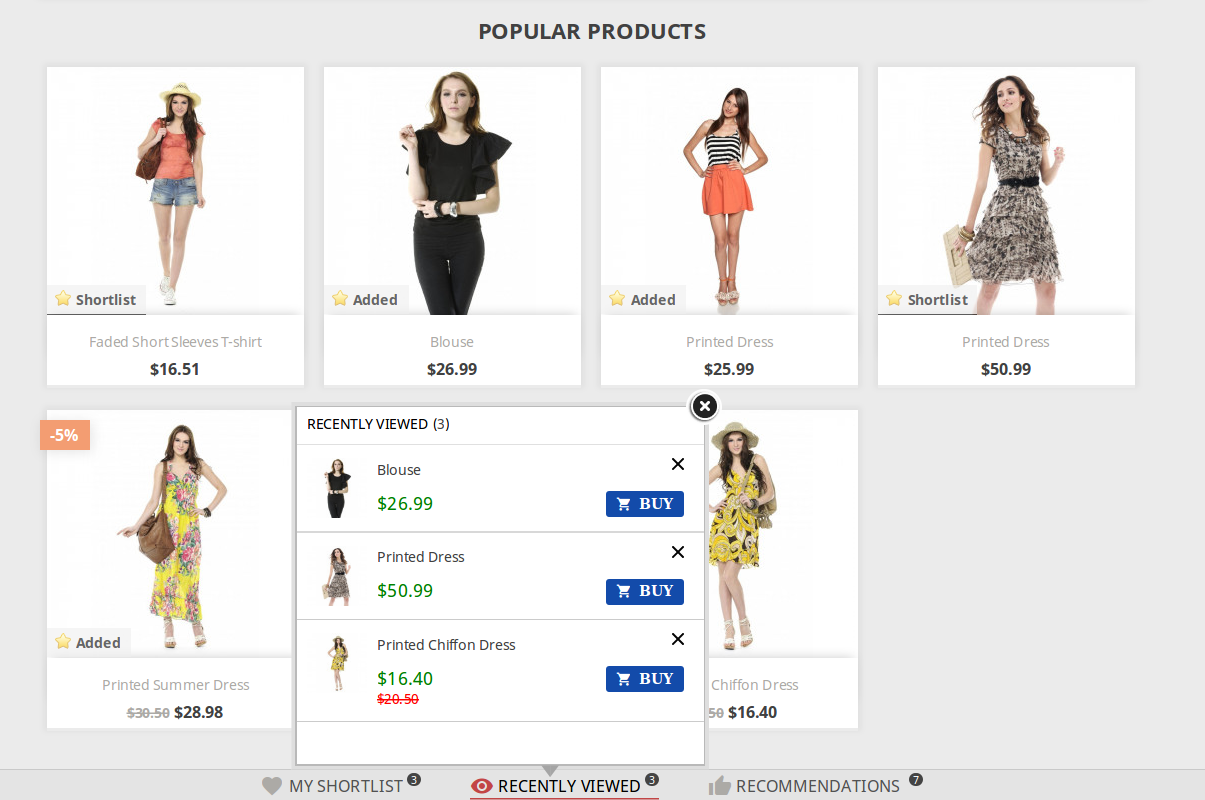
This pop-up contains the products that are recently viewed by the customer. They can directly go to the product detail page of any product listed in this pop-up by clicking on the product name or by clicking on the ‘Buy’ button in front of the respective product.
PrestaShop Advanced Wishlist Addon 1.6
PrestaShop Advanced Wishlist Addon 1.7
Recommendations
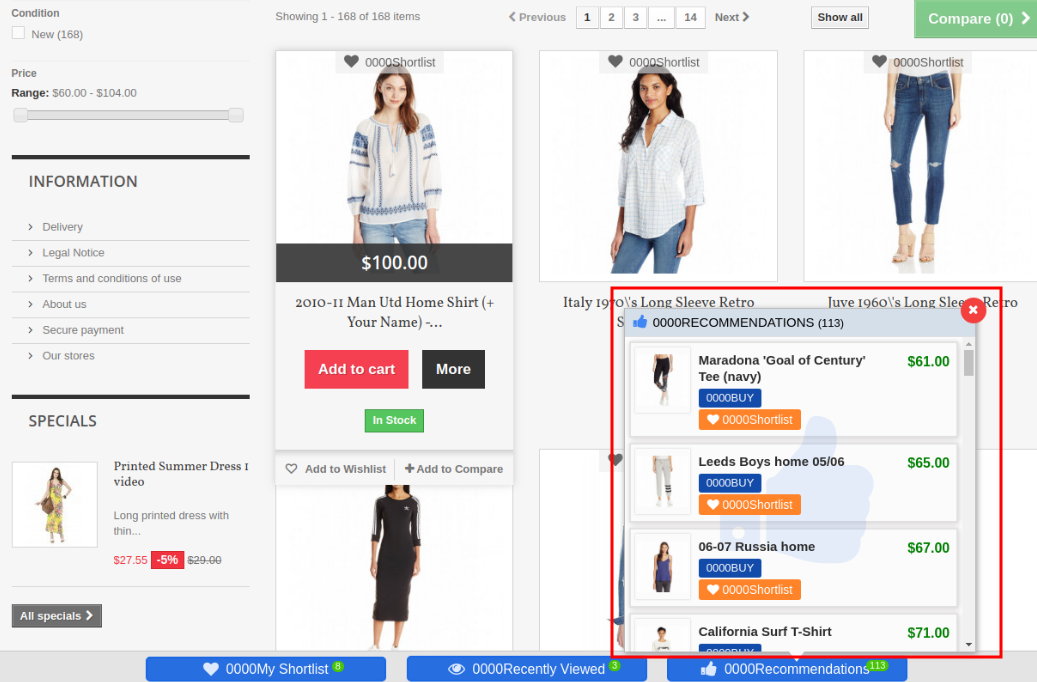
Content of this pop-up depends upon the choice of the admin. This Prestashop wishlist addon may have a list of selected products, it may have related products based on the browsing history of the customer or it can also have a maximum of two banners with an option of the link over them.
The recommendation pop-up with banners looks as follows:
PrestaShop Advanced Wishlist Addon 1.6
PrestaShop Advance Wishlist Addon 1.7
The online store admin can provide an option to share wish listed products on social media platforms like Facebook, Twitter and Whatsapp:
Online users can view whatsapp sharing option on their mobile devices:
The online users can view a specific tab for viewing wish list.
The online users can view wishlist on checkout page.
The online users get an option to move any cart product in wishlist:
Important Things
Refresh home page of your store every time you enable/disable plugin. If Prestashop favorite product list module is not working after installation then please check permissions on modules folder. The folder should be writable. Please make the folder permission to 755.
Before Installing Prestashop wishlist module, please check that Customer.php file already exists in root/override/classes/ folder. if yes, then Please remove it and clear the cache. We prefere that if exist, then please contact to our support to doing the same.
Now you can try Prestashop advanced wishlist addon by Knowband for on your Prestashop website. KnowBand Prestashop save for later addon helps you engage more customer to your store & increase the customer base.
This addon is basically addon for marketplace. Sometimes, customer have an query related to product of seller before purchasing the same and wants to clear his query by talking with seller as well as keep the records of all previous talks with seller at one place.
So, keeping this in mind, this ad-don will provide features to customer through which customer can make queries to sellers and seller can reply to customer queries.
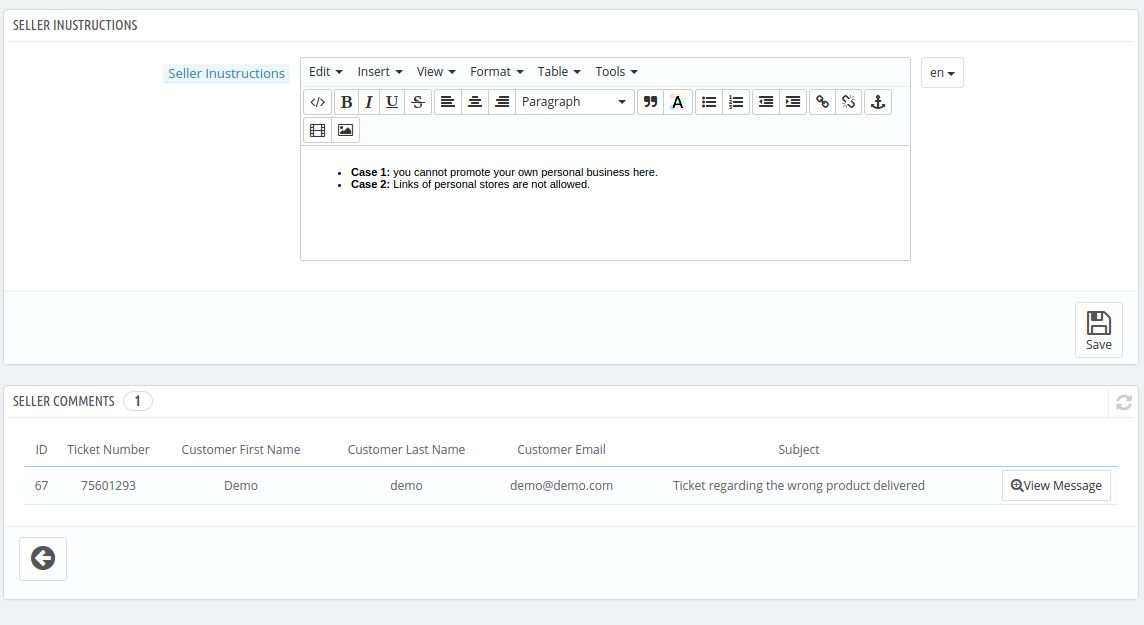
This interface will have two fields for the admin in the back end. Both of the fields are listed below:-
1. Seller Instructions: These are the instructions given by the admin to the seller which the seller will have to keep in mind while commenting or replying to the customers tickets.
2. Seller Comments Listing: This interface will also have all the listing of the comments which are done by the seller on the customer tickets. The admin can approve or disapprove the comments done by the seller. If the admin disapproves the comment then it will not be shown to the customer in the front else vice-verse.
Menu Location
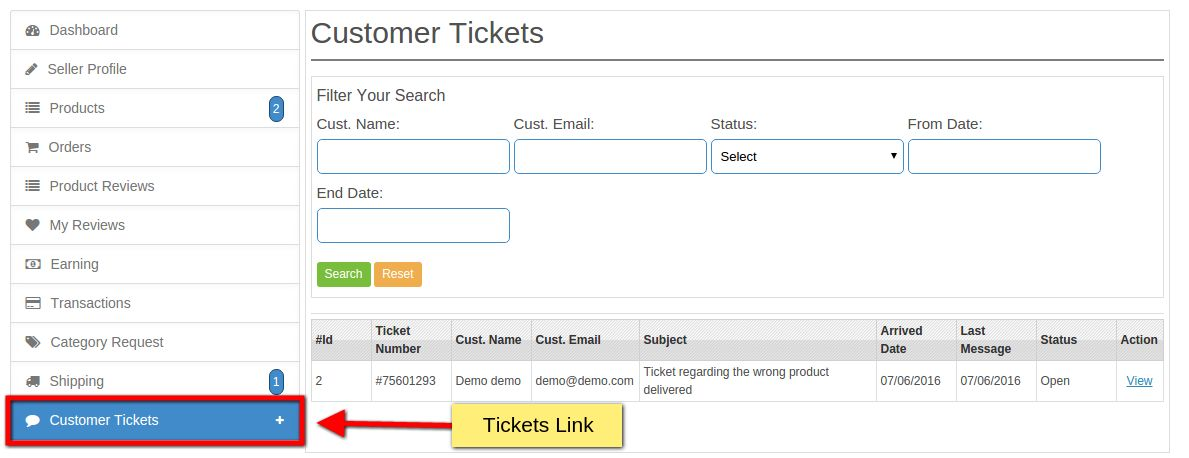
After installation, a menu will be displayed to the seller as shown in below screen:
On clicking the highlighted link, a drop sown will appear which will be having two options in it one to view all the tickets which will redirect the seller to the ticket listing page and the other will be the configuration option which will lead the seller to the configuration page.
Customer Tickets Listing Interface
Here all the tickets which were created by customers to corresponding seller will listed as shown in the above screen:
Filter Description
1. Customer Name: With this filter, seller filter tickets by customer name
2. Customer Email: Filter by email.
3. Status: Filter tickets by status (All, Open, Pending, Closed).
4. From Date: Filter tickets by from date. From date means, queries come after and on this date.
5. End Date: Filter tickets by end date. End date means, queries come before and on this date.
Table Description
1. Id: Unique identifier of the query.
2. Customer Name: Name of the customer who created corresponding ticket.
3. Customer Email: Email of the corresponding customer.
4. Query Subject: Subject or title of corresponding ticket.
5. Arrived Date: Date on which corresponding ticket has arrived.
6. Last Message: Date on which last reply to customer gone or last reply given by customer to seller.
7. Status: Status of ticket.
8. Action: Action on the corresponding ticket.
View Query Interface
There will be a link Viewon with each ticket in list shown in above point. By Clicking on this link, system will open page where seller can see all the conversation on corresponding ticket between him and customer. Also a form through which seller can reply to customer as shown in below screen:
On Sending reply to customer, system will send about the same to customer.
Configuration Page
This is a page where seller can enable/disable this feature from customers. After disabling this, customer cannot create ticket to this seller. Also, seller can configure that at which location on website my contact link will be displayed to customers. Link for configuration page will be shown under Customer Tickets Link.
Customer Interface
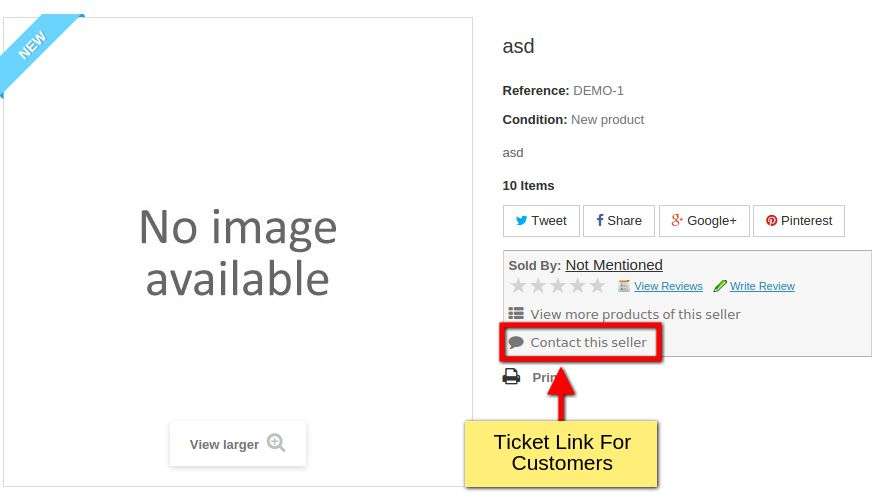
If seller allow customers to contact him, then system will display contact link for sellers on various page as shown in below screen:
On Product Page:
On Seller Profile Page:
On clicking on contact link, system will redirect customers to contact form from where customers can create his ticket/query to corresponding seller.
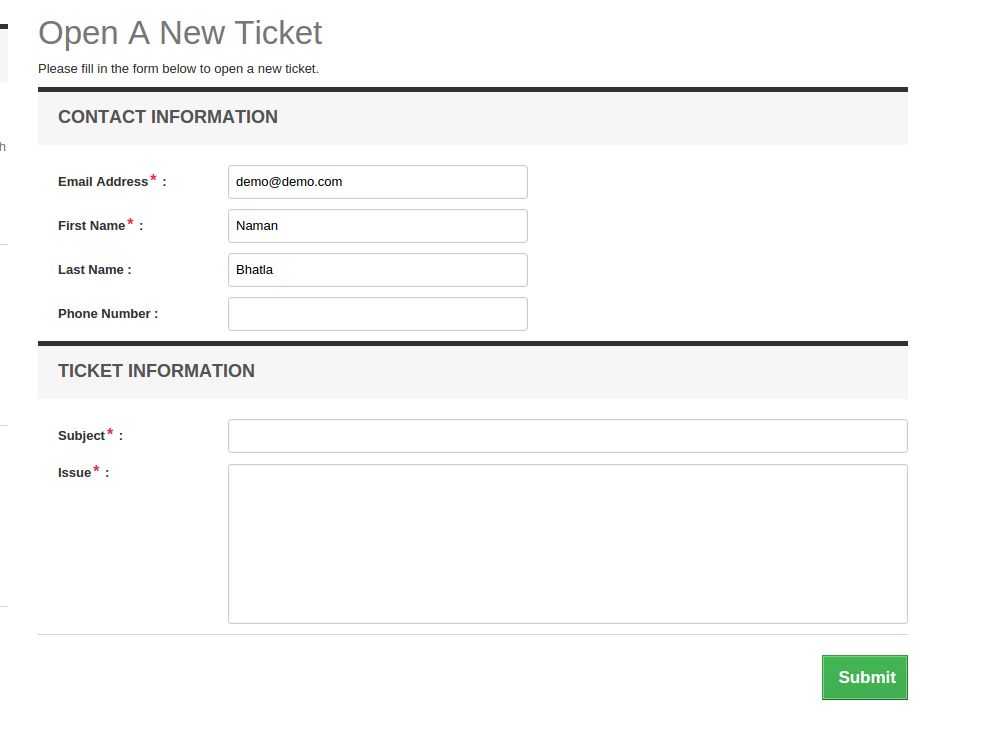
Seller Contact Form
Here, customer can create ticket for sellers as shown in below screen:
View Previous Tickets
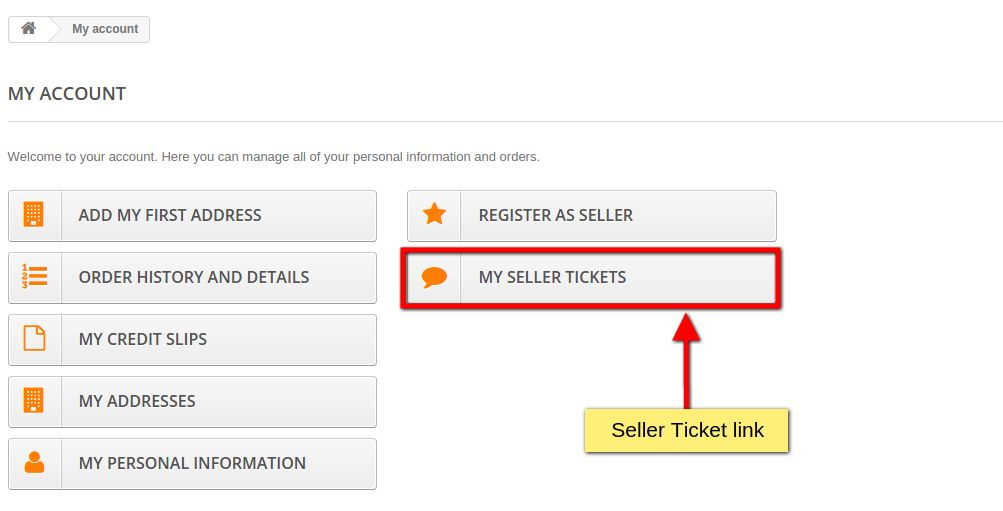
Customers can view his ticket records by going into my account section, where a link to view his all previous tickets will be shown as shown in below screen:
On clicking above highlighted link, system will redirect customer to page where all the tickets created by customer to sellers will be listed as shown in below screen:
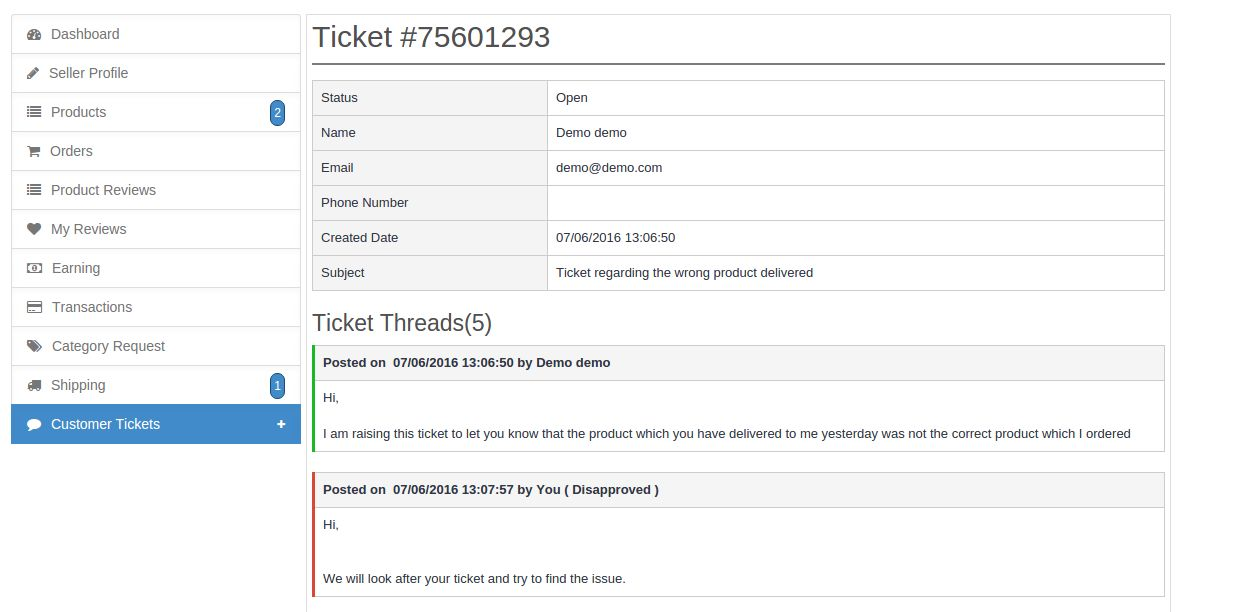
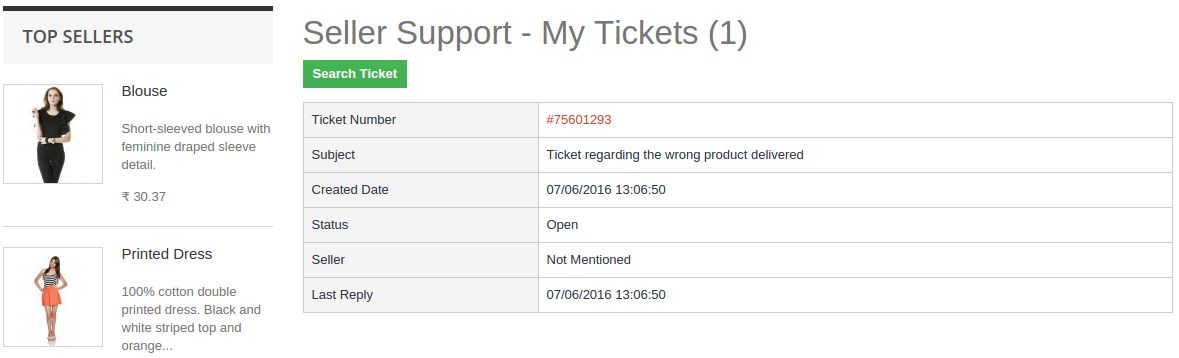
On clicking ticket number link system will redirect customer to ticket view page where customer can view his all conversations with seller on corresponding ticket. Also send an reply to seller for the same.
Magento Infinite Scroll Module is a Magento extension incorporates the feature of infinite scroll in the site. When enabled, Magento Infinite Scroll extension makes changes in the product listing page. With the Magento fast scrolling, the store admin can remove the pagination from the category pages of the site. Magento quick scroll module even reduces the load time in refreshing the page everytime a visitor navigates to the next page. Magento Infinite Scroll Extension by Knowband also has the feature of load more link which can allow the store visitors to move directly to the top of the web page.
1.1 Merchant Benefits of Magento Infinite Scroll Module:
The store admin can include the option of the infinite scroll with the help of Magento infinite scroll plugin with making any code changes.
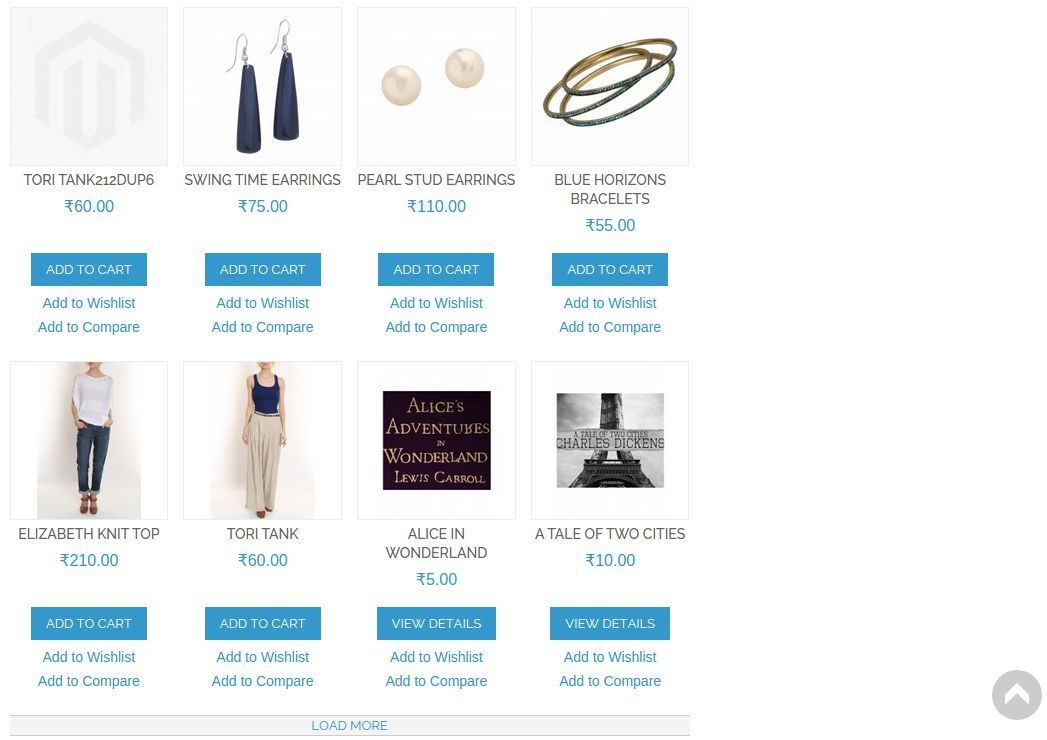
The Magento Infinite Scroll extension even allows the store admin to include the ‘Load More’ option on the site. With this, more products will be loaded only if the customers click on the link.
The admin gets an option to change the look and feel of these features from the back-end of the Magento Endless Scrolling module.
The Go to the Top link, allows the store visitors to move to the top of the web page. Even the appearance of this link can be changed from admin interface of Magento Infinite Scroll extension.
The admin can either add or remove the toolbar from the front-end of the site.
Magento Infinite Scroll module even offers the admin to set-up their sandbox site for the testing purpose.
2.0 Steps for Installation of Magento Infinite Scroll Extension
Follow the following steps for installing Magento Infinite Scroll Module:
The Magento Infinite Scroll Module offers a number of easy customization options to the store admins. They are discussed in details below.
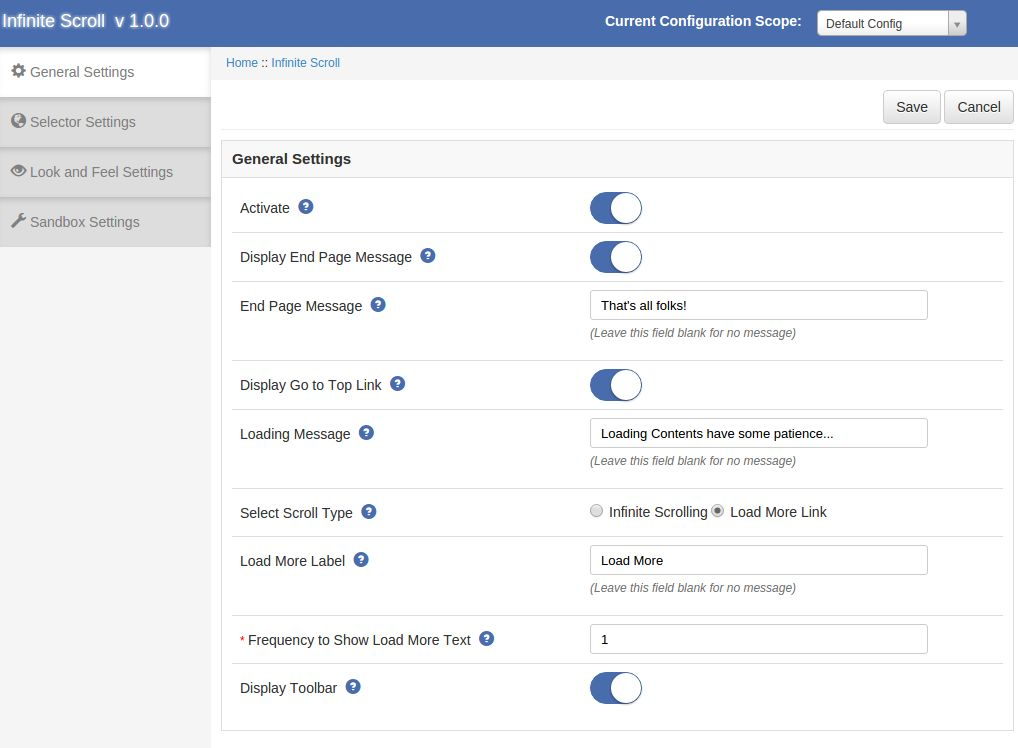
3.1 General Settings
The General Settings tab of Magento Infinite Scroll plugin has following options:
Active: Enables or Disables the Magento Product Auto Loading plugin on the storefront.
Display End Page Message: Enable to display the message at the bottom of the page.
End page Message: Set the text which is to be displayed at the bottom of the page.
Text on Next Button: Set text which is to be displayed on next button.
Display Go to top Link: Enable to show go to the top link at the left bottom of the page.
Loading Message: Set the message which is to be displayed when the content of next page is loaded.
Select Scroll Type: Select the type of scrolling whether infinite or load more link. When infinite scroll is opted, the feature of infinite scrolling will be enabled in the front-end. Whereas when the Load More option is selected, you will be required to enter following information.
Load More Label: Set the label text which is shown at load more link.
Frequency to show load more text: Set the page number from which load more link appears.
Display Toolbar: Enable it to display toolbar at product listing page.
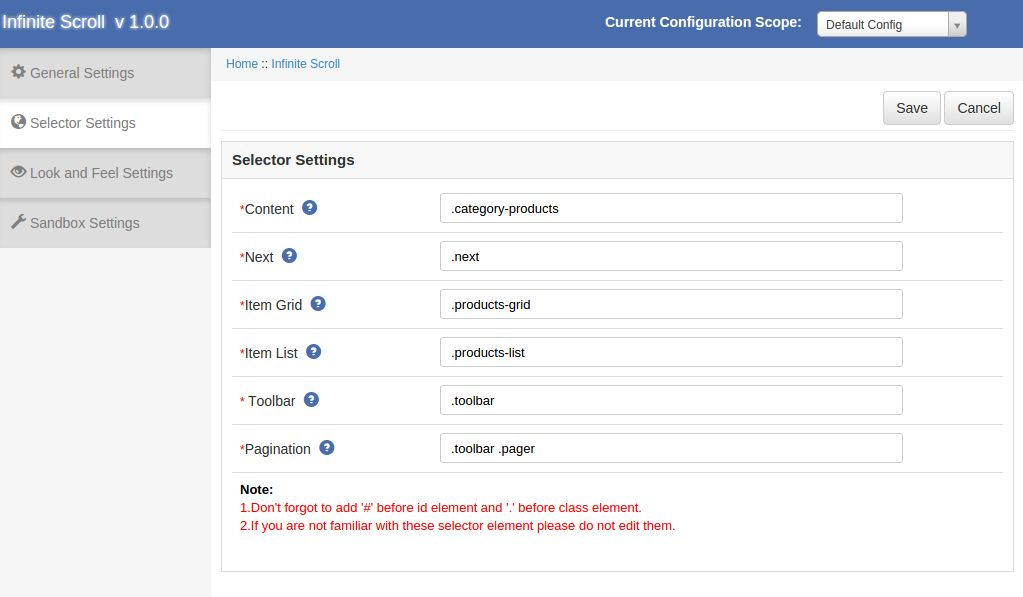
3.2 Selector Settings
The Selector Settings tab of Magento Infinite Scroll extension is to set class name and id name of following option:
Content: Set the class name of container on which the loaded content is appended.
Next: Set the class name of next element.
Item Grid: Set the class name of the element on which product is shown if it is grid set .products-grid.
Item List: Set the class name of the element on which product is shown if it is list set .products-list.
Toolbar: Set the class name of toolbar element.
Pagination: Set the class name of pagination element.
Note: Leave the Selector Setting untouched if you are not familiar with the same.
Look and Feel Settings
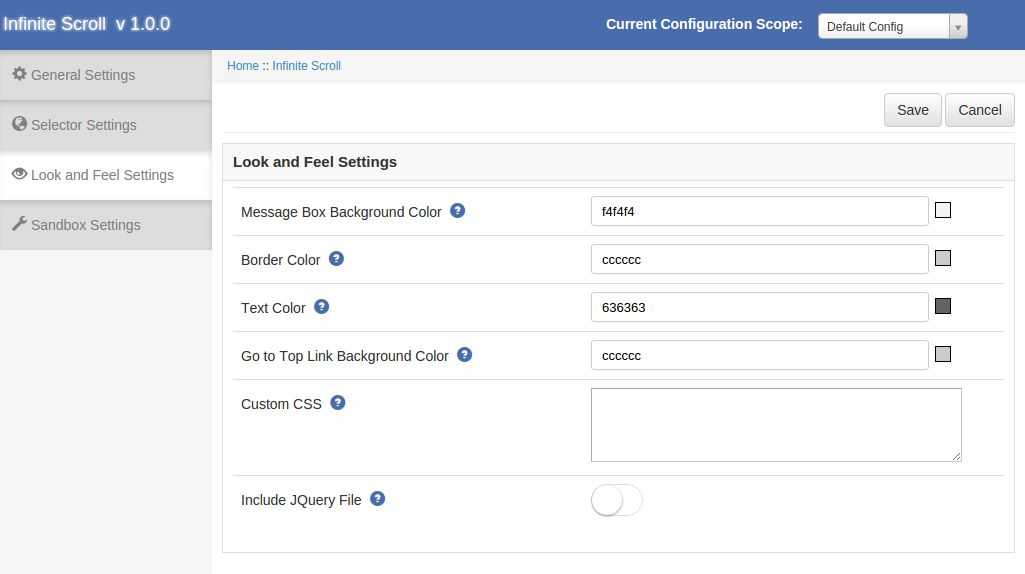
The look and feel settings tab of Magento Infinite Scroll has the following options:
Message Box Background Color: Set the background color of the message box.
Border Color: Set the border color of the message box.
Text Color: Set the text color of message text.
Got to Top Link Background Color: Set the background color of the ‘Go to top’ link.
Custom CSS: option to add your own CSS code.
Include JQuery: Enable if the current theme does not have the jquery file.
3.4 Sandbox Settings
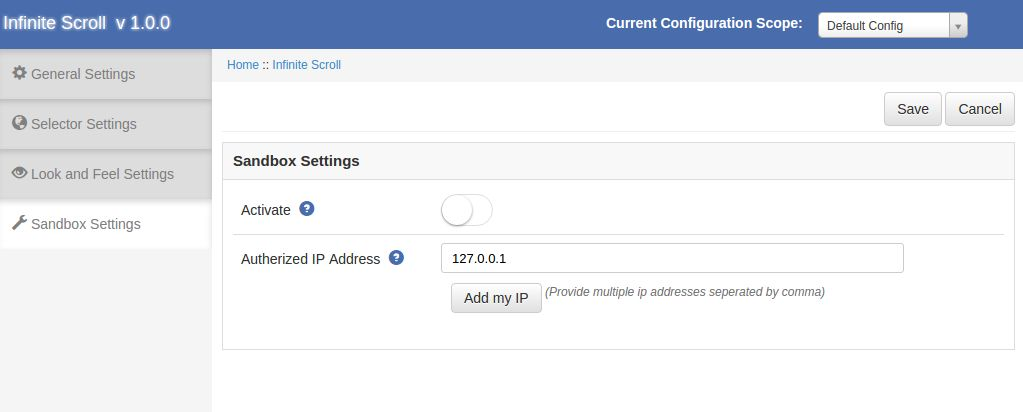
The Sandbox Settings tab of Magento Infinite Scroll is to enable this module on a particular IP.This tab has the following options:
Activate: Enable it to use sand box mode.
Authorized IP Addresses: Provide the multiple IP addresses separated by comma or you can add your IP by clicking on Add my IP button.
4.0 Store Front
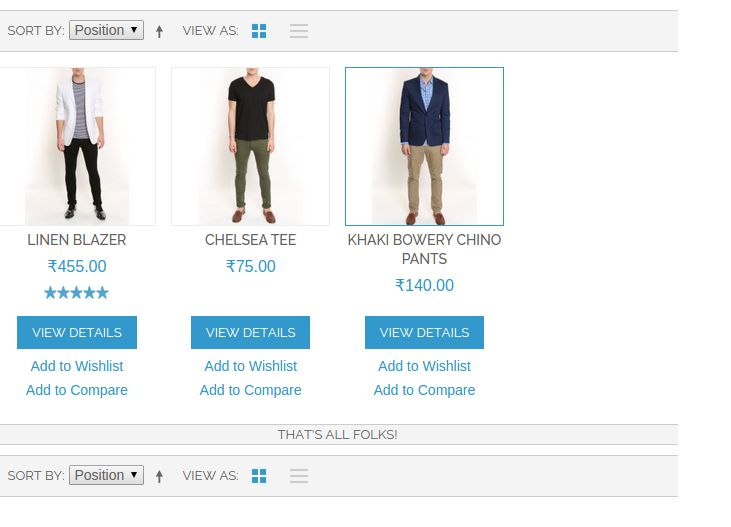
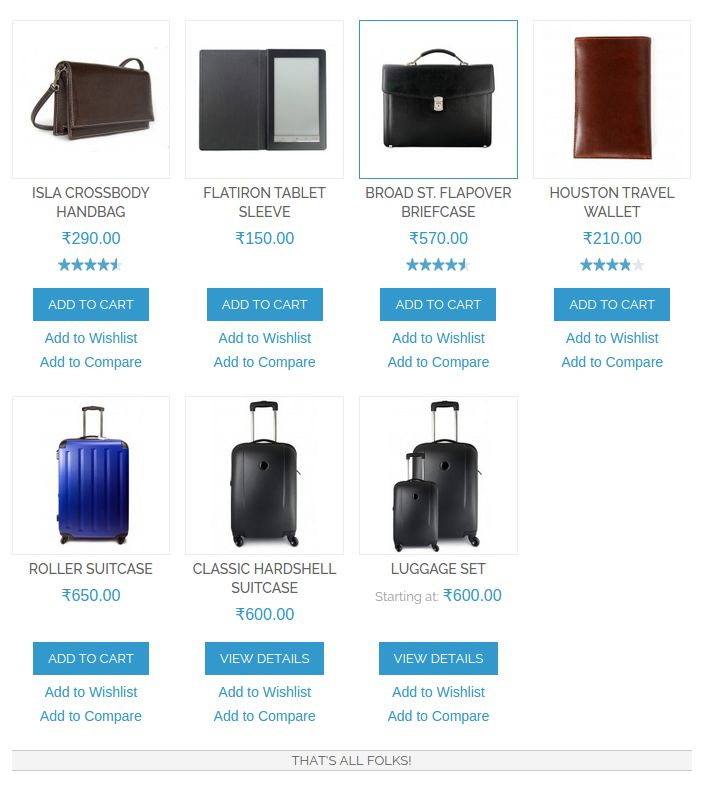
The changes made from the back-end of the Magento Infinite Scroll will be incorporated in the front-end of the site as well. After enabling the Magento Infinite Scroll plugin the product listing page in the front of the shop will change a bit as the pagination is disappear and next page product is loaded by scrolling or as per the settings saved.
The Magento Infinite Scroll module at the front-end appears as follows: