PrestaShop Mobile App Builder – User Manual

Get fully Flutter Android & iOS apps for your PrestaShop website & start selling your products on Mobile Apps!

1.0 Introduction
prestashop-mobile-app-builder

This is the user guide of the advanced & readymade Flutter mobile app solution of PrestaShop Mobile App Builder. This is an eCommerce website plugin designed & crafted to build perfect & featured Android & iOS shopping apps for you.

1.1 PrestaShop Mobile App Builder: A Brief Introduction

The PrestaShop Mobile App Builder is the most advanced & automated solution to take your online website business to the mobile platform. It transforms your entire website into a featured Mobile App & allows you to sell products on mobile along with the traditional website. The functionalities & working of the app exactly match the website & work flawlessly on both Android & iPhone devices.

Our PrestaShop Mobile App Builder is the pre-configured framework designed by experts & professionals to build a pair of Flutter eCommerce apps. The apps are capable of taking all your store products to the user’s fingertips & boost sales & revenue. So, if you are a PrestaShop store merchant & looking for a full-fledged mobile app solution, this is your best chance. Read the complete article to get fully intact info on PrestaShop Mobile App Development.

Also, our PrestaShop Mobile App Builder extension is fully compatible with the Multi-vendor Marketplace plugin. You can bring the entire marketplace listing on the same Mobile Apps. We even offer a combo pack of our PrestaShop Mobile App Builder with PrestaShop Multi-Vendor Marketplace in PrestaShop Advanced Marketplace With Mobile App.

New Update: PrestashopMobile App and AI Chatbot Integration 6.0.6

The PrestaShop Mobile App Builder now supports integration with the PrestaShop AI Chatbot, helping store owners provide AI-powered assistance to mobile app users. The chatbot can help customers find products, get answers to common questions, and receive personalized product recommendations directly within the mobile shopping experience.

Moreover, the following benefits of PrestaShop Mobile App Maker would compel you to go for this Flutter app solution:

  • A no-code Mobile App solution.
  • Friendly admin panel with complete access.
  • 3 months of free support
  • Fully Flutter solutions (Android & iOS)
  • 100% synchronization between your apps & website
  • Highly customizable with design & functioning control.
  • Increases user engagement with handy marketing tools.
  • Increases traffic & revenue to your store.

1.2 Top-notch Features of PrestaShop Mobile App Builder:

Here is the list of some of the key features which you will get in your apps with Prestashop Mobile App Builder:

  • Customizable Home Screen Layout (Complete Flexibility)
  • Store Branding
  • WhatsApp Chat Support (24*7)
  • Google & Facebook Login
  • OTP & Fingerprint Login
  • Both Tablet & Mobile Support
  • Android 4.2 and so on Android VersionSupport
  • iOS 9 and so on iOS VersionSupport
  • Automatic Inventory Update
  • Multiple Color & Font Choices
  • Multi-lingual & RTL (Right To Left) Support
  • Multi-currency Support
  • All Product Type Support
  • Website Payment Method Supported on Apps
  • Website Shipping Method Supported on Apps
  • Unlimited Push Notifications
  • Product Social Sharing Options
  • Multiple Filtering & Sorting Options
  • Wishlist Functionality
  • Website Coupon/Vouchers Supported on Apps.
  • Simplified Checkout Screen
  • Real-time Order Tracking
  • Seamless Accordion Menu
  • Clear-cut Product & Category Screen
  • Show Video Banner Elements on the Home Page and Category Product Listing Pages
  • List/Grid Product View Options
  • Login/Sign-up pop-up
  • Enhanced Review Section
  • Multi-layered layout
  • Automated Banner Sliders
  • Notification Tab

Latest Version Updates in PrestaShop Mobile Apps:
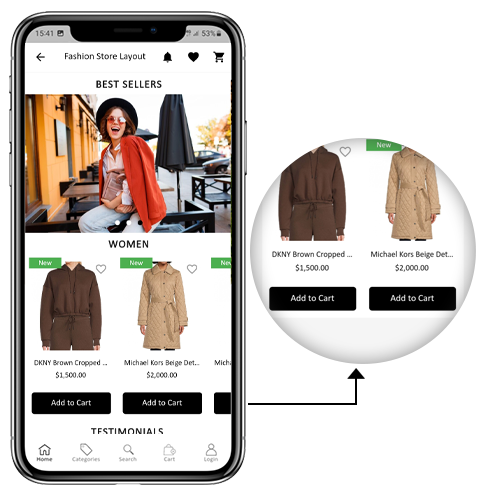

a) “Add To Cart” Button on Home & Category Screen

The PrestaShop Mobile App has been made more usable for online shoppers with an inbuilt “Add To Cart” button for products on the Home & Category screen. This allows users to quickly add products to the cart by just tapping the cart button.

The Add To Cart button is also available on the category screen of mobile apps. The users can simply scroll down to the bottom to browse the products and keep on adding products to the cart by simply tapping the Add To Cart button.
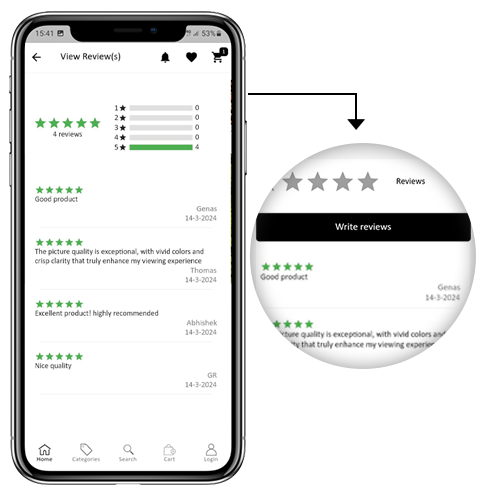
b) Product Reviews on App

Our PrestaShop Mobile App is now compatible with the default Product Comments module of PrestaShop. Now, the user can post reviews for the products on the website and the same will appear on the app as well. Also, the user gets to view all reviews from the app and write them as well.

c) Related Products on App

The PrestaShop Mobile App Builder is now compatible with the Automatic Related Products module. The related products can be displayed on the product page of the website and mobile app. This compatibility can be used as a perfect tool to improve cross-selling for your business.

–> Explore PrestaShop Related Products

d) Offline Mode Accessibility:
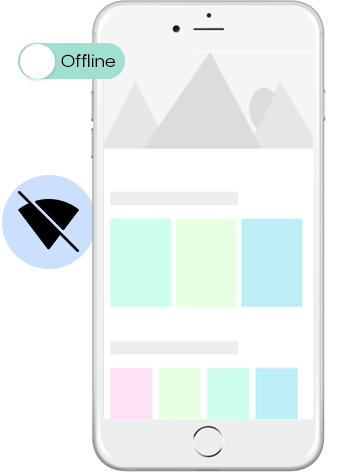
The eCommerce mobile apps with this extension will now work in offline mode as well i.e. without internet connectivity. The users get to browse the pages anytime which were loaded while active internet. Categories, products, cart screen, etc.

–> Explore PrestaShop Image Search

e) GDPR Compliance:

Now, the apps with PrestaShop Mobile App  Builder are fully compliant as per the GDPR regulations of the EU. It will offer more control to app users over their stored personal data. The store admin can simply configure the GDPR settings to work on the application & the same will be displayed on various app screens like sign-up, login, checkout, payment, etc. Online shoppers even get the right to ask the store merchant for the removal of his/her personal information.

–> Explore PrestaShop GDPR Module

f) Spin & Win (Gamified Email Subscription) Compatibility:
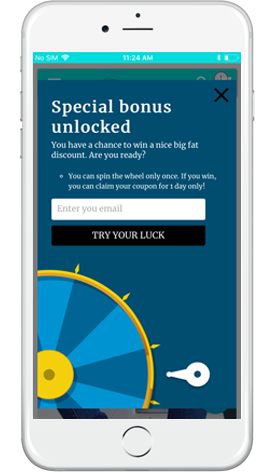
The PrestaShop Mobile App Creator is also compatible with PrestaShop Spin & Win extension. The gamified email subscription pop-up is used for offering a spin-wheel interactive pop-up that can be scheduled for entry or exit display on the web store. Now, with this integration, the same pop-up will be automatically displayed on the apps. You just need to install the extension on your website.

–> Explore PrestaShop Spin Win Module

This list doesn’t end here. Get to know more about the features in detail from here.

g). Video Banner Elements:

The all-new Prestashop App Maker comes with video banner components available on the home page. The store admin can now showcase different videos with the option to upload/YouTube videos on the home page banner components.

h). List/Grid View:

The Android and iOS App built with Prestashop Native Mobile App Builder provides the app users with the opportunity to explore the products in list/grid view, enhancing the visuals and customer experience. 

Now, the users can simply tap on the list/grid button provided on the product listing pages to switch between list and grid view for the products.

i). Video/Banner Options on the Category Product Listing Pages:

Showcase your product carousal with the all-new video/banner upload options introduced in the updated Mobile App Maker for Prestashop. The store admin can upload videos below 2 MB or can also showcase the YouTube videos directly on the category product listing pages. This feature provides better UI control to the store admin, enhancing the customer experience at the same time. 

J). Automated Banner Sliders:

In the latest Mobile App Builder module, we have introduced the automated banner slider feature that allows the Prestashop store administrator to configure the automated sliding time from the module backend. 

The admin can use the functionality, particularly for the “Banner Horizontal Sliders” home page layout components, and can add sliders for both videos and image banners. 

K). Enhanced Review Section:

If you are using PrestaShop’s default Product Comment module, you can enjoy the enhanced review section in the app. All the approved reviews now come with enhanced UI that delivers a top-notch visual experience for your Android and iOS App users. 

L). Login/Sign-up Pop-up:

Capturing the visitors’ emails is one of the biggest challenges in eCommerce. However, we have simplified this process by introducing the login/sign-up pop-up in the recent Mobile App Builder version. 

The store admin can add a login pop-up that will appear for non-logged-in customers, increasing the email opt-in chances by providing simple login options to the users. 

2.0 PrestaShop Mobile App Demo

KnowBand understands your concern about your uncertainty to go for the solution & to curb the same, it has offered a free demo for all eCommerce store owners. The merchants can view our demo store working on the mobile app & even their store working on our demo apps.

2.1 View Our Demo Store working on Apps

Want to see the eCommerce app features? We have integrated our demo store with the app where you can explore the fully functional app and see all its features. Just follow the below instructions:

Step 1: Download and install the Nautica PrestaShop Mobile App from either App Stores on your mobile device. Here, are the links to download demo apps:

Apple App Store  – https://testflight.apple.com/join/PAcL7EEE

Google Play Store– https://play.google.com/store/apps/details?id=com.velsof.prestashopgenericapp&pli=1

Step 2: the Open the Nautica PrestaShop App and hit the view demo button.

That’s it! You will see our demo store running on the demo app. You can browse the same, check all functionalities, create an orders, etc.Note: To access the Admin Panel of KnowBand Mobile App Builder on our demo store, visit here.

2.2 View Your Store working on Demo Apps

Not satisfied? Want to test your store on the demo apps? Well, we got you covered with everything. You can experience your store on our demo app as well that too without any cost. Just 3 steps are all you need to follow for the same:

Step 1: Download & install FREE PrestaShop Mobile App Builder plugin & install it on your store.

Step 2: Install the Demo Apps (links in the previous section) on your mobile device. Open App & enter your Store URL.

Step 3: Tap “View Your Store” and start experiencing your store on demo apps.

Step 4: Enter your store URL in the appeared box.

Example: https://www.example.com/

Note: This Free version of Mobile App Builder is just for the demo purpose & no APK/IPA files will be provided with this module. To get your own APK/IPA files, you need to purchase the paid version of the PrestaShop Mobile App Builder.

3.0 Build your PrestaShop Mobile App in 3 Simple Steps

We hope that you liked the demo of our PrestaShop Mobile Apps and found what you were looking for. So, this is the time to get a Flutter pair of apps for your store. The process to build an eCommerce mobile app is as simple as it could get. Just follow 3 simple steps & your app will be ready in 1-2 working days.

Step 1: Install-Module on your website

Download Prestashop Mobile App Builder & install the same on your store.

Step 2: Share your App Specifications

Share your App details/requirements in our pre-requisites form.

Step 3: Get Your Apps in 1-2 days

Our skilled & professional developers build your apps matching exactly the shared details. We would get back to you with APK/IPA files in 1-2 days.

Note: You can publish these APK/IPA files on respective app stores. Refer following links for the same:

How to publish an app on Google Play Store?

How to publish an app on the Apple App Store?

Still an issue? Tell us, we would publish the apps for you. Moreover, for any queries and suggestions, please reach us at support@knowband.com.

4.0 Module Installation

Once you have purchased the PrestaShop Mobile App Builder module, you will get the following files as listed below:

1. Compressed File in ZIP format (contains the source code of the addon)2. User Manual

Now, you can go on with the further installation process in the following two ways:

Module Installation using FTP Details

Module Installation using Admin Details

5.0 Admin Panel Screens

Once the PrestaShop Mobile App Maker is successfully installed on your website, it’s time to configure the Admin Panel of PrestaShop Mobile App Creator. Once you click on the “Configure” option on KnowBand Mobile App Builder, you will get the following tab with friendly interfaces. Let’s narrow down them one by one.

5.1 General Settings

The General Setting tab is all about the settings required to run your Mobile App on the user’s devices. This tab contains all the necessary generalized options to sync the app.
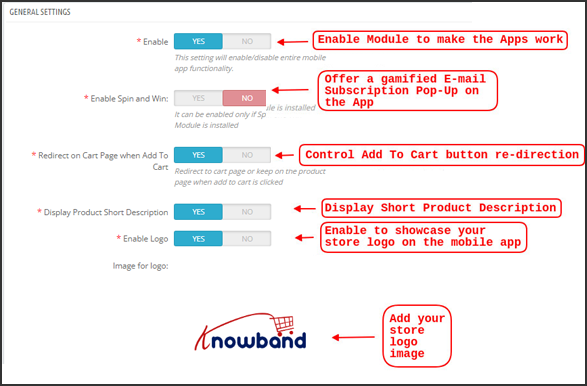
a) Enable Plugin: Enable the PrestaShop Mobile App Creator plugin to make your mobile app work on user’s devices.

b) Enable Spin and Win: Enable to display a gamified spin-wheel pop-up on the home screen whenever any user opens the app. It can be used to offer discounts/deals & capture their e-mails in return for marketing purposes. To make this functionality work, you need to install Knowband’s Spin and Win module on your website.

Note: The Spin and Win Module will only work in case you have installed the plugin in your store end.

c) Redirect on Cart Page when Add To Cart: This functionality allows you to control the navigation of the “Add To Cart” button. You can either redirect your users to the shopping cart or keep them on the product page whenever they tap Add To Cart button. This enhances the chances of additional purchases.

d) Display Short Description: Enable to display product short description on the product screen along with full description & other details.

e) Select Layout: Choose the desired Home Page Layout for your PrestaShop app. You can create multiple home screen layouts in the backend as per various festivals & themes & use them as per your store requirement.

f) App Button Color: Choose the desired button color for your PrestaShop Mobile App.

g) App Theme Color: Choose the desired theme color for your PrestaShop Mobile App.

h) Image for logo: Upload your store logo image to be displayed on the top header of the app. This promoted your brand among worldwide mobile shoppers.
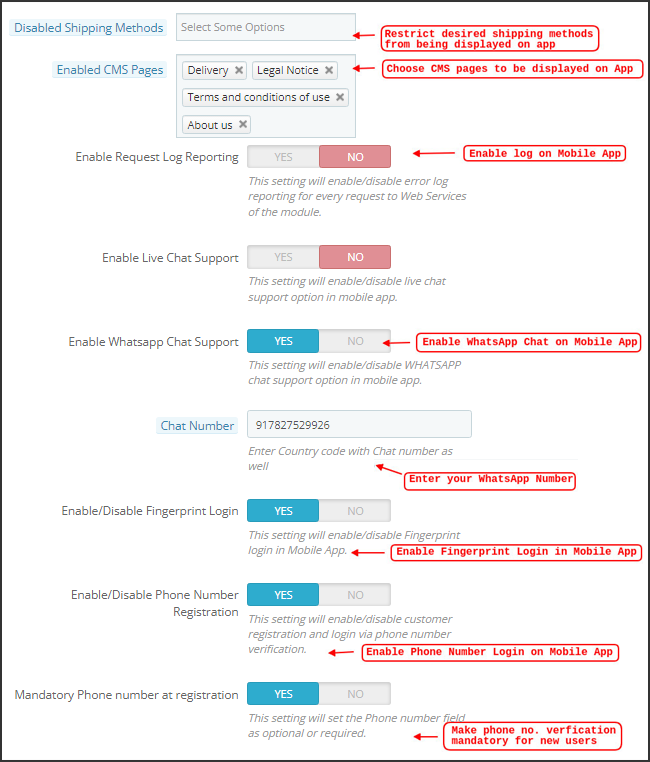
i) Disabled Shipping Methods: Choose desired shipping methods that you don’t want to be displayed on your PrestaShop Mobile App.

j) Enabled CMS Pages: Choose desired CMS pages to be displayed on the mobile apps.

k) Enable Request Log Reporting: Enable log on the mobile apps to get details of any abnormal behavior of your app.

l) Enable WhatsApp Chat Support: Enable the WhatsApp chat option on your PrestaShop Mobile Apps. The users can directly contact you at your WhatsApp number entered in the backend.

m) Enable/disable Phone Number Registration: Enable the Phone Number login option in your PrestaShop Mobile App & let your users authenticate with OTP verification.

n) Enable URL encoding of Image links: Enable this functionality to support Non-ASCII characters on the app.

o). Enable/Disable Fingerprint Login: This option enables or disables the fingerprint of Face ID login options in the Android and iOS apps. 

p). Enable Notification List Feature: The admin can show/hide the notification section in the app for the customers with the help of this button. 

q). Enable Sign In Login Popup: This button is designed to enable/disable the login pop-up for customers who have not completed registration on the store. 

r). App Icon Theme Color: The store admin can configure the color of app icon themes, especially Wishlist, Cart, and Hamburger menu icons. 

s). Enable Social Login: The following button can show/hide the social login options Google, Facebook, and Apple from the apps.

5.2 Push Notifications Settings

The PrestaShop Mobile App Creator for Android/iOS leverages the Power of Push Notification using the Google Primary Services for the Push Notification to Mobile devices. It brings this handy marketing tool to grab immediate user attention & boost sales. Highlighting your daily deals & offers is just a message away with your PrestaShop Mobile App. Both automated & custom notifications are available with PrestaShop Mobile App Maker.

a). Service Account Json: Since the traditional Firebase push messaging API is deprecated and replaced with a service Json file, this section allows the admin to configure the Json file extracted from the Firebase account. 

Either you can configure the same on your own, or we will also share your service Json file at the time of app creation.

b) Enable/Disable Order Creation Notification: Enable/Disable automated Push Notification sent to the app users for successful order creation.–> Title and Message for Push Notification: Enter the title and message on the push notification setting for successful order creation.

c) Enable/Disable Order Status Changed Notification: Enable/Disable automated Push Notification sent to the app users for any update regarding their previous order delivery status.–> Title and Message for Push Notification: Enter the title and message on the push notification setting whenever there is an update the in previous order delivery status.

d) Enable/Disable Abandoned Cart Notification: Enable/Disable automated push notifications sent to the users who have abandoned cart without successful purchase.–> Title and Message for Push Notification: Enter the title & message of the push notification for abandoned cart app users.

e) Time Interval: Interval (in hours) for sending Push Notification to app users who have abandoned their cart without successful purchase.

5.3 Push Notification History

This tab contains the history of all sorts of push notifications sent to every user with concerned details. The merchant can get to know about every notification sent earlier. This tab also has the option to send a custom notification to the users crafted from the backend. You can easily make them aware of any store-related details or discounts through manually sent notifications.
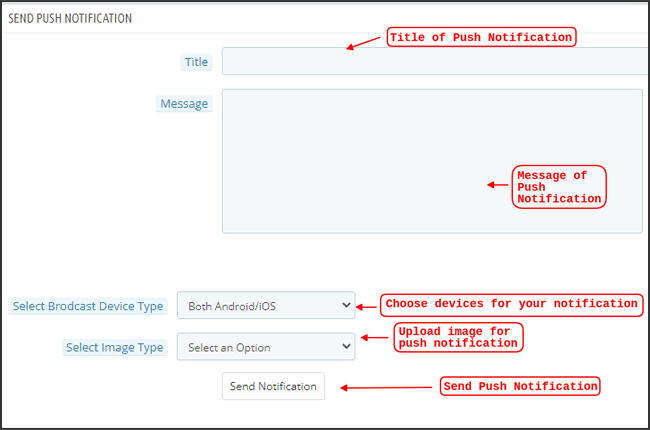
Send Notification:

This option is there to send a manual notification to the app users as per your choice. You can configure the title, message, landing page, image, etc., and notification of your choice as shown below snapshot:
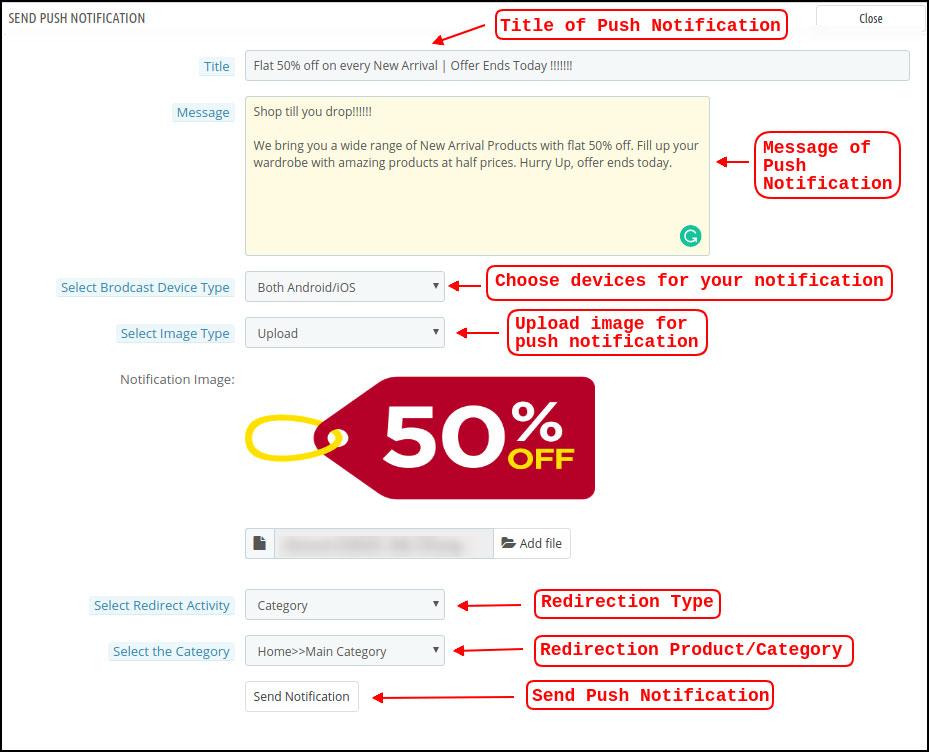
a) Title of the Push Notification: The title of your manual Push Notification that is to be sent to the app users.

b) Message of the Push Notification: The message of your manual notification which is to be sent to the app users.

c) Device Type: You can choose the users on Android/iOS or on both to whom your manual Push Notification is to be sent.

d) Image Type: You can upload the desired image/banner justifying your notification. The banner image can be uploaded or used through an existing URL.

e) Notification Image: The store admin get to preview the notification image & analyze how it will look on the user’s apps.

f) Image URL: The actual URL of the notification image which is to be sent to the app users.

g) Redirection Activity: You can choose the redirection of your notification by choosing from Home Screen/Any Category/ Any Product here. Whatever you set, your users will be redirected to the same on tapping the push notification.

h) Select the Category/Product: You can choose any relevant category/product screen for your notification.

i) Send Notification: Once you have crafted & previewed your notification, it is time to send the same on your apps.

5.4 Payment Methods

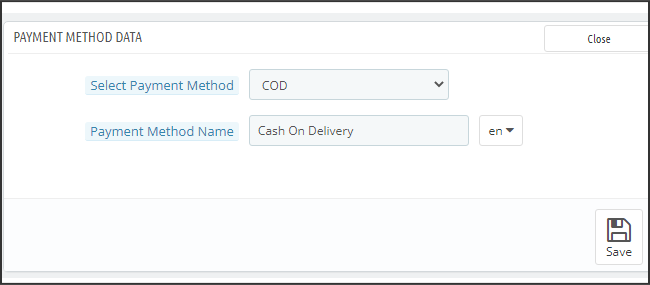
The PrestaShop Mobile App Creator for Android & iOS supports all sorts of website payment methods on the Android & iOS apps. Additionally, it brings COD payment option & the flexibility to add other Web-Viewpayment methods as well.

By-Default, there is only a Cash On Delivery Payment Method in our Mobile App. However, if you want to add the same payment methods as on your PrestaShop store, disable the COD method from the module back-end. After disabling the COD method, all the payment methods that are available on your web-end will appear fine in your Mobile Apps.
5.5 Home Page Layout

This is one of the most amazing functionalities of the PrestaShop Mobile App Builder plugin to design & craft multiple home screen layouts using various designing attributes/elements. This tab contains the list of all the home screen layouts configured earlier based on various themes & fonts as shown in the snapshot below:
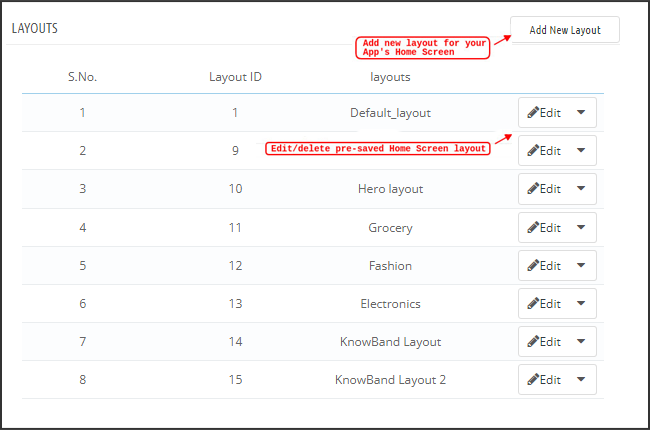
To configure the home page layouts, the following elements are available in the back-end:

  • Top categories
  • Square Banner
  • Horizontal Sliding Banner
  • Grid Banners
  • Countdown Banner
  • Grid Products
  • Horizontal Sliding Products
  • Recently Accessed Products
  • Login/Sign-Up Pop-Up

The store merchant can configure & use any of these attributes to craft & save multiple layouts. These layouts can be used as per the theme & requirements. Also, the positioning of various elements can be altered with just a simple drag & drop functionality.

Top Categories:

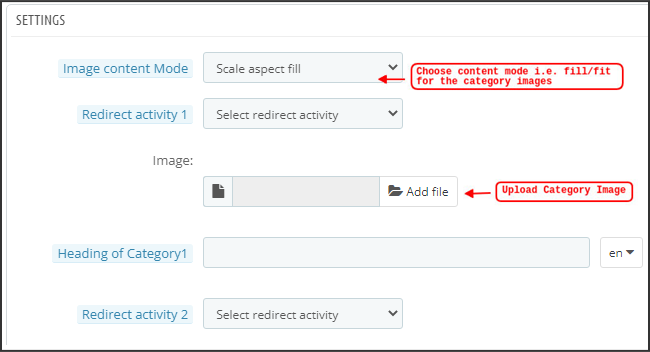
Top categories are displayed in the form of small squares on the home screen & can be configured including their image & landing categories/products. The PrestaShop Mobile App Maker offers a maximum of 8 categories in which a minimum of 4 are mandatory.
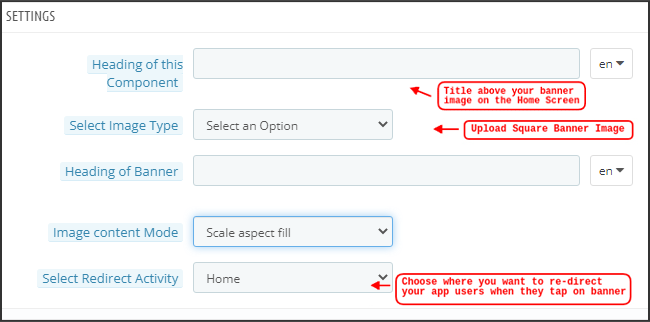
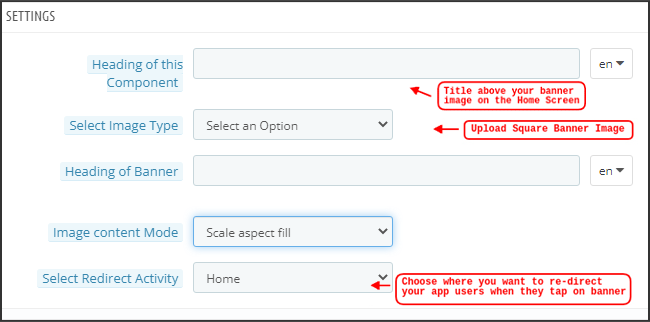
Square Banner:

Another attribute is Square Banner listing which is used to offer a square-shaped banner on the home screen of the app. You can customize the banner by choosing the right image & landing screen for the same. In the Recent Updates, we have also added the video selection option for the banner squares. Now the admin can also choose between the options of Video Upload or YouTube Video Link for the square banners.
Horizontal Sliding Banner:

These are the rectangle-shaped available in horizontal sliding & can be fully customized from the backend. The admin can also configure the automated banner sliding time interval for the horizontal banner sliders components.

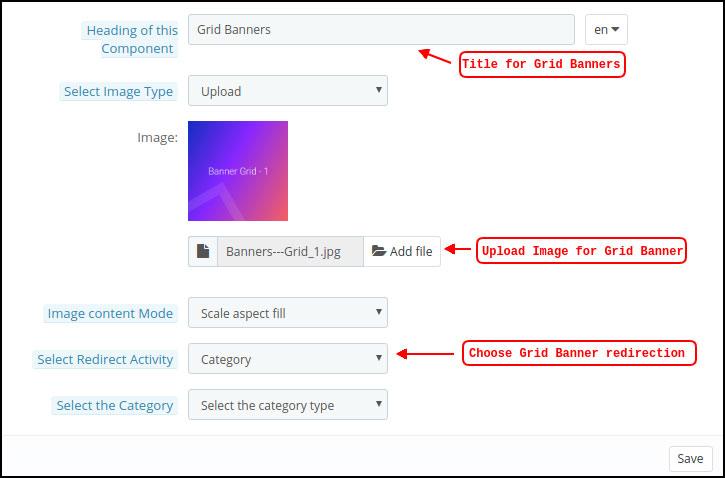
Grid Banners:

These are square-shaped banners listed on the home screen in the grid form. You can set as many banners as you want on the home screen & customize their image & landing page accordingly.
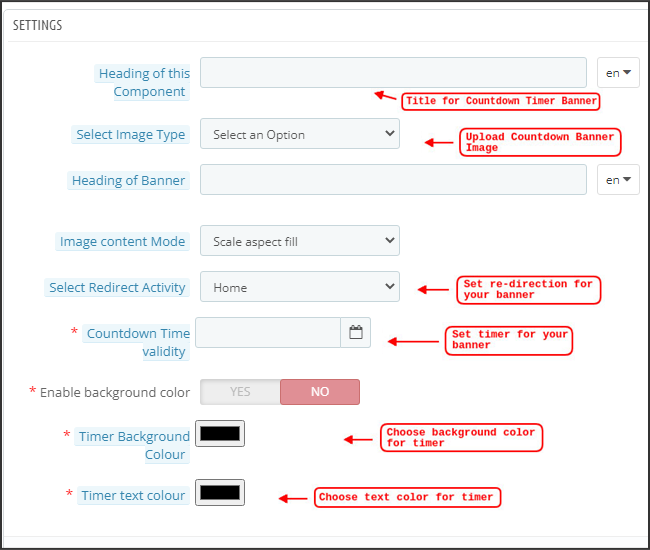
Countdown Timer Banner:

The PrestaShop Mobile App Builder offers a banner with a countdown timer. You can set the banner image & landing screen & set the timer till you want to display the banner. Once the timer is over, the banner will automatically disappear.
Square Products:

As for banners, the PrestaShop Mobile App Creator offers products to display on the home screen in the form of a square listings.
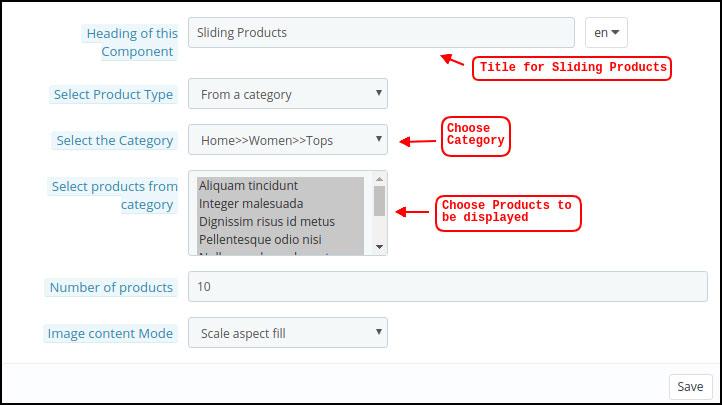
Horizontal Sliding Products

You can add the products in the form of horizontal sliders. The selected products could be of any specific category or other highlights as Best Sellers, Featured Products, etc.
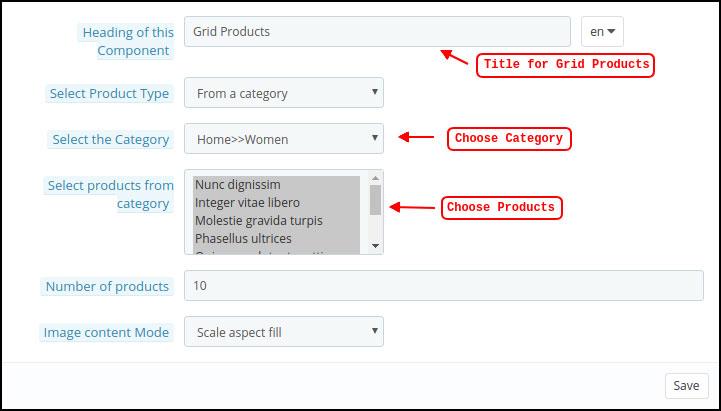
Grid Products:

The products can also be added to the home screen in the form of grid listings. The products can be chosen from any category.
Recently Accessed Products:

The PrestaShop Mobile App Creator provides the recent tab element which displays the recent products viewed by the user. You can just add the element in your layout to display the same on the home screen.

Note: The store admin can add up to 20 elements while designing a layout in the backend panel. 

Login/Sign Up Pop-Up:

We have introduced a new login pop-up that will encourage the customers to log in to their accounts with a single tap login/sing-up option provided on the home page of the apps.

5.6 GDPR Compliance

The PrestaShop Mobile App Builder offers GDPR compliance in mobile apps. The store admin can simply make a few clicks in the admin panel and apps will become GDPR compliant.
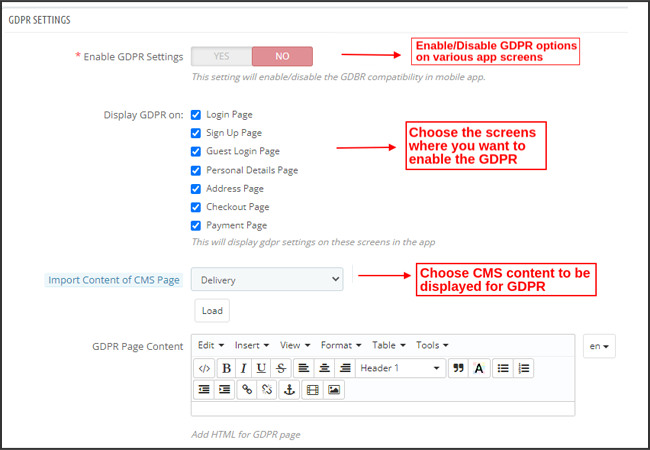
a) Enable GDPR Settings: Enable this tab to offer GDPR compatibility on various app screens.

b) Display GDPR on: Choose the app screens where you want to activate GDPR options.

c) Import Content Of CMS Page: Choose the CMS page whose content needs to be added for the GDPR option.

6.0 Mobile App Screens

6.1 Home Screen

The Home screen of your PrestaShop Mobile App will be exactly as you want it to be. The PrestaShop Mobile App Maker offers complete flexibility to design & craft a home screens into your hands. Using multiple banners(Square, Grid, Sliding), products (Square, Grid, Sliding), countdown timer banner, and recent products tab in the backend, you get to design intuitive layouts for your home screen. The following options are available on your app home screen:

Moreover, the positioning of various design elements can also be altered as per the requirement.

1. Dynamic Layouts:

Using various elements you can create & save various layouts in the backend & re-use them as per various events & festivals. You can design & craft your app home screen dynamically.

2. Brand Logo:

Your store logo is represented on the left-middle section of the top header of your PrestaShop Mobile App. The logo is fully configurable from the module backend & can be enabled/disabled including image changes.

3. Search:

The search option allows the mobile app shoppers to get easily & quickly what they desire. In your PrestaShop Mobile App, product search will be in two forms: The search option can be found on the bottom tab bar layout of PrestaShop Mobile App.

–> With Text: Your App users can search for desired products just by typing some related keywords. The PrestaShop Mobile App will show relevant results to that keyword.

4. Wishlist Bag:

The wishlist bag is displayed on the top header of your PrestaShop Mobile App containing all bookmarked products. The app users can save their desired products in a wishlist bag for future purchases.

5. Shopping Cart:

The Shopping Cart is available on the top-right corner of the app home screen. The users can get to know about the products added to their cart right from there.

6. WhatsApp

On the right-bottom of the home screen, there is a live seller-buyer chat option. The mobile app shoppers can easily & directly message you their query & you can resolve them instantly.

6.2 Accordion Menu (Navigation Bar)

The PrestaShop Mobile Apps for Android & iOS come up with proper categorization of products is available on the website. Mobile shoppers can easily browse products from multiple categories. All CMS pages are also available in Accordion Menu. It provides the following options:

1. My Account

My Account screen contains all the user information like Personal Details, Shipping Address(s) & Order Details. The shoppers can view all the info related to them & can update personal details & login passwords as well.

2. Categories

These categories are the same as on your website. You can map them accordingly & offer a 3-level categorization to your app users for hassle-free browsing.

3. CMS Pages

Various CMS pages like About Us, Contact Us, Terms & Conditions, etc. Available on your website are displayed here. You can choose the desired one from the PrestaShop Mobile App Builder backend to be displayed on Mobile App.

4. Language(s)

The language option allows your users to view PrestaShop Mobile app in their Nativelanguage. All available languages are displayed under this option only.

5. Currency(s)

All available currencies on your eCommerce website are displayed on PrestaShop Mobile App as well. The shoppers can view & purchase the product price in their desired currency.

6. Login/Logout

Your users can easily log in/log out from PrestaShop Mobile App using this option.

7. Notification Settings:

The app users can control the specific push notifications they want to receive in the app. The options allow mobile app users to choose between all notifications, promotional notifications, and order status update notifications.

6.3 Category Screen:

All the sub-categories, parent categories & other associated categories are available in your PrestaShop Mobile App. The category screen is designed to deliver clutter-free experience in two basic views: Grid & List. The product image, name, price, the discount is displayed in all listings with an option to add them to the wishlist bag as well. The Mobile Apps with PrestaShop Mobile App Builder have layered navigation which makes the product search just simpler. The following options are available on the category screens:

Furthermore, now the admin can also enhance the UI of the category product listing page by adding video/images on the category page section.


1. Sort:

This option allows the shoppers to select the desired order in which the category product pricing is to be sorted. Two sorting orders are available in your apps: Price: Low to High & Price: High to Low.

2. Filter:

The option to filter products simplifies product search. The app users can filter the products in your PrestaShop Mobile App based on various attributes like size, color, compositions, Condition, Manufacturer, Price, etc. The users can search for their favorite products in minutes using these filters.

6.4 Product Screen:

The product screen of your PrestaShop Mobile App is simple & intriguing. Multiple images of the same product are displayed along with the name & price. The product availability is also displayed as “In Stock” or “Out Of Stock” based on inventory status. It contains the following other options:
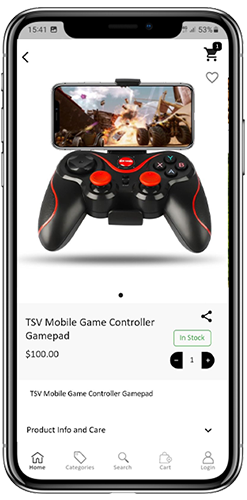
1. Product Options:

All the options related to the product like size, color, etc. are displayed on this screen. These product options are the same as available on the website.

2. Short Description

Users get to read the short description of your product to quickly make up their minds.

3. Product Info & Care

The complete product information is listed on the website is displayed here. The app users can get complete product details from here.

4. Add To Wishlist:

The Mobile App users can directly bookmark the product just by tapping “Add To Wishlist” on the left bottom of the product screen.

5. Add To Cart:

As the name “Add To Cart” button adds the product directly into the cart & the users can further go on with the purchase.

6. Product Social Sharing:

There is an option on this screen to share your product on multiple social platforms, including Bluetooth & e-mail. The app users can share the products among their friends/relatives on multiple social platforms & lure heavy users to your app.

6.5 Wishlist Screen:
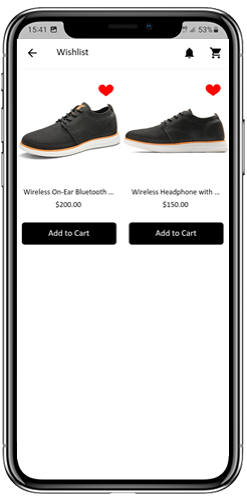

Your PrestaShop Mobile App Creator would have a wishlist bag allowing the users to bookmark products for future purchases. The users can view the list of all bookmarked products from here. It has two options:

1. Add To Cart:

The app users can add the bookmarked product directly into the shopping cart by choosing Add To Cart option.

2. Remove From Wishlist:

The users can even remove any wishlist product if not feel like buying that.

6.6 Login Screen

The PrestaShop Mobile App Creator offers various one-tap login options & makes the sign-in/registration process more seamless:

1. Login

The app users can authenticate & access apps using e-mail sign-in credentials.
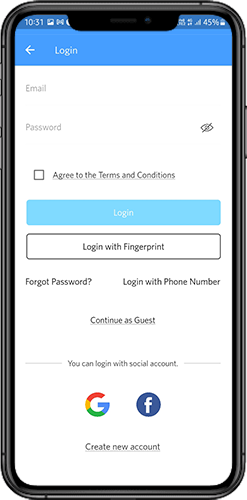
2. Sign Up

All the new app users can sign-up & create their account on the store from the mobile App. The sign-up form of the PrestaShop Mobile App only asks for relevant details.

3. Login with Phone Number

Your Mobile App comes up with an easier & robust phone number login option which makes it easier for the users to verify the OTP & login app.

4. Login with a Fingerprint

Your users also get an option to log in with fingerprint authentication. This allows users to access apps in seconds.

5. Login with Facebook

The users can log in to the app using their Facebook Account Credentials.

6. Login with Google

The users can log in tothe app using their GoogleAccount Credentials.

6.7 Shopping Cart Screen:

The Shopping Cart screen of your PrestaShop Mobile App will display all products to the shopping cart. The app users can view the product’s name, quantity, total price & shipping cost. This screen has the following options:
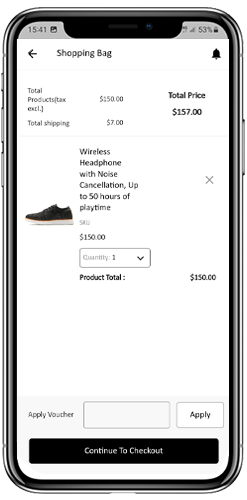
  1. Apply Voucher

This option allows the users to get discounts & offers by entering valid coupons & vouchers running on your website.

2. Total Product Price

The users can view the complete cost of their shopping bag from here. It is automatically updated as per any update with product quantity or addition.

3. Update Product Quantity

The app users can even update the product quantity with the “Update Quantity” option.

4. Remove Product

The app users can simply remove the product from the cart by simply tapping the “Remove” option.

5. Continue To Checkout

The front-end mobile app users can proceed further to the checkout & payment screens just by tapping the “Continue To Checkout” option. It will re-direct them on the checkout screen.

6.8 Checkout Process

The Prestashop mobile app Builder consists of a simplified checkout process. The front-end mobile app users have the option to select the shipping details, billing details, order numbers, order comments, and so on in the checkout process of the mobile app.

Users of the Android and iOS apps only need to follow a few simple steps to place their orders.

1. Customers can select the desired product and add it to the shopping cart. After clicking on the shopping bag, he or she can also select the desired product quantity. Moreover, the front-end mobile app users can see the total number of products and shipping costs.

The customer also has the option to apply any voucher and coupon code at the bottom of the same page.

2. After clicking on the Continue to Checkout option, the user can review the order where he or she can see several details. Such as product price, shipping cost, shipping address (It can be edited on the same page), order summary (Number of the products), total price, and so on.

Additionally, the customer has the option to select their preferred mode of shipping on the same page. The user can also put his or her special request or requirement in the order comment option appearing on the bottom of the screen.
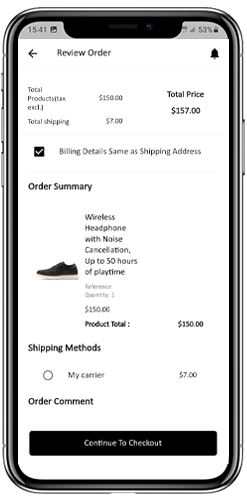
  1. The user will be redirected to the payment method screen after clicking on the continue to checkout option.
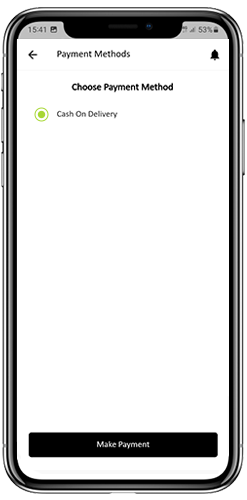
On this screen, users have the option to select from all of the website payment options. By default, the shopping app consists of a cash-on-delivery option as a mode of payment.

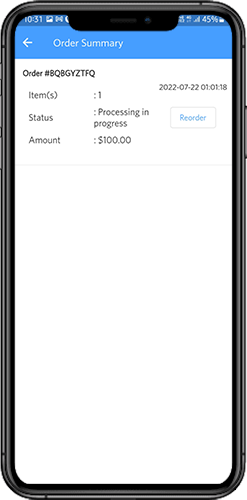
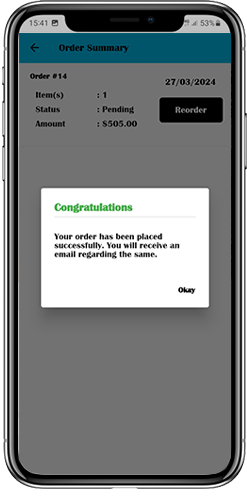
  1. When the user performs the payment activity, then he or she will be redirected to the order summary screen. where the customer can see the order status, order number, amount, and so on. The front-end mobile app users will get the order confirmation popup message on their mobile phone screens as well.
6.8 My Account Screen

My account screen of the Android/iOS eCommerce app allows users to view the complete account details including a list of previous orders. My Account screen offers the following options:
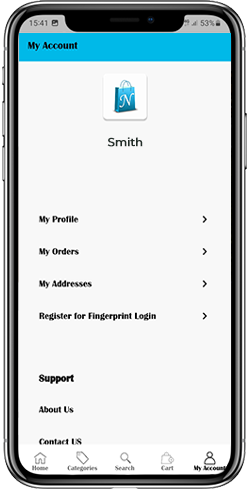
  1. Order History

The users get to know about complete order details being placed earlier. The order submission date, order reference, price & delivery status is displayed.

2. Update Profile

Users can also update their pre-saved profile details such as First or last name, phone number & password.

3. Shipping Address(s)

The app users can see the complete list of saved Shipping Addresses. A new Shipping address can also be added from here.

4. Order Details

The app users can get to view the complete list of the previously placed app orders.

5. Re-order feature

There is a direct re-order product directly by clicking the “Re-order” button. All the previous orders will be added to the cart by just tapping a single button.

6.10 Order Detail Screen
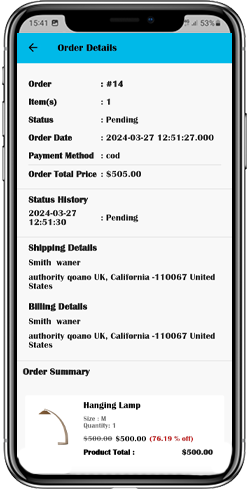
Order details screen of PrestaShop eCommerce App provides complete order detail such as shipping address, product summary, shipping and payment method, and total cost summary. The users can even track the delivery of previously placed orders directly from this screen.

7.0 Video Tutorials

8.0 Advanced PrestaShop Marketplace with Mobile App

KnowBand’s PrestaShop Marketplace converts your online website into a fully fledged marketplace. The PrestaShop Mobile App Builder is fully compatible with PrestaShop Marketplace extension. This means you can bring the entire marketplace listing on the same PrestaShop Mobile Apps. Thus, launch a pair of Marketplace-compatible Mobile Apps with KnowBand & attract a large base of sellers & customers to your store.

–> As the user clicks on the Seller option, he/she is redirected to the Seller page of the mobile store. The user can view the list of the sellers of the marketplace along with their ratings.

–> The customers can click on the name of the seller in order to see his profile and product being offered. The sellers can log in with their username and password. They are then redirected to the dashboard.

Get to know more about PrestaShop Marketplace with Mobile App from here.

Android & iOS Mobile App Builder for PrestaShop is also available at the Offical PrestaShop Addon Store

7 Key Factors to Choose the Best Shopping Cart Solutions with Knowband!

The shopping cart is one of the customers’ most important aspects of the checkout process. Not only does it help the customers make the order decision but it also defines the overall checkout experience.

For the same reason, selecting the right shopping cart solution is crucial for the success of your online store. A robust shopping cart can enhance the user experience, streamline the checkout process, and ultimately drive sales. Therefore, at Knowband, we offer a vast variety of solutions to streamline the cart experience for your shoppers. This article will explore seven key factors when choosing the best shopping cart solutions.

1. User-Friendly Interface:

A user-friendly interface is essential for any shopping cart solution. Moreover, customers expect a seamless and intuitive experience when shopping online. Knowband’s Ajax Cart module for Prestashop exemplifies this by allowing customers to add products to their cart without page reloads, providing a smoother shopping experience. This not only reduces cart abandonment but also improves customer satisfaction.

Key Features:

  • Quick product addition without page reload
  • Supports product variations and customizations
  • Mobile-friendly design

2. Cart Abandonment Solutions:

Cart abandonment is a significant challenge in eCommerce. Addressing this issue can greatly increase your conversion rates. Knowband’s Prestashop Abandoned Cart Serial Reminders module helps recover lost sales by sending automated reminders to customers who have left items in their carts.

With the abandoned cart recovery module for Prestashop, you can set automated mail reminders for the incomplete orders of your customers.

Key Features:

  • Customizable email templates
  • Multiple reminder schedules
  • Detailed reporting and analytics

3. Integration with Payment Gateways:


A good shopping cart solution should support multiple payment gateways, ensuring a convenient checkout process for customers. While Knowband provides various plugins that integrate seamlessly with popular payment gateways, it’s essential to choose a solution that aligns with your target market’s preferences.

On the other hand, we provide a One-page supercheckout extension for Prestashop that can help you reduce the time frame during checkout for your shoppers.

Considerations:

  • Support for major payment gateways (PayPal, Stripe, etc.)
  • Secure payment processing
  • Flexibility to add or remove payment options and layout modifications

4. Incentive Programs:

Incentive programs like loyalty points can significantly boost customer retention and repeat purchases. Loyalty programs not only work as a silent marketing tool but also spread brand awareness in the market.

Knowband’s Loyalty Points module allows you to reward customers for their purchases, encouraging them to return and shop more frequently.

Key Features:

  • Customizable point-earning and redemption rules
  • Integration with various eCommerce platforms
  • Easy management of loyalty points

5. Flexibility and Customization:

Every online store has unique needs, and a one-size-fits-all approach rarely works. The ability to customize your shopping cart solution is crucial. Knowband’s Opencart and Prestashop Gift the Product modules add a personal touch to the shopping experience, allowing customers to send products as gifts with personalized messages and wrapping options.

Furthermore, the store admin can set various Gift product rules from the module backend to attract customers.

Gift The Product – Prestashop Addons

The Prestashop Gift the Product module from Knowband enables customers to send personalized gifts directly from the online store, enhancing shopping experience and customer satisfaction.

SHOP NOW

Key Features:

  • Customizable gift options
  • Easy integration with the shopping cart
  • Enhanced customer satisfaction

6. Security:

Security is a paramount concern for online transactions. Ensuring your shopping cart solution is secure can build trust with your customers and protect sensitive data. At Knowband, we ensure a safe and secure environment for our plugin users by providing the below-mentioned features.

Security Features:

  • SSL support
  • Regular updates and patches
  • Compliance with data protection regulations

Our Cart Recovery Specials!

1. Abandoned Cart Serial Reminders:

The abandoned cart module helps recover lost sales by sending timely reminders to customers who have abandoned their carts. With customizable templates and multiple reminder schedules, it significantly boosts conversion rates.

2. Gift the Product:

Enhance the shopping experience with this module that allows customers to send gifts directly to their loved ones, complete with personalized messages and wrapping options. This feature can differentiate your store and increase customer loyalty. Moreover, the store admin gets the flexibility to configure the Gift rules based on various criteria.

3. Loyalty Points:

Reward your customers for their purchases with the Loyalty Points module. It provides flexible point earning and redemption rules, integrating seamlessly with your eCommerce platform to drive repeat business.

4. Ajax Cart:

The Ajax Cart module enhances the shopping experience by enabling quick product additions without page reloads. This feature reduces cart abandonment and keeps customers engaged throughout their shopping journey.

Recommended Read – Try out Ajax Cart Module for PrestaShop Stores to Upgrade your Shopping Experience

Conclusion!

Choosing the right shopping cart solution is pivotal for the success of your eCommerce store. Factors such as a user-friendly interface, cart abandonment solutions, payment gateway integration, incentive programs, flexibility, security, and customer support are crucial. On the other hand, you can enhance the shopping experience, increase customer satisfaction, and ultimately drive more sales for your online store with Knowband’s cart recovery specials.

Feel free to get in touch with our support team at our address support@knowband.com for more queries. Also, you can watch videos here:

For more videos, visit our YouTube channel here: @knowbandplugins5978


Build a Multi-Vendor Marketplace like eBay with Knowband!

Creating a multi-vendor marketplace akin to eBay can be a transformative step for your e-commerce business. However, building such a comprehensive platform can be challenging without the right tools. Fortunately, Knowband offers an exceptional Multi-Vendor Marketplace module for PrestaShop and OpenCart, designed to simplify the process and provide a seamless experience for both marketplace administrators and users.

Furthermore, multi-seller marketplaces like eBay have revolutionized the e-commerce landscape by bringing together a diverse array of products and sellers under one virtual roof. This model not only attracts a broad audience but also enhances the variety and competitiveness of the offerings.

Knowband’s Multi-Vendor Marketplace Extension:

Knowband is a trusted name in the e-commerce industry, known for delivering high-quality modules and extensions that enhance online store functionalities. On top of that the Multi-Vendor Marketplace Extension for Opencart is a comprehensive solution that equips you with all the tools needed to create and manage a successful multi-seller marketplace.

Key Features!

Intuitive Seller Dashboard: 

With the multi-seller marketplace addon for Prestashop, sellers have access to a dedicated dashboard where they can manage their products, orders, and sales with ease. The dashboard provides detailed insights into performance metrics, helping sellers optimize their strategies.

Easy Product Listing: 

The extension simplifies the product listing process for sellers. They can add, edit, and manage their products effortlessly, ensuring a smooth and efficient workflow.

Moreover, the admin has proper control over seller shops, which means the seller must have to get the product listings and orders approved by the Prestashop store admin to continue selling on the marketplace.

Commission Management: 

Administrators can set and manage commission rates for different sellers. The extension supports flexible commission structures, including fixed and percentage-based fees, providing multiple revenue streams.

This means you can charge different commission rates from sellers based on their selling category.

Order and Shipping Management: 

Sellers can handle their orders and shipping independently. The Multi-Vendor extension for Opencart integrates with various shipping carriers and supports multiple shipping methods, ensuring timely and reliable deliveries.

Review and Rating System: 

A robust review and rating system enhances transparency and trust. Buyers can leave feedback for sellers and products, helping other users make informed purchasing decisions.

Multi-Language and Multi-Currency Support: 

To cater to a global audience, the extension supports multiple languages and currencies.

Mobile-Friendly Design: 

With a responsive design, the marketplace offers an optimal browsing experience across all devices, including desktops, tablets, and smartphones.

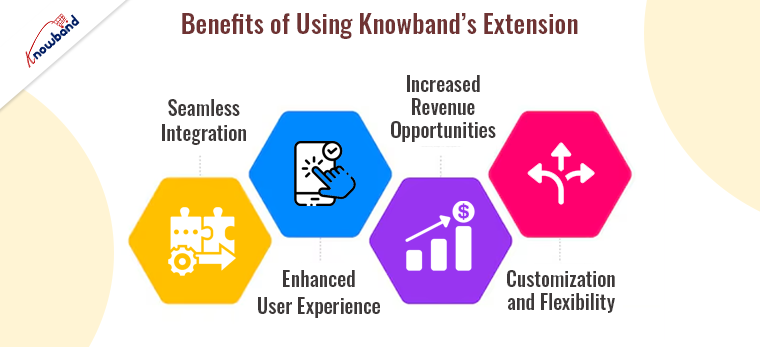
Benefits of Using Knowband’s Extension!

Seamless Integration:

Knowband’s Multi-Seller Marketplace Addon seamlessly integrates with PrestaShop and OpenCart, two of the most popular e-commerce platforms. This ensures that you can leverage the powerful features of these platforms while adding robust multi-vendor functionalities. The extension is designed to work out of the box, reducing the need for extensive customization and allowing you to focus on growing your marketplace.

Enhanced User Experience:

A user-friendly interface is crucial for attracting and retaining users. Furthermore, Knowband’s Multi-Channel Marketplace extension offers an intuitive experience for both sellers and buyers. It ensures that the sellers can manage their stores with ease, while buyers can enjoy a streamlined shopping experience, complete with advanced search and filtering options.

Increased Revenue Opportunities:

By providing a platform for multiple sellers, you can significantly expand your product range and attract more customers. The competitive nature of a multi-vendor marketplace often leads to better prices and increased sales.
Additionally, the marketplace extension for Prestashop allows you to earn through various revenue streams, including commission fees, subscription plans for sellers, and featured product listings.

Customization and Flexibility:

Knowband’s extension offers a high degree of customization, allowing you to tailor the marketplace to your specific needs. Moreover, you can configure seller registration processes, set commission rates, and customize the appearance of your marketplace to align with your brand identity. Therefore, this flexibility ensures that your marketplace stands out in a crowded e-commerce landscape.

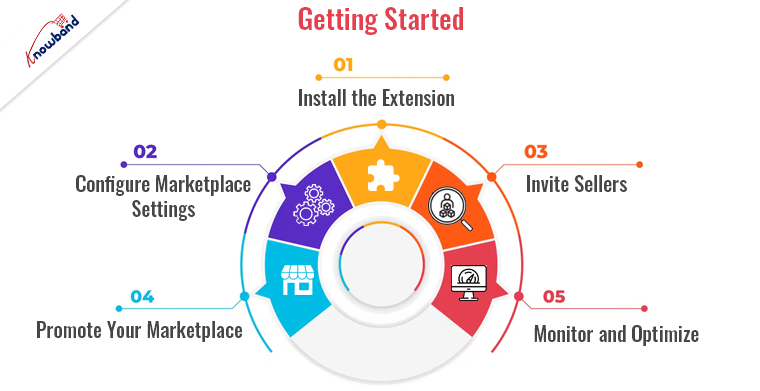
Getting Started!

Building your own multi-vendor marketplace with Knowband’s extension is straightforward. Here’s a step-by-step guide to get you started:

Install the Extension: 

Purchase and download the extension from Knowband’s website. Follow the provided installation instructions to integrate it with your PrestaShop or OpenCart store.

Configure Marketplace Settings: 

Access the extension’s settings from your admin panel. Configure general marketplace settings, including commission rates, payment methods, and shipping options.

Invite Sellers: 

Encourage sellers to join your marketplace by highlighting the benefits and ease of use. Provide them with clear guidelines and support to get started.

Promote Your Marketplace: 

Utilize various marketing strategies to attract buyers and sellers to your new marketplace. Consider email marketing, social media campaigns, and SEO techniques to drive traffic.

Monitor and Optimize: 

Use the detailed reports and analytics provided by the extension to monitor marketplace performance. Make data-driven adjustments to optimize user experience and maximize revenue.

Conclusion!

Building a multi-vendor marketplace like eBay is an ambitious but achievable goal with the right tools and strategies. Knowband’s Multi-Vendor Marketplace provides all the features and functionalities needed to create a successful platform. By leveraging this powerful extension, you can offer a unique shopping experience that attracts buyers, empowers sellers, and drives business growth.

Visit Knowband today and start building your multi-vendor marketplace with confidence!


Recommended Read: Stay Tuned: Prestashop v8.1 Compatible Multi-Vendor Marketplace Addon!

PrestaShop Introduces a New Translation System

PrestaShop is a well-known open-source e-commerce platform which has released PrestaShop version 1.7.6, which includes a new Prestashop translation system meant to enhance online stores’ multilingual capabilities. This new system offers improved accuracy, efficacy, and user-friendliness, and addresses the drawbacks of previous translation techniques. In this blog post, we will provide a thorough technical explanation of PrestaShop’s new translation system, highlighting its features, architecture, and benefits.

Context and Purpose:-

The ability to offer information in many languages is essential for addressing a varied customer base as e-commerce continues to grow globally and conventional translation systems frequently suffer from errors, inefficiencies, and human labor.

Classic vs. New Prestashop Translation System

Classic Translation System: –

The classic translation system in PrestaShop was primarily file-based and less flexible:

  • File-Based Translations: Translations were stored in PHP files, which could be cumbersome to manage.
  • Limited Context Awareness: The classic system lacked robust context handling, leading to potential translation inconsistencies.
  • Manual Updates: Translating and updating content required significant manual effort, especially for larger stores.

New Translation System: –

The new Prestashop translation system offers several improvements:

  • Symfony Translation Component: Utilizes Symfony’s robust framework for handling translations efficiently.
  • XLIFF Translation Files: Employs the XLIFF (XML Localization Interchange File Format) standard, making translations easier to manage and more consistent.
  • Database Storage: Centralizes translation data, improving management and performance.
  • Contextual Awareness: Ensures that translations are accurate within their specific usage context.

Demonstrating the New Prestashop Translation System with a Demo Module

Let’s walk through creating a demo module to showcase the new translation system for Prestashop. We’ll call this module ‘kbdemotranslation’.

Step 1: Setting Up the Module Structure

First, create the basic structure of your PrestaShop module. Your directory structure should look like this:

Step 2: Setting Up the Module’s Main File

Create the main module file kbdemotranslation.php:

Therefore, in this main module file, we define the module class, its metadata, and the basic installation and uninstallation methods. The getContent() method is where we assign the translated strings to Smarty variables and render the configuration template.

Here, ‘Modules.Kbdemotranslation.Kbdemotranslation’ is the translation domain of the text.

Step 3: Creating the Template File 

Create custom template file named ‘configure.tpl’ in the views/templates/admin directory of the module:

This template file displays the translated strings assigned in the getContent method. The ‘nofilter’ modifier is used to ensure that HTML tags in the translations are rendered correctly.

Step 4: Adding Translations via the PrestaShop Back Office

With the module structure and files in place, the next step is to add translations via the PrestaShop back office. Here’s how you can do it:

  • Access the Translation Interface: Go to your PrestaShop back office, and navigate to “International” > “Translations.”
  • Select the Module to Translate: Under “Modify translations,” choose “Installed modules translations” from the dropdown menu, select your language, and choose the ‘kbdemotranslation’ module.

  • Add Translations: You will see a list of translatable strings. Add translations for the strings “Demo Translation Module,” “A module to demonstrate the new translation system in PrestaShop,” “Hello World,” and “Your order will be delivered soon.”

Further, after adding translations, these translations will be stored in the database and automatically applied when the module is used.

Translation Domain:

The translation domain used by PrestaShop is below-

Modules.Nameofthemodule.Specificpart

  • Here ‘Modules’ refer to the name of the modules directory. This part will always be the same.
  • ‘Nameofthemodule’ refers to the name of the module for which you want to add the translations. There are some rules to define this part-
    The first letter will always be in Upper Case, and all other alphabets will be in lower case. And (A-z, 0-9) characters are allowed in this part.
  • ‘Specificpart’ is for the developers to define to what section the translation belongs. And in this part, underscores, dots, and dashes are allowed.

Conclusion

Moreover, the new Prestashop translation system represents a significant advancement in managing multilingual content for e-commerce stores. By addressing the challenges of traditional translation methods and introducing innovative features, PrestaShop provides merchants and developers with a powerful tool to enhance their global reach. Hence, the system’s technical robustness ensures improved efficiency, accuracy, and scalability, making it an essential component for any business looking to expand its international presence.

You can also explore a wide range of Prestashop, Opencart, WooCommerce, Shopify, and Magento 2 ready-to-use eCommerce extensions.

In case you have queries/suggestions, you can reach out to our technical support portal at our email address support@knowband.com.

Take a look at our bestseller module One Page Supercheckout for Prestashop and Android and iOS App Maker for Prestashop.

Recommended blog: 

All You Need to Know About New Prestashop 8.1.5

Which One To Choose: PrestaShop 1.7 or PrestaShop 8.1?

How Shipping Costs Affect Conversion Rates: Prestashop Seller Guide by Knowband!

In the competitive landscape of e-commerce, conversion rates serve as a critical metric for success. Understanding the factors that influence these rates is paramount for businesses striving to turn visitors into customers. Among these factors, shipping costs play a significant role. Not only does it impact the overall order total but also plays an important role for customers during the decision-making process.

Thus, being one of the major factors for customers, the Shipping costs play a vital role for both store admin and customers. Following the same, this article delves into the impact of shipping costs on sales and highlights how tailored shipping solutions, such as Knowband’s “Prestashop Shipping Cost by Zipcode” module, can optimize conversion rates.

The Influence of Shipping Costs on Conversion Rates:

Shipping costs are a pivotal consideration for online shoppers. It means high shipping fees can prevent potential buyers from making the orders, leading to cart abandonment and lost sales. Therefore, conversely, transparent and reasonable shipping costs can enhance customer trust and increase the likelihood of completing a purchase.

Here’s a closer look at why shipping costs matter so much for customers:

Price Sensitivity: Consumers are highly sensitive to total purchase costs, including shipping. For the same reason, unexpected or high shipping fees can lead to sticker shock, causing shoppers to abandon their carts at the final step.

Perceived Value: Free or low-cost shipping often enhances the perceived value of a product. Customers may perceive the same product as more valuable if they don’t have to pay extra for shipping. Leading further, the following fact boosts the chances for the customer to make orders.

Trust and Transparency: Clear communication of shipping costs on Prestashop upfront fosters trust. On the other hand, hidden fees or late-stage revelations about shipping costs can erode trust and deter purchases.

Competitor Comparison: In a market where comparison shopping is easy, competitive shipping rates can be a deciding factor. Shoppers choose a retailer that offers lower or free shipping over one with higher fees.

Customizing Shipping Costs to Enhance Sales!

One effective way to address these concerns is by customizing shipping costs based on various factors such as location. Furthermore, the tailored shipping solutions not only meet customer expectations but also optimize the business’s operational costs.
The “Prestashop Shipping Cost by Zipcode” module by Knowband offers a sophisticated approach to managing shipping costs.

Benefits of Zipcode-Based Shipping Cost Customization:

Precision: 

With the Prestashop Shipping Cost by Zipcode addon, businesses can set precise shipping rates based on the destination. Moreover, this precision ensures that customers are charged fairly, reflecting the actual cost of delivery to their specific location.

Flexibility: 

Knowband’s Prestashop Shipping Cost by Post Code module allows for flexible pricing strategies. Furthermore, the retailers can offer free or reduced shipping rates in strategic zones to boost sales in targeted areas.

Enhanced Customer Experience: 

Providing accurate shipping costs at the point of checkout improves the overall customer experience. Furthermore, the shoppers appreciate knowing their total cost upfront, which increases the likelihood of completing the purchase.

Operational Efficiency: 

The Prestashop Shipping Cost by Postal Code module helps streamline shipping operations. Thus, by automating the calculation of shipping fees based on zip code, businesses can reduce manual errors and save time.

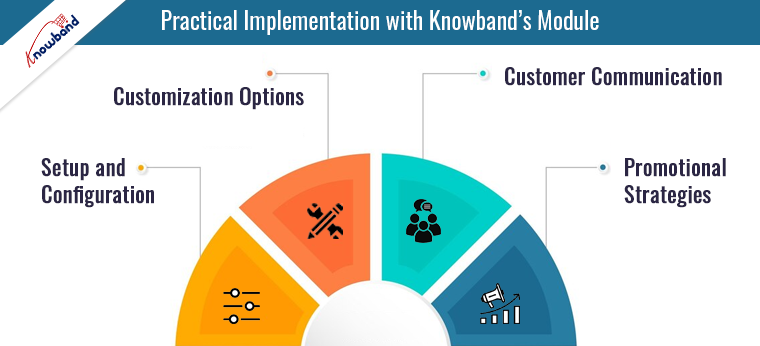
Practical Implementation with Knowband’s Module!

Knowband’s “Prestashop Shipping Cost by Zipcode” module is designed to address these needs effectively. Here’s how it can be implemented to maximize sales:

Setup and Configuration: 

The module is easy to install and configure within the Prestashop platform. Businesses can define shipping rates based on zip code, postal code, or country, ensuring that each location is accurately accounted for.

Customization Options: 

Retailers can set different shipping rates for various locations, including international destinations. This feature is particularly beneficial for businesses looking to expand their market reach without compromising on shipping cost accuracy.

Customer Communication: 

With the Prestashop Shipping Cost by Postal Address module, businesses can communicate shipping costs to customers during the checkout process. This transparency reduces cart abandonment and enhances customer satisfaction.

Promotional Strategies: 

Businesses can leverage the Prestashop Delivery Cost by Post Code module to create promotional shipping offers. For example, offering free shipping in specific zip codes can drive sales in targeted regions.

Conclusion!

Shipping costs have a profound impact on e-commerce conversion rates. By understanding and addressing the factors that influence these rates, businesses can enhance their sales performance. The “Prestashop Shipping Cost by Zipcode” module by Knowband provides a robust solution for customizing shipping costs based on location, ensuring fair pricing, and improving customer experience.

Recommended blog: PrestaShop Shipping Cost by Zip Code Addon


All You Need to Know About New Prestashop 8.1.5

Why PrestaShop:

In the year 2007, PrestaShop comes into the picture and becomes one of the most usable e-commerce platforms just because of its various features. At current time it is being used by almost 667,000 sites worldwide.

PrestaShop stands out as an excellent e-commerce solution thanks to its open-source nature, which means it’s both free and highly adaptable. It boasts a user-friendly interface, supports multiple languages and currencies, and includes essential e-commerce features.

However, It offers SEO tools and scalability for business expansion. A large community providing robust support, modules, and frequent updates, PrestaShop is an ideal choice for small to medium-sized businesses looking to expand globally.

What’s New in Prestashop 8.1.5?

In 2022 PrestaShop launched its version 8 with new features. From that day to now it has continuously updated its features and functionality. In 2024 PrestaShop released its latest version 8.1.5.

PrestaShop, the popular e-commerce platform, has unveiled its latest release, version 8.1.5. Hence, this update brings a host of enhancements, bug fixes, and refinements, aimed at delivering a smoother experience for both store owners and developers. Now we will go through the improvements and fixes introduced in this latest version.

Let’s take a closer look at the key improvements and fixes introduced in this version.

Back Office Improvements:

Enhancements:

Cart View Page:

The cart view page has been enhanced to provide more information, making the checkout process more transparent and user-friendly. The following improvements are included:

  • Introducing a shareable link for carts pending order placement.
  • Displaying the cart creation date on the cart page.
  • Displaying the last update date for the cart on the cart page.
  • Enhancing the visual appeal and functionality of buttons on the cart page.

Back office Bugs which are fixed in the version:

  • Catalog Filters: Multiple filters in the Stocks section of the Catalog were not working correctly. This issue has been fixed, ensuring accurate stock management.
  • Rule Group for New Products: The most used rule group has been added to new products, simplifying the process of adding products and improving efficiency for store administrators.
  • File Manager: A newer method has been integrated into the file manager, enhancing its functionality and performance.
  • MetaType Length Constraint: Moreover the Length constraints have been implemented for MetaType, ensuring data integrity and consistency.
  • HelperKpi Source: HelperKpi source is now consistently set and uses conditional refresh for improved performance.
  • Product CSV Import: An issue where importing products via CSV could inadvertently wipe category assignments has been fixed, providing a more reliable import process.

Front Office Enhancements:

Improvements:

Classic Theme: The classic theme has been updated to version 2.1.3, incorporating enhancements and optimizations for a better front-end user experience.

Front office Bugs which are fixed in the version:

  • Invoice Download: Non-logged-in customers can now download invoices, ensuring accessibility to important documents.
  • Import/Export Store Contact: An issue with importing store contacts via the Back Office Import/Export functionality has been addressed, improving data management capabilities.
  • Hidden Vouchers: A display issue where hidden vouchers were still being shown has been fixed, ensuring accurate voucher management.

Core Enhancements and Fixes

Improvements:

  • Google Analytics Module: The ps_googleanalytics module has been updated, incorporating enhancements and optimizations.
  • Composer Modules Update: Modules have been updated via Composer for PrestaShop 8.1.5, ensuring compatibility and stability.
  • Version Update: The version has been bumped to 8.1.5, marking the release of this latest version.

Bug Fixes:

  • Google Analytics Downgrade: The ps_googleanalytics module has been downgraded to address issues or regressions introduced in the latest version.
  • Backup Tool: An issue where the backup tool was creating nulls has been resolved, ensuring data integrity during backup operations.
  • Shipping Cost Display: The display of shipping costs on the order details page has been fixed by backporting from version 9, ensuring accurate order information.

This latest release of PrestaShop, version 8.1.5, brings a range of enhancements and fixes that will improve the overall user experience and functionality of your e-commerce store. Further, Upgrade now to take advantage of these improvements and stay ahead in the competitive e-commerce landscape.

Recommended read: Which One To Choose: PrestaShop 1.7 or PrestaShop 8.1?

You can also explore a wide range of Prestashop, Opencart, WooCommerce, Shopify, and Magento 2 ready-to-use eCommerce extensions.

In case you have queries/suggestions, you can reach out to our technical support portal at our email address support@knowband.com.

Take a look at our bestseller module One Page Supercheckout for Prestashop and Android and iOS App Maker for Prestashop here:


How to Set up Different Payment Methods in Prestashop

Several payment alternatives must be set up in PrestaShop to provide customers with flexibility and convenience throughout the checkout process. When it comes to payment methods, different consumers have varied preferences. For example, some customers could like using their credit or debit cards, while others might prefer PayPal, bank transfers, or other options.
Moreover, lowering cart abandonment rates can be achieved by streamlining the checkout procedure and providing dependable, well-known payment options. Customers may leave their carts empty before purchasing if they come across a Different Payment Method option they are uncomfortable using or don’t believe.

Different Payment Methods in Prestashop:

Accessing the Payments page:

Further, look for the “Payment” option in the left vertical navigation menu after logging into the PrestaShop admin area. Click on it once you’ve located it. There will be a drop-down menu with the following choices: “Preferences” and “Payment Methods.”

Once clicking on the  “Payment Methods” option, the user will be redirected to a page called “Payment Methods”.

The page is divided into two sections.

  1. In the “Active payment” section all the already installed payment methods will be shown. Right next to each of the already installed methods for paying, there will be a “Configure” button of course if the method supports any configuration.
  2. All of the alternate payment options are displayed in the “Modules list” section once you scroll down to it. The “Install” button appears next to each module, and clicking it will install and enable the selected different Payment Method.

Default Payment Methods:

By default, 4 payment methods are installed on Prestashop stores. Therefore, all we need to do is configure these payment methods if you wish to offer them to the customers.

  • Payment by bank transfer
  • Payment by cheque
  • Payment by Stripe
  • Payment by Paypal

Payment by bank transfer

To accept payment by bank transfer on your store :

  1. Navigate to the Payment page > Payment methods.
  2. In the list of available payment modules, search for “Wire payment” and select it by clicking the Configure button.
  3. Fill in all the account details that will enable your customers to make the transfer, then click on Save.
  4. Reservation lead time: This could be used to inform customers of the duration (in days) for which the products they want to buy will be held in reserve while they wait for the transfer to be completed.
  5. Customer information: Provide any details to share with customers, such as the processing time or the dispatch time following transfer reception.

Payment by cheque

To accept payment by cheque in your store :

  1. Navigate to the Payment page > Payment methods.
  2. Select “Payment by check” from the list of available payment modules by looking for it, and then press the Configure button.
  3. After entering the beneficiary’s name (the order) and the address where the check is to be sent, then click on the Save button.

PrestaShop supports different payment methods such as Amazon Pay, ViaBill, Skrill Official, CCBill  USA, Canada, U.K. & EU v5.0.0, Cash on delivery

Payment by Stripe

First, select “Upload a module” from the module manager in the back office.

Next, choose the file from the system or drag and drop the module file. In this way, the module installation will be successful.


Once after installation of the module click on configure. The below page will be opened.

Now, need to create the API keys, for the same it is required to register your account on https://stripe.com/.

If you’re using it for the live site, you can use the live keys; otherwise, you can use the test keys to simply test the module.

Payment by Paypal

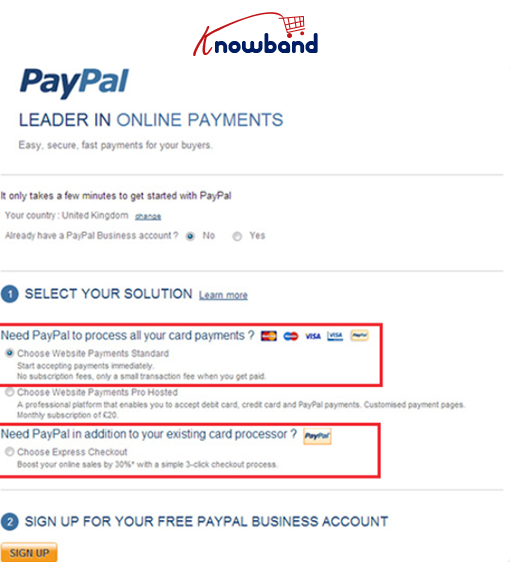
Once after install the module, we will click on the configure button, We will see the below page:

  1. To use PayPal to accept credit cards, select “Website Payments Standard.”
  2. If your website currently accepts credit cards and you just want to add PayPal as an extra payment option for your consumers, choose “Express Checkout.”


Register for a free PayPal Business Account. (Refer to the above image for reference)

  • You can skip this step if you already have a PayPal Business Account.
  • Click “Sign Up” to open a PayPal Business Account if you don’t already have one.

Fill out the following three API fields after clicking the “Get My PayPal API Credentials” button:

  • API signature; 
  •  API password;
  •  API username;

To find the above details please use the below steps 

  1. Create an account on www.paypal.com and if you already have one then Login to and click Profile.
  2. Click on the My Selling Tools tab on the pay, In the section of API access click on the update button


3. On the API access page select the Request API Credentials

Now use these credentials to configure PayPal. Now you are ready to use the same on your store

Recommended read: What Are the Different Payment Methods Used in E-commerce? 

You can also explore a wide range of Prestashop, Opencart, WooCommerce, Shopify, and Magento 2 ready-to-use eCommerce extensions.

In case you have queries/suggestions, you can reach out to our technical support portal at our email address support@knowband.com.

Take a look at our bestseller module One Page Supercheckout for Prestashop and Android and iOS App Maker for Prestashop. Also, you can watch our latest videos here:


Which One To Choose: PrestaShop 1.7 or PrestaShop 8.1?

PrestaShop stands out as a compelling choice between Prestashop 1.7 and Prestashop 8.1 for e-commerce ventures, thanks to its open-source nature, which makes it both free and highly customizable. It boasts a user-friendly interface, supports multiple languages and currencies, and comes equipped with essential e-commerce functionalities. 

Additionally, PrestaShop offers SEO capabilities and scalability to accommodate the growth of your business. Supported by a large community, the platform provides extensive support, modules, and regular updates, making it ideal for small to medium-sized businesses aiming for a global market reach.

The release of PrestaShop 8, with its numerous improvements, has sparked interest among e-commerce enthusiasts. Hence, if you’re considering upgrading to PrestaShop 8, or if you’re unsure which version to choose for your online store, so this blog will help you make an informed decision. We’ll root about the differences and comparisons between PrestaShop 1.7 and PrestaShop 8.

Why Choose the Right Platform?

Choosing the right e-commerce platform is significant for the success of your online business. An inadequate platform can lead to limitations in scalability, customization, security, and other critical areas. PrestaShop, being a robust and customizable platform, could be the ideal choice for your e-commerce venture. With SW Hosting, you can deploy PrestaShop with its pre-configured version 8 in just one click.

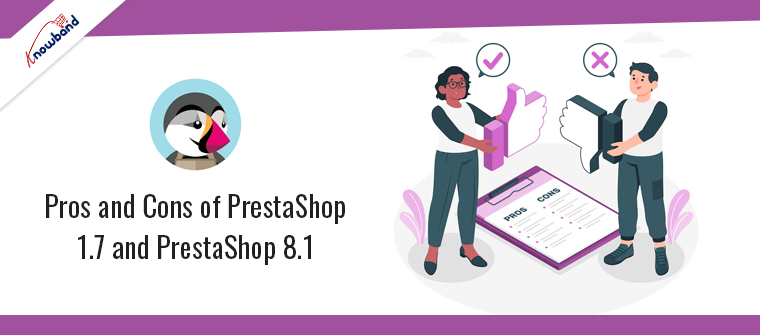
Pros and Cons of PrestaShop 1.7 and PrestaShop 8.1

When deciding between PrestaShop 1.7 and PrestaShop 8.1, it’s crucial to consider how each version aligns with your business needs, technical resources, and future goals. Here’s a practical comparison:

PrestaShop 1.7

Pros:

  • Stability: With years of market presence, this version is well-vetted and reliable for everyday operations.
  • Strong Community: An extensive array of themes and modules, supported by a vibrant community, ensures you have numerous resources for troubleshooting or enhancing your store.
  • Continued Support: Despite its age, PrestaShop 1.7 still receives essential updates and support, keeping it viable for many businesses.

Cons:

  • Aging Technology: The technology underpinning 1.7 is somewhat dated, potentially limiting your ability to leverage newer web technologies.
  • Performance Limitations: For stores with high traffic volumes or large inventories, 1.7 may struggle to keep up, impacting user experience.
  • Diminishing Updates: As newer versions emerge, the focus on 1.7 will wane, possibly reducing the frequency and scope of future updates.

PrestaShop 8.1

Pros:

  • Improved Performance: 8.1 brings optimizations that enhance loading times and overall responsiveness, crucial for retaining customers and improving search engine rankings.
  • Updated Infrastructure: Built on the latest versions of Symfony and PHP, 8.1 offers increased security and efficiency, making your site more robust against vulnerabilities.
  • User-Friendly Backend: The redesigned backend simplifies daily management tasks, which can be particularly beneficial for new users or expanding businesses.

Cons:

  • Migration Challenges: Upgrading from 1.7 might involve significant hurdles due to changes in core and module architectures.
  • Compatibility Issues: Some existing modules and themes may need updates or replacements to work seamlessly with 8.1, incurring additional time and cost.
  • Increased Resource Needs: The newer technology stack might require a more powerful hosting solution, increasing monthly operational expenses.

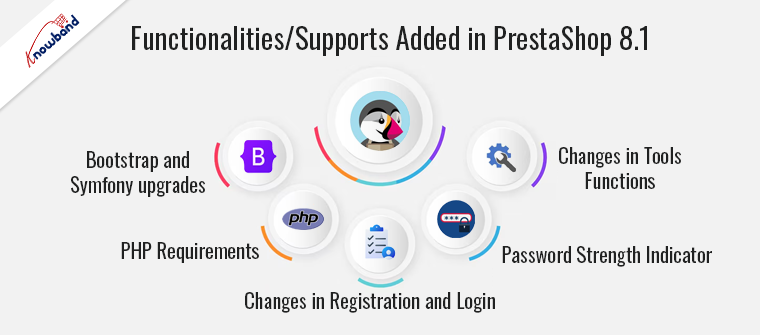
Functionalities/Supports added in PrestaShop 8 and above versions:

Bootstrap and Symfony upgrades: 

Versions 8 and above have upgraded to Bootstrap and Symfony versions v4.4.

PHP requirements: 

PrestaShop 8 and above require at least PHP 7.2.5 and are compatible with PHP v8.1, while some previous versions of PrestaShop 1.7 support PHP v7.1.

Changes in registration and login: 

Customer registration and login have been divided between two controllers, potentially causing issues with third-party modules incompatible with PrestaShop 8.

Password Strength Indicator: 

Introduced to provide real-time clues for a strong password, with the minimum password length set to 8 characters.

Changes in Tools functions: 

Parameters like $id_lang and $separator have been removed from Tools::displayDate(), and Tools::jsonDecode() and Tools::jsonEncode() functions have been replaced with PHP functions json_decode() and json_encode() respectively.

Conclusion:

Further, if you value stability and have existing familiarity with the platform, PrestaShop 1.7 might be easier for you to continue using. On the other hand, if you’re starting fresh or seeking a platform with a more modern and efficient user interface, PrestaShop 8.1 could be easier to adopt and use effectively. Carefully weighing these factors against your specific needs and goals will help you make an informed decision between PrestaShop 1.7 and PrestaShop 8.1 for your e-commerce venture.

Recommended read: Why migrate from PrestaShop1.7 to PrestaShop 8.1?

You can also explore a wide range of Prestashop, Opencart, WooCommerce, Shopify, and Magento 2 ready-to-use eCommerce extensions.

In case you have queries/suggestions, you can reach out to our technical support portal at our email address support@knowband.com.

Take a look at our bestseller module One Page Supercheckout for Prestashop and Android and iOS App Maker for Prestashop. Also, you can watch our latest videos here:


Step-by-Step Guide for Adding Custom HTML Block in PrestaShop

Why should we add a custom HTML block on our PrestaShop Store?

Adding a custom HTML block in PrestaShop website can enhance its functionality or overall style by allowing the store owners to include custom texts, images, links, or other HTML elements to the website and these blocks can be added to showcase different content on different controllers or pages. 

The process of adding a custom HTML block in PrestaShop store is similar for all the versions.

To add a custom block, we will use a Custom Module in the PrestaShop store.

Why a Custom Module?

Flexibility and tighter integration within an online store are two major advantages of creating a bespoke HTML block using a specific PrestaShop module and this strategy works especially well when store owners have specific criteria that the pre-existing modules do not meet, or when adding new functionality without modifying the platform’s core files is desired.

By choosing to create a custom module, PrestaShop store owners can precisely tailor the look and feel of their eCommerce environment to match their marketing objectives and customer interaction strategies and this customization enables further personalization of the user experience, which may increase customer satisfaction and loyalty and along with that it gives business owners the flexibility to swiftly adapt to shifting market trends and maintain a competitive edge by including unique features that raise customer satisfaction and operational efficiency.

Below is a step-by-step guide on how to create and use a custom HTML block in PrestaShop store:-

Step 1: Make Basic Files and Module Directory

  1. Add a Fresh Directory: Navigate to the PrestaShop installation’s modules directory and create a new folder named ‘myhtmlblock’.
  2. PHP Main File: Please create a file called ‘myhtmlblock.php’ inside this directory. This file will contain the main class of your module.

Step 2: Code Your Module

Open ‘myhtmlblock.php’ and add the following PHP code to define your module:


Also make sure that in each and every folder of the HTML Module, there is a file named ‘index.php’ having below code:


Step 3: Add a Template File

Create a folder structure within the module directory like this: views/templates/hook and inside the hook directory, create a file named ‘displayHome.tpl’:


Please note that, at the beginning of the Template file, a comment on the file path and its name has been added to show the same in the HTML content of your store.

Step 4: If desired, include a Configuration Page

If the store owner wants to make the HTML content configurable from the admin panel then they will need to implement a configuration form in the ‘getContent()’ method of your module class and as a result, the admin or store owner will be able to change the HTML text without changing the code.

Step 5: Installing the Module

  • Get into the PrestaShop admin panel.
  • Under Modules choose Module Manager.
  • Click on ‘Upload a Module’ and select the zip file of your module, or find your module in the module list if it’s already on the server.
  • Select ‘Install’.


Step 6: Place the Module on Other Hooks (Optional)

The custom HTML block in Prestashop will need to be displayed in several places throughout the PrestaShop website, thus we will need to change the module’s ‘install()’ method to register multiple hooks. Every hook has a designated spot on the website where content can be shown.

Typical hooks include the following:

  • displayFooter
  • displayLeftColumn
  • displayRightColumn
  • displayProductAdditionalInfo
  • displayTop

Step 7: Test Your Module

After installation, go to the homepage of your site to see your new custom HTML block in action.


If you added a configuration form, try changing the HTML block content through the PrestaShop back office to see if it updates correctly.

This approach gives you full control over what your module does and where it appears within your PrestaShop site, making it a powerful way to customize your store’s functionality and design.

In case you have queries/suggestions, you can reach out to our technical support portal at our email address support@knowband.com.

Take a look at our bestseller module One Page Supercheckout for Prestashop and Opencart Android and iOS Mobile App Builder Plugin here and you can enhance the product visuals on your store using the Prestashop Product Designer/Customizer addon.

Also, you can watch our latest videos here: