PrestaShop Mobile App Builder – User Manual

Get fully Flutter Android & iOS apps for your PrestaShop website & start selling your products on Mobile Apps!

1.0 Introduction
prestashop-mobile-app-builder

This is the user guide of the advanced & readymade Flutter mobile app solution of PrestaShop Mobile App Builder. This is an eCommerce website plugin designed & crafted to build perfect & featured Android & iOS shopping apps for you.

1.1 PrestaShop Mobile App Builder: A Brief Introduction

The PrestaShop Mobile App Builder is the most advanced & automated solution to take your online website business to the mobile platform. It transforms your entire website into a featured Mobile App & allows you to sell products on mobile along with the traditional website. The functionalities & working of the app exactly match the website & work flawlessly on both Android & iPhone devices.

Our PrestaShop Mobile App Builder is the pre-configured framework designed by experts & professionals to build a pair of Flutter eCommerce apps. The apps are capable of taking all your store products to the user’s fingertips & boost sales & revenue. So, if you are a PrestaShop store merchant & looking for a full-fledged mobile app solution, this is your best chance. Read the complete article to get fully intact info on PrestaShop Mobile App Development.

Also, our PrestaShop Mobile App Builder extension is fully compatible with the Multi-vendor Marketplace plugin. You can bring the entire marketplace listing on the same Mobile Apps. We even offer a combo pack of our PrestaShop Mobile App Builder with PrestaShop Multi-Vendor Marketplace in PrestaShop Advanced Marketplace With Mobile App.

New Update: PrestashopMobile App and AI Chatbot Integration 6.0.6

The PrestaShop Mobile App Builder now supports integration with the PrestaShop AI Chatbot, helping store owners provide AI-powered assistance to mobile app users. The chatbot can help customers find products, get answers to common questions, and receive personalized product recommendations directly within the mobile shopping experience.

Moreover, the following benefits of PrestaShop Mobile App Maker would compel you to go for this Flutter app solution:

  • A no-code Mobile App solution.
  • Friendly admin panel with complete access.
  • 3 months of free support
  • Fully Flutter solutions (Android & iOS)
  • 100% synchronization between your apps & website
  • Highly customizable with design & functioning control.
  • Increases user engagement with handy marketing tools.
  • Increases traffic & revenue to your store.

1.2 Top-notch Features of PrestaShop Mobile App Builder:

Here is the list of some of the key features which you will get in your apps with Prestashop Mobile App Builder:

  • Customizable Home Screen Layout (Complete Flexibility)
  • Store Branding
  • WhatsApp Chat Support (24*7)
  • Google & Facebook Login
  • OTP & Fingerprint Login
  • Both Tablet & Mobile Support
  • Android 4.2 and so on Android VersionSupport
  • iOS 9 and so on iOS VersionSupport
  • Automatic Inventory Update
  • Multiple Color & Font Choices
  • Multi-lingual & RTL (Right To Left) Support
  • Multi-currency Support
  • All Product Type Support
  • Website Payment Method Supported on Apps
  • Website Shipping Method Supported on Apps
  • Unlimited Push Notifications
  • Product Social Sharing Options
  • Multiple Filtering & Sorting Options
  • Wishlist Functionality
  • Website Coupon/Vouchers Supported on Apps.
  • Simplified Checkout Screen
  • Real-time Order Tracking
  • Seamless Accordion Menu
  • Clear-cut Product & Category Screen
  • Show Video Banner Elements on the Home Page and Category Product Listing Pages
  • List/Grid Product View Options
  • Login/Sign-up pop-up
  • Enhanced Review Section
  • Multi-layered layout
  • Automated Banner Sliders
  • Notification Tab

Latest Version Updates in PrestaShop Mobile Apps:
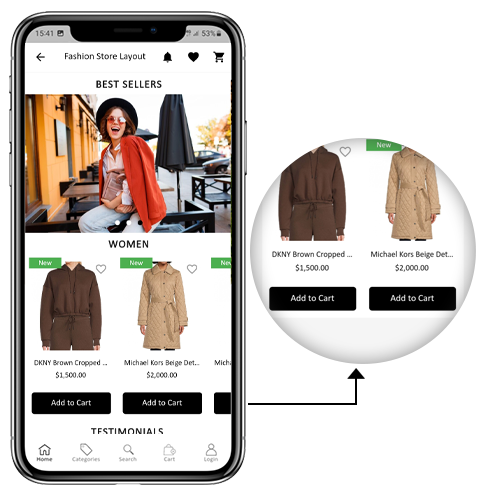

a) “Add To Cart” Button on Home & Category Screen

The PrestaShop Mobile App has been made more usable for online shoppers with an inbuilt “Add To Cart” button for products on the Home & Category screen. This allows users to quickly add products to the cart by just tapping the cart button.

The Add To Cart button is also available on the category screen of mobile apps. The users can simply scroll down to the bottom to browse the products and keep on adding products to the cart by simply tapping the Add To Cart button.
b) Product Reviews on App

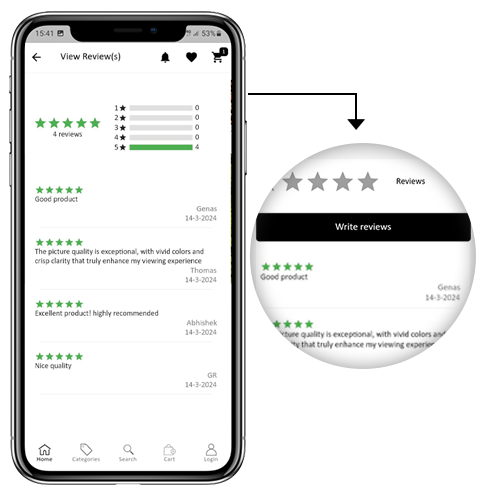
Our PrestaShop Mobile App is now compatible with the default Product Comments module of PrestaShop. Now, the user can post reviews for the products on the website and the same will appear on the app as well. Also, the user gets to view all reviews from the app and write them as well.

c) Related Products on App

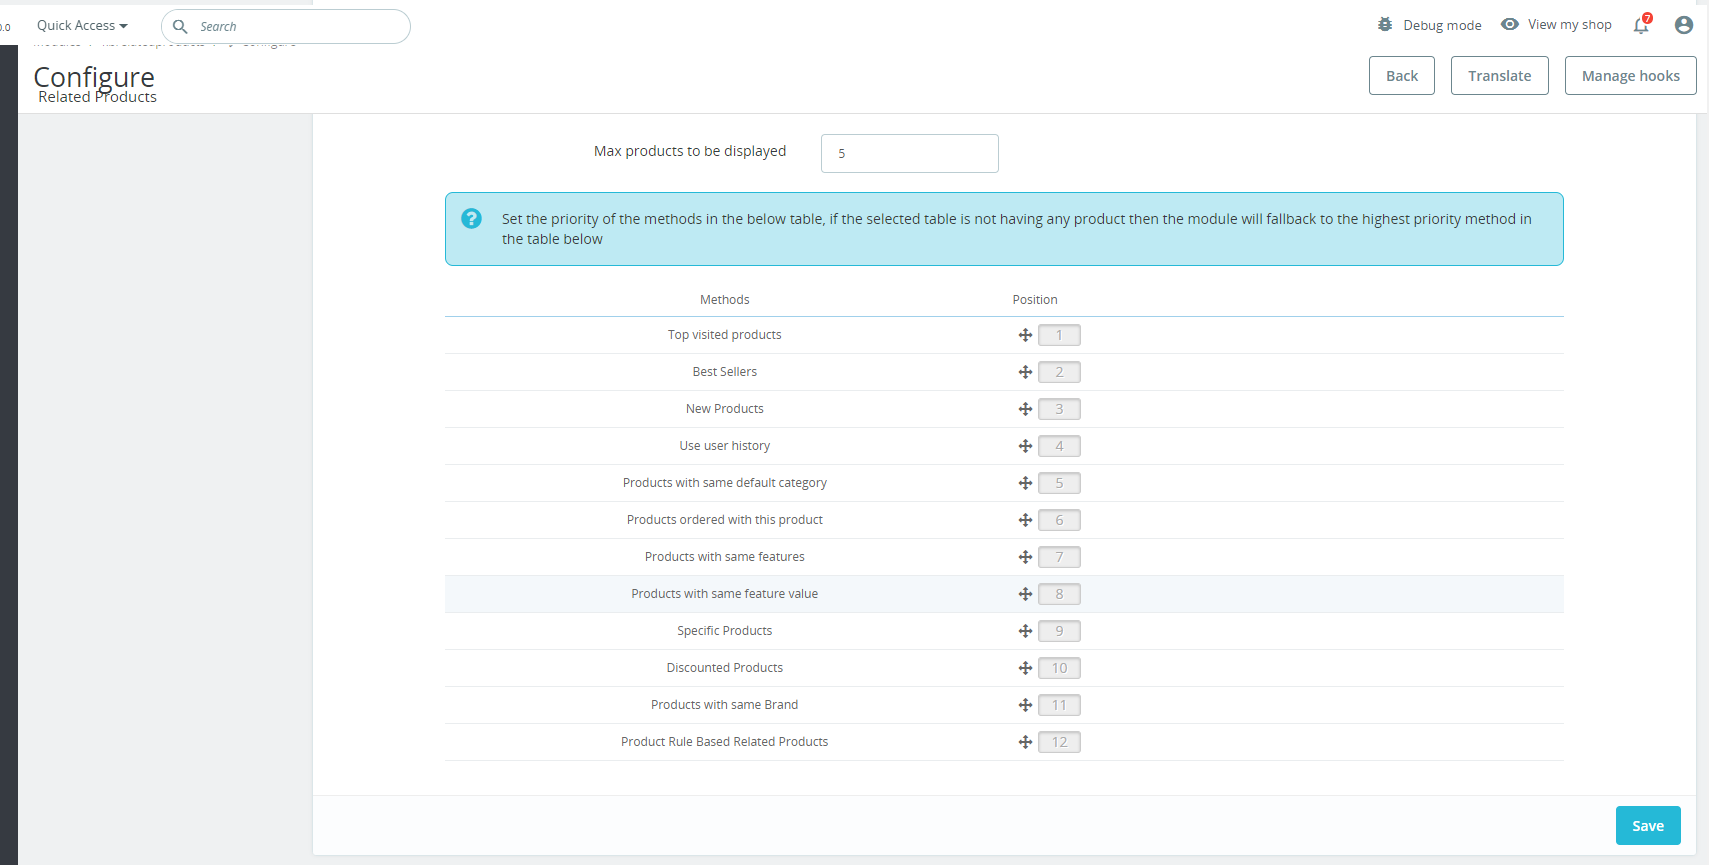
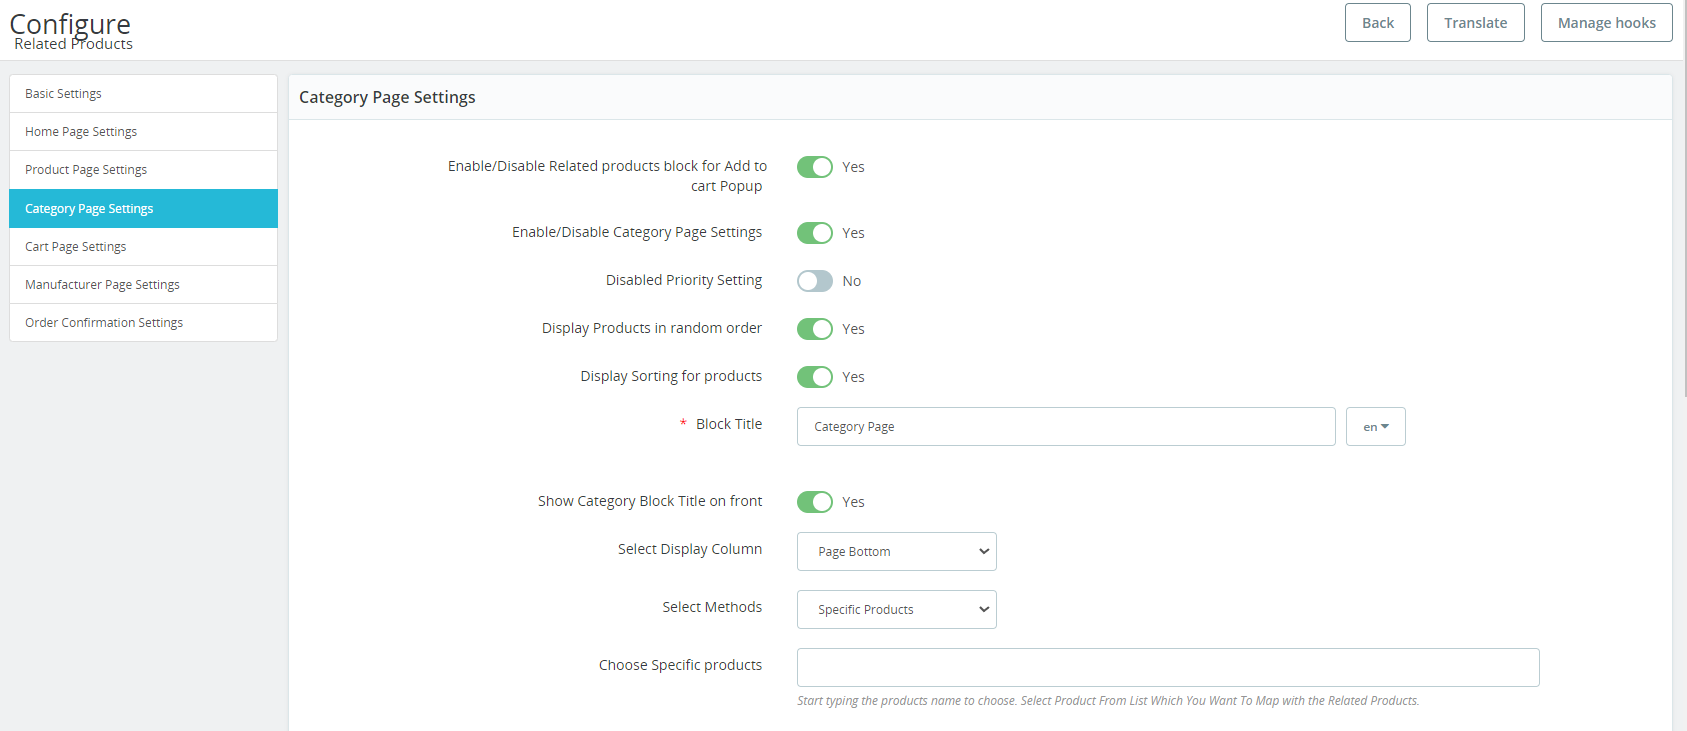
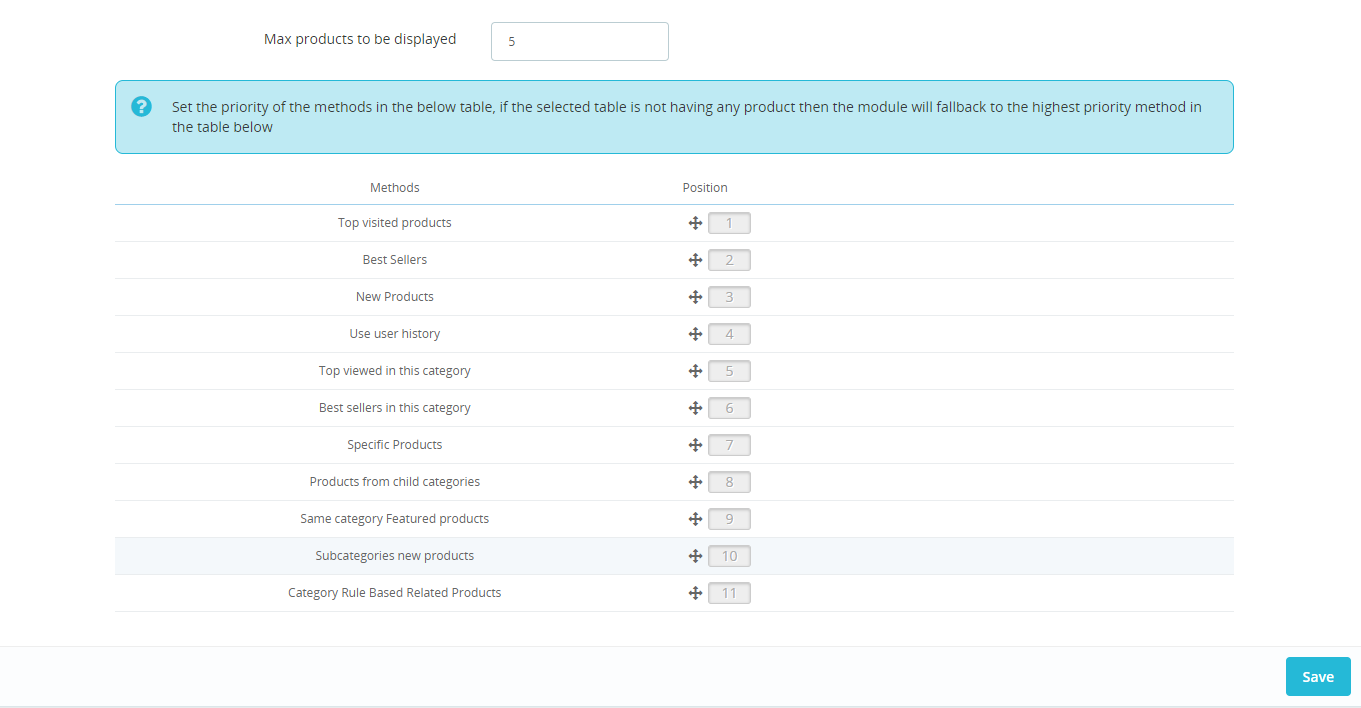
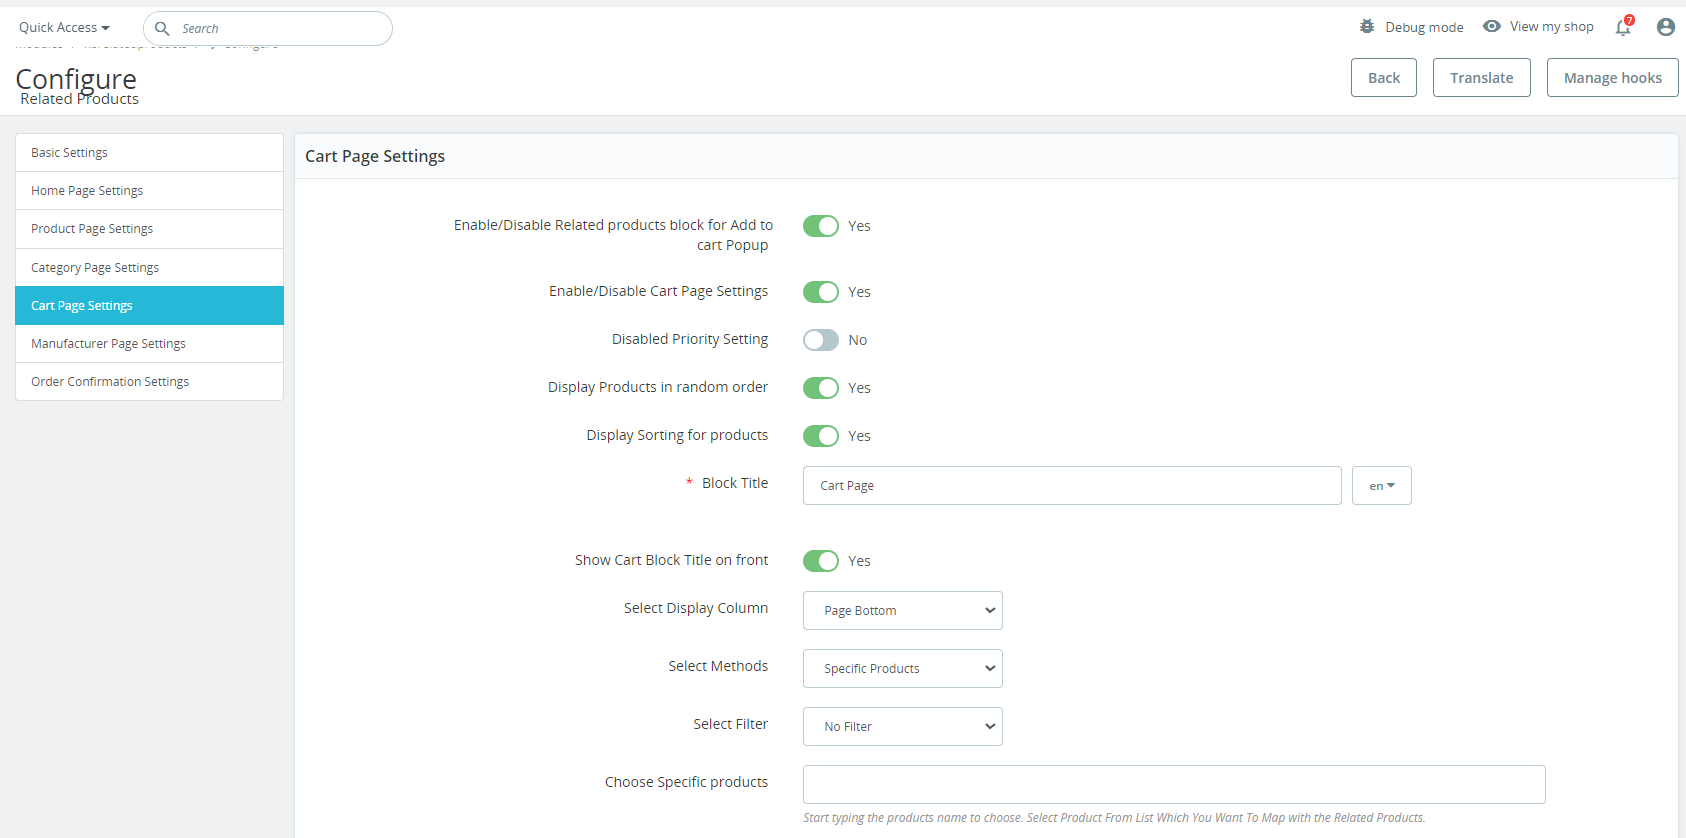
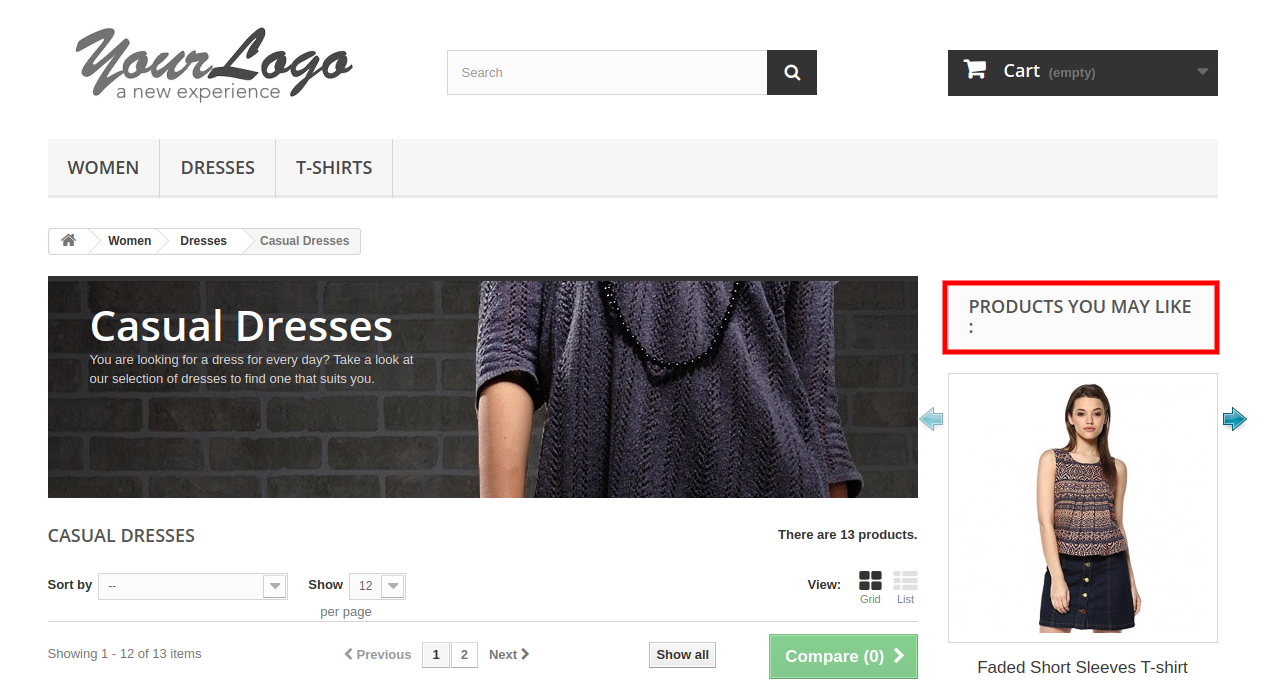
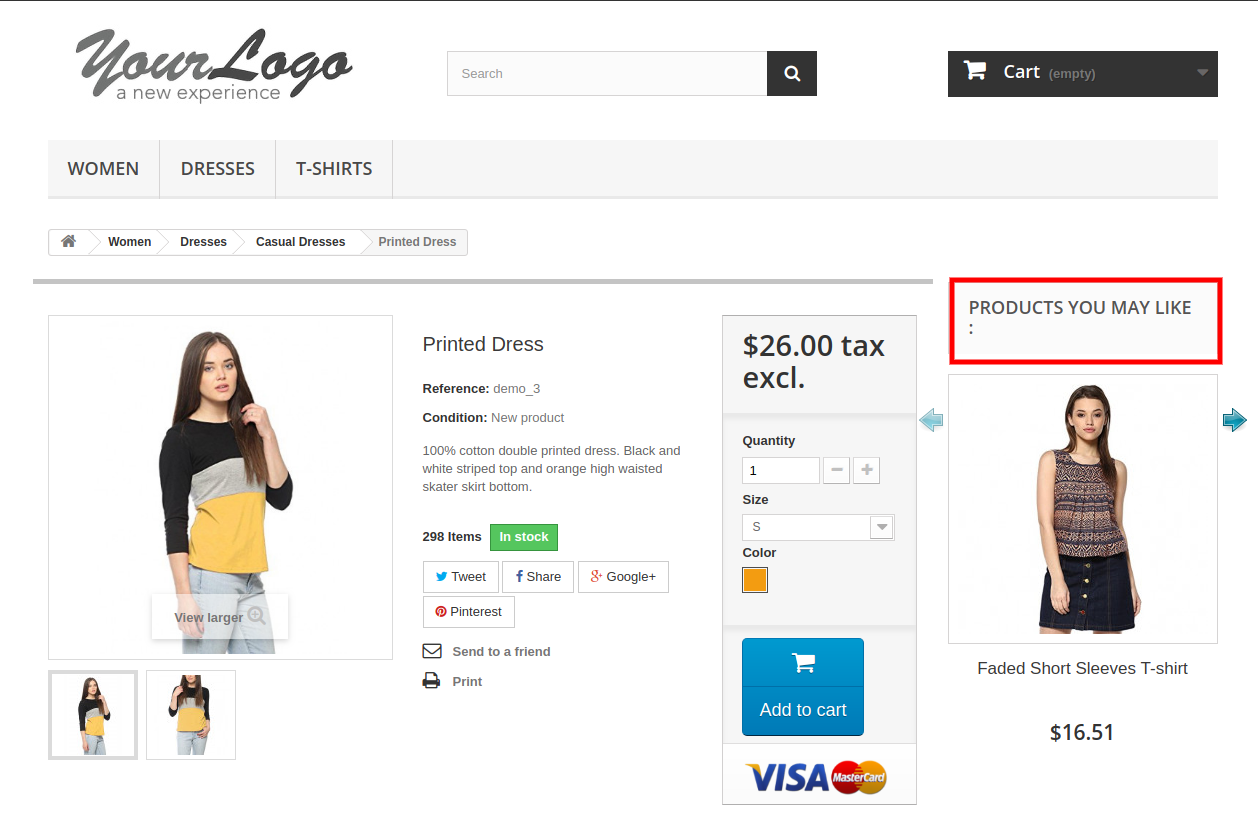
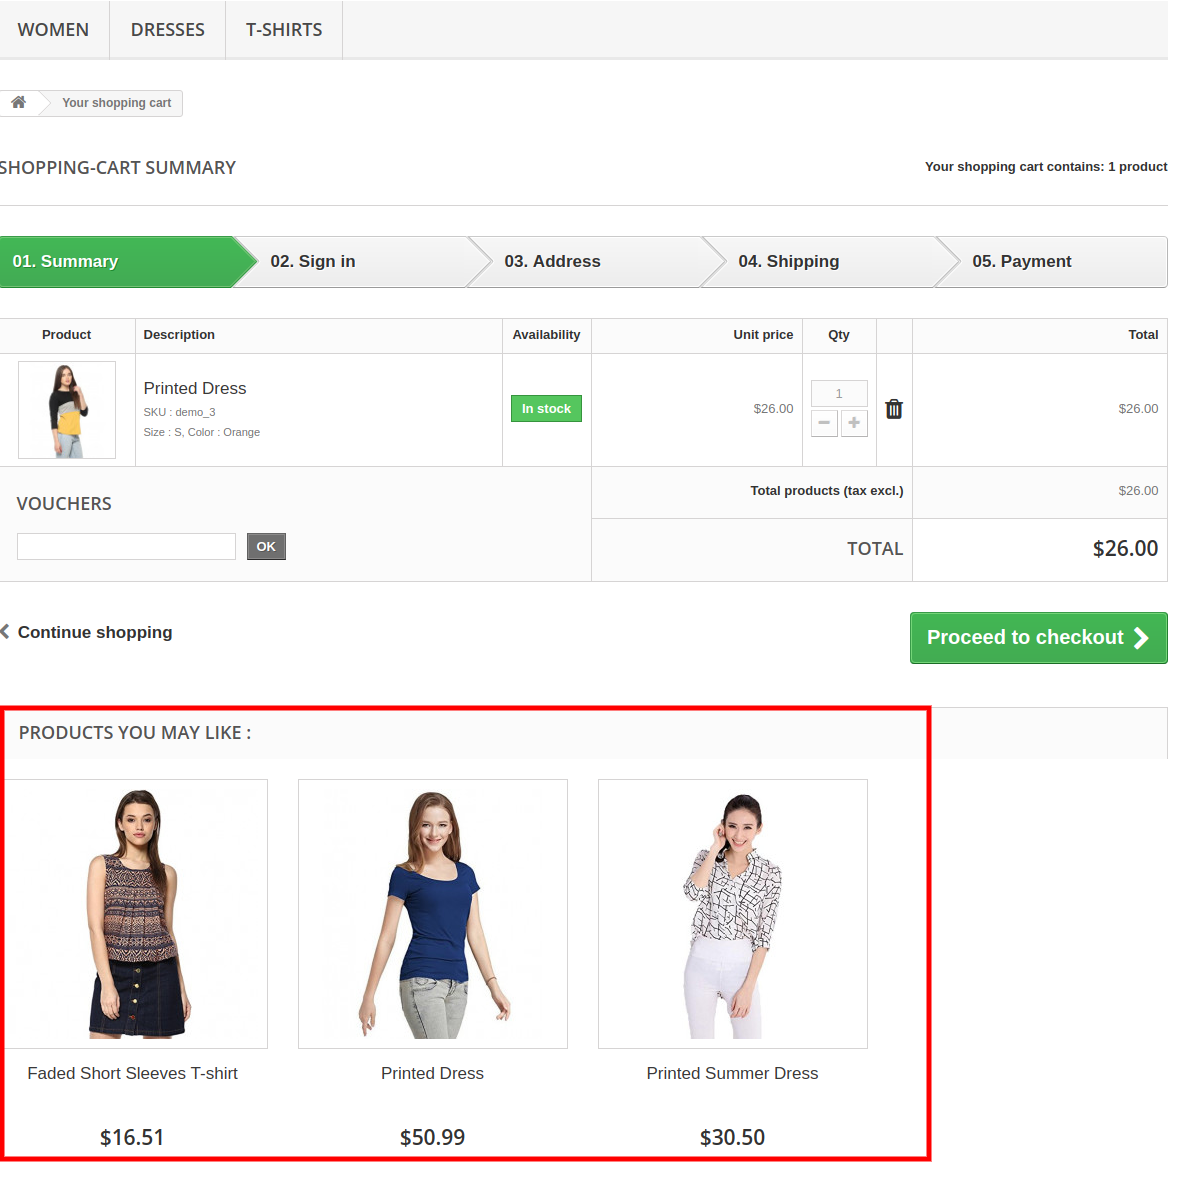
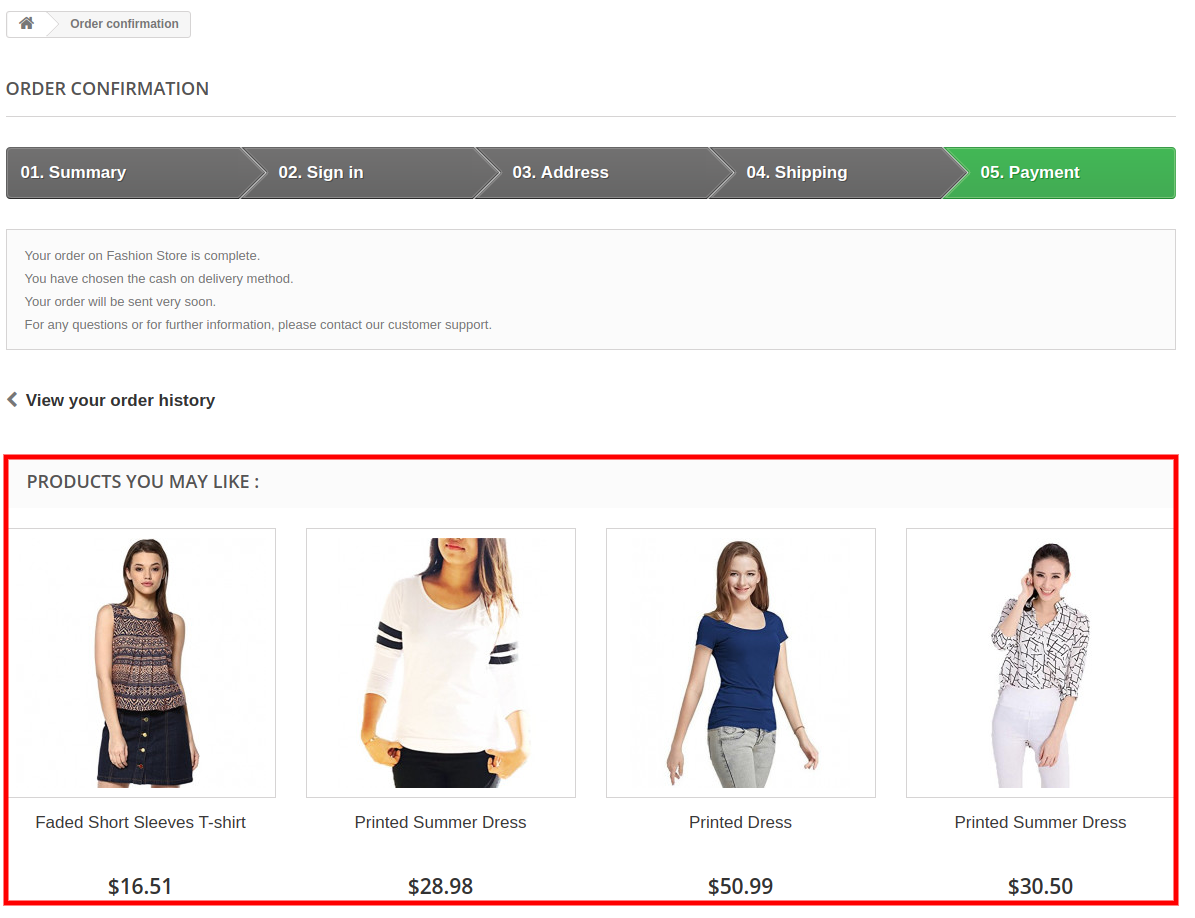
The PrestaShop Mobile App Builder is now compatible with the Automatic Related Products module. The related products can be displayed on the product page of the website and mobile app. This compatibility can be used as a perfect tool to improve cross-selling for your business.

–> Explore PrestaShop Related Products

d) Offline Mode Accessibility:
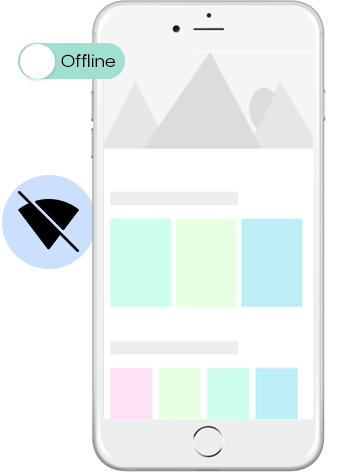
The eCommerce mobile apps with this extension will now work in offline mode as well i.e. without internet connectivity. The users get to browse the pages anytime which were loaded while active internet. Categories, products, cart screen, etc.

–> Explore PrestaShop Image Search

e) GDPR Compliance:

Now, the apps with PrestaShop Mobile App  Builder are fully compliant as per the GDPR regulations of the EU. It will offer more control to app users over their stored personal data. The store admin can simply configure the GDPR settings to work on the application & the same will be displayed on various app screens like sign-up, login, checkout, payment, etc. Online shoppers even get the right to ask the store merchant for the removal of his/her personal information.

–> Explore PrestaShop GDPR Module

f) Spin & Win (Gamified Email Subscription) Compatibility:
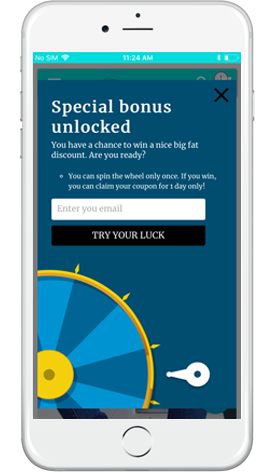
The PrestaShop Mobile App Creator is also compatible with PrestaShop Spin & Win extension. The gamified email subscription pop-up is used for offering a spin-wheel interactive pop-up that can be scheduled for entry or exit display on the web store. Now, with this integration, the same pop-up will be automatically displayed on the apps. You just need to install the extension on your website.

–> Explore PrestaShop Spin Win Module

This list doesn’t end here. Get to know more about the features in detail from here.

g). Video Banner Elements:

The all-new Prestashop App Maker comes with video banner components available on the home page. The store admin can now showcase different videos with the option to upload/YouTube videos on the home page banner components.

h). List/Grid View:

The Android and iOS App built with Prestashop Native Mobile App Builder provides the app users with the opportunity to explore the products in list/grid view, enhancing the visuals and customer experience. 

Now, the users can simply tap on the list/grid button provided on the product listing pages to switch between list and grid view for the products.

i). Video/Banner Options on the Category Product Listing Pages:

Showcase your product carousal with the all-new video/banner upload options introduced in the updated Mobile App Maker for Prestashop. The store admin can upload videos below 2 MB or can also showcase the YouTube videos directly on the category product listing pages. This feature provides better UI control to the store admin, enhancing the customer experience at the same time. 

J). Automated Banner Sliders:

In the latest Mobile App Builder module, we have introduced the automated banner slider feature that allows the Prestashop store administrator to configure the automated sliding time from the module backend. 

The admin can use the functionality, particularly for the “Banner Horizontal Sliders” home page layout components, and can add sliders for both videos and image banners. 

K). Enhanced Review Section:

If you are using PrestaShop’s default Product Comment module, you can enjoy the enhanced review section in the app. All the approved reviews now come with enhanced UI that delivers a top-notch visual experience for your Android and iOS App users. 

L). Login/Sign-up Pop-up:

Capturing the visitors’ emails is one of the biggest challenges in eCommerce. However, we have simplified this process by introducing the login/sign-up pop-up in the recent Mobile App Builder version. 

The store admin can add a login pop-up that will appear for non-logged-in customers, increasing the email opt-in chances by providing simple login options to the users. 

2.0 PrestaShop Mobile App Demo

KnowBand understands your concern about your uncertainty to go for the solution & to curb the same, it has offered a free demo for all eCommerce store owners. The merchants can view our demo store working on the mobile app & even their store working on our demo apps.

2.1 View Our Demo Store working on Apps

Want to see the eCommerce app features? We have integrated our demo store with the app where you can explore the fully functional app and see all its features. Just follow the below instructions:

Step 1: Download and install the Nautica PrestaShop Mobile App from either App Stores on your mobile device. Here, are the links to download demo apps:

Apple App Store  – https://testflight.apple.com/join/PAcL7EEE

Google Play Store– https://play.google.com/store/apps/details?id=com.velsof.prestashopgenericapp&pli=1

Step 2: the Open the Nautica PrestaShop App and hit the view demo button.

That’s it! You will see our demo store running on the demo app. You can browse the same, check all functionalities, create an orders, etc.Note: To access the Admin Panel of KnowBand Mobile App Builder on our demo store, visit here.

2.2 View Your Store working on Demo Apps

Not satisfied? Want to test your store on the demo apps? Well, we got you covered with everything. You can experience your store on our demo app as well that too without any cost. Just 3 steps are all you need to follow for the same:

Step 1: Download & install FREE PrestaShop Mobile App Builder plugin & install it on your store.

Step 2: Install the Demo Apps (links in the previous section) on your mobile device. Open App & enter your Store URL.

Step 3: Tap “View Your Store” and start experiencing your store on demo apps.

Step 4: Enter your store URL in the appeared box.

Example: https://www.example.com/

Note: This Free version of Mobile App Builder is just for the demo purpose & no APK/IPA files will be provided with this module. To get your own APK/IPA files, you need to purchase the paid version of the PrestaShop Mobile App Builder.

3.0 Build your PrestaShop Mobile App in 3 Simple Steps

We hope that you liked the demo of our PrestaShop Mobile Apps and found what you were looking for. So, this is the time to get a Flutter pair of apps for your store. The process to build an eCommerce mobile app is as simple as it could get. Just follow 3 simple steps & your app will be ready in 1-2 working days.

Step 1: Install-Module on your website

Download Prestashop Mobile App Builder & install the same on your store.

Step 2: Share your App Specifications

Share your App details/requirements in our pre-requisites form.

Step 3: Get Your Apps in 1-2 days

Our skilled & professional developers build your apps matching exactly the shared details. We would get back to you with APK/IPA files in 1-2 days.

Note: You can publish these APK/IPA files on respective app stores. Refer following links for the same:

How to publish an app on Google Play Store?

How to publish an app on the Apple App Store?

Still an issue? Tell us, we would publish the apps for you. Moreover, for any queries and suggestions, please reach us at support@knowband.com.

4.0 Module Installation

Once you have purchased the PrestaShop Mobile App Builder module, you will get the following files as listed below:

1. Compressed File in ZIP format (contains the source code of the addon)2. User Manual

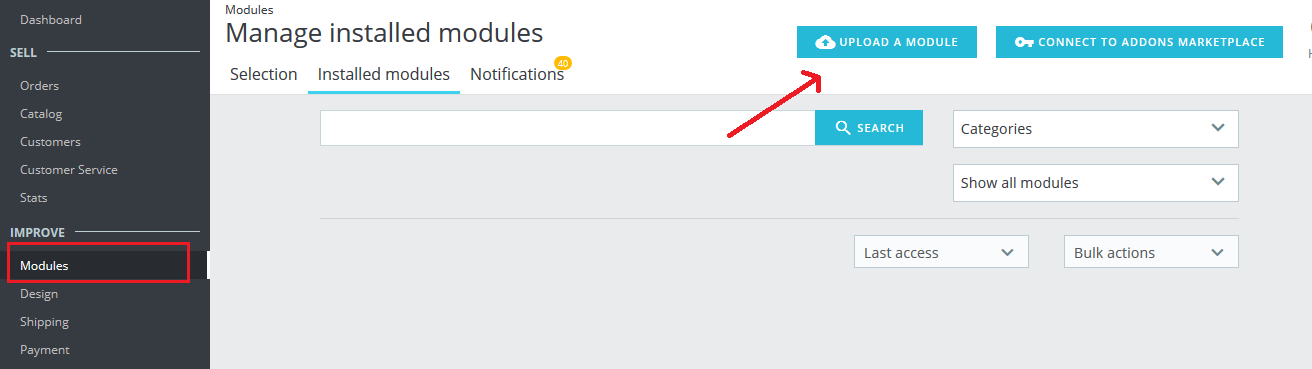
Now, you can go on with the further installation process in the following two ways:

Module Installation using FTP Details

Module Installation using Admin Details

5.0 Admin Panel Screens

Once the PrestaShop Mobile App Maker is successfully installed on your website, it’s time to configure the Admin Panel of PrestaShop Mobile App Creator. Once you click on the “Configure” option on KnowBand Mobile App Builder, you will get the following tab with friendly interfaces. Let’s narrow down them one by one.

5.1 General Settings

The General Setting tab is all about the settings required to run your Mobile App on the user’s devices. This tab contains all the necessary generalized options to sync the app.
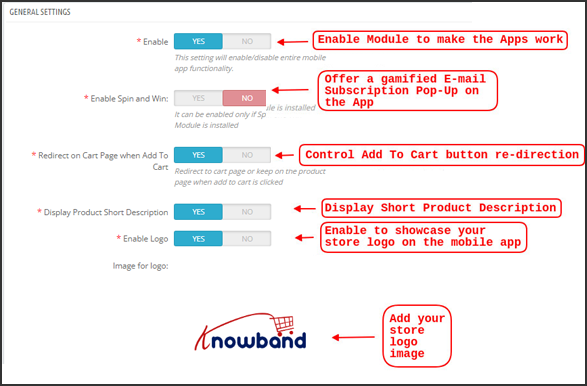
a) Enable Plugin: Enable the PrestaShop Mobile App Creator plugin to make your mobile app work on user’s devices.

b) Enable Spin and Win: Enable to display a gamified spin-wheel pop-up on the home screen whenever any user opens the app. It can be used to offer discounts/deals & capture their e-mails in return for marketing purposes. To make this functionality work, you need to install Knowband’s Spin and Win module on your website.

Note: The Spin and Win Module will only work in case you have installed the plugin in your store end.

c) Redirect on Cart Page when Add To Cart: This functionality allows you to control the navigation of the “Add To Cart” button. You can either redirect your users to the shopping cart or keep them on the product page whenever they tap Add To Cart button. This enhances the chances of additional purchases.

d) Display Short Description: Enable to display product short description on the product screen along with full description & other details.

e) Select Layout: Choose the desired Home Page Layout for your PrestaShop app. You can create multiple home screen layouts in the backend as per various festivals & themes & use them as per your store requirement.

f) App Button Color: Choose the desired button color for your PrestaShop Mobile App.

g) App Theme Color: Choose the desired theme color for your PrestaShop Mobile App.

h) Image for logo: Upload your store logo image to be displayed on the top header of the app. This promoted your brand among worldwide mobile shoppers.
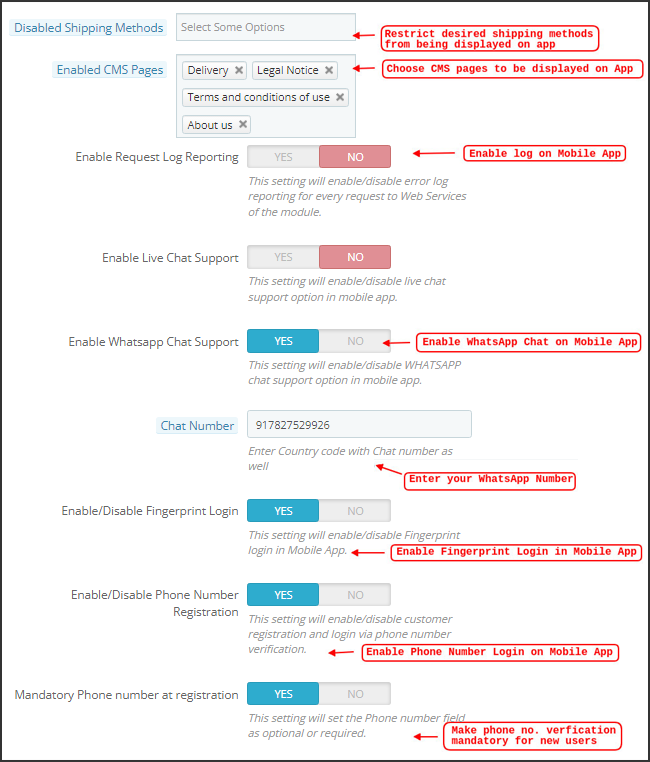
i) Disabled Shipping Methods: Choose desired shipping methods that you don’t want to be displayed on your PrestaShop Mobile App.

j) Enabled CMS Pages: Choose desired CMS pages to be displayed on the mobile apps.

k) Enable Request Log Reporting: Enable log on the mobile apps to get details of any abnormal behavior of your app.

l) Enable WhatsApp Chat Support: Enable the WhatsApp chat option on your PrestaShop Mobile Apps. The users can directly contact you at your WhatsApp number entered in the backend.

m) Enable/disable Phone Number Registration: Enable the Phone Number login option in your PrestaShop Mobile App & let your users authenticate with OTP verification.

n) Enable URL encoding of Image links: Enable this functionality to support Non-ASCII characters on the app.

o). Enable/Disable Fingerprint Login: This option enables or disables the fingerprint of Face ID login options in the Android and iOS apps. 

p). Enable Notification List Feature: The admin can show/hide the notification section in the app for the customers with the help of this button. 

q). Enable Sign In Login Popup: This button is designed to enable/disable the login pop-up for customers who have not completed registration on the store. 

r). App Icon Theme Color: The store admin can configure the color of app icon themes, especially Wishlist, Cart, and Hamburger menu icons. 

s). Enable Social Login: The following button can show/hide the social login options Google, Facebook, and Apple from the apps.

5.2 Push Notifications Settings

The PrestaShop Mobile App Creator for Android/iOS leverages the Power of Push Notification using the Google Primary Services for the Push Notification to Mobile devices. It brings this handy marketing tool to grab immediate user attention & boost sales. Highlighting your daily deals & offers is just a message away with your PrestaShop Mobile App. Both automated & custom notifications are available with PrestaShop Mobile App Maker.

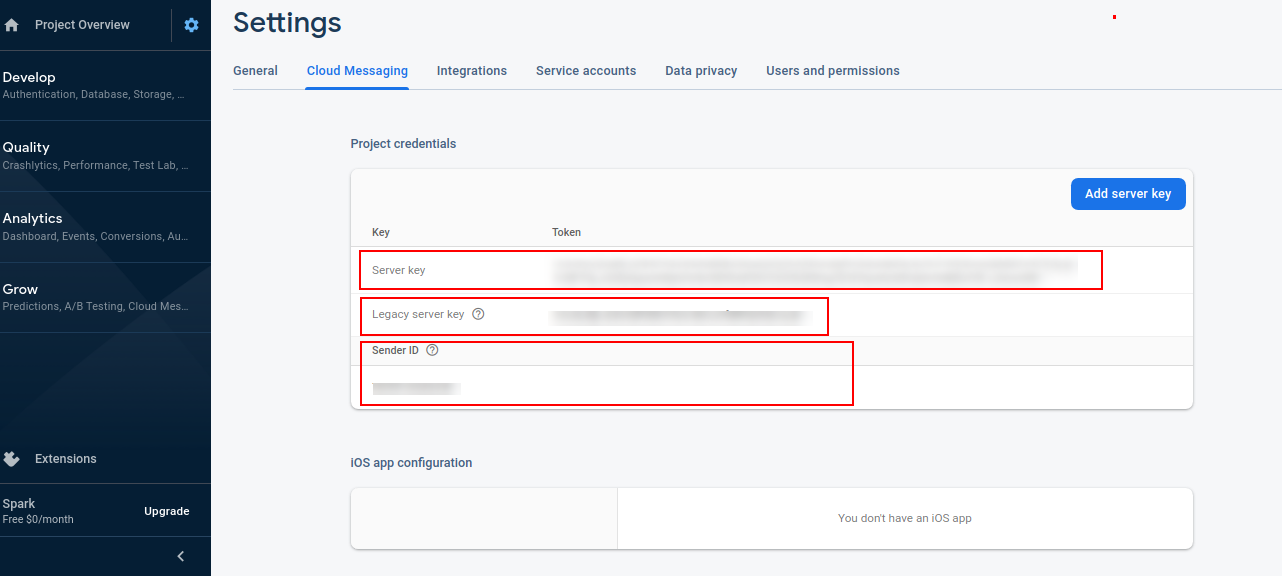
a). Service Account Json: Since the traditional Firebase push messaging API is deprecated and replaced with a service Json file, this section allows the admin to configure the Json file extracted from the Firebase account. 

Either you can configure the same on your own, or we will also share your service Json file at the time of app creation.

b) Enable/Disable Order Creation Notification: Enable/Disable automated Push Notification sent to the app users for successful order creation.–> Title and Message for Push Notification: Enter the title and message on the push notification setting for successful order creation.

c) Enable/Disable Order Status Changed Notification: Enable/Disable automated Push Notification sent to the app users for any update regarding their previous order delivery status.–> Title and Message for Push Notification: Enter the title and message on the push notification setting whenever there is an update the in previous order delivery status.

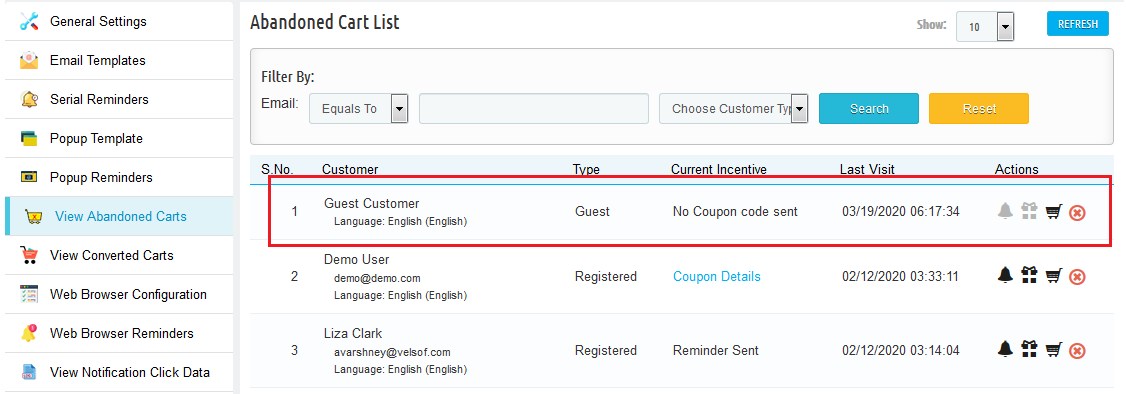
d) Enable/Disable Abandoned Cart Notification: Enable/Disable automated push notifications sent to the users who have abandoned cart without successful purchase.–> Title and Message for Push Notification: Enter the title & message of the push notification for abandoned cart app users.

e) Time Interval: Interval (in hours) for sending Push Notification to app users who have abandoned their cart without successful purchase.

5.3 Push Notification History

This tab contains the history of all sorts of push notifications sent to every user with concerned details. The merchant can get to know about every notification sent earlier. This tab also has the option to send a custom notification to the users crafted from the backend. You can easily make them aware of any store-related details or discounts through manually sent notifications.
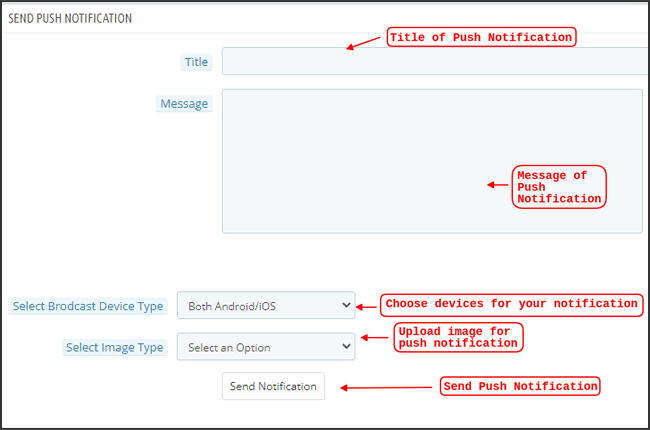
Send Notification:

This option is there to send a manual notification to the app users as per your choice. You can configure the title, message, landing page, image, etc., and notification of your choice as shown below snapshot:
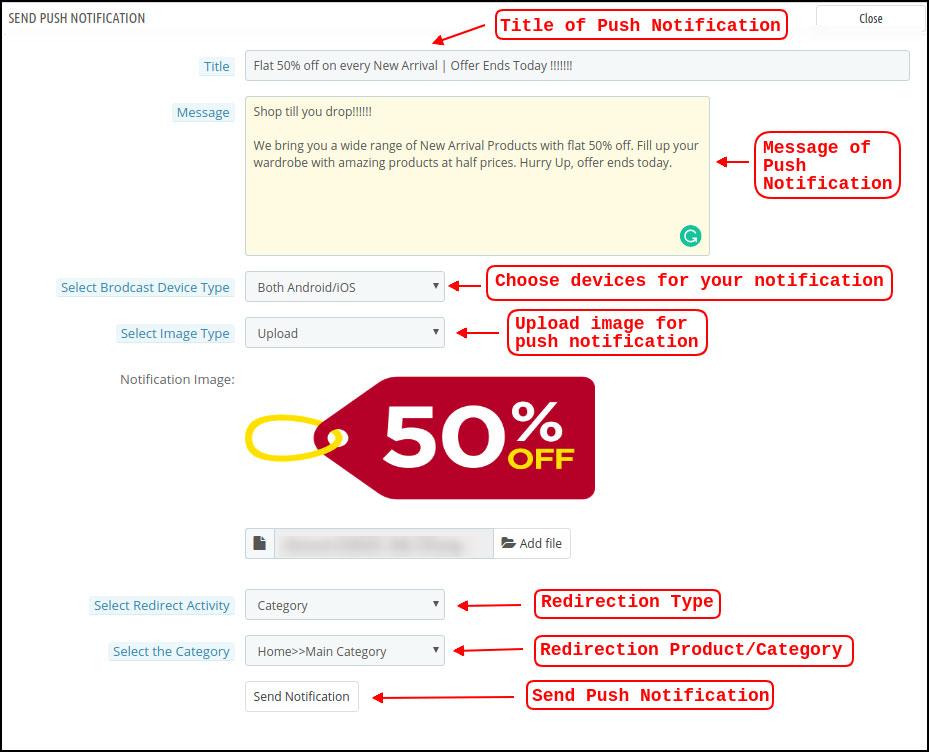
a) Title of the Push Notification: The title of your manual Push Notification that is to be sent to the app users.

b) Message of the Push Notification: The message of your manual notification which is to be sent to the app users.

c) Device Type: You can choose the users on Android/iOS or on both to whom your manual Push Notification is to be sent.

d) Image Type: You can upload the desired image/banner justifying your notification. The banner image can be uploaded or used through an existing URL.

e) Notification Image: The store admin get to preview the notification image & analyze how it will look on the user’s apps.

f) Image URL: The actual URL of the notification image which is to be sent to the app users.

g) Redirection Activity: You can choose the redirection of your notification by choosing from Home Screen/Any Category/ Any Product here. Whatever you set, your users will be redirected to the same on tapping the push notification.

h) Select the Category/Product: You can choose any relevant category/product screen for your notification.

i) Send Notification: Once you have crafted & previewed your notification, it is time to send the same on your apps.

5.4 Payment Methods

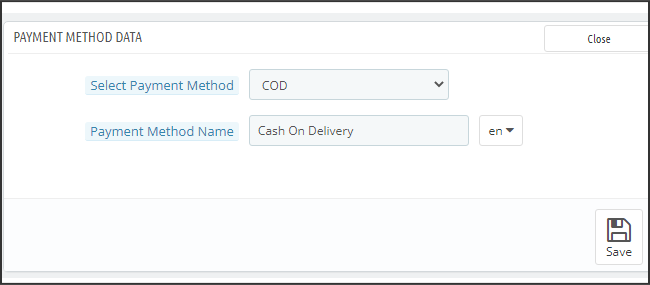
The PrestaShop Mobile App Creator for Android & iOS supports all sorts of website payment methods on the Android & iOS apps. Additionally, it brings COD payment option & the flexibility to add other Web-Viewpayment methods as well.

By-Default, there is only a Cash On Delivery Payment Method in our Mobile App. However, if you want to add the same payment methods as on your PrestaShop store, disable the COD method from the module back-end. After disabling the COD method, all the payment methods that are available on your web-end will appear fine in your Mobile Apps.
5.5 Home Page Layout

This is one of the most amazing functionalities of the PrestaShop Mobile App Builder plugin to design & craft multiple home screen layouts using various designing attributes/elements. This tab contains the list of all the home screen layouts configured earlier based on various themes & fonts as shown in the snapshot below:
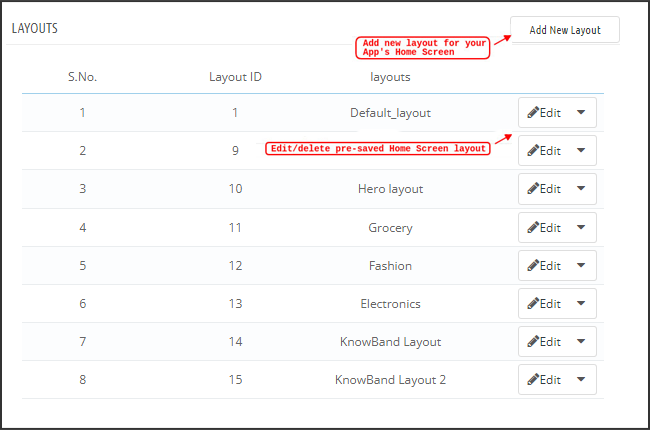
To configure the home page layouts, the following elements are available in the back-end:

  • Top categories
  • Square Banner
  • Horizontal Sliding Banner
  • Grid Banners
  • Countdown Banner
  • Grid Products
  • Horizontal Sliding Products
  • Recently Accessed Products
  • Login/Sign-Up Pop-Up

The store merchant can configure & use any of these attributes to craft & save multiple layouts. These layouts can be used as per the theme & requirements. Also, the positioning of various elements can be altered with just a simple drag & drop functionality.

Top Categories:

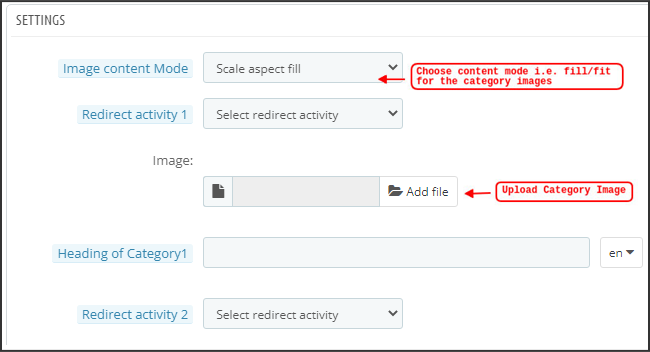
Top categories are displayed in the form of small squares on the home screen & can be configured including their image & landing categories/products. The PrestaShop Mobile App Maker offers a maximum of 8 categories in which a minimum of 4 are mandatory.
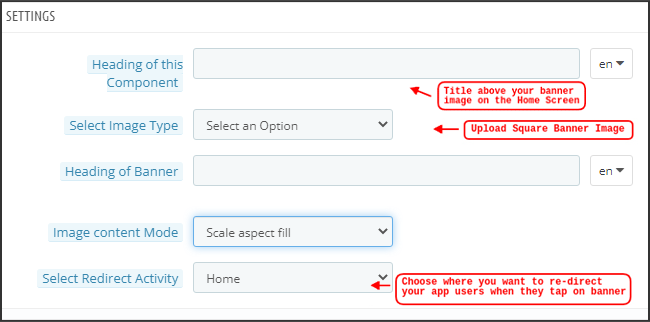
Square Banner:

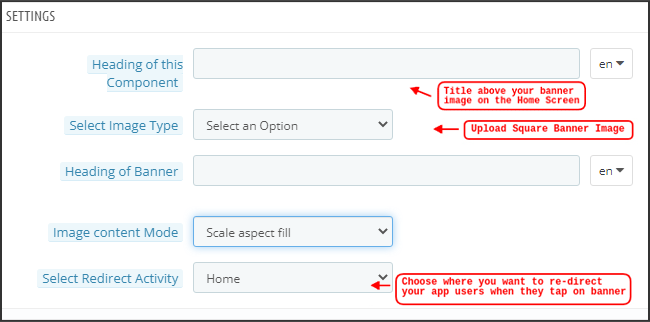
Another attribute is Square Banner listing which is used to offer a square-shaped banner on the home screen of the app. You can customize the banner by choosing the right image & landing screen for the same. In the Recent Updates, we have also added the video selection option for the banner squares. Now the admin can also choose between the options of Video Upload or YouTube Video Link for the square banners.
Horizontal Sliding Banner:

These are the rectangle-shaped available in horizontal sliding & can be fully customized from the backend. The admin can also configure the automated banner sliding time interval for the horizontal banner sliders components.

Grid Banners:

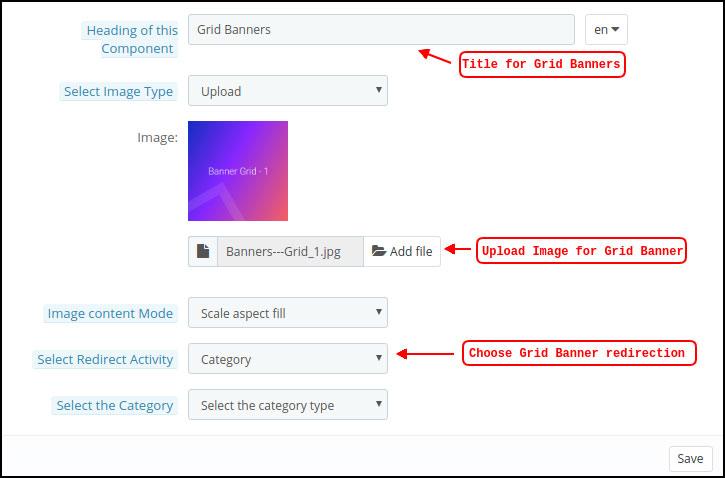
These are square-shaped banners listed on the home screen in the grid form. You can set as many banners as you want on the home screen & customize their image & landing page accordingly.
Countdown Timer Banner:

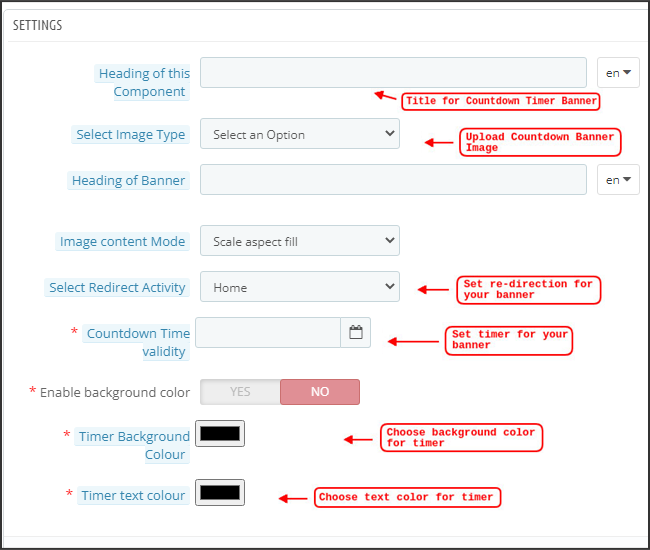
The PrestaShop Mobile App Builder offers a banner with a countdown timer. You can set the banner image & landing screen & set the timer till you want to display the banner. Once the timer is over, the banner will automatically disappear.
Square Products:

As for banners, the PrestaShop Mobile App Creator offers products to display on the home screen in the form of a square listings.
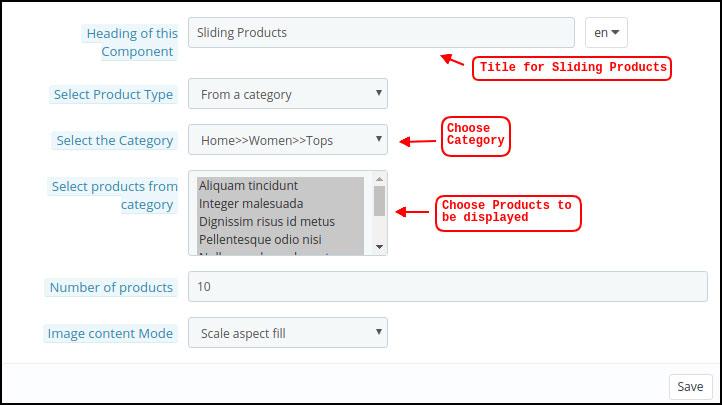
Horizontal Sliding Products

You can add the products in the form of horizontal sliders. The selected products could be of any specific category or other highlights as Best Sellers, Featured Products, etc.
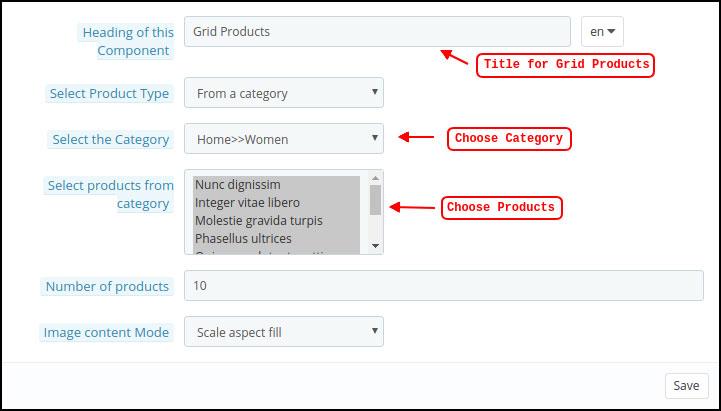
Grid Products:

The products can also be added to the home screen in the form of grid listings. The products can be chosen from any category.
Recently Accessed Products:

The PrestaShop Mobile App Creator provides the recent tab element which displays the recent products viewed by the user. You can just add the element in your layout to display the same on the home screen.

Note: The store admin can add up to 20 elements while designing a layout in the backend panel. 

Login/Sign Up Pop-Up:

We have introduced a new login pop-up that will encourage the customers to log in to their accounts with a single tap login/sing-up option provided on the home page of the apps.

5.6 GDPR Compliance

The PrestaShop Mobile App Builder offers GDPR compliance in mobile apps. The store admin can simply make a few clicks in the admin panel and apps will become GDPR compliant.
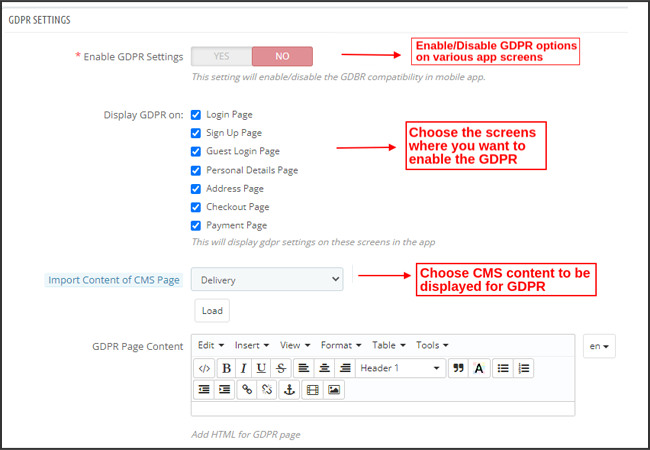
a) Enable GDPR Settings: Enable this tab to offer GDPR compatibility on various app screens.

b) Display GDPR on: Choose the app screens where you want to activate GDPR options.

c) Import Content Of CMS Page: Choose the CMS page whose content needs to be added for the GDPR option.

6.0 Mobile App Screens

6.1 Home Screen

The Home screen of your PrestaShop Mobile App will be exactly as you want it to be. The PrestaShop Mobile App Maker offers complete flexibility to design & craft a home screens into your hands. Using multiple banners(Square, Grid, Sliding), products (Square, Grid, Sliding), countdown timer banner, and recent products tab in the backend, you get to design intuitive layouts for your home screen. The following options are available on your app home screen:

Moreover, the positioning of various design elements can also be altered as per the requirement.

1. Dynamic Layouts:

Using various elements you can create & save various layouts in the backend & re-use them as per various events & festivals. You can design & craft your app home screen dynamically.

2. Brand Logo:

Your store logo is represented on the left-middle section of the top header of your PrestaShop Mobile App. The logo is fully configurable from the module backend & can be enabled/disabled including image changes.

3. Search:

The search option allows the mobile app shoppers to get easily & quickly what they desire. In your PrestaShop Mobile App, product search will be in two forms: The search option can be found on the bottom tab bar layout of PrestaShop Mobile App.

–> With Text: Your App users can search for desired products just by typing some related keywords. The PrestaShop Mobile App will show relevant results to that keyword.

4. Wishlist Bag:

The wishlist bag is displayed on the top header of your PrestaShop Mobile App containing all bookmarked products. The app users can save their desired products in a wishlist bag for future purchases.

5. Shopping Cart:

The Shopping Cart is available on the top-right corner of the app home screen. The users can get to know about the products added to their cart right from there.

6. WhatsApp

On the right-bottom of the home screen, there is a live seller-buyer chat option. The mobile app shoppers can easily & directly message you their query & you can resolve them instantly.

6.2 Accordion Menu (Navigation Bar)

The PrestaShop Mobile Apps for Android & iOS come up with proper categorization of products is available on the website. Mobile shoppers can easily browse products from multiple categories. All CMS pages are also available in Accordion Menu. It provides the following options:

1. My Account

My Account screen contains all the user information like Personal Details, Shipping Address(s) & Order Details. The shoppers can view all the info related to them & can update personal details & login passwords as well.

2. Categories

These categories are the same as on your website. You can map them accordingly & offer a 3-level categorization to your app users for hassle-free browsing.

3. CMS Pages

Various CMS pages like About Us, Contact Us, Terms & Conditions, etc. Available on your website are displayed here. You can choose the desired one from the PrestaShop Mobile App Builder backend to be displayed on Mobile App.

4. Language(s)

The language option allows your users to view PrestaShop Mobile app in their Nativelanguage. All available languages are displayed under this option only.

5. Currency(s)

All available currencies on your eCommerce website are displayed on PrestaShop Mobile App as well. The shoppers can view & purchase the product price in their desired currency.

6. Login/Logout

Your users can easily log in/log out from PrestaShop Mobile App using this option.

7. Notification Settings:

The app users can control the specific push notifications they want to receive in the app. The options allow mobile app users to choose between all notifications, promotional notifications, and order status update notifications.

6.3 Category Screen:

All the sub-categories, parent categories & other associated categories are available in your PrestaShop Mobile App. The category screen is designed to deliver clutter-free experience in two basic views: Grid & List. The product image, name, price, the discount is displayed in all listings with an option to add them to the wishlist bag as well. The Mobile Apps with PrestaShop Mobile App Builder have layered navigation which makes the product search just simpler. The following options are available on the category screens:

Furthermore, now the admin can also enhance the UI of the category product listing page by adding video/images on the category page section.


1. Sort:

This option allows the shoppers to select the desired order in which the category product pricing is to be sorted. Two sorting orders are available in your apps: Price: Low to High & Price: High to Low.

2. Filter:

The option to filter products simplifies product search. The app users can filter the products in your PrestaShop Mobile App based on various attributes like size, color, compositions, Condition, Manufacturer, Price, etc. The users can search for their favorite products in minutes using these filters.

6.4 Product Screen:

The product screen of your PrestaShop Mobile App is simple & intriguing. Multiple images of the same product are displayed along with the name & price. The product availability is also displayed as “In Stock” or “Out Of Stock” based on inventory status. It contains the following other options:
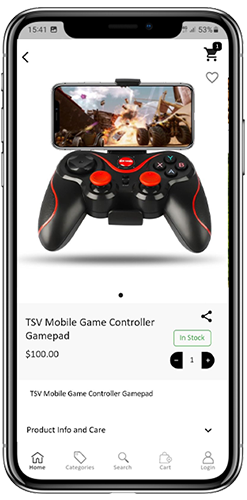
1. Product Options:

All the options related to the product like size, color, etc. are displayed on this screen. These product options are the same as available on the website.

2. Short Description

Users get to read the short description of your product to quickly make up their minds.

3. Product Info & Care

The complete product information is listed on the website is displayed here. The app users can get complete product details from here.

4. Add To Wishlist:

The Mobile App users can directly bookmark the product just by tapping “Add To Wishlist” on the left bottom of the product screen.

5. Add To Cart:

As the name “Add To Cart” button adds the product directly into the cart & the users can further go on with the purchase.

6. Product Social Sharing:

There is an option on this screen to share your product on multiple social platforms, including Bluetooth & e-mail. The app users can share the products among their friends/relatives on multiple social platforms & lure heavy users to your app.

6.5 Wishlist Screen:
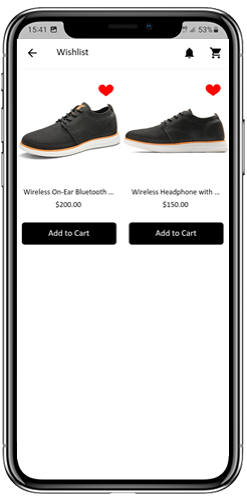

Your PrestaShop Mobile App Creator would have a wishlist bag allowing the users to bookmark products for future purchases. The users can view the list of all bookmarked products from here. It has two options:

1. Add To Cart:

The app users can add the bookmarked product directly into the shopping cart by choosing Add To Cart option.

2. Remove From Wishlist:

The users can even remove any wishlist product if not feel like buying that.

6.6 Login Screen

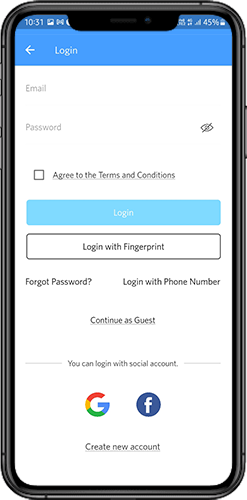
The PrestaShop Mobile App Creator offers various one-tap login options & makes the sign-in/registration process more seamless:

1. Login

The app users can authenticate & access apps using e-mail sign-in credentials.
2. Sign Up

All the new app users can sign-up & create their account on the store from the mobile App. The sign-up form of the PrestaShop Mobile App only asks for relevant details.

3. Login with Phone Number

Your Mobile App comes up with an easier & robust phone number login option which makes it easier for the users to verify the OTP & login app.

4. Login with a Fingerprint

Your users also get an option to log in with fingerprint authentication. This allows users to access apps in seconds.

5. Login with Facebook

The users can log in to the app using their Facebook Account Credentials.

6. Login with Google

The users can log in tothe app using their GoogleAccount Credentials.

6.7 Shopping Cart Screen:

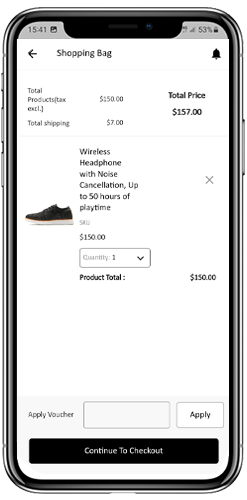
The Shopping Cart screen of your PrestaShop Mobile App will display all products to the shopping cart. The app users can view the product’s name, quantity, total price & shipping cost. This screen has the following options:
  1. Apply Voucher

This option allows the users to get discounts & offers by entering valid coupons & vouchers running on your website.

2. Total Product Price

The users can view the complete cost of their shopping bag from here. It is automatically updated as per any update with product quantity or addition.

3. Update Product Quantity

The app users can even update the product quantity with the “Update Quantity” option.

4. Remove Product

The app users can simply remove the product from the cart by simply tapping the “Remove” option.

5. Continue To Checkout

The front-end mobile app users can proceed further to the checkout & payment screens just by tapping the “Continue To Checkout” option. It will re-direct them on the checkout screen.

6.8 Checkout Process

The Prestashop mobile app Builder consists of a simplified checkout process. The front-end mobile app users have the option to select the shipping details, billing details, order numbers, order comments, and so on in the checkout process of the mobile app.

Users of the Android and iOS apps only need to follow a few simple steps to place their orders.

1. Customers can select the desired product and add it to the shopping cart. After clicking on the shopping bag, he or she can also select the desired product quantity. Moreover, the front-end mobile app users can see the total number of products and shipping costs.

The customer also has the option to apply any voucher and coupon code at the bottom of the same page.

2. After clicking on the Continue to Checkout option, the user can review the order where he or she can see several details. Such as product price, shipping cost, shipping address (It can be edited on the same page), order summary (Number of the products), total price, and so on.

Additionally, the customer has the option to select their preferred mode of shipping on the same page. The user can also put his or her special request or requirement in the order comment option appearing on the bottom of the screen.
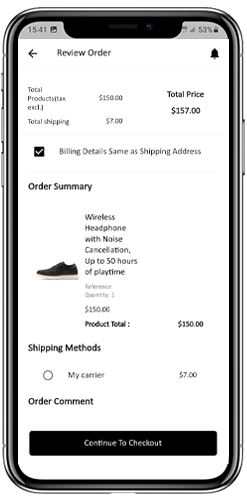
  1. The user will be redirected to the payment method screen after clicking on the continue to checkout option.
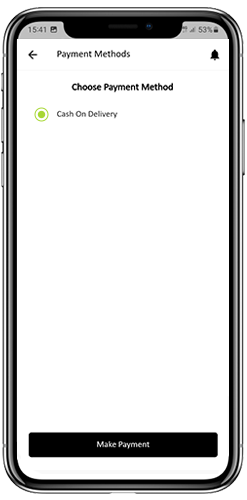
On this screen, users have the option to select from all of the website payment options. By default, the shopping app consists of a cash-on-delivery option as a mode of payment.

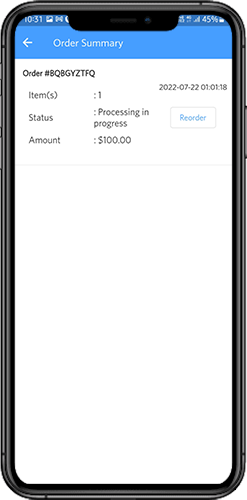
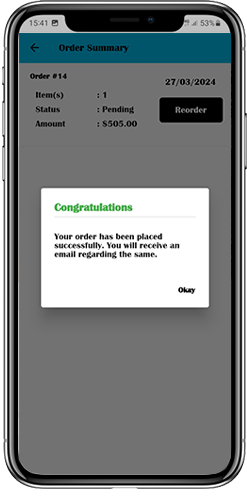
  1. When the user performs the payment activity, then he or she will be redirected to the order summary screen. where the customer can see the order status, order number, amount, and so on. The front-end mobile app users will get the order confirmation popup message on their mobile phone screens as well.
6.8 My Account Screen

My account screen of the Android/iOS eCommerce app allows users to view the complete account details including a list of previous orders. My Account screen offers the following options:
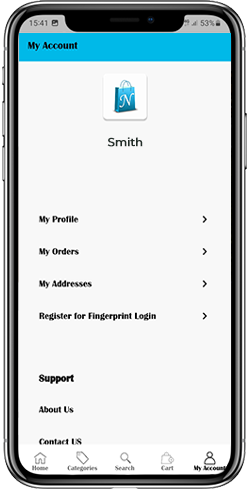
  1. Order History

The users get to know about complete order details being placed earlier. The order submission date, order reference, price & delivery status is displayed.

2. Update Profile

Users can also update their pre-saved profile details such as First or last name, phone number & password.

3. Shipping Address(s)

The app users can see the complete list of saved Shipping Addresses. A new Shipping address can also be added from here.

4. Order Details

The app users can get to view the complete list of the previously placed app orders.

5. Re-order feature

There is a direct re-order product directly by clicking the “Re-order” button. All the previous orders will be added to the cart by just tapping a single button.

6.10 Order Detail Screen
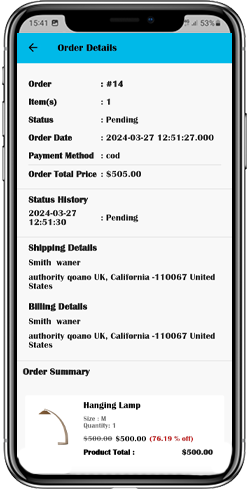
Order details screen of PrestaShop eCommerce App provides complete order detail such as shipping address, product summary, shipping and payment method, and total cost summary. The users can even track the delivery of previously placed orders directly from this screen.

7.0 Video Tutorials

8.0 Advanced PrestaShop Marketplace with Mobile App

KnowBand’s PrestaShop Marketplace converts your online website into a fully fledged marketplace. The PrestaShop Mobile App Builder is fully compatible with PrestaShop Marketplace extension. This means you can bring the entire marketplace listing on the same PrestaShop Mobile Apps. Thus, launch a pair of Marketplace-compatible Mobile Apps with KnowBand & attract a large base of sellers & customers to your store.

–> As the user clicks on the Seller option, he/she is redirected to the Seller page of the mobile store. The user can view the list of the sellers of the marketplace along with their ratings.

–> The customers can click on the name of the seller in order to see his profile and product being offered. The sellers can log in with their username and password. They are then redirected to the dashboard.

Get to know more about PrestaShop Marketplace with Mobile App from here.

Android & iOS Mobile App Builder for PrestaShop is also available at the Offical PrestaShop Addon Store

Prestashop Order Return Manager Addon- User Manual

1.0 Introduction

Managing the customer return request is not an easy task. It takes a lot of time and effort. The RMA system plays an important role in an eCommerce store. Without the RMA system, the store owner enables to manage of the customer request with ease and customer are also enabled to return and refund the product. Worry no more! The Prestashop Return Manager Addon adds the functionality to manage return requests for any order placed by a customer as well as a guest customer. The Prestashop return manager addon allows admin to adds a return manager button link to the front-end through which any customer/guest customer can apply for the return of any product contained in an order placed earlier.

IT is very easy to use and the customer can return any product in order completely or partially, which means the customer can also return half or less quantity of any product in the order.

How can Prestashop return manager work:

The first process this, the customer can initiate the product return request from their account page, after initiating the request the Store admin receives the return request.

When a user requests a product return, the admin can verify the return request genuine or not. If the request is genuine then they can approve the return request. The admin change return product status form the back end interface.

This Prestashop Return Manager addon offer two functionality:

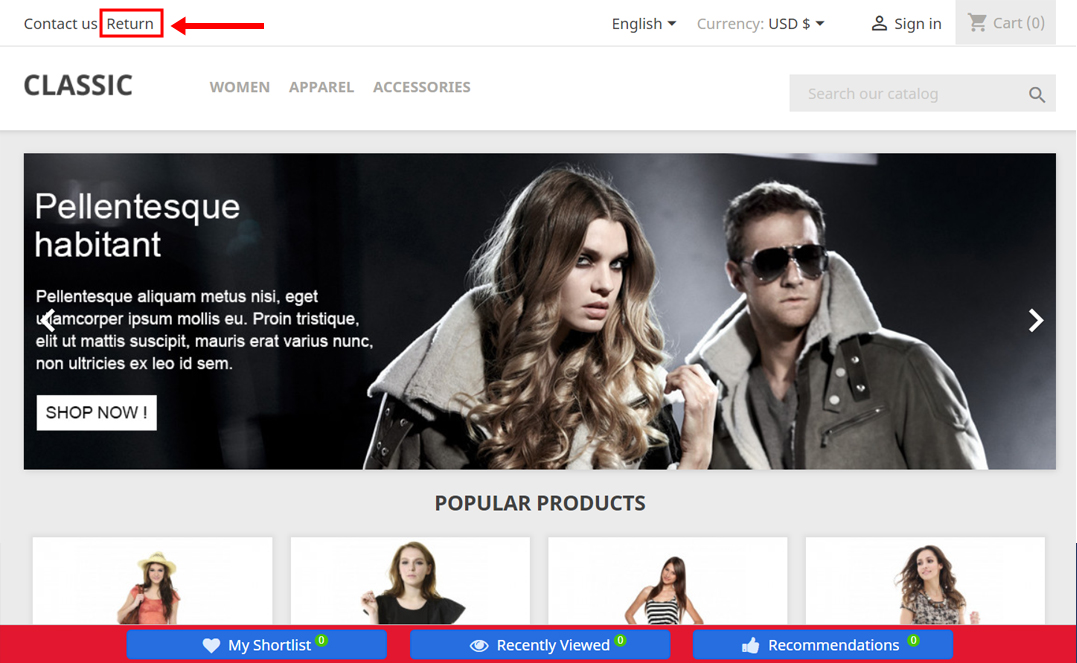
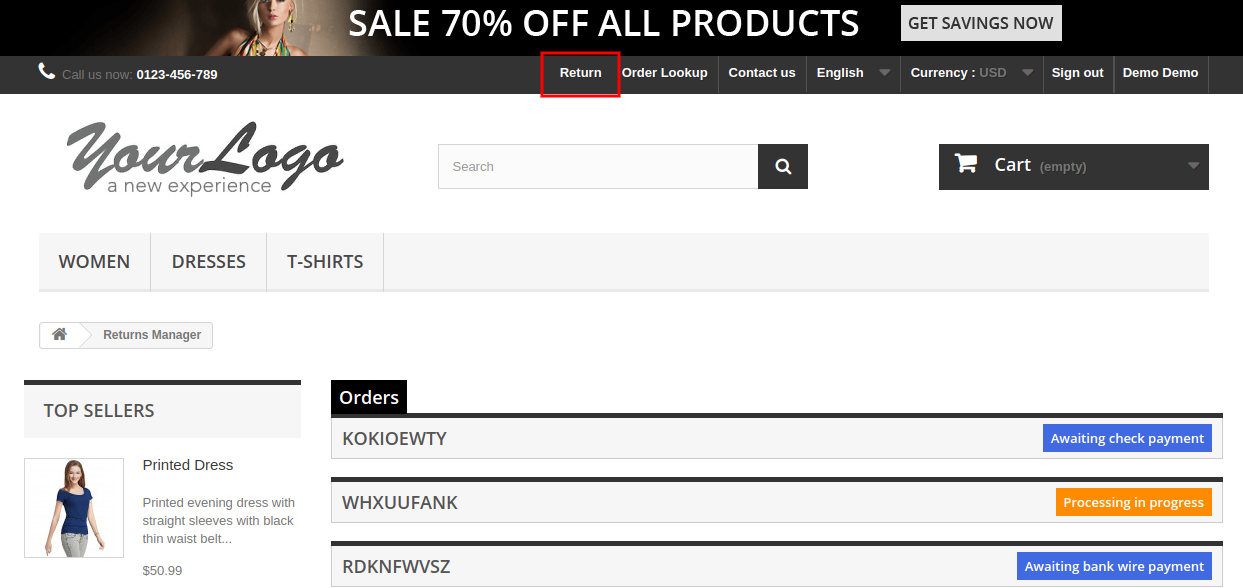
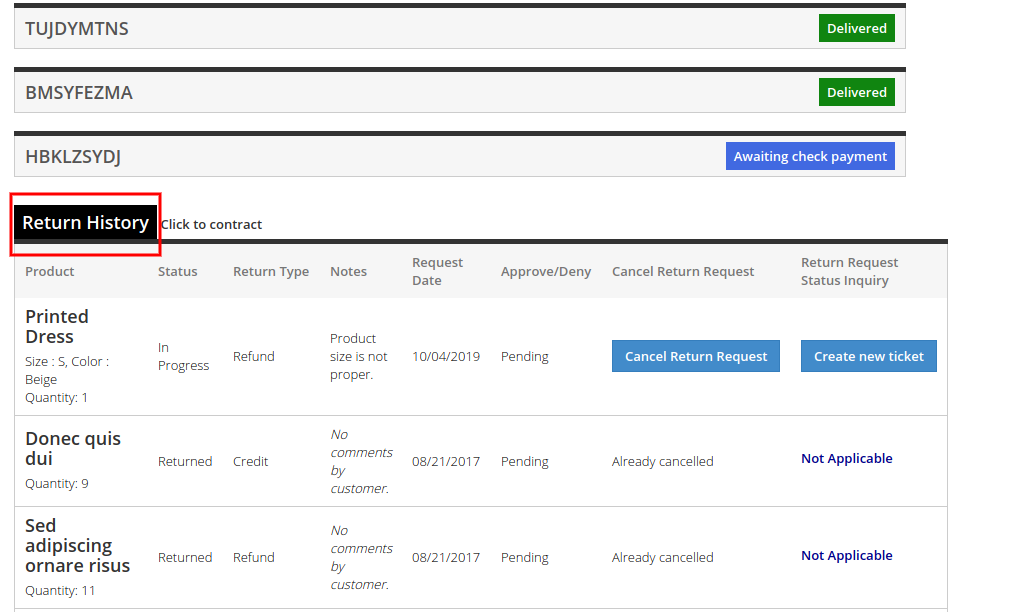
For the login users- The Prestashop order refund addon shows the return manager link appears in the header as well as the ‘My Account’ page. When the logged-in customer opens a My Account page this page containing the list of all the orders that he/she placed and the products that are eligible for return have a link to apply for a return. This page also contains the history of returns applied by the logged-in customer.

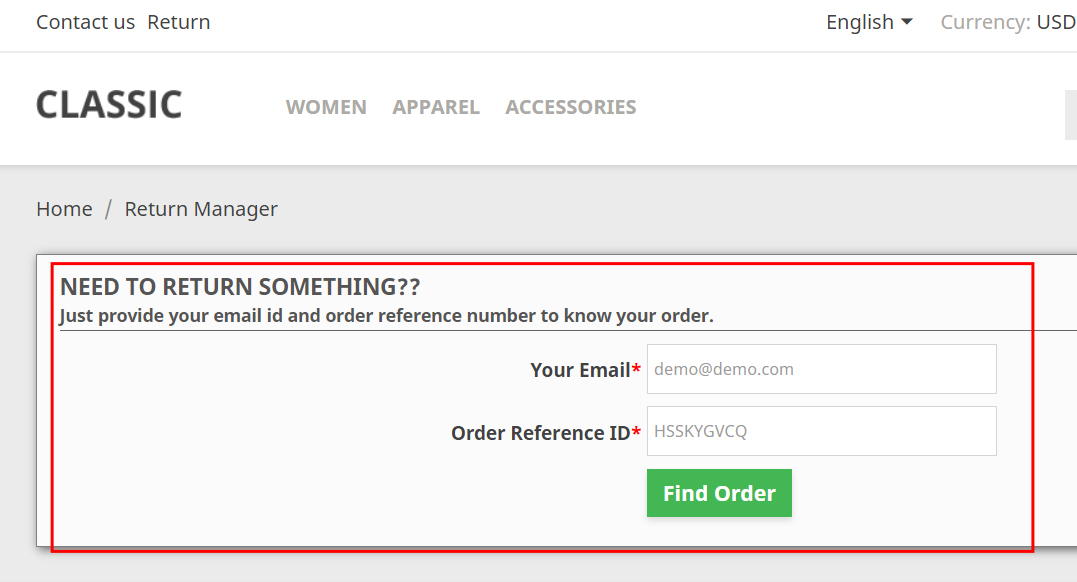
For the Guest users- In case the user is not logged-in the website then the return manager link opens a page containing a form to find any order. After finding an order using the form the order detail appears and the products from that particular order that is eligible for return have a link to apply for a return. This page also contains the history of returns applied by the guest customer who has placed this particular order.

In the updated version of this Prestashop Order refund manager module, the online users can also cancel their order for a limited period. The online merchant can apply the related settings from the admin interface.

What is new in the version v3.0.8:

In the updated version,

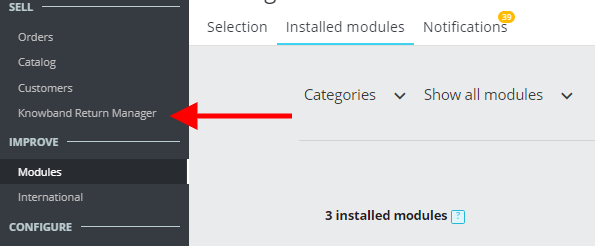
  • The Return Manager module allows the admin to use the module form the left menu of the Prestashop backend.
  • The admin can check the status of returns & cancellations at one place.
  • The admin can also a custom text explaining the order status or any other details in the return status email template.
  • The admin gets an option to select the order status from which he wants the return policy to apply for customers.
  • Return Manager module allows admin to send the test email before making the email live.
  • the Return Manager module allows the admin use the module form the left menu of the Prestashop backend.
  • The admin can check the status of returns & cancellations at one place.
  • The admin can also a custom text explaining the order status or any other details in the return status email template.
  • The admin gets an option to select the order status from which he wants the return policy to apply for customers.
  • Return Manager module allows admin to send the test email before making the email live.

1.1 Benefit of Merchant

  1. This Prestashop return manager addon allows the admin to enable/disable the functionality as per the desires.
  2. This Prestashop return manager Extension enables the admin to select the return method i.e. Credit, Refund, and Replacement.
  3. The Admin can manage or change the credit return message, refund return message, and replacement return message from the admin interface of the Prestashop return manager Module.
  4. ThisPrestashop order return manager Extension allows admin to customize the look and feel of the Return Manager link that shows the Front End.
  5. Prestashop order return manager plugin gives the freedom to the merchant to manage the return slip settings. The store admin sets the return address or adds the return address and they can also change return guidelines that print on the return slip.
  6. This Prestashop RMA enables admin to select the default return and refund policy and they can also add the new return policy.
  7. This PrestaShop return product addon allows admin to set the return reason on the back-end and he/she also adds the new return reason.
  8. The Store admin can change the return status of the online customer from the back-end.
  9. It generates a return request from the back-end and the admin can find any order by simply providing the reference number and the corresponding email and then apply for a return accordingly.
  10. The Prestashop store admin can customize the email templates accordingly with the help of the Prestashop order refund addon.
  11. Prestashop order return manager Addon allows the merchant to view all the pending returns and refunds of the buyers.
  12. The Prestashop Return Manager plugin enables the admin to view the active return list.
  13. The Admin can set filter the archives list and view all return requests that are complete.
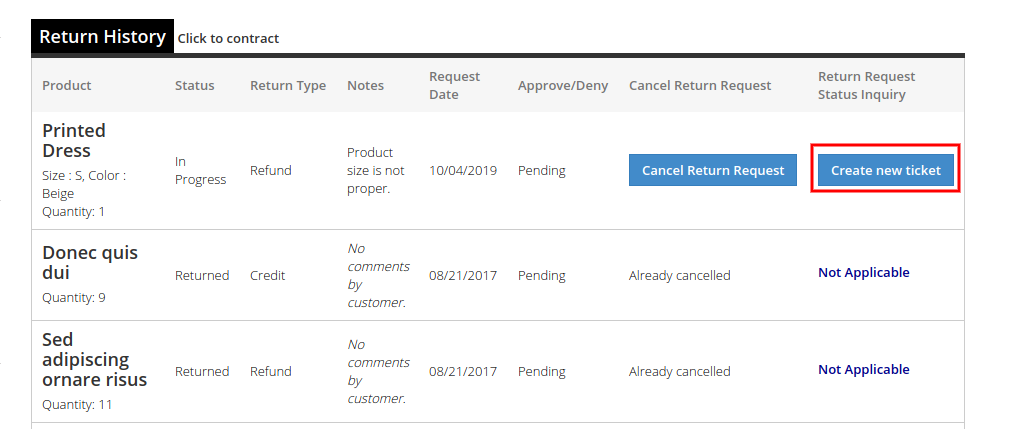
  14. Customers can inquire about the status of their actions return requests. They also get an option to cancel that request.
  15. Prestashop order return manager Addon allows customers to return their order for the selected order status.
  16. Prestashop return manager extension allows you to set minimum and maximum days for each type “Credit/Refund/Replacement” within a return policy.
  17. It is easy to update the pending and active return requests list by clicking the Refresh button provided at the Prestashop refund order Extension admin interface.
  18. When the active return requests are marked completed, the inventory is automatically completed.
  19. You can generate and send the discount voucher to the customers for submitting a refund request.
  20. Admin can also include custom CSS and JS code from the admin interface of Return Manager for Prestashop.
  21. The online store merchant can allow the online users to select the products which he/she wants in replacement.
  22. The online merchant can allow the users to return the whole order by selecting products.
  23. This Prestashop return manager module allows the store merchant to set custom fields from the admin interface.
  24. Admin can now allow the online users to send order cancellation requests from the website front-end interface.
  25. The Prestashop Return Manager Module allows the admin to set up the order status on which the users can cancel their orders.

Note: Prestashop Return Manager Addon is now compliant with the GDPR. We have integrated the GDPR hooks on our return manager module.  Please refer to the General Settings to know more about the GDPR.

2.0 Installation Guide

To install this Prestashop Return Manager Addon, please follow the following steps:

1. Copy the whole folder named as “return manager” into your modules folder of the root directory of your PrestaShop store through FTP.

2. You will be able to find the Prestashop return manager extension ready to be installed in the “Modules” in your PrestaShop store as shown below.

For version 1.6 –

For version 1.7 –

Click on the Install link to install the Prestashop return manager addon.

2.1 Module Implementation

The Prestashop Return Manager Addon implementation will have two sections:

1- Admin Module
2- Front-End Module

3.0 Admin Module

In the admin module, there will be the following options to configure this Prestashop replacement manager Addon. The Prestashop replacement manager Module includes 18 tabs and they are as follows.

Return Manager Prestashop extension allows admin to check the status of all return and cancellation requests at a single click.

Easy Navigation: The admin can access the module from the left menu of the Prestashop backend easily.


The Prestashop return manager addon will provide the following interface:

  1. General Settings
  2. Custom CSS/JS
  3. Return Slip Settings
  4. Return Policies
  5. Return Reasons
  6. Cancel Reasons
  7. Return Statuses
  8. Return Address
  9. Create a Return
  10. Email Templates
  11. Pending Order Cancel List
  12. Complete Order Cancel
  13. Pending Return List
  14. Active Returns List
  15. Canceled Returns List
  16. Archives List
  17. Custom Fields
  18. Other Plugins

Each tab contains some specific settings/functionality that can be changed according to the need. Each tab of this Prestashop Return Manager Addon explained below.

3.1 General Settings

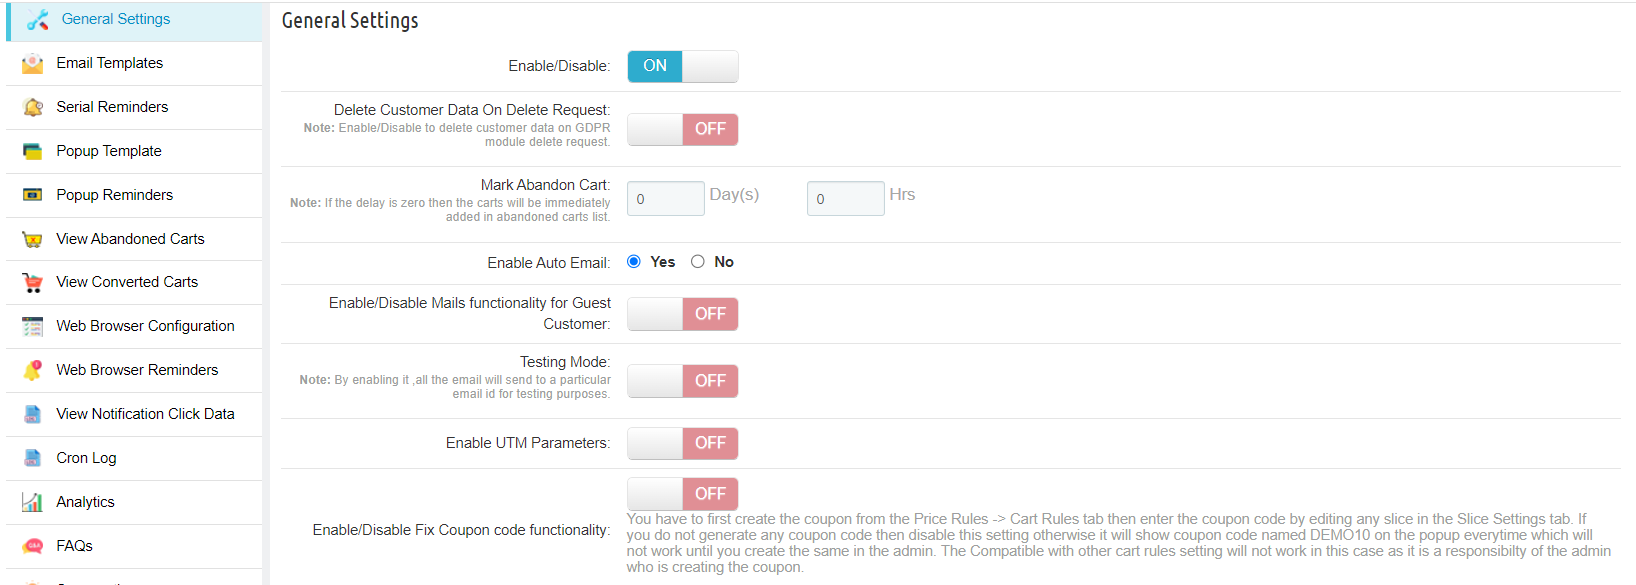
After clicking on the configure link on the Prestashop replacement manager Module listing page (configure link will automatically appear once you install the plugin), the system will open general settings tabs by default.

This tab will be having the following options to configure the Prestashop replacement manager Module.


Initially, fields in the above form will be already filled with their default values.

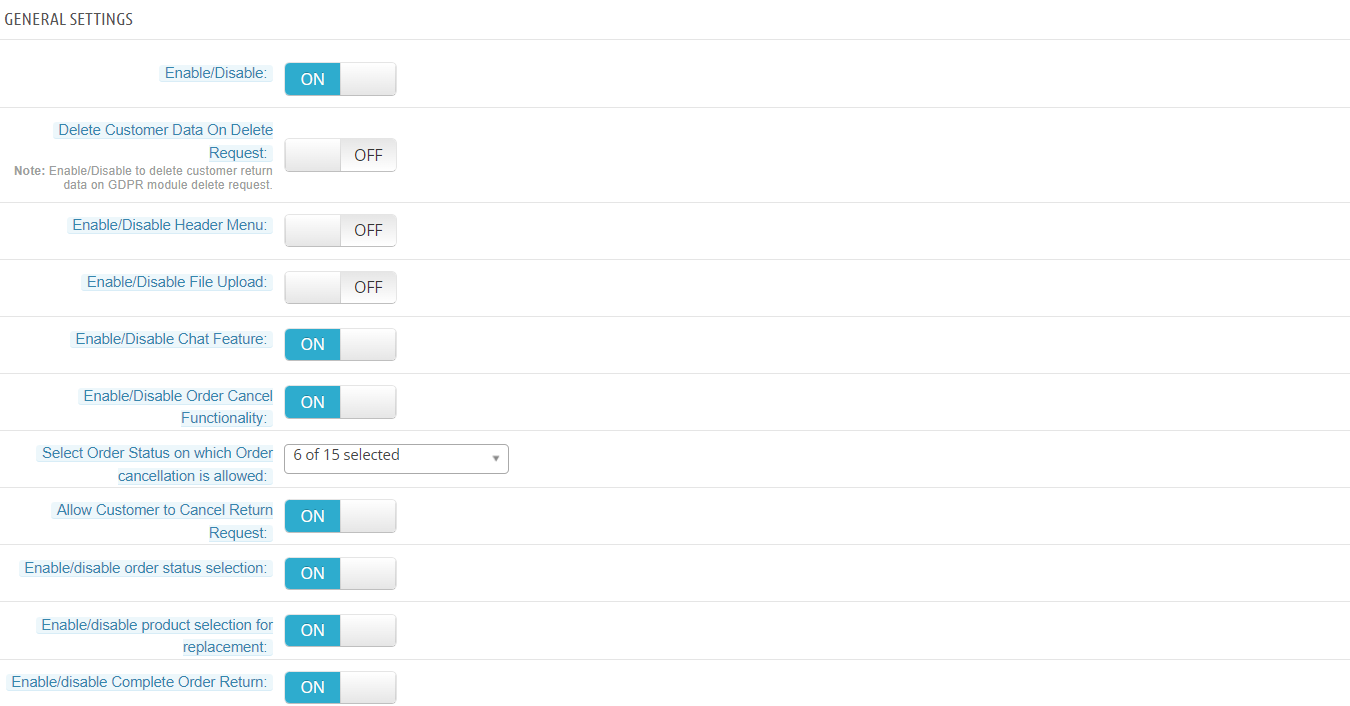
  • Enable/Disable: Initially, this Prestashop order return addon general settings will be “OFF”. The Online store admin can enable/disable this Prestashop order refund extension by turning ON/OFF in this setting.
  • Delete Customer Data on Delete Request: This feature allows the store admin to delete the customer data from the back-office. The module deletes the subscriber details automatically. If you are using the official GDPR module then you must need to enable this setting. The main purpose of this feature is to export and deletes user data on the PrestaShop GDPR module request. The Customer Data will be deleted on if this setting is ON.
    Note: It is also compatible with our Prestashop GDPR Module.
  • Enable / Disable Header Menu: When the field is enabled, the Return tab will be available in the store’s header through which placed orders can be returned.
  • Enable/Disable File Upload: In this tab, the admin can enable/disable the File Upload option button. This option allows the customer to upload the return product image.
  • Enable/Disable Chat Feature: This option enables or disables the ticket system for your store. If this feature is enabled, customers can raise a ticket and chat regarding their return requests.
  • Enable/disable Order Cancel Functionality: Activate or deactivate the functionality of order cancellation.
  • Select Order Status on which Order cancellation is allowed: Select the order status on which you want to allow order cancellation.
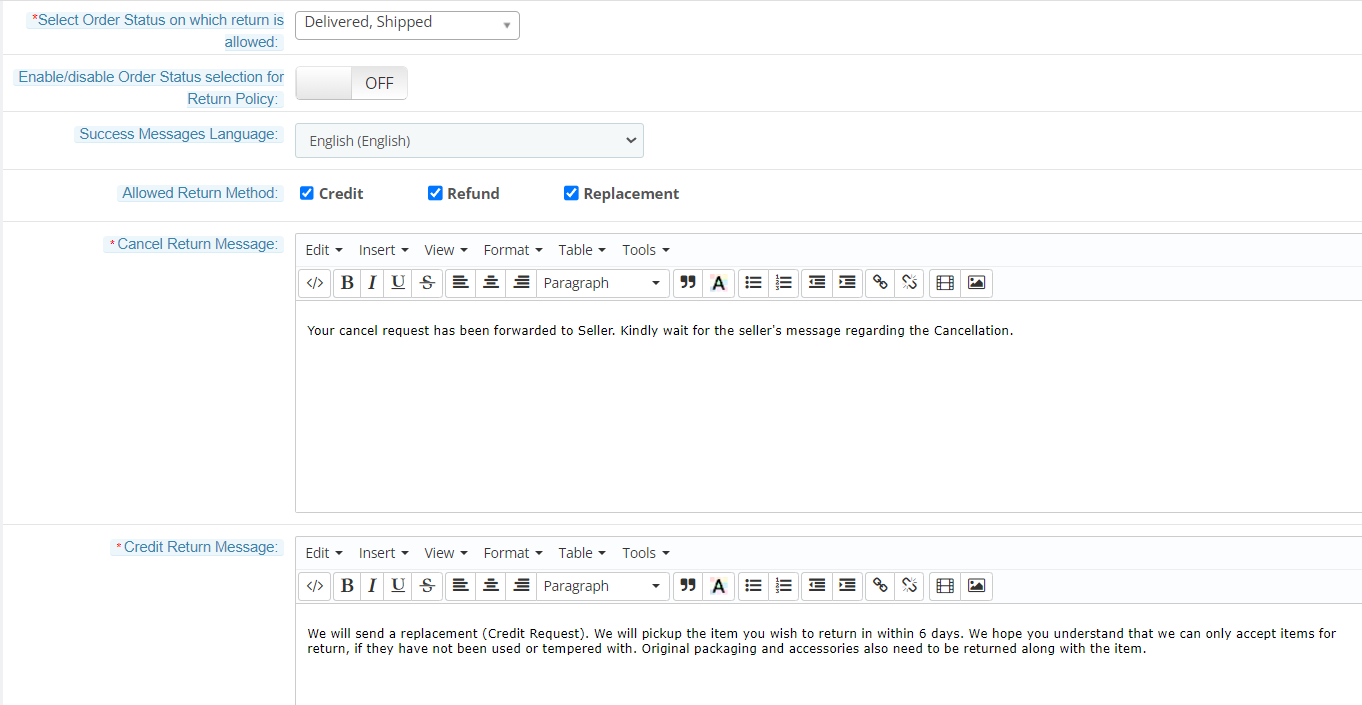
  • Enable/disable Order Status selection for Return Policy: Return Manager module Admin can set order status after reaching which the return policy will be considered. Once this feature is enabled then the admin can select the Order Status from which Return policies are applicable.

  • Allow Customer to Cancel Return Request: This option allows or disallows the customer to cancel their return request. if this option is enabled, the customer can cancel their return request.
  • Enable/Disable Order Status Selection: This functionality lets you enable or disable product returns on selected order status.
  • Enable disable product selection for replacement: The merchant can allow the online users to select the products which they want in replacement.
  • Enable Disable complete order return: Customers can return the whole order if they wish to do so. Admin can activate or deactivate the complete order return facility from the admin interface of the Prestashop order return manager Module. Users can select the products which he wants to return.
  • Select Order Status on which Order Return is Allowed: With this option, admin can set the specific order status on which they want to allow returns on the store.
  • Enable/disable Order Status selection for the Return Policy: When the field is enabled the user can select the order status on which the Return Policy will be applicable.
  • Success Messages Language: This drop-down contains all the languages available and enabled in the system, to save the success messages in a different language you have to choose the desired language from this dropdown. The success messages will be saved for the selected language when you submit the form.
  • Allowed Return Method: This option allows the admin to select the return method which they want to offer.
  • Order Cancellation Message: Here, the admin can set the message for display to the users after creating order cancel request.
  • Credit Return Message: It allows the admin to change the text as well as the format (HTML Design) of the text that will be displayed on the successful submission of a return request (Credit Type) by any customer.
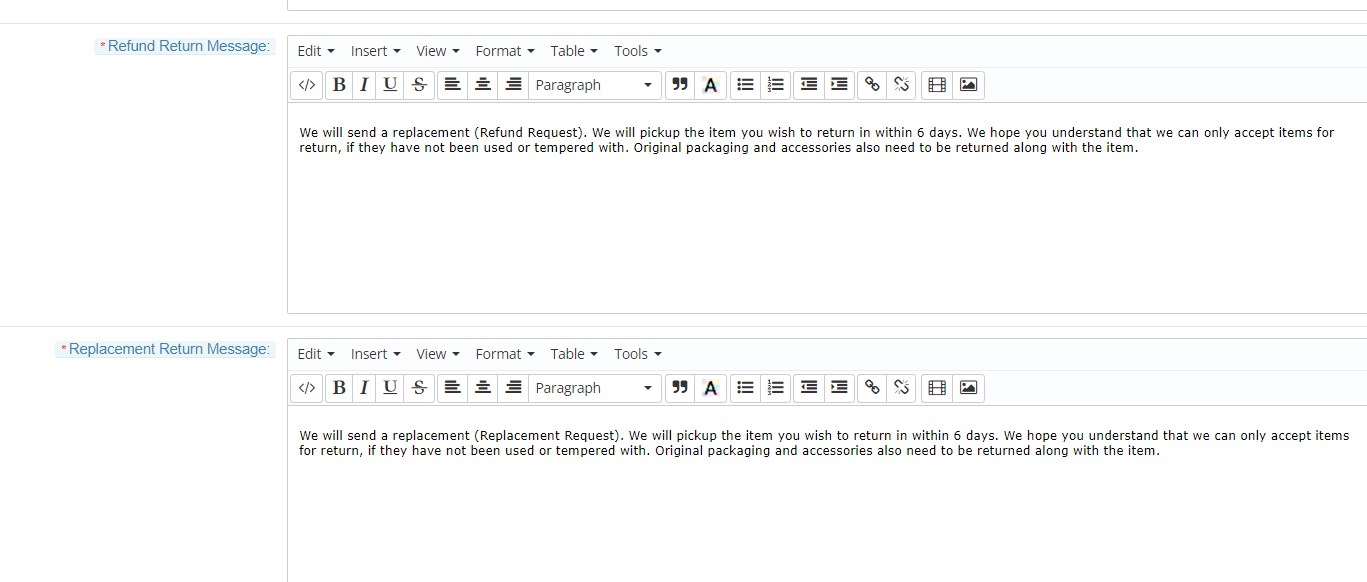
  • Refund Return Message: This option enables the admin to change the text as well as the format (HTML Design) of the text that will be displayed on the successful submission of a return request (Refund Type) by any customer.
  • Replacement Return Message: This Prestashop return manager addon enables the admin to change the text as well as the format (HTML Design) of the text that will be displayed on the successful submission of a return request (Replacement Type) by any customer.

3.2 Custom CSS and JS

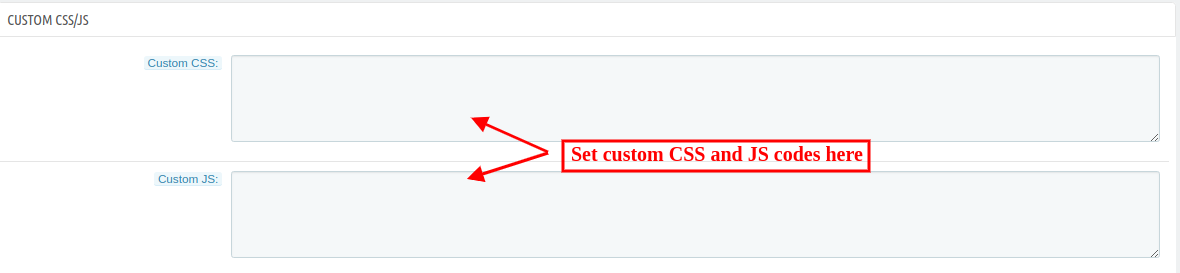
  • Add CSS Code: With this option, you can add additional CSS code.
  • Add JS Code: With this option, you can add additional JS code.

3.3 Return Slip Settings

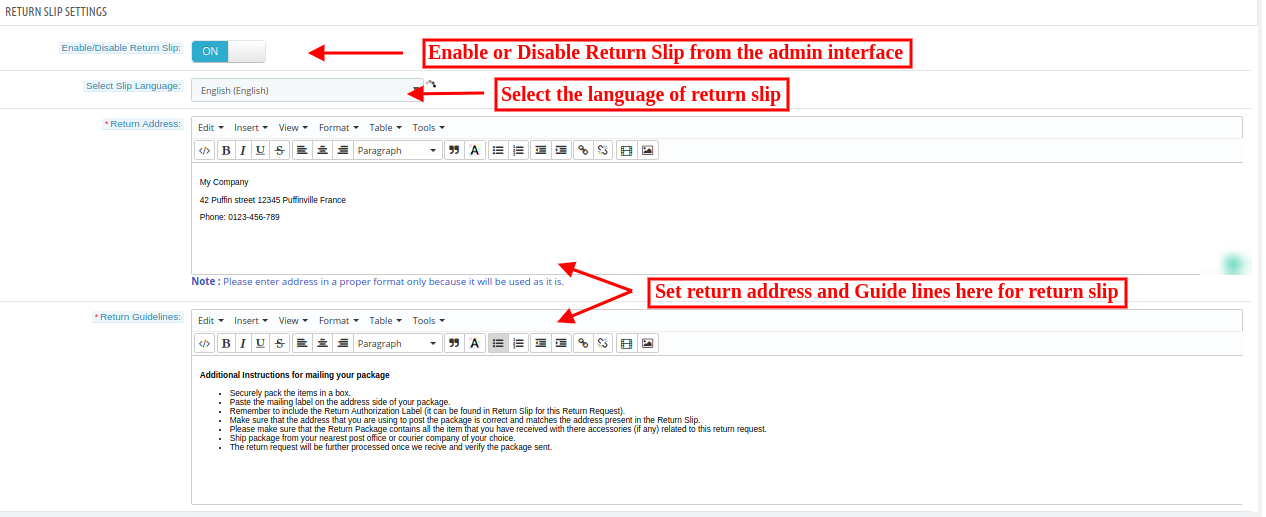
In this tab, the merchant can alter the settings and content of the Return Slip. This return slip is generated automatically when the admin approves any return request (if the feature is enabled). The return slip is generated in the ‘PDF’ format and is mailed to the customer in the mail for Return Request Approval Notification.

The Prestashop store admin needs to implement these settings:


  • Enable/Disable Return Slip: Initially, this will be “OFF”. Admin can enable/disable the Return Slip feature by turning ON/OFF in this setting. Return slips are only generated when the feature is turned ON.
  • Select Slip Language: This drop-down contains all the languages available and enabled in the system, to save the Return Slip content in a different language you have to choose the desired language from this dropdown. The content will be saved for the selected language when you submit the form.
  • Return Address: This address will be printed on the return slip and will also be displayed on the return request form.
  • Return Guidelines: These guidelines will be printed on the return slip.

3.4 Return Policies

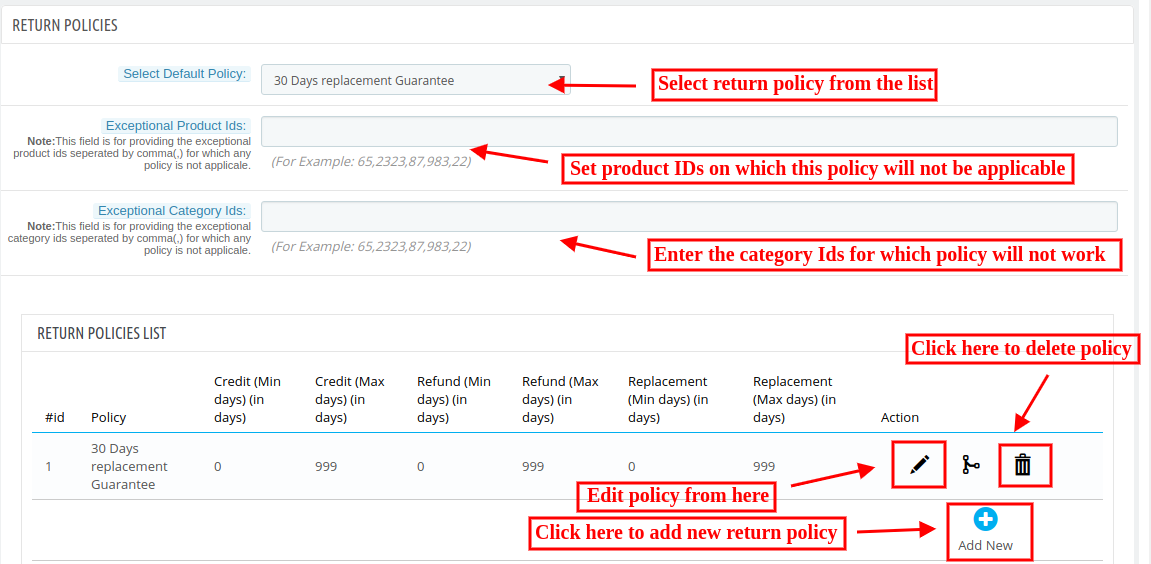
In this tab, the admin can add new return policies and can also edit or delete an existing return policy for the PrestaShop product return extension.

There is also an option to map the return policies to categories. A product is eligible for return only if it’s Default Category is mapped to a policy.

3.4.1 How to find the Default Policy of a product?

It allows the store admin to find the default policy. Following are the steps to find default policy of a product –

1. Go to Catalog > Products
2. Click on the “Edit” button of the desired product.
3. Click on the “Associations” tab.

The “Default Category” of the desired product will be displayed.

Note: One category can only be mapped with at-most one policy. But one policy can be mapped with more than one category.


This PS module provides an option to map the return policies to products.

This tab contains a list of existing return policies for the Prestashop replacement manager Module. The admin can also create a new return policy using the Add New button at the bottom of the policies tab. After clicking on the add new button a pop-up appears containing the form to create the return policy.

3.4.2 How to add a new policy?

The Prestashop refund order Extension provides the store admin option to add the new return policy. Following are the steps to add a new policy –

1. Go to Module and Services > Search module “Return Manager” > Click on the “Configure” button. > “General Setting” tab will display.
2. Click on the “Return Policies” tab.
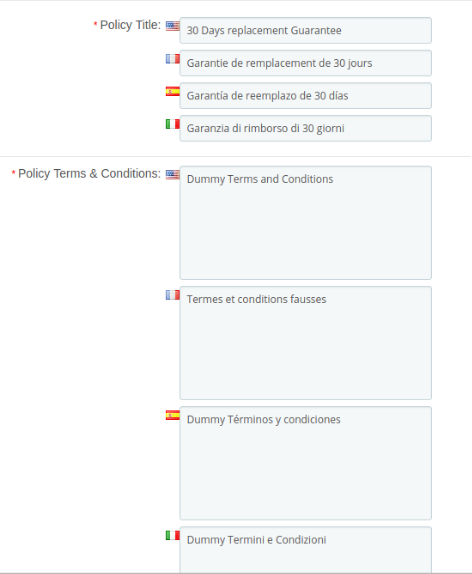
3. Click on the “Add New” button. A pop-up will display to add a new policy.
4. Fill all the mandatory fields and click on the “Save” button.
5. After the successful validation, the new policy would be added to the “Return Policies List” table.


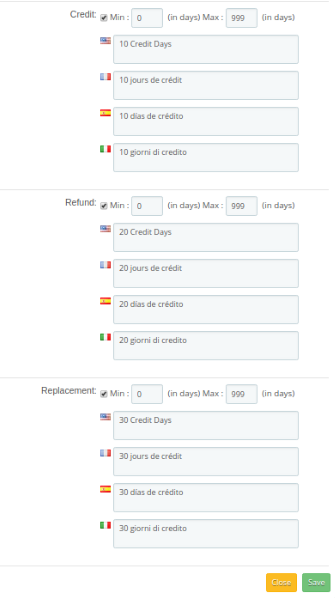
The form contains several input fields to enter the data of the policy like the name of the policy, validity, terms and condition of the policy and the option to choose the parameters i.e. Credit, Return and Replacement.

The admin can also enter the minimum and maximum days applicable to this return policy for different options as shown in the form below.

3.4.3 How to apply on policy for any product/category?

The Prestashop RMA extension allows the seller to apply policy for any product/category. Following are the steps to apply no policy for some product/category –

1. Go to Module and Services > Search module “Return Manager” > Click on the “Configure” button. > “General Setting” tab will display.
2. Click on the “Return Policies” tab.
3. Enter Product Id / Category Id at the field Exceptional Product Ids / Exceptional Category Ids respectively for which no policy would be applicable.
4. Click on the “Save” button.

3.4.4 How to edit a policy?

The Prestashop refund order Extension allows the eCommerce merchant to edit the already added policy. Following are the steps to edit a policy –

1. Go to Module and Services > Search module “Return Manager” > Click on the “Configure” button. > “General Setting” tab will display.
2. Click on the “Return Policies” tab.
3. Click on the “Edit” icon of the desired policy.
4. A pop-up will open with all the data already persist on the field as shown below.
5. Fill all the mandatory fields and click on the “Save” button.

Actions

1. The admin can edit any policy using the first link in the Action column from the policy listing table. On clicking this link a modal containing the form for the policy will appear and the data for that policy is already filled in the fields. The admin can edit any data and can save the changes made.
2. The second link in the actions column is for mapping categories to the policy. On clicking this link a modal will appear containing the options to map the categories to that particular policy.

3.4.5 How to map policy with categories?

The Prestashop RMA extension allows the admin to map. Following are the steps to map policy with categories –

1. Go to Module and Services > Search module “Return Manager” > Click on the “Configure” button. > “General Setting” tab will display.
2. Click on the “Return Policies” tab.
3. Click on the “map” icon of a particular policy.
4. A pop will display with a drop-down field to map this policy with the categories as shown below.
5. Click on the “Save” button.

Note: The policy for a particular product would be decided based on the “Default Category” of the product.

3. The third link in the Action column is for deleting any particular policy.

3.4.6 How to delete a policy?

The Prestashop product return manager module  allows the eCommerce store merchant to delete the pre-defined. Following are the steps to delete a policy –

1. Go to Module and Services > Search module “Return Manager” > Click on the “Configure” button. > “General Setting” tab will display.
2. Click on the “Return Policies” tab.
3. Click on the “Delete” icon for the policy you want to delete.
4. Confirm by clicking on the “OK” button.

3.5 Return Reasons

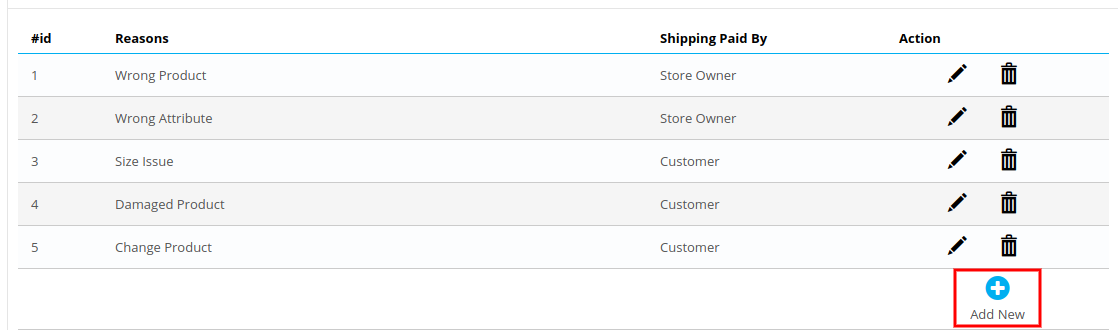
In this tab, a list of return reasons will appear in the form of a table. By default, there are 5 reasons already added into the Prestashop RMA and they are non-editable. The admin can further add any numbers of reasons into the Prestashop return manager addon.

The two links below the action column in the reasons list are for editing and deleting the existing return reasons.

3.5.1 How to add a new Return Reason?

The Prestashop return manager addon allows the store admin to add and edit the new return reason. Following are the steps to add a return reason –

1. Go to Module and Services > Search module “Return Manager” > Click on the “Configure” button. > “General Setting” tab will display.
2. Click on the “Return Reasons” tab.
3. Click on the “Add New” button. A pop-up will display to add a new Return Reason.
4. Fill all the mandatory fields and click on the “Save” button.
5. After the successful validation, the new return reason would be added to the “Return Reasons List” table.


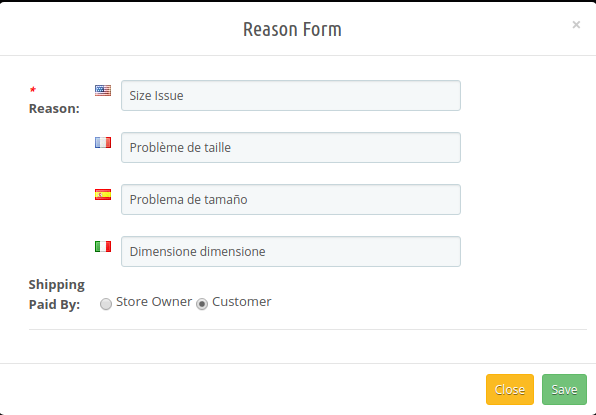
The admin can add as many reasons as required to the system using the ‘Add New’ link at the bottom of the listing tab. On clicking on the link a form will appear to add new Return Reason into the Prestashop Order Refund Extension. The form is shown below:

3.5.2 How to edit a Return Reason?

The Prestashop return manager addon allows the store admin to edit the return reason. Following are the steps to edit a return reason –

1. Go to Module and Services > Search module “Return Manager” > Click on the “Configure” button. > “General Setting” tab will display.
2. Click on the “Return Reasons” tab.
3. Click on the “Edit” icon of the desired reason.
4. A pop-up will open with data already persist in the field.
5. Fill the mandatory fields and click on the “Save” button.

3.5.3 How to delete a Return Reason?

The Prestashop return manager module allows the store admin to delete the already added return reason. Following are the steps to delete a return reason –
1. Go to Module and Services > Search module “Return Manager” > Click on the “Configure” button. > “General Setting” tab will display.
2. Click on the “Return Reasons” tab.
3. Click on the “Delete” icon of the return reason you want to delete.
4. Confirm by clicking on the “OK” button.

3.6 Cancel Reasons

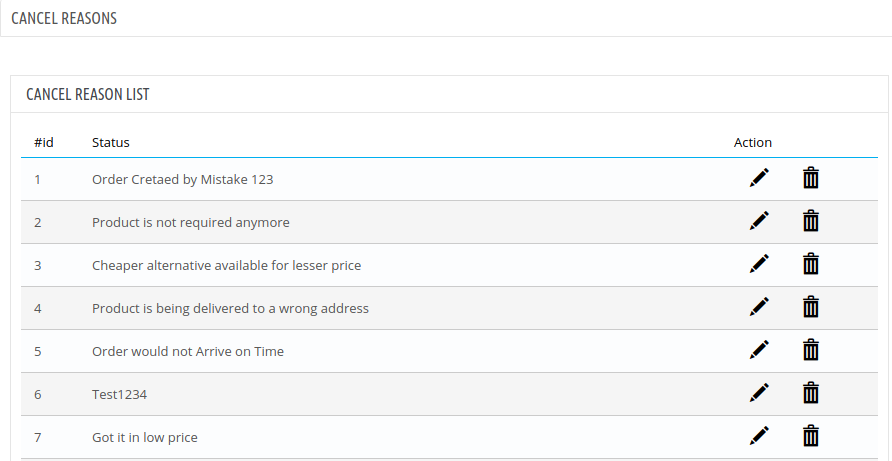
The online merchant can list the reasons for order cancellation. The online users can choose from these listed reasons while creating an order cancellation request.

Admin can add, delete and edit any cancel reason from the admin interface of this Prestashop Return Manager Module.

3.6.1 Steps for adding new cancel reasons:

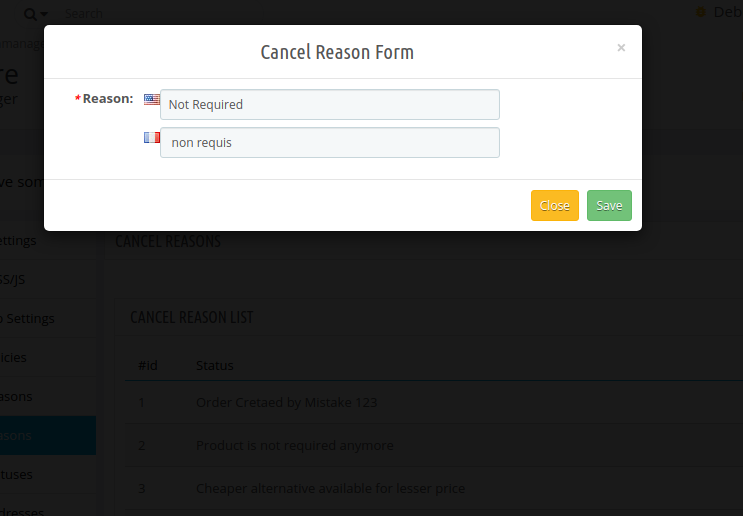
Admin needs to click on add new button and enter the reasons in different languages. Please check the below screenshot:

3.6.2 Steps for editing any cancel reason:

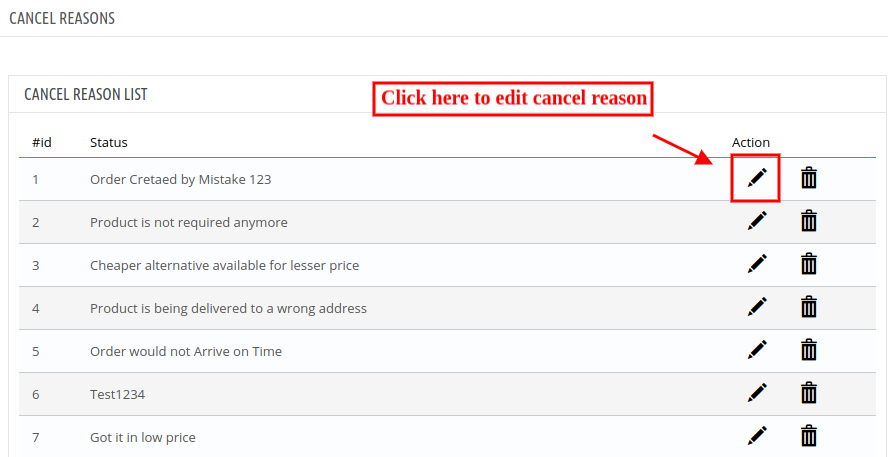
Admin needs to click on edit option and change the reason. After that, he can save it. Check the screenshot:

3.6.3 Steps for Deleting cancel reason:

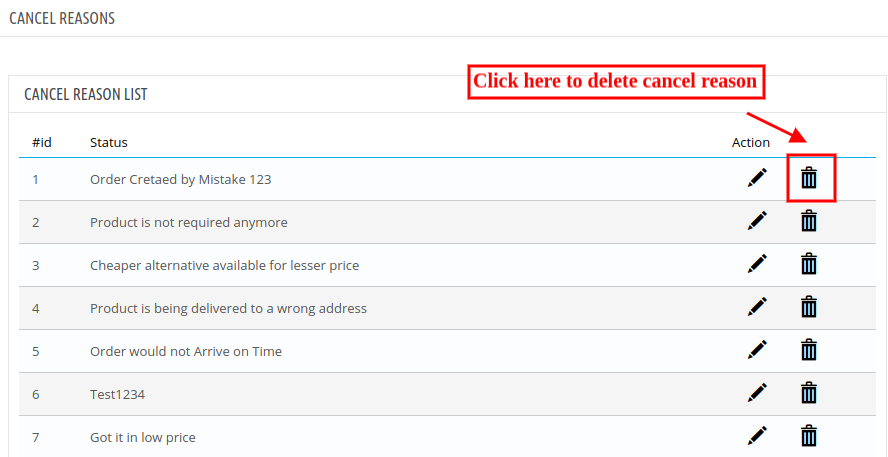
Admin needs to click on the delete icon and in the message box click on ok button. Check the below screenshot:

3.7 Return Statuses

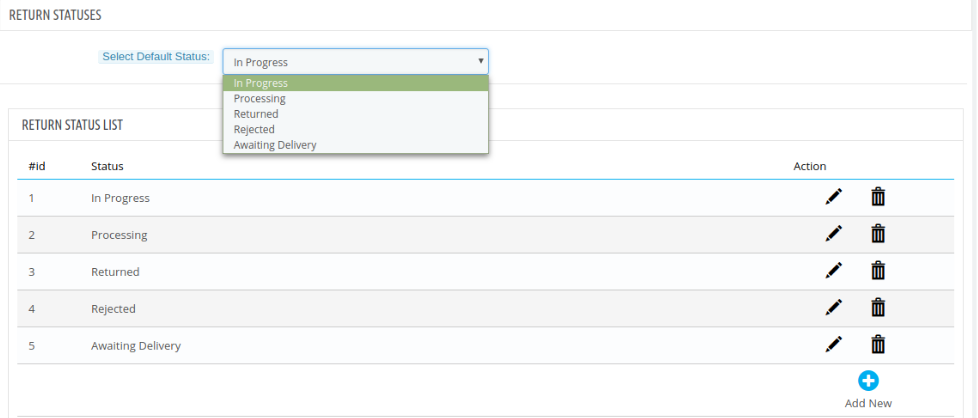
This tab contains a list of return statuses in the form of a table. By default, there are 5 statuses already added to the Prestashop return manager addon and they are non-editable. The admin can further add any numbers of statuses into the system. The tab also contains an option to choose default and the final status of any return request.

The two links below the action column in the statuses list are for editing and deleting the existing return statuses.
The admin can also change the default return status and final return status from the drop-downs in this tab.

3.7.1 How to add a new Return Status?

The Prestashop return manager addon allows the store admin to add the new return status. Following are the steps to add new return status –
1. Go to Module and Services > Search module “Return Manager” > Click on the “Configure” button. > “General Setting” tab will display.
2. Click on the “Return Statuses” tab.
3. Click on the “Add New” button. A pop-up will display to add a new Return Status.
4. Fill all the mandatory fields and click on the “Save” button.
5. After the successful validation, the new return status would be added to the “Return Reasons List” table.
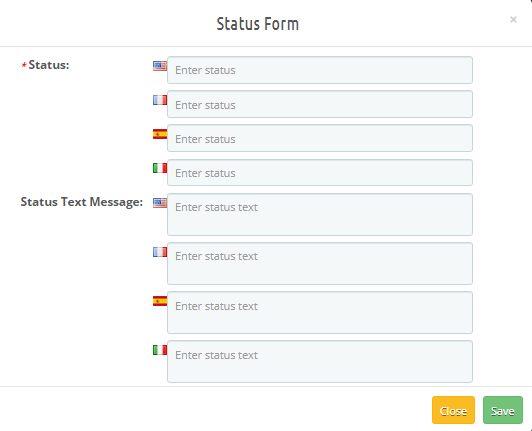
The admin can add as many statuses as required to the system using the ‘Add New’ link at the bottom of the listing tab. On clicking on the link a form will appear in a modal to add new Return Reason into the system. The form is shown below:


6.While adding the new return status admin can also add a status message explaining the meaning of that particular return status which he can highlight in the return status email as a Custom Text using placeholders.

3.7.2 How to edit a Return Status?

The Prestashop product return manager addon allows the store admin to edit the return status. Following are the steps to edit return status –

1. Go to Module and Services > Search module “Return Manager” > Click on the “Configure” button. > “General Setting” tab will display.
2. Click on the “Return Statuses” tab.
3. Click on the “Edit” icon of the desired return status.
4. A pop-up will open with data already persist in the field.
5. Fill the mandatory fields and click on the “Save” button.

3.7.3 How to delete a Return Reason?

The Prestashop RMA module  allows the store admin to delete the return reason. Following are the steps to delete return status –
1. Go to Module and Services > Search module “Return Manager” > Click on the “Configure” button. > “General Setting” tab will display.
2. Click on the “Return Statuses” tab.
3. Click on the “Delete” icon of the return status you want to delete.
4. Confirm by clicking on the “OK” button

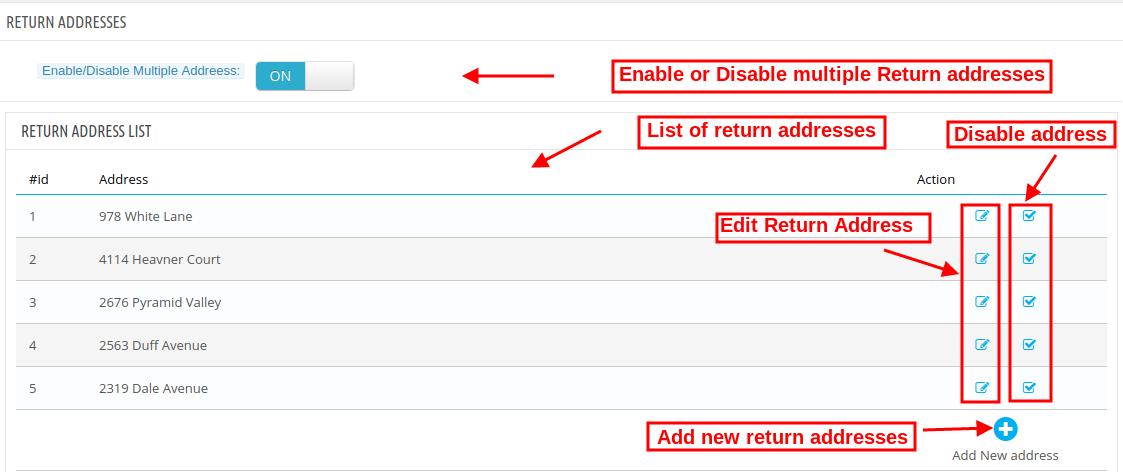
3.8 Return Addresses

The online merchant can add, delete and modify return address from the admin interface of this Return manager module. The admin can view a list of added addresses and also modify it or disable it anytime.


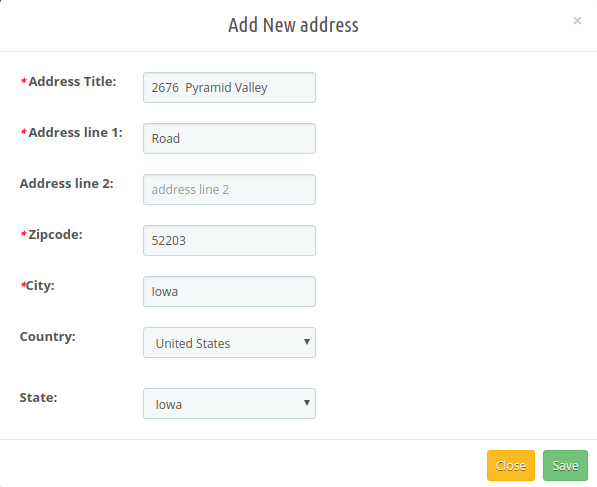
Admin can add a new address by clicking on the “+” sign. After that, the admin needs to add address details like area, zip code, city, country and state.


The online merchant can easily edit and disable the generated address without any hassle.

3.9 Create a Return

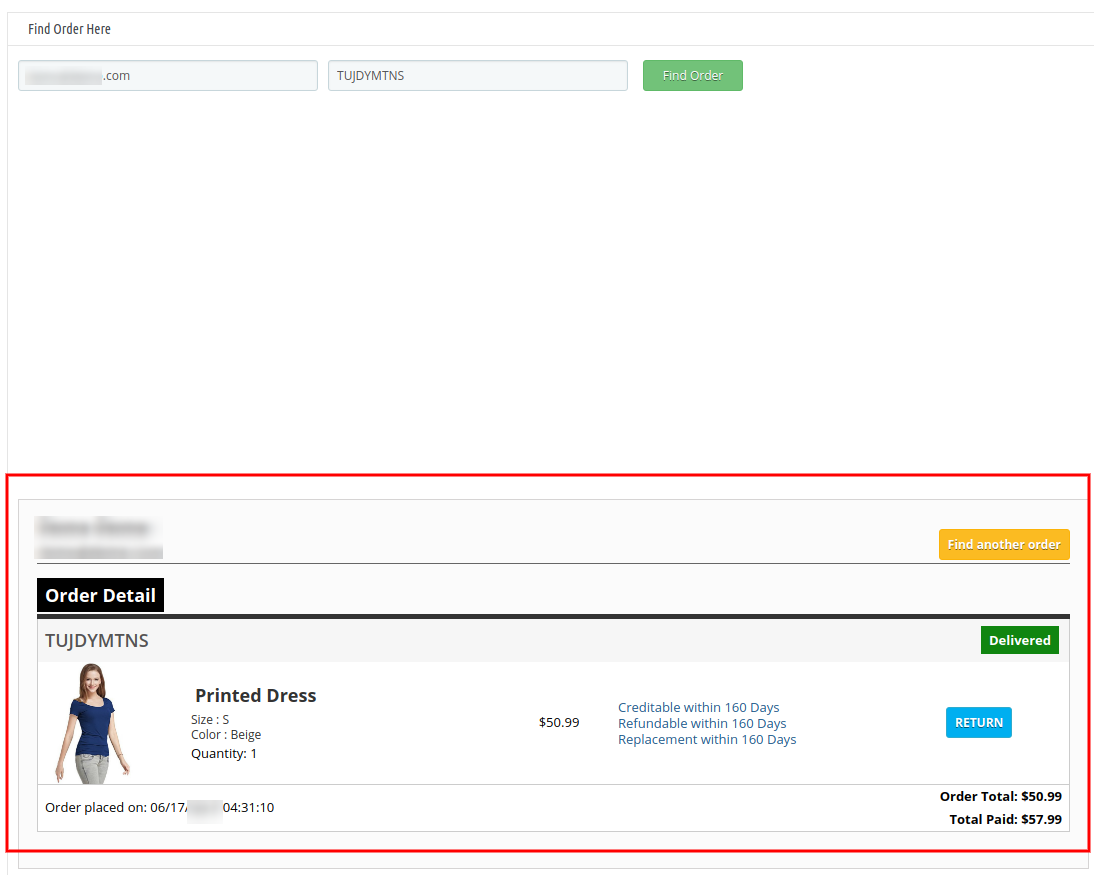
This tab is used to generate a return request from the admin panel itself. The tab contains a form through which the admin can find any order by simply providing the reference number and the corresponding e-mail and then apply for return accordingly.


3.9.1 How to Create a Return?

The Prestashop product return manager addon allows the store admin to create the return. Following are the steps to create a return –

  • Go to Module and Services > Search module “Return Manager” > Click on the “Configure” button. > “General Setting” tab will display.
  • Click on the“Create a Return” tab.
  • Enter Email Id of the customer and the Reference Id of the order.
  • Order Details will be displayed in that particular order as shown below.
  • Click on “Return Button” for the desired product. A pop up will be displayed to completed the return process.
  • Filled all the mandatory fields and agree to Terms and Conditions.
  • Click on the “Submit” button. The return request would be sent and order details would be added in “Pending Returns List” tab

Note:

  • Any return request whether it is created by admin or customer is moved to the pending returns and the admin has to approve it first to further change the status of the return request or to take any further action.
  • The orders that are delivered are only eligible for return.
  • By default, the status of the return request is set to default return status set by the admin in the ‘Return Statuses’ tab.
  • When the admin finds an order using the find order form then the order detail for the respective order will appear containing the list of products and a return button in front of products eligible for return. When the admin clicks on the return button a pop-up will appear containing the return form and enter specific data for the return request. Admin can fill the form for generating a return request on behalf of users.

3.10 Email Templates

This tab contains an interface through which the admin can edit or translate (to any language) any email template that is used in this system.


3.10.1 How to edit an Email Template?

The Prestashop order return manager Addon allows the store admin to edit the email template. Following are the steps to edit an email template –

1. Go to Module and Services > Search module “Return Manager” > Click on the “Configure” button. > “General Setting” tab will display.
2. Click on the “Email Templates” tab.
3. Select the desired template you want to edit.
4. Fill all the mandatory fields, apply the desired change and click on the Save button at the bottom of the form.

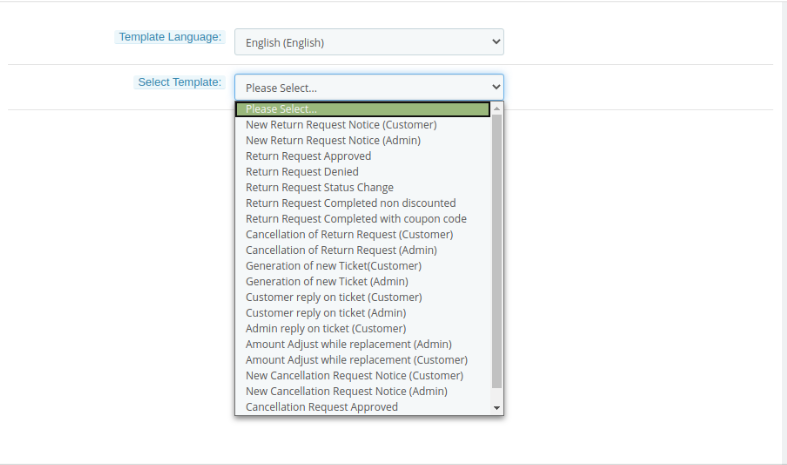
There are 20 email templates available that are used by this Prestashop return manager Addon:

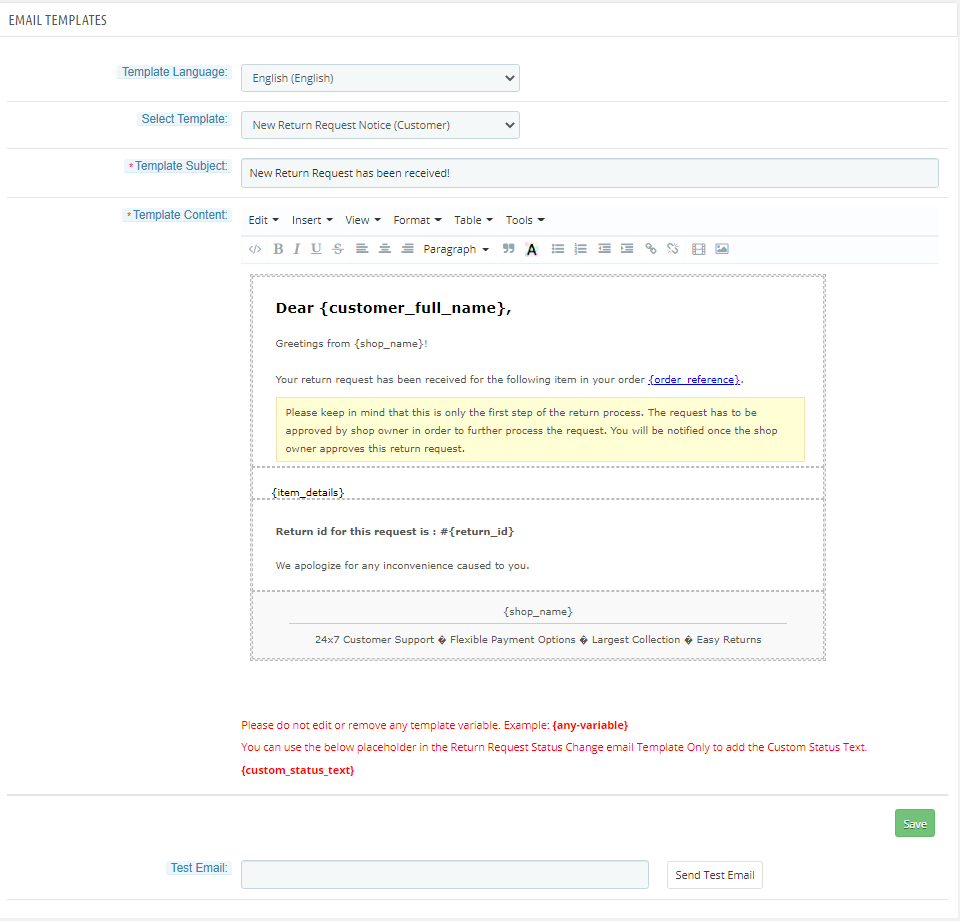
  • New Return Request Notice (Customer): This mail template is used to notify the customer regarding the new Return Request generated by the customer itself. The customer who has created the return request will only receive this mail.
  • New Return Request Notice (Admin): This mail template is used to notify the Store Owner regarding the new Return Request generated by any customer.
  • Return Request Approved: This mail template is used to notify the customer regarding the Approval of the Return Request that is created by the customer earlier.
  • Return Request Denied: This mail template is used to notify the customer regarding the Dis-Approval of the Return Request that is created by the customer earlier.
  • Return Request Status Change: This mail template is used to notify the customer regarding the update in the status of the Return Request that is created by the customer earlier.
  • Return Request Completed non-discounted: This mail template is used to notify the customer regarding the completion of the Return Request that is created by the customer earlier.
  • Return Request Completed with coupon code: In this mail template, the customers will get return request completion information along with the coupon code.
  • Cancellation of return request(Customer): This email template will be used to notify customers regarding return request cancellation done by them.
  • Cancellation of return request(Admin): This email template will notify the store admin regarding return request cancellation.
  • Generation of New Ticket(Customer): When the customer generates any new ticket, this email template will be used for sending emails regarding this ticket generation.
  • Generation of New Ticket(Admin): Whenever customers generate a new ticket, this email template will be used to notify the store admin regarding ticket generation.
  • Customer Reply on Ticket(Customer): Customers will get an email notification when they reply on any ticket.
  • Customer Reply on Ticket(Admin): Admin will get the notification on customers to reply to the ticket.
  • Admin Reply on Ticket(Customer): Customers will get a notification on the admin’s reply on tickets.
  • Amount Adjust while replacement(Admin): Admin will get notification regarding Amount Adjust while replacement.
  • Amount Adjust while replacement(Customer): Customers will get notification regarding Amount Adjust while replacement.
  • New Cancellation Request Notice(Customer): Customers will get notification regarding their cancellation request.
  • New Cancellation Request Notice(Admin): Admin will get notification regarding the new cancellation request.
  • Cancellation Request Approved: Notification regarding approval of cancellation request.
  • Cancellation Request Declined: Notification regarding rejection of cancellation request.

To edit or translate any email template the admin has to choose the desired email template and language. On doing the same the email template data will appear in a form below, to save the changes made the admin has to click on the ‘Save’ button at the bottom.

Admin can send the test email while setting up the template before making it live.

Admin can add a custom text using placeholders in the return status emails.

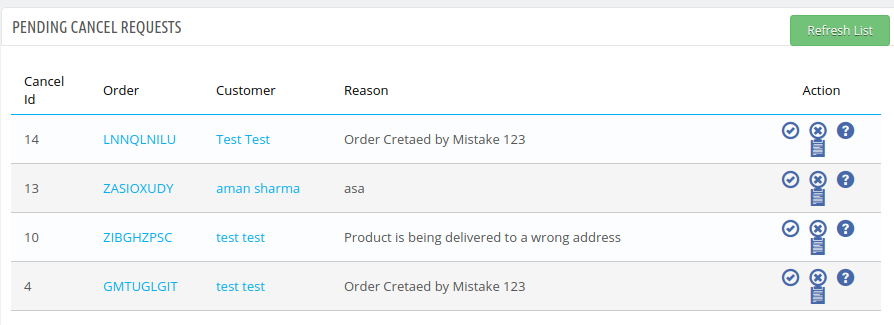
3.11 Pending Order Cancel List

Admin can view the order cancellation requests which are pending. Admin can approve or decline the request from here. Admin can also refresh the list and check new cancellation requests.

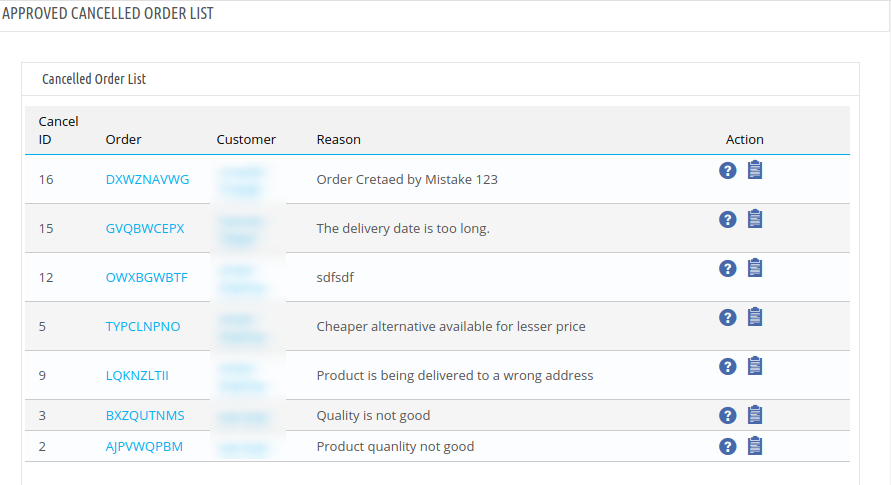
3.12 Complete Order Cancel

Here, the admin can view the approved canceller orders and also check the customer notes if available.

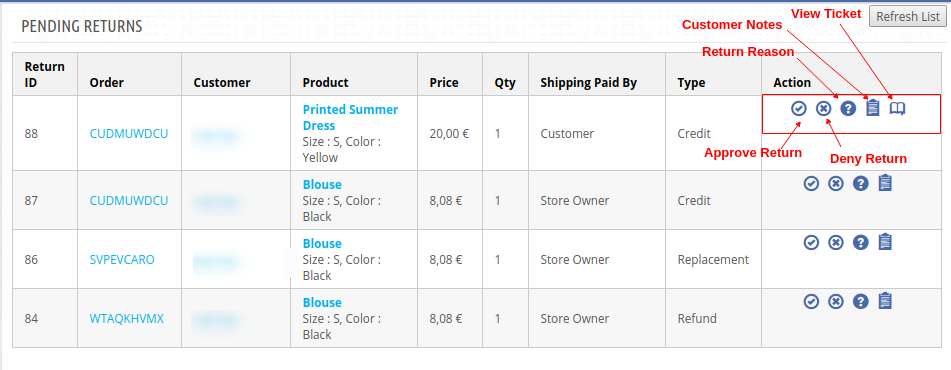
3.13 Pending Returns List

This tab contains a list of all the returns that are pending i.e. are not approved by the admin. The admin has to approve a return request to perform several operations on the return request like changing the status and completing the return process.

3.13.1 How to approve a return request?

The Prestashop product return manager addon allows the store admin to edit the return request. Following are the steps to approve a return request –

1. Go to Module and Services > Search module “Return Manager” > Click on the “Configure” button. > “General Setting” tab will display.
2. Click on the “Pending Returns List” tab.
3. Click on the tick button.

3.13.2 How to deny a return request?

The Prestashop RMA manager module allows the Prestashop store merchant to deny the return request. Following are the steps to deny a return request –

1. Go to Module and Services > Search module “Return Manager” > Click on the “Configure” button. > “General Setting” tab will display.
2. Click on the “Pending Returns List” tab.
3. Click on the cross button.


You will find the “Refresh List” button which fetches and updates all the pending return requests.

The admin can approve or deny a return request using the actions available in front of the list.

Once the admin approves a return request then it is moved to the Active Returns List.

On the other hand, if the admin denies a return request that it is removed from the list and this action can not be undone.

The admin can view the detail of the product, the details of the order and also the details of the customer by clicking on the respective links from the list of the pending return.

Admin can view the reason corresponding to a return request.

They can view extra product return notes if provided by the customer.

If the ticket system is enabled, customers can raise a ticket from the return section of their account. Corresponding to the order return request, admin can view the ticket as shown below:

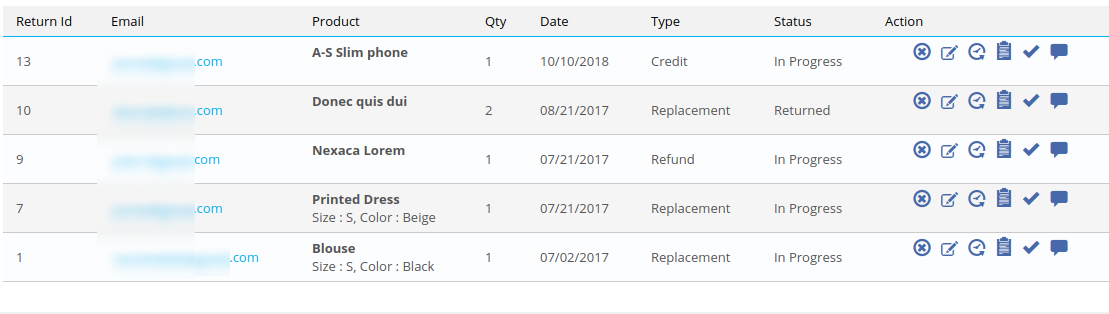
3.14 Active Returns List

This tab contains a list of all the returns that are approved by the admin. The admin can proceed with the return process after approving the return request using this tab. The admin can view the return status history, change the status of the return request, and can also deny a request from this tab as well.

You will find the “Refresh List” button which fetches and updates all the active return requests.

The actions that can be performed from this tab for the active returns are:

  • Deny the return request.
  • Change the status of the return request.
  • View history of the return request.
  • View customer comments.
  • Mark the return request as complete.
  • View the ticket information

When the admin marks a return request as complete then it is moved to the archives list.

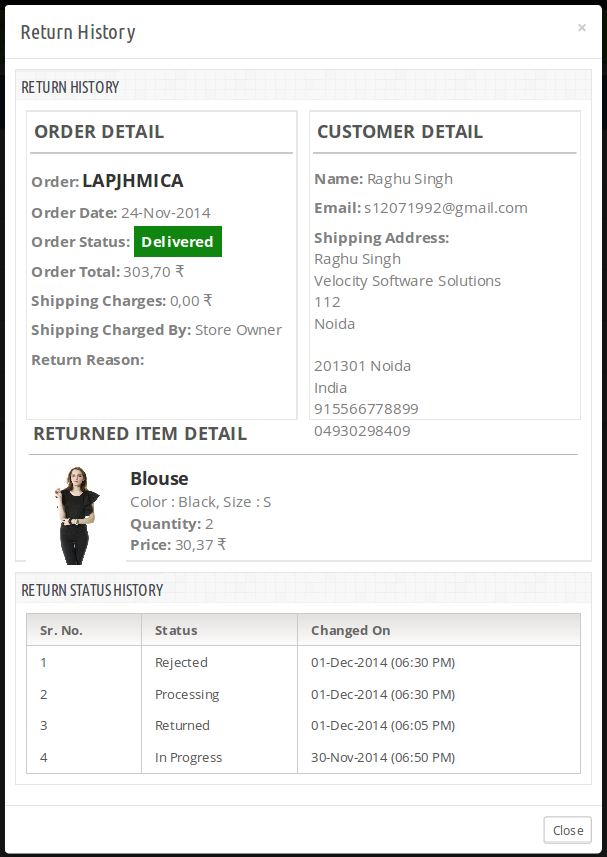
When the admin clicks on the view history link in front of the return from the active returns list then a modal will appear containing the details of the order and the return status history for that return request. The modal is as follows:


3.14.1 How to change return status?

The Prestashop return manager extension  allows the store admin to change the return status. Following are the steps to change return status –

1. Go to Module and Services > Search module “Return Manager” > Click on the “Configure” button. > “General Setting” tab will display.
2. Click on the “Active Returns List” tab. A pop up will display with the field to change the status.
3. Change the status and click on the “Save” button

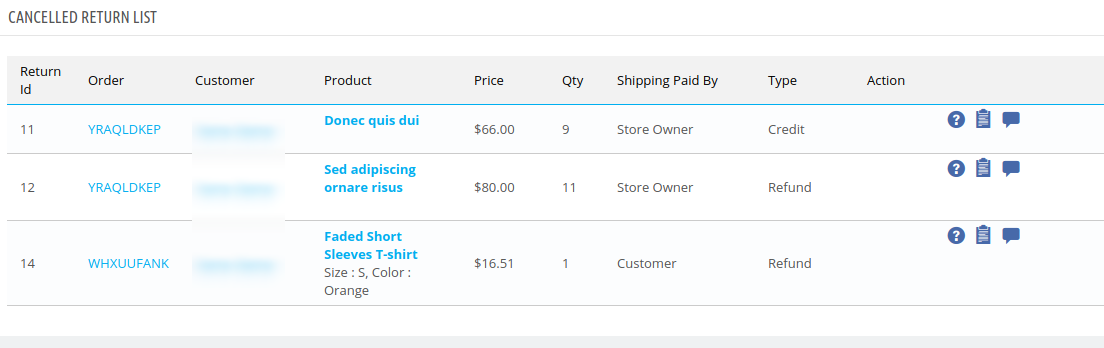
3.15 Canceled Return List

Customers can cancel their placed return requests from their account section. The information about those canceled requests can be checked under this section.

3.16 Archives List

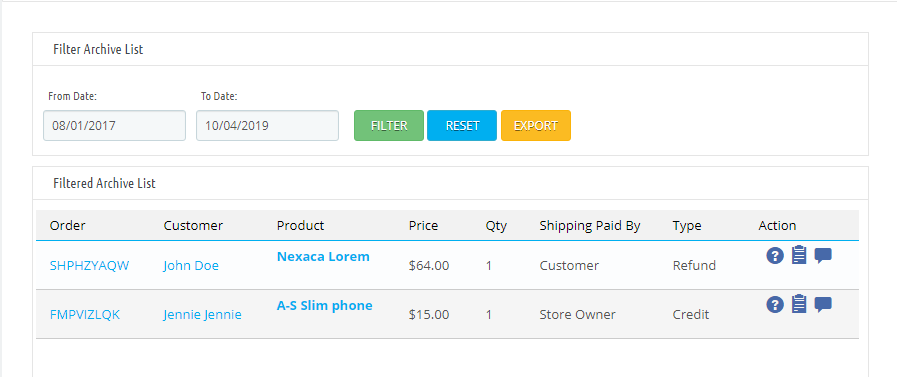
This tab contains all the return requests that are complete. The tab also contains a form through which the admin can filter the archives list and can also export the list of completed return requests based on certain filters to a CSV file.


3.17 Custom Field

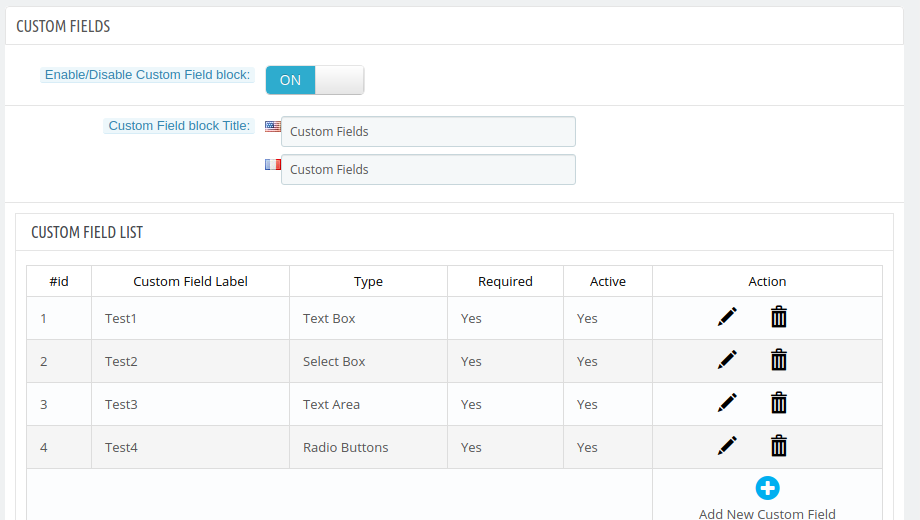
In the updated version, the online store merchant can also create custom fields from the admin interface. They can add, update and delete custom fields.


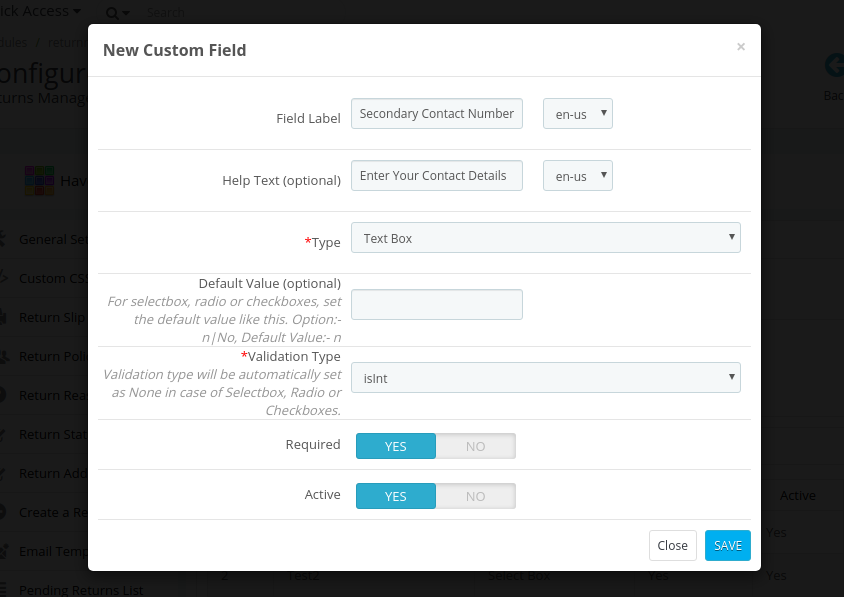
The online merchant can click on add new custom fields for creating new custom fields. After clicking on this, the admin will get these options as shown below:

The online merchant can enter these details and create a field as shown below:

  • Field Label: Enter Field Label in multiple languages.
  • Help Text: Set Help text in various languages.
  • Type: Select from available field type. Admin can select from the text box, select box, text area, radio buttons and checkboxes.
  • Default Value: Enter the default value here.
  • Validation Type: Select from available validation type. Admin can set none validation type, isint, isname and isemail validation type.
  • Required: Admin can set any field as required field.
  • Active: Admin can enable or disable any field.

3.18 Other Plugins

As the admin clicks on this “Other Plugins” tab, they will be redirected to the Addon store where they can buy other plugins for their Prestashop store.

4.0 Front End Module

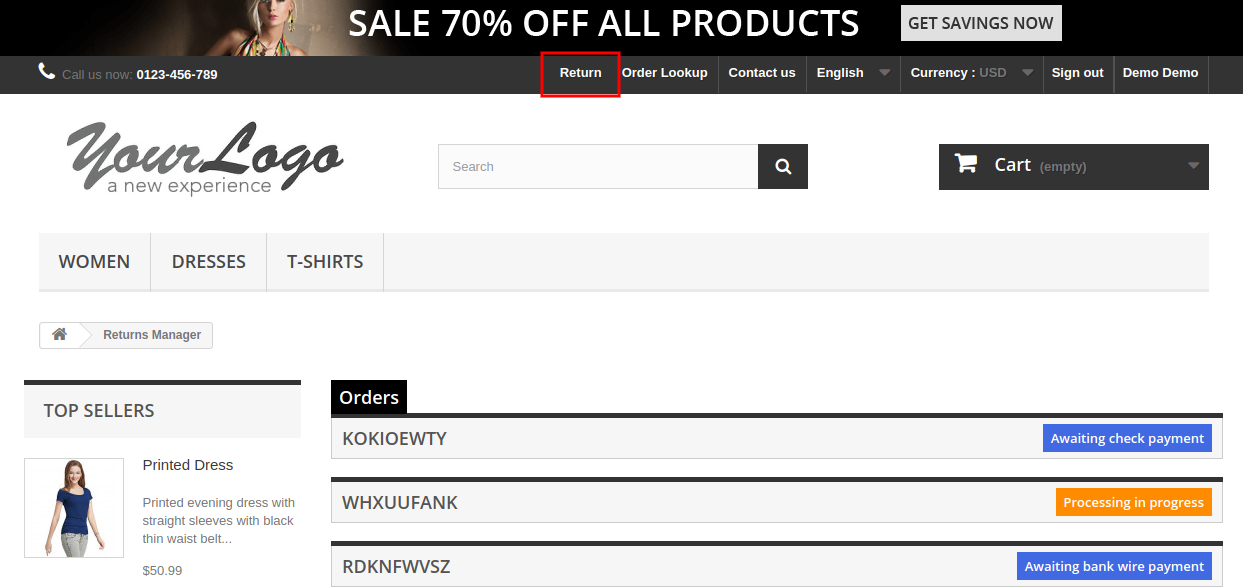
After enabling the Prestashop Reward Point module the front-end user will see a link in the header of the front-end through which the user can navigate to a new page.

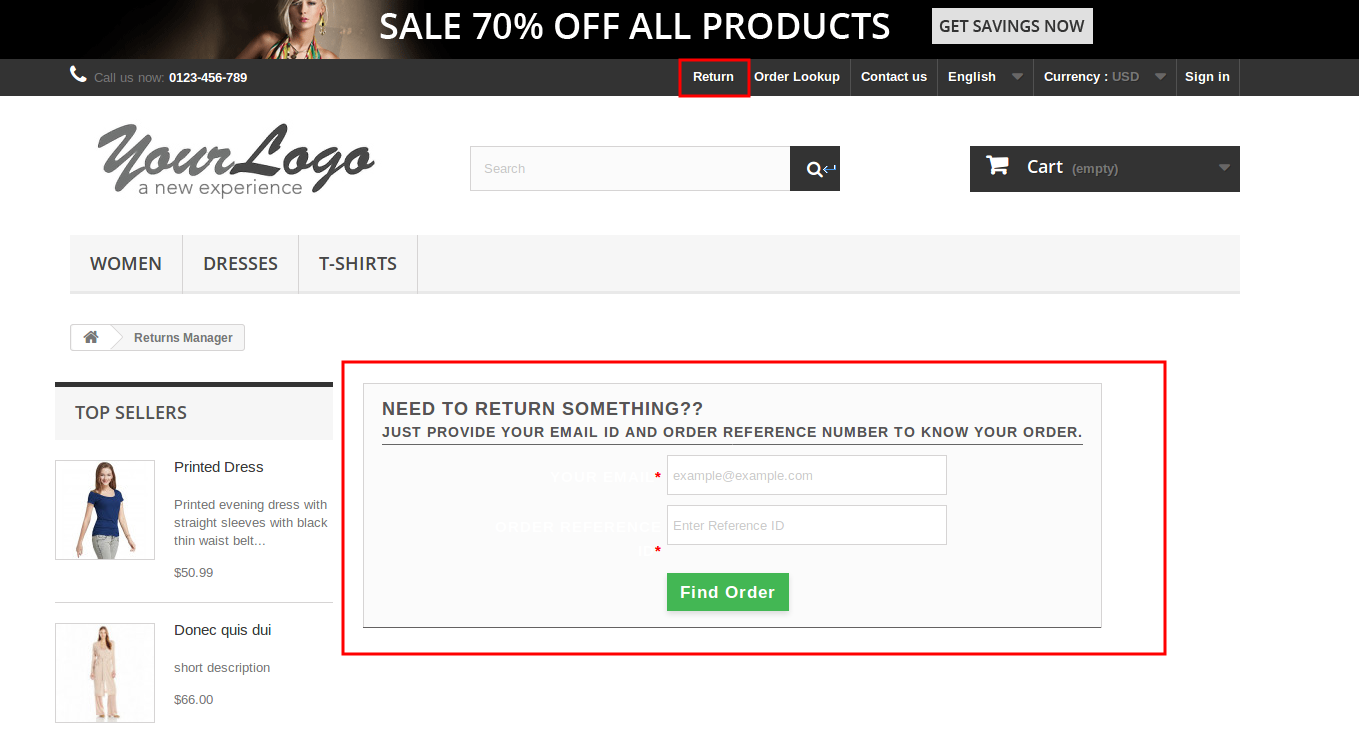
The link in the header of the front-end will appear as follows:

For Version 1.6-


For Version 1.7-


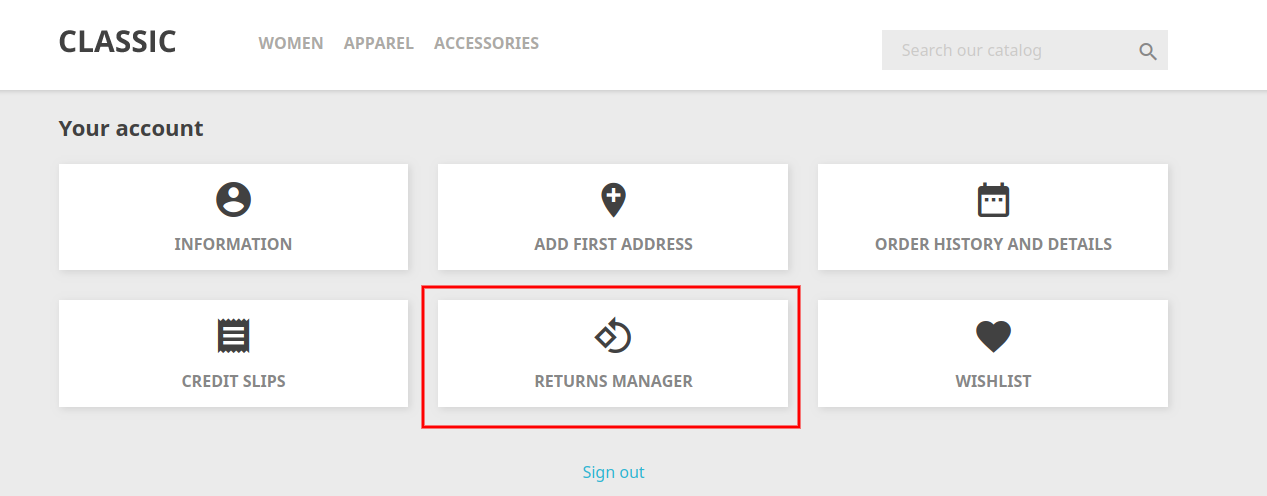
The link for the Returns Manager page will also appear on the ‘My Account’ page of any customer. This link only appears to a logged-in customer on the ‘My Account’ page.

For Version 1.6-
 
For Version 1.7-

When the customer clicks on this link then a new page will open based on the logged-in status of the customer.

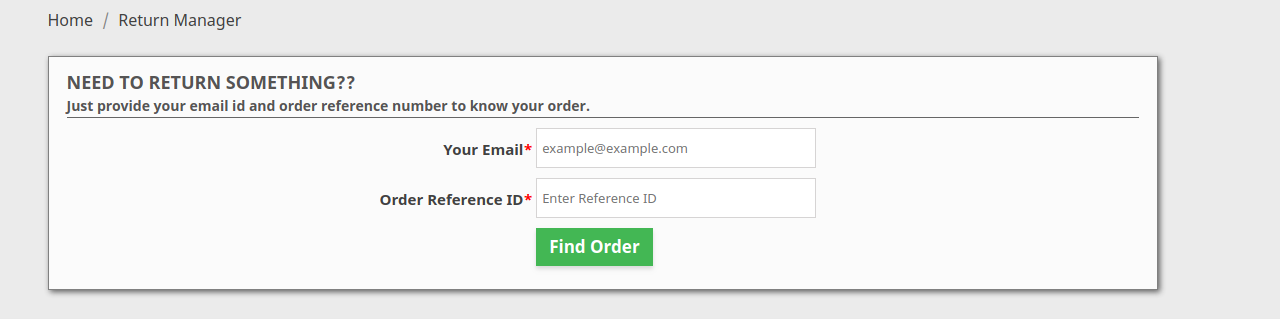
In case the user is a guest and is not logged into the website then the page will contain a form to find the order as follows:

For Version 1.6-


For Version 1.7-


After proving the order reference number and the respective email the details of that order will appear including the return history based on the email provided by the customer. The order details will appear as follows:

For Version 1.6-

There will be a popup on which customers can add details for generating the return request.

For Version 1.7-

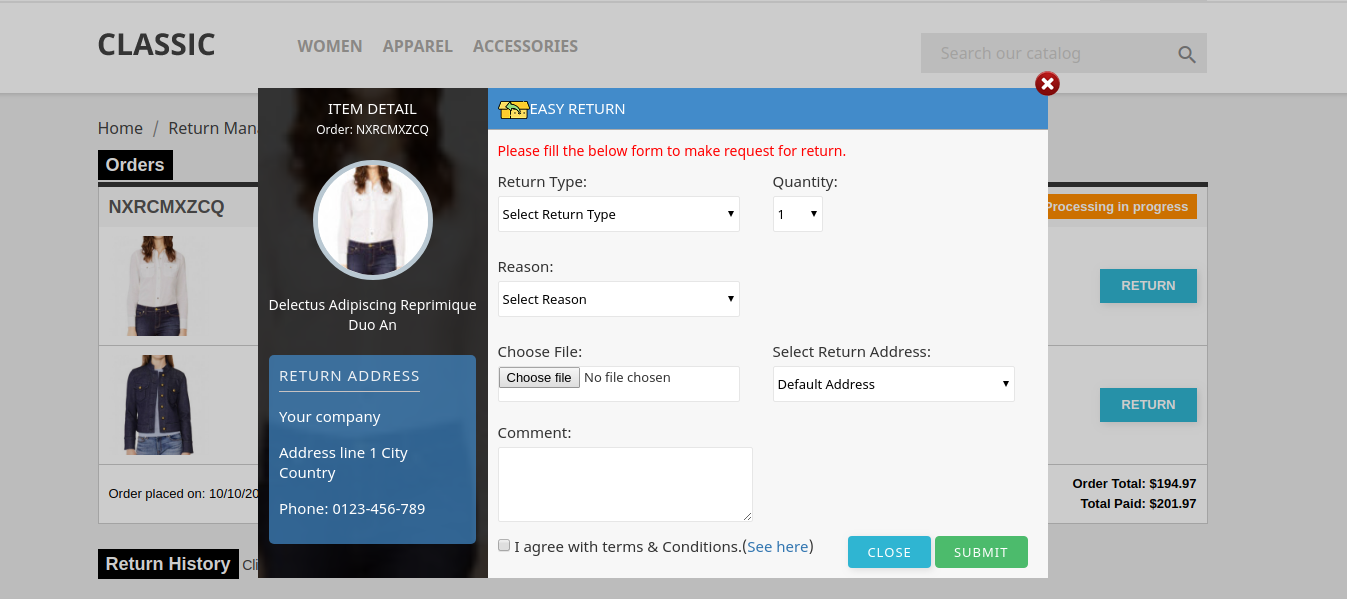
The products that are eligible for return in that particular order will have a return button. Through this button, the customer can apply for the return of that particular product.

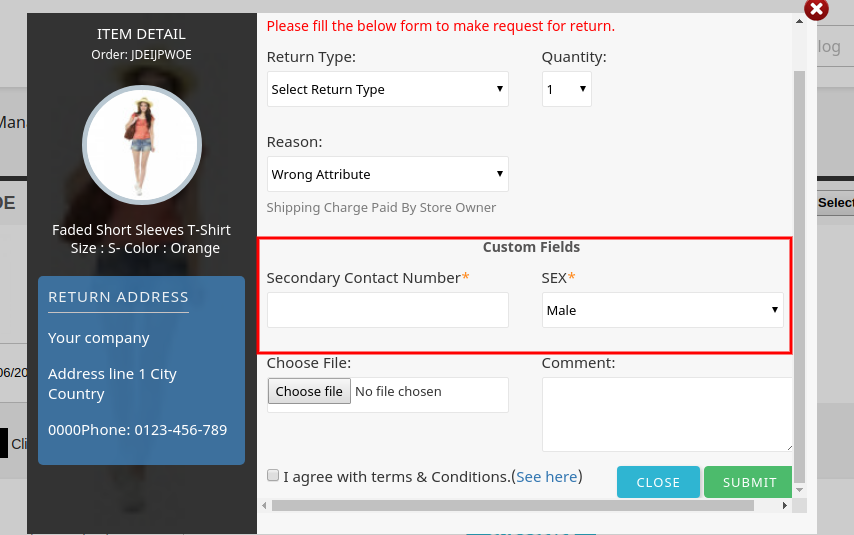
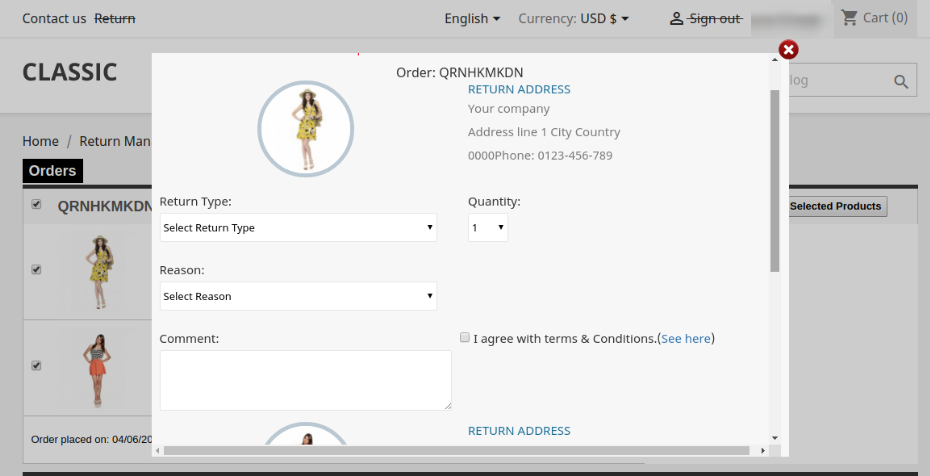
On clicking on the Return button a pop-up will appear containing the form for return of that particular order. The form will appear as follows:

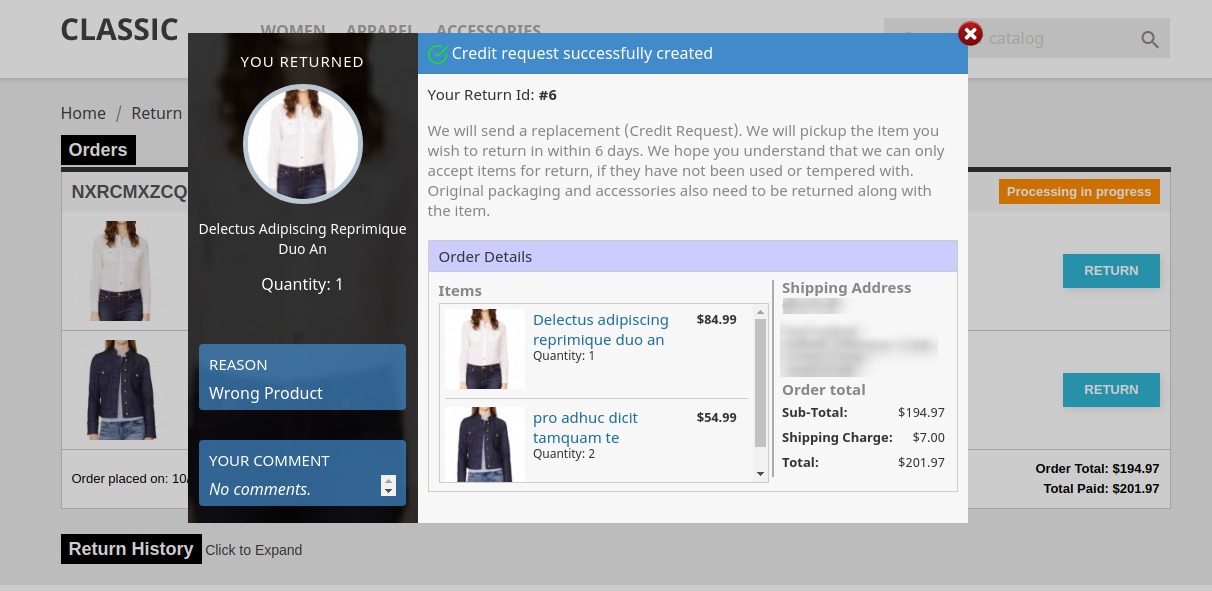
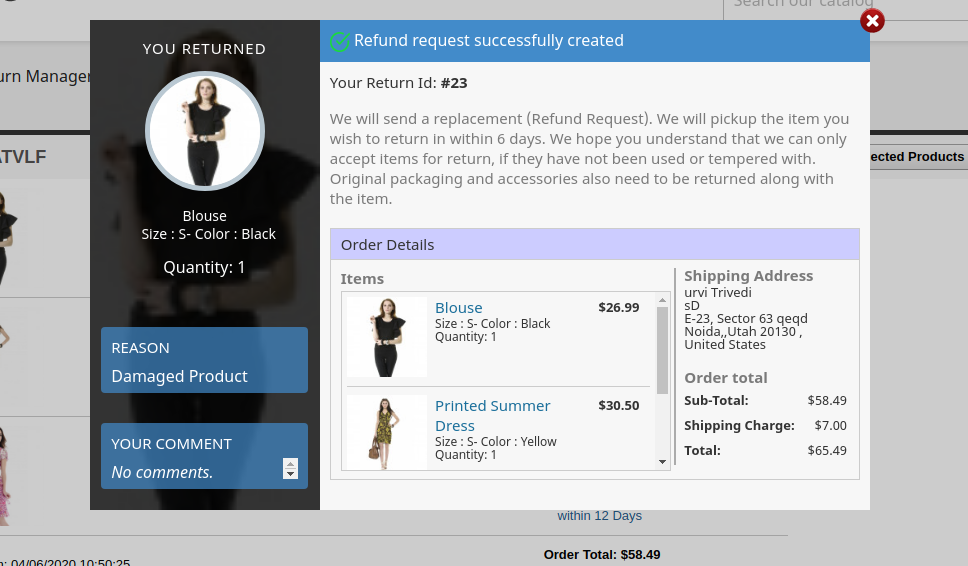
This PrestaShop Return Manager addon allows the customer has to fill the above form and then click on submit then a success form will appear showing the successful submission of the return request as shown below :

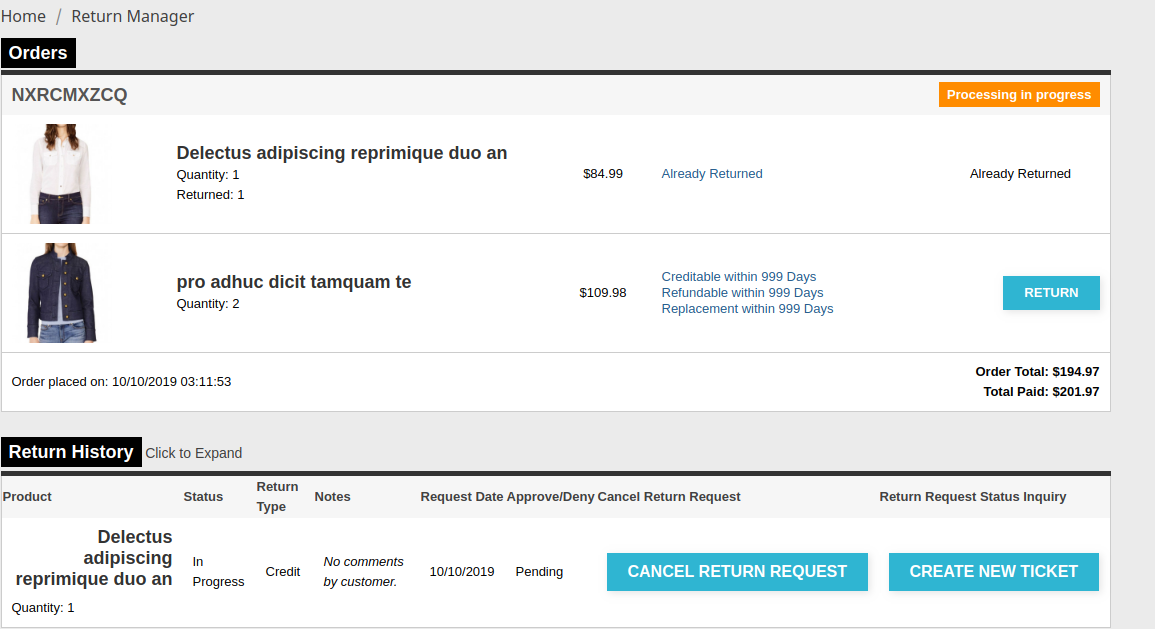
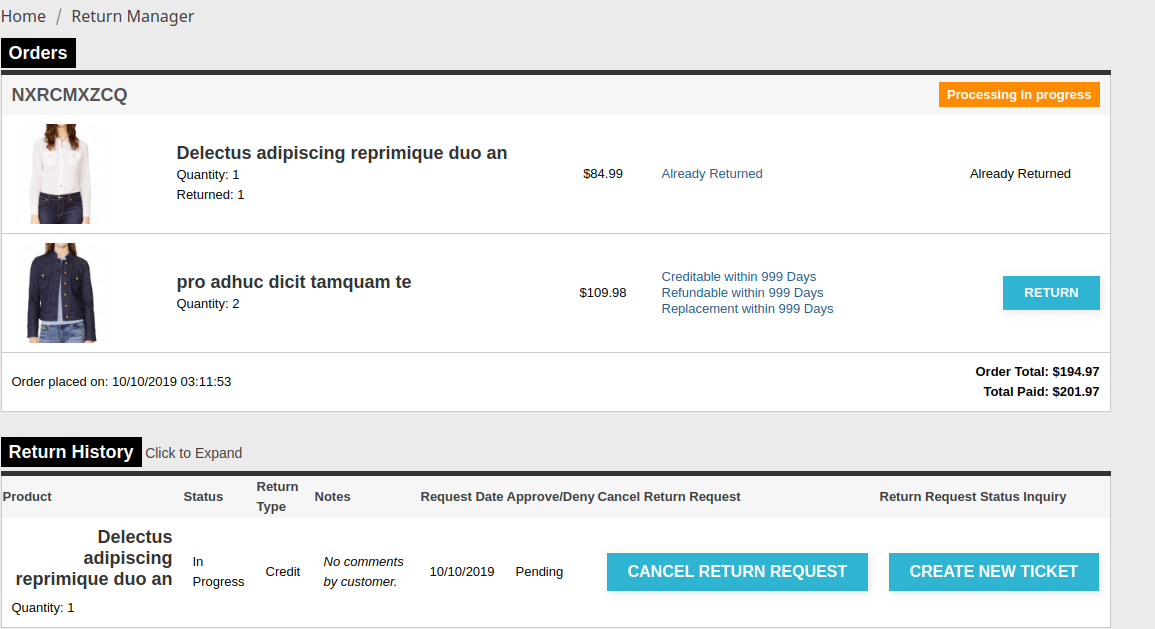
– In case the user is a registered customer and is logged into the website then the page will contain a list of all the orders placed by the customer. The page will appear as follows:

For Version 1.6-

For Version 1.7-


Customers can also generate a ticket for return related information.

For Version 1.6-


For Version 1.7-


In the updated version, the online users can select the product for return and also enter the details in custom fields s shown below:

While selecting the replacement option, the online users can get an option to select the products which he wants in return.

The online users can return overall order or return only selected product which he wants to return.

The online users can also return the whole order if he wishes to do so.

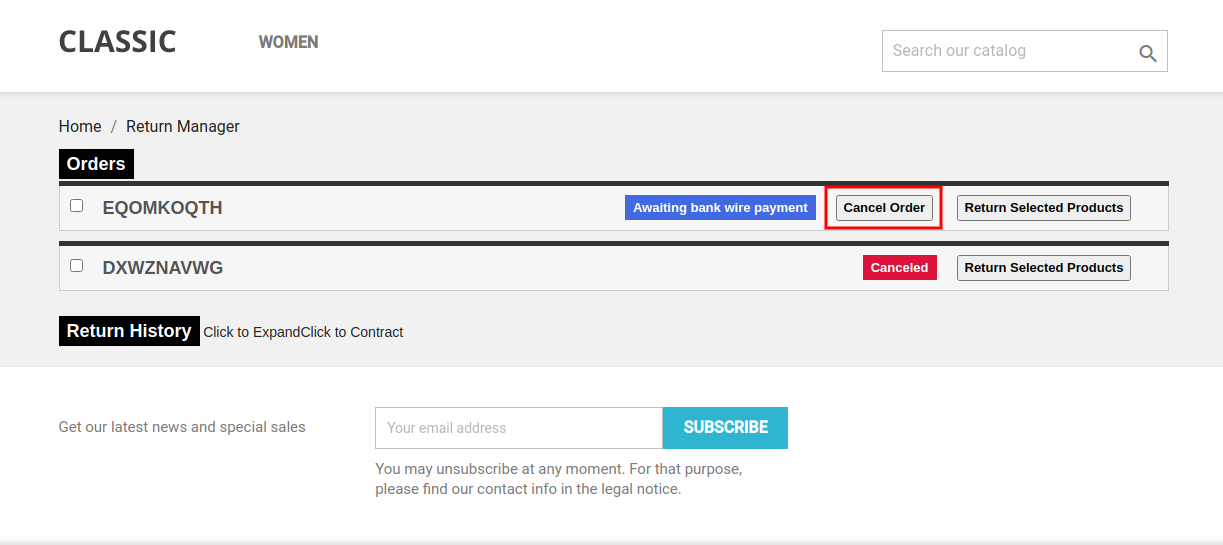
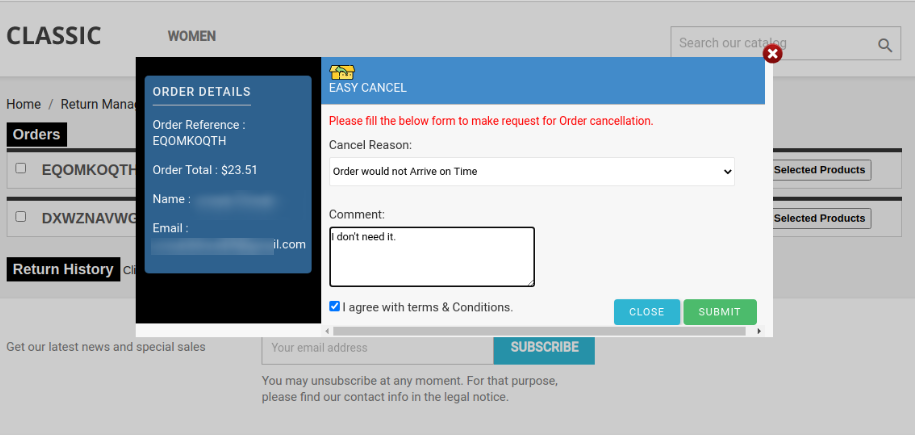
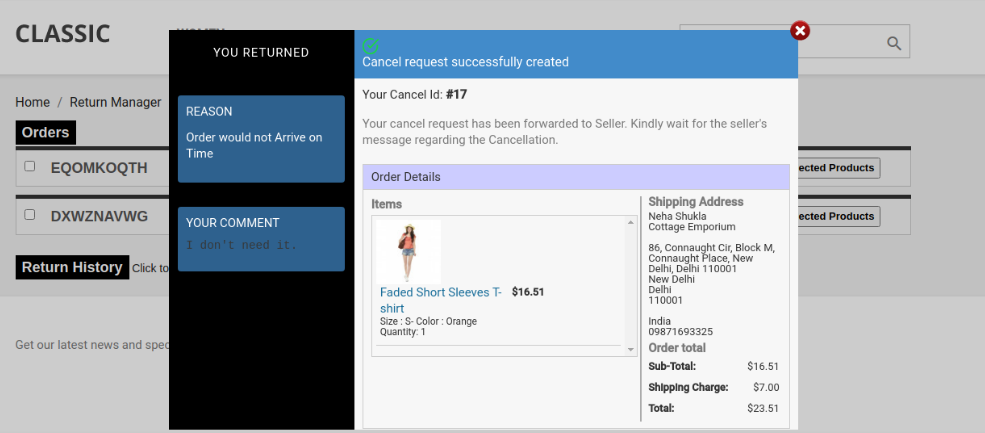
Order Cancellation:

The online users gets an option to cancel the order for a short period. The customers need to go to the My Account >> Return Manager section to cancel the order as shown below:

The online users can select from the listed reasons and also write their comment for order cancellation.

After submitting the request, users can view this message:

Once the online merchant approves the request, the user will view the status as canceled and also get an email notification while requesting the order cancellation and approval/decline.

5.0 Tutorial: Watch the YouTube Video Guide

To help you set up and use the Knowband PrestaShop Return Manager (RMA) Module, we have prepared a detailed YouTube tutorial video. This video walks you through the installation, configuration, and usage of the module, making returns, refunds, and order cancellations easy to manage.

In This Tutorial Video, You Will Learn:

  • How to install and activate the Return Manager module in your PrestaShop store
  • How to configure return policies, reasons, and order status conditions
  • How customers can raise return and cancellation requests from their account
  • How the admin can approve or manage requests efficiently

Watch the tutorial here:

For any questions, assistance, or custom modifications related to the Return Manager module, contact our support team:
support@knowband.com

6.0 Recommendations

1. Refresh the home-page of your store every time you enable/disable plugin.

2. If the Prestashop product return manager is not working after installation then please check permissions on the modules folder. The folder should be writable. Please make the folder permission to 755.

This way, Knowband’s Prestashop return manager module makes return management simple and hassle-free for the online store admin. This feature-rich Prestashop addon offers a simple and user-friendly platform for handling return requests. At the same time, it makes the overall return process simple for online users. The online users can easily create return requests and also generate tickets for followup. This PrestaShop Return manager module is mobile responsive and offers smooth functioning.

You can try Prestashop addon for on your Prestashop website. Prestashop Return Product extension helps you increase customer engagement to your store & increase brand awareness.

For more details about Prestashop return manager Module, please visit here:

Prestashop return manager Module Link

Prestashop return manager Extension Admin Demo Link

Prestashop return manager Module Front Demo Link

Prestashop order return manager Extension Addon Store Link

For any questions, assistance, or custom modifications related to the Return Manager module, contact our support team:
support@knowband.com

PrestaShop Automatic Related Products Module – User Manual

1.0 Introduction

The online store merchant can now grab customer’s focus and improve website sales by using PrestaShop product cross-selling module. Knowband offers PrestaShop Automatic Related Product addon which allows the online sellers to display related products on various website pages. This advance related product extension provides an option to set specific conditions for showing appropriate similar products on each page.

The store admin can set the methods and filters for displaying the products as similar products. The PrestaShop Automatic Related Product addon allows the admin to show the related product column on the left, right or page bottom. Online customers can view similar products and get the right product of their choice. Thus, the admin can improve sales and conversion rate also just by using this Prestashop Automatic Related Product addon.

What’s New in V2.0.1.

  1. Random product display: Now you can showcase your products in a more dynamic way by displaying them in random orders with Prestashop Related Product Addon.
  2. Related products on super-checkout: We have added related products on the super-checkout page to increase cross-selling opportunities.
  3. Sorting functionality for related products: You can now sort related products by various criteria, such as price or popularity, name, etc.
  4. Brand slider on the home page: Now, the Presta admins can also add brand sliders on the home page to highlight your brand and products.
  5. Multiple tabs on the home page: You can now organize your products better by displaying them on multiple tabs, such as top products, new products, best products, and user history products.
  6. Customization options for slider: Prestashop sellers can customize the slider’s background color, height, width, and other settings to match your website’s design.
  7. Related products on add to cart popup: We have added related products on the add-to-cart popup to increase upselling opportunities.
  8. Additional methods on product and category pages: You can now display discounted products, products with the same brand, and rule-based related products on the product page, and child categories, same category feature products, subcategories new products, and rule-based related products on the category page.
  9. Flexible display options for related products: You can choose to display related products either in a slider view or a 2-column list view.
  10. Prestashop-related product module is now compatible with Prestashop v8.0.x.

1.1 Benefits for Merchants

  1. This Prestashop product cross-selling module helps the admin to increase the customer’s average cart value by showing similar products.
  2. There are higher chances of conversions if a store visitor finds the desired product in a similar product block.
  3. The store admin can display perfect similar products in order to increase sales and offer a better store experience to the customers.
  4. PrestaShop Similar products module allows setting the related product block position according to their preference.
  5. There are multiple conditions available for showing similar products in an advanced way.
  6. This PrestaShop alike product module provides an option to hide the out-of-stock products and show only available products as similar products.
  7. With the help of this PrestaShop-related products plugin, the admin can reduce the bounce rate by engaging the customers.
  8. Prestashop related products module allows the eCommerce store admin to show new arrivals as similar products in order to promote new products.
  9. The e-merchant can show those products on which he wants to grab the customer’s attention. The Prestashop Automatic Related Product module allows the eCommerce store admin to display the related products on different website pages.
  10. Compatible with Prestashop v8.0.x.

1.2 Features of the PrestaShop Automatic Related Product Addon

  1. Admin can show related products on various website pages like homepage, product pages, category pages, cart page, manufacturer pages and order confirmation page with the help of this Prestashop product cross-selling addon.
  2. The admin has the option to show available products as related products. The out of stock products won’t be displayed as related products. The Prestashop similar products addon provides an option to show only in-stock products in the related products list.
  3. The online seller can enter a related product block title. The PrestaShop related products module allows the admin to set block titles in various languages.
  4. The PrestaShop advance related product extension provides various methods for showing the related products. The store merchant can display top-visited products, bestsellers, and new products or use user history for showing the related products.
  5. The maximum number of the related product to display on different pages can be fixed from the admin interface of this Prestashop similar products addon.
  6. The PrestaShop related products addon allows the admin to set the method priority and different filters for showing related products.
  7. The PrestaShop related products addon is fully mobile responsive.
  8. Related products extension is multi-store compatible and offers multi-lingual support.

2.0 Installation Steps

The admin will get the below-mentioned files after purchasing the Automatic Related Product addon:

1. The zipped file that consists of the source code of this Automatic Related Product addon.

2. User Manual

Follow these steps to install the Prestashop Automatic Related Product addon:

  • The admin needs to unzip the zipped file. This file includes some files and folders.
  • After that, admin can copy the overall content of the folder and paste them into the “Modules” folder of the store’s directory. The admin can follow the path – Root Directory/modules/.

3. Now, the store owner can install the Automatic Related Product addon. As an eCommerce store owner, you can find that in Store Admin -> Modules and Services. It would be shown as below:
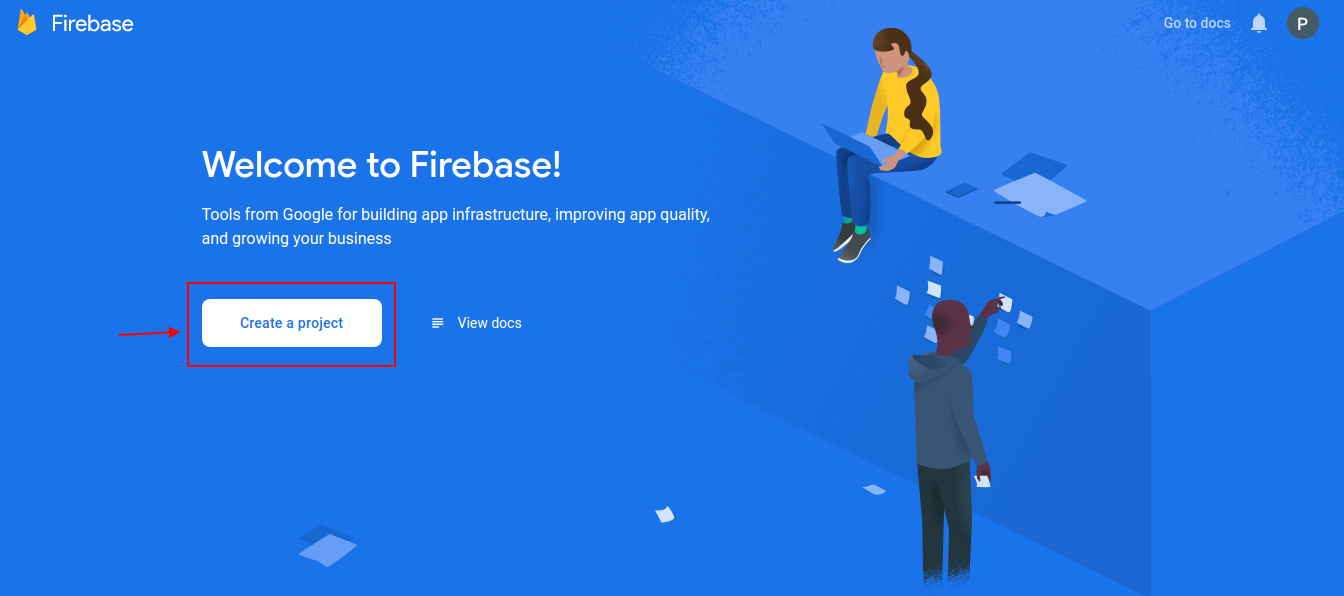
Now you just need to click on “Install” button to install this Prestashop Automatic Related Product addon easily. A confirmation pop-up will be shown. Click on “Proceed with the installation” option. This step will install the Automatic Related Product addon and show notification – “Module(s) installed successfully”.

3.0 Admin Interface

There are various customization options. The store admin can apply the settings and show the similar products on various website pages. These are the customization options:

  1. Basic Settings
  2. Home Page Settings
  3. Product Page Settings
  4. Category Page Settings
  5. Cart Page Settings
  6. Manufacturer Page Settings
  7. Order Confirmation Settings

3.1 Basic Settings

1. Enable/Disable: The store admin can activate or deactivate the functionality just by toggling the button. The Prestashop similar products addon can be activated or deactivated easily from the admin interface.

2. Display Related Products on the Super checkout Page: With the help of this option, the admins can show/hide related products on the One Page checkout page. Not only it will help the customers to get a better UI but also will help in cross-sales.

3. Show only those products which are currently available in stock: The e-Commerce store admin can enable the menu option if he wants to show only in-stock products as related products. Prestashop Automatic Related Product addon provides an option to show all the products or in-stock products as related products.

4. Enter Slider Previous/Next Button Color: You can choose the button color of the previous/next button (for the product slider only).

5. Enter Heading Color: With the following option, the admins can change the related product text heading color.

6. Enter Slider Background color: The following option will manage the slider’s background color.

7. Enter the Product’s Actual Price Color: From here, you can easily manage the color of the actual prices of related products.

8. Enter product’s Old Price color: The following option can be used for changing the color of the old price of related products.

9. Enter Product Title Color: You can manage the product title’s color from the following option.

10. Enter Slider Border Color: The following option will manage the Related Products slider’s border color.

11. Custom CSS: Now, Prestashop Related product module allows the Prestashop admins to add customized CSS for making their related product blog sound. While adding custom CSS, the admins cannot include the style tag in the same.

12. Custom JS: In case you want to add custom JavaScript, you can add the same in the following text field. Also, the Prestashop admins cannot include JS tags in the following text field.

3.2 Home Page Settings

1. Display Related Product in List View (with 2 Columns): If you enable the following option then instead of slider view, the related products will appear in the list view.

2. Enable/Disable Brand Slider on Home Page: You can show/hide the brand slider on the home page (only if enabled).

3. Enable/Disable Homepage settings: The eCommerce store admin can activate or deactivate the homepage settings by clicking on this option from the admin interface Prestashop-related products module.

4. Enable/Disable Multitab for Home Page: If Enabled then a Multitab with Top Visited products, New products, Best seller Products, and User History Products are displayed instead of the Home Page Slider.

5. Select Methods: In the following option, the admins can add the methods based on which they want to show top sellers, new, or most visited products.

6. Disabled Priority Settings: The admins can enable/disable the priority settings with the help of the following button.

7. Display Products in Random order: If you will enable the following button, the related products will appear in a random order every time.

8. Display Sorting for Products: If the following option is enabled, the customers will get the sorting options on the related product slider.

9. Block Title: You can enter the name of the title that will appear on the front end (home page) above related products.

10. Show Home Block Title on Front: The admins can show/hide the home block title on the front end with the following button.

11. Select Display Column: Select the column in which the related products need to be displayed. Here, you can choose if you want to show the products on the page bottom, left column, or right column.

12. Select Methods: In the following option, the admins can add the methods based on which they want to show top sellers, new, or most visited products.

13. Choose Specific Products: Here you can map all the products that you want to add as related products on the front end. Once you will start typing the name, you can find all the suggestions related to the entered text.

14. Max Products to be Displayed: The Prestashop retailers can enter the maximum number of related products they want to show on the front end.

The store admin can also set the priority of the methods. The related product of higher priority will be selected first.

3.3 Product Page Settings

1. Enable/disable Product Page Settings: The store owner can activate or deactivate the product page settings just by a button toggle.

2. Disabled Priority Setting: The admins can enable/disable priority settings from here.

3. Enable/Disable Related products Block for Add to Cart Pop up: If the following option is enabled, the related product blog will appear on the pop-up while adding the product to the cart.

4. Display products in random order: Knowband Prestashop Related products module allows the admins to display/hide products in random order. The admins can simply manage the same from this particular button.

5. Display Sorting for Products: If the following option is enabled, the customers will get the sorting options on the related product slider on the product page.

6. Block Title: From this option, the admin can manage the block title for the related products on the product page.

7. Show Product Block Title on Front: This option will show/hide the Home Block title on the front for the product page only.

8. Select Display Column: Select the column in which the related products need to be displayed. Here, you can choose if you want to show the products on the page bottom, left column, or right column.

9. Select Methods: In the following option, the admins can add the methods based on which they want to show top sellers, new, or most visited products.

10. Select Filter: Select the filter based on which the products on the front will be displayed.

11. Choose Specific Order: Here you can map all the products that you want to add as related products on the front end. Once you will start typing the name, you can find all the suggestions related to the entered text.

12. Max products to be displayed: Admin can select the maximum number of products to display as related products.

The store admin can set the priority of the methods. if there is no product on the higher priority method, then the Prestashop product cross-selling module will show the product from the lower priority.

3.4 Category Page Settings

1. Enable/Disable Related Products Block for Add to Cart Popup: If the following option is enabled, the related product blog will appear on the pop-up while adding the product to the cart.

2. Enable/Disable Category Page Settings: The store admin can enable or disable the category page settings from the admin interface.

3. Disabled Priority Setting: The admins can enable/disable priority settings for the category page from this particular option.

4. Display Products in Random Order: In case you want to show random related products every time, you can keep this option enabled.

5. Display Sorting for Products: If the following option is enabled, the customers will get the sorting options on the related product slider.

6. Block Title: With the help of this particular text field, the admins can manage the block title for the related products on the category page.

7. Show Category Block Title on the Front: Show/hide the home block title on the front for category pages with this option.

8. Select Display Column: You can manage the display column from this option. Further, you can select the options such as bottom, column left, and column right for showing the related products title.

9. Select Methods: The Prestashop admins can manage the methods based on what they want to show the related products. For example, the admin can select methods for most visited products, top-selling products, new products, or products from categories or subcategories, etc.

10. Choose Specific Products: Here you can map all the products that you want to add as related products on the front end. Once you will start typing the name, you can find all the suggestions related to the entered text.

11. Max Products to be Displayed: You can enter the maximum number of the related products you want to display on the category page.

3.5 Cart Page Settings

1. Enable/Disable Related Products block for add to cart popup: If the following setting is enabled, the related products will appear on the add-to-cart pop-up.

2. Enable/Disable Cart Page Setting: This button will enable/disable the related products on the cart page.

3. Disabled Priority Setting: Like cart page settings, this option can be used for making the priority setting work.

4. Display Products in Random Order: In case you want to show off the related products in random order, you can use this particular option.

5. Display Sorting for Products: If you enable this option, the users can sort the products on the slider.

6. Block Title: The admin can manage the related products block title for the cart page from this particular text field.

7. Show Cart Block Title on Front: From here, the admin can show/hide the cart block title on the front end.

8. Select Display Column: You can choose and manage the location of the related product blog from this option.

9. Select Display Column: You can manage the display column from this option. Further, you can select the options such as bottom, column left, and column right for showing the related products title.

10. Select Methods: The Prestashop admins can manage the methods based on what they want to show the related products. For example, the admin can select methods for most visited products, top-selling products, new products, or products from categories or subcategories, etc.

11. Choose Specific Products: Here you can map all the products that you want to add as related products on the front end. Once you will start typing the name, you can find all the suggestions related to the entered text.

12. Max products to be displayed: the admin can fix the maximum products count for displaying on the category page.

The store admin can also set the priority of every method easily from the admin interface. the Prestashop related products module picks the product from the lower method if no product will be available on the higher method.

3.6 Manufacturer Page Settings

1. Enable/Disable Related Products Block for add to cart pop-up: If the following setting is enabled, the related products will appear on the add-to-cart pop-up on the manufacturer page.

2. Enable/Disable manufacturer Page Settings: The store admin can enable or disable the manufacturer page settings from the admin interface of this Prestashop alike product addon.

3. Disabled Priority Setting: This option can be used for making the priority setting enabled or disabled.

4. Display Products in Random Order: In case you want to show off the related products in random order to your visitors, you can use this particular option. If this option is enabled, all the related products will appear in random form every time.

5. Display Sorting for Products: If you enable this option, the users can sort the products on the related product slider.

6. Block Title: The PrestaShop related products plugin allows the admin to set the related products block title in multiple languages.

7. Show Manufacturer Block Title on front: This feature lets the admin to enable or disable the module tab heading and also the heading text can be customized.

8. Select Display Column: The PrestaShop related products plugin allows the admin to show the related products in various positions like the left column, the right column of product or page bottom.

9. Select Methods: There are various methods to select from. The admin can show the related products as per Bestsellers, Top visited products, New Products, Use user history, Top viewed by this manufacturer, Bestseller in this manufacturer.

10. Choose Specific Products: For this option, you can add specific products just by entering the name and the related products will appear based on the same.

11. Max products to be displayed: The Prestashop related products addon allows the store admin to fix the maximum products count for displaying on the category page.

The store admin can also set the priority of every method easily from the admin interface. the Prestashop product cross-selling module picks the product from the lower method if no product will be available on the higher method.

3.7 Order Confirmation Settings

1. Enable/Disable Related Products Block for Add to Cart Pop-Up: If you have enabled the following setting, the related products will appear on the add-to-cart pop-up on the Order Confirmation page.

2. Enable/Disable Order Confirmation Page Settings: The store admin can enable or disable the Order Confirmation Page settings from the admin interface.

3. Disabled Priority Setting: The admin can enable/disable priority settings from here.

4. Display Products in Random Order: Using this option, the admins can show related products in random order to the visitors. If this option is enabled, all the related products will appear in random form every time.

5. Display Sorting for Products: If you enable this option, the users can sort the products on the related product slider.

6. Block Title: The Prestashop related products plugin allows the admin to set the related products block title in multiple languages.

7. Show Order Block Title on front: This feature lets the admin to enable or disable the module tab heading and also the heading text can be customized.

8. Select Display Column: The Prestashop related products addon allows the admin to show the related products in various positions like the left column, the right column of product or page bottom.

9. Select Methods: There are various methods to select from. The admin can show the related products as per Top visited products, Best Sellers, New Products, Use user history, Products ordered with the products of order and Products of the same category as the products of the order.

10. Select filter: The store admin can select the filters like no filter, keyword, attribute.

11. Choose Specific Products: For this option, you can add specific products just by entering the name and the related products will appear based on the same.

12. Max products to be displayed: The admin can fix the maximum products count for displaying on the category page. The store admin can also set the priority of every method easily from the admin interface. The Prestashop Automatic Related Product addon picks the product from the lower method if no product will be available on the higher method.

Category Mapping:

Store Admin can Create, Edit and Delete new Category rules under the Category Mapping tab.
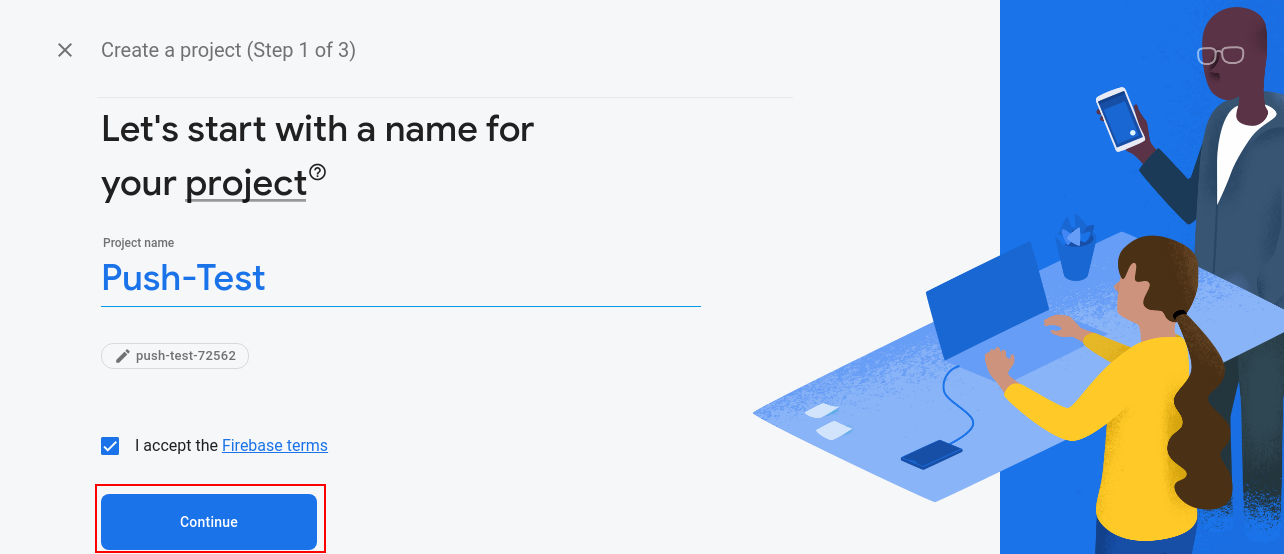
After clicking on the Add new Mapping button, a new mapping form will be open with following fields :

The admin has the ability to create rules for category pages by mapping multiple categories to a specific category. This means that on the designated category page, all products from the mapped categories will be displayed. This provides greater control and flexibility to the admin in curating product displays and enhancing the user experience on the website.

4.0 Front-end Interface

The customers can view the related products as shown in the below-mentioned images.

At the home page the related products will be displayed like the below image:

The customers can also view the related products on the product page:

Similar products will display on add to cart pop up too:

This way, the online store admin can showcase related products on different website pages like homepage, product pages, category pages, cart page, manufacturer page and order confirmation pages also. This way, the e-merchant can grab the customers attention on those products which he wants them to purchase. The Prestashop Automatic Related Product module allows the eCommerce store admin to implement this functionality to showcase related products on the website pages without any code changes. The eCommerce store admin can configure this Prestashop similar products addon according to their requirements and showcase the related products on the website pages easily. The customers can also view the related products and select the best one for themselves. The Prestashop similar products addon shows related products which increase the cart value of the customers.

For more PrestaShop Addons please visit Knowband.

For more details please visit:

PrestaShop Automatic Related Product Module Product page link.

Prestashop similar products addon admin demo link.

Prestashop Automatic Related Product module Front-demo link.

PrestaShop related products Addon User manual link.

Prestashop product cross-selling module addon store link.

Please contact us at support@knowband.com for any query or custom change request as per your business requirement.

Módulo de productos relacionados automáticos PrestaShop

1.0 Introducción

El comerciante de la tienda en línea ahora puede captar la atención del cliente y mejorar las ventas del sitio web mediante el uso del módulo de venta cruzada del producto PrestaShop. Knowband ofrece Producto relacionado automático de PrestaShop complemento que permite a los vendedores en línea mostrar productos relacionados en varias páginas web. Esta extensión de producto relacionada con el avance proporciona una opción para establecer condiciones específicas para mostrar productos similares apropiados en cada página.

El administrador puede establecer los métodos y filtros para mostrar los productos como productos similares. El complemento PrestaShop Automatic Related Products le permite al administrador mostrar la columna del producto relacionado a la izquierda, a la derecha o en la parte inferior de la página. Los clientes en línea pueden ver los productos similares y obtener el producto correcto de su elección. Por lo tanto, el administrador también puede mejorar las ventas y la tasa de conversión.

Beneficios de 1.1 para comerciantes

  1. Este módulo de venta cruzada de productos ayuda al administrador a aumentar el valor promedio del carrito del cliente al mostrar productos similares.
  2. Hay mayores posibilidades de conversiones si un visitante de la tienda encuentra el producto deseado en el bloque de producto similar.
  3. El administrador de la tienda puede mostrar productos similares perfectos para aumentar las ventas y ofrecer una mejor experiencia de la tienda a los clientes.
  4. El módulo de productos similares permite configurar la posición del bloque de producto relacionado de acuerdo con sus preferencias.
  5. Hay múltiples condiciones disponibles para mostrar productos similares de manera avanzada.
  6. Este módulo de producto similar a PrestaShop ofrece una opción para ocultar los productos agotados y mostrar solo productos disponibles como productos similares.
  7. Con la ayuda de este plugin de productos relacionados con PrestaShop, el administrador puede reducir la tasa de rebote mediante la participación de los clientes.
  8. El administrador puede mostrar los recién llegados como productos similares para promocionar nuevos productos.
  9. El e-comerciante puede mostrar los productos sobre los que desea captar la atención del cliente.

Características de 1.2 del complemento de producto automático relacionado con PrestaShop

  1. El administrador puede mostrar productos relacionados en varias páginas web, como página de inicio, páginas de productos, páginas de categorías, página de carrito, páginas de fabricantes y página de confirmación de pedidos.
  2. El administrador tiene una opción para mostrar los productos disponibles como productos relacionados. Los productos agotados no se mostrarán como productos relacionados.
  3. El vendedor en línea puede ingresar el título del bloque de producto relacionado. El módulo de productos relacionados con PrestaShop le permite al administrador establecer el título del bloque en varios idiomas.
  4. La extensión de producto relacionada con Advantage PrestaShop proporciona varios métodos para mostrar los productos relacionados. El comerciante de la tienda puede mostrar los productos más visitados, los más vendidos, los nuevos productos o usar el historial de usuarios para mostrar los productos relacionados.
  5. El número máximo de productos relacionados para mostrar en diferentes páginas se puede arreglar desde la interfaz de administración.
  6. El complemento de productos relacionados con PrestaShop permite al administrador establecer la prioridad del método y diferentes filtros para mostrar productos relacionados.
  7. El complemento de productos relacionados con PrestaShop es completamente móvil.
  8. La extensión de productos relacionados es compatible con múltiples tiendas y ofrece soporte en varios idiomas.

Pasos de instalación de 2.0

El administrador obtendrá los archivos mencionados más abajo después de comprar el complemento de Producto relacionado automático:

1. El archivo comprimido que contiene el código fuente de este complemento de Producto relacionado automático.

2. Manual de usuario

Siga estos pasos para instalar el complemento de Producto relacionado automático:

  • El administrador necesita descomprimir el archivo comprimido. Este archivo incluye algunos archivos y carpetas.
  • Después de eso, el administrador puede copiar el contenido general de la carpeta y pegarla en el "módulos"carpeta del directorio de la tienda. El administrador puede seguir el camino Directorio raíz / módulos /.

3. Ahora, el dueño de la tienda puede instalar el Administrador de tienda -> Módulos y servicios. Se mostraría de la siguiente manera:

Ahora solo debes hacer clic en "Instalar"botón para instalar este complemento de Producto relacionado automáticamente. Se mostrará una ventana emergente de confirmación. Haga clic en la opción" Continuar con la instalación ". Este paso instalará el complemento de Producto relacionado automático y mostrará la notificación Módulo (s) instalado (s) con éxito“.

Interfaz de administración 3.0

Hay varias opciones de personalización. El administrador de la tienda puede aplicar la configuración y mostrar productos similares en varias páginas web. Estas son las opciones de personalización:

  1. Ajustes básicos
  2. Configuración de la página de inicio
  3. Configuración de la página del producto
  4. Configuración de página de categoría
  5. Configuración de la página del carro
  6. Configuración de la página del fabricante
  7. Configuración de confirmación de pedido

Configuración básica de 3.1

1. Habilitar deshabilitar: El administrador de la tienda puede activar o desactivar la funcionalidad simplemente al alternar el botón.

2. Mostrar solo los productos que están actualmente disponibles en stock: El administrador puede habilitar la opción de menú si solo desea mostrar productos almacenados como productos relacionados.

Configuración de la página de inicio de 3.2

1. Activar / desactivar la configuración de la página de inicio: El administrador de la tienda de comercio electrónico puede activar o desactivar la configuración de la página de inicio haciendo clic en esta opción.

2. Título del bloque: El propietario de la tienda puede ingresar el título del bloque de productos relacionados. El complemento PrestaShop Automatic Related Products le permite al administrador de la tienda ingresar el título del bloque en diferentes idiomas.

3. Seleccionar columna de visualización: El propietario de la tienda puede mostrar los productos relacionados en varias columnas, como la parte inferior de la página, la columna izquierda o la columna derecha.

4. Seleccionar métodos: Hay varios métodos disponibles, como el administrador que puede mostrar los productos más visitados, los más vendidos, los nuevos productos y el historial de usuarios.

5. Productos máximos que se mostrarán: El propietario de la tienda puede establecer la cantidad máxima de productos para mostrar en la página principal del sitio web.

El administrador de la tienda también puede establecer la prioridad de los métodos.

Configuración de la página del producto 3.3

1. Activar / desactivar la configuración de la página del producto: El propietario de la tienda puede activar o desactivar la configuración de la página del producto simplemente presionando un botón.

2. Título del bloque: El administrador puede ingresar el título del bloque de productos relacionados en varios idiomas.

3. Seleccionar columna de visualización: El administrador de la tienda puede mostrar los productos relacionados en la columna de la izquierda, en la columna de la derecha o en la parte inferior de la página.

4. Seleccionar método: El administrador puede seleccionar el método que debe mostrarse en el front-end. Existen varios métodos como el administrador que puede mostrar los productos visitados más vendidos, los más vendidos, nuevos productos, productos basados ​​en el historial de usuarios, productos con la misma categoría predeterminada, productos ordenados con este producto, productos con la misma característica y productos con el mismo valor de característica.

5. Seleccionar filtro: El administrador de la tienda puede seleccionar el filtro según el cual se mostrarán los productos en el frente. Aquí, el administrador puede seleccionar ningún filtro, palabras clave y atributo.

6. Productos máximos que se mostrarán: El administrador puede seleccionar la cantidad máxima de productos para mostrar como productos relacionados.

El administrador de la tienda puede establecer la prioridad de los métodos. si no hay producto en el método de mayor prioridad, entonces el módulo mostrará el producto de menor prioridad.

Configuración de la página de la categoría 3.4

1. Activar / desactivar la configuración de la página de categoría: El administrador de la tienda puede habilitar o deshabilitar la configuración de la página de categoría desde la interfaz de administración.

2. Título del bloque: La extensión de producto relacionada con el avance de PrestaShop permite al administrador establecer el título del bloque de productos relacionados en varios idiomas.

3. Seleccionar columna de visualización: La extensión de producto relacionada con el avance de PrestaShop permite al administrador mostrar los productos relacionados en varias posiciones, como la columna izquierda, la columna derecha del producto o la parte inferior de la página.

4. Seleccionar métodos: Hay varios métodos para seleccionar. El administrador puede mostrar los productos relacionados según los Más vendidos en esta categoría, los productos visitados más vendidos, los más vendidos, los productos nuevos, el historial de usuarios o los más visitados en esta categoría.

5. Productos máximos que se mostrarán: El propietario de la tienda en línea puede corregir el recuento máximo de productos para mostrar en la página de la categoría.

El administrador de la tienda también puede establecer la prioridad de cada método fácilmente desde la interfaz de administración. El módulo selecciona el producto del método inferior si no hay producto disponible en el método superior.

Configuraciones de la página de carro 3.5

1. Activar / desactivar la configuración de la página de categoría: El administrador de la tienda puede habilitar o deshabilitar la configuración de la página del carrito desde la interfaz de administración.

2. Título del bloque: La extensión de producto relacionada con el avance de PrestaShop permite al administrador establecer el título del bloque de productos relacionados en varios idiomas.

3. Seleccionar columna de visualización: La extensión de producto relacionada con el avance de PrestaShop le permite al administrador mostrar los productos relacionados en varias posiciones como en

4. Seleccionar métodos: Hay varios métodos para seleccionar. El administrador puede mostrar los productos relacionados como por Bestsellers, productos visitados principales, productos nuevos, historial de usuario, productos pedidos con los productos en el carrito, productos de la misma categoría que los productos del carrito.

5. Seleccionar filtro: El administrador de la tienda no puede mostrar ningún filtro, palabra clave o filtro de atributos.

6. Productos máximos que se mostrarán: el administrador puede corregir el recuento máximo de productos para mostrar en la página de la categoría.

El administrador de la tienda también puede establecer la prioridad de cada método fácilmente desde la interfaz de administración. el módulo selecciona el producto del método inferior si no hay producto disponible en el método superior.

Configuración de la página del fabricante de 3.6

1. Activar / desactivar la configuración de la página del fabricante: El administrador de la tienda puede habilitar o deshabilitar la configuración de la página del fabricante desde la interfaz de administración.

2. Título del bloque: El complemento de productos relacionados con PrestaShop permite al administrador establecer el título del bloque de productos relacionados en varios idiomas.

3. Seleccionar columna de visualización: El plugin de productos relacionados con PrestaShop le permite al administrador mostrar los productos relacionados en varias posiciones, como la columna de la izquierda, la columna de la derecha del producto o la parte inferior de la página.

4. Seleccionar métodos: Hay varios métodos para seleccionar. El administrador puede mostrar los productos relacionados según Lo más vendido, Productos visitados principales, Nuevos productos, Usar historial de usuarios, Visto más arriba por este fabricante, Más vendido en este fabricante.

5. Productos máximos que se mostrarán: el administrador puede corregir el recuento máximo de productos para mostrar en la página de la categoría.

El administrador de la tienda también puede establecer la prioridad de cada método fácilmente desde la interfaz de administración. el módulo selecciona el producto del método inferior si no hay producto disponible en el método superior.

Configuración de confirmación de pedido 3.7

1. Activar / desactivar la configuración de la página de confirmación de pedido: El administrador de la tienda puede habilitar o deshabilitar la configuración de la página de confirmación de pedido desde la interfaz de administración.

2. Título del bloque: El módulo permite al administrador establecer el título del bloque de productos relacionados en varios idiomas.

3. Seleccionar columna de visualización: El módulo le permite al administrador mostrar los productos relacionados en varias posiciones, como la columna izquierda, la columna derecha del producto o la página inferior.

4. Seleccionar métodos: Hay varios métodos para seleccionar. El administrador puede mostrar los productos relacionados según los productos visitados, los mejores vendedores, los nuevos productos, el historial de usuarios, los productos pedidos con los productos de pedido y los productos de la misma categoría que los productos de pedido.

5. Seleccionar filtro: El administrador de la tienda puede seleccionar los filtros como sin filtro, palabra clave, atributo.

6. Productos máximos que se mostrarán:?The admin can fix the maximum products count for displaying on the category page.

El administrador de la tienda también puede establecer la prioridad de cada método fácilmente desde la interfaz de administración. el módulo selecciona el producto del método inferior si no hay producto disponible en el método superior.

Interfaz de usuario 4.0

Los clientes pueden ver los productos relacionados como se muestra en las imágenes mencionadas a continuación.

En la página de inicio, los productos relacionados se mostrarán como la imagen siguiente:

Los productos similares se mostrarán en las páginas de categoría como se muestra a continuación:

Los clientes también pueden ver los productos relacionados en la página del producto:

Los productos similares se mostrarán en la página del carro como se muestra a continuación:

Los clientes también pueden ver el producto similar en la página de confirmación de pedido:

Para obtener más Complementos de PrestaShop por favor visite Knowband.

Para más detalles, visite:

PrestaShop Enlace de página de producto de módulo de producto automático relacionado.

Por favor support@knowband.com para cualquier consulta o solicitud de cambio personalizada según los requisitos de su empresa.

Module Produits associés à PrestaShop Automatic

1.0 Présentation

Le marchand en ligne peut désormais se concentrer sur les clients et améliorer les ventes sur le site Web en utilisant le module de vente croisée des produits PrestaShop. Offres Knowband PrestaShop Automatic Produits associés addon qui permet aux vendeurs en ligne d'afficher des produits connexes sur différentes pages du site Web. Cette extension de produit liée à l'avance offre une option pour définir des conditions spécifiques pour afficher des produits similaires appropriés sur chaque page.

L'administrateur peut définir les méthodes et les filtres pour afficher les produits en tant que produits similaires. L'addon de produit associé automatique de PrestaShop permet à l'administrateur d'afficher la colonne de produit associée à gauche, à droite ou au bas de la page. Les clients en ligne peuvent voir les produits similaires et obtenir le bon produit de leur choix. Ainsi, l'administrateur peut également améliorer les ventes et le taux de conversion.

Avantages 1.1 pour les commerçants

  1. Ce module de vente croisée de produits aide l'administrateur à augmenter la valeur moyenne du panier du client en affichant des produits similaires.
  2. Les chances de conversion sont plus grandes si un visiteur du magasin trouve le produit souhaité dans le bloc de produit similaire.
  3. L'administrateur du magasin peut afficher des produits similaires parfaits pour augmenter les ventes et offrir une meilleure expérience de magasin aux clients.
  4. Des modules de produits similaires permettent de définir la position du bloc de produit correspondant en fonction de leurs préférences.
  5. Il existe plusieurs conditions pour afficher des produits similaires de manière avancée.
  6. Ce module produit similaire à PrestaShop offre la possibilité de masquer les produits en rupture de stock et d’afficher uniquement les produits disponibles en tant que produits similaires.
  7. Avec l'aide de ce plugin de produits liés à PrestaShop, l'administrateur peut réduire le taux de rebond en engageant les clients.
  8. L'administrateur peut afficher les nouveaux arrivants en tant que produits similaires afin de promouvoir de nouveaux produits.
  9. L'e-commerçant peut montrer ces produits sur lesquels il veut attirer l'attention du client.

Fonctionnalités de 1.2 de l’extension PrestaShop Automatic Related Product

  1. L'administrateur peut afficher les produits associés sur différentes pages Web telles que la page d'accueil, les pages de produits, les pages de catégorie, la page du panier, les pages du fabricant et la page de confirmation de commande.
  2. L'administrateur a la possibilité d'afficher les produits disponibles en tant que produits connexes. Les produits en rupture de stock ne seront pas affichés en tant que produits connexes.
  3. Le vendeur en ligne peut saisir le titre de bloc de produit associé. Le module de produits liés à PrestaShop permet à l'administrateur de définir le titre du bloc dans différentes langues.
  4. L'extension de produit liée à l'avance de PrestaShop fournit différentes méthodes pour afficher les produits associés. Le commerçant peut afficher les produits les plus visités, les best-sellers, les nouveaux produits ou utiliser l'historique des utilisateurs pour afficher les produits associés.
  5. Le nombre maximum de produits associés à afficher sur différentes pages peut être fixé à partir de l'interface d'administration.
  6. L'addon des produits liés à PrestaShop permet à l'administrateur de définir la priorité de la méthode et différents filtres pour afficher les produits associés.
  7. L'addon des produits liés à PrestaShop est entièrement mobile.
  8. L'extension des produits associés est compatible avec plusieurs magasins et offre un support multilingue.

Étapes d'installation de 2.0

L'administrateur obtiendra les fichiers mentionnés ci-dessous après l'achat de l'add-on de produit lié automatique:

1. Le fichier compressé qui constitue le code source de cet addon de produit associé automatique.

2. Manuel utilisateur

Suivez les étapes ci-dessous pour installer l’addon Automatic Related Product:

  • L'administrateur doit décompresser le fichier compressé. Ce fichier comprend des fichiers et des dossiers.
  • Après cela, l'administrateur peut copier le contenu global du dossier et les coller dans le "Modules"dossier du répertoire du magasin. L'administrateur peut suivre le chemin Répertoire racine / modules /.

3. Maintenant, le propriétaire du magasin peut installer le Store Admin -> Modules et services. Il serait montré comme ci-dessous:
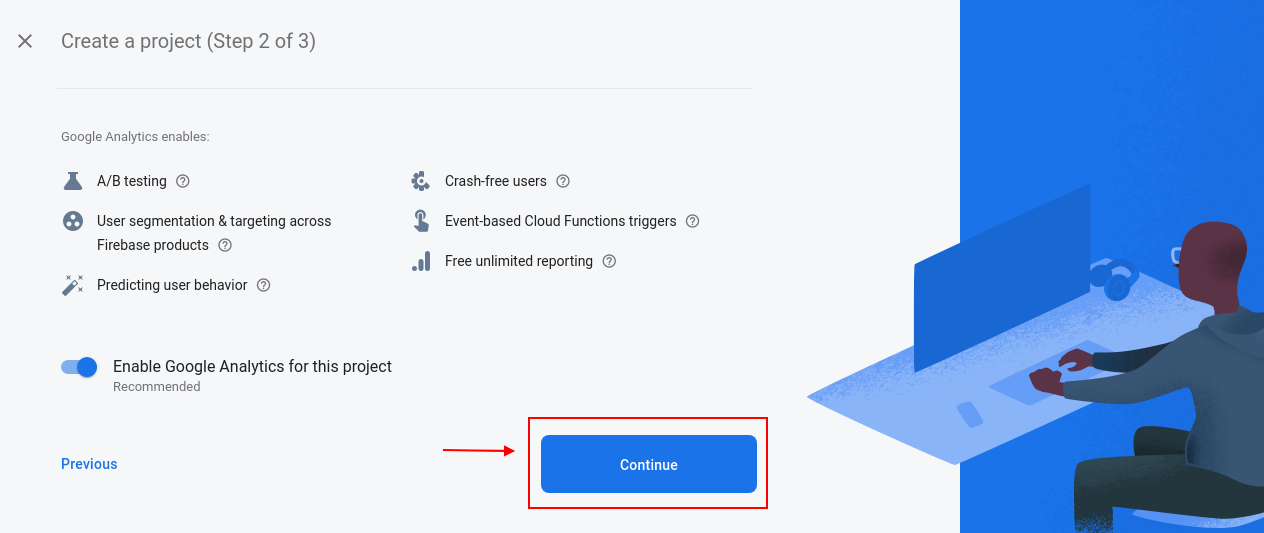
Il ne vous reste plus qu'à cliquer sur "installer"bouton pour installer facilement cet addon automatique de produit connexe. Une fenêtre de confirmation apparaîtra. Cliquez sur" Poursuivre avec l’installation ". Cette étape installera l’addon automatique de produit associé et affichera la notification. Module (s) installé avec succès“.

Interface d'administration 3.0

Il existe différentes options de personnalisation. L'administrateur du magasin peut appliquer les paramètres et afficher les produits similaires sur différentes pages du site Web. Voici les options de personnalisation:

  1. Réglages de base
  2. Paramètres de la page d'accueil
  3. Paramètres de la page du produit
  4. Catégorie Paramètres de page
  5. Paramètres de la page du panier
  6. Paramètres de la page du fabricant
  7. Paramètres de confirmation de commande

Paramètres de base de 3.1

1. Activer désactiver: L'administrateur du magasin peut activer ou désactiver la fonctionnalité simplement en basculant le bouton.

2. N'afficher que les produits actuellement disponibles en stock: L'administrateur peut activer l'option de menu s'il souhaite afficher uniquement les produits en stock en tant que produits associés.

Paramètres de la page d'accueil de 3.2

1. Activer / désactiver les paramètres de la page d'accueil: L'administrateur du magasin de commerce électronique peut activer ou désactiver les paramètres de la page d'accueil en cliquant sur cette option.

2. Titre du bloc: Le propriétaire du magasin peut saisir le titre du bloc de produits associé. L'addon du produit associé automatique de PrestaShop permet à l'administrateur du magasin d'entrer le titre du bloc dans différentes langues.

3. Sélectionnez Afficher la colonne: Le propriétaire du magasin peut afficher les produits associés dans différentes colonnes, telles que le bas de la page, la colonne de gauche ou la colonne de droite.

4. Sélectionnez les méthodes: Diverses méthodes sont disponibles, comme l'administrateur peut afficher les produits les plus visités, les best-sellers, les nouveaux produits, l'historique des utilisateurs.

5. Max produits à afficher: Le propriétaire du magasin peut définir le nombre maximum de produits à afficher sur la page d'accueil du site Web.

L'administrateur du magasin peut également définir la priorité des méthodes.

Paramètres de la page de produit 3.3

1. Activer / désactiver les paramètres de la page du produit: Le propriétaire du magasin peut activer ou désactiver les paramètres de la page du produit simplement en appuyant sur un bouton.

2. Titre du bloc: L'administrateur peut saisir le titre du bloc de produits associés dans différentes langues.

3. Sélectionnez Afficher la colonne: L'administrateur du magasin peut afficher les produits associés dans la colonne de gauche, la colonne de droite ou le bas de la page.

4. Méthode de sélection: L'administrateur peut sélectionner la méthode à afficher sur le front-end. Il existe différentes méthodes, telles que l'administrateur peut afficher les produits les plus visités, les best-sellers, les nouveaux produits, les produits basés sur l'historique, les produits avec la même catégorie par défaut, les produits avec la même fonctionnalité.

5. Sélectionnez Filtre: L'administrateur du magasin peut sélectionner le filtre en fonction duquel les produits à l'avant seront affichés. Ici, l'administrateur ne peut sélectionner aucun filtre, mot-clé ou attribut.

6. Max produits à afficher: L'administrateur peut sélectionner le nombre maximum de produits à afficher en tant que produits connexes.

L'administrateur du magasin peut définir la priorité des méthodes. S'il n'y a pas de produit sur la méthode de priorité supérieure, le module affichera le produit de la priorité inférieure.

Paramètres de la catégorie 3.4

1. Activer / désactiver les paramètres de page de catégorie: L'administrateur du magasin peut activer ou désactiver les paramètres de page de catégorie à partir de l'interface d'administration.

2. Titre du bloc: L'extension de produit liée à l'avance de PrestaShop permet à l'administrateur de définir le titre du bloc de produits associé dans plusieurs langues.

3. Sélectionnez Afficher la colonne: L'extension de produit liée à l'avance de PrestaShop permet à l'administrateur d'afficher les produits associés dans différentes positions, telles que la colonne de gauche, la colonne de droite du produit ou le bas de la page.

4. Sélectionnez les méthodes: Il existe différentes méthodes pour sélectionner. L'administrateur peut afficher les produits connexes selon les meilleures ventes dans cette catégorie, les produits les plus consultés, les meilleures ventes, les nouveaux produits, l'historique des utilisateurs ou les articles les plus consultés dans cette catégorie.

5. Max produits à afficher: Le propriétaire de la boutique en ligne peut fixer le nombre maximum de produits à afficher sur la page de la catégorie.

L'administrateur du magasin peut également définir facilement la priorité de chaque méthode depuis l'interface d'administration. Le module choisit le produit de la méthode inférieure si aucun produit n'est disponible pour la méthode supérieure.

3.5 Paramètres de la page du panier

1. Activer / désactiver les paramètres de page de catégorie: L'administrateur du magasin peut activer ou désactiver les paramètres de la page du panier à partir de l'interface d'administration.

2. Titre du bloc: L'extension de produit liée à l'avance de PrestaShop permet à l'administrateur de définir le titre du bloc de produits associé dans plusieurs langues.

3. Sélectionnez Afficher la colonne: L’extension de produit liée à l’avance de PrestaShop permet à l’administrateur de montrer les produits associés dans diverses positions, comme dans

4. Sélectionnez les méthodes: Il existe différentes méthodes pour sélectionner. L'administrateur peut afficher les produits associés selon les meilleures ventes, les produits les plus visités, les nouveaux produits, l'historique des utilisateurs, les produits commandés avec les produits du panier, les produits de la même catégorie que les produits du panier.

5. Sélectionnez le filtre: L'administrateur du magasin ne peut afficher aucun filtre, mot-clé ou filtre d'attribut.

6. Max produits à afficher: L'administrateur peut fixer le nombre maximum de produits à afficher sur la page de catégorie.

L'administrateur du magasin peut également définir facilement la priorité de chaque méthode depuis l'interface d'administration. le module choisit le produit de la méthode inférieure si aucun produit n'est disponible avec la méthode supérieure.

Paramètres de la page du fabricant 3.6

1. Activer / désactiver les paramètres de page du fabricant: L'administrateur du magasin peut activer ou désactiver les paramètres de la page du fabricant à partir de l'interface d'administration.

2. Titre du bloc: Le plugin des produits liés à PrestaShop permet à l'administrateur de définir le titre du bloc de produits associés dans plusieurs langues.

3. Sélectionnez Afficher la colonne: Le plugin de produits liés à PrestaShop permet à l'administrateur d'afficher les produits associés dans différentes positions, telles que la colonne de gauche, la colonne de droite du produit ou le bas de la page.

4. Sélectionnez les méthodes: Il existe différentes méthodes pour sélectionner. L'administrateur peut afficher les produits connexes conformément aux meilleures ventes, aux produits les plus visités, aux nouveaux produits, à l'historique des utilisateurs, au produit visualisé par ce fabricant, à la meilleure vente dans ce fabricant.

5. Max produits à afficher: L'administrateur peut fixer le nombre maximum de produits à afficher sur la page de catégorie.

L'administrateur du magasin peut également définir facilement la priorité de chaque méthode depuis l'interface d'administration. Le module choisit le produit de la méthode inférieure si aucun produit n'est disponible avec la méthode supérieure.

Paramètres de confirmation de commande 3.7

1. Activer / désactiver les paramètres de la page de confirmation de commande: L'administrateur du magasin peut activer ou désactiver les paramètres de la page de confirmation de commande à partir de l'interface d'administration.

2. Titre du bloc: Le module permet à l'administrateur de définir le titre du bloc de produits associé dans plusieurs langues.

3. Sélectionnez Afficher la colonne: Le module permet à l'administrateur d'afficher les produits associés dans différentes positions, telles que la colonne de gauche, la colonne de droite du produit ou le bas de la page.

4. Sélectionnez les méthodes: Il existe différentes méthodes pour sélectionner. L'administrateur peut afficher les produits associés selon les produits les plus visités, les meilleurs vendeurs, les nouveaux produits, utiliser l'historique des utilisateurs, les produits commandés avec les produits de commande et les produits de la même catégorie que les produits de commande.

5. Sélectionnez le filtre: L'administrateur du magasin peut sélectionner les filtres comme aucun filtre, mot-clé, attribut.

6. Max produits à afficher:?The admin can fix the maximum products count for displaying on the category page.

L'administrateur du magasin peut également définir facilement la priorité de chaque méthode depuis l'interface d'administration. le module choisit le produit de la méthode inférieure si aucun produit n'est disponible avec la méthode supérieure.

Interface frontale 4.0

Les clients peuvent voir les produits connexes comme indiqué dans les images mentionnées ci-dessous.

À la page d'accueil, les produits associés seront affichés comme l'image ci-dessous:

Les produits similaires seront affichés sur les pages de catégories comme indiqué ci-dessous:

Les clients peuvent également consulter les produits associés sur la page du produit:

Les produits similaires s'afficheront sur la page du chariot comme indiqué ci-dessous:

Les clients peuvent également visualiser le produit similaire sur la confirmation de commande. Page:

Pour plus PrestaShop Addons s'il vous plaît visitez Connaître.

Pour plus de détails s'il vous plaît visitez:

PrestaShop Lien produit automatique.

S'il vous plaît support@knowband.com pour toute requête ou demande de modification personnalisée selon vos besoins professionnels.

PrestaShop Automatic Verwandte Produkte Modul

1.0 Einführung

Der Online-Shop-Händler kann nun mit dem Produkt-Cross-Selling-Modul von PrestaShop den Fokus des Kunden auf sich ziehen und den Verkauf seiner Website verbessern. Know-how-Angebote PrestaShop Automatisches verwandtes Produkt Addon, das es den Online-Verkäufern ermöglicht, verwandte Produkte auf verschiedenen Webseiten anzuzeigen. Diese erweiterte Produkterweiterung bietet die Möglichkeit, spezifische Bedingungen für das Anzeigen entsprechender ähnlicher Produkte auf jeder Seite festzulegen.

Der Administrator kann die Methoden und Filter für die Anzeige der Produkte als ähnliche Produkte festlegen. Das PrestaShop-Zusatzprodukt für automatisches Produkt ermöglicht es dem Administrator, die zugehörige Produktspalte links, rechts oder unten anzuzeigen. Die Online-Kunden können die ähnlichen Produkte sehen und das richtige Produkt ihrer Wahl bekommen. Somit kann der Administrator auch die Umsatz- und Conversion-Rate verbessern.

1.1 Vorteile für Händler

  1. Dieses Produkt-Cross-Selling-Modul hilft dem Administrator, den durchschnittlichen Warenkorbwert des Kunden zu erhöhen, indem ähnliche Produkte angezeigt werden.
  2. Es gibt höhere Chancen auf Conversions, wenn ein Filialbesucher das gewünschte Produkt im ähnlichen Produktblock findet.
  3. Der Ladenadministrator kann perfekt ähnliche Produkte anzeigen, um den Umsatz zu steigern und den Kunden ein besseres Einkaufserlebnis zu bieten.
  4. Das Modul "Ähnliche Produkte" ermöglicht die Einstellung der Position des entsprechenden Produktblocks entsprechend ihrer Präferenz.
  5. Es sind mehrere Bedingungen verfügbar, um ähnliche Produkte auf fortschrittliche Weise anzuzeigen.
  6. Dieses PrestaShop-ähnliche Produktmodul bietet eine Option zum Ausblenden nicht vorrätiger Produkte und zum Anzeigen nur verfügbarer Produkte als ähnliche Produkte.
  7. Mit Hilfe dieses Plugins für PrestaShop-verwandte Produkte kann der Administrator die Absprungrate reduzieren, indem er die Kunden anspricht.
  8. Der Administrator kann Neuankömmlinge als ähnliche Produkte anzeigen, um neue Produkte zu bewerben.
  9. Der E-Merchant kann jene Produkte zeigen, auf die er die Aufmerksamkeit des Kunden lenken möchte.

1.2 Funktionen des PrestaShop Automatic Verwandte Produkt addon

  1. Der Administrator kann verwandte Produkte auf verschiedenen Websites wie Homepage, Produktseiten, Kategorieseiten, Warenkorbseite, Herstellerseiten und Bestellbestätigungsseite anzeigen.
  2. Der Administrator hat die Option, verfügbare Produkte als verwandte Produkte anzuzeigen. Die nicht vorrätigen Produkte werden nicht als verwandte Produkte angezeigt.
  3. Der Online-Verkäufer kann den zugehörigen Produktblocktitel eingeben. Mit dem PrestaShop-Modul für verwandte Produkte kann der Administrator den Blocktitel in verschiedenen Sprachen festlegen.
  4. Die erweiterte PrestaShop-Produkterweiterung bietet verschiedene Methoden zum Anzeigen der zugehörigen Produkte. Der Ladenhändler kann die am häufigsten besuchten Produkte, Bestseller, neue Produkte anzeigen oder die Benutzerhistorie zum Anzeigen der zugehörigen Produkte verwenden.
  5. Die maximale Anzahl der zugehörigen Produkte, die auf verschiedenen Seiten angezeigt werden sollen, kann über die Administratoroberfläche festgelegt werden.
  6. Mit dem PrestaShop-Addon für verwandte Produkte kann der Administrator die Methodenpriorität und verschiedene Filter für die Anzeige verwandter Produkte festlegen.
  7. Das PrestaShop-verwandte Produkt-Addon ist vollständig mobil responsiv.
  8. Verwandte Produkte Erweiterung ist Multi-Store-kompatibel und bietet mehrsprachige Unterstützung.

2.0 Installationsschritte

Der Administrator erhält die unten genannten Dateien nach dem Kauf des Add-ons für automatisches Produkt:

1. Die gezippte Datei, die den Quellcode dieses Add-Ins für automatisches verwandtes Produkt enthält.

2. Benutzerhandbuch

Befolgen Sie diese Schritte, um das Add-In für automatisches Produkt zu installieren:

  • Der Administrator muss die gezippte Datei entpacken. Diese Datei enthält einige Dateien und Ordner.
  • Danach kann der Administrator den gesamten Inhalt des Ordners kopieren und in den "Module"Ordner des Geschäftsverzeichnisses. Der Administrator kann dem Pfad folgen Stammverzeichnis / Module /.

3. Jetzt kann der Ladenbesitzer das installieren Store Admin -> Module und Dienste. Es würde wie folgt angezeigt:
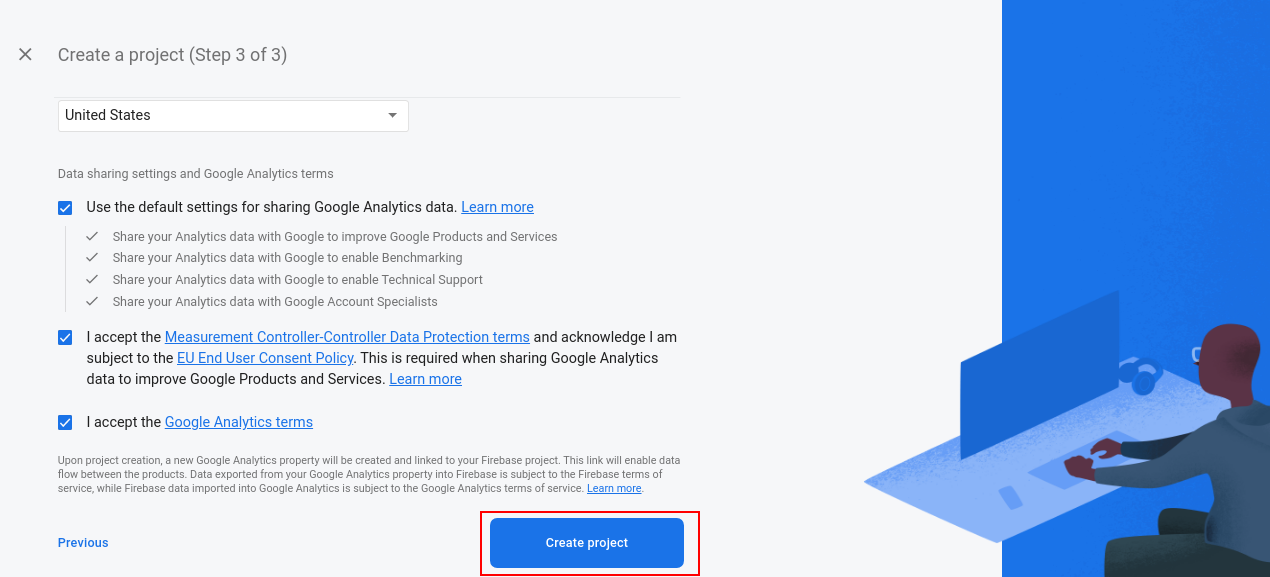
Jetzt müssen Sie nur auf "klickeninstallieren"Klicken Sie auf diese Schaltfläche, um das Add-In für automatisches Produkt einfach zu installieren. Ein Bestätigungs-Popup wird angezeigt. Klicken Sie auf" Mit der Installation fortfahren ". Dieser Schritt installiert das Add-In für automatisches Produkt und zeigt Benachrichtigungen an Module wurden erfolgreich installiert“.

3.0 Admin-Schnittstelle

Es gibt verschiedene Anpassungsoptionen. Der Store-Administrator kann die Einstellungen übernehmen und ähnliche Produkte auf verschiedenen Webseiten anzeigen. Dies sind die Anpassungsoptionen:

  1. Grundeinstellungen
  2. Startseite Einstellungen
  3. Einstellungen der Produktseite
  4. Kategorieseiteneinstellungen
  5. Seiteneinstellungen für Einkaufswagen
  6. Hersteller Seiteneinstellungen
  7. Auftragsbestätigungseinstellungen

3.1 Grundeinstellungen

1. Aktivieren deaktivieren: Der Shop-Administrator kann die Funktionalität aktivieren oder deaktivieren, indem Sie einfach die Schaltfläche wechseln.

2. Zeige nur die Produkte, die momentan auf Lager sind: Der Administrator kann die Menüoption aktivieren, wenn er nur Produkte im Laden als verwandte Produkte anzeigen möchte.

3.2-Homepage-Einstellungen

1. Aktivieren / Deaktivieren der Homepage-Einstellungen: Der E-Commerce-Shop-Administrator kann die Homepage-Einstellungen aktivieren oder deaktivieren, indem er auf diese Option klickt.

2. Blocktitel: Der Geschäftsinhaber kann den Titel des zugehörigen Produktblocks eingeben. Mit dem Zusatz PrestaShop Automatic Related Product kann der Geschäftsadministrator den Blocktitel in verschiedenen Sprachen eingeben.

3. Wählen Sie Anzeigespalte: Der Geschäftsinhaber kann die zugehörigen Produkte in verschiedenen Spalten wie der Seitenunterseite, der linken Spalte oder der rechten Spalte anzeigen.

4. Wählen Sie Methoden: Verschiedene Methoden stehen zur Verfügung wie der Administrator kann Top besucht Produkte, Bestseller, neue Produkte, Benutzerhistorie zeigen.

5. Maximal anzuzeigende Produkte: Der Ladenbesitzer kann die maximale Anzahl der Produkte festlegen, die auf der Homepage der Website angezeigt werden.

Der Geschäftsadministrator kann auch die Priorität der Methoden festlegen.

3.3-Produktseiteneinstellungen

1. Produktseite Einstellungen aktivieren / deaktivieren: Der Ladenbesitzer kann die Einstellungen der Produktseite nur durch einen Knopfwechsel aktivieren oder deaktivieren.

2. Blocktitel: Der Administrator kann den Titel des entsprechenden Produktblocks in verschiedenen Sprachen eingeben.

3. Wählen Sie Spalte anzeigen: Der Shop-Administrator kann die zugehörigen Produkte in der linken, rechten oder unteren Seite anzeigen.

4. Wählen Sie Methode: Der Administrator kann die Methode auswählen, die im Frontend angezeigt werden soll. Es gibt verschiedene Methoden, wie der Administrator die meistbesuchten Produkte, Bestseller, neue Produkte, auf Benutzerhistorie basierende Produkte, Produkte mit derselben Standardkategorie, mit diesem Produkt bestellte Produkte, Produkte mit derselben Funktion und Produkte mit demselben Funktionswert anzeigen kann.

5. Wählen Sie Filter: Der Shop-Administrator kann den Filter auswählen, nach dem die Produkte im Vordergrund angezeigt werden. Hier kann der Administrator keinen Filter, Schlüsselwörter und Attribute auswählen.

6. Maximal anzuzeigende Produkte: Der Administrator kann die maximale Anzahl der Produkte auswählen, die als verwandte Produkte angezeigt werden sollen.

Der Geschäftsadministrator kann die Priorität der Methoden festlegen. Wenn auf der Methode mit höherer Priorität kein Produkt vorhanden ist, zeigt das Modul das Produkt mit der niedrigeren Priorität an.

3.4 Kategorie Seiteneinstellungen

1. Aktivieren / Deaktivieren der Kategorieseiteneinstellungen: Der Store-Administrator kann die Kategorieseiteneinstellungen über die Admin-Oberfläche aktivieren oder deaktivieren.

2. Blocktitel: Mit der erweiterten PrestaShop-Produkterweiterung kann der Administrator den Titel des zugehörigen Produktblocks in mehreren Sprachen festlegen.

3. Wählen Sie Anzeigespalte: Die mit PrestaShop Advance verbundene Produkterweiterung ermöglicht es dem Administrator, die zugehörigen Produkte in verschiedenen Positionen wie der linken Spalte, der rechten Spalte des Produkts oder der Seite unten anzuzeigen.

4. Wählen Sie Methoden: Es gibt verschiedene Methoden zur Auswahl. Der Administrator kann die zugehörigen Produkte als Bestseller in dieser Kategorie, Meistbesuchte Produkte, Bestseller, Neue Produkte, Nutzerhistorie oder Top in dieser Kategorie anzeigen.

5. Maximal anzuzeigende Produkte: Der Besitzer des Online-Shops kann die maximale Anzahl der Produkte für die Anzeige auf der Kategorieseite festlegen.

Der Store-Administrator kann die Priorität jeder Methode auch einfach über die Admin-Oberfläche festlegen. Das Modul wählt das Produkt aus der niedrigeren Methode aus, wenn auf der höheren Methode kein Produkt verfügbar ist.

3.5 Warenkorb Seiteneinstellungen

1. Aktivieren / Deaktivieren der Kategorieseiteneinstellungen: Der Geschäftsadministrator kann die Einstellungen für die Einkaufswagenseite über die Verwaltungsoberfläche aktivieren oder deaktivieren.

2. Blocktitel: Mit der erweiterten PrestaShop-Produkterweiterung kann der Administrator den Titel des zugehörigen Produktblocks in mehreren Sprachen festlegen.

3. Wählen Sie Anzeigespalte: Die erweiterte PrestaShop-Produkterweiterung ermöglicht es dem Administrator, die zugehörigen Produkte in verschiedenen Positionen wie in anzuzeigen

4. Wählen Sie Methoden: Es gibt verschiedene Methoden zur Auswahl. Der Administrator kann die verwandten Produkte als Bestseller, Top besuchte Produkte, neue Produkte, Benutzerhistorie, Produkte, die mit den Produkten im Warenkorb bestellt wurden, Produkte der gleichen Kategorie wie die Produkte des Warenkorbs anzeigen.

5. Wählen Sie den Filter: Der Geschäftsadministrator kann keinen Filter, Schlüsselwort- oder Attributfilter anzeigen.

6. Maximal anzuzeigende Produkte: Der Administrator kann die maximale Produktanzahl für die Anzeige auf der Kategorieseite festlegen.

Der Store-Administrator kann die Priorität jeder Methode auch einfach über die Admin-Oberfläche festlegen. Das Modul wählt das Produkt aus der niedrigeren Methode aus, wenn auf der höheren Methode kein Produkt verfügbar ist.

3.6 Manufacturer Seiteneinstellungen

1. Aktivieren / Deaktivieren der Seiteneinstellungen des Herstellers: Der Geschäftsadministrator kann die Einstellungen der Herstellerseite über die Administratorschnittstelle aktivieren oder deaktivieren.

2. Blocktitel: Das Plug-in PrestaShop related products ermöglicht dem Administrator, den Titel des zugehörigen Produktblocks in mehreren Sprachen festzulegen.

3. Wählen Sie Anzeigespalte: Das PrestaShop related products plugin ermöglicht es dem Administrator, die verwandten Produkte in verschiedenen Positionen wie der linken Spalte, der rechten Spalte des Produkts oder der Seite unten anzuzeigen.

4. Wählen Sie Methoden: Es gibt verschiedene Methoden zur Auswahl. Der Administrator kann die verwandten Produkte nach Bestseller, Meistbesuchte Produkte, Neue Produkte, Benutzungshistorie, Top gesehen von diesem Hersteller, Bestseller in diesem Hersteller zeigen.

5. Maximal anzuzeigende Produkte: Der Administrator kann die maximale Produktanzahl für die Anzeige auf der Kategorieseite festlegen.

Der Store-Administrator kann die Priorität jeder Methode auch einfach über die Admin-Oberfläche festlegen. Das Modul wählt das Produkt aus der niedrigeren Methode aus, wenn auf der höheren Methode kein Produkt verfügbar ist.

3.7 Bestellbestätigungseinstellungen

1. Aktivieren / Deaktivieren der Auftragsbestätigungsseite Einstellungen: Der Geschäftsadministrator kann die Einstellungen der Bestellbestätigungsseite über die Verwaltungsoberfläche aktivieren oder deaktivieren.

2. Blocktitel: Das Modul ermöglicht es dem Administrator, den Titel des zugehörigen Produktblocks in mehreren Sprachen festzulegen.

3. Wählen Sie Anzeigespalte: Das Modul ermöglicht es dem Administrator, die zugehörigen Produkte in verschiedenen Positionen wie der linken Spalte, der rechten Spalte des Produkts oder der Unterseite der Seite anzuzeigen.

4. Wählen Sie Methoden: Es gibt verschiedene Methoden zur Auswahl. Der Administrator kann die verwandten Produkte nach oben besuchte Produkte, Bestseller, neue Produkte, Benutzerhistorie, Produkte mit den Produkten der Bestellung und Produkte der gleichen Kategorie wie die Produkte der Bestellung angezeigt zeigen.

5. Wählen Sie den Filter: Der Store-Administrator kann die Filter wie kein Filter, Schlüsselwort, Attribut auswählen.

6. Maximal anzuzeigende Produkte:?The admin can fix the maximum products count for displaying on the category page.

Der Store-Administrator kann die Priorität jeder Methode auch einfach über die Admin-Oberfläche festlegen. Das Modul wählt das Produkt aus der niedrigeren Methode aus, wenn auf der höheren Methode kein Produkt verfügbar ist.

4.0-Front-End-Schnittstelle

Die Kunden können die verwandten Produkte wie in den unten genannten Bildern gezeigt sehen.

Auf der Startseite werden die zugehörigen Produkte wie unten abgebildet angezeigt:

Die ähnlichen Produkte werden auf Kategorieseiten wie folgt angezeigt:

Die Kunden können die zugehörigen Produkte auch auf der Produktseite anzeigen:

Die ähnlichen Produkte werden auf der Einkaufswagenseite wie folgt angezeigt:

Die Kunden können das ähnliche Produkt auf der Auftragsbestätigungsseite auch sehen:

Weitere PrestaShop Addons besuchen Sie bitte Knowband.

Für weitere Informationen besuchen Sie bitte:

PrestaShop Link für automatisches Produkt-Modul Produkt-Seite.

Bitte support@knowband.com für jede Abfrage oder benutzerdefinierte Änderungsanforderung gemäß Ihrer Geschäftsanforderung.

Modulo di prodotti correlati automatici PrestaShop

1.0 Introduzione

Il commerciante di negozi online può ora attirare l'attenzione del cliente e migliorare le vendite del sito web utilizzando il modulo di vendita incrociata del prodotto PrestaShop. Knowband offre Prodotto correlato automatico PrestaShop addon che consente ai venditori online di visualizzare prodotti correlati su varie pagine del sito. Questa estensione di prodotto relativa all'anticipo fornisce un'opzione per impostare condizioni specifiche per la presentazione di prodotti simili appropriati su ciascuna pagina.

L'amministratore può impostare i metodi e i filtri per la visualizzazione dei prodotti come prodotti simili. L'addon relativo al prodotto correlato automatico PrestaShop consente all'amministratore di mostrare la colonna del prodotto correlato a sinistra, a destra o in basso sulla pagina. I clienti online possono visualizzare i prodotti simili e ottenere il prodotto giusto a loro scelta. Pertanto, l'amministratore può anche migliorare le vendite e il tasso di conversione.
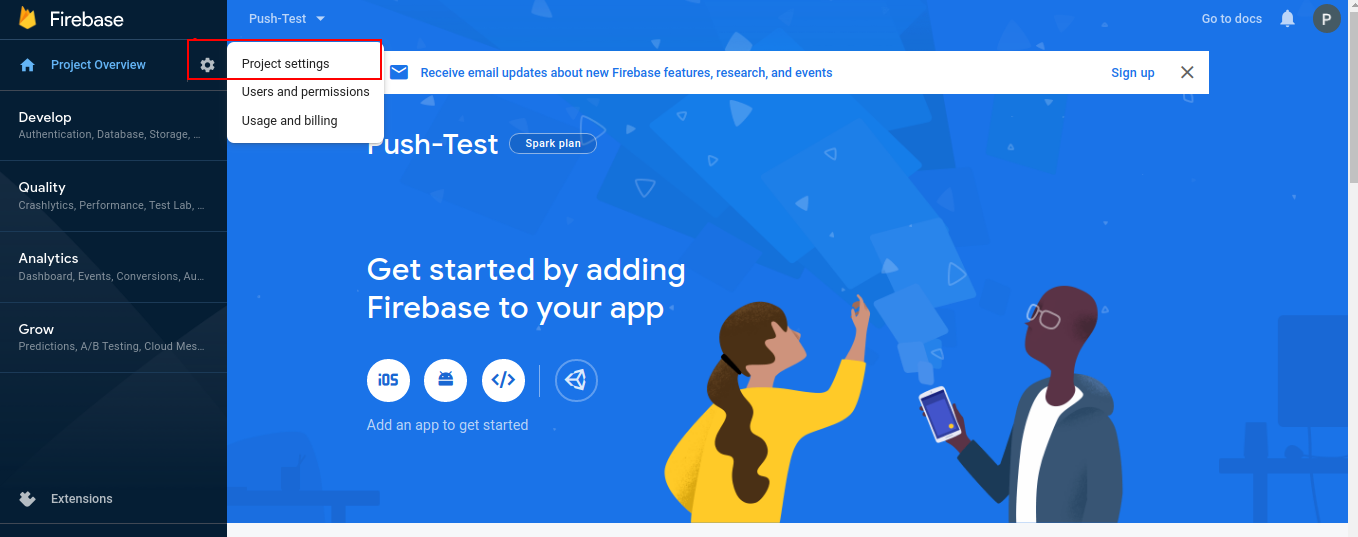
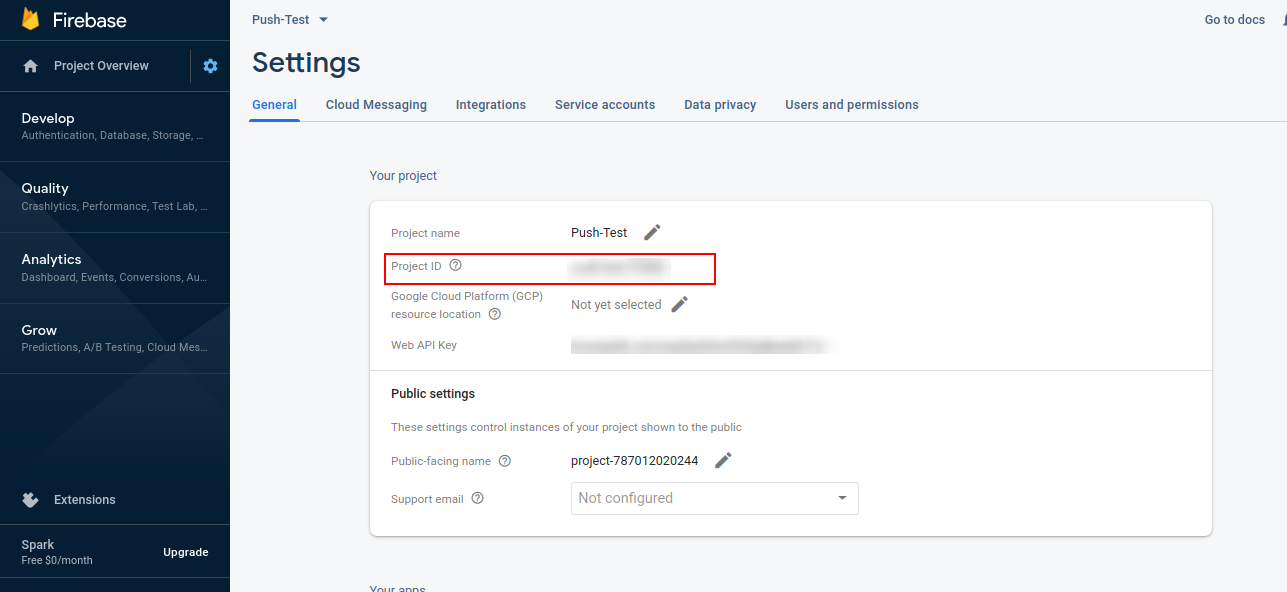
Vantaggi 1.1 per i commercianti

  1. Questo modulo di cross-selling del prodotto aiuta l'amministratore ad aumentare il valore medio del carrello del cliente mostrando prodotti simili.
  2. Ci sono maggiori possibilità di conversioni se un visitatore del negozio trova il prodotto desiderato nel blocco del prodotto simile.
  3. L'amministratore del negozio può visualizzare prodotti simili perfetti al fine di aumentare le vendite e offrire un'esperienza migliore ai clienti.
  4. Il modulo Prodotti simili consente di impostare la relativa posizione del blocco del prodotto in base alle proprie preferenze.
  5. Sono disponibili più condizioni per mostrare prodotti simili in modo avanzato.
  6. Questo modulo di prodotto simile a PrestaShop offre un'opzione per nascondere i prodotti non disponibili e mostrare solo i prodotti disponibili come prodotti simili.
  7. Con l'aiuto di questo plug-in relativo ai prodotti correlati a PrestaShop, l'amministratore può ridurre la frequenza di rimbalzo coinvolgendo i clienti.
  8. L'amministratore può mostrare nuovi arrivi come prodotti simili per promuovere nuovi prodotti.
  9. L'e-merchant può mostrare quei prodotti sui quali vuole attirare l'attenzione del cliente.

Caratteristiche 1.2 del componente aggiuntivo automatico relativo a PrestaShop

  1. L'amministratore può mostrare i prodotti correlati su varie pagine del sito web come homepage, pagine di prodotto, pagine di categoria, pagina del carrello, pagine del produttore e pagina di conferma dell'ordine.
  2. L'amministratore ha un'opzione per mostrare i prodotti disponibili come prodotti correlati. I prodotti esauriti non verranno visualizzati come prodotti correlati.
  3. Il venditore online può inserire il titolo del blocco prodotto correlato. Il modulo dei prodotti relativi a PrestaShop consente all'amministratore di impostare il titolo del blocco in varie lingue.
  4. L'estensione di prodotto relativa a PrestaShop in anticipo fornisce vari metodi per mostrare i prodotti correlati. Il commerciante del negozio può visualizzare i prodotti più visitati, i bestseller, i nuovi prodotti o utilizzare la cronologia utente per mostrare i prodotti correlati.
  5. Il numero massimo del prodotto correlato da visualizzare su pagine diverse può essere risolto dall'interfaccia di amministrazione.
  6. Il componente aggiuntivo di prodotti correlati a PrestaShop consente all'amministratore di impostare la priorità del metodo e diversi filtri per mostrare i prodotti correlati.
  7. L'addon dei prodotti correlati a PrestaShop è completamente mobile.
  8. L'estensione dei prodotti correlati è compatibile con più negozi e offre supporto multilingue.

2.0 Fasi di installazione

L'amministratore riceverà i seguenti file dopo aver acquistato l'addon relativo al prodotto correlato automatico:

1. Il file zippato che costituisce il codice sorgente di questo addon relativo al prodotto correlato automatico.

2. Manuale utente

Seguire questi passaggi per installare l'addon relativo al prodotto correlato automatico:

  • L'amministratore deve decomprimere il file zippato. Questo file include alcuni file e cartelle.
  • Successivamente, l'amministratore può copiare il contenuto generale della cartella e incollarli nel "moduli"cartella della directory del negozio. L'amministratore può seguire il percorso Directory di root / moduli /.

3. Ora, il proprietario del negozio può installare il Amministratore del negozio -> Moduli e servizi. Sarebbe mostrato come di seguito:

Ora devi solo cliccare su "Installazione"per installare facilmente questo addon relativo al prodotto correlato automatico.Verrà mostrato un pop-up di conferma.Fare clic sull'opzione" Procedi con l'installazione ".Questo passaggio installerà l'addon relativo al prodotto correlato automatico e mostrerà la notifica Modulo (i) installato con successo“.

3.0 Admin Interface

Ci sono varie opzioni di personalizzazione. L'amministratore del negozio può applicare le impostazioni e mostrare i prodotti simili su varie pagine del sito. Queste sono le opzioni di personalizzazione:

  1. Impostazioni di base
  2. Impostazioni della pagina iniziale
  3. Impostazioni della pagina del prodotto
  4. Impostazioni della categoria di pagina
  5. Impostazioni della pagina carrello
  6. Impostazioni pagina produttore
  7. Impostazioni di conferma dell'ordine

3.1 Impostazioni di base

1. Attiva / Disattiva: L'amministratore del negozio può attivare o disattivare la funzionalità semplicemente attivando il pulsante.

2. Mostra solo i prodotti attualmente disponibili in magazzino: L'amministratore può abilitare l'opzione di menu se vuole mostrare solo prodotti disponibili come prodotti correlati.

Impostazioni della pagina iniziale 3.2

1. Abilita / Disabilita le impostazioni della Home page: L'amministratore del negozio eCommerce può attivare o disattivare le impostazioni della homepage facendo clic su questa opzione.

2. Titolo del blocco: Il proprietario del negozio può inserire il titolo del blocco prodotti correlati. L'addon relativo al prodotto correlato automatico PrestaShop consente all'amministratore del negozio di inserire il titolo del blocco in diverse lingue.

3. Seleziona colonna display: Il proprietario del negozio può mostrare i prodotti correlati in varie colonne come pagina in basso, colonna sinistra o colonna destra.

4. Seleziona metodi: Sono disponibili vari metodi come l'amministratore può mostrare i prodotti più visitati, i bestseller, i nuovi prodotti, la cronologia degli utenti.

5. Prodotti massimi da visualizzare: Il proprietario del negozio può impostare il numero massimo di prodotti da mostrare sulla homepage del sito web.

L'amministratore del negozio può anche impostare la priorità dei metodi.

Impostazioni della pagina del prodotto 3.3

1. Abilita / disabilita le impostazioni della pagina del prodotto: Il proprietario del negozio può attivare o disattivare le impostazioni della pagina del prodotto semplicemente premendo un pulsante.

2. Titolo del blocco: L'amministratore può inserire il titolo del blocco prodotti correlati in varie lingue.

3. Seleziona la colonna Display: L'amministratore del negozio può mostrare i prodotti correlati sulla colonna sinistra, sulla colonna destra o sulla pagina inferiore.

4. Seleziona metodo: L'amministratore può selezionare il metodo che deve essere visualizzato sul front-end. Esistono vari metodi come l'amministratore può mostrare i prodotti più visitati, i bestseller, i nuovi prodotti, i prodotti basati sulla cronologia utente, i prodotti con la stessa categoria predefinita, i prodotti ordinati con questo prodotto, i prodotti con le stesse funzionalità e i prodotti con lo stesso valore.

5. Seleziona filtro: L'amministratore del negozio può selezionare il filtro in base al quale verranno visualizzati i prodotti nella parte anteriore. Qui, l'amministratore può selezionare nessun filtro, parole chiave e attributi.

6. Prodotti massimi da visualizzare: L'amministratore può selezionare il numero massimo di prodotti da visualizzare come prodotti correlati.

L'amministratore del negozio può impostare la priorità dei metodi. se non ci sono prodotti con il metodo con priorità più alta, il modulo mostrerà il prodotto dalla priorità più bassa.

Impostazioni della pagina categoria 3.4

1. Abilita / Disabilita impostazioni delle categorie di categorie: L'amministratore del negozio può abilitare o disabilitare le impostazioni della pagina della categoria dall'interfaccia di amministrazione.

2. Titolo del blocco: L'estensione di prodotto relativa a PrestaShop consente all'amministratore di impostare il titolo del blocco relativo ai prodotti in più lingue.

3. Seleziona colonna display: L'estensione di prodotto relativa all'anticipo PrestaShop consente all'amministratore di mostrare i prodotti correlati in varie posizioni, come la colonna di sinistra, la colonna di destra del prodotto o il fondo della pagina.

4. Seleziona metodi: Ci sono vari metodi tra cui scegliere. L'amministratore può mostrare i prodotti correlati secondo I più venduti in questa categoria, i prodotti più visitati, i più venduti, i nuovi prodotti, la cronologia degli utenti o I più visti in questa categoria.

5. Prodotti massimi da visualizzare: Il proprietario del negozio online può fissare il numero massimo di prodotti da visualizzare nella pagina della categoria.

L'amministratore del negozio può anche impostare facilmente la priorità di ogni metodo dall'interfaccia di amministrazione. Il modulo preleva il prodotto dal metodo inferiore se nessun prodotto sarà disponibile con il metodo più alto.

3.5 Impostazioni pagina carrello

1. Abilita / Disabilita impostazioni delle categorie di categorie: L'amministratore del negozio può abilitare o disabilitare le impostazioni della pagina del carrello dall'interfaccia di amministrazione.

2. Titolo del blocco: L'estensione di prodotto relativa a PrestaShop consente all'amministratore di impostare il titolo del blocco relativo ai prodotti in più lingue.

3. Seleziona colonna display: L'estensione di prodotto relativa all'anticipo PrestaShop consente all'amministratore di mostrare i prodotti correlati in varie posizioni come in

4. Seleziona metodi: Ci sono vari metodi tra cui scegliere. L'amministratore può mostrare i prodotti correlati come Bestseller, Prodotti più visitati, Nuovi prodotti, cronologia utente, Prodotti ordinati con i prodotti nel carrello, Prodotti della stessa categoria dei prodotti del carrello.

5. Seleziona filtro: L'amministratore del negozio può visualizzare nessun filtro, parola chiave o filtro degli attributi.

6. Prodotti massimi da visualizzare: l'amministratore può correggere il numero massimo di prodotti da visualizzare nella pagina della categoria.

L'amministratore del negozio può anche impostare facilmente la priorità di ogni metodo dall'interfaccia di amministrazione. il modulo preleva il prodotto dal metodo inferiore se nessun prodotto sarà disponibile con il metodo più alto.

Impostazioni pagina produttore 3.6

1. Abilita / Disabilita impostazioni pagina produttore: L'amministratore del negozio può abilitare o disabilitare le impostazioni della pagina del produttore dall'interfaccia di amministrazione.

2. Titolo del blocco: Il plug-in relativo ai prodotti correlati a PrestaShop consente all'amministratore di impostare il titolo del blocco dei prodotti correlati in più lingue.

3. Seleziona colonna display: Il plug-in relativo ai prodotti correlati a PrestaShop consente all'amministratore di mostrare i prodotti correlati in varie posizioni, come la colonna di sinistra, la colonna di destra del prodotto o il fondo della pagina.

4. Seleziona metodi: Ci sono vari metodi tra cui scegliere. L'amministratore può mostrare i prodotti correlati come Bestsellers, Prodotti più visitati, Nuovi prodotti, Usa cronologia utente, I più visti da questo produttore, Bestseller in questo produttore.

5. Prodotti massimi da visualizzare: l'amministratore può correggere il numero massimo di prodotti da visualizzare nella pagina della categoria.

L'amministratore del negozio può anche impostare facilmente la priorità di ogni metodo dall'interfaccia di amministrazione. il modulo sceglie il prodotto dal metodo più basso se nessun prodotto sarà disponibile con il metodo più alto.

Impostazioni di conferma dell'ordine 3.7

1. Abilita / Disabilita impostazioni della pagina di conferma dell'ordine: L'amministratore del negozio può abilitare o disabilitare le impostazioni della pagina di conferma dell'ordine dall'interfaccia di amministrazione.

2. Titolo del blocco: Il modulo consente all'amministratore di impostare il titolo del blocco relativo ai prodotti in più lingue.

3. Seleziona colonna display: Il modulo consente all'amministratore di mostrare i prodotti correlati in varie posizioni come la colonna di sinistra, la colonna di destra del prodotto o il fondo della pagina.

4. Seleziona metodi: Ci sono vari metodi tra cui scegliere. L'amministratore può mostrare i prodotti correlati secondo i prodotti Top visitati, i più venduti, i nuovi prodotti, la cronologia degli utenti, i prodotti ordinati con i prodotti dell'ordine e i prodotti della stessa categoria dei prodotti dell'ordine.

5. Seleziona filtro: L'amministratore del negozio può selezionare i filtri come nessun filtro, parola chiave, attributo.

6. Prodotti massimi da visualizzare:?The admin can fix the maximum products count for displaying on the category page.

L'amministratore del negozio può anche impostare facilmente la priorità di ogni metodo dall'interfaccia di amministrazione. il modulo preleva il prodotto dal metodo inferiore se nessun prodotto sarà disponibile con il metodo più alto.

Interfaccia 4.0 front-end

I clienti possono visualizzare i prodotti correlati come mostrato nelle immagini sotto menzionate.

Nella home page i prodotti correlati verranno visualizzati come nell'immagine seguente:

I prodotti simili verranno visualizzati nelle pagine delle categorie come mostrato di seguito:

I clienti possono anche visualizzare i prodotti correlati nella pagina del prodotto:

I prodotti simili verranno visualizzati nella Pagina carrello come mostrato di seguito:

I clienti possono anche visualizzare il prodotto simile nella pagina di conferma dell'ordine:

Per ulteriori Addons PrestaShop visitare il sito Knowband.

Per maggiori dettagli visita:

PrestaShop Link alla pagina di prodotto del modulo prodotto correlato automatico.

per favore support@knowband.com per qualsiasi richiesta o richiesta di modifica personalizzata in base ai requisiti aziendali.

Moduł PretalShop Automatic Related Products

1.0 Wprowadzenie

Kupiec sklepu internetowego może teraz skupić uwagę klienta i poprawić sprzedaż strony internetowej dzięki modułowi sprzedaży krzyżowej PrestaShop. Oferty Knowband Automatyczny produkt pokrewny PrestaShop dodatek, który umożliwia sprzedawcom internetowym wyświetlanie powiązanych produktów na różnych stronach internetowych. To rozszerzenie produktu związane z wyprzedzeniem umożliwia ustawienie określonych warunków wyświetlania odpowiednich podobnych produktów na każdej stronie.

Administrator może ustawić metody i filtry wyświetlania produktów jako podobnych produktów. Automatyczny dodatek do produktu pokrewnego PrestaShop pozwala administratorowi wyświetlać pokrewną kolumnę produktu po lewej, prawej lub na dole strony. Klienci online mogą przeglądać podobne produkty i wybrać odpowiedni produkt. W ten sposób administrator może również poprawić sprzedaż i współczynnik konwersji.

Korzyści 1.1 dla handlowców

  1. Ten moduł sprzedaży krzyżowej pomaga administratorowi zwiększyć średnią wartość koszyka klienta, pokazując podobne produkty.
  2. Istnieje większa szansa na konwersję, jeśli użytkownik sklepu znajdzie żądany produkt w podobnym bloku produktu.
  3. Administrator sklepu może wyświetlać perfekcyjnie podobne produkty, aby zwiększyć sprzedaż i zaoferować klientom lepsze wrażenia w sklepie.
  4. Moduł podobnych produktów umożliwia ustawienie odpowiedniej pozycji bloku produktu zgodnie z ich preferencjami.
  5. Dostępnych jest wiele warunków umożliwiających wyświetlanie podobnych produktów w sposób zaawansowany.
  6. Ten sam moduł produktu PrestaShop oferuje opcję ukrywania niedostępnych produktów i pokazywania tylko dostępnych produktów jako podobnych produktów.
  7. Dzięki tej wtyczce produktów pokrewnych PrestaShop administrator może zmniejszyć współczynnik odrzuceń, angażując klientów.
  8. Administrator może pokazywać nowo przybyłych jako podobne produkty w celu promowania nowych produktów.
  9. Sprzedawca może pokazać produkty, na które chce zwrócić uwagę klienta.

Cechy 1.2 automatycznego dodatku do produktu pokrewnego PrestaShop

  1. Administrator może wyświetlać powiązane produkty na różnych stronach internetowych, takich jak strona główna, strony produktów, strony kategorii, strona koszyka, strony producenta i strona potwierdzenia zamówienia.
  2. Administrator ma opcję wyświetlania dostępnych produktów jako powiązanych produktów. Produkty niedostępne w magazynie nie będą wyświetlane jako produkty powiązane.
  3. Sprzedawca internetowy może wprowadzić powiązany tytuł bloku produktu. Moduł produktów pokrewnych PrestaShop pozwala administratorowi ustawić tytuł bloku w różnych językach.
  4. Rozszerzenie produktów związanych z zaliczką PrestaShop zapewnia różne metody wyświetlania powiązanych produktów. Sprzedawca sklepu może wyświetlać najczęściej odwiedzane produkty, bestsellery, nowe produkty lub korzystać z historii użytkownika do wyświetlania powiązanych produktów.
  5. Maksymalna liczba powiązanych produktów do wyświetlenia na różnych stronach może być ustalona z poziomu interfejsu administratora.
  6. Dodatek do produktów pokrewnych PrestaShop pozwala administratorowi ustawić priorytet metody i różne filtry do wyświetlania powiązanych produktów.
  7. Dodatek do produktów pokrewnych PrestaShop jest w pełni mobilny.
  8. Rozszerzenie produktów pokrewnych jest kompatybilne z wieloma sklepami i oferuje wsparcie w wielu językach.

Etapy instalacji 2.0

Administrator otrzyma poniższe pliki po zakupie dodatku Automatyczny produkt powiązany:

1. Spakowany plik składający się z kodu źródłowego tego dodatku do automatycznego produktu pokrewnego.

2. Instrukcja obsługi

Wykonaj następujące kroki, aby zainstalować dodatek Automatyczny produkt powiązany:

  • Administrator musi rozpakować spakowany plik. Ten plik zawiera niektóre pliki i foldery.
  • Następnie administrator może skopiować ogólną zawartość folderu i wkleić je do "Moduły"folder katalogu sklepu. Administrator może podążać ścieżką Katalog główny / moduły /.

3. Teraz właściciel sklepu może zainstalować Store Admin -> Moduły i usługi. Zostanie to pokazane poniżej:
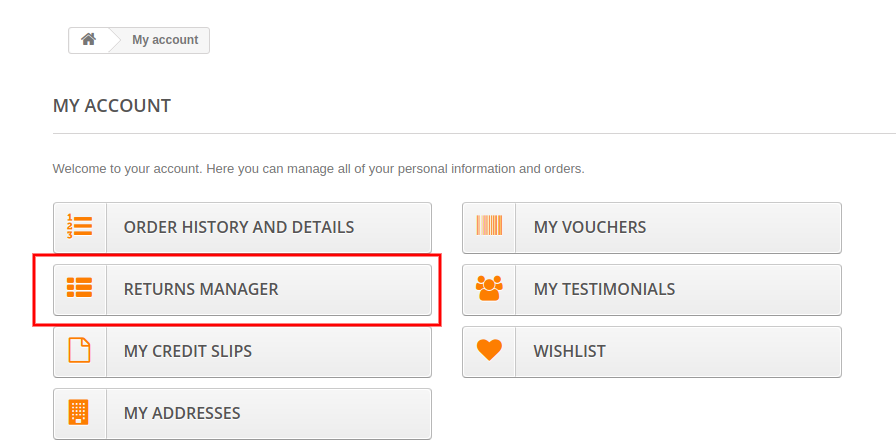
Teraz wystarczy kliknąć "zainstalować", aby łatwo zainstalować dodatek do Automatycznego Podobnego Produktu, pojawi się okienko z potwierdzeniem, kliknij opcję" Kontynuuj instalację ". W tym kroku zostanie zainstalowany dodatek do Automatycznego powiązanego produktu i powiadomienie Moduły zainstalowane pomyślnie“.

Interfejs administracyjny 3.0

Dostępne są różne opcje dostosowywania. Administrator sklepu może zastosować ustawienia i wyświetlić podobne produkty na różnych stronach internetowych. Oto opcje dostosowywania:

  1. Podstawowe ustawienia
  2. Ustawienia strony głównej
  3. Ustawienia strony produktu
  4. Ustawienia strony kategorii
  5. Ustawienia strony koszyka
  6. Ustawienia strony producenta
  7. Zamów ustawienia potwierdzenia

Podstawowe ustawienia 3.1

1. Włącz / wyłącz: Administrator sklepu może aktywować lub dezaktywować funkcjonalność po prostu przełączając przycisk.

2. Pokaż tylko te produkty, które są obecnie dostępne w magazynie: Administrator może włączyć opcję menu, jeśli chce wyświetlać tylko produkty w magazynie jako produkty powiązane.
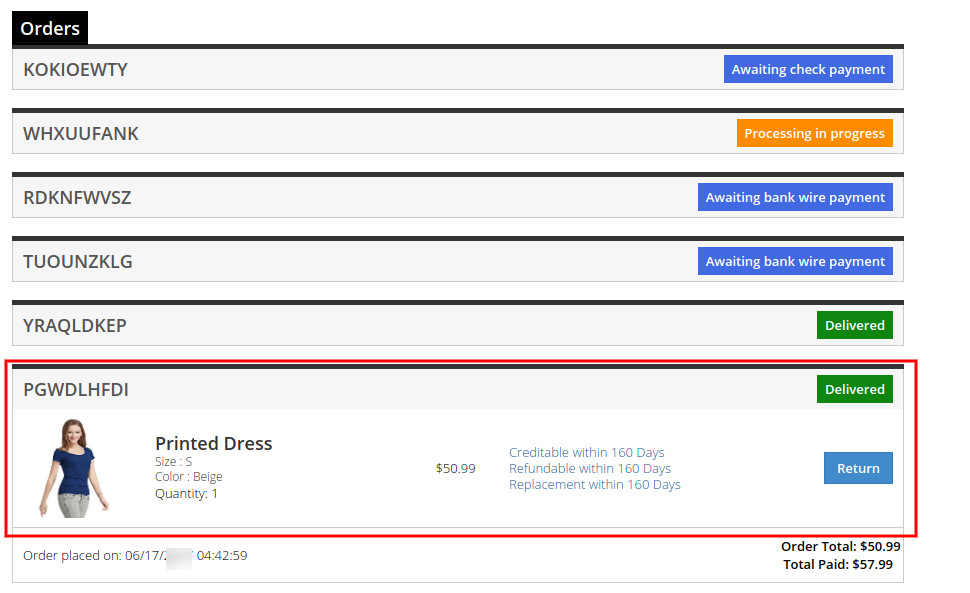
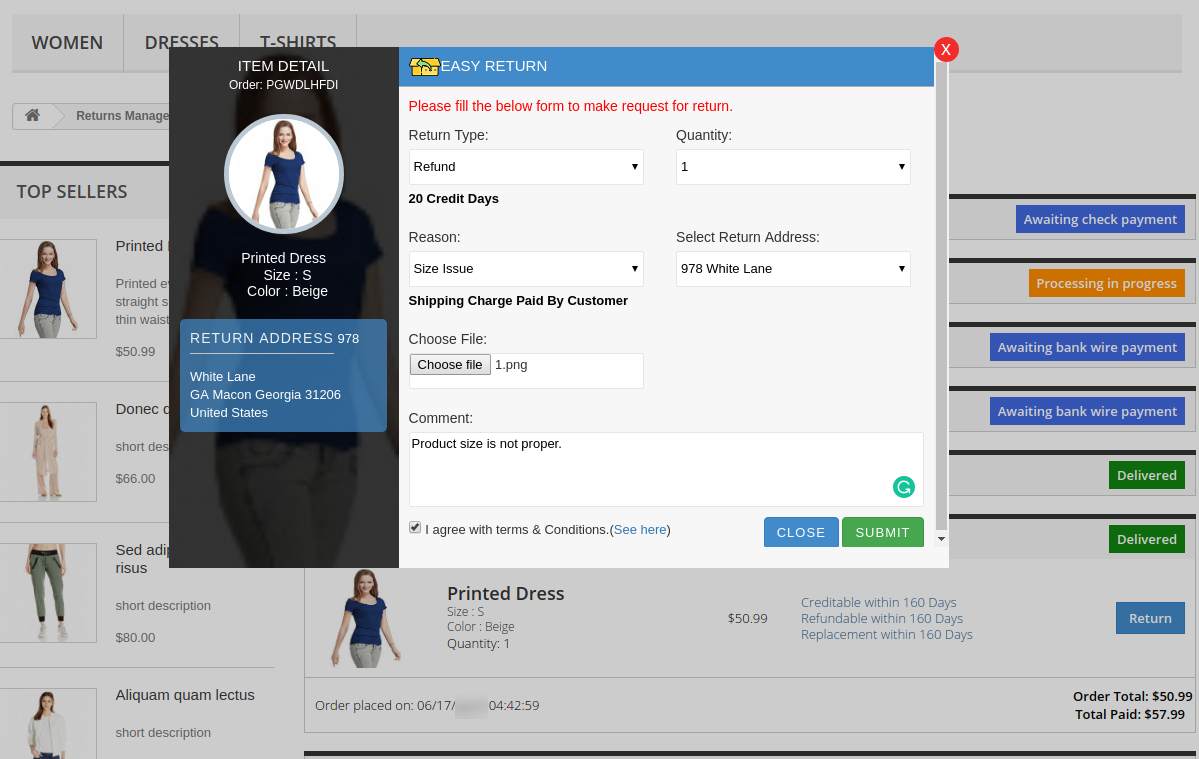
Ustawienia strony głównej 3.2

1. Włącz / wyłącz ustawienia strony głównej: Administrator sklepu eCommerce może aktywować lub dezaktywować ustawienia strony domowej, klikając tę ​​opcję.

2. Tytuł bloku: Właściciel sklepu może wprowadzić tytuł powiązanego bloku produktów. Dodatek do produktu pokrewnego PrestaShop pozwala administratorowi sklepu na wpisanie tytułu bloku w różnych językach.

3. Wybierz wyświetl kolumnę: Właściciel sklepu może wyświetlać powiązane produkty w różnych kolumnach, np. Na dole strony, w lewej kolumnie lub w prawej kolumnie.

4. Wybierz metody: Dostępne są różne metody, takie jak administrator może wyświetlać najczęściej odwiedzane produkty, bestsellery, nowe produkty, historię użytkowników.

5. Maksymalne produkty do wyświetlenia: Właściciel sklepu może ustawić maksymalną liczbę produktów do wyświetlenia na stronie głównej witryny.

Administrator sklepu może również ustawić priorytet metod.

Ustawienia strony produktu 3.3

1. Włącz / wyłącz Ustawienia strony produktu: Właściciel sklepu może aktywować lub dezaktywować ustawienia strony produktu za pomocą przełącznika przycisku.

2. Tytuł bloku: Administrator może wprowadzić tytuł bloku powiązanych produktów w różnych językach.

3. Wybierz kolumnę Wyświetl: Administrator sklepu może wyświetlać powiązane produkty w lewej kolumnie, prawej kolumnie lub na dole strony.

4. Wybierz metodę: Administrator może wybrać metodę, która ma być wyświetlana na front-end. Istnieją różne metody, takie jak administrator może wyświetlać najczęściej odwiedzane produkty, bestsellery, nowe produkty, produkty oparte na historii użytkownika, produkty o tej samej kategorii domyślnej, produkty zamawiane z tym produktem, produkty o tej samej funkcji i produkty o tej samej wartości funkcji.

5. Wybierz filtr: Administrator sklepu może wybrać filtr, zgodnie z którym wyświetlane będą produkty z przodu. Tutaj administrator może wybrać filtr, słowa kluczowe i atrybut.

6. Maksymalne produkty do wyświetlenia: Administrator może wybrać maksymalną liczbę produktów do wyświetlenia jako produkty powiązane.

Administrator sklepu może ustawić priorytet metod. jeśli nie ma produktu w metodzie o wyższym priorytecie, moduł wyświetli produkt z niższym priorytetem.

Ustawienia strony kategorii 3.4

1. Włącz / wyłącz ustawienia strony kategorii: Administrator sklepu może włączyć lub wyłączyć ustawienia strony kategorii z poziomu interfejsu administratora.

2. Tytuł bloku: Rozszerzenie produktu związane z zaliczką PrestaShop umożliwia administratorowi ustawienie tytułu bloku powiązanych produktów w wielu językach.

3. Wybierz wyświetl kolumnę: Rozszerzenie produktu związane z zaliczką PrestaShop pozwala administratorowi wyświetlać powiązane produkty w różnych pozycjach, takich jak lewa kolumna, prawa kolumna produktu lub strona na dole.

4. Wybierz metody: Istnieją różne metody do wyboru. Administrator może wyświetlać powiązane produkty według Bestsellerów w tej kategorii, najczęściej odwiedzanych produktów, bestsellerów, nowych produktów, historii użytkownika lub Najlepiej oglądanych w tej kategorii.

5. Maksymalne produkty do wyświetlenia: Właściciel sklepu internetowego może ustalić maksymalną liczbę produktów do wyświetlania na stronie kategorii.

Administrator sklepu może również łatwo ustawić priorytet każdej metody z poziomu interfejsu administratora. Moduł wybiera produkt z niższej metody, jeśli żaden produkt nie będzie dostępny w wyższej metodzie.

Ustawienia strony koszyka 3.5

1. Włącz / wyłącz ustawienia strony kategorii: Administrator sklepu może włączyć lub wyłączyć ustawienia strony koszyka z poziomu interfejsu administratora.

2. Tytuł bloku: Rozszerzenie produktu związane z zaliczką PrestaShop umożliwia administratorowi ustawienie tytułu bloku powiązanych produktów w wielu językach.

3. Wybierz wyświetl kolumnę: Rozszerzenie produktu związane z zaliczką PrestaShop pozwala administratorowi wyświetlać powiązane produkty w różnych pozycjach, takich jak w

4. Wybierz metody: Istnieją różne metody do wyboru. Administrator może wyświetlać powiązane produkty według bestsellerów, najczęściej odwiedzanych produktów, nowych produktów, historii użytkownika, produktów zamawianych z produktami w koszyku, produktów tej samej kategorii co produkty koszyka.

5. Wybierz filtr: Administrator sklepu może nie wyświetlać filtru, słowa kluczowego lub filtru atrybutów.

6. Maksymalne produkty do wyświetlenia: administrator może ustalić maksymalną liczbę produktów do wyświetlania na stronie kategorii.

Administrator sklepu może również łatwo ustawić priorytet każdej metody z poziomu interfejsu administratora. moduł wybiera produkt z niższej metody, jeśli żaden produkt nie będzie dostępny w wyższej metodzie.

Ustawienia strony producenta 3.6

1. Włącz / wyłącz ustawienia strony producenta: Administrator sklepu może włączyć lub wyłączyć ustawienia strony producenta z poziomu interfejsu administratora.

2. Tytuł bloku: Wtyczka Powiązane produkty PrestaShop pozwala administratorowi ustawić tytuł powiązanych produktów w wielu językach.

3. Wybierz wyświetl kolumnę: Wtyczka produktów powiązanych PrestaShop pozwala administratorowi wyświetlać powiązane produkty w różnych pozycjach, takich jak lewa kolumna, prawa kolumna produktu lub strona na dole.

4. Wybierz metody: Istnieją różne metody do wyboru. Administrator może wyświetlać powiązane produkty według bestsellerów, najczęściej odwiedzanych produktów, nowych produktów, historii użytkowników, najlepszych oglądanych przez tego producenta, bestsellerów tego producenta.

5. Maksymalne produkty do wyświetlenia: administrator może ustalić maksymalną liczbę produktów do wyświetlania na stronie kategorii.

Administrator sklepu może również łatwo ustawić priorytet każdej metody z poziomu interfejsu administratora. moduł wybiera produkt z niższej metody, jeśli żaden produkt nie będzie dostępny w wyższej metodzie.

3.7 Ustawienia potwierdzenia zamówienia

1. Włącz / wyłącz Ustawienia strony potwierdzenia zamówienia: Administrator sklepu może włączyć lub wyłączyć ustawienia strony potwierdzenia zamówienia z poziomu interfejsu administratora.

2. Tytuł bloku: Moduł umożliwia administratorowi ustawienie tytułu bloku powiązanych produktów w wielu językach.

3. Wybierz wyświetl kolumnę: Moduł pozwala administratorowi wyświetlać powiązane produkty w różnych pozycjach, takich jak lewa kolumna, prawa kolumna produktu lub strona na dole.

4. Wybierz metody: Istnieją różne metody do wyboru. Administrator może wyświetlać powiązane produkty według najczęściej odwiedzanych produktów, bestsellerów, nowych produktów, historii użytkownika, produktów zamawianych z produktami zamawianymi i produktów tej samej kategorii co produkty zamówienia.

5. Wybierz filtr: Administrator sklepu może wybrać filtry, takie jak brak filtra, słowo kluczowe, atrybut.

6. Maksymalne produkty do wyświetlenia:?The admin can fix the maximum products count for displaying on the category page.

Administrator sklepu może również łatwo ustawić priorytet każdej metody z poziomu interfejsu administratora. moduł wybiera produkt z niższej metody, jeśli żaden produkt nie będzie dostępny w wyższej metodzie.

Interfejs przedni 4.0

Klienci mogą wyświetlać powiązane produkty, jak pokazano na poniższych obrazkach.

Na stronie głównej powiązane produkty będą wyświetlane jak na poniższym obrazku:

Podobne produkty będą wyświetlane na stronach kategorii, jak pokazano poniżej:

Klienci mogą również wyświetlać powiązane produkty na stronie produktu:

Podobne produkty zostaną wyświetlone na stronie koszyka, jak pokazano poniżej:

Klienci mogą również zobaczyć podobny produkt na stronie potwierdzenia zamówienia:

Aby uzyskać więcej PrestaShop Addons odwiedź Knowband.

Więcej szczegółów można znaleźć na stronie:

PrestaShop Automatyczny link do produktu link do strony produktu.

Proszę support@knowband.com dla dowolnego zapytania lub niestandardowej prośby o zmianę zgodnie z wymaganiami biznesowymi.

Módulo de Produtos Relacionados Automáticos PrestaShop

1.0 Introdução

O comerciante da loja on-line agora pode se concentrar no cliente e melhorar as vendas do site usando o módulo de venda cruzada de produtos PrestaShop. Ofertas Knowband PrestaShop Automático Produto Relacionado addon que permite que os vendedores on-line exibam produtos relacionados em várias páginas do site. Essa extensão de produto relacionada ao avanço fornece uma opção para definir condições específicas para mostrar produtos similares apropriados em cada página.

O administrador pode definir os métodos e filtros para exibir os produtos como produtos semelhantes. O addon PrestaShop Automatic Related Product permite que o administrador mostre a coluna do produto relacionado à esquerda, à direita ou na parte inferior da página. Os clientes on-line podem visualizar os produtos similares e obter o produto certo de sua escolha. Assim, o administrador pode melhorar as vendas e a taxa de conversão também.

Benefícios 1.1 para comerciantes

  1. Esse módulo de venda cruzada de produtos ajuda o administrador a aumentar o valor médio de carrinho do cliente, exibindo produtos semelhantes.
  2. Há maiores chances de conversões se um visitante da loja encontrar o produto desejado no bloco de produto similar.
  3. O administrador da loja pode exibir produtos similares perfeitos para aumentar as vendas e oferecer uma experiência de loja melhor aos clientes.
  4. Módulo de produtos similares permite definir a posição do bloco do produto relacionado de acordo com sua preferência.
  5. Existem várias condições disponíveis para mostrar produtos semelhantes de maneira avançada.
  6. Este módulo de produto semelhante da PrestaShop oferece uma opção para ocultar os produtos fora de estoque e mostrar apenas produtos disponíveis como produtos similares.
  7. Com a ajuda deste plug-in de produtos relacionados ao PrestaShop, o administrador pode reduzir a taxa de rejeição envolvendo os clientes.
  8. O administrador pode mostrar novos lançamentos como produtos semelhantes para promover novos produtos.
  9. O e-comerciante pode mostrar os produtos nos quais ele deseja atrair a atenção do cliente.

1.2 Recursos do addon de produto relacionado automático da PrestaShop

  1. O administrador pode mostrar produtos relacionados em várias páginas de websites, como página inicial, páginas de produtos, páginas de categorias, páginas de carrinho de compras, páginas de fabricantes e página de confirmação de pedidos.
  2. O administrador tem uma opção para mostrar produtos disponíveis como produtos relacionados. Os produtos esgotados não serão exibidos como produtos relacionados.
  3. O vendedor on-line pode inserir o título de bloco do produto relacionado. O módulo de produtos relacionados ao PrestaShop permite que o administrador defina o título do bloco em vários idiomas.
  4. A extensão de produtos relacionados ao avanço do PrestaShop fornece vários métodos para mostrar os produtos relacionados. O comerciante da loja pode exibir os principais produtos visitados, best-sellers, novos produtos ou usar o histórico do usuário para exibir os produtos relacionados.
  5. O número máximo de produtos relacionados a serem exibidos em páginas diferentes pode ser corrigido na interface administrativa.
  6. O addon de produtos relacionados ao PrestaShop permite que o administrador defina a prioridade do método e filtros diferentes para exibir produtos relacionados.
  7. O addon de produtos relacionados ao PrestaShop é totalmente móvel e responsivo.
  8. A extensão de produtos relacionados é compatível com várias lojas e oferece suporte multilíngüe.

Etapas de instalação do 2.0

O administrador receberá os arquivos abaixo mencionados após a compra do complemento Automatic Related Product:

1. O arquivo compactado que consiste no código-fonte desse complemento Automatic Related Product.

2. Manual do usuário

Siga estas etapas para instalar o complemento Automatic Related Product:

  • O administrador precisa descompactar o arquivo zipado. Este arquivo inclui alguns arquivos e pastas.
  • Depois disso, o administrador pode copiar o conteúdo geral da pasta e colá-los no "Módulos"pasta do diretório da loja. O administrador pode seguir o caminho Diretório Raiz / módulos /.

3. Agora, o dono da loja pode instalar o Administrador de Loja -> Módulos e Serviços. Seria mostrado como abaixo:

Agora você só precisa clicar em "Instalar"botão para instalar este addon Automatic Related Product facilmente. Um pop-up de confirmação será mostrado. Clique na opção" Continuar com a instalação ". Esta etapa irá instalar o addon Automatic Related Product e mostrar notificação Módulo (s) instalado (s) com sucesso“.

Interface administrativa 3.0

Existem várias opções de personalização. O administrador da loja pode aplicar as configurações e mostrar os produtos semelhantes em várias páginas do site. Estas são as opções de personalização:

  1. Basic Settings
  2. Configurações da página inicial
  3. Configurações da página do produto
  4. Configurações da página de categoria
  5. Configurações da página do carrinho
  6. Configurações da página do fabricante
  7. Configurações de confirmação de pedido

Configurações Básicas do 3.1

1. Habilitar desabilitar: O administrador da loja pode ativar ou desativar a funcionalidade apenas pressionando o botão.

2. Mostrar apenas os produtos atualmente disponíveis em estoque: O administrador pode ativar a opção de menu se desejar mostrar apenas produtos em estoque como produtos relacionados.

Configurações da Página Inicial do 3.2

1. Ativar / desativar as configurações da página inicial: O administrador da loja de comércio eletrônico pode ativar ou desativar as configurações da página inicial clicando nessa opção.

2. Título do bloco: O proprietário da loja pode inserir o título do bloco de produtos relacionados. O addon PrestaShop Automatic Related Product permite que o administrador da loja insira o título do bloco em diferentes idiomas.

3. Selecione Exibir Coluna: O proprietário da loja pode mostrar os produtos relacionados em várias colunas, como o canto inferior da página, a coluna da esquerda ou a coluna da direita.

4. Selecione Métodos: Vários métodos estão disponíveis, como o administrador pode mostrar os principais produtos visitados, best-sellers, novos produtos, histórico do usuário.

5. Produtos máximos a serem exibidos: O dono da loja pode definir o número máximo de produtos para mostrar na página inicial do site.

O administrador da loja também pode definir a prioridade dos métodos.

Configurações da Página do Produto 3.3

1. Ativar / desativar as configurações da página do produto: O dono da loja pode ativar ou desativar as configurações da página do produto apenas com um botão.

2. Título do bloco: O administrador pode inserir o título do bloco de produtos relacionados em vários idiomas.

3. Selecione a coluna Exibir: O administrador da loja pode mostrar os produtos relacionados na coluna da esquerda, na coluna da direita ou na parte inferior da página.

4. Selecione o método: O administrador pode selecionar o método que deve ser exibido no front-end. Existem vários métodos, como o administrador pode mostrar os produtos mais visitados, best-sellers, novos produtos, produtos baseados no histórico de usuários, produtos com mesma categoria padrão, produtos encomendados com este produto, produtos com o mesmo recurso e produtos com o mesmo valor de recurso.

5. Selecione o filtro: O administrador da loja pode selecionar o filtro de acordo com o qual os produtos na frente serão exibidos. Aqui, o administrador pode selecionar nenhum filtro, palavras-chave e atributo.

6. Produtos máximos a serem exibidos: O administrador pode selecionar o número máximo de produtos para exibir como produtos relacionados.

O administrador da loja pode definir a prioridade dos métodos. Se não houver produto no método de prioridade mais alta, o módulo mostrará o produto a partir da prioridade mais baixa.

Configurações da página de categoria 3.4

1. Ativar / desativar configurações de página de categoria: O administrador da loja pode ativar ou desativar as configurações da página da categoria na interface de administração.

2. Título do bloco: A extensão de produto relacionada ao PrestaShop permite que o administrador defina o título do bloco de produtos relacionados em vários idiomas.

3. Selecione Exibir Coluna: A extensão do produto relacionado ao avanço do PrestaShop permite que o administrador mostre os produtos relacionados em várias posições, como coluna da esquerda, coluna da direita do produto ou parte inferior da página.

4. Selecione Métodos: Existem vários métodos para selecionar. O administrador pode mostrar os produtos relacionados conforme os Mais Vendidos desta categoria, Produtos mais visitados, Mais Vendidos, Novos Produtos, histórico de usuários ou Mais vistos nesta categoria.

5. Produtos máximos a serem exibidos: O proprietário da loja on-line pode corrigir a contagem máxima de produtos para exibição na página da categoria.

O administrador da loja também pode definir a prioridade de cada método facilmente na interface de administração. O módulo seleciona o produto do método inferior, se nenhum produto estiver disponível no método superior.

Configurações da página de carrinho 3.5

1. Ativar / desativar configurações de página de categoria: O administrador da loja pode ativar ou desativar as configurações da página do carrinho na interface de administração.

2. Título do bloco: A extensão de produto relacionada ao PrestaShop permite que o administrador defina o título do bloco de produtos relacionados em vários idiomas.

3. Selecione Exibir Coluna: A extensão de produto relacionada ao PrestaShop permite que o administrador mostre os produtos relacionados em várias posições, como em

4. Selecione Métodos: Existem vários métodos para selecionar. O administrador pode mostrar os produtos relacionados de acordo com os Mais Vendidos, Produtos mais visitados, Novos Produtos, histórico do usuário, Produtos encomendados com os produtos no carrinho, Produtos da mesma categoria que os produtos do carrinho.

5. Selecione o filtro: O administrador da loja não pode exibir nenhum filtro, palavra-chave ou filtro de atributo.

6. Produtos máximos a serem exibidos: o administrador pode corrigir a contagem máxima de produtos para exibição na página da categoria.

O administrador da loja também pode definir a prioridade de cada método facilmente na interface de administração. o módulo seleciona o produto do método inferior, se nenhum produto estiver disponível no método superior.

Configurações da página do fabricante 3.6

1. Ativar / desativar configurações de página do fabricante: O administrador da loja pode ativar ou desativar as configurações da página do fabricante na interface de administração.

2. Título do bloco: O plug-in de produtos relacionados ao PrestaShop permite que o administrador defina o título do bloco de produtos relacionados em vários idiomas.

3. Selecione Exibir Coluna: O plug-in de produtos relacionados ao PrestaShop permite que o administrador mostre os produtos relacionados em várias posições, como a coluna da esquerda, a coluna direita do produto ou o fundo da página.

4. Selecione Métodos: Existem vários métodos para selecionar. O administrador pode mostrar os produtos relacionados de acordo com os Mais Vendidos, Produtos mais visitados, Novos Produtos, Usar histórico do usuário, Mais vistos por este fabricante, Mais vendidos neste fabricante.

5. Produtos máximos a serem exibidos: o administrador pode corrigir a contagem máxima de produtos para exibição na página da categoria.

O administrador da loja também pode definir a prioridade de cada método facilmente na interface de administração. o módulo escolhe o produto do método inferior se nenhum produto estiver disponível no método superior.

Configurações de confirmação de pedido 3.7

1. Ativar / desativar configurações de página de confirmação de pedido: O administrador da loja pode ativar ou desativar as configurações da Página de confirmação de pedido na interface de administração.

2. Título do bloco: O módulo permite que o administrador defina o título do bloco de produtos relacionados em vários idiomas.

3. Selecione Exibir Coluna: O módulo permite que o administrador mostre os produtos relacionados em várias posições, como coluna da esquerda, coluna da direita do produto ou parte inferior da página.

4. Selecione Métodos: Existem vários métodos para selecionar. O administrador pode mostrar os produtos relacionados de acordo com os produtos mais visitados, Best Sellers, Novos Produtos, Usar histórico do usuário, Produtos encomendados com os produtos do pedido e Produtos da mesma categoria dos produtos do pedido.

5. Selecione o filtro: O administrador da loja pode selecionar os filtros como nenhum filtro, palavra-chave, atributo.

6. Produtos máximos a serem exibidos:?The admin can fix the maximum products count for displaying on the category page.

O administrador da loja também pode definir a prioridade de cada método facilmente na interface de administração. o módulo seleciona o produto do método inferior, se nenhum produto estiver disponível no método superior.

Interface 4.0 Front-end

Os clientes podem visualizar os produtos relacionados, conforme mostrado nas imagens abaixo mencionadas.

Na página inicial, os produtos relacionados serão exibidos como a imagem abaixo:

Os produtos similares serão exibidos nas páginas da categoria, conforme mostrado abaixo:

Os clientes também podem visualizar os produtos relacionados na página do produto:

Os produtos semelhantes serão exibidos na Cart Cart, conforme mostrado abaixo:

Os clientes também podem visualizar o produto similar na confirmação do pedido.

Para mais Suplementos PrestaShop visite Banda de conhecimento.

Para mais detalhes, visite:

PrestaShop Link da página do produto Módulo de produto relacionado automático.

Por favor support@knowband.com para qualquer consulta ou solicitação de alteração personalizada de acordo com seus requisitos de negócios.