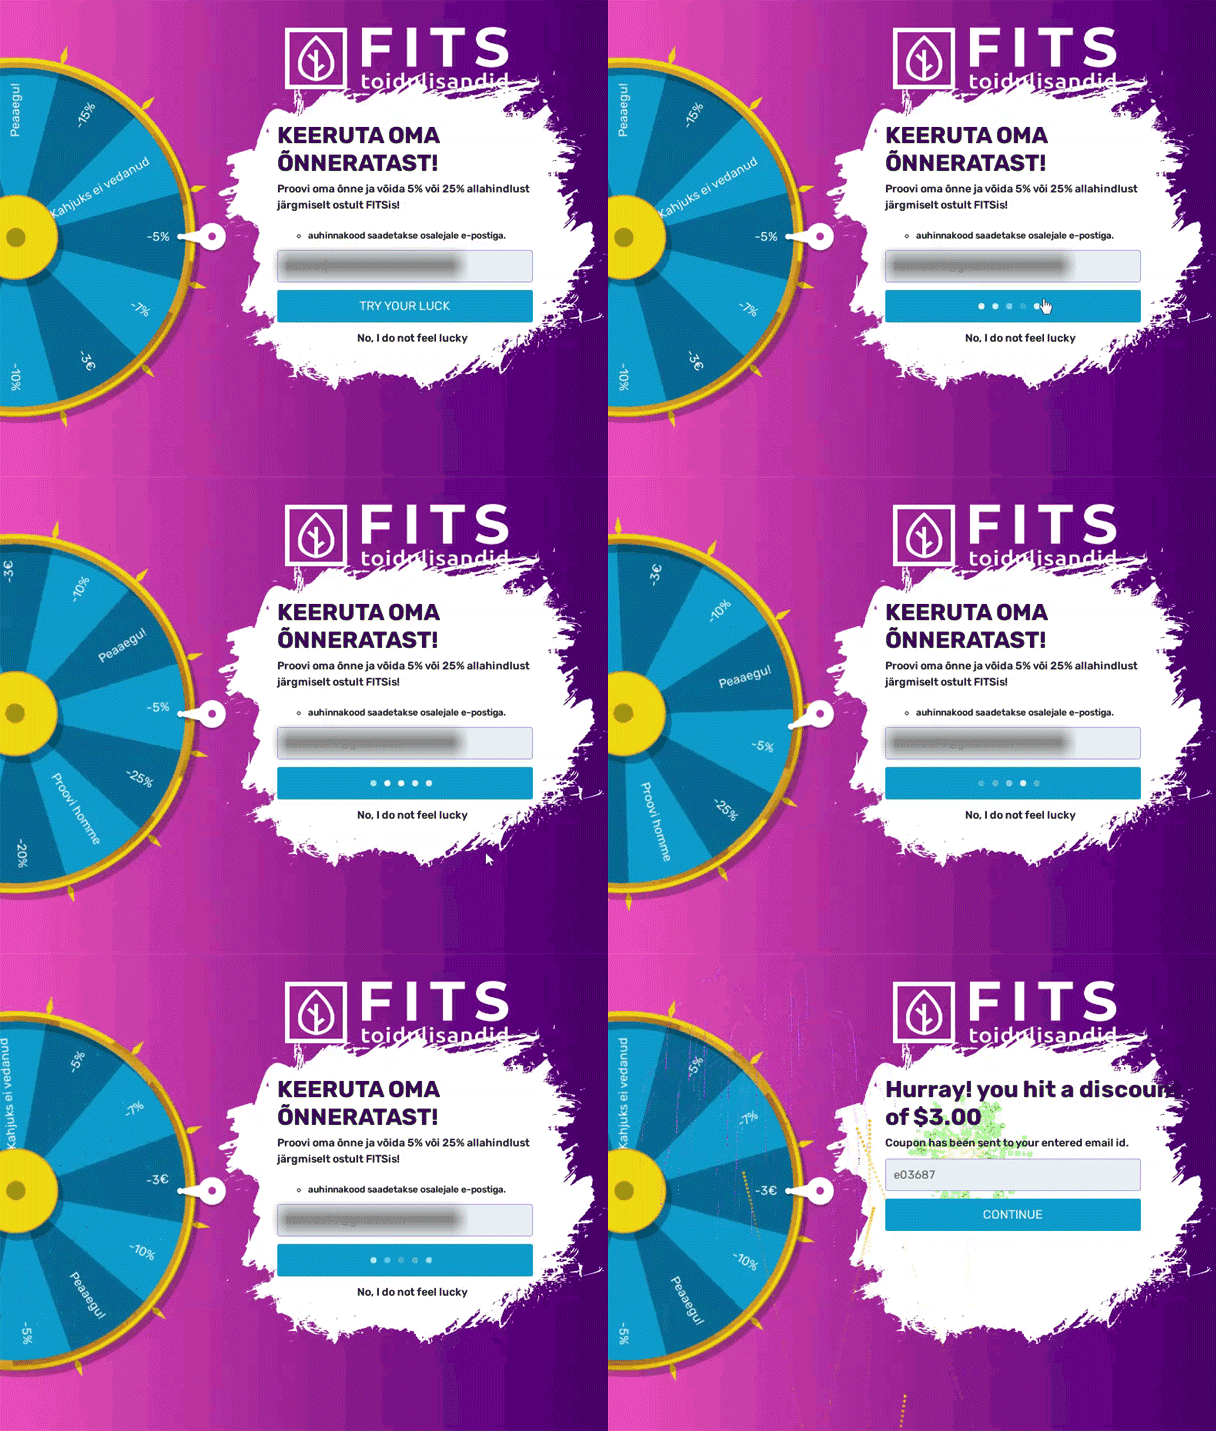
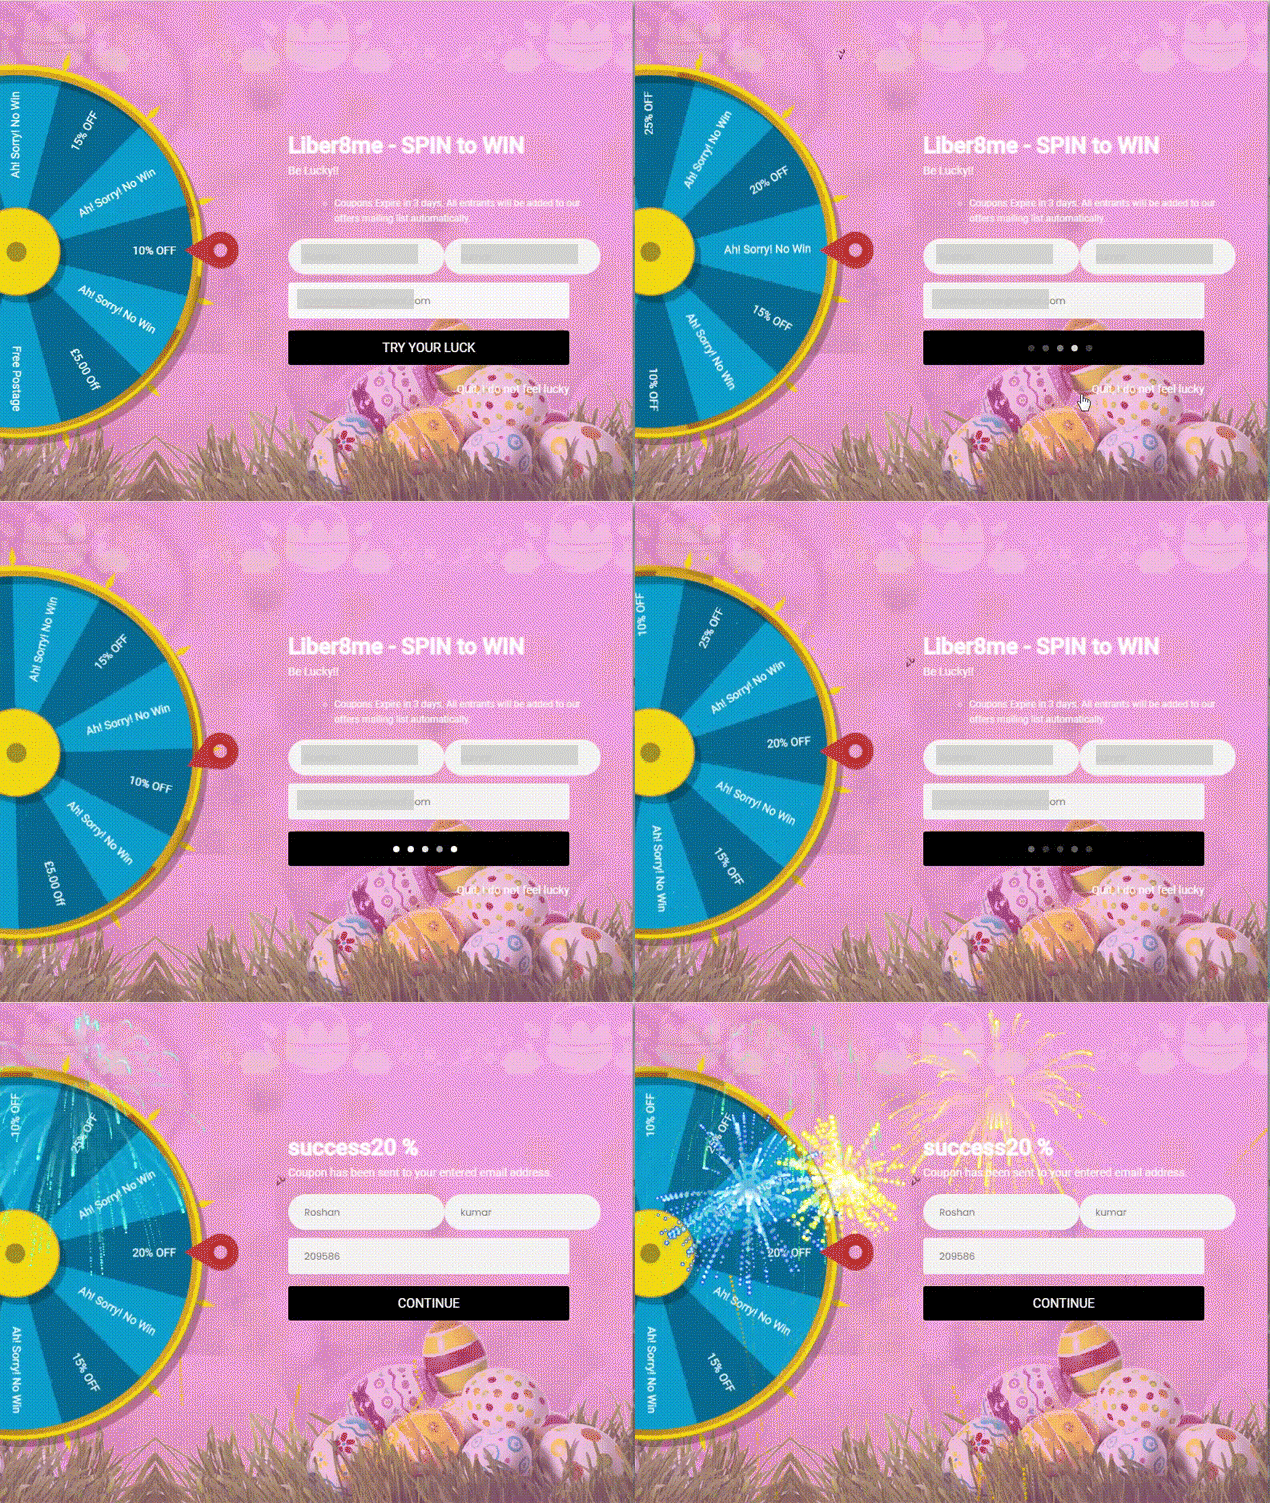
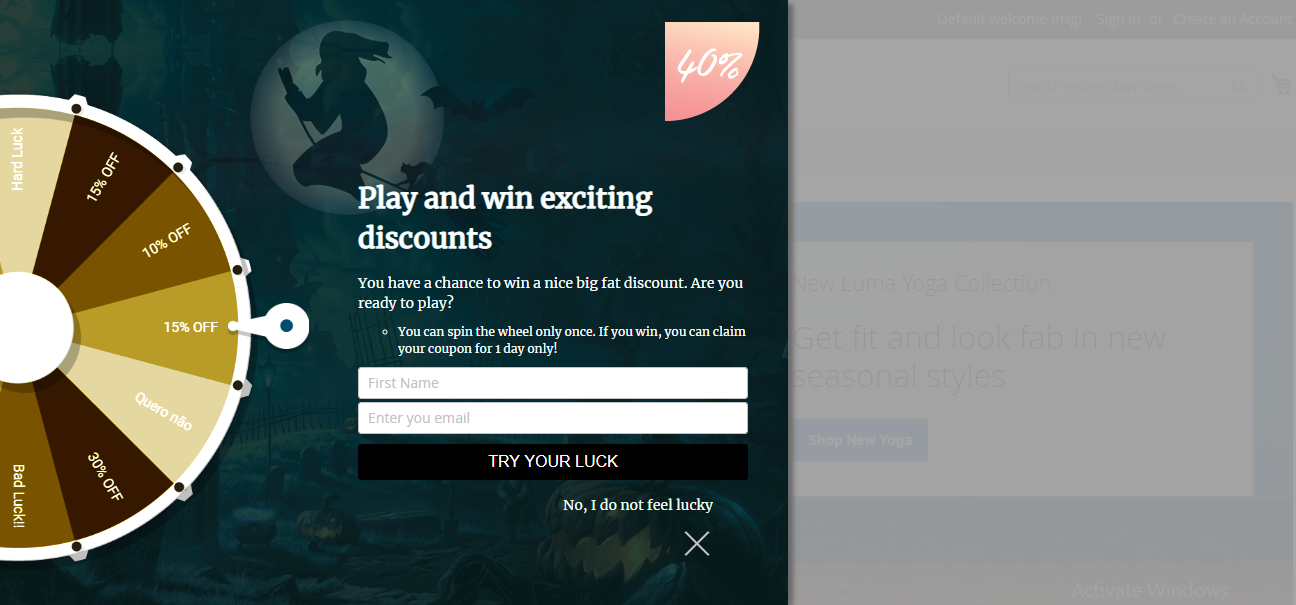
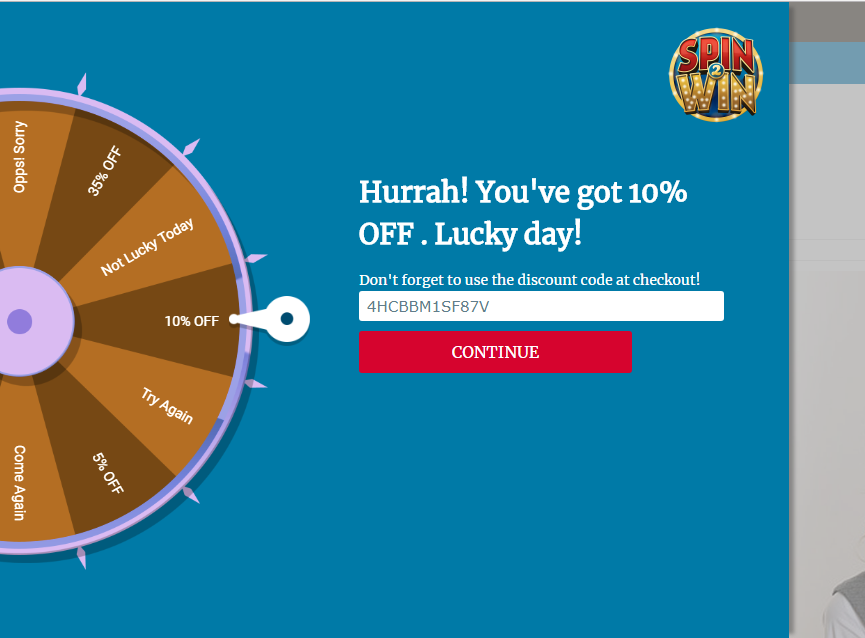
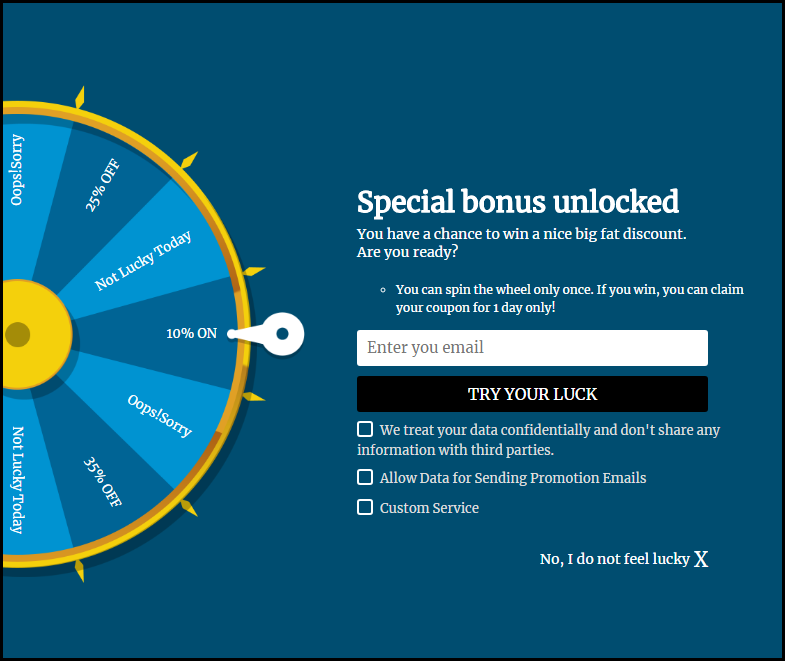
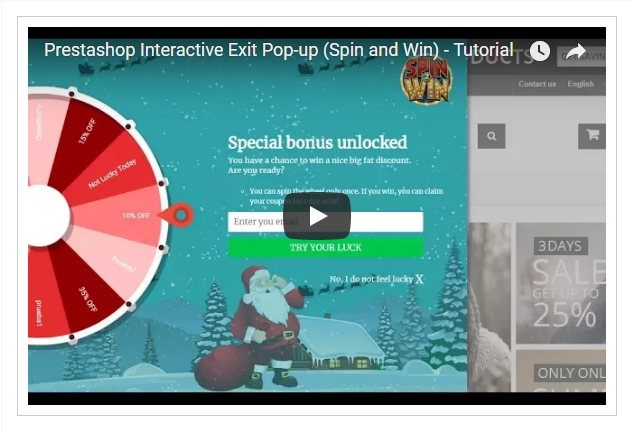
Every brand using a Gamified Pop-up has similar goals: increase awareness of the offer, keep customers engaged in a game, and encourage them to shop on your store by implementing the wheel and quick win function.
Spin and Win is an effective pop-up module for holiday marketing campaigns, and we’re really thrilled to introduce it to you. Visitors to your site can enter their email for a chance to win fantastic discounts and prizes by using the spin-and-win campaign. You can use this pop-up to creatively develop the top of your marketing funnel for your target demographic.
1000+ downloads of Knowband Spin and Win popup
Customers are talking about it!
You can check more reviews on the Knowband Spin and Win Product Pages.
The Spin and Win is a 3-in-1 plugin, use it as an:
Entry pop-up,
Exit-pop-up, or
Subscription popup.
Talking about its advantages, it boosts conversion, customer engagement and develops an email subscribers list for personalized marketing campaigns.
Let us see some statistics on Gamification and how it is helping eCommerce
Gamification in eCommerce and the addition of interactive aspects to online shopping experiences can have a significant impact on customers. Here are some data from AYTM’s eCommerce Gamification survey that explains how customers react to Gamification or any interactive feature while shopping online.
Because eCommerce gamification is still a new concept, companies are continually coming up with new and innovative methods to include it into their shopping experiences.
Customers, on the other hand, tend to choose certain established routes over others.
When sites or apps allow shoppers to earn points for completing purchases, 48% of respondents said they like it.
Customers like it when businesses integrate games or interactive components in their purchasing experience, according to 38% of customers.
36% of respondents stated they are more likely to visit websites with interactive elements.
Also, 30% stated they are more likely to buy from websites with interactive features.
With gamified content, Ford Motors raised revenues by more than $8 million and increased Facebook likes by 600 percent.
There is no way you will lose a customer if you have a gamified pop-up in your store. It can increase the average time spend by 3X just like it did for Verizon Wireless.
You may achieve similar results by including a KnowBand’s spin and win wheel that simultaneously attracts your audience’s interest, rewards them with a fun prize, and collects their email address.
Some Real-Life Examples of KnowBand’s Spin and Win Popup Extention
Use it to improve the UI of the home page
A pop-up that increases customer engagement
Include Knowband Spin and Win Popup in your eCommerce store (PrestaShop, OpenCart, Magento, WooCommerce)
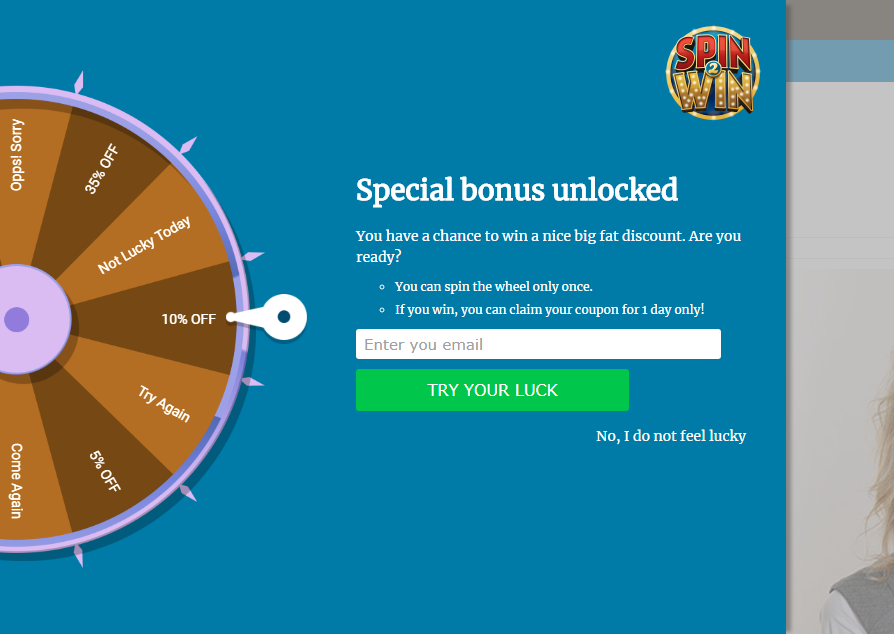
Visitors to your site are prompted to enter their email address for a chance to win one of 12 offers using any targeting parameters you like (e.g., page URL, device kind, session history, and more). On the thank you page, whichever slice of the wheel they land on, they’ll see a promo code that they may use in your online store.
To receive the code, they will have to enter their email address. You can ask them if they would like to receive any further updates from your store and your task here is done. Isn’t Spin and Win is the easiest way to ask for an email!
How to Customize Spin and Win Wheel:
Customizing the wheel is straightforward from your end. Each wheel can have up to 12 winning slices, each with a distinct payout.
Select the wording for each of the wheel’s slices, including the winning and losing slices.
From any of the coupons, you’ve produced in your account, determine the offer and offer code for each of the winning slices.
Choose the colors and theme that will be used on your wheel.
The Module has several themes for various occasions like Christmas, New Year, Halloween, Valentines Week, Diwali, and many more.
Decide how often each winning slice should appear.
To spin the wheel, change the text and design of the tab and form.
Make changes to your thank-you page.
Press the publish button or schedule the wheel to get published automatically.
To summarise, gamifying your e-commerce business would therefore help you grow faster. On any platform, we can share our accomplishments and work progress.
To add any new feature in your eCommerce store, you can visit KnowBand store and explore our exclusive range of plugins and extensions available for all the major eCommerce platforms.
“Magento 2 Spin and Win email subscription pop up extension adds a Gamification interface on your website and provides a gamifying experience to your web visitors. In return, you can capture their email addresses.”
Email Popups are amazing. They help you grow your email list faster than any other technique. Among all the email subscription popups, the spin and win popup also referred to as the spin to win or spin 2 win popup is the most effective and engaging.
Today, you need to provide a reason to your customers to make them stay on your website. There should be something engaging or entertaining, a kind of fun activity that catches their interest. Spin 2 win gamification popup does exactly the same. It involves a user in a game, which eventually increases the average time spent by a user on your website.
Thus, we can say that the Spin and Win pop up is not only helpful in building the email list but also improves your website’s bounce rate.
Magento 2 Spin and Win Pop up
In this article, I am going to talk about the Magento 2 Spin and Win email subscription pop up extension. If you have an e-commerce store set up on the Magento 2 platform, you can take advantage of this Magento 2 extension to increase user engagement, enhance user experience and grow your email list.
Magento 2 Spin and Win Interactive pop up extension is a 3-in-1: Entry, Exit and Email subscription popup that helps you grab user attention and user engagement followed by the user email address. Wondering how?
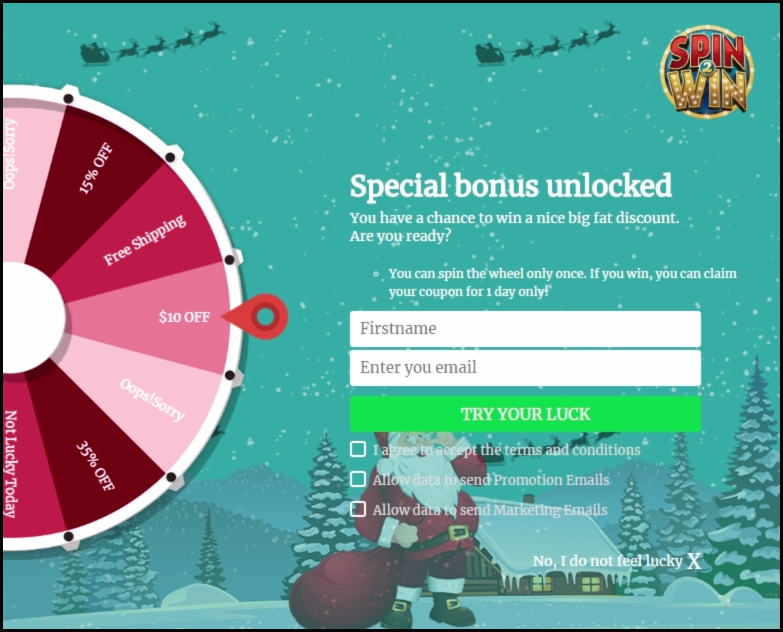
Magento 2 Spin and Win email sign up pop up extension allows you to display a spin and win wheel on your website. Because of a gaming look, it attracts user attention. The wheel contains some offers and discounts which a user can avail after spinning it. The wheel asks users to try their luck by spinning it to earn some amazing discounts.
Spinning the wheel requires a user to enter his/her details like name and email address. Once the details have been provided, the wheel starts spinning. As a result, the user spends more than the usual time on your website and you also get the customer data without sounding needy.
Features of the Magento 2 Spin and Win extension
1. Schedule a theme:
With the updated version of Magento 2 Spin and Win extension, you can schedule a theme by adding a date validity and theme expiry time. It will automatically switch the theme as scheduled. This new functionality will reduce the extra efforts of the store admin.
2. Themes for multiple occasions
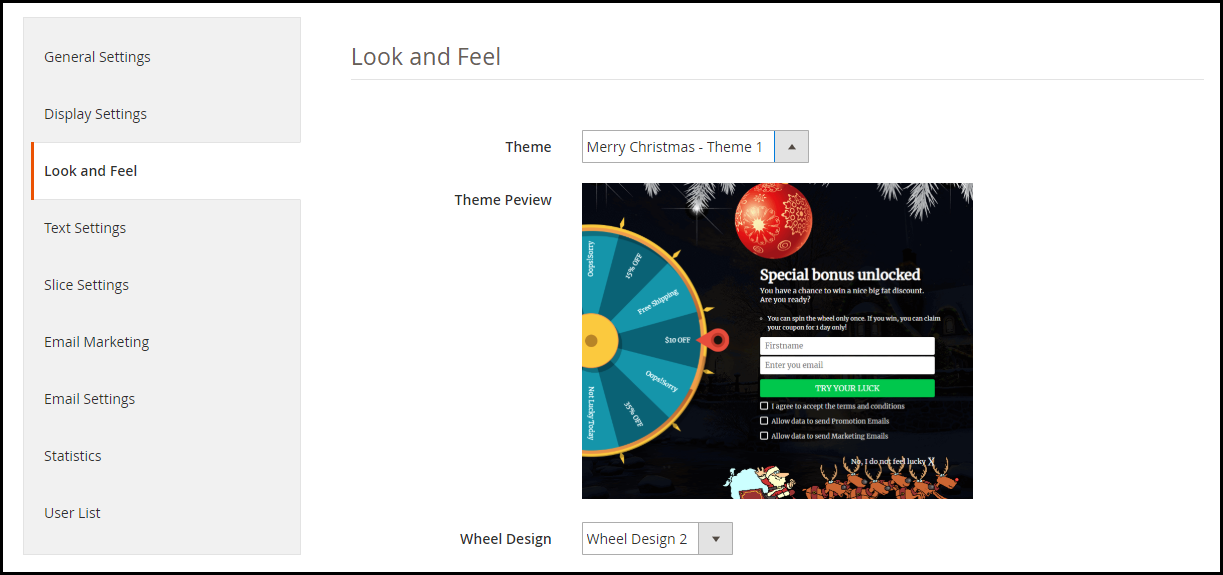
Magento Spin and Win popup comes up with pre-existing themes for multiple occasions like Halloween, Diwali, Christmas, New Year, etc. You can design your popup as per the occasion to give it the festival look. There are many other options to adjust the look and feel of the popup.
With Mother’s Day just around the corner, you can also customize the popup as per the occasion to give your web visitors the feel of Mother’s Day when they land on your website. If you are running exclusive offers on Mother’s Day, displaying those offers with a related theme would look very appealing.
3. Customize the spin and win wheel
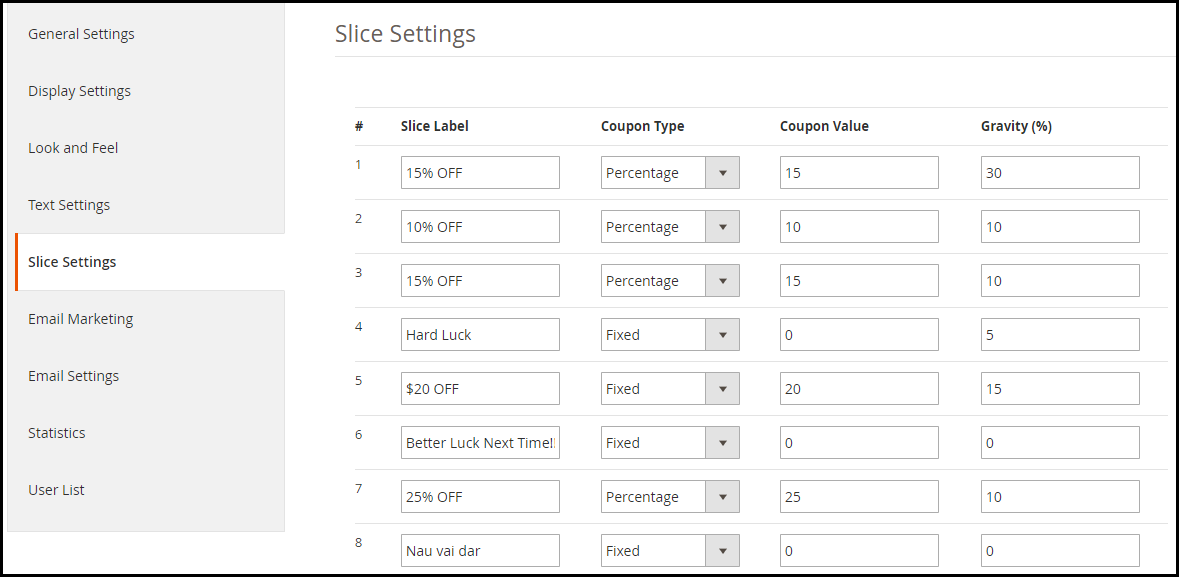
Magento 2 Spin and Win subscription pop up extension comes up with 6, 8, and 12 slices in the wheel. You can create a label for each slice. For example, you can create one label as “10% off”, other as “Better luck next time” and so on.
In addition to this, you can set the coupon value for each slice. There is also an option called “Gravity” which lets you set the frequency of a slice. For example, a slice having a gravity of 20 will have a higher probability of appearance than a slice having the gravity below 20. The combined gravity for all the slices cannot be more than 100.
4. Set maximum display frequency of the popup
Display the spin and win gamification popup every time a user visits your website/ one visit per hour/ one visit per day/ one visit per week or one visit per month.
5. Set the hiding time of the popup
You can either choose to display the spin 2 win popup always or hide it after a short time, for example, 10 seconds, 20 seconds, 30 seconds, etc.
6. Choose whom to display the popup
Display the spin and win popup either to all visitors, new visitors, or returning visitors.
7. Show the progress meter for offers claimed
With this new version of the Magento 2 Spin and Win email subscription module, the store owner can show the percentage for number of offers claimed along with the custom text for the progress meter.
8. Display popup based on user behavior
The Magento 2 Spin and win newsletter subscription pop up extension provides 4 options to display the popup based on user behavior:
Immediately: As soon as a user enters your website
After a time(in seconds): The popup is displayed after a user spends the defined time on your website.
When scrolling down: Popup is displayed to the user after he or she scrolls down a considerable percentage of your website content.
When exit: Popup is displayed when a user intends to take an exit from your website.
9. Display popup based on location
You can either display the spin 2 win pop up to the users coming from worldwide or you can show or hide the popup for users of a particular location.
10. Set a specific period for the popup appearance
If you want to display the spin and win gamification popup for a limited time, just mention the active and inactive date. The popup functionality will run for the defined time only.
11. Allow a customer to spin the wheel once or for n number of times
Magento 2 Spin and win interactive pop up extension has an Email recheck functionality. If enabled, a single visitor won’t be able to spin the wheel more than once else a user can spin the wheel and generate the coupon as many times he or she wants.
12. Enable wheel sound and display fireworks on winning a discount
Turn on the wheel sound so that every time a user spins the wheel, it creates a sound. Moreover, you can display fireworks when a user wins an offer.
13. Set the wheel display interval
If you want to display the spin 2 win popup after a certain time, you can mention the number of days after which you want to get it displayed. For example, if the number of days is selected to be 2, then only after the completion of 48 hours, the popup will be displayed to the user.
14. Collect emails directly in your MailChimp, Klaviyo, and Constant Contact account
If a visitor turns into your subscriber, their information would directly be sent over your MailChimp, Klaviyo, and Constant Contact account, whichever you have set up from the back-end.
15. Customize your Email templates
Magento 2 Spin and win email sign up pop up extension offers pre-existing email templates to give a pleasant look to your emails. You can customize the email content accordingly.
16. Track Statistics
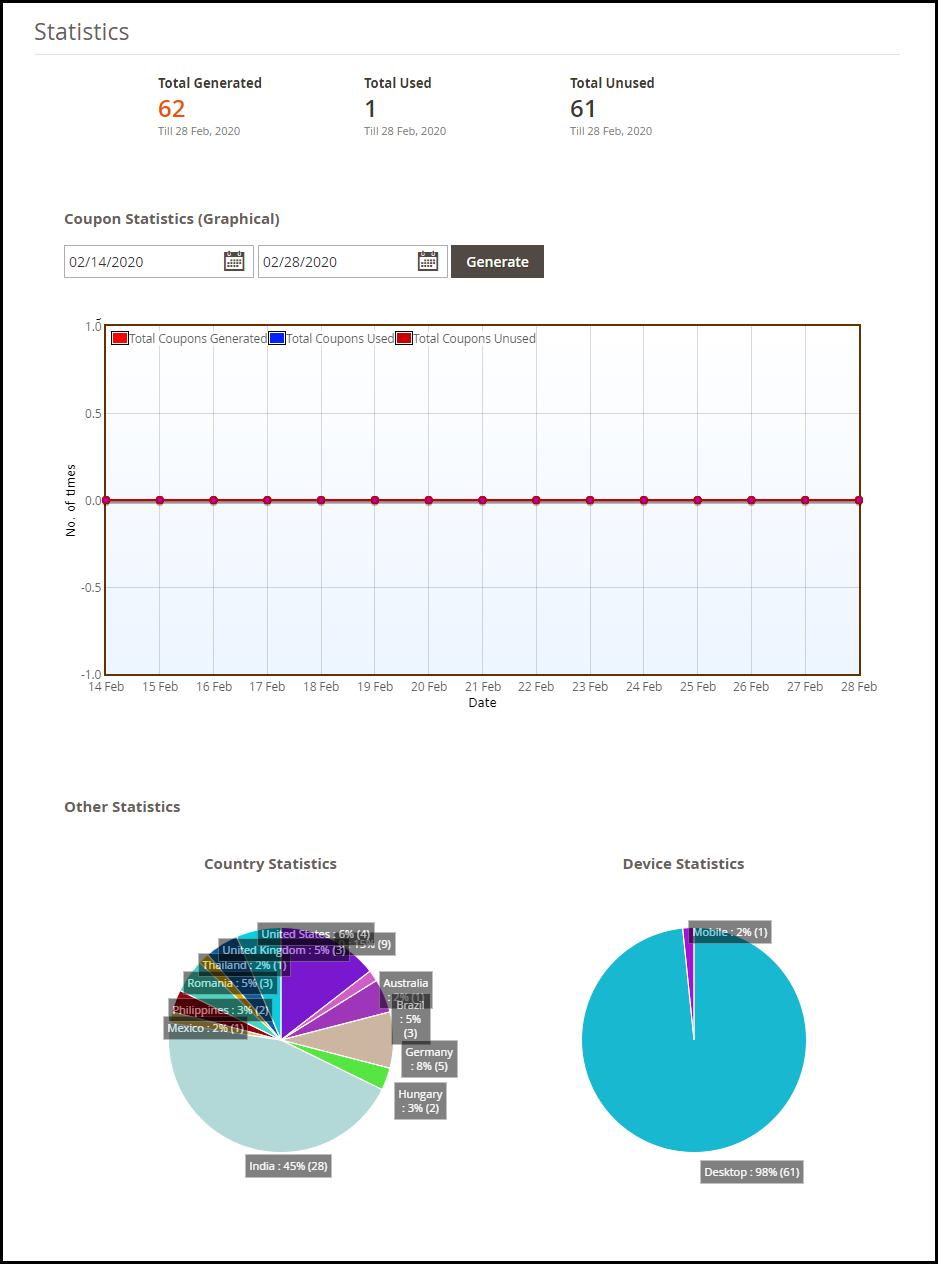
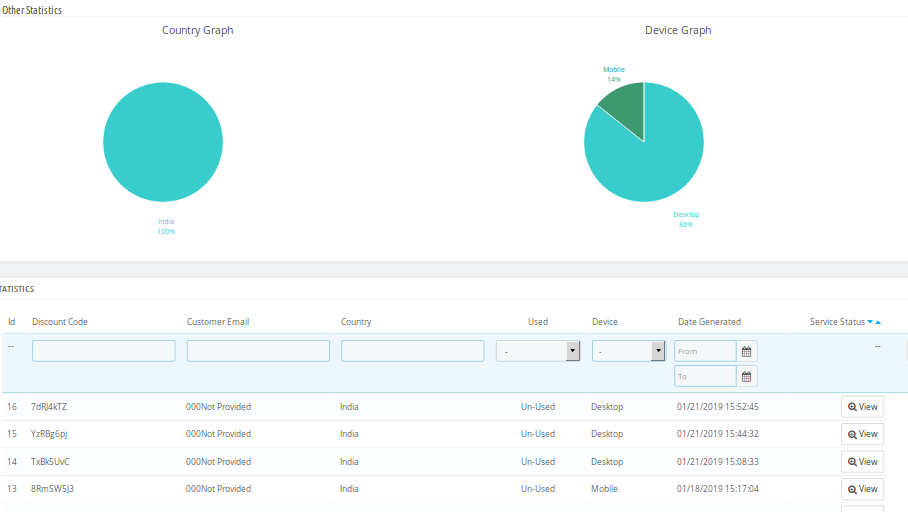
With Magento 2 Spin wheel pop up extension, you can view stats in graphical form and pie charts, for-
Total coupons generated, used coupons, and unused coupons
Country-wise stats (visitors coming from different countries)
Device-wise stats (mobile, desktop, tablet, etc)
Final Word
If you are serious about growing your email list, you should definitely consider implementing the Spin to Win extension on your Magento 2 store. Though the primary purpose of a spin and win popup is to collect more email addresses, it provides many more benefits to your e-commerce website.
If you have any queries regarding this Magento 2 Spin and Win pop up extension, feel free to drop a comment below or you can contact us at support@knowband.com
Introduction to Magento Spin and Win(Email Subscription) Extension
Knowband’s Magento Spin and Win (email subscription) extension takes the opportunity of the customer interaction to its maximum potential. The seemingly easy task of retaining the customers is actually the biggest challenge in the eCommerce scenario. Highly responsive and interactive spin and win pop-up makes this tedious job easier for the sellers and fun-filled for the customers. Without boring them with the annoying subscriber notification, the exit-intent popup compels the customers to enter their email id in order to spin the wheel. The gamified interface in return provides alluring offers to the customers which can be further used for shopping from the site. The addictive lucky draw contest lures the visitors to visit the site again and again.
The Extension is a 3 in 1 pop up:
a. Entry Pop up: Display the pop up as soon as the visitor enters the website.
b. Exit Pop up: Display the pop up as soon the visitor tries to leave the website (The extension works on the exit intent of the visitors)
c. Email subscription pop up: The Interactive extension is used to capture emails for newsletter subscription. The email Id entered in the Subscription pop up is directly integrated with the Mail Chimp and Klaviyo account of the Magento store admin.
1.1 Merchant Benefits
Increased customer engagement on your store using interactive gamified interface.
Increased customer base by capturing email Ids for Newsletter subscription, which can be later used for personalized promotions and email marketing.
High Impact on direct sales and ensures returning customers
Turns normal visitors into potential buyers
Fully customizable Email subscription pop up
Offers detailed reporting.
Intuitive back end interface, which is easy to understand and configure.
New attractive themes for spin and win popup helps merchant in drawing the attention of the visitors.
1.2 Features of Magento Spin and Win-Email Subscription extension
1. Lets your customer spin the wheel and win discounts using a fun filled spin-win game.
2. Responsive Exit pop up, Entry pop up or Email Subscription pop up
3. It is a great tool to enhance customer base as the customer has to enter their email Ids to get the discounts.
4. The Interactive email subscription pop up converts normal visitors into potential buyers by offering a complete new way to offer discounts.
5. This Exit pop up extension is fully customizable, you can match it with your website theme.
6. Offers 5 Ready-made email templates, Magento store admin can customize them further.
7. Offers Mail Chimp and Klaviyo Integration
8. Look and Feel settings to set spin and win pop up background color, font and button color, Display Image, etc.
9. Customize the email subscription pop up using Custom CSS and JS.
10. Email Recheck option to restrict the use of same email Id to get discounts multiple times.
11. Pull Out Tab facility to close the Spin and Win subscription pop up.
12. Choose whom to display, where and when to display, maximum display frequency of the Spin and win (email subscription) pop up
13. Option to display the pop up on Category page, Home page, Product page etc.
14. Option to set the discounts on each slice and the probability of each slice.
15. Check the performance of the interactive spin and win pop up by comparing the total generated vs used coupons using interactive graphical reports and tabular reports.
16. Intuitive back end interface.
17. Desktop, Mobile and Tablet responsive design
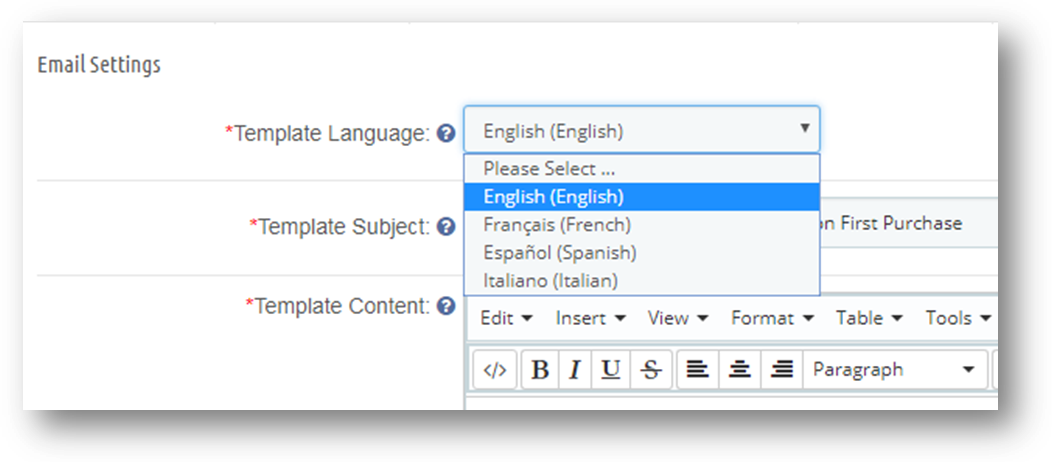
18. Multi lingual supported
19. Magento Spin and Win is Compatible with all themes.
1.3 Installation of Magento Spin and Win-Email subscription pop up extension:
Follow the simple steps in order to install the Magento Spin and Win Extension:
You’ll get a zipped file. Unzip the package on the root folder of your Magento setup via FTP manager (like Filezilla or WinSCP – download here: https://filezilla-project.org/). You’ll find the files and folders as shown in the image below:
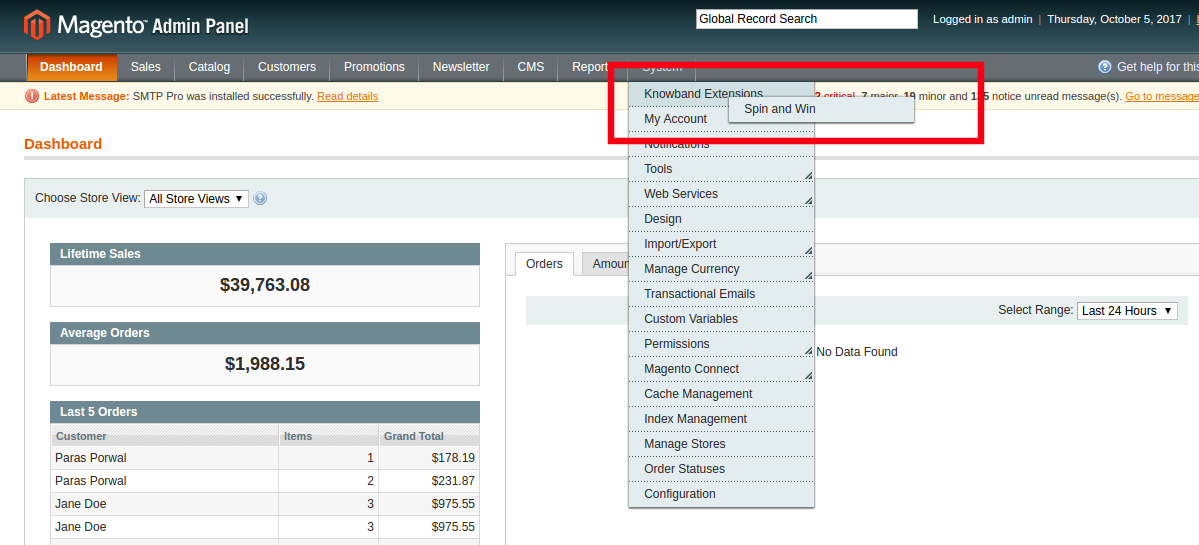
The extension is now installed and ready for use. In Admin Panel, go to “System > Knowband Extensions > Ajax Spin and Win”.
You can now use and configure the extension.
Admin Interface
The web admin interface of highly responsive Magento Wheelio offers complete customization option to the store admin. The various features and functionalities offered by the extension can be modified from the admin panel. Some of the customization options offered by the plugin includes the following:
General settings
Display settings
Look and feel settings
Slice settings
Email marketing
Email settings
Statistics
Let us discuss the various customization options which are discussed in detail.
General Settings
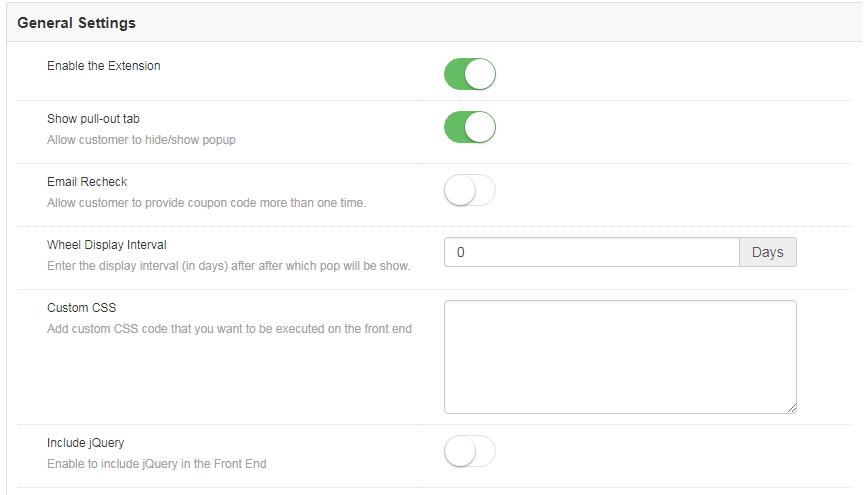
The General settings offer a number of customization options. The various fields in this tab are discussed below.
1.2.1.1How to enable and configure the extension?
Enable the extension
The various customization options include enabling or disabling the plugin as well. The admin can switch the button to enable the extension on the Magento store.
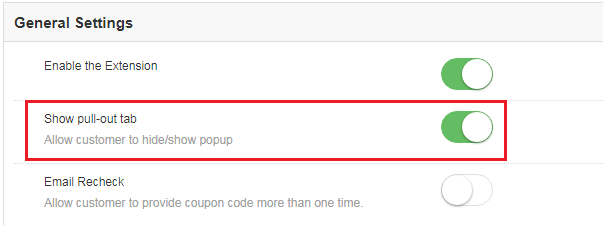
Show Pull-out tab
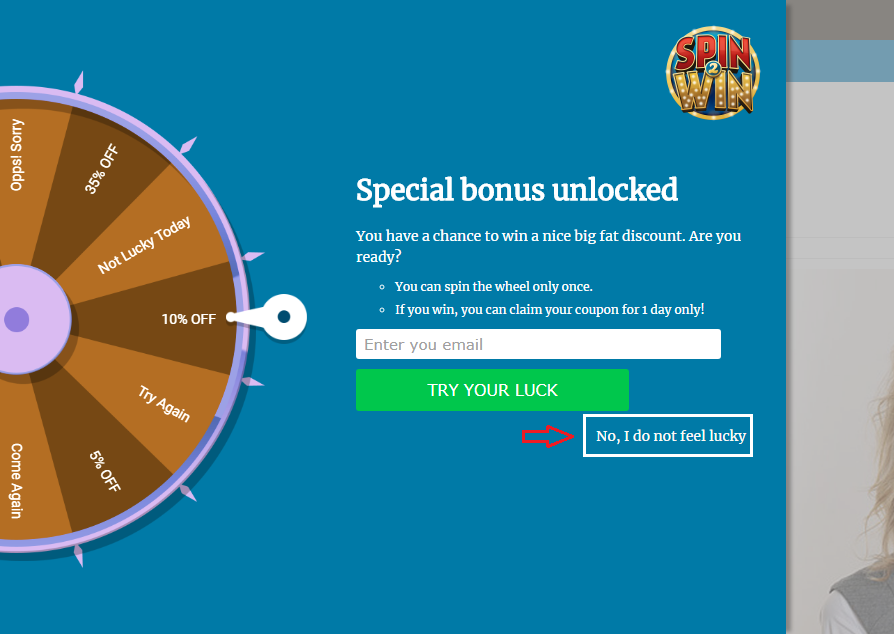
The site visitors can remove the spin wheel from the screen of the website by clicking on the ‘No I do not feel lucky’ button.
Magento Spin and Win wheel can be brought back to the screen if this option is enabled.
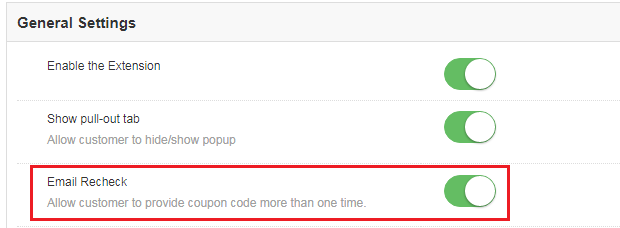
Email Recheck
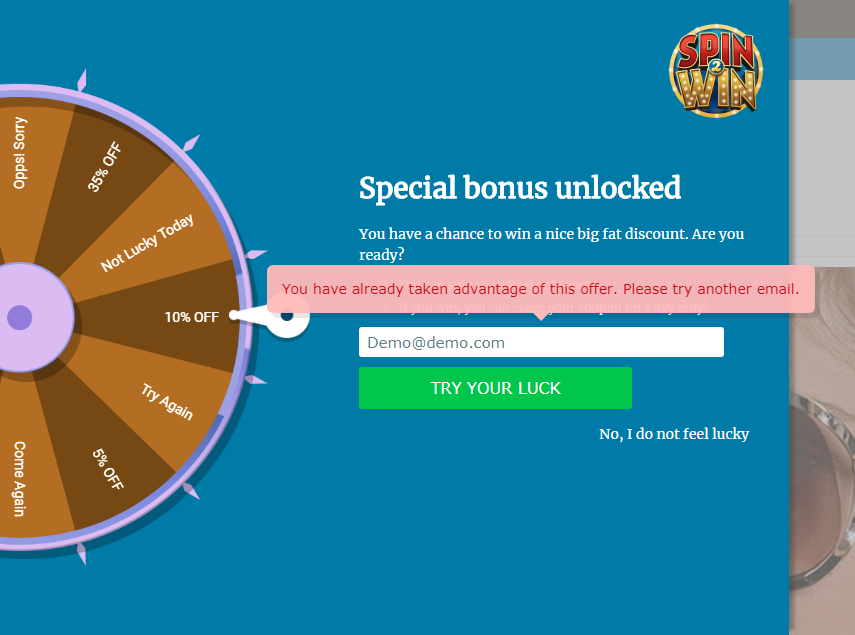
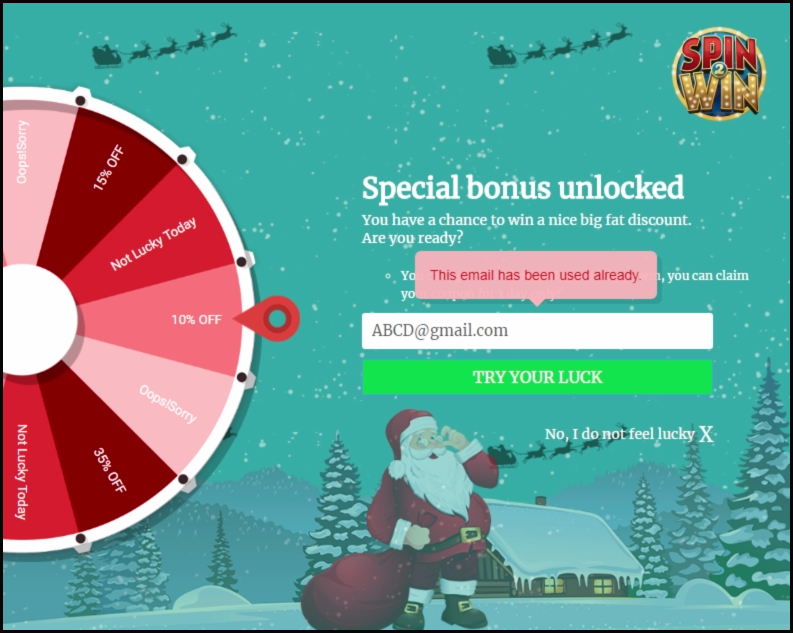
Magento Spin and Win can check the duplicity of email ids entered in the Email subscription pop-up by enabling this option. Once this is enabled, the store visitors can spin the wheel only once with a single email id.
This makes sure that one email id can avail the offer only once. In case the same id is used to spin the wheel twice, then, the extension will flash a message as shown in the image below.
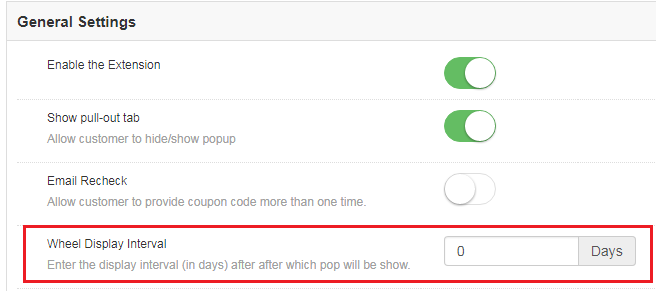
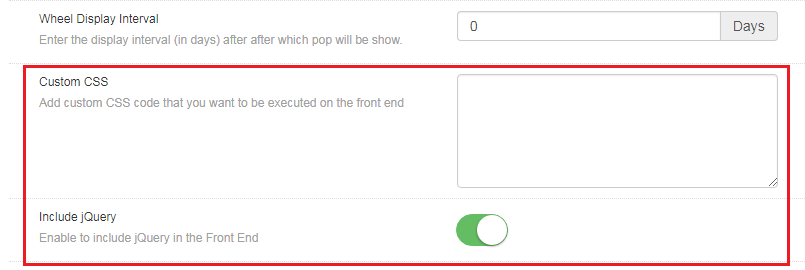
Wheel Display Interval
This field allows the Magento store admin to set the number of days after which the pop-up will be shown on the website. By default, it is set to 0.
Custom CSS
Magento store admin gets to change the look and feel of the Magento extension by including Custom CSS code in this section.
Include jQuery
Magento store admin can enable the JQuery in the front end by enabling this button. This option allows him/her to include jQuery in the extension.
Display Setting
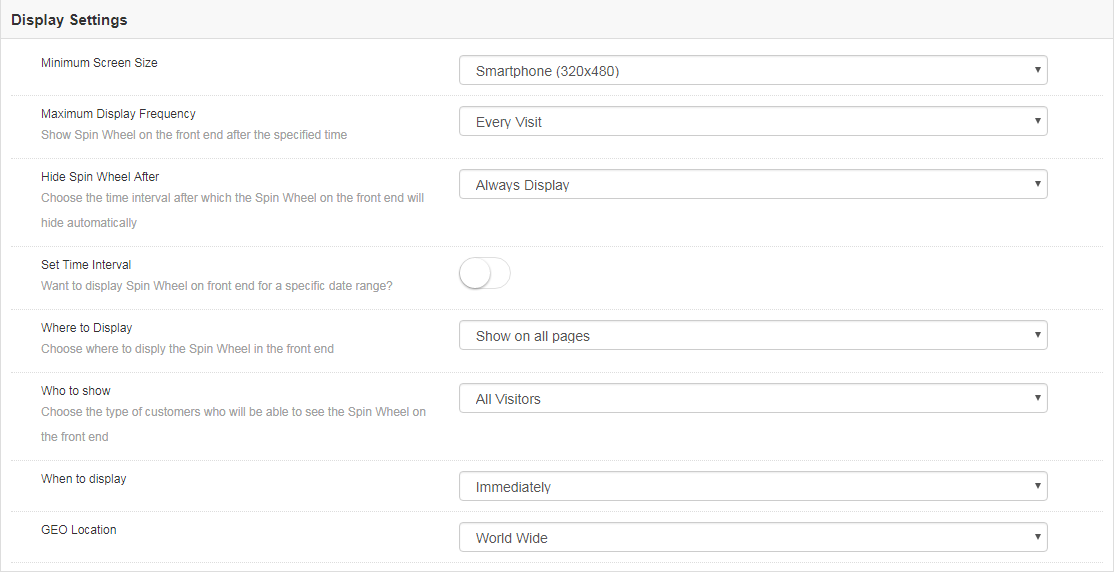
This tab allows the Magento store admin to change the display settings of the interactive pop-up shown in the front-end of the eCommerce site.
The various customization options are discussed in detail below:
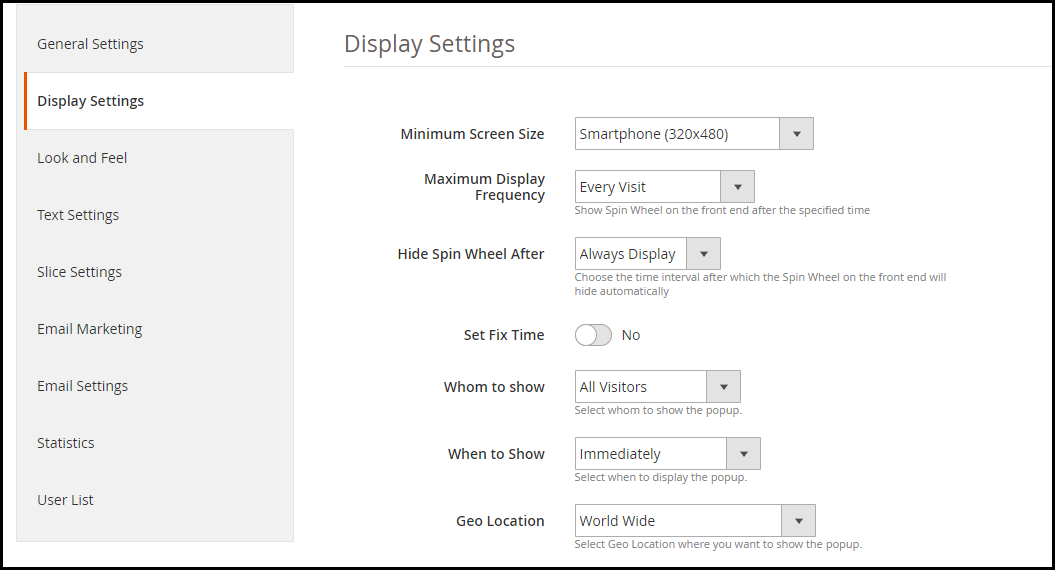
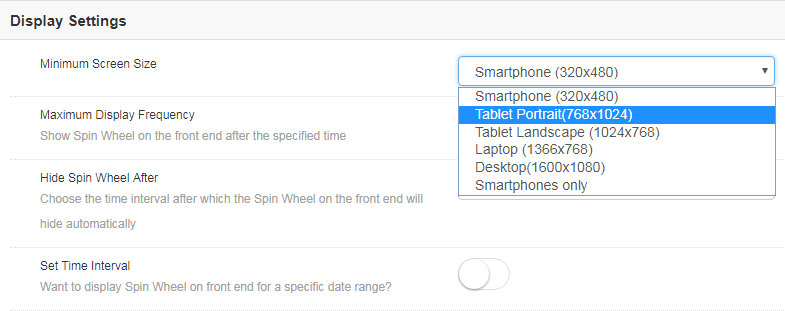
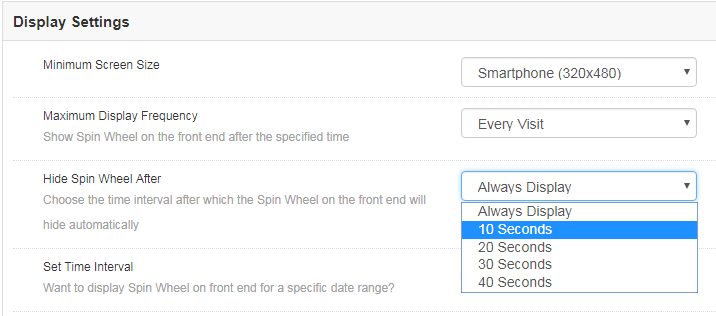
Minimum Screen Size
This tab can help you set the minimum standard size of the screen with which the extension will be compatible. Select the minimum screen size and the extension will flawlessly work on any size larger than the one selected.
The admin gets to choose from a number of options in the drop-down list. All he needs to is to select the one that he finds suitable.
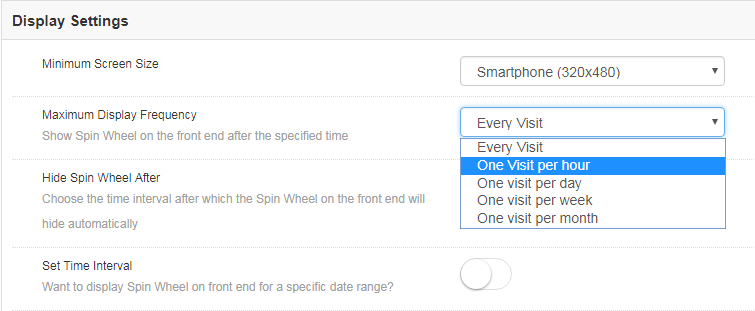
Maximum Display Frequency
You can even select the maximum frequency of the email subscriptiondisplay. The admin gets to choose from the varied options in the list. You can either allow the wheelio to pop-up on every visit of the customer or else, you can set it’s display on hourly, weekly or monthly basis.
Hide Spin Wheel After
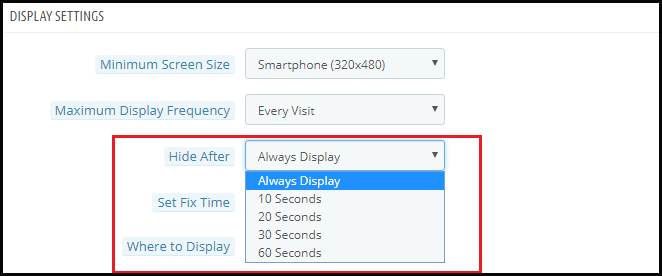
Along with the display option, the store admin gets an option to hide the spin wheel as well. Magneto store admin can either display the wheel all through the customer’s visit unless it is manually removed by the customers. The merchant can even set the time after which it will be removed from the web page.
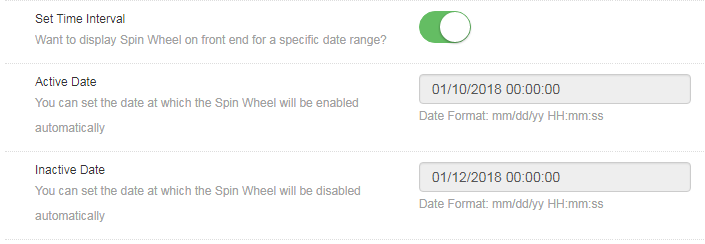
Set Time Interval
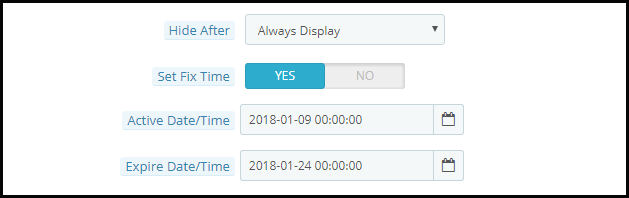
Do you want to display the gamified pop-up for a certain time? This tab allows you to set the duration when you want display or hide the email subscription pop up. All you need to do is to enable the button shown in the image below.
Once it is enabled, you will get an option to set the time and date of the duration when you want the spin wheel to be enabled or disabled on the front-end.
Enter the date in the prescribed format, that is, mm/dd/yy as well as the time in both the sections. The Exit intent pop up will be displayed only in between the duration set.
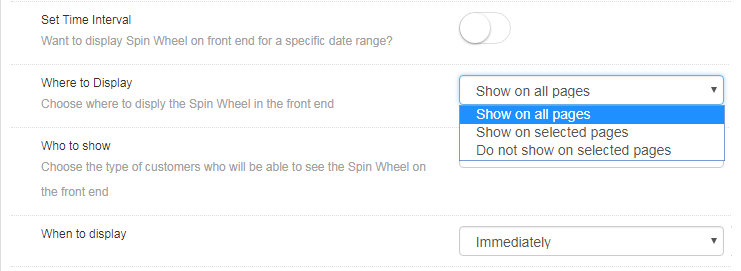
Where to Display
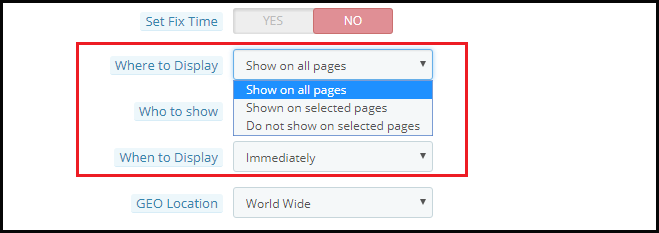
The entry and exit pop-up can be displayed anywhere in the website. No code changes are required to be done for the same. All the admin needs to do is to select the web page where he wants this spin and win extension to show up.
By default, the ‘Try your Luck’ wheel will be shown on every page of the website. However, if the admin wants to display it on a particular page only, he can choose ‘Show on selected pages’. The admin will then get an option to choose the pages where he wants to flash this email subscription pop-up.
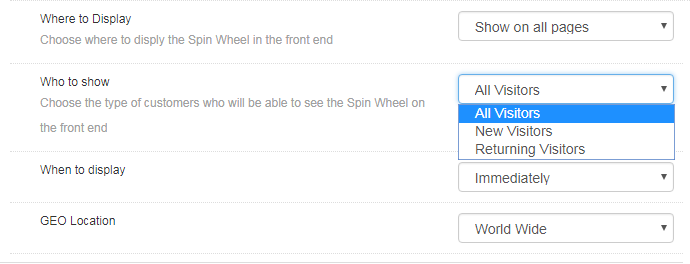
Who to Show
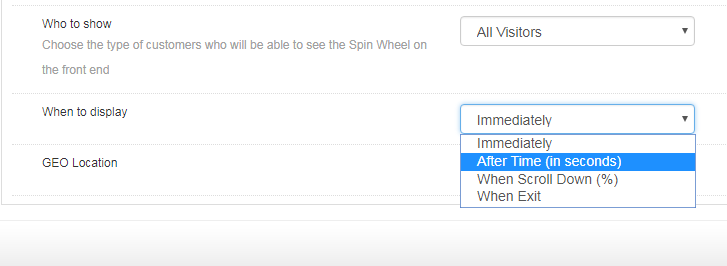
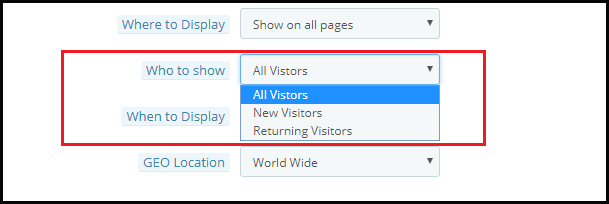
Choose your target audience whom you want to avail the coupons offered by the spin the wheel extension. You can either show the wheel to all the visitors, or to the new visitors or to the customers who are visiting your site again.
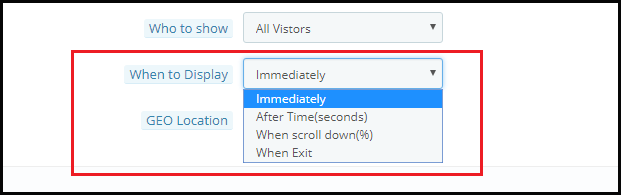
When to Display
Choose the time which you think is feasible for displaying the wheel by selecting one from the options shown in this tab.
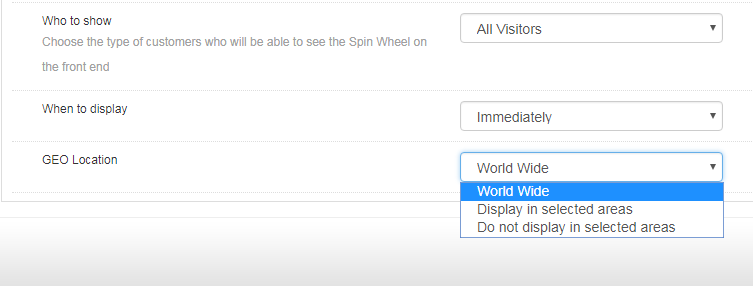
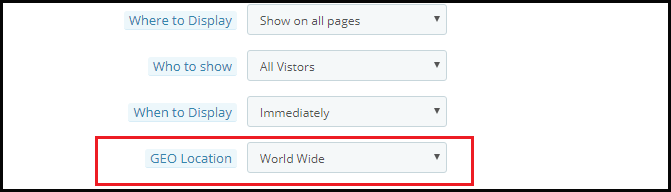
GEO Location
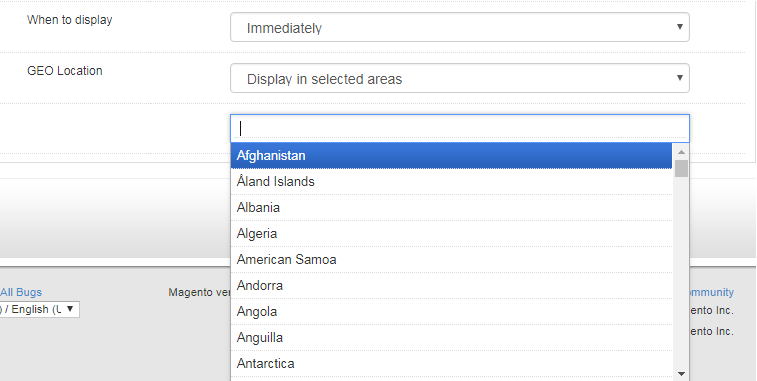
The admin can even select the GEO location in which he wants to display the pop-up.
Selecting the default option of worldwide will allow to display the extension at every places where the website is being viewed. In case, you want to display or do not want to display it at a particular location, then, you can select the place as shown in the image below.
Look and Feel Settings
Along with the various customization options, the web admin panel allows to change the look and feel of the entire Magento email subscription pop-up.
1.2.3.1 How to change the look of the spin wheel?
Here are some of the ways in which you can change the look and feel of the spin and win(Exit Intent pop up) extension.
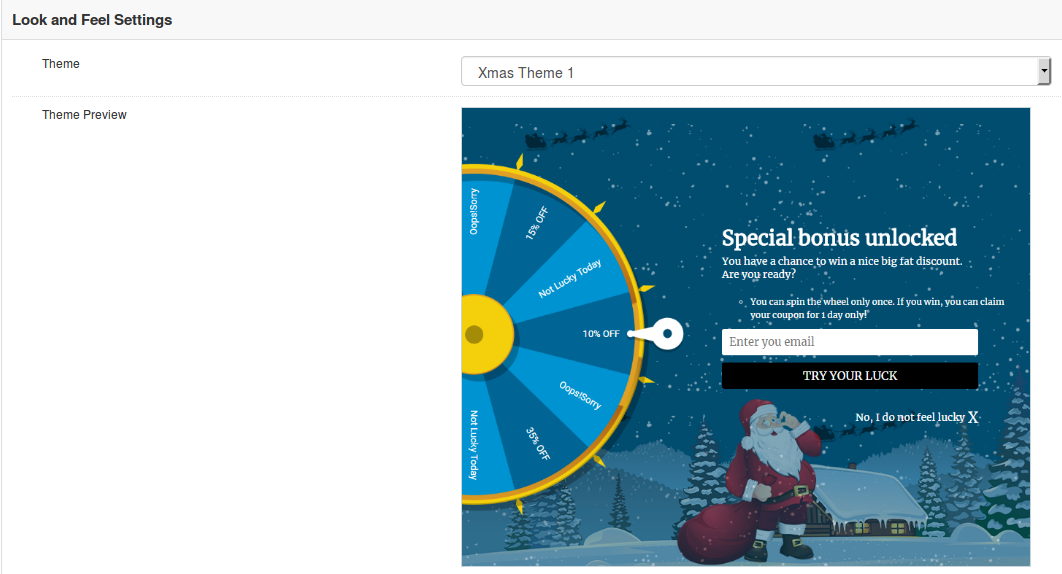
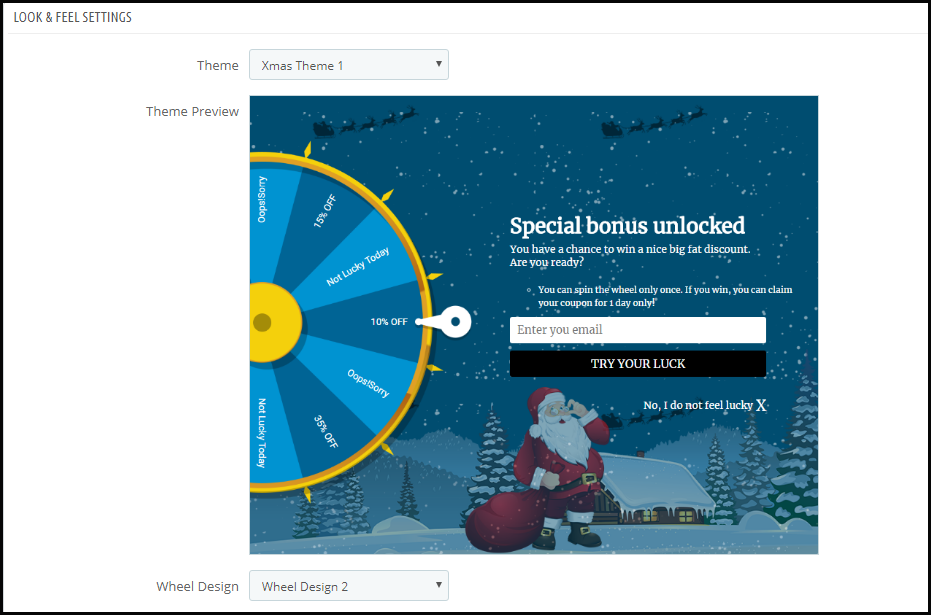
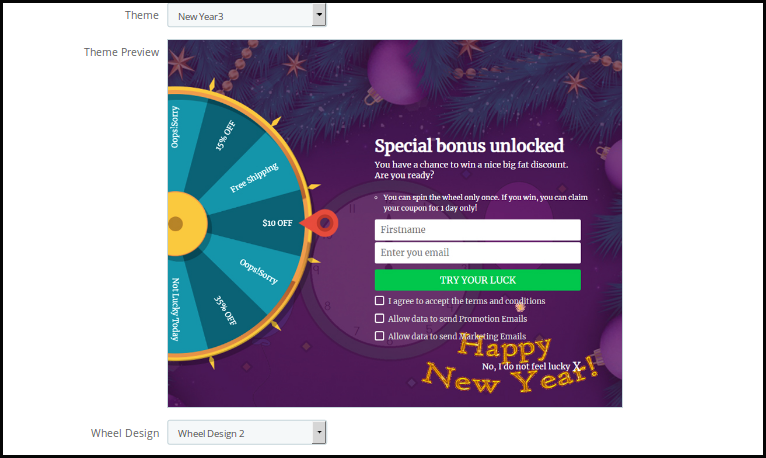
Theme: Admin can select a desired theme for the spin and win email subscription popup based on different occassions like Thanksgiving, Easter, Black Friday, Christmas etc
Theme Preview: Using this option of Magento Spin and Win module, you can preview a template before applying the final changes to your website.
Display image
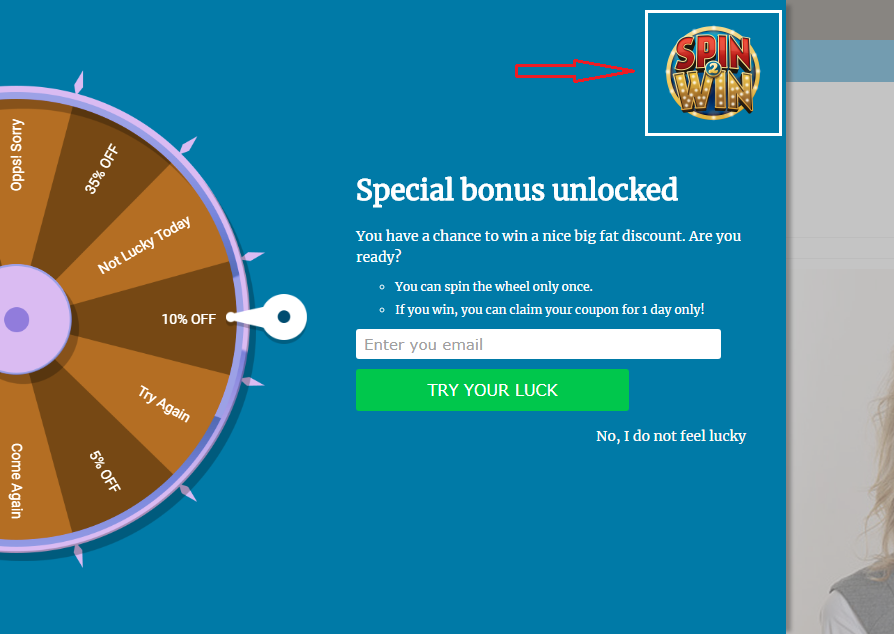
Magento spin and win extension allows the store owner to show an image on the spin wheel. The image can enabled by switching the button as shown below.
Not just this, the admin can even change the image as per the requirement by choosing it from the local drive.
The image selected at the back end of the extension will be shown in the front end.
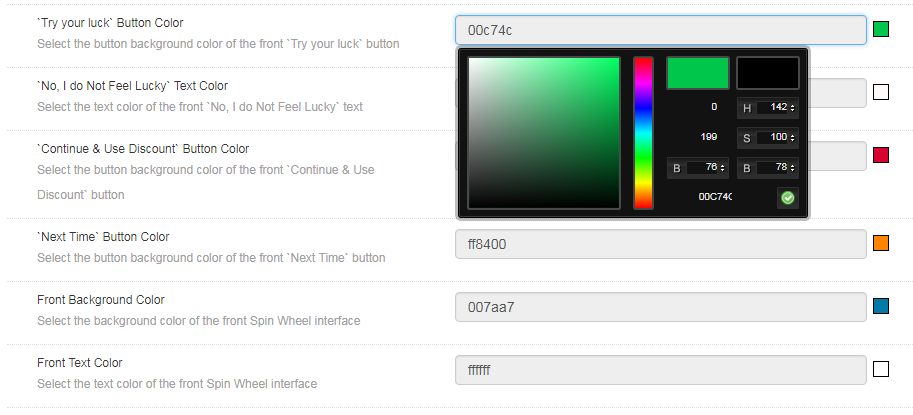
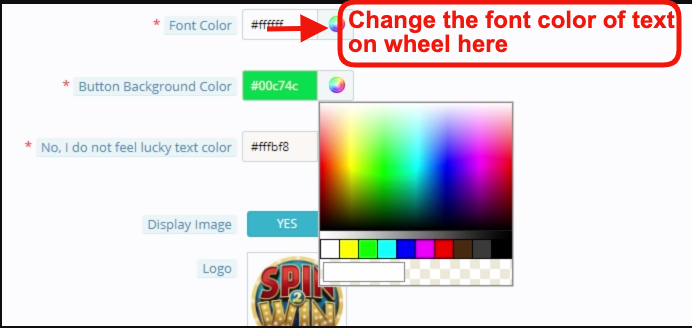
Background and Font Colors
The Responsive Email subscription pop up extension offers a completely customizable interface. Right from the background color of the wheel to the color of the slices as well as font color, everything can be changed by selecting the color that suits the theme of your website.
‘Try your luck’ button color: This can change the font color of the button that is clicked before spinning the wheel.
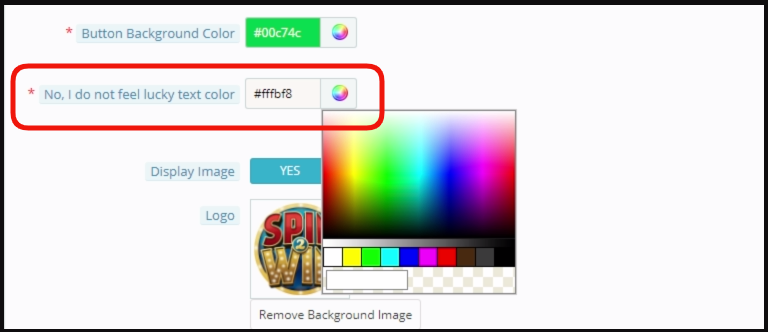
‘No, I do not Feel Lucky’ color: Change the font color of the button by selecting the shade from here.
‘Continue & Use Discount’ and ‘Next Time’ button color: Select the color of this button in accordance with the color of the background.
Front Background Color: Select the background color of the front interface of the spin wheel from here.
Front Text Color: The font color of the text displayed on the interface can be changed from here.
Slice Settings
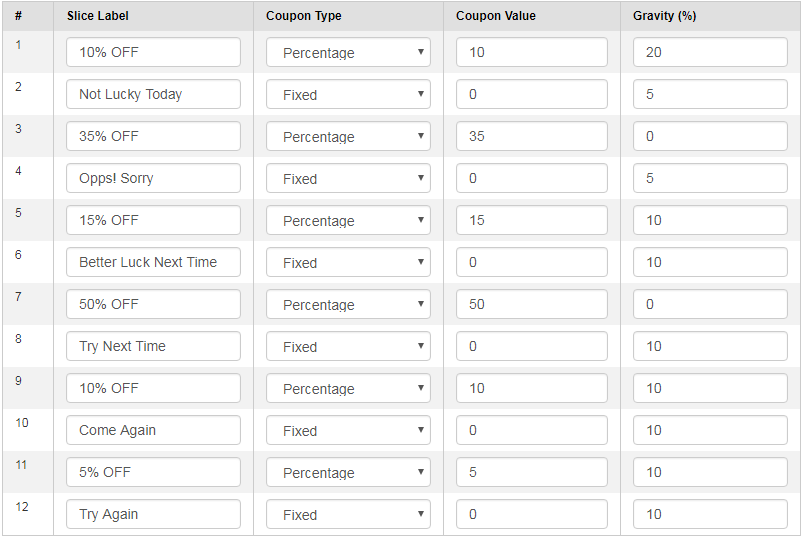
Not just the look and feel of the spin wheel, even the slices of the wheel can be changed and customized as per the need of the Magento store admin. There are 12 slices offered in the admin panel by default. The discounts offered, the label of the slice, the coupon type as well as the value coupon.
In addition, the possibility of a particular slice being selected after the spin can be set as well. Enter the desired value in the Gravity column accordingly. This value cannot be greater than 100 or less than 1. Moreover, the sum of the value of all the 12 slices should not exceed 100.
Email Marketing
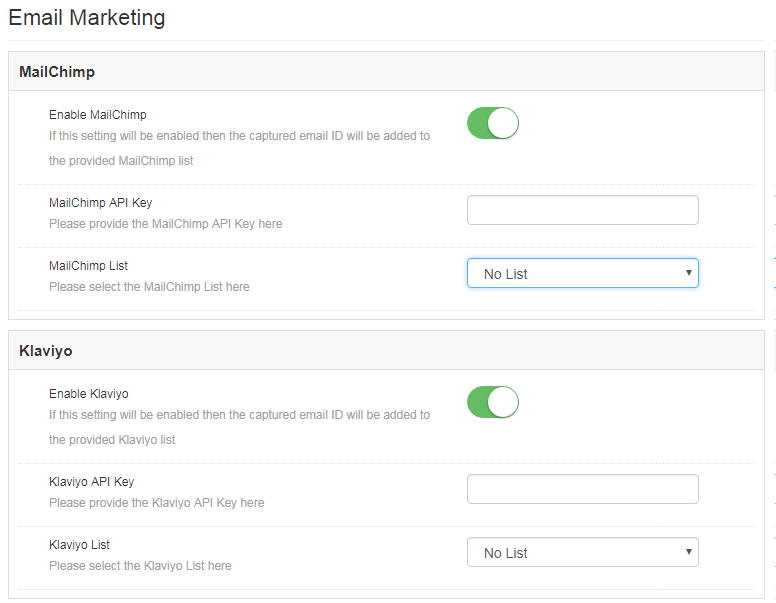
The Spin and Win extension has an inbuilt email integrator. The email ids of the store visitors captured by the plugin is automatically added to the MailChimp, Klaviyo accounts of the Magento store owner. Reducing the effort and time consumed in manual synchronization, the Magento email integrator makes email marketing easier for the merchants.
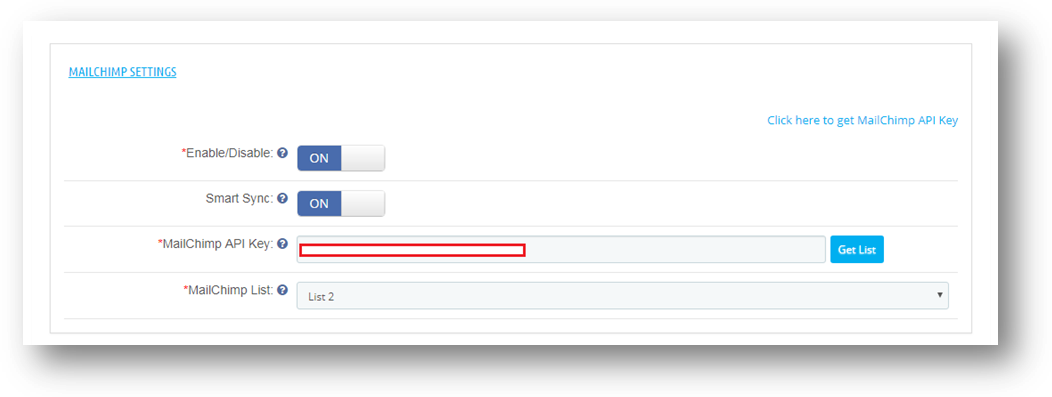
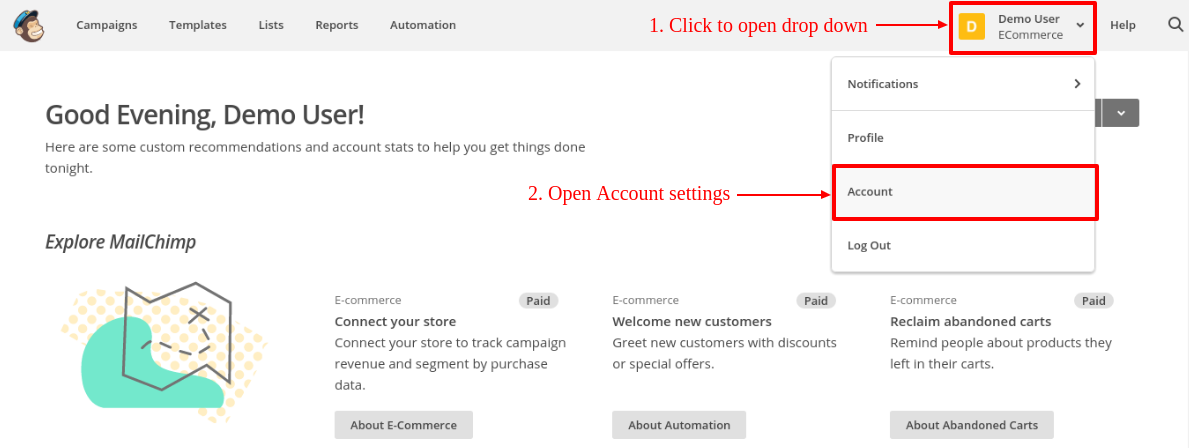
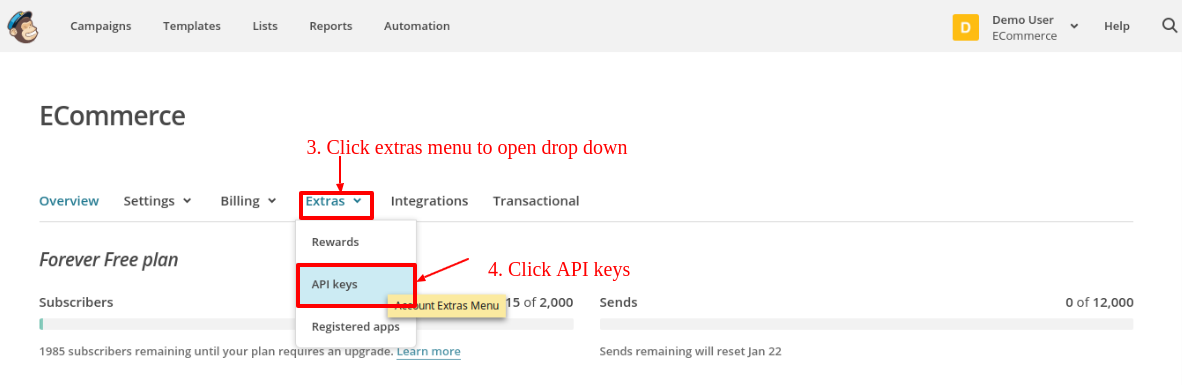
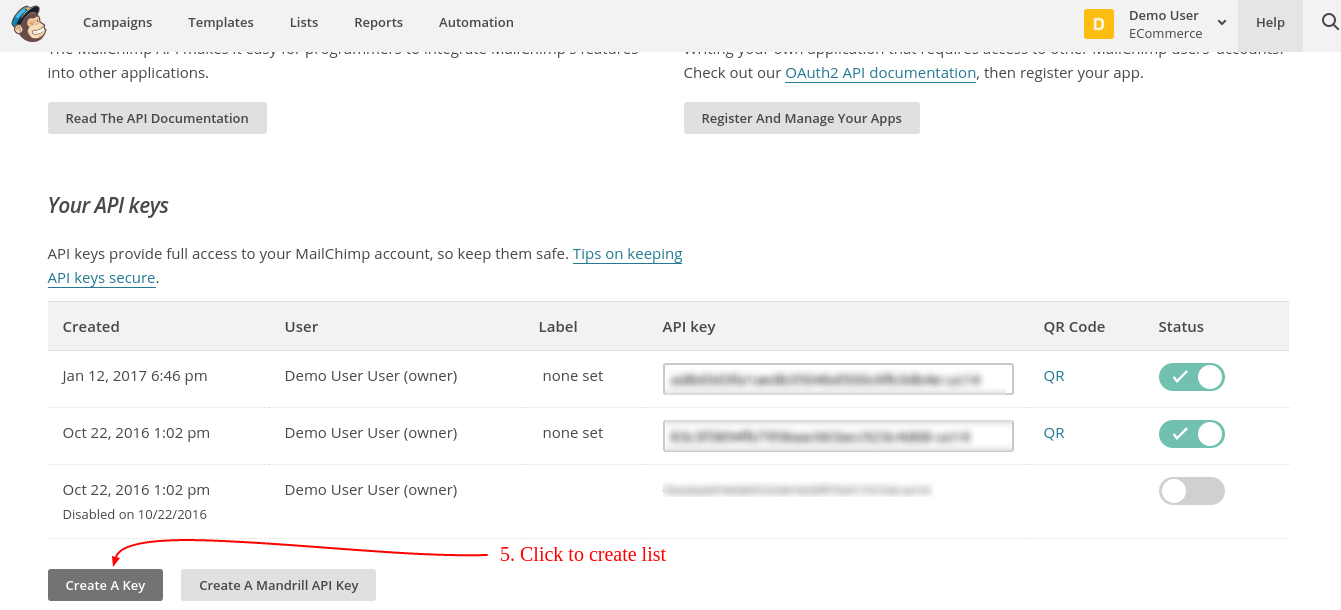
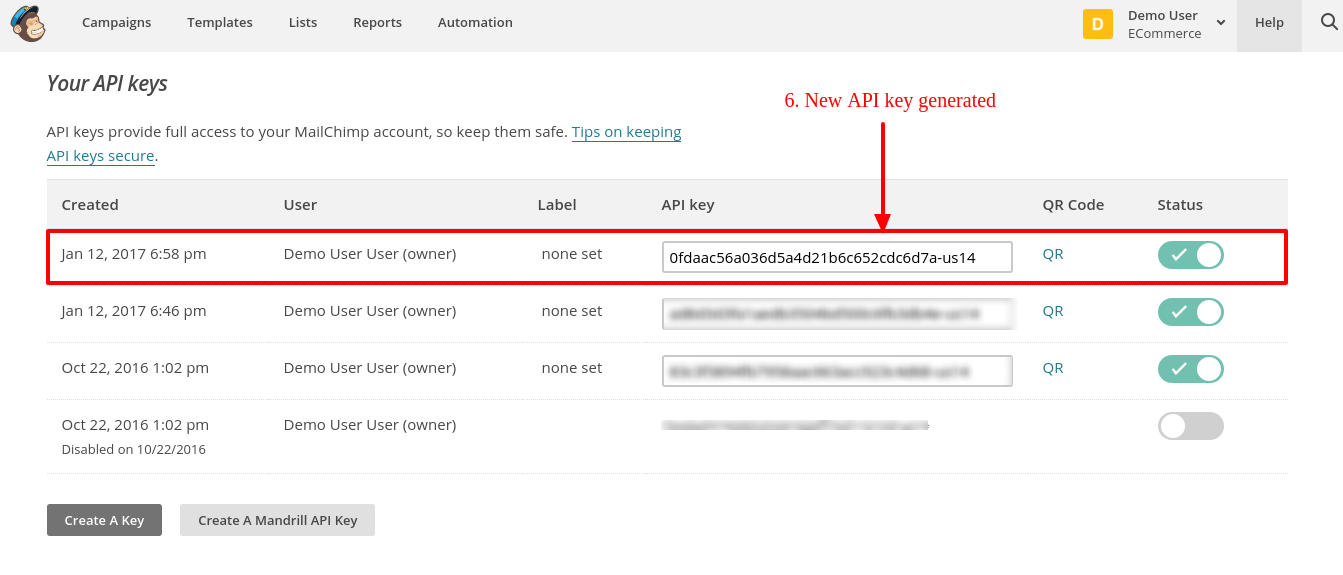
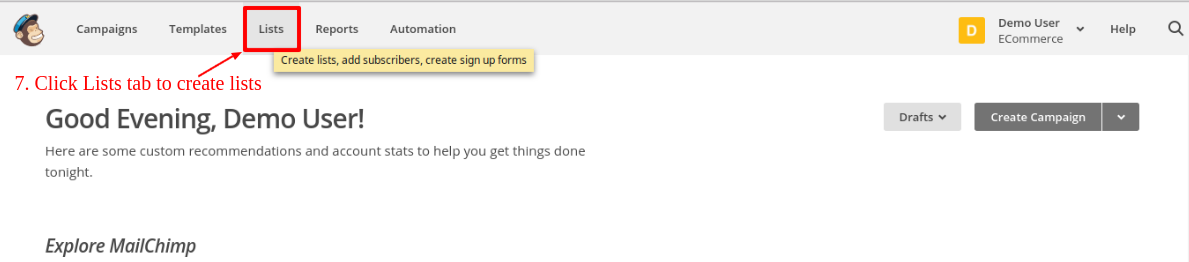
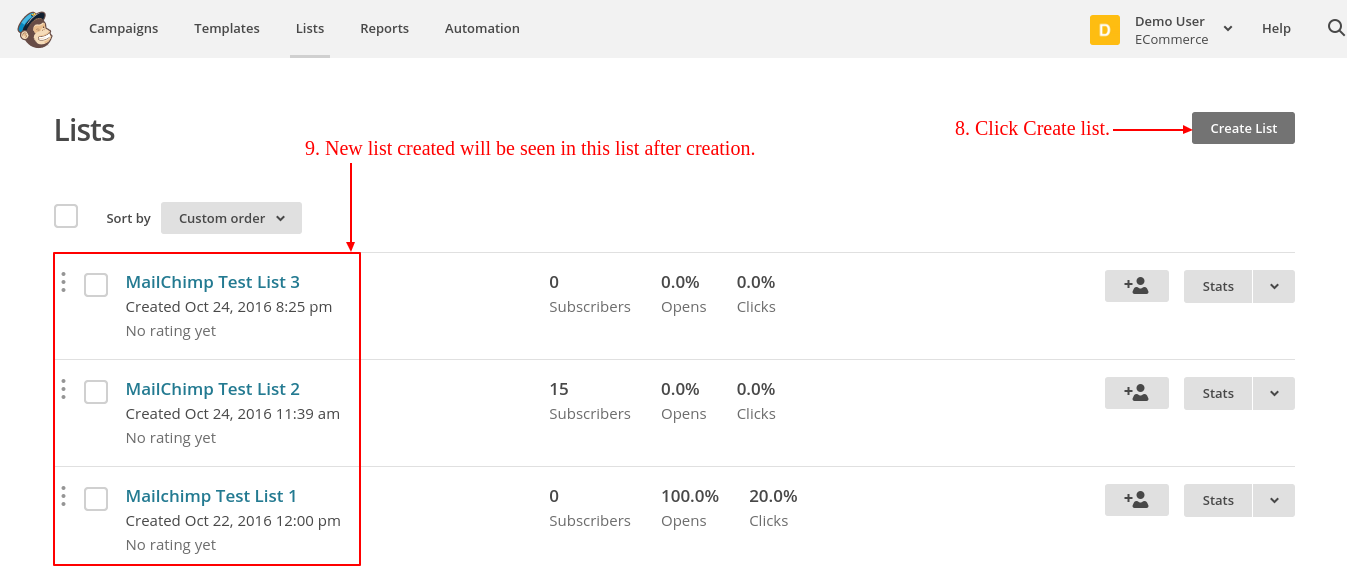
All you need to do to enable this functionality is, enter the API Key of your account, select the list of the email ids that you want to synchronize and your job is done. You are now ready to send promotional triggers in order to compel your customers to visit your store back.
Email Settings
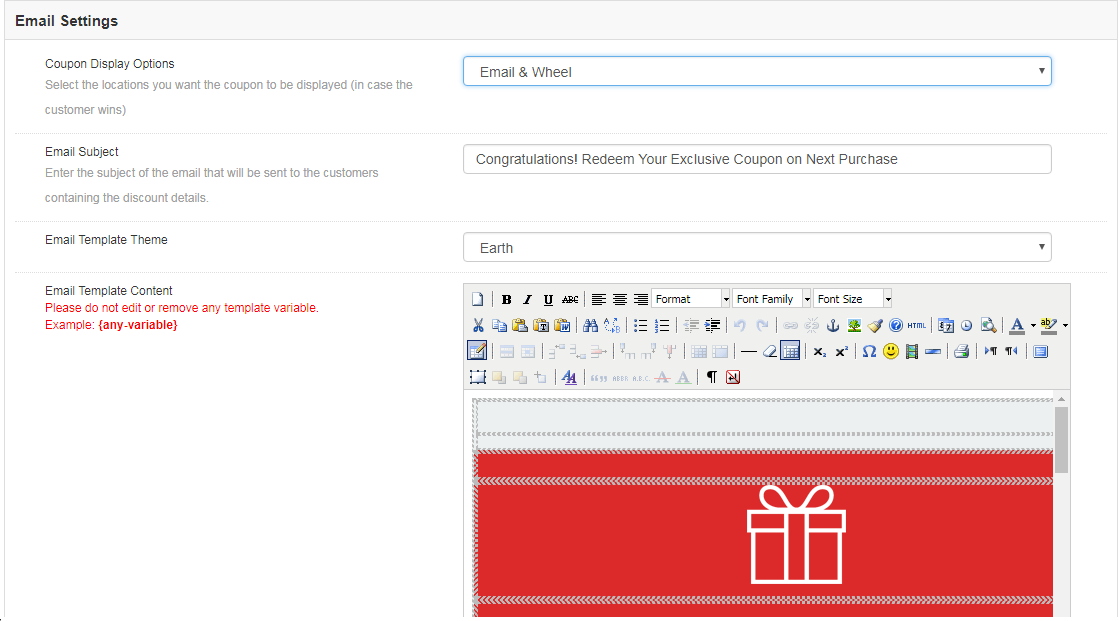
The coupon generated by the spin wheel can be copied directly from the wheel and used for shopping. At the same time, the coupons can be sent to the customers via email notification. It depends on the admin. He can choose the Coupon Display Option that suits his business model best.
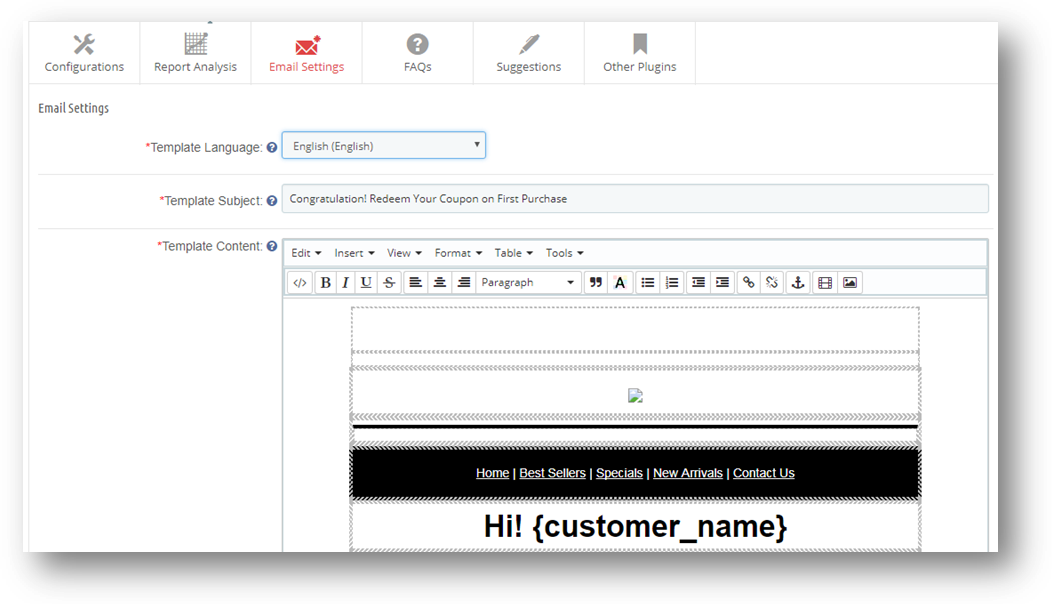
Instead of setting the subject line manually for every mail, you can directly change it from the admin panel and set it for each and every email that is to be send to the customers.
The email integrator comes with a bundle of email templates. The store admin can choose the one that he finds attractive, personalize it as per the need and send it to the prospective customers.
Statistics
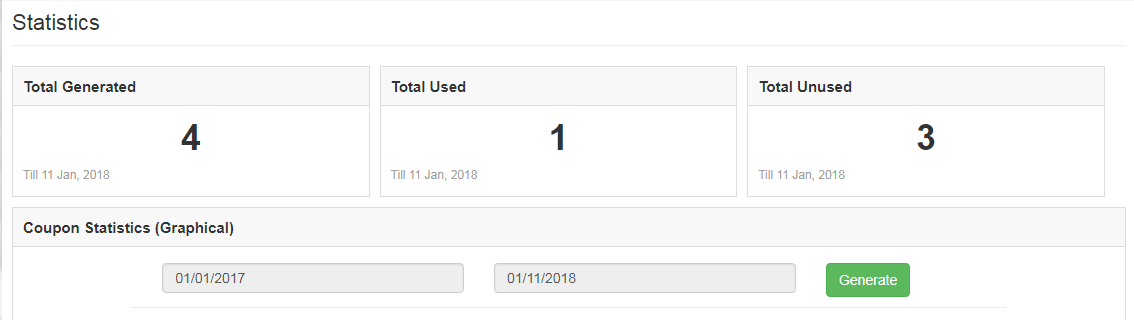
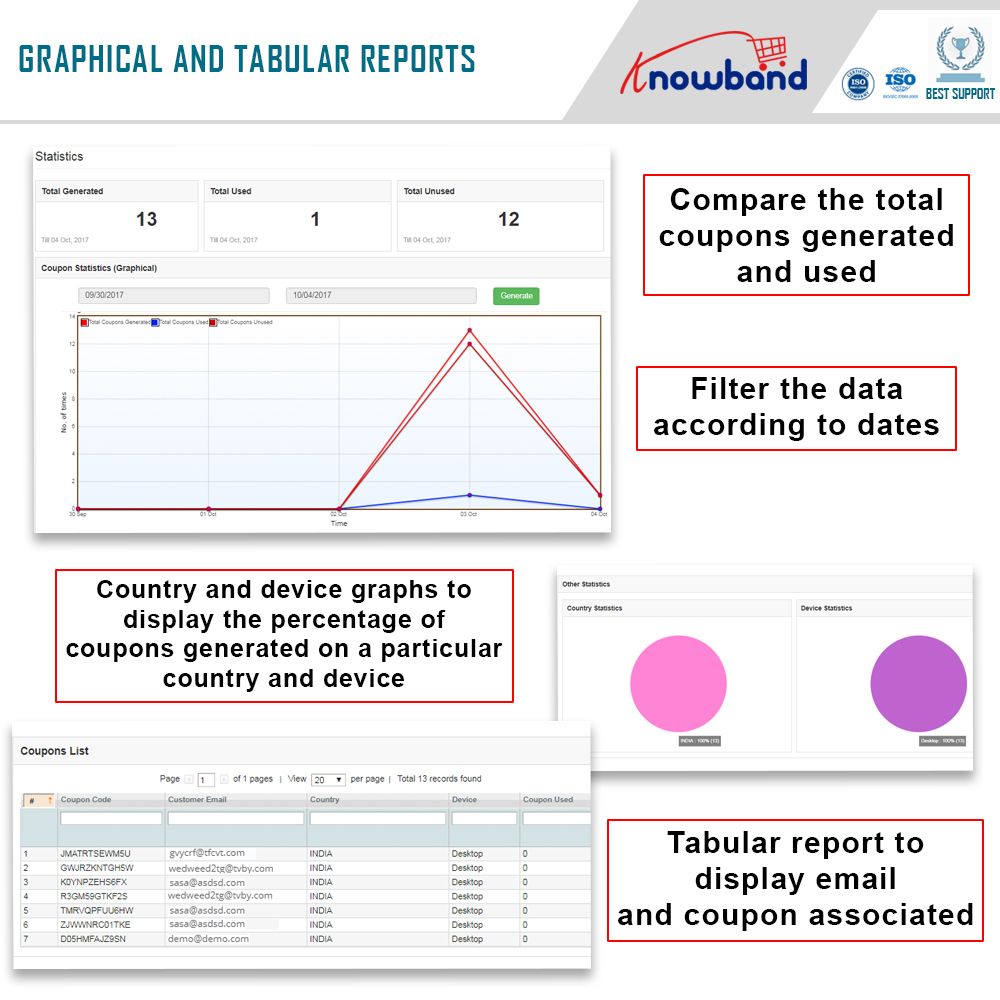
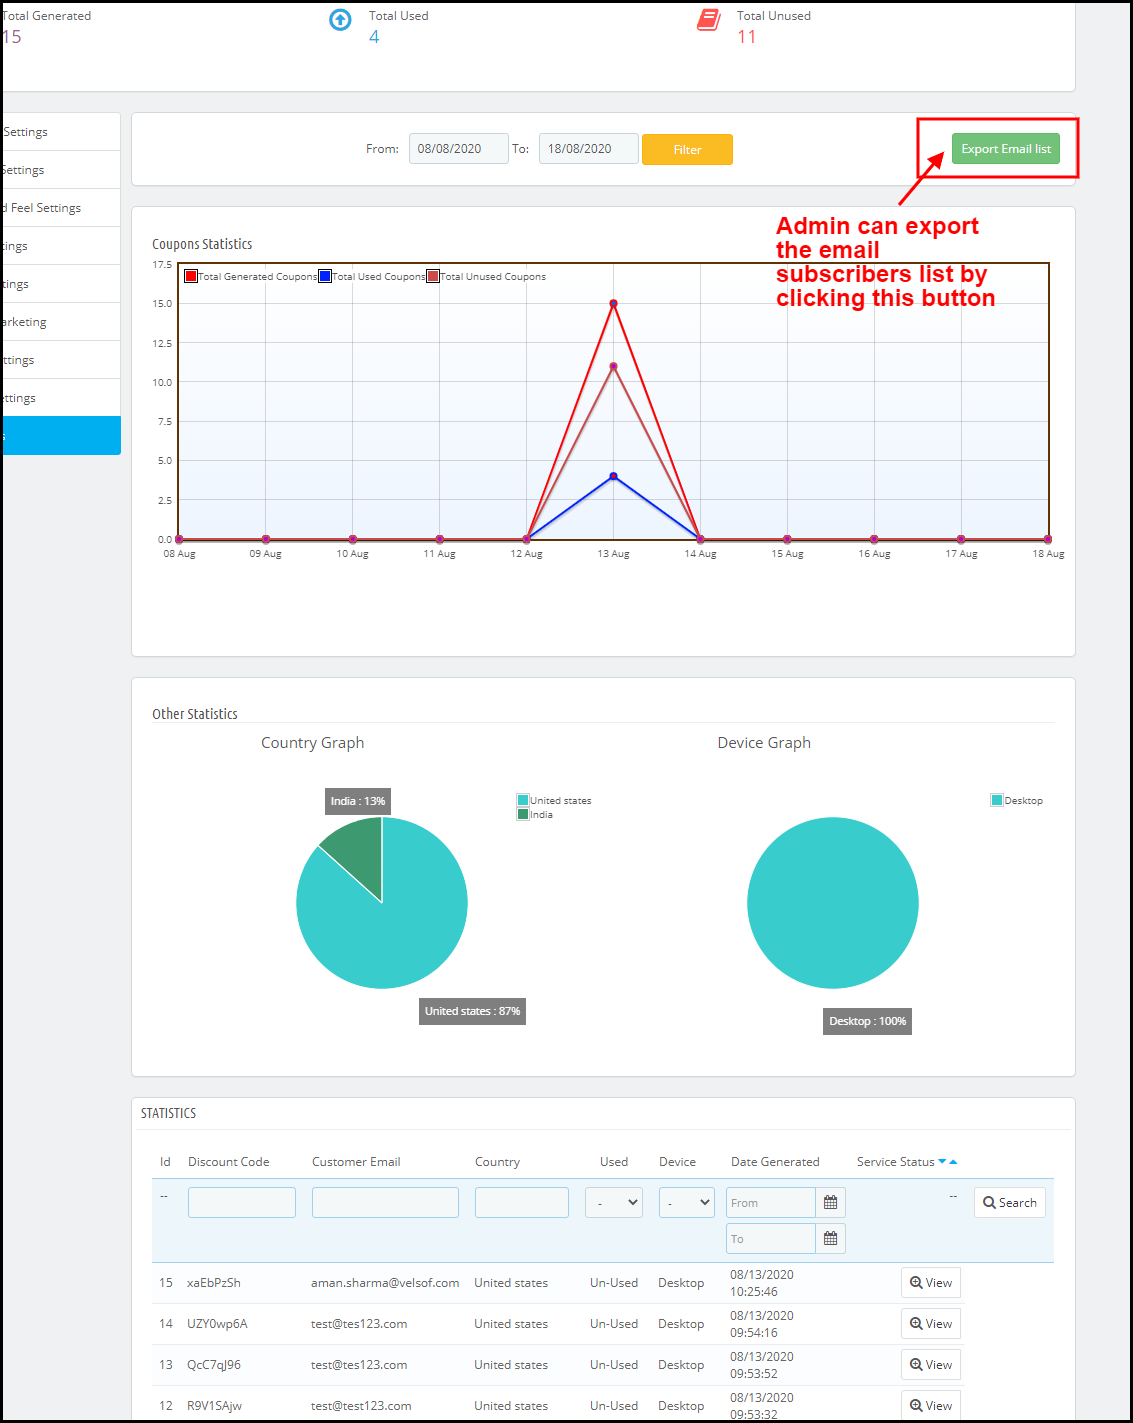
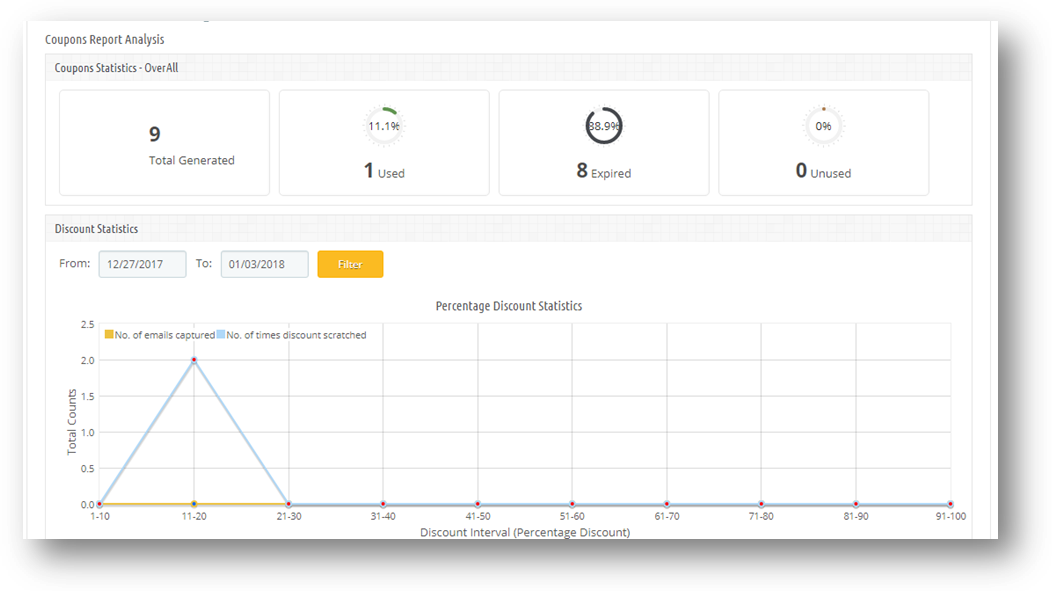
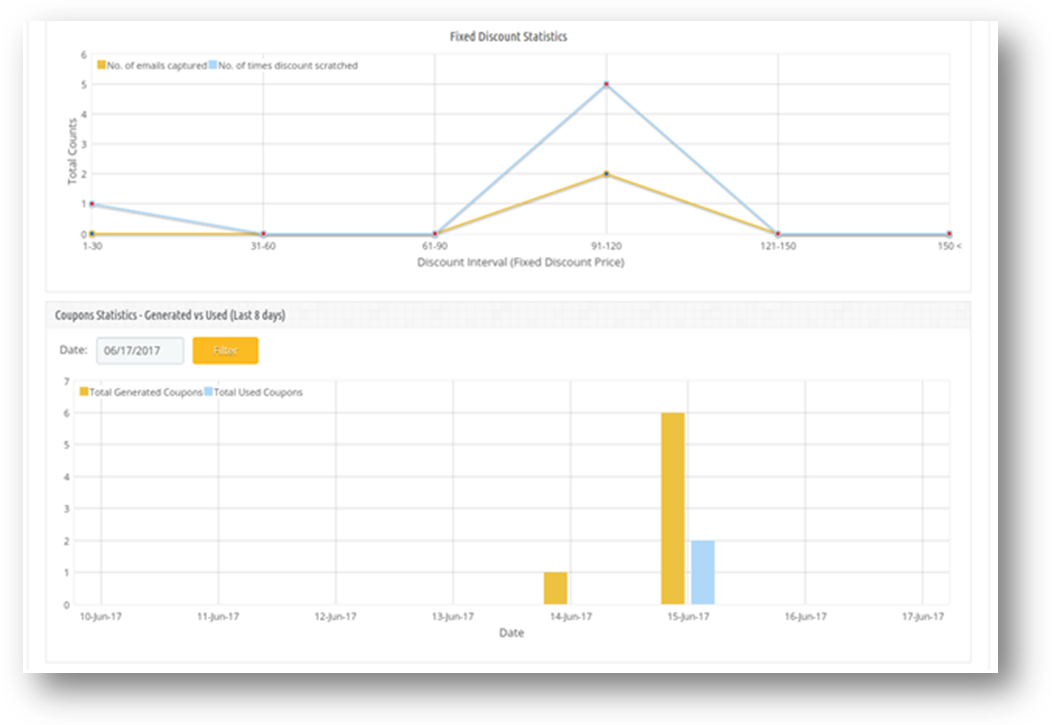
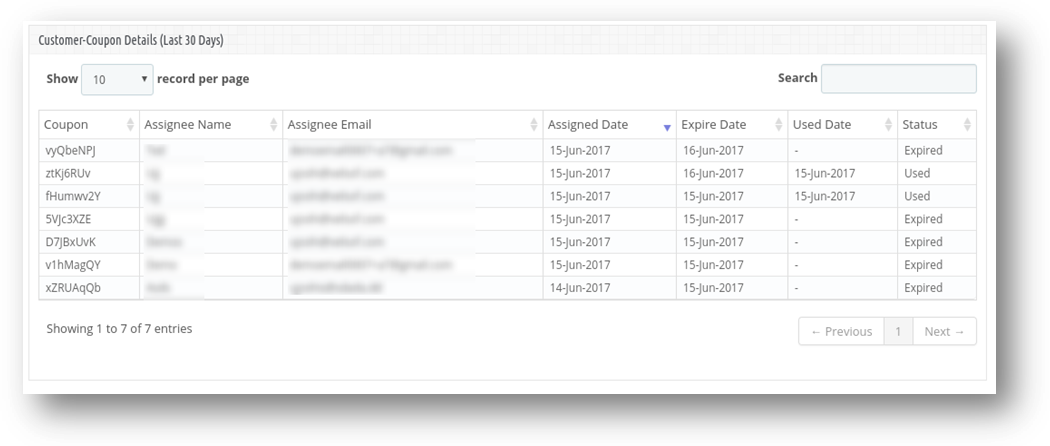
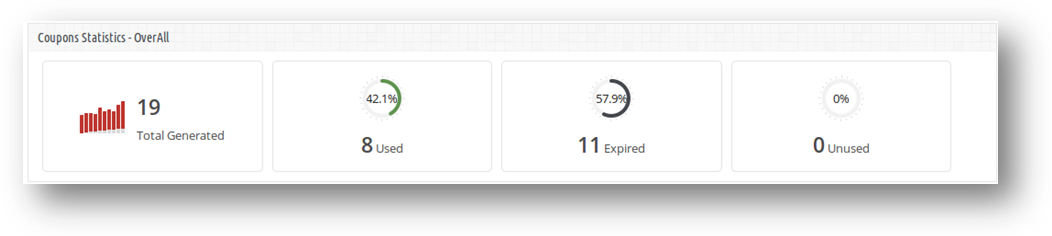
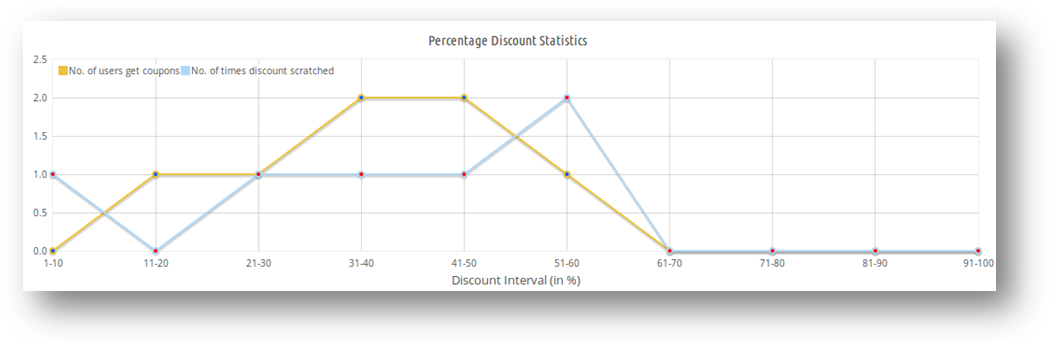
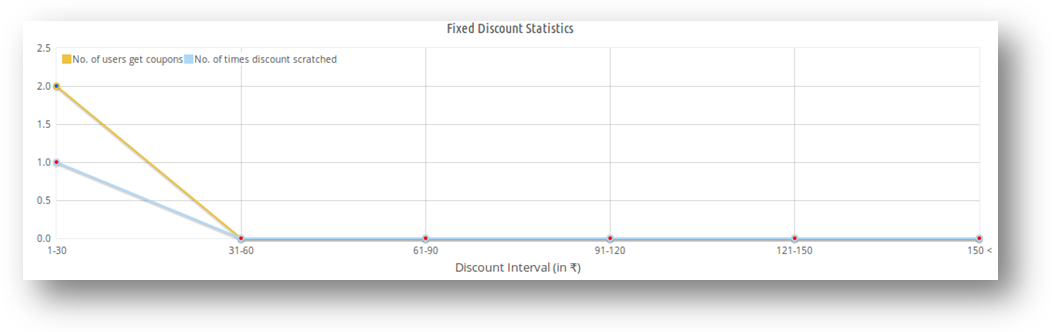
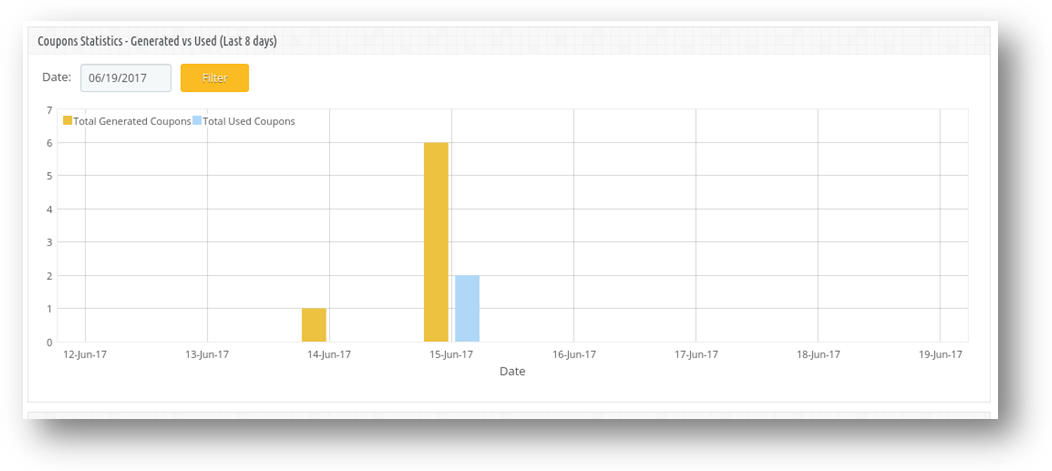
Magento Spin and win extension offers the statistical report of the number of coupons that are generated along with the number of coupons that were used and the ones that were left unused.
The same report is generated in tabular as well as in the graphical format. The report can be filtered by selecting the dates.
This tab even generates country-wise statistics. Along with this, it offers the insight whether the coupon was generated on the desktop computers or on any other device.
Store Front-end
Once Spin and Win extension is enabled, the interactive pop-up will show up in the front end of the eCommerce store.
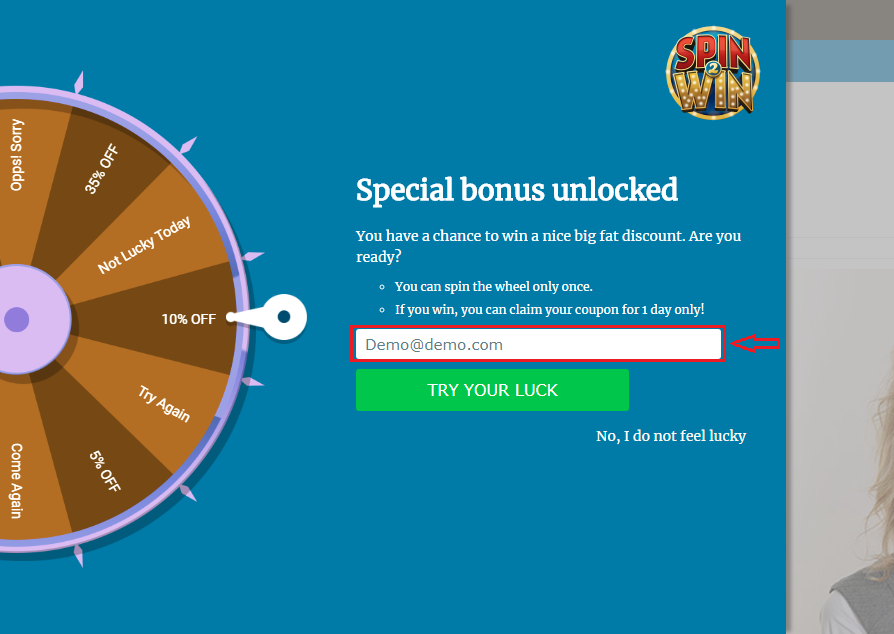
The store visitors can spin the wheel by entering their email ids. Thus, you need not stick to the annoying exit pop-ups in order to get the personal data of the customers. You can effortlessly lure them by offering enticing giveaways in return of spinning the wheel.
The coupon will be generated automatically once the wheel spins. The customer can then avail the offer by copying the code.
The same code can even be conveyed to the customers via email notification.
Disclaimer: In case the “Spin and Win” wheel popup does not display at the front, kindly clear the cache or delete the cookies. Sometimes cookies prevent the popup from displaying at front.
The addition of subscriber pop up in any website comes with a lot of added advantages. Most of the time, the website owners wishes to connect with a very large number of people, so that, if they want to update or inform them about any new activity, it can be done via the subscription Email id. It is one of the oldest and the most reliable form of communication between the sellers and the customers.
In this regard, today most of the website has come up with numerous form of email subscription pop up in order to get a better customer base. They try to lure the customers to subscribe to the website through various means. This has become a common practice as the conversion rate using the email subscription method are quite appreciable. The more number of email subscription improves the chances of the web store to gather a large number of traffic to the web store. It is noticed that at least 57% of the customers respond to the Email subscribed messages from the websites.
Most of the time, it is fruitful to use these email subscription pop up but the website must make sure that the inclusion of these pop ups is done in a very exciting manner The increasing number of these email subscription pop up have started to annoy the customers and most of the time they tend to ignore to fill out any details required by these forms. Therefore, the websites face a challenge on how to successfully incorporate these subscription pop ups in the website, so that the customers are not annoyed and at the same time the websites can make successful email subscription.
The points that must be kept in mind by the web stores owners before incorporating email subscription pop up in the websites can be listed as-:
Why to use?
The first thing that occupies the owners mind regarding the web store is Conversions. Every web store owner wants to make a healthy number of conversions on from their web store. In order to do so, it becomes quite important to have an approach. Thus, using the email subscription pop up allows the web store to connect to maximum number of the customers on the web store. The web store owner can inform them about the new arrivals, product updates and any ongoing sales on the web store. Therefore, a better subscriber base helps the web store owner to maximize the reach of the webs store and gather a better traffic to the web store.
What to use?
The owners can use the various forms in order to get the subscription from the customers. The first and the foremost requirement of a better email subscription pop up is that it must be attractive and the customers must not at any time feel like the web store is demanding way too much from them. Therefore, the various forms of pop up such as Spin and win pop up, Magento Scratch coupon pop up or some attractive email subscription pop up can be used, which can provide the customers with better offers on their purchase and at the same time can fetch the web store with a better number of subscribers to promote the web store.
Where to use?
One of the most important thing about the email subscription pop up is the position. The constantly appearing email subscription pop up annoys the customers very much and at one point or other the customers feel like giving up the web store and quitting. Therefore, the position and the timing of the email subscription popup is one of the important thing to be kept in mind. The better way to use the pop up would be as the exit pop up or during the checkout page because the customer is leaving the website either on a high note or on a lower note. Therefore, in this case if the web store provides the customers with some opportunities in the form of scratch card or freebies, it may motivate them to provide email ids. This is what makes the exit pop-ups a must-have for the eCommerce websites in particular. It compels the visitors to reconsider their exit.
When to use?
The web store can make sure the frequency of using the email subscription pop up may not be exceeding the customers tendency to go with them. If at any point the customer feels like the web store is being way too demanding than that may lead to negative results for the customers and they may leave or wouldn’t consider making a purchase. Thus, it becomes quite important to make sure that the timings of the email subscription pop up are evenly distributed and would fit in with the concern of the customers.
How to use?
The idea of using email subscription pop up is quite dependable. Every web store owner will have a different idea on how to make use of these pop ups. Thus, if the web store want they can opt various options such as use them as a gaming pop up like Spun and win pop up, which is a email subscription pop up but offers the customers a lot of offers based on owner’s preferences by taking their Email Id as a token of entrance to the contest. Same if the case with Magento scratch card, which offers the customers with the handsome discount based on their luck by taking their Email Id. Therefore there are a lot of ways to use these email subscription pop up. It basically depends upon the web store owner, in which way he wants to make use of these pop ups.
Over to You
The idea of using email subscription pop up is quite innovative. The web stores can gain a good number of subscribers if they make better use of these email subscription pop up. As, the email subscription pop ups are not limited to the classic way off asking for Email id, therefore they are one of the important assets for the web store owners in order to make a good number of conversions on the web store. Redefine your subscription based request and reap the desired result for your site.
1.0 Introduction to Prestashop Email subscription popup – Spin and Win
PrestaShop is a free, open-source eCommerce solution. Anyone can create his/her store using Prestashop with minimal effort. The admin needs no technical knowledge to set up the Prestashop store. Prestashop Email subscription popup by Knowband has replaced the old way of email subscriptions as the old-fashioned way of offering a 10% discount in exchange for email ids does not excite the visitors. We at Knowband have come up with a new way of engaging the customers with the website. Prestashop Spin and Win (Prestashop Email Subscription popup) addon display an interactive and responsive gamified interface in the front-end of the website.
New themes available: In 2020, there are 4 New Year themes available for the store admin.
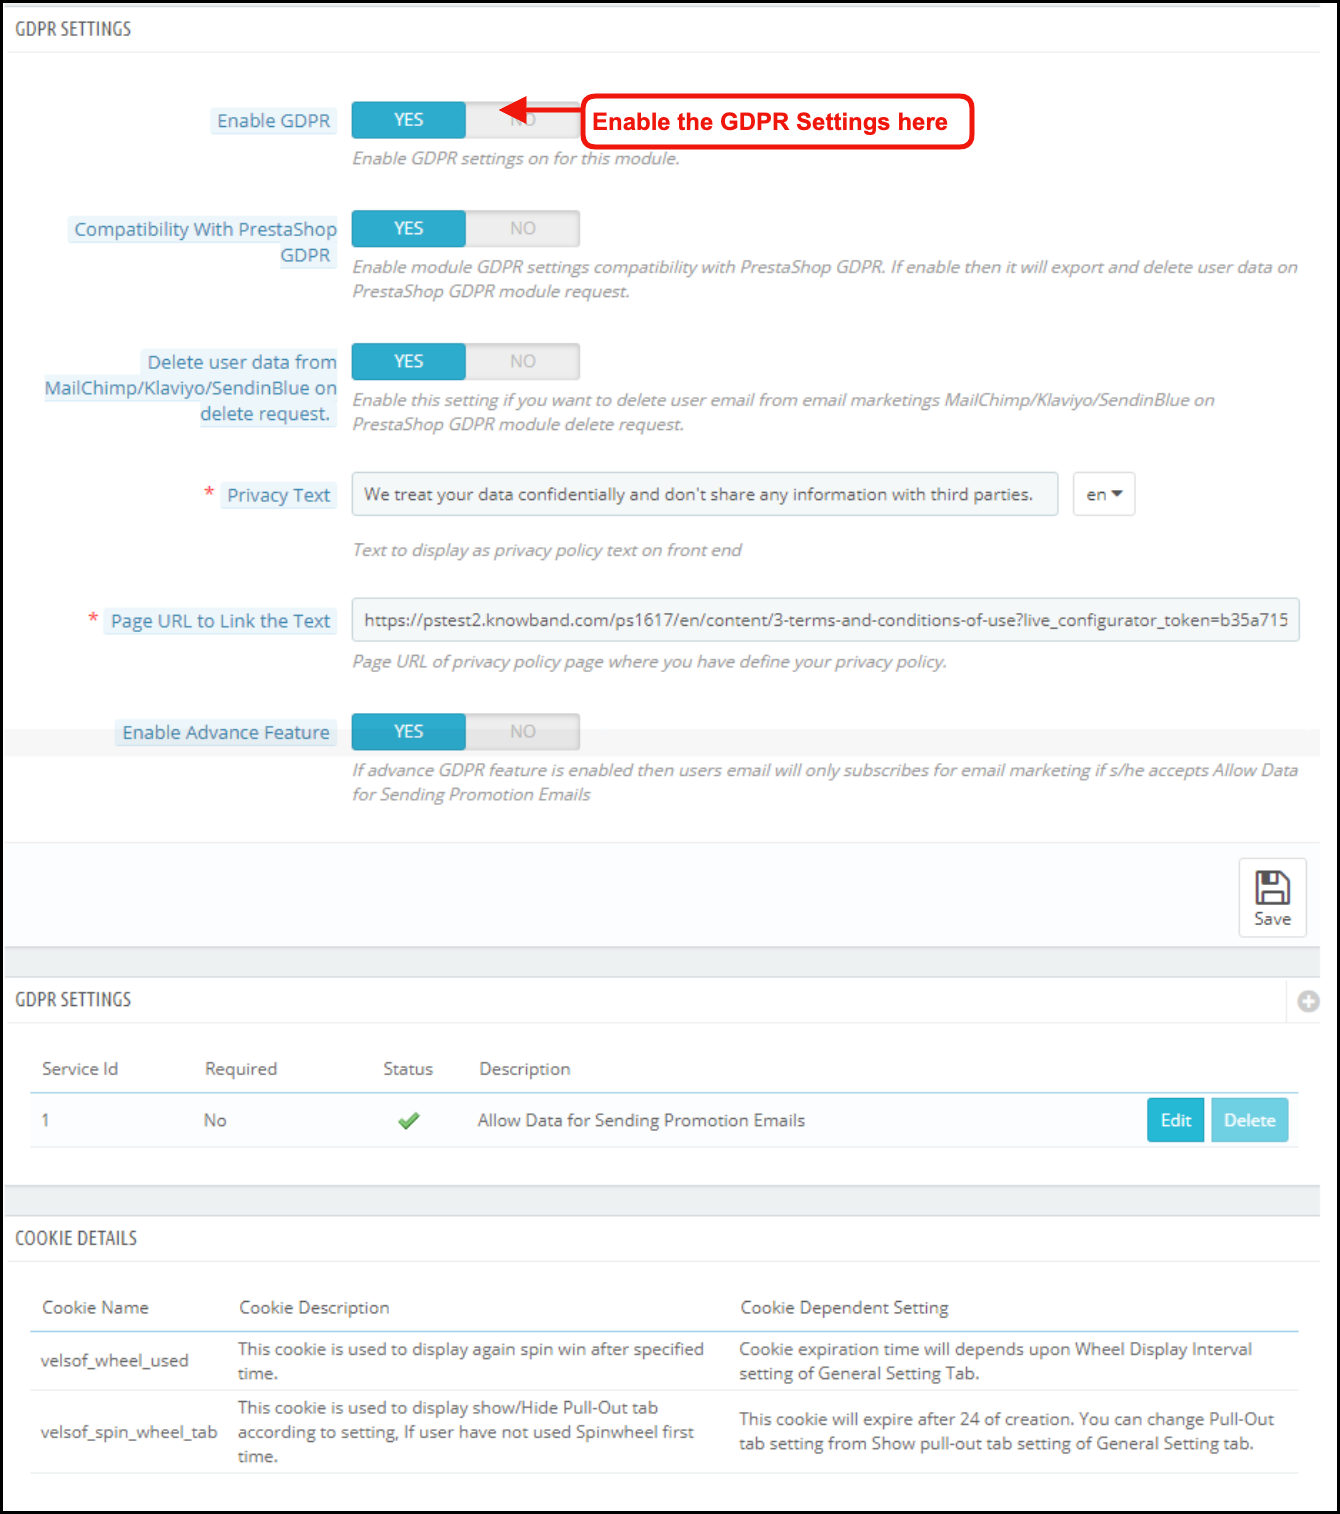
Spin and Win addon is now compliant with the GDPR. GDPR settings are available in the module using which the Prestashop admin can comply with the rules of the GDPR. Please refer to the GDPR Settings to know more about the GDPR.
The overall functionality of Spin and win(a responsive email subscription pop up):
1. The customer visits the website.
2. Newsletter subscription pop up appears on the Prestashop storefront. (is usable as an entry or exit pop up)
3. The user enters the email Id.
4. Spin the spin and win pop up and get discounts
5. Email Ids entered are captured by the addon.
The responsive and interactive email subscription pop interface enhances the customer experience and compels them to visit your site again. The addonis usable as an exit-intent pop-up as well as email subscription pop-ups in the eCommerce sites.
What’s New?
Theme Scheduling: The eCommerce store owner can schedule a theme for any occasion by adding the start and end date.
Update Number of Slices: This new feature allows the admin to select the number of slices for when. Now admin can select 6, 8, or 12 slices for the wheel.
Export Email Functionality: Updated version has Export Email functionality to export emails of customers into a CSV file from the admin panel.
Show Progress meter: Under the general setting of Spin and Win, the store admin can set the Progress meter percentage which will display on the front end of the Popup.
Provide an option to customers to choose to generate a coupon with or without email ID: If the admin enables, it has the functionality to provide an option for customers to choose whether they want to provide their email id or not.
Testing based on IP Address: The eCommerce store owners can now test the Spin and Win addon before actually implementing it on the store by entering their IP Address.
Set Coupon Expiry day: This new feature allows the admin to set the coupon expiry date even after the coupon is generated.
Minimum Amount filled: Under the slice settings tab, the admin can now set the minimum value the cart should have for the coupon. Further, that the customer uses.
1.1 Merchant Benefits of this Newsletter subscription popup addon:
By using this Exit popup cum Entry popup addon, the store owners can achieve the following things.
Boosts Lead generation.
The customer can claim the discount by entering their email id. Hence, it increases the customer base of the store user.
The responsive and interactive user-friendly interface ensures a high impact on direct sales. It improves the overall conversion rate, using coupons and discounts.
Turn Visitors into potential buyers and improve conversion rates by offering users a completely different way to win discounts.
Fully Customizable subscription pop up
Detailed Reporting.
Export Email subscriber list in.CSV format
Theme scheduling for occasions without taking extra effort.
The look and feel of the spin and win pop up as well as the email notification is customizable from the back end.
GDPR Settings are available in the module using which the Prestashop admin can comply with the rules of GDPR.
New classic themes for Spin and Win popup help e-merchants in drawing user attention on different occasions. New Holiday themes for Christmas and New Year are available to attract more and more visitors to the store.
Effortlessly generate a fixed coupon code for each Spin Win slice.
Restrict the compatibility of Spin and Win coupons with other active coupons of the store.
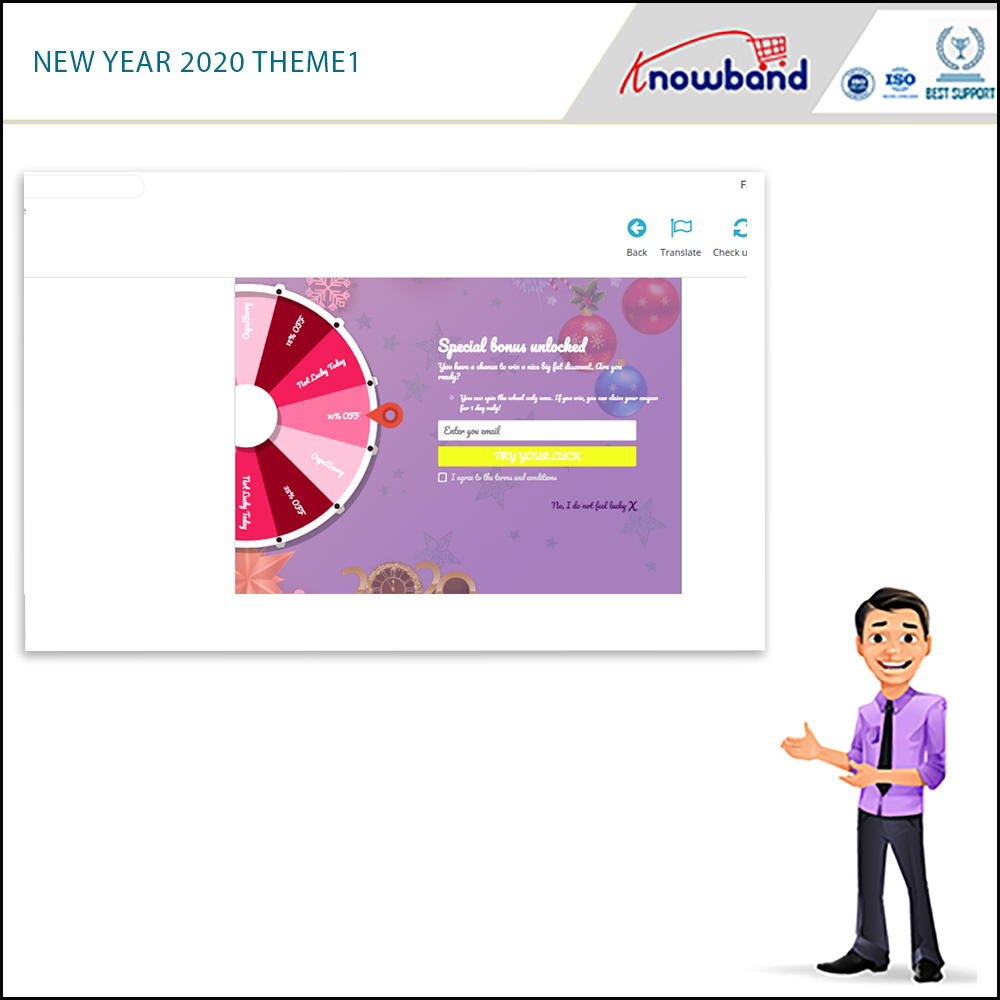
The store owner can now display the latest New Year 2020 themes on his website.
1. Responsive 3 in 1 pop-up: Is usable as an Entry pop up, Exit pop up, or Email Subscription pop up.
2. The admin can select from the multiple available wheel designs as well as spin and win themes to choose from.
3. The new version allows the admin to schedule a valid active and expiry date for a theme. After the expiry date, it will be set to the default one.
4. The interactive Spin and Win game lures customers and helps admin to engage more customers thereby increasing the customer base of the site.
5. The interactive Spin and Win game lures customers and helps admin to engage more customers thereby increasing the customer base of the site.
6. The back-end offers Readymade Email Templates which is further customizable.
7. The store admin can change the look and feel of the Prestashop exit pop-up as per the requirement. The admin can now apply the latest New Year 2020 themes as well on his website.
8. Prestashop Spin and Win (email subscription) pop up offers Mail Chimp, Klaviyo and, SendinBlue Integration.
9. Spin and win popup allows the admin to choose the number of slices in a wheel. There are 6, 8, and 12 sliced wheel options available.
10. Show the progress meter on the front end with a progress percentage. This will display with a label that the admin adds.
11. Prestashop Exit pop up allows admin to provide an option for customers to choose whether they want to provide their email id or not.
12. Set the discounts and offers on each slice and also set the gravity of each slice, the slice with maximum gravity will have larger occurrences.
13. Prestashop Newsletter subscription popup addon allows admin to customize the email subscription pop up using Custom CSS and JS without making any changes in the base code
14. Prestashop Entry popup addon allows admin to choose whom to display, where and when to display, maximum display frequency of the Spin and win (email subscription) pop up.
15. Prestashop Newsletter subscription popup offers wheel sound options which adds a sound when the Spin wheel rotates, it gives a more lively feeling of the Spin and Wins game.
16. Prestashop Exit intent popup addon offers an option to show fireworks on the Spin and Win popup when a customer wins a discount to make the win of the customer more exciting and fun.
17. Prestashop Newsletter popup offers an Email Recheck option on the cart as well. Just to make sure if the customer who is applying the coupon is the same who played the Spin and Win game.
18. Prestashop Exit popup addon allows admin to choose the pages to display the pop up i.e, Category page, Home page, Product page, etc.
19. Email Recheck option to Restrict the same Email Id from availing the discount coupon more than once.
20. Prestashop Newsletter subscription popup addon offers to Pull Out Tab facility for customers as spinning the wheel is not compulsory for visitors.
21. Prestashop Newsletter popup addon allows Prestashop admin to preview the Email subscription popup and the Spin wheel at the admin panel itself.
22. Prestashop Email Subscription popup addon offers a Responsive and Interactive user-friendly interface that ensures a high impact on direct sales. Turn Visitors into potential buyers and improve conversion rates by offering users a completely different way to win discounts.
23. Prestashop Spin and win is compliant with the GDPR, GDPR settings are available in the Spin and Win admin panel. Using these settings admin can comply with the rules of GDPR.
24. Prestashop Spin and Win module offers Detailed Reporting
Check the performance of the interactive spin and win pop up by comparing the total generated vs used coupons using interactive graphical reports
Tabular reports displaying coupon codes, details of coupon holders (customers), the country where the addon is usable, and the device on which the customer uses it.
The report which incorporates email addresses of the customers can be exported in the form of.CSV file
27. Prestashop Spin and Win are Compatible with all themes.
28. Desktop, Mobile, and Tablet responsive design
29. Prestashop Spin and Win popup module allow the admin to control the compatibility of Spin and Win coupon with other site coupons. If this feature disables, then the coupon generated from Spin and Win will not work with the other active coupons. They can also set a coupon expiry date as well.
30. Admin can generate a fixed coupon code for each slice of the Spin Wheel. They can also fix the minimum cart value customers should have to generate the discount coupon.
31. This interactive spin and win popup offer a direct coupon generation functionality that allows the customers to generate a spin win coupon without filling any user name fields.
32. Prestashop email subscription popup allows admin to select one or more customer groups which include: visitor, guest, the customer.
33. Admin can set the visibility of Spin and Win popup on the specified number of page visits. If 0 is entered then this functionality will disable and the user will see the spin wheel popup as they enter the site.
34. Prestashop Interactive popup addon allows the store owners to test the module before implementing it on the store.
2.0 Installation of Spin and Win – Responsive Email Subscription pop up
Once you purchase the addon, follow the below steps:
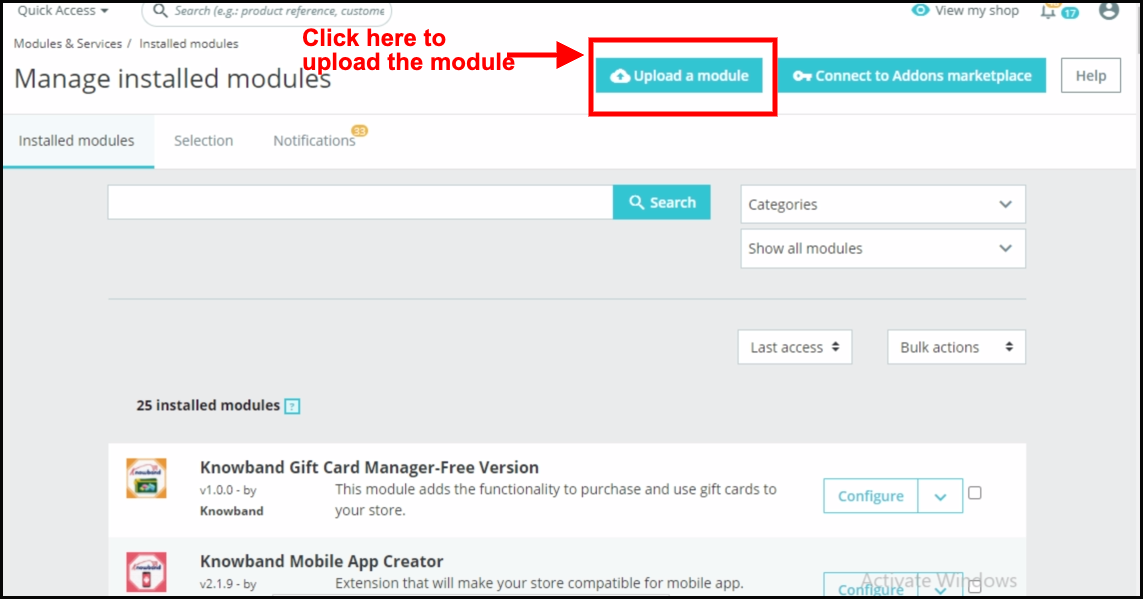
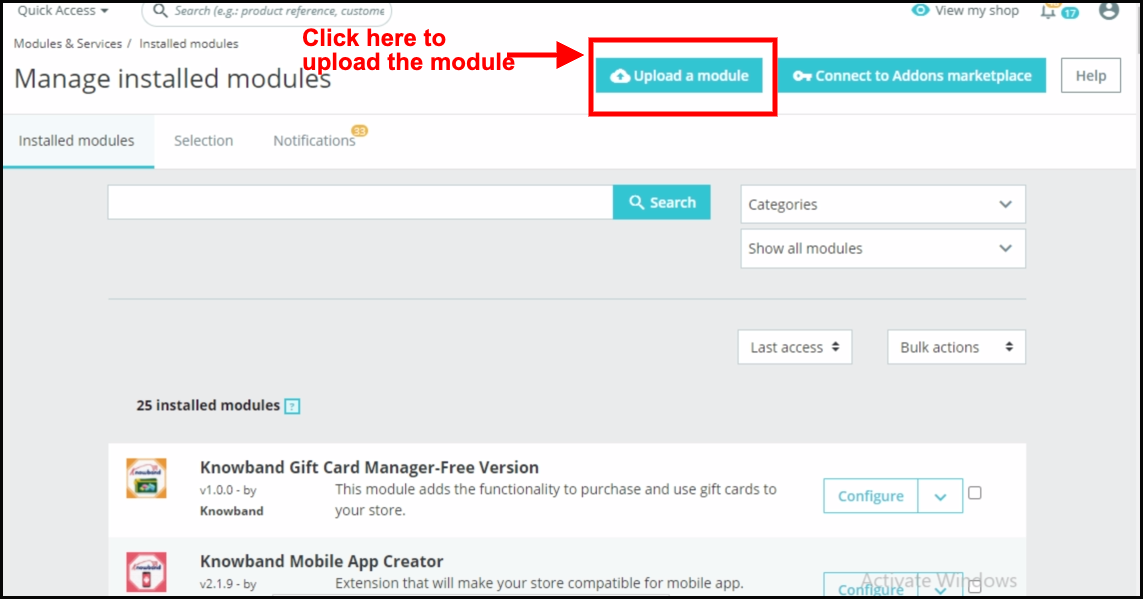
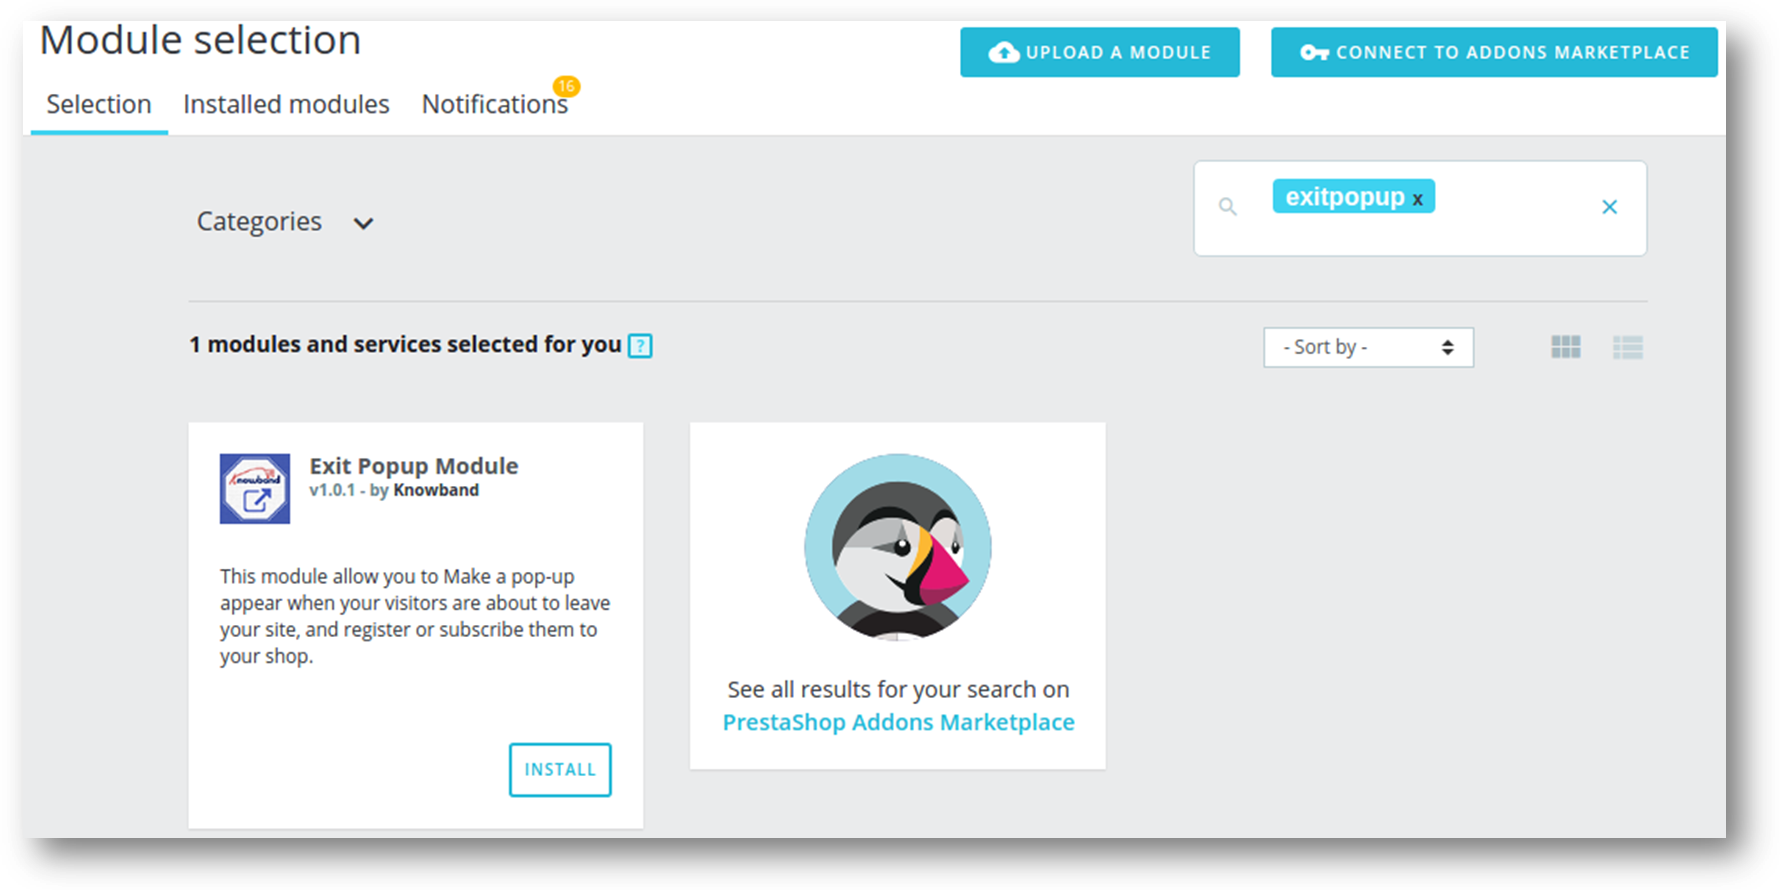
Go to the Store Admin -> Modules and Services.
2. Click on “ Upload a module”. You can drag or drop the file or can simply select the file from the system.
Once the file is completely uploaded, a notification of “Module(s) installed successfully” will display.
3.0 Admin Interface – Spin and Win – Entry, Exit, and Email subscription pop up
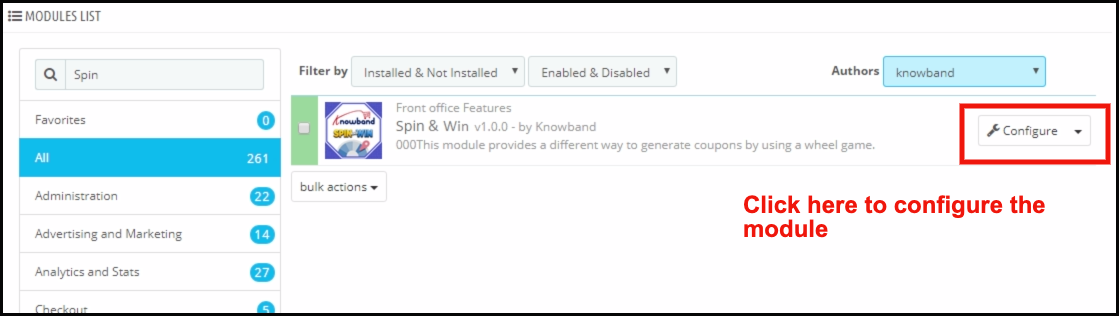
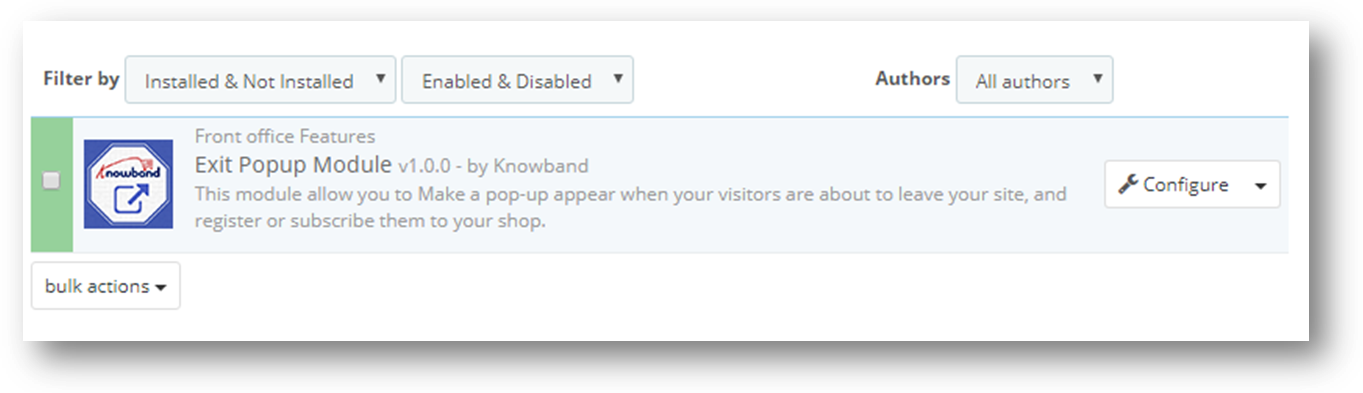
Once the installation is complete, the next steps include configuring the addon. Click on the ‘Configure’ button just next to Prestashop Spin and Win Addon.
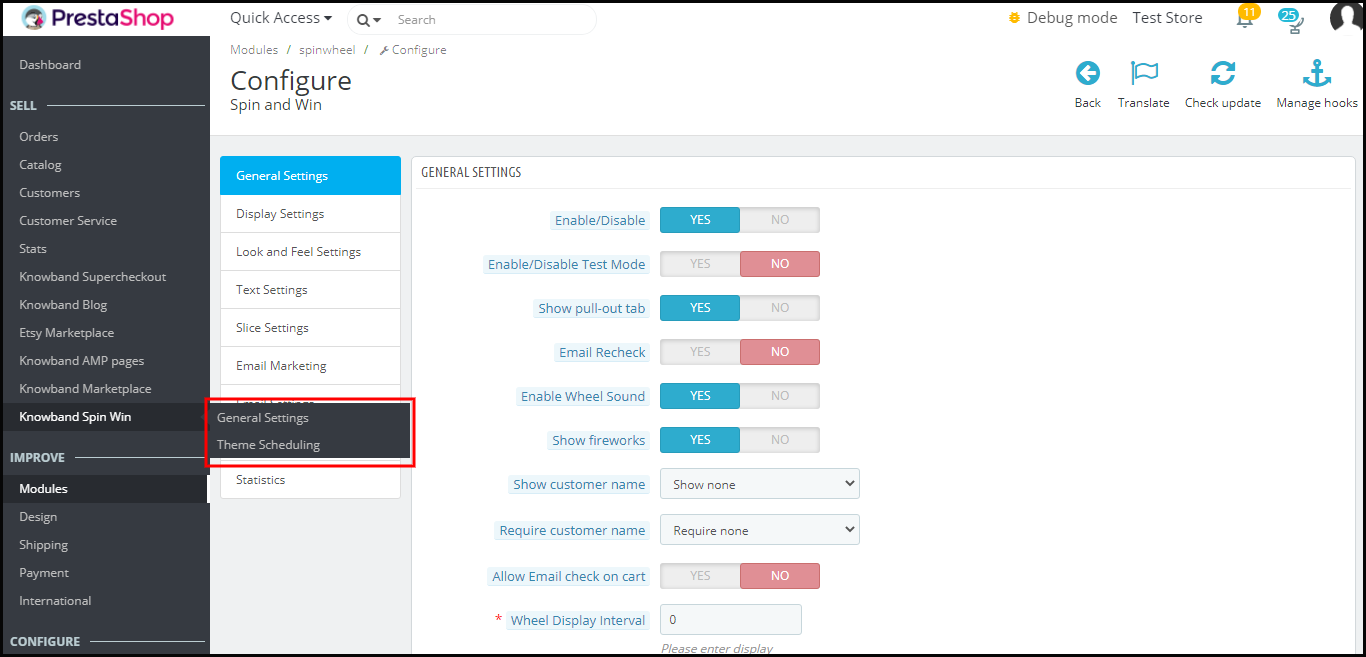
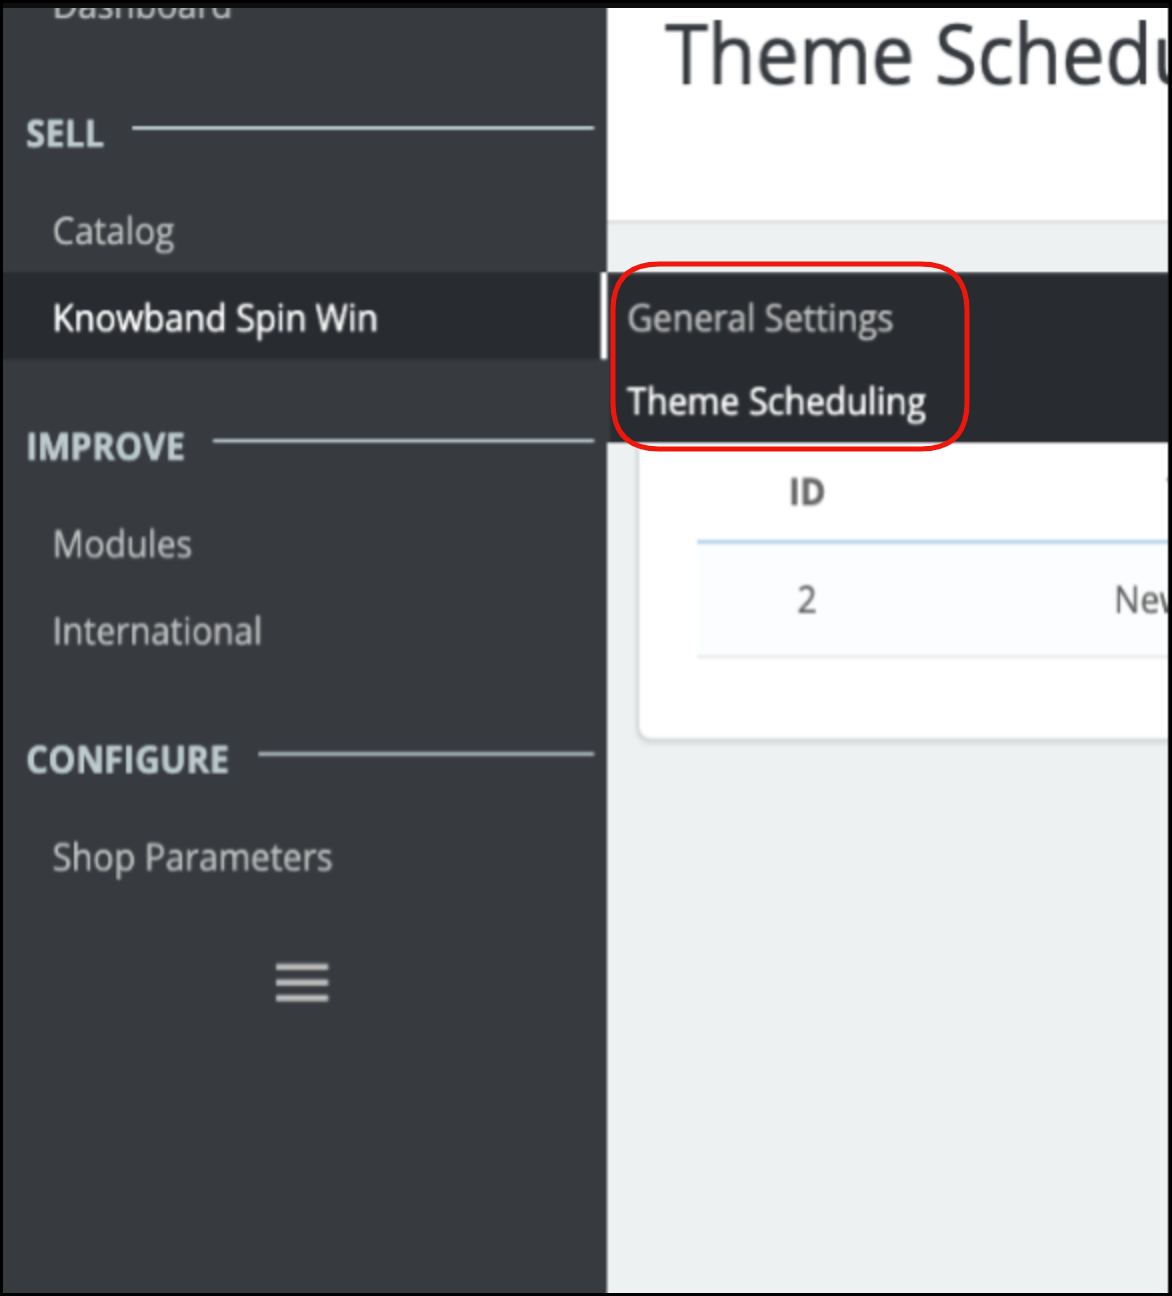
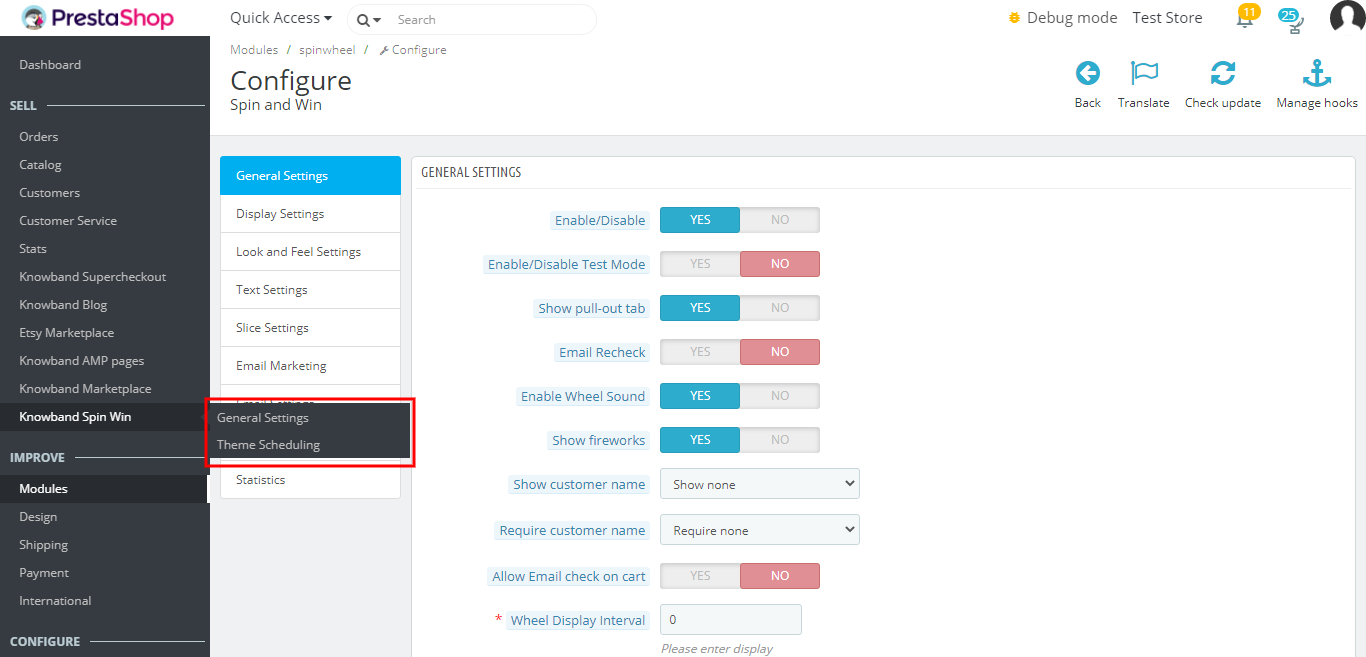
The Prestashop admin panel of the addon offers various customization options to the Prestashop store owners. The new version has two default setting options separately for General settings and Theme scheduling.
3.1 How to start the configuration process?
On clicking configure from the module listing page, Prestashop Admin will be redirected to the configuration page. The very first tab in the main menu includes “General Setting” as shown below:-
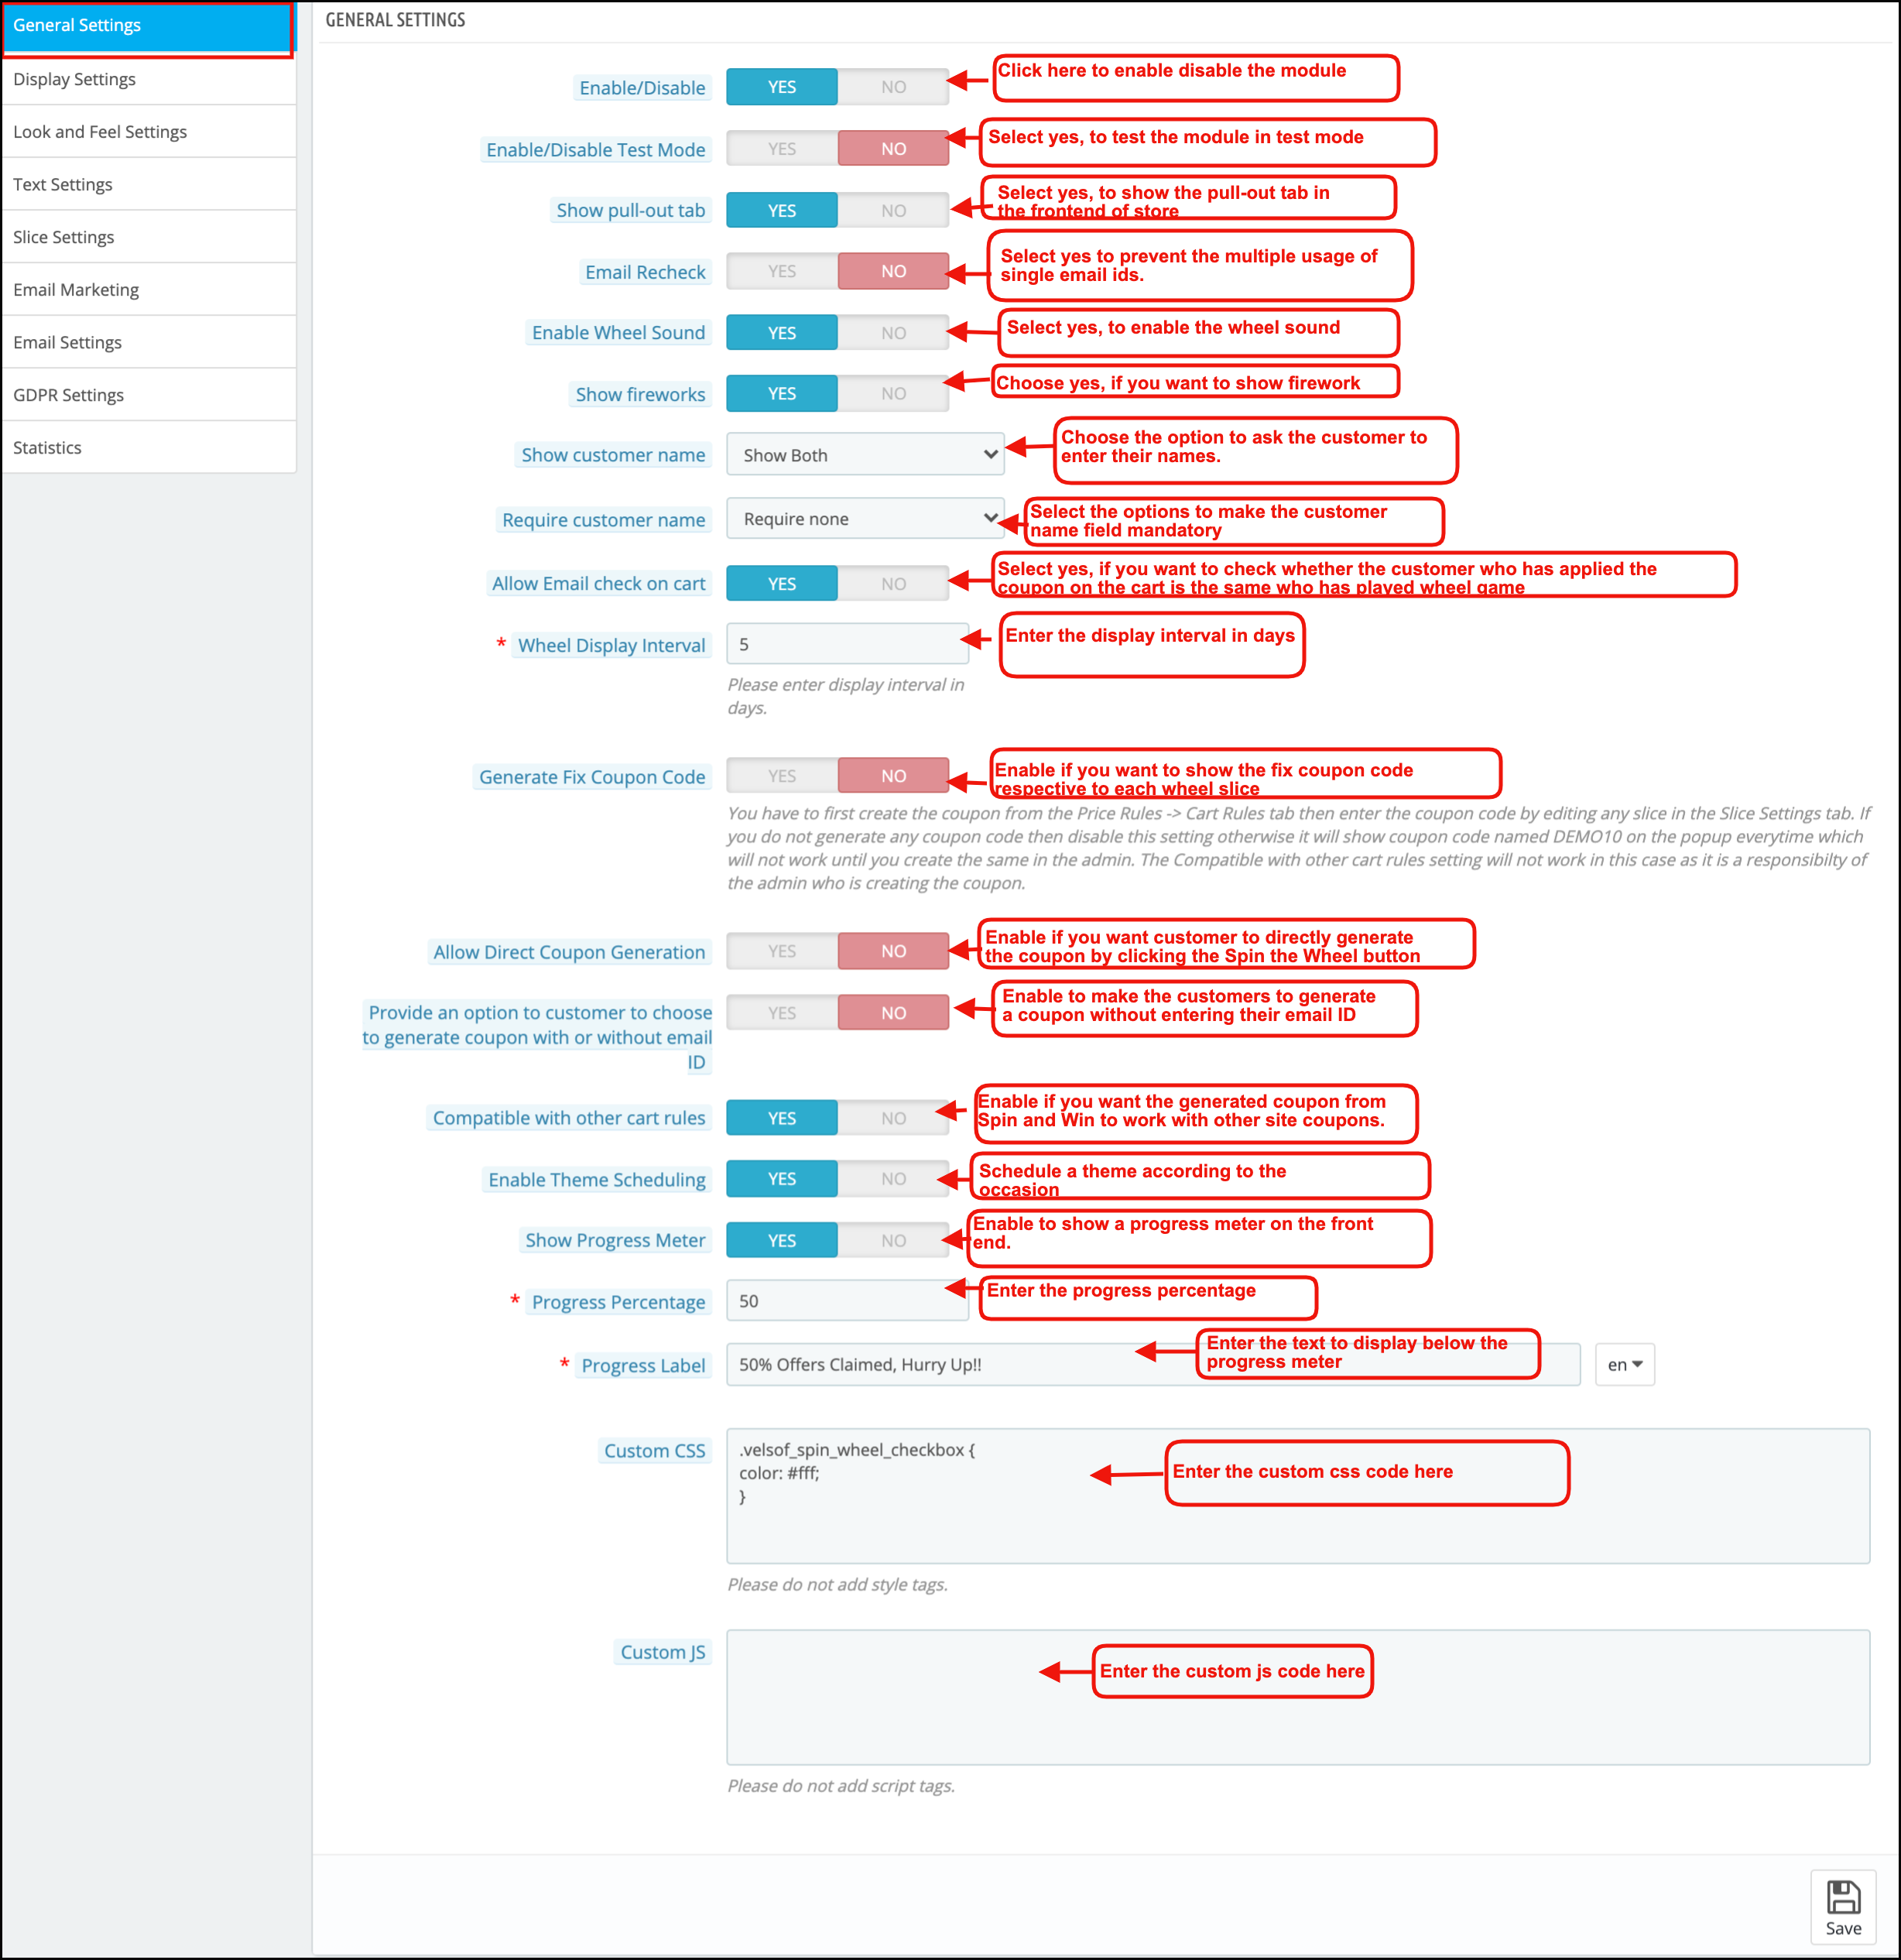
Listed below are some of the customization options that can help the admin make the initial changes in their Spin and Win (email subscription) Addon.
1. Enable/Disable:-The admin can enable or disable the addon using this setting.
2. Enable/Disable Test Mode:- The store admin can enable the test mode and enter their IP Address to test the module before implementing it in the store
3. Show Pull-out Tab:- The visitors of the website can remove the spin and win pop up by clicking on the ‘I’m not feeling lucky link as shown in the image below.
By enabling this setting, the store owner can provide the option to pull the spin and win spin and win pop up back on the screen by the user.
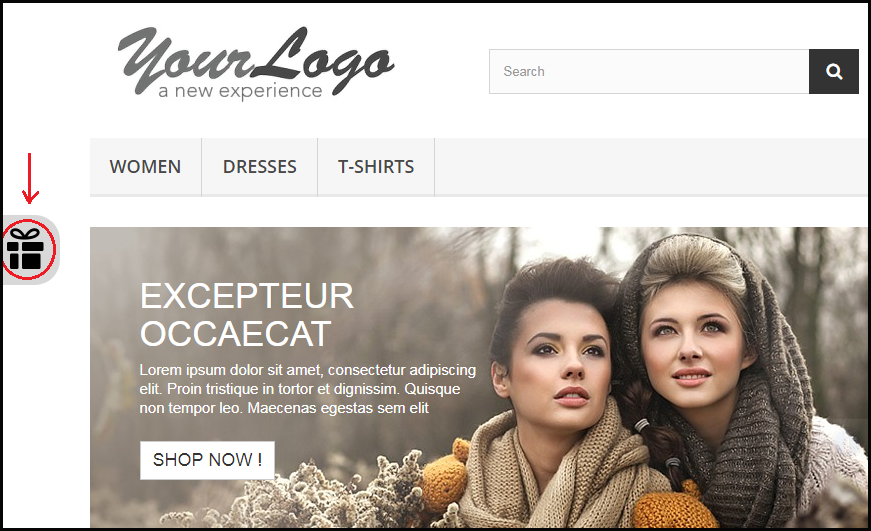
The customer can click on the gift icon on the left side as highlighted in the image above to pull out the email subscription pop up spin and win pop back.
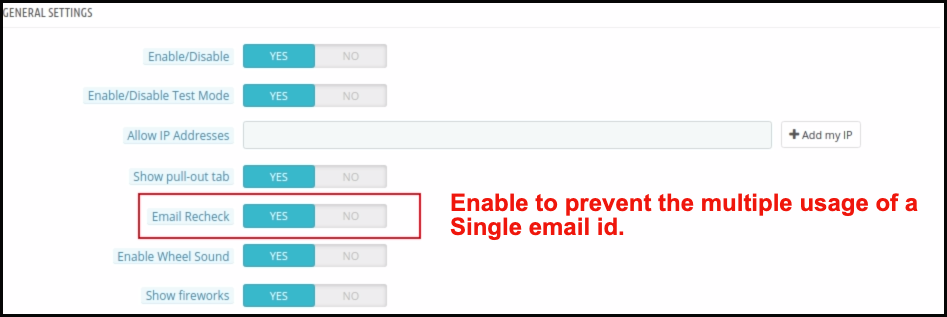
4. Email Redundancy Check:- This provides an option on the Prestashop store to verify the email id of the customer to ensure that there is no repetition of email ids. In case, the customers are only allowed to use coupon code ones. The customers cannot use the single email id twice. This can be done by enabling the Email Recheck option as shown in the image below.
In case the same email id is entered again, a message will be shown as below.
5. Enable Wheel Sound: Prestashop store admin can enable wheel sound. Further, the wheel will generate a tapping sound when he enables this option.
6. Show Fireworks: Prestashop Newsletter subscription popup addon offers an option for admin to show fireworks on the email subscription popup when a customer wins a discount. Admin can enable this setting to make the win of the customer more special and exciting.
7. Show Customer Name: Prestashop admin can now ask for the Customer name before a customer plays the Spin and Win game.
8. Require Customer Name: Prestashop admin has an option to make the Customer name field mandatory or optional.
9. Allow Email Recheck on Cart: This option will check whether the customer who has applied the coupon on the cart is the same who has played the Spin and Win the game.
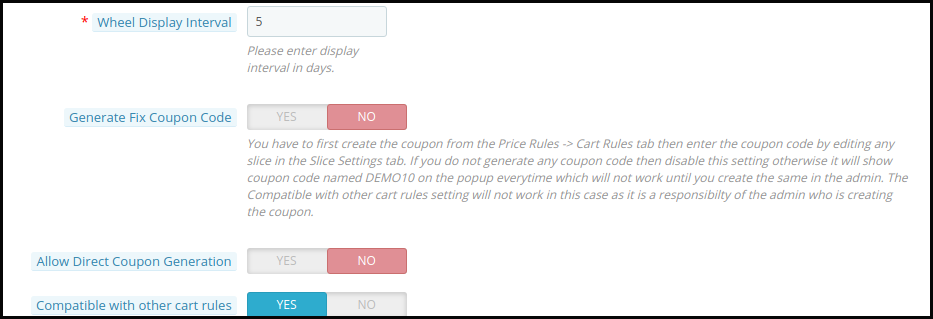
10. Spin and win pop up Display Interval:- Prestashop store admin can enter the number of days after which the Spin and win pop up(email subscription pop up) will display to the customer.
11. Generate Fix Coupon Code: Admin can enable/disable this option to add fix coupon code respective to each wheel slice under the Slice Settings tab of the module. For this, the admin has to first create the coupon code from the Price Rules -> Cart Rules tab then enter the coupon code by editing a particular slice.
12. Allow Direct Coupon Generation: If the admin enables this setting, then the customer can directly generate the coupon by clicking the Spin the Wheel button. If he disables it, then the customer has to fill in the required information to play the game.
13. Provide an option to customers to choose to generate a coupon with or without email ID: With Prestashop Spin and win, the admin can allow users to generate a coupon without entering their email ID.
14. Compatible with other cart rules: Admin can control the compatibility of spin and win coupon code with other active coupons on site. If the admin disables this setting, then the coupon generated from Spin and Win will not work with other site coupons.
15. Enable Theme Scheduling: If the admin enables this, he can now schedule a theme according to the occasion, and once the validity of the theme gets over, it will be set to the default theme.
16. Show Progress Meter: With this new feature of Exit pop up, the admin can show a progress meter on the front end.
17. Progress Percentage: Prestashop spin and win module allow admin to insert a value for displaying the progress percentage i.e. the value for offers claimed.
18. Progress label: In this tab, the admin can add a text which will display below the progress meter like ‘75% Offers Claimed, Hurry Up!!’.
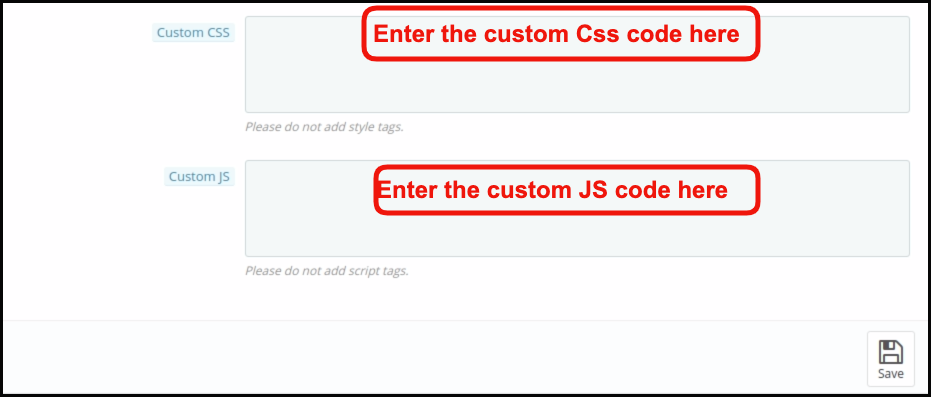
19. Custom CSS and Custom JS:- The admin can even change the look and feel of the addon as per their need by entering the custom CSS and custom JS code in this section.
Save the changes that you have made in the configuration setting.
3.2 How to change the Display Settings?
This option enables you to change the setting of the display of this email subscription Spin and win pop up. It includes the following setting options.
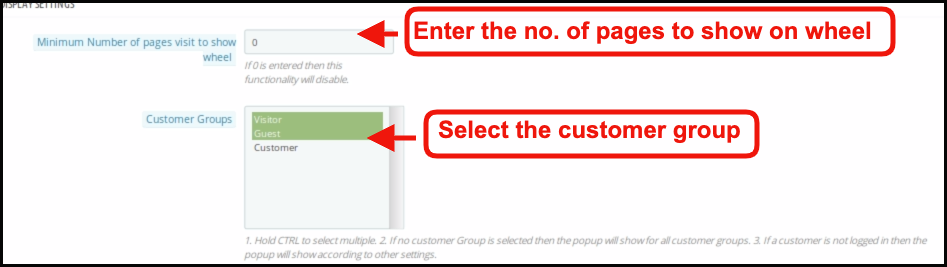
1. Minimum Number of pages visit to show wheel: Admin can set the minimum count of site pages while should be visited to show the spin wheel to customers. If the admin enters 0, then the functionality disables.
2. Customer Groups: Admin can select one or more groups to which the spin and win popup will display. Use the CTRL key to select multiple options.
3. Minimum Screen Size: The drop-down list offers a few screen sizes for the admin to choose from.
4. Maximum Display frequency: The admin can select the frequency of the spin and win pop up email subscription pop up display here. Select one option from the multiple choices offered in the drop-down list.
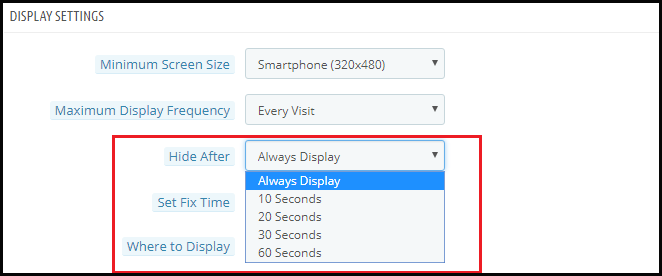
5. Hide After: The admin can select the time interval in seconds after which he wants to hide the spin and win pop up and win pop up.
6. Set Fix Time: You can enable or disable the fixed time from here.
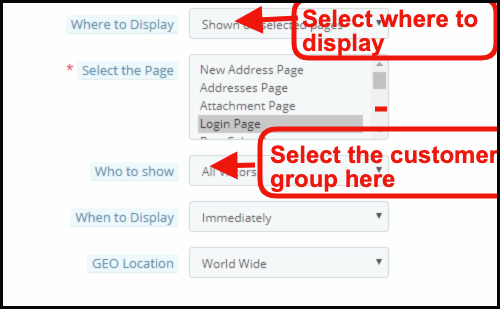
7. Where to Display: You can select the pages where you want to display the spin and win pop up. Admin can select Product page, category, Home page to display this interactive and responsive email subscription pop up.
8. Who to Show: You can select the visitors to whom you want to show the spin and win pop up. You may select ‘All Visitors’, ‘Registered Visitors’, or ‘Guest Visitors’.
9. When to Display: You may choose exactly when you want the spin and win pop up to display. You can either display it immediately when the customer lands on your site or after some time or when the visitor scrolls down or you can use it as an exit intent pop up.
10. Geo Location: You can even select the display option as per the Geolocation of the visitor.
3.3 How can the look and feel of the addon be changed?
The Look and Feel Setting in the Prestashop admin panel allows you to change the look of the spin and win pop up as it appears on the website.
1. Theme: Prestashop admin can see the preview of the Prestashop Newsletter popup in the admin panel itself before making it live. There are multiple themes to choose from. Admin can choose as per the occasions like New Year and Christmas. The PrestaShop admin can now apply the latest New Year 2020 themes on his website. There are 4 eye-catching New Year 2020 themes to choose from.
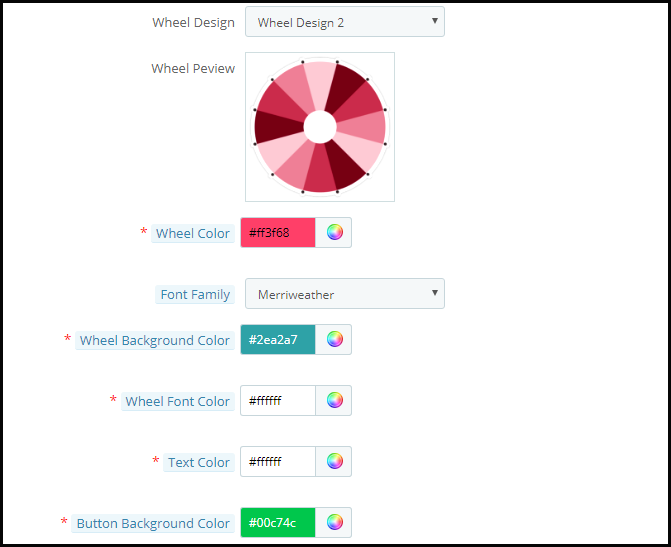
2. Wheel Design: Prestashop store admin can change the Design of the spin wheel. Prestashop admin can also see the preview of the Spin wheel in the admin panel itself.
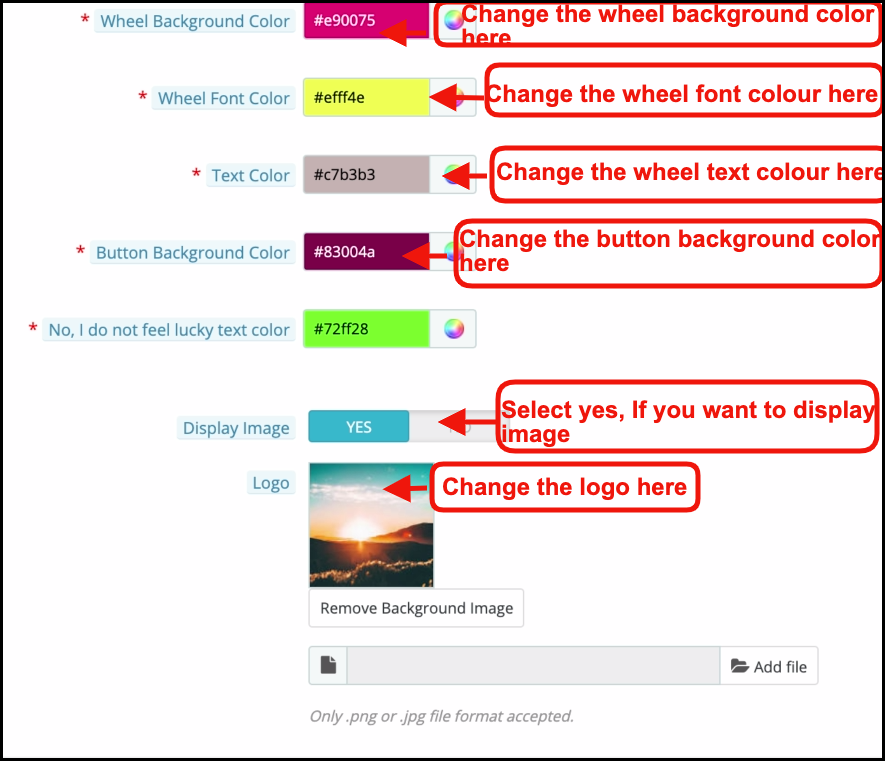
3. Wheel Color: Prestashop admin can select the color of the Wheel using this option. The spin wheel is customizable in endless ways and the admin can even match it with the Prestashop store theme.
4. Font Family: Prestashop email subscription popup allows Prestashop admin to choose the Font suitable on the Newsletter subscription popup.
5. Wheel Background and Font color: Background color and Fonts on the Spin Wheel are customizable using these options.
6. Text Color and Button Background color: The Text color and the Button background color on the Email subscription popup is customizable using these options.
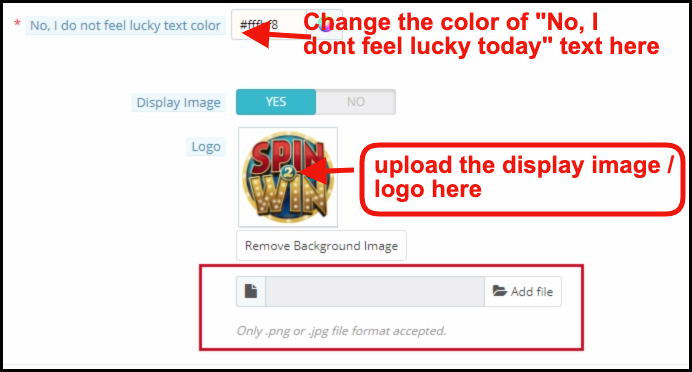
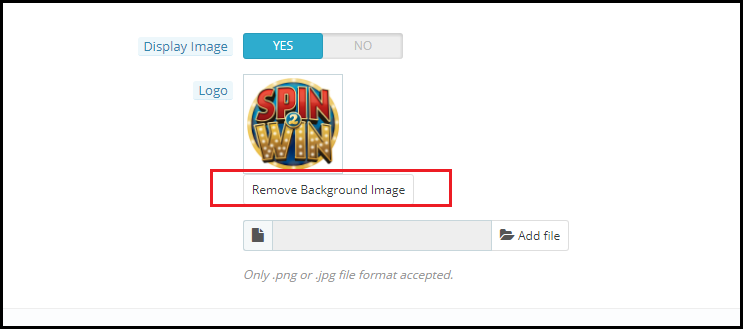
7. Display Image: You can enable or disable the Display Image by selecting the Yes or No button.
You can change the logo that displays with the spin and win pop up. The image of the logo to display can be selected from the device by clicking on the Add File button as shown in the image below.
The changes made here will be reflected on your website.
The spin and win pop up shown on the website includes the ‘Try Your Luck’ button. You can change the color of the button by changing the setting of ‘Button Background Color’.
Even the font of ‘I’m not feeling lucky’ can be changed as shown in the image below.
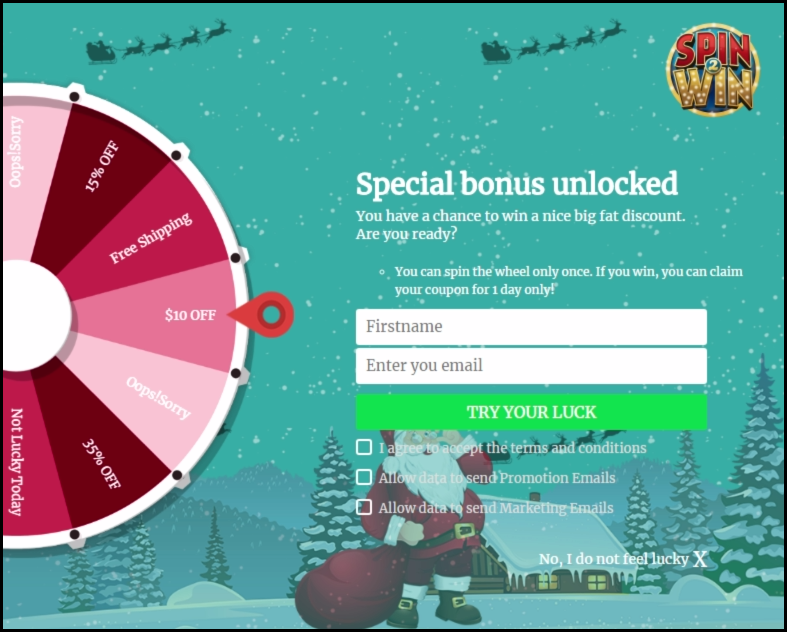
The entire changes made by you will be reflected on the front end as shown in the image below.
At last, the admin panel even provides an option to remove the background image if he wants to by clicking on the Remove Background Image Button.
3.4 How can the look and feel of the Spin and win pop up be changed?
The admin can change the look and feel of the spin and win pop up by changing the Look and Feel Settings configuration in the ‘Wheel Setting’ option.
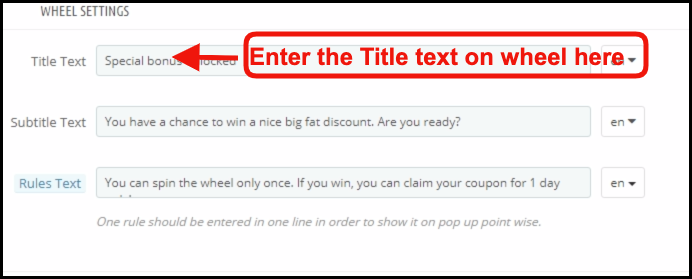
3.5 How can Prestashop admin change the Text on the Email Subscription pop up?
Prestashop admin can change the text on the Email Subscription pop up using the Text settings. Admin can customize the text in any language.
3.6 Can admin change the setting of the different slices of the Spin and win pop up?
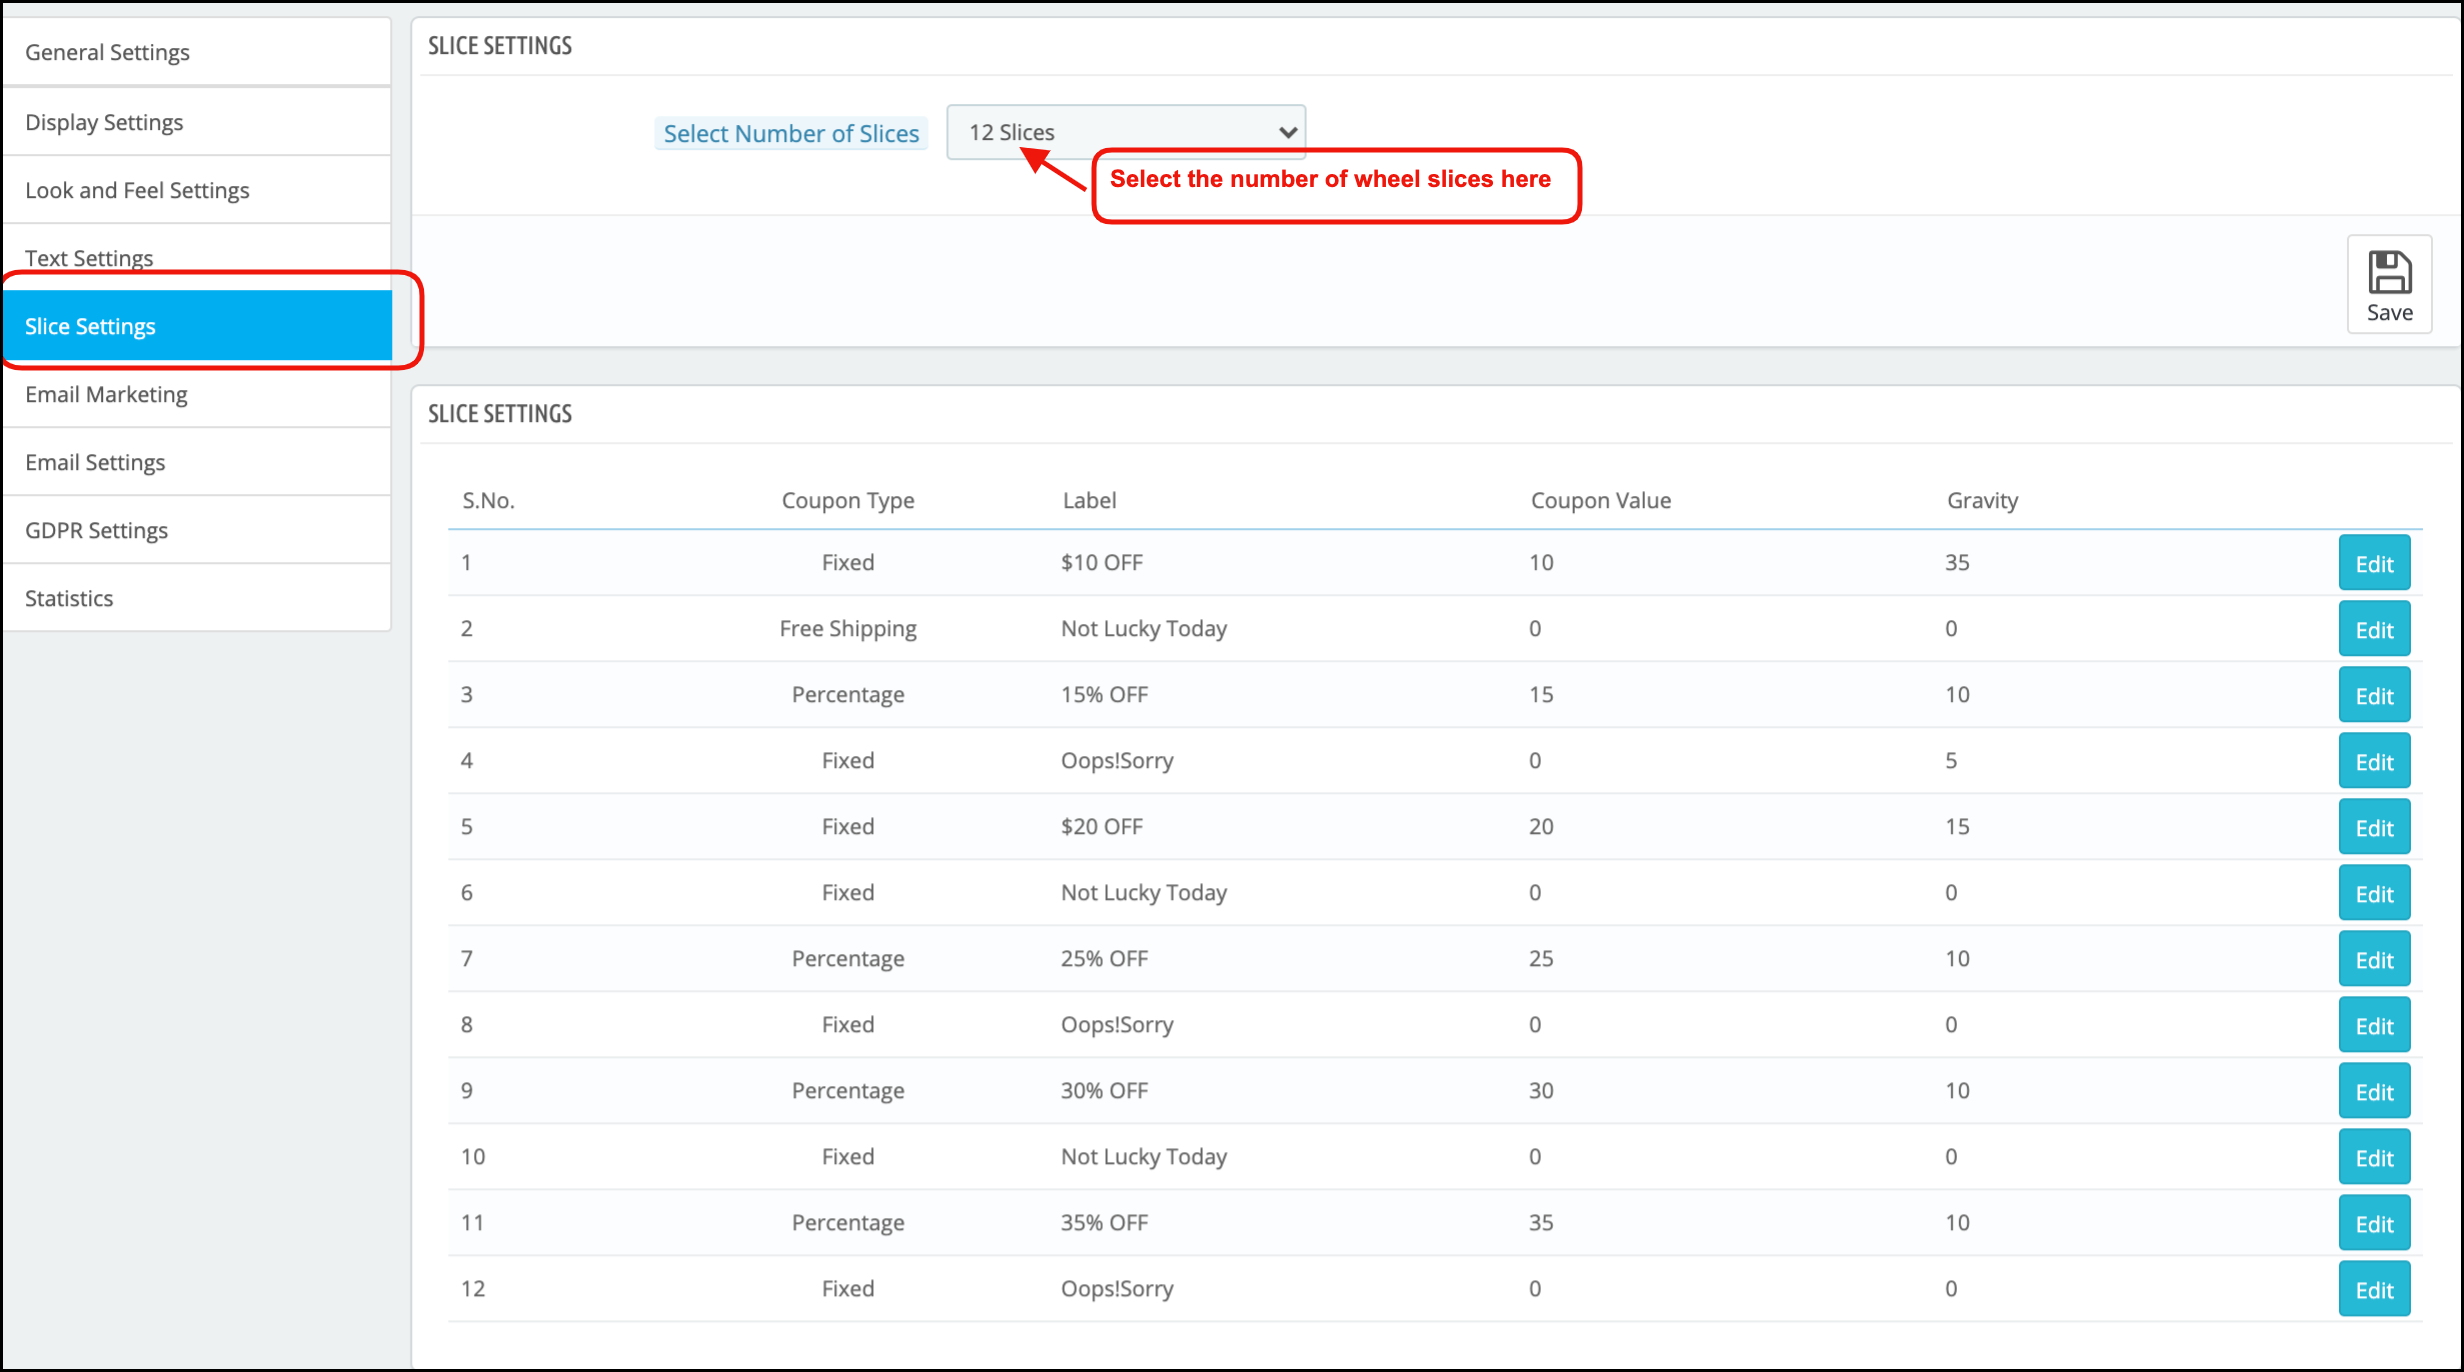
Yes, even the settings and the text or offers available in the different slices of the spin and win pop up can be changed from the ‘Slice Setting’ option.
As you click on the setting, you will get an option to select the number of slices to show on the front end and the list of the various slices will be shown.
Select Number of Slices: With the Updated version of the spin and win module now admin can select out of six, eight, or twelve slices for the front end.
Each slice can be configured by clicking on the Edit button.
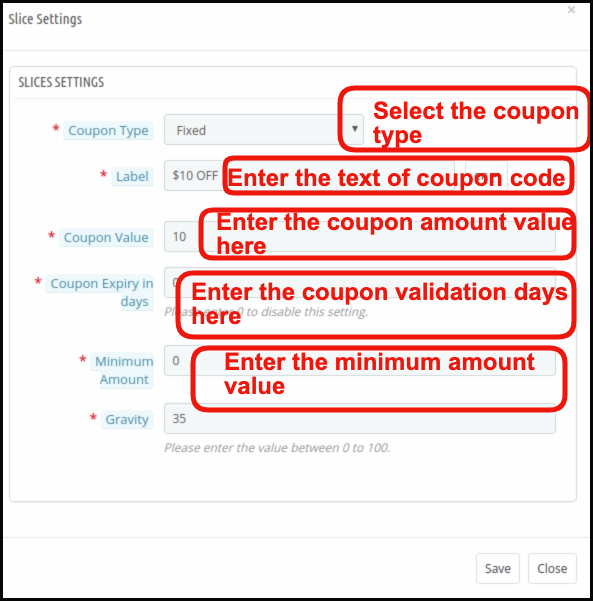
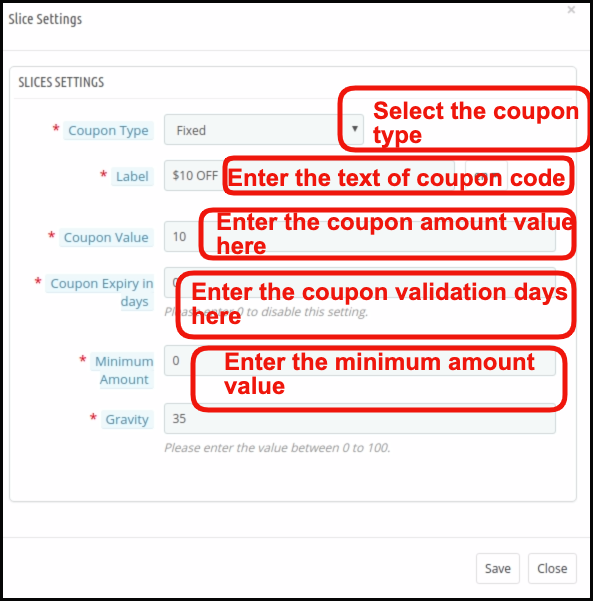
As you click on the Edit button, a pop up will appear where Prestashop store admin can set the Coupon Type (Which can be Fixed or in Percentage or gift or free shipping ), Label, Coupon Value, Coupon expiry in days, minimum amount, Gravity and fix coupon code. Save the changes and the same will be reflected in the spin and win pop up shown on your website.
3.7 How is the email customized?
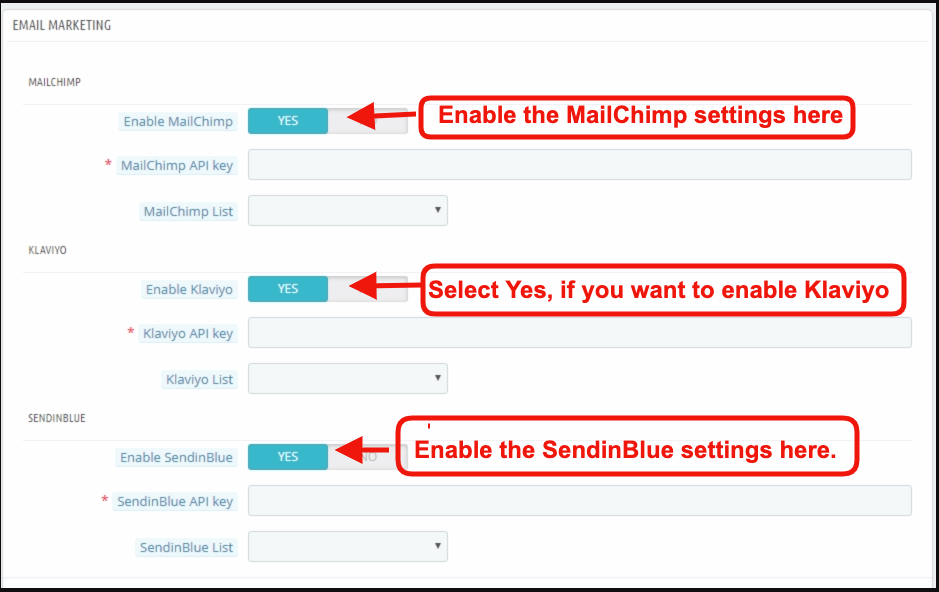
Prestashop spin and win addon offer Mail Chimp, Klaviyo and, SendinBlue integration. The email Id entered in the email subscription popup is automatic with the store owner’s Mail Chimp, Klaviyo and, SendinBlue account. The emails captured are usable for personalized promotions.
3.8 How can I change the email settings?
The ‘Email Setting’ option allows the admin to customize the email templates that are sent to the customers.
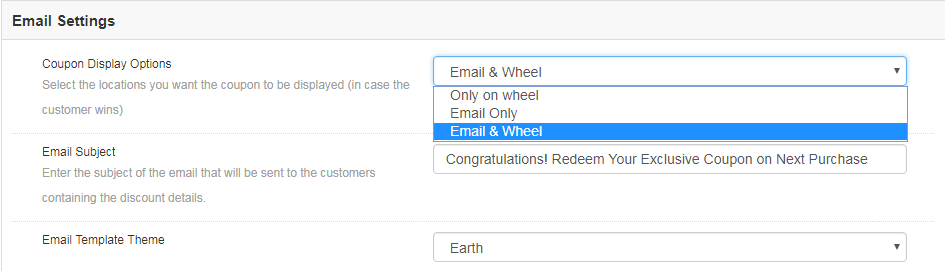
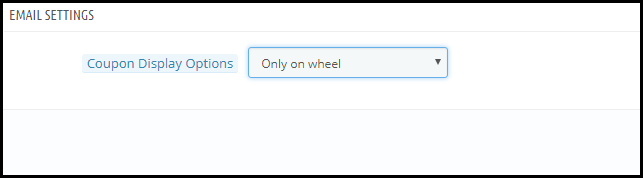
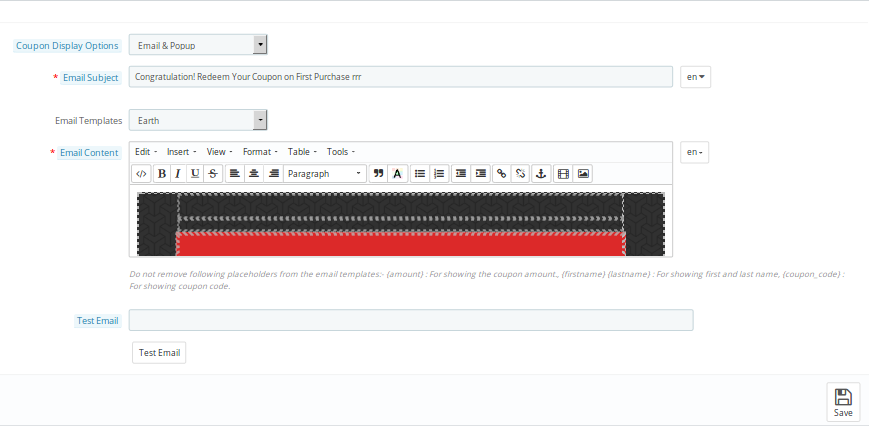
Coupon Display Options: It allows the admin to choose the places where he wants to display the coupon. Namely ‘Only on Wheel’, ‘Email Only’, ‘Email & Wheel’.
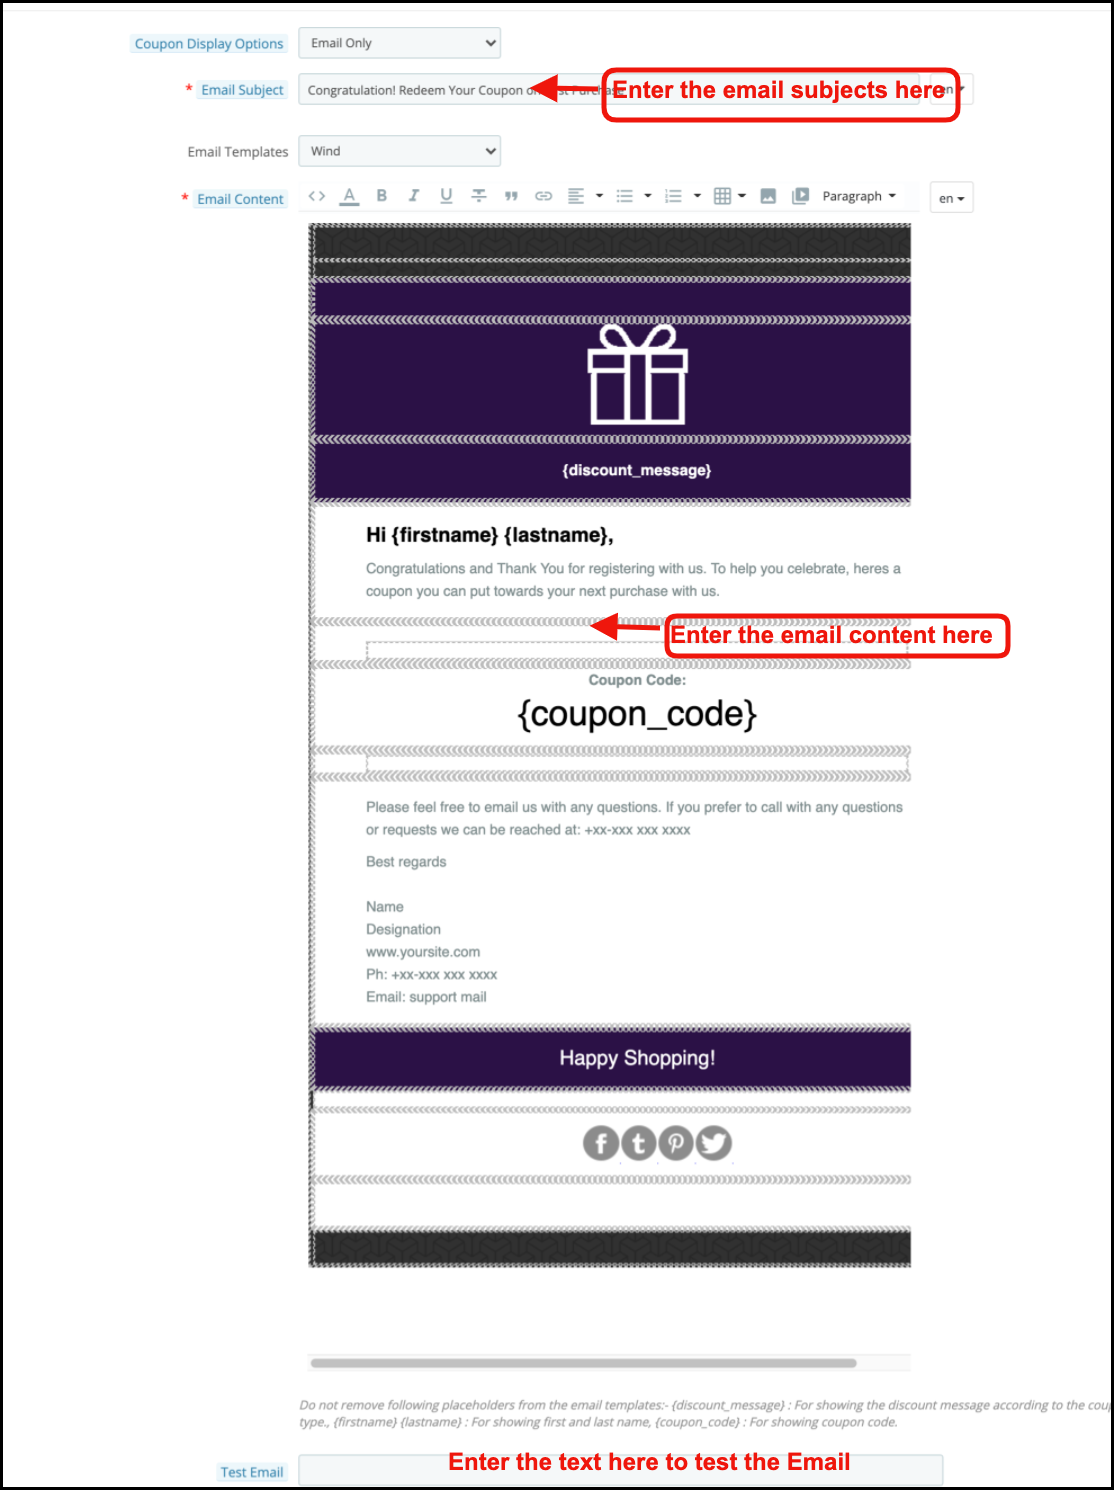
Email subject: Set the subject of the email in this tab.
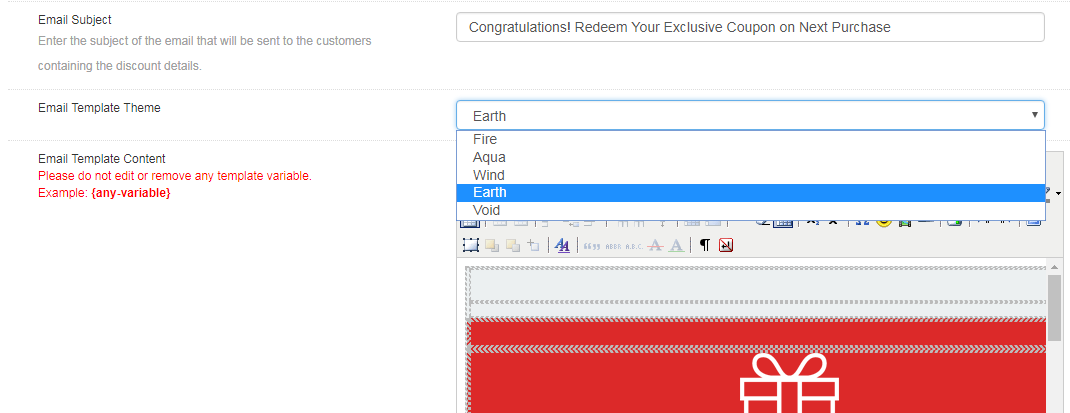
The Email Templates: In the next tab sellers can choose the templates from the available templates.
Email content: In this tab, the store owner can customize the email body at his convenience.
3.9 GDPR Settings
GDPR or General Data Protection Regulation is a new act that will be enforced from 25 May 2018. It is mandatory for all the companies which are handling the personal data of EU citizens. GDPR offers various rights to the customers (mentioned below) which helps them to keep their data safe and secure.
1. The right to be informed
2. The right of access
3. The right to rectification
4. The right to erasure
5. The right to restrict processing
6. The right to data portability
7. The right to object
8. Rights concerning automated decision making and profiling
GDPR settings will help the Prestashop store admin to comply with these rules. Please refer to the attached screenshot in which we have highlighted the GDPR Settings tab.
a) Enable GDPR: Enable or disable the GDPR options using this option. There are the following options in the GDPR settings tab for the merchants to make the popup module compliant with the GDPR. The GDPR settings will remain unavailable by default and as per the business need, the store admin needs to enable it.
b) Compatibility with Prestashop GDPR: Admin has the option to enable/disable this feature. If you are using the official GDPR module then you must need to enable this setting. The main purpose of this feature is to export and delete user data on the PrestaShop GDPR module request. It is also compatible with Prestashop GDPR Module developed by Knowband.
c) Delete user data from MailChimp/Klaviyo/SendinBlue on delete request: As the Spin and Win pop-up addon syncs the captured email ids to the MailChimp/Klaviyo/SendinBlue email service providers (third-party service providers, so if this setting is on and you use the services of any one of these email service provider then on the data deletion request the subscriber details will get deleted automatically).
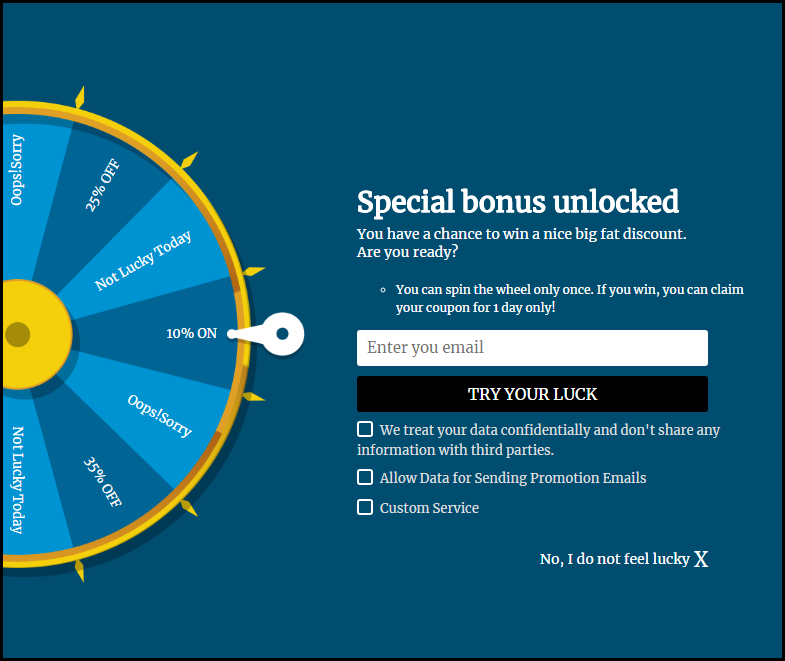
d) Privacy Text: The module will add a checkbox to the pop-up design with the privacy text; this text will be visible to the front-end user at the time of entering the email id in the email box.
e) Page URL to Link the Text: Admin can add the link to “Privacy Policy” or any other page with this message.
f) Enable Advanced Feature: This option allows the store admin to add more checkboxes to the pop-up design for marketing permission or any other permission like age verification (age should be 16+).
If the admin enables the Advance Feature setting, then he will be able to access the additional checkbox setting option. As per requirement, the admin can add multiple checkboxes.
g) Service Settings: All the additional checkboxes that the admin adds will be listed under the Service Settings. Admin can add multiple checkboxes with ease.
How to add a new checkbox:
1. Click on the (+) sign to add a new checkbox.
Note: By default one service will be listed on the service list and the admin can update the text for the service.
2. On clicking the + sign will open a pop-up and admin need to enter the details like – Service Label, Make service mandatory and Enable Service.
Service Label: This is a text input field. The text entered here will be visible to the front-end user.
Make Service Mandatory: This is a toggle button. If this is set to Yes, then this field will be marked as Mandatory, and without confirming the checkbox visitors will not be able to get the offer.
Enable Service: Admin has the choice of Enable/Disable a service at any time.
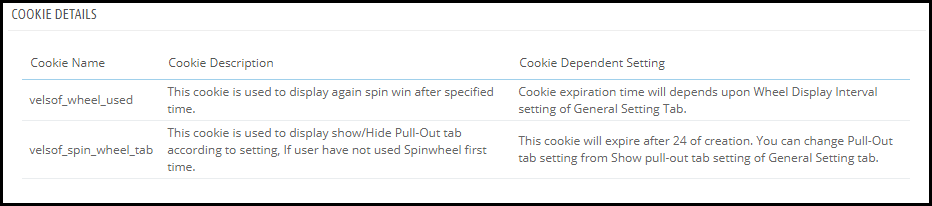
Cookie Details:
As the Spin and Win module uses the Cookies so the description and the use of these cookies have been listed in the section so that the admin can put these details on the Cookie Policy or Privacy Policy page.
Record of consent:
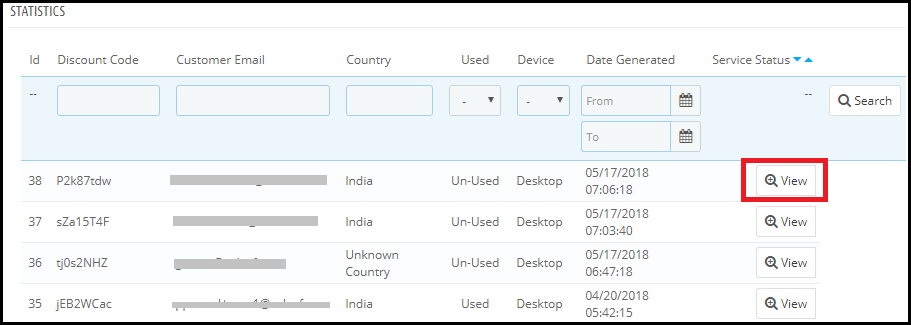
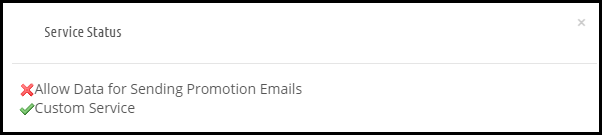
As soon as the user opt-in for the promotion and spin and the wheel to get the discount coupon code. The Spin and Win Pop-up module keeps the proof of the opt-in, as it is needful for the lawful processing of the captured data. As the unique coupon code is generated each time so the Statistics tab of the Spin and Win GDPR Compliant Module also records the permissions of the users. Please refer to the attached screenshot.
On clicking the view button admin can check the permission of the user.
After enabling the GDPR Settings the Spin and Win pop-up design will look like this –
3.10 How is the statistical report of the Spin and win pop up generated?
Yes, the Prestashop admin has complete access to the statistical report of the visitors who spin the wheel and claim the coupon generated by the same. The report is generated in both graphical and tabular format.
(New Feature) Export Email List: Now Prestashop Exit Pop Up allows the store admin to export the list of email subscribers by clicking the Export Email Button on the Statistics Setting Page.
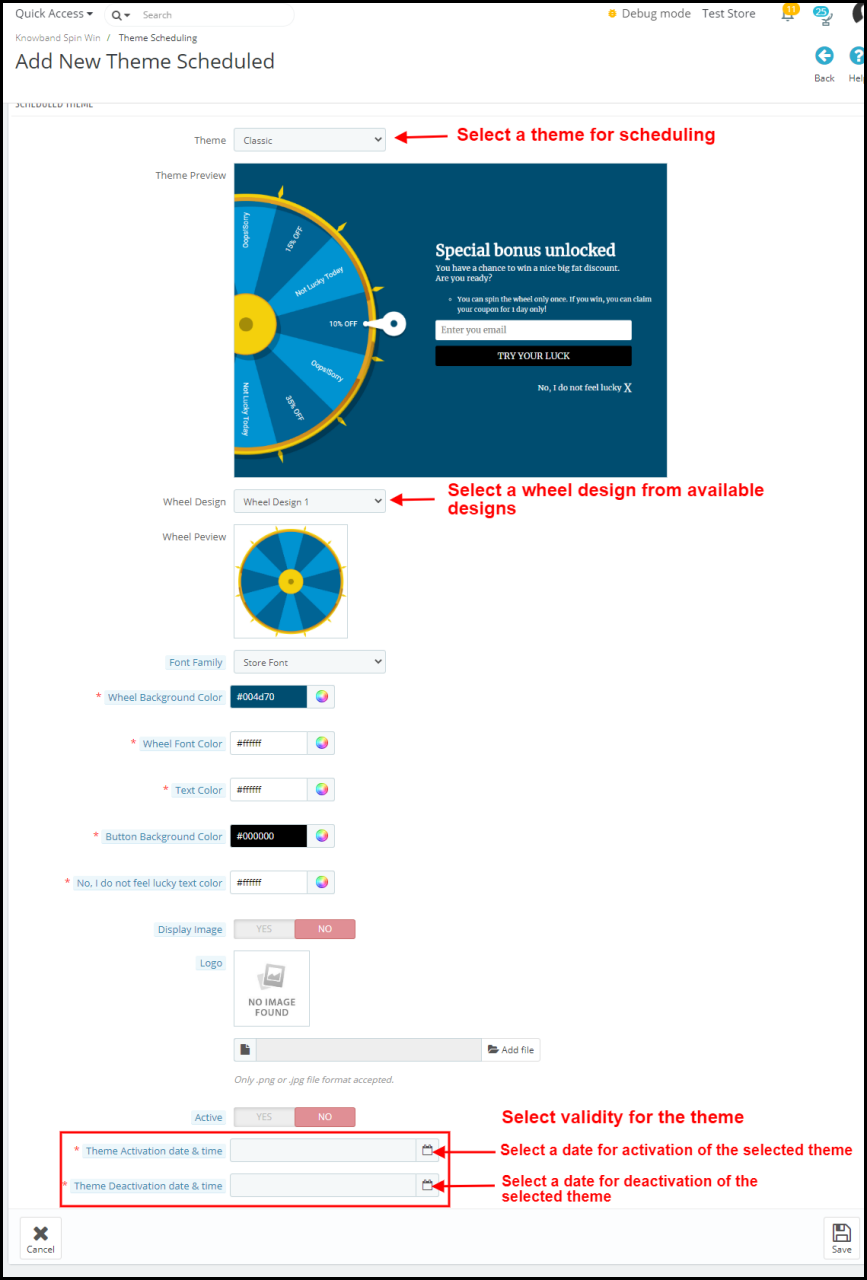
4.0 Theme Scheduling
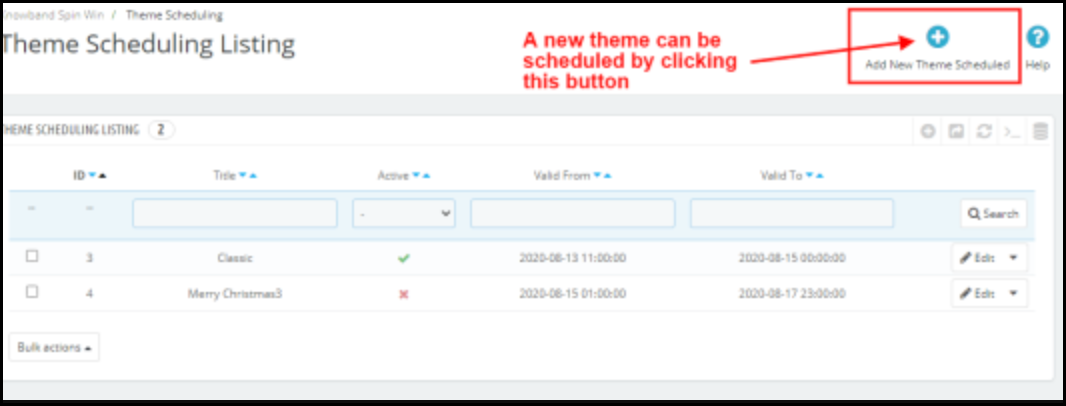
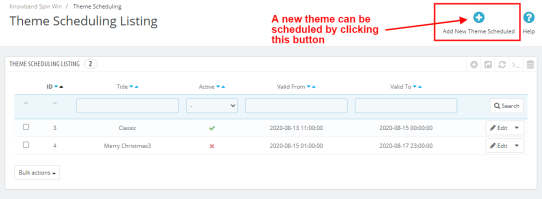
Theme Scheduling is the new feature in Prestashop Spin and Win email subscription module. This feature allows the admin to select the validity date and expiry date for a particular theme. Prestashop Store owner can now set a schedule for displaying a specific theme on a particular occasion and this will automatically change to the default theme on the theme deactivation date.
Add New Theme Schedule: Prestashop store admin can add a new theme schedule by clicking the ‘Add New Theme Schedule’ button.
For this, you can select the theme type and change the look and feel of the wheel. (refer 3.3 Look and Feel Setting)
The new feature in Theme Scheduling
Active: With Prestashop spin and win module admin can activate or deactivate a new theme schedule by a toggle button.
Theme Activation date and time: If the new theme is activated, the store admin will have to enter the date and time for the activation of a particular theme.
Theme Deactivation date and time: The activated theme will be deactivated on the date and time entered in this tab. This allows the admin to apply a theme for the Spin and Win module for a fixed time and the store admin can plan this way before the special day.
Disclaimer: In case the “Spin and Win” wheel popup does not display at the front, kindly clear the cache or delete the cookies. Sometimes cookies prevent the popup from displaying at the front.
Introduction to Prestashop Exit pop up(email subscription) addon
Prestashop Exit pop up is a highly responsive Prestashop addon which shows an email subscription pop-up whenever any user visits or intend to leave your store. The feature-rich email subscription pop up encourages the visitors to complete their purchases by giving them discounts or coupon code when they are about to exit the site. With the help of the Prestashop addon, you can even subscribe them to the newsletter or register them for a new user. Prestashop exit popup also serves as an entry popup for the visitors hence gains customer attention as they enter to the website. By offering attractive discounts, the admin is able to attain customer loyalty as they enter to the store or when they wish to close the website window.
Prestashop Exit intent (email subscription)popup offers a lead generation strategy to engage the customer on the website for a longer duration by showing an engaging email subscription pop up.It is a great tool to get your customers registered for email subscriptions. The Prestashop addon curbs the exit of the store visitors when they are just about to leave the website. The hold back visitor feature of this Prestashop subscription pop up addon is beneficial to the store owners especially when the visitor decides never to return back to the store. This addon ensures that the customer will either stay back or return to the site in future for grabbing special discounts.
Features of Exit intent (email subscription) pop up addon:
The Prestashop exit pop-up addon provides discount and enticing offers to the customers just when they are about to leave the site.
This reduces the exit rate of the site and increases the average session time of each visitor.
The fully customizable Prestashop Email subscription Pop up addon can be matched with the theme of your Prestashop store.
The admin can set two different themes for entry popup and exit popup.
The store admin gets an option to change the look and feel of the email subscription pop up that is displayed on the front-end of the website.
The admin can view the performance of Exit pop up by comparing the total generated vs used coupons.
The Prestashop extension even allows you to test the subscription block before it is incorporated into the store.
The admin gets Custom CSS and JS option to customize the email subscription pop up.
Mail Chimp Integration syncs the email generated by the Prestashop subscription pop-up with the Mail Chimp account of the seller. The other email marketing services include Klaviyo and SendinBlue.
The e-marketers can send Automated emails with discount coupon codes.
The Prestashop store owners can subscribe your store visitors to the newsletter or register them for a new user.
Multi-lingual support.
Compatible with all Prestashop themes.
The Prestashop plugin has a responsive design and is compatible with multiple devices.
Benefits to the Merchant
The email subscription pop up encourages the store visitors to stay on the site for a longer duration.
The coupon codes motivates them to complete their purchases
This is one of the ways to reduces the Abandoned Carts.
With an increase in the user engagement, the store conversions increase drastically.
The store admin can convert your store visitors into your subscribers for the newsletter
Collects emails which can be later used for Mail marketing or Personalized promotions.
Admin can set differernt themes for welcome and exit intent popup.
With this entry-exit popup module, admin can control whether popup needs to be displayed on user entry, user exit or both.
Installation of Exit pop up-email subscription addon
After purchasing this responsive Exit pop up addon, you will get following files as listed below:
1. Compressed File in ZIP format (contains source code of the module)
2. User Manual
Follow the steps to install the extension:
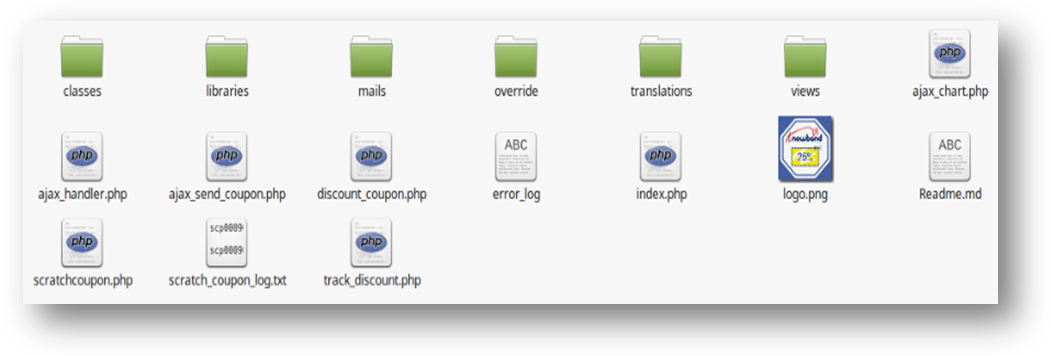
Unzip the compressed file. It would contain files and folders as shown below –
Copy all the files and folders of an unzipped folder into your PrestaShop store “modules” directory on the path – Root Directory/modules/.
Now the exit pop up(email subscription)is ready to be installed on your store and you can find that in Store Admin -> Modules and Services. It would be shown as below –
For Prestashop 1.6.x.x-
For Prestashop 1.7.x.x-
4. Click on “Install” button to install the addon. It would show a pop-up for your confirmation. Click on “Proceed with the installation” option. This step will install the addon and show notification – “Module(s) installed successfully”.
How to configure Exit pop up-email subscription addon?
This addon is configurable and Prestashop Store Owner or Prestashop Store Admin can setup or configure this email subscription pop up through Admin Panel of store by following steps –
Go to Store Admin -> Modules and Services.
Find “Exit popup” and click “configure” button given corresponding to the addon.
It would open a new page as shown below.
The configuration settings of this Prestashop welcome popup are divided into seven sections namely:
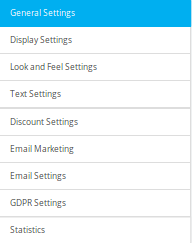
General Settings
Display Settings
Look and Feel Settings
Text Settings
Discount Settings
Email Marketing Settings
Email Settings
GDPR Settings
Statistics
Each section is described below.
Dashboard
You will see four statistics data in the dashboard.
Total Visitors- This is the count of total visitors who have seen the Email subscription pop up on exit.
Total Stayed User-This is the count of total users who stayed on your site after the Exit pop up appears on Prestashop storefront.On hover, you will also see the percentage of stayed users.
Total Newsletter Email subscription-This is the count of total newsletter subscription by the exit pop up addon.On hover, you will also see the percentage of total newsletter email subscriptions.
Total Coupons Generated- This is the count of total coupons generated by the email subscription pop up.On hover, you will see the percentage of total used coupons by Prestashop store visitors.
General Settings
You have to follow steps given below to configure General Settings –
Goto the Module and Services -> Module and Services
It would list all the modules of the Prestashop store. Find ‘Exit popup’ in modules list.
Now click on ‘Configure’ button given corresponding to the ‘Exit popup’ addon.
It would redirect Prestashop Store Owner or Admin to the general settings page as shown below
Update the values of given fields corresponding to ‘General Settings’ as per need.
Now click on ‘Save’ and it would validate and save the provided values.
That’s it.
This section has following input field which Prestashop store admin can update –
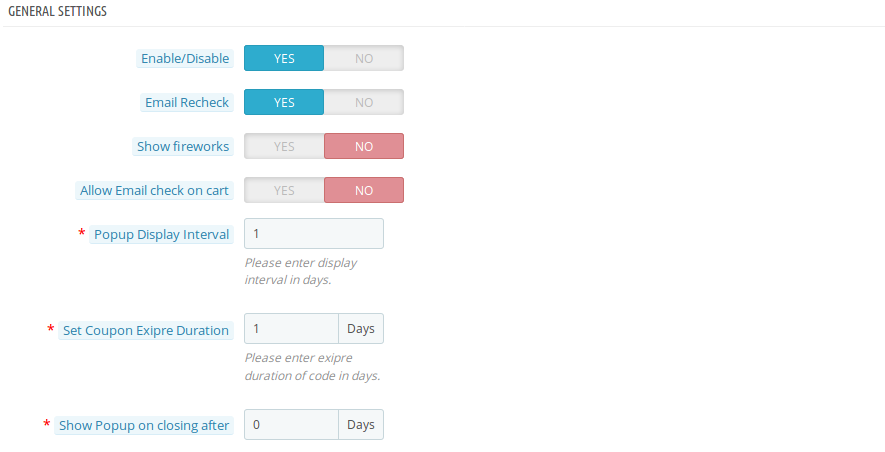
Enable/Disable: To enable the plugin, switch the enable button from OFF to ON. The default value will be set to “OFF”.
Email Recheck: This option lets admin to ensure that no user is provided coupon more than one time.
Show Fireworks: Admin can show fireworks in the background as the customer wins the coupon code.
Allow email check on cart: This option allows the admin to check whether the actual owner of this coupon and the one who is applying the coupon code are same or not. If this option is enabled, then no duplicate email ids will be accepted.
Popup Display Interval: Enter display interval(in days) after which the popup will be shown once the coupon is generated.
Set Coupon Expire Duration: This option lets you set the expire duration of the coupon(in days).
Show Popup on closing after: This allows the admin to set the number of days after which the entry popup or exit popup will be shown once closed by the user.
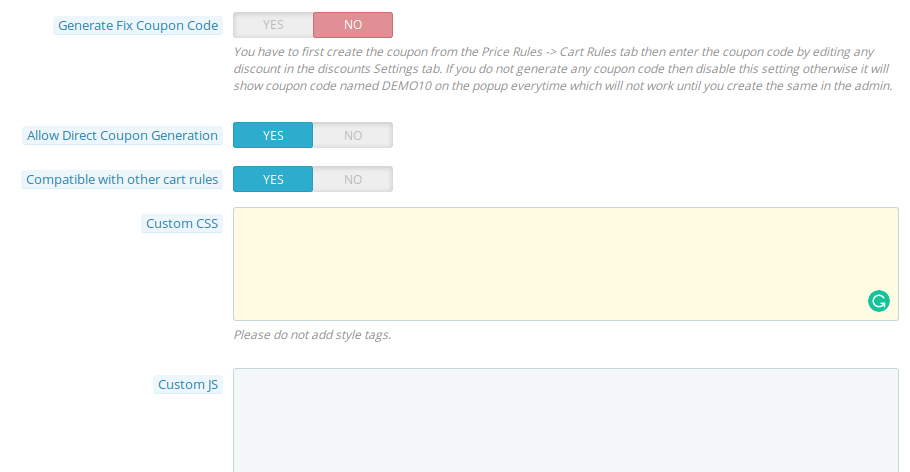
Generate Fix Coupon Code: Using this option, you can generate and set a fix coupon code for entry popup and exit poup.
Allow Direct Coupon Generation: If this setting is enabled, then the customer can generate the coupon code just by clicking the Get Coupon Code button.
Compatible with other Cart Rules: If you want that coupon generated from exit popup should not be used with the coupons generated from other sources, then set its compatibilty OFF.
Custom CSS and Custom JS: Admin can update the CSS and JS to customize the email subscription pop up without touching the base code of the addon. This field can help you in customizing the email subscription pop up according to your Prestashop store theme.
Display Settings
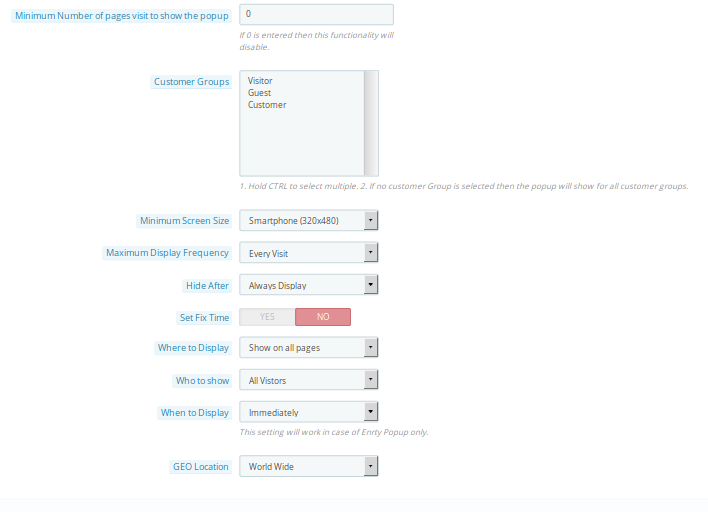
Maximum number of page visits to show popup: This option sets the page visit count after which the exit popup will be shown to the user.
Customer Groups: Admin can select the customer group from choices: Visitor, Guest or Customer.
Minimum Screen Size: Admin can select minimum screen size configuration to show entry-exit popup.
Maximum Display Frequency: Admin can also set maximum display frequency to display entry-exit popup.
Hide After: Select the time after which the popup hides automatically.
Set Fix Time: Admin can set fix time under which the customers can win discount coupons. This includes active popup date and expire popup date.
Where to Display: Admin can select the site pages where they want to display the entry-exit popup.
Who to Show: Admin can set the category of customers to which the entry-exit popup will be shown. This includes new visitors, returning visitors or all visitors.
When to Display: Admin can set when to display the popup to the users, after some specified time, scroll down percentage or immediately as the user enters the site. This setting will only work for entry popup.
Geolocation: Admin can set the geolocation where they want to show this entry-exit popup to the site users.
Look and Feel Settings
You have to follow steps given below to configure Look and Feel Settings –
Goto the Module and Services -> Module and Services
It would list all the modules of the store. Find ‘Exit popup’ in modules list.
Now click on ‘Configure’ button given corresponding to the ‘Exit popup’ addon.
It would redirect Prestashop store admin to a new page. Click on “Look and Feel Settings” tab and it would open a new section as shown below.
Update the values of given fields corresponding to ‘Look and Feel Settings’ as per need.
Now click on ‘Save’ and it would validate and save the provided values.
That’s it.
This section has following input field which Prestashop store admin can update –
This Prestashop addon offers multiple themes to choose from. Other than five ready made popup templates, there is one default theme which is fully configurable from the backend interface. If the admin chooses any pre-defined template then he only requires to choose the background image for the entry-exit popup. But choosing default theme gives the following listed features to the admin.
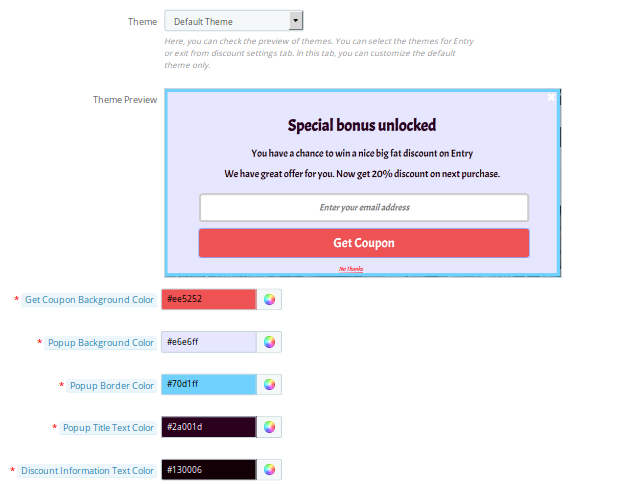
Theme Preview: This option allows admin to preview various theme selection done in the above option.
Get Coupon background color: This option sets the background color of get coupon button shown over entry-exit popup.
Popup background color: Admin can set the background color of this exit popup using this option.
Pop up border color: Configures the border color of the Email subscription exit pop up.
Pop up title text Color: Configures the Title color of the Email subscription Exit Popup.You can set any color which matches your theme.
Discount information text color: Admin can configure the color of discount information text.
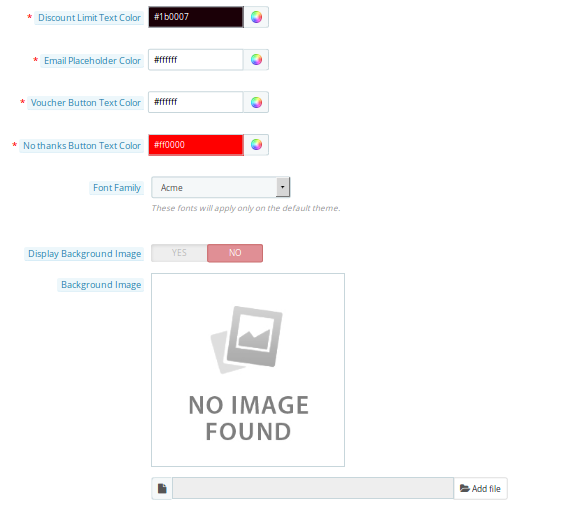
Discount limit text color: Admin can set the color of discount limit text.
Email Placeholder color: This option changes the background color of email placeholder.
Voucher button text color: Change font color of get coupon text using this option.
No thanks button text color: Change font color on No Thanks button.
Font family: Change font family of text shown over popup.
Display background image: Show or hide background image on popup.
Background image: If the above option is enabled, then you can browse and select desired image as background image.
Text Settings
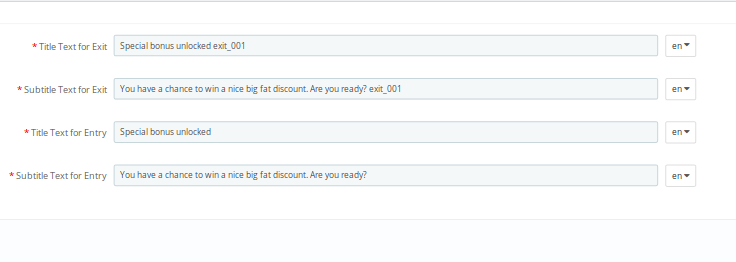
The text settings for Prestashop Exit Popup can be configured using the following options. The admin can set the various texts in different languages.
Title Text for Exit: This option sets the title text for the exit popup.
Subtitle text for Exit: This option sets the subtitle text for exit popup.
Title text for Entry: This option sets the title text for entry popup.
Subtitle text for Entry: This option sets the subtitle text for entry popup.
Discount Settings
You have to follow steps given below to configure Discount Settings –
Goto the Module and Services -> Module and Services
It would list all the modules of the store. Find ‘Exit popup’ in modules list.
Now click on ‘Configure’ button given corresponding to the ‘Exit popup’ module.
It would redirect Store Owner or Prestashop store admin to a new page. Click on “Discount Settings” tab and it would open a new section.
Update the values of given fields corresponding to ‘Discount Settings’ as per need.
Now click on ‘Save’ and it would validate and save the provided values.
That’s it.
This section has following input field which Prestashop store admin can update –
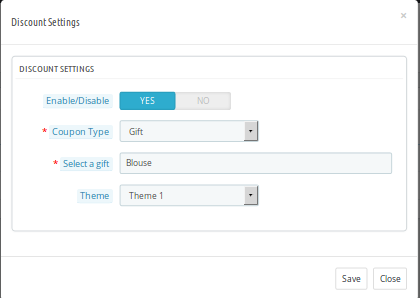
Admin can see the details of various discounts set for entry and exit popup. By clicking on the edit option admin can configure each of the set discounts separately. The discount settings popup contains the following options:
Enable/Disable: Admin can enable or disable the discount offered corresponding to welcome or exit popup.
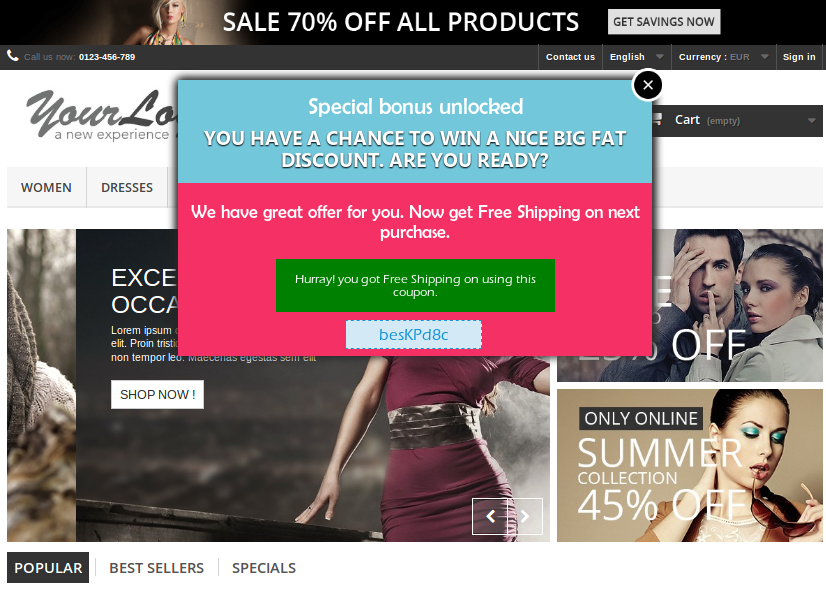
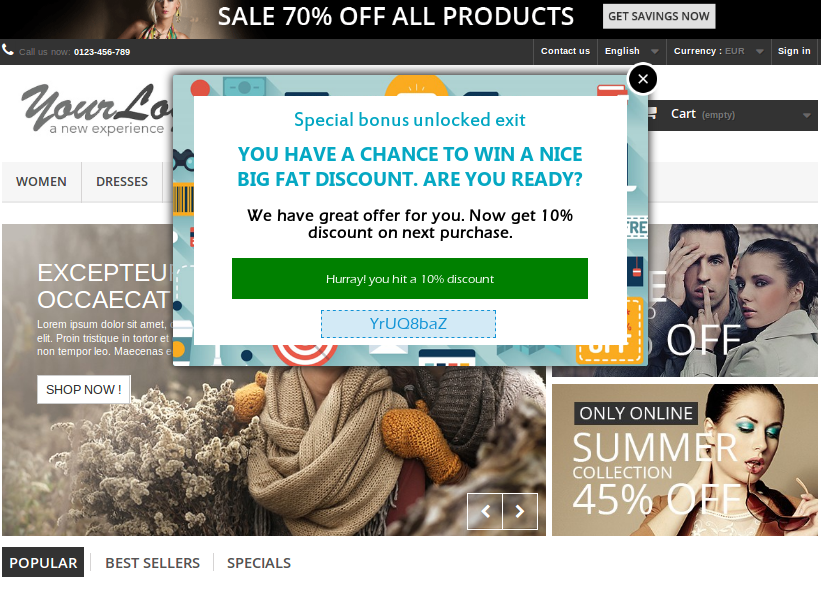
Coupon Type: This option allows the admin to set the type of offer they want to provide on the entry-exit popup. It can be in the form of a fixed or percencentage discount, free shipping or a gift.
Select a Gift/Value: If its value then set the fixed or percentage value you want to offer as discount. If its a gift then select the product that you want to offer as gift to your customers.
Theme: This option allows the admin to set a separate theme for entry and exit popup.
Email Marketing
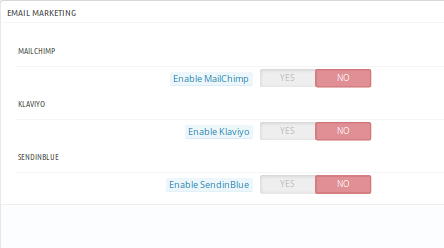
This section of Prestashop email subscription exit popup provides you three inbuilt choices for email marketing as given below:
This Prestashop module offers you three email marketing options as
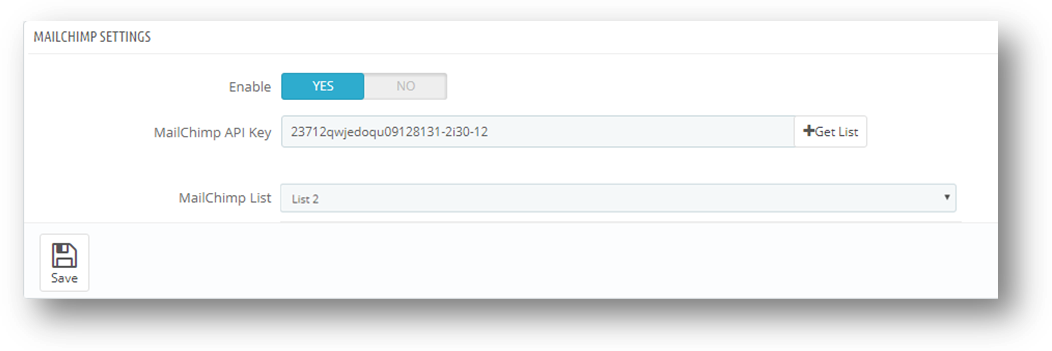
MailChimp
Klaviyo
Sendin Blue
Each of them can be separately enabled/disabled and can be configured by setting up the required API keys from this backend panel.
Email Settings
The email settings of Prestashop entry-exit(email subscription) popup offers you following configuration settings as given below:
Coupon Display Options: Admin can choose whether they want to display the coupon code on popup only, email only or both.
Email Subject: Admin can set the subject for the email sent to the customers as they win the discount coupon.
Email Template: This options lets admin choose the template for the discount winning email. This email template is same for entry and exit popup.
Email Content: Admin can set the content of the discount email sent to the customers. They can specify the coupon code and coupon validity in the discount email.
Test Email: Admin can use this option to test the discount emails on a specific email before sending them to the actual user.
GDPR Settings
Prestashop email subscription exit popup addon is GDPR compatible and so the various GDPR settings can be configured using the given options listed below:
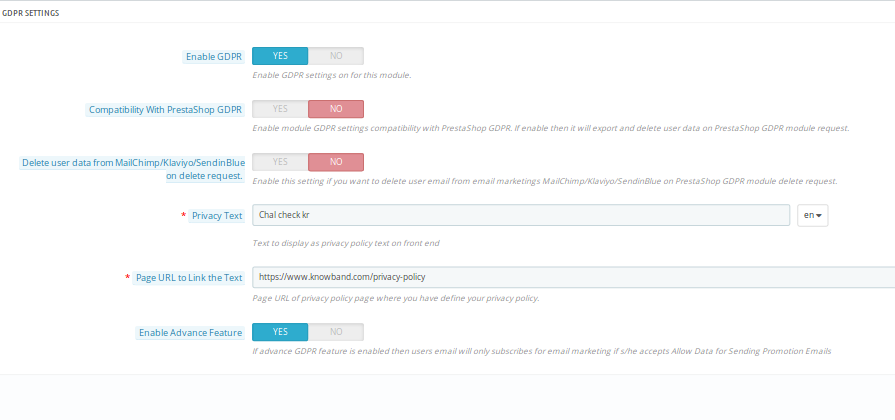
Enable GDPR: Enable or disable GDPR settings for this Prestashop exit popup module.
Compatibilty with Prestashop GDPR: Enable/disable module GDPR settings compatibility with PrestaShop GDPR. If enable then it will export and delete user data on PrestaShop GDPR module request.
Delete user data based on email marketing service request: Enable this setting if you want to delete user email from email marketings MailChimp/Klaviyo/SendinBlue based on PrestaShop GDPR module delete request.
Privacy Text: Admin can set a privacy text shown over the entry, exit popup.
Page URL to link the text: Admin can set a specific page URL of privacy policy page where you have defined your privacy policy for your website.
Enable Advance Feature: If advance GDPR feature is enabled then users email will only subscribes for email marketing if s/he accepts Allow Data for Sending Promotion Emails.
Statistics
You have to follow steps given below to configure Statistics-
Goto the Module and Services -> Module and Services
It would list all the modules of the store. Find ‘Exit popup’ in modules list.
Now click on ‘Configure’ button given corresponding to the ‘Exit popup’ addon.
It would redirect Prestashop store admin to a new page. Click on “Statistics” tab and it would open a new section as shown below –
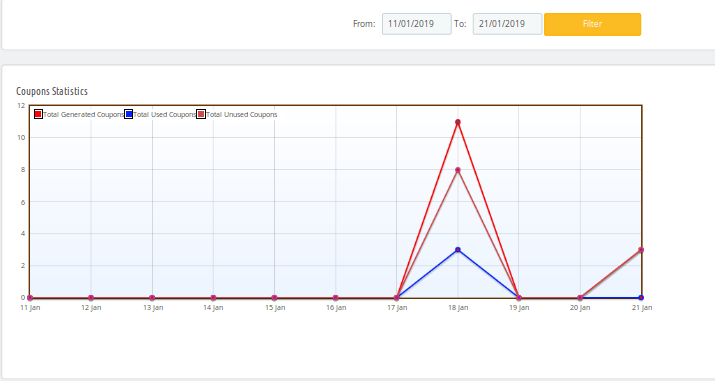
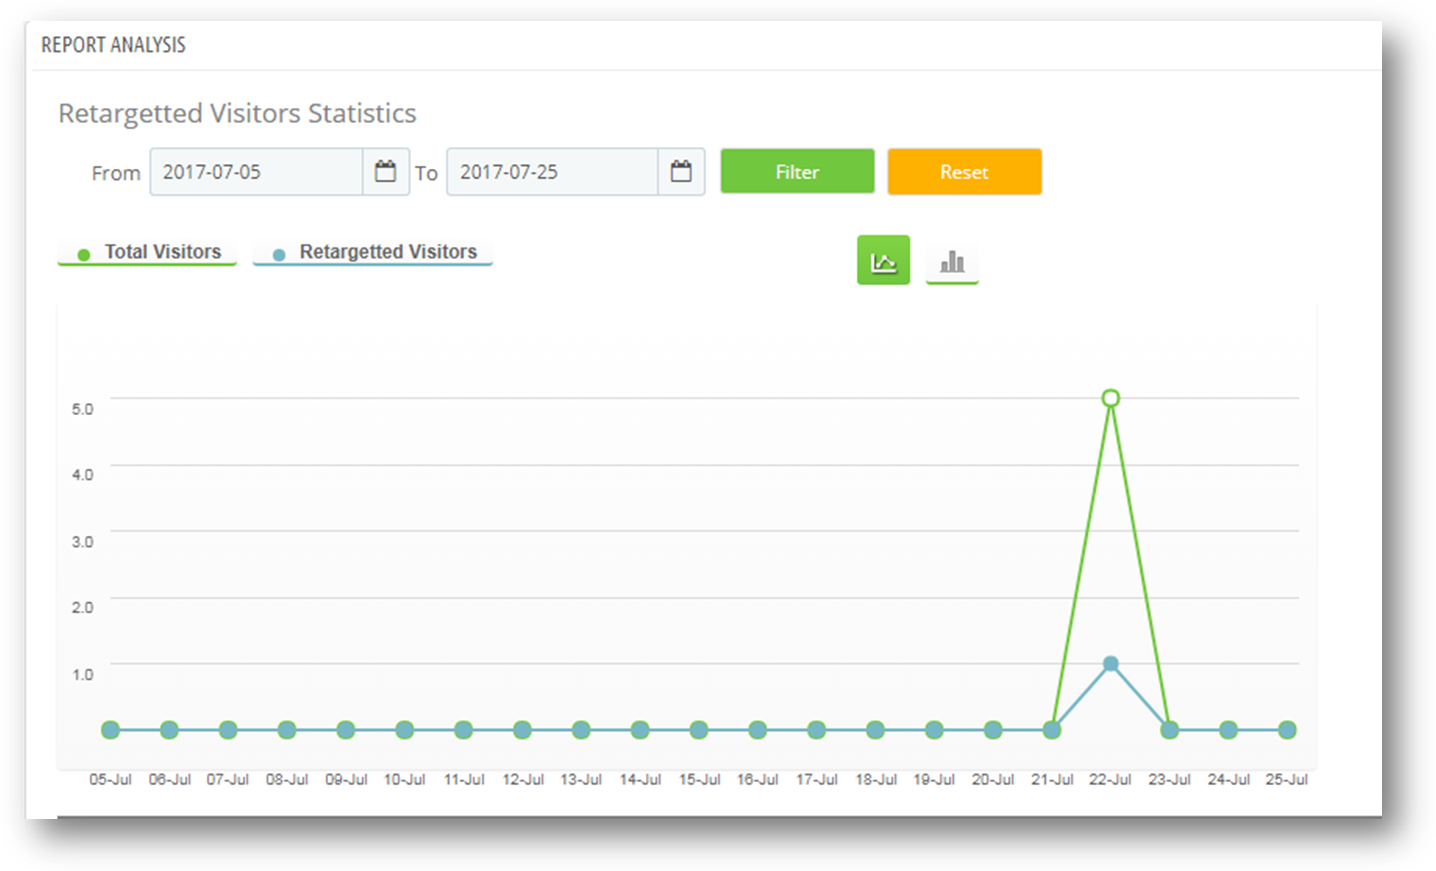
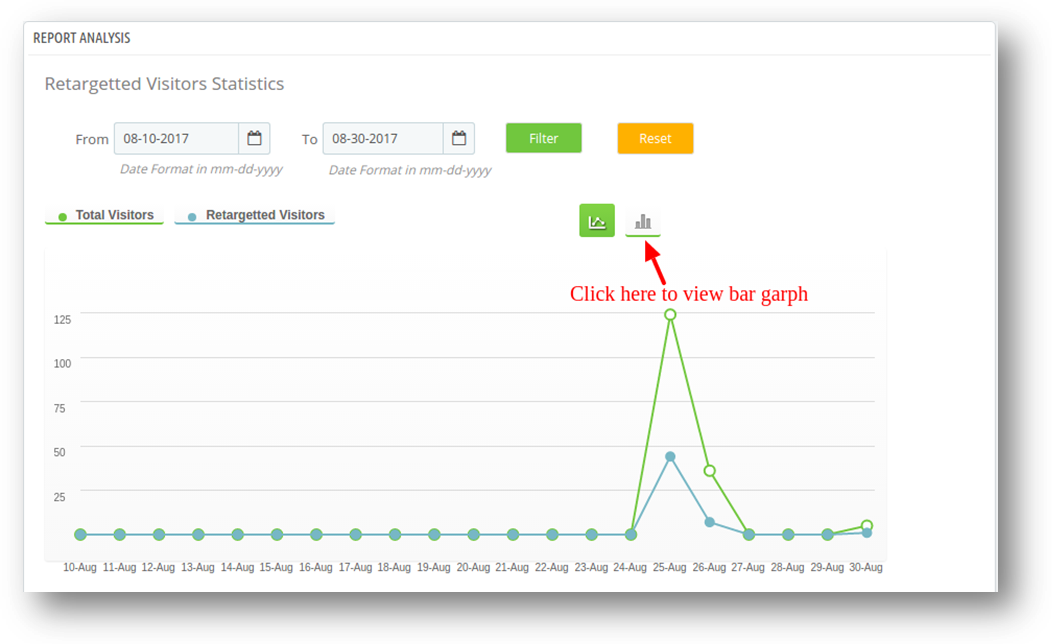
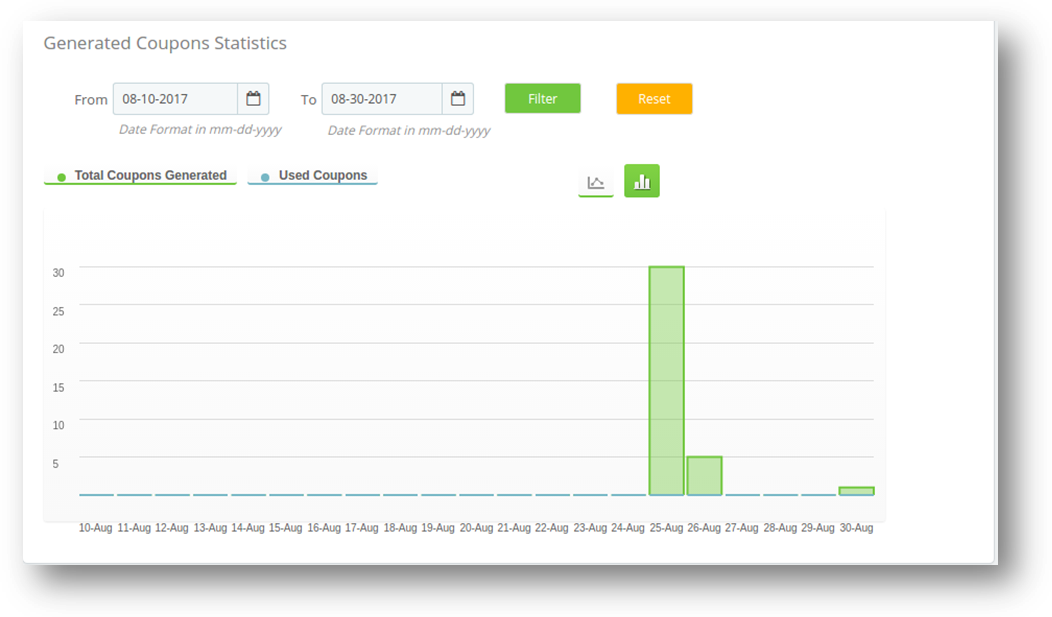
This tab shows the report analysis in graphs.You can filter the graph by selecting the date range in the ‘from’ and ‘to’ date fields.
There are two graphs in this tab-
Visitor graph: This is the graph between total visitors and retargeting visitors.
X-axis- Date and time
Y-axis- Total visitors and total staying users
Coupon Graph: This is the graph between the total generated coupon and total used coupons.
X-axis- Date and time
Y-axis- Total generated coupons and total used coupons
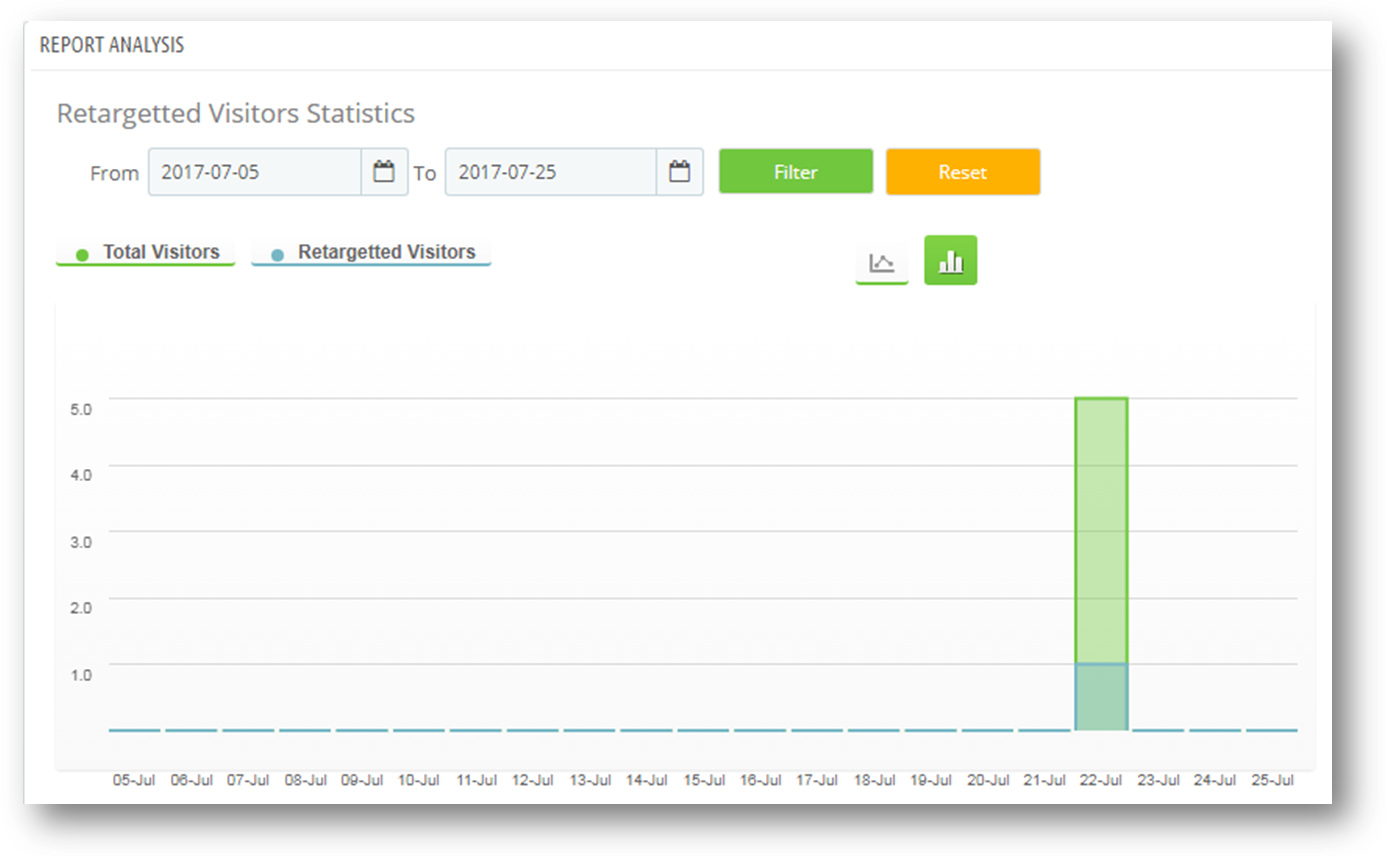
You can also view the graph in two form 1. Lines 2. Bars
1. Line graphs
Bar graph: To view bar graph.You need to click on its icon as shown in the following figure.
Bar graph will look like this.
MailChimp Settings
You have to follow steps given below to configure Statistics-
Goto the Module and Services -> Module and Services
It would list all the modules of the store. Find ‘Exit popup’ in modules list.
Now click on ‘Configure’ button given corresponding to the ‘Exit popup’ addon.
It would redirect Prestashop store admin to a new page. Click on “MailChimp settings” tab and it would open a new section as shown below –
Enable/Disable: The admin can enable/disable the Mailchimp settings. It will be initially set to “OFF”.
MailChimp API Key: MailChimp API key is the key that the user created on his/her MailChimp account at https://www.mailchimp.com. This API key will be used to connect to the MailChimp API. When user fills the “MailChimp API Key” field with a valid API key and click Get List button then the lists related to that MailChimp API key will display.
MailChimp Lists: MailChimp Lists will be available when the MailChimp API key is provided.
Frontend
Prestashop Welcome or Entry popup shown as the customers enters on the site.
Prestashop Exit popup as the customer intends to leave the site or intends to close the window.
Recommendations
– If the plugin is not working after installation then please check permissions on modules folder. The folder should have write access. Please make the folder permission to 755.
Disclaimer: In case the “Exit” popup does not display at the front, kindly clear the cache or delete the cookies. Sometimes cookies prevent the popup from displaying at front.
Buy Prestashop Exit Pop up module on the Addon store
1. Introduction to Scratch Coupon/Email Subscription pop up
Prestashop Scratch Coupon addon allows store owner to provide discount coupons to the visitors using an interactive scratch to win pop up(email subscription pop up) interface on the website front and analyze the customer’s need by tracking discount coupons. The customers receives the coupon codes via email.
Coupon codes with discounts highly affects the shopping behavior of the visitors as most of the visitors love to buy the products at a special discounted price, therefore coupons play an important role in cart conversions.
Highly interactive and responsive Prestashop scratch coupon also offers email subscription, the module integrates your store to your Mail Chimp account, i.e the email that the user enters in the scratch coupon pop up is automatically integrated with your Mail chimp account, which can be later used for personalized promotions or Email marketing.
Key Features of Prestashop scratch coupon:
Provides Interactive Scratch coupon email subscription pop up interface on Prestashop Store front.
Sends personalized emails with coupon code included.
Graphical and tabular reports for Coupon and Sales make the performance analysis easy for the store owners.
Mail Chimp Integration: Email Integration with smart sync feature.
Direct impact on sales and customer engagement
Increase the percentage of returning customers on your Prestashop store
Highly interactive and responsive pop up interface makes the customer win discounts and feel special
Improves conversion rates by providing customers an interactive email subscription pop up to win discounts
Fully customizable email subscription pop up, matches with your website’s theme
Extremely responsive and user friendly back end interface
Option to Show/Hide Scratch Coupon email subscription box on any desired page of the prestashop store.
Option to allow or restrict free shipping on the coupon.
Customizable Email Templates
Multi Lingual Support
Multi store compatible
Prestashop Scratch coupon is compatible with all the themes
Desktop, Mobile and Tablet responsive design.
Adds a feature of gamification to the website which makes the store visitors scratch and win discounts.
2. Installation-Prestashop scratch coupon addon
To install this Prestashop addon, please follow these steps:
Folder structure of the Scratch Coupon plugin folder(scratchcoupon).
Copy the whole folder named as “scratchcoupon” into your modules folder of the root directory of your PrestaShop store through FTP.
You will be able to find the Scratch Coupon plug-in ready to be installed in the “Modules” in your PrestaShop store as shown below.
Click on the Install button to install the plugin.
3. Admin Interface
After installing Scratch coupon addon into store, following interfaces will display:
Configurations
Report Analysis
Email Settings
FAQs
Suggestions
Other Plugins
3.1 Configurations
After clicking on configure button of “Scratch Coupon” addon on module listing page, system will open “Configurations” tabs by default as shown in screen below:
This tab contains 3 sub-tabs: –
General Settings
Look and Feel Settings
MailChimp Settings
Note : Prestashop store admin can expand or contract these tab by clicking on the tab.
3.1.1 General Settings
When Prestashop store admin clicks on “General Settings” tab then the fields shown below will display. The fields in the form will already be filled by their default values.
Enable/Disable: Initially, this will be “OFF”. User can enable/disable addon functionality by turning it ON/OFF.
Pages to Display: Admin can search and select the pages where he/she wants to display the scratch coupon email subscription popup.
Enable Box Hide: The scratch coupon pop up is displayed, each time the page reloads. So, prestashop store owner can disable the popup and enable the box hide option to show a box on the side, when a customer clicks on this box the scratch coupon email subscription pup up appears.
Coupon Expire: The Responsive addon allows store owners to set the coupon expiry days, the coupon will be expired after the specified days. Customers are informed via emails regarding the coupon expiry.
Scratch Box Display Interval: Store admin can also set the number of days after which the email subscription popup appears again with another coupon code for the same customer.
Discount Type: Here admin can set the type of discount to be offered to the customer i.e Fixed price discount, Fixed percentage based discount or percentage range discount
Fix Percentage: By default, this option will be selected. Here user can set the fix percentage discount. Fix percentage value will lie between 1 and 100. On front end, each coupon will have fix discount percentage.
Percentage Range: On selecting this option. Two inputs will be shown as shown in screen below:
Here user can set the range of percentage. By setting this option, plug-in will randomly generate discount within percentage range on front end.
Fix Price: If user set fix amount discount instead of percentage. Then this option will fulfill this need. Here user can set fix amount in USD.
Allow Free Shipping: By default “No” will be selected. On selecting “Yes”. Free shipping will be allowed on the generated coupons.
Allow Coupon without login: By default “No” will be selected. On selecting “Yes”, customers can apply the coupon without loggin in to the Prestashop store.
Note : Only that customer can use the coupon to whom it is assigned. If the Customer is different and admin configure Allow Coupon without login option as “Yes”, then the coupon will automatically be removed from the cart.
Send Email to Admin: By default “No” will be selected. When set to “Yes” the module sends the scratch coupon discount notification to admin.
Admin Mail Subject Line: Admin can set the subject line for scratch coupon discount notification emails..
3.1.2. Look and Feel Settings
When admin clicks on “Look and Feel Setting” tab then all the fields shown below will display. Initially, all the fields in the form will already filled by their default values.
Box Background Color: Define the background color of scratch coupon box on front end. A color picker will pop up from where Prestashop admin can change background color..
Main Title:. The title displays on the top of the coupon box at front. Admin can customize the text with the available options:
Bold: To darken the title.
Italic: To italic the title
Color: To set the color of the title.
Scratch Box Title: Scratch box title is very important as it attracts the customers. Scratch box title should be catchy and should attract customers. It is displayed just above the Scratch area on the email subscription pop up.
Form Title 1: Used to display the information of the discount won by the customer. For example: Congrats! you have just won 10% OFF on your first purchase on Fashion Store.
Form Title 2: Admin can use this field to provide any information to the customer.
Name Title: In this field admin can set the title for the input field which will require name of the customer at front end. Here user have two option to set title:
Email Title: In this field user can set the title for the input field which will require email of the customer at front end.
Input Field Border: Use to style the border of input fields on front end. We recommend that, please use opposite color of background color to clearly show the input fields on front end.
Button: Admin can set the title of button. The button will be displayed on front end. Customer must have to click on this button to get the coupon. Admin can customize the button text or background color
Button Text:. This will be the text shown on button.
Button Text in Progress:. This text will be shown when system processing and sending coupon to customer. After sending coupon, this will be replaced by “Button Text” value.
Success Message: Success message will be shown after sending coupon to corresponding customer.
Success Thanks: Success thanks message will be shown as heading of the Success Message after sending coupon to corresponding customer .
Get Coupon Code Label: ‘Coupon code label’ text will display as label of the button when Scratch Coupon box is hidden.
3.1.3 MailChimp Settings
When admin clicks on “MailChimp Settings” tab then the fields shown below will display. The fields in the form will be already filled by their default values.
Enable/Disable : From this option admin can enable/disable the MailChimp settings. Initially it will be set to off.
2. Smart Sync : This option when enabled, email id after validation will be synchronized if visitor/guest/customer remove focus after filling email field irrespective of the fact if the user have submitted the form. If it is disabled the email will be synced only when form is submitted at the front-end.
3. MailChimp API Key : MailChimp API key is the key that the user created on his/her MailChimp account at https://www.mailchimp.com. This API key will be used to connect to the MailChimp API. When user fill the “MailChimp API Key” field with a valid API key and click Get List button then the lists related to that MailChimp API key will display.
4. MailChimp Lists : MailChimp Lists will be available when the MailChimp API key is provided.
On Dashboard, click button on upper right corner of dashboard. Drop down menu will open, click Account link in that menu as seen in screen below.
On Account settings page, some sub menus will be visible. Click “Extras” sub-menu to open drop down menu. Click “API keys”as shown in screen below:
On API keys page, click “Create a key”to generate API key. After creation, a new API key will be added to your API keys list. Screen is given below:
Now to create list, click Lists tab in upper menu. Admin will be redirected to new page where he/she can view lists and create lists also. Screen is given below:
On Lists page, Click “Create list” to create new list. After creation lists will be visible on Lists page as shown in screen below.
3.2 Report Analysis
In this tab, addon will show the coupons and discount statistics in graphical format. With the help of these statistics, store owner will be able to analyze customer’s need in form of discounts and time as shown in screen below:
Prestashop store Admin can also see the discount details up-to last 30 days as shown below.
Following graphs will be shown in this tab:
Coupon Statistics – OverAll: This section will show over all summary of Total Generated, Used, Expired and Unused coupons
Discount Statistics: In this section, how many number of customers applied for which discount range and how many times coupon is scratched for which discount range. As there are two types of discount: percentage and fixed amount; in system. Addon will show separate graph for both discount types as follows:
Percentage discount statistics: This will be a line graph, in which discount interval will be of 10% upto 100%. Percentage based discounts statistics displays the number of times the email is captured and the number of times the coupon is scratched for percentage based disounts.
Fixed Amount discount statistics: Fixed amount discounts statistics displays the number of times the email is captured and the number of times the coupon is scratched for Fixed amount discounts.This will also be a line graph, in which discount interval will be of 30 and 6 intervals will be shown.
With the help of these two graphs, Prestashop store owners can track the customer’s needs in terms of discounts. Information gathered in these statistics will be helpful in attracting more customers by offering preferred discounts and increase store sales. Admin can also filter these graphs by selecting dates.
Coupon Statistics – Generated Vs Used: The graph shows the comparison between total coupon generated and the total coupons used by the customers. The graph shows data of last 8 days. User can also filter graph by selecting date. Following is the sample screen shot of statistics:
3.3 Email Settings
This section contains a readymade email template which can be later customized as per the requirement in any language. Email template can be stored for multiple languages present in the system.
.
Note:- The email template contains pure html only and some template variables (example:- {any_var}). It is recommended not to edit any part of the email template containing such text otherwise the email template will not work properly.
3.4 FAQs
This tab contains several questions (with answers to them) that are asked by our customers. We recommend you to go through the questions before raising any ticket for this plugin.
3.5 Suggestions
In case you want to give any suggestions for some new features to be included in the new version of this plugin than you can use this tab.
3.6 Other Plugins
This tab redirects to our developer page having list of other plugins developed by us. If you like this plugin than you can try our other plugins as well.
4. Front End Interface-Prestashop Scratch Coupon/Email subscription Addon
On prestashop store front, the interactive and responsive scratch coupon email subscription pop up will be displayed on selected pages after enabling it from admin panel. This scratch coupon pop up will be displayed on top of the homepage.
Note : Validation for scratch coupon will be there even if module is disabled or uninstalled.
Following is the screen of scratch coupon email subscription box with default values:
After scratching coupon area, an input form will be open just below the coupon pop up as shown in screen below:
After providing name and email into form, Prestashop scratch coupon addon will send coupon with discount to the customer. After sending email to customer, a success message will be displayed as shown in below screen:
The above message will be disappear after 5 seconds and next discount will be shown on the same system after defined (set through admin panel) days.
5. Tracking Information
On front end, this addon tracks following information to create analysis reports in the form of graphs:
Discount Scratch Tracking: Whenever customer scratches to win, the addon tracks that event and save into DB, after that automatically disable the tracking process until the browser will not re open again on the same system.
Coupon Tracking: After sending the mail to the customers with coupon and other details, the addon saves the coupon information in the database with the corresponding customer details. Which it later use to generate the stats for the generated coupons and customers.
Send Email to Admin: If prestashop store owner allow email to admin, then it will also send the same email with discount coupon and coupon details to admin.
Enable discount coupon again: After sending coupon to customer, it will not re-generate discount on the same system until admin allows to display the email subscription pop up again.
Recommendations
In case module is displaying override issue while installation or re-installation of the module, please make sure that the file “CartRule.php” doesn’t exist inside the folder “override/classes” of your store’s root directory. In case it already exist there, you need to follow the steps mentioned below.
Steps –
1. Cut the file “CartRule.php” from “override/classes/CartRule.php” of your store’s root directory and paste it in some other directory.