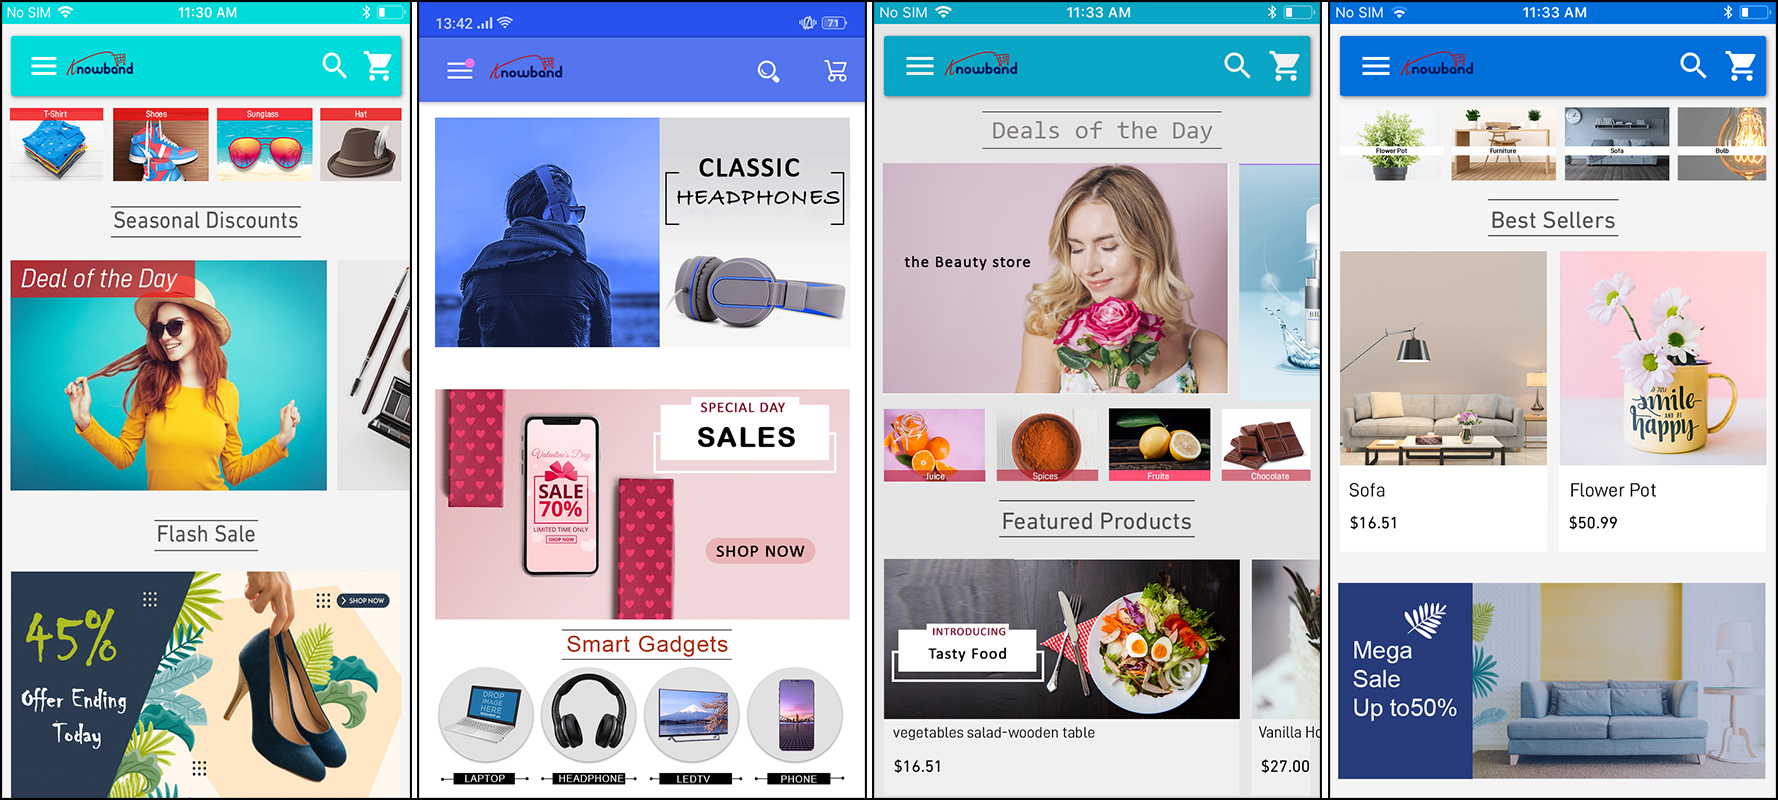
With a change in the eCommerce business scenario, the revenue of online stores has also been affected. Mobile optimization has become quite an essential requirement for eCommerce website sites nowadays. From conversion rate optimization to search engine optimization, no expert will tell you that targeting mobile customers is not beneficial. In fact, you will remain in a disadvantage against your rivals by not considering mobile customers in your marketing plan. In this write-up, I am going to tell you the easiest way to own a pair of native mobile apps. Earlier, you either required to learn the coding/programming or hire a professional to create eCommerce Mobile App. But, now all you need to go for automated solutions and launch fully synced eCommerce apps for your business.
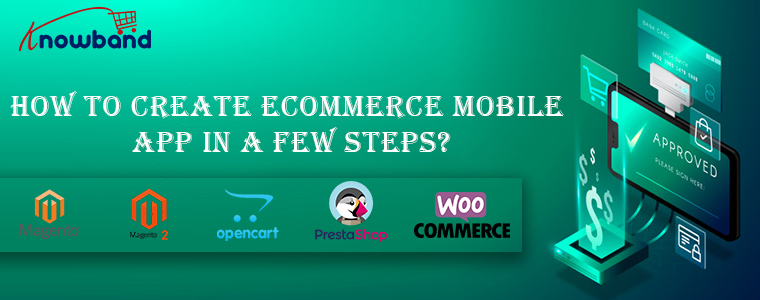
KnowBand has brought one such solution with Mobile App Builder plugin. This is a readymade solution to provide you native Android/iOS apps for your store. It is designed in such a way that all the functionalities of the app can be controlled from the backend panel without making any code changes. The eCommerce Mobile App Creator is available for following CMS platforms:
How to create eCommerce mobile app in a few steps?
In order to utilize the services of Mobile App Builder extension, you need to follow the following steps:
Step 1: Purchase the Module
Visit the above links as per your eCommerce website platform. Purchase the module and install the zip file on your store. Once installed you get the complete admin panel access to control the app. Open it and enable the respective Mobile App Builder.
Step 2: Share your App Specifications
After purchasing the module, you will receive an email having a small questionnaire that you need to fill and respond back. In the questionnaire, you will be asked to share some information regarding your app. Based on which, the development team will develop and customize the app.
Step 3: Publish APK/IPA on App Stores
After the development is complete, the team will share the APK file of the app with you. Now, you need to publish this APK on Google Play to make your App available to your customers. You can publish the app by yourself, or it can also be done by Knowband for a small fee.
That’s all with the process to create your own mobile app with KnowBand. You can even test your store on our demo app before going for the actual module purchase. Let’s find out how?
How to test your store on our demo Mobile App for free?
In case you want to see how your mobile app would look like, there are free versions of the Mobile App builder that you can try. The free version of the Mobile App Builder lets you see how your eCommerce store will look and work on the App. You need to implement the following steps that are mentioned below for having a free demo:
Step 1: Visit any of the links below according to your eCommerce platform:
Step 4: Open the App and enter your store URL in the field. Make sure you enter the full store URL of your store i.e. https://www.example.com/
Step 5: You have successfully completed the initial setup of the demo app. Now you can experience your store as a mobile app and test it as you want.
That’s all! Now, analyze your app functionalities. You can even find the detailed testing process from here.
Why own a pair of native eCommerce mobile app?
In addition to having a mobile responsive site, mobile apps have come up as a more advanced way to target mobile users. No doubt you still need a mobile site to come in the good eyes of Google and your mobile customers. But, all of your rival sites know this too, and that’s why they have already started the mobile optimization for their stores. So, what else do you need to have an upper hand against your competitors? A mobile app for sure. Let’s take a look at some of the major benefits of tapping into mobile commerce:
1. Improved Usability for online shoppers-
Downloading and installing the app is a one-time process. After that, your customers can visit your store anytime in just a single click. This ease of visiting your store improves the interactivity of the customers with your business and ensures a 24X7 availability. The exclusive mobile app interface makes navigation through your store quite easy, quick, and interactive. Furthermore, mobile apps can be presented as per your will. You can design the home screen and highlight popular products of your store as well.
2. Leverage built-in Smart Phone features-
The Android and iOS platforms provide a number of built-in features on smartphones. Mobile apps can adapt to these built-in features and leverage them for providing a more engaging user experience to the customers. For example, you can use the GPS location tracking to present the location-based shopping experience to your customers. You can leverage microphone to provide voice-based app search for faster-searching experience.
3. Users always prefer mobile apps over the mobile site-
Apps make the shopping experience faster, interactive, more secure, and reliable. Users don’t have to remember an URL or log in each time they visit the store. Sites having both mobile apps and mobile sites receive more qualified traffic on the mobile app than on the mobile sites.
4. Mobile app push notifications is a boon-
You don’t have to depend only on email marketing for communicating with your customers. Through mobile apps push notifications, you can always and instantly send messages to your users that too in a more personalized way. You can’t integrate push notifications to boost sales if you don’t have an app. Push notifications are more hardware features that are based on GPS, secure connection and some API and it’s not available for websites.
5. Brand loyalty will enhance user engagement-
Nothing can be more useful for putting your products and brand in the center of attraction than a mobile app. Apps are the shortest route to your business available for 24X7. Just a single click on the app icon and customer is on your business center. Mobile apps are useful tools for creating a more loyal section of customers who love online shopping anytime from anywhere. Showcasing your brand logo on the mobile app leave your professionalism on the shoppers.
Over To You
So, this is how you can get a mobile app for your eCommerce store without doing much of the complex tasks. KnowBand’s Mobile app builder is the easiest way to get a native Android/iOS app for your store. Moreover, I have also explained how you can try a free demo of the app to experience your store as a mobile app. Leverage this useful service and get your app developed today by the expert eCommerce and mobile app developers.
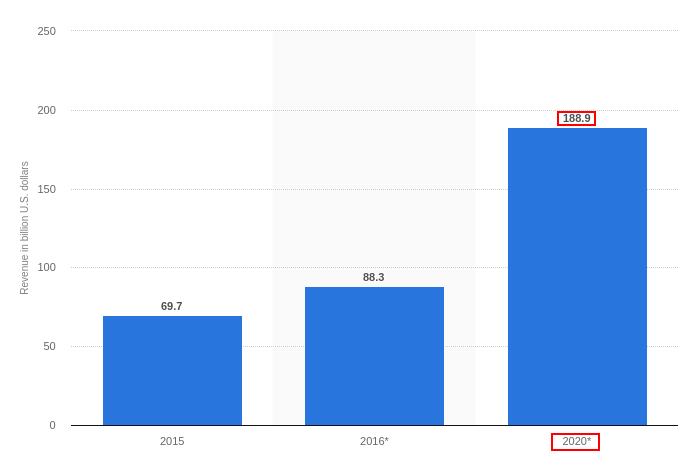
PrestaShop websites are getting popular day by day. PrestaShop has released its latest version 1.7 with more new and advanced features. We might observe an increase in the number of PrestaShop sites in the near future soon. For the time being, this eCommerce platform has already gained popularity and is expected to even become more popular in the upcoming years. A large number of PrestaShop website owners who are competing with each other and other eCommerce platforms to secure their shares of conversions can be highly be benefited with the adaptation of a mobile app for their site. This is a statistics report that suggests the mobile app revenue would grow up to $188.9B by the year 2021.
KnowBand makes PrestaShop App development easy for you!
KnowBand has brought this automated PrestaShop Mobile App Builder plugin to own a pair of the native mobile app. This module is designed as such to provide mobile apps in a pure non-coding way. All you need to do is to follow a few simple steps and get your apps in no-time.
Step 2: Once the module is installed, we will share a pre-requisites form through the mail. You can share all the specifications and requirements with us.
Step 3: Once all the required information is received, our skilled development team will develop an APK/IPA file and share with you to which you can host on the PlayStore/App Store. Your customers will download the App from respective stores and install on their phone.
So, these are the three easiest steps that can help to get a mobile app for your PrestaShop website in a much economic manner.
Here are some benefits of using PrestaShop Mobile App builder :
1. Real-time Synchronization:
The PrestaShop Mobile App and the website are two entities of your eCommerce business, that need to run in proper sync. Using a Mobile app developed with PrestaShop Mobile App Builder, you will get an API (web service module) which will synchronize the mobile app with the website in much much quicker manner.
Every inventory (Product, category addition), order details and other store-related details are automatically reverted on the mobile app. This does not let store admin make the changes on a manual basis.
2. Tablet & Mobile Support:
Your apps are fully native and work flawlessly on all the handheld devices. With multiple screen-size support, your users can browse the app on all sorts of tablets, smartphones, iPad, and iPhone. Moreover, taking your app to the Android and iOS platform targets almost every mobile users around the world effortlessly.
3. Multi-lingual & RTL Support:
The Mobile Apps for PrestaShop supports all sorts of languages like English, French, Spanish, Italian, Polish etc. The module even supports various Right To Left scripts like Urdu, Hebrew, Arabic etc.
4. Brand Presence:
The eCommerce Mobile App for PrestaShop provides complete white label app to enhance your store branding strategies. The module allows you to display the store logo on the header of the app and strengthen your brand loyalty.
5. Rich Color Choices:
Right color schemes play a very vital role in luring potential users to your app. The PrestaShop Mobile App Maker provides various color options in the module backend like the theme, background, button, button text etc. Now, you can choose the desired color for your app and change them whenever required.
6. Flexible Home Screen:
Provide impeccable design to the home screen of your app. The PrestaShop Mobile App Creator has simplified the home screen by making it fully flexible to all sorts of customization. You can create multiple layouts based on various festivals & events. They can be easily used from the backend whenever required.
Furthermore, this feature brings various attributes for home screen customization like banners, sliders, countdown banner, recent products etc. You can provide whichever look you feel right for your app.
7. Quick Login Options:
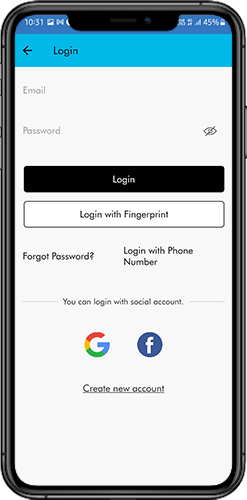
Your PrestaShop Mobile App should have the perfect login screen in the mobile app as it is responsible to massive users retention on your store. With this module, your users get Google, Facebook, OTP, Fingerprint login options. It enhances the UX to another level.
8. Simplified Checkout:
The multi-screen and lengthy checkout screen often becomes the reason behind the user abandoning the cart. The PrestaShop Mobile App Builder provides simplified single-page checkout screen and makes the order submission easy for the users.
9. Easy Payment Options:
Making online payment with PrestaShop Mobile App is easier than ever. The PrestaShop Mobile App Creator supports all sorts of website payment methods along with custom payment method like Stripe, Braintree, PayU etc. The robust and easy payments in app motivate the users to make the purchase.
10. Effortless Trade:
The PrestaShop Mobile App Creator supports all sorts of shipping methods on the eCommerce app. All placed order deliveries can be easily handled by store admin without any hassle.
11. Social Sharing:
Promoting your store products on different social networks could be the sale booster for your business. The PrestaShop Mobile App Builder allows the users to share your products with their family and friends with their product screen.
12. Coupons & Vouchers Support:
Mobile coupons are the modern way to offer discounts and deals to app users. The PrestaShop Mobile App Creator support all sorts of coupons and vouchers on the mobile app.
13. Gamified E-mail Subscription Pop-up:
The PrestaShop Mobile App Creator provides the gamified e-mail subscription pop-up in the mobile app. The store admin can offer various deals and discounts with the same and capture the user’s e-mail as well. This spin-wheel responsive interface will only work on an app if KnowBand’s PrestaShop Spin and Win module is installed on the store.
14. Unlimited Push Notifications:
Deliver all sorts of information and notifications to the app users with unlimited push notifications service and grab their immediate attention. The PrestaShop Mobile App Builder provides both automated as well as manual notifications to mobile shoppers.
15. Web-admin Interface:
The PrestaShop Android/iOS Mobile App Builder provides complete admin panel access to the store admin. This allows them to manage the app functionalities on their own.
Conclusion
That’s all! Having a PrestaShop Mobile App would definitely prove to be one of the strides to enhance the reach and visibility of your online business. In lieu of it boost the sales and conversions of your store. KnowBand even provides the Mobile App Builder for other eCommerce platforms as well. Get to know more from here.
With changing landscape of online business, mobile apps have gained much significance than before. The quick surge in the use of mobile devices around the world have made these mobile apps an indispensable part of online business activities. Moreover, as per a recent report of App Annie, a research firm that offers insight about mobile app usage has put forward certain amazing facts regarding utilizing mobile apps for online business. These crucial facts are described below:
According to the report, the revenues generated from global mobile apps will surge to $51 billion in the year 2016.
The rate of global mobile app downloads will increase significantly and will reach upto 284 billion by year 2020.
Mobile app stores will see a significant increase in their growth by the end of year 2020, while Google Play will reach the mark of 166 billion along with the market share of iOS which will raise to the level of 35.2 billion.
The impact of mobile apps on an online business can’t be ignored at all with the above startling facts. If you are still not active in the direction of mobile app development, you will have to bear the harsh business consequences. Let us understand the importance of mobile apps in an online business environment for better conversions and sales.
They offer more value to targeted customers-
Mobile apps comes as a brilliant way to target customers and improve business fortunes without any hassle. Store owners can give more importance to their targeted customers by providing loyalty programs through mobile apps to boost customer engagement and sales. You can also offer dedicated offers and rewards to your mobile customers for improving the sales and revenue of your business. Particularly, eCommerce mobile apps are more capable to bring more sales and customers for their online business.
Mobile apps helps in boosting the brand value of a company-
Due to the increased usage of mobile devices globally, businesses have a higher chances of reaching out to their targeted customers through engaging mobile apps. If you are having a PrestaShop site, it is now easier to transform it into an appealing PrestaShop mobile app through the help of this PrestaShop Mobile App Builder plugin from Knowband store. In this way, by having a deeper reach among your targeted customers, site can enhance their brand value and popularity to a great extent.
Mobile apps offer better user experience to customers-
It is often seen that customers are reluctant to make an online purchase due to the complicated user experience offered on a site. Considering the challenges experienced by customers, mobile apps offer a better user experience due to the presence of numerous features and functionalities in a mobile device. Mobile app developers can take the help of features like GPS, camera, NFC and other such components for providing appealing push up notifications about new offers, deals and products, geo- location based offers for customers, online payment facility and others for providing a better user experience for targeted customers.
It helps in effective marketing of your online business-
The importance of marketing can’t be denied in a business environment due to the increasing competition in every business segment. By creating an amazing OpenCart mobile app with the help of OpenCart Mobile App Builder module, it is now easy to improve the marketing of your OpenCart site. You can easily integrate various social sites like Facebook, Twitter, Linked In and others with your mobile app for enhancing your marketing and promotional strategies.
Mobile apps helps in building customer engagement and sales-
With the help of mobile apps, it is now much easier to stay engaged with your customers irrespective of the location of your desktop. These apps help in delivering better customer engagement and sales for any business due to ease of mobile connectivity with the company. Especially, in case of eCommerce stores, mobile apps can encourage customers for a quick product purchase and can improve sales to a great extent.
If you are trying to take your business to new level of business engagement, mobile apps need to be included in your business expansion plans. They are helpful in improving the user experience, conversion rates and sales of a business to a great extent. So, create amazing OpenCart mobile app and PrestaShop mobile app for your website to grab higher conversions and sales.
Holen Sie sich native Android- und iOS-Apps für Ihre PrestaShop-Website und starten Sie den Verkauf Ihrer Produkte über mobile Apps!
1.0 Einführung
Dies ist die Bedienungsanleitung der fortschrittlichen und vorgefertigten nativen mobilen App-Lösung PrestaShop Mobile App Builder. Hierbei handelt es sich um ein E-Commerce-Website-Plug-in, das entwickelt und hergestellt wurde, um perfekte und vorgestellte Android- und iOS-Shopping-Apps für Sie zu erstellen.
1.1 PrestaShop Mobile App Builder: Eine kurze Einführung
Der PrestaShop Mobile App Builder ist die fortschrittlichste und automatisierteste Lösung, um Ihr Online-Website-Geschäft auf die mobile Plattform zu bringen. Es verwandelt Ihre gesamte Website in eine vorgestellte mobile App und ermöglicht es Ihnen, Produkte auf Mobilgeräten zusammen mit der traditionellen Website zu verkaufen. Die Funktionen und Funktionen der App sind genau auf die Website abgestimmt und funktionieren sowohl auf Android- als auch auf iPhone-Geräten einwandfrei.
Unsere PrestaShop Mobile App Builder ist das vorkonfigurierte Framework, das von Experten und Fachleuten zum Erstellen von nativen eCommerce-Apps entwickelt wurde. Die Apps sind in der Lage, alle Ihre Geschäftsprodukte den Fingerspitzen des Benutzers zuzuführen und Umsatz und Ertrag zu steigern. Wenn Sie ein PrestaShop-Händler sind und nach einer vollwertigen mobilen App-Lösung suchen, ist dies Ihre beste Chance. Lesen Sie den vollständigen Artikel, um vollständige Informationen zur Entwicklung der PrestaShop Mobile App zu erhalten.
Außerdem ist unsere PrestaShop Mobile App Builder-Erweiterung voll kompatibel mit Marktplatz mit mehreren Anbietern Plugin. Sie können den gesamten Marktplatzeintrag auf denselben mobilen Apps bereitstellen. Wir bieten sogar ein Kombipaket an PrestaShop Mobile App BuildermitPrestaShop-Marktplatz für mehrere Anbieter in PrestaShop Advanced Marketplace mit mobiler App.
Außerdem,
A?no-code?Mobile?App?solution.
Freundlich
3-Monate
Völlig
100%
Höchst
Erhöht sich
Erhöht sich
Erstklassige 1.2-Funktionen von PrestaShop Mobile App Builder:
Nachfolgend finden Sie eine Liste der wichtigsten Funktionen, die Sie mit Prestashop Mobile App Builder in Ihren Apps erhalten:
Anpassbares Layout des Startbildschirms (vollständige Flexibilität)
Store Branding
Zopim- und WhatsApp-Chat-Unterstützung (24 * 7)
Google- und Facebook-Login
OTP & Fingerprint Login
Tablet- und Mobile-Support
Unterstützung für Android 4.2 bis Android 8.0 (Oreo)
Unterstützung für iOS 9 bis iOS 11
Automatische Bestandsaktualisierung
Mehrere Farben und Schriftarten
Unterstützung für mehrere Sprachen und RTL (von rechts nach links)
Unterstützung für mehrere Währungen
Unterstützung für alle Produkttypen
Website-Zahlungsmethode Wird von Apps unterstützt
Versandart der Website für Apps
Integration von benutzerdefinierten Zahlungsmethoden
Unbegrenzte Push-Benachrichtigungen
Social Sharing-Optionen für das Produkt
Mehrere Filter- und Sortieroptionen
Erweiterte Sprachsuche (nur Android)
Wishlist Funktionalität
Auf Apps unterstützte Website-Gutscheine.
Vereinfachter Checkout-Bildschirm
Echtzeit-Auftragsverfolgung
Nahtloses Akkordeon Menü
Übersichtlicher Bildschirm für Produkte und Kategorien
Die Liste der erstaunlich vielen Funktionen geht weiter und weiter. Lesen Sie weiter, neue Überraschungsvorteile dieses Plugins stehen noch aus.
Erfahren Sie mehr über die Funktionen im Detail von hier.?
2.0 PrestaShop Mobile App
KnowBand versteht Ihre Bedenken hinsichtlich der Ungewissheit, dass Sie sich für die Lösung entscheiden. Die Händler können unseren Demo-Store in der mobilen App und sogar ihren Store in unseren Demo-Apps anzeigen.
2.1 Sehen Sie sich unseren Demo-Shop an, der an Apps arbeitet
Möchten Sie die Funktionen der eCommerce-App sehen? Wir haben unseren Demo-Store in die App integriert, in der Sie die voll funktionsfähige App erkunden und alle ihre Funktionen sehen können. Befolgen Sie einfach die folgenden Anweisungen:
Schritt 1: Laden Sie die Nautica PrestaShop Mobile App aus einem der App Stores auf Ihr Mobilgerät herunter und installieren Sie sie. Hier finden Sie die Links zum Herunterladen von Demo-Apps:
Schritt 2: Öffnen Sie die App und tippen Sie im Begrüßungsbildschirm auf die Schaltfläche "Demo anzeigen". Geben Sie einige relevante Details wie Name, E-Mail & Store-URL ein. Das ist es! Sie werden sehen, dass unser Demo-Shop in der Demo-App ausgeführt wird. Sie können das gleiche durchsuchen, alle Funktionen überprüfen, eine Bestellung erstellen usw. Hinweis: Um auf das Admin-Panel von KnowBand Mobile App Builder in unserem Demo-Store zuzugreifen, besuchen Sie hier.
2.2 View Your Store arbeitet an Demo-Apps
Nicht zufrieden? Möchten Sie Ihren eigenen Shop mit den Demo-Apps testen? Nun, wir haben dich mit allem bedeckt. Auch das können Sie in unserer Demo-App kostenlos erleben. Sie müssen nur 3-Schritte ausführen:
Schritt 1: Laden Sie das KOSTENLOSE PrestaShop Mobile App Builder-Plugin herunter und installieren Sie es in Ihrem Geschäft.
Schritt 2: Installieren Sie die Demo-Apps (Links im vorherigen Abschnitt) auf Ihrem Mobilgerät. Öffnen Sie die App und geben Sie Ihre Store-URL ein.
Schritt 3: Tippen Sie auf "Shop anzeigen" und erleben Sie Ihren eigenen Shop mit Demo-Apps. Sie können das installierte PrestaShop Mobile App Creator-Modul im Backend Ihrer Website konfigurieren. Erfahren Sie mehr über das Testen von PrestaShop Mobile App Maker in hier.
3.0 Erstellen Sie Ihre PrestaShop Mobile App in 3 Simple Steps
Wir hoffen, dass Ihnen die Demo unserer PrestaShop Mobile Apps gefallen hat und Sie gefunden haben, wonach Sie gesucht haben. Nun ist es an der Zeit, ein natives Paar Apps für Ihren Shop zu erwerben. Der Prozess zum Erstellen einer mobilen eCommerce-App ist so einfach wie möglich. Befolgen Sie einfach die einfachen Schritte von 3 und Ihre App ist in 1-2 Werktagen fertig.
Schritt 1: Installieren Sie das Modul auf Ihrer Website
Herunterladen
Schritt 2: Teilen Sie Ihre App-Spezifikationen
Teilen Sie Ihre App-Details / Anforderungen in
Schritt 3: Holen Sie sich Ihre Apps in 1-2 Tagen
Unsere erfahrenen und professionellen Entwickler erstellen Ihre Apps so, dass sie genau den gemeinsam genutzten Details entsprechen. In 1-2-Tagen werden wir uns mit APK / IPA-Dateien bei Ihnen melden.
Hinweis: Sie können diese APK / IPA-Dateien in den jeweiligen App Stores veröffentlichen. Siehe auch folgende Links:
Immer noch ein Problem? Sagen Sie uns, wir würden die Apps für Sie veröffentlichen. Wenn Sie Fragen haben, wenden Sie sich bitte an support@knowband.com.
Sobald der PrestaShop Mobile App Maker erfolgreich auf Ihrer Website installiert wurde, ist es Zeit, das Admin-Panel von PrestaShop Mobile App Creator zu konfigurieren. Wenn Sie in KnowBand Mobile App Builder auf die Option "Konfigurieren" klicken, wird die folgende Registerkarte mit benutzerfreundlichen Oberflächen angezeigt. Lassen Sie uns sie eins nach dem anderen eingrenzen.
5.1 Allgemeine Einstellungen
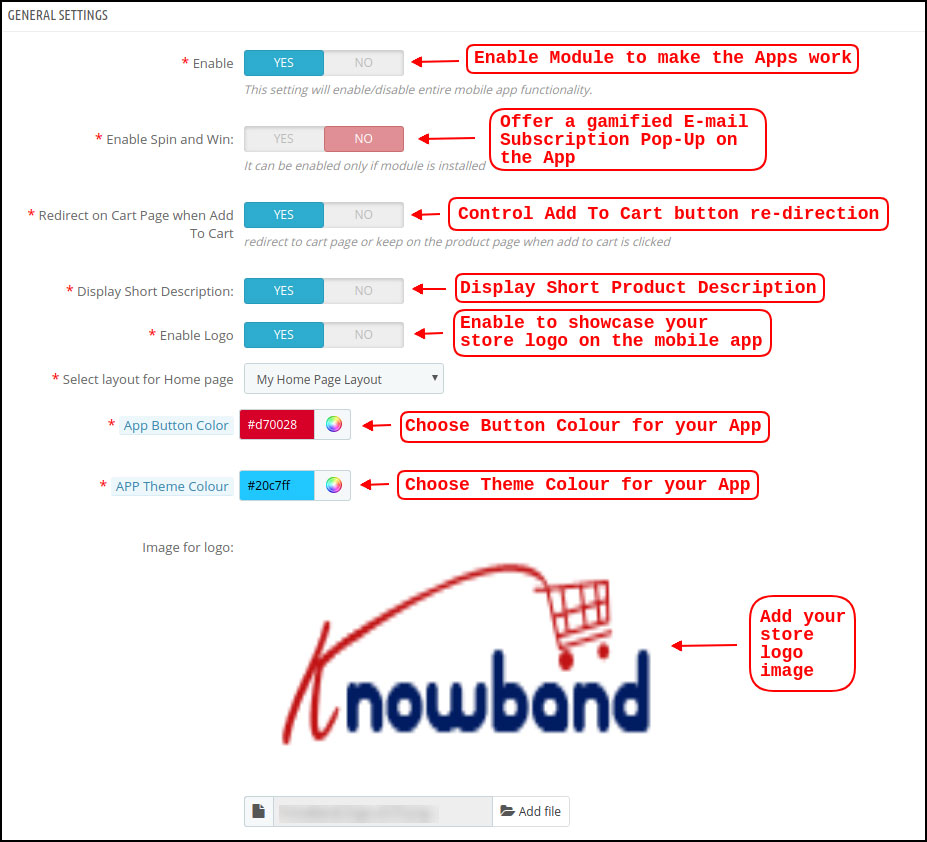
Auf der Registerkarte Allgemeine Einstellungen werden die Einstellungen angezeigt, die zum Ausführen Ihrer mobilen App auf den Geräten des Benutzers erforderlich sind. Diese Registerkarte enthält alle erforderlichen allgemeinen Optionen, um die App mit Ihren make it-Funktionen auf Geräten zu synchronisieren.
a) Plugin aktivieren: Aktivieren Sie das PrestaShop Mobile App Creator-Plugin, damit Ihre mobile App auf den Geräten der Benutzer funktioniert.
b) Aktivieren Sie Spin und Win: Aktivieren Sie diese Option, um ein gamifiziertes Popup-Fenster auf dem Startbildschirm anzuzeigen, wenn ein Benutzer die App öffnet. Es kann verwendet werden, um Rabatte / Angebote anzubieten und deren E-Mails als Gegenleistung für Marketingzwecke zu erfassen. Damit diese Funktionalität funktioniert, müssen Sie das Spin and Win-Modul von Knowband auf Ihrer Website installieren.
c) Auf der Warenkorbseite umleiten, wenn in den Warenkorb: Mit dieser Funktion können Sie die Navigation der Schaltfläche "In den Warenkorb" steuern. Sie können Ihre Benutzer entweder in den Warenkorb umleiten oder sie auf der Produktseite belassen, wenn sie auf die Schaltfläche In den Warenkorb tippen. Dies erhöht die Chancen auf einen Zukauf.
d) Kurzbeschreibung anzeigen: Aktivieren Sie diese Option, um die Kurzbeschreibung des Produkts zusammen mit der vollständigen Beschreibung und anderen Details auf dem Produktbildschirm anzuzeigen.
e) Layout auswählen: Wählen Sie das gewünschte Startseitenlayout für Ihre PrestaShop-App. Sie können im Backend mehrere Startbildschirm-Layouts für verschiedene Festivals und Themen erstellen und diese gemäß Ihren Anforderungen im Geschäft verwenden.
f) Farbe der App-Schaltfläche: Wählen Sie die gewünschte Tastenfarbe für Ihre PrestaShop Mobile App.
g) Farbe des App-Themas: Wählen Sie die gewünschte Designfarbe für Ihre PrestaShop Mobile App.
h) Bild für Logo: Laden Sie Ihr Geschäftslogo hoch, damit es in der oberen Kopfzeile der App angezeigt wird. Dies förderte Ihre Marke unter den weltweiten mobilen Käufern.
i) Deaktivierte Versandmethoden: Wählen Sie die gewünschten Versandarten aus, die nicht in Ihrer PrestaShop Mobile App angezeigt werden sollen.
j) Aktivierte CMS-Seiten: Wählen Sie die gewünschten CMS-Seiten aus, die in den mobilen Apps angezeigt werden sollen.
k) Aktivieren Sie das Anforderungsprotokoll-Reporting: Aktivieren Sie die Anmeldung bei den mobilen Apps, um Details zu ungewöhnlichem Verhalten Ihrer App abzurufen.
l) Live-Chat-Unterstützung aktivieren: Aktivieren Sie die Chat-Option Zopim (Zendesk) in Ihren PrestaShop Mobile Apps. Damit die Chat-Funktionalität funktioniert, ist ein Chat-API-Schlüssel erforderlich, der Ihnen zusammen mit Ihrer App zur Verfügung gestellt wird.
m) WhatsApp Chat-Unterstützung aktivieren: Aktivieren Sie die WhatsApp-Chat-Option in Ihren PrestaShop Mobile Apps. Die Benutzer können Sie direkt über Ihre im Backend eingegebene WhatsApp-Nummer kontaktieren.
n) Aktivieren / Deaktivieren der Rufnummernregistrierung: Aktivieren Sie die Anmeldeoption für die Telefonnummer in Ihrer PrestaShop Mobile App und lassen Sie Ihre Benutzer mit der OTP-Überprüfung authentifizieren.
o) Aktivieren Sie die URL-Codierung von Bildlinks: Aktivieren Sie diese Funktion, um Nicht-ASCII-Zeichen in der App zu unterstützen.
5.2 Push-Benachrichtigungseinstellungen
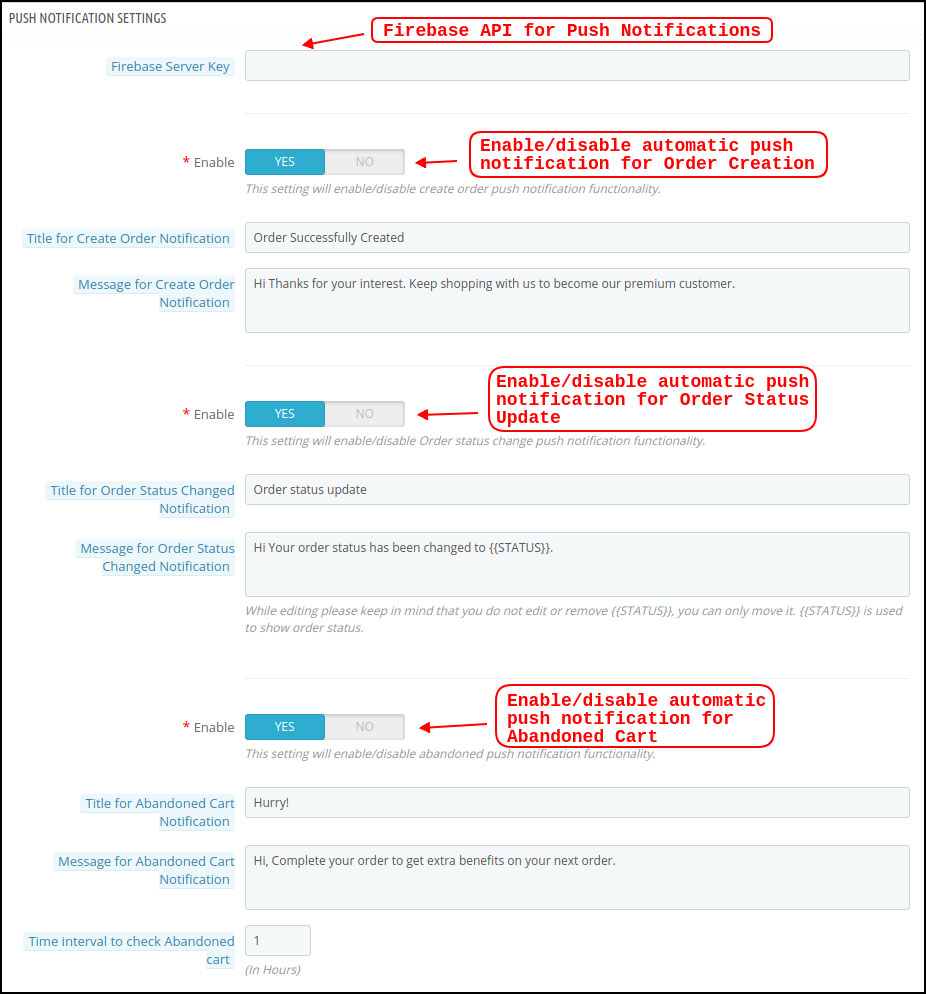
Der PrestaShop Mobile App Creator für Android / iOS nutzt die Push-Benachrichtigungsfunktion mithilfe der Google Primary Services für die Push-Benachrichtigung für Mobilgeräte. Dieses praktische Marketing-Tool sorgt für sofortige Aufmerksamkeit und steigert den Umsatz. Mit Ihrer PrestaShop Mobile App ist es nur eine Nachricht entfernt, Ihre täglichen Angebote hervorzuheben. Mit PrestaShop Mobile App Maker sind sowohl automatische als auch benutzerdefinierte Benachrichtigungen verfügbar.
a) Firebase-Server-Schlüssel: Der Firebase-Serverschlüssel wird zum Konfigurieren der Push-Benachrichtigungen für die Anwendung verwendet. Dieser Schlüssel stellt sicher, dass die Benachrichtigungen von all Ihren App-Benutzern weltweit empfangen werden.
b) Benachrichtigung zur Auftragserstellung aktivieren / deaktivieren: Aktivieren / Deaktivieren Sie die automatische Push-Benachrichtigung, die an die App-Benutzer gesendet wird, um die Bestellung erfolgreich zu erstellen. -> Titel und Nachricht für Push-Benachrichtigung:?Enter title and message of push notification for successful order creation.
c) Benachrichtigung über Statusänderung der Bestellung aktivieren / deaktivieren:Aktivieren / Deaktivieren Sie die automatische Push-Benachrichtigung, die an die App-Benutzer gesendet wird, um Aktualisierungen ihres vorherigen Bestellzustands zu erhalten. -> Titel und Nachricht für Push-Benachrichtigung:?Enter title and message of push notification whenever there is an update in previous order delivery status.
d) Benachrichtigung über verlassenen Einkaufswagen aktivieren / deaktivieren: Aktivieren / Deaktivieren Sie die automatische Push-Benachrichtigung, die an Benutzer gesendet wird, die den Einkaufswagen ohne erfolgreichen Kauf verlassen haben. -> Titel und Nachricht für Push-Benachrichtigung:?Enter the title & message of push notification for abandoned cart app users.
e) Zeitintervall:?Interval (in hours) for sending Push Notification to app users who have abandoned their cart without successful purchase.
5.3 Push-Benachrichtigungsverlauf
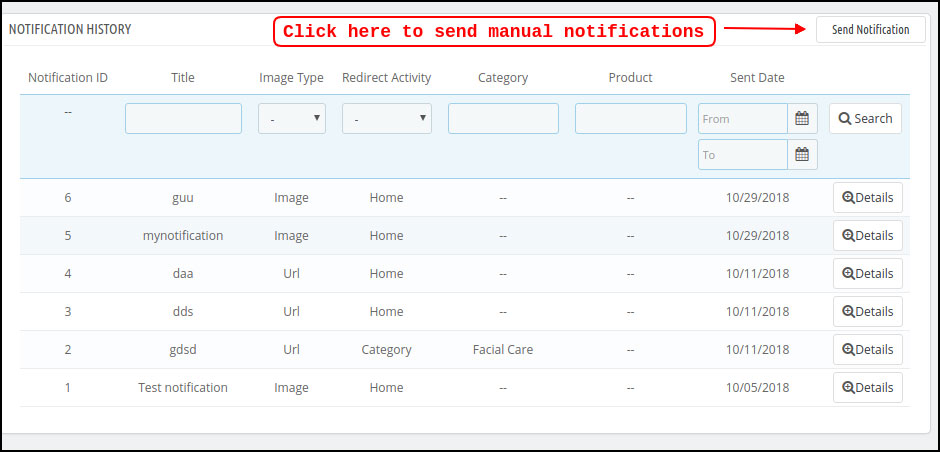
Diese Registerkarte enthält den Verlauf aller Arten von Push-Benachrichtigungen, die an jeden Benutzer mit den entsprechenden Details gesendet wurden. Der Händler kann sich über jede früher gesendete Benachrichtigung informieren. Diese Registerkarte bietet auch die Möglichkeit, eine benutzerdefinierte Benachrichtigung an die vom Backend gestalteten Benutzer zu senden. Sie können sie durch manuell gesendete Benachrichtigungen einfach auf geschäftsbezogene Details oder Rabatte aufmerksam machen.
Benachrichtigung senden:
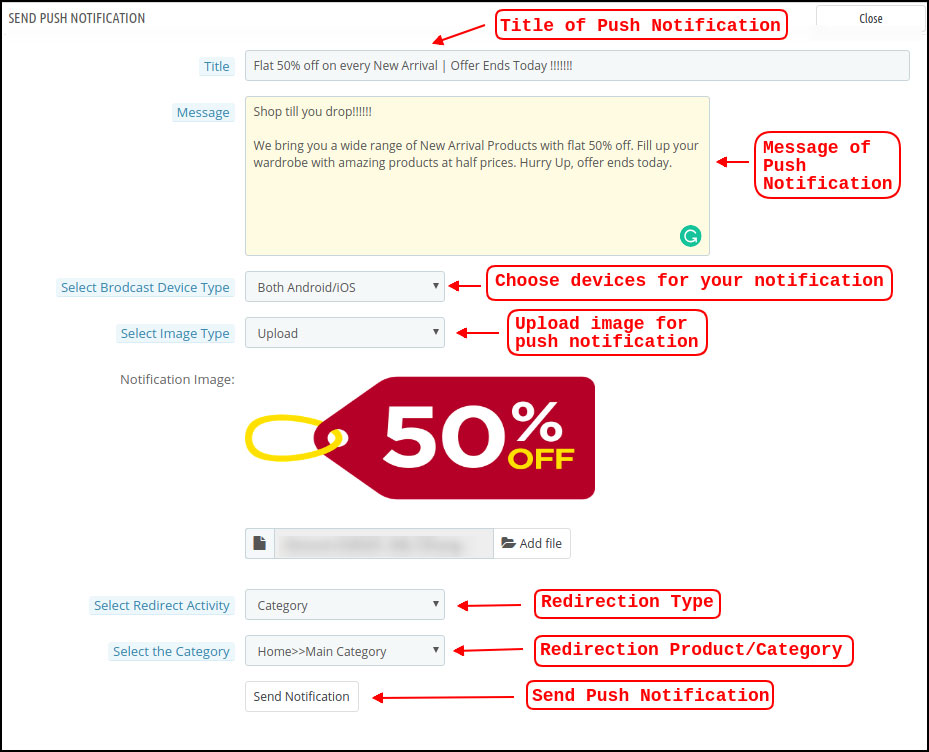
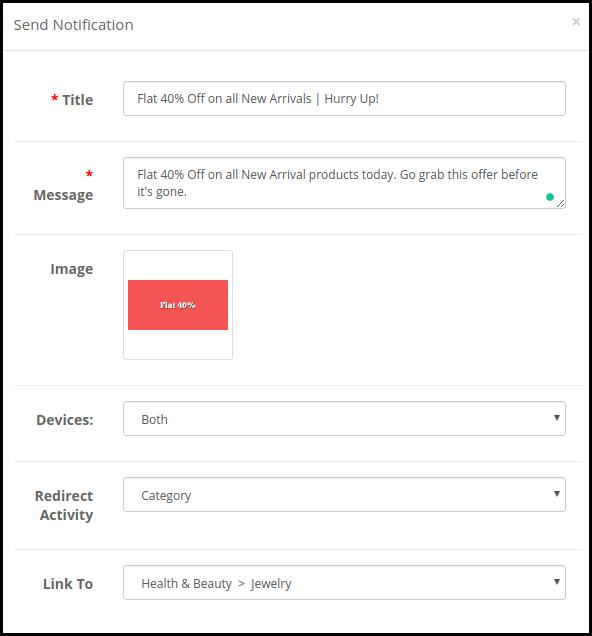
Mit dieser Option können Sie eine manuelle Benachrichtigung an die Benutzer der App senden. Sie können den Titel, die Nachricht, die Landing Page, das Bild usw. und die Benachrichtigung Ihrer Wahl wie im folgenden Schnappschuss gezeigt konfigurieren:
a) Titel der Push-Benachrichtigung: Der Titel Ihrer manuellen Push-Benachrichtigung, die an die App-Benutzer gesendet werden soll.
b) Nachricht der Push-Benachrichtigung: Die Nachricht Ihrer manuellen Benachrichtigung, die an die App-Benutzer gesendet werden soll.
c) Gerätetyp: Sie können die Benutzer auf Android / iOS oder auf beiden auswählen, an die Ihre manuelle Push-Benachrichtigung gesendet werden soll.
d) Bildtyp:?You can upload the desired image/banner justifying your notification. The banner image can be uploaded or used through an existing URL.
e) Benachrichtigungsbild: Der Store-Administrator kann eine Vorschau des Benachrichtigungsbilds anzeigen und analysieren, wie es auf den Apps der Benutzer angezeigt wird.
f) Bild-URL: Die tatsächliche URL des Benachrichtigungsbilds, das an die App-Benutzer gesendet werden soll.
g) Umleitungsaktivität:Sie können die Weiterleitung Ihrer Benachrichtigung wählen, indem Sie hier unter Startbildschirm / Beliebige Kategorie / Beliebiges Produkt auswählen. Unabhängig davon, was Sie einstellen, werden Ihre Benutzer beim Tippen auf die Push-Benachrichtigung an dieselbe Adresse umgeleitet.
h) Wählen Sie die Kategorie / das Produkt:?You can choose any relevant category/product screen for your notification.
i) Benachrichtigung senden: Sobald Sie Ihre Benachrichtigung erstellt und in der Vorschau angezeigt haben, ist es an der Zeit, diese auf Ihren Apps zu senden.
5.4-Zahlungsmethoden
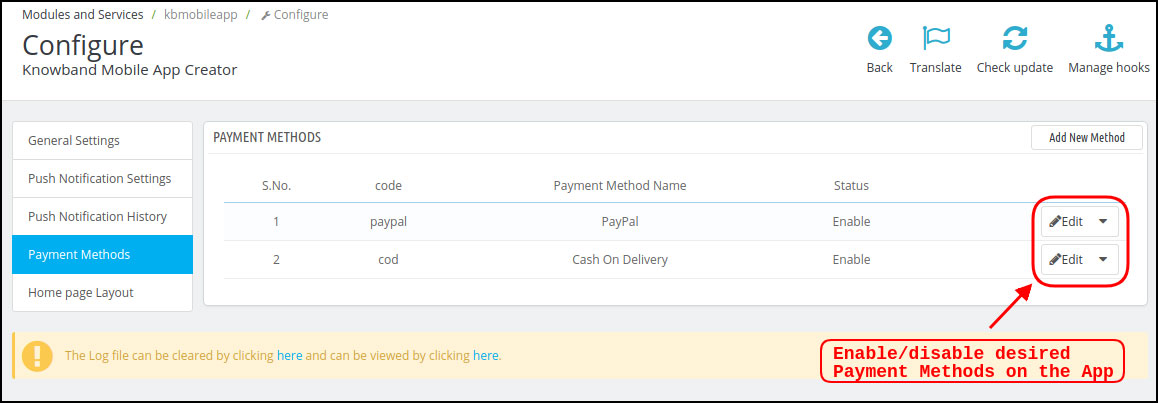
Der PrestaShop Mobile App Creator für Android und iOS unterstützt alle Arten von Website-Zahlungsmethoden für Android- und iOS-Apps. Darüber hinaus bietet es PayPal- und Nachnahmezahlungsoptionen sowie die Flexibilität, auch andere native Zahlungsmethoden hinzuzufügen.
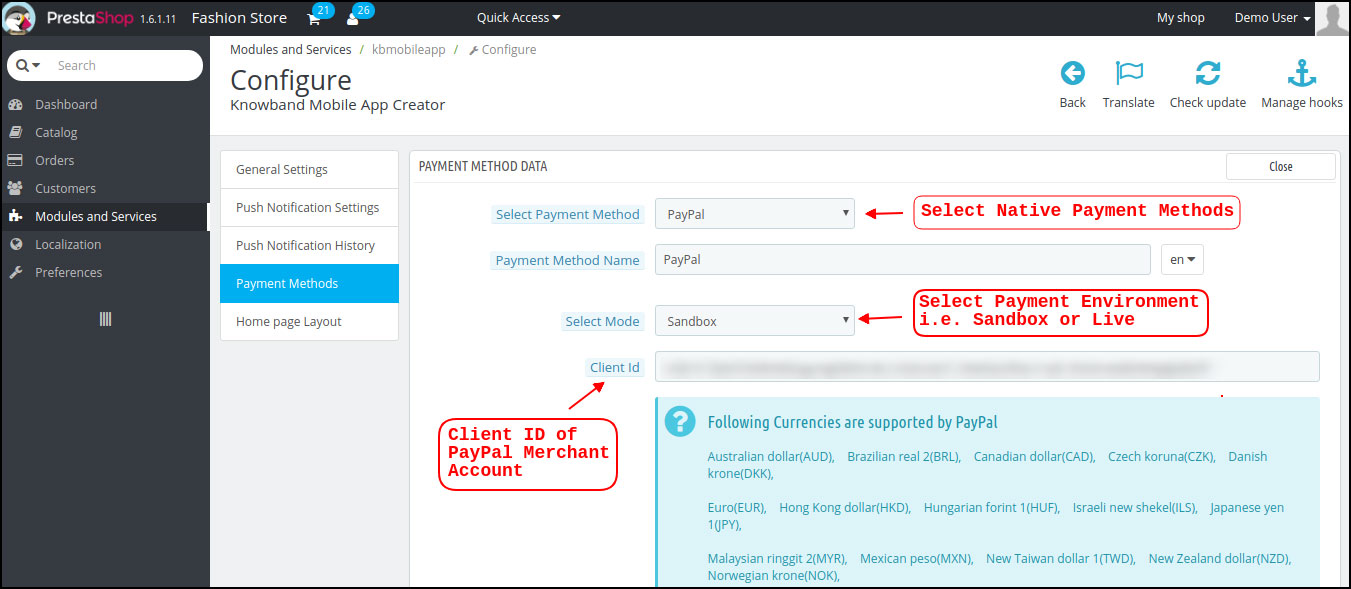
Sie können die folgenden Parameter in den Standardzahlungsmethoden (PayPal) bearbeiten:
a) Name der Zahlungsmethode: Bearbeiten Sie den Namen der Zahlungsmethode, die in der App angezeigt werden soll.
b) Modus auswählen: Wählen Sie die Zahlungsumgebung aus, z. B. Sandbox oder Live. Diese Einstellungen sind nur für den Fall verfügbar, dass der Store-Administrator die Zahlungsmethode testen möchte, bevor er fortfährt.
c) Kundennummer:?This is used in the case of PayPal Payment in order to identify the Merchant Account to which the Payment has to be made while placing the order.
5.5-Homepage-Layout
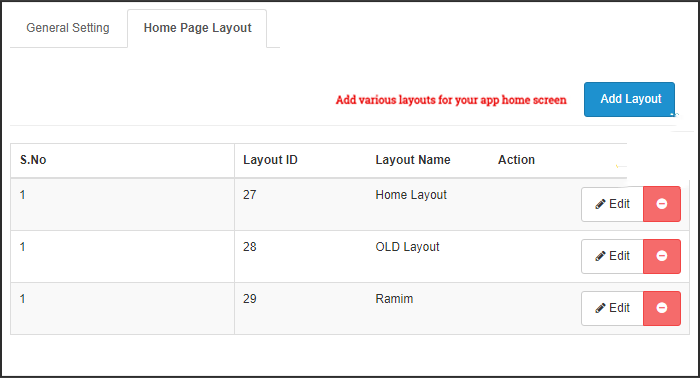
Dies ist eine der erstaunlichsten Funktionen des PrestaShop Mobile App Builder-Plugins zum Entwerfen und Erstellen mehrerer Startbildschirm-Layouts unter Verwendung verschiedener Designattribute / -elemente. Diese Registerkarte enthält die Liste aller zuvor konfigurierten Startbildschirm-Layouts basierend auf verschiedenen Themen und Schriftarten, wie im folgenden Schnappschuss gezeigt:
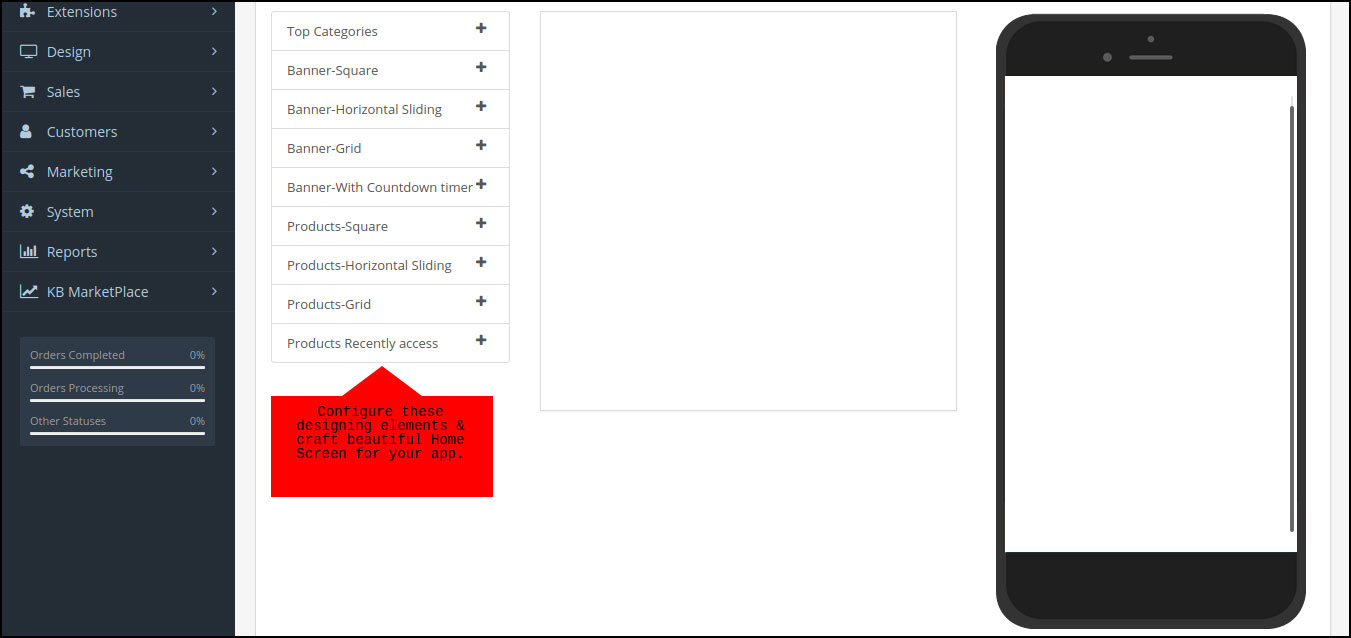
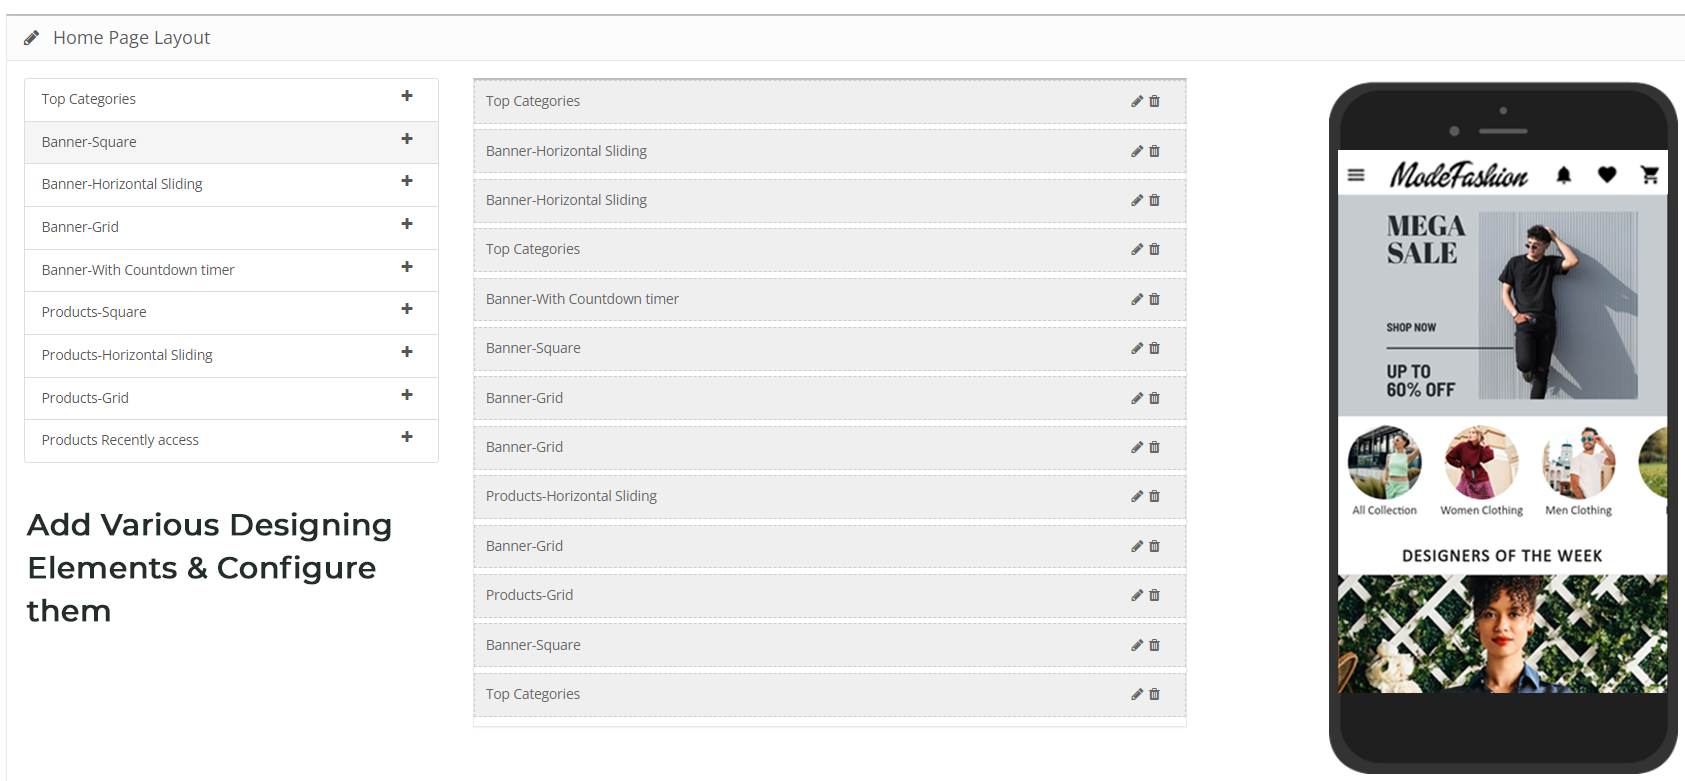
Um die Layouts der Startseite zu konfigurieren, stehen im Backend die folgenden Elemente zur Verfügung:
oben
Quadrat
Horizontal
Gitter
Countdown
Gitter
Horizontal
Vor kurzem
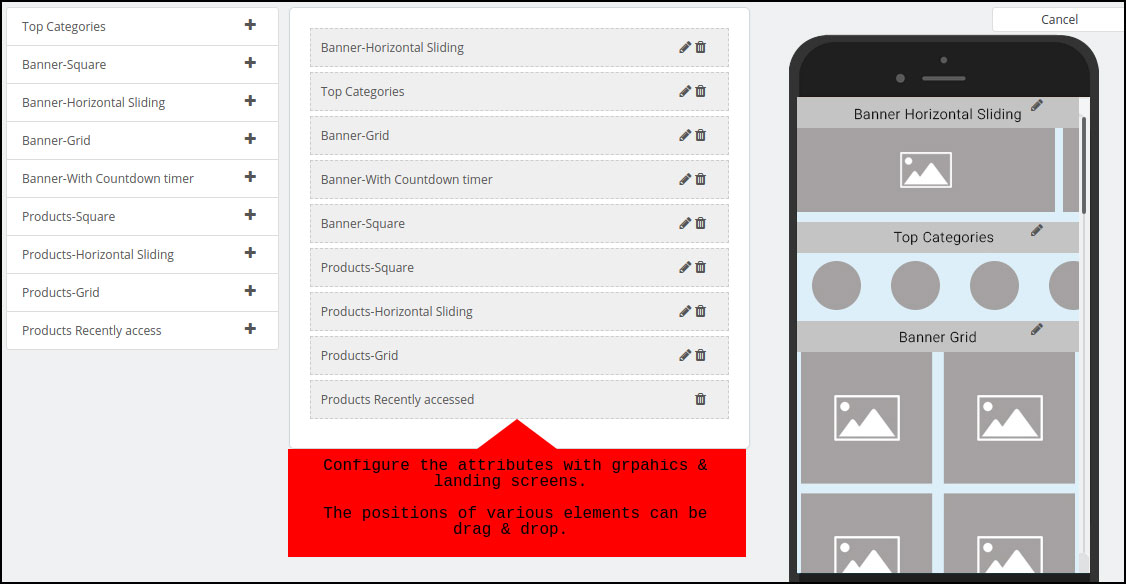
Der Händler kann eines dieser Attribute konfigurieren und verwenden, um mehrere Layouts zu erstellen und zu speichern. Diese Layouts können gemäß dem Thema und den Anforderungen verwendet werden. Auch die Positionierung verschiedener Elemente kann mit einer einfachen Drag & Drop-Funktion geändert werden.
oben
oben
Quadrat
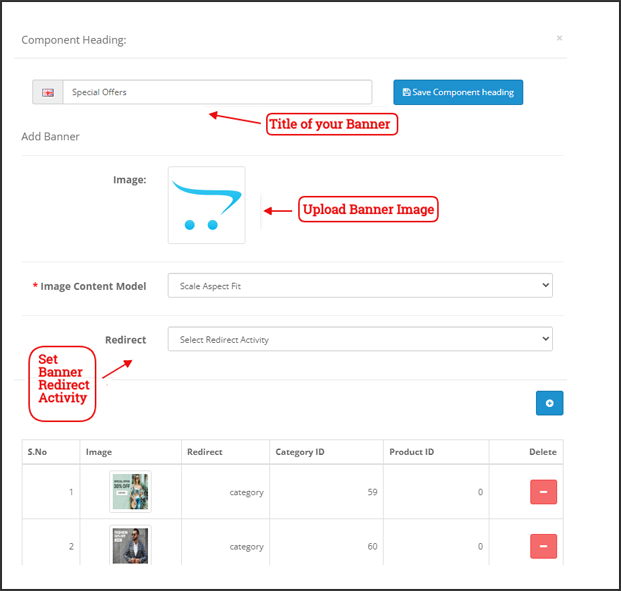
Ein weiteres Attribut ist die quadratische Bannerliste, mit der ein quadratisches Banner auf dem Startbildschirm der App angezeigt wird. Sie können das Banner anpassen, indem Sie das richtige Bild und den richtigen Startbildschirm auswählen.
Horizontal
Dies sind die rechteckigen Elemente, die beim horizontalen Schieben verfügbar sind und die vom Backend aus vollständig angepasst werden können.
Gitter
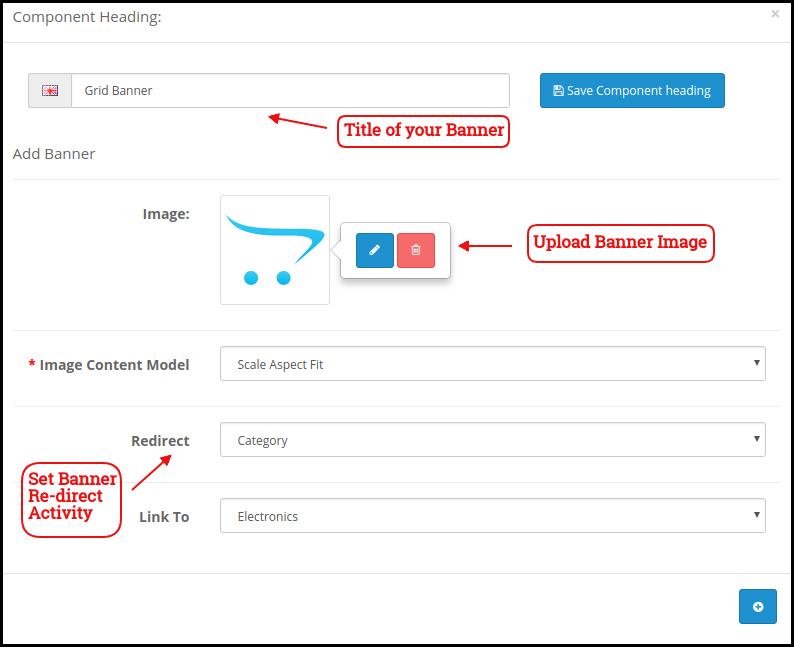
Hierbei handelt es sich um quadratische Banner, die auf dem Startbildschirm in der Rasterform aufgelistet sind. Sie können auf dem Startbildschirm so viele Banner einstellen, wie Sie möchten, und das Bild und die Zielseite entsprechend anpassen.
Countdown
Das
Quadrat
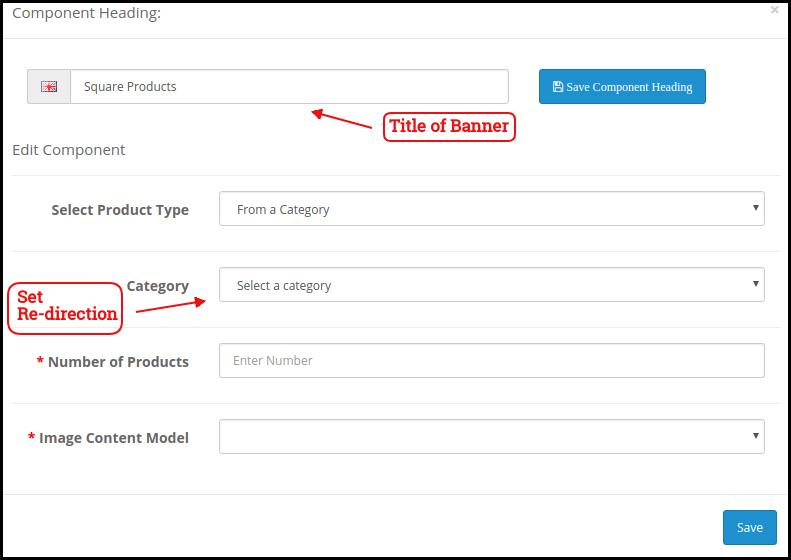
Ab Banner bietet der PrestaShop Mobile App Creator Produkte zur Anzeige auf dem Startbildschirm in Form einer quadratischen Auflistung an.
Horizontale Gleitprodukte
Sie können die Produkte in Form von horizontalen Schiebereglern hinzufügen. Die ausgewählten Produkte können einer bestimmten Kategorie oder anderen Höhepunkten wie Bestsellern, Vorgestellten Produkten usw. angehören.
Rasterprodukte:
Die Produkte können auch in Form von Rasterauflistungen auf dem Startbildschirm hinzugefügt werden. Die Produkte können aus jeder Kategorie ausgewählt werden.
Kürzlich aufgerufene Produkte:
Der PrestaShop Mobile App Creator bietet das Element "Zuletzt verwendet", auf dem die zuletzt verwendeten Produkte angezeigt werden, die vom Benutzer angezeigt werden. Sie können das Element einfach in Ihr Layout einfügen, um es auf dem Startbildschirm anzuzeigen.
6.0 Mobile App Bildschirme
6.1-Startbildschirm
Der Startbildschirm Ihrer PrestaShop Mobile App ist genau so, wie Sie es möchten. Der PrestaShop Mobile App Maker bietet umfassende Flexibilität, um den Startbildschirm in Ihre Hände zu legen. Mit mehreren Bannern (Quadrat, Gitter, Schieben), Produkten (Quadrat, Gitter, Schieben), Countdown-Timer-Bannern und der Registerkarte "Neueste Produkte" im Backend können Sie intuitive Layouts für Ihren Startbildschirm erstellen. Auf dem Startbildschirm der App stehen folgende Optionen zur Verfügung:
Darüber hinaus kann die Positionierung verschiedener Gestaltungselemente je nach Anforderung geändert werden.
1. Dynamische Layouts:
Mit verschiedenen Elementen können Sie verschiedene Layouts im Backend erstellen, speichern und für verschiedene Events und Festivals wiederverwenden. Sie können Ihren App-Startbildschirm dynamisch entwerfen und gestalten.
2. Markenlogo:
Ihr Geschäftslogo wird im linken mittleren Bereich der oberen Kopfzeile Ihrer PrestaShop Mobile App angezeigt. Das Logo ist im Modul-Backend vollständig konfigurierbar und kann einschließlich Bildwechsel aktiviert / deaktiviert werden.
3. Suche:
Mit der Suchoption können die Käufer von mobilen Apps einfach und schnell das finden, was sie möchten. In Ihrer PrestaShop Mobile App gibt es zwei Möglichkeiten für die Produktsuche:
-> Mit Text: Ihre App-Benutzer können nach gewünschten Produkten suchen, indem Sie einige verwandte Stichwörter eingeben. Die PrestaShop Mobile App zeigt relevante Ergebnisse für dieses Keyword an.
-> Mit Stimme: Sie müssen nichts eingeben, Ihre PrestaShop Android App ist mit der erweiterten Sprachsuchfunktion ausgestattet. Die Benutzer können die Produkte nur nach relevanten Stichwörtern durchsuchen.
4. Wunschzettel Tasche:
Die Wunschliste wird in der Kopfzeile Ihrer PrestaShop Mobile App mit allen mit Lesezeichen versehenen Produkten angezeigt. Die App-Benutzer können ihre gewünschten Produkte für den zukünftigen Kauf in der Wunschliste speichern.
5. Einkaufswagen:
Der Warenkorb ist in der oberen rechten Ecke des Startbildschirms der App verfügbar. Dort können sich die Nutzer über die Produkte informieren, die sie in ihren Warenkorb gelegt haben.
6. WhatsApp / Zendesk-Chat:
Rechts unten auf dem Startbildschirm befindet sich eine Live-Chat-Option für Verkäufer und Käufer. Die Käufer mobiler Apps können Ihnen einfach und direkt eine Nachricht zu ihrer Anfrage senden und Sie können sie sofort lösen.
6.2-Akkordeonmenü (Navigationsleiste)
Die PrestaShop Mobile Apps für Android und iOS bieten eine ordnungsgemäße Kategorisierung der auf der Website verfügbaren Produkte. Mobile Käufer können problemlos Produkte aus mehreren Kategorien durchsuchen. Alle CMS-Seiten sind auch im Akkordeon-Menü verfügbar. Es bietet die folgenden Optionen:
1. Mein Konto
Der Bildschirm "Mein Konto" enthält alle Benutzerinformationen wie persönliche Daten, Lieferadresse (n) und Bestelldaten. Es gibt sogar eine Option für die Benutzer, um ihren Fingerabdruck zu registrieren. Die Käufer können alle mit ihnen verbundenen Informationen einsehen und ihre persönlichen Daten sowie das Anmeldekennwort aktualisieren.
2. Kategorien
Diese Kategorien entsprechen denen Ihrer Website. Sie können sie dementsprechend zuordnen und Ihren App-Benutzern eine Kategorisierung auf 3-Ebene zum problemlosen Browsen anbieten.
3. CMS-Seiten
Verschiedene CMS-Seiten wie Über uns, Kontakt, Allgemeine Geschäftsbedingungen usw., die auf Ihrer Website verfügbar sind, werden hier angezeigt. Sie können aus dem PrestaShop Mobile App Builder-Backend das gewünschte auswählen, das in der Mobile App angezeigt werden soll.
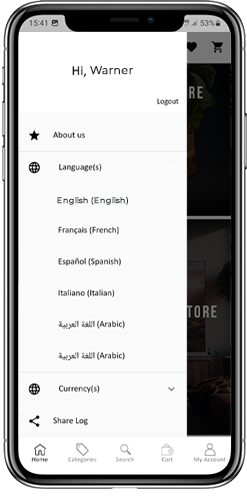
4. Sprachen)
Mit der Sprachoption können Ihre Benutzer die PrestaShop Mobile-App in ihrer Muttersprache anzeigen. Alle verfügbaren Sprachen werden nur unter dieser Option angezeigt.
5. Währung (en)
Alle auf Ihrer E-Commerce-Website verfügbaren Währungen werden auch in der PrestaShop Mobile App angezeigt. Die Käufer können den Produktpreis in ihrer gewünschten Währung anzeigen und kaufen.
6. Einloggen Ausloggen
Ihre Benutzer können sich mit dieser Option ganz einfach bei PrestaShop Mobile App an- und abmelden.
6.3-Kategoriebildschirm:
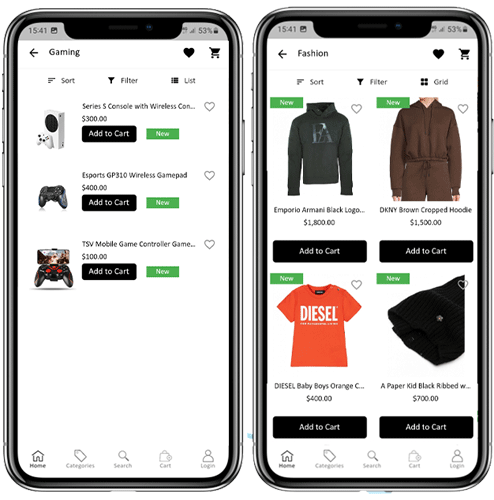
Alle Unterkategorien, übergeordneten Kategorien und anderen zugehörigen Kategorien sind in Ihrer PrestaShop Mobile App verfügbar. Der Kategoriebildschirm ist in zwei Richtungen übersichtlich gestaltet Grundansichten: Gitter & Liste. Das Produktbild, der Name, der Preis und der Rabatt werden in allen Auflistungen mit der Option angezeigt, sie auch in die Wunschliste aufzunehmen. Die mobilen Apps mit PrestaShop Mobile App Builder verfügen über eine mehrschichtige Navigation, die die Produktsuche vereinfacht. Folgende Optionen stehen auf den Kategoriebildschirmen zur Verfügung:
1. Sortieren:
Mit dieser Option können die Käufer die gewünschte Reihenfolge auswählen, in der die Preise für die Kategorieprodukte sortiert werden sollen. In Ihren Apps sind zwei Sortierreihenfolgen verfügbar: Preis: Niedrig zu Hoch und Preis: Hoch zu Niedrig.
2. Filter:
Die Option zum Filtern von Produkten vereinfacht die Produktsuche. Die App-Benutzer können die Produkte in Ihrer PrestaShop Mobile App anhand verschiedener Attribute wie Größe, Farbe, Zusammensetzung, Zustand, Hersteller, Preis usw. filtern. Mit diesen Filtern können die Benutzer innerhalb von Minuten ihr Lieblingsprodukt suchen.
6.4-Produktbildschirm:
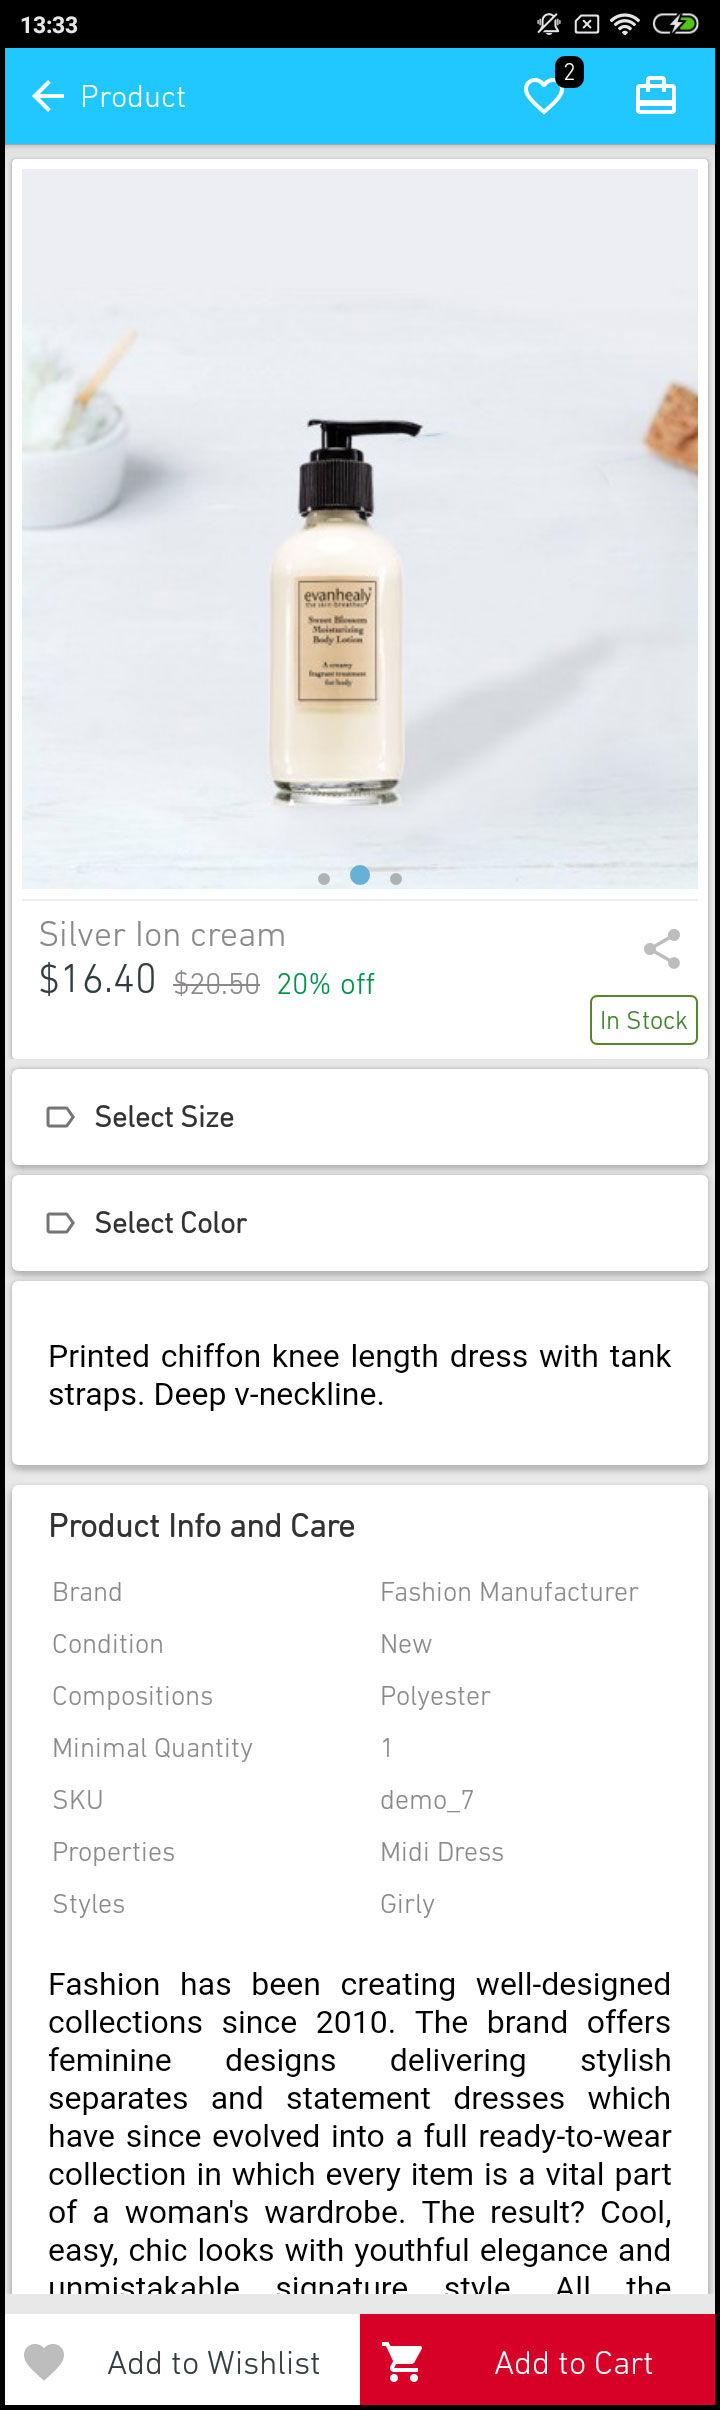
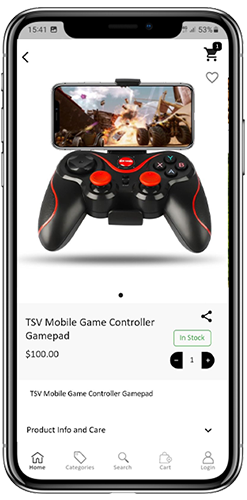
Der Produktbildschirm Ihrer PrestaShop Mobile App ist einfach und faszinierend. Es werden mehrere Bilder desselben Produkts zusammen mit Name und Preis angezeigt. Die Produktverfügbarkeit wird je nach Lagerstatus auch als "Auf Lager" oder "Nicht auf Lager" angezeigt. Es enthält die folgenden anderen Optionen:
1. Produktoptionen:
Auf diesem Bildschirm werden alle produktbezogenen Optionen wie Größe, Farbe usw. angezeigt. Diese Produktoptionen entsprechen denen auf der Website.
2. kurze Beschreibung
Benutzer können die Kurzbeschreibung Ihres Produkts lesen, um sich schnell zu entscheiden.
3. Produktinfo & Pflege
Die vollständigen Produktinformationen, wie sie auf der Website aufgeführt sind, werden hier angezeigt. Die App-Benutzer können hier vollständige Produktdetails abrufen.
4. Zur Wunschliste hinzufügen:
Die Benutzer der mobilen App können das Produkt direkt mit einem Lesezeichen versehen, indem sie links unten auf dem Produktbildschirm auf "Zur Wunschliste hinzufügen" tippen.
5. In den Warenkorb legen:
Wie durch den Namen "In den Warenkorb" Button wird das Produkt direkt in den Warenkorb gelegt und der Benutzer kann mit dem Kauf fortfahren.
6. Produkt-Social-Sharing:
Auf diesem Bildschirm besteht die Möglichkeit, Ihr Produkt auf mehreren sozialen Plattformen, Bluetooth und E-Mail, freizugeben. Die App-Benutzer können die Produkte auf mehreren sozialen Plattformen für ihre Freunde / Verwandten freigeben und viele Benutzer zu Ihrer App locken.
6.5 Wishlist Screen:
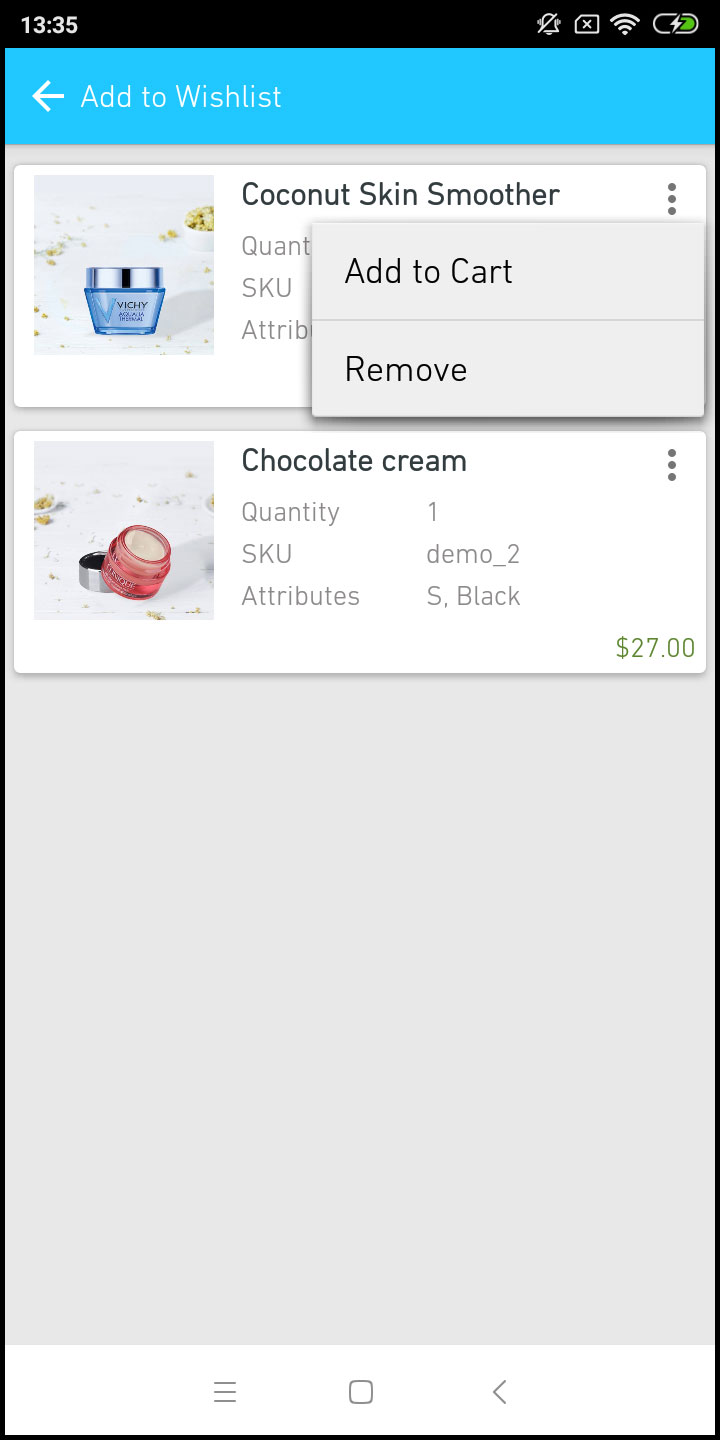
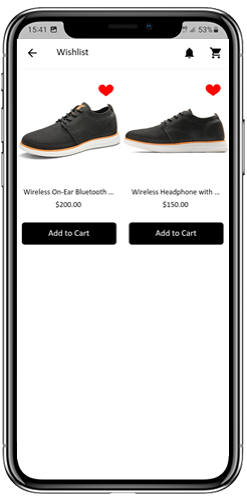
Ihr PrestaShop Mobile App Creator verfügt über eine Wishlist-Tasche, mit der Benutzer Produkte für zukünftige Einkäufe als Lesezeichen speichern können. Die Benutzer können von hier aus die Liste aller mit Lesezeichen versehenen Produkte anzeigen. Es gibt zwei Möglichkeiten:
1. In den Warenkorb legen:
Die App-Benutzer können das mit einem Lesezeichen versehene Produkt direkt in den Warenkorb legen, indem sie die Option In den Warenkorb wählen.
2. Von Wunschliste entfernen:
Die Benutzer können sogar jedes Produkt aus der Wunschliste entfernen, wenn sie dies nicht kaufen möchten.
6.6-Anmeldebildschirm
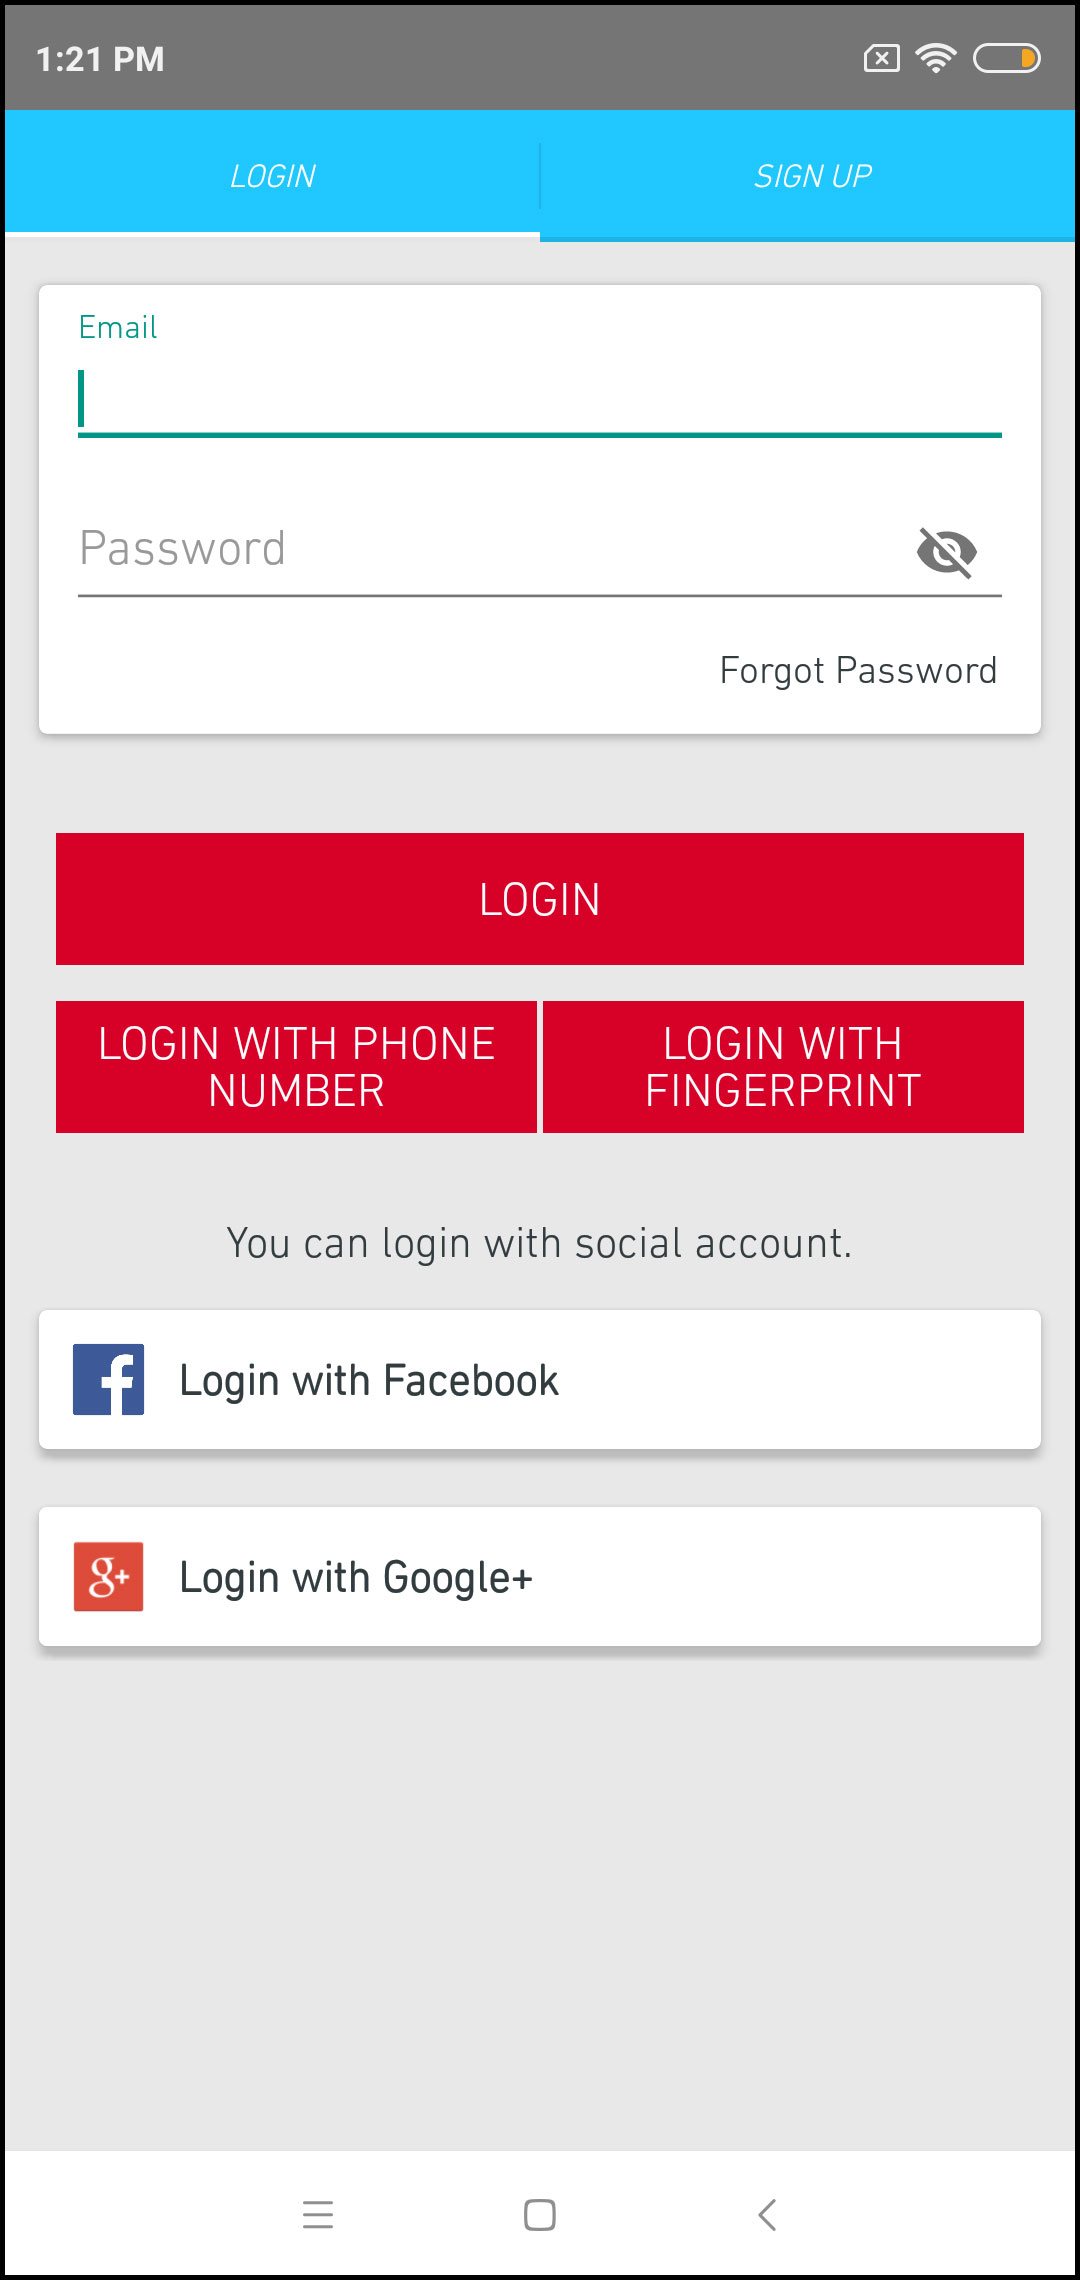
Der PrestaShop Mobile App Creator bietet verschiedene Ein-Tipp-Anmeldemöglichkeiten und vereinfacht den Anmelde- / Registrierungsprozess:
1. Anmeldung
Die App-Benutzer können sich mit E-Mail-Anmeldeinformationen authentifizieren und auf Apps zugreifen.
2. Anmelden
Alle neuen App-Benutzer können sich über die mobile App anmelden und ihr Konto im Store erstellen. Im Anmeldeformular der PrestaShop Mobile App werden nur relevante Details abgefragt.
3. Einloggen mit Telefonnummer
Ihre mobile App bietet eine einfachere und zuverlässigere Anmeldeoption für Telefonnummern, mit der die Benutzer die OTP- und Anmelde-App leichter überprüfen können.
4. Loggen Sie sich mit Fingerabdruck ein
Ihre Benutzer haben auch die Möglichkeit, sich mit Fingerabdruck-Authentifizierung anzumelden. So können Benutzer in Sekundenschnelle auf Apps zugreifen.
5. Mit Facebook einloggen
Die Benutzer können sich mit ihren Facebook-Zugangsdaten bei der App anmelden.
6. Mit Google+ anmelden
Die Benutzer können sich mit ihren Google+ Konto-Anmeldeinformationen bei der App anmelden.
6.7-Warenkorb-Bildschirm:
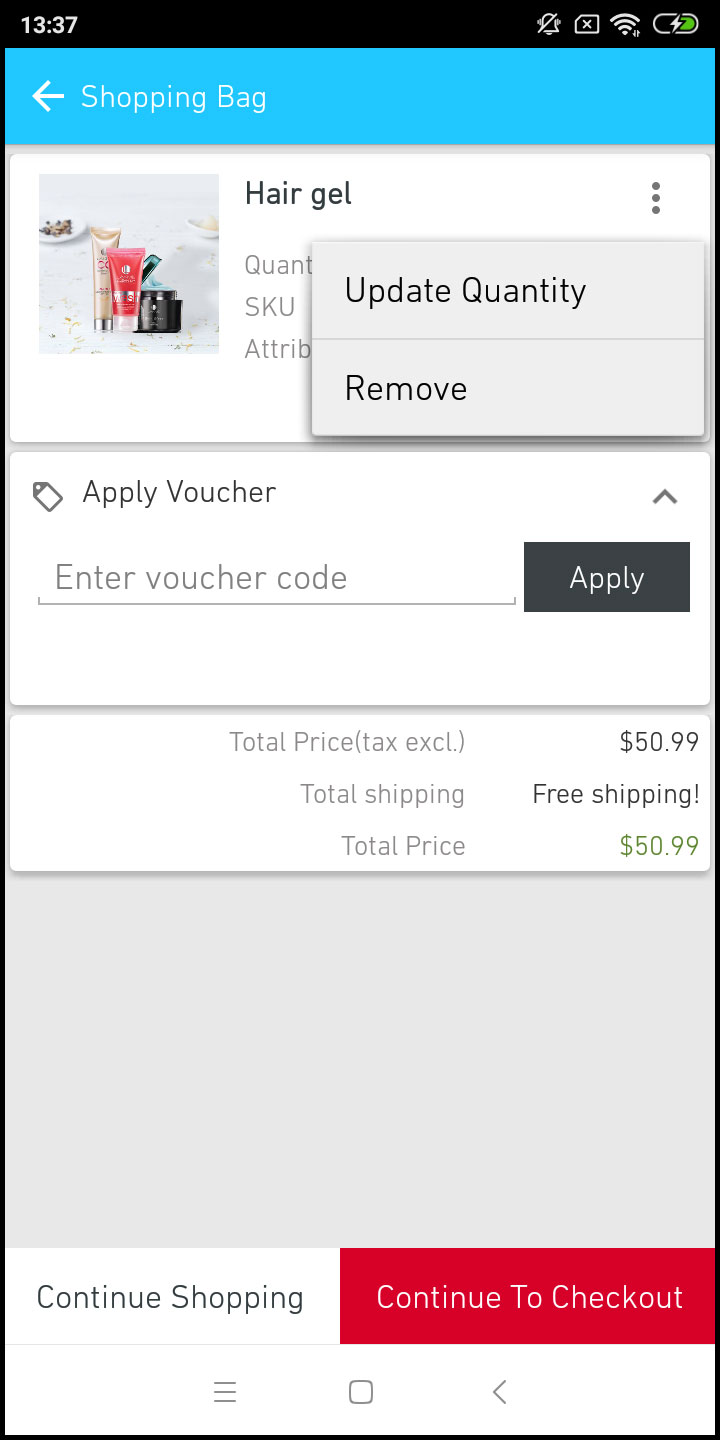
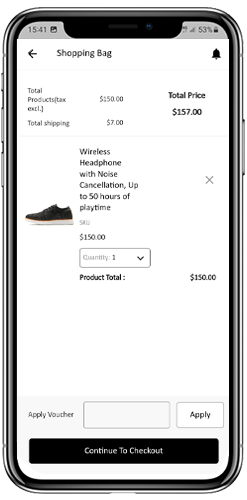
Auf dem Warenkorb-Bildschirm Ihrer PrestaShop Mobile App werden alle Produkte angezeigt, die dem Warenkorb hinzugefügt wurden. Die App-Benutzer können den Produktnamen, die Menge, den Gesamtpreis und die Versandkosten anzeigen. Dieser Bildschirm bietet folgende Optionen:
1. Gutschein einlösen
Mit dieser Option können die Benutzer Rabatte und Angebote erhalten, indem sie einen gültigen Coupon und Gutschein eingeben, die auf Ihrer Website ausgeführt werden.
2. Gesamtproduktpreis
Die Benutzer können die vollständigen Kosten ihrer Einkaufstasche von hier aus einsehen. Es wird automatisch nach jeder Aktualisierung mit Produktmenge oder Ergänzung aktualisiert.
3. Produktmenge aktualisieren
Die App-Benutzer können sogar die Produktmenge mit der Option "Menge aktualisieren" aktualisieren.
4. Produkt entfernen
Die App-Benutzer können das Produkt einfach aus dem Warenkorb entfernen, indem sie einfach auf die Option "Entfernen" tippen.
5. Mit dem Einkaufen fortfahren
Die App-Benutzer können den Warenkorb verlassen, um weitere Produkte in Ihrer App zu durchsuchen. Die Käufer mobiler Apps werden beim Tippen auf die Option Einkauf fortsetzen zum Startbildschirm weitergeleitet.
6. Weiter zur Kasse
Die Benutzer der mobilen Front-End-App können mit der Option "Weiter zur Kasse" zu den Bildschirmen "Kasse & Zahlung" wechseln. Sie werden auf dem Checkout-Bildschirm umgeleitet.
6.8 Checkout-Bildschirm
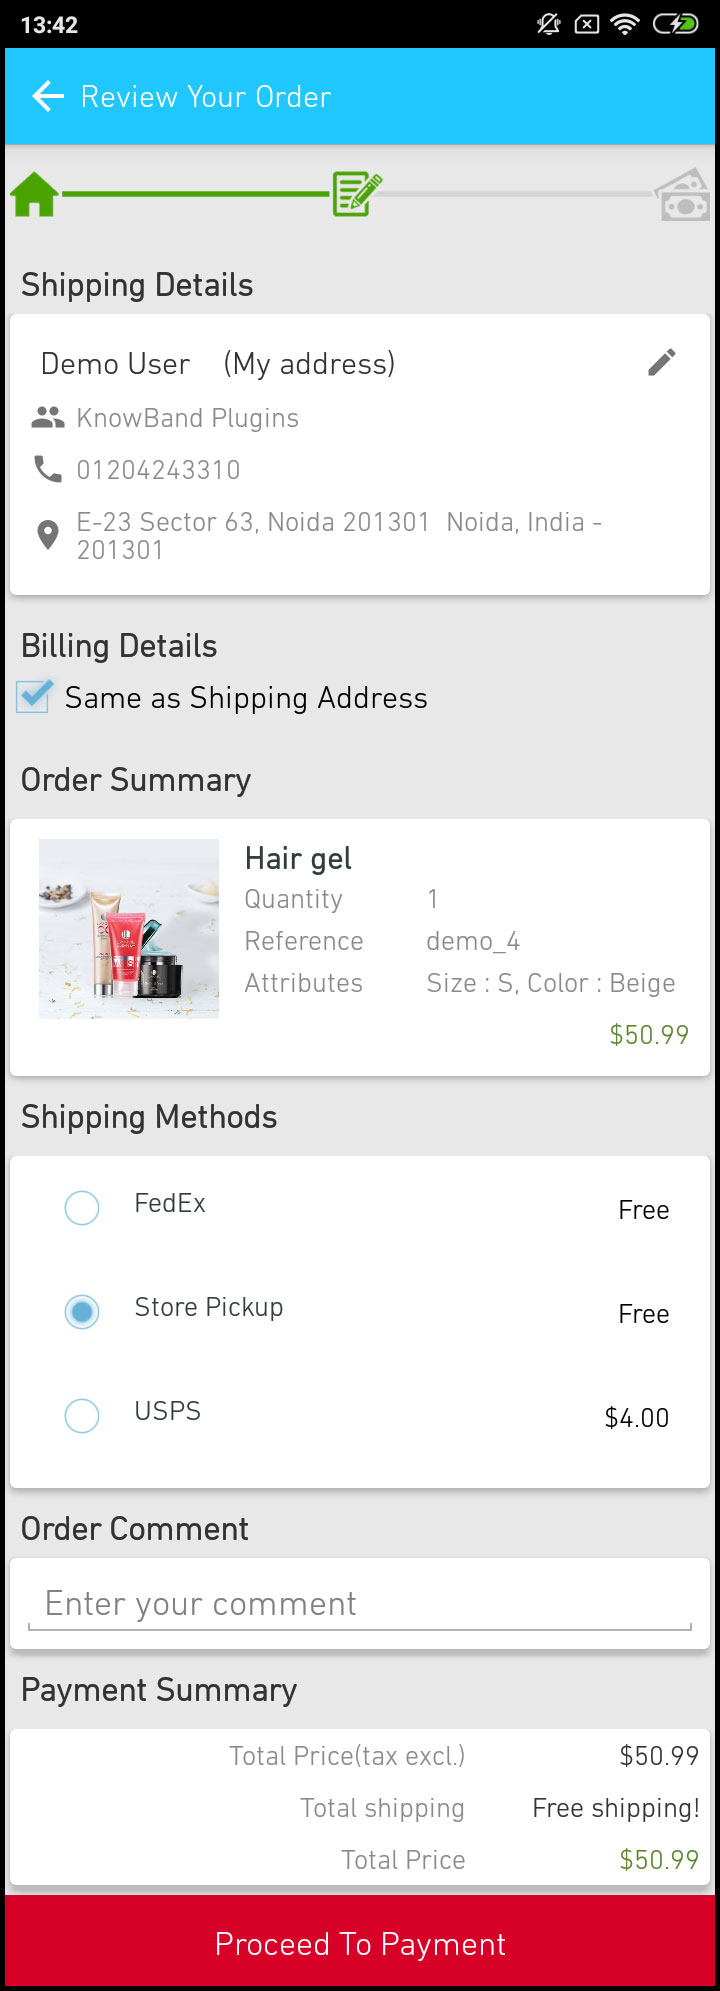
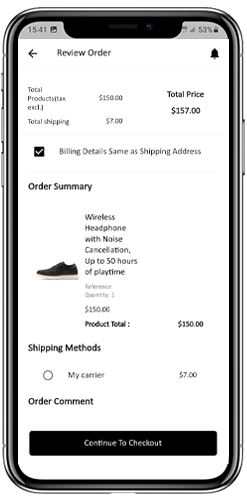
Die mobilen Apps mit PrestaShop Mobile App Maker verfügen über einen vereinfachten Einzelbildschirm-Checkout mit nur relevanten Informationen. Die Benutzer können vollständige Checkout-Details wie Versanddetails, Rechnungsdetails, Bestellzusammenfassung, Bestellkommentar und Zahlung anzeigen Zusammenfassung.
1. Lieferanschrift
Dieser Bildschirm enthält Details zu den vom Benutzer gespeicherten Lieferadressen. Bei Bedarf kann der Benutzer auch die neue Lieferadresse bearbeiten / speichern. Die Gesamtkosten Ihres Produkts werden gemäß der ausgewählten Versandmethode aktualisiert.
2. Rechnungsdetails
Mit dieser Option können die Benutzer Rechnungsdetails für ihren Einkauf eingeben. Sie können auch die Lieferadresse so wählen, dass sie mit der Rechnungsadresse übereinstimmt. Die gespeicherte Rechnungsadresse kann ebenfalls bearbeitet werden.
3. Bestellübersicht
Die App-Benutzer können die in diesem Abschnitt gekauften Produktdetails anzeigen, bevor sie den endgültigen Kauf tätigen.
4. Versandarten
Alle verfügbaren Versandmethoden werden in diesem Abschnitt des Checkout-Bildschirms angezeigt. Die Benutzer können hier den gewünschten auswählen.
5. Kommentar bestellen
Die App-Benutzer können auch Kommentare zu ihrer Bestellung hinzufügen, die auf der Bestellwebseite im Backend angezeigt werden.
6. Zahlungsübersicht
In diesem Abschnitt wird die vollständige Aufschlüsselung der gesamten Zahlungsdetails angezeigt.
7. Weiter zur Zahlung
Die App-Benutzer werden nach dem Tippen auf die Schaltfläche "Weiter zur Zahlung" zum Zahlungsbildschirm weitergeleitet.
6.9-Zahlungsbildschirm:
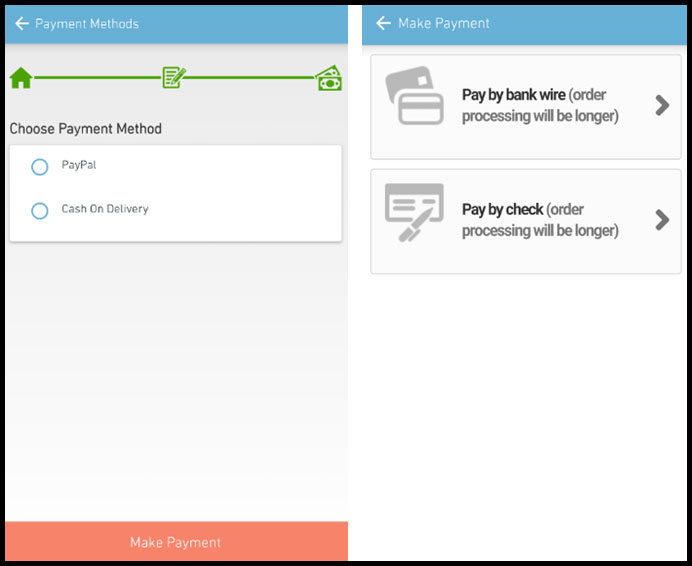
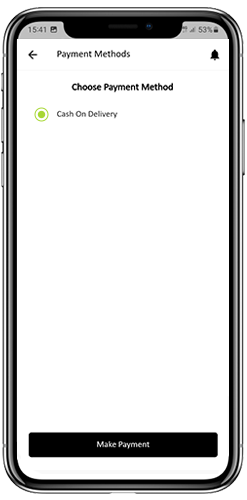
Der Zahlungsbildschirm in Ihrem PrestaShop Mobile App zeigt sowohl native Web-View- als auch App-Zahlungsmethoden an. Der PrestaShop Mobile App Maker unterstützt alle Arten von Website-Zahlungsoptionen in der App. PayPal- und Nachnahmezahlungsmethoden sind in den Android- und iOS-Apps verfügbar. Darüber hinaus können verschiedene andere native Zahlungsoptionen wie PayU, Apple Pay, Amazon Pay, Braintree, Stripe usw. auf Anfrage auch in die App integriert werden.
6.10 Mein Konto-Bildschirm
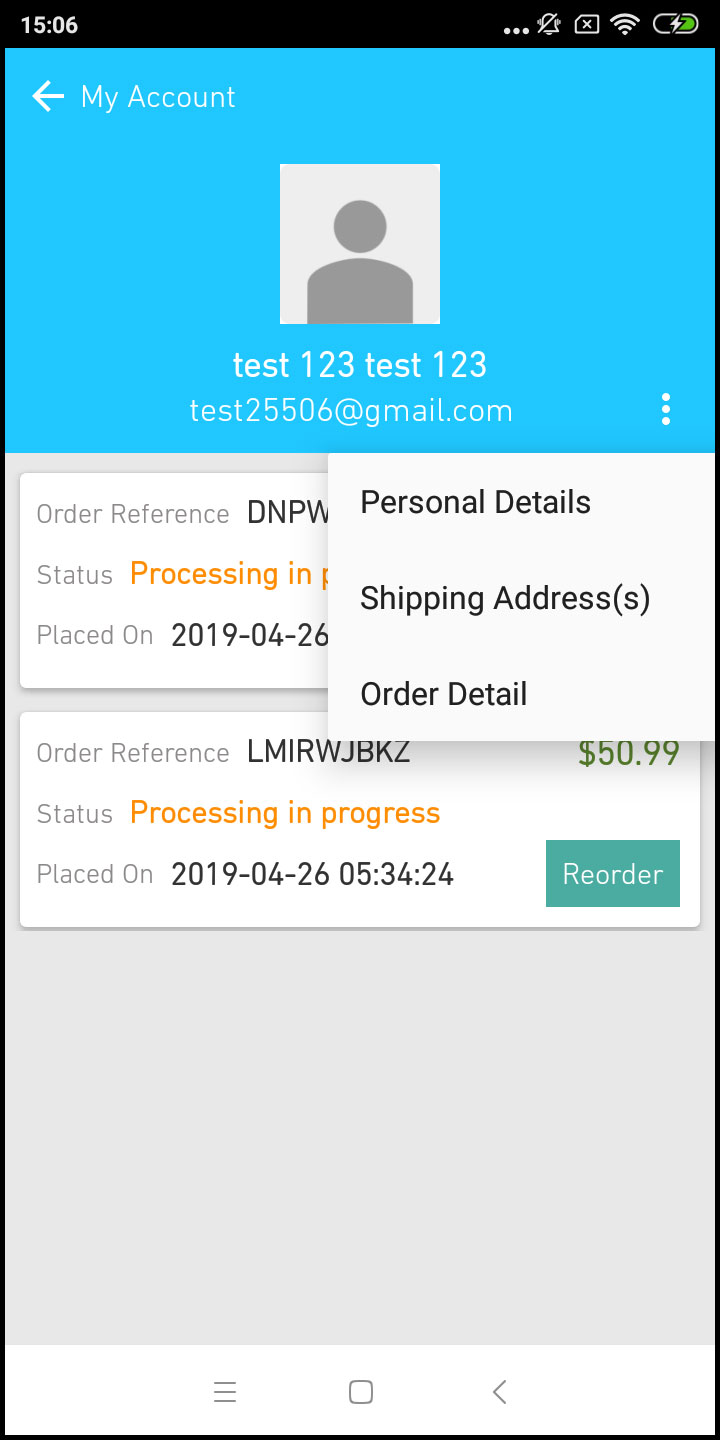
Auf dem Bildschirm Mein Konto der Android / iOS-E-Commerce-App können Benutzer die vollständigen Kontodetails einschließlich einer Liste früherer Bestellungen anzeigen. Mein Konto
1. Bestellverlauf
Die Benutzer erfahren, dass die vollständigen Bestelldaten früher eingegeben wurden. Das Datum der Bestellung, die Bestellnummer, der Preis und der Lieferstatus werden angezeigt.
2. Profil aktualisieren
Benutzer können auch ihre vorab gespeicherten Profildetails wie Vor- oder Nachname, Telefonnummer und Passwort aktualisieren.
3. Lieferadresse (n)
Die App-Benutzer können die vollständige Liste der gespeicherten Lieferadressen anzeigen. Hier kann auch eine neue Lieferadresse hinzugefügt werden.
4. Bestelldetails
Die App-Benutzer können die vollständige Liste der zuvor aufgegebenen App-Bestellungen anzeigen.
5. Nachbestellungsfunktion
Sie können ein Produkt direkt nachbestellen, indem Sie auf die Schaltfläche "Nachbestellen" klicken. Die gesamte vorherige Bestellung wird mit nur einem Knopfdruck in den Warenkorb gelegt.
6.11-Auftragsdetailbildschirm
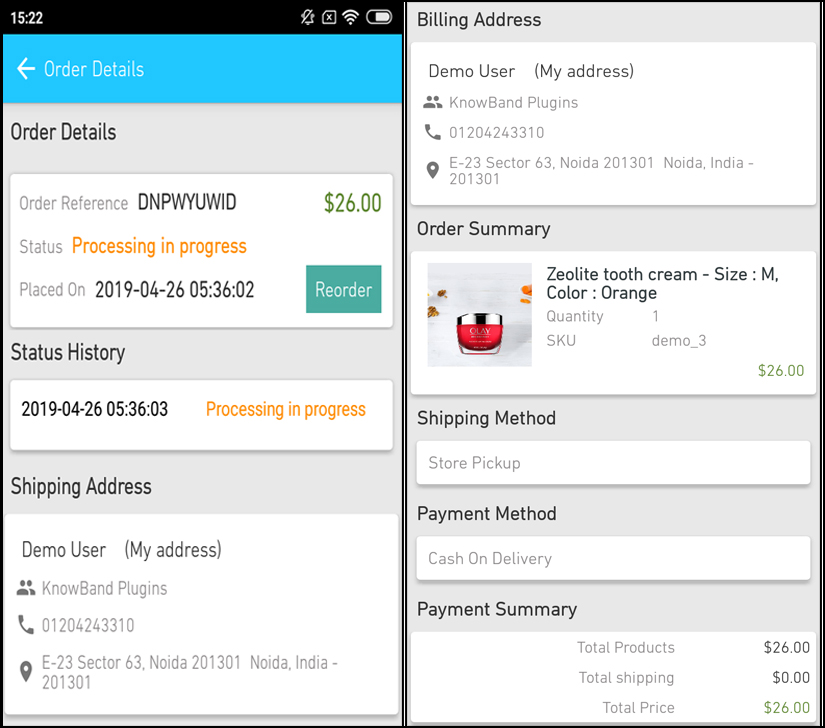
Der Bestelldetails-Bildschirm der PrestaShop eCommerce App bietet vollständige Bestelldetails wie Versandadresse, Produktübersicht, Versand- und Zahlungsmethode sowie Gesamtkostenübersicht. Die Benutzer können sogar die Zustellung zuvor aufgegebener Bestellungen direkt von diesem Bildschirm aus verfolgen.
Develop FlutterOpenCart Mobile App for your eCommerce store with KnowBand’s OpenCart Mobile App Builder & start observing a sudden growth in your store conversions & sales.
1.0 Introduction
If you are an OpenCart website owner & currently selling products on your website, try KnowBand’s automated mobile apps solution & take your business to the mobile world. The OpenCart Mobile App Builder is the pre-configured framework designed to develop FlutterAndroid & iOS apps for your online website. This ready-to-go mobile app solution is the most advanced & smartest solution to own a pair of fully functional Android & iOS stores without any coding or technical skills.
KnowBand has made a mark in the eCommerce industry as a leading mobile app provider for almost all the major eCommerce platforms. Its OpenCart Mobile App Builder is the easiest way to build feature-packed OpenCart Mobile Apps in just 3 simple steps:
2. Share the app-related specifications & requirements.
3. Get your own FlutterOpenCart Apps in 2-3 days.
We, at KnowBand, are an exceptionally skilled and proficient pool of programmers, designers, and other involved professionals. We can deliver an OpenCart mobile app that closely matches your personal expectations and business requirements. If you are not sure about the utility of this mobile app for your OpenCart store, let us throw some light on this amazing OpenCart Mobile App Builder.
Latest Enhancements in Opencart Mobile App Builder v4.8
The OpenCart Mobile App Builder Extension now introduces two powerful new integrations with the AI-Powered Chatbot Extension and the Opencart VideoMate Extension. These latest integrations significantly improve customer engagement, automate support, and enhance product presentation within your mobile application.
The Opencart AI Chatbot Extension leverages popular and advanced AI models of 2026, such as OpenAI ChatGPT, Google Gemini, Claude, and DeepSeek, enabling intelligent, real-time customer interaction directly inside the mobile app.
The Opencart Video Manager Extension transforms the shopping experience with immersive video carousels and a floating video player, helping merchants showcase products in a more engaging and conversion-driven format.
Together, these features make the OpenCart Mobile App Builder a complete AI-powered mobile commerce solution for modern eCommerce stores.
1.1 Prominent Features of OpenCart Mobile App Builder:
The following are some of the major features you’ll get in your OpenCart Mobile Apps:
–> Customizable Home Screen Layout (Complete Flexibility)
1.2 Recent Enhancements in Opencart Mobile App Builder!
1. Dynamic Position of the Signup-Login Popup in Home Page Layout: Admins can now customize the position of the signup-login popup on the home page, offering a more flexible user experience.
2. Enhanced Review Pages:
Write Review: Simplified process for customers to leave feedback.
Read Review: Improved interface for browsing reviews.
Review on Product Page: Reviews are now more accessible directly on product pages.
3. Video in Banner Elements: We have introduced video options in the banners available for the app’s home page layout. Now, the admin can add a YouTube video or can also upload a video below 2 MB for the square, horizontal, grid, and countdown banner components.
4. Push Notification Updates: Recently Firebase has officially deprecated the older cloud messaging API. Due to that the admin configurations now support uploading Firebase key JSON files for better management.
5. CMS and Layout Redirection in Banners and Category Elements: Banners and category elements available in the home page layout now support redirection to CMS and multi-layered layouts.
6. Automatic Banner Sliding in Horizontal Banner Slider: Horizontal banner sliders now feature automatic sliding, improving user engagement. The admin can also add the time difference on which he wants to slide the banners automatically.
7. List and Grid View for Product Listing Screen: Users can toggle between list and grid views on the product listing screen for more convenient browsing. This new feature not only improves the UI but also provides more convenience to the customers while browsing the products.
8. Common Notification by Admin: Admins can now send common notifications to all users, ensuring important messages reach everyone. Furthermore, customers can check all the past notifications in the notification tab available in the app.
9. Custom Banner Element in Home Page Layout: Now, the Opencart admin can upload banners of any size, offering greater customization of the home page.
10. Redirection in Top Category Element: Top category elements now support redirection to specific layouts, improving user navigation.
11. Advertisement Setting: The enhanced OpenCart Mobile App Builder allows store admins to turn their apps into revenue-generating channels by incorporating in-app advertisements. With Google AdMob integration, admins can now display banner ads on various app pages, creating a seamless way to generate additional income while keeping users engaged.
12. Navigation Setting: With flexible customization options, the store admin can adjust the look and feel of the tab bar layout. Now, the modules allow the admin to choose the names, set redirections, choose icons, and personalize color schemes, offering a unique and branded app experience that aligns with their store’s style.
Knowband’s OpenCart Mobile App Builder
The OpenCart Mobile App Builder by Knowband helps you create a mobile app for your store without coding. Easily turn your website into a user-friendly app!
KnowBand offers a demo of OpenCart Mobile Apps before actual mobile app development. We have brought free of cost demo for all the eCommerce store owners out there.
2.1 View Our Demo Store working on Apps
Take a look at our app functionalities with our demo OpenCart Mobile Apps. We have integrated our demo store with the app in order to let you explore the app working. All you need to do is to follow these simple instructions:
Step 1: Download and install the Nautica OpenCart Mobile App on your testing device. Here, are the links to OpenCart Demo Apps:–> Apple App Store–> Google Play Store
Step 2: Open the App and tap the “View Demo” button being displayed on the splash screen. Enter some relevant details like Name, E-mail & Store URL & experience our demo store running on the demo app.
Note: To access the Admin Panel of KnowBand’s OpenCart Mobile App Builder on our demo store, visit here.
2.2 View Your Store working on Demo Apps
Want to test your own store on the demo apps. Well, we made even that possible with 3 simple steps:
Step 2: Install the Demo Apps (links in the previous section) on your mobile testing device. Open the App & enter your website URL in “View Your Store”.
Step 3: Tap “View Your Store” and start experiencing your own store on OpenCart Demo apps.
Note: This Free version of Mobile App Builder is just for the demo purpose & no APK/IPA files will be provided with this module. In order to get your own APK/IPA files, you need to purchase the paid version of the OpenCart Mobile App Builder.
3.0 Build OpenCart Mobile App in 3 Simple Steps
Once you are satisfied with the demo apps working, it’s time to build your own mobile apps. The process to develop mobile apps with OpenCart Mobile App Builder is only a matter of these 3 simple steps:
Step 1: Purchase & Install Module on your website.
If there is any issue while publishing the app on respective stores, we would get it done for you.
4.0 Admin Panel Screens
Once the OpenCart Mobile App Builder is installed on the website, let’s take a look at its backend panel configuration. First of all, go to Extensions>>Modules>>KnowBand Mobile App Creator & click on configure option. It will bring the following interfaces to you:
4.1 General Settings:
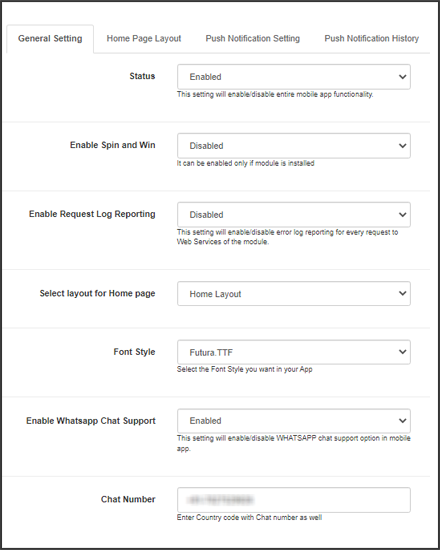
a) Status: Enable/disable the OpenCart Mobile App Builder module to make the apps work on mobile devices.
b) Enable Back in Stock: This option allows the admin to enable/disable Knowband’s back-in-stock module in the apps.
c) [New] Enable Spin & Win: This option allows the admin to enable or disable the Knowband’s Spin & Win Module in the mobile app.
d) [New] Enable AI Chatbot: You can now enable the AI Chatbot on your mobile app using the Opencart AI Chatbot Extension.
e)[New] Enable Videomate: Now, admins can easily add the instagram reels, shorts, videos in trending vidgets using the Opencart Videomate Extension
f) Font Style: This option provides multiple font styles to suit your app’s appearance.
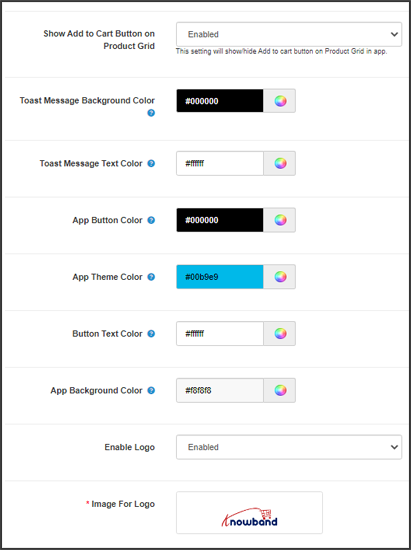
g) Show Add to Cart Button on Product Grid: If you want to show/hide the “add to cart” button from the product listing pages, you can manage the same from this button.
h) Mandatory Phone Number at Registration: Make the mobile number field optional/mandatory on the app’s sign-up page from here.
i) Redirect on Cart Page when Add to Cart: If you want users to directly redirect to the cart page upon clicking on the “add to cart” button, you can enable this option from here.
j) Enable Notification List Feature: This button allows the store admin to enable/disable the notification feature in the Android and iOS apps.
k) Enable Sing-up Pop-up: You can enable/disable the login pop-up for the non-logged-in customers in the app.
l) Enable Request Log Reporting: Enable the error log on mobile apps. This log file is used when the app shows any error or abnormal behaviour.
m) Select Layout for Home Page: Choose the desired layout for your app home screen. You can create multiple layouts under the Home Page Layout tab.
n) Enable WhatsApp Chat Support: Enable/disable the WhatsApp chat option on mobile apps.
o) App Button Color: Choose the button color for your apps.
p) App Theme Color: Choose the theme color for your apps.
q) App Button Text Color: Choose a button-text color for your apps.
r) App Background Color: Choose a background color for your apps.
p) Enable Logo: Enable the logo in your mobile apps. You can upload the logo image which will be displayed on the header of the mobile apps.
q) Fingerprint Login: Enable/disable fingerprint login in mobile apps.
r) Phone Number Login: Enable/disable phone no login in the mobile apps.
s) Disabled Shipping Methods: Disable the shipping methods that you do not want to display in the apps.
4.2 Payment Methods:
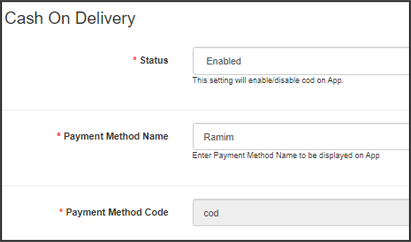
The OpenCart Mobile App Creator offers additional COD payment option to make the payments easier in the apps. The mobile apps with this extension already support web-view payment options in mobile apps.
4.3 Push Notifications:
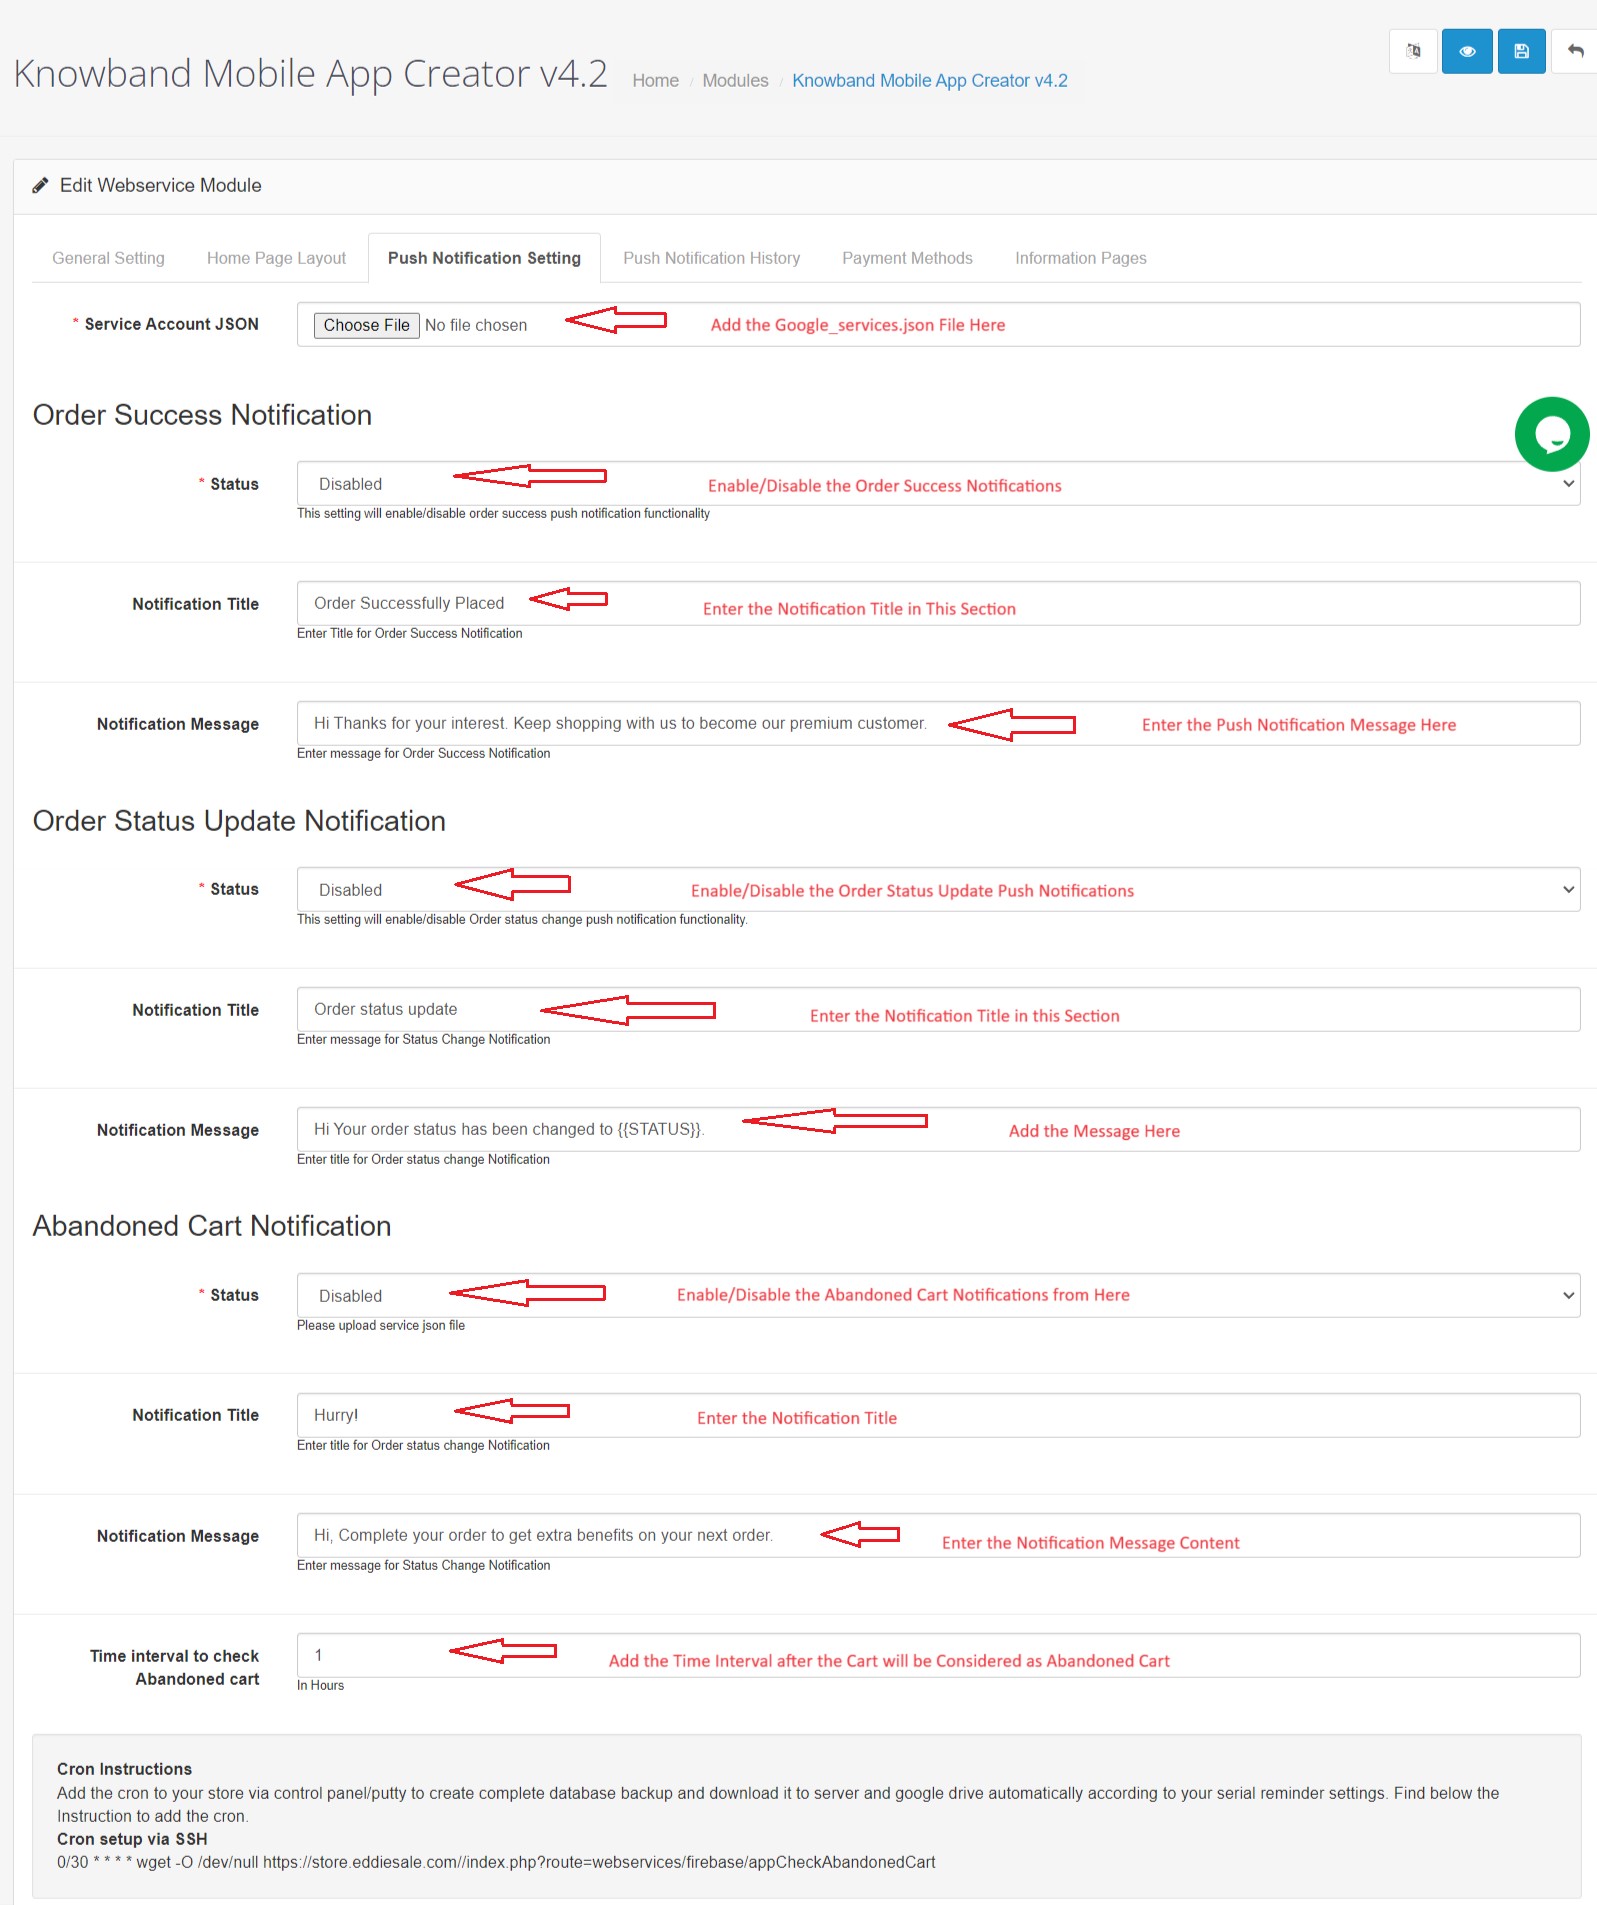
a) Service Account Json: In order to set-up the push notification in both the Android and iOS app, you will have to add the google_services.json file in this section. You can get the same in your Firebase account or can also ask the Knowband support team for the JSON file for your Firebase project.
b) Order Success Notification: Configure an automated order creation push notification which would be sent automatically on the user’s apps who successfully create an order.
c) Order Status Update Notification: Configure an order status update notification which would be sent automatically to the users whenever there is an update in order delivery status.
d) Abandoned Cart Notification: Configure automated abandoned cart notification which would be sent automatically to the users who left their products in the cart.
e) Send Notification: The store admin can even send manual notifications & highlight any deal or discount to the mobile app users.
4.4 Information Pages:
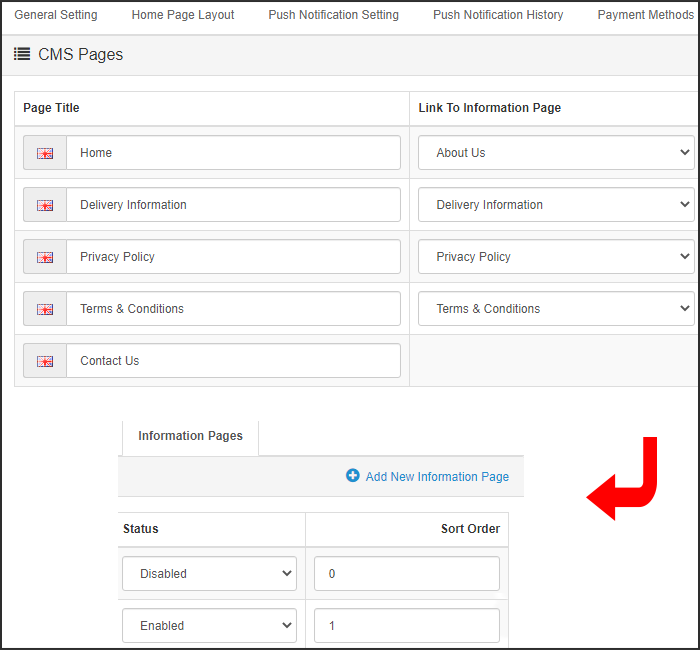
This tab of the OpenCart Mobile App Maker allows you to manage the CMS pages on the apps. You can customize the name and landing page of various CMS along with their sort order. New pages can also be added from here if there is a requirement.
4.5 Home Page Layout:
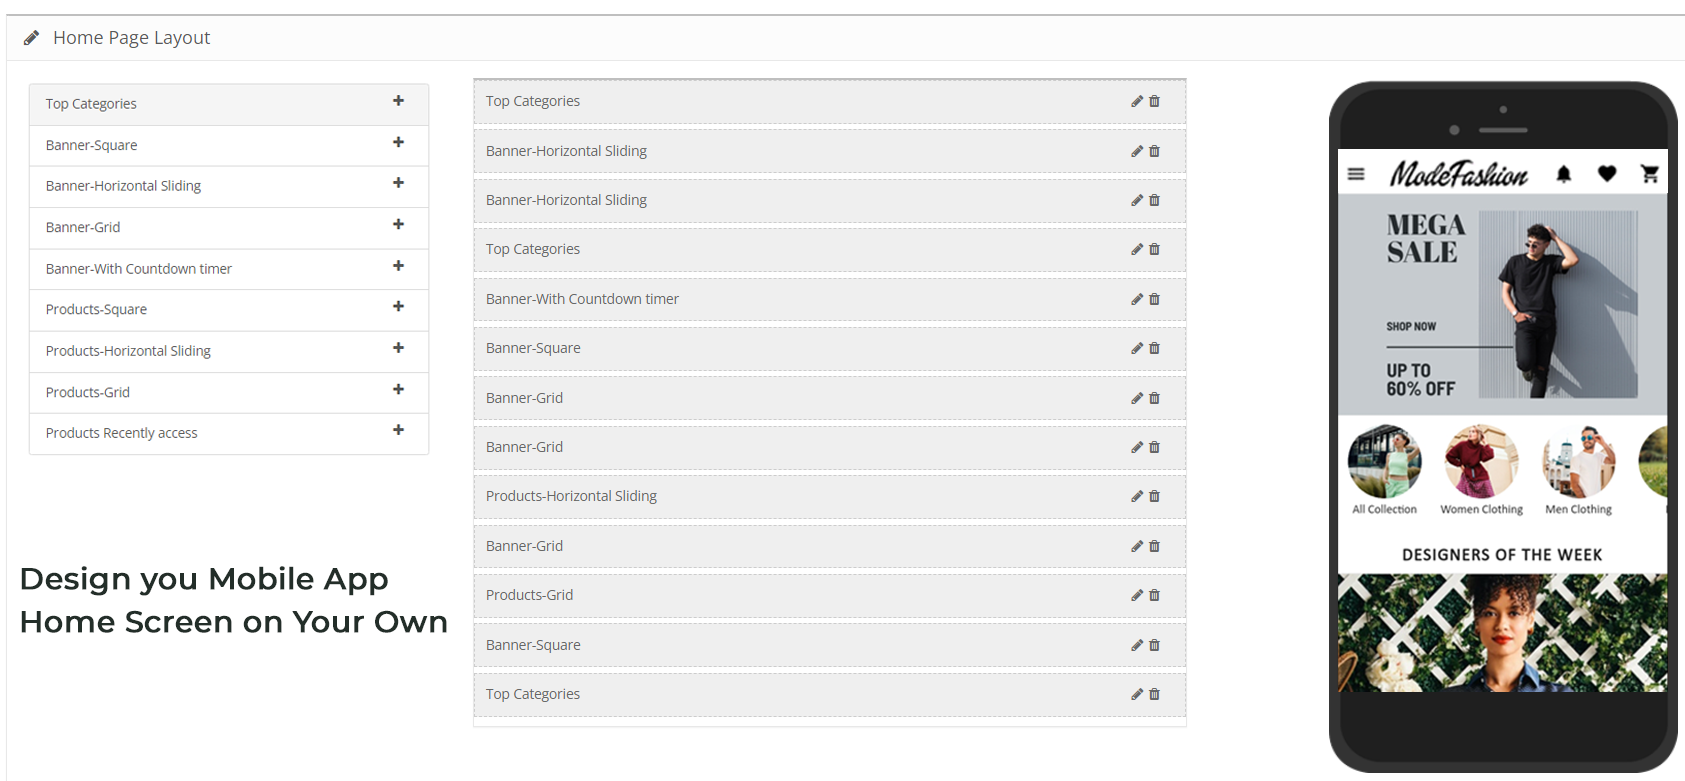
The OpenCart Mobile App Builder allows you to create & save various intuitive & appealing layouts for your mobile app home screen.
After adding the layout, click on Edit option & start adding & configuring various elements for your app home screen.
The store admin can configure the following design elements on the mobile app home screen:
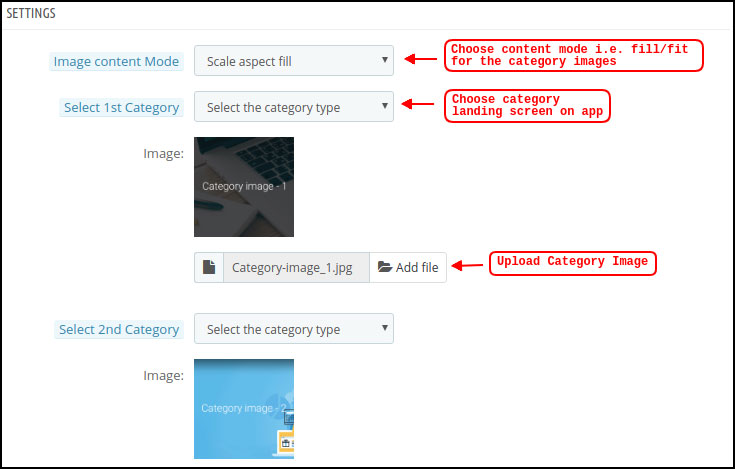
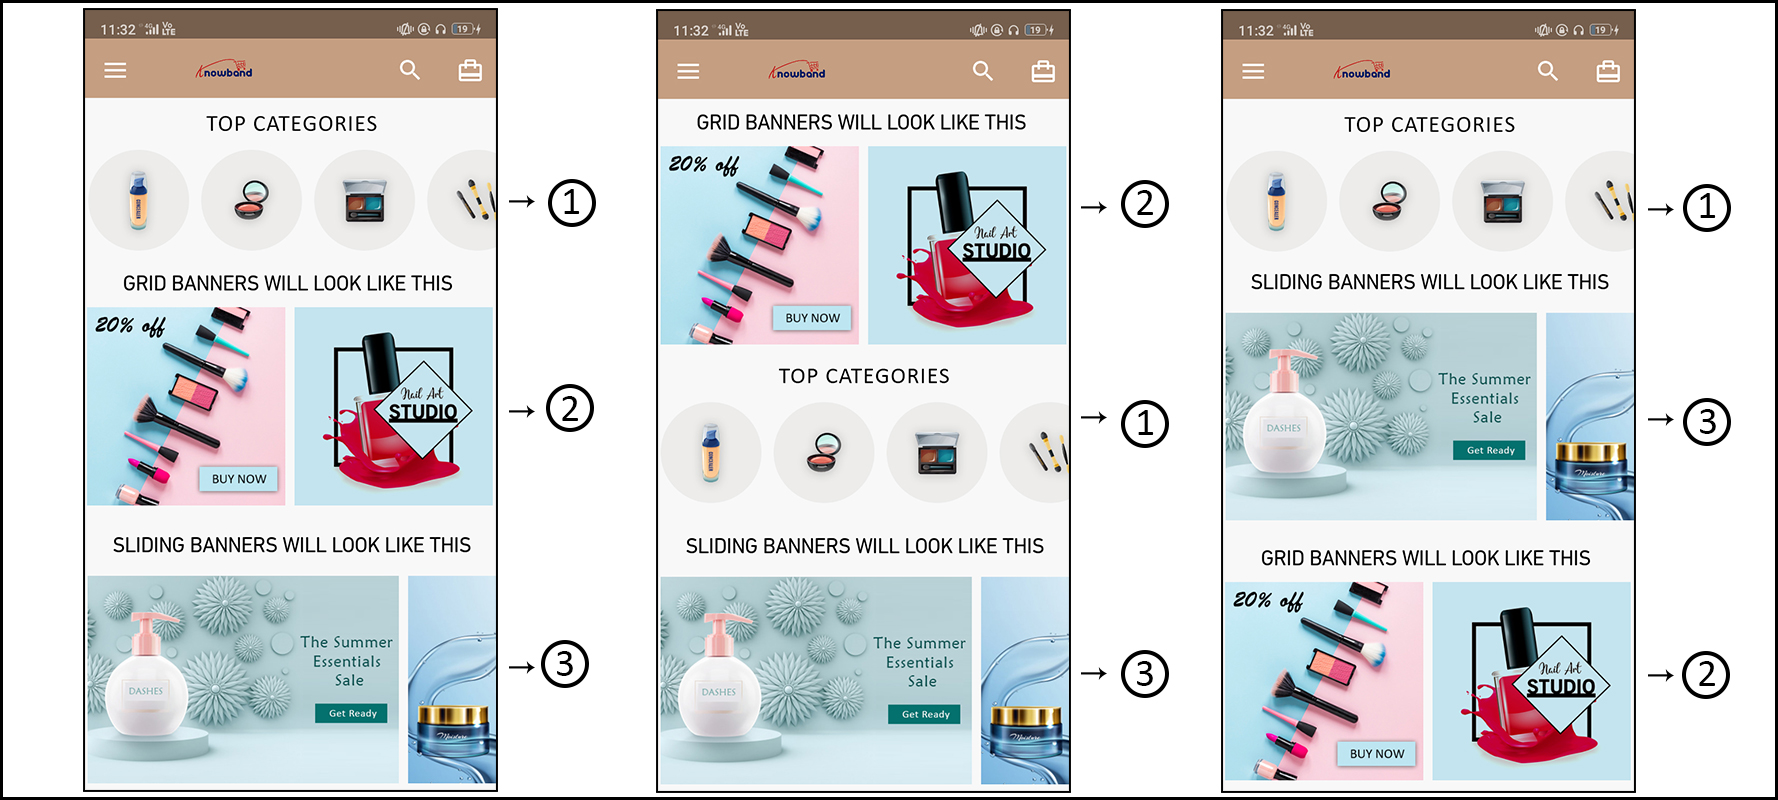
Top Categories:
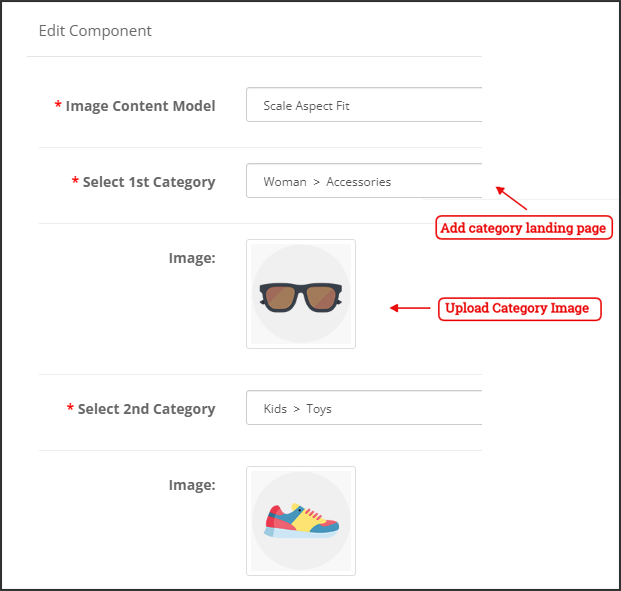
These are the categories displayed on the top of the home screen in the form of squares. You can configure their images & landing pages from the backend. Maximum 8 such categories are added of which 4 are mandatory.
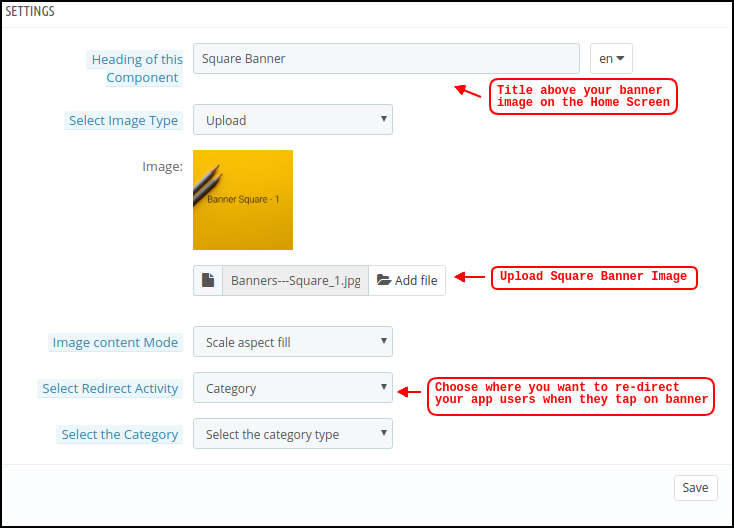
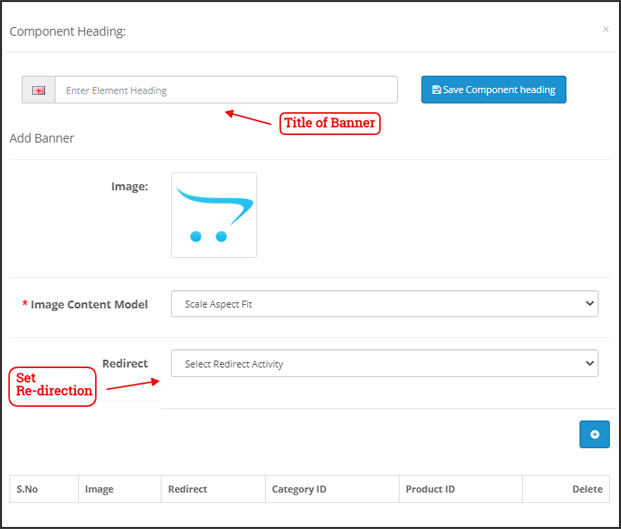
Square Banner:
You can offer a square-shaped banner on the home screen of OpenCart Mobile App whose image & landing page link can set from the backend.
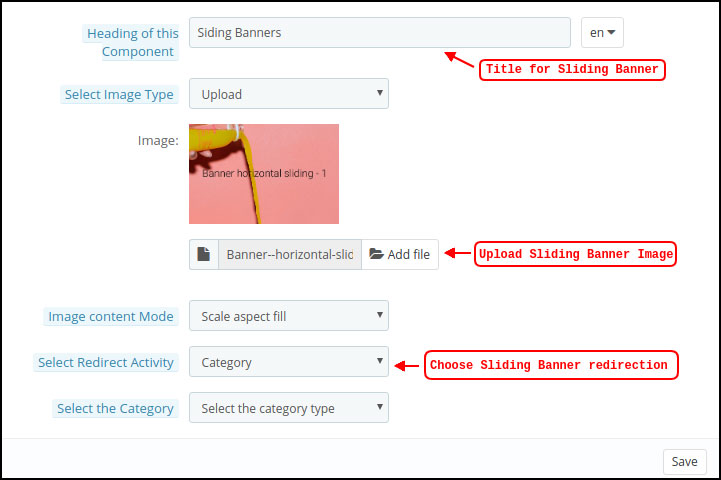
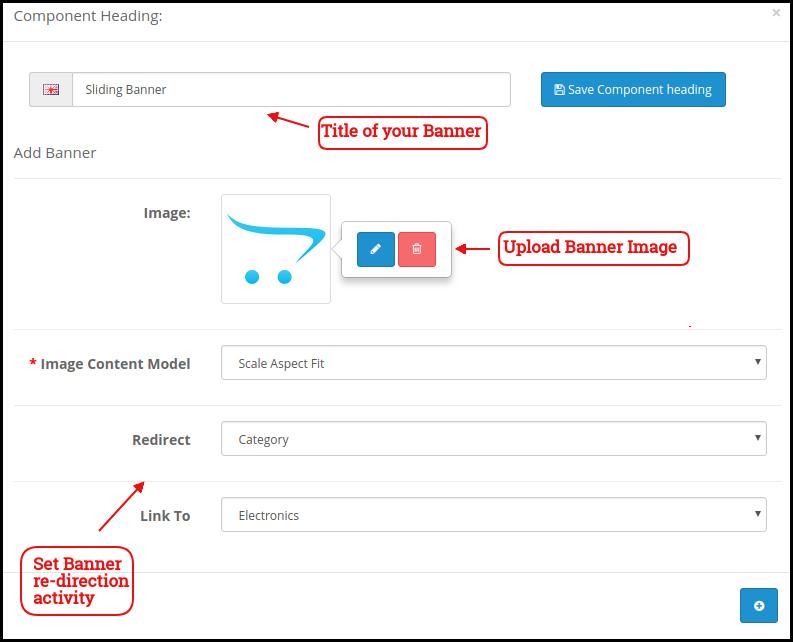
Sliding Banner:
These are the sliders for your home screen which can be configured from the module backend.
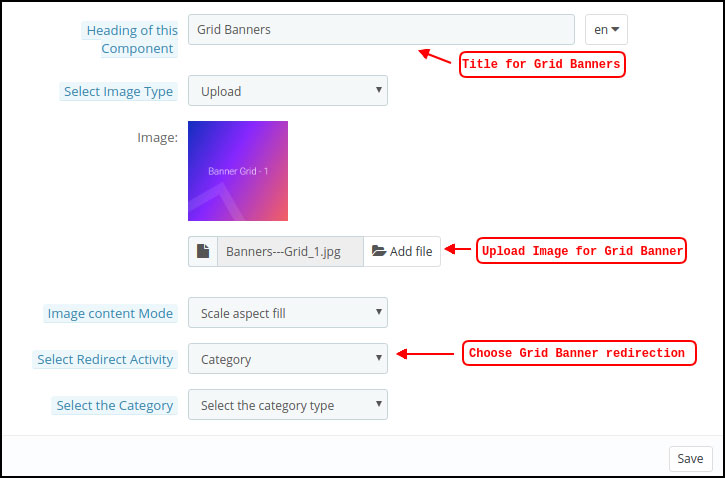
Grid Banner:
These are the banners for the app home screen displayed in the form of a grid listing & can be customized accordingly.
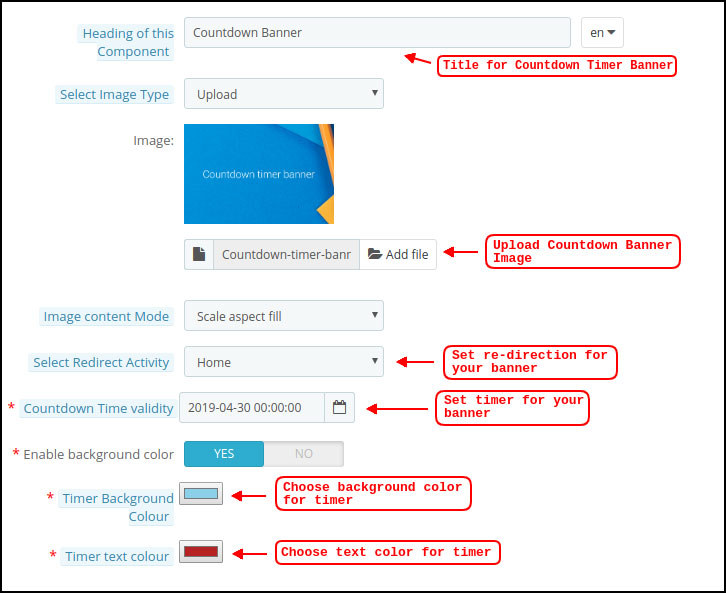
Countdown Banner
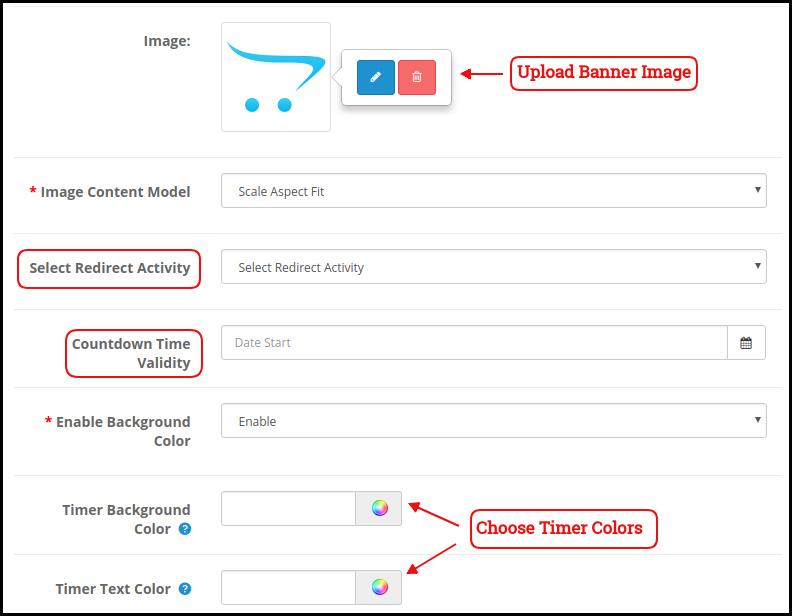
The OpenCart Mobile App Maker offers a count-down timer banner in your mobile apps. You can configure the banner image, landing page, and timer from the backend.
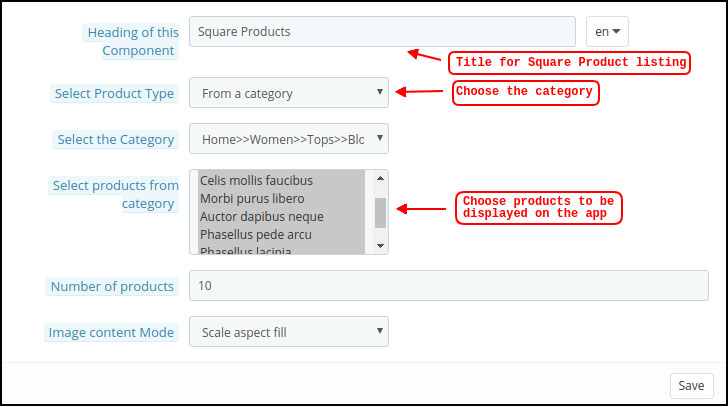
Square Products:
You can even list the products in square listing on the mobile app home screen.
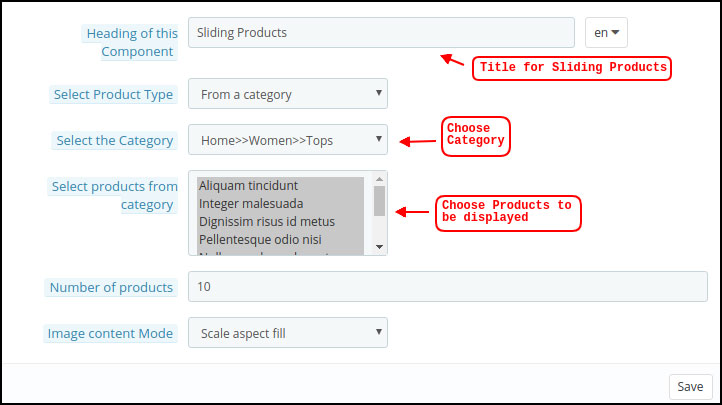
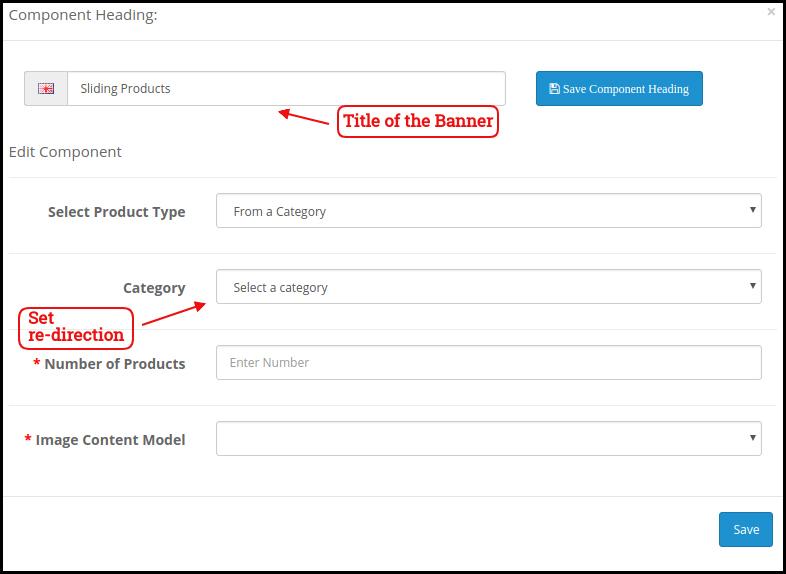
Sliding Products
The products can be displayed in the slider view on the mobile app Home Screen & can be configured from backend panel.
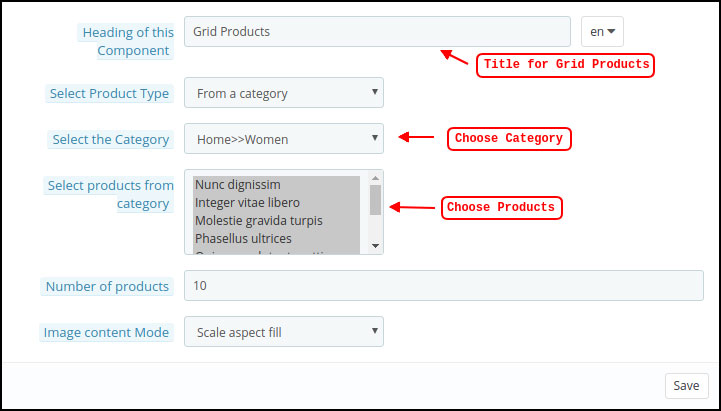
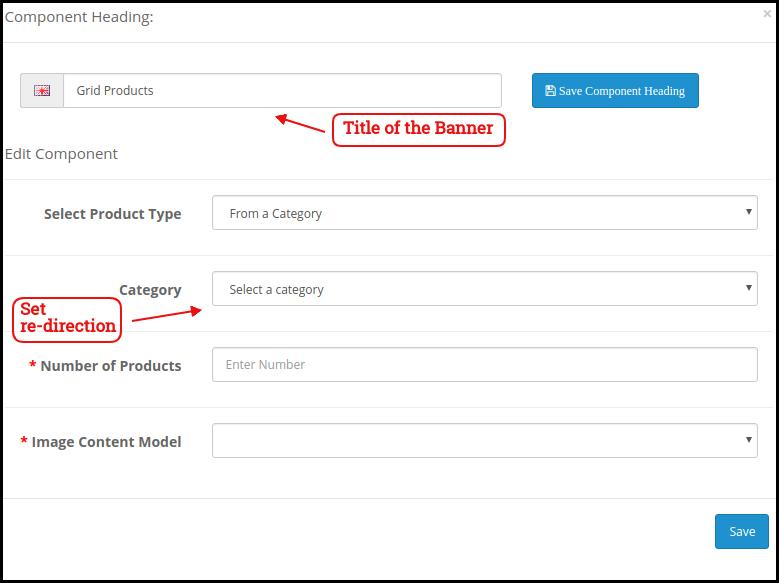
Grid Products:
The products can be displayed in the grid view on the home screen.
Products Recently Accessed:
The OpenCart Mobile App Creator offers the recent products tab on the mobile app home screen which displays recent products viewed by the user. You can just add the element in your layout to display the same on the home screen.
Login/Sign up Pop-up:
The Opencart admin can encourage the customers to keep their account logged in in the apps by showing a dynamic login/sign-up pop-up on the home page of the app.
Advertisement Banner:
The Opencart App admin can select the position of the advertisement banner on the home page with this layout component.
Note: The store admin can add up to 20 elements while designing the layout in the backend panel.
4.6 Advertisement Setting:
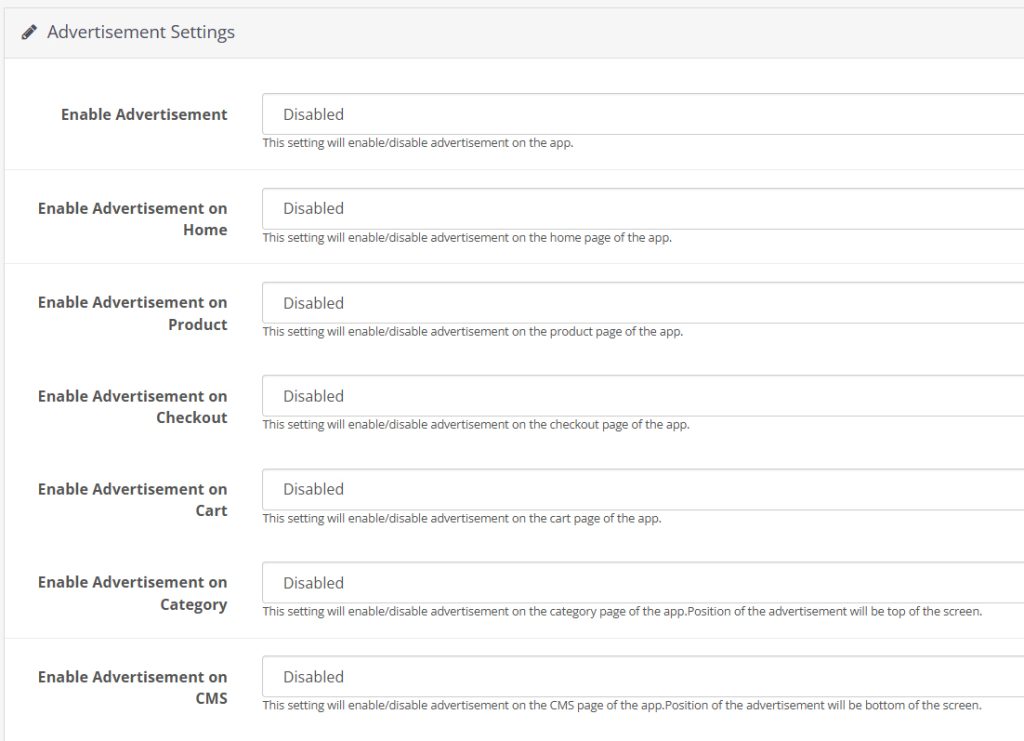
The updated Opencart App Maker allows the store admin to use their apps as an additional income channel by providing in-app advertising features in the apps. The new app comes with Google AdMob integration that allows the admin to show banner advertisements on the different pages of the app.
Enable Advertisement:
This setting will enable/disable the advertisements in the apps.
Enable Advertisement on Home:
If you want to enable/disable the advertisement feature on the home page of the app, you can use the following button.
Home Ad Unit ID:
The admin can find the Ad Unit ID on the Google AdMob console. Once done, you can enter the unit ID in the following section.
Enable Advertisement on Product:
This button will enable/disable the advertisement on the product page of the app.
Product Ad Unit ID:
Enter the Product Ad Unit ID in this section.
Select Product Position:
Using this option, the store admin can select the position of the Ad on the product page. This feature allows the admin to select from the below product image and description or above the add to cart button or related product section, providing more flexibility to the store admin.
Enable Advertisement on Checkout:
Using this button, the store admin can enable/disable the Advertisements on the checkout page.
Checkout Ad Unit ID:
Enter the Unit ID here.
Select Checkout Position:
Select the Advertisement position from here. The store admin can select from various options like top of the screen, bottom of the screen, above the products, and below the shipping methods.
Enable Advertisement on Cart:
Enable/Disable the advertisement on the cart page with this button.
Cart Ad Unit ID:
Enter the Unit ID for the banner on the cart page.
Select Cart Position:
The store admin can select the ad position from here. This option allows the admin to select from below the products or above the products option.
Enable Advertisement on Category:
This feature will enable/disable the Advertisement on the category page.
Category Ad Unit ID:
Enter the category Ad Unit ID.
Enable Advertisement on CMS:
Enable/Disable the advertisement on the CMS pages from here.
CMS Ad Unit ID:
Add the CMS Ad Unit ID.
4.7. Navigation Setting:
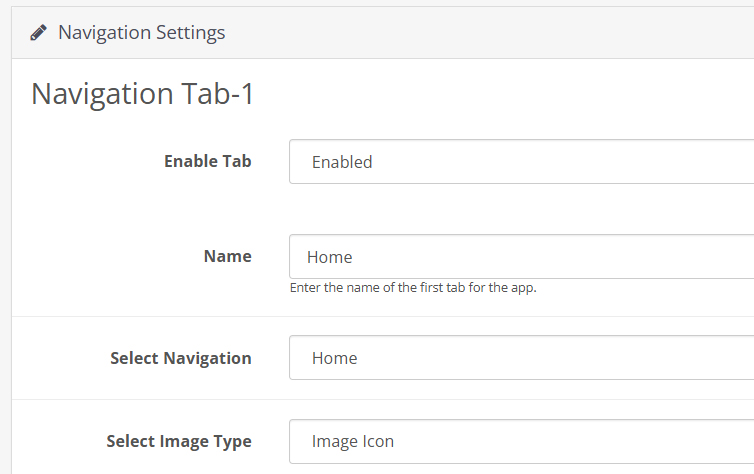
The Opencart Mobile App Builder provides the admin with the option to modify the look and feel on the bottom navigation bar of the app. Using the built-in features, the store admin can modify the name, redirection, icon, and color combinations of the tab bar layout.
Here is a detailed overview:
Enable Tab:
The store admin can enable/disable the bottom navigation icons from the following option.
Name:
Enter the navigation icon name here.
Select Navigation:
Select the redirect activity from home, cart, category, search, and profile from here.
Select Image Type:
The store admin can select if he wants to upload a custom image for the navigation bar components or the option to select built-in images is also there under the configurations.
In total, the app provides 5 different bottom navigation bar icons that can be configured with the help of the above-mentioned guide.
5.0 Mobile App Screens:
5.1 Home Screen:
The OpenCart Mobile App Builder offers a dynamic home screen in the mobile apps which can be easily designed from the backend panel. The store admin gets the complete flexibility to design & craft the home screen as per his/her choice. The OpenCart Mobile App Builder offers the following designing elements:
–> Top Categories
–> Square Banners
–> Sliding Banners
–> Grid Banners
–> Square Products
–> Sliding Products
–> Grid Products
–> Countdown Timer Banner
–> Recently Viewed Products
-> Login/sign up Pop-up.
The positioning of these attributes can also be changed as well just with simple drag & drop.
a) Dynamic Layouts: Craft alluring home screen layouts on your own which connect with the users & compel them to make the purchase.
b) Website Logo: Add your store logo in the module backend & display the same on the header of the app.
c) Search: The search option in the OpenCart Mobile App allows the users to search for products without any hassle. Keyword makes it easier for the buyers to get the right product in the least time.
d) Wishlist: Wishlist option in the OpenCart Mobile App lets you bookmark the products regarding future purchase.
e) Shopping Cart: The users can access the shopping cart from the top-right corner of the home screen.
f) WhatsAppYour OpenCart Mobile App users can directly contact you regarding any query or concern through WhatsApp chat option on the home screen.
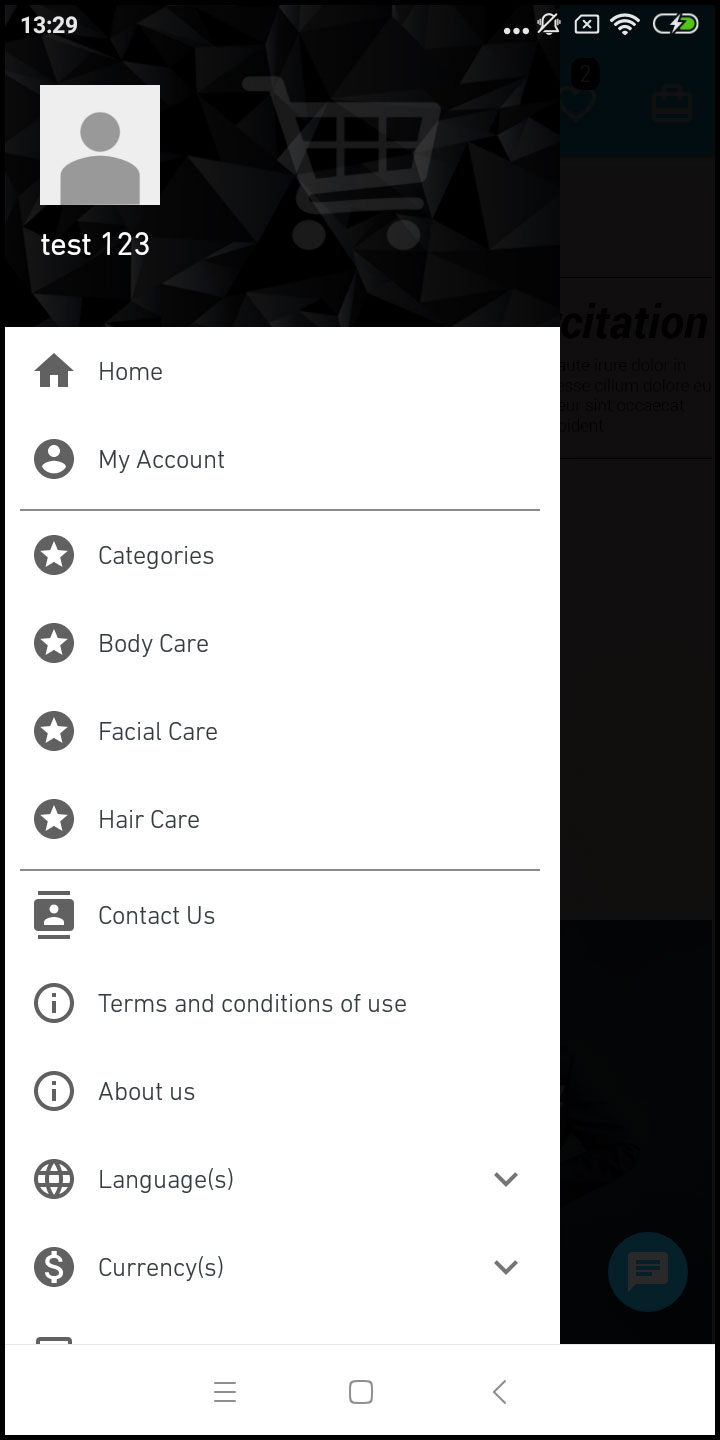
5.2 Accordion Menu (Navigation Bar)
The OpenCart Mobile Apps for Android & iOS come up with easy to use categorization of your store products. The online shoppers get to browse all the categories in the navigation bar along with all CMS pages.
The Accordion menu categories are the same as of your store & it provides the following options:
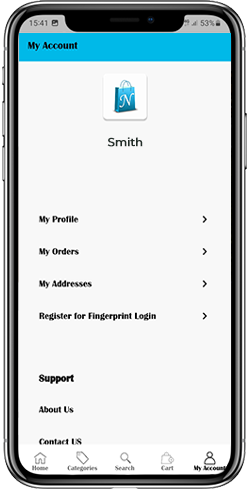
My Account: The My Account screen of OpenCart Mobile App contains all the user information like Personal Details, Shipping Address(s) & Order Details. There is even an option for the users to register their fingerprints. The online shoppers get to view complete personal details from here & update the password as well.
Categories: All your store categories are fetched on the mobile apps as well. Offer a multi-level categorization to your app users & let them browse products with ease.
CMS Pages: All of your website CMS pages like About Us, Contact Us, Terms & Conditions, etc will be displayed here.
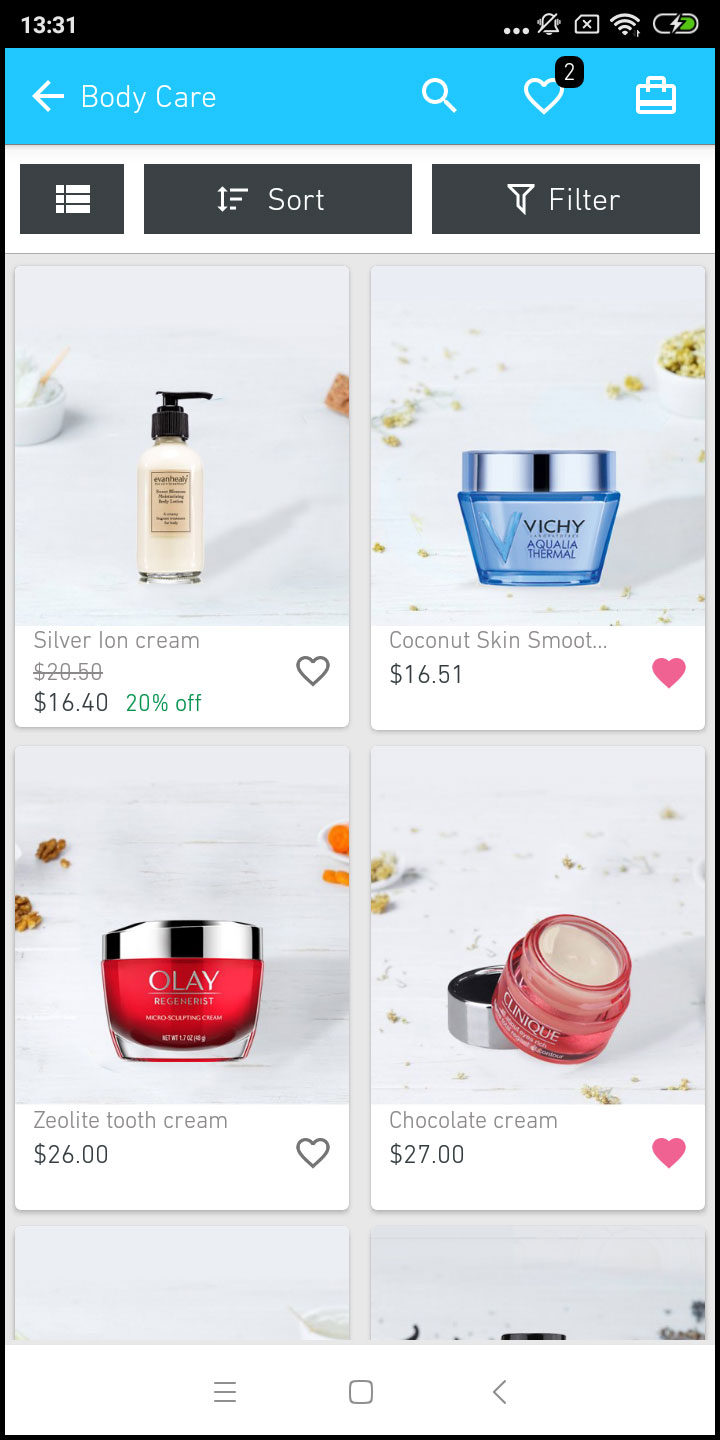
5.3 Category Screen:
All sorts of categorizations available on your the OpenCart stores will be displayed in the mobile apps as well. The category screen has two views: Grid & List view. The product image, name, and price is displayed for all product listings. The mobile apps with OpenCart Mobile App Maker have multiple filter & sorting options which simplify product search for the users.
Sort: Sort option in OpenCart Mobile Apps allow the users to view products in Low to High or High to Low category.
Filter: Filter down the category products with various attributes like price, cost etc. & search desired products without any efforts.
5.4 Product Screen:
The product screen of the OpenCart Mobile App is as simple & easy-to-use as it could get. Every product has multiple images displayed along with its name & price. The product availability is also displayed as “In Stock” or “Out Of Stock”. The product screen has the following other options:
Product Options: Various options related to the product like size, color, etc. are displayed on the product screen. These options are the same as available on your website.
Short Description: Users get to read the short description of your product to quickly make up their minds. The OpenCart Mobile App displays both short & full descriptions of the products.
Product Info & Care: All the information related to the specific product is displayed under this section. This is the same information as of the website.
Add To Wishlist: The users can even add the products into the wishlist bag from here. The products added in wishlist are bookmarked for the future purchase.
Add To Cart: The Add To Cart button allows you to add product in the cart which can be processed further in successful order creation.
Product Social Sharing: The OpenCart Mobile App has the option to share the products on different social platforms, Bluetooth & e-mail. The users can share the products with their friends & relatives & bring potential users to your store.
5.5 Wishlist Screen:
The OpenCart Mobile App Builder has a wishlist bag allowing the users to bookmark products for future purchases. The users can view the list of all wishlist products from this screen. It has the following options:
Add To Cart:
The app users can add the wishlist product directly into shopping cart with Add To Cart option.
5.6 Login Screen
The OpenCart Mobile App Creator offers various one-tap login options & make sign-in/registration process more seamless:
Login: The app users can authenticate & access OpenCart Mobile Apps using e-mail sign-in credentials.
Sign Up: All the new users can sign-up & create their account on the store from the mobile App. The sign-up form of the OpenCart Mobile App is fully uncluttered.
Login with Phone Number: Your OpenCart Mobile App comes up with a phone number login option as well which allows users to verify OTP & log in without any hassle.
Login with Fingerprint: Your app users also get an option to log in with a fingerprint. This biometric authentication allows the users to login apps in seconds.
Login with Facebook: The users can log in into mobile apps using their Facebook Account Credentials.
Log in with Google: The users can log in into app using their Google Account Credentials.
5.7 Shopping Cart Screen:
The Shopping Cart screen of your OpenCart Mobile App will display all products added into shopping cart.
The app user’s can view Product name, quantity, total price & shipping cost. This screen has the following options:
1. Apply Voucher:This option allows the users to get discounts & offers by entering valid coupons & voucher running on your website.
2. Total Product Price:The users can view the complete cost of their shopping bag which is automatically updated as per any addition in the cart.
3. Update Product Quantity:The users can even update the specific product quantity.
4. Remove Product:The app users can simply remove the product from the cart.
6. Continue To CheckoutThe app users can proceed further to the checkout & payment screens just by tapping the “Continue To Checkout” option. It will re-direct users on the checkout screen.
5.8 Checkout Process:
There is a simplified checkout process in the OpenCart mobile app builder. Details like shipping details, billing details, order numbers, order comments, and others are available for customers in the checkout process of the mobile app.
Orders can be placed by just following a few easy steps on the eCommerce mobile apps.
Users can choose a product and add it to their cart. After clicking on the shopping bag, the customer can select the appropriate amount of a product. In addition, mobile app users can view the total number of products and shipping prices.
At the bottom of the same page, the customer also gets the option to apply any vouchers and coupon codes.
2. The user can review the order after selecting the Continue to Checkout option and can see various details. Such as product pricing, shipping cost, shipping address (editable on the same page), order summary (number of products), and total price.
Moreover, the customer can choose their preferred shipping method on the same page. In addition, the user can specify any particular requests or requirements in the order comment field at the bottom of the screen.
3. After clicking on the continue to checkout option, the front end mobile app user will be redirected to the payment method screen. On this screen, customers can choose from all the payment alternatives available on the e-commerce website. The Android and iOS apps consist of a cash-on-delivery payment option by default.
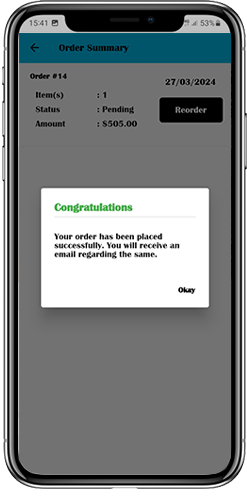
4. Once the user has completed the online payments, he or she will be forwarded to the order summary screen. In which, the customer can view the order status, order number, and amount, along with other information. The order confirmation popup message will also appear on the screens of mobile app users.
5.9 Payment Screen:
The payment screen on OpenCart Mobile App displays both web-view & Flutterapp payment methods. The OpenCart Mobile Apps supports all sorts of website payment options along with PayPal & COD payment methods. Moreover, various other native payment options like PayU, Apple Pay, Amazon Pay, Braintree, Stripe etc. can also be added in your mobile app over a fair price.
5.10 My Account Screen
My Account screen of the OpenCart Android/iOS App allows the users to view the complete account details including a list of all previous orders by just tapping on my orders option. My Account screen has the following other options:
Order History:The users get to know about complete order details created on the app. The order creation date, reference, price & delivery status is available on this screen.
Update Profile:Users can also update their pre-saved profile details like First or last name, phone number & password.
Shipping Address(s):The app users can see the complete list of saved Shipping Addresses. New Shipping address can also be added from here.
Order Details:The app users can view the complete list of the previously placed orders from the app.
Re-order feature:There is a direct re-order functionality allowing the users to repeat the order just by clicking the “Re-order” button
5.11 Order Detail Screen
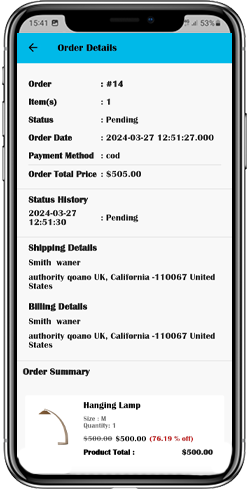
Order details screen of OpenCart Android & iOS App provides complete order detail such as shipping address, product summary, shipping and payment method, and total cost summary. This order detail is of the previous order placed by you. The users can even track the delivery of previously placed orders directly from this screen.
5.12. In-App Advertisement Samples:
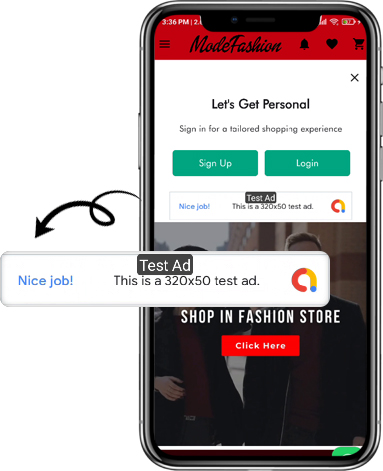
The admin can set the advertisement banners on the different pages of the app. Here’s how it will look to your customers.
6.0 Advanced OpenCart Marketplace with Mobile App
KnowBand’s OpenCart Marketplace converts your online website into a fully-fledged marketplace. The OpenCart Mobile App Builder is fully compatible with OpenCart Marketplace extension. This means you can bring the entire marketplace listing on the same OpenCart Android & iOS Mobile Apps. Thus, launch a pair of Marketplace-compatible Mobile Apps with KnowBand & attract a large base of sellers & customers to your store.
–> As the user clicks on the Seller option, he/she is redirected to the Seller page of the mobile store. The user can view the list of the sellers of the marketplace along with their ratings.
–> The customers can click on the name of the seller in order to see his profile and the product being offered. The sellers can log in with their username and password. They are then redirected to the dashboard.
7.0 OpenCart Mobile App Builder for Android and iOS – Video Tutorial
This video tutorial walks you through the complete configuration of the OpenCart Mobile App Builder extension by KnowBand. Learn how to set up your app from backend to frontend with step-by-step guidance on:
General Settings
Push Notification Settings
Payment Methods
Home Page Layout
And many more essential configurations
By the end of this tutorial, you’ll be able to fully configure your OpenCart mobile app for both Android and iOS, ensuring a smooth and professional setup.