In general terms a MarketPlace is ‘an open space where a market is/ was formerly held.’ It means that a space with relation between sellers and customers. There are several sellers selling goods to several customers.
An online MarketPlace (or online e-commerce marketplace) is a type of e-commerce site where product or service information is provided by multiple third parties, whereas transactions are processed by the MarketPlace operator. Online marketplaces are the primary type of multi channel e-commerce.
In an online marketplace, consumer transactions are processed by the MarketPlace operator and then delivered and fulfilled by the participating retailers or wholesalers (often called drop shipping). Other capabilities might include auctioning (forward or reverse), catalogs, ordering, wanted advertisement, trading exchange functionality and capabilities like RFQ, RFI or RFP.
In general, because marketplaces aggregate products from a wide array of providers, selection is usually more wide, availability is higher, and prices are more competitive than in vendor-specific online retail stores.
Examples of online marketplaces are Amazon.com, etsy, eBay, Snapdeal, Flipkart, Kaymu, Rakuten, and NASDAQ.
MarketPlace Extension
MarketPlace extension for Magento is developed for simply converting a simple Magento store to a MarketPlace with lots of features to customers, sellers and store owner. Any customer can register as a seller and can enjoy the features of a seller as well as customer of the store.
The seller sells products on the store and in return the store owner gets a commission by percentage from the total sale made by the seller. The commission percentage that the store owner gets can be modified and the store owner can set percentage to any desired value.
Prerequisite
The Knowband MarketPlace Extension is necessary to be installed on the system for using this MarketPlace Addon.
This module is basically for the sellers on Magento MarketPlace to let them know about the decreasing stock of their products. In this module the admin can set a specific quantity of the products and if any of his products got below this mark then the particular seller will receive an alert mail regarding the lowering of the product.
The admin can also set a cron which will send a mail to the seller as soon as the stock of any of the products is down or as soon as an order is placed making the stock of that product less from the given low stock quantity.
Installation Manual
Follow the following steps for installing Magento MarketPlace Low Stock Alert Addon
1. Download the Addon package.
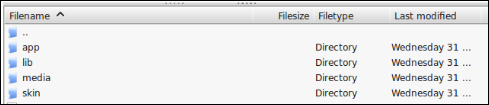
2. Unzip the package on your root folder of Magento setup via FTP manager (like Filezilla or WinSCP – download here: https://filezilla-project.org/).
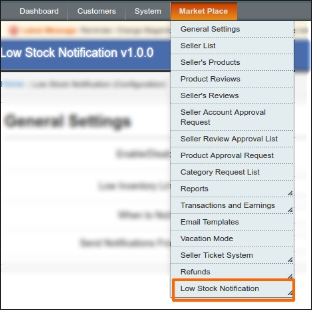
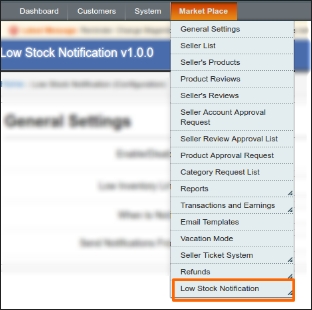
3. In Admin Panel under the Menu “Market Place” next to System menu, you will see a new menu option “Low Stock Notification”. In case you are not able to see the link under System, please clear Magento Cache first then check again.
4. With this the extension gets installed on your system.
Module Interfaces
This module will be accessible through Admin account only.
Admin Account Interfaces
This is the interface which will be accessible only through seller account section.
Menu Location
After installation, a menu will be displayed to the admin as shown in below screen:
On clicking the highlighted link, system will redirect admin to his low stock alert configurations page.
Low Stock Alert Configuration
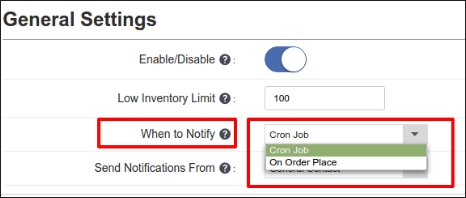
Here all the settings of the modules are mentioned. These are explained below:
Settings Description
1. Enable/Disable : The module will only work if this field is set to enabled. If this module is disabled then the module does not work.
2. Low Inventory Limit : In this field the admin will set the low stock quantity. If the quantity of any of the products of the seller goes below this value then the seller will receive an email after the order is placed or when the cron works.
3. When to Notify : There are two options. If “Cron Job” is enabled then the cron set up by the admin works and if “On Order Place” field is enabled then the seller will receive the mails when an order is being placed by a customer.
4. Notification Email : This is the email of the seller in which the seller will receive the low stock alert mails.
Module Work Flow
When the admin will enable the module and set the low stock quantity then after every order is placed for the products of the seller, The seller will receive an alert email if the quantity of the product is now lower then the low stock quantity set by the seller.
The seller may also receive email according to the cron set up by the admin on his server but if the admin has disabled the cron settings from his interface then he wont receive any of the emails which will be generated from the cron.
MockingFish is a web optimization and testing tool which allows web marketers, online business entrepreneurs and product managers to perform A/B tests. Being an easy to use testing tool, it allows websites to load faster, have a user friendly layout and eventually increase conversion rate on the website. For more details: https://www.mockingfish.com/
How it works?
Following are the steps to initiate optimoid experiments on your store :
1. Create an account on MockingFish.
2. Create New Project and Experiment.
3. Configure the experiment and get the script code.
4. Open MockingFish Module in your Magento store’s admin console.
5. Paste the script, activate the module and save the settings.
6. That’s it. Your MockingFish script is now added to every page of you store for experiments.
Installation Guide
1. Download the zip from magento store & unzip into a folder.
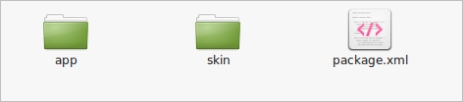
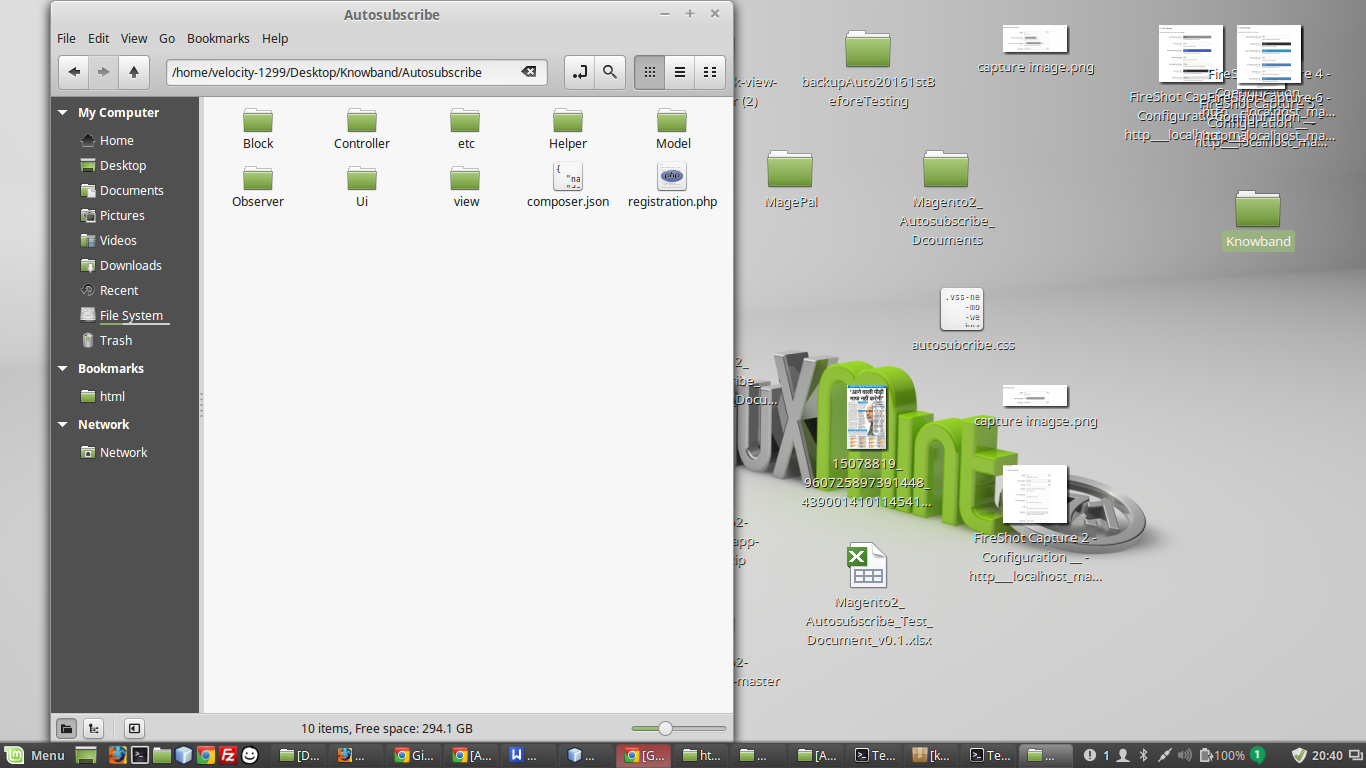
2. After unzip, following files/folders will be extract as shown in below screen:
3. Login via FTP & Drag drop all the folders into your server root directory.
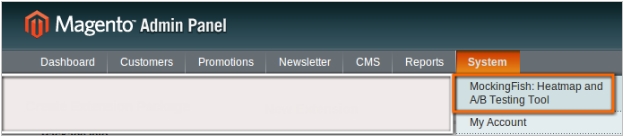
4. You will find the extension link will be displayed under System >> MockingFish : Heatmap and A/B Testing Tool.
User Manual
This module will basically work and visible in administration panel. There is no interaction of customers with this module and only administrator has access of this module.After copy this module, a link to access this module will be displayed under “System >> MockingFish : Heatmap and A/B Testing Tool”menu as shown below screen:
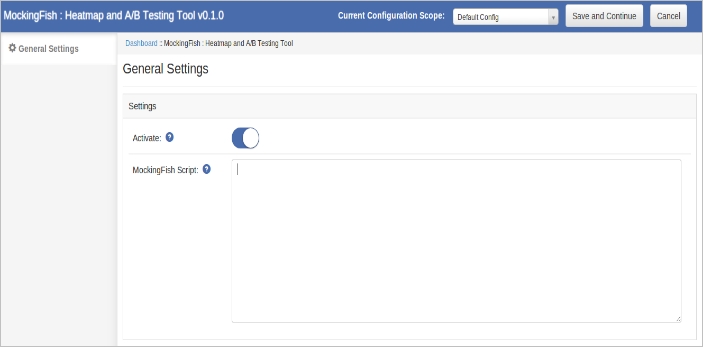
After clicking on this link, module page will be open as shown in below screen:
In module’s top navigation bar, there are following controls:
1. Current Configuration Scope : This option is used to change the store configuration scope.
2. Save and Continue : This option is used to save the module settings.
3. Cancel : This option will cancel the current changes in settings.
General Settings
On clicking the module link, this tab will be open by default as shown as above screen. This tab has following options :
1. Activate: This option is used to enable or disable the module.
2. MockingFish Script: Paste the script provided by MockingFish App Experiment.
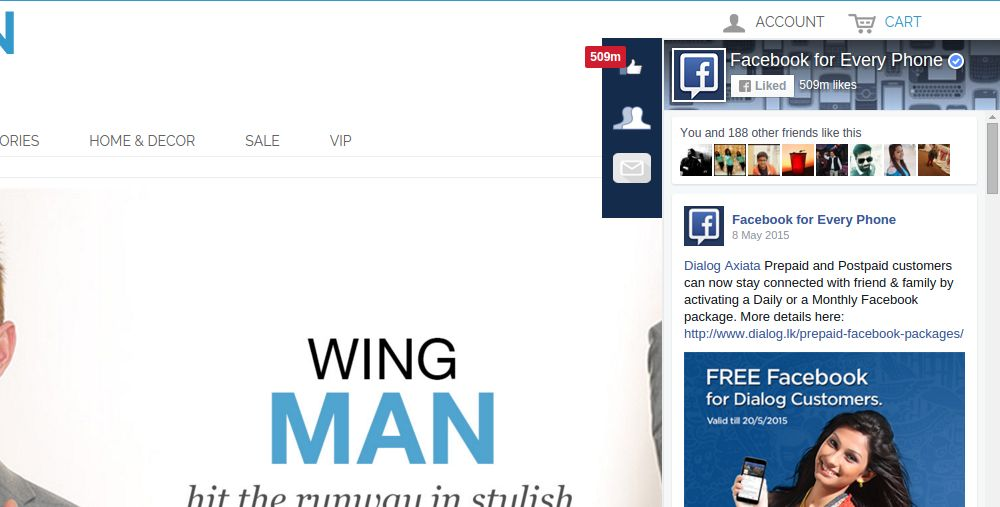
Facebook Post Feed is an addon which when enabled creates a button on every page of the shop which when clicked makes a Facebook page window slide in where the customer can see all the posts of the page which the admin has selected to show them. This helps the admin to advertise any page which he wants and get likes and comment of the customer.
To install this addon, please follow the following steps:
1. Merge the addon code into the your shop folder structure.
2. After merging this addon folder, system will list the addon in system->vss extensions->facebookpostfeed
General Settings
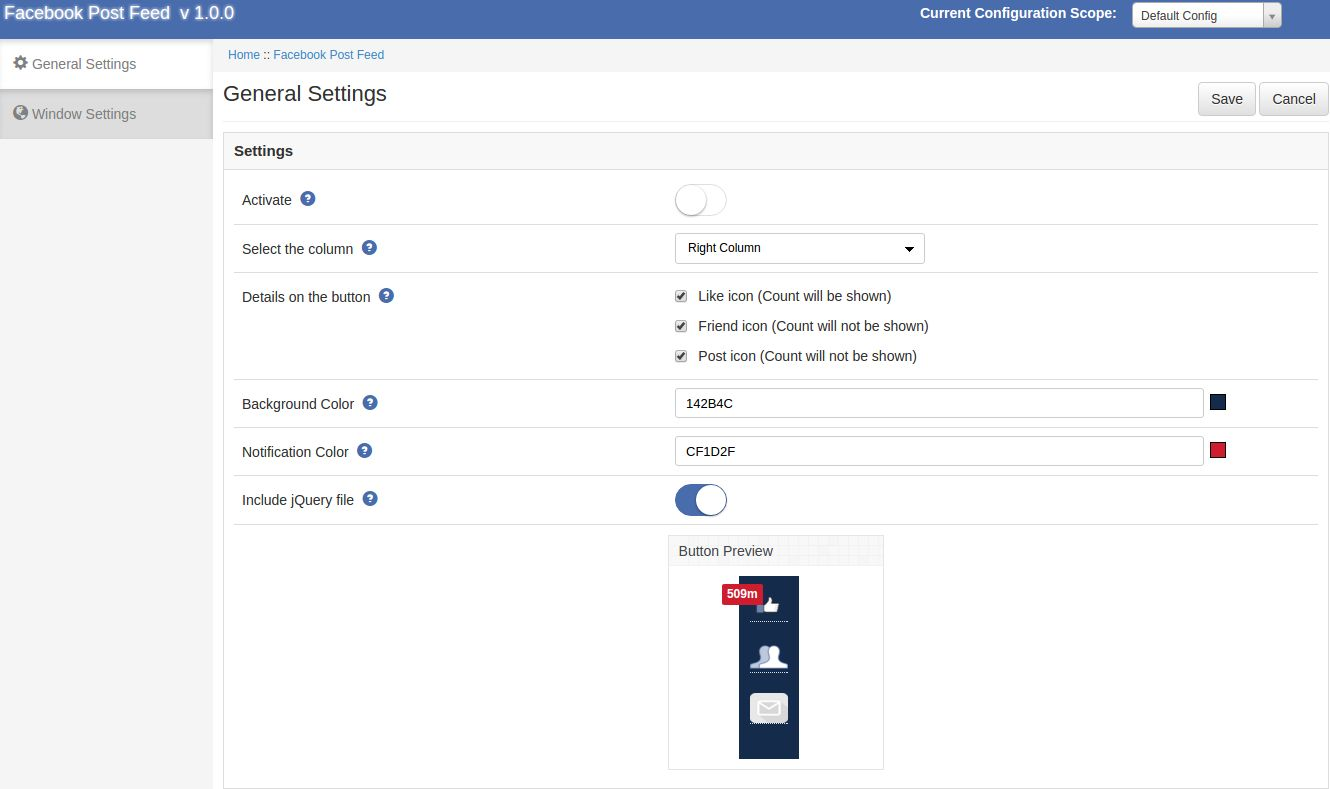
After clicking on configure link of Facebook Post Feed module General settings tab will open.
Fields listed will be filled with some default values
General Settings Tab Details:
1. Enable/Disable: Initially, this will be OFF. User can enable/disable addon functionality by turning this ON/OFF.
2. Show button on: This is a drop down box in which the admin can select that the page button which he has selected should appear in the left column or the right column of the shop.
3. Details on button: Here the admin can select that what details of the page should appear on the page when the page loads he can select his choices between number of likes, number of friend count and number of post
4. Background Color: This is a color picker in which the admin can decide what should be background color of the button appearing on the screen
5. Notification Background Color: This is also a color picker which enabled the admin to deicde the color of the notification box on the screen.
Window Settings
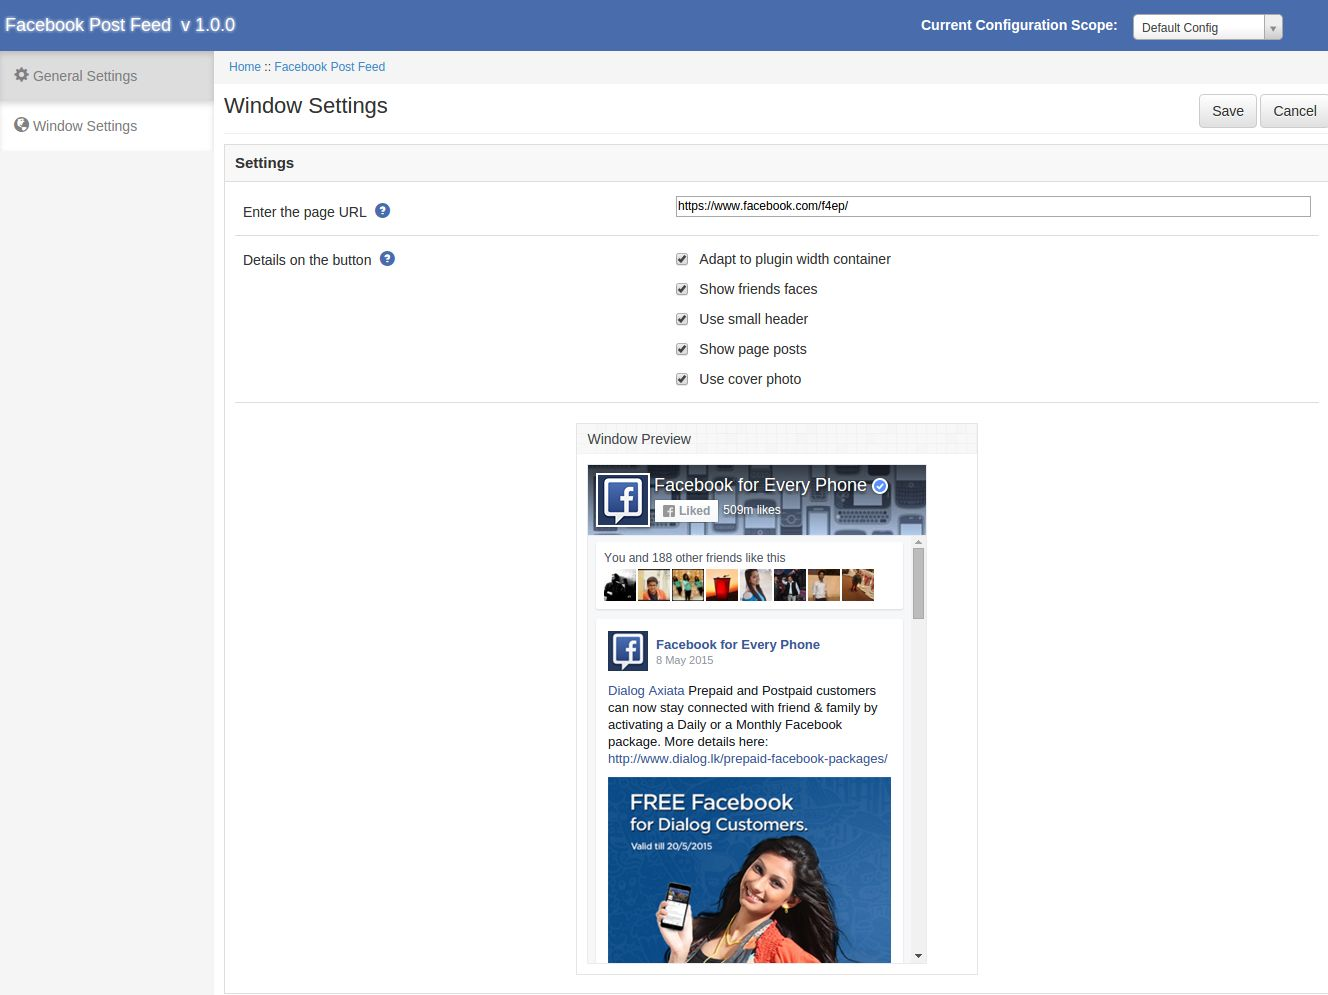
After clicking on the product settings tab the below screen appears.
Window Settings Tab Details:
1. Enter the page link: Here the admin has to enter the page link whose posts he wants to show on the screen by default its the Facebook page which is been shown.
2. Facebook window UI: Here the admin can decide what should be the UI of the window which is appearing on the screen. Such as the cover photo,showing friends faces,number of posts.
Front End Module
After enabling this plugin a button starts to appear on every page of the shop and the appearance of the button is according to the settings done in the back end of the module.
The module at the front-end appears as follows:
We hope that we have covered all the concerns regarding the installation and product guide of this Magento Social Extension. You should also check other Magento Extensions which will help you to improve your eCommerce store.
The Magento Previous next product is an addon which when enabled makes changes in the product page by adding two buttons at each side of the product to let the customer navigate to the previous and the next product of the current product. It also has the feature of navigating from the keyboard arrow keys and in case of mobile has the feature of the swiping in the product page and then navigating through the products.
Steps for Installation of Magento previous next product navigation Extension:
Follow the following steps for installing Magento paginator Module:
2. Unzip the package on your root folder of Magento setup via FTP manager (like Filezilla or WinSCP – download here: https://filezilla-project.org/).
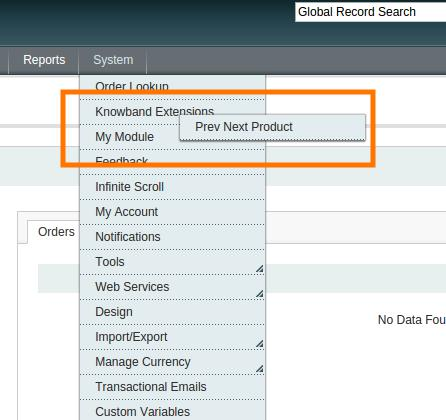
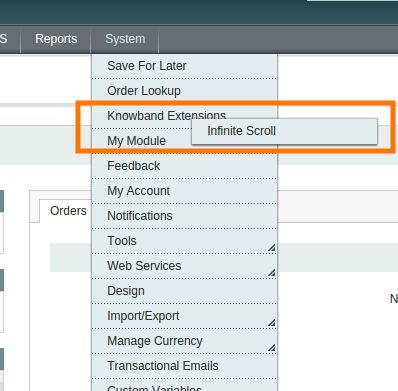
3. In Admin Panel go to System > Knowband Extensions > Prev Next Product.
4. That is all – Your system is ready.
General Settings
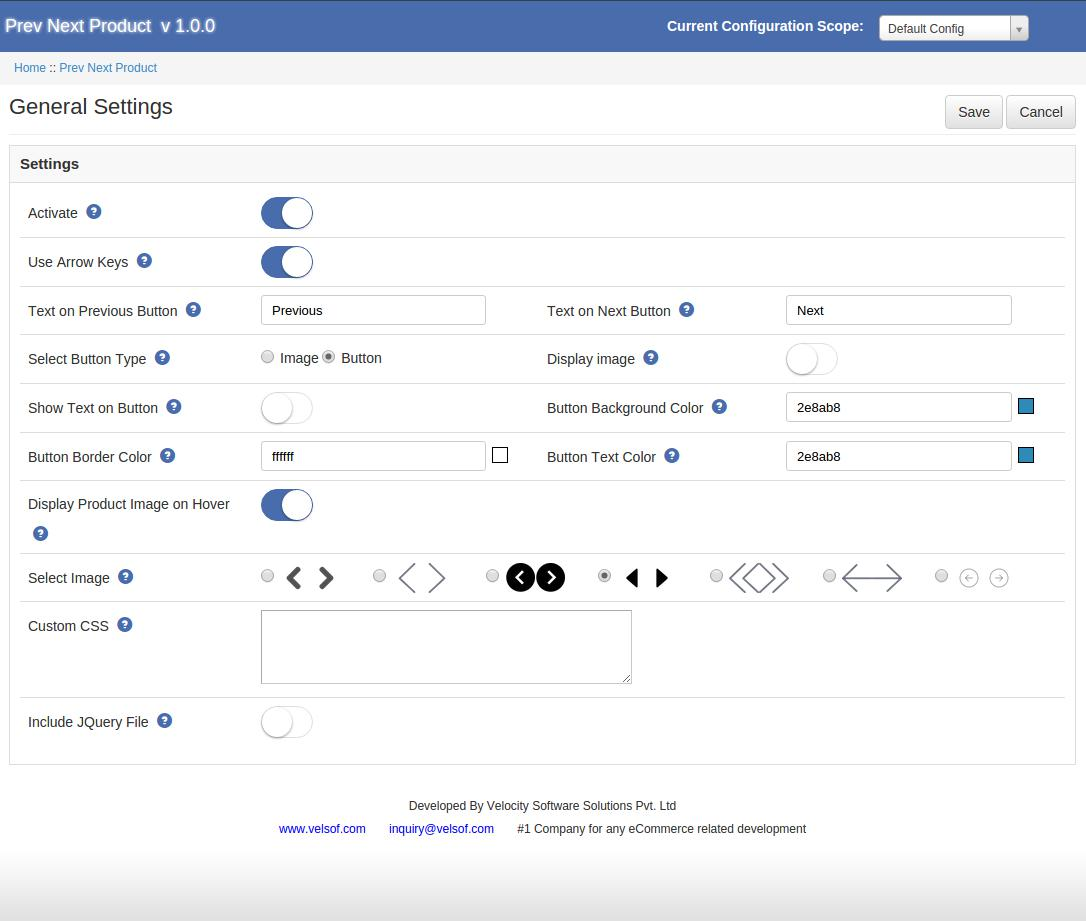
The General Settings of the Magento navigation has following options:
Active: This field of the Magento previous product enables or disables the plugin on the store front.
Use arrow keys: This option of Magento next product is to enable for the navigation by using keyboard keys.
Text on Previous Button: In this field of Previous next product Magento, the admin can set text which is to be displayed on previous button.
Text on Next Button: This field of Magento extension allows the admin to set the text which is to be displayed on next button.
Select Button Type: The admin can choose the type of button of the Magento previous next product navigation whether the image or button.
Display Image: This feature of Magento previous next product Enable to display image on button.
Show Text on button: Enable to show the text on button of the Magento paginator.
Button Background Color: Set the background color of the Magento navigation button.
Button Border Color: This field of Magento previous product, sets the border color of the button.
Button Text Color: Set the text color of the Magento Extension.
Display product image on hover: This feature of Magento next product is to enable the display previous/next product image on hover.
Custom CSS: The previous next product Magento extesnion has the option to add their own css code.
Include JQuery File: This field of Magento previous next product navigation offers the admin to enable if the current theme does not have the jquery file.
Store Front:
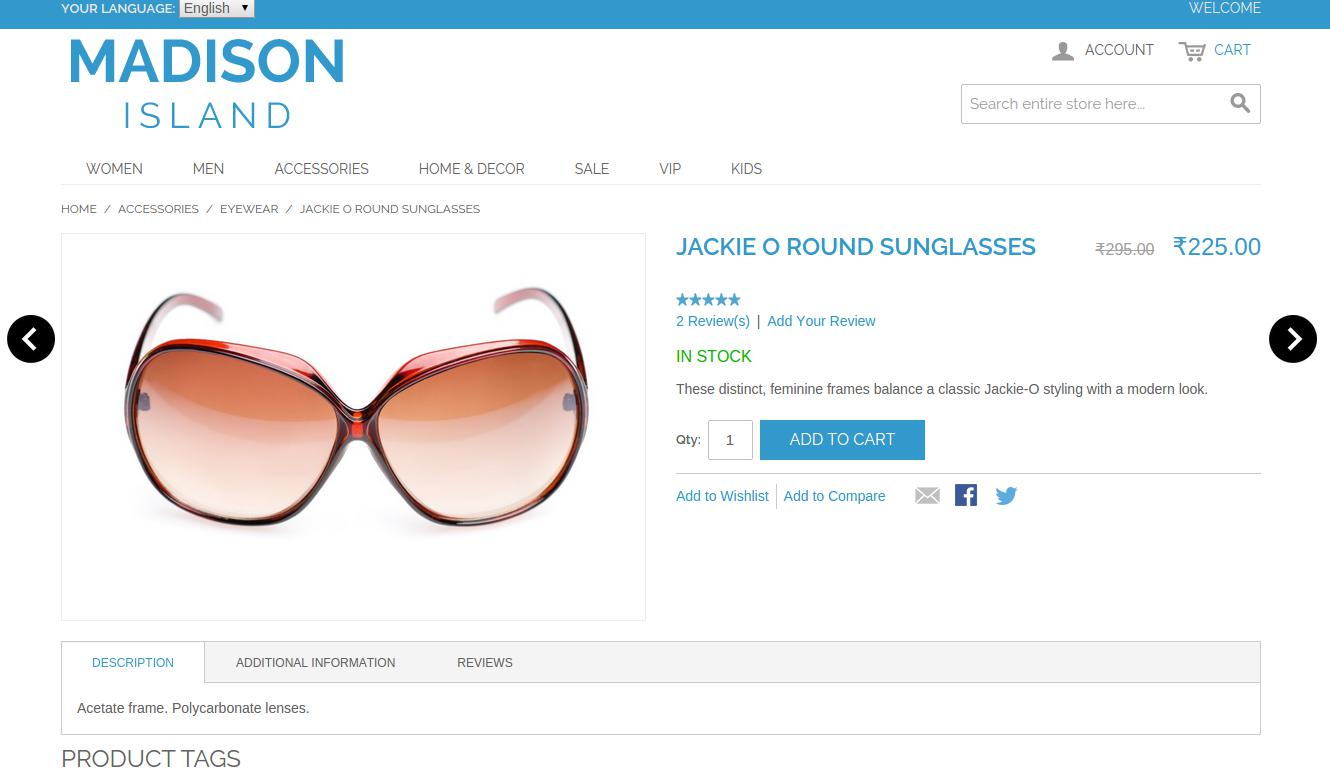
After enabling this Magento previous next product plugin the product page in the front of the shop will change a bit as the two buttons will be added in the side of the product.
The Magento paginator module at the front-end appears as follows:
Find more details about this Prestashop plugin by Knowband below:
Magento Infinite Scroll Module is a Magento extension incorporates the feature of infinite scroll in the site. When enabled, Magento Infinite Scroll extension makes changes in the product listing page. With the Magento fast scrolling, the store admin can remove the pagination from the category pages of the site. Magento quick scroll module even reduces the load time in refreshing the page everytime a visitor navigates to the next page. Magento Infinite Scroll Extension by Knowband also has the feature of load more link which can allow the store visitors to move directly to the top of the web page.
1.1 Merchant Benefits of Magento Infinite Scroll Module:
The store admin can include the option of the infinite scroll with the help of Magento infinite scroll plugin with making any code changes.
The Magento Infinite Scroll extension even allows the store admin to include the ‘Load More’ option on the site. With this, more products will be loaded only if the customers click on the link.
The admin gets an option to change the look and feel of these features from the back-end of the Magento Endless Scrolling module.
The Go to the Top link, allows the store visitors to move to the top of the web page. Even the appearance of this link can be changed from admin interface of Magento Infinite Scroll extension.
The admin can either add or remove the toolbar from the front-end of the site.
Magento Infinite Scroll module even offers the admin to set-up their sandbox site for the testing purpose.
2.0 Steps for Installation of Magento Infinite Scroll Extension
Follow the following steps for installing Magento Infinite Scroll Module:
The Magento Infinite Scroll Module offers a number of easy customization options to the store admins. They are discussed in details below.
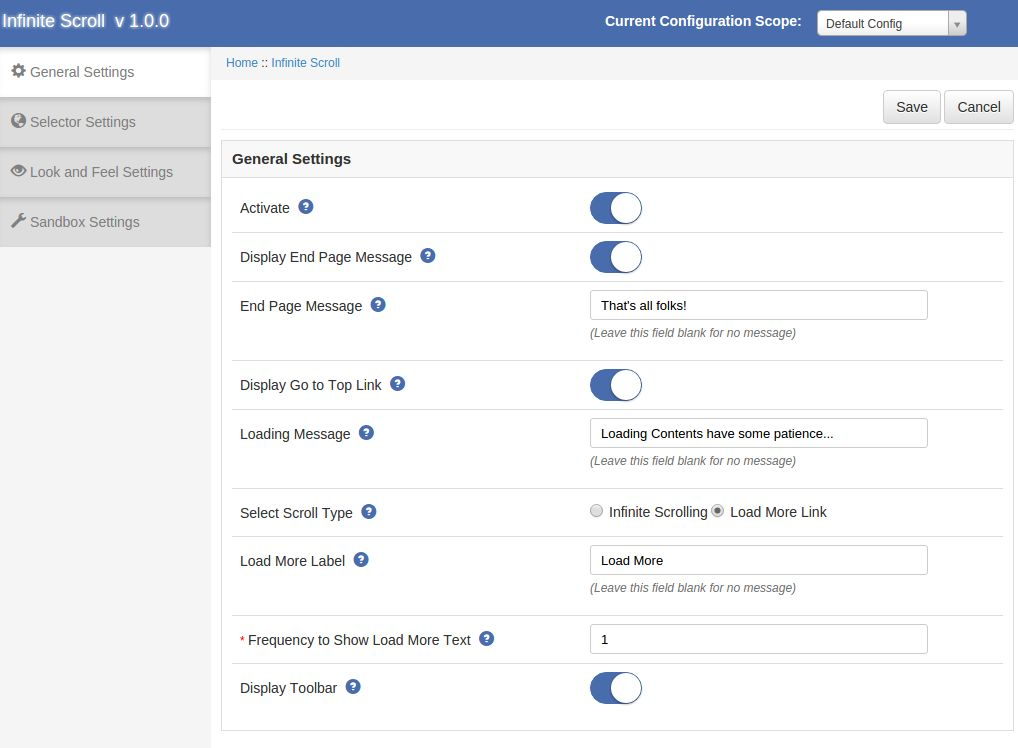
3.1 General Settings
The General Settings tab of Magento Infinite Scroll plugin has following options:
Active: Enables or Disables the Magento Product Auto Loading plugin on the storefront.
Display End Page Message: Enable to display the message at the bottom of the page.
End page Message: Set the text which is to be displayed at the bottom of the page.
Text on Next Button: Set text which is to be displayed on next button.
Display Go to top Link: Enable to show go to the top link at the left bottom of the page.
Loading Message: Set the message which is to be displayed when the content of next page is loaded.
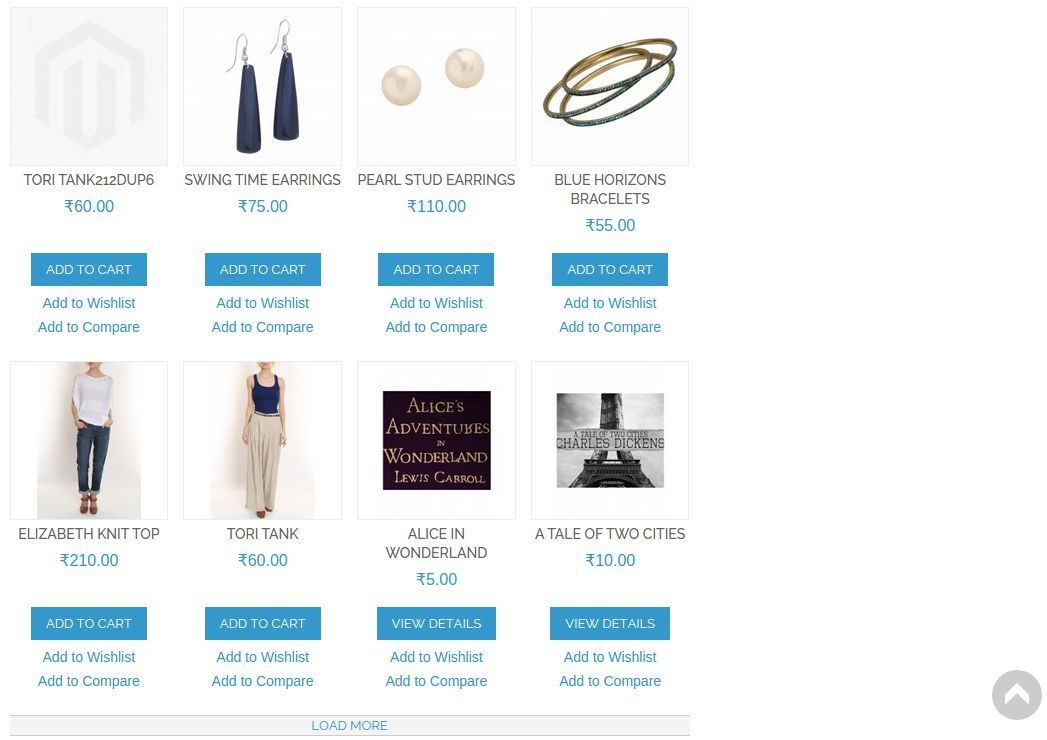
Select Scroll Type: Select the type of scrolling whether infinite or load more link. When infinite scroll is opted, the feature of infinite scrolling will be enabled in the front-end. Whereas when the Load More option is selected, you will be required to enter following information.
Load More Label: Set the label text which is shown at load more link.
Frequency to show load more text: Set the page number from which load more link appears.
Display Toolbar: Enable it to display toolbar at product listing page.
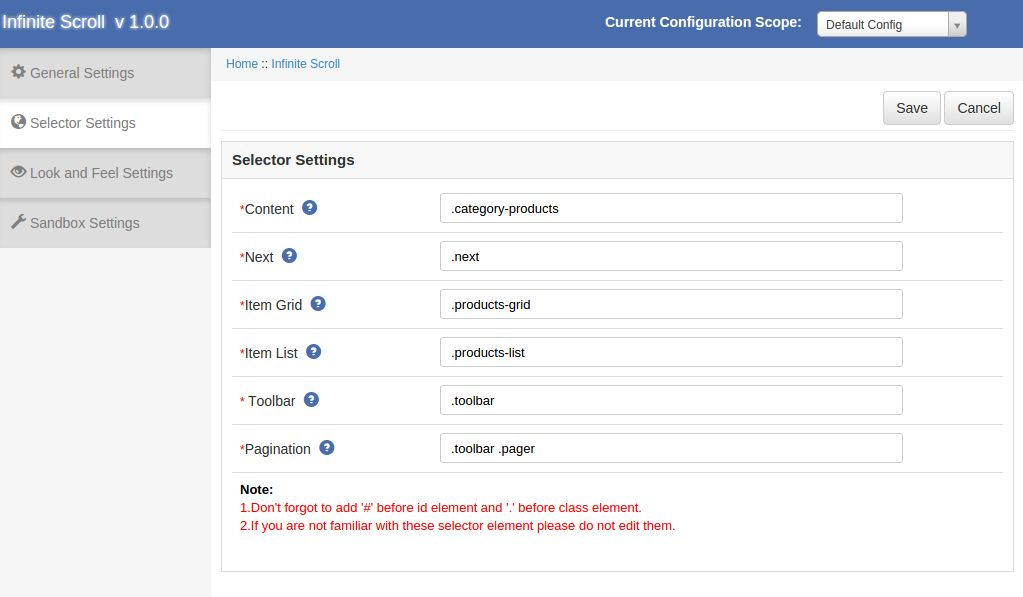
3.2 Selector Settings
The Selector Settings tab of Magento Infinite Scroll extension is to set class name and id name of following option:
Content: Set the class name of container on which the loaded content is appended.
Next: Set the class name of next element.
Item Grid: Set the class name of the element on which product is shown if it is grid set .products-grid.
Item List: Set the class name of the element on which product is shown if it is list set .products-list.
Toolbar: Set the class name of toolbar element.
Pagination: Set the class name of pagination element.
Note: Leave the Selector Setting untouched if you are not familiar with the same.
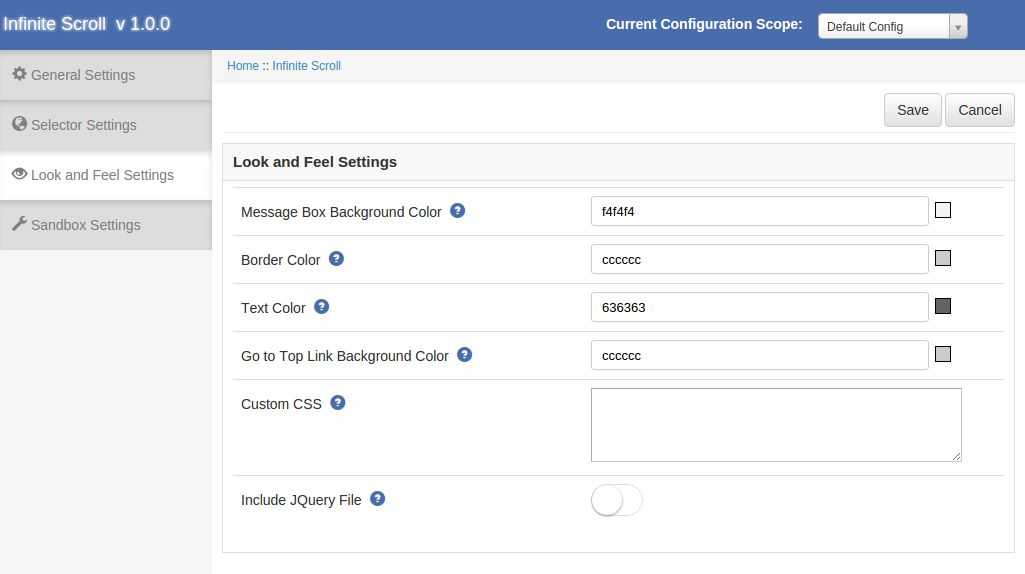
Look and Feel Settings
The look and feel settings tab of Magento Infinite Scroll has the following options:
Message Box Background Color: Set the background color of the message box.
Border Color: Set the border color of the message box.
Text Color: Set the text color of message text.
Got to Top Link Background Color: Set the background color of the ‘Go to top’ link.
Custom CSS: option to add your own CSS code.
Include JQuery: Enable if the current theme does not have the jquery file.
3.4 Sandbox Settings
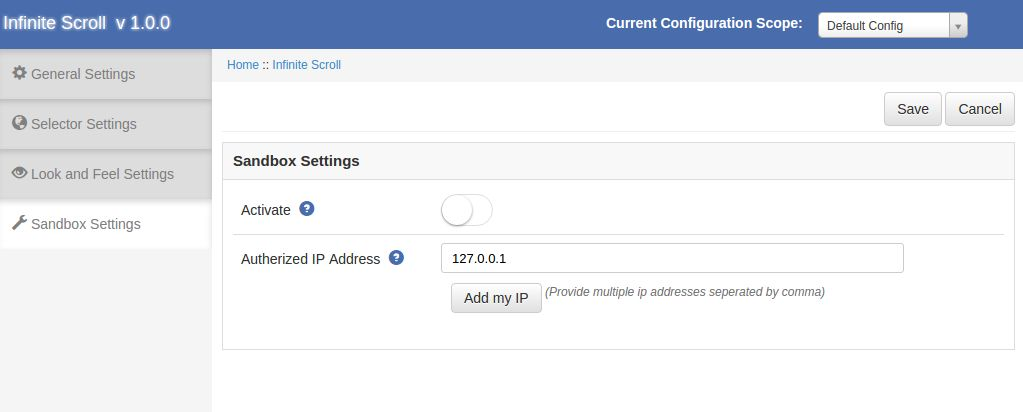
The Sandbox Settings tab of Magento Infinite Scroll is to enable this module on a particular IP.This tab has the following options:
Activate: Enable it to use sand box mode.
Authorized IP Addresses: Provide the multiple IP addresses separated by comma or you can add your IP by clicking on Add my IP button.
4.0 Store Front
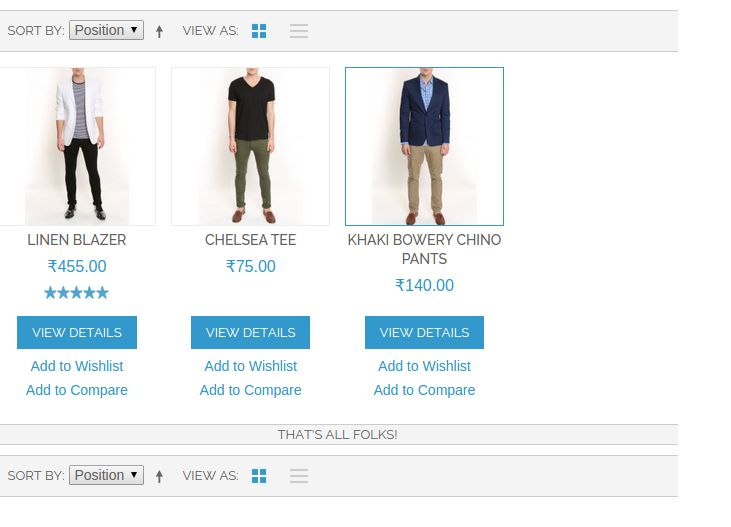
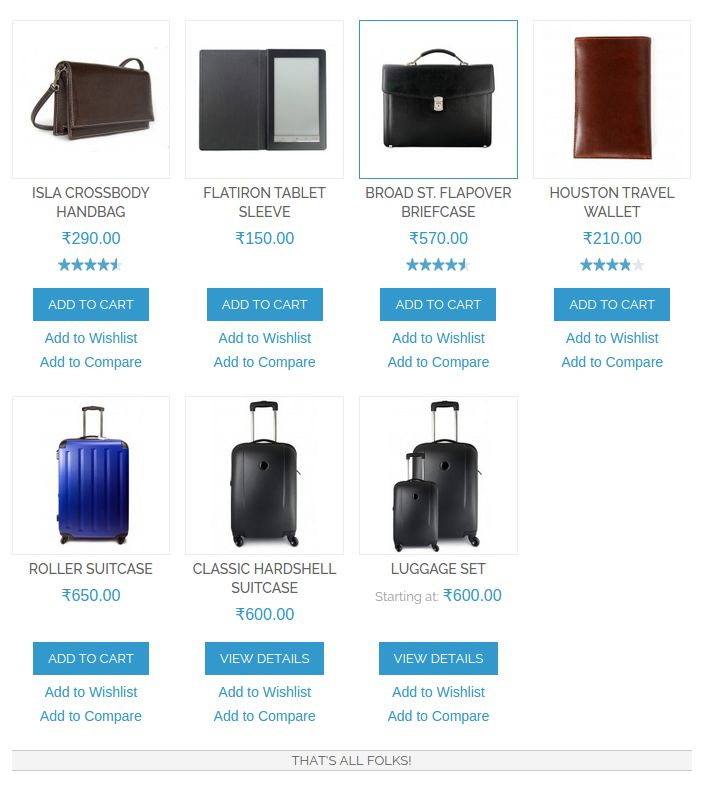
The changes made from the back-end of the Magento Infinite Scroll will be incorporated in the front-end of the site as well. After enabling the Magento Infinite Scroll plugin the product listing page in the front of the shop will change a bit as the pagination is disappear and next page product is loaded by scrolling or as per the settings saved.
The Magento Infinite Scroll module at the front-end appears as follows:
Installation Steps of Magento Advanced Wish List Extension
1.0 Introduction
Most of the time eCommerce store visitors have to plan their shopping in advance – they may need certain products regularly (e.g. consumer goods or food, clothes); for special occasions, to make sure they will have all they need, etc. For this purpose making the easy, they save the favorite product to their wishlist. The Magento Advanced wishlist extension makes this process much more comfortable – with it customers can save the favorite products, they are planning to buy in the future, etc.
This Magento advanced order list extension motivates the customer to come back to your website as well as attract the new shoppers and they place more orders. This Magento extension shows the popup of the wishlist product at the bottom of the webpage with the help of this, they can transform wishlist products into checkout with just a click of a button.
1.1 Benefits of the merchant:
The Magento advanced wishlist extension allows the customer to maintain the private wishlist of the product that can help for future reference.
The Magento extension provides an option to the store admin can view the complete list of products saved by the customer on their wishlist.
The Magento Advance order list extension allows the e-merchant to change the look and feel of the wishlist and add to cart button and they can also allow the default. color settings as per requirement.
The Magento advance purchase list has an option to include the jQuery file if required.
The online retailers can set the expiry of the saved product in days.
With the help of this Magento advanced wishlist extension, the store admin can view the which product is most popular and high demanded.
The store admin can analysis the sales report.
The Admin can Re-Price the products to increase sale.
This Magento saves for later extension compatible with all themes.
Mobile responsive.
Easy installation and use.
2.0 Installation Guide
1. Folder structure of the Magento Return Manager module.
2. Copy all the above folders into Magento root directory and clear the cache (if enabled).
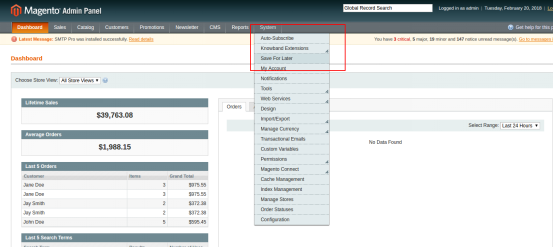
3. Now, login to the admin panel of your Magento store. You will be able find the “Save for Later” option inside the “System > Knowband Extensions > Save for Later” menu.
2. On clicking menu Save For Later the module for plugin will open. It contains navigational bar at the top, Tab menu at the left and in main content the first general setting tab will display.
4. You can now configure the Magento Save for Later Extension as per your requirements and check its working in the front end at following URL:
https://pstest2.knowband.com/mage1932
3.0 Admin Module
After installing the Magento advanced wishlist plugin into magento store, the module will provide following options inside “Save For Later” menu:
Above 4 points are actually one section comes under “Settings” but described here as separate entity for more clarity.
Each interface is in form of a tab and each tab contains some specific settings/functionalities that can be changed according to the need. Each tab is explained below.
3.1 General Settings
1. Active: Initially, this will be “OFF”. The e-merchant can enable the module, select enable present under the label Activate.
2. Remove Wishlist : Check this option to remove the default wishlist from the website.
3. Use Default Color Setting: This option will allow the store admin to reset your color setting to default. The default color values will display by default. Remember if you wish to change the color setting then this option must be disabled.
4. View All Button Color: To Select a color for the view all button color in the saved product list. See below image:
5. View All Button Text Color: Select the color value for text over the view all button color.
6. Add To Cart Button Color: Select the color for add to cart button visible on the page open on the click of view all button.
7. Add To Cart Button Text Color: Select the color for the text over the add to cart button.
8. Days to Store guest Product: For guest users the product will be saved in the cookies. Using this option you can set the expiry days for cookies.By Default cookies will stored for 10 days.
9. Jquery File: jQuery i.e. a javascript framework is required for this plugin to work. Sometimes themes used in magento already includes it but sometime they do not. If jquery is already included in your theme select no else select yes to include it.
3.2 Category Analysis
This Magento advanced wishlist extension allows the admin to make an analysis on the Categories. Here the store merchant can view the graph for the categories using the dropdown menu and date filters. When the admin opens the tab, by default last week report will display. If there is no product saved in last week then no record found message will display instead of the graph.
Below the graph a grid is provided. This grid will display the categories of the product saved.
On the top of the grid there is an export button , that will export the grid data into csv file. You can find particular record for category by using its id and search button available on top left of the grid.
In the Grid you can see an action column, on click of it a new grid will open in another browser tab displaying the products saved under that category.
NOTE: The No. of Product will be display according to configuration scope.
3.3 Product Analysis
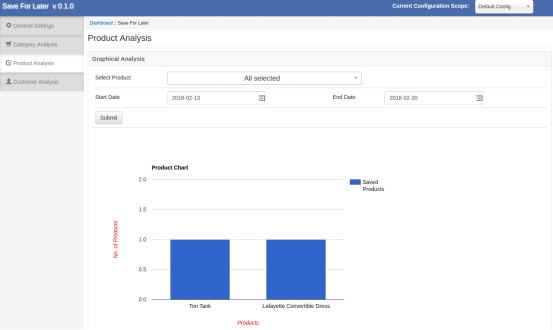
This Magento advance purchase list allows the admin to make an analysis on the Products. The Product analysis tab the online retailers can view the graph for the product using the dropdown menu and date filters. When the admin opens the tab, by default last week report will display. If there is no product saved in last week then no record found message will display instead of the graph. Below the graph a grid is provided. This grid will display the categories of the product saved.
On the top of the grid there is an export button , that will export the grid data into CSV file. You can find particular record for category by using its id and search button available on top left of the grid.
NOTE: The No. of Product will be display according to configuration scope,
3.4 Customer Analysis
This Magento advance order list allows the Magento store owners to make an analysis on the the online customer. The Online store owner can view the use count of the SAVE FOR LATER option for each user in the grid.
Also, there is a column view saved products, on click a new grid will open in new tab displaying the products saved by that customer.
NOTE: The no. of use count and no of product can be different. When you click on view saved product , only those product will be displayed which are saved in customers list that time.
Hope that we have covered all the concerned regarding the installation of Magento Extension. If you are new on Magento then you can also check our blog of Top Magento themes of 2015.
4.0 Front End Module
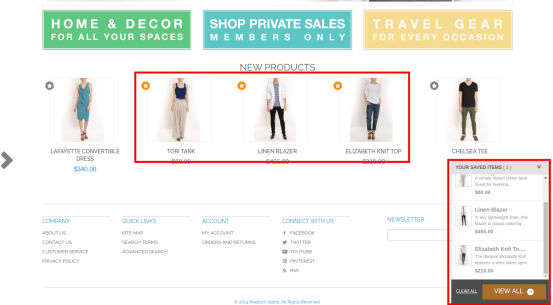
After enabling the Magento save for later module, customers will be able to see a bottom bar on every page of the store containing the “Your Saved Item block” enabled through configuration panel of the magnto extension.
The bottom bar at the front-end appears as shown below:
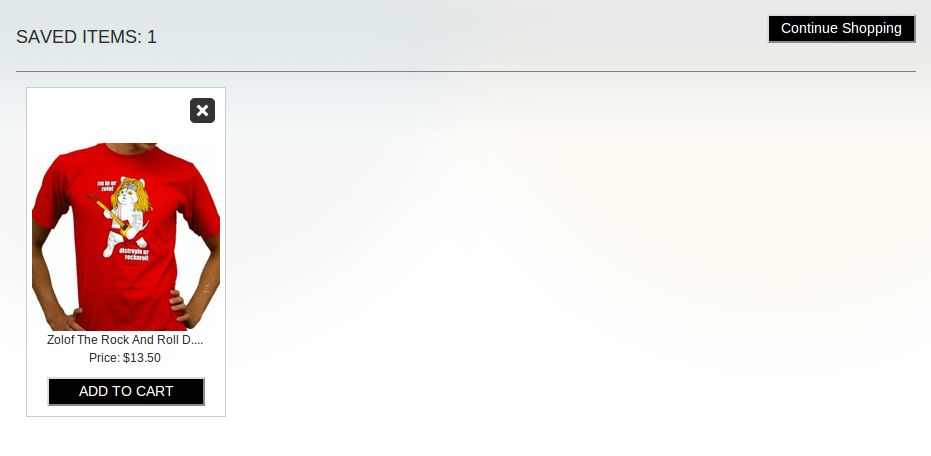
The highlighted “Shortlist” button will allow customers to shortlist corresponding products into a separate bucket. This bucket is displayed at the bottom of the page as highlighted in above screen.
When the customer clicks on “Shortlist” button, a product gets added to bucket and button text will get changed from “Shortlist” to “Added”.
You can try Knowband’s Magento Advanced Wishlist extension for on your Magento store. Magento advance order module helps you increase customer engagement to your store & you can
Provide the option to the online shoppers to save the favorite product to their wishlist.
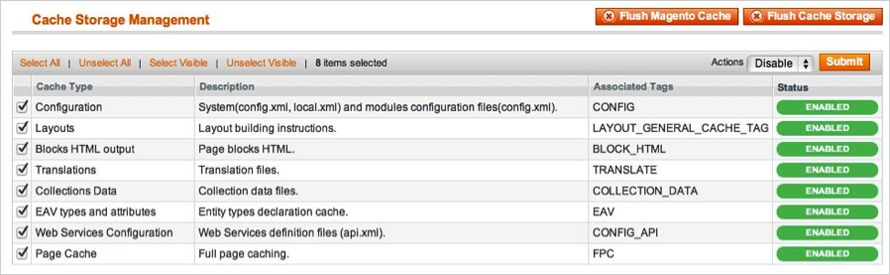
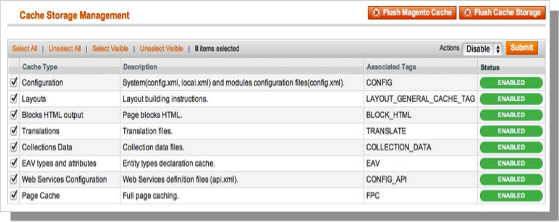
The Magento front end relies heavily on caching to provide a faster experience to customer. This is a wonderful tool, but can wreak havoc during the installation process. To ensure that the cache is not the cause of any problems, we should turn it off. This can be done from the admin console
by navigating to the cache management page (System->Cache Management), selecting all caches, clicking disable from the drop-down menu, and submitting the change.
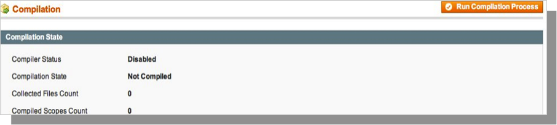
2. Disable Compilation Mode
This may not be an issue for many readers, but if you are using Magento’s compilation mode on your store, it is important that you remove it. Without going into to many details, compilation mode takes many files spread out over the system and condensing them into a single file that can be run very quickly. If an extensions files are not in the system when this single file is compiled, they will not be included. To check that this is disabled, go to System->Tools->Compilation. If the compiler status is Disabled, you are ready to go. If not, simply click the Disable button on the right hand side of the screen.
Choose an Installation Method
There are two different methods used to install extensions. The first involves taking advantage of the Magento Connect Manager, while the second involves manually installing the files via ftp or command line. The first option is generally used by store owners and is a relatively automated process, the problem is that if there is a problem with this process, you are at the mercy of the connect manager to tell you where the problem is coming from. Option two involves getting your hands on the files yourself and manually dropping them into the Magento installation.
Option 1: Using Magento Connect
Required Materials:
User account for Magento Connect
Magento Admin account with access to Magento Connect Manager
As stated before, this option is relatively easy to implement. The first step is finding the link on Magento Connect for the extension you wish to install. Once there click install now. If you are not currently logged into the site you will be prompted to do so. Next, select the version of Magento connect you are using (if in doubt, select 2.0), accept the extensions license agreement, and copy the extension key.
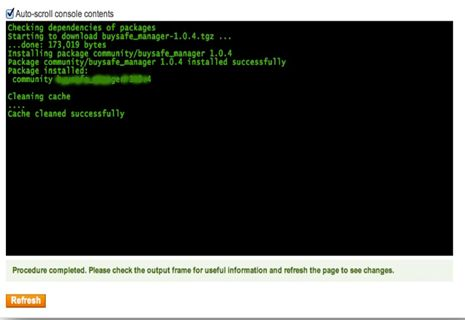
Log into your stores admin console and navigate to System->Magento Connect->Magento Connect Manager. At this point you will be prompted to re-enter your administrator credentials. In order to install an extension from the connect manager; you must have an account with full access to the administration console. If you were given limited access, Magento will not allow you to proceed. Once you are logged into the manager, simply paste the extension key into the text box and click install. A system window will appear towards the bottom of the page that will display the progress of your
installation.
Congratulations, you have successfully installed the extension on your store. Be sure to test thoroughly before re-enabling the cache/compilation. If you found no problems both before and after these features have been re-enabled, you should be ready to repeat the installation process on your live site. DONT FORGET TO BACKUP ALL FILES AND DATABASES BEFORE
INSTALLATION!
Option 2: Manual Installation Required Materials:
All files used by the extension.
FTP access to your website.
The connect manager is a useful tool for installing extensions, but prefer hands-on method when it comes to installations. It feels more comfortable when you are personally in control of the process.
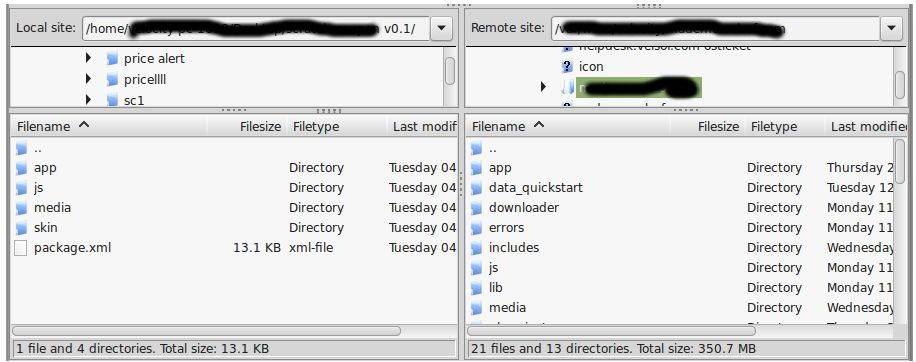
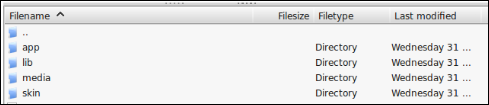
Do you see an app-code directory there, what about app-etc-modules? If you dont see these directory paths and files contained within them chances are that the extension download was faulty. Take a look at the package.xml file, this is the blueprint used by Magento Connect to arrange the files in the proper places. You may need to use this to ensure that everything is as it should be. Once you have reviewed the extension files you are ready to perform the last step. Using your ftp client, drag all of the files onto the store root of the magento instance.
Depending on the number of files in the extension, this may take a few moments. Now go to the admin console and click Flush Cache Storage. This is the requirement for any extension that adds pages to the admin console. Logging out and back in is also required to ensure that everything loads properly. If you cannot clear the cache via the admin console for any reason,
you will need to clear the cache manually via your FTP client (see the first FAQ question for assistance). That is the final step. Congratulations on a successful installation.
Troubleshooting and FAQs
I loaded all files onto my Magento store, and now get a white screen for some or all of the admin console.
This is a fairly common problem, and 99% of the time it is cache related. If you can get to it, go to System->Cache Management and click Flush Cache Storage. This will ensure that everything cached by Magento is deleted and will to be regenerated. Log out and back in to complete the process.
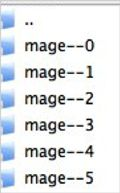
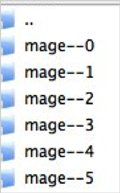
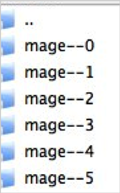
If you are completely cut off from the admin console, navigate to the var-cache directory of your website. You should see a series of directories named mage*. Delete all of these directories (DO NOT DELETE var-cache). This is the equivalent of flushing the cache storage from the admin console.
I am receiving a Magento error when accessing certain pages. How can I debug this?
This question really deserves a blog post all to itself, but a good start would be to go into the errors directory of your store. Locate the local.xml.sample file and rename it local.xml. The next time you see the error detailed information will be provided explaining where the error took place. Dont forget to change this back when you are finished troubleshooting!
I have a critical error with my webstore and need to turn off an extension I cannot access the admin console. What do I do?
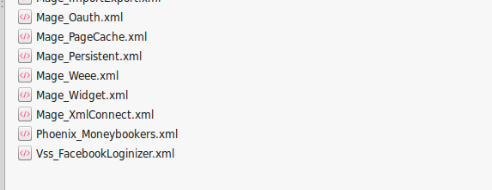
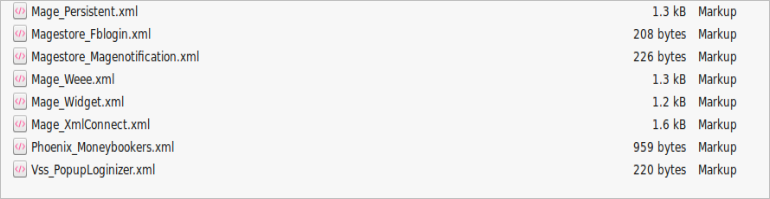
Go to the app-etc-modules directory and open the file that goes with your extension. The naming convention is generally DeveloperName_ExtensionName.xml. In this case it would be
Velocity_Popup.xml.
Look for the active tags in the file, change the value from true to false and save your changes. This tells Magento that the extension is disabled and not to run any code associated to it. Deleting the Magento cache is recommended (and most likely required) for this change to take effect.
User Guide
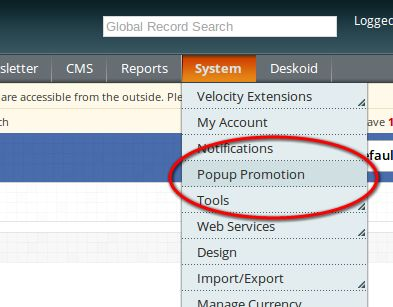
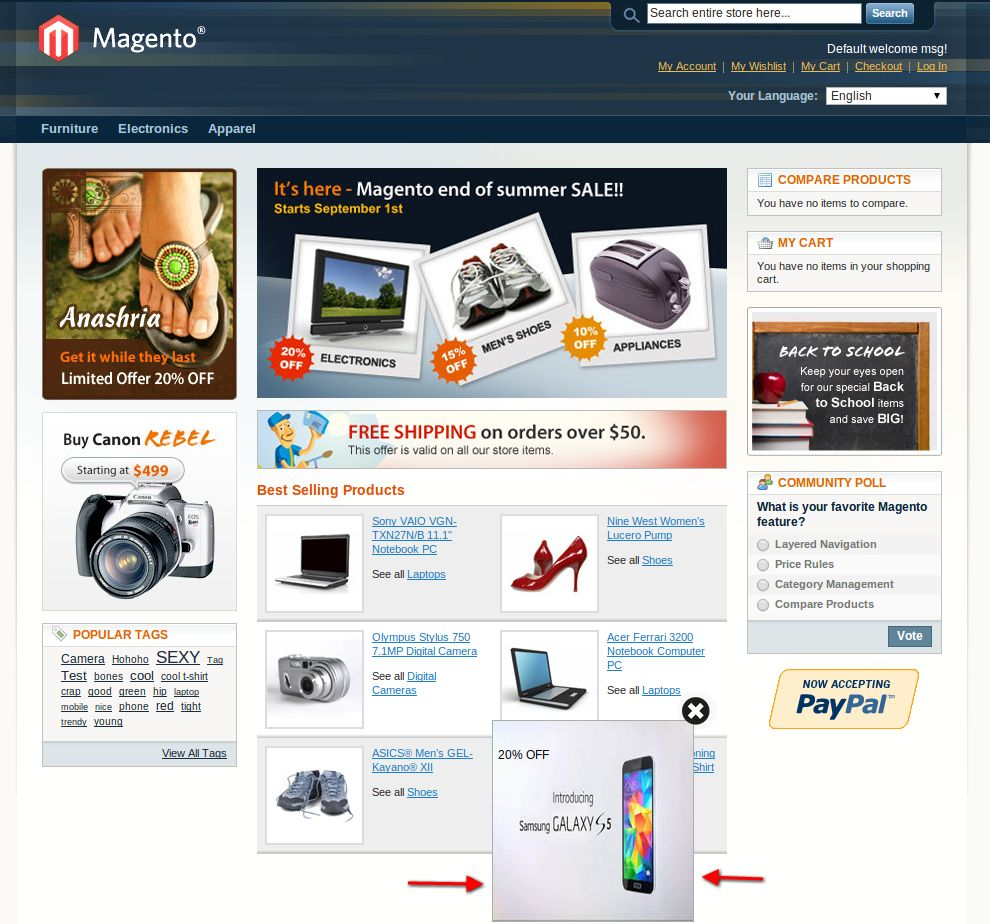
1. To excess Popup Promotion plugin, Click on Popup Promotion Tab appearing in navigation menu as shown below.
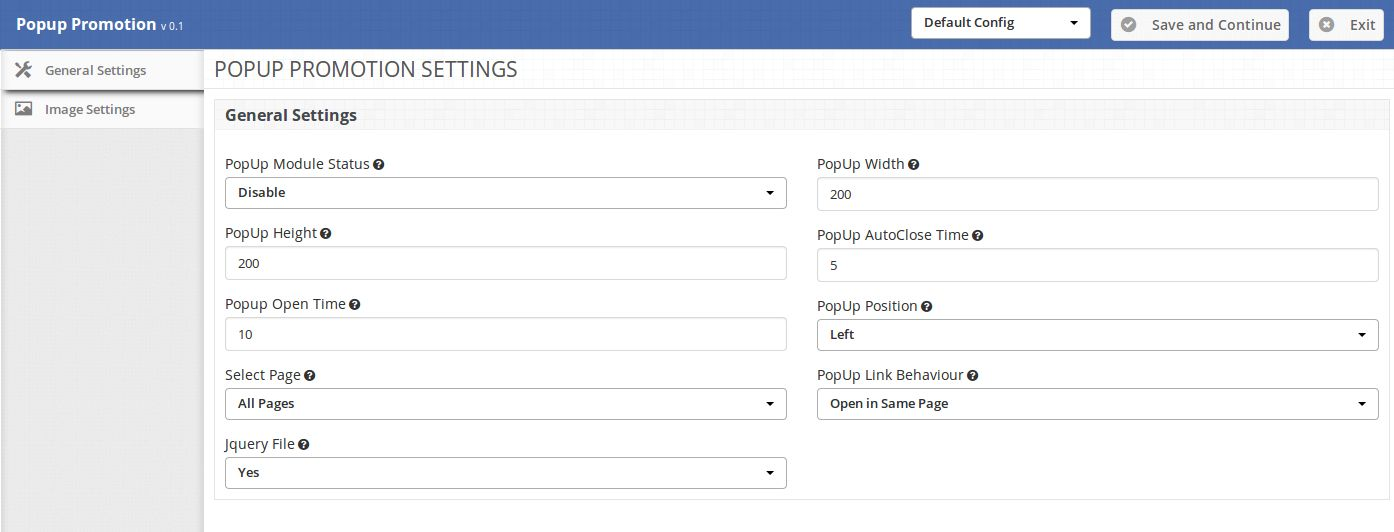
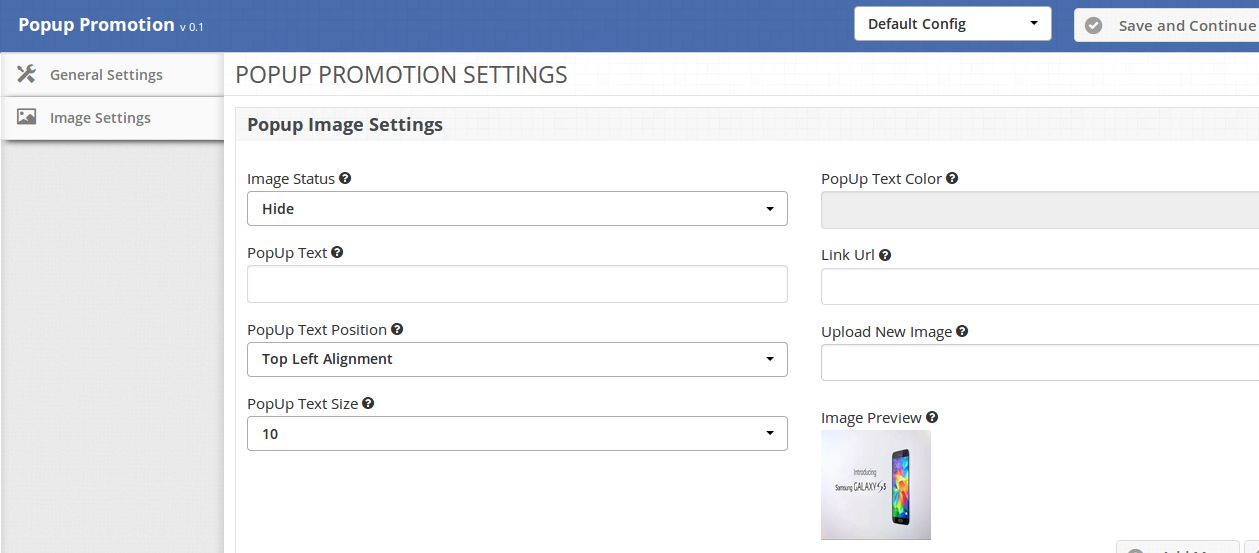
2. On clicking menu Popup Promotion the module for plugin will open. It contains navigational bar at the top, Tab menu at the left and main content in the center as shown below.
General Settings Tab
General Settings:
1. Popup Module Status: To enable the plugin, select enable present under the label of Popup Module Status.
2. Popup Height and Popup Width: Enter the Popup Width and Popup Height in pixels. Please note you should enter only numeric value do not write px or other character.
3. Popup Open Time: Enter the time in seconds which will set the time after which Popup will display when customer open the page.
4. Popup Auto Close Time: Enter the time in seconds which will set the time after which popup will automatically closed.
NOTE : If the Customer close the Popup then the Popup will close instantly but Popup will display again with new Ad (if set ) after the seconds set in Popup Open Time.
5. Popup Position : Select the position of Popup to display with reference to web page.
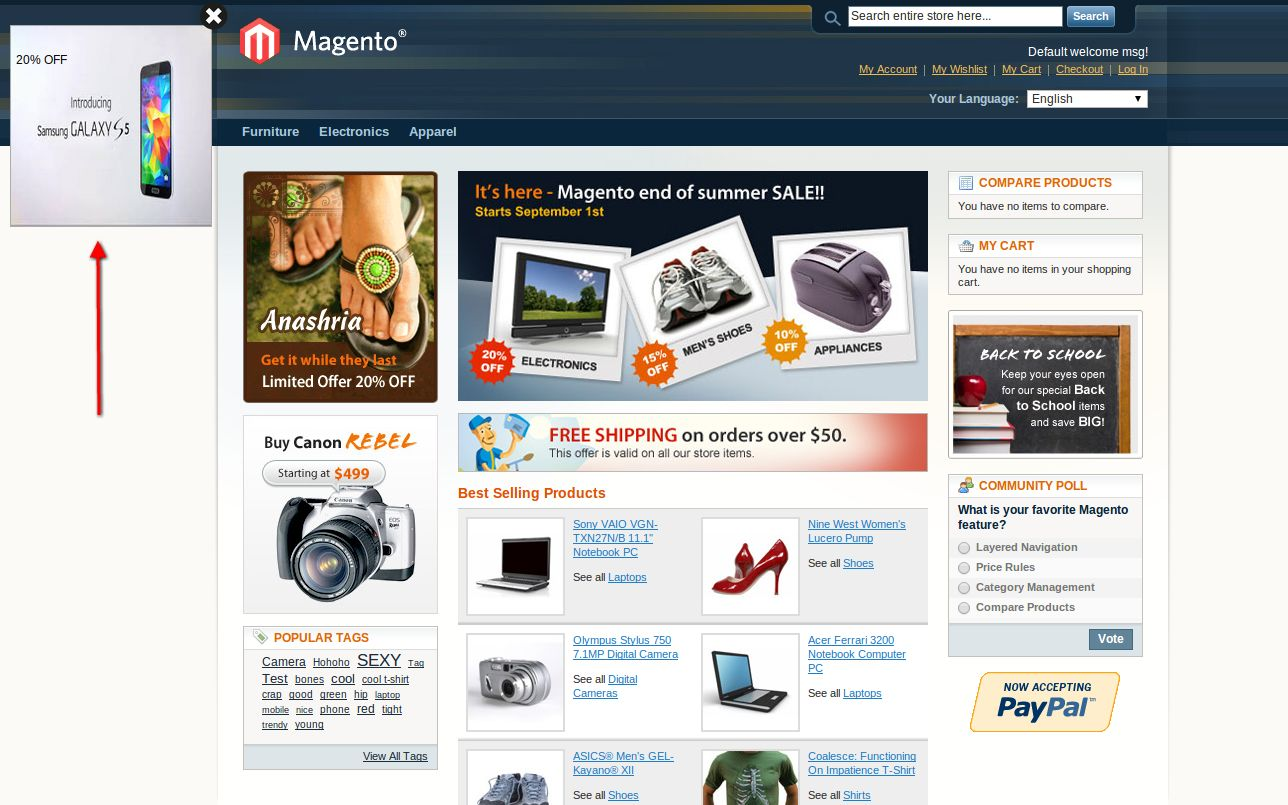
Left : The popup will display in top left of web page.
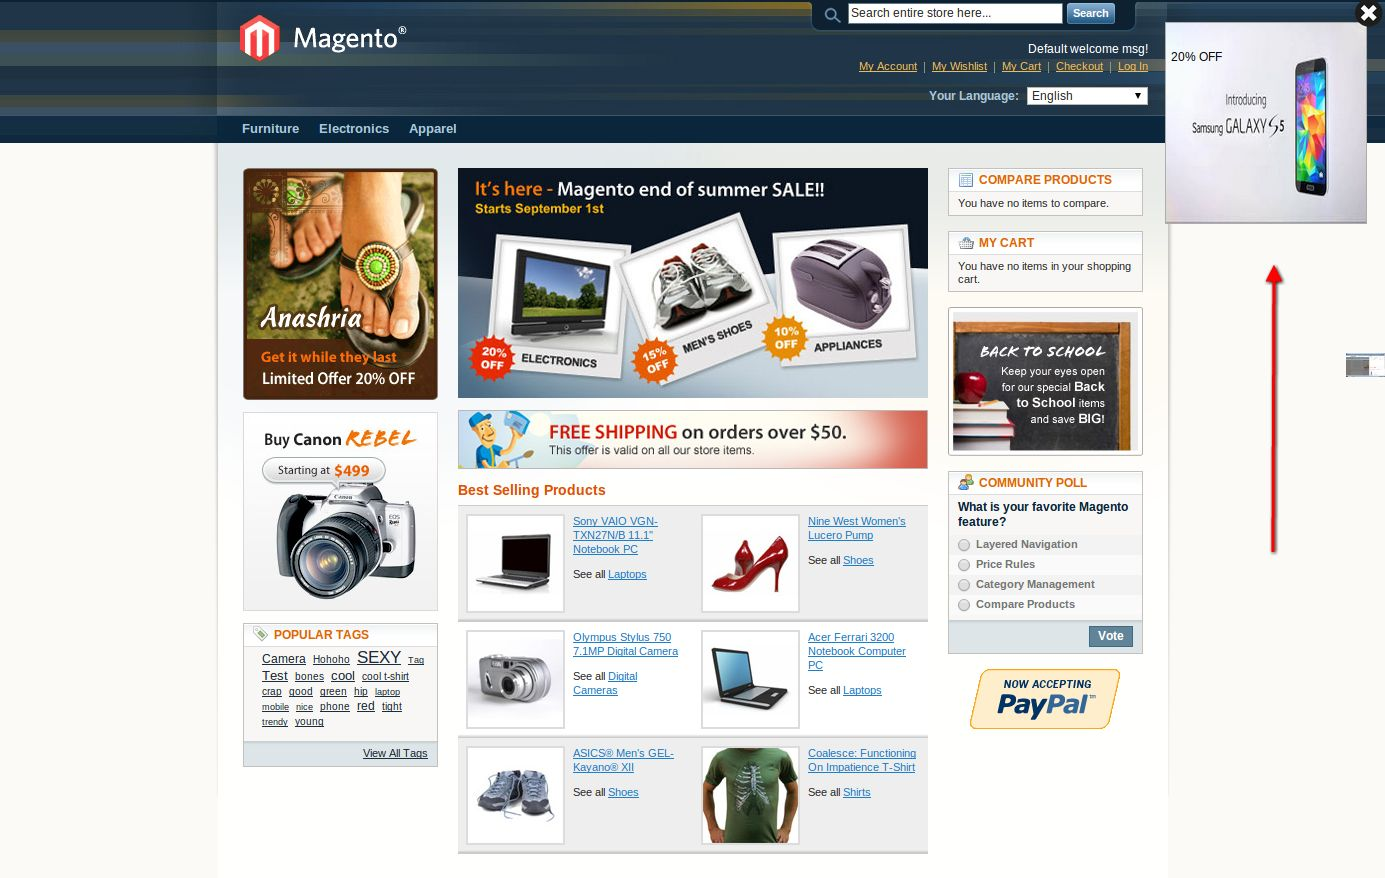
Right : The popup will display in top right of web page.
Bottom Left : The popup will display in Bottom left of web page.
Bottom Right : The popup will display in Bottom right of web page.
Bottom Center : The popup will display in Bottom Center of web page.
(Left)
(Right)
(Bottom Center)
6. Select Page: Select the page where you want to display the popup,
All Pages : The popup will display on all pages of website.
Category Pages : The popup will display on all category pages of website.
Product Pages : The popup will display on all product pages of website.
7. Popup Link behaviour : Select the type of link behaviour,
Open in New Tab/Page : The Popup link will open in a new tab/page.
Open in Same Page: The Popup link will open in a same tab/page.
8. Jquery File : jQuery i.e. a javascript framework is required for this plugin to work.
Sometimes themes used in magento already includes it but sometime they dont. If jquery is already inlcluded in your theme select no else select yes to include it.
Image Settings Tab
Popup Image Setting
1. Popup Image Status: This option is used to show / hide the image. This option is useful in case of multiple images.
2. Popup Text: Enter the text (if required) to be displayed on the image.
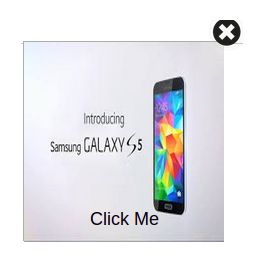
3. Popup Text Position: Set the position of text to be display on the Image of popup. For ex. See the text Click Me in below screen shot .
Top Left Alignment:
Bottom Center Alignment: 4. Popup Text Size: Enter the size of text in pixels. Enter only numeric value , do not write px in end.
5. Popup Text Color : When you click in text box a color picker will open. Select the desired color.
6. Link Url: Enter the URL to which customer will redirect on clicking that popup image.
NOTE : Enter the URL carefully. Its better to write url like https://www.example.com/.
7. Upload the image: Upload the image that you want to display in the popup. You can select image of any size and resolution .
NOTE : Upload the image having resolution equal or more than the popup resolution for better quality of popup.
8. Image Preview : When you save the settings the uploaded images preview will display here. If incorrect image is uploaded you can again upload new image using previous Upload New Image option.
NOTE:
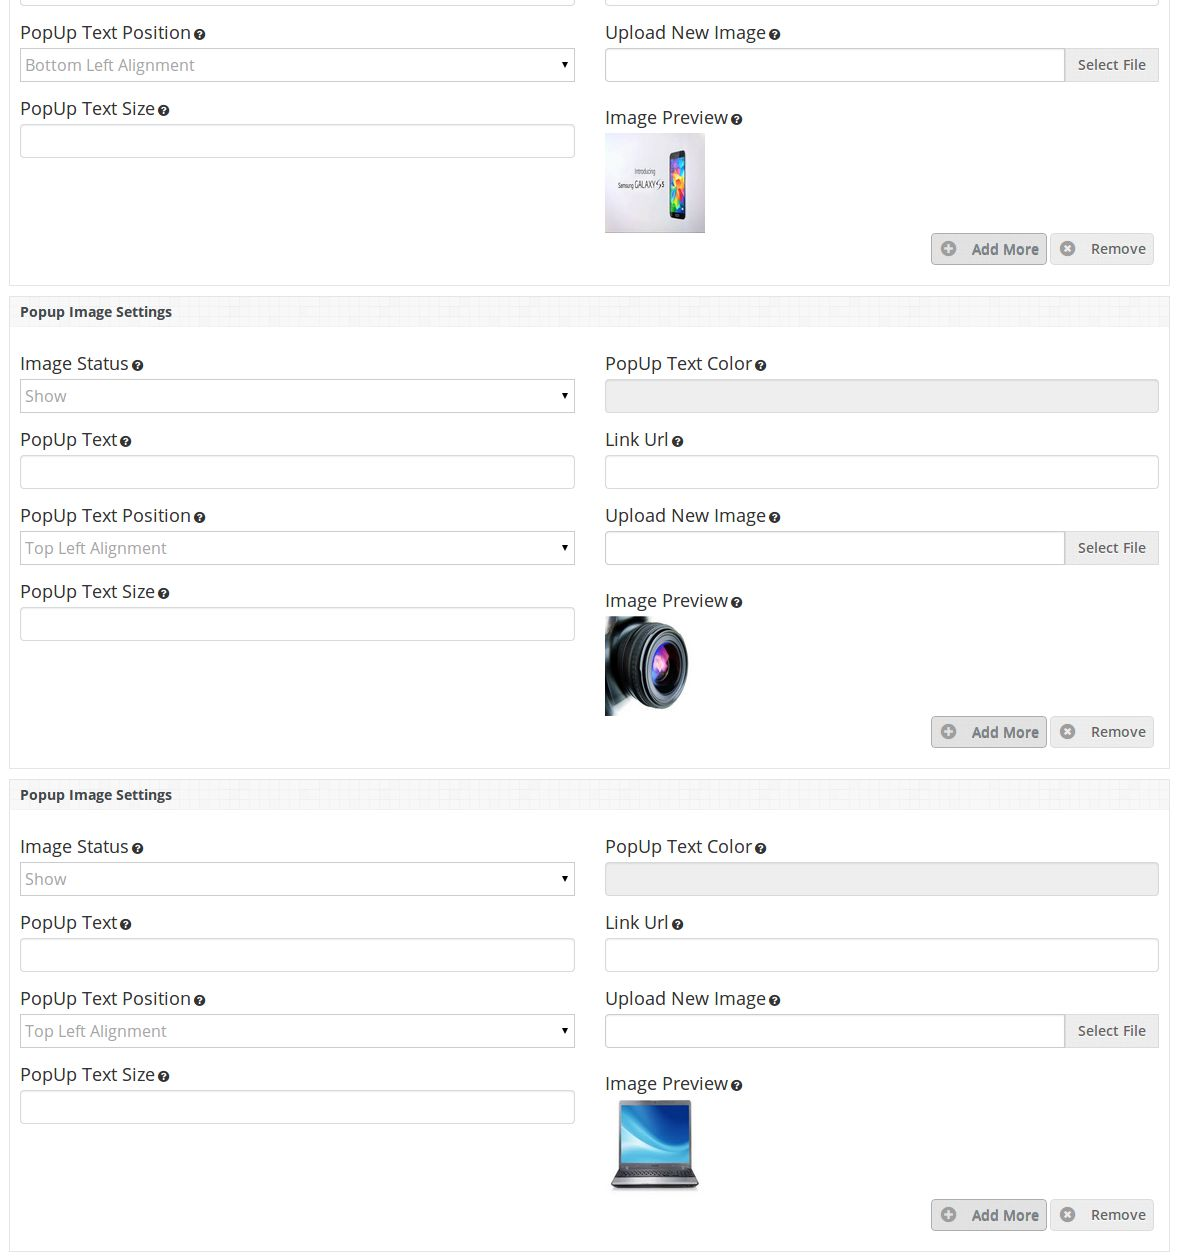
1. If you want to add more Ads just click Add More Button and One more Popup Image Setting Widget will display below.
2. If You want to remove/delete any Ad just press the remove button.
NOTE: You cannot remove the first Ad but if you do not want to display that Ad then just select Hide from Image Status or you can change the Image.
The connect manager is a useful tool for installing extensions, but prefer hands-on method when it comes to installations. It feels more comfortable when you are personally in control of the process.
Do you see an app-code directory there, what about app-etc-modules? If you dont see these directory paths and files contained within them, chances are that the extension download was faulty. Take a look at the package.xml file, this is the blueprint used by Magento Connect to arrange the files in the proper places. You may need to use this to ensure that everything is as it should be. Once you have reviewed the extension files you are ready to perform the last step. Using your ftp client, drag all of the files onto the store root of the magento instance.
Depending on the number of files in the extension, this may take a few moments. Now go to the admin console and click Flush Cache Storage. This is the requirement for any extension that adds pages to the admin console. Logging out and back in is also required to ensure that everything loads properly. If you cannot clear the cache via the admin console for any reason, you will need to clear the cache manually via your FTP client (see the first FAQ question for assistance). That is the final step. Congratulations on a successful installation.
Troubleshooting & FAQs
I loaded all files onto my Magento store, and now get a white screen for some or all of the admin console.
This is a fairly common problem, and 99% of the time it is cache related. If you can get to it, go to System->Cache Management and click Flush Cache Storage. This will ensure that everything cached by Magento is deleted and will to be regenerated. Log out and back in to complete the process.
If you are completely cut off from the admin console, navigate to the var-cache directory of yourwebsite. You should see a series of directories named mage*. Delete all of these directories (DO NOT DELETE var-cache). This is the equivalent of flushing the cache storage from the admin console.
I am receiving a Magento error when accessing certain pages. How can I debug this?
This question really deserves a blog post all to itself, but a good start would be to go into the errors directory of your store. Locate the local.xml.sample file and rename it local.xml. The next time you see the error detailed information will be provided explaining where the error took place. Dont forget to change this back when you are finished troubleshooting!
I have a critical error with my webstore and need to turn off an extension I cannot access the admin console. What do I do?
Go to the app-etc-modules directory and open the file that goes with your extension. The naming convention is generally DeveloperName_ExtensionName.xml. In this case it would be Velocity_FacebookLoginizer.xml.
Look for the active tags in the file, change the value from true to false and save your changes. This tells Magento that the extension is disabled and not to run any code associated to it. Deleting the Magento cache is recommended (and most likely required) for this change to take effect.
User Guide
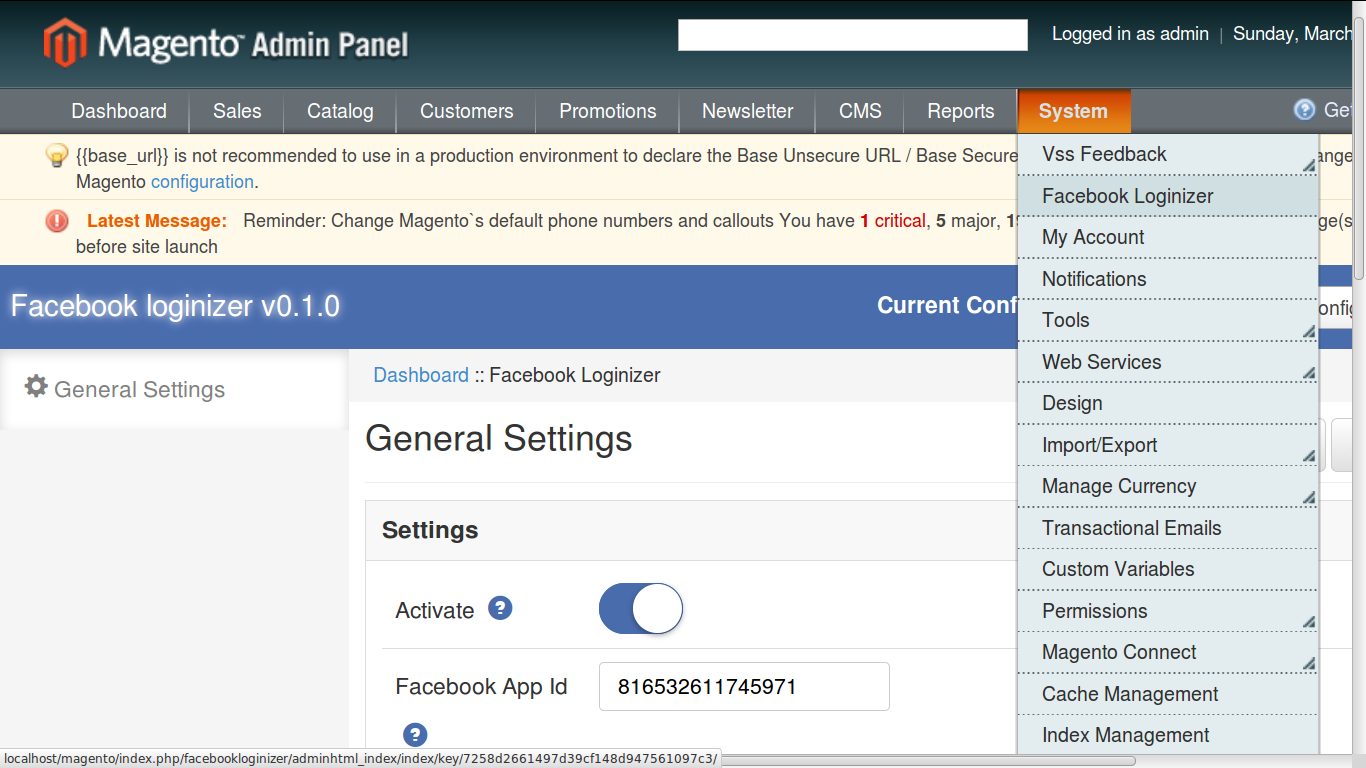
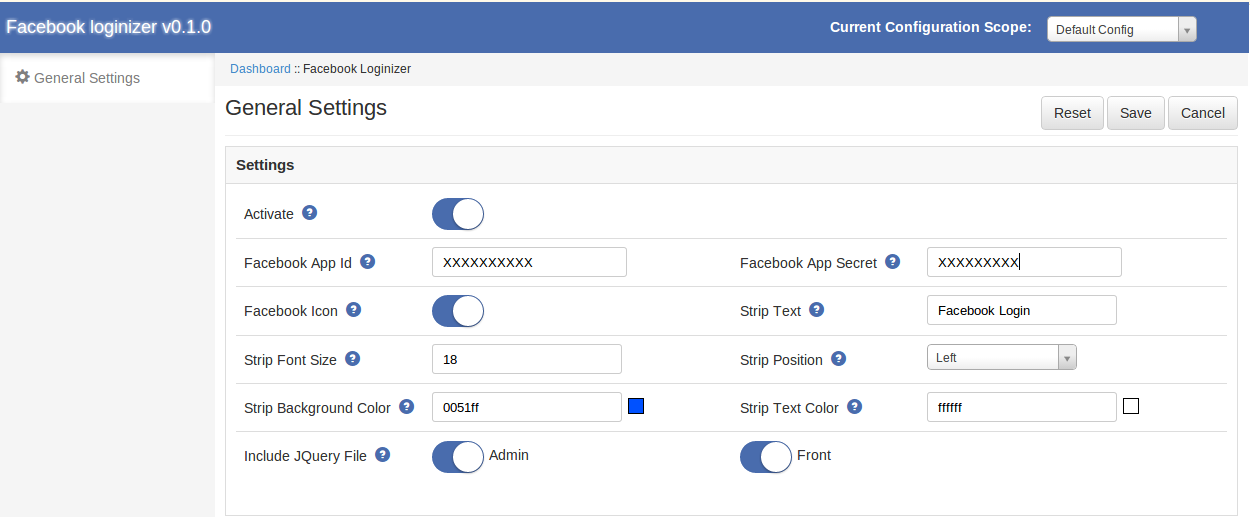
To excess Facebook Loginizer plugin, Click on Facebook Loginizer Menu appearing in System Menu navigation .
On clicking menu Facebook Loginizer the module for plugin will open. It contains navigational bar at the top and in main content the general setting tab will display.
General Settings Tab
General Settings:
1. Active: To enable the plugin, select enable present under the label Activate.
2. Facebook App Id: Enter your Facebook app id which you get from Facebook.
3. Facebook Secret: Enter your Facebook secret which you get from Facebook.
4. Facebook Icon: Enable or Disable the Facebook icon from front side.
5. Strip Text: Enter the text which you want to show on front side.
6. Strip Font Size: Enter numeric value which set the font size of strip text.
7. Strip Position: Select position which shows strip left/right side of page.
8. Strip Background Color: Select background color for your strip.
9. Strip Text Color: Select text color of strip text.
10. Include jQuery File: jQuery i.e. a javascript framework is required for this plugin to work. Sometimes themes used in magento already includes it but sometime they do not. If jquery is already included in your theme then deactivate else activate to include it.
Appendix
How to get Facebook App details?
Steps:
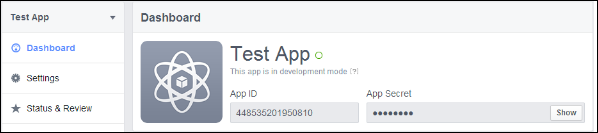
Go to Facebook Developers Website (https://developers.facebook.com) or click on link given top right of respective tab in module configuration page.
Click on Apps -> Create a new App.
Follow the instructions on the screen.
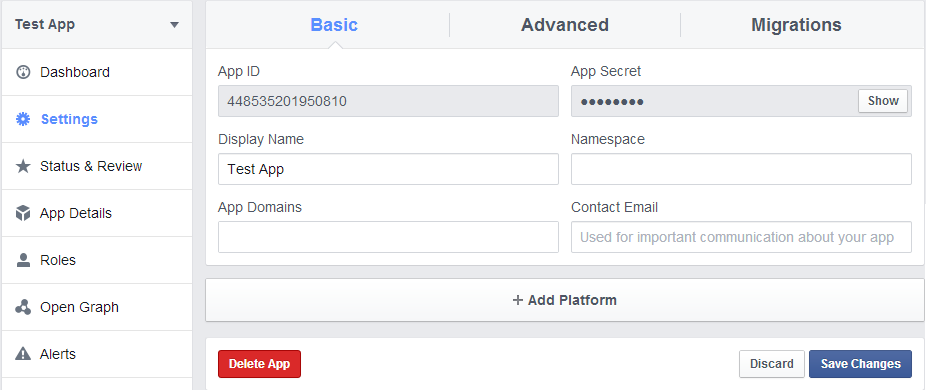
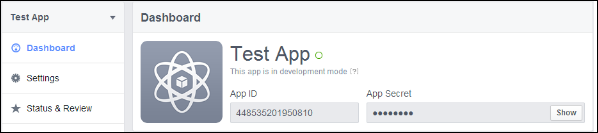
You will get the App ID and App Secret (Click Show button).
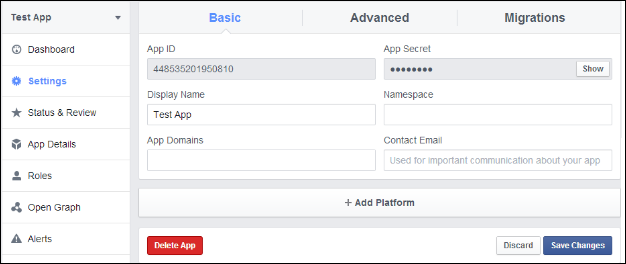
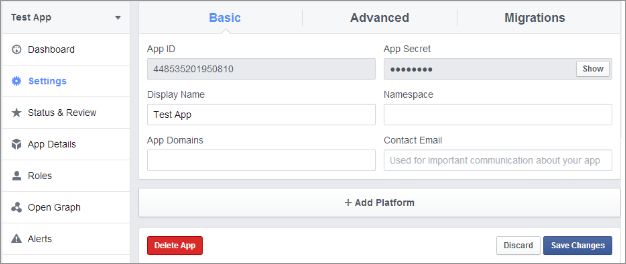
Now, go to Settings from left menu.
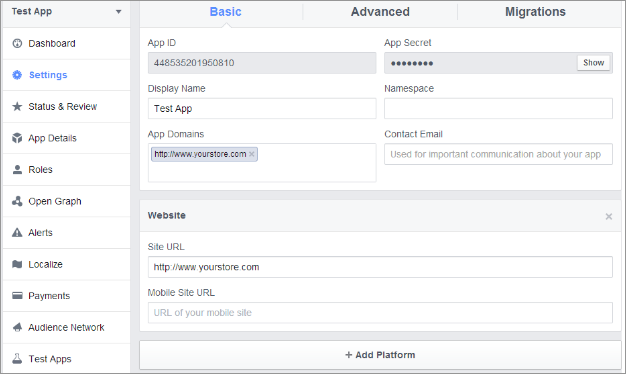
Click on Add Platform button.
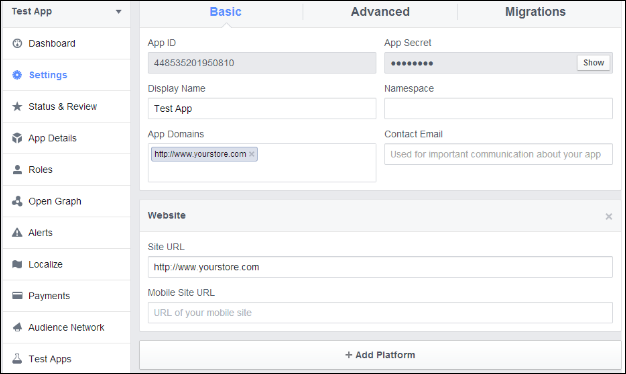
Select Website.
Enter your App Domain and Site URL.
Application Type: Web Application.
Authorized JavaScriptorigins: Your store domain name. (https://www.example.com)
Click Save Changes button.
Now, go to Status & Review tab from left menu and make the Application Live.
Introduction of Magento Social Login Extension by Knowband:
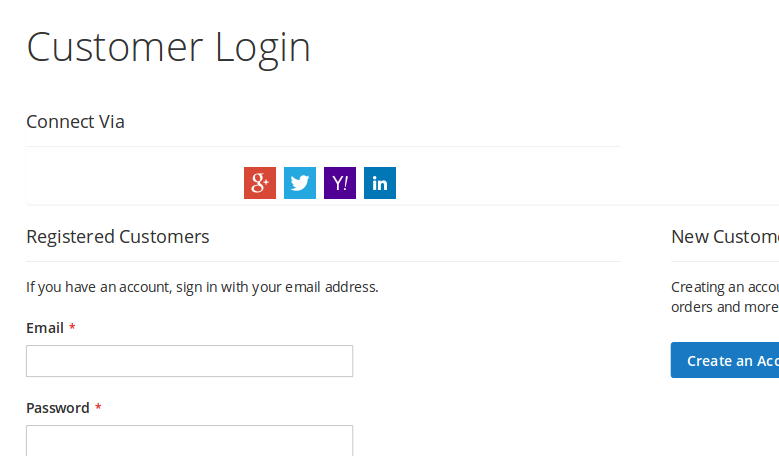
Magento Social Login Extension by Knowband allows users to login via their social accounts out of prvided 15. For example Facebook, Google Plus, Twitter, LinkedIn, Live, Yahoo, Instagram and many others. The Magento social login plugin is designed to simplify the logins for the users. By integrating social login plugin on your Magento store, you allow your visitors to login to your website with their existing social network accounts.
Steps For Installation of Magento Social Loginizer Extension:
Required Materials:
All files used by the extension.
FTP access to your website.
The connect manager is a useful tool for installing Magento extensions, but prefer hands-on method when it comes to installations. It feels more comfortable when you are personally in control of the process.
Do you see an app-code directory there, what about app-etc-modules? If you don’t see these directory paths and files contained within them, chances are that the extension download was faulty. Take a look at the package.xml file, this is the blueprint used by Magento Connect to arrange the files in the proper places. You may need to use this to ensure that everything is as it should be. Once you have reviewed the extension files you are ready to perform the last step. Using your ftp client, drag all of the files onto the store root of the magento instance.
Depending on the number of files in the Magento extension by Knowband, this may take a few moments. Now go to the admin console and click Flush Cache Storage. This is the requirement for any extension that adds pages to the admin console. Logging out and back in is also required to ensure that everything loads properly. If you cannot clear the cache via the admin console for any reason, you will need to clear the cache manually via your FTP client (see the first FAQ question for assistance). That is the final step. Congratulations on a successful installation.
Troubleshooting & FAQs
I loaded all files onto my Magento store, and now get a white screen for some or all of the admin console.
This is a fairly common problem, and 99% of the time it is cache related. If you can get to it, go to System->Cache Management and click Flush Cache Storage. This will ensure that everything cached by Magento is deleted and will to be regenerated. Log out and back in to complete the process.
If you are completely cut off from the admin console, navigate to the var-cache directory of your website. You should see a series of directories named mage*. Delete all of these directories (DO NOT DELETE var-cache). This is the equivalent of flushing the cache storage from the admin console.
I am receiving a Magento error when accessing certain pages. How can I debug this?
This question really deserves a blog post all to itself, but a good start would be to go into the errors directory of your store. Locate the local.xml.sample file and rename it local.xml. The next time you see the error detailed information will be provided explaining where the error took place. Dont forget to change this back when you are finished troubleshooting!
I have a critical error with my webstore and need to turn off an extension I cannot access the admin console. What do I do?
Go to the app-etc-modules directory and open the file that goes with your extension. The naming convention is generally DeveloperName_ExtensionName.xml. In this case it would be Velocity_SocialLoginizer.xml.
Look for the active tags in the file, change the value from true to false and save your changes. This tells Magento that the Magneto extension is disabled and not to run any code associated to it. Deleting the Magento cache is recommended (and most likely required) for this change to take effect.
User Guide
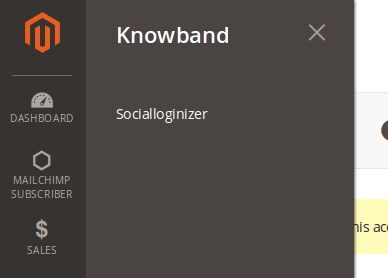
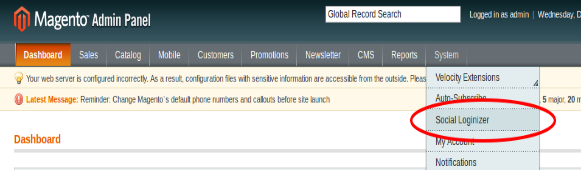
To excess Magento Social Loginizer plugin, Click on Social Loginizer Menu appearing in System Menu navigation menu as shown below.
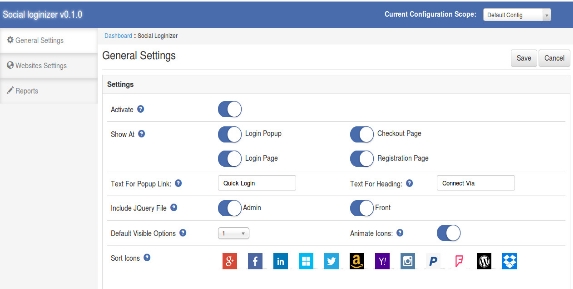
After clicking on Social Loginizer menu, the Magento social login plugin by Knowband will open. It contains navigational bar at the top, Tab menu at the left and in main content the first general setting tab will display.
General Settings Tab
General Settings:
Active: To enable the Magento facebook login extension plugin, select enable present under the label Activate.
Show At :
Login Popup: To enable the login popup.
Checkout Page: To add Magento social media login plugin on checkout page.
Login Page: To add social login bar on login page.
Registration Page: To add Magento social login extension on registration page.
Test for Popup Link: Set the text for login popup link which will shown next to default login link of the Magento social login plugin.
Test for Heading: Set the text for heading of social media login plugin Magento which will shown on selected pages.
Include jQuery File: jQuery i.e. a javascript framework is required for this Magento plugin to work. Sometimes themes used in Magento already includes it but sometime they do not. If jquery is already included in your theme then deactivate else activate to include it.
Default Visible Option: Select the no. of social icons to be visible by default on Magento social media login extension.
NOTE : In Magento social login module, only small icons will be visible and only maximum 6 icons will be visible.
Animate Icons: Activate this option to turn on the animation effect on icons of Magento social login.
Sort Icons: This option of Magento social media login allow to sort the order of icons in which they will display at login bar and login popup.
Loginizer Settings Tab
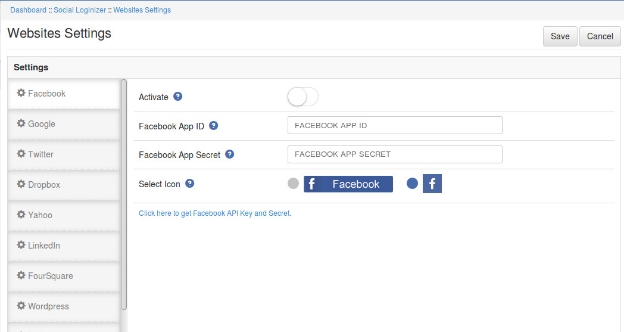
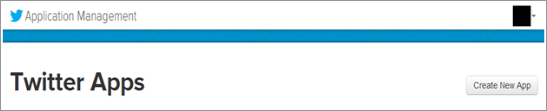
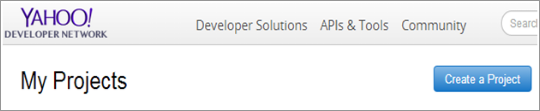
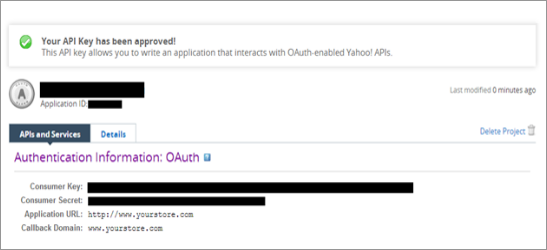
In this tab of Magento twitter login extension, you can save API key and Secret for each social website. There is a side bar listing all the websites. On click of any website its corresponding setting options will be shown. Below option there a link of corresponding website where you can create your application and get your client id and secret. In each website settings there will be following 4 options:
Website Settings:
Active: To enable the Magento social login, select enable present under the label Activate.
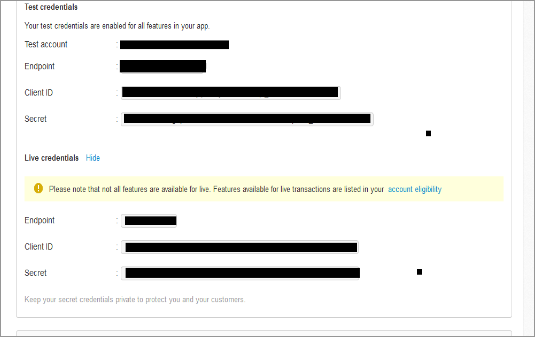
App ID (eg. for Facebook : Facebook App Id): In this field of Magento social media login, you need to enter your Application ID/Client ID/Consumer ID provide by corresponding website
App Secret (eg. for Facebook : Facebook App Secret): This field of Magento social login extension allows you to enter your Application Secret/Client Secret /Consumer Secret provide by corresponding website.
Select Icons: For each Magento social login, there are two kind of icons small and large. Select any one of the icon to show at social login bar.
Report Tab:
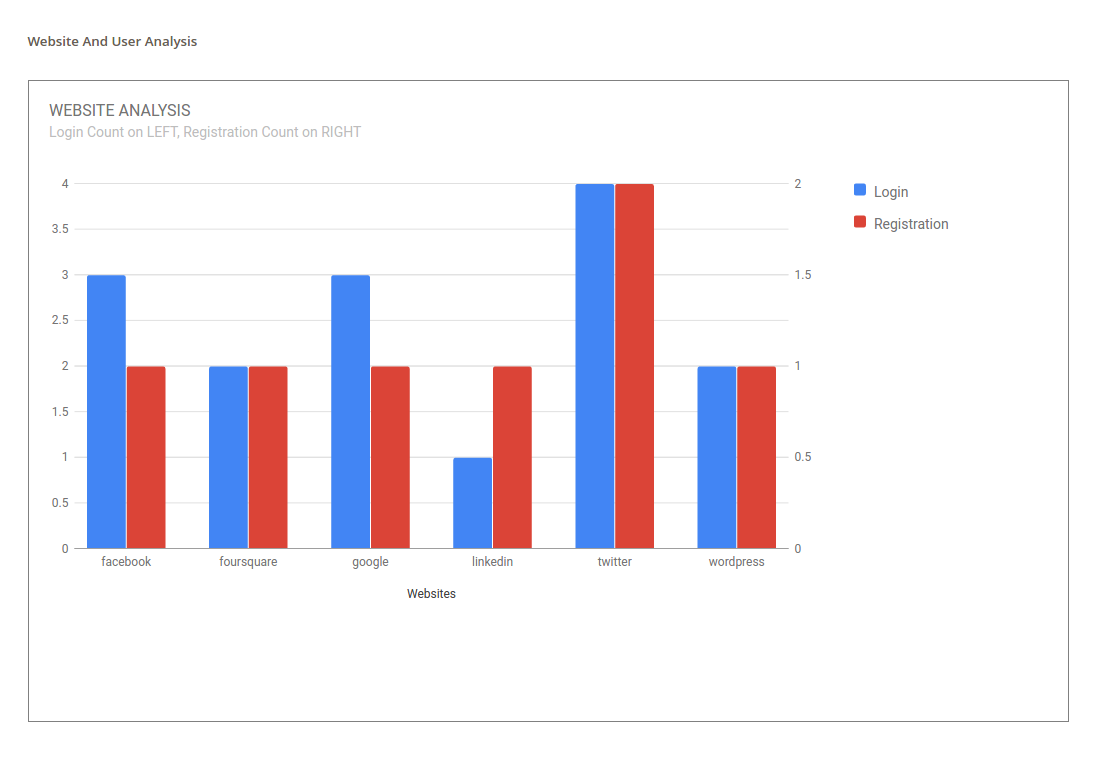
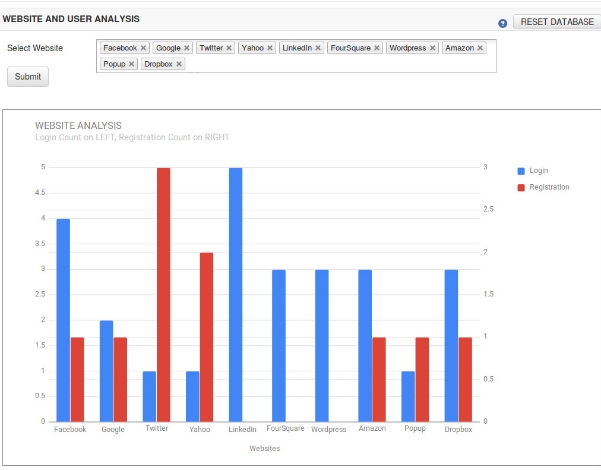
In this tab of Magento social login module, you can get graphical and tabular analytic data that will help you for analysis. There is a option of select website. On click of the option a dropdown listing all the websites will display choose websites and click on the submit button. That will create a graph for the selected website represent login and registration count for each selected websites.
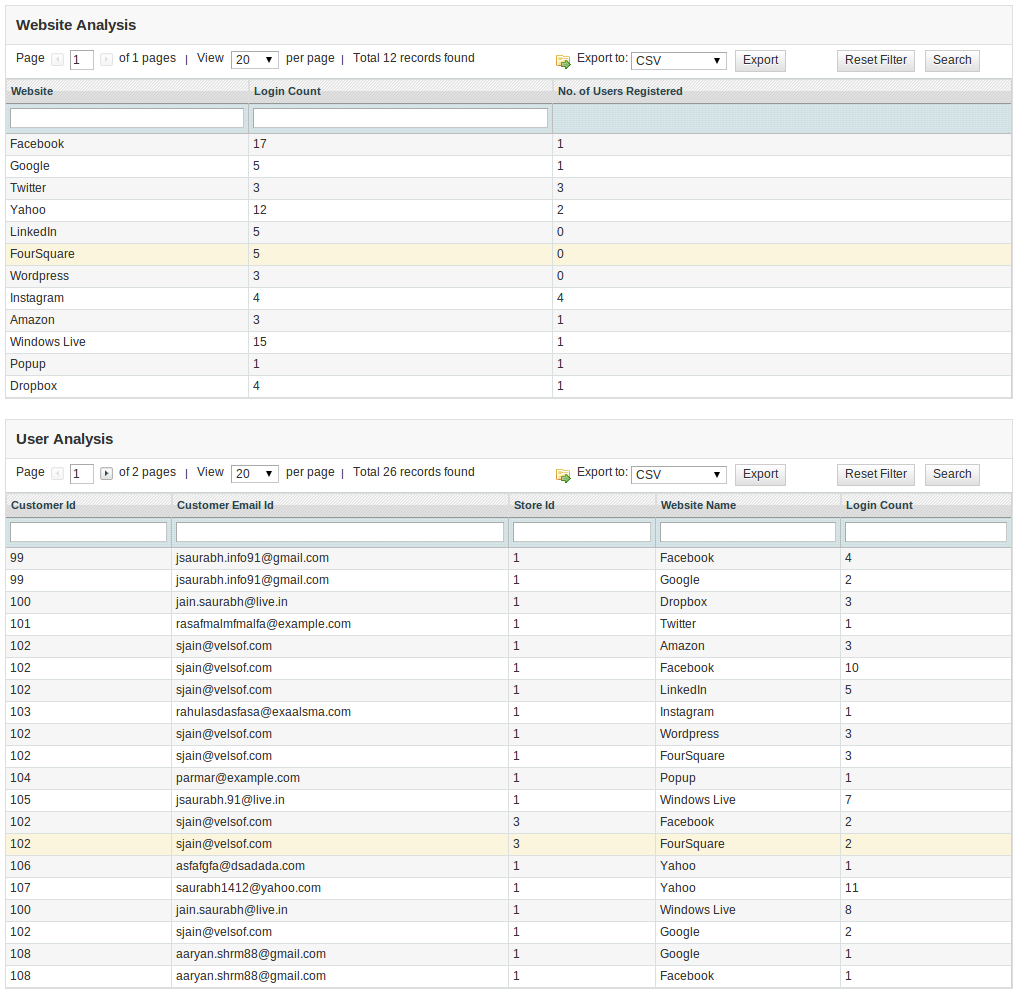
In the graph below, you can see the table for website analysis and another table for customer analysis data. The website analysis table show websites and their total login and registration count and the customer analysis table shows customer details and his login details (login count and website name).
At top right , there is button Reset Database. This option will delete all the login and registration data from database. This will not affect your core database table. It will clear records only from the table created by this magento social media login extension.
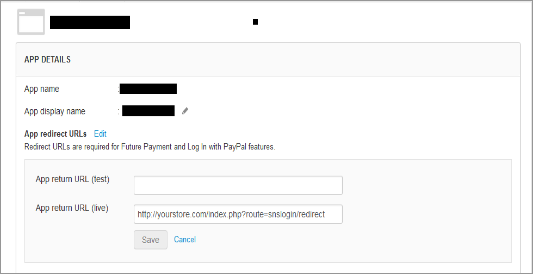
How To Set Redirect URL?
Let your website url be www.example.com.
If Url Rewrite is enabled in your website then redirect url will be
1. Go to Facebook Developers Website (https://developers.facebook.com) or click on link given top right of respective tab in module configuration page.
2. Click on Apps -> Create a new App.
3. Follow the instructions on the screen.
4. You will get the App ID and App Secret (Click Show button).
5. Now, go to Settings from left menu.
6. Click on Add Platform button.
7. Select Website.
8. Enter your App Domain and Site URL.
Application Type: Web Application.
Authorized JavaScript origins: Your store domain name. (https://www.example.com)
9. Click Save Changes button.
10. Now, go to Status & Review tab from left menu and make the Application Live.
How To Get Google App Details?
Steps:
1. Go to Google Developers Console (https://code.google.com/apis/console)or click on link given top right of respective tab in module configuration page.
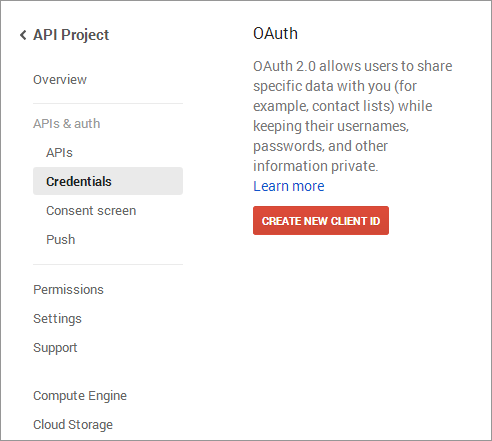
2. Now click Apps &Auth-> Credentials from left menu.
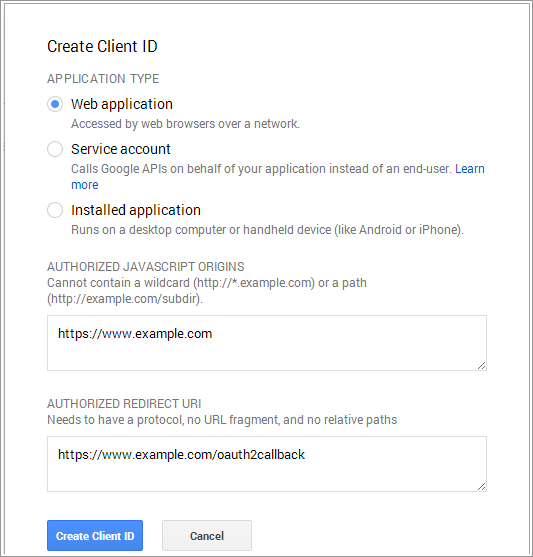
3. Click Create New Client ID button from the right panel of the screen.
4. Fill the pop-up form with below details:
Application Type: Web Application.
Authorized JavaScript Origins: Your store domain name. (https://www.example.com)
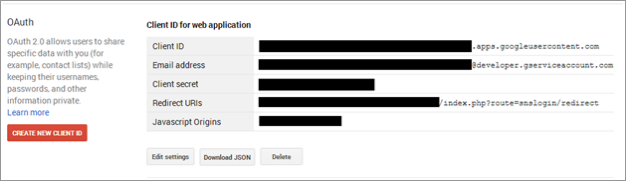
5. Now click Create Client ID button to get your Client ID and Client Secret Key.
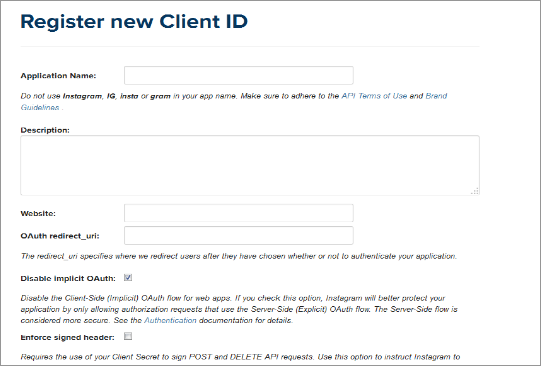
3. Fill the required details as per instructions. Home URL will be your Store URL.
4. Click Create Project button.
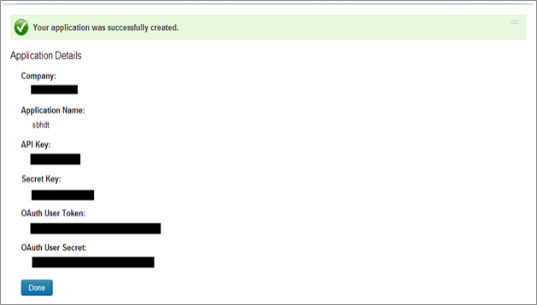
5. Copy your Consumer Key and Consumer Secret.
How To Get Amazon App Details?
Steps:
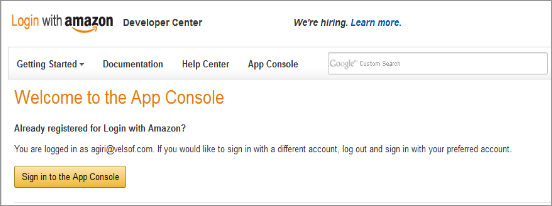
1. Go to Amazon Developer Network (https://login.amazon.com/manageApps) or click on link given top right of respective tab in module configuration page.
2. Click on Sign in to App Console button.
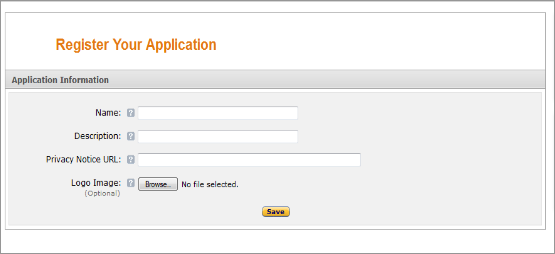
3. After successful login to App Console click on Register new application button in top right of page and you will be redirected to following page.
4. Enter Application Details as follows:
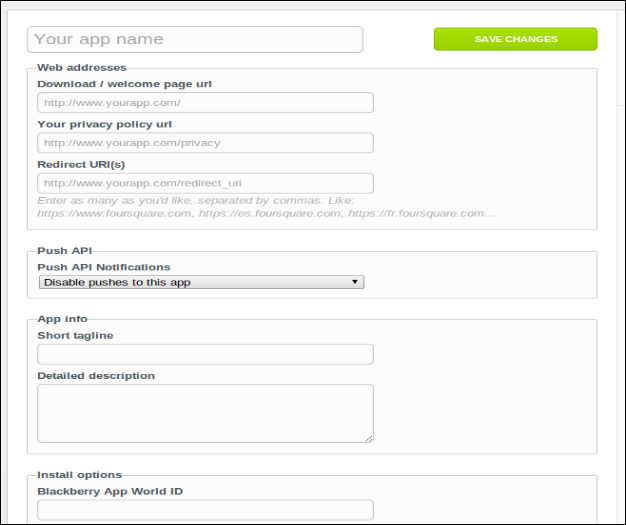
Name: Name of your Application.
Description: Description of your application.
Privacy Notice URL: Url of privacy policy page of your store.
5. Logo Image: Select optional logo image of your store.
6. Click Save button.
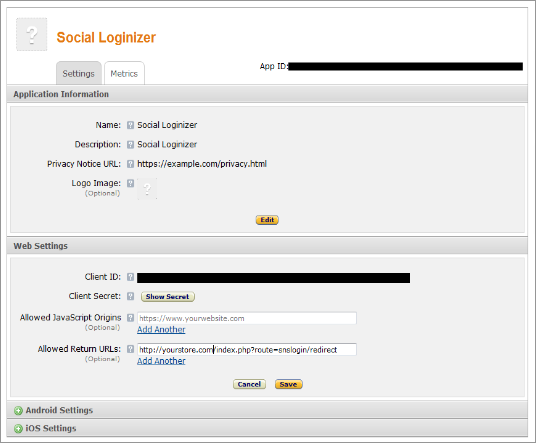
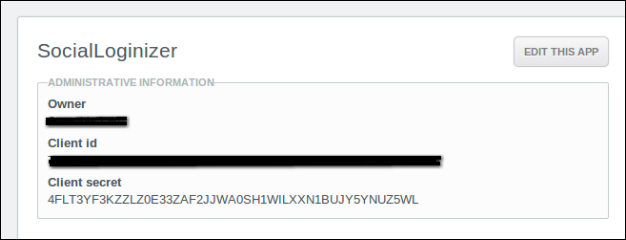
7. Now click on Web Settings to get your client id and secret.
8. Allowed Return URL : Loginizer redirect page URL of your store.
Note: To enable Amazon login into your website, your website must be secure with HTTPS otherwise Amazon login will not work.
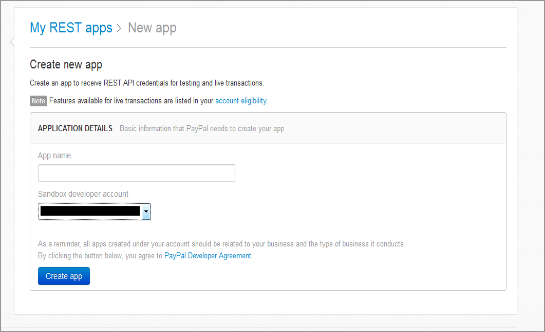
2. Click On the Create App button and provide a name for Application.
3. Fill up the details , set redirect url and save the settings.
4. Copy and paste the key and secret in plugin admin panel.
How To Get WordPress App Details?
Steps:
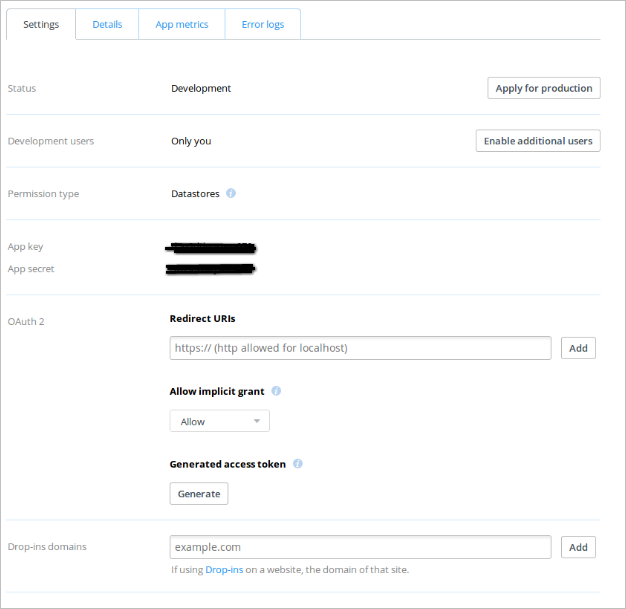
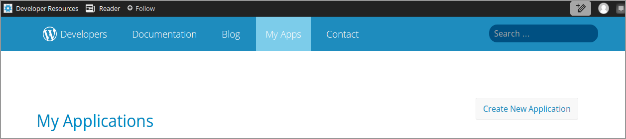
1. Go to WordPress Developer Website (https://developer.wordpress.com/apps/) or click on link given bottom of respective tab in module configuration page.
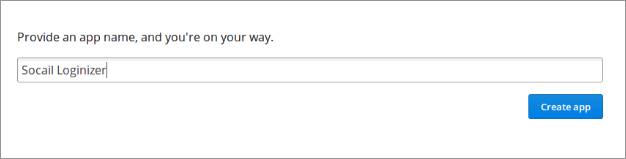
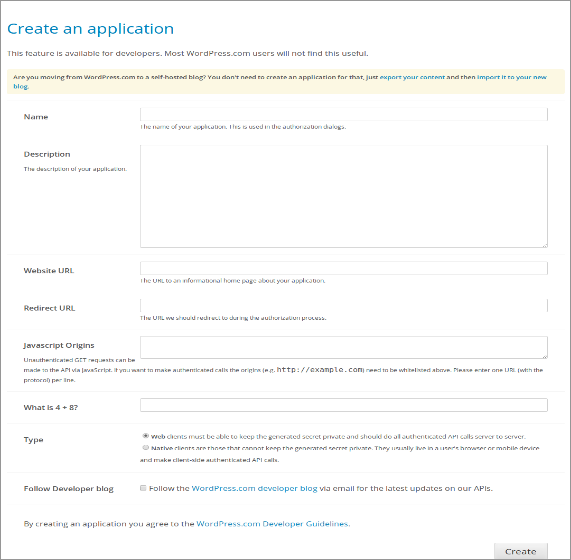
2. Click On the Create App button and provide a name for Application.
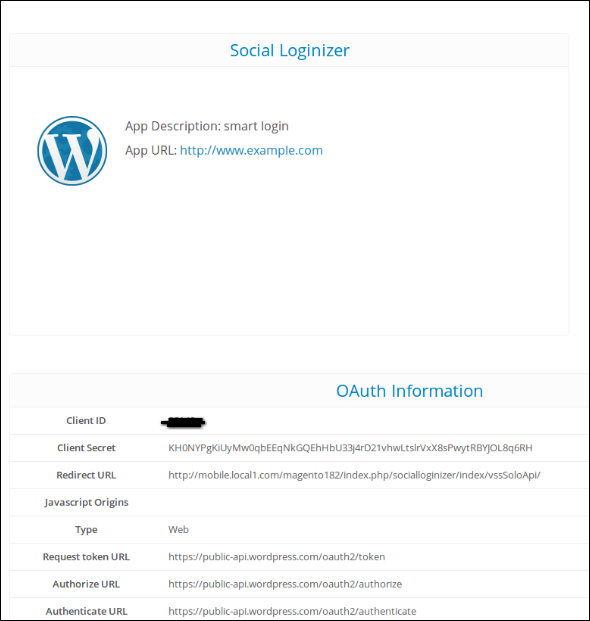
3. Fill up the details and save the application.
4. Copy and Paste the credentials in Magento extension admin console.
Magento Mobile Order Lookup module by Knowband incorporates the feature of easy order status tracking in the front-end of Magento site. With the help of Magento Mobile Order Lookup extension, the online shoppers can see their order status just by entering their reference ID and email address. Magento Mobile Order Lookup plugin offers quick order tracking. The customers need not log into their account.
1.1 Admin Benefits of Magento Mobile Order Lookup extension
The Magento Order Lookup module add a quick order tracking option in the front-end of the site at a button click.
The Magento Quick Order Lookup module allows the store admin to optimize the customer service of the site.
Knowband’s Magento Fast Order Lookup module offers a completely configurable interface that can easily be used.
The admin can change the look and feel of the order lookup block from the back-end of Magento Order Status module.
Magento Order tracking extension makes it easier for the customers to view the shipping details without logging in.
The Magento Mobile Order Tracking module even offers the statistical report of the number of customers who tracked the orders using mobile lookup option.
The Magento Order Detail module is multi-lingual compatible.
1.2 Customer Benefits of Magento Mobile Order Lookup Module
With the help of Magento Mobile Order Lookup module, the customers can view their order details without logging into their account.
The Magento Mobile Order Lookup plugin reduces the need of contacting the customer support.
Reducing the time invested in order tracking, Magento Mobile Order Lookup module optimizes the shopping experience of the customers.
2.0 Pre-Installation Steps of Magento Mobile Order Lookup Extension
Check out the steps below:
1. Disable the Cache:
The Magento front end relies heavily on caching to provide a faster experience to the customer. This is a wonderful tool, but can wreak havoc during the installation process. To ensure that the cache is not the cause of any problems, we should turn it off. This can be done from the admin console by navigating to the cache management page (System->Cache Management), selecting all caches, clicking on disable button from the drop-down menu, and submitting the change.
2. Disable Compilation Mode:
This may not be an issue for many readers, but if you are using Magento compilation mode on your store, it is important that you remove it. Without going into many details, compilation mode takes many files spread out over the system and condensing them into a single file that can be run very quickly. If an extensions files are not in the system when this single file is compiled, they will not be included. To check that this is disabled, go to System->Tools->Compilation. If the compiler status is Disabled, you are ready to go. If not, simply click the Disable button on the right-hand side of the screen.
2.1 Choose an Installation Method
There are two different methods used to install extensions.The first involves taking advantage of the Magento Connect Manager, while the second involves manually installing the files via FTP or command line. The first option is generally used by store owners and is a relatively automated process, the problem is that if there is a problem with this process, you are at the mercy of the connect manager to tell you where the problem is coming from.Option two involves getting your hands on the files yourself and manually dropping them into the Magento installation.
Option 1: Using Magento Connect
Required Materials:
User account for Magento Connect
Magento Admin account with access to Magento Connect Manager
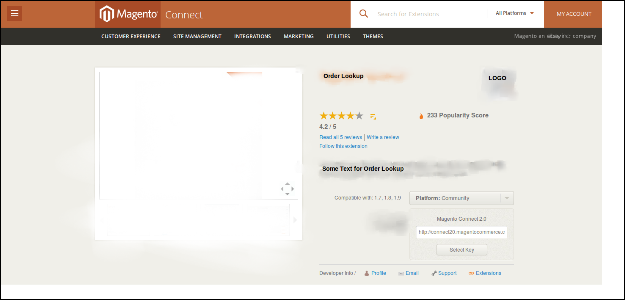
As stated before, this option is relatively easy to implement. The first step is finding the link on Magento Connect for the extension you wish to install. Once there click install now. If you are not currently logged into the site you will be prompted to do so. Next, select the version of Magento connect you are using (if in doubt, select 2.0), accept the extensions license agreement, and copy the extension key.
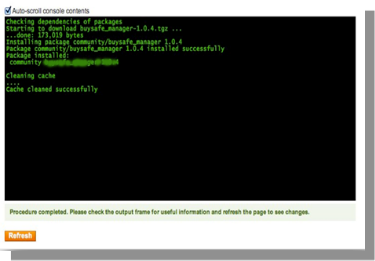
Log into your store’s admin console and navigate to System->Magento Connect->Magento Connect Manager. At this point, you will be prompted to re-enter your administrator credentials. In order to install an extension from the connect manager; you must have an account with full access to the administration console. If you were given limited access, Magento will not allow you to proceed. Once you are logged into the manager, simply paste the extension key into the text box and click install. A system window will appear towards the bottom of the page that will display the progress of your installation.
Congratulations, you have successfully installed the extension on your store. Be sure to test thoroughly before re-enabling the cache/compilation. If you found no problems both before and after these features have been re-enabled, you should be ready to repeat the installation process on your live site. DONT FORGET TO BACKUP ALL FILES AND DATABASES BEFORE INSTALLATION!
Option 2: Manual Installation
Required Materials:
All files used by the Magento Mobile Order Lookup extension.
FTP access to your website.
The connect manager is a useful tool for installing extensions, but prefer hands-on method when it comes to installations. It feels more comfortable when you are personally in control of the process.
Do you see an app-code directory there, what about app-etc modules? If you don’t see these directory paths and files contained within them chances are that the extension download was faulty. Take a look at the package.xml file, this is the blueprint used by Magento Connect to arrange the files in the proper places. You may need to use this to ensure that everything is as it should be. Once you have reviewed the extension files you are ready to perform the last step. Using your FTP client, drag all of the files onto the store root of the Magento instance.
Depending on the number of files in the Magento Mobile Order Lookup plugin, this may take a few moments. Now go to the admin console and click Flush Cache Storage. This is the requirement for an extension that adds pages to the admin console. Logging out and back in is also required to ensure that everything loads properly. If you cannot clear the cache via the admin console for any reason, you will need to clear the cache manually via your FTP client (see the first FAQ question for assistance). That is the final step. Congratulations on a successful installation.
3.0 Troubleshooting & FAQs
I loaded all files of Magento Mobile Order Lookup onto my Magento store, and now get a white screen for some or all of the admin console.
This is a fairly common problem, and 99% of the time it is cache related. If you can get to it, go to System->Cache Management and click Flush Cache Storage. This will ensure that everything cached by Magento is deleted and will to be regenerated. Log out and back in to complete the process.
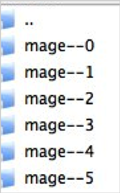
If you are completely cut off from the admin console, navigate to the var-cache directory of your website. You should see a series of directories named mage*. Delete all of these directories (DO NOT DELETE var-cache). This is the equivalent of flushing the cache storage from the admin console.
I am receiving a Magento error when accessing certain pages. How can I debug this?
This question really deserves a blog post all to itself, but a good start would be to go into the errors directory of your store. Locate the local.xml.sample file and rename it local.xml. The next time you see the error detailed information will be provided explaining where the error took place. Don’t forget to change this back when you have finished troubleshooting!
I have a critical error with my webstore and need to turn off an extension I cannot access the admin console. What do I do?
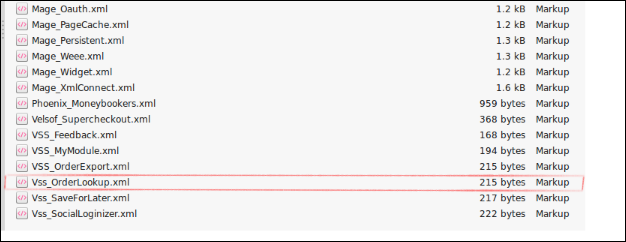
Go to the app-etc-modules directory and open the file that goes with your extension. The naming convention is generally DeveloperName_ExtensionName.xml. In this case, it would be Vss_OrderLookup.xml.
Look for the active tags in the file, change the value from true to false and save your changes. This tells Magento that the extension is disabled and not to run any code associated to it. Deleting the Magento cache is recommended (and most likely required) for this change to take effect.
4.0 User Guide
To excess Magento Mobile Order Lookup plugin, Click on Order Lookup Menu appearing in System Menu navigation menu in the admin panel as shown below.
On clicking menu Order Lookup the admin interface of Magento Order Lookup plugin will open. Magento Order Lookup extension contains navigational bar at the top, Tab menu at the left and in main content the first general setting tab will display.
4.1 General Settings Tab
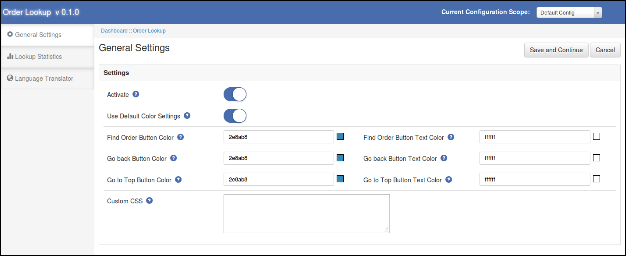
This tab of Magento Order Lookup plugin is helpful to change the basis settings of the order lookup plugin like enabling the plugin or changing the button colors etc.
Active: To enable the Magento Mobile Order Tracking plugin, select enable present under the label Activate.
Use Default Color Setting: This option will allow you to reset your color setting to default. The default color values will display by default. Remember if you wish to change the color setting then this option must be disabled.
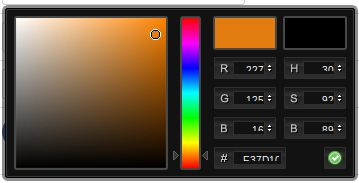
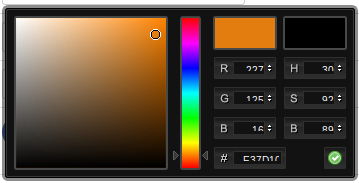
Color Settings: These settings enables the user to select different colors for different buttons available for the plugin in the front end. The admin can pick the color using a very interactive color picker. The snap for the same is as follows:
Custom CSS: This setting enables the admin to add any block of CSS code to any page of the Order Lookup (front-end only).
4.2 Lookup Statistics Tab
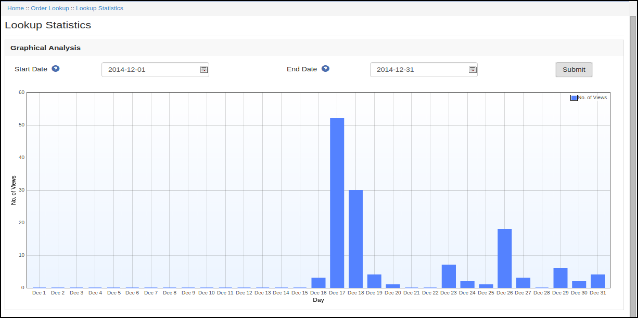
This tab of Magento Mobile Order Tracking module enables the admin to do an analysis of the use of the plugin. Using this tab the admin can analyze how many users have used the plugin to lookup orders using the plugin for any date range. The admin can choose the date range from respective date pickers to filter the analysis. The screenshot for the same is as follows:
4.3 Language Translator Tab
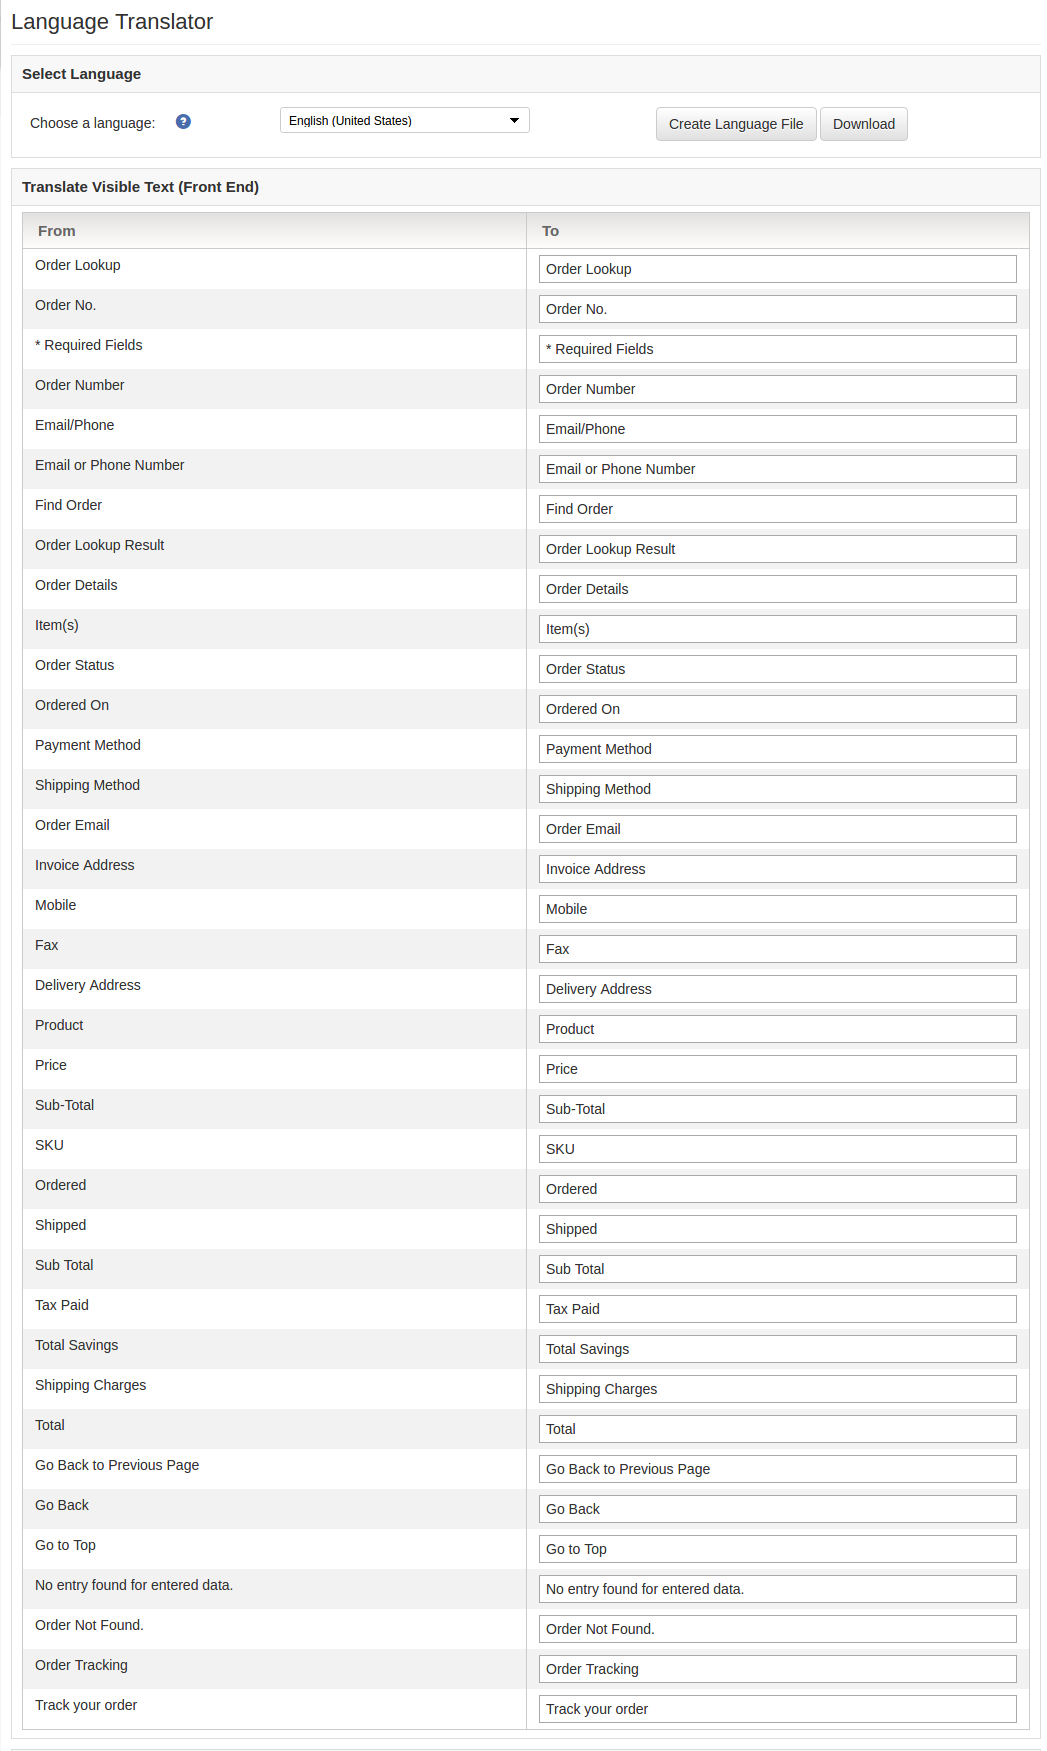
In this section of Magento Mobile Order Lookup module, the admin can enter the text as required to change the texts that are displayed in the admin panel of Magento Fast Order Lookup as well as front-end.
The admin interface of Magento Mobile Order Lookup extension for the language translator consists of two blocks through which the admin can enter the language texts for the admin panel and front-end. The admin can also download the language file generated using the language translator tab only for the Magento Mobile Order Lookup module.
5.0 Website UI
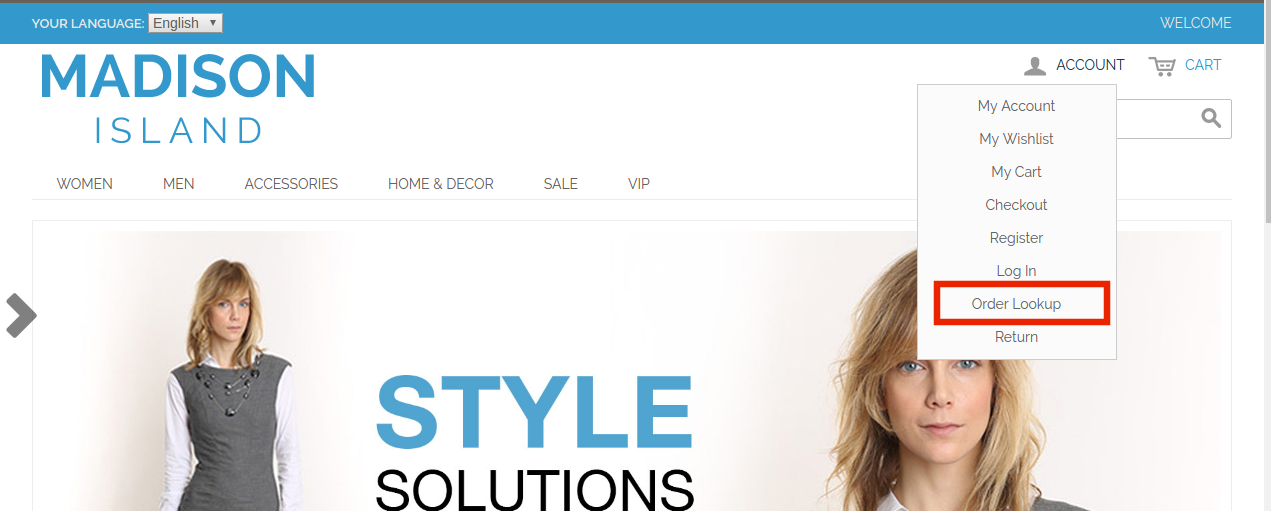
Once the Magento Mobile Order Lookup extension is enabled, an order lookup option will be added in the front-end of the website.
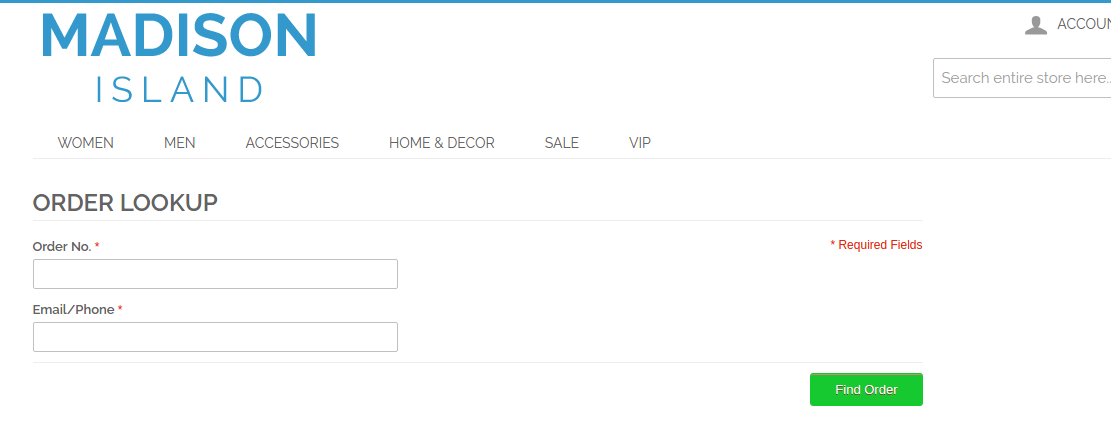
Once this link is clicked, the customer will be redirected to the page shown below:
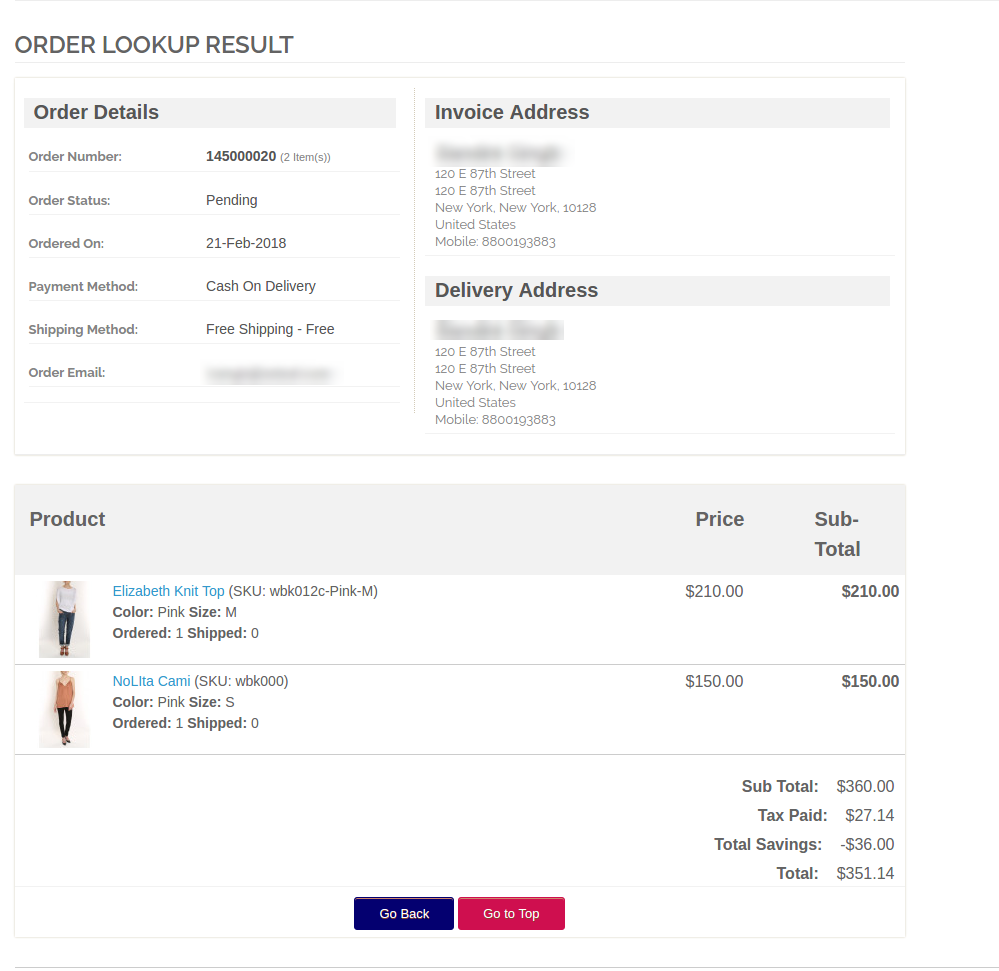
The customers can enter their order reference number and registered email ID in order to get the order detail.