Magento Mobile Order Lookup – User Manual

1.0 Introduction

Magento Mobile Order Lookup module by Knowband incorporates the feature of easy order status tracking in the front-end of Magento site. With the help of Magento Mobile Order Lookup extension, the online shoppers can see their order status just by entering their reference ID and email address. Magento Mobile Order Lookup plugin offers quick order tracking. The customers need not log into their account.

1.1 Admin Benefits of Magento Mobile Order Lookup extension

  1. The Magento Order Lookup module add a quick order tracking option in the front-end of the site at a button click.
  2. The Magento Quick Order Lookup module allows the store admin to optimize the customer service of the site.
  3. Knowband’s Magento Fast Order Lookup module offers a completely configurable interface that can easily be used.
  4. The admin can change the look and feel of the order lookup block from the back-end of Magento Order Status module.
  5. Magento Order tracking extension makes it easier for the customers to view the shipping details without logging in.
  6. The Magento Mobile Order Tracking module even offers the statistical report of the number of customers who tracked the orders using mobile lookup option.
  7. The Magento Order Detail module is multi-lingual compatible.

1.2 Customer Benefits of Magento Mobile Order Lookup Module

  • With the help of Magento Mobile Order Lookup module, the customers can view their order details without logging into their account.
  • The Magento Mobile Order Lookup plugin reduces the need of contacting the customer support.
  • Reducing the time invested in order tracking, Magento Mobile Order Lookup module optimizes the shopping experience of the customers.

2.0 Pre-Installation Steps of Magento Mobile Order Lookup Extension

Check out the steps below:

1. Disable the Cache:

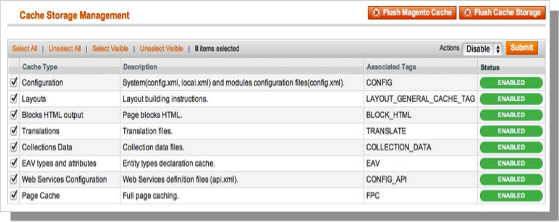
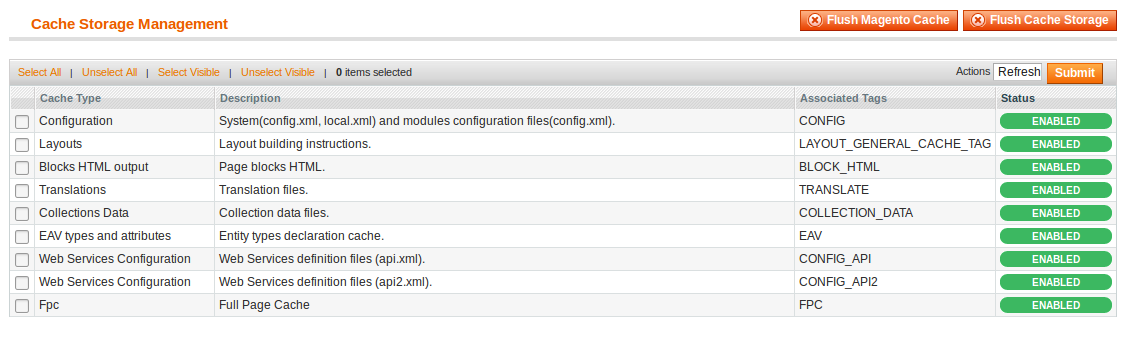
The Magento front end relies heavily on caching to provide a faster experience to the customer. This is a wonderful tool, but can wreak havoc during the installation process. To ensure that the cache is not the cause of any problems, we should turn it off. This can be done from the admin console by navigating to the cache management page (System->Cache Management), selecting all caches, clicking on disable button from the drop-down menu, and submitting the change.

2. Disable Compilation Mode:

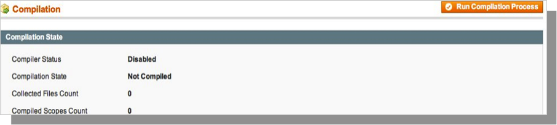
This may not be an issue for many readers, but if you are using Magento compilation mode on your store, it is important that you remove it. Without going into many details, compilation mode takes many files spread out over the system and condensing them into a single file that can be run very quickly. If an extensions files are not in the system when this single file is compiled, they will not be included. To check that this is disabled, go to System->Tools->Compilation. If the compiler status is Disabled, you are ready to go. If not, simply click the Disable button on the right-hand side of the screen.

2.1 Choose an Installation Method

There are two different methods used to install extensions.The first involves taking advantage of the Magento Connect Manager, while the second involves manually installing the files via FTP or command line. The first option is generally used by store owners and is a relatively automated process, the problem is that if there is a problem with this process, you are at the mercy of the connect manager to tell you where the problem is coming from.Option two involves getting your hands on the files yourself and manually dropping them into the Magento installation.

Option 1: Using Magento Connect

Required Materials:

User account for Magento Connect

Magento Admin account with access to Magento Connect Manager

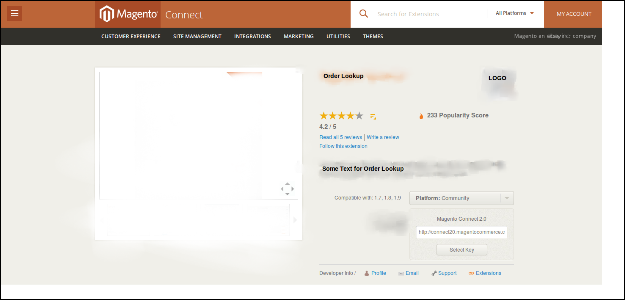
As stated before, this option is relatively easy to implement. The first step is finding the link on Magento Connect for the extension you wish to install. Once there click install now. If you are not currently logged into the site you will be prompted to do so. Next, select the version of Magento connect you are using (if in doubt, select 2.0), accept the extensions license agreement, and copy the extension key.

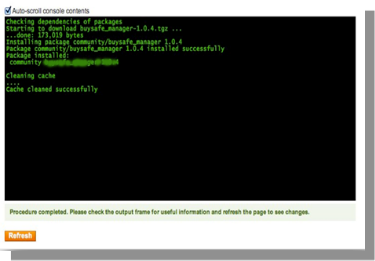
Log into your store’s admin console and navigate to System->Magento Connect->Magento Connect Manager. At this point, you will be prompted to re-enter your administrator credentials. In order to install an extension from the connect manager; you must have an account with full access to the administration console. If you were given limited access, Magento will not allow you to proceed. Once you are logged into the manager, simply paste the extension key into the text box and click install. A system window will appear towards the bottom of the page that will display the progress of your installation.

Congratulations, you have successfully installed the extension on your store. Be sure to test thoroughly before re-enabling the cache/compilation. If you found no problems both before and after these features have been re-enabled, you should be ready to repeat the installation process on your live site. DONT FORGET TO BACKUP ALL FILES AND DATABASES BEFORE INSTALLATION!

Option 2: Manual Installation

Required Materials:

All files used by the Magento Mobile Order Lookup extension.

FTP access to your website.

The connect manager is a useful tool for installing extensions, but prefer hands-on method when it comes to installations. It feels more comfortable when you are personally in control of the process.

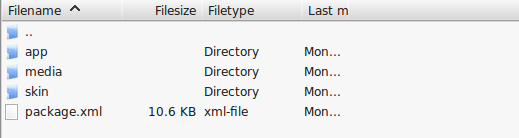
Do you see an app-code directory there, what about app-etc modules? If you don’t see these directory paths and files contained within them chances are that the extension download was faulty. Take a look at the package.xml file, this is the blueprint used by Magento Connect to arrange the files in the proper places. You may need to use this to ensure that everything is as it should be. Once you have reviewed the extension files you are ready to perform the last step. Using your FTP client, drag all of the files onto the store root of the Magento instance.

Depending on the number of files in the Magento Mobile Order Lookup plugin, this may take a few moments. Now go to the admin console and click Flush Cache Storage. This is the requirement for an extension that adds pages to the admin console. Logging out and back in is also required to ensure that everything loads properly. If you cannot clear the cache via the admin console for any reason, you will need to clear the cache manually via your FTP client (see the first FAQ question for assistance). That is the final step. Congratulations on a successful installation.

3.0 Troubleshooting & FAQs

I loaded all files of Magento Mobile Order Lookup onto my Magento store, and now get a white screen for some or all of the admin console.

This is a fairly common problem, and 99% of the time it is cache related. If you can get to it, go to System->Cache Management and click Flush Cache Storage. This will ensure that everything cached by Magento is deleted and will to be regenerated. Log out and back in to complete the process.

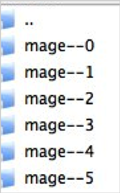
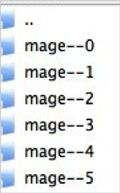
If you are completely cut off from the admin console, navigate to the var-cache directory of your website. You should see a series of directories named mage*. Delete all of these directories (DO NOT DELETE var-cache). This is the equivalent of flushing the cache storage from the admin console.

I am receiving a Magento error when accessing certain pages. How can I debug this?

This question really deserves a blog post all to itself, but a good start would be to go into the errors directory of your store. Locate the local.xml.sample file and rename it local.xml. The next time you see the error detailed information will be provided explaining where the error took place. Don’t forget to change this back when you have finished troubleshooting!

I have a critical error with my webstore and need to turn off an extension I cannot access the admin console. What do I do?

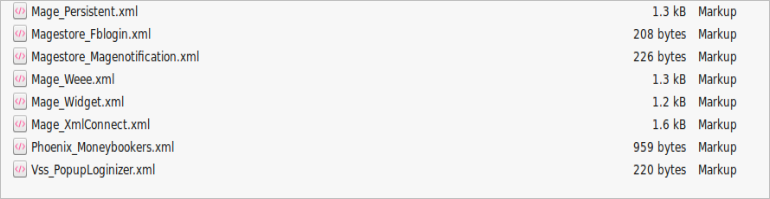
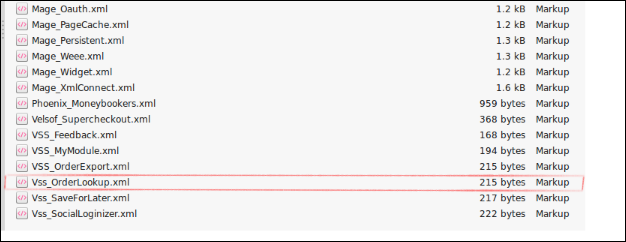
Go to the app-etc-modules directory and open the file that goes with your extension. The naming convention is generally DeveloperName_ExtensionName.xml. In this case, it would be Vss_OrderLookup.xml.

Look for the active tags in the file, change the value from true to false and save your changes. This tells Magento that the extension is disabled and not to run any code associated to it. Deleting the Magento cache is recommended (and most likely required) for this change to take effect.

4.0 User Guide

  • To excess Magento Mobile Order Lookup plugin, Click on Order Lookup Menu appearing in System Menu navigation menu in the admin panel as shown below.

  • On clicking menu Order Lookup the admin interface of Magento Order Lookup plugin will open. Magento Order Lookup extension contains navigational bar at the top, Tab menu at the left and in main content the first general setting tab will display.

4.1 General Settings Tab

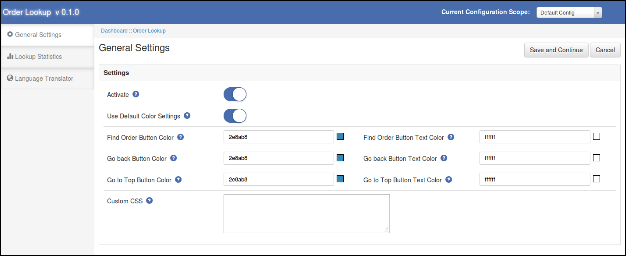
This tab of Magento Order Lookup plugin is helpful to change the basis settings of the order lookup plugin like enabling the plugin or changing the button colors etc.

  • Active: To enable the Magento Mobile Order Tracking plugin, select enable present under the label Activate.
  • Use Default Color Setting: This option will allow you to reset your color setting to default. The default color values will display by default. Remember if you wish to change the color setting then this option must be disabled.
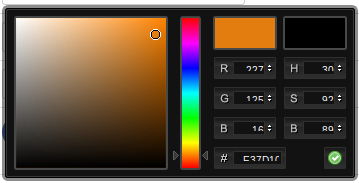
  • Color Settings: These settings enables the user to select different colors for different buttons available for the plugin in the front end. The admin can pick the color using a very interactive color picker. The snap for the same is as follows:

  • Custom CSS: This setting enables the admin to add any block of CSS code to any page of the Order Lookup (front-end only).

4.2 Lookup Statistics Tab

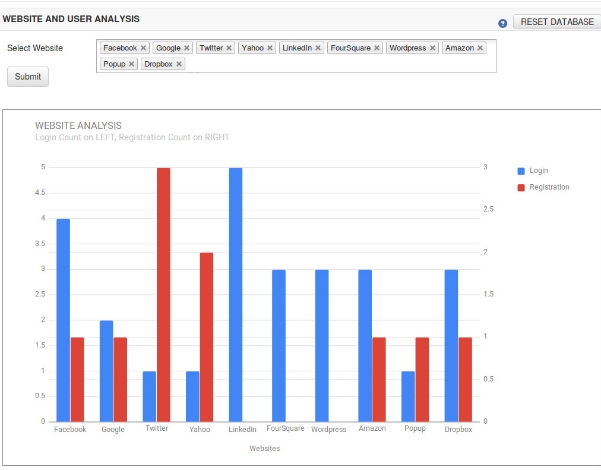
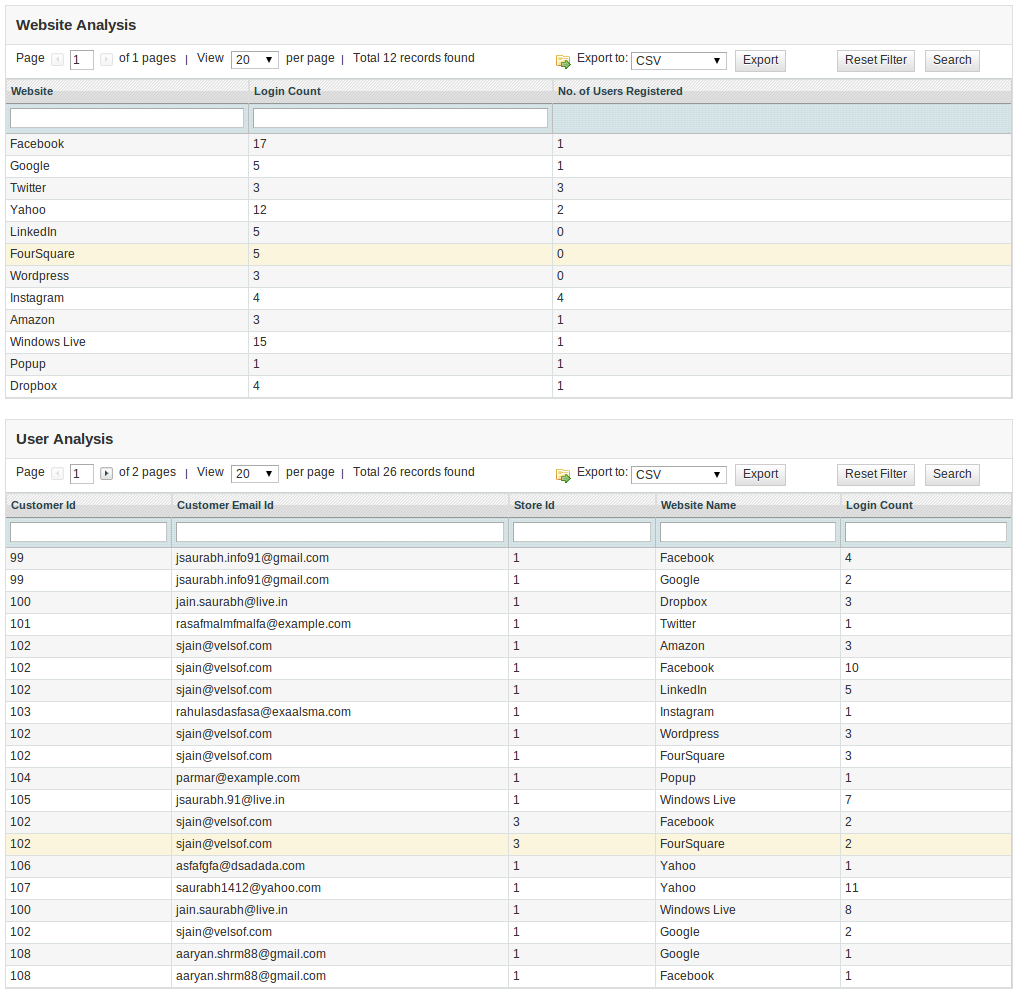
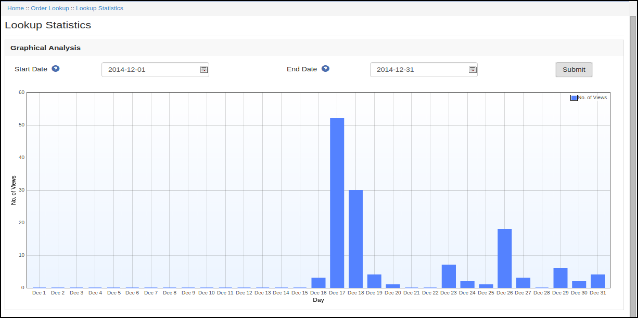
This tab of Magento Mobile Order Tracking module enables the admin to do an analysis of the use of the plugin. Using this tab the admin can analyze how many users have used the plugin to lookup orders using the plugin for any date range. The admin can choose the date range from respective date pickers to filter the analysis. The screenshot for the same is as follows:

4.3 Language Translator Tab

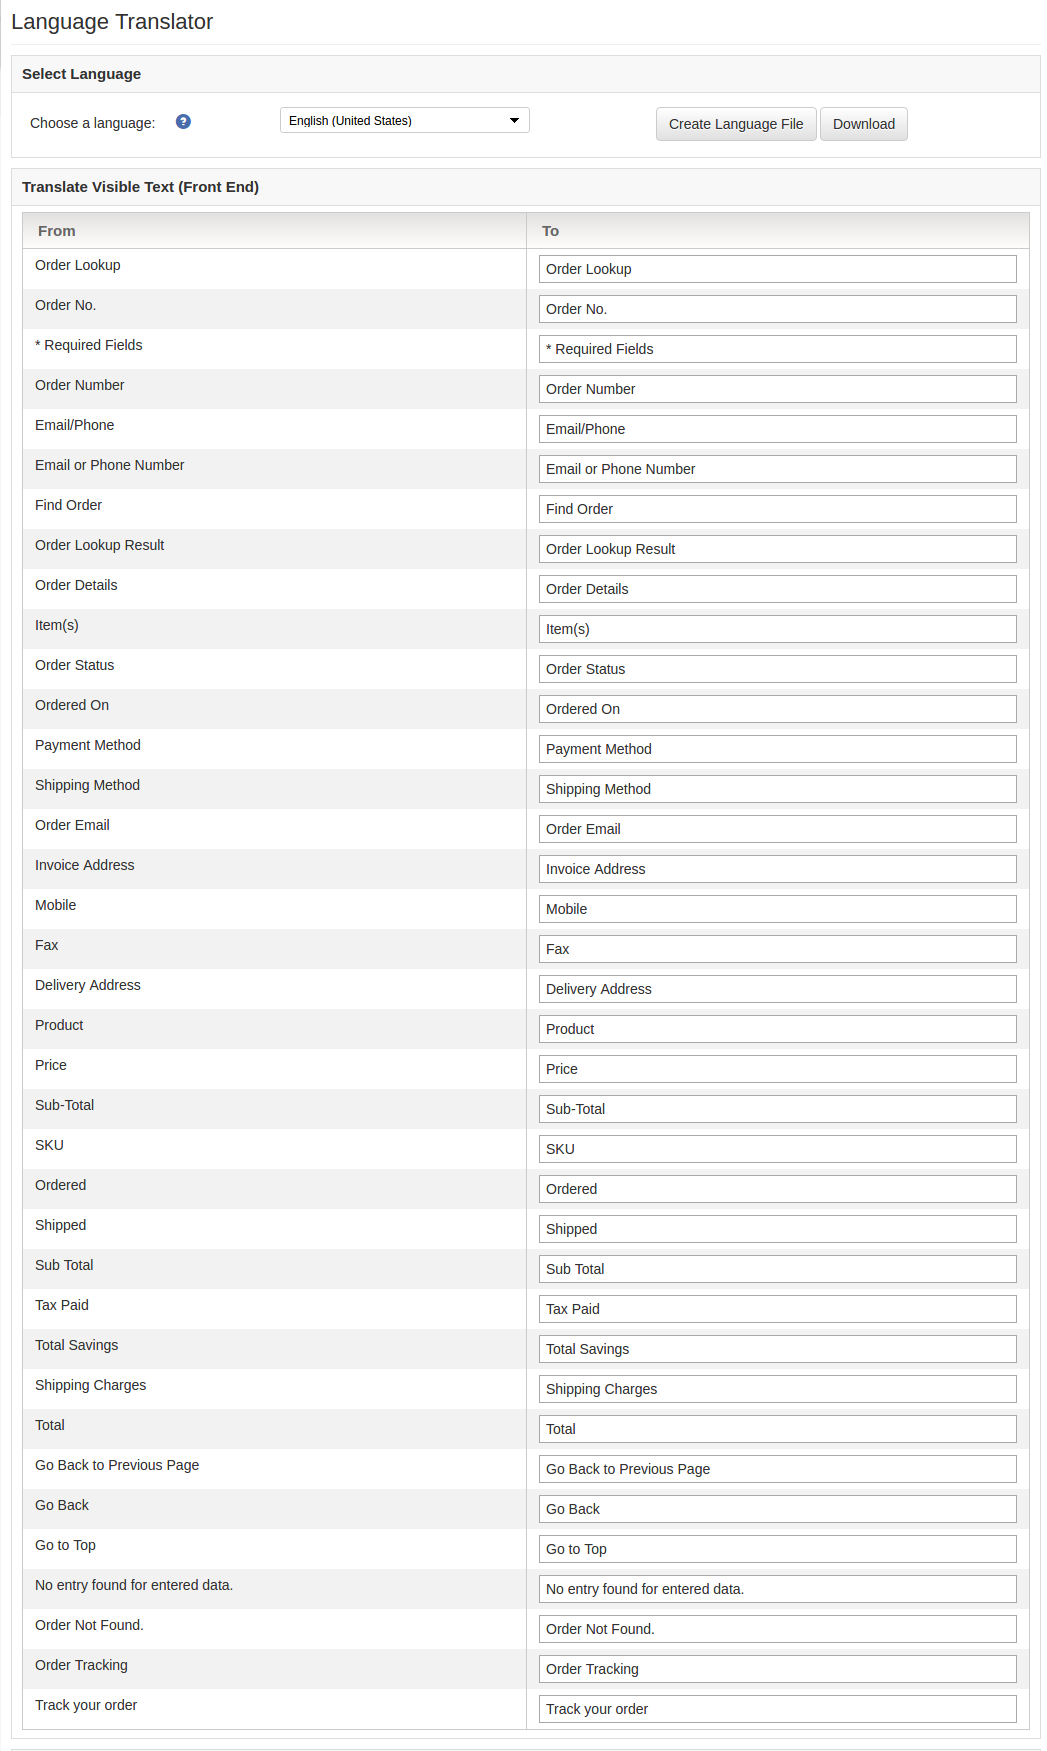
In this section of Magento Mobile Order Lookup module, the admin can enter the text as required to change the texts that are displayed in the admin panel of Magento Fast Order Lookup as well as front-end.

The admin interface of Magento Mobile Order Lookup extension for the language translator consists of two blocks through which the admin can enter the language texts for the admin panel and front-end. The admin can also download the language file generated using the language translator tab only for the Magento Mobile Order Lookup module.

5.0 Website UI

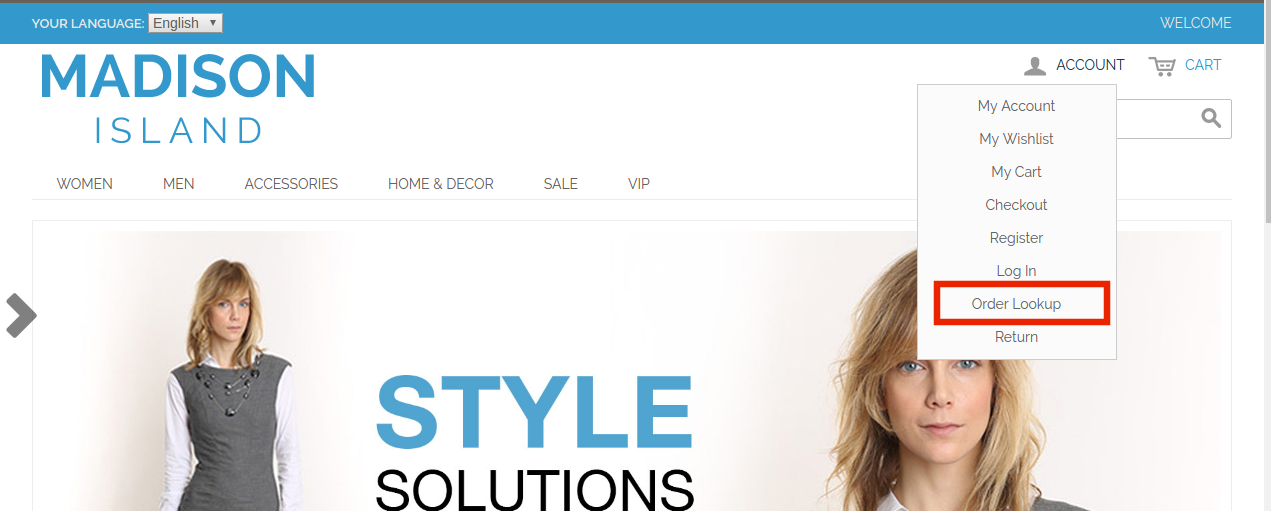
Once the Magento Mobile Order Lookup extension is enabled, an order lookup option will be added in the front-end of the website.

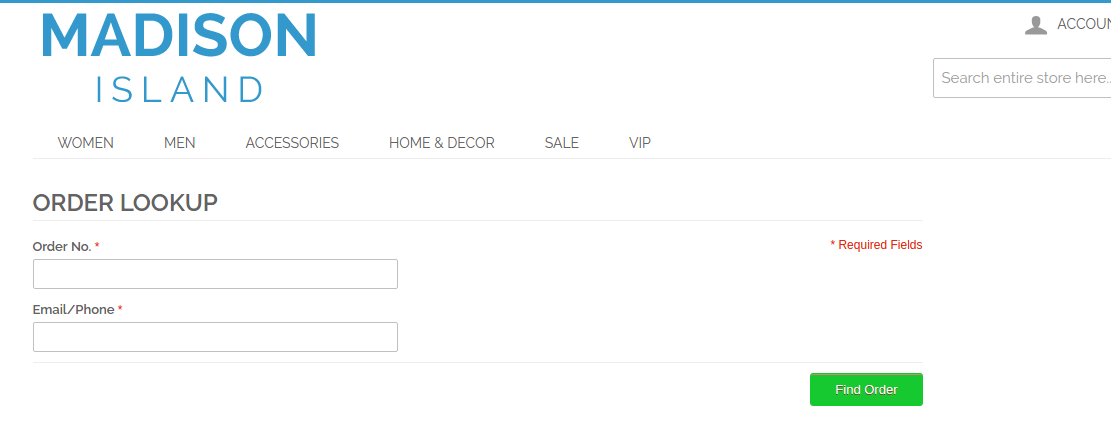
Once this link is clicked, the customer will be redirected to the page shown below:

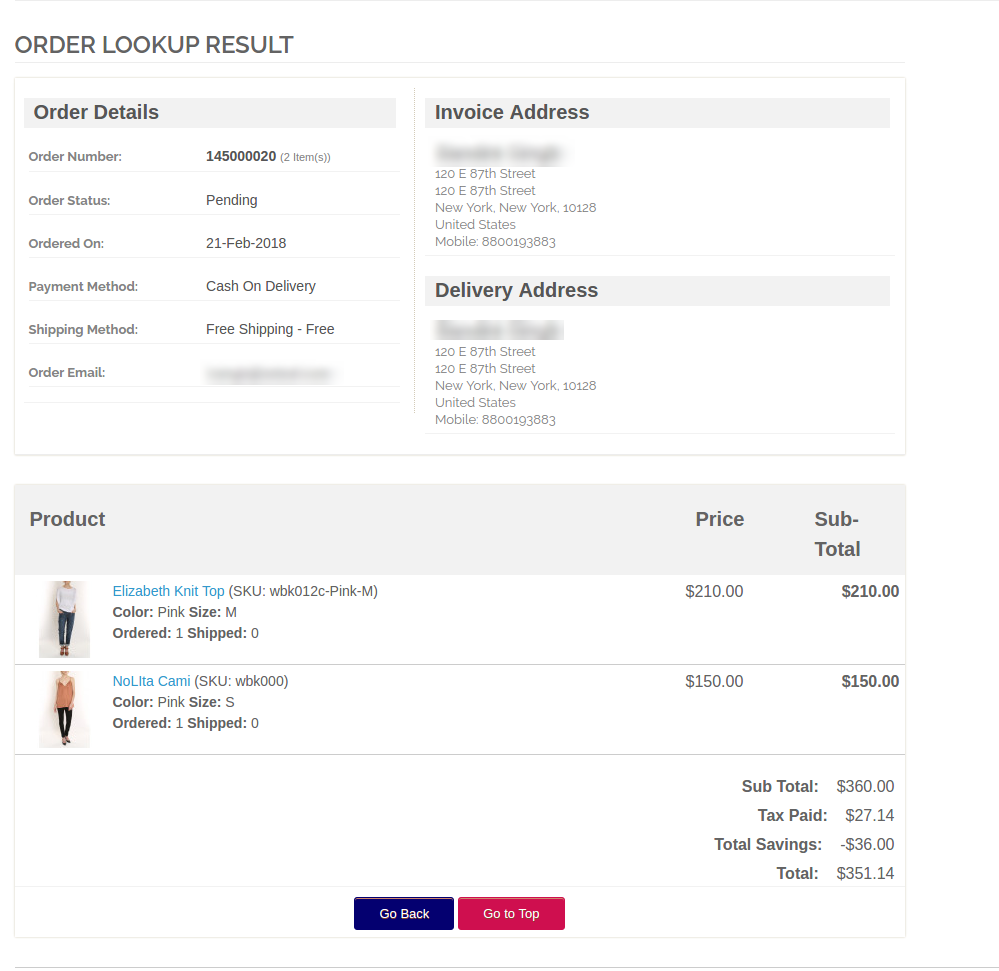
The customers can enter their order reference number and registered email ID in order to get the order detail.

Module Link: https://www.knowband.com/magento-mobile-order-lookup

Liked This? You’ll Like These Too

Magento Blog – User Manual

Installation Steps

1. Disable the Cache

The Magento front end relies heavily on caching to provide a faster experience to customer. This is a wonderful tool, but can wreak havoc during the installation process. To ensure that the cache is not the cause of any problems, we should turn it off. This can be done from the admin console by navigating to the cache management page (System->Cache Management), selecting all caches, clicking disable from the drop-down menu, and submitting the change.

2. Disable the Compilation Mode

This may not be an issue for many readers, but if you are using Magentos compilation mode on your store, it is important that you remove it.Without going into to many details, compilation mode takes many files spread out over the system and condensing them into a single file that can be run very quickly. If an extensions files are not in the system when this single file is compiled, they will not be included. To check that this is disabled, go to System->Tools->Compilation. If the compiler status is Disabled, you are ready to go. If not, simply click the Disable button on the right hand side of the screen.

3. Required Material

All files used by the extension.
FTP access to your website.

The connect manager is a useful tool for installing extensions, but prefer hands-on method when it comes to installations. It feels more comfortable when you are personally in control of the process.

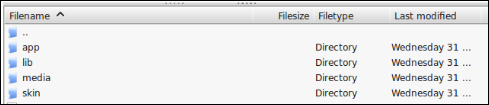
Do you see an app-code directory there, what about app-etc-modules? If you dont see these directory paths and files contained within them, chances are that the extension download was faulty. Take a look at the package.xml file, this is the blueprint used by Magento Connect to arrange the files in the proper places. You may need to use this to ensure that everything is as it should be. Once you have reviewed the extension files you are ready to perform the last step.Using your ftp client, drag all of the files onto the store root of the magento instance.

Depending on the number of files in the extension, this may take a few moments. Now go to the admin console and click Flush Cache Storage. This is the requirement for any extension that adds pages to the admin console. Logging out and back in is also required to ensure thateverything loads properly. If you cannot clear the cache via the admin console for any reason, you will need to clear the cache manually via your FTP client (see the first FAQ question for assistance). That is the final step. Congratulations on a successful installation.

NOTE In extension there is folder named as “knowband_wordpress”.You can rename this folder as per your choice.

4. Access Magento Blog in Admin-Console

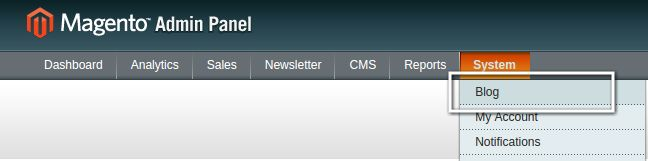
1.To excess Magento Blog plugin, Click on Blog Menu appearing in System Menu navigation menu as shown below.

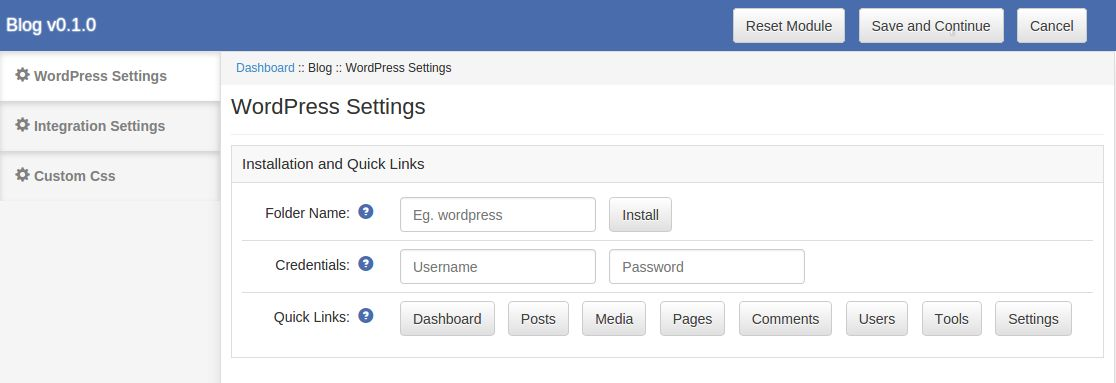
2. On clicking menu Blog the module for plugin will open. It contains navigational bar at the top, Tab menu at the left and in main content the first general setting tab will display.

Troubleshooting & FAQs

“I loaded all files onto my Magento store, and now get a white screen for some or all of the admin console.”

This is a fairly common problem, and 99% of the time it is cache related. If you can get to it, go
to System->Cache Management and click Flush Cache Storage. This will ensure that
everything cached by Magento is deleted and will to be regenerated. Log out and back in to
complete the process.
If you are completely cut off from the admin console, navigate to the var-cache directory of
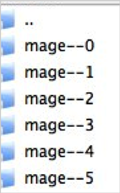
your website. You should see a series of directories named mage*. Delete all of these
directories (DO NOT DELETE var-cache). This is the equivalent of flushing the cache storage
from the admin console.
“I am receiving a Magento error when accessing certain pages. How can I debug this?”

This question really deserves a blog post all to itself, but a good start would be to go into the
errors directory of your store. Locate the local.xml.sample file and rename it local.xml. The
next time you see the error detailed information will be provided explaining where the error took
place. Dont forget to change this back when you are finished troubleshooting!

I have a critical error with my webstore and need to turn off an extension I cannot access the admin console.What do I do?

Go to the app-etc-modules directory and open the file that goes with your extension. The naming
convention is generally DeveloperName_ExtensionName.xml. In this case it would beVss_Blog.xml.Look for the active tags in the file, change the value from true to false and save your changes.This tells Magento that the extension is disabled and not to run any code associated to it.Deleting the Magento cache is recommended (and most likely required) for this change to take
effect.

WordPress Settings

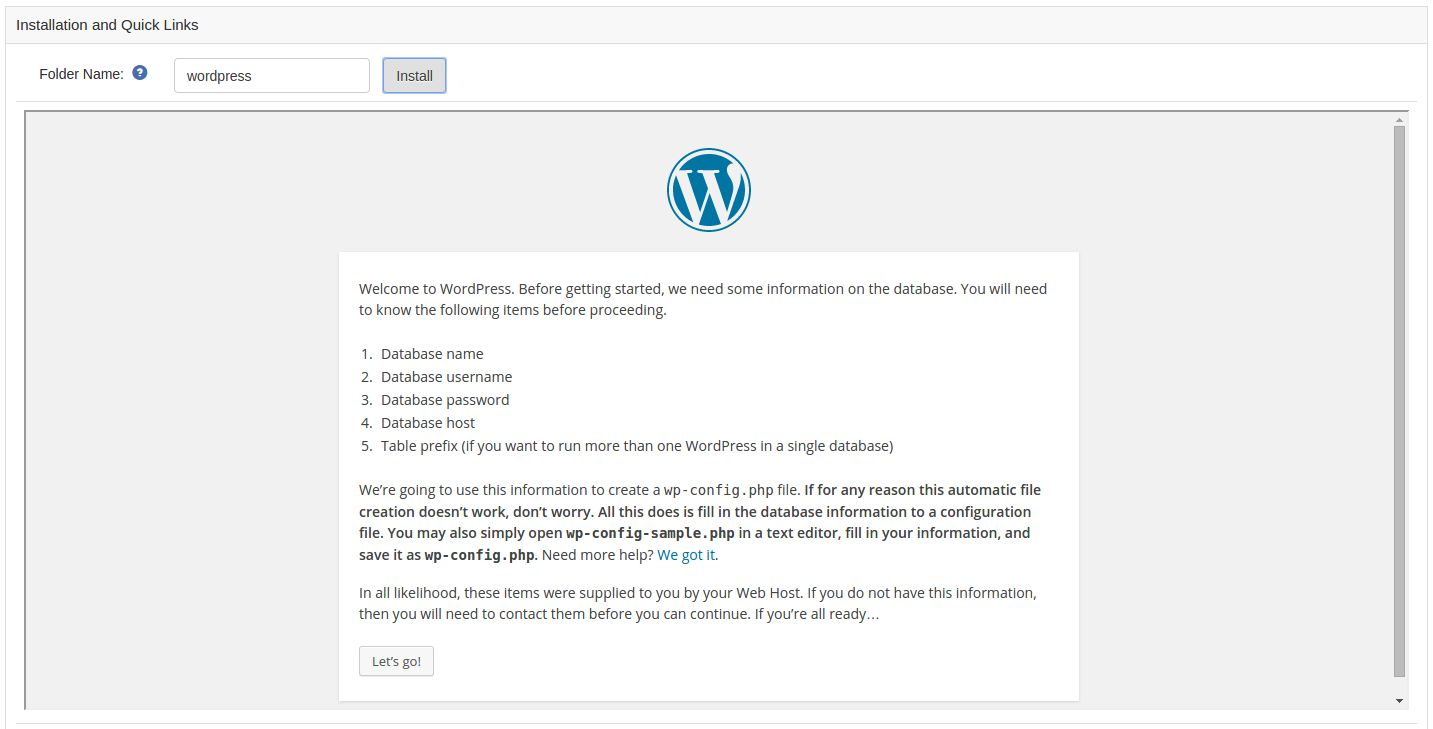
This tab provide interface for installing WordPress and Quick links for WordPress Admin Panel. Before beginning the installation copy the WordPress folder in magento root directory and make sure it have write permission as WordPress need to write a file during installation . If Write permission is not given to WordPress folder then you have to manually write a file. After copying folder open WordPress Setting Tab.
1. Folder Name : Enter the name of the root directory of WordPress by default its wordpress.
Note: Dont add any slash before and after folder name. Simply enter the folder name.
Eg: wordpress.

2. Install : After entering the folder name click install button. When you click the install
button a frame will open below and follow the instructions. The frame will look like as shown below:

WordPress Installation

Step 1: Welcome Screen. Click button labeled as Lets Go.

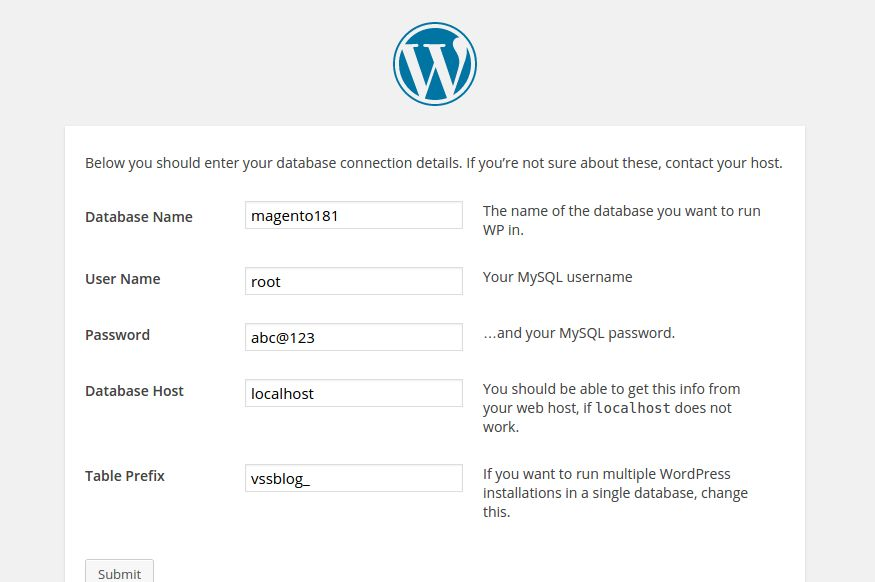
Step 2: Database Configuration. Here you will get all fields automatically filled. You just need to click submit. The WordPress database will be created in your magento database.

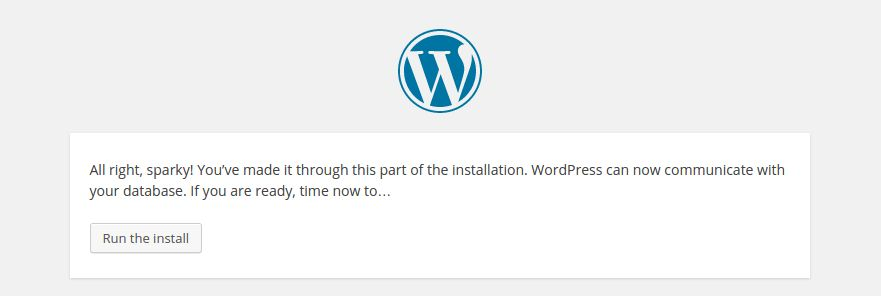
Step 3: Run Installaer. Click button Run Installer.

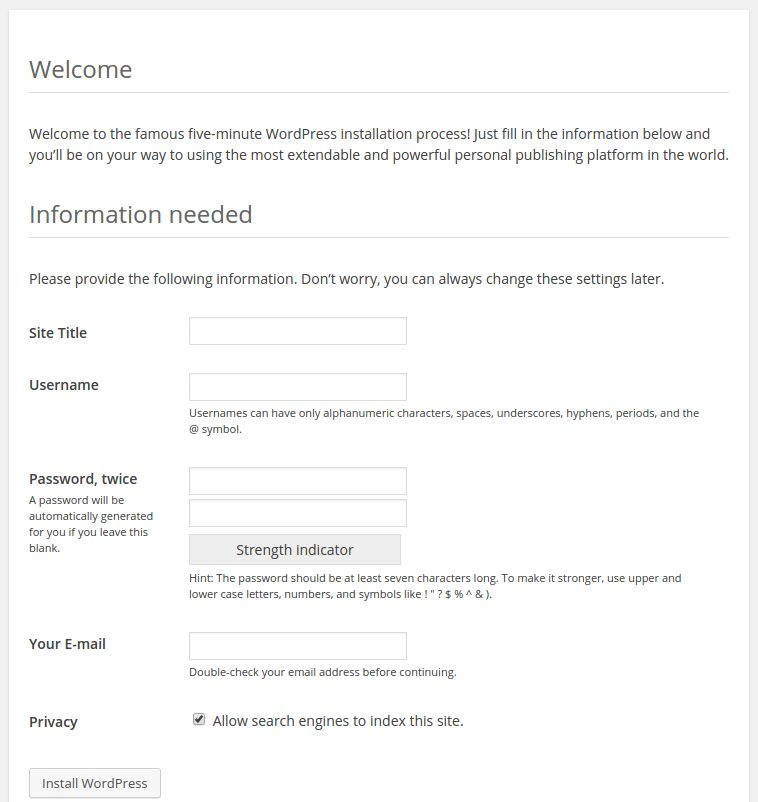
Step 4: Configure WordPress Account. Setup your WordPress account details and click install. That it you just successfully installed
WordPress.

3. Credentials: Enter your WordPress username and password and click save and continue.

4. Quick Links: Once you saved the WordPress credentials you can use these links to access WordPress controls automatically without logging in.

Integration Settings

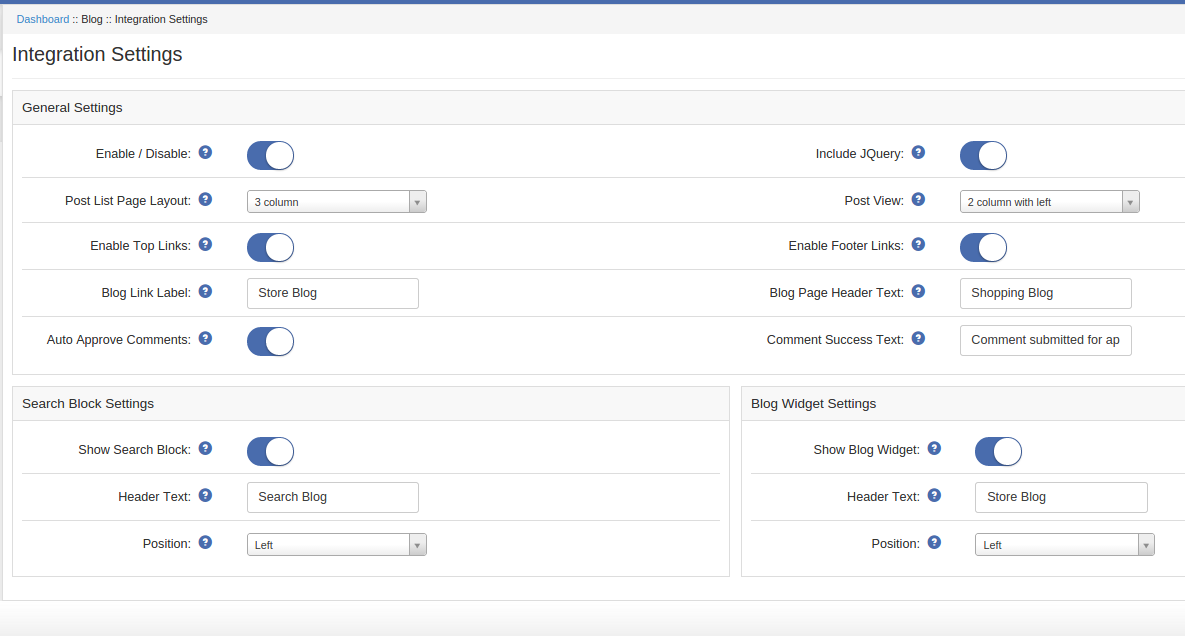
In this tab you can configure the magento- wordpress integration setting.Following is the details
for each option:

General Settings:

1. Enable/Disbale: To enable the Magento Blog Module for your store.

2. Include JQery:  jQuery is a java framework which is required for this module. Many
magento themes and extension inlcude jQuery store frontend. Enable if your theme or other
extension is not using jQuery.

3. Post List Page Layout: Select a page layout for page on which all blog post will be listed.

4. Post View Page Layout: Select a page layout for page on which blog complete content of post will be display with comments if allowed.

NOTE: In one page layout Search block and Blog Widget will not display as they both can be set only either left column or Right column.

5. Blog Link Label: Set the text label for top links and footer links.

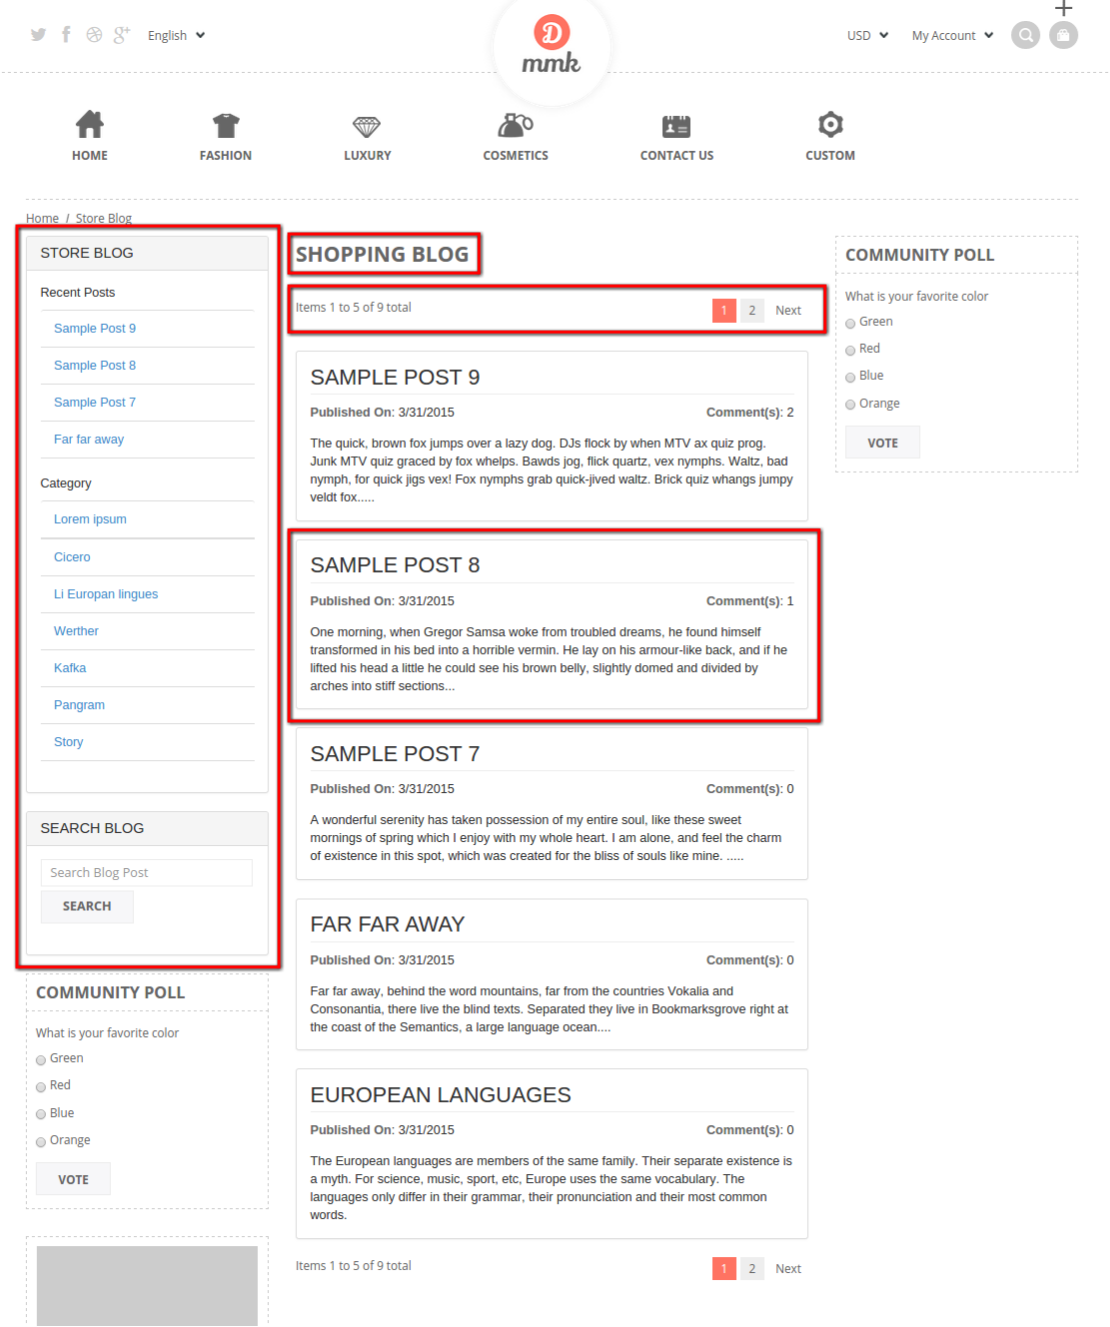
6. Blog page Header Text: Set the text for header of blog page .

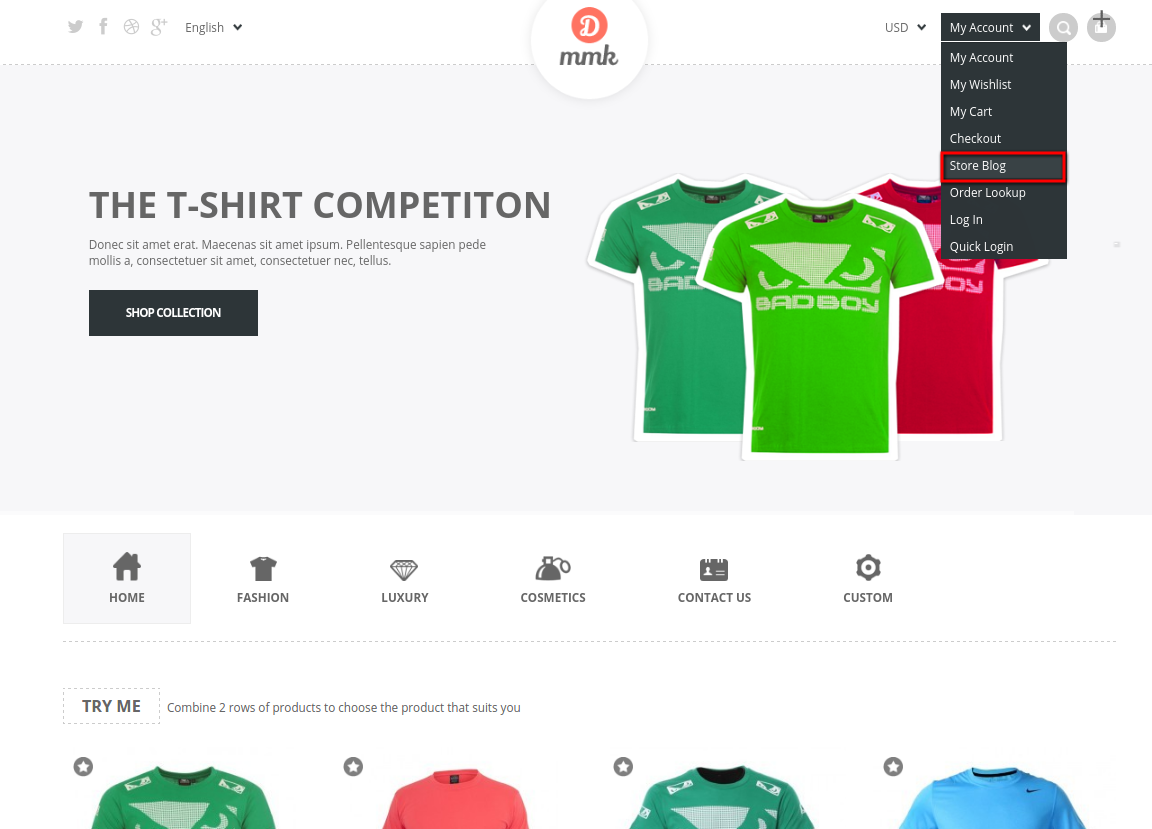
7. Enable Top links: Add a link in top links which allow users to access the Blog Pages.

8. Enable Footer links:  Add a link in Footer links which allow users to access the Blog Pages.

NOTE: Disabling both link will make user unreachable to Blog pages.

9. Auto Approve comments: Enable this to automatically approve the comments on the blog.

10. Comment Success Text: Set a text to be display when a comment is successfully posted and submitted for approval.

Search Block Settings:

1. Show Search Block: A block containing a text field that allow user to search the blog post.

2. Header Text : Set a header text for search block.

3. Position : Set the position of search block.

Blog Widegt Settings:

1. Show Blog Widget: A block containing 5 recent post and all parent category of blogs. When user click any on recent post that post will open. When a user click any of category then all posts of that category will listed.

2. Header Text: Set a header text for blog widget.

3. Position: Set the position of blog widget.

Custom CSS Settings

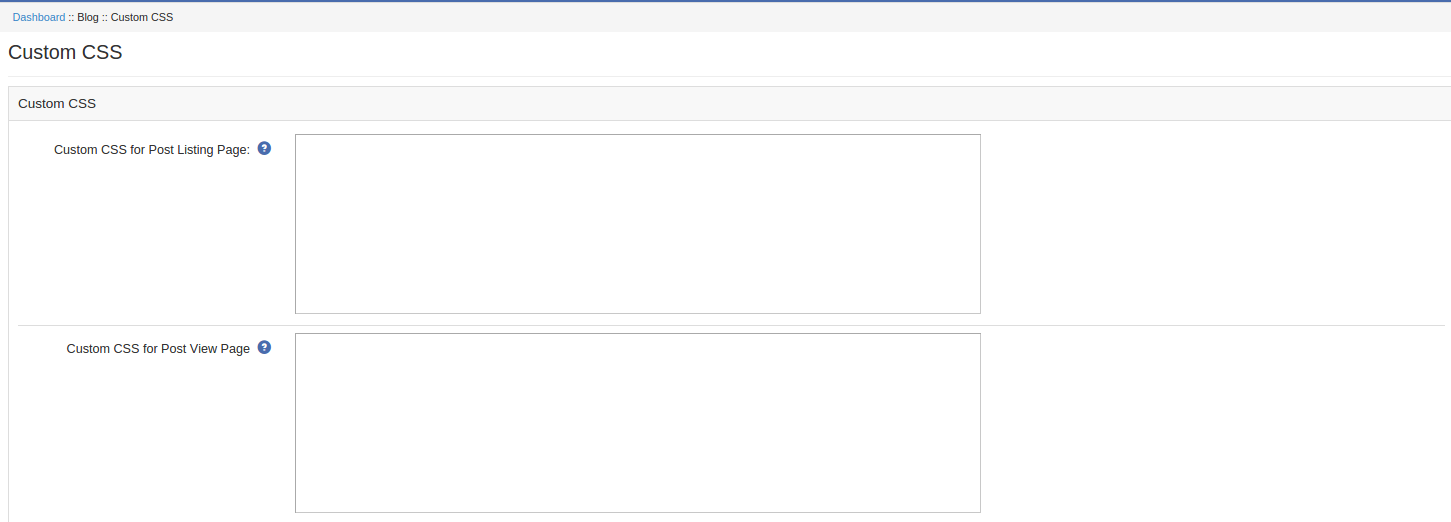
In this tab you can get CSS for blog list page , blog view page , search block and blog widget also. Following is the details of each option:

1. Custom CSS for Post Listing Page: Enter the CSS code you want to apply on blog list page.

2. Custom CSS for Post View Page: Enter the CSS code you want to apply on blog view page.

3. Custom CSS for Search Block: Enter the CSS code you want to apply on Search Block.

4. Custom CSS for Blog Widget: Enter the CSS code you want to apply on blog widget.

Blog Top Link


Blog Footer Link

Blog Listing

Blog Post and Comment

Liked This? You’ll Like These Too

Knowband Magento Scratch Coupon Module – User Manual

Introduction

Knowband offers scratch coupon module will enable store owner to allow the system to give discount coupons to endpoint customers and analyze the customer’s need by tracking discount coupons. As we know that customers attract to any shopping sites on the base of attractive offers and various type of discounts. So, keeping these points in mind, this plug-in will generate discount coupon on the front end to all visited customers, based on defined discount criteria by the store owner.

Features:

  • The Magento email subscription module is fully customizable.
  • The Magento subscription module is fully compatible with all themes.
  • The scratch coupon Magento extension is easy to install and configure.
  • The Magento scratch game offers hassle-free implementation.
  • The store admin can allow free shipping.
  • The store admin can fix coupon code length.
  • The store admin can include JQuery if needed.
  • Expiry date of the coupon can be fixed in the admin panel.
  • The Magento scratch game offers mobile responsive layout.
  • The store admin can choose the page to show scratch coupon.
  • The store owner doesn’t need to change codes on the back-end.
  • It is so easy to enable/disable the module just by a button toggle.
  • The Magento scratch card offers fixed or percentage based coupon code.
  • The Magento scratch game allows look and feel settings on the admin panel.
  • There are coupon statistics represented in the form of a pie chart or via graphical figures to track an overall view.
  • The Magento scratch pop up offers an analysis report for monitoring the performance of this functionality from the admin end.

User Guide

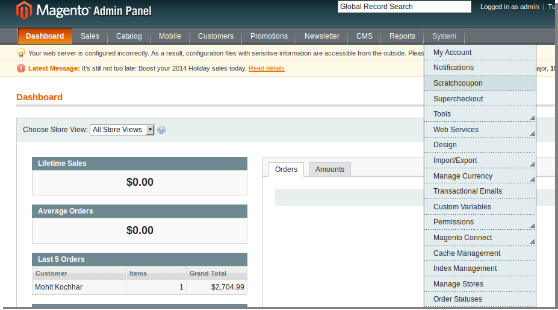
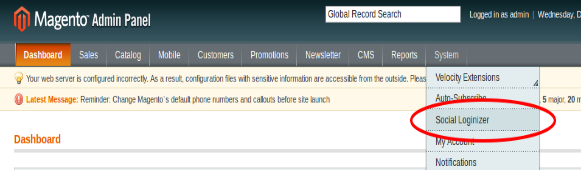
1. To excess Scratch Coupon plugin, Click on scratch coupon option appearing as a sub-menu in navigation menu under System main menu as shown below.

2. On clicking sub-menu “Scratchcoupon” the module for the plugin will open. It contains navigational bar at the top, the menu at the left and main content in the center.

General Settings

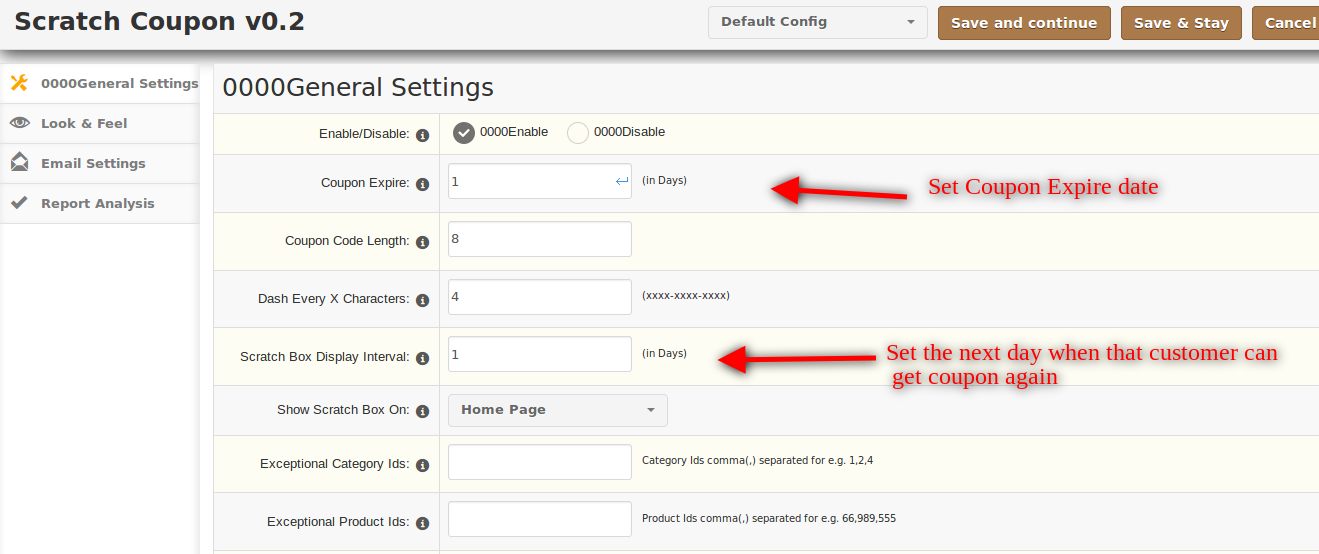
1. Enable/Disable: To enable the plugin, select enable present right to the label of “Enable/Disable”.

2. Coupon Expire: Enter coupon expire(in days) in the text-box present to the right of the label “Coupon Expire”. This will create a coupon which will expire in the days entered by you in the text-box.

3. Coupon Code Length: This will create coupon code of exactly that length which is entered by you in the text-box present to the right of label “Coupon Code Length”.

4. Dash every X characters: To create the coupon with code containing “-” i.e. xxx-xxx-xxx enter the value after which the dash will appear in the code. In case you don’t want a dash in the code, enter 0.

5. Scratch Box Display Interval: Scratch Box will be available again to a particular user after a certain period of time, this period depends on the value entered by the user in the text-box present.

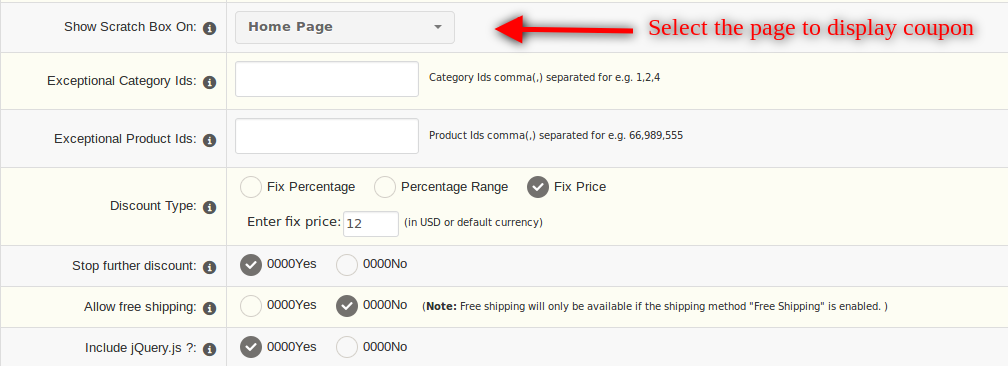
6. Show Scratch Box on: Here admin can select the page on which the scratch coupon will be shown.

7. Exceptional Category ID/Product ID: The store admin can enter the product and category ID to which he/she wants to exclude the scratch coupon box.

8. Discount Type: Three different types of discount can be provided to users.

  1. Fix Percentage: In this fix, percentage value has to be entered in the textbox present.
  2. Percentage Range: Random percentage range will be provided as a discount if this is selected.
  3. Fix price: In this fix, the price will be provided as a discount, value has to be entered in the text-box.

9. Stop further discount: On enabling this option further discount to shop cart won’t be allowed if a coupon is applied.

10. Allow Free Shipping: Coupons created should allow free shipping or not is controlled by this option. If selected yes, free shipping will be provided. If selected no, free shipping won’t be provided.

11. Include jQuery: jQuery is a javascript framework which is required to make this plugin work. Sometimes themes used already contain this framework, in such cases, this should be selected as “No” otherwise it should be “Yes”.

Look and Feel

This tab basically contains setting for how the scratch box will appear in the catalog.

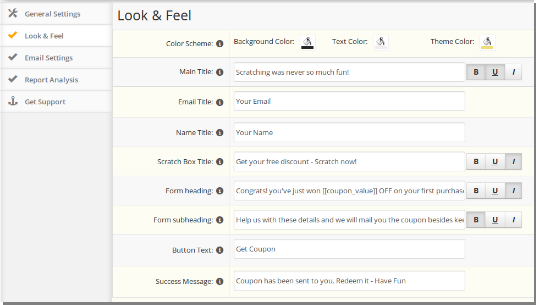
1. Color Scheme: This contains the color appearance of the scratch box.

  • Background Color: This will control the background color of the box which will be shown in the catalog.
  • Text Color: This will control the color of the text being shown in the scratch box.
  • Theme Color: This will control the color of other options like border color, button color and etc.

2. Main Title: This will control the title shown at the top of the scratch box. Options to make the title Bold, Italic and underline are available.
3. Email Title: This will control the label shown in the scratch box form.
4. Name Title: This will control the label shown in the scratch box form.
5. Scratch Box Title: This will control the secondary title present just below the Main title. Options to make the title Bold, Italic and underline are available.
6. Form Heading: This will control the title present at the top of the scratch box form.Options to make the title Bold, Italic and underline are available.
7. Form Subheading: This will control the title present below the Form Heading in the scratch box form.Options to make the title Bold, Italic and underline are available.
8. Button Text: This will control the text shown in the button which is present the scratch box form section.
9. Success Message: This will control the success message which is shown after coupon is successfully dispatched to the user.

Email Settings

This tab contains setting for email which is sent the customer after scratching the coupon.

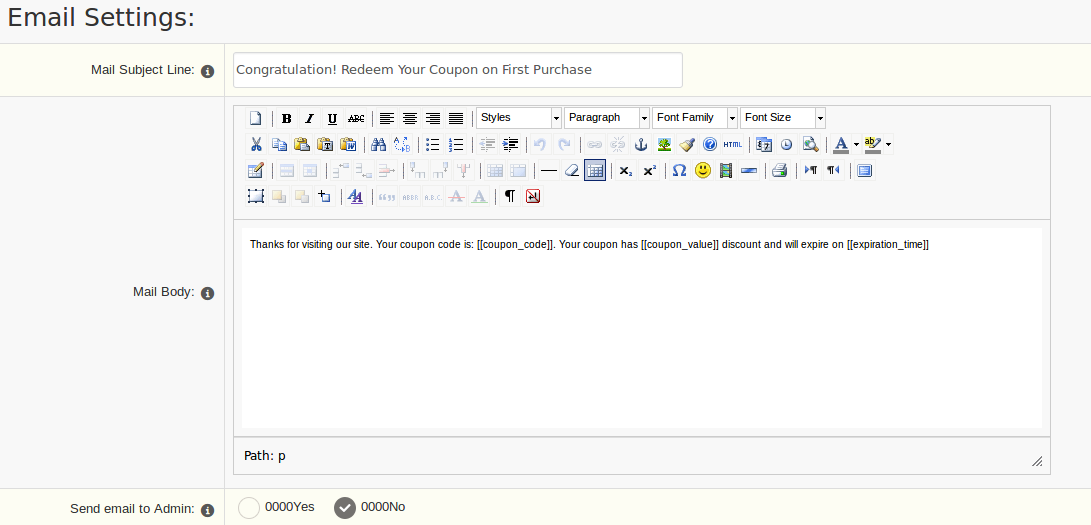
1. Mail Subject Line: This will control the text of the subject in the email which is sent to the customer after scratching coupon.

2. Mail Body: This will control the text of the main message which is sent to the customer after scratching coupon.

3. Send the email to Admin: If a copy of the email which is being sent to the customer is also required by admin, then this option should be selected as “Yes”. In case a copy is not required by admin, this should be selected as “No”.

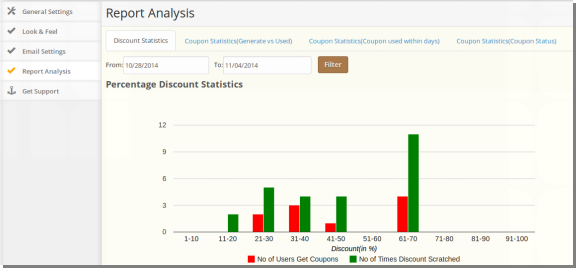
Report Analysis

This tab contains reports related to coupons and discount being generated from the scratch coupon.

It is divided into four sections:

  1. Discount Statistics
  2. Coupon Statistics(Generate vs Used)
  3. Coupon Statistics(Coupon used within days)
  4. Coupon Statistics(Coupon Status)

1. Discount Statistics:

This tab will show the statistics related to the type of discount i.e. Fixed or Percentage. Also, it shows statistics related to no of times coupons were scratched and no of users that actually received a coupon.

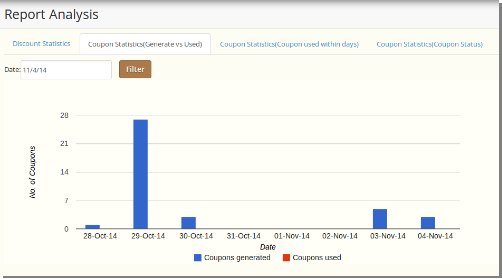
2. Coupon Statistics-Generate vs Used:

This tab will show the statistic related to no of coupon generated and no of coupon that was used. By selecting a date, you can get statistics related to that particular day.

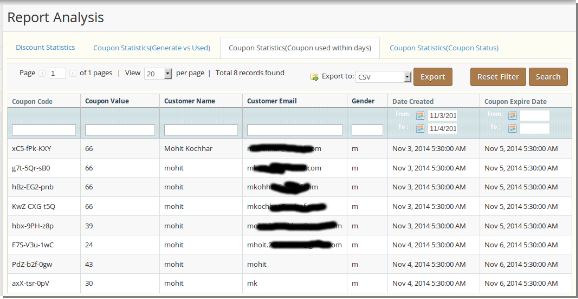
3. Coupon Statistics-Coupon used within days:

This tab will show the statistic related to coupons generated within particular days. It also contains list of all coupons generated and assigned to customers as shown below:

4. Coupon Statistics-Coupon status:

This tab will show the statistic related to coupons generated, coupons used and coupons expired between given interval of time in form of a pie chart as shown below.

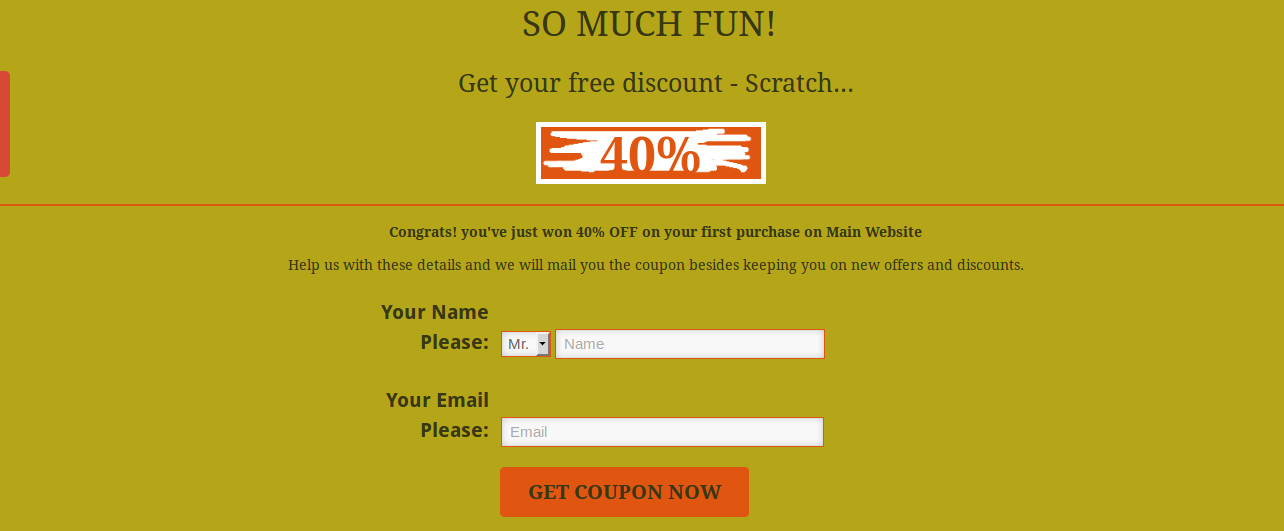
Front End: 

The  front-end will look like this:

For more deails:

Module Link: https://www.knowband.com/magento-scratch-coupon

Admin Demo Link:  https://mademo3.knowband.com/index.php/admin/dashboard/index/key/178e67cede3ca718eb701ff7ac4c11fc/

Front Demo Link: https://mademo3.knowband.com/

YouTube Video Link:  https://www.youtube.com/watch?v=6NNAZjEoscM&feature=youtu.be

Please contact us at support@knowband.com for any query or custom change request as per your business requirement.

Magento Master Deal – User Manual

Introduction of Magento Master Deal Extension

1.0 Introduction

The Magento master deal extension by Knowband is one of the best promotional modules that allows the admin to create deals to provide discounts on several products and list them all on one single page so that a customer can view all of the discounted products on one single page instead of browsing on the whole website. Magento deal timer extension allows the store admin to offer time-limited promotion. The Online retailers can now put forward a master deal and enhance the chances of conversions with the help of this boost sale plugin. The Magento deal promotion extension timer increases the effectiveness of the promotions and enables you to sell more.

1.1 Benefit of the Store Admin:

  • The Magento master deal module enables the Magento store admin to enable/disable the deal as his/her need.
  • The Admin can include jQuery if required.
  • The Magento master deal module enables the e-merchant to select the banner position to display the discount product.
  • The Magento product discount extension enables the e-merchant to select the banner type to display the discount product.
  • The Magento deal promotion extension by Knowband allows the store admin to enter the deal text to display on the deal.
  • The Online retailers can customize the look and feel of the deal banner or products.
  • The Magento master deal extension allows the store admin to set the discount amount and expiry duration, (that is, the start and end date) of the sale.With the help of this Magento extension, the admin to create N number of the deal if they want.
  • The Magento deal timer extension enables the store admin to set the priority of the deals.
  • The Admin can set the fixed percentage or fix the price of the master deal.
  • In the statistics tab of this Magento master deal extension, the admin can view the no. of deal products and no of deal product sale.
  • This Magento deal timer extension helps the online retailers to increase the sale of the website.
  • The Magento master deal module is multi-shop supported.
  • The multi-lingual support allows the admin to set the title in multiple languages.
  • This Magento deal promotion extension works flawlessly.
  • This Magento master deal extension is mobile responsive, the customer can view the deal banners or product on the mobile device.
  • This Magento extension reduces the cart abandoned rate of the website.

2.0 Installation

After purchasing the Magento single click checkout extension, you will get the following files as listed below:

1. magentocustommaintenancepage.zip (contains source code of the extension)
2. User Manual

Follow the following steps for installing Magento One Click Checkout Module:

Download the Magento extension package.
1.Unzip the magentocustommaintenancepage.zip file.

2. Copy all the files and folders of unzipped folder into your store root directory.
3. After copying all the files and folders, clear the cache.
4. Open any page of your store. Magento will install the module at the time of loading any page.
5.In the Admin Panel, go to “System > Knowband Extensions > Masterdeal”
To access Magento master deal extension, click on MasterDeal Menu appearing in System Menu navigation menu as shown below.
On clicking menu Masterdeal the module for plugin will open. It contains navigational bar at the top, Tab menu at the left and in main content the first Setting tab will display.

3.0 Extension Interfaces

There are two interfaces in this extension. Each interface has a different functionality according to its use. These interfaces are:

A.Admin Panel Interface (Only be accessible by admin/store owner)
B.Front End Interface (accessible to front end user)

Each interface has been described in separate section.

4.0 Admin Panel Settings

Admin Panel Settings contains the 3 tabs for settings.

4.1 General Settings

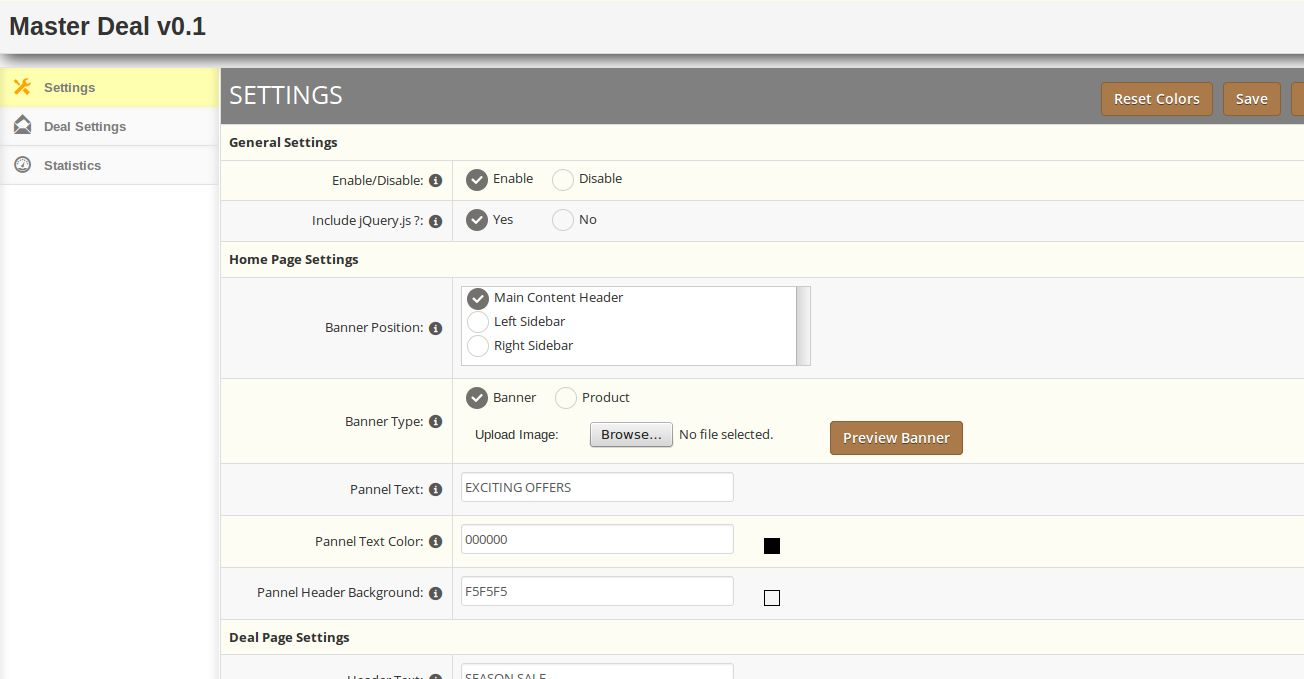
1. Enable/Disable: To enable the Magento Master Deal Extension, select enable option.

2. Include jQuery File: jQuery i.e. a javascript framework is required for this Magento deal timer extension to work.

Sometimes themes used in Magento already includes it but sometime they do not. If jquery is already included in your theme then deactivate else activate to include it.

4.1.1 Home Page Settings

1. Banner Position: Select a Banner Position on homepage according to your layout. To show banner in main content of homepage then select Main Content Header , for left column select left sidebar and for right column select Right Sidebar.

2. Banner Type : Select Banner type as Banner to set a banner image in home page panel. Otherwise select Product to display some deal products in home page panel.

NOTE: Preview of Banner Image will be available after saving the setting.

3. Panel Text : Enter the text to be display on the header of Home page Panel.

4. Panel Text Color: Select a color for above stated Text.

5. Panel Header Background : Select a color for background of Home Page panels Header.

4.1.2 Deal Page Settings

1. Header Text : Set a text for the header of Deal Page listing all the deal products.

2. Header Text Color: Select Color for the header text.

3. Header Text Background: Select Color for the header text background.

4.1.3 Product Panel Settings:
1. Timer Color: Set a color for the timer on the product panel.
2. Timer Background Color: Select Background Color for the Timer.

3. Hover Effect : Adds a special effect on product panel when mouse hovers on them . To enable this effect select yes.

4. Timer Color: Select color for timer text during hover effect.

5. Background: Select color for Product Panel during hover effect.

4.2 Deal Setting Tab

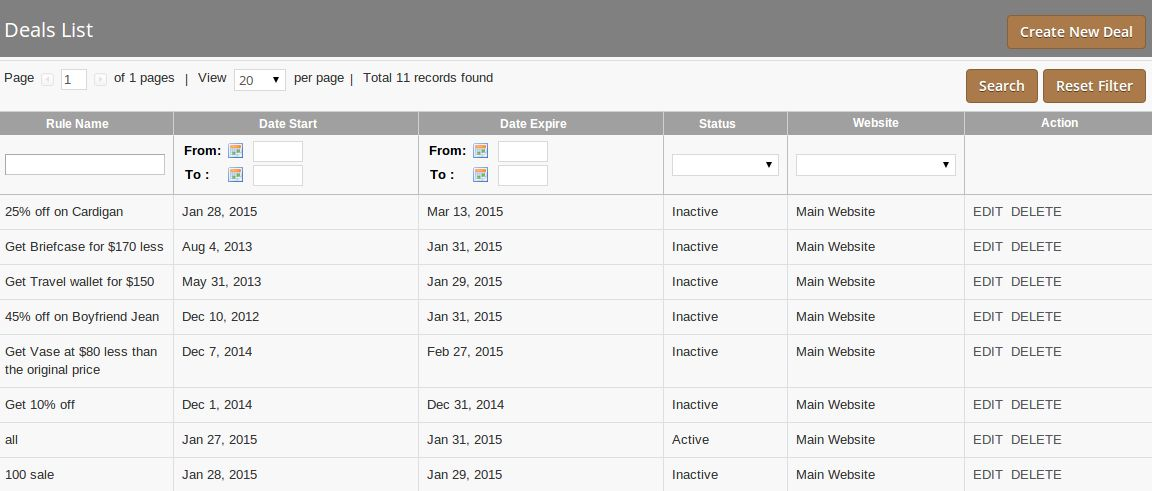
In this tab you can create, view , edit, delete the deals (i.e. Magento Catalog Price Rules.). You can also use Magento’s default interface to setup the price rules. When you click on the Deal Setting Tab , at first a grid will display listing all the deals. In grid the last column ACTION provide two options:

1. EDIT : On Click of this, the details of deal will displayed where you can also edit the deal.

2. DELETE: On click of this, the corresponding deal will be deleted.

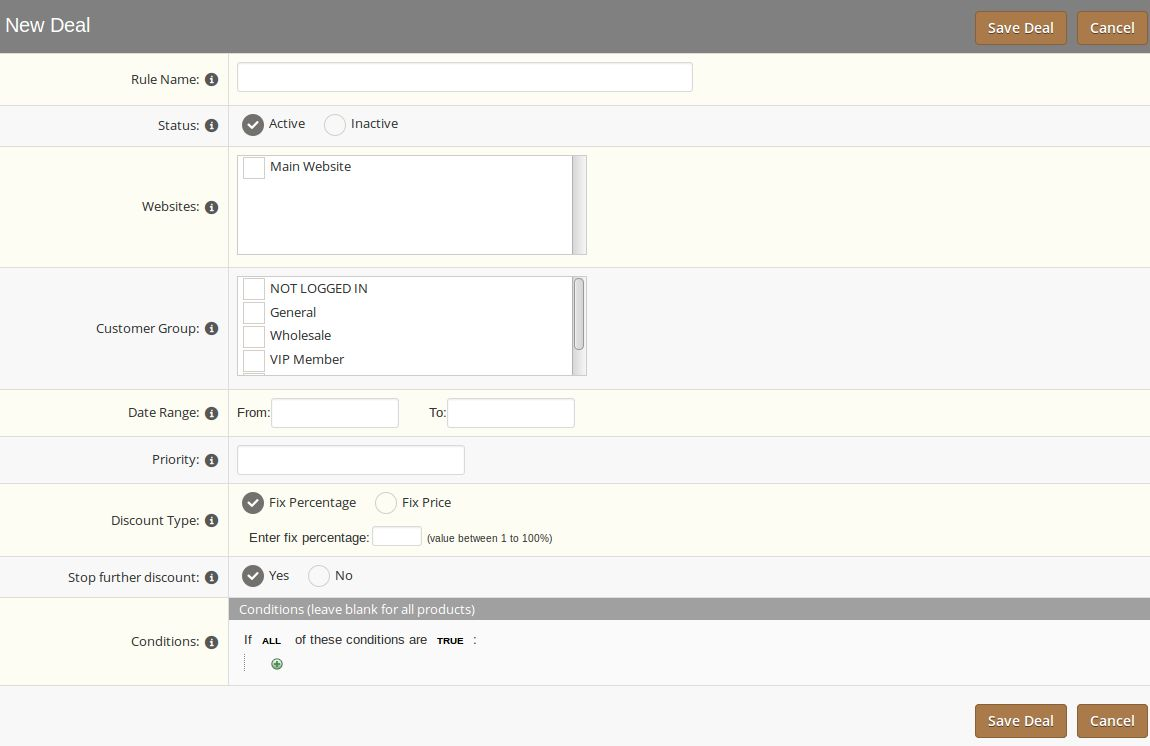
On the right top of the grid , there is button labeled as Create New Deal . On clicking , a form will display to create new deal(i.e Catalog Price Rule).

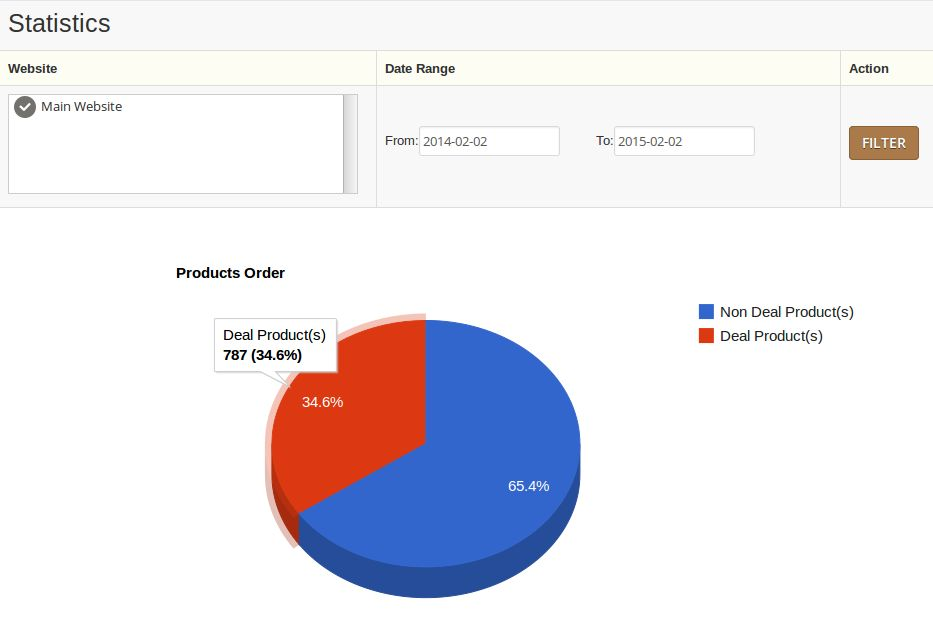
4.3 Statistics Tab

This Tab show a pie chart describing the no. of deal products(i.e the product having discount under any deal) ordered among all orders during the selected date range.

You can try Knowband’s Magento Master Deal Extension for on your Magento store. KnowBand’s Magento single click checkout module helps you increase customer engagement to your store and boost the sale in youre eCommerce store.

5.0 Front End

Front End Interface will show the master deal extension with configured settings set through the admin panel of this Magento master deal extension. You can find screenshot below-

Module Link: https://www.knowband.com/magento-master-deal

Please contact us at support@knowband.com for any query or custom change request as per your business requirement.

3 Must have OpenCart Extensions to Get More Traffic

In this blog, we have tried to help you out with some powerful extensions for a website designed on OpenCart shopping platform. Installing these extensions will definitely motivate your visitors to spend more time on your site and will help achieve increased visibility and ranking too.

Here’s a brief description of these 3 highly functional extensions for increasing traffic on your OpenCart store-

1. OpenCart Abandoned Cart–

It is a very useful plugin for increasing traffic of your site. If you have an OpenCart site, you will definitely be able to recover abandoned cart and improve the buying experience of your users. 

Increase sales-

By sending an email reminder (cart abandoned recovery mail) to customers who have abandoned the cart.

Fully customizable Email Content

Knowband’s OpenCart Abandoned Cart allows a store owner to send personalized emails that redirect the user’s session on your site with a single click, making it easy for customers to complete the checkout process.
The “follow-up with email” feature of this extension increases the likelihood that the customers will return to your site for completing the purchase. Abandoned cart follow up mails are the most widely used marketing strategy for increasing customer engagement on your store.
According to the data by SalesCycle, “48.1% of abandoned emails were opened, 14.9% were clicked and 33.3% were actually converted into a purchase.”

In order to increase chances of engaging customers, OpenCart Abandoned Cart allows you to send emails within a time interval set. It also allows the store admin to add images and other deals and discount to increase chances of visitor returning back to your store. With more and more customers getting engaged on your store, the website traffic will automatically increase, thereby leading to improved bounce rates.


2. OpenCart One Page checkout–

People love simplicity, be it while shopping online or conducting transactions. Out of so many reasons, “a lengthy checkout” is one amongst those reasons which actually increases cart abandonment. Always remember the simpler and the easier; the process is, the more likely your customers will continue the purchase.

With “OpenCart One Page Super checkout”, you will allow customers to quickly view their items in the cart and move forward with just a single step to complete the purchase.

The added features of this extension like, “enabling social login“, “mobile responsive theme”,  “supporting multiple shipping and payment method” also adds to its functionality and motivates your customers to come back again, thereby increasing traffic and sales on your website.

The feature of “social login” motivates customers to come back because it reduces the hassle of lengthy and forceful signing up. Customers just need to type in their social account info to sign up which they really do enjoy.

Similarly, with a mobile supportive theme design, a large number of mobile users get an option to access your website with mobile and other digital devices. This increases mobile traffic and maximizes the reach of your business to targeted users.


3. OpenCart Social Login–

Social login is a feature that allows customers to log in via their social networking accounts like, Facebook, Twitter, Google+ or LinkedIn.  With too many passwords to remember, customers always look for convenience therefore they prefer returning to sites which offer this facility.

Not only social logins are super convenient but also they encourage authenticity for your brand.

Installing OpenCart Social Login on your store is a great way to boost registrations as it provides ease and convenience.

This extension also allows aggregating your customer data from across the web. With this data businesses will be able to better target their marketing campaigns and make informed business decisions. In addition to it, the aggregation of data also provides increased conversions and traffic for your site.

The sleek, simple and easy to understand User Interface (UI) allows the store manager to control the look and feel of your store with an interactive web based user interface.

To know more about the functionalities of this plugin and the way it functions, you can go to the main product page. Installing any of these extensions is just a matter of few minutes and does not require much technical expertise. If you follow the instructions provided on our manual carefully, you will be able to download it manually. For any other guidance and assistance, we are here to serve you anytime.

Advantages of using Prestashop Responsive Checkout

Considering this in mind, we have introduced an amazingly faster and seamless checkout for your store- the all new “Prestashop Responsive Checkout”

With almost half of website traffic coming from mobile devices, it is really important for you to have a responsive design for your website’s checkout page.

Prestashop One Page Responsive Super Checkout is designed specifically for the screen size your customer is using. The Responsive design of this extension is not only pleasing to eyes but also improves conversions by providing a faster and easier checkout experience to customers.

Stress Free and Fast Checkout-

Responsive design is aimed to provide a smoother and faster navigation. We carefully and intelligently consider every detail of the buying process to make checkout process frictionless for your users. By adapting to any screen size, this extension provides your customers with a user-friendly checkout experience. The overall graphic design is so clear, simple and easy to understand that it keeps customers focused on placing an order.

On mobile devices the real estate of a website becomes very limited, therefore the order summary and other checkout page details switches to the bottom on right side of the mobile screen. This further helps customers finish the purchase with less scrolling ultimately resulting in more orders for your store.

SEO-

Google actually recommends websites that use responsive design for higher ranking on search results. It is because having one URL for each page across all devices makes it easier for customers to interact with your site. Moreover, using a single URL prevents redirecting which reduces load time, allowing Google to crawl your website faster.

Better Conversion rates-

With a responsive checkout optimized for all screen sizes, businesses will be able to target more number of mobile users. This in turn would further promote more sales and conversions.

Conclusion

So, is a responsive checkout a better methodology for eCommerce retailers to increased revenue generation and conversion optimization?

At Knowband, we have been designing the right approach for delivering a mobile based experience to help businesses achieve their goals significantly. If you are looking for the same, the do contact us.

You Might Also Like:

3 Essential features your Ecommerce Store needs for sure

Depending upon the different requirements of individual stores, there are some basic functionalities that every Ecommerce store should have in order to succeed in the online retail market.

Listed below are some most important plugins you must have for your website. Let’s take a deep look into it-

Newsletters (For acquiring customer database)

Similar to social media, Newsletters too open a communicating channel between you and your customers. They serve as a valuable marketing tool to expose your brand in front of targeted audiences and provide a better opportunity to maximize your visibility. With the help of newsletters, businesses are able to showcase their brand, products and services to their customers. This in turn increases conversion and user engagement rate.

There are various plugins available at Knowband that allows you to create and send emails to customers by an automating email marketing campaign. These modules are important for increasing the value of your existing customer base and acquire new customers.

Shopping Cart (For Managing orders)

Shopping cart acts as the mirror of your eCommerce website. Think how a customer can make the purchase without the functioning of a shopping cart. We all have been to websites where the shopping cart is finicky or perhaps off-putting because every time you add a new item, the page gets refreshed and you lose your place in the search results index. Isn’t that annoying? What do you do then, you just move on to some other website.

Don’t let this happen with your store. Invest in a good shopping cart, such as OpenCart Ajax Cart + by Knowband that allows you manage order processing easily and effectively. Every single detail related to the cart page appears in the form of pop up, whenever a customer adds any product to the shopping cart.

Social Media (For encouraging faster sign ups on your site)

With social media dominating almost every aspect of consumer’s life, it is estimated that 75% of eCommerce sales is generated using social networking platforms. Social traffic leads to increased conversions and better user engagement on your site. In addition, it provides higher click through rates with increased brand awareness, therefore it becomes necessary to integrate social login features on your eCommerce store.

At Knowband, we have designed the best social media extensions that integrate with your eCommerce store to enable a personalized user experience to visitors all across the globe.

Magento Social Login and Magento Facebook Login are our top selling plugins that allows users to sign up using their own social profiles like Facebook and Google+.

Conclusion

If you want to give your online store the edge over competitors, then you need to integrate these 3 functionalities for increasing conversions, sales and revenue on your eCommerce store.

You Might Also Like:

Opencart Advanced Wishlist Extension – User Manual

1.0 Introduction

Imagine you are browsing through your mobile phone and saw that pretty dress but couldnt buy it right now because its month’s end and let’s face it you are broke! You added it to your wishlist so that if its price comes down or when you get your salary credited, you will buy it. Suddenly a support Team member of that eCommerce site calls/e-mails you and offers you a coupon on that Dress. You feel happy and buy that Dress because now it’s affordable. Offering wish lists is an effective way to reduce Shopping Cart Abandonment and fulfill sales from customers who showed intent but didn’t end up purchasing. Wish lists are mutually beneficial: they give customers an easy way to remind themselves of a product and help merchants measure product interest beyond a clear-cut sale. OpenCart Advanced Wishlist Extension by Knowband helps customer to shortlist their favorite products so that they can be aware of the products they want to purchase or view later.

This OpenCart save for later extension is like a basket in hand where you add whatever you like and proceed with the checkout when you are ready to buy it. As a Store Admin you can keep a track on the requirements of your customers and proceed accordingly with your sales plan.


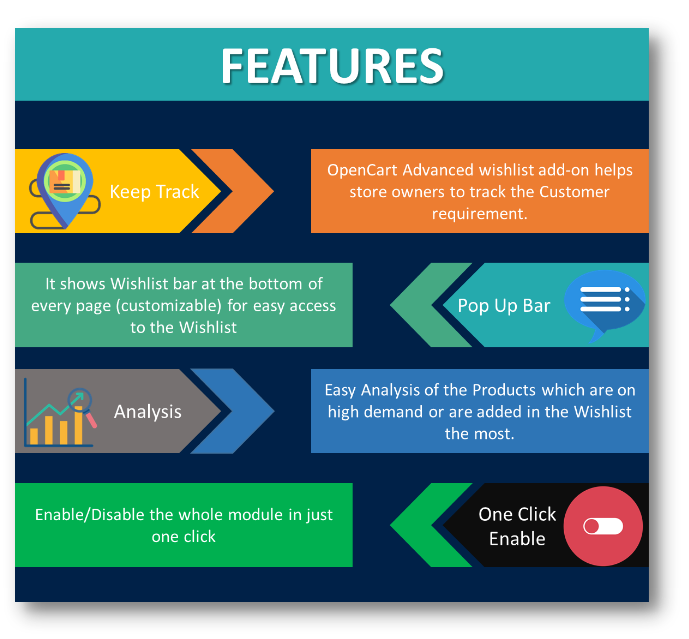
1.0.1 Features of OpenCart Advanced Wishlist Extension

2.0 Installation Guide

Before starting the installation process, you have to buy the Opencart Advanced order list extension by the Knowband store. Once purchased, you will receive the following files on your registered email.

  • Source code of Opencart Advanced order list extension in zipped file format.
  • User Manual of Opencart save for later plugin.

Now in order to install this on your online shop, follow the given steps:

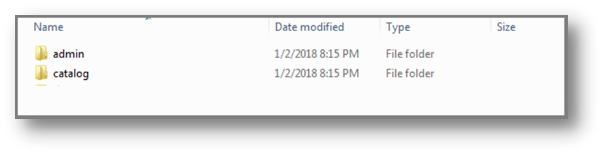
Step 1: Unzip the zip file. You will get the folders as shown in the image below


Step 2: Copy all the folders of the zip file in the Root Directory of OpenCart setup via FTP manager.

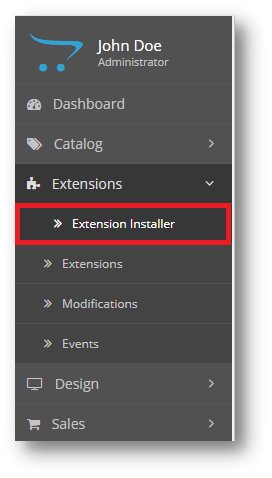
Step 3: There is a file name kbadvancedwishlist.ocmod.xml (for oc<3.0)
kbadvancedwishlist.ocmod.zip (for oc>3.0). You need to install this file in the following Location:


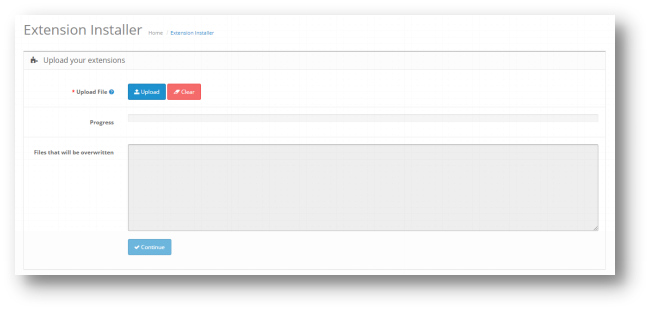
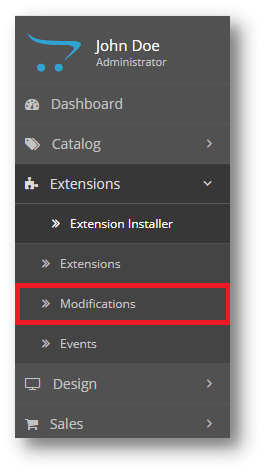
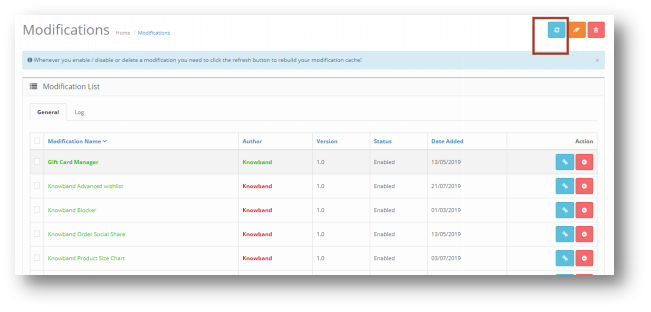
Step 4: After Installation you need to select this file and refresh Modifications:


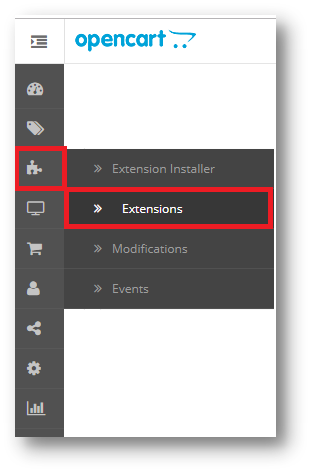
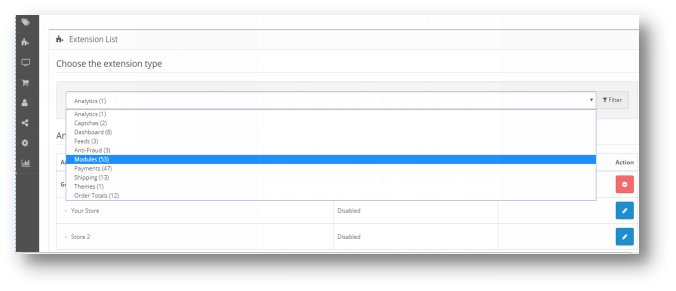
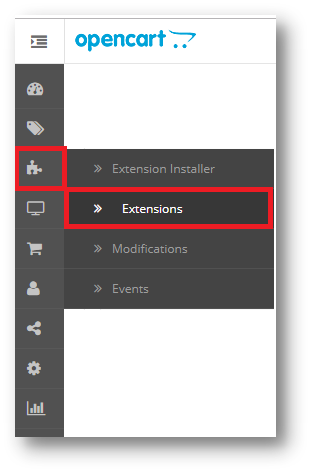
So, Opencart save for later plugin is now successfully installed and is ready to use at your store. Go to the admin menu and click on the extensions. Choose the Extension Type as Modules. You will find a list of modules. Select the Knowband Advanced Wishlist.

3.0 Admin Interface of OpenCart Advanced Wishlist Extenstion

To configure the Size guide module for OpenCart, Navigate the settings in the following order:
Admin Panel > Extensions >Modules>Knowband Advanced Wishlist

The Admin Interface of OpenCart Advanced Wishlist Extension is divided into 6 Tabs:

  • General Settings
  • Product Analysis Report
  • Customer Analysis Report
  • Order Analysis Report
  • Support

3.0.1 General Settings

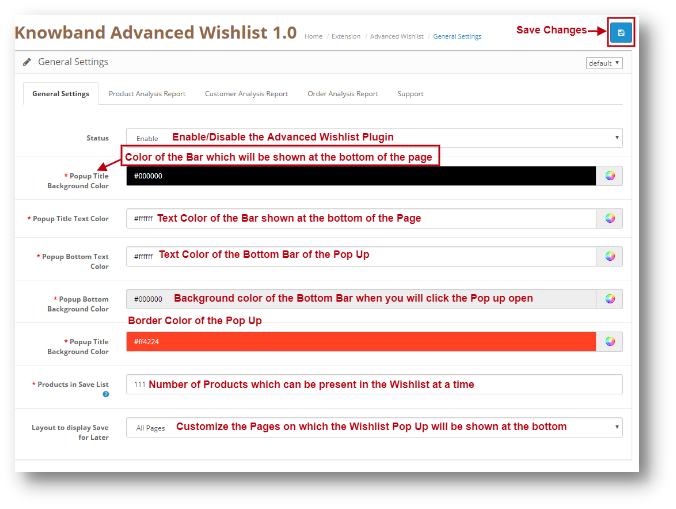
This setting will have the Option to enable/disable the plugin. The page will look like as shown below:


3.0.2 Product Analysis Report

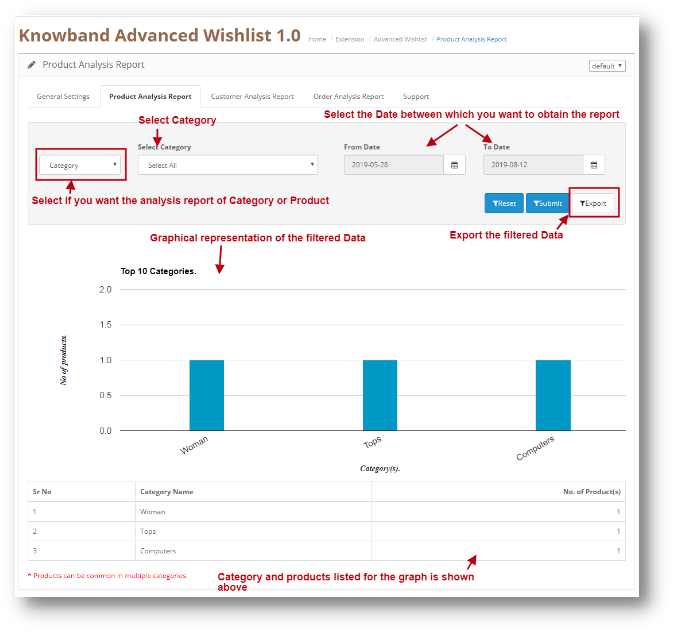
Through this setting of OpenCart save for later module, you can view the reports of a Particular Category. You can analyze the most popular category or the Category which was added in the Wishlist of the Users the most. The Screen will look like as shown below:


Filter your Report:
You can filter your Report on the basis of the categories added in your web Store and also on the basis of Date. You can just Enter the ‘To’ and ‘From’ Date and the reports will be shown to you.

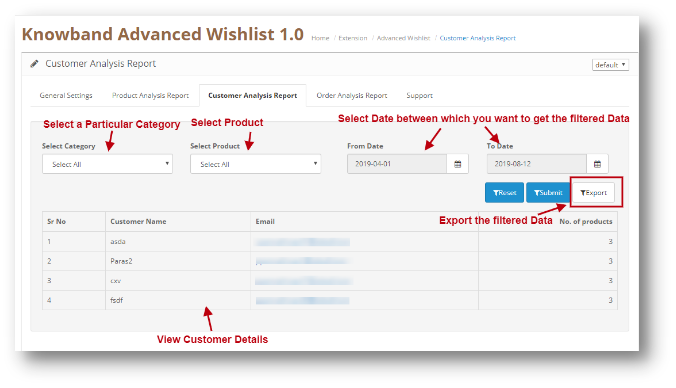
3.0.3 Customer Analysis Report

Through this setting of OpenCart Advanced Wishlist module, you can view the reports of a Particular Customer. You can analyze the most loyal customers of yours in your Store. The customer information will be shown here. The Screen will look like as shown below:


Filter your Report:
You can filter your Report on the basis of the categories and Products added in your web Store and also on the basis of Date. You can just Enter the ‘To’ and ‘From’ Date and the reports will be shown to you.

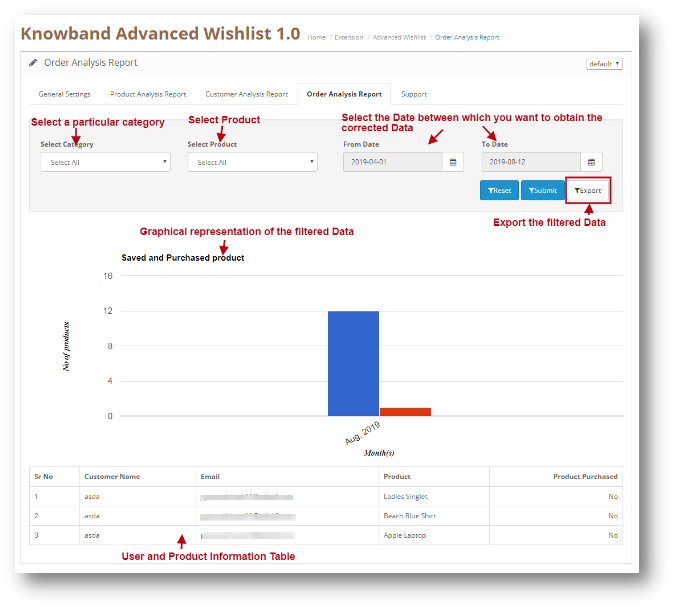
3.0.4 Order Analysis Report

Through this setting of OpenCart Advanced Wishlist module, you can view the reports of a Particular Product on the basis of how much it was ordered by customers. You can also view the report of the products which was in the Customer’s Wishlist and were later added in the Cart and were ordered. You can analyze the most popular Product in your Store or the Product which was added to the Cart of the Users the most. The Screen will look like as shown below:

Filter your Report:
You can filter your Report on the basis of the categories and Products added in your web Store and also on the basis of Date. You can just Enter the ‘To’ and ‘From’ Date and the reports will be shown to you.

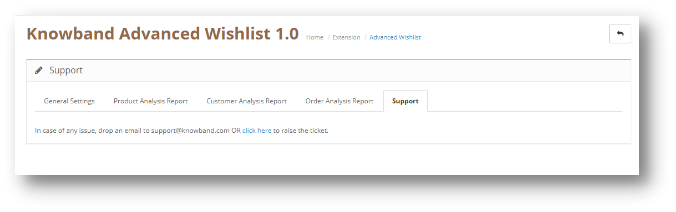
3.0.5 Support

In case of any issue, drop an email to support@knowband.com OR click here to raise the ticket.

4.0 User Interface of OpenCart Advanced Wishlist Extention

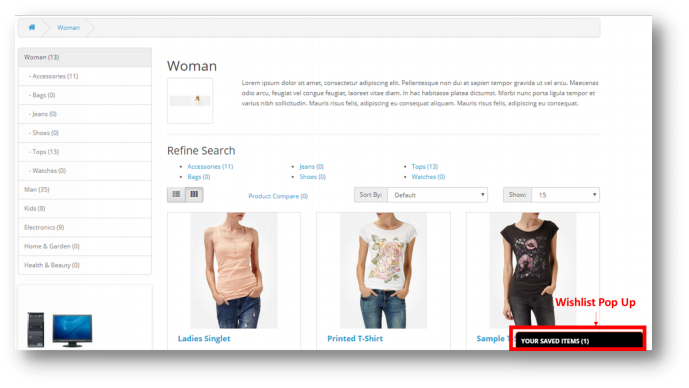
The Wishlist pop up will be shown to the user at the bottom of the page as shown below:

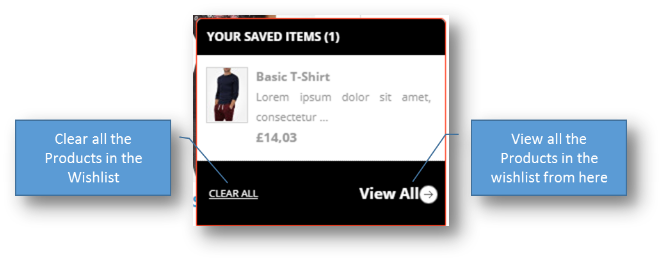
When User will click on the Pop-Up Bar, the following pop-up will show:

5.0 Opencart Advanced Wishlist Tutorial

In this comprehensive tutorial, we walk you through everything you need to know about the OpenCart Advanced Wishlist. From installation to complete configuration, we cover all the settings step by step.

You’ll also learn how to set up and customise the wishlist for the frontend, ensuring a seamless experience for your customers.

This video provides complete guidance from start to finish, making it easy for you to implement and manage the Advanced Wishlist on your OpenCart store.

6.0 Knowband Support

If you face any issues or need assistance with the OpenCart Advanced Wishlist, Knowband provides dedicated support to help you resolve your queries quickly. Our support team can assist with installation, configuration, customisation, and troubleshooting.

You can reach Knowband support via email at support@knowband.com or by raising a support ticket through our official website. We will guide you step by step to ensure the extension works perfectly for your store.

Explore more plugins

Opencart Video Manager extension:  https://www.knowband.com/opencart-videomate-extension

Opencart AI Content Generator Plugin: https://www.knowband.com/opencart-ai-content-generator

OpenCart Sales Coupon Enhancer – User Manual

1.0 Introduction

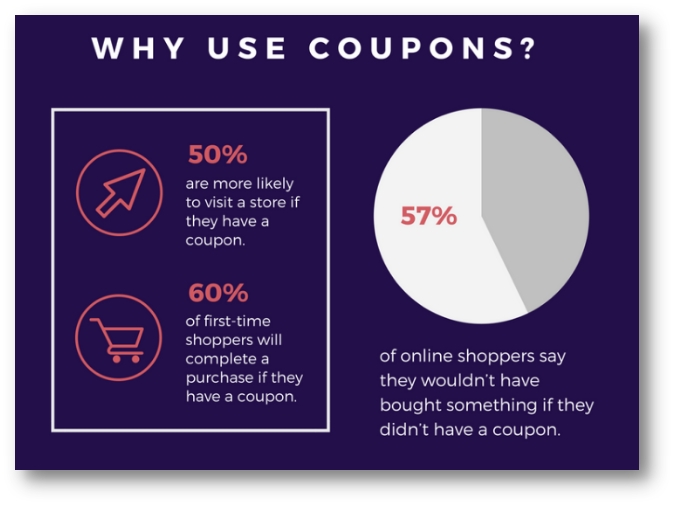
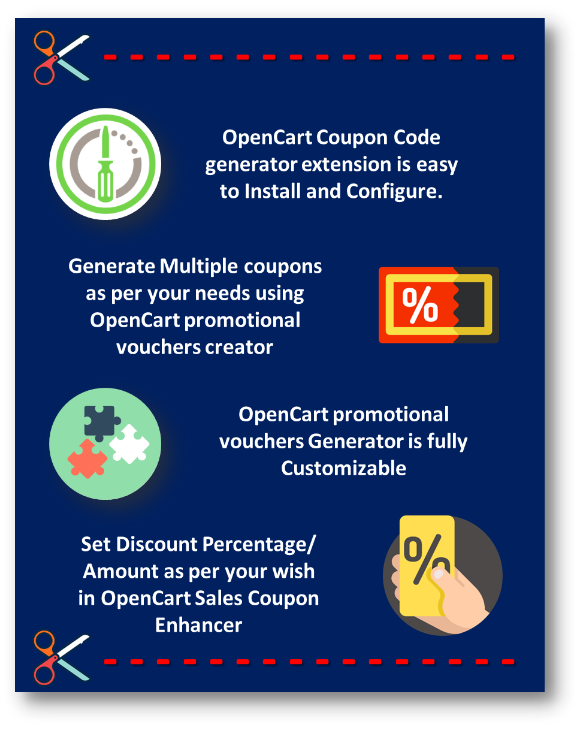
Coupons are the best way to get your Customer’s Attention. The goal of any offer or coupon is to encourage the consumer to try the product or service. Offering Coupons introduce new customers to your store, introducing new product lines, providing a way to get rid of unwanted inventory to make room in your warehouse or store for a newer product, encouraging customers to try a new brand that is more profitable to you or getting customers to come back to your Web store. Opencart Sales Coupon Enhancer by Knowband makes the job of generating these coupons easy for you. You are just one click away of generating your Discount coupons as per your needs by OpenCart Coupon Code generator Extension.

The key to maximizing the advantage of coupons in today’s digital world is using coupons as a way to build your customer base. Coupons can become a crucial part of your social media marketing provided you use them strategically.

Using discounts coupons can be a powerful tool to get you the spike in sales that you are looking for. And once you’ve achieved that, you can then use it as a springboard to skyrocket your sales to even greater heights. You can easily generate your coupons using Opencart coupon code generator extension and thus increasing your sales.


1.1 Features

2.0 Installation Guide

Before starting the installation process, you have to buy the Opencart sales coupon enhancer by the Knowband store. Once purchased, you will receive the following files on your registered email.

  • Source code of Opencart sales coupon enhancer in zipped file format.
  • User Manual of Opencart sales coupon enhancer.

Now in order to install this on your online shop, follow the given steps:

Step 1: Unzip the zip file. You will get the folders as shown in the image below:


Step 2: Copy all the folders of the zip file in the Root Directory of OpenCart setup via FTP manager.

Step 3: There is a file name kbsales_coupon_enhancer.ocmod,xml (for OC<3.0) or  kbsales_coupon_enhancer.ocmod,zip (for OC>3.0). You need to install this file in the following Location:

Step 4: After Installation you need to select this file and refresh Modifications:

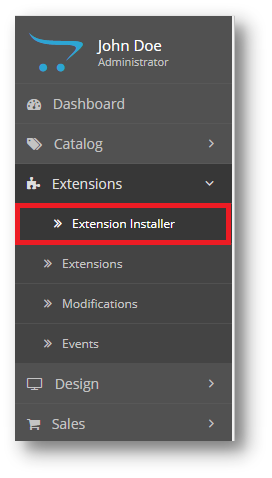
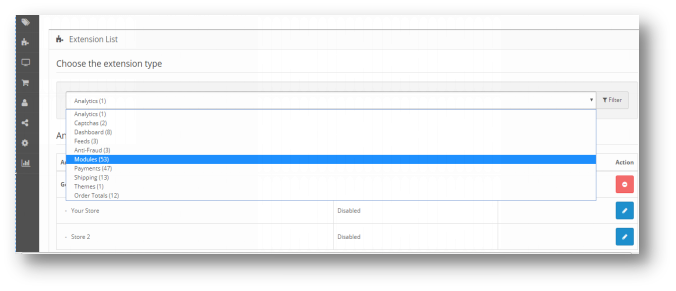
So, Opencart sales coupon enhancer is now successfully installed and is ready to use at your store. Go to the admin menu and click on the extensions. Choose the Extension Type as Modules. You will find a list of modules. Select the Knowband Sales coupon Enhancer.

3.0 Admin Interface of OpenCart Sales Coupon Enhancer

To configure the Sales Coupon Enhancer module for OpenCart, Navigate the settings in the following order:

Admin Panel >> Extensions >> Modules >> Knowband Sales Coupon Enhancer

The Admin Interface of OpenCart Sales Coupon Extension includes four main settings:

  • General Settings
  • Configure Coupons
  • Statistics
  • Coupons

3.0.1 General Settings

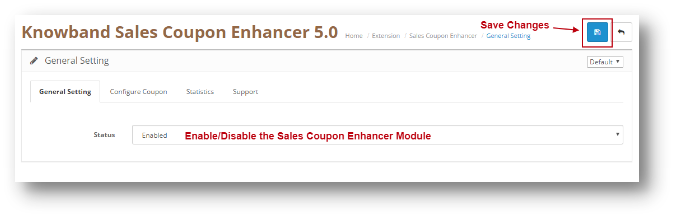
This setting will have the Option to enable/disable the plugin. The page will look like as shown below:

3.0.2 Configure Coupon

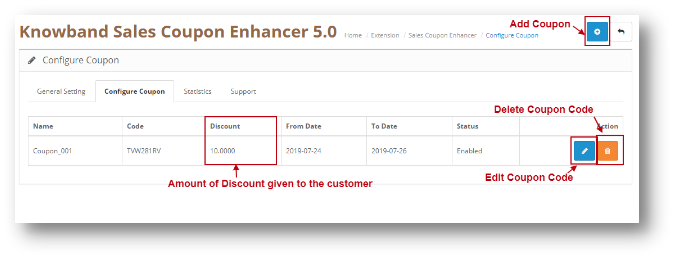
Through this setting of OpenCart Sales Coupon Extension, you can add a New Coupon Code or make changes in the Existing Coupon Codes. The screen will look like as shown below:

  • Edit a Coupon: You can Edit an existing Coupon using the Edit option. The screens for Editing Coupon will be same as Adding a Coupon. The only difference will be that Edit will have the fields already filled.
  • Delete a Coupon: You can delete a Coupon by clicking on the ‘Trash’ Icon.

3.0.2.1 Add a Coupon

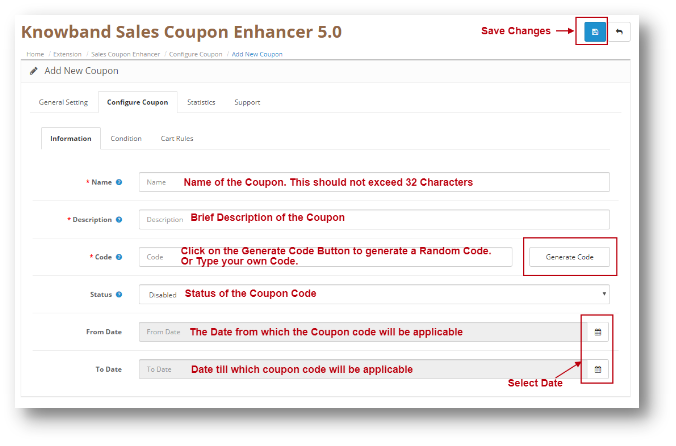
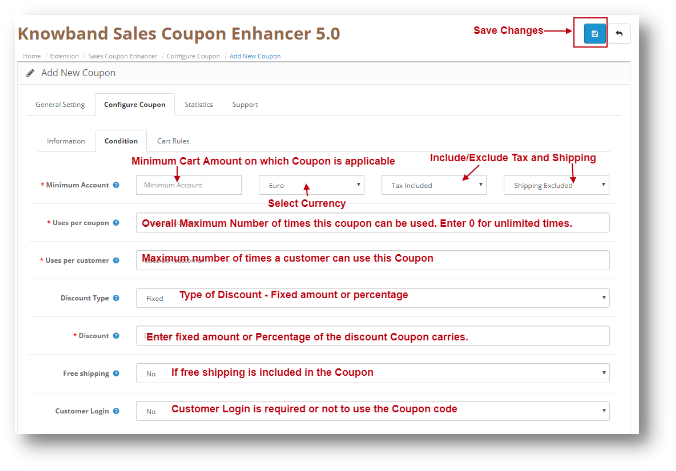
You can add a Coupon Code by Clicking on the ‘+’ Icon provided on the Top of the Page. The following screen will show up. Add Coupon will have three Tabs as explained below:

Information


Condition Tab


Cart Rules

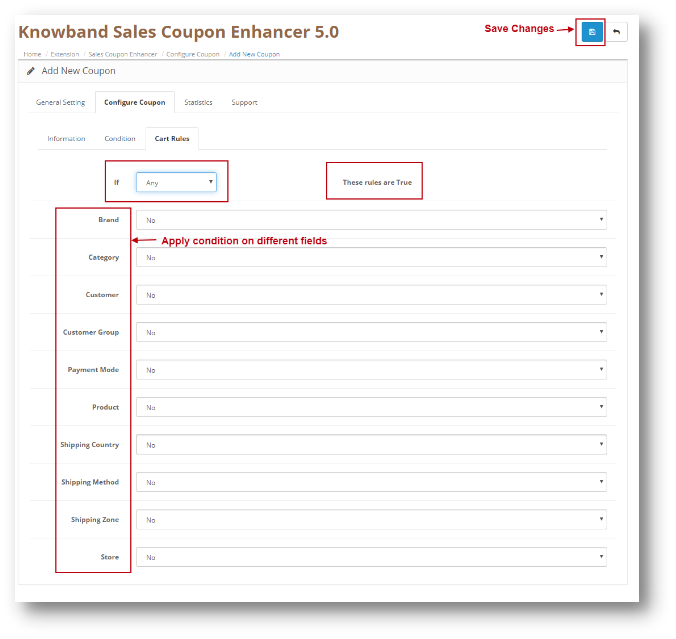
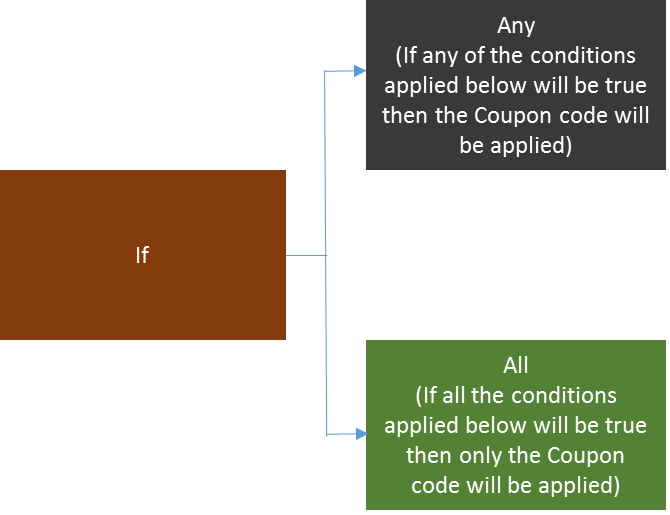
You can apply different conditions on a coupon using Cart Rule Tab in OpenCart promotional vouchers Generator. Conditions are explained in detail below. Let’s have a look at the screenshot:

Conditions on Different fields:

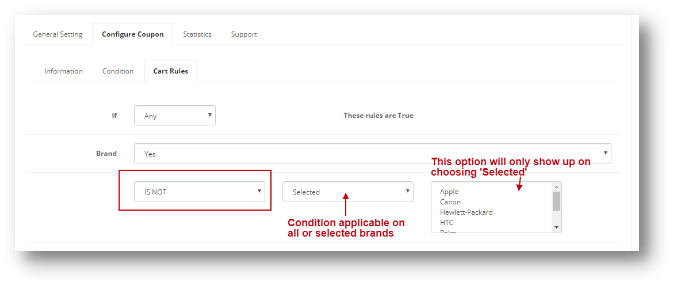
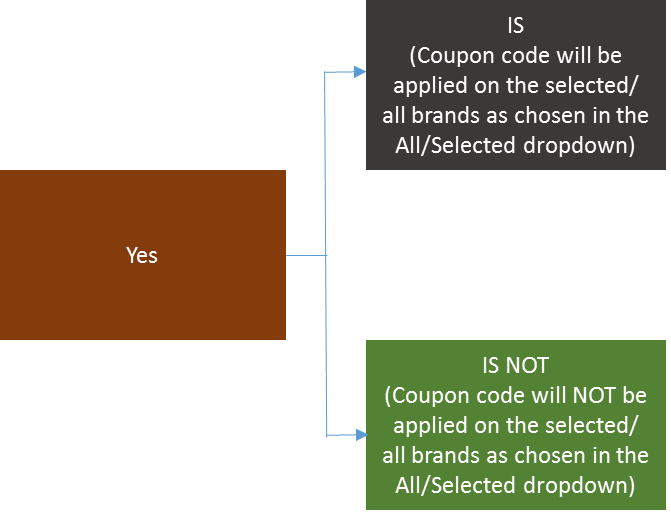
Various fields are shown in the Opencart Promotional Vouchers Creator. Let’s take one example of Brand and apply a condition on it. To apply a condition, select Yes in the dropdown of the Brand. The screen will look like as shown below:


This is how you can select the condition for different fields in the Cart Rules Tab.

3.0.3 Statistics

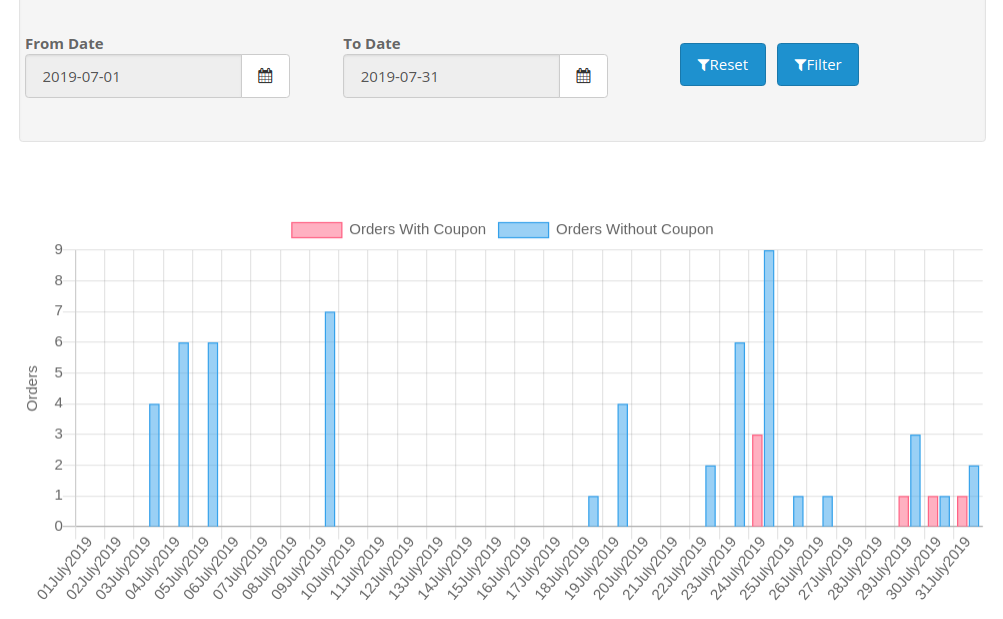
Through this setting of OpenCart Sales Coupon Extension, you can view the statistics of your Coupons. It will show you the graphical representation of Order placed which used coupons and which did not. The screen will look like as shown below:

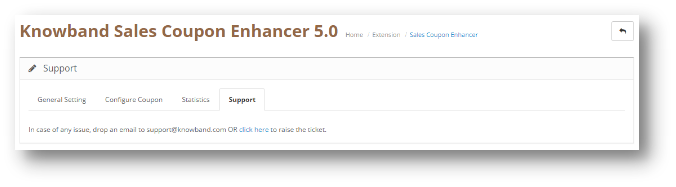
3.0.4 Support

If you need any Support, then drop an email to support@knowband.com OR click here to raise the ticket.


4.0 User Interface of OpenCart Sales Coupon Enhancer

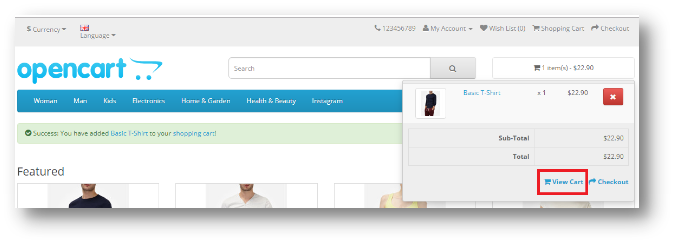
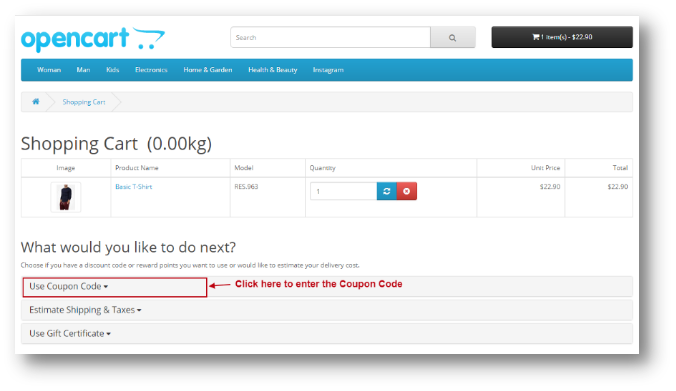
Once you add a Product from cart, Click on View cart as shown in the screenshot below:

The following page will open up:

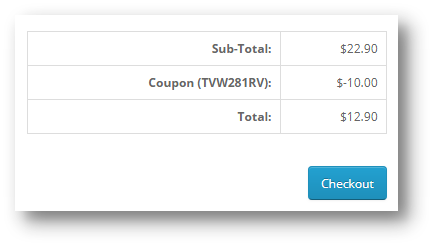
Once the Coupon Code is applied, Amount will be discounted in the Total Section and User can proceed with the Checkout.