How to Add Valentine’s Day Vibes on Your PrestaShop eCommerce Store

Valentine’s day, love day is just around the corner. As a matter of fact, people around the world spend a lot of time looking for a present for their loved ones on this special day. Valentine’s Day eCommerce sales surpassed a record $21 billion worth of goods in the US alone last year, with one in four Americans ordering their gifts online.

Maybe not everyone will get all lovey-dovey and starry-eyed in February, but because of the increased sales opportunity, marketplace sellers and online store owners will love this time.

The pandemic hit the lives hard but Valentine’s week is the chance to show your love, care, and affection to the person closest to your heart. People will surprise one another with gifts and for that online shopping will be their first choice.

Is your eCommerce store ready to sell love for Valentine’s love week?

I am sharing a list of 7 PrestaShop modules that will add love vibes to your eCommerce store

1. Build your Storefront with a Romantic Look
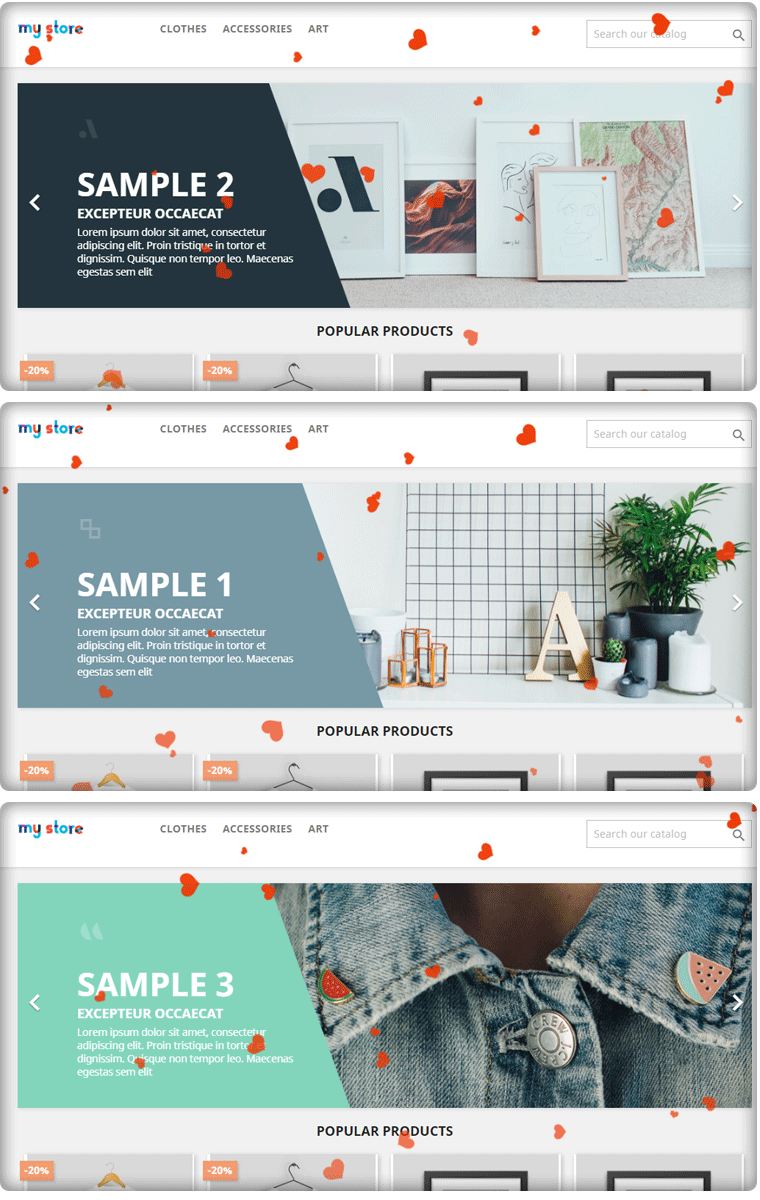
This is probably one of the most all-time things shop owners can think of during Valentine’s Week preparation: decorating the store to make this romantic day look and feel like it.

Showing people Valentine’s Day spirit in your store will boost the customer shopping experience. It also inspires them to purchase more, particularly when your design layout is eye-catching.

Website Decoration Effect Module for PrestaShop smoothly implements the love effect on the store. You can add these effects on various pages of the store. Different header elements, footer elements, and other random elements are available and a special holiday discount coupon strip can be displayed at the footer.

2. Sell Love themed Products

It can be a real challenge to buy presents for loved ones, whether it’s a best friend, better half, or other, especially if you want to stray from the conventional equation of candy-flowers-teddy bear.

Loved-themed custom gifts from the customer are a perfect way to shower love on their special one. It is a perfect opportunity to showcase items that may not necessarily have been thought about by your audience.

Custom design products like a coffee mug, books, love quotes printed t-shirts, and other such products can be designed and personalized.

3. Let them Buy Valentine Special Gift Card

Valentine’s Day is a high-yielding time for gift-giving, unlike other holiday times, such as Christmas or Black Friday, which is more likely to inspire personal purchases.

To find the ideal gift for their loved ones, friends, and family, shoppers usually browse through different websites. Why not let your shoppers give photo-printed personalized e-Gift cards to their loved ones?

On your PrestaShop website, the Gift Card module adds a gift card section and provides you with pre-existing gift card templates for various occasions, including Valentine’s Day.
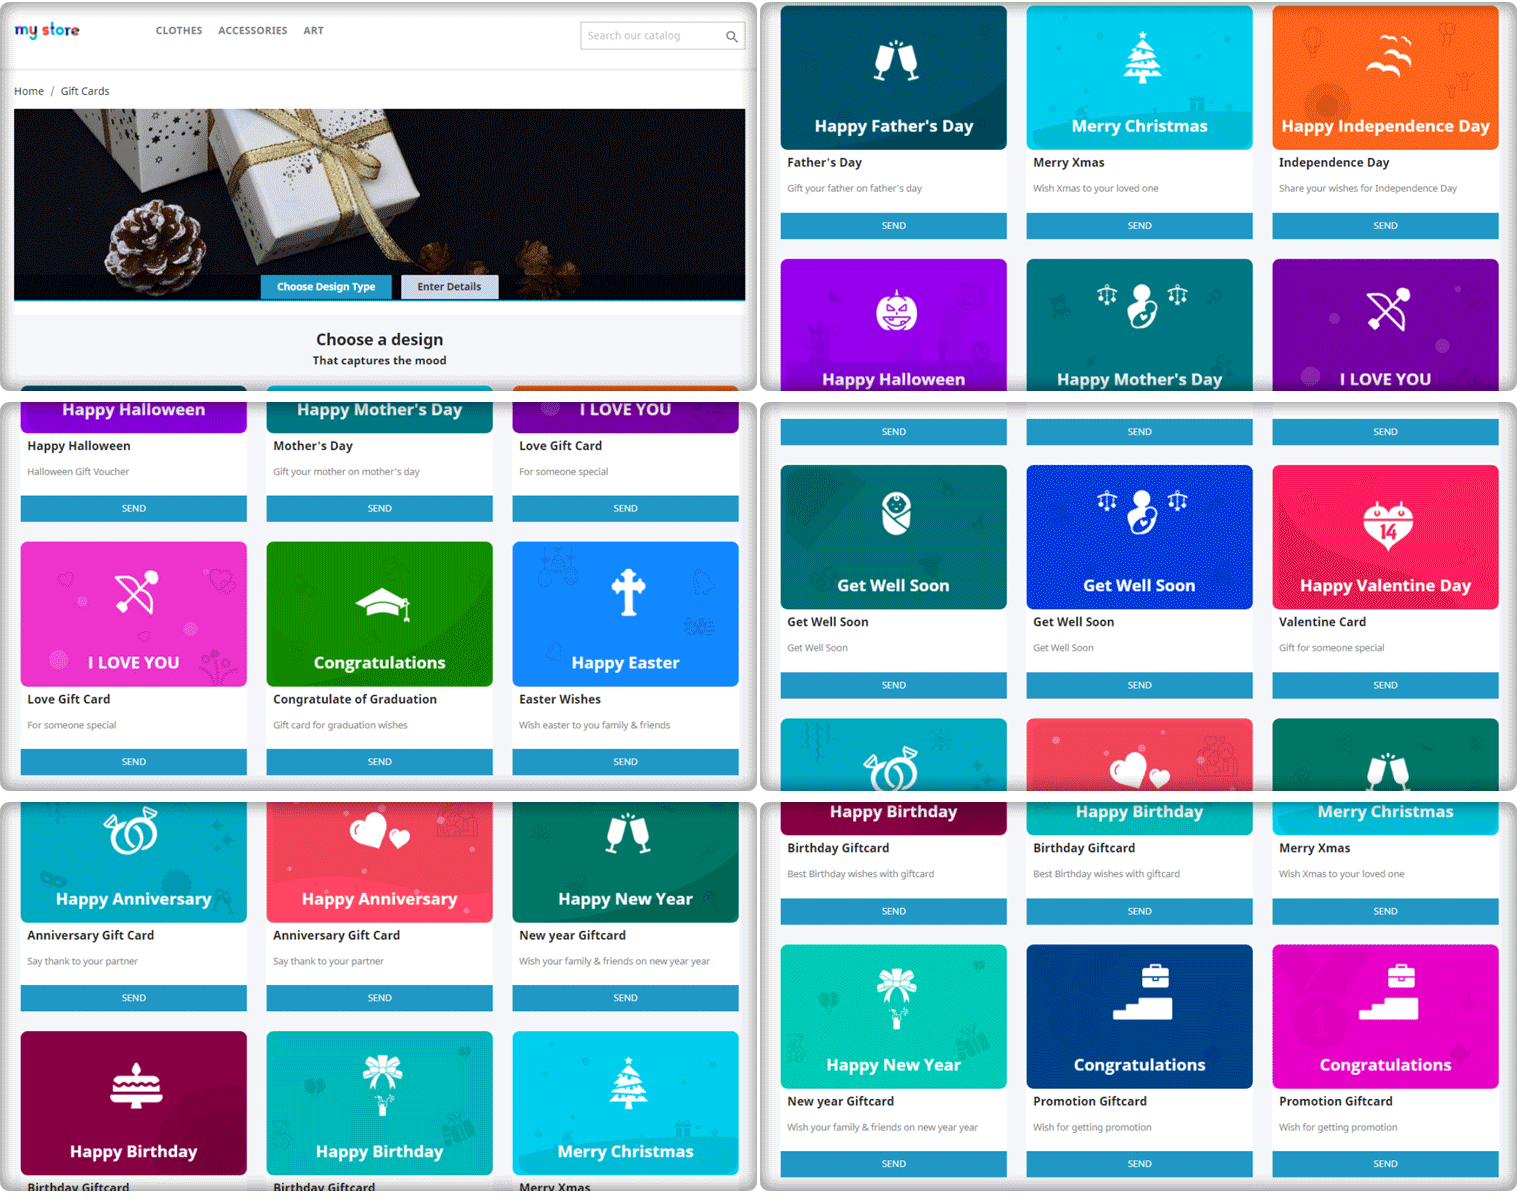
Read why clients find Knowband PrestaShop Gift Card Module Impactful on Holiday Sales.

4. Add Gamified element with Valentine’s Theme

Now that Christmas and New Years’ are over, Valentine’s Displays in grocery stores are already up. If you haven’t started decorating the front end of your e-Commerce store for Valentine’s Day, now is the time!

An attractive gamified element on your home page will increase customer engagement.

To give your website an awesome look, the PrestaShop Spin and Win Module have several themes planned for every occasion. Be it Chocolate Day, Rose Day, Pledge Day, Proposal Day, Teddy Day, and Valentine’s Day, we have covered it all.
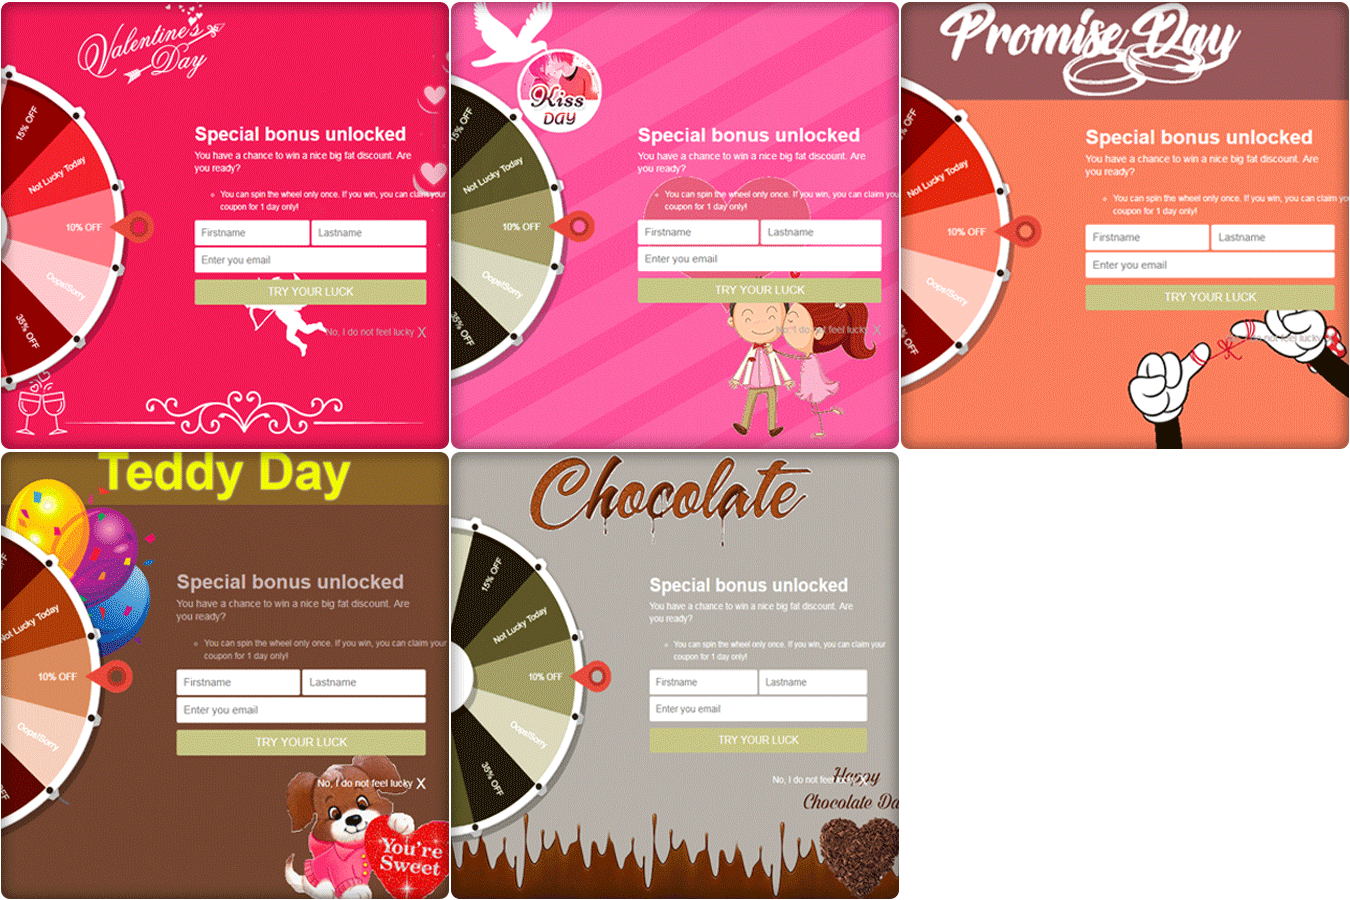
Click here to know what clients have to say about spin to win, gamification popup.

5. Promote your sales, offers, or campaigns for holidays

Buyers are concerned about losing out. Tapping into this anxiety will lead to creating more sales. When tapping into this Fear of Missing Out (FOMO), flash sales, limited-time deals, and holiday promotions are excellent.

For last-minute campaigns, a perfect idea for a flash sale is to create a separate page that includes all the products with discounts. Chocolates, mugs, and heart-shaped pieces make perfect flash sales items for Valentine’s Day.

Promote your sales and define the deal rules in advance with PrestaShop Advanced Promotion Manager. It has several templates and customized options available for the store owner.

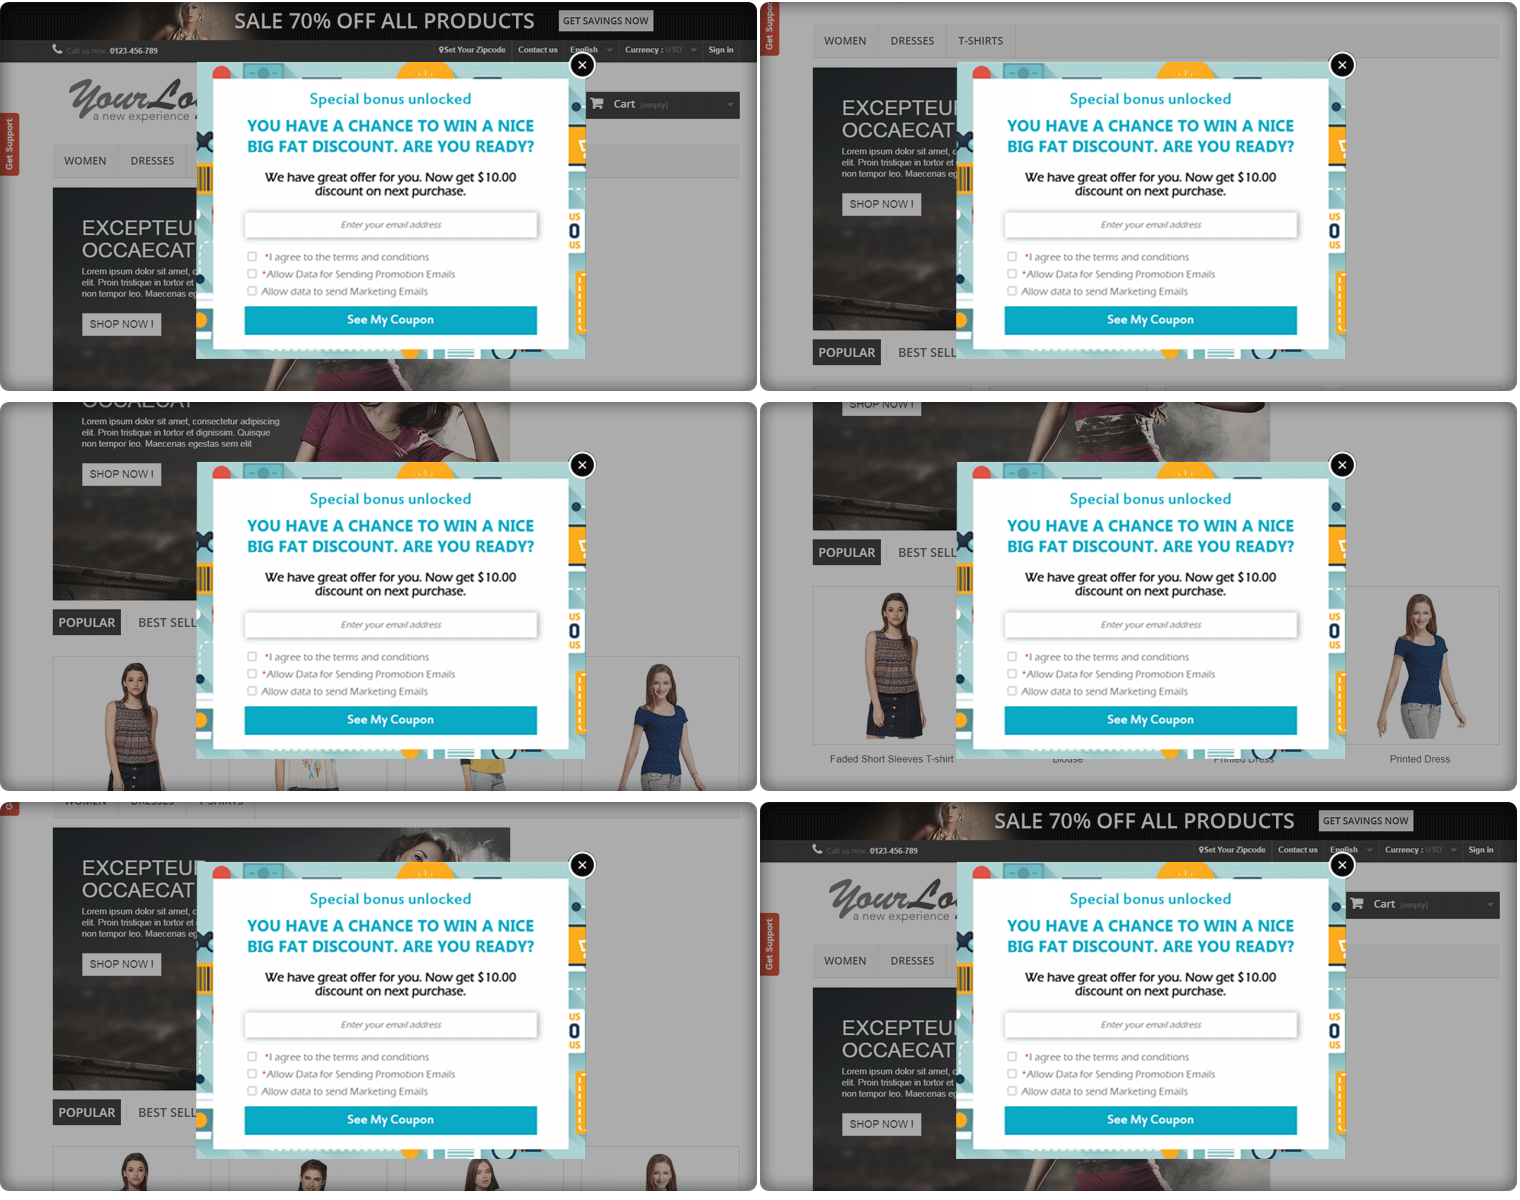
6. Grab their Attention with Exit Pop up

If a customer wants to leave your website without completing the purchase, a tempting deal at the point of exit can influence their buying decision. Through the exit pop-up, you may make an effort to make them stay and complete the order.

The owner of the store will boost both customer loyalty and website sales. This Valentine’s Day, don’t let the visitor go away without making the purchase.

Exit popups also ensure that, unlike other popups that can appear at any point in time, the user experience is preserved until the very last moment. In addition, you can use PrestaShop Exit Popup as an entry pop-up too.
7. Offer Seamless Home Delivery of the Products

Everybody wants to surprise their loved ones on Valentine’s Day. Thus, giving an anonymous gift delivery to your customers reveals how thoughtfully you handle your customers.

Imagine that this Valentine’s Day marketing idea would be a ‘lifesaver’ if a person wants to confess his love to someone but doesn’t have the confidence to give her the gift personally.

You can manage the home deliveries on the PrestaShop store with Delivery Boy App. It makes the whole tedious process a simple one. Many eCommerce owners are using it, here are some reviews.

Conclusion: Valentine’s week is approaching rapidly and adding these or any of these PrestaShop Modules will empower your sale and increase customer engagement in your store. These are easy-to-implement ideas that will be of great use to you on this special occasion.

Not just Valentine’s Week but these modules are excellent for all over the year sales. Visit the KnowBand store for any eCommerce assistance.

Recommended Reads:

How to create Prestashop Module Web Service API?

This blog is all about how to create and use the Prestashop Webservices API. Prestashop has default Web Services tool available which allows accessing the store from remote applications.

Prerequisites

  1. You Prestashop store should have “module rewrite” enabled for apache.
  2. It is preferable to use SSL (https:) for web service calls, as it avoids the “man in the middle” type security issues.
  3. Check that the five methods GET, POST, PUT, DELETE and HEAD are supported on the server.

To ensure the security and efficiency of your Prestashop Web Services, it’s essential to use SSL (HTTPS) for all web service calls. This prevents “man in the middle” attacks, safeguarding your data during transmission. Additionally, verifying that your server supports the HTTP methods GET, POST, PUT, DELETE, and HEAD is crucial for seamless operation. By configuring these settings, you optimize your store’s performance and security, ensuring reliable access and management of your Prestashop resources through the API.

How to configure Web Services in the Prestashop?

1. Login into the Prestashop Back-office.

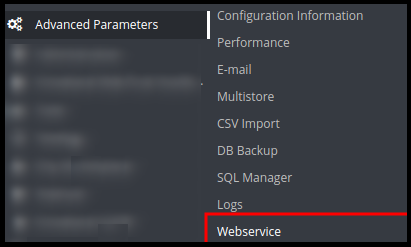
2. Navigate to Advance Parameters -> Web Services menu options to open the Web Services page.


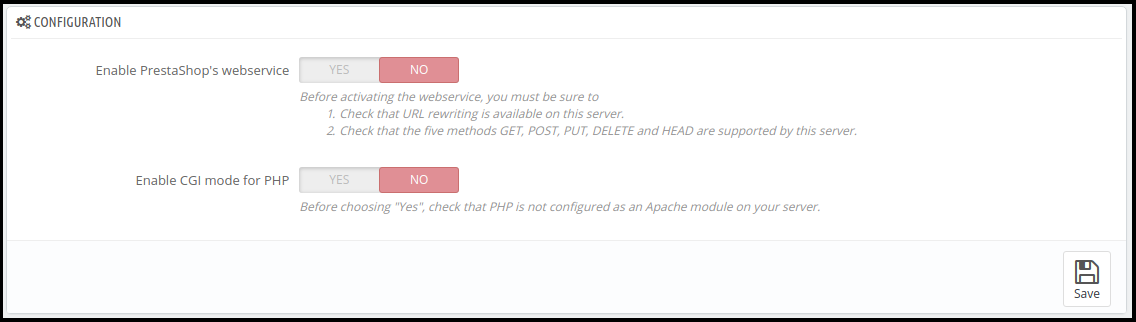
3. It will redirect to the Web Services page having the listing of available Web Services and the configuration form to configure the service.

4. The Configuration form has the following fields:
a) Enable Prestashop’s web service: Enable the setting to use web service in the Prestashop Store.

b) Enable CGI mode for PHP: Enable the setting to use PHP as CGI script instead of Apache module.

5. Click on the Save button to save the configuration. Now, you can use the Web Services in your Prestashop Store.

How to add/Update Web Services in the Prestashop?

1. Login into the Prestashop Back-office

2. Navigate to Advance Parameters -> Web Services menu options to open the Web Services page.

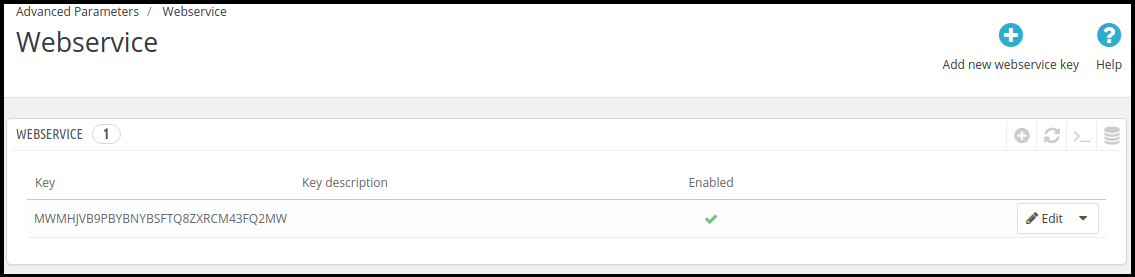
3. It will redirect to the Web Services page having a listing of available Web Services.

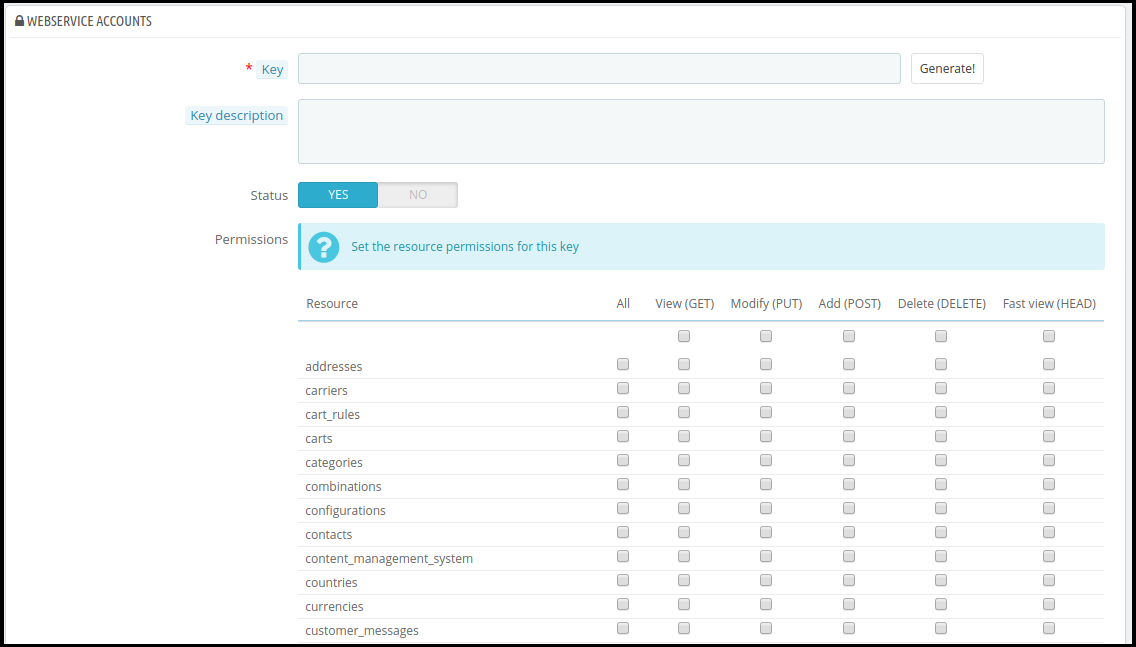
4. Click on the “Add new web service key” button to add new web service key to access only to the certain resources of the Prestashop store.

a) Key: This is a unique key. You can enter it manually or click on the Generate button to generate a random key for the Prestashop web service.

b) Key Description: You can provide the description regarding the key for better understanding.

c) Status: Enable the key to provide a grant to access the data using the key.

d) Permission: Provide the permission to access the data using the certain key. You can check the specific permission to grant access of the data like Add, Edit, delete or view. Here, we have checked the permission to Countries and Currency.
5. Click on the Save button to add the key to the web services.

How to the access the Web Service?

Once you have created the key for the web service and properly configured, you need to hit the following URL in your browser:

https://{store root path}/api/

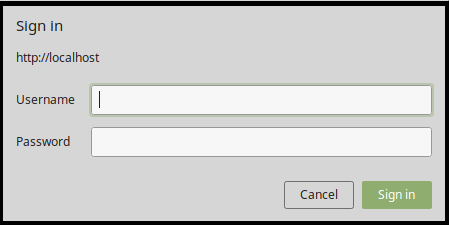
It will prompt you for username and password to access the resource.

a) Username: Enter the key of the web service which is generated in the above step. For Example MWMHJVB9PBYBNYBSFTQ8ZXRCM43FQ2MW

b) Password: It should be blank as no password required.

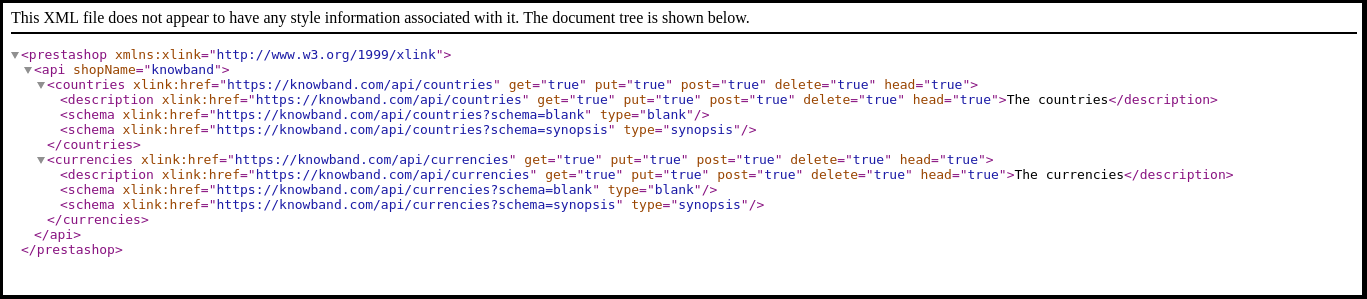
After sign in, you will access the list of the resources and all permitted CRUD options that you have configured in your Prestashop Store.

You are now successfully connected to the Prestashop web service.

a) To GET the list of entities for a particular resource:

https://shop_root_url/api/resouce

Example: https://www.knowband.com/api/customers to get a list of all customers.

b) To GET a specific customer by ID:

https://shop_root_url/api/customers/1

For Example: To get the detail of customer having ID 10

https://www.knowband.com/api/customers/10

Recommend Watch: 

How to create Prestashop Module Webservice API for Prestashop 1.7?

We will show you how to create a module to fetch customers. For this, we will register a hook addWebserviceResources of ServiceRequest for the resources instead of overriding getResources() function of ServiceRequest Class in Prestashop 1.7.

Creating custom web service APIs in Prestashop 1.7 involves using the WebserviceSpecificManagement class. This allows you to define specific functionalities and manage data processing. For instance, implementing the WebserviceSpecificManagementKbCustomer class lets you handle customer data efficiently. Therefore, this approach provides a flexible and robust solution for extending Prestashop’s capabilities, enabling tailored interactions with your store’s data. By leveraging these advanced customization options, you can create more dynamic and responsive eCommerce solutions that meet unique business needs.

1. Register addWebserviceResources hook in the module.

public function install() {

parent::install();

$this->registerHook('addWebserviceResources');

return true;

}

2. Add a hook listener to define the class and description. Set specific_management to true if you want to use WebserviceSpecificManagement instead of ObjectModel file.

public function hookAddWebserviceResources()

{

return array(

'kbcustomer' => array(

'description' => 'Knowband Custom Customer',

'specific_management' => true,

),

'kbaddress' => array(

'description' => 'Knowband Custom Address',

'class' => 'kbaddress'

)

);

}

3. Create WebserviceSpecificManagement class file as WebserviceSpecificManagementCLASSNAME which implements WebserviceSpecificManagementInterface

For Example – WebserviceSpecificManagementKbCustomer which is similar to /classes/webservice/WebserviceSpecificManagementImages.php.

You must have to include the functions which are defined in WebserviceSpecificManagementImages.php class. These are:

  • setObjectOutput
  • setWsObject
  • getWsObject
  • getObjectOutput
  • setUrlSegment
  • getUrlSegment
  • getContent
  • manage (where data is processed)

1. Now add the key having resource kbcustomer in the web service in the back-office.

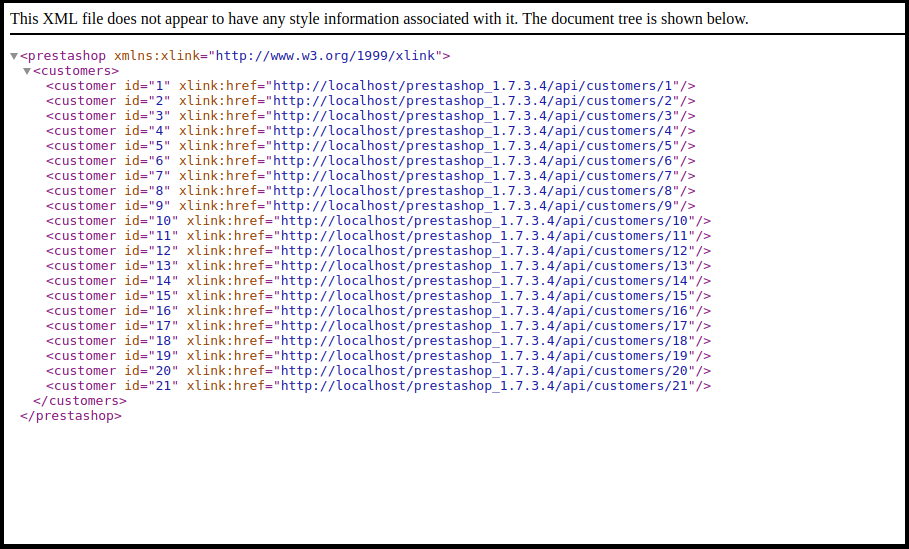
2. Now, visit the https://{youstore.com}/api/kbcustomer to see the response in XML. In the below example, we display the listing of all customer available in the store.

Add include_once(_PS_MODULE_DIR_.’YOURMODULENAME/classes/WebserviceSpecificManagementKbCustomer.php’);

in your module file.

class WebserviceSpecificManagementKbcustomer implements WebserviceSpecificManagementInterface

{

/** @var WebserviceOutputBuilder */

protected $objOutput;

protected $output;


/** @var WebserviceRequest */

protected $wsObject;


public function setUrlSegment($segments)

{

$this->urlSegment = $segments;

return $this;

}


public function getUrlSegment()

{

return $this->urlSegment;

}

public function getWsObject()

{

return $this->wsObject;

}


public function getObjectOutput()

{

return $this->objOutput;

}


/**

* This must be return a string with specific values as WebserviceRequest expects.

*

* @return string

*/

public function getContent()

{

return $this->objOutput->getObjectRender()->overrideContent($this->output);

}


public function setWsObject(WebserviceRequestCore $obj)

{

$this->wsObject = $obj;

return $this;

}


/**

* @param WebserviceOutputBuilderCore $obj

* @return WebserviceSpecificManagementInterface

*/

public function setObjectOutput(WebserviceOutputBuilderCore $obj)

{

$this->objOutput = $obj;

return $this;

}


public function manage()

{

$objects_products = array();

$objects_products['empty'] = new Customer();

$customer_list = Customer::getCustomers();

foreach ($customer_list as $list) {

$objects_products[] = new Customer($list['id_customer']);

}

$this->_resourceConfiguration = $objects_products['empty']->getWebserviceParameters();

$this->output .= $this->objOutput->getContent($objects_products, null, $this->wsObject->fieldsToDisplay, $this->wsObject->depth, WebserviceOutputBuilder::VIEW_LIST, false);

}

}

The below screenshot provide you the visual of the output:

If you want the output in JSON format then append &output_format=JSON at the end of the URL. For example: https://{yourstore.com}/api/kbcustomer&output_format=JSON

Output: {“customers”:[{“id”:1},{“id”:2},{“id”:3},{“id”:4},{“id”:5},{“id”:6},{“id”:7},{“id”:8},{“id”:9},{“id”:10},{“id”:11},{“id”:12},{“id”:13},{“id”:14},{“id”:15},{“id”:16},{“id”:17},{“id”:18},{“id”:19},{“id”:20},{“id”:21}]}

In the END!

With over 13 years of technical expertise, Knowband offers comprehensive app and web development services using the latest technologies, including various PHP frameworks and React. We provide more than 100 ready-to-use extensions for popular eCommerce platforms like Prestashop, Opencart, WooCommerce, and Magento 2.

For any queries, please feel free to reach us at support@knowband.com. Knowband is also a Premium Prestashop Partner and a Superher Seller providing more than 100 Prestashop modules to suit all your eCommerce needs.

Check our most popular One page Supercheckout module for Prestashop here.


Prestashop One Page Supercheckout Addon

The Prestashop One Page Supercheckout addon by Knowband makes checkout faster and easier by putting everything on one page, helping to reduce cart abandonment.

SHOP NOW

Prestashop Mailigen and MailChimp Integrator Addon- User Manual

Prestashop Mailigen & MailChimp Integrator Addon

1.0 Introduction

Prestashop Mailigen & MailChimp Integrator Addon by Knowband is a Prestashop module that allows the system to automatically sync customers email addresses of your store on Mailigen Account or MailChimp Account or both accounts. Mailigen and Mailchimp both are email service providers through which you can send newsletters or emails related to your services and offers to your customers. Also, Both provides number of email templates which you can select as per your need.

1.1 Benefits of the Admin:

1. This Prestashop Mailigen and MailChimp Integrator addon allows the store admin to enable/disable the module as per need.
2. Smart sync feature allows admin to subscribe users to his/her Mailigen and MailChimp account.
3. The Prestashop Mailigen and MailChimp Integrator extension offers the smart sync feature. However, the module synchronizes of email as soon as focus is blurred from email field.
4. The Prestashop Mailigen extension allows the store admin to sync the Mailigen account by entering the Mailigen API Key.
5. The Prestashop MailChimp integrator module allows the store admin to sync the MailChimp account by entering the MailChimp API Key.
6. The Store admin can easily synchronize the Mailigen & MailChimp account with your store without any hassle.
7. With the help of this Magento Addon, The Online retailers can send email campaigns to all the customers either they have registered to the site or not.
8. The advanced feature of this Prestashop extension, the admin can also include Field Id and Class Id to sync emails from the non-default email fields.
9. The Prestashop addon helps the Prestashop merchant in email marketing.
10. The Admin can boost the website revenue.

2.0 Installation

After purchasing the Prestashop Mailigen and MailChimp Integrator extension, you will get following files as listed below:

1. Compressed File in ZIP format (contains source code of the module)
2. User Manual

Follow the following steps to install the extension:

1. Unzip the compressed file. It would contain files and folders as shown below –

2. Copy all the files and folders of unzipped folder into your store “modules” directory on the path – Root Directory/modules/.

3. Now Prestahsop extension is ready to be installed on your store and you can find that in Store Admin -> Modules and Services. It would shown as below –

For Prestashop 1.6.x.x


For Prestashop 1.7.x.x


4. Click on “Install” button to install the Prestahsop MailChimp integartor addon. It would show a pop-up for your confirmation. Click on “Proceed with the installation” option. This step will install the Prestashop addon and show notification – “Module(s) installed successfully”.

3.0 How to configure module ?

This Prestashop Mailigen and MailChimp integrator extension is configurable and the Store Owner can setup or configure this Prestashop module through Admin Panel of store by following steps given below –

1. Go to Store Admin -> Modules and Services
2. Find “Mailigen and MailChimp” and click “configure” button given corresponding to the module.
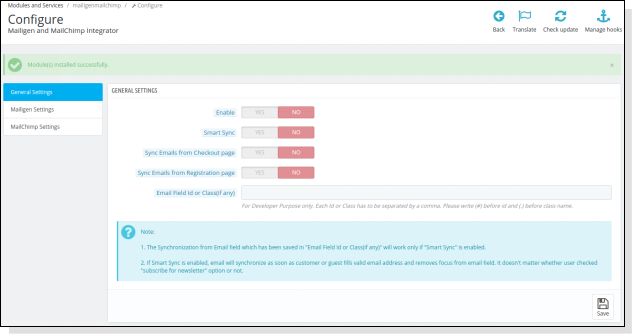
3. It would open a new page as shown below –

4.0 Admin Panel

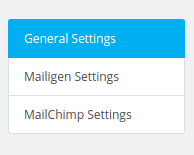
The admin panel will have 3 tabs for configuring this plugin, as listed below:

  1. General Settings
  2. Mailigen Settings
  3. MailChimp Settings

4.1 General Settings

This section the Prestashop Mailigen and MailChimp integrator extension allows the online retailers to enable/disable the Prestashop addon with some more configurations.

You have to follow steps given below to configure General Settings –

1.Goto the Prestashop Module and Services -> Module and Services
2.It would list all the modules of store. Find ‘Mailigen and MailChimp’ in modules list.
3.Now click on ‘Configure’ button given corresponding to the ‘Mailigen and MailChimp’ module.
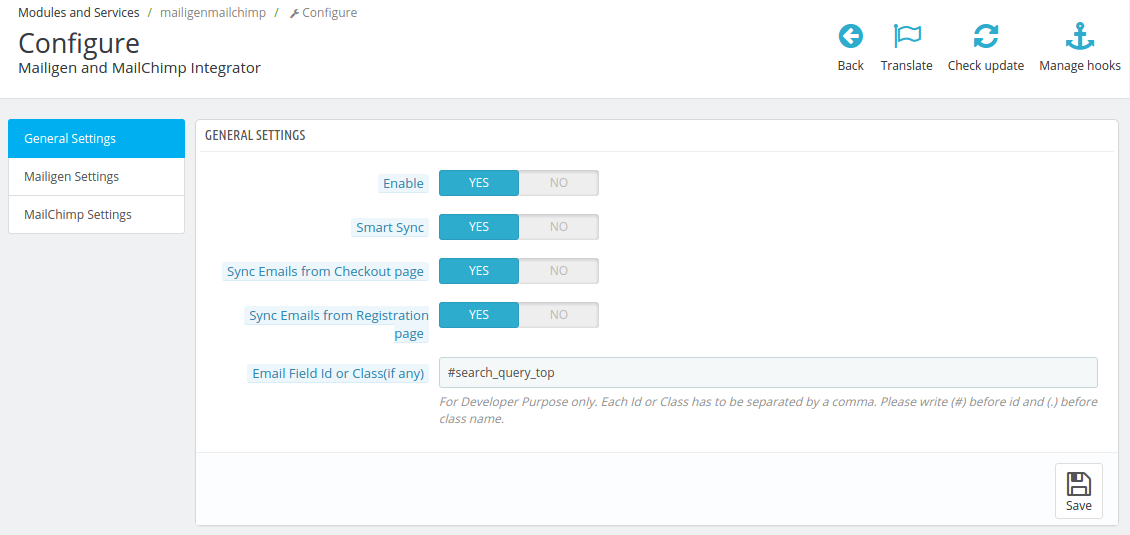
4.It would redirect eCommerce merchant to a new page as shown below –


5.Update the values of given fields corresponding to ‘General Settings’ as per need.
6. Now click on ‘Save’ and it would validate and save the provided values.

That’s it.

From here admin can enable/disable Prestahsop extension Also he/she can set the page ( registration and checkout ) from where to sync e-mail id.

General Settings tab will have following options:

1.  Enable: From this button admin can enable/ disable the Knowband’s Prestahsop Mailigen and MailChimp module. By default, it will be off.

2. Smart Sync: This option when enabled, email id after validation will be synchronized if visitor/guest/customer remove focus after filling email field irrespective of the fact if the user have submitted the form or not or user have opted for newsletter subscription or not. If it is disabled the email will be synced only when form is submitted and if customer has opted for newsletter subscription.

3. Sync Email from Checkout page: From this button admin can set whether to sync email from checkout page or not. If enabled, email will be synced from the checkout page to accounts configured in admin panel. If customer chooses guest checkout then only email address filled at the time of checkout will sync.

4. Sync Email from Registration page: From this option the Prestashop store Admin can set whether to sync email from registration page or not. If enabled, email will be synced from the registration page to accounts configured in admin panel. If guest chooses to create account on checkout page or guest sign up in both cases, email will be synced if he/she chooses “subscribe for newsletter”.

5. Email Field Id or class (if any): This text field is for developer purpose only. From this option the Online retailers  or his/her developer can set the fields of email or newsletter from which he/she wants email to sync. The field id name or class name should be followed by (#) or (.) respectively. The purpose of this field is to make module compatible with other newsletter forms which comes with theme or some third party module.

4.2 Mailigen Settings

This section allows the store admin to enable/disable Mailigen functionality which allow system to sync emails on Mailigen system.

You have to follow steps given below to configure Mailigen Settings –

1. Goto the Module and Services -> Module and Services
2. It would list all the modules of store. Find ‘Mailigen and MailChimp’ in modules list.
3. Now click on ‘Configure’ button given corresponding to the ‘Mailigen and MailChimp’ module.
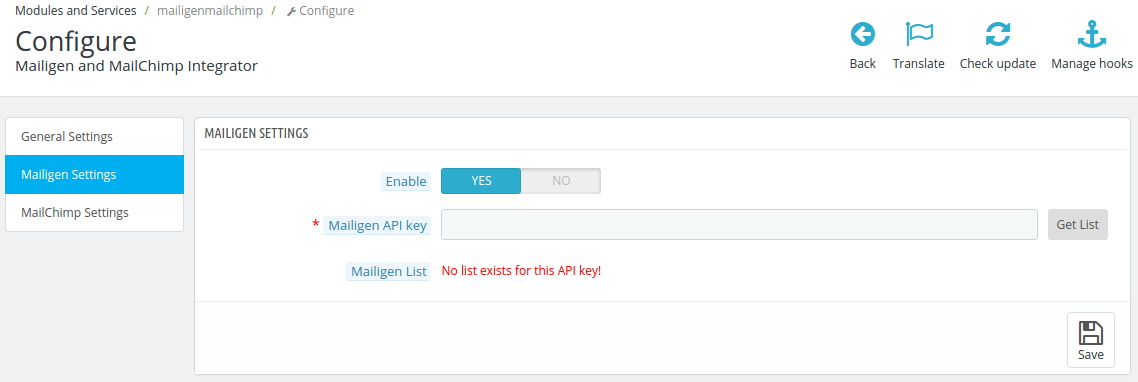
4. It would redirect Store Owner to a new page. Click on “Mailigen Settings” tab and it would open a new section as shown below -\


5. Update the values of given fields as per need.
6. Now click on ‘Save’ and it would validate and save the provided values.
7. That’s it.

Mailigen Settings tab will have following options.

Enable: From this option admin can enable/disable the Mailigen settings. Initially it will be off.

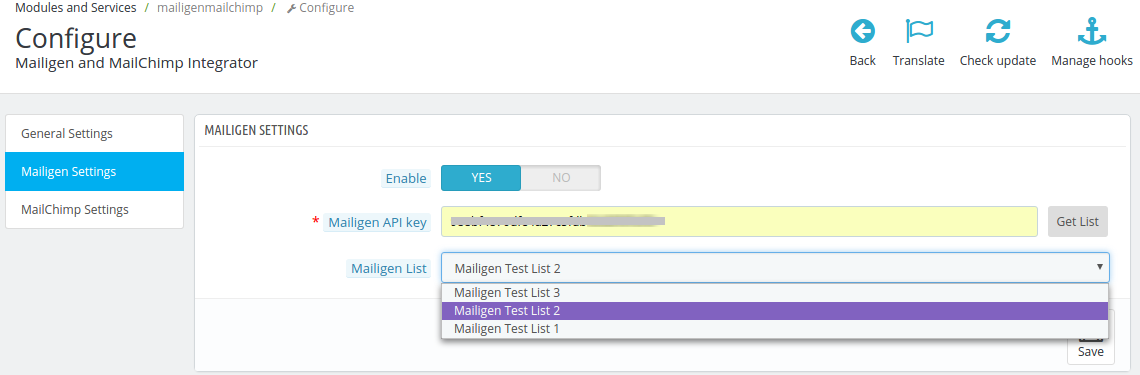
Mailigen API Key: Mailigen API key is the key that the user created on his/her Mailigen account at www.mailigen.com. This API key will be used to connect to the Mailigen API. Fill API field with correct API and click Get List button. Lists drop down will be visible containing all the lists related to that Mailigen API key.

Mailigen Lists:  Mailigen Lists will be available when the Mailigen API key is provided.

NOTE : If the Mailigen Settings > Mailigen API key field is empty then no lists will be shown , but an error message will be shown instead saying ‘No lists exist for this API key !’ as shown in screen above.

To Set up Mailigen Account

  • Visit mailigen and create account. After account creation, login to your account.
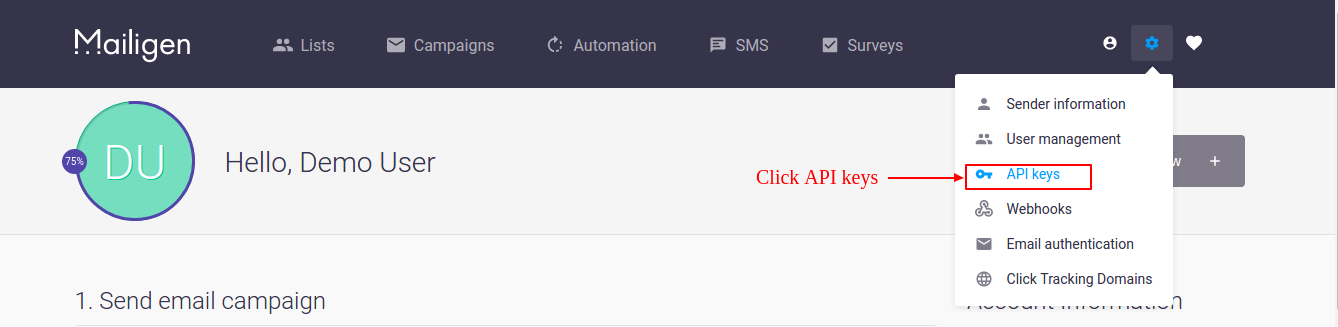
  • On Dashboard, click settings icon on upper right corner of dashboard as seen in screen below.

  • After clicking settings icon drop down will open, click API keys in that menu. Screen is given below:

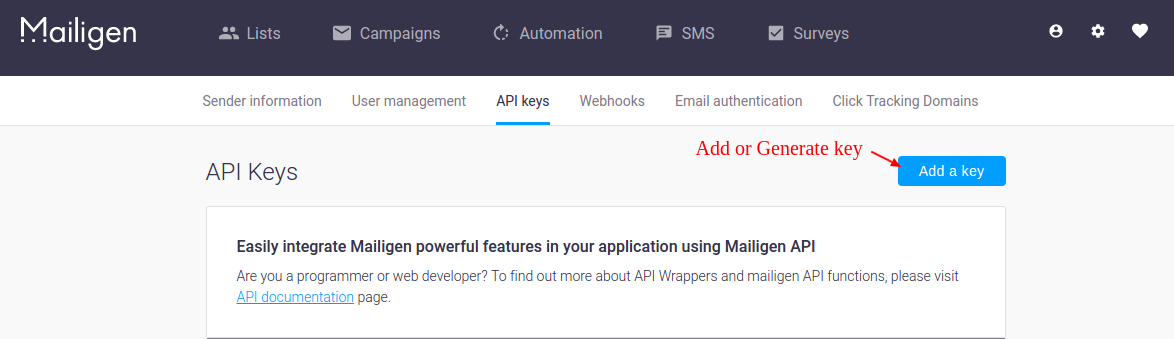
  • After clicking “API keys” link, admin will be redirected to new page where he/she can add API key. Click Add a key link to create API.

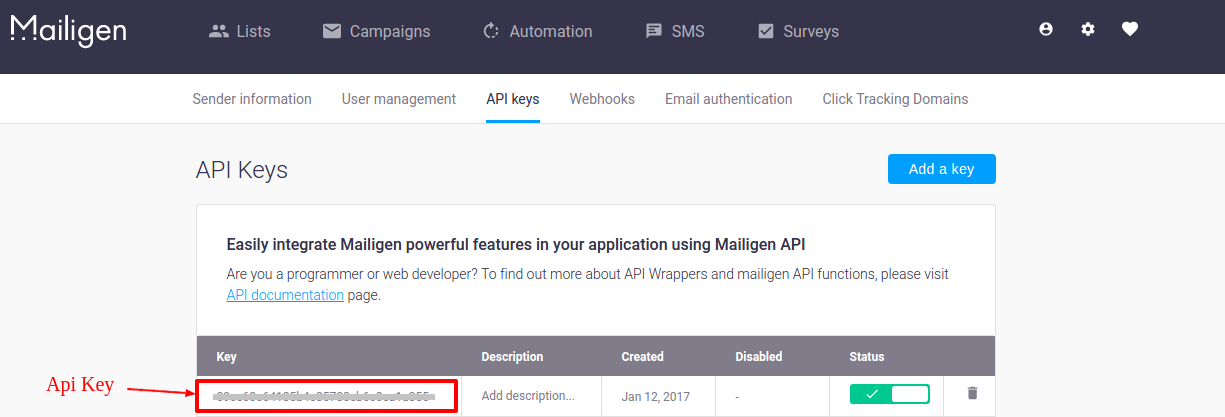
  • After generation of key, your API key will be visible in list as shown below. Use this key load your lists in plugin.

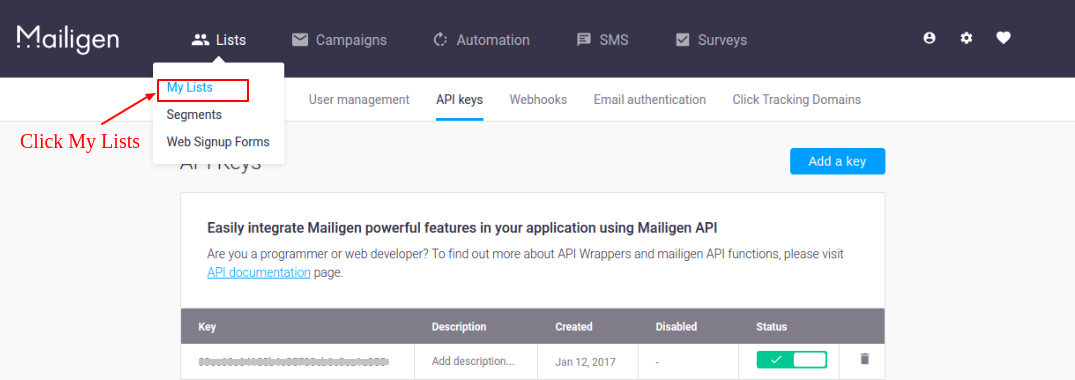
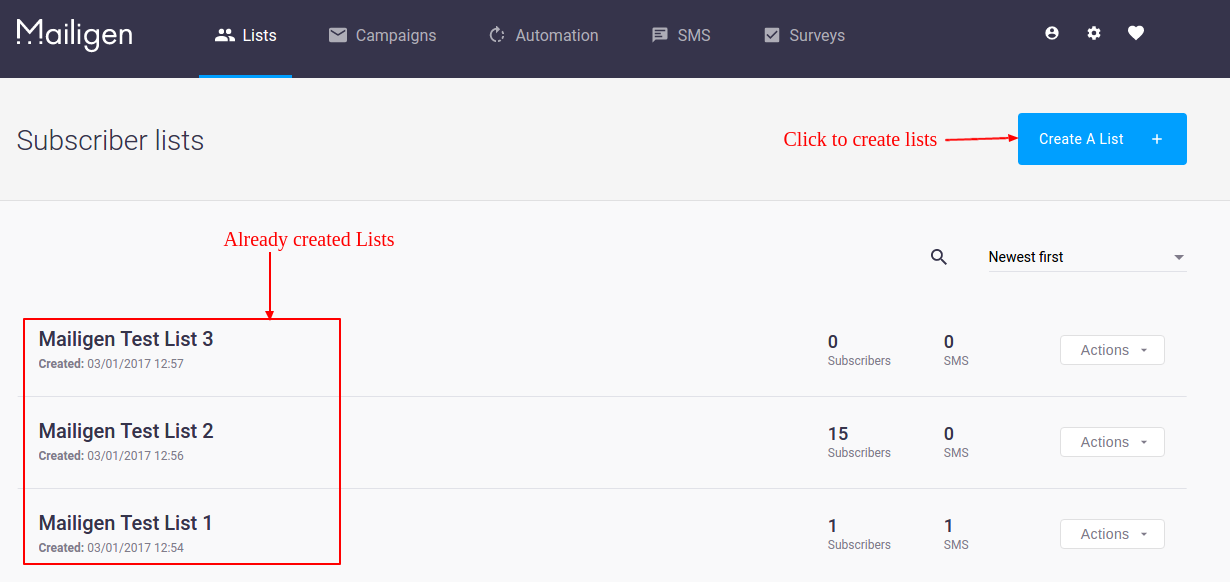
  • Now to create list, Go to Lists tab in upper menu. Drop down will open. Click “My Lists”link to view you lists or to create lists.

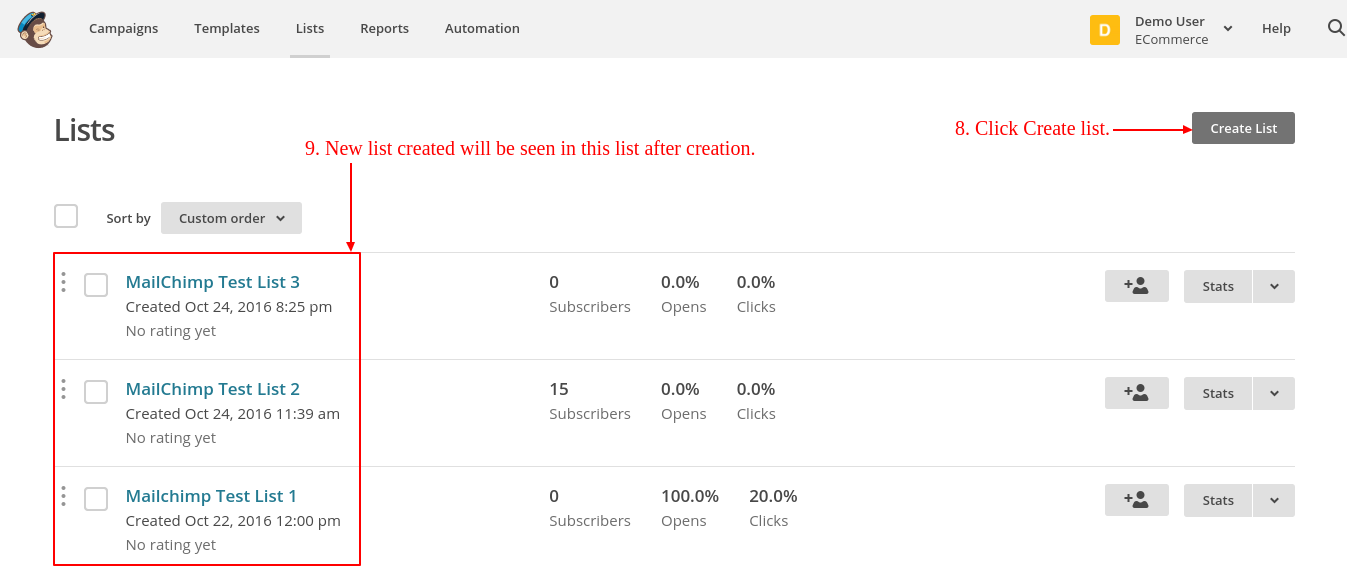
  • On My Lists page, Click “Create a list” to create new list. After creation lists will be visible on My Lists page as shown in screen below.

4.3 MailChimp Settings

This section allows admin to enable/disable MailChimp functionality which allow system to sync emails on MailChimp system.

You have to follow steps given below to configure MailChimp Settings –

1. Goto the Module and Services -> Module and Services
2. It would list all the modules of store. Find ‘Mailigen and MailChimp’ in modules list.
3. Now click on ‘Configure’ button given corresponding to the ‘Mailigen and MailChimp’ module.
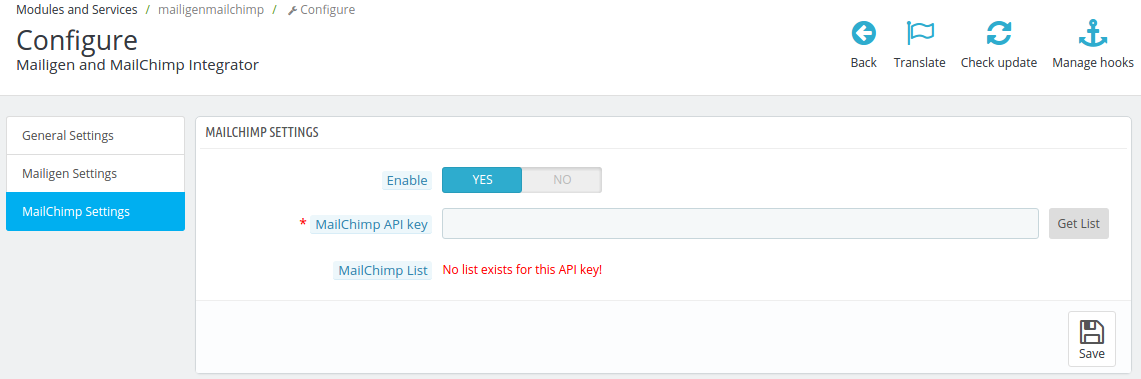
4. It would redirect Store Owner or Admin to a new page. Click on “MailChimp Settings” tab and it would open a new section as shown below –


5.Update the values of given fields as per need.
6.Now click on ‘Save’ and it would validate and save the provided values.
7.That’s it.

MailChimp Settings tab will have following options.

Enable/Disable: From this option admin can enable/disable the MailChimp settings. Initially it will be off.

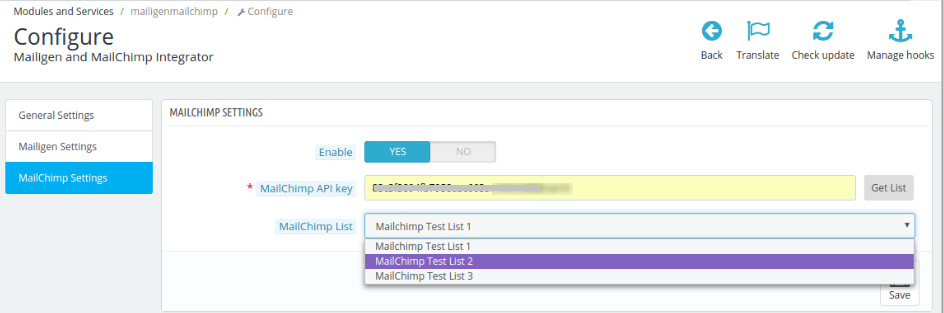
MailChimp API Key: MailChimp API key is the key that the user created on his/her MailChimp account at www.mailchimp.com. This API key will be used to connect to the MailChimp API. Fill API field with correct API and click Get List button. Lists drop down will be visible containing all the lists related to that MailChimp API key.

MailChimp Lists: MailChimp Lists will be available when the MailChimp API key is provided.

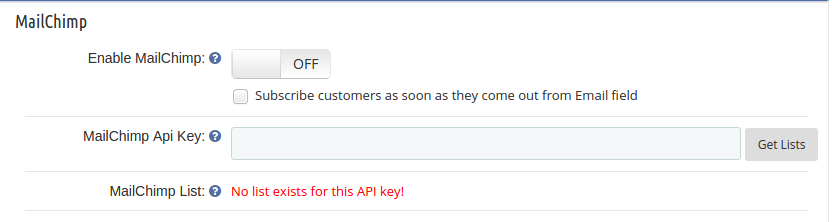
NOTE : If the MailChimp Settings >MailChimp API key field is empty then no lists will be shown , but an error message will be shown instead saying ‘No lists exist for this API key !’ as shown in screen above.

To Set up MailChimp Account

  • Visit mailchimp and create account. After account creation, login to your account.
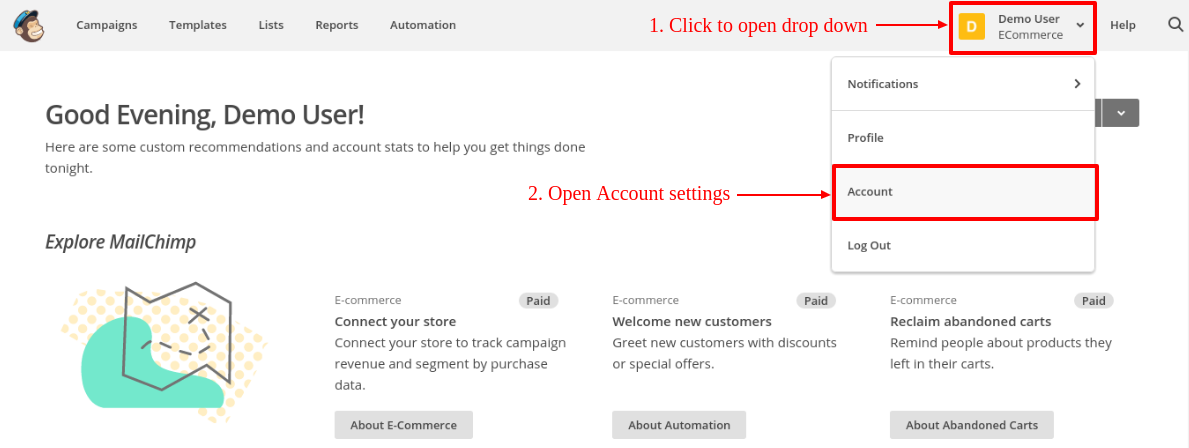
  • On Dashboard, click button on upper right corner of dashboard. Drop down menu will open, click Account link in that menu as seen in screen below.

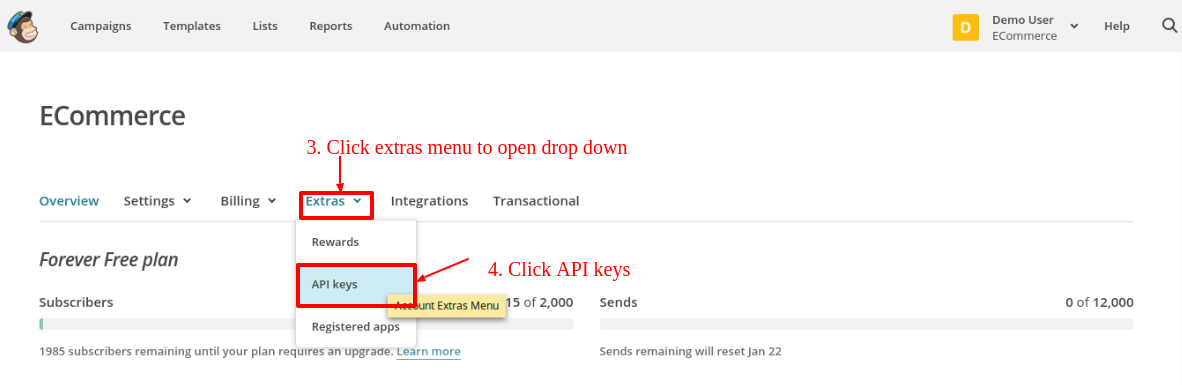
  • On Account settings page, some sub menus will be visible. Click “Extras” sub-menu to open drop down menu. Click “API keys”as shown in screen below:

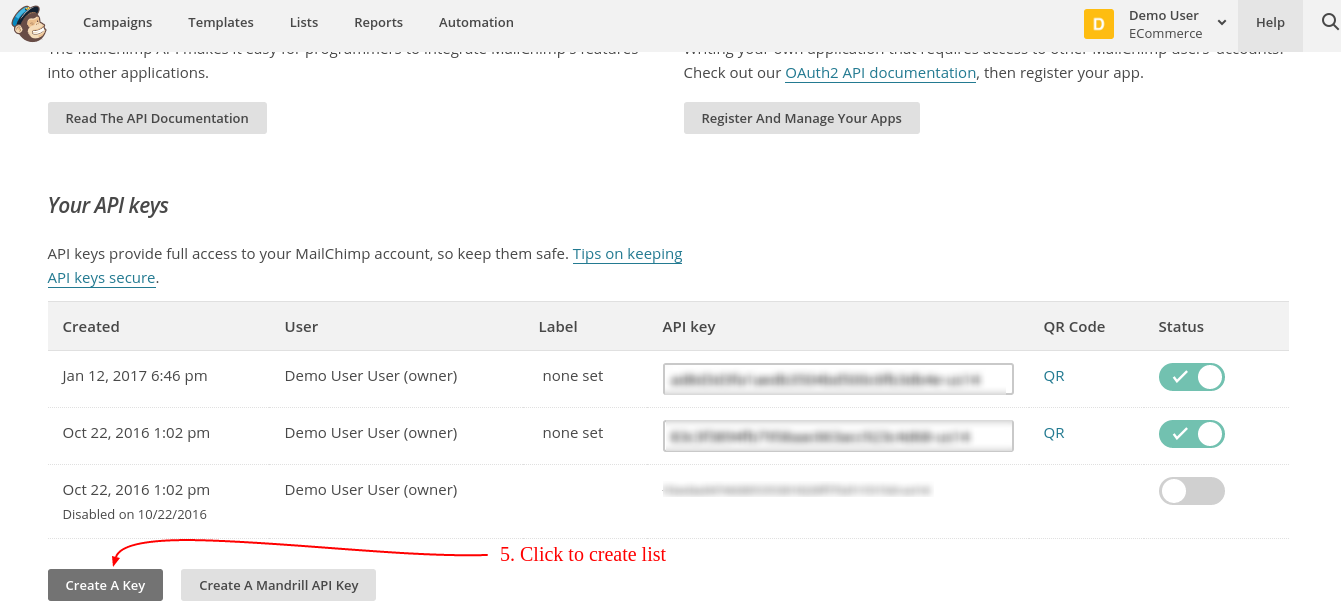
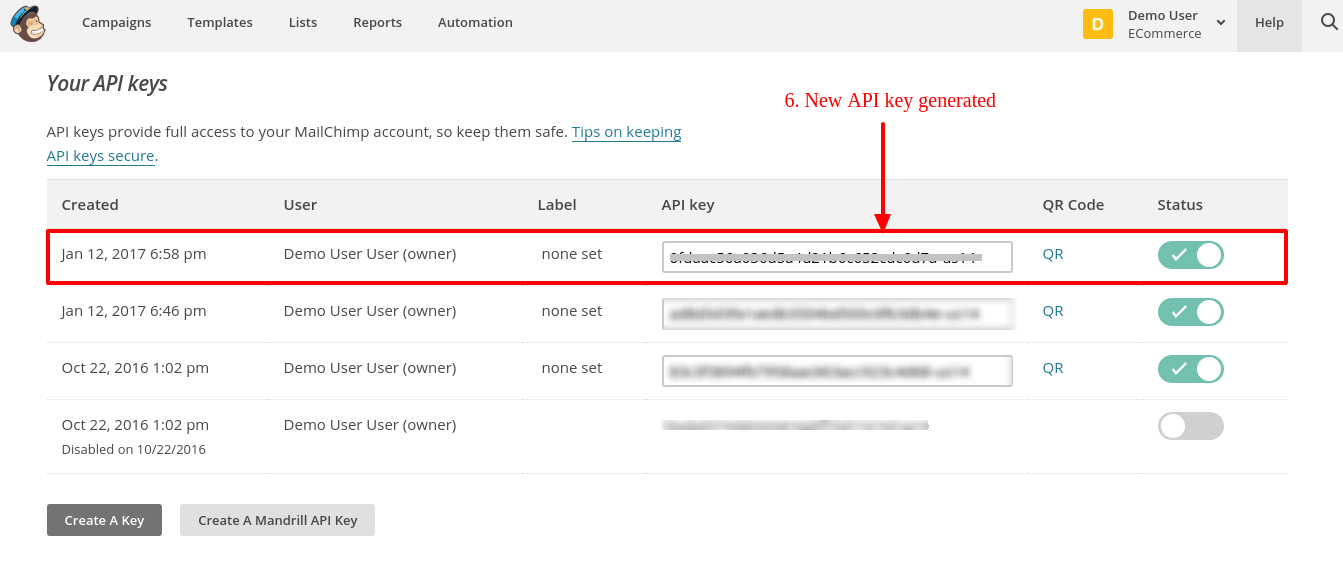
  • On API keys page, click “Create a key”to generate API key. After creation, a new API key will be added to your API keys list. Screen is given below:

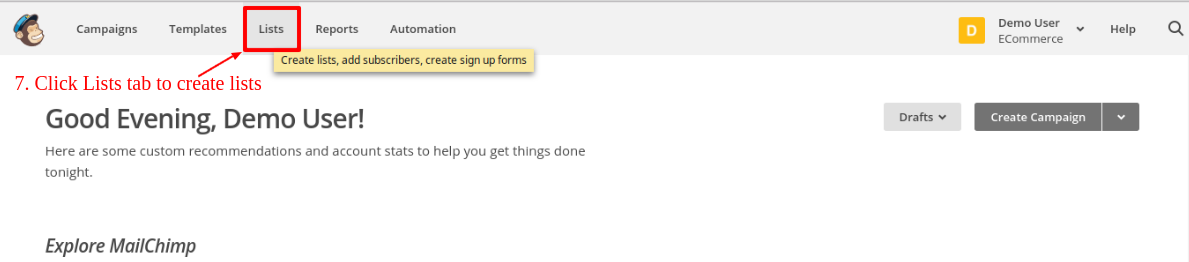
  • Now to create list, click Lists tab in upper menu. Admin will be redirected to new page where he/she can view lists and create lists also. Screen is given below:

  • On Lists page, Click “Create list” to create new list. After creation lists will be visible on Lists page as shown in screen below.

5.0 Front End

Newsletter Subscription

If Smart sync is disabled and customer or guest enters email in newsletter field and click submit, email will be added to the lists configured in admin panel. If smart sync is enabled, email( if valid) will be added to lists on removing focus from email field. It doesn’t matter whether user clicked submit button or not.

Registration Page

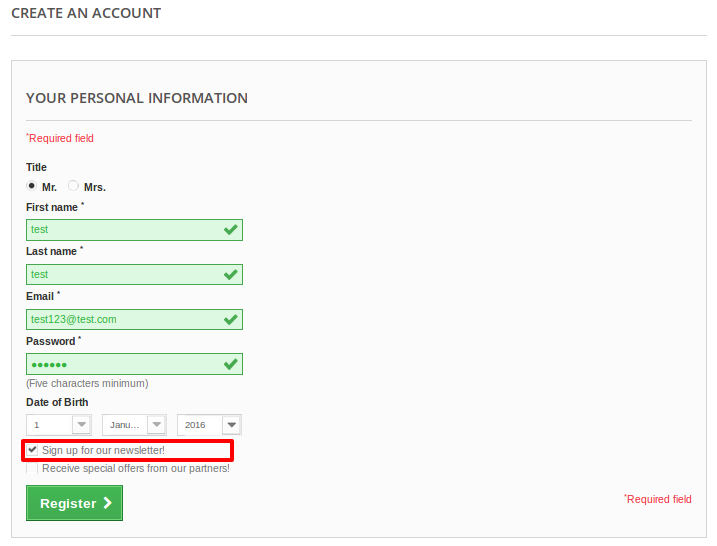
If the ‘Sync Email from Registration Page’ setting is enabled in Admin panel, then after registration customer’s email address will be synchronized to the configuration lists if he/she chooses the option to subscribe to newsletter. If “Smart Sync” is also enabled then email will be synchronized with lists on removing focus from email field. It doesn’t matter whether user registered or not.

Checkout Page

If the ‘Sync Email from checkout page’ is enabled in admin panel, then on the guest checkout page after checkout, guest’s email address will be synchronized to the configuration lists if he/she chooses the option to subscribe to newsletter. If “Smart Sync” is also enabled then email will be synchronized with lists on removing focus from email field. It doesn’t matter whether user checkout successfully or not.

Note: If “Smart Sync” is enabled then it doesn’t matter whether customer or guest checked “Sign up for newsletter” or not, synchronization will take place on blur event from email input field.

You can try Prestashop Mailigen and MailChimp Integrator addon for on your Prestashop website. KnowBand’s Prestashop Mailigen and MailChimp Integrator extension helps you in email marketing to your eCommerce store & boost th website traffic.

Module Link: https://www.knowband.com/prestashop-mailigen-mailchimp-integrator
Admin Demo Link: https://ps.knowband.com/demo3/16/admin1/index.php?controller=AdminLogin&token=ffa17b0c72ff8c0ab7cf3e344c5ae4fc&redirect=AdminModules&demo_lang=en
Front Demo Link: https://ps.knowband.com/demo3/16/en/login

Please contact us at support@knowband.com for any query or custom change request as per your business requirement.

One Page Checkout module for PrestaShop

Adopt a feature-loaded PrestaShop One Page Checkout module for your PrestaShop 1.7 store.

PrestaShop is one of the widely used eCommerce platforms that has grabbed worldwide attention due to its amazing features and functionalities. It is used all across the world by the people who are involved in the field of eCommerce business and is growing every year. This eCommerce platform has the bulk of features, themes, and extensions that can effortlessly improve the performance of any PrestaShop store.

It is a proven fact that 70% of your customers abandon their cart while checking out of the site. This is when the customers find the checkout process to be long and tedious. It won’t be wrong to state that with easy access to so many choices, the online shoppers won’t bother going through the lengthy checkout forms. The lengthy process may prove hazardous especially when the customers are already on the fence about making the purchase. This is when a single-page checkout scores over the multi-page checkout processes.

PrestaShop One Page Checkout module is one of the ways of optimizing the checkout process of the eCommerce store. The Prestashop addon has made another major step towards improving customer experience and boosting eCommerce performance with its latest PrestaShop 1.7 version. With its latest offering that was available for PrestaShop clients since 7th November 2016, people are increasingly embracing this new PrestaShop version. This PrestaShop 1.7 platform has new exciting features like the introduction of Symfony2 framework, a rebuilt Theme system, Starter theme, a  revamped product creation page, a modified modules page, a reorganized main menu and other such functionalities.

However, if you still feel the need to optimize the checkout experience of your PrestaShop 1.7 store, here is the brilliant PrestaShop 1.7 One Page checkout addon for you. If you think that this PrestaShop Addon is not worth your attention, do take a quick look at these features mentioned below:

1. Guest Checkout and Social login facility

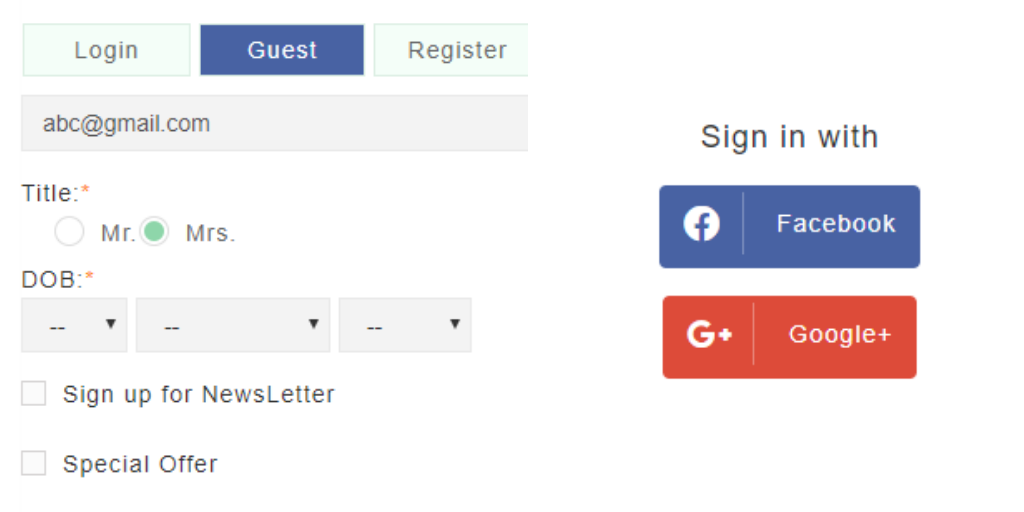
Customers on your PrestaShop 1.7 store don’t require any separate checkout accounts for making a quick online product purchase. The Prestashop module offers easy account login facility with the help of social media sites like Facebook and Google+ thereby improving the overall customer engagement. In fact, users can now log in/sign-up using their Paypal account too. Along with the social login options, the customers can even complete the transaction as a Guest user. The online shoppers can even register via their email account.

PrestaShop One Page Checkout module also offers the Guest Checkout facility, hence allowing your store visitors to checkout without getting registered.

2. Error reporting to customers

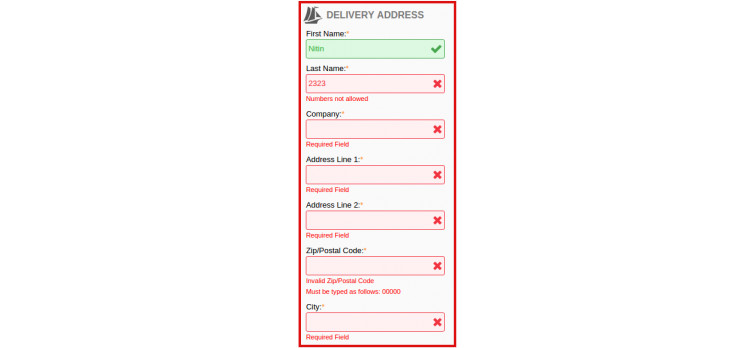
Now, the customers making an online purchase on your site can easily know where he/she has actually committed the mistakes on the checkout page. This PrestaShop 1.7 checkout extension offers immediate error messages along with the inline validation facility for helping out customers during the checkout process.

3. Easy for field customization

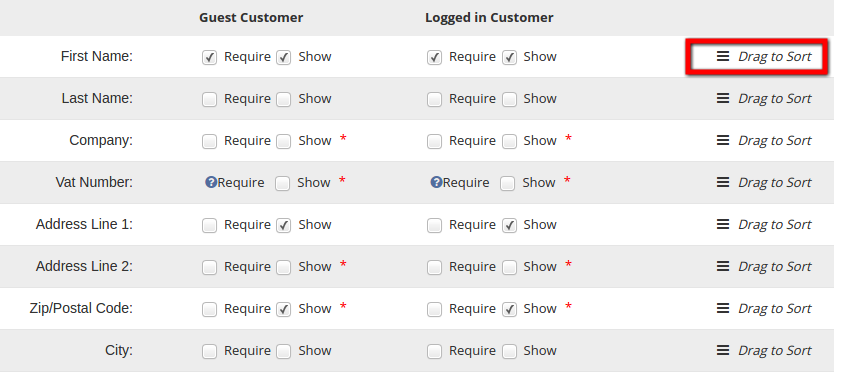
The checkout form includes a large number of fields which at times may become difficult to handle. You get a number of already created fields in the admin interface. All you need to do is to select the ones that you are looking to display in the front-end. The admin can display different fields to the customers who are logged in and to the ones who are not. There is an option to select the fields for different customer groups. In addition, the robust Prestashop One Page Checkout module makes it easier for the store owners to rearrange the various fields. This can be simply done by dragging and dropping the various fields.

4. MailChimp Integration

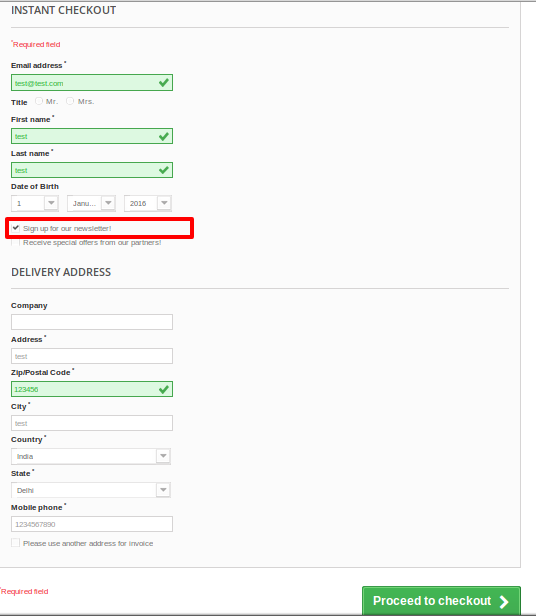
The Prestashop plugin comes with an inbuilt MailChimp integrator. The integrator sends the email ids of the customers captured on the checkout page directly to the MailChimp account of the store admin. This can be done either when the customer selects the checkbox for newsletter subscription. Even if the customer logins via their Google account, the email id will be sent to the MailChimp account. This makes it easier for the e-marketers, to design their marketing strategies and reach out to the customers for re-marketing.

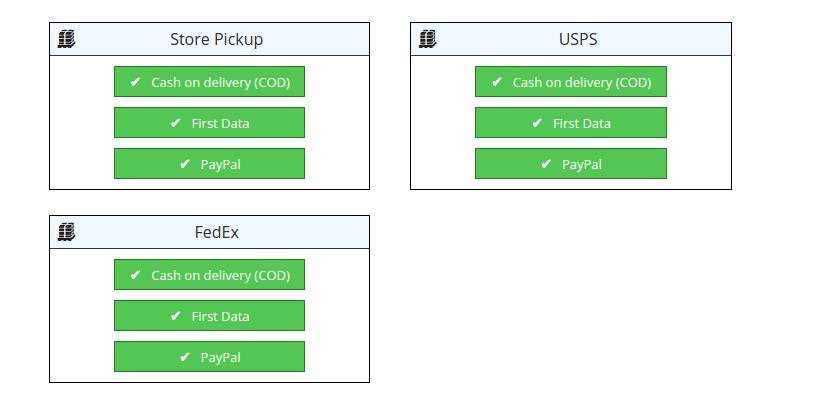
5. Presence of multiple payment and shipping methods

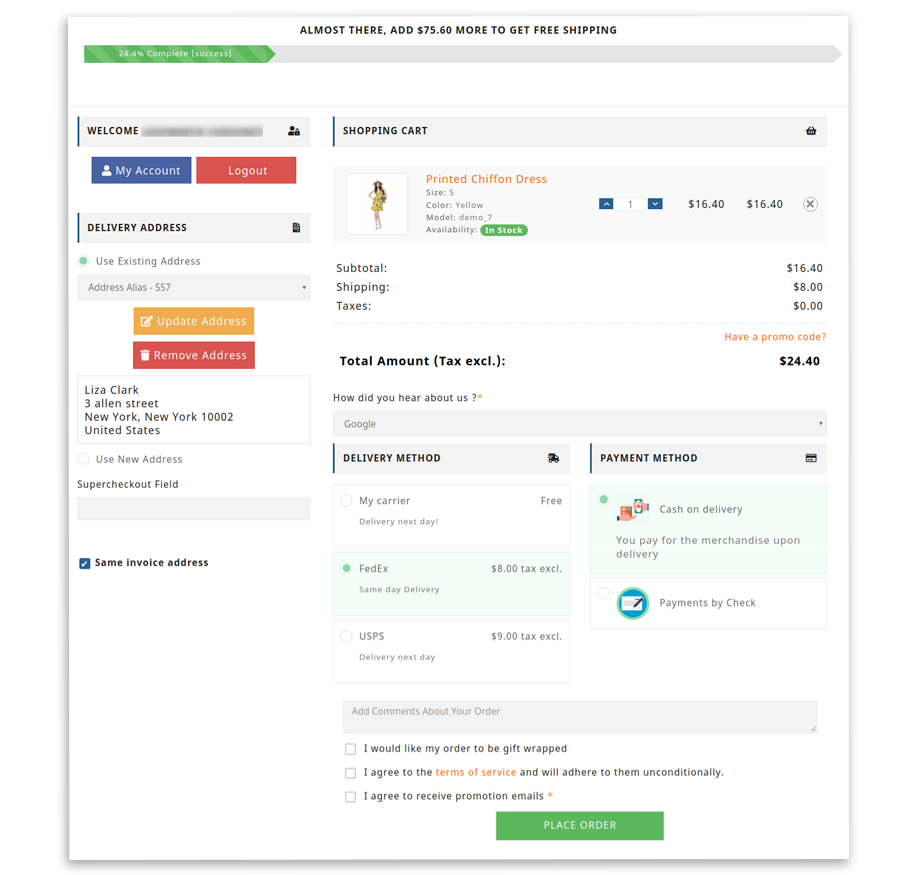
Now, your customers arriving at the PrestaShop 1.7 store will not be forced to fill all information first to be able to view shipping and payment methods. With one page checkout layout of this PrestaShop extension, customers will be able to view available shipping and payment methods as soon as they come on the checkout page. The feature-packed module is even compatible with the Mondial Relay like shipping methods.

6. Offers the wide range of customer base

This PrestaShop One Page Checkout module is fully responsive in nature that makes it ideal to be used on multiple platforms for desktops, laptops, smartphones, and tablets. By targeting multiple device users at the same time, you can effortlessly improve your chances of product sales and conversion rates. The fully-customizable interface makes it easier for the store owner to retain the customers and reduce the cart abandonment rate of the shopping site.

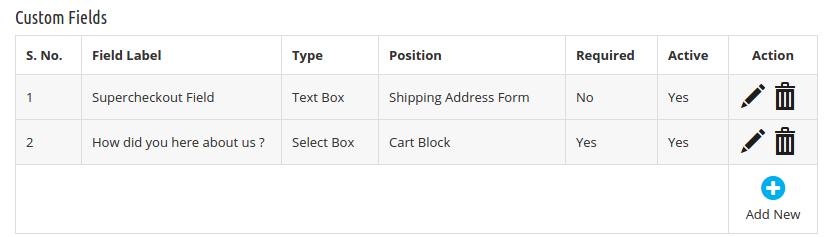
7. Custom fields

Versatility is the key when it comes to this module. The admin interface offers a number of form field to the store owner. In addition, he can add custom fields on the checkout page. The already created fields can be edited or deleted as per the requirement of the admin. Hence the extension, squeezes the checkout process for your store visitors, at the same time it even allows you to get additional information about your potential customers.

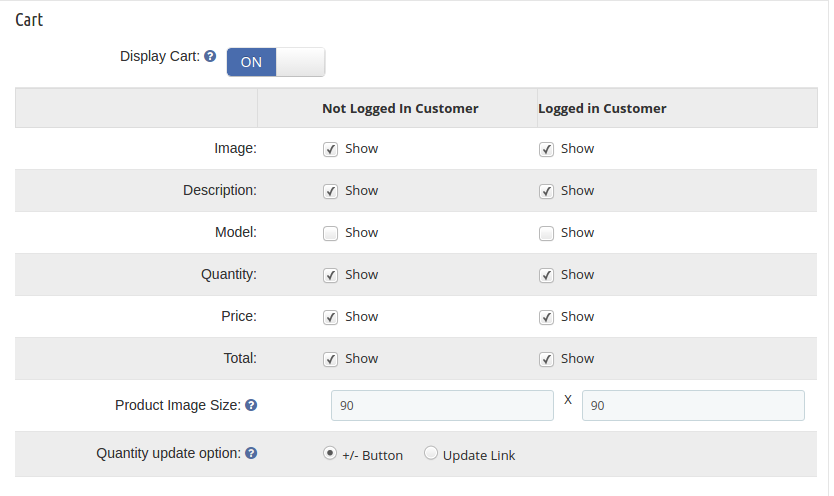
8. Shopping cart customization

The module is a one-stop-solution for the Prestashop store owners when it comes to optimizing the shopping experience of the customers. The store admin can select the fields that he wants to display in the shopping cart of the site. The various information fields can be arranged in the front-end as it was done in the checkout page. Besides the information fields, the admin can even display the order details of the customer in the cart.

9. Front-end optimization

The module allows you to squeeze multiple steps of the checkout into a single page without affecting the front layout. The best part of the addon is that there are no code changes required to be done. The frontal layout can be changed by just dragging and dropping the various elements.

10. PrestaShop One Page Checkout module is GDPR compliant

In addition to all the features, the Prestashop one step checkout extension offers compliance with EU’s GDPR as well. The Prestashop addon has been upgraded as per GDPR standards. You can now include multiple opt-ins in your site. There is an option to create multiple policies for this compliance. You can enable the policy that you want to display in the front-end.

In case you site deals into the European Union countries in any way, then, you need to take the consent of the customers before using their personal details for any purpose. The PrestaShop One Page Checkout module allows you to check the consent of the customer from the back-end.

11. Mobile-friendly Interface

With the increasing dominance of mobile sites and mobile-first users, providing a responsive interface to the prospective customers is the key. Keeping this in mind, Prestashop one page checkout addon has been designed to be mobile-friendly. The single-step checkout process will work flawlessly on mobile devices. Thus, you can now offer at-par services to your target customer base whether they are using a desktop site or mobile devices. All the features offered by the Prestashop one page checkout plugin will be compatible with your mobile site as well.

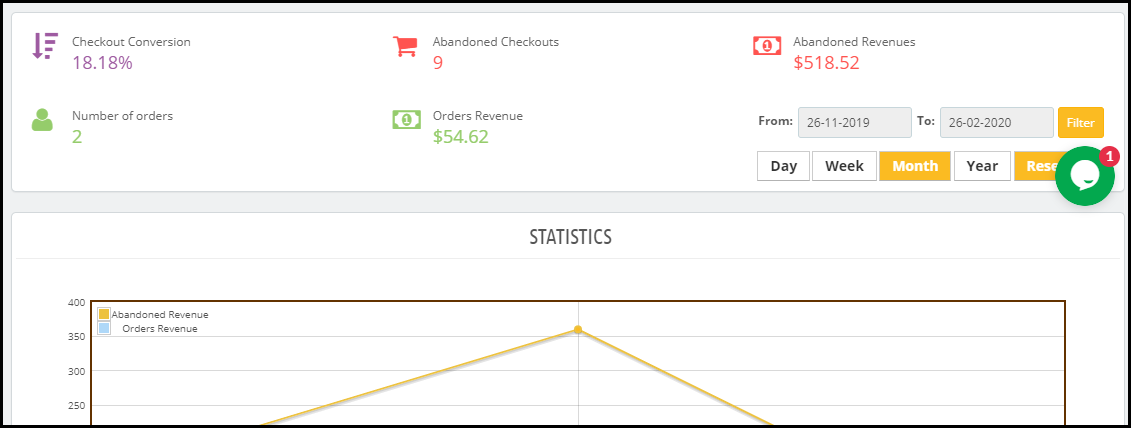
12. Track Abandoned Carts during Checkout [New]

PrestaShop One Page Checkout module now displays statistics around checkout abandonments under the “Abandoned Checkout Statistics.” This section displays how many orders have been placed, how many checkout abandonments have happened alongside the checkout conversion, abandoned revenue, and revenue generated from the orders. The data can be filtered out for a specific period.

The statistics are represented in graphical as well as tabular form.

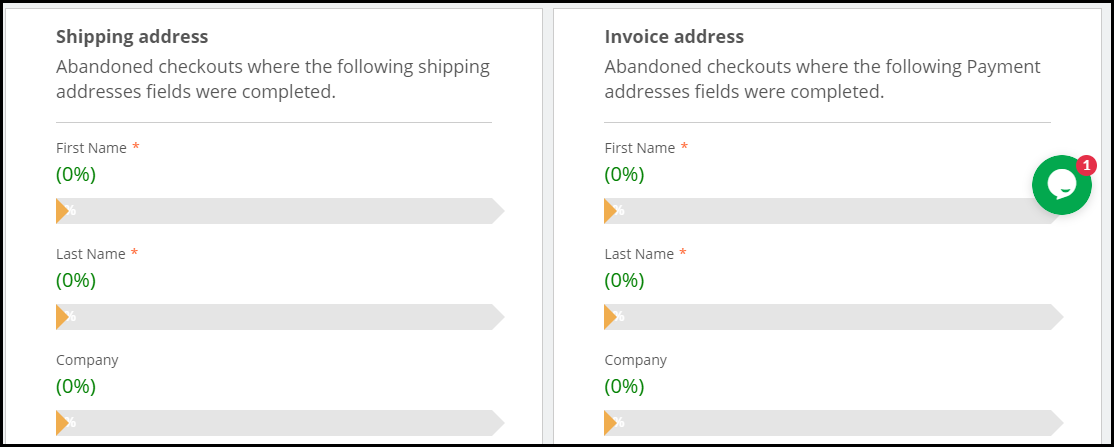
13. Track User Behaviour on the Checkout [New]

This option in the PrestaShop One Page Checkout module lets you check which specific fields are causing checkout abandonment. It displays the entire checkout fields and shows a percentage bar for each. Field having higher percentage means they are not causing any trouble to the visitors whereas the fields having low percentage means it is the actual cause of checkout abandonment.

This particular feature gives you the option to optimize your checkout fields so that you could improve your conversions.

14. CIF/DNI/NIF Validator [New]

Enabling CIF/DNI/NIF validation on the checkout page verifies the identification number of the shoppers coming to your website from Spain.

15. Free Shipping Banner [New]

PrestaShop One Page Checkout module also allows you to display a free shipping banner on the top your checkout page. You can specify the minimum amount on or above which the free shipping banner would be displayed to the user. This helps you increase the average order value since customers would be tempted to get free shipping.

16. Easy customization facility

This PrestaShop addon allows easy customization in the checkout process.

This Prestashop addon allows easy customization in the checkout process. Every checkout process on a PrestaShop site that claims to be simplified still contains a wide number of unnecessary checkout fields and steps. It is important to remove these irrelevant checkout steps from your checkout process to grab maximum customer attention and sales. The PrestaShop One Page Checkout module allows site admin to perform quick customization on the checkout page of their website. The store admin can even change the look and feel of the checkout page by incorporating the custom CSS code and JavaScript. With easy customization option, the admin can easily upgrade their site as per the need and requirement.

Over to You

Just upgrading the version of your store is not enough. You need to keep every single aspect in sync with the changes. The checkout process is one of the most important aspects that contribute to the overall conversions. So, don’t compromise with the ineffective checkout process on your PrestaShop 1.7 store, but take the right steps now. You just need to install this feature-packed PrestaShop checkout extension from the Knowband store to stay ahead of your business rivals. For more information, do visit the Knowband store without any further delay.

PrestaShop One Page Checkout module has been downloaded 7000+ times on the official addon store and over 5000 times on the Knowband store.

Check the Prestashop One Page Checkout User Manual to get step by step guide on how you can install this module.

Related Stories: