With the help of Prestashop SEO Wizard Addon the Prestashop store admin can enhance the visibility of the eCommerce site in a hassle free way. The Knowband Prestashop SEO Wizard module simplifies the most time-consuming works of SEO by automating the entire process. The Prestashop Merchant can now create the sitemaps or the XML files for the web pages as well as interlink URL of targeted pages with the anchor text at a button click. The site mapping can be done in multiple languages.
Searching the keywords in the contents of the site and then manually adding the links was quite a task earlier, but not anymore. The Prestashop SEO Wizard Module makes the entire process automated. It searches for the keyword in the long or short description in the front-end and adds the links automatically. Even the meta tags for the web pages can be added from the admin interface. You can optimize the product, category, manufacturer or even the CMS pages in a few simple steps. Become an SEO expert and let your web store rank higher in the SERP of the various search engines.
1.1 Project Objectives
Prestashop SEO expert addon offers a number of optimization options. Some of them are listed below:
1. The Prestashop SEO module allows the admin to create the XML file of the various web pages at a button click. Easing out the task of sitemap creation, the website can now rank be fetched by Google in minimal time.
2. The Prestashop SEO Wizard Addon searches for the specified keywords from the content of the website and attaches relevant links to it in minimal time.
3. The priority of the web pages, as well as the frequency of web crawling, can be set as well.
4. The store admin can include the nofollow or dofollow as per their wish. At the same time, the option to open the links in new tab can be incorporated without making any code changes.
1.2 Benefits of the Merchant
With the help of this Prestashop SEO Wizard Extension, the Prestashop store admin can create the XML sitemap of the PrestaShop as per desires.
The Store admin has access to set the priority if the web pages as per need.
This Prestashop SEO Expert addon allows the admin to set the frequency of the crawling as his/her requirement.
The Merchant can enable/disable the image option in the sitemap.xml file of the product pages.
The Prestashop SEO Expert Addon allows the e-merchant to enable/disable the sitemap at any time.
The Prestashop SEO addon gives the option to the store admin to add the link on the targeted keywords of the entire site as their need. It saves a lot of time to the admin.
The Admin can already add interlink on the targeted keywords edit or delete as per desires.
This Prestashop SEO Wizard addon enables the admin to keyword for the interlinking is searched in the short or long description of the products.
With the help of this Prestashop SEO Wizard module, the store admin to add the follow or no follow a link and it also allows the admin to open the link in new tab.
This Prestashop SEO expert module allows the store merchant to optimize the meta tags, meta title, meta description of the products, manufacturer, and categories page.
The Admin can optimize the products, categories, CMS, Manufacturers, product meta tag, update category meta tag and update manufacturers meta tags of the website incorporated in the front-end of the website from the Optimization Setting tab.
The entire interlinking is done from the back-end of the Prestashop XML file creation module.
The Prestashop SEO Expert extension allows the admin to restore the initial data via the group.
This Prestashop automated site interlinking Module in multilingual support.
This Prestashop SEO Wizard extension compatible with multiple stores.
Prestashop Sitemap generator Module for SEO helps the merchant to improve the visibility of the website.
2.0 Installation
After purchasing the Prestashop SEO Wizard Module, you’ll get following files as listed below:
1. kbseowizard.zip (contains source code of the module)
2. User Manual
Follow the steps mentioned below to install the extension:
Unzip the kbseowizard.zip file. It would contain files and folders as shown in the image below –
Copy all the files and folders from the extracted folder and paste them into “Modules” directory of your store. Follow the path – Root Directory/modules/.
3. The Prestashop SEO addon can be installed on your store now. You can find that in Store Admin -> Modules and Services. It would be shown as below –
You may even search for the module in the admin modules listwith the following details –
Keyword – SEO Wizards
Category – Front office
Filter By – Installed & Not Installed / Enabled & Disabled
4. Click on “Install” button to install the Prestashop SEO Wizard extesnion. It would show a pop-up for your confirmation. Click on “Proceed with the installation” option. This step will install the Prestashop module and show notification – “Module(s) installed successfully”.
3.0 Admin Interface
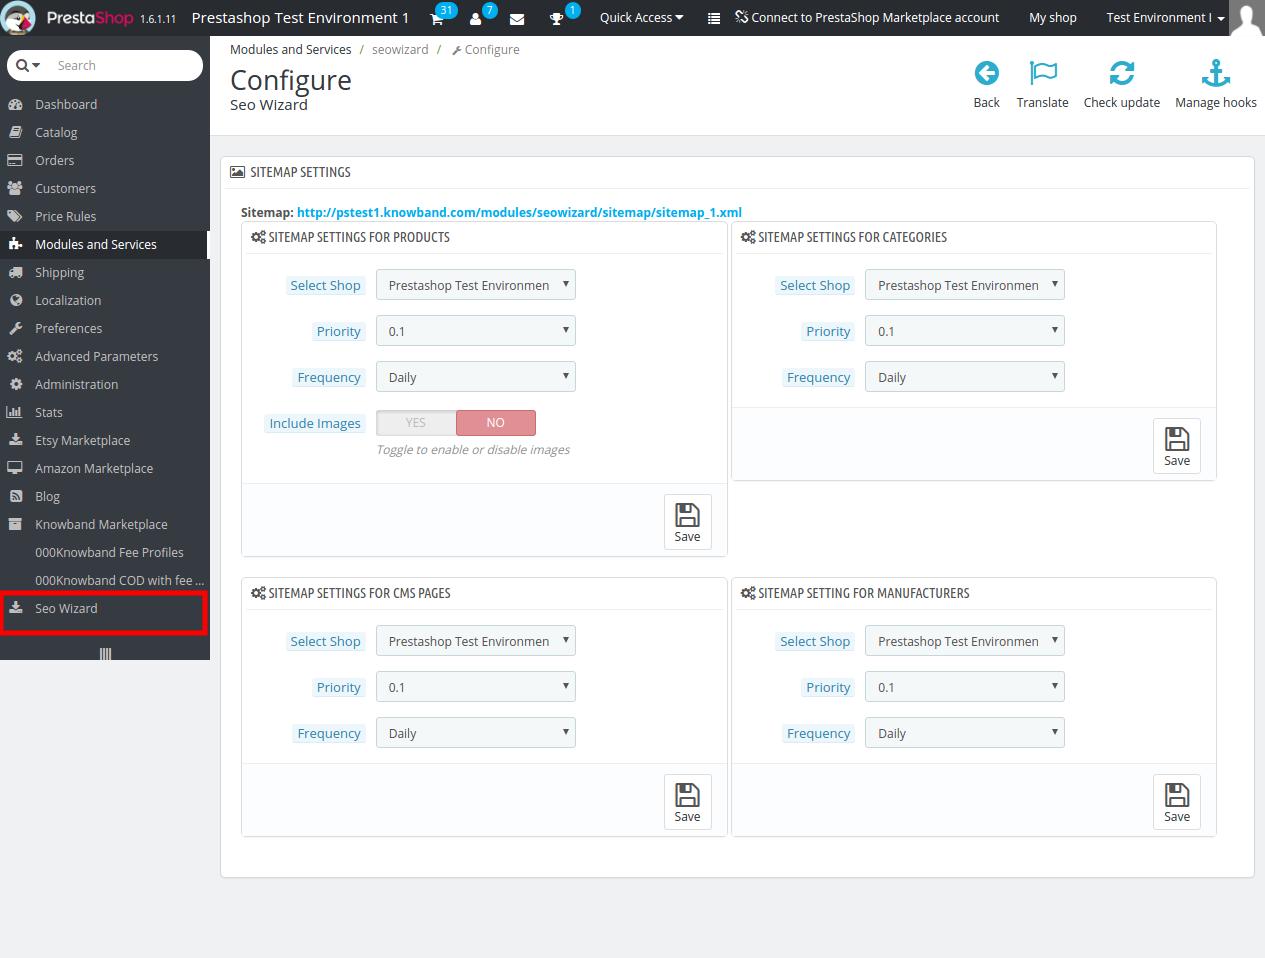
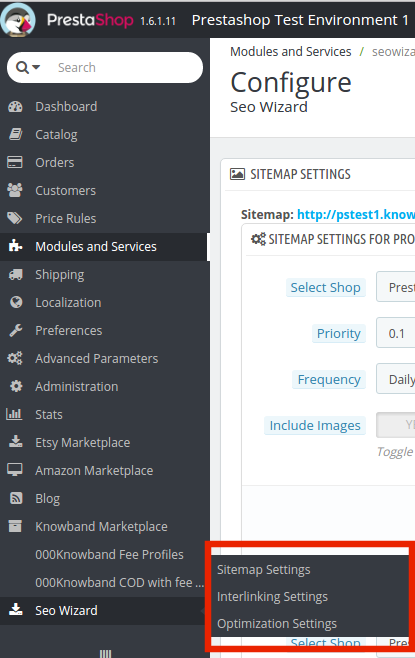
This Prestashop module allows the e-merchants to enhance the various SEO aspects of the site. Right from the sitemaps to the interlinking everything can be done in one link. This is the most time consuming and tedious task for the e-marketers. The Prestashop SEO wizard addon makes it simple and a matter of moments. You can find the Prestashop SEO expert extension in the main menu of the admin interface.
It basically offers four optimization options. They are listed below:
SiteMap Setting
Interlinking Setting
Optimization Setting
Meta Tag Settings
3.1 How is the Site Map created?
The site map of the web pages makes it easier for Google to find your sites. The creation of .XML file involved a lot of steps, but it can now be done at a button click.
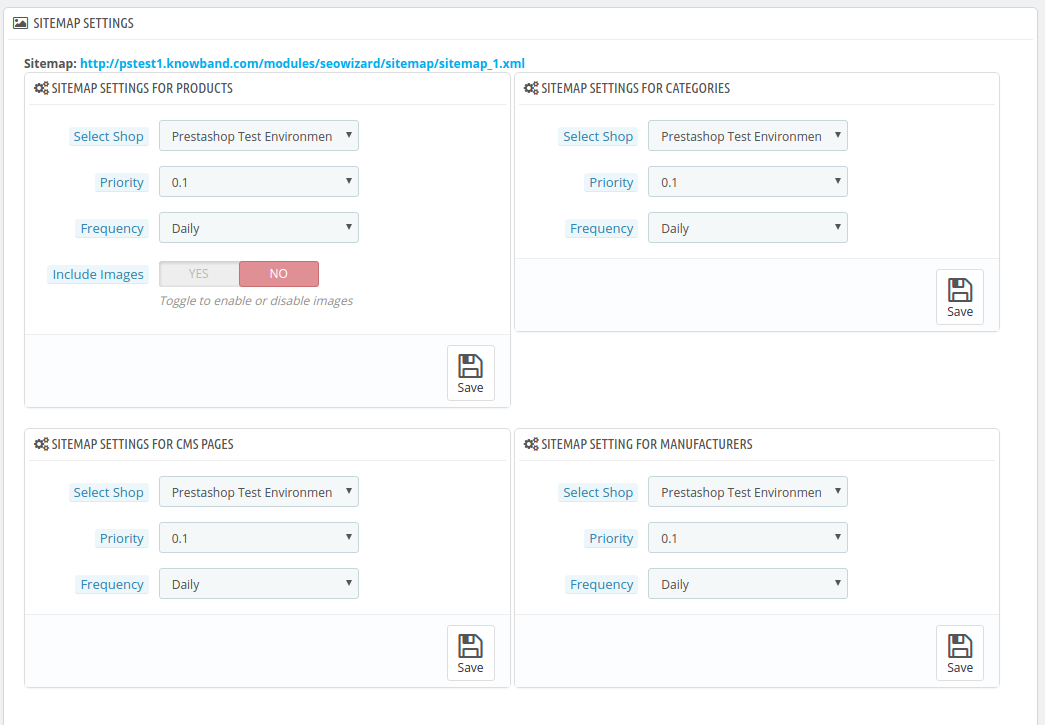
The Prestashop SEO addon allows the admin to create the sitemap or the .xml file for four different web page types. They are:
For Products
For Categories
For CMS Pages
For Manufacturers
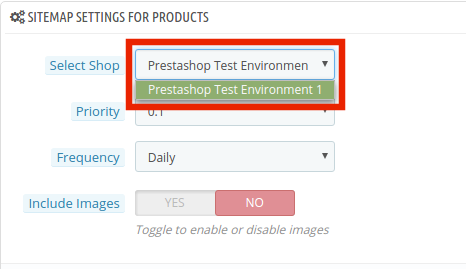
The Prestashop SEO Expert Extesnion is multi-store compatible. The admin can Select Shop from the dropdown menu in which they are looking to include the optimization option.
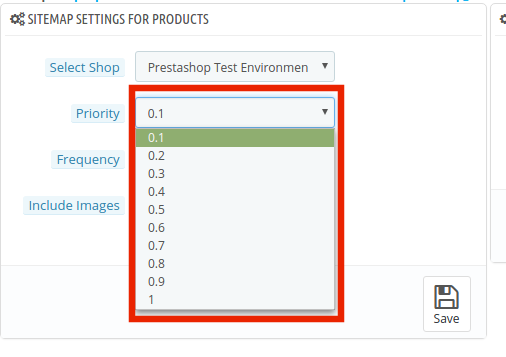
In addition, the admin can set the priority of each web page type as per the need. All he needs to do is to select the priority rank.
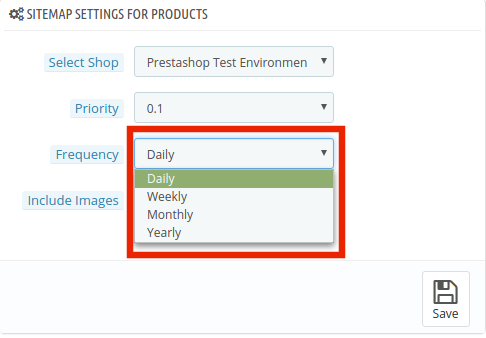
The frequency in which you want Google to crawl the web page can be selected. The crawling frequency can be set on Daily, Weekly, Monthly and Yearly basis.
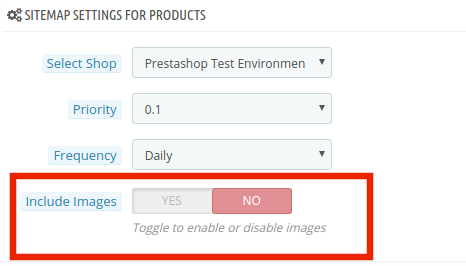
In addition, the admin can include the sitemapping of the product images just by a button click.
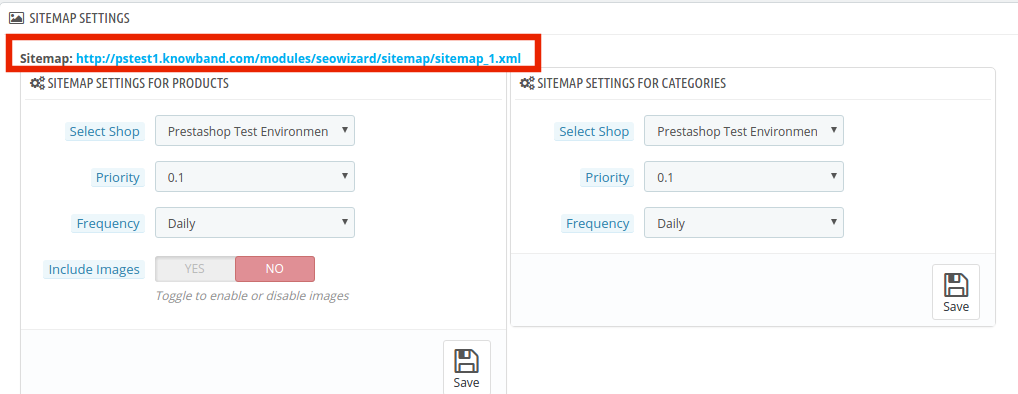
Make the changes and click on ‘save’. The .xml file will be created automatically. The link of thesame can be viewed at the top as shown in the image.
This Pretashop SEO wizard addon shown the xml file is obtained in the usual format.
The same process is followed in all the four web page types.
3.2 How is the Interlinking done on the site?
3.2.1 How is the new links created?
The Prestashop SEO Wizard extesnion allows the admin to add links to the keywords mentioned in the website in one go. Once the keyword and the link are mentioned in the back-end, the Pretsahop addon fetches for the word in the short description of the product pages and other web pages. The keywords are then converted to the anchor tag and specified links are attached to it.
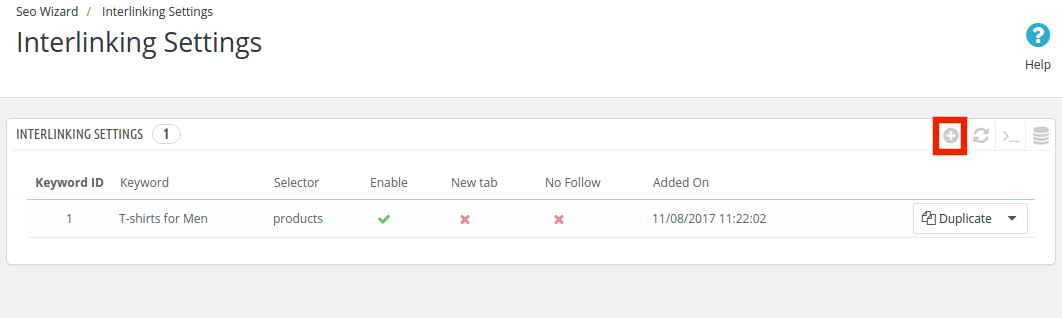
In order to do the interlinking, go the ‘Interlinking Setting’ of the Prestashop SEO expert module. It shows the list of the already created links and keywords. In order to create new once, click on the ‘+’ in the top right section.
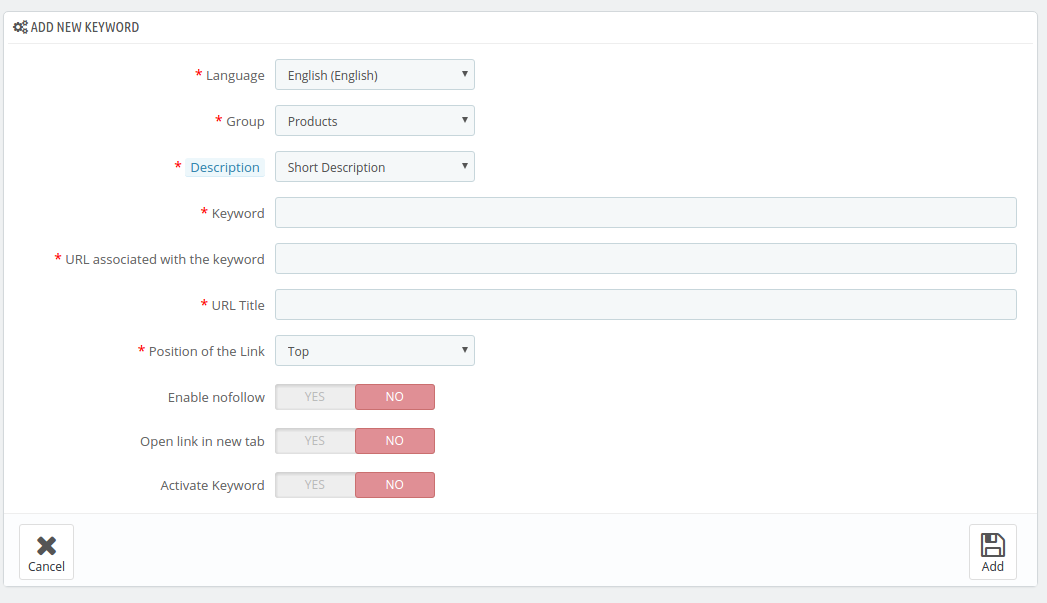
Enter the information required in the admin interface.
Language: The Prestashop SEO Wizard module offers multi-lingual support and the changes can be done in various languages.
Group: The group or type of web page, that is, Product, Manufacturer, CMS pages or Categories, can be selected from here. The interlinking will then be done in those pages only.
Description: This field is only for the product pages. The merchant can either select the ‘Short’, ‘Long’ or ‘Short and Long’ description. The keyword entered will then be searched in the selected descriptions and interlinking will be done in the same.
Keyword: Enter the keyword that you want to use as an anchor text.
URL: The URL that is to be linked with the keyword is mentioned in this section.
The position of the Link: The position of the link, that is, Top or Bottom can be selected here.
Enable Nofollow: The link can be used as a nofollow or a dofollow link as per the requirement of the user. In case you want to keep it as a nofollow link, switch the button on.
Open in New Tab: By enabling this feature, you can make sure that the links will open in the new tab instead of the same tab.
Activate Keyword: The keywords can be activated by toggling the button here.
3.2.2 How are the links keywords edited or deleted?
The keywords and the related information can be edited by clicking on ‘Edit’ button as shown below. The admin interface even offers the options to delete the existing ones.
3.3 How are the changes incorporated in the website?
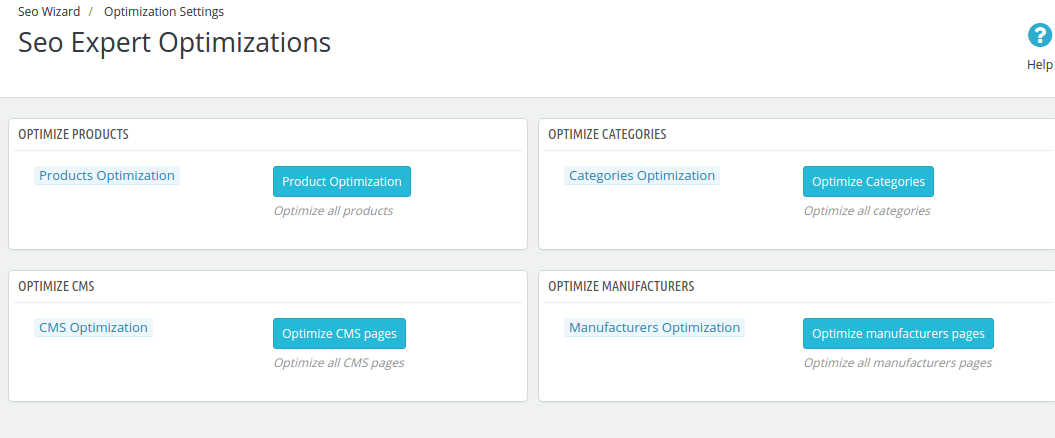
The entire interlinking done in the backend can be incorporated in the front-end of the website from the Optimization Setting tab.
The changes can be implemented on the front-end of the website by clicking on the ‘Optimize’ button. This option is available for all the different page type of group. Each page type can be optimized separately.
3.4 How to add Meta Tags in the Web Pages?
This Prestashop SEO Wizard addon simplifies the most time-consuming task of the e-marketers. The meta tags, that is, the meta titles, descriptions and keywords can be added for the product pages, category pages as well as for the manufactures.
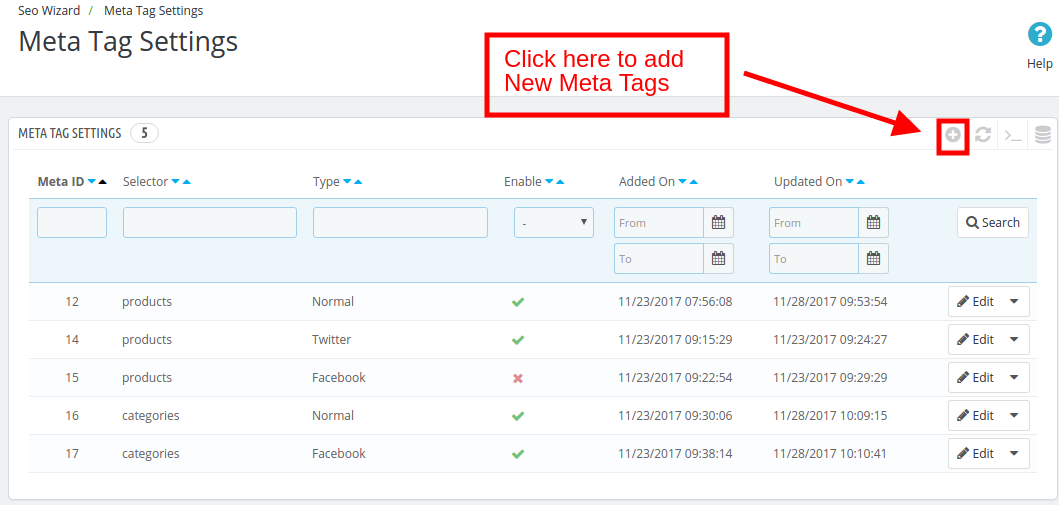
The list of the tags already created can be viewed in the ‘Meta Tag Setting’ tab. In order to create the new one, click on the ‘+’ sign in the top right corner of the admin interface.
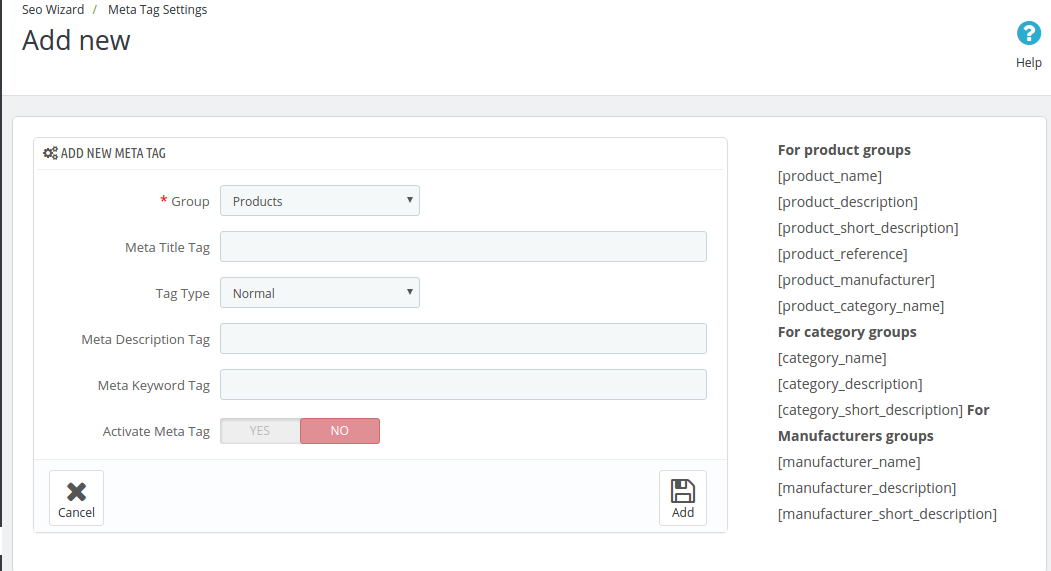
The meta tags can be, then, entered by filling up the required information fields.
Group: Select the group type in which you want to add the tags. You can choose from the Products, Categories or Manufacturer. Meta Title Tag: Enter the meta title for the web page here. Tag Type: The tag type can be Normal, Facebook or Twitter. The admin can select any from the drop-down menu. Meta Description Tag: The short meta descriptions of the web page can be entered here. Meta Keywords Tag: The keyword relevant to the web pages can be entered here. You can enter the main keywords, it’s variants as well as the long-tail keywords here. Activate Meta Tag: The meta tags can be enabled/disabled by toggling the button.
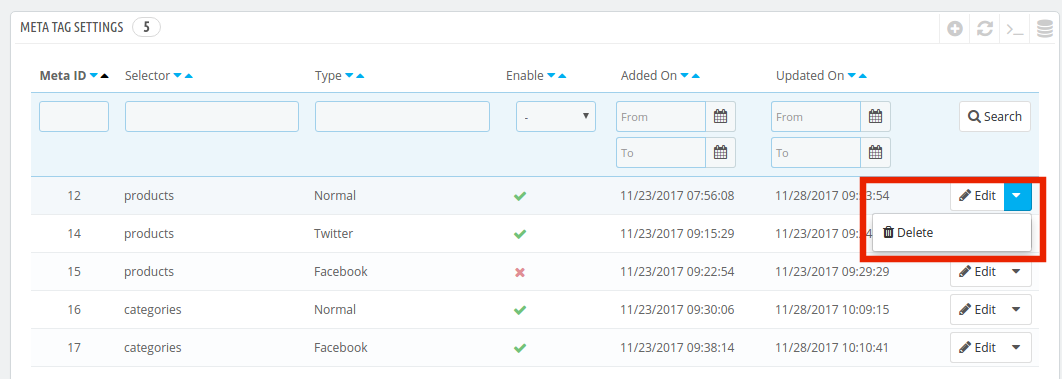
The created tags can be edited or deleted as shown below:
Now you can try Prestashop SEO Wizard module for on your Prestashop website. KnowBand Prestashop SEO Addon helps you engage more customer to your store & increase the customer base. The Prestashop XML file creation Extension allows the admin to manage SEO of the website easily without any hassle. The online seller can easily manage the interlinking, XML file creation and meta tags generation without any lengthy and time taking process.
The Prestashop Merchant can now create the sitemaps or the XML files for the web pages as well as interlink URL of targeted pages with the anchor text (read more about it here – Linkio.com) at a button click. The site mapping can be done in multiple languages.
An efficient customer support increases the chance of conversion of an online shopping site. If you want good customer base for your eCommerce store, then ,you need to provide efficient and hassle-free customer support to store users.
For Prestashop store, Knowband provides “Prestashop Login as Customer Addon”. With the help of this Prestashop addon the store administrator can login to the front-end of the website as one of their customers. In order to optimize user experience by assisting them in every phase of online transaction, logging into the site as one of the customers becomes a must.
The Prestashop addon also allows the store admin to test the website from user’s point of view. So that, the Prestashop admin can optimize eCommerce store as per the requirement of the visitors. The Prestashop store admin need not have the password in order to browse the store. It can be done by just clicking on the email id of the customers.
1.1. Project Objectives
The store owner can achieve following objective with the help of this Prestashop plugin.
1. The module allows the store admin to log into your shop as any of the registered customers in order to detect the website problem.
2. It even allows the admin to help the customer with their online purchase process without even knowing their password.
3. The Prestashop store admin can now test their website from the point of view of their customer at any time.
4. It ensures customer retention by providing an effortless way to solve their problems.
5. It is now easy to manage customer’s cart and orders .
6. From admin customers and orders pages, log in directly without search the customer.
2.0 Installation
Once the module is purchased from us, you’ll get following files as listed below:
1. loginascustomer.zip which contains the source code of the module.
2. User Manual
Follow the following simple steps in order to install the extension in your Prestashop store:
Unzip the loginascustomer.zip file. It would contain files and folders as shown below –
Copy all the files and folders of unzipped folder and paste them into your store’s “Modules” directory on the address path – Root Directory/modules/.
The module can be installed on your store. You can find it in Store Admin -> Modules and Services. It would shown as below –
In case, you are not able to find module in admin modules list, please try searching module with following details –
Keyword – Login as Customer
Category – Front office
Filter By – Installed & Not Installed / Enabled & Disabled
Click on “Install” button to install the module. It would show a pop-up for your confirmation. Click on “Proceed with the installation” option. This step will install the module and show notification – “Module(s) installed successfully”.
3.0 Admin Interface
Prestashop quick login as client module offers easy configurable and customization settings. The addon can be used and configured at just a few button toggles.
3.1 How to start the configuration process?
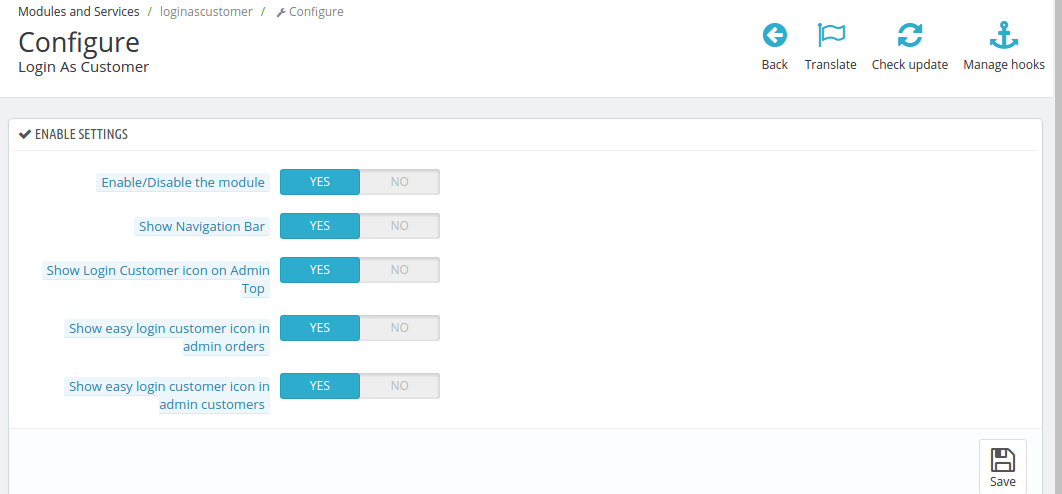
Once the login as customer plugin is installed and you enter the admin interface, you’ll find five customization options. These options are listed below:
Enable/disable the module
Show Navigation Bar
Show Login Customer Icon on Admin Top
Show Easy Login Customer Icon on Admin Order
Show Easy Login Customer Icon on Admin Customer
3.1.1 Enable/Disable Setting
The Prestashop Login As Customer without Password can be enabled or disabled from the Prestashop store by switching the button. Once enabled, the admin gets an access to login the website as any of the registered customers.
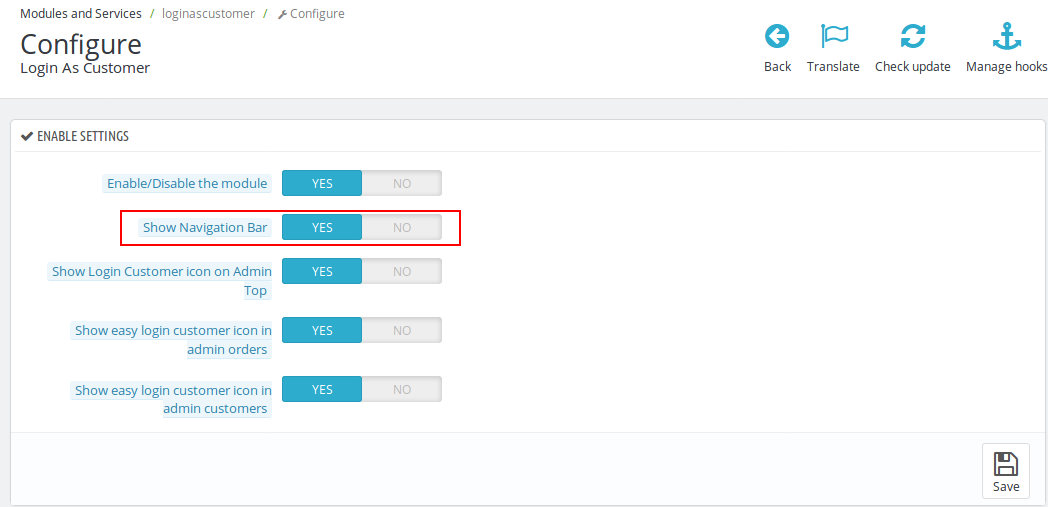
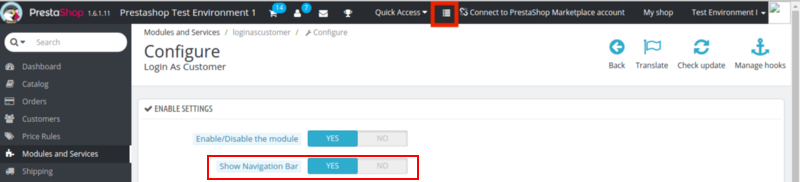
3.1.2 Show Navigation Bar
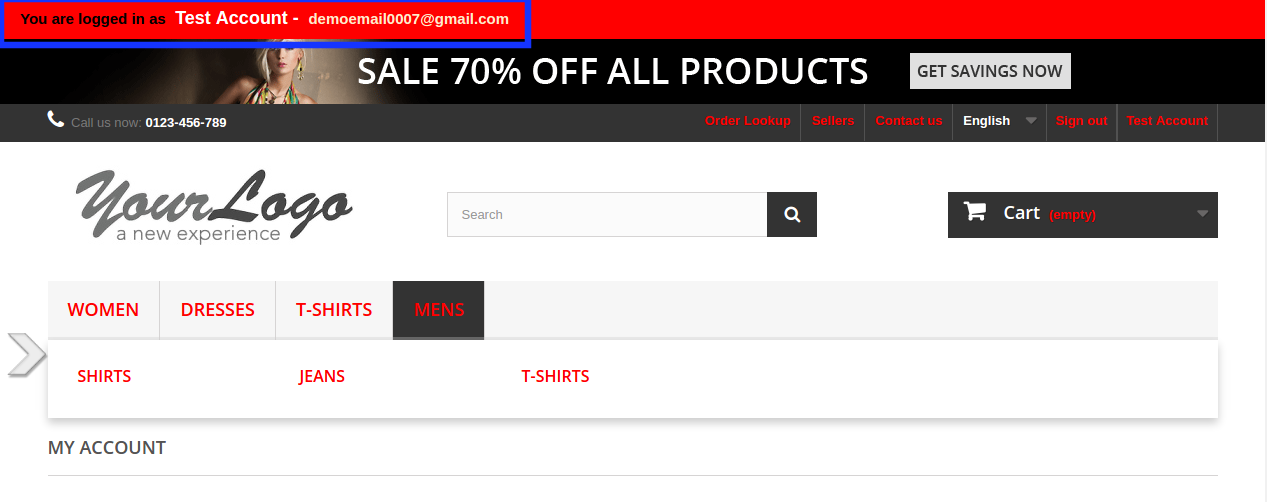
The navigation bar shows the name of the customer with which the admin is logged in. The log in details will be shown at the top of the website as shown in the image below. The store owner can even disable this functionality just clicking a button.
Feature at Admin Interface:
Feature at Website Front End:
3.1.3 Show Login Customer Icon on Admin Top
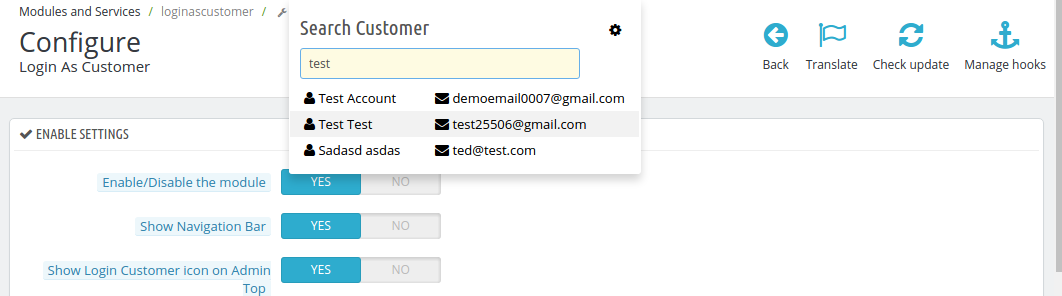
Since there may be a large number of registered customers on the eCommerce store, choosing one particular name for logging in may become difficult. The Prestashop addon provides an option to search the name of the customers in the admin interface. On enabling this feature, the icon of the search bar will be shown at the top of the admin panel.
The admin can search for the customers by entering the name in the search bar.
On clicking the options provided in the search the admin will be automatically redirected to the front-end of the website logged in as that particular customer.
3.1.4 Show Easy Login Customer Icon on Admin Order
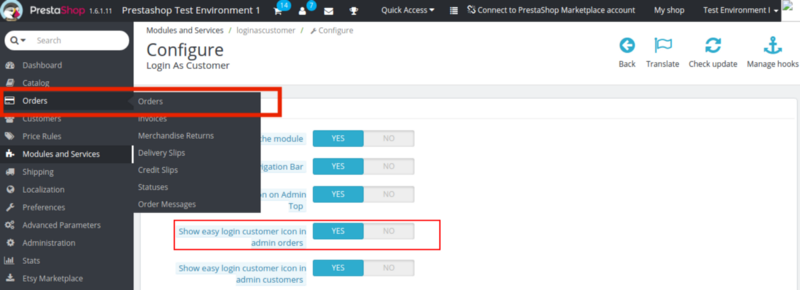
The login details of the customers can even be selected from the Order tab of the admin panel. The admin can go to the order details of any of the customers and the module provides them with an option to log in to the website as that particular customer.
Follow the steps mentioned below to use this feature:
1. Go to the ‘Order’ tab in the main menu of the admin interface.
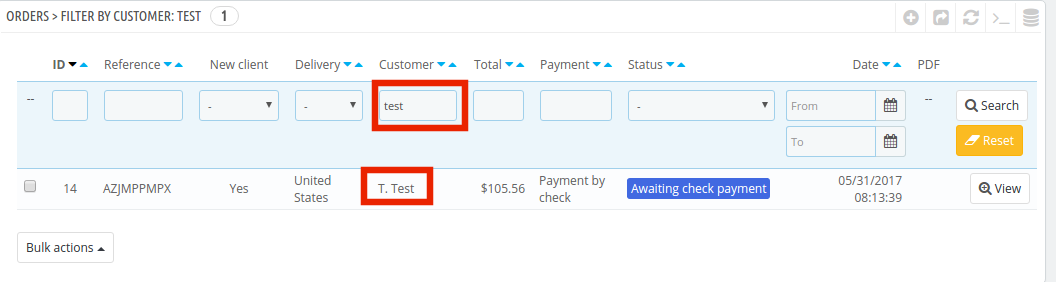
2. The tab shows the entire list of the orders placed on your web store. You can use the filters to select a particular customer.
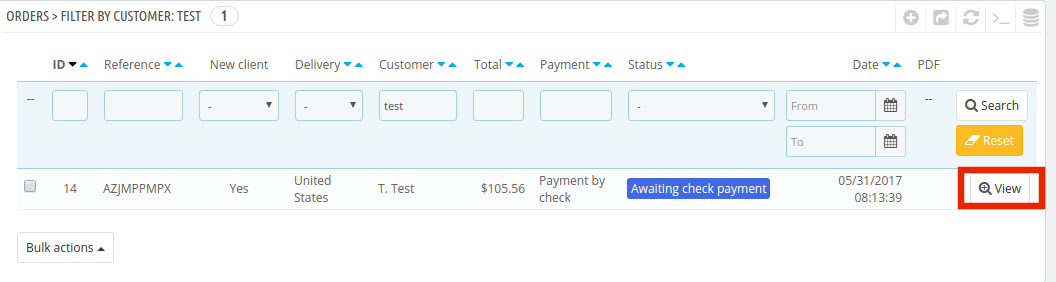
3. Enter into the order details of the customer by clicking on ‘View’.
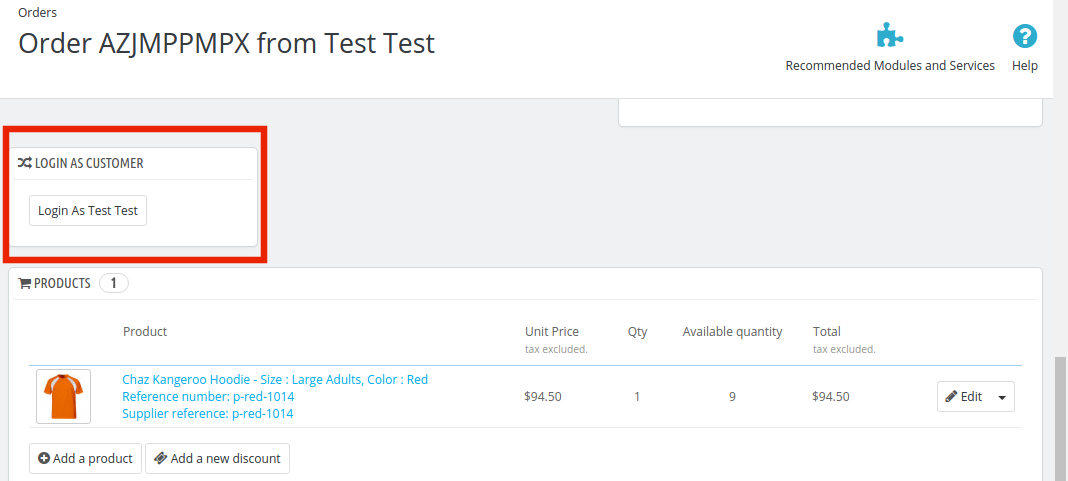
4. The order detail page provides an option to the admin to log in as that particular customer. On clicking the button as shown below, the admin is redirected to the front-end of the website.
3.1.5 Show Easy Login Customer Icon on Admin Customer
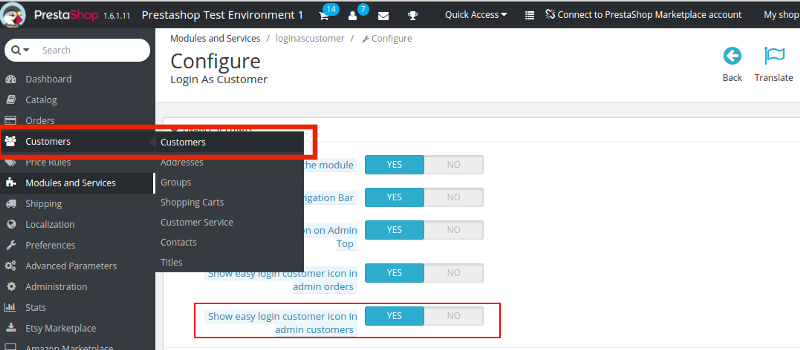
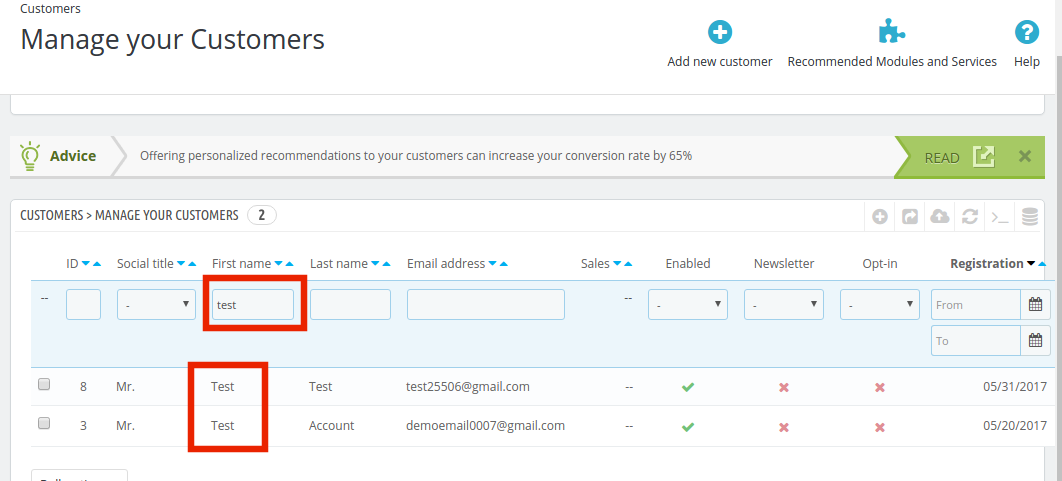
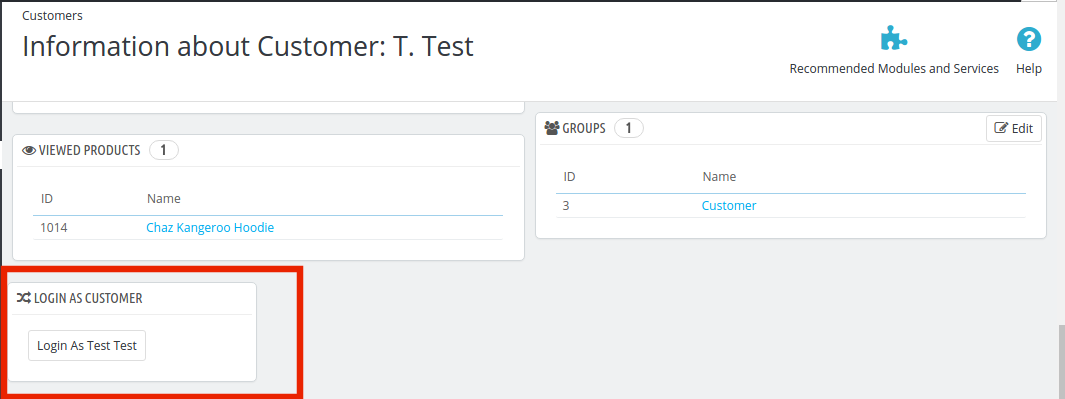
The same features is offered in the ‘Manage your Customer’ tab of the admin interface. This feature can be incorporated by enabling it. The process of finding the email id from the ‘Customer’ tab remains the same.
1. Go the ‘Customer’ tab of the main menu of the admin panel.
2. Filter the name of the customer from the database.
3. Go to the profile of the customer and you’ll find an option to log in as that customer.
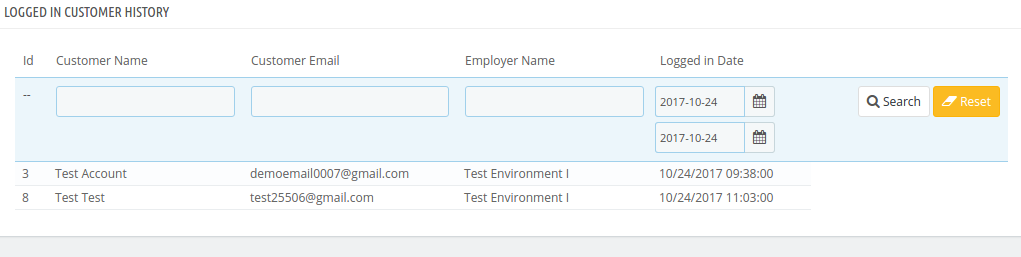
3.2 How to find the logged in customer history?
The Prestashop module offers an detailed report of the logged in customer history. The admin can keep a track on the customer whose personal details were used to log into the website.
4.0 Website UI
4.1 My Account Page
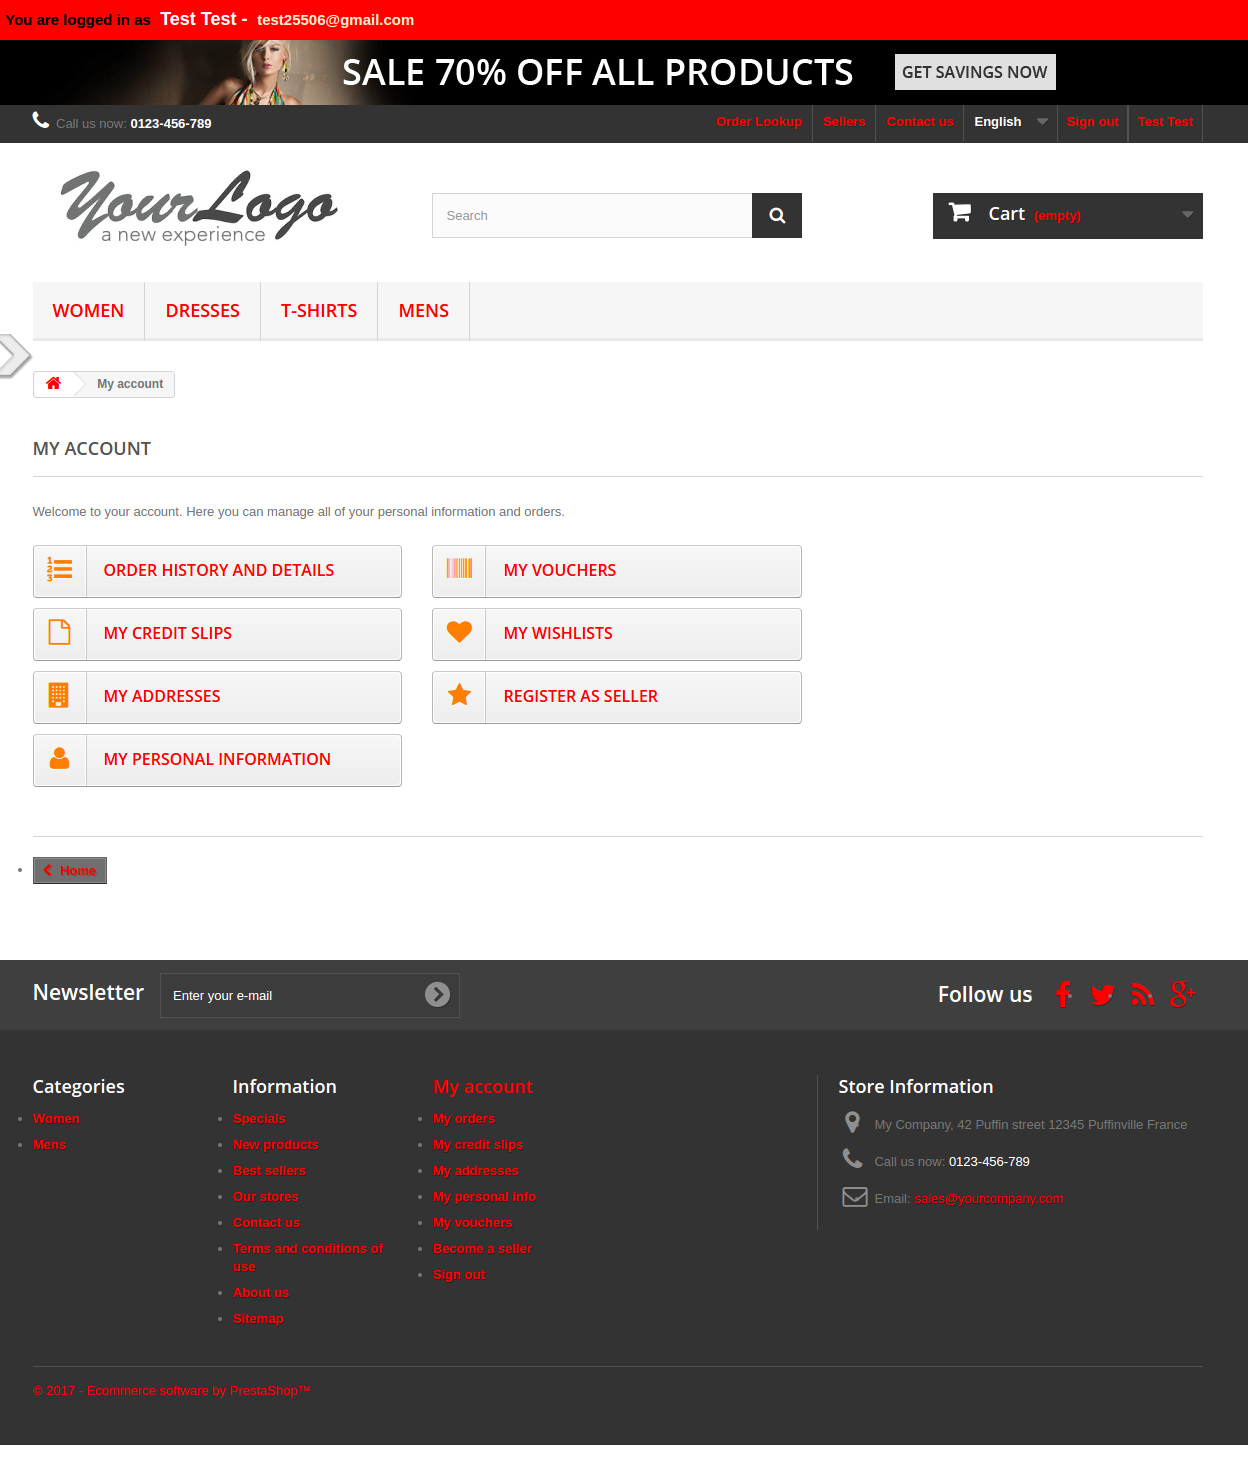
Once the store admin log into the website as a customer, the gets the access of the entire account of the customer.
The Prestashop store admin can view the wish list, add or delete a product from the cart or make any changes in the account as per the requirement. This offers an easy way to test the site from the user’s perspective. At the same time, the admin can assist the customer in case they face any problem in completing the transaction or finding the product according to their need.
Browsing the eCommerce website as a store user, admin can test the store functionalities in a much effective manner. Moreover, the addon helps you in optimizing the website and providing an improved customer experience. With the help of this addon, the support team can easily guide their customers in dealing with the problems while placing an order. Whenever the customer is not able to add a product to cart or unable to apply a coupon code then, in that case, the admin can solve the problems by using remote access to their account. You can purchase this module from addon store
Managing the shipping costs for different countries and regions is the biggest issue while catering to online customers globally. Knowband offers Prestashop Shipping Cost by Zipcode module allows the Prestashop eCommerce store admin to fix different shipping charges for different regions. This Prestashop Shipping Cost by Zipcode addon is one of the best Prestashop extensions. The Prestashop Shipping Cost by Post Code module helps you segregate the countries into the zone. The Prestashop store admin can enter multiple postal codes for the different regions. At the same time, he/she can even set the minimum and maximum range of the postal codes for a particular region from the admin interface of this Prestashop Shipping Cost by the country addon. The shipping cost for each zone can be set easily without any hassle. The charges will be calculated automatically at the checkout page in accordance to the zip code entered by the customer.
This Prestashop Shipping Cost by Zipcode addon is highly customizable and the store admin just needs to configure it as per the requirements. The admin needs to apply shipping cost settings a single time. There is no need to change any setting again and again. The online customers can view the shipping charges at the same time when they enter their area pin code. The transparency of the shipping cost calculation process increases customers trust on the website. The Prestashop zipcode wise shipping cost module makes shipping cost calculation very easy for the online store admin.
1.1. Project Objectives
Listed below are some of the objectives that the store owner can achieve with Prestashop Shipping cost by postal address.
The Prestashop eCommerce store admin can fix different shipping charges for the different regions in which the eCommerce site is operating.
The shipping charges of the customers are calculated automatically based on the zip code entered by them.
The amount charged will including or excluding the tax and handling charges as set by the store admin.
Store admin can fix the carrier charges according to the total price or total weight.
CSV File upload tab will allow the admin to add the shipping conditions for multiple locations in bulk.
1.2. Features
It is very easy to install and configure this Prestashop Shipping Cost by Zipcode addon.
The Prestashop Shipping Cost by Post Code module offers a simple and hassle-free implementation.
The e-merchant can enable or disable the shipping cost by postal code module just by toggling the button.
The admin can select zones from the dropdown list and also can add new zones whenever required.
The Prestashop Shipping Cost by Postal Code module admin interface offers a list of the countries to select from.
Admin can set shipping cost according to zip codes of the particular region.
The Prestashop shipping cost by location module allows admin to set the shipping cost according to the range of the postal codes that exist in that particular region.
The Prestashop shipping cost by country allows editing various shipping cost provided by the admin.
The shipping cost by zone module allows admin to fix the shipping charge based on zone, country, state/region, city, postcode range.
The Prestashop Shipping Cost by location plugin allows the store admin to disable the product delivery for a particular zone or region.
The Prestashop Shipping Cost by Postal Code addon is multi-lingual compatible.
The Prestashop delivery cost by postcode plugin is compatible with the latest versions of Prestashop.
The Prestashop eCommerce store admin can create the term and conditions of the carrier options.
ImportCSV file feature in the backend allows the admin to add shipping conditions for various countries, zones, zipcodes in bulk
2.0 Installation
Purchase the Prestashop shipping cost by postcode module from the store. On completing the transaction, follow the below steps:
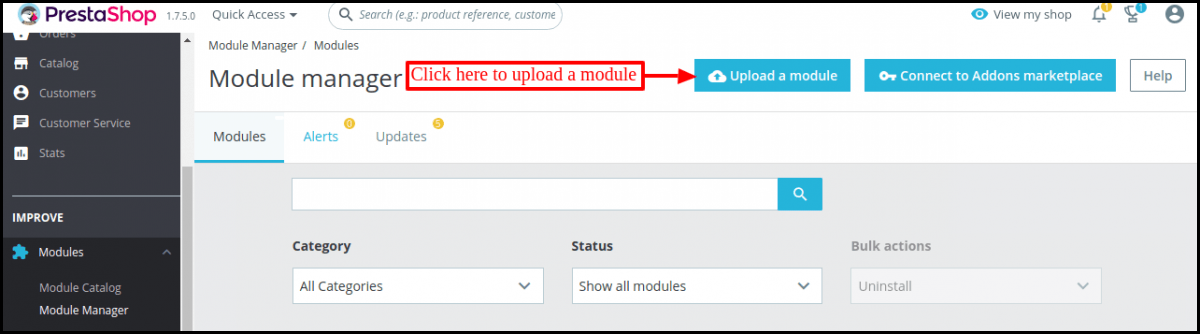
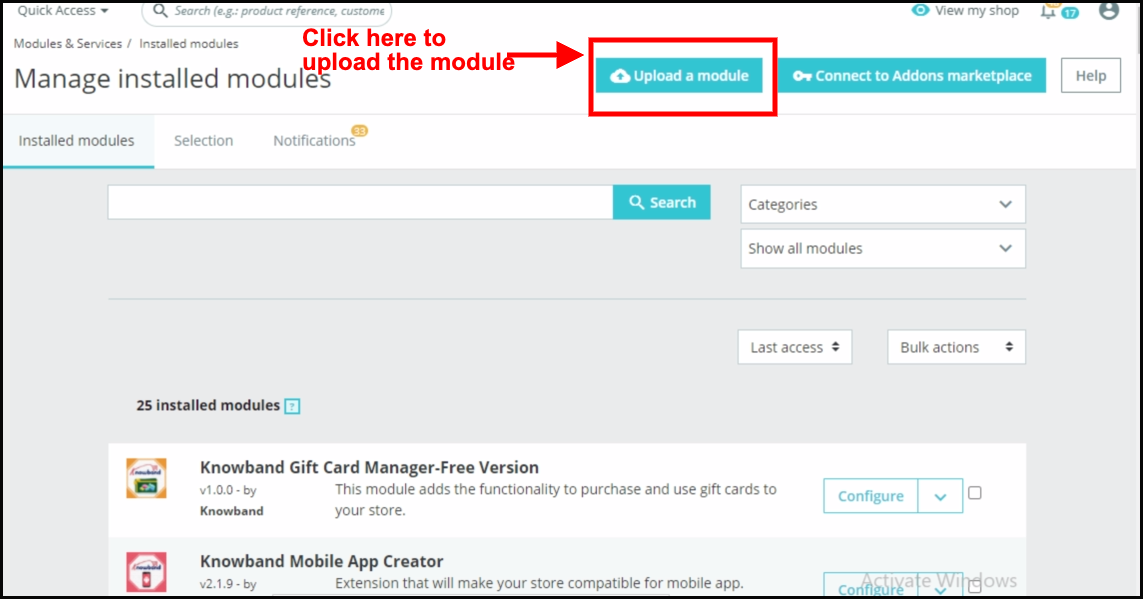
From the backend of the store, go to the Module Manager and click on “Upload a module”.
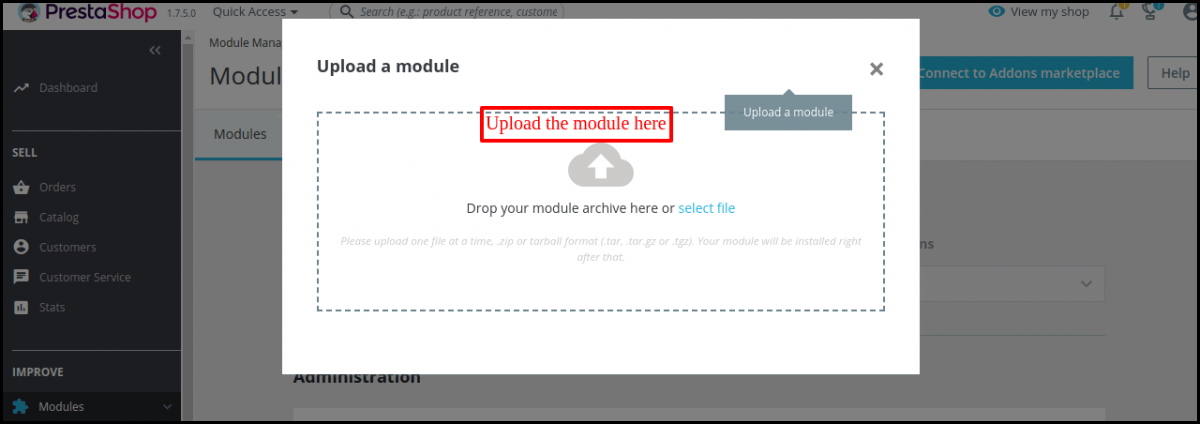
Upload the file from the system or drag and drop your module file here in the next tab. This step will install the module and show notification – “Module(s) installed successfully”.
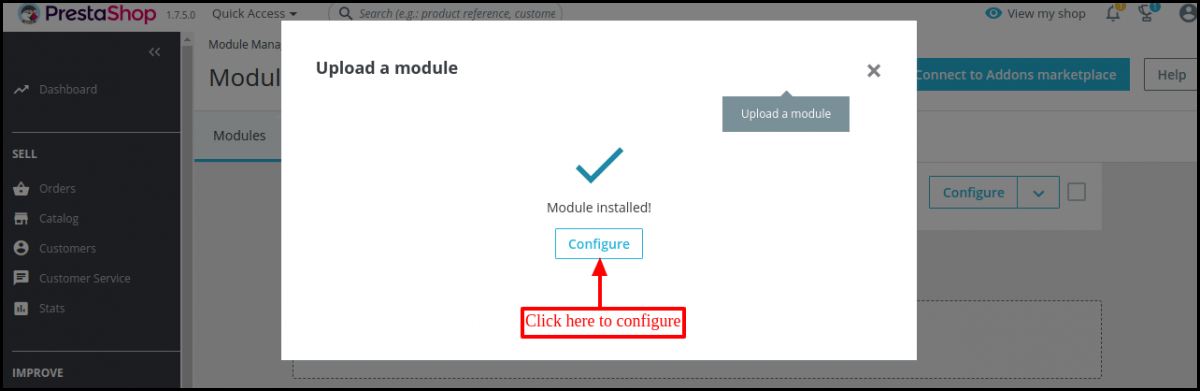
Once the installation process is completed, “Module installed” notifications will get displayed.
Click on the configure button and your module is ready to use.
In case, you are not able to find the module in the admin modules list, please try searching module by entering the Keyword, Shipping Cost by Zipcode.
3.0 Admin Interface
This Prestashop Shipping Cost by Zipcode module is completely configurable. The settings can be updated via the admin interface.
3.1 How to start using the module?
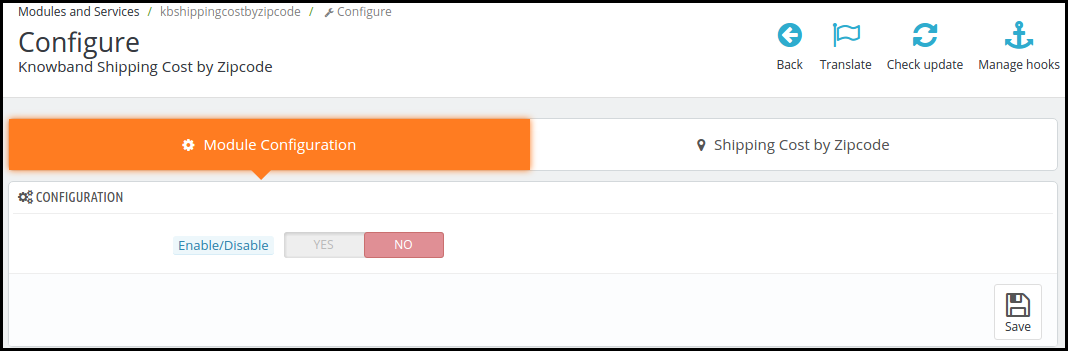
Once the installation is complete, all you need to do is to enable the Prestashop shipment charge by zipcode module on your Prestashop store by toggling the button as shown in the image below.
3.2 How to add new shipping conditions?
The very first step for adding new shipping cost by zipcode is to divide the location where you cater your products into different zones. The Prestashop Shipping Cost by Post Code module allows easy creation of zone and separation of the various regions. Follow the below-mentioned steps in order to create new conditions.
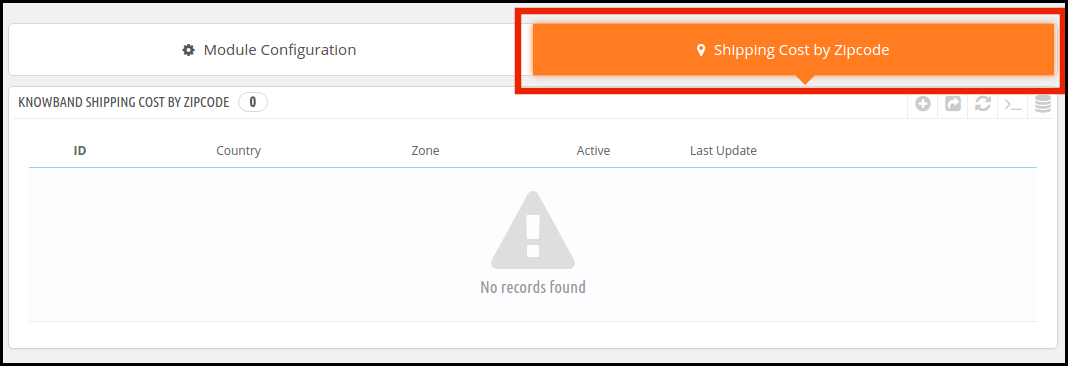
1. Go to the ‘Shipping Cost by Zipcode’ tab.
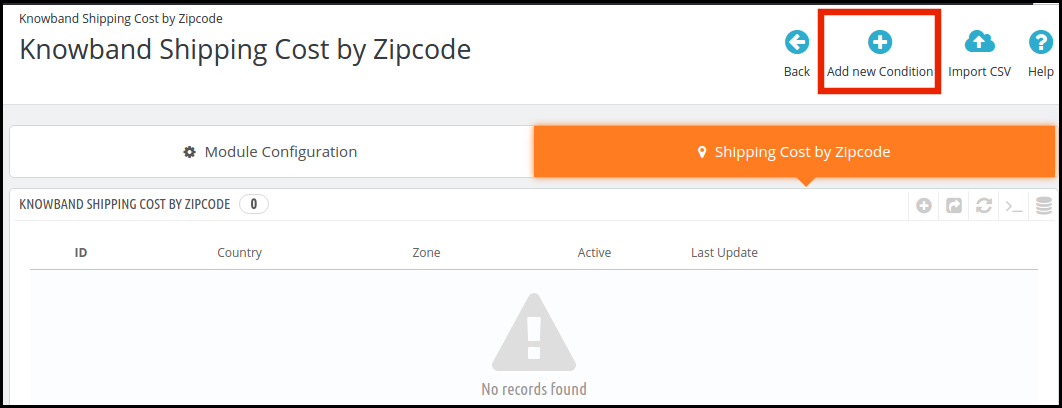
2. In order to create new zones, you need to click on the ‘Add New Condition’ on the top of the admin interface.
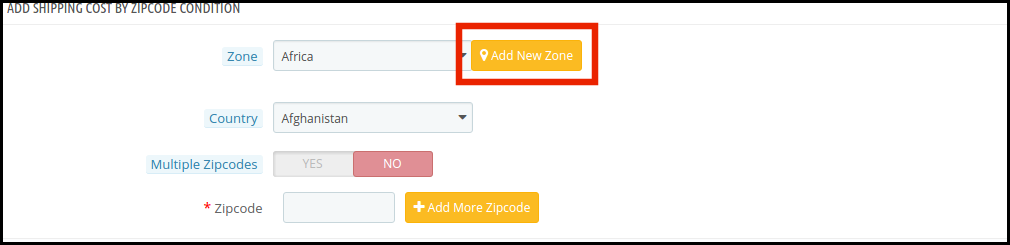
3. Once this is done, you’ll be redirected to the customization page. The Prestashop store admin is required to enter the following information as shown in the image below.
Let us discuss the options one-by-one.
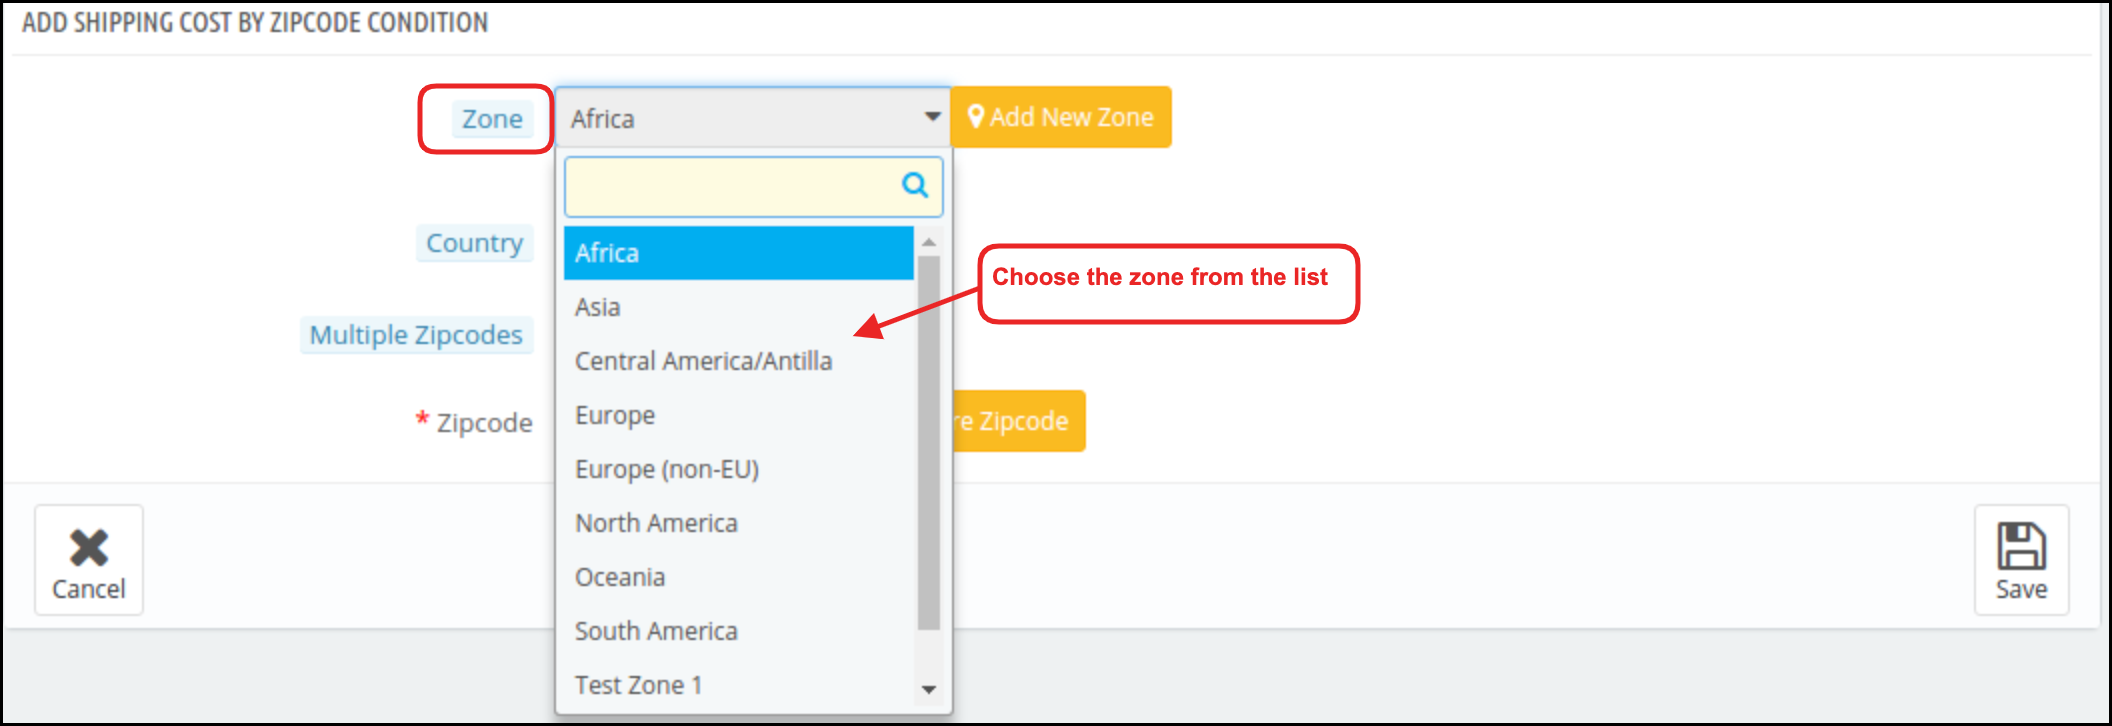
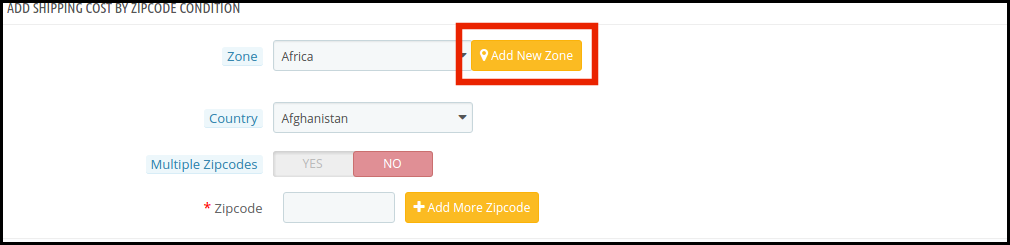
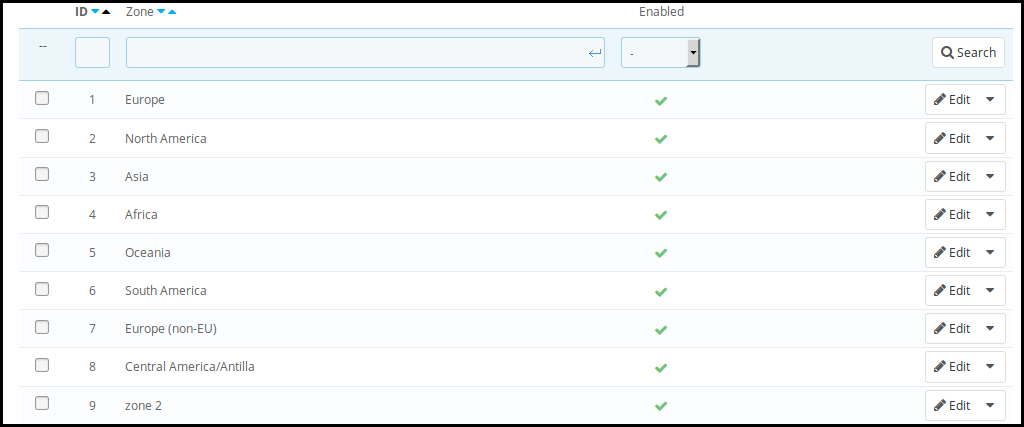
Zone: The various zones already created on the store will be shown in the drop-down list. The Prestashop store admin can select anyone and make the necessary changes.
In case, the admin wants to create a new zone, he can do so by clicking on the ‘Add New Zone’ option.
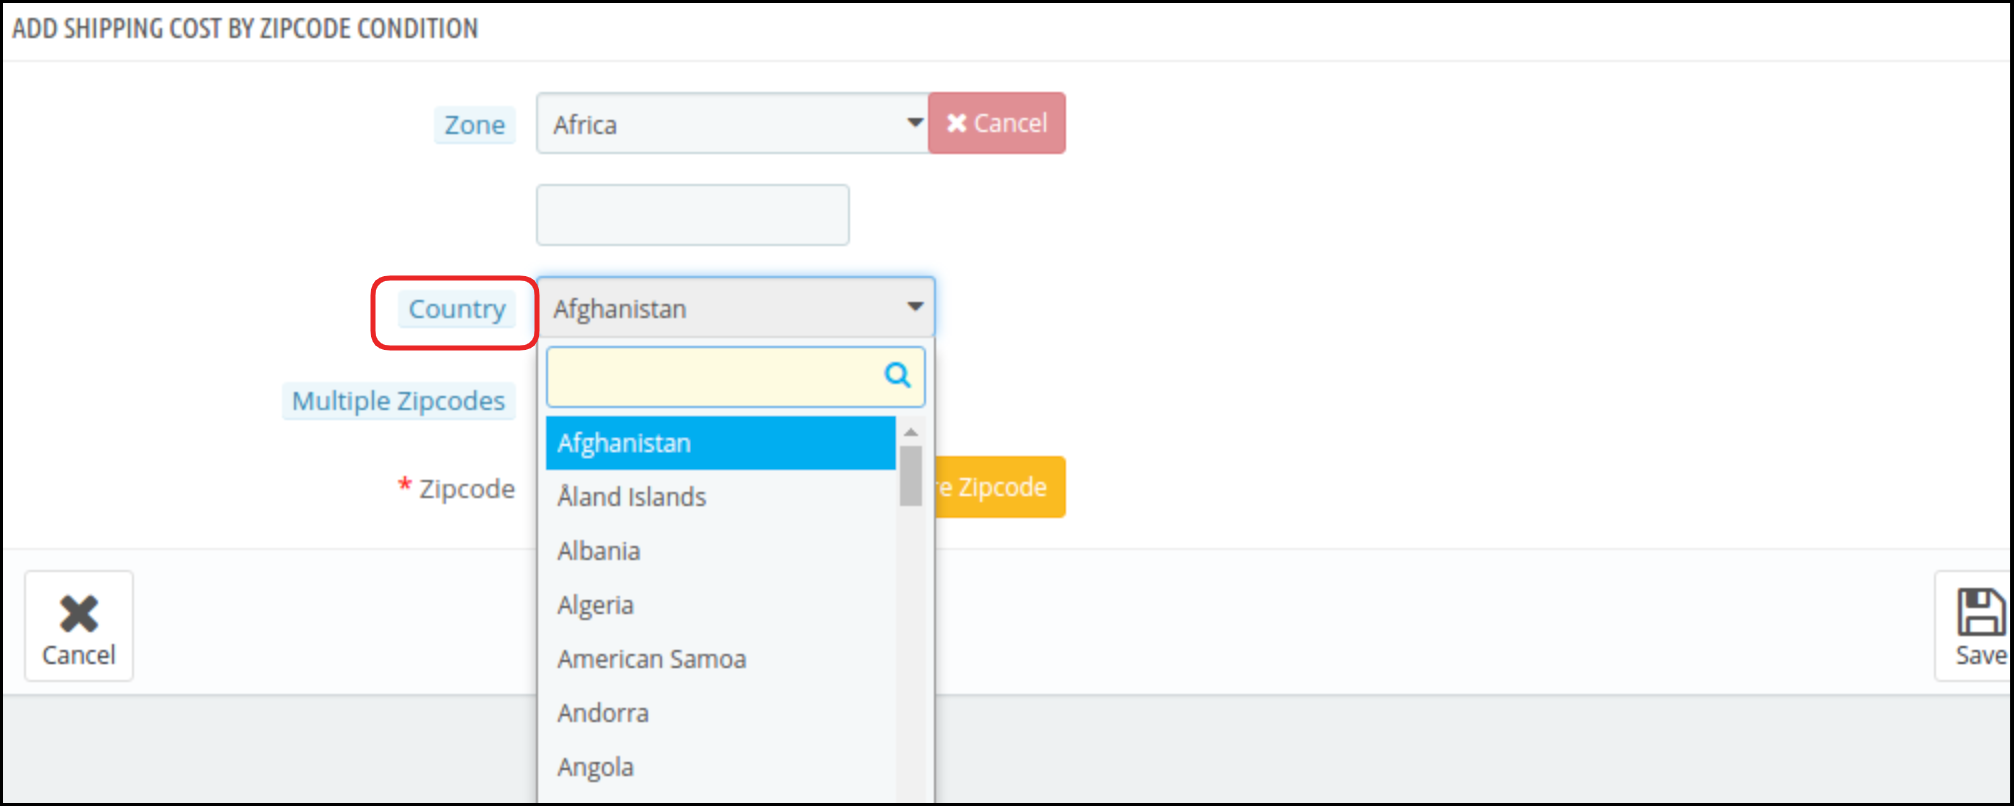
Country: The country for that particular zone can be selected from the list available.
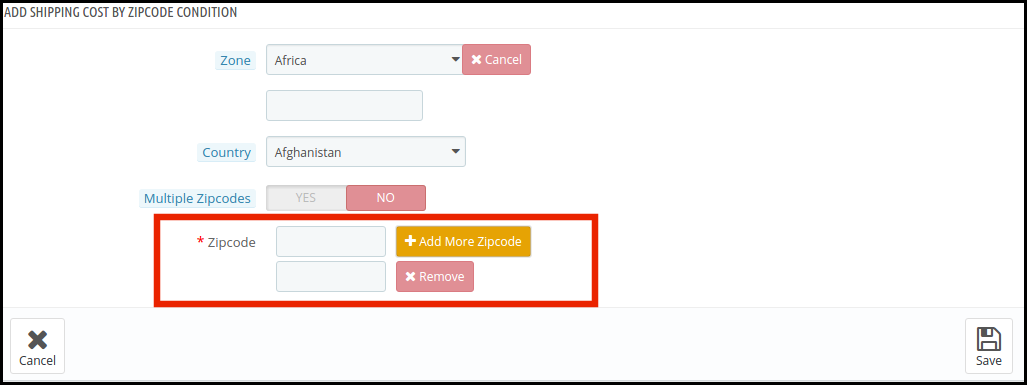
Zipcodes: A particular zone can have either have multiple zip codes. The Prestashop store admin can add the postal codes by clicking on the ‘Add More Zipcodes’.
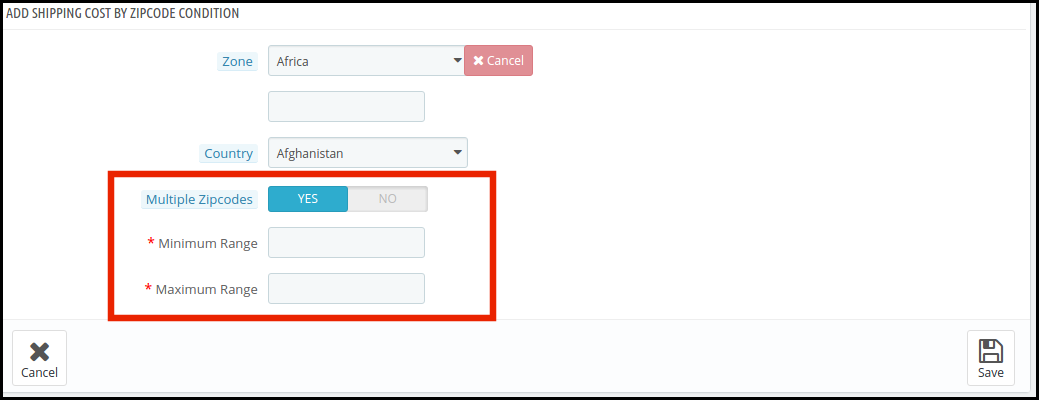
Multiple Zipcode: In case the eCommerce store admin is looking to add the range of the postal codes, he can do so switching this button on.
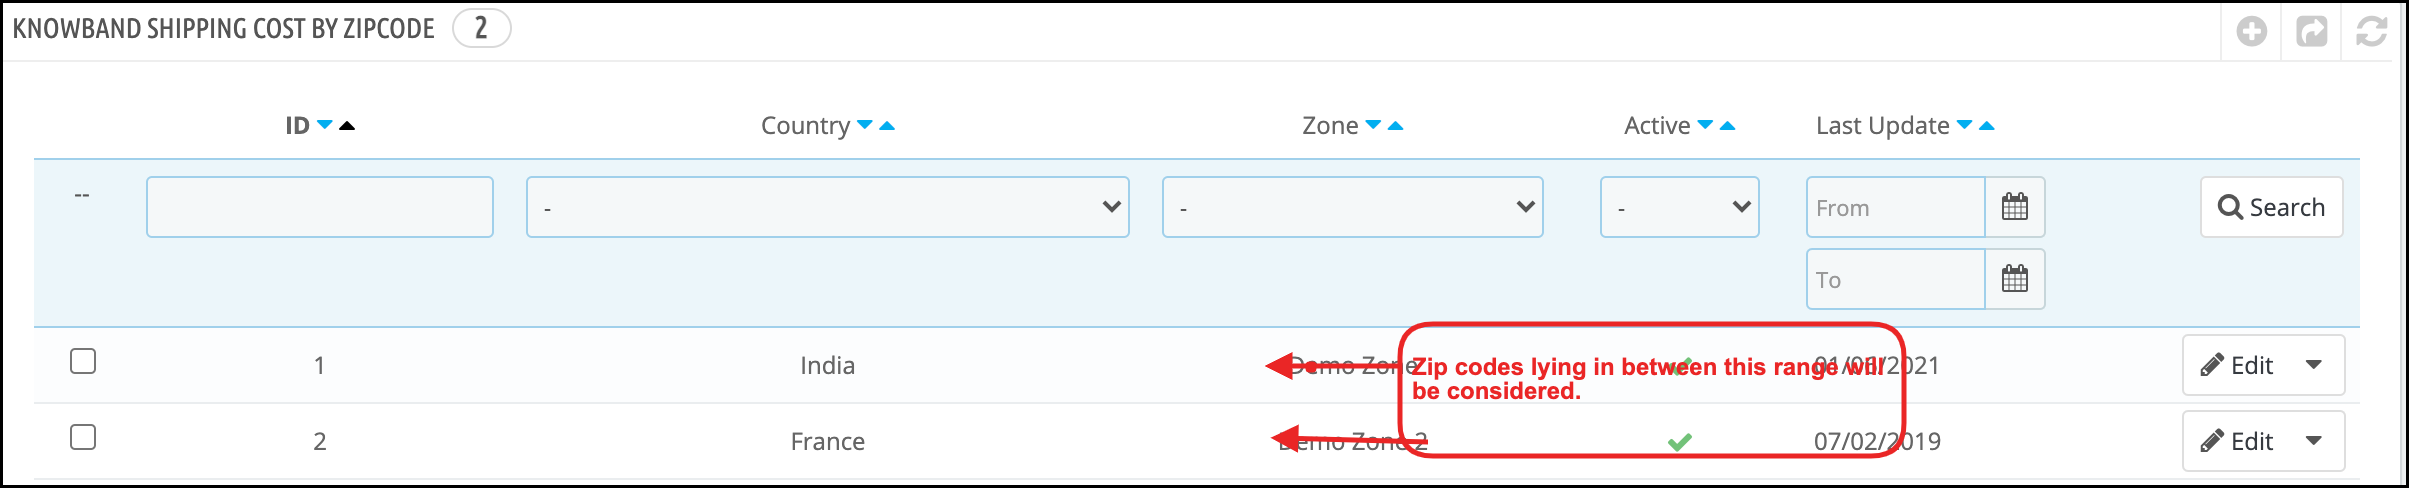
The Prestashop eCommerce store admin can then enter the minimum and maximum range of the postcodes. Any zip codes lying in between this range will be considered in that particular zone and the shipping charges will be calculated accordingly.
The list of the zones created can be viewed in the ‘Shipping Cost by Zipcode’ tab.
The exiting zones can be edited or deleted by clicking on the respective buttons.
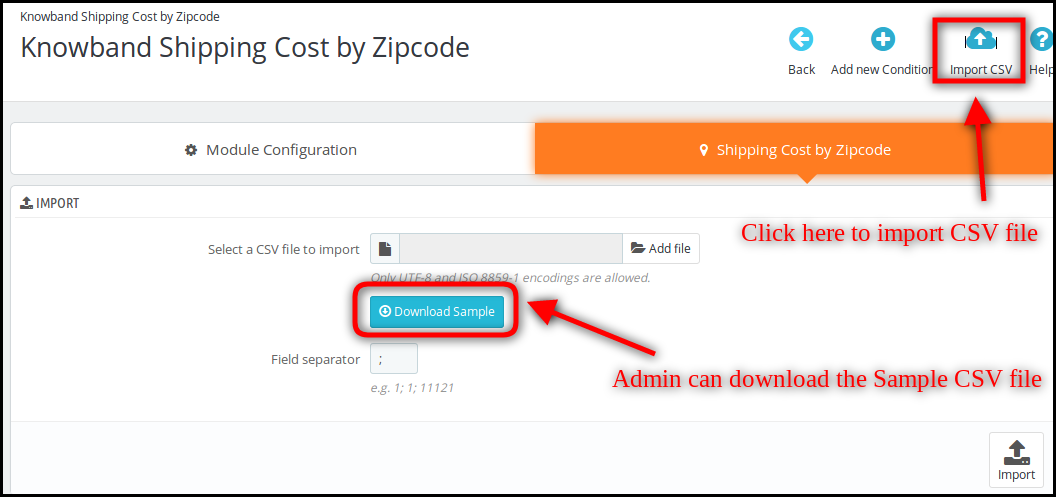
Import CSV:
The store admin can download a sample CSV file for adding multiple zip-codes. The admin just needs to click on the “Import CSV” option. The admin can download the sample CSV file.
Sample CSV File: There are three fields in sample CSV file ie.Country id, Zone and Zip Code.
The admin can enable or disable the zone from the admin panel.
After activating a particular zone the admin can insert the particular country ID and zip code easily. Thus the admin can easily enter multiple zipcodes at a time without any hassle.
3.3 How to enter shipping costs?
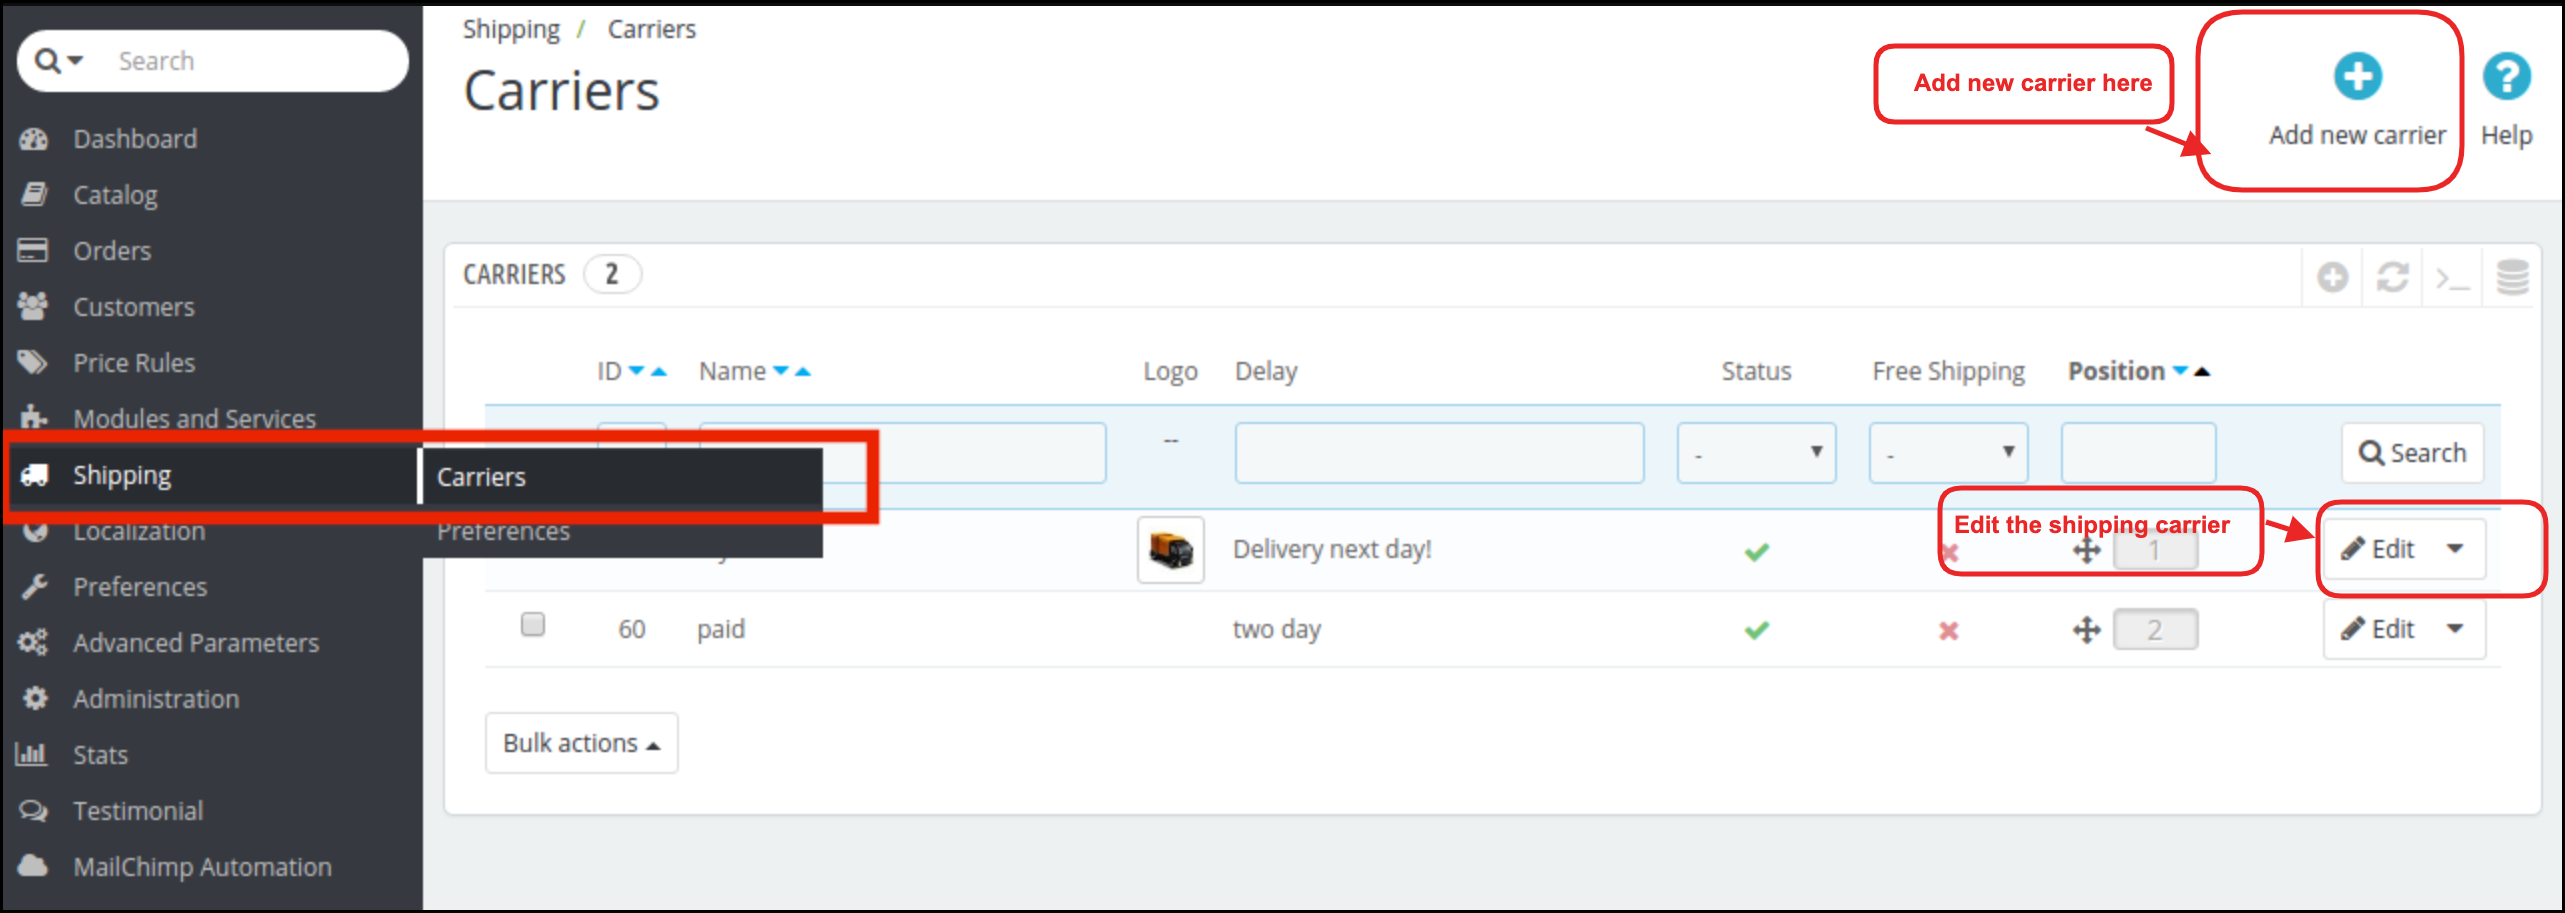
The shipping conditions can be fixed in the Shipping option of the main menu of the admin interface. Follow the below-mentioned root for the same.
Go to the Main Menu -> Shipping -> Carrier -> Select the carrier option that you want to edit.
The admin can browse the ‘Edit’ option in order to make the necessary changes.
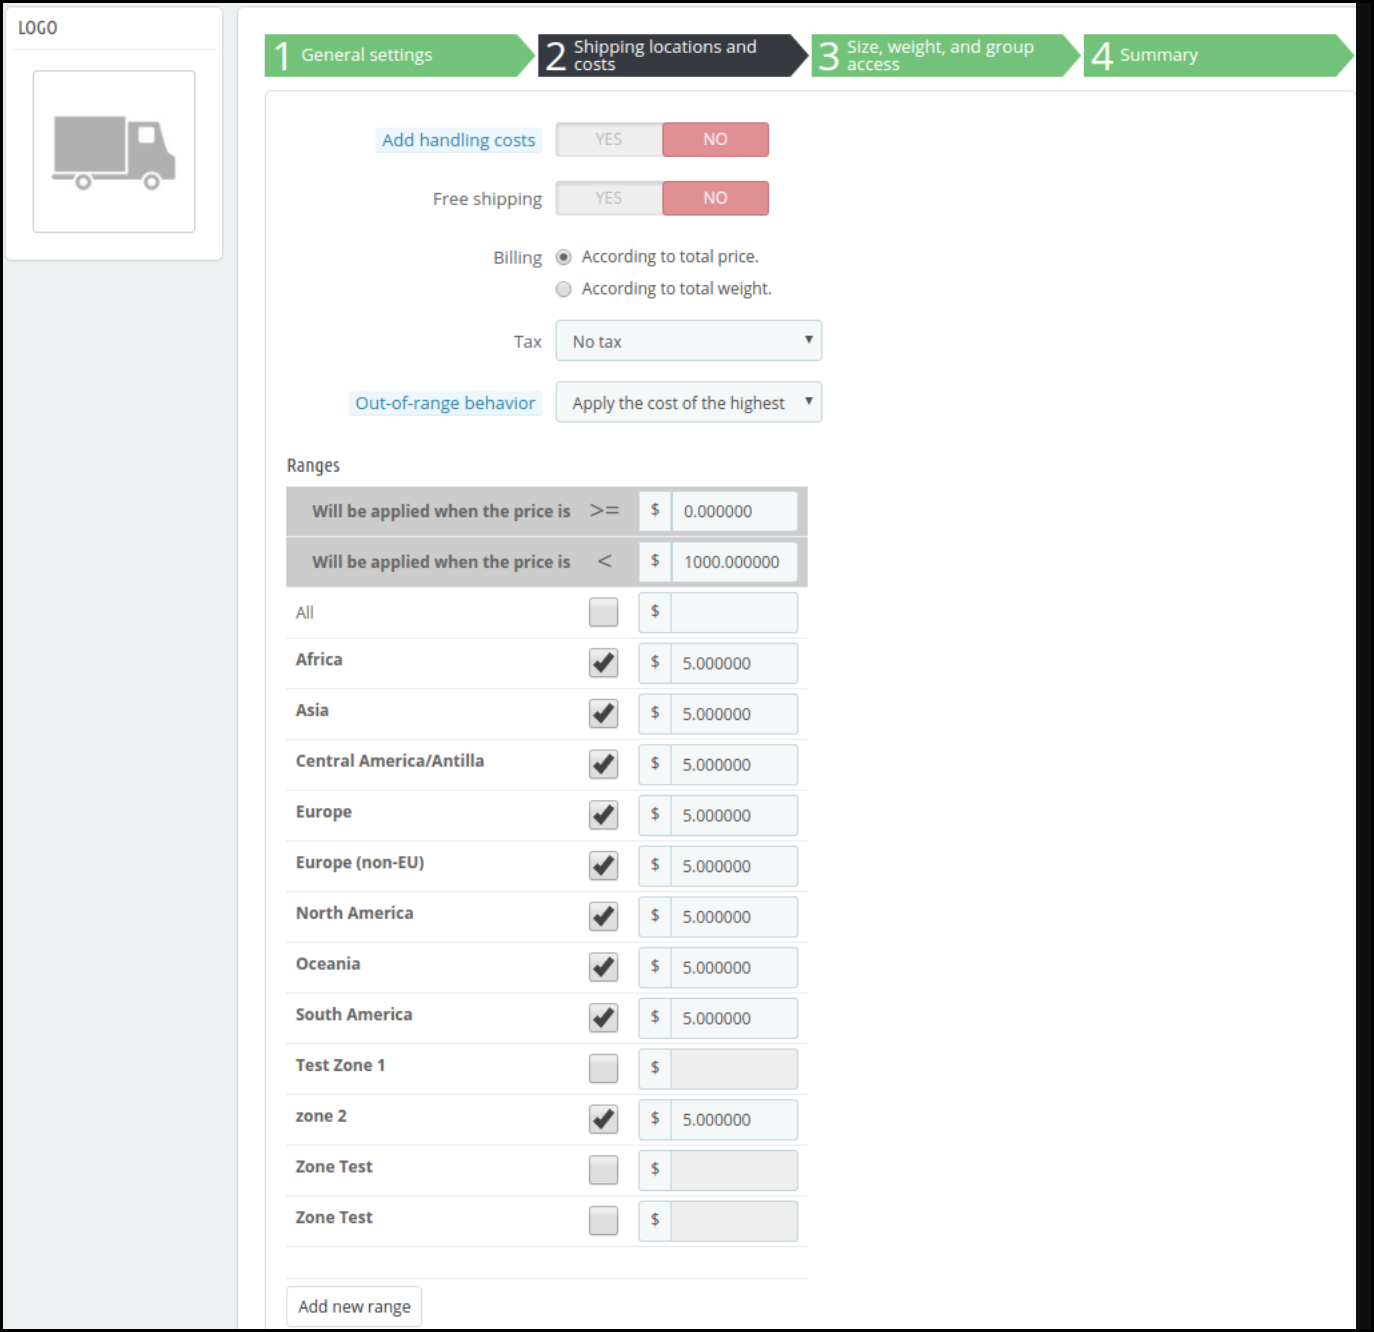
While the ‘General Setting’ and other options remain the same as per the store admin’s requirement, he can change the shipping cost based on the zipcodes. For this, he needs to go to the ‘Shipping Locations and Costs.
The Prestashop eCommerce store admin gets to optimize the shipping management by adding delivery cost for different regions. The shipping cost for the customers will then be calculated by taking all the aspects into account.
4.0 Website UI
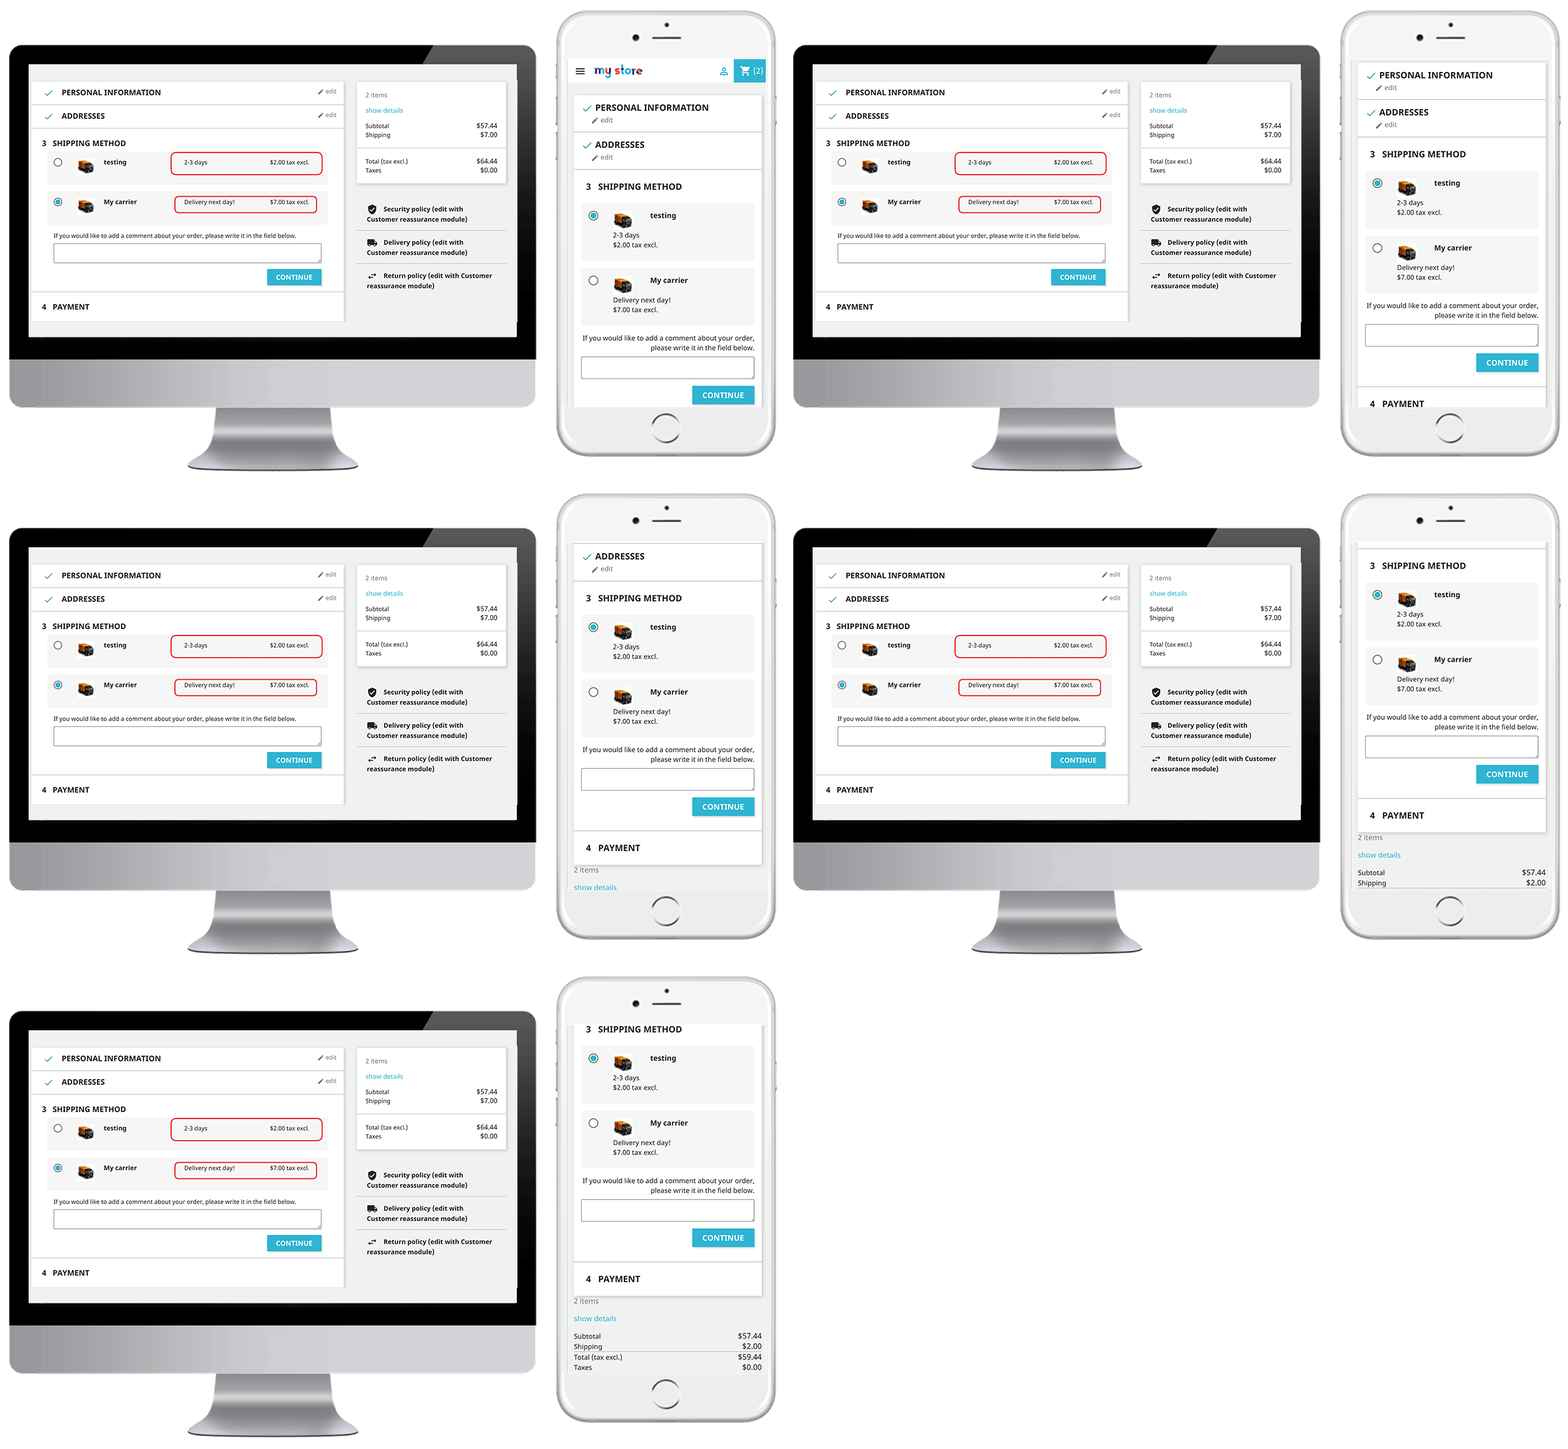
In the front-end of the eCommerce website, the customer can enter their postal code and the carrier option available in that location and the total shipping cost will be calculated and shown in the checkout page as shown in the image below:
This way, the online store merchant can implement Prestashop Shipping Cost by Zipcode addon for automatic cost calculation. The eCommerce store admin can manage the delivery cost as per the customer’s area Pincode. The Prestashop Shipping Cost by Zipcode module allows the online store admin to segregate customers location into regions, countries, zones and area pin codes. The online store merchant can also include tax and handling fee in the shipping charges if he wishes to add it. The Prestashop Shipping Cost by Postal Code module allows the store admin to offer services and products all over the world by simplifying the shipping cost calculation process. After a successful setup, the Prestashop delivery cost by postcode addon automatically calculates the shipping cost on the checkout page.
For additional guidance, please refer to the tutorial video available below, which provides a step-by-step walkthrough of this module.
To protect your eCommerce store from spammer, fake registration, and unwanted traffic, Prestashop Block User/Bot by IP, Country or User Agent has come in quite handy. The Prestashop Block User Addon helps the store admin to block or keep away the unwanted boots from their site by creating a list of the IP addresses, countries and user agents that he wants to keep away from the site. It also has the option to customize messages that are shown on the frontend or to the banned user. This Prestashop module, also provides the option for “Request for removing the banishment” to the banned user, which can be helpful to identify the user if he got blocked mistakenly.
With the digitalization of the eCommerce websites, automated programs commonly referred to as bots are designed for both beneficial and destructive purposes. Banning the bots with malicious intent can lead to a secure eCommerce website. Any website especially a shopping website is concentrated with the bulk of user data including their personal and confidential information. Bots can be used for many malicious purposes including fake registrations, stealing the content and other useful details. This Prestashop Block User/Bot by IP module from Knowband can help you with malicious purposes bots without making any changes in the website code.
What’s new?
Now there are some additional features in this module:
The store admin can now enable Google ReCaptcha version 3 on the store front end to block the access of bots from entering the store.
The PrestaShop admin can now capture all the IP addresses that access the store.
Prestashop Block User Addonallows the admin to add and create IP addresses and user agents in bulk.
1.1 Objectives of Prestashop Block Bot Addon
Listed below are some of the objectives that can be achieved with the help of this Prestashop Block User/bot by IP Addon.
The Prestashop store admin can enable or disable Prestashop Block User/bot by IP at a button click.
The Prestashop store admin can list out the IP address that he wants to ban from the website.
The Prestashop addon even allows the store owner to prevent their sites from being viewed in a particular country.
In addition, the user agents can even be blocked from the store as per the requirement using this Prestashop block user/bot by IP, country or user agent.
The Prestashop store admin can customize the front-end of the website the way he/she wants it to be displayed to the blocked customers.
The blocked users get an option to request the admin to remove them from banishment.
2.0 Installation
After purchasing module, you will get following files as listed below:
Blockuser.zip. This folder contains the source code of the module.
User Manual
Follow the steps mentioned below in order to install the extension on your store:
Unzip the blockuser.zip file. The unzipped folder contains the files and folders as shown in the image below –
Copy all the files and folders of zipped folder and paste them into your store “Modules” directory. Follow the address path Root Directory/modules/.
Now module is ready to be installed on your store and you can find that in Store Admin -> Modules and Services. It would shown as below –
In case, you are not able to find module in admin modules list, please try searching module with following details –
Keyword – Block User
Category – Front office
Filter By – Installed & Not Installed / Enabled & Disabled
Click on “Install” button to install the module. It would show a pop-up for your confirmation. Click on “Proceed with the installation” option. This step will install the module and show notification – “Module(s) installed successfully”.
3.0 Admin Interface
The Prestashop block user module offers to be an effortless means to block the unwanted traffic from the site from the admin interface without making any code changes in the website. Here we described how the admin interface works.
3.1 How to start using the module?
In admin interface we have five tabs which are labeled as “Module Configuration”, Block User by IP Address, “Block User by Country”, “Block by User Agent” and “Blocked Customer Request”.
Now we are starting with the first tab i.e ‘Module Configuration’. This tab will be the default option. Below are the options which will be covered under this tab.
Enable/Disable: First we need to enable this Prestashop module by toggling the button to get an access to block the user/bot. Initially, it is selected as “YES” which means the module is enabled.
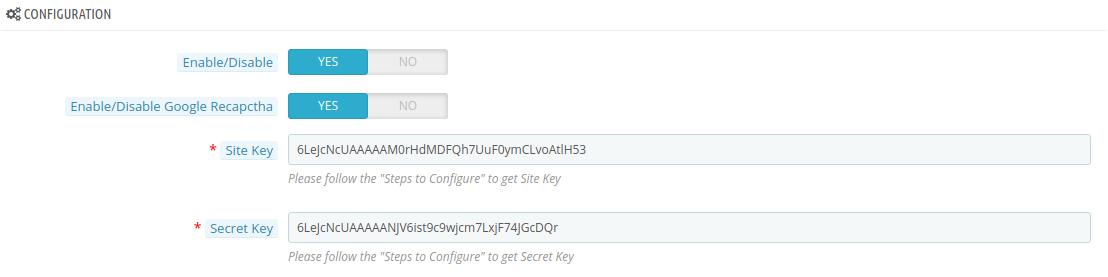
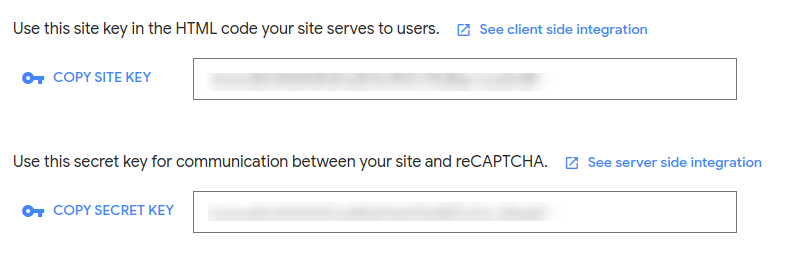
Enable/Disable Google ReCaptcha: With the google reCaptcha feature, they can enable/disable the v3 of google reCaptcha with just a single click on the toggle. Site Key: The admin has to enter the site key to display the reCaptcha on the store frontend. Secret Key: Admin has to enter a secret key to authorize communication between the application and the reCaptcha to verify the user’s response. They have to generate the secret key to incorporate the reCaptcha functionality on the store.
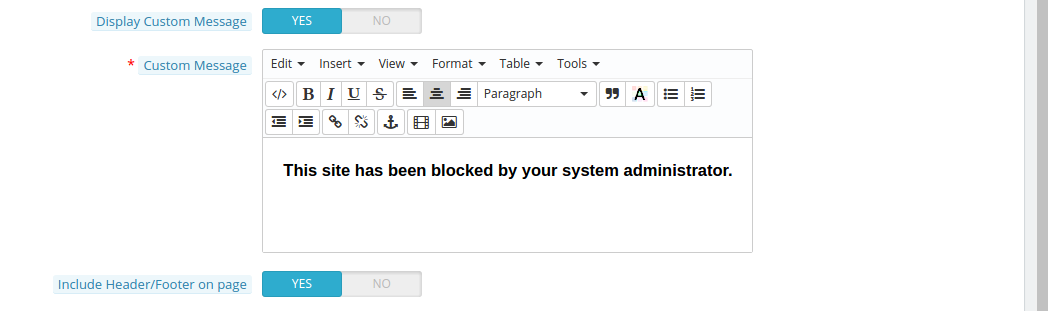
Display Custom Message: Admin can show customized message in the front end of the website. By default it is enable if customer wants he can disable this.
Custom Message: This option will be shown only when you enable the display custom messages. In this, the text box will have some options to customize the text format. You have to write your custom message in this text box so that, it will be shown on the front end of the website to the blocked user.
Include Header/Footer on the page: If this option is enabled then the blocked user can see the header and footer of the website, otherwise, they are able to see the blank web page with the custom message only. Initially, it is selected as “YES” which means the header and footer will be shown to the banned user. To disable this option, toggle the button to “No”.
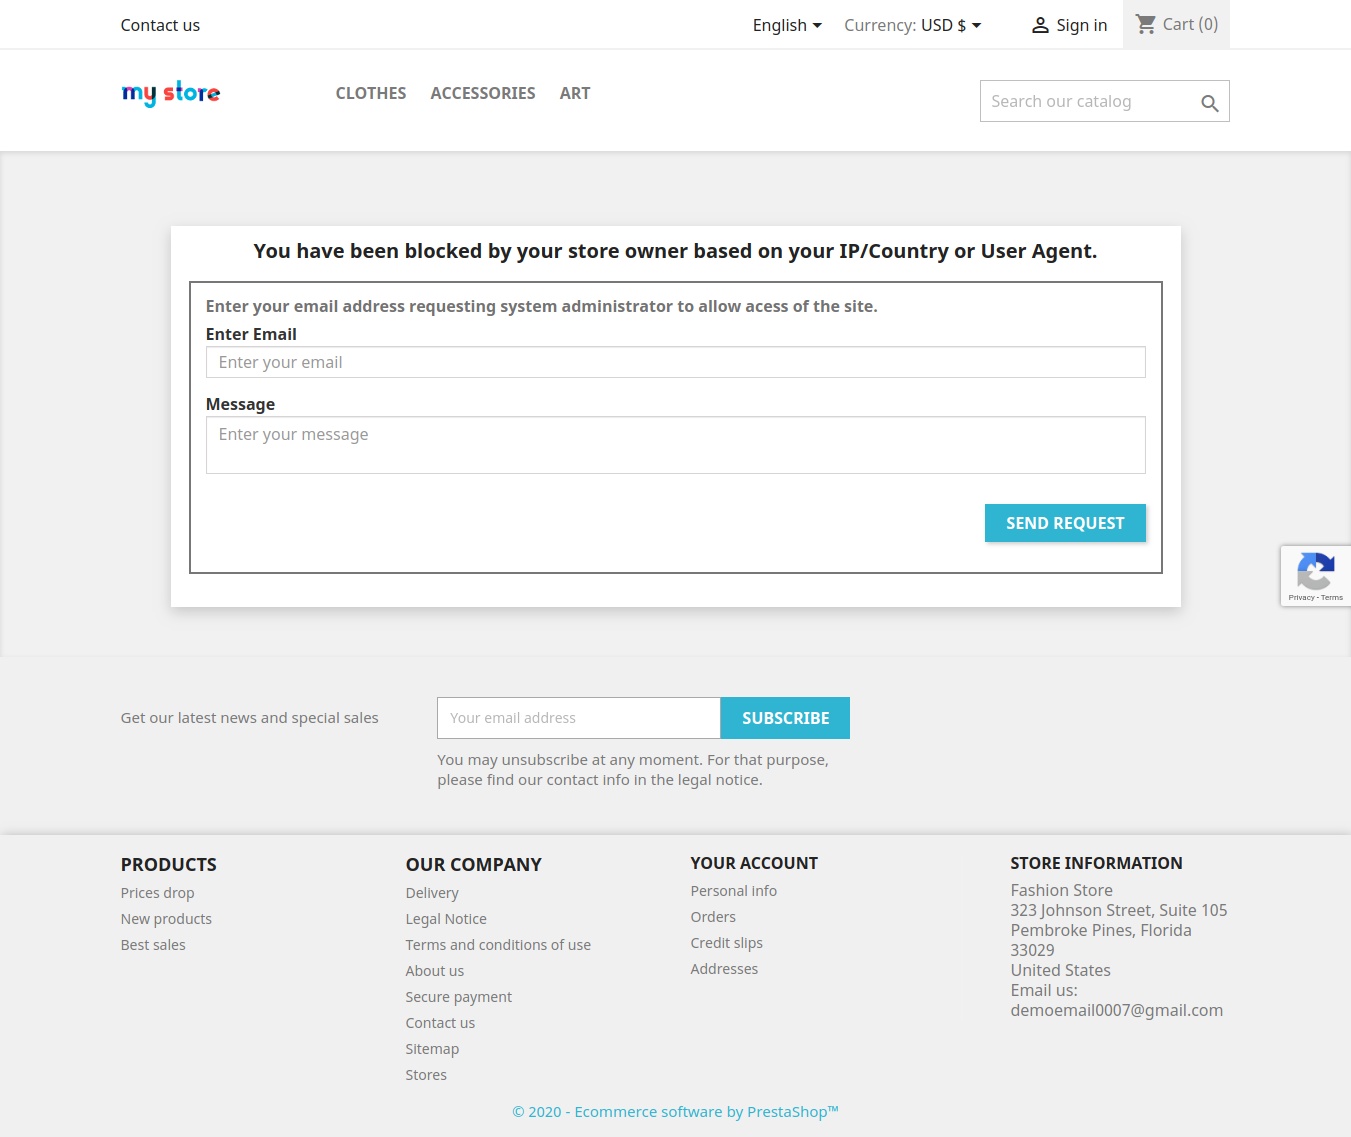
Customer Email Notification: This option provides a way for the banned users to drop a request to remove the banishment. This features can be enabled or disabled by the store owner. The visitors can enter their email ids and enter the message that they want to send. By default it is enabled.
Mail Subject: The admin can even customize the message or the mail subject that is to be send along with the mail. Prestashop store admin may customize this mail subject.
3.2 How to get Site Key and Secret Key?
Follow these steps to get Site and Secret Key –
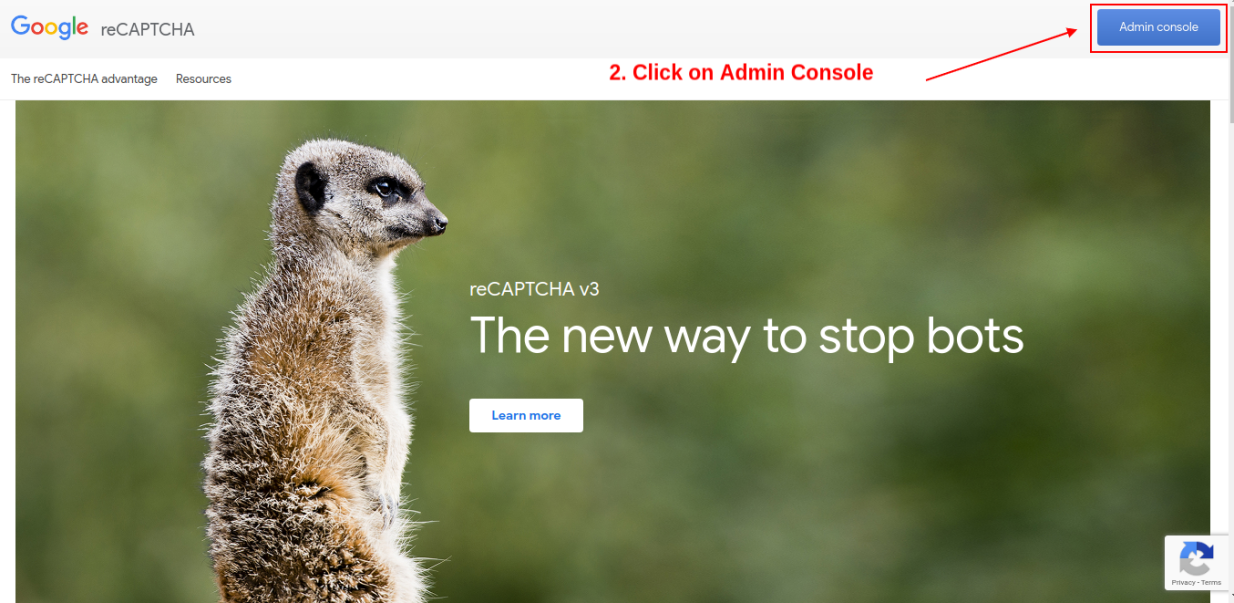
Visit the URL: https://www.google.com/recaptcha/intro/v3.html
Click on “SIGN UP” if you do not have a Gmail account.
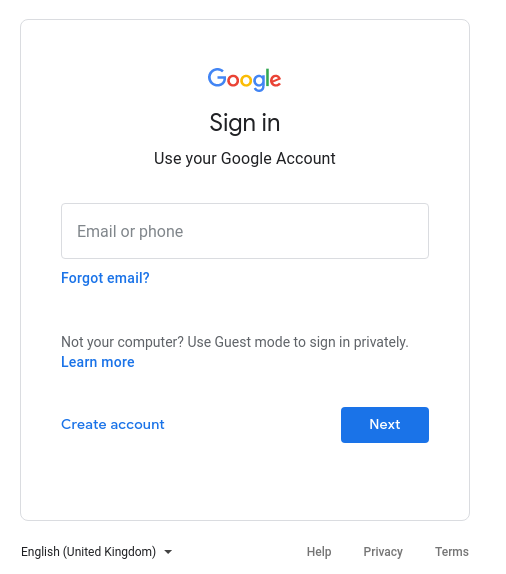
Create/Login to your Gmail account and then click on create.
Enter “Label” of your Domain.
Enter “Domains” of your store.
Click on “Register”.
Copy the “Site Key” and “Secret Key” and paste it into GeneralSetting Tab.
3.3 How to block user or bot by IP address?
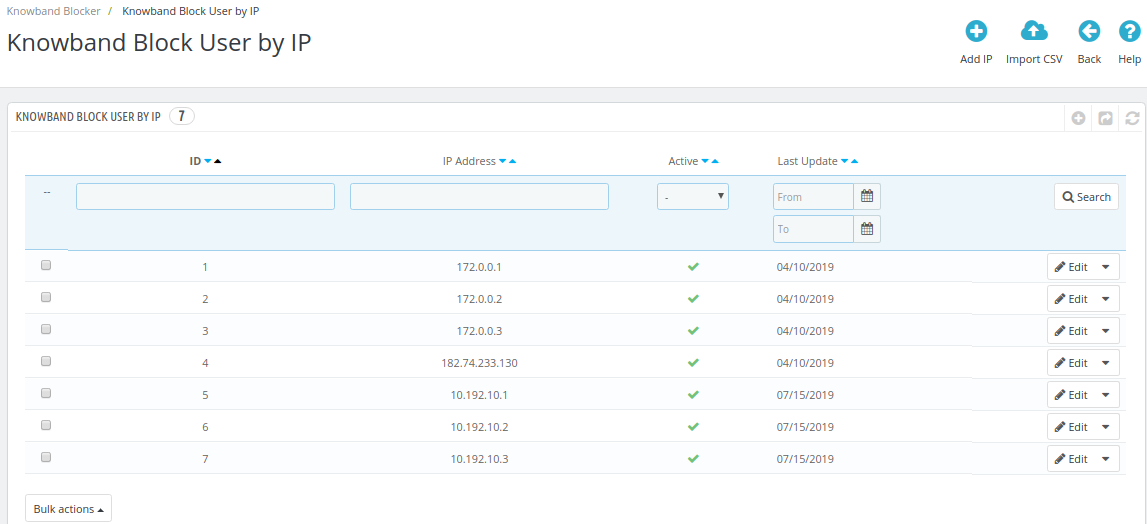
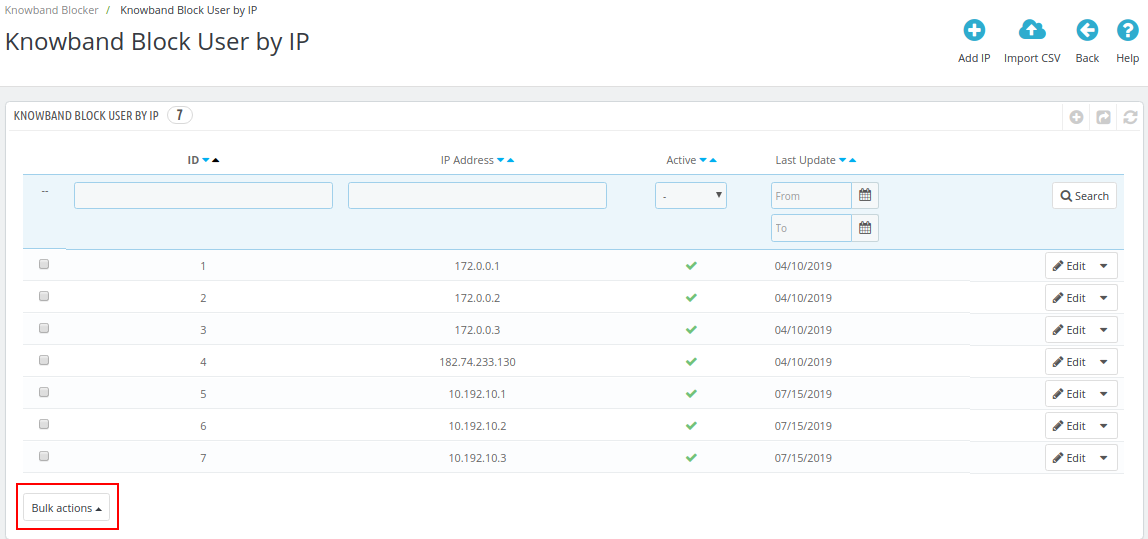
The Next tab is ”Block User by IP Address” which includes the entire list of the IP addresses that have been entered by the admin with their “ID”, “IP Address”, “Active” and “Last Update” Status.
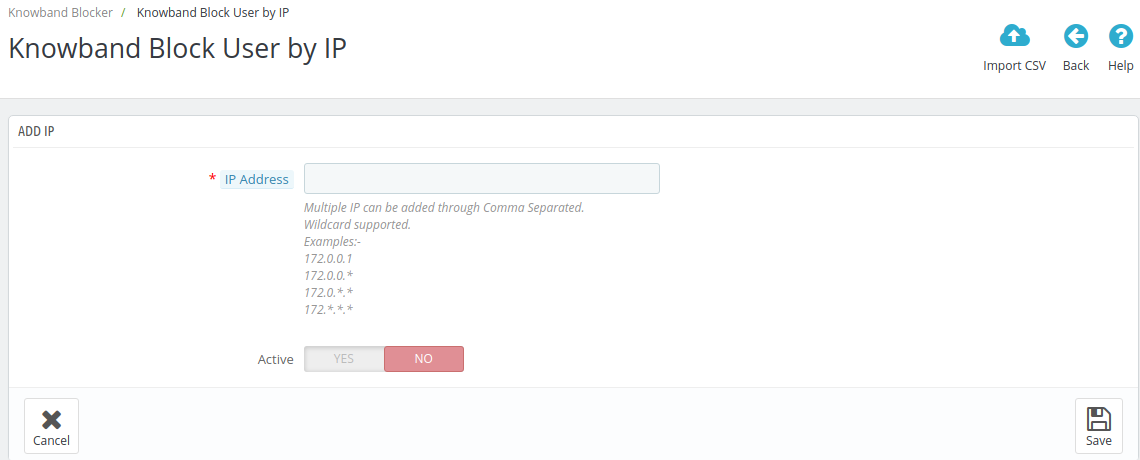
In order to add a new IP address, the e-merchant can go to the ‘Add IP’ option on the top of the admin interface.
The store admin can block the IP addresses and user agents in bulk with ‘Import CSV’ option on the top of the admin interface.
Prestashop block user/bot by IP module: The store owner can enter the particular IP that he wants to track or else he can enter the range of the IP address by using wildcard characters such as “*” sign. This will help the owner block the traffic coming from a particular organization.
After inserting the IP, enable the ‘Active’ tab of the list to block that particular or series of that IP.
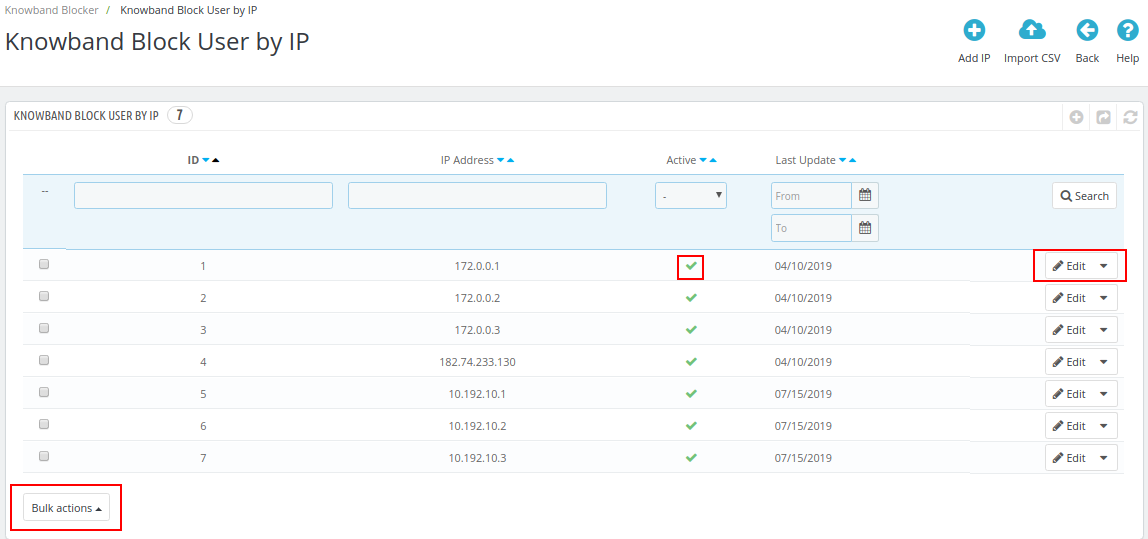
If you want to make any changes in the existing IP, the admin can click on the ‘Edit’ button and similarly, the list can be removed by clicking on the Edit drop-down which has the ‘Delete’ option.
The admin can enable and disable the addon from bulk actions tab. The admin just needs to click on the text box in front of the ID or can also choose select all option from the Bulk actions tab.
3.4 How to block user or bot by country?
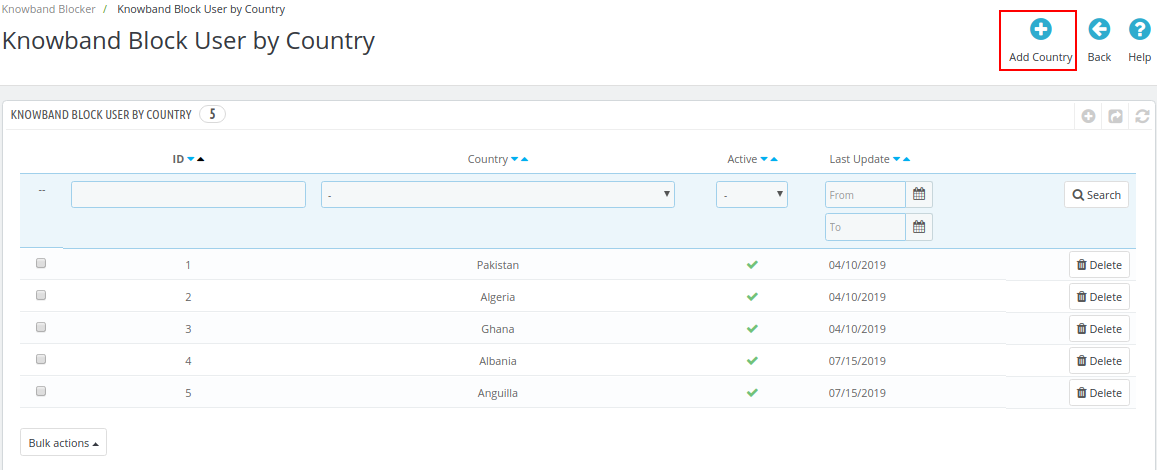
The ‘Prestashop Block User/bot by Country’ include the list of the countries that have been selected for the banishment. The e-merchants can block the entire country from accessing their website. “Prestashop block user/bot by country addon” comes as a handy tool when it comes to limiting the access to the site from a particular location.
For adding the new country to the block list, , click on the ‘Add Country’ option on the top right side of the interface.
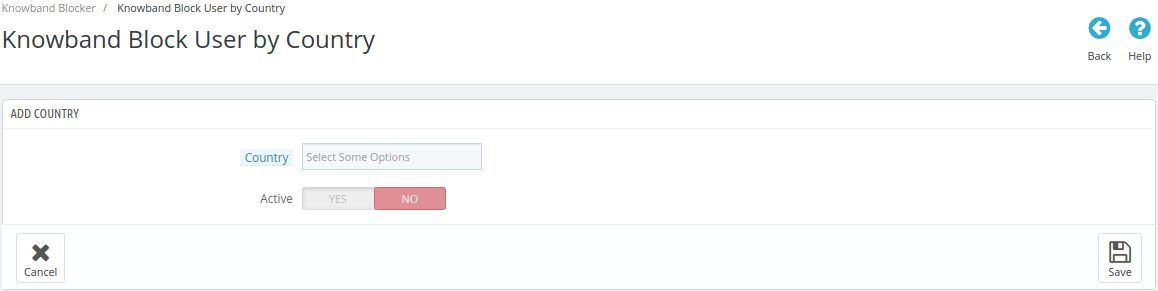
Just select the country’s name from the drop-down list that you want to block and toggle on the “Active” button to enable it.
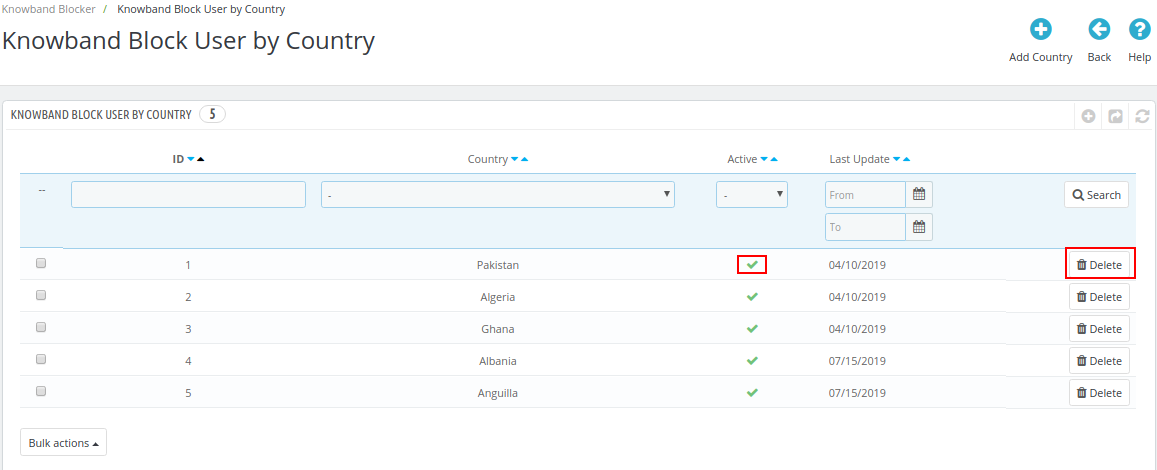
The country can be unblocked from the list by disabling the button in the ‘Active’ column. Similarly, the list can be removed by clicking on the ‘Delete’ option.
By using bulk actions Prestashop store admin can enable or disable the user agent in bulk.
3.5 How to block user or bot by User Agent?
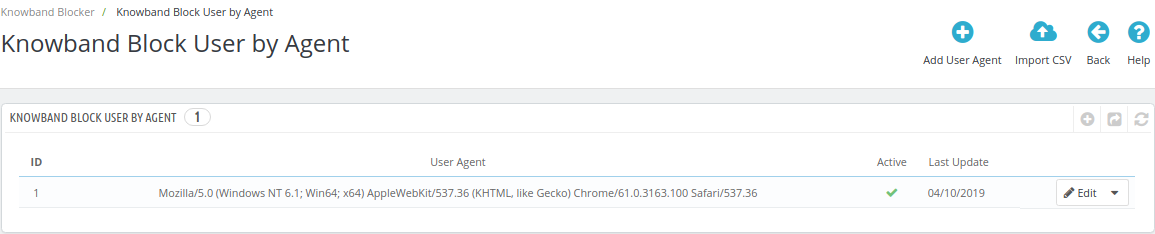
With the help of Prestashop block customer/bot by user agent, the module allows the store owner to block the users based on the user agent being used from the tab ‘Block by User Agent’.
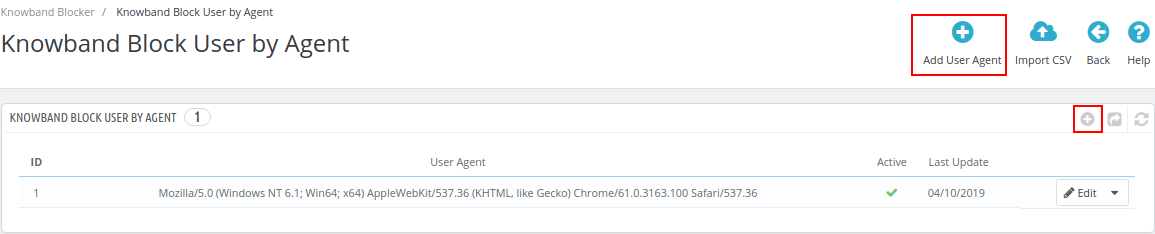
To add the new user agent, the module provides an option on the top right side of the admin panel.
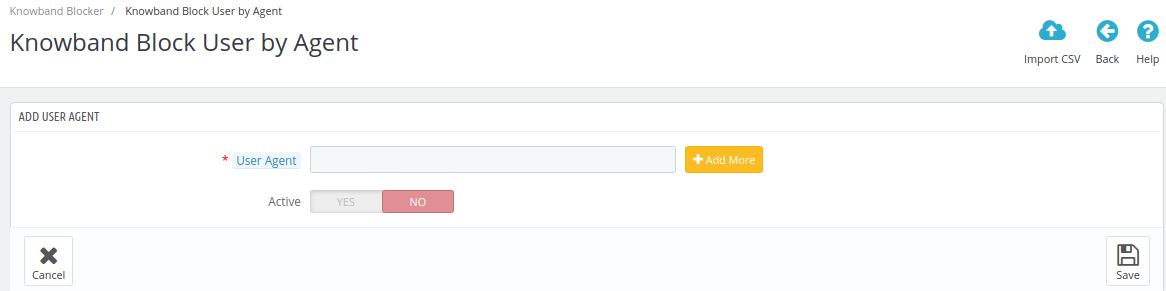
The store owner is required to enter the name of the user agent and enable the banishment. Then, active the banishment by toggling the button to “YES”.
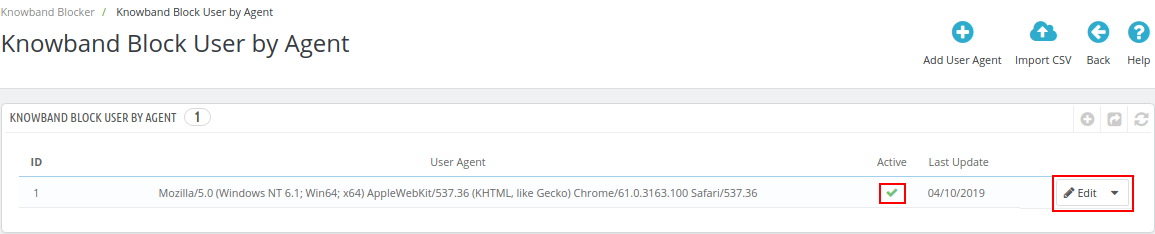
The process of enabling the banishment and editing the already created user agent name remains the same as the other two options.
The store admin can add browser user agent in bulk with ‘Import CSV’ option on the top of the admin interface.
3.6 Blocked Customer Request
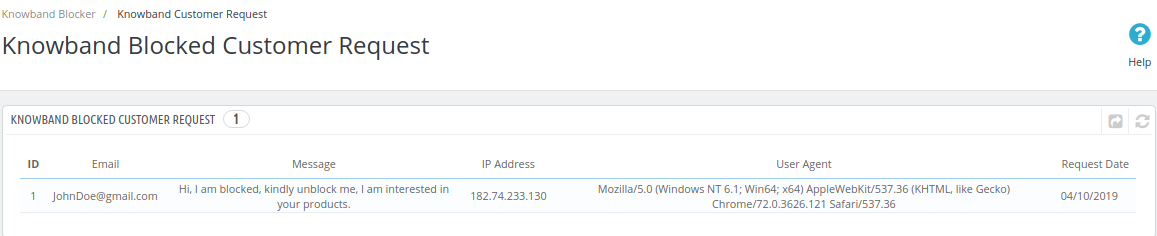
The front-end of the website offers an option to the customers to send a request for unblocking them by entering their email address and message. The entire list of the requests generated can be viewed by the admin in the ‘Blocked Customer Request’ tab then the request can be processed further accordingly.
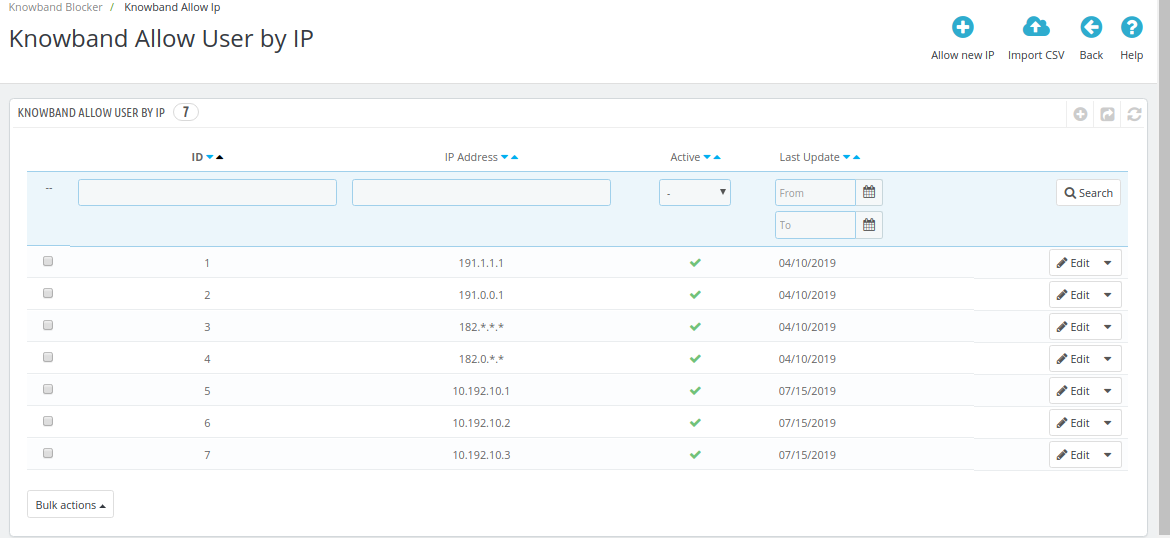
3.7 Allow User by IP
The store admin can allow unblocking through the IP address of the blocked users. The admin can see the allowed IPs from the Allow user by IP tab.
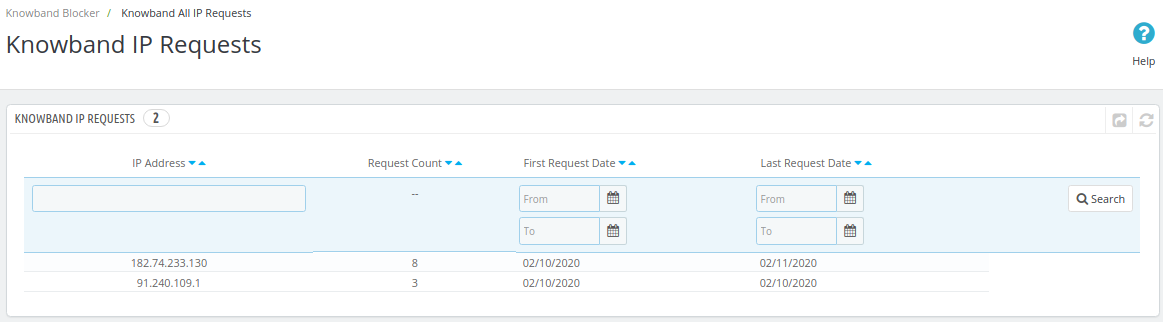
3.8 Knowband all IP Requests:
With Knowband all IP Requests tab, the PrestaShop admin can now track all the IP addresses that hits or accesses their stores.
4.0 Website UI
4.1 Website with Header and Footer
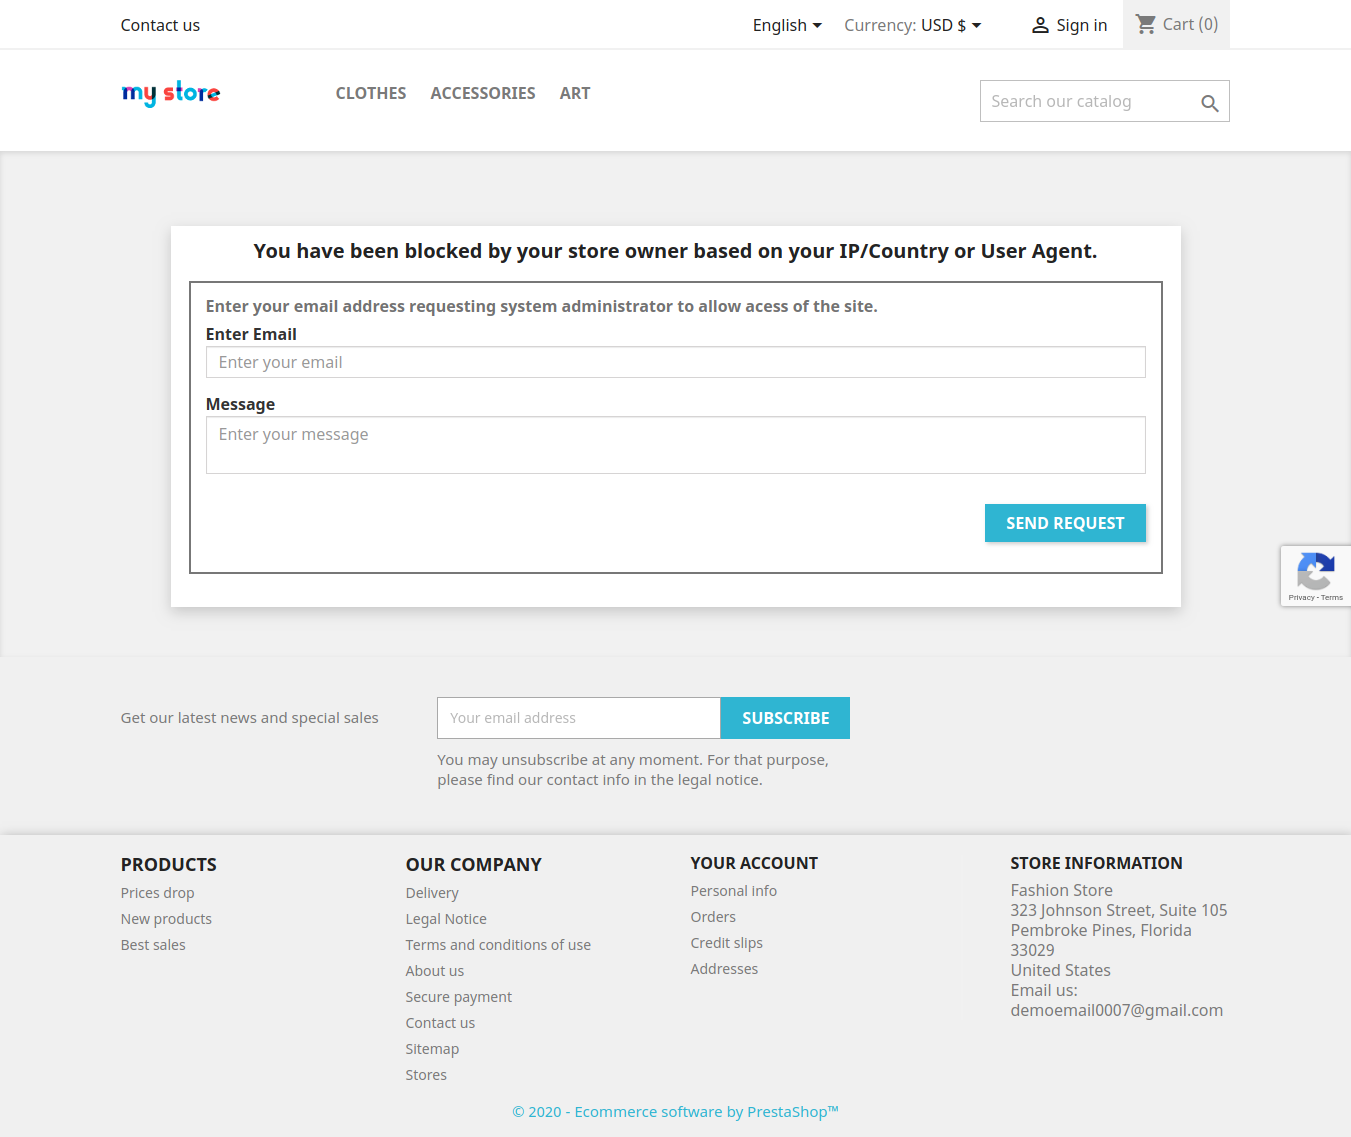
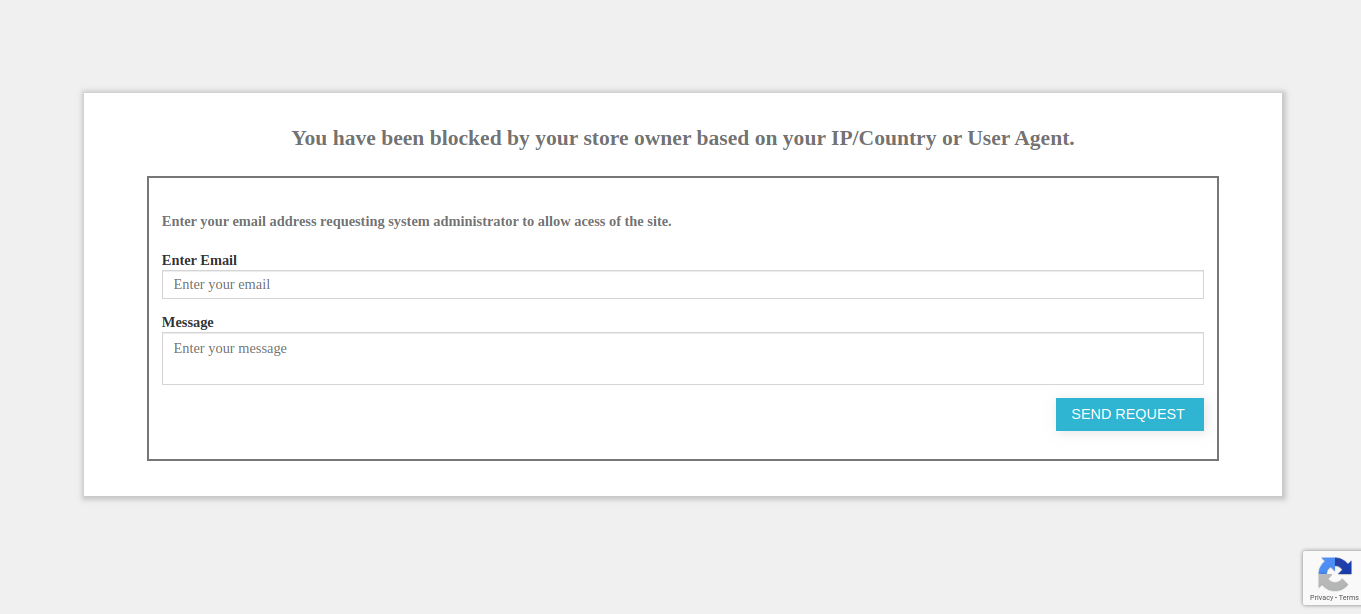
The users can be blocked based on their IP address, the country as well as the user agent. Once a visitor is denied the access to the site, a message is shown to him/her along with the option to send their unblock request to the Prestashop store admin.
4.2 Website without Header and Footer
The store owner can restrict the customers from viewing the header and footer as well. In this, the functionality is disabled from the front-end of the website and will be shown as in the image below:
4.3 Customer Request
The blocked users can even request the admin to unblock him from the site by sending a request message. The request will be listed in the admin panel of the interface and can be processed accordingly.
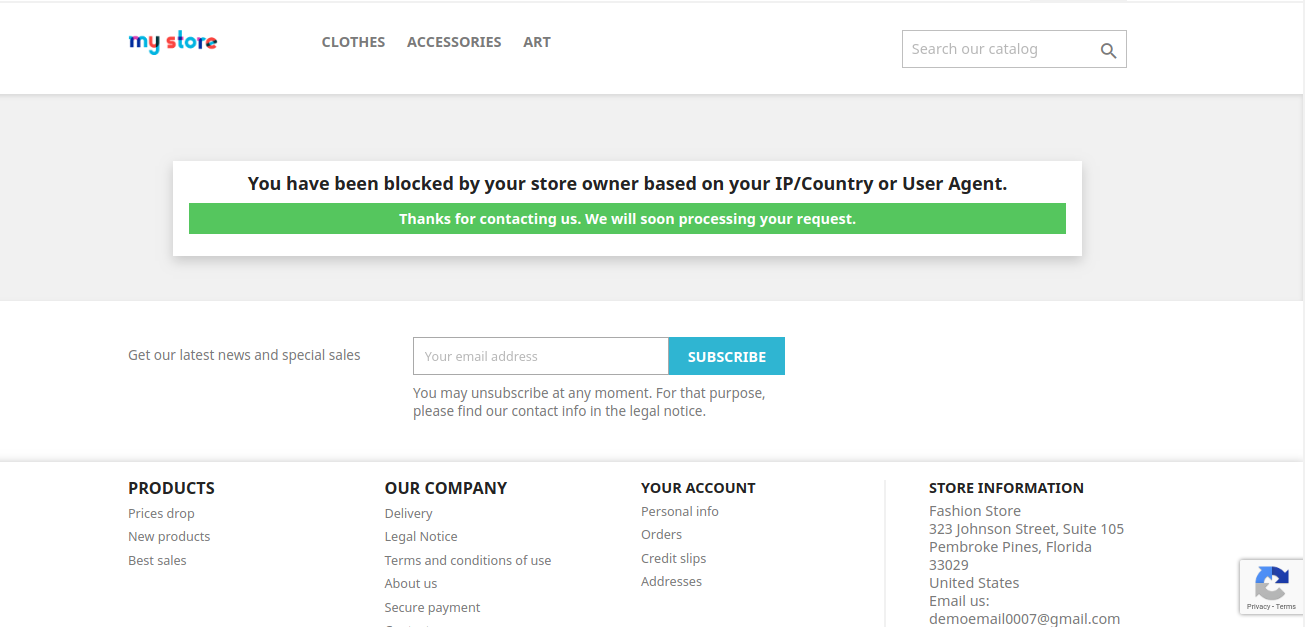
Once the request is send, a message will be flashed in the front-end.
Prestashop spam blocker addon allows the admin to show header and footer information to the blocked users/bots. This way the confidentiality of the website is maintained along with providing some useful content to the spam users. Consequently, this addon helps in achieving quality traffic to the website thereby adding to the security of the website. Store admins can purchase this user blocker addon from the Addon Store
5.0. Tutorial Video for Prestashop IP Blocker Module Addon
The Prestashop store owners can now gather more information about their customers by adding the custom fields on the registration form of the website. If Prestashop store owners will get to know more information about the customer, then they can use the same to prepare the marketing and sales pitch of the products. Prestashop Custom Registration Fields addon allows the store admin to add new custom fields and edit the old ones in the registration form. To validate the fields, it is easy to set validation rules from the admin interface. The Prestashop addon lets the admin add any type of field and set the validation rules for the same.
The store owners can even create various sections on the registration form in order to place the custom field. The best part is that all this can be done without making any changes in the code. The Prestashop admin can add the custom field, text box, radio button, or checkboxes.
NOTE: The Knowband’s Prestashop Custom Registration Field Module is compatible with GDPR.
1.1. Benefits of Prestashop Custom Registration Fields Module:
Prestashop custom registration fields module allows the store owner to optimize the registration form of their website with minimal effort and in a matter of moment.
The Prestashop store admin can create new custom fields for the registration form of the website and can edit the existing ones at a button click.
The Prestashop Custom Registration Fields module allows the admin to create the sections on the registration form. This makes the placement of the custom fields easier. Using these custom fields sections store admin can set the custom fields on the top or bottom of the registration form.
Validated various fields easily in a few simple steps.
Prestashop custom registration fields module allows the store admin to mark any custom field as mandatory to fill.
The entire fields created can be effortlessly exported in an excel sheet.
It allows the admin to add new fields without making any changes in codes.
This Prestashop Custom Registration Fields addon helps you to know your customer by gathering more information through the Custom Fields.
Prestashop custom registration fields module is GDPR compliant.
Prestashop custom registration field extension allows the store admin to add custom CSS to change the look and feel of the registration form.
2.0 Installation for Prestashop Custom Registration Fields
In order to install the addon follow the below-mentioned steps.
1. Purchase the module from KnowBand. You’ll be provided with the following files:
kbcustomfield.zip
User Manual
2. Unzip the kbcustomfield.zip file. It would contain a number of files and folders as shown below –
3. Now navigate to the“Module and services” section from the side menu and click on the “Upload a module” button. You can drag and drop the file or can simply select the file from the system. Once the file is completely uploaded, a notification of “Module(s) installed successfully” will be displayed.
4. Now module is ready to be installed on your store and you can find that in Store Admin -> Modules and Services. It would shown as below –
In case, you are not able to find module in admin modules list, please try searching module with following details –
Keyword – Custom Field
Category – Front office
Filter By – Installed & Not Installed / Enabled & Disabled
5. Click on the “Enable” button to activate the Prestashop custom registration field module.
6. Now the module is ready to use and you can configure it by clicking on the “Configure” button as shown below:
3.0 Admin Interface of Prestashop Custom Registration Fields
This module is configurable and configuration settings can be updated via the back-end of the admin interface.
3.1 How can the Prestashop Custom Registration Fields module be configured?
Once the module is installed, you can now enter the admin interface. In this Prestashop custom field registration module, you will find three customization options.
Module Configuration
Custom Field Section
Custom Fields
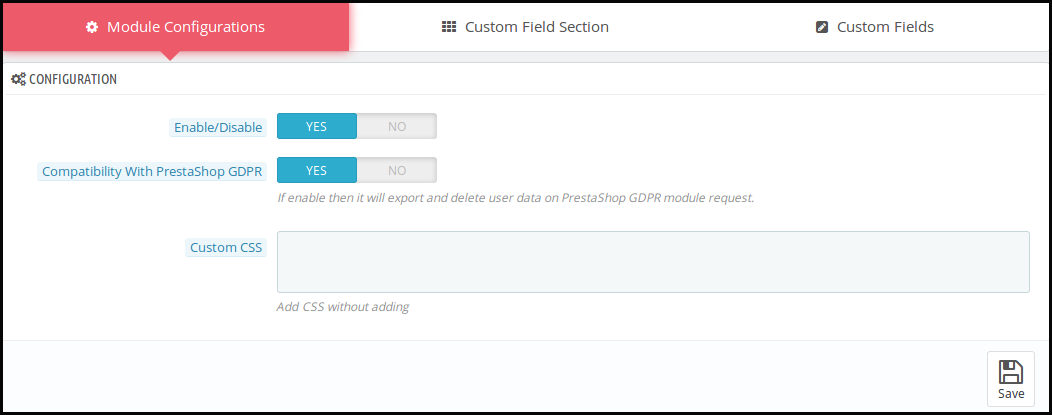
Module Configuration: In this, Prestashop store admin can enable the module and also can set the custom CSS.
Enable/Disable Module: The admin gets to customize the look and feel of the same by entering the Custom CSS code. Without getting much into the complexity of the coding, the admin can enter the code in the section shown below.
Compatibility with Prestashop GDPR: The admin can enable or disable this feature. Enabling this feature will export and delete the user data on the Prestashop GDPR module request.
Custom CSS: The admin gets to customize the look and feel of the same by entering the Custom CSS code. Without getting much into the complexity of the coding, the admin can enter the code in the section shown below.
3.2 How to create the custom field section?
The custom field section refers to the blocks in the registration form where the various created fields will be placed.
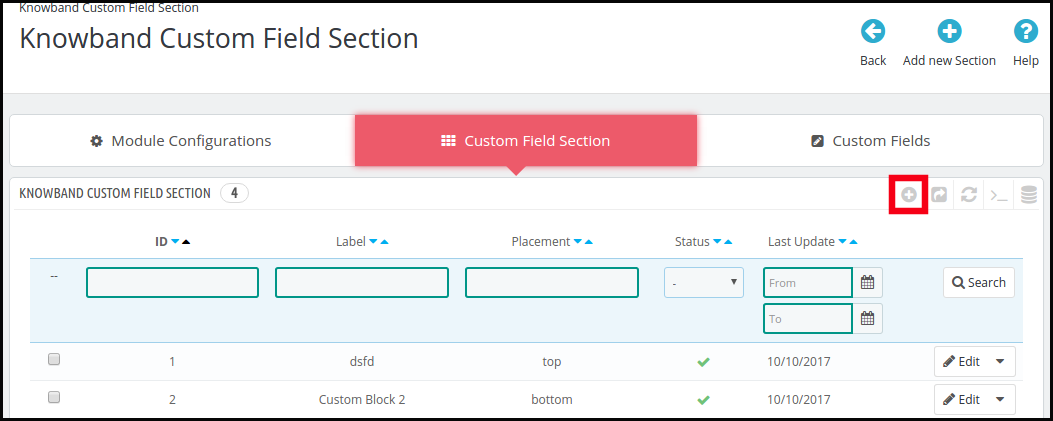
Add Custom Field Section: In order to create a new field section, go to the Custom Field Section Tab and click on the ‘+’ sign in the right side as shown below.
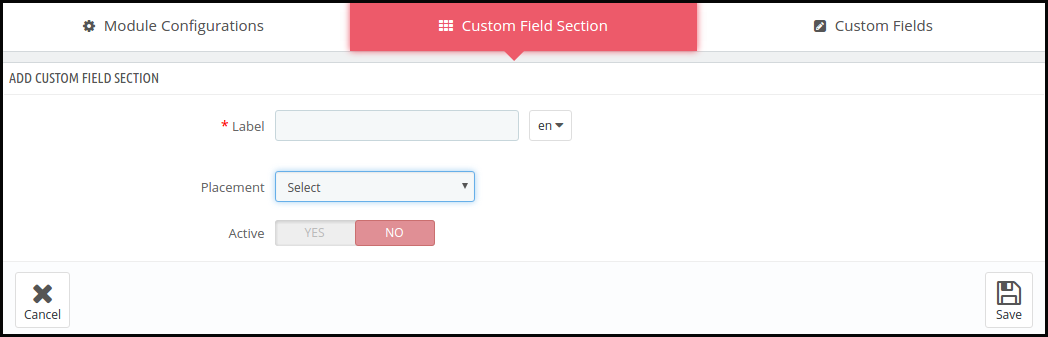
On clicking here, the admin will be redirected to the custom fields section creation page.
The store admin is required to fill in the information and the section will be created.
Label: This refers to the name of the section. The label name can be entered in multiple languages as per the requirement of the website.
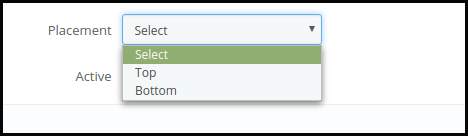
Placement: The admin can select the position where he wants to place that particular custom field section.
Active: The created section can be deactivated by just toggling the button.
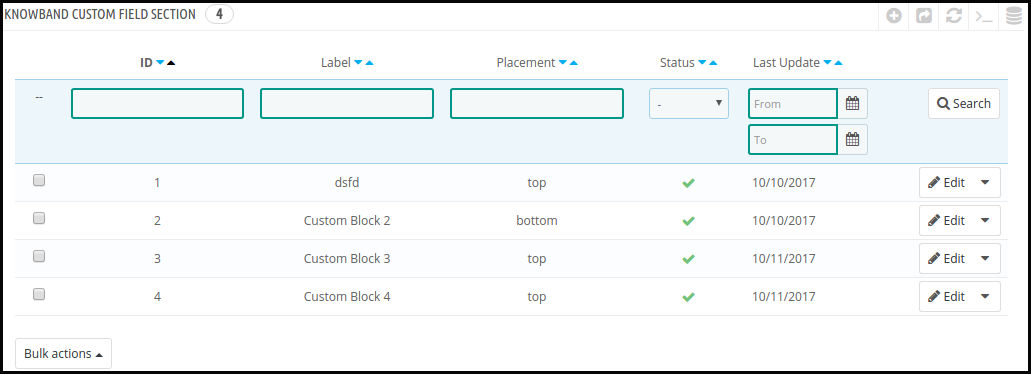
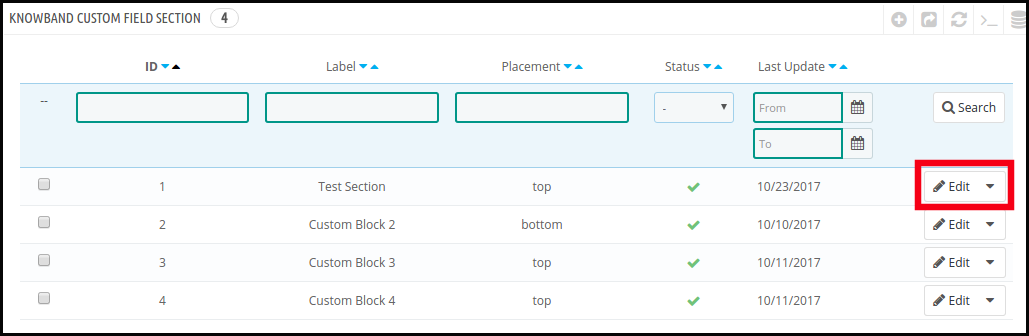
View Custom Field Section: The entire list of the field sections created will be seen in this tab as shown in the image below.
Edit Custom Field Section List: In case of any changes required to be done in the created sections, the admin can go to the edit section and complete their modifications.
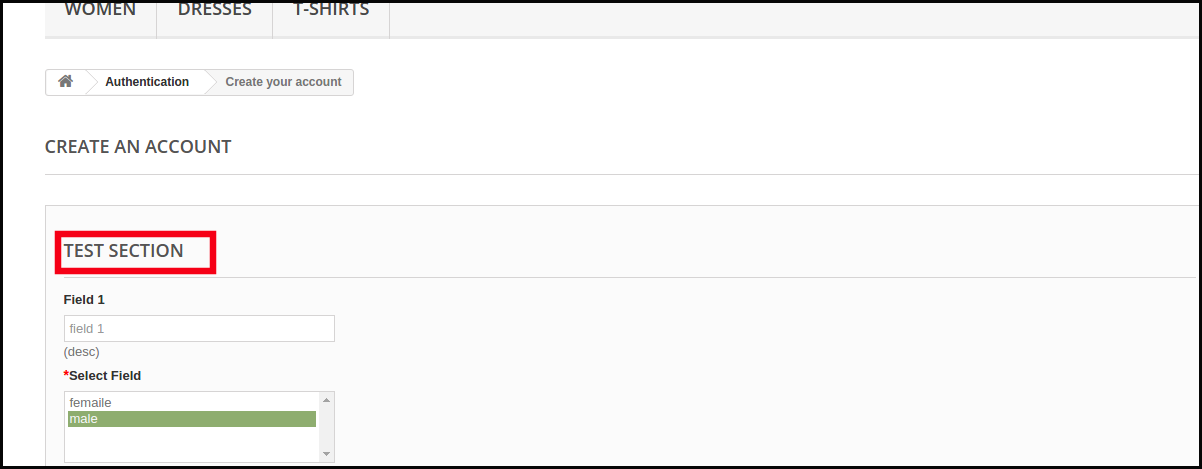
The section created will be shown in the front end of the website as shown in the below image.
3.3 How to create the custom field for the registration forms?
Once the Prestashop Custom Registration Fields module is enabled, the admin gets an option to create ‘N’ numbers of fields. All what the store admin needs to do is to click on the ‘+’ sign in the right side of the admin panel as shown in the image below.
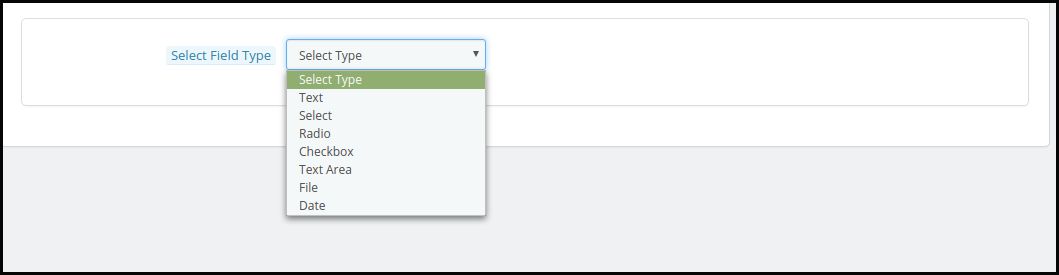
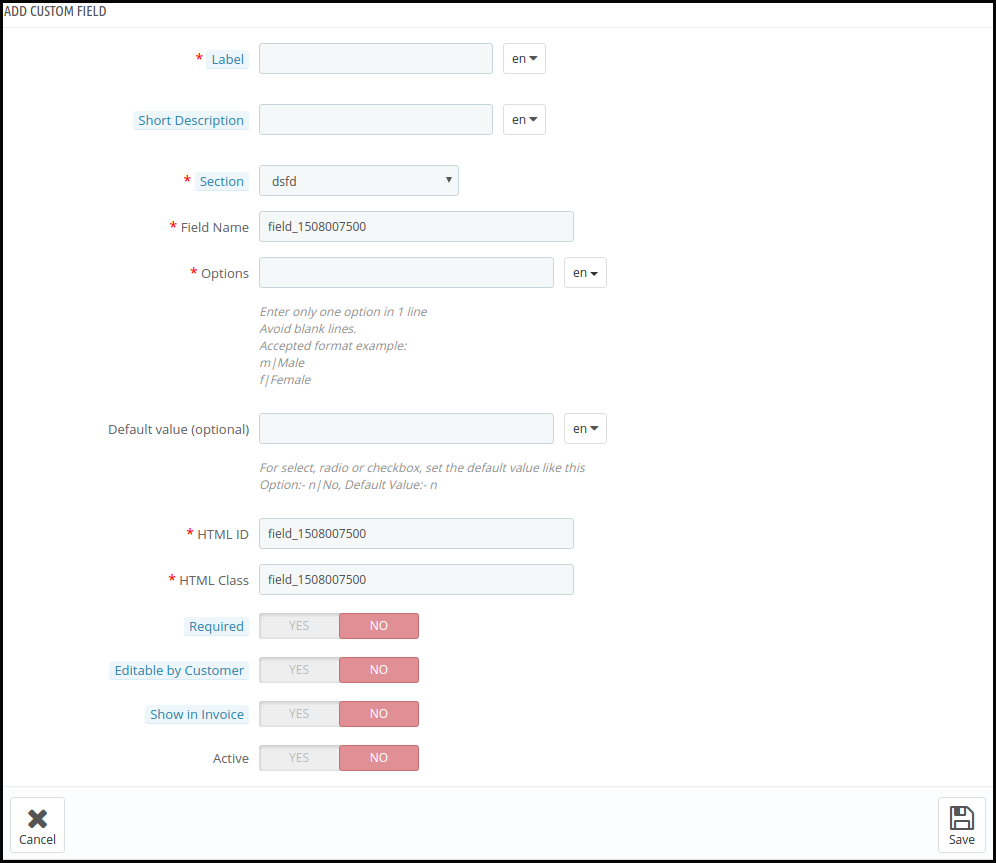
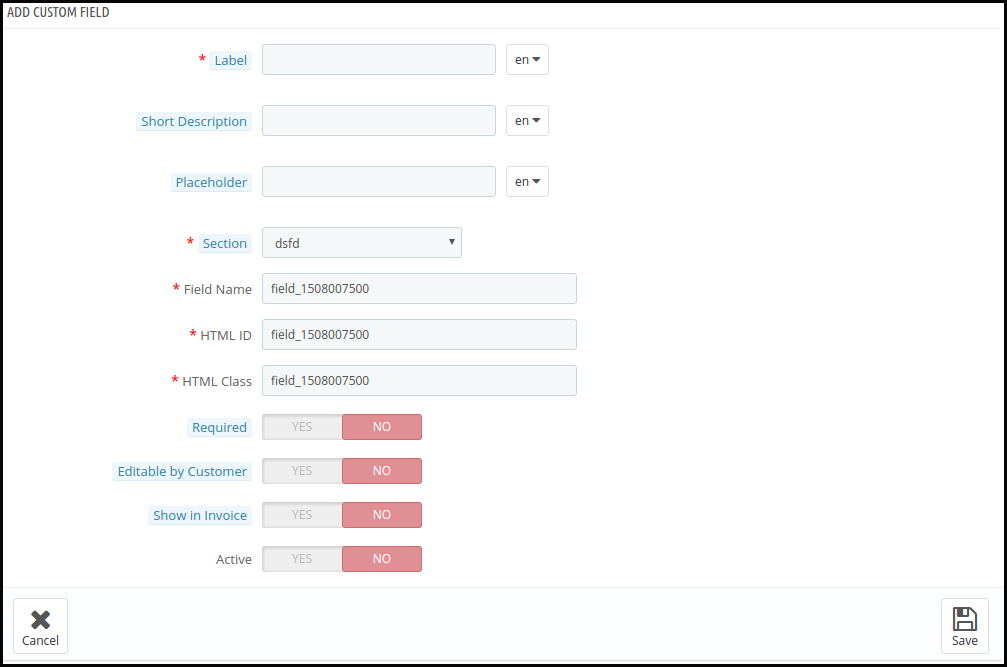
This will redirect the Prestashop store admin to the field creation page. The admin will be required to select the type of field that he is looking to create. The various type of fields is provided in the dropdown list. The admin can select any one of them.
The various options offered by Prestashop Custom Registration Fields Module are given below.
Text
Select
Radio
Checkbox
Text Area
File Date
Different field types required different information to be filled in. Let us discuss them one by one.
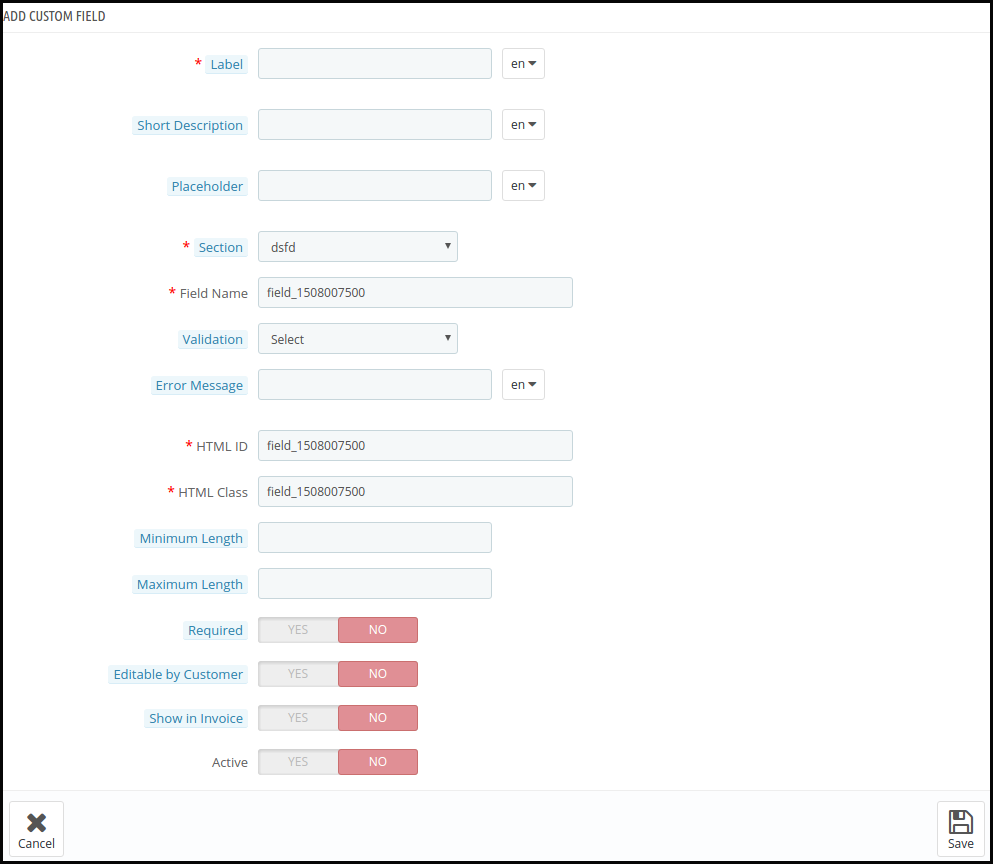
3.3.1 Text Field
The text fields allow the customers to enter their personal information in a textbox. This field may be used for Name, Last Name, Address, and other such information.
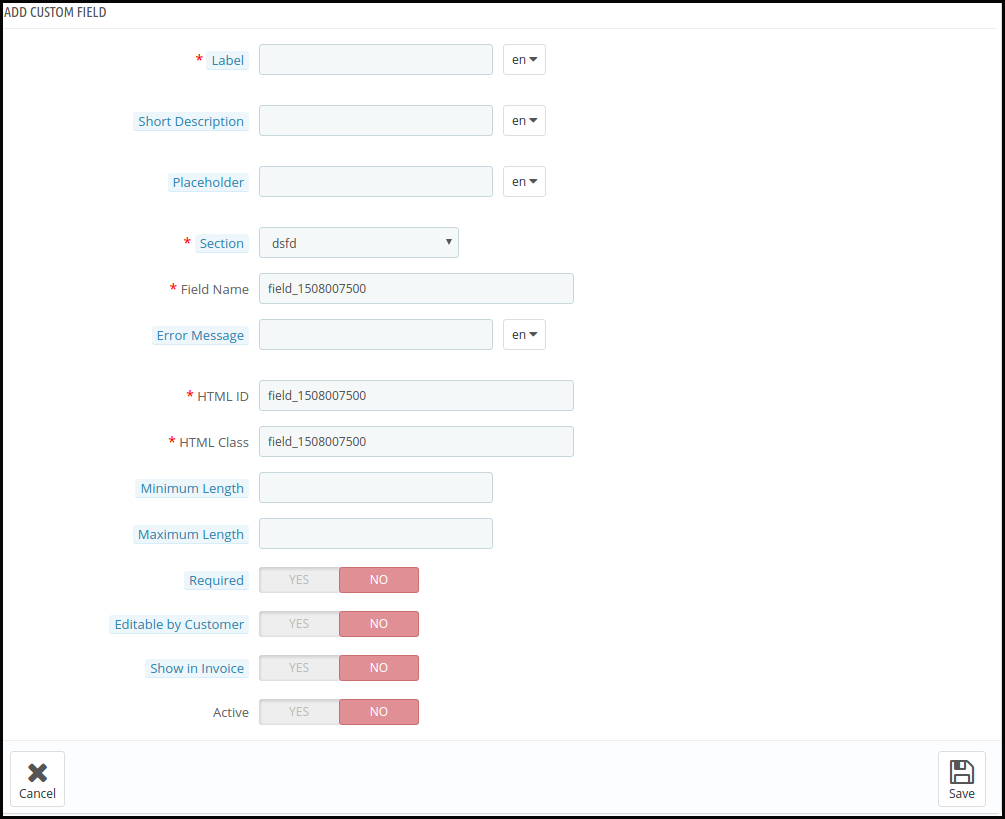
The Prestashop store admin can be asked to fill-up the form as shown in the image below.
Label: Label includes the name of the field that will be displayed on the front-end of the website.
Short Description: The short description will specify exactly what the customers are supposed to mention in that field.
Placeholder: The admin can enter the Placeholder in this section. All these inputs can be entered into multiple languages.
Section: Section allows the admin to select the block where he wants to place that particular field.
Field Name, HTML ID, HTML Class: This section will provide a unique identity to the fields. It will be the same for all three sections.
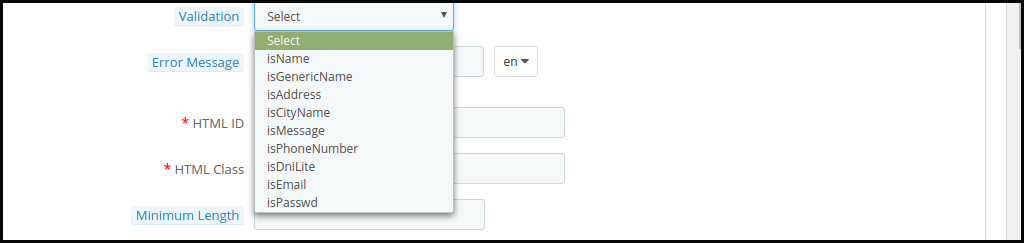
Validation: The admin can select the validation type for the various fields without making any query changes. The various validation options offered are mentioned below:
isName
isGenericName
isAddress
isCityName
isMessage
isPhoenNumber
isDniLite
isEmail
isPassword
In case the validation rules are not followed while entering the information, it will show an error message to the customers.
Using Prestashop Custom Registration Fields, the Prestashop store admin can select the validation type as per their requirement.
Error Message: Displays a custom error message in case the customer enters the wrong information. It supports multiple languages.
Maximum and Minimum Length: This section allows you to fix the word limit for the fields. In case, no value is entered, then, the text box will be able to intake as many characters and words.
Required Field Validator: Enabled this in the mandatory fields. In case the visitors leave it empty, the Prestashop custom registration field will show an error.
Editable by the Customer: Enable this feature will make the fields editable by the customers.
Show in Invoice: The information entered by the customers will be shown on the invoice if this field is enabled.
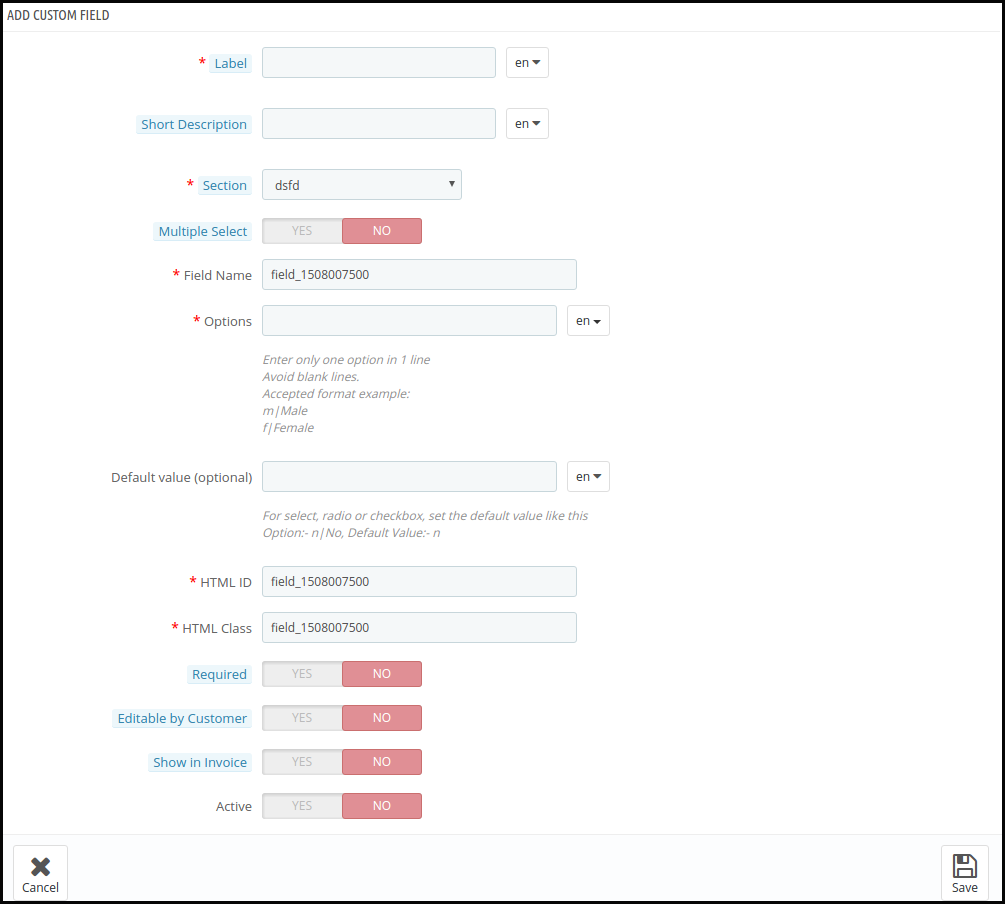
3.3.2 Select Field
This field allows the customers to choose an option from the multiple choices available. For instance, the ‘Gender’ field offers the option of ‘Male’ and ‘Female’.
The Label Name, Short Description, Section selection remains the same in this field type as the other ones. Here are the customization options offered to the Prestashop store admin.
Multiple Select: The store visitors can offer to select more than one choice by enabling this button.
Options: Enter varied options here. The multi-lingual support allows you to enter the choices in multiple languages.
Default Value: This is an optional field. The store admin can set the default value for the Radio, Select, or Checkbox options.
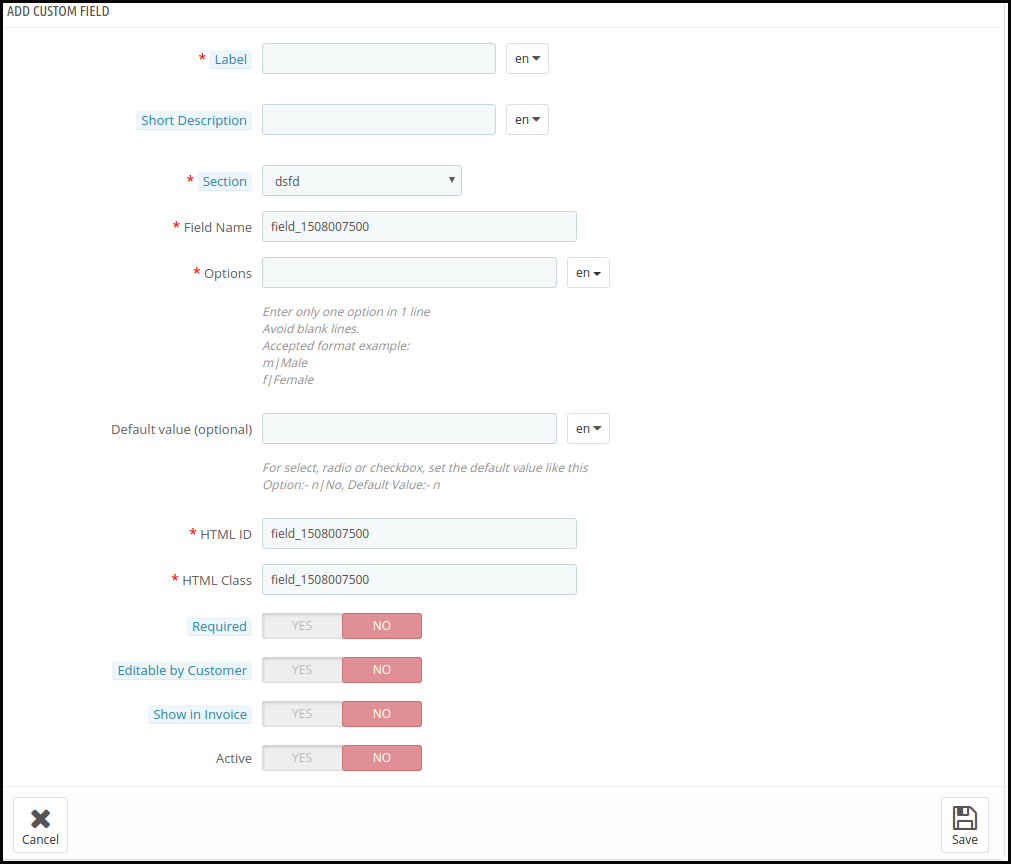
3.3.3 Radio Field
Radio buttons function as the channel presets on radios. While the Select field allows the customers to even choose more than one option, the radio buttons allow the visitors to choose only one option at a time.
The customization option of this field is the same as the ‘Select’ field only the ‘Multiple Select’ options is missing here.
3.3.4 Check Box Field
The functionality of the check-boxes is the same as the radio buttons and select fields. The only difference is that the customers select the options by checking the boxes.
3.3.5 Text Area Field
Text field offers the only line to the store visitors to enter their information. Use it to gather Name, Surname, and others. However, use Text Field type when multiple lines are necessary to enter the information. Even in this as well, admin can fix the the maximum and minimum length of the characters.
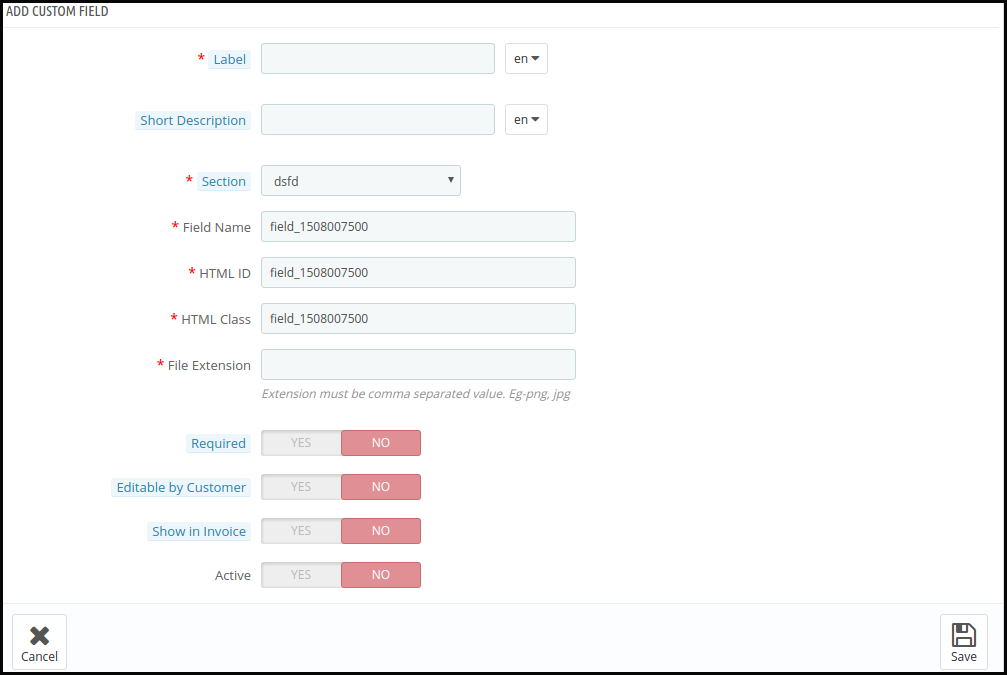
3.3.6 File
This field allows the store visitors to upload a file such as images, documents, and others on the website. The e-merchant can enter the required file extensions. If customer uploads a file with a different extension, it will display an error message.
3.3.7 Date
This field allows the customers to enter the date in the format set at the backend of the admin panel. In case of the wrong format or false information, it displays an error message.
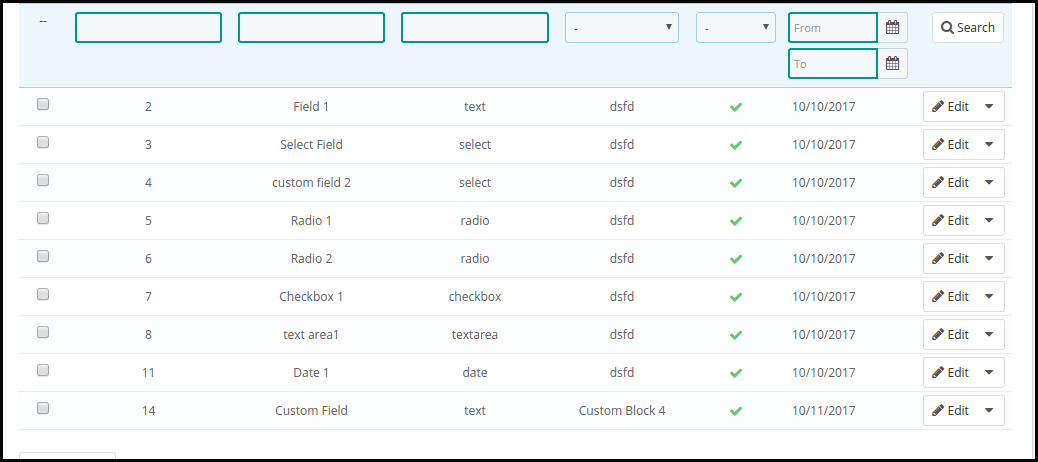
All the custom fields created by the Prestashop store admin will be shown in the admin panel.
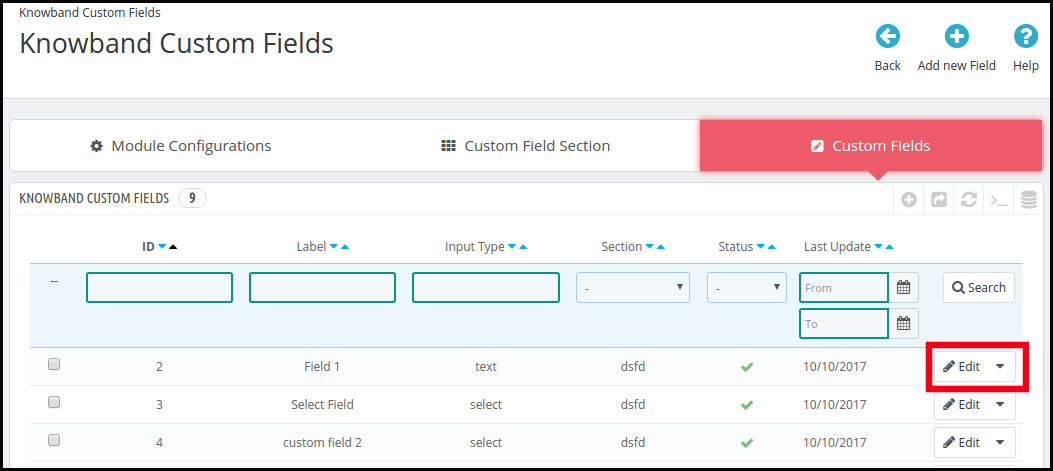
In case you need to edit any already existing field, do it by clicking on the Edit buttons.
3.4 How can the custom field be exported in an Excel Sheet?
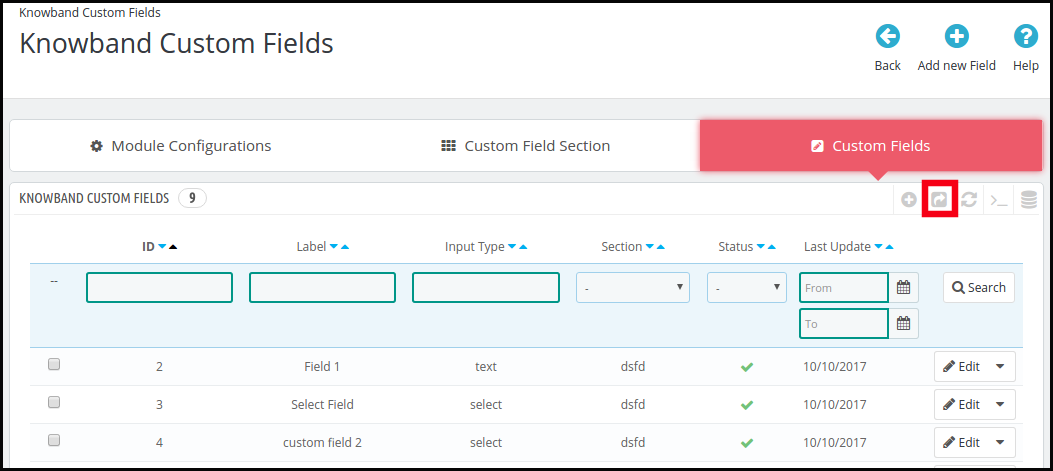
Prestashop custom field for registration field addon allows the store admin to export the list of the custom fields created in the back-end in an excel sheet. To do this, click on the arrow button on the top of the admin panel on the right side. The same is shown in the image below. Export the custom field sections just at a button click.
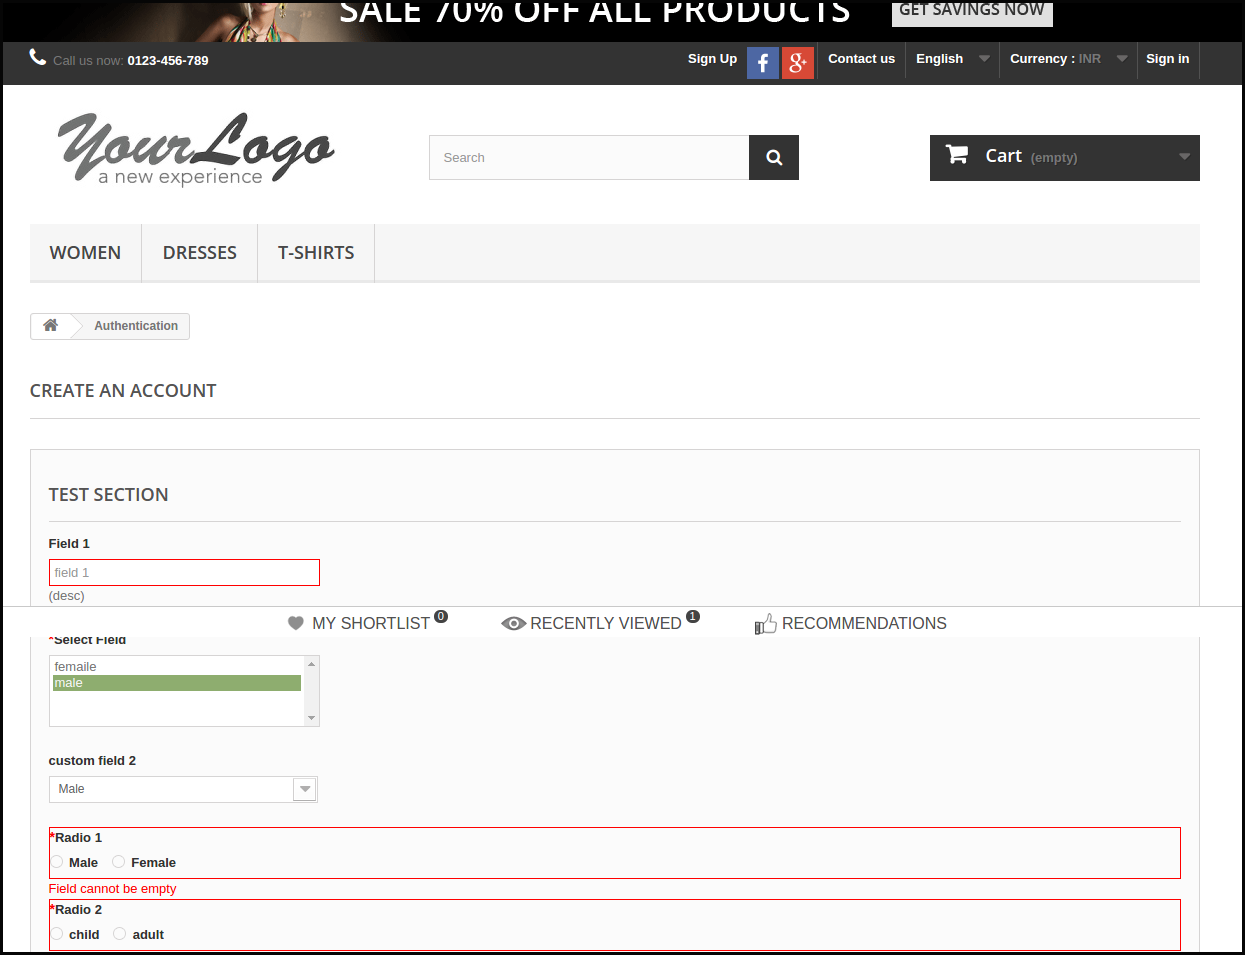
4.0 Front Interface for PrestaShop Custom Registration Fields
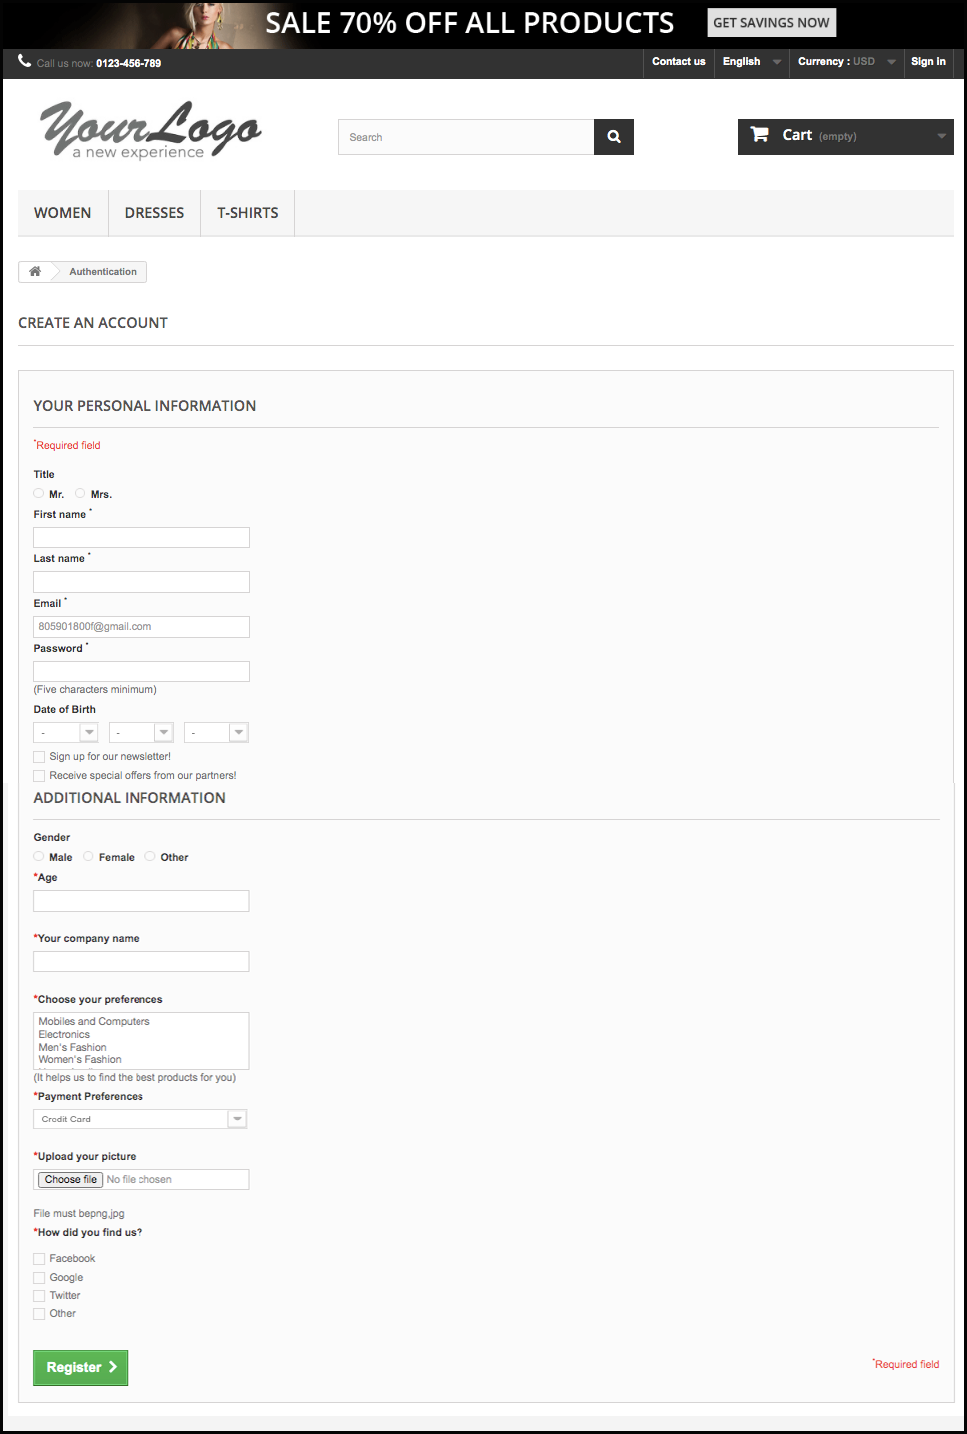
As soon as you create various custom fields and the custom field section, the registration form will be available for the store visitors.
This is how the registration form looks like:
No coding, no hassles. If you want to target your customers correctly, then you must have a good knowledge of your customers. Gathering their statistics at the time of registration provides a personalized experience to your customers and help you to know about user behavior. Additionally, you can easily utilize the collected data for your marketing and promotional campaigns.
5.0.0 Tutorial Video of Prestashop Custom Registration Field Module
Checkout our complete tutorial videos, which cover all the features from Installation to the complete frontend working.
Prestashop Shipping Timer module increases the conversion rate by displaying the timer for the one-day delivery offer. If the product is ordered within the time span specified by the timer, then, the package is delivered to the customer on the same day. The countdown timer specifying the time limit for availing this offer creates an urgency in the minds of the store visitors. Aiding the purchase decision of the customers, the Prestashop addon is an effortless way to boost the chances of conversions.
1.1. Basic Features of this Prestashop Shipping Timer addon
The Prestashop Shipping Timer module is easy to install and configure.
The admin can easily enable or disable this Prestashop shipping timer addon.
This Prestashop addon offers hassle-free implementation.
The Prestashop shipping module is highly customizable.
The Prestashop shipping module is multi-lingual compatible.
No code changes are required for implementation.
There is no technical help is needed for showing shipping timer in the front-end.
Multiple choices for selection that is categories, countries, suppliers, manufacturer etc.
The Prestashop store admin can set the start & end time.
Admin can select the days for showing the countdown timer.
Admin can set the vacation dates to restrict the functionality.
Admin can show warning on the cart page
The plugin allows the admin to set the look and feel of the timer.
The Prestashop store admin can view order details.
The Prestashop Countdown timer helps to increases conversion rate.
The countdown timer ensures fast decision making by customers.
Customers don’t need to compare delivery timing for the same products on other websites.
1.2. Project Objectives
The Prestashop Extension offers a win-win situation for both the customers as well as the store admin. While the store visitors get the much needed quick delivery option, the e-merchants clear off their inventory with minimal effort. Here are some of the objective that Prestashop one-day delivery timer module offers to the eCommerce store owners.
The admin can fix the time duration for the one-day shipment offer. A timer will be shown on the product page reminding the customers about the time limit.
The admin can select the product, category in which he is looking to add the feature. The e-merchant can even select the name of the supplier and manufacturer in which he wants to offer one-day delivery offer. The module even provides an option to select the region and countries in he wants this offer to be applicable.
The highly customizable module allows the admin to change the look and feel of the timer in a matter of moment.
The orders received can be viewed in the admin interface.
2.0 Installation
The Prestashop store admin is required to purchase the module. Once the purchase is done, following files and folders will be delivered.
shippingtimer.zip that contains source code of the module
User Manual
Follow the following steps to install the extension:
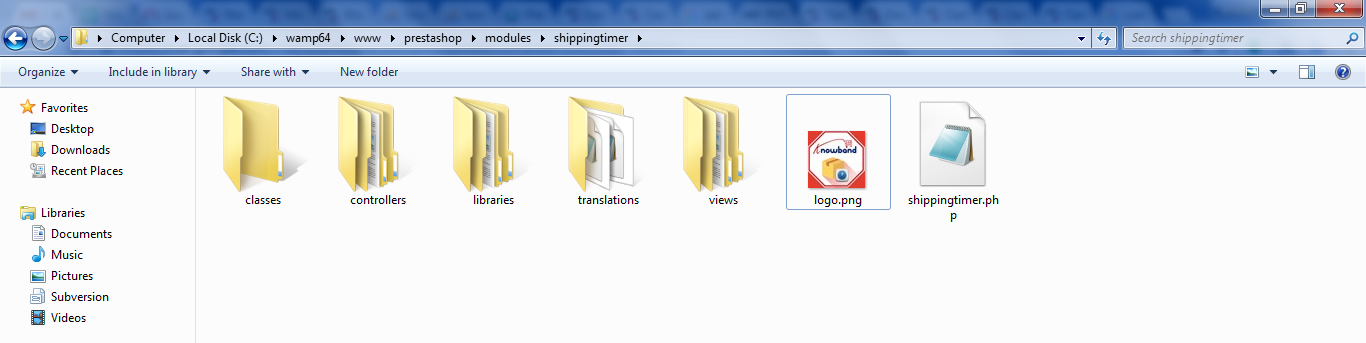
Unzip the shippingtimer.zip folder. The folder would consist of the files and folders as shown below –
Copy all the files and folders from the unzipped folder and paste them into your store “Modules” directory on the path – Root Directory/modules/.
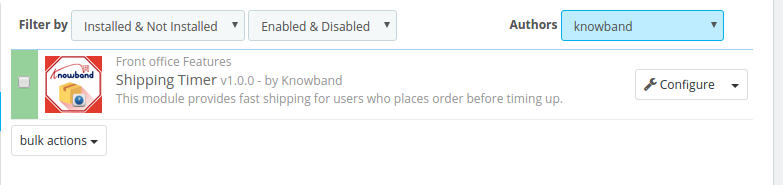
The Prestashop Shipping Timer can now be installed on your Prestashop store.You can find it in Store Admin -> Modules and Services. It would be shown as below –
In case, you are not able to find module in admin modules list, you can search for it in the search tab-
Keyword – Shipping Timer Category – Front office Filter By – Installed & Not Installed / Enabled & Disabled
Click on “Install”.it would show a pop-up for your confirmation. Click on “Proceed with the installation” option. This step will install the module and show notification – “Module(s) installed successfully”.
3.0 Admin Interface
On entering the admin interface of the Prestashop module, the store owner gets a number of easy configuration options. The changes in the features and functionalities of the module can be customized with a few button clicks. Let us discuss the various configuration option one-by-one.
3.1 How to start the configuration process?
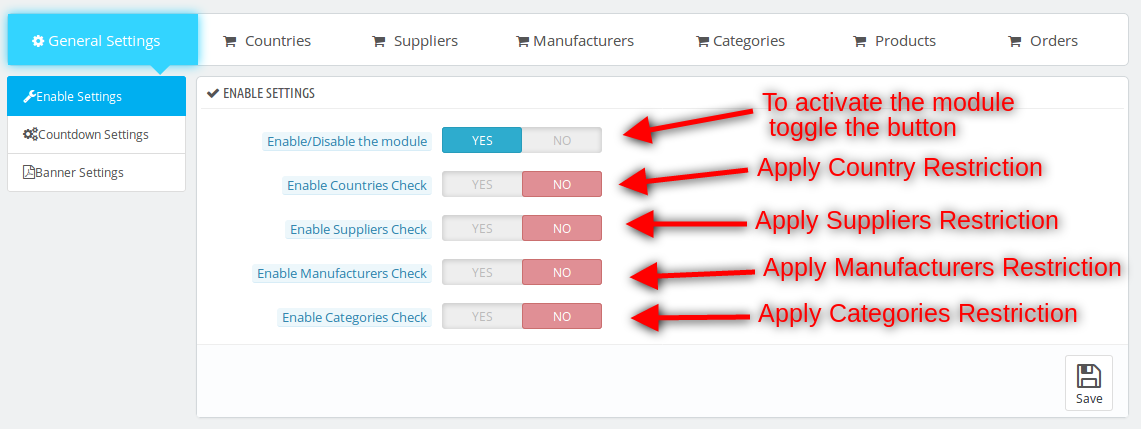
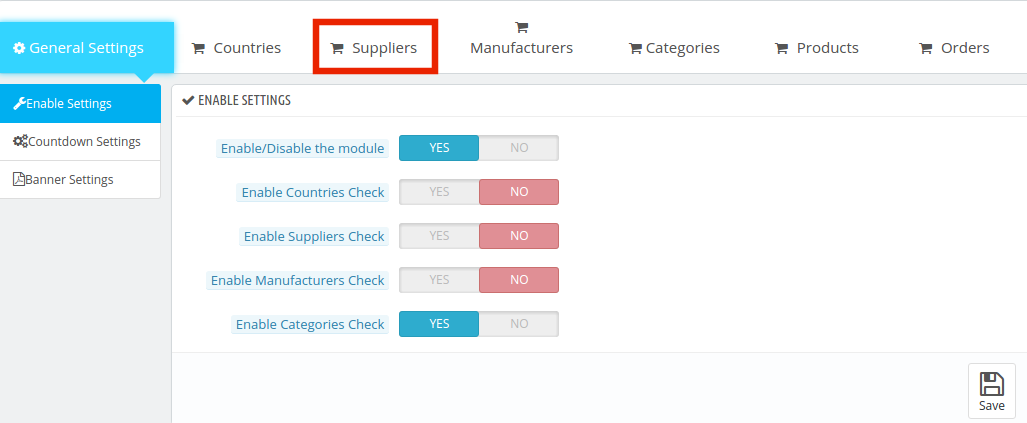
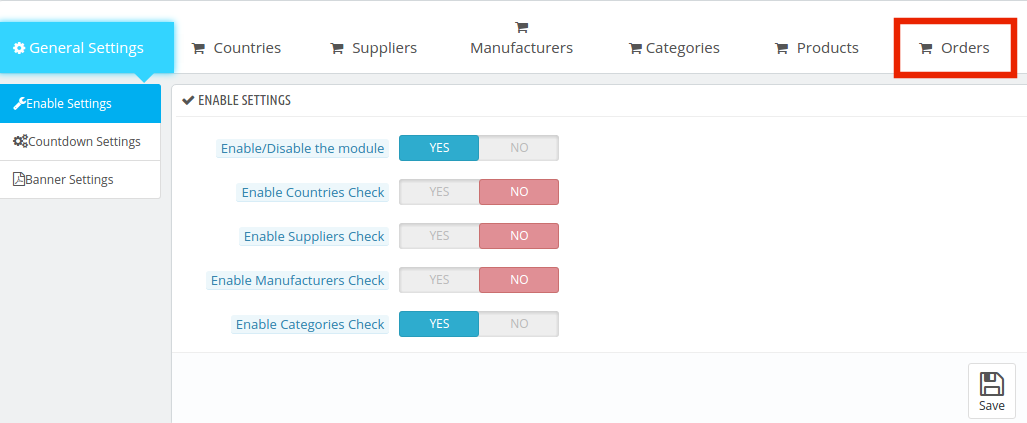
The configuration process of Prestashop shipping timer module starts with the General Setting tab of the addon. Listed below are some of the options offered in this tab.
Enable/Disable the Module
Enable Country Check
Enable Supplier Check
Enable Manufacturer Check
Enable Categories Check
3.1.1 Enable and Disable the Module
Along with all the customization option, the store admin gets the option to enable or disable the module from the Prestashop store. This can be done just by toggling the button shown below.
3.1.2 Enable Country Check
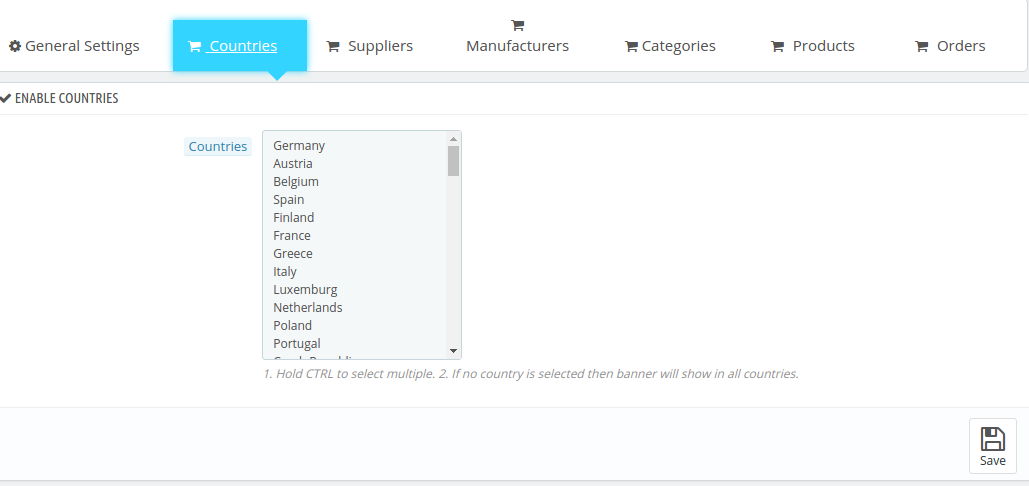
The free shipping timer can be set for all the countries in which the eCommerce company is operating. The countdown for one-day delivery is set by default for all the countries if the button is switched off.
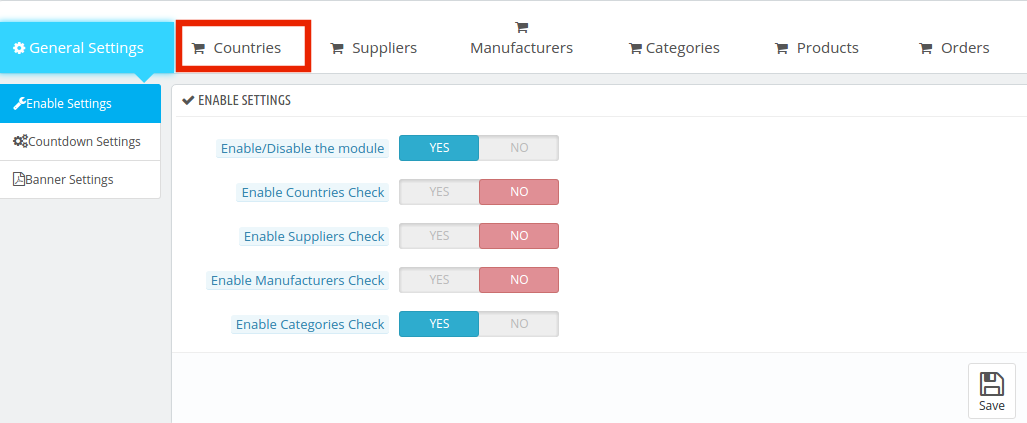
In case, the admin wants to disable this option for any particular country, then, he can do so by switching it on. Once this is done, the admin can select the countries where he wants to give this offer from the ‘Countries’ tab.
The admin is provided with the list of various countries to choose from. The locations can be selected from the list. In case, no country is selected, then, the offer will be applicable in all the countries.
3.1.3 Enable Supplier Check
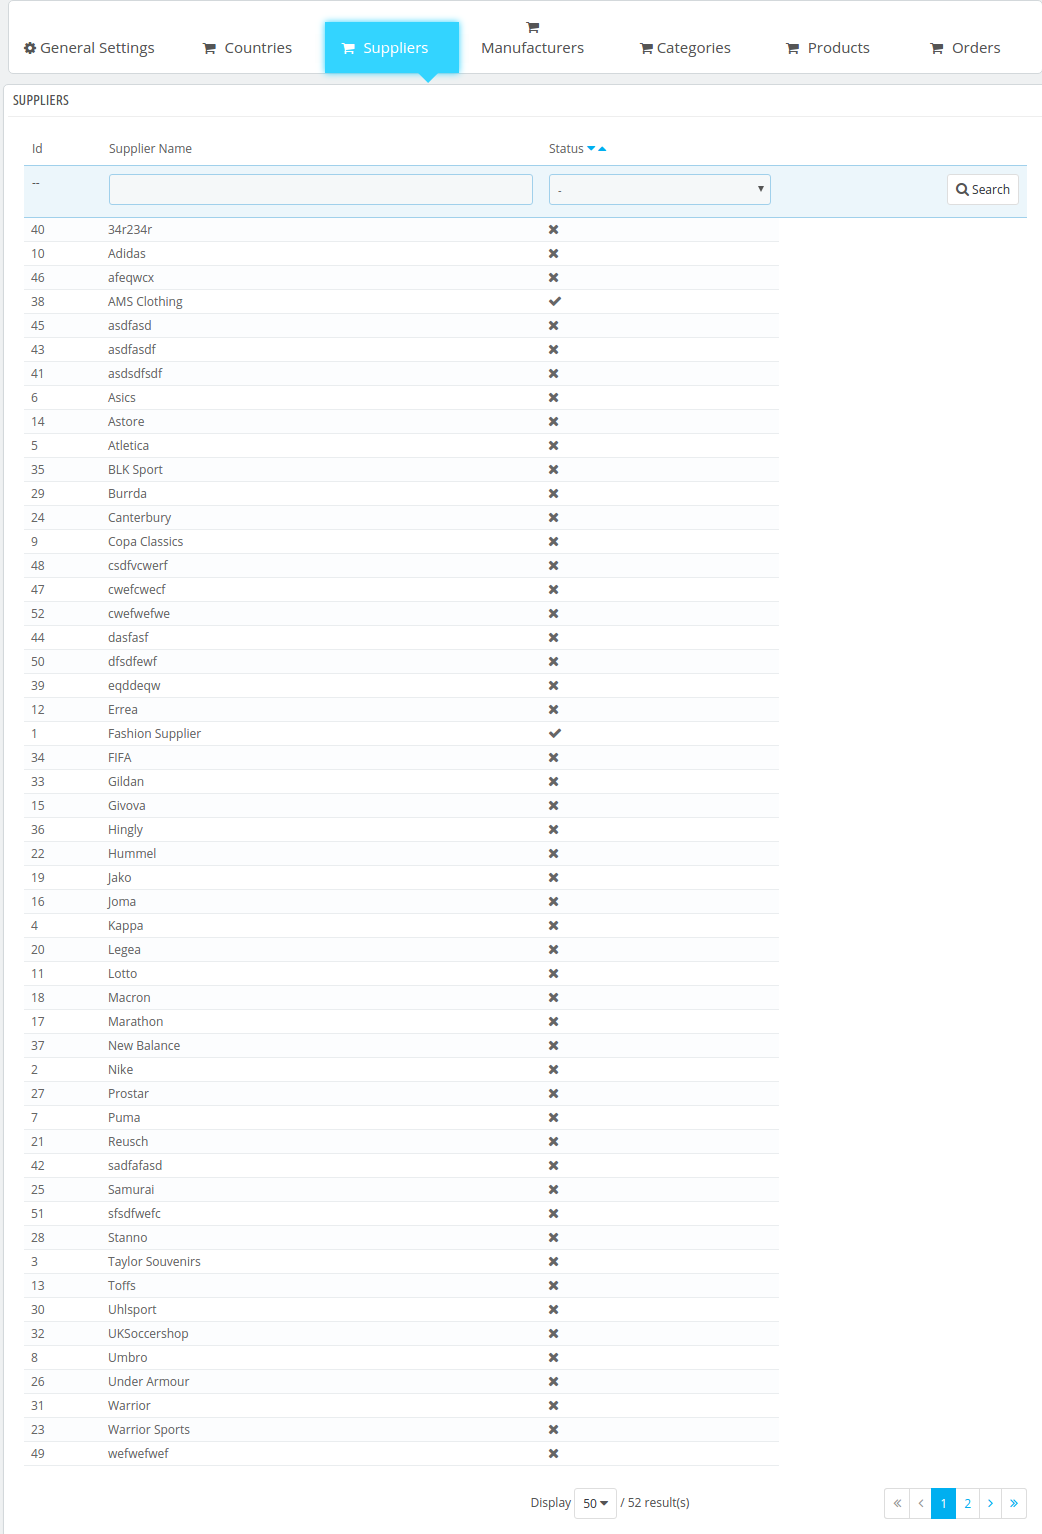
The offer can be made valid for the selected supplier as per the need of the store admin. For selecting or deselecting any particular supplier, the ‘Enable Supplier Check’ button should be switched on.
Once this is done, the admin can select the name of the supplier from the tab as shown in the image below.
The Supplier Tab includes the names of the different suppliers operating on the eCommerce store. The admin needs to check the names manually in order to add this feature. The search bar enables the store owner to find the name of a particular supplier instantly.
3.1.4 Enable Manufacturer Check
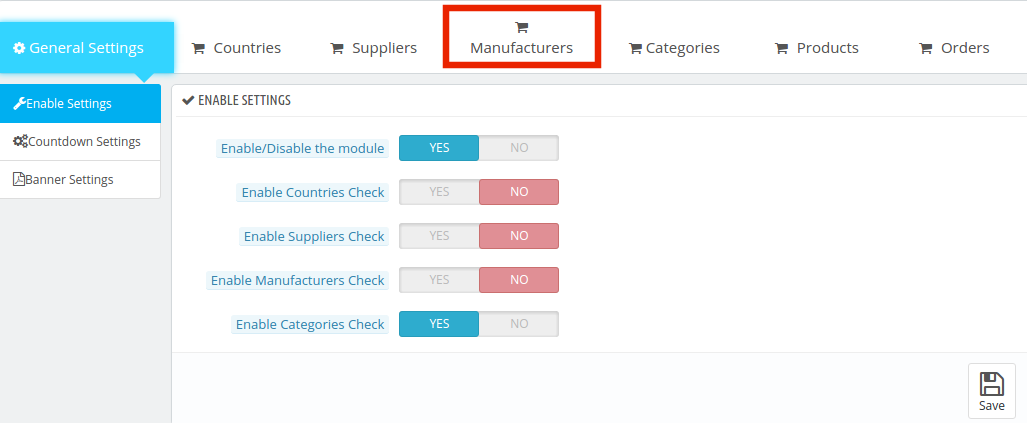
The same process can be adopted in selecting or deselecting the manufacturer. Enable the features from the ‘General Setting’ tab.
Once this is enabled, the admin can go to the Manufacturer tab.
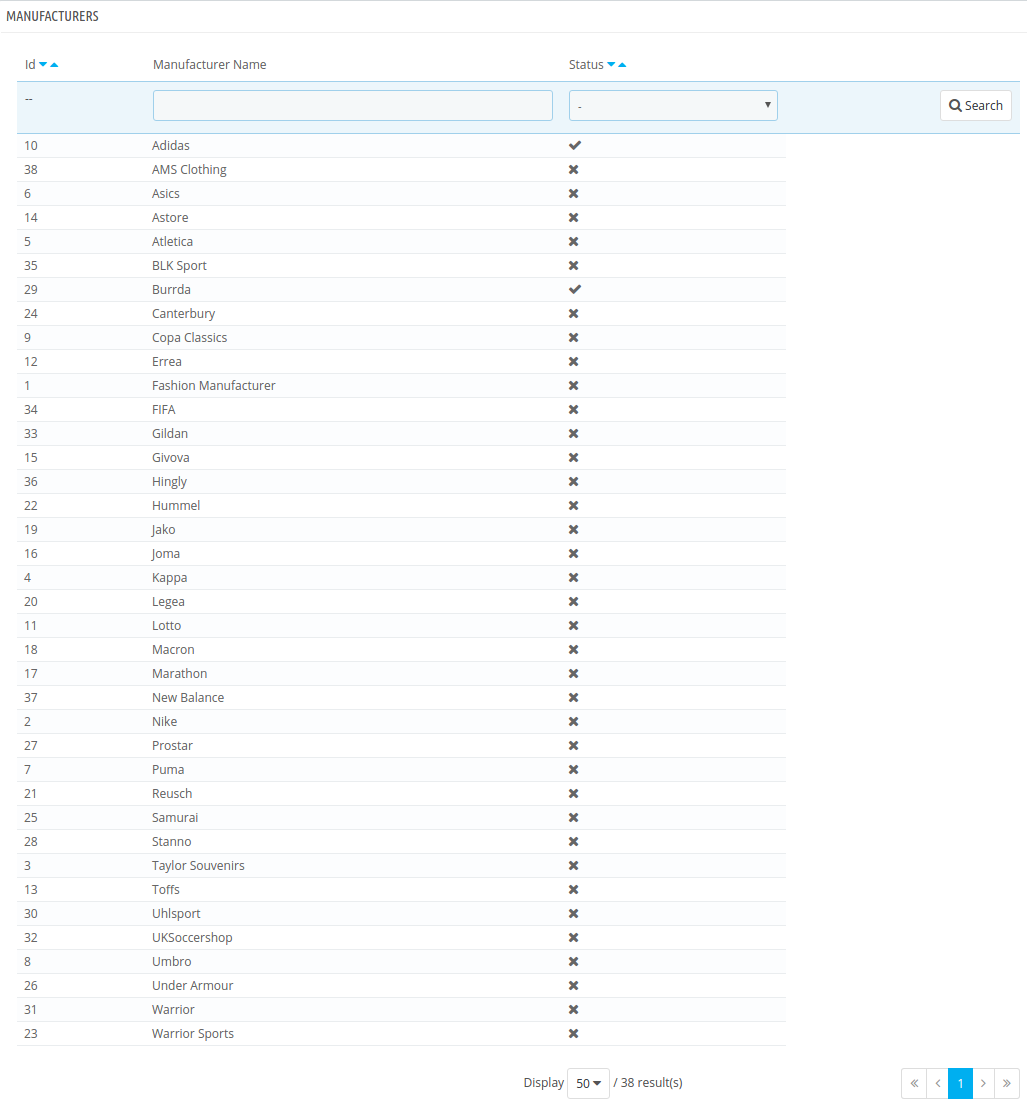
This includes the list of the brands and manufacturer of the Prestashop eCommerce store. Select the names in which want you to offer one-day delivery and save the changes made in the configuration.
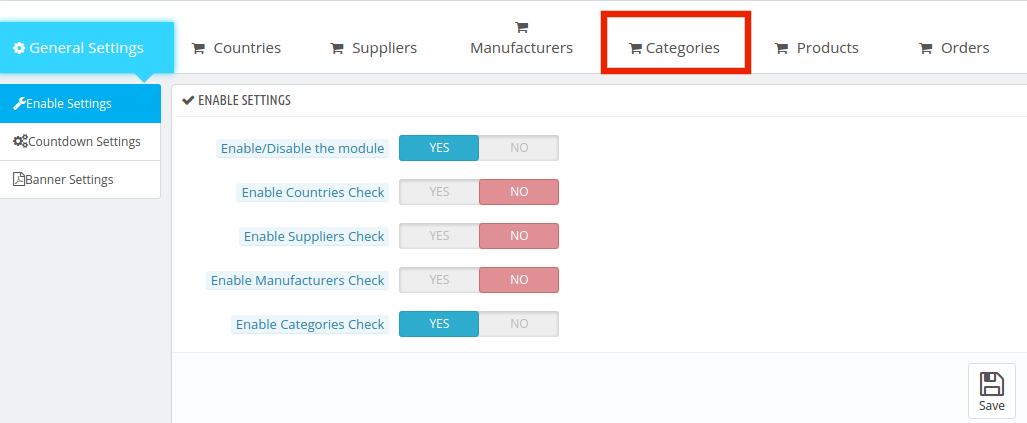
3.1.5 Enable Categories Check
The Prestashop eCommerce admin can enable or disable the Category check by toggling the button as shown below.
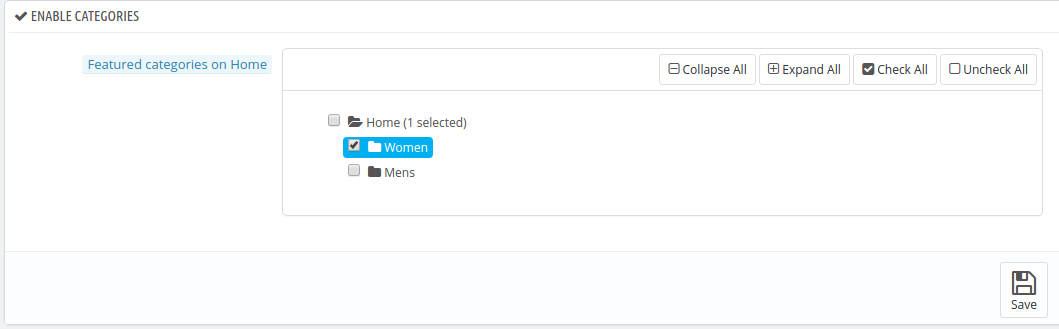
The category tab includes the list of the categories that you have on the website.
The Prestashop store admin can expand the categories and select the ones in which he wants to add this feature of shipping timer. The categories can be checked or unchecked with a button click.
3.1.6 How can the products for adding the shipping timer be selected?
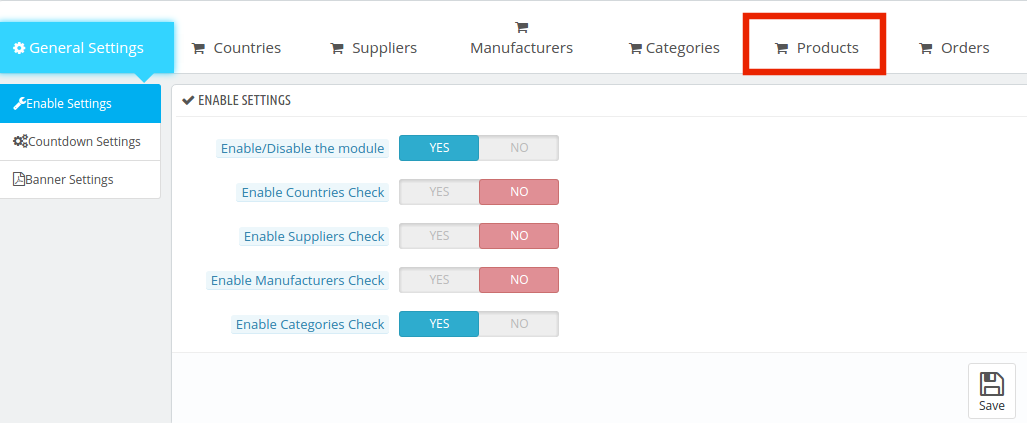
In order to select the products that are to include the shipping timer, the admin can go to the ‘Product’ tab.
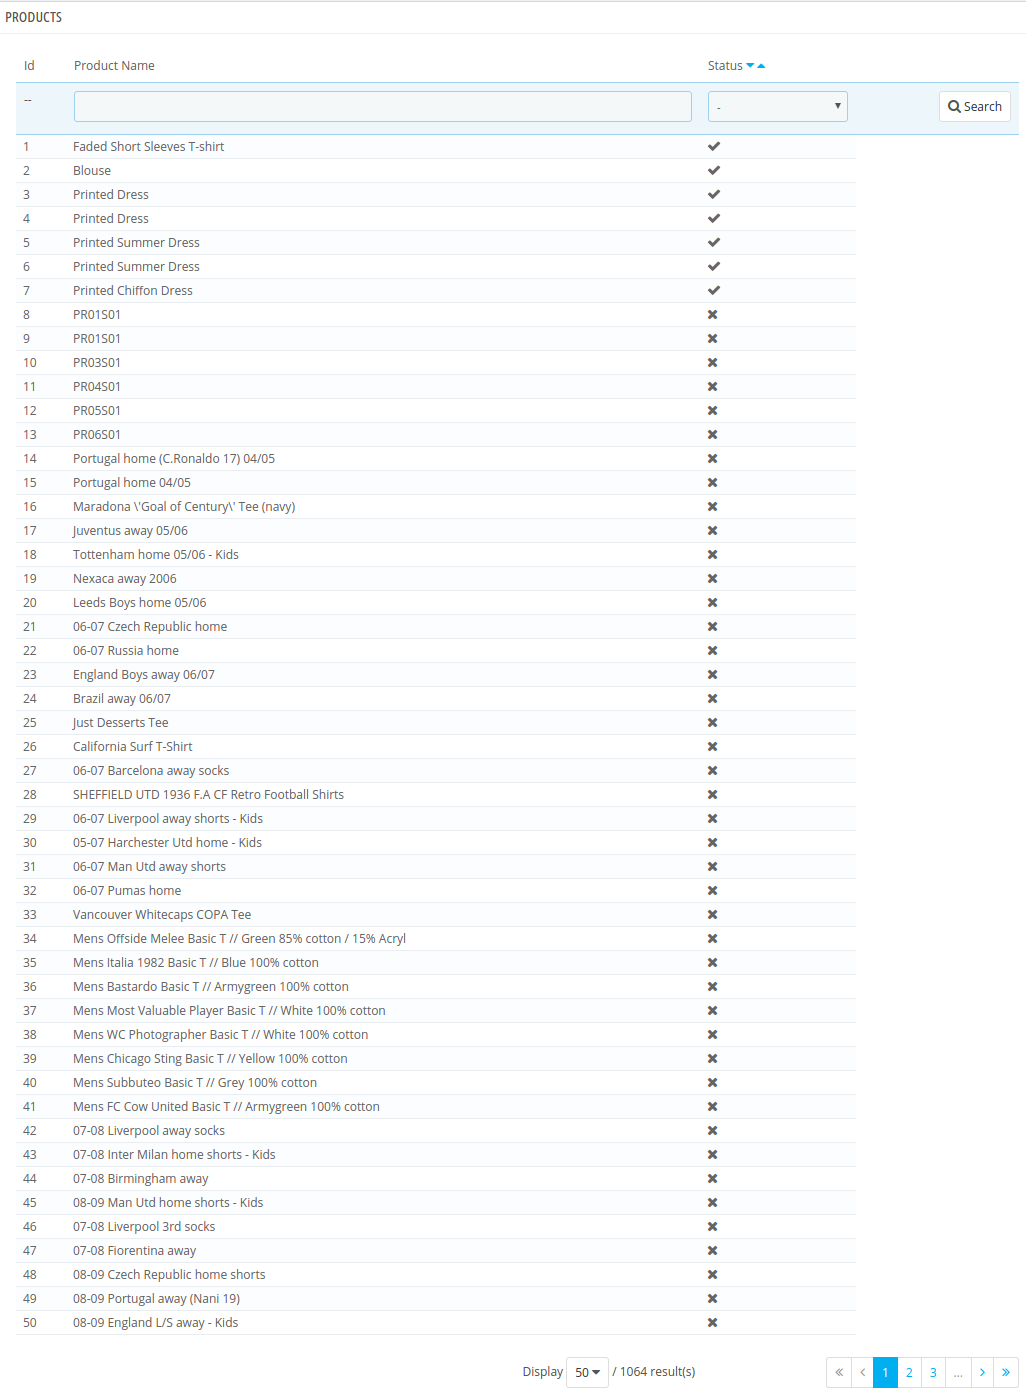
The tab includes the entire list of the products being offered at the eCommerce site. The admin can check each product in which he wants to offer instant shipping option.
3.1.7 How to check the orders placed?
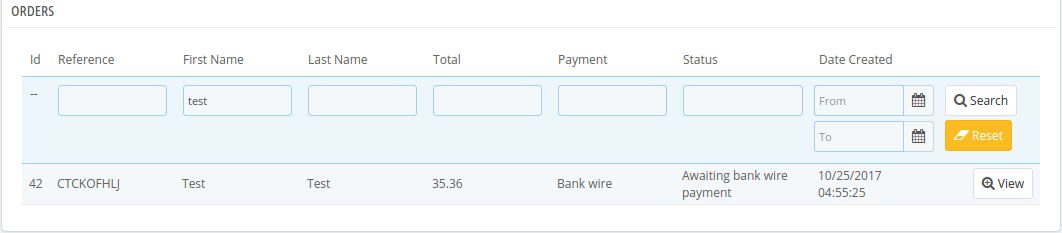
Prestashop one-day delivery timer module even allows the admin to track the orders received. The purchase orders of the products with the one-day shipping features can be viewed in the ‘Order’ tab of the admin interface.
The entire list of the orders received can be retrieved in this tab. The admin can apply the filters to see the details of any particular customer as per the need.
3.2 How to apply the countdown settings?
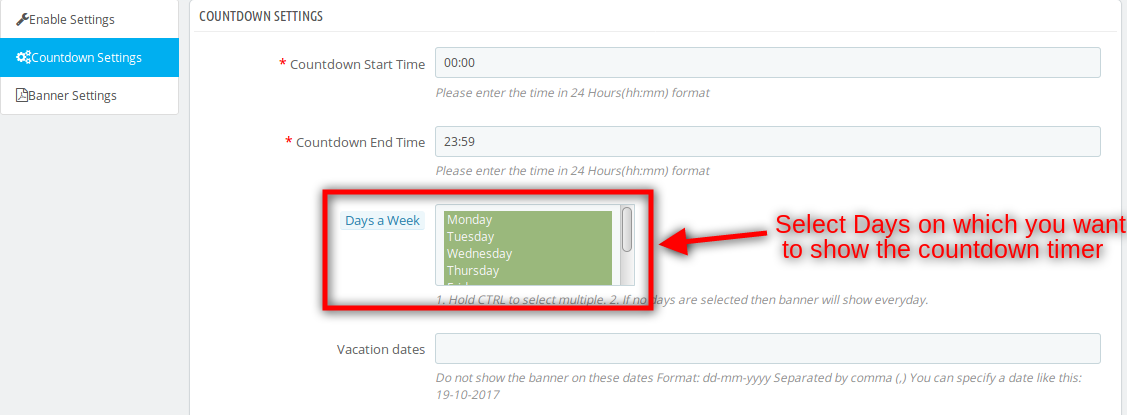
The shipping timer and the countdown setting can be changed from the back-end of the module. The admin can fix the time when the timer is to start and end. They are even given a choice to select the days of the week when they want to show the timer.
Countdown Start Time: This refers to the time when the timer of the shipping offer is to start on the website.
Countdown End Time: This determines the time after which the customers will not be able to avail the features of one-day shipping. Both the time should be entered in 24 Hours format.
Days of the Week: The admin can select the days when he wants to offer this features. In case no day is selected, the timer will be shown everyday.
Vacation Dates: If case the admin doesn’t want to show the timer on a particular day, he can enter the dates in this section. Multiple dates can be entered separated by commas. This can prove a helpful feature during holidays.
3.3 How to change the look and feel of the timer?
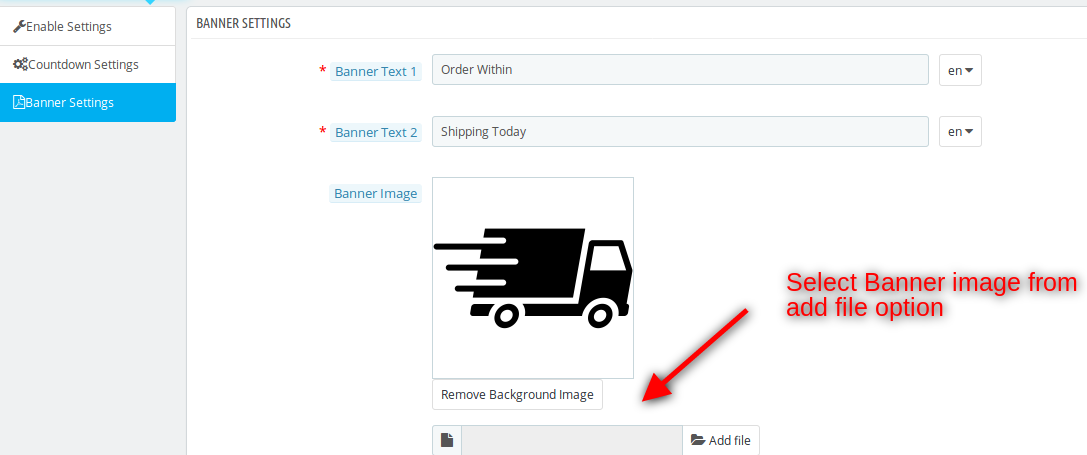
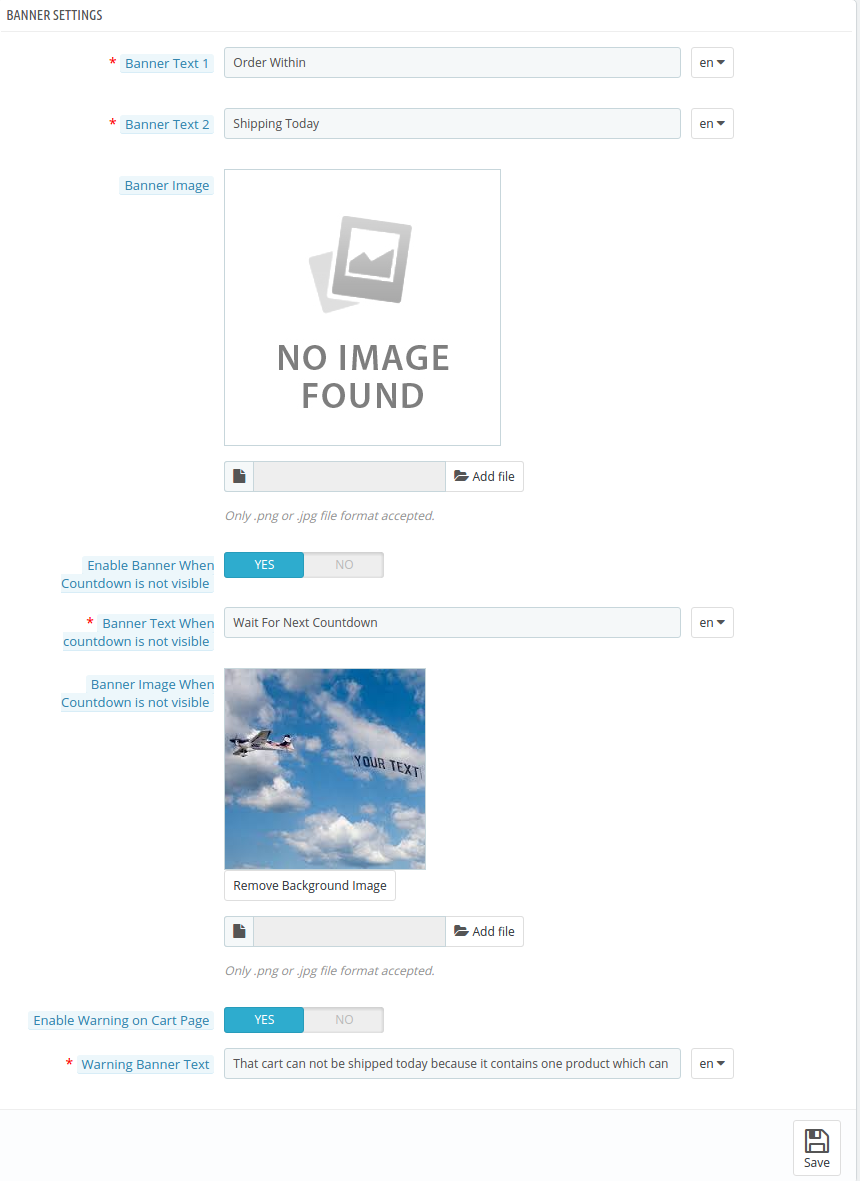
The banner setting and the look and feel of the changed from the ‘Banner Settings’ tab. Here are the customization options offered.
1. Banner Text 1 and Text 2: The text that you want to show on the banner countdown clock can be written here. The module offers multi-lingual support, so, the text can be entered in multiple languages depending upon the website.
2. Banner Image: The image of the countdown meter can be selected from the local drive and uploaded on the front-end of the website.
3. Enable Banner When Countdown is not Visible: When the countdown to the shipping offer is not working, the admin gets an option to show some other banner in the front-end. This feature can be enabled or disabled as per the need.
4. Banner Text When Countdown is not Visible: Once this feature is enabled, the store owner is required to enter a text that will be shown along with the banner. The admin can flash the message reminder the customer about the future offers.
5. Banner Image When Countdown is not Visible: This banner image can be selected from the local drive of the computer.
6. Enable Warning on Cart Page: If the products with this feature are added to the cart, the admin can show the necessary message to the customer by enabling this button. The message may remind the customer about the insufficient cart value for availing the offer or any other message as per the need.
7. Warning Banner Text: The text that the admin wants to be shown in the cart can be entered here.
4.0 Website UI
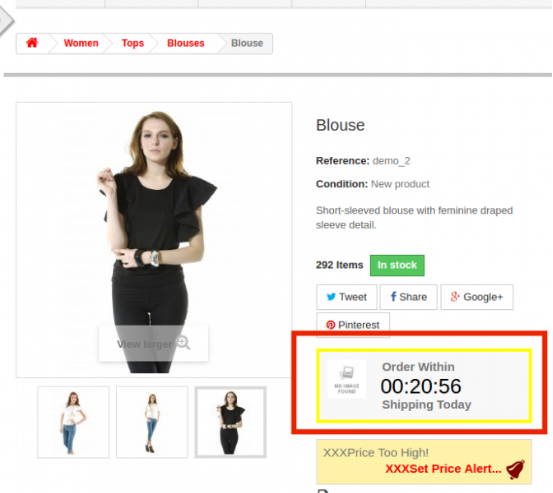
The shipping timer will be shown in the front-end of the website as customized by the admin. The countdown timer on the product page of the website is shown in the image below.
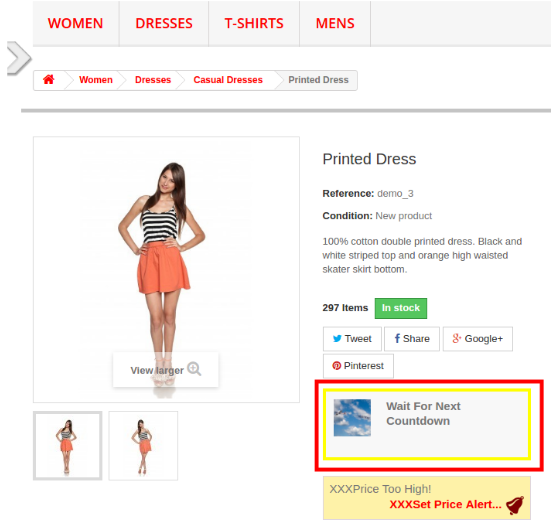
In case, the countdown or the timer is not shown, then, the alternate banner will be shown in the front-end.
This way the customers can get the ordered product on the same day. This Prestashop shipping timer addon shows a shipping timer on the product page which makes a sense of urgency in the customer’s mind. Thus the customer can make their purchase decision fastly without wasting any time. Same day delivery is a very demanding feature from customer’s end. Thus with the help of this Prestashop shipping timer plugin, the store admin can offer same day delivery to the customers and at the same time, the admin can also boost the conversion rate of the website. The Prestashop countdown timer addon is fully customizable and the customers can easily view the countdown timer on the front-end. The Prestashop countdown timer module allows the admin to show shipping timer without any code changes and technical help. This Prestashop shipping module offers a user-friendly and mobile responsive also.
There are many aspects to manage the online business like: marketing strategy, social media optimization, email marketing- the list goes on and on. Present time most of the online merchants offering free shipping to their customer & they see the result free shipping generates more sale. Knowband offers you a Prestashop Free Shipping Manager Addon.
The Knowband Prestashop Free Shipping manager addon allows the admin to offer free shipping to the customers. Not just this, the admin can even apply shipping charges when the cart value is below a certain limit. All this can be done following few simple customization option at the back end of the admin interface of the module.
The shipping charges are determined by two factors. They are listed below:
The cart value or the total price of the order: The store admin can determine the shipping charges as needed when the cart value of the shopper is below a certain limit. This limit can be set by the store owner himself.
The total weight of the order: The store admin can even charge shipping amount when the weight of the parcel exceeds beyond a certain permissible limit.
1.1 Benefits of Merchant
The Prestashop free shipping manager addon is aimed at making it easier for the store owner to manage the shipping cost of their website. Listed below are some of the objectives that can be achieved by the Prestashop extension:
Terms & Conditions: It allows the store owner to set the terms and conditions for the shipping of the eCommerce store. The admin can offer free shipping or charge an amount as per his wish.
Free Shipping by Price: It allows the store owner to set the price of cart value below this price admin won’t be allowed the Free shipping by price.
Free Shipping by Weight: It allows the store merchant to set the minimum and maximum limit of the weight of the package below this weight they can charge the shipping cost.
Free Shipping by Zone: It allows the PrestaShop admin to select the country where they want to offer free shipping by zone.
Free Shipping by Carrier: It allows the owners to select the carrier option which his/her want to provide the free shipping option.
Look and Feel Settings: In this option admin can change the background color, button color and border color of the free shipping block.
Customer Selection: In this option, Prestashop store merchant can select the customer according to the need.
The Free shipping comples customer to add more product to the shopping cart.
These Prestashop addons motivate customers to spend more time on your website and your customers will feel in control of what they’re spending on.
1.2 Benefits of Customer
This Prestashop Free Shipping manager module shows a block on cart summary which gives the exact information about the condition.
This Prestashop Free Shipping manager extension gives them access to a customer to buy the product with free shipping.
2.0 Installation
After purchasing the Prestashop Free Shipping manager addon, you will get following files as listed below in the apk folder:
freeshipping.zip (contains source code of the module)
User Manual
In order to install the extension in your Prestashop store follow the below mentioned steps:
Unzip the freeshipping.zip file. It would contain a number of files and folders as shown below
Copy the entire content, that is, the files and folders of the unzipped folder. Paste the same into the “Modules” folder of your store’s directory. Follow the below-mentioned address path – Root Directory/modules/.
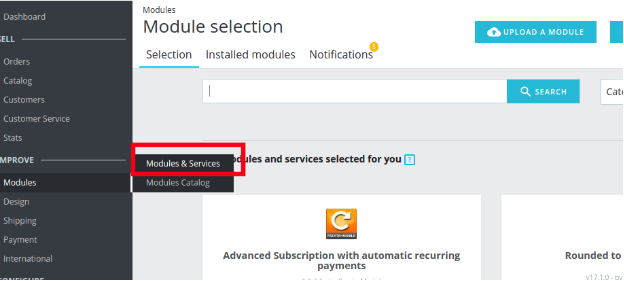
The plugin is all set to be installed in the store. Go to the Store Admin and then to‘Modules and Services’. Your module will be shown as below –
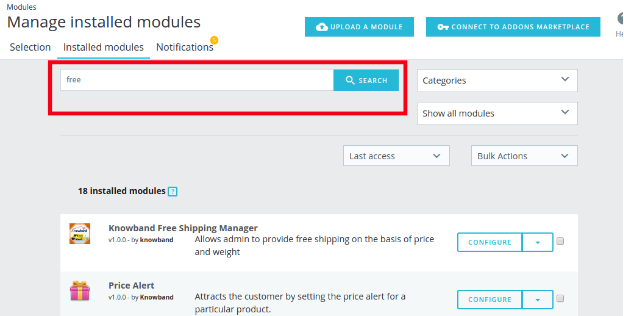
In case, you are not able to find module in admin modules list, you can do so by searching for it with the details mentioned below-
Keyword – Free Shipping
Category – Front office
Filter By – Installed & Not Installed / Enabled & Disabled
Click on the “Install” button just next to your module. It would show a pop-up for your confirmation. Click on “Proceed with the installation” option. This step will install the module and show notification – “Module(s) installed successfully”.
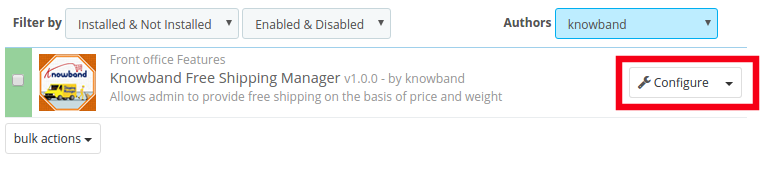
Once the installation is complete, you can get an access to the admin interface of the module by clicking on the “Configure” button.
3.0 Admin Interface
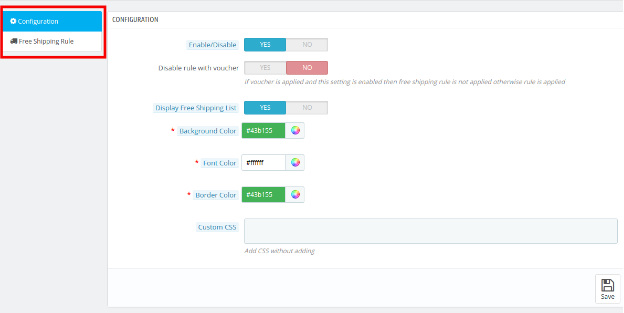
The Prestashop Free Shipping Manager addon is fully configurable. The best thing is the configuration settings can be updated via the admin interface by just clicking the buttons. No code changes are required for the same. The admin interface of the extension has two customization options. They are listed below:
1- Configuration
2- Free Shipping Rule
These options are discussed in detail below:
3.1 Configuration Settings
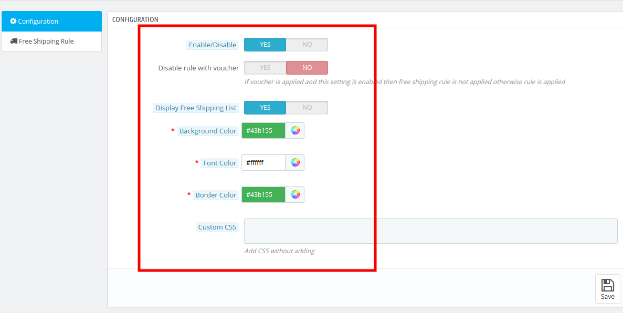
The ‘configuration’ tab of the Prestashop Free Shipping Manager extension offers the seven options to admin that are shown on image below:
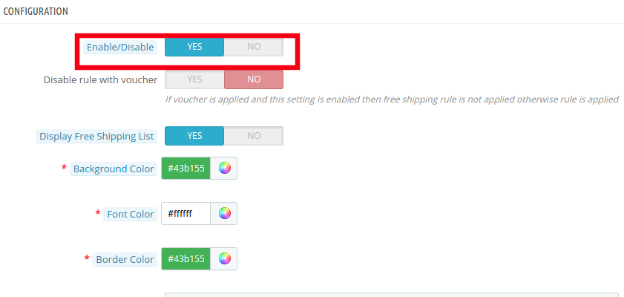
3.1.1 Enable the module: In this section admin can enable/disable the module. This can be done with a button toggle as shown below.
Listed below are some of the options that are offered to the store owner by Prestashop Free Shipping Manager Module.
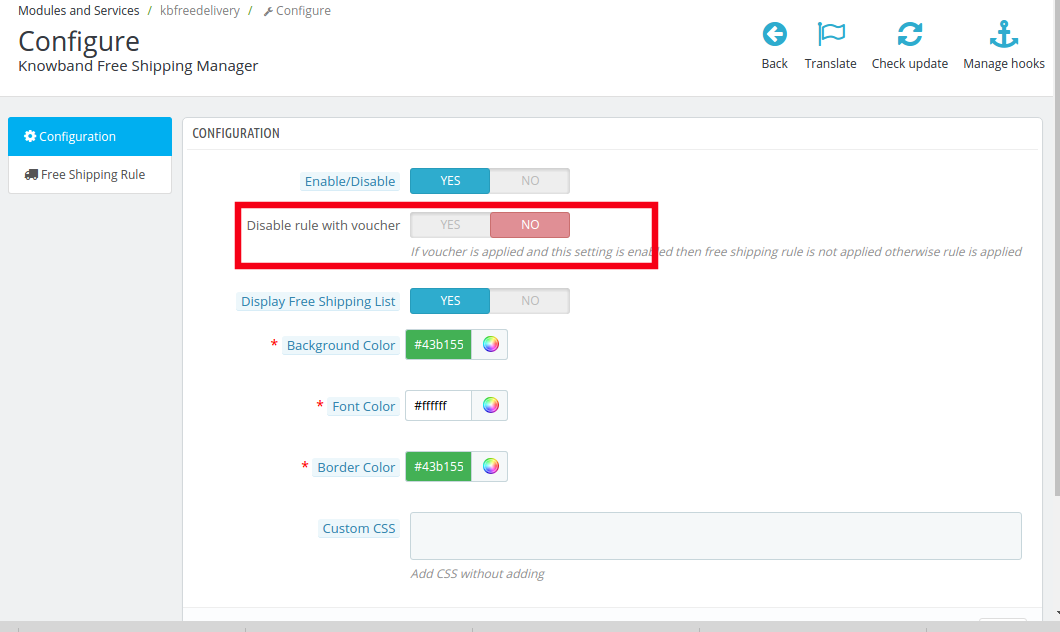
3.1.2 Disable Rule With Voucher
Once this setting is disabled, the free shipping offer will not be applicable even when the voucher is applied.
As it is disabled, the free shipping rule will not be applicable if the voucher is applied on any purchase.
In case, you want to offer free shipping even if any voucher code is applied, then, you can do so by enabling the button.
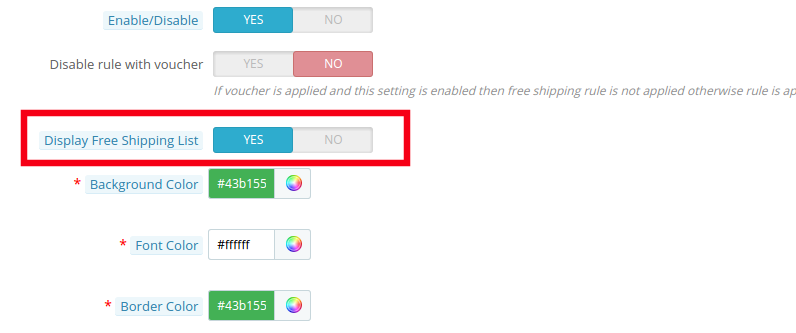
3.1.3 Display Free Shipping List
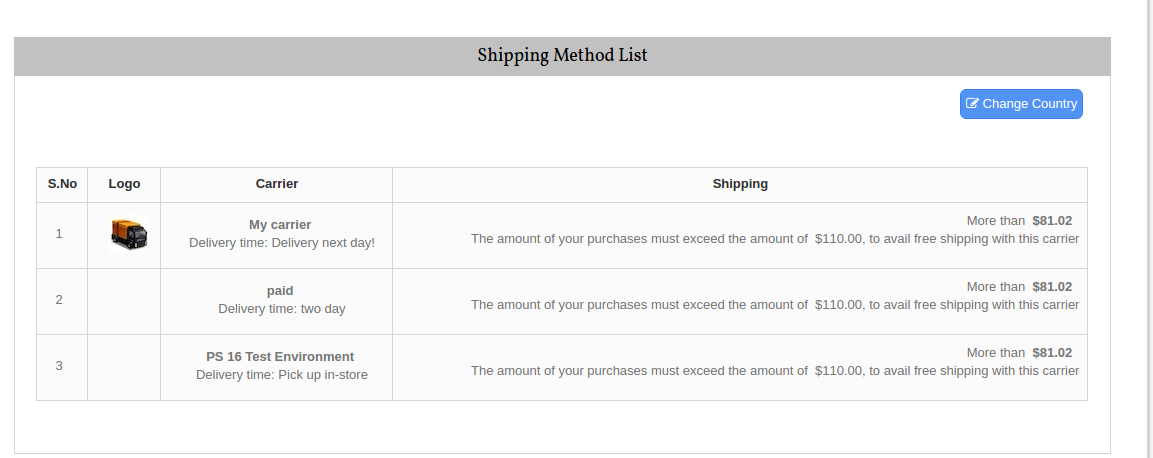
The various free shipping methods can be displayed to the visitors on the website. The list will be shown as mentioned in the image below.
However, if the Prestashop store admin wants to remove the feature, he can do so by disabling the button mentioned below.
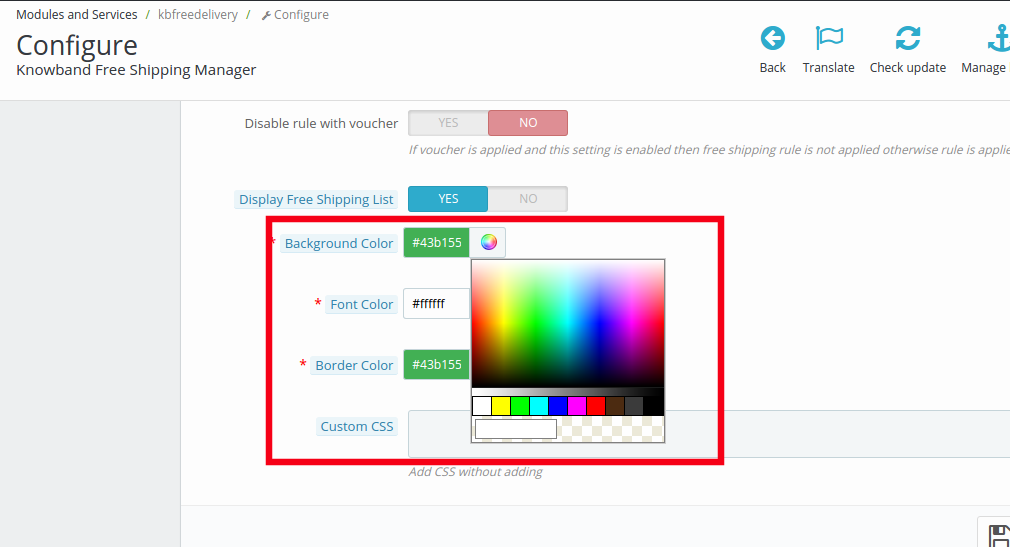
3.1.4 Background Color
The color picker can help you change the background color of the free shipping display.
You may the color that suits the theme of your Prestashop store.
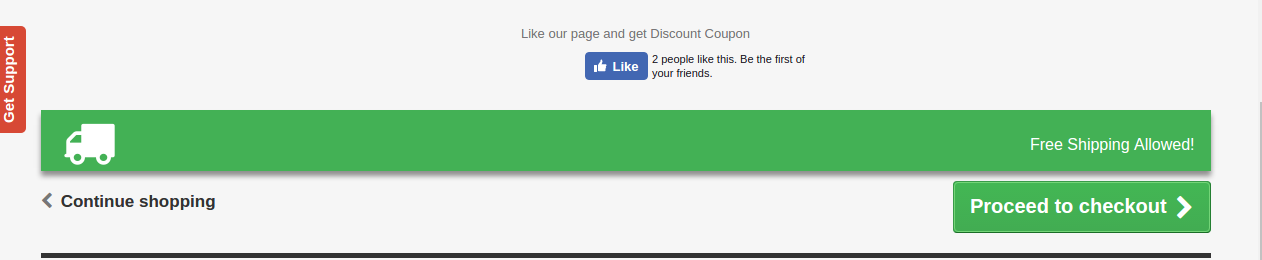
The message will be displayed in the front end of the website as shown in the image below.
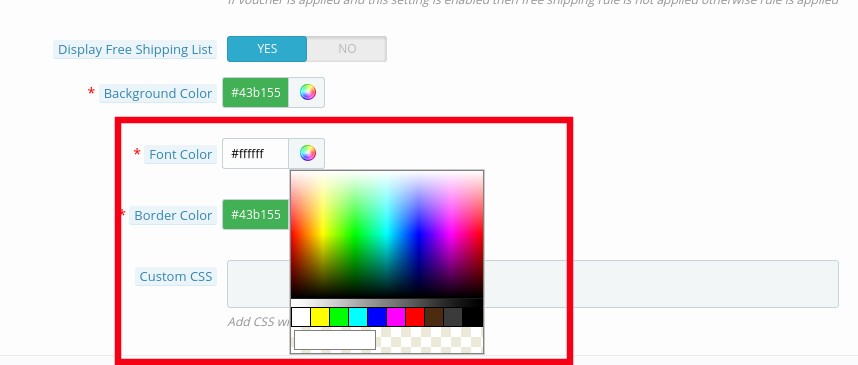
3.1.5 Font Color
The font color of the message that is to be flashed on the website can be picked and set from here.
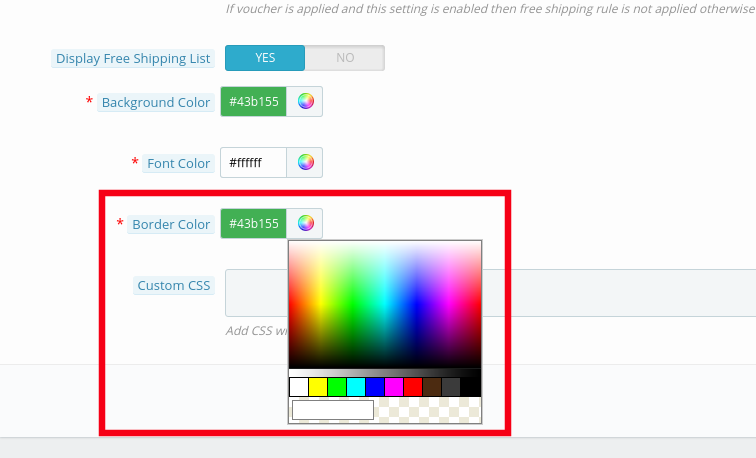
3.1.5 Border Color
The entire block can be customized as per the requirement of the website. The border color of the box can be selected and changed from color picker as shown in the image below.
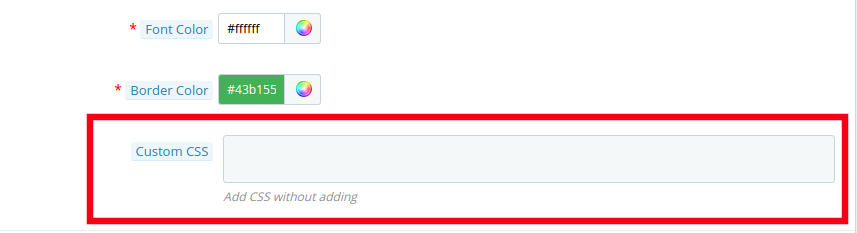
3.1.6 Custom CSS
Any custom change in the look and feel of the module can be done from here. The store admin can customize it by entering custom CSS code in the block shown below.
3.2 Free Shipping Rule
The online merchants get full access to change and modify the terms and conditions of shipping method on their website. All this can be done by just filling up few information.
Follow the steps mentioned below in order to make the changes:
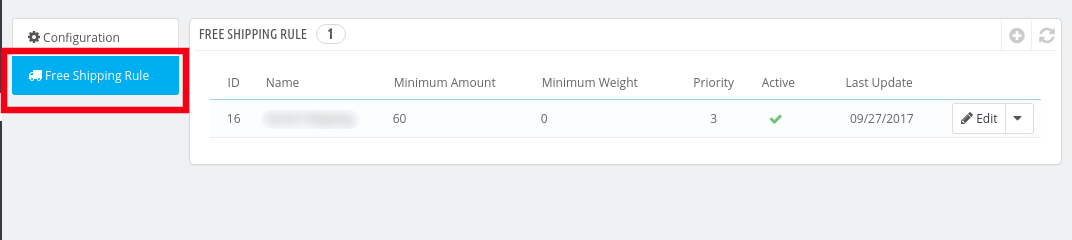
Go to “Free Shipping Rule”. You’ll be redirected to the interface where you will get the list of the rules already fixed by you.
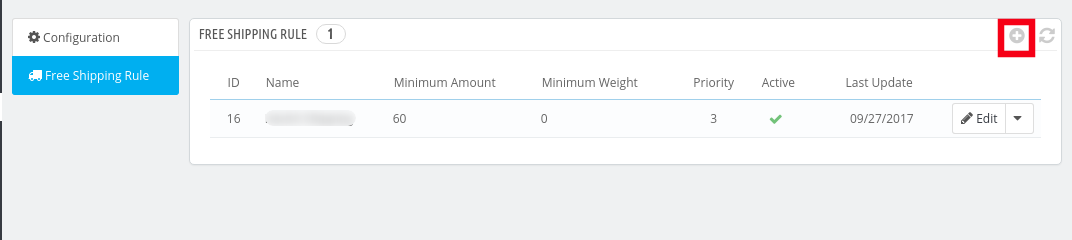
In order to add new rules click on the ‘+’ sign on the right end of the page as shown in the image below:
You’ll be redirected to “Add Free Shipping Rule” page.
Listed below are some of the information that you need to enter in order to set the free shipping rules.
Enter the Name: Enter the name of the shipping rule. It can be anything as per your convenience.
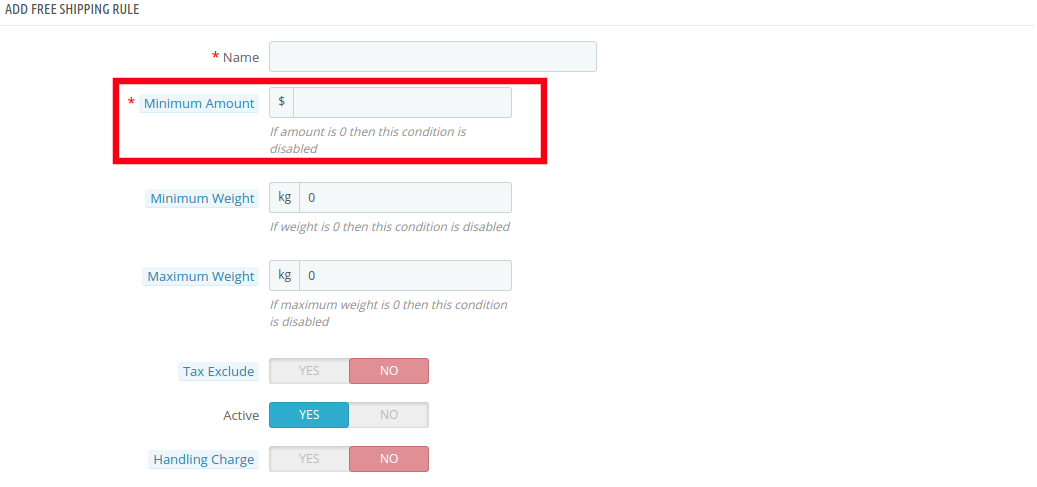
Minimum Amount: Enter the minimum cart value at which you want to offer the free shipping by price options. This facility will be disabled at the store if the minimum amount is ‘0’.
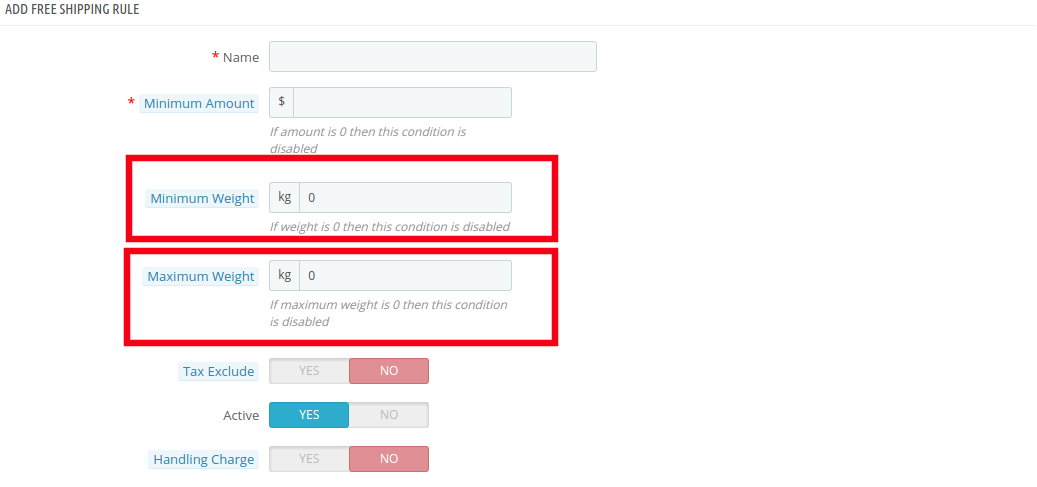
Minimum Weight and Maximum Weight: Set the minimum and maximum weight of the parcel beyond which you are looking to charge the shipping cost. Below this limit, the site will by default offer free shipping facility. The weight is to be entered in Kilogram.
Tax Exclude: You can include the tax or exclude it from the shipping charges by enabling or disabling the button mentioned below.
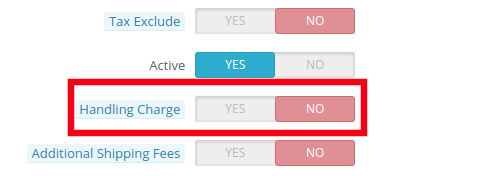
Handling Charge: The merchant can even include the handling charge in the shipping cost by enabling this button. Otherwise, he can leave it disabled.
Additional Shipping Charge: In case of any additional shipping charge, the store owner can enable the button shown in the image below.
Zone: The Prestashop Free Shipping Manager Addon even allows the store admin to set free shipping facility as per the geographical location of the customer. The admin can choose the zones where he wants to offer this facility and give the facility to customer to buy the products free shipping by zone.
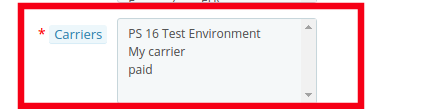
Carrier: In this section prestashop store admin can selectall the carrier options in which you would like to include this facility.
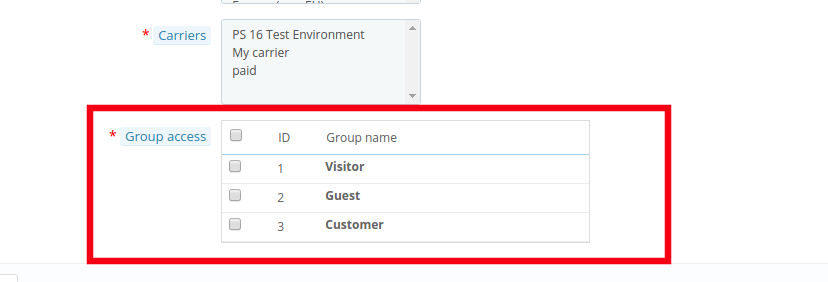
Group Access: The store admin can offer the free shipping facility to the Registered Customer, the Visitors or the New Customers as per his wish. Just check the options that you want to include in the feature.
4.0 Website UI
The changes done in the prestashop store back-end will be reflected in the front-end of the website.
4.1 Free Shipping Block
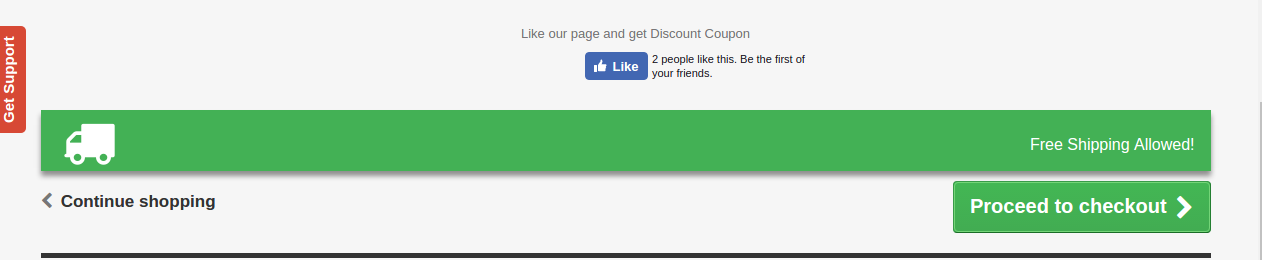
The free shipping block will be shown as mentioned below.
4.2 Free Shipping Limit
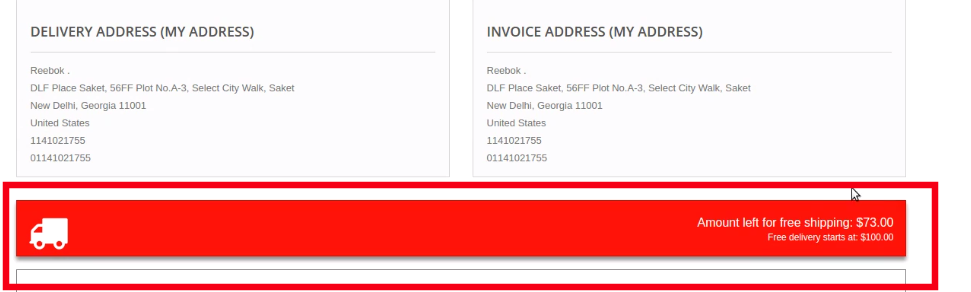
In case you have fixed any limit for the offering free shipping than the same will be shown on the cart of the shopper. If the customer select the product below the cart limit this block shows a block on cart summary which gives them the exact information on the condition to fulfill.
4.2 Free Shipping List Display
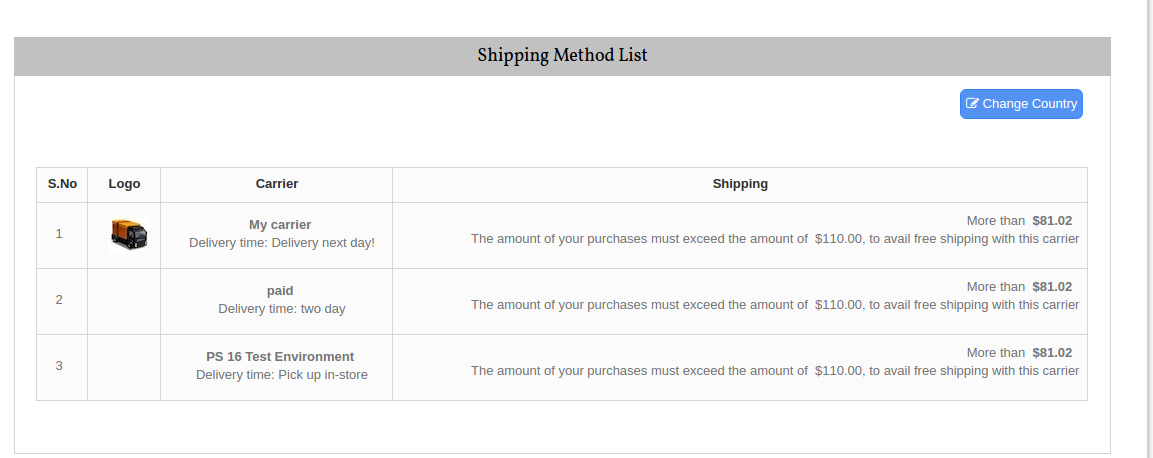
The entire list of the free shipping methods will be displayed on the website if the functionality is enabled by the store admin. This can provide a better user experience and ensure more transparency during the transaction.
Now you can try Prestashop free shipping manager module for on your Prestashop website. KnowBand Prestashop Free Shipping Manager Addon helps you enagege more customer to your store & increase the customer base.
Creating a product-based photo album on Facebook has always been a time-consuming and painful process for the eCommerce store owners. While the social media marketing is the key to success in the eCommerce ecosystem, getting rid of the hurdles have always been a tough task.
Prestashop Fb Album module is one such addon that makes the job easier for the Prestashop store owners. This powerful tool can increase the customer engagement along with the number of Facebook followers of your online store.
1.1 Project Objectives
The module can be used by the store owner to achieve following objectives:
The Prestashop plugin allows the store owner to create a new album on Facebook directly via the admin panel of the module.
The admin can even customize the existing albums.
The visitors can perform a product search via a simple product name or brand
Select the desired photos of a particular product and post the complete album on the Facebook page with just a click of a button
Enhances the look and feel of the Facebook page with alluring visual communication
2.0 Installation
Once the purchase and download is complete, you’ll find following files in the module folder:
1. facebookalbum.zip (It contains source code of the module)
2. User Manual
Follow the following steps to install the extension:
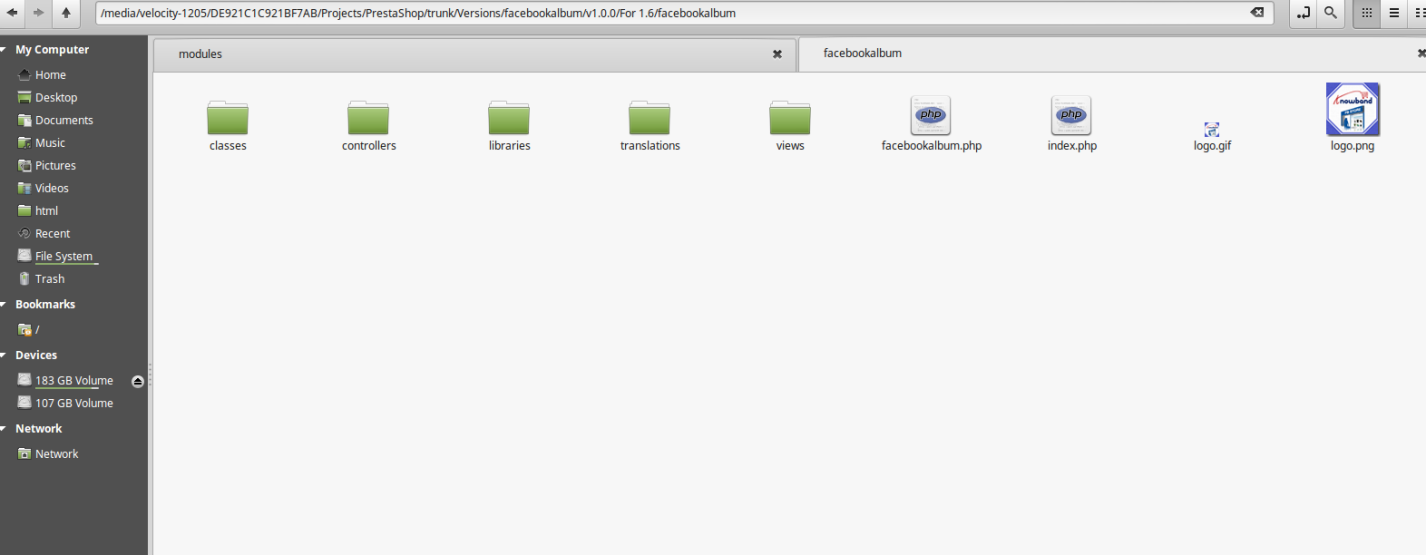
Unzip the facebookalbum.zipfile. It would contain files and folders as shown in the image below.
Copy all the files and folders of unzipped folder into your store “modules” directory on the path – Root Directory/modules/.
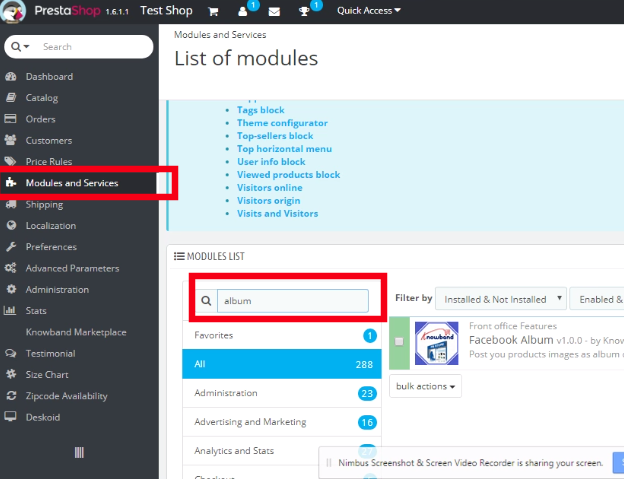
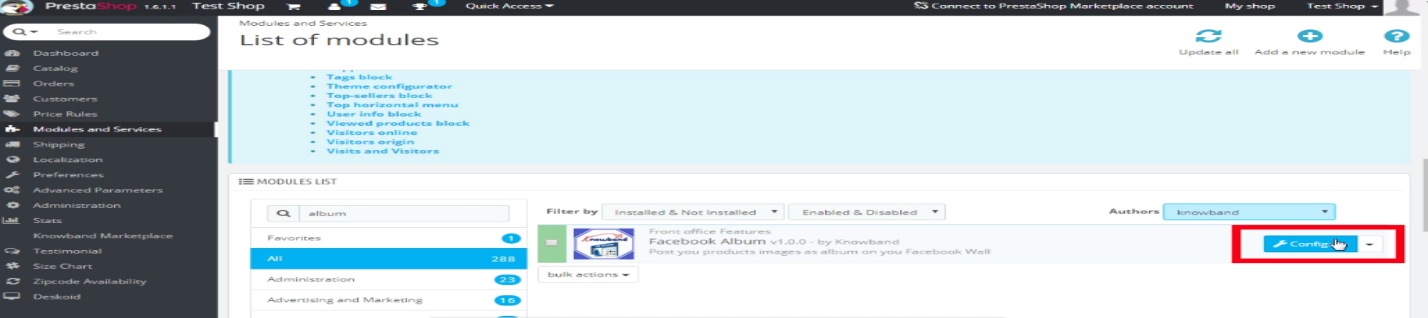
The module is now ready to be installed in your store. Go to the Store Admin and then to Modules and Services. Seach the name of your plugin in the Search tab, as shown in the image below.
Click on “Install” button to install the module. It would show a pop-up for your confirmation. Click on “Proceed with the installation” option. This step will install the module and show notification – “Module(s) installed successfully”.
The module is now successfully installed and ready for use. You can configure it as per your store requirement from the admin panel.
3.0 Facebook App Creation
Facebook App can be created by following steps mentioned below:-
1. Go to given url mentioned below:
https://developers.facebook.com/apps/
2. Click on the “Add a New App”button.
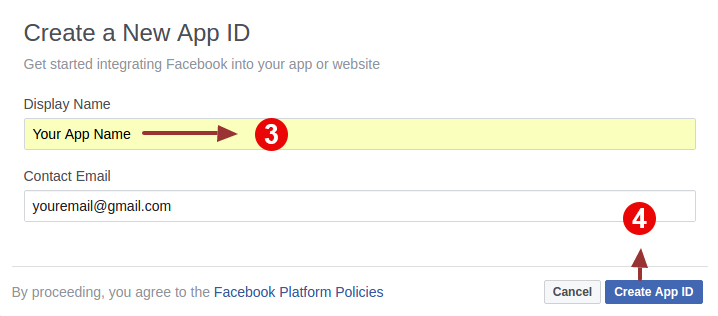
4. Enter your App name and email id, then click on “Create App ID” button.
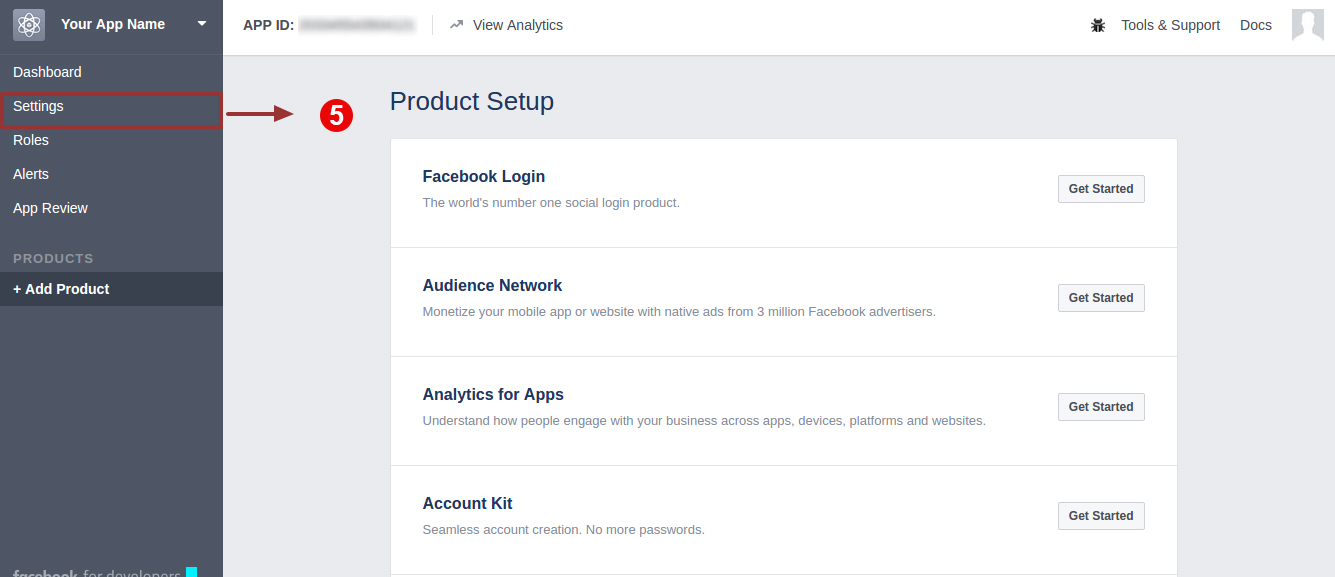
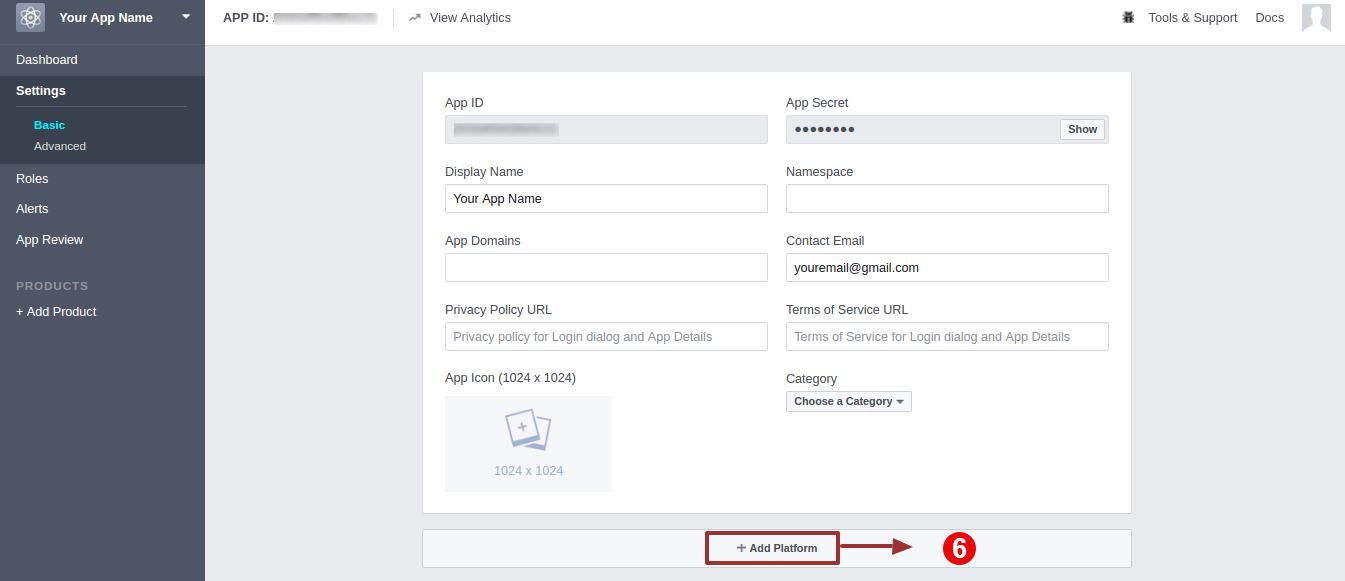
4. Click on “Setting” tab.
5. Click on “Add Platform”.
6. Choose “Website” as platform.
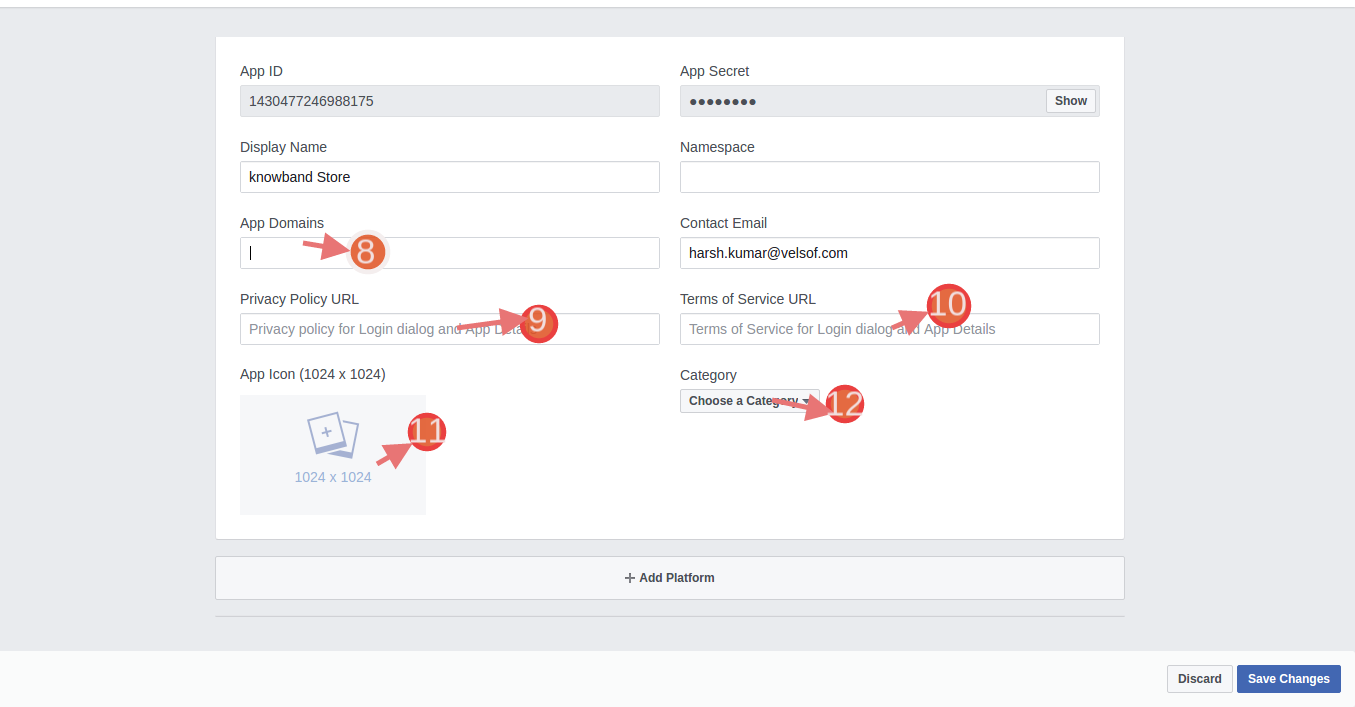
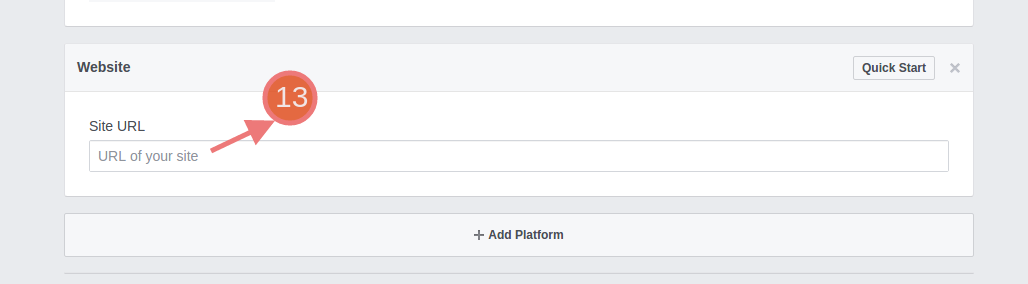
7. Enter your “App Domain” , “Contact Email”,”Privacy url”,”Terms and Conditions url”,”AddLogo”,”Select Category”,“Site URL” and click on “Save Changes” button.
App Domains:
yourdomain.com is correct
yourdomain.com/store is incorrect
www.domain.com is incorrect
Enter your Site URL.
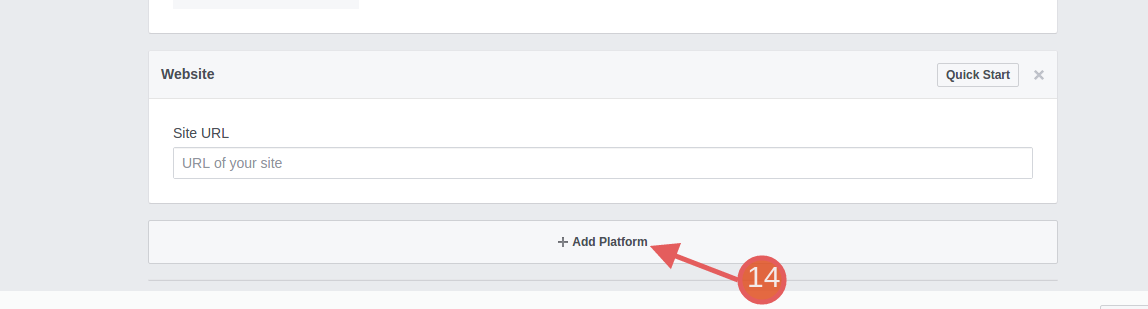
Once again click on “Add Platform to add Page”
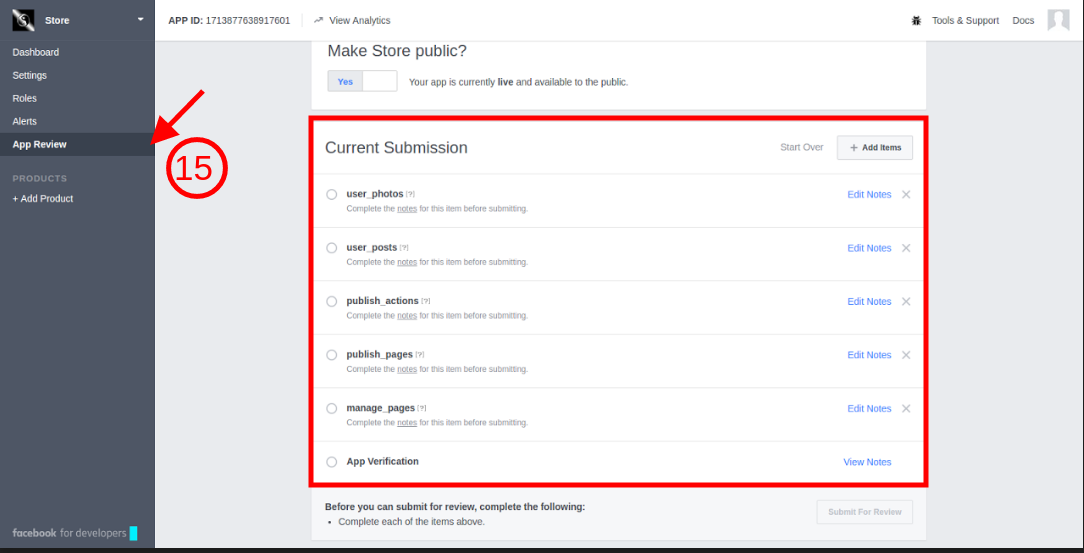
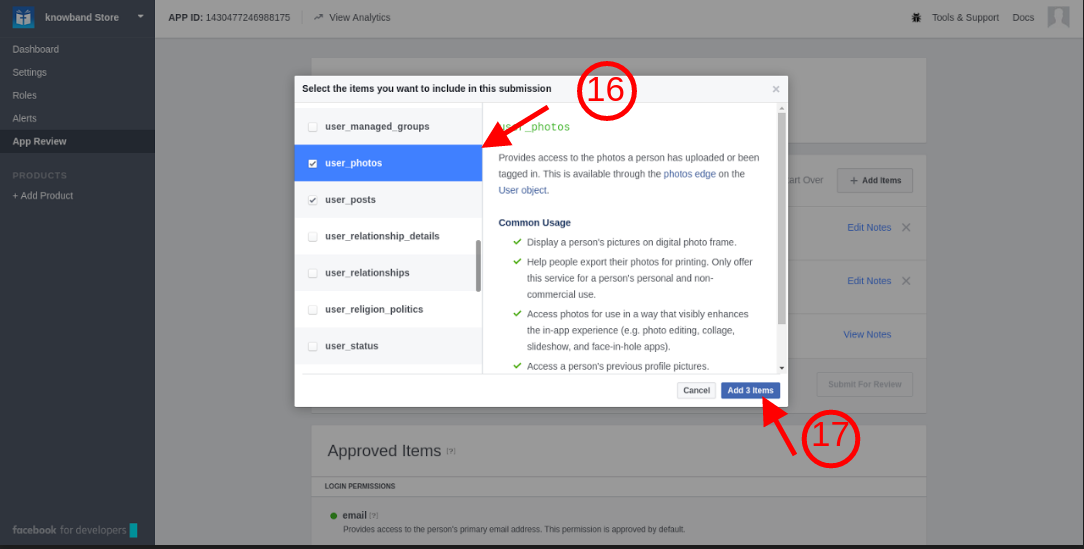
8. Under “App Review” tab:-
Check all the permissions shown in the tab.
Select ‘User Photo’ tab and then click on ‘Add 4iteks’
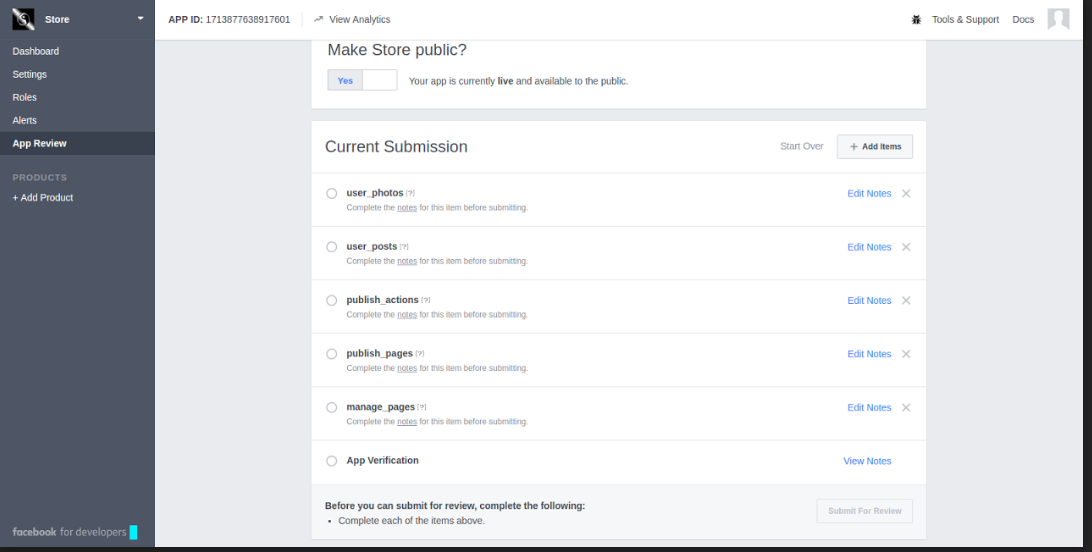
After following the steps mentioned above, the screen will be displayed as shown below.
4.0 Admin Interface
The store owner gets complete access to the change the various functionality offered by the plugin. In order to go to the admin panel, click on the ‘Configure’button.
4.1 How to sync Prestashop FB Album Module with the eCommerce store?
On clicking the “Configure” button, the admin will be redirected to the admin interface of the module.
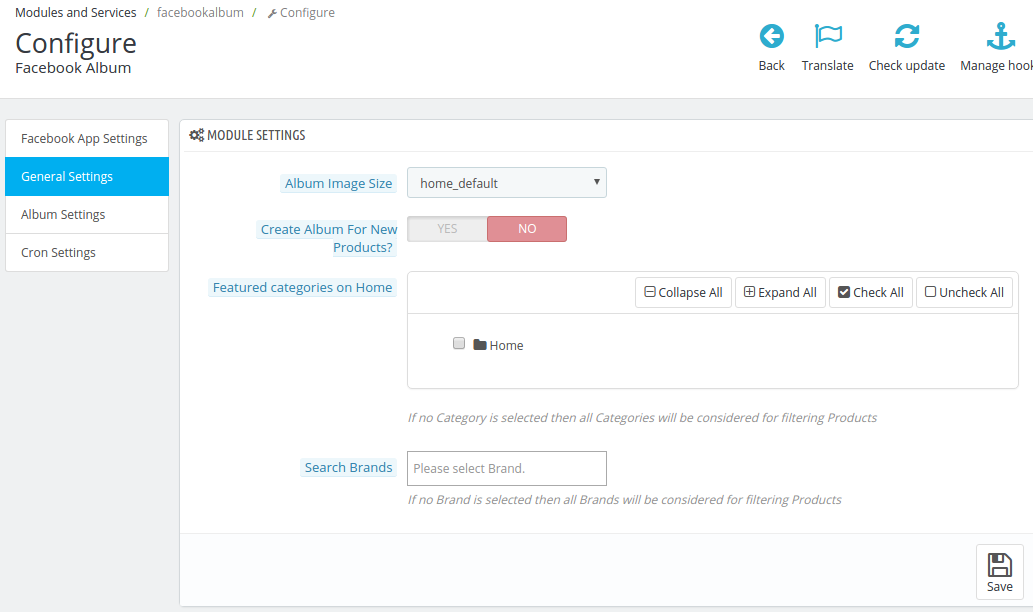
The configuration page includes following setting options:
Facebook App Setting
General Setting
Album Setting
Cron Setting
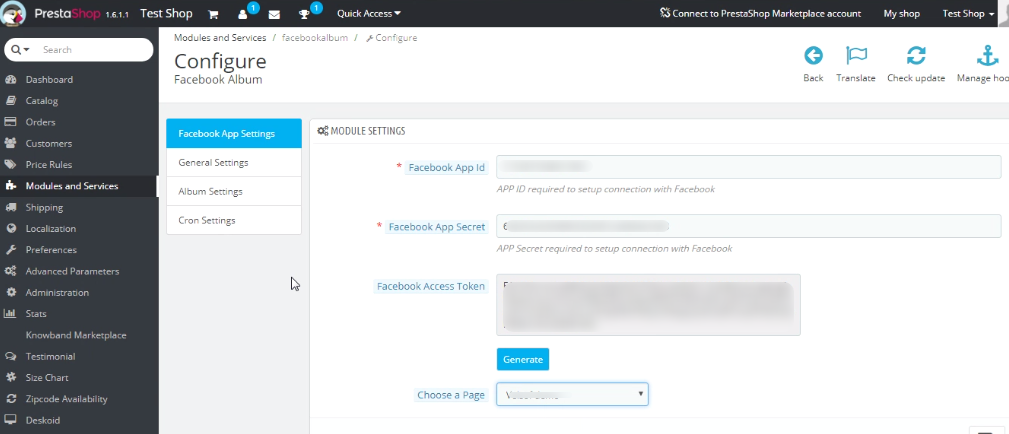
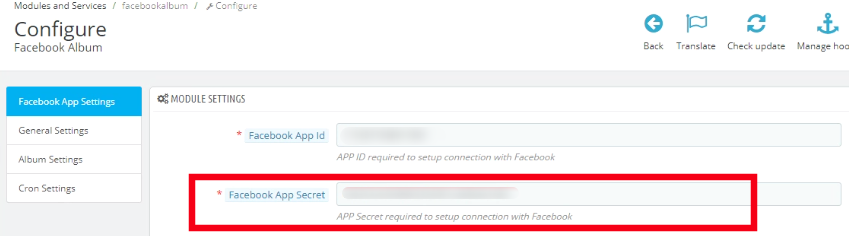
The first step includes the process of ‘Facebook App setting’. That is, the store admin will be asked to save the “Facebook App Id” and “Facebook App Secret” and connect to Facebook as shown below:-
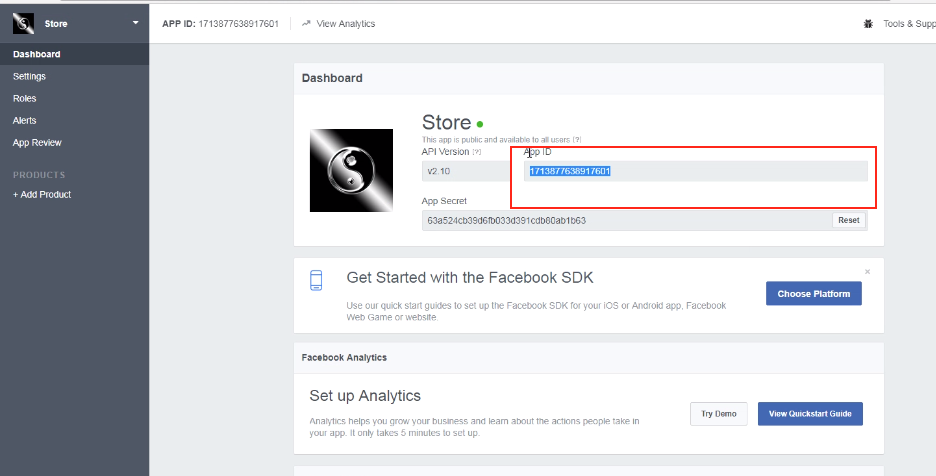
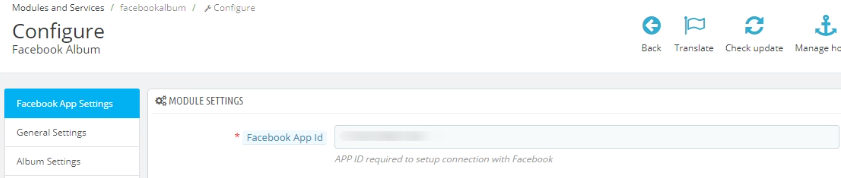
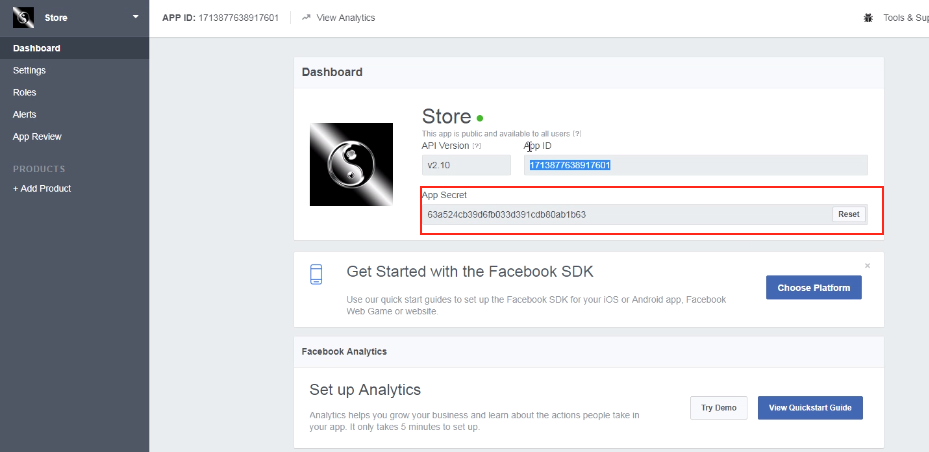
4.1.1 Where can you find the Facebook App Id and App Secret?
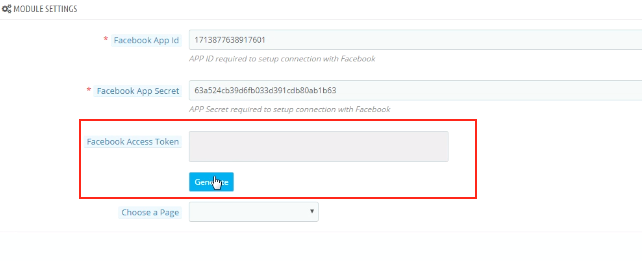
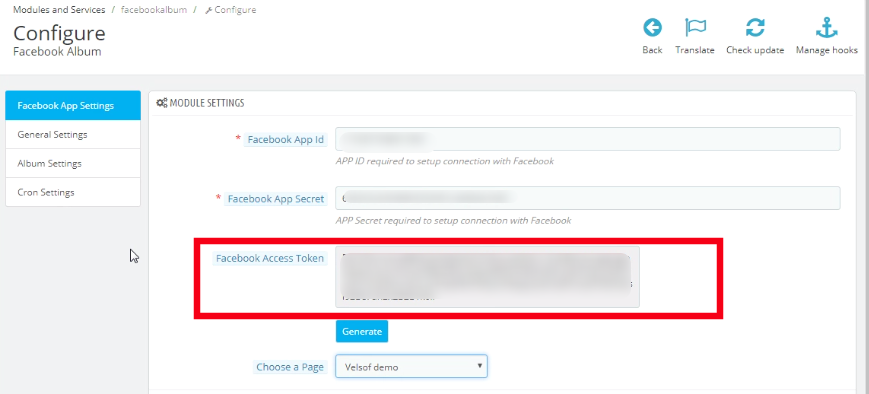
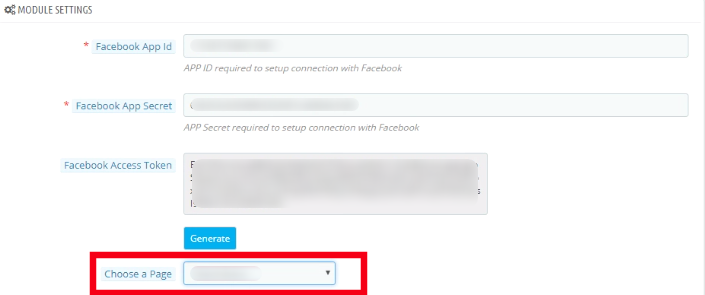
The Facebook App Setting includes the process to the sync the Facebook profile of the store owner. Follow the below-mentioned steps:-
Facebook App Id:- In order to find the App id, go to the dashboard of your Facebook App. Copy the app id from the column shown in the image below and paste it in the setup page of the module.
Facebook App Secret:- The next thing you need to do is to copy the Facebook App Secret from the dashboard. Copy the App Secret from the next column as shown in the image below and paste it in the admin interface of the module.
Facebook Access Token: Once the App id and App secret are saved, the Facebook Access Token will be generated automatically. Click on the ‘Generate’ button. This button will be disabled by default and will be enabled only when the App Id and App Secret is entered.
As you click on the button, you will get a pop-up for Facebook Login. Log in your Facebook store and the access token will be generated.
The module is now synced with your Facebook store and is ready for use.
‘Choose the Page’ from the options given in the dropdown list and save the changes. The posts will be displayed on the page selected by you. For instance, we take the page as shown in the image below.
4.2 How to customize the front end of the Facebook Album?
On adding/editing any profile, the admin will be asked to connect to Facebook App. Once the module is successfully synced with the Facebook Page of the admin, the store owner can customize the look and feel of the album to be displayed on the Facebook page. The ‘General Setting’ offers various customization options. Let us discuss the customization options one-by-one.
4.2.1 Album Image Size
The size in which you want to display the image of your album can be selected from here. There are various options available in the drop box, you may choose the one that suits your requirement.
4.2.2 Create Album for new product
This option provides you a choice to select Whether you want to create a look book for the new arrivals or not. You may enable or disable it as per your requirement.
As this feature is enabled, a series of questions are asked to the user.
4.2.2.1 Choose an album from the existing ones for the album of new products
The store admin can either create an entirely new album for the new arrivals or else he choose one from the existing albums. In order to choose one from the existing albums, disable Create New Album.
The albums already existing on your Facebook Page will be displayed in the drop box of the next column, that is, Select from Existing Album. Make your selection and then choose the images you want to display.
You can either select All Images or just the Cover Image from the Album Image section as shown in the image below.
4.2.2.2 Create a new album for the new products
Prestashop FB Album plugin even offers you an option to create a new album for the new products. In order to do so, enable Create New Album.
Enter the name of the album in the section New Product Album Name.
Write a short New Product Album Description in the next column.
4.2.4 Featured categories on Home
Select the featured categories of your eCommerce store that you want to display in the photo album.
The entire category can be view by clicking on the Expand All button. Check the categories that you want to include and the changes will be synced in your Facebook Album.
4.2.4 Search Brand
Select the brands from the choice offered that you specifically want to include in the search filters. In case, none of the brand is selected than the module will consider all the brand for filtering products.
4.4 How to customize the photo album?
There are two functionalities offered by this customization option. They are listed below.
Customization the existing albums
Creation of new album
Let us discuss them one-by-one in details.
Customization of exiting album
In order to customize the existing album, select the one from the dropdown list of Select from Existing Album.
Once the album is selected, choose the image of the product that you want to include in the album from Search Product option.
As you hit the Search button, the images of that product will be displayed you can choose the image that you need to include in the photo album.
You can either Add the image in the album queue or you can choose the option of Post Now.
Creation of New Album
In order to create a new album enable the Create New Album option.
Enter name of the product album and the description in the following sections.
Select the images of the product in the same way as it was done earlier.
The album is ready to be displayed on the Facebook Page of your store.
4.4 How can Cron Setting help?
The Cron setting allows you to sync your photo albums and post it on the Facebook page.
‘Sync New Product Album’ will allow you to sync the products album on your Facebook page. The albums will, then, get listed below.
On clicking the ‘Send Album Manually’, the album will get posted on the Facebook Wall of the admin.
The admin can even delete the listed albums from the queue by clicking on the ‘Delete’ icon.
5.0 Facebook Photo Album UI
Once you have configured Prestashop Facebook Album module and synced with the Facebook profile, the photo albums will be shown on your Facebook page.
5.1 Facebook Photo Album
The album will be shown on the Facebook as shown in the image below.
5.2. Photo Album with description
Right from the products images to the descriptions, everything will be shown on the wall post of your Facebook page.
1.0 Introduction to Prestashop Email subscription popup – Spin and Win
PrestaShop is a free, open-source eCommerce solution. Anyone can create his/her store using Prestashop with minimal effort. The admin needs no technical knowledge to set up the Prestashop store. Prestashop Email subscription popup by Knowband has replaced the old way of email subscriptions as the old-fashioned way of offering a 10% discount in exchange for email ids does not excite the visitors. We at Knowband have come up with a new way of engaging the customers with the website. Prestashop Spin and Win (Prestashop Email Subscription popup) addon display an interactive and responsive gamified interface in the front-end of the website.
New themes available: In 2020, there are 4 New Year themes available for the store admin.
Spin and Win addon is now compliant with the GDPR. GDPR settings are available in the module using which the Prestashop admin can comply with the rules of the GDPR. Please refer to the GDPR Settings to know more about the GDPR.
The overall functionality of Spin and win(a responsive email subscription pop up):
1. The customer visits the website.
2. Newsletter subscription pop up appears on the Prestashop storefront. (is usable as an entry or exit pop up)
3. The user enters the email Id.
4. Spin the spin and win pop up and get discounts
5. Email Ids entered are captured by the addon.
The responsive and interactive email subscription pop interface enhances the customer experience and compels them to visit your site again. The addonis usable as an exit-intent pop-up as well as email subscription pop-ups in the eCommerce sites.
What’s New?
Theme Scheduling: The eCommerce store owner can schedule a theme for any occasion by adding the start and end date.
Update Number of Slices: This new feature allows the admin to select the number of slices for when. Now admin can select 6, 8, or 12 slices for the wheel.
Export Email Functionality: Updated version has Export Email functionality to export emails of customers into a CSV file from the admin panel.
Show Progress meter: Under the general setting of Spin and Win, the store admin can set the Progress meter percentage which will display on the front end of the Popup.
Provide an option to customers to choose to generate a coupon with or without email ID: If the admin enables, it has the functionality to provide an option for customers to choose whether they want to provide their email id or not.
Testing based on IP Address: The eCommerce store owners can now test the Spin and Win addon before actually implementing it on the store by entering their IP Address.
Set Coupon Expiry day: This new feature allows the admin to set the coupon expiry date even after the coupon is generated.
Minimum Amount filled: Under the slice settings tab, the admin can now set the minimum value the cart should have for the coupon. Further, that the customer uses.
1.1 Merchant Benefits of this Newsletter subscription popup addon:
By using this Exit popup cum Entry popup addon, the store owners can achieve the following things.
Boosts Lead generation.
The customer can claim the discount by entering their email id. Hence, it increases the customer base of the store user.
The responsive and interactive user-friendly interface ensures a high impact on direct sales. It improves the overall conversion rate, using coupons and discounts.
Turn Visitors into potential buyers and improve conversion rates by offering users a completely different way to win discounts.
Fully Customizable subscription pop up
Detailed Reporting.
Export Email subscriber list in.CSV format
Theme scheduling for occasions without taking extra effort.
The look and feel of the spin and win pop up as well as the email notification is customizable from the back end.
GDPR Settings are available in the module using which the Prestashop admin can comply with the rules of GDPR.
New classic themes for Spin and Win popup help e-merchants in drawing user attention on different occasions. New Holiday themes for Christmas and New Year are available to attract more and more visitors to the store.
Effortlessly generate a fixed coupon code for each Spin Win slice.
Restrict the compatibility of Spin and Win coupons with other active coupons of the store.
The store owner can now display the latest New Year 2020 themes on his website.
1. Responsive 3 in 1 pop-up: Is usable as an Entry pop up, Exit pop up, or Email Subscription pop up.
2. The admin can select from the multiple available wheel designs as well as spin and win themes to choose from.
3. The new version allows the admin to schedule a valid active and expiry date for a theme. After the expiry date, it will be set to the default one.
4. The interactive Spin and Win game lures customers and helps admin to engage more customers thereby increasing the customer base of the site.
5. The interactive Spin and Win game lures customers and helps admin to engage more customers thereby increasing the customer base of the site.
6. The back-end offers Readymade Email Templates which is further customizable.
7. The store admin can change the look and feel of the Prestashop exit pop-up as per the requirement. The admin can now apply the latest New Year 2020 themes as well on his website.
8. Prestashop Spin and Win (email subscription) pop up offers Mail Chimp, Klaviyo and, SendinBlue Integration.
9. Spin and win popup allows the admin to choose the number of slices in a wheel. There are 6, 8, and 12 sliced wheel options available.
10. Show the progress meter on the front end with a progress percentage. This will display with a label that the admin adds.
11. Prestashop Exit pop up allows admin to provide an option for customers to choose whether they want to provide their email id or not.
12. Set the discounts and offers on each slice and also set the gravity of each slice, the slice with maximum gravity will have larger occurrences.
13. Prestashop Newsletter subscription popup addon allows admin to customize the email subscription pop up using Custom CSS and JS without making any changes in the base code
14. Prestashop Entry popup addon allows admin to choose whom to display, where and when to display, maximum display frequency of the Spin and win (email subscription) pop up.
15. Prestashop Newsletter subscription popup offers wheel sound options which adds a sound when the Spin wheel rotates, it gives a more lively feeling of the Spin and Wins game.
16. Prestashop Exit intent popup addon offers an option to show fireworks on the Spin and Win popup when a customer wins a discount to make the win of the customer more exciting and fun.
17. Prestashop Newsletter popup offers an Email Recheck option on the cart as well. Just to make sure if the customer who is applying the coupon is the same who played the Spin and Win game.
18. Prestashop Exit popup addon allows admin to choose the pages to display the pop up i.e, Category page, Home page, Product page, etc.
19. Email Recheck option to Restrict the same Email Id from availing the discount coupon more than once.
20. Prestashop Newsletter subscription popup addon offers to Pull Out Tab facility for customers as spinning the wheel is not compulsory for visitors.
21. Prestashop Newsletter popup addon allows Prestashop admin to preview the Email subscription popup and the Spin wheel at the admin panel itself.
22. Prestashop Email Subscription popup addon offers a Responsive and Interactive user-friendly interface that ensures a high impact on direct sales. Turn Visitors into potential buyers and improve conversion rates by offering users a completely different way to win discounts.
23. Prestashop Spin and win is compliant with the GDPR, GDPR settings are available in the Spin and Win admin panel. Using these settings admin can comply with the rules of GDPR.
24. Prestashop Spin and Win module offers Detailed Reporting
Check the performance of the interactive spin and win pop up by comparing the total generated vs used coupons using interactive graphical reports
Tabular reports displaying coupon codes, details of coupon holders (customers), the country where the addon is usable, and the device on which the customer uses it.
The report which incorporates email addresses of the customers can be exported in the form of.CSV file
27. Prestashop Spin and Win are Compatible with all themes.
28. Desktop, Mobile, and Tablet responsive design
29. Prestashop Spin and Win popup module allow the admin to control the compatibility of Spin and Win coupon with other site coupons. If this feature disables, then the coupon generated from Spin and Win will not work with the other active coupons. They can also set a coupon expiry date as well.
30. Admin can generate a fixed coupon code for each slice of the Spin Wheel. They can also fix the minimum cart value customers should have to generate the discount coupon.
31. This interactive spin and win popup offer a direct coupon generation functionality that allows the customers to generate a spin win coupon without filling any user name fields.
32. Prestashop email subscription popup allows admin to select one or more customer groups which include: visitor, guest, the customer.
33. Admin can set the visibility of Spin and Win popup on the specified number of page visits. If 0 is entered then this functionality will disable and the user will see the spin wheel popup as they enter the site.
34. Prestashop Interactive popup addon allows the store owners to test the module before implementing it on the store.
2.0 Installation of Spin and Win – Responsive Email Subscription pop up
Once you purchase the addon, follow the below steps:
Go to the Store Admin -> Modules and Services.
2. Click on “ Upload a module”. You can drag or drop the file or can simply select the file from the system.
Once the file is completely uploaded, a notification of “Module(s) installed successfully” will display.
3.0 Admin Interface – Spin and Win – Entry, Exit, and Email subscription pop up
Once the installation is complete, the next steps include configuring the addon. Click on the ‘Configure’ button just next to Prestashop Spin and Win Addon.
The Prestashop admin panel of the addon offers various customization options to the Prestashop store owners. The new version has two default setting options separately for General settings and Theme scheduling.
3.1 How to start the configuration process?
On clicking configure from the module listing page, Prestashop Admin will be redirected to the configuration page. The very first tab in the main menu includes “General Setting” as shown below:-
Listed below are some of the customization options that can help the admin make the initial changes in their Spin and Win (email subscription) Addon.
1. Enable/Disable:-The admin can enable or disable the addon using this setting.
2. Enable/Disable Test Mode:- The store admin can enable the test mode and enter their IP Address to test the module before implementing it in the store
3. Show Pull-out Tab:- The visitors of the website can remove the spin and win pop up by clicking on the ‘I’m not feeling lucky link as shown in the image below.
By enabling this setting, the store owner can provide the option to pull the spin and win spin and win pop up back on the screen by the user.
The customer can click on the gift icon on the left side as highlighted in the image above to pull out the email subscription pop up spin and win pop back.
4. Email Redundancy Check:- This provides an option on the Prestashop store to verify the email id of the customer to ensure that there is no repetition of email ids. In case, the customers are only allowed to use coupon code ones. The customers cannot use the single email id twice. This can be done by enabling the Email Recheck option as shown in the image below.
In case the same email id is entered again, a message will be shown as below.
5. Enable Wheel Sound: Prestashop store admin can enable wheel sound. Further, the wheel will generate a tapping sound when he enables this option.
6. Show Fireworks: Prestashop Newsletter subscription popup addon offers an option for admin to show fireworks on the email subscription popup when a customer wins a discount. Admin can enable this setting to make the win of the customer more special and exciting.
7. Show Customer Name: Prestashop admin can now ask for the Customer name before a customer plays the Spin and Win game.
8. Require Customer Name: Prestashop admin has an option to make the Customer name field mandatory or optional.
9. Allow Email Recheck on Cart: This option will check whether the customer who has applied the coupon on the cart is the same who has played the Spin and Win the game.
10. Spin and win pop up Display Interval:- Prestashop store admin can enter the number of days after which the Spin and win pop up(email subscription pop up) will display to the customer.
11. Generate Fix Coupon Code: Admin can enable/disable this option to add fix coupon code respective to each wheel slice under the Slice Settings tab of the module. For this, the admin has to first create the coupon code from the Price Rules -> Cart Rules tab then enter the coupon code by editing a particular slice.
12. Allow Direct Coupon Generation: If the admin enables this setting, then the customer can directly generate the coupon by clicking the Spin the Wheel button. If he disables it, then the customer has to fill in the required information to play the game.
13. Provide an option to customers to choose to generate a coupon with or without email ID: With Prestashop Spin and win, the admin can allow users to generate a coupon without entering their email ID.
14. Compatible with other cart rules: Admin can control the compatibility of spin and win coupon code with other active coupons on site. If the admin disables this setting, then the coupon generated from Spin and Win will not work with other site coupons.
15. Enable Theme Scheduling: If the admin enables this, he can now schedule a theme according to the occasion, and once the validity of the theme gets over, it will be set to the default theme.
16. Show Progress Meter: With this new feature of Exit pop up, the admin can show a progress meter on the front end.
17. Progress Percentage: Prestashop spin and win module allow admin to insert a value for displaying the progress percentage i.e. the value for offers claimed.
18. Progress label: In this tab, the admin can add a text which will display below the progress meter like ‘75% Offers Claimed, Hurry Up!!’.
19. Custom CSS and Custom JS:- The admin can even change the look and feel of the addon as per their need by entering the custom CSS and custom JS code in this section.
Save the changes that you have made in the configuration setting.
3.2 How to change the Display Settings?
This option enables you to change the setting of the display of this email subscription Spin and win pop up. It includes the following setting options.
1. Minimum Number of pages visit to show wheel: Admin can set the minimum count of site pages while should be visited to show the spin wheel to customers. If the admin enters 0, then the functionality disables.
2. Customer Groups: Admin can select one or more groups to which the spin and win popup will display. Use the CTRL key to select multiple options.
3. Minimum Screen Size: The drop-down list offers a few screen sizes for the admin to choose from.
4. Maximum Display frequency: The admin can select the frequency of the spin and win pop up email subscription pop up display here. Select one option from the multiple choices offered in the drop-down list.
5. Hide After: The admin can select the time interval in seconds after which he wants to hide the spin and win pop up and win pop up.
6. Set Fix Time: You can enable or disable the fixed time from here.
7. Where to Display: You can select the pages where you want to display the spin and win pop up. Admin can select Product page, category, Home page to display this interactive and responsive email subscription pop up.
8. Who to Show: You can select the visitors to whom you want to show the spin and win pop up. You may select ‘All Visitors’, ‘Registered Visitors’, or ‘Guest Visitors’.
9. When to Display: You may choose exactly when you want the spin and win pop up to display. You can either display it immediately when the customer lands on your site or after some time or when the visitor scrolls down or you can use it as an exit intent pop up.
10. Geo Location: You can even select the display option as per the Geolocation of the visitor.
3.3 How can the look and feel of the addon be changed?
The Look and Feel Setting in the Prestashop admin panel allows you to change the look of the spin and win pop up as it appears on the website.
1. Theme: Prestashop admin can see the preview of the Prestashop Newsletter popup in the admin panel itself before making it live. There are multiple themes to choose from. Admin can choose as per the occasions like New Year and Christmas. The PrestaShop admin can now apply the latest New Year 2020 themes on his website. There are 4 eye-catching New Year 2020 themes to choose from.
2. Wheel Design: Prestashop store admin can change the Design of the spin wheel. Prestashop admin can also see the preview of the Spin wheel in the admin panel itself.
3. Wheel Color: Prestashop admin can select the color of the Wheel using this option. The spin wheel is customizable in endless ways and the admin can even match it with the Prestashop store theme.
4. Font Family: Prestashop email subscription popup allows Prestashop admin to choose the Font suitable on the Newsletter subscription popup.
5. Wheel Background and Font color: Background color and Fonts on the Spin Wheel are customizable using these options.
6. Text Color and Button Background color: The Text color and the Button background color on the Email subscription popup is customizable using these options.
7. Display Image: You can enable or disable the Display Image by selecting the Yes or No button.
You can change the logo that displays with the spin and win pop up. The image of the logo to display can be selected from the device by clicking on the Add File button as shown in the image below.
The changes made here will be reflected on your website.
The spin and win pop up shown on the website includes the ‘Try Your Luck’ button. You can change the color of the button by changing the setting of ‘Button Background Color’.
Even the font of ‘I’m not feeling lucky’ can be changed as shown in the image below.
The entire changes made by you will be reflected on the front end as shown in the image below.
At last, the admin panel even provides an option to remove the background image if he wants to by clicking on the Remove Background Image Button.
3.4 How can the look and feel of the Spin and win pop up be changed?
The admin can change the look and feel of the spin and win pop up by changing the Look and Feel Settings configuration in the ‘Wheel Setting’ option.
3.5 How can Prestashop admin change the Text on the Email Subscription pop up?
Prestashop admin can change the text on the Email Subscription pop up using the Text settings. Admin can customize the text in any language.
3.6 Can admin change the setting of the different slices of the Spin and win pop up?
Yes, even the settings and the text or offers available in the different slices of the spin and win pop up can be changed from the ‘Slice Setting’ option.
As you click on the setting, you will get an option to select the number of slices to show on the front end and the list of the various slices will be shown.
Select Number of Slices: With the Updated version of the spin and win module now admin can select out of six, eight, or twelve slices for the front end.
Each slice can be configured by clicking on the Edit button.
As you click on the Edit button, a pop up will appear where Prestashop store admin can set the Coupon Type (Which can be Fixed or in Percentage or gift or free shipping ), Label, Coupon Value, Coupon expiry in days, minimum amount, Gravity and fix coupon code. Save the changes and the same will be reflected in the spin and win pop up shown on your website.
3.7 How is the email customized?
Prestashop spin and win addon offer Mail Chimp, Klaviyo and, SendinBlue integration. The email Id entered in the email subscription popup is automatic with the store owner’s Mail Chimp, Klaviyo and, SendinBlue account. The emails captured are usable for personalized promotions.
3.8 How can I change the email settings?
The ‘Email Setting’ option allows the admin to customize the email templates that are sent to the customers.
Coupon Display Options: It allows the admin to choose the places where he wants to display the coupon. Namely ‘Only on Wheel’, ‘Email Only’, ‘Email & Wheel’.
Email subject: Set the subject of the email in this tab.
The Email Templates: In the next tab sellers can choose the templates from the available templates.
Email content: In this tab, the store owner can customize the email body at his convenience.
3.9 GDPR Settings
GDPR or General Data Protection Regulation is a new act that will be enforced from 25 May 2018. It is mandatory for all the companies which are handling the personal data of EU citizens. GDPR offers various rights to the customers (mentioned below) which helps them to keep their data safe and secure.
1. The right to be informed
2. The right of access
3. The right to rectification
4. The right to erasure
5. The right to restrict processing
6. The right to data portability
7. The right to object
8. Rights concerning automated decision making and profiling
GDPR settings will help the Prestashop store admin to comply with these rules. Please refer to the attached screenshot in which we have highlighted the GDPR Settings tab.
a) Enable GDPR: Enable or disable the GDPR options using this option. There are the following options in the GDPR settings tab for the merchants to make the popup module compliant with the GDPR. The GDPR settings will remain unavailable by default and as per the business need, the store admin needs to enable it.
b) Compatibility with Prestashop GDPR: Admin has the option to enable/disable this feature. If you are using the official GDPR module then you must need to enable this setting. The main purpose of this feature is to export and delete user data on the PrestaShop GDPR module request. It is also compatible with Prestashop GDPR Module developed by Knowband.
c) Delete user data from MailChimp/Klaviyo/SendinBlue on delete request: As the Spin and Win pop-up addon syncs the captured email ids to the MailChimp/Klaviyo/SendinBlue email service providers (third-party service providers, so if this setting is on and you use the services of any one of these email service provider then on the data deletion request the subscriber details will get deleted automatically).
d) Privacy Text: The module will add a checkbox to the pop-up design with the privacy text; this text will be visible to the front-end user at the time of entering the email id in the email box.
e) Page URL to Link the Text: Admin can add the link to “Privacy Policy” or any other page with this message.
f) Enable Advanced Feature: This option allows the store admin to add more checkboxes to the pop-up design for marketing permission or any other permission like age verification (age should be 16+).
If the admin enables the Advance Feature setting, then he will be able to access the additional checkbox setting option. As per requirement, the admin can add multiple checkboxes.
g) Service Settings: All the additional checkboxes that the admin adds will be listed under the Service Settings. Admin can add multiple checkboxes with ease.
How to add a new checkbox:
1. Click on the (+) sign to add a new checkbox.
Note: By default one service will be listed on the service list and the admin can update the text for the service.
2. On clicking the + sign will open a pop-up and admin need to enter the details like – Service Label, Make service mandatory and Enable Service.
Service Label: This is a text input field. The text entered here will be visible to the front-end user.
Make Service Mandatory: This is a toggle button. If this is set to Yes, then this field will be marked as Mandatory, and without confirming the checkbox visitors will not be able to get the offer.
Enable Service: Admin has the choice of Enable/Disable a service at any time.
Cookie Details:
As the Spin and Win module uses the Cookies so the description and the use of these cookies have been listed in the section so that the admin can put these details on the Cookie Policy or Privacy Policy page.
Record of consent:
As soon as the user opt-in for the promotion and spin and the wheel to get the discount coupon code. The Spin and Win Pop-up module keeps the proof of the opt-in, as it is needful for the lawful processing of the captured data. As the unique coupon code is generated each time so the Statistics tab of the Spin and Win GDPR Compliant Module also records the permissions of the users. Please refer to the attached screenshot.
On clicking the view button admin can check the permission of the user.
After enabling the GDPR Settings the Spin and Win pop-up design will look like this –
3.10 How is the statistical report of the Spin and win pop up generated?
Yes, the Prestashop admin has complete access to the statistical report of the visitors who spin the wheel and claim the coupon generated by the same. The report is generated in both graphical and tabular format.
(New Feature) Export Email List: Now Prestashop Exit Pop Up allows the store admin to export the list of email subscribers by clicking the Export Email Button on the Statistics Setting Page.
4.0 Theme Scheduling
Theme Scheduling is the new feature in Prestashop Spin and Win email subscription module. This feature allows the admin to select the validity date and expiry date for a particular theme. Prestashop Store owner can now set a schedule for displaying a specific theme on a particular occasion and this will automatically change to the default theme on the theme deactivation date.
Add New Theme Schedule: Prestashop store admin can add a new theme schedule by clicking the ‘Add New Theme Schedule’ button.
For this, you can select the theme type and change the look and feel of the wheel. (refer 3.3 Look and Feel Setting)
The new feature in Theme Scheduling
Active: With Prestashop spin and win module admin can activate or deactivate a new theme schedule by a toggle button.
Theme Activation date and time: If the new theme is activated, the store admin will have to enter the date and time for the activation of a particular theme.
Theme Deactivation date and time: The activated theme will be deactivated on the date and time entered in this tab. This allows the admin to apply a theme for the Spin and Win module for a fixed time and the store admin can plan this way before the special day.
Disclaimer: In case the “Spin and Win” wheel popup does not display at the front, kindly clear the cache or delete the cookies. Sometimes cookies prevent the popup from displaying at the front.
PrestaShop Fb Wall Post User Manual provides an easy to use and configure feature to the Prestashop store owners to automatically post your products, categories and brands on your official Facebook page. The innovative and easy to understand and configure module helps in boosting the customer engagement on the social media platform in just a few button click.
1.1. Project Objectives
The module can be used by the store owner to achieve following things:
It allows the admin to post product, category and brand automatically on your Facebook store.
The Module even allows the admin to post the new products on the Facebook page of the store
The admin can hide or display the price of the product.
You can even get the Low Stock post with the help of this module.
The admin can even post the discount coupons.
2.0 Installation
Follow the following steps to install the extension:
Unzip the Facebookwallpost.zip file. It would contain files and folders.
Copy all the files and folders of unzipped folder into your store “modules” directory on the path – Root Directory/modules/.
The module is now ready to be installed in your store. You can find it in Store Admin -> Modules and Services.
Click on “Install” button to install the module. It would show a pop-up for your confirmation. Click on “Proceed with the installation” option. This step will install the module and show notification – “Module(s) installed successfully”.
3.0 System Setup
Before proceeding ahead, it is important to know that what is the correct flow of actions to setup this system as there are several things which are dependent on other things and if we do not take care of them then it would become difficult to process smoothly or may be error prone.
4.0 Admin Interface
The admin interface of the module is completely configurable. Click on the ‘Configure’ next to the module in the admin panel.
4.1 How To Start configuration process?
After clicking the “Configure” button, the admin will be redirected to the Configuration page of the module. It offers the below-listed configuration options:
Facebook App Setting
General Setting
Alert Setting
Category Setting
Manual Post
Cron Setting
Let us discuss each options one-by-one.
Facebook App Setting:- The Facebook App Setting includes the process to the sync the Facebook profile of the store owner. Follow the below-mentioned steps:-
Facebook App Id:- This field is for Facebook App Id created for this module. Enter the Facebook App Id in the first column. In order to find the App id, go to the dashboard of your Facebook App. Copy the app id from the column shown in the image below and paste it in the setup page of the module.
Facebook App Secret:- This field is for Facebook App Secret created for this module. Copy the App Secret from the next column as shown in the image below.
‘Save’ the changes made in the configuration setting.
Facebook Access Token: The next thing you need to do is generate the ‘Facebook Access Token’. Once the changes are saved, click on the ‘Generate’ button. This button will be disabled by default. It will be enabled only when the App Id and App Secret is entered and the changes have been saved.
As you click on the button, you will get a pop-up for Facebook Login. Log in your Facebook store and the access token will be generated.
The module is now synced with your Facebook store and is ready for use.
‘Choose the Page’ from the options given in the dropdown list and save the changes. The posts will be displayed on the page selected by you.
4.2 General Settings
The module is now successfully synced with the Facebook Page of the admin.
The General Setting allows to make the necessary changes in the look and feel of the FB Wall Post module. Here are some of the options offered.
You can change the ‘Maximum number of Products Per Cron’.
You can select the ‘Post Language’.
The admin can set the ‘Product Description’.
Select the ‘Product Image Size’ from the options offered in the dropdown list.
The ‘Show Price’ option enables you to either display or hide the price of the products.
The admin can select the desired ‘Currency’ from the option available.
‘Post New Products?’ option asks you if you want to Post New products on the Facebook Wall or not.
In case you are posting the new product, then, you can even set the description for the same in the ‘New Product Post Description’.
Click on the ‘Save’ button in order to save the changes made by you.
4.3 Alert Setting
Here, you can enable/disable the option to send Stock Ending Alert Wall Posts.
In case, you enable this option, then, you’ll be asked a series of question which includes the following.
Stock Quantity Left: You can enter the quantity of the stock below which the alert will be send on the wall post.
Wall Post Text for Stock Ending Alert: You can enter the text that you want to be displayed when the inventory falls below a certain limit.
Generate Coupon For Stock Alert: You can enable it if you want to send coupon along with the Alert. In case you enable the coupon code option, the module provides an option to customize the vouchers as well.
Voucher Name: The name of the voucher can be entered in the first column. You can even choose from the different language options available and select the one as per your requirement.
No. Of Vouchers: Allow you to select the number of vouchers you want to send.
Voucher Type: You can select the type of voucher you want to send. It can ‘Absolute’ or ‘Percentage’.
Can be used with Other Vouchers: You can enable this option if the voucher can be send with other vouchers as well.
Voucher Validity: Set the duration for which the voucher is valid is here.
4.4 Category Selection
You can select the categories you want to display on the Facebook wall post here. Check the options that you want to display. Only those products whose default category is selected in this section will be posted on the Facebook Wall.
4.5 Manual Post
This option allows you to customize the wall post manually.
Search Product: It will show the dropdown of various product options. You can select the one as per your wish.
Wall Post Text For Products: Set the text that you want to display on the wall post. Click on ‘Post Product Now’ button and the products will be posted.
Search Category: It will show the dropdown of various category options. You can select the one as per your wish.
Wall Post Text For Categories: Set the text that you want to display on the wall post. Click on ‘Post Category Now’ button and the products will be posted.
Search Brand: It will show the dropdown of various brands options. You can select the one as per your wish.
Wall Post Text For Brands: Set the text that you want to display on the wall post. Click on ‘Post Brand Now’ button and the products will be posted.
4.6 Cron Selection
Add the cron configuration to your store in order to sync the products and send Facebook wall posts to your customers automatically according to your setting.
‘Sync Product Manually’ will allow you to sync the products. The products will then get listed below. The admin can even delete the listed products from the table by clicking on the ‘Delete’ icon.
On clicking the ‘Send Post Manually’, the products will get posted on the Facebook Wall of the admin.
5.0 Facebook Tab UI
Once you have already configured Prestashop Facebook Wall Post module and synced with the Facebook profile, the changes will be shown in the front end.
5.1 Home Page
Home page will have the UI similar to mentioned below.
5.2. Selected Page
Go to the page which you selected earlier in the admin interface. The products posted will be shown on the wall post of the page.
As you can see in the image below, the Stock ending alter has been posted on the wall along with the Product Price and the Coupon Code.
The Product along with the price can be seen on the wall of the Facebook.
This is how the brand posted on the wall will look like.
The category to be displayed on the Facebook will be seen like this in the front end.