
1.0 Introduction
To protect your eCommerce store from spammer, fake registration, and unwanted traffic, Prestashop Block User/Bot by IP, Country or User Agent has come in quite handy. The Prestashop Block User Addon helps the store admin to block or keep away the unwanted boots from their site by creating a list of the IP addresses, countries and user agents that he wants to keep away from the site. It also has the option to customize messages that are shown on the frontend or to the banned user. This Prestashop module, also provides the option for “Request for removing the banishment” to the banned user, which can be helpful to identify the user if he got blocked mistakenly.
With the digitalization of the eCommerce websites, automated programs commonly referred to as bots are designed for both beneficial and destructive purposes. Banning the bots with malicious intent can lead to a secure eCommerce website. Any website especially a shopping website is concentrated with the bulk of user data including their personal and confidential information. Bots can be used for many malicious purposes including fake registrations, stealing the content and other useful details. This Prestashop Block User/Bot by IP module from Knowband can help you with malicious purposes bots without making any changes in the website code.
What’s new?
- Now there are some additional features in this module:
- The store admin can now enable Google ReCaptcha version 3 on the store front end to block the access of bots from entering the store.
- The PrestaShop admin can now capture all the IP addresses that access the store.
Prestashop Block User Addonallows the admin to add and create IP addresses and user agents in bulk.
1.1 Objectives of Prestashop Block Bot Addon
Listed below are some of the objectives that can be achieved with the help of this Prestashop Block User/bot by IP Addon.
- The Prestashop store admin can enable or disable Prestashop Block User/bot by IP at a button click.
- The Prestashop store admin can list out the IP address that he wants to ban from the website.
- The Prestashop addon even allows the store owner to prevent their sites from being viewed in a particular country.
- In addition, the user agents can even be blocked from the store as per the requirement using this Prestashop block user/bot by IP, country or user agent.
- The Prestashop store admin can customize the front-end of the website the way he/she wants it to be displayed to the blocked customers.
- The blocked users get an option to request the admin to remove them from banishment.
2.0 Installation
After purchasing module, you will get following files as listed below:
- Blockuser.zip. This folder contains the source code of the module.
- User Manual
Follow the steps mentioned below in order to install the extension on your store:
- Unzip the blockuser.zip file. The unzipped folder contains the files and folders as shown in the image below –
- Copy all the files and folders of zipped folder and paste them into your store “Modules” directory. Follow the address path Root Directory/modules/.
- Now module is ready to be installed on your store and you can find that in Store Admin -> Modules and Services. It would shown as below –

In case, you are not able to find module in admin modules list, please try searching module with following details –
Keyword – Block User
Category – Front office
Filter By – Installed & Not Installed / Enabled & Disabled
Click on “Install” button to install the module. It would show a pop-up for your confirmation. Click on “Proceed with the installation” option. This step will install the module and show notification – “Module(s) installed successfully”.
3.0 Admin Interface
The Prestashop block user module offers to be an effortless means to block the unwanted traffic from the site from the admin interface without making any code changes in the website. Here we described how the admin interface works.
3.1 How to start using the module?
In admin interface we have five tabs which are labeled as “Module Configuration”, Block User by IP Address, “Block User by Country”, “Block by User Agent” and “Blocked Customer Request”.
Now we are starting with the first tab i.e ‘Module Configuration’. This tab will be the default option. Below are the options which will be covered under this tab.
- Enable/Disable: First we need to enable this Prestashop module by toggling the button to get an access to block the user/bot. Initially, it is selected as “YES” which means the module is enabled.
- Enable/Disable Google ReCaptcha: With the google reCaptcha feature, they can enable/disable the v3 of google reCaptcha with just a single click on the toggle.
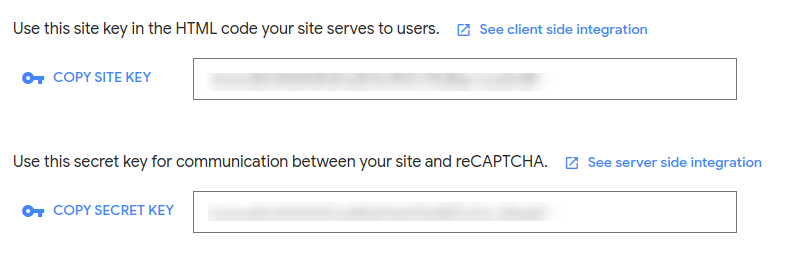
Site Key: The admin has to enter the site key to display the reCaptcha on the store frontend.
Secret Key: Admin has to enter a secret key to authorize communication between the application and the reCaptcha to verify the user’s response. They have to generate the secret key to incorporate the reCaptcha functionality on the store.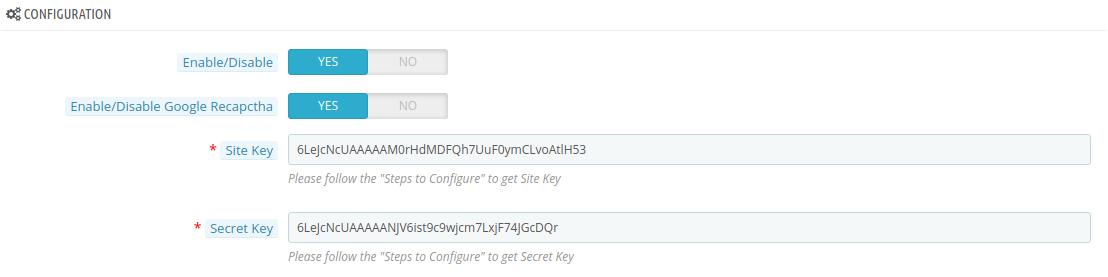
- Display Custom Message: Admin can show customized message in the front end of the website. By default it is enable if customer wants he can disable this.
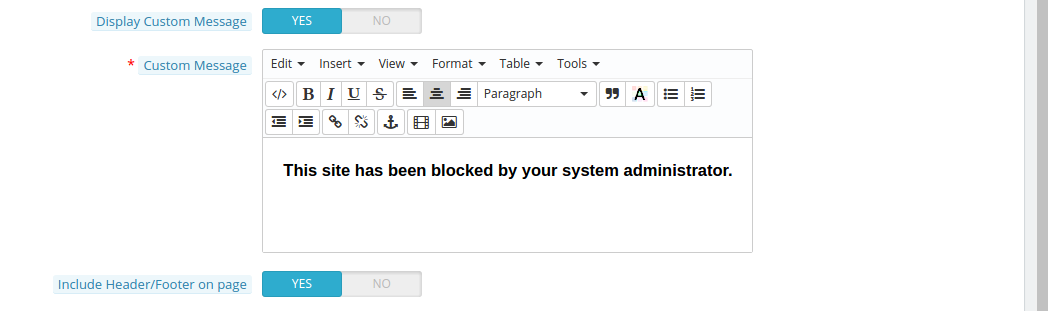
- Custom Message: This option will be shown only when you enable the display custom messages. In this, the text box will have some options to customize the text format. You have to write your custom message in this text box so that, it will be shown on the front end of the website to the blocked user.
- Include Header/Footer on the page: If this option is enabled then the blocked user can see the header and footer of the website, otherwise, they are able to see the blank web page with the custom message only. Initially, it is selected as “YES” which means the header and footer will be shown to the banned user. To disable this option, toggle the button to “No”.

- Customer Email Notification: This option provides a way for the banned users to drop a request to remove the banishment. This features can be enabled or disabled by the store owner. The visitors can enter their email ids and enter the message that they want to send. By default it is enabled.

- Mail Subject: The admin can even customize the message or the mail subject that is to be send along with the mail. Prestashop store admin may customize this mail subject.
3.2 How to get Site Key and Secret Key?
Follow these steps to get Site and Secret Key –
Visit the URL: https://www.google.com/recaptcha/intro/v3.html
Click on “SIGN UP” if you do not have a Gmail account.
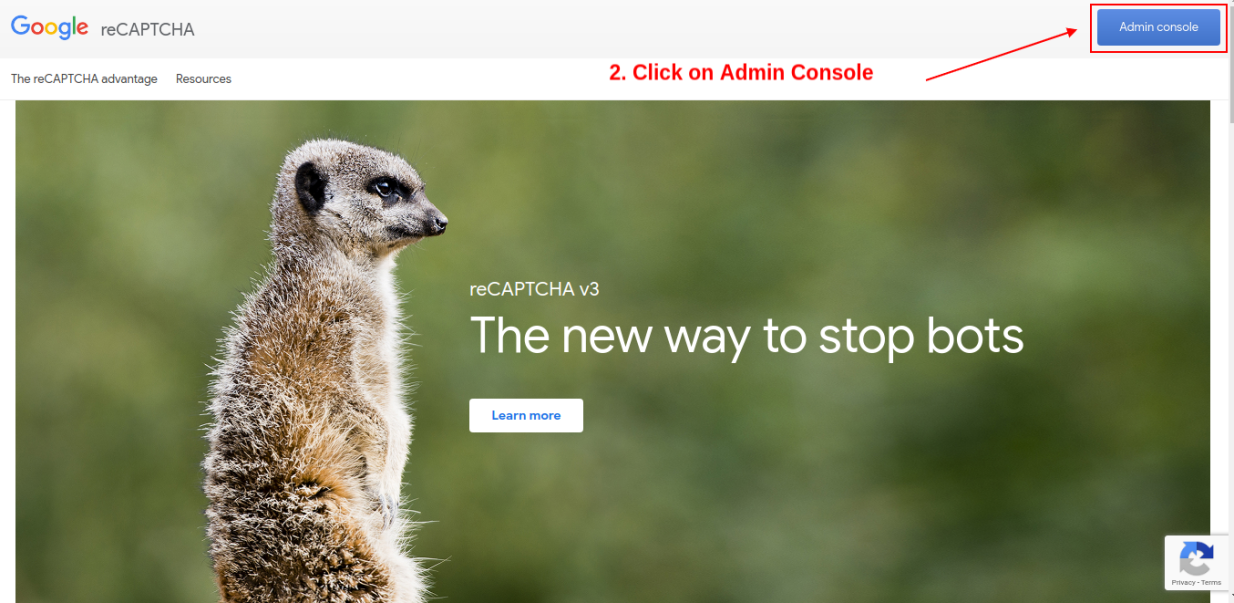
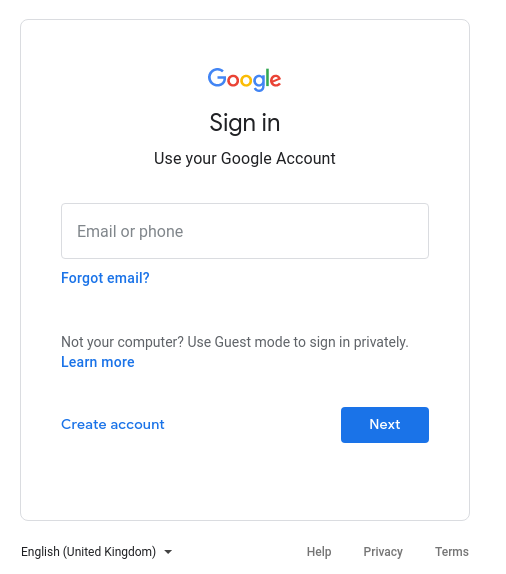
Create/Login to your Gmail account and then click on create.
- Enter “Label” of your Domain.
- Enter “Domains” of your store.
- Click on “Register”.
- Copy the “Site Key” and “Secret Key” and paste it into GeneralSetting Tab.
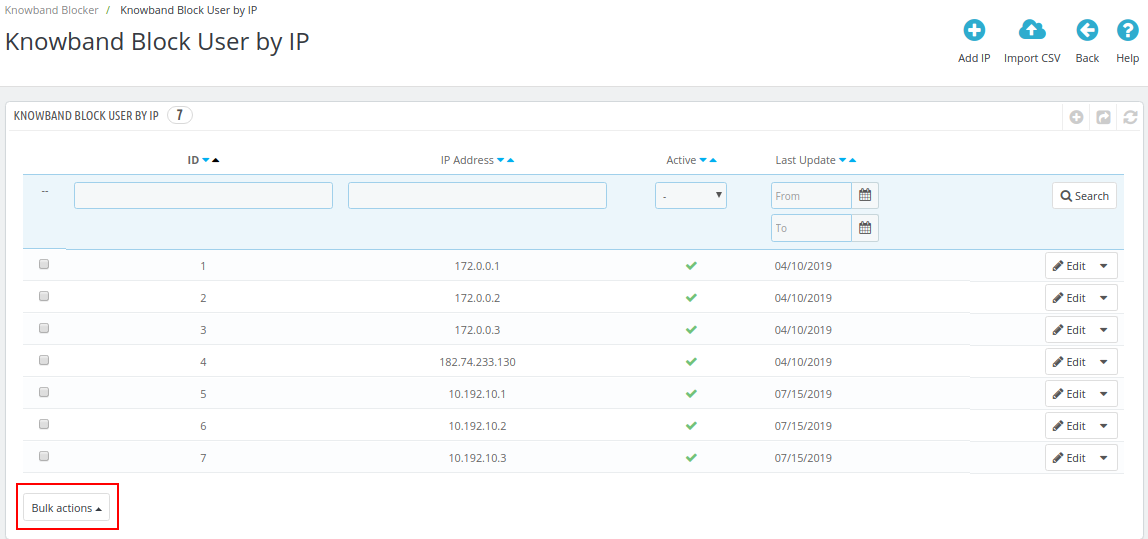
3.3 How to block user or bot by IP address?
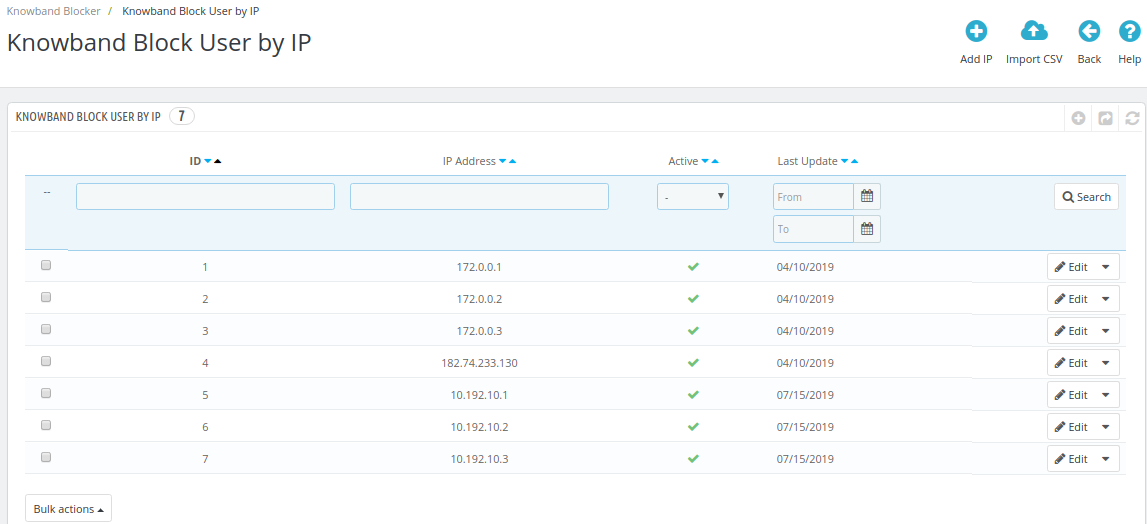
The Next tab is ”Block User by IP Address” which includes the entire list of the IP addresses that have been entered by the admin with their “ID”, “IP Address”, “Active” and “Last Update” Status.
- In order to add a new IP address, the e-merchant can go to the ‘Add IP’ option on the top of the admin interface.

- The store admin can block the IP addresses and user agents in bulk with ‘Import CSV’ option on the top of the admin interface.

- Prestashop block user/bot by IP module: The store owner can enter the particular IP that he wants to track or else he can enter the range of the IP address by using wildcard characters such as “*” sign. This will help the owner block the traffic coming from a particular organization.
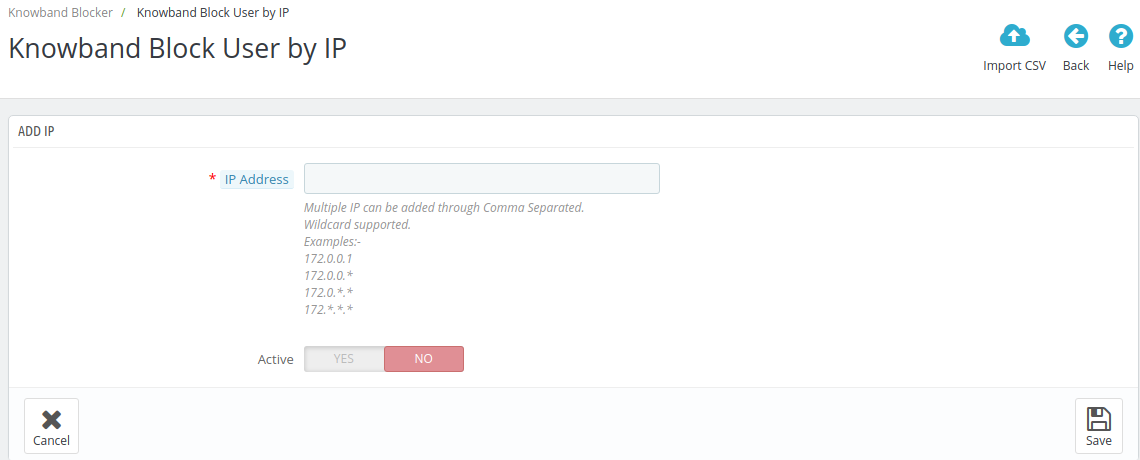
- After inserting the IP, enable the ‘Active’ tab of the list to block that particular or series of that IP.
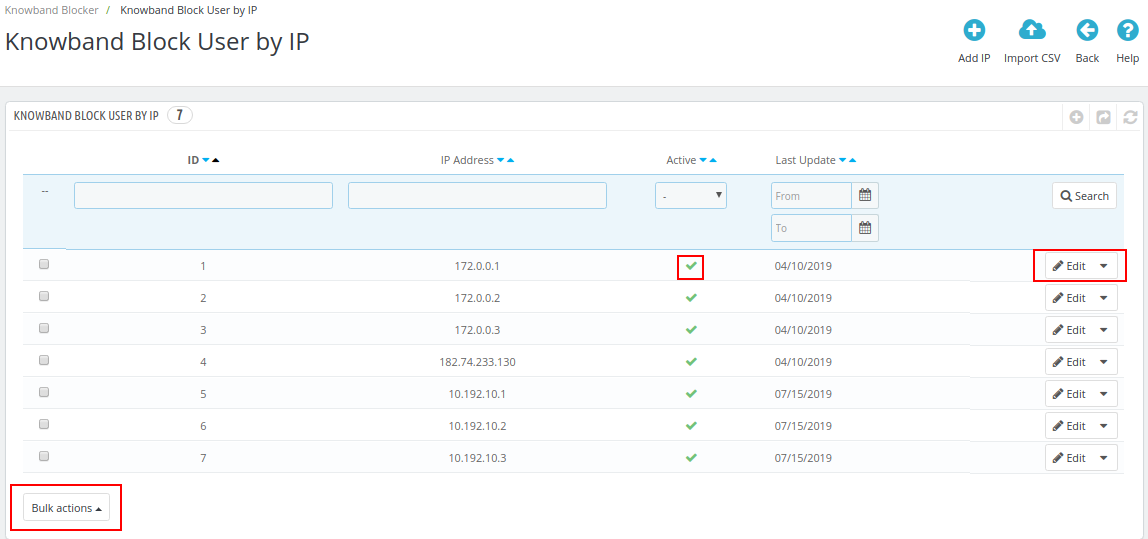
- If you want to make any changes in the existing IP, the admin can click on the ‘Edit’ button and similarly, the list can be removed by clicking on the Edit drop-down which has the ‘Delete’ option.
- The admin can enable and disable the addon from bulk actions tab. The admin just needs to click on the text box in front of the ID or can also choose select all option from the Bulk actions tab.
3.4 How to block user or bot by country?
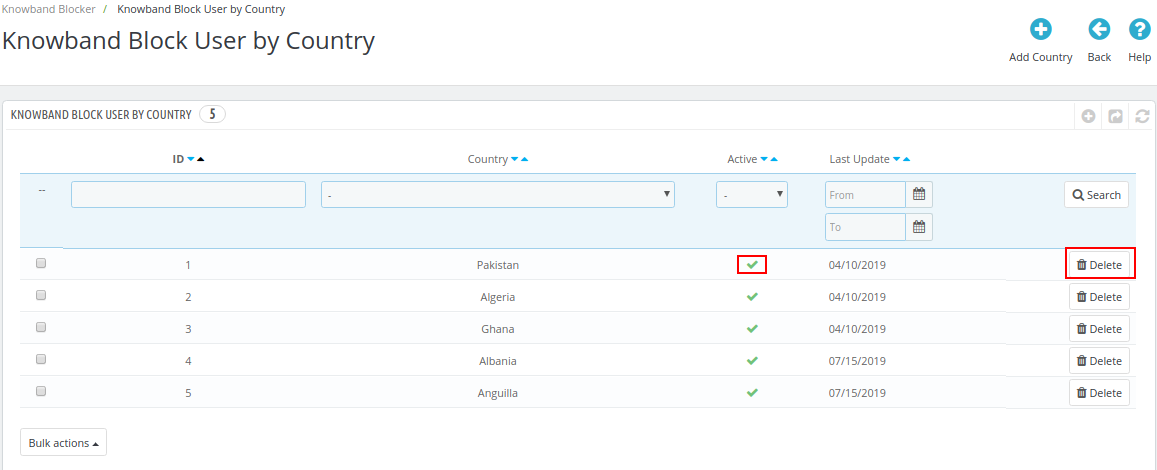
The ‘Prestashop Block User/bot by Country’ include the list of the countries that have been selected for the banishment. The e-merchants can block the entire country from accessing their website. “Prestashop block user/bot by country addon” comes as a handy tool when it comes to limiting the access to the site from a particular location.
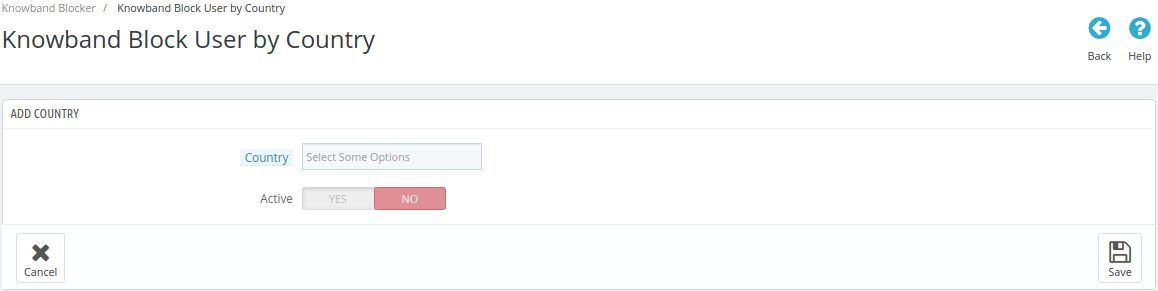
- For adding the new country to the block list, , click on the ‘Add Country’ option on the top right side of the interface.
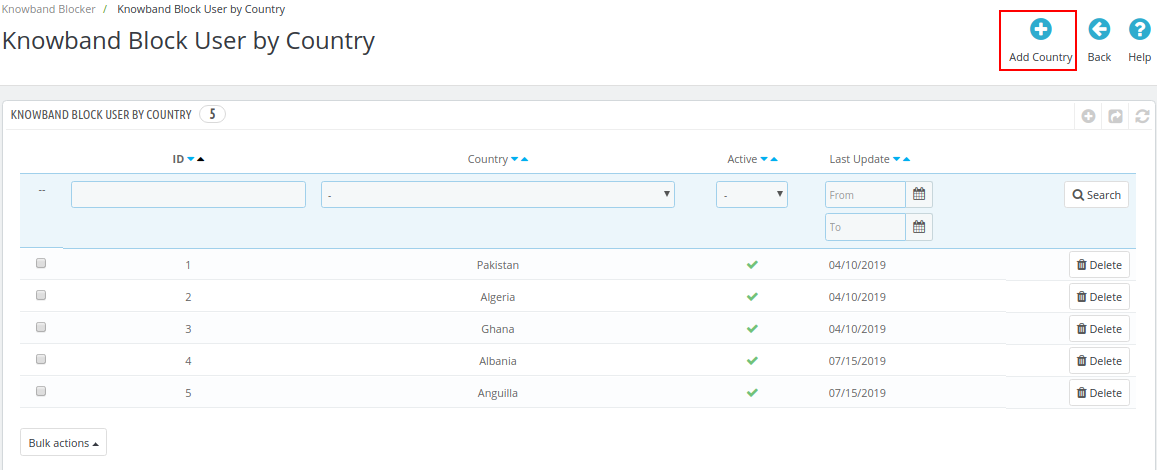
- Just select the country’s name from the drop-down list that you want to block and toggle on the “Active” button to enable it.
- The country can be unblocked from the list by disabling the button in the ‘Active’ column. Similarly, the list can be removed by clicking on the ‘Delete’ option.
- By using bulk actions Prestashop store admin can enable or disable the user agent in bulk.
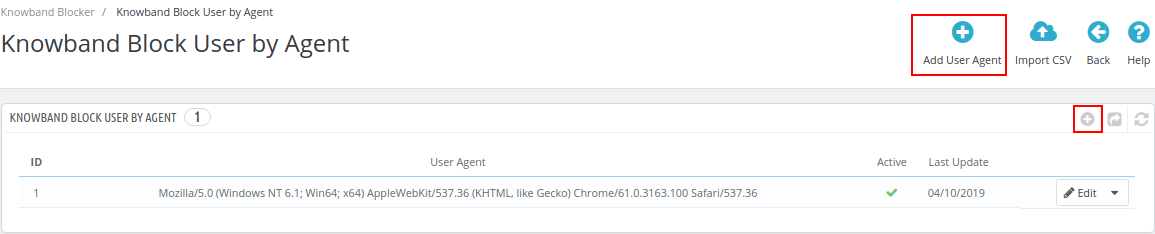
3.5 How to block user or bot by User Agent?
With the help of Prestashop block customer/bot by user agent, the module allows the store owner to block the users based on the user agent being used from the tab ‘Block by User Agent’.
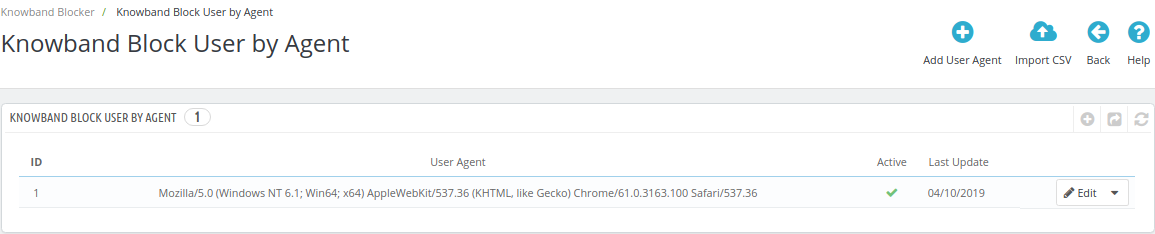
- To add the new user agent, the module provides an option on the top right side of the admin panel.
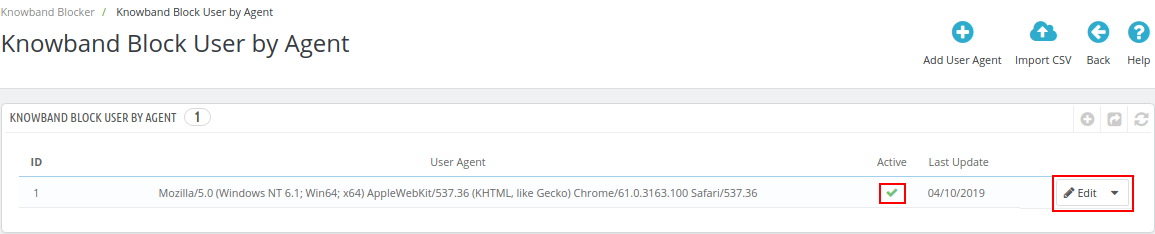
- The store owner is required to enter the name of the user agent and enable the banishment. Then, active the banishment by toggling the button to “YES”.
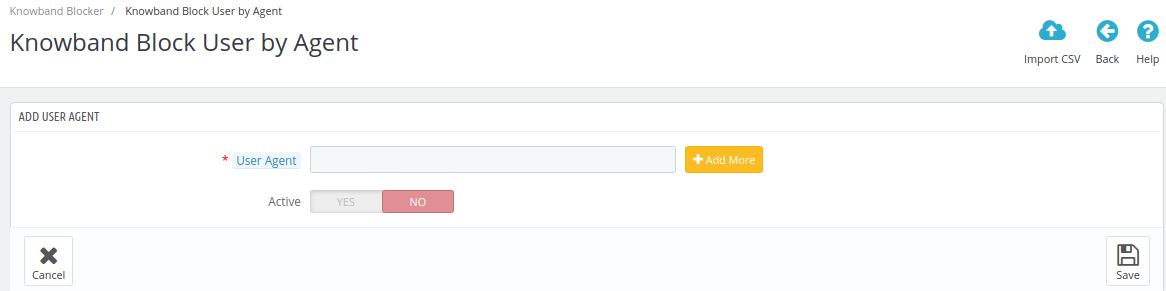
- The process of enabling the banishment and editing the already created user agent name remains the same as the other two options.
- The store admin can add browser user agent in bulk with ‘Import CSV’ option on the top of the admin interface.

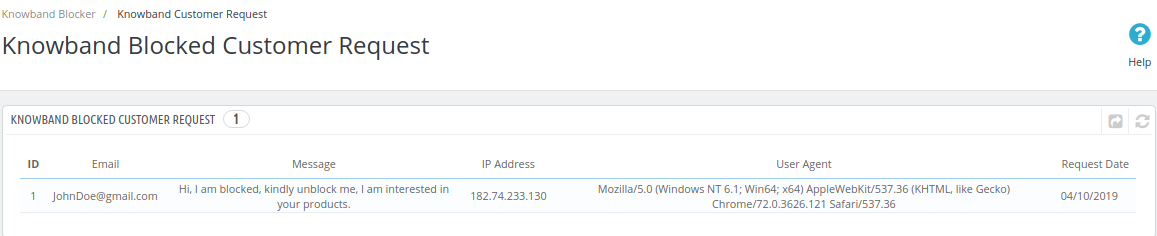
3.6 Blocked Customer Request
The front-end of the website offers an option to the customers to send a request for unblocking them by entering their email address and message. The entire list of the requests generated can be viewed by the admin in the ‘Blocked Customer Request’ tab then the request can be processed further accordingly.
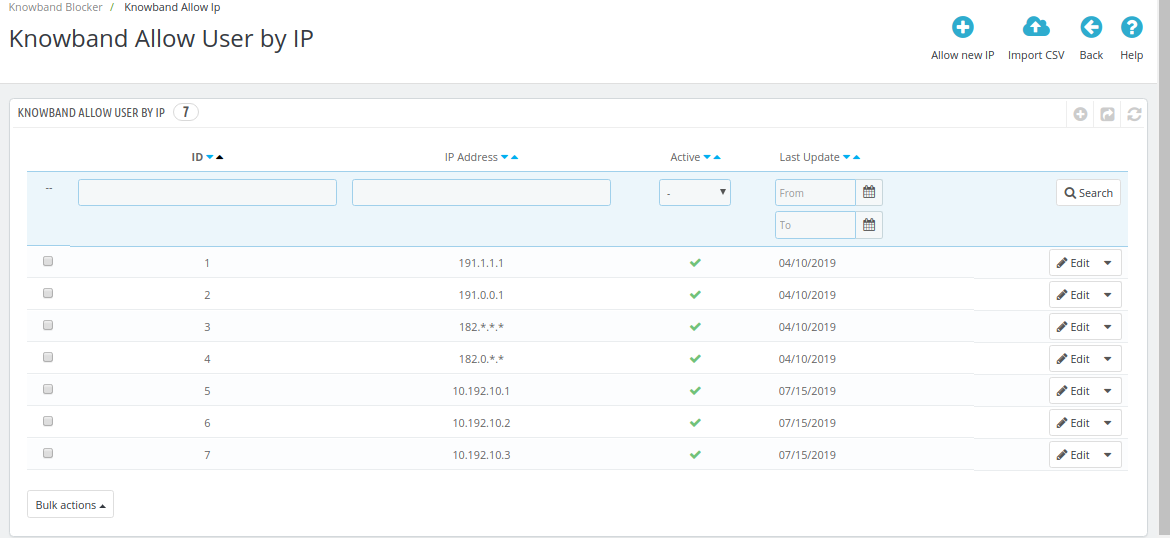
3.7 Allow User by IP
The store admin can allow unblocking through the IP address of the blocked users. The admin can see the allowed IPs from the Allow user by IP tab.
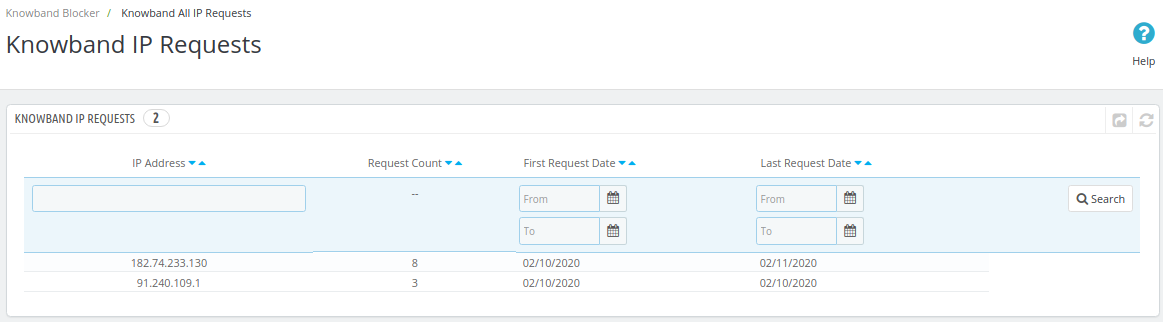
3.8 Knowband all IP Requests:
With Knowband all IP Requests tab, the PrestaShop admin can now track all the IP addresses that hits or accesses their stores.
4.0 Website UI
4.1 Website with Header and Footer
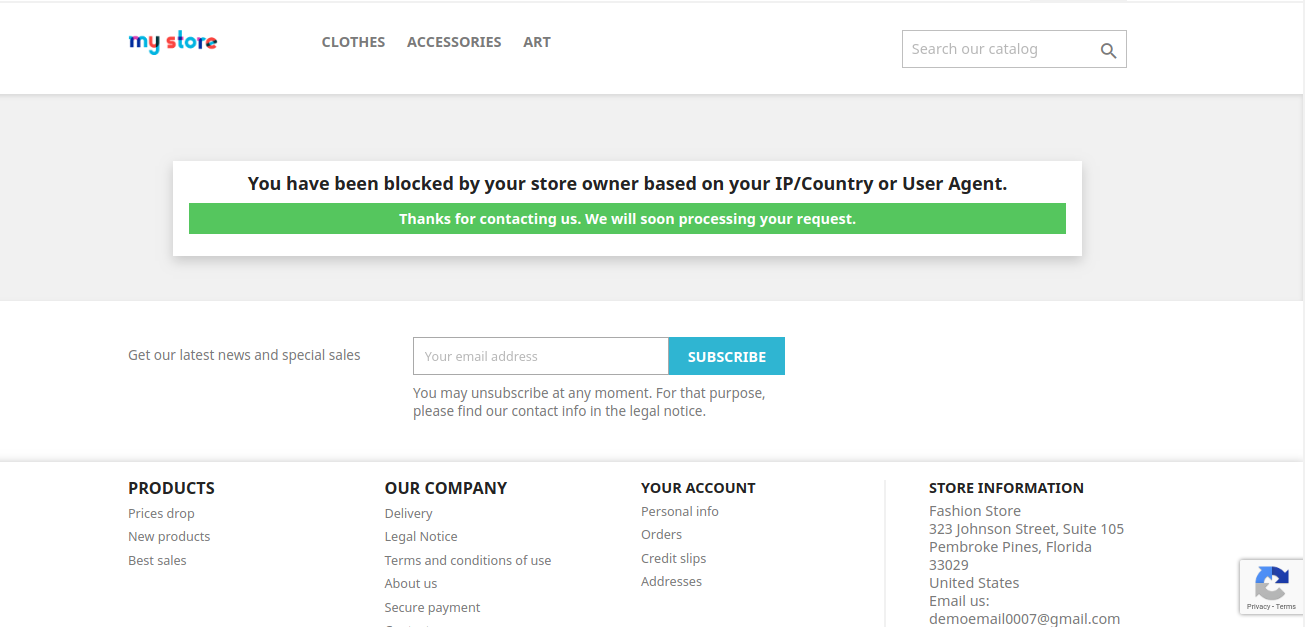
The users can be blocked based on their IP address, the country as well as the user agent. Once a visitor is denied the access to the site, a message is shown to him/her along with the option to send their unblock request to the Prestashop store admin.

4.2 Website without Header and Footer
The store owner can restrict the customers from viewing the header and footer as well. In this, the functionality is disabled from the front-end of the website and will be shown as in the image below:
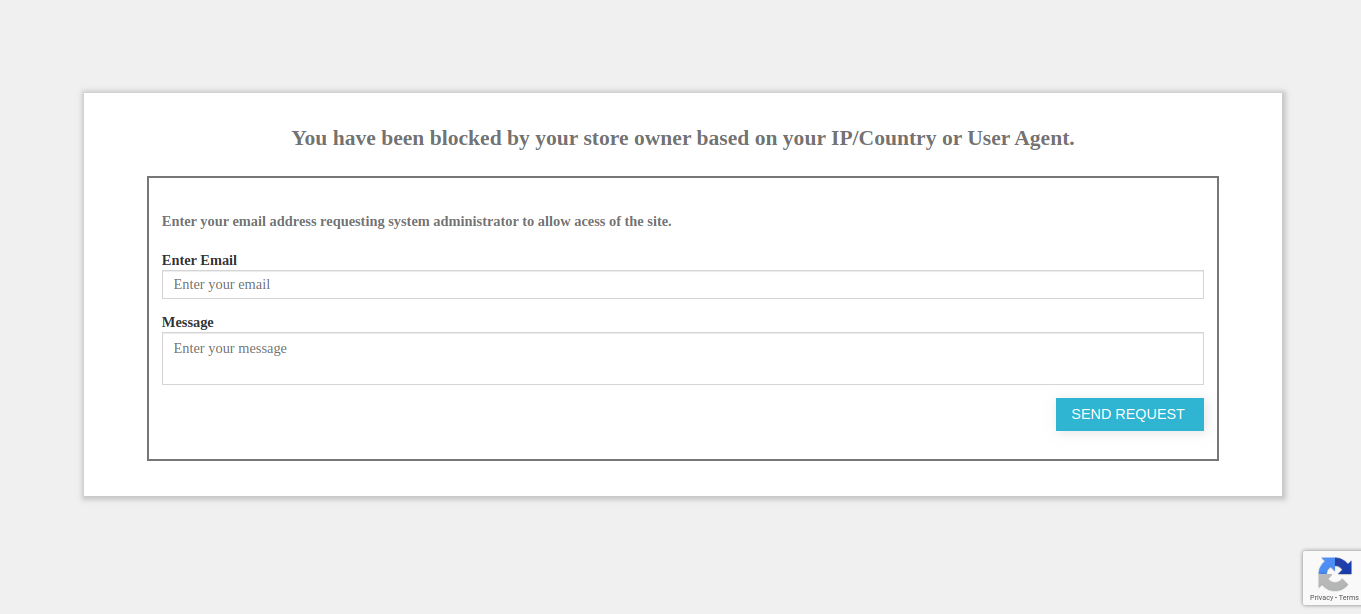
4.3 Customer Request
The blocked users can even request the admin to unblock him from the site by sending a request message. The request will be listed in the admin panel of the interface and can be processed accordingly.
Once the request is send, a message will be flashed in the front-end.
Prestashop spam blocker addon allows the admin to show header and footer information to the blocked users/bots. This way the confidentiality of the website is maintained along with providing some useful content to the spam users. Consequently, this addon helps in achieving quality traffic to the website thereby adding to the security of the website. Store admins can purchase this user blocker addon from the Addon Store
