Online customer reviews deliver positive and negative both aspect of your online business, which includes products, services, supports, buy interactions and many others. According to a survey, 70% of customers firstly go through the reviews and then makes the final purchase.
The Prestashop Review Booster Addon by Knowband reminds your customers to write the reviews about the product they’ve purchased. This not only increases the trust of your customers but also increases customer’s engagement towards your store.
Steps For Installation of Prestashop Review Booster Addon
To install this store review addon by Knowband, please follow the following steps:
1. Add addon folder under modules folder of your system.
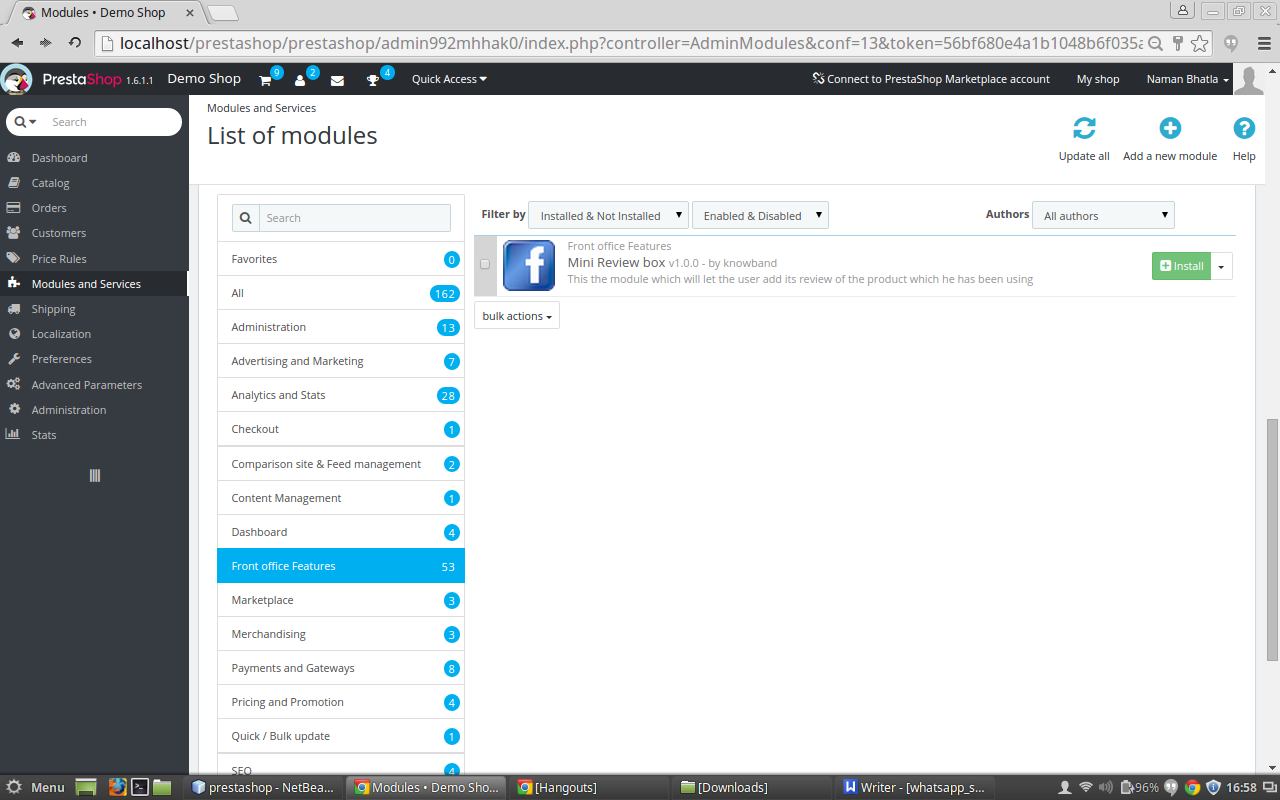
2. After adding this addon folder, system will list the addon on module page under front office feature category as given below:
3. Click on install to install the plugin
Admin Interface
The Prestashop get review addon provides following interfaces to the admin:
1. General Settings
2. Advance Settings
General Settings:
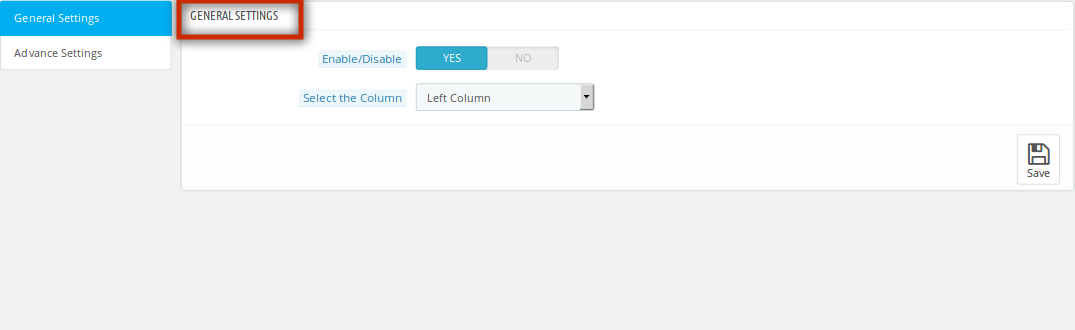
After clicking on configure link of Prestashop review booster addon on module listing page, system will open general settings tabs by default as shown in screen below:
Fields listed will be filled with some default values
GENERAL SETTINGS TAB DETAILS:
Enable/Disable : The Prestashop review manager addon allows the admin to enable/disable tha addon functionality by turning this ON/OFF.
Select the Column : This will be a drop down list of columns where we can display this Prestashop get review addon by Knowband. By default its value will be the left column. The admin can change it to right column by choosing the option given in this drop down menu..
Advance Settings
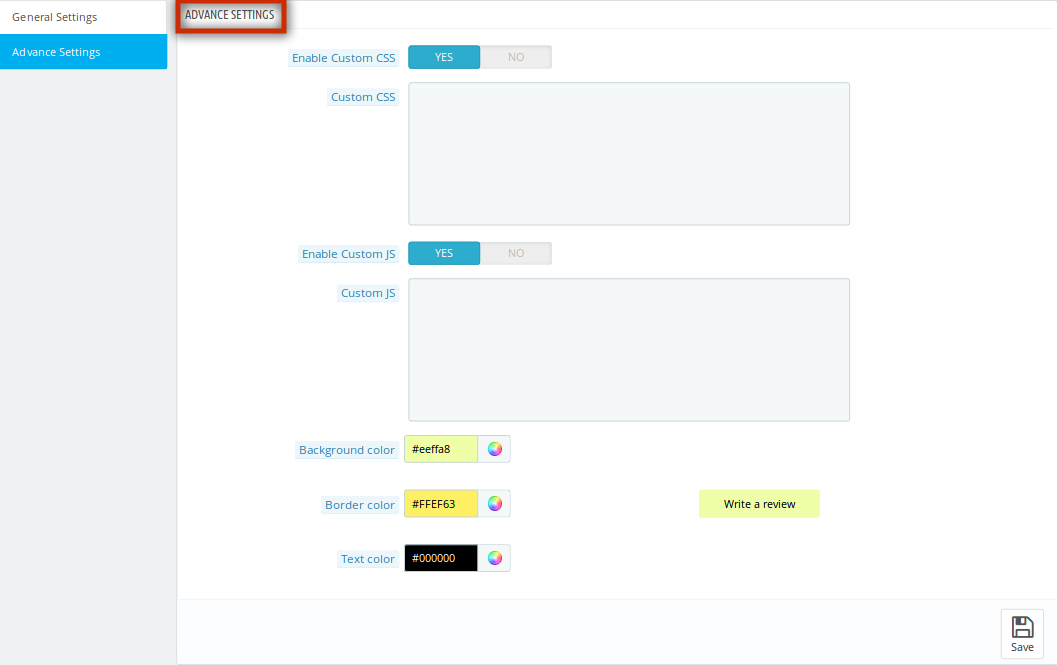
After clicking on the advance settings tab the below screen appears.
ADVANCE SETTINGS TAB DETAILS:
Enable/Disable Custom CSS: This enable/disable button of Prestashop review incentive addon by Knowband will help the store owner to set the status of the custom CSS which will be entered in the next field.
Custom CSS: This field of product review addon will be a text area in which the shop owner can enter the CSS code which he wants to show up in the front end of the shop.
Enable/Disable Custom JS: This enable/disable button of Prestashop store review addon will help the store owner to set the status of the custom JS which will be entered in the next field.
Custom JS: This field of Prestashop plugin by Knowband will be a text area in which the admin can enter the JS code which he wants to show up in the front end of the shop
Background Color: In this color picker option of Prestashop plugin, the admin can select the background color of the button.
Text Color: This field of store review addon by Knowband offers the admin to select the color of the text of the button.
Border Color: In this color picker, the admin can decide the color of the border of the button.
Front End Module:
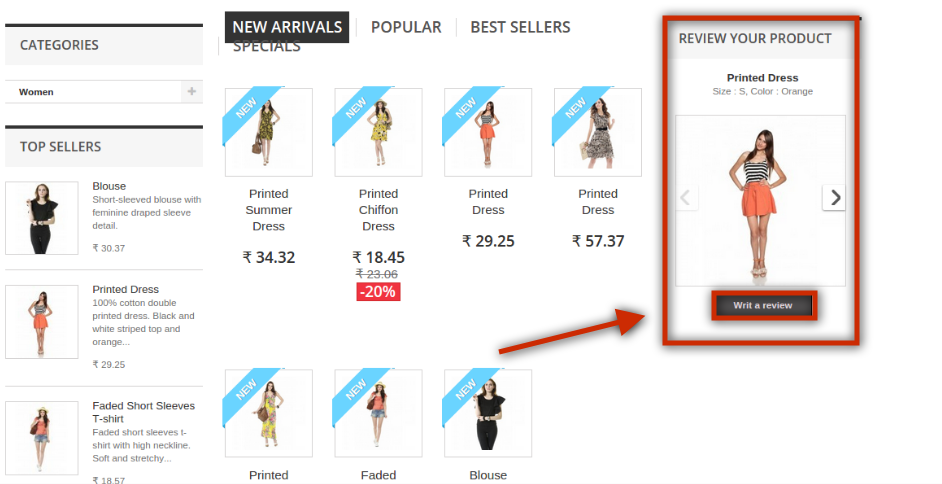
After enabling the Prestashop review manager plugin by Knowband, the front-end user will see the box appearing in any of the column which the admin has selected in the back end of this Prestashop module. Even the changes which the admin has made in the back end of the module will appear with the box in the front end
The Prestashop plugin at the front-end appears as follows:
AFTER CLICKING ON THE REVIEW BUTTON
User can add the review in the fields given in this particular form and as soon as he will submit the form, the comments will be saved and this product will be marked as reviewed and will not be shown again.
Recommendations :
Refresh home page of your store every time you enable/disable the plugin. If plugin is not working after installation then please check permissions on modules folder. The folder should be writable. Please make the folder permission to 755.
Knowband offers Prestashop Search Auto Suggest Addon which implements autocomplete search field functionality on your Prestashop eCommerce store. The Prestashop auto suggest module provides search suggestions to customers when the customer types anything in the search field. With the help of this Prestashop plugin, the online store admin can also display prices on the product suggestion list. The eCommerce store admin can filter the product search result on the bases of stock status also.
This Prestashop auto suggest plugin makes product searching much easier for the customers. The Prestashop fast search addon allows search in product description by product name, SKU, Description, Tag, UPC, EAN .etc). This way the online store admin can offer a better store experience to the customers by showing them suggested products during product search. The customers can view a list of products as suggestions at the same time when they start searching for any product on the website search box.
What’s new:
In the updated versions of this Prestashop Search Auto Suggest Module, there are some additional features:
Admin can show product and category headings on the website front-end interface. The Prestashop quick auto search plugin also allows setting the heading font and background color.
There is an option to set look and feel of search suggestions from custom layout settings of this Prestashop Fast auto search plugin.
Admin can also show popular and recent searches to the online users by enabling and setting the number from the admin interface.
In search analytics settings, the online merchant can view last three month’s data. Prestashop Fast auto search plugin shows a graph for providing details of total searches, unique searches and number of users.
1.1 Benefits for Merchants Offered by Prestashop Fast auto search plugin
With this Prestashop Search Auto Suggest Module, the online merchant can show search suggestions to the online users at the same time when they start typing anything.
There is an option to display product prices along with product suggestions. The online users can also view the thumbnail image with the products.
The Prestashop Fast auto search plugin allows the store admin to set the number of product suggestions.
The Prestashop store admin can change the limit of characters to start searching. The minimum character limit is 3.
There is an option to search the term in products and category or admin can select only one of them for searching the term.
The Prestashop search complete addon provides an option to set the product search result based on stock status. Out of stock products can be hidden.
The Prestashop addon allows search in product details ie product name, SKU, Description, Tag, etc.
The Prestashop auto correct search addon allows the store merchant to set the look and feel of search suggestions from the admin interface.
The online merchant can also showcase popular and recent searches to the users.
Prestashop autocorrects search addon can check the top 10 search keywords in your store. This way, the online merchant can get an idea of popular keywords for that product.
The Prestashop search auto complete module provides search statistics that provide information about the keyword searched by the user.
In Search Analytics, the online merchant can view the status of the last three months. Admin can view total searches, unique searches and the number of users who used the functionality.
1.2 Features offered by Prestashop quick auto search plugin
The PrestaShop quick auto search plugin offers the autocomplete search suggestions feature.
The Prestashop fast search addon offers to search on the bases of details like name, description, tags, SKU .etc
The quick search addon offers products or category searching suggestions. Admin can also select both of them.
The Prestashop quick auto search plugin provides fast ajax search results.
The e-merchant can show prices with the product suggestions. The Prestashop Fast auto search plugin allows showing or hiding the product prices with the product suggestions.
The Prestashop Fast auto search plugin shows the top 10 searched keywords list in the search statistics.
The Prestashop search autocomplete module is multi Store compatible.
The Prestashop search suggestion plugin is SSL, theme and browser compatible.
The Prestashop quick search addon allows showing product and category headings on the website front-end interface. Admin can also set the heading font and background color.
From custom layout settings of this Prestashop Fast auto search plugin, the online merchant can set the look and feel of the search results.
There is an option to display popular and recent searches to the users on the front-end interface. Admin can also set the number of results.
Prestashop Fast auto search plugin shows a graph in the search analytics section for viewing total searches, unique searches and number of users easily.
Online users can get the desired product without any wastage of time. They need to search for it in the search box only.
The online customers can also view the product price directly in search of suggestions.
The Prestashop search autocomplete plugin offers a thumbnail image that helps the customer to select the product.
There is no need to type the complete name of the product.
The Prestashop addon offers a mobile-responsive interface. The online users can also view search suggestions in their mobile devices.
Prestashop search autocomplete plugin is browser compatible.
The online users can also view recent and popular searches.
The online users have an option to select products from the category section or product section of the search result.
2.0 Installation
Once the store admin purchases the Prestashop search auto complete module from the Knowband store, he will get below-mentioned files:
1. The zipped file consists of the source code of the Prestashop search auto complete module.
2. User Manual
The online store owner can follow the provided steps to install the Prestashop search auto complete module.
First of all the admin needs to unzip the zipped file. This file includes a few files and folders.
Copy all the folder and paste them into the “Modules” folder of the store’s directory. The admin can follow the path – Root Directory/modules/.
3. Now the store owner can install the Prestashop quick auto search plugin. As an eCommerce store owner, the admin can find that in Store Admin -> Modules and Services. It would be shown as below –
Now the admin can click on the “Install” button to install this module easily. A confirmation pop-up will be shown. Click on “Proceed with the installation” option. This step will install the live chat support module and show notification – “Module(s) installed successfully”.
3.0 Admin Settings
The Prestashop store admin can change the various settings of this Prestashop search suggestion module according to requirements. By using this Prestashop auto correct search addon the admin can automatically complete the search on the website. The admin can apply the settings to implement the auto suggest functionality. These are the configuration options as shown below:
General Settings
Product search Settings
Custom Layout
Search Statistics
Search Analytics
Admin can apply these settings and implement the functionality of showing search suggestions.
3.1 General Settings
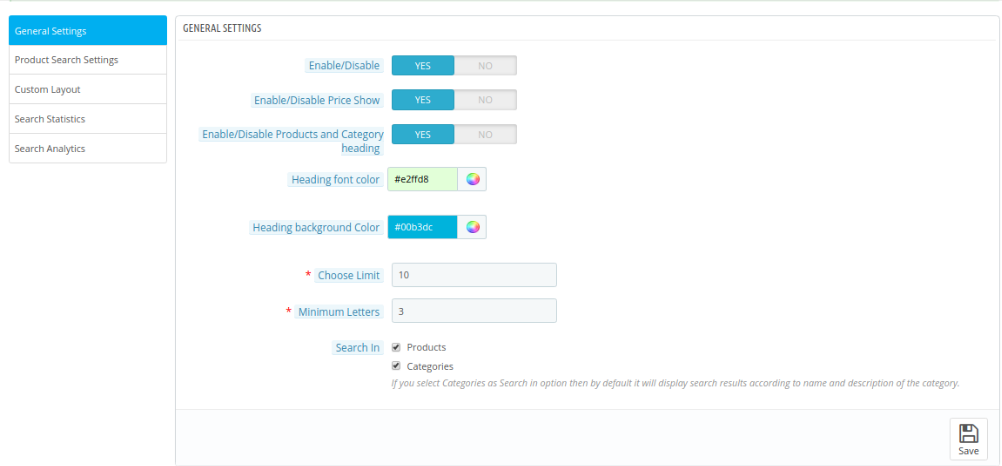
When the admin will click on the configure link on the Prestashop search auto complete module, the system will open general settings tabs by default. These are the configuration options available in this section:
Initially, fields in the above form will be already filled with their default values.
Enable/Disable: Enable the option for activating the auto suggest functionality.
Enable/Disable Price Show: Enable the option for showing product price along with the suggestions. For hiding the price, admin can disable this option.
Enable/Disable Products and Category heading: Activate this option for showing products and category headings in search suggestions.
Heading Font Color: Set the font color for category/product headings.
Heading Back-ground Color: Set the background color for category/product headings.
Chose Limit: Using this option the admin can set the maximum limit show search result by default the value will be 10.
Minimum Letters: The minimum letters the user enter to start the search can be set using this option. By default, the value will be 3.
Search In: The Prestashop admin can choose what to show the search result by simply checking the options.
3.2 Product Search Settings
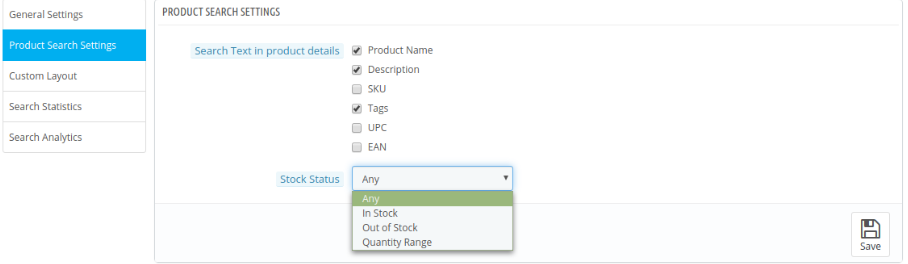
In this tab, the admin can configure all the settings regarding product search details are described below:
Search Text In Product Details: In this option, Prestashop admin can choose where to search the search term in the product details simply by checking the options.
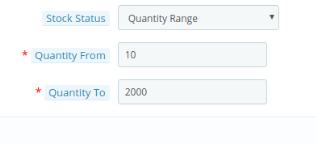
Stock Status: Admin can show all the products or as per the stock status. The Prestashop search auto complete module allows showing only in-stock products, only out of stock products or as per the quantity range.
3.3 Custom Layout
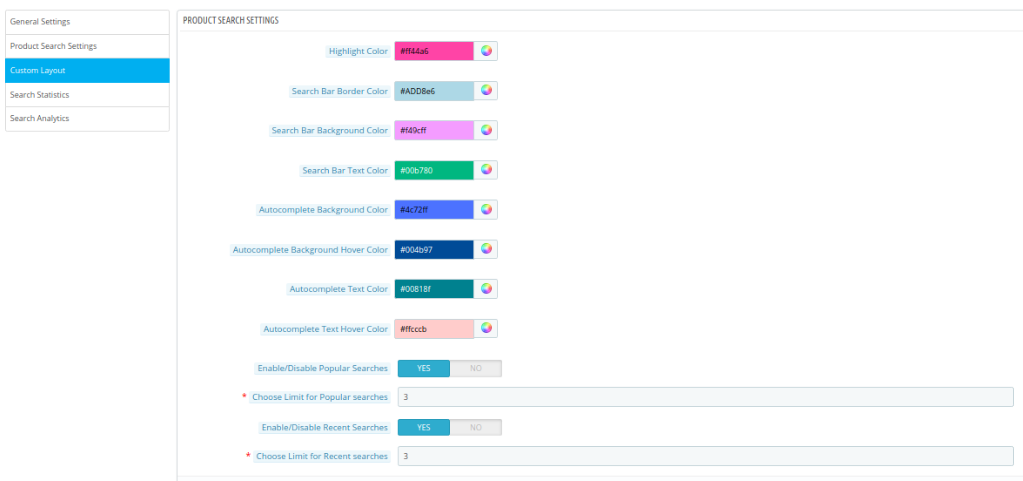
The online store merchant has an option to set the look and feel of product suggestions. These are the customization options as shown below:
Highlight Color: Set the highlight color for the search suggestions.
Search Bar Border Color: Enter the border color for the search bar.
Search Bar Background Color: Select the background color for the search bar.
Search Bar Text Color: Choose for the search bar text color.
Autocomplete Background Color: From the color picker tool, select the background color for auto complete section.
Autocomplete Background Hover Color: Set the autocomplete background color on hover.
Autocomplete Text Color: Select the color for autocomplete text.
Autocomplete Text Hover Color: Choose Autocomplete Text Hover Color from the color picker tool.
Enable/Disable Popular Searches: Enable this option if you want to show popular searches in front-end interface.
Choose Limit for Popular searches: Enter the number of popular searches that you want to show.
Enable/Disable Recent Searches: Enable this option if you want to show recent searches in front-end interface.
Choose Limit for Recent searches: Set the number of recent searches that you want to show to the users.
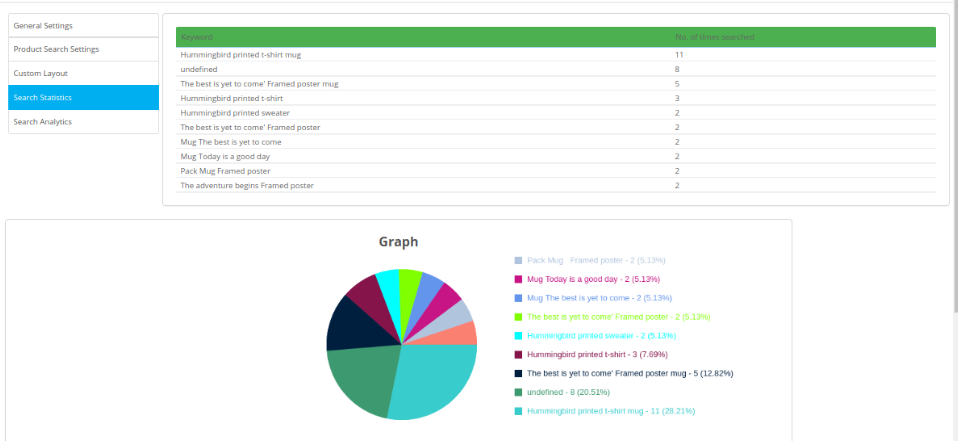
3.4 Search Statistics
In this tab, the admin can view the keyword searched by the users in the front end in the form of the list and graph.
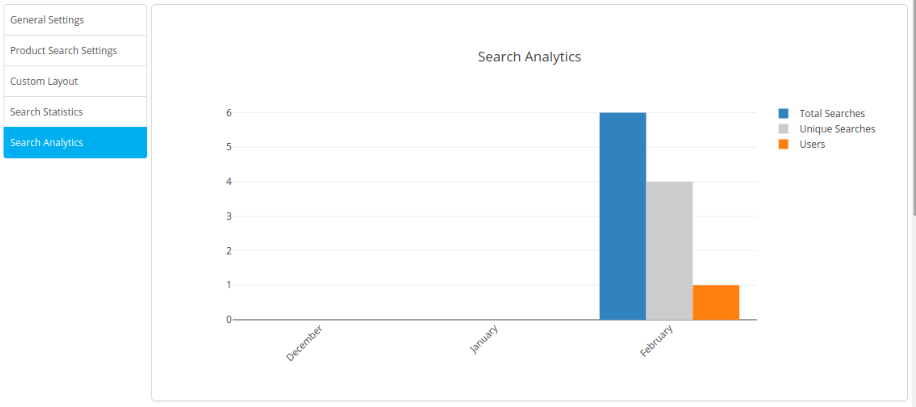
3.5 Search Analytics
In this section, the store merchant can view a graph of the previous three months in which he can view total searches, unique searches and number of users.
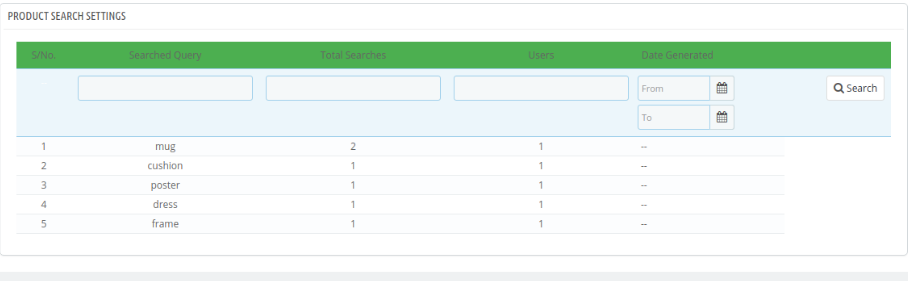
Admin can also view the searched queries in product search settings as shown below:
4.0 Front-end Interface
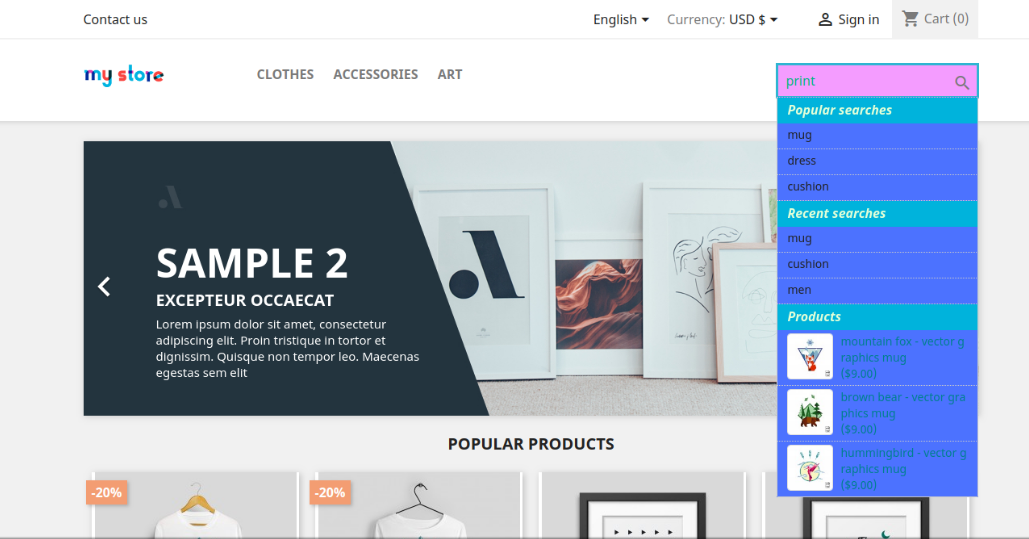
The online user can search the product using advanced algorithms, just by entering text in the search box user will be able to view the search result as shown below:
Clicking on any product or category will redirect the online users to the particular product/category. The online users can view category wise suggestion and product-wise suggestions in different headings as shown below:
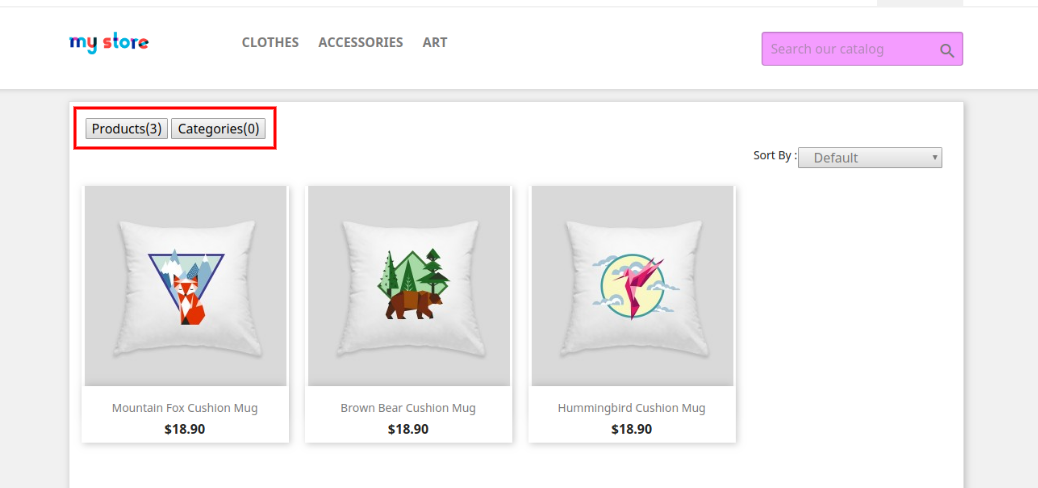
The online users can also control the results by selecting the category or products option:
Thus with the help of this Prestashop auto-correct search addon, the eCommerce store admin can offer a better store experience to the store visitors and customers as well. The customers can easily view the desired products without even inserting the full name. This Prestashop search suggestion module offers a user-friendly interface.
The online users can get search suggestions while searching for any product on the website search box. The customers can easily get the product which improves their store experience. The eCommerce store admin can show price details with the product suggestions. The Prestashop auto suggest addon is highly customizable and allows the store admin to select from category or products for showing searches from selected sections. Prestashop fast search addon also provides an option to hide out of stock products from the search suggestions list.
This way, the online store admin can easily show suggestions to the customers and make shopping easy for the customers. The Prestashop search auto complete module shows the highlighted text color, category/product background color and text color for setting look and feel of suggested products. The Prestashop auto correct search addon is multi-lingual compatible, multi-store compatible and offers smooth functioning. The Prestashop search suggestion module can provide multiple suggestions that can help the customers and they can purchase the desired product without wasting time.
Recommendations
Refresh the home page of your store every time you enable/disable plugin.
If Prestashop Fast auto search plugin is not working after installation then please check permissions on modules folder. The folder should be writable. Please make the folder permission to 755
1. Add addon folder to the modules folder of your system.
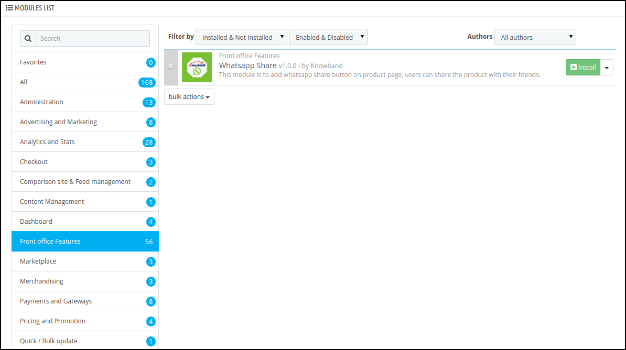
2. After adding this Prestashop addon folder, the system will list the Prestashop whatsapp addon on the module page under front office feature category as given below:
2.0 User Guide
This User Manual provides you the guidelines of this Prestashop addon.
2.0.1 Admin Interface
Once you’ve installed the Prestashop whatsapp share addon by Knowband, the following features will be provided to the admin:
2.0.1.1 General Settings
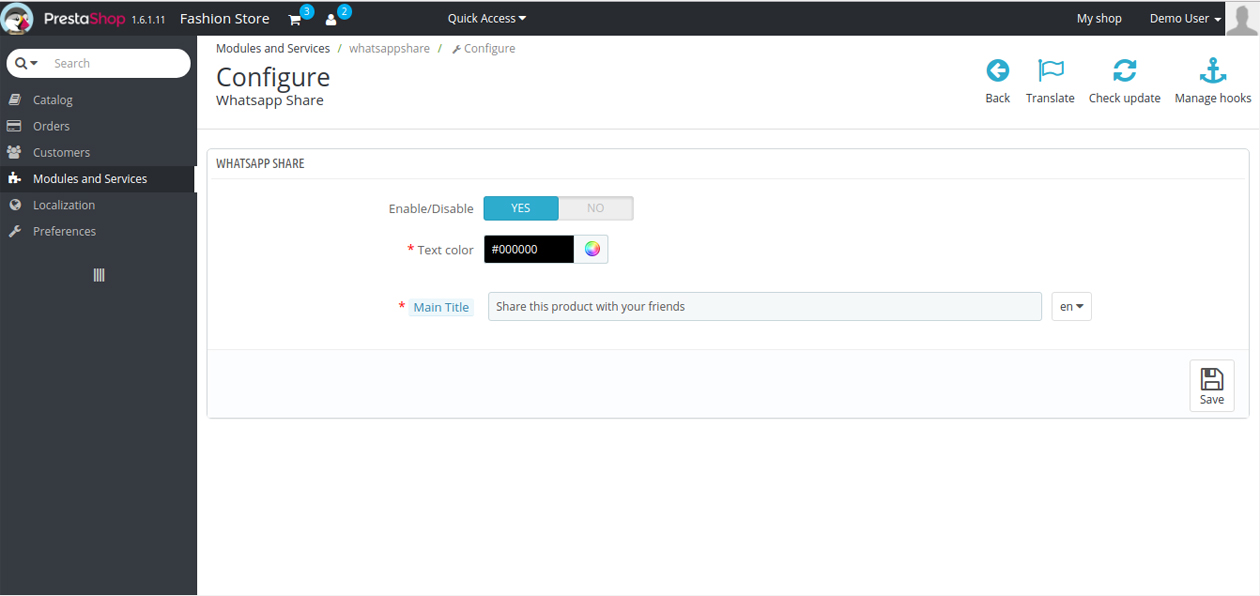
After clicking on the configure link of Whatsapp Share addon on the module listing page, the system will open general settings tabs by default as shown in the screen below:
Fields listed will be filled with some default values
Enable/Disable: Initially, the Prestashop addon will be OFF. The user can enable/disable the addon’s functionality by turning this ON/OFF respectively.
Main Title: The text to be displayed on the front end to the end users while they view the page, following are the settings the admin can control:
Font Style: Font style Bold and Italic can be set here by simply clicking on the icon provided according to the choice.
Font Color: Store owners can change the text color according to choice by selecting the color from color picker.
Language: Different languages according to the enabled language can be set by the owner by default the text will be ‘Share this product with your friends’.
2.0.2 Front End Module
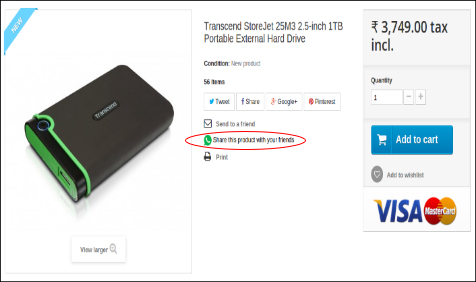
After enabling the Prestashop Share with WhatsApp plugin by Knowband, the front-end user will see the share button on every product page, provided the user is viewing from a small device.
The Share button at the front-end appears as follows:
The Prestashop Twitter Post Feed is an addon which provides a feature to advertise your Twitter Page on your store by adding Twitter window (Notification Bar). Users can click on this bar and see the summary of added Twitter Page. Users can also like and comment on the same. This advertisement helps to share information/updates about the store and can increase the conversion.
2.0 Steps for Installation
1. Copy twitter post feed module folder under your root_directory/modules/of your store via FTP or use Prestashop interface to upload the plugin.
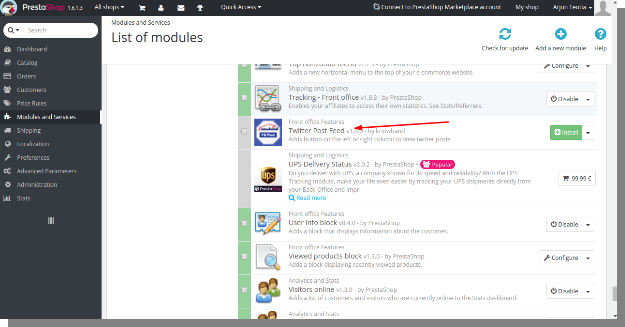
2. After copying, the Prestashop module will be listed on module listing page in the admin panel as given in the below screen.
3. If Prestashop twitter post module is not displaying on your module listing page, search it by filtering module with following details:
Filter by: Installed & Not Installed/Enabled & Disabled
Note:
1. When you will click on install button, a pop-up box will appear which will display warning messages. You can ignore these messages and move ahead. There will be no negative impact of this warning message on your store.
2. After installing Prestashop feed module, a “configure” button will be in front of this plugin on the module listing page as shown in the screen below:
3.0 Configuration Settings
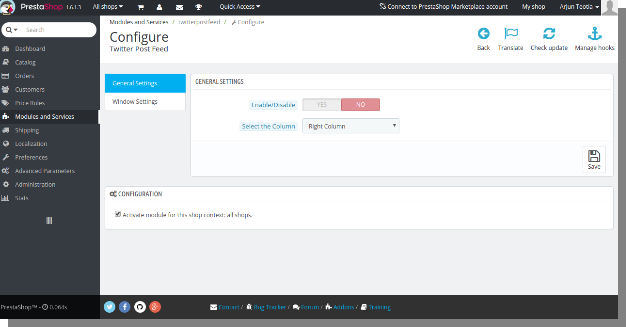
To access this module, Click on configure button of twitter post feed module. On clicking, module interface will be open and following screen will be displayed as given below:
This User Manual provides you the guidelines of this Prestashop addon. This module has 2 interfaces –
The admin interface
The front end interface
3.1 Admin Interface
Admin can setup or configure this module through Admin Panel of store by following steps given below –
Go to Store Admin -> Modules and Services
Find “Twitter Post Feed” and click “configure” button given corresponding to the module.
General Settings tab will be displayed.
Enable the “Enable/Disable” Button.
Click on Save button.
3.1.1 General Settings
Enable/Disable: To enable the twitter feed plugin, switch the enable button from OFF to ON. The default value will be “OFF”.
Select the Position: This is the option to choose which column your twitter post feed will display on your front page. The default value will be “Left Column”.
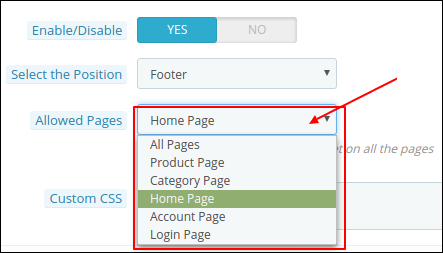
Allowed pages: This is a drop-down option. Here, you can choose the pages on which you want to display the Twitter feed.
Custom CSS: Admin can add custom CSS codes in this section to override the CSS of the Prestashop twitter feed module.
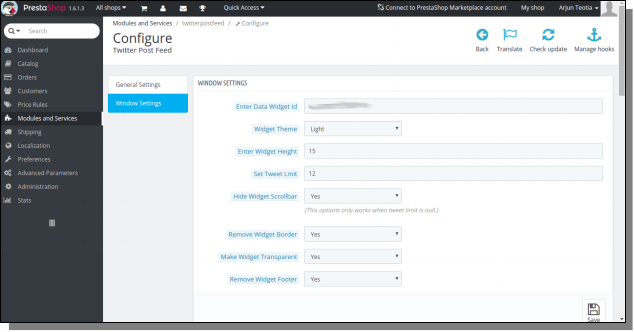
3.1.2 Window Settings
This tab basically contains look and feel of maintenance page. These settings are for our user interface on maintenance page.
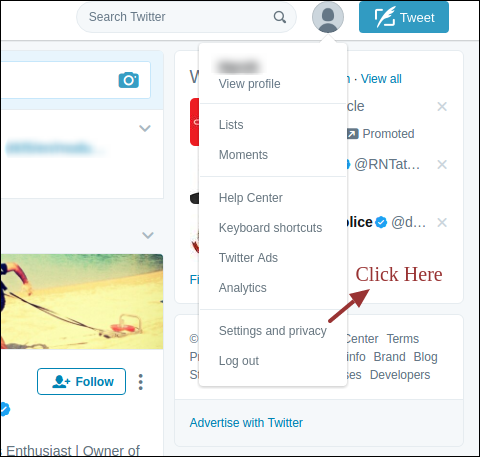
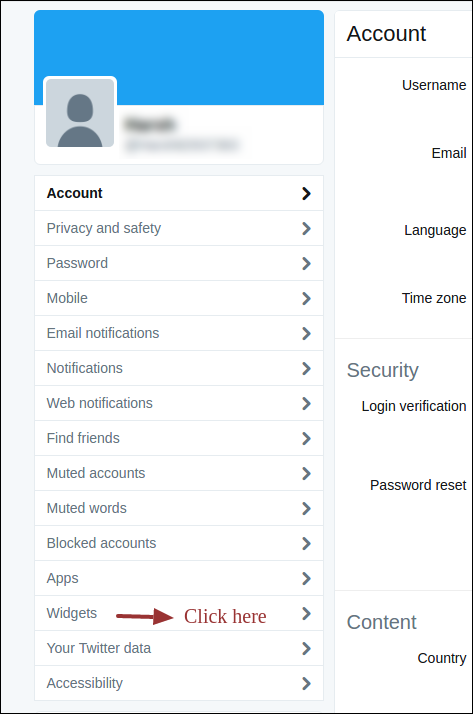
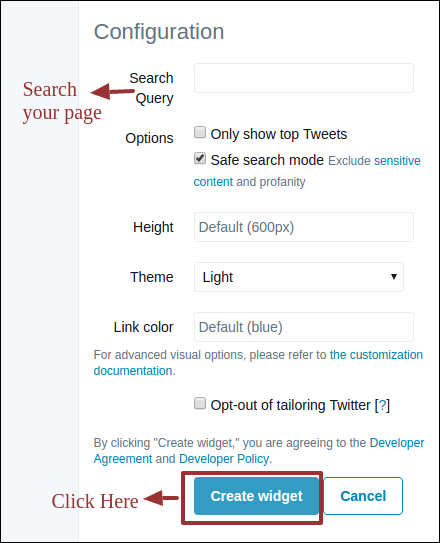
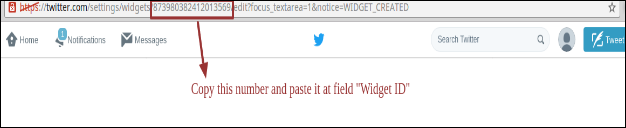
Data Widget ID: This is the widget ID of your twitter page. You need a widget ID to show your tweets from Twitter on your website. To know your twitter widget ID please see here.
Widget Theme: You can also have an option to show your tweet window in dark or light theme. The default value of this field will be“light”.
Widget Height: This is the height of twitter window. Default data will be white “15px”. This only works when tweet limit is null.
Set Tweet Limit: You can also limit the number of tweets on the window using this options. The default data will be“null”.
Hide Widget Scrolling: This is the option to turn off scrolling in your tweet widget if it is annoying on your desired page. The default value will be ‘Yes’.
Remove Widget Border: This is the option to remove the border from your tweet twitter feed addon if it is annoying on your desired page. The default value will be ‘Yes’.
Make Transparent Widget: You can also make your Prestashop module transparent on your desired page using this option. The default data will be “No”.
Remove Widget Footer: You can remove the widget footer if it is annoying on your desired page. The default data will be “Yes”.
Recommendation: Do not set tweet limit, some page may be distorted.
3.1.2.1 How to get Widget ID?
You can get the Widget ID by following steps given below –
Search your Twitter page and click on “Create Widget”.
Copy the Numeric Content from the URL as shown below and paste it at field “Widget ID”.
3.2 Front End Interface
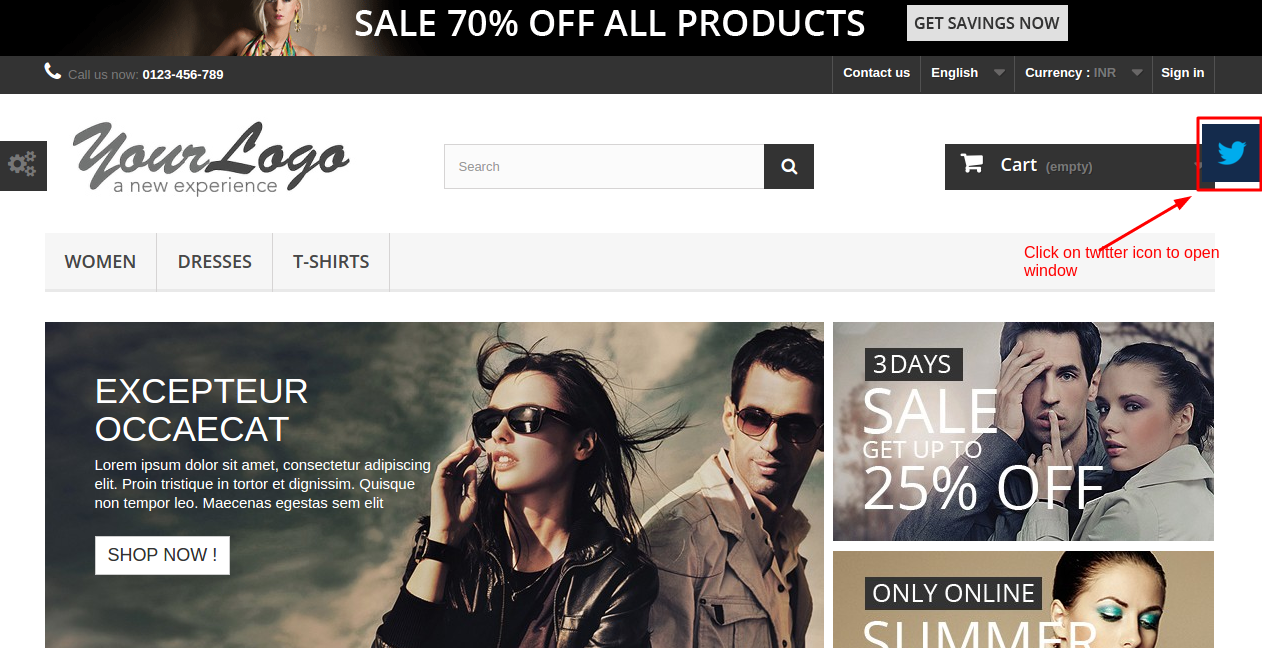
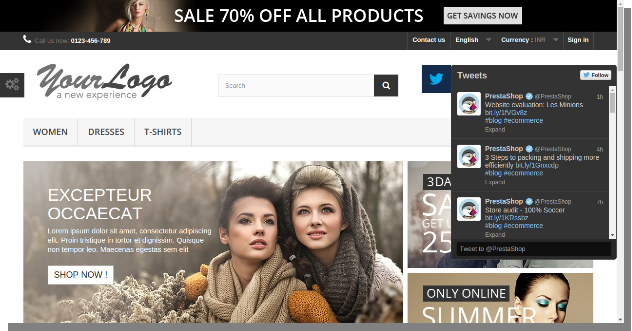
3.2.1 Twitter Icon on right column
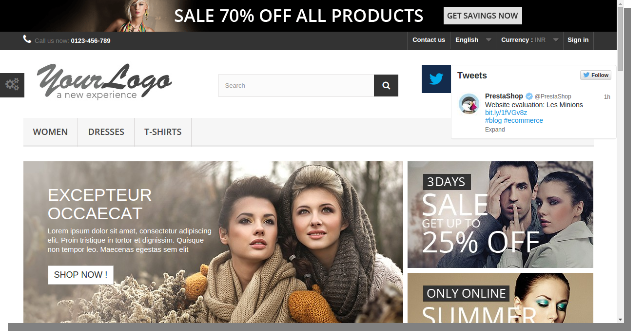
3.2.2 After clicking on icon default Settings Interface
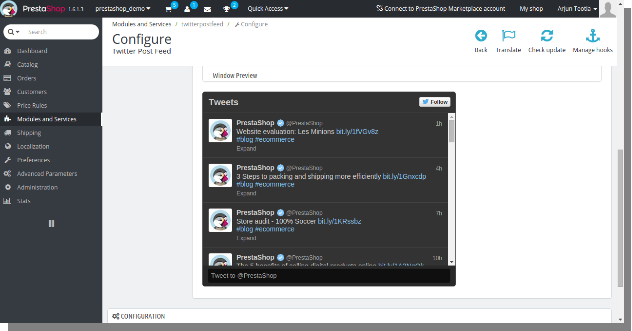
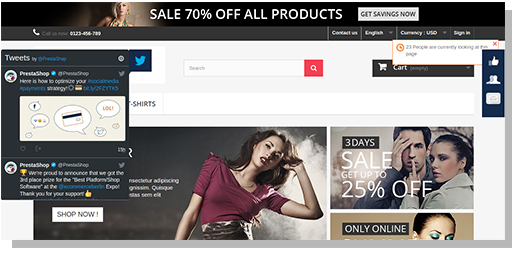
3.2.3 Dark theme with tweet footer
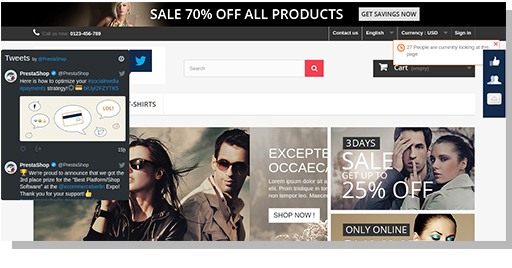
3.2.5 Without Tweet Footer
3.2.5 Light theme with tweet footer
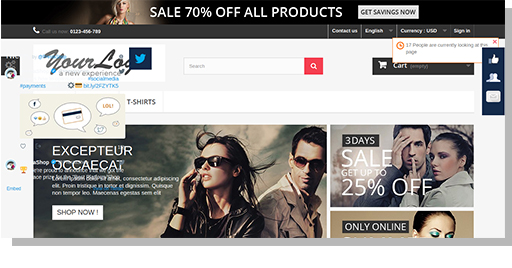
3.2.6 Dark theme with transparent widgetFrom all of the above images, you can easily make your homepage more social for your customers. They can tweet easily and read all the tweets by you.
1. Introduction to Scratch Coupon/Email Subscription pop up
Prestashop Scratch Coupon addon allows store owner to provide discount coupons to the visitors using an interactive scratch to win pop up(email subscription pop up) interface on the website front and analyze the customer’s need by tracking discount coupons. The customers receives the coupon codes via email.
Coupon codes with discounts highly affects the shopping behavior of the visitors as most of the visitors love to buy the products at a special discounted price, therefore coupons play an important role in cart conversions.
Highly interactive and responsive Prestashop scratch coupon also offers email subscription, the module integrates your store to your Mail Chimp account, i.e the email that the user enters in the scratch coupon pop up is automatically integrated with your Mail chimp account, which can be later used for personalized promotions or Email marketing.
Key Features of Prestashop scratch coupon:
Provides Interactive Scratch coupon email subscription pop up interface on Prestashop Store front.
Sends personalized emails with coupon code included.
Graphical and tabular reports for Coupon and Sales make the performance analysis easy for the store owners.
Mail Chimp Integration: Email Integration with smart sync feature.
Direct impact on sales and customer engagement
Increase the percentage of returning customers on your Prestashop store
Highly interactive and responsive pop up interface makes the customer win discounts and feel special
Improves conversion rates by providing customers an interactive email subscription pop up to win discounts
Fully customizable email subscription pop up, matches with your website’s theme
Extremely responsive and user friendly back end interface
Option to Show/Hide Scratch Coupon email subscription box on any desired page of the prestashop store.
Option to allow or restrict free shipping on the coupon.
Customizable Email Templates
Multi Lingual Support
Multi store compatible
Prestashop Scratch coupon is compatible with all the themes
Desktop, Mobile and Tablet responsive design.
Adds a feature of gamification to the website which makes the store visitors scratch and win discounts.
2. Installation-Prestashop scratch coupon addon
To install this Prestashop addon, please follow these steps:
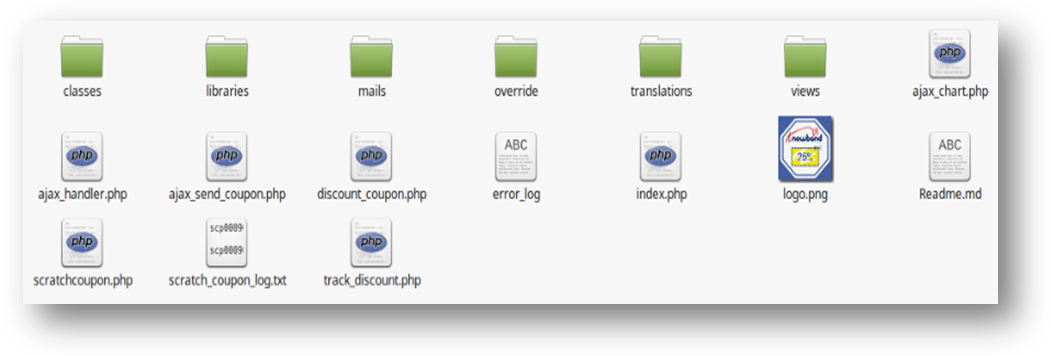
Folder structure of the Scratch Coupon plugin folder(scratchcoupon).
Copy the whole folder named as “scratchcoupon” into your modules folder of the root directory of your PrestaShop store through FTP.
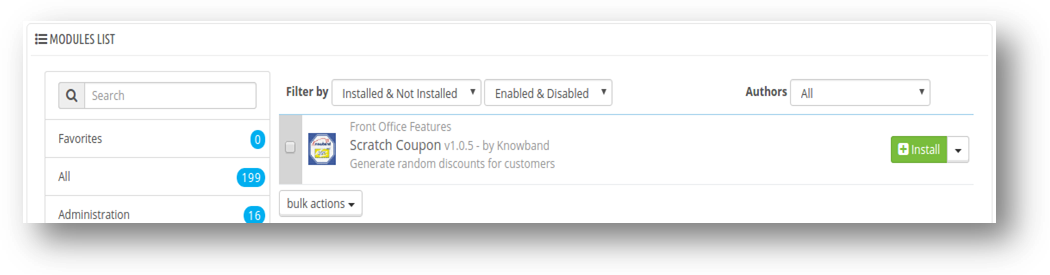
You will be able to find the Scratch Coupon plug-in ready to be installed in the “Modules” in your PrestaShop store as shown below.
Click on the Install button to install the plugin.
3. Admin Interface
After installing Scratch coupon addon into store, following interfaces will display:
Configurations
Report Analysis
Email Settings
FAQs
Suggestions
Other Plugins
3.1 Configurations
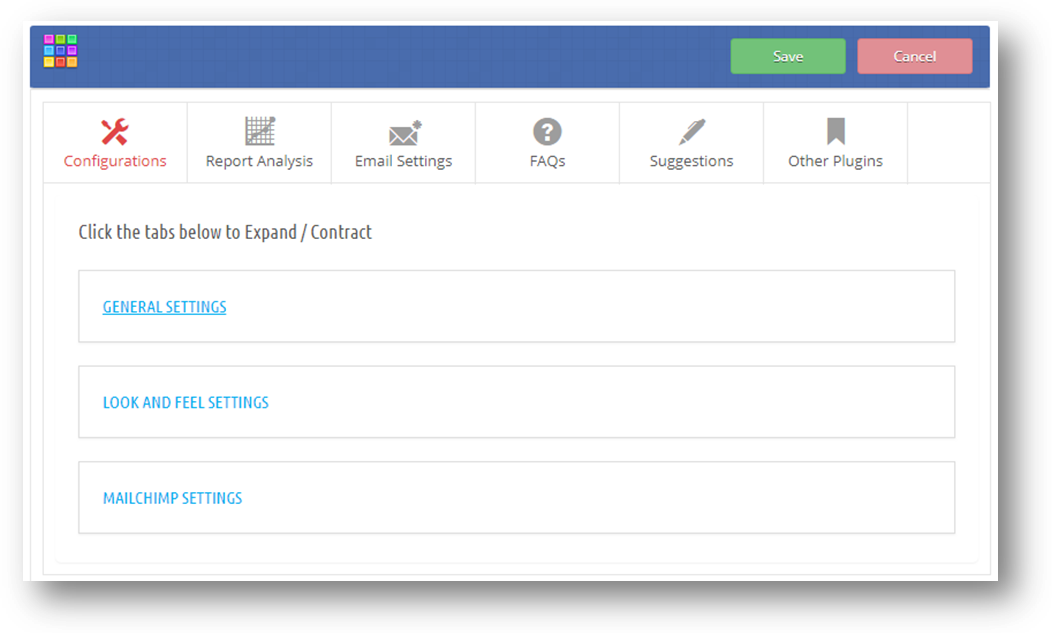
After clicking on configure button of “Scratch Coupon” addon on module listing page, system will open “Configurations” tabs by default as shown in screen below:
This tab contains 3 sub-tabs: –
General Settings
Look and Feel Settings
MailChimp Settings
Note : Prestashop store admin can expand or contract these tab by clicking on the tab.
3.1.1 General Settings
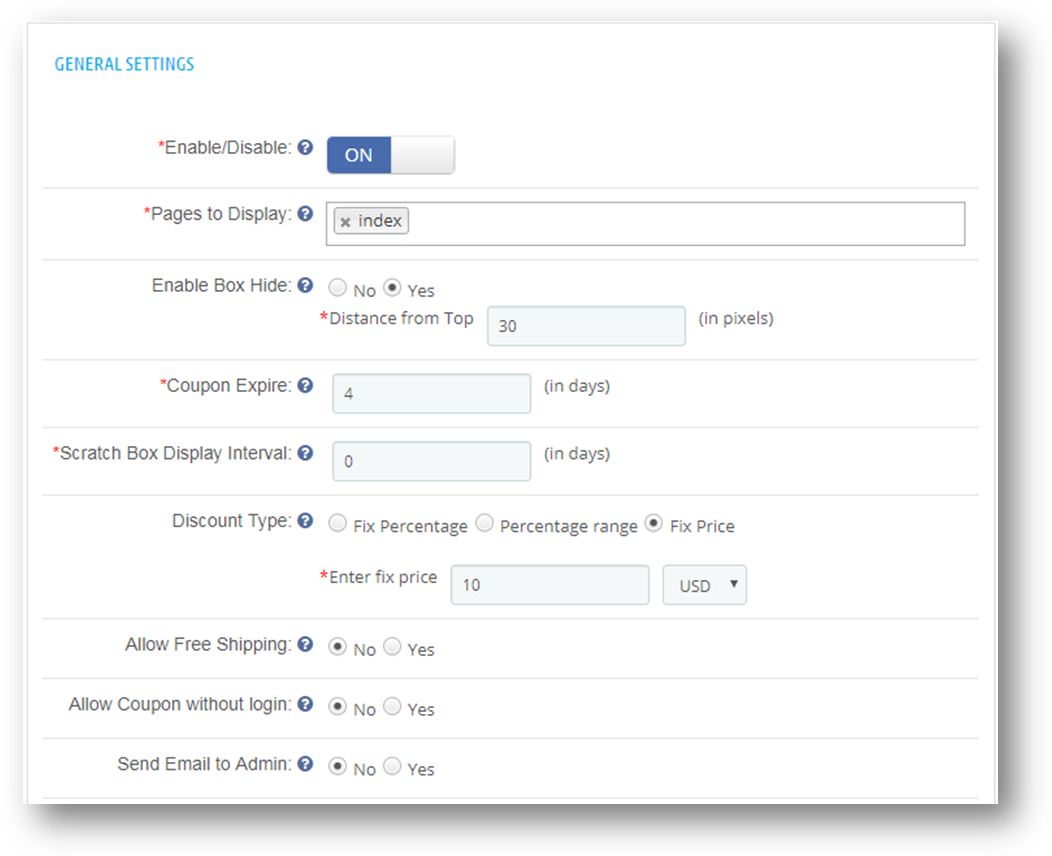
When Prestashop store admin clicks on “General Settings” tab then the fields shown below will display. The fields in the form will already be filled by their default values.
Enable/Disable: Initially, this will be “OFF”. User can enable/disable addon functionality by turning it ON/OFF.
Pages to Display: Admin can search and select the pages where he/she wants to display the scratch coupon email subscription popup.
Enable Box Hide: The scratch coupon pop up is displayed, each time the page reloads. So, prestashop store owner can disable the popup and enable the box hide option to show a box on the side, when a customer clicks on this box the scratch coupon email subscription pup up appears.
Coupon Expire: The Responsive addon allows store owners to set the coupon expiry days, the coupon will be expired after the specified days. Customers are informed via emails regarding the coupon expiry.
Scratch Box Display Interval: Store admin can also set the number of days after which the email subscription popup appears again with another coupon code for the same customer.
Discount Type: Here admin can set the type of discount to be offered to the customer i.e Fixed price discount, Fixed percentage based discount or percentage range discount
Fix Percentage: By default, this option will be selected. Here user can set the fix percentage discount. Fix percentage value will lie between 1 and 100. On front end, each coupon will have fix discount percentage.
Percentage Range: On selecting this option. Two inputs will be shown as shown in screen below:
Here user can set the range of percentage. By setting this option, plug-in will randomly generate discount within percentage range on front end.
Fix Price: If user set fix amount discount instead of percentage. Then this option will fulfill this need. Here user can set fix amount in USD.
Allow Free Shipping: By default “No” will be selected. On selecting “Yes”. Free shipping will be allowed on the generated coupons.
Allow Coupon without login: By default “No” will be selected. On selecting “Yes”, customers can apply the coupon without loggin in to the Prestashop store.
Note : Only that customer can use the coupon to whom it is assigned. If the Customer is different and admin configure Allow Coupon without login option as “Yes”, then the coupon will automatically be removed from the cart.
Send Email to Admin: By default “No” will be selected. When set to “Yes” the module sends the scratch coupon discount notification to admin.
Admin Mail Subject Line: Admin can set the subject line for scratch coupon discount notification emails..
3.1.2. Look and Feel Settings
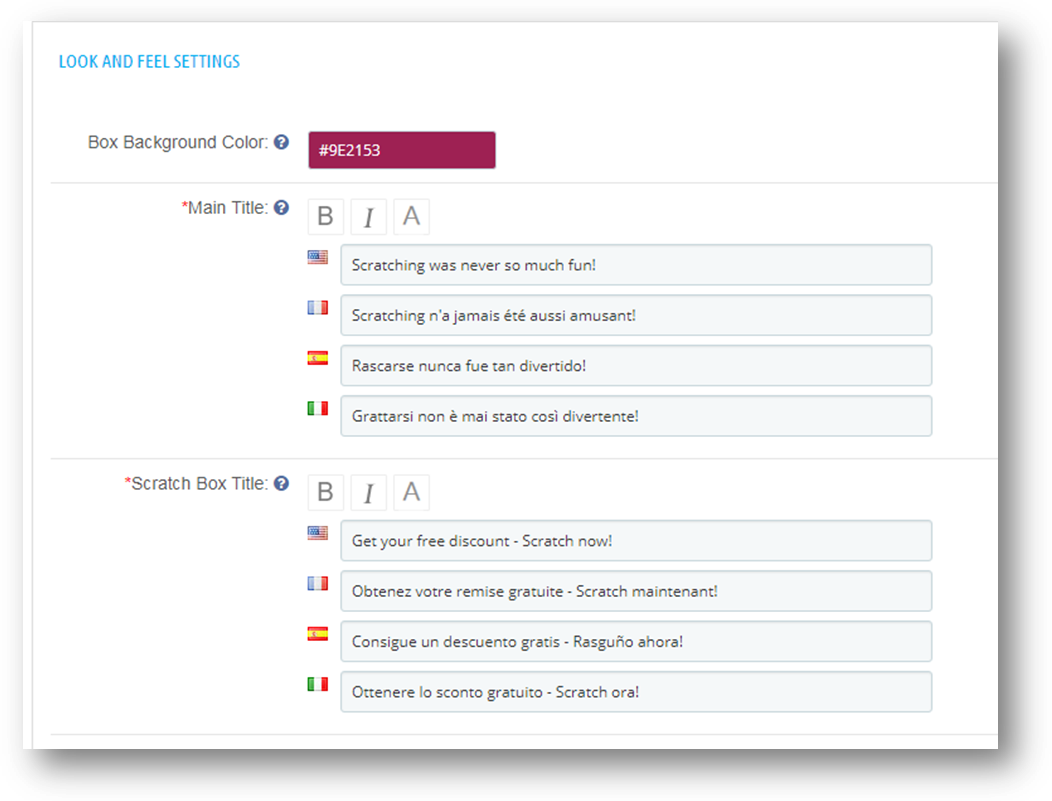
When admin clicks on “Look and Feel Setting” tab then all the fields shown below will display. Initially, all the fields in the form will already filled by their default values.
Box Background Color: Define the background color of scratch coupon box on front end. A color picker will pop up from where Prestashop admin can change background color..
Main Title:. The title displays on the top of the coupon box at front. Admin can customize the text with the available options:
Bold: To darken the title.
Italic: To italic the title
Color: To set the color of the title.
Scratch Box Title: Scratch box title is very important as it attracts the customers. Scratch box title should be catchy and should attract customers. It is displayed just above the Scratch area on the email subscription pop up.
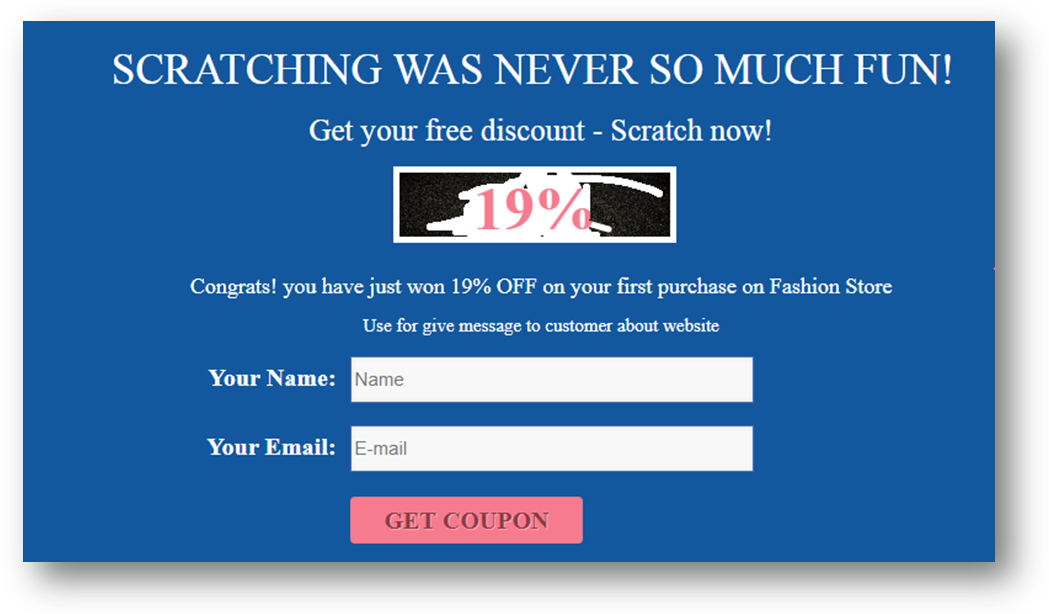
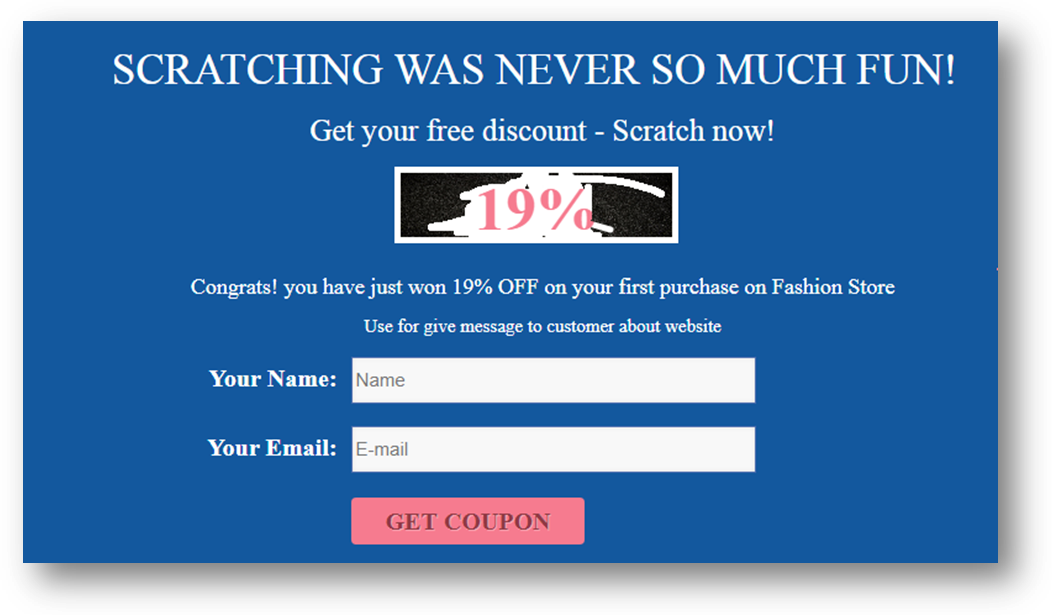
Form Title 1: Used to display the information of the discount won by the customer. For example: Congrats! you have just won 10% OFF on your first purchase on Fashion Store.
Form Title 2: Admin can use this field to provide any information to the customer.
Name Title: In this field admin can set the title for the input field which will require name of the customer at front end. Here user have two option to set title:
Email Title: In this field user can set the title for the input field which will require email of the customer at front end.
Input Field Border: Use to style the border of input fields on front end. We recommend that, please use opposite color of background color to clearly show the input fields on front end.
Button: Admin can set the title of button. The button will be displayed on front end. Customer must have to click on this button to get the coupon. Admin can customize the button text or background color
Button Text:. This will be the text shown on button.
Button Text in Progress:. This text will be shown when system processing and sending coupon to customer. After sending coupon, this will be replaced by “Button Text” value.
Success Message: Success message will be shown after sending coupon to corresponding customer.
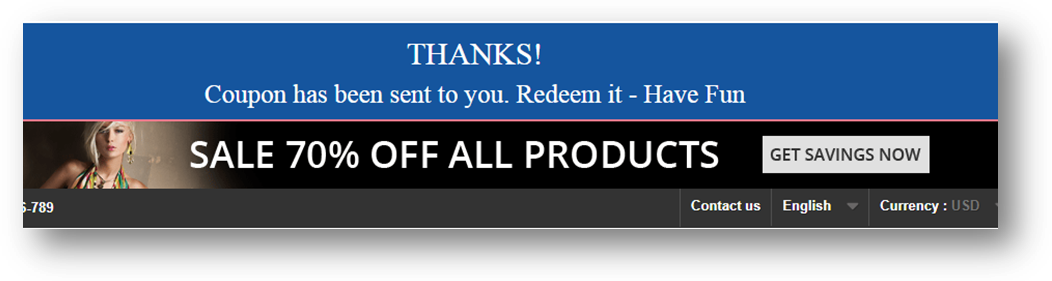
Success Thanks: Success thanks message will be shown as heading of the Success Message after sending coupon to corresponding customer .
Get Coupon Code Label: ‘Coupon code label’ text will display as label of the button when Scratch Coupon box is hidden.
3.1.3 MailChimp Settings
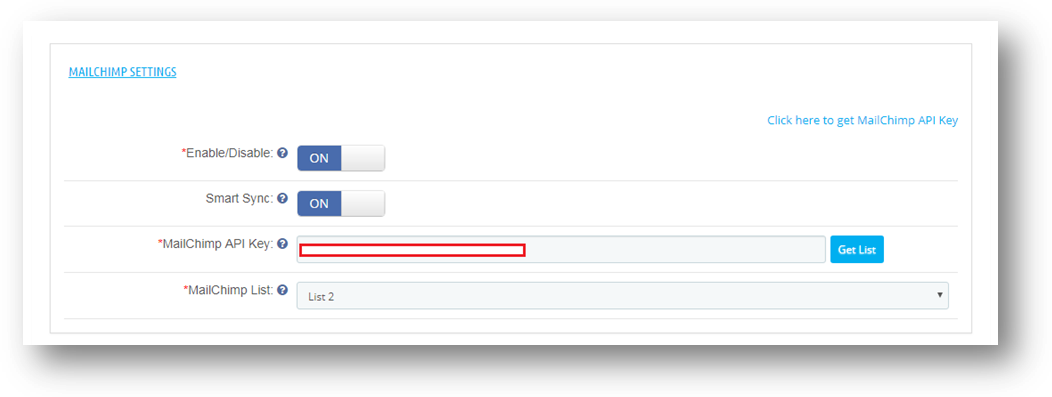
When admin clicks on “MailChimp Settings” tab then the fields shown below will display. The fields in the form will be already filled by their default values.
Enable/Disable : From this option admin can enable/disable the MailChimp settings. Initially it will be set to off.
2. Smart Sync : This option when enabled, email id after validation will be synchronized if visitor/guest/customer remove focus after filling email field irrespective of the fact if the user have submitted the form. If it is disabled the email will be synced only when form is submitted at the front-end.
3. MailChimp API Key : MailChimp API key is the key that the user created on his/her MailChimp account at https://www.mailchimp.com. This API key will be used to connect to the MailChimp API. When user fill the “MailChimp API Key” field with a valid API key and click Get List button then the lists related to that MailChimp API key will display.
4. MailChimp Lists : MailChimp Lists will be available when the MailChimp API key is provided.
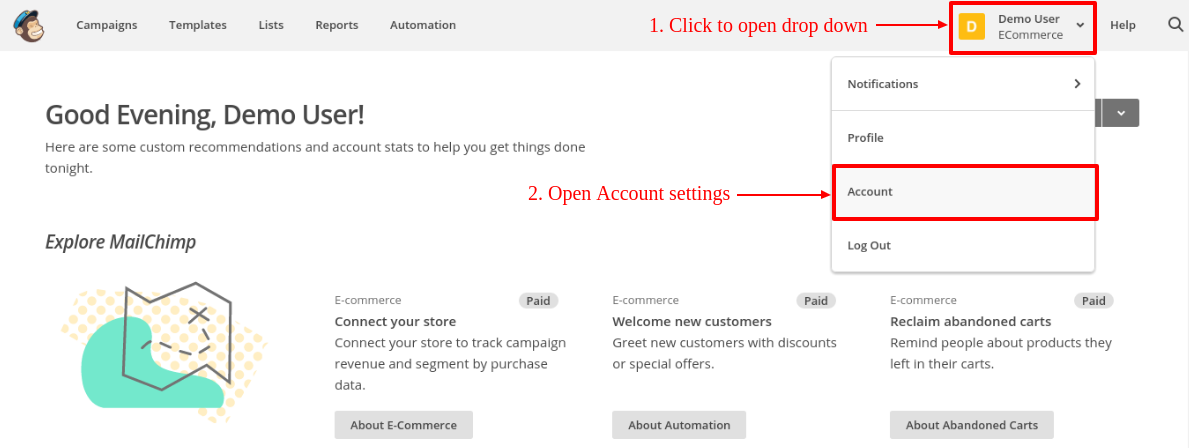
On Dashboard, click button on upper right corner of dashboard. Drop down menu will open, click Account link in that menu as seen in screen below.
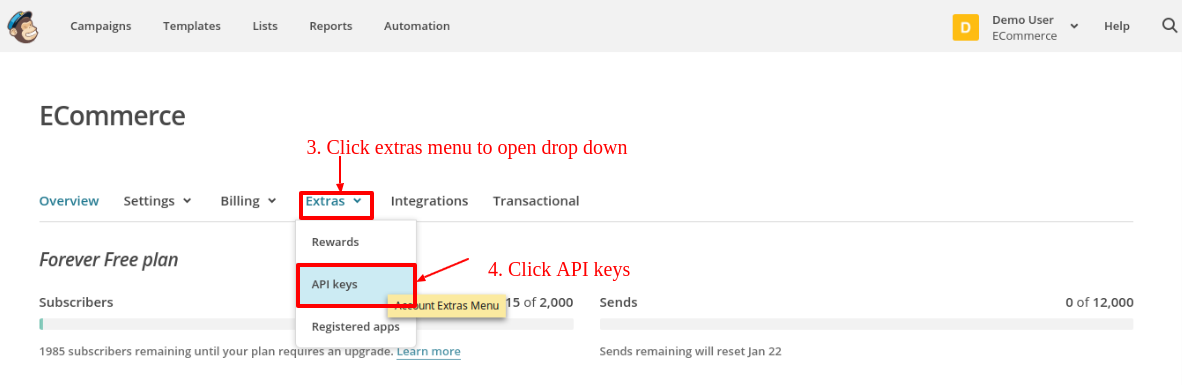
On Account settings page, some sub menus will be visible. Click “Extras” sub-menu to open drop down menu. Click “API keys”as shown in screen below:
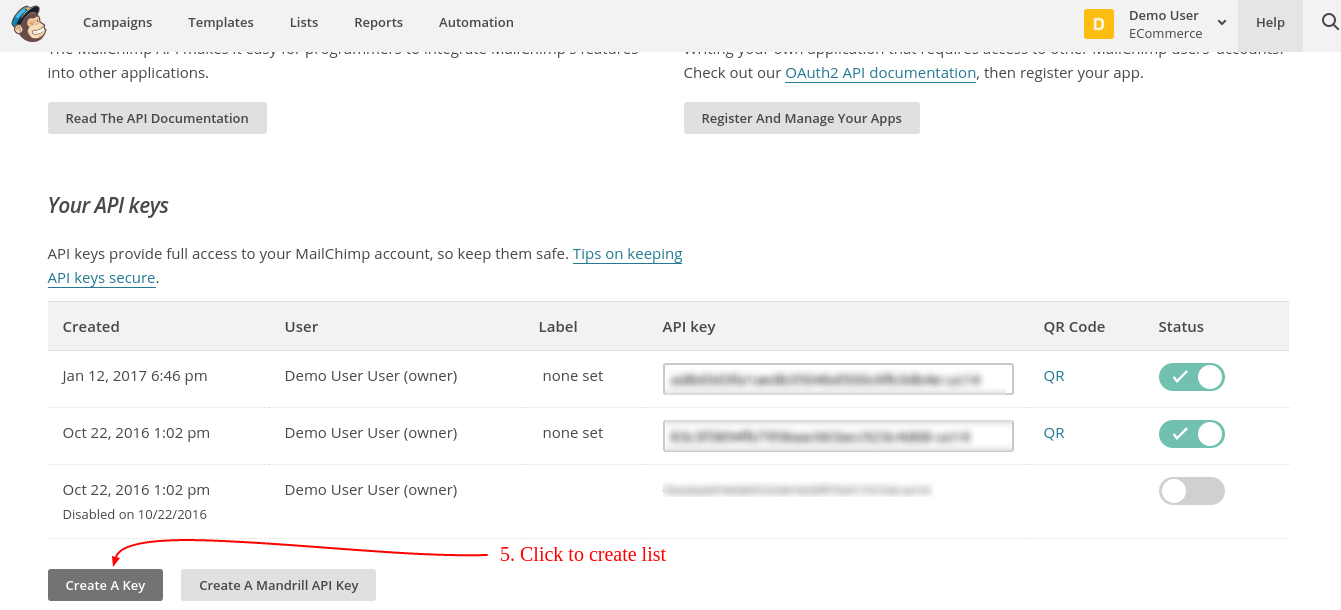
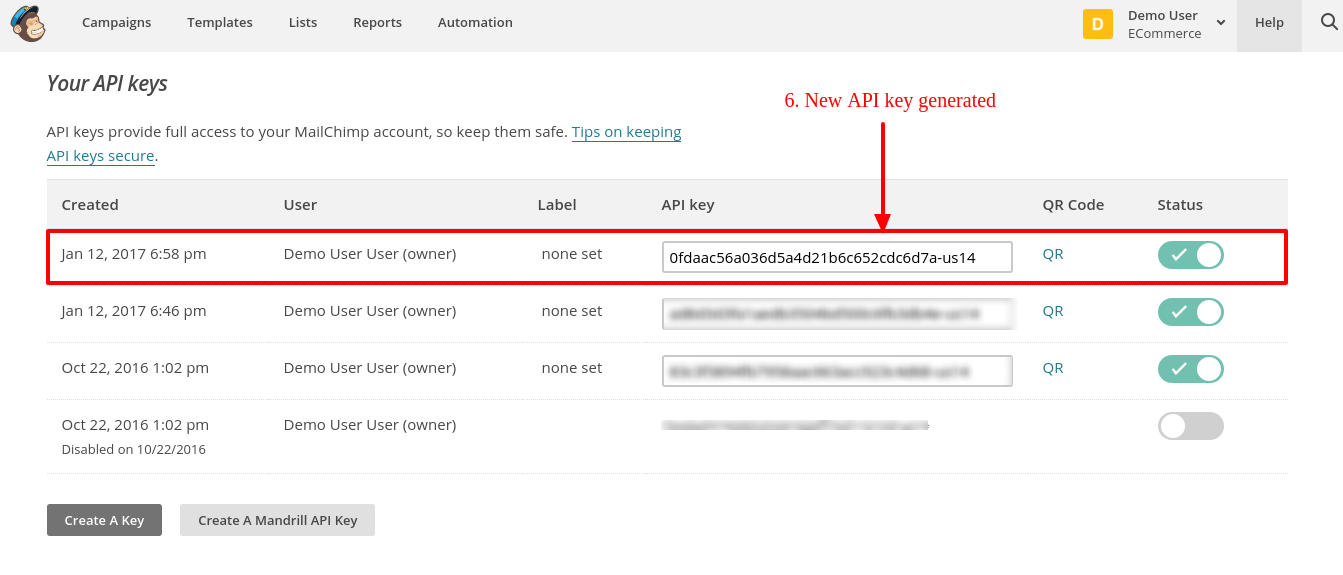
On API keys page, click “Create a key”to generate API key. After creation, a new API key will be added to your API keys list. Screen is given below:
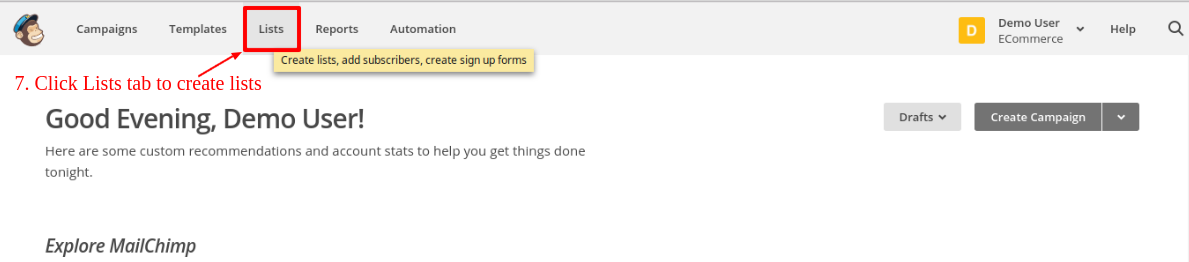
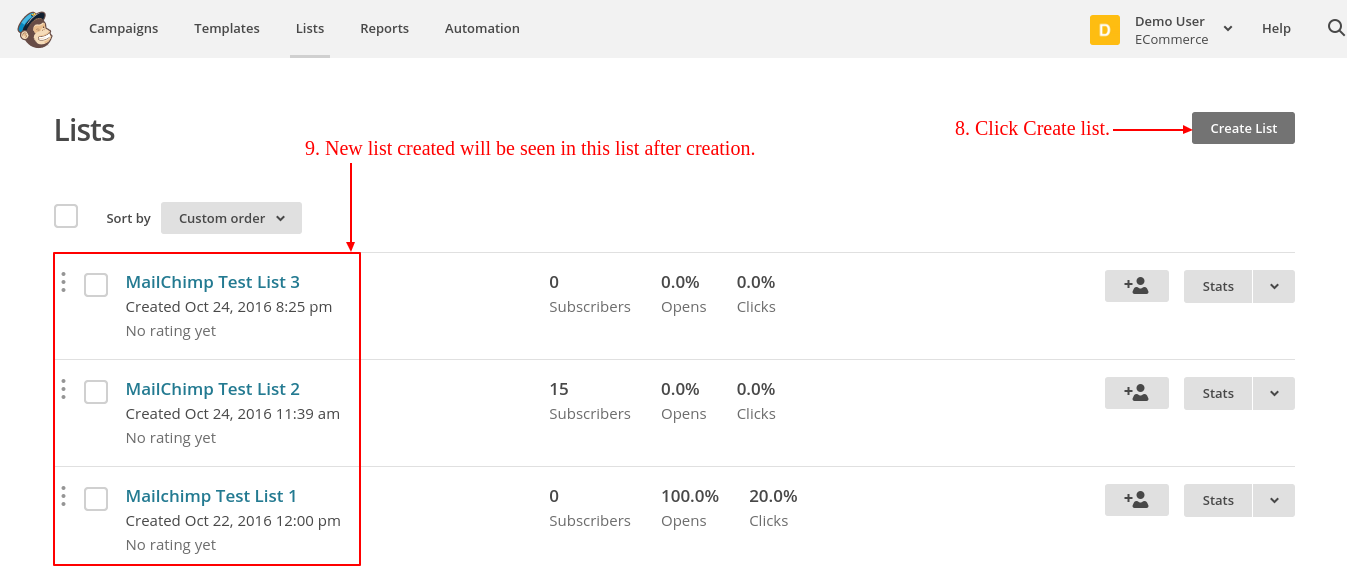
Now to create list, click Lists tab in upper menu. Admin will be redirected to new page where he/she can view lists and create lists also. Screen is given below:
On Lists page, Click “Create list” to create new list. After creation lists will be visible on Lists page as shown in screen below.
3.2 Report Analysis
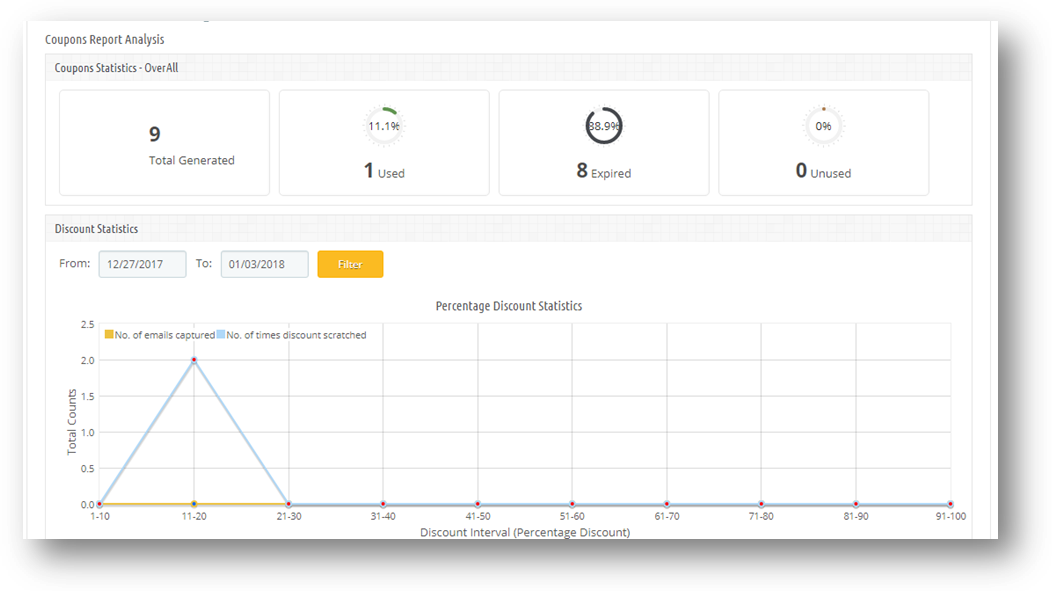
In this tab, addon will show the coupons and discount statistics in graphical format. With the help of these statistics, store owner will be able to analyze customer’s need in form of discounts and time as shown in screen below:
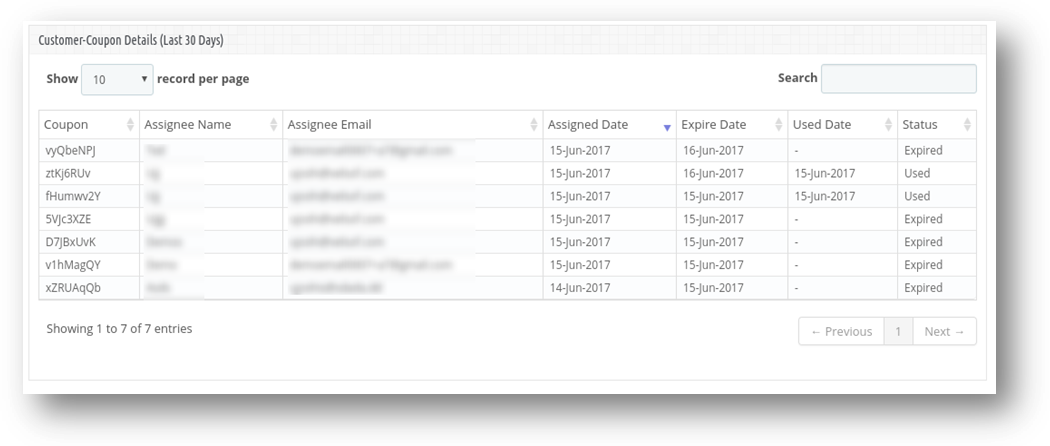
Prestashop store Admin can also see the discount details up-to last 30 days as shown below.
Following graphs will be shown in this tab:
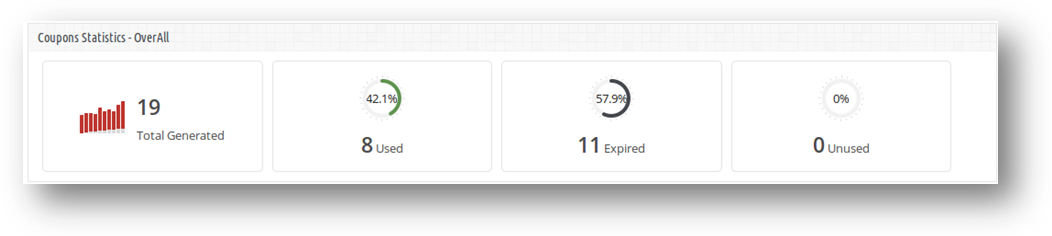
Coupon Statistics – OverAll: This section will show over all summary of Total Generated, Used, Expired and Unused coupons
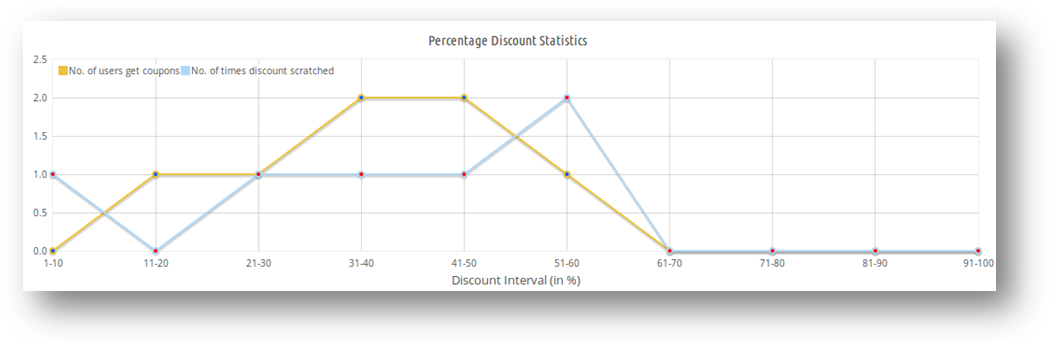
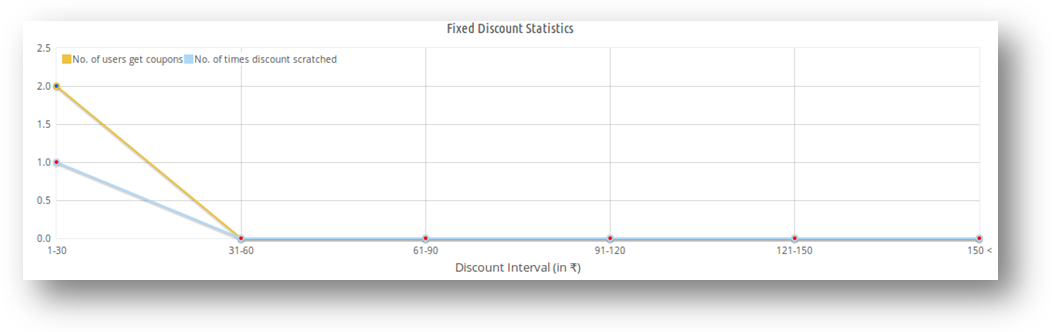
Discount Statistics: In this section, how many number of customers applied for which discount range and how many times coupon is scratched for which discount range. As there are two types of discount: percentage and fixed amount; in system. Addon will show separate graph for both discount types as follows:
Percentage discount statistics: This will be a line graph, in which discount interval will be of 10% upto 100%. Percentage based discounts statistics displays the number of times the email is captured and the number of times the coupon is scratched for percentage based disounts.
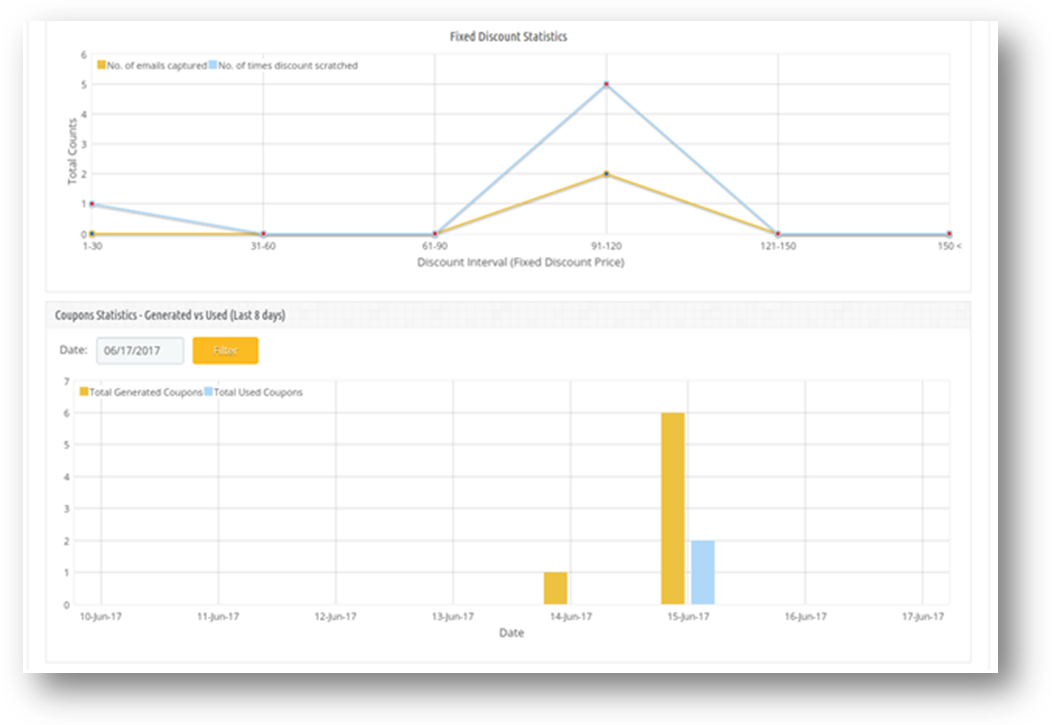
Fixed Amount discount statistics: Fixed amount discounts statistics displays the number of times the email is captured and the number of times the coupon is scratched for Fixed amount discounts.This will also be a line graph, in which discount interval will be of 30 and 6 intervals will be shown.
With the help of these two graphs, Prestashop store owners can track the customer’s needs in terms of discounts. Information gathered in these statistics will be helpful in attracting more customers by offering preferred discounts and increase store sales. Admin can also filter these graphs by selecting dates.
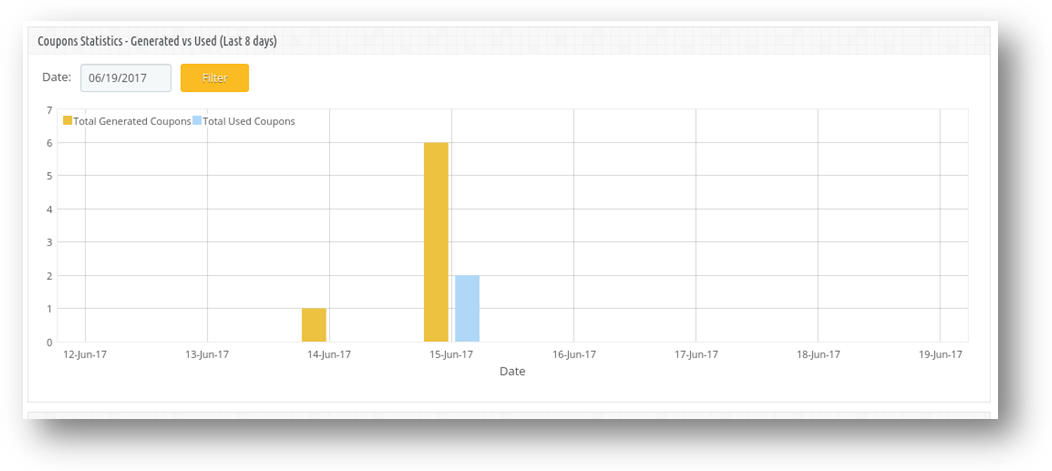
Coupon Statistics – Generated Vs Used: The graph shows the comparison between total coupon generated and the total coupons used by the customers. The graph shows data of last 8 days. User can also filter graph by selecting date. Following is the sample screen shot of statistics:
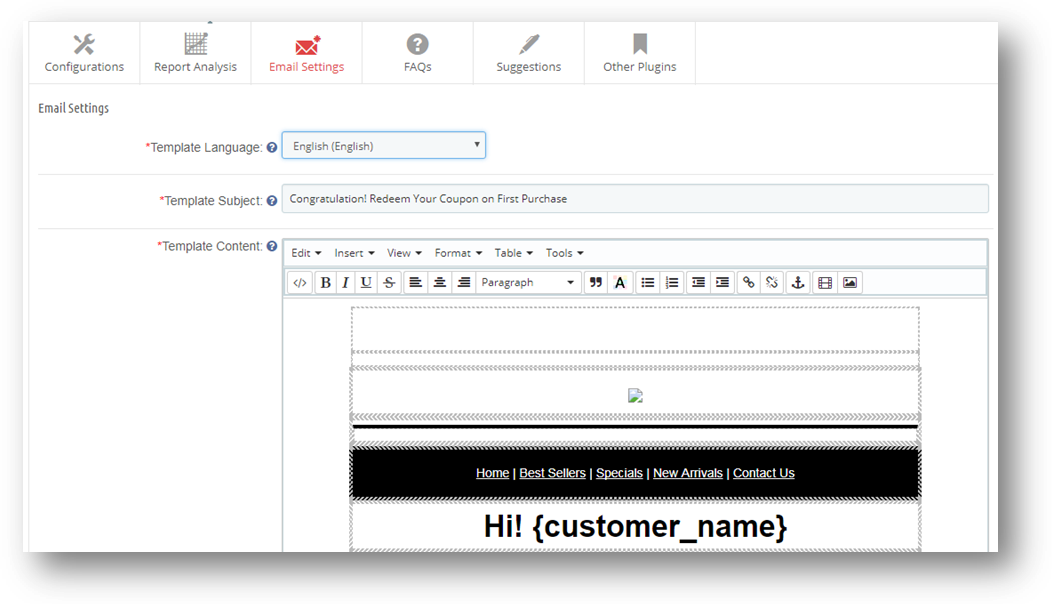
3.3 Email Settings
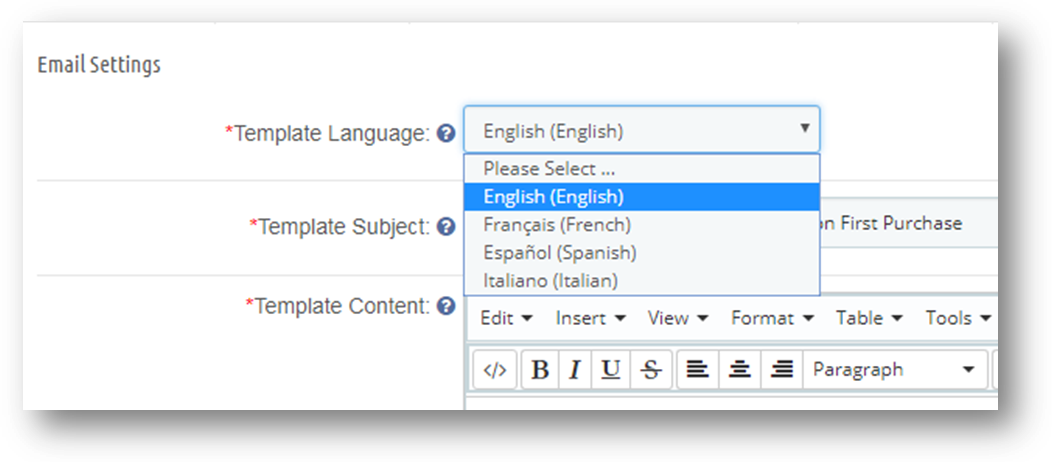
This section contains a readymade email template which can be later customized as per the requirement in any language. Email template can be stored for multiple languages present in the system.
.
Note:- The email template contains pure html only and some template variables (example:- {any_var}). It is recommended not to edit any part of the email template containing such text otherwise the email template will not work properly.
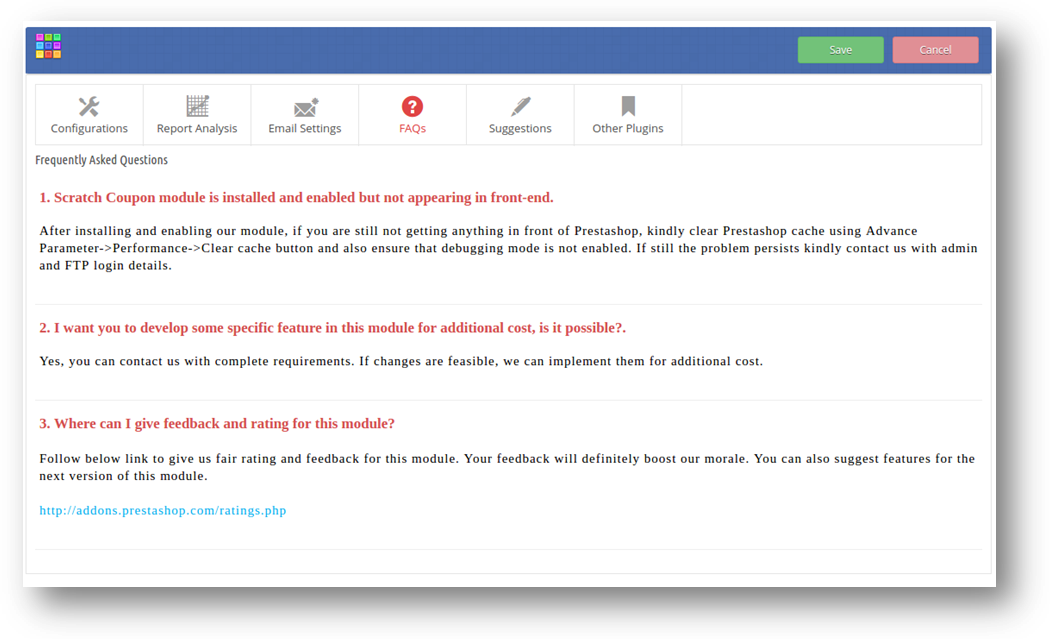
3.4 FAQs
This tab contains several questions (with answers to them) that are asked by our customers. We recommend you to go through the questions before raising any ticket for this plugin.
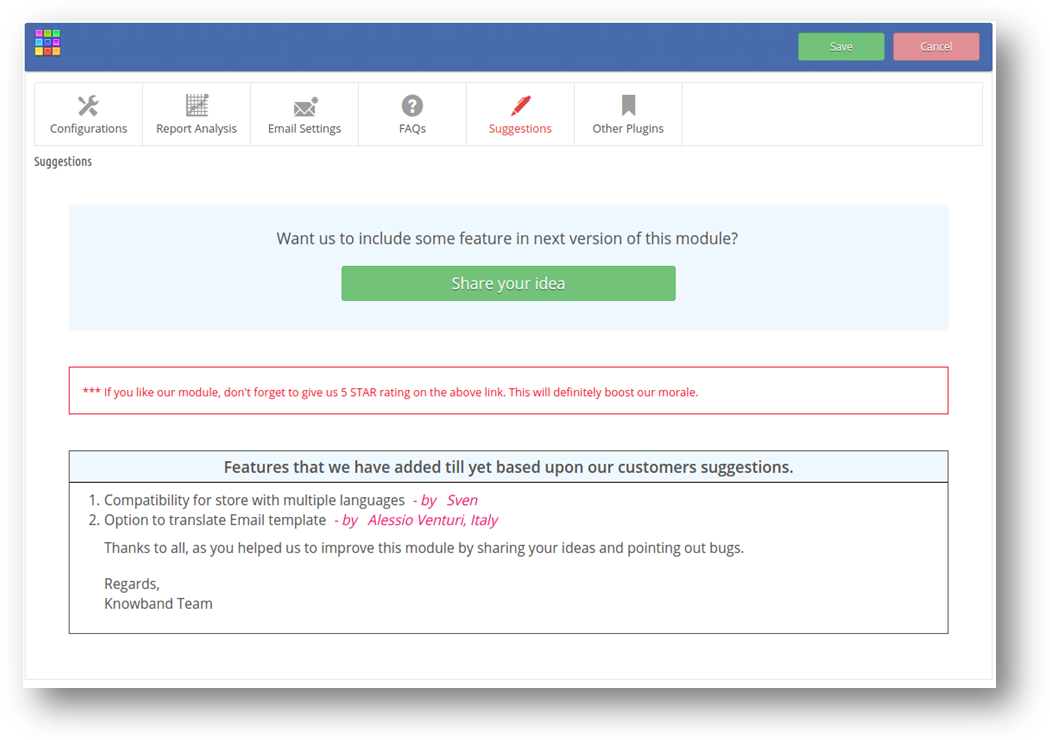
3.5 Suggestions
In case you want to give any suggestions for some new features to be included in the new version of this plugin than you can use this tab.
3.6 Other Plugins
This tab redirects to our developer page having list of other plugins developed by us. If you like this plugin than you can try our other plugins as well.
4. Front End Interface-Prestashop Scratch Coupon/Email subscription Addon
On prestashop store front, the interactive and responsive scratch coupon email subscription pop up will be displayed on selected pages after enabling it from admin panel. This scratch coupon pop up will be displayed on top of the homepage.
Note : Validation for scratch coupon will be there even if module is disabled or uninstalled.
Following is the screen of scratch coupon email subscription box with default values:
After scratching coupon area, an input form will be open just below the coupon pop up as shown in screen below:
After providing name and email into form, Prestashop scratch coupon addon will send coupon with discount to the customer. After sending email to customer, a success message will be displayed as shown in below screen:
The above message will be disappear after 5 seconds and next discount will be shown on the same system after defined (set through admin panel) days.
5. Tracking Information
On front end, this addon tracks following information to create analysis reports in the form of graphs:
Discount Scratch Tracking: Whenever customer scratches to win, the addon tracks that event and save into DB, after that automatically disable the tracking process until the browser will not re open again on the same system.
Coupon Tracking: After sending the mail to the customers with coupon and other details, the addon saves the coupon information in the database with the corresponding customer details. Which it later use to generate the stats for the generated coupons and customers.
Send Email to Admin: If prestashop store owner allow email to admin, then it will also send the same email with discount coupon and coupon details to admin.
Enable discount coupon again: After sending coupon to customer, it will not re-generate discount on the same system until admin allows to display the email subscription pop up again.
Recommendations
In case module is displaying override issue while installation or re-installation of the module, please make sure that the file “CartRule.php” doesn’t exist inside the folder “override/classes” of your store’s root directory. In case it already exist there, you need to follow the steps mentioned below.
Steps –
1. Cut the file “CartRule.php” from “override/classes/CartRule.php” of your store’s root directory and paste it in some other directory.
Prestashop Facebook Post Feed is an addon which provides a feature to advertise your Facebook Page on your store by adding Facebook window (Notification bar) in the left or right. Users can click on this bar and see the summary of added Facebook Page. Users can also like and comment on the same. This advertisement helps to share information/updates about the store and can increase the conversions.
1.1 Features of the Prestashop Facebook feed addon
The feature-packed module includes:
The Prestashop addon is fully customizable and can be activated or deactivated from the back end.
The Facebook feed addon by Knowband allows you to show the Facebook posts of your page on their website along with the Like button.
Without having any knowledge about coding, the admin can install and configure the module effortlessly.
The Prestashop Facebook Post Feed plugin is multi-lingual and multi-currency taking your business to a wider reach.
The addon lets your followers your posts, like them and follow your news as well as notification without actually going on FB. Hence, it generates more traffic and sales in the store.
The admin can change the background color and the color of the notification bar in accordance with the theme of the store.
The Facebook Post Feed is an easy way to promote your business by sharing the news, posts, and other notifications while the customers find an easy way to like them by hitting the ‘Like’ button.
The store admin can preview the changes made in the back end and see how they’ll look on the front end.
2.0 Steps For Installation
After purchasing Prestashop facebook wall feed module from Knowband, you will get the following files as listed below:
1. Compressed File in ZIP format (contains source code of the module)
2. User Manual
Follow the following steps to install the Prestashop addon:
Unzip the compressed file. It would contain files and folders as shown below –
Copy all the files and folders of the unzipped folder into your store “modules” directory on the path – Root Directory/modules/.
Now, the Prestashop facebook feed module is ready to be installed in your store and you can find that in Store Admin -> Modules and Services. It would be shown as below –
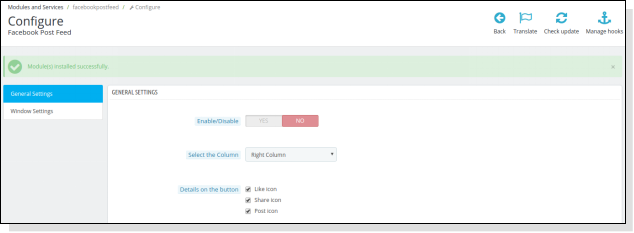
Click on “Install” button to install the module. It would show a pop-up for your confirmation. Click on “Proceed with the installation” option. This step will install the module and show notification – “Module(s) installed successfully”.
3.0 How to configure module?
Admin can setup or configure Prestashop Facebook Post Feed module through Admin Panel of store by following steps given below –
Go to Store Admin -> Modules and Services
Find “Facebook Post Feed” and click “configure” button given corresponding to the module.
It would open a new page as shown below –
There are following sections available to configure this Facebook feed module –
General Settings
Window Settings
Each section is explained below –
3.1 General Settings
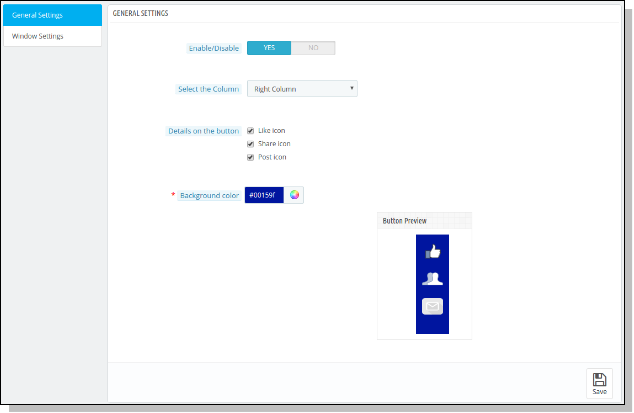
This section allows admin to enable/disable Prestashop Facebook Post Feed module with some other general settings like column selection, background color, and the details on the button (the like icon, share icon and post icon).
You have to follow steps given below to configure General Settings –
Go to the Module and Services -> Module and Services
It would list all the modules of the store. Find ‘Facebook Post Feed’ in modules list.
Now click on ‘Configure’ button given corresponding to the ‘Facebook Post Feed’ module.
It would redirect the Store Owner or Admin to a new page as shown below –
Update the values of given fields corresponding to ‘General Settings’ as per need.
Now click on ‘Save’ and it would validate and save the provided values.
That’s it.
This section contains following options –
Enable/Disable: Initially, this will be “OFF”. Admin can enable/disable add-on functionality by turning this “ON/OFF”.
Select the column: This is a drop down box in which the admin can select that the page button which he has selected should appear in the left column or the right column of the store. 3.Details on the button: Here, admin can select icons to display on Facebook Button. Choices can be Like Icon, Share Icon and Post Icon. 4.Background Color: This is a color picker in which admin can decide what should be background color of the button appearing on the screen.
3.2 Window Settings
This section allows admin to update the settings for the Facebook window being shown on the storefront.
You have to follow steps given below to configure Window Settings –
Go to the Module and Services -> Module and Services
It would list all the modules of the store. Find ‘Facebook Post Feed’ in modules list.
Now click on ‘Configure’ button given corresponding to the ‘Facebook Post Feed’ module.
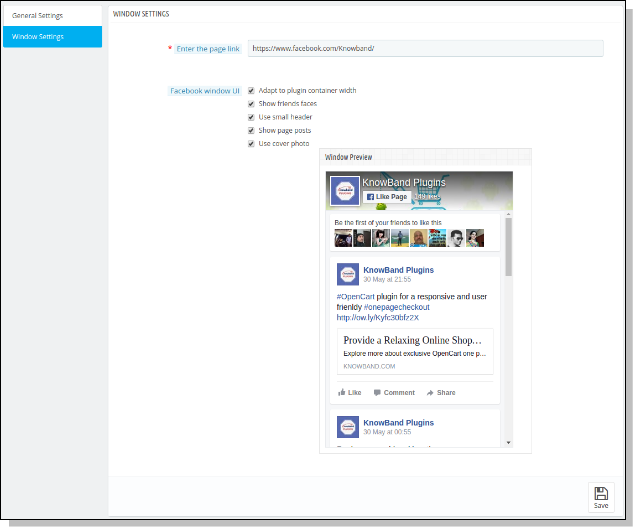
It would redirect Store Owner or Admin to a new page. Click on “Window Settings” and it would open a new section as shown below –
Update the values of given fields corresponding to ‘Window Settings’ as per need.
Now click on ‘Save’ and it would validate and save the provided values.
That’s it.
This section contains following options –
Enter the page link: Here, the admin has to enter the page link to show posts of that page on the window added by the module on the storefront. By default, Facebook Page will be shown.
Facebook window UI: Here, admin can decide what should be the UI of the window which is appearing on the screen. This option allows admin to include the following options:
a) Adapt to plugin container width
b) Show friends faces
c) Use small header
d) Show page posts
e) Use cover photo
4.Store Front Appearance
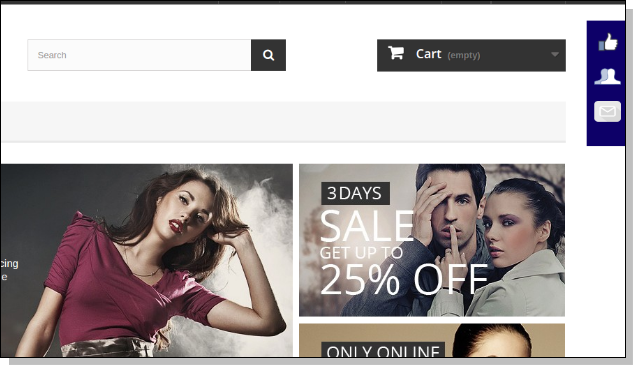
After enabling Prestashop facebook wall feed, a button starts to appear on every page of the shop and the appearance of the button is according to the settings done in the back end of the module.
The module at the front-end appears as follows –
Recommendations
Refresh home page of your store every time you enable/disable plugin. If the Prestashop Facebook Post Feed plugin is not working after installation then please check permissions on modules folder. The folder should be writable. Please make the folder permission to 755.
The Prestashop Gift The Product addon by Knowband gives the benefits to both, the customer and the consumer. This module will absolutely help the merchant to increase the sales of the store and on the other hand, it will surely get the customers benefited by offering them products for free. This Prestashop extension will be the best option for a merchant to get the customers to his stores.
Objectives:
With the help of this Prestashop free gift addon by Knowband, the website owners can get the following things:
Increase in the customer’s engagement.
Reduction of the risk of cart abandonment.
Increase in the sale of the store.
Customer will be rewarded with freebies.
Prestashop gift product encourages the customer to buy things more often.
This Prestashop freebie addon will be one of the best options for the merchant to get the customers to his store.
Installation:
To install this Prestashop freebie addon, please follow the following steps:
1. Add addon folder under modules folder of your system.
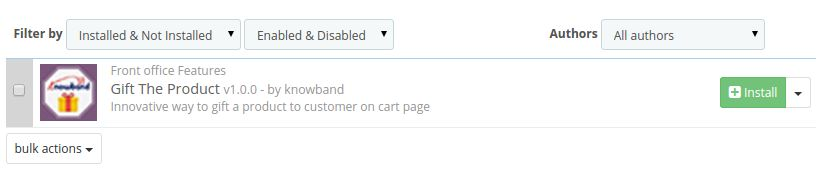
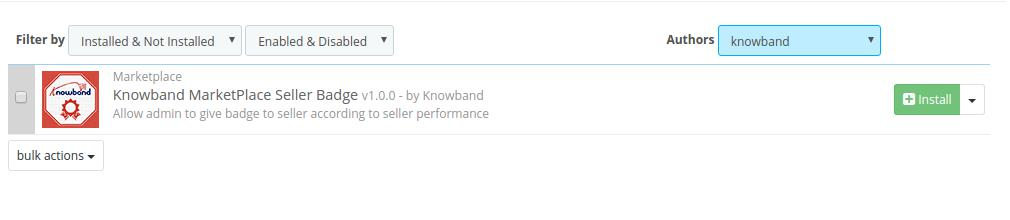
2. After adding this addon folder, system will list the addon on module page under front office feature category as given below:
In admin module, you’ll see following options to configure this Prestashop promotion gift module:
1. General Settings
2. Price Rules
Each section is described in details below:
General Settings:
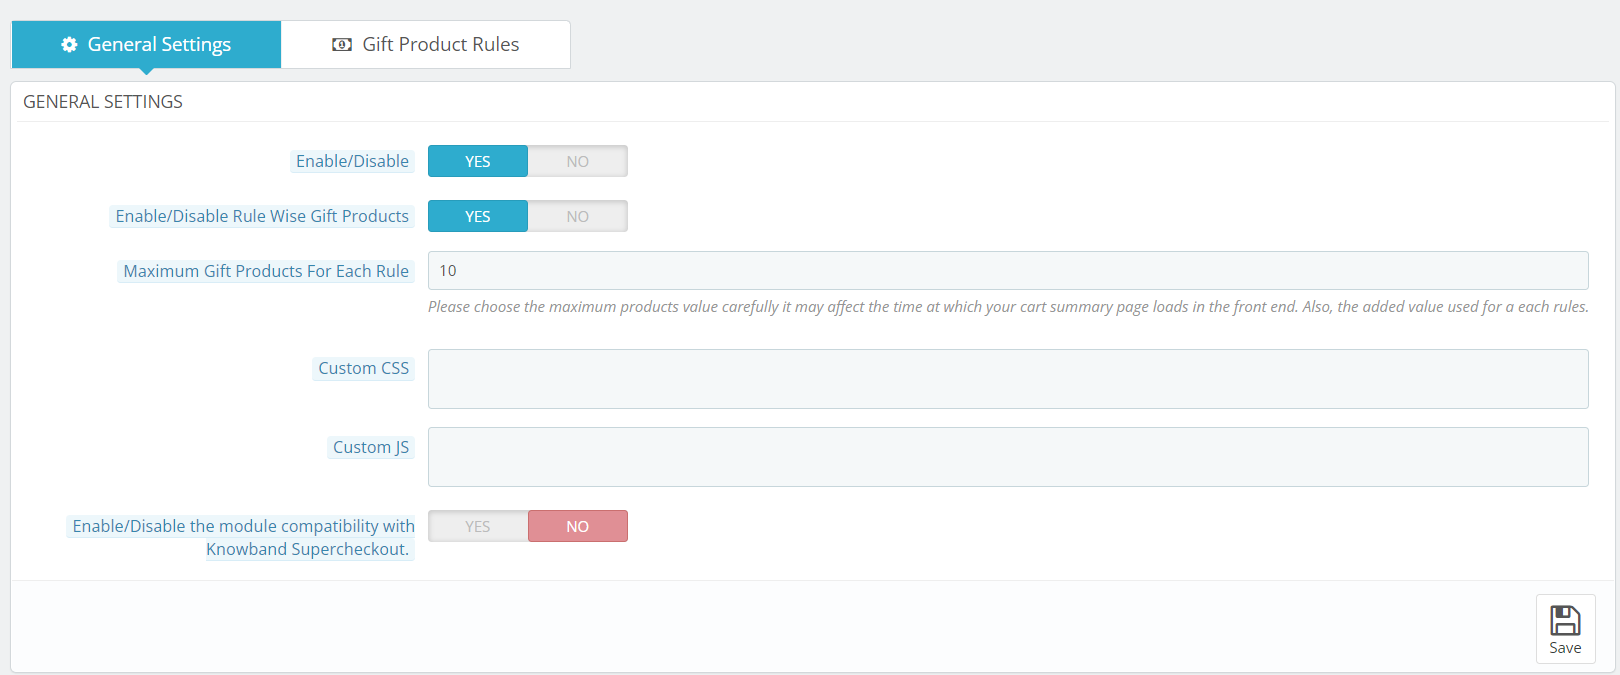
This section of Prestashop gift the product addon will have the following options to configure this Prestashop gift module:
1. Enable/Disable: This option has a toggle button with two specific values, i.e. YES and NO. This Prestashop reward gift addon will only work if this is set to YES. If you select NO, then none of the features will work. By default, this option is set to NO. You’ll need to select YES.
2. Enable/Disable Rule Wise Gift Products: This field is provided so that admin can set the restriction on the number of gift products displayed on the front for selection.
3. Maximum Gift Products For Each Rule: If this field is enabled then customer can chose more than 1 gift product according to the specified rules.
4. Custom CSS and JS: These fields have been given to the admin so that he can change the look and feel of the front end of the Prestashop free gift addon.
5. Enable/Disable the module compatibility with Knowband Supercheckout: This option has a toggle button with two specific values, i.e. YES and NO. This Prestashop reward gift addon will work with Knowband One Page checkout if this is set to YES. If you select NO, then it will not work with One page checkout module.
Price Rules:
In this section of Prestashop gift module, the admin will have to make the following price rules that will decide the gift product.
1. Price Rule Name: Here, you need to enter the name of the price rule that you want to be saved.
2. Minimum Cart Amount: Now, the admin will have to set the minimum cart amount to decide the Prestashop gift product.
3. Minimum Gift Product Amount: In this field of Prestashop freebie addon by Knowband, the admin will have to enter the minimum product amount of the gift products.
4. Maximum Gift Product Amount: Lastly, the admin will have to enter the maximum product amount of the gift products.
The Gift products which will be in between the entered price range will be shown to the customer in the front end.
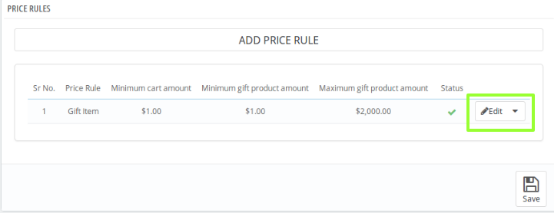
This is how the Price Rule section looks like:
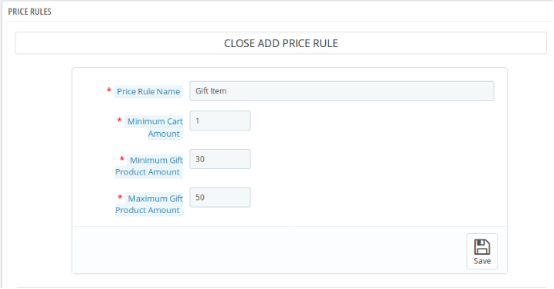
On clicking the edit button, a form will appear Where you’ll have to make the desired changes. This is how the Price Rule form looks like:
Front End Module
Once the Knowband Prestashop product purchase reward addon is enabled, a block will appear just below the cart summary on the front end saying “CONGRATULATIONS!! YOU ARE ELIGIBLE TO GET ONE OF THESE GIFTS”. This block will include the gift products according to the price rules which have been decided by the admin in the back-end of Prestashop gift the product addon.
We hope that we have covered all the concerns regarding the installation and product guide of this Prestashop Discount and Promotion Addon.
Watch Video Tutorial of Prestashop free gift addon:
Tutorial: Watch the YouTube Video Guide
To help you set up and use the Knowband PrestaShop Gift The Product Module, we have prepared a comprehensive YouTube tutorial video. This video demonstrates step-by-step how to install, configure, and manage gift rules to enhance your store’s promotional campaigns.
In This Tutorial Video, You Will Learn:
How to install and activate the Gift The Product module in your PrestaShop store
How to create gift rules based on cart value, product purchase, categories, or customer groups
How to display gifts on product pages and cart pages
How to manage multiple gift offers and set priority levels
Watch the tutorial here:
If you are a store owner and looking for an appealing option that can attract the customers to the store, then Prestashop freebie addon is the best solution for offering free gift products to your customers on completing the final checkout of the product.
Gifting can make anybody happy and if you don’t believe then you can simply buy Prestashop gift the product addon and experience better results for your Prestashop store.
For any questions, assistance, or custom modifications related to the Gift The Product module, contact our support team: support@knowband.com
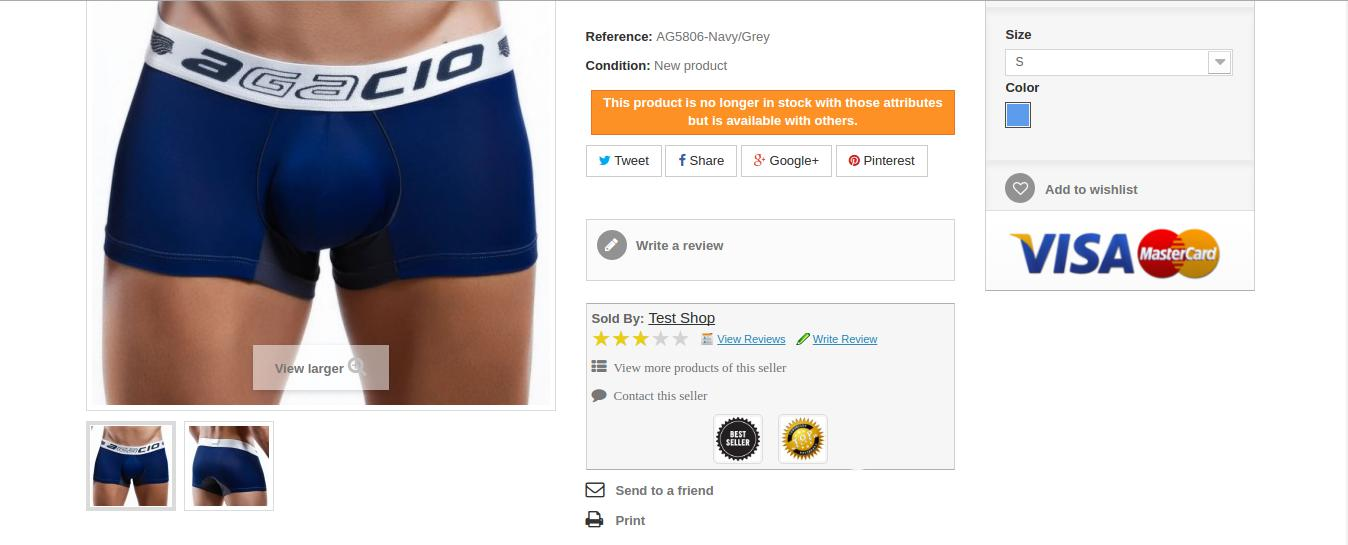
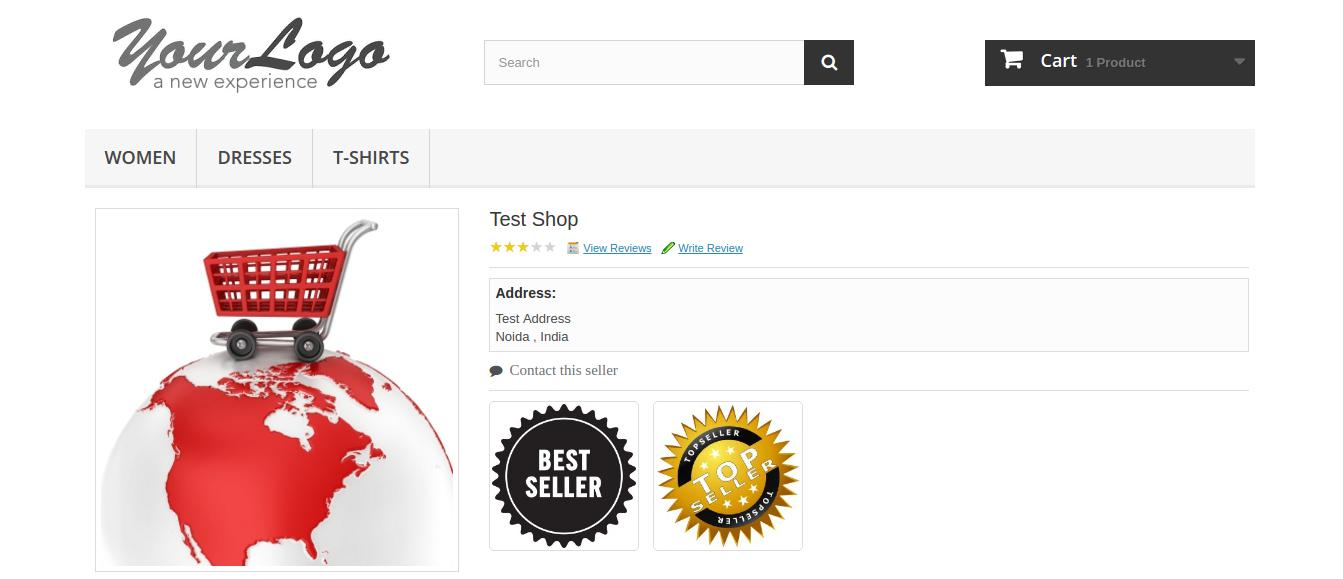
This addon is basically an Prestashop Marketplace Addon. The Marketplace admin can create seller badges based on the various parameter to be satisfied by a seller to obtain one. Seller badges are displayed to the customers once they visit the seller profile page or product page of a particular seller. Admin can create Seller Badges for his sellers like Best Seller, Best Customer Support, Best New Seller etc. Parameters to obtain one can be set from the back-end panel of admin.
So, keeping this in mind, this ad-don will provide features to customer through which customer can see a seller badge and interprete the kind of seller on the marketplace.
This interface will have two fields for the admin in the back end. Both of the fields are listed below-:
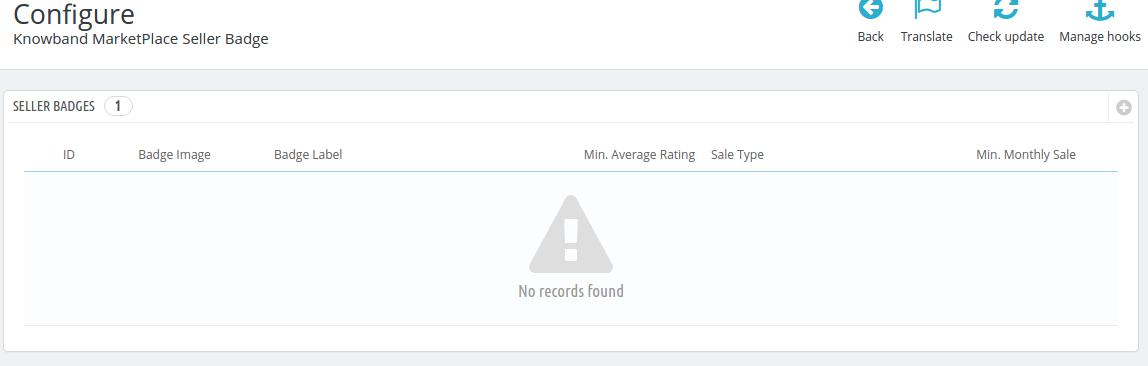
List of seller badges
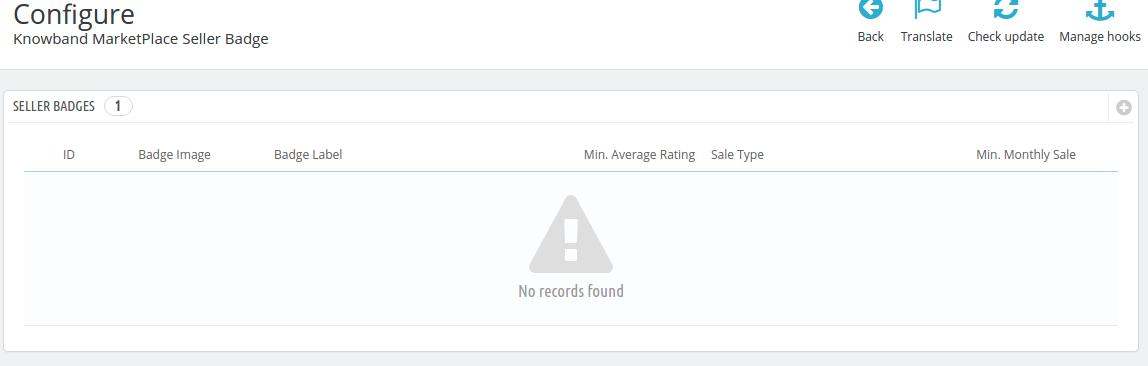
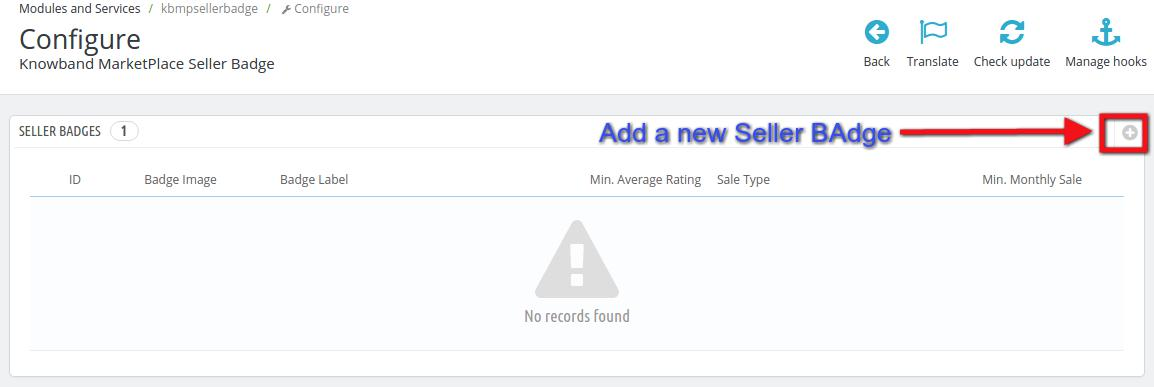
The list of seller badges already applied can be found in the Configuration settings in inside Modules and Services >> Modules and Services on the admin panel.
Add new Seller Badge:
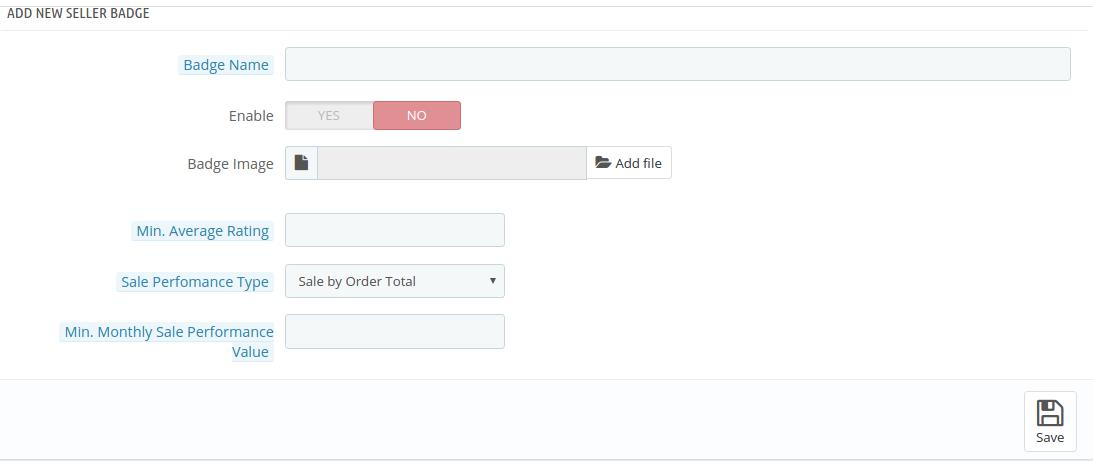
Admin can add a New Seller Badge on his marketplace site by navigating to Modules and Services >> Modules and Services >> Knowband Marketplace Seller Badge >> Add New (Plus Icon)
1. Badge Name: Give a name to your seller badge. This name is for admins personal reference, it will not be displayed to any one else.
2. Enable: Select the status as Yes if you want the badge to be active on the marketplace.
3. Badge Image: Upload an image for the badge that will be visible to the customers on the sellers profile page or the product page of the particular seller.
4. Min. Average Rating: Provide the Rating Parameter to achieve the particular badge. For example, you can decide seller has to get at least 3 stars to obtain this badge.
5. Sale Performance Type: Provide a parameter that will be used to decide if a seller is eligible for the particular badge. You can select from two types of parameters, Sale by Order Total or Sale by Product Sold.
If you select Sale by Order total, then the eligibility of seller will be checked on the basis of total orders processed by him on his store.
If you select the Sale by Product Sold, then the eligibility will be tested on the basis of the total products sold by a seller on his store.
6. Min. Monthly Sale Performance Value: Enter the minimum Monthly sale required for a seller to be eligible for the particular badge.
7. Save : Save once your settings are done.
Customer Interface
Here the customers can see the badges acquired by the sellers on two types of interfaces.
Product page Interface
1. The Product Page of the particular seller as shown in the screen shot below:
Seller Profile interface
2. The seller profile Page on the front end of the store.
Configuration Page
This is a page where seller can enable/disable this feature from customers. After disabling this, customer cannot see the Seller Badges on the marketplace. Also, Admin can configure the badges from the same interface.
This online shoppers is always in the search of exciting offers, reward points and deals. This is one of the ways to encourage them to purchase the products. If your eCommerce store is unable to trigger the purchase decision of the customers, then, it is certainly going to hurt your business in the long run. Knowband’s Prestashop Reward Points Addon will prove to be a great bonus to the merchants store as it can motivate the customer purchase more and more products. The customers can win reward points in return of the purchases.
Knowband’s Prestashop Loyalty Points Module enables the customers to win reward points after he/she has placed any order. The reward points allows the customers to shop even more at discounted prices. Once the customer has won enough reward points, they can get discount in return of the points.
All the settings regarding the Prestashop reward points addon and the discount values will be given to the merchant in the backed of the extension. Now the Prestashop Reward Points addon is compliant with GDPR. The online mercant can activate the settings to delete the customer details on GDPR data deletion request. The admin can also display a privacy policy consent on the website and also set it’s text and URL in different languages.
1.1 Benefit of Merchant Prestashop Reward Points Addon
Knowband’s Prestashop Loyalty Points Module enables the admin to give the loyalty points to customer when they place their order.
This Prestashop Reward Points Addon allows the admin can set rules for guest as well as registered customer.
The admin can set the N number of discount and reward points rules according to the need.
The Prestashop Reward Points extension allows the admin to view the list of customers used rewards points and remaining rewards points.
This Prestashop Addon helps the admin to engage more the customer to the website.
This Prestashop reward points addon motivate the customer to place another order to use reward points.
It helps the admin to reward the loyal customer by giving them loyality points.
With help of this Prestashop reward points addon, the admin can increase revenue and conversion of website.
Presatashop Loyality Points Extension helps you to improve your popularity by letting the customers share the reward points with others.
The online merchant can also set the GDPR related settings from the admin interface of this Prestashop Reward Points Module.
The Prestashop product purchase reward extension allows the admin to set the privacy policy consent, it’s text and links in different languages.
The e-merchant can also activate the settings for deleting the customer data on GDPR data deletion request.
1.2 Benefit of Customer Prestashop Reward Points Addon
Customer can use the reward points to they make purchase in the future.
This Prestashop Loyalty Points Module allows the customer to share the loyalty points with their friends.
Customer can view the reward points his/her profile.
2. Installation
To install this Prestashop Purcharse points addon, please follow the following steps:
Add addon folder under modules folder of your system.
After adding this Prestashop addon folder, system will list the addon on module page under “front office feature”category as given below:
In admin module, there will be following options to configure this Prestashop Reward Points addon. The Prestashop Addon includes 7 tabs and they are as follows
1. General Settings.
2. Guest Reward Points Settings.
3. Guest Discount Settings.
4. Registered Customer Reward Points Settings.
5. Registered Customer Discount Settings.
6. Email Settings.
7. Statistics.
Each section is described in details below.
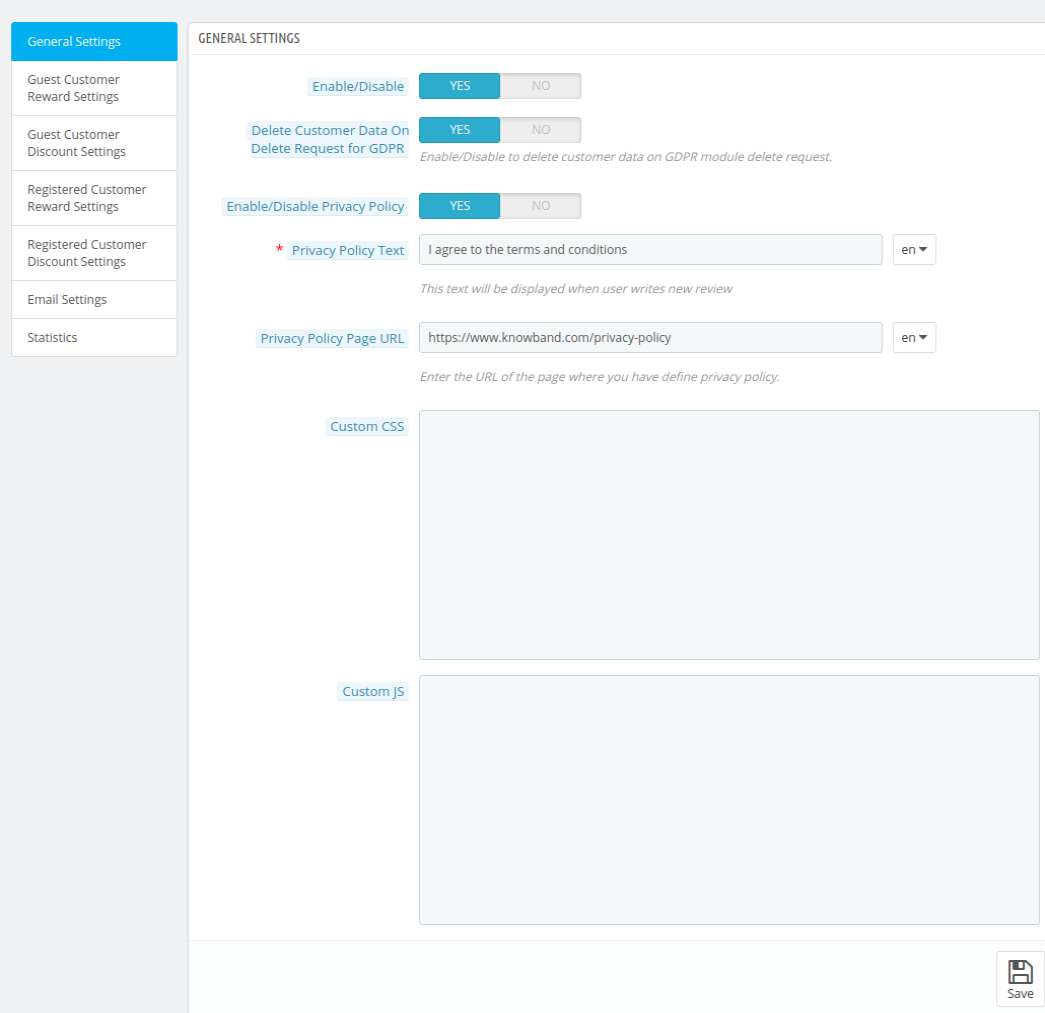
3.1 General Settings
This section will be having following options to configure the Prestashop loyalty points addon.
1. Enable/Disable: This option will be having a toggle button with two specific values ON and OFF. This module will only work if this is set to ON. If this is set to OFF then none of the feature will be working and not even impacting any other section of website. By default, this option will be OFF.
2. Delete customer data on Delete request for GDPR: The online store admin can enable the settings to delete the customer details on GDPR deletion request.
3. Enable/disable privacy policy: The online merchant can activate or deactivate the settings for showing privacy policy consent check-box.
4. Privacy policy Text: The online merchant can set the privacy policy text from the admin interface in different languages.
5. Privacy policy URL: The online store owner can set the privacy policy URL from the admin interface of this reward point module.
6. Custom CSS and JS: These fields have been provided to let the admin change the look and feel of the front end of the module. So if he feels to add certain CSS or JS in the front the he can enter those into these field respectively.
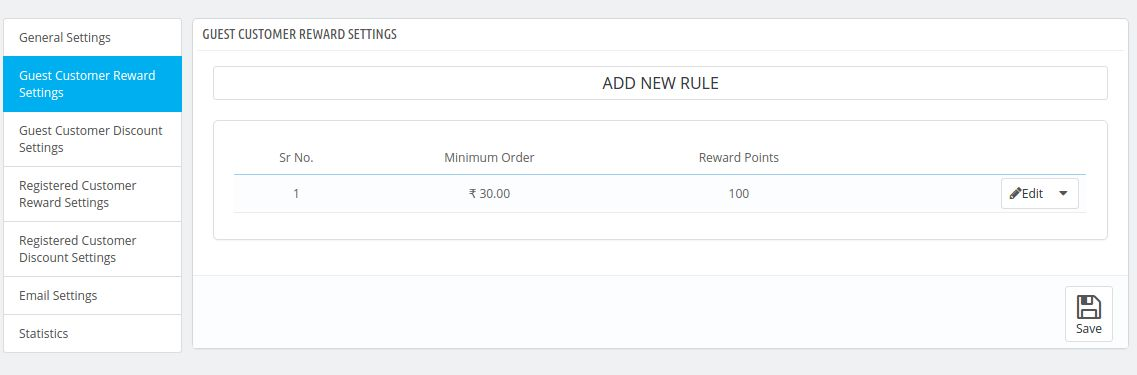
3.2 Guest Reward Points Settings
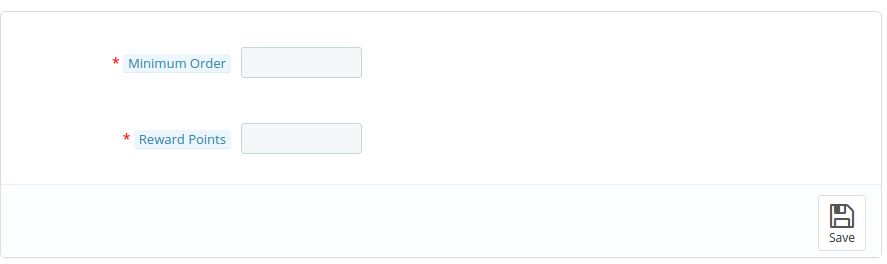
In this tab the merchant will enter the rules according to which a guest customer will win the reward points. When the merchant will click on the add new button available in the tab then a pop up will appear which will have the following fields in it-
1. Minimum Order : Here the admin will enter the minimum amount of the order which has to be their to give the customer certain reward points.
2. Reward Points : Here the admin has to enter the number of reward points which a customer will be awarded after placing the order if he satisfies the above two conditions.
Admin can even edit or delete the created rule by clicking on the action buttons which will be available in the same row where the rule will be listed.
Form which will appear after clicking on add new button-
3.3 Guest Discount Settings
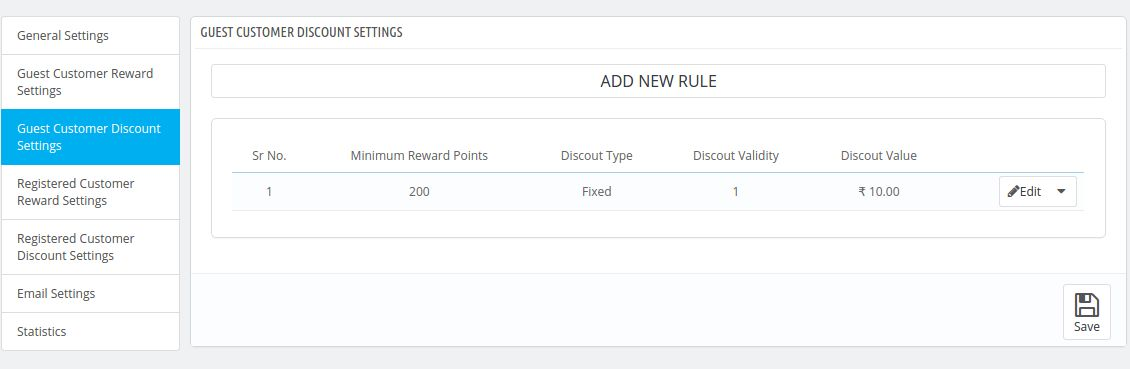
The settings done in this tab will only work for guest customers.In this tab the merchant will have to enter the discount and reward points settings i.e after how many reward points the customer will get discount. Fields which will be available in these tab are-
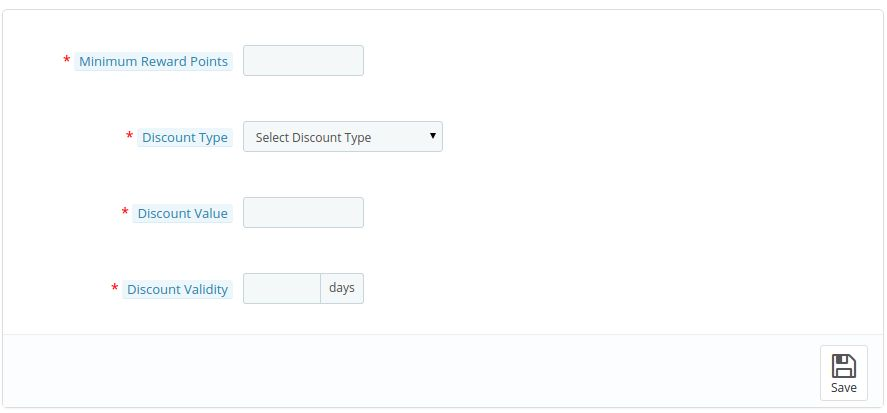
1. Minimum Reward Points : In this field he admin will enter the minimum amount of reward points which a customer should have to satisfy this rule.
2. Discount Type : In this field the admin will select the type of discount which will be given to customer if he satisfies the above conditions. It may be percentage or fixed discount.
3. Discount Value : In this field the admin has to enter the discount value which the customer will get after applying the minimum reward points.
4. Discount Validity : In this field the admin will enter the discount validity of the discount which will be generated
Form which will appear after clicking on add new button.
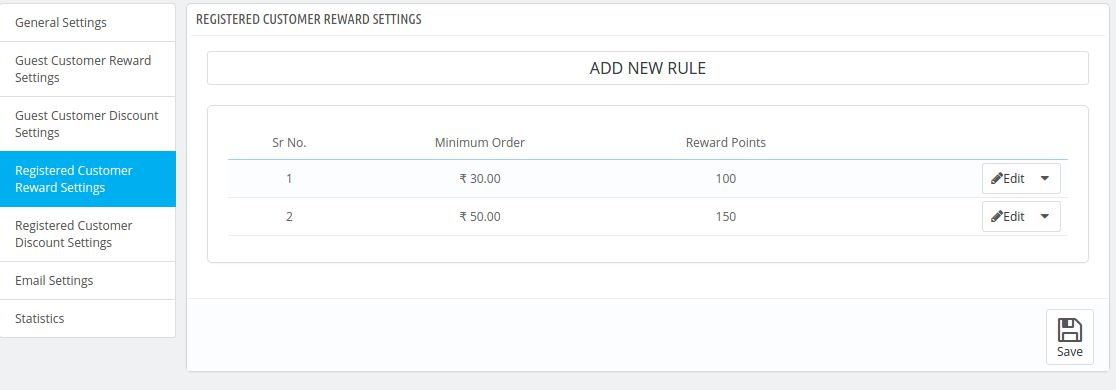
3.4 Registered Customer Reward Settings
This tab will be same as the guest reward settings tab. But the only difference in this tab is that it will work only for the customers who are registered.
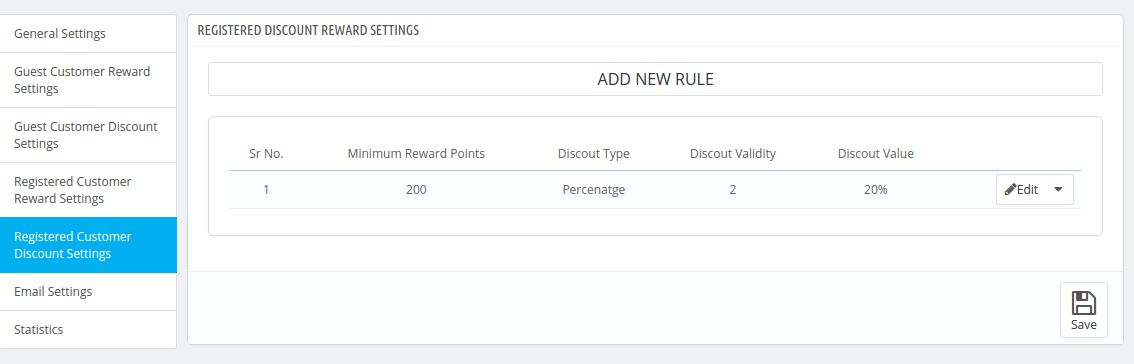
3.5 Registered Customer Discount Settings
This tab will be same as the settings for the guest discount settings tab. But the only difference in this tab is that it will work only for the customers who are registered.
3.6 Email Settings
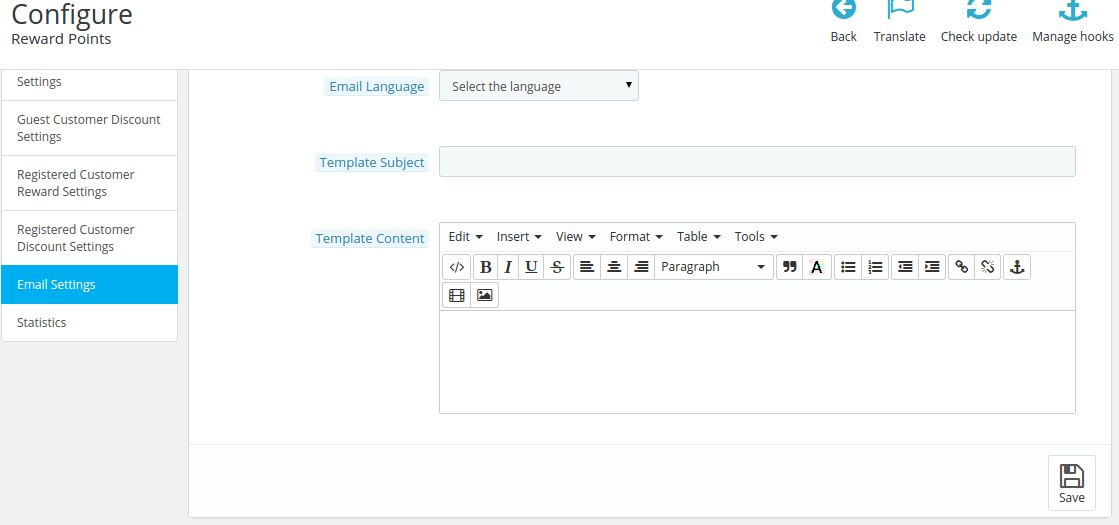
When the customer will share its reward points with other customer from the front end then the customer to whom the reward points are shared will get a mail from the store end to let them know about the reward points added to their account.
1. Select Language: Here the admin will select the email language using which he will send the email to the customers who have won the jackpot
2. Email Subject: Here the admin can enter the email subject. What ever subject the admin will enter in this email field will be used as the subject of the email sent to the customer whenever they will win any jackpot in the front.
3. Email Content: Here the admin can enter the email content which will be sent to the customers who will win the jackpot in the front..
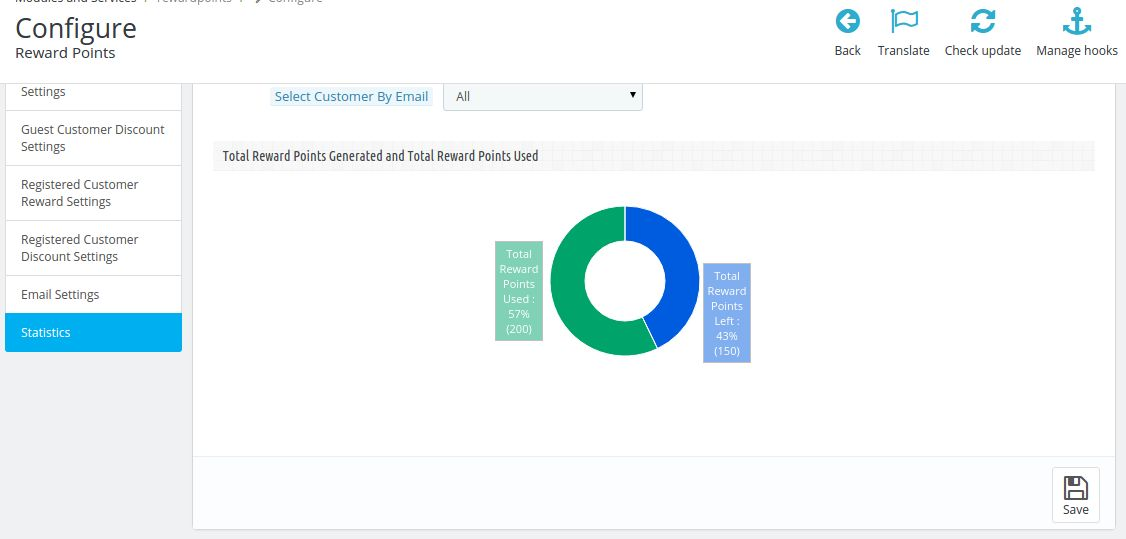
3.7 Statistics
In this tab admin can view the stats of the reward points which are generated till date. The admin may also view the total number of reward points generated and used and may also filter the reward points according to the customer those who have used this module to get reward points.
4. Front End Module
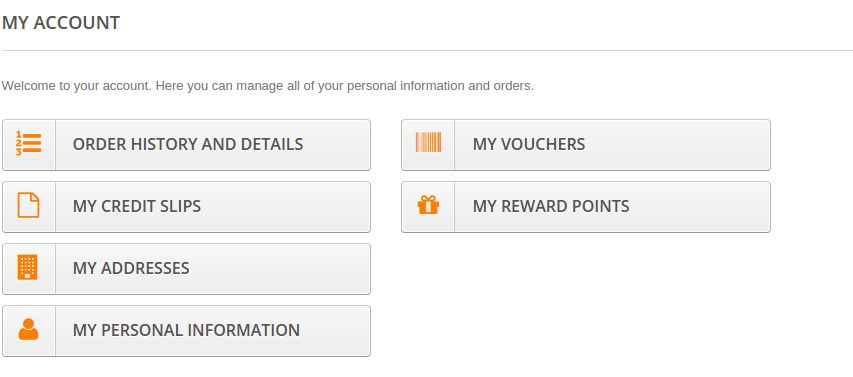
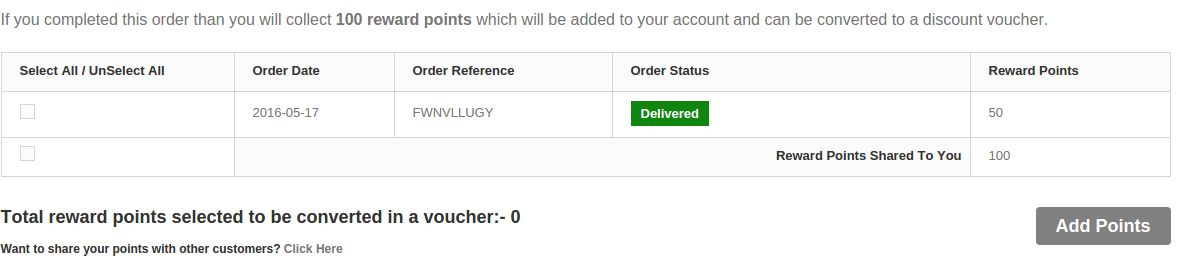
When the module is enabled from the admin panel then it will first appear in the account of the customers. A link stating My Reward Points starts appearing in the account of the customers, On clicking the link the customer will be directed to the list of reward points which they have won by placing different orders. If the order of the particular reward points is delivered then those reward point will be available for use to the customer.
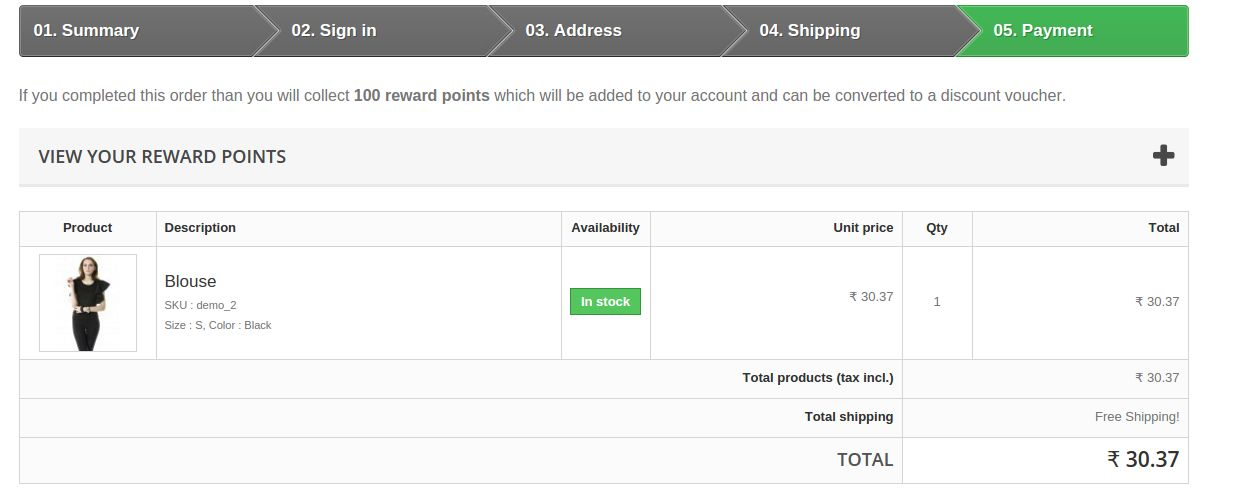
The Prestashop Loyalty Points Addone will also appear above the cart when the customer is about to do the payment for the order. The customer can view his/her reward points and add those reward points to the cart.
You can try Prestashop reward points addon for on your Prestashop website. KnowBand’s Prestashop Loyalty Points extension helps you reward the loyal customer to your store & increase the revenue of website.
The Prestashop Mobile Order Lookup Addon by Knowband is designed for the Prestashop eCommerce businesses and enables the customer to view order info or order status without logging into the account. The Prestashop order details module also allows the store owner to keep a track of the orders and view the customer status.
Merchant Benefits of the Prestashop Mobile Order Lookup Addon:
The Prestashop mobile order lookup module by Knowband lets the customers track their order status without logging into the account in the store.
Use of Prestashop order details addon, the store merchant can track the customer details from the back-office of the module.
Knowband’s Prestashop Order Lookup addon gives store admin the option to monitor the number of customers who viewed their order status.
The Online store merchant can customize the look and feel of the Order Lookup button text and color from the back-end of the Prestashop shipping details module.
Prestashop mobile order lookup module by Knowband allows the admin to change or add the new test which are shown above order lookup result.
This Prestashop order lookup module supports the multiple themes.
Prestashop order details addon by Knowband reduces the burden on manual support system through real-time tracking.
Knowband’s Prestashop mobile order lookup addon admin interface extremely easy to use.
2.0 Installation
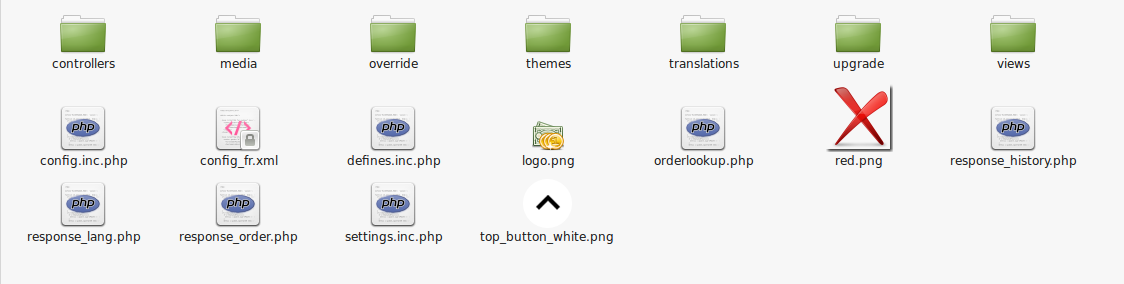
The screenshot below shows the folder structure of the Order Lookup plugin folder.
Folder structure of the Order Lookup plugin folder.
Copy the whole folder named as order lookup into your modules folder of the root directory of your PrestaShop store through FTP.
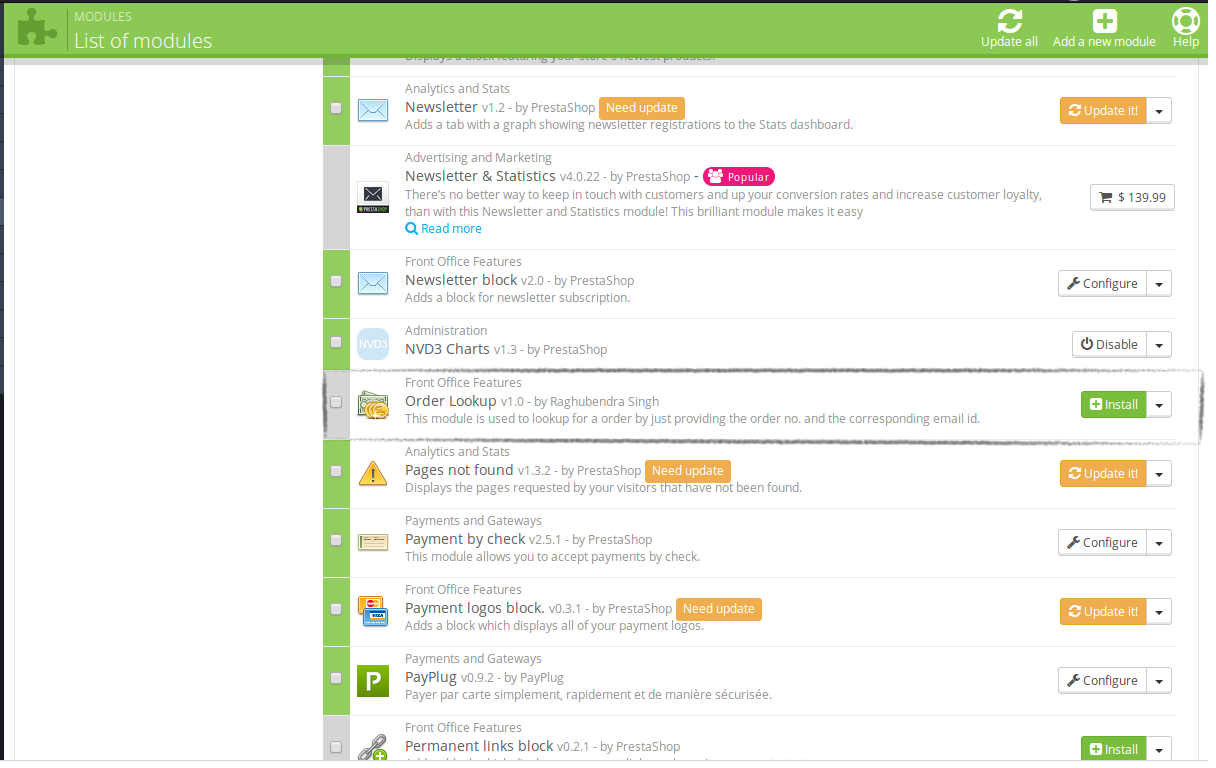
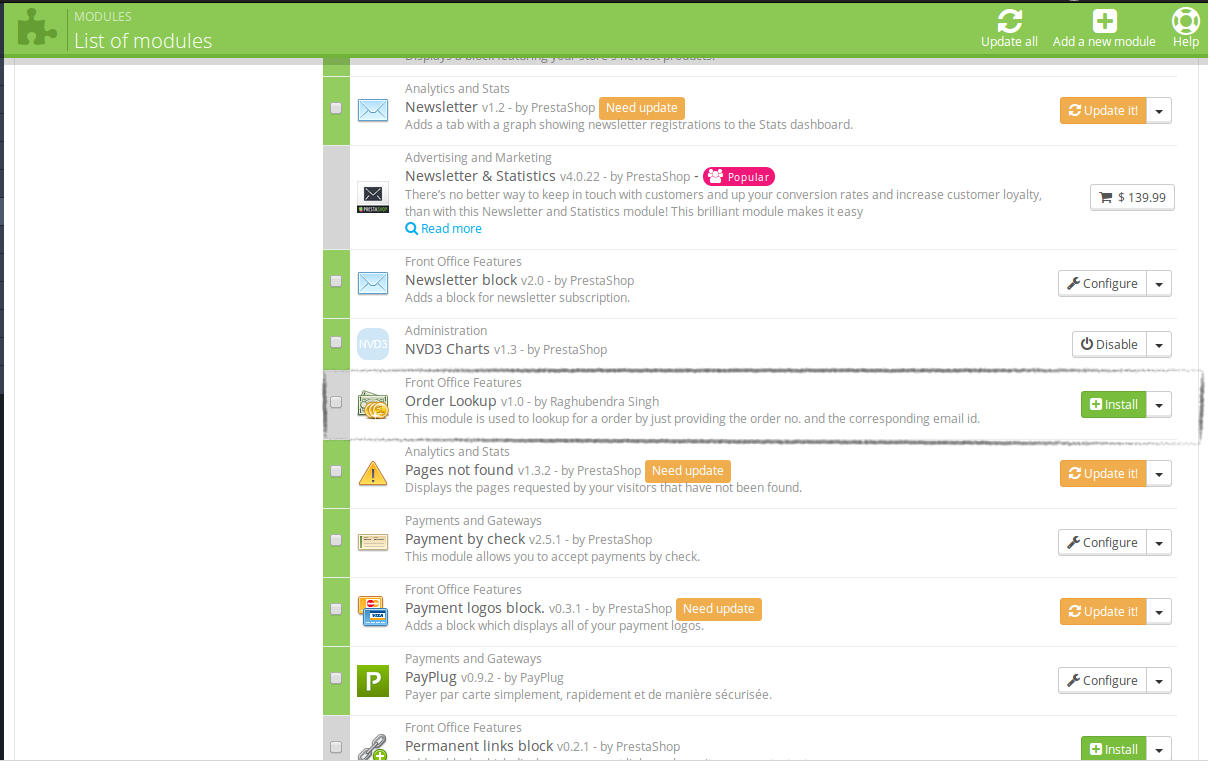
You will be able to find the Prestashop order details addon ready to be installed in the Modules in your PrestaShop store as shown below.
Click on the Install link to install the Mobile order lookup Prestashop addon.
3.0 Admin Module
Here, the Prestashop store owner can change the various settings of this plugin according to the requirements which will be reflected on front-end as well as in the admin panel.
To install this plug-in, please follow the following steps:
Add all whole plugin folder to the modules folder into the root directory of the PrestaShop Store.
After adding the plug-in files, then the system will list the plug-in on the module page.
Click on install/uninstall according to the need.
3.0.1 Admin Interface
After installing Prestashop order details module into the store, it will provide the following interface:
General Settings
Lookup Statistics
Language Translator
Get Support
Each interface is explained below.
3.0.1.1 General Settings
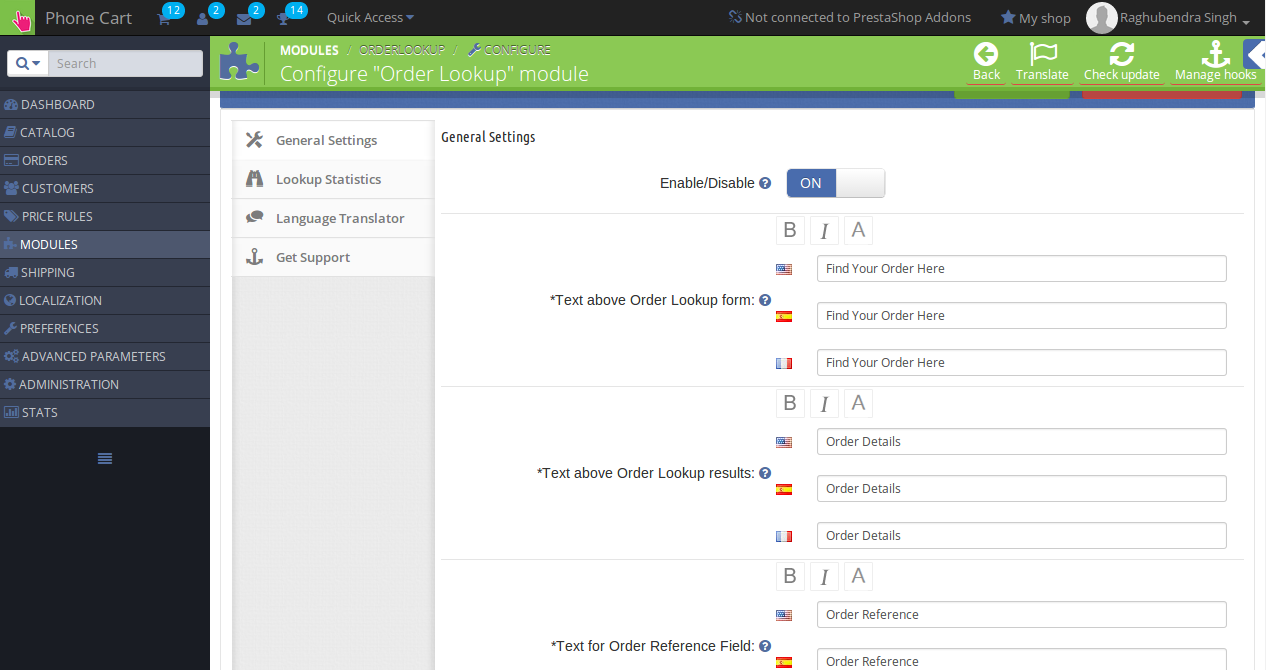
On clicking the configure link on the module listing page (configure link will automatically appear once you install the plugin), the system will open general settings tabs by default as shown in the screen below:
Initially, the fields in the above form will be already filled with their default values.
Enable/Disable: Initially, this will be OFF. The Prestashop store Admin can enable/disable plug-in by turning ON/OFF this setting.
Text control: Here, the admin can control text which would be shown on Order Lookup page and on the result page. Admin can also set different text, text layout and text color for all the languages available in the system. The type of format and text set by the admin in these controls are visible at front-end for the corresponding language selected.
Color control: Here, the admin can control colors of the buttons which would be shown on Order Lookup page and on the result page.
3.0.1.2 Lookup History
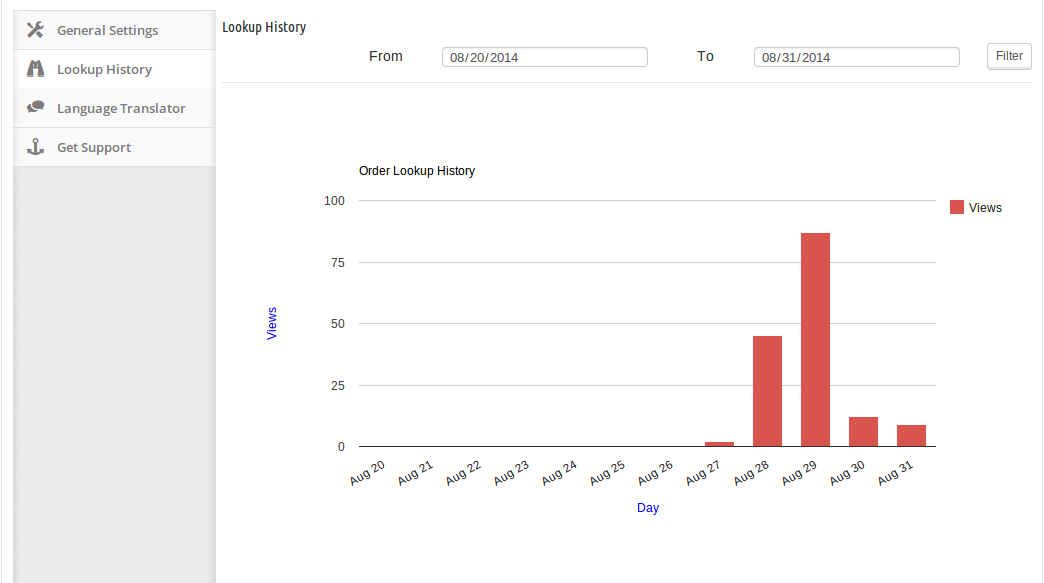
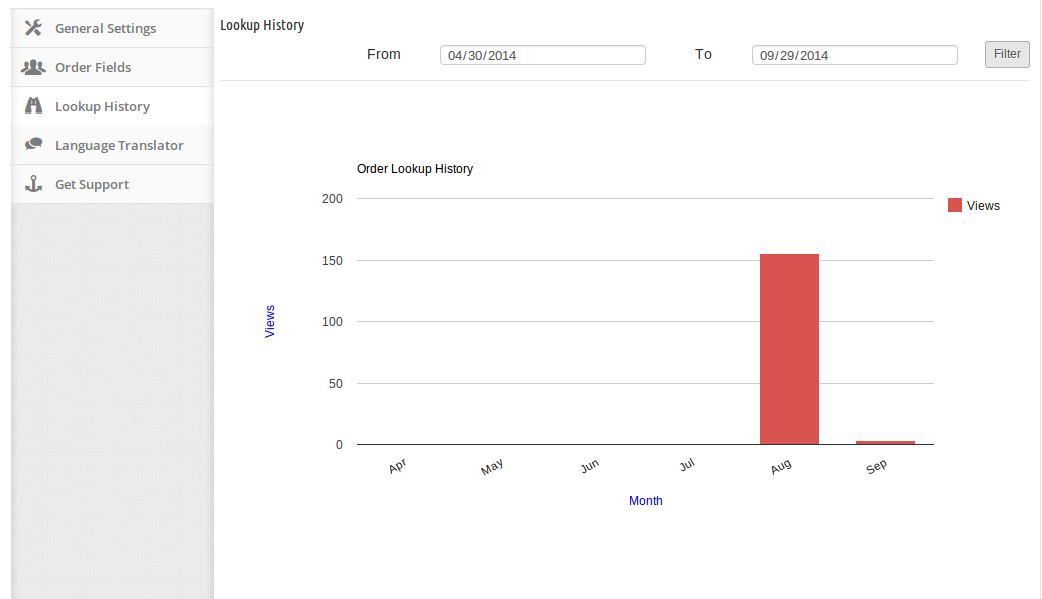
In this tab, Prestashop order status plugin will show the statistics of Lookup page view in terms of number. Reports will be displayed in the form of graphs. With the help of these statistics, the admin will be able to know at which time, Order Lookup page opened most. The store owner can enter any range and the system will show the results accordingly. By default, the graph will show the stats for the current week. The lookup stats are shown as follows:
3.0.1.3 Language Translator
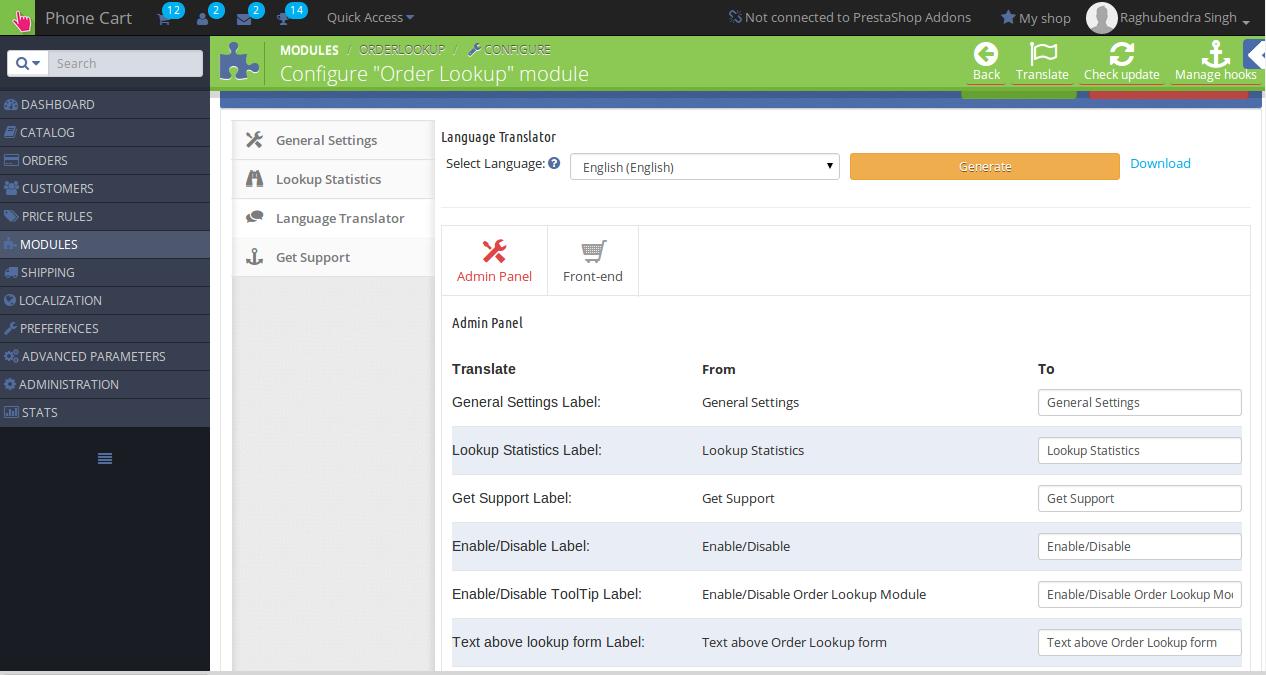
In this section, the admin can enter the text and can also change the texts that are displayed in the admin panel as well as front-end for the Mobile order lookup Prestashop addon. The interface for the language translator consists of two tabs through which the admin can enter the language texts for the admin panel and front-end. The admin can also download the language file generated. The language translator looks like the following:
3.0.1.4 Get Support
If the admin has found any issue regarding the Prestashop plugin and wants any type of support, then via this link, he/she can create a ticket for any query on our help desk support. On clicking this link, a new tab open with where the admin can generate the ticket for support.
4.0 Front End Module
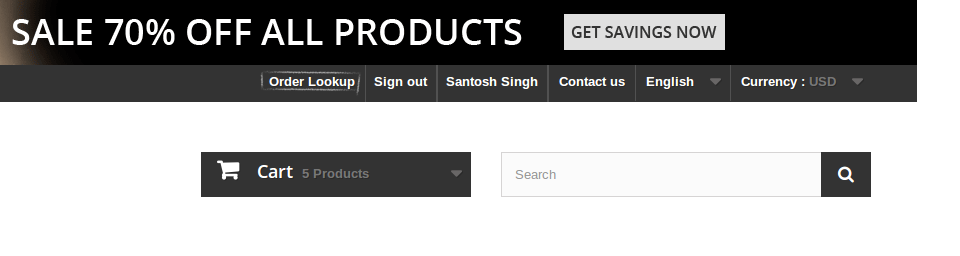
At the front end, the customer will see a link on top menu which will redirect the customer to Order lookup form page.
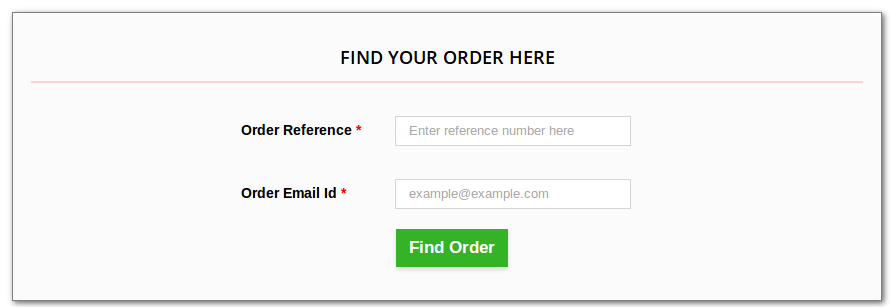
When the customer will click on the link, a new page would open which will ask for Order reference and email id.
The link to the order lookup page will appear as follows:
When the customer clicks on the link, a new page would open which will ask Order reference and email id.
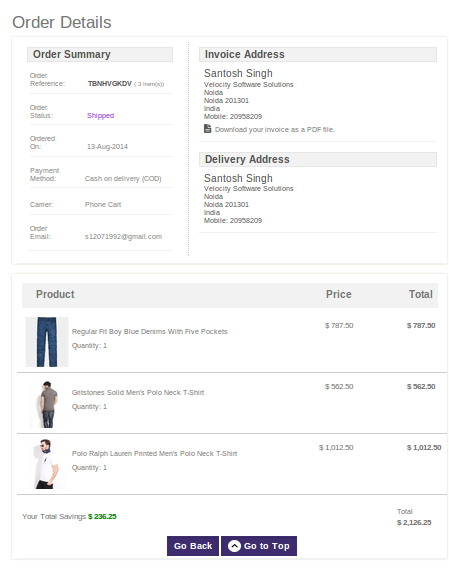
After entering correct details, the customer will be shown the corresponding Order data.
Recommendations :
Refresh home page of your store every time you enable/disable plugin. If the Prestashop extension is not working after installation then please check permissions on modules folder. The folder should be writable. Please make the folder permission to 755.
For more information about Prestashop Mobile Order Lookup: